How to Play Blu-ray on Xbox One When you Don’t Have Internet

Xbox is a great brand, but many users are wondering does Xbox One play Blu-ray without the Internet. The answer is yes, but before we get to that, let’s take a quick history lesson.

The Xbox is a gaming brand launched in November 2001 by Microsoft with the first generation console and now has five game consoles.

This console supports CDs and DVDs and has two online services: Xbox live and Xlink kai. The Xbox console also has music mixer software, a DVD playback kit, and Xbox Linux software. 

The second-generation Xbox console (Xbox 360) supports CD, DVD, and USB drives with supported media, HD DVD movies added on a drive, and DLNA servers. The Xbox 360 console also supports online services, including webcams, Xbox Live, and an arcade.

The third generation of consoles consists of Xbox One, Xbox One S, and Xbox One X. All three models of the third generation support CDs, DVDs, and Blu-ray, while all three support DLNA servers and USB drives of supported media. 

The third generation of Xbox has live features, including Skype, Xbox Live, and Microsoft Edge, among many others. The fourth generation of Xbox consoles consists of the Xbox series S and the Xbox series X. 

The Xbox series S supports DLNA servers and USB Drives with supported media. The Xbox series X also supports USB drives with supported media and DLNA servers alongside Blu-ray disks, DVD, CD, and UHD blu ray discs.

Unfortunately, it’s not always easy to play optical discs on your console, and many reported errors when playing DVDs on Xbox, but that can be easily fixed.

If you ever wondered how to watch a DVD on Xbox One without the internet, this guide will show you how to do it.

Can you play a DVD on Xbox One without the internet? 

1. Go offline on your Xbox

  1. Scroll to the left side of your Home Screen and open the guide.
  2. Go to Settings.
  3. Choose All settings.
  4. Go to Network.
  5. Open Network settings.
  6. Select Go offline.

If you don’t have an Internet connection, use your phone as a hotspot and connect to it, and then go offline on your console.

This is the best way to use Xbox One Blu-ray player offline, so we encourage you to try it.

2. Go online and start the playback

  1. Connect to the Internet. You can use your phone as a hotspot.
  2. Start the playback.
  3. Once the playback starts, disconnect from the hotspot.

This is a neat little workaround and it should keep your Blu-ray player working for about 24 hours or so.

Alternatively, you could watch Blu-ray movies on your Xbox One by playing videos using USB ports to convert Blu-ray movies to a digital format with DVD-to-digital format converter software.

Does Xbox One play Blu-ray? 

Xbox one can play Blu-ray discs, however, the supports are region-specific with specific formats. The Xbox one supports Blu-ray discs sold in the same region as the console. It is important to note that Xbox game discs are not coded by region. 

However, some Blu-ray discs are not specified for a particular region or are suitable for any region. These Blu-ray discs that are not region specified will play on any Xbox One console. 

Xbox One consoles are coded A to C depending on the region. Here’s a table showing the areas for the different Xbox One codes.

Supported Blu-ray regions (Source: Xbox)

The Xbox One console also has specified formats of which Blu-ray discs can play. Here are the Xbox One Blu-ray disc formats:

  • 3D Blu-ray discs when they’re played on a 3D television 
  • Mastered Blu-ray discs

What are the differences between Xbox One and other versions?

Before we start, let’s take a quick look at Xbox One’s hardware:

  • CPU: 1.75 GHz 8 Core AMD custom processor
  • RAM: 8GB DDR3 2133MHz
  • Flash Memory: 8GB
  • GPU: 853 MHz, 768 shader cores, 1.31 TFLOPS
  • Storage: 500 GB (5400 rpm)

These are specifications for the original Xbox One, but over the years Microsoft released Xbox One S and Xbox One X that brought better hardware and performance. It important to mention that these two versions brought 4K Blu-ray support to Xbox.

Unlike Xbox 360, Xbox One offers full Blu-ray support, but just like its predecessor, it can handle both DVDs and CDs.

The Xbox One has more efficient hardware, which allows for more efficient functionality, which is expected.

This version also brings improved controllers with buttons like the view that enables players to replay gameplay and it has also introduced a USB charging port.

The Xbox One controller is slimmer and has one analog stick that is easier to move around and you can also find a D-pad that is easier to use than previous models.

While Xbox One can’t compare to the latest generation of Xbox consoles in terms of performance, it can still play Blu-Ray discs, unlike Xbox Series S.

But the question remains, can Xbox One play Blu-ray discs without Internet? Keep on reading to find out.

Can all Xbox One play Blu-ray?

Xbox One 4K support (Source: Xbox)

Does Xbox One play Blu-ray movies? The answer is yes, Xbox One can play Blu-ray discs, but there are a few limitations.

It’s worth mentioning that digital editions of Xbox One S can’t play Blu-rays or any type of optical media since they don’t have an optical drive.

Many are wondering if Xbox One S good Blu-Ray player and the answer is yes, because it supports 4K playback, but you need the version that has an optical drive.

Does Xbox One play Blu-ray in 4K, you may ask? The answer is yes, but you can enjoy 4K playback on only the Xbox One S/X model.

How does Xbox One Blu-ray player app work?

An Xbox One Blu-ray player app is needed to play Blu-ray discs. You can install the app from the store by doing the following:

  1. Press the Xbox button to access the Guide and select Home, and go to the store.
  2. Go the search and type blu ray in the search bar.
  3. Look for Blu-ray player app and select it.
  4. Select Install to download and install the Blu-ray player app.

Here’s how to install the Xbox One blu ray player app by inserting a disc: 

  1. Insect a blu ray disc or DVD into your Xbox.
  2. Look at the options and select blu ray player app when you see it.
  3. Once the blu ray player app details page opens, select Install.
  4. The disc will start playing automatically.

Once the installation is complete, you can play Blu-ray movies by installing the disc into your Xbox One console. 

How to play a non-Blu-ray DVD on Xbox One?

  1. Press the Xbox button on your controller to open the Guide.
  2. Select Store and go to Search.
  3. Type DVD in the search bar and select the DVD player app.
  4. Select Install.
  5. You can now watch DVDs by inserting them into your Xbox One. 

If you’re wondering why can’t you watch a DVD on Xbox One, the reason is the missing DVD player, so just download it and the issue should be gone.

After downloading it, you should be able to play any DVD on Xbox One without issues.

You could download these apps on your Xbox one and enjoy streaming movies. If you do not have an account on any platform, you can sign up from your Xbox one and enjoy streaming movies. 

Alternatively, you could rent movies from the movies and TV app on the Xbox home screen. 

As you can see Xbox One can play Blu-ray without the Internet, but you need to make a couple of adjustments beforehand.

Do keep in mind that issues with discs can occur, and many reported that Xbox One isn’t reading discs, but that can be easily fixed.

We hope you’ve enjoyed reading this piece! Please share your thoughts in the comments section below

Exe Files not Opening on Windows 7: How to Force Open Them

Exe files are essential documents that are used to make changes to your PC. However, some users complain that these exe files are not opening on Windows 7.

This can be a significant problem, but there are different ways to fix it. Keep reading this article to discover the best solutions to solve this problem.

Why are my exe files not opening?

The possible causes of the exe files not opening on Windows 7 issue are within a close circle. Below are the two known ones:

  • Modified registry setting: If Exe files are not working on your Windows 7 PC, it is usually due to modifications made to your registry. The solution here is to reset your registry to default.
  • Presence of malware: Another factor that can cause this issue is the activity of malware. Viruses can modify your registry without you noticing. The quickest and most effective fix for this is to scan for malware using one of the best antivirus software.

What to do if I’m unable to open any program in Windows 7

1. Reset registry to default

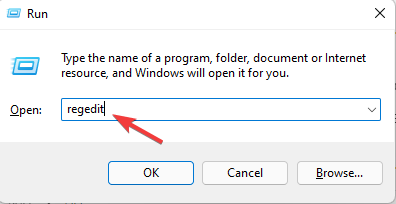
  1. Press the Windows key+ R, enter regedit, and click OK.
    regedit exe file not opening windows 7
  2. Navigate to the path below in the left pane: HKEY_CLASSES_ROOT\.exe
    option
  3. Now, right-click the (Default) option in the right pane and choose Modify.
    modify
  4. Change the Value data to exefile and click OK.
    value option exe file not opening windows 7
  5. Now, navigate to the path below in the left pane and double-click (Default) in the right pane: HKEY_CLASSES_ROOT\.exefile
    exefile
  6. Change the Value data to “%1” %* and click OK.
    value exefile  exe file not opening windows 7
  7. From here, navigate to the following key in the left pane: HKEY_CLASSES_ROOT\exefile\shell\open\
    open
  8. Double-click on (Default) in the right pane and set its Value data to “%1” %*.
  9. Finally, click OK to save the changes and exit the Registry Editor.
    value open

If, at any time, exe files are not opening on Windows 7, the first line of action is to reset your PC’s registry to default. This is because a .exe file that fails to open is associated with a particular registry setting.

To reset the registry to default, follow the step-by-step guidelines above. If these steps are followed correctly, your .exe files should now open fine without any problems.

2. Scan your system for malware

  1. Press the Windows key, type Microsoft Security Essentials, and then press Enter.
  2. Now, select Full under Scan options.
  3. Finally, click the Scan now button.
    scan now exe file not opening windows 7

If you can’t open exe or any files on your Windows 7 computer, it might be due to the activities of viruses. Using Microsoft Security Essentials should detect and eliminate the virus.

However, malware is evolving increasingly, and antivirus tools are keeping up, constantly updating their libraries to recognize as many new threats as possible.

To stand a great chance against this malware, you need to use one of the best antiviruses in TotalAV. This software employs the best modern practices and takes a no-nonsense stand against viruses.

Also, it does not just offer offline security but also protects you online. So TotalAV might be all you need to eliminate even the most stubborn malware on your PC.

⇒ Get TotalAV

3. Restore file association for .exe files

  1. Download this .reg file.
  2. Once the file is downloaded, double-click it.
  3. Now, click Yes when the confirmation dialog appears.
    yes

If you recently changed something in your registry before noticing that exe files are not opening on Windows 7, the alterations might cause the issue.

Running the file above should fix the exe file association on your Windows 7 PC and reset your registry. This should fix the issue for good.

That’s about it. You now have everything needed to make your exe files work again on your PC. All you need to do is to follow the steps carefully, and things should be back to normal.

If you are facing other issues, like the action cannot be completed because the file is open prompt, check our detailed guide to fix it quickly.

Feel free to let us know the solution that helped you fix this issue in the comments below.

Best Christmas Live Wallpapers & Screensavers for Windows [Free]

In this article, we’re going to list the best Christmas live wallpapers and screensavers for your PC.

Programs like DeskScapes, a product from Stardock that allows you to bring your desktop to life using animated wallpapers, screensavers, and more, all created by you.

Besides, it has plenty of templates, so give it a try!

DeskScapes

Turn your desktop into a fantastic display of Christmas joy creating your own live wallpapers!
Check price Visit website

What are the best Christmas live wallpapers & screensavers for Windows 10/11?

Snow Village 3D Live Wallpaper and Screensaver

The Snow Village 3D Live Wallpaper and Screensaver brings a festive, winter-themed village right to your desktop.

The scene features a snow-covered village with charming animated characters and houses decorated for the holidays.

The 3D environment lets you view the village from different angles, while snowflakes fall gently from the sky, creating a truly immersive experience.

⇒ Get Snow village 3D Live Wallpaper and Screensaver

Christmas HD Live Wallpaper

This cute wallpaper will showcase a small Christmas tree with lovely red ornaments on a frozen foreground. And the snowflakes fall realistically, bringing the magic of Christmas into everyone’s house.

The application will launch in full-screen mode, allowing you to use it as a screensaver by just leaving it open; alternatively, you can use it in window mode.

⇒ Get Christmas HD Live Wallpaper

Christmas Cottage 3D Screensaver

Christmas Cottage 3D Screensaver transports you to a picturesque winter cottage surrounded by snow-covered trees and twinkling lights.

The cozy atmosphere is enhanced by a warm fireplace and gently falling snow. The 3D environment features animated animals like reindeer, creating a peaceful, holiday-inspired retreat on your screen.

Customizable options, including snow intensity and ambient sounds like crackling firewood, let you fine-tune the experience.

⇒ Get Christmas Cottage 3D Screen Saver

Fireside Christmas Wallpaper

Try the Fireside Christmas 3D wallpaper, which features a beautifully adorned fireplace waiting for Santa Claus to leave presents in each sock.

It’s a simple, high-quality photograph that captures the moment we’ve all been waiting for.

When the clock strikes midnight, a magical carriage pulled by reindeer brings in the presents, along with the joyful spirit of Christmas.

⇒ Get Fireside Christmas Wallpaper

Christmas Snowman

Do you want a traditional Christmas screensaver? Then you’re in for a big surprise. What about a dancing snowman that sets off fireworks, decorates the Christmas tree, and turns the lights while listening to vinyl records? It is amusing and entertaining for both children and adults.

The snowman is wearing some funky yellow glasses that make him look like he’s at a Christmas party. The screensaver features cheerful sound effects and 3D images.

⇒ Get Christmas Snowman

Santa’s Castle Screensaver and Wallpaper

The screensaver Santa’s Castle takes us to the factory of gifts and good deeds, where the magic happens, and Christmas comes to life.

You can enjoy the screensavers and take a peek at what’s happening around the castle. Santa keeps looking at the clock since not everything is finished yet, but the elves will finish everything on time.

The reindeer are waiting outside in the calm snow. The things that children worldwide have asked for and wished for will be waiting for them the next morning.

⇒ Get Santa’s Castle

Realistic Fireplace TV

The dynamic fireplace background and the moving fire flames are in original 3D quality (4k or full HD fireplace) if you want to personalize your Windows 10 and 11 desktops with unique design ideas.

A live fireplace wallpaper or a free fire screensaver for television, without having to watch a virtual fireplace video on YouTube.

Great for people who wish to add the beauty of a Christmas fireplace without the hassle of a real wood-burning log fireplace over the holidays.

⇒ Get Realistic Fireplace TV

The Christmas Slideshow

Beautiful genuine winter sceneries, Christmas tree ornaments, and warm candlelight will fill your home with joy and warmth.

This slideshow is ideal if you don’t need background music or a well-decorated home and only want 7 gorgeous, magical images that change every few seconds.

This reminds us of the value of storytelling, the symbols of the Christmas tree, and how cold winter nights can bring us all together for a memorable moment with people we care about.

⇒ Get The Christmas Slideshow

Snowmen Theme pack

The Snowmen Theme Pack offers a collection of animated snowmen designs, each adding its own festive touch to your desktop.

From playful snowmen building snow forts to others dressed in Christmas accessories like scarves and hats, this pack brings plenty of whimsy and charm.

With customizable options to adjust the intensity of the snowfall and tweak snowman accessories, it’s perfect for those looking for a fun, lighthearted Christmas experience.

⇒ Get Snowmen

Christmas Evening live wallpaper and screensaver

This beautiful Christmas live screensaver from 3PlaneSoft lets you know that Christmas is knocking on your door. The bright colors will cheer you up and make your friends ask you where you got the screensaver from.

Magical music in the background with a clock ticking and angels standing high above the little house, it’s a perfect lullaby for kids on Christmas Eve.

While is snowing outside, inside, the little details of the decorations can be inspirational for your house! Candles flickering, jingles announce Santa Clause’s arrival, but it’s time for decorations and preparations for the magical night.

⇒ Get Christmas Evening Screensaver

White Christmas live wallpaper and screensaver


This screensaver features a beautiful small house with a wood bridge in front of it. Snow is falling, windows are lightened and a beautiful Christmas tree shines in the dark outside the house.

Even if it is just one house in the forests, this is an interpretation of a beautifully decorated cottage house, with lots of lights and fully covered in snow, perfect for its guests.

It gives a calm, blissful feeling to enjoy the holidays with loved ones. Or maybe it is set up for a New Year’s party? You can now get the White Christmas live wallpaper and screensaver from 3PlaneSoft and see for yourself the magical surrounding the Holidays this year.

⇒ Get White Christmas Screensaver

Santa Claus live wallpaper and screensaver

This impressive live wallpaper and screensaver let you watch Santa prepare to deliver presents to all the kids who’ve been good this year.

The moment you have been waiting for comes to life with this dynamic live wallpaper. With joyous music and jingle bells in the background, Santa is moving in the villages to make people happy.

You can become his companion and ride over breathtaking countryside landscapes and cozy little villages. Rudolf and delivering the presents that are waiting for you below the Christmas Tree. Let Santa Claus and the magical creatures in your hearth and home this year on your PC as well!

⇒ Get Santa Claus Screensaver

Christmas Live Wallpaper

Christmas Evening Live Wallpaper and Screensaver sets the scene for a peaceful holiday evening. A glowing Christmas tree stands by a window, where you can see snow gently falling outside.

Soft Christmas carols play in the background, adding to the tranquil atmosphere. The scene includes customizable snow effects and background music, letting you personalize the experience.

If you’re looking for a calming, serene Christmas theme, this live wallpaper offers a relaxing and festive way to enjoy the holiday season on your desktop.

⇒ Get Christmas Live Wallpaper

Christmas Snow Screensaver

White Christmas Live Wallpaper and Screensaver captures the essence of a traditional snowy holiday scene.

With snowflakes gently falling over a cozy cabin and a Christmas tree glowing warmly inside, this wallpaper brings the magic of a white Christmas to life.

The peaceful winter landscape is enhanced by customizable snowfall and ambient sound effects like jingling bells or carols. Perfect for users who want to create a classic wintery atmosphere, this wallpaper brings a serene and festive vibe to your desktop or screensaver.

⇒ Get Christmas Snow Screensaver

My 3D Christmas Tree

Christmas Live Wallpaper offers a dynamic holiday scene with a beautifully decorated Christmas tree, twinkling lights, and a glowing fireplace.

The animation includes gently falling snowflakes, creating a magical atmosphere on your desktop.

With customizable settings for snow intensity and background music, you can adjust the wallpaper to fit your preferred holiday mood.

⇒ Get My 3D Christmas Tree

Christmas Serenity

In the twilight, a Christmas tree decked with colorful lights sits among other snow-covered trees in a yard in front of a house.

The image is not moving, yet in the foreground, snowflakes of varying sizes fall from the top of the screen. In the Screen Saver Settings window, the screensaver is called NY1.

Try out the static 3D Christmas tree and enjoy the silence on a peaceful night after Christmas Eve.

⇒ Get Christmas Serenity

Night Before Christmas 3D

The kids are sleeping, and the cat is watching over the Christmas tree, but don’t worry, it won’t knock it down in this screensaver.

This dynamic screensaver depicts every detail of Christmas’s beautiful moments, including a decorated Christmas tree, stockings hung from the mantelpiece, flickering candles, and wrapped gifts.

The screensaver chooses a scene randomly when it starts up, but you may choose one from the options menu, where you can also change the music and sound effects and hide the house cat.

⇒ Get Night Before Christmas 3D Screensaver

Santa’s Workshop Screensaver

Do you recall Santa’s Castle? We took a look inside to see how the little helpers make toys and gifts. We discovered that they began working 172 days before Christmas.

That’s a lot to accomplish, yet they’re well-organized and complete everything on time. Look inside Santa’s North Pole workshop, where elves are hard at work creating gifts to be handed at Christmas.

A calendar on the rear wall of the workshop counts down the days till Christmas, and Santa Claus periodically looks in to see how the elves are doing.

⇒ Get Santa’s Workshop Screensaver

3D Christmas Cottage

Each image features a landscape with a Christmas-themed cottage with lights strung from the roof and neighboring trees, as well as snowy mountains visible in the murky twilight sky.

Snowflakes fall from the sky, and various birds and rabbits fly or wander around the screen while music plays in the background; all this can be turned off if desired.

Take a trip in the forest with the 3 cottages magically decorated in the background of your PC.

⇒ Get 3D Christmas Cottage

Holiday Tree Screensaver

Even though it is not the only one of its sort, it appears that this specific pine tree has the Christmas holiday charm.

A giant pine tree surrounded by other trees sits alone in the middle of a snowy plot of land, decorated with string lights and a dazzling tree-topper.

Snowflakes fall from the top of the screen, and the moon casts a shadow onto the ground as the lights at the top and the bottom alternate in brightness. Note that the screensaver will be listed as NY3 in the screensaver panel.

⇒ Get Holiday Tree Screensaver

Christmas Countdown Screensaver

With the Christmas Countdown screensaver for your PC, you may count down the days, hours, minutes, and seconds till Christmas Day. This is a simple 2D animation that children may use to count down the days before Christmas Eve.

The Christmas tree, a burning fireplace, two elves, a steaming Christmas dinner, and a window looking out on a snowman, Rudolph the reindeer, and snow falling outside stand in the middle of a cozy room.

⇒ Get Christmas Countdown Screensaver

Christmas Tree at fireplace

If you prefer classic Christmas symbols, this live wallpaper depicting a Christmas tree near a fireplace is the right choice for you.

The Christmas tree balls subtly shine, while the fire burns in the fireplace, and the ornated Christmas Tree is enjoying also the warmth of the fireplace.

Everything stops and lets you enjoy the moment after decorating the Christmas tree, or you may use this wallpaper while you decorate, for more inspiration.

⇒ Get Christmas Tree at fireplace

An old fireplace

If you like the live wallpaper listed above, you’ll also like this one. The images use the same Christmas symbols set in a different environment. This live wallpaper depicts an old fireplace in a library.

Near the fireplace, there is also a chair with a cat sleeping on it, and, of course, a Christmas tree. The cat is sleeping peacefully, presents lay below the Christmas Tree

⇒ Download this live wallpaper

Vintage Christmas

The clock is ticking, and soon you’ll receive many presents. Santa is on its way, and it is snowing outside. Fortunately, you can always take cover inside the house, where it’s warm and cozy.

A fairy Santa Clause wanders around, and the clock ticking in the background delivers a euphoric 2D moment while waiting for the kids to fall asleep and enjoy a silent night.

⇒ Get Vintage Christmas

That should be it! We hope you will enjoy a peaceful Holiday season with lots of dear ones close to you and, of course, with amazing wallpapers and screensavers!

There are many more Christmas live wallpapers and screensavers available from NewFreeScreensavers.

In case you want to bring some festive spirit to your live meetings, here is our selection of the best Teams Christmas backgrounds.

If you’ve come across other resources for live wallpapers specific to the holiday season, use the comment section below and tell us more about your favorite Christmas live wallpapers and screensavers.

Error 0x80073d0b While Moving Games: 4 Methods to Fix it

We usually prefer an unclogged system partition, so moving files out of it is essential. But many users reported getting the 0x80073d0b error while moving games to another drive.

The problem is usually encountered with Xbox games and the ones installed from the Microsoft Store. So, let’s find out how you can fix things.

Why does error code 0x80073d0b appear?

Here are a few reasons you are getting the error:

  • System services – Certain systems affect how games are stored, which might lead to error 0x80073d0b when moving them.
  • Bug in Windows – Many users reported the error after updating Windows, which points to a bug in the installed version.
  • Issues with the game – If the problem lies with only one game, it could be the game settings or policies set by the developers that prevent the game from being moved.

Also, listed below are a few games you may encounter the error with:

  • We couldn’t move Forza Horizon 5 – The error is usually met with Forza Horizon 5, and checking the folder permissions might do the trick.
  • We couldn’t move Microsoft Flight Simulator – When facing the issue with Microsoft Flight Stimulator, our solutions should help.

How can I fix error 0x80073d0b?

Before we try the slightly tricky solutions, here are a few quick ones that might do the trick:

  • Restart the computer and then try moving the application.
  • Check for Windows updates, and if a newer version is available, install it.
  • When installing a game, you are given the option to choose the location. So select the desired partition on the drive right then.

If these don’t work, head to the solutions listed next.

1. Use a third-party PC repair tool

We recommend using a professional third-party tool with powerful features that can scan and replace any broken system files in just a few moments.

The OS needs healthy registry files and the proper settings values to provide an error-free experience.

2. Modify service status and Registry

  1. Press Windows + R to open Run, type services.msc in the text field, and hit Enter.services
  2. Locate Encrypting File System service, right-click on it, and select Properties.properties
  3. Now, choose Manual from the Startup type dropdown menu, and click OK.manual to fix 0x80073d0b
  4. Again, press Windows + R to open the Run command, enter regedit, and click OK.resgitry
  5. Click Yes in the UAC prompt.
  6. Paste the following path in the address bar and hit Enter:HKEY_LOCAL_MACHINE\SYSTEM\CurrentControlSet\Control\FileSystemnavigate
  7. Now, double-click on the NtfsDisableEncryption entry on the right.NtfsDisableEncryption
  8. Enter 0 under Value data and click on OK to save the changes.modify value data to fix 0x80073d0b
  9. Once done, restart the computer for the changes to come into effect.

3. Modify folder properties

  1. Press Windows + E to open File Explorer, click on the View menu, hover the cursor over Show, and select Hidden items.View hidden items
  2. Navigate the Program Files folder in the drive where the games are installed, locate WindowsApps, right-click on it, and select Properties.properties
  3. In the General tab, click on Advanced.advanced to fix 0x80073d0b
  4. Uncheck Compress contents to save disk space and Encrypt contents to secure data and click OK.disable compression
  5. Once done, navigate to the Security tab, and click on Advanced.advanced
  6. Click Continue.continue to fix 0x80073d0b
  7. Next, click on Change.change
  8. Click the Advanced button.advanced
  9. Click on Find now to list the various accounts.find now
  10. Choose yours from the list, and click OK to save the changes.choose account to fix 0x80073d0b
  11. Click OK on all previously opened Windows to apply the changes.

Once done, verify if the 0x80073d0b error is resolved. If not, head to the last solution.

4. Use PowerShell

Note icon NOTE
PowerShell is an advanced tool, so if you plan to use it to make system changes, be sure to create a backup beforehand.
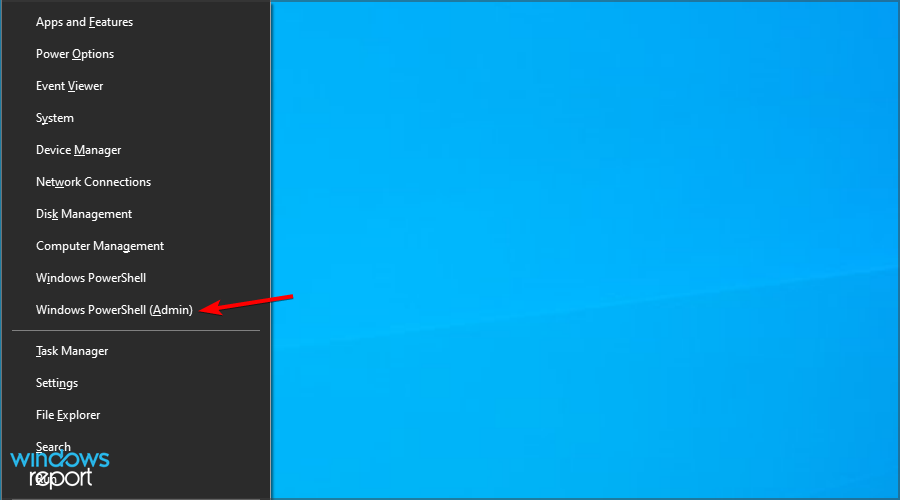
  1. Press Windows + X to open the Power User menu, and choose Windows PowerShell (Admin).
  2. Click Yes in the UAC prompt that appears.
  3. Once the PowerShell opens, run this command:Get-AppXPackage | Foreach {Add-AppxPackage -DisableDevelopmentMode -Register “$($_.InstallLocation)\AppXManifest.xml”}
  4. Wait for the process to finish.

If nothing has worked, you may reregister the Microsoft Store app, which will fix things for good, and the 0x80073d0b error won’t appear again.

In case that doesn’t work, reinstall the game, and this time, choose the location on the desired partition.

Before you leave, do not forget how to download apps without using Microsoft Store.

Did you find a different solution to this problem? Let us know in the comments section below.

How to Fix the Xbox YouTube App if it’s Not Working [Guide]

If the YouTube app is not working on your Xbox One, check out this article for a working solution. This issue may manifest in different ways: YouTube won’t launch, the video won’t play when you resume it, an error code may also appear on the screen, and more.

Here’s how one user describes these annoying YouTube app launch issues on the Xbox One:

I use the Xbox One YouTube app daily. About a month ago while I was watching a video, my power went out. When it came back on, I went to resume my video and it wouldn’t play. I closed the app and went to my history to replay it but it won’t start. Not from the beginning or from where I left off. […]

Nothing will play and it is just a black screen with the play time at 0:00 no matter how long the video it is. Any help would be greatly appreciated.

How do I fix my Xbox One’s YouTube app?

The quickest way to solve the issue is by restarting your console. In most cases, this is just a temporary bug. If that doesn’t work, check your Xbox Live account and then uninstall and reinstall the YouTube app.

If you want to know how to do that, check the steps below.

What to do if YouTube won’t work on Xbox One:

Solution 1 – Launch the YouTube app again

  1. If the app is available on the Home screen, highlight that tile with your controller but don’t select it.
  2. Press the Menu button  on the controller.
  3. If the option to Quit is present, select it. If there is no Quit option, this means that the app is not currently running.
  4. Launch YouTube again by selecting it from the recently used tiles or from My games & apps.youtube doesn't work on xbox one

Solution 2 – Check your Xbox Live account

Make sure that you are the only one signed into Xbox Live. Sign out any other guest accounts and profiles because there could be some interfering settings.

Also, there could be some user conflicts that affect how apps work. The best solution is to keep only your account connected.

Solution 3 – Restart your Xbox One console

  1. Press the Xbox button to open the guide > go to Settings.
  2. Select Restart console > select Restart now to confirm.youtube app is not working on xbox one
  3. Launch the app again.

To turn off you console, you can also press and hold the Xbox button for 10 seconds.

Solution 4 – Uninstall and reinstall the YouTube app

If the issue still persists, try uninstalling the YouTube app and then reinstalling it.

  1. On Home, select My games & apps > select the YouTube app.
  2. Press the Menu button  on your controller > select Uninstall.

Update: Microsoft is aware of the issue and rolled out some updates that entirely solved the problem. It seems that for now, there are no more reported issues with the YouTube app on Xbox.

From now on, if you bump into this problem again, be sure to try the solutions above as they will most certainly help you resolve it.

If you’ve come across other solutions to fix this problem, feel free to list the troubleshooting steps in the comments section below.

READ ALSO:

Bad Object Header BSOD: Fix it With These 4 Simple Steps

Blue Screen of Death is one of the most dreaded errors in Windows, and each time it’s encountered, the OS crashes, leading to data loss. One of these, the Bad Object Header error, is slightly intricate to resolve.

The tricky part which makes troubleshooting a tad more difficult is that the underlying cause could have to do with both the hardware and the software. So, let’s find out all about the stop code Bad Object Header with a bug check value of 0x00000189.

What causes Bad Object Header?

Here are a few reasons you might be getting the error:

  • Incompatible or outdated drivers – In most cases, it was either incompatibility or running an outdated driver that triggered the error.
  • Issues with the RAM modules – If the RAM modules malfunction, chances are you will encounter this error and several others.
  • Corrupt system files – When the system files are corrupt, the OS won’t function effectively, trigger BSOD errors, and Windows will abruptly crash.

How can I fix the Bad Object Header BSOD error?

Before we try the slightly complex and time-consuming solutions, here are a few quick tricks:

  • Check for Windows Updates and make sure you are running the latest version. If there are any updates available, install them right away.
  • Make sure the hardware components are correctly connected, including the RAM and CPU.
  • Scan your PC for malware using Windows Security, the built-in antivirus, or a reliable third-party antivirus that detects all malware and viruses.
  • Look for issues with the storage drive using an effective health check tool since a failing hard drive can also trigger the Bad Sector Header error.

If none of these work, head to the solutions listed next.

1. Use a specialized software

Since any BSOD problem is rather complex, then using specialized software that will scan your entire device and fix the cause of the Blue Screen error is indicated.

2. Update the drivers

  1. Press Windows + R to open Run, type devmgmt.msc, and hit Enter.device manager
  2. Expand the Display adapters entry, right-click on the graphics adapter, and choose Update driver.update driver to fix bad object header
  3. Now, select Search automatically for drivers.search automatically for drivers

Drivers are an integral part of the computer and allow the effective functioning of the hardware. If Windows cannot find a newer version, you can constantly manually update the driver. To find out which driver needs to be updated, check the log files.

3. Test the RAM

An easy way to test the RAM is to run Windows Memory Diagnostic, a tool that comes installed in Windows and eliminates trivial issues. It runs a few quick tests and lists out the problems with the RAM if any.

Another more reliable option is to run MemTest86+, an open-source tool that does extensive testing on all RAM modules identifies even the minutest of the issues, and lists them. However, it will take a few hours for a complete scan.

If the RAM modules turn out to be faulty, we recommend replacing them immediately since the constant BSOD errors followed by OS crashes can lead to other severe issues.

4. Disable automatically restart

  1. Press Windows + S to open Search, type View advanced system settings in the text field, and click on the relevant search result.view advanced system settings
  2. In the Advanced tab, click on Settings under Startup and Recovery.settings
  3. Now, untick the checkbox for Automatically restart under System failure, and click OK to save the changes.disable automatic restart to fix bad object header

Once done, verify whether the BAD_OBJECT_HEADER 189 error is resolved. In case you still come across Bad Object Header, take your PC to a repair shop and get the various hardware components and connections checked.

Also, discover the best Windows 11 hidden tips and tricks for a seamless experience.

Please tell us which fix worked for you in the comments section below. And do not forget to drop any solutions that we may have missed.

How to Use Discord on Xbox [Simple Guide]

Discord is a free voice, video, and text chat app millions of people use to talk and hang out with their communities and friends. It can be used for many things, including art, projects, family trips, and health support.

Many users have been asking about using Discord on Xbox. As we know, Discord can now be integrated with this platform as Xbox’s online services allow it. Using Discord can arguably make communication more robust for gamers.

Keep reading this post to learn how you can use Discord on Xbox.

Can you use Discord on Xbox?

Users can use Discord to connect with friends and communities. You can chat with anyone on Discord Xbox Series X via voice channels or group calls.

Integrating Discord will unlock new features like in-game voice chat, switching between chats, etc. Also, you will be able to see who is on call, adjust the sound, and get a more streamlined audio experience.

How do I get Discord on Xbox?

1. Log into your Discord account

Firstly, start by logging into your Discord account. Open the Discord web page or app, enter your credentials, and click Login.

discord xbox

Suppose you don’t have one, then create your Discord account. You can do so by picking up a username and password. Once you enter all the credentials, Discord will send an email to the registered email address to verify it.

Several users complain about Discord causing high CPU usage. Rest assured that our guide shows you what to do if that happens.

2. Link Discord to Xbox

  1. 1. Open the Discord app on your device.

  2. 2. Click on Community and select Account Settings.

    xbox navigate to account settings
  3. 3. Scroll down and click on the Link button beside Discord.

    discord xbox
  4. 4. You will now the redirected to a page asking you to authorize Xbox to access your Discord account.

  5. 5. Click on Authorize, and it’s done.

    Authorize discord to connect to xbox
  6. You can integrate Discord on Xbox by connecting the accounts you have on each of them. You can do so via Xbox’s options menu. From it, you can link your Xbox account to other accounts, such as Steam, Twitter, Reddit and more.

3. Enjoy the integration

It looks good to have both of your profiles linked to each other. However, the usage of this integration is minimal. The integration is now available for years, and there is no telling if the situation might improve.

Nevertheless, Discord’s Xbox rich presence will still help coordinate your gaming sessions. As we know, communication is a massive part of why Discord gained its popularity. Still, users might face some errors while using this cross-platform integration.

This was how you could use Discord on Xbox. We hope that the steps mentioned above were able to help you.

If you still have any issues, feel free to comment below. We are eager to hear from you.

How to Update Roblox on PC [Complete Guide]

Updating Roblox is important if you want the latest features, bug fixes, and security patches. Being one of the most popular games in the world, you can download and play Roblox on a number of platforms including PC and Mac.

But if you’re using a computer, you need to make sure that your version of Roblox is up to date. The process should occur automatically, but if it doesn’t, you may have to trigger it manually. Otherwise, you might have trouble connecting with other players.

Why should I update Roblox? 

As a general rule, any software you use should always be kept up-to-date to avert risk. The same applies to Roblox. If you are not yet convinced of the importance of updating, here are a few more reasons:

  • New features/updates – Roblox releases new features and content on a regular basis, including new games and features for existing games.
  • Security updates – Updates help the Roblox servers to fight against hackers and cheaters. If you want to get rid of hackers, you need to update regularly.
  • Latest bug fixes – New updates address any issues you encounter while playing the game. This includes fixing crashes and other problems when playing Roblox.
  • Performance enhancements – By staying up to date, you’ll benefit from a better overall experience on Roblox. 
  • Improved stability and reliability – With each update, Roblox strives to make the newer version better by ensuring that it runs smoothly on all supported versions of Windows.

How do I update my Roblox version?

Before you update your Roblox game, check the following:

  • Make sure that your computer meets the minimum requirements for updating your game. If it does not meet these requirements, then there is a chance that the update will fail.
  • Check the size of the update and ensure you have enough free space on your device.
  • Turn off all background apps and close all other programs before updating your Roblox game.

1. Update automatically

  1. Navigate to your browser and go to Roblox’s official site.
  2. Log into your account if you haven’t already.
  3. Click on any game to run, and the update should be triggered automatically.

2. Uninstall and reinstall the Roblox app

  1. Hit the Windows key and click on Settings.settings windows 11
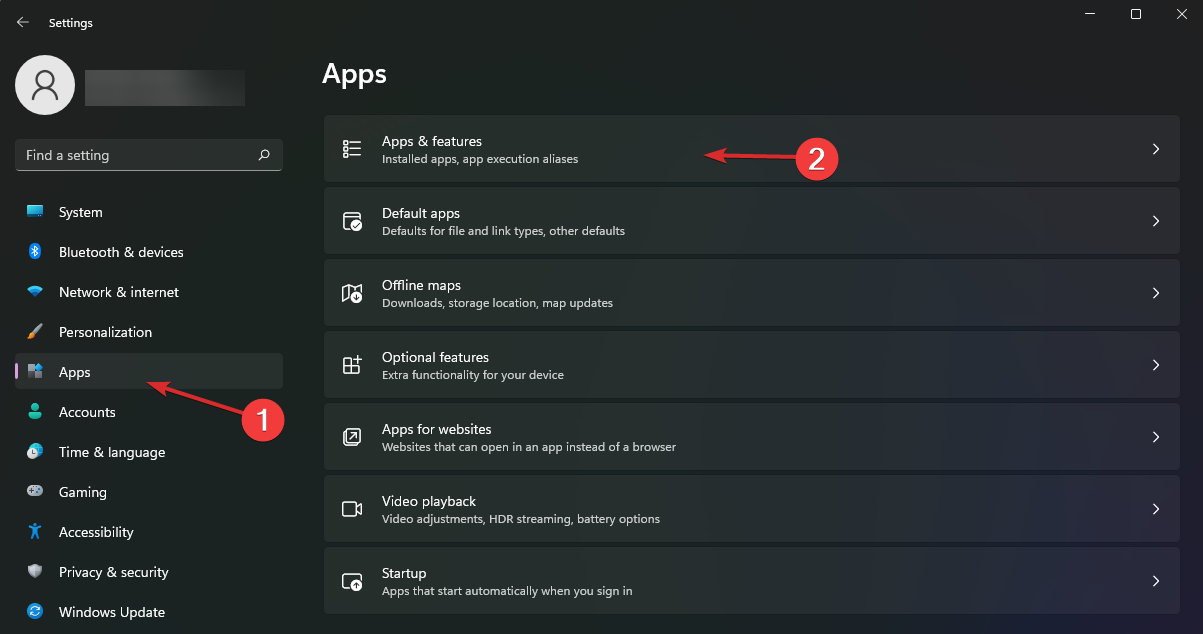
  2. Click on Apps on the left pane then select Apps and features on the right pane.
  3. Locate Roblox, click the three vertical ellipses, and hit Uninstall.
  4. Go back to the Roblox site and download it again.

This method ensures that you get the latest version, especially if your previous version was corrupted.

Why can’t I update my Roblox game?

There are many reasons why you can’t update your Roblox game, but here are just a few of the most common ones:

  • Connection issues – If your connection is not strong enough or it drops out frequently, it might be difficult to update your game. 
  • Insufficient space – If you don’t have enough space on your computer, it won’t be able to install or update the game.
  • Firewall interference – Make sure that your anti-virus/anti-malware software isn’t blocking Roblox from installing or updating correctly. You can turn off its real-time protection feature temporarily while installing or updating the game.
  • Server issues – If you are not able to update your game, it means that either the Roblox server or your computer is having issues. You should check the Roblox status page just to be sure or try again later.
  • Browser cache – If you’re using Roblox on a browser, it is possible there’s a lot of accumulated browser cache that is preventing the update.

If you’re yet to enjoy all that Roblox has to offer because of geo-restrictions, we have recommended some of the best VPNs for Roblox. These will allow you to access the software from anywhere.

We also have an answer for when Roblox is unable to update, so be sure to check out our comprehensive article on the same.

For any additional thoughts on this topic, feel free to drop us a comment down below.

Steam Not Recognizing Installed Game: How to Fix It Quickly

Steam allows you to manage all your games from one place. However, it seems like Steam doesn’t sometimes recognize installed games.

The problem can occur if you decide to clean install Windows and take a backup of the Steam app folder containing your game files and other data.

You then move it back to the Steam installation folder only to have Steam to re-download all the game data back again. So, if Steam is not detecting installed games, continue reading the guide below and discover the best methods to eliminate this problem quickly.

Why is Steam not recognizing the installed game?

A few factors can cause Steam not to recognize the installed game issue. Below are some of the prominent causes:

  • Unrecognized game files: If Steam is not detecting your installed games, it might be because it does not recognize the game files again. The solution to this is to reinstall these games.
  • Insufficient space: In some cases, this issue might be caused by insufficient space on your primary drive. You can fix this by moving some games to an external drive and recognizing them from there.

What can I do if Steam doesn’t recognize installed games?

1. Reinstall the games without downloading

  1. Hit the Windows key, type Steam, and then open it.
  2. Go to Games.
  3. Select and click Install for the game Steam failed to recognize.
  4. Steam will start to discover existing files for the game.

If Steam fails to recognize any of the installed games, it will allow you to install them again.

If you have the game data in the Steam apps folder, you can force Steam to recognize the games by initiating the game’s installation.

2. Add the Steam Library folder manually

  1. Press the Windows key, type the app’s name, and launch Steam.start
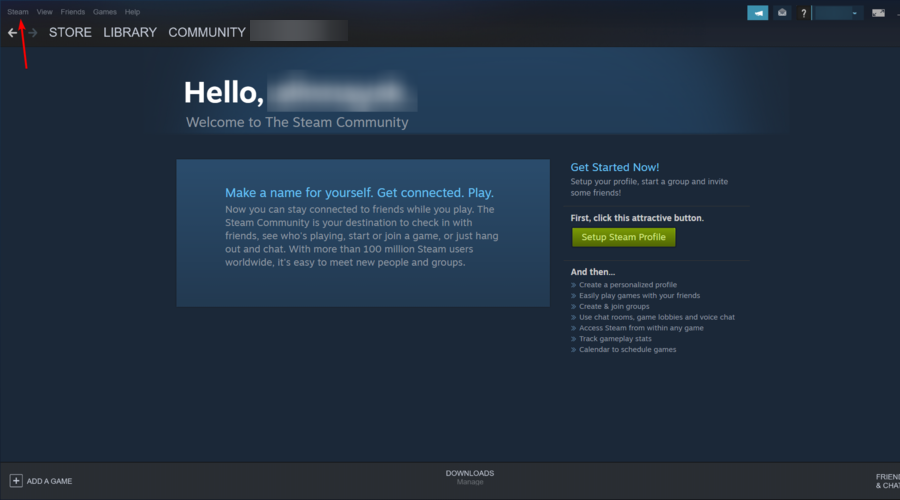
  2. From the top-left corner of the window, click on Steam.option steam not recognizing installed game
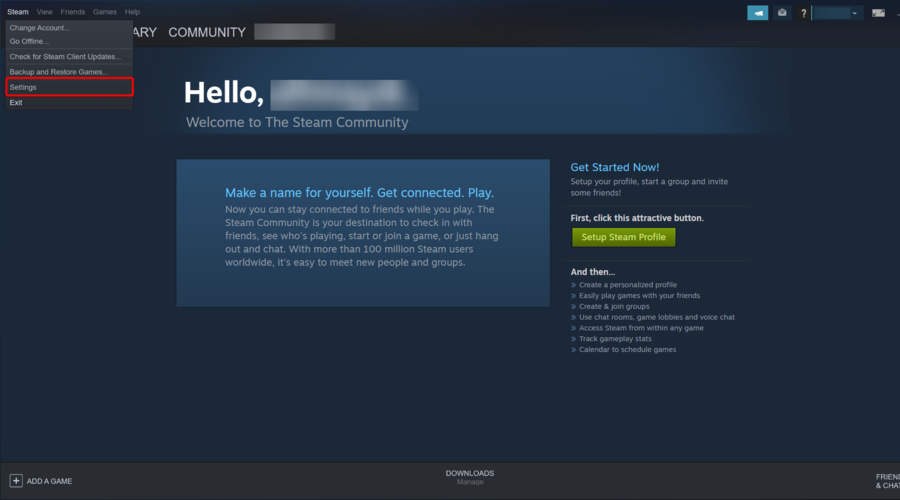
  3. Navigate to Settings.settings
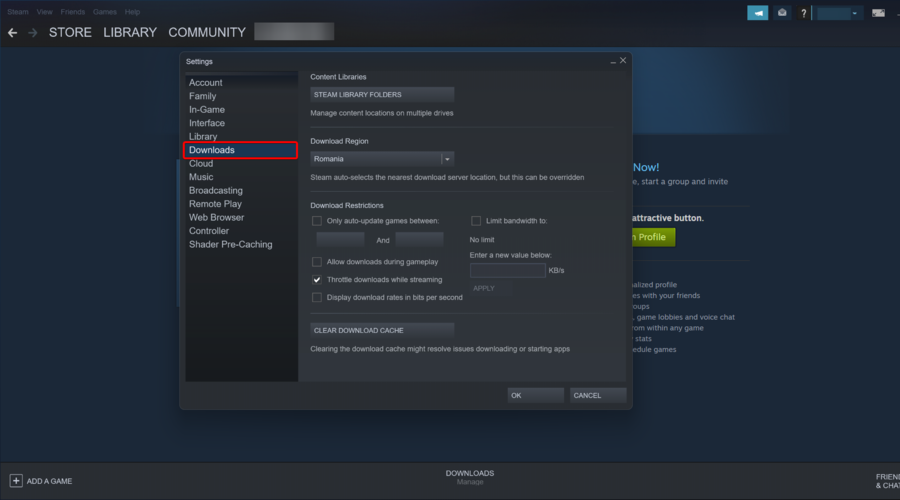
  4. Click on the Downloads tab.downloads
  5. Click on STEAM LIBRARY FOLDERS.library
  6. In the pop-up window, click the Add button (marked as a +).icon  steam not recognizing installed game
  7. Select the location where all your Steam game data is saved, then click on Add.add steam not recognizing installed game
  8. Close the settings.
  9. Exit Steam, then restart the app.
  10. Steam should now recognize installed games again and list them in the games folder.

Steam, by default, stores the game data in the Steamapps folder on the installation disk. If you had a custom location where the game data was stored, you could try to add the location in the Steam app to fix this issue.

3. Recognize Games from a new drive

  1. Click on the Windows search bar, type Steam, and open the desktop app.
  2. From the top-left corner of the window, click on Steam.
  3. Navigate to Settings.
  4. Click on the Downloads tab.
  5. Now, from the right window pane, click on Steam Library Folders.
  6. In the pop-up window, click the Add button (marked as a +).
  7. Navigate to the location where your games are moved (new directory) that is: D:/games/your_subdirectory
  8. Click on Select and close to save the library folder.

If your main drive (steam default installation location) does not have enough space to install all the games, you can move the game data to a new hard drive and then add the Game Library Folder manually in the Steam app.

In the steps above, you can find how to do it if you want your games to be in the D:/games directory. Thus, you’ll need first to create a subdirectory named Steamappscommon. The folder structure will look like this:D:\Games\steamapps\common

Once the subdirectory is created, move all the games to the newly-created directory.

After moving the games, the game directory will look like this:D:\Games\steamapps\common\Assassin's Creed IV Black Flag D:\Games\steamapps\common\Counter Strike Global Offensive

Exit Steam and relaunch it. The app will scan the newly selected Library folder and show all the games as installed.

4. Use .acf Cache to force recognize Steam games

  1. Make sure that you have reinstalled Steam or have the existing installation.
  2. Right-click on the game data folder, then paste it to: C: \Program Files (x86)\Steam\Steamapps folder
  3. Press the Windows key, type Steam, and then open the first result.
  4. At this point, Steam may show some games that are installed correctly.
  5. For the games that show as not installed, select and click on the Install button.
  6. Steam will start to discover all the existing files.
  7. However, if Steam does not recognize the current files, it will begin downloading them, and the progress will read 0%.
  8. Pause the updating for the games and exit Steam.
  9. Go to the path below and find all the current .acf files: C:\Program Files (x86)\Steam\Steamapps
  10. Copy all the .acf files and move them to a new folder outside the Steamapps folder.
  11. Relaunch Steam again. In the Games library, the affected game will show as uninstalled.
  12. Exit Steam.
  13. Move all the .acf files back into this folder: C:\Program Files (x86)\Steam\Steamapps folder
  14. Restart Steam. Go to the Game library and click Resume Updating for the games that you paused previously.

If you have taken the Steamapps folder backup with all the game data, you can use the Steam cache files to force Steam to recognize the installed games from the game data. In other words, you make Steam scan for games that you own.

If everything goes right, all the games that you had previously installed will appear as installed. However, if an update is required, proceed with it.

That’s about it for Steam not recognizing the installed game issue. With the solutions in this guide, you should be able to get Steam to recognize your games even on an external drive.

Are you facing similar issues, like the Steam game not showing up in the library? Then check our guide for the surefire solutions to get it back.

Feel free to let us know the solution that helped you fix this issue in the comments below.

How to Fix the Windows 10 Activation Error Code 0xc004f211

The error 0xc004f211 is a common problem with Windows 10 activation. It means that the Microsoft servers have detected an error with your installation of Windows 10. 

Most users who encounter this error report that it appeared after a significant hardware change. You can easily reactivate Windows after a hardware change, but if you get an error, then this article is for you.

Why am I getting the Windows 10 activation error 0xc004f211? 

The 0xc004f211 error is a common issue that many users face while trying to activate Windows 10. This error can be triggered by a variety of reasons:

  • You’re using a pirated copy of Windows – If Microsoft detects that your copy of Windows is not genuine, then there’s no way to fix this problem other than purchasing an official license.
  • System requirements have not been met – If you have recently upgraded from an older version of Windows to Windows 10, then there is a chance that some of your old hardware drivers might not be compatible with the new version.
  • The product key has reached its limit – It is possible that the product key has been used on the maximum allowed devices.
  • Invalid product key – Make sure that you are using the correct product key for Windows 10. It’s possible your product key is not working because you’re entering it incorrectly.
  • Third-party key generator – If you have installed a third-party key generator on your Windows PC and want to activate your Windows 10 with a genuine product key, then you might get this error.
  • Virus/malware – It is possible that your PC is infected with malware that is interfering with the activation process. Ensure you have a comprehensive antivirus program.

How can I fix the Windows 10 activation error 0xc004f211?

First off, ensure you check off the following:

  • Verify that your product key is from a trusted source.
  • Ensure you’re activating from a Microsoft account.
  • Check and ensure that the hardware is compatible with the OS. You may run into an unsupported processor error if your CPU does not meet the requirements.

1. Run the Windows Activation troubleshooter 

  1. Click on the Start menu and select Settings.
  2. Select Update & Security.update and security
  3. Click on Activation and click on Troubleshoot.
  4. Click on I changed hardware on this device recently, then select Next.
  5. Type and enter the credentials associated with your Microsoft account.
  6. Mark the This is the device I’m using right now checkbox and click Activate.

Note that this will only work if your digital license is linked to the Microsoft account you’re using.

2. Perform a clean install

If the above doesn’t work, you may need to perform a clean install of Windows 10. As long as you have a retail copy of Windows 10 on DVD or USB flash drive, then you can just perform a clean install of the operating system without having to worry about the activation error message.

This means that you will need to remove everything from your computer, including all your files, settings, programs, and apps. As such, you have to back up all your data beforehand.

If nothing seems to work for you then you should contact Microsoft Customer Support and let them know about this problem so that they can help you resolve it quickly by providing appropriate solutions for it.

Hopefully, you have been able to resolve the Windows 10 activation error 0xc004f211 with one of our solutions. You may also encounter other related activation errors, such as the Windows 10 activation error 0x80041023, but we have covered fixes in our detailed guide.

Let us know of any other activation error you may have come across that you would like us to cover in the comment section below.

10 Best Xbox Games For Christmas 2026 [Sales & Offers]

Looking for the best Xbox Christmas games to enjoy this season? We got you. As Xbox enthusiasts ourselves, we scoured the web and found some of the best games, and also some great deals and offers.

So, if you’re looking for a way to pass the time this Christmas, you can find the best Xbox games below. We included titles from a wide range of genres. Check them out.

What are the best Xbox games to play this Christmas?

FC 24 – Incredible graphics

  • More than 700 teams
  • Amazingly realistic graphics
  • Over 30 leagues to choose from
  • More than 19,000 players
  • Older PCs will have issues when playing online

FC 24, formerly known as FIFA has evolved gradually since its first version and has now reached an incredible graphics level, with some saying that it almost looks real.

The game’s graphics have evolved, alongside notable improvements in player control, interaction, and realistic movement. As for the customization tools that allow you to create a player of your own, they have also been improved tremendously.

Assassin’s Creed Valhalla – Improved physics engine

  • Lead raids against Saxon fortresses and troops
  • Can dual-wield weapons
  • Great graphics and epic story-line
  • Open-world exploration
  • Diverges a lot from the Assassin's Creed mythos

Assassin’s Creed Valhalla is the latest game in the epic series of the different assassin’s adventures.

This game offers stunning graphics and realistic physics for an immersive Viking experience. You get to explore a vast open world, take on quests, meet characters, and uncover hidden areas.

A key feature is your own village to control resources, construction, and villagers’ happiness. Return to improve your village or explore the world at your own pace.

If you like open-world games and adventure, and you’re curious to see one of the best graphics engines on the market at work, then you have to look no further. Just claim this Assassin’s Creed Valhalla G2A deal right away!

NBA 2K24 – Realistic movement

  • Improved graphics and assist engine
  • A revolutionary aiming feature that uses the stick
  • A.I. off-ball team-mates are a lot better at opening spaces
  • Great player customization options
  • Lots of off-court pay-to-win microtransactions

NBA 2K24 is an exceptional basketball simulator game that we all ended up loving. This last version of the game offers unparalleled graphic and physics engine improvements.

It also revolutionizes aiming with the shot-stick feature, allowing you to manually aim shots instead of relying on automatic aiming like in previous versions.

This adds a competitive edge, challenging both experienced and new players.

Watch Dogs: Legion – Multitude of skills

  • Great graphics
  • An amazing story that explores the hardships of living in a dystopian future
  • Can recruit any NPC in DedSec
  • You can play with a variety of characters
  • A wide range of skills imply a wide number of possible outcomes
  • Some character recruitment missions tend to repeat

As opposed to the previous versions of this game, in Watch Dogs: Legion you don’t play as a single character, but as any character of your choosing that is part of the DedSec hacker group that fights against the tyrannical techno-fascist police state depicted in the game.

This, in turn, allows you to take advantage of a multitude of skills and character features, thus enabling you to take down your enemies in a variety of ways. 

Make sure to explore this beautifully rendered and challenging world this Christmas. The Watch Dogs: Legion G2A offer might just sound like music to your ears.

Mafia: Definitive Edition – Immersive storyline

  • Amazing story-line
  • Improved state-of-the-art graphics
  • Completely re-written dialog
  • Fresh soundtrack
  • Some open-world side missions would have been a great addition

This last rendition of the highly-acclaimed Mafia game, called Mafia: Definitive Edition is a long-waited refurbish of the original game.

Not only that the graphics and other engines have been improved, but the prohibition-era adventures we’ve all grown to love have a new and polished feel as well.

The storyline of this game is incredibly immersive, offering you a glimpse into the underlying structure of the fictional city of Lost Heaven, based on a real-life version of Chicago back in the day.

Even though the game is presented as an open-world type, the 20 missions it contains are all set in a linear mode, as we have used in the previous release.

Sekiro: Shadows Die Twice – Various mythical places

  • Map levels that intertwine beautifully with the story
  • Hidden areas that offer help
  • A prosthetic arm that allows you to grapple to new heights
  • Improved stealth features
  • Ability to resurrect if killed in battle
  • The game can be paused at any time
  • The battle engine can be complicated to master

Sekiro: Shadows Dies Twice is an incredibly beautiful hack and slash game that doesn’t disappoint at all when it comes to graphics, storyline, and physics engine either.

The most iconic element of change for this game is the extremely interesting prosthetic arm that can be used as a grappling hook, weapon, and tools gadget.

This tool enables you to explore a wide range of iconic and mythical places, while also offering you a quick way of getting out of the way of enemies, and an increased overall feeling of freedom while exploring the map.

Wasteland 3 – Exciting features

Wasteland 3 is another great gaming option to try out this Christmas vacation, with an incredibly wide amount of exciting features, weapons, and characters set in a post-apocalyptic environment.

This turn-based role-playing game gives you a very complex story, great strategic combat elements, and a wide range of ways to do it.

Being the winner of the best RPG  prize at the Games Com Awards, this game offers a very complex and interesting character creation system and a variety of abilities to choose from.

⇒ Get Wasteland 3

Forza Horizon 5 – Designable stunts

  • Rich and varied locations
  • Customized cars
  • You can create your own races
  • Some users experienced engine sounds glitch

This amazing racing game brings a new dimension to this genre, by letting you explore the world while experiencing a variety of colorful details.

This feature not only makes the game feel more realistic but also contributes to the way players can interact and race while enjoying the beautiful graphics and varied locations of Mexico.

Seasons change every week, allowing you to explore various driving conditions such as dry, wet, muddy, snowy, and icy environments.

You can play solo or join forces with other players and form a powerful team while trying to become the Horizon Superstar.

Ace Combat 7: Skies Unknown – Realistic flight controls

Ace Combat 7 Skies Unknown is a very realistic and fun virtual combat game that offers you incredible graphics, realistic flight controls, and a chance to use a wide array of combat techniques.

Beyond the entertaining dog fights and chases, you can also enjoy immersive photo-realistic renditions of scenery and detailed aircraft designs.

To make it even more real, the entire game is filled with real-world current and near-future weapon systems, while also offering you the Ace Combat feel you’ve grown to love.

⇒ Get Ace Combat 7: Skies Unknown

Destroy All Humans 2 – Fun mission

Destroy All Humans 2 is a very entertaining game to enjoy this Christmas vacation.

As the name suggests, the game objective is very simple: destroy all humans.

You can do so by using Crypto’s out-of-this-world weaponry, using psychokinesis to smash humans to the ground or send them flying, while also being able to throw any object in the world at them.

As you may have guessed, it’s the sequel to the much appraised title Destroy all Humans!

⇒ Get Destroy All Humans 2

As you can see, this guide has provided you with some of the best Xbox One games for Christmas 2020. After all, this year’s vacation is all about you and your loved ones.

If you have any other suggestions, feel free to share them with us by using the comments section below this article.

9 Methods to Fix Disk Management if It’s Not Loading

The Disk Management tool provides handy options for disks, file systems, and volumes. However, sometimes you might get an Unable to Connect to Virtual Disk Service or Disk Management could not start Virtual Disk Service (VDS) on… error message.

Why my Disk Management is empty? Here’s another question that mustn’t be overlooked. It seems as though some of the system files are broken on your computer.

You will need to start the file-checking scan for the system. You may accomplish this by implementing the third method that we provide below.

Then, the Disk Management app won’t load. If you can’t open the Disk Management window, this is how you can fix the system utility in Windows 10.

Why is Disk Management not loading?

If loading Disk Management takes a significant amount of time, the problem may be caused by the hardware on your computer. The corruption of one or more of the system’s files is yet another prevalent reason why it won’t load.

Disk Management is a useful tool that allows you to manage drives on your PC. However, certain issues can sometimes occur, such as:

  • Disk Management takes a long time to load – If Disk Management takes a long time to load, the issue might be caused by your hardware. To fix the problem, check if your hard drive is working properly.
  • Disk Management stuck on loading disk configuration – According to users, Disk Management can become stuck while loading disk configuration. If you encounter this issue, disconnect any unnecessary USB devices from your PC and check if that helps.
  • Windows 10 Disk Management not working – Sometimes, Disk Management won’t work due to file corruption. If your system files are corrupted, you might have to run a DISM or SFC scan to repair them.
  • Disk Management not initialized, showing anything, opening, loading – Various problems can appear with Disk Management, and sometimes these issues can affect older versions of Windows. Even if you don’t use Windows 10, you should be able to apply most of our solutions to the older versions of Windows.
  • Disk Management could not start VDS – This issue can occur if the required services aren’t running. To fix the problem, be sure that the VDS service is enabled on your PC.

What can I do if Disk Management is not working?

All these issues will be addressed below, so don’t worry; you are not the only one who encountered them.

Without further ado, let’s jump into the list of solutions for Disk Management not loading, Connecting to Virtual Disk Service issues, and more.

1. Try fixing Disk Management from the Services window

  1. If Disk Management is not showing, open the Services window by pressing Windows + R. Enter services.msc into Run’s text box and press Enter.
    Disk Management takes a long time to load
  2. Next, scroll to Remote Access Connection Manager and double-click it.
  3. Click the Startup type drop-down menu and select Disabled.
  4. Press the Apply and OK buttons at the bottom of the window.
    Disk Management takes a long time to load
  5. Now double-click Remote Access Auto Connection Manager in the Services window.
  6. Select Disabled from its Startup type drop-down menu. Then click the Apply and OK buttons as before.
  7. Scroll to the Virtual Disk and double-click it to open the window in the snapshot below.
    Disk Management stuck on loading disk configuration
  8. Click the Startup type drop-down menu and select either Manual or Automatic from there. Then you should press Apply and OK to confirm the new settings.
    Disk Management could not start VDS
  9. Now restart Windows and open the Disk Management tool.

You can easily repair the Disk Management tool from the Services tool in Windows. See how to do that by following the steps above.

Most users don’t know what to do if their Windows key stops working. Check out our detailed guide and be a step ahead.

2. Run the System File Checker and DISM

2.1 Run the SFC scan

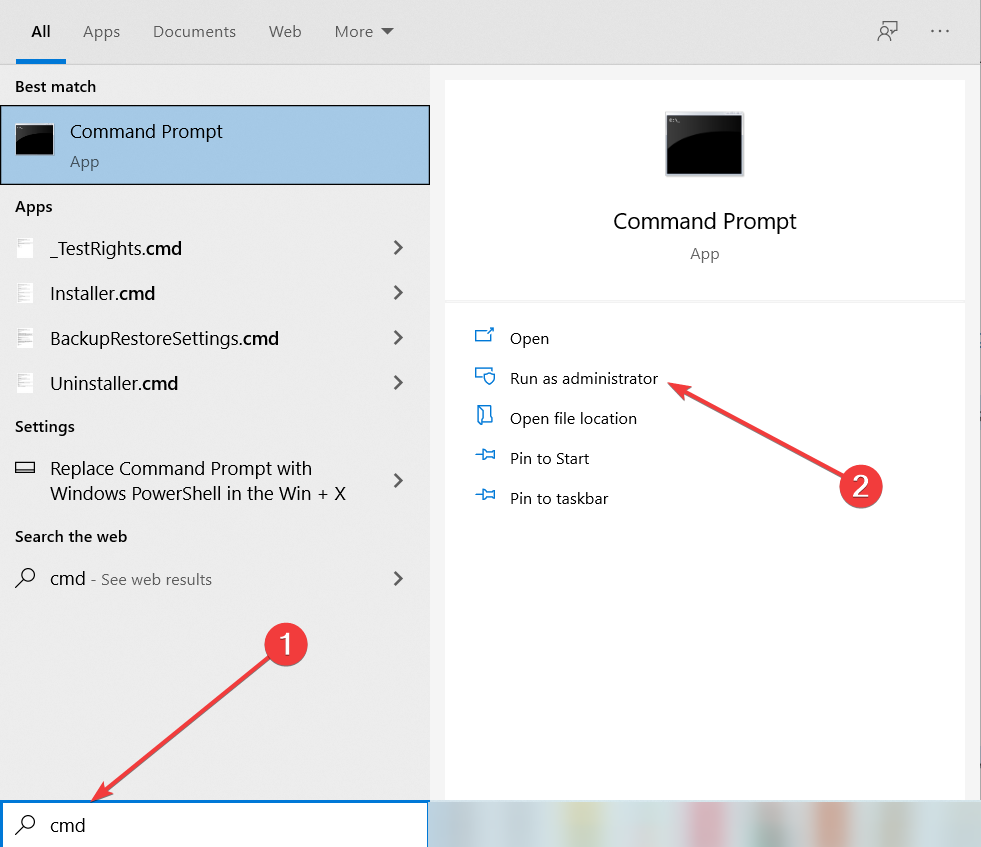
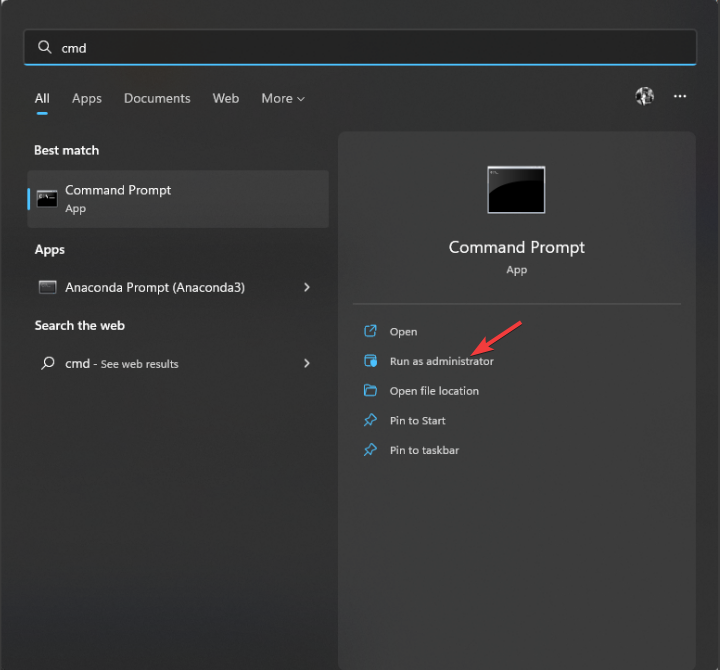
  1. Press Windows, type cmd, and click on Run as administrator to start Command Prompt with administrator privileges.
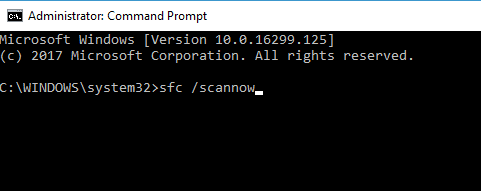
  2. Enter the following command and press the Enter key: sfc /scannow
    Disk Management takes a long time to load
  3. When the scan is done, any issues found and fixed are then noted in the Command Prompt. Restart Windows if the System File Checker repairs some files.

Scannow, or System File Checker, is a handy tool that can fix Windows system files.  So, this might also come in handy for fixing the Disk Management utility.

If you’re having trouble accessing Command Prompt as an admin, then you better take a closer look at our handy guide to fix the problem.

If the SFC scan doesn’t solve your issue, you might want to try performing a DISM scan. To do that, apply the following steps.

2.2 Run a DISM scan

  1. Start Command Prompt as administrator just like we did before.
  2. When Command Prompt starts, enter this command and press Enter: DISM /Online /Cleanup-Image /RestoreHealth
    Disk Management could not start VDS

DISM scan will now start. Keep in mind that the DISM scan can take up to 20 minutes or more to complete so don’t interrupt it. Once the scan is finished, check if the problem still persists.

If you were unable to perform an SFC scan before, try running it after the DISM scan. Once the SFC scan is finished, the corrupted files will be repaired and the issue should be resolved.

If the DISM scan failed on Windows take a look at our guide and get rid of the worries in no time.

2.3 Use a specialized tool

Using a dedicated tool can be a great help in this kind of situation because it repairs and optimizes systems automatically. It monitors your computer’s health constantly and keeps it at its best performance.

3. Consider using a reliable third-party tool

If Disk Management isn’t loading on your PC and you lack the patience to apply one troubleshot tip for another, you might want to consider using a third-party tool from the start.

Disk Management is a convenient tool since it comes with Windows, but if you can’t start it, you might consider using the tool recommended below instead.

Unlike Disk Management, such programs offer some advanced features to manage hard drives and partitions with ease. Best of all, they aren’t at all complicated to use.

Hence, to find another third-party solution that can manage your disk and partitions, you definitely can proceed using the best disk management tools on Windows 10.

So, if you can’t run Disk Management at all, you might give it a try and see if it’s your cup of tea.

4. Check your hardware

Sometimes Disk Management won’t be able to start if there’s an issue with your hardware. To check if everything is in order, be sure that your hard drive is correctly connected to your PC.

In addition to your hard drive, several users reported that the issue can occur due to your card reader. If the pins on the card reader are bent, you might experience issues with Disk Management.

In case there’s a problem with your card reader, you might need to take your PC to the repair center to solve the problem.

If you’re still running an old OS, here’s our guide on how to access and use Disk Management in Windows 7.

5. Disconnect unnecessary devices

According to users, issues with Disk Management can occur due to other USB devices attached to your PC.

If you have an external hard drive or USB flash drive connected, disconnect them before trying to start Disk Management.

In some rare cases, your phone can cause this issue to appear. If your phone is connected to your PC, be sure to disconnect it and try to start Disk Management again.

6. Make sure that Cyberlink Virtual Drive is running

This solution applies to you only if you have Cyberlink software on your PC. According to users, they could not start Disk Management because Cyberlink Virtual Drive wasn’t running.

  1. To fix the problem, press Windows + R then type services.msc and press Enter.services-w10 disk management not loading
  2. Look for the Cyberlink Virtual Drive service, right-click it and make sure it is started. Press Restart in order to give it a boost.restart disk management not loading

7. Use Diskpart

If you’re an advanced user comfortable with using the command line tools, you might want to try Diskpart.

Diskpart offers the same features as Disk Management, but it runs in the command line environment, so it might not be as user-friendly as Disk Management.

In case you’re not familiar with this tool, we advise you to read a tutorial or two and learn its syntax in order to use it.

Diskpart is more complex than Disk Management, and since it doesn’t have a graphical environment, you can sometimes make irreversible changes to your PC by accident.

In order to avoid any problems and file loss, be sure to be extra cautious and read a tutorial or two on how to properly use Diskpart.

8. Keep your system up to date

  1. Press Windows + I to open the Settings app. Once it opens, navigate to the Update & Security section.
    Disk Management stuck on loading disk configuration
  2. Now click the Check for updates button. If any updates are available, they will be downloaded in the background.
    Windows 10 Disk Management not working

Sometimes, issues with Disk Management can occur due to certain bugs. If that’s the case, the best course of action would be to ensure that your PC is up to date with system updates.

These updates often bring new features and bug fixes, so it’s advised to keep your PC up to date.

By default, Windows 10 automatically downloads the updates in the background, but due to certain glitches, you might miss an update or two. However, you can check for updates manually by doing as described above.

Once the updates are downloaded, restart your PC in order to install the updates. After updating your system, check if the problem still persists.

If you’re having trouble opening the Setting app, don’t worry as we have already put together a detailed guide, just for you.

9. Create a new user account

  1. Open the Settings app and navigate to the Accounts section.
    Disk Management not opening
  2. Now select Family & other users from the menu on the left. In the right pane, select Add someone else to this PC.
  3. Select I don’t have this person’s sign-in information.
    Disk Management takes a long time to load
  4. Now select Add a user without a Microsoft account.
    Disk Management stuck on loading disk configuration
  5. Enter the desired username and click Next.
    Windows 10 Disk Management not working

If Disk Management won’t load on your PC, the issue might be a corrupt user profile. To fix the problem, it’s advised to create a new profile.

After creating a new account, switch to it and check if that solves the problem.

If the issue doesn’t appear on the new account, you need to move your files to the new account and use it instead of your old account.

In case Windows won’t let you add a new user account, follow the easy steps we have included and create or add as many accounts as you want!

How do I restart the Disk Management Service?

  1. Press Windows + R then enter services.msc inside the text box and press OK.services-w10 disk management not loading
  2. Look for the Virtual Disk service then double-click it and under the Service status section press Stop then Start and OK.stop-start disk management not loading

If Disk Management is not loading in Windows 10 or connecting to Virtual Disk Service got stuck, you finally know what to do.

However important, Disk Management is not the only or the best such software. You can also use other efficient disk management software suggested in the article.

Being unable to connect to a virtual disk service is unpleasant, but not impossible when you have the right tips.

After you have fixed the issue, we recommend reading our guide on how to convert a RAW to NTFS drive without formatting.

If you have any other questions, feel free to leave them in the comments section below.

Xbox One External Hard Drive Not Working: Why & How to Fix

The console installs every game entirely to the hard drive but some games can be pretty massive, and they can fill up the 500GB of hard drive pretty fast.

Thankfully, you can buy an external hard drive and connect it to the Xbox One in order to have additional storage.

Sometimes it might happen that your Xbox One external hard drive is not working properly.

If you are in this situation and you are looking for solutions, then keep on reading this article to learn how you can fix it.

However, first, make sure that your drive has USB 3.0 connectivity and has a capacity of at least 256 GB. If your drive doesn’t fit these requirements, it won’t be recognized by your Xbox One.

Steps to fix Xbox One external hard drive not working:

Solution 1: Preliminary steps

There are some things you should try first. They are very simple and intuitive solutions but they could spare you a lot of hassle:

  1. Restart your Xbox One as it is a quick fix that usually helps in many cases
  2. Remove and reconnect your external storage device
  3. Connect your external storage device to a different USB port on your Xbox One console
  4. Check the external hard drive on your computer to see if it is recognized.

Solution 2: Power cycle your console

Another suggestion is to perform a hard power cycle:

  1. Turn off your console by holding the Xbox button  on the front of the console for approximately 10 seconds. The console will turn off.
  2. Turn your console back on by pressing the Xbox button  on the console or the Xbox button on your controller

Note: If you do not see the green boot-up animation when the console restarts, repeat the steps described above. Make sure that you hold the power button until the console completely shuts down.

Solution 3: Check Xbox One HDD requirements

According to the manufacturer, for an external storage drive to save games and apps from Xbox One, it must meet the requirements mentioned below:

  1. It uses a USB 3.0 connection. If you are using a USB hub, the hub must also be USB 3.0 or later.
  2. It has 256 GB or larger storage capacity.
  3. It has a partition.
  4. No more than three storage devices are connected to the console at the same time.

If some of the requirements are not met, at least you know this is a hardware issues.

Solution 4: Update your Xbox One

It might be possible that there are recent updates for your Xbox One pending. You can manually update your firmware for your console to detect your external storage.

In order to update your console, please follow the steps described below:

  1. Press the Xbox button to open the guide
  2. Select System and go to Settings
  3. Choose System and then go to Updates
  4. If you see an update available, then you need to install it

After you have installed the update, go back to Settings, select System, and then Storage and check whether your device appears in the list.

Solution 5: Adjust the power management for storage

Another good suggestion is to check your power settings. In order to do that:

  1. Press the Xbox button  to open the guide and select System
  2. Go to Settings and choose Power & startup
  3. Select Power mode & startup and make sure that your Power mode is set to Instant-on
  4. Deselect the option When Xbox is off, turn off storage

Solution 6: Reset the Xbox One operating system

There may be a problem with your console’s operating system hence Xbox One external hard drive won’t work. The reset can be done without deleting your games or apps.

In order to do that:

  1. Press the Xbox button  to open the guide and select Settings
  2. Select All settings and then choose System
  3. Go to Console Info & updates and select reset xbox one
  4. When prompted if you want to reset your console, select Reset and keep my games & apps. Thus, The operating system will reset  delete potentially corrupted data without deleting your games or apps

We hope that the solutions above helped you solve your problem and your Xbox One external hard drive is working again. Hopefully, you now have more space to save your games.

If you have other suggestions or solutions, let us know in the comments section below.

  • What format does an external hard drive need to be for Xbox one?
Most external hard drives are formatted to NTFS, but your Xbox One needs a FAT32 one. So first of all, format your external hard drive to FAT32. If it won’t format, here’s an excellent guide to fix that issue.
  • What format does a USB need to be for Xbox one?
If your Windows PC can read it, so does your Xbox One. So you can format it in either FAT32 or NTFS. If the USB device is not recognized, fix the problem with our full guide.

Adyen Error Codes: Use These Quick Methods to Fix Them

Is Adyen showing any error codes? This will cause payment issues, and in some cases, it might leave your data vulnerable. This is why it’s important to use antivirus for online banking for any extra layer of security.

Suppose you struggle to figure out what the error code means and how to resolve it. Then, we will help you with this!

Why do Adyen error codes occur?

There are multiple reasons for errors, but there are the most common ones:

  • Authentication – If there’s a problem with the API key, you might encounter this error. The issue is server-related and not caused by multi-factor authentication software.
  • Missing parameters – If you leave specific fields empty, you might encounter various errors. Consider using form filler software to ensure all the necessary info is added.

How do I fix Adyen error codes?

1. Error code: 000 – Unknown

This error can be due to various reasons:

  • Validation 000: The lookup was unsuccessful
  • The authentication key or the API key is invalid
  • The message fails to parse
  • paymentDetails missing
  • Merchant permission is absent
  • The Account Updater connection only accepts Visa and Mastercard
  • Required CVC for OneClick payments

You can fix the mentioned issues by contacting customer support and letting them know you are facing error code 000 and cannot execute your command. They’ll figure out what’s causing the problem and fix it.

2. Error code: 100 – Required object amount is not provided

The issue is because of a few missing parameters. You can fix this issue by adding the missing parameters, either amount or originalReference. 

Or you can also identify the missing parameters by comparing the request to the endpoint’s standard request.

3. Error code: 104 – Billing address problem

If you face an Adyen error code 104-Billing address problem, a required field under billingAddress is missing.

Confirm if all the bill’s information is filled in correctly before re-submitting.

4. Error code: 109 – Invalid variant

The 109 error code can be because of missing txvariant details. To solve this error, confirm the requestData and make sure the information entered is correct.

5. Error code: 112 – This bank country is not supported

If you encounter error 112, it can be because the countryCode is missing or the length does not comply with ISO standards.

6. Error code: 114 – Received an incorrect InvoiceLine

The Adyen error code 114 could be because lineReference is set to ‘null’ or incorrect currency is used. You can fix the error by comparing the invoice line to the requestData.

7. Error code: 125 – Invalid recurring contract specified

In the case of Adyen error code 125 (Invalid recurring contract specified), ensure the recurring object is set up correctly.

8. Error code: 174 – Unable to decrypt data

The error occurs due to the following reasons:

  • Using GET instead of POST for HTTP.
  • Environment mismatch
  • Improperly generated Origin/Client key
  • API key mismatch

To fix this issue using a plug-in, generate a new web service using the relevant permissions.

9. Error code: 200 – Invalid country code

This issue can occur if the countryCode is incorrect. You need to use ISO 3166-1 alpha-2 format to fix it.

After doing that, payment errors 200-006, 200-018, 200-023, and 200-011 should be resolved.

10. Error code: 702 – Problem parsing request

This error occurs for the following reasons:

  • The request isn’t in a valid format. For example, this happens if the request contains a field that’s not recognized.
  • Empty input that results in a null result. This occurs if you use requestData from the API Explorer without filling in merchant account info.
  • Internal error
  • shopperEmail is set to null.

11. Error code: 803 – PaymentDetail not found

If you are facing an error 803, it could be due to the following reasons:

  • The merchant has disabled the contract that has ceased to exist.
  • The merchant tries to make a payment via an ongoing contract that has been updated, disabled or removed in the past.
  • selectedRecurringDetailReference could be missing.
  • You disabled the recurringDetailReference using the /disable endpoint.
  • Or you could be missing the requestData.

The simple solution to fix Adyen’s error code 803 is to verify that the values being passed are correct and valid and then proceed with the command to execute the action.

This isn’t the only online service with payment issues, and we already wrote about Something that went wrong on our end PayPal error, so you might want to check it out.

We hope this guide was helpful to you in solving the Adyen error codes. Have you experienced any of these issues? Let us know in the comments below.

6 Best Browsers That Don’t Track Your History & Private Data

Online privacy is and always was a really big concern for everyone. People want to browse the internet without leaving a trace of private information behind them.

The main door to the Internet is your browser and everyone, from the government, Facebook, and Instagram, to Google and Microsoft wants to know what you’re doing at all times.

What’s your email address, who’s your online friend, what’s your favorite music channel, or how many times do you access a website, all of them and many more are daily questions that need to be answered.

But where are the answers? Funny you should ask. All of this info and much more is in your browsing history, search history, passwords saved, online purchases, Facebook account, and the ads you click.

To even have a hope of preserving your online footprint, you’ll need the safest browser that doesn’t track history, and today we’ll talk about the best ones.

How can I browse without being tracked?

Browsing the web without having third parties collect your online data can be done by using a VPN service to change your IP address.

Once your IP address has changed, any possible third-party tracking will not be able to collect your personal data like bank accounts, private information about your family, clicks, preferences, etc., making the online experience a much safer environment.

As in the case of every software on the market, not all VPNs are made the same, and there are two big categories:

  • Built-in VPN services – Applications that already have a VPN service built into the structure of the software. Can be extremely easy to use, accessible, and offers great protection if implemented correctly, and most of them are also completely free to use.
  • Third-party VPN services – Apps that are built as stand-alone entities, which are not integrated into other software. These VPN services provide the same capabilities as the built-in ones but will be a bit harder to access, while also usually requiring a monthly subscription.

As today we’re talking about the best browsers that don’t save your history or data, we will be focusing more on the first category: built-in VPNs, so make sure to read through the information provided and choose the best fit for your needs.

Can you be tracked if you use incognito?

The Incognito Mode only prevents your browser from storing any history of the sites that you visit, and will not accept any cookies or site data, while also not saving any data added to online forums.

Your online activities will be easily tracked by the websites that you visit, the owner of your company, and your ISP provider.

If you would like to not be tracked online, the only possibility is using a VPN service, and a browser with a built-in service is even better.

Read along to find out more information.

Is there a truly private browser?

Tor is a web browser that is both open source and free, and it offers users complete anonymity. Tor users can conceal their online browsing activities and the IP address from their Internet service providers by using a three-step encryption process.

Which browser has no history?

The following are the best browsers that have no to little tracking:

Browser’s namePrivacy-focused featureAdblocking capabilities
Opera OneIn-built VPNYes (Block ads setting)
AVG Secure BrowserAnti-tracking toolsYes (Automatic ad-blocker)
UR BrowserNinja Mode (completely anonymous)Yes (Ad and cookie blocker)
Tor BrowserOnion servicesNo (extensions aren’t advised)
WaterfoxNo telemetryYes
Firefox QuantumYou can turn off all tracking optionsNo (you can add extensions)

What is the best non-tracking browser?

Opera One – Powerful built-in VPN support

Opera One is the best browser to use if you want to keep your personal data private and prevent third parties from tracking your online activities.

There are three main features that make Opera One a privacy-friendly browser: the built-in ad blocker, tracker blocker, and VPN. Opera One’s ad blocker detects and blocks ad scripts leading to faster loading speeds.

At the same time, the tool also protects your computer. Malicious ad attacks have increased in frequency in recent years. Opera One’s ad blocker can successfully block any type of ad, including malware-loaded ads.

The tracker blocker detects and blocks online trackers thus protecting your personal data. Third-party tracking codes and cookies can no longer collect information about your online behavior and activities.

Opera One is one of the few browsers with a built-in VPN. You can use this tool to encrypt your connection, hide your IP address, or access geo-restriction content.

It also has a redesigned interface with a modular design and tab islands to make your multitasking more easier and efficient.

AVG Secure Browser – Lightweight and secure usage

AVG browser is a great suitable choice for digital data safety, especially for tracking engines that collect personal information.

This browser is multi-platform and can be used on Windows, Mac, or Android devices. Therefore, you can avoid tracking cookies wherever you may be.

Compared with other options, this browser differentiates due to its privacy technology that specifically targets adware or threats regarding your data.

More exactly, you can make use of capabilities like anti-phishing defense that ensures secure navigation without cyber threats or malicious websites.

Additionally, this browser has in-built security against tracking engines so you keep your browsing history untouched.

If you’re not convinced yet, be aware that you have an overall digital fingerprint safety to block any tracking attempt on your device. Moreover, the privacy cleaner functionality will erase history or other browsing data with a single click.

UR Browser – 3 levels of online privacy

UR Browser is one of your best bets to keep your private information secure. It was created by AdaptiveBee with user security and privacy in mind.

UR is based on Chromium and it’s available for Mac and Windows.

It comes with amazing security features like a powerful ad and 3-rd party cookies blocker, a built-in VPN, anti-fingerprinting functionality, and a completely anonymous private browsing mode called Ninja Mode.

To encrypt your data, the browser uses HTTPS redirection, which is a much more secure protocol. Also, a very important thing to mention is that UR stores databases on its servers.

This way, no browsing history is collected in this browser. Furthermore, UR automatically disables things like prediction text on web searches, automatic password filling, and automatic updating, making it a great browser without history.

Of course, UR Browser is highly customizable with unique home screens, a lot of wallpapers, an updated news feed, and many other features that help you make it exactly what you want.

Tor Browser – Private with no record history

Tor is another browser that does not track user activity and is heavily focused on user privacy and security. It’s available for Windows, macOS, and GNU/Linux in 32-bit and 64-bit versions that are constantly updated.

Its main focus is on anonymity. Based on a modified Firefox ESR, it contains things like NoScript and HTTPS-Everywhere.

The browser works in a network that promises to protect a user’s browsing history, location, messages, and any online personal data from people or bots that perform network traffic analysis.

Tor network is a web of servers operated by volunteers. Their aim is to keep browsing data as secure as it can be. You don’t have to worry about browsing history, saved passwords, or auto-completion data.

Also, it’s worth mentioning that Tor is the only browser that uses onion services. This means that users can publish websites and other services without revealing their location.

⇒ Download Tor Browser

Waterfox – 64-bit open-source

Waterfox is a 64-bit open-source browser based on Mozilla Firefox. It was created in 2011 and it’s available for Windows, macOS, and Linux.

The most important difference between Firefox and Waterfox is that the last one has telemetry completely turned off. Data collection, startup profiling, sponsored tiles, and Tracking have been removed.

Also, the lack of telemetry helps with the speed of the browser. Without data collection or ads, websites load much faster and everything is smoother.

It can run any plugins, Firefox add-ons, and any extensions you want.

Rest assured, with Waterfox none of your history, passwords, cookies, and other personal data gets public or shared anywhere.

⇒ Download Waterfox

Firefox Quantum – Very customizable

Firefox Quantum is the newest version of Firefox. It’s available for Windows, macOS, Linux, IOS, and Android. Unfortunately, it’s also one of the older players in the browser picture.

Firefox wasn’t always the safest, but with this new update, things have changed drastically. It has excellent privacy protection features, customization options, regular updates, and good security.

It also has a lot of add-ons and extensions that can take the thing to the next level. You can customize it in almost any way you want.

You’ll have to remember that out-of-the-box Firefox still has telemetry, but you can easily disable it in the settings. With telemetry turned off, you won’t have to worry anymore.

Of course, there are a few other things you can enable/disable like Tracking protection, geolocation, cookies control, autocomplete, and password protection.

All these features and more can help you create a private and secure environment that will minimize your online trial.

⇒ Download Firefox Quantum

Which browser has the best Incognito mode?

As we already discussed, the Incognito mode, or any other variant of the same idea, will not be able to protect your data online and can only do so locally and with limited efficiency.

That being said, the browser with the best incognito mode is Opera One, which allows users to go fully anonymous online by using its built-in VPN service.

Even though the so-called Private Browsing tab in Opera One does the same thing as in the case of Incognito Mode in Chrome, having the capability to turn on a VPN also makes this the best browser option on the market.

As you can see, there are choices for everyone. Some browsers are more advanced; others are simpler. It depends on what you’re looking for. A special mention of Ungoogled Chromium which removes all telemetry features can also be a good privacy-focused browser.

If you want to learn more about private browsers, our LibreWolf vs Firefox article is a great place to start.

Share your thoughts in the comments section below if you have experienced any of these browsers. Also, if you have more questions or suggestions, leave them there.

What is Xbox error code 0x903f900a and How to Solve it?

The Xbox console is the choice for many people when it comes to playing video games online. However, despite Microsoft’s console popularity, the Xbox is affected by many errors.

Two of these errors are 0x903f900a and 0x803f900a. There are certain similarities between these issues. As the users reported, these error codes appear when trying to start a game.

One user described the following problem when trying to play a game on Xbox:

I get this code (0x903f900a) when I try to play something, but when I check the xbox errorhelp site, it apparently doesn’t exist. Since Microsoft has no idea what’s going on, maybe someone here does?

So, this error code doesn’t even appear on the support site for Xbox. However, another similar error code appears.

A user wrote the following message on the official Xbox forum:

I bought my xbox one and it came with Forza. After a month, my xbox game pass has expired and i’m no longer able to play forza, even if I’ve never played online and i own the game. I get the error message: sign in with the profile used to buy this game
and make sure your subscription to Xbox Live Gold or EA access is up to date (0x803f900a). Why can’t I launch the game???

Fortunately, there are more details about this error code. Somehow, Xbox doesn’t recognize the profile used to buy this game.

As you can see, the issues are similar, and today we will show you how to fix them.

How to fix Xbox error code 0x803f900a?

1. Reset your console

  1. Press the power button and hold it for 10 seconds.
  2. Unplug the power cable from the back of the console for 5 minutes.
  3. Plug the cable back in and start the Xbox to see if the problem persists.

2. Reinstall the game

A quick solution that worked for many users was to uninstall and install the game again.

3. Renew your game subscription

Probably, your subscription has expired. Therefore, you need to renew your subscription. To do that, go to Settings, then to Subscriptions.

Conclusion

As you can see, the errors 0x903f900a and 0x803f900a can be solved with very quick and easy methods.

Did our solutions work for you? How did you solve these errors? Do let us know in the comments section below!

5 Best Christmas VR Games to Play Now [Oculust Quest, Vive]

The festive season is here, and we’re sure many of you want to play funny Christmas games on your computers. Previously, we shared a list of the best Christmas games to play on Steam, and now, we’ve got another surprise for you: a list of the best Christmas VR games to play this winter.

Best Christmas VR games to play this winter

1. I hate Santa

  • Fun and crazy premise
  • Delightful winter atmosphere
  • Incredibly fun for users of all ages
  • Not everyone hates Santa

I hate Santa is a cool snowball fight game you can play this winter. You can start your own snowball fights from the comfort of your house and shoot, dodge, and level up to defeat crazy kids in epic fights. When you finish this game, you’ll find out Santa’s darkest secret.

2. A very bad Christmas Eve

  • Engaging puzzles
  • Great graphics
  • Free world mechanics
  • Outstanding immersion experience
  • Pretty short

You’re the only elf that Santa can rely on to supply gifts for kids all around the world.The goal is to repair a few pieces of machinery that help Santa make and deliver the gifts, such as the RPS (Reindeer Positioning System), by completing a few puzzles.

You’ll see things can get messy pretty quickly, so you have to pay attention if you want to meet your goal.

3. Santa Sling

  • Great skill game
  • Perfect for those that love Santa
  • Has a certain competitive feel
  • Amazing graphics
  • The OST could use some more songs

Santa Sling is a casual first-person VR game where you play as Santa delivering presents to kids from your sleigh in a Christmas-themed town.

Sounds all too easy? Well, you need to use your magic slingshot to target chimneys before Christmas Eve ends. Earn bonus points by launching the presents through the rings.

4. Quizality Christmas Edition

  • Great trivia game for friends and family
  • Best played with someone else
  • Amazing Christmas theme
  • Not much fun when played alone

If you like quizzes and winter, this is the right game for you. Quizality Christmas Edition is a single player multiple choice quiz set in a VR Winter Wonderland.

The difficulty increases as you progress through the game. Embark on a sleigh journey through a winter wonderland and answer questions on Christmas movies, music and trivia.

You can get Quizality Christmas Edition as an Early Access game from Steam.

5. Christmas Massacre

  • Great for those that love action-packed games
  • Fast-paced FPS combat
  • You get to shoot evil snowmen
  • The graphics could really use an update

Well, if you’re a zombie game fan, we’re sure you’ll enjoy playing Christmas Massacre. Evil snowmen are going to attack you all the time and you’ll need to blast them with lethal Christmas tree ornaments, candy canes and snowballs.

Playing this VR shooter is not as easy as you might have thought. You’d better grab a gun in each hand if you want to stand a chance against the vicious hoards of snowmen.

Keep an eye on the cash as well. The more you collect throughout the waves of snowmen, the quicker you can upgrade your weapons.

That was our selection of the best Christmas VR games, so grab your gear and have some fun in virtual space.

If VR is not really your thing, here’s our selection of the best PC games to play this Christmas.

Which one did you enjoy most? Let us know in the comments below, and if you have some other ideas, we would love to hear them as well.

Xbox System Error E105: What is and How to Fix

Xbox One startup error code e105 happens during a system startup and freezes the system, so you get an error message that reads: e105 and a frozen screen that tells you to restart your Xbox console.

You could also see a something went wrong screen or a startup error message. In order to fix Xbox startup error code e105, try the solutions listed below.

How do I fix the startup error code e105 on Xbox One?

1. Restart your console

  1. Press the Xbox button to open the guide. Pressing the Xbox button will open the guide from any other screen on the console.
  2. Go to Settings.
  3. Select Restart console.
  4. In the last menu select Yes to confirm.

If you’re unable to access the guide or the console seems frozen, press and hold the Xbox button on the console for about 10 seconds until the console turns off.

After the console shuts down, touch the Xbox button on the console again to restart.

2. Power cycle the console

  1. Turn off your console by holding the Xbox button for roughly 10 seconds. The console will turn off.
  2. Turn your console back on by pressing the Xbox button on the console or the Xbox button on your controller. If you don’t see the green boot-up animation when the console restarts, repeat these steps. Make sure that you hold the power button until the console completely shuts down.

Note: If your console is in Instant-On power mode, these steps will completely shut it off. This mode will be disabled until you restart the console.

3. Disconnect and reconnect your console’s power cable

  1. Turn off the Xbox One console by pressing the Xbox button on the front of the console for about 10 seconds until it shuts down completely.
  2. Unplug the console’s power cable. Wait 10 seconds. Be sure to wait 10 seconds. This step resets the power supply.
  3. Plug the console power cable back in.
  4. Press the Xbox button on your console to turn on the Xbox One

4. Restore your console to factory defaults

If resetting the console doesn’t correct Xbox One startup error code e105, you can use Xbox Startup Troubleshooter to restore it completely to factory settings.

This will, however, erase all accounts, saved games, settings, and home Xbox associations. Anything not synchronized with Xbox Live will be lost.

Note: You should only use this option as a last resort.

  1. Power off your console, and then unplug the power cord to ensure that the console is completely powered off.
  2. Wait 30 seconds, then plug the power cord back in.
  3. Press and hold the BIND button (located on the left side of the console) and the EJECT button (located on the front of the console), and then press the Xbox button on the console.
  4. Continue holding the BIND and EJECT buttons for 10-15 seconds.
  5. Listen for two power-up tones a couple of seconds apart. You can release the BIND and EJECT buttons after the second power-up tone.
  6. The console should power up and take you directly to the Xbox Startup Troubleshooter.
  7. To reset your console from the Xbox Startup Troubleshooter, use the D-pad and A button on your controller to select Reset this Xbox.
  8. When prompted, select Remove everything.

Your console should function correctly now.

If that didn’t help, then your console needs to be repaired to correct Xbox error e105, so you can submit a repair request to Xbox Device Support.

Were you able to fix Xbox error e105 using these solutions? Let us know in the comments section below.

Choose the Don’t Turn off Automatically option and you are set. Also, double-check the power brick and that all cables are plugged and functioning correctly.

How to Fix 0xc004f050 Activation Error in Windows 10

If you’ve just installed Windows 10 on your computer or upgraded it from an older operating system, you might have encountered the 0xc004f050 Windows 10 activation error.

Even if you have used a legitimate product key to install Windows 10, this error message might still appear because Microsoft hasn’t recognized the new hardware configuration yet.

What causes the 0xc004f050 Windows 10 activation error?

The 0xc004f050 Windows 10 activation error can happen for a variety of reasons. Here are some of the most common causes:

  • Hardware issues – If your computer has hardware issues, then it might not be able to transfer your Windows license from one PC to another. 
  • Server issues – It is possible that at the time of activation, Microsoft servers were busy because of some network issue. You’ll just have to try later.
  • Virus/malware infections – Viruses and malware can interfere with the normal operation of your system and prevent proper communication between Microsoft and your PC.
  • Unsupported license – There are risks of running an unlicensed version of Windows 10 that isn’t supported by Microsoft. This means you can’t complete the activation process.
  • You have an OEM license – OEM licenses are typically tied to machines. Some Windows licenses can be transferred, and in others, you’ll get the Product key can’t be used in this copy of Windows error.
  • The activation key is for a different edition – If you’re trying to use the product key for a different version of Windows, say Windows 10 home to pro, you may encounter this error.

How do I fix the 0xc004f050 Windows 10 activation error?

1. Run the Windows Activation troubleshooter 

  1. Click on the Start menu and select Settings.
  2. Select Update & Security.update and security
  3. Click on Activation and click on Troubleshoot.
  4. Click on I changed hardware on this device recently, then select Next.
  5. Type and enter the credentials associated with your Microsoft account.
  6. Mark the This is the device I’m using right now checkbox and click Activate.

2. Use the automated Telephone system

  1. Press Windows + R to open the Run window.
  2. Type slui 4 and hit Enter.SLui
  3. In the Select your region window, select the country and click Next.
  4. Call one of the numbers displayed on the screen to get a Confirmation ID.Activation by phone 2
  5. Once you get the confirmation ID, enter it and click Activate Windows.Activation by phone 3

3. Clean install Windows

A clean installation is one of the best ways to fix the 0xc004f050 error. When you clean install Windows 10, all the files and settings will be removed from your computer, so you can start over with a fresh system.

The main benefit of a clean install is that it will remove all the glitches or bugs caused by outdated files, apps, or drivers on your computer. Be sure to back up all your files prior to a clean install.

And that’s how to solve the 0xc004f050 Windows 10 activation error. There are also other activation errors you may come across, and we’ve got you covered.

If it’s the Windows 10 activation error 0xc03f6506, we have a detailed guide on how to fix it, so don’t hesitate to check that out too.

We’d love to know of any other solution that may have worked for you but not mentioned here. Let us know in the comment section below.

Logitech G432 Mic Not Working: 6 Easy Fixes to Apply Now

Imagine a situation where you having a ball of a gaming session with your friends, but all of a sudden, your mic stops working. Sounds pretty frustrating, right? Although Logitech microphones are some of the best ones available out there in the market, they are also prone to issues.

There are multiple user reports that confirm the Logitech G432 mic not working issue. While the problem is there on other versions of the mic as well, the Logitech G432 one is widely reported.

Why is my Logitech G432 mic not working?

There can be a bunch of reasons why your Logitech G432 mic is not working or has stopped working midway. After some research, we have deduced a list that will help you understand the reasons:

  • Outdated drivers: Often, hardware malfunction is because of outdated drivers. Outdated drivers make it hard for the hardware to communicate smoothly with the PC, thereby causing the issue.
  • The hardware is faulty: Due to wear and tear, the mic might have become dysfunctional. In such a case, you might need to replace it.
  • Changes in system settings: There are chances that you might have muted the mic or tweaked some sound settings that are causing the problem.
  • A different device has taken over: If you use two mics for your work, then chances are that the other mic might have been set as default.

How can I fix the Logitech G432 mic that isn’t working?

Here are a few things that you can do before you make the jump over to the advanced solutions:

  • Certain temporary glitches or bugs can be easily fixed by restarting the PC. Here’s what to do if the computer is stuck on restarting.
  • Check the volume levels and make sure that the mic isn’t muted.
  • Make sure that the connection of the Logitech mic is firm and that there aren’t any loose connections.
  • Also, try connecting it to a different port to ensure that the mic isn’t at fault.

Now, let us check out the advanced solutions and apply them one by one and see if this helps you resolve the issue or not.

1. Update the driver

  1. Open the Start menu.
  2. Search for Device Manager and open it.
  3. Expand the Audio inputs and outputs.
  4. Right-click on your Logitech G432 mic and select the Update driver option.
  5. Click on Search automatically for drivers option.
  6. Let the system search for the updated drivers.
  7. After the installation is complete, restart your PC and check if this resolves the issue or not.

Updating drivers is the first thing that you should do if you come across any issues with the hardware attached to your PC.

While you can follow the above steps and update the driver, there is another way of keeping all of your drivers up to date because the above method requires you to manually update each driver one by one.

We would suggest you use a third-party trusted software called Outbyte Driver Updater. With a few clicks, it updates all the drivers on your PC. It helps you fix broken or faulty drivers and missing driver files, update drivers, create driver backups, and much more.

Outbyte Driver Updater

Have all your old drivers updated so you won’t experience any more issues.
Free Trial Download Now

2. Enable the microphone

  1. Open the Start menu.
  2. Open Control Panel.
  3. Click on View by and select Small icons.
  4. Click on Sound.
  5. Switch to the Recording tab.
  6. Right-click on the empty area and select Show Disabled Devices.
  7. If your Logitech G432 mic is listed there then you need to right-click on it and select Enable.
  8. Also, if the mic isn’t set as default, then click on it and select the Set as default option.

3. Check mic levels

  1. Open the Start menu.
  2. Open Control Panel.
  3. Click on View by and select Small icons.
  4. Click on Sound.
  5. Switch to the Recording tab.
  6. Right-click on the Logitech G432 mic and select Properties.
  7. Switch to the Levels tab.
  8. Dial up the Microphone volume levels.
  9. Click OK and check if this resolves the issue or not.

Often users have reported that turning up the microphone volume levels helped them fix the Logitech G432 mic not working issue. You can also try boosting the Microphone boost levels as well, which is right below the Microphone volume.

4. Allow microphone access

  1. Press the Win + I keys to open Settings.
  2. Click on Privacy & security.
  3. Click on Microphone under App permissions.
  4. Toggle on the Microphone access.

If this toggle isn’t turned on then your microphone will not be used on your PC. In such a case, it is essential that you turn this privacy setting on and see if this resolves the issue.

5. Rollback the driver

  1. Open the Start menu.
  2. Search for Device Manager and open it.
  3. Expand the Audio inputs and outputs.
  4. Right-click on your Logitech G432 mic and select the Properties option.
  5. Click on the Roll back driver option.

Sometimes new drivers are buggy and can cause multiple issues with the hardware. In such a case, it is advised to roll back the drivers back to the previous version.

6. Reinstall the driver

  1. Open the Start menu.
  2. Search for Device Manager and open it.
  3. Expand the Audio inputs and outputs.
  4. Right-click on your Logitech G432 mic and select the Uninstall option.
  5. Follow the prompts to completely uninstall the drivers from your PC.
  6. Restart your PC.

If nothing works then you can try using it on another PC or connect it to another port and check if your mic is working or not.

In case it doesn’t work even after replacing the PC and port, then chances are that your Logitech mic is broken, and you need to replace it.

That is it from us in this guide. If you want to know the different ways via which you can enable the microphone on your PC, then we have a dedicated guide on it as well.

Let us know in the comments below which one of the above solutions helped you resolve the problem.

Why Won’t My Pictures Import to My Computer & How To Fix It

If your photo import is not working on Windows 10, here is all the information you should have.

Ever since Windows 10 was launched, users encountered issues when trying to import photos from their external devices (camera, phones) to their computers.

Microsoft’s forum is flooded with user complaints regarding these issues, but it seems Microsoft did not hurry to find a solution.

When Windows 10 users try to import photos from, let’s say, their camera to their laptop, various error messages may appear on the screen: An error has occurred while attempting to import. Either the source is unavailable or the destination is full or read-only or Something went wrong. Try again or cancel.

Why won’t my computer let me import photos?

Transferring photos to your computer should be easy, but you may run into complications once in a while. These could be for different reasons.

Here are a few causes:

  • Access rights – If you transfer from a mobile device with a cable, you must configure the phone to allow file transfer.
  • Damaged cables – This goes without saying, if your cable is broken, the import will not work.
  • Malware infection – As you already know, malware can affect several processes, and file imports are one of them.
  • Locked devices – Some devices can be locked, and nothing will be transferable if that is the case.

Note that when an import can not be completed, there are different messages you may get on your computer, including:

  • Windows 10 photo import something went wrong – This is quite a general error, but one of our solutions will help you fix it.
  • Photo importing Windows 10 denied – You should be able to fix it by choosing a different import directory.
  • Windows 10 Photo app not importing – Be sure to check your camera settings to get rid of this message.
  • Photo import not working/ very slow – This can occur due to your antivirus, so you might have to disable it or uninstall it.
  • Windows 10 photo import is not working on iPhone – Many users have reported this problem, and the solution is within anyone’s reach: switch to a Mac laptop.
  • My pictures won’t import to my computer from camera – If you are unable to import photos into Windows 10, the problem may lie with the settings you have chosen for your camera.
  • My pictures won’t import to my computer from my iPhone, Android, iPad – If Windows 10 flat-out refuses to let you import photos, you should probably look into purchasing an app from a third-party developer.
  • Why won’t all my pictures import to my computer – all my photos aren’t showing up to import – A number of users claimed that the issue was resolved simply by restoring the default settings for photo import in Windows 10.
  • Looking for new photos and videos 0 items – However, while your antivirus is an essential component of your operating system since it will protect you from malicious software, it also has the potential to make it difficult to import photos into your computer.
  • Looking for a device to import from – Another workaround that you can try if you’re having problems importing photos is provided here. Simply slot the microSD card or SD card into the appropriate slot on the card reader.
  • Something went wrong your files might not have been imported, and my pictures won’t import to my computer Windows 7, 8, 10, 11 – If starting the application in administrator mode resolves the issue, you should consider making that the default behavior for the application going forward and ensuring it always uses administrative privileges.

Without further ado, let’s just jump right in!

What can I do if my PC won’t import photos?

1. Change your security settings

  1.  Right-click on the Pictures folder in File Explorer, and click on Properties.
    Windows 10 photo import something went wrong
  2. Click on the Security tab.
    Windows 10 Photo app not importing
  3. Under Group or User names click on Home Users, on the user you are logged in with, then under Permissions for that user, click on Full control.
    photo import not working on windows 10
  4. Repeat step 3 for Administrators under Group or Username.
  5. If you don’t see the downloaded photos, restart your Windows 10 device and import them again.

2. Restore default settings for the Pictures folder

    This very intuitive solution can be easily done in a few clicks and potentially fix your photo import not working issue on Windows 10.

  1. 1. Locate the Pictures directory, right-click it and choose Properties from the menu.

    photo import not working on windows 10
  2. 2. Go to the Location tab and click Restore Default.

    Photo importing Windows 10 denied
  3. 3. Now, click on Apply and OK to save changes.

After that, your Pictures directory will be restored to its default location, and the problem with photo importing should be resolved.

Several users reported fixing the issue simply by restoring the default Windows 10 photo import settings.

3. Use specialized photo management software

If you’re having photo importing issues on your PC, you might be able to solve the problem by using third-party applications.

Many great applications allow you to manage your photos, but ACDSee Photo Editor, Photo Manager Deluxe and Adobe Bridge stand out.

All applications offer a simple-to-use and friendly interface, and you should be able to import your photos without any problems.

Adobe Bridge is a powerful asset manager that lets you preview, manage, modify and publish multiple assets easily, plus it imports photos from devices flawlessly.

You can also import pics from Adobe Stock and various libraries since the Bridge integrates seamlessly with these apps.

Needless to say, you will enjoy a wide range of additional features that will come in handy, like organization tools, filters, and search options.

4. Check your camera settings

If photo import is not working on Windows 10, the issue might be your camera settings. Check your camera settings if you’re trying to import pictures from your camera.

According to users, if your USB connection settings are set to Auto on your camera, you won’t be able to transfer your photos.

To fix the problem, open your camera settings and make sure to choose MTP or PTP mode before trying to import your photos.

This issue also affects your phone, so be sure to set the connection method to MTP or PTP on your phone before you try to import pictures.

5. Check your antivirus

Your antivirus is a crucial component of your operating system since it will keep you safe from malware, but your antivirus can also cause photo importing issues to appear.

All cameras and phones connect to a PC via USB cable, and many antivirus tools will block USB devices by default to prevent malware from spreading.

However, sometimes this feature can prevent you from importing photos to your PC, and to fix the problem, you need to check your antivirus settings.

Several users recommend disabling your firewall during photo import, while others suggest allowing Runtime Broker to go through your firewall.

If that doesn’t work, you might be able to fix the problem simply by disabling your antivirus. If you can’t find the feature blocking photo import, temporarily disabling your antivirus is the second-best option. We’ve got a dedicated guide on removing it from your PC for Norton users.

In some cases, the issue might persist. As a result, you might have to uninstall your antivirus entirely. After uninstalling the antivirus, check if the problem is resolved.

If removing the antivirus solves the problem, you might consider switching to a different antivirus solution.

Whether you’re considering uninstalling your current antivirus software or not, look into the best uninstaller software available.

6. Manually transfer your photos

  1. Connect your phone or camera to your PC.
  2. Now open This PC and navigate to your phone or digital camera.
    photo import not working on windows 10
  3. Navigate to Internal Storage or SD card directory. (If the images are stored on your internal memory, go to Internal Storage. On the other hand, if you’re keeping them on a microSD or SD card, go to SD card directory.)
    photo import not working on windows 10
  4. Now navigate to DCIM > Camera; all your photos and videos should be there.
  5. Move your photos and videos to the desired directory on your PC.

This is just a workaround, but if the photo importing feature isn’t working on your PC for some reason, be sure to try this method. This method might not be as straightforward as photo importing, but it will work.

7. Connect your SD card to a card reader

This is another workaround that might help you with photo importing issues. Insert the SD card or microSD card into a card reader.

After that, right-click the new drive on your PC that represents your SD card and choose Autoplay. Now you should be able to import photos.

This is a workaround since you’ll have to remove your SD card and connect it to a card reader whenever you want to transfer photos from your camera or phone.

Many users reported that it works, so feel free to try it out.

8. Try running the Photos app as an administrator

8.1 Open app as admin

  1. Locate your photo importing application.
  2. Right-click it.
  3. Choose the Run as administrator option from the menu.
    Windows 10 photo import something went wrong

If nothing happens when you click on Run as administrator, check out one of our solutions.

8.2 Set app to always use admin rights

  1. Right-click your photo importing application and choose Properties from the menu.
  2. Go to the Compatibility tab and check Run this program as an administrator.
    Windows 10 Photo app not importing
  3. Now click Apply and OK to save changes.

If running the application as an administrator fixes the problem, you might want to set the application always to use administrative rights.

After that, your photo importing application will always run with administrative privileges, and you won’t experience any issues.

How do I import photos with Windows 10?

  1. Connect your camera or your photo device.
  2. Launch the File Explorer, click on this PC, then right-click on your Camera and select Import pictures and videos.
  3. The Camera Import Wizard will launch. Select the standard selection, then click Next.
    photo import not working on windows 10
  4. Click on the Import button.

This is a native photo importer feature for Windows 10.

Many users have asked why won’t my pictures import to my computer. One of the solutions above will help you import your photos on Windows 10. So if your photo import is not working on Windows 10, we are confident it should now be fixed.

Remember that we have not made this list in any particular order, and you should pick and choose what solutions feel more appropriate for your case.

For more information, check out how to fix Windows 10 Photo Viewer not working with five expert solutions.

If you have any other questions, don’t hesitate to leave them in the comments section below, and we’ll be sure to check them out.

Sound is Not Working on Lenovo Laptop: 5 Ways to Fix it

If your Lenovo sound is not working, discover the best solutions by reading our thorough guide in its entirety.

Users have reported having sound issues with Windows 10 Lenovo laptops. This can be highly frustrating, as you can’t play any audio files on your Lenovo PC.

The reasons that can cause this sort of issue can vary, ranging from problems with your physical sound card to missing drivers installed on your PC.

However, there’s a way to fix these problems for your laptop, and today we’ll show you how to fix sound on Lenovo laptops.

This article will also help you if the Lenovo speakers are not working or the Lenovo audio is not working on your laptop.

Why is my Lenovo laptop sound not working?

If your Lenovo laptop is muted, there are a few things that you may consider. The most common triggers are:

  • The volume level – There are chances you have the volume set to zero; in this case, there will be no sound naturally.
  • Ruined internal speakers – While settings are often the culprit, you should double-check that your speakers are not broken.
  • Sound on the wrong device – This is funny, but your OS may send the sound to the wrong device. If that is the case, you will have no audio on the Lenovo computer.
  • Audio enhancement – If you have any audio enhancement, there are chances that they are disrupting the sound, and you may need to do away with them or reconfigure them.
  • Problems with drivers – If you are using corrupted or outdated drivers, at a point, they will stop receiving sound, and you will have to update or reinstall them.

Moreover, here are some error variations that you may meet and fix with the solutions below:

  • Lenovo speakers not working – Lenovo laptop speakers not working Windows 11
  • Lenovo laptop speakers not working but headphones are
  • No sound Windows 11 Realtek – Lenovo Realtek audio driver not working
  • Lenovo no audio output device is installed
  • Lenovo no sound after Windows update
  • Lenovo ThinkPad speaker / Synaptics audio not working
  • Lenovo Legion or IdeaPad 3 sound not working Windows 11
  • Lenovo laptop sound not working Windows 10
  • The audio service is not running Lenovo Windows 10

While these are not the only causes, they are an excellent place to start troubleshooting. And we will be introducing you to the best solutions.

How to fix Lenovo laptop with no sound on Windows 11?

1. Uninstall the sound driver from Device Manager

  1. Press the Win + X keys on your keyboard and select Device Manager.
  2. Click on the Sound, video and game controllers option, right-click on the audio device and select Uninstall.
    lenovo sound not working
  3. Restart your PC, and after the restart process is completed, Windows will attempt to reinstall the driver.

You need to know that the system will install a default driver, not the exact one for your device. If this doesn’t solve the problem, follow the next solution.

2. Update the audio driver

2.1 Update the drivers manually

  1. Press the Win + X keys on your keyboard and select Device Manager.
  2. Click on the Sound, video and game controllers option, right-click on the audio device, and select Update driver.
  3. Select the option Search automatically for updated driver software.search automatically driver - fix sound lenovo laptops
  4. Restart your PC.

If there’s no sound on Lenovo desktop, updating the drivers might do the trick, if the problem lies with corrupt or outdated audio drivers.

2.2 Update drivers automatically

Windows 10’s driver updater isn’t all that reliable, and sometimes a scan might not yield any results.

However, third-party driver updaters don’t have this issue, which is the case with Fortect Driver Updater. This powerful driver updater allows you to scan for and update all your driver in one go and act as great long term maintenace tool.

⇒ Get Fortect Driver Updater

2.3 Lenovo audio drivers not working

  1. Open your browser and go to the Lenovo support website.
  2. Choose the PC section and then select View product support.
  3. Now search for the correct product or download the Lenovo Service Bridge to detect your product automatically.
  4. Select the audio drivers and download them.
  5. Now repeat solution number 2 but at the third step, instead of searching automatically for drivers, go for the second choice: Browse my computer for drivers software and select your drivers from your hard drive.

Suppose you own a Lenovo laptop in the unlikely event that the driver updating was unsuccessful. In that case, you will need to visit the manufacturer’s website and download the correct drivers, as shown in the steps above.

3. Check if your sound settings are correct

  1. Right-click the sound icon found in the Windows 10 taskbar and select Open sound settings.sound settings in taskbar - fix sound lenovo laptops
  2. Inside the Sound Settings window, ensure that the appropriate device is selected in the section Choose your output device, and make sure the volume is not set to Mute.sound output device and volume - fix sound lenovo laptop
  3. Scroll down and select App volume and device preferences.
  4. Inside that screen, ensure that the apps you’re using to listen to music are not muted and that the output and input options are appropriately chosen.sound volume for apps - fix sound lenovo laptops
  5. Try to play sound again.

Fixing the sound settings might restore the sound to normal. If Windows 11 Sound settings are not opening, restart the computer and then try again.

If this doesn’t fix your issue, please follow the next method.

4. Change the properties of your audio device

    Another simple and time-saving method to resolve Lenovo sound issues on Windows 11 is to modify the properties of the audio device like in the example below.

  1. 1. Right-click the sound icon found in the Windows 10 taskbar and select Sounds.

    sounds option taskbar - fix sound lenovo laptops
  2. 2. Select the Playback tab, select your speakers (Default) and click on Properties.

    sound playback properties - fix sound lenovo laptops
  3. 3. In the Advanced tab, select the drop-down list and choose all the options. Then, click the Test button after each change to see if it works.

    sound-lenovo-laptop

Changing the sample rate worked for some users, so if they managed to fix the sound problem, make sure you try it also.

5. Restart Audio Services

  1. Press the Windows key + R, type services.msc, and hit Enter.services.msc - fix sound lenovo laptops
  2. Find Windows Audio in the list and double-click it.
  3. Set Startup type to Automatic, press Stop, and press Start; finally, click Apply and check to see if the issue is solved.

How do I enable internal speakers on my Lenovo?

  1. Right-click the sound icon found in the Windows 10 taskbar and select Sounds.
    sounds option taskbar - fix sound lenovo laptops
  2. Select the Playback tab, right-click your speakers (Default) and click on enable.
  3. Now click on OK to save the changes.

Lenovo laptop speakers not working, but headphones are

If the speakers are not working in Windows 10, ensuring the sound goes to the correct device is essential. And it can also help in this situation.

If your laptop speakers are correctly set as the default audio device, you can also try to connect external speakers to the audio connectors (go for the Stereo headphone jack).

Finally, even though it may sound trivial, check your keyboard to verify that the sound is not muted.

Many users reported that the Volume key does not correctly communicate with the system tray and can be turned off without any visual indications.

This article explored the best troubleshooting methods available to fix sound issues on Lenovo laptops.

In most cases, the trigger is a bad driver, and following the solutions we covered should be well on your way.

All the solutions we have discussed have been for Windows 11, but the good news is that if you followed the guide, the exact solutions would work on Windows 10.

So, if you have sound issues on a Lenovo laptop running the latest Windows OS, pick any of the solutions that seem most appropriate to your case from the ones mentioned above.

If you still have audio issues on your PC, you can fix them now with the help of this simple guide. Let us know if this guide helped you by using the comment below.

5 Best Headsets that Enhance Your Xbox One Gaming Experience

Virtual Reality gaming is growing at a fast pace as it allows the user to actually feel as if he/she is present there in the game scenario. Microsoft has announced that with the help of its cloud gaming technology, Microsoft will bring Xbox gaming to Meta’s Quest 2 VR headset.

This collaboration will bring the ability to use the Oculus VR headset with the Xbox console. To play VR games, you need to have a VR headset, and in this guide, we will explain what VR headsets work with Xbox one. Let us get right into it.

Does Xbox One have VR games?

As of now, the Xbox does not support VR functionality, unlike PlayStation. However, you can still use a VR headset as a display with your Xbox console. There are VR games available for Xbox, though.

You can use the different VR headsets to immerse yourself in the content that you are viewing. Also, you need to keep in mind that not all VR headsets will work with Xbox One console.

Overall, the content won’t be fully optimized, but that is what you get till the time Microsoft actually brings VR functionality to Xbox consoles.

What VR headset is best for Xbox One?

Meta Oculus Rift – High-resolution VR headset

  • Lets you directly play Xbox One games on the headset
  • Built-in gyroscope
  • 110-degree FOV
  • 1080p high resolution for each eye
  • The product is discontinued

One of the best answers to the question of what VR headsets work with Xbox One is Oculus Rift. It is by far the best VR headset that you can get for your Xbox console. Do note that it has been discontinued by Meta, so you need to do some searching to get your hands on this VR headset.

You can directly play Xbox One games on this VR headset. All you need to do is connect the console via the app and play. This supports Xbox One titles, including Xbox 360 games playable on Xbox One.

There is a gyroscope, 110-degree FOV, and 1080p high resolution for each eye. The best part about the Oculus Rift headset is that it supports different controllers, including the Xbox One controllers.

HTC Vive Cosmos Elite VR Headset – The best VR headset for comfort

  • 2880 x 1700 combined Pixel resolution
  • Flip-up design
  • Comfortable to wear
  • The sound quality is nice
  • Built-in Vive reality system
  • The field of view is less
  • The software is laggy

HTC Vive Cosmos Elite VR Headset is a great option if you want it to pair with your Xbox console. It offers crystal clear graphics with a combined resolution of 2880 x 1700.

The audio quality is pretty impressive, and it is sufficient to get you immersed in your content. You can use the Xbox One streaming app and view the content in brilliant quality.

The flip-up design makes it awesome for you to switch between virtual reality and reality. But users have reported some lag when streaming content on HTC Vive Cosmos Elite VR Headset.

Sony PlayStation VR – Affordable with the best compatibility

  • Affordable
  • OLED display
  • Top-notch performance
  • Provides full-VR sensations
  • Comfortable to wear for long hours
  • Build quality is a bit low
  • Requires HDMI cable to use with Xbox

PlayStation VR is another great VR headset option for your Xbox console. Notably, you can make use of an HDMI cable to connect it to your Xbox console and use it for viewing content on it.

It comes with a 1080p display, giving you better clarity and immersive viewing. There is a 5.7-inch OLED display that offers 120FPS. PlayStation VR is a comfortable and adjustable design.

Although you won’t be able to get the 3D sound as promised with the PlayStation VR, the sound quality is awesome (which you will only get out of your TV) and really puts you right into the game or the content you are viewing.

Meta Oculus Quest 2 – High-resolution and high performance VR headset

  • Super fast processor
  • High-resolution display
  • Best for Xbox in terms of compatibility
  • Comes with integrated speakers
  • 3.5mm jack
  • Decent battery life
  • Requires Facebook sign in
  • Poor ergonomics

The Oculus Quest 2 is by far the best VR headset that you can get for your Xbox console. You can connect your Xbox console using Virtual Desktop and mirror your PC screen on your Oculus Quest 2.

Then you can make use of the Xbox Cloud Gaming or Xbox Game Pass to load your local games on your PC and play them on your Quest 2.

It comes with a display resolution of ​1832×1920 per eye and supports up to 90Hz. There is a 3.5mm headphone jack and integrated speakers as well.

The battery life on the Oculus Quest 2 is also great, as it can last you about 2-3 hours on a continuous run. It is the closes to VR on Xbox you can get with Oculus Quest 2.

Microsoft HoloLens 2 – Upgraded performance

  • 2K-resolution display
  • Better FOV
  • Upgraded performance
  • Built-in spatial sound
  • Decent ergonomics
  • Pretty expensive

Developed by Microsoft, HoloLens 2 is a pretty expensive way of viewing Xbox content in virtual reality.

Since these are made by Microsoft, they also work on Windows PCs. Do note that these are not primarily designed for gaming, however, you can make use of your PC to stream Xbox games into it and play in VR.

It gets you a great fit, they are comfortable, and they have a great resolution giving you crisp picture quality. Unfortunately, the only thing that could keep Microsoft HoloLens 2 away from users is its steep price.

The above answers your question about what VR headsets work with Xbox One. But there are a few things that you should keep in mind before selecting a VR headset for yourself.

You should ensure that there are connectivity options available. Since Xbox does not support VR in any sort, connectivity with any VR headset could be an issue. Make sure it has an HDMI port to connect the headset to your TV.

Also, apart from using it with Xbox, you can select a VR headset that is compatible with other devices or can be used on its own with a smartphone or PC. This makes sure that you have an entertainment device and not a VR headset that only works partially with Xbox.

Last but not the least, the specifications of the VR headset matter. You can check if the resolution of the display is high or not and also if there are advanced music options available or not, as these features could add to your content viewing or gaming experience.

Let us know in the comments below which one of the above VR headsets you chose to connect with your Xbox One console.

If you are experiencing frame rate issues with the Xbox Series X. then we have a guide that will help you resolve the problem.

Users of Xbox have reported that they are facing problems updating the Call of Duty Cold War game. Since this game is pretty popular this affects a lot of users. You can refer to our guide on fixing Call of Duty Cold War not updating on Xbox and resolving the issue.

Windows 10 Brightness Slider Missing? Here’s How to Get It Back

If the brightness slider is missing from your Windows 10, it’s likely because of faulty drivers or Adaptive Brightness being on. Third-party app conflicts can also lead to this problem.

Follow the steps below to fix the brightness adjustment missing from Windows 10:

How do I get my brightness slider back on Windows 10?

1. Uninstall the monitor driver and install the default one

1.1 Reinstall the monitor driver

    If you run intro trouble regarding the brightness option on Windows 10, you can bring it back just by reinstalling your display driver or update the old version. See how to proceed with the next steps.

  1. 1. Press Windows + X to open the Power User menu, and choose Device Manager from the list.

    Brightness option unavailable Windows 10
  2. 2. Go to the Monitors section and expand it.

    brightness-option-not-available-windows-10
  3. 3. Find your monitor driver, right-click it and choose Uninstall device

    brightness-option-not-available-windows-10
  4. 4. Check Delete the driver software for this device and click OK if the option appears.

  5. 5. Your monitor driver is uninstalled. Now, click the Scan for hardware changes icon.

    scan for hardware changes to fix brightness option not available in windows 10
  6. 6. This will install the default monitor driver, and your brightness settings should work now.

The issue might be your monitor driver if the brightness option is unavailable on your Windows 10 PC. However, you can fix the problem simply by reinstalling the monitor driver.

1.2 Check if the monitor driver is disabled

  1. In the Device Manager, expand the Monitors section, and locate the problematic device.
  2. Right-click it and if you find the Enable device option listed, click on it.enable device
  3. If the option reads Disable device, the driver is already running, and you can head to the next solution.

After installing the default monitor driver, check if the problem is still there. This issue can also occur if your monitor driver is disabled. To check if that’s the case, perform the steps above.

You can also manually update the driver by visiting the graphics card manufacturer’s website and downloading the latest version of it.

2. Update your display adapter driver

  1. Enter Device Manager in the Search bar, and click on the relevant search result.device manager
  2. Double-click on Display adapters.display adapters
  3. Right-click on your graphics card and select Update driverupdate driver to fix brightness option not available in windows 10
  4. Now, select Search automatically for drivers.search automatically for drivers
  5. Wait for your computer to locate and install the best available drivers.

Follow these steps to update your display adapter drivers. This process is the simplest, but we recommend using a professional third-party tool if you want to update all your drivers and fix any related problems automatically.

3. Check your graphics card software

Many users reported that the brightness option isn’t available on their PC, which can be a problem for some users. However, your graphics card driver software can change the brightness option.

Applications such as Catalyst Control Center and Nvidia Control Panel allow you to change various options related to your graphics card. Among these options is the ability to adjust your screen brightness.

All graphics cards come with driver software, so if you can’t find the brightness option on your PC, check your graphics card driver software and adjust the screen brightness from there.

4. Try third-party applications

If you don’t have a brightness option available, you might be able to change the brightness using a third-party application.

Many applications allow you to adjust hue, saturation, and brightness, so do a quick search and try one of these apps.

5. Change your power settings

  1. Press Windows + S and enter power settings. Now choose Power & sleep settings from the list of results.
  2. Click Additional power settings in the right pane.
    Laptop brightness not working
  3. Locate your currently selected play and click Change plan settings.
    Screen brightness option not showing up
  4. Now click Change advanced power settings.
    Can't adjust brightness Windows 8
  5. Locate and enable the following options: Display brightness, Dimmed display brightness, and Enable adaptive brightness.
    Brightness option grayed out Windows 10

According to users, if Windows 10 brightness setting is missing on your PC, the issue might be your power settings.

To fix the problem, you must make a few changes to your power plan settings. After enabling these options, save the changes, and you should be able to adjust your screen brightness again without any issues.

Here’s what you should do if the power plans are missing in Windows 10.

6. Install a Generic PnP monitor driver

  1. Open Device Manager, expand the Monitors section, right-click your monitor, and choose Update driver from the menu.
    Can't adjust brightness Windows 7
  2. Choose Browse my computer for the driver software option.
    Brightness option unavailable Windows 10
  3. Now, select Let me pick from a list of available drivers on my computer.
    Can't adjust brightness Windows 8
  4. Select Generic PnP Monitor from the list and click Next.
    Missing brightness slider Windows 10

According to users, this issue can occur if you don’t have a Generic PnP Monitor driver installed; however, once you install the driver, the problem should be resolved, and the brightness option will now be available in Windows 10.

7. Remove TeamViewer

Although TeamViewer can be a helpful application, some users reported that it caused issues with the brightness option.

If you can’t adjust the brightness on your screen, be sure to uninstall TeamViewer and check if that solves your problem.

In case you’re not familiar, uninstaller software is a unique application that will altogether remove the problematic application and all its files and registry entries.

By using efficient uninstaller software, you’ll ensure that there aren’t any leftover files that can cause the issue to reappear in the future.

8. Use your keyboard or monitor buttons to adjust the brightness

If the brightness option isn’t available, you might be able to fix the problem by manually changing the brightness.

Most laptops have a keyboard shortcut to adjust the screen brightness easily. To see which shortcut changes the intellect, we advise you to check your laptop manual.

Even desktop users can manually change the brightness using the dedicated buttons. In addition, almost all monitors have configuration buttons next to the power button, and using these; you can easily adjust your screen settings, such as hue, brightness, and contrast.

9. Install the latest updates

  1. Press Windows + I to open the Settings app and select Update & Security.update & security
  2. Click on the Check for updates button right in the Windows Update section.check for updates to fix brightness option not available in windows 10
  3. If an update is listed after the scan, click on Download and install.download & install

If the brightness option is not available on the Windows 10 PC, it’s possible that you don’t have the latest system updates.

Usually, Windows 10 downloads the necessary updates automatically, but sometimes you might miss an update or two. So, it’s recommended that you manually check for them every once in a while.

After the updates are installed, the problem with the brightness setting should be fixed.

What can I do if the brightness bar not showing on Windows 11?

Adjusting the brightness of your PC can be pretty valuable, especially when you multitask and require different brightness levels for various programs. Also, the change in your surroundings is a good reason to modify the brightness.

Here, you could try executing the steps in the previous section, and things should work out in most cases. However, if the problem persists after that, performing a system restore should do the trick.

Also, you could look for other apps that might conflict with the OS’s functioning and lead to the brightness option not being available in Windows 11. If any are found, uninstall the apps right away.

In case nothing else works, resetting Windows 11 to its factory settings would come to your aid and will fix the problem. Though, you would lose the stored data, installed apps, and configured settings on the PC.

How to add a brightness slider in Windows 10?

  1. First, press Windows + I to open the Settings app and select System.setting
  2. Now, select Power & sleep from the left and click on Additional power settings on the right.Additional power settings to fix brightness option not available in windows 10
  3. Then, click on Change plan settings.change plan settings
  4. Next, select Change advanced power settings.change advanced power settings
  5. Finally, double-click to expand the Display section and disable Enable adaptive brightness under it.disable adaptive brightness to fix brightness option not available in windows 10

This will reveal the brightness slider at the bottom of the Action Center. If the brightness option is still unavailable in Windows 10, you can try the following solutions to get things up and to run.

Other problems related to the brightness option missing

  • Brightness option unavailable or grayed out in Windows 10 – often fixed by updating your graphics card drivers.
  • Adjust plan brightness slider missing in Windows 10 – can be caused by conflicts with software like TeamViewer.
  • Brightness bar not showing in Windows 10 – commonly resolved by reinstalling the monitor driver.
  • Laptop brightness option not showing – usually due to incorrect power settings or hardware detection issues.
  • Screen brightness option disappeared – can be adjusted manually via display driver software or third-party apps.
  • Cannot adjust brightness or brightness slider missing in Windows 11, 8, or 7 – many fixes for Windows 10 also apply to these versions.
  • Monitor brightness changing automatically – caused by adaptive or auto-brightness settings; learn how to stop monitor brightness from changing automatically.
  • Brightness control buttons not working – due to hardware or driver issues; see how to fix brightness buttons not working on Windows PCs.

This concludes our guide, and we hope you managed to fix the brightness problem on Windows 10.

Also, find out what to do if Adaptive Brightness won’t turn off in Windows 10.

If you have any other suggestions, leave them in the comments section below.

Microsoft makes it easier for Teams users to open PDF files with Adobe Acrobat

Microsoft has announced that it has deeply integrated the Adobe Acrobat app into Teams. Just like the standalone Adobe Acrobat app offering, users will now be able to view, edit, export, organize, combine, convert compress, protect and access PDFs from Teams chats, channels, OneDrive, or SharePoint.

Therefore, if you use Adobe Acrobat as your default PDF file viewer in your organization, you will now be able to do this within the Microsoft Teams app. What’s more, users don’t require an Adobe Acrobat subscription once the admin sets it as the default PDF file viewer via the admin center. However, if you need access to premium features such as combine, protect, and export, you’ll need to have an Acrobat Standard or Pro account.

Check out the Adobe features that will be available to you in Teams below:

Adobe Acrobat further indicated that:

Adobe understands digital security is a key priority for organizations. PDFs shared or collaborated on are sent to Adobe Document Cloud servers in the region in which the user is located for transient processing and then deleted within 24 hours. The documents remain encrypted both in transit and at rest during this process. The modified documents with the comments are then stored in the original SharePoint or OneDrive.

Both Microsoft and Adobe Acrobat are working together closely to make the app deployment easier for admins through the M365 Admin Center and ensure that the user experience is at its best in general. Users should expect significant updates and improvements in the future.

Share your thoughts with us regarding Adobe Acrobat integration in Microsoft Teams.

via: Microsoft, Adobe

How to Uninstall McAfee if It Won’t Uninstall [4 Easy Ways]

Your McAfee Antivirus license has just expired. You tried to remove the software from your computer but some strange error messages prevent you from completing the procedure correctly.

Do not despair, this guide can help you solve the problem. From the traditional removal method to the use of a specialized uninstaller tool, this guide will show you how to remove McAfee completely.

Why does McAfee keep popping up after Uninstall?

This is because the antivirus wasn’t completely or successfully removed from your computer.

If you can’t uninstall McAfee on your computer, it is likely because you are doing it wrongly. For example, trying to uninstall any McAfee tool on your PC from Settings, instead of the Control Panel will likely be an effort in futility.

Also, there is a special McAfee Removal tool designed by the developers for the complete removal of the software and its components. So, you can always use that too.

What do I do if McAfee won’t Uninstall?

    1. Uninstall McAfee

  1. 1. Type control in Windows Search, then click on Control Panel from results.

    control panel mcafee wont uninstall
  2. 2. Click on Uninstall a program under the Programs option.

    uninstall a program mcafee wont uninstall
  3. 3. Select the icon for McAfee tool to remove and click the Uninstall / Change button.

    uninstall/change
  4. 4. In the window that opens, click on the Yes button.

  5. 5. Put the checkmark next to the entries McAfee LiveSafe (or McAfee Internet Security) and Remove all files for this program.

  6. 6. Finally, follow the simple onscreen instructions to complete the process and restart your PC.

In addition, it’s also advised to remove SiteAdvisor software by following the aforementioned steps. This will also help you with the McAfee WebAdvisor uninstall.

Having trouble cleaning up the browser add on? See our dedicated Remove McAfee WebAdvisor guide for extension only steps across Chrome, Edge, and Firefox.

2. Uninstall McAfee using the removal tool

  1. Download the McAfee Removal Tool.
    mcafee removal tool uninstall mcafee
  2. Double-click the downloaded file and click the Yes button to begin the installation.
  3. Click on the Next button and Accept the conditions of use on the next page.
  4. Now, click on the Next button when prompted to remove McAfee Antivirus and type the verification code displayed on the desktop.
  5. From here, follow the onscreen instruction to complete the process and restart your PC.

This tool will not just help you solve the McAfee antivirus won’t uninstall issue but also help with the removal of WebAdvisor and LiveSafe.

Remember to go to McAfee’s website to deactivate the antivirus license after removing it.

Also, it’s recommended to use the removal utility as soon as you download it. The software is constantly updated and if you don’t have the latest version, it might not work properly.

3. Force McAfee to uninstall from Command Prompt

  1. Press Windows then type cmd and open the Command Prompt result as an administrator.cmd-run-admin 0x80070002 windows update
  2. Type or paste the following command and press Enter to run it: Program Files\McAfee\Agent\x86/frminst.exe/forceuninstallmcafee Remove McAfee if It Won’t Uninstall

4. Uninstall McAfee apps from smartphones and tablets

  1. Select the icon of the app from the drawer.
  2. Keep your finger pressed on the icon for a couple of seconds and select the Uninstall option.
    uninstall mobile mcafee wont uninstall
  3. Select OK when the warning appears on the screen and you’re done.
    ok

Alternatively, to get the same result from the Settings menu. With the steps in this guide, we believe you should be able to delete the software and all its components.

Whether you want to get rid of bugs like McAfee changing search engine, or your subscription expired, the steps above should help you force an uninstall.

Lastly, it would be best if you considered installing an alternative piece of antivirus software that will keep you safe at all times. TotalAV is the one that we are currently using and that we highly suggest to everyone.

Before you leave, find out the steps to reduce mfevtps.exe’s CPU usage.

Please, be free to let us know if you were able to remove the software in the comments below.

How to Fix BCM20702a0 Driver Error on Windows 11

Using the Bluetooth component on your PC requires the service of drivers that help make it accessible. However, if these drivers are not intact, you can run into errors like the BCM20702A0 driver error on Windows 11.

Also, you can encounter Bluetooth Support Service error 1079 on Windows 11.

What causes the BCM20702A0 driver error on Windows 11?

Many factors can cause the BCM20702A0 The drivers for this device are not installed. There are no compatible drivers for this device error.

A common factor is the BCM20702A0 Bluetooth adapter driver is not unavailable or not installed correctly on your PC. It prevents Bluetooth components on your PC from communicating with your OS as they should.

Other factors that can cause the BCM20702A0 error are:

  • Driver compatibility issues – If the driver is not compatible with your OS, it can cause problems with how it communicates with your computer. Also, you can encounter errors if the driver versions don’t meet the system requirements.
  • Compromised Windows file or system – When the Windows operating system files are not intact, it can cause issues with its interaction with its components. Also, wrong system settings can prompt the error.
  • Corrupt or outdated driver – The Bluetooth drivers on your PC may be corrupt or missing, so the Broadcom driver (BCM20702A0) can’t communicate with them. Hence, it will prompt the BCM20702A0 driver error to appear.
  • Third-party app interference – Sometimes, the correct driver installation process can be impeded by the activities of third-party apps like antivirus software on your computer. Also, the Windows Firewall can block it.

Nevertheless, you can fix the BCM20702A0 driver error on Windows 11 by troubleshooting your PC.

How do I fix the BCM20702A0 driver error on Windows 11?

Before trying any advanced troubleshooting on your PC, do the following:

If you can’t fix the error, proceed with the solutions below.

1. Run the Bluetooth troubleshooter

  1. Press Windows + I to open the Windows Settings app.
  2. Click on System on the left pane and select Troubleshoot.
  3. Click on Other troubleshooters.
  4. Find Bluetooth under the Other section, then click the Run button against it to start the Bluetooth troubleshooter.
  5. Wait for the process to complete, then restart your computer.

2. Enable/Disable Airplane Mode

  1. Press Windows + R key to open the Run dialog box, type ms-settings:network, then click OK to open the Network & Internet Settings.
  2. Navigate to Airplane mode on the right pane, then toggle on the switch to stop all wireless communication.
  3. Restart the PC.
  4. Click on the Airplane mode icon at the right end of the taskbar, then click the Airplane icon to turn it off.

Turning on and off the Airplane mode will stop every wireless communication, prompting their processes to refresh and fix the error.

3. Restart the Bluetooth Support Service

  1. Press Windows + R key to prompt the Run dialog box, type services.msc, and press Enter to open the Services window.
  2. Find Bluetooth Support Service and right-click on it, then click on Restart from the drop-down.

 If the Restart option is greyed out for you, continue with the steps below.

  1. Right-click on the Bluetooth Support Service and select Properties.
  2. Go to the Startup type and choose Manual, then click OK to save the changes.
  3. Restart your PC to allow the changes to sync, then check if the problem persists.

Restarting the Bluetooth Support Service will allow it to refresh and fix any errors affecting the Bluetooth features.

However, we have a detailed guide on how to fix Bluetooth Support Service error 1079 on Windows 11.

4. Update the Bluetooth driver

  1. Press Windows + X key to launch the Quick Link Menu and click on Device Manager.
  2. Navigate to Bluetooth, right-click on the Bluetooth adapter, then select the Update driver from the drop-down.
  3. Click on Search automatically for drivers.
  4. Restart your PC and check if the error persists.

The Bluetooth driver update will fix bugs and improve Bluetooth functionality on your PC. You can check our article for other ways to update drivers in Windows 11.

If this seems somehow too complicated, we also recommend using a third-party tool to do this automatically for you.

Conclusively, you can check for solutions to fix Bluetooth not working on Windows 11. Also, you can read about fixes for Bluetooth missing in Device Manager on your PC.

If you have questions or suggestions, kindly leave them in the comments section below.

Microsoft Edge 108 hits the Stable Channel

Microsoft Edge’s latest version has shipped to the Stable Channel for everyone to download, bumping it to version 108.0.1462.42. The release is fairly minor, as it comes with two feature updates and the usual reliability fixes.

First up is the Graph APIs for Cloud Site List Management, which is in place to help administrators create, manage, and publish their site lists for IE mode in the cloud. Next up is enhanced web defense that will allow users to browse through the internet safely. This is courtesy of the rewritten Microsoft Defender SmartScreen library for Microsoft Edge on Windows, Mac, and Linux.

With this particular update, the new SmartScreen library will be making its debut on Linux. It was however available to both Windows and Mac users. And finally, the update also adds new product optimizations in the form of better proxy handling as well as bug fixes by having the SmartScreen library leverage Microsoft Edge’s built-in network stack.

As usual, the release brings some depreciated and new policies. We invite you to check out Microsoft’s changelog for more on these. Be sure to also check out Microsoft Edge’s previous release to the Stable Channel in case you missed it.

Microsoft Edge should auto-update to the latest version, but if it does not, you can trigger it manually. Just head to the browser’s menu, choose Help and Feedback then About Microsoft Edge and wait for the update to download, and then restart.

Via: Microsoft

Can’t Move the Folder Because There is a Folder in the Same Location

Transferring files and folders from one location to another is a common task all users perform. But, many reported getting the Can’t move the folder because there is a folder in the same location message when doing so.

This prevents the transfer of while, and users are left to fend for themselves. So, let’s find out all about the error and the solutions that worked for others.

Why can’t I move a folder into another folder?

Here are some of the reasons you are getting the error:

  • Syncing issues with OneDrive – In most cases, it was a problem with OneDrive that triggered the error message.
  • Corrupt system files – Oftentimes, corrupt system files were the reason users faced the problem, and fixing these should do the trick.
  • File mapping – Many users reported that folder mapping was the culprit, and restoring defaults fixed things.

What should I do if I can’t move the folder because there is a folder in the same location that can’t be redirected?

Before trying the slightly complex solutions, here are a few quick tricks:

  • Restart the computer and check if you are now able to perform the operation. Take immediate action if the computer is stuck on restarting.
  • Update Windows to the latest available version.

If both these don’t work, head to the ones listed next.

1. Set a default path to be able to move the folder

  1. Right-click on the folder you’re facing the problem with, and select Properties.Folder Properties
  2. Navigate to the Location tab, click on Restore Default, and then on OK to save the changes.
    Can't move the folder because there is a folder in the same location that can't be redirected

Make sure to copy all the files from the old location to the new location. Not doing so can lead to data loss.

2. Change OneDrive settings

  1. Choose the OneDrive icon in the system tray, click on the gear icon, and select Settings.settings
  2. Navigate to the Account tab, and click on Choose folders.choose folder
  3. Untick the option for Files not in a folder, and click on OK to save the changes.uncheck files not in folders to fix can't move the folder because there is a folder in the same location

3. Run a DISM scan

  1. Press Windows + R to open Run, type cmd, and hit Ctrl + Shift + Enter.
  2. Type the following commands one by one and hit Enter after each:
    DISM /Online /Cleanup-Image /CheckHealth DISM /Online /Cleanup-Image /ScanHealth DISM /Online /Cleanup-Image /RestoreHealth
    Can't move the folder because there is a folder in the same location that can't be redirected
  3. Restart your device once done and check if the error is resolved.

If you can’t change the location of the documents folder in Windows 10 or Windows 11, this can occur due to system image corruption. Running the DISM tool will repair any image corruption on your device.

If you want to avoid the manual steps of managing registries and system optimization, we recommend installing a comprehensive repair tool.

4. Tweak the Registry to fix the error

Note icon NOTE
Before getting started with this method, create a System Restore Point or backup the registry. So if anything goes wrong, you can restore things. Also, be cautious while executing the steps and make to follow them as it is.
  1. Press Windows + R to open Run, type regedit, and hit Enter.move folder folder location redirected
  2. Click Yes in the UAC prompt.
  3. Once the Registry Editor opens, navigate to the following path:
    HKEY_CURRENT_USER\Software\Microsoft\Windows\CurrentVersion\Explorer\User Shell Folders
  4. Refer below to find the registry key for the folder facing this issue. Then change its Value data to the path listed next to it:
    • Desktop – %USERPROFILE%\Desktop
    • Favorites – %USERPROFILE%\Favorites
    • Music – %USERPROFILE%\Music
    • Pictures – %USERPROFILE%\Pictures
    • Videos – %USERPROFILE%\Videos
    • Documents – %USERPROFILE%\Documents
    • Downloads – %USERPROFILE%\Downloads
      Can't move the folder because there is a folder in the same location that can't be redirected
  5. Once done, save the changes and then close the Registry Editor.
  6. Now, press Ctrl + Shift + Esc to open the Task Manager.
  7. Search for Windows Explorer, right-click on it, and select Restart.
    move folder folder location redirected

Once done, the Can’t move the folder because there is a folder in the same location error should be fixed. If not, head to the next method.

5. Re-link OneDrive

  1. Click on the OneDrive icon in the Taskbar.
  2. Click on the gear icon at the top and then on Settings.
    move folder folder location redirected
  3. Now navigate to the Account tab, click on Unlink this PC, and follow the instructions on the screen to complete the process.
    move folder folder location redirected
  4. Close OneDrive and restart your device.
  5. Once done, open OneDrive and sign in again with your account.
    move folder folder location redirected

If you can’t move the documents folder out of OneDrive, this error can also occur due to OneDrive sync issues. To solve this, try unlinking and then re-linking your OneDrive account. Remember, you will not lose any data in the process.

6. Run an SFC scan

  1. 1. Press Windows + S to open Search, type Command Prompt, right-click on the relevant search result, and select Run as administrator.

    open cmd prompt as administrator
  2. 2. Type the following command and hit Enter: sfc/scannow

    Can't move the folder because there is a folder in the same location that can't be redirected
  3. 3. Once the scan is done running, restart your device and check if the error is fixed.

  4. Corrupted system files on your Windows device can be responsible for the Can’t move the folder because there is a folder in the same location error. If that’s the case, run an SFC scan to get rid of these files.

By now, you will have the Can’t move the folder because there is a folder in the same location error fixed in Windows. Also, if nothing works, you can always reset the PC to factory settings.

Besides, find out how to boost the performance of Windows 11 for a seamless experience.

If you still have any issues, feel free to comment below. We’re eager to hear from you.

Star Wars Jedi: Survivor key art and release date revealed

This week has turned out to be a pretty big one for the sequel to Star Wars Jedi: Fallen Order, Star Wars Jedi: Survivor.

Earlier this week, the listing for Jedi: Survivor on Steam updated with the release date of March 15th 2023. Some people seemed to have seen March 16th listed as the date which suggests that the game will get a simultaneous worldwide release. For example, the game will likely unlock on the 16th in Australia and on the 15th in the United States due to the time difference.

The listing also included new images and details of pre-order bonuses in addition to some plot information and the type of gameplay that fans can expect.

All of this new information and media was quickly removed from the listing but not before numerous people took copious amounts of screencaps. You can check them out below.

Among the briefly-online images was a new promotion poster or cover artwork for Star Wars Jedi: Survivor. However, soon after its removal from the Steam listing, the official EA Star Wars Twitter account tweeted it out along with the announcement that gameplay footage from Star Wars Jedi: Survivor would be revealed during The Game Awards this Thursday.

It’s expected that the March 15th release date will also be officially revealed during the same The Game Awards presentation.

Development of a sequel to Star Wars Jedi: Fallen Order had been hinted at ever since the game’s release in late-2019. However, proper details and the title, Star Wars Jedi: Survivor, wasn’t announced until early-2022.

Star Wars Jedi: Survivor is set between Star Wars Episode III and IV (around the same time as the Obi-Wan Kenobi and Andor TV series) and follows Cal Kestis, the protagonist from Fallen Order, as he continues to survive during the Empire’s rise to power across the galaxy. The game will release on Windows PC and Microsoft’s current gen Xbox Series S and Xbox Series S consoles.

How to Print Labels From Excel: 6 Easy Steps

Printing labels from a mailing list maintained in Excel can be tricky. However, it can be done with some help from Word’s Start Mail Merge feature. 

This guide will discuss a step-by-step process to print labels from Excel. Let’s get started! 

Can you print labels directly from Excel?

Yes, you can print labels directly using Excel. However, doing so will not give you many options to customize the labels. Also, it is a bit tricky. Therefore, it is advised to use Word’s Start Mail Merge feature and Excel data to create labels from the mailing list.

How do I print labels from an Excel spreadsheet?

Before proceeding with the steps, go through the following preliminary checks:

  • First, make sure your data is uniformly formatted and mistake-free.
  • To make mailing labels, you need to add descriptive column headings.
  • Double-check to ensure that there is no blank row or column within the list.
  • Create separate columns for the title, first and last name, street address, etc.

1. Prepare the worksheet in Excel

  1. Launch Excel and open a spreadsheet.
  2.  Segregate the details in individual columns; the header should be Title, First Name, Last Name, Street Address, City, State, and ZIP code.Arrange your data - Print labels EXCEL
  3. Fill in the data accordingly, go to File, and then click Save from the left sidebar.
  4. Now click Browse, name the file, and save it in the desired location.Browse

2. Setup labels in Word

  1. Launch Microsoft Word on Windows; under New, click Blank document.
  2. Select the Mailings tab from the toolbar, click Start Mail Merge, and choose Labels from the menu.Start Mail Merge
  3. From the next window, Label vendors dropdown menu, choose the label vendor.
  4. Select a label type from the Product number list.Label options
  5. Click the New Label button and choose label dimensions.Label Details
  6. Now, click OK and OK again.

3. Connect labels and worksheet

  1. On the Word document, go to the Mailings tab and Select Recipients.
  2. Click on Use an Existing List to use that Excel sheet you created.Mailing list
  3. From the File Explorer window, please navigate to the spreadsheet and double-click on it.
  4. On the Select Table window, click on the Sheet that you want to use. Then, put a checkmark on the First row of data containing column headers and click OK.Select table

4. Add mail merge fields

  1. On labels document on Word, go to the Mailings tab, and click the Address Block option.
  2. On the Insert Address Block window, click Match Fields.Match fields
  3. Now on the Match Fields window, under Required for Address Block, make sure the entries are correct and are the same as mentioned in the spreadsheet.Match Fields 2
  4. Click OK. 
  5. Now on the Insert Address Block window, you will get a preview of the label created. Please double-check it and Click OK.
  6. In the first label on the Word document, it should say AddressBlock. Next, go to the Mailings tab, then click Update Labels. After that, all the titles will automatically display AddressBlock.Update labels
  7. On the Mailing tab, click Finish & Merge option and choose Edit Individual Documents. Edit doc
  8. On Merge to Document, Select All and click OK.Merge to new document

5. Save labels as PDFs & print them

  1. Go to File and click Save as on Word document.
  2. Select Browse, then go to Save as type, choose PDF as file type, and save it with a name. Click Save.
  3. Go to the File tab on Word and click Print.Print
  4. Select your printer from the available options and click Print.

How to print labels from Excel in Word?

You must use the Start Mail Merge feature available on Word to print labels from Excel using Word. The feature makes it easy to customize the labels and also saves time.

So, these are easy steps to print labels from Excel in no time. You can also print labels using Excel via a portable label maker, Phomemo D30, and your phone. To learn more about the device, read this guide.

Before you leave, don’t miss our latest guide to learn how to mail merge from Excel to Microsoft Word for more information.

If you have any questions or concerns about the subject, please let us know if it worked for you in the comments section below.

B1initializelibrary Failed: How to Fix Error 0xc00000BB

Trying to start your computer usually but are stuck with  b1initializelibrary failed 0xc00000bb error? It could happen if a BIOS issue or any system files were infected.

In this guide, we will discuss the reasons for the issue along with all the available fixes. Let’s get started! 

What is b1initializelibrary failed 0xc00000bb?

After researching and studying the use cases, we have made out a list of reasons which could cause the issue: 

  • Booting sequence is corrupted – If there is a booting problem, you might get the error code every time you will start your computer. You need to change the master boot record, boot sequence, and boot configuration data.
  • Secure boot is enabled – If you have cloned HDD/SSD, you might get this error at startup. In this case, you need to disable Secure Boot to get rid of the error.
  • 4G Decoding disabled – If 4G decoding is disabled, it could cause a problem. You need to enable the 4G decoding feature from UEFI firmware settings.
  • Memory Management registry key – ClearPageFileAtShutdown DWORD is also found to be the culprit of the issue. To resolve the issue, you need to modify the key from Registry Editor.
  • Corrupted system file – If there are corrupted system files, which can’t be repaired using bootrec.exe, chances are the files are the reason for your computer being stuck up on startup.

How do I fix error 0xc00000bb?

1. Enable 4G Decoding

  1. Press Windows + I to open Settings.
  2. Go to System, then Recovery.System - Recovery Windows 11
  3. Now go to Advanced startup and click Restart Now.Recovery Advanced Startup
  4. On Choose an option screen, click Troubleshoot.Choose an option
  5. Now select Advanced Options.Advanced Options
  6. On the next screen, select UEFI firmware settings and then click Restart.UEFI
  7. You will get a screen; click on the option available for BIOS Utility, like press F10 to go to BIOS utility.
  8. Navigate to 4G Decoding, and select Enabled.
  9. Go to the Exit tab, and click on Save changes & Exit to restart your computer normally.

2. Fix the Master Boot Record and rebuild the boot configuration data

  1. Go to the login screen, click the Shutdown icon, then press and hold the Shift key while choosing Restart.
  2. From the Advanced Options screen, select Command Prompt.Command Prompt Advanced Options
  3. Choose your account and enter your credentials to launch the command prompt window.
  4. Type the following commands one by one and press Enter after each command:  bootrec.exe/fixmbr bootrec.exe/fixboot bootrec.exe/scanos bootrec.exe/rebuildbcd
  5. Once the process is done, restart your computer.

3. Disable Secure Boot

  1. Press Windows + I to get Settings.
  2. Go to System, then Recovery.
  3. Navigate to Advanced startup, and click Restart Now.
  4. On the Next screen, choose Troubleshoot.
  5. Go for Advanced options, now click on UEFI firmware settings and click Restart.UEFI 2
  6. From the next screen, choose the option to enter BIOS.
  7. Go to Boot, then Secure boot and select Disabled.
  8. Switch to the Exit tab and select Save changes & Exit.

4. Make changes to the ClearPageFileAtShutdown key in Registry Editor

  1. Press Windows + R to get the Run window.
  2. Type msconfig and press Enter to open System Configuration.MS CONFIG RUN COMMAND
  3. Go to Boot, and click on the radio button beside Safe boot.Safe boot
  4. Click Apply and OK. When prompted, click on Restart.msconfig restart prompt
  5. Now, fire up the Run window again, type regedit, and press Enter.
  6. Follow this path: Computer\HKEY_LOCAL_MACHINE\SYSTEM\CurrentControlSet\Control\Session Manager\Memory Management
  7. Locate and right-click on ClearPageFileAtShutdown and select Modify.Clearpagefileatshutdown enabled
  8. Now change the Value data to 1 and choose Hexadecimal and click OK.

So, these steps you can follow to fix the b1initializelibrary failed 0xc00000bb error. If nothing worked for you, an in-place upgrade is advised. If you are stuck in the process somewhere, feel free to let us know in the comments section below, we will be happy to help! 

Class Not Registered VBA Error: How to Fix It [Excel]

Though the Microsoft Office suite is one of the best products in the category, users often come across errors in it. One such is the Class not registered VBA error in Microsoft Excel.

The error is usually encountered when trying to run a macro in Excel, though that’s not always the case. When this happens, you are unable to perform the desired function.

However, the Class not registered VBA error is not as intricate as it appears, and we have listed the best fixes for it in the following section.

How do I fix the Class not registered VBA error?

1. Repair Microsoft Office

  1. Press Windows + R to launch the Run command, type appwiz.cpl in the text field, and either click on OK or hit Enter to launch the Programs and Features window.appwiz.cpl
  2. Locate the Microsoft Office entry, select it, and then click on Change.Change to fix class not registered vba
  3. Click Yes in the UAC (User Account Control) prompt that pops up.Click Yes
  4. Now, select the Online Repair option, and click on the Repair button to start the process.Online repair to fix class not registered vba

The repair process is found to eliminate a lot of issues with Microsoft Office including the Class not registered VBA error. If this method doesn’t work, head to the next one.

2. Register critical DLL file

  1. Press Windows + S to launch the Search menu, enter Windows Terminal in the text field at the top, right-click on the relevant search result, and select Run as administrator from the context menu.Windows Terminal to fix class not registered vba
  2. Click Yes in the UAC prompt that appears.Yes
  3. Now, click on the downward-facing arrow, and select Command Prompt from the list of options. Alternatively, you can hit Ctrl + Shift + 2 to launch Command Prompt.Command Prompt to fix class not registered vba
  4. Type/paste the following command and hit Enter:cd C:\Windows\SysWOW64\Execute command
  5. Now, execute the following command to register the required DLL file:Regsvr32 fm20.dllregister dll file to fix class not registered vba

Another quick way to register missing DLL files or replace the corrupt ones is to use a reliable third-party tool. These tools will also look for corrupted files and repair the damage caused.

3. Run DISM and SFC scan

  1. Press Windows + R to launch the Run command, enter wt in the text field, press and hold the Ctrl + Shift key, and then click on OK or hit Enter to launch an elevated Windows Terminal.Windows Terminal
  2. Click Yes in the UAC prompt.Click Yes
  3. Click on the arrow at the top, and select Command Prompt from the dropdown menu. Command Promp to fix class not registered vba
  4. Now, paste the following three commands one at a time, and hit Enter after each to run the DISM tool:DISM.exe /Online /Cleanup-image /Scanhealth DISM.exe /Online /Cleanup-image /Restorehealth DISM.exe /online /cleanup-image /startcomponentcleanup
  5. Now, execute the following command to perform the SFC scan:sfc /scannowSFC scan to fix class not registered vba

The SFC (System File Checker) scan and DISM (Deployment Image Servicing and Management) tool are two effective methods to fix a bunch of issues having to do with corrupt system files or problems with the Windows image.

4. Update Microsoft Office

  1. Launch any Microsoft Office app, and open a new blank document.
  2. Now, click on the File menu near the top-left corner.File menu to fix class not registered vba
  3. Select Account from the list of options on the left.Accounts
  4. Next, click on the Update Options button under Product Information.Update options
  5. Finally, select Update Now from the options in the flyout menu.Update now to fix class not registered vba
  6. Wait for the update to install, if there’s one available.

If it’s a problem with the current version, try installing the latest version of Microsoft Office.

These are all the ways you can fix the Class not registered VBA error when trying to run macro in Excel. In case none of the methods here help, upgrade to the latest iteration of MS Office available.

Also, find out how to fix the VBA runtime error 1004.

If you have any other queries or know a method that’s not listed here, please drop a comment in the section below.

Best Windows 11 Folder Settings [Tips & Tricks]

It must be the same for your Windows computer if you want to keep things organized. Maintaining organized files and folders can be difficult if you don’t know your way around. 

This guide will discuss some nifty tips and tricks for folder settings on Windows 11 to help you adjust folder settings per your preferences. Let’s begin!

What are the best tips and tricks for Windows 11 folder settings?

1. Set default folder view to all folders

  1. Open File Explorer, and click the View button. Next, choose icon options from Extra large, Large, Medium, and Small.Folder view
  2. Now click on three dots and select Options.Folder Options original
  3. On the View tab of the Folder Options window, click Apply to Folders.Apply to Folders
  4. Click Apply and OK.

2. Open File Explorer on This PC

  1. Open File Explorer, click three dots, and select Options.
  2. Now beside Open File Explorer to, click on the dropdown and select This PC.This PC
  3. Click Apply and OK.

3. Access Advanced Folder Commands

  1. Open File Explorer.Screenshot
  2. Please select a folder, press the Shift key, and then right-click on it to open advanced commands.

4. Change the Location of User Folders

  1. Open File Explorer, right-click on the folder, and select Properties.Properties User folders
  2. Go to Location, click Move, select the new location, click Apply, and then OK.User folder edit

5. Optimize your Downloads Folder 

  1. Open File Explorer, right-click on the Downloads folder, and select Properties.
  2. Go to the Customize tab and select General items from the drop-down menu under Optimize this folder.General Items
  3. Click Apply and OK.

6. Remove recently used files from Quick Access

  1. Open File Explorer, click on three dots, and select Options.
  2. On the Folder Options window, go to the General tab under Privacy, and remove the checkmark beside the desired option.Folder
  3. Click Apply and OK.

7. Show/Hide files and folder

  1. Launch File Explorer, click on three dots, and select Options.
  2. On Folder Options, go to the View tab, under Advanced Settings, navigate to Files and Folders, then Hidden files and folders. Put a checkmark beside any of the two options accordingly.Folder Hide
  3. Click Apply and OK.

Should you feel the need to hide folders in your Windows 11, we have a detailed article on how to go about it.

8. Share files with Apps, PC, and People

  1. Open File Explorer. Locate and click on the file you want to share.
  2. Now, click on the Share icon.Share with
  3. Choose the desired option. 

9. Dock File Explorer windows side by side

  1. Open all the File Explorer windows that you want to work on.Windows Dock
  2. Hover on the square icon from the top right corner and select the number of docks.
  3. Now select the windows that you want to open.

10. Open Files with single-click

  1. Open File Explorer, click on three dots, and select Options.
  2. On the General tab on the Folder Options page, click the radio button to select Single-click to open an item.Single folder
  3. Click Apply and OK.

So, these are some of the most valuable tips and tricks to use folder settings on Windows 11 and personalize folders on your PC.

To learn more about customization, we have a great guide on how to customize File Explorer in Windows 11, so don’t miss it.

Which one do you use the most? Feel free to tell us in the comments section below.

Excel Not Printing Gridlines: Here’s Why & How to Fix It

Some Excel users need to print their spreadsheets with gridlines. Then the printed output will include cell gridlines along with their values.

However, some users have said in MS support forum posts that their printers don’t print the gridlines in their Excel sheets.

One user added that:

Borders were printing last week on older version of Excel. With 2010, gridlines and borders are not printing.

How do I make Excel spreadsheet gridlines print again?

1. Make sure the Print gridlines option is selected

  1. Check that the Print gridlines option is selected in Excel.
  2. Click the Page Layout tab shown directly below.
  3. Select the Print check box under Gridlines.
The Print check box excel spreadsheet borders and gridlines not printing

2. Reduce the scale to 99 percent

  1. At first, select the Page Layout tab.
  2. Click inside the Scale box shown directly below.Scale box excel spreadsheet borders and gridlines not printing
  3. Enter 99 in the Scale box, and press the Return button.
  4. Then try printing the spreadsheet again.

3. Deselect the Draft quality option

  1. Select Excel’s Page Layout tab.
  2. Then, click the Page Setup button shown in the snapshot directly below.Page Setup button excel spreadsheet borders and gridlines not printing
  3. Click the Sheet tab on the Page Setup window.Page Setup window excel spreadsheet borders and gridlines not printing
  4. Deselect the Draft quality check box.
  5. Select the OK option.

4. Update the printer’s driver

You’ve heard that it’s essential to have your drivers properly updated. Outdated driver versions often lead to major stability problems, so make sure this isn’t your case as well.

When you first plug in a device, Windows will often install its own generic version of the driver itself, and the devices should get basic functionality from the start.

However, you want more than that for your printer. Manually looking for the right drivers is a challenging task. Avoid it from the start by downloading and installing Outbyte Driver Updater.

This tool gives you the chance to instantly update all your drivers with a few clicks and get back to printing in no time.

No less important, before you go obsessing about keeping your drivers up to date, start using this tool to schedule driver scans. Isn’t it easier this way?

Additionally, the software helps you to automatically update old drivers individually or at one go. Plus, you will handle corrupted or missing drivers more easily with automated support at any time.

Then, using specialized aid from this program is way better than doing it manually, plus you can optimize your PC performance by properly resolving driver issues.

⇒ Get Outbyte Driver Updater

5. Select the best print quality

  1. Select the File tab.
  2. Click Print on the left of the tab.
  3. Click Printer Properties to open a window like the one shown directly below.printer properties window excel spreadsheet borders and gridlines not printing
  4. Select the tab that includes a print quality option like the one shown directly below.
    • The tab that includes that option varies between printer properties windows.Print quality settings excel spreadsheet borders and gridlines not printing
  5. Click Best if Standard is selected.

6. Select Print to PDF

  1. First of all, click the File tab.
  2. Click Print to open the options shown directly below.Excel's print options excel spreadsheet borders and gridlines not printing
  3. Select Print to PDF on the printer drop-down menu.Print to PDF option excel spreadsheet borders and gridlines not printing
  4. Click the Print button.
  5. A Save Print Output window will then open. Enter a title for the PDF file in the text box.
  6. Click the Save button.
  7. Open the spreadsheet’s Portable Document File in Adobe Reader or other alternative PDF software.
  8. Print the spreadsheet from the PDF software.

Those are some of the resolutions that can fix Excel spreadsheets’ gridlines not printing.

Remember that you can also open and print Excel spreadsheets within alternative freeware spreadsheet applications like LibreOffice Calc. A spreadsheet’s gridlines might print fine when you utilize Calc.

Which one of these fixes did the trick for you? Let us know by leaving us a message in the comments section below.

0x8007232b: How to Fix This Windows Activation Error

If you try installing Windows Enterprise using volume-licensed media, you might get an activation error code: 0x8007232b. Don’t worry; it can be fixed.

In this guide, we will discuss the available fixes after discussing the possible reasons for the issue.

What causes Windows activation error 0x8007232b?

There could be several reasons for the error to occur, some of which are listed below: 

  • KMS client unable to find KMS server – If your KMS client, i.e., your computer, cannot find KMS Server Resource Records in DNS due to network problems.
  • When activating an account using a generic product key –  If you try to activate your user account using Volume License generic product key or a product key that is not unique, this error could happen. 
  • KMS host is not on the network – If the KMS host doesn’t exist, you need to install MAK systems to eliminate the error.
  • Trying the conventional way to activate Windows – From Windows 10 onwards, using the old activation method to activate your Windows can lead to this error.

What can I do to fix Windows activation error 0x8007232b?

Before proceeding to the detailed troubleshooting, try these quick fixes: 

If that doesn’t work,  use these straightforward methods to fix error 0x8007232B: 

1. Run Network Troubleshooter

  1. Press Windows + I to get Settings.
  2. Go to System, and click Troubleshoot.Error 0x8007232B Troubleshooter
  3. Now click Other troubleshooters.Troubleshooter 2
  4. Beside Network Adapter, click Run.Network Adapter
  5. Follow the on-screen instructions to finish.

2. Change the product key from KMS to MAK

  1. Press the Windows key, type CMD and click Run as administrator to open the elevated Command Prompt.DOS COmmand Prompt
  2. Copy and paste the following command and press Enter to get your product key. You may skip this if already have a product key: wmic path softwareLicensingService get OA3xOriginalProductKey
  3. Type the following command and press Enter. Replace xxxxx with the product key you got from step 2: slmgr -ipk xxxxx – xxxxx – xxxxx – xxxxx – xxxxx

3. Use the default product key: 

  1. Press Windows + R to open the Run window.Activation Error 0x8007232B
  2. Type slui.exe 3 and press Enter. Press OK on the UAC prompt.
  3. Go to the Change product key and click Change.Activation
  4. Use the following generic product keys according to your version of Windows and click Next. Windows 11 Enterprise – XGVPP-NMH47-7TTHJ-W3FW7-8HV2C Windows 11 Pro Education – 8PTT6-RNW4C-6V7J2-C2D3X-MHBPB Windows 11 Pro – VK7JG-NPHTM-C97JM-9MPGT-3V66T Windows 11 Home – YTMG3-N6DKC-DKB77-7M9GH-8HVX7
  5. Restart your computer and try again with your product key.

4. Configuring The KMS Host Against KMS Clients

  1. Press Windows + R to open the Run window.
  2. Copy and paste the following command to install KMS and press OK: slmgr.vbs /ipkRun KMS install 0x8007232B
  3. Open the Run window again, type the command to activate KMS online, and press OK: slmgr.vbs /ato Run activate Windows
  4. In the run window, type the following command to activate Windows using the telephone: slmgr.vbs /dtiAcrivate Windows
  5. Call the Microsoft center, get the Confirmation ID, and enter it when prompted to activate.
  6. Now in the run console, type: slmgr.vbs /atpConfirmation id

5. Connecting The KMS Client To The KMS Host When DNS Is Unavailable

  1. Press the Windows key, type CMD and click Run as administrator.DOS COmmand Prompt
  2. Type the following command: slmgr.vbs /skms
  3. Restart your PC.

6. Installing MAK manually

  1. Go to Microsoft Volume Licensing Service Center.
  2. Sign in and get your keys and keys link.
  3. Press Windows + X and select Terminal (Admin) from the menu to open PowerShell.Open Powershell
  4. Type the following command and press Enter: slmgr.vbs /ipk MAKProductKey
  5. Copy and paste the command to activate your Windows online: slmgr.vbs /ato
  6. Click OK to confirm.

So, these are the methods to fix activation error code 0x8007232B on Windows 11. Try these methods and let us know in the comments section below if anything worked for you.