Windows users complain about getting an error saying You will need to provide administrator permission to change these attributes. It appears when you try to perform some tasks on your PC.
Windows uses permissions to keep its files and data safe from unauthorized users or intruders, and administrator permission is one.
The administrator permission comes as a privilege of an Administrator account. It has a higher permission level that allows users to make changes requiring special permissions without problems.
Furthermore, the Administrator account is the controlling account with access to add or remove important items for the PC. So, trying to change some attributes on your PC can result in errors if you don’t have administrator permission.
Why do I get the error message to provide administrator permission to change attributes?
There isn’t a particular cause for the error saying you need administrator permission to change attributes on your PC. However, the most common reason is third-party apps interfering with the process. Apps like antivirus software can impede the security performance of your computer.
Other factors that can cause permission issues on your computer are:
System files –Having corrupt system files on your PC can cause it to malfunction sometimes. These files can impede your access to some items on your PC and the ability to change attributes.
Issues with the security permissions –When you don’t have the right security permissions settings on your device, it can prevent you from accessing items that should be available for any user.
The causes for the problem can be different on various PCs. Nonetheless, you can fix the problem by tweaking some settings on your computer.
What can I do to get administrator permissions to change attributes?
We encourage you to try the following preliminary checks:
Disconnect any remote connection on your PC.
Restart your computer and check if the permission issues persist.
Proceed with the solutions below if you can’t fix the problem.
1. Restart Windows in Safe Mode
Press the Windows key, click the Power icon, hold the shift key and click on Restart.
On the Advanced Recovery Options window, click on Troubleshoot and select the Advanced options.
Click on Startup Settings and select Restart.
Press 4 to Enable Safe Mode.
Restarting Windows in Safe Mode will fix startup issues that are causing your computer to request administrator permissions where it’s not needed.
2. Run an SFC scan
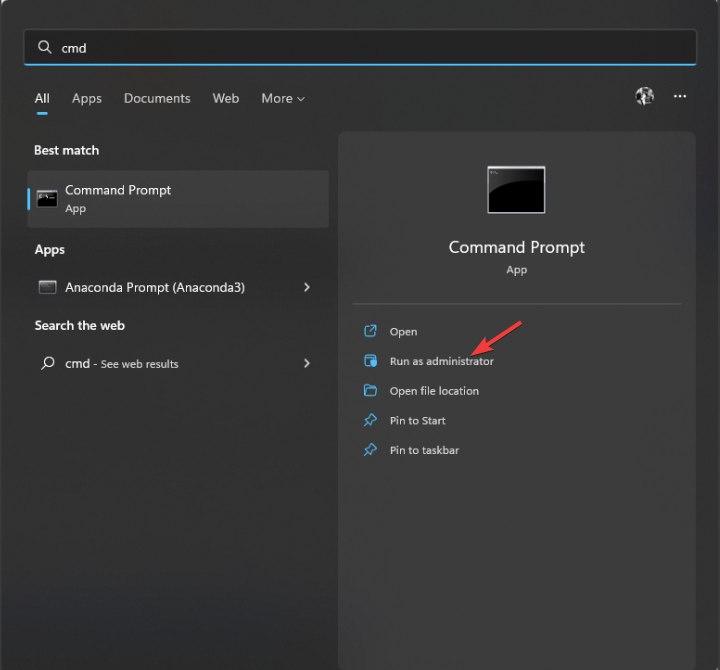
Left-click the Start button, type cmd, and select Run as administrator from the drop-down.
Click Yes when the User Account Control prompt appears.
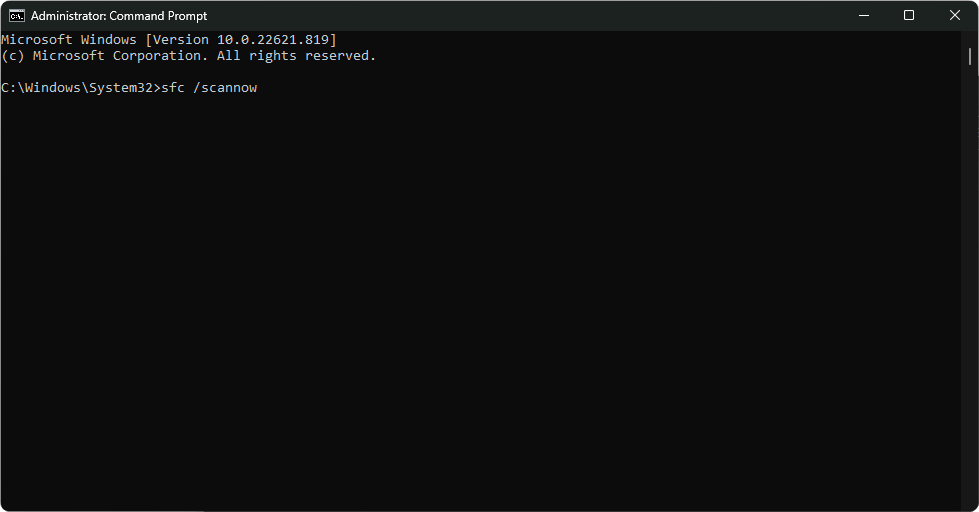
Type the following command and press Enter: sfc /scannow
Restart your PC and check if the problem persists.
Left-click the Start button, type cmd, and select Run as administrator.
Type the following command and press Enter: net user administrator /active:yes
Sign out from the current user account and log into the Administrator account showing on the log-on screen.
Enabling the Administrator account on your computer will grant you access to various locations, files, or programs that may demand administrator privileges.
4. Take ownership of the file prompting the error
Press Windows + E key to open the File Manager.
Navigate to the concerned file, right-click on it, then select Properties from the drop-down.
Go to Security and Advanced, then set yourself as the Owner of the file.
Close the page and check if the problem is fixed.
Setting yourself as the owner allows you to access your files without permission problems.
Malwarebytes is a reliable antimalware that you can install on your PC to keep it safe from viruses and malware attacks. Lately, many users report having issues with the app. The Malwarebytes’ unable to connect the service error prevents users from accessing it.
Why is Malwarebytes unable to connect the service?
Malwarebytes cannot connect the service error that appears when you click the app icon on your PC. It can occur due to any factors affecting the Malwarebytes software and your PC.
However, the common factor is installation file problems. When the antimalware client installation files on your computer are compromised, they can impact how the app works. Other factors that may cause Malwarebytes not to connect to the service are:
Conflict with other programs –Malwarebytes can run into several issues with other anti-malware apps running on your PC. Hence, it won’t work if they conflict or render the same services as the Windows Defender.
Outdated Malwarebytes software – This tool should automatically install updates and add the needed patches to improve performance. However, the software not being updated can cause it to crash or not open on your PC.
Nevertheless, the cause of Malwarebytes’ inability to connect the service error can differ on various PCs. Hence, we’ll take you through some fixes to generally resolve the issue.
How do I fix Malwarebytes if it’s unable to connect the service?
Before proceeding with any advanced troubleshooting, go through the following:
Temporarily disable antivirus software on your computer.
Restart your PC and check if the problem persists. This should be an intuitive task, yet if any issues occur, let us show you what to do when your computer is stuck on restarting.
If you can’t fix the problem, try the solutions listed below.
1. Check if there is something wrong with Malwarebytes Service
Press Windows + R key to open the Run dialog box, type services.msc, then press Enter to open the list of services on your PC.
Find and right-click Malwarebytes Service, then click Properties from the drop-down.
Go to the Startup type tab and change it to Automatic.
Check if the service is running. If not, click on Start until its status changes to Running.
2. Restart Malwarebytes in Safe Mode
Press the Windows key, click the Power icon, hold the shift key and click on Restart.
On the Advanced Recovery Options window, click on Troubleshoot and select the Advanced options.
Click on Startup Settings and select Restart.
Press 4 to Enable Safe Mode.
Then launch the Malwarebytes app in this mode.
Your PC will restart in Safe Mode. Restarting Windows in Safe Mode can resolve startup problems and app activities interfering with the Malwarebytes program.
Are you frequently seeing an error message like there was a problem starting p17rune.dll? If yes, this article has the solutions you have been looking for.
Usually, the problem related to the DLL file named p17rune.dll appears after Windows startup. It also may appear suddenly in the middle of work or in any other situation. Luckily, you can easily fix this problem. But, you should know about the reasons before knowing the solutions.
What causes the p17rune.dll file-related error on Windows?
Usually, the p17rune.dll file is an essential component used by software developed by Creative Technology Ltd. It is a well-known company in the audio industry. You may have been using their sound card and software like Sound Blaster, etc.
So, if the problem appears, it may be because of the following reasons:
The DLL file has a problem: The p17rune.dll file may be missing or has been corrupted.
Outdated software: If you have software that uses this file, it may be outdated and cannot function properly in the latest OS.
There is a leftover: You may have used software developed by Creative in the past, and that was not uninstalled properly.
Outdated driver: If there is an obsolete driver, especially for the sound card developed by Creative, it can be the reason.
Antivirus: Your antivirus may be interfering with something that is causing the problem, so make sure to choose a less intrusive one.
If the above things are OK, follow these methods to fix the p17rune.dll file problem.
1. Download and replace the p17rune.dll file
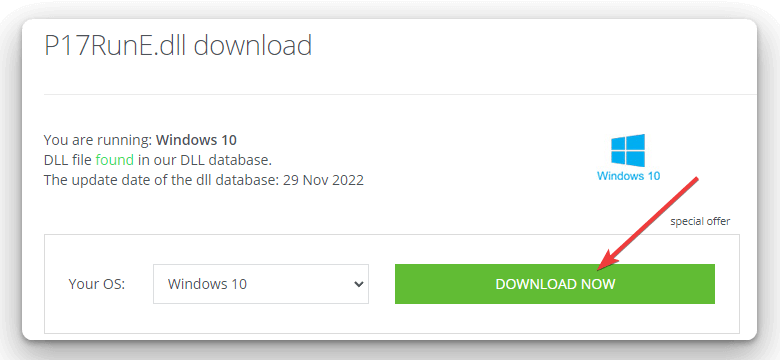
Visit a trusted website from where you can find this DLL file.
Download P17RunE.dll.
Copy the DLL file.
Paste it in the following location: C:\Windows\System32
Please note that the location can be different in your case. It depends on the software that needs this file. The common place for such DLL files is the System32 folder. But, for some specific software, it can be in the installation directory or anywhere else.
2. Update the related software
2.1 Uninstall the software
Press Win + I on the keyboard to launch Windows Settings.
Navigate to Apps and click on Installed apps.
Find the app you want to uninstall.
Click on the three horizontal dots next to it and click on Uninstall.
To uninstall, we suggest you use a tool like IObit Uninstaller or Revo Uninstaller. These tools leave no leftovers while uninstalling anything, unlike the built-in uninstaller of Windows. Please keep in mind that the leftovers of specific software also may cause DLL file errors.
2.2 Install the latest version
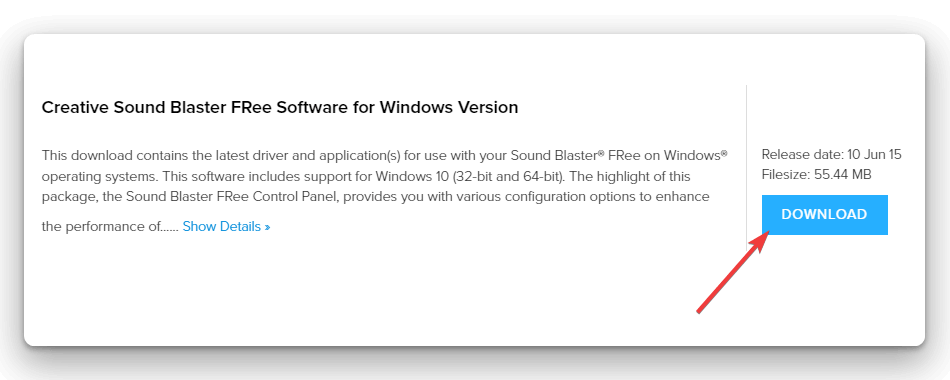
Go to the official software publisher site and download the software.
Install it on your PC.
Now, see if it has fixed the P17RuneE.DLL file error or not.
3. Update the sound driver
Open the Start Menu.
Type Device Manager and press Enter to launch Windows Device Manager.
Expand Sound, video & game controllers.
Right-click on the audio driver and choose Update.
Pick your preferred method to update.
Restart your computer.
The above step may not be the best solution. So, we suggest you use Outbyte Driver Updater. This tool can find the latest driver and install it with just a single click.
Outbyte Driver Updater
The best driver-updating solution to use on your PC as it can find the latest updates from a vast database.
You can have a look at the list of best DLL repair tools that often come in handy when you get errors related to such Dynamic Link Library files.
This article has described how you can get rid of there was a problem starting P17RuneE.DLL on Windows. If you know any other better method, you can share it in the comment box.
If you see the EFI USB device has been blocked by security policy error when trying to use a bootable USB drive on your Windows PC, it’s due to the Secure Boot feature blocking access.
To help you fix this, we’ll show you how to disable secure boot and reset BIOS. So, if you’re ready to get your system running the way you want, just keep reading.
How can I fix the device has been blocked error in Windows 11?
1. Disable Secure Boot
1.1 Restart the UEFI Firmware settings
Hold down the Windows key and press I to launch Settings.
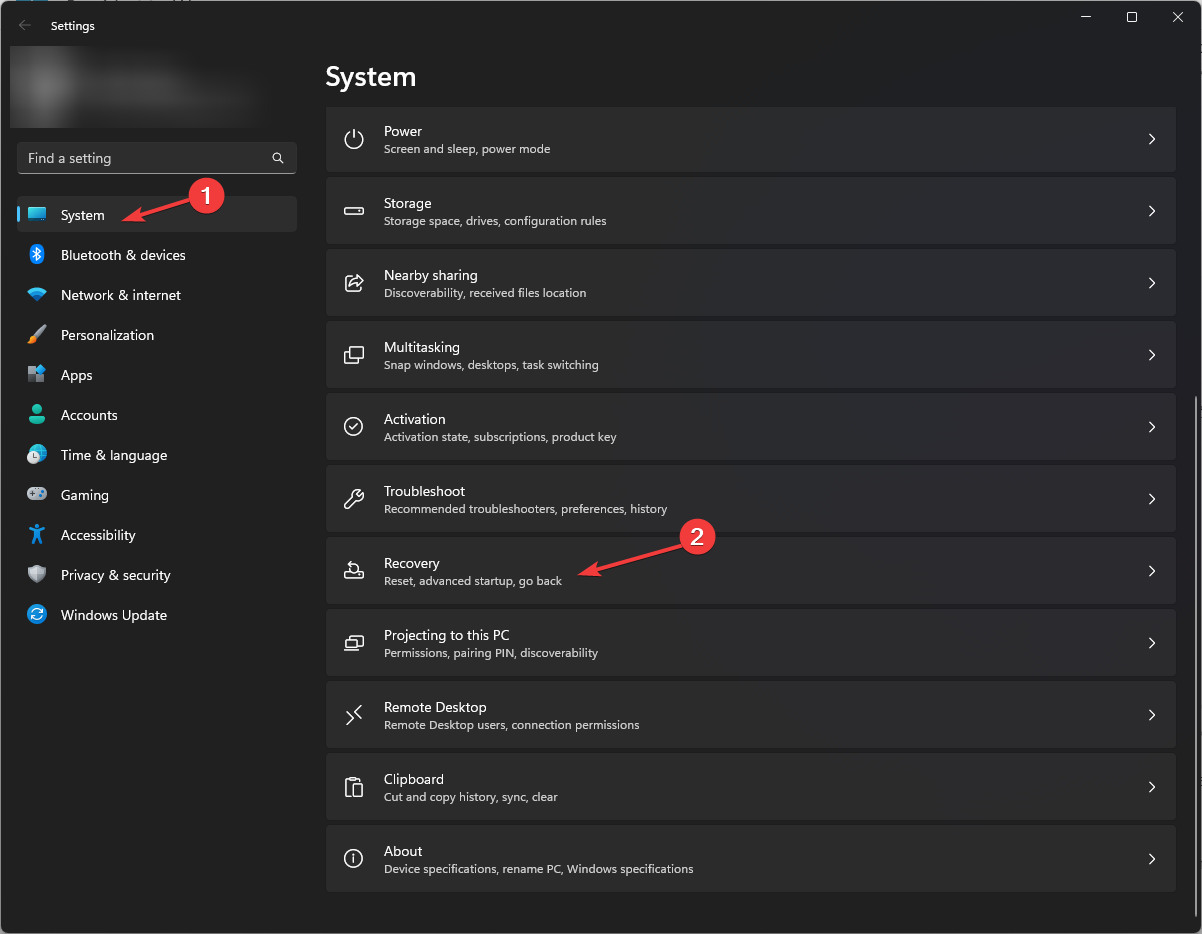
Click the System tab’s Recovery navigation option. You’ll need to select Update & Security and Recovery in Windows 10’s Settings app.
Select the Restart now option to enter Advanced Startup.
Then choose the Troubleshoot option.
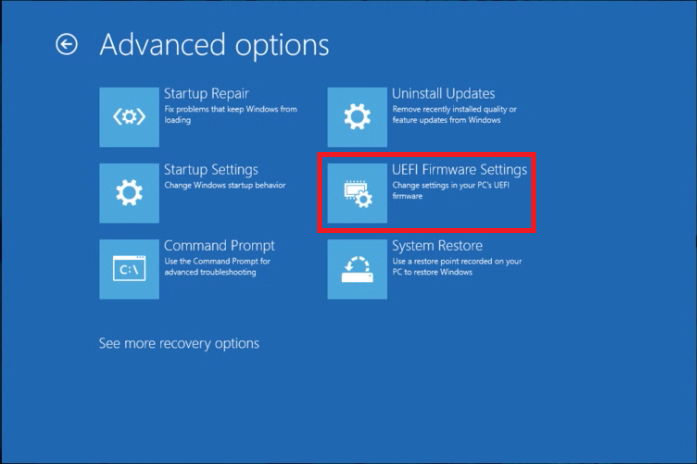
Select Advancedoptions, then select UEFI Firmware Settings.
Click the UEFI firmware Restart option.
1.2 Disable the Secure Boot setting
NOTE
BIOS/UEFI firmware layouts can vary between different PC models. So, the exact steps for accessing the disabling Secure Boot BIOS setting can also vary slightly.
Select the Security (or a Boot) tab inside BIOS.
Find and select the Secure Boot option with the keyboard.
Press Enter to bring up a Disable option and select it.
Next, press the F10 button to save and exit BIOS.
Select Yes to confirm.
Some users may need to set an admin password to change the Secure Boot setting. If that option isn’t accessible, try selecting the Set Administrator Password option within the BIOS first.
Enter your PC’s BIOS via Settings as outlined for the first fix or with a different method. Our how-to enter BIOS guide includes numerous methods for entering the BIOS on Windows PCs.
Select the Exit tab in the BIOS.
Press the F9 key to select the Load Default Settings option. Or select that option with the arrow keys and hit Enter.
Then select Yes to confirm the selected option.
Press the F10 key and select the Save option.
There aren’t many ways to fix the EFI USB device has been blocked by security policy error, but the options above are proven to work.
Sometimes, running Windows updates the usual way may not work for you, so you need another way to go about it. However, an alternative is running Windows updates from the command line.
Many users struggle to download a batch or all Windows updates because they don’t know the right way. However, it is possible to download all Windows updates at once on your PC.
Furthermore, before installing all Windows updates, you must be exposed to the right system environment. It is because the contemporary Windows update channels, such as Settings and others, don’t have the option to download all.
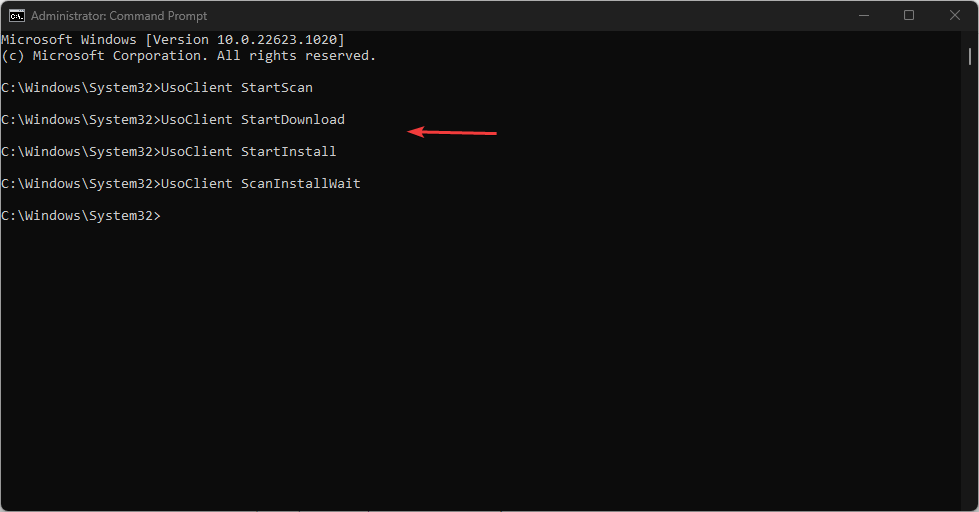
Hence, downloading Windows updates from the Command Prompt or Windows PowerShell makes it easier to install a batch or all updates at once. It is possible through designated command lines to invoke your Windows history and install all updates.
How do I run Windows updates using the command line?
We recommend you go through the following preliminary checks:
Some of our readers have requested to know how to change the desktop icon size in Windows 11 without changing the display resolution.
The size of desktop icons can be affected by other activities on the PC, thereby disrupting your personalization settings. Hence, we have outlined ways to change them.
Why are my icons so big in Windows 11?
There can be several reasons why your Windows 11 icons are so big. The following are some of the potential reasons:
After a Windows update –When Windows updates itself, various communication errors between drivers and between the old and new settings may occur, thereby enlarging the icons.
Your scaling settings –It is possible that your scaling settings have been changed, increasing or reducing the size of your desktop icons. Fixing this will only require you to reset your preferences.
Driver issues –If you wonder why are my desktop icons so big all of a sudden, it can be due to the absence of some necessary drivers on your computer.
Now that you know some potential reasons why your desktop icon size has increased, let’s proceed to how to change the desktop icon size in Windows 11.
How do I change my desktop icon size without affecting the resolution?
1. Change the icon size through the context menu
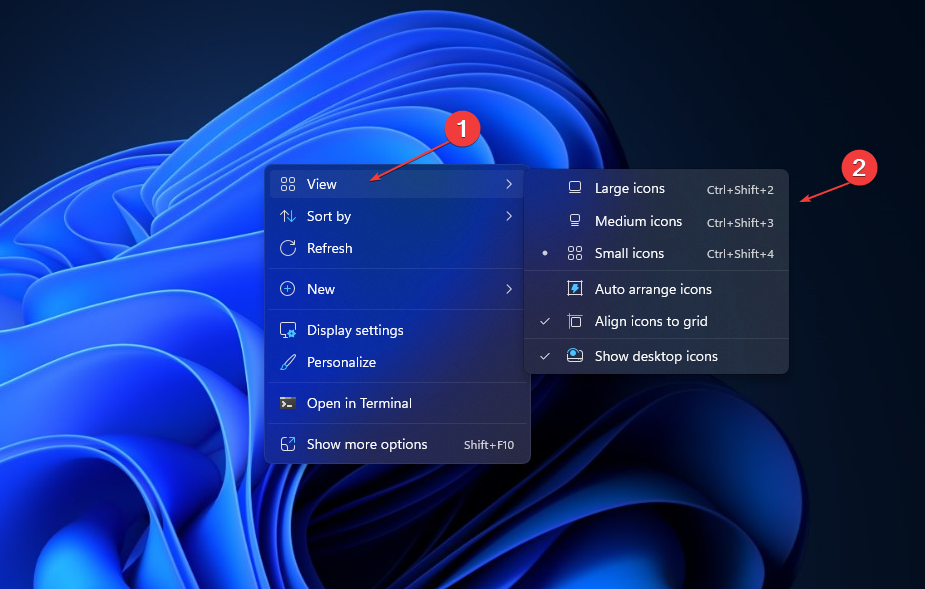
Right-click anywhere on your desktop to open the context menu and select the View submenu.
Then choose the icon size you want: Large icons/Medium icons/Small icons from the context menu.
The above fix is easy to access right from your desktop and does not affect its resolution.
You can try any of the fixes in this article to know which works best for you. If you have any questions or suggestions, please use the comments section below.
Microsoft Teams is a communication and collaboration tool that comes built-in with Microsoft Windows 11. On other versions, you can install them separately.
While there are specific solutions to these issues, the culprit often is corrupt cache files. Cache files can often conflict with the app’s performance and cause multiple issues. In this guide, we will give you simple steps on how to clear the Microsoft Teams cache. Let’s get right into it.
You can also make use of the command prompt and clear the cache for Microsoft Teams. It is a bit easier as all you need to do is run a command and it will do its job.
What is cache, and how does clearing it fix things?
Cache are files that your browser or app will store so that it can load certain files related to the webpage or app faster on your PC.
The cache files could be anything ranging from images, clips, fonts, and other technical elements such as CSS, HTML, JavaScript, etc. All these files are stored locally to save downloading them again and again and speed up your browsing.
Now, many people have a question about how clearing an app or browser cache helps fix things. To simplify things, there are chances that the cache files stored on your PC locally are outdated and the website or app has been updated to a newer version.
Due to this mismatch, chances are that the app will misbehave or malfunction. This conflict can be easily avoided by clearing the app or browser cache.
Difference between Cookies and Cache
Cookies
Cache
Cache files save basic information about a website or app, such as fonts, images, clips, etc.
Cache files save basic information about a website or app such as fonts, images, clips, etc.
Cookies keep a track of which website you interacted with.
Cache files will remain the same even if someone other than you uses that app or website.
Cookies expire automatically.
The cache needs to be cleared manually.
Cookies take up only a small amount of storage space.
Cache eats up a good amount of storage if not cleaned regularly.
Cookies are more memory intensive.
Cache is less memory intensive.
That is it from us in this guide. You can check out our guide that gives you stepwise instructions to record a Microsoft Teams meeting.
Also, you can check out our guide that will help you resolve audio issues with Microsoft Teams. Let us know in the comments below which one of the above methods you use to delete the cache files for Microsoft Teams.
The Google Chrome OS can’t open this page error is pretty confusing as this has been reported by users on different brands’ Chromebooks. It can occur when you try to open certain programs, especially has been reported while running Roblox.
If you are also one of such users and facing the Google Chrome OS can’t open this page error and are looking for solutions then you are at the right place. Because in this guide, we will give you multiple solutions that will help you resolve the problem. Let us get right into it.
What causes Google Chrome OS can’t open this page error?
After some research, we have found some common reasons that usually trigger the Google Chrome OS can’t open this page error;
DNS issues: DNS stands for Domain Name System and it translates the domain names into IP addresses. If there is some issue with DNS then it could trigger multiple problems including the one at hand.
Weak internet connection: A webpage not loading is often because of a poor internet connection. You should check if the internet that you are connected to is working and there isn’t any problem.
Your antivirus is blocking the program: Due to aggressive antivirus software, certain applications are blocked by default, as the program reads them as a threat to your PC.
Problematic Chrome OS settings: You or a third-party app might have tweaked the Chrome OS settings, which is why you facing this issue.
How can I fix the Google Chrome OS can’t open this page error?
Before jumping to the advanced solutions, here are a few quick fixes that you can apply to resolve the error:
Restart your Chromebook and check if this fixes the issue or not. There might be a temporary glitch that is causing the problem.
Check the web address that you have entered in the address bar to make sure you’re going to the right webpage.
Try to open the same webpage on another Chromebook connected to the same network and check if the issue exists there or not.
Now let us take a look at the advanced solutions that could possibly help you resolve the problem.
1. Clear the cache and cookies of Chrome
Open Chrome browser on your Chromebook.
Click on the 3-dot menu icon.
Select More tools and click on Clear browsing data.
Check the boxes for Cookies and other site data and the Cached image and files option.
Hit the Clear data button and see if this resolves the issue or not.
Often corrupt cache and cookies can cause the program to misbehave and throw multiple errors. You can simply clear the cache and cookies on your Chrome browser and check if this resolves the issue or not.
2. Restore Google Chrome to default settings
Launch Google Chrome.
Click the 3-dot menu icon.
Select Settings.
Expand the Advanced section and click on Reset settings.
On the right side, click on the Restore settings to their original defaults option.
Again select Reset settings.
Restart your Chromebook and check if this resolves the issue or not.
Often extensions can tweak the Chrome setting which could result in the browser malfunctioning. In such a case, as advised by one of the users, it is best to reset the Chrome browser to its default settings as it will bring back the browser to its original state.
The browser will start looking for an update, and if it finds one, will install it on your PC.
There might be a bug in the current version of the browser that you are using and there is a new update pending to install. Simply check if there is a new update available and if yes, then you can download it and check if this resolves the issue or not.
4. Update Chromebook OS
Click on the time icon at the bottom and select Settings.
On the bottom left, click on About ChromeOS.
Click on Check for updates.
If there is a new update available, then your Chromebook will start downloading the update.
Often installing a new update fixes a bunch of petty issues that you might be experiencing on your Chromebook.
Check if there is a new update available for your ChromeOS and if yes, then install it right away and see if this resolves the issue.
Speaking of Chromebook issues, several users reported that the Chromebook keyboard isn’t working for them. However, we covered this issue in a recent article, so you might want to check it out.
Let us know in the comments below, which one of the above solutions helped you resolve the Google Chrome OS can’t open this page error.
Ads popping up in the bottom-right corner of the desktop can be disturbing sometimes because they interrupt your computer activities. It can occur due to a couple of reasons.
Why do ads consistently pop up in my desktop’s bottom right corner?
The most common reason is that you have allowed some websites or online services to send notifications. So, not managing your browser notifications can prompt ads to pop up in the notification bar.
Other reasons that can be responsible for the ads frequently popping up in the bottom right corner of the desktop are:
Features added from the recent Windows update – Features like News and Interests can make it difficult to use your PC without sending a notification and can also prevent you from using it.
Programs notifications on your PC –The apps installed on your computer can send in ads at will if you have the notification feature enabled. It allows the app to send in ads about new products, updates, and other content. So, you can see ads popping up in the bottom right corner of the desktop if the app notification is on.
Adware on your PC –Users can experience ads popping up consistently from the bottom right corner due to adware on their browser or PC. They can be malicious and sometimes hard to get rid of.
What can I do if ads keep popping up in the bottom right corner of my desktop?
Before using any advanced troubleshooting steps, try to turn off background apps running on your computer and restart Windows in Safe Mode. If the ads keep popping up, try the solutions below.
1. Block pop-up ads in your browser
Launch the Chrome browser on your PC, click the Menu button, and select Settings from the drop-down menu.
Select click Privacy and security. Scroll down and click on the play button against the Site Settings option to expand it.
Navigate to the Content tab, then click the Pop-upsand redirects option.
On the Default behavior section, click the radio button next to the Don’t allow sites to send pop-ups or use the redirects option.
Close your browser and check if the ads pop-up persists.
Disabling the option that blocks browser ads from showing on your desktop is a viable way to fix the issue.
2. Customize Windows notifications for specific or all apps
Press Windows + I key to launch the Windows Settings app.
Click on System, then select Notifications to expand it.
Scroll down to the Notifications from apps and other senders tab, and toggle off the switch for apps you don’t want to receive notifications or toggle off the Notifications to disable the notifications from all your apps.
Navigate to Tips and suggestions about Windows and uncheck the box.
Close the Settings window and check if the problem persists.
The above settings will stop notifications from senders, preventing them from being able to send ads.
Xbox Series X was a ‘hot’ item on Black Friday, report claims
According to data from Adobe, Xbox Series X was one of the top five hot products following Black Friday and Cyber Monday, a surprising change from expectations that the Xbox Series S would outperform, particularly as it was the only Xbox Series console to be discounted.
Xbox Series X|S successor tentatively slated for a 2028 release
Hints about when the next generation of consoles may release are starting to drop, with Microsoft saying in response to a CMA issues statement, “Ineed (sic) the next new generation of consoles are not expected to be released before the fall of 2028 at the very earliest.”
Microsoft likely to offer EU regulators concessions in Activision Blizzard acquisition
Usually, when you try to run any software, service, or app that requires the Linux environment, you may get an error.
In most cases, if you install the Ubuntu app from the Microsoft Store and open it, this problem will appear. When it occurs, you get the following message: The Windows Subsystem for Linux optional component is not enabled. Please enable it and try again.
It also may show an error code 0x8007019e. But don’t worry, you can easily fix this problem if you take the proper steps.
Does the Windows Subsystem for Linux slow down a PC?
To make your development work much more pleasant, you may enable WSL. It does not hurt Windows performance.
Any services in the background take a few computing resources. The WSL is not different. However, according to the users, it doesn’t slow down the PC.
We have tested it by ourselves. Our research also has found that modern computers can easily handle Windows Subsystem for Linux without negatively affecting performance.
Moreover, it can be an essential feature for some users. So, you may need to turn it on, particularly when you face the error mentioned in this article.
How do I enable Windows Subsystem for Linux on Windows?
If you want to enable WSL on your PC, you can easily do it. But, before that, we suggest you do the following things:
Update Windows to the latest version.
Ensure you are using Windows 11 or 10, as other versions don’t support this feature.
Now, you can follow the methods mentioned below to enable Windows Subsystem for Linux.
1. Install the optional feature
Press Win + I on the keyboard to open Windows Settings.
Go to Apps and click on Optional features.
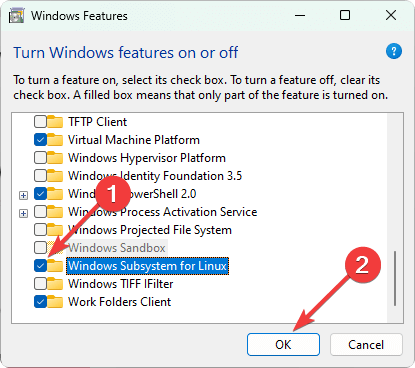
Click on More Windows features to open the Windows Features window.
Tick Windows Subsystem for Linux and click on OK.
It will install the required components.
Restart your PC after completing the process.
Alternatively, you also can search for the optionalfeatures on the Start Menu to find and open the Windows Features window. It can be necessary if you don’t find the exact options shown in the above steps.
After enabling the WSL, you can try to open the Ubuntu terminal or any other app or service that was showing the error. Hopefully, you will not see the same again.
2. Use the PowerShell command
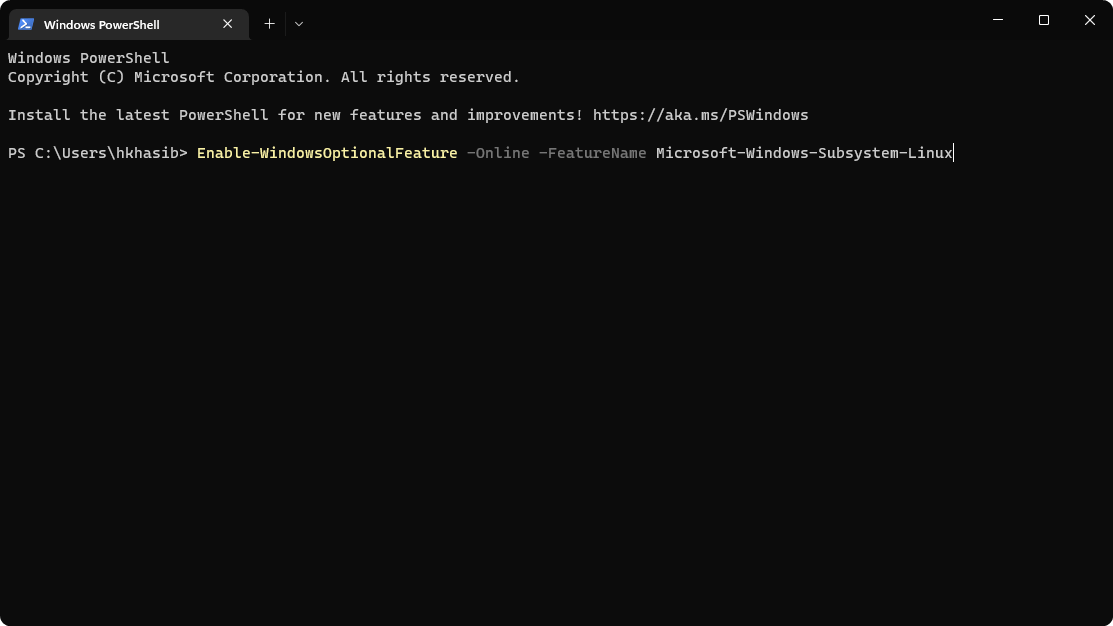
Open the Start Menu, type PowerShell, and hit Enter.
Now, type the following command and press Enter to execute it: Enable-WindowsOptionalFeature -Online -FeatureName Microsoft-Windows-Subsystem-Linux
Wait for a while.
Restart your PC after PowerShell installs the required features.
Now, verify if it has solved the problem or not. If PowerShell can successfully enable this optional feature, you can use the Ubuntu terminal or any other app that requires WSL without any error.
If you are using the latest builds, enabling Developer Mode is no longer necessary. In case you are running an older build, perform the steps below to enable it.
Open Windows Settings.
Go to Privacy & security and click on For developers.
Turn the Developer Mode by tweaking the appropriate switch.
Click on Yes on the popup window.
Restart your PC.
For more detailed steps, learn how to enable Windows 11 Developer Mode. If the Developer Mode is a requirement, try to enable the latest WSL again and see if it works.
This article has explained how to fix Windows Subsystem for Linux is not enabled. If you have any opinions or suggestions, feel free to let us know in the comments box.
If you are here today to remove the itibiti.exe file, you should be careful while deleting it.
While we guide you through the process, it’s important to find out if this file is indeed a virus or adware that should be removed, or if it’s completely safe.
What is Itibiti.exe, and why should you remove it?
Itibiti.exe is a file that is a part of the Itibiti SoftPhone and Knctr applications for Windows, but it’s not important.
Some of the reasons why the removal of itibiti.exe from your PC is important are:
Affects different browsers – It’s a malicious process that can affect browsers like Chrome, Firefox, Edge, and others, for example, automatically opens multiple windows, etc.
Misleading ads and updates – The file can display ads loaded with malware that can offer fake software updates or detect viruses.
Affects computer’s performance – It has a negative impact on the overall performance and speed of your Windows PC.
Below are some of the important facts about the itibiti.exe file:
Location
C:\Program Files\Itibiti Soft Phone\ subfolder
Publisher
Itibiti Inc
Full Path
C:\Program Files\Itibiti Soft Phone\Itibiti.exe
Help file
www.itibitiphone.com/knctr/useragreement.html
Publisher Website
www.itibitisystems.com
File Size
up to 8.58 MB in size on most Windows
Is it safe, or is it a virus/malware?
To confirm if the itibiti.exe file is a virus or malware, you must check its actual location as shown below:
Go to the Start button, right-click it, and select Task Manager.
Next, select the Processes tab, right-click on the itibiti.exe process, and select Properties.
In the Properties dialogue, navigate to the Digital Signatures tab and check for the name of the signer.
If the field says, Unable to verify, then chances are, that the file is a virus.
If you suspect that itibiti.exe is a virus, a download of an itibiti exe remover would be a smarter decision. In this post, we will show you how to permanently delete the file from your Windows 11 PC.
How to permanently remove Itibiti.exe from Windows 11?
Before you try the primary methods, make sure to run some checks to confirm that the error you see is due to the itibiti.exe file and only then proceed with its removal. You should run an antivirus scan, repair corrupted files with the System File Checker utility, and end the process in the Task Manager.
1. Use an antivirus software
1.1 Using Windows Defender
Go to the extreme right end of the taskbar, expand the system tray, and click on the Windows Security icon.
On the Windows Security screen, click on Virus & threat protection.
Next, click on Scan options.
On the next page, select the Microsoft Defender Antivirus (offline scan)option. Click on Scan now.
Your PC will restart and the scanning process will begin.
While Windows Defender offers a pretty good antivirus software that offers a strong defense against viruses and malware, some threats need more powerful protection.
Press the Win + E shortcut keys to open File Explorer and search for itibiti.exe.
Windows will now display all the copies of the file. From here, look for the associated process or the program.
For example, if itibiti.exe is found in the below folder, then it belongs to the Dummy program: C:\Program Files\Dummy program\**example subfolder**
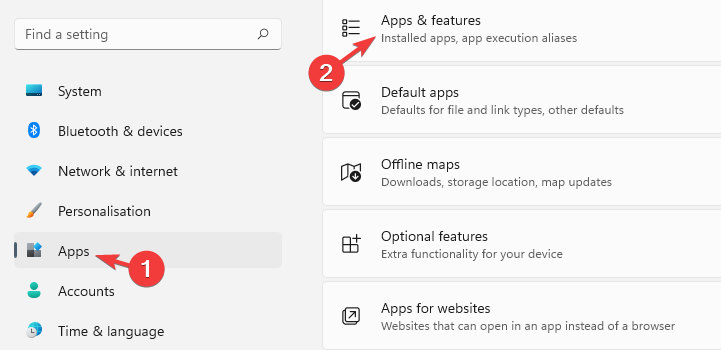
Now, press the Win + I keys together to launch Windows Settings, click on Apps on the left, and then click on Apps & features on the right.
Look for the associated program in the App list. It should be either Itibiti_Knctr_C11 or the developer name, click on the three dots next to it, and click on Uninstall.
Click Uninstall again in the prompt to confirm the action.
You can also uninstall the program directly using the uninstaller located in its directory. The path usually looks like this: C:Program Files\Itibiti_Knctr_C13\Itibiti_Knctr_C11 \Itibiti Soft Phone\ Itibiti.exe_uninstall.exe.
3. Delete all occurrences
Press the Win + E shortcut keys to launch File Explorer and look up itibiti.exe.
Windows will now list all the occurrences of the file. You can delete each file manually. However, if it’s running in the background, you won’t be able to delete the files.
For this, right-click on the Start button and select Task Manager.
Under the Processes tab, go to Background processes, right-click on itibiti.exe, and select End task.
Usually, the itibiti.exe file is not harmful, but removing it may affect the performance of any associated programs.
So, if you encounter any unexpected errors or issues, they could also be related to corrupt system files, outdated drivers, or the software not updating the problem.
Alternatively, you can create a restore point to revert the changes in the future if any issues occur due to the presence of itibiti-exp.
At the same time, make sure that you clean the computer frequently using a dedicated cleaning tool that helps you clear all junk files from your PC. Speaking of cleaning, we also have a guide on how to remove icmon.exe, so don’t miss it.
Please let us know in the comments section below if you have any other questions about a suspicious file like itibiti.exe.
Windows Live Mail users have reported facing 0x8de00005 error, which prevents them from using the mail app. Notably, users aren’t able to send/receive mail using their accounts.
This issue mostly is reported by users on older versions of Windows and it can cause Windows Live Mail to stop working. In this guide, we will give you a bunch of solutions that you can apply to resolve the Windows Live Mail error 0x8de00005 on your PC. Let us get right into it.
What is Windows Live Mail error 0x8de00005?
When your PC throws a Windows Live Mail error 0x8de00005, then you will get either of a couple of the deficiency codes, i.e., 3219 or 3202. The causes are usually the following:
Client configuration – A common cause can be your client configuration. Make sure that HTTPS and IMAP are properly configured to fix this problem.
Account problems – In some instances, you might have an account issue, so you might have to change or even delete your Outlook account.
How can I fix the Windows Live Mail error 0x8de00005?
Here are a few quick things that you can try out before going ahead with the advanced solutions;
You can try restarting your PC. Certain temporary glitches or bugs can be easily resolved by restarting the PC, as it will load all the system files from scratch.
Check the Internet connection and make sure that it is working well. A limited Internet connection can often give rise to multiple errors.
Close the program completely and launch it back again and check if this resolves the error or not.
Now let us take a look at some advanced solutions if the above preliminary ones did not fix the issue.
1. Configure Hotmail correctly
Launch any web browser on your PC.
Log in to your Hotmail account.
Click Options.
Select More Options.
Click on Account details under Managing your account.
Provide your password, if asked.
Under Other options, click on Connect with HTTPS option.
Tap on the circle for Don’t use HTTPS automatically option.
Restart your PC.
Launch Windows Live Mail with your Hotmail account.
Click the Send/Receive button to re-sync, and check if the problem is resolved or not.
2. Deactivate the old account
Launch Windows Live Mail.
Select your email account.
Right-click on your email account name and select the Properties option from the context menu.
Deselect the Include this account when receiving mail or synchronizing option from the General tab.
Check the Manually Configure Server Settings option.
Under Server type, select IMAP as the server type.
In the Server Address field, type imap-mail.outlook.com and in port type 993.
Check Requires a secure connection SSL option.
Under Outgoing Server Information, type smtp-mail.outlook.com as the server address, and in port type 587.
Check the Requires a secure connection SSL and Requires Authentication options.
Click Next.
Click Finish.
4. Remove the old account
Launch Windows Live Mail.
Select your email account.
Right-click on your email account name and select the Remove account option from the context menu.
Click on Yes to confirm the deletion.
Once you have shifted all your email messages from your old account to your new one (which you have added using solution 2), then, you can go ahead and remove your old account following the steps mentioned in this solution.
Do note that removing the account is irreversible, i.e., you won’t be able to get it back. So, make sure that you have transferred all your emails from your old account to your new one before deleting them.
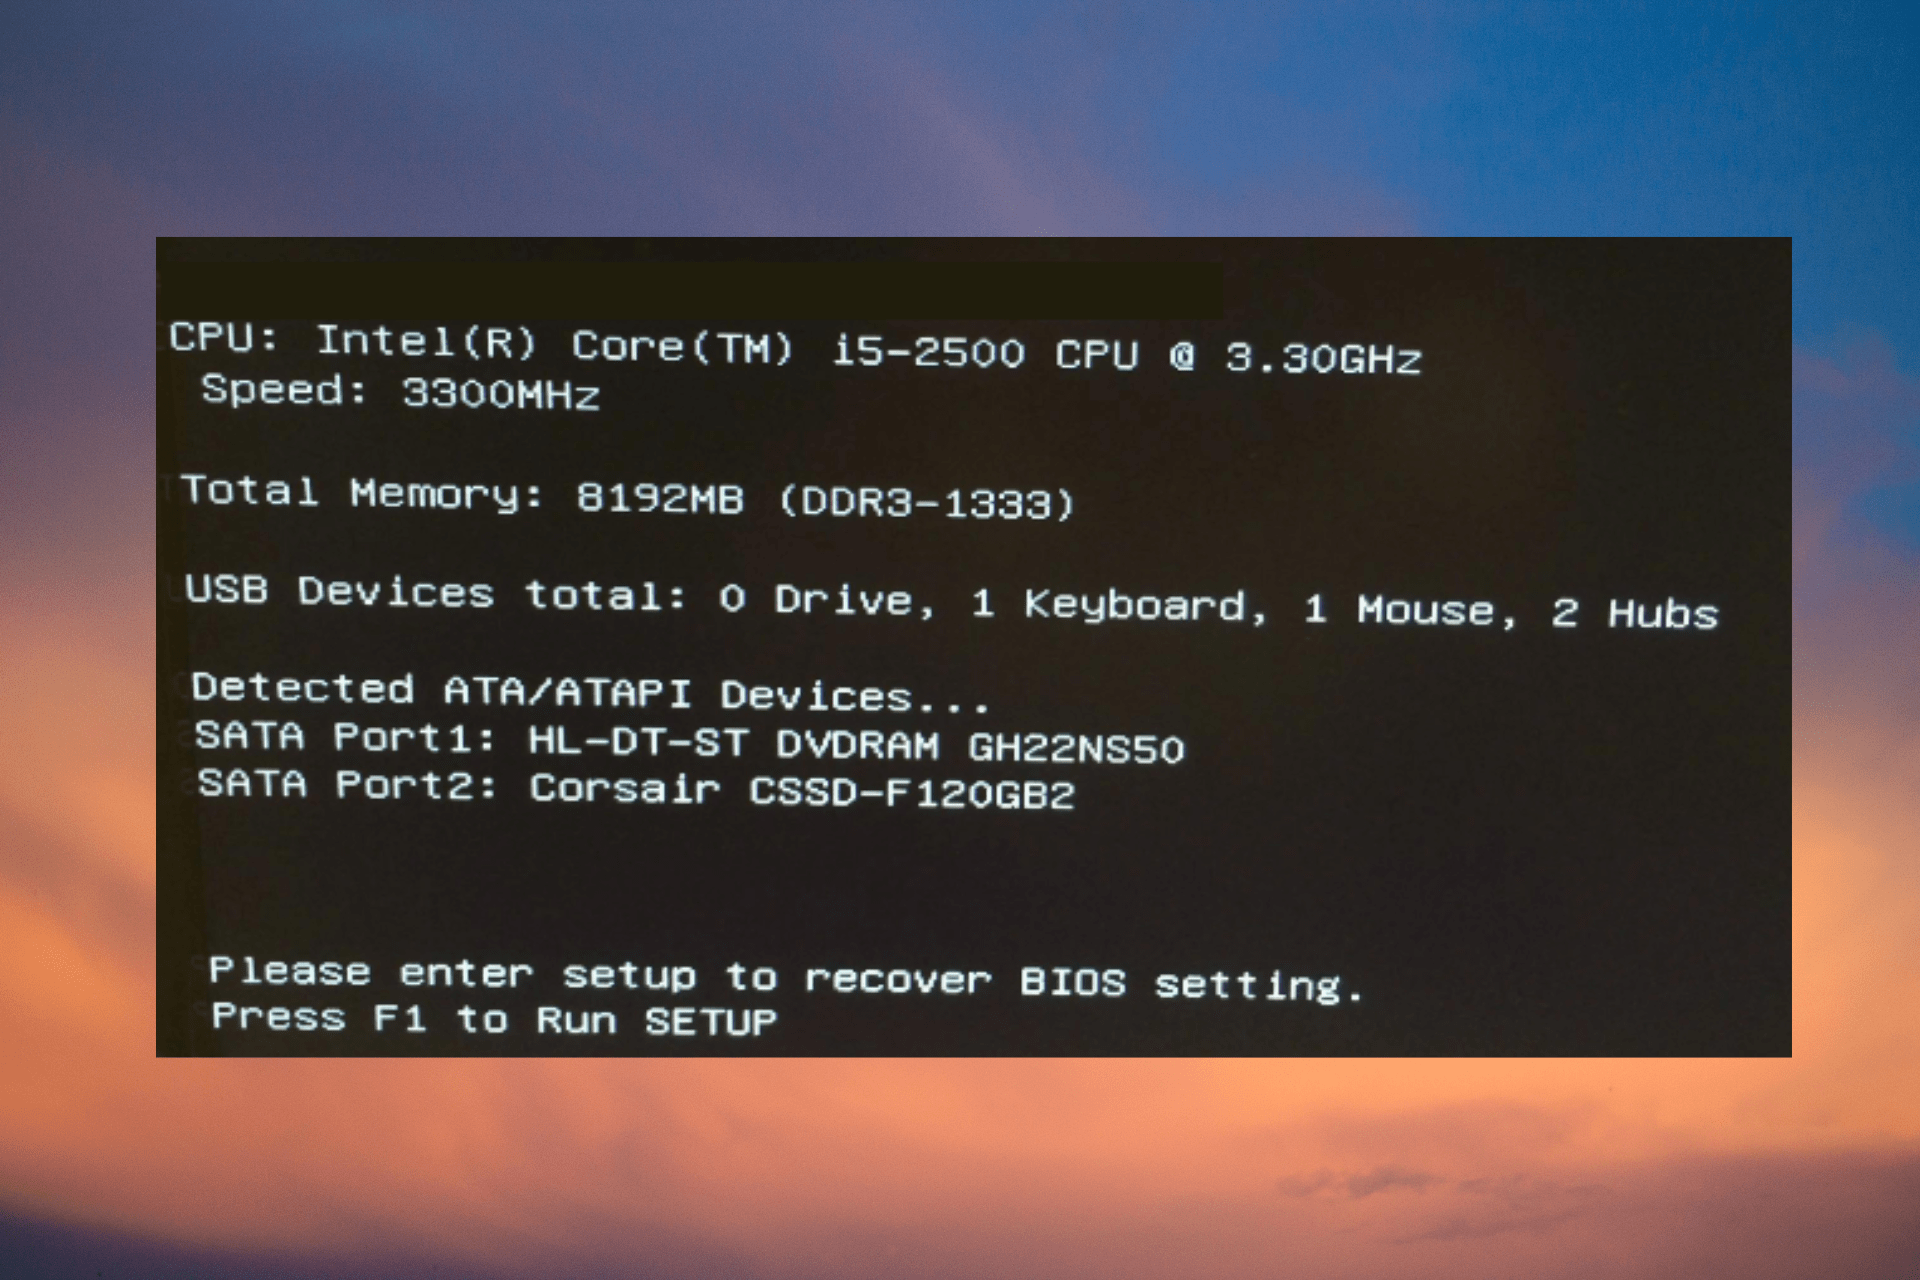
When trying to do a cold boot, you may bump into the error message, Please enter setup to recover BIOS settings as your PC is starting up.
You may not encounter this issue when doing a normal restart, but only during a cold boot. Besides, it also wipes off all the saved BIOS changes. To know more about what is BIOS and how to use it, you can follow our detailed guide.
What causes the please enter setup recovery BIOS settings error?
Some of the primary reasons why you may see the BIOS settings error are as below:
The CMOS battery is dead –When the motherboard model and the coin-cell batteryare old.
BIOS version is outdated – Sometimes, the BIOS needs to be updated to the latest version for proper functioning.
Ignore this error message completely if you don’t need any non-default settings.
But, if you still keep receiving the same error, Please enter setup to recover BIOS settings and press F1 to run the setup, you can follow the below workarounds.
1. Replace the CMOS battery and change the F1 settings
Enter BIOS, and press F7 to enter the Advanced Mode.
Here, go to the Boot tab and disable the Wait For ‘F1’ If Error option.
Now, press and hold the power button until the computer shuts down completely. Remove any power sources from the laptop, and the battery to proceed.
Before you dismantle your laptop, make sure to discharge any static electricity to avoid any damage.
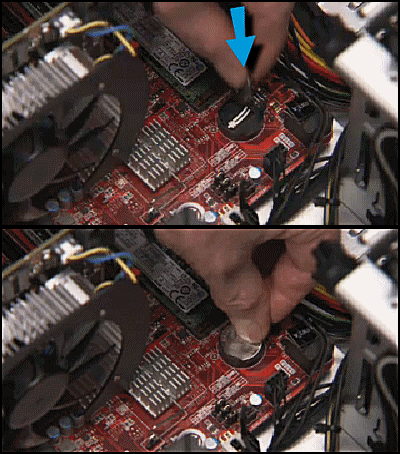
You can now remove the bottom panel of the laptop, or dismantle it to access the CMOS battery, which looks like a coin.
It is typically located near your PCI slots but could also be found in other locations based on the motherboard manufacturer. Now, remove the battery.
Next, hold the power button on your laptop for about 10-15 seconds to discharge any remaining power. This will reset the CMOS memory and your BIOS.
Now, place the CMOS battery back in its location, reassemble your laptop, plug the power source back, and boot up your laptop.
Enter BIOS again, reset the time and date, and press F10 to save the settings and exit.
Now, shut down your PC, wait for a while and as you turn on your PC, you should not see the error anymore. You can also refer to our detailed guide on how to fix corrupt CMOS for more solutions.
2. Change BIOS settings
2.1 Enable CSM
Enter BIOS on your PC based on the model, navigate to Security Options and turn off Secure Boot. Save the changes and restart your PC.
Next, enter BIOS again, go to the Boot section, and disable Fastboot.
Now, enable CSM (Compatibility Support Module), save the changes, and restart your PC.
You can now cold boot your PC and check if the issue is fixed or, if you still see the error, please enter setup to recover BIOS settings and press F1 to run setup.
This method can also help you with an issue such as when the PC won’t exit BIOS and we have some more solutions for the same.
If you are unable to set up Hamachi and want to know how to allow the app through Firewall, you are at the right place.
When trying to set up Hamachi, you may often come across errors such as Inbound Traffic blocked, check firewall settings, which arise due to the Firewall blocking the application.
Why does Firewall block Hamachi?
There could be different reasons why the Firewall may block Logmein Hamachi as below:
Hamachi is included in the list of Protected Network Connections – If the application is among the protected networks, you may have difficulty accessing it.
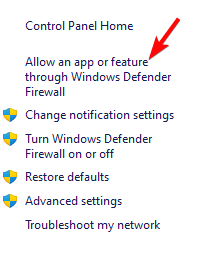
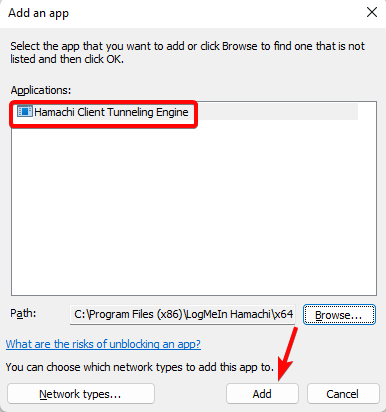
Press theWin + R to open up a Run dialog box. Then, type firewall.cpl and press Enter to open up the Windows Defender Firewall window.
Next, click on the Advanced settings option on the left to open Windows Defender Firewall with Advanced Security.
Here, click on Inbound Rules on the left. Next, on the right, go to Actions and click on New Rule.
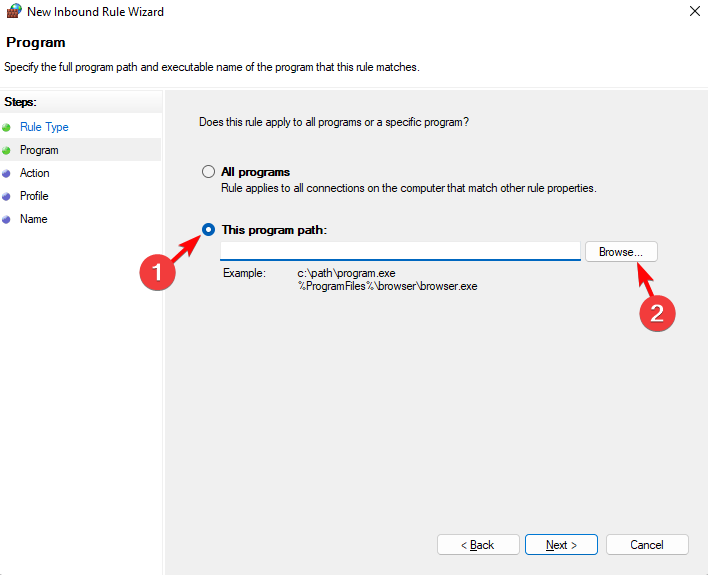
Inside the New Inbound Rule Wizard, select Program in Rule Type, and click Next.
On the next screen, select This program path and click on Browse.
In the File Explorer window, navigate to the below path, and double-click on hamachi-2.exe:C:\Program Files (x86)\LogMeIn Hamachi\x64
For a 32-bit Windows version, navigate to the below path instead, double-click on hamachi-2-ui.exe:C:\Program Files (x86)\LogMeIn Hamachi
Once the path is selected, click Next.
Next, select Allow the connection in the Action screen, and press Next.
On the Profile page, select Domain, Private and Public, and click Next.
Now, name the new rule as, for example, Allow Hamachi, and click Finish.
Once the inbound rule is created successfully, reboot your PC, and now Firewall would not be blocking Hamachi anymore.
What can I do if Hamachi is not connecting?
To open the Run console, press the Win + R keys together. Now, type devmgmt.msc and hit Enter to open up Device Manager.
Next, expand the Network adapters section, and select LogMeIn Hamachi Virtual Ethernet Adapter.
Click on the Actions tab at the top, and select Add legacy hardware.
On the Add Hardware wizard, click Next.
Next, select the Install the hardware that I manually select from a list (Advanced) option and press Next.
Now, under Common hardware types, find and select Network adapters in the list, and select Next.
On the next screen, click on Have Disk button at the bottom.
In the Install from Disk window, click on the Browse button, navigate to the below path, and double-click on hamachi.inf: C:\Program Files (x86)\LogMeIn Hamachi\x64
Back in the Install From Disk dialogue, press OK.
As you return to the Add Hardware window, press Next.
This will trigger the Hamachi driver installation. Now, follow the on-screen instructions to finish the installation.
Once done, reboot your computer and check if the issue is resolved and Hamachi is connecting now. But, if Hamachi does not work on your Windows 11 PC, we have some best solutions for you.
However, if you are unable to allow hamachi through Firewall because the Windows Exclusions are not working, we have some quick fixes to help you troubleshoot the issue.
Above are three quick methods to allow Hamachi through Windows Defender Firewall. However, if it’s the Avast Firewall that’s blocking a program, you can follow the solutions in our detailed post.
For any other issues with the Hamachi VPN service or the Windows Defender Firewall, let us know in the comments section below.
Sometimes you might get a 0x803fa067 error during Windows 11 activation. This can be a problem since you won’t activate your license, but there are ways to fix this issue, and this guide will show you how.
What causes Windows Activation Error 0x803fa067?
Using an invalid key will give you this error, however, sometimes a problematic update can also cause this issue.
What can I do to fix Windows Activation Error 0x803fa067?
1. Run Windows Activation Troubleshooter
Press Windows + I to get Settings.
Go to System, then click Activation.
Click Troubleshoot.
Select the appropriate option and click Next.
Enter your Microsoft credentials and click Sign in.
Put a checkmark beside This is the device I’m using right now on the next screen.
Click Activate.
2. Disconnect the PC from the internet and upgrade
Press Windows + I to open Settings.
Go to System, then click Activation.
Now under Upgrade your edition of Windows, go to the Change product key and click Change.
When we replace any of the hardware on our computer, we might get an error, like being unable to activate Windows after a hardware change. However, it is pretty standard and can be fixed easily.
This guide will discuss all the potential fixes to resolve this Windows Activation issue. Let’s begin.
What causes unable to activate Windows after hardware change?
There are various reasons for the issue to occur. We have listed some of the most popular ones here:
Proof of purchase in case you need to contact Microsoft support.
Once you have these, let us start the troubleshooting steps to activate your Windows:
1. Reactivate Windows with Activation Troubleshooter (digital license)
Note: Make sure you have logged in on your computer using an Administrator account. This method will only work for computers linked with Microsoft accounts.
Press Windows + I to get the Settings window.
Go to System, then click Activation.
Click Troubleshoot.
On the Troubleshooter window, you will get Windows can’t be activated on your device. Select I changed hardware on this device recently, then click Next.
Enter your Microsoft account username and password and click Sign in.
From the list of devices linked to your Microsoft account page, place a checkmark beside This is the device I’m using right now.
2. Reactivate Windows using the product key (without signing into your Microsoft account)
Press Windows + I to get Settings.
Go to System, then click Activation.
Under Upgrade your edition of Windows, go to the Change product key and click Change.
Enter the product key and click Next.
On the next page, click Activate.
3. Contact Microsoft Support
If you cannot reactivate Windows even after performing these methods, carefully note down all the errors you are getting, and contact Microsoft support. Explain to them your case, and a Microsoft representative will help you activate your Windows license.
So, you can do these things if you cannot activate Windows after a hardware change. Try these methods and let us know which worked for you in the comments below.
Software isn’t always going to work without any hiccups and, sometimes, it fails badly right when you actually need it the most.
For example, many users have reported getting the Microsoft Store Page could not be loaded error on both Windows 10 and 11.
Today, we’re going to look at some of the ways you can fix this annoying error. And yes, the Microsoft Store Page could not be loaded can also affect Xbox One users.
Why is Microsoft Store saying page could not be loaded?
If you’re having trouble launching the Microsoft Store, one of the first things to check is if you’re signed in with a Microsoft account.
The Microsoft Store Page not loading problem can usually be caused by slow or faulty internet connections.
Don’t worry, we are going to look into some of the fixes that helped other users struggling with the same Store problem.
How do I fix Microsoft Store page could not be loaded?
1. Disable Proxy servers
Press Win + I to bring up Settings.
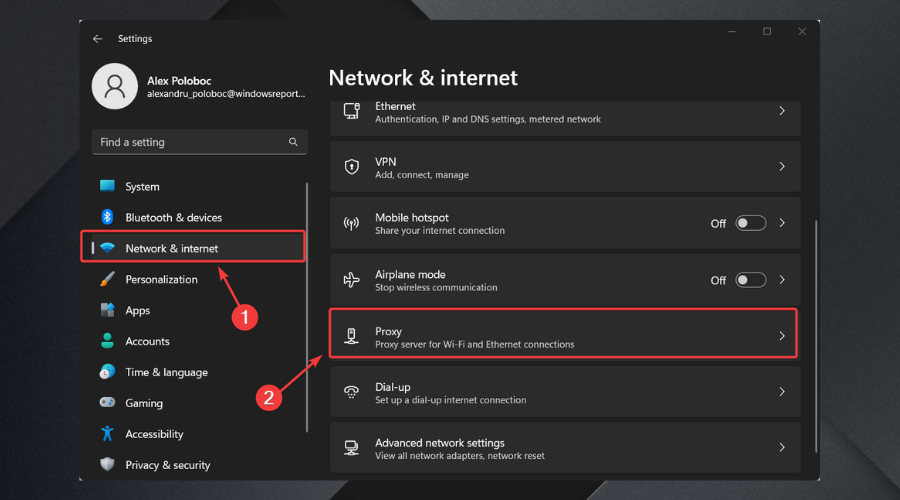
Select Network & Internet, then choose Proxy.
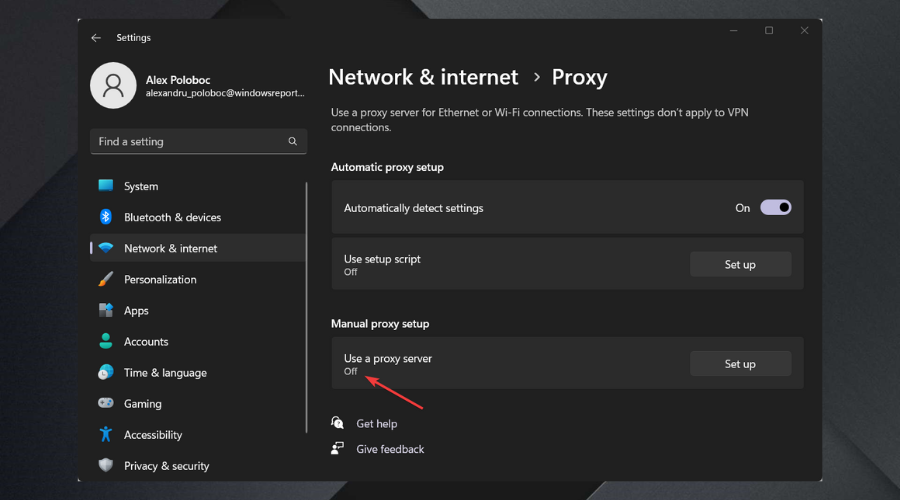
Disable the Use a Proxy server option.
2. Change DNS server
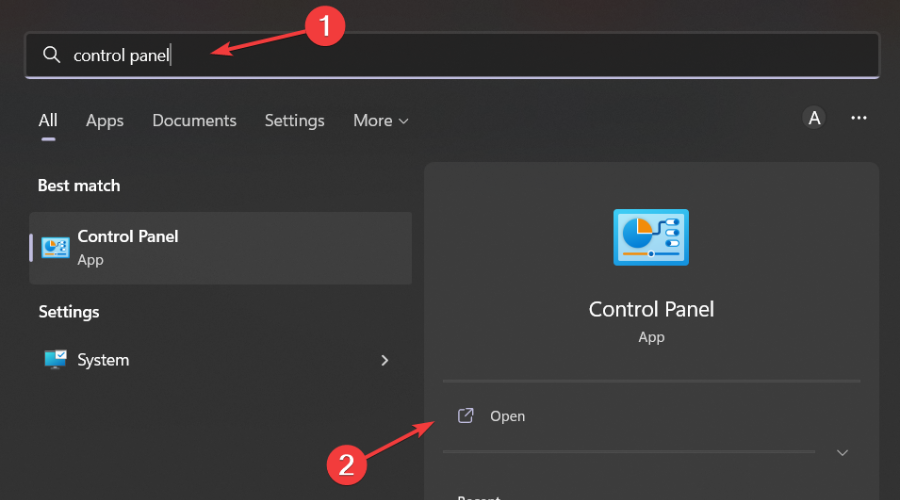
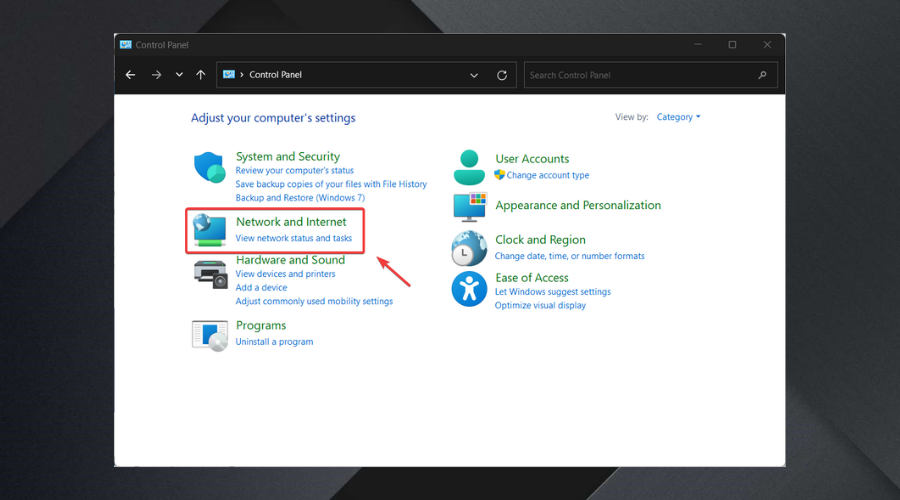
Search for Control Panel and open the app.
Go to Network and Internet.
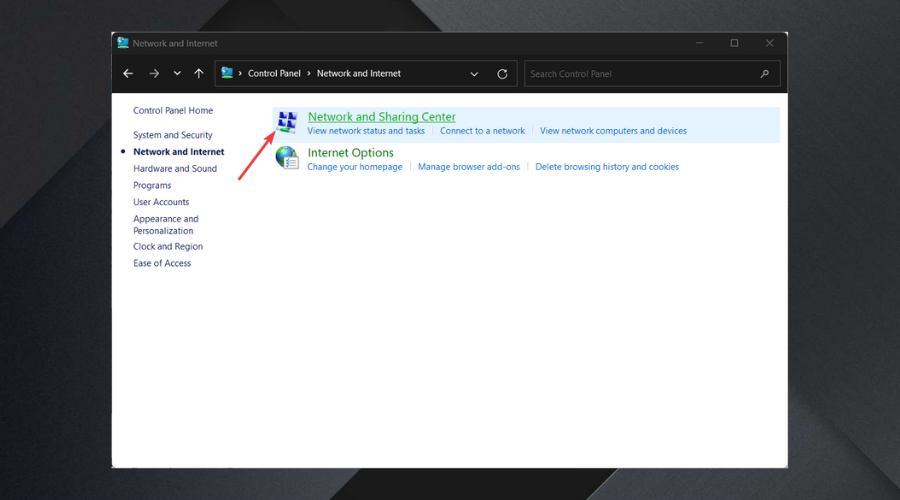
Now, go to Network and Sharing Center.
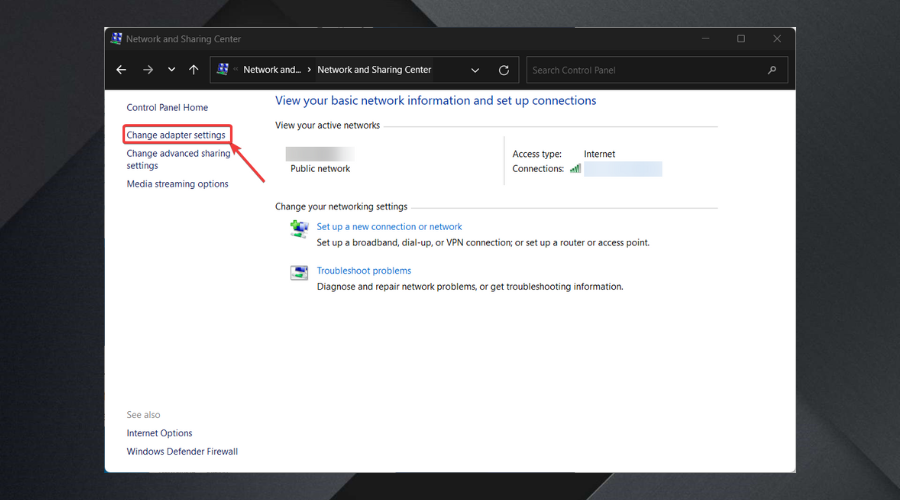
Next, choose Change adapter settings.
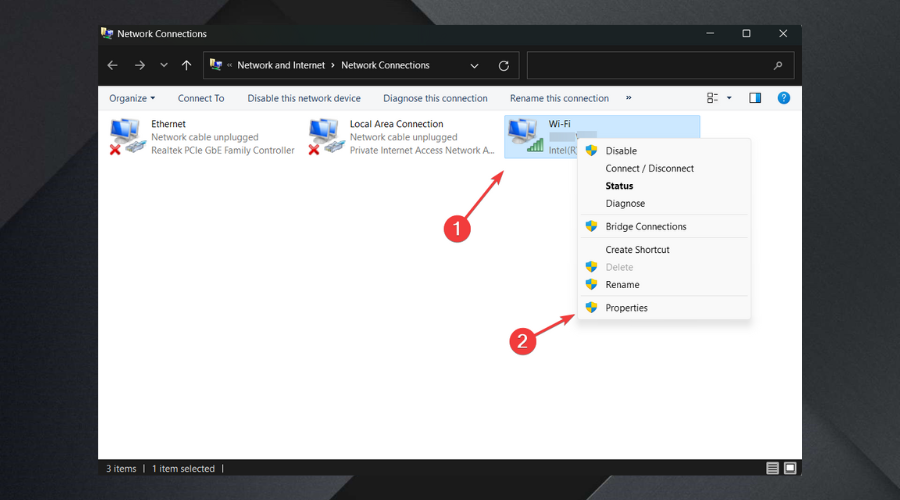
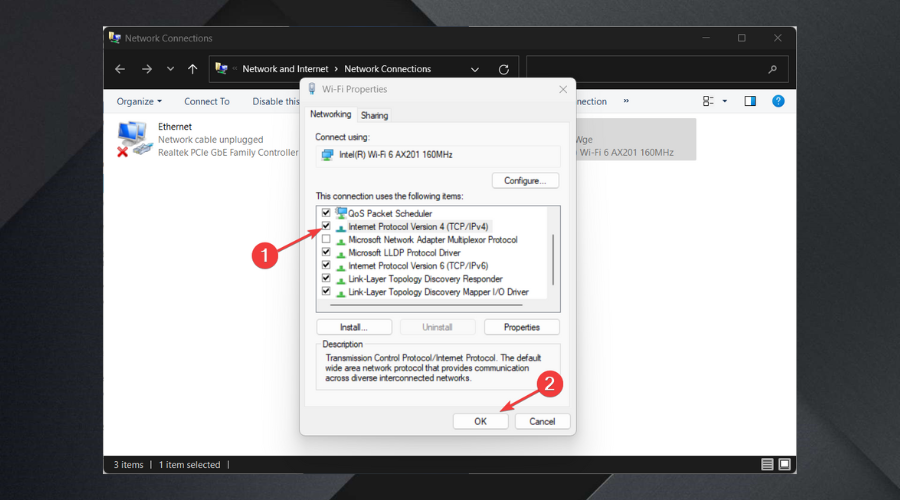
Now, right-click on the connection you are currently using and select Properties.
Select Internet protocol version 4 (TCP/IPv4) and click on Properties.
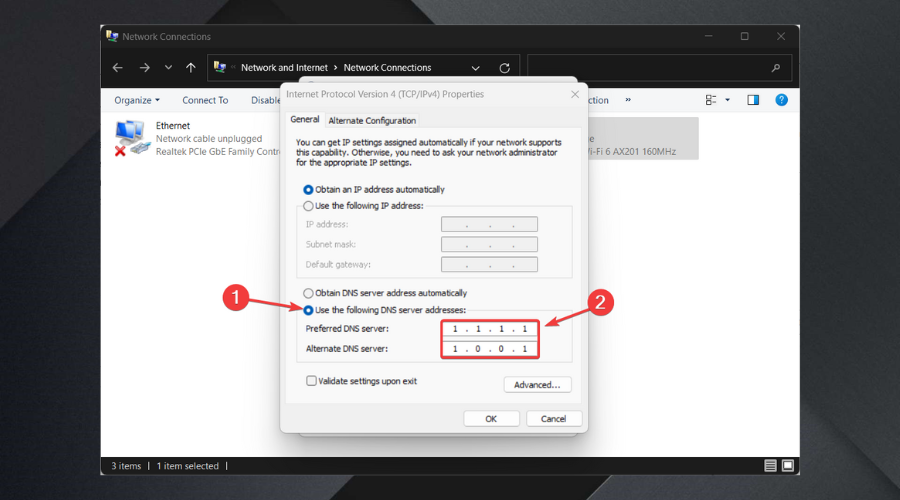
Select the Use the following DNS Server addresses option.
In the top row, you will add 1.1.1.1, while in the bottom one we have 1.0.0.1, then press OK.
3. Activate TLS 1.2
Press Win + I to bring up Settings.
Select the Network & Internet tab, then press Advanced network settings.
Click on Internet options.
Select the Advanced tab, check the box next to TLS 1.2, then press Apply.
What are some of the most common Microsoft Store errors?
As you would have expected, the error code we talked about fixing today isn’t the only one that can ruin your Microsoft Store experience.
Before we conclude, let’s look at some of the other issues you might have to deal with when using the Microsoft Store.
Microsoft Store Won’t Open: If the Microsoft Store doesn’t open at all, the first thing you should do is restart your computer.
Microsoft Store Cache May Be Damaged: The best thing you can do in this situation is to clear the cache, just like we’ve shown you above.
Microsoft Store Is Missing: In case you are having this problem, you will have to reinstall the Microsoft Store entirely.
Microsoft Store Download Is Stuck: Make sure you are not trying to download to an external hard drive before you start troubleshooting.
Error Code 0x80072EFD: This error appears when the Store is having network issues, with a few simple being updating Windows, disabling your anti-virus, and ensuring the time and date are correct on your system.
Error Code 0x80072EE7: This annoying error lets users know that the server has stumbled, and it’s a network issue that can occur even if your internet is working perfectly.
Error Code 0x8000ffff: When talking about this error, know that it will appear in the Store and say that the page can’t be loaded, so do a system search for Find and fix network problems, select the result, then run the troubleshooter.
Remember that we can also help you fix the 0x80072F05 Microsoft Store error, just in case the need ever comes.
Now you know a lot more about the Microsoft Store Page could not be loaded code: 0x80131500 error and what to do to fix it.
Use the methods above and go back to browsing the Microsoft Store in no time. Share in the comments section below if this article helped you move past this situation.
If you get Error: 14098, the component store has been corrupted; you won’t be able to complete the DISM scan.
This can be a problem, especially if you encounter any significant errors on your PC that require you to use DISM. Luckily, a few solutions can help you fix this problem.
What is error code 14098?
This error code is associated with a DSIM error The component store has been corrupted.
It can be caused by a bad Windows image file.
In some cases, Windows Update components can cause this problem.
Corrupted installation will cause this problem as well.
How do I fix the Windows component store?
Before diving into detailed troubleshooting solutions, perform the following preliminary fixes:
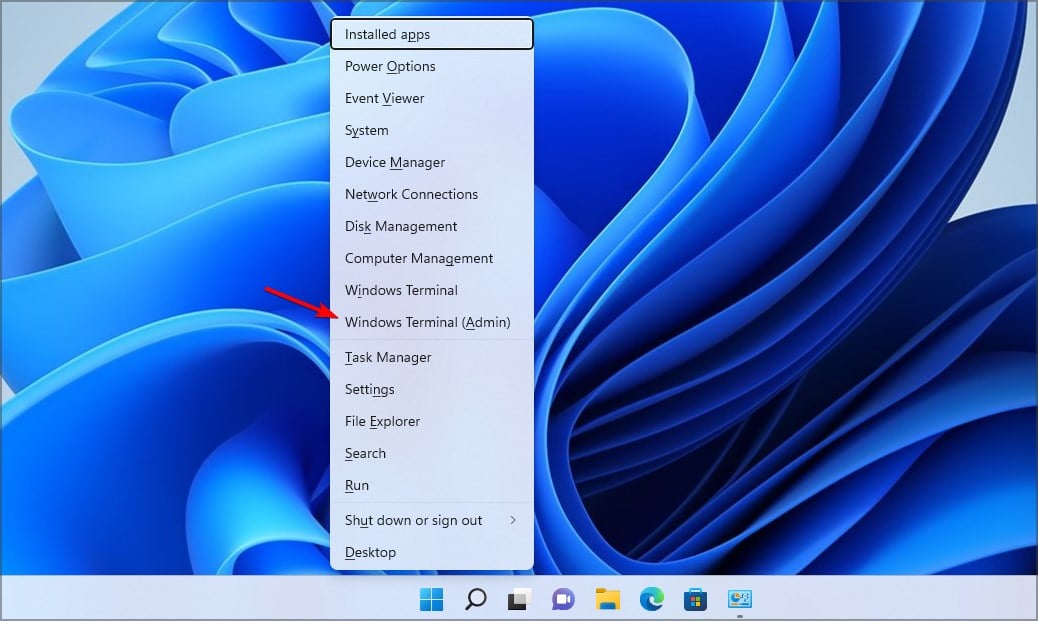
Press the Windows key + X and choose Windows Terminal (Admin).
Next, run the following commands: net stop wuauserv net stop cryptSvc net stop bits net stop msiserver Ren C:\Windows\SoftwareDistribution SoftwareDistribution.old Ren C:\Windows\System32\catroot2 Catroot2.old net start wuauserv net start cryptSvc net start bits net start msiserver
After running them, check if the problem is resolved.
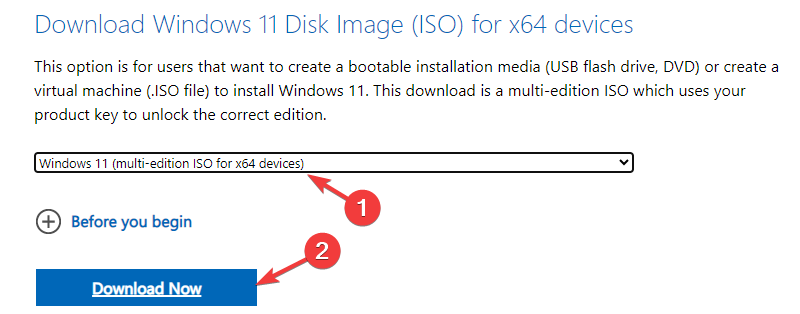
Select the version you want to download and click on Download Now.
Select the desired language.
Lastly, click on 64-bit Download.
Wait for the download to finish.
After doing that, you need to mount the ISO file and use it to perform DISM scan by doing the following:
Double-click the ISO file you downloaded to mount it. Pay attention which is the drive letter of the mounted file. In our example, it’s F.
Next, press the Windows key + X and choose Windows Terminal (Admin).
After that, run dism /Get-WimInfo /WimFile:f:\sources\install.wim
A list of available Windows editions will appear. Locate your edition and memorize its index. In our case, it’s 6.
Run the following command, but be sure to use the right index that you get from the previous step: dism /online /cleanup-image /restorehealth /source:f:\sources\install.wim:6 /LimitAccess
Wait for the process to finish.
Lastly, confirm that the error is gone with the following command: Dism /Online /Cleanup-Image /CheckHealth
3. Perform in-place upgrade
Mount the Windows ISO file by double-clicking it.
Once you open it, locate and run the setup file.
Optional: Click on Change how Setup downloads updates and select Not right now. After that, click Next.
Wait for setup to prepare the necessary files. If have skipped the previous step, it might take a bit longer.
Accept the terms of service.
Select Keep personal files and apps and click on Next.
Follow the instructions on the screen to complete the setup.
To learn more about this process, we have a great guide on in-place Windows upgrade, so you might want to check it out for more information.
Windows Component Store is used for customization and optimization of Windows. It can do the following:
It uses Windows Update to install new component versions.
Allows users to enable or disable Windows features.
You can use it to move systems between different Windows Editions.
It allows you to perform system recovery in case corruption or boot failure appears.
It can uninstall problematic updates.
The component store has been corrupted, which is a significant problem, and if you’re still having issues, you might have to reset Windows 11 to factory settings.
If you are stuck somewhere while performing the steps, feel free to ask your questions in the comments section below.
The 0x803fb005 error is one that can arise for some users when trying to get apps from Microsoft Store. When users try to download apps from MS Store, a Something unexpected happened error message pops up with the 0x803fb005 code.
Consequently, users can’t download the required apps. Have you encountered that error message? If so, check out the potential fixes for it below.
Why does the Microsoft Store error 0x803fb005 appear?
This issue usually appears if there’s a problem with the server, and if that happens, you’ll get Something happened on our end error message when trying to use the store.
These types of errors can be problematic, and many reported that Windows Store games won’t download. Keep in mind that this also applies to apps, meaning that you won’t be able to download anything at all.
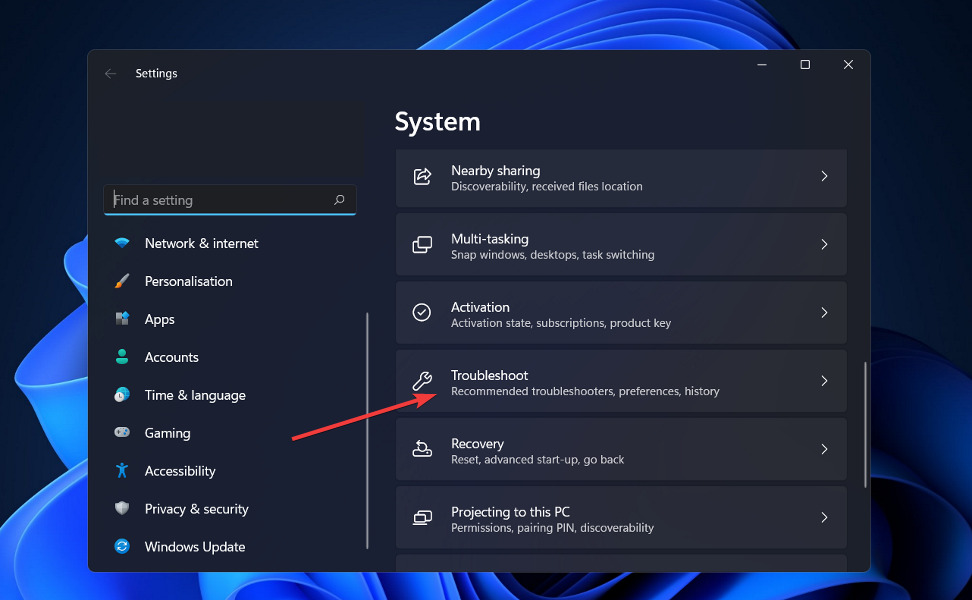
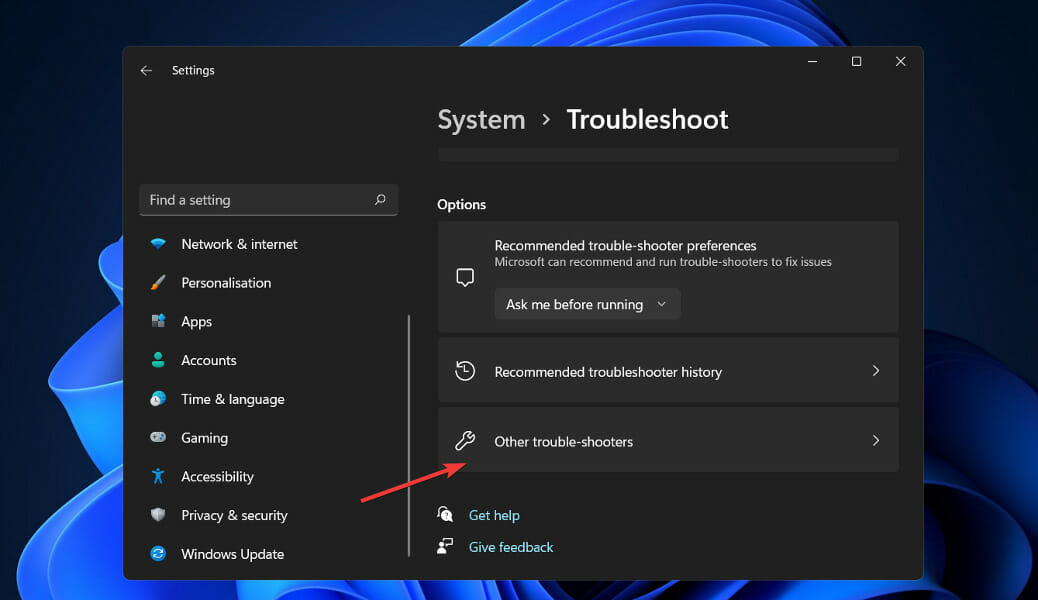
Click Additional troubleshooters to open the window shown in the snapshot directly below.
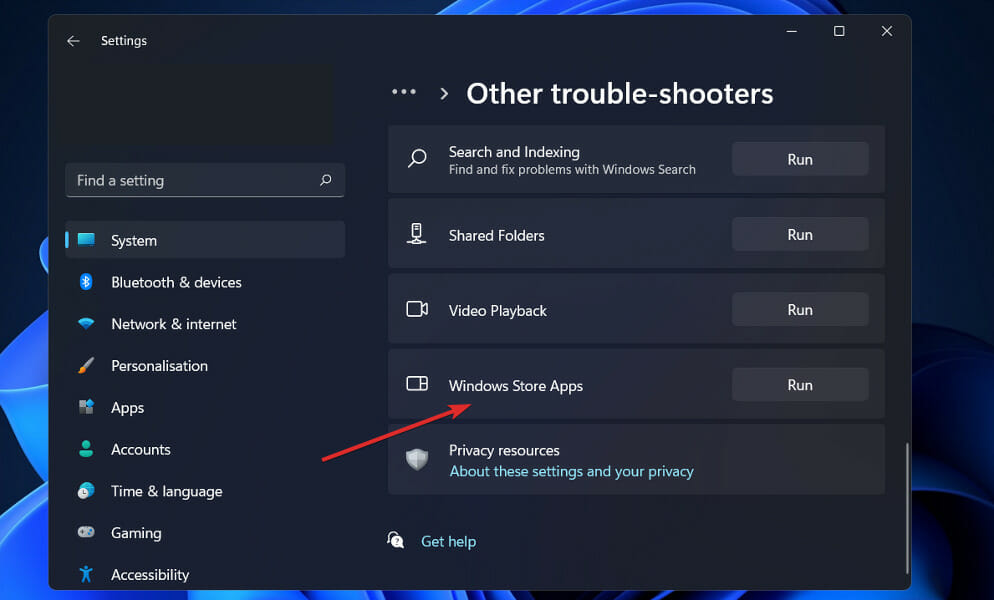
Select Windows Store Apps, and click the Run the troubleshooter button.
The troubleshooter will then open. Select the Apply fix option for any resolutions it provided.
Restart Windows after going through the troubleshooter.
2. Reset the Microsoft Stor
Press the Start button.
Click the Settings button on the Start menu.
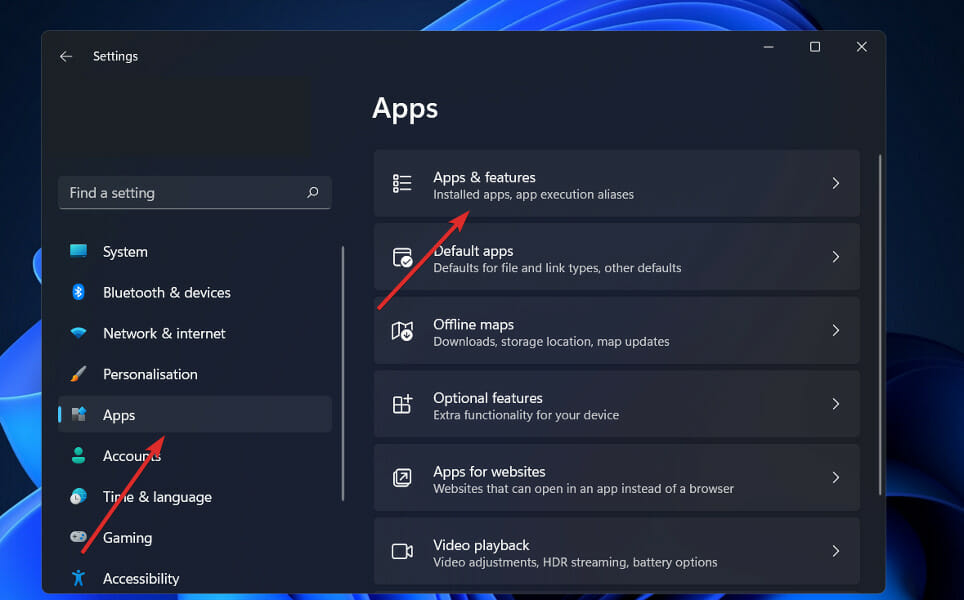
Click Apps to open the Settings tab in the snapshot directly below.
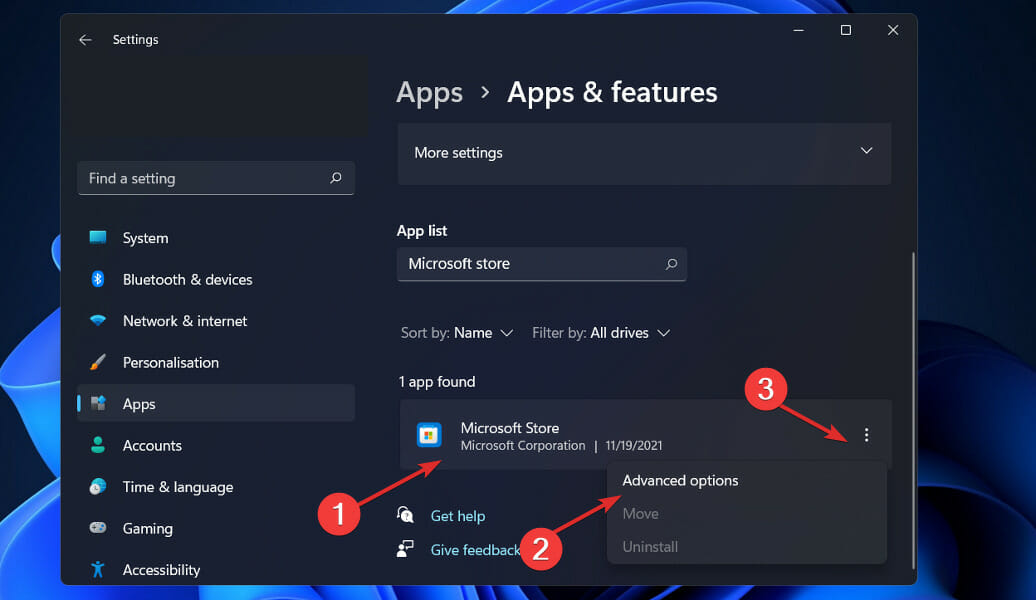
Select Microsoft Store, and click Advanced options.
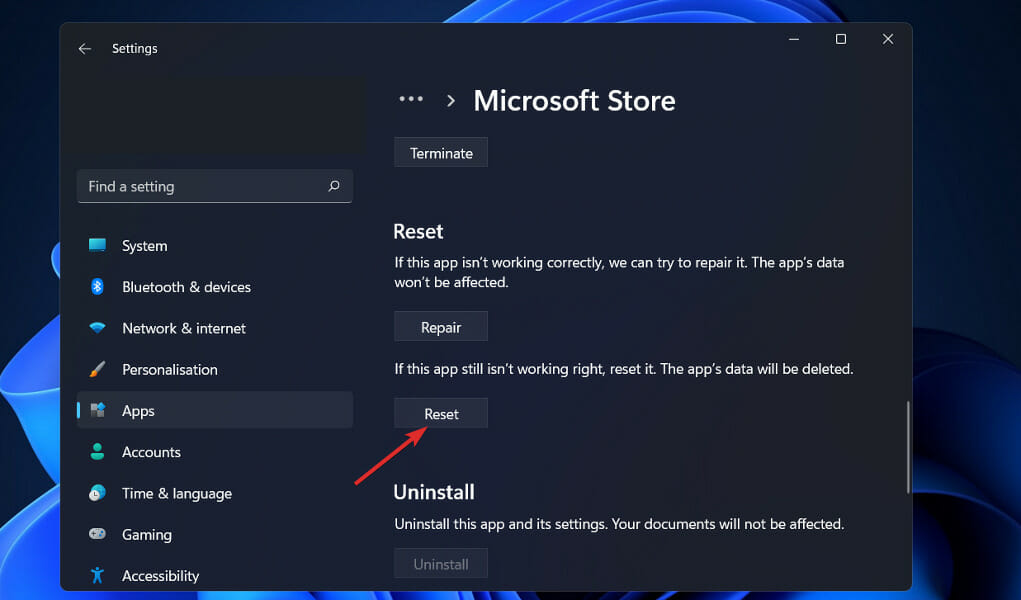
Press the Reset button.
Click Reset again to confirm.
Restart Windows after resetting Microsoft Store.
3. Turn off your antivirus utility
It might be the case that error 0x803fb005 is due to a third-party antivirus utility blocking the MS Store. In this case, turning that antivirus utility off might resolve the issue.
How exactly you do that varies for a different software, but most antivirus utilities include options on their system tray context menus users can select to disable them. Right-click an antivirus utility’s system tray icon to open its context menu and select the required option to disable it.
If turning off the antivirus utility does resolve the MS Store 0x803fb005 error, you might as well uninstall it. You can do that from the Programs and Features applet or with a removal utility for the antivirus utility. Windows Defender can fill the void left by the uninstalled antivirus package.
The Windows Store is an awesome addition in Windows 8 and proves just how efficient Microsoft’s strategy has been.
There are some annoying issues with the Windows Store for Windows 8, 8.1 and Windows RT users and one of the most present is the fact that featured apps don’t appear for some. Here are some potential fixes.
Update -> the Windows Store is now called the Microsoft Store.
But, just like many new products, it has issues or things that must be fixed from the user side. If you are aware, there wasn’t a single iPhone launch, for instance, that didn’t have issues.
While that might be frustrating for the user, one must realize that this is natural to happen. But are users indulgent enough?
How can I fix the Featured Apps feature missing in Microsoft Store?
I’ve just finished solving my issue with the fact that I wasn’t seeing too many apps in the Windows Store. I’ve managed to find some very, very basic solutions to fix the issue.
Activating and displaying all apps in the Windows Store was pretty easy. Now, if you are opening the Windows Store and you don’t see featured applications like in the above picture, then it probably means you’re having the same issue I had.
There’s no solution for it to work, but if you have followed my article about how you need to change localization settings, then probably, all you’ll need to do is to perform a restart and see the featured apps appear.
This is not a big issue, rather a “cosmetical” one, but it gives you the feeling that the Windows Store is a desert when nothing grows, it’s quite ugly, to be frank.
So, what you need to do is to perform those changes and wait for the featured apps to appear. I can’t imagine another reason why it might not work.
I even asked Paul Thurrot, the manager of WinSuperSite, a well-known authority in matters of Windows subjects and he said “I’m guessing that not all apps appear in all markets”. So, if you “trick” your computer into thinking he’s in the USA, that should do it.
The Microsoft Store is one of the most important apps to install for Windows 11 users. It’s a place where you can purchase apps, games, and other content for your computer.
If your app gets into any sort of issues, you can reinstall Microsoft Store, and we will tell you exactly how to do it.
How do I download Microsoft Store on my PC?
To download the Microsoft Store, follow the steps below:
Press Windows + I keys simultaneously to open Settings.
Search for Microsoft Store and click the three ellipses in the upper-right corner.
Select Downloads and updates.
Click Get updates.
If there’s an update, Microsoft Store will restart and you’ll get the latest version.
If it is not available on your PC, you can download it from Microsoft’s official website. Follow the steps below to download:
Click the Get button and Microsoft Store will start downloading.
Open the installation file to install Microsoft Store app on your PC.
In some instances, you may have to uninstall and reinstall Microsoft Store to continue using it without any issues.
How can I reinstall Microsoft Store?
1. Use Powershell
A fast and secure way to reinstall Microsoft Store on your PC is to do it using the built-in command line tool Powershell.
With a simple command introduced in it, Microsoft Store will be automatically reinstalled.
1. Press Windows + I keys simultaneously to open Settings.
2. Type Powershell in the search bar and clickRun as administrator.
3. Type the following command:Get-AppxPackage -allusers Microsoft.WindowsStore | Foreach {Add-AppxPackage -DisableDevelopmentMode -Register "$($_.InstallLocation)\AppXManifest.xml"}
4. Press Enter to execute the command.
5. Microsoft Store is now reinstalled on your computer.
You can also reinstall Microsoft Store using cmd by following the same steps.
2. Reinstall MS Store using the Registry
Press the Windows + R keys to open the Run command.
Type regedit in the dialog box and press Enter.
Navigate to the following location: HKEY_LOCAL_MACHINE\SYSTEM\CurrentControlSet\Services\AppXSvc
Right-click on Start and select Modify.
In the next window that opens, set the Value data field to 2 and press OK to save changes.
If none of the above methods appeal to you or you just want to reinstall Microsoft Store without Powershell, you can use the long route. Here, you can find Microsoft Store in the Apps section and uninstall it then go to Microsoft’s website to download the installation package.
If you can’t download or update your apps from the Microsoft Store on your Windows 10 or 11 PC, you may need to repair the app store.
Users have also reported that they cannot reinstall Microsoft Store in Windows 10 but worry not as you can make the necessary repairs with this method.
Some of the reasons you may want to repair your Microsoft Store include:
Apps not working as expected.
Microsoft Store doesn’t launch or load.
App updates not working.
To repair, follow the steps below:
Press the Windows + I keys simultaneously to open Settings.
Select Apps on the left pane and Apps & features on the right pane.
Navigate to Microsoft Store, click on the three ellipses and select Advanced options.
Under Reset, click Repair.
You can follow a complete guide that explains how to restore the app by using this repair and reset method repair and reset Microsoft Store.
How do I reset Microsoft Store?
Sometimes, repairing Microsoft Store doesn’t quite do the job. You can opt to reset Microsoft Store to resolve any issues you may be experiencing.
Press the Windows + I keys simultaneously to open Settings.
Select Apps on the left pane and Apps & features on the right pane.
Navigate to Microsoft Store, click on the three ellipses and select Advanced options.
Click on Reset.
How to reinstall Microsoft Store on Xbox One?
The Microsoft Store is available on the Xbox One console. If you’re having trouble downloading games or apps, you may have to uninstall and reinstall Microsoft Store.
To uninstall, follow the steps below:
On your Xbox One, press the Xbox button to open the guide.
Select My games & apps.
UnderSee all, find Microsoft Store.
Select Uninstall.
Restart your console again then follow steps 1-2.
Locate Microsoft Store and click Ready to install.
How do I fix the Microsoft Store on my Xbox One?
The Xbox One is a great place to enjoy video games, but you can also use it to watch movies and shows. The Microsoft Store is where you can go to purchase movies and TV shows, as well as other apps.
But sometimes, the app store can become unresponsive or fail to load properly. If this happens, here are some things that you should try:
Try to restart your console
If your Xbox One is not responding at all, then restarting it might be your first step in fixing the problem. Restarting your console will close all applications running on it, including the Microsoft Store app.
Connect to a different Wi-Fi network
Make sure you have an active internet connection – If you have an active internet connection but nothing happens when you open the store, try disconnecting from Wi-Fi.
In this case, try using an ethernet cable instead. This will help rule out any issues with your wireless connection being too slow or unstable.
Check for updates
If there are any available, they’ll be downloaded automatically. This update can fix several issues with the Microsoft Store.
Also, if you don’t have enough space available, you won’t be able to download or play any game until you free up some storage space. Your Microsoft Store may be unresponsive because of insufficient space.
You can uninstall other apps or delete saved data from games to free up space and give the app store enough room.
If none of these methods work, try doing a soft test of your console and see if the Microsoft Store problem persists.
We hope that at this point of the article if you were experiencing any trouble with reinstalling Microsoft Store, one or more of our recommended solutions has been able to come to your rescue.
With the launch of Windows 11, the programs too came with a refreshed UI to match the OS design, and Microsoft Store was not left behind.
Its main purpose is to provide a unified experience for finding and downloading software and apps. You can browse through categories such as games, music, movies, TV shows, and so on.
The newly revamped store has more to offer compared to the Windows 10 version. One of the most notable differences between the two stores is their design.
Secondly, there are more apps and games and not just the UWP apps are available but also apps from third-party app stores. You can get a full in-depth look at the new Microsoft Store in our dedicated article.
Once you have the Microsoft Store reinstalled, discover how to make the most of it in this complete guide: How to Use Microsoft Store.
Luckily, if you are yet to download Windows 11, you can still get the Microsoft Store on your Windows 10.
If you face any additional issues such as Microsoft Store not opening, refer to our guide to find several recommended fixes.
You may also encounter an issue where the Microsoft Store is missing after an update but worry not as we have comprehensively covered the steps you should take to address the problem.
We hope you managed to reinstall Microsoft Store using our guide. Have any other queries or thoughts? Feel free to engage us in the comment section below.
If you see Secure Boot State unsupported on the System Information page on Windows 11, but it is enabled in BIOS, there could be a problem with Secure boot.
This guide will discuss the common reasons for the issue and potential fixes. Let’s start!
What is the reason for Secure Boot State unsupported on Windows?
There can be various reasons for the secure boot to be unsupported. However, some of the common reasons for the issue occurrence are:
Features like TPM and Secure boot are disabled – If features, including Secure boot TPM 2.0, are not enabled, you might see Unsupported beside Secure Boot State on the System Information page. You need to enable these features to resolve the issue.
Incompatibility hardware – If your Windows system requirements are not apt for device encryption, you might see the issue.
BIOS mode set to Legacy – If BIOS mode is set to Legacy instead of UEFI, you get this error.
How do I fix the Secure Boot State unsupported error on Windows?
Before proceeding to advanced fixes, check out if your device supports the following features:
Some of our readers have recently reported various problems with Microsoft Store, which are recurrent in Windows 10/11. One of which is the Microsoft store 0x8A150006 error code. Hence, we will explore the causes and possible solutions here.
What causes the Microsoft store error 0x8A150006?
A lot of reasons can cause the error code: 0x8A150006. Hence, these are some of the common causes:
Corrupt app cache – When the cache files are corrupted, it impacts the apps’ proper functioning and often leads to errors. Learn how to clear the cache in Windows 11.
Issues with the Microsoft Store app – Improper installation or outdated app version can also stem from the error 0x8A150006.
Wrong Microsoft Store settings – There are default Microsoft Store settings. If tampered with, it could affect the installation of apps from the store.
Incorrect date and time on the PC – If your device is not set to the appropriate date and time, it could hinder the updates. It may be helpful to familiarize yourself with how to change the date and time on Windows 11.
Poor Internet connection – This is one of the primary reasons for this error. Encountering this error is almost inevitable if you are not correctly connected to the internet.
Regardless of the causes, we will outline the best fixes for the problem below.
How do I fix Microsoft Store error 0x8A150006?
Before engaging in any troubleshooting or settings tweaks, users should ensure they perform the following checks:
Update your Windows to the latest available version.
Ensure that you are correctly connected to the Internet and receive a decent speed.
Having confirmed the above checks, and the error 0x8a150006 persists, you can try any of the fixes below.
1. Run the Windows Store Apps troubleshooter
Press Start on your Taskbar and type troubleshoot, and press Enter.
Click on Other troubleshooters.
Select Windows Store Apps, and click the Run button.
Follow the onscreen prompts to fix the diagnosis.
After the troubleshooting process, restart Windows.
Whether this fixes your Microsoft Store or not, using the troubleshooter is an excellent means to get helpful information regarding your PC.
2. Clear the cache
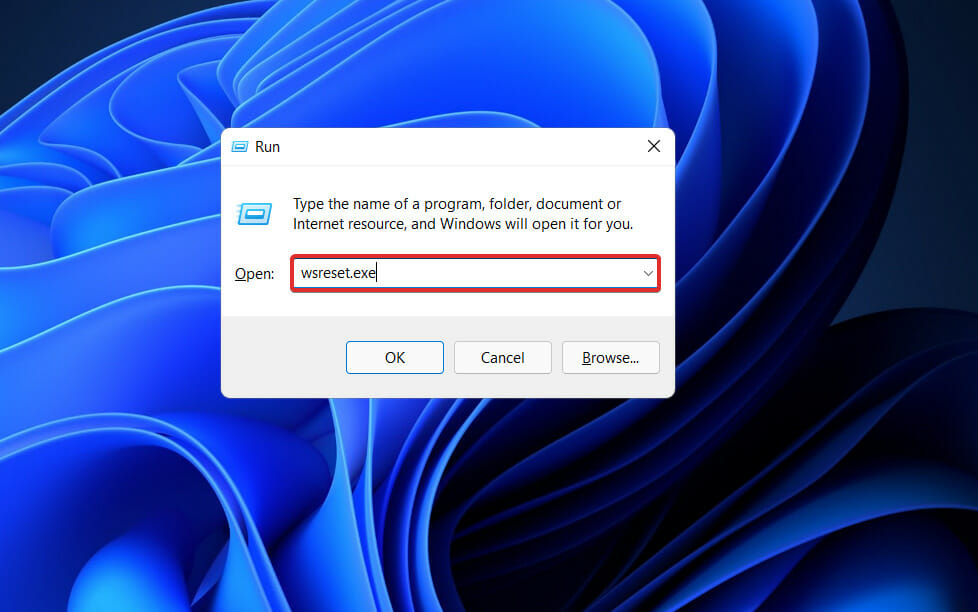
Press the Windows key + R to start the Run app, type wsreset.exe in the text field, and press Enter or click OK.
The reset will take a few settings, and the Store will open again.
The above fix eliminates the corrupt data your device has stored from websites and apps you visit. Worry less. It does not affect your photos or the files.
Right-click on time and date on the right side of your taskbar and go to Adjust date/time.
Toggle off the Set time automatically and click the Change button.
Under Change date and time manually set the correct date and time, then click on Change.
Finally, check the dropdown menu to choose the correct Time zone corresponding to your region.
When you encounter this issue, adjusting your PC’s date, time and region should fix the Microsoft Store error 0x8A150006.
5. Disable Windows Defender
Left-click on the Start button, type Security, and select Windows Security from the results.
Click on Virus & threat protection, then select Manage settings.
Turn off the Real-time protection.
However, should the issue persists even after you disable Real-time protection, try uninstalling the antivirus apps on your PC.
If the above solutions didn’t work in your case, you could also look at another article on various problems having to do with the Microsoft Store in Windows 10. The solutions may be applied by Windows 11 users as well.
If you have questions, comments, or further suggestions regarding Microsoft Store Error 0x8A150006, do not hesitate to use the comments section below.
Microsoft Store is a core component of Windows OS. It is the best place to download tested and trusted apps for your PC.
However, like virtually all other components of Windows, this app is not free from issues. For example, users now complain that the Windows Store closes immediately after opening.
When the Microsoft store opens and closes, it can be frustrating, it is not the most challenging issue to fix, as shown in the following sections of this guide.
Why does my Microsoft Store instantly close?
There are various reasons your Microsoft Store closes immediately after opening on Windows. It could be due to system issues with some system services or the app itself.
Below are some of the causes as reported by users:
Disabled system services: Sometimes, Windows Store closes immediately because the necessary services to run it are disabled. You need to enable these services and restart your PC to solve this problem.
Corrupt app cache: If the Windows Store app cache is corrupt, you can face all sorts of issues with it. To fix this issue, you need to reset the cache or reinstall the Microsoft Store app.
Glitches with the Store app: At times, the Windows Store opens and then closes because of minor glitches with the app. Running the Windows App Store troubleshooter should fix this issue easily.
Faulty Windows version: Your Windows install version might get corrupted over time. This can cause the Windows Store to crash or the Microsoft Store not to open at all. You might need to perform a clean install of Windows 10 to fix this.
Now that we made this clear, let’s find out what to do when the Microsoft Store flashes and disappears.
How can I fix Windows Store if it closes immediately after opening?
1. Reset the Store app
Press the Windows key + I to open the Settings app and choose the Apps option.
Select Microsoft Store from the list of apps and click Advanced options under it.
Finally, click the Reset button to return it to default and click Reset again to confirm.
If the Windows Store app closes immediately after launching, it might be because of minor issues. Hence, the first line of action is to rest the app to default and undo all changes made to it.
2. Change the owner of some system folders
Open Windows Explorer and go to C:/Program Files.
Right-click the WindowsApps folder and choose Properties.
Choose the Security tab and click the Advanced button.
Now, click Change in the Owner section.
Enter your PC user name in the Enter the object name to select and click Check Names, followed by OK.
Check the Replace owner on subcontainers and objects box and click Apply and OK.
Now, go to C:/Windows/SystemApps and repeat Steps 1 to 6 for the SystemApps folder.
Restart your PC.
When your PC restarts, press the Windows key + X and select Windows PowerShell (Admin).
Copy and paste the command below and hit Enter: Get-AppXPackage -AllUsers | Foreach {Add-AppxPackage -DisableDevelopmentMode -Register "$($_.InstallLocation)\AppXManifest.xml"}
Now, wait for the command to finish running.
Finally, go back and change the owner of the WindowsApp to TrustedInstaller and that of the SystemApps folder to System.
After the last step, you can now check if the Windows Store still closes immediately after opening. It must also be said that you need to be careful while changing folder ownership. So, you need to follow the instructions above to the letter.
3. Install the Media Feature Pack for Windows 10 N
Press the Windows key + R, type winver, and click OK to know your Windows version.
Open and execute the downloaded file and restart your PC.
Sometimes, your Windows Store app closes immediately because your PC is missing some vital media files. This is especially true for Windows 10 KN or N users.
Downloading the Media Feature Pack should help fix this issue here.
Press the Windows key + R, enter services.msc, and click OK.
Check if the Microsoft Store Install Service is running. If it is, right-click and choose Restart.
If it is disabled, double-click it, and set the Startup type to Automatic.
Now, click the Start button followed by OK.
Repeat Steps 2 to 4 for the Windows Update service.
The Windows 10 services are essential for the easy running of its apps and processes. However, if the services needed to run and update the Windows Store are disabled, they can cause the app to close immediately after opening.
Thus, enabling the services above and restarting your PC should restore normalcy. The Microsoft Store opens and then closes issue should be gone.
5. Reset the Microsoft Store cache
Press the Windows key + R and type wsreset.exe.
Click the OK button to run the command.
Finally, wait for the process to complete, and the Microsoft Store should open automatically.
At times, Windows Store closes immediately after opening because of corrupt cache files. To restore normalcy, you must reset the cache using the above steps.
6. Reinstall the app
Press the Windows key +X and select the Windows Powershell (Admin) option.
Copy-paste the command below and hit Enter: Get-AppXPackage *WindowsStore* -AllUsers | Foreach {Add-AppxPackage -DisableDevelopmentMode -Register "$($_.InstallLocation)\AppXManifest.xml"}
Now, restart your computer.
If the Windows Store app is faulty, it might close immediately after opening. However, the steps above will help install a clean app version. This should hopefully get rid of the faults.
7. Perform an in-place upgrade
Go to the Windows 10 download page and click the Download Now button under the Create Windows 10 installation media section.
Click the downloaded app to run it.
Choose the Upgrade this PC now option and click the Next button.
Ensure that the Keep personal files and apps box is checked on the Ready to Install page. If not, click the Change what to keep option and select your preferences.
If all is set, click the Install button and follow the onscreen instructions to complete the process.
The Windows Store closes immediately after opening issue is one of the most troublesome issues with the Store app. However, with the solutions listed in this guide, you should be able to fix them quickly.
If you are trying to install SQL Server Data Tools (SSDT) and getting Setup Failed incorrect function (0X80070001), then you are not alone. Don’t worry; it can be fixed.
This guide will explain all the reasons behind the issue and the available fixes. Let’s get started!
How can I fix the SSDT setup failed incorrect function 0x80070001?
Before diving into the detailed solutions, try these quick fixes first:
If none of these worked for you, check out these detailed troubleshooting steps:
1. Use the Registry Editor
Press the Windows key, type CMD and click Run as Administrator.
Type the following command and press Enter: chkdsk
Copy and paste the following command and press Enter sfc/scannow
Now, type in the following commands and press Enter after every command: DISM /Online /Cleanup-Image /CheckHealthDISM /Online /Cleanup-Image /ScanHealthDISM /Online /Cleanup-Image /RestoreHealth
Restart your computer once the scan is done.
2. Uncheck the automatic configuration script
Press the Windows key, type Control Panel and click Open.
Select View byLarge icons and click Internet Options.
Go to Connections and click LAN settings.
Under Automatic configuration, uncheck use automatic configuration script.
Click OK, then Apply and OK.
3. Use Regedit
3.1 If you can locate TLS 1.0 Key
Press Windows + R key to open the Run window.
Type regedit and hit Enter to open Registry Editor.
Follow this path: Computer\HKEY_LOCAL_MACHINE\SYSTEM\CurrentControlSet\Control\SecurityProviders\SCHANNEL\Protocols\TLS 1.0\Client
Right-click on Client, select DWORD (32-bit) Value, and name it Enabled.
Double-click on the DWORD, change the Value data to 1, and click OK.
Save the .exe files for both at the same location. Now, press Windows, type CMD and click Run as administrator.
Locate the path where you downloaded the files, copy the path, and keep it aside.
Type cd <path> to change the directory, just like this cd C:\Users\user\Downloads
Now paste this command mentioned below and press Enter. This will initiate the installation, and files will be downloaded in the folder vs_SQL.exe --layout C:\ SSDT2017 \ -- lang en-us
If you get any download errors, type the command mentioned below: vs_SQL.exe --layout C:\SSDT2017 --fix
Now type the following path one by one and press Enter: cd C:\SSDT2017vs_setup.exe --NoWeb
Click the Install button on the installation wizard to install Visual Studio Data Tools 2017.
Now, double-click the SSDT-Setup-ENU.exe, and on the installation wizard, put a checkmark beside SQL Server Analysis Services, SQL Server Reporting Services, and SQL Server Integration Services, and click Install.
Please wait for the installation to complete and restart your computer when prompted.
So, these are steps to resolve the SSDT setup failed incorrect function 0x80070001. Try these methods and let us know which worked for you in the comments section.
Rust is one of the games that give you an exhilarating experience. It seems to include them all – betrayal, cruelty, and greed that make it a frustrating, malicious experience but sublime in equal doses.
Imagine being in the middle of such an immersive game, then your connection just drops, or the speeds are slowed down, or you discover it is blocked. What to do?
Here’s where the best VPNs for Rust come in to deliver the speed, privacy, ping, and unblock of content that you need to play the game successfully.
If Rust has detected your current VPN, try another one from this list we’ve carefully compiled.
If you play games on your mobile device, this Express VPN International Ltd. service is the right provider.
This VPN for Rust has a strong network of servers in 94 countries. It is also known for its excellent mobile and intuitive custom apps, plus its solid speeds and good performance levels.
However, ExpressVPN costs more than most other VPNs, plus you don’t get a sneak peek because there’s no free trial.
Your best bet is the one-year plan, which is more affordable than other plans and gives a bonus of three months.
It works on major operating systems including Windows and features throttle-free servers, a zero-log policy, so it doesn’t maintain your user logs or monitor your online activity.
It supports protocols including PPTP, L2TP, OpenVPN, and SSTP for enhanced privacy and security.
ExpressVPN
Reduce latency and enjoy seamless gaming with this fast and secure VPN.
This VPN is great for security, which is among the priorities for gamers while playing online. Its network features more than 5400 servers in 59 locations and supports a maximum of 6 devices with one single connection, which is pretty good compared to other VPNs.
This Tefincom & Co., S.A. service is great for its tight security and extensive server network.
The Panama-based VPN delivers performance and speed; gamers can play it on any major operating system, including Windows.
Regarding security, it offers a double VPN functionality, which means traffic is sent through two separate VPN servers, a dedicated IP, DDoS protection on specific servers, plus a zero-logs policy.
With this VPN for Rust, you get a free trial, and if you upgrade and commit for a longer period, it can be very affordable, especially with a three-year subscription.
NordVPN
NordVPN is one of the greatest VPNs on the market, and it works flawlessly with Rust!
PIA is known for its great performance, value, and extensive network (especially if network size is a top priority for you when it comes to enjoying Rust), with over 3200 servers in 46 countries.
It has many impressive features such as support for ten devices, major protocols including PPTP, L2TP/IPSec, OpenVPN, and built-in blocking of ads.
Well, you’ll also appreciate that this Kape Technologies VPN solution is so affordable. You can also pay using Bitcoin, gifts, credit cards, and other options.
While it has no free trial option, PIA offers a seven-day refund without sneaky restrictions.
In terms of performance, this VPN for Rust works on Windows and other major operating systems, with a quick and easy setup and a basic interface.
To choose your server location, right-click the system tray icon and select the location you want.
Some other key features that you’ll enjoy using:
Fast and easy to use
Feel free to set custom encryption and authentication options, from none at all to the highest military-grade standards
Protection against DNS and IPv6 leaks
Extra PIA MACE feature to block ads, trackers, and malicious sites while you’re online
Useful kill switch to disable the Internet when the VPN disconnects thereby reducing identity leaks
Private Internet Access
Private Internet Access is the best VPN to play Rust. Now available at a major discount!
Its distinct structure for carrying out data transfer in a network is through a carefully encoded tunnel built between your device and one of its servers via software that can’t be intercepted.
When you activate CyberGhost VPN, all your Internet activities, whether surfing, messaging, downloading, or even streaming, are carried out, and the VPN automatically protects you every time you use a new Wi-Fi connection.
Whether gaming from a hotel, school, airport, or other public space, CyberGhost is the best VPN for Rust, with timely connectivity and privacy while hiding your IP and replacing it with your preferred one so you can play anonymously.
You can also access censored or geo-restricted content worldwide and use it on all devices and major operating systems with router configuration.
It does its job pretty well, with minimal ads and without significant performance drops.
CyberGhost VPN
Do you want to play Rust without any limitations? You should check out CyberGhost VPN.
With this tool, you will be able to reduce latency issues with the help of a private DNS, built-in Split-tunneling features, and thousands of servers available across the whole globe.
Surfshark is a VPN service with fast speed rates and great security. Not only will you be able to play Rust with no issues, but you can also hide your IP address to protect your identity on gaming platforms.
As mentioned, you can use the split tunneling feature to prioritize traffic toward gaming. You can identify it in the UI under Bypasser and activate it with just one click.
Surfshark can also improve your overall browsing experience with its built-in ad blocker, anti-malware, and anti-phishing features.
Plus, in terms of privacy, there’s no need to worry. This VPN service has a strict no-logs policy. They do not store your data and use end-to-end AES-256-GCM encryption to ensure no third party can detect your identity or online activity.
This is a key benefit regarding your privacy, but it also benefits your gaming experience. Internet Service Providers may restrict your traffic after you exceed a certain limit, but with a VPN, they cannot detect how much traffic you actually use.
Other key features of Surfshark include:
Secure kill switch
IPv4
Open source VPN
NoBorders mode
Secure IKEv2, IPsec protocols
It’s also essential to mention that this VPN service lets you connect an unlimited number of devices. With one subscription, you can secure as many platforms as you like.
Surfshark
Play Rust on the platform of your choice and enjoy fast speeds and great privacy with Surfshark!
VyprVPN is one of the fastest VPN providers you can use for gaming, with over 700 servers in more than 70 locations and over 200,000 IP addresses to use on up to 5 devices simultaneously.
This tier 1 network VPN for Rust has its servers and infrastructure, which means it is great regarding performance and speeds.
Other features include the NAT firewall that blocks unsolicited inbound traffic and simple apps for all your devices.
VyprVPN
Check out VyprVPN, a VPN that protects your privacy and works great with Rust.
IPVanish – Own network infrastructure for faster connections
This is an impressive VPN you can use for gaming, with over 1400 servers in more than 60 locations. It also supports up to 5 devices in a single connection simultaneously.
Among its benefits are great server coverage and excellent performance, and it runs its network and infrastructure, which makes it even faster than the competition with excellent download speeds.
With this StackPath, LLC VPN for Rust, you can find a solid server sorted by ping time and usage, so you can hunt for a server that is specifically tailored for gaming.
However, it is a bit pricey compared to average VPNs and has no free trial, though you get a 30-day refund with subscriptions.
Other features include a kill switch, compatibility with major operating systems, switching IPs at your own will, a zero log policy for anonymity and privacy, and no geo-restrictions.
IPVanish
Looking for a VPN that works great with Rust? Why not try IPVanish?
This VPN has much to offer, with features such as 100 percent access to streaming media sites like Netflix, Hulu, and others, more than 2000 servers in 140+ countries, and over 80,000 IP addresses.
You also have the chance to enjoy a kill switch and a NAT firewall. It also provides DDoS protection, a maximum of 10 simultaneous connections for your devices, and protocols such as OpenVPN, L2TP, PPTP, and IPSec.
It is compatible with major operating systems, including Windows, and is secure and private, with strong encryption and the largest range of subscription payment options.
The Hong Kong-based GZ Systems Limited VPN for Rust has been around since 2007 and is known for its Split Tunneling feature lets the VPN client remain active for specific apps as other traffic flows outside the VPN tunnel once activated.
Gamers will definitely appreciate this feature. Other notable features include Smart DNS to bypass geo-restrictions, web protection and NAT firewall, stealth VPN browser for high censorship locations, and dedicated streaming.
PureVPN
Geoblocking doesn’t let you enjoy Rust? It would help if you used PureVPN.
Yes. Rust bans IP addresses that link to VPNs or proxies. They do so to avoid combat hackers.
We advise you to use a reputable VPN with a double VPN, powerful encryption, or some obfuscation. This way, it will appear as if you browse on regular traffic, not via VPN.
We must also mention that the Rust team can whitelist your VPN IP if you contact them and explain that you need a VPN to access the game.
How do Rust servers detect VPNs?
Rust admins can access the IP address you use to access the game. They can look up your IP and see if it’s proprietary to an Internet Service Provider or hosted by a VPN.
Some IP addresses link directly to the exact VPN client you use, while others are more difficult to detect.
Rust also gets VPN detected thanks to automatic traffic analysis. Since they ban VPNs, they can use some automatic tools to detect and restrict usage.
Which VPN do you use for Rust? Please share with us in the comments section below.
Even more, since it’s an online game, Rust faces the same technical challenges as other similar games, including the dreaded packet loss, so don’t hesitate to take immediate action. And if you need to lower your ping when playing in other regions, you can use third-party software or troubleshoot the connection yourself.
FAQ
Can you get banned on Rust?
Yes, several things can lead to a ban from the game: – Cheating – Buying another person’s account – Creating a new account after being banned – Using a VPN – Toxic and offensive behavior
Do Rust servers allow VPN use?
Strictly speaking, Rust doesn’t allow VPN or proxy server use.
However, players who require the use of such services can whitelist their Steam accounts using the game’s webpage or Discord bot.
Unfortunately, they’ll have to do that whenever they want to use the encrypted network.
Can you get IP banned on Rust?
Yes, Rust often enforces IP bans on players suspected of cheating.
That’s why it doesn’t support the free use of VPNs for accessing the game.
In conclusion, downloading and installing Opera GX on Windows 11 is simple and can be done in three different ways. You can also sideload Opera GX on your smart TV. Follow the steps above and let us know if you have any questions.
Microsoft has not forgotten what it promised some time ago, in terms of allowing the old-school Windows 32 apps to be present in the Windows 11 Store.
And what better contender to break the ice on the new operating system, than the classic, well-known WinZip.
WInZip 26 Pro Edition is available to download for free, and we will tell you all about it in this article.
WinZip apps are present in the Store on Windows 11
Microsoft mentioned that they have worked closely alongside the WinZip team, in order to bring a fully functional app to the new Store.
And while WinZip still has some similar apps for Windows 10, it is known that those apps are more in the realm of Store editions, which may limit both functionality and design.
If you were wondering about the new WinZip 26 Pro version, know that you can download it as a free app, and you can run it for a while, before having to purchase a license code, which will unlock the Pro version.
So the main difference is that payments for the pro version will go through WinZip themselves, not through the Microsoft Store, which represents one of the major changes that come with Windows 11.
WinZIP 26 Pro is fully operational offline and it includes all the encryption and compression features we are used to.
It supports all major file formats, enables email transfer, is light and very easy to use.
However, you should also know that it’s not just WinZip that’s coming to the new store.
The CorelDRAW Graphics Suite will also make an appearance on the new Store, of course, as a classic Win32 app. You may want to look for that app later this year when Windows 11 will go live.
A lot to look forward to, with Microsoft’s new operating system indeed. Many have already adhered to Windows 11 and the OS is getting more and more stable and reliable, enabling a seamless migration.
Its normal to have all these speculations and unpleased third parties, looking from the outside and criticizing every tiny little aspect of the new OS, as it’s still early in its life.
Consider this period as Windows 11’s first steps and closely observe how it will mature and blossom into a fully operational must-have software. Or not, depending on what Microsoft decides to do with it.
Have you browsed the Windows 11 Store yet? If so, share you experience with us in the comments section below.
Today, we’ll show you how to use Canva on a PC (the desktop app). From installing it to other configuration tips, you’ll probably find all you’re looking for here.
So, if you’re ready to enjoy Canva on your Windows 11 PC, keep reading.
How can I download Canva for Windows 11?
Tip
If you’re a graphic designer on the go, you might want to use Canva on mobile too. Having it both on PC and mobile gives you the flexibility you always wanted. Canva’s sync feature is impressive.
Let’s not forget we’re here today for the PC app:
Launch the Microsoft Store on your PC.
In the search bar, type canva.
Click on the first result.
Finally, press the Install button.
What does Canva for Windows 11 have to offer?
Overall, Canva is user-friendly, cost-effective, and ready for many different types of projects. So we get why you’d be interested in it.
It helps you better organize and present big ideas with mind maps, charts, and diagrams to make data visually appealing and easily understood.
This graphic design program offers professional layouts for social media websites that are precisely the standard graphics you need for Facebook, Twitter, Google+, Pinterest, or Instagram content, making your work much easier.
Here are Canva’s features at a glance:
Extensive Library: Over a million photos, layouts, illustrations, graphics, fonts, templates, frames, and icons.
Visual Organization: Create mind maps, charts, and diagrams for visually appealing data presentation.
Social Media Ready: Professional layouts for Facebook, Twitter, Google+, Pinterest, and Instagram.
User-Friendly: Intuitive interface for both beginners and professionals.
Its interface is quite intuitive and easy to use for both first-timers and professionals to create custom web and print content and media.
The Canva app is free to download from the Microsoft Store but in order to benefit from all its features, you need to upgrade it to Canva Pro.
Because Canva has a lot of features you can access by only registering for an account, it gained a lot of popularity pretty fast.
Users have been using it to create digital content for all types of websites, for school or work projects, for print media, and even wedding invitations.
Canva helps you plan and design any visual content you can think of from scratch but it also offers thousands of free templates created by professional designers.
If you’re an influencer and want to grow the number of followers, Canva puts at your disposal an Instagram Story Editor and Story highlights maker, Twitch Kits to design Twitter banners, Youtube thumbnails, and more.
You can create gifs and videos of any kind, add music, edit them, and share your design directly on social media platforms.
Canva also has a lot of features targeted to cater to businesses. From workplace templates, business plans, and training manuals to remote-friendly presentations with Canva live.
It is clear why this app is so beloved and popular as you can use it to create any kind of design you want and personalize each and every one of them to your liking.
Not to mention that a lot of the features are free to use as long as you register for an account.
Why should I use the Canva app from Microsoft Store?
The app is pretty much the same as the web-based version, but the app is easier to use and launch with the click of a button. Further, the web version may be plagued by the 500 server error so the app comes in handy in such situations.
You are always logged in and the app stores all your projects and uploads, you just need to register for an account.
Canva only weighs 111.7 MB, so you won’t need too much space to download it. As opposed to the web-based version, using the app will improve the performance of your browser as there will be one less tab open.
Your workflow will be improved as well as you can multitask way easier with the app open in the taskbar.
And with Canva’s new tab reordering feature, you can organize your design tabs to keep what’s most important work upfront.
Moreover, users can email their projects instantly to social networks or messaging apps by clicking the Share button present on each design.
What is Microsoft’s vision for the new store?
Starting with a more open Microsoft Store for developers and surprising partnerships, the new store is proving to be one of the most pleasant surprises that came with the announcement of a new Windows 11.
Microsoft now allows developers to publish their unpacked Win32 desktop apps so we can expect to see a lot of popular applications available for download.
Developers can also bring their own commerce platform in their apps without paying Microsoft any fee meaning they can keep 100% of their revenue.
And because Microsoft has more relaxed restrictions on the types of apps that are allowed to appear on Windows 11’s store, lots of companies are now publishing their desktop apps to the new app store.
Worth mentioning is also the fact that the Microsoft store will be available to Windows 10 users as well:
Today, we are excited to introduce a new Microsoft Store coming soon to both Windows 11 and Windows 10. It will help you discover and install the best apps, games, movies and even special offers – like unique movie discounts for Xbox Game Pass members.
Also, get the latest scoop on Windows 11 availability & price and find out how much it will cost to upgrade for Windows 10 or Windows 7 users as well as for those who want to switch to a new OS.
Did you know that you can convert Canva to Word file? That’s right, but unfortunately, this feature isn’t natively available, so you need to rely on third-party solutions.
What do you think about Canva’s partnership with the new Microsoft Store? Use the comments section below and let’s start a discussion.
When it comes to PC enthusiasts, this was a good year. This year’s hot trends are mainly connected to Virtual Reality, 4K graphics, and Stick Desktops.
If you are professional and your performance depends on your PC’s capability or a dedicated gamer who wants the top-notch gaming experience. For these reasons, we prepared a list of PC’s that will take your job or visual pleasure to another level.
This desktop computer is powered by an 12th Gen Intel Core i5-12400 6-core processor for optimum performance, and it sports 12GB RAM, alongside a 512GB SSD.
Acer’s desktop is perfect for work but the Intel UHD Graphics 730 coprocessor is not exactly great for gaming.
You will need an additional investment in a dedicated card if you want to play the latest titles.
The good news is that it’s already coming with a keyboard and mouse, so you just need to hook it up to a monitor, and you’re ready to go.
They say that the greatest gifts can come in the smallest packages, and a solid mini PC is proof of that, especially when you compare the insides with the outsides.
On that note, the Blackview MP60 has powerful components that make it as good as a full-fledged PC from a few years ago, all while being so small it fits in your pocket.
Besides, it is a great work PC while on the go since it supports dual-monitor setups for increased productivity.
Another great option for all-in-one fans is the Lenovo IdeaCentre AIO 3i. It’s got anything you need, including a pop-up 720p webcam for live calls.
Truth be told, it’s not the most powerful desktop on our list, but with a 13-gen i5 Intel Core processor and 16 GB of RAM, you get the job done.
As for storage, there is a 512 GB SSD that can handle all your data. The 23.8-inch Full HD display and the slim frame make this all-in-one PC a pretty nice appearance on the desk.
If you don’t care how the outside looks and are looking for an extremely powerful PC that gets the job done, then the HP Envy Gaming Desktop is precisely what you need.
This HP desktop comes prepared for gaming with NVIDIA GeForce RTX 3070 graphics, an Intel Core i9-12900 processor, and 32 GB of RAM.
You will fit all the latest games on the 2TB PCIe SSD & 2TB HDD combo. Windows 11 Pro comes preinstalled but you will have to get a keyboard and a mouse.
There is a HDMI and 2 DisplayPort outputs for connecting an external monitor.
Let’s face it, Christmas is about enjoying yourself, and when it comes to PCs, this means either watching movies or gaming.
If you prefer the latter, then you’ll definitely love getting the iBUYPOWER Gaming PC, because it has both the insides and the outsides of a true gaming rig.
It comes with an Intel i7-12700F 3.6 GHz (4.8GHz Max Turbo), 16GB DDR4 RAM, and as for storage it features a 1 TB NVME SSD that comes with a pre-installed Windows 11 Home.
On the graphics side, the GeForce RTX 3060 TI 8GB board can really make a gamer happy.
Gaming computers are probably the ones that evolve faster than any other category. Alienware is one of the brands that distinguished itself with amazing gaming configurations.
When you are paying so much money for a gaming PC nowadays, you have a few things in mind. First, you want to play the latest titles in the 4k resolution with ultra settings. Second, you certainly don’t want to change your configuration for a couple of years.
Don’t worry, you won’t have to. For example, you can run an absurdly demanding game on dual 4K monitors with amazing FPS. More than a few years will pass, and Alienware Aurora R15 will withstand every upcoming game.
After that, when they finally make a really large step up, you can upgrade your hardware by yourself, without tools.
What is inside this powerful monster? A 13th Gen Intel Core i9-13900KF, the Nvidia Ge Force RTX 3090 Ti graphics card, 64GB of DDR5 RAM, and 4TB PCIe SSD + 2TB 3.5″ HDD for storage.
To top it up, there’s also Wi-Fi 6 connectivity, Windows 11 Home preinstalled
If you don’t want to worry about running some games, the Aurora R15 is a good machine to play the hottest titles in the comfort of your home for Christmas.
This was our list of desktop PCs that are formidable in various categories. As you can see, each one of them has something special to offer. So, we hope it helped you to decide which is the best workstation/gaming hub to get for the upcoming year.
What are your thoughts on the list? Are there some pre-built PCs you rather buy? Tell us in the comments section.
However, when Microsoft Store is crashing or not loading, you’re only limited to downloading the apps from their original source, if you can find them in the first place. Users have reported their Microsoft Store crashing on launch, as well as after opening the app and using it for a while.
Don’t worry because there are a few easy ways to solve this problem and we will help you do so with the solutions below.
But first, let’s see what are the reasons why Microsoft Store crashes on Windows 11. They are mostly the same as in Windows 10 so they will seem familiar.
Why is Microsoft Store crashing on Windows 11?
First of all, Microsoft Store is an app like any other and there are many causes for it to crash, including file corruption, interferences with another app or the antivirus, a recent Windows update, and many more.
However, we will highlight the most important reasons why Microsoft Store keeps crashing in Windows 11:
➡ The Microsoft Store cache is overloaded
Microsoft Store has its own cache that can get clogged with a lot of data and when it’s full, this turns into a problem.
This is the most common issue with the Store app in Windows 11 but you will see that our solution below will take care of this problem quickly.
➡ Issues with Windows Update
Windows updates are usual suspects when it comes to any app or system function not working but Microsoft issues patches to fix them.
That is why is very important to keep the system updated and even get the optional ones that may seem less important.
Some updates may even encounter issues
Sometimes, the updates have issues themselves so make sure you check the Windows Update section as often as you can.
However, if this problem appeared after a recent Windows update, you should try to roll it back and get back to the previous state until Microsoft issues a fix.
➡ Microsoft Store is out of sync
Although it may sound strange, if the time and date on your PC don’t correspond with those from the server, Microsoft Store may go haywire.
It can also happen if you change your physical location or if you use a proxy or a VPN, so make sure you check these settings.
And now that we know about all these mishaps, read below to see how you can fix Microsoft Store crashing or not loading in Windows 11.
What can I do if Microsoft Store keeps crashing on Windows 11?
1. Clear the Microsoft Store cache
Press the Windows key + R to start the Run app.
Type wsreset.exe and hit Enter or click OK.
A blank window will appear and the command will run for a few seconds. Don’t close that window.
After that, Microsoft Store will open automatically.
2. Run the dedicated troubleshooter
Click the Start button and select Settings.
Select the System option from the left pane, then choose Troubleshoot from the right.
Now, click on Other troubleshooters.
Scroll down until you find Windows Store Apps anc click the Run button.
The system will start scanning for any potential problems with the Windows apps, including Microsoft Store, and if it finds any, it will address them.
3. Use a PowerShell command
Press the Windows key + X keyboard shortcut and select Windows Terminal (Admin) from the list.
Paste the following command and press Enter to run it: Get-AppXPackage *WindowsStore* -AllUsers | Foreach {Add-AppxPackage -DisableDevelopmentMode -Register “$($_.InstallLocation)\AppXManifest.xml”}
Click the Start button, select the Power button, then choose Restart.
After the reboot, try to open Microsoft Store again and see if it works. The PowerShell command basically reinstalls the package so, after that, the issue should be resolved.
4. Repair and reset Microsoft Store
Click the Start button and select Settings.
Choose Apps from the left pane, then click on Apps and features from the right.
Wait for the list to be populated, then scroll down, find Microsoft Store, then click on the three vertical points and select Advanced options.
Now, scroll down until you find the Reset section and click the Repair button.
Wait for the process to finish and check Microsoft Store again. If it still has issues, click the Reset button below. However, this will delete all app data in the process, including the sign-in details.
You can use a dedicated step by step guide to fully repair and reset the app by following this article repair and reset Microsoft Store.
5. Install the latest Windows updates
Click the Start button and select Settings.
Now select Windows Updates from the left pane and hit the Check for updates button.
If they are any new updates, the system will download and install them, and you will be prompted for a restart.
6. Set the correct time and date
Press the Windows key + R to start a Run window, then type timedate.cpl and hit Enter or click OK.
Click on the Internet Time tab and select Change settings.
Make sure to check the box for Synchronize with an Internet time server, then select time.windows.com from the drop-down list and hit the Update now button.
You will get the message that The clock was successfully synchronized and you can click OK, then check if Microsoft Store is working properly.
The Microsoft Store server detects the time and date from your system and if it’s not in sync, you won’t be able to access some personalized settings from the Store.
This conflict may cause the app to crash or malfunction so if you have this problem, the simple procedure above should clear it.
Press the Windows key + R to start Run, then type cmd and press Ctrl + Shift + Enter to run Command Prompt with full privileges.
Now type the following command and press Enter to run it: sfc /scannow
After the scan is completed, restart your computer and see if Microsoft Store is running properly.
The System File Checker will scan the system for any corrupted files and repair them so if the problem is due to any such file issues, this should fix it.
7.2 Run the DISM scan
NOTE
The DISM (Deployment Imaging and Servicing Management) scan requires an Internet connection so make sure you check that before running the scan.
Press the Windows key + R to start Run, then type cmd and press Ctrl + Shift + Enter to run Command Prompt with full privileges.
Now type the following command and press Enter to run it: DISM /Online /Cleanup-Image /RestoreHealth
After the process finishes, restart your PC and check if Microsoft Store is working as it should.
8. Create a new user account
Select the Start button and choose Setttings.
Choose the Accounts option from the left, then select Family and other users from the right.
From the Other users section click the Add account button.
Select the I don’t have this person’s sign-in information option.
Click on Add a user without a Microsoft account.
Next, complete the username. You can also add a password but it’s not necessary. If you leave the password fields blank, the user will just pressing the Enter key to log in.
To change the user, click the Start button, select the username that is already logged-in and select the newly created user from the list.
Another issue that might be causing the Microsoft Store to malfunction may be the user account. That is why creating a new one could fix the problem right away.
Click the Search button on the Taskbar, type windows security and select the app from the results.
Now click on the Virus & threat protection option.
Click on Manage settings under Virus & threat protection settings.
Turn the real-time protection off by toggling the button.
Some of our readers had problems with Microsoft Store because their antivirus was blocking the app. If that’s the case, you should disable the antivirus temporarily and see if that changes things.
We showed you how to turn off the protection for Windows Defender but if you have a third-party antivirus installed check its settings and deactivate it from there.
All antiviruses have a turn-off button so it shouldn’t be too complicated to find it from their menus. In this case, you should consider switching to a new antivirus solution.
There are a few antivirus tools on the market, but if you want one that won’t interfere with your system, we can recommend Bitdefender.
10. Deactivate the proxy
Click the Search icon from the Taskbar, type internet options and select Internet options from the results.
Next, click the Connections tab and select LAN settings below.
Uncheck the Use a proxy server for your LAN if it is check.
A proxy can help you protect your privacy but sometimes, this can create conflicts with Microsoft Store so it wouldn’t hurt to disable your proxy at least temporarily and check if the Store works properly after that.
How to change the location of the downloaded apps in Windows 11?
Select the Start button and click on Settings.
Choose System from the left pane and select Storage from the list on the right.
Now click on Advanced system storage.
A menu will drop down. Select Where new content is saved.
Look at the first option, New apps will save to: and select another drive from the drop-down menu below.
By default, when you download a new app by using Microsoft Store, it will be stored on the C: drive but you don’t want to put too much strain on the drive where you have the system, right?
Another issue is that when you download an app but you don’t have the space to do so, the Store doesn’t notify you and you can’t find anything when you look for the app.
Many of you were wondering how some of the most beloved apps were going to transition and, of course, change on Microsoft’s new operating system.
While some apps still won’t function on the new OS, many of our trusty applications are now available and look pretty awesome.
Read on to find out all about using VLC Media Player for Windows 11 and downloading the app right now.
Is there a VLC Media Player for Windows 11?
You will surely be pleased to learn that the Win32 version of the VLC player is now available via the Microsoft Store application on Windows 11.
Compared with the Universal Windows Application (UWP), the Win32 version is more comprehensive, supplemented by all the codecs that everyone expects.
The Win32 version of the beloved player comes equipped with these functions:
Multimedia player
Audio and music player
Subtitle synchronization
File transcoding
Streaming
Digital TV Tuner
DVD playback
Audio CD player
How do I download VLC on Windows 11?
In order to download and install this app to your device, follow these simple steps:
Open the Microsoft Store from the taskbar.
2. In the search box of the Store type VLC and press Enter.
3. From the results, click on VLC Win32.
4. Click on the Install button.
The VLC player has a more fluent look on Windows 11
Let us take the VLC media player, for example, which is and has been the go-to choice in terms of video playback, for millions of users.
The software has transitioned flawlessly to Windows 11, is fully functional, and looks better than it ever did. VLC’s appearance now follows the theme of the OS, with a more fluent look and rounded corners,
As with all the other apps that call Windows 11 home, upon hovering the mouse cursor over the maximize button, located on the top right corner of the VLC window, you will have some snap options available.
This will give you the ability to choose how and where you wish to pin VLC on your desktop, so you can watch your favorite videos while performing other tasks.
All-in-all, this software seems to run pretty smoothly, with no errors or bugs that we can flag, for the moment.
And given the fact that it made the transition to the new operating system without any flaws, it could still be the number one media player, based on user choice, for many years to come.
Windows 11 have taken to social media to say how pleased they are with how VLC looks and performs on Microsoft’s new operating system.
Is your Microsoft Store stuck on pending on your Windows 11 device? Let us share all you must know.
The Microsoft Store is the hub for your Windows 11 PC, where you can download official apps and games that work out of the box.
Sometimes updates and downloads get stuck, you wouldn’t be able to stop it, and the download just does not complete from the Microsoft Store.
We will share with you some effective methods that will help you fix Microsoft Store download pending problem.
Why is my Microsoft Store download pending?
For starters, there isn’t a specific reason for the Microsoft Store stuck on pending on Windows 11 issue. However, since Microsoft released its latest operating system last year, some users who have installed it faced this problem on their newly upgraded PCs.
Here are some of the reasons behind this error:
Faulty internet connection – This is a principal reason, and your only workaround will be changing your internet connection.
Use of a Virtual Proxy Network (VPN) – Sometimes, VPNs will block out certain elements and may make a download get stuck. Of course, you should only use the best VPNs to avoid this.
Corrupted cache files – If you have old cached files, they may as well interfere with the proper running of some applications.
Incorrect date and time settings – In most cases, this will lead to your internet connection not working on the device.
Insufficient storage space – While this is a trigger, you will notice that the download may never start in these cases. Insufficient space triggers many download issues on Windows devices.
Now that you have some information about the reason behind this problem let us check out the solutions to fix Microsoft Store stuck on a pending issue on Windows 11.
How can I fix the Microsoft Store stuck on pending issue?
Before you go into any of the solutions below, you should do the following:
Restart your device, as this may help with several minor computer issues.
1. Disable VPN or manual proxy setting
Press your keyboard’s Windows + Ibuttons to open the Settings page. From the left side pane, select Network & internet.
Now select the Proxy tab from the right-side list of options.
Under the Manual proxy setup section, click the Set up button next to the Use a proxy server option.
At last, toggle off the Use a proxy server option. Finally, hit the Save button and exit. That’s it!
VPN or Virtual Proxy Network is best when trying to access websites that aren’t available in your region or restricted by your government.
2. Check date and time settings
Press your keyboard’s Windows + Ibuttons to open the Settings page.
Select Time and Language from the left-hand pane, then select Date & Time from the right side.
Under the Date & Time menu, make sure to turn on the Set time automatically and Set your time zone automatically options.
Another thing that you can do is to hit the Sync now button under the Additional settings section. This will sync your date and time with the Windows Time Server.
Once everything is done, you can check if the Microsoft Store update stuck on the pending error is fixed on your Windows 11 PC.
3. Reset Microsoft Store
Press your keyboard’s Windows + I buttons to open the Settings page. Then click on Apps and choose Installed apps.
Search for Microsoft Store under the App list search bar. Next, click on the 3-dot menu icon and select Advanced options.
Scroll down and click on the Reset button.
The Microsoft Store app data will now be reset, but all the apps you have installed on your Windows 11 PC will remain intact.
4. Run the Windows troubleshooter
Open the Start menu and search for Troubleshoot Settings. Open it.
In the newly opened window, select the Other troubleshooters option.
Scroll down and click on the Run button next to Windows Store Apps.
The troubleshooter will detect the issues with Microsoft Store and attempt to fix them along the way.
Open File Explorer, navigate to This PC,and open the Local Disk C Drive (C:).
Double-click the Windows folder and then open SoftwareDistribution.
Select all files and delete them.
The Software Distribution folder is where temporary files are stored on your Windows 11 PC. You can check if clearing the software distribution folder helps fix the Microsoft Store not downloading apps issue on your PC.
6. Run SFC Scan
Search for Command Prompt in the Start menu. Then, open it as an administrator.
Type in the below command and press Enter: sfc/scannow
The System File Checker will now check your system, and if it finds missing or corrupt files, it will repair them.
After the process is complete, reboot your PC and see if this fixes the Microsoft Store stuck on pending error on your Windows 11 PC.
7. Relogin your Microsoft account
So, to reconnect your account, open the Microsoft Store app and tap on the profile icon. Then, select the Sign out option.
Re-open Microsoft Store and click on the Sign in button. Enter your Microsoft account credentials. Click continue and proceed ahead with reconnecting your account.
If you have read this far, you should have successfully fixed the error of Microsoft Store stuck on pending on your Windows 11 device.
Let us know in the comments below which of the solutions mentioned above helped you resolve the Microsoft Store stuck on pending error on Windows 11.
Error code: 0x80073CFB occurs for some users when they try to download and install Microsoft Store apps.
Instead of downloading and installing a selected app, MS Store displays an error message with the 0x80073CFB code. The 0x80073CFB error message says this:
Something unexpected happened… Reporting this problem will help us understand it better. You can wait a bit and try again or restart your device. That may help.
As a consequence, users can’t download and install any MS Store apps for which that issue occurs. Does that error message sound familiar to you? If so, you might be able to fix the Microsoft Store error 0x80073CFB with some of the potential resolutions in this guide.
What is the 0x80073CFB Microsoft Store error?
Some users have discussed the 0x80073CFB error on the Microsoft support forum, Reddit, and others. That error can arise in both Windows 11 and 10. One user’s forum post said this about a Web Media Extensions 0x80073CFB error:
Several days ago, I received an update notification on Microsoft Store for Web Media Extension. I try to install it and get error 0x80073CFB. My question is: does Windows 11 need Web Media Extension? If Windows 11 needs it, can anyone help me to fix the error?
Aside from that, users have reported error 0x80073CFB arising when they try to download and install game apps. Numerous players have reported error 0x80073CFB for Forza Horizon 4. In one forum post, a user stated:
I need help fixing this problem. I just bought the game (Forza Horizon 4), and when I start to download it stops after seconds and this message appears: (Reporting this problem will help us understand it better. You can wait a bit and try again or restart your device. That may help. 0x80073CFB).
Some players have also posted on forums about a 0x80073CFB Minecraft error. Another user’s Microsoft forum post said this about the error:
I bought Windows 10 Minecraft, but keep getting error code 0x80073CFB. My purchase went through, and I have Minecraft on the store. Whenever I try to download it, however, it keep saying that something unexpected happened.
So, error 0x80073CFB isn’t an entirely uncommon Windows 11/10 issue. The exact causes for it aren’t entirely clear, and there are numerous ways you might be able to resolve that error. These are some of the most likely potential fixes for the 0x80073CFB Microsoft Store error.
How do I fix the error code: 0x80073CFB?
Although the steps below are for Windows 11, the solutions work just as well for Windows 10, so you can safely try them out.
1. Run the Windows Store Apps troubleshooter
Open your Start menu, and select Settings from there.
Next, click the Troubleshoot navigation option.
Select Other trouble-shooters to view a list of Windows 11 troubleshooters.
Then click the Run button for Windows Store Apps to open that troubleshooter.
Go through that troubleshooter to apply any potential fixes.
2. Sign out and back into the Microsoft Store
Bring up the Start menu, and click the pinned Microsoft Store app.
Click the user account button at the top of the Microsoft Store app.
Then select the Sign out option.
Click the user account button again and Sign in.
Select an account to sign in with, and press the Continue button.
Click the Run as administrator button for the Command Prompt.
Then type in this command: wsreset
Press the Enter key to clear to run wsreset.
4. Repair the Microsoft Store App
Bring up Settings by pressing its Windows + I key combination.
Select Apps on the left side of Settings.
Click Apps & features to view a list of installed apps.
Next, click the three-dot button for Microsoft Store shown directly below.
Select Advanced Options to view further settings.
Press the Repair button.
Finally, click the Reset option.
5. Check your PC’s date/time settings are right
Press the Settings app’s Windows key + I keyboard shortcut.
Select the Time & language tab.
Click the Date & time navigation option.
Toggle the Set time automatically option on.
Turn on the Set time zone automatically option if it’s off.
If a Time Zone Change prompt pops up, click OK on it.
NOTE
If the Windows system tray’s clock time gradually changes after correcting it, you might need to replace your PC’s CMOS battery. Alternatively, sync your PC’s clock with Windows Time Server. To do so, press the Sync now button within the Date & time settings.
6. Disable proxy server
First, open the search utility’s text box with the Windows key + S keyboard shortcut.
Enter the keyword proxy in the Type here to search box.
Click Proxy settings in the search tool.
Press the Set up button for the Use a proxy server option.
Launch Command Prompt with elevated rights as outlined within steps one to three of the third resolution.
Before running an SFC scan, input this command and press Enter: DISM.exe /Online /Cleanup-image /Restorehealth
Then input the following command and hit Return: sfc /scannow
Wait for the system file scan to reach the 100 percent mark and display an outcome within the Command Prompt’s window.
8. Clear the Software Distribution folder
Open Command Prompt as an administrator as specified in resolution three.
To stop the Windows Update service, input this command and press Enter: net stop wuauserv
Type in this command and press Enter: ren c:/windows/SoftwareDistribution softwaredistribution.old
Now restart Windows Update by typing this command and pressing Return: net start wuauserv
9. Reinstall Microsoft Store
Click Start with your right mouse button and select Windows Terminal (Admin) on the menu.
Next, click the Open a new tab button to select Windows PowerShell.
Input this PowerShell command and press Enter: Get-AppxPackage -allusers *WindowsStore* | Remove-AppxPackage
Select Power and Restart on your Start menu to reboot.
Open PowerShell again after restarting Windows.
To reinstall MS Store, input this command and press Return: Get-AppxPackage -allusers *WindowsStore* | Foreach {Add-AppxPackage -DisableDevelopmentMode -Register “$($_.InstallLocation)\AppXManifest.xml”}
Should I reinstall Windows 11/10 to fix this?
Some users have said reinstalling Windows has resolved the 0x80073cfb Microsoft Store error for them. So, that might be a potential resolution worth considering. As that’s a very drastic potential fix, however, it should only be a last resort if other alternatives don’t fix the issue.
If you must reinstall Windows 11/10, we recommend you do so with Reset this PC. With that utility, you can restore Windows to its factory defaults and preserve user files (you’ll still need to reinstall software). Check out our How to reset Windows 11 to its factory settings guide for further details.
Hopefully, you won’t need to take such drastic action. The above potential resolutions are among the most widely confirmed to fix the 0x80073CFB Microsoft Store error. So, there’s a good chance at least one of them will fix the same issue on your PC.
If those potential fixes aren’t enough, however, you can send a support request to Microsoft’s help service for Windows. You can get in touch with that service by entering a description on the Contact Microsoft Support page and clicking Get Help > Contact Support.
You can also discuss the 0x80073CFB error in the comments section below. Feel free to add any pertinent questions there. Users who have resolved this issue with alternative resolutions not mentioned above are most welcome to share their fixes below.
If Microsoft Store is blocked in Windows 11, you won’t be able to download or update apps. You might see an error like 0x800704 or a message saying it’s blocked by your administrator.
This usually happens because of account restrictions, system settings, or broken files. If you’re using a work or school device, it could be set up that way on purpose. But even personal devices can run into this. Below are the most common reasons and how to fix them fast.
What can I do if my Microsoft Store is blocked in Windows 11?
Right-click on the Start icon in the Taskbar or press Windows + X to launch the Quick Access menu and select Settings.
The System tab will be open by default. Scroll down on the right side of the window and select Troubleshoot from the list of options.
Tap on Other troubleshooters.
Locate the Windows Store Apps and click on Run next to it.
Windows will now discover and resolve any issues that may have arisen with the software or its configuration settings. Once the mistakes have been identified, instructions will be provided, so make sure to carefully follow these instructions.
2. Clear the cache
Press the Windows key + R to start the Run app, then type or paste in wsreset.exe and press Enter or click OK.
The reset will take a few settings and then the Store will open again.
Clearing your cache just gets rid of the data your device has stored from the websites and apps you visit, it has no effect on your photos or the files you have put there.
3. Reset the app
Press the Windows key + I to open the Settings app, then click on Apps in the right panel followed by Apps & features.
Now search for Microsoft Store, click on the three dot menu, and choose Advanced options.
Navigate to the Reset section and click on the Reset button.
Any deactivated apps, notification restrictions, default apps, background data limits, and permissions restrictions will be erased from your device’s storage when you reset your app options. This is likely to help you when the Microsoft Store is blocked on Windows 11.
4. Enable Microsoft Store from the Group Policy Editor
Press the Windows key + R to start the Run app then type or paste in gpedit.msc and press Enter or click OK.
Navigate to Administrative Templates under Computer Configuration, then choose the Windows Components subfolder and scroll down to Store.
In the right pane, locate the Turn off the Store application policy, then right-click on it and select Edit.
If the setting is Enabled, then modify its feature to Not Configured or Disabled, then hit the Apply and OK buttons.
After you’re finished, restart your computer to ensure that the modifications take effect, and then reopen the Store application.
5. Update Windows
Press the Windows + I buttons from your keyboard to open the Settings app and click on the Windows Update option in the left panel.
If you have any new updates to download, click on the Install now button and do wait for the process to complete, otherwise click on the Check for updates option.
If you’re using an earlier version of Windows, it’s conceivable that this is causing the problem, which may be solved by updating the operating system. The bug will almost certainly be fixed in a future software version.
6. Turn off third-party antivirus software
Another possible cause of the Microsoft Store blocking problem could be the use of third-party antivirus software. Third-party antivirus utilities should be turned off to ensure this does not happen.
The antivirus utility icons are located in the system tray to the right of the Windows 10 taskbar, and users may right-click on them to access context menu options for the software that has been installed.
Those context menus typically feature a deactivate setting of some type, which users can pick in order to turn off the antiviral software in the background.
What happens if I remove the Microsoft Store app?
In the first place, Microsoft has said that the ability to uninstall the Microsoft Store application is not supported.
Given that a mechanism to uninstall the software was actually introduced in Windows 10, the phrase appears to be a little strange.
It is most probable that Microsoft meant that uninstalling the Microsoft Store app is not recommended rather than not supported.
Then, according to Microsoft, there is no other option than to reset or reinstall the operating system in order to reinstall the app.
To put it another way, if you uninstall the Microsoft Store app from your device and later decide that you want it back, the only option to get it back is to reinstall Windows 11 or reset your device.
The fact that the app has been deleted may be worrying to some users; however, a simple PowerShell script may be used to restore it.
To accomplish this, first start PowerShell with administrator privileges from the Windows + X menu, and then type or paste the following command and hit Enter: Get-AppXPackage *WindowsStore* -AllUsers | Foreach {Add-AppxPackage -DisableDevelopmentMode -Register “$($_.InstallLocation)\AppXManifest.xml”}
Yes, if you want to download or update apps like Xbox, Photos, Calculator, or any tool that comes through the Windows Store. It’s also the easiest way to get official, safe apps without digging around online.
2. Why is Microsoft Store blocked on my Windows 11 device?
It’s usually blocked by admin settings, group policy, or parental controls. On work or school devices, IT might have disabled it on purpose.
3. What does error code 0x800704 mean?
This code shows up when Windows can’t open the Store due to permission issues, broken services, or missing system files.