Update reminders could be annoying sometimes, but how annoying is it when you constantly get the reminder about the same update, even if you’ve installed that update before? This is the case when Windows update keeps reinstalling.
So if your computer is receiving the same update repeatedly, we maybe have a solution.
Why is my Windows 10 constantly updating?
If Windows keeps installing the same update, it could be triggered by different factors. Here are the most common:
Badly installed updates – This error mostly happens when the OS cannot install the update correctly. Sometimes, these updates need deletion.
Problematic updates – While updates are welcome additions, there are a few cases of bad updates, which can cause bugs on your computer.
Windows unable to detect updates – Even after an update is installed, in some rare cases, the OS may be unable to detect it, leading to fresh installation attempts.
Speaking of Windows Update issues, users also reported the following problems:
Windows 10 keeps installing updates – According to users, Windows 10 keeps installing the same updates on their PC. You must stop the Windows Update service and delete the SoftwareDistribution directory to fix this problem.
Same Windows update keeps trying to install – This is another problem that Windows users can encounter. If you’re having this issue on your PC, you should be able to fix it using one of our solutions.
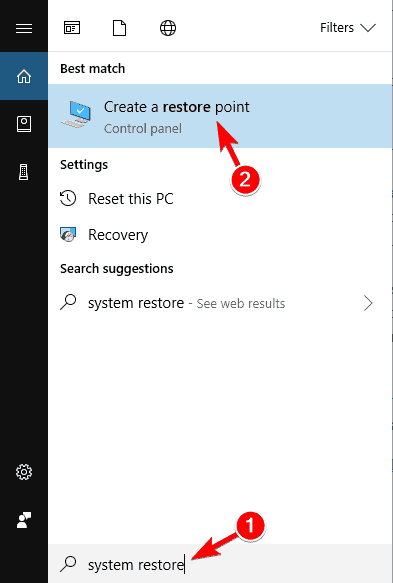
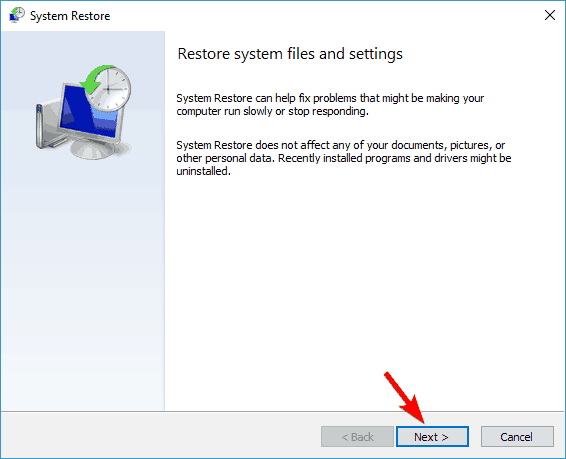
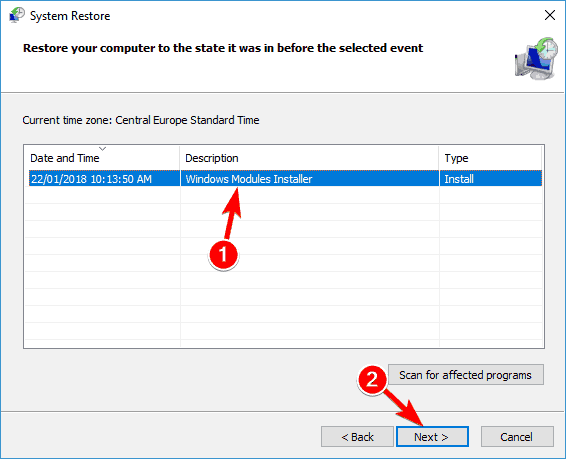
Windows 10keeps downloading the same updates – This is also a common problem with Windows 10. If Windows 10 keeps downloading the same update, you can fix the problem by removing the problematic update or by using System Restore.
Now let us explore the best solutions.
What can I do when Windows Update keeps installing the same update?
1. Delete the SoftwareDistribution directory
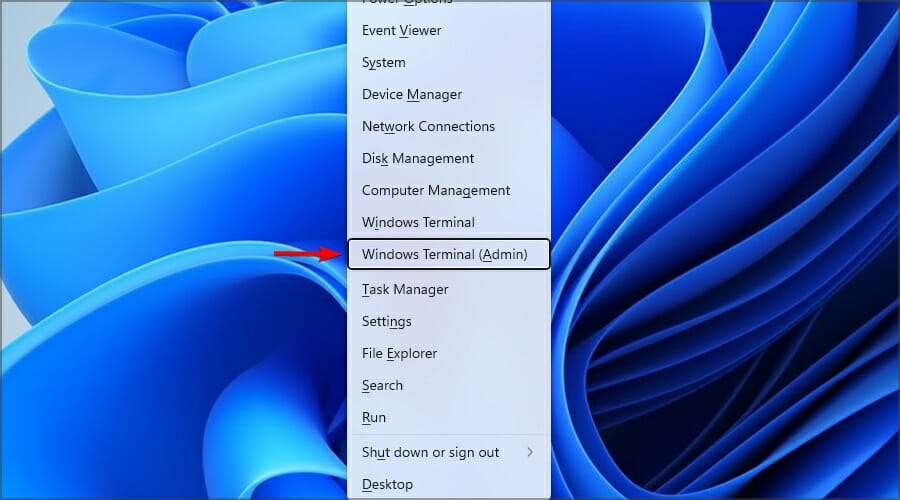
Press Windows Key + X and select Command Prompt (Admin) from the menu.
Type the following scripts, pressing Enter after each one: net stop wuauserv rename c:windowsSoftwareDistribution softwaredistribution.old net start wuauserv exit
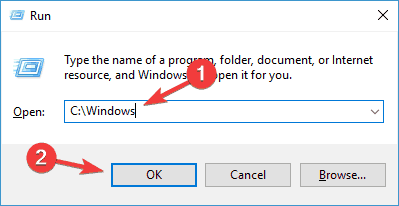
Press Windows Key + R and enter C:\Windows, press Enter, or click OK.
This will open the Windows folder, search for SoftwareDistribution and delete it.
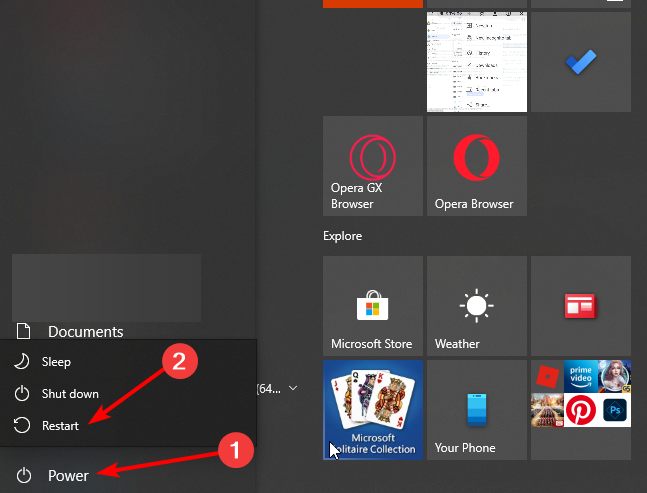
Finally, restart your computer.
Now all backups and downloads of Windows Update are deleted, and your problematic update, and you shouldn’t face this issue anymore.
2. Remove the problematic update
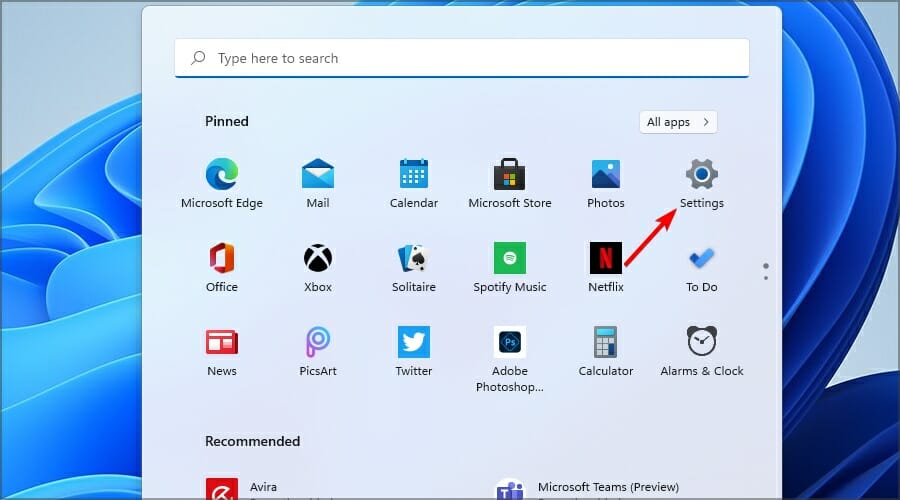
Open the Settings by using the Windows Key + I shortcut.
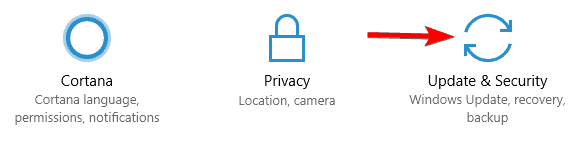
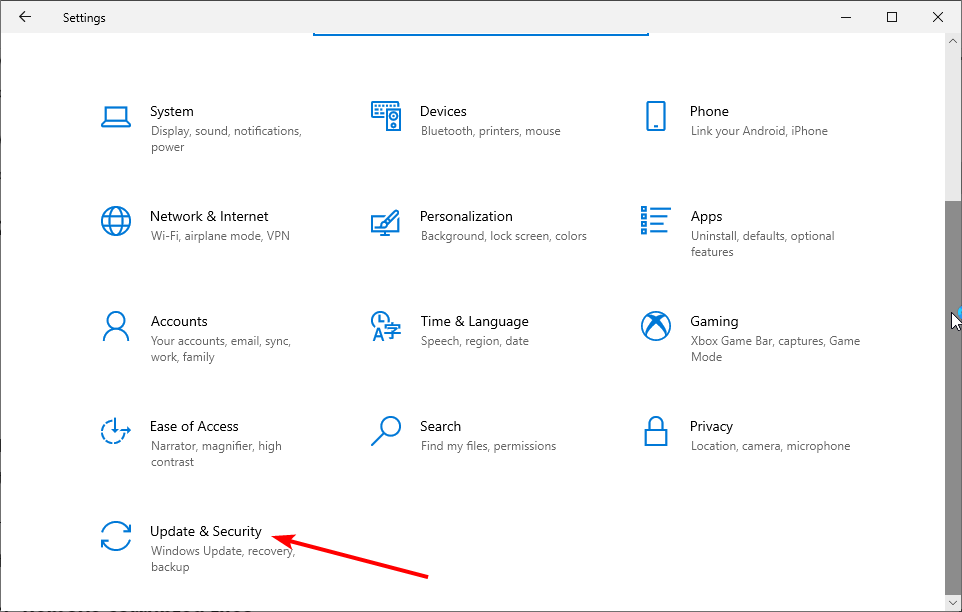
When the Settings app opens, click the Update & Security section.
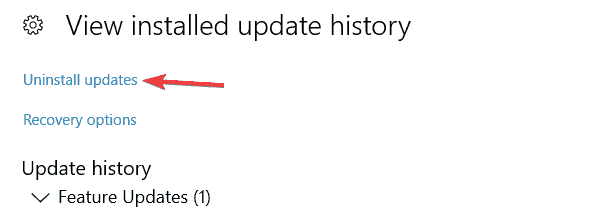
Now click View installed update history.
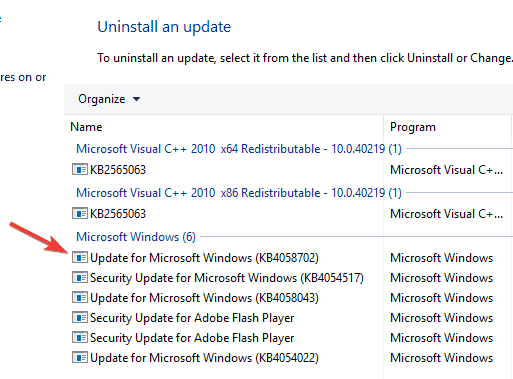
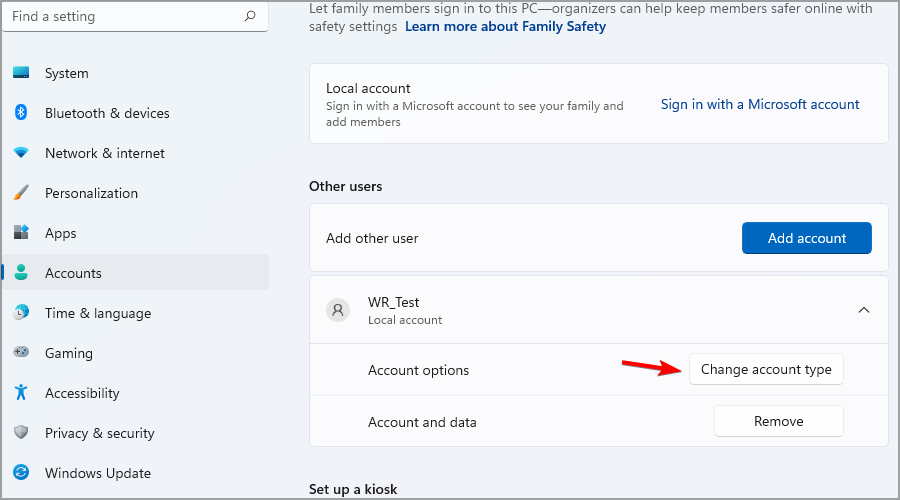
Select Uninstall updates.
Lastly, double-click an update to remove it.
After uninstalling recent updates, check if the issue persists. If this solution solves the problem, you’ll need to prevent Windows from downloading the problematic update again.
After doing that, your problem should be resolved entirely.
3. Reinstall .NET Framework
Usually, uninstalling and then reinstalling or repairing the.NET Framework should resolve many problems, but specific systems may encounter errors or failure for various reasons.
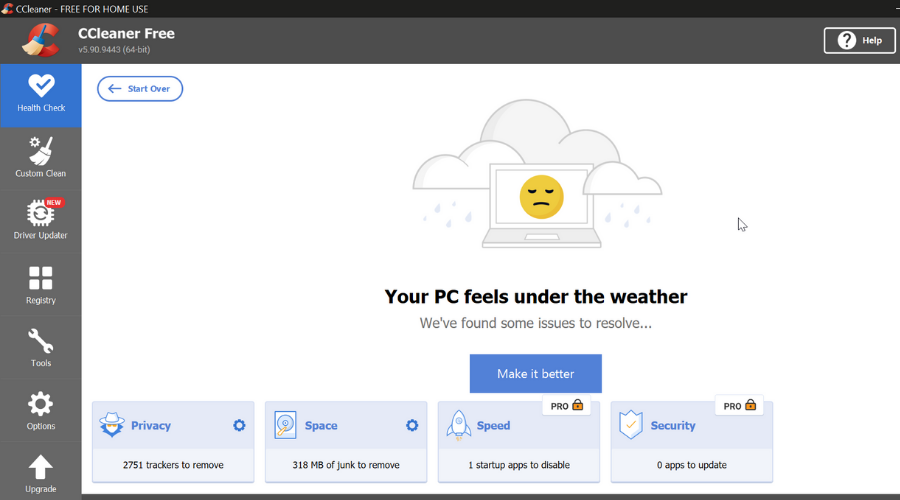
When installing, removing, or cleaning the traces of the.NET Framework, a cleanup program named CCleaner is available to complete all necessary tasks.
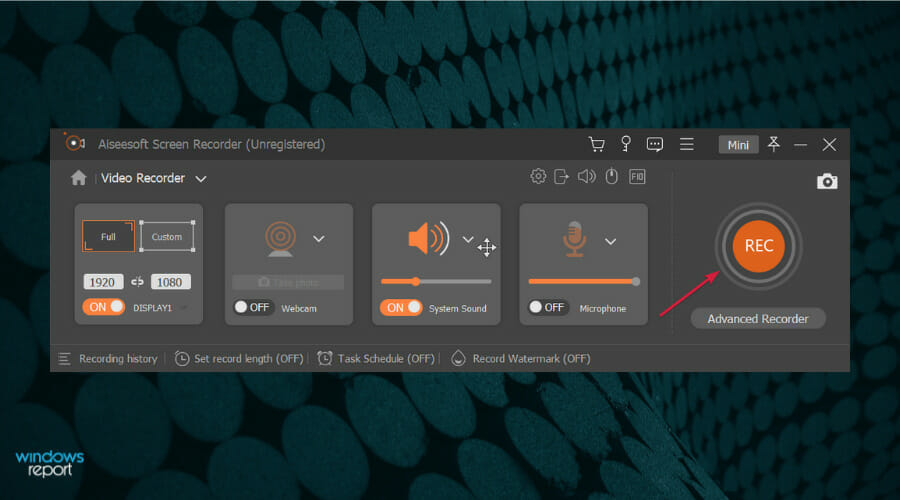
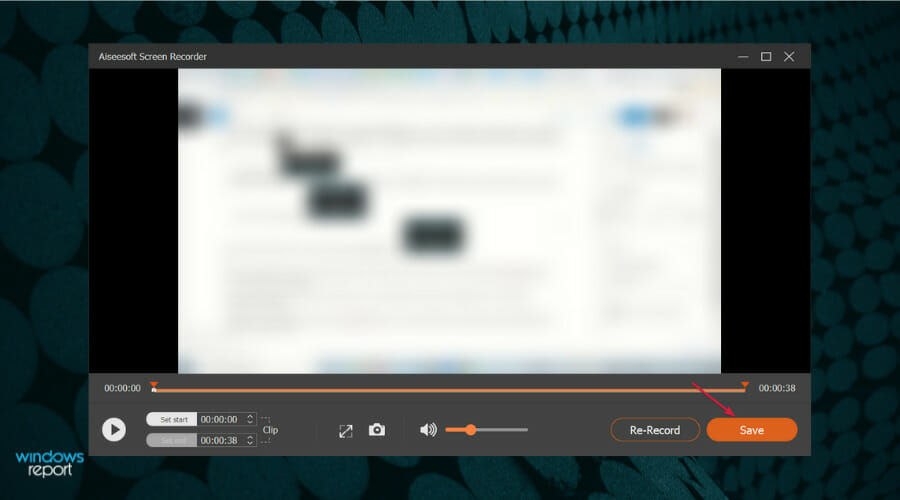
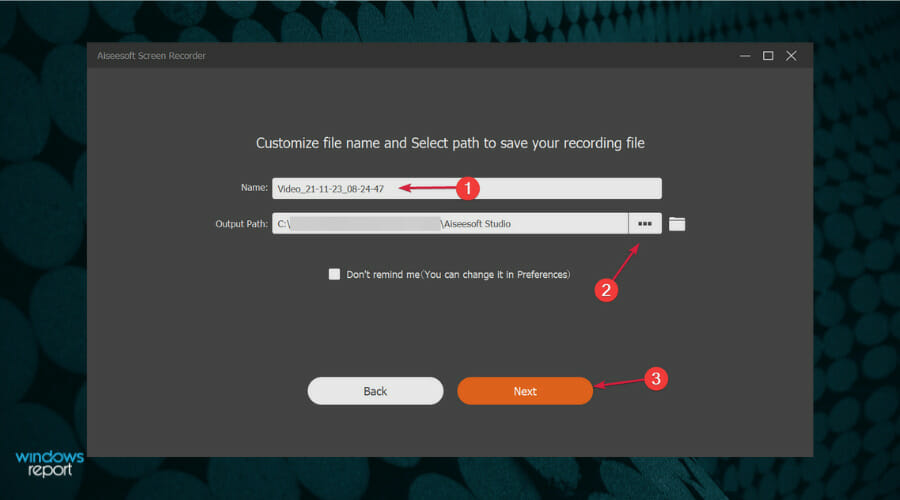
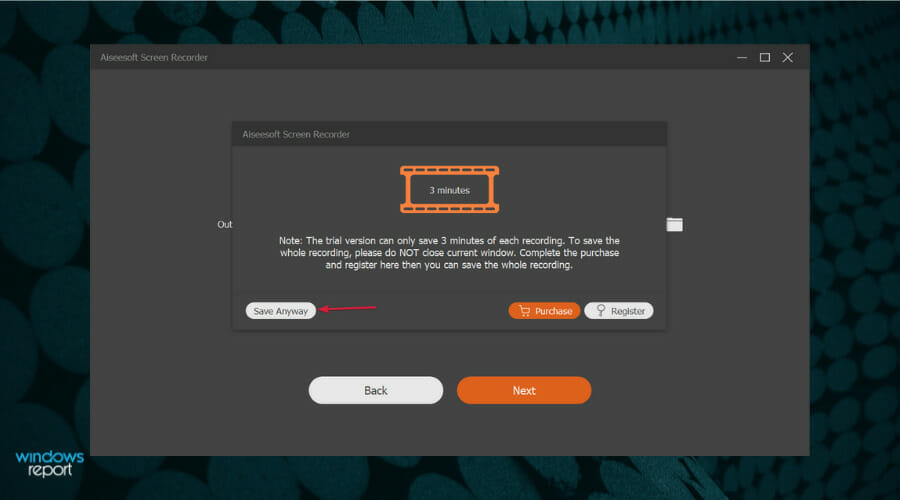
This process requires you to remove all fires related to .NET Framework 4 and download it again as a Windows update.
The tool will clean up the system by removing files, folders, registry keys and values, and Windows Installer product registration information for the.NET Framework.
After removing .NET Framework 4, you can download it automatically as a Windows update, and the problem should be resolved.
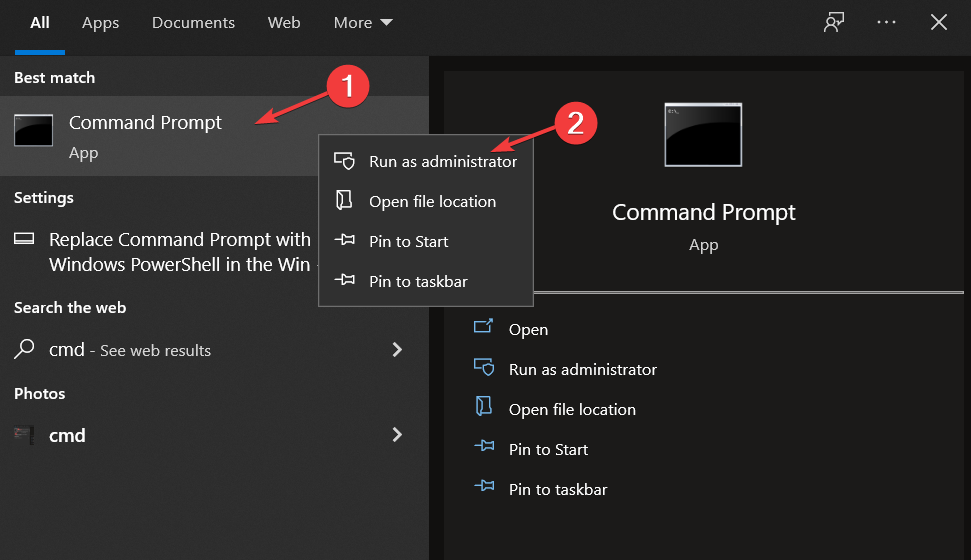
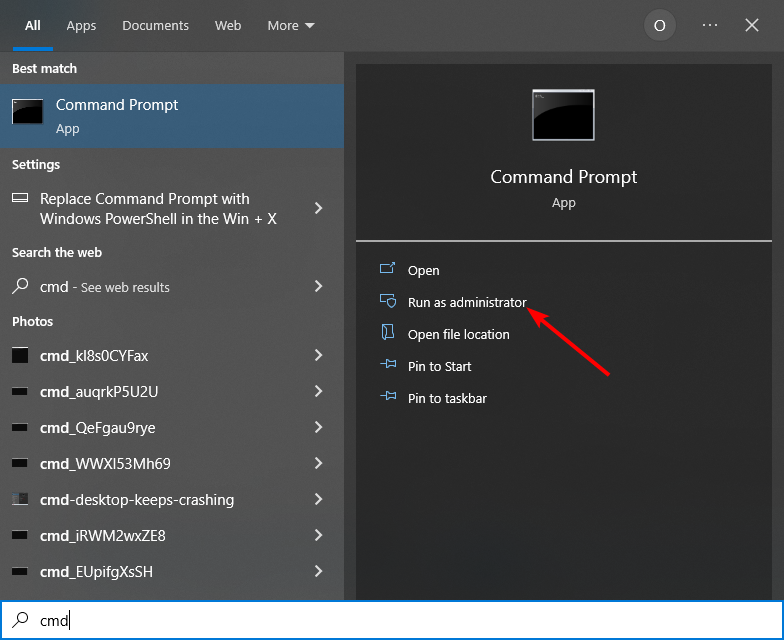
Go to Start, type command, right-click on Command Prompt, and select Run as administrator.
A new cmd window appears. Type the line below and hit Enter: sfc /scannow
Finally, wait until the scan and repair process is finished.
6.2 Running DISM
Go to Start, type command, right-click on Command Prompt, and select Run as administrator.
A new cmd window appears. Type the line below and hit Enter: DISM.exe/Online /Cleanup-image /Restorehealth
Also, if the DISM can’t obtain files online, try using your USB or DVD installation. Insert media, type the command below, and hit Enter (be sure to replace /C:/RepairSourceWindows with the path of your DVD or USB). DISM.exe/Online /Cleanup-Image /RestoreHealth /Source:C:RepairSourceWindows /LimitAccess
That is all you should do if the Windows update keeps reinstalling on your devices.
Lastly, please reach the comments section below if you have any additional comments or questions or if this solution somehow didn’t work.
USB-C not working on Windows 11 is a common issue caused by software, hardware, or settings problems affecting charging and data transfer.
This guide covers USB-C port troubleshooting on Windows 11 to fix USB Type-C port not working or not charging issues and restore proper device connection. For broader USB solutions, see our Windows 11 USB device recognition guide.
What should I do if USB C device is not recognized on Windows 11?
Frequently, simply rebooting your Windows 11 PC clears RAM, stops interfering background apps, and fixes minor issues, helping the system detect a USB-C device, so it’s the easiest first step before trying more advanced solutions if the problem continues after several restarts.
2. Reinstall your USB driver
Using Device Manager to update or reinstall drivers is the easiest way to do it.
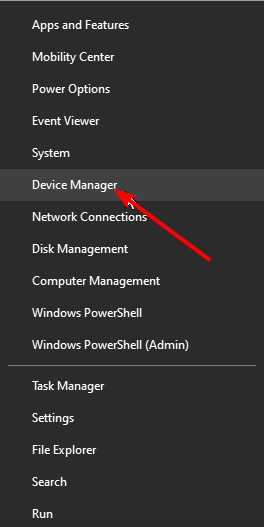
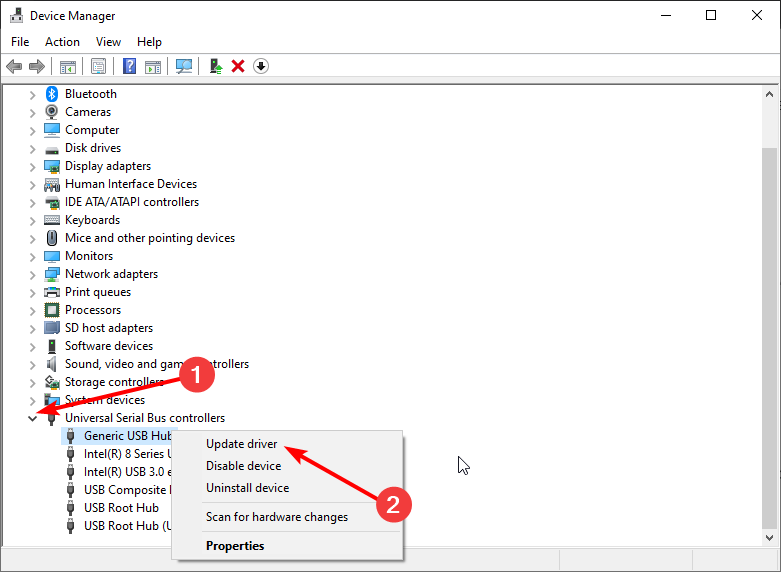
Right-click on the Start menu and select the Device Manager option.
Expand the Universal Serial Bus devices option.
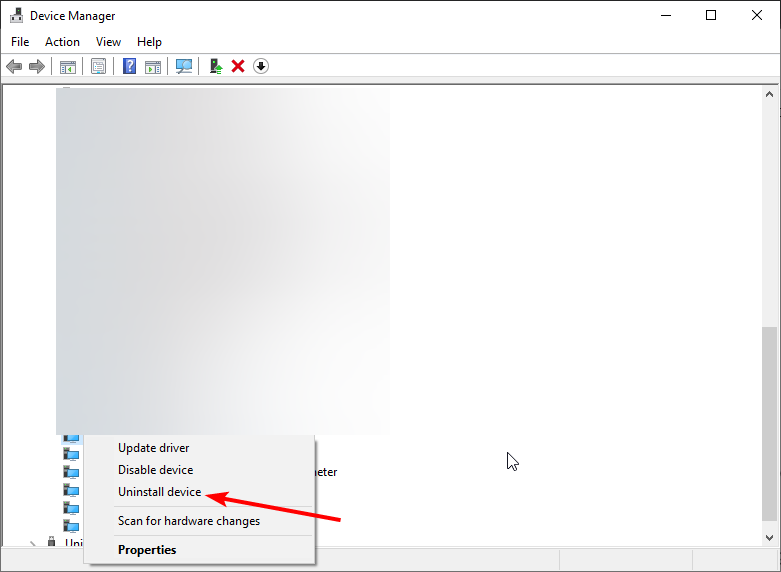
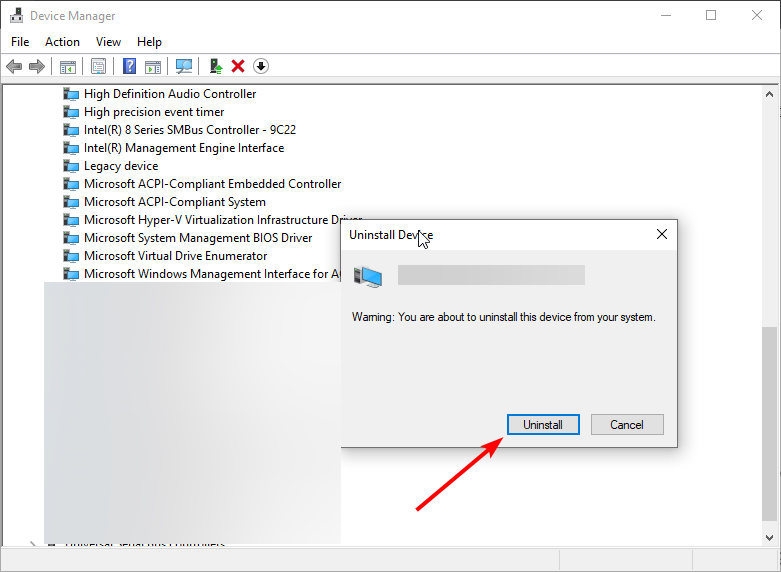
Right-click on your device, and select Uninstall.
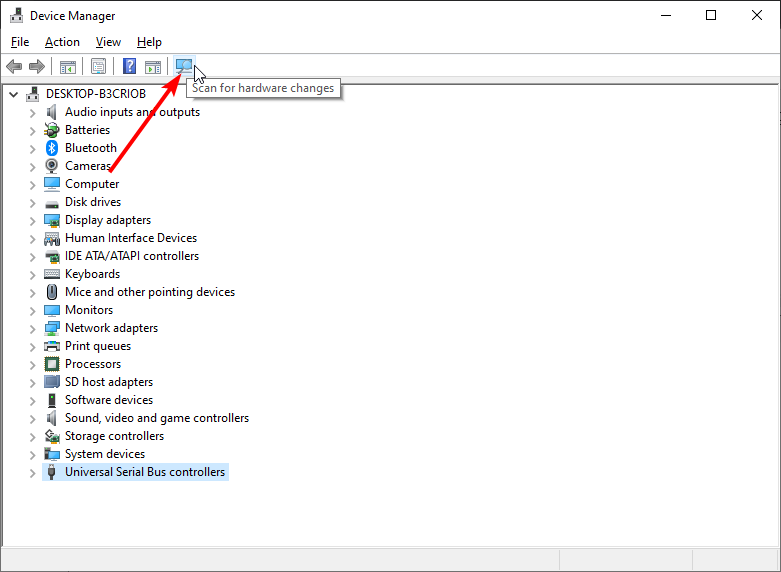
Restart the computer. When the computer is restarted, the driver will automatically be reinstalled.
One of the first things you need to do to fix the USB-C port not working issue is reinstall your USB drivers.
3. Clean your USB port
It would help to clean the USB port with a paintbrush or a microfiber cloth and then retry the connection.
The USB port on a computer may get blocked with particles or dust over time. When this happens, your gadgets may stop communicating, and your Windows 11 will not be able to recognize USB C.
4. Enable trusted devices
Connect to your Windows 11 PC with a USB C cable.
Click on Trust when prompted on your phone.
Some gadgets, such as the iPhone, offer an additional authentication layer to ensure that the user’s identity is verified.
Therefore, you must unlock your iPhone before connecting it to your Windows 11 PC for the first time. The user will be asked to trust the linked device by iOS. Your iPhone content will display on your PC after you’ve been authorized.
5. Edit the power management settings
Right-click on the start menu and select the device manager option.
Expand the Universal Serial Bus devices option, right-click on your device, and select properties.
Navigate to the Power Management tab, uncheck Allow the computer to turn off this device to save power, and click ok.
6. Disable the USB hang setting
Click on the start menu, type power plan, and select the Edit power plan app.
Click on Change advanced power settings.
Expand USB settings, select disable under the USB selective suspend setting.
Click the start menu, type Windows security, and select the Windows security app.
Click on Virus & Threat Protection on the left pane, and select the Quick Scan option on the right.
While the app is scanning, you can minimize the windows and continue with whatever work you perform on your PC.
8. Check for Windows update
Click on the start menu, type Windows Update, and select the Windows update settings option.
If there are any updates, click on download and install.
Restart your PC.
9. Replace your USB C Device
If the USB C port is verified to be functional, the problem may be with the device you’re connecting. If Windows isn’t detecting the device, you may consider replacing it with something different.
A USB hard disk, for example, can only be recognized when the device has not failed. Therefore, before you contemplate replacing your device, ensure you have tested it on another computer if possible.
Unfortunately, determining why a USB device has stopped functioning is difficult. To explore, you should review the device’s user manual or, if feasible, explore the device’s manufacturer assistance options.
What is the USB Type C?
In simpler terms, USB C is a specific USB connector with its cable and circuitry. USB C is used to carry both power and data, just like any other USB cable.
The design of USB Type C differs significantly from that of its predecessor, USB A. The Type C is oval and perfectly symmetrical, so there’s no danger of accidentally inserting it into the incorrect port. The following are the primary characteristics that distinguish USB C from other standard cables:
Speed
Power capability
Supported data protocol
The transmission speed is determined by the device to which it is connected. For example, a USB Type C cable connected to a USB 3.1 port gives a transfer rate of 10 GB per second. The USB 3.2 connector will transport data at a rate of 20 GB per second, while the Thunderbolt 3 port will reach 40 GB per second.
When it comes to electricity, USB Type C can charge laptops, cellphones, portable devices, and power banks. Type C is identical to Type A in that it only produces 2.5 watts of electricity. However, if the device supports PD, or Electricity Delivery, the USB-C port may supply up to 100 watts of power.
USB-C on Windows 11: FAQ
Why isn’t my USB-C device recognized on Windows 11?
This usually happens because of outdated or corrupted drivers, loose connections, or hardware problems. Restarting your PC, reinstalling USB drivers via Device Manager, and checking the cable and port for dirt or damage often solve the problem. Also, ensure your device is unlocked or trusted if it requires authentication (like an iPhone).
What are the power settings affecting USB-C ports in Windows 11?
Windows can turn off USB devices to save power, which may cause ports to stop working temporarily. To fix this, open Device Manager, find your USB device under “Universal Serial Bus controllers,” right-click, select Properties, go to the Power Management tab, and uncheck “Allow the computer to turn off this device to save power.” Also, disable USB selective suspend via Power Options to keep ports active.
Does Windows 11 support all USB-C features?
Windows 11 supports USB-C standards, but the actual features (like power delivery, data speed, or video output) depend on your hardware. Your USB-C port and connected device must support these features. Windows 11 alone doesn’t guarantee them. Check your device specs to confirm what USB-C functions it supports.
Are there any known issues with USB-C ports after Windows 11 updates?
Some Windows 11 updates have caused USB-C port problems due to driver incompatibilities or power management bugs. If your USB-C port stops working after an update, try rolling back the driver, checking for further updates, or running Windows Troubleshooter. Keeping your system and drivers updated usually resolves these issues.
How can I check if my USB-C port supports DisplayPort or HDMI?
Not all USB-C ports support video output. To check, look up your PC or motherboard model specs on the manufacturer’s website for “DisplayPort Alternate Mode” or “video output over USB-C.” Alternatively, check your device manager or user manual. If it supports video, you can connect monitors using compatible USB-C to DisplayPort or HDMI adapters.
Summary
Like with many minor PC issues, when Windows 11 is not recognizing your USB C, you do not need a technician; you can simply follow the solutions above and have your PC working perfectly again.
Please note that these fixes are not in any particular order, but we highly recommend that you try every solution before buying or replacing your USB-C device.
Tell us what solutions have worked for you. We look forward to reading your comments.
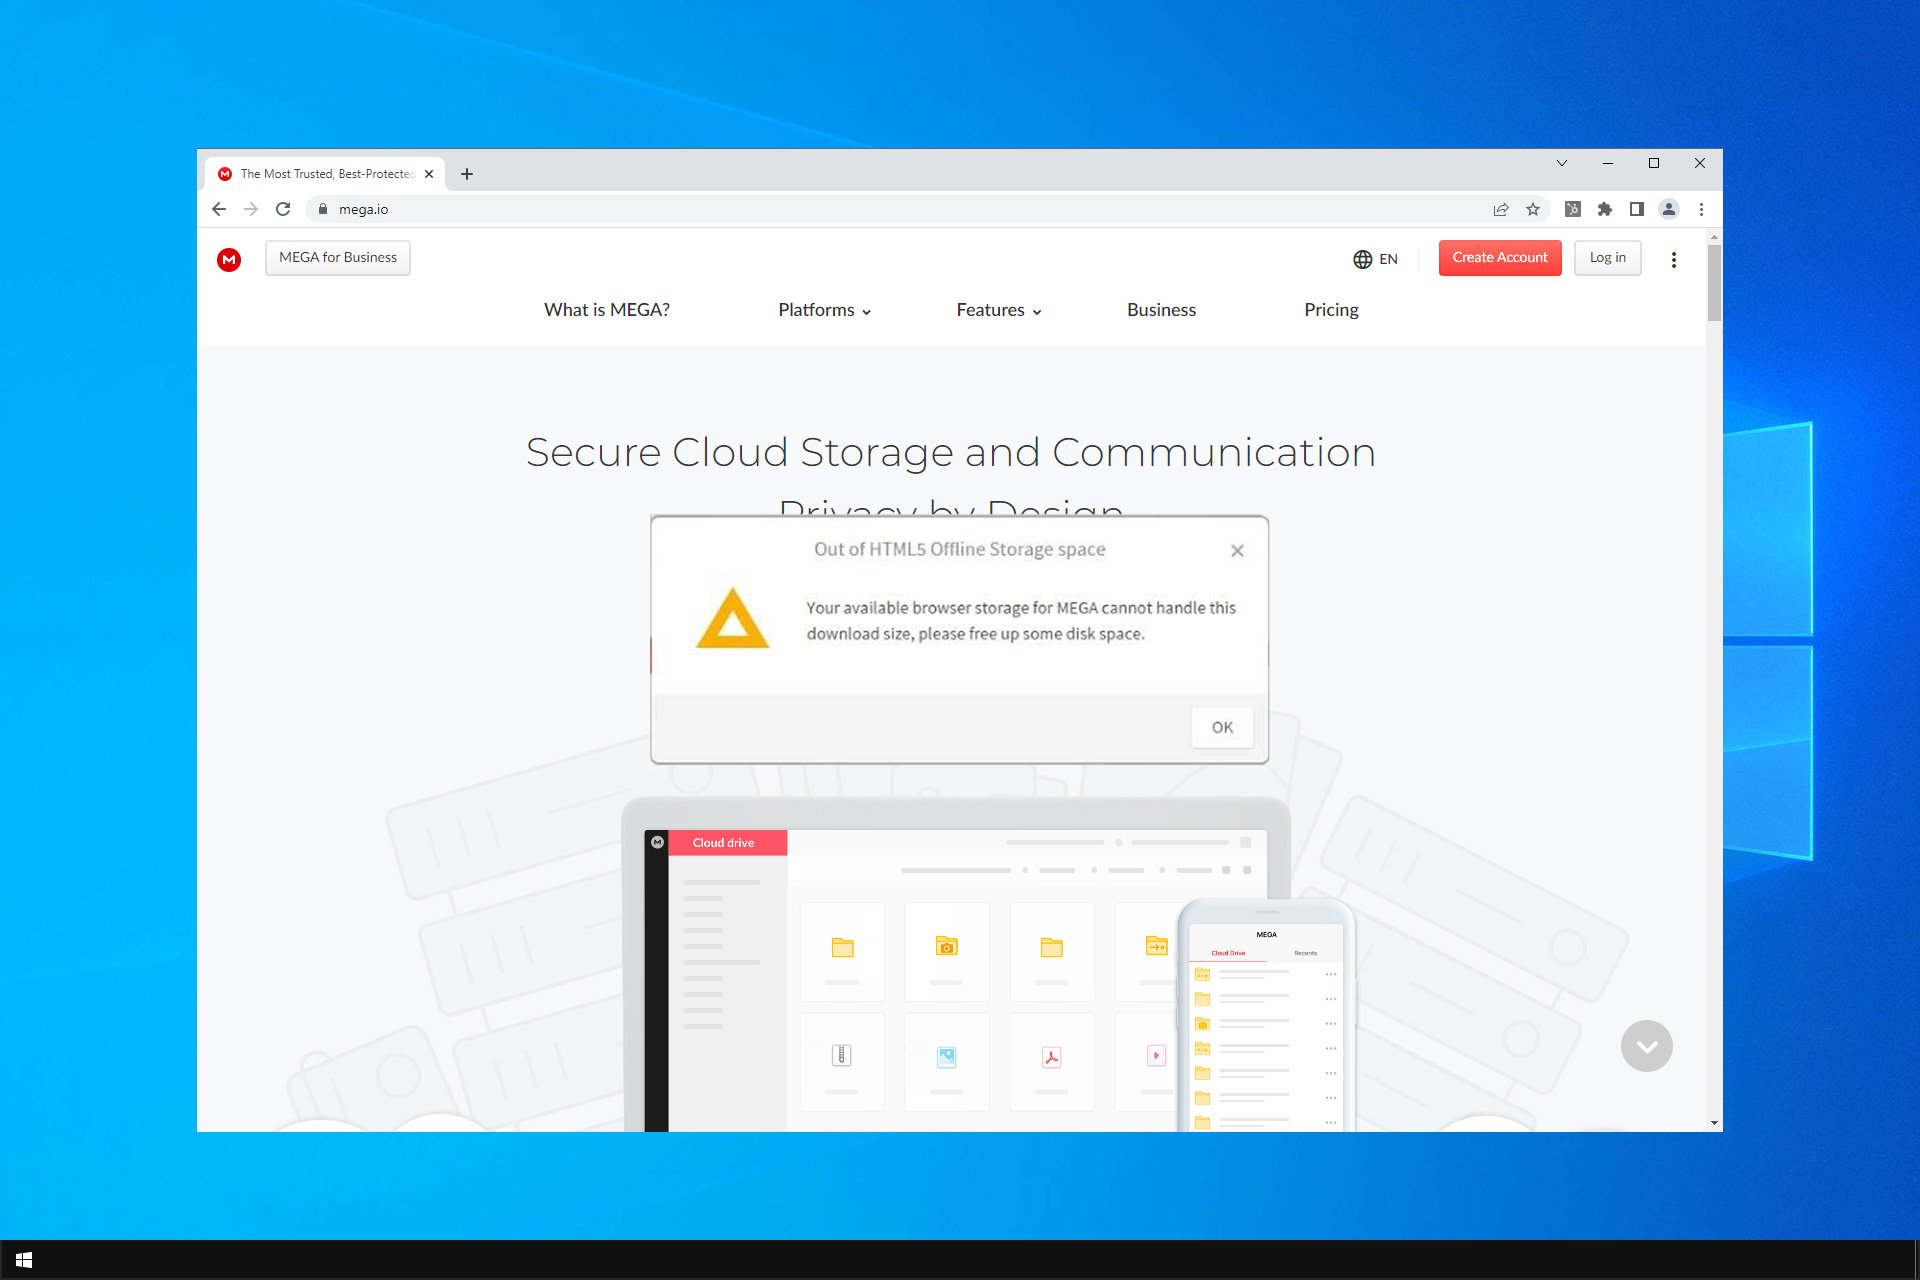
If you use the file hosting service and you don’t delete that data, your browser might start moving slower and you can even get errors such as Your in-browser storage for MEGA is full.
How do I fix my browser storage Mega is full?
1. Delete the Mega.nz cookies
1.1 On Chrome
1. Launch Chrome.
2. Click the three dots icon at the top right corner in Chrome, and openSettings.
3. Under Privacy and security, choose Site settings to open the content permissions.
4. Then click onView permissions and date stored across sites.
5. Enter mega.nz in the search box.
6. Click on mega.nz, then select the three points menu and select Clear data. The your in browser storage for mega is full in Incognito mode issue will be fixed.
The first fix for the Out of HTML5 offline storage space error involves deleting the Mega.nz cookies from your browser.
Depending on your preferred browser, the process will be slightly different, but the steps are mostly the same.
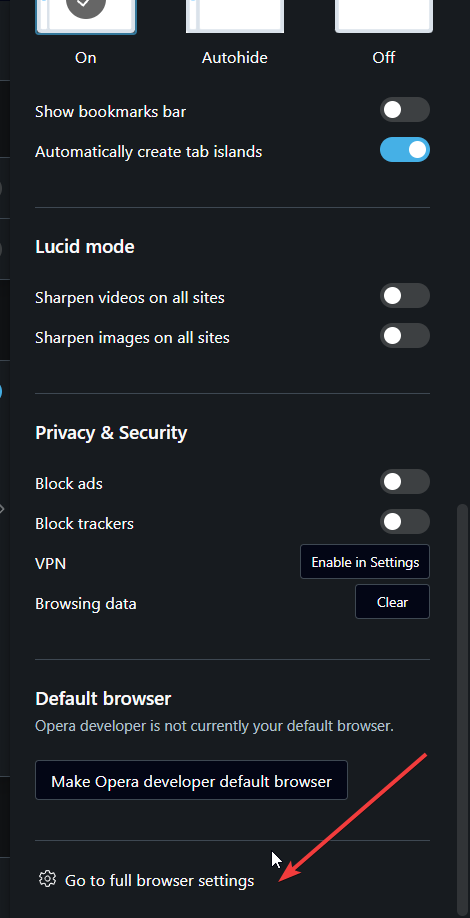
1.2 On Opera One
If you’re having Your in browser storage for mega is full in Opera One or Opera GX, you can fix it by doing the following:
Open Opera One. Click the Opera One menu and then select Settings.
Navigate to Privacy & security. Now select Cookies and other site data.
Go to See all cookies and site data.
Locate mega.nz on the list and click the Delete icon.
If you ever wondered how to clear in browser storage for Mega, then the methods above should be able to help you.
2. Delete cache using File Explorer
Press the Windows key + E to start File Explorer. Enter the following line in the address bar and hit Enter: %LOCALAPPDATA%\Google\Chrome\User Data\Default\Cache
Now, use the Ctrl + A key shortcut to select all the contents, right-click on a file and select Delete.
After doing this, the Your in browser storage for MEGA is full message in Chrome will be gone.
For Opera One users, do the following, repeat the same steps, but go to the following directory Opera One Software\Opera One Stable
Now you just need to delete all directories inside of the Opera One Stable folder.
3. Reset Google Chrome
Click the three dots in the top right corner, and openSettings.
Go to the bottom of the Settings window and select Advanced.
Scroll down to the Reset and clean up option, under System.
Click on Restore settings to their original defaults
Finally, press the Reset settings button.
Resetting Google Chrome might fix the Insufficient disk space for MEGA running in Chrome, so be sure to try it.
For Opera One/Opera GX, do the following:
Click the Menu button and then select Settings.
Go to the Browser in the left pane. In the right pane go to Restore settings to their original defaults.
Click Reset to confirm.
4. Download Mega files with a specialized tool
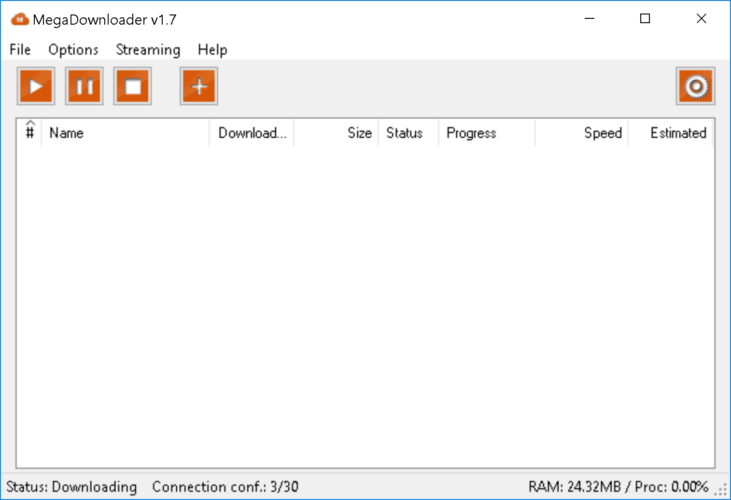
Alternatively, users might find that they can download large files with the MegaDownloader software. That’s a dedicated download manager for mega.nz with fewer file download shortcomings than Chrome.
Thus, the in-browser storage for MEGA is full error might not arise for users who utilize that software as it doesn’t store cookies.
Users can add that software to Windows by clicking Download on the MegaDownloader page.
5. Free some drive storage
Press the Windows key + E to start File Explorer.
Click on This PC, right-click on the drive you want to clean up, and choose Properties.
Click on Disk Cleanup under the Properties window.
Select the types of files you want to delete and click OK (you can delete temporary files, log files, files in your recycle bin, etc.).
Click on Clean Up System Files and wait until the cleaner calculates everything. It will give you even more free space by cleaning some unnecessary system files.
Check the Windows Update Cleanup and hit the OK button.
Go to More Options and click on Clean up under System Restore and Shadow Copies (This command deletes all previous system restore points, except the most recent one.).
If you’re getting Your in-browser storage for Mega is full, your download will continue automatically after you free up some space message, then freeing up some space is the way to go.
You can’t even imagine how easy it is to switch to a different browser without losing any data. The Opera One browser has organizing capabilities to ease downloads and Mega Storage.
With the built-in ad blocker, various messengers integrated right in the sidebar, and workspaces to group tabs together you get to manage your browser space easier.
Browser storage is closely related to the amount of storage space that you have on your PC. Unfortunately, you can’t control how much storage space is available to your browser.
The only way to increase the browser storage is by increasing the overall storage space by removing files and apps that you don’t use, or by getting a larger drive to store your files.
Those are some resolutions that might fix your Mega in browser storage error.
You might also want to check the best personal cloud storage services that come as a great alternative to Mega.
Don’t forget to tell us whether one of the solutions gets you through the problem. If you have any other suggestions or questions, feel free to leave them in the comments section below.
Thanks to web apps like Excel Online, accessing and editing your workbooks online shouldn’t be an issue. However, it is not all rosy, as users have been facing issues such as the Excel Online not working and can’t open files error.
The inability to open workbooks from Microsoft Excel or SharePoint is troubling users. As reported, they are usually met with the We’re sorry we can’t open the workbook in the browser error and can’t proceed.
This will provide some tips on how to solve this quickly and effectively.
Why won’t Excel open in the browser?
There are various reasons your workbook might not open in Excel on your browser. This can be because of an issue with the browser you are using.
Also, it might be because you have Sharepoint disabled. And to make a file accessible online on your browser, you need to have the feature enabled.
How can I fix the Sorry we can’t open your workbook in Excel online error?
1. Try with a different browser
Let’s start by migrating to Edge or IE. Yes, we know those might not be browsers of your choice, but they work the best with other web-based Microsoft applications.
Additionally, you can install specific IE-specific add-ons which might allow you unprecedented access to your workbook, be it SharePoint or Excel.
Alternatively, you can give Opera One a try. This Chromium-based browser checks all the boxes regarding reliability and safety.
So, how about a browser that’s privacy-oriented and feature-rich? It won’t cost you anything but some time to install and try.
Besides, the browser is customizable to fit various needs, thanks to the extensive add-on support and it comes with a built-in AI.
Opera One
Thanks to this fast, efficient, and highly customizable web browser, open, edit, and work on your SharePoint workbooks without any issues.
Excel will display a notice known as a #REF error if a formula makes reference to a cell that does not now exist. This is typically the result of removing cells that a calculation is referring to.
Fixing your #REF errors is likely to solve the We’re sorry we can’t open the workbook in the browser error.
1. Launch Excel and open the problematic workbook.
2. Press Ctrl + F then click theReplacetab.
3. Type#REF! inside theFind what field.
4. Leave the Replace field empty.
5. Finally, click Replace All. The function will delete all #REF Excel errors and thus fix the issue.
3. Turn on Sharing
Click on the Review tab.
Choose the Share Workbook tool.
Check the Allow Changes box and confirm changes.
Usually, some parts of the file are not supported for sharing, but you should still be able to show the central part of the file in the web-based application.
However, you need to enable sharing for the said file before we can access it online. This option is disabled by default, and you should allow it for an Excel sheet or SharePoint file to be accessible online.
With this, you should be able to fix the error that couldn’t open the workbook in Excel Online.
Finally, you can try editing the file copy instead of the original file. That allowed some users to access the file online, even though it still might not work in the likes of Chrome or Firefox, so have that in mind. Again, you choose to edit the copy, which should help.
Once the error appears, click Edit a copy, and you can merge everything locally. Don’t forget to use a different name, or the original file will be replaced upon saving otherwise.
The solutions are also effective if you are experiencing the following errors:
This workbook contains too many objects (charts, shapes, pictures, etc.)
We’re sorry. We can’t open the workbook in the browser because it uses these unsupported features: workbook protection
We’re sorry. We can’t open the workbook in the browser because it uses these unsupported features: scenario manager
Sorry, We can’t open your workbook in Excel Online because it exceeds
We’re sorry. We couldn’t open your workbook in the browser because it uses these unsupported features: charts or objects with external references (links to other workbooks)
We’re sorry. We can’t open the workbook in the browser because it uses these unsupported features: XML maps
With that said, we can conclude this article. If you have any questions or alternative workarounds, feel free to tell us in the comments below.
Blue Screen of Death errors can cause many problems on Windows 10; unfortunately, these errors can sometimes be hard to fix. The PNP detected fatal error is a good example.
Since these issues can be problematic, we’ll show you how to fix the Blue Screen of Death problem with the stop code PNP_DETECTED_FATAL_ERROR.
The PNP_DETECTED_FATAL_ERROR is a blue screen issue and can cause many points on your PC. This problem can be annoying since it suddenly forces your PC to restart.
What is a PnP error?
This is a BSOD error that different factors may trigger but is usually related to plug-and-play devices on your computer. Some of the significant characteristics for the error include:
Problematic Windows update – Windows updates are a huge factor; in some cases, the updates may be buggy, and at other times you may not have gotten the latest updates.
Outdated or faulty drivers – Since these devices are peripherals, they need drivers for proper interaction. Therefore, you may expect this error when your drivers are outdated or bad.
A computer system can instantly identify any hardware device without setting up hardware like dip switches or jumpers. These easily attachable devices are called PnP (Plug and Play) devices. PnP devices include mice, display monitors, keyboards, memory cards, USB flash drives, and hard drives.
Speaking of this failure, users reported the following problems:
Problem with PNP devices Windows 10 – There are many problems with PNP devices that can occur, but if you encounter any of issues, be sure to try some of our solutions
PNP blue screen – PNP error will always show a blue screen and force your PC to crash; your drivers most likely cause this, so be sure to update them
BSOD PNP_DETECTED_FATAL_ERROR – This is a BSoD error, and like many other BSoD errors, it can be hard to solve; however, this issue is often caused by software and driver issues, so you might want to remove specific applications and check if that helps.
PNP_DETECTED_FATAL_ERRORNorton, ntoskrnl.exe – Many users reported that Norton antivirus caused this issue on their PC; if that’s the case, remove Norton from your PC and install a different antivirus instead
PNP_DETECTED_FATAL_ERRORafter Windows update – Sometimes you can encounter this error message after a Windows update; if that’s the case, you need to find and remove the problematic update from your PC and check if that solves the problem
How do I fix the PNP_DETECTED_FATAL_ERROR?
Before trying these fixes, do the following:
Unplug and replug your peripherals
Reboot the device
Ensure that there are no problems with your hardware, like the RAM, for instance
In many cases, these are simple ways to undo common computer issues.
1. Use a repair tool
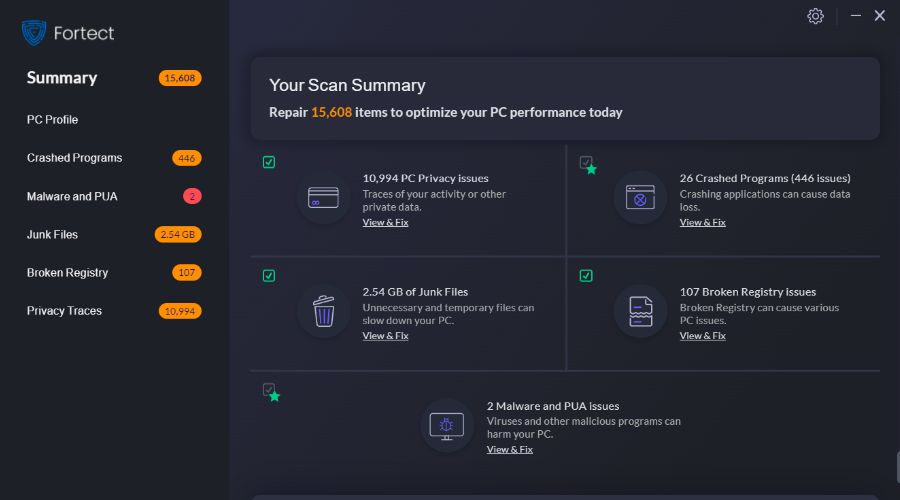
BSOD errors are hard to troubleshoot manually. Fortunately, there are dedicated tools that will find the cause and possible solutions to computer errors, including blue screens.
2. Update Windows 10
Press the Windows Key + I to open the Settings app.
When the Settings app opens, navigate to the Update & Security section.
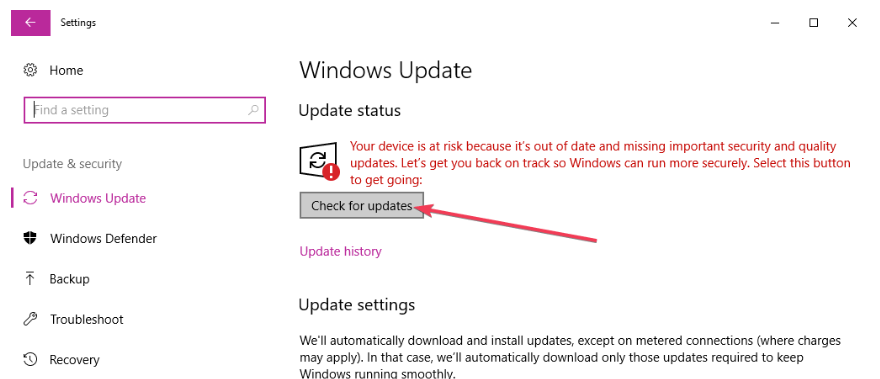
Now click the Check for updates button.
Windows will now scan for available updates and download them automatically in the background. Once the updates are downloaded, they’ll be installed as soon as you restart your PC.
3. Remove your antivirus
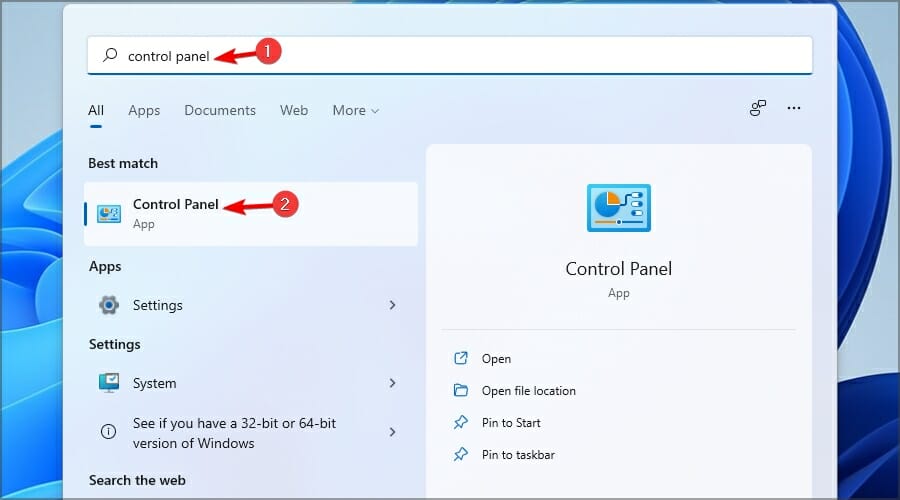
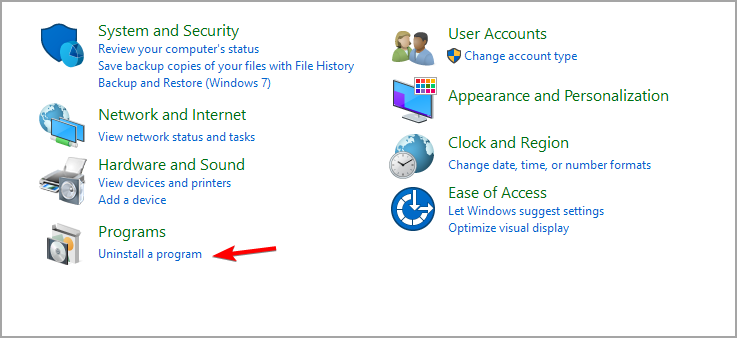
On Windows search, type the control panel and select Uninstall a program.
Click on your antivirus from the app list and select the Uninstall button.
Follow the wizard to complete the uninstallation.
If removing your antivirus solves the problem, you should consider switching to a different antivirus solution. We recommend you use any of these best antiviruses for Windows 10.
You should also follow the same steps to remove any problematic software. You may automate the process using any of the best uninstaller software.
Windows 10 requires drivers to recognize your hardware. If a specific driver is out of date, you won’t be able to use that hardware, and you’ll get a BSOD error such as PNP DETECTED FATAL ERROR.
Updating drivers is pretty simple, and you can do it simply by visiting your hardware manufacturer’s website and downloading the latest drivers for your device.
Many users reported that the Intel DPTF Manager driver was causing the issue. If you have this driver, we advise you to roll back to the previous version and check if that solves the problem.
Downloading all drivers manually can be a long and tedious process. Therefore we strongly recommend you use a tool that allows you to update all your drivers automatically.
Restart your computer a few times during the boot sequence to start Automatic Repair.
Select Troubleshoot.
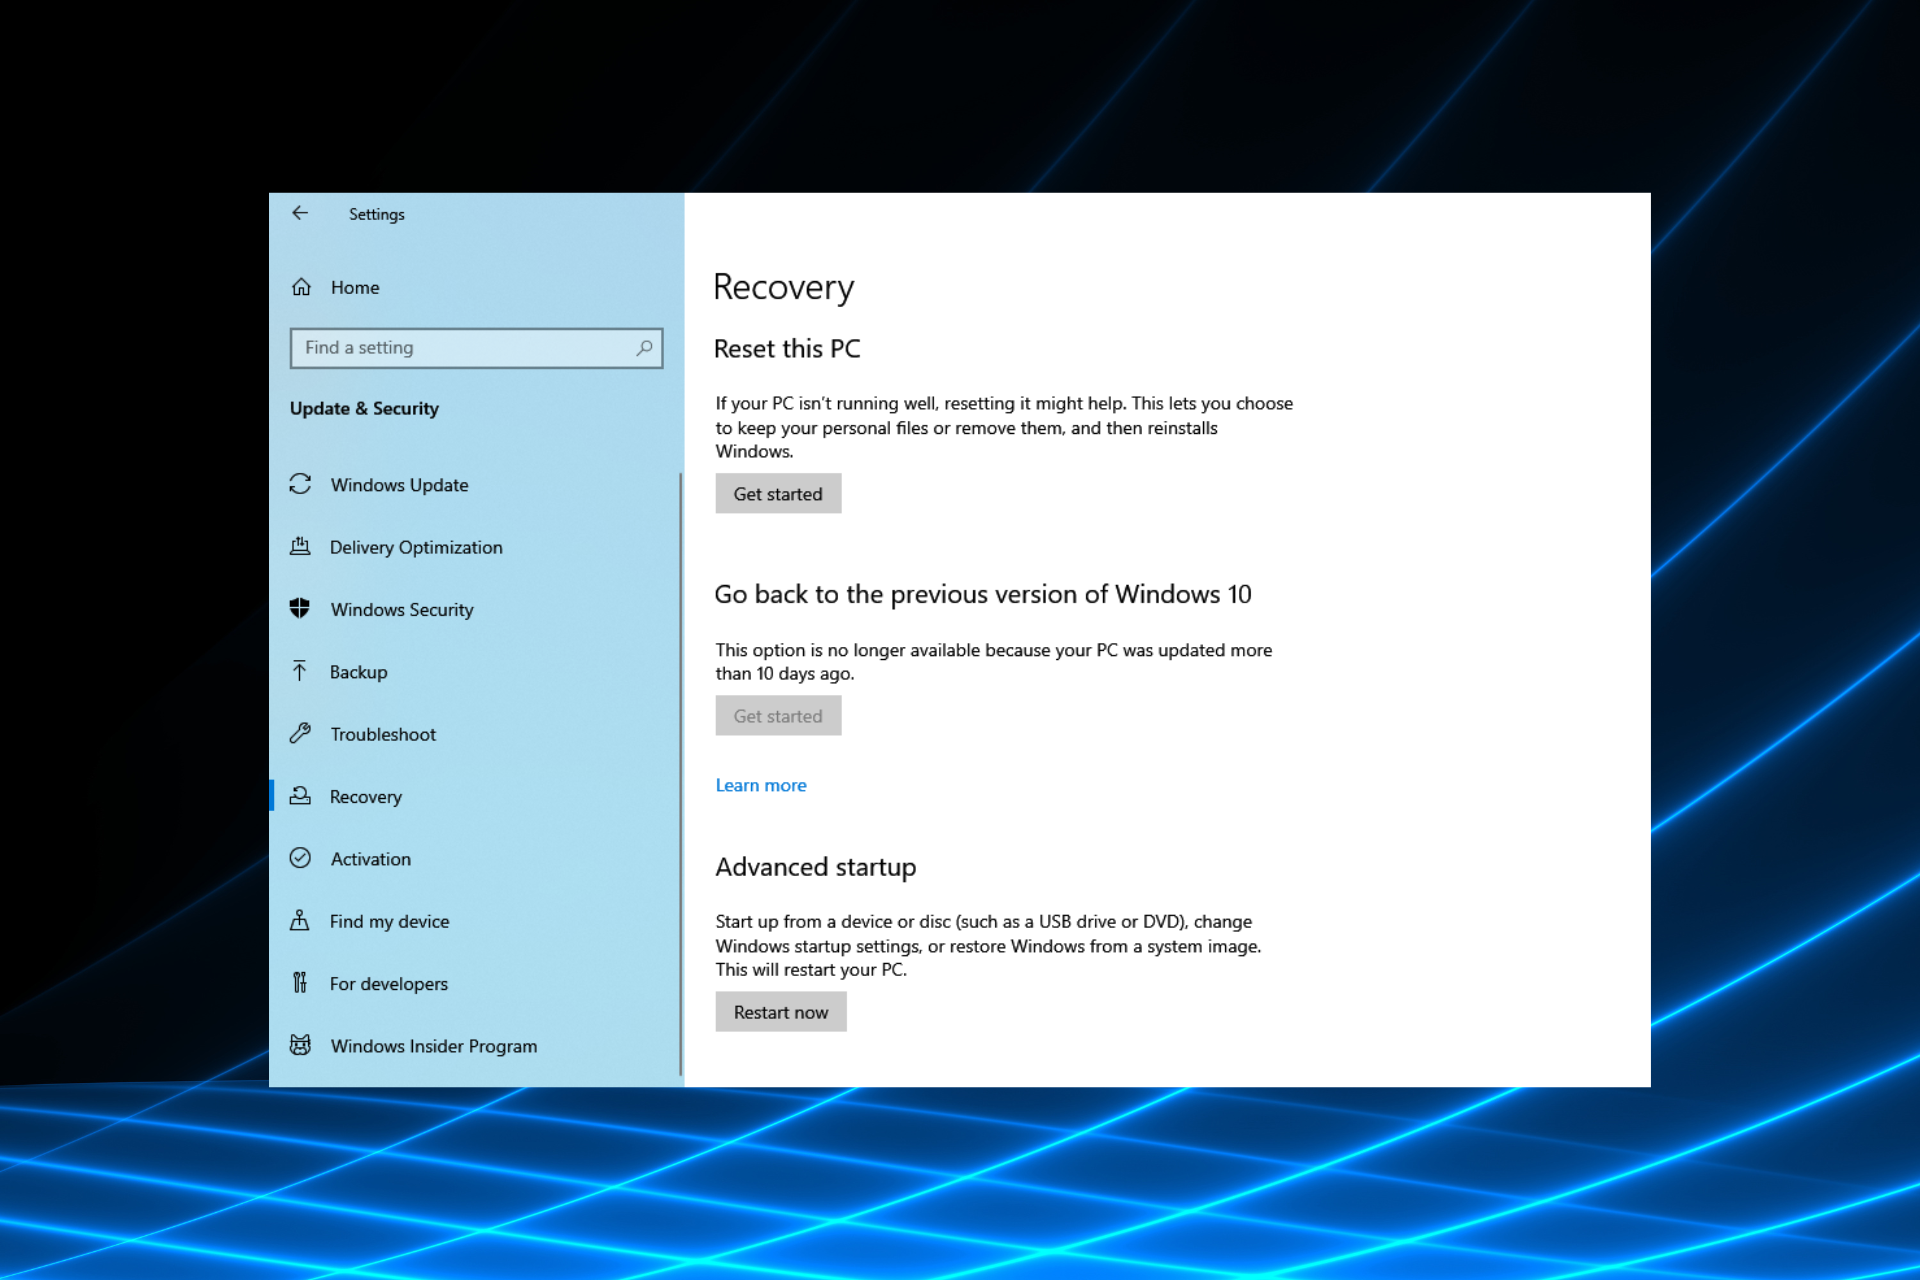
Choose Reset this PC, and select Remove everything. If you’re asked to insert Windows 10 installation media, do that.
Select only the drive where Windows is installed and click the Reset button.
Follow the instructions and wait for the reset process to complete.
The PNP-detected fatal error could cause specific problems, but it can be easily fixed by updating your drivers or removing your antivirus software.
The solutions discussed should come in handy for problemS with PNP devices on Windows 10, the stop code PNP detected fatal errors, and PNP detected fatal errors on different manufacturers and platforms like Dell, Virtualbox, HP, and Intel devices.
Nothing changes if you already have a personalized domain email address on Outlook.com, but just as long as the email is set up in Outlook. Just a quick note, you won’t be able to complete the email setup on a mobile web browser, you’ll need to set it up on a PC.
“Starting November 30, 2023, Microsoft 365 Personal or Microsoft 365 Family subscribers will no longer be able to create a new personalized email address associated with their Outlook.com mailbox.
After November 30, 2023, Microsoft 365 Personal or Microsoft 365 Family subscribers who remove their personalized email address from their Outlook.com account will not be able to add it back. The feature will no longer be available to you.”
If you are a Microsoft 365 Personal or Family subscriber and want to create a custom Outlook.com email address after November 30, 2023, you will need to upgrade to a small business plan, like M365 Business Basics.
M365 Business Basic works out to about $432 a year for 6 accounts ($72 a year per account), which costs substantially more than the $99 a year offered by a M365 Family account. However, if you run a one-person office, it’s almost the same price for a M365 Personal ($69) as it is for M365 Business Basic ($72).
Set up a personalized email address
Until November 30, 2023, you can still add personalized email addresses to M365 Personal and Family accounts, but you have to act fast. Here’s what to do.
Under Personalized email address, select Get Started.
Add a domain on Business Basic
Microsoft 365 Business Basic offers the best value compared to other plans because it provides businesses with professional email, cloud file storage, and access to the web and mobile versions of your favorite Microsoft/Office apps.
When you purchase M365 Business Basic, you have the option of using a domain you already own or buying one when you sign up. Here’s what to do.
If your domain registrar uses Domain Connect, Microsoft will automatically verify your domain and connect your Microsoft 365 account.
Still need help?
If you run into issues trying to set up your personalized email address, Microsoft is still working on adding descriptive error messages and is open to suggestions on how to fix this known issue. Here are a couple of things you can do.
1. Go to https://account.live.com/names/Manage. If you have more than 10 aliases on your Microsoft account, you will need to remove some before you can add a personalized email address.
2. Go to https://account.microsoft.com/security and click UPDATE INFO. If the alias that you are trying to add is already listed on this page, you will need to replace it with a different address before you can finish creating your personalized email address.
Microsoft notes that you might not be able to create a personalized email address for a child account, but they are working to fix this issue. Microsoft 365 subscribers can check out the new YouTube channel aimed at helping M365 for small business owners.
So what do you think about Microsoft’s decision to get rid of custom domains? Let us know in the comments!
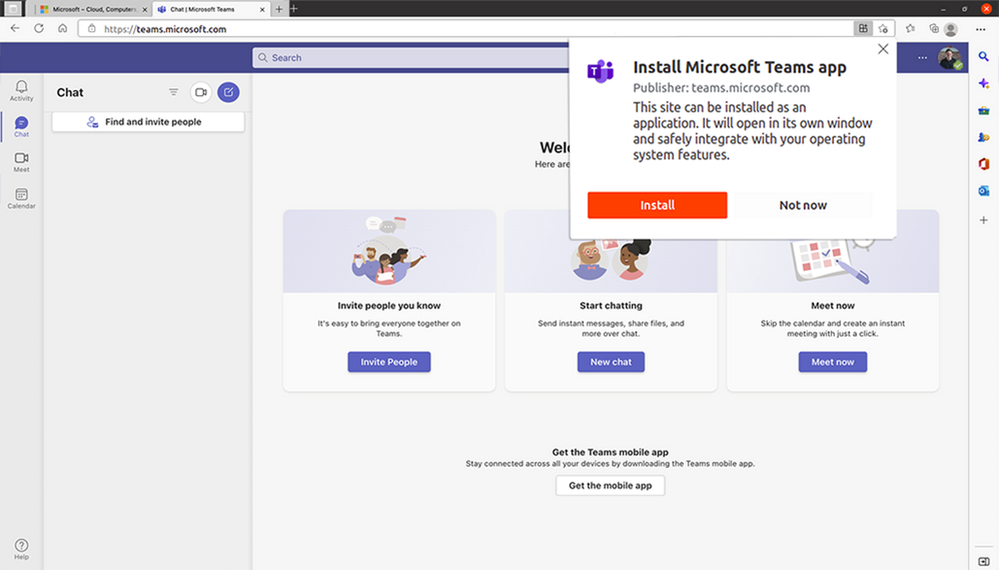
Today, Microsoft announced that Teams progressive web app (PWA) for Linux has reached broad availability. If you are using either Microsoft Edge or Chrome on Linux, then you will be able to access the new Teams PWA experience.
“Linux customers who rely on Microsoft Teams for collaboration and communication needs told us they want the full richness of Teams features available for their users in a secure way. This can now be achieved using the Teams PWA”. says Microsoft.
With this in place, Linux users will be able to get the latest Microsoft Teams features quicker as it closes the gap between the Teams desktop client on Linux and Windows.
What’s more, Linux users will now get to access more features such as gallery view, reactions, the raise-a-hand feature in meetings, and custom backgrounds. On top of that, the PWA experience will also provide you with desktop-like app features like system notifications for chat and channel and a dock icon with respective controls.
While on the Edge browser, the PWA for Linux can be used with Conditional Access configuration and applied through Endpoint Manager which will in turn allow users to access the Teams web application securely.
Generally, Ethernet cable connections are widely known for being secure. However, many users complain about their Ethernet disconnecting on Windows 7.
This can be a very frustrating issue, as it can disrupt your internet connection. If you are using a Dell system, you can check our guide to Ethernet not working through the Dell dock.
What causes Ethernet to disconnect on Windows 7?
There can be many reasons for your Ethernet to disconnect randomly. It could be due to driver issues or hardware problems. Let’s take a look at each of these possibilities one by one.
Overload on the network – Multiple devices connected to the same network utilize a significant amount of bandwidth that affects Ethernet connection.
Faulty hardware –In case you have a faulty Ethernet card, it could be causing the issue.
The cable may be the culprit – The loose or damaged cable between your computer and the router can cause an intermittent connection.
Configuration settings – Invalid configuration settings can also be the reason for your Ethernet to disconnect on Windows 7 because they can disrupt the connection.
Now that you are well aware of nuisances that result in the disconnection of the Ethernet on Windows 7 let’s move on to the possible solutions that can help you fix this issue once and for all.
How do I keep Ethernet from disconnecting on Windows 7?
Before moving on to the detailed solutions, we suggest you check the basics to resolve the problem. Try these workarounds:
Check your cable connection and make sure that it is not loose and properly plugged in. Also, check if the cable is damaged or not. If yes, then replace it.
If you have tried out all the above-mentioned preliminary checks, yet the issue persists, move on to the detailed solutions given below.
1. Run Troubleshooter on Network Adapter Settings
Type Troubleshooting in the search bar and click on it to open up the application.
Now, click on the View all option, present inside the left panel.
Scroll down and click on Network Adapter.
In the Network Adapter window, click on Advanced.
Check the box next to Apply repairs automatically, then click on Next.
Then, the troubleshooter will initiate. It might take a few minutes to run, and you will receive a comprehensive report in the end.
Running the troubleshooter on network adapter settings is likely to resolve the issue of the Ethernet getting disconnected at random intervals. In case you are still experiencing the said issue, try out further solutions given below.
2. Tune the Power management settings for the network adapter
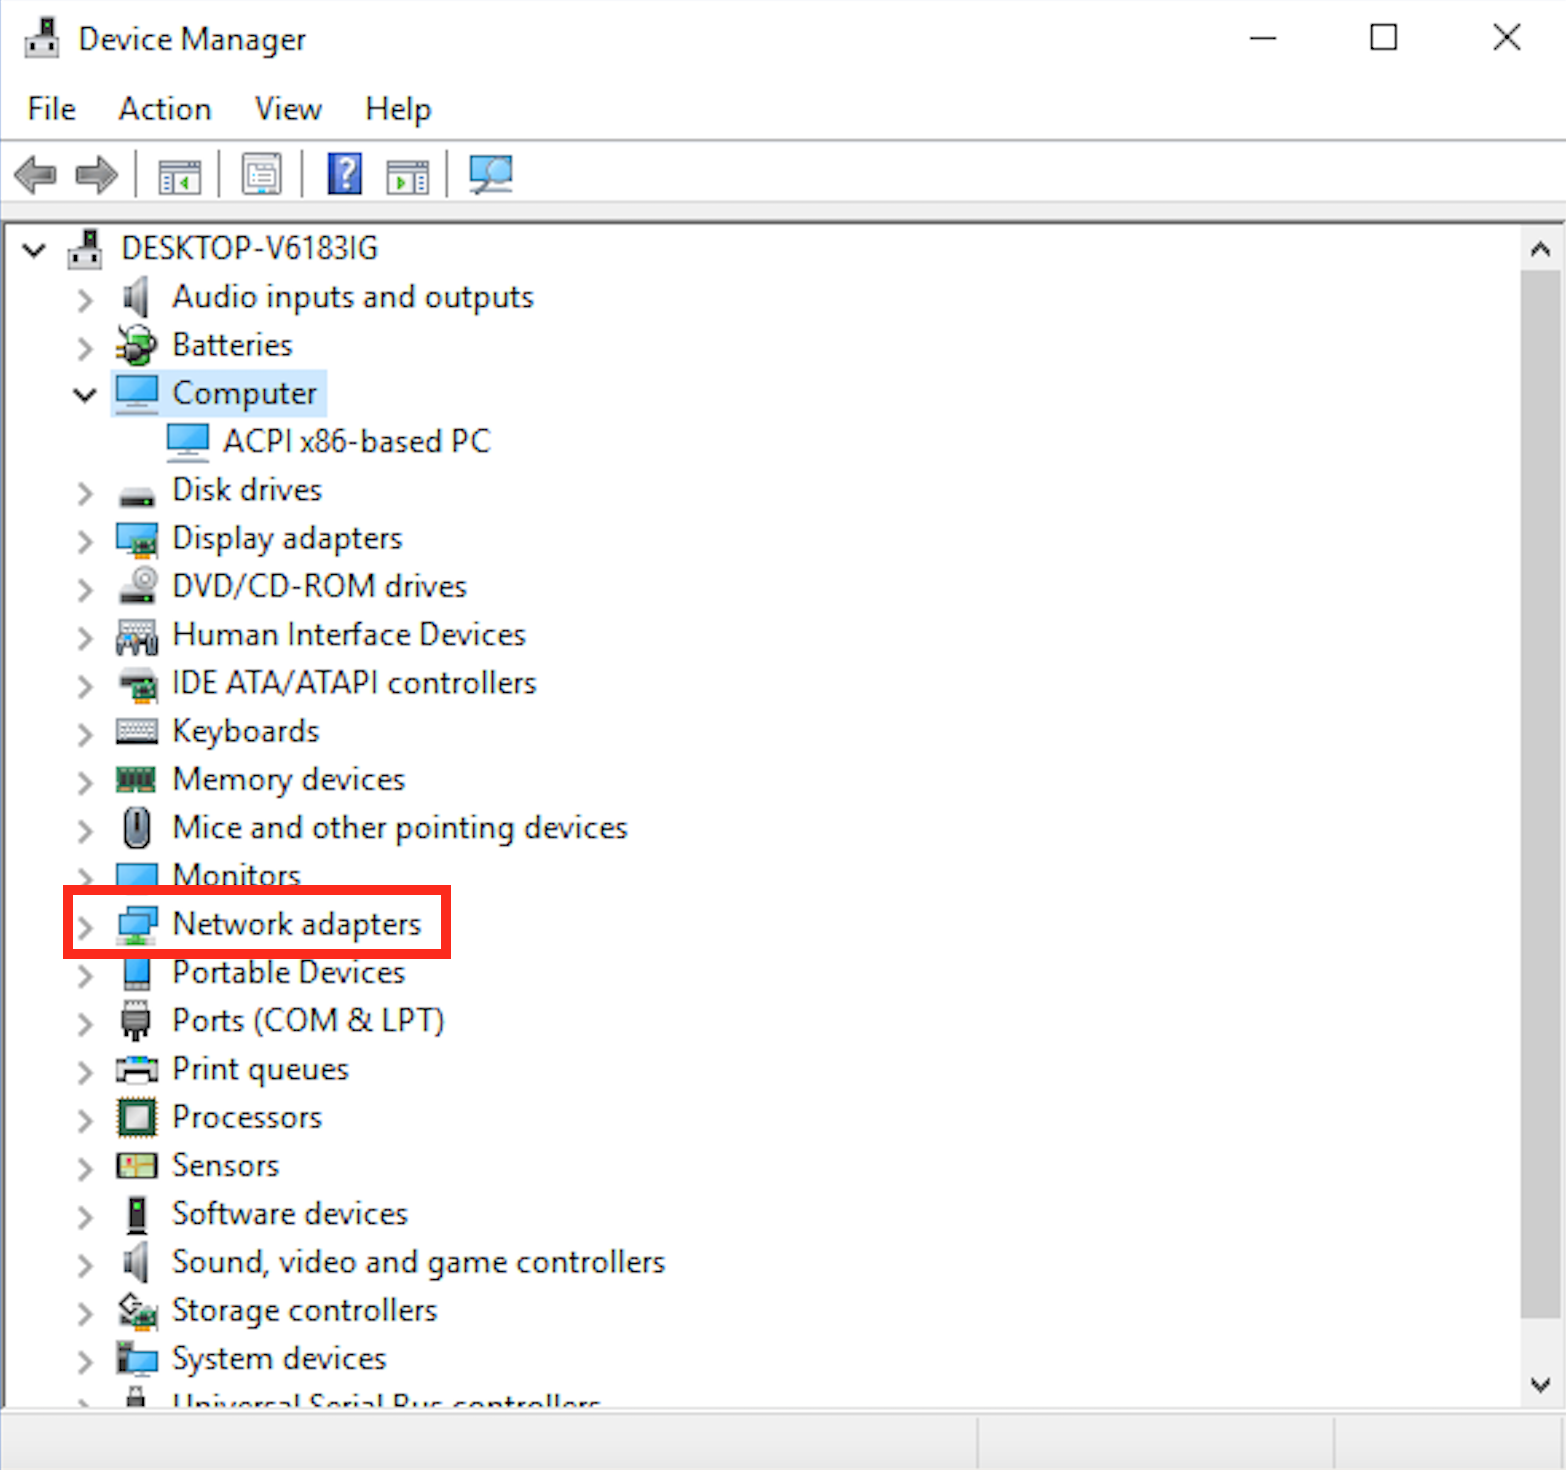
Type device in the Search bar, and click on Device Manager to open it.
Inside the Device Manager window, double-click on Network adapters to expand it.
A popup window will open up. Enter the Power Management tab within the popup window.
Within the Power Management tab, uncheck the box present beside Allow the computer to turn off this device to save power.
Lastly, click on OK to save the changes that you just made.
At times users have specific power-saving options enabled, which cause the Ethernet to get disconnected randomly.
In this case, altering those power-saving settings for the Ethernet adapter will for sure resolve this issue. If you can’t seem to spot the Power management tab, you can check our guide to fix the Device Manager missing Power management tab.
3. Don’t use a Proxy server
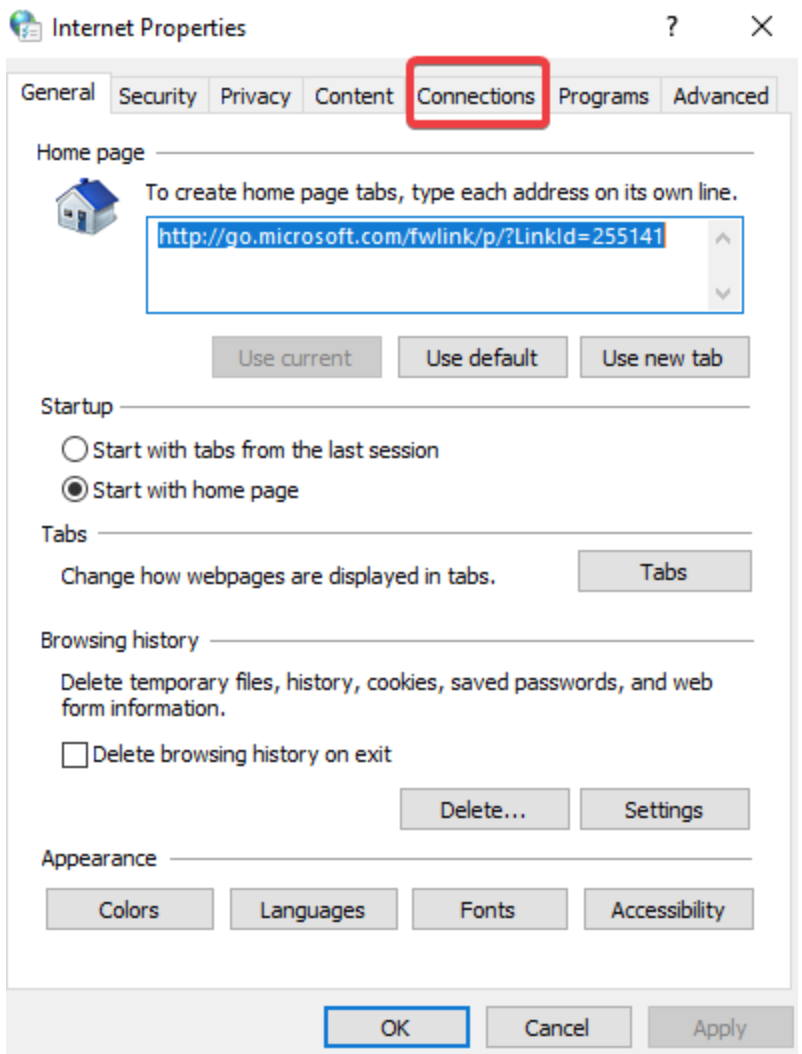
Type Internet Options in the search bar, and open up the application.
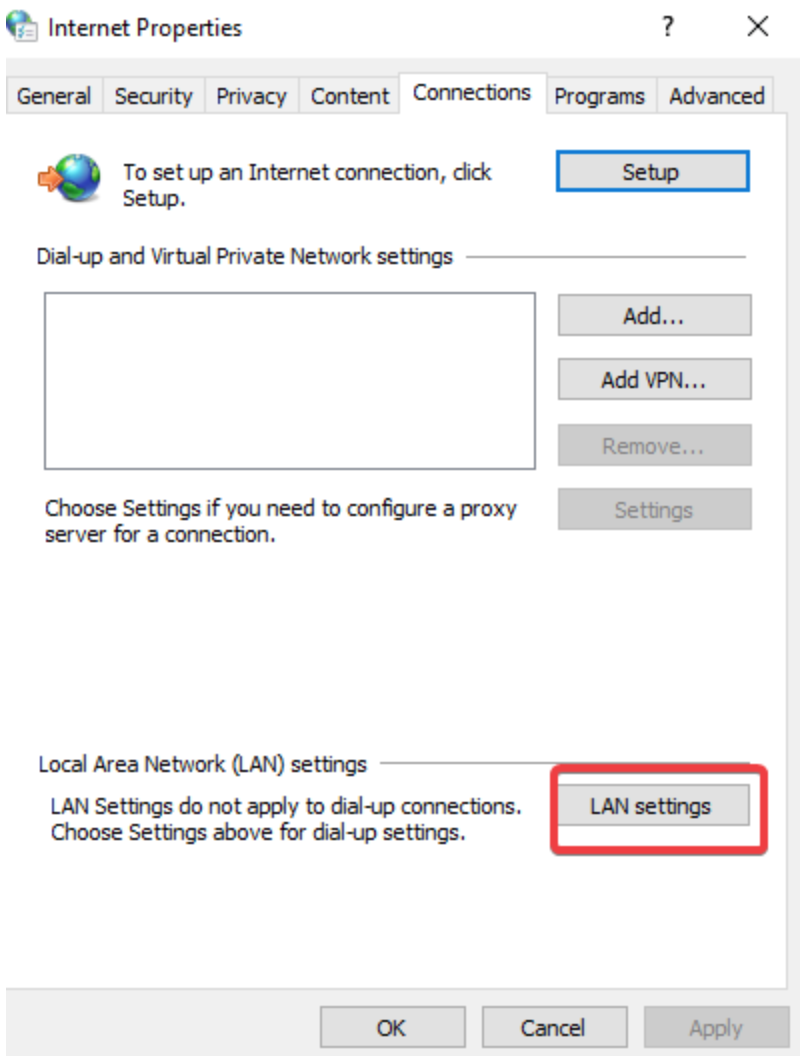
Enter the Connections tab present within the Internet Options window.
Now click on the LAN settings option present at the bottom left corner.
Deselect the box present beside Use a proxy server and click on OK to save the changes.
Often proxy servers interrupt your Ethernet connection by blocking your PC’s IP address from servers you usually connect to.
Hence, not making use of proxy servers is one great way to ensure a smooth Ethernet connection that won’t disconnect from time to time.
4. Turn off Windows Firewall
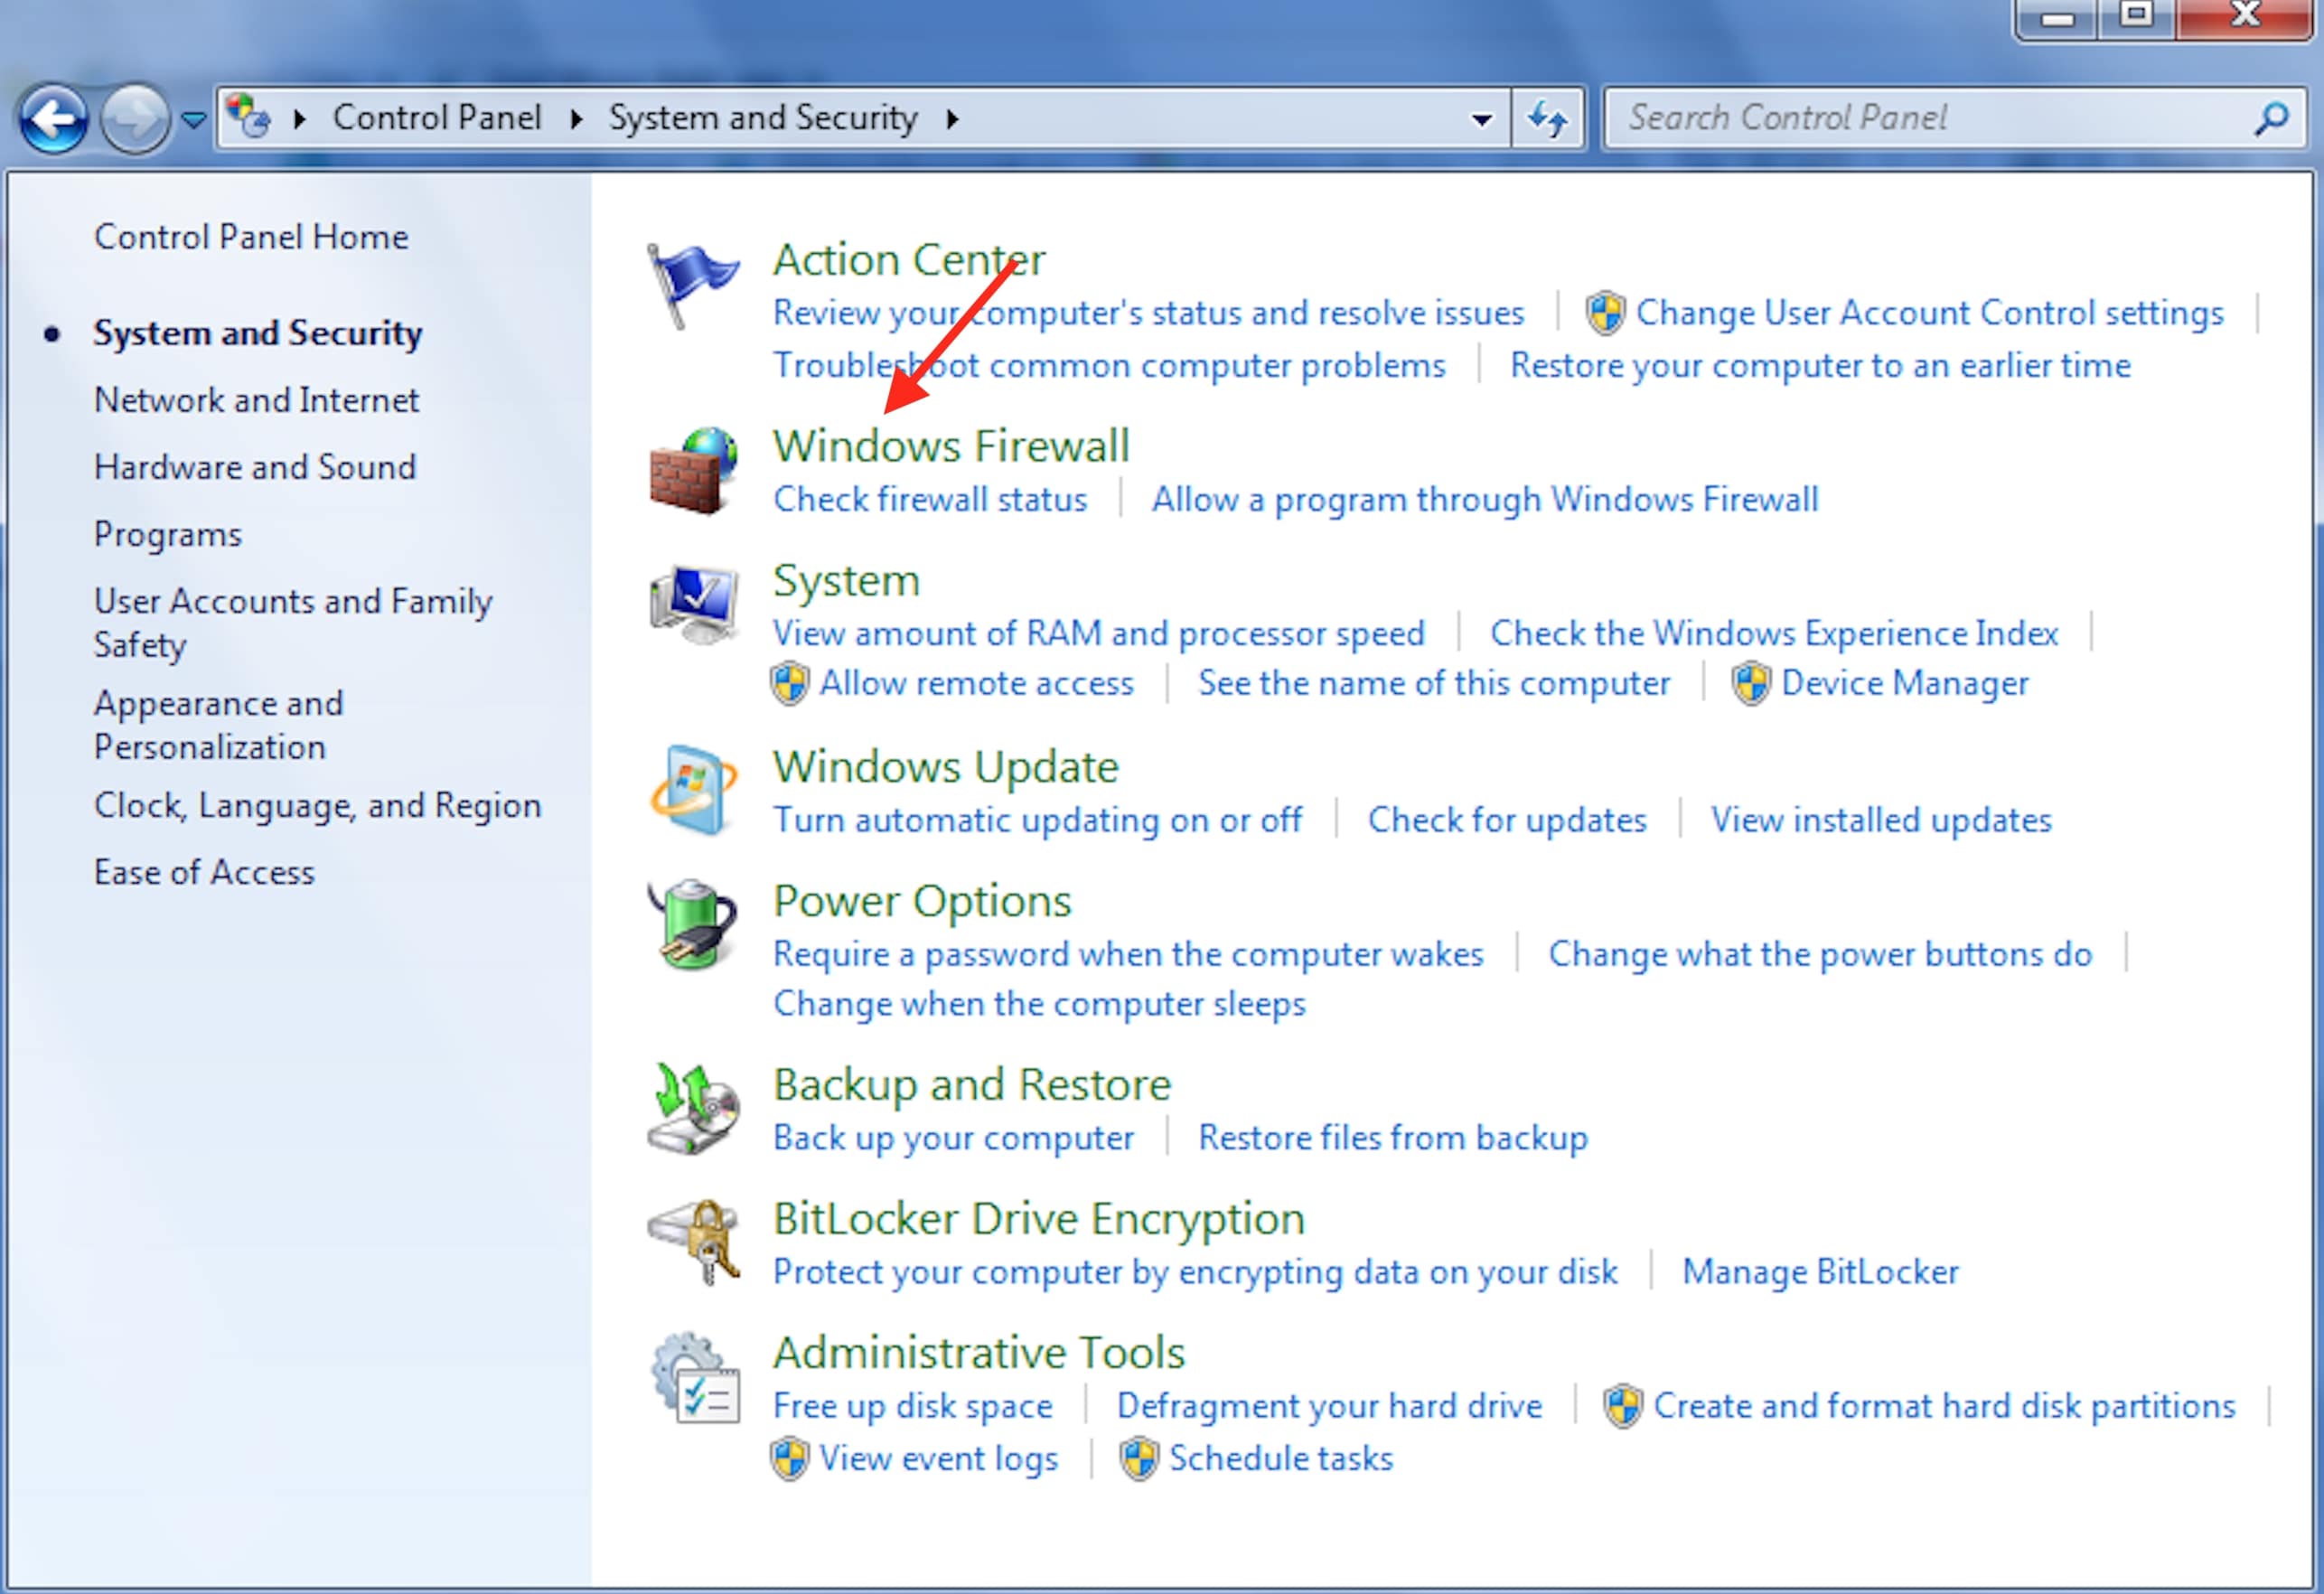
Click on the Start button and then on the Control Panel to open up the application.
Then, click on Windows Firewall.
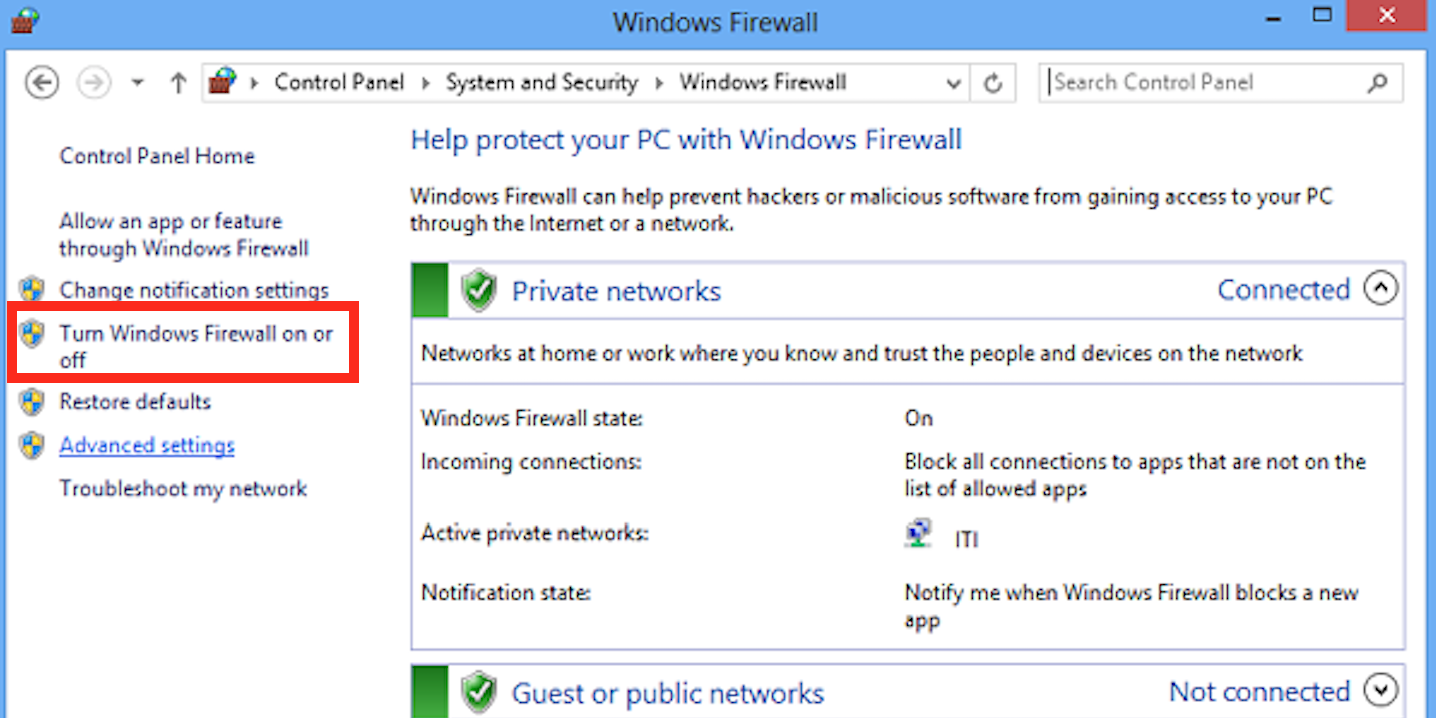
Inside the Windows Firewall tab, click on Turn Windows Firewall on or off, present in the left panel.
Next up, make sure both radio buttons of Turn off Windows Firewall (not recommended) are marked, and then click on OK to save changes.
A firewall does a great job in terms of providing protection against malicious spyware however, at times, it might interrupt the Ethernet connection on your PC.
In this case, disabling the Windows Firewall is your best bet. Switching off the Windows Firewall will enable you to enjoy a seamless Ethernet connection on Windows 7.
5. Add administrative and local services via Command Prompt
Click on the Start button, type Command Prompt and click on it to open up the application.
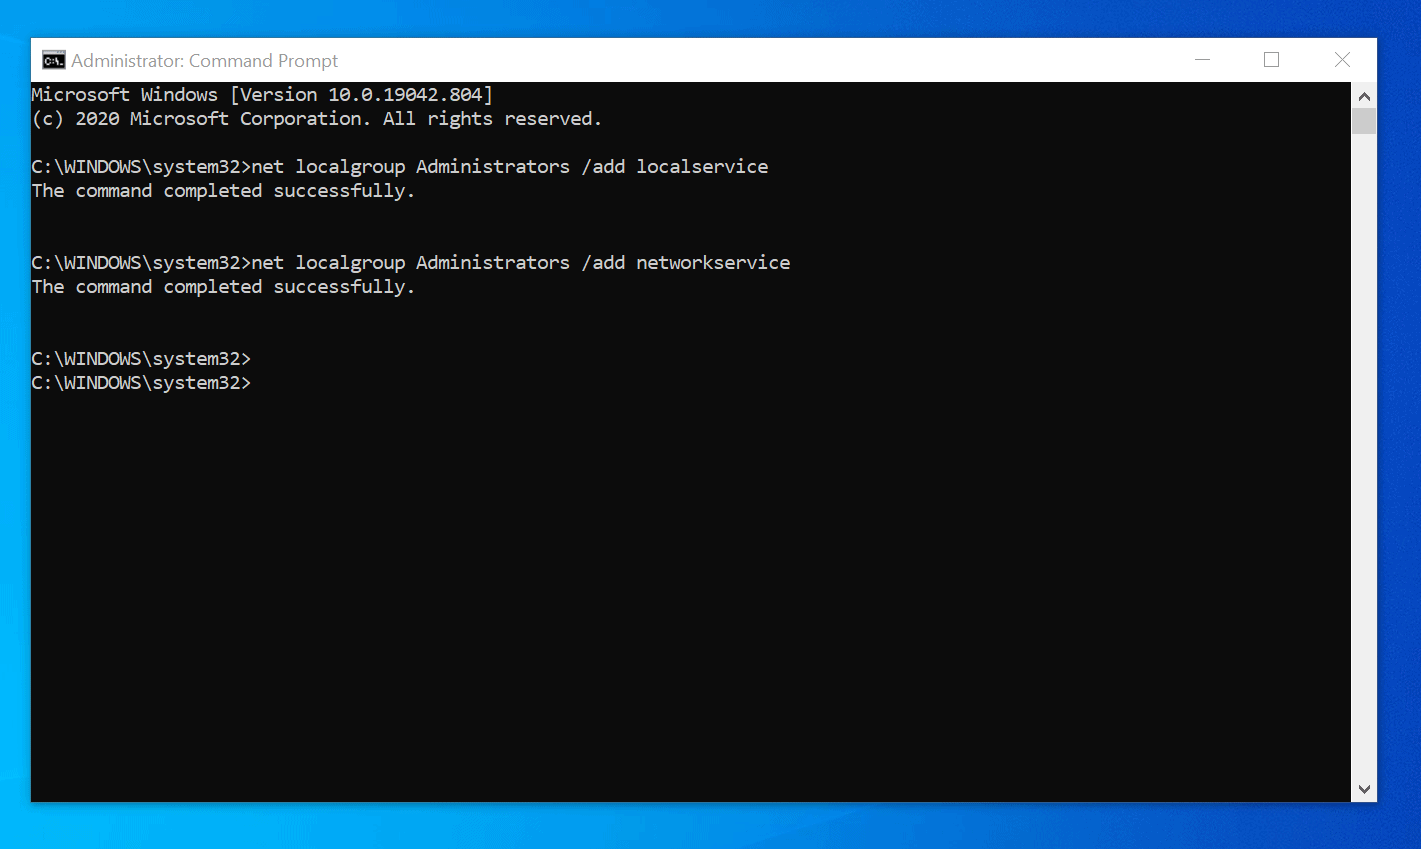
Copy and paste the following command, then press Enter. net localgroup Administrators /add networkservice
Then, again copy and paste the following command, then press Enter. net localgroup administrators /add localservice
Lastly, type the following command and then press Enter. exit
Once you have run the commands mentioned above, simply restart your computer to see if you have managed to fix the Ethernet connection.
Running the commands mentioned above on Command Prompt is likely to result in a smoother and more secure Ethernet connection on Windows 7.
We hope that this guide helped you in resolving your problem. If you have any further questions, please let us know in the comments section below.
Windows 11 removed the Search bar from Taskbar in order to optimize the user interface. However, it seems that we’re getting something similar in form of a Windows 11 desktop search bar.
You might not have noticed it for a while, but the Redmond-based tech company is still trying to push as many users as possible into defaulting to Edge when it comes to browsers.
The search bar works as an address bar, and it allows you to visit any page or search the web right from the Desktop.
Once you enter your search term, the Edge browser will automatically open and search for your query.
Thus, if you aren’t a fan of the idea of a new way to browse the web but do not appreciate Microsoft forcing you to use Edge, voice your concerns in the Feedback Hub.
How do I put the search bar on my desktop Windows 11?
Use ViveTool
In order to enable your desktop search bar, first of all, you need to install the Windows 11 Build 25120 that we’ve highlighted above. That is a Dev build so you need to be an Insider.
Next, you will need a tool called ViveTool and we’re going to show you how you can use it and get the Windows 11 desktop search box.
If you’re seeing the message There might be a problem with the driver for the WiFi adapter in Windows 10, it means your network adapter isn’t functioning properly. This guide offers fast and effective ways to fix WiFi adapter driver issues and get your internet back online.
How do I fix There might be a problem with the driver for the WiFi adapter?
Choose Troubleshoot. In the right pane, select Internet Connections and click Run the troubleshooter.
Follow the on-screen instructions to complete the process.
2. Update your drivers
1. Right-click the Starticon, then select DeviceManager from the list.
2. Expand the Network adapterssection.
3. Right-click the wireless driverand select Update driver.
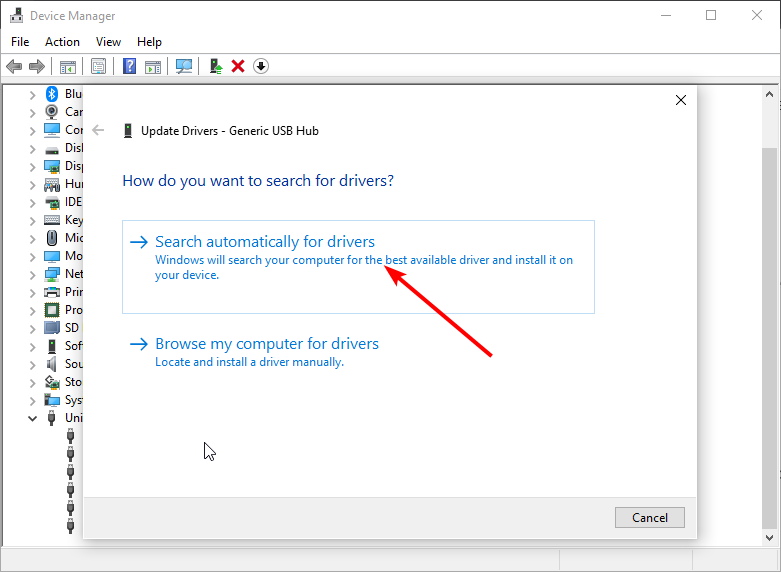
4. Click the Search automatically for drivers option.
5. Wait for the process to finish up and reboot your PC.
A great fix for the There might be a problem with the driver for the WiFi adapter message is to update your drivers. The easiest way to do this is via Device Manager, as shown above.
If you want to prevent driver-related issues in the future, we advise you to use professional driver updater software.
A dedicated tool will automatically find outdated drivers and update them, so if you want your PC to run smoothly, be sure to try this application. It will also keep your system safe from permanent damage by manually downloading and installing the wrong driver versions.
Right-click your network adapter and choose Properties.
Locate AVG network filter on the list and disable this feature.
Users reported this problem with AVG antivirus and Kaspersky, and in order to fix the issue, it’s advised to disable AVG network filter feature. If that doesn’t help, you might have to remove your antivirus software.
5. Make sure that the necessary services are running
Press Windows Key + R and type services.msc. Click OK or press Enter.
Locate WLAN AutoConfig service and double-click it.
Head over to the Dependencies tab and check all the services on the list. Memorize or write down all the services.
Now go back to the Services window and make sure that all these services are running.
In addition, be sure to set their Startup type to Automatic. Keep in mind that you need to do this for all services from Step 3.
Look for Show more restore points option and enable it.
Select the desired restore point and click Next.
Follow the on-screen instructions to complete the process.
There might be a problem with the driver for the Ethernet / Wi-Fi adapter message can be quite problematic, but we hope you solved the issue using one of our solutions.
If you’re looking for the best browser for low-end PCs, you’re in the right place. You no longer have to worry about slow performance and heavy resource usage.
We found the lightest browsers that won’t hog your resources. Find below all details about speed, RAM usage, as well as features so you can have all the info you need to make the best choice.
What are the best browsers for old PCs?
Here’s a quick look at our top 5 contenders. If you want more details and additional suggestions, we got them in the rows below.
Opera One is perhaps the greatest browser to use on your old Windows PC running Windows 7 and later versions for fast page-loading speeds and advanced AI tools.
Useful features:
Adblocker that loads webpages up to 90% faster
Free VPN included
Keyboard shortcuts instead of pointing and mouse-clicking
Tracker blocker that prevents data collection
Intuitive and distraction-free browser experience
It is optimized to consume as few resources as possible. It blocks ads which reduces website loading speed by a lot.
Plus, with a VPN built into the browser, you can ensure that your IP will not be tracked across the web, and at the same time will allow you to act region-restricted content without issues.
NOTE
Keep in mind that Opera One officially ended support for older Windows OS including XP and Vista. You may have to download older versions that aren’t as secure as the latest development.
UR Browser is a highly versatile browser that’s perfect for old computers. In addition, it packs many modern features that will help you quickly and safely surf the Internet.
Main features:
Your data is not shared with Google
The browser relies on privacy-friendly search engine Qwant
Built-in ad blocker
You appear as a different user on the Internet
The built-in VPN fully encrypts your connection
This browser loads webpages faster than any other browser you used on your good old PC.
UR Browser doesn’t load any trackers or ads. As you all know, ads and cookies often slow down your browser. This issue is even more prevalent on old computers.
UR-Browser also blocks dangerous websites that may install malware on your PC. In addition, automatic HTTPS redirects and the built-in virus scanner will stop virtually any cyber threat that may target your PC.
UR Browser
The UR Browser is an ideal choice if you still use an old computer. Third parties won’t be able to profile you.
K-meleon browser’s UI design is comparable to Firefox, and the software has extensive customization options for its toolbars, menus, and hotkeys. This makes it a great option to use on your outdated PC.
Main features:
Highly extensible
Very low RAM impact
No malware and adware
It runs on Windows 95, XP, Vista, and other platforms that predate Windows 7. The software has a recommended 256 RAM system requirement.
You can easily change the skin, buttons, toolbar, and even the menus from this software, not only making visual changes, but also an improvement in usability.
Pale Moon is a browser forked from Firefox’s source code. This is a stripped-down version of Firefox that runs on Windows XP and Vista.
Useful features:
Independent from Mozilla and Google
Supports all web standards in existence
Open-source
Supports complete themes
This lightweight browser has its own add-on ecosystem, and even though the classic Firefox add-ons can work, there might be compatibility issues here and there.
The browser also shares many of Firefox’s customization options for tabs, page content, etc.
If you find that this is not a priority for you, then you won’t regret giving Pale Moon a try.
The latest Firefox versions are not supported on older versions of operating systems anymore. However, this is still the best browser for slightly outdated Windows 7 desktops or laptops.
Other useful features:
Strong privacy settings
Very good processing speeds
Cloud backup services
Included screen-capture tool
Great mobile features
Stability is key for this browser, while the customization features ensure that you can make this software feel like your own with just a few clicks of the mouse.
Mozilla claims that Google Chrome hogs 1.77x more RAM than Firefox, and if you used Chrome for more than a few days, your system has felt its effects. So where does that leave Firefox, one might ask.
When it comes to add-ons, Firefox offers thousands of options that include a variety of elements, from functionality-related enhancements to operational improvements.
Midori (green in Japanese) is a lightweight browser that is not known very well across the web but offers a low impact on system resources and very good speeds as well.
Other useful features:
RSS support
Spell checker included
Remembers tabs open in the previous session
Font and display customization
Midori’s developers have designed this software to be a streamlined alternative to more bloated browsers. While this browser packs less than alternative browsers, it has only 37 megabytes.
If you’re looking for a different kind of browser, then Mypal Browser might be just what you need. The browser is designed to be compatible with older operating systems, and it still works on Windows XP.
Main features:
Mature fork of Firefox
Uses the Goanna rendering engine
Support for Pale Moon and legacy extensions
Perfect for older PCs and operating systems
There are two versions of this software, one based on Firefox Quantum, and while this is the more modern version, it’s unstable but it still works.
The other version is based on Pale Moon, but the development of that version has been abandoned, so while it works, it might be out of date.
Mypal Browser uses the Goanna rendering engine, thus ensuring maximum performance, even on older hardware.
The browser supports Pale Moon extensions, as well as legacy Firefox extensions that were released before Quantum. Customization is also a big part, and every part of the interface is customizable.
Overall, this is a great browser, especially if you’re on an older PC and you haven’t upgraded yet to a modern operating system.
Falkon is a lightweight web browser and it’s available on multiple platforms. The software is using QtWebEngine for rendering.
Main features:
Available on multiple platforms
Uses QtWebEngine
Lightweight
Available in portable version
Regarding the features, you can find all the standard features, such as bookmarks, history, and tabs. If you want, you can show your bookmarks or browsing history in a sidebar, which is a nice touch.
Falkon can be installed system-wide or you can install the portable version and use it to run it from a flash drive.
It’s worth mentioning that the software uses DuckDuckGo as the default search engine, so your search queries will remain private and secure from third parties.
The browser has limited extension support, so you probably won’t find your favorite extensions available. Overall, it’s a great browser, but it has a couple of limitations.
Another lightweight browser that is worth checking out is Lunascape Orion. The software uses a special technology that delivers faster startup and JavaScript operations.
Main features:
Multiple Rendering Engines
Fast Startup and JavaScript
Add-on Compatibility
Floating Sidebar
Split-Screen Tab Views
Each engine is configurable, so you can access the similar settings that you have available on other browsers. In addition to rendering engines, the software supports various add-ons.
It allows you to use Firefox, Internet Explorer, and Lunescape add-ons. Thanks to the floating sidebar, you can run multiple Gecko add-ons simultaneously and display them separately from the browser.
If you’re looking for a multi-platform web browser, SeaMonkey is a perfect choice. The software works on all versions of Windows, starting from Windows 7.
Other useful features:
Lightweight themes
HTML editor
Web development tools
IRC chat
However, you’re not limited only to Windows, and you can use it on Mac OS X 10.9 or newer and Linux. In fact, it’s a great alternative to conventional explorers if you’re looking for a lightweight browser for Mac.
Regarding the requirements, this browser is quite lightweight, and it needs 1GB RAM and 800MHz CPU.
Extensions are also available, allowing you to customize your browser with additional features. Thanks to the Data Manager feature, all your data such as cookies, permissions, preferences, passwords, and autofill data will be located in a single place.
We have to mention feed detection which allows you to easily subscribe to certain websites. Lastly, there’s a built-in email client, so you won’t have to use any third-party tools.
Overall, this is a pretty versatile web browser with a wide array of features, so it’s worth checking out.
Slim Browser is designed to be fast and responsive while delivering an ad-free browsing experience. In addition to blocking the ads, the software also offers extensive tracking protection.
Useful features:
Instant photo framing and upload
One-click Facebook integration
Web page and text translation
Weather forecast
The browser supports customization via extensions, and it’s compatible with all Firefox extensions, so you can enhance it any way you want.
To make accessing your favorite sites faster, the software supports URL aliases, so you can open the desired website simply by typing a few letters.
You can also find other interesting features, such as a web page screenshot tool that allows you to take a screenshot of the whole page or just one of its segments.
To answer this question, our team of testers has downloaded and installed all of the browsers we will cover in this article.
Each browser variant has been benchmarked using the Base Mark Web 3.0 test while using the same system, with the same configuration and number of running programs.
To understand the results, a higher score value implies better browsing speeds for the browsers presented below.
Browser
Benchmark Score
1. UR Browser
1413.48
2. Opera One
835.6
3. Falkon
800.6
4. Slim Browser
675.43
5. SeaMonkey
658.35
6. MyPal
609.81
7. Maxthon
581.35
8. Firefox
567.65
9. Pale Moon
533.02
10. K-Meleon
332.91 - Browser wasn't able to run WebGL 2.0 Test
11. Lunascape Orion
No benchmark tests chould be run
12. Midori
No benchmark tests chould be run
At the top of our list, we have UR Browser with a benchmark score of 1413.48, making it the fastest browser for all PCs and an excellent option for low-specced PCs worldwide.
Following close behind, we have Opera One with a score of 835.6, making it the second-fastest browser for PCs with low system resources.
Another essential factor to consider is your PC optimization, which can also increase the usability of all apps, including the browser.
What browser uses the least RAM?
Opera One takes the cake and has proven to have the least impact on your resources. If you’re wondering which browser is best for 1GB RAM, you’ll be pleased to know that it only uses around 600MB.
The tests that we concluded were made using the same laptop while also playing the same youtube video at the same quality (720p).
Here are the results:
Browser
CPU Usage
Memory Usage
Opera One
0.7 - 1.0 %
400- 620 MB
UR Browser
0.8 - 2.0 %
657 - 651 MB
Falkon
2.3 - 3.1 %
387 MB
Slim Browser
1.9 - 2.8 %
410 - 420 MB
SeaMonkey
2.2 - 3.1 %
336 - 353 MB
Maxthon
2.2 - 3.1 %
290 - 336 MB
Firefox
1.4 - 2.3 %
415 - 478 MB
K-Meleon
1.4 - 2.5 %
160 - 170 MB
Lunascape Orion
2.2 %
259 MB
Midori
2.4 - 3 %
355 MB
Pale Moon
1.5 - 2.9 %
539 MB
Mypal
2.6 - 3.1 %
569 MB
As you can see from the tests we performed, the browser that stands out with the most negligible impact on system resources is Opera One, using only 0.7 to 2.0% of the CPU and around 600MB.
This makes it the best browser for 1GB RAM PCs. It’s also the best browser for 2GB RAM PCs, for that matter.
In the same idea, this browser will also perform perfectly and offer you greater browsing speeds on a 4GB RAM system as well, making it the best browser for 4GB RAM laptops and PCs.
Close behind we have UR Browser that uses 0.8-2.0 % of the CPU’s power, and 650MB memory usage. This option could be fit to run on a 1GB RAM PC but loses in front of Opera One because of the security and stability differences.
The rest of the browsers, even if some are more lightweight than others, have shown varied results, so the decision might come down to the exact circumstances you find yourself in.
Taking the system usage data for each of these browsers and combining this information with the results of the benchmark tests, we can come to a set of very specific conclusions:
These are the best browsers for laptops or desktops with less than 4 GB RAM and CPU specifications with lower clock speeds.
Summary
As you can see, a few browser options can increase your PC’s usability, no matter how old. The best part is that some have great design and security features, so you won’t go missing in these departments.
The best bet on all fronts is the UR Browser, followed closely by K-Meleon and Pale Moon.
The rest of the options we presented are more resource-heavy and could cause problems on an old system, but the extra features could prove helpful if they work on your system.
These browsers are compatible with a broader range of Windows platforms than most software and won’t hog a considerable percentage of system resources, even on outdated desktops and laptops.
You can also explore modern lightweight options by checking this guide on alternative browsers for Windows 11 which highlights efficient tools that work smoothly even on modest hardware.
Encountered an error, A running process may be interfering with the correct operation of AoE2 DE, while Playing Age Of Empires 2: Definitive Edition? You are not alone; it happens to the best of us.
This guide will discuss how to fix this issue so you can play your favorite real-time strategy game without any hindrance. But first, let us know why this error occurs in the first place.
Why does a running process may be interfering with the correct operation of AoE2 DE error occur?
Users usually face this issue because of the antivirus software installed or security settings enabled on their computers. The problem could also be due to game overlays or active processes.
Security tool: Sometimes, your antivirus software or Windows Defender flags some associated files of the game as a threat and tries to stop them from running.
Active processes: Some unnecessary processes may use up the RAM needed to run the game smoothly, hence the issue.
Game Overlays:Game overlays can be a great way to connect, read chat, and view events in your Activity Feed, but it is not always optimized for all the games. Therefore, it could make your game freeze or even crash.
What can I do if a running process may be interfering with the correct operation of AoE2 DE error?
Before jumping into serious troubleshooting, here are a few things you can do to resolve the problem:
Restart your computer.
Ensure your Windows is up to date.
Disable all unnecessary active processes before running the game.
Try to run steam/the game with admin rights, as the issue could have occurred because the game didn’t have enough permissions to run.
If you have an antivirus installed on your computer, you must add the whole game installation folder to the exclusion list.
Steps to whitelist a folder can be different for every antivirus tool; we have mentioned adding a folder to the exclusion list for Avast for you.
Launch Avast and go to Settings.
Select General> Exceptions.
Go to File Paths> Browse.
Locate the game installation (.exe) file and add it.
Click OK and turn on real-time protection.
3. Disable the Antivirus
If adding an exception doesn’t work, try disabling the antivirus while you play the game. Here we have mentioned the steps to disable Avast for you:
Go to the system tray and click the Avast icon.
Click Avast shields control, you will get options to disable. Choose accordingly.
Click OK to confirm the action. The antivirus will be disabled for the chosen time. Please make sure you enable antivirus on your computer once done playing the game
So, in this way, you can fix a running process may be interfering with the correct operation of AoE2 DE error.
You can reach out to the Age of Empires support team if the issue persists. They will ask you to provide specific details, including your antivirus software’s name, DxDiag, mdmp file, and recent crash logs. If you are unsure how to find this information, you can check out this support article from the Age of Empires website.
If we have missed any solutions that helped you resolve the issue, please mention them in the comments below.
The ISO files can be used to share enormous amounts of data online in a single file without any data loss. Users employ these files in software like Hyper-V.
But, like all programs, this virtualization product is not without errors! Recently, you may face frustrating issues like Hyper V not booting from ISO on your Windows 10 PC.
Thankfully, this guide has three amazing hacks to help restore your Hyper-V device to normal condition.
The problem might also occur when your PC’s ISO file is stored in another incompatible shared folder.
What can I do if Hyper V is not booting from ISO?
Before diving into the in-depth solutions, you can try making a copy of the ISO file and use that instead. This has worked out for many users.
1. Move the ISO file to the local physical drive
Go to File Explorer and choose your ISO file.
Then, click on the Mount button under the Disc Image Tools tab, as shown.
Move the necessary files, right-click on the drive and click on Eject to unmount the ISO file.
2. Disable Secure boot in the BIOS settings (UEFI boot issue)
Open the BIOS settings on your PC by pressing the F1, F2, and F12 or tapping the ESC keys when your PC is booting.
Then, navigate to Troubleshoot,followed by Advanced Options: UEFI Firmware Settings.
Locate the Secure Boot setting in the BIOS setting and disable it. You can find this setting in the Security tab, the Boot tab, or the Authentication tab.
Now, save the changes and exit. Wait until the PC reboots.
Check if the Hyper-V ISO not booting is resolved now.
One common factor responsible for it is compatibility. In other words, not all monitors are compatible and can work with any PC. So, users can find it hard to detect a monitor that isn’t compatible with their devices.
Outdated Windows –This will prevent your PC from accessing updates and patches for fixing bugs. Hence, it can cause issues with you detecting the third monitor.
Outdated drivers – When these drivers are outdated, they malfunction and affect the system’s performance. They can prevent your PC from being able to detect or connect with a third monitor.
Issues with your PC’s monitor settings – Your computer needs to be configured to detect and use the third monitor. If there is any problem with the settings on your PC, it may be impossible to get through with the process.
These causes may vary in different devices, but almost the same solutions can fix them.
What can I do if the third monitor is not detected on Windows 11?
Users should observe the following preliminary beck before trying any advanced troubleshooting:
Unplug USB devices plugged into your PC.
Power cycle the third monitor not detected on Windows.
A great method you should give a try is using Outbyte Driver Updater, which is a specialized tool that runs an extensive scan of your device to find missing or outdated drivers and then updates them automatically.
Outbyte Driver Updater
Advanced driver update software that easily updates all your device drivers in need.
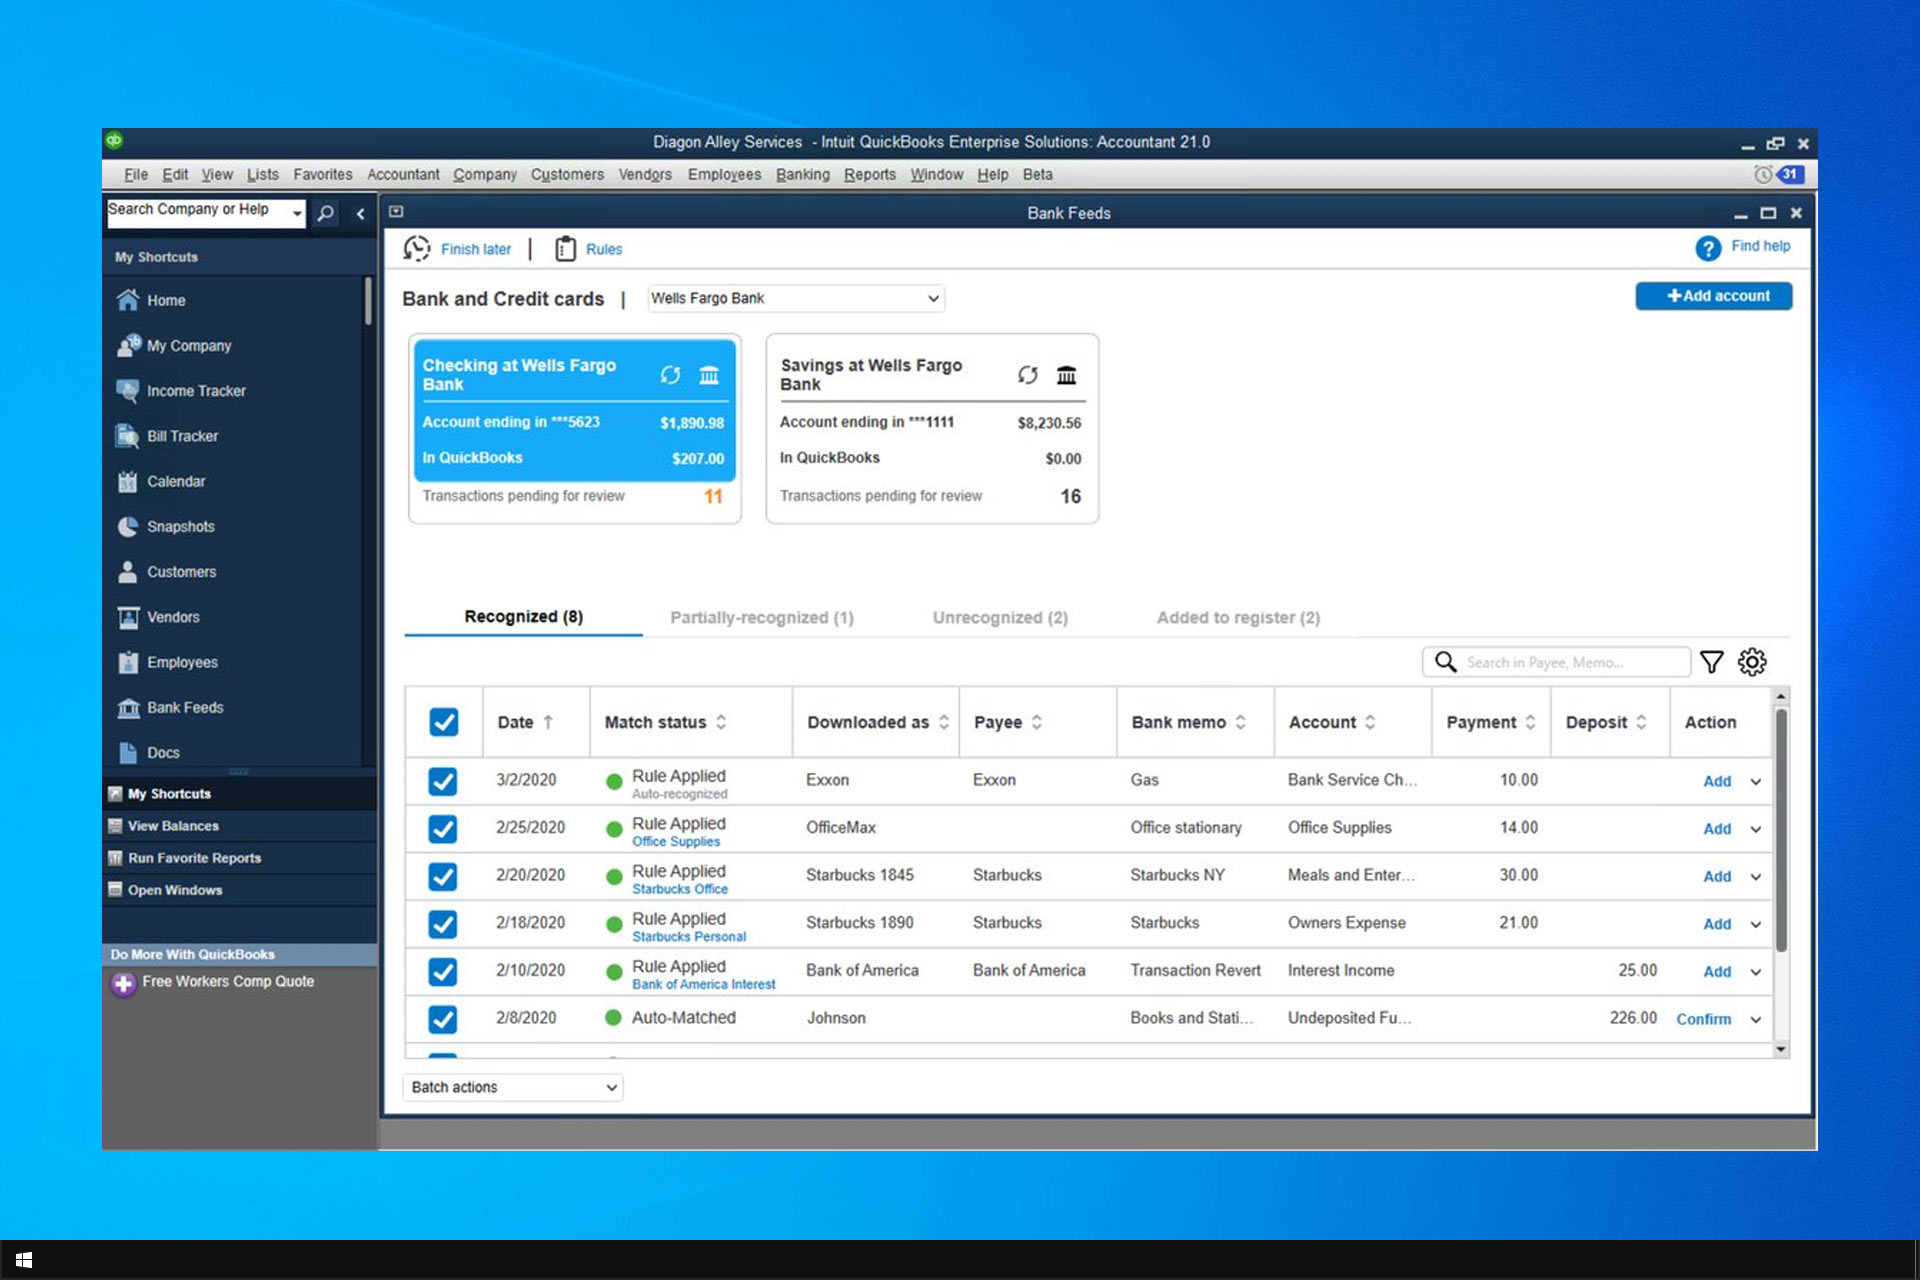
QuickBooks Desktop is an accountancy application for Windows, but many reported that QuickBooks won’t open in Windows 10.
This isn’t the only issue with this service, and many reported QuickBooks scanner driver error 281. However, in today’s guide, we’ll focus on what to do if this app won’t launch on your PC.
How come QuickBooks Desktop won’t open?
First, let’s consider some of the more likely reasons for QuickBooks Desktop not opening in Windows 10. These are some of the potential causes for QuickBooks Desktop launch issues:
Corrupted or faulty QuickBooks Desktop installation – QuickBooks Desktop has a corrupted installation.
A recent Windows 10 update – Uupdates are known to generate compatibility issues, and several users reported that QuickBooks won’t open after Windows 10 update.
Corrupted QBWUSER.INI data file – QBWUSER.INI is a registration file for QuickBooks Desktop that might be corrupted.
Conflicting apps – A background app could be interfering with QuickBooks Desktop.
What can I do if QuickBooks Desktop is not opening in Windows 10?
1. Terminate the QBW32.exe process before launching
Right-click any empty part of Windows 10’s taskbar and select Task Manager.
Click Processes inside Task Manager.
Look for and select a QBW32.exe process for QuickBooks Desktop on the tab.
Select the End task option for QBW32.exe.
Then try launching QuickBooks Desktop.
2. Rename the QBWUSER.ini file
Open File Explorer.
Select Explorer’s Hidden items checkbox on the View tab.
Next, bring up the folder that contains the QBWUSER.ini file. You can find that file in this directory path: C:\Users\YOUR USER NAME\AppData\Local\Intuit\QuickBooks [year]
Click the QBWUSER.ini file with your right mouse button to select Rename.
Type QBWUSER.ini.old for the file’s title and press Enter.
Then select the Installation Issues tab in QuickBooks Tools Hub.
Click the QuickBooks Install DiagnosticTool button.
Wait for the diagnostic tool to finish.
Close the QuickBooks Diagnostic Tool window.
Press the Alt + F4 key combination and select Restart on the drop-down menu.
The Program Problems tab also includes troubleshooting options that can feasibly fix QuickBooks Desktop not opening. Select theQuick Fix my Program option on that tab to run a quick repair scan.
4. Select the Repair option for QuickBooks Desktop
Click the Type here to search bar or button on Windows 10’s taskbar.
Enter the keyword appwiz.cpl (for the Programs and Features applet) in the search box.
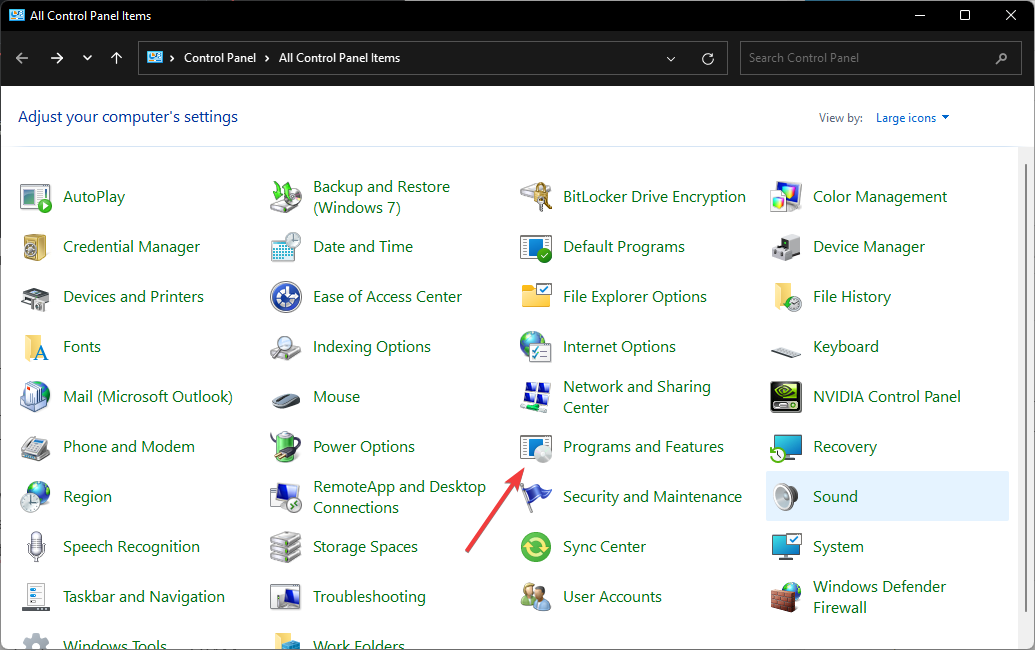
Select the appwiz.cpl search result to view Windows 10’s uninstaller tool.
Next, select QuickBooks Desktop in the Programs and Features applet.
Click QuickBooks Desktop’s Repair option.
Select the Repair radio button in the QuickBook Installation window.
Then click the Next option to repair.
Restart Windows 10 afterward.
5. Run QuickBooks in Safe Mode
Open the Start menu and then click the Power button.
Hold Shift and select Restart.
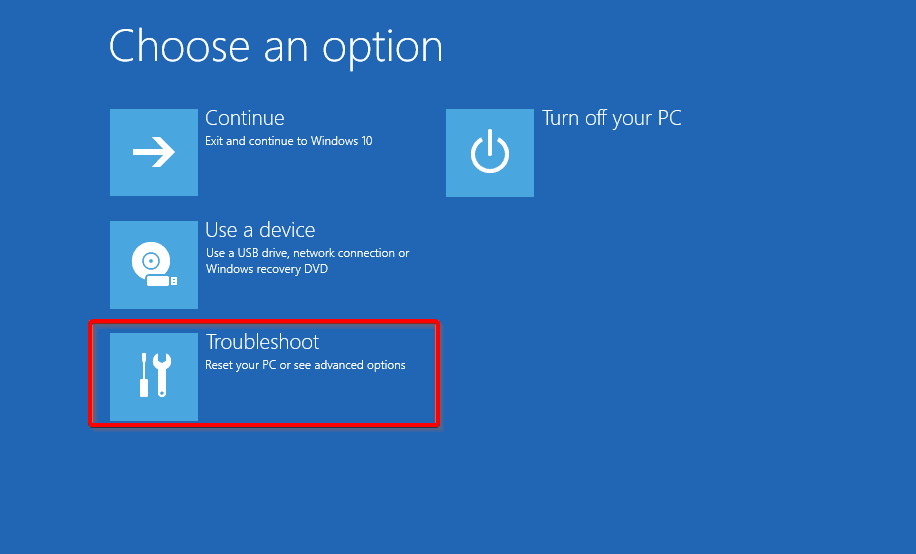
Select Troubleshoot.
Next, navigate to Advanced options.
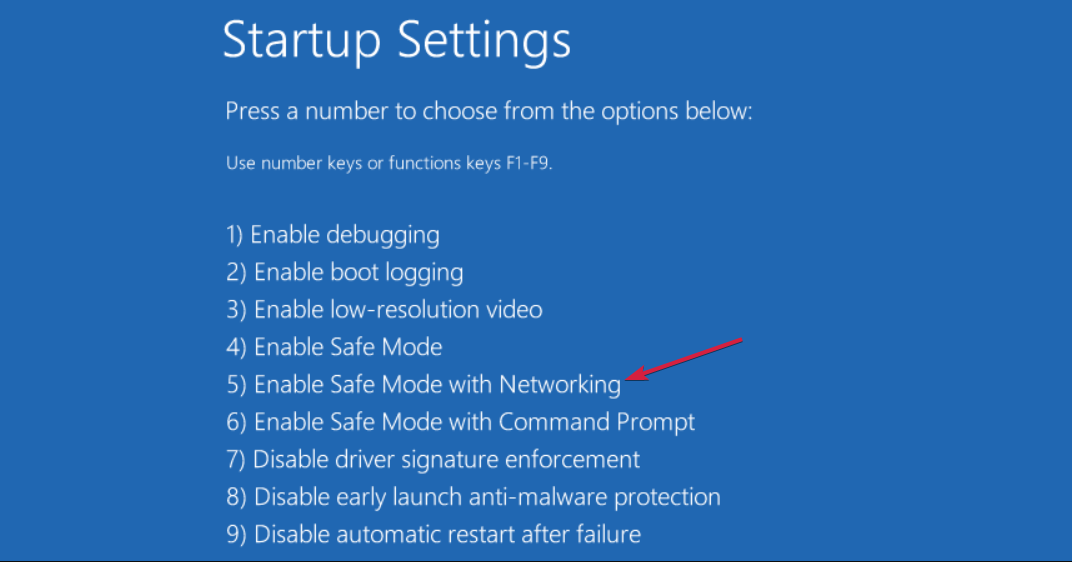
Click on Startup options and then click on Restart.
Select Enable Safe Mode with Networking.
Launch QuickBooks Desktop and check if the problem is still there.
If you can start QuickBooks in Safe Mode, there was probably a background process conflicting with that application. You can continue utilizing it in Safe Mode or try to identify the conflicting software.
Download QuickBooks Desktop Manager if you don’t already have it.
Open the QuickBooks Desktop Manager, and reinstall the latest QuickBooks Desktop version from there.
NOTE
The QuickBooks Tools Hub includes a Clean Install Tool option you can select before reinstalling the software. That option will thoroughly eradicate leftover residual files from uninstalling QuickBooks.
We hope one of those resolutions kick-starts your QuickBooks Desktop application. If you still need other potential fixes, you can contact QuickBooks Desktop support.
Halo Infinite is one of the most popular multiplayer FPS games. However, users often get into trouble while playing multiplayer matches. When this type of problem occurs, gamers may see the following message:
Error retrieving data center connection quality information. Please try again later
Why does the Halo Infinite game fail to retrieve data centers?
If you get this error while attempting to play a multiplayer game, it may happen due to the following reasons:
Background service issue: Some required background processes are necessary to run Halo Infinite properly on your PC.
Network driver problem: Incompatible or outdated drivers can cause this problem as well.
Corrupted game files: Corrupted game files may cause Halo Infinite crashing issues or communication problems with the data center.
How do I fix the error retrieving the data center in Halo Infinite?
Before going through the main methods to solve the problem, we would like to suggest you apply these steps:
Check if an outage going on in Halo Infinite servers. For this, you can follow the Down Detector.
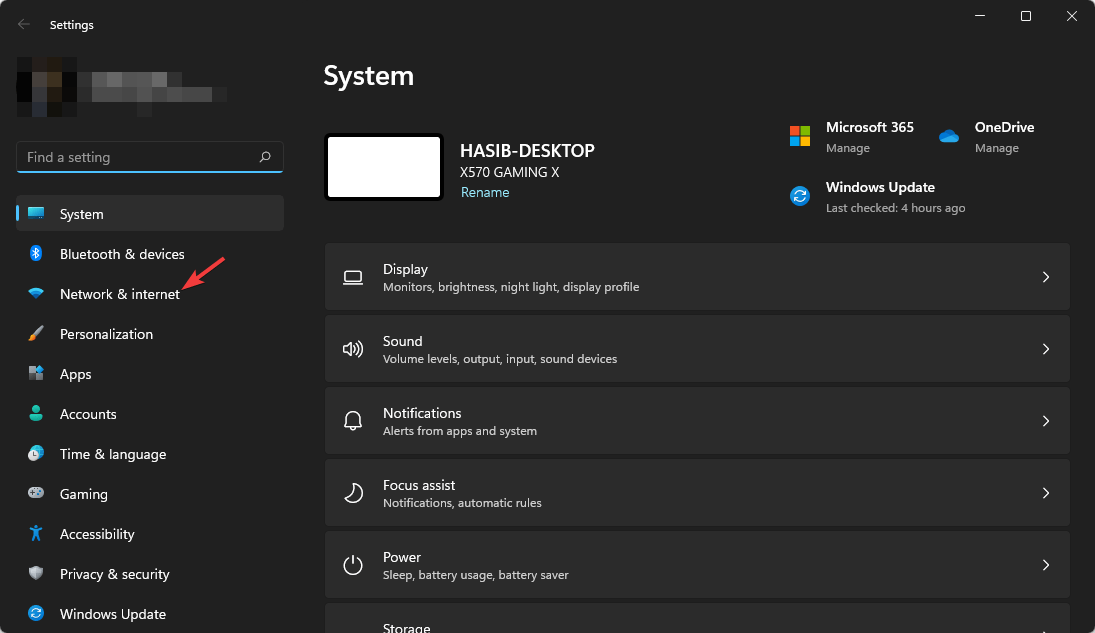
Verify the internet connection, so go to Network & Internet from the Windows Settings and click on Advanced network settings. Go to Network reset next, click on Reset now, and follow any on-screen steps. You may also check if there is something wrong with your internet connection.
Choose the drive where you want to move the game and click on Move.
Wait until the process is complete.
5.2 Change on Steam
Go to Halo Infinite properties on Steam like before.
Go to the Local Files tab.
Click on the Move install folder.
Choose a folder or drive and click on Move.
Wait a bit while it finishes the process.
For best, you also may try uninstalling the game completely and installing it again on a different drive. It may fix Halo Infinite error retrieving the data center.
We also recommend you use a VPN like Private Internet Access (PIA) or ExpressVPN. These two work great with most multiplayer games like Halo Infinite. If the normal internet connection fails to retrieve the data center on Halo Infinite, trying any of these VPNs is a good idea.
We also suggest you learn the ways to solve Halo Infinite packet loss issues. There, you will also find some suggestions which are also applicable to this problem.
This article has shown the methods to solve Halo Infinite error retrieving data center issue. If you know any other methods that may work, let us know in the comment box.
The gameinputsvc.exe is also known as the GameInput Host Service, being part of the system but not essential for your Windows OS.
However, itis important when it comes to the proper functioning of games on a PC. Hence, if gameinputsvc.exe is crashing, we have the solutions to fix it.
What causes gameinputsvc.exe to crash?
Gameinputsvc.exe usually crashes due to the following reasons:
Corrupted system files – Corrupted system files are those files that suddenly become inoperable; if gameinputsvc.exe has become corrupt, it is likely to crash.
Outdated software package – If the software package that stores gameinputsvc.exe is outdated, the API file will likely crash.
Now that you are well aware of the reasons behind gameinputsvc.exe crashing, let’s move on to possible fixes that can help you get around this issue.
How do I fix gameinputsvc.exe crashing?
Before you move to detailed solutions for resolving gameinputsvc.exe is crashing, quickly take a look at these quick workarounds:
Restart your computer. Sometimes, the services can be hindered by other processes and this error will disappear out of nowhere. If your PC is not restarting, rest assured that we’ve got some quick solutions.
Check for possible Windows updates because it’s possible that a new patch can solve this issue. Also, here’s how to fix Windows Update errors in Windows 11.
In case trying out the above fixes doesn’t work in your favor. You can move ahead with the detailed solutions given below.
1. Switch the GameInput Service to Manual
Press the Windows + R key combination, type services.msc, and press Enter.
Double-click on the GameInput Service, then switch the Startup type to Manual.
Now, hit the Apply and OK buttons and try to reopen the Xbox app.
Switching the GamingInput Service to manual has fixed this problem for many of our readers so make sure you try it.
If it doesn’t work, feel free to switch the service back to Automatic by following the steps above.
2. Run SFC and DISM scans
Click on the Search icon from the taskbar, type cmdin the bar, and click on Run as administrator to open Command Prompt with full rights.
Copy and paste the following command in the Command Prompt and hit Enter. sfc /scannow
In case the prior command doesn’t work, copy and paste the following command and hit Enter. DISM.exe /Online /Cleanup-Image /RestoreHealth
You are likely to face the issue of gameinputsvc.exe file crashing if the system has become corrupted or if you have any issues on your disk. Running the scans above will clear that problem.
If the manual steps somehow don’t work for you, there are also automatic solutions you can go for, such as a reliable repair tool that replaces all corrupt files with new parts from its thorough vault.
3. Rename files in the WindowsApps
Firstly, type the file and click on File Explorer to open it.
Now click on View present at the top, then check the box present next to Hidden items.
Next, enter the Local Disk (C:) and go to the following location in File Explorer. C:\Program Files\WindowsApps
In the above location, search these two folders’ names as: Microsoft.GamingServices_4.66.2001.0_neutral_~_8wekyb3d8bbwe and Microsoft.GamingServices_4.66.2001.0_x64__8wekyb3d8bbwe
Now simply rename these folders by clicking on the rename icon present in the toolbar. You can simply add any prefix, such as X, so that the folders appear to be named as XMicrosoft.GamingServices_4.66.2001.0_neutral_~_8wekyb3d8bbwe and XMicrosoft.GamingServices_4.66.2001.0_x64__8wekyb3d8bbwe
Your PC might have a distinct version of Microsoft Game Input however, Microsoft.Gaming.Services file is the one we need to replace.
Hence, regardless of the file version, simply locate the Microsoft Gaming input file and rename it. Renaming these files will prevent the gaminginputsvc.exe from crashing at random intervals.
Type msconfig in the Search bar and click on System Configuration to open it.
Enter the General tab and then select Selective startup.
In the Selective startup, uncheck the box beside Load startup items and make sure to check the remaining 2 boxes beside Load system services and Use original boot configuration, respectively.
Next up, enter the Services tab.
Inside the Services tab, check the box beside Hide All Microsoft Services and then click on Disable all.
Lastly, click on OK and restart your computer. This will run your PC into a Clean Boot.
Running a Clean boot will help you fix any issues with the gameinputsvc.exe.
Hopefully, the above guide helped you troubleshoot the abrupt crashing problem of gameinputsve.exe.
The Norton antivirus is one of the most-used security software on Windows 10. However, users are complaining that they are getting the dreaded BSOD from this software.
Fortunately, it is an issue that can be fixed easily by changing a few things. And we are going to show you the quick and effective ways to solve the Norton Antivirus BSOD issue on Windows 10.
Why does Norton Antivirus BSOD appear?
There are various reasons for the Norton Antivirus causing BSOD issues in Windows 10. Below are some of the well-known causes:
Outdated PC: Some users reported that Norton Antivirus keeps crashing Windows 10 on some Windows builds. However, this has been rectified in some releases. Thus, to fix it, you need to update your PC. Here’s what to do in the event that Windows is unable to finish installing updates.
Memory issues: This issue can also be caused by faulty memory partitions. You can fix this by running the Memory Diagnostic tool or using a third-party tool in MemTest86.
Faulty installation: Sometimes, it might be that your installation of the Norton Antivirus is faulty or does not work with your PC version. In this case, you need to uninstall the software in Safe Mode.
Wrong Windows installation: If you started noticing the BHDrvx64 SYS BSOD with Norton Antivirus after upgrading to Windows 10, the problem might be with the upgrade process. To fix this, you need to clean install Windows 10.
How do I fix Norton Antivirus BSOD?
1. Update PC
Press the Windows key + I to open the Settings app and select Update & Security.
Click the Check for updates button.
Now, download and install the available updates.
The Norton Antivirus BSOD on Windows 10 can appear because of your PC version. Thus, updating your PC should restore normalcy in this case.
2. Run the Memory Diagnostic tool
Press the Windows key + R, type mdsched.exe, and click OK.
Select the Restart now and check for problems (recommended) option.
Now, wait for the diagnosis to be complete and apply any recommendations.
Some users have reported that the Norton Antivirus BSOD on Windows 10 issue is down to faulty memory. Aside from using the Memory Diagnostic tool, you can download MemTest86 to check your RAM for issues.
If these tools discover any unfixable problem, you might need to change the affected memory.
3. Use a professional BSoD troubleshooter
With BSoD errors never having a clear cause unless you’re really good at reading memory dumps, it’s hard to tell what causes them or not.
It can actually be Norton, driver issues, or even hardware issues, but testing them out one by one can be frustrating and time-consuming.
That’s precisely why we recommend you try out a professional BSoD troubleshooter since they are created to run through all possible causes one by one, from drivers to DLLs, registries, and more.
4. Uninstall Norton in Safe Mode
Press the Windows key and click the Power icon.
Hold the Shift key and select the Restart option.
If the BSOD is preventing from doing this, press and hold the power button for about 10 seconds to shut down your PC. Press the power button again to turn it on.
When the manufacturer icon shows up, repeat Step 3. Do this 3 times and your PC should bring up the Windows Recovery Environment.
Now, select Choose an option > Troubleshoot > Advanced options.
Choose Startup Settings from the options.
Click the Restart button.
When your PC restart, press F5 or 5 to Enable Safe Mode.
Now, press the Windows key + I and select the Apps option.
Finally, choose the Norton Antivirus and click the Uninstall button.
If uninstalling Norton Antivirus fixes the BSOD on Windows 10, you should continue using only Microsoft Defender.
Alternatively, you could always consider using an alternative tool in ESET NOD32. This lightweight antivirus software does everything to protect your PC online and offline without causing any issue.
Also, it detects and eliminates viruses before they can affect your PC. You only need to install it and it will take care of your privacy and security.
Choose, your language, time, and keyboard input and click the Next button.
Click the Install now button.
Enter your activation key in the next window or choose I don’t have a product key followed by Do this later, if you upgraded from older operating systems.
Choose the current edition of Windows 10 you have license for and click Next.
Now, accept the terms and license and click Next.
Choose the Custom: Install Windows only (Advanced).
Select your drive and click New. If you have multiple partitions listed, delete them all, leaving only one allocated partition.
Choose the unallocated drive, the click New followed by Apply and OK.
Your drive will now be divided into multiple partitions. Choose the Primary partition and click the Next button.
Now, wait for Windows to install and follow the onscreen instruction to complete the setup.
Finally, if all the solutions above do not fix the Norton Antivirus BSOD on Windows 10, you might need to clean install Windows. This has proved to work for users that upgraded from the older operating system.
With this, we can conclude this guide. You only need to follow the instructions therein carefully and everything should be back to normal.
There are multiple user types on Windows, each with different permissions. Out of all available groups, the administrator group has the most privileges. Sometimes, to make certain changes on your PC, you need to have the maximum rights.
If you want to change your current account settings and give it additional privileges, this is possible in Windows 11 and the process isn’t that much different when compared to the one of making yourself an administrator in Windows 10.
Why don’t I have admin rights on Windows 11?
If you don’t have admin rights on Windows 11, it might be because you are using a standard account instead of an administrator account.
Also, if you are using a PC owned by your company, the admin rights might be disabled by your organization.
Should I use an administrator or a standard account?
Administrators have full and unrestricted access to system files, and they can install applications. However, this isn’t without security concerns.
If your PC were to get infected by malware, it could spread with almost no restrictions and perform whatever it wants if it infects a user with maximum access rights.
By using a standard account, the malware won’t be able to run without extra permissions, so the chance of getting infected is smaller.
How can I change the administrator account in Windows 11?
1. Use the Settings app
Click the Start button in the Taskbar.
Select Settings.
Now go to the Accounts section and choose Family & other users.
Select the account that you want to change to administrator and click on Change account type.
Set the Account type to Administrator and click OK to save changes.
If the Settings app fails to work, you can fix the issue by using the command-line tool and running a few commands, as described in this guide on what to do if the Settings app crashes in Windows 11.
Start Windows Terminal by pressing Windows Key + X and choosing the Windows Terminal (Admin) from the list.
Click the down arrow and select Command Prompt.
When the Command Prompt window opens, run this command: net localgroup Administrators "WR_Test" /add
Optional: To remove an account from the Administrators group, run this command: net localgroup Administrators "WR_Test" /delete
These are some methods to change the administrator account on Windows 11 on a Lenovo laptop and other PCs. All our solutions are relatively simple, but we suggest using the Settings app since it’s the most straightforward.
However, if you’re an advanced user you can enable the hidden administrator account for high level operations. You can also add a user account to the administrator group quickly using the Terminal because it only takes a few seconds.
Some users are using their Xbox One controller on their PC, but sometimes they might encounter a USB device not recognized message. The Xbox Controller USB device might not be recognized due to driver issues or due to problems with the cable or USB port. This may also lead to the Xbox controller blinking when plugged in.
Before applying the solutions below, try changing the USB cable and the port you’re using on your PC.
How do I fix the Xbox Controller USB device not recognized error?
1. Update the USB drivers
Press the Windows key + X and select Device Manager.
Click the arrow next to USB Serial Bus controllers to expand it and right-click each of the drivers there.
Choose the Update driver option.
Now, select the Search automatically for drivers option and install any available update.
According to users, if Xbox One controller is giving youUSB device not recognized message, the problem is most likely your USB controller driver. Alternatively, you can visit your motherboard manufacturer and download the latest USB drivers for your motherboard.
However, if you need a surefire way to update all your drivers, you should use a dedicated tool in Outbyte Driver Updater. This tool is ultra-lightweight and does not only update your drivers, but also fixes the broken ones, and fills in the missing ones.
Simply download and install Outbyte Driver Updater, and upon the first launch, it will already start scanning your system for drivers. You then only need to select the ones you want to fix, and this tool will take care of the rest.
Outbyte Driver Updater
Update all your drivers with ease so all your devices can be recognized instantly.
Press the Windows key + R, type cmd, and choose Run as administrator under Command Prompt.
Type the command below and hit Enter: msdt.exe -id DeviceDiagnostic
Finally, wait for the command to complete.
If you’re getting USB device not recognized or unknown message while using the Xbox One controller on your PC, the problem might be some minor glitches. Using the Hardware and Devices troubleshooter should fix these glitches.
3. Reinstall Xbox controller drivers
Open theDevice Managerand locate your Xbox One controller.
Right-click the driver and choose Uninstall device from the menu.
Click the Uninstall button to confirm the action.
After removing the driver, click Scan for hardware changes icon.
A common cause for USB device not recognized message can be your drivers. If your PC can’t recognize Xbox One controller, perhaps you can fix this problem simply by reinstalling your drivers
Clicking the Hardware changes icon should reinstall the driver. Some users are also suggesting installing the Xbox One controller driver manually.
4. Update Plug and Play Software Device Enumerator driver
Open the Device Manager, expand the System devices option and right-click Plug and Play Software Device Enumerator.
Choose Update driver from the menu.
Select Browse my computer for driver software.
Now, choose Let me pick from a list of devices on my computer.
Select Plug and Play Software Enumerator and click Next.
According to users, if your Xbox One controller is giving you USB device not recognized message, the problem might be Plug and Play Software Device Enumerator driver.
To fix the issue, you need to use the default driver available for it on your PC.
5. Update your PC
Press the Windows key + I to open the Settings app and select the Update & Security option.
Click the Check for updates button in the right pane.
Download and install any available updates and restart your PC.
An outdated PC can cause different problems. This can be the reason your Xbox controller USB device is not working.
To fix the problem, you need to update your PC. After installing the updates, you can try reconnecting your PC from a USB port at the back of your PC.
There you have it: Everything you need to solve this problem. You only need to follow the steps above and you should be back playing games with your controller.
Cookies are basically small text files written by a web browser that contain information about your interaction with the virtual world. When these files accumulate, however, they can cause problems on your PC.
In this article, we will explore the best apps that allow you to easily and thoroughly clear up any cookies from your browser.
Should I clear cookies?
While cookies and other browser data help to improve your overall experience, it is good to clean them once in a while. This is because clearing them frees up valuable space and keeps your PC clean.
Also, clearing cookies helps to solve some browser issues. Thus, you should try clearing them every other month. Here’s how to clear cache, cookies & history in the AOL Browser, and take a closer look at our list below as well.
Fortect will bring you lots of help regarding this matter as it is an outstanding optimizing software with numerous advanced features.
First off, it has a feature that helps you proceed with a browser cleanup where you can remove all web browser tracking cookies, clearing any trace of your browsing activity in no time.
Thanks to its extensive scanning option, you are able to see your computer’s condition and its vulnerabilities, which can be fixed afterward.
Furthermore, with the Fortect app, you can delete all junk files and build-ups from your folders, disk, and hard drive to free up space and boost your PC’s performance.
Fortect also offers these key features:
Full diagnostic and scan report
Refresh the operating system
Advanced OS repair technology
Fortect
The perfect solution for cookies and junk file removal alongside advanced OS repair technology.
CCleaner is one of the most well-known apps for computer optimization. It includes powerful tools that make it an excellent cookie cleaner on popular browsers like Chrome and Firefox.
After you installed CCleaner, you can select the areas to clean and hit Analyze to see how much space can be freed up. After this, click the Run Cleaner button to remove everything that CCleaner found.
We recommend you always double-check the list found in CCleaner after analyzing your PC because you might want to keep some cookies like stored browser passwords.
One of the best features of CCleaner is the automatic clean-up of your browser cookies, trackers, internet history, download history, and cache. It can even delete individual session activity.
In addition to the cleaner function, CCleaner has two other major features:
Registry cleaner – Finds and fixes registry errors
Tool management – program uninstaller, startup program editor, browser plug-ins, etc.
CCleaner
Use the number-one cookie cleaner tool for your PC. It protects your privacy and makes the PC faster and more secure!
SecureClean is a powerful app that lets you permanently erase temporary, cached, cookies, and deleted files regularly. You can do it once or create a schedule.
Because of the personal data collected constantly on your PC in cookie files, personal documents, browsing histories, passwords, etc. you need a reliable application to secure your PC.
SecureClean uses government-grade wiping technology to ensure your data is unrecoverable, even with the most sophisticated tools. This makes it the ideal cookie cleaner for your PC.
Beyond the need to protect your privacy, you also want to delete cookies and other stored information because, in time, they clutter the system and slow it down.
By using this program, you can also white list cookies you don’t want deleted (log-in info) so that it skips them when the cleaning process is started.
SecureClean can completely erase unused files and information, including:
Cookienator is a great tool that allows you to remain anonymous from search engines like Google and other notorious web-usage trackers such as Doubleclick or Omniture.
With a simple user interface, Cookienator is designed to automatically skip the important cookies, and delete only those that pose a risk to your privacy.
Cookienator is one of the most lightweight options presented in this article. It is a single executable file that you install on your computer and once runs, it will show you how many cookies it would like to remove.
It will also not run in the background constantly, but only for a few seconds when you start up your PC.
This app is configured to clean up crumbs left on your computer by sites like Google, AOL, Yahoo, MSN, etc but this list can be easily edited by editing the filters.
Like all the other cookies exterminators it is recommended you close your browser/s before running Cookienator, so it can gain access to all the files stored.
This program is a quick and convenient alternative to CCleaner. Bleachbit is open source and users are also allowed to make their own contributions and fix any bugs.
Bleachbit is simpler than CCleaner but this works to its advantage because of the small size of the program. There is also a portable version available for those of you looking to build a USB toolkit.
This makes it the ideal cookie cleaner you can download for free and without installing it on your PC.
Key features include:
Support for a massive range of programs
Quick and simple everyday maintenance tasks
Deep scan options – in-depth analysis of your system files
Shred option – deletes unwanted files securely by overwriting them several times
Free of charge
Command line interface for scripting and automation
This app is a manager of the cookies created by most Windows browsers: IE, Firefox, Google Chrome, Mozilla, etc.
Cookies Monster allows you to set a list of the cookies that you want to protect and then it will delete the remaining ones with just one mouse click.
It can also detect and delete the cookies from the sites included in your favorites or bookmarks. Great for those who don’t want to disable or block all the cookies.
The list presented in this article gives you a wide range of options to protect your privacy.
You can find software options that are lightweight and offer singular cookie deletion features or more complex programs that allow you to manage your online security at a professional level.
Do you need a list of the best PC optimization software? Check our carefully selected list of software to get the best to keep your PC running smoothly.
If you’ve got any suggestions or comments, feel free to use the comment section below.
The video memory management internal error is one of the Blue Screen of Death issues on Windows 10. Users report facing this error when trying to run their favorite games.
Also, this issue can make your PC restart and lead to other problems. In this guide, we have curated the surefire fixes to fix the video memory management internal error effortlessly.
What causes video memory management internal?
While there are various errors that can lead to the video memory management internal issue, below are some of the common ones:
Faulty display driver: If you are getting the video memory management internal error when shutting down or running a game, it might be because of your display driver. To solve this, you need to roll back or update your driver.
Outdated PC: Some users have reported this problem on Windows 10 builds. Updating your PC to the latest version should help restore normal service here.
Corrupt system files: Another cause of this BSoD error is corrupt or broken system files. Repairing and restoring these files should solve this problem easily.
How can I fix the video memory management internal error?
Before delving into the fixes in this guide, below are some basic troubleshooting steps that can save you stress:
Update your BIOS from the manufacturer’s website.
Disable any feature you have overclocked.
Run your games in Windows Mode.
If the above preliminary checks do not solve the issue, you can explore the fixes below.
1. Rollback display driver
Press the Windows key + X and select Device Manager.
Click the arrow next to the Display adapters and double-click the driver there.
Select the Driver tab at the top and click the Roll Back Driver button.
If the button is not clickable, click the Update Driver button.
From here, select the Search automatically for drivers option and install any available updates.
If you are getting the video memory management internal error when streaming on sites like Netflix, or while playing games, it might be due to problems with your drivers. Users with NVIDIA drivers report facing this issue.
Alternatively, you can download and install the drivers from the manufacturer’s website. This has proved effective for some users.
To make things easier, we recommend using a dedicated tool in Fortect Driver Updater. This software automatically scans and fixes outdated and broken drivers. This ensures you never face any driver-related issues on your PC.
Press the Windows key + I and select Update & Security.
Click the Check for updates button.
Now, download and install any available update.
The video memory management internal error can also be caused by an outdated OS. Users have reported that installing the Windows 10 Technical Preview build 10049 solved the problem. If you can’t find this build, you can just update your PC to the latest version.
Right-click the problematic application and choose Properties from the menu.
Choose the Compatibility tab, check Run this program in compatibility mode for.
Finally, Select Windows 10 and click Apply, followed by OK to save your settings.
Sometimes, you can encounter the video memory management internal error on Adobe Premier Pro and other apps because you are not running them in compatibility mode. The steps above should help you solve this problem effectively.
Press the Windows key + S, type cmd, and select Run as administrator under Command Prompt.
Type the command below and press Enter to run it: sfc/scannow
Wait for the command to complete, type the command below and hit Enter: DISM /Online /Cleanup-Image /RestoreHealth
System files are important for the smooth running of your PC. If they are corrupt, it can lead to the video memory management internal BSoD error.
Alternatively, you can fix this issue using a specialized system file fixer. This error can also appear in the form of video_memory_management_internal, and to get rid of it for good you can use a repair tool.
5. Reset Windows 10
Press the Windows key + I and choose the Update & Security option.
Select Recovery in the left pane and click Get Started under Reset this PC.
Choose whether to keep or remove your files and click the Next button.
Now, follow the onscreen instruction to complete the process.
If all the solutions above fail to solve this BSoD issue, you might need to reset your PC to default. Note that You might also need a bootable USB flash drive to complete Windows 10 reset, and you can easily create one by using Media Creation Tool.
The video memory management internal error can be frustrating, as it disrupts your activities. Thankfully, it is an issue that can be solved following the fixes in this guide.
When trying to build a UWP app you may sometimes realize that the Windows.Storage namespace is not found.
On a closer look, this issue arises mostly due to an error on your end, and that’s what we will discuss in further sections. But, if the UWP apps lag & stutter on your Windows 11 PC, you can refer to our post for some effective solutions.
What is Windows.Storage namespace?
Windows.Storage namespace is a collection of Windows APIs that offers classes for managing files, folders, and application settings.
Sometimes, while using Visual Studio you may encounter an issue like Windows.Storage namespace not available or not found. This could be due to any of the following reasons:
If you are using the object browser incorrectly –The object browser is by default set to All Components which needs to be changed to what you have.
You have not included the reference to the proper package – You won’t get access to the Windows.Storage namespace, unless you add the references to the correct package.
Note that the System.Windows.Storage is not the same as Windows.Storage. If the error message reads System.Windows.Storage (part of .NET & the root namespace for WPF), it’s different from Windows.Storage (root namespace for WinRT, the primary API for UWP apps).
How can I fix Windows.Storage Namespace Not Found error?
1. Add the references to UWP DLLs and WINMD files manually
When using Visual Studio, go to Solution Explorer, right-click on References, and select Add Reference from the context menu.
On the left side of the Reference Manager, click on Browse and navigate to the following path: C:Program Files (x86)Windows Kits10UnionMetadatawinmd
Now, add it to your project as a reference. Also, make sure to change the filter to All Files.
Again, right-click on References, and click on Add Reference from the context menu.
Next, on the left of the Reference Manager, go to Browse and find the directory, C:Program Files (x86)Reference AssembliesMicrosoftFramework.NETCorev4.5.
Add System.Runtime.WindowsRuntime.dll to your project.
So, if you are unable to access Windows.Storage namespace, it could be possible that you have not added the reference to the proper package.
In this situation, you may feel that Windows.Storage namespace is not found. You would need to download the package following the above steps.
You can now build your own WPF application location-aware by calling on the Geolocator class in Windows.Devices.Geolocation API.
At the same time, you can also use the asynchronous pattern in UWP. This is because the classes and methods you usually consider as UWP code is now incorporated with classes and methods from WPF.
But, if the Windows.storage.dll crashes on your Windows PC, we recommend a list of solutions that may help you fix the issue quickly.
2. Use the object browser correctly
By default, the object browser is set to All Components, hence, firstly, select NET Portable Subset(Visual Studio 2013).
Next, to add the Windows.Storage, select All Components, and look for Windows.winmd.
Now, Highlight the desired Component, and click on Add to References in Selected Project under Solution Explorer.
This will add the reference to the Portable Library project, and you can now use your StorageFolder in Class1.cs.
Alternatively, if you do not want to install the Windows Store at this moment, but simply want to use some of those Windows APIs, you can get them from your app. How?
Sometimes, Windows users may use an additional second hard drive on their PC to maximize the storage capacity, or even for regular backups.
However, the secondary hard drive may freeze your PC due to reasons such as malware threats, bad sectors on the HDD, messy HDD connections, and even a faulty hard drive itself. This seems to be a general problem, therefore, we’ve come up with the right solutions to fix it.
How do I fix the secondary hard drive if it freezes the PC?
1. Run the Hardware & Devices troubleshooter
Click the Start icon, type cmd, and click Run as administrator under Command Prompt.
Type the command below and hit Enter: msdt.exe -id DeviceDiagnostic
Now, wait for the command to complete.
If your hard drive freezes Windows Explorer or the whole system, it might be due to glitches on your PC. The first course of action here is to run the Hardware and Devices troubleshooter.
2. Boot in Safe Mode
Press the Windows key + I and select Update & Security.
Choose Recovery in the left pane and click the Restart now button under Advanced startup.
Select Troubleshoot > Advanced options when your computer restarts.
Now, choose Startup Settings from the option.
Click the Restart button.
Finally, press the corresponding key Enable Safe Mode.
3. Run CHKDSK
Launch Command Prompt as an admin.
Type the command below and hit Enter: chkdsk /f /r Y:
Wait for the command to finish running. Note that you should replace Y with the letter of your hard drive.
If your internal hard drive freezes your computer when connected just like a secondary hard drive, it might be down to a corrupt partition. Running the CHKDSK command will scan and fix the problems if possible.
Open File Explorer and right-click the problematic external hard drive.
Choose the Properties option.
Select the Security tab at the top and click the Edit button in To change permissions, click the Edit section.
Click the Add… button.
Now, type everyone in the open space.
Finally, check the box for Full control and click OK.
The hard drive freezes computer issue can also be down to lack of permission. The steps above should rectify this problem.
5. Update the HDD driver
Press theWindows key + Xand selectDevice Manager.
Double-click the Disk drives option to expand it and right-click the driver.
ChooseUpdate Driver.
Select Search automatically for drivers and install any available update.
Alternatively, you can go to the drive manufacturer’s website to download and install the driver.
To make things easier, you can use a dedicated driver updating tool to update the driver more easily by always finding compatible drivers without any errors.
Why does my hard drive keep freezing?
There are various reasons the external hard drive freezes Windows 10 computers. Below are some of the notable ones:
Faulty drive: If your Toshiba or Seagate external hard drive freezes your computer, it might be due to faulty partitions on the drive. To solution here is to fix this partition with some commands.
Lack of appropriate permission: At times, this issue might be due to a lack of the required permission to use the hard drive. The solution here is to take full control of the hard drive.
Outdated driver: The driver for the external hard drive that freezes your PC might be outdated leading to this issue. You will need to update the driver to get past the problem.
That’s just about it for the hard drive freezes computer issue. With the detailed steps in this guide, we believe you have everything to fix the issue easily.
Pshed.dll is a Dynamic Link Library system file that’s sometimes referenced in different Blue Screen of Death issues.
The dump files for those BSOD error messages specify that they’re caused by a Pshed.dll driver. There are various ways you can fix Pshed.dll BSOD errors and today we’ll show you the best methods to use.
What causes Pshed.dll BSOD?
There are a few reasons for the pshed.dll error on Windows 10. Below are the common ones:
Outdated drivers: The Pshed.dll WHEA Uncorrectable Error is one of the frustrating BSoD issues that can be caused by outdated drivers. Your only way around this is to update your drivers.
Corrupt system files: Faulty system files are one of the biggest causes of this Blue Screen of Death error. You need to repair and restore these files to get past this Pshed.dll NTOSKRNL.exe BSoD.
Faulty memory: When your PC memory is faulty, it can also lead to this issue. You can confirm this by running the Memory Diagnostic tool.
If it does not work, you can explore the solutions below.
1. Repair system files
Press the Windows key + S, type cmd, and select Run as administrator under Command Prompt.
Type the command below and press Enter: sfc /scannow
Wait for the command to finish, copy and paste the command below, and hit Enter: DISM.exe /Online /Cleanup-image /Restorehealth
SFC and DISM scans are the two repair tools for fixing system files. They should be able to fix the Pshed.dll issue. Here’s what to do if sfc /scannow isn’t working.
Also, some third-party Windows 10 repair utilities can fix a wide range of BSOD errors. Those system repair packages include scanning options for hardware, security, and stability issues.
After scanning your system, rest assured that you can fix these problems with just a click of a button.
2. Update system drivers
Press the Windows key + X and choose Device Manager.
Click the arrow next to the option to update driver for, right-click the driver there, and choose Update driver.
Now select Search automatically for drivers and follow the instructions on the screen.
Repeat these steps for all outdated drivers.
Pshed.dll BSOD errors, and others, can be caused by outdated drivers, so be sure to update them. Updating drivers manually is a tedious task, and this is why it’s better to use a dedicated tool.
Press the Windows key + R, type rstrui.exe, and hit Enter.
Tick the Choose a different restore point button and click Next.
Choose a later restore point before you started getting the Pshed.dll error and click Next.
Finally, click the Finish button to confirm the action.
In a case where you can’t get past the Pshed.dll issue, you might need to restore your PC to a later time to make it work.
The above resolutions could feasibly fix the majority of Pshed.dll Windows 10 BSOD errors for most users. Nevertheless, those who still need more potential fixes should check out the best BSOD repair software.
Did you find a different solution for this problem? Do not hesitate to let us know in the comments section below.
Solid state drives (SSD) are now more commonly used compared to their counterparts, HDDs, because of their capacity and affordability, plus ease of use.
If your SSD started out with blazing speeds, but now it simply just drags along, there are tools you can use to whip it back into shape, by optimizing it. You just need to find genuine tools and steer clear of snake-oil types that can damage your SSD.
Do you need software for SSD?
While it is not compulsory to install SSD management software to get the best out of it, some tools can help you optimize it in the long run. This is because your SSD can slow down later after extended use.
These tools can help you restore it to full strength and help you get the best value from it.
Fortect is a powerful software designed to improve your computer’s health and maintain it long-term by offering various helpful features.
First off, it can perform a comprehensive scan of your whole system to establish your PC condition and find the irregularities that interfere with its performance.
It can clean up your folders, disk, SDD, and more by removing all the unnecessary files that often clog your computer’s health.
It can also erase all web browser tracking cookies, leaving no trace of your browsing activity behind, thus improving your online safety.
Moreover, Fortect optimizes your device by repairing or replacing damaged and missing OS files, including DLLs and registry keys, with healthy components from its extensive repository.
Other key features include:
Damaged files removal
Optimize Windows Registry
Thorough diagnostic report
Fortect
Maintain your SDD clean and your computer in check with the Fortect software.
MiniTool Partition Wizard is a comprehensive partition management tool that supports SSD partitions and can measure SSD performance.
Recovery is one of the main features of this software. It can retrieve lost partitions and it recognizes and recovers lost/deleted files from damaged or inaccessible drives and folders.
The disk clone and system migration features are also useful for backing up and upgrading the hard drive.
In addition to those features, MiniTool Partition Wizard also comes with an integrated Disk Diagnostic Master which measures your disk read/write speed, analyzes the disk usage, and verifies file system integrity.
This software offers full control over your partitions, allowing users to resize, move, extend, split, and convert their partitions.
Plus, it can also hide or unhide server and non-server partitions, create new partitions, format them, and more.
MiniTool can also measure the transfer speed rate under various scenarios with the help of the Disk Benchmark feature.
Other key features of MiniTool Partition Wizard include:
Space Analyzer
Disk customization (name, size, sectors)
Bootable media builder
The software is compatible with Windows 10 and older versions of the OS. The features are available by license purchasing, 1 license works for one PC.
MiniTool Partition Wizard
Manage and diagnose your disks and partitions with this intuitive tool that saves you lots of time and hassle.
It also picks after apps like Microsoft Office and includes a registry cleaner as well.
Along with that, CCleaner also incorporates an uninstaller that lets you visualize all your apps and easily decide which you want to remove, directly from the app’s UI.
However, it’s not recommended to shred files or wipe free disk space on SSDs since it could damage your disk.
The software has an intuitive UI. From the main Window, you can access multiple features, such as the Health Check, the Custom Clean, or the Registry clean.
The health check is a full PC assessment scan that will let you know whether you have any unnecessary files that take up disk space for no reason.
You will get a report on where they are located and get to decide whether you want CCleaner to remove them. These actions can be taken in bulk, or you can select individual files and apps.
Other key features include:
One-click software updater
Detects web trackers
Helps disable unnecessary background/startup apps
CCleaner has a freeware version as well as a premium version which includes additional utilities such as a driver updater and a file recovery tool.
CCleaner
Keep your computer resources organized and healthy with this all-in-one software.
SSDs, as stated, are great because of their blazing-fast speeds, but most of these drives lack in terms of disk space, and those that do have space are pretty pricey.
SSD Boost Manager is an SSD management software that is free to use and helps you by copying programs to a different hard drive and linking the two.
This way, you can move programs you do not often use to a smaller hard drive, and preserve space for the apps used regularly.
With just one click, you can move files from your slow HDD to your fast SSD and your OS will still think the game is on your HDD, plus you don’t need to reinstall.
This SSD manager is a very light application. So, you will not have to worry about it taking up disk space or slowing down your PC.
It is easy to use and install. After you download the installer, you will be ready to manage your SSD in less than 5 minutes.
Other key features of SSD Boost Manager include:
HDD directory restore
Simple UI
Compatible with all Windows versions
However, it comes in French as the default language, but you can change to English.
SSD Life is a light and simple SSD management software that displays how much data has been written or read throughout your drive’s lifetime.
You can also find information on the disk space, and an estimate of the drive’s health plus how much time is left for it to continue operating in the same conditions.
It may not change settings or tweak your system, but gives you insight into how your SSD works. Furthermore, it is good for when you purchase a used SSD, so you can use it to perform speed and health checks, in turn saving you money and stress.
SSD Life offers easy-to-follow reports on the state of your SSD. It is able to identify the exact version, give you information on the total file size, and also free/used space.
Along with that, SSD Life can approximate how long the SSD has been in use and whether it supports trim.
It can also let you know how much data the SSD writes and reads on a daily and weekly basis. It also offers the total number of data that has ever been written or read onto the SSD.
Other key features of SSD Life include:
Capable to detect and asses any type of SSD
Available in English, German, Russian, and Japanese
Available in a portable version
SSD life has a free version, as well as a professional version. The professional version is a one-time purchase and it offers a 15-day free trial.
OCZ SSD Utility is an SSD management software solution that updates your system’s firmware and flashes only secondary drives.
It is complementary software to help you maintain, monitor, and tune your SSD.
The features of this SSD utility software include a dashboard for a real-time overview of the system status, capacity, interface, and health updates among other info.
It also gives maintenance updates, and checks your SSD life, plus the SSD Tuner lets you fine-tune your drive for long-term performance.
Other features include the OS tuner, which lets you tune how your OS interacts with your SSD and you can choose from either of three modes: reliability/performance/capacity or customize the settings by yourself.
It also has support if you need help to figure out settings or troubleshooting, DAS control, configure namespaces, and manage partitions.
Other key features of OCZ SSD Utility include:
Responsive support contact page
Namespace management support
OS tuner
The utility is compatible with Windows, macOS, and Linux computers.
Samsung Magician provides firmware updates, drive health analysis, optimization, and over-provisioning to extend your SSD’s life. This SSD management software is designed to work with all Samsung SSD products but is not compatible with other manufacturers’ SSDs.
The tool lets Samsung SSD users check real-time information about the performance, power usage, capacity, health, and security of their solid-state drives.
Samsung Magician has a modern and intuitive UI with multiple scan and diagnostic tools that can help users troubleshoot and solve SSD-related issues.
It offers support for portable SSDs as well as integrated SSDs.
It also lets you choose the performance and power options in order to get perfect optimization and get the best out of your drive.
It comes with several built-in modes such as Full Performance, Power Saving, and Standard. You can also create and save your own preferred modes.
Other key features of Samsung Magician include:
Customizable benchmark testing
Built-in chat support
Security features including password and fingerprint reset
Samsung Magician is free. If you have the Samsung 470, 750, 830, 840, 850, 860, 950, and 960 series, you can use this crucial SSD software.
Intel Memory and Storage Tool is one of the easiest SSD management software tools. It optimizes your drives and receives frequent updates. It has the ability to run garbage collection on the drive, which you can schedule or automate.
The tool also lets you access easy-to-understand drive information such as model, firmware version, estimated life, device information, drive health, and more.
Along with that, it displays system information such as CPU usage state, chipset information, controller name, and driver versions. It has a trim functionality that is used to optimize Intel SDDs performance.
This Intel SSD toolbox also has a scan function that can run quick diagnostic scans to test read and write functionality.
It can also adapt system settings for optimal performance and power efficiency.
Other key features of Intel Memory and Storage Tool include:
Proactive notifications
Compatible with all Windows operating systems starting with Windows 8
Supports irmwa
Keep in mind that if your system has password protection enabled, the Intel SSD may reject any requests from the host to update the firmware. The best solution is to simply turn off password protection and only then update the firmware.
We grouped these two SSD management software tools into one entry because one can’t exist without the other.
They can analyze your SSD and tell you more about the drive, with insights as to the number of writes already absorbed, time left before it fails, and the firmware number, plus whether it needs a firmware update.
CrystalDiskInfo tells you about the drive’s life expectancy from its SMART sensors, while CrystalDiskMark benchmarks SSD drives to determine their speed. Using CDM can expedite your SSD’s failure as it writes a lot of information to HDDs.
CrystalDIskMark detects the name and version of your SSD and measures sequential and random performance (read/write/mix).
It has multiple measure modes, including peak, real-world, and demo. The software includes multiple language packs and customizable themes.
CrystalDisk info offers general information about your SSD such as temperature, health status, firmware number, interface, transfer mode, and more.
The tool lets you tweak different modes. You can use these to increase performance or to preserve the life of the SSD.
Other key features of CrystalDisk Info include:
Real-time notifications
Email alerts
Graph reports
These tools are available for free. Both are lightweight, so they will not take up too much disk space.
With this, we round up our extensive review of the best SSD management software you can use. If you have slow SSD issues, find out how you can easily speed it up on Windows 10.
These are the best tools for SSD management, so be sure to give them a try. If you’re interested in SSD performance, we also have a guide on how often should you TRIM SSD, so be sure to check it out.
Did your favorite SSD management software make the list? Let us know what you use by leaving a comment in the section below.
A factory reset can be performed via several processes occurring in different parts of the system. A common process is doing a Windows 10 factory reset from the boot.
Users can also reset their PCs from Settings, recovery, USB drive, etc. To avoid an error indicating that you can’t factory reset Windows 10/11. So, you should understand how to do it correctly.
Is it safe to reset BIOS to factory settings?
The BIOS in Windows is an essential startup program. It is a built-in core processor software responsible for booting up your PC. Resetting the BIOS (Basic Input/Output System) will restore the factory enable settings for BIOS, clearing any recent configurations.
However, resetting BIOS to factory settings is safe and does not pose any threats to Windows. All the changes you’ve made on your boot order and other features for booting your PC will be deleted.
So, resetting BIOS to factory settings will only impact the BIOS. It won’t reset the complete PC to factory settings.
After observing the checks above, proceed with the factory reset steps below:
1. Use a Recovery drive
Press the Windows + S keys on the second PC, type recovery drive, and select Create a recovery drive.
Check the Backup system files in the recovery drive option box, then click the Next button.
Select a USB flash drive connected to your PC from the list and click Next.
Follow the instructions on the screen to create the Recovery drive.
Unplug the drive from the second PC and insert it into the HP desktop. Then, press the Power button to start the HP desktop, then wait for it to detect the USB drive.
Select Use a device from the options.
Follow the installation wizard for instructions on how to complete the installation process.
This solution is more suited to factory resetting an HP device from boot on Windows 10. Read our guide if you have issues creating a recovery drive.
2. Use the Windows recovery
Press the power button and continuously press the F4, F10, F11, or F12 keys to open the System Recovery page.
On the Choose an option page, select the Troubleshoot option.
Click Reset this PC, then select either Keep my files or Remove everything.
Wait for your laptop to factory reset from boot after this. If you can’t find the Recovery Environment on Windows 10/11, click this link for a guide on how to find it.
Also, Acer users can try this method to factory reset their PC from the boot should they get locked out.
These are the best ways to factory reset from the boot, depending on your device manufacturer. It is advisable to back up your files before attempting this, as you may lose all your files and data.
If you have further questions and suggestions, kindly drop them in the comments section below. We’d like to hear from you.
If you want to continue receiving security patches on your Windows 7 machines, you need to install KB4474419, KB4490628, and KB4484071 before you hit the Update button.
The update has no prerequisites, it can be installed independently. Keep on reading to learn how:
How do I install Windows 7 KB4474419 and other updates?
Use Control Panel
Open Control Panel.
Select Windows Update.
Now click the Check for updates button.
Windows will look for available updates and download them automatically.
The easiest way to download KB4474419 is with Windows Update, so we encourage you to try it.
Enter the KB number in the search field and click on Search.
Locate the update that matches your system, in our case, it was Windows 7 and click on Download. If you’re using the 32-bit operating system, select the KB4474419 32-bit version instead.
A new window will appear. Click the link to download the update.
Once the file is downloaded, run it and follow the instructions on the screen to install the update.
As you can see, this is an easy way to download and install KB4474419 for 64-bit and 32-bit PCs without having to use Windows Update.
How to uninstall KB4474419?
Open Control Panel.
Navigate to Uninstall a program.
Now select View installed updates.
Double-click the KB4474419 and follow the instructions on the screen to remove it.
What can I do if I miss the deadline to download KB4474419?
If you have not downloaded the update before the stipulated time, you can go to the Windows Update Catalog to download it manually. Note that you might need to install the earlier versions of the updates before installing the latest one.
If you face some KB4474419 download issues for some reason, you might need to perform an in-place upgrade.
What should I know about KB4474419, KB4490628, and KB4484071?
The rollout is targeting the users of Windows Server 2008 R2 Service Pack 1 and Windows 7 Service Pack 1 and encourages them to install the three updates.
Those users who currently have Windows 7 Service Pack 1 (SP1) need to install the KB4474419 Windows security update to receive the SHA-2 code sign support. This pack is also useful for users who encounter OpenVPN TAP driver errors.
KB4490628
Secondly, you can resolve the hash algorithm issue by installing the KB4490628 servicing stack update. You will get SHA-2 signed Windows Updates on your system.
KB4484071
Finally, addresses the issues that are faced by the users with Windows Server Update Services 3.0 Service Pack 2 (WSUS).
Microsoft has made it clear that WSUS update tasks can’t be performed by the WSUS 3.0 SP2 generally known as WSUS 3.2 without installing the SHA-2 update.
If you have any issues with KB4474419, then you can remove it easily by following the instructions above.
All of the Windows Server 2008 and Windows 7 machines have received all of these updates via Windows Update as a part of Patch Tuesday.
Don’t forget that Microsoft retired Windows 7 back in January 2020, and those who still want to continue receiving updates need to purchase an EOS package.
Lastly, maybe it’s time for you to upgrade Windows 7 to Windows 10, and get access to new features and security improvements, so be sure to consider that as well.
Feel free to let us know if you encounter any issues downloading these updates in the comments below.
If your Xbox app is stuck on preparing, you’re not alone. Many Windows users report seeing the app freeze at 0% or get stuck on downloading, installing, or preparing to download. This issue often comes down to corrupted cache, network problems, or a faulty installer. Here’s how you can fix it.
This often fixes minor glitches that cause the Xbox app installer to hang.
2. Clear the Microsoft Store and Xbox App Cache
A corrupted cache can leave the Xbox app stuck on preparing 0%. Similar cache errors often cause the app to close or crash unexpectedly, as reported in cases of the Xbox app randomly closing on Windows 10.
Press Win + R and type wsreset.exe.
Wait until the Command Prompt window closes automatically.
Relaunch the Microsoft Store and Xbox app.
This resets cached data and forces a fresh sync with Microsoft servers.
3. Check Gaming Services (and the EA App)
Xbox app downloading issues can happen if the Gaming Services component is broken or if the EA App is malfunctioning, especially for EA Play titles. In some cases, a broken service can even trigger crashes in the Xbox app on Windows 11.
Open PowerShell as Administrator. If you’re unfamiliar with it, check this guide on how to use PowerShell in Windows 10.
Run: get-appxpackage Microsoft.GamingServices | remove-AppxPackage -allusers start ms-windows-store://pdp/?productid=9MWPM2CQNLHN This reinstalls Gaming Services from the Microsoft Store.
If you’re installing an EA Play game, update or reinstall the EA App. Problems like the EA error code EC 10000 often happen when the app is outdated.
Open the EA App and sign in before retrying the download in the Xbox app.
Both components need to be working properly — if either is corrupted, the Xbox app may stay stuck on preparing or 0%.
A fresh installation often resolves cases where the Xbox app installer is stuck. Need a full console offline update walkthrough? See Update Xbox Offline.
FAQs
Why is my Xbox app stuck on preparing?
It usually happens due to corrupted cache, broken Gaming Services, or pending Windows updates.
How do I fix Xbox app stuck on preparing 0%?
Clear the cache with wsreset.exe, reset the app in Settings, or reinstall Gaming Services.
Is the Xbox app download stuck a common issue?
Yes, many users experience the Xbox app install stuck problem when network or system files misbehave.
Can I avoid Xbox games getting stuck installing?
Keep Windows updated, maintain free disk space, and regularly reset the cache to prevent errors.
We often come across issues with the computer where recovery seems like the only viable solution. And subsequently, we head to the Recovery settings, but several users reported that it crashes immediately in Windows.
The issue appears to be highly intricate in nature, and most of the solutions don’t work. But, we have gathered the best fixes shared by users that will help you fix things in no time.
Why do recovery settings crash in Windows 10?
Here are some of the reasons why the recovery setting closes immediately in Windows 10:
Bug in the installed version – If you started facing the issue after updating the OS, it’s likely a bug in the installed version. In these cases, Microsoft usually releases a patch in the subsequent updates.
Corrupt system files – If the system files are corrupt, it should be pretty evident because you wouldn’t be able to access certain parts of the PC. This issue can be fixed by running the DISM tool and SFC scan.
Outdated drivers – Several users reported outdated drivers to be the reason their recovery setting crashes in Windows 10.
What do I do if the recovery settings crash in Windows 10?
Before we head to the slightly tricky and time-consuming solutions, here are a few quick ones you can try:
Restart the computer.
Install the latest version of Windows.
If the two didn’t work, the following solutions surely would.
1. Uninstall recent Windows Update
Press Windows + I to open Settings, and click on Update & Security.
Click on View update history on the right.
Now, click on Uninstall updates.
Locate the last installed update, and click on Uninstall.
Click Yes in the confirmation prompt.
You may have to similarly update a few more recent updates to get things working.
In most cases, users find that a bug in the installed version of the OS crashes Windows recovery settings. Many reported the KB5015807 update to be the underlying cause, so you should first uninstall this.
Also, you will have to disable automatic updates to ensure that the buggy one is not reinstalled. From now on, the settings window shouldn’t disappear in Windows 10.
2. Update the graphics driver
Type Device Manager in the Search bar, and click on the relevant search result.
Expand the Display adapters entry, right-click on the active graphics adapter, and select Update driver.
However, the manual approach puts your PC at risk in case of any lapse during the process. Many experts recommend it’s best that you use reliable driver update software, which will automatically locate and install the best drivers as soon as they are available.
Outbyte Driver Updater is a great driver update program that can run a thorough scan of your PC to find outdated drivers, including your graphics driver, and then automatically updates them with the newest version.
Outbyte Driver Updater
Choose the Outbyte Driver Updater software to maintain your device drivers up to date and prevent performance matters.
Press Windows + R to open Run, type cmd in the text field, and press Ctrl + Shift + Enter.
Click Yes in the UAC prompt.
Now, paste these three commands individually and hit Enter after each:dism /online /cleanup-image /scanhealthdism /online /cleanup-image /restorehealth
Once done, execute the following command to run the SFC scan: sfc /scannow
4. Reset Windows
If Windows recovery settings still won’t open and crash each time, your last option is to factory reset Windows 10.
This will most certainly fix the problem, but it would wipe the system clean, and any files or apps stored on it would be lost.
If you don’t prefer doing a reset, wait for a while and update the PC once a newer version is available and check if that fixes things. In case it doesn’t reset is the only choice.
By now, the Windows recovery settings crashes will be fixed, and you can easily access the Recovery Mode or perform other advanced troubleshooting.
Having knowledge of how to factory reset Windows 10 without settings can be more effective and comprehensive. Moreover, you can perform a factory reset on your Windows 10 to return your PC to its first state. So, it is essential to have a knowledge of how to factory reset Windows 10 before going into it.
Is factory resetting your PC a good idea?
The first question that should come to your mind is, should I factory reset my PC? Factory resetting your PC allows you to remove apps, settings, and drivers and install them cleanly without any problems.
It puts Windows to its original state, and the files pre-installed in your PC at the time of purchase would be intact even when reset.
However, some notable advantages come from factory resetting your Laptop. Likewise, there are some disadvantages that it poses to you as a user and also to your laptop.
What are the benefits of factory resetting?
Factory resetting your PC will help it fix issues deep-rooted in the system, causing it not to function as it should.
It deletes all corrupted system files on your computer. Also, it restores the system settings configured when you purchased the system.
Make sure you plug your PC into a stable power source.
Disconnect any remote connection on your PC.
Unplug USB devices and peripherals connected to your computer.
The above steps will help prepare your PC for the factory reset process and be sure it is successful. Then, you can proceed with the following steps to factory reset your Windows 10.
1. Factory reset via the Advanced Startup options
Click the Start button and click the Power option, press the Shift key and click Restart from Power options.
Select Troubleshoot from the options available on the new window.
Click on the Reset your PC option.
On the Reset page, choose either the Keep my files or Remove everything option to perform a complete reset.
Click the Reset button to proceed with the reset, then wait for the process to complete.
Resetting the PC using the advanced startup screen is the easiest method to reset only the C drive on Windows 11; read this guide to learn more solutions.
Likewise, it is common for users to complain about having issues while resetting Windows. So, check our guide on how to fix a factory reset stuck on both Windows 10 and 11.
Kindly leave your questions and suggestions in the comments section below.
Blue Screen of Death or BSoD errors are some of the most crucial errors you would come across on your Windows 11 PC. If you want to know more about BSoD, then you can check out our dedicated guide.
Many of our readers reported that Windows 11 throws a BSoD when Minecraft is launched. If you are also experiencing the same issue, then this guide is here to help you.
What can cause the BSoD error in Minecraft on Windows 11?
Here are a few common reasons because of why you could come across the Blue Screen of Death error when launching Minecraft on your PC.
You are using a different Minecraft launcher – Several user reports confirm that using a different launcher other than the original one causes this issue.
The Minecraft launcher isn’t up to date – You need to make sure that you are running the latest available version of the Minecraft launcher.
The correct Java file isn’t selected – You need to make sure that the correct version of the Java installed on your PC is selected in the Minecraft launcher.
Your antivirus is causing issues – Often antivirus software can cause issues running a program, as it may appear as a threat to the PC.
Problems with your BIOS – If you haven’t updated your BIOS then this could also result in BSoD errors.
Now that we know the reasons behind this BSoD, let’s start fixing it with our solutions below.
How can I fix the Minecraft BSoD error on Windows 11?
Before you attempt any advanced troubleshooting, here are a few things that you can try:
The error could be because of a temporary glitch which can be easily fixed by restarting your PC.
New updates can fix the bugs present because of the previous update. Check and install if a new Windows update is available.
Open the Start menu by pressing the Windows button.
Search for Minecraft launcher.
Right-click on it and select App Settings.
Click on Repair and Reset.
For several of our readers, simply repairing and resetting the Minecraft launcher solved the BSoD error with it. You can also try and check if this fixes the issue for you.
Click on the drop-down menu next to the Play button.
Choose Latest Release.
The update should start.
Usually, the Minecraft Launcher updates itself if a new update is available when you launch it. However, you can force the update to install by following the above method.
You need to keep the BIOS updated if you want to ensure your PC’s performance is optimal and you don’t run into multiple issues with it.
However, updating BIOS is a tricky task and should not be done, if you haven’t created a data backup. So, the first thing before you should do a BIOS update is to back up all of your data.
Now, you can follow our guide that helps you with all the necessary steps that you need to follow to update BIOS on your Windows 11 PC.
Well, the Windows 11 Minecraft BSoD error isn’t the only issue users have reported facing. You could also come across the Minecraft launcher not working in Windows 11 issue but this dedicated guide will help you fix it.
If Minecraft isn’t using GPU on your PC, then you can check out our guide that gives you 3 tips to fix the problem at hand.
That is it from us in this guide. Let us know in the comments below, which one of the solutions helped you resolve the Minecraft BSoD problem in Windows 11.
In this guide, we’ll dissect what this error is is and what you can do to fix it if you encounter it.
What does LUA Error stand for?
LUA error in WoW script appears if the code in the addon encounters issues. There are several causes for LUA errors, and with the following being the most common ones:
Bugs in the code – The most common cause for LUA errors is the addon code. Sometimes issues with the code can occur resulting in an error message.
Corrupted files – Corrupted files such as Config.wtf can cause errors with your add-ons.
Graphics settings – Certain graphics settings can sometimes cause problems with add-ons resulting in an error message.
How do I fix Lua error in WoW?
1. Adjust your graphics settings
Launch the game and open the game menu. Click on System.
Now set Graphics Quality to a different value. You might even put it on the lowest value.
Click on Apply and OK to save changes.
Resettings graphics settings to default can also help with this problem.
2. Delete the Config.wtf file
Go to WoW’s installation directory. By default, it should be: C:\World of Warcraft\
Next, navigate to WTF directory.
Locate the Config.wtf file, right-click it, and choose Delete.
Once you delete the file, start the game again.
This should help you fix LUA error function permanently on your PC.
If you’re running World of Warcraft, close it completely.
Uninstall any addon manager you may be running.
Navigate to the World of Warcraft folder on your computer.
Once you’re in the World of Warcraft folder, click on the game version of WoW that’s giving you Lua errors (_retail_, classic_era, or _classic_).
Rename the following folders:
Cache: Cache_Old
Interface: Interface_Old
WTF: WTF_Old
Launch WoW.
Once the game starts, reset all your settings to the default.
Lastly, in the console run the following command: /console cvar_default
By doing this, you can disable Lua errors WoW Shadowlands or WoW Classic.
With the simple solutions in this guide, you can understand, manage, troubleshoot, and fix WoW Lua errors. As for other errors, we also tackled Device Driver Is Not Compatible in WoW in a different article.
Did we miss anything? Which solution solved your issue? Don’t hesitate to let us know down in the comments section.
Windows 10 is a great operating system, bringing many new features and implementations. If you ever wondered how to record the screen with audio in Windows 10, in today’s article we’re going to show you how to do it.
In order to capture your screen in Windows 10, you must use software that Microsoft incorporated into the operating system.
This software will come in handy for all folks that would like to do it. We are talking about the Xbox One screen recorder also known as XboxOne DVR, which is part of the Xbox Game Bar.
Obviously, people need to record their screens for a variety of reasons, not only gaming, since it is great for presentations, online school, and work.
This tool allows you to record your screen on Windows 10 on any occasion (if your GPU meets the recommended requirements). And all within the system, without any 3rd-party software.
Does Windows 10 have video recording software?
Yes. Windows 10 has the Xbox Game Bar pre-installed on all devices that support it.
It was created specifically to record gaming sessions, but you can use it to record anything you do on your PC. It’s a good tool to make instructional videos or even presentations.
Does Windows 10 screen recorder record sound?
Yes. The built-in Windows Game Bar recording software lets you record audio as well. It offers users the possibility to record system audio as well as microphone audio.
Both can be recorded at the same time, for highly interactive videos, but you can also pick just one, or not record audio at all.
Tip
The Game Bar is great for quick captures, but if you want more advanced options such as custom dimensions, drawing tools, mouse emphasis, or closed captions, you’ll be better off with a third-party tool like Loom.
How can I easily record the screen with audio in Windows 10?
Record the screen in Windows 10 using Xbox Game Bar:
In order to capture your screen in Windows 10, you must use software that Microsoft incorporated into the operating system.
1. Press Windows Key + G at the same time.
2. Select Yes, this is a game.
3. In the Settings, you can set up recordingfeatures to your liking.
Backgroundrecording
Timer
Clip length
Customizable shortcuts
Audio, as desired
4. Click on the webcamicon to bring up the Capturemenu.
5. Once you’ve set up everything, just click on the circle and the recording should start.
6. To stop recording, just bring back command panel (Windows Key + G) and click the Stop button.
7. Alternatively, you can press the Windows Key + Alt + Rkeyboard shortcut to start/stop recording.
8. All of your recordingswill be stored in the following path: C:/Usersuser/name/Videos/Captures
This is how you can record your screen in Windows 10 with audio without having to install any third-party software.
It’s important to mention that you can use this tool to record your screen on laptops as well, as long as your laptop meets the hardware requirements.
Recommended system requirements
Note that you need to make sure you have the appropriate GPU. That’s the main reason why the below procedure is primarily intended for gamers.
These are the requirements you have to meet in order to record the game/screen footage:
The PC Video card must support the following encoders:
Intel Quick Sync H.264
NVidia NVENC
AMD VCE
AMD: AMD Radeon HD 7700 series, HD 7700M series, HD 8500 series, HD 8500M series, R9 series, and R7 series or later
NVIDIA: GeForce 600 series or later, GeForce 800M series or later, Quadro Kxxx series or later
Intel: Intel HD graphics 4200 or later, Intel Iris Graphics 5100 or later
If yours isn’t capable enough, perhaps it’s time to get a new one. Our list of best gaming laptops will provide the highest-performing products on the market at the moment.
NOTE
If your device does not support the Xbox Game Bar and you really need to show your screen to someone, you should know that most of the games have recording or screen-capturing features as well.
Screen recording affects performance
You’ve seen how simple it really is to record your gameplay on the screen, yet we have to mention that doing this will most likely affect your PC’s performance.
Depending on your computer’s capabilities and power, your in-game FPS will either slightly drop or drastically take a hit.
If your device can barely run a game with optimal FPS, trying to record gameplay on top of that will probably be too much to handle.
There are plenty of tools that can record your screen nowadays. Some are lightweight, some focus on performance, and some record higher resolutions, and 60 FPS.
To take screenshots, simply press the PrtSc key on your keyboard while you’re gaming, and the game will immediately create a screenshot into a designated directory.
Moreover, there are other ways to take screenshots on Windows 10. Here’s a list of different ways to take screenshots for you to check out.
If you’re not satisfied with the Xbox Game Bar or your hardware simply does not support it, you might want to try using specialized software.
Alright, since we talked about the methods of recording your screen, we have to tell you about the main differences between a video that has 30 FPS and one that has 60.
Firstly, we should briefly define what FPS is. The official term is Frames Per Second, and it’s pretty self-explanatory. It’s the number of frames registered in the course of an entire second.
Obviously, a higher number of frames will result in a more detailed movement. The image will flow better and smoother, more naturally.
Usually, a higher amount of FPS requires beefier specs, but it is entirely worth it. Clearly, a video that plays at 60 FPS will be more enjoyable to watch than one that only plays at 30.
However, when capturing your screen at 30 FPS, the video will occupy less space, so you basically trade image quality for more space.
Here is how you can record your screen at 30/60 FPS:
Press the Windows Key + S and type in Settings.
Select Gaming.
Then, click on Game DVR.
Scroll to Video Frame Rate and select either 30/60 FPS.
As you can see, recording in 60 FPS is quite easy. All you need to do is toggle the appropriate settings in the Windows settings. Additionally, you can change the quality of the video in the same place.
With this being said, make sure you follow our steps, and if you encounter any issues, feel free to tell us in the comments section below.
Whether you want to produce great tutorials for your readers or fans, record your gameplay to show them your skills, or just show someone a trick, you will need a good screen recorder.
Screen recorder software can be pretty difficult to use and sometimes you will get lost through their settings.
That’s why we’re going to show you an easy way of recording your desktop using a great tool called Aiseesoft Screen Recorder.
⏺️How can Aiseesoft Screen Recorder help you to record the screen?
The purpose of Aiseesoft Screen Recorder is pretty obvious from its name but it does a lot more than record your screen or desktop.
➡️ It captures any activity on your PC, including a video call, a webcam, and your gameplay and it does all that at the exceptional video quality.
For instance, it is very useful for recording a lecture or a presentation, taking snapshots, or even recording your voice.
➡️Moreover, you can highlight the cursor movement during the screen capturing so that viewers can see it a lot better.
➡️The tool comes with a dedicated game recorder that captures the sound from the game and your mic simultaneously.
➡️Plus, it supports GPU acceleration to record the game without lag and webcam overlay for adding great commentary during the most exciting scenes.
So, the possibilities are only limited by your creativity and, as you will see next, it’s also extremely easy to use.
How to use Aiseesoft Screen Recorder to record my screen with audio?
You will receive the installer file and after you run it, click on Install.
After a few seconds, you will be prompted that the installation was successful so click the Start Now button.
Now, you will be able to choose if you want to run the Free Trial version, to purchase or to register your product if you already bought the licence from the website.
Next, you even get to choose between two skin options. We chose Elegance, of course, then hit OK.
Now, from the main screen, select Video Recorder.
In the next window, from the first tile you can select the Full screen or a Custom selection and right below you have the option to set the resolution of the caption selection. There’s even an option to choose the screen if you’re working with multiple displays.
Next, you can turn on the webcam and change its settings, turn ON or OFF the system sound and set the volume level or turn on the microphone.
The only thing left to do is to press the big red Record button.
A countdown will indicate the recording start and when you click the Stop button, your recorded clip will show up on the built-in editor. If you buy the full version, you can also cut the desired selection and then hit the Save button.
Now type the name of the video, set the destination on your drive and click Next.
If you’re running the free version, you will be prompted with the message that you can only save 3-minute clips but if you have the full version, you won’t have that limitation. Click the Save anyway option.
After that, you will see a screen with a list with all your recordings and on the right, you will find 5 more tools that you can click on to download and use their free trial versions.
As you can see from one of our screenshots above, with the Free Trial version you will be limited to 3-minute intervals for saving after each recording.
Also, you won’t be able to edit your video and you will not benefit from the noise cancellation and microphone enhancement features.
However, you are free to make as many screens captures as you want without any watermark and the upgrades and technical support are free.
What are the other Aiseesoft Screen Recorder settings?
If you click the Settings button from the main screen, you will discover a comprehensive menu with a lot of options to play with.
Hit the cogwheel icon to access the Settings menu
By default, the first window will be the video recording Preferences. In the Recording panel above there are a lot of options like the ones to hide the interface when taking a screenshot, show the recording boundary, and more.
Below, you will be able to set up the Directory Settings, the location where you want to store all the files you’re saving.
The video recording preferences window in Aiseesoft Screen Recorder
It’s also important to go through the Output menu because there you will be able to change the file formats for all the photos, videos, and audio you record.
For the photos, you can choose between PNG, JPG, BMP, GIF, and TIFF, for videos you have MP4, WMV, MOV, F4V, TS, Avi, and GIF, and the sound can be recorded as MP3, WMA, M4A, and AAC.
Access the Output menu to set up the audio, video and photo file formats
So, this is how you can record your desktop and webcam quickly by using the free version of Aiseesoft Screen Recorder.
Aiseesoft Screen Recorder also has other important functions, such as Game Recorder, Phone Recorder, real-time editing feature (available in trial version), etc.
We hope we convinced you that it’s extremely easy to capture anything on your screen. At least that’s how we felt like using this app.
Did you get to use Aiseesoft Screen Recorder? Let us know all about your experience in the comments section below.