Discord Installation Has Failed: How to Fix It Properly

If your Discord installation has failed, we will take you through some of the best fixes for Windows 10.

Discord might stop running without apparent reasons, though usually, the problems are related to corrupted files. For example, a Windows 10 update or a new program installed on your PC can interfere with internal Discord packages.

Why does Discord keep saying installation failed?

It might be the case that a previous version of Discord was installed on your computer at some point, and that installation left behind some files that are incompatible with the newer version.

In this case, you will have to completely remove Discord and then reinstall the application.

Why can’t I install Discord on Windows 10? This is a common issue, and the Discord installation failed error can appear on Windows 11 as well. However, in most cases, you just need to clear the application cache and try to install it again.

On the other hand, if you don’t have the necessary permissions, you might get Failed to extract the installer during Discord setup.

  • Background app – It is not uncommon for some applications running in the background to interfere with installing the Discord app.
  • Old discord installations – If you try to install Discord on a device with an old installation, it is likely that the installation will fail. Leftovers from the previous Discord design can also prevent you from having a clean installation.
  • No admin privileges – The Windows privileges that run on your operating system are also necessary. Thus, you have to ensure that you’re using the correct ones.

As you can see, there are a handful of reasons why your installation may fail. A few of the most common triggers for this problem include:

When the installation fails, you may be hit with any of the following messages:

  • Discord installation has failed to extract the installer – Other means of extracting the executable file may be required. For example, scanning your device for malware might help if you fail to extract the Discord installer.
  • The Discord won’t install on PC – You should just take a look at the fixes below, as they have proved very helpful.
  • Discord installation has failed check setup log – The setup log summarizes everything that happens during installation.
  • Discord installation has failed on Squirrel – Squirrel is a complete updater or installer. You can see it in action by looking through Discord’s starting logs.

Now that you know the most common reasons for a failed Discord installation in Windows 10, let’s see what you can do to fix it.

 How do I fix the Discord installation failed?

Before you download and install Discord, ensure that your computer meets the minimum system requirements, as this could be an easy reason why your installation may fail.

Once you have gotten that out of the way, proceed to these solutions.

1. Stop the Discord process 

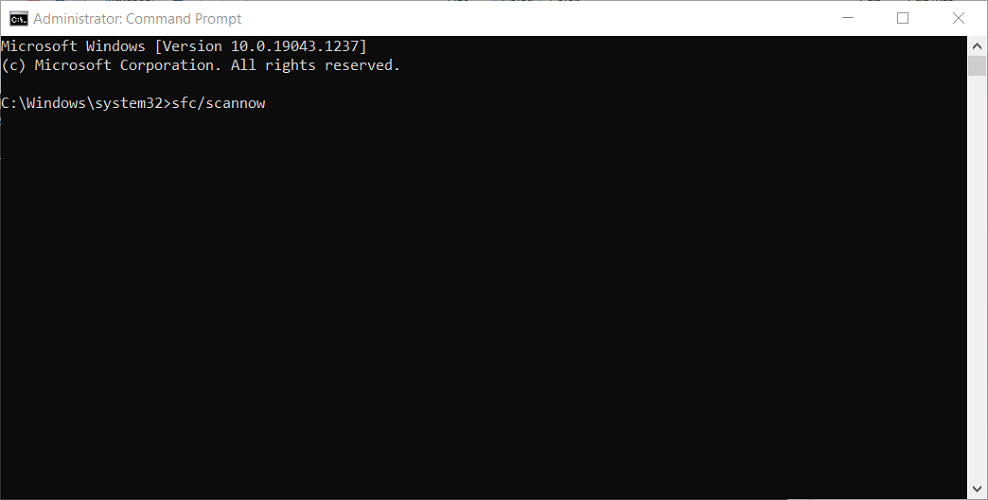
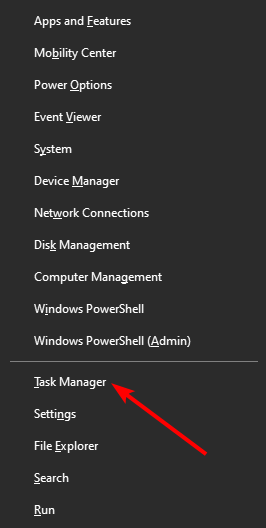
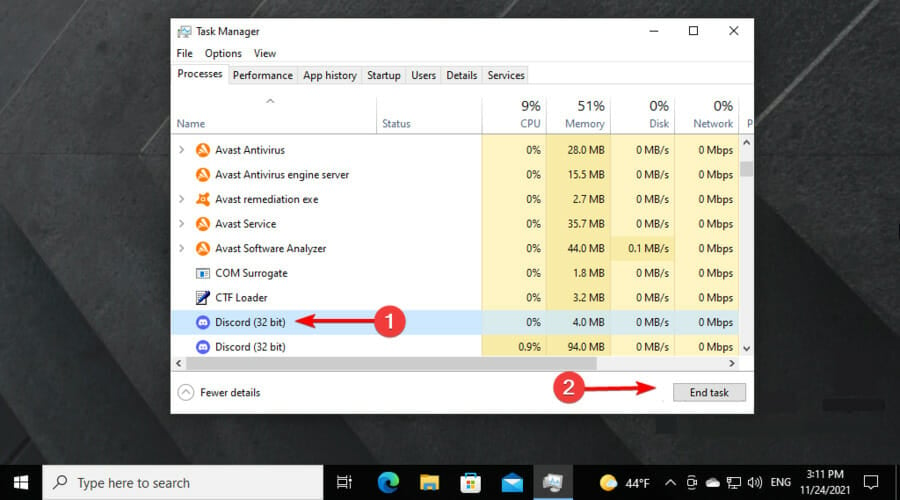
    An intuitive and effective solution to repair Discord installation errors is to terminate the process from Task Manager. You can apply the practical steps below to do it fast.

  1. 1. Use the following keyboard shortcut: Ctrl + Alt + Del, and choose Task Manager.

    discord installation has failed
  2. 2. Under Background Processes, find any entry that might be related to Discord.

  3. 3. To end the process, select it and click the End Task button. (if there are multiple instances, you have to pick them one by one).
    cant-install-discord

2. Uninstall the previous Discord app

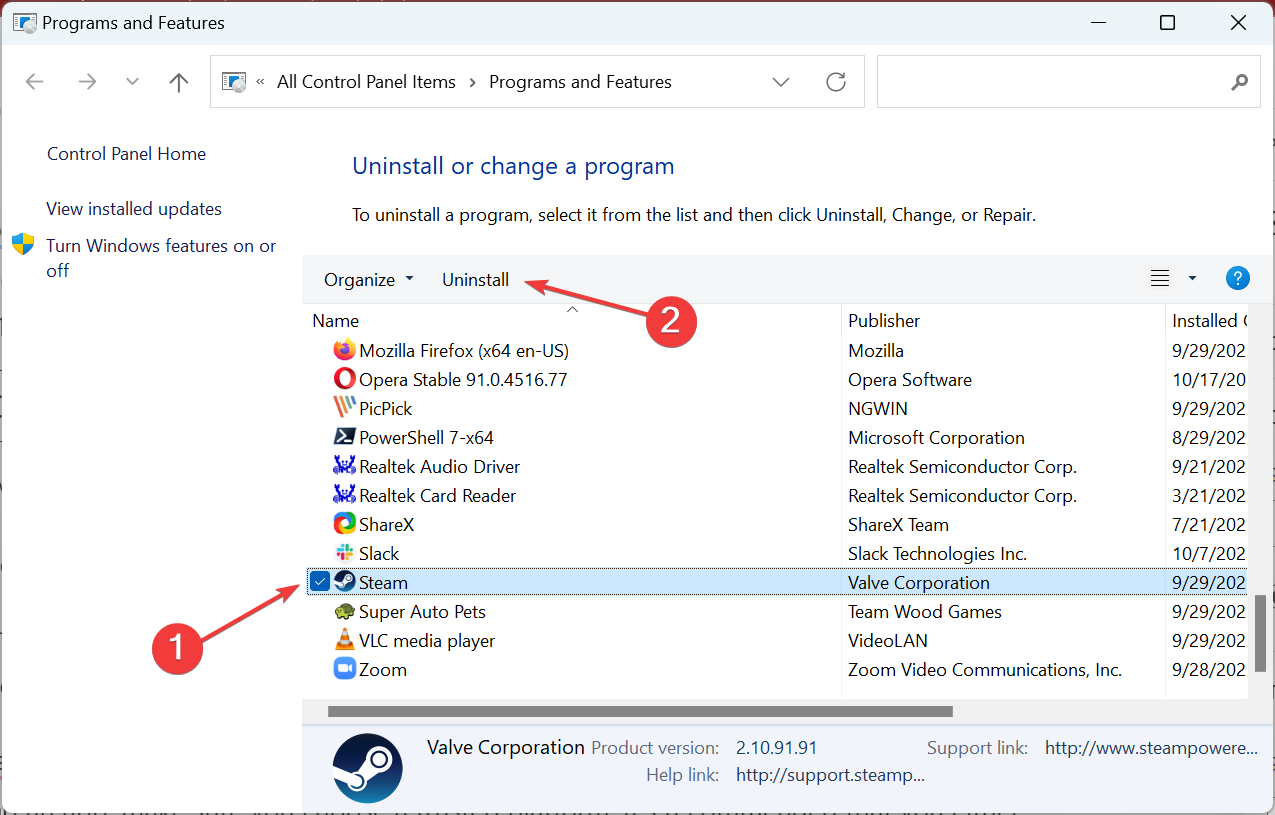
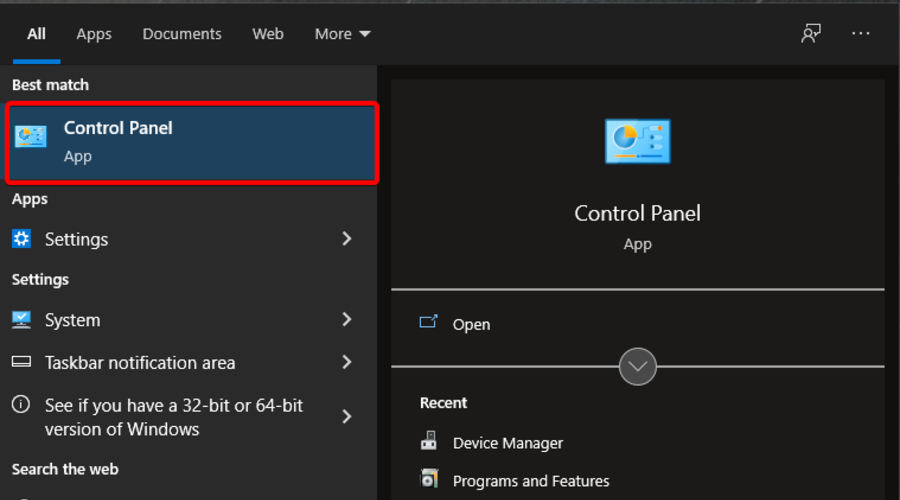
  1. Hit the Windows key, type Control Panel, then open it.
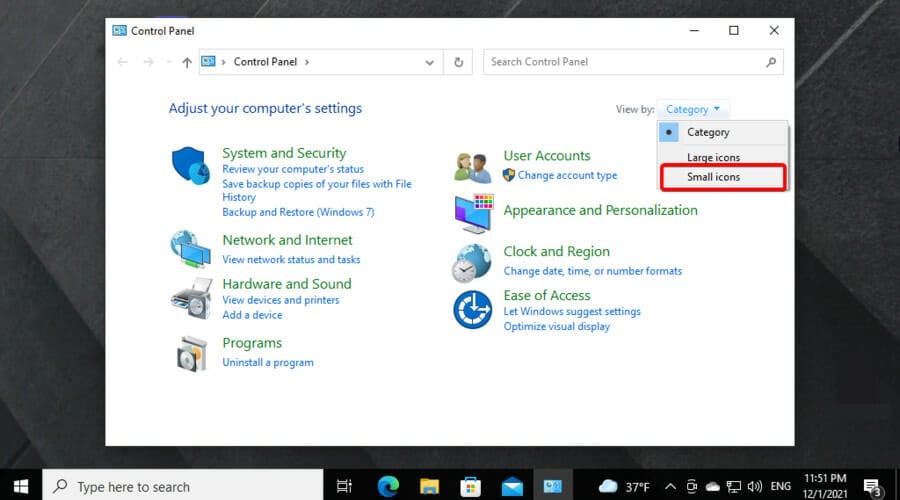
  2. From the View by option located in the right corner, switch to Small icons.
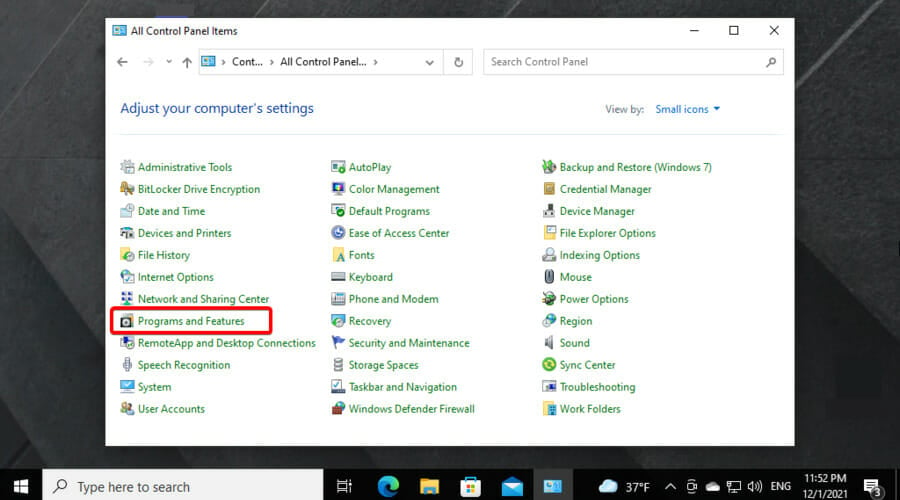
  3. Select Programs and Features.
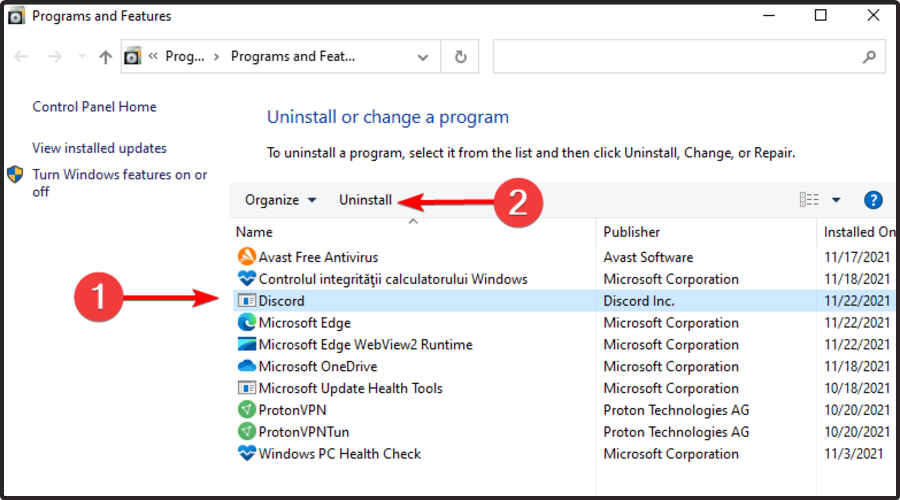
  4. In the list of programs, find and select Discord, then choose Uninstall.
  5. Restart the computer.

As a best practice, before installing a program that is already installed, you need to uninstall it from Control Panel. Usually, if you don’t uninstall first, you receive an error message.

However, some apps let you install multiple versions, which can also lead to computer issues.

3. Remove the file still left on your device

  1. Press Windows + R keyboard hotkeys to open the Run dialog window.
  2. Type %appdata% and hit the Enter key.
  3. Go to the Local and Roaming folders from the open path, and locate and delete the Discord folder.
  4. Restart your computer at the end.
  5. You should be able to reinstall Discord on your Windows 10 system without problems.

4. Run the installation as an Administrator

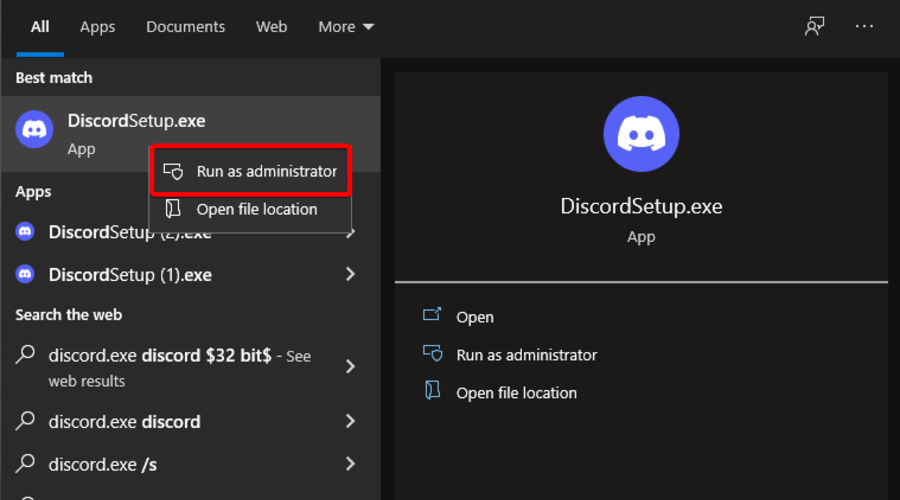
  1. Hit the Windows key and type Discord.exe.
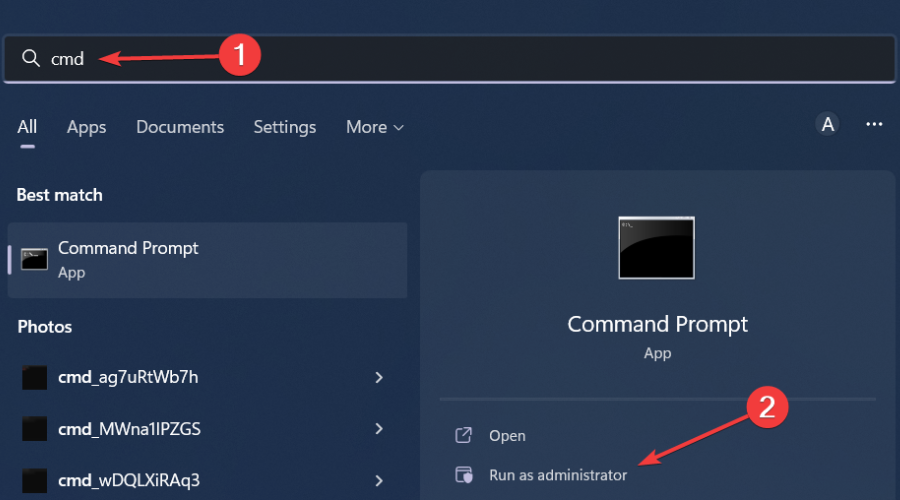
  2. Now, right-click on the first result and choose to Run as administrator.
  3. If the UAC is prompted, choose Yes.

If the Discord installation has failed, running it as an admin may be an easy fix.

5. Uninstall the Windows update

  1. Use the following keyboard shortcut: Windows + I to open Windows Settings.
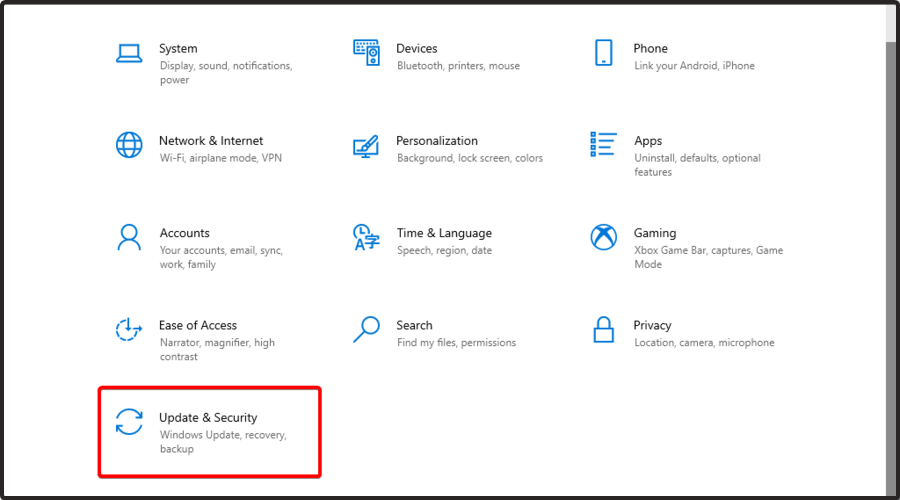
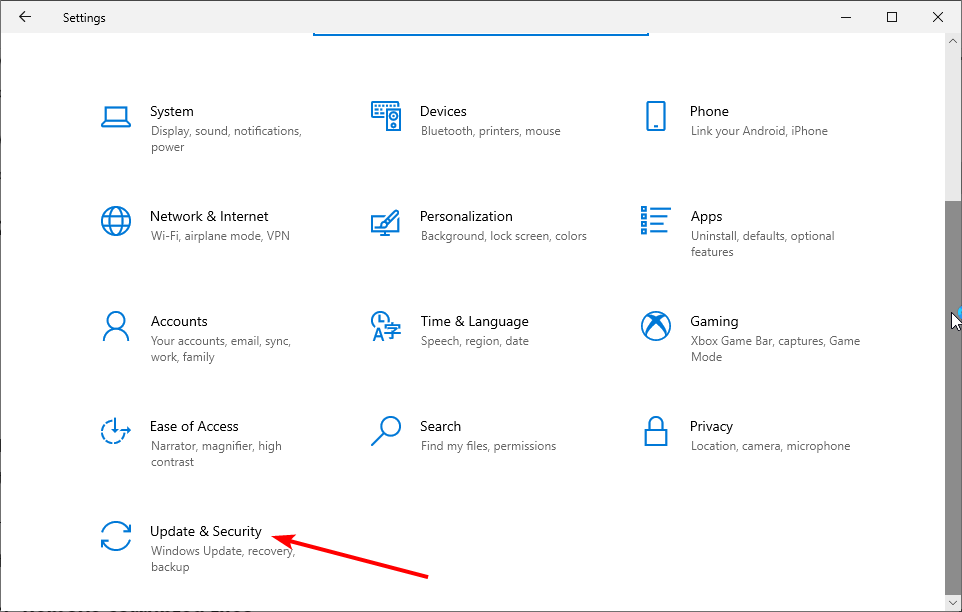
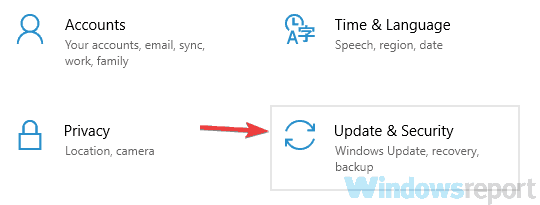
  2. Click on Update & Security.
  3. Go to Windows Update and choose View Update history.
  4. Click on the first option, Uninstall updates.
  5. From there, you can uninstall specific Windows updates.
Note icon NOTE
If Discord was corrupted by a recent Windows 10 update, you could try to remove the Windows package.

This solution should be used as a last resort; Windows updates are patches that address OS problems, security issues, new features, etc. Thus, it is essential to keep your Windows up to date.

Those troubleshooting steps can fix the Discord installation engine for Windows 10. For more solutions, you can check out how to fix Discord installation failed in Windows 11.

Our today’s guide presented only the most efficient solutions if the Discord installation failed on your OS. To solve it quickly, make sure you read the steps thoroughly.

Encountering file upload issues too? Our guide provides Discord error: Upload Failed. File Cannot Be Empty solutions to help you resolve these common problems in no time.

If you have further questions or if you need to fix other similar problems, don’t hesitate to leave a comment in the section below.

Also, the Discord support team is always excited to help you so that you can contact it through the official support page.

Here’s the list of Windows 11-supported Intel, Qualcomm & AMD CPUs

We all know that it has been only a little over a month now since Microsoft began to publicly roll out the Windows 11 22H2 feature update.

Also, about a week ago, the Redmond-based tech giant released an updated processor support page for the new 22H2 update.

And, although the system requirements of Windows 11 haven’t changed since the original 21H2 release, Microsoft has added a separate list of CPUs exclusively for Windows 11 22H2.

What CPUs now fully support Windows 11 version 22H2?

We’re sorry to burst your bubble, but if anyone here was hoping that their currently unsupported hardware could suddenly appear on the supported list, that is simply not going to happen.

However, people have been running unsupported systems on Windows 11 22H2 as well, just like they were doing with the 21H2 version, so that was never going to be an issue.

That being said, it is not the old list either as new processor SKUs have been added. These include the 13th Gen Raptor Lake-S CPUs from Intel which was released at the end of last month.

If you are an AMD fan, just know that over on the AMD side, the Ryzen 7000 series desktop CPUs have been added as well.

We’ve prepared the full lists for you right here, so you don’t have to go scouring the internet looking for the information you need.

Windows 11 22H2-supported CPUs – Qualcomm

ManufacturerBrandModel
Qualcomm®Snapdragon™Snapdragon 850[1]
Qualcomm®Snapdragon™Snapdragon 7c
Qualcomm®Snapdragon™Snapdragon 7c Gen 2
Qualcomm®Snapdragon™Snapdragon 8c
Qualcomm®Snapdragon™Snapdragon 8cx
Qualcomm®Snapdragon™Snapdragon 8cx Gen 2
Qualcomm®Snapdragon™Microsoft SQ1
Qualcomm®Snapdragon™Microsoft SQ2

This wasn’t a lengthy list at all, but don’t worry. The truth is that not so many people use Qualcomm CPUs these days, so you should wait and see the AMD and Intel lists.

However, that doesn’t mean that these processors have been forgotten. Above, yo have the entire compatibility list for Windows 11 version 22H2.

Windows 11 22H2-supported CPUs – AMD

ManufacturerBrandModel
AMDAMD3015e
AMDAMD3020e
AMDAthlon™3000G
AMDAthlon™300GE
AMDAthlon™300U
AMDAthlon™320GE
AMDAthlon™Gold 3150C
AMDAthlon™Gold 3150G
AMDAthlon™Gold 3150GE
AMDAthlon™Gold 3150U
AMDAthlon™Silver 3050C
AMDAthlon™Silver 3050e
AMDAthlon™Silver 3050GE
AMDAthlon™Silver 3050U
AMDAthlon™7120e
AMDAthlon™7120U
AMDAthlon™7220e
AMDAthlon™7220U
AMDAthlon™ Gold PRO3125GE
AMDAthlon™ Gold PRO3150G
AMDAthlon™ Gold PRO3150GE
AMDAthlon™ PRO300GE
AMDAthlon™ PRO300U
AMDAthlon™ PRO3045B
AMDEPYC™7252
AMDEPYC™7262
AMDEPYC™7272
AMDEPYC™7282
AMDEPYC™7302
AMDEPYC™7313
AMDEPYC™7343
AMDEPYC™7352
AMDEPYC™7402
AMDEPYC™7413
AMDEPYC™7443
AMDEPYC™7452
AMDEPYC™7453
AMDEPYC™7502
AMDEPYC™7513
AMDEPYC™7532
AMDEPYC™7542
AMDEPYC™7543
AMDEPYC™7552
AMDEPYC™7642
AMDEPYC™7643
AMDEPYC™7662
AMDEPYC™7663
AMDEPYC™7702
AMDEPYC™7713
AMDEPYC™7742
AMDEPYC™7763
AMDEPYC™7232P
AMDEPYC™72F3
AMDEPYC™7302P
AMDEPYC™7313P
AMDEPYC™73F3
AMDEPYC™7402P
AMDEPYC™7443P
AMDEPYC™74F3
AMDEPYC™7502P
AMDEPYC™7543P
AMDEPYC™75F3
AMDEPYC™7702P
AMDEPYC™7713P
AMDEPYC™7F32
AMDEPYC™7F52
AMDEPYC™7F72
AMDEPYC™7H12
AMDRyzen™ 33100
AMDRyzen™ 32300X
AMDRyzen™ 33200G with Radeon™ Vega 8 Graphics
AMDRyzen™ 33200GE
AMDRyzen™ 33200U
AMDRyzen™ 33250C
AMDRyzen™ 33250U
AMDRyzen™ 33300U
AMDRyzen™ 33350U
AMDRyzen™ 34300G
AMDRyzen™ 34300GE
AMDRyzen™ 34300U
AMDRyzen™ 35300GE
AMDRyzen™ 35300U
AMDRyzen™ 35400U
AMDRyzen™ 37320e
AMDRyzen™ 37320U
AMDRyzen™ 3 PRO3200G
AMDRyzen™ 3 PRO3200GE
AMDRyzen™ 3 PRO3300U
AMDRyzen™ 3 PRO4350G
AMDRyzen™ 3 PRO4350GE
AMDRyzen™ 3 PRO4450U
AMDRyzen™ 3 PRO5350G
AMDRyzen™ 3 PRO5350GE
AMDRyzen™ 3 PRO5450U
AMDRyzen™ 52600
AMDRyzen™ 53600
AMDRyzen™ 53600
AMDRyzen™ 52500X
AMDRyzen™ 52600E
AMDRyzen™ 52600X
AMDRyzen™ 53350G
AMDRyzen™ 53350GE
AMDRyzen™ 53400G with Radeon™ RX Vega 11 Graphics
AMDRyzen™ 53400GE
AMDRyzen™ 53450U
AMDRyzen™ 53500 Processor
AMDRyzen™ 53500C
AMDRyzen™ 53500U
AMDRyzen™ 53550H
AMDRyzen™ 53580U Microsoft Surface® Edition
AMDRyzen™ 53600X
AMDRyzen™ 53600XT
AMDRyzen™ 54500U
AMDRyzen™ 54600G
AMDRyzen™ 54600GE
AMDRyzen™ 54600H
AMDRyzen™ 54600HS
AMDRyzen™ 54600U
AMDRyzen™ 55300G
AMDRyzen™ 55300GE
AMDRyzen™ 55500U
AMDRyzen™ 55600G
AMDRyzen™ 55600GE
AMDRyzen™ 55600H
AMDRyzen™ 55600HS
AMDRyzen™ 55600U
AMDRyzen™ 55600X
AMDRyzen™ 56600H
AMDRyzen™ 56600U
AMDRyzen™ 57520U
AMDRyzen™ 57600X
AMDRyzen™ 5 PRO2600
AMDRyzen™ 5 PRO3600
AMDRyzen™ 5 PRO3350G
AMDRyzen™ 5 PRO3350GE
AMDRyzen™ 5 PRO3400G
AMDRyzen™ 5 PRO3400GE
AMDRyzen™ 5 PRO3500U
AMDRyzen™ 5 PRO4650G
AMDRyzen™ 5 PRO4650GE
AMDRyzen™ 5 PRO4650U
AMDRyzen™ 5 PRO5650G
AMDRyzen™ 5 PRO5650GE
AMDRyzen™ 5 PRO5650HS
AMDRyzen™ 5 PRO5650HX
AMDRyzen™ 5 PRO5650U
AMDRyzen™ 5 PRO5750G
AMDRyzen™ 5 PRO5750GE
AMDRyzen™ 72700
AMDRyzen™ 75800
AMDRyzen™ 75800
AMDRyzen™ 72700E Processor
AMDRyzen™ 72700X
AMDRyzen™ 73700C
AMDRyzen™ 73700U
AMDRyzen™ 73700X
AMDRyzen™ 73750H
AMDRyzen™ 73780U Microsoft Surface® Edition
AMDRyzen™ 73800X
AMDRyzen™ 73800XT
AMDRyzen™ 74700G
AMDRyzen™ 74700GE
AMDRyzen™ 74700U
AMDRyzen™ 74800H
AMDRyzen™ 74800HS
AMDRyzen™ 74800U
AMDRyzen™ 75700G
AMDRyzen™ 75700GE
AMDRyzen™ 75700U
AMDRyzen™ 75800H
AMDRyzen™ 75800HS
AMDRyzen™ 75800U
AMDRyzen™ 75800X
AMDRyzen™ 76800H
AMDRyzen™ 76800U
AMDRyzen™ 76810U
AMDRyzen™ 77700X
AMDRyzen™ 7 PRO2700
AMDRyzen™ 7 PRO3700
AMDRyzen™ 7 PRO2700X
AMDRyzen™ 7 PRO3700U
AMDRyzen™ 7 PRO4750G
AMDRyzen™ 7 PRO4750GE
AMDRyzen™ 7 PRO4750U
AMDRyzen™ 7 PRO5850HS
AMDRyzen™ 7 PRO5850HX
AMDRyzen™ 7 PRO5850U
AMDRyzen™ 95900
AMDRyzen™ 95900
AMDRyzen™ 93900 Processor
AMDRyzen™ 93900X
AMDRyzen™ 93900XT
AMDRyzen™ 93950X
AMDRyzen™ 94900H
AMDRyzen™ 94900HS
AMDRyzen™ 95900HS
AMDRyzen™ 95900HX
AMDRyzen™ 95900X
AMDRyzen™ 95950X
AMDRyzen™ 95980HS
AMDRyzen™ 95980HX
AMDRyzen™ 96900HX
AMDRyzen™ 96980HX
AMDRyzen™ 97900X
AMDRyzen™ 97950X
AMDRyzen™ 9 PRO3900
AMDRyzen™ 9 PRO3900
AMDRyzen™ EmbeddedV2516
AMDRyzen™ EmbeddedV2546
AMDRyzen™ EmbeddedV2718
AMDRyzen™ EmbeddedV2748
AMDRyzen™ Threadripper™ PRO5945WX
AMDRyzen™ Threadripper™ PRO5955WX
AMDRyzen™ Threadripper™ PRO5965WX
AMDRyzen™ Threadripper™ PRO5975WX
AMDRyzen™ Threadripper™ PRO5995WX

So, if you are using an AMD CPU on your rig, these are the models that Microsoft has approved and deemed Windows 11 22H2-compatible.

Now, let’s also check the list of Intel processors, although we warn you that this one is considerably longer than the AMD one.

Windows 11 22H2-supported CPUs – Intel

ManufacturerBrandModel
Intel®Atom®x6200FE
Intel®Atom®x6211E
Intel®Atom®x6212RE
Intel®Atom®x6413E
Intel®Atom®x6414RE
Intel®Atom®x6425E
Intel®Atom®x6425RE
Intel®Atom®x6427FE
Intel®Celeron®6305
Intel®Celeron®7300
Intel®Celeron®7305
Intel®Celeron®3867U
Intel®Celeron®4205U
Intel®Celeron®4305U
Intel®Celeron®4305UE
Intel®Celeron®5205U
Intel®Celeron®5305U
Intel®Celeron®6305E
Intel®Celeron®6600HE
Intel®Celeron®7305E
Intel®Celeron®7305L
Intel®Celeron®G4900
Intel®Celeron®G4900T
Intel®Celeron®G4920
Intel®Celeron®G4930
Intel®Celeron®G4930E
Intel®Celeron®G4930T
Intel®Celeron®G4932E
Intel®Celeron®G4950
Intel®Celeron®G5900
Intel®Celeron®G5900E
Intel®Celeron®G5900T
Intel®Celeron®G5900TE
Intel®Celeron®G5905
Intel®Celeron®G5905T
Intel®Celeron®G5920
Intel®Celeron®G5925
Intel®Celeron®G6900
Intel®Celeron®G6900E
Intel®Celeron®G6900T
Intel®Celeron®G6900TE
Intel®Celeron®J4005[2]
Intel®Celeron®J4025
Intel®Celeron®J4105[2]
Intel®Celeron®J4115[2]
Intel®Celeron®J4125
Intel®Celeron®J6412
Intel®Celeron®J6413
Intel®Celeron®N4000[2]
Intel®Celeron®N4020
Intel®Celeron®N4100[2]
Intel®Celeron®N4120
Intel®Celeron®N4500
Intel®Celeron®N4505
Intel®Celeron®N5100
Intel®Celeron®N5105
Intel®Celeron®N6210
Intel®Celeron®N6211
Intel®Core™i3-1000G1
Intel®Core™i3-1000G4
Intel®Core™i3-1005G1
Intel®Core™i3-10100
Intel®Core™i3-10100E
Intel®Core™i3-10100F
Intel®Core™i3-10100T
Intel®Core™i3-10100TE
Intel®Core™i3-10100Y
Intel®Core™i3-10105
Intel®Core™i3-10105F
Intel®Core™i3-10105T
Intel®Core™i3-10110U
Intel®Core™i3-10110Y
Intel®Core™i3-10300
Intel®Core™i3-10300T
Intel®Core™i3-10305
Intel®Core™i3-10305T
Intel®Core™i3-10320
Intel®Core™i3-10325
Intel®Core™i3-11100HE
Intel®Core™i3-1110G4
Intel®Core™i3-1115G4
Intel®Core™i3-1115G4E
Intel®Core™i3-1115GRE
Intel®Core™i3-1120G4
Intel®Core™i3-1125G4
Intel®Core™i3-12100
Intel®Core™i3-12100E
Intel®Core™i3-12100F
Intel®Core™i3-12100T
Intel®Core™i3-12100TE
Intel®Core™i3-1210U
Intel®Core™i3-1215U
Intel®Core™i3-1215UE
Intel®Core™i3-1215UL
Intel®Core™i3-1220P
Intel®Core™i3-1220PE
Intel®Core™i3-12300
Intel®Core™i3-12300HE
Intel®Core™i3-12300HL
Intel®Core™i3-12300T
Intel®Core™i3-13100
Intel®Core™i3-13100F
Intel®Core™i3-13100T
Intel®Core™i3-8100
Intel®Core™i3-8100B
Intel®Core™i3-8100H
Intel®Core™i3-8100T
Intel®Core™i3-8109U
Intel®Core™i3-8130U
Intel®Core™i3-8140U
Intel®Core™i3-8145U
Intel®Core™i3-8145UE
Intel®Core™i3-8300
Intel®Core™i3-8300T
Intel®Core™i3-8350K
Intel®Core™i3-9100
Intel®Core™i3-9100E
Intel®Core™i3-9100F
Intel®Core™i3-9100HL
Intel®Core™i3-9100T
Intel®Core™i3-9100TE
Intel®Core™i3-9300
Intel®Core™i3-9300T
Intel®Core™i3-9320
Intel®Core™i3-9350K
Intel®Core™i3-9350KF
Intel®Core™i3-L13G4
Intel®Core™i3-N300
Intel®Core™i3-N305
Intel®Core™i5-10200H
Intel®Core™i5-10210U
Intel®Core™i5-10210Y
Intel®Core™i5-10300H
Intel®Core™i5-1030G4
Intel®Core™i5-1030G7
Intel®Core™i5-10310U
Intel®Core™i5-10310Y
Intel®Core™i5-1035G1
Intel®Core™i5-1035G4
Intel®Core™i5-1035G7
Intel®Core™i5-1038NG7
Intel®Core™i5-10400
Intel®Core™i5-10400F
Intel®Core™i5-10400H
Intel®Core™i5-10400T
Intel®Core™i5-10500
Intel®Core™i5-10500E
Intel®Core™i5-10500H
Intel®Core™i5-10500T
Intel®Core™i5-10500TE
Intel®Core™i5-10505
Intel®Core™i5-10600
Intel®Core™i5-10600K
Intel®Core™i5-10600KF
Intel®Core™i5-10600T
Intel®Core™i5-11260H
Intel®Core™i5-11300H
Intel®Core™i5-1130G7
Intel®Core™i5-11320H
Intel®Core™i5-1135G7
Intel®Core™i5-11400
Intel®Core™i5-11400F
Intel®Core™i5-11400H
Intel®Core™i5-11400T
Intel®Core™i5-1140G7
Intel®Core™i5-1145G7
Intel®Core™i5-1145G7E
Intel®Core™i5-1145GRE
Intel®Core™i5-11500
Intel®Core™i5-11500H
Intel®Core™i5-11500HE
Intel®Core™i5-11500T
Intel®Core™i5-1155G7
Intel®Core™i5-11600
Intel®Core™i5-11600K
Intel®Core™i5-11600KF
Intel®Core™i5-11600T
Intel®Core™i5-1230U
Intel®Core™i5-1235U
Intel®Core™i5-1235UL
Intel®Core™i5-12400
Intel®Core™i5-12400F
Intel®Core™i5-12400T
Intel®Core™i5-1240P
Intel®Core™i5-1240U
Intel®Core™i5-12450H
Intel®Core™i5-12450HX
Intel®Core™i5-1245U
Intel®Core™i5-1245UE
Intel®Core™i5-1245UL
Intel®Core™i5-12500
Intel®Core™i5-12500E
Intel®Core™i5-12500H
Intel®Core™i5-12500HL
Intel®Core™i5-12500T
Intel®Core™i5-12500TE
Intel®Core™i5-1250P
Intel®Core™i5-1250PE
Intel®Core™i5-12600
Intel®Core™i5-12600H
Intel®Core™i5-12600HE
Intel®Core™i5-12600HL
Intel®Core™i5-12600HX
Intel®Core™i5-12600K
Intel®Core™i5-12600KF
Intel®Core™i5-12600T
Intel®Core™i5-13400
Intel®Core™i5-13400F
Intel®Core™i5-13400T
Intel®Core™i5-13500
Intel®Core™i5-13500T
Intel®Core™i5-13600
Intel®Core™i5-13600K
Intel®Core™i5-13600KF
Intel®Core™i5-13600T
Intel®Core™i5-8200Y
Intel®Core™i5-8210Y
Intel®Core™i5-8250U
Intel®Core™i5-8257U
Intel®Core™i5-8259U
Intel®Core™i5-8260U
Intel®Core™i5-8265U
Intel®Core™i5-8269U
Intel®Core™i5-8279U
Intel®Core™i5-8300H
Intel®Core™i5-8305G
Intel®Core™i5-8310Y
Intel®Core™i5-8350U
Intel®Core™i5-8365U
Intel®Core™i5-8365UE
Intel®Core™i5-8400
Intel®Core™i5-8400B
Intel®Core™i5-8400H
Intel®Core™i5-8400T
Intel®Core™i5-8500
Intel®Core™i5-8500B
Intel®Core™i5-8500T
Intel®Core™i5-8600
Intel®Core™i5-8600K
Intel®Core™i5-8600T
Intel®Core™i5-9300H
Intel®Core™i5-9300HF
Intel®Core™i5-9400
Intel®Core™i5-9400F
Intel®Core™i5-9400H
Intel®Core™i5-9400T
Intel®Core™i5-9500
Intel®Core™i5-9500E
Intel®Core™i5-9500F
Intel®Core™i5-9500T
Intel®Core™i5-9500TE
Intel®Core™i5-9600
Intel®Core™i5-9600K
Intel®Core™i5-9600KF
Intel®Core™i5-9600T
Intel®Core™i5-L16G7
Intel®Core™i7-10510U
Intel®Core™i7-10510Y
Intel®Core™i7-1060G7
Intel®Core™i7-10610U
Intel®Core™i7-1065G7
Intel®Core™i7-1068G7
Intel®Core™i7-1068NG7
Intel®Core™i7-10700
Intel®Core™i7-10700E
Intel®Core™i7-10700F
Intel®Core™i7-10700K
Intel®Core™i7-10700KF
Intel®Core™i7-10700T
Intel®Core™i7-10700TE
Intel®Core™i7-10710U
Intel®Core™i7-10750H
Intel®Core™i7-10810U
Intel®Core™i7-10850H
Intel®Core™i7-10870H
Intel®Core™i7-10875H
Intel®Core™i7-11370H
Intel®Core™i7-11375H
Intel®Core™i7-11390H
Intel®Core™i7-11600H
Intel®Core™i7-1160G7
Intel®Core™i7-1165G7
Intel®Core™i7-11700
Intel®Core™i7-11700F
Intel®Core™i7-11700K
Intel®Core™i7-11700KF
Intel®Core™i7-11700T
Intel®Core™i7-11800H
Intel®Core™i7-1180G7
Intel®Core™i7-11850H
Intel®Core™i7-11850HE
Intel®Core™i7-1185G7
Intel®Core™i7-1185G7E
Intel®Core™i7-1185GRE
Intel®Core™i7-1195G7
Intel®Core™i7-1250U
Intel®Core™i7-1255U
Intel®Core™i7-1255UL
Intel®Core™i7-1260P
Intel®Core™i7-1260U
Intel®Core™i7-12650HX
Intel®Core™i7-1265U
Intel®Core™i7-1265UE
Intel®Core™i7-1265UL
Intel®Core™i7-12700
Intel®Core™i7-12700E
Intel®Core™i7-12700F
Intel®Core™i7-12700H
Intel®Core™i7-12700HL
Intel®Core™i7-12700K
Intel®Core™i7-12700KF
Intel®Core™i7-12700T
Intel®Core™i7-12700TE
Intel®Core™i7-1270P
Intel®Core™i7-1270PE
Intel®Core™i7-12800H
Intel®Core™i7-12800HE
Intel®Core™i7-12800HL
Intel®Core™i7-12800HX
Intel®Core™i7-1280P
Intel®Core™i7-12850HX
Intel®Core™i7-13700
Intel®Core™i7-13700F
Intel®Core™i7-13700K
Intel®Core™i7-13700KF
Intel®Core™i7-13700T
Intel®Core™i7-7800X
Intel®Core™i7-7820HQ[1]
Intel®Core™i7-7820X
Intel®Core™i7-8086K
Intel®Core™i7-8500Y
Intel®Core™i7-8550U
Intel®Core™i7-8557U
Intel®Core™i7-8559U
Intel®Core™i7-8565U
Intel®Core™i7-8569U
Intel®Core™i7-8650U
Intel®Core™i7-8665U
Intel®Core™i7-8665UE
Intel®Core™i7-8700
Intel®Core™i7-8700B
Intel®Core™i7-8700K
Intel®Core™i7-8700T
Intel®Core™i7-8705G
Intel®Core™i7-8706G
Intel®Core™i7-8709G
Intel®Core™i7-8750H
Intel®Core™i7-8809G
Intel®Core™i7-8850H
Intel®Core™i7-9700
Intel®Core™i7-9700E
Intel®Core™i7-9700F
Intel®Core™i7-9700K
Intel®Core™i7-9700KF
Intel®Core™i7-9700T
Intel®Core™i7-9700TE
Intel®Core™i7-9750H
Intel®Core™i7-9750HF
Intel®Core™i7-9800X
Intel®Core™i7-9850H
Intel®Core™i7-9850HE
Intel®Core™i7-9850HL
Intel®Core™i9-10850K
Intel®Core™i9-10885H
Intel®Core™i9-10900
Intel®Core™i9-10900E
Intel®Core™i9-10900F
Intel®Core™i9-10900K
Intel®Core™i9-10900KF
Intel®Core™i9-10900T
Intel®Core™i9-10900TE
Intel®Core™i9-10900X
Intel®Core™i9-10920X
Intel®Core™i9-10940X
Intel®Core™i9-10980HK
Intel®Core™i9-10980XE
Intel®Core™i9-11900
Intel®Core™i9-11900F
Intel®Core™i9-11900H
Intel®Core™i9-11900K
Intel®Core™i9-11900KF
Intel®Core™i9-11900T
Intel®Core™i9-11950H
Intel®Core™i9-11980HK
Intel®Core™i9-12900
Intel®Core™i9-12900E
Intel®Core™i9-12900F
Intel®Core™i9-12900H
Intel®Core™i9-12900HK
Intel®Core™i9-12900HX
Intel®Core™i9-12900K
Intel®Core™i9-12900KF
Intel®Core™i9-12900KS
Intel®Core™i9-12900T
Intel®Core™i9-12900TE
Intel®Core™i9-12950HX
Intel®Core™i9-13900
Intel®Core™i9-13900F
Intel®Core™i9-13900K
Intel®Core™i9-13900KF
Intel®Core™i9-13900T
Intel®Core™i9-7900X
Intel®Core™i9-7920X
Intel®Core™i9-7940X
Intel®Core™i9-7960X
Intel®Core™i9-7980XE
Intel®Core™i9-8950HK
Intel®Core™i9-9820X
Intel®Core™i9-9880H
Intel®Core™i9-9900
Intel®Core™i9-9900K
Intel®Core™i9-9900KF
Intel®Core™i9-9900KS
Intel®Core™i9-9900T
Intel®Core™i9-9900X
Intel®Core™i9-9920X
Intel®Core™i9-9940X
Intel®Core™i9-9960X
Intel®Core™i9-9980HK
Intel®Core™i9-9980XE
Intel®Core™m3-8100Y
Intel®Pentium®Gold 4417U
Intel®Pentium®Gold 4425Y
Intel®Pentium®Gold 5405U
Intel®Pentium®Gold 6405U
Intel®Pentium®Gold 6500Y
Intel®Pentium®Gold 6805
Intel®Pentium®Gold 7505
Intel®Pentium®Gold 8500
Intel®Pentium®Gold 8505
Intel®Pentium®Gold G5400
Intel®Pentium®Gold G5400T
Intel®Pentium®Gold G5420
Intel®Pentium®Gold G5420T
Intel®Pentium®Gold G5500
Intel®Pentium®Gold G5500T
Intel®Pentium®Gold G5600
Intel®Pentium®Gold G5600E
Intel®Pentium®Gold G5600T
Intel®Pentium®Gold G5620
Intel®Pentium®Gold G6400
Intel®Pentium®Gold G6400E
Intel®Pentium®Gold G6400T
Intel®Pentium®Gold G6400TE
Intel®Pentium®Gold G6405
Intel®Pentium®Gold G6405T
Intel®Pentium®Gold G6500
Intel®Pentium®Gold G6500T
Intel®Pentium®Gold G6505
Intel®Pentium®Gold G6505T
Intel®Pentium®Gold G6600
Intel®Pentium®Gold G6605
Intel®Pentium®Gold G7400
Intel®Pentium®Gold G7400E
Intel®Pentium®Gold G7400T
Intel®Pentium®Gold G7400TE
Intel®Pentium®J6426
Intel®Pentium®N6415
Intel®Pentium®Silver J5005[2]
Intel®Pentium®Silver J5040
Intel®Pentium®Silver N5000[2]
Intel®Pentium®Silver N5030
Intel®Pentium®Silver N6000
Intel®Pentium®Silver N6005
Intel®ProcessorN100
Intel®ProcessorN200
Intel®Xeon®Bronze 3104
Intel®Xeon®Bronze 3106
Intel®Xeon®Bronze 3204
Intel®Xeon®Bronze 3206R
Intel®Xeon®D-1702
Intel®Xeon®D-1712TR
Intel®Xeon®D-1713NT
Intel®Xeon®D-1713NTE
Intel®Xeon®D-1714
Intel®Xeon®D-1715TER
Intel®Xeon®D-1718T
Intel®Xeon®D-1722NE
Intel®Xeon®D-1726
Intel®Xeon®D-1732TE
Intel®Xeon®D-1733NT
Intel®Xeon®D-1735TR
Intel®Xeon®D-1736
Intel®Xeon®D-1736NT
Intel®Xeon®D-1739
Intel®Xeon®D-1746TER
Intel®Xeon®D-1747NTE
Intel®Xeon®D-1748TE
Intel®Xeon®D-1749NT
Intel®Xeon®D-2712T
Intel®Xeon®D-2733NT
Intel®Xeon®D-2738
Intel®Xeon®D-2752NTE
Intel®Xeon®D-2752TER
Intel®Xeon®D-2753NT
Intel®Xeon®D-2766NT
Intel®Xeon®D-2775TE
Intel®Xeon®D-2776NT
Intel®Xeon®D-2779
Intel®Xeon®D-2786NTE
Intel®Xeon®D-2795NT
Intel®Xeon®D-2796NT
Intel®Xeon®D-2796TE
Intel®Xeon®D-2798NT
Intel®Xeon®D-2799
Intel®Xeon®E-2104G
Intel®Xeon®E-2124
Intel®Xeon®E-2124G
Intel®Xeon®E-2126G
Intel®Xeon®E-2134
Intel®Xeon®E-2136
Intel®Xeon®E-2144G
Intel®Xeon®E-2146G
Intel®Xeon®E-2174G
Intel®Xeon®E-2176G
Intel®Xeon®E-2176M
Intel®Xeon®E-2186G
Intel®Xeon®E-2186M
Intel®Xeon®E-2224
Intel®Xeon®E-2224G
Intel®Xeon®E-2226G
Intel®Xeon®E-2226GE
Intel®Xeon®E-2234
Intel®Xeon®E-2236
Intel®Xeon®E-2244G
Intel®Xeon®E-2246G
Intel®Xeon®E-2254ME
Intel®Xeon®E-2254ML
Intel®Xeon®E-2274G
Intel®Xeon®E-2276G
Intel®Xeon®E-2276M
Intel®Xeon®E-2276ME
Intel®Xeon®E-2276ML
Intel®Xeon®E-2278G
Intel®Xeon®E-2278GE
Intel®Xeon®E-2278GEL
Intel®Xeon®E-2286G
Intel®Xeon®E-2286M
Intel®Xeon®E-2288G
Intel®Xeon®E-2314
Intel®Xeon®E-2324G
Intel®Xeon®E-2334
Intel®Xeon®E-2336
Intel®Xeon®E-2356G
Intel®Xeon®E-2374G
Intel®Xeon®E-2378
Intel®Xeon®E-2378G
Intel®Xeon®E-2386G
Intel®Xeon®E-2388G
Intel®Xeon®Gold 5115
Intel®Xeon®Gold 5118
Intel®Xeon®Gold 5119T
Intel®Xeon®Gold 5120
Intel®Xeon®Gold 5120T
Intel®Xeon®Gold 5122
Intel®Xeon®Gold 5215
Intel®Xeon®Gold 5215L
Intel®Xeon®Gold 5215M
Intel®Xeon®Gold 5217
Intel®Xeon®Gold 5218
Intel®Xeon®Gold 5218B
Intel®Xeon®Gold 5218N
Intel®Xeon®Gold 5218R
Intel®Xeon®Gold 5218T
Intel®Xeon®Gold 5220
Intel®Xeon®Gold 5220R
Intel®Xeon®Gold 5220S
Intel®Xeon®Gold 5220T
Intel®Xeon®Gold 5222
Intel®Xeon®Gold 5315Y
Intel®Xeon®Gold 5317
Intel®Xeon®Gold 5318N
Intel®Xeon®Gold 5318S
Intel®Xeon®Gold 5318Y
Intel®Xeon®Gold 5320
Intel®Xeon®Gold 5320T
Intel®Xeon®Gold 6126
Intel®Xeon®Gold 6126F
Intel®Xeon®Gold 6126T
Intel®Xeon®Gold 6128
Intel®Xeon®Gold 6130
Intel®Xeon®Gold 6130F
Intel®Xeon®Gold 6130T
Intel®Xeon®Gold 6132
Intel®Xeon®Gold 6134
Intel®Xeon®Gold 6136
Intel®Xeon®Gold 6138
Intel®Xeon®Gold 6138F
Intel®Xeon®Gold 6138P
Intel®Xeon®Gold 6138T
Intel®Xeon®Gold 6140
Intel®Xeon®Gold 6142
Intel®Xeon®Gold 6142F
Intel®Xeon®Gold 6144
Intel®Xeon®Gold 6146
Intel®Xeon®Gold 6148
Intel®Xeon®Gold 6148F
Intel®Xeon®Gold 6150
Intel®Xeon®Gold 6152
Intel®Xeon®Gold 6154
Intel®Xeon®Gold 6208U
Intel®Xeon®Gold 6209U
Intel®Xeon®Gold 6210U
Intel®Xeon®Gold 6212U
Intel®Xeon®Gold 6222V
Intel®Xeon®Gold 6226
Intel®Xeon®Gold 6226R
Intel®Xeon®Gold 6230
Intel®Xeon®Gold 6230N
Intel®Xeon®Gold 6230R
Intel®Xeon®Gold 6230T
Intel®Xeon®Gold 6234
Intel®Xeon®Gold 6238
Intel®Xeon®Gold 6238L
Intel®Xeon®Gold 6238M
Intel®Xeon®Gold 6238R
Intel®Xeon®Gold 6238T
Intel®Xeon®Gold 6240
Intel®Xeon®Gold 6240L
Intel®Xeon®Gold 6240M
Intel®Xeon®Gold 6240R
Intel®Xeon®Gold 6240Y
Intel®Xeon®Gold 6242
Intel®Xeon®Gold 6242R
Intel®Xeon®Gold 6244
Intel®Xeon®Gold 6246
Intel®Xeon®Gold 6246R
Intel®Xeon®Gold 6248
Intel®Xeon®Gold 6248R
Intel®Xeon®Gold 6250
Intel®Xeon®Gold 6250L
Intel®Xeon®Gold 6252
Intel®Xeon®Gold 6252N
Intel®Xeon®Gold 6254
Intel®Xeon®Gold 6256
Intel®Xeon®Gold 6258R
Intel®Xeon®Gold 6262V
Intel®Xeon®Gold 6312U
Intel®Xeon®Gold 6314U
Intel®Xeon®Gold 6326
Intel®Xeon®Gold 6330
Intel®Xeon®Gold 6330N
Intel®Xeon®Gold 6334
Intel®Xeon®Gold 6336Y
Intel®Xeon®Gold 6338
Intel®Xeon®Gold 6338N
Intel®Xeon®Gold 6338T
Intel®Xeon®Gold 6342
Intel®Xeon®Gold 6346
Intel®Xeon®Gold 6348
Intel®Xeon®Gold 6354
Intel®Xeon®Platinum 8153
Intel®Xeon®Platinum 8156
Intel®Xeon®Platinum 8158
Intel®Xeon®Platinum 8160
Intel®Xeon®Platinum 8160F
Intel®Xeon®Platinum 8160T
Intel®Xeon®Platinum 8164
Intel®Xeon®Platinum 8168
Intel®Xeon®Platinum 8170
Intel®Xeon®Platinum 8171M
Intel®Xeon®Platinum 8176
Intel®Xeon®Platinum 8176F
Intel®Xeon®Platinum 8180
Intel®Xeon®Platinum 8253
Intel®Xeon®Platinum 8256
Intel®Xeon®Platinum 8260
Intel®Xeon®Platinum 8260L
Intel®Xeon®Platinum 8260M
Intel®Xeon®Platinum 8260Y
Intel®Xeon®Platinum 8268
Intel®Xeon®Platinum 8270
Intel®Xeon®Platinum 8272CL
Intel®Xeon®Platinum 8276
Intel®Xeon®Platinum 8276L
Intel®Xeon®Platinum 8276M
Intel®Xeon®Platinum 8280
Intel®Xeon®Platinum 8280L
Intel®Xeon®Platinum 8280M
Intel®Xeon®Platinum 8351N
Intel®Xeon®Platinum 8352M
Intel®Xeon®Platinum 8352S
Intel®Xeon®Platinum 8352V
Intel®Xeon®Platinum 8352Y
Intel®Xeon®Platinum 8358
Intel®Xeon®Platinum 8358P
Intel®Xeon®Platinum 8360Y
Intel®Xeon®Platinum 8362
Intel®Xeon®Platinum 8368
Intel®Xeon®Platinum 8368Q
Intel®Xeon®Platinum 8380
Intel®Xeon®Platinum 9221
Intel®Xeon®Platinum 9222
Intel®Xeon®Platinum 9242
Intel®Xeon®Platinum 9282
Intel®Xeon®Silver 4108
Intel®Xeon®Silver 4109T
Intel®Xeon®Silver 4110
Intel®Xeon®Silver 4112
Intel®Xeon®Silver 4114
Intel®Xeon®Silver 4114T
Intel®Xeon®Silver 4116
Intel®Xeon®Silver 4116T
Intel®Xeon®Silver 4208
Intel®Xeon®Silver 4209T
Intel®Xeon®Silver 4210
Intel®Xeon®Silver 4210R
Intel®Xeon®Silver 4210T
Intel®Xeon®Silver 4214
Intel®Xeon®Silver 4214R
Intel®Xeon®Silver 4214Y
Intel®Xeon®Silver 4215
Intel®Xeon®Silver 4215R
Intel®Xeon®Silver 4216
Intel®Xeon®Silver 4309Y
Intel®Xeon®Silver 4310
Intel®Xeon®Silver 4310T
Intel®Xeon®Silver 4314
Intel®Xeon®Silver 4316
Intel®Xeon®W-10855M
Intel®Xeon®W-10885M
Intel®Xeon®W-11055M
Intel®Xeon®W-11155MLE
Intel®Xeon®W-11155MRE
Intel®Xeon®W-11555MLE
Intel®Xeon®W-11555MRE
Intel®Xeon®W-11855M
Intel®Xeon®W-11855M
Intel®Xeon®W-11865MLE
Intel®Xeon®W-11865MRE
Intel®Xeon®W-11955M
Intel®Xeon®W-1250
Intel®Xeon®W-1250E
Intel®Xeon®W-1250P
Intel®Xeon®W-1250TE
Intel®Xeon®W-1270
Intel®Xeon®W-1270E
Intel®Xeon®W-1270P
Intel®Xeon®W-1270TE
Intel®Xeon®W-1290
Intel®Xeon®W-1290E
Intel®Xeon®W-1290P
Intel®Xeon®W-1290T
Intel®Xeon®W-1290TE
Intel®Xeon®W-1350
Intel®Xeon®W-1350P
Intel®Xeon®W-1370
Intel®Xeon®W-1370P
Intel®Xeon®W-1390
Intel®Xeon®W-1390P
Intel®Xeon®W-1390T
Intel®Xeon®W-2102
Intel®Xeon®W-2104
Intel®Xeon®W-2123
Intel®Xeon®W-2125
Intel®Xeon®W-2133
Intel®Xeon®W-2135
Intel®Xeon®W-2145
Intel®Xeon®W-2155
Intel®Xeon®W-2175
Intel®Xeon®W-2195
Intel®Xeon®W-2223
Intel®Xeon®W-2225
Intel®Xeon®W-2235
Intel®Xeon®W-2245
Intel®Xeon®W-2255
Intel®Xeon®W-2265
Intel®Xeon®W-2275
Intel®Xeon®W-2295
Intel®Xeon®W-3175X
Intel®Xeon®W-3223
Intel®Xeon®W-3225
Intel®Xeon®W-3235
Intel®Xeon®W-3245
Intel®Xeon®W-3245M
Intel®Xeon®W-3265
Intel®Xeon®W-3265M
Intel®Xeon®W-3275
Intel®Xeon®W-3275M
Intel®Xeon®W-3323
Intel®Xeon®W-3335
Intel®Xeon®W-3345
Intel®Xeon®W-3365
Intel®Xeon®W-3375

These are the CPU models that the Redmond tech giant known as Microsoft has deemed worthy to run the new 22H2 version of the Windows 11 operating system.

We will keep you posted as soon as new details on this matter are published by the department heads over at Redmond.

If you want to know how Snapdragon CPUs compare to its competitors, our Snapdragon X Elite vs M4 article will answer that question.

Do you have an AMD, Intel, or Qualcomm CPU that is not on the list? Share your findings with us in the comments section below.

Fix: Hyper V Is Not in a State to Accept Replication

Hyper-V is a wonderful product and Microsoft has done an excellent job with it. One of the most important features that they have added to it, is the ability to replicate virtual machines between hosts. 

This is invaluable when you want to ensure that your virtualized workloads can be recovered quickly and without fail in case of disaster. These benefits are not without issues, however. The biggest one is that the replication process may at times fail. 

Why is Hyper-V not in a state to accept replication?

Ever wondered why you get an error when you try to replicate Hyper-V? Below are some of the common reasons:

  • Disabled Hyper-V service – You need to enable the Hyper-V service to perform certain operations. Check whether you had earlier disabled it.
  • Outdated VM host – You may have a virtual machine running on an outdated Hyper-V host, which has now been disabled. This means that the Hyper-V role will be removed from this server.
  • Insufficient permissions – A Hyper-V virtual machine has two kinds of permissions: ownership and access. It may be a case of Hyper-V is not authorized to connect issue. Whenever you try to make any changes, Windows verifies whether you have enough permissions to make the said changes.
  • Storage failure –  Storage volume for both machines need to be available in order for Hyper-V to work correctly. If there is no appropriate data integrity protection for its virtual machines, Hyper-V may not be in a state to accept replication. Sometimes, there’s just not enough memory in the system to start the virtual machine.
  • Intermittent connection with the host – If you are having network issues, it could cause the virtual machine to lose connection with the host. The disrupted connection when reconnected and you attempt to resume replication may fail.

What is a Hyper-V saved state?

A saved state allows a Hyper-V virtual machine to temporarily pause its execution and write the current state of the machine to disk. 

This can be especially useful for a virtual machine that’s been running for a long period of time and has generated large amounts of data that would be difficult to recreate if the system needed to be restarted, such as a database server. 

Saved states capture the entire state of a virtual machine, including memory, processor state, and device state. If you save a state and then close the virtual machine, you can open it up again later to continue working on your computing task without any disturbances.

How can I fix Hyper-V if it is not in a state to accept replication?

A few basic checkpoints before moving to more advanced troubleshooting include:

You can now proceed to the following solutions.

1. Refresh the Hyper-V Manager 

  1. Right-click on the host computer in Hyper-V Manager and select Refresh.
  2. Restart your PC.

2. Stop and restart the Hyper-V service 

  1. Hit the Windows + R keys to open the Run dialog box.
  2. Type in services.msc and hit Enter.
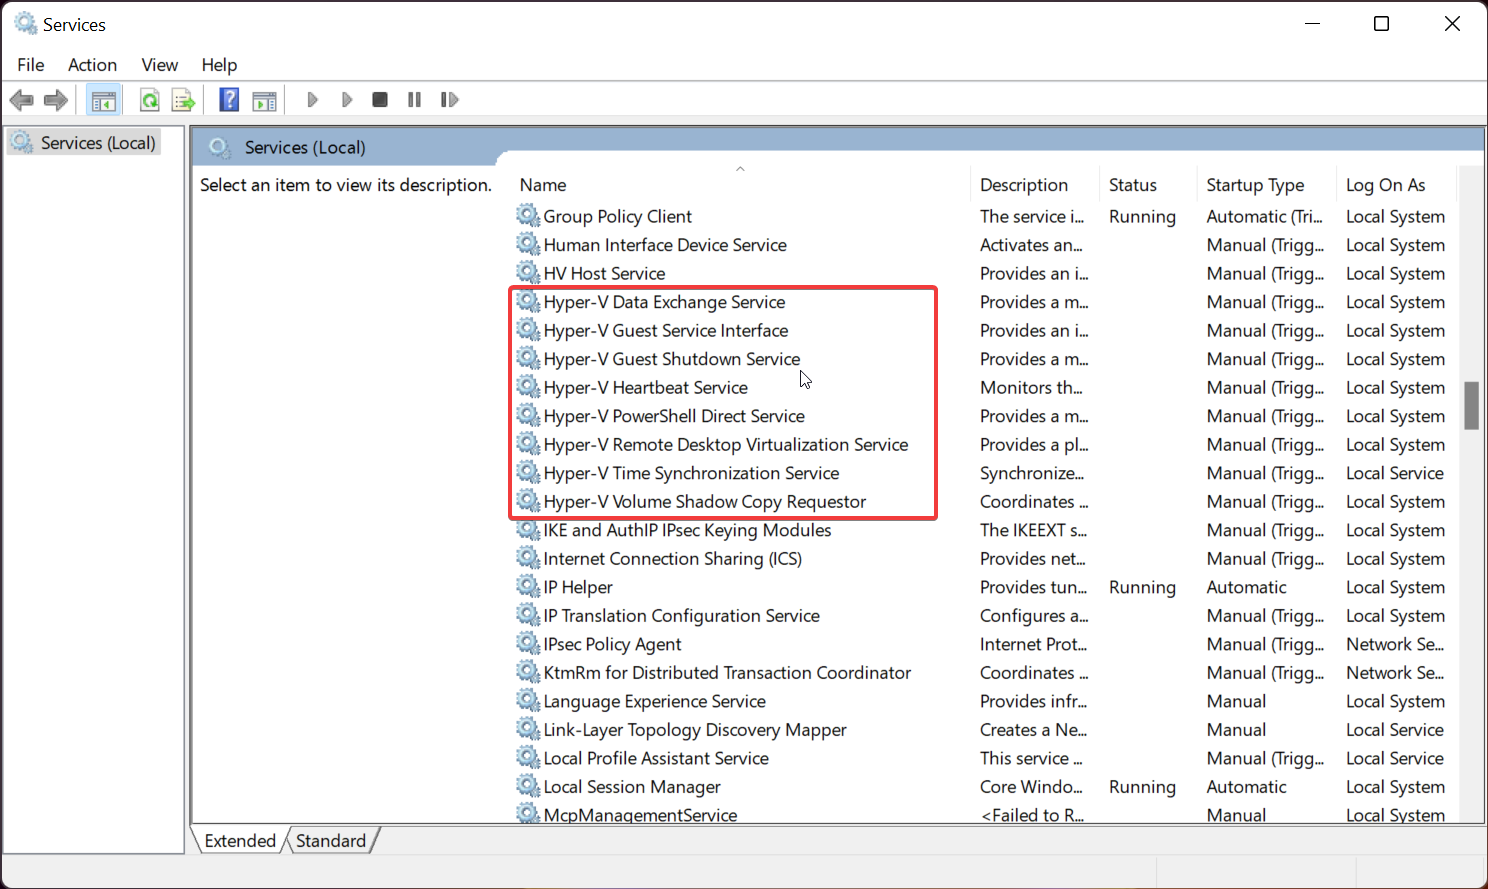
  3. Locate the Hyper-V related services, right-click on each, select Stop, then Start again.

3. Run Hyper-V as an administrator

  1. Right-click on the Start menu and select Computer Management.
  2. Locate and expand Local Users and Groups and double-click on Groups.
  3. Select and open Hyper-V Administrators.
  4. Click on Add, and in the Enter the object names to select field, enter your user account name.
  5. Press OK, then click Apply and OK to save the changes.
  6. Reboot your PC.

Aside from Hyper-V not being in a state to accept replication, you may also come across an error where the option to delete a checkpoint is missing. Should this be the case, refer to our expert guide on how to maneuver around this issue.

You may also face a problem where you can’t install Hyper-V but we have also discussed extensively ways to bypass this issue in our article.

Be sure to also check out our excellent recommendation of the best Hyper-V backup software. You don’t have to risk losing significant amounts of data.

Let us know any additional solutions that may have worked for you but are not mentioned here in the comments section below.

6 Quick Tips to Fix Your Laptop Camera If It’s not Working

Let’s quickly fix your laptop camera when it’s not working so you can get back to conference apps like Zoom or Teams, take pictures or (why not) record videos.

How to fix my camera on my laptop?

We outlined easy-to-follow steps below. If you prefer video formats, check this out:

1. Run the Hardware troubleshooter

  1. Click on Windows search, type control, and select the Control Panel option.
  2. Go to the View by option in the top right corner, click the drop-down arrow, and select Large icons.
    laptop camera not working
  3. Select Troubleshooting, and click on the View all option on the left pane.
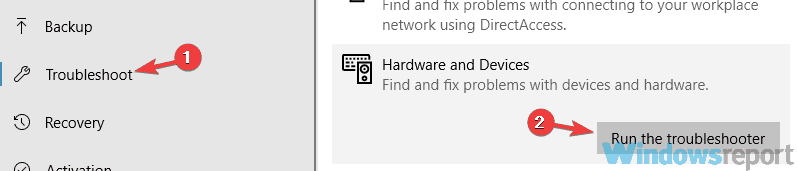
  4. Choose Hardware and Devices, and click Next.

Follow the on-screen instructions to run the Hardware and Devices troubleshooter. The troubleshooter will begin detecting any issues.

If you’re experiencing problems with your PC’s recently installed device or hardware, then run the Hardware and Devices troubleshooter to resolve the issue.

This checks for commonly occurring issues and ensures any new device or hardware is correctly installed on your computer.

2. Update the laptop camera driver

    You can repair the laptop’s camera just by updating your web camera driver. Plus, it’s possible to perform this action from Device Manager as presented down below.

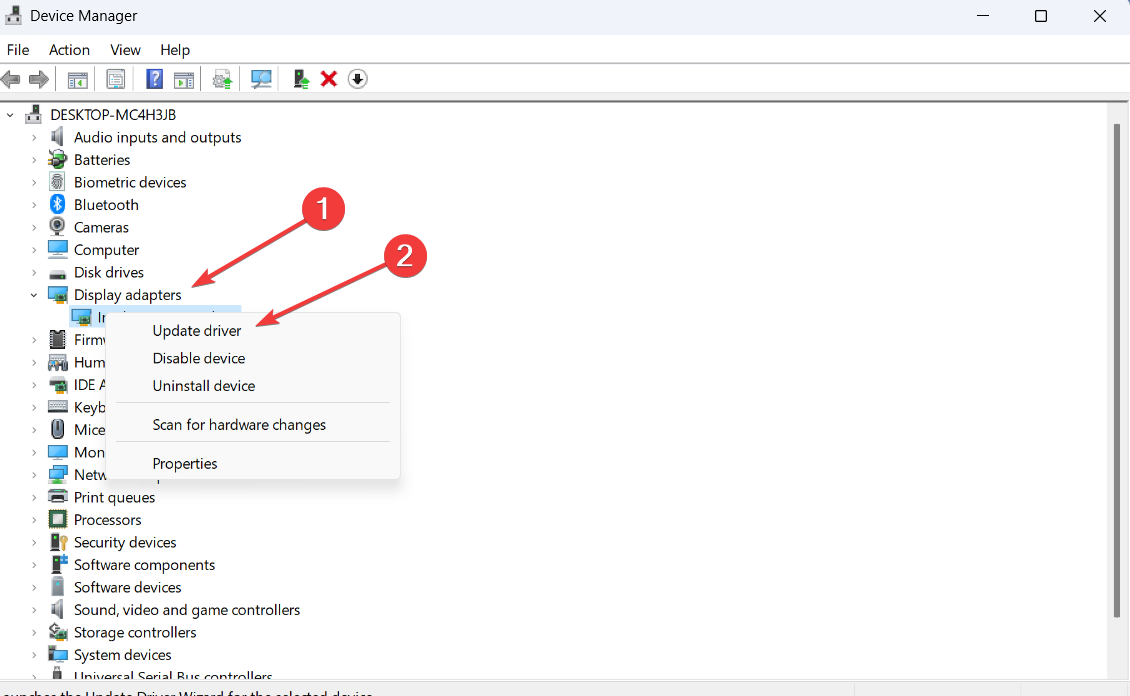
    1. Right-click Start, and select Device Manager.
    laptop camera not working
  1. 2. Go to Camera and click to expand it.

    fix-laptop-camera-wont-work
  2. 3. Right-click on the laptop camera or integrated webcam driver, and select Update Driver.

    laptop camera not working
  3. 4. When prompted to choose How do you want to search driver, select Search automatically for updated driver software.

    fix-laptop-camera-wont-work

Finding the right driver can be a difficult task. Therefore, we recommend you use an automatic driver updating tool to scan your PC for out-of-date or missing drivers and automatically update them.

Dedicated driver updaters will match your hardware with its corresponding driver, eliminating additional problems that can occur when using a mismatched driver. An easy to use and powerful tool that can handle this is Fortect Driver Updater.

3. Reinstall the laptop camera

  1. Right-click the Start button, and select Device Manager.
    laptop camera not working
  2. Go to Camera and click to expand it.
  3. Right-click on your laptop camera or integrated webcam, and choose Uninstall device.
  4. Reboot your PC.

4. Roll back driver

  1. Right-click Start, and select Device Manager.
    laptop camera not working
  2. Go to Camera and click the arrow to expand the list.
  3. Right-click on your webcam and choose Properties.
    laptop camera not working
  4. Locate the Driver tab, and click Roll Back Driver if it is not greyed out.
    laptop camera not working

5. Check your antivirus software

  1. Click on the hidden access arrow in the Taskbar.
    laptop camera not working
  2. Click on your antivirus icon, hover over Avast shields Control and select Disable for 10 minutes (This step varies for different antivirus software).
    laptop camera not working
  3. Try reaccessing the camera.

If your laptop camera doesn’t work or open, or you get an error saying that the laptop camera cannot be found or cannot start, it may be caused by antivirus software that is blocking it or an outdated webcam driver.

6. Check the camera privacy settings

  1. Click Start, and select Settings.
    laptop camera not working
  2. Type webcam in the search field box, then select Camera privacy settings.
  3. Check if the Let apps use my camera toggle is On.
    laptop camera not working

The solutions above will work if the laptop camera is not working and showing a black screen. They will also come in handy if the laptop camera is not working but the light is on, or if it is not working with services like Google Meet, Teams, or on Zoom.

Why is my camera not working on my laptop?

On your Windows 10 devices, there are a few reasons why the camera may not work. The top triggers for this problem include:

  • Driver-related issues – This could be missing drivers after an update or old and corrupted device drivers.
  • Compatibility with the antivirus program – In some cases, users have found out that the antivirus program blocks the camera. Hence you should use only the most compatible Windows 10 antivirus software.
  • Problems with the system settings – In some cases, the apps do not have the authority to use the camera; when that is the case, it will not turn on.
  • Hardware issues – You may simply be dealing with a bad camera and will need to replace your webcam.

This article will also help you fix the following camera errors:

  • Error code 0xa00f4271 – It manifests itself when you are trying to use your webcam
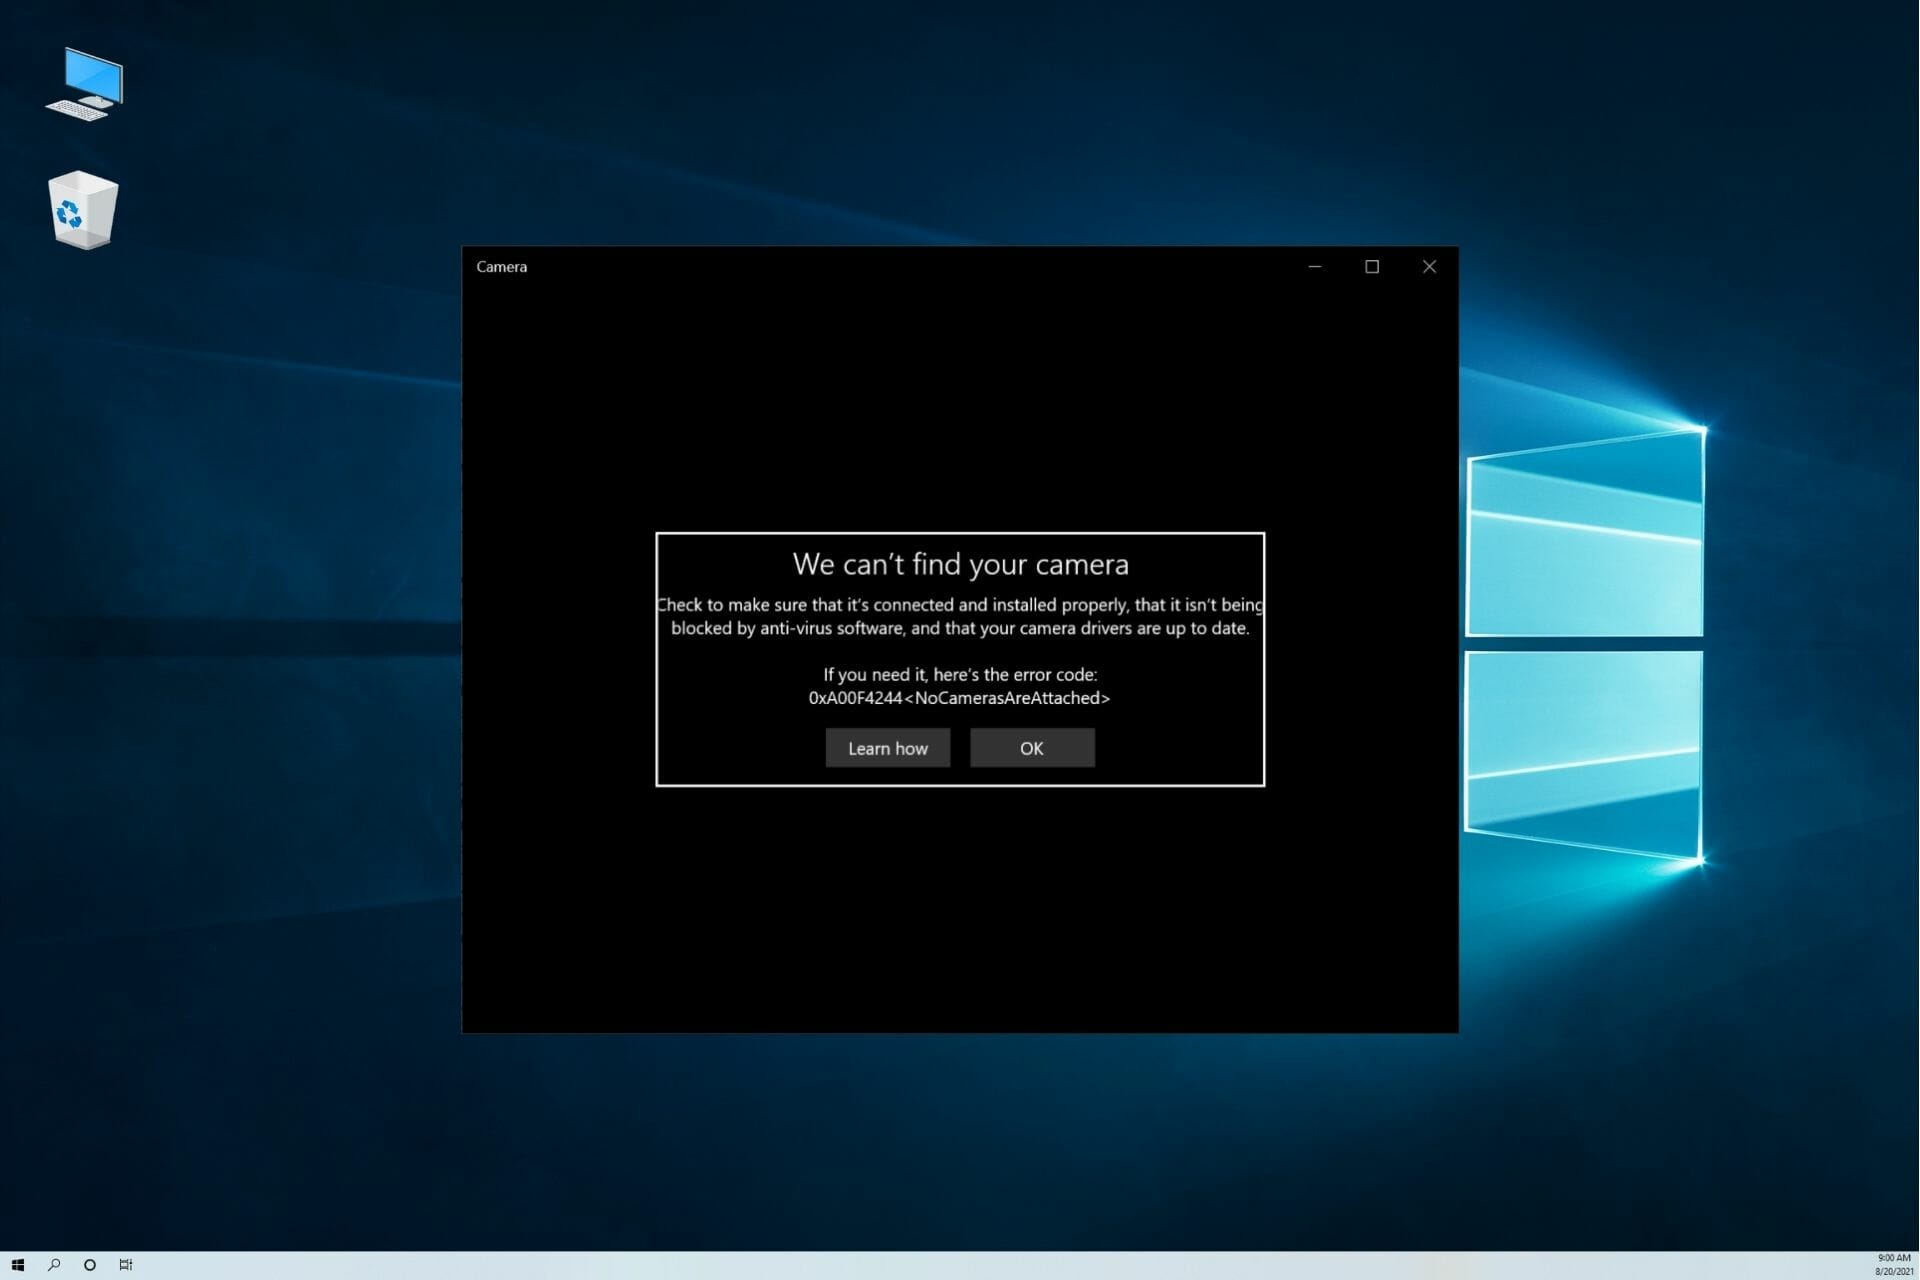
  • 0xa00f4244 No cameras are attached error – This happens when the Camera app can’t detect your webcam properly
  • Error 0xa00f4292 – Corrupted or missing drivers are the root of this issue, but our guide will help you fix it as well
  • Laptop camera not working in Windows 10, 11, 7, 8 – The solutions above are applicable to all OS iterations.
  • HP, Dell, Lenovo, Asus, Acer, MSI laptop camera not working – Update the laptop camera drivers on all laptop brands in order to fix this.
  • Laptop camera not working on Zoom, Teams, Google Meet, Discord – Check if the apps have the right to access your camera.

Before you leave, don’t miss our guide on what to do if you encounter a Camera reserved by another app error.

Let us know in the comments section below whether any of these solutions worked to resolve the laptop camera issue. Also, leave there any other questions you may have.

How to Update Your Xbox One Controller on Windows 10 & 11

Keeping your controller up to date is important, and speaking of which, it’s essential to know how to update Xbox One controller drivers on Windows.

However, imagine a scenario where you connect your Xbox controller to your Windows 10 or Windows 11 PC, only to find out there’s an Xbox controller driver error.

This is where this guide comes into the picture. Because in this post, we will explain how you can install the latest Xbox One controller drivers on Windows 10 or 11. Let us check out the guide.

Does Windows 10/11 have Xbox One controller drivers?

To answer this, in short, is that neither Windows 10 nor 11 comes pre-installed with Xbox One or Xbox controller drivers, for that matter.

However, as soon as you plug in your Xbox One or any other Xbox controller, Windows 10/11 OS will automatically detect the device and install compatible drivers.

This negates the need to install drivers for your Xbox One controller separately on your Windows 10 or 11 PCs.

But like every other Windows problem, several user reports claim that their Windows 11 PC did not recognize the Xbox controller when connected.

Fortunately, we have a comprehensive guide on fixing the Xbox controller not recognized in Windows 11, which could help you fix the problem.

Windows 10 users are no different, and they have been complaining about this issue for quite some time. Don’t worry, as this guide has you covered.

How can I update my Xbox One controller drivers on Windows 10 & 11?

1. Via Device Manager

1.1 Update your controller driver on Windows 11

  1. Connect your Xbox One controller to your PC with a USB cable.
  2. Press the Win + X buttons to open the Device Manager.
  3. Expand the Microsoft Xbox One Controller category.
  4. Right-click on it and select Update driver.
  5. Click on the Search automatically for updated drivers.Selecting the option search automatically for drivers
  6. Your system will look for the updated drivers, and if it detects one, it will prompt you to update.
  7. Restart the PC.

2. Update your controller driver on Windows 10

  1. 1. Make sure your controller is connected with a USB cable.

  2. 2. Press Windows key + X and select Device Manager from the menu that opens.

    select device manager
  3. 3. Locate your Xbox controller in the list, right-click it and choose Update driver.

  4. 4. Select Search automatically for drivers.

    search automatically for driver
  5. 5. Wait while Windows downloads the appropriate driver for your Xbox One controller.

  6. The easiest way to update your Xbox One Controller driver on a Windows 10 PC is via the built-in Device Manager tool.

    You need to connect your controller to your PC via USB, and then configure Device Manager to automatically look for drivers for it.

Using the above steps to look for updated drivers via the Device Manager is one of the easiest ways to update your Xbox One wired controller driver on Windows 10 or 11.

2. Use dedicated software

  1. Download and install Outbyte Driver Updater.
  2. Launch Outbyte Driver Updater software.
  3. The software will perform an initial analysis of your PC.
  4. Select all the drivers to update or fix. In our case, it is the Xbox One controller driver.
  5. Wait for Outbyte Driver Updater to download the selected drivers for you.
  6. Click on Install Driver.
  7. Follow the driver’s installation instructions.
  8. Reboot your PC for the changes to take effect.

Outbyte Driver Updater is a one-stop solution for all your driver-related needs. It lets you keep all of your drivers on your Windows PC up to date and helps you with multiple other scenarios.

You can use a trusted third-party tool to fix faulty or broken drivers, locate missing drivers, perform driver backups, schedule scans, and more.

3. Use the Xbox Accessories app

  1. Open Microsoft Store on your PC.
  2. Search for Xbox Accessories. Select Xbox Accessories from the list of results.
  3. Click Get and wait for the app to download.
  4. Plugin your Xbox One controller to your Windows 10 or 11 PC using the USB cable, and start the app.
  5. The Xbox Accessories app will detect your controller.
  6. Press the 3-dot icon below the Configure button on the Xbox Accessories home page.
  7. If a new update is available, you will see the Update required button. For some users, even though the update is available, the app says No update available. But you need to click on it continuously to force the app to check for updates.
  8. Click Continue.
  9. The Xbox Accessories app will begin the update process.
  10. Once the process is complete, you will see a green tick mark above your controller’s image.
  11. Click Next.

This is a simple solution, and it will help you update the Xbox One controller Bluetooth driver on Windows 10 and 11.

You can easily install the latest Xbox One controller drivers using the above methods on your Windows 10 or Windows 11 PC. Once you have got the latest drivers, it’s imperative that you calibrate the Xbox One controller for the best performance.

We have to mention that sometimes you can encounter a problem while connecting your Xbox controller, but we covered this issue in our Xbox controller not recognized on Windows 11 guide.

Let us know in the comments section below which one of the methods mentioned above you followed to update the firmware of your Xbox One controller on your Windows PC.

Fix: CPU at 100% For no Reason [Nothing is Running]

High CPU activity and memory leaks were there from the beginning and will most likely be there. However, on most occasions, affected users can determine which service is behind the high CPU activity.

Sometimes, there’s nothing strange in Task Manager, but the CPU still hits a high activity percentage. We’ve prepared a list of applicable solutions that should help you address this issue.

Why is my CPU at 100% when nothing is running?

While this seems to be a strange situation, there are a few regular culprits. Amongst them are:

  • Malware or virus – Many computer problems that seem hard to identify are triggered by some malware and will only be detected using a good antivirus.
  • Background programs – In many cases, you do not typically need to start these programs, but they run automatically. So even if you think you have not launched any program, something may be running.
  • Problems with Windows Management Instrumentation – This service is a service that frequently misbehaves and can inflict CPU spikes. Its main use is to manage the execution of various background systems in a network.

If you notice that your CPU usage jumps to 100 for no reason, you should try some of the fixes below.

How do I fix high CPU usage when nothing is running?

1. Scan your computer

1.1 Using third-party tools

The worst scenario for high CPU usage when nothing pops up in Task Manager is a virus infection or malicious software that runs in the background.

To stay safe from any ransomware or other type of viruses that can lead to computer damage, we recommend you use TotalAV.

It is easy to install and takes only a few minutes for the entire installation process. Moreover, it has lightweight settings that will not interfere with your system or cause interruptions.

Why is my CPU at 100 when nothing is running? Well, a virus infection can be the answer to this question. Using TotalAV you will stay secure from such viruses.

TotalAV

Lightweight antivirus solution that will unquestionably eliminate any digital threat from your device.
Free Trial Visit Website

1.2 Using Windows inbuilt tool

  1. Open Settings by pressing Windows + I hotkey.
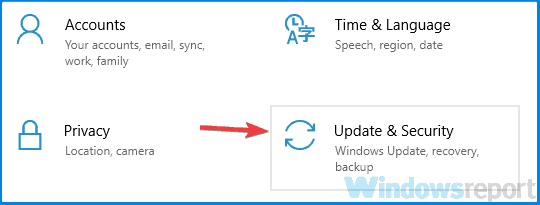
  2. Choose Update & Security.
  3. From the left pane, select Windows Security.cpu at 100 for no reason
  4. Select Virus & threat protection from Protection Areas.cpu at 100 for no reason
  5. Click on Scan Options, then select Windows Defender Offline Scan and click the Scan now button.cpu at 100 for no reason
  6. Your PC will restart, and the scanning procedure will commence.
Note icon NOTE
Windows Defender is a great built-in security solution from Windows. You can use it alongside the recommended Vipre antivirus for more online protection and a virus-free computer.

2. Disable background programs

    It’s easy to disable background programs and you can perform it using Task Manager app to close unused applications from your PC.

    1. Right-click on the Taskbar and open Task Manager.
    start task manager
  1. 2. Select the Startup tab.

    high cpu but nothing in task manager
  2. 3. Select every program that you don’t need to start alongside Windows and click the Disable button.

    cpu at 100 for no reason
  3. 4. Close Task Manager, and in the Windows Search bar, type msconfig and open System Configuration.

    empty-task-manager-high-cpu
  4. 5. Select the Services tab, check the Hide all Microsoft services box, and click the Disable button.

    high cpu but nothing in task manager
  5. 6. Restart your PC.

Note icon NOTE
Even though the absence of any feedback in Task Manager makes this scenario rather peculiar, the application’s background activity is still likely the main cause of the abysmal CPU activity.

3. Restart Windows Management Instrumentation

  1. Type services in the search bar and open Services.
  2. Navigate to the Windows Management Instrumentation service.
    cpu at 100 for no reason
  3. Right-click on it and choose Restart from the contextual menu.
    cpu at 100 for no reason
  4. Confirm that the issue of CPU at 100 for no reason is resolved.

4. Check Advanced Power Settings

  1. Right-click on the battery icon in the Taskbar’s Notification area and open Power Options.
  2. Select your default power plan and click on the Change plan settings link.
  3. Choose Change advanced power settings.
  4. Expand Processor power management and then do the same with Minimum processor state.
  5. Set both On battery and Plugged in options to 5% and confirm changes.high cpu but nothing in task manager
  6. Restart your PC.
Note icon NOTE
Some CPU-related Power settings might affect the system readings and thus trick you into thinking your processor is all the time at 100%.

Certain plans will apply a high CPU percentage, which you’ll not want to do when the Minimum Processor State is at hand. You should go for the bare minimum of 5%.

5. Reset your PC

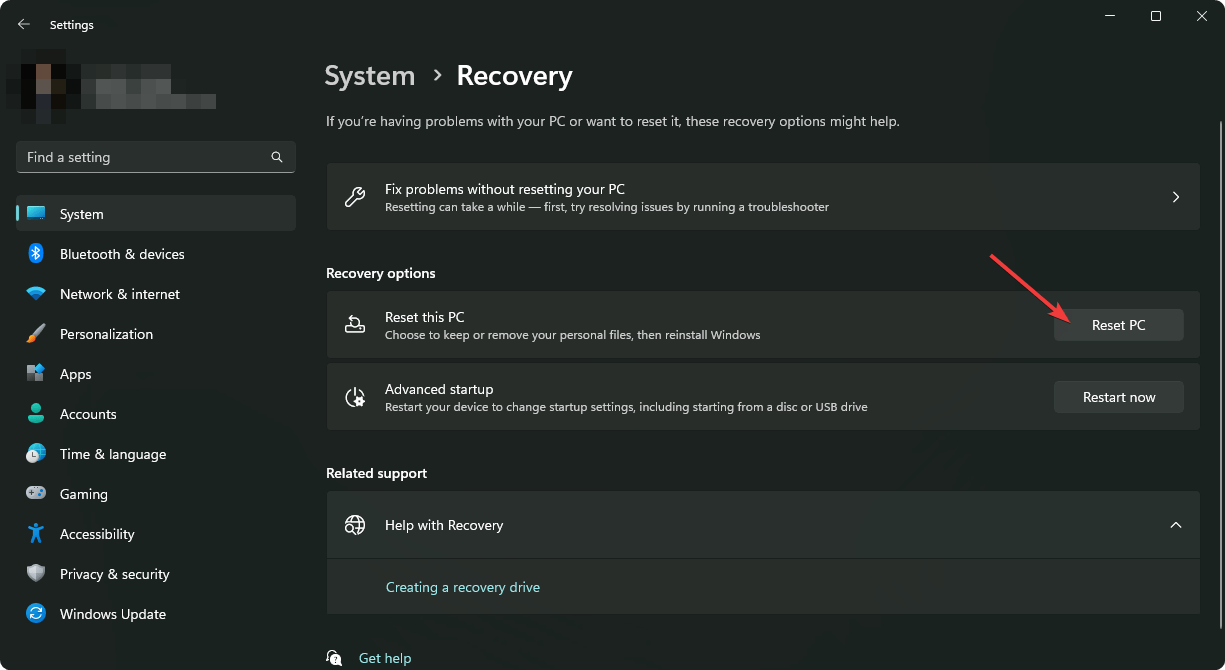
  1. In the Windows Search bar, type recovery and open Recovery options from the list of results.
  2. Click on the Get started button under the Reset this PC recovery option.high cpu but nothing in task manager
  3. Choose whether you want to preserve files stored on the system partition or not.
  4. Follow the instructions until the system is refreshed.
Note icon NOTE
Use this solution as a final resort. By doing so, you’ll have a chance to retain your files while the system is refreshed and completely restored to its initial values.

All of the above solutions should help you when dealing with CPU at 100 for no reason.

If you have any questions or maybe an alternative solution for this issue, share them with us and other affected readers. You can do so in the comments section below.

5 Ways to Fix Your Surface Pen when It’s Not Erasing

Surface Pen not erasing – that’s a problem users complain about while using the device. It makes it impossible to clean or erase things while using the device.

Likewise, some users report that their Surface Pen is not writing, but the button is working, making it tiring to use.

Why is my Surface Pen eraser not working?

Many factors can impede the Surface Pen’s performance, resulting in issues like the Surface pen not working but connected. Some notable ones are:

  • Corrupt or broken Surface Pen driver: The Surface Pen can run into issues if its driver is not intact. It affects the components dependent on it, causing them not to work as they should.
  • Issues with the pen pairing: For the Surface Pen to function correctly, you require a smooth pairing between the Surface Pen and the Surface Pro device. However, irregularities in the pairing process can affect the pen’s ability to erase.
  • Physical issues: The Surface Pen can suffer damage from fall impact or physical contact. Hence, some functions on it may be affected.

How do I get my Surface Pen eraser to work?

We recommend you go through the following preliminary checks before proceeding with any advanced troubleshooting:

  • Disconnect external devices connected to your device.
  • Take out the battery for a few seconds and put it back in to restart the pen.
  • Check for any physical damage, like the pen tilt that can cause it to stop working.

If the Surface Pen eraser not working error persists, then you can go ahead with the solutions below.

1. Remove and pair your pen again

  1. Press Windows + I key to open the Windows Settings app.
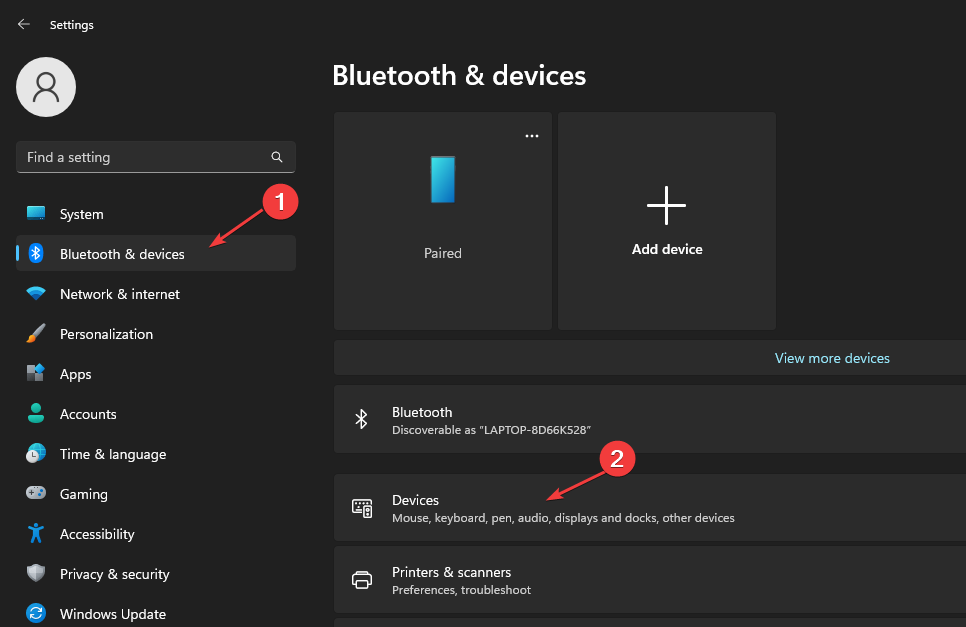
  2. Navigate to the Bluetooth & devices tab and select the Devices option.
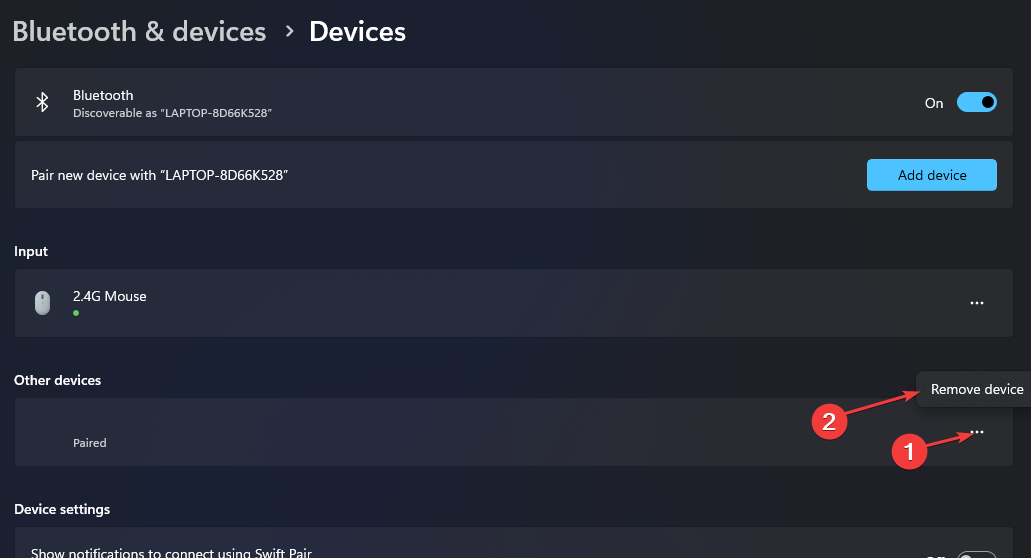
  3. Locate your pen in the window’s right pane, click the Remove button, and select Yes to confirm that you want to remove the device.
  4. Press and hold the pen button for 5-6 seconds until the signal light shows, then pair the pen via Bluetooth with your PC.

Removing and pairing the pen will fix any pairing issues affecting its functionality, causing it not to erase.

2. Reinstall the pen driver

  1. Right-click the Start button and select Device Manager from the drop-down.
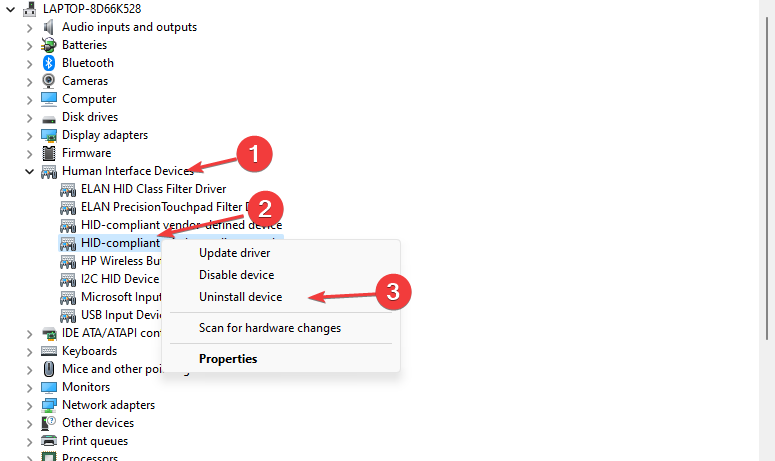
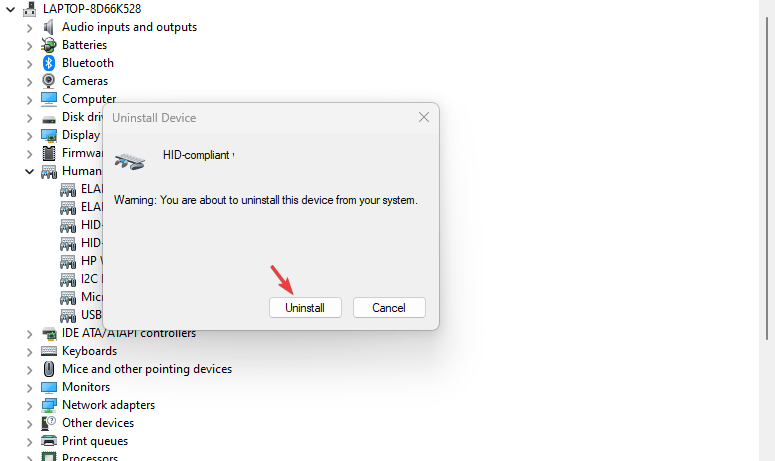
  2. Expand Human Interface Devices, locate HID-Compliant Pen from the list, right-click and select Uninstall device from the options.
  3. Click on Uninstall to confirm the process.
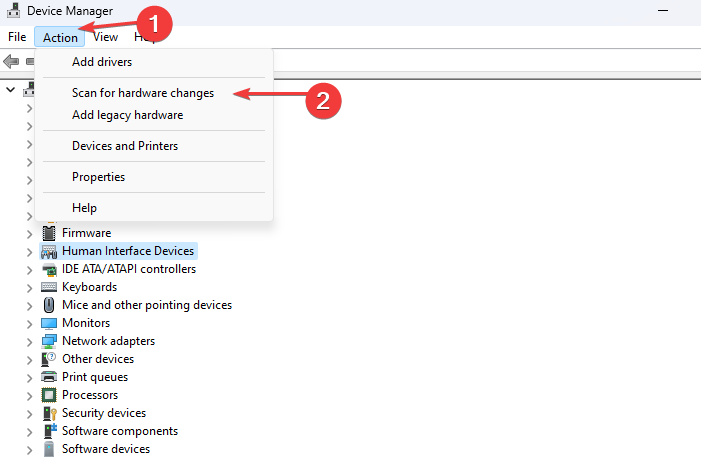
  4. Select the Action tab, click the Scan for hardware changes icon, and wait while the driver installs.

Restart your device and check if the Surface Pen not erasing issue is fixed.

3. Run the Bluetooth troubleshooter

  1. Click the Starts button, and click the Settings app.
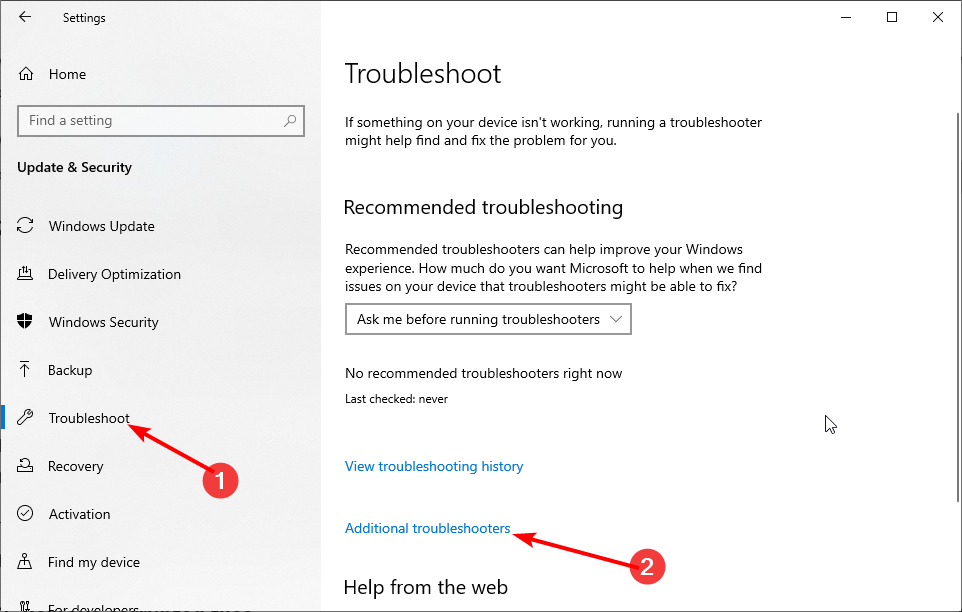
  2. Click System and select Troubleshoot.
  3. Choose Other troubleshooters.
  4. Then select the Run button in front of Bluetooth.
  5. Follow the instructions on the screen to complete the troubleshooting.

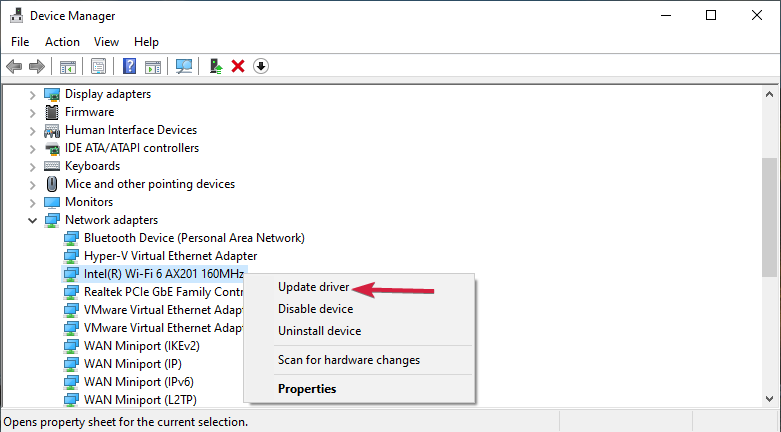
4. Update device drivers

  1. Right-click the Start button and select Device Manager from the drop-down.
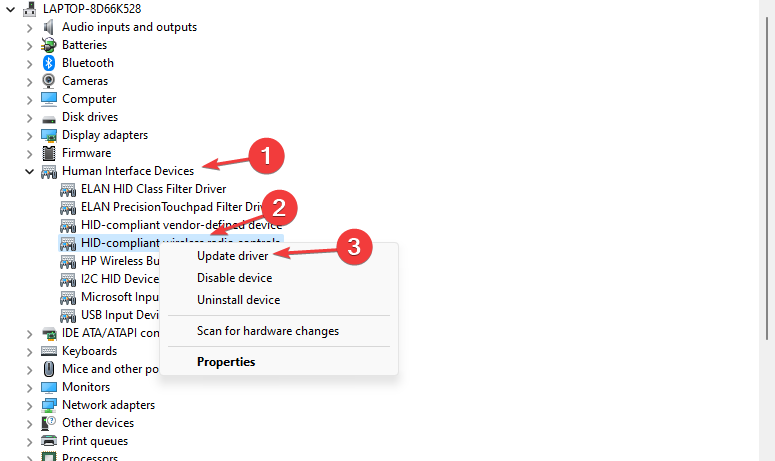
  2. Expand Human Interface Devices, locate HID-Compliant Pen from the list, right-click and select Update driver from the options.
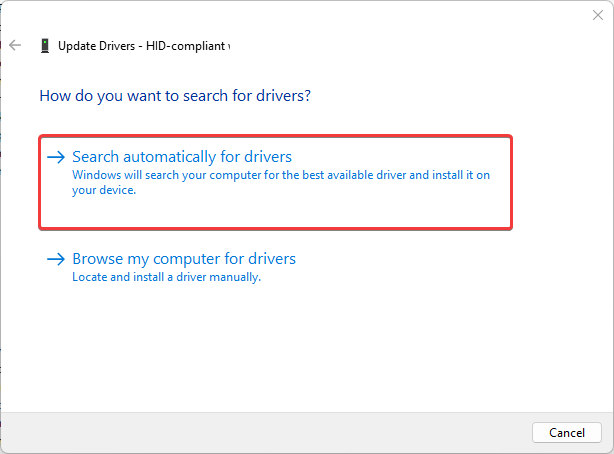
  3. Select Search automatically for updated driver software, then click the Update Driver button.

Repeat the steps above for as many drivers as you can. It’ll help fix Surface Pen issues on your PC. Also, you can check other ways to update drivers on Windows 11.

If you want a quicker process, you can try an automated solution that will do the job for you. Outbyte Driver Updater is an amazing option because it scans your PC for outdated drivers and finds the latest updates from its database.

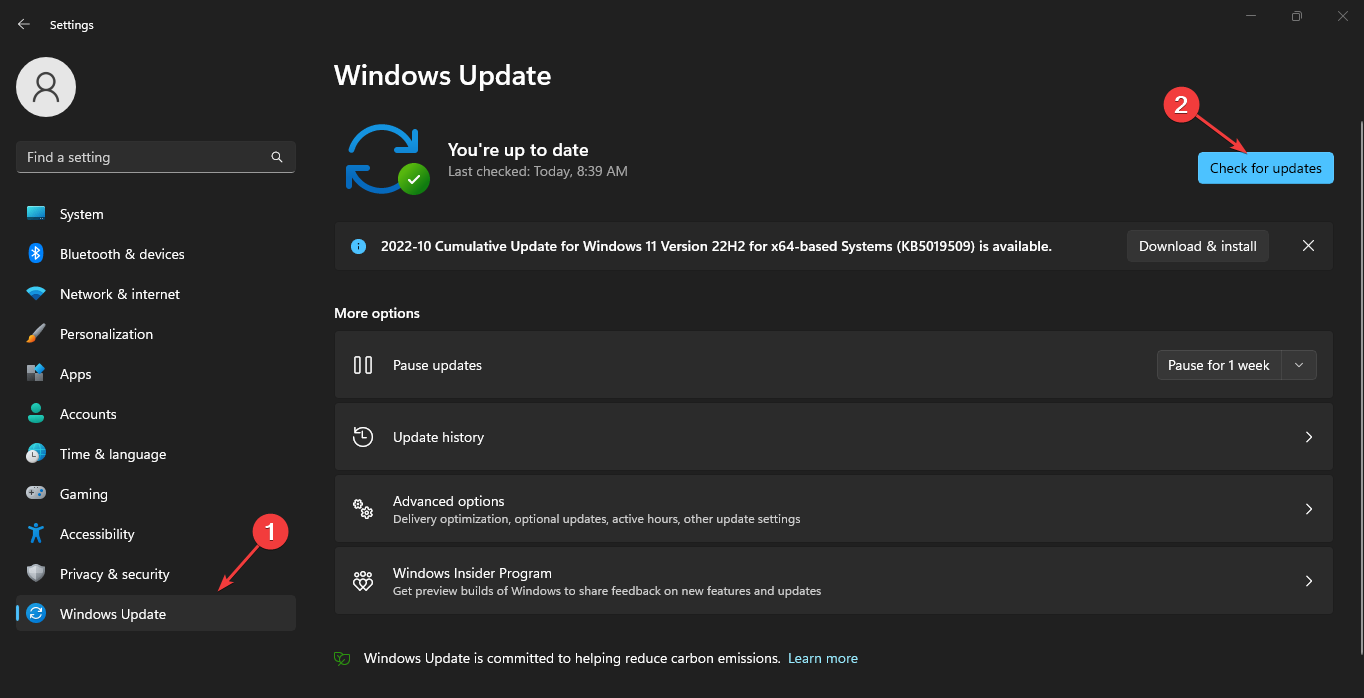
5. Update Windows

  1. Right-click on the Start button and select the Settings option from the drop-down.
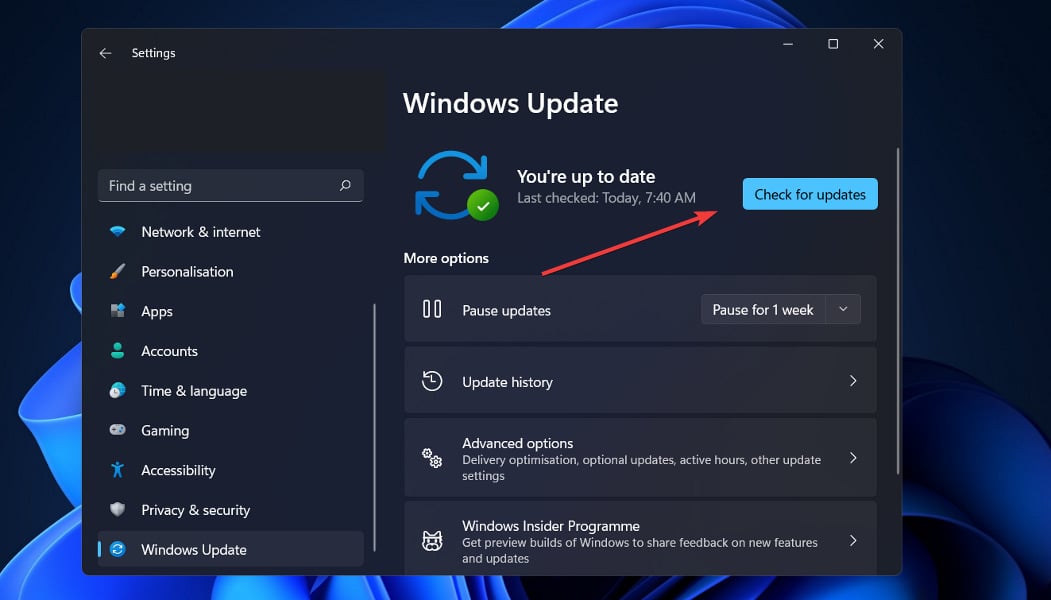
  2. Click on Windows Update and select Check for updates on the Windows update page (if there are any updates available, Windows will search for and install them).

Also, make sure to read how to fix Windows Update and Security not opening on Windows 11.

These are the best ways to fix the Surface Pen if it’s not erasing. Kindly follow all the steps strictly for optimal results.

Also, we have a detailed guide on fixing the Surface Pro intermittent pen accuracy issue in a few easy steps.

For further questions and suggestions, kindly leave them in the comments section below.

KB5020539: Everything there is to know about this Windows 11 update

Yes, it is that time of the week again when we talk about all of the changes, improvements, and new bugs that come with the latest Insider Preview updates.

It hasn’t been that long since we’ve received new software from Microsoft, but the changes keep on coming. Be sure to check out everything that is happening with Windows 11 22H2.

Before you get too excited though, just know that this feature update for the Windows 11 operating system is still full of bugs.

That being said, starting today, Windows 11 Insiders can actually download the KB5020539 cumulative update to their Windows 11PCs.

What changes through KB5020539?

Now, in order to actually improve the predictability of restarts, Microsoft has made the following changes to the Update Stack Orchestrator:

  • The Deadline calculation for both quality and feature updates is now based on the time the client’s update scan initially discovered the update. Previously, the Deadline was based on the release date of the update for quality updates and the reboot pending date for feature updates.
  • The Specify deadlines for automatic updates and restarts Group Policy setting was split into two separate settings to align with the existing configuration service provider (CSP) policies. The options in the Group Policy settings are the same for both feature and quality updates. Each of the new settings also has a Don’t auto-restart until end of grace period option. The new Group Policy settings are:
    • Specify deadlines for automatic updates and restarts for quality updates
    • Specify deadlines for automatic updates and restarts for feature updates

Now that we know what constitutes the highlights of this new software release, let’s also have a more in-depth look at the changelog.

There are a lot of improvements, fixes, and known issues to go through still, so we might as well just do it together and help each other out.

Changes and Improvements

[Start menu]

  • Trying out a small change to the Start menu where some Insiders will see badging on their user profile notifying them that certain actions need to be taken.

[Widgets]

  • Trying out some different positions of the header with new icons for the Widgets board to learn how to best optimize the Widgets board for our users. By using monoline icons, our goal is to bring consistent, clean, and accessible icons to communicate action and features with simple visuals for users.
We’re trying out some different positions of the header with new icons for the Widgets board.

[Input]

  • The change to support the use of clipboard history (WIN + V) on password fields that began rolling out with Build 25206 is now available to all Windows Insiders in the Dev Channel.
  • We made a change to allow you to contribute your voice clips to Microsoft again even if on-device speech recognition is used.

[Voice typing]

  • Rolling out a change to sync voice typing settings, Automatic punctuation and Voice typing launcher, across all devices signed in using the same Microsoft account. You can toggle this feature via Settings > Accounts > Windows backup > Remember my preferences > Accessibility. This currently only works with Microsoft accounts today with AAD support coming later.

[Settings]

  • A new dialog will warn users of potential data loss if they elect to change the partition style of their storage drive under System > Storage > Disks & Volumes > Disk Properties.
  • Updated the ethernet and Wi-Fi property pages in Settings to now show gateway information in the network details summary.

Moving on from the long list of improvements and tweaks, let us also examine the Fixes list. By doing so, we can learn what Microsoft has managed to fix since the last Dev Channel build.

Fixes

[General]

  • Fixed an issue which was causing some Insiders to not be able to upgrade to recent Dev Channel builds, with error 0xC1900101. As a reminder, this is a generic rollback error code, so if you are continuing to see this error after today’s update you may be encountering a different issue. If you do, please file feedback about it under Install and Update > Downloading, installing, and configuring Windows Update in the Feedback Hub.

[Tablet-optimized taskbar]

  • Fixed an issue that was causing explorer.exe to crash while switching between apps on the tablet-optimized taskbar.
  • Start’s touch gesture should now follow your finger correctly with the tablet-optimized taskbar.
  • Improved how touch gestures and their animations with the tablet-optimized taskbar work with the touch keyboard.
  • You can now swipe up from within the taskbar with a pen to expand the tablet-optimized taskbar.

[System Tray Updates]

  • Fixed an issue causing explorer.exe to crash when dragging icons in the system tray.
  • Right-clicking system tray icons should no longer cause the auto-hidden taskbar to hide incorrectly.
  • The show hidden icons panel in the system tray should no longer block context menus opened after it.
  • Fixed an issue where the first time you tried to open Quick Settings from the system tray it wouldn’t work.
  • Fixed an issue that was preventing system tray icons from updating in real time.

[File Explorer]

  • When you scroll to the bottom of the navigation pane using a mouse wheel and try to scroll back up it should no longer get stuck at the bottom.
  • Fixed an issue which could cause certain apps to hang when opening the Open File Dialog or Save File Dialog.
  • Made another fix for a case which could lead to people seeing divider lines overlapping entries in the navigation pane.

[Start menu]

  • Fixed an issue where dragging content across an open Start menu folder could cause a crash.
  • Made a fix to help address an issue where Search might not respond when clicking on the search icon in the taskbar.
  • Opening images from search should no longer unexpectedly open them in Print.

[Input]

  • Fixed an issue where over time you might lose the ability to interact with certain games using the mouse.
  • Fixed an issue where the multiplication sign (×, U+00D7) wasn’t displaying correctly in the Yu Gothic font family for people with high resolution screens.

[Settings]

  • The size of UWP app icons under Apps > Startup shouldn’t be so small now.

[Task Manager]

  • Dragging Task Manager from the bottom area of the title bar to move the window should work now.

[Other]

  • Fixed a couple issues causing certain apps to crash in recent builds, including OneNote. We are continuing to investigate feedback in this space.
  • Made a change to address an issue which could lead to performance degradation when using performance monitoring tools which leveraged the Microsoft-Windows-DxgKrnl ETW provider. This also impacted performance for Windows Mixed Reality. As a reminder, if you’re experiencing performance issues, please see here for steps on filing actionable performance feedback.
  • Fixed an issue where recording devices with “Listen to this device” enabled might not show in the volume mixer when they were playing sound.
  • If you reset your PC, the screen displayed while it’s resetting will now be black so it’s consistent with the upgrade screens.
  • If you were experiencing Gaming Services crashes while trying to play certain games in the previous Dev Channel flight, please check the Microsoft Store for Gaming Servicing updates, it should be resolved now.
  • Fixed an issue which was causing certain PCs to unexpectedly bugcheck on upgrade to the latest builds, with the error message saying “MULTIPROCESSOR_CONFIGURATION_NOT_SUPPORTED”.
  • Fixed an issue from the previous flight which could cause Miracast to unexpectedly not be able to connect.

Known issues

[General]

  • Looking into reports that audio stopped working for some Insiders after upgrading to the latest flights.
  • Investigating reports of crashes with a few different apps and games in recent builds.
  • Investigating reports that various UI elements in apps appear to be disappearing and reappearing sometimes in recent builds.

[Tablet-optimized taskbar]

  • The taskbar sometimes flashes when transitioning between desktop posture and tablet posture.
  • When using the bottom right edge gesture to see Quick Settings, the taskbar sometimes stays stuck in the expanded state, instead of dismissing to collapsed state.

[Input]

  • Investigating reports that the text cursor becomes white on white when hovering over text fields, making it difficult to see.

[Widgets]

  • In right-to-left display languages like Arabic, content animates out of view before the widgets board resizes when clicking to expanded view of the widgets board.

What can I do if I can’t install KB5020539?

  1. Press Win+ I to access Settings.
  2. Select the System category and click on Troubleshoot.w11 troubleshoot
  3. Press the Other troubleshooters button.other troubleshooters windows 11
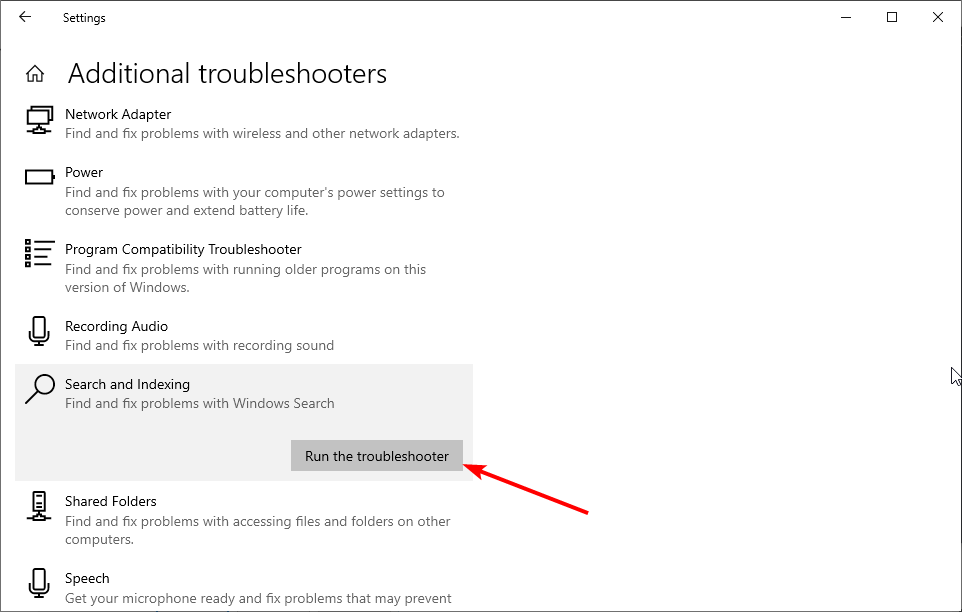
  4. Press the Run button next to Windows Update.windows update troubleshooter

Don’t forget to report any other issues you might come across, in order for Microsoft to address and improve the overall OS experience for us all.

This is everything you can expect if you are a Windows 11 Dev Channel Insider. Leave a comment below if you found any issues since installing this cumulative update and if you’re interested in downloading the KB5034123 updates for Windows 11, the standalone links are included in our article.

Twitch Fix: This Premium Content is not Available in Your Region

Are you getting the error: This premium content is not available in your region with error #1 on Twitch? If yes, this article will help you solve and learn more about this problem.

Twitch is currently one of the world’s biggest and most advanced online streaming platforms. But is it a global platform if users complain about a message stating that this premium content is unavailable in your region. (error #1)?

In the beginning, Twitch used to be based around the gaming industry, allowing gamers to live stream their gameplay. However, twitch recently developed the IRL streaming section and expanded its access to eSport competition broadcasts.

Error #1 Twitch often frustrates users as it does not allow them to watch live streams. So what to do when you get served the Twitch premium content not available in your region card?

When this error occurs on Twitch, you will usually see the following message:

This premium content is not available in your region. (Error #1)

We have come up with a solution to help you overcome this error. However, before knowing about the troubleshooting methods, let’s learn more about this problem.

These are the best solutions that we found for solving this problem:

  1. Use a browser optimized for Twitch
  2. Use a VPN service

Let’s take a look into these options and acknowledge what each software solution has to offer.

Why does Twitch say content is not available?

Twitch’s regional restriction policy causes the issue.

Twitch uses your IP address to determine your estimated location. If it finds that you are out of the supported region for that premium content, you will get the message: Content not available in your region.

This platform applied geo-restriction to some of its contents. Unfortunately, this is the only reason you may get this error.

screenshot: this premium content is not available in your region. (error #1)

How do you watch region lock on Twitch?

If you want to bypass region lock and watch your desired content on Twitch, you must depend on a VPN or Proxy. However, the proxy is not a recommended solution due to its poor performance and security issues.

Does VPN affect streaming on Twitch?

All VPNs come with a minimal to medium speed penalty due to their nature. But, it can help you to watch better content on Twitch. Keep in mind that not all VPNs will work effectively in this case.

A top-class VPN can improve the Twitch streaming experience if your ISP uses poor routing. If you already have a better connection, top VPNs may come with a very small or unnoticeable speed penalty. But, the fantastic benefit is you can bypass the Twitch region block and enjoy any content easily.

However, If you get the premium content not available error with code #1, we have practical solutions to bypass the restriction and resolve the problem.

How do I fix this premium content is not available in your region Error #1?

Use a browser optimized for Twitch

You can fix error #1 Twitch and dodge regional restrictions by using Opera GX’s built-in VPN feature. This browser is built for gaming and streaming and has built-in Twitch integrations for quick access.

You can stream Twitch in a browser with an incorporated VPN in just a few clicks. Few browsers offer you this luxury, and the built-in VPN is one of Opera GX’s best features.

If you see an error message like Your device does not support playback of premium content, using a compatible and optimized browser like Opera GX can help you.

You need to download the browser using the button below (it only takes a couple of minutes) and then go to the Settings menu to activate the VPN (from the same name category).

fix twitch error 7000

You should know that using Opera GX’s VPN requires no subscription, payment, or additional extensions, and it keeps your location private so that you can surf the web smoothly.

Activating the VPN ensures that your device will always be registered to the desired location. Needless to say, this helps prevent errors such as this premium content is unavailable in your region. (error #1) Twitch.

Don’t worry; there is no data traffic limit! And you can also use the VPN in a private browsing window. Additionally, Opera has customized versions for PC, mobile (including older phones), Mac, or Linux. Besides, you can synchronize the Opera browser across your devices to easily manage all the settings.

Opera GX

Experience a fast and lightweight browser that will speed through the Internet with no interruptions.

Use a VPN service

If you still get the error, we recommend using a decent VPN service that can bypass geo-blocks and perform better while streaming video content. However, if you use a random or cheap VPN, you may get messages like A proxy or unblocker has been detected on Twitch.

So, we recommend you use Private Internet Access (PIA). It has a massive global network that ensures better speed than similar services.

With a good VPN client, you’ll be able to gain a virtual IP address from different locations across the globe.

This will grant you access to geo-restricted content and let you watch Twitch on networks that may have it blocked (school/work). It will appear as you browse from the location of your VPN’s server.

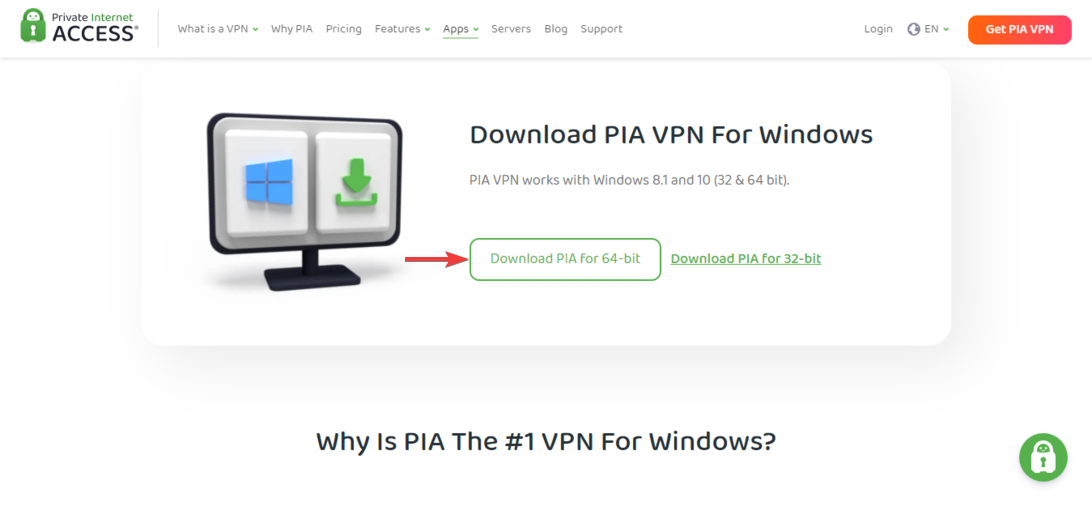
  1. Create an account for a reputable VPN service and download the appropriate application. We picked Private Internet Access.
  2. Open the installer wizard and finish the installation process.
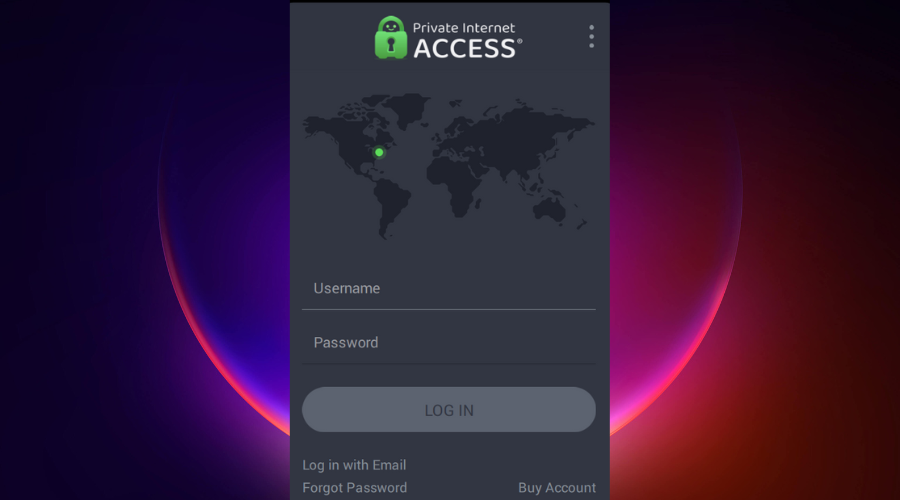
  3. Launch the app and log in with your credentials.premium content not available
  4. Connect to the VPN server depending on your preferred location.
  5. Open the Twitch app or visit its website.

After this, you can stream your favorite content without geoblocking. We picked PIA VPN because it has streaming optimized servers and tons of locations in the whole world.

We hope our quick guide on fixing the Twitch premium content not available error code #1 helped you out. Find more guides on fixing Twitch error codes like the popular Twitch error 2000. Feel free to comment in the dedicated section below and tell us if you can access Twitch now.

Here’s how you can enhance battery life with Efficiency mode in Edge

Towards the end of last year, we saw Microsoft add a new Efficiency mode in Edge, designed to complement the browser’s Sleeping Tabs feature. Efficiency mode is designed to help users manage their resources properly, in turn, this helps them save battery life on their devices.

Since then, the feature has evolved to provide an even better experience and help users save battery life. According to Microsoft, “The feature was originally released in Stable 101, and in initial testing on Surface devices, efficiency mode has been shown to save you on average 25 minutes of battery and with these new improvements, you can expect your battery life to be further extended”.

Efficiency mode on Edge now comes with a couple of neat power-saving features, for instance, the moment your device detects that you are running on battery, the feature automatically picks up the slack. What’s more, you can also choose to have the feature on at all times, even when your device is connected to power.

The feature is available to users in form of two options: Maximum Savings and Balanced Savings. Microsoft recommends that users should use the Balanced Savings option. When a filled “heart pulse” icon pops up in your toolbar, this is an indication that Efficiency mode is on.

thumbnail image 1 of blog post titled Efficiency mode in Microsoft Edge: Save even more battery life with recent updates Re: Efficiency mode in Microsoft Edge: Save even more battery life with recent updates

If you select the Balanced savings option, and you are using your device unplugged from the power source and it is not on low battery, then the effects of Efficiency mode are “moderate”. This is because changes made to the browser to help save battery life are negligible and have little impact on the browsing experience. However, when your battery is low (20%), Efficiency mode now takes up more measures to ensure that the battery life is extended as much as possible. In turn, this affects the browsing experience, for instance, playing videos may not be as smooth.

On the other hand, you can select the Maximum Savings option. This option will take effect when you are not plugged into a power source regardless of the battery level. The browsing experience changes that take place while on Balanced Savings are similar to the ones on the Maximum Savings option. However, more measures are taken to help enhance your device’s battery life even connected to a power source as long as you selected the Maximum Savings option.

In other Edge related news, Microsoft is currently testing out new filter options on the Find on Page feature in a bid to enhance the search results experience. Let us know what you think below.

What is GPO Security Filtering and How to Set it Up

The Group Policy security filtering is a feature most Windows users have no idea how it works. It is essential as it offers some filtering options that help keep the device safe. More so, a good understanding of the GPO helps you fix issues with the Group Policy on your PC.

What is security filtering?

Security filtering in Group Policy is an Active Directory (AD) functionality. It concerns the Group Policy Object (GPO) implementation. It allows users to specify accounts or devices to a Group Policy Object (GPO) applies.

Furthermore, Group Policy security filtering helps you limit the clients affected by the Group Policy Object (GPO) settings.

Likewise, it allows you to organize GPO settings impact by delegating Read and Apply permissions to the clients or the group they belong.

Why do I need security filtering?

Using the Group policy’s security filtering offers you many advantages. It reduces the stress of assigning permissions to users or groups in the Group Policy editor.

Some notable reasons why you need security filtering include:

  • You can create Group Policy Objects (GPOs) – To be more precise, it allows Administrators to create Group Policy Objects (GPOs) for a particular Organization Unit (OU) or the entire domain. Then, it only applies the GPO to specific users or clients that are part of the group.
  • Group Policy Object applications management – Group Policy security filtering helps you get past the stress of dealing with authenticated users having insufficient or excessive Group Policy Object applications.
  • Mask or lock a Group Policy Object (GPO) in the Group Policy Repository – With that in mind, it is not accessible to users or groups to see or edit the targeted GPOs.

Depending on how conversant you’re with Group Policy filtering, you can use security filtering to improve your Group Policy.

How do I set security filtering in Group Policy?

Before proceeding with the guide for settings security filtering in Group Policy, take care of the following:

After going through the checks above, proceed with the steps below to set security filtering in Group Policy.

1. Via the Group Policy Management Console

  1. 1. Press the Windows + R keys to open the Run app as an administrator.

  2. 2. Input gpmc.msc in the Run box and press Enter to open the Group policy management console.

  3. 3. Go to the directory containing the Group Policy Object you want to modify and click on it.

    click on the directory you want to edit
  4. 4. Navigate to the Scope tab and the Security Filtering tab at the bottom of the page.

  5. 5. Select the Authenticated users option and click Remove or Add to select users, then the computers to the GPO would be applied.

    select authenticated users
  6. 6. Go to the Select User, Computer, or Group dialog box, and input the name of the group whose members you want to apply the GPO.

  7. 7. Click OK (objects added to the security filtering appear in the Delegations tab. So you can further assign more permissions).

  8. 8. Click OK (objects added to the security filtering appear in the Delegations tab. So you can further assign more permissions).

    click on group policy object
  9. 9. Check the Allow box for the Apply group policy option in the Permissions tab below the Groups or usernames tab.

    Checking the box will set the security filtering option and apply it to the selected group or user.

  10. You can set up Group Policy security filtering directly from the Group Policy Management Console. You can access it via the Run dialog.

However, we recommend that users link the GPO to an Organization Unit to fix issues that may impede the application of Group Policy options.

  1. Start your PC and log in with an administrator account.
  2. Click Start, then select the Windows tools option.
  3. Navigate to the Group Policy Management Console (GPMC).
  4. Locate the Organization Unit you want to link to a Group Policy object, right-click on it, and select the Link an existing GPO option.
  5. Navigate to the Select GPO tab below Group Policy Objects, then select the GPO you want to link.
  6. Click OK to save the changes in the GPMC.

Linking the GPO to an OU is one of the Group Policy security filtering best practices users can adopt.

Nevertheless, in a few steps, you can learn how to install Group Policy Editor on Windows Home.

Also, we have a detailed guide on installing the Group Policy Management Console on Windows 11 if you have issues accessing it.

We also have a great guide on how to use Gpedit.msc on Server 2019, so don’t miss it.

For further questions and suggestions, leave them in the comments section below. We’d like to hear from you.

8 Best Help Desk Software for IT Technical Support

We are all familiar with the concept of help desk, it’s the destination wherein all our problems get resolved.

Basically, it’s a mechanism by which companies attend to the grievances of the customers and eventually help them out. Help desk is a quintessential business element for both small and large organizations.

How can Help desk software help me?

Help desk software helps to automate a majority of the customer readdressed processes and thus manage the entire process with increased efficiency.

The Help desk software usually takes care of the Ticket Management, Automation Suite, and Reporting and Optimisation. These three functions are usually considered to be of prime importance in help desk.

The automated suite also stores and manages customer details along with all the other relevant information in a single hub. Let’s take a look at some of the best help desk software out there.

Which is the best Help desk software for Windows PC?

ServiceDesk Plus – Best for solving client complaints

Customer service is among the pillars of every modern-day business, and this includes IT, so a professional tool like ServiceDesk Plus is a must-have if you want to have the best experience with your clients.

By enhancing visibility and centralizing control over the entire process, also ensures that your business will never have to deal with downtimes due to IT issues.

The service is available in 3 different subscription forms, and depending on which you get, you will gain access to the following features:

  • Incident management
  • A self-service portal powered by a knowledge base
  • Extended multi-site support
  • Help desk management
  • Incident management
  • IT project management, and more

ServiceDesk Plus

ServiceDesk Plus has all the tools a professional helpdesk software should have and more. Try it today!
Free trial Visit Website

Freshdesk – Best customer support tool

Freshdesk is often touted as an easy-to-use Helpdesk solution. More than often mid-sized and smaller companies find the Helpdesk software to be steeply-priced and the Freshdesk seems to offer a formidable alternative.

This software is part of a main hub for customer service, chat and messaging, HR and IT management, marketing and sales automation, all this to make your company thrive.

Freshworks offers highly intuitive support across all channels. Save time on all your repetitive tasks all from one platform with Workforce Automation

Freshdesk has a limited, free version and 3 different paid plans. The payment options are flexible and you can try all plans for free for 21 days.

Moreover, Freshbooks’ key features are:

  • Workforce automation
  • Intuitive and user-friendly interface
  • Multi-channel live-chats for web and mobile devices
  • AI-powered chat-bots for answering easy questions
  • Smart support calls so all customers get right to the expert

Freshdesk

Provide outstanding help to your customers at a lower cost but with great features.
Free trial Visit Website

JitBit – Best for email ticketing

If you’re looking for a clean and simple help desk ticketing system, JitBit is also a powerful tool that only takes seconds to set up.

By simply forwarding your emails from the support box to this helpdesk, you will be able to start managing tickets quickly and a lot more efficiently.

The fact that JitBit has both SaaS and on-premise versions makes it perfect to be integrated with any of your mailboxes, Active Directory, Google Drive, and a lot more.

Although its main focus is on email ticketing, Jit Bit also features live chat, a knowledge base, and chatbots.

And getting back to emails, the app supports IMAP, POP3, SMTP, native MS Exchange protocols, and more.

It is also protected with anti-spam and anti-flooding capabilities, doubled by email deduping features. And if you’re using the SAAS version, you may also get built-in mailboxes if you need them.

Take a closer look at its best features:

  • Easy to implement in both SAAS or on-premise versions
  • IMAP, POP3, SMTP, and native MS Exchange protocols support
  • Can be integrated with any email box
  • Anti-spam and anti-flooding protection
  • Built-in email deduping feature

JitBit

Get the best help desk email ticketing tool that provides support for any email box or protocol.
Free trial Visit website

Gorgias – Best sales tracking and managing

Gorgias is a help desk software that takes care of and centralizes with ease all support tickets received.

It makes it easy to see all your customer data and complaints in one place. Process orders, change subscriptions, and manage payments all from one software.

This software is built for improving the work efficiency with your clients. Gorgias will help you engage with your customers more and organically increase your sales and ad effectiveness.

Now you can easily track all your sales via SMS, social media replies, and live chat conversations on your website.

Also, Gorgias includes main key features such as:

  • 80+ integrations with Shopify, Magento, Bigcommerce, etc.
  • A smart way to centralize interactions
  • Answer automation for common requests
  • Easy tracking of your support performance
  • All desk help data in one software

Gorgias

Smart desk helper to centralize all your sales and clients’ data.
Free Trial Visit Website

SolarWinds Service Desk – Best IT functionalities

SolarWinds Service Desk is best suited for IT companies who are looking out for ITSM (IT Service Management) functionalities.

The service desk functionality offered by SolarWinds Service Desk is full-fledged in nature and it allows businesses to respond in a timely and better manner.

SolarWinds Service Desk will allow users to manage the service tickets and company assets. The tool is available across all major platforms, and it can also be accessed on a smartphone or tablet.

SolarWinds Service Desk offers a free 30-day trial and beyond that one needs to pay for the cloud-based service annually.

⇒ Get SolarWinds Service Desk

Jira Service Desk – Numerous add-ons and features

Jira Service Desk is an IP service management software that is designed to help IT companies manage incidents, ticket management, and assist in solving queries by accessing the knowledge base.

The Hipchat integration is a bonus and so are the numerous add-ons including Zephyr, Scriptrunner, Sauce, and Testrail.

Jira Service has a free version with a 3-agent limit. It also has 3 subscription-based plans, with additional features & a greater number of agents. All paid plans come with a 7-day free trial. 

⇒ Get Jira Service Desk

Vision Helpdesk Software – Great at ticket management

Vision Helpdesk Software is a cloud-based ticket management solution that offers multiple channels of support including emails, calls, chats, and also social media accounts.

The working hours for the staff can be customized and the company can also create an escalation rule. The Macros help users speed up the process of changing bulk ticket status and allocation tickets to the agents in a single click.

Customers can either choose to download the Vision Helpdesk or they may also choose to use the SaaS edition while registering.

⇒ Get Vision Helpdesk Software

Zoho Desk – Good customer chat options

Zoho is a well-known name when it comes to enterprise offerings and the Zoho Desk is no different.

The Zoho Desk is a cloud-based help desk solution that is capable of scaling up and caters to businesses of any size.

The tool offers features like Instant messaging, a community dashboard feature, and a separate Twitter dashboard.

⇒ Get Zoho Desk

Another help desk software that you could use is Tidio for Windows; it helps manage customer queries and convert them to tickets, ensuring they get resolved faster. The platform offers a 7-day trial period for you to judge if it is helpful for you.

Each of the Helpdesk software has its own unique selling proposition. The size of your organization, along with the requirements, should be the basis while choosing your Helpdesk software.

I would personally suggest that one should pilot the trial version of the helpdesk software before actually buying and deploying the same.

Ethernet Spiking in Task Manager: Fix Ping Spikes in 8 Steps

Ping (or latency) spikes are one of the main causes of lag in multiplayer games. Many users switch to Ethernet connections because they’re less susceptible to ping spiking.

So, if you require answers about Task Manager Ethernet spikes, the insights and solutions described below will help.

Why is my Ethernet spiking in Task Manager?

There are a lot of reasons why you experience Ethernet spikes in Task Manager, and we will highlight the most important ones:

  • Network congestion – When you see lots of Ethernet spiking in Task Manager, you might be connected to a very congested cell tower. And network congestion causes data packet loss.
  • Limited bandwidth – If you have many devices connected to the same router/modem, your available bandwidth will suffer.
  • Incorrect configuration – Sometimes, even the simple fact that your connection settings are not configured properly may lead to Ethernet spikes.

Here is how to stop Ethernet spikes on Windows 10, or at least reduce random Ethernet ping spikes for games and software.

How do I fix ping spikes on Ethernet?

Before getting to the main solutions to fix Task Manager Ethernet send and receive problems, there are a few things you can do to improve the situation:

  • Make sure you don’t have any other programs running that may consume your bandwidth.
  • Restart your router. Sometimes ping spikes on Ethernet are easily solved this way.
  • Disconnect other devices that are using the same connection/router.
  • Check if there are any ongoing app or system updates. If so, try to prioritize and let the processes finish.
  • Update your Windows OS. Microsoft is patching the system all the time and a pending update might fix this exact problem.
  • If you’re utilizing a crossover cable for your connection, consider replacing it with proper Ethernet cables. CAT-5 or CAT-6 cables are best for Ethernet connections.

If you’ve crosschecked the prerequisite measure above, this comprehensive guide will help you learn how to stop ping spikes on Ethernet with simple steps.

1. Update your network drivers

  1. Right-click the Start button and select Device Manager.
  2. Click on the Network adapters section to expand it, right-click on your device, and select Update driver.
  3. Now, select Search automatically for drivers.
  4. If there are any new ones, the system will install them.

Outdated network drivers can cause Ethernet lag spikes. The fastest fix? Use a driver updater like Fortect, it scans your system, detects outdated drivers, and updates them automatically to keep your network stable.

2. Change to Google DNS

  1. 1. First, click the Start button and choose Settings from the menu.

  2. 2. Next, select Network & Internet to open the tab in the screenshot below.

    go to the status tab
  3. 3. Click on Change adapter options to open the Network Connections Control Panel applet.

  4. 4. Double-click your Ethernet connection.

    ethernet properties
  5. 5. Select Internet Protocol Version 4 (TCP/IPv4) and press the Properties button.

  6. 6. Next, select the Use the following DNS server addresses radio button.

  7. 7. Enter 8.8.8.8 within the Preferred DNS server box and 8.8.4.4 for the Alternative DNS server box.

    set google dns settings
  8. 8. Click the OK button and close the window.

  9. If you’re experiencing ethernet spiking issues and you’re using an automatically selected DNS server address, you should change to Google’s DNS.

    Google has a safe public DNS Server that offers reliable latency and should fix your internet issues.

3. Select the WPA2-PSK [AES] protocol

  1. Click the Start button, type cmd, and select Run as administrator from the results.
  2. Type this command in the prompt’s window and press Enter: ipconfig
    ipconfig command ethernet spiking in task manager
  3. Next, note down your IP address listed for the Default Gateway, which will be something like 192.168.1.1.1.
  4. Open a web browser and input your IP address in the browser’s URL bar and press Enter to open your router’s configuration (firmware) page.
    Sky router login page ethernet spiking in task manager
  5. Log in to your router firmware page (check your router’s manual for login details).
  6. Select a WPA2-PSK [AES] option within your router’s security settings.

This procedure is different for any manufacturer and router, but if you have difficulties, we gave a dedicated article on how to access your router’s page.

4. Close bandwidth-hogging background programs

  1. Right-click the Windows 10 taskbar and select Task Manager on the menu that opens.
  2. Next, click the Network column within the Processes tab of Task Manager.
    Processes tab ethernet spiking in task manager
  3. Select apps and background services with high network percentage figures (for bandwidth utilization) and click End task to close them.

This setting might be the reason why Windows can’t get the network settings from the router.

5. Use a VPN

NordVPN ethernet spiking in task manager

VPN servers often provide more stable network performance even during peak periods. For that reason, we recommend NordVPN, which is among the most high-rated VPN services. Our fix gaming lag post provides further details about how you can reduce ping spiking with NordVPN.

NordVPN packs in all the features you would expect from a quality VPN service, plus a bit more besides. It supports a variety of protocols, such as OpenVPN, L2TP, IPSec, and PPTP. Furthermore, this software also utilizes the next-generation AES-256-GCM VPN encryption algorithm.

Other useful NordVPN features

  • It includes a Dark Web Monitor for dark web email alerts
  • Presets enable users to launch NordVPN with custom connection configurations
  • NordVPN incorporates double data encryption
  • Supports proxy server connectivity

NordVPN

NordVPN enables you to resolve any Ethernet ping spikes by managing your network through their servers.
Check price Visit website

6. Reset the network settings using Command Prompt

  1. Click the Start button, type cmd into the Search field, and select Run as administrator from the results.
  2. Then input all these separate network commands, pressing Enter after each one:
    netsh winsock reset
    netsh int ip reset
    ipconfig /release
    ipconfig /renew
    ipconfig /flushdns

    ipconfig /flushdns ethernet spiking in task manager
  3. Thereafter, open the Task Manager’s Performance tab to see if the latency spiking has dropped off.

7. Reset Windows 10’s network settings

  1. Click the Start button and select Settings.
  2. Click Network & Internet and then Status in Settings.
  3. Click Network reset to open the button directly below.
    Reset now button ethernet spiking in task manager
  4. Press the Reset now button.

We have a complete guide on how to reset network settings in Windows 10 that will provide more information.

8. Turn off Windows Defender Firewall

  1. Click the magnifying glass taskbar button and enter firewall in the Search box.
  2. Select Windows Defender Firewall to open that applet.
    Windows Defender Firewall ethernet spiking in task manager
  3. Click Turn Windows Defender Firewall on or off to open further options.
    The Turn off Windows Defender Firewall settings ethernet spiking in task manager
  4. Select both Turn off Windows Defender Firewall options and click OK to exit.

It’s recommended that you only temporarily turn off the firewall to reduce Ethernet spiking for gaming. Turn the firewall back on when not playing games.

If you have a third-party antivirus utility installed, that might also incorporate its own firewall. So, temporarily disable its shield whilst gaming. To do so, right-click the system tray icon for your antivirus software and select a disable or turn off the context menu option.

You might also be interested in our guide on how to fix network congestion because that might also influence the Task Manager Ethernet performance.

We also have a dedicated guide on the best LAN VPN to use while gaming.

Those are some of the best ways to fix Ethernet lag spikes. If your Ethernet spiking is especially severe, however, consider contacting your ISP.

Your ISP can check for network issues causing the spiking and give you guidance for enhancing your connection quality.

Even more, this guide on what to do if Ethernet is not working is worthy of your attention. Take a closer look and let u know which solution worked for you in the comments area below.

Discord Black Screen in Windows 11: How to Quickly Fix It

Some users have been complaining that they often see a black screen when using Discord on their Windows 11 computers. We understand how frustrating this can be for users who rely on the platform to communicate with others, so we’ll show you how to fix it quickly.

What causes Discord black screen issues in Windows 11?

There are a few reasons why you might be getting a black screen when using Discord on your Windows 11 computer:

  • Outdated or corrupted graphics driver – Try updating your graphics driver, as described below, and see if that fixes the problem.
  • The app needs an update – Using an outdated version of Discord can lead to this issue, so refer to our procedure and take immediate action.
  • Problems with Hardware Acceleration – Discord can run more smoothly by taking advantage of your computer’s hardware.
  • Apps running in the background – Too many apps running in the background can take up valuable CPU resources, which can lead to a black screen.
  • Increase in Discord cache files and app data – Discord collects data in the background to open your frequently visited channels quickly. However, too many cache files can lead to a black screen in Windows 11.
  • Poorly configured VPN – The Discord black screen problem in Windows 11 could also be caused by a malfunctioning VPN. That’s why we recommend switching to a more reliable VPN.

How can I fix Discord’s black screen issues in Windows 11?

Before you proceed to the major fixes in this guide, try some of these simple solutions to solve the Discord black screen issue on your Windows 11 PC.

  • Try turning off your VPN and see if that solves the issue or switch to another VPN service.
  • Make sure your internet connection is working properly.
  • If the Discord app for Windows 11 isn’t working properly, you can always use the web version to stay up-to-date on channel discussions.

If the basic steps listed above don’t fix your issue, proceed to the following methods.

1. Update Discord

  1. Go to Microsoft Store and open the library menu.
  2. Click on Get updates and install the latest version of the Discord app on your Windows 11 computer.

2. Check Discord’s server status

Discord offers an official website where you can check the server status in real time. Sometimes, glitches at the company servers can cause problems like the black screen issue.

If this is the case, try accessing Discord again once the outage is over.

3. Update Windows

  1. Press the Windows key, type check for updates into the search bar, and hit Enter.
  2. In the right pane, click on the Check for updates option.
  3. If there are any pending updates available for your device, press the download and install button and wait for the installation process to complete.

4. Clear Discord cache/app data

  1. Press the Windows key + R simultaneously.
  2. In the run box, type the following, and hit Enter: %appdata%
  3. Find the Discord folder by scrolling down the list.
  4. Right-click on the folder and select Delete.
  5. Launch Discord again and you should no longer see the black screen.

5. Use Discord in Compatability Mode

  1. Right-click on the Discord app and select Properties.
  2. Under the compatibility tab, check the box next to Run this program in compatibility mode for.
  3. Choose an operating system from the drop-down menu.
  4. Then, click Apply at the bottom to save your settings.

6. Update the graphics card driver

  1. In the Windows search bar, type in Device Manager and hit Enter.
  2. Expand the Display adapters section.
  3. Right-click your graphics card and select Update driver.
  4. In the next window that appears, choose Search automatically for updated driver software.
  5. Windows will now search for and install the latest driver for your graphics card.
  6. Once the drivers are installed, restart your PC.

7. Enable Hardware Acceleration

1.1 Enable Hardware Acceleration in Google Chrome

  1. Launch the Google Chrome browser.
  2. Click the three dots in the top-right corner of the screen and select Settings.
  3. In the Settings menu, type hardware acceleration into the search bar.
  4. Find the toggle for Use hardware acceleration when available and switch it to the On position.

1.2 Enable Hardware Acceleration in the Discord app

  1. Open Discord on your Windows computer and click on the Settings icon at the bottom of the screen.
  2. In the settings menu, go to the Advanced tab.
  3. Enable the Hardware Acceleration toggle.

Besides the presented issue, there are other Discord problems that you may come across. For example, some users have reported that their Discord audio cuts out randomly, which can be frustrating if you’re trying to communicate with teammates.

Alternatively, if Discord keeps freezing, we have a comprehensive guide that will help you through the entire process.

If you’d like to share which of the methods worked for you, please leave a comment below. We would love to hear from you.

Windows 11 Can’ t Connect to Organization’s Server [Fix]

Windows 11 cannot connect to the organization’s activation server – that’s a common problem that users face after upgrading their OS. The error occurs when the Windows Activation server fails to recognize the license tied to the user’s account.

Why can’t Windows 11 connect to the organization’s activation server?

There can be many reasons why Windows 11 is not connecting to your organization’s activation server. To save time, check for the following:

  • Connecting to an incorrect system – You should verify whether the system was activated through a Volume licensing agreement. If it didn’t, it’s time for you to activate your Windows again.
  • Ex-employee – If you’re no longer a part of the organization, then you cannot activate your copy of Windows anyway.
  • Remote work set up – Your computer needs to stay connected with the organization network at least once in 180 days to maintain its license. This could pose an issue for employees who work remotely, as they might not be able to connect to the company network and activate their OS.

What can I do if Windows 11 cannot connect to the organization’s activation server?

To fix the issue, try the following things first:

  • Check if the activation servers are reachable from your current location.
  • Try disabling your VPN network and see if that resolves the problem after some time. Even if this is the cause of the issue, it won’t be fixed instantly. Keep the Privacy option disabled and see if Windows can activate itself.
Note icon NOTE
The solutions provided in this article are for those who have a legal version of Windows 11. If you’re receiving a message that reads This copy of Windows is not genuine, even though you have a valid version of the OS, please go through our guide.

1. Change the license key

If you are not a part of the organization that purchased the product through Volume licensing, you would have to buy a new license and/or a new copy of Windows 11.

Also, be sure to get the same version of Windows to avoid formatting your computer.

2. Run the Network Adaptor Troubleshooter

  1. Press the Windows key + I to launch the Settings app.
  2. Under System, scroll down and select Troubleshoot from the list of options.
  3. Once inside the Troubleshoot menu, click on the Other Troubleshooters option.
  4. Now, scroll down until you find the Network Adapter troubleshooter.
  5. Click on the Run button next to it.
  6. After identifying the cause of the problem, the troubleshooter will provide you with instructions on how to fix the issue.

Be sure to read and follow the instructions on your computer screen carefully.

3. Verify if the system was activated through a Volume licensing agreement

  1. In the Windows Search Bar, type Command Prompt, and click on Run as administrator.
  2. Type or copy-paste the following command and press Enter: slmgr.vbs /dlv
  3. If the value of the Product Key Channel says GVLK, it reflects that the system was activated via a Volume licensing agreement.

4. Activate Windows 11 via phone

  1. Press the Windows key + R simultaneously to open the Run dialog box.
  2. In the Run box, type in the following and hit Enter. slui.exe 4
  3. Select your country from the drop-down menu and click Next to continue.
  4. Dial up the toll-free number.
  5. The automated phone system will ask for the Installation ID numbers mentioned in step 2 and, in turn, give you a Confirmation ID.
  6. Once you have received the Confirmation ID, enter it into the required field and click Activate.

You could also alleviate the stress by contacting Microsoft’s customer support to get your Windows 11 activated. Alternatively, if you notice that your Windows 10 Activation key is not working, we have created a quick guide to help you fix the issue.

Thank you for reading this guide; we hope it helped solve your problem. Please let us know in the comments section below if you have any additional questions.

Microsoft enhances support for Intel and AMD processors on Windows 11 22H2

In September, Microsoft started rolling out Windows 11 22H2 which featured a ton of enhancements geared toward enhancing the user’s experience. The company then announced that it would hasten the process by availing the update to those clicking on the Check for updates after launching Windows Update Settings.

And now, Microsoft has broaden its list of supported processors for both Intel and AMD. According to Microsoft, “The processors listed represent the processor models which meet the minimum floor for the supported processor generations and up through the latest processors at the time of publication. These processors meet the design principles around security, reliability, and the minimum system requirements for Windows 11″.

If you are not already running Windows 11 22H2, and have found that your processor features in either one of the lists, then you can make the update. However, you should note that some users have encountered some issues with the update, such as, printer compatibility issues and a file copy bug that slows down the OS. Be sure to also check out Microsoft’s list of supported Qualcomm processors.

via Neowin.net


Hanging or Crashing Apps: 6 Ways That Can Fix Them

Multiple users say that starting the troubleshooter for a program didn’t help them fix hanging or crashing apps issue on their PC.

If you are also experiencing Windows troubleshooter hanging or crashing apps issues on your Windows 11 PC, then you are at the right place.

If you want to learn more about crashing programs on Windows and how to fix them, we have a special guide dedicated just to that.

Why can’t Windows troubleshooter fix hanging or crashing apps?

There are a few common reasons behind the Windows troubleshooter hanging or crashing apps problem:

  • Your PC is missing some important files – If some important system files get corrupted or go missing, then you would come across such issues and you need to take immediate action.
  • You haven’t updated your PC – You should keep your PC up to date in order to fix the bugs or glitches present in your PC because of the previous update.
  • The app itself is buggy – There are chances that the app that you are having trouble with is faulty and not your PC.
  • There is some issue with the Microsoft Store – Since this issue is popping up on apps downloaded from the Microsoft Store, it could be an issue with the Store itself. Here is how you can fix issues with the Microsoft Store.
  • Your PC is infected by a virus or malware – A virus or malware could very well affect the smooth performance of your PC. Check out some of the best antivirus software that you can get for your Windows 11 PC to keep it protected.

Now that you are aware of some of the common reasons that could trigger the Windows troubleshooter hanging or crashing apps problem, check out the easiest ways to resolve it.

What can I do if the Windows troubleshooter is hanging or crashing apps?

  • There might be a temporary error or glitch that is causing the issue, which can be fixed by a simple restart.
  • A clean install could help you restore important files for the program that might have gone missing.
  • If the issue is from Windows’ end, then the best way to fix it is to install the latest Windows update as it might have brought a bug fix that gets rid of the error.

1. Perform SFC and DISM scans

  1. Press the Windows key on your keyboard to open the Start menu.
  2. Search for Command Prompt and open it as an administrator.
  3. Type the below command and press Enter: sfc /scannowsfc scan command in command prompt
  4. Wait for the process to complete.
  5. After that, type the below command and press Enter: DISM.exe /Online /Cleanup-image /Restorehealthdism

You can also use an automated solution to perform an in-depth scan of your device to find broken components.

2. Reset Microsoft Store

  1. Press the Windows key on your keyboard to open the Start menu.
  2. Search for Command Prompt and open it as an administrator.
  3. Type the below command and press Enter: WSReset.exewsreset

WSReset is a troubleshooting tool or a command that is used to reset or clear the Microsoft Store. It does not affect or change your account settings or delete installed apps.

Moreover, it is an executable file located in the C:\Windows\System32 directory. Try running the command and check if this fixes the issue or not.

3. Check the time and date

  1. Press the Windows button to open the Start menu.
  2. Search for the Date and time and open the appropriate option.
  3. Make sure the Set time automatically toggle is set to on.
  4. Also make sure that under Time zone, the correct time zone for your country is selected.
  5. Once selected, hit the Sync now button.

4. Re-register Store apps

  1. Press the Windows key on your keyboard to open the Start menu.
  2. Search for PowerShell and open it as an administrator.
  3. Type the below command and press Enter: Get-AppXPackage | Foreach {Add-AppxPackage -DisableDevelopmentMode -Register "$($_.InstallLocation)\AppXManifest.xml"}
  4. Let the command complete its process.
  5. Close Windows PowerShell and check if this fixes the issue or not.

5. Clear Microsoft Store cache

  1. Open File Explorer.
  2. Hit the View button at the top menu, select Show, and click on Hidden items.
  3. Navigate to this path: C:\Users\:your username:\AppData\Local\Packages\Microsoft\WindowsApps\Microsoft.WindowsStore_8wekyb3d8bbwe\LocalCache
  4. Delete the LocalCache folder.
  5. Restart your PC and check if this resolves the issue or not.

6. Reset your PC

  1. Press Windows + I buttons to open Settings.
  2. Select System from the left side.
  3. Click on Recovery on the right.
  4. Under Recovery options, hit the Reset PC button.clicking reset PC win11 settings
  5. Choose the option to Keep my files.keep files dism error 1392
  6. Follow the on-screen prompts and complete the reset process.
  7. Once done, try using the problematic app and check if this fixes the issue or not.

Resetting your PC will replace all the corrupt or missing system files and will bring your PC back to a state where everything was running smoothly.

It is also advised that you should keep your copy of Windows up to date with the latest version available. You can check out our guide if you are having issues with Windows update not working.

You can also try creating a new user account and loading the program using that account. If there is no issue with the newly created account, then you can go ahead and delete the previous account.

Well, if nothing works, then as a last resort, you can go ahead and install a fresh copy of Windows 11. We have a guide that guides you on how you can install Windows 11.

Let us know in the comments below, which one of the solutions helped you resolve the Windows troubleshooter hanging or crashing apps problem.

Windows 11 Dump File Location: How to Easily Find it

Windows 11 dump file location is one of the first things you’ll need to know when troubleshooting a system crash or Blue Screen of Death. These files are snapshots of your computer’s memory at the time of failure, and they can point you straight to the cause of the problem, whether it’s faulty drivers, bad hardware, or a software conflict. In this guide, we’ll show you where to find them, the types of dump files Windows 11 creates, and how to read them so you can get your PC back in working order.

What is a BSoD dump file in Windows 11?

In simple terms, the BSoD dump file is a log file of your PC’s memory at the time it experienced the BSoD error.

This crash file contains information about what exactly was in your computer’s memory before it crashed and could help you locate the possible reason that caused the error in the first place.

There are basically three types of memory dump files:

  • Complete memory dump – It contains all the information of your PC’s physical memory at the time it crashed. A complete memory dump is the most ideal dump file for troubleshooting errors.
  • Automatic memory dump – By default, your Windows 11 PC is set to Automatic memory dump, which contains basic information such as loaded drivers, kernel info, and processes.
  • Small memory dump: Small memory dumps or minidump contains the kernel stack information for the thread that caused the particular crash.

How can I find the Windows 11 BSoD dump file?

  1. In your homescreen, right-click on This PC and select Properties.
  2. Under Related links, select Advanced system settings.
  3. Click on Settings under the Startup and Recovery section.
  4. If under Write debugging information is selected as Automatic memory dump, then you need to select Complete memory dump for the dump file that contains all information for troubleshooting.
  5. The memory dump file is typically located in %SystemRoot%\MEMORY.DMP with system root is typically C:\Windows.
  6. You can locate the Small memory dump or Minidump file in %SystemRoot%\Minidump location.

How can I read the Memory.DMP file in Windows 11?

  1. Visit the official Microsoft WinDbg download page.
  2. Hit the Get in Store app button.
  3. Click on the Open Microsoft Store button in the dialogue box that appears.
  4. Click the Get button.
  5. Once the installation is complete, click on Open.
  6. Click on File.
  7. Select Start debugging and then click on Open Dump file.
  8. Locate the dump file in the folder %SystemRoot%\MEMORY.DMP which is usually found in the C Drive.
  9. Click Open.
  10. Do note that opening the dump file may take some time. So, you need to wait.
  11. In the run command, type the below and press Enter: !analyze -v
  12. The process will start and you can keep an eye on the progress bar to know when the process will be complete.
  13. After completion, the WinDbg will show you the results, and based on that you can take further troubleshooting steps.

You can review the dump file, and as you go through it, you will also find more information. Notably, the FAILURE_BUCKET_ID and MODULE_NAME are the ones where you need to keep an eye out, which could indicate what is causing the problem.

While this report can be overwhelming for regular users, as it is not meant for them, you can always take cues from the report or search the hints mentioned in the report and search it over the internet to get help online.

If you have BSOD issues with your system, you should consider employing the help of specialized tools that allow you to clean your computer and replace any broken system files.

How to delete system error dump files in Windows 11?

Use Windows Settings

  1. Press the Win + I buttons to open Settings.
  2. Click on System then select Storage.
  3. Click on Temporary files.
  4. Check the box for the System error memory dump files option.
  5. Hit the Remove files button.

Use Disk Cleanup

  1. Press the Windows button to open the Start menu.
  2. Search for Disk Cleanup and open it.
  3. Select the drive where the system dump file is located and press OK.
  4. Click the Clean up system files option.
  5. Check the box for System error memory dump files.
  6. Hit the OK button.

Use Command Prompt

  1. Press Windows button to open the Start menu.
  2. Search for Command Prompt and click on Run as administrator option.
  3. Type the below command and press Enter: del /f /s /q %systemroot%\memory.dmp

If you are coming across BSoD error, and want to fix it without going through the fuss of manually doing it, then you can check out our guide that lists some of the best BSoD fixers for Windows 11.

Moreover, before going ahead and fixing the problem, it is very important to know the root cause of it. If you want some behind-the-scenes knowledge on what causes BSoD error, then you can check out this article including the main BSoD causes.

That is it from us in this guide. Let us know in the comments below if you were able to locate the system crash memory dump file on your Windows 11 PC.

Windows 11 Apps Not Opening: 7 Steps to Fix it

We have all got a bunch of apps installed on the PC for various tasks, and most perform one critical function or the other. However, many users have reported that Windows 11 apps are not opening, no matter how many times they try.

Unsurprisingly, this erratic behavior can be traced back to previous OSs, and it’s still not uncommon to struggle with apps that won’t open in Windows 10.

Why do programs not open when I click on them?

There are a few issues that would lead to apps not opening on the computer after you install Windows 11. They include:

  • An older version of the app is installed – If Windows 11 apps are not loading after the upgrade, it likely points to incompatibility. Updating the app should do the trick here.
  • Critical services not running– There are certain services that need to be running for apps to work, in the absence of which, these may crash.
  • Presence of malware or virus – A malware or virus is often found to be the reason why a Windows 11 application is not opening.
  • A bug in the installed version of Windows – In some cases, the installed version has a bug that triggers the error and leads to Windows 11 apps not responding or crashing.
  • Issues with the user account – A corrupt user account seemed to have affected most users, and creating a new user profile worked. Also, it could be the reason why games not opening in Windows 11.

Speaking of the error, here are a few possible situations you may find yourself in:

  • Windows 11 default apps not working – If there were issues with the installation, the default apps might not work.
  • Windows 11 apps not opening from Taskbar – Many users reported that they couldn’t open the apps pinned to the Taskbar. In this case, try opening it directly from the launcher.
  • Windows 11 apps open, but not visible – This is usually due to misconfigured graphics settings or running an outdated driver. Updating the graphics driver should work.
  • Windows 11 Settings not opening – It is a common issue reported by many and includes both, the Settings app crashing or not opening in Windows.

Why are none of my Microsoft apps working?

If apps downloaded from the Microsoft Store are not working, it could be a problem with the Microsoft Store, and resetting its cache usually work.

In case of wondering Why are all my programs not responding?, note that it points to a critical issue with the hardware. You should check the RAM and CPU.

Also, certain third-party apps are known to trigger conflicts and cause all programs to stop responding. Besides, the presence of malware or virus is just as likely to be the underlying cause here.

What can I do if Windows 11 apps are not opening?

Here are a few quick tricks and workarounds that may work, and it’s recommended that you try these first:

  • Restart the computer.
  • Make sure you are running the latest version of Windows 11. If not, update the OS.
  • Scan the PC for malware with the built-in Windows Security or an effective third-party antivirus.
  • Launch the Task Manager and verify that your PC has sufficient free resources to run apps.
  • Check for overheating.
  • Disconnect all non-critical peripherals, including external microphone, speaker, and printer, amongst others.

If these don’t work, the following definitely would.

1. Terminate all app-related process

  1. Press Ctrl + Shift + Esc to open the Task Manager, and locate all processes for the app that’s not opening or responding.
  2. Right-click on each process and select End task from the context menu.end task to fix windows 11 apps not opening
  3. After all the processes have been terminated, relaunch the app.

This method has worked for a few users, particularly those who reported that Discord is not opening.

2. Update the app

Note icon NOTE
If the problematic app has been downloaded from the official website or a third-party source, check the built-in app settings for the option to update. In case you can’t find one, check the FAQ section. For apps downloaded and installed from the Microsoft Store, follow the steps listed below to update.
  1. Press Windows + S to launch the Search menu, enter Microsoft Store in the text field, and click on the relevant search result.Launch Microsoft Store to update apps
  2. Click on the Library icon near the bottom-left corner.Open Library to view the installed apps
  3. Next, click on Get Updates to download any available updates for the apps.Download the available updates for apps not working
  4. Wait for the updates to download and install.Wait for the installation to complete

Running an older version may also lead to Windows 11 apps not opening on your PC. Hence, it’s recommended that you update the app as soon as a newer version is launched.

3. Repair/reset the Windows 11 apps that won’t open

  1. Press Windows + I to launch Settings, and select the Apps tab.Select Apps tab in Settings
  2. Click on Apps and features to view the apps installed on your computer.Apps & features
  3. Locate the app that you are facing trouble launching, click on the ellipsis next to it, and select Advanced options.Locate the Windows 11 app that won't open
  4. Click on Repair under Reset and wait for the process to complete. It would take a few moments.Repair the app that won't open
  5. Click on Reset, if the Repair button is not accessible or repairing the app didn’t fix the problem.Reset the app that won't open
  6. Again, click on Reset in the pop up that appears.Confirm reset

Repairing an app is a simple yet effective way of fixing issues affecting its functioning. And the best part, it does not affect the stored data, thereby ensuring that you don’t lose any.

Resetting, however, will delete any stored data and changes you made to the app setting. Thus, it should be your secondary approach in case repairing doesn’t work. After repair/reset, check if the Windows 11 apps finally open if they were not opening earlier.

4. Reinstall the app that won’t open in Windows 11

  1. Press Windows + R to open Run, type appwiz.cpl and click OK.appwiz.cpl
  2. Locate and select the problematic application, and then click on Uninstall.uninstall to fix windows 11 apps not opening
  3. Now, follow the on-screen instructions to complete the uninstallation process.

If none of the methods listed above have fixed the issue, the problem may lie with the app itself, one that could not be resolved by either repairing or resetting it. In which case, you will have to reinstall it. Make sure to do that from the official source.

5. Run the critical services

  1. Press Windows + R to launch the Run command, type services.msc, and click on OK.Launch the Service app
  2. Locate and double-click on the Application Identity service. Open service properties
  3. Check the Service status. If it stays Stopped, execute the other steps listed here. In case it reads Running, head to the next fix.Check service status
  4. Click on Start under Service status to run the service.Start the service
  5. Click on OK to save the changes.Save changes
  6. Similarly, run the Windows Update service.run Windows update service

After starting the Application Identity and Windows Update services, the Windows 11 apps not opening earlier shouldn’t throw any more issues.

6. Modify the Registry

Note icon NOTE
Modifying the Registry is a critical process, and any lapse on your end can affect the functioning of the computer. Therefore, we recommend that you follow the steps listed here as is without making any other changes.
  1. Press Windows + R to launch Run, type regedit in the text field, and click on OK.Launch registry editor
  2. Click Yes on the UAC prompt that appears.
  3. In the Registry, paste the following path into the address bar at the top and hit Enter: HKEY_LOCAL_MACHINE\SOFTWARE\Microsoft\Windows\CurrentVersion\Policies\SystemNavigate to the path
  4. Locate and double-click on the FilterAdministratorToken key.
  5. If the key doesn’t exist, right-click on the empty space, hover the cursor over New, and select DWORD (32-bit) Value from the context menu. Name the key as FilterAdministratorToken.Create new key
  6. Right-click on the key and select Modify from the context menu.Modify key
  7. Enter 1 under Value data and click on OK to save the changes.Modify value data
  8. Close the Registry and restart your PC.

7. Create a new user account

Most of you would have been able to fix the issue with the methods listed earlier. However, if it persists, you are left with no option but to create a new user account.

In some cases, the current user account may corrupt, leading to various issues, including one where the apps are not opening in Windows 11.

For user accounts, you have two options, either log in with a Microsoft account or create a new local account. Both have their sets of pros and cons, and choosing one is an individual decision based on your requirements.

The above methods are likely to fix the issue when apps are not opening in Windows 11. If they don’t, you can perform a system restore, and in case nothing else works, reinstall Windows 11.

Also, if you recently upgraded, roll back to the previous iteration when facing issues with the OS, though the option is available for a limited period.

Besides, if you were wondering how to force open an app on Windows 11 every time it boots, simply add it to the Startup folder. Before you go, don’t forget to check our guide on Settings app not opening on Windows 11 for more solutions.

Let’s know which solution worked for you in the comments section below and whether the problem was limited to a single app or all of them.

Fix Programs Closing by Themselves in Windows 10 [5 Steps]

After certain Windows 10 updates, many users have reported that apps open and close immediately.

When Windows 10 apps are not opening, it points to a deeper problem that needs to be identified and eliminated. Also, for many, it is only the Microsoft Store apps that open and close immediately.

Why are my applications randomly closing?

Here are some of the reasons why you are encountering the issue:

  • Third-party apps creating conflicts – Several third-party apps and processes have been found to conflict with the functioning of the OS and cause other apps to crash.
  • Corrupt system files – A major reason behind apps crashing in Windows and a few scans should get things running.
  • Issues with the user profile – Corrupt user profile can cause a range of issues, including programs closing by themselves.
  • Bugs in the last installed version of OS – Oftentimes, it was a bug in the recently installed version of OS that caused the problem. Apply the below procedure for Windows 10 or check this guide on how to uninstall an update on Windows 11 if you are using this OS.

How do I stop apps from closing in Windows?

Let’s first try a few quick checks that have worked for users.

  • If this is the first time you are encountering this problem, restart the computer. In many cases, it was a one-off issue and didn’t appear again.
  • Try logging in with another user profile, preferably an Administrator account.
  • Check for overheating.
  • Make sure the RAM is properly seated.

If these methods didn’t work, the next few solutions surely would.

1. Disable and uninstall Asus GPU Tweak 

  1. To fix the Microsoft apps close immediately issue, click the System Tray icon, right-click on Asus GPU Tweak 2/3, and choose Close/Exit.
  2. After closing it, relaunch any app on your PC and check if it stays open without any issues. 

If the problem seems to have disappeared, you should uninstall Asus GPU Tweak.

Uninstall Asus GPU Tweak 

  1. Press Windows + R to open Run, type appwiz.cpl in the text field, and click OK.appwiz.cpl to fix windows 10 apps open and close immediately
  2. Locate the Asus Tweak GPU app and click Uninstall.
  3. Follow the on-screen instructions to complete the process.
  4. Once done with the uninstallation, restart the computer.

The Asus GPU Tweak app has been reported to conflict with other Windows apps, and because of it, your game opens and closes immediately in Windows 10.

Keep in mind that other apps, too, can cause this problem, so you might have to remove them as well. To make sure that an application is completely removed, we suggest using a dedicated utility such as CCleaner.

CCleaner is a tool that specializes in cleaning junk files, finding and uninstalling old and unused apps, and scanning your computer deeply for other errors.

CCleaner

Give your system the cleaning it deserves to keep it in top shape.
Free Trial Visit Website

2. Disable startup apps

  1. To fix the Office apps close immediately after opening issue, press Ctrl + Shift + Esc to open the Task Manager, and head to the Startup tab.task manager
  2. Locate every single program that reads Enabled under the Status column, select it, and then click on Disable.disable startup apps to fix windows 10 apps open and close immediately
  3. Once done, restart the computer.

If Windows 10 apps open and close immediately on startup, it could be one of the other startup apps that caused the issue. So, disable every one of these and check if the problem is resolved.

3. Boot in Safe Mode

    The Safe Mode would provide you with an optimal environment to troubleshoot the problem.

    1. Press Windows + I to open Settings, and click on Update & Security.
    update & security
  1. 2. Navigate to the Recovery tab, and click on the Restart now button under Advanced startup.

    get started to fix windows 10 apps open and close immediately
  2. 3. Click on Troubleshoot.

  3. 4. Select Advanced options.

    advanced options
  4. 5. Now, choose Startup Settings.

    startup settings to fix windows 10 apps open and close immediately
  5. 6. Click the Restart button.

    restart to fix windows 10 apps open and close immediately
  6. 7. You will now find display multiple boot options. Press either 4–6 or F4–F6 to boot into the desired Safe Mode.

    safe mode to fix windows 10 apps open and close immediately

Once in Safe Mode, launch any app on your PC and check if programs are closing by themselves issue in Windows 7/10/11 is gone.

Also, you can also safely uninstall the problematic app causing the error in Safe Mode if it wasn’t possible earlier.

4. Uninstall the latest Windows update

  1. To fix the Windows 10 apps open and close immediately issue, press Windows + I to open Settings, and click on Update & Security.update & security
  2. Click on View update history.view update history to fix windows 10 apps open and close immediately
  3. Choose Uninstall updates.uninstall updates to fix windows 10 apps open and close immediately
  4. Now, select the last installed update, and then click Uninstall.uninstall to fix windows 10 apps open and close immediately
  5. Click Yes in the confirmation prompt.confirm change

Do note that you will have to disable Windows 10 updates to stop these from installing automatically until a newer version with a patch is released. And once it’s available, go ahead and install it.

5. Reinstall Windows

When nothing else works, you have no option but to reinstall Windows 10. We recommend creating a bootable USB drive using Rufus and then installing the OS through it.

A clean install is usually the best choice since new Windows files are installed, and everything on the PC is wiped clean. For most users, reinstalling Windows 10 is what finally fixes things when apps open and close immediately.

Alternatively, if a virus is closing programs automatically, check out how to recover your computer after a malware infection.

That’s all the solutions you will ever need to eliminate the problem, and it should certainly be fixed by now.

Also, find the best software to install on Windows 10 and improve your work efficiency.

If the solutions from this guide helped you fix the issue, let us know in the comments below.

The Display Settings Could Not be Saved [Error Fix]

Display-related issues are undoubtedly the most annoying because of the many problems users are prone to discover while dealing with the Windows 11 operating system.

Many of us are unfortunate enough to run into display issues or binging our favorite shows in the middle of work.

However, we are always here to help with such problems, so don’t worry. And, if your PC shuts down instead of sleeping, you will also find that answer here.

We also have a guide that covers autorun.dll errors on Windows 10/11, just in case you or one of your friends need such knowledge.

Why weren’t my display settings saved?

Don’t worry, we’re not talking about any severe or system-breaking bugs, so your PC is not even close to becoming bricked or unusable.

However, the causes triggering The display settings could not be saved and have to be dealt with swiftly to avoid future unpleasant surprises.

And before we get into how we can fix this, let’s see exactly what triggers it:

Now that we know what causes this erratic behavior let’s get to why we are here and find out how we can eliminate this problem.

How can I fix the display settings could not be saved error?

1. Change the display resolution

  1. Press Win + I to access Settings.
  2. Select the System tab, then click on Display.display settings
  3. Select the desired resolution, then close the Settings window.windows 11 resolution

2. Update the graphics driver

  1. Search for Device Manager and open the app.device manager
  2. Expand Display adapters, right-click the one you are using, then select Update driver.update display driver
  3. Select Search automatically for drivers.search automatically for display drivers

3. Change monitor order

  1. Press Win + I to access Settings.
  2. Select the System tab, then click on Display.display
  3. Click on Identify to display a number on each screen to identify which screen is primary and which is secondary.multiple displays
  4. Now click on the screen number you want to make primary, expand Multiple displays and then check the box next to Make this my main display.make this my primary monitor

4. Run the troubleshooter

  1. Search for cmd, then click Run as administrator to open Command Prompt with administrator privileges. cmd
  2. Type in the following command, then press the Enter button on your keyboard: exe -id DeviceDiagnosticcmd
  3. Click on Hardware and Devices troubleshooter, run the tool and restart your PC.

5. Reinstall the graphics card driver

  1. Search for Device Manager and open the app.device manager
  2. Expand Display adapters, right-click on the one you are using, then select Uninstall device.uninstall device
  3. Your PC will automatically search for the latest drivers and install them.

After reading this article, you will be much more prepared and knowledgeable when such a situation arises.

Remember that not all issues are as severe and need a clean reinstall for Windows 11. Sometimes, the most straightforward solutions are the most effective ones.

Leave a comment below if this simple guide has also helped you fix this annoying display issue for the latest Microsoft-designed operating system.

Windows Explorer is Slow: 8 Ways to Make It Fast Again

The good old File Explorer has been around for a long time and is still one of the few programs we integrate into our daily routines. Unfortunately, users have been complaining that Windows Explorer becomes slow and laggy on Windows 10 for some reason.

This can be frustrating, as it takes up to four or five minutes to load for some users. Fortunately, the issue can be fixed easily, as we will show in this guide.

Why is my Windows File Explorer so slow?

There are a series of reasons the Windows Explorer can be slow on Windows 10. Below are some of the popular causes:

  • Unavailability of enough free system resources – This is the main cause of apps and processes slowing down on PC. You may try to disable unnecessary startup apps and processes.
  • Activities of the Windows Explorer process – The Windows Explorer process in the Task Manager might be carrying out too many tasks. To restore normal service in this case, you need to restart the process.
  • Corrupt system files – Faulty or broken system files can affect your PC in different ways, including causing the File Explorer to be slow. You can fix this by running SFC and DISM scans to repair and restore these system files.
  • Issues with search and indexing – Sometimes, Windows Explorer is slow because of glitches with search and indexing on your PC. One way to solve the problem here is to run the appropriate troubleshooter.
  • Wrong folder optimization setting – In some cases, the folder that is causing Windows Explorer to be slow might be optimized for an unsuitable parameter. To make things run smoothly again, you need to change the folder optimization setting.

How do I speed up File Explorer?

1. Restart File Explorer

    If Windows Explorer is slow when loading with the green bar taking time to complete, it might be because it has run into some temporary issues. The easiest solution is to restart the process from the Task Manager.

    1. Press Ctrl + Shift + Esc on your keyboard to start Task Manager.
  1. 2. Once Task Manager starts, locate Windows Explorer and right-click it.

  2. 3. Choose Restart from the menu.

    file-explorer-slow-windows-10

Another solution that we strongly recommend is to install a dedicated third-party file manager which is designed to work fast on slow PCs.

We recommend WinZip in regards to its performant engine that optimizes the process and allows you to compress your files in several known formats.

2. Run the search and indexing troubleshooter

  1. Press the Windows key + I and select the Update & Security option.
    update and security windows explorer slow
  2. Choose Troubleshoot in the left pane and click Additional troubleshooters in the right pane.
    troubleshoot windows explorer slow
  3. Select the Search and Indexing option and click the Run troubleshooter button.
    run troubleshooter
  4. Follow the simple onscreen instructions to apply the recommended fixes.

If the Windows Explorer is slow to copy files after an update or you are having trouble tracing the cause of the issue, it is recommended to run the search and indexing troubleshooter.

This will detect and recommend any issue that might be causing problems with the indexing and loading of files in Explorer.

3. Remove corrupted files

  1. Press the Windows key + S, type cmd, and click Run as administrator under Command Prompt.
  2. When Command Prompt starts, type the command below and hit Enter. sfc/scannow
  3. Wait for the scan to complete.
  4. If SFC scans fails, type the commands below and hit Enter after each: DISM /Online /Cleanup-Image /CheckHealth DISM /Online /Cleanup-Image /ScanHealth DISM /Online /Cleanup-Image /RestoreHealth
  5. Wait for the DISM to finish and try to perform the SFC scan again.

Corrupt or broken system files are part of the reasons Windows Explorer might be running slowly. Running the SFC and DISM scans should help you detect and repair the files. In case you require specialized support, there is an alternative method.

4. Disable unnecessary startup tasks

  1. Press the Windows key + X and select Task Manager.
    task manager
  2. Choose the Startup tab at the top.
  3. Right-click the unnecessary apps there and select Disable.
    disable windows explorer slow

Insufficient system resources is one of the reasons Windows Explorer might be slow when loading a folder on startup. To create enough resources for it, you need to disable the unnecessary startup apps. Also, close any app that you are not using at the moment.

5. Disable the Windows Search service

  1. Press Windows Key + R and enter services.msc. Press Enter or click OK.
  2. When the Services window opens, locate Windows Search and double-click it.
  3. Once the Properties window opens, set the Startup type to Disabled. If the service is running, click the Stop button to stop it.
  4. Now click Apply and OK to save changes.

Windows 10 uses all sorts of services in order to run, but sometimes certain services can cause problems. If File Explorer is slow on your PC, that might be due to the Windows Search service.

6. Change folder optimization

  1. Right-click the folder that’s slowing down File Explorer and Choose Properties from the menu.
    properties
  2. Go to the Customize tab and set Optimize this folder for to General items.
  3. Check Also apply this template to all subfolders.
  4. Click Apply and OK to save changes.

Windows 10 frequently performs optimization in the background, and that can cause File Explorer to be slow.

If Windows 10 File Explorer’s slow green bar is seen when trying to access a specific folder, you might want to change that folder’s optimization.

Note that if multiple folders are involved, you’ll have to repeat this solution for every affected item.

7. Check your Quick access list and clear File Explorer history

  1. Open File Explorer, right-click Quick access, and choose Options from the menu.
    options
  2. Under the General tab, change Open File Explorer to This PC.
    this pc windows explorer slow
  3. Uncheck the two boxes under the Privacy section and click the Clear button to clear File Explorer history.
  4. Click Apply and OK to save changes.
    ok apply

If Windows Explorer is slow when you are on network drives, you might want to clear its history as shown in the steps above.

8. Replace the date column

  1. Press the Windows key + E to open File Explorer.
  2. Right-click one of the classification columns and select More…
    more windows explorer slow
  3. Now, uncheck the box for Date and check the box Date modified.
  4. Click the OK button to save the changes.
    date modified

The classification columns go a long to determine how fast Windows Explorer loads. Using the Date as one of the columns makes Windows Explorer load slowly because it (Date) is not available in the file system metadata.

Instead, it will be extracted from the individual files to be loaded which causes Explorer to be slow.

Having to deal with a slow Windows Explorer is exasperating as it wastes valuable time. But we hope you managed to take your File Explorer to a snappier state with the help of our tips.

If you want to know how to fix most File Explorer issues on Windows, check our detailed guide on the topic to keep the app running smoothly.

Feel free to let us know the solution that helped you fix the issue in the comments below.

How to Run Hardware Diagnostics on Windows 10 [5 Ways]

To prevent and troubleshoot issues, important to know how to run hardware diagnostics on Windows 10. You can use tools like Performance Monitor, Windows Memory Diagnostic, or specialized commands.

Wee cover these methods and other solutions to help you troubleshoot your system. Just follow the steps below.

How do I run hardware diagnostics on Windows 10?

1. Use the Performance Monitor tool

  1. Press the Windows key and search for Performance Monitor. Open the top result.
    Searching for Performance Monitor in Windows Search Bar
  2. From the left pane menu, expand the Data Collector Sets section. Click on the System option.
    Navigating Performance Monitor Hardware Diagnostics App
  3. Right-click System Diagnostics and select Start to begin system diagnostics tests.
    Starting System Diagnostics Test in Performance Monitor
  4. Now, from the left pane menu, expand the Reports section, expand the System section, and open the System Diagnostics section.
    Searching for System Diagnostics Test Results in Performance Monitor
  5. You will find the generated system diagnostics test report here. Simply double-click the report to view it. Check out your PC’s Diagnostic Results.
    Viewing System Diagnostics Test Results in Performance Monitor

Need a quick primer before diving into your results? Read our guide on system diagnostics for a clear overview.

2. Use the Windows Memory Diagnostic app

  1. Press Windows and search for Windows Memory Diagnostic. Click the first result to open it.Searching for Windows Memory Diagnostic in Windows Search Bar
  2. Select the option Restart now and check for problems (recommended).Windows Memory Diagnostic Options
  3. Let the PC restart. Once the PC is restarted, the memory diagnostic scan will automatically begin. Wait for the process to finish. Your PC will reboot automatically afterward.Windows Memory Diagnostics Scan Window
  4. After logging in, the results will be displayed on the desktop. In case the test results fail to show on the screen automatically, use the Event Viewer app to check the scan results. Thus, press Windows and search for Event Viewer in the Search bar. Open the first app.Searching for Event Viewer in Windows Search Bar
  5. From the left pane menu, expand the Windows Logs section and click on the System option.Navigating Windows Memory Diagnostic Menu
  6. In the right pane Actions menu, expand the System section. Click on the Find… option.Using the 'Find' option in Event Viewer
  7. In the text field, type MemoryDiagnostic and click on Find Next to look for the memory diagnostic scan log.Searching for the Windows Memory Diagnostic Scan Event in Event Viewer Log
  8. View the results of the memory diagnostic scan in the General tab.Viewing the Windows Memory Diagnostic Scan Result in Event Viewer

Unless you find any errors, your PC’s RAM is not a cause for concern. Check out more details on the Windows Memory Diagnostic Tool and how it can help keep your PC’s memory in check.

3. Run a CHKDSK scan to check for bad sectors

  1. Press the Windows key and search for CMD in the Search bar. Choose the Run as administrator option under the result.Opening Command Prompt for CHKDSK Scan
  2. Type the following command and run it by pressing Enter. A prompt will appear asking you to schedule the scan on the next restart. Type Y and then press Enter: CHKDSK /RRunning CHKDSK Scan on Command Prompt
  3. Restart your PC. Once the PC restarts, the CHKDSK scan will begin automatically. Wait while hardware diagnostics is ran in Command Prompt.
  4. Once the scan is complete and you log in, press Windows and search for Event Viewer in the Search bar. Open the app.Opening Event Viewer to check CHKDSK Scan Results
  5. From the left pane menu, expand the Windows Logs section and click on the Application option.Navigating the Event Viewer App
  6. In the right pane Actions menu, expand the Application section. Click on the Find… option.Using the Find Option in Event Viewer App
  7. In the text field, type Wininit and click on Find Next to look for the CHKDSK scan log.Searching for the CHKDSK Scan Results in Event Viewer Log
  8. View the results of the CHKDSK scan in the General tab.Viewing the CHKDSK Scan Results in the Event Viewer App

Click inside the text box in the General tab. Press Ctrl+A to select all of the text, copy, and paste it onto a new text file. This will make viewing the results quite convenient.

To learn more, we have a great guide on how to run chkdsk on Windows 11, so you might want to check it out.

Note icon NOTE
The CHKDSK scan can end up taking a lot of time. A good estimate is probably around 2-3 hours.

4. Run the Battery diagnostics command

  1. Right-click the Start icon then select the Command Prompt or Windows PowerShell (Admin) option from the menu.Windows + X Command
  2. Once the Command Prompt/ Windows PowerShell loads, type in the following command and run it by pressing Enter: powercfg /batteryreportWindows PowerShell Running Battery Diagnostics
  3. An HTML file will be generated in a specified location. Open the file (in a browser) and view the results.Battery Diagnostics Battery Report

For an even deeper analysis, check out the 10 best tools for checking battery health on Windows 10.

5. Use a third-party diagnostics tool

If you’re looking for a more detailed look at your system, a third-party tool like AIDA64 Extreme can give you all the info you need.

It checks everything from temperature and voltage to performance, and even lets you stress test your PC to uncover hidden issues.

AIDA64 Extreme

AIDA64 Extreme

Troubleshoot your device with tests for temperature, performance, and hardware stability using AIDA64 Extreme.
Check price Visit website

If you have a diagnostic tool from your manufacturer, then you can use it as well.

Moreover, you might want to use PC maintenance software and motherboard diagnostic software in order to help your computer perform optimally all the time.

Feel free to ask us questions in the comments section below. Let us know which method you used to run a hardware diagnostic test.

How to Disconnect a Display From Windows Display Settings

Knowing exactly what you need to do when you run into trouble on your Windows 11 PC can save time and make your life much easier.

Actions such as disconnecting a display from your Windows 11 PC can be done without having to unplug the cable itself necessarily.

Look at the best resource monitor software for your Windows 11 PC if we are discussing monitors and the new OS.

Why do I need to disconnect the display from Windows settings?

Well, one scenario that comes to mind involves an environment with too many cables to successfully or safely disconnect the cable.

Not wanting to plug, unplug constantly, and re-plug cables can make someone want to pursue an alternative to disconnecting a display.

Yes, you can do so from the display settings, the same place you use to change your Windows 11 device’s resolution.

How can I disconnect a display from Windows display settings?

  1. 1. Press Win + I to access Settings.

  2. 2. Select the System tab, then click on Display.

    go to display settings
  3. 3. Choose the monitor you want to disconnect.

  4. 4. Select the Show only on X option to connect to only one display and disconnect the other.

    click to disconnect display
  5. 5. Close the Settings window.

  6. You can easily disconnect a display via Windows Settings in just a few clicks, from the Display section.

    That being said, after you complete the steps, the desktop contents will only appear on the display you selected while disconnecting the other monitor.

    Also, if you want to re-connect the display, you can use the exact instructions, only this time select the Extend these displays option or any other.

There is an easier way to choose what display you are using everything on without having to open the Settings app.

Press Win + P, then select PC Screen Only to achieve the same goal as the process we’ve presented above.

project pc screen only

That’s all you need to do if you want to disconnect a display on Windows 11 directly from the Display section of the Settings app.

So, if you don’t feel like manually unplugging the display’s cable from the PC, follow the above solutions, and everything will be fine.

Leave a comment below if this guide has assisted you in achieving your goal on your Windows 11-powered PC.

5 Best PSU Test Software for Your Computer’s Power Supply

Using PSU test software is probably the best method to diagnose your power supply.

Testing your computer’s power supply is especially helpful when diagnosing startup failures, crashes, or sudden shutdowns, all common symptoms of a power supply problem in Windows.

Let’s take a quick look at our top picks (more details below):

SoftwareFeaturesUsage and menusFunctionalityEfficiency
AIDA64 ExtremeAll-in-one PC diagnostic toolFriendly and customizable UI9/1010/10
Iolo System MechanicPC optimization toolsModern design, easy to use10/108/10
Open Hardware MonitorFree PSU test softwareCompressed view, minimal interface8/109/10
HWMonitorDiagnostics and monitoringLightweight, straightforward information9/108/10
Sidebar DiagnosticsBuilt-in diagnostic toolMinimal, graph design8/107/10

Best PC Power Supply Monitoring Software

AIDA64 Extreme – Professional PC power supply tester with CPU power monitoring.

AIDA64 Extreme is an advanced system diagnostics utility that functions as an effective PSU test software.

It provides information about your system hardware and identifies the voltage or temperature status of your PC. In addition, you can learn about your PC performance limits with a 64-bit stress testing module.

All in all, such complex software can offer you overclocking support or extensive information about hardware performance in minutes.

Tools like AIDA64 Extreme can help you understand system demands, but if you’re unsure how much power your system needs, here’s a guide on how to check your PSU wattage.

Check out other exciting features that come with AIDA64 Extreme:

  • Thesystem memory, FPU, and CPU
  • The setup process is fast and straightforward
  • AIDA64 Extreme comes with a user-friendly interface with an organized layout
  • All the computer component-related data are broken down into separate categories
  • The information covers general areas of your system such as power management, sensors, and overclocking
  • The tool runs benchmarks and generates reports
AIDA64 Extreme

AIDA64 Extreme

Find your PC’s performance limits with advanced diagnostics and stress testing tools!
Check price Visit website

Iolo System Mechanic – Computer power supply tester software optimizing PC performance

Iolo System Mechanic is an all-in-one PC optimizer with versatile features. It focuses on improving the overall performance of your device.

It has PC cleaning features and will help you get rid of bloatware and useless startup programs. In fact, it has the ability to remove 50 different types of junk files.

More so, if you need to boost your PC performance by increasing CPU and RAM resources, this software is your chance. It can therefore help your system to run high-demanding programs and function as power supply stress test software.

Other key features of this software are:

  • Defragments drives and frees memory
  • Protects router ports and other connected devices
  • Removes bloatware
  • Improves RAM usage in real-time
  • User-friendly and modern interface
  • Boosts internet speed
Iolo System Mechanic

Iolo System Mechanic

Use Iolo to automate complex processes and speed up functions while maintaining high security.
Check price Visit website

Open Hardware Monitor – Free power supply test and monitoring software tool.

open hardware psu test software

Open Hardware Monitor is a free open-source tool that can monitor temperature sensors, fan speeds, load, and voltages, and serve as PSU test software.

It is very useful if you require information about temperature sensors, fan speed, load, and clock speeds or voltages of your computer.

It can as well monitor any other hardware resources and read data about your chips found on almost every mainboard. So you can discover data about CPU temperature by reading the sensors of multiple processors like AMD or Intel.

Check out the best features included in this software:

  • Check system power supply
  • Monitor CPU temperature
  • Check GPU systems

⇒ Get Open Hardware Monitor

HWMonitor – Lightweight check power supply PC software with sensor monitoring.

Hwmonitor psu test software

HWMonitor is a lightweight system monitoring tool. This hardware monitoring software will read your system’s primary health sensors for the most common chips.

You can monitor voltages or hardware resources’ temperature at a glance and see how the system reacts. With this, you can always use it as PSU test software.

If your motherboard isn’t receiving power properly, PSU monitoring tools like HWMonitor can help you detect voltage issues. Learn more about how to fix a motherboard not getting power.

You can thus see detailed reports of your system, regarding the CPU, hard disk, or graphics card.

Check out its essential features:

  • HWMonitor’s job is to keep track of the most critical sensors on your computer and find out live readings for the HDD temperature and fan speed
  • It provides accurate data regarding your power supply
  • Setting up the program is an effortless task, and it will not require any particular configuration
  • Lists all the components in a hierarchical order so that you’ll be able to sport them more easier
  • It provides data revolving around the CPU, GPU, and HDD

⇒ Get HWMonitor

Sidebar Diagnostics – Customizable power supply software monitor and hardware tool

sidebar PSU test software

When it comes to analyzing the resource consumption figures Windows itself provides a competent tool named Resource Monitor that can work as PSU test software.

This utility has all the basics covered when it comes to data about the system’s memory, CPU, disk, and network stats but it’s not entirely convenient when you have tons of running apps.

Sidebar Diagnostics, on the other hand, provides a more convenient solution for viewing and analyzing hardware data.

Check out its best features below:

  • This is a lightweight tool that does mainly what the native Resource Monitor does, but it displays data more attractively
  • It comes with a sidebar that is integrated into your desktop
  • It displays data about RAM, CPU, GOU, active drivers, power supply, network, and more
  • The tool is really customizable allowing you to set things according to your preferences

⇒ Get Sidebar Diagnostics

These are the best programs that can function as PSU test software. It’s best to head over to their official websites to check out the complete set of features and see which one seems the best for your skill level and your system’s needs.

Once you’ve confirmed your PSU is stable, you can run a computer performance test online to evaluate how your hardware performs under load.

Moreover, if you’re looking for the best PSU for the 4090 series of NVIDIA GeForce RTX, we can help out!

If you need more info about a PSU Tester or two, don’t hesitate to reach for the comments section below.

How to Fix Gpedit.msc Not Found in Windows 11 – 5 Tested Ways

Dealing with gpedit.msc missing? You’re not alone, and you’re not doing anything wrong. Gpedit.msc (Group Policy Editor) is a powerful Windows tool used to control advanced system settings like updates, user permissions, and security restrictions.

But on Windows 11 Home, it’s missing by design. Try to launch it (Win + R > gpedit.msc), and you’ll likely get the error: “Windows cannot find ‘gpedit.msc’. Make sure you typed the name correctly…”

The good news? You can still enable it manually, without having to upgrade. Check the methods below to see how.

How to fix gpedit missing in Windows 11

1. Enable Group Policy Editor with a batch file

  1. Press the Windows + S key to open the Search bar, then type cmd and right-click on the most relevant result to run it as an administrator.
  2. Now type or paste in the following commands and press Enter after each:

FOR %F IN ("%SystemRoot%\servicing\Packages\Microsoft-Windows-GroupPolicy-ClientTools-Package~*.mum") DO ( DISM /Online /NoRestart /Add-Package:"%F" )

FOR %F IN ("%SystemRoot%\servicing\Packages\Microsoft-Windows-GroupPolicy-ClientExtensions-Package~*.mum") DO (
DISM /Online /NoRestart /Add-Package:"%F"
)

Once the processes are complete and reach 100 percent, you can close the Command Prompt window and try to open Gpedit.msc again.

A Command Prompt window will appear at this point. Wait until it says 100 percent before continuing. Before you close that window, be sure that this operation was accomplished correctly.

A simpler and safer way to restore missing Windows files is with the help of specialized software.

2. Enable Group Policy Editor via the Command Prompt

  1. Press the Windows + S key to open the Search bar, then type cmd and right-click on the most relevant result to run it as an administrator.cmd-run-as-admin avast high cpu windows 11
  2. Now type or paste in the following commands and press Enter after each:

FOR %F IN ("%SystemRoot%\servicing\Packages\Microsoft-Windows-GroupPolicy-ClientTools-Package~*.mum") DO ( DISM /Online /NoRestart /Add-Package:"%F" )

FOR %F IN ("%SystemRoot%\servicing\Packages\Microsoft-Windows-GroupPolicy-ClientExtensions-Package~*.mum") DO (
DISM /Online /NoRestart /Add-Package:"%F"
)
gpedit-install-command windows cannot find gpedit.msc windows 11

Once the processes are complete and reach 100 percent, you can close the Command Prompt window and try to open Gpedit.msc again.

3. Download gpedit-main zip file

  1. Go to the Gpedit-main Github page to download the zip.
    download gpedit.msc windows 11 download
  2. Right-click the zip folder and select the Extract All… option. Choose a location to extract the files to complete the process.
    extract all gpedit.msc windows 11 download
  3. Now, open the extracted folder, right-click on the .bat file there, and select Run as administrator.
    run as gpedit.msc windows 11 download
  4. Wait for Command Prompt to open and install the needed extensions. Close CMD once it shows The operation completed successfully message.
  5. Finally, you now press the Windows key + R, type gpedit.msc, and click OK to access the Group Policy Editor.
    run option gpedit.msc windows 11 download

Another way around the Gpedit.msc not found on Windows 11 is to download the .bat file as shown above. This method also works on Windows 11 Home Edition, so be sure to try it.

4. Update Windows

  1. Press the Windows key + I and click on Windows Update from the left side menu.windows-update-settings kernel security check failure windows 11
  2. Click on Check for updates.checl-for-updates kernel security check failure windows 11

If you’re using an earlier version of Windows, this could be a contributing factor to the error, which can be fixed by updating the operating system. They should probably fix this error in a subsequent software release.

5. Use the Microsoft Management Console

  1. Press Win + R to open the Run dialog.
  2. Type mmc and press Enter.mmc command
  3. In the Microsoft Management Console, click File at the top-left.
  4. Select Add/Remove Snap-in from the dropdown.mmc file
  5. Scroll down and select Group Policy Object Editor and click on it.
  6. In the new window, choose Local Computer and click Finish.local computer policy
  7. Click OK to return to the console.
  8. Go to File and choose Save As, name the file and save it to a preferred location.save group policy editor file
  9. When you want to open to Group Policy Editor, just double-click the saved file

That’s about it on the Gpedit.msc not found on Windows 11 issue and how to download it.

Alternatively, you can learn how to edit the Group Policy in Windows 10 and use the same procedures in Windows 11, as they are similar.

You can also use gpedit.msc on Server 2019, and we have a great guide on how to do it.

Let us know in the comments section below which solution worked best for you as well as how often you use Group Policy Editor.

Reset All Audio Settings on Windows 11 [Quick Steps]

While your Windows OS is more than capable of managing sound on your PC, you will still need to intervene and reset sound settings in case you are facing audio issues or glitches. 

That being said, with the aesthetic changes made by Microsoft in Windows 11, it has become harder for some users to zero in on these settings.

Before we dive into the solutions, know that we can also offer assistance if your Windows 11 PC has no sound at all.

Why do I need to reset my Windows 11 sound settings?

You don’t necessarily need to do so, but when problems start interfering with how you do things on your PC, you might want to do something about it.

Like when your Windows 11 OS doesn’t recognize your headphones, there are some causes that trigger this behavior.

If you have sound problems, know that it can happen because:

  • Your drivers have become corrupt or are outdated
  • Operating system errors and glitches

But don’t worry, after going through this guide all your Windows 11 sound-related problems will surely be history.

How do I reset all the sound settings on Windows 11?

1. Reset from the Settings app

  1. 1. Press Win + I to access Settings.

  2. 2. Click on the System tab, then select Sound.

    sound settings windows 11
  3. 3. Go to Volume Mixer.

    volume mixer
  4. 4. Press the Reset button.

    reset sound settings windows 11
  5. 5. Close the window.

  6. If you’re looking to reset all sound settings on your Windows 11 PC, you need to look no further than Windows Settings. From the Volume Mixer section, you can complete the reset in a few clicks.

2. Uninstall/re-install the audio driver

  1. Search for Device Manager and open the app.device manager
  2. Expand Sound, video & game controllers, then right-click on the audio driver and select Uninstall device.uninstall audio driver
  3. After uninstalling the audio driver, your system will re-install it automatically.

3. Restart Windows audio services

  1. Search for Services and open the app.services
  2. Right-click on Windows Audio and select Restart.windows audio

4. Use Windows troubleshooter

  1. Search for Troubleshooting settings and open the app.troubleshooting settings
  2. Click on Other troubleshooters.other troubleshooters
  3. Next to Playing Audio, click on the Run button.run troubleshooter

5. Reset system sounds to default

  1. Search for Change system sounds and open the Control Panel app.change sound system
  2. Under Sound scheme, select Windows default.1
  3. Click on Apply, then click OK to close the window.2

These are the process you are looking at when you are having issues with the sound on your Windows 11-powered PC or laptop.

We’ve also prepared an interesting article bout what you can do if your gaming sounds simply stop on your Windows 11 device.

Leave a comment below and tell us if this article has helped you fix your sound-related Windows 11 problems.

How to Deploy/Change Folder Redirection Path in Group Policy

You are clearly interested in knowing more about how the Group Policy editors work, thus you came here to learn a lot more on the subject.

And, as always, we will oblige and offer the most accurate information. You might also be interested in Group Policy drive mapping, so we got you covered on that as well.

How does Group Policy folder redirection work?

You should definitely know that, in the Windows Server 2012 R2 environment, redirecting users’ files to a common storage area is sometimes the most practical path of action.

On the off chance, you are still learning the OS for the first time, enabling folder redirection might not be so intuitive.

But don’t worry, as Microsoft has provided a simple and easy way to do this on the domain or OU level, and we are also going to assist you step by step.

Before we do so though, we have to remind you that you will also find information on how to block Group Policy inheritance for a domain/OU right here.

So, without any further ado, let’s have a closer look at how you can activate folder redirection for the Group Policy Editor.

How do I deploy/change folder redirection paths in Group Policy?

  1. 1. In Server Manager, click on Tools, then access the Group Policy Management in an account that has permission to edit Group Policy.

  2. 2. Right-click on Group Policy Objects OU and select New, then select a name.

    create new
  3. 3. Right-click on the folder you want to change the path for, then click on Properties.

  4. 4. Select the redirect destination, then click on Apply.

  5. 5. Return to the Group Policy Management Console and right-click on a domain/ OU.

  6. 6. Select Link an Existing GPO and then choose the Group Policy Object that you just created.

    link an existing gpo setting
  7. 7. Run PowerShell, then type in the following command and press Enter: gpupdate /force

    insert the gpuupdate command
  8. 8. For the changes to take effect, you will need to log off and log back in so press Y and Enter.

  9. Performing a Group Policy folder path redirection is simple and can be done within a few minutes with the help of Group Policy Management and a command-line tool.

    Know that, if your new file doesn’t appear, consider going back to your new GPO and making sure that the file path is correct. Also, make sure that the folder you are redirecting it to actually exists.

    In order to change the root path destination, follow the exact same process from above, and only modify the destination folder when that step comes.

Is it absolutely necessary to perform a Group Policy folder path redirection?

No, this isn’t some type of written or even unwritten rule. You only need to perform a Group Policy folder redirection if you absolutely need to do so.

Otherwise, in many circumstances, it’s better to use the existing folder or provide access to a new folder instead.

That being said, using our guide, even beginners can easily complete it, provided they also understand the implicated factors.

If you need to switch more things around, keep in mind that you can also delete and recreate a mapped drive for the users.

The replace action overwrites all existing settings that are associated with the mapped drive. In case the mapped drive does not exist, the Replace action will create the drive.

That being said, you might also be interested in how to install Group Policy Management Console on Windows 11.

Be sure to leave a comment down below if this article has helped you with your Group Policy folder patch redirection.

How to Roll Back Drivers on Windows 11

Some users may seek to roll back driver updates to resolve issues arising after recent device driver updates. Rolling back a device’s driver will restore the previous one that the new one replaced.

There’s more than one way you can roll back a Windows 11 update. Below are four methods for reverting driver updates on Windows 11 PCs.

What is a device driver?

A driver is software that facilitates communication between Windows 11 (or other OS) and its associated hardware device. They’re kind of like language translators between hardware and computer platforms.

Companies frequently release new driver versions for their hardware. More essential system drivers will often be updated automatically with Windows updates.

You should confirm your current driver version before applying any rollback method, so you can use this guide to check driver version in Windows 11 before proceeding.

How can I roll back driver updates in Windows 11?

1. Select the Roll Back Driver option

  1. 1. Right-click the button for opening the Start menu and select Device Manager.

    open device manager
  2. 2. Double-click whatever hardware category includes the device for which you want to roll back a driver.

  3. 3. Right-click a device for which to roll back the driver and select Properties.

    select properties
  4. 4. Select the window’s Driver tab.

  5. 5. Then click the Roll Back Driver button.

    click to roll back driver windows 11
  6. 6. Select a reason for rolling back the driver.

    select a reason why you want to rollback driver windows 11
  7. 7. Press Yes to restore the previous driver.

  8. 8. Click Start and Power on the menu. Then select the Restart option.

    restart pc
  9. You can easily roll back recent drivers on your Windows 11 PC via Device Manager. This built-in tool on your computer allows you to manually choose which drivers you want to roll back from your list of available devices.

2. Reinstall old driver packs

  1. Right-click the Start button and select Device Manager and navigate to a hardware device category.
  2. Then right-click a hardware device and select Uninstall device.
    Uninstall device option roll back driver windows 11
  3. Select the Attempt to remove driver for this device option if there is one.
  4. Click Uninstall to confirm.
    Uninstall Device window roll back driver windows 11

When you’ve uninstalled a device driver, you can manually reinstall an older one to roll back to. Many device manufacturer websites will include old drivers as well as the latest ones.

For example, you can download old drivers for NVIDIA GPUs from the Advanced Driver Search page. Select your GPU model, All on the Recommended menu, and click Search to view a list of downloadable drivers.

When you’ve downloaded the previous driver version, open the folder that contains the driver package in Explorer. Double-click its setup package to install the driver.

You can also uninstall some drivers via Programs and Features or with third-party uninstallers.

3. Roll back driver updates with System Restore

  1. Click the Search tool on your taskbar (it has a magnifying glass icon) type recovery and select Recovery to bring up a Control Panel applet.
    A Recovery search  roll back driver windows 11
  2. Select the Open System Restore option.
    Open System Restore option roll back driver windows 11
  3. If a Choose a different system restore option is available, select that radio button.
  4. Click Next to view your PC’s available restore points and select one that predates the driver update on your PC.
  5. Click the Scan for affected programs button to view a list of programs and drivers the restore point will remove. If you can see the recent driver update listed, the restore point will remove it.
    Scan for affected programs button roll back driver windows 11
  6. Select Close to return to the restore point list.
    Affected programs info roll back driver windows 11
  7. Press Next to go to the confirmation stage.
  8. Then click Finish to roll back the driver and Windows.
    The Finish option roll back driver windows 11

4. Back up and restore drivers

4.1 Back up all drivers

  1. Press the Windows key + E to start File Explorer.
  2. Right-click the C: drive and select Show more options.
    Show more options option roll back driver windows 11
  3. Hover your mouse pointer over New and select the Folder option.
  4. Input Driver Backup Folder for the directory’s name. That new folder will include your driver backups.
  5. Click in the Search box at the top of Windows 11’s Start menu, type cmd, and select Run as administrator from there.
    The Run as administrator option roll back driver windows 11
  6. Input and execute this command with the actual folder path you just created, included at end: dism /online /export-driver /destination:C:\Driver Backup Folder
    The backup driver command roll back driver windows 11

4.2 Restore old drivers from the backup folder

  1. Right-click the Start button and select Device Manager.
  2. Right-click a device for which to restore a driver and select Update driver.
    Update driver roll back driver windows 11
  3. Select the Browse my computer option.
    Browse my computer for drivers option roll back driver windows 11
  4. Make sure that the Include subfolders checkbox is selected.
  5. Click Browse to select the Driver Backup Folder.
    Include subfolders option
  6. Then click the OK option.
  7. Select Next to start a driver search in your selected folder.

Some third-party driver updater tools also incorporate backup features for drivers. For example, Outbyte Driver Updater enables you to back up drivers with compressed ZIP archives.

Is there a way I can disable automatic driver updates?

You can disable automatic driver updates via the Control Panel. Press your keyboard’s Windows key + S. Type change device in the text box and select Change device installation settings.

A Device installation window will then open. Select the No option on that window. Press the Save Changes button to apply.

Many readers asked us: Why can’t I roll back my driver? Well, the Roll Back Driver option won’t be available when your PC hasn’t, or no longer, retained a previous driver version for a device.

However, you can still manually reinstall a previous driver version, as outlined for method two.

You can roll back to previous drivers in Windows 11 with any of the above methods. The first method is the fastest, but that option isn’t always available.

If you’re not using the latest version, we also have a guide on how to roll back the driver on Windows 7, so you might want to check it out.

Try the second, third, or fourth methods when you can’t select to roll back a driver. You’ll need to have enabled System Restore and backed up all drivers for the third and fourth methods to be valid.

How to Boot Into Dell Recovery Mode on Windows 11

Some of us might want Microsoft Surface laptops and tablets, while others go for devices from manufacturers such as HP, Asus, Razer, Lenovo, or Dell.

If you chose Dell, you might want to know what to do when the Dell update is not working. Also, we recommend having a look at what to do in situations when the Dell XPS 13 battery is not detected.

What options do I get if I boot into Dell Recovery Mode?

Dell users have been reporting problems for as long as the company has existed, so there’s really not a shock factor when you hear something like that.

In this article, you will find the exact steps you need to go through in order to complete this. However, before we get into that, let’s discover what the benefits of putting your PC into Recovery Mode can have:

System recovery optionDescription
Startup RepairFixes certain problems, such as missing or damaged system files, that might prevent Windows from starting correctly.               
System RestoreRestores your computer’s system files to an earlier point in time without affecting your files, such as e-mails, documents, or photos. If you use System Restore from the System Recovery Options menu, you cannot undo the restore operation. However, you can run System Restore again and choose a different restore point, if one exists.              
System Image RecoveryYou need to have created a system image beforehand to use this option. A system image is a personalized backup of the partition that contains Windows and includes programs and user data, like documents, pictures, and music.
Windows Memory Diagnostic ToolScans your computer’s memory for errors.
Command PromptAdvanced users can use Command Prompt to perform recovery-related operations and also run other command line tools for diagnosing and troubleshooting problems.

If any of the actions in the table above is what you are actually after, follow the solutions below to properly complete this process.

How can I boot into Dell Recovery Mode on Windows 11?

Note icon NOTE
Remember to save any work you are doing or important files before you engage in booting your Dell into Recovery Mode.
  1. 1. Press Win + I to access Settings.

  2. 2. Select the System tab, then click on Recovery.

    recovery
  3. 3. Next to Advanced setup, click the Restart now button.

    restart now
  4. 4. Click on Restart now.

    restart now
  5. 5. After the system has rebooted, select Troubleshoot.

    troubleshooting
  6. 6. Select Advanced options.

    advanced options
  7. 7. Click on Startup Settings.

    startup settings
  8. 8. Press the Restart button.

    restart
  9. 9. Use the number keys (4/5/6) to select which Safe Mode version you want to boot into.

    safe mode
  10. It is quite simple to boot your Windows 11 Dell device into Recovery Mode. The entire process can be done from the built-in Settings on your PC.

    Basically, you need to navigate to the Recovery section, restart your PC, and then choose the preferred Startup Setting via Advanced Settings.

Don’t worry, there is absolutely no rush. Take your time and complete this process properly, as seen in the screenshots above.

Speaking of Dell machines, we can also show you how to tackle scenarios where your external monitor is not working on your Dell laptop.

Furthermore, if you are in need of assistance with a Dell device when Miracast is not working, you will find the solutions here as well.

Has this guide been helpful to you? Leave a comment below and share your thoughts and opinions with us.

Fix: Realtek Audio Manager Keeps Popping Up

Trying to get your work done, but the Realtek Audio Manager keeps popping up constantly to annoy you and disturb the overall workflow?

If you don’t know about the installation of audio drivers, do check our complete guide on how to install any audio drivers in Windows 11.

What causes the Realtek Audio Manager to pop up?

With the popping up error, if you are getting the not supported message, then you should check our guide on fixing the device type not supported error Realtek Audio Manager.

Mostly an issue with the driver can result in Realtek Audio Manager behaving like this. Apart from this, the following causes can potentially cause the Realtek Manager to pop up.

  • Incompatible plugged audio device – One possibility is that you have an audio device plugged into your computer that is not compatible with the Realtek sound drivers.
  • Outdated Realtek drivers – Another possibility is that your Realtek drivers are outdated and need to be updated.
  • Windows might need an update – It is also possible that your Window needs to be updated.

Now that you can identify the causes behind this issue let’s move on to possible solutions that can help you keep the Realtek Audio Manager from popping.

To troubleshoot further issues that can occur with the Realtek audio manager or having no sound problem, you can have help from our guide to fixing no sound problems in Windows 11.

How do I keep Realtek Audio Manager from popping up?

Before moving towards detailed solutions, here are some quick checks that you can do to keep Realtek Audio Manager from popping up.

  • Check the audio device connector that is not loose. Realtek Audio Manager will pop up if the connector is not tight.
  • Make sure that the cables are properly intact and that there is no issue with the hardware.
  • Restarting your computer can also help because restarting will reinitialize the sound drivers.
  • If you have installed any new programs or updates, try uninstalling them by following the given method to uninstall updates in Windows 11.

Now that we have gone through some quick checks let’s move on to the detailed solutions.

1. Disable notifications via Settings

  1. Click on the Start button at the bottom of your screen and select the Settings option.
  2. Click on System in the side panel and then click on Notifications.
  3. Turn the Notifications toggle button of Realtek Audio Manager to Off.

Turning off all notifications via settings will keep the Realtek Audio Manager from popping on the screen.

If you do not see the Realtek Audio Manager in your Windows 11, check the article comprising solutions for missing Realtek Audio Manager in Windows 11.

2. Check for Windows updates

  1. Click on the Start button at the bottom of the screen and select the Settings option.
  2. Click on the Windows Update from the right sidebar and then click on Check for updates.
  3. If updates are available, then install them, and hopefully, your issue will be resolved.

3. Update the Realtek audio drivers 

  1. Type device manager in the search bar and click on Open.
  2. Then, click on Sound, video and game controllers, right-click on Realtek(R) Audio and click on Update driver.
  3. A confirmation prompt will open up again; click on Search automatically for drivers to automatically search and install the updated drivers.

Uninstalling the Realtek Audio Manager from your system will definitely resolve this issue. If you wish to reinstall the Realtek driver, then check this article on how to download Realtek audio drivers in Windows 11.

4. Enable the Remove Ballon Tips

  1. Press the Windows + R button to open the run box, type the following command to open the Local Group Policy Editor, and click on the OK button. gpedit.msc
  2. Click on Administrative Template and then click on Start Menu and Taskbar.
  3. Double-click on Remove Balloon Tips on Startup Menu items.
  4. Then, select the Enabled option and click on the OK button.

5. Uninstall and reinstall the Realtek Audio software

  1. Click on the Start button and select the Settings option.
  2. Click on Apps and then click on the Apps and features option.
  3. Type Realtek, click on the three dots of Realtek Audio Console, and click on Uninstall option from the dropdown.
  4. Again click on the Uninstall option on the confirmation popup.
  5. Once the Realtek software is uninstalled, install it again and check whether the issue is resolved or not.

However, if you think Realtek Audio Manager is necessary, then you should check this guide to know why I should need Realtek Audio Manager.

We hope this guide helped you immensely in clearing the issue of the Realtek Audio Manager popping up on the screen for a smooth workflow.

Before you go, don’t miss out on our RtkAudUService64 guide that explains more about this file and Realtek Manager.

If you have any further queries or suggestions or facing any other problem regarding Windows 11, do let us know in the comments section below.

Windows Activation Notice Keeps Popping Up: 5 Ways to Fix it

Many Windows users have expressed discontent with the pesky Windows Activation notice that keeps popping up on their computer screens. If you face the same issue, this guide is for you.

Windows Activation is an anti-piracy feature by Microsoft that checks to see if your copy of Windows is legitimate. However, the tech giant has become less strict about this policy. So, even if your PC fails the activation process, Windows will continue to work normally until you solve the issue.

Why does the Windows Activation notice keep popping up?

  • Windows license expired – The Windows Activation notice may keep popping up if your Windows license has expired. This is a common issue that we’ve seen on many Windows computers that were activated using a KMS or Windows 10/11 product key. You may receive a message from Microsoft that reads your Windows license will expire soon.
  • Invalid license -If you input a key that you got from an online source, it might not work because it has been used by others and Microsoft’s online activation technology blocks users who try to use the same product key. Make sure you’re using a valid activation key to avoid this issue.

In some cases, Microsoft will keep asking for activation even though your version of the OS is already activated.

Below we have compiled five different methods to help you get rid of the Windows Activation notice that keeps popping up on your computer screen. So, let us get started.

What can I do if the Windows Activation notice keeps popping up?

This guide will cover five of the most common practical solutions to the Windows Activation notice that keeps popping up. But please verify the following before moving forward:

  • First, verify that your copy of Windows is legitimate.
  • Look for key features that will help you verify its authenticity, like the Certificate of Authenticity (COA), proof of license label, and an edge-to-edge hologram.

1. Remove background images via Control Panel

  1. Go to the Windows Search bar, type Control Panel, and Enter.
  2. Hover over to Ease of Access Center and click on Optimize visual display option.
  3. Now, under the Make the computer easy to see section, scroll down and tick the box next to Remove Background Images (Where Possible)
  4. Click on Apply and restart your device.

2. Execute a script through Windows Powershell

  1. Go to the Windows Search bar, type in Windows Powershell, and click on Run as Administrator on the right.
  2. In the window that opens, type or copy-paste the following script and hit Enter.slmgr /renew
  3. Lastly, restart your computer.

3. Activate Windows

  1. Press the Windows key + I simultaneously to open the Settings app.
  2. Under Systems, please scroll down to Activation and click it.
  3. Expand the Upgrade your edition of Windows section and click the Change Product key option.
  4. Enter your 24-character alphanumeric product key and click Next.
  5. Microsoft will now activate your Windows OS.

4. Disable Windows Tips

  1. Press the Windows key + I simultaneously to open the Settings app.
  2. Under Systems, go to Notifications.
  3. Please uncheck the box next to Get tips and suggestions when I use Windows and Show me the Windows welcome experience after updates and occasionally when I sign in to highlight what’s new and suggested.

5. Edit Registry Key

  1. Press the Windows key + R to open the Run dialog box.
  2. Type regedit and hit Enter to launch the Registry Editor.
  3. Click on File and then Export.
  4. Choose a secure location on your computer to save the backup, and name it Original Registry.
  5. Now, in the Registry Editor, locate or copy-paste the following: HKEY_LOCAL_MACHINE\SOFTWARE\Microsoft\Windows NT\CurrentVersion\SoftwareProtectionPlatform\Activation
  6. In the right pane, right-click on Manual and select Modify.
  7. Change the value data from 0 to 1 and click Ok.
  8. Restart your computer for changes to take effect.

You can get rid of the Activate Windows notice by simply changing the Registry. However, if none of the solutions work for you, try contacting the Microsoft customer support team to resolve your issue.

We hope one of these methods finally works for you to eliminate that irritating Windows activation notice. Alternatively, you can also go through our guide on Windows 10/11 Pro activation error 0xc004f014.

If you have questions or need clarification on anything, please reach out to us in the comments section below. We’ll be happy to help.

Fix: Logitech G HUB is Not Downloading Presets

Logitech G HUB not downloading presets is a known issue that has been widely reported on the Logitech forums. If you are facing the same problem, then you are in the right place.

This article will provide you with some effective methods on how to fix the issue. So, let us get started without wasting any time.

Why are presets not downloading in Logitech G HUB?

The presets are not available for download could be due to one of these reasons:

  • No internet: The device does not have an internet connection. To fix this, you will need to contact your ISP and ask for help.
  • Storage space issue: Not having enough storage space available on your computer can cause a variety of issues, including conflicts when trying to run the Logitech G Hub. To fix this, you will need to make some more space on your HDD.
  • Profile settings: Updating your profile name and picture is important if you want to download presets.
  • Firewall block: Your firewall settings are blocking downloads from the Logitech website.

How do I fix the preset not downloading in Logitech G HUB?

When downloading presets from G Hub, make sure you do the following:

  • Update your profile name and picture.
  • Download the presets for the same device model as the one you have. Otherwise, the preset won’t work.
  • Check the ports. Make sure they’re properly plugged in and that the connections are tight.
  • Ensure that you have the correct device selected in Logitech G HUB. If you have any doubts, consult the documentation that came with your product.
  • Try downloading the latest version of the software.
  • If everything fails, restart your computer.

1. Allow the app through Windows Firewall

  1. Go to the Start menu and search for Firewall.
  2. Then, click on the Allow an app or feature through Windows Firewall option.
  3. Click the Change settings button at the top.
  4. Scroll down to the bottom and click Allow another app.
  5. Click Browse and search for Logitech G HUB.
  6. Next, click on the app and select the Add button option.
  7. Once Logitech G HUB has been given permission, click OK.

Sometimes, The Windows Firewall can prevent Logitech G HUB from working properly. if you find that your firewall is still blocking apps even after you’ve tried disabling it, don’t hesitate to go through our guide on the same.

2. Update device drivers

  1. Go to the Windows Search Bar, type in Device Manager, and hit Enter.
  2. Expand the Sound Videos and Game section.
  3. Right-click on your sound device and select Update driver.

Aside from protecting you against malicious software, your device drivers also help eliminate bugs and glitches. Thus, updating them could potentially fix your issue.

3. Reinstall Logitech G HUB

  1. First press the Win + R keys on your keyboard to open the Run box.
  2. Type or paste control appwiz.cpl and press Enter.
  3. Click the Logitech G HUB app icon and select Uninstall.
  4. Once done, restart your computer.
  5. Now, visit the Logitech G HUB download page and select the Download for Windows option.
  6. Follow the on-screen instructions to proceed.

4. Set LGHUB Updater Service Startup type to Automatic

  1. Press the Win + R keys on your keyboard to open the Run box.
  2. Type Services.msc in the search bar and press Enter.
  3. Find LGHUB Updater Service in the list of Services.
  4. Right-click on it and select Properties.
  5. On the General tab, set the Startup type to Automatic using the dropdown button next to it.
  6. Click OK and restart your PC for changes to take effect.

The LGHUB Updater Service should not be disabled as it is essential for the G HUB to function properly. You will need to set its startup type to Automatic from either Manual or Disabled and see if it fixes your issue.

Alternatively, you can directly reach out to Logitech G HUB customer support if none of the solutions work for you. Also, we have a few recommendations for fixing the most common problems like the Logitech G HUB not working in Windows 11.

If you have any questions about the above processes, feel free to leave a comment below. We would love to hear from you.

Posted in Fix

Display Settings are Greyed Out? How to Get Them Back

Windows users can experience many issues without necessarily being tied to just one part of the operating system.

If you need to reset the sound settings on your Windows 11, our guide will surely be of assistance. But you can also run into display problems, and we’ll help you with those.

Why are my display settings greyed out on Windows 11?

Simple actions, such as switching wallpapers, or changing the system’s resolution, can prove impossible if you get a bug many users spoke about on forums and social media platforms.

Responsible for the Windows 11 display settings being greyed out include:

  • Malicious software and viruses – Having any software that endangers your system installed can cause a variety of issues, and in order to fix this, you will need to use good antivirus software.
  • Corrupted or outdated drivers – Drivers are the basis of every software running on your PC, so updating drivers is of paramount importance.
  • Too many junk files – Having a regular system cleanup is extremely important, but you can simplify the process by using specialized software.

Speaking purely based on the reports, most users facing this issue have recently upgraded to Windows 10/11 or installed specific system updates.

Without any double, this could be causing incompatibility between the operating system and outdated drivers, causing the affected PC to disable some functions related to the misconfigured drivers.

Before we start this troubleshooting process, though, be sure to make the first steps towards fixing the problem, such as:

  • Restart your PC
  • Scan your PC for malware
  • Clean junk files from your PC

How can I fix the Windows 11 display settings when greyed out?

1. Enable GPU Scaling

1.1. Intel

  1. Click on Intel HD Graphics located in the Notification Area of the Taskbar.
  2. Click Display.
  3. Click Maintain Display Scaling, then click Apply.
  4. Finally, restart your Windows 11 PC.

1.2. AMD

  1. Open your AMD Radeon control panel from the Taskbar.
  2. Click Display.
  3. Look for GPU Scaling and turn it on.
  4. Restart your Windows 11 PC.

1.3. Nvidia

  1. Click NVIDIA from the Taskbar to open its settings.
  2. Click on Adjust Desktop Size and Position from the left menu.
  3. Select your scaling mode: Full Screen, Aspect Ratio, or No Scaling.
  4. Choose GPU in the dropdown under Perform scaling on.
  5. Save your settings and restart your system.

2. Update your display driver

  1. Search for Device Manager and open the app.device manager
  2. Extend Display adapters, right-click on your GPU and select Update driver.display drivers
  3. Click on Search automatically for drivers.search automatically for drivers

3. Remove malware from your PC

  1. Press Win + I to access Settings.
  2. Select the Privacy & Security tab, then click on Windows Security.windows security
  3. Click on the Open Windows Security button.ope windows security
  4. Click on Virus & threat protection.virus and threat protection
  5. Click the Quick Scan button.quick scan
  6. If your PC finds any threats, click on the Remove button.

4. Update Windows to the latest version

  1. Press Win + I to access Settings.
  2. Click on the Windows update tab, then click on Search for updates.windows update
  3. If Windows found any updates, click on the Install now button.

5. Reset your PC

  1. Press Win + I to access Settings.
  2. Select the System tab, then click on Recovery.recovery windows 11
  3. Click on the Reset PC button.reset this pc

6. Install display drivers in compatibility mode

  1. Manually download the display driver you need from the manufacturer’s website.
  2. Right-click on the setup file and select Properties.properties
  3. Select the Compatibility tab, then select Windows 8 from the dropdown, click on the OK button, and then on Apply.compatibility mode
  4. Reboot your PC.

Windows 11 users who reported their display settings getting greyed out and becoming inaccessible have also said that these solutions helped them fix the problem.

Make sure to follow each step, and you will be back to normal in no time. Leave a comment below if this guide has helped you as well.

How to Boot Lenovo into Recovery Mode on Windows 11

Booting into a Lenovo Recovery mode on Windows 11 allows you to access the Windows Recovery Environment (WinRE). It repairs many factors causing unbootable operating systems.

However, users complain about not being able to find the Recovery Environment on Windows 11.

Why should I boot Lenovo into Recovery Mode on Windows 11?

The Lenovo Recovery mode gives users Windows Recovery Environment (WinRE) access. It is a pre-installed troubleshooting tool that accompanies the Windows operating system.

Furthermore, it offers a series of Recovery options that allows you to perform advanced troubleshooting on your PC. Some features are:

  • Running startup repairs: When you run into startup errors in your Lenovo PC, booting into the Recovery mode allows you access repair tools to fix the startup bug affecting your PC.
  • Resetting your PC: You can use the Lenovo Recovery mode to restore factory settings and reinstall Windows. However, if the factory reset is not working, try the fixes in this guide.
  • Access the Command Prompt: The Windows Recovery Environment on Lenovo allows users to use the Command Prompt to access the Registry Editor and copy system files. Also, you can perform an SFC scan to verify the status of protected files on your computer.
  • System restores: Booting Lenovo into Recovery mode allows you to restore your PC to a previous point.

Also, the Windows Recovery Environment (WinRE) allows you to boot your PC from a bootable USB drive.

How can I boot my Lenovo PC into Recovery mode on Windows 11?

Before booting your Lenovo PC into Recovery mode, we recommend you go through the following preliminary checks:

Follow the steps below to boot your Lenovo PC into Recovery mode on Windows 11.

1. Via the Settings app

  1. Press the Windows + I keys to prompt the Windows Settings app.
  2. Go to System or select Recovery.
  3. Navigate to the Advanced startup section and select the Restart now option to boot your Lenovo PC in Recovery mode.

If Advanced startup is missing from your PC, you can learn how to add it through this guide.

2. Use the Start menu

  1. Press the Start button on your keyboard and click on the Power option.
  2. Then press and hold the Shift key on your keyboard as you select the Restart option.

You may also check this guide on fixing the Start menu when it’s not working on Windows 11.

3. Use Windows PowerShell command

  1. 1. Click on the Start button to open the Windows Search box.

  2. 2. Type PowerShell in the search box, and select Run as administrator.

    run powershell as administrator
  3. 3. Input the following command: shutdown /r /o

  4. 4. Press Enter to run the command.

    boot lenovo into recovery mode windows 11
  5. 5. Alternatively, input this command, then press Enter:shutdown /r /o /f /t 0

  6. A very quick and easy way to boot your Lenovo device into Recovery Mode is via a command-line tool such as Powershell. All you need to do is input a command and run it.

    You should only force Windows 11 to boot into Recovery mode using the second command if the first fails. Windows will boot into Windows Recovery Environment (WinRE) in a few seconds.

4. Boot your Lenovo PC into Recovery mode via Security Screen

  1. Press the Ctrl + Alt + Del keys on the desktop to prompt the Windows Security Screen.
  2. Select the Power button in the bottom-right corner of the screen.
  3. Press and hold the Shift key, then choose the Restart option.

You can read our guide on what to do if Windows 11 won’t enter Recovery mode on your PC.

5. Via Automatic Repair

  1. Press and hold the Power button on your Lenovo PC until the screen goes off.
  2. A Preparing Automatic Repair option should appear below the Windows logo; wait while it loads.
  3. Select Advanced Options on the next prompt to launch the Windows Recovery Environment (WinRE).

You can read about how to fix Automatic Repair when it’s not working in Windows 11.

Nonetheless, you can refer to our article on how to enter recovery mode on Windows 11 for more details on accessing the Windows Recovery Environment.

Also, users can check our guide for fixing the Windows 11 Error Recovery screen on boot issues in a few steps.

If you have further questions, kindly leave them in the comments below. We’d appreciate a response from you.

Realtek Audio Driver Install Loop: 5 Quick Ways to Fix It

Realtek Audio Driver is key for sound on your PC, letting you hear through speakers or headphones. Sometimes, though, it gets stuck in an endless loop—super frustrating. This article shows how to fix that, and you can also learn why the Realtek audio driver matters.

What causes the endless loop?

When installing the Realtek driver on Windows 11, an endless loop can happen due to:

  • Windows update glitches causing conflicts.
  • Disabled Microsoft UAA Bus, which the driver needs to work.
  • Outdated or corrupt drivers that aren’t compatible with Windows.

Now that you know the causes, let’s explore fixes to solve the issue.

How do I fix the Realtek audio driver’s endless loop?

1. Update the Realtek audio driver

  1. Type Device Manager in the search panel below and click on Open.
  2. Click on Sound, video, and game controllers in the Device Manager window, then right-click on Realtek High Definition Audio, and from the drop-down, click on Update driver.
  3. Click on the option to Search automatically for drivers.
  4. It will update the drivers automatically; hopefully, your problem has been resolved too.
  5. If it doesn’t work, manually uninstall the drivers and install them again by typing the Device Manager in the search panel below and clicking on Open.
  6. Click on Sound, video, and game controllers in the Device Manager window, then right-click on Realtek High Definition Audio, and from the drop-down, click on Uninstall device.
  7. A confirmation prompt will open up, check the Delete the driver software for this device option and click on Uninstall.
  8. Once the driver has been uninstalled, a confirmation prompt will ask you to restart the PC. Click on Yes.
  9. Then, install the drivers again and see whether the issue is resolved or not.

If you don’t know how to download the Realtek drivers in Windows 11, then check our guide to downloading Realtek drivers in Windows 11.

Now that you have installed the pre-existing Realtek audio driver, the endless loop is likely to subside; if the problem continues, move on to further solutions given below.

2. Run Microsoft audio troubleshooter 

  1. Type Troubleshoot settings in the search bar present at the bottom of the screen, and click on Open.
  2. Then, click on Other troubleshooters.
  3. Click on the Run button of the Playing Audio option.

Manually running troubleshooting on audio settings is likely to resolve your problem. If you’re still experiencing the same issue, you can try other solutions given below.

If you are using Dolby Atmos sound in your system and it is not working in Windows 11 then you should read our article on fixing Dolby Atmos not working in Windows 11.

3. Disable audio enhancements

  1. Click on the Audio icon, right-click on the Audio icon again and select Go to Settings.
  2. Then, click on the Speakers option.
  3. Turn the option of Enhance audio to Off.

By doing this, you will be able to reduce the number of processes that the Realtek audio driver has to go through, which might fix the problem.

4. Check for driver updates in Windows Update

  1. Click on the Start button at the bottom of the screen and select Settings.
  2. Click on the Windows Update from the sidebar and then click on Advanced options.
  3. Then, click on Optional updates.
  4. Click on Driver updates, check the pending driver updates and click on Download and Install button.

If you are facing the Realtek audio error code 0001 on Windows 11, then you must follow our guide to fix Realtek error code 0001.

5. Turn the mono audio option Off

  1. Click on the Start button from the bottom of the screen and select the Settings option.
  2. Click on the System option, and then click on Sound.
  3. Scroll down and make sure the toggle button of the Mono audio is off.

Along with the above error, if you ever face an audio rendering error in Windows 11, our article on fixing audio rendering errors in Windows 11 might help you.

For a step-by-step fix for the Realtek audio driver endless loop issue, see how to resolve Realtek audio driver endless loop errors.

We hope that this article helped you in solving your problem. If you have any further queries, feel free to reach out to us in the comments section below.