6 Fixes for Laptop Microphone Not Working [Built-in Mics]

Several users have complained about microphone issues on Windows 10 devices, so, like always; we prepared a comprehensive guide to help them and yourself.

If your Windows 10 device presents this problem, this guide will help you fix your microphone. There are a few steps to do if the built-in mic is not working, but rest assured, they are easy and effective.

Why is my built-in microphone not working?

There are a lot of causes why the built-in microphone is not working. The most common of them is a corrupted driver. However, you should also check if the mic is muted or if the app you’re using it has enough permissions.

Here are some of the most common iterations of these problems, and for some of them, we already have comprehensive solutions:

Here are a few methods for you to try, but before you start, if you have more than one audio port, try plugging your microphone in a different one and try it.

How do I turn my microphone back on my laptop?

1. Set your microphone as default

    1. Right-click on the volume icon and select Recording Devices.
  1. 2. In the window that opens, select the device which has the status Ready.

  2. 3. Click on the Set Default from the bottom of the window.

  3. 4. If you’ve done this correctly you should see the green mark on the correct microphone and audio level reacting to sound.

To check if your microphone is set to the default value, you must check it from the Recording tab. To access this option, follow the steps above.

This quick fix is usually all you need, and your microphone should work properly now.

2. Use the Audio troubleshooter
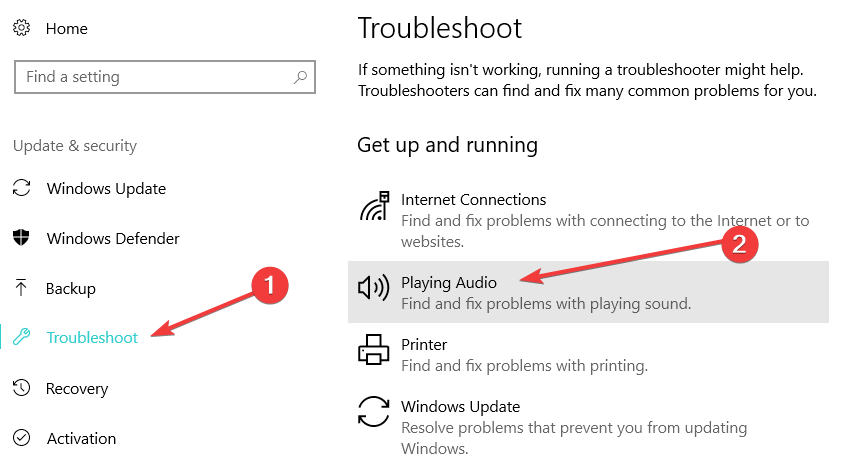
fix built-in microphone windows 10
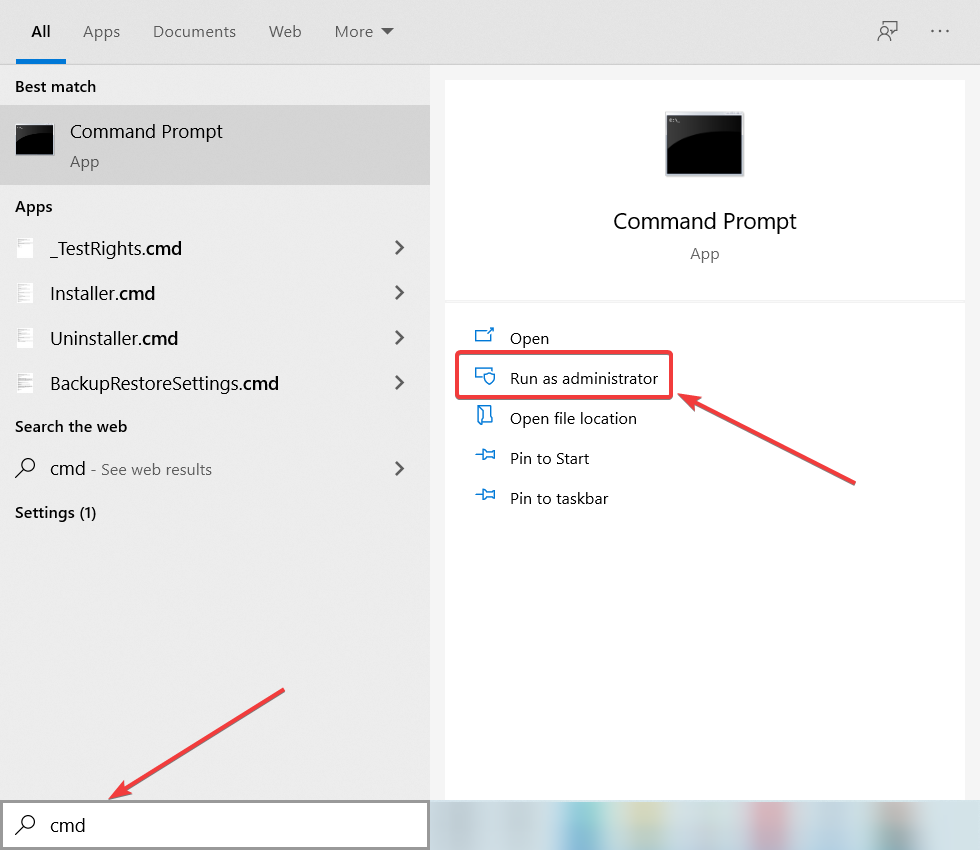
  1. Open Windows Search using the Windows key + S combination, type troubleshooting in the box, and select the utility from the results.
  2. The Troubleshooting window will now open. From the left menu, select View All.
  3. From the list that opens, select Recording Audio, and a new window will open.
  4. Follow the steps of the troubleshooter and apply the fixes that are provided.

If the first method did not fix your problem, then you should use the Windows audio troubleshooter, which might be of help in some cases. To do this, go through the steps above.

Windows 10 offers a series of dedicated troubleshooters that you can use to fix microphone issues.

To run these troubleshooters, go to Settings, click on Update & Security, then click on Troubleshoot and select and run the following troubleshooters: Playing Audio, Recording Audio, and Speech.

If the issue affects your headset, you can run the Hardware and Devices troubleshooter.

Granted that this isn’t as quick as the first method, the troubleshooting utility might provide the solution if your microphone isn’t working on your Windows 10 device.

3. Update Audio Drivers

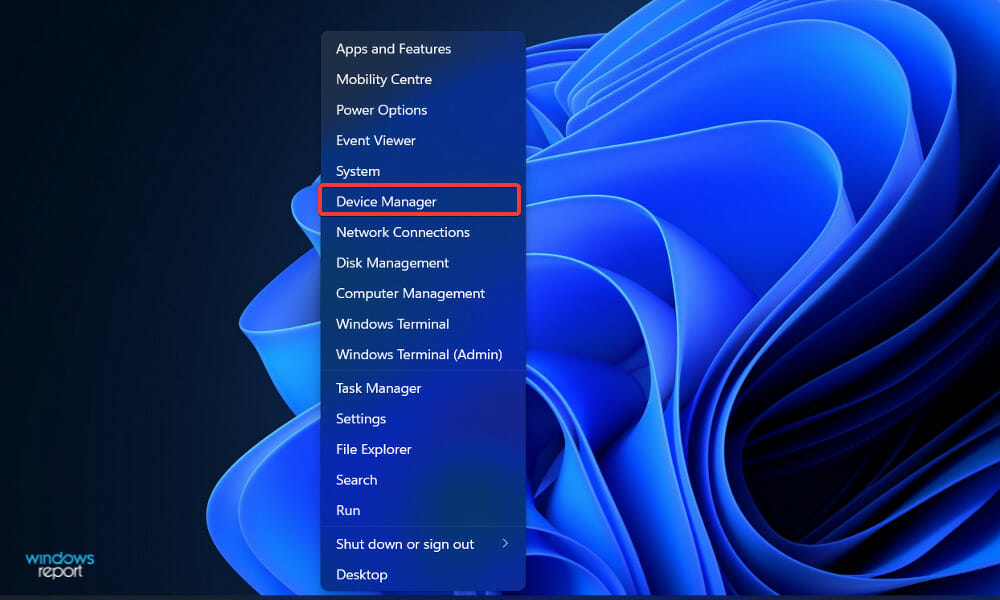
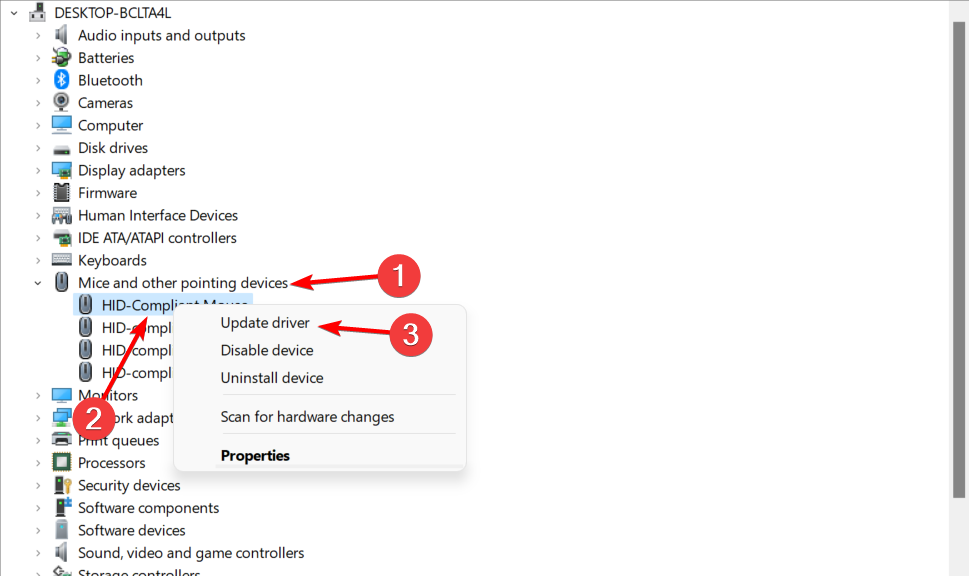
  1. Right-click the Start button and select Device Manager.
  2. Locate your audio device in the list, right-click it and select Properties.
  3. In the window that opens, select the Driver tab and click on Update Driver.
  4. Instruct the wizard to search on the Internet for a suitable driver and let it install the updates it finds (if any).

The third time’s a charm, right? If both of the methods above have failed, you might want to update your audio drivers, which might help if there is a problem with the installed drivers.

There are two methods of doing this, and we suggest you try them both. For the manual update, you can use the steps above.

If the default driver update utility does not find an update, visit the website of your sound card manufacturer and download from there the latest driver.

Install the driver, and that should fix your problem. Additionally, if none of the solutions are working, try the microphone (if you have a headset with a microphone) on a different computer.

We also recommend the tool below to download all the outdated drivers on your PC automatically.

This recommended solution can repair and update your drivers in just one go and just a few clicks. Don’t worry because it’s very simple to use.

Outbyte Driver Updater

Upkeep your drivers and fight off any corruption that prevents your microphone from working!
Free trial Download now

4. Enable app access to the microphone

  1. Click the Windows button and select Settings.
  2. Now, go to Privacy.
  3. Scroll down and select Microphone from the left, then check the option Allow apps to access your microphone.

If you’re running Windows 10 and noticed the built-in microphone is not working with particular apps and programs, ensure that the respective software can access your microphone.

The OS automatically blocks app access to your microphone due to privacy concerns. Luckily, we have a full guide on how to bypass the mic cam access issues.

5. Disable audio enhancements

  1. Click the Start button and choose Settings.
  2. Now, click on Apps.
  3. Look for the audio enhancement app you installed recently, click on it, and hit the Uninstall button (The app shown in the image is just an example).

Audio enhancement software can help you improve the overall sound quality on your Windows 10 computer, but sometimes these programs can cause more harm than good and bring up issues like static noise in your microphone.

If your built-in laptop microphone stopped working after you installed or updated an audio enhancement software, try disabling it to see if this solves the problem.

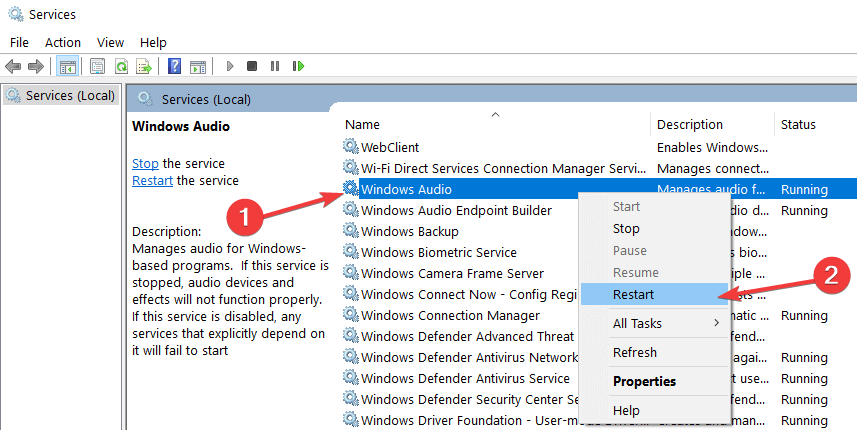
6. Reset Windows Audio Service

  1. Go to Search, type services.msc, and hit Enter to launch the Services page.
  2. Locate the Windows Audio service.
  3. Right-click on it and select Start if the service is not enabled. If it’s enabled, then select Restart.reset windows audio service
  4. Wait for a few seconds and restart your computer.

We hope our solutions helped you fix the internal microphone issues, and you can now communicate without any problems.

You might also be interested in reading our guide on what to do if the microphone level is too low. We also have a guide on what to do if microphone is not showing up in Device Manager, so don’t miss it.

If you have any other suggestions or questions, comment below, and we will get back to you as soon as possible.

How to Set Different Wallpapers on Dual Monitors Windows 11

Windows 11 has dedicated a lot of effort to offer an unmatched desktop visual experience. Customization is unparalleled even on a dual-screen setup. If you want to know how to set different wallpapers on dual monitors in Windows 11, you’re in the right place.

Now, you can easily add multiple monitors to enhance productivity, and increase comfort. Such displays are great if you are dealing with a lot of content on your computer.

Tasks are both easier and faster to perform with multiple monitors because you can do them in parallel.

In addition, it makes life easier for your eyes because you don’t have to keep switching your gaze from one display to another.

Can I put 2 different wallpapers on dual monitors?

Most people use dual-monitor setups for gaming, entertainment, or work. But what if you want to use wallpaper on your Windows 11 PC? The big question is how will the double monitor setup impact that decision.

You’ll be pleased to know that you can set a different wallpaper on each monitor, stretch a wallpaper across two monitors in Windows 11, or simply set up live wallpapers on Windows 11.

You can even use wallpapers for dual monitors with different resolutions.

In our guide today, we will show you how to set different wallpapers on dual monitors in Windows 11.

How do I set different wallpapers on dual monitors Windows 11?

1. Use the Settings app

  1. Press the Windows + I keys at the same time to open the Settings window.
  2. Navigate to the Personalization tab.
  3. Go to Background and select Personalize your background to open the drop-down menu.
  4. Click on the Browse photos button and select the desired wallpaper for your first monitor. browse pc for photos
  5. The chosen picture will show up in the Recent images section. Right-click on it and select Set for monitor 1. set dual screen wallpaper windows 11 option
  6. Repeat the process for the other monitor.

Lots of users prefer to set a different wallpaper on each monitor on Windows 11. The OS is very customizable and allows you to easily do this via Settings.

This is also how you can change the wallpaper on a second monitor in Windows 11. Now, if you want to set the same wallpaper, simply select the option Set for all monitors at the end of the procedure described here.

2. Copy files to the Windows directory

  1. Locate the images you want to use as a background, select both of them, and click on Copy.
  2. Navigate to: C:Windows/Web/Wallpaper/Windows
  3. Right-click and select Paste from the menu.
  4. Select the checkbox for Do this for all current items and click on Continue.
  5. Select your preferred images and right-click to select Set for monitor 1 or Set for monitor 2 from the menu.
  6. Restart your device to effect the changes.

3. Use the Run command dialog

  1. Press the Windows + R keys simultaneously to open the Run window.
  2. Enter the following command in the dialog box:shell:::{ED834ED6-4B5A-4bfe-8F11-A626DCB6A921} -Microsoft.PersonalizationpageWallpaper
  3. Click on Desktop Background.
  4. Select your desired wallpaper, right-click on it, and select Set for monitor 1 or Set for monitor 2.
  5. Restart your device for the changes to take effect.

How can I stretch my wallpaper across two monitors in Windows 11?

At times, you may want your wallpaper to extend across all your monitors for a more uniform and seamless look. Here are the steps you should follow:

  1. Press the Windows + I keys simultaneously to open Settings.
  2. Select System and click on Display.
  3. Click the Advanced display button to open the drop-down menu.
  4. Select Extend and both monitors will have the extended wallpaper.

Can’t set different backgrounds for dual monitors Windows 11

While using a different background per monitor is not complicated in theory, occasional faults can happen. Some users struggle with Set for monitor 1 missing scenarios.

Others cannot seem to master wallpapers for dual monitors with different resolutions. Whatever the situation, if you can’t set different backgrounds for dual monitors in Windows 11, we have a few tips:

  1. Use the Windows + TAB shortcut on your keyboard.
  2. Locate the desktop icons at the bottom of your screen.
  3. Make sure you only keep Desktop 1 and close all the others.
Note icon NOTE
You won’t be able to set different wallpapers on your Windows 11 dual monitors if they are mirrored.

Now, we’ve already seen how you can stretch a wallpaper across two monitors in Windows 11. But what if your screens have different resolutions?

Wallpapers for dual monitors with different resolutions

You can set up different resolutions on each monitor if you are using the screens for different activities. While perfect alignment is not tangible, there is a trick you can try to match your background to your dual desktop setup.

  1. Get the resolution details from each of your screens and sum up the widths. This will be your cumulative resolution.
  2. Next, tweak the image so that its resolution matches that of your monitors.
  3. Save the newly modified picture on your PC and use the Settings app to set up the wallpaper just as indicated in our first solution.

To fully enjoy the benefits of this setup and get the most out of it, consider trying a dual monitor customization software and ease the process of managing multiple screens.

If you were looking for ways to different wallpapers on dual monitors in Windows 11, we hope this guide provided you with the answers you need.

PC Games to Play When Bored [18 Cool Titles]

If you’re looking for some good games to play when bored on a computer but can’t decide on which one to grab, we’ll give you a helping hand.

In this article, we’ll list a series of random games to play when you’re bored, including action games, strategy games, drawing games, puzzles, and even some other simple games that can’t even be categorized. Read on to find out more!

What to play when bored on PC?

Clustertruck

The Clustertruck platform game was created by the independent Swedish firm Landfall Games and released by tinyBuild. On September 27, 2016, it was made available for Windows, Linux, macOS, Xbox One, and PlayStation 4.

Before exploring this game any further, you must note that it is not free, and at the time of writing this article, it would cost about $14.99. That said, we love it for so many other reasons. First, it very well satisfies lovers of racing games and speed.

You will need to race through multiple obstacles of varying difficulty. While the first-person viewpoint it offers may initially seem discouraging, the physics are so well done that it becomes less of a bother as you play. Heads up! Be prepared to die multiple times as you start the game.

This is almost inevitable for newbies and is one of the reasons why it keeps you glued to your seat. On the downside, the opening world may be underwhelming, but as soon as you get past it, it becomes much more fun. You should give it a try!

⇒ Play Clustertruck

Crossy Road

Have you found the answer to the old joke, ‘Why did the chicken cross the road?‘ We think we might have, and the answer is: out of boredom!

This colorful game, although very simple and straightforward with blocky graphics, still makes a very fun option when you’re not in the mood to play any complex and demanding games.

As you might have expected, you play as a chicken who not only tries to pass the road without getting crushed by cars and trucks but also picks up coins along the way.

Advancing in this game, you realize that the coins you gather can also improve the way you can explore this virtual world, so make sure to pick them all up!

HearthStone

HearthStone is a very engaging and competitive card game initially launched in 2014, which offers gamers a way to spend a few hours of their time every session.

One of the most important elements in this game, besides the variety of characters, powers, and animations, is the complexity of every situation and the high probability of being amazed at the results.

If you’ve ever played this game, you know that at any point, you could be hit by three Arcane Missiles no matter your defense, or lose a game that you thought was already won.

The excitement of getting various cards and that one simple mistake or running out of luck can cause you to lose the match, makes this game a go-to option when feeling bored.

Added to this, you can also earn new cards through playing, or investing in card packs which will surely give you an edge against your opponents.

You can choose to play online in 1v1 matches which also involve ranking, try the casual mode for a more worry-free environment, and even play against a friend.

⇒ Download HearthStone via Battle.net

Line Rider

Line Rider may be one of your first calls if you want to play a JavaScript or Windows internet game. Boštjan Čadež created it in 2006, and after featuring it on DeviantArt, it took the internet by storm.

This game looks basic but is truly very entertaining. You would have to draw a couple of lines using your mouse and watch the young animated character slide through when you press the play button.

We love this game because it tests your ability to create smooth, easy-to-follow tracks with your mouse movements. You aim to keep the young character on track for as long as possible, and it is quite an exciting way to stay engaged and pass some free time.

Lastly, it would not matter what browser you use, as the game is made to be compatible with almost all the available browsers. So, simply get connected to the internet, fire up your browser and play away.

⇒ Play Line Rider

Cookie Clicker

A cookie is the central theme of the incremental clicking game Cookie Clicker. The game starts off rather slow as you click toward automation and beyond.

Early on, you may still profit by clicking the cookie as quickly as possible. Still, ultimately, your automation and improvements should relieve some pressure on your fingers so you can enjoy the moment.

The game is genuinely intriguing since there’s more to it than first seems. There are a lot more events and attention-grabbing features than merely clicking to acquire buildings, make some renovations, and move on.

There are other aspects nearby that are just as entertaining and potentially lucrative as the news ticker positioned at the screen top.

A bonus for the Steam version depends on the number of other people also using it. This implies that, provided you have the unlockable content, and the game is sufficiently well-liked on Steam at the time you play, you will get yet another set of cookie production bonuses.

Additionally, you have the option of ascending and resetting your progress in favor of chips of prestige and heavenly chips, which provide benefits and advantages.

⇒ Play Cookie Clicker

Marvel Snap

For those of you who are fans of the Marvel universe, this is the perfect game! You can throw your favorite Marvel superheroes in battles to death while using cunning strategies and focusing on the powers of each character.

This online card game offers countless hours of fun. It allows you to understand the abilities and shortcomings of every hero you engage with, while also ensuring that your boredom doesn’t take charge entirely.

With almost unlimited effects, powers, and interactions, this game will keep you on your toes.

You can create your perfect Avengers crew and fight immersive battles in well-known places like the Stark Tower, Daily Bugle, or Central Park.

As your card deck is formed out of 12 cards and doesn’t include duplicates, you can get the hang of it quickly and learn how to use your energy wisely to reach your goals.

Each card pulled from the deck is revealed, and thus the effects of that card are presented, ensuring that you not only will go through the thrill of battle but experience surprises at every turn.

⇒ Play Marvel Snap on Steam

Fall Guys

Fall Guys is a battle royale-style party game developed by Mediatonic and published by Devolver Digital. The game features colorful, bean-like characters known as Fall Guys, and they compete in obstacle course-style minigames to be the last ones standing.

The game has been well-received by critics and players alike for its fun and fast-paced gameplay and its charming and humorous presentation. We love it because of its variety of minigames, which range from simple obstacle courses to more complex challenges that require precise timing and quick reflexes.

The game also features randomized elements, such as the course layout or the inclusion of certain obstacles, which helps keep each round feeling fresh and unpredictable. Another aspect of the game that we admire is its accessibility.

The controls are simple and easy to pick up, and the game features various customization options for players to customize their Fall Guys characters. The game also features a well-designed online multiplayer system, which allows players to compete against each other in real-time.

Furthermore, the servers are stable, and the matchmaking process is quick and efficient. In all, it is a fun and engaging party game that is well-suited for both casual and hardcore players and is a great game to play with friends or family.

⇒ Play Fall Guys

Quick Draw

If you are fascinated by AI, this is a game for you. You will be given the word and asked to sketch it, and while you trace it, the AI will try to deduce what you are attempting to draw.

The game goes in rounds of 6, and the aim is to draw representations close enough to the words you are given so that the AI makes a correct guess before 20 seconds.

It is a fascinating game, and you will go from drawing easy tasks, like a zig-zag, to more complex ones, like an entire train. We also love it because the controls are simple.

So all you need is to arm yourself with a mouse, and you are good to go. Play and see how many drawing the AI can guess correctly.

⇒ Play Quick Draw

Enter the Gungeon

Here is another fun one to pass some time. Enter the Gungeon was developed by Dodge Roll, and released on April 5, 2016, and since its release, it has become a massive hit among gamers online.

Enter the Gungeon takes the dungeons of The Legend of Zelda and blends them with the action sequences and complexity of Nuclear Throne. You will attempt to get a gun that can kill your past by entering the Gungeon while playing as one of four characters, each with its own unique loadout.

Along the journey, you’ll come across many similarly adorable but dangerous foes with gun and bullet themes. Blow them away with a variety of outrageous weapons. Whether you play with a gamepad or a keyboard and mouse, the gunplay is flawless and feels tight and polished.

You will repeatedly visit the Gungeon in this rogue-like game to earn new weapons and skills. Fortunately, since the dungeons are produced randomly, the repetition never seems too much. Over 200 weapons are available, several different monsters to confront, and many exceptionally well-kept secrets exist.

Before many weapons emerge, you must buy them using in-game money that bosses drop.

However, before you can accomplish that, you’ll need to free several prisoners who have taken up residence either within the actual Gungeon or close to the entrance, known as the Breach.

⇒ Play Enter The Gungeon on Steam

Factorio

Factorio is a factory construction and survival game like no other, offering you a wide range of buildings, soldiers, and layouts which will be more than enough to keep you occupied for the next couple of hours.

Even though it is a game with simple graphics, and a simple premise, diving deep into this game will involve an immense array of variations and elements to understand.

When it comes to the premise. it seems pretty simple: you crashed onto an alien planet and need to develop the infrastructure to build a rocket to leave this planet and return home. That being said, you are not the only one inhabiting this planet, so ‘dealing with the locals’ will involve fighting various critters of various sizes and skill sets.

To reach your goal, you will have to expand the surface and complexity of the factory, so conquering new land is an everyday task you simply must complete, indifferent to the consequences to the inhabitants of this alien world.

Chuzzle Deluxe

If you’re a fan of puzzle games, then you might be already familiar with the Chuzzle series. The first thing you’ll notice about this game is its colorful interface and great music.

Your goal in this game is to combine three or more Chuzzles to clear them. After you combine enough of them, you’ll advance to the next level.

The game also features some powerups, so you might get Chuzzles that explode after you combine them. There are also giant Chuzzles available that take up four spaces. However, as you progress, certain rows will become locked, so you won’t be able to move them unless you destroy the lock.

But even if you have no moves left, you can scramble the board twice before the game ends. It’s worth mentioning that the game has four different modes and tens of achievements, so it will provide you with hours of fun.

Chuzzle is a great puzzle game, with colorful graphics, a great soundtrack, and cute sound effects, so it’s worth trying out.

⇒ Play Chuzzle Deluxe on Steam

A Dark Room

A Dark Room is as simple as a game can be in design, as the entire story is built gradually by simple lines of text and audio effects.

Don’t let the simple appearance fool you, though, as the complexity of the story is far beyond what it would seem like at first glance.

You have a few simple commands to use at a given time, and every one of those decisions impacts the storyline.

Explore this simple text world and try to stay alive while experiencing the sound effects, which will surely provide you with a more immersive experience than without them.

⇒ Play A Dark Room

Stardew Valley

If you’re looking for a stress-free simulation game that you can play for hours, you can’t go wrong with Stardew Valley. This is a farming simulator adventure game, and your goal is to establish a farm and explore the world.

You can plant all sorts of crops, but you must take care of them if you want them to grow properly. The game allows you to decorate your farm any way you want, and you can build buildings, farm crops, or raise animals.

During your gameplay, you’ll meet a cast of friendly and interesting characters and explore the world while fighting various enemies. The game has an extensive crafting system, allowing you to make different foods, clothes, and other items. The best thing about the game is that you can play it any way you want.

You can choose to explore the world and fight monsters, or you can work on your farm, and customize it how you want. There are no time limits, so you can enjoy the game at your own pace.

The game is surprisingly complex, and it will take you tens of hours until you reach the endgame and even more if you want to achieve 100% completion. Stardew Valley is a unique game, with great graphics, a complex crafting system, and interesting characters, so it’s worth checking out.

⇒ Play Stardew Valley on Steam

Color Pipes

Puzzle games are fun, and if you need a game that will test you to the limits, then Color Pipes is the right one for you.

The game’s premise is pretty simple, you have a board with several differently colored circles. Your goal is to connect the circles of the same color with a line.

However, lines can’t go one over another, so you’ll need to plan the best route to connect all the dots carefully. While the game sounds simple, the puzzles can get pretty challenging, so the game will keep you occupied for days until you manage to solve them all.

There are 5 difficulty levels and 24 different puzzles for each level, which will put to the test even veteran puzzle players. If you love puzzles and you’re looking for a challenging game, Color Pipes is worth checking out.

⇒ Play Color Pipes

Wordle

Probably one of the most recent additions that took the web by storm is Wordle. In this game, you need to guess the given five-letter word.

Simply enter your word, and if the letters match their position, they’ll be colored green. In case letters are available in the given word, but it’s not in the correct position, they will be yellow.

The game’s premise is pretty simple, but it’s harder than it looks. You only have six tries, so you must make sure that each of your tries matters and guess at least a couple of letters.

After the six tries, the game is over. It’s important to mention that there’s only one word given per day, so you can’t solve multiple puzzles daily.

Overall, it’s an exciting game, and perfect to play if you want a quick puzzle game. The game is completely free, so go ahead and give it a try.

⇒ Play Wordle

Slither.io

If you like online games, and you are a fan of the Snake games, Slither.io is a must-try. The game is pretty simple, you control the snake and eat the light circles on the map to grow.

The more you eat, the more you grow, but the same goes for other players. The game’s goal is to be the last snake standing, and you win by causing other players to collide with your body.

The movement is simple, and you move automatically by pointing your cursor. You can also use the Space key to gain boost, but keep in mind that using boost will cause you to lose length, so use it only when necessary.

It’s worth mentioning that you can choose one of many available skins for your snake, and you can even create one from scratch if you wish to do so.

Overall, this is a fun and simple game that you can play in your browser, so be sure to give it a try.

⇒ Play Slither.io

The Wiki Game

Wikipedia is a great source of information, but did you know there’s also a Wikipedia game? That’s right, and in it, you need to traverse from a random starting article to another random within a 2-minute time limit.

To navigate through the articles, you can only utilize the links that are available in the current article. This doesn’t seem too complicated at first, but it can get challenging depending on the random articles you get.

The game requires you to have basic knowledge in order to connect the two articles, so certain rounds can be harder than others.

After the round, a new set of articles is determined, and the game starts again. This is an interesting concept, and it’s a great game if you like reading Wikipedia and learning.

While playing, you’ll also compete with other players so you can see how fast you get from one term to another, so it’s a great choice if you’re feeling competitive and want to test your knowledge.

⇒ Play The Wiki Game

Plants vs. Zombies

Another classic that you must try if you haven’t already is Plants vs. Zombies. In this game, your objective is to save your home from hordes of zombies by using different plants.

While playing the game, you collect points, and you use them to purchase new plants and place them on the map. Regarding the available plants, there are 49 plants that you can utilize any way you want.

When it comes to zombies, there are 26 different types, and each type has unique features and abilities that pose a different challenge.

The game has 5 different modes that you can play, including Adventure Mode, Mini Games, Puzzle Mode, Survival Mode, and Zen Garden mode.

Overall, it’s a unique game with great graphics, interesting enemies, and power-ups, so if you want a game that will keep you invested, be sure to try it.

⇒ Play Plants vs. Zombies on Steam

As you can see, there are many games to choose from for those moments when you don’t feel like playing a heavy graphics game, nor do you want to think too much about this topic.

This list will provide you with countless hours of fun, so make sure to explore them all!

DS4 for Windows 11: How to Download & Set up

For those who are still unsure of what DS4Windows is or why they require this application, here is a brief explanation. The software allows you to use your PlayStation and Nintendo controllers on a Windows 11 PC by simulating a virtual DS4 controller on your computer.

With it comes new capabilities, such as the ability to remap or rebind the keys to your preference (buttons, joysticks, keyboards, mice, and so on), as well as the ability to play far more games with your controller.

There is no need to purchase a controller that is compatible or to restrict yourself to only using a keyboard and mouse. Take command of the situation! Remember that while it is possible to switch from Xbox to DS4 emulation, keep in mind that the vast majority of games only support gamepads.

It is possible that your gamepad will not be identified if you switch to DS4 emulation because the game itself does not have native compatibility for controllers. Follow along as we will show you how to download the DS4Windows program on your computer, right after we see how the software works.

Is DS4Windows safe?

The software is a virtual emulator that may be used in conjunction with PlayStation 3 and Xbox 360 video games. It gives customers a plethora of options, including the ability to change settings fast and map controllers. It is completely safe to download and install from official websites.

It can be infected with adware or malware, and in rare cases, it might be infected with a virus, however there is a means to determine whether or not an application is an official one.

If you have downloaded the DS4Windows file from an unauthorized website or if you have installed it via a thumb drive or a pen drive, you should be cautious. Hackers can modify any application software from these sources to suit their needs and intentions.

why ds4 windows 11 download

Using the DualShock 4 PlayStation 4 controller on a PC isn’t for everyone, and we understand why. In contrast to keyboard gamers, you have chosen to live the analog life rather than submitting to the complicated hand positioning required by a mouse.

Although there are a variety of options available, the PlayStation 4 controller has quickly become one of the team’s favorite PC gaming controllers, not least because it feels amazing in your hands.

Despite keeping the classic shape of the controller, the new controller features more modern joysticks and triggers that are better suited to modern shooters and action games than its predecessor—though it is not as sensationally exciting as the DualSense controller found on the PlayStation 5.

It takes a little more effort to get the DualShock 4 to operate on a PC, but Steam, the gaming community, and an official Bluetooth dongle make the process a little less difficult. In fact, if you prefer Steam as your gaming platform of choice, its integration makes it simpler to use an Xbox controller.

How can I download DS4 for Windows 11?

1. Use DS4Windows’s website

  1. Head to DS4Windows’s official website and click on the Download button from the top-right corner.download-ds4-official ds4 windows 11 download
  2. You will be redirected to a new window from where you can hit the Download button.download-again ds4 windows 11 download
  3. Once the ZIP folder is downloaded, head to its location, right-click on it and choose Extract All.zip-unzip ds4 windows 11 download
  4. Now access the unzipped folder and look for the executable file. Once you find it, double click on it to start the installation process. That’s it!executable-file ds4 windows 11 download

The software’s official website is as secure as you can get. If you are afraid that you might catch viruses from any other third-party links, feel assured that you can follow their website safely.

2. Use a third party website

  1. Head to filehonor’s link for DS4Windows and hit the Download button. download-filehonor ds4 windows 11 download
  2. Note that this version is free. From the new window, scroll down until you see the download link and click on it.download-link ds4 windows 11 download
  3. Now you will have to click on all the links under the Assets section and save them on your computer.assets ds4 windows 11 download
  4. Navigate to your files’ location, right click on the ZIP files and choose Extract All. Repeat the step for both of the ZIP files. zip-extract ds4 windows 11 download
  5. Now look for the DS4Windows executable file(.EXE) inside one of the folders and double click on it. The installation process will start automatically.

Can I connect XBOX to my PC?

xbox ds4 windows 11 download

In the world of video games, Microsoft has had a long and illustrious association with them. As a result of its relationship with the PC, more than a billion people play video games on the platform.

Meanwhile, the Xbox has maintained its position as one of the most popular video game home consoles for the past two decades, despite the fact that certain systems have received more favorable reviews than others.

Historically, PC and console gaming were considered to be two distinct entities. The former prefers high-powered specialized machines, whilst the latter is more concerned with mass accessibility.

Still, Microsoft, more than any other corporation, possesses a unique position as well as the motivation and drive to close the gap.

The latest iteration of Windows, Windows 11, may not fully integrate all aspects of gaming into the long-awaited singularity, but it is Microsoft’s most gaming-friendly operating system yet. It essentially transforms your PC into an Xbox, erasing the distinction between the two systems.

When you turn on your computer, you’ll be able to access a slew of impressive gaming features. Microsoft’s formerly independent Xbox PC application is now included with Windows 11.

Everyone who has the Xbox program installed on their computer may sync their credentials with the PC, form groups, communicate with their friends, listen to music, customize their avatars, and keep track of their achievements.

With the Game Bar program, you can take amusing screenshots and amazing movies, as well as keep track of the overall performance of your computer. The Xbox app, in addition to providing useful auxiliary functions, provides compelling reasons to make your PC your primary gaming platform.

For further information and solutions to a possible error you might face, take a look at our guide on how to fix DS4Windows controller connection in Windows 10/11.

Alternatively, another common error is users rendered unable to sign in to Xbox account in Windows 10/11, to which we have responded with a thorough article on the issue at hand.

And lastly, if you encounter bugs while trying to download games from the XBOX Game Pass, we recommend that you head to our post in order to learn how to fix it.

Was this guide helpful for you? Don’t hesitate to let us know in the comments section below. Thanks for reading!

KB5022358: Everything you need to know about this Beta Channel build

After presenting the latest Dev Channel build and the cumulative update (KB5022360) that users of the stable version received, it’s time to turn to the Beta Insider Channel.

Keep in mind that KB5022360 will also bump your Windows 11 version from 21H2 to version 22H2. We also recommend you check out the issues that Windows 11 version 22H2 users are still struggling with.

We’ve also provided a detailed preview of the changes that Microsoft is preparing for File Explorer, so make sure you take a quick peek.

Circling back to the Beta Channel, Insiders will be pretty pleased with what the Redmond-based tech giant has provided before the weekend.

What should I expect from builds 22621.1245 and 22623.1245?

As we’ve got accustomed to by now, Microsoft released twin builds, in the form of 22621.1245 and 22623.1245 (KB5022358) to the Beta Channel for Windows 11 Insiders.

Just like usual, build 22623.1245 comes with new features rolling out, while build 22621.1245 has new features off by default.

The only change is that Microsoft is beginning to roll out screen recording in Snipping Tool to Windows Insiders in the Beta Channel.

And, as part of the most recent Snipping Tool update, the tech giant also added the ability to pause while recording and you should notice improved performance and reliability.

The rest of the changelog is just your boilerplate stuff, fixes to some of the issues that were still affecting OS performance. Let’s take a closer look.

Fixes in Build 22623.1245

[Taskbar & System Tray]

  • Fixed a high hitting ShellExperienceHost crash related to interacting with Quick Settings.

[Task Manager]

  • Fixed a few issues causing Task Manager crashes.
  • You now shouldn’t have to make Task Manager be as wide before the navigation pane appears.
  • If text scaling has been increased, the search box shouldn’t overlap with the title bar text anymore.
  • Made some tweaks to address cases where text in dialogs was getting cut off when text scaling was increased.
  • Fixes an issue where certain parts of the title bar couldn’t be used to drag the window.

Fixes for BOTH Build 22621.1245 & Build 22623.1245

  • This update changed the experience for preview .NET Framework updates. After you installed this update, all future preview (optional) .NET Framework updates would be displayed on the Settings > Windows Update > Advanced options > Optional updates On that page, you could control which optional updates you wanted to install.
  • Fixed an issue that affected the ReFS. The issue caused high nonpaged pool usage, which depleted system memory.
  • Fixed an issue that affected copying from a network to a local drive. Copying was slower than expected for some users.
  • Fixed an issue that caused Windows Server 2022 domain controllers (DC) to stop responding. This occurred when they processed Lightweight Directory Access Protocol (LDAP) requests.
  • Fixed an issue that affected a Group Policy for Expanded Toasts.
  • Fixed an issue that might have occurred when the Input Method Editor (IME) was active. Applications might have stopped responding when you used the mouse and keyboard at the same time.
  • Fixed an issue that affected conhost.exe. It stopped responding.
  • Fixed a resource conflict issue between two or more threads (known as a deadlock). This deadlock affected COM+ applications.
  • Fixed an issue that affected devices that are subject to Microsoft Exploit Protection Export Address Filtering (EAF). Some applications stopped responding or did not open. These included Microsoft Office and Adobe Reader.
  • Fixed an issue that stopped you from searching for a file based on the file’s contents.
  • Fixed an issue that affected searchindexer.exe. It randomly stopped you from signing in or signing out.
  • Fixed an issue that might have occurred when you converted or reconverted Japanese Kanji using a multibyte character set (MBCS) app. The cursor might have moved to the wrong location when you typed.
  • Vhanged how you enabled the Windows diagnostic data processor configuration in preparation for EU Data Boundary To learn more, see Enable Windows diagnostic data processor configuration.
  • Fixed an issue that affected mstsc.exe. It stopped responding while connecting to a RemoteApp and Desktop Connection.
  • Fixed an issue that might have affected FindWindow() or FindWindowEx(). They might have returned the wrong window handle.
  • Fixed an issue that affected picture files you found using search on the taskbar. This issue stopped you from opening those pictures.
  • Fixed an issue that might have affected applications that used Microsoft Edge WebView2 to display content. Applications that used WebView2 included Microsoft Office and the Widgets app. The content might have appeared blank or greyed out.

What can I do if I can’t install KB5022358?

  1. Press Win+ I to access Settings.
  2. Select the System category and click on Troubleshoot.w11 troubleshoot
  3. Press the Other troubleshooters button.other troubleshooters windows 11
  4. Press the Run button next to Windows Update.windows update troubleshooter

Also, make sure to report any other issues you might come across, in order for Microsoft to address and improve the overall OS experience for us all.

This is everything you can expect if you are a Windows 11 user. Leave a comment below if you found any issues since installing this build.

Chrome Says Not Secure But The Certificate Is Valid: Fix

When you’re trying to access a website and Google Chrome says the certificate is not secure, but you know the certificate is valid, it’s warning you that the webpage you are on has a mixture of HTTP and HTTP resources.

Chances are your connection is not secure in Chrome. We’ve put together methods that will help you solve the problem.

A website certificate is vital. The website’s server uses the HTTPS certificate to prove the website’s identity to web browsers like Chrome. 

This is crucial since anyone can create a certificate claiming to be valid. Chrome requires websites to use certificates from trusted organizations.

?️Quick Tip:

Before we begin troubleshooting and resolving the issue, we suggest that you view the required URL with a more trustworthy and end-to-end security browser.

It will tell you who issued the certificate, what sort of certificate it is, and whether the issuer is well-known and legitimate. You may set Opera One to notify you about public sites that use certificates issued by local vendors if you believe this might be the problem.

Opera One

Consider this reinvented browser for more information about a site’s security certificate.

Why does Chrome say that the certificate is not secure?

The not secure warning you encounter on a webpage means the website does not provide an encrypted connection.

Here are some common Chrome errors you might encounter when using the web browser and what they mean.

  • This webpage has a redirect loop or ERR_TOO_MANY_REDIRECTS – The webpage you’re trying to access has too many redirects; probably because the cookies are not working correctly
  • This webpage is not available or ERR_SSL_VERSION_OR_CIPHER_MISMATCH – The website you’re visiting has an outdated security code, and Chrome blocks the connection
  • Connect to a network – You have to sign in before using your Wi-Fi portal and connect to the website
  • ERR_SSL_WEAK_EPHEMERAL_DH_KEY – The website to which you’re trying to connect has an outdated security code
  • Delete Expired DigiCert Certificate (Mac computers only) – The webpage uses a certificate that isn’t set upright on your computer
  • This site can’t provide a secure connection; network error sent an invalid response or ERR_SSL_FALLBACK_BEYOND_MINIMUM_VERSION – If the page had a problem which Chrome couldn’t understand, you’d see this error; the solution is to ‌contact the website owner

Sometimes, third-party software on your PC is stopping Chrome from safely connecting to the web.

This error only occurs on Windows OS, and most likely, the culprit is the Superfish software on your computer.

You can remove it by downloading the SuperFish removal tool and following the installation instructions.

What can I do when Chrome says the certificate is not secure?

1. Clear Chrome’s cache and cookies

  1. Open the Chrome browser on your PC.
  2. At the top right, click on More.chrome says not secure but certificate is valid
  3. Click on More tools and then select Clear browsing data. chrome says not secure but certificate is valid
  4. Select the Advanced tab.chrome says not secure but certificate is valid
  5. Choose a time frame, such as Last hour or All time.
  6. Ensure that you check Cookies and other site data and Cached images and files box.
  7. Click on Clear data.chrome says not secure but certificate is valid
  8. Reload the website.

Browsers store local copies on your computer data so that they don’t have to load the website from scratch every time you visit a website.

Clearing Chrome’s cache and cookies will help the website load from scratch with updated information and might help validate the website’s security certificate.

2. Flush your DNS records on Windows

  1. Press Win + R simultaneously to open the Run console.chrome says not secure but certificate is valid
  2. Type cmd and then press Enter.
  3. In the command prompt window, type the following command: ipconfig/flushdnschrome says not secure but certificate is valid
  4. Press Enter to clear the DNS.
  5. You’ll receive a message showing the successful clearance of the DNS records.chrome says not secure but certificate is valid

Sometimes a DNS cache may become corrupted because of a technical glitch on the website’s administrative side.

It can also become corrupted because of DNS poisoning. DNS poisoning is when unauthorized domain names or IP addresses are inserted into the cache.

Flushing the DNS will clear any IP address or DNS records in your system’s cache. It helps to resolve connectivity and Internet security issues.

3. Use the Chrome DevTools

  1. On the non-secure web page, press Ctrl + Shift + I to open Chrome DevTools. You can also right-click anywhere on the page and click inspect.
  2. Once DevTools is open, click on Security.chrome says not secure but certificate is valid
  3. Reload the page from the Security tab to see what’s causing the non-secure error.not secure website
  4. If the non-secure error is caused by mixed content resources, Google will show you that too.
  5. Click on View # requests in Network Panel.
  6. You will see if unsecured images cause the non-secure connection.

This usually happens when the website administrator hosts images on a secondary domain and that domain uses the https:// connection.

However, Chrome will show you if the website has an expired, missing, or invalid SSL certificate. Click on view certificate, and you will find all the details regarding the website’s certificate.

How do I fix the site’s security certificate that is not trusted for Mac?

1. Delete problematic certificates

  1. Open the Keychain Access app from the Utilities.
  2. Select the login keychain.keychain login
  3. Choose Certificates at the bottom menu bar.click on certificates
  4. Right-click on any certificate that displays a red X, then click on Delete. The certificate will be re-downloaded.

2. Override the old certificate

  1. Double-click the certificate to open its settings in the Keychain app.
  2. Click the arrow next to Trust to display the trust policies for the certificate.
  3. Choose new trust settings from the pop-up menu to override the trust policies.
  4. Close the window to override the trust policies and quit Keychain.

The certificate is the one MacOS uses to validate the connection you’re trying to make with the website’s server. macOS warns you if the certificate is invalid or has expired.

You can also clear your browser’s cache. Clearing the cache is important because the downloaded cache on your computer might be obsolete.

Another way you can troubleshoot this error is to ensure that the date and time on your device are in sync with the website’s server.

If you’ve tried the methods above but couldn’t resolve the issue, you can contact the website’s administrator for support.

For any problem with your website’s security certificate, we have prepared an in-depth guide to help you solve that. Speaking of which, we recently covered error during SSL handshake with remote server in a different guide, so don’t miss it.

Should you have any other questions or suggestions, write about them in the comments section below and we will get back to you.

Outlook Navigation Bar Moved to Left: How to Change Its Location

Microsoft moved the Outlook Navigation bar to the Left to make it look similar to its other Office apps’ interface. However, several users have dissed the decision and expressed anger. If you are one of them, don’t worry, we have the fix.

This guide discusses all the possible fixes to bring the Outlook navigation bar to the bottom. Let’s get started! 

What can I do if the Outlook Navigation bar is moved to the left?

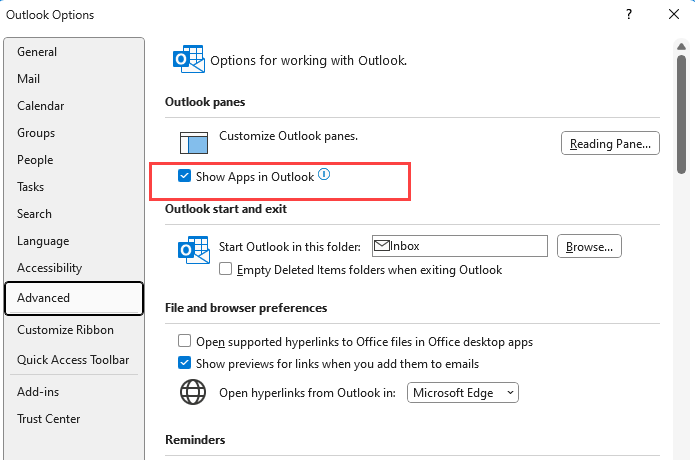
1. Change Outlook settings

  1. Click on File and choose Options.
  2. Click on Advanced and disable Show Apps in Outlook.
  3. Save changes.

2. Use Registry Editor

Note icon NOTE
Before making any changes, it is advised to back up your registry files. To do that, go to File, then click Export. Now save the .reg file to an accessible location.

3.1 If Microsoft.Office.Outlook.Hub.HubBar is present

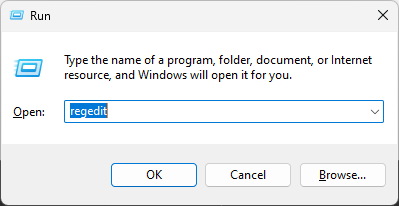
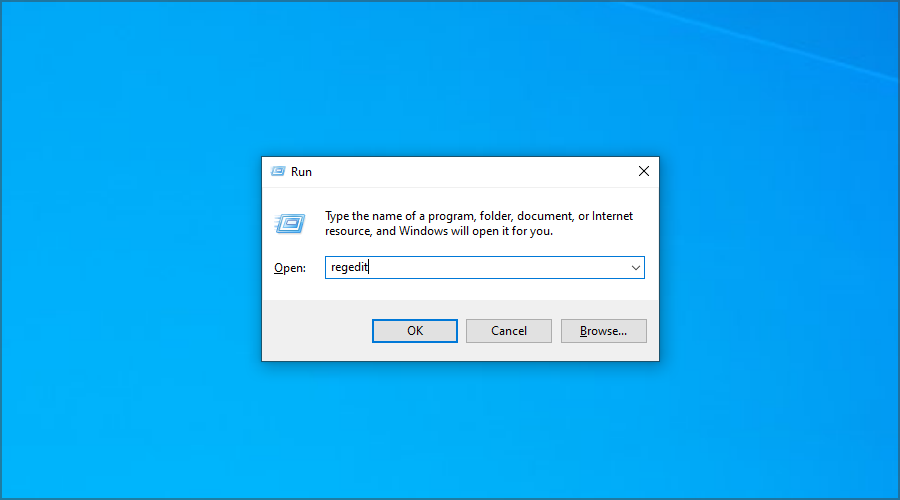
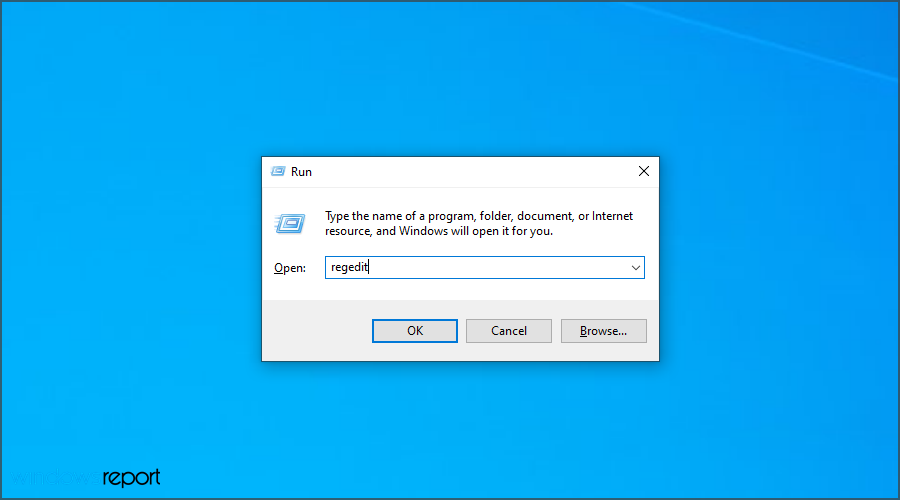
  1. Press Windows + R to open the Run console, type regedit, and hit Enter.REGEDIT RUN COMMAND
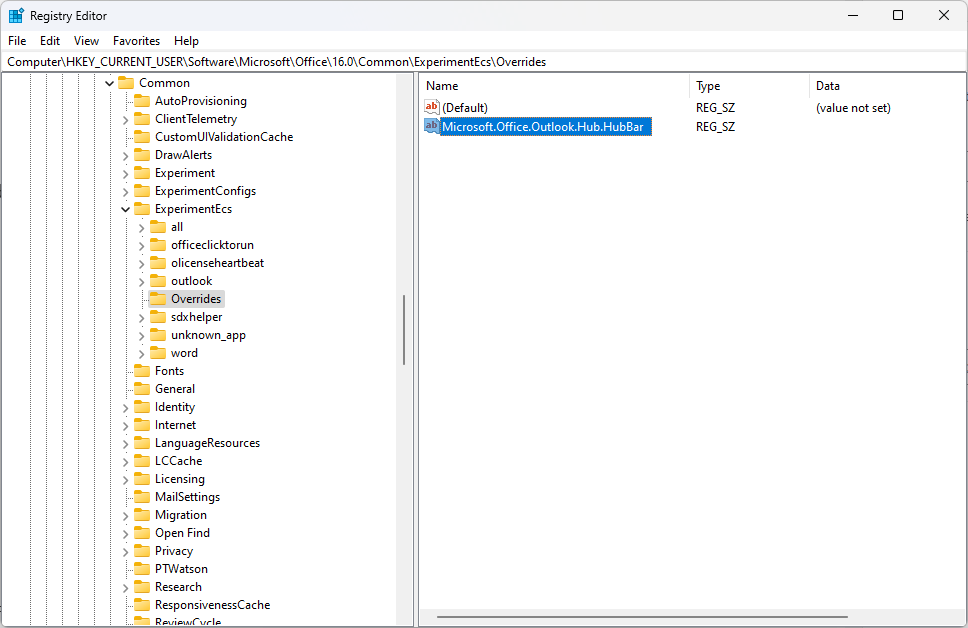
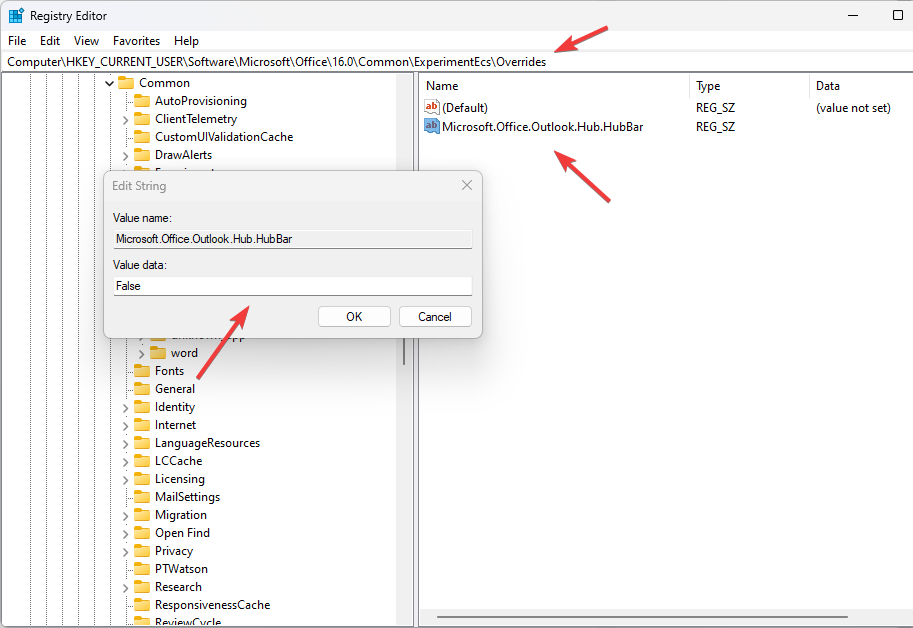
  2. Follow the below-mentioned path: HKEY_CURRENT_USER\Software\Microsoft\Office\16.0\Common\ExperimentEcs\OverridesRegedit 3
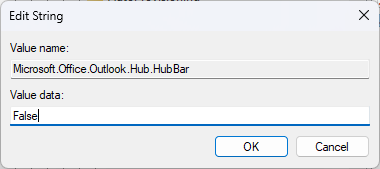
  3. Locate and double-click Microsoft.Office.Outlook.Hub.HubBar String and edit its Value data to False.False
  4. Now, relaunch Outlook for the changes to come into effect and check if the Navigation bar is still on the left.

In case you want to know how to backup and share custom views on Outlook, read this guide.

3.2 If Microsoft.Office.Outlook.Hub.HubBar is not present

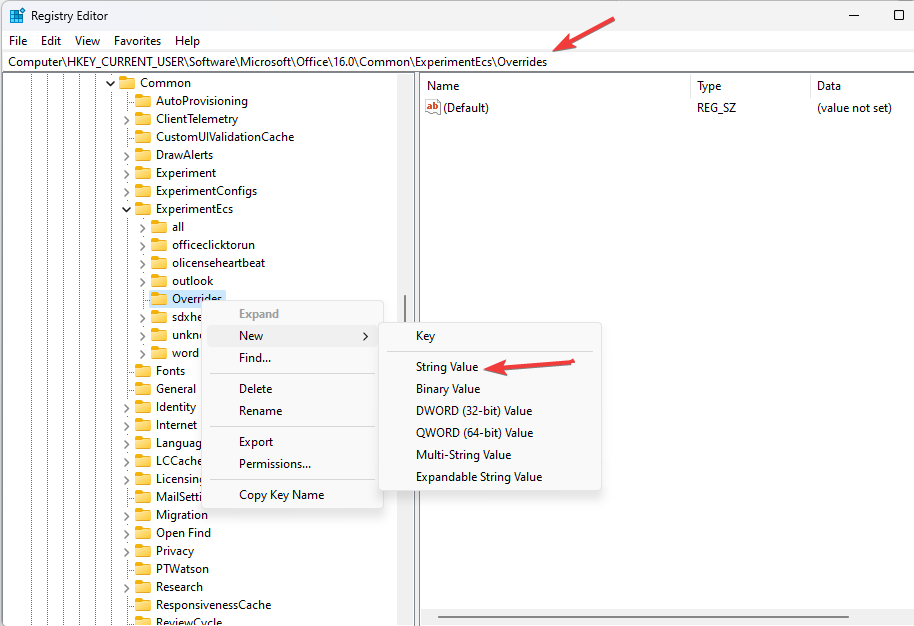
  1. Launch the Registry Editor, and navigate the following path: HKEY_CURRENT_USER\Software\Microsoft\Office\16.0\Common\ExperimentEcs\Overrides
  2. Right-click on Overrides and select New, then choose String Value.Outlook navigation pane
  3. Name it, Microsoft.Office.Outlook.Hub.HubBar.
  4. Double-click on it, modify the Value data to False, and save the changes.Navigation pane 2
  5. If Outlook is running, close it and then relaunch the program for the changes to be visible.

So, these are steps to bring the Microsoft Outlook navigation bar from left to bottom. If you don’t wish to make changes to the Registry, please wait for the update from Microsoft.

If you’re facing issues like Outlook not updating your inbox, the sender’s name missing from your inbox, or your Outlook view suddenly changing by itself, these guides can help you get things back to normal.

Also, if you are looking for an alternative, find out the best email clients that work with Office 365.

If you have any queries or want to share feedback, drop a comment in the section below.

Google Meet Stuck On Getting Ready: 3 Quick Fixes

Despite having to play catch-up with competitors such as Zoom and Microsoft Teams in the beginning, Google Meet has made significant strides in the previous few months.

Meeting with Gmail has proven to be a successful integration for Google since it has made the service far more accessible to many of the company’s most loyal customers.

Furthermore, because Google Meet can be accessed directly from a browser window, the inconvenience of downloading and launching a separate application has been avoided.

Sadly, Meet users have stated that the service has not always lived up to the billing and have experienced unexpected loading screens and delays.

We have prepared below a list of solutions you can take in order to fix the Getting ready loop issue right after we understand why the error occurred in the first place. Follow along!

Why does the Google Meet getting ready loop happen?

In the event that you find yourself caught on the loading screen for an interminable period of time, waiting for the Connecting icon to stop spinning, you might be inclined to ask yourself why does it happen.

While pinpointing the exact reason for the problem is difficult, if not impossible, we suspect that the entire problem is due to a faulty network connection.

When you request that Google Meet host a meeting, the service checks that all of the necessary hardware and network requirements are met before beginning the session.

If one or both of the participants fails to perform under duress, the session will not be able to begin, and Google Meet will remain stuck on the Getting ready page.

Moreover, if this is the case, we may be able to resolve the problem without causing shambles by using the trial and error method.

How can I fix Google Meet stuck on getting ready?

1. Check your Internet connection

If there is a connection problem, it is critical to rule out the most serious possibility on the list, an unreliable Internet connection, before proceeding. The most common reason for connectivity problems is a shaky connection, which occurs more often than you might think.

Before proceeding further down the list, make sure to troubleshoot your Internet connection. It’s as simple as going to a video streaming service and watching one or two videos to see if they’re playing smoothly.

Alternatively, click on the WiFi icon from your taskbar to see whether you are connected to the Internet or not. If it turns out you aren’t, choose a network and connect to it.wifi google meet getting ready loop

Otherwise, if you are connected to a network already but the videos you tried to watch aren’t loading, you should unplug and replug your router.

2. Replug the camera

One of the most prevalent annoyances associated with video chatting and conferencing has got to be running into webcam difficulties. Google Meet, in particular, has become well-known for being plagued by the issue.

As a result, it’s usually advisable to unplug the camera and reconnect it to check if anything has changed in the meanwhile.

If you’re working on a laptop and don’t have access to an external webcam, you could delete your webcam driver and restart your computer to have the driver reinstalled again.

3. Reinstall the webcam driver

  1. Right-click on the Start icon then click on Device Manager to open it.device-manager google meet getting ready loop
  2. Now locate the Camera option, expand it then right-click the driver and choose Uninstall.device-manager google meet getting ready loop
  3. Restart your computer and it will automatically reinstall the camera driver.

Also, let us remind you that Outbyte Driver Updater is a reliable solution created specifically for those who want to keep all of their computer’s driver software up to date with ease. Do not hesitate to give it a try as well.

What are the advantages of using Google Meet?

Google Meet is a free service available to all Google users. In the free edition, participants are limited to a maximum of 100 people.

A further advantage is that the time limit for free users is 60 minutes, as opposed to Zoom, which has a 40-minute meeting limit for its free edition.

Of course, because it is organically integrated with other Google services, people who already have Google accounts will be able to quickly begin using Google Meet without any difficulty.

An additional benefit of using Google Meet is that it is really straightforward to use. It is as simple as clicking or tapping on a link to participate in a meeting.

It should be noted that the platform’s default video resolution for both incoming and outgoing video feeds is 360p. The resolution, on the other hand, can be changed to 720p.

In addition, users can individually adjust the resolution of the send and receive feeds, allowing them to have greater control over their data usage.

Google’s global IT infrastructure, which has been in place for many years, provides assurance of security. Keep in mind that the organization adheres to internal and legal standards in order to protect data privacy, digital properties, and the interests of its user community.

It employs encryption to protect video calls, brute force attack avoidance tactics, and multi-factor account login and recovery to keep users’ information safe.

For more information check out our article on how to connect the meeting room system to Google Meet, to enhance your video-audio call experience.

Alternatively, if you have any issues with the audio, you should take a look at our guide on what to do if the mic is off due to the size of the call on Google Meet.

And lastly, you can round up your knowledge about this beautiful Google feature by reading our post on how to use Google Meet inside Gmail.

Let us know in the comments area below which approach worked best for you in fixing the Google Meet suck on getting ready loop, as well as how frequently you utilize Google Meet. Thanks for reading!

7 Best Home Server Software for Windows and Linux

If you have a network of computers in your home, with files, and folders that are shared amongst all users, then you know how sharing these individually from one computer to another can be tedious and time-consuming.

This is why you need a home server – a computer with a hard drive that is connected to the Internet, runs 24/7, and acts as your physical file storage system. Thus, a home server allows each computer in your home network to easily and at any time access shared files and folders.

Like any other computer, a home server needs software to operate. In this article, we describe some of the best home server software you can buy to get you started.

What is the best home server software?

Windows Server 2019

  • Robust media streaming capability
  • Image-based back up of every computer daily
  • It’s easy to manage your server
  • You can restore single files or your entire PC
  • Full remote support on your desktop
  • Upgrades are not simple

This server software by Microsoft makes accessing your files and media from any computer in your home, whether you’re there or away.

Designed for homes and home-based businesses with multiple computers, this software helps you protect, organize, and connect all your media files in a central location.

With Windows Server 2019, you can also increase your storage capacity owing to its 64-bit functionality, which means you can add external hard drives or install add-ins to utilize your home network fully.

Therefore, this Windows server solution guarantees proof quality regarding file management and comes with a lifetime license for the user.

Amahi Home Server

This home server software is designed for small spaces such as your home or small business.

Amahi is powerful, simple, and lets you stream and share your media files to all your devices, and screens. You can also manage all your storage needs, including entertainment content and other important files.

One of the advantages of Amahi is it comes with one of the largest app stores, through which you can extend your server to do anything you so wish with one click.

More so, such a great solution provides total software support for your devices by offering a server connection for all your hardware devices.

You can, therefore, organize all your data between home devices to create common storage for family use or maybe regarding essential business needs.

If you prefer creating or building your home server from a simplified context, Amahi is your best bet.

Pros:

  • Cross-platform compatibility
  • Available in over 20 languages
  • Has a large media app and web app store
  • It is a pre-built operating system

Cons:

  • You have to buy some plugins
  • Only supports PCs with a 64-bit processor

⇒ Sign up for Amahi home server software

Ubuntu home server software

Ubuntu Server Edition is one of the top home server software worldwide and provides support for all your remote backup, file serving and media streaming needs.

It is known for its ease of use, an automated installation that makes it easier to install its components, rather than manually doing it, and comes with a host of applications to integrate your home server with your home network.

Through the Ubuntu Advantage service program, customers resolve their problems quickly and have direct access to Ubuntu experts through their world-class support system.

You can access Ubuntu Server in various ways, such as virtual machine installation, manual installation, or automated server provisioning.

Thus, if you require reliable server support for your home devices, this open-source server provider will surely help any user manage file batches with ease.

Pros:

  • World-class support
  • Ease of use
  • Deploys anywhere
  • Speed and simplicity
  • Agile and secure

⇒ Get Ubuntu Server Edition

FreeNAS home server software

This home server software is an operating system that creates a centralized portal for easy access to your files and data.

FreeNAS can be installed on any hardware platform and is used with ZFS – a highly flexible, enterprise-ready open-source file system that eliminates most of the shortfalls of legacy file systems.

Some of the salient features of FreeNAS home server software include:

  1. File sharing: FreeNAS offers file sharing support such as SMB/CIFS (for Windows), NFS, AFP, FTP, iSCSI, WebDAV, among others.
  2. Data protection: Together with ZFS, which is designed for data integrity and offers single parity blocks that repair corrupt data, FreeNAS provides data protection so you can rest easy knowing your files are secure.
  3. Encryption: With FreeNAS, you can create passwords for extra protection against loss or theft.
  4. Snapshots and Replication feature: With FreeNAS, you can also get snapshots of the whole file system, and see them anytime. Snapshots help you access your files just as they were at the time the snapshot was taken, plus previous snapshots can be accessed or duplicated to recover the data from file systems – just like local backups.
  5. Web interface: FreeNAS has a user-friendly web interface that is simple, and makes complex administrative tasks easier to handle for just about anyone.
  6. Backup services: FreeNAS offers back up support services for Windows and other operating systems.
  7. Plugins: With FreeNAS, you get a myriad of plugins including support for Bit Torrent, Couchpotato, Gamez, and Plex, among others. However, you can also write and distribute plugins for whatever you want like media streaming or web applications – it’s limitless.

You can use FreeNAS home server software at home to protect, backup, and store all your data.

Pros:

  • User-friendly web interface that anyone can use
  • It is free
  • It is a pre-built operating system
  • You can run it from a hard drive, optical disc, or even a flash drive
  • Improves workflow
  • Flexible system
  • Uses little RAM requirement (96MB)
  • No storage limits

⇒ Get FreeNAS

OpenMediaVault

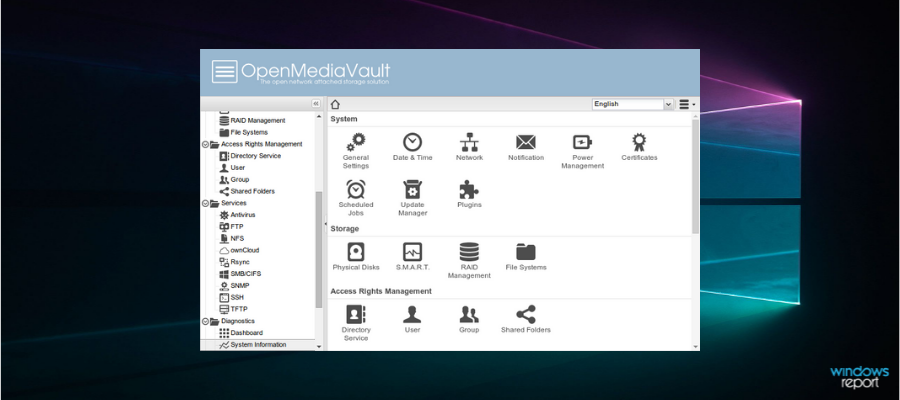
This software is a network-attached storage (NAS) solution based on the Debian Linux system.

This tool includes multiple system services and works as a plugin as well. You can perform certain services with this modular interface, such as SSH, SFTP, OR DAAP media servers.

The target of OpenMediaVault software implies small businesses or small home office firms that need to manage files smoothly and access files using network storage.

Furthermore, this service is running online, so users can use it freely for file sharing, email notifications, link aggregation, or volume management.

Hence, if you need reliable, out-of-the-box software that will greatly help with your media server needs, look no further than this.

⇒ Get OpenMediaVault

Rockstor

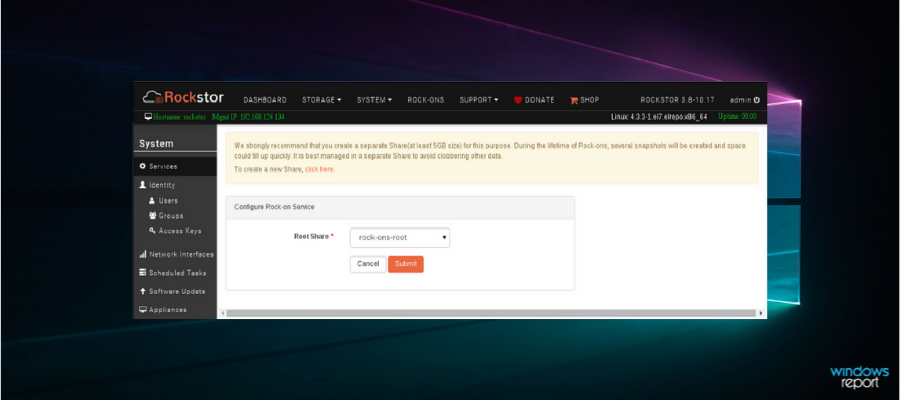
The next solution on our list is Rockstor, a personal server service that helps you instantly store and access data.

This tool offers support for Linux servers and BTRFS in data management, in addition to other devices’ storage. Thus, you can set up a private cloud server to manage or share your files without limitations.

Hence, it’s possible to benefit from safer file access because you can sort out lots of information with no need for multiple devices or extensive memory cards.

In addition, by choosing this option, you will reduce costs for extra storage, scale up privacy and performance, and access your data anywhere you are from mobile devices.

Such practical software is probably the ideal option compared with public cloud storage. That is because it offers stronger privacy, cost reduction, anti-theft protection, and more.

Therefore, there’s no need to rely on other average programs when you hold a private cloud storage solution like this.

⇒ Get Rockstor

ClearOS home server software

This open-source platform integrates free open source technologies in order to deliver a simple, low-cost hybrid experience for your home network.

Free open-source technologies allow you to enjoy the ClearOS home server experience but only pay for products and services you really need.

What makes ClearOS home server software special is this element of integration. Still, it also provides user-friendly, easy-to-use, and intuitive web-based graphical user interfaces for fast, easy setup and installation.

The built-in, growing online app store – Marketplace – delivers over 100 apps and services, so you get to enjoy a free collection of apps while paying for, downloading, and installing only the apps you really need.

Pros

  • Available in over 80 languages
  • Easy to set up, install, and use
  • Comes with a free downloadable version
  • You only pay for apps you really need
  • Growing online app store

⇒ Get ClearOS

This brings us to the end of our list. If you still haven’t decided which tools to install, read the description of each software again, and select the one that best suits your needs. However, if you’re on a budget, check out the cheapest Windows servers.

If you’ve used other home server software that you think we should add to our list, let us know in the comments below.

Roblox Chat Not Working: Causes & Quick Fixes

If you want to fix the Roblox chat not working problem on PC, Xbox, or any other systems, go through this article to get the proper instructions.

Roblox is a fun interactive online multiplayer gaming platform where you can play over 15 million games and have fun with your friends and other people who will eventually become your virtual friends.

The thing that makes Roblox so interactive is that you can chat with all the users who are currently playing on the server with you.

But from time to time, gamers complain about an error that’s preventing them from chatting in Roblox. This article will guide you step by step in fixing any Roblox chat-related issues like private chat not working, Roblox studio chats not working, etc.

Roblox is interactive by its nature and may create some types of connections between players in the same world.

This can’t be possible if you have chat errors and you’re not able to use the in-built chat in the game. Hence, let’s see how we can resolve the chat error in Roblox with the practical solutions below.

Why can’t I chat in Roblox?

This chat error in the game may occur due to language settings or your current privacy settings.

It’s already known that different international keyboards can generate chat problems in Roblox and limit essential interaction.

These two reasons are probably the main factors of Roblox chat errors, and if you can’t communicate with other players, check these settings to resolve the issue.

Quick Tip:

Before going in-depth with the following solutions, you might want to consider a gaming browser like Opera GX.

This unique browser offers integrations with gaming apps like Twitch or Discord, fast navigation, or GX Corner with the latest game releases.

Opera GX

Resolve chat problems in Roblox using this cutting-edge gaming browser with VPN support.

How can I fix the Roblox chat not working issue?

1. Set keyboard language to English (US)

  1. Press Win + I on the keyboard to open Windows Settings.
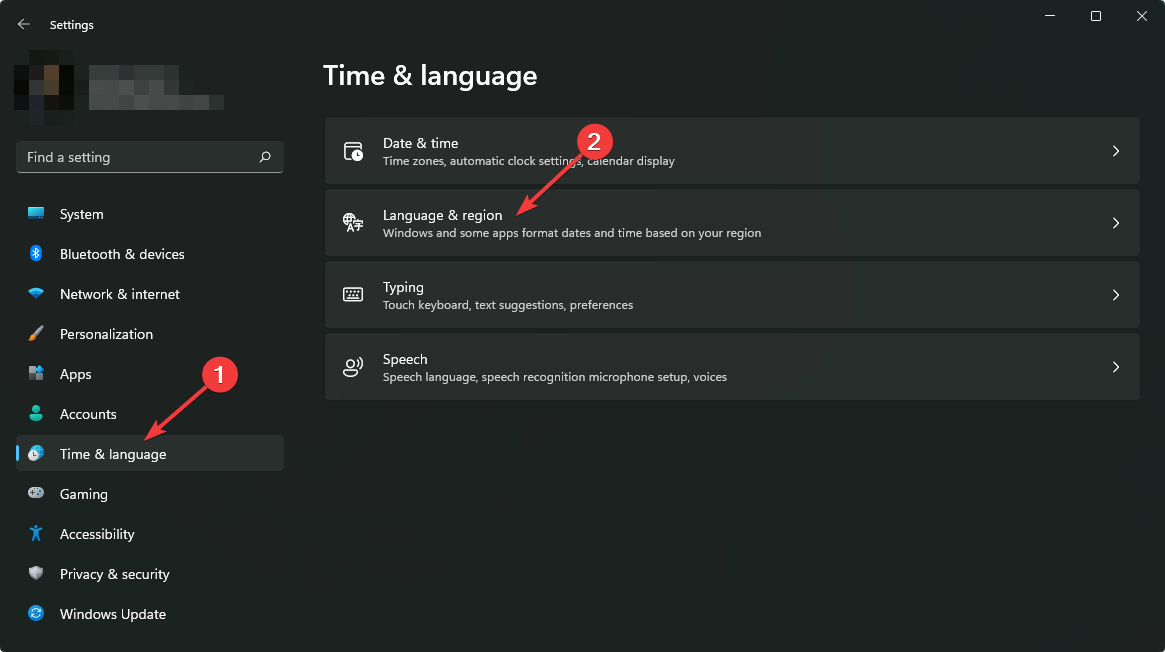
  2. Go to Time & language and then click on Language & region.going language and region windows 11 settings
  3. Set the language to English (United States) for available options.windows 11 settings language settings english us
  4. From Windows Settings, Go to Time & language and then Typing.
  5. Click on Advanced keyboard settings.clicking advanced keyboard settings windows 11 settings
  6. Set the default input method to English (US).Override default english method to english us windows 11 settings

One of the facts is that some users are from other countries than the US, and their keyboards are set to a different language and keyboard patterns.

Because in Roblox, you use backslash “/” to chat, it might be useful to change your language preferences to English US.

2. Change chat privacy settings on Roblox

  1. In Roblox, click on the gear icon and go to its Settings.going settings roblox game
  2. Go to Privacy.
  3. Now set the setting to Everyone for Who can message me, Who can chat with me, and Who can chat with me in-app.roblox seting who can message me to everyone

Many users reported that chat not working on their Xbox as well as PC. The reason is related to the fact that the developers added a default system of settings. As a result, the contact settings are set to “No one” in the privacy section. Changing this setting to everyone will fix the can’t chat in Roblox error.

This is the most common fix you can use to fix the Can’t chat in Roblox error.

3. Change your user age details

  1. Go to Settings and then Account Info in Roblox.
  2. Correct your Birthday, so the age becomes 13+.correcting birthday roblox settings

If you still can’t use the chat in Roblox, it might be due to the given age in your own account. You can fix the issue by following the above steps. It will also fix if Roblox chat disappeared or is not showing up.

If you don’t have the minimum required age of 13, it means you can’t access certain features in the game due to aggressive or explicit content.

4. Reinstall the Roblox application

  1. Go to Windows Settings like before.
  2. Go to Apps and then Apps & features.going apps & features Microsoft windows 11
  3. Search for Roblox.
  4. Click on three vertical dots and choose Uninstall.uninstalling roblox windows 11 settings
  5. Now, Download Roblox and install it again on your system.

If you still can’t chat in Roblox, it means the feature is broken. A potential fix for this problem would be to simply uninstall and reinstall the game on your PC.

Can you voice chat on Roblox on PC?

It is possible to voice chat in the game and talk with your friends vocally while you enjoy the game.

This functionality was recently launched as a beta version in February 2021, and many users used it for easier communication. If you notice that the Roblox voice chat not working, you apply the above fixes. These will also work for this as well.

However, there are certain rules you must follow in order to chat in the game. More exactly, you need to have the age 13+ to use voice chat.

Is Roblox voice chat safe?

The Roblox safety features for chat and privacy ensure that you are secure while using voice chat.

All types of chat in the game are verified and filtered from offensive or inappropriate language and behavior.

You also have filter options that detect personal information and assure your anonymity on the site or in relation to other players.

It’s also possible to block and report abuse in case of a bullying situation against you based on personal traits.

How do you add voice chat on Roblox?

You can add the voice chat option in Roblox only after the required age verification steps.

So, the age verification process can be done with a valid ID and a selfie proof of yourself. After you have the approval, you can enable voice chat from the Settings menu.

In the Settings menu, look for the Spatial Voice chat option found in the game Privacy settings and click on it to allow.

Roblox: You are muted and cannot talk on this channel

If you suddenly see that you are muted and cannot talk or chat on this channel, it means an admin has muted you. Also, developers keep some players muted for some reasons.

If it happens for every game, you can verify if your age is correct or not. This article has explained the solutions to fix the Roblox chat not working problem.

Also, note that Roblox browser extensions are great tools that help improve its functionality. Our selection won’t disappoint you.

If you’ve encountered other solutions to fix the issue of Roblox chat not working, please list them in the comment section below.

20 Best Safari Browser Games to Play [Single & Multiplayer]

Looking for the best games to play on Safari? You’re in the right place. Today, we’ll take a look at the best options you can play both on desktop and on your phone.

From multiplayer adventures to single-player puzzles, we’ve got a bunch of options that are easy, fun, and light on resources. Let’s check them out.

What are the best games to play on Safari?

Deadbeat – Beat based game

deadbeat browser game

This is a rhythm browser game that can be played on your Safari browser, as well as other nice gaming browsers.

You control your character in Deadbeat by moving them around the screen, leaping, and engaging in counterattacks while a variety of beats are being thrown at you in time with the music.

The gameplay is heavily influenced by Everhood. This particular piece of music was composed by Mori Calliope, and each track features its own one-of-a-kind pixel art backdrop as well as animation. The songs come fast so be careful not to break anything.

⇒ Play Deadbeat

Aquapark – Unique racing game

aquapark safari browser game

This is by far one of our favorite multiplayer games on Safari to play. Aquapark.io is unlike any other racing game you’ve ever seen.

In Aquapark.io 2, you may compete against other players to see who can become the champion of the wildest water slide in the world!

Get to the bottom of the water slide and give it your best shot to come in first.

Keep holding down the left mouse button to have your figure race down the water slide. Try your hand at Aquapark.io and see if you can win against everyone else without drowning.

⇒ Play Aquapark

I’m (not) a lawyer – Strategy game based on logic

i'm not a lawyer browser game

Here is a simple but exciting game. Cat and Dog have been summoned to the stand and tell their stories. It’s up to you, the Lawyer, to figure out who is speaking the truth and who isn’t.

The twist here is that your assertions are ALWAYS correct no matter what happens. Who will be held accountable?

It’s all up to you! This is one of the best games on Safari for free that will keep you curious and enticed.

⇒ Play I’m (not) a lawyer

Kraft & Slash – For players who like to craft

kraft and slash safari game

There are a lot of weapons to make in this game, but only a few components are available. So you’ll have to make the best decisions.

You’ll drag components unto a crafting board, then assemble them with a tap. By dragging pieces to a Compendium button in the bottom left corner, you will be able to access additional information.

⇒ Play Kraft & Slash

Artificer – For cat lovers

artificer browser game

Our main character has recently completed their training as an artificer and has been sent to a remote town that is somehow tied to some very significant secrets.

To fulfill the bizarre requests of your clients, you and your (usually reliable) helper Kraft will need to combine various components.

To showcase your works, you’ll need to drag components to a crafting board, combine two elements by clicking the board, and then drop your work on a client’s portrait.

⇒ Play Artificer

Betrayal.io – For Among Us fans

betrayal.io browser game

This is another social deduction game made for multiple players like Among Us. You can play as a crewmember or the evil betrayer. As the betrayer, you aim to destroy operations without getting murdered.

If your crewmates suspect you, they might convene a meeting and expel you.

Betrayers can interrupt operations and remove crew members. You will have vents to get about unnoticed. As a betrayer, you must kill all of your crewmates to win.

⇒ Play Betrayal.io

LOLbeans.io – Similar to Fall Guys

lolbeans.io browser game

LOLBeans is a browser game similar to Fall Guys which you will play on your mobile, desktop, or tablet, and we regarded it as one of the best games on Safari to play with your friends.

You may compete with as many as 30 of your friends in an obstacle course of amusing mini-games. If you do not get to the end of the course in time you get eliminated from the round. In the end, there will be only one victor.

⇒ Play LOLbeans.io

Deepest Sword – For dragons fanatics

deep sword browser game

You probably could tell from the name that this browser game has something to do with swords. But it’s not just swords, it’s swords and dragons.

As a player, you’ll be fighting the mother of all dragons. She is however a patient dragon who waits to see if you can stab her heart with your sword.

You should not miss, because if you do, you can expect a ball of red-hot fire coming your way.

⇒ Play Deepest Sword

Shapez.io – Strategy game

shapez.io browser game

This game is all about utilizing shapes, as the name implies. You’ll be constructing factories across an ever-growing landscape to automate the production and processing of more complicated forms.

You’ll need to be a quick thinker who can modify forms in a short amount of time. It is an easy but intriguing game to play.

⇒ Play Shapez.io

Tomb Temple Run – Temple Run for browsers

tomb temple run browser game

The Safari browser Tomb Temple Run is an endless runner game with 3D images. If you have played Temple Run, then this variation will be familiar.

It has all of the gameplay elements that have become common in previous games in the genre. You will be able to jump, run, gather coins, evade opponents, and unlock new characters.

⇒ Play Tomb Temple Run

Safari Animal Hunter – For those who like to hunt

safari animal hunter browser game

The deer hunting tasks and all the other Safari hunting tasks in the Animal Hunter game come in a variety of environments.

The game’s visuals are based on hunting scenes, and you’ll have a good time accomplishing different missions.

This is an animal hunter game in which you must take tactical action to keep the prey from fleeing.

⇒ Play Safari Animal Hunter

Agar.io – Minimalist competitive game

agar.io

The game is simple, and you’ll notice little circles in the backdrop connecting the various colored dots.

They travel over a specified region, and all you must do is devour other circles to grow yours as large as possible.

There is a leaderboard, and the idea is to aim at taking the top place. Besides being something to brag about, it will also be tons of fun.

⇒ Play Agar.io

Krunker.io – Tactical first-person shooter game

krunker.io browser game

Krunker.io is a first-person Safari browser-based tactical shooter game. You will have up to 8 people in the lobby who compete by shooting each other or may complete missions.

It’s compatible with Mac, ChromeOS, Windows PCs, and Linux. You may also play it off the browser by downloading the client version, which is available for both Mac and Windows.

⇒ Play Krunker.io

Ev.io – Set in a dystopian future

ev.io browser game

This is another multiplayer first-person shooter game set in a dystopian future. Ev.io has level designs akin to games like Destiny, Halo, and Quake. You have a variety of weapons and powers that you may employ on the battlefield to your benefit.

In Ev.io, there are multiple science-fiction-inspired stages, and you’ll exploit the advanced design to your advantage. To reach lofty areas, double or triple leap, and startle your enemies with an assault from above.

⇒ Play Ev.io

Brutal – More brutal than you think

brutal browser game

This is an excellent multiplayer .io game where you have to pilot a car with a circular flail. The goal is to grow your flail while utilizing it to kill other players.

When you are hit by another player’s flail, you will be erased and will have to restart the game; conversely, if your flail hits or touches another player, they will be killed.

⇒ Play Brutal

Repuls.io – Multiplayer shooting game

repuls.io browser game

Docski created Repuls.io, another multiplayer shooting game. In a wide-open environment, you will combat online against actual gamers while discovering a range of vehicles, weapons, and equipment.

You get to handle a figure that is always moving, allowing you to move and fire at the same time. Because each weapon has its limitations and strengths, you can quickly develop a play style and set yourself apart from the rest.

⇒ Repuls.io

Browser Quest – For those who love exploration

browser quest game

Browser Quest is a browser-based multiple-player game that invites you to discover a realm of exploration.

It is compatible with Safari, Chrome, and Firefox, as well as Android and iOS smartphones. What are you waiting for? Try it out!

⇒ Play Browser Quest

Diep.io – Competitive multiplayer game

games on safari

Diep.io is a multiplayer game developed by Matheus Valadares. It is accessible on all major browsers including Safari.

In a two-dimensional arena, players operate tanks and gain marks by demolishing shapes and eliminating other players.

The tanks will level up as you gain points. When a player levels up, they may put a new skill point in the tank attributes like bullet damage and movement speed.

⇒ Play Diep.io

Arras.io – Diep.io fan-made game

games on safari

Diep.io’s fan-made sequel, Arras.io, is another browser game to try. It has a large number of playable levels that begin with the very basics which fire just one bullet every shooting cycle.

You have to work your way going upward. You will gain a Tier when you reach Levels 10, levels 25, and levels 45, which allows you to access new, more powerful classes.

⇒ Play Arras.io

Top Outpost – Zombie game

top outpost browser game

If you love zombie games, then here is the game for you. Top Outpost tests your resilience in defending your territory from these undead creatures.

It would appear that you are the only one alive, as well as the only one able to defend yourself against the advancing swarm of zombies. Your objective is to stay alive for as long as you possibly can.

Be careful, since it’s going to grow more difficult to stay alive with each passing day.

⇒ Play Top Outpost

Our list covers shooter, zombie, music, and adventure games. You will have fun with all of these. We will like to hear from you in the comments and are curious to know which are your favorites.

Play away!

Discord Extension: How to Get the Best One [6 Ranked]

Discord is perfect for talking over voice, video, audio, and text messages with friends and colleagues. Discord can be used on all devices. When it comes along with useful extensions it can make the conversation even more engaging and fun.

In this article, we will explore the best Discord extensions that you can use, so make sure to keep on reading.

Why should I use extensions for Discord?

As in the case of other programs, using extensions for Discord enables you to customize your experience on this software even further.

Even though customizing your experience can be very efficient, extending Discord’s features is another important element when considering using extensions.

Now, let’s see what are the most popular options. To discover which one suits you the most, make sure you read them all.

Quick Tip:

What if you can benefit from the Discord extension without installing anything? Actually, you have it integrated on Opera GX.

This featured browser was developed by Opera for gaming enthusiasts, and it offers app integrations with Discord so you can chat with friends while doing anything else.

Opera GX

Discover the entire gaming hub in this amazing browser with lots of Discord benefits.

What are the best Discord extensions I can use?

Netflix has become one of the most popular streaming services where you can watch almost anything you want, from movies to documentaries, TV shows, and so on.

The Netflix Party Chrome extension is a great tool that will allow you to watch movies together with friends and family, whenever you want.

This extension can prove incredibly useful, especially because a lot of people are not being able to meet because of the pandemic, and thus enables you and your friends/family to keep enjoying the simple elements of life.

Being able to use Netflix like this also enables your loved ones to feel closer to you, and you to them, making it one of the best Discord extensions on the market.

All you need to do is enter the Netflix Party page and access Join Server, and that is about all. This will take you to a log-in page where you need to enter your username.

Check out these Netflix Party features:

  • Dedicated to friends and family
  • Designed for streaming
  • Popular among users

⇒ Try Netflix Party

Chroma Discord App

Another great extension for Discord that you can use is the Chroma Discord app from Razer that you can install pretty easily by following the indications presented on their page.

This extension has some amazing effects, such as waiting for messages, a message has arrived, leaving and joining a voice channel, and many more.

Besides the awe-inspiring effects that you will get by using it, it’s also very efficient when it comes to adaptability and stability.

The Setup Instructions are also presented on the downloading page, and once you install the extension and you authorize it to interact with Discord events, you are set to go.

These are the most incredible Chroma Discord App attributes:

  • It is easy to install
  • Amazing effects
  • Integrated Setup Instructions

⇒ Try the Chroma Discord App

Robinhood

The Discord Robinhood Extension is extremely easy to use, all you need to do is visit their website and submit a few basic details.

The extension is perfect for managing your investments and keeping a closer eye on your hard-earned cash.

Discord Robinhood extension offers functions for saving money that is actually excellent and it also comes with some premium features, such as extensive research study and data.

Some of the best Robinhood features are:

  • Easy to use
  • Designed for managing investments
  • Premium tools

⇒ Use Robinhood

Discord Unblocked

If you cannot access Discord, especially on Chromebooks then this extension is perfect for you as it will allow you to finally use it on your device.

It is built in the Chrome App Builder and it receives updates as soon as Discord releases them, which is fantastic.

Moreover, this extension will help you minimize CPU usage keeping your experience excellent, considering that it is also really easy to use.

Some of the most important Discord Unblocked features are:

  • Receives Discord updates extremely fast
  • It doesn’t consume your PC’s resources

⇒ Use Discord Unblocked

OBS Streamkit Overlay

OBS Streamkit Overlay is a fantastic customizable source that will let you depict your text and voice chat activity while playing games.

You can display server information to viewers and save up time simultaneously. The Streamkit Overlay can be easily installed and implemented.

Once you have done that, all is left to do is customize it in a way that will best fit your needs, using the 3 available options: status, chat, and voice.

Let’s take a look at the most valuable OBS Streamkit Overlay characteristics:

  • Customizable source
  • Easy to install and configure
  • 3 available options

⇒ Use OBS Streamkit Overlay

Discord Activity

Discord Activity is another great extension that you can install and benefit from the fantastic features that will enhance your experience.

With this extension, you can set any of the following options, whenever you want to: play, stream, listening and watch.

Moreover, the extension also has a YouTube, Plex, and SoundCloud integration allowing you to automatically share the things you are watching or listening to on these platforms.

These are the key features of Discord Activity:

  • It has YouTube, Plex, SoundCloud
  • Excellent for playing, streaming, listening or watching

⇒ Use Discord Activity

Can extensions for Discord steal my account?

Using extensions that have been vetted by Discord doesn’t pose any security threats either to your system or your account credentials.

Even though that is the case, it is always good to use only extensions created by respected companies and brands to avoid ben affected by any leaks of information.

That being said, we strongly recommend quickly accessing your Discord profile even while browsing the Internet by using the amazing Opera GX.

In case you’re interested in discovering some other options, we suggest checking the best Discord browsers.

However, it seems like sometimes Discord can’t unmute the browser. If it’s ever happening to face this issue, feel free to use some dedicated solutions.

We hope that we have managed to help you find and install the best Discord extension.

If you have additional recommendations or suggestions, don’t hesitate to leave us a comment in the dedicated section below.

How To Stop Microsoft Edge From Running in Background

Many are wondering how to stop Edge from running in the background since it uses your PC’s resources. This is easier than you think, and this guide will show you how to do it.

Why is Microsoft Edge running in the background?

Edge runs in the background so it can deliver notifications and receive updates, but you can easily stop it.

How can I stop Microsoft Edge from running in the background?

1. Use Windows Settings

1.1 Use Windows Settings on Windows 10

  1. Click on the Start button on the home screen and select Settings.
    stop edge from running in background
  2. Go to the Privacy tab.
    stop edge from running in background
  3. On the right, you will see all the apps currently installed on your PC. All the apps would be set to run in the background. Locate Edge and disable it to prevent the app from running in the background.

1.2 Use Windows Settings on Windows 11

  1. Click on the Start menu and select the Settings app.
    stop edge from running in background
  2. On the left pane, select the Apps option, then select Apps & features from the right pane.
    stop edge from running in background
  3. Scroll down to any app and click the menu (the three vertical dots), then select Advanced options.
  4. Under the Background apps permissions menu, expand the dropdown list and select Never.
    stop edge from running in background

If Microsoft Edge keeps running in the background at the end of these steps, you should try the next solution.

Opera One

Enjoy surfing the Internet with a browser that will stay closed once you exit it, and not run in the background without your knowledge.

2. Edit your Windows Registry

  1. Press the Windows key + R, type in regedit, and click Ok or hit Enter.
    stop edge from running in background
  2. Navigate to the following path: Computer\HKEY_LOCAL_MACHINE\SOFTWARE\Policies\Microsoft\MicrosoftEdge\Main
  3. Go to the main folder, and right-click the empty area on the right side.
  4. Select New, choose the DWORD (32-bit) Value, and name it AllowPrelaunch.
    stop edge from running in background
  5. Double-click this and set its value to 0.
    stop edge from running in background
  6. This should help you stop Microsoft Edge from running in the background.

How do I stop unnecessary background processes?

  1. Right-click on the Start menu and select the Task Manager.
    stop edge from running in background
  2. Click on the Startup tab.
  3. Click on any program and select the Disable button at the bottom right corner.

To learn more, visit our guide on how to disable background apps on Windows 11.

Should I continue running background extensions and apps when Microsoft Edge is closed?

Running background extensions and apps has no malicious consequences on your computer. However, this may be too tasking on an older computer and will make the device lag.

That’s it. In this article, we have shown you how on Windows 10/11, you can stop Edge from running in the background.

Unfortunately, this isn’t the only problem you can encounter, and many reported that Internet Explorer opens Edge, but there’s a way to fix this issue.

Many also reported having too many background processes, so it’s no wonder they want to stop Edge from running. To learn more, we have a guide on how many processes should be running on your PC, so don’t miss it.

Let us know if you are successful in stopping Edge Chromium from running in the background. And if you have any other suggestions or questions, feel free to leave them in the comments below.

How to Find Wi-Fi Password on Chromebook

With Chromebook, you can set the system to memorize some Wi-Fi credentials to connect automatically the next time you use a specific network.

However, the number of memorized connections is limited. So you can store the Wi-Fi password somewhere – if only you knew it!

Finding the Wi-Fi password of the connected network on a Chromebook requires some programming knowledge, but following the steps exactly as shown below might have a positive result.

How do I see my WiFi password on Chromebook?

1. Enter developer mode on Chromebook

  1. Press simultaneously Esc + Refresh + Power.
  2. Press Ctrl + D on the first screen.
  3. Press Enter on the second screen.

The whole process can take 10-20 minutes. Additionally, it will result in the loss of all data saved on your Chromebook before entering developer mode.

You cannot get the Wi-Fi password without entering developer mode, so don’t skip this step. If you wonder how to see the Wi-Fi password on your Chromebook, you will still need to enter this mode.

2. Get the password in the Chromebook Crosh shell

  1. Press Ctrl + Alt + T to enter Crosh shell.
  2. Type the following lines: shell sudo su cd home/root lsfind out network password chromebook
  3. You should get a code string that you have to copy.
  4. Then type cd and paste the string there. Press Enter afterward.
  5. Type the following command: shill/shill.profile
  6. Find the name of your network and somewhere below it, find the line which says Passphrase=rot47: followed by some random text.
  7. Decrypt the text using the following commands and replace yourtexthere with your text: echo yourtexthere | tr '!-~' 'P-~!-O'
  8. Finally, you will get your Wi-Fi password. This is how to see your Wi-Fi password on Chromebook.

Unfortunately, this is the only way to find a Chromebook’s Wi-Fi password. For those who wondered how to find the Wi-Fi password on Chromebook with Crosh, here’s the solution. It’s not the simplest solution, but it works.

Can you view the Wi-Fi password on Chromebook?

Yes, as you can see above, you can. If you’ve lost or forgotten the password for your Chromebook’s wireless network, you just need to follow a few straightforward and uncomplicated procedures. Your history contains the stored passwords, which you may retrieve whenever you like.

Your Chromebook will remember the Wi-Fi password for any network to which you connect it automatically when you connect it.

What is Wi-Fi sync on Chromebook?

You are able to synchronize your encrypted Sticky Password database between any two of your devices using the Local sync option, which may be done over your local Wi-Fi or another local network (wired LAN).

We recommend that you turn it on at all times to prevent unpleasant situations from bothering you.

How do I find my Wi-Fi password on my Chromebook without developer mode?

Entering developer mode on a Chromebook is analogous to rooting an Android device or jailbreaking an iOS device.

By entering this mode on your Chromebook, you can execute various commands, install extra software, and personalize your device according to your preferences.

If you wish to view the stored Wi-Fi passwords on your Chrome browser, you will need first to enable developer mode on your browser. There is no other way around it.

How to share Wi-Fi passwords from Chromebook?

Your Android phone and Chromebook Wi-Fi passwords may be synced. This allows you to avoid setting up a network connection and entering the password on both devices. All you have to do is configure Wi-Fi Sync on your Chromebook and connect your phone.

You must first sync your phone with your Chromebook to share your Wi-Fi networks and password between the two devices.

Can you share the Wi-Fi password from Chromebook to Chromebook?

Unfortunately, you can’t share your Wi-Fi password from Chromebook to Chromebook directly. You will need to use an Android phone as a middleman.

We hope that this guide proved to be helpful to you. Moreover, we recommend that you take a look at the 5+ best antiviruses with Wi-Fi protection for peace of mind.

Before you leave, don’t miss our guide that focuses on troubleshooting constant Chromebook restarts.

Comment in the dedicated section below if you have any other suggestions or solutions.

Logtransport2.exe Error On Shutdown: 6 Easy Fixes

Some users contacted us about a Logtransport2.exe error that arises when they shut down or restart Windows. Some say that they click OK, the PC reboots, and everything works as it should. This message isn’t serious and while you can ignore it, it has the tendency to show up quite often.

The above message is an Adobe Acrobat error that appears usually during PC shut down. Many wonder how they can fix this issue in Adobe DC, and today we’re going to show you the best ways to do it.

Adobe applications send certain data to the online servers. In case the application isn’t able to establish a connection, you’ll encounter this error message on your PC.

How can I fix the Logtransport2.exe error on shutdown?

1. Update Adobe Acrobat

  1. Open your Acrobat software.
  2. Click the Help menu.
  3. Select the Check for updates option.
  4. Press the Download and Install button if there are updates available.
  5. Click the Close button on the updater window when the update is done.

2. Repair the Adobe Acrobat installation

  1. Press and hold the Windows Key along with R to open Run.
  2. Enter appwiz.cpl and press Enter.
  3. Next, select the Adobe Acrobat Reader software within Programs and Features.
  4. Click the Change option.
  5. Select the Repair installation errors option.
  6. Press the Next button.

3. Reinstall Adobe software

  1. Press Windows Key + I to open the Settings app.
  2. Head over to the Apps section.
  3. Select Adobe Acrobat and click on Uninstall.
  4. Click on Uninstall again.
  5. Once the software is removed, download and install it again.

To make sure that the software is completely removed and there are no leftovers after the uninstallation, you might want to use specialized software such as CCleaner.

4. Change Adobe account settings

Note icon NOTE
This resolution is for users with Adobe Creative Cloud accounts.
  1. Open the Adobe Creative Cloud Desktop window.
  2. Click the profile button at the top right of the Creative Cloud window.
  3. Select Adobe account on the menu.
  4. Click Profile in the browser tab that opens.
  5. Select the Privacy tab.
    Privacy settings logtransport2 exe error on shutdown adobe dc
  6. Uncheck the checkbox for the Yes, I’d like to share information on how I use Adobe desktop apps option.
  7. Then deselect the Yes, allow my content to be analyzed by Adobe using machine learning techniques checkbox.

5. Edit the registry

  1. Launch Run with the Windows Key + R keyboard shortcut for it.
  2. Next, type regedit and press Enter.
  3. Open this registry key: HKEY_CURRENT_USER\SOFTWARE\Adobe\CommonFiles\UsageCC\(user GUID)
  4. Select the user GUID registry key.
  5. Right-click a space on the side of the Registry Editor and expand the New section. Then select DWORD (32-bit) Value.
  6. Type DWORD as the title for the new string.
  7. Double-click DWORD to open an Edit String window.
  8. Input 0 within the Value data box if that’s not already the value. Click OK on the Edit DWORD window.

The user GUID key is one with a uniquely assigned value for a signed-in user. We also recommend you back up the registry or create a system restore point before modifying it.

6. Change registry permissions for the Usage CC key

Note icon NOTE
Keep in mind that modifying registry permissions can cause issues with your system, so be sure to create a backup before using this solution.
  1. Press Windows Key + R and enter regedit. Click OK.
  2. Browse to the following registry path: HKEY_CURRENT_USER\SOFTWARE\Adobe\CommonFiles\UsageCC
  3. Right-click the UsageCC key and select Permissions to open a window like the one directly below:
  4. Click Advanced to open an Advanced Security Settings window.
  5. Press the Disable inheritance button.
  6. Select the Remove all inherited permissions option.
  7. Click on Apply and OK to save changes.
  8. On the Permissions for UsageCC window, select the System group.
  9. Press the Remove button.
  10. Click Apply and OK on the Permissions for Usage CC window.
  11. Thereafter, restart your desktop or laptop after changing the permission settings.

What’s the difference between Adobe Acrobat and Reader?

Adobe Reader is a PDF viewer software that lets you view and print documents. The software is free to use, and it’s one of the best tools for this task.

Acrobat Reader and Acrobat Pro DC differences (Source: Adobe)

Sadly, the application doesn’t support any editing so if you want to create PDF files or edit them, you’ll need to use Acrobat Pro software.

The application has all the features of Reader, but it supports editing, scanning, signing, and file conversion. All these options don’t come for free, but you can test the software for a week and see if it suits you.

Is LogTransport2.exe dangerous?

LogTransport2 is perfectly safe, and it belongs to Adobe Acrobat. If you notice it, you won’t have to worry about it, since it’s free from malware.

The main purpose of this file is to send logs to Adobe, and while it’s not harmful, it does collect some of your data, so you might want to disable it.

Can I stop applications from sending data to Adobe?

The data sharing option is turned on by default, and all collected information is used to analyze user behavior. Many users don’t approve of this and want to stop their data from being shared.

Fortunately, this feature is fully optional, and it can be disabled from the Adobe Account Privacy settings page. However, most users won’t even know that this feature is available, so they’ll keep it enabled.

These are some of the solutions that you can use if you’re getting a Logtransport2.exe error while trying to shut down your computer.

This issue isn’t serious, and it won’t cause Adobe Acrobat Reader crashes on your PC, but it can get tedious since it appears frequently. Out latest guide covers Error Fail Shutdown, so feel free to check it out.

Did you find a way to fix this problem on your own? Share your solution with us in the comments section below.

Synaptics Touchpad Driver for Windows 11: Download & Install

In this post, we will see how to download the Synaptics touchpad driver on Windows 11 for HP, Dell, Asus, Acer, Lenovo, MSI, and Toshiba.

We’ll also clear out what it actually does so you’ll know whether you need it or not.

How do I install Synaptics touchpad driver on Windows 11?

1. Use Device Manager

Note icon NOTE
This solution will work only if you already have the driver installed but you want to update it.
    1. Right-click on the Start icon from Taskbar and choose Device Manager.
  1. 2. Expand the Mice and other pointing devices section and right-click on the Synaptics touchpad driver in order to choose Update driver.

  2. 3. Choose the Search automatically for drivers option.

  3. 4. Next, click on the Select for updated drivers on Windows Update option.

  4. 5. Click on Advanced options then Optional updates in order to see the available Synaptics touchpad driver for download. Lastly, select it and hit the Download & install button.

2. Try a third-party software

The simplest way to add this driver to your PC is through a driver updater software. This light tool incorporates a driver scanner and downloader.

Once you start it up, it will scan your PC and identify what drivers to install or update. Then, it’ll just ask for your permission to do so and automatically install them.

Updated drivers will be downloaded by the software as soon as they are made available by their respective manufacturers. This will save you time and possible driver-related bugs that can pop up due to outdated versions.

3. Use your laptop manufacturer’s website

  1. We will be using Lenovo as an example, but you will have to navigate to your own specific device manufacturer in order to download the Synaptics touchpad driver. This being said, here’s the Lenovo support page from where you can choose a PC in order to start.pc-lenovo windows 11 error kmode exception not handled
  2. Next, enter your product model and go to Drivers & software.lenovo-driver windows 11 synaptics touchpad driver
  3. Type Synaptics touchpad driver in the search bar. The available drivers will be shown to you as a result. synaptics windows 11 synaptics touchpad driver

Note that on the manufacturer’s website, you may also find it as the Synaptics pointing device driver for Windows 11.

Do I need a Synaptics Touchpad Driver?

For laptops that feature touchpads manufactured by Synaptic, the Synaptic touchpad driver is intended to be used with them.

TouchPad (Source: Synaptics)

If you uninstall the driver, Windows will simply switch to utilizing the generic one as a replacement. This restriction does not, however, allow the user to make use of device-specific functionality like two-finger scrolling.

As you can see, the Synaptics touchpad driver Windows 11 and Windows 10 64-bit download and installation are fairly easy. You can also compare this with the Windows precision driver and see which one best fits your needs.

Alternatively, if the touchpad is not working in Windows 11 and you can’t figure it out, check out our article to solve the issue in no time. To learn more about similar tools, visit our what is SynReflash guide.

We also have guides on Synaptics touchpad driver code 24, and Synaptics touchpad driver error code 10, so feel free to check them out.

Sometimes a quick driver update is all you need to fix Synaptics Touchpad driver scroll not working and other issues, so ensure that your drivers are always up to date.

Leave us a comment in the section below and tell us what you think and whether you have more methods in mind. Thanks for reading!

Fix: PUBG Keeps Crashing PC [On Startup, In-Game]

PUBG is an amazing multiplayer action game, but many users reported PUBG crashing while in-game and on startup. This can be a huge problem and cause you to lose your match.

This can be frustrating, with users struggling to play the game for a meaningful stretch. If you face this issue, be at ease, as the solutions in this guide will help you fix it for good.

Why does PUBG keep crashing?

Below are some of the reasons PUBG keeps crashing your PC in-game and on startup:

  • Outdated game: This issue sometimes occurs because your game lacks the latest patches. The solution to this is to download the latest updates for your game.
  • Lack of administrative privilege: Sometimes, you might face this issue because you’re not running PUBG and Steam as an admin. You must run the game as an administrator to ensure it has all the privileges.
  • Outdated driver: If your display driver is obsolete, PUBG will likely crash your PC. The solution to this is to update your driver to the latest version.

How to fix PUBG crash on startup?

1. Install the latest updates

The team at Bluehole (PUBG devs) regularly releases patches that fix the most common issues users report.

To achieve this, you can visit the official PUBG patches webpage and download the latest patches for the game.

Once you update the game, check if the problem is still there.

2. Disable overclocking

If you are using overclocking to get better performance from your GPU, it is worth noting that this can affect the stability of PUBG.

If PUBG is crashing in-game, we recommend you try resetting your overclocking settings to the default and see if that fixes the problem.

Also, you should uninstall any third-party overclocking software installed on your PC.

3. Update your drivers

  1. Press the Windows key + X and select the Device Manager option.
    device manager pubg keeps crashing pc
  2. Click the arrow next to the Display adapters option and right-click the device.
  3. Now, select the Update driver option.
    update driver
  4. Finally, click Search automatically for drivers and install any available updates.
    search for

If PUBG is crashing in-game, your drivers may be the problem. To solve this, you are advised to update your graphics drivers to the latest version and check if that helps.

If you cannot get the latest drivers following the method above, you can go to the manufacturer’s website to get them.

If you feel the same way and prefer safety overtaking any chances, you can use a third-party solution to update all your drivers automatically.

As expected, a couple of clicks while using this tool are all it takes to update all your drivers. This will ensure the best graphics performance and the fewest bugs, so confirm that it has worked for you, too.

⇒ Get Fortect Driver Updater

4. Update Windows

  1. Press the Windows key + I to open the Settings app and select Update & Security.
    update and pubg keeps crashing pc
  2. Click the Check for updates button.
    check for
  3. Finally, install all the available updates and restart your computer.

Sometimes, PUBG might be crashing your PC in-game or on startup because of an outdated operating system. You can fix this quickly by following the steps above to update your PC.

5. Run Steam and PUBG with admin privileges

  1. For Steam, launch File Explorer and navigate to the path below C: > Program Files (x86) > Steam
  2. Right-click on Steam.exe and select Run as Administrator.
    run as admin
  3. For PUBG, navigate to the path below: C: > Program Files (x86) > Steam > steamapps > common > Battlegrounds > TslGame > Binaries > Win64
  4. Right-click TsLGame.exe and select Run as Administrator.

If PUBG is crashing in-game, it’s possible that you don’t have the necessary privileges to run it. To fix that, follow the above steps.

6. Update/Reinstall Visual C++ Redistributable for Visual Studio 2015

  1. Press the Windows key + R, type appwiz.cpl, and click the OK button.
    appwiz pubg keeps crashing pc
  2. Right-click the Visual C++ Redistributable for Visual Studio 2015 option and select Uninstall.
    uninstall
  3. Now, follow the onscreen instructions to complete the removal.
  4. Finally, visit Microsoft’s official webpage to download and install the tool.

If PUBG keeps crashing your PC in-game, the Visual C++ Redistributables might be the problem. To fix the issue, you might have to update or reinstall them. 

There you go. You might want to try these solutions if PUBG keeps crashing your PC in-game.

If other games like Assassin’s Creed Valhalla keeps crashing your PC, check our detailed guide to restore normalcy to the game.

If you are facing other issues like PUBG Anti-Cheat error, it could be due to third-party software interference; read this guide to learn solutions to fix it.

Feel free to let us know in the comments below the solution that helped you fix this issue.

Posted in PC

Could Not Create the Java Virtual Machine: 4 Easy Fixes

The Java virtual machine fatal exception error pops up for some users when they try to launch software built on Java. Minecraft users are no strangers to this issue.

The full error message states: Could not create the Java Virtual Machine. Error: A fatal exception has occurred. This is due to memory size issues and incorrect path settings or corrupt files.

How do I fix Could not create the Java Virtual Machine error?

1. Remove JDK (Java Development Kit)

  1. Press Windows + I to open Settings, head to Apps from the navigation pane, and click on Installed apps.installed apps
  2. Locate the Java Development Kit, click on the ellipsis next to it, and choose Uninstall.uninstall JDK
  3. Follow the on-screen instructions to complete the process.

That’s it! Our readers pointed out that it was the development kit that conflicted with the process and led to the Could not create the Java Virtual Machine error, and uninstalling the program did the trick.

2. Set up a new system variable for Java

  1. Open Run with the Windows key + R keyboard shortcut, then enter sysdm.cpl in Run and click OK.
    could not create the java virtual machine
  2. Select the Advanced tab on that window, and click the Environment Variables button.
  3. Click the New button under the System variables box.
  4. Enter _JAVA_OPTIONS in the Variable name text box.
  5. Then, enter –Xmx512M in the Variable value text box, which increases RAM allocation to 512 megabytes.
  6. Click the OK button to close the window, then press the OK button on the Environmental window.

Importantly, note that instead of using a double hyphen in the Variable value as stated above, you can use a single hyphen (-Xmx512M) as this is often more effective, and would not spark up other complications.

If you still see the error, try the extra fixes in our Java Virtual Machine Launcher error guide.

3. Select the Run as administrator option for Java

    The Java Virtual Machine error can also be due to insufficient admin rights. Thus, some users might need to assign admin rights to Java. You can try the steps below to apply this solution. 

  1. 1. Press the Windows key + S keyboard shortcut, and enter Java. Right-click on Java and select Open file location to open Java’s folder in File Explorer.

  2. 2. Right-click java.exe and select Properties.

  3. 3. Head to the Compatibility tab and select the Run this program as an administrator option.

    java-virtual-machine-fatal-error
  4. 5. Select the Apply option, and click OK to close the window.

    java-virtual-machine-fatal-error

4. Reinstall Java

  1. First, open the Run accessory by pressing the Windows key + R.
  2. Type the command below and hit Enter.
    appwiz.cpl
  3. Select Java from the program list and click Uninstall.
    java-virtual-machine-fatal-error
  4. Click Yes on any confirmation window that opens.
  5. Restart Windows, open the Java download page in a browser, and download either the 32 or 64-bit offline Windows versions.
    java-virtual-machine-fatal-error
  6. Users need 32-bit Java for 32-bit programs and 64-bit Java for 64-bit software. If in doubt, your best bet is to download and install both Java versions.
  7. Thereafter, open the Java setup wizard, and click the Install button.

That’s how users can fix this fatal error and get back to running the required Java software.

Do I need to install JVM?

Any machine on which you want to run Java code must have the Java Runtime Environment (JRE) installed. This is because Java does not run natively on a computer as C++ or C does; instead, someone must translate Java’s instructions into machine code, which the JVM does.

This error may come in different shades, including Could not create the Java Virtual Machine in Android Studio, Docker, Pentaho, Elasticsearch, Sonarqube, Minecraft, Eclipse, React Native, and IntelliJ, yet rest assured that you’ll find our solutions useful.

Any of the previously mentioned solutions may be successfully applied when getting a Java virtual machine launcher error which arises even if nothing has changed on your computer, and it’s most likely related to Java installation.

Things are no different when it comes to the Could not create the Java virtual machine a fatal exception has occurred error. This problem also seems to appear randomly. Make sure you aren’t using a 32-bit VM and a 64-bit Eclipse.

Minecraft could not create the Java virtual machine is an error that shows up when trying to launch Minecraft. The main reason is that it needs admin access in order to function properly. Also, read our detailed guide on how to install Java on Windows 11.

If you have any other questions or advice for other users to try, don’t hesitate to leave a comment below.

FIXED: Language Bar Missing From Taskbar Windows in 11

Have you recently encountered a missing language bar on Windows 11? This seems to be a rampant issue among most Windows 11 users.

A missing language bar often signals an issue with the multiple languages installation and settings on your device. Also, it would prevent you from switching between keyboards at will.

Luckily, it’s fixable, and we’ll explain all the steps below.

What can I do if the language bar is missing on Windows 11?

Note icon NOTE
If your language bar isn’t visible, try switching keyboards with short keys: Alt + left Shift

1. Remove and again add the language pack

  1. Press Windows + I to open Settings, head to Time & language from the navigation pane, and click on Language & region on the right.language & region
  2. Click on the ellipsis next to the other language pack, and choose Remove.remove
  3. Click Yes to confirm the change.confirm change
  4. Now, click on the Add a language button.add a language
  5. Search for the language pack you removed earlier, select it from the list, and click on Next.language pack
  6. Finally, click on Install and wait for the process to complete.install to fix windows 11 language bar missing

One of our readers pointed out that re-adding the language pack usually fixes things when the language bar is missing in Windows 11.

2. Update Windows

  1. Click the Start button and select Settings app.
  2. Choose Windows Update from the left pane and Check for updates.

If there are new updates, Windows will automatically identify and download them. Then you can update and restart your device to fix the missing language bar problem.

However, if Windows Update is not working correctly, it’s time to apply some easy fixes.

3. Enable the language bar in Settings

  1. Click the Start button and select Settings app.
  2. Click Time & language and click Typing.
  3. Choose Advanced Keyboard settings.
  4. Expand the Language bar options.
  5. Check the box for Show text labels on the Language bar and Show additional Language bar icons in the taskbar.
  6. Click OK to save the changes.

Once done, verify whether the language bar is still missing in Windows 11. If that’s the case, head to the next solution.

4. Change Registry Editor settings

  1. Press the Windows + R keys to launch the Run dialogue box, input regedit, and click OK or press Enter.
  2. Copy and paste this path to navigate and press Enter: HKEY_CURRENT_USER\SOFTWARE\Microsoft\CTF\LangBar
  3. Double-click on DWORD ShowStatus and edit value data to 4.
  4. Click OK to save changes and restart the PC.

It’s of utmost importance to follow this method strictly to get back the missing language bar in Windows 11. Wrongful modification of the Registry Editor may lead to a serious problem for the PC.

We recommend performing a backup of the Registry, but if you run into trouble, here’s our guide on how to restore the Registry without a backup.

5. Use Command Prompt

  1. Click the Start button, input cmd, and click on Run as administrator.
  2. Input the following and press Enter: sfc/scannow
  3. Then, run the following and press Enter: CHKDSK/f/r
  4. Press Y and hit Enter.
  5. Finally, restart your PC.

This process will scan and also perform a disk checkup for your PC during the reboot process.

As earlier stated, corrupt files can cause Windows 11 to miss the language bar. Hence, this process will identify the corrupt files affecting the PC.

6. Run Ctfmon.exe

  1. Click the Start button and input ctfmon, then click on Run as administrator on the right.
  2. Choose Yes to grant permission.
  3. Restart your PC.

These are the best fixes to solve the Windows 11 language bar missing problem. We hope you were able to re-enable the language bar. It is essential to follow the steps outlined to get the best results.

Besides, you can find out what to do if you cannot remove the keyboard language in Windows. Lastly, check how to remove the keyboard layout in Windows 11 if you face any issues.

If you have any other questions or know a method not listed here, simply comment in the section below.

Microsoft Store Something Happened On Our End: 5 Easy Fixes

Microsoft Store sends a Something happened on our end, waiting a bit might help error message to many users who try to launch the app.

Seems like the app itself won’t open and you might also have problems with apps and games that you downloaded through it.

Here’s how to fix it:

How do I fix the Microsoft Store Something happened on our end error?

1. Run the Windows Store Apps troubleshooter

  1. 1. Press the Windows key + S hotkey and type troubleshoot.

  2. 2. Select the Troubleshoot settings.

  3. 3. Choose the Additional troubleshooter option.

    additional troubleshooting something has happened on our end waiting a bit might help
  4. 4. Scroll down and select Windows Store Apps.

    windows store
  5. 5. Click the Run the troubleshooter button to open the Windows Store Apps troubleshooter.

    run troubleshoot
  6. 6. Then go through the troubleshooter’s potential resolutions.

  7. The built-in troubleshooter on Windows is an excellent tool to detect and fix issues on your PC. It can also help resolve the Microsoft Store something happened on our end error.

    So, you should also give it a try before moving to other sophisticated solutions.

If the built-in troubleshooter doesn’t help you properly, then you should give a try to a specialized system repair tool. This software can help you fix common issues when your PC might not deliver the performance it should.

2. Clear app cache

  1. Press the Windows + R to open the Run utility, enter wsreset.exe, and click OK.
    ws reset something has happened on our end waiting a bit might help
  2. A blank window will then open while resetting the MS Store. After that, the MS Store app might open.

If you are getting the Something happened on our end Microsoft Store error after running the troubleshooter, the issue might be due to glitches or wrong settings on the Microsoft Store app.

Resetting the app should help restore normalcy in this case.

3. Check the Buy and Download Xbox Live setting

  1. Log in to the Xbox Live website and open Settings.
    xbox live
  2. Select the XBOX One Online Safety tab.
  3. Select the Only Free radio button for the Buy and Download option.

Adjusting the Buy and Download Xbox Live setting is another resolution that can fix the try that again, something happened on our end. Waiting a bit might help fix the Windows Store something happened on our end error for some users. So, be sure to try it out too.

4. Clear the LocalCache folder

  1. Open Run by pressing the Windows key + R hotkey.
  2. Input %localappdata% in the run box and click OK to open File Explorer.
    run local
  3. Select the Packages folder.
    packages something has happened on our end waiting a bit might help
  4. Choose the Microsoft.WindowsStore_8wekyb3d8bbwe folder.
    microsoft
  5. Now, select the LocalCache folder.
    local cache
  6. Press the Ctrl + A keys to select the contents of the folder.
    select all
  7. Finally, hit the Delete button to remove them.

A corrupted LocalCache folder can be the source of various Microsoft Store errors. So, clearing that folder is a possible resolution for Something happened on our end. Waiting a bit might help error.

5. Create a new user account

  1. Press Windows + R to open Run, type netplwiz in the text field, and hit Enter.netplwiz
  2. Click on the Add button to create a new user account.add
  3. Now, to log in using a Microsoft account, enter the linked email address in the text field, and follow the on-screen instructions to complete the process.email address
  4. To create a local account, click on Sign in without a Microsoft account (not recommended).sign in without a microsoft account
  5. Choose Local account at the bottom.local account
  6. Enter the username and password for it, and click on Next to proceed. Though not recommended, a local account can be created without setting a login password, so you can leave those fields blank.user name
  7. Verify the details, and click on Finish to complete the account creation.complete

All that’s left is for you to log in to Windows using the new account, and Microsoft Store should no longer throw an error.

6. Run the Windows troubleshooter

  1. Open Settings and go to Update & Security.9
  2. Select Troubleshoot, then click Additional troubleshooter.
  3. Find and select Windows Store Apps.
  4. Click Run and follow the on-screen instructions.

What does something happened on our end mean for Microsoft Store?

Something happened on our end. Waiting a bit might help Microsoft Store error message can be caused by an inactive or slow Internet connection.

However, if you are sure your network is fine, you might need to consider other factors, like Microsoft server problems.

Also, glitches within the Microsoft Store app can cause the Something happened on our end error on Windows.

The problem likely arose due to corruption of the user account, which is quite difficult and time-consuming to fix. And by creating a local account, you save both time and effort.

You can also try to:

  • Restart the computer and check if you can now access the Microsoft Store.
  • If you have a VPN configured to reroute the connection, disable it, and then try accessing the Store.

The Something happened on our end error can be frustrating, as it might make you miss out on some deals. But with the fixes in this guide, you should be able to solve the problem for good.

Now that you have fixed things and can access the Store, check our curated list of the best apps for Windows and download them right away.

Before you leave, don’t miss our guide on Oops not sure what happened there Xbox Store error.

Feel free to let us know the fix for the Microsoft Store Something happened on our end error in this guide that helped you get the error in the comments below.

Chrome Sync Keeps Pausing and Asking to Sign In: 7 Fixes

Several browsers, including Google Chrome, offer sync functionality, wherein data and other information are synced across devices. But, several users reported that Chrome sync keeps pausing on their devices.

While the syncing feature stopping or not working is a different issue altogether, in this case, the toolbar reads Paused. And, your data is not synced across devices.

If you’re wondering why Chrome sync keeps pausing, here is everything you need to know about the problem and its most effective solutions.

Why does my Chrome sync keep pausing?

There are a few potential reasons why your Chrome sync may be pausing. Some possible causes include:

  • Lack of internet connectivity – If your device is not connected to the internet, Chrome sync will not be able to function.
  • An issue with your Google account – If there is an issue with your Google account (e.g. incorrect login credentials), Chrome sync will not function.
  • A problem with the Chrome browser – If there is a problem with the Chrome browser (e.g. a bug), Chrome sync may not function properly.
  • Problem with the device – If your device is running low on storage or other resources, it may cause the Chrome sync to pause.

Let’s now head to the methods to fix things when Chrome sync is not working.

How can I fix the Google Chrome sync pausing problem?

1. Switch to another browser

Most users who faced the problem and could not fix it simply switched to other browsers. This is primarily because Chrome consumes substantial system resources. And as soon as it starts throwing errors, users switch to a better browser.

We recommend using Opera One, a new-age browser in every respect. It offers a built-in VPN, an ad blocker for maximum security, alongside many other user-oriented features. Plus, it has a sync feature, which works seamlessly across devices.

Besides, Opera One offers tab synchronization where users can view and access the tabs open on other devices. Not only that, you can organize your work with the tab islands feature and multiple workspaces.

Opera One

Resolve any syncing issues between your devices using this skillful browser.

2. Configure Chrome to run as an administrator

  1. Right-click on the Chrome launcher, and select Properties.Properties to fix chrome sync keeps pausing
  2. Go to the Compatibility tab.Compatibility
  3. Tick the checkbox for Run this program as an administrator, and click on OK to save the changes.Run as administrator to fix chrome sync keeps pausing

Any application running on the computer requires certain permissions to work effectively. And, launching the browser with administrative privileges may help fix the Chrome sync keeps pausing issue.

3. Change the Google account settings

  1. Open Chrome, click on the ellipsis near the top-right, and select Settings from the menu.Settings
  2. Click Manage your Google Account.Manage your Google account
  3. In the Google Account window that opens, click Manage your data & privacy under Privacy & personalization.Manage your data and privacy to fix chrome sync keeps pausing
  4. Check if Web & App Activity and Location History are paused. If yes, execute the following steps to enable them both. In case both are already enabled, head to the next method.paused
  5. Click on Web & App Activity.Web and app activity
  6. Now, click on the Turn on button.Turn on to fix chrome sync keeps pausing
  7. Again, click Turn on in the window that pops up.Turn on
  8. Similarly, enable Location History as well.Enable both

Once done, restart the browser and check if the Chrome sync keeps pausing issue is resolved. In case Chrome sync is still not working, head to the next method.

4. Turn off the Clear cookies and site data when you quit Chrome option

  1. Paste the following path in the address bar and hit Enter:chrome://settingsChrome settings
  2. Select Privacy and security from the tabs on the left.Privacy & security
  3. Click on Cookies and other site data.Cookies and other site data to fix chrome sync keeps pausing
  4. Turn off the toggle for Clear cookies and site data when you close all windows option.disable toggle

5. Add a Google account page to allowed sites

  1. Click on the ellipsis near the top-right corner in Chrome, and select Settings.Settings
  2. Click Privacy and security from the options on the left.Privacy and security
  3. Now, click on Site Settings.Site settings to fix chrome sync keeps pausing
  4. Click on Cookies and site data.Cookies and site data to fix chrome sync keeps pausing
  5. Press the Add button next to the Sites that can always use cookies option.Add
  6. Enter accounts.google.com in the text field, and then click on Add.accounts.google.com

After making the changes, restart the browser for these to fully come into effect and check if the Chrome sync keeps pausing error is fixed.

6. Modify the Registry

  1. Press Windows + R to launch the Run command, enter regedit in the text field, and click OK to launch the Registry Editor.regedit
  2. Click Yes in the UAC prompt that appears.Click Yes
  3. Now, paste the following path in the address bar and hit Enter:HKEY_LOCAL_MACHINE\SOFTWARE\Policies\Google\Chromepaste path
  4. Right-click on the empty space, hover the cursor over New, select DWORD (32-bit) Value, and name it as SyncDisabled.New DWORD to fix chrome sync keeps pausing
  5. Once done, double-click on the DWORD to change its value.Double-click
  6. Enter 0 under Value data, and click on OK to save the changes.enter 0

The Registry method did the trick for a lot of users when Chrome sync kept pausing regularly. But, make sure to follow the steps as it is and not make any other changes to the Registry.

7. Add a new Registry key

  1. Press Windows + R, type regedit, and hit Enter.
  2. Navigate to the path below or create it if it does not exist:
    HKEY_LOCAL_MACHINE\SOFTWARE\Policies\Google\Chrome
  3. Right-click any space on the right pane, hover above New, and select DWORD.
  4. Name it SyncDisabled, then give it a value of 1 to Disable and 0 to Enable.

8. Reset Google Chrome settings

  1. Launch Chrome, paste the following in the address bar, and then hit Enter.chrome://settings/resetPaste path
  2. Click the Restore settings to their original defaults option.Restore settings to their original defaults
  3. Finally, click the Reset settings button to confirm.Reset settings to fix chrome sync keeps pausing

That’s it! If you were wondering how to fix sync paused in Chrome, these methods would help easily resolve the problem in no time.

One of our readers suggested that uninstalling all VPN apps and extensions from the browser might also help fix the error, so try that as well. Also, find out what to do if you see the Not enough memory to open this page error in Google Chrome.

If you have any other queries or know of a method that’s not listed here, drop a comment below.

Fix: File Explorer Keeps Opening by Itself in Windows 11

File Explorer is a Microsoft tool that allows you to manage your files, and it’s one of the most used utilities on Windows 11. However, sometimes, it may exhibit strange behaviors, like when it keeps opening itself.

Sometimes the File Explorer is unresponsive and keeps freezing. While these are normal occurrences, it doesn’t mean they are not annoying. If you have experienced this issue, below we debunk why it happens and offer various troubleshooting options.

Why is my File Explorer opening on its own? 

If you’re experiencing a problem where File Explorer keeps opening itself in Windows 11, below are some possible triggers:

  • Virus infection – Virus infections are one of the most common reasons File Explorer keeps opening itself. A reliable antivirus can protect you from malware.
  • Conflicting programs – The most common reason for this is that you have recently installed a third-party program on your computer.
  • An app is trying to open File Explorer – You may have installed an app on your computer trying to access this folder. If you granted it permission, it will keep trying to open the folder.
  • Corrupt profile – A corrupt profile is a rare occurrence, but when it happens, it means your system cannot handle normal operations.

How do I stop File Explorer from opening?

Before proceeding to the multiple-step solutions, try the following:

1. Restart File Explorer

  1. Right-click on your Taskbar and select Task Manager to open.task-manager-right Fix Logitech G Hub Stuck on Loading Screen
  2. Locate Windows File Explorer, right-click, then select End task.
  3. Click on File in the top left corner and select Run new task.run-new-task windows 11 taskbar empty
  4. In the dialog box that appears, type explorer.exe to restart File Explorer.

2. Clear File Explorer history

  1. Hit the Windows key, type Control Panel and select Open.
  2. Search and click to open File Explorer Options.
  3. Under the General tab and select Clear next to the Clear File Explorer history option.

3. Run System File Checker (SFC) Scan

  1. Hit the Windows key, type cmd in the search bar, and click Run as administrator.
  2. Type the following command and press Enter: sfc /scannow

Alternatively, scan your PC with a specialized repair tool and allow it to fix any issues that can lead to File Explorer errors. They are user-friendly, accurate, and can help you maintain overall good system functionality.

4. Run a virus scan

  1. Press the Start Menu, search Windows Security, and click Open.
  2. Select Virus & threat protection.
  3. Next, press Quick scan under Current threats.
  4. If you don’t find any threats, proceed to perform a full scan by clicking on Scan options just below Quick scan.
  5. Click on Full scan to perform a deep scan of your PC.Full Scan Scan Now
  6. Wait for the process to finish and restart your system.

5. Disable File Explorer Hotkey

  1. Hit the Windows + R keys to open the Run command.
  2. Type Regedit in the dialog box and hit Enter.REGEDIT RUN COMMAND
  3. Navigate to the following location: HKEY_CURRENT_USER\Software\Microsoft\Windows\CurrentVersion\Explorer\Advanced
  4. Right-click on Advanced and select New Expandable String Value.
  5. Name it as DisabledHotkeys, then right-click on it and select Modify.
  6. In the Value data, type in the letter E, which stands for the Windows shortcut Win + E that opens File Explorer and press OK.
  7. Close the Registry and restart your PC for the changes to take effect.

Editing the registry is a delicate operation, and it’s important to be mindful of your actions. The Windows Registry is a database that stores all sorts of information about your computer.

If you make changes to it, they’ll be permanent. You should exercise caution when editing the registry because doing so can affect your entire system.

6. Create a new user account

  1. Hit the Windows + R keys to open the Run command.
  2. Type netplwiz and press Enter.
  3. Click Add in the User Accounts window.
  4. Select Sign in without a Microsoft account (not recommended).sign in without microsoft account
  5. Click on Local account button.
  6. Enter a username and password (optional) for the new user account, and a hint, in case you set a password. Once done, click on Next.
  7. Click on Finish to create the Local account.click Finish to create local user account windows 11

7. Perform a clean boot

  1. Hit the Windows key, type msconfig, and open System Configuration.
  2. Switch to the Services tab and select Hide all Microsoft services.
  3. Click on the Disable all button, then hit the Apply button to save the changes.
  4. Go back and click on the Startup tab and select Open Task Manager.
  5. In the Startup tab of the Task Manager, Disable all the Enabled startup items.
  6. Close Task Manager and restart your PC.

A clean boot is a way to safely remove a program or configuration file that may be causing issues in your PC. By performing a clean boot, you can find out which program or files are causing problems and fix them.

How to stop File Explorer from opening on Startup in Windows 11?

Windows File Explorer is a file manager that can manage files and folders on your computer. It’s a common utility for many users, but some users who prefer third-party file managers may not have much use for it.

As such, having it open during startup can be a nuisance and contribute to your PC taking too long to start.

If you’re not using it, you might want to disable it. To do so, follow the steps below:

  1. Right-click on your Taskbar and select Task Manager to open.task-manager-right Fix Logitech G Hub Stuck on Loading Screen
  2. Navigate to the Startup tab, locate File Explorer, click on it and select Disable.

The steps above also apply when File Explorer keeps opening by itself in Windows 10 and 7 too. You may also encounter an issue where the File Explorer keeps crashing, so check out our article on how to solve it.

If you experience lag issues with File Explorer, we also have an expert article to boost its speed once again. Don’t forget that you can also customize your File Explorer if you want to get the most out of it.

For any additional thoughts on this topic, leave us a comment down below.

How to Get Help in Windows Keeps Popping Up: 3 Easy Fixes

Windows 10, though an advanced OS for its time, wasn’t completely free of errors. Users regularly had trouble with one thing or the other. An annoying problem encountered by many was the How to get help in Windows 10 popup.

The popup usually appears on Edge, but other browsers and even Windows, too, had the same issue. And the constant interruptions lead to users losing critical time and affecting their workflow. So, let’s find out all about it.

Why does How to get help in Windows pop-up keep appearing?

Here are a few reasons you might be facing the problem:

  • Stuck key(s): If the F1 key is stuck, that’s the reason you see the annoying How to get help in Windows 10 popup.
  • Issues with the keyboard drivers: Oftentimes, corrupt or outdated drivers make the device act weirdly, and the same applies to the keyboard.
  • Conflicting programs: Several conflicting third-party programs could also trigger the error, and you will have to identify and uninstall the app.

What can I do if the How to get help in Windows keeps popping up?

Before heading to the slightly complex solution, try these quick ones:

  • Check if the F1 key is stuck or if something is lodged under it. Also, if other keyboard shortcuts act weird, it could be that the device itself is malfunctioning.
  • Run a malware scan on the computer using the built-in Windows Security or an effective third-party antivirus capable of eliminating viruses and other threats.
  • Connect another keyboard and verify whether the problem is resolved. In case, yes, it was the keyboard that caused the How to get help in Windows 10 popup to appear, while if the problem persists, it’s a software problem.

If none work, move to the ones listed next.

1. Modify file permissions

  1. Press Windows + E to open File Explorer, paste the following path, and hit Enter:C:\Windowspath
  2. Right-click on the HelpPane.exe file, and select Properties.properties
  3. Now, head to the Security tab, and click on Advanced.advanced to fix How to get help in Windows 10
  4. Click on Change.change
  5. Now, enter your Windows username, and click on Check Names.username
  6. Once it appears, click on OK.ok
  7. Again, click Apply and then OK to save the changes.apply
  8. Now, in the Security tab, click on Edit.edit to fix How to get help in Windows 10
  9. Next, click on Add.add
  10. Again, enter the same username you used earlier, click on Check Names, and then on OK.check names
  11. Check all the permissions here, and click on OK.full permission to fix How to get help in Windows 10
  12. Click OK on all previously opened Windows for the changes to come into effect.

That’s it! Once you are done, even pressing F1 wouldn’t trigger the How to get help in Windows 10 popup to appear. If the problem persists, you will have to modify the file name as illustrated next.

2. Rename the file

  1. Locate the HelpPane.exe file, right-click on it, and choose Rename.rename to fix How to get help in Windows 10
  2. Click Continue in the confirmation prompt.continue
  3. Type HelpPane_OLD.exe and save the changes.new name

Once done, verify whether the How to get help in Windows 10 popup still appears.

3. Use a script

  1. Open a new Notepad window and paste the following script into it: @echo off taskkill /f /im HelpPane.exe takeown /f %WinDir%\HelpPane.exe icacls %WinDir%\HelpPane.exe /deny Everyone:(X)script to fix How to get help in Windows 10
  2. Next, press Ctrl + S, enter the file name as script.cmd, and click Save.script.cmd
  3. After the file is created, double-click on it to execute the script.

That’s it! One of the solutions must have fixed things when the How to get help in Windows 10 popup keeps appearing. And if you also find Get Help not working in Windows, repairing or resetting the app will do the trick!

For a step-by-step walkthrough on using and troubleshooting Microsoft’s support tool, read our full guide on the Get Help app in Windows 11. Also, while at it, find out how to speed up your Windows 10 PC.

You can also explore how remote support works in Windows by reading the Remote Help App guide which explains how Microsoft enables secure assistance across devices.

Do not forget to tell us which fix worked for you in the comments section below.

Microsoft’s GitHub now has over 100 million active users

GitHub has announced that over 100 million developers are making use of the platform to write code. Microsoft acquired the web-based hosting service back in 2018, spending $7.5 billion in stock.  However, the Redmond company let GitHub continue running as a single entity.

At the time of acquisition, the platform had just gained 3 million developers pushing it to 31 million active users in general. Later on, in 2019, the company set a goal and was aiming to have 100 million developers using GitHub by 2025.

This puts GitHub two years ahead of its initial goal and it is still committed to its cause, “to help bring more new developers into technology and help people work together to build the next great thing, accelerate human progress, and solve problems we don’t yet understand.”

Mid-last year, the platform launched Copilot to help developers use AI to develop and write code powered by OpenAI. However, a class action lawsuit was filed by a developer thus preventing it reach a wide audience. The lawsuit was filed on the premise that the Copilot project pirates open-source development by violating GitHub’s policies, the California Consumer Privacy Act, and DCMA 1202.

The case is still in its primary stages and the way forward is yet to be determined. GitHub has further added that it will continue to provide developers with tools and resources that will help them write code effectively and efficiently. That is, “From creating the pull request to empowering developers with AI through GitHub Copilot, everything we do has been to put the developer first.”

What Are the Signs of GPU Failure & What Can You Do?

GPU failure is a common occurrence in PCs and can happen even to the most powerful GPUs. However, there are some important signs that you should look out for if you suspect your GPU may be failing soon.

While most people don’t think about the GPU when it comes to their computer’s performance, the fact is that your GPU is one of the most important components in any computer. The signs of GPU failure can be difficult to detect, but in this article, we explore the tell symptoms.

What causes GPU to fail? 

Your GPU may fail, but you’re unaware of why it has happened. GPU failures can be caused by several factors, such as:

  • Power surges – A power surge can damage a GPU, especially if you don’t have surge protection devices.
  • Dust build-up or corrosion – Dust build-up on your GPU can reduce its lifespan over time if left untreated. Corrosion of parts can also affect your PC’s performance negatively.
  • Overclocking the GPU – This increases the performance of the device, but it also increases the power draw and heat output. This can lead to hardware failures and other problems if you don’t have overclocking monitor software.
  • Heat – GPUs generate a lot of heat when running at full capacity, so make sure you regularly check your GPU’s temperature and that your case has enough ventilation. 
  • Vibration – GPUs are heavy and expensive, so be sure to place them on a table or other stable surface if you can. Also, keep them away from speakers or other loud equipment. 

What happens when a graphics card goes bad?

Now that you know why your GPU is failing, you’ll want to know what to expect. The first thing that happens is that the computer may not recognize the GPU at all. This can happen if you’re using an old driver or if there’s a conflict with something else on your computer. 

If you don’t know what to do and your computer won’t boot, your only option is to remove the new video card and install another one until you get things working again.

The problem may be more severe, such as a freeze when using certain applications. In such a case, you’ll need to reinstall Windows using an ISO file of your current version.

How do I know if my GPU is failing?

1. Overheating

If you experience an unusual amount of heat coming from your graphics card, it’s possible that your GPU is overheating. This may occur when the graphics card’s fan is not working properly or if it fails to cool down after running for long periods of time. 

Overheating will cause the GPU to generate more heat than it can dissipate and eventually fail. This can lead to permanent damage to your computer’s hardware and system components as well as cause other problems in your computer.

2. Slow PC

Another sign of a failing GPU is reduced performance or even no performance at all. If you’ve been running your PC for months without any problems, and suddenly it starts to run slow and unresponsive, your GPU may be the culprit.

You’ll notice that even the most mundane tasks, like opening folders or launching apps, take excruciatingly long. With time, your computer will slow down or become unstable. 
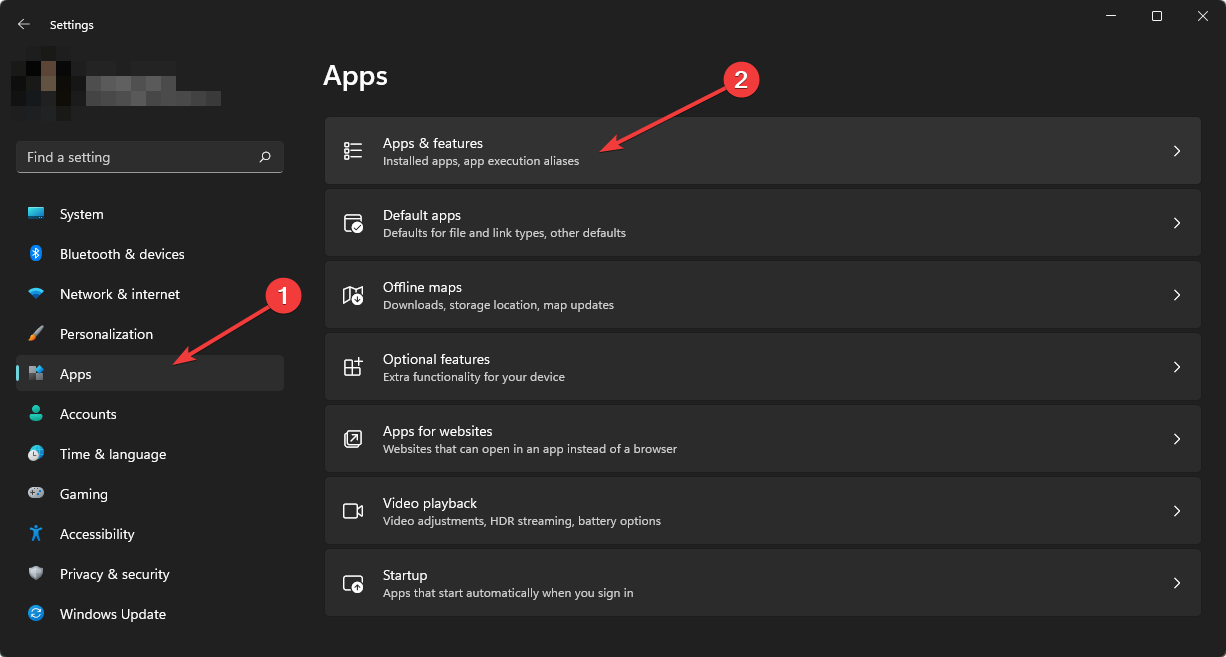
3. Random freezes and crashes

Screen glitches and freezing are typical symptoms of a failing GPU. If your computer has a screen constantly flickering or turning black, the problem may be with your graphics card. 

You may notice a static pattern on your screen when playing games or watching videos. This could also be an indication that your GPU is failing. These crashes can be game-specific or game-related, depending on the graphic needs of each.

4. Strange fan noises

You may hear a strange noise coming from your computer’s case. This could be your GPU fan or the hard drive’s vibration. The problem lies in the fact that the cooling system of your computer is not working properly.

The noise is usually caused by dust or debris entering your video card or motherboard. You should clean it up as soon as possible so that you don’t have to deal with this problem for long periods of time.

5. Frequent black/blue screens

A video card that’s failing is more likely to give you black screens and blue ones. Black screens render your PC unusable. The more frequent the occurrence, the more likely your video card is not functioning properly.

This is caused by the GPU overheating and the inability to complete a single task quickly enough. BSOD errors are a normal occurrence, but if they happen often enough, your GPU is trying to communicate.

How long do GPUs last before dying?

GPUs are designed to be extremely reliable and have a long lifespan, but they still have a finite amount of life left in them. The lifespan of a GPU varies by manufacturer and model. 

If you’re using it in an average way, it will last you a few years. However, if you’re using it to its full potential, you may have a dead GPU before too long. 

Your GPU’s longevity will be dependent on factors such as:

  • Amount of time you spend gaming –  Gaming is an intense activity that taxes not only your CPU but also your video card. 
  • Type of games you play – If you spend most of your time playing first-person shooters and racing games, then a high-end graphics card will last longer than an integrated one used for playing casual games.
  • Overclocking – A more powerful GPU can be pushed harder than a weaker one. However, overclocking causes stress which can cause issues down the road.
  • Type of GPU –  Each manufacturer manufactures their own cards, which are often built using a different process and therefore produce better or worse performance. You can compare GPUs before you make a decision.
  • The temperature at which your computer runs – GPUs can become damaged when exposed to high temperatures for long periods of time. 

GPU failure signs will most likely be invisible to the everyday user, at least until it’s too late. However, now that you know GPU dying symptoms, you can take the necessary steps to ensure you take care of yours. 

If it’s too late and you already have a dead GPU, it may be time to upgrade to a new graphics card.

Let us know how you keep your GPU in good shape in the comment section below.

Fix: OneDrive Is Missing from File Explorer in Windows 10

OneDrive is one of the most important parts of Windows, especially for those who use Office apps a lot. But, Microsoft’s cloud storage client can sometimes cause some trouble, as many reported that OneDrive is missing in File Explorer in Windows 10.

This is a strange issue that doesn’t happen quite often, but if it happens to you, things will surely get annoying. Though there are several ways to fix things if the OneDrive icon is missing in File Explorer.

Why is OneDrive not showing in File Explorer on Windows?

If OneDrve has sync issues, it might not appear properly in Windows. This isn’t the only problem, many reported that OneDrive status icons are missing on their PC.

There are multiple reasons for this, most notably bugs in the system, and a quick update should fix that. Alternatively, restarting the necessary services might help.

That’s not the only issue, and many reported that OneDrive doesn’t show thumbnails, but you might be able to fix that by waiting for the files to sync properly.

Why is OneDrive missing on my PC?

This can occur for several reasons, such as issues with your Microsoft or user account. Missing updates can also cause issues with certain components, leading to OneDrive missing from File Explorer in Windows 10.

In some instances, you might be having problems with your registry or policy settings that are preventing OneDrive from working properly.

Where are OneDrive files stored locally?

Users typically create the same local file on their PCs after uploading it to the cloud. Typically, it is stored on the following path:

C:\Users[username]\OneDrive

Please substitute your exact username for [username].

As more files are uploaded to the cloud over time, local files may be formed.

What other issues with OneDrive can appear?

  • OneDrive not showing in File Explorer Windows 10 – If OneDrive isn’t showing in File Explorer, that might be due to your policy settings. To fix the issue, you need to go to Group Policy Editor and check if OneDrive is enabled.
  • OneDrive shared folder not showing in Explorer – This is another problem that can appear with OneDrive. However, you can fix that problem simply by installing the missing Windows Updates.
  • OneDrive disappeared Windows 10 – Some users reported that OneDrive disappeared completely from Windows 10. This can be a problem, but you might be able to fix it simply by modifying the Registry.
  • OneDrive missing from Taskbar – Several users reported that OneDrive is missing from their Taskbar. This is a minor problem, and you should be able to fix it by running the OneDriveSetup.exe file.

So, we gathered a few possible solutions for this problem, and we hope at least one of them will be helpful to you. Check out those solutions below.

What can I do if OneDrive is missing from File Explorer?

Before heading to the slightly complex solutions, try these quick ones:

  • Restart the computer.
  • Update Windows 10 in case there are any pending updates for the OS.

If these two don’t work, get to the solutions listed next.

1. Make sure your PC is synced with OneDrive

If your computer isn’t fully synced with the cloud, the OneDrive folder will be missing in File Explorer in Windows 10. So, before you try anything else, ensure everything is synced correctly.

If you notice any issues in this regard, find out what to do if the OneDrive account isn’t synced properly in Windows 10.

Alternatively, you can switch to another, more reliable cloud-sharing service such as Sync and avoid all these problems.

2. Save an image to OneDrive

  1. Right-click on the OneDrive icon in the system tray, click on the gear icon and then choose Settings.settings
  2. Now, enable the toggle for Save the screenshots I capture to OneDrive.save screenshots I capture to OneDrive
  3. Press Windows + Shift + S to open Snip and Sketch and capture a screenshot.
  4. Once it’s captured, open the file, press Ctrl + S, enter a name for the screenshot, and then click Save.save screenshot
  5. Now, press Windows + E to open File Explorer, and the OneDrive option should be listed in the navigation pane.

A quick workaround shared by one of our readers was to capture a screenshot using Snip and Sketch and upload it to OneDrive, which would automatically get the cloud service to appear in File Explorer, and it will no more be missing in Windows 10.

3. Switch to a Local Account

  1. Press Windows + I to open the Settings app, and navigate to the Accounts section.
  2. If you’re already logged in with your Microsoft Account (and you probably are), click on Sign in with a local account instead.
  3. Click on Next to proceed.
  4. Enter your Microsoft account credentials to confirm that you’re authorized to make the change, and then click OK.
  5. Enter your new local user name and password, you can also add a password. Click Next.
  6. Click Sign out and finish.
  7. Once you log back in, navigate to the Settings app and go to Accounts.
  8. Go to Sign in with a Microsoft account instead
  9. Enter your login credentials.

If you run into any issues, find out how to fix things when unable to log in with the Microsoft account in Windows.

4. Make sure the file path isn’t too long

  1. Visit the OneDrive web app and log in.
  2. Locate the file or directory that might be causing problems.
  3. Right-click it and choose Rename.
  4. Now enter a shorter name.
  5. Check if the problem is resolved.

OneDrive allows only 440 characters-long file paths, so if a path of your specific file or folder is longer, it won’t be shown, so be sure to change it.

5. Remove all OneDrive entries from your registry

Note icon NOTE
This solution doesn’t work on Windows 10 or 11, so use it only on older versions.
  1. Press Windows key + R and enter regedit. Now press Enter.
  2. Go to Edit and select Find.
  3. In Find what field enter onedrive and make sure to check all Look at options. Now click Find next.
  4. Once you find OneDrive entries, remove them and repeat the previous step. Keep repeating this process until you remove all OneDrive entries from your PC.
  5. According to users, there might be about 20 entries on your PC, so this process can take a while.

6. Modify your registry

  1. Press Windows key + R and enter regedit.
  2. Now navigate to this key on your PC: HKEY_LOCAL_MACHINE\SOFTWARE\Policies\Microsoft\Windows
  3. Now look for the OneDrive key. If it’s not available, right-click on Windows and expand the New section, and select Key. Name the key OneDrive.
  4. Navigate to the OneDrive key.
  5. Now look for DisableFileSyncNGSC key in the right pane and double-click to open it.
  6. If it’s missing, simply right-click the empty space in the right pane, expand the New menu and select DWORD (32-bit) Value.
  7. Now enter DisableFileSyncNGSC as the name of the new key. Double-click the newly created DWORD.
  8. Now change the Value data to 0 and click OK to save changes.

According to users, sometimes you might be able to fix the problem by modifying your registry. Once you make these changes, OneDrive should not be missing from File Explorer in Windows 10 anymore.

7. Make changes to your Group Policy

  1. Press Windows key + R and enter gpedit.msc. Now press Enter.
  2. In the left pane, navigate to Computer Configuration and then to Administrative Templates. Now choose Windows Components and select OneDrive.
  3. Now double-click Prevent the usage of OneDrive for file storage to open its properties.
  4. When the properties window opens, set the policy to Not Configured and click Apply and OK to save changes.

If OneDrive is missing from your PC, the problem might be your group policy. Sometimes certain policies can be set that will prevent OneDrive from working properly. However, you can always manually disable these policies.

After doing that, OneDrive should start working again, and you won’t have any issues with it.

8. Run the OneDriveSetup.exe file

  1. Press Windows + R, paste the following path, and hit Enter: %localappdata%\Microsoft\OneDrive\Update
  2. The Update directory will now appear. Double-click OneDriveSetup.exe and follow the instructions on the screen to set up OneDrive.

After running the OneDrive.exe file is missing in File Explorer, the other methods here should get things up and running.

How do I add OneDrive to File Explorer on Windows 11?

Make sure that the OneDrive icon isn’t hidden

  1. Press Windows key + S and type taskbar. Select Taskbar settings from the search results.
  2. Now click on Taskbar corner overflow.
  3. If OneDrive is on the list, make sure that it’s enabled.

Once done, OneDrive should appear in File Explorer and will not be missing anymore in Windows.

Is OneDrive free to use?

Yes, when you sign up with a Microsoft account, you get 5GB of cloud storage for free. However, if you need more space, you’ll need to purchase a subscription.

But even in the free version, OneDrive offers enough space for basic needs, so it’s worth checking out.

Is OneDrive available on all versions of Windows?

This used to be the case, but Microsoft has plans to drop support for older versions up to 10. Only Windows 10 and 11 users will have the OneDrive app available.

However, the web version will continue to work regardless of the platform you’re using, so you won’t lose your files.

How do I add OneDrive to the Explorer navigation pane?

  1. Press Windows + R to open the Run command, enter regedit in the text field, and click OK.regedit
  2. Click Yes in the UAC prompt that appears.click Yes
  3. Paste the following path in the address bar and hit Enter:Computer\HKEY_CURRENT_USER\Software\Classes\CLSID{018D5C66-4533-4307-9B53-224DE2ED1FE6}
  4. Now, double-click the System.IsPinnedToNameSpaceTree DWORD.System.IsPinnedToNameSpaceTree key
  5. Enter 1 under Value Data, and click on OK to save the changes.change value data
  6. Similarly, set 1 as the value data for the same DWORD in the following path:HKEY_CURRENT_USER\Software\Classes\WOW6432Node\CLSID{018D5C66-4533-4307-9B53-224DE2ED1FE6}

So, if OneDrive is not showing in the File Explorer navigation pane in Windows 11, you can now easily add it.

That’s about it, we hope this article helped you to solve the problem when OneDrive is missing in File Explorer in Windows 10 and 11. Also, find out what to do if you can’t access the OneDrive account.

If you have any comments, questions, or suggestions, just let us know in the comment section below.

Mouse Keeps Jumping Around: Why It Happens & Fix

If your mouse keeps jumping around or ignoring your movements on Windows 10, you’re not alone. It’s a frustrating issue that can seriously mess with your workflow.

While it might be a simple driver glitch or system setting, sometimes the mouse itself is the problem. Before replacing it, try a few quick fixes first.

This guide covers the main reasons your cursor jumps and how to fix them, including tips on updating your drivers and running a virus scan to rule out malware.

How can I fix the mouse if it’s jumping around on Windows 10?

Before we head to making changes to Windows, here are a few quick tricks that might work:

  • Unplug the mouse and connect it to a different USB port in case the present USB port is not working or is faulty. Also, disconnect all non-critical peripherals from the PC and check if the problem is resolved.
  • A user pointed out that in touchscreen laptops, the problem may appear due to the improper functioning of the screen. In this case, disable the touchscreen functionality in the BIOS. Then, check the manufacturer’s website for the exact steps.
  • Try using another mouse and verify whether it, as well, jumps on Windows 10. Because in that case, the problem indeed lies with the computer.

If nothing listed previously worked, try the fixes listed next.

1. Adjust the touchpad delay time and disable the touchpad

1.1 Adjust touchpad delay time

  1. Press the Windows + I hotkeys on your computer, then select Devices.devices-w10 mouse jumping around windows 10
  2. Next, select the Mouse tab and change the mouse speed. Touchpad cursor jumping around in Windows 10 will no longer be an issue.mouse-speed mouse jumping around windows 10

1.2 Disable touchpad

  1. On your home screen, click on the arrow located near the clock and then right-click on the touchpad icon.
  2. Select Property of Touch-Pad, and switch to the tab associated with your Touchpad from the next window. fix mouse jumps pc mouse properties
  3. Click the Stop Device button or check the Disable when external USB pointing device plugin checkbox. This way, you can fix the mouse jumps on your PC.

Due to the same reasons explained during the previous troubleshooting solution, you must also try to disable the touchpad.

If this didn’t help you fix the problem, we also have an excellent guide on avoiding your touchpad interfering with your mouse.

2. Check the associated drivers

  1. Right-click the Start icon, then select Device Manager.device-manager-w10 amd driver install problems
  2. Navigate towards Mice and other pointer devices—Right-click on each driver and select Update driver.update-driver-mice mouse jumping around windows 10
  3. Then, restart your Windows 10 computer and see if that resolves the mouse jumps in Windows 10.

If, after updating the driver, the issue is still there, try to manually install the latest driver version available.

To avoid damaging system settings, we strongly recommend using dedicated software such as the one recommended below to search the web and suggest appropriate drivers update the old ones.

Not only that the software will ease the job for you, but you can also use it for further monitoring the essential system drivers and processes to optimize and update them accordingly.

Outbyte Driver Updater

Take advantage of in-depth scans and let the tool find the latest updates for your device drivers.
Free trial Download now

3. Adjust the settings from Control Panel

  1. Press Windows, then input control and select Control Panel from the list.control-panel-serarch-w10 opera not responding
  2. Type mouse inside the search bar and select the Mouse result.mouse-search mouse jumping around windows 10
  3. Make sure you uncheck the box next to Enhance pointer precision, then click OK.

Mouse Acceleration is another name for the Enhance Pointer Precision feature. When you use it, it will make on-the-fly adjustments to your DPI to provide you the ability to move your cursor over a greater distance.

When you are attempting to aim, the value of your DPI will fluctuate all the time as a result of this.

4. Scan your computer

  1. Press the Windows key + R, and in the Run box, type msconfig, then press Enter.msconfig mouse jumping around windows 10
  2. In the window that opens, switch to the Boot tab. From there, check Safe Boot located under Boot options.boot-safe mouse jumping around windows 10
  3. Also, check the Network box. Click OK and then Apply.
  4. Restart your Windows 10 device.
  5. Now resume the scanning process for removing possible malware.

Malware or viruses can be why the mouse jumps in Windows 10, so you need to remove the malicious program accordingly.

We recommend you use some of the best virus removal tools for Windows 10. There you go; that’s how you can fix the mouse jumps in Windows 10 problem.

How can I fix the mouse jumping around on Windows 11?

  1. Press Windows + I to open Settings, then go to Windows Update.windows-update kernel auto boost lock acquisition with raised irql
  2. Click the Check for updates button in order to bring your OS up-to-date and fix mouse jumps on PC.check-updates-w11 kernel auto boost lock acquisition with raised irql

By updating your OS, you will use the latest bug fixes and features that can address the PC mouse jumps that have been causing you issues so far.

Why is my mouse jumping around on my laptop?

Malfunctioning hardware, such as the mouse, the USB port, and the cable, is frequently the cause of the mouse moving about randomly. Also, issues with the screen on touchscreen laptops have been reported to be the underlying cause here.

The erratic behavior of the cursor can also be caused by a mouse pointer that is corrupted, an out-of-date device driver, faulty touchpad settings, or even malware. By following the above solutions, you can address all these issues and successfully regain access to your mouse.

For more solutions, we recommend you check what to do if the cursor freezes, jumps, or disappears in Windows.

Other common mouse issues include the cursor not going to the second screen, disappearing entirely, lagging during use, or clicking on its own.

Do tell us which troubleshooting solution worked for you by using the comments field below. Of course, stay close and check out our tutorials for learning further Windows-related tips and tricks.

Microsoft OneNote’s Vertical Tabs layout option is now available on Windows

In December, Microsoft announced its plans to introduce a new layout option for OneNote on Windows. The company termed this addition as a “top request” from users as it would make it easier for them to navigate through their resources.

The company has now announced that the Vertical Tabs layout option is now available for the OneNote Windows client. You should be able to access this new feature if you are running on Version 2302 (Build 16124.20000) or later.

To access this feature, you’ll need to navigate through View > Tabs Layout > Vertical Tabs. Likewise, you can also revert back to the horizontal tabs layout option by navigating through the same path but instead of selecting Vertical Tabs choose Horizontal Tabs.

Microsoft plans to add a Vertical Tabs layout option to OneNote on Windows soon - OnMSFT.com - December 8, 2022

It should be noted that this new feature is not rolling out to OneNote for Windows 10 because Microsoft is set to drop its support in 2025.  The company already removed it from the Microsoft Store and replaced it with the new and unified OneNote app.

That said, you can still make use of OneNote for Windows 10 though you’ll now need a direct link to download it. It still features pages, sections, and notebooks aligned on the left-hand side, and more.

If you want to get the new unified app, it comes as part of the pre-installed Office apps in a new Windows 11 device. If not, check out our expert guide which will help you download and install the correct version of the app. We also invite you to check out our separate post that will equip you with neat tricks and tips that will help you get started with OneNote.

Microsoft is upgrading Windows 11 21H2 devices to Windows 11 22H2 automatically

If your device is running on Windows 11 21H2, it might be upgraded to Windows 11 22H2 automatically soon. Microsoft has announced that it has started automatically upgrading devices running on Windows 11, version 21H2 (both Home and Pro editions) to Windows 11, version 22H2.

As you might already be aware, Microsoft is set to drop support for Windows 11 21H2 on October 10, 2023. Upgrading devices to Windows 11 22H2 is Microsoft’s way of ensuring that users are using up to date and secure Windows versions.

According to Microsoft:

Since Windows 10, we have been helping Windows users stay up to date and secure with supported versions of Windows through automatic updates. We are utilizing this same approach for Windows 11 to help you stay protected and productive.

That said, the process will be gradual “starting with those devices that have been using version 21H2 for the longest period of time.” Of course, Microsoft is providing users with a little bit of wiggle room since Windows 11 21H2 will still continue to receive security updates, at least for the next nine months.

This way users will be able to choose when they want to upgrade to the newer and supported Windows version. However, if you want to transition to Windows 11 22H2 before Microsoft cut support for Windows 11 21H2 you can check if the update is available for your device via the Windows Update settings.

“Customer feedback and analysis show a positive experience with Windows 11, version 22H2,” says Microsoft. It should be noted that not all customers will be able to upgrade to the newer Windows version just yet because the company has placed a compatibility hold for users with certain versions of drivers for Intel SST on Intel 11th Gen Core processors and Windows 11. However, Microsoft is currently working on a fix for the issue and has provided a workaround for the same in the meantime.

Why Does Microsoft Edge Keep Freezing? (Quick Fix Guide)

If you’re wondering why does Microsoft Edge keep freezing, you’re likely dealing with a common issue. Many Windows users report that Edge keeps freezing, becomes unresponsive, or even causes the system to slow down. These problems often stem from corrupted browser data, hardware acceleration, or problematic extensions.

How to fix Edge when it keeps freezing in Winodws 10/11

1. Repair Edge and modify the settings

  1. Press Windows + R to open Run, type appwiz.cpl, and hit Enter.appwiz.cpl
  2. Locate Microsoft Edge, select it, and then click on the Change button.change to fix microsoft edge keeps freezing
  3. Click Yes in case a UAC prompt appears.
  4. Now, click on Repair and wait for Edge to reinstall.repair to fix microsoft edge keeps freezing
  5. Once done, launch the browser, click on the ellipsis near the top right, and choose Settings.settings to fix microsoft edge keeps freezing
  6. Head to the Privacy, search, and services tab, select the Balanced option under Tracking prevention, and disable the toggle for Always use “Strict” tracking prevention when browsing InPrivate.balanced to fix microsoft edge keeps freezing

That’s it! A user pointed out that repairing the browser and then modifying the privacy settings can fix things when Microsoft Edge keeps freezing.

2. Clean Edge cache

2.1 Clear cookies and site data

  1. Start Edge, click the Menu button (the three horizontal dots) in the top right corner, and choose Settings from the menu.
  2. Click on the three horizontal lines from the top left and select the Cookies and site permissions options from the list.
  3. Now select Manage and delete cookies and site data.
  4. Now click on See all cookies and site data.
  5. You will see all cookies stored in your browser. Click on the Remove all button.
  6. Confirm the selection by clicking the Clear button.

2.2 Clear browsing data

  1. Start Edge.
  2. Enter Settings as shown in the previous solution.
  3. Click on the three horizontal lines from the top left and select Privacy, search, and services from the list.
  4. Scroll down and click on Choose what to clear button.
  5. Select the data you want to clear and click on the Clear now button.

If Microsoft Edge is hanging, clearing the cache and browsing data is a quick fix.

3. Use a cleaning tool

Microsoft Edge freezes can be a big problem, but according to users, you can fix this issue simply by using a specialized cleaning tool.

They do this by fixing and repairing any files and libraries on your PC by comparing them with their own libraries, creating backups, and ensuring everything is in check.

Of course, the tools are useful for the entire well-being of your PC, not just your Microsoft Edge installation.

4. Use PowerShell

  1. Right-click the Start button and click on PowerShell (Admin) from the list.
  2. When PowerShell opens, enter the following command and press Enter to run it: $manifest = (Get-AppxPackage Microsoft.WindowsStore).InstallLocation + 'AppxManifest.xml' ; Add-AppxPackage -DisableDevelopmentMode -Register $manifest
  3. After the process is completed, close PowerShell and restart your PC.
  4. After your PC restarts, check if the problem is resolved.

5. Turn off Internet Explorer 11

  1. Press Windows + S and enter windows features. Select Turn Windows features on or off.
  2. Locate Internet Explorer 11 on the list and uncheck it.
  3. Click OK to save the changes.

6. Try resetting Microsoft Edge

6.1 Use the Reset option

  1. Open Edge.
  2. Click the Menu button and select Settings.
  3. From the left pane, select Reset settings.
  4. Now click on Restore settings to their default values.
  5. Confirm that you want to perform the reset.

6.2 Delete the Edge pack

  1. Press Windows key + R and enter %localappdata%. Click OK or press Enter.
    microsoft-edge-keeps-freezing-local-1
  2. Go to the following directory and delete all files from it: Packages\Microsoft.MicrosoftEdge_8wekyb3d8bbwe
    microsoft-edge-keeps-freezing-local-2

6.3 Use PowerShell to reset Microsoft Edge

  1. Open PowerShell as administrator as shown in Solution 6.
  2. When PowerShell opens, enter this command, and press Enter to run it: Get-AppXPackage -AllUsers -Name Microsoft.MicrosoftEdge | Foreach {Add-AppxPackage -DisableDevelopmentMode -Register "$($_.InstallLocation)AppXManifest.xml" –Verbose}

We have to mention that using PowerShell can be dangerous, therefore be extra cautious. Resetting Microsoft Edge will clear all your settings, so you might have to set them again.

7. Run the System File Checker and DISM

7.1 Run the SFC scan

  1. Type cmd in Windows search and click on Run as administrator to start Command Prompt with full privileges.
  2. When Command Prompt starts, enter the following command and press Enter to run it: sfc /scannow
  3. Wait for the process to complete.

7.3 Run a DISM scan

  1. Start Command Prompt as administrator, as shown in the previous solution.
  2. Enter the following command and press Enter to run it: DISM /Online /Cleanup-Image /RestoreHealth

If the System File Checker toot doesn’t fix the problem, you might want to try using a DISM scan to set things right again.

8. Change your DNS

  1. Open Network Connections window. To do that, press Windows key + X and choose Network Connections from the menu.
    microsoft-edge-keeps-freezing-dns-1
  2. Locate your network connection, right-click it and choose Properties from the menu.
    microsoft-edge-keeps-freezing-dns-2
  3. Select Internet Protocol Version 4 (TCP/IPv4) and click on Properties.
    microsoft-edge-keeps-freezing-dns-3
  4. Select Use the following DNS server addresses and enter 8.8.8.8 as Preferred DNS server and 8.8.4.4 as Alternate DNS server. You can also use 208.67.222.222 as Preferred and 208.67.220.220 as Alternate DNS server.
    microsoft-edge-keeps-freezing-dns-4
  5. Click OK to save the changes.

If Microsoft Edge is stuck, then the issue can be your DNS, and you can fix things simply by changing it.

If you encounter any other DNS problems or you want to get in-depth expertise, check our comprehensive guide on how to fix DNS issues in Windows 10.

9. Enable Automatically manage paging file size

  1. Press Windows + I to open the Settings app.
  2. Click on System.
  3. Scroll on the left pane, click About, then select Advanced system settings on the right.
  4. Under Performance, click Settings.
  5. Click the Advanced tab, then the Change button.
    microsoft edge keeps freezing
  6. Tick Automatically manage paging file size for all drives.

10. Use another browser

Simply use another browser to save a website link to your Desktop and open that file using Microsoft Edge. According to users, this problem seems to be caused by tabs in Microsoft Edge, and by using this workaround, you’ll be able to use Edge without any freezes.

More so, it has tools that Edge doesn’t, such as a built-in unlimited VPN and integrated social network tools on its sidebar.

Opera

Opera

Upgrade to this error-free browser & enjoy a freeze-free experience!

How can I improve my Microsoft Edge performance?

The best way to improve performance is to disable extensions you don’t actively use. It’s also advised to keep the number of open tabs to a minimum or close the more demanding pages.

Additionally, you can enable Microsoft Edge Efficiency mode to optimize the resource usage of your browser.

Wrapping up

For more information, we suggest visiting our guide on reducing Microsoft Edge’s high CPU usage.

Freezes can cause you to lose your open tabs, but there are ways to restore previous session in Edge easily.

If you have any other suggestions or want to express your thoughts, leave them in a comment in the dedicated section below.

FAQ

Why does my Edge browser keep freezing on startup?

It may be due to corrupted profile data or startup extensions. Try resetting Edge or starting in InPrivate mode.

What if Edge keeps freezing even after updates?

Try reinstalling Edge or switching to a clean browser profile. If that fails, scan your system for malware or perform a Windows repair.

Does Edge freezing affect the whole system?

In some cases, yes—especially if hardware acceleration or video decoding causes GPU overload.

Can too many tabs cause Edge to freeze?

Yes. High RAM usage from many open tabs or heavy websites can slow down or freeze the browser.

Fix: “The Disk Structure is Corrupted and Unreadable” Error

The disk structure is corrupted and unreadable error occurs when a hard disk has a corrupted partition. Windows can’t access the corrupted partition and open its files when that happens.

While the error is more common in external disk drives, it can also occur with internal HDDs. Irrespective of the affected disk, the solutions in this guide should help you fix the issue easily.

How do I fix the Disk structure is corrupted and unreadable HDD error in Windows

1. Unplug and re-plug the external HDD or USB drive

If you’re getting this error with removable storage, such as a USB drive, unplug the storage device. Then, close all software on your taskbar and plug the external storage back in.

Or, reboot Windows before you plug the external HDD back in. Then, try opening the same files you did before when you got the Disk structure is corrupted and unreadable error.

2. Run a Check Disk (CHKDSK) Scan

  1. Press the Windows key, type cmd, and select Run as administrator under Command Prompt.
    cmd admin the disk structure is corrupted and unreadable
  2. Type the command below (replace c with the drive letter of the faulty disk) and press Enter: chkdsk c: /rchkdsk
  3. Now, press Y if you are prompted.
  4. Finally, restart your PC, and the scan will start automatically.

Windows has a Check Disk utility that scans hard disks and fixes any errors it might find. It checks the disk’s file system integrity, such as in the Master File Table.

This is undoubtedly the best Windows tool to fix the disk structure is corrupted and unreadable error.

3. Reinstall external hard drives

  1. Press the Windows key + X and select the Device Manager option.
    device manager
  2. Click the Disk drives option to expand it and right-click the faulty drive.
  3. Now, select the Uninstall device option.
    uninstall device the disk structure is corrupted and unreadable
  4. Click the Uninstall button to confirm the action.
    uninstall button
  5. Finally, click the Scan for hardware changes icon at the top and restart your PC.
    scan for

Sometimes, the disk structure is corrupted, and unreadable error can be caused by faulty drivers. The solution to this is to uninstall and reinstall the corrupt driver.

4. Fix the HDD with M3 RAW

  1. Open M3 RAW and select the drive to fix.
  2. Click the Next button to scan the disk drive.
  3. The software will show you a list of files on the disk drive. Press the Fix Drive button to fix the disk drive.

There are numerous third-party programs you can use to fix the disk structure is corrupted and unreadable errors. M3 RAW checks and repairs file systems.

While it isn’t freeware, you can add the trial version to Windows from this website and fix a disk drive.

5. Fix the HDD With MiniTool Partition Wizard

  1. Open the MiniTool Partition Wizard window that lists all connected hard drives.Mini Tool Partition Wizard
  2. Select the corrupted disk drive, and click Check File System on the left of the window.
  3. A Check File System window opens from which you can select the Check & fix detected errors option.
  4. Press the Start button to initiate the scan.
  5. Restart Windows after the MiniTool Partition Wizard file system scan.

MiniTool Partition Wizard is a highly rated freeware disk partition manager that boasts a 20 million-strong user base and supports most storage devices.

This can also fix disk structure errors for drive partitions. Get MiniTool Partition Wizard and fix your disk drive by following the steps above.

6. Format the external disk drive

  1. Plug the external storage device into a desktop or laptop.
  2. Open the File Explorer and click This PC to open a list of devices and drives.
  3. Then, right-click a drive listed there and select Format to open the window below.
    format the disk structure is corrupted and unreadable
  4. Choose a file system format from the File system drop-down menu.
  5. Finally, select the Quick Format option if it’s not already selected, and press the Start button to format the drive.
    quick format

This fixes external drives that don’t include Windows, such as flash USB sticks. Formatting a drive erases all its contents and establishes a new file system to replace the corrupted one.

This is a good fix for the disk structure is corrupted and unreadable error if the files on the storage drive aren’t essential. But if you need to keep some of the drive’s content, save the files with a data recovery utility program such as EaseUS Data Recovery Wizard.

Those are some of the best ways to fix corrupted disk structures with Windows tools and third-party software.

If you need more third-party disk management utilities that can also fix drive errors, check our detailed guide on the topic.

Feel free to let us know the solution that helped you fix this error in the comments below.

How to Run 32 Bit Programs on 64 Bit on Windows 11?

Even though a 64-bit system is more capable and faster in handling multiple operations, some apps only run on 32-bit systems on Windows 11.

So, if you have a 64-bit system and wondering if you can run 32-bit programs on it, then the answer is yes.

This guide will discuss methods with step-by-step instructions to run 32-bit apps on 64-bit Windows 11 computers. Let’s get started1!

What can I do to run 32-bit programs on 64-bit on Windows 11? 

1. Enable 32-Bit Application

1.1 Enable Internet Information Services & CGI

  1. Press the Windows key, type Control Panel, and click Open.Control Panel
  2. Select Category from the dropdown for View By. Click Programs.Control Panel - Programs-run 32 bit programs on 64 bit windows 11
  3. Under Programs and Features, click Turn Windows features on or off.Turn Windows features on or off
  4. On the Windows Features window, select Internet Information Services.
  5. Now click World Wide Web Services to expand it.
  6. Click on Plus sign beside Application Development Features.
  7. Put a checkmark next to CGI. Click OK to save the changes. IIS manager enable services
  8. Windows will now apply the features; once done, click Close.Apply features Close the window

1.2 Make changes to Advanced Settings 

  1. Press the Windows key, type Internet Information Services (IIS) Manager, and click Open.IIS Manager - run 32 bit programs on 64 bit windows 11
  2. Double-click on the Desktop to expand it.
  3. Click on Application Pools from the left pane.
  4. From the right pane, right-click on DefaultAppPool, and select Advanced Settings.run 32 bit programs on 64 bit windows 11
  5. Under General, for Enable 32-Bit Applications, select True from the dropdown.General Enable 32-bit version Windows 11
  6. Click OK.

2. Download and run 32-bit programs

  1. Download the installer file of a 32-bit tool.Winrar download - run 32 bit programs on 64 bit windows 11
  2. Double-click on the installer file to run the installation.
  3. Follow the on-screen instructions to complete the process.
  4. Use the app as usual.

So, these are steps that you need to follow to enable and run 32-bit programs on 64-bit Windows 11 computers. Try them to install the old or legacy apps on your new Windows 11 computer, and let us know in the comments section below.

Windows 10 Login Screen Doesn’t Appear: How to Fix & Causes

We all know how the Windows 10 boot sequence works. However, some users are complaining that the Windows 10 login screen doesn’t appear for some reason.

If you are facing this issue, there is nothing to worry about, as we have prepared the fixes to help you rectify it in this guide.

How do I show the login screen on Windows 10?

1. Initiate a fresh restart

A restart operation might fix the Windows 10 login screen that doesn’t appear issue, if the malfunction is not caused by corrupted files or by a malicious app or process.

All you need to do is to press and hold the Power button for a few seconds until the shutdown process is completed.

Then, re-initiate the boot sequence. If the problem is still there, download one of these registry cleaners and scan your system. If the Windows login screen is still not appearing, press the Ctrl + Alt + Del keys to reload the sign-in page.

2. Access Windows Safe Mode

  1. Press the Power button to force your PC to shut down. Power on your PC and forcibly shut it down again. Repeat this thrice to bring up the Advanced recovery menu.
  2. From the next screen, choose Troubleshoot.
    troubleshoot windows 10 login screen doesnt appear
  3. Next, click on Advanced options.
    advanced option
  4. Now, select Startup Settings.
    startup settings
  5. Click the Restart button from the next window.
    restart windows 10 login screen doesnt appear
  6. Finally, press the corresponding window to Enable Safe Mode or Safe Mode with Networking.
    enable safe

If the Windows 10 login screen doesn’t appear because of a malicious app or a broken process, you should start your device in Safe Mode. While Safe Mode is running, third-party apps will be automatically disabled.

Also, from safe mode, you can run a system scan to address possible errors automatically:

  1. Press the Windows key, type cmd, and select Run as administrator under Command Prompt.
    cmd admin
  2. Type the command below and hit Enter: sfc/ scannowcmd admin windows 10 login screen doesnt appear
  3. Finally, wait for the command to complete running and restart your PC.

If your Windows 10 laptop login screen due to a corrupt system file, running the SFC scan should fix the issue for good.

3. Create a new user account

  1. First, enter Safe Mode as explained in Solution 2.
  2. Press the Windows key+ I and select the Accounts option.
    accounts
  3. Next, select Family & other users in the left pane.
  4. Click Add someone else to this PC under Other users.
    family and
  5. Now, select I don’t have this person’s sign-in information.
    i dont have windows 10 login screen doesnt appear
  6. Click Add a user without a Microsoft account.
    add a
  7. Finally, enter the username, password, and other details and click Next to complete the process.
    next

Sometimes, the Windows 10 login screen doesn’t appear might be because of a glitch with your user account. In this case, you need to create a new account in Safe Mode to fix the issue.

4. Set automatic login

  1. Follow the steps in Solution 2 to access Safe Mode.
  2. When your PC boots up, press the Windows key + R, type netplwiz, and hit Enter.
    netplwiz run
  3. Now, uncheck the box for Users must enter a username and password to use this computer.
  4. Save your changes and reboot your Windows 10 system.

While this might not fix the cause of the Windows 10 login screen flashes then disappears issue, it allows you to use your device without having to enter your username and password during Windows 10 boot sequence

5. Run the command prompt line at boot

  1. Repeat Steps 1 to 3 in Solution 2.
  2. Now, select the Command Prompt option.
    command prompt windows 10 login screen doesnt appear
  3. Type the command below and hit Enter: net user Administrator /active:yesnet user
  4. Finally, reboot your computer.

Another effective method to fix the Windows 10 login screen that doesn’t appear is to activate the hidden admin account. This should trigger the login page on your next restart.

6. Perform a startup repair process

  1. Repeat Steps 1 to 3 in Solution 2.
  2. Choose System Restore.
    system restore
  3. Now, choose a restore point and click Next.
    restore point windows 10 login screen doesnt appear
  4. Follow the onscreen instructions to complete the process.
  5. If the System Restore does not fix the problem, repeat Steps 1 and 2 and select Startup Repair in Step 3 instead.
    startup repair
  6. Finally, follow the onscreen prompts to complete the process.

In some cases, issues with your startup files might cause the Windows 10 login screen doesn’t appear issue. Thankfully, Windows has a built-in feature for fixing issues with the startup process.

With this solution, we can conclude this detailed guide. If you are looking for how to fix the missing user and password prompt on Windows 10 login screen, you should find useful solutions in this guide.

If Windows 10 is stuck on the login screen instead, check our detailed guide to fix that too effectively.

Feel free to let us know the solution that helped you fix this issue in the comments below.

Windows 11 Beeps In Sleep Mode: 3 Ways To Stop It

Some users have posted on the Lenovo forum about Windows 11 beeping in standby mode. Apparently, some Lenovo PCs beep whenever they enter or exit standby mode on Windows Vista, 7, 11 or 10. That doesn’t mean that Windows 11 isn’t beeping in standby mode (sleep mode or hibernation) on other configurations.

One Thinkpad user shared his concerns with this occurrence.

How do I turn off these annoying beeps that sound every time my computer goes into and out of sleep and hibernation?

Learn how to disable beeping with the instructions below.

What can I do if Windows 11 beeps in Sleep Mode?

1. Deselect the Beep When Power State Changes Option

  1. Lenovo users have confirmed they’ve fixed standby mode beeping by deselecting a Beep when power state changes Power Management option. To deselect that setting, double-click the green battery icon on Windows’ system tray.
  2. Press the Advanced button on the Power Manager window.
  3. Select the Global Power Settings tab, which includes the Beep when power state changes option.
  4. Deselect the Beep when power state changes check box.lenovo power management
  5. Select the Apply option.
  6. Click the OK button.

2. Turn Off the System Beep

  1. Alternatively, users can turn off general beeping in Windows to fix beeping in standby mode. To do so, open Run with the Windows key + R keyboard shortcut.
  2. Then input ‘Control Panel’ in the Open box, and select the OK option.control panel
  3. Enter ‘change system sounds’ in the Control Panel’s search box.
  4. Click Change system sounds to open the window in the snapshot below.sound settings sounds tab
  5. Select Default Beep in the Program Events box.
  6. Select the (None) option in the Sounds drop-down menu.sounds default beep select None
  7. Press the Apply button.
  8. Then click OK to exit the window.
  9. Note that beeping might return when an alternative theme is selected. Thus, users might need to adjust the default beep settings as outlined above when they change the theme.

3. Turn Off Beeping Via the Command Prompt

  1. Users can also turn off system beeping via the Command Prompt. First, open the Run accessory.
  2. Then enter ‘cmd’ in Run’s text box.
  3. Press the Ctrl + Shift + Enter hotkey to open an elevated Prompt window.
  4. Input ‘sc stop beep’ in the Command Prompt, and press the Return button.sc stop beep cmd
  5. Then enter ‘sc config beep start= disabled’ in the Command Prompt and press Return.sc config beep start= disabled cmd

Those are a few of the resolutions that might fix Windows beeping in standby mode. In addition, some users with older PCs (such as the Lenovo B570) can also disable a Power Beep setting on the Configuration tab in the system BIOS to fix Windows beeping in standby.

We hope you managed to get rid of the Windows 11 beeping in Sleep Mode issue using our guide. Let us know what worked for you.

What Are the Best Software for Learning C++?

When it comes to computer language, the most well-known of them is C++ as it is widely used to develop various programs. C++ is a unique general-purpose programming language that gives programmers features to develop large-scale applications from search engines to graphics software, and video games.

One of the best ways to learn C++ programming is by using special text editors called IDE (Integrated Development Environment); this gives you built-in functions like code completion, compiling, and syntax.

IDE are better for learning C++ because they offer an easy user interface and offer comprehensive tools to ensure adequate C++ project completion. Windows Report has compiled some of the best IDE software for learning C++ programming language.

What is the best software you can use for learning C++?

Educative.io – In-depth information

Educative.io is an excellent C++ learning platform with tons of courses and information to help its users develop their programming skills.

It offers a C++ interactive learning course with the most popular programming languages around the world.

You can start with the basics of C++, explore templates, and obtain the skill of multithreading and concurrency concepts in C++.

Educative.io provides you with all the essentials of embedded programming and graph algorithms, and you can practice using OOP techniques with its powerful tools.

Other best features of Educative.io:

  • Create and personalize content
  • Progress tracking
  • Complete courses

Educative.io

Learn the C++ programming language step by step with this great platform.
Check price Visit Website

Apache NetBeans – Unique Qt toolkit support

This is an open-source platform for programming and is popular among the C++ community of users and is also compatible with other programming languages. It has a comprehensive community library of plugins.

There are several templates and project types which can be used to build programs and projects. Programmers can also use the drag-and-drop feature to import files to build applications from base templates.

It has a well-integrated C++ editor with a GDB debugger tool and offers support for various compilers which includes GNU, Oracle, MinGW, and Solaris Studio.

Apache NetBeans can highlight source code syntactically and semantically and allows you to refactor code effortlessly with a set of helpful and excellent tools.

Other best features of Apache NetBeans:

  • Easy file navigation
  • Unique Qt toolkit support
  • Easy support for source inspection

⇒ Get Apache NetBeans

CodeBlocks – Highly customizable

This software for learning C++ is free to use with an easily customizable cross-platform C++ IDE which offers comprehensive features.

CodeBlocks enables the import of plugins, and also authorizes users to develop plugins that become part of the code.

It is fast and easy to use and offers you access to multiple compiler support including GCC, clang, Borland C++ 5.5, and many others.

Furthermore, it provides multiple support for full breakpoints including code breakpoints, data breakpoints, and breakpoint conditions.

Other best features of CodeBlocks:

  • Interfaces support both GNU and GDB
  • Custom memory dump and syntax highlighting
  • Highly customizable and extensible

⇒ Get CodeBlocks

BlueFish – Powerful search and point functions

BlueFish is a powerful editor specially created for programmers and web developers and offers more extensive features than a normal text editor.

It has a multiple-document interface, is easy to use, and offers many features for writing software code and website scripts.

You can use it on multiple platforms and is compatible with many devices including the Windows operating system.

BlueFish starts really fast which helps you load hundreds of files within seconds and allows you to work effectively on multiple projects and automatically reinstates settings for each project.

The major features are listed below:

  • Full site uploader and downloader tool
  • Supports multiple encoding formats
  • Powerful search and point functions

⇒ Get BlueFish

GitHub – Collaborative coding

GitHub is a powerful software with built-in security, specially designed for collaboration that has a wide range of innovative tools.

This platform offers a full development environment where you can code, build, test, and open pull requests from any repository.

GitHub has a Pilot feature that helps you get suggestions for whole lines or entire functions exactly within your editor.

Moreover, you can use its Collaborative function which is a dedicated space for your community where you can ask and answer questions and have conversations with each other.

Other best features of GitHub:

  • Built-in security
  • Collaborative coding
  • Dedicated space for community

⇒ Get GitHub

Eclipse – Built-in browser

best software for learning C++

Eclipse is a popular open-source IDE software for learning C++ among programmers that offers a nice drag-and-drop user interface functionality tool.

The IDE supports GUI and is based on the code of the primary eclipse platform and has numerous features like a built-in browser and macro definition browsers.

It is a cool code editor with syntax highlighting and provides you with full support for your project creations.

You can combine effortlessly multiple languages support and other characteristics into any of its default packages.

Other best features of Eclipse:

  • Resourceful source code refactoring and generation
  • Easy-to-use interface
  • Compatible with Windows OS

⇒ Get Eclipse

CLion – Fully integrated code analyzer

CLion is a premium tool editor which has powerful features to ensure seamless C++ programming for its users.

The tool comes with a fully integrated C++ environment for programmers and provides Cmake as a model for the embedded terminal windows.

In addition, CLion also enables you to access their smart code assistance that fully understands C and C++ with which you can read and write code efficiently.

You can simply find the context usages of a symbol by typing its name and obtain insight into function calls with the software’s parameter name hints.

Other best features of CLion:

  • Easy to use GUI
  • Fully integrated code analyzer and debugger
  • Easy code generation and refactoring

⇒ Get CLion

KDevelop – Modern technology

best software for learning C++

KDevelop is a freeware open-source software for learning C++ which is written on the base codes of KDevPlatform, KDE, and Qtlibrarie.

It is cross-platform compatible with Windows, and other operating systems and can help you enable plugins.

KDevelop has modern technology that offers consistent development environments, helping you get the job done with ease.

This software has an advanced editor with semantic code analysis and provides you with various workflows to assist, improve, and verify the code’s quality and functionality.

Other best features of KDevelop:

  • Multiple support for line editing within plugins
  • Easy use of widgets to create more vertical space in the home menu
  • Free download

⇒ Get KDevelop

Have you used any of the software we mentioned above for learning C++ programming language? Share your experience with us by commenting below.

How to Create Or Change A Custom Paper Size in Windows 11?

If you want to get a printout of your documents but the printer is not configured to use an incorrect paper size, the results will not be desirable.

To fix this, you need to change the paper size. It is a simple process and can be done in a few steps. 

This guide will discuss methods to create or change custom paper sizes on Windows 11. Let’s get started! 

How can I create or change a custom paper size on Windows 11? 

1. Use the Microsoft Office

1.1 Create a custom paper size

  1. Click on the File menu.File menu_custom paper size windows 11
  2. Now select Print, and click Page Setup. Print - Print setup
  3. In the Page Setup window, go to the Paper tab, and for Paper size, select page size from the dropdown. PageSetup
  4. Choose the Width and Height.
  5. Switch to Layout and Margins one by one and make changes accordingly.
  6. Now click OK. 

1.2 Choose the paper size for a particular page

  1. Open the document. Select the text on the document you want to change.
  2. Go to the Layout menu, under Page Setup, and click Size. Printout - custom paper size windows 11
  3. Choose the paper size from the recent list or click More Paper Sizes.
  4. Select the paper size from the dropdown.
  5. Next, navigate to Apply to choose Selected text from the dropdown list.Selected text
  6. Click OK. 

1.3 Choose the paper size for a section

  1. Select the section of the document. Then, on the View menu, click Print Layout. Print Layout Options - custom paper size windows 11
  2. To display nonprinting characters, go to the Home tab and click the button on the Show all nonprinting characters. Home tab - Show indisplaying characters button
  3. Go to the Layout menu, click Breaks, and select Section break for the section you want to change. Layout and section break
  4. Now under Page Setup, click Size. More paper sizes
  5. Click More Paper Sizes to open the Page Setup properties.
  6. Choose the custom size or the paper size from the list.
  7. Now go to Apply to option, and choose Selected text from the dropdown.Select text OK
  8. Click OK.

1.4 Choose the default paper size for new documents 

  1. Go to the File menu.
  2. Click Print, then click Page Setup.
  3. Go to Set As Default.Set as Default -custom paper size windows 11
  4. Click Yes. 

2. Use the Control Panel

  1. Press the Windows key, type Control Panel, and click Open. Control Panel
  2. Select View by and choose Category.
  3. Under Hardware and Sound, click View devices and printers.Hardware and sound - custom paper size Windows 11
  4. Choose Printers & Scanners.Printers & Scanners
  5. Go to Print Server Properties. Printer Server Properties
  6. Under Forms on, select the paper size dimensions.
  7. Choose the Form name and put a checkmark on Create a new form.
  8. Under Paper size, select the Height and Width. Create a new form - custom page size on Windows 11
  9. Under Margin, edit the Left, Right, Top, and Bottom fields.
  10. Now choose Save From and close the window. 

So, these are methods that you can use to create custom paper sizes on Windows 11. Try them and let us know which worked for you in the comments below.