Some Windows users are complaining about a strange issue they are experiencing. The issue of Windows File Explorer not showing the top bar prevents them from being able to minimize or maximize any application on their computer.
This is because the title bar is completely absent. Although this is a rare issue, there are many possible causes for it. This is one of many File Explorer problems that can occur.
There is no reason to get worried if you are experiencing a similar circumstance. This post will give you several fixes for this issue; if you use them, your issue should be resolved right away.
Why is Windows File Explorer not showing the top bar?
The Minimize, Maximize, and Close buttons are often located in the upper right corner of an application’s window on Windows. You might assume that they have no potential for failure because you use them every day.
However, there are times when the top bar and its buttons vanish. This problem could be brought on by a third-party customization app, wrong system settings, or corrupt files. These suggestions can assist you in troubleshooting the issue if the Windows file explorer top bar is missing.
How do I fix Windows File Explorer not showing the top bar?
1. Restart your computer
Click the Windows start button and select the Power icon.
Select Restart from the Power icon.
2. Check if your Windows is updated
Press the Windows + I key combination to launch Settings and then click on Update & Security.
Select Windows Update on the left-hand side menu.
Click Check for Updates.
Allow Windows to download and install any available updates. Your computer might restart after the process completes.
Type msconfig in the text field and then select OK.
In the System Configuration window, select the General tab and uncheck the box next to Load startup items.
Enable Load system services under Selective startup.
Open the same window’s Services tab then select Hide all Microsoft services.
Select Disable all then click Apply and OK in order to save the changes on your computer.
Restart your computer and it will start in clean mode.
4. Force Windows to repair display issues
Press Ctrl+ Shift + Win + B key combination to force Windows to take action.
Your screen will go black for a moment.
Your display driver will be restarted and the screen will turn back on.
What are the differences between Windows File Explorer in Windows 10 and 11, and which is better?
Windows 10 and 11 have a lot of design differences. With pastel colors, rounded corners for all windows, and a cleaner interface than its predecessor, Windows 11 delivers an interface that looks more like a Mac.
Microsoft made every effort to streamline the user interface in order to create a clean environment for work and pleasure.
Snap Layouts is another new feature in Windows 11. Similar to how users can group apps on Android and iOS, this allows users to more efficiently manage their windows and apps.
Snap Layouts offer a variety of layout choices to arrange the various windows on the screen. With the help of the productivity tool Snap, users can logically arrange windows and other apps on their screens.
Users of Windows 10’s Snap feature must manually arrange their windows by hovering to the left or right of the screen or by using specific keyboard shortcuts.
This article has covered some of the causes of Windows File Explorer not showing the top bar and how to resolve the issue.
Unfortunately, this isn’t the only problem, and many reported that File Explorer keeps crashing. However, we covered this issue in a separate guide, so feel free to try it out.
We hope that you are now able to sort the problem. Feel free to comment in the comment section below, about your experiences, your questions, or any other things you feel compelled to share.
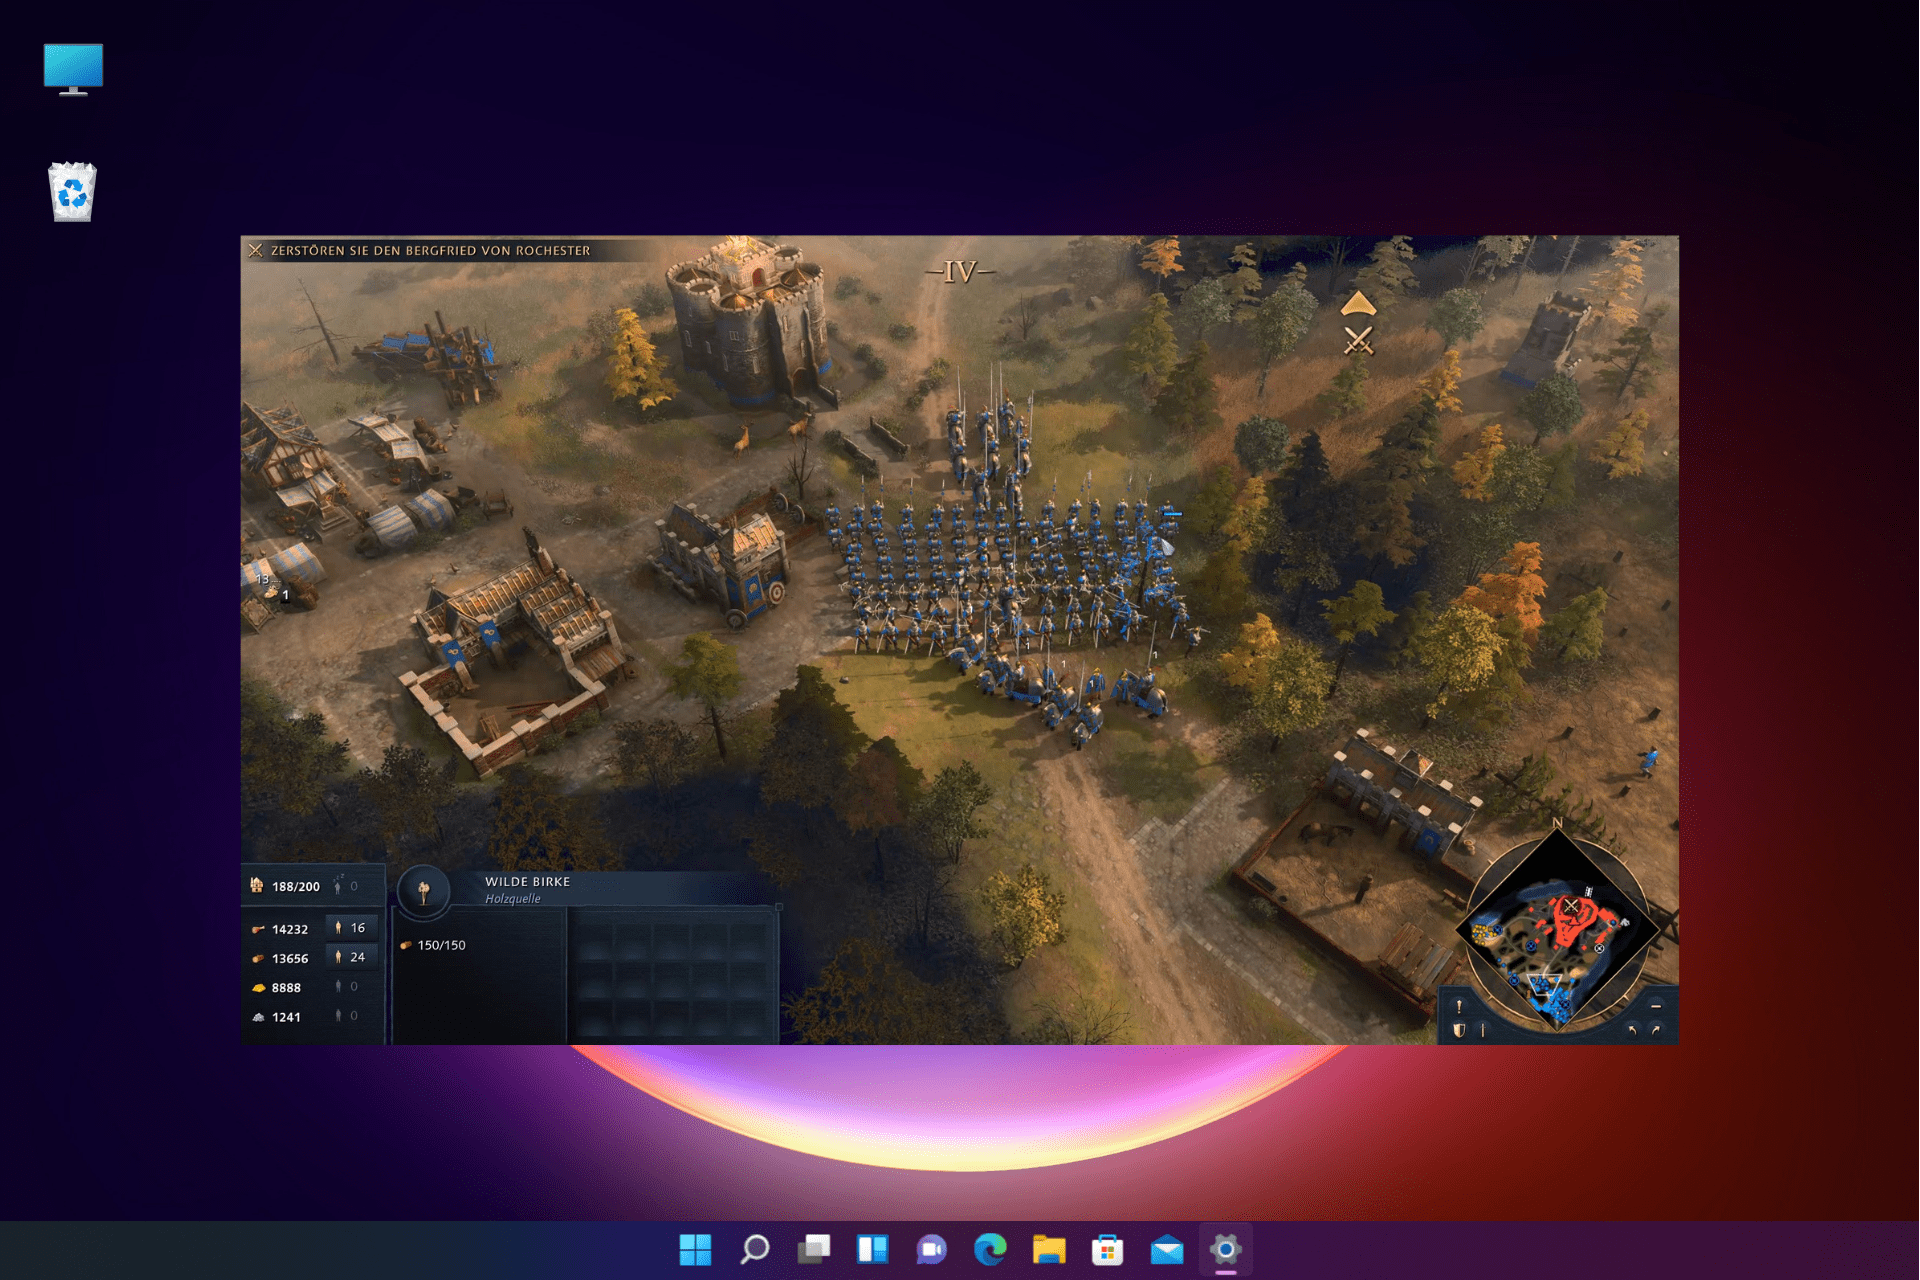
A magnificent game and an able successor to the AoE 3, the Age of Empires 4 is known for performance issues like FPS drops, lags and stuttering.
While it’s a widely popular game offering the feel of the old-style games and the way it illustrates history, users have been complaining of a host of issues.
From lags, freezes, or stutters to low FPS or sudden crashes, there has been a multitude of issues being reported since its release.
Some of the common causes that are known for sudden FPS drops in AOE 4 are:
High graphics settings
G-sync enabled
Too many applications running in the background
OneDrive syncing enabled
Higher refresh rate
Multiple GPUs
High network usage
Bigger map with a higher population
Higher display resolution
Outdated graphics drivers
If the game is not yet updated
Before you move over to the troubleshooting methods, make sure that you close any unused applications or programs that are running in the background.
Also, ensure that the display resolution is set to 1920×1080 and the gameplay resolution scale to 100.
We have compiled a few workarounds that will not just help you with the FPS drop issue in the Age of Empires 4 but will also fix the lags and stuttering issue.
How do I fix FPS drops in the Age of Empire 4?
1. Set refresh rate to 60Hz
Press the Win + I keys simultaneously to launch Windows Settings.
Now, click on System on the left of the Settings app.
Next, on the right, click on Display.
On the Display settings page, scroll down and click on Advanced display.
Now, on the Advanced display screen, go to the Choose a refresh rate field and set it to 60Hz.
Once done, you can now check if the Age of Empires FPS drop issue is fixed.
2. Update the GPU drivers
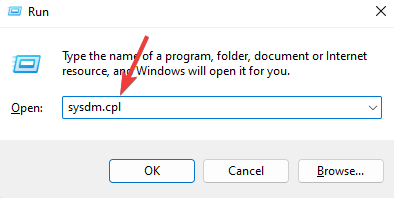
Press the Win + R keys together to launch the Run console.
Type sysdm.cpl in the search bar and hit Enter.
As the System Properties dialog opens, go to the Hardware tab, and click on the Device Installation Settings button.
In the next dialog, select No and press Save changes.
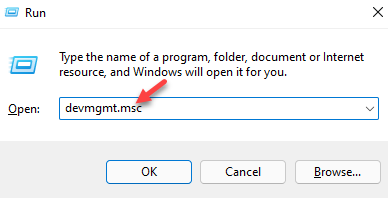
Confirm the changes and now, press the Win + R shortcut keys to open the Run console.
In the search field, type devmgmt.msc and hit Enter.
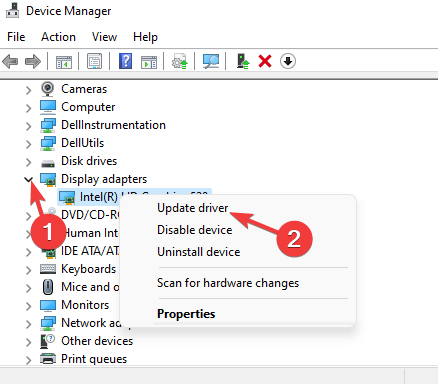
Next, expand Display adapters in the Device Manager. Here, right-click on the GPU and selectProperties.
Now, go to the Driver tab, and click on Update driver.
Once done, close Device Manager and restart your PC for the changes to be effective. The FPS drops issue on Age of Empire 4 should be fixed now.
3. Tweak Windows 11 graphics settings
3.1 Disable Hardware-Accelerated GPU Scheduling
Press the Win + I buttons together to open WindowsSettings.
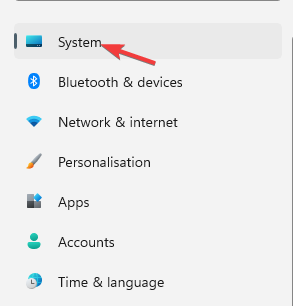
Next, click on System from the left.
Now, go to the right and select Display.
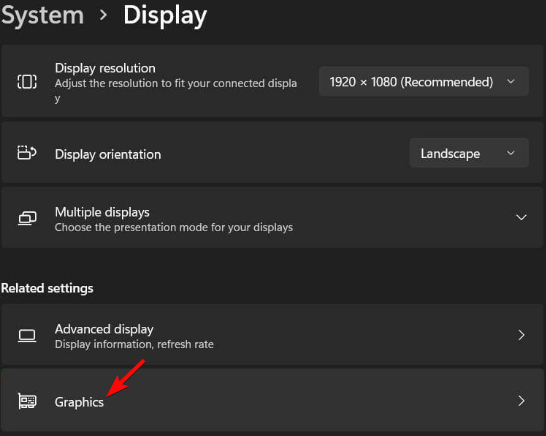
On the Display settings screen, click on Graphics.
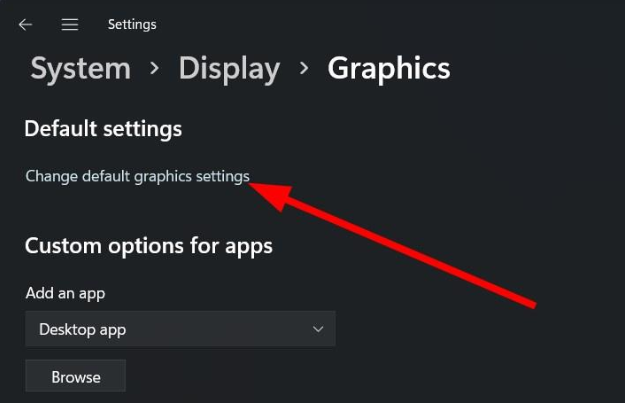
Next, click on Change default graphics settings on the right.
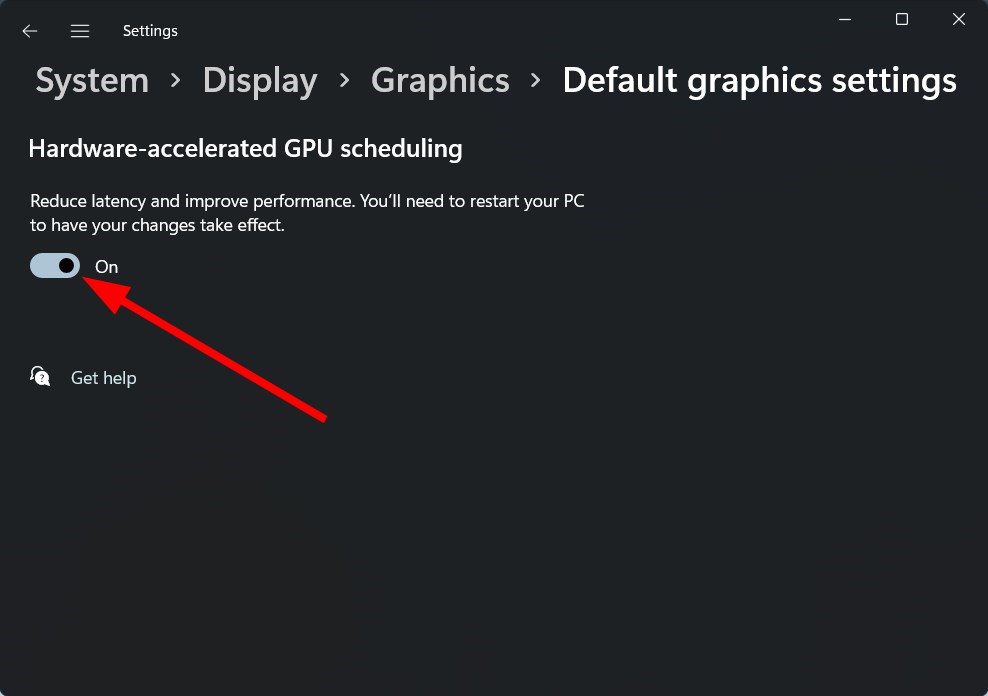
Now, turn off Hardware Accelerated GPU Scheduling.
Rebootyour PC for the changes to be effective and now the Age of Empires 4 FPS drops issue should be resolved.
3.2 Set AOE IV app to High Performance
Press the Win + I hotkeys to launch the Windows Settings menu.
On the left side of the app, click on System.
Now, click on the Display option on the right.
Next, click on Graphics.
On the right, under the list of apps, look for Age of Empires 4 and click on Options.
In the Graphics Preference window, select High performance, and click on Save.
You can now try playing the Age of Empires 4 game and you should not experience FPS drops, lags, or stuttering.
4. Change AOE 4 graphics settings
A lot of users fixed the stuttering by just tweaking a few settings in the graphics settings menu.
Here is what I think are the best graphics settings for Age of Empires 4:
Vertical Sync = On
Framerate Limit = 60 FPS
Game Window = Exclusive Fullscreen
In case you are facing a scroll lag issue in the Age of Empires 4 game, you can set the image quality to medium, and leave everything else on high.
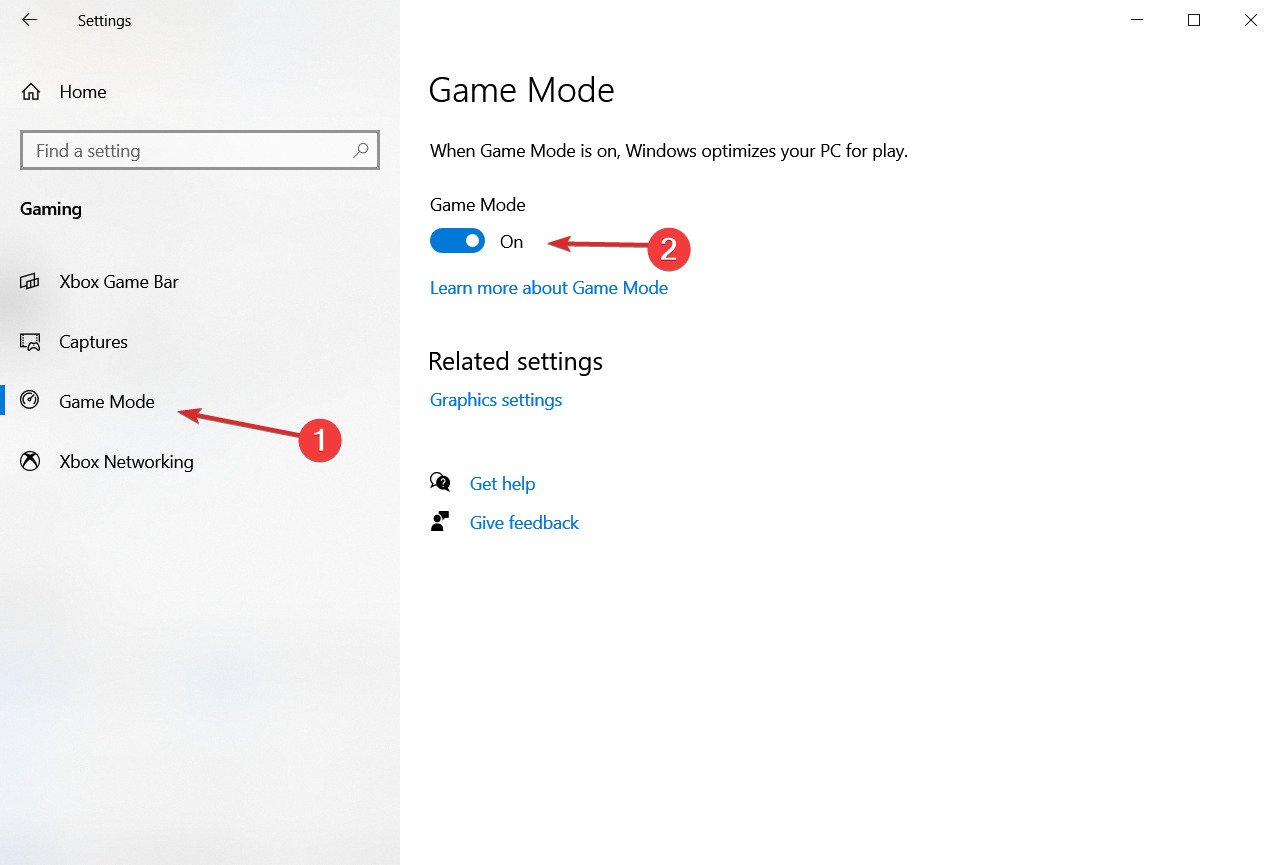
5. Enable the Game Mode
Open the Settings app by pressing the Win + I keys simultaneously.
Next, click on Gaming on the left.
Now, go to the right side and click on Game Mode.
On the right side, move the toggle to the right to turn on the Game Mode.
You can now check the game and there should be no lags in the Age of Empires 4 multiplayer or FPS drops.
To optimize Age of Empires IV, make sure to follow the below instructions:
Make sure that your PC meets the minimum requirements
Lower the in-game graphics settings (Image Quality, Lighting Quality, Texture Detail, Geometry Detail) to low
Play on a smaller map with a lower population
Close any applications running in the background
Keep a check on your network usage
In addition, if the Documents folder is set to sync with OneDrive, disable syncing to fix the Age of Empires 4 stuttering issue as shown below:
Go to your taskbar, and click on the OneDrive icon in the system tray.
Next, click on Help & Settings on the top right.
Now, select Pause Syncing.
Now that the sync is paused, launch AoE4 and check if you are still suffering from FPS drops, lag, and stuttering.
How do I show FPS in Age of Empires 4?
Usually, Age of Empires 4does not have any hotkeys, functions, or a menu option to check FPS while playing.
But, you can enable the Steam in-game overlay (if using Steam) in your global steam settings to check your frames.
However, as an alternative, you can use the Windows game bar to track performance and FPS by pressing the Win + G shortcut keys.
Nvidia users can use its GeForce Experience overlay, MSI Afterburner, or Fraps to find and measure your in-game FPS and track any performance dips.
At the same time, make sure that the game is updated to the latest version to avoid any performance issues.
Also, make sure to select the correct graphics processor (Nvidia/AMD) to avoid any FPS drops, lags, or stuttering.
Besides, Nvidia users can disable G-sync through the Nvidia Control Panel and the VRR option should also be turned off. But. if this does not help you may uninstall and reinstall the game to fix the issue.
If you have any other issues related to the Age of Empires 4, you can let us know in the comments box below.
Microsoft news recap is a weekly feature highlighting the top Microsoft news stories of the past week. Sit back, grab some coffee, and enjoy the read!
Microsoft Docs moves to new home at Microsoft Learn
It has been announced that Microsoft Docs has moved to Microsoft Learn. This change means that the URL has changed from docs.microsoft.com to learn.microsoft.com/docs, but that all bookmarks will continue to work.
Microsoft and BBC Earth join to bring Frozen Planet II to Minecraft
Microsoft has partnered with BBC Earth in order to bring Frozen Plant II to Minecraft Education Edition. There will be five free worlds made available, with the first having already launched on September 21 on Minecraft Education Edition and Minecraft Bedrock.
Satya Nadella is confident that Activision deal will be approved, he tells Bloomberg
Yes, this is true since the 2206 update. We examined data since Series X|S launch & determined the online compatibility check isn't needed in the vast majority of cases for Xbox One discs. Some games may still need to be updated online after install to ensure the best experience.
Several Canon printer users have reported that they encounter the Canon printer Bluetooth not working error. It can be very annoying for some users if the flexibility to print from anywhere without having to connect your device to the printer physically is no longer available.
There can be various reasons for these errors depending on the kind of device and kind of printer you wish to pair.
This article will provide simplified troubleshooting tips to fix your Canon printer Bluetooth not pairing issue.
Why is my Bluetooth not working on the Canon printer?
Bluetooth deactivated: It could be because the device’s Bluetooth or the printer’s Bluetooth is not turned on. You need to ensure that your printer’s Bluetooth.
Multiple devices connected: The printer can only communicate with one device simultaneously. Sometimes, the printer may be communicating with another previously connected device.
Connected to a USB cable: Another common reason that Canon printer Bluetooth is not pairing is that if it is connected to a computer with a USB cable, it cannot communicate using Bluetooth simultaneously. You’ll need to disconnect the USB cable and try pairing the printer again.
Does my Canon printer have Bluetooth?
Some Canon printers can connect to the computer via either the USB or Bluetooth connection system. You can decide to switch to a Bluetooth connection at any time, as long as your Canon printer is Bluetooth-enabled.
However, if your printer is not Bluetooth-enabled, you can’t adjust your printer to function as a Bluetooth device.
How do I fix the Canon printer’s Bluetooth?
1. Disable the USB cable connection
Remove the USB cable connection from your computer. This will enable you to connect via Bluetooth.
Do not bother about adding a new driver because the current printers are already installed from your USB connection.
2. Connect your printer via Bluetooth
Press the Windows + R to launch the Run dialogue box.
Type bthprops.cpl in the box and click OK.
Click Add device in the window, then select My device is set up and ready to be found.
Click Next for the computer to scan for any nearby Bluetooth devices.
Choose your Canon Bluetooth printer from the list that pops up and click Next.
The printer should connect to your computer, and you can begin using it with a wireless connection.
3. Update your drivers
If you still can’t connect to the Bluetooth of the Canon printer, you might want to consider updating your printer drivers.
Once you start the printer, ensure that it is not displaying any error, such as flashing lights or error codes on the screen. But, if the printer senses any error, try using the error code to fix the problem.
Make sure to address the error before proceeding with other steps.
5. Run the printer troubleshooter
Press theWindows key, type troubleshooting in the provided box, and launch the settings.
Click on Other troubleshooters in the new result.
Choose the Printer and click on the Run button.
Follow the on-screen prompts to complete the troubleshooting.
This should hopefully fix any issues with the Canon printer’s Bluetooth that could cause it not to work.
Enter your printer’s model name in the provided box.
Click on the Search icon and select your printer from the result.
Go to the Drivers & Downloads section.
Next, choose your operating system and click Select next to the driver you want to download.
Click Download.
Open the downloaded file, and click Yes. (You will then be moved to a setup wizard)
In the setup wizard, click Next.
Click Yes as you approve the license agreement.
Choose the mode of connection you used for your printer during the installation.
Then, click Next.
You can try any of the troubleshooting steps above to fix your Canon printer Bluetooth not working errors.
Do you need Wi-Fi to use Bluetooth on a printer?
Bluetooth printers are built with Bluetooth Standard technology to communicate with connected devices. Hence, Bluetooth printers do not use Wi-Fi to print content from your computer. You can use Bluetooth without Wi-Fi.
Yes, you can allow remote access to other participants in Microsoft Teams and also allow them to control your screen by clicking on the screen items, editing, and even typing.
Using this feature, you can easily give control, and the other user can take control or request control of the shared content during a meeting on the Teams app.
It’s an important feature considering that the Teams app is used for official meetings, and hence, it helps you share presentations or exchange files with other participants during the meeting.
Before enabling remote access, ensure you have the Microsoft Teams remote control administrator rights.
Next, on the left, under Meetings, go to Meeting Policies.
Now, on the right, under Content sharing, turn on Allow an external participant to give or request control.
You can now give control of your screen during your sessions with external users.
2. Allow remote control during the meeting
1. Launch Microsoft Teams and Join a meeting.
2. Next, click on Join now to start the meeting.
3. Once you join the meeting, in the middle of your video you will see a couple of options. Here, click on the up arrow (Share desktop icon).
4. Next, select to share either the Entire screen, a Window, or a Chrome Tab, and click on Share.
5. You will now notice that the content that you chose to share, will be surrounded by ared/blueborder.
6. As you move the mouse to the top of the screen, you will see a bar with a drop-down arrow that reads, Give control.
7. Click onGive controland pick the user you want to give control to.
8. You will now notice two pointers on the screen, one of which has your initials and the other with the user’s initials.
There is the possibility of enabling Remote Control in Teams during a meeting that has already begun. This is a handy method for when you cannot plan in advance which participants have something to share with the others.
As the meeting’s organizer, you need to first start sharing your screen, and then configure settings to give control to another user.
Next, wait till a participant is ready to share his screen.
Now, click on the Request controlbutton to request the participant to grant control over his screen.
Alternatively, if the participant requests control, you can either Allow or Deny sharing the screen.
You now have access to the screen that the participant wants to share for the presentation, even if you joined the meeting without an account.
Why can’t I give remote control on Teams?
Sometimes, when an external user requests control on Microsoft Teams, you do not see an option to allow or deny the request.
While the Request control option is missing on Microsoft Teams, the Give Control drop-down menu also stops responding as you try to open it.
To resolve this issue, you must enable hardware acceleration on Chrome/Edge. Here, as an example, we will show you how to enable hardware acceleration for Chrome:
Open Chrome, click on the three dots on the top right, and select Settings.
In the Settings window, click on System on the left.
Now, on the right, turn on Use hardware acceleration when available.
Click on Relaunch to restart Chrome and for the changes to be effective.
If you are using Edge, you can follow a similar process to enable hardware acceleration to fix the issue. Now, you should be able to give control to Teams to the participants.
As a participant, you can access files on the host’s PC effortlessly, using the Microsoft Teams remote control function on the desktop.
You can also edit the presentation and help the host deliver a successful interactive meeting.
Microsoft Outlook is a popular email client and one of the most productive tools for managing personal information such as webmail, contacts, calendar entries, and lots more.
Likewise, using a tool as advanced as Outlook has benefits. However, Microsoft Outlook, just like other platforms, has difficulties users complain about. One of these issues is that Outlook zoom is greyed out.
For those asking where is the zoom slider in Outlook, it’s positioned at the bottom-right corner and can be used to increase or decrease the text. So, when Outlook zoom in and out is not working, it presents a major issue and often leads to other problems.
Some say that the Outlook calendar zoom is greyed-out, the Outlook email zoom is greyed-out, the Outlook zoom slider is stuck at 10, and many others.
Fortunately, there are ways to fix Outlook if the zoom button is greyed out or not working. This article will take you through how to permanently fix the issue and get your Outlook zoom working in no time.
Why is the zoom bar greyed out in Outlook?
Zoom is not enabled in Outlook: The zoom button can be greyed-out if the zoom feature is not enabled in Outlook. Users need to download the zoom add-in for Outlook to be able to use the zoom button.
Outdated Outlook software: If you were wondering why can’t I zoom out in Outlook, chances are the app is outdated. It indicates that Outlook lacks the essential updates and patches that help it fix bugs and improvements.
Reading pane view is off: Using the zoom slider in Outlook may not work because it only works if the reading pane view is on. However, this may cause Outlook zooming in and out not to work.
Launch Outlook on your computer and navigate to File.
Click on the Office Account.
Select the Update Options and click on the Enable Updates option or Update Now.
Restart your PC.
Updating Outlook can help fix Outlook zoom in and out if it’s not working. Likewise, it is a good fix for the Outlook zoom slider stuck at 10.
2. Use another zoom method
If the zoom slider is greyed out in MS Outlook 2016, there are other ways users can use the zoom feature in Outlook. For those trying to discover how do I unlock zoom in Outlook, you can use the keyboard and mouse combination for it.
Press and hold Ctrl on your keyboard, then tap + to zoom in as much as you want.
Likewise, press and hold the Ctrl key on your keyboard, then push the scroll wheel forward to enlarge your display in Outlook. It is a good alternative if the Outlook zoom button is greyed out.
If you notice Outlook not updating inbox or failing to show new emails, follow the steps below to fix it fast. This problem can happen in both the classic and new Outlook versions. Sometimes Outlook is stuck updating inbox or doesn’t refresh automatically, which can block important messages.
Luckily, there are several fixes you can try to restore Outlook synchronization and get your inbox working again.
What can I do if my Outlook inbox is not updating?
Input this Network and Sharing Center Run command and click OK: control.exe /name Microsoft.NetworkAndSharingCenter
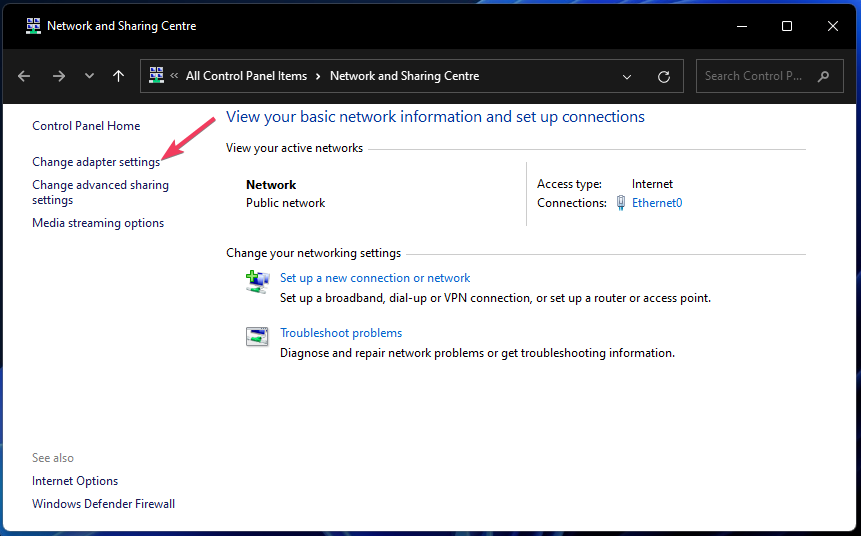
Then click that Control Panel applet’s Change adapter settings navigation option.
Right-click your internet connection adapter and select Properties.
Uncheck the Internet Protocol Version 6 checkbox.
Select OK to apply the new setting.
5. Repair the MS Office Suite
Bring up Windows 11’s or 10’s search box. Pressing Windows + S will open that search tool.
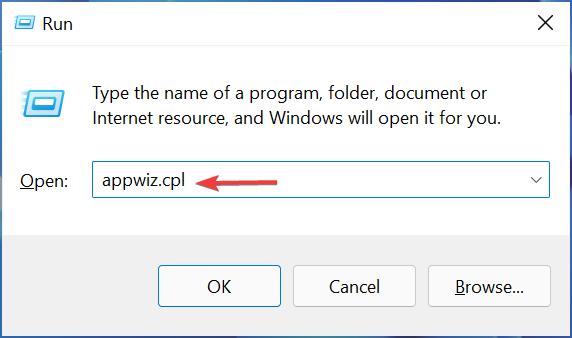
To find Programs and Features, input appwiz.cpl in the search box.
Click appwiz.cpl to bring up the Control Panel’s uninstaller tool.
Select your MS Office application listed within Programs and Features.
Press its Change button.
Select the Repair radio button if you’re using Office 2016. Office 365 users should select the more thorough Online Repair option.
Click the Repair or Continue button.
6. Manually Update Outlook Folders
If Outlook is not updating inbox automatically, force a manual refresh.
Steps:
Go to the Send/Receive tab.
Click Send/Receive All Folders.
Wait until synchronization completes.
Check if your inbox now shows new emails.
This is a quick way to bypass auto-sync issues when Outlook is stuck.
7. Verify Mail Server Settings
Incorrect account settings may leave Outlook synchronization status stuck updating inbox.
Steps:
Go to File > Account Settings > Account Settings.
Select your email account and click Change.
Verify incoming/outgoing server names and ports.
Save and restart Outlook.
Correct server details ensure Outlook can sync your mailbox properly.
8. Update Outlook Application
Using an outdated version may cause Outlook not syncing problems.
Steps:
Open Outlook and go to File > Office Account.
Click Update Options > Update Now.
Wait for updates to finish installing.
Restart Outlook and check your inbox.
Updating eliminates bugs and improves synchronization.
9. Remove and Re-add Your Account
If none of the above works, re-adding the account can reset syncing.
Steps:
Go to File > Account Settings > Account Settings.
Select your account and click Remove.
Restart Outlook.
Add your account again using correct login details.
This often fixes Outlook not refreshing with new emails.
Is there a better email client than Outlook?
There are certainly quite a few alternatives to Outlook. Thunderbird and Mailbird are two of the most notable alternative email clients. Our email client software guide provides further details about those applications and others.
There aren’t any guaranteed solutions for Outlook’s inbox not updating since potential causes are varied. However, the resolutions outlined here are among the more likely Outlook inbox fixes.
Outlook’s Inbox Repair tool (otherwise SCANPST.EXE) may also help some users fix the inbox not updating. This Microsoft webpage provides guidelines for repairing data files with SCANPST.EXE.
Many Windows users have always wanted to replace their AMD GPU with an Nvidia graphics card on their system.
There has always been a debate over which graphics card is better whether it is AMD or Nvidia since both companies provide the best graphics card possible.
Yes! You can easily swap GPUs on your system these days. The process is incredibly simple and it can be completed in just a couple of steps.
If you haven’t done this before, don’t worry, this guide will show you how to change the AMD graphics card to Nvidia properly.
Do I need to uninstall drivers before installing a new GPU?
You have to uninstall the old GPU drivers completely from the system before going to install the new graphics card drivers.
Otherwise, you might encounter some compatibility issues, so removing the drivers is recommended.
How do I replace my AMD GPU with Nvidia?
1. Uninstall the AMD graphics drivers
Press the Windows and R keys together to open the run console.
Type appwiz.cpl in the textbox and then press Enter.
This opens the Programs and Features wizard.
Search for the AMD software from the list and select it.
Click Uninstall from the top of the wizard.
This starts uninstalling the AMD drivers from the system completely.
For best results, users are recommending using DDU to remove your drivers. If you’re not familiar, visit our how-to-use Display Driver Uninstaller guide for more info.
To completely uninstall AMD drivers, we recommend using automated software. CCleaner is a tool that specializes in uninstalling programs along with all associated files and deep roots within your computer.
Next, click the Power button and choose Shut down.
Once your PC is turned off, disconnect the computer case from the power outlet.
Disconnect all peripherals that are connected to your case.
3. Remove your AMD GPU
NOTE
Replacing a GPU can be a complicated process. If your computer is under warranty or if you don’t know how to do it safely, contact a professional.
Open the computer case and locate your graphics card.
Unscrew any screws that might be holding it to your case. Next, disconnect all the cables that are connected to it.
Carefully remove the old GPU from the slot. Keep in mind that there’s a lock next to the slot that is holding your GPU, so make sure you press and hold it beforehand.
4. Insert a new GPU
Carefully insert your new GPU into the PCI-E slot.
Connect the necessary cables, and secure the new GPU to your case with a screw.
After everything is connected, close the computer case and connect your cables.
Start your PC.
If you don’t hear any beeping noise and the image is displayed on your monitor, it means that the new GPU is successfully installed.
While playing Borderlands 3 if you are experiencing lags or stuttering, the issue is mostly related to network issues or problems with the FPS.
However, there could be other reasons as well that can affect the performance of the game and some of them include:
Outdated graphics drivers
Higher graphics configuration that the game is not designed to handle
DirectX configuration
Windows graphics settings
Pending Windows OS update
Accumulated junk files
Fortunately, there are a few workarounds that can help you fix the Borderlands 3 low FPS issue even on a high-end PC.
Before you proceed with the methods below, make sure that you restart the system once to check if it helps fix the issue.
Besides, you can also check your network connection or close any unused background applications to get rid of game lags or FPS drops.
How do I fix my FPS drop in Borderlands 3?
1. Run the game launcher as an administrator
Right-click on the launcher on the desktop and select Properties.
In the Properties dialog, select the Compatibility tab.
Here, navigate to Settings and check the box next to Run this program as an administrator. Press Apply and OK to save changes and exit.
So now, whenever you open the game it will open with administrator rights, thus, helping you to get rid of the FPS drops issue.
2. Update your drivers
Some of the most common issues are a result of outdated drivers. You can opt for a professional program that can help you scan your PC for incompatible or old drivers.
It will provide a thorough report of your device drivers and update immediately each one of them if that is the case. Plus you can set it up so it will run periodic scans so you can be sure your drivers never go out of date again.
Press the Win + Rkeyssimultaneously and the Run console is launched.
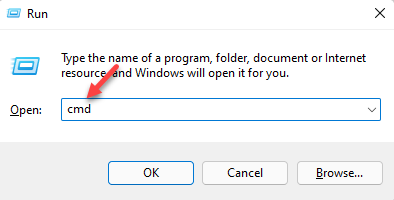
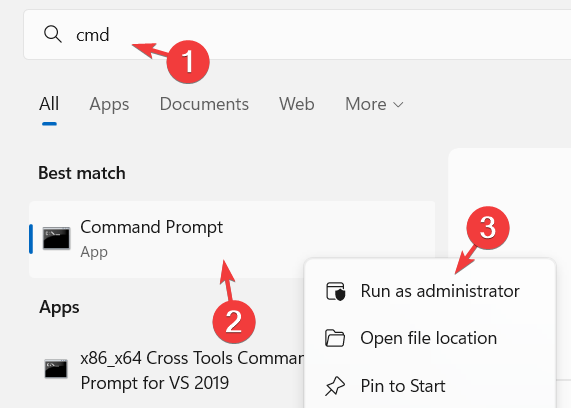
Type cmd in the search box and press the Ctrl + Shift + Enter hotkeys to open Command Prompt as administrator.
Type the below commands one after another in the Command prompt (admin) and hit Enterafter each one: ipconfig /releaseipconfig /renew
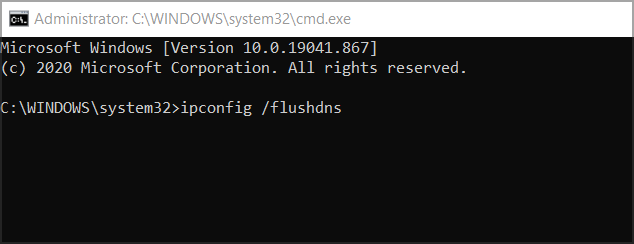
Once the IP address is successfully renewed, run the below command and hit Enter to flush the DNS cache: ipconfig /flushdns
Now, exit Command Prompt, restart your PC, and check if the FPS drops issue is resolved.
6. Use Google Public DNS address
Open the Run console by pressing the Win + R shortcut keys.
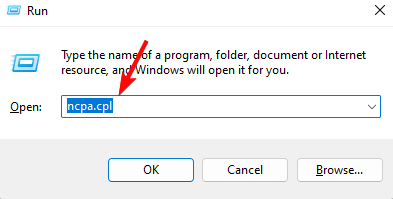
Now, in the search field, type ncpa.cpl and hit Enter.
Next, in the Network Connections window, right-click on your network connection and select Properties.
Under the Networking tab, select Internet Protocol Version 4 (TCP/IPv4) and click on Properties.
In the next dialog, go to the General tab, and select Obtain an IP address automatically.
Now, select Use the following DNS server addresses options, and input the below Google Public DNSaddress in the respective fields: Preferred DNS server: 8.8.8.8; Alternate DNS server: 8.8.4.4.
Now, launch Borderlands 3 and check if you still experience stutters, slow FPs, or lags during the game.
Bonus tip
Additionally, you can modify in-game settings as below:
➡Set the display mode to full screen
➡Change the game settings(below is an example):
Graphics API – Direct X 11
Overall Quality: Medium (If using an old PC model, set it low/very low)
Anti Aliasing: FXAA
FidelityFX Sharpening: On
Camera Motion Blur: Off
Object Motion Blur: Off
Texture Streaming: Ultra
Anisotropic Filtering: 16x
Material Complexity: Medium
How do I make Borderlands 3 run smoother?
While the above troubleshooting methods can help you to fix issues such as FPS drops, lags, and stuttering, you can also turn off the hardware acceleration for a smoother performance.
So, for example, if you are playing the game on Discord, you can follow the below steps to turn off the feature:
Launch Discord and click on the gear icon in the bottom left to open Settings.
On the left, click on Appearance.
Now, on the right, under Advanced, turn off Hardware Acceleration.
You can now try playing Borderlands 3 on Discord and it should run it smoothly.
At the same time, make sure that you always check for the latest updates for the game to keep off any performance issues.
Now, circling back to what is important now, if you get the An unknown error has occurred, the steps below will save you.
Why does Amazon keep saying an error has occurred?
This is a pretty common error, so don’t even sweat about it. A lot of Amazon users report dealing with this situation, so you aren’t alone in this.
So, if Amazon keeps saying Sorry, something went wrong, just refresh the page or reload the app, as the first line of defense.
This common error usually results from a poor connection, so check and see if your internet is working properly or if you are downloading a large file.
Furthermore, assuming Amazon servers are actually online, you should double-check that your PC or phone network connection is working as intended.
Thus, presuming you are now dealing with An unknown error has occurred, please try again later on Amazon, here’s what you need to do.
Quick Tip
An option that we recommend is switching to a more suitable browser. Opera GX can be very useful because of its various built-in features. It lets you set limits on CPU, RAM, and Network usage to speed up your online activity.
You can also control your privacy and security with its free integrated VPN. Your IP address is replaced with a virtual one, making it harder for websites to track your location and identify your PC.
Opera GX
Try this browser to boost your online activity and to make it more secure.
How do I fix an unknown error has occurred on Amazon?
1. Restart the Amazon app
The simplest solutions bring the best results in solving what appear to be impossibly intricate problems, so we will go this route at first.
Before we commit to doing anything else, let’s simply restart the app. A lot of users facing this problem state that it only took restarting the app for the problem to go away.
It might not seem like much, but that is all that software needs sometimes, a good old-fashioned reboot, and all will be good.
2. Update the Amazon app
More times than not, software starts to malfunction and exhibit strange behavior when it becomes outdated, in case you didn’t know.
That being said, keeping your app up to date with the latest patches and fixes is vital for it to properly function and not display any errors.
Just hit the update button and let the app download its latest build, afterwards simply start Amazon and keep on shopping.
3. Delete the Amazon app cache
1. Start the Settings app and tap Apps.
2. If necessary, tap See all apps and then tap Amazon Shopping.
3. Tap Storage & cache.
4. Tap Clear storage.
4. Update Windows
PressWindows+Ito access Settings.
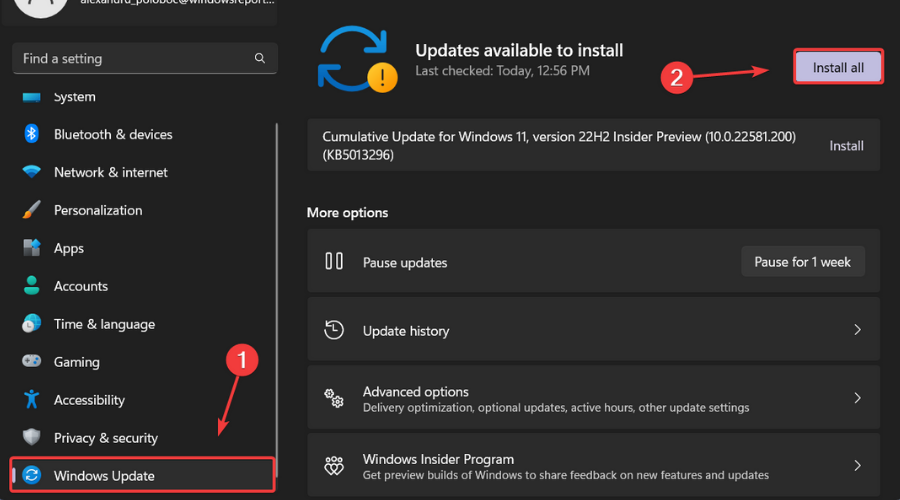
Select the Windows updates tab and click Install all.
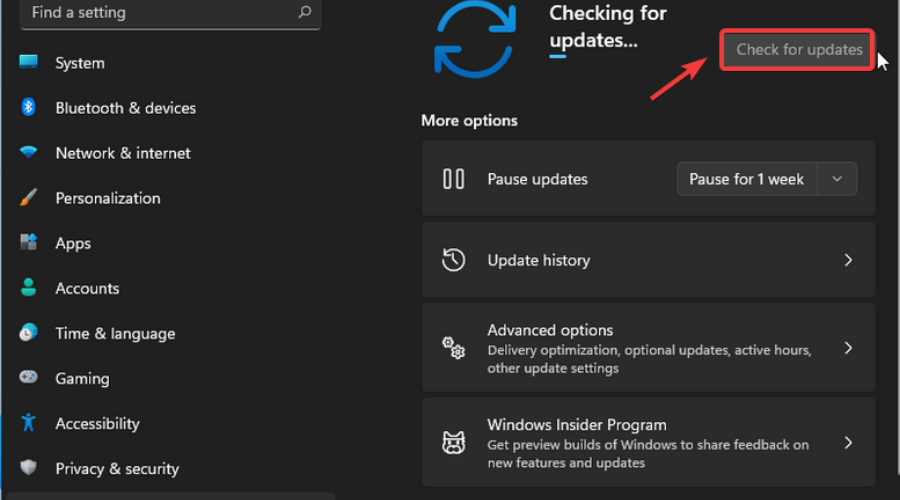
If no updates are queued for installation, press the Check for updates button.
5. Uninstall/Re-install the app
Press Win + I to access Settings.
Select the Apps tab, then click on Installed Apps.
Look for the Amazon app, click on the dots next to it and select Uninstall.
Re-install the app.
How do I empty my Amazon cache?
This is one of the easiest actions you can do and it will only take one minute of your time, so don’t worry about it.
All you need to do is follow the steps shown in solution 3, where we’ve explained exactly what you need to do on your end.
It’s not from the app itself, and you will have to go to your system’s settings and access this information. From there, you can delete the Cache for pretty much everything installed.
So, if you are in a scenario where Firestick displays An unknown error occurred connecting to Amazon Appstore, use the solutions in this article.
In fact, the steps above can be useful in pretty much all Amazon Appstore connection failures, so keep that in mind.
Has this guide been helpful? Share your experience with us in the comments section below.
Alienware laptops are ranked some of the best laptops in the market, and it is because of the features incorporated into them.
However, users recently complained about Alienware laptops not recognizing headphones or not playing sounds from the headphones. Users also complain about Dell laptops not recognizing headphones in Windows 11.
Furthermore, users may encounter Alienware not playing sound from headphones due to various factors. These factors can be audio output issues, audio driver issues, Realtek audio driver problems, and lots more.
Likewise, these causes of the Alienware laptop not recognizing headphones may differ in various laptops.
Hence, this article will discuss some of the best fixes to help you get rid of the Alienware laptop and other laptops not recognizing headphones issues.
Why is my laptop not detecting headphones?
Outdated audio driver: Users may encounter many problems with audio-related components such as device detection, audio output selection, etc. if the audio driver is outdated. It indicates that your computer lacks the patches and updates to fix bugs affecting its audio system.
Boot errors: The Alienware laptop may encounter many errors during startup that can impede its smooth operation. It can cause the computer’s essential components to become inactive because they cannot function properly due to boot errors.
Problems with running Realtek drivers: Realtek audio driver is the sound driver responsible for managing how audio components on your Windows devices work. It’s essential for audio device detection. Hence, users may encounter issues with their laptops recognizing headphones if the Realtek drivers are outdated or corrupt. It can cause Realtek not to detect headphones on your Alienware.
Faulty or broken headphones: Alienware laptop not recognizing headphones may be due to defective headphones. So, the PC may have difficulties processing the headphone or detecting it. A broken headphone may cause the Alienware headset mic not to work.
How do I fix my laptop if it’s not detecting headphones?
1. Restart your computer
Click on the Start button on your screen.
Select Power options.
Click on Restart and OK.
Restarting your computer will help fix startup errors that may prevent your laptop from recognizing headphones.
2. Update the audio driver
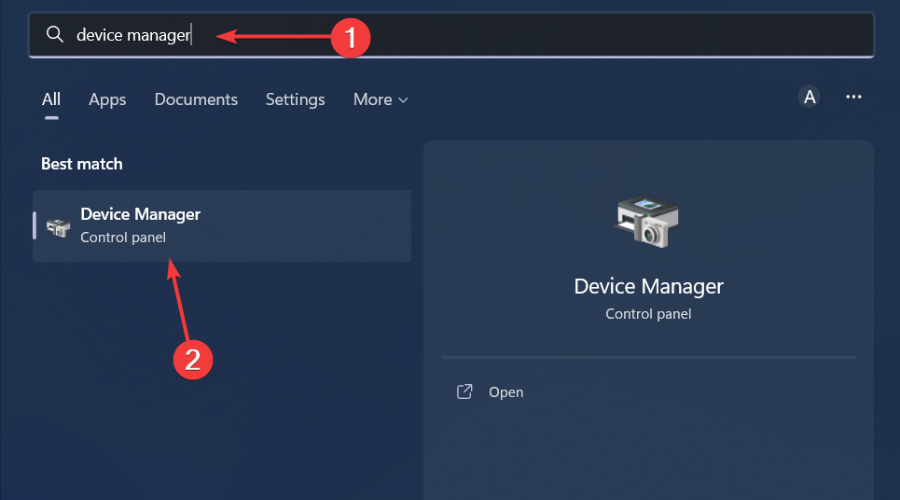
Right-click on the Start button and select the Device Manager option.
Select your audio device and right-click on it.
Select Update driver from the options and choose the Search automatically for drivers.
If there are any updates, the installation wizard will install them automatically. Restart your computer after the installation is complete and check if your Alienware can recognize headphones.
You can also try to use a specialized program that will help you accomplish this process automatically. Outbyte Driver Updater performs an in-depth scan of your device for outdated drivers and chooses the latest update for them to improve your PC’s condition.
Outbyte Driver Updater
Benefit from Outbyte Driver Updater’s great features and keep your device drivers in check.
Press Windows + R keys simultaneously to prompt the Run window.
Type devmgmt.msc in the search space and press Enter.
Navigate to the Sound, video, and game controllers option and double-click on it.
Right-click on the Realtek High Definition Audio device and select Uninstall. (Confirm any additional prompts that pop up)
Restart the computer. Windows will have the proper drivers installed on the next startup.
4. Set headphones as the default output device
Press the Windows + Rkeys to prompt the Run window.
Type the control panel in the search space and launch the Control Panel.
Select Hardware and Sound, then click on Sound.
Click on the Playback tab to check if the Headphone device defaults.
If it’s not set as default, click and tap the Set default option.
Click OK to save the changes on your computer.
Setting headphones as the default output should help your laptop play sound through it.
5. Use another headphone for your Alienware laptop
Users can switch to another headphone to check if the problem is really from the computer. A broken headphone won’t work on Alienware, so it may be impossible to detect it.
Connecting external devices like monitors to your computer allows you to multitask. However, users can encounter many problems using these external devices, especially monitors.
Many users complain about the third monitor flickering when connected to the computer. Due to the unstable display screen, it is hard to focus on the monitor.
Moreover, many things may be responsible for the external monitor flickering issues and may differ on different PCs. Cable issues, refresh rate issues, and others are the most common causes of this problem.
Nonetheless, the third monitor flickering issue is not a grievous matter; you can fix it with just a few steps. Hence, this article will discuss the steps to fix the problem and other screen flickering issues.
Why is the third monitor flickering?
Cable issues: Connecting an external screen to your computer with a cable that has a problem can cause many problems. Whether an HDMI cable or a VGA cable, you can encounter issues if the cable is not correctly connected or is faulty. Likewise, not plugging the cable into the appropriate port can make it malfunction and result in the VGA monitor flickering.
Outdated graphics drivers: The graphic driver is responsible for creating a stable display for your computer. However, the graphics driver may not function when outdated because it lacks patches and updates. So, external screens can flicker if the graphics driver is not up-to-date.
External screen refresh rate: The third screen refresh rate of the third screen may be low and may differ from that of the computer. Screen refresh rate determines how many times per second the monitor updates with a new image display. As a result, users may encounter issues with the third monitor if its refresh rate differs from your computer.
Broken monitor: A broken monitor can cause problems with your display. It can cause flickering on the monitor, making it impossible to see the screen content. Likewise, if the monitor is not correctly connected to power, it can cause issues with its display.
How do I fix the third monitor when it’s flickering?
1. Check your cable
The first thing you should do if the third monitor is flickering is to check whether there are any issues with the cable. Likewise, check the connection port to see if the cable is connected to the appropriate port.
Furthermore, we recommend you switch to a new and quality cable to check if the cable is faulty. It’ll help you decipher where the issue is prompting.
2. Update the graphics driver
Press on Windows + R simultaneously to launch the Run window.
Type the following into the search space: devmgmt.msc, and click the OK button.
Click on the Display adapters from the search results, select the driver from the drop-down, and then right-click on it.
Click the Update driver Software option, then select Search automatically for drivers.
Restart your computer after the updating process is complete. Updating your graphics driver will fix the monitor flicker issues.
Alternatively, you can use specialized software to update your GPU drivers automatically. Outbyte Driver Updater is a tool that scans your PC for outdated drivers and updates them to the latest version.
Outbyte Driver Updater uses its database of over 18 million driver files to find the latest versions of all outdated drivers and safely install them.
Outbyte Driver Updater
A fast and simple-to-use tool to keep all drivers updated.
Right-click on any space on the desktop and select Display settings.
Select the monitor experiencing the mouse lagging issue at the top of the screen.
Select Advanced display settings and click on Display adapter properties for your selected display number.
Navigate to the Monitor tab, then Monitor settings.
Change the Screen refresh rate to match the main screen’s refresh rate.
Click on Apply, then OK to save the changes.
Restart your computer and see if the third monitor flickering issues persist. It is also a good fix for the second monitor flickering.
4. Check the power supply to the monitor
Monitors can affect their displays if power cables connect to them loosely or supply low currents.
Hence, check if there’s any problem with the connection. If the cable is broken or the connection is loose, adjust it correctly.
5. Change your monitor
We recommend you get a perfectly working monitor and check if the flickering issues persist. So, it’ll save you the stress of battling a bad monitor.
If the monitor is faulty, there’s no point in keeping it with you. Just get a better working option to have the issue fixed.
You can also learn how to fix cases where only part of your laptop display flickers by reading our detailed guide on part of laptop screen flickering.
Do display port cables matter?
The straight answer is yes. Display port cables differ in transmission speed, color depth, resolution, refresh rate, etc. So, it would help if you considered buying a quality display port cable to enjoy a stable cable connection.
Data is sent and received across a network in small units known as packets in any network environment. This is true for everything you do on the internet, including emailing, uploading or downloading images or files, browsing, streaming, gaming, and even voice and video communication.
BT Smart Hub 2 packet loss occurs when one or more of these packets are interrupted during their journey.
Ping is your connection’s reaction time, or how quickly you receive a response after sending out a request. A low ping indicates a more responsive connection, which is particularly important in real-time applications such as gaming and voice and video calls. Milliseconds are used to measure ping (ms).
Why am I all of a sudden getting packet loss on BT Smart Hub 2?
There are a couple of reasons why you are getting BT Smart Hub 2 packet loss. One of them is network congestion. Congestion on the network is the most common cause of network packet loss. Since all networks have space constraints, network congestion is very similar to peak hour traffic.
Another major issue for your network is the rate at which hardware becomes obsolete or redundant these days. Firewalls, routers, and network switches consume a lot of power and can significantly weaken network signals.
Software bugs are another reason you are getting BT Smart Hub 2 packet loss. Bugs or glitches in your system can sometimes cause network performance to degrade and packet delivery to fail.
Hardware reboots and patches may be necessary to resolve bugs. Other reasons include security threats and overtaxed devices.
How do I fix packet loss on BT Smart Hub 2?
1. Do a ping test
Click the Windows Start button, type Command Prompt, and click on it to open the Command Prompt.
Type ping, space, and then enter an IP address, for example, 192. XXX. X.X.
Examine the ping results to see the issue with your BT Smart Hub 2.
2. Use a VPN
Packet loss is generally created by an unstable connection to the server. Whether you have internet issues or the server is not working properly, you might encounter packet loss or ping spikes.
With a VPN you can connect to a different server that works better. It’s completely safe and it also makes you untrackable for online threats. Our recommendation is ExpressVPN for its amazing features.
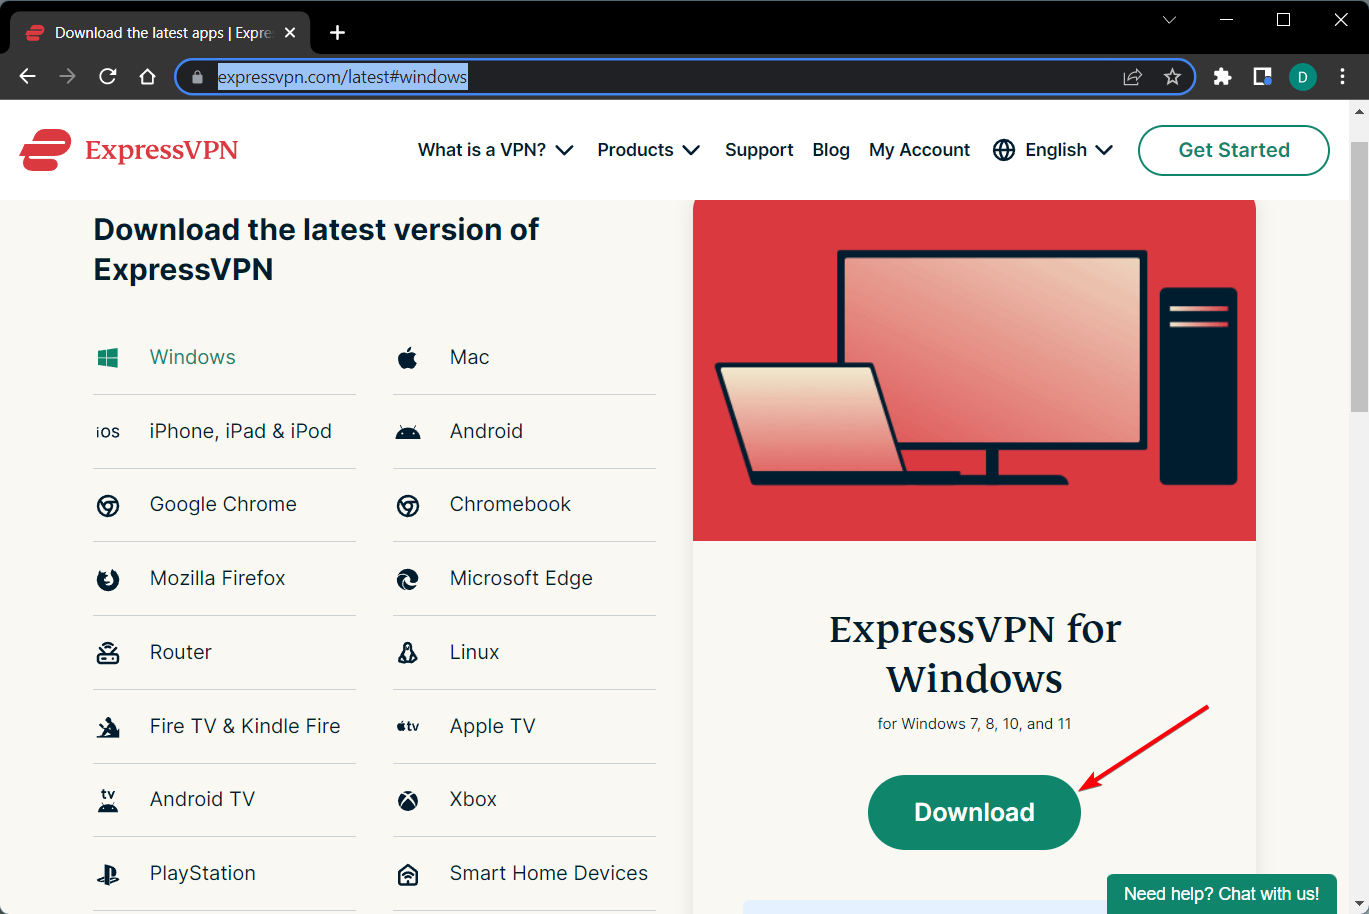
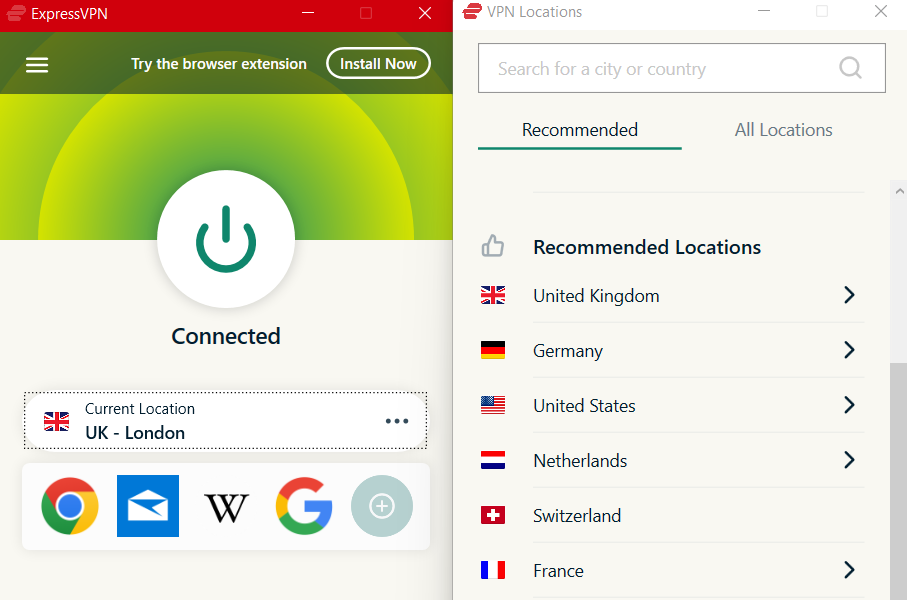
Here is how to download and connect to a VPN (we’ll be using ExpressVPN as an example):
After the download ended, install the VPN then open it.
Click on choose location and select from the list the server you want to connect to.
After you connect to the server, feel free to check if any spike drop appears again.
ExpressVPN is as simple as above, the connection is made in a few moments and it won’t affect your internet speed or PC performance. It has servers in over 90 countries so you are sure to find the right one for you.
ExpressVPN
Your online helper against lag spikes and packet loss for any connection.
Remove the modem and router from the power supply.
Wait at least 15 seconds before proceeding.
Plug the modem back into the power outlet first, then wait 1-2 minutes before turning it on.
Wait for all of the panel lights on your cable modem to turn green before testing your internet connection.
4. Check the physical connections
Make sure that all of the device connections are made appropriately.
Connect all ports to the devices appropriately using the necessary cables. Packet loss will happen if the cable connections are incorrect and the connection is loose.
5. Use a wired connection
Connect a laptop to the back of the Hub using a network cable.
Launch your browser and visit a website of your choice.
If this works, restart all your devices and then connect them again.
6. Check BT Broadband status
Disconnect your phone from the Wi-Fi network.
Connect it through mobile data to establish if there could be a problem in your area.
If there is a problem, you can contact support or revert to a fiber optic cable and ethernet instead of Wi-Fi.
How can I improve my broadband quality?
You might need to switch to a new deal or provider if the speed you’re now receiving is far below what you require.
However, there are a few things you may do to boost the speed if you’re normally at ease with it.
They include placing your router in a centralized location, choosing a wired connection over Wi-Fi, trying a wireless booster, giving your computer a spring clean, turning off Wi-Fi on all of your unused gadgets and if you are working from home you can switch your conference calls to audio-only.
Packet loss is a relatively common network issue that can be caused by simple problems with the system software and cables, among others.
It cannot be totally eliminated; it can only be reduced by measures and the use of various instruments for network testing and monitoring. The fixes discussed above will help you deal with packet loss without any problems.
You can also use dedicated network monitoring tools which address owners of medium to large networks, as well as business clients. Let us know which one worked for you in the comments area below.
When users upgrade their graphics card in their system for a better experience while playing games, they noticed that the GPU in the AMD system is not being fully utilized.
Due to this, they are facing quite a lag and problems while playing the games or using the system in general. A few users also faced no AMD graphics driver installed error in Windows 11 system.
Why is my GPU utilization so low?
There are certain reasons why GPU is not being fully utilized on the system and they are listed below.
Corrupted system files – When any system files get corrupted, it will create problems like this
Graphics settings – A game’s graphical settings may need to be changed if it is frequently producing this problem
Heavy applications running in the background – There is an issue when several large apps that are not needed are operating in the background
Now that we know where the problems arise from, here is how we can fix the AMD GPU issue.
How do I force my AMD GPU usage?
1. Disable all startup programs
Press the Ctrl + Shift + Esc keys together to open the TaskManager.
Click the Startup tab on the left side and right-click on a startup app listed.
Choose Disable from the context menu.
Do the same to disable all the startup apps listed under the Startup apps tab.
2. Run the SFC scan
Press the Windows key and type cmd.
Right-click on the Command Prompt app and select Run as administrator from the context menu.
Click Yes on the UAC prompt on the screen.
Now type the below line in the command prompt window and press the Enter key: sfc /scannow
This will scan for all the corrupted files and then repair them.
3. Update the chipset driver
Open the Run console by pressing the Windows and R keys together.
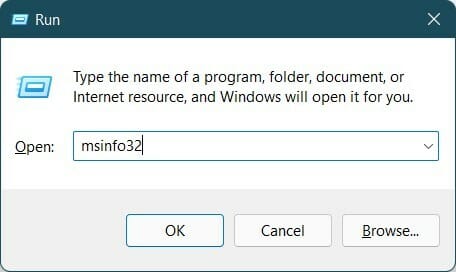
Type msinfo32 in the run console and press Enter.
In the System Information window, select the System Summary option on the left side.
Then check for the BaseBoard Product option on the right side and note down its value, which is the chipset model.
Now visit the AMD website and search for your chipset model and download its drivers.
Finally, install the drivers on your system.
Alternatively, a fast and simple solution is to use a third-party tool to automatically scan for outdated drivers and update them safely.
4. Change the graphics settings
Press the Windows key and type graphics settings and press the Enter key.
On the graphics page, select the application or game that is causing the GPU issue and click Options.
In the Graphics preference window, choose High performance and click Save.
This will change the graphics settings for that application on the system.
Press the Windows + X keys together and then press the M key to open the Device Manager app.
Expand the Display adapters option by double-clicking on it.
Right-click on the graphics driver and choose the Update driver option from the context menu.
Click the Search automatically for drivers option to start updating.
Once done updating, you can close the device manager window.
How do I know if my CPU is bottlenecking my GPU?
To determine whether your CPU is bottlenecking GPU, you will have to check both CPU and GPU usage under the Performance tab in the Task Manager app.
If the CPU is utilizing around 90% or more and probably higher than the GPU load, you can conclude that your CPU is bottlenecking your GPU. This can be improved by underclocking the GPU safely.
Did you manage to resolve the GPU usage problem on your Windows 11 PC? Let us know more about it in the comments area below.
Several users have recently complained of Outlook not inserting signatures. This can be annoying to most users as it can be redundant to write out your name and contact information manually every time.
Email signatures enable people to get in contact with you as well as it also adds some polish to your writing.
When you have your signature saved automatically, it reduces the stress of repeating it after every response.
If you encounter the Outlook not adding signature automatically problem, you can read further into this article to find the best fix just right for you.
Why is my signature image not showing in Outlook?
The recipient’semail client is at fault: Some email clients do not automatically download media files which the signature image. Hence, if your recipient’s email client falls under this category, the signature image may not display to them. There is almost nothing you can do then for your recipient to specifically instruct their email client to download the images attached to your emails.
New update code issue: The problems with the signature feature are found mainly in the new update of older versions of MS Office. What’s best to do in this instance is to update or install the more recent version of MS Office.
Outlook on the web policy: While sending email via Outlook on the web, there is an OWA policy that may make you get the Outlook web not inserting signature error. You will have to enable the signature image to use it. Unfortunately, only registered organizations are allowed to view or change the policy. Hence, making it inaccessible to users with a personal MS account.
How do I fix the Outlook signature not working?
1. Add a new signature
Open Outlook and click on File.
Click Options to open the Outlook dialog box.
Click Mail on the left pane.
Select the Signatures in the right pane labeled as Create or modifysignatures for messages. (After clicking it, you should be able to add your customized signature)
Click your signature, then locate the Message Format.
Click on HTML on the Compose messages in HTML format, then a drop-down menu will appear.
Select Plain text and click on Save.
This changes the format of your signature to plain text, which is readable on all devices. Hence, it fixes Outlook not inserting the signature problem.
3. Double spacing in email signature block
Create your email signature block in a Word processor.
Copy and paste the email signature you created into the signature editor.
Make your final adjustments if there are any.
You can then Save.
The double-spacing problem could be solved using the Shift + Enter keys combination.
Although this alternative may sometimes cause the signature to appear as text in a one-liner, it’s better to follow the first solution above.
Select the Outlook Web App policies tab in the top menu.
Select the policy in action (OwaMailboxPolicy in this example) and edit it.
Go to the features tab, and click More options at the bottom of the window.
Look under the User experience section, and select the Email signature checkbox.
5. Use embedded graphics
Click File > Options > Mail > Signatures.
In the signature editor window, click on the picture icon.
Select a picture from your local drive.
To ensure that your embedded images look correctly on the recipient’s side, you must use a third-party solution like CodeTwo Signatures for Office 365.
How do I set up an automatic signature in Outlook 365?
In Outlook, multiple ways exist to create one or more automatic signatures for your email messages.
Your signature can be either text, images, your e-business card, a logo, or even an image of your handwritten signature.
You can follow our first solution in this guide to set up your customized signature in Outlook without hassles.
These are the most efficient troubleshooting fixes for the Outlook not inserting signature problem. If the fixes are followed strictly, you should fix the problem quickly.
If you need to set up an IPsec VPN client on Windows 10 PC, we’re here to help. Using a virtual private network, you can hide your IP address, encrypt your data traffic, and ultimately protect your online privacy.
You can also watch unlimited streaming by using a VPN to circumvent geoblocks and unblock Netflix libraries that aren’t normally available in your country.
What’s an IPsec VPN client?
An IPsec VPN client is a virtual private network service that supports the IPsec protocol. IPsec is used by the VPN to encrypt and protect your data across the Internet.
IPsec (Internet Protocol security) is a VPN protocol that authenticates and encrypts data transferred over the web. It supports multiple encryption methods, including 256-bit AES.
An IPsec VPN client is a virtual private network client that uses the IPsec protocol. However, IPsec can’t be used standalone because it’s only an encryption protocol that provides data security and privacy.
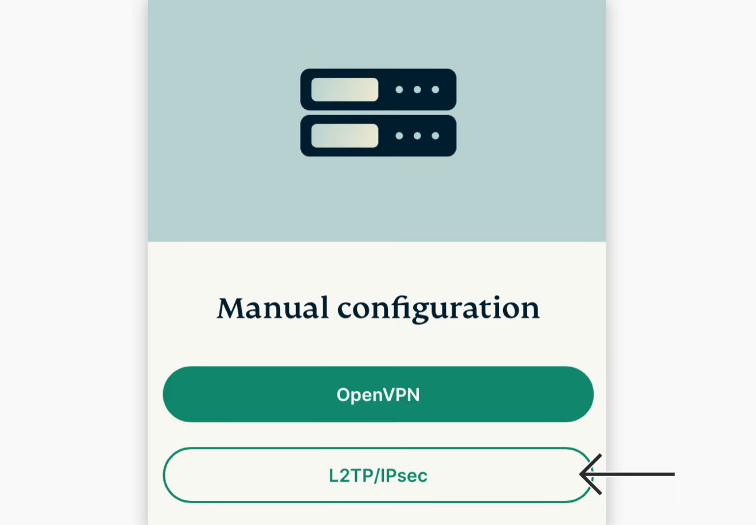
A VPN connection also requires a tunneling protocol to deliver data. As such, IPsec is typically accompanied by L2TP or IKEv2, resulting in the L2TP/IPsec and IKEv2/VPN protocols.
Does Windows 10 support IPsec VPN?
Windows 10 has native support for L2TP/IPsec. You can also set up a VPN on Windows Vista or older editions if you can find one that’s still compatible.
You can use this protocol to set up the built-in Windows VPN (for Windows 10 and 11). It is also compatible with third-party VPN clients that support it.
It’s possible to create a VPN connection in Windows 10 using the built-in OS settings and then add the VPN client’s login information, but it’s recommended to use a dedicated client for best performance.
How do I set up an IPsec VPN client on Windows 10?
To set up a VPN with IPsec on Windows, you need a client that offers you the possibility to connect using this protocol, and our top choice in this regard is ExpressVPN.
The VPN has thousands of fast servers all around the world and industry-leading VPN security to make sure your data stays completely private: military-grade encryption,
You’ll get information about your username and password + IPsec server addresses.
Save this information so you can add it to your VPN connection.
The user name and password for the IPsec connection will be necessary once you configure your VPN connection using Windows settings.
2. Create a VPN connection
Right-click the Start button and go to Network Connections.
Select VPN on the left side and click Add a VPN connection.
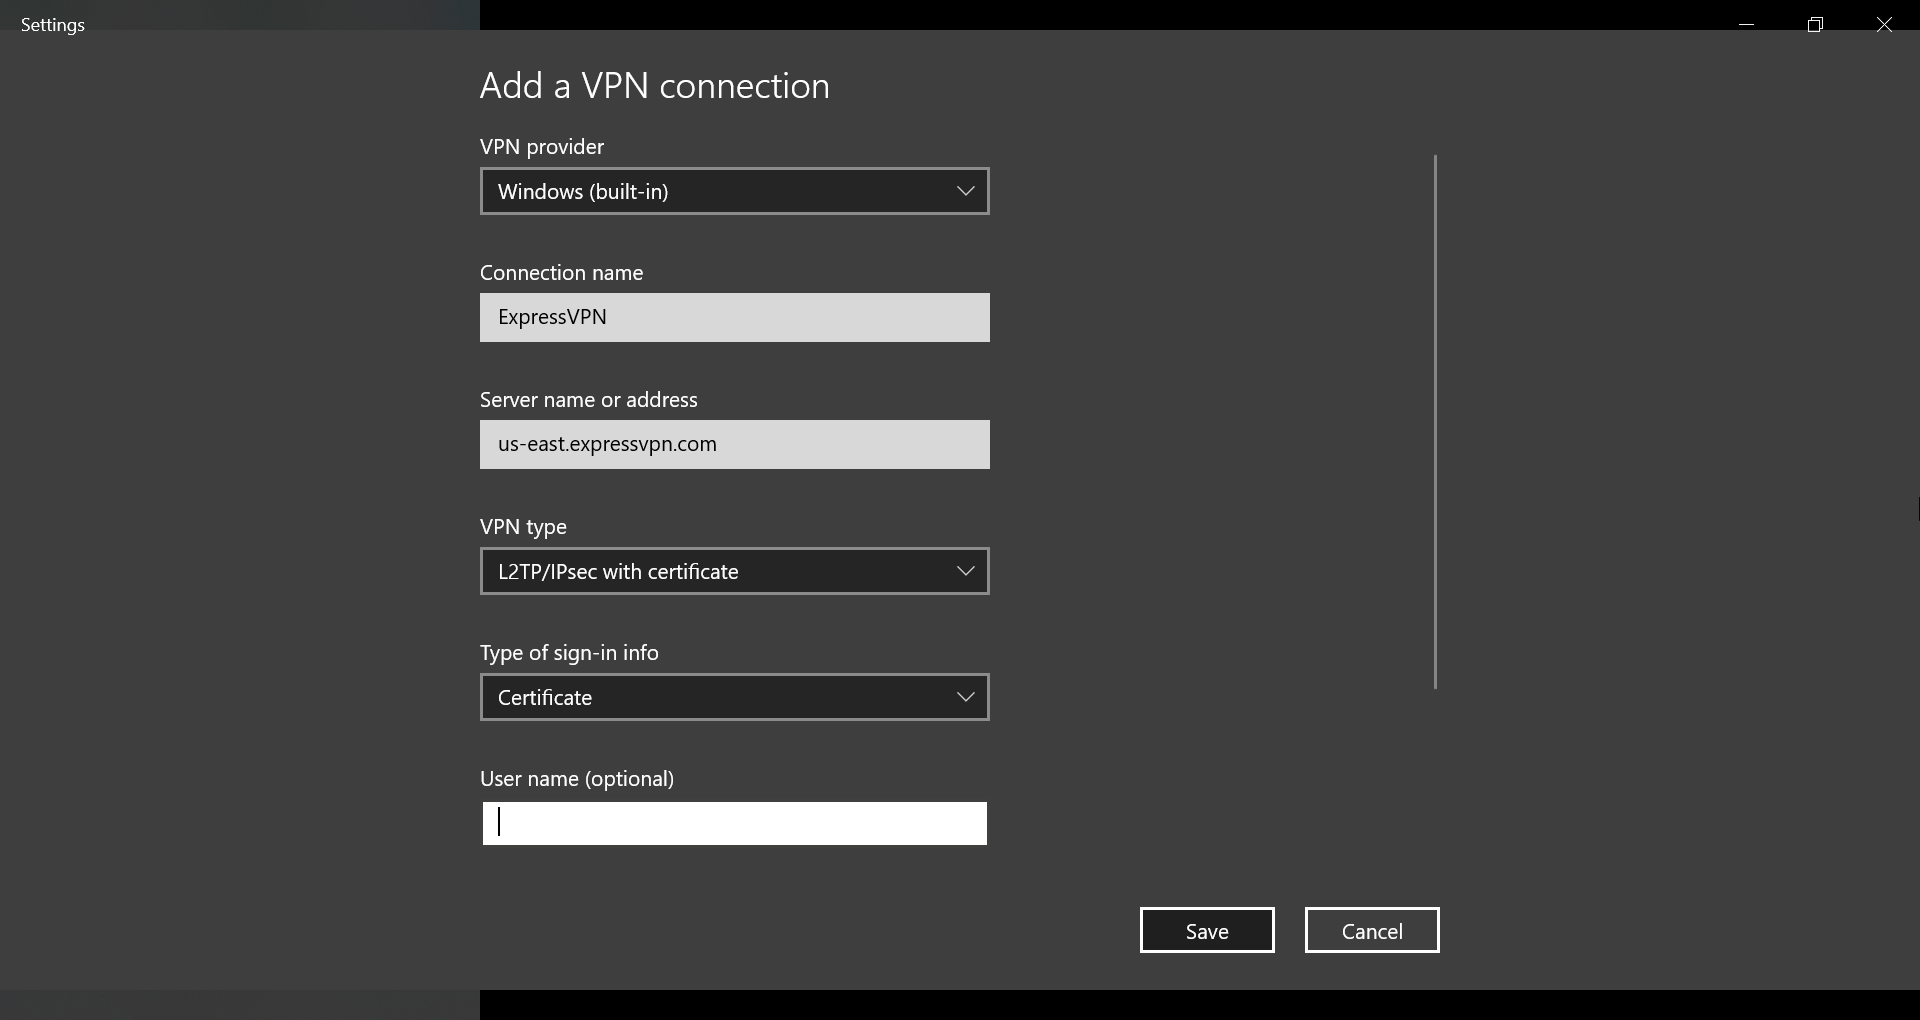
Set VPN provider to Windows (built-in) and write a Connection name.
At Server name or address, type one of the server addresses provided by the ExpressVPN configuration page.
Set VPN type to L2TP/IPsec with certificate.
At Type of sign-in info, select User name and password.
At User name (optional) and Password (optional), paste the ExpressVPN credentials you previously obtained.
Enable Remember my sign-in info and click Save.
3. Connect and disconnect from the IPsec VPN
Click the Network icon in the systray.
Select the IPsec VPN connection.
Click Connect or Disconnect.
4. Change IPsec VPN settings
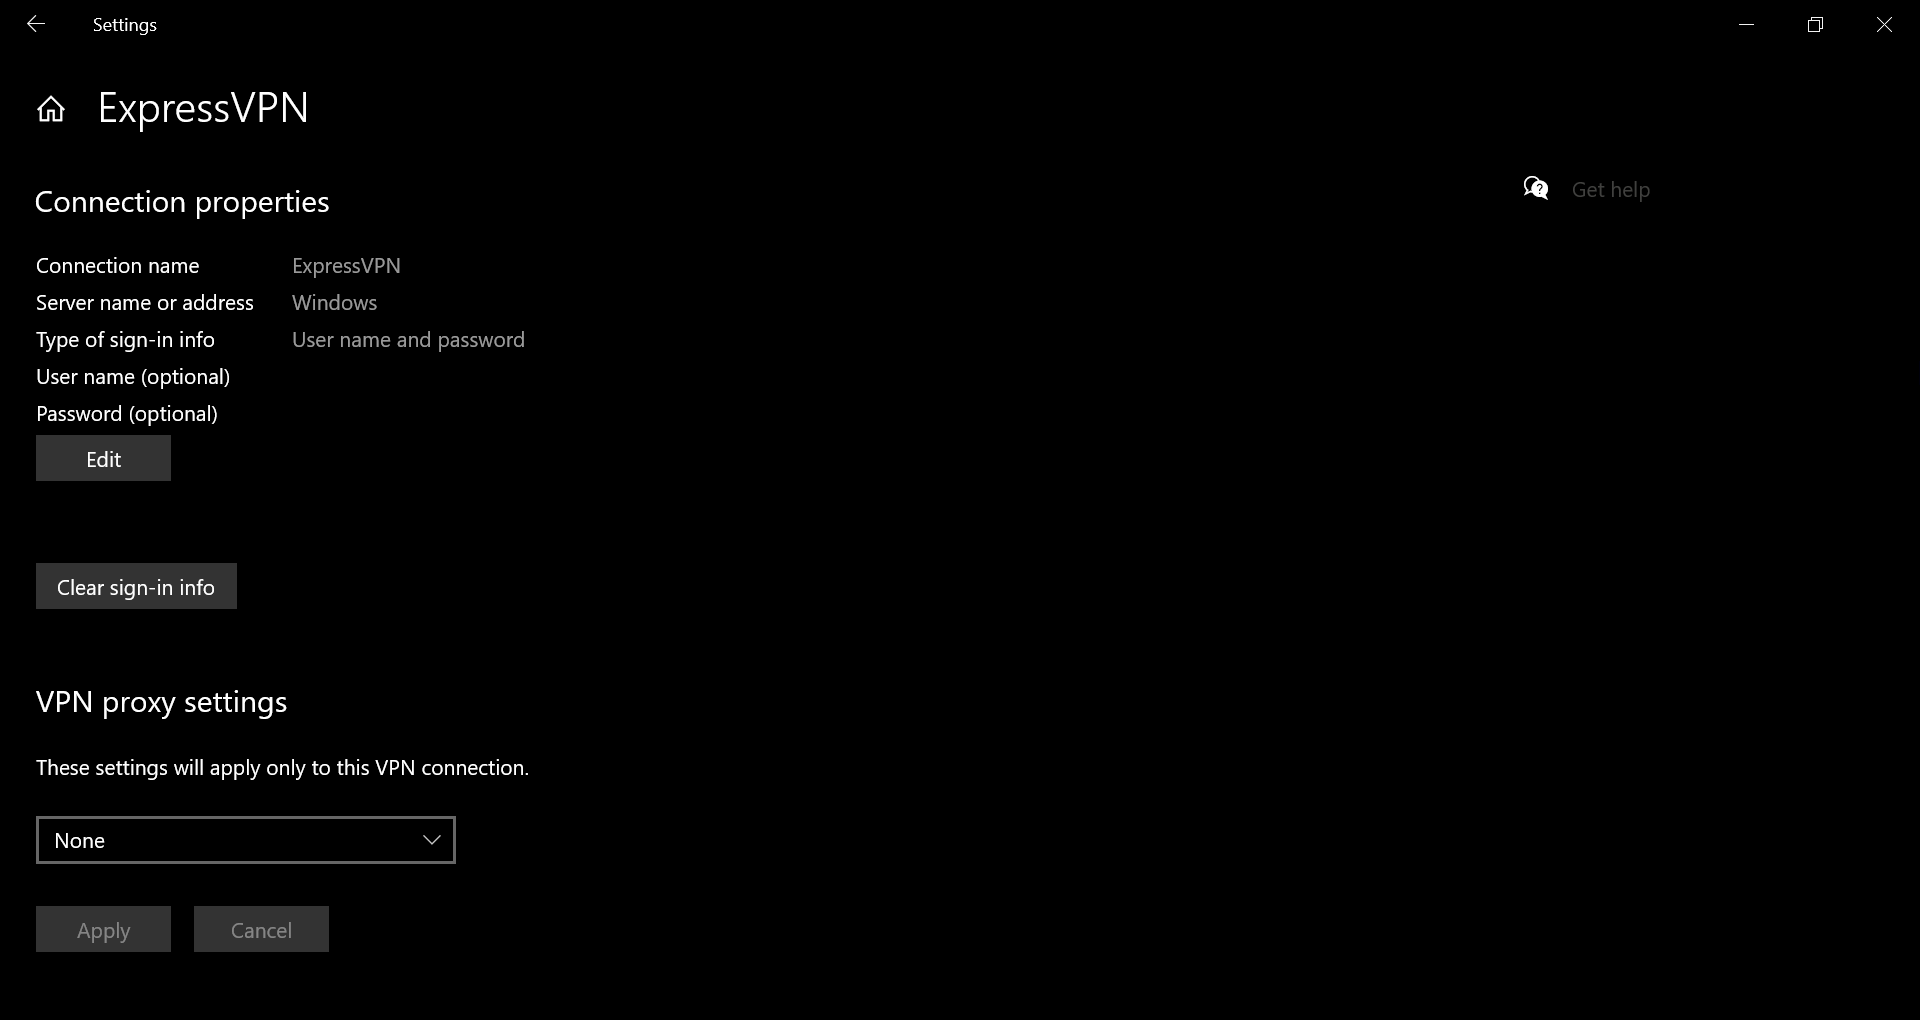
Right-click the Start button and go to Network Connections > VPN.
Select the IPsec VPN connection and click Advanced options.
At Connection properties, click Edit.
Change VPN connection details and click Save.
If you want to connect to a different VPN server, you can either edit VPN connection details to set the new address or create a new VPN connection for each address.
5. Remove the IPsec VPN connection
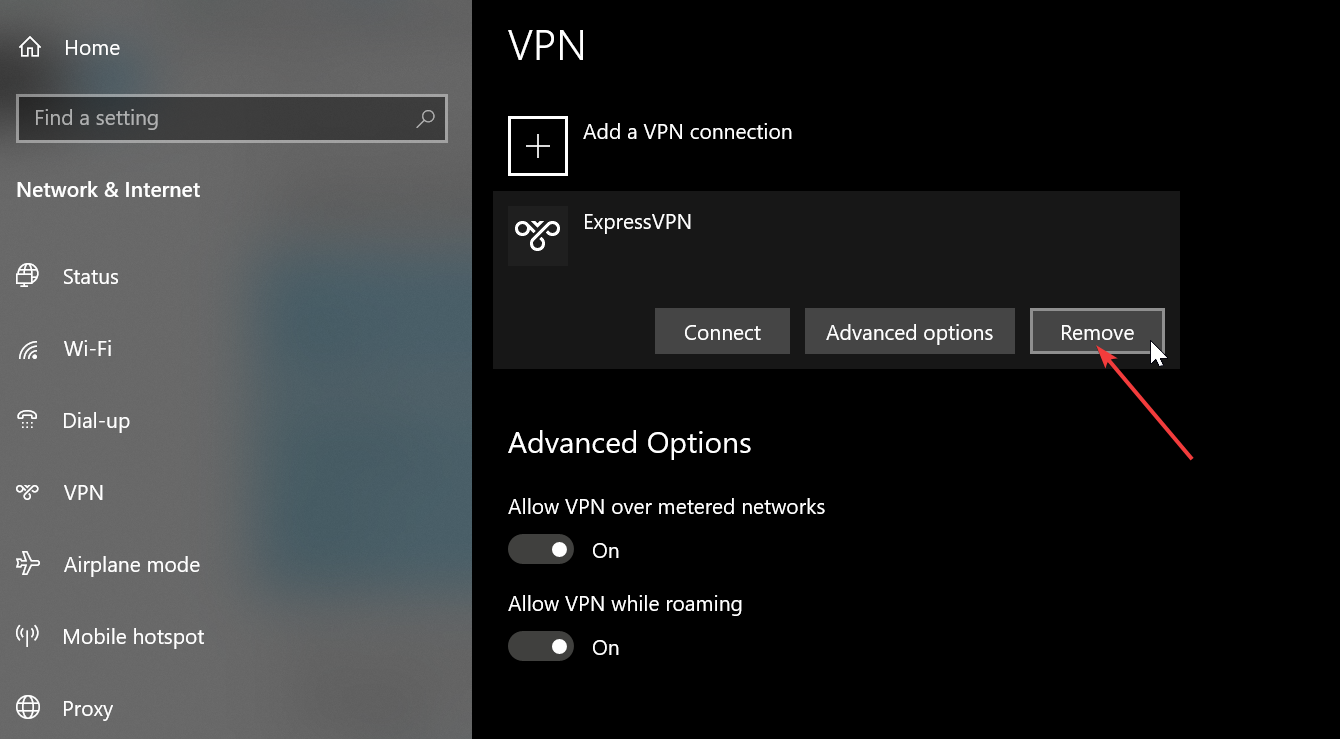
Right-click the Start button and go to Network Connections > VPN.
Select the IPsec VPN connection.
Click Remove.
Why use ExpressVPN
ExpressVPN is compatible with all popular platforms, including Mac, Linux, Android, and iOS.
You can even set it up on a router to share VPN access with all connected devices. Otherwise, up to 5 devices can share the VPN account for ExpressVPN.
Furthermore, ExpressVPN supports OpenVPN and Lightway, in addition to PPTP and L2TP with IPsec.
It comes with private DNS, gaming optimized servers, SOCKS5 and Shadowsocks proxy servers, port forwarding, split tunneling, and a kill switch.
What else you should know about ExpressVPN:
+4000+ servers in 94 countries
No traffic logs
24/7 live chat support
30-days money-back guarantee
7-day free trial (mobile)
ExpressVPN
Quickly set up an IPsec VPN client connection on Windows 10 using this fast and secure VPN app.
In conclusion, you can easily set up an IPsec VPN client on Windows 10 in order to protect your online privacy and computer security, as well as to unblock streaming services and minimize jitter. You can even set up an IPsec connection on XP by using the best VPN for Windows XP.
You just need to get equipped with a premium VPN that not only supports the IPsec protocol but also comes with high-speed VPN servers and superior security features, like ExpressVPN.
Windows 11, like other platforms in its series, has a lock screen you’ll see just before logging into your user account.
That lock screen displays the time, date, one app status icon, and a magnifying glass icon. Clicking on the magnifying glass icon brings up the login text box and screen.
The lock screen also has a Windows + L keyboard shortcut. Pressing that hotkey returns you to a lock screen, from where you’ll need to click and then log back into Windows.
Do I need to have the lock screen enabled on my Windows 11 PC?
Although the lock screen displays date/time info and an app status icon, it’s hardly a necessity. Some users might prefer to disable it so they don’t need to click to reach the login screen.
There isn’t an option in Settings that turns off the lock screen, but you can still disable it with the methods below.
Has the lock screen changed in any way in Windows 11?
Microsoft has made some relatively minor changes to Windows 11’s lock screen. It has a new default Windows 11 background wallpaper for one thing. However, you can change that wallpaper via Settings.
You’ll also notice the date/time info has changed position on Windows 11’s lock screen. Now it displays that info at the top center of the screen instead of the bottom left corner. The clock time text also has a bolder font type.
However, those are only small changes Microsoft has applied to the lock screen. There isn’t that much difference between the lock screens in Windows 11 and 10.
So, it’s unlikely users who didn’t want Windows 10’s lock screen enabled will want to keep it after upgrading to 11.
How can I turn off the lock screen in Windows 11?
1. Edit the Registry
Right-click the taskbar button for the Start menu and select Run.
To open the Registry Editor, input the following text and press Enter: regedit
Next, open this registry location: HKEY_LOCAL_MACHINE\SOFTWARE\Policies\Microsoft\Windows
Right-click Windows on the left side of the Registry Editor and select New > Key.
Type Personalization in the key’s text box.
Right-click the Personalization key and select the New > DWORD (32-bit) value options.
Enter NoLockScreen to be the DWORD’s title.
Double-click NoLockScreen to open an Edit DWORD window for it.
Input 1 within the Value data text box, and click OK to apply.
Open the Start menu, select Power, and click Restart.
2. Use the Group Policy Editor
1. Bring up the Run dialog (it has aWindows+Rkeyboard shortcut).
2. Open Group Policy Editor by entering this command and clicking OK:gpedit.msc
3. Next, click Computer Configuration and Administrative Templates.
4. Select Control Panel > Personalization to open the policy setting shown directly below.
5. Double-click the Do not display the lockscreen policy.
6. Then select theEnabled radio button.
7. Press the Apply and OK buttons to save the setting.
A great tool you can use to turn off Windows 11’s lock screen is none other than the Group Policy Editor. It is built-in on your PC and can be safely used to tweak any PC options you want to.
NOTE
Windows 11 Home edition doesn’t include the Group Policy Editor. However, you can enable Group Policy Editor in the Home edition as outlined within our How to enable Gpedit.exe in Windows 11 guide.
Not exactly, but you can bypass the login screen by configuring Windows to automatically sign in for you. Then you won’t ever need to manually log in to Windows.
To do so, you’ll first need to edit the registry and deselect the User must enter a user name and password to use this computer as follows.
Open Registry Editor as covered within the first two steps of method one.
Go to this registry key location: HKEY_LOCAL_MACHINE\SOFTWARE\Microsoft\Windows NT\CurrentVersion\PasswordLess\Device
Double-click the DevicePasswordLessBuildVersion DWORD for the Device key.
Then erase the current value from the data box, and enter 0 to replace it.
Click OK to confirm.
Thereafter, close the Registry Editor.
Open the Run dialog.
Enter this Run command and click OK: netplwiz
Deselect the Users must enter a username and password to use this computer checkbox.
Press the Apply button to save the new settings, and click OK to close the window.
So, that’s how you can disable the lock screen in Windows 11 with three different methods. It’s relatively straightforward to enable that screen by editing the registry as outlined above. You can also set up a System Restore point beforehand just in case.
If you prefer not to edit the registry, however, you can disable the lock screen with Winaero Tweaker instead. That’s a great freeware customization app with which you can customize Windows 11/10 in many ways. So, it’s worth checking out Winaero for much more than just disabling the lock screen.
We hope you managed to successfully turn off Windows 11’s lock screen using our methods. Write to us in the comments section below if you have any thoughts you want to share with us.
Norton Secure VPN is a VPN service created by Symantec, a renowned security company.
You can use it to change your IP address, encrypt your data traffic, and protect your online privacy when browsing the web.
However, many users say that Norton Secure VPN stopped working on their devices, gets stuck trying to connect, frequently disconnects, and other similar issues.
If this sounds familiar, check out our easy troubleshooting guide below and easily fix Norton Secure VPN by following our instructions.
First of all, your VPN can be imperative at certain times and you need it for improved privacy. So in case, your Norton VPN doesn’t work, there are clear methods you should use.
The most important check you should do might be on your network connection to see if everything works properly.
The scenarios involving this VPN functionality errors impact every user’s privacy, so it’s best to be aware of these:
Norton VPN won’t turn on, respectively Norton VPN keeps turning off
Norton VPN not connecting – Secure VPN has experienced a connection failure
Norton VPN not working on Mac, Windows 10, Windows 11, Android, iPhone (iOS)
Norton VPN connection blocked
Norton VPN server error – Norton VPN error 809
Norton VPN not changing location
Norton VPN region not working (India, UAE)
Secure VPN can’t connect because a torrent app is running – Norton VPN is not working with Utorrent, Netflix, Warzone
Norton VPN stops the internet or causing slow internet
Norton Secure VPN your connection is unprotected
You can have lots of running issues with Norton Secure VPN as reported by the users, and the described ones are a few of them.
Still, are you wondering if Norton Secure VPN works? It is a good option for hiding your IP and protecting your online privacy. But it has few VPN servers and not enough advanced features.
Why does my Secure VPN keep turning off?
To clarify this issue for your Norton VPN, you must consider interferences with security processes like antivirus or firewall.
Apart from an unstable Internet connection, your VPN can be restricted by your firewall to secure the system from potentially harmful software.
If you have a firewall application installed, carefully adapt the steps above.
3. Update and restart Norton Secure VPN
Make sure to keep Norton Secure VPN updated to the latest version. Otherwise, it might not work properly on your device.
Suppose you encounter the Update Required: A critical update has been downloaded and must be installed before continuing to use the Norton Secure VPN message. In that case, you have to remove and reinstall Norton Secure VPN.
It’s also a solution to fix any problems you might have with the Symantec TAP driver (in Device Manager).
4. Change your DNS settings
On Windows 10, right-click the Start button and select Network Connections.
Click Change adapter options
Right-click your Internet connection and select Properties
Double-click Internet Protocol Version 6 (TCP/IPv6)
Select Use the following DNS server addresses.
Set Preferred DNS server to 8.8.8.8
Set Alternate DNS server to 8.8.4.4
Click OK
Try to connect with Norton Secure VPN
These instructions should resolve any issues you might have with your DNS resolver on your PC, such as slow page loading time. It could also be why Norton Secure VPN doesn’t work.
But you can quickly fix this by using other DNS servers. We used Google Public DNS in our example above, which provides free and public DNS servers that improve your online security and speed up your Internet connection
If Norton Secure VPN doesn’t connect, there might be a problem with the server. Perhaps there are too many users connected to that server or it’s currently down for maintenance.
To fix this problem, try connecting to another virtual location from the list.
6. Reinstall the WAN Miniport drivers
Right-click the Windows Start button and select Device Manager.
Expand Network Adapters.
Right-click WAN Miniport (IKEv2) and select Uninstall device.
Do the same thing for WAN Miniport drivers (IP) and WAN Miniport drivers (IPv6)
Open the Action menu and click Scan for hardware changes
Try using Norton Secure VPN again
If your VPN connection fails on your PC, it might be due to WAN Miniport functionality issues. But you can easily fix this problem by reinstalling those devices.
7. Refresh network settings
Run cmd with elevation rights: press Ctrl + R, type cmd, hold Ctrl + Shift and press Enter
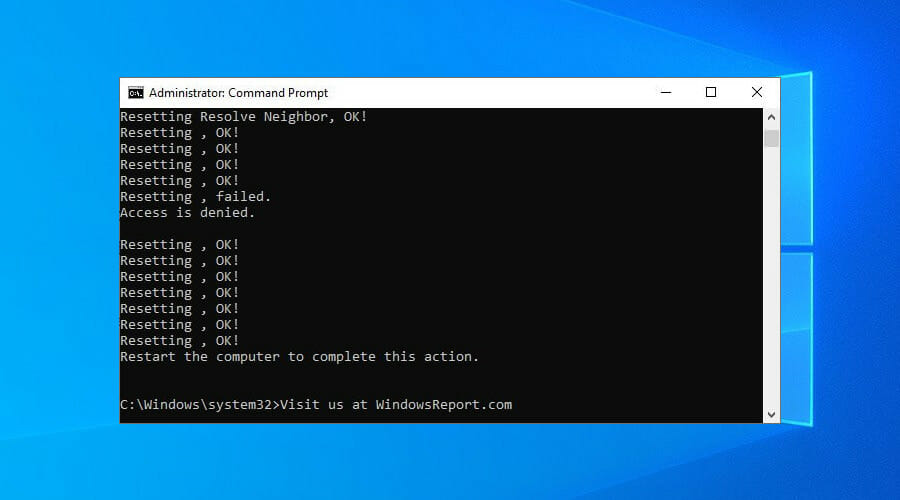
Copy and paste the next lines (press Enter between each line)
8. Check the root certificates of Norton Secure VPN
Press the Start button, type certificates, and select Manage computer certificates.
Open the Personal folder on the left side.
Look for SurfEasy in the Issued By column.
If there are multiple SurfEasy entries, delete the old ones by considering the Expiration Date.
Do the same in the Trusted Root Certification Authorities and Intermediate Certification Authorities folder.
Old and expired certificates could be the reason why Norton Secure VPN suddenly stopped working on your computer. You just have to find and delete them.
To recap, the solutions above should help you fix Norton Secure VPN if it stops working or won’t connect to your PC.
You can check your Internet connection, add an exception in the firewall, verify the root certificates, etc.
If you’re still encountering issues with Norton Secure VPN, you might consider using the Norton Power Eraser to scan for and remove any deeply embedded threats that could be affecting the VPN’s functionality.
In case you want Norton to do more than provide anonymity, check out our interesting and detailed review of Norton 360 Deluxe to understand how it can protect all your devices.
However, if it’s a recurring issue, consider dropping support for Norton Secure VPN and choosing a better, more reliable VPN like the one suggested, ExpressVPN.
Switching from Mojang to a Microsoft account might be a challenging procedure, and many users need help linking these two together.
The migration is permanent and there is no going back once you have completed the actions listed below to link these two accounts.
Further, the Java edition (which is associated with your Mojang account) and the Bedrock edition (which is the Console version) are two distinct versions that need separate accounts.
But if you want to play Minecraft on your PC with your already existing Mojang account you can simply migrate your Mojang account to your Microsoft account.
What are the benefits of migrating from Mojang to Microsoft?
Support for two-factor authentication, unification of Minecraft games under one account, improved parental controls, and chat/invitation blocking are all advantages of migrating Mojang accounts to Microsoft accounts.
Despite the fact that migration is required for all Java Edition accounts, players who complete it will earn a free cape as a prize.
1. Migrate from Mojang to Xbox using a new Microsoft account
Log in to Minecraft with your Mojang account and select MOVE MY ACCOUNT on the prompt IT’S YOUR TURN TO MOVE! on your profile page. The migration notice from the launcher will also take you to your profile page.
You’ll need to confirm your email address by getting a code to the email address associated with your Mojang account. Click GET CODE and look for the confirmation code in your email.
Click SUBMIT AND START MIGRATION after entering the code in the box provided in the pop-up window.
You’ll be asked to set up a new Microsoft account with a new password. Please note that you will not be allowed to use an email address from your workplace or school.
After that, you’ll be sent to a screen where you’ll be asked to confirm your nationality and date of birth. Your Mojang account will be used to fill up this information automatically.
You’ll be asked to establish an Xbox profile and a Gamertag in the following stage.
You’ll be led to a final screen that will ask you to COMPLETE MOVE and provide you with some extra information. You’ll also see an option that allows you to create or select a different Microsoft account at this time.
That’s all there is to it once you’ve verified you wish to complete the move. A confirmation notice will appear when your Minecraft account has been converted to your new Microsoft account.
Make sure you log out of your Mojang account and then log in with your new Microsoft account the next time you run the Minecraft launcher.
2. Connect your Mojang account to Xbox using an already existing Microsoft account
Another handy method to link your Mojang and Xbox accounts is by using the MOVE MY ACCOUNT option and perform the migration using an already existing Microsoft account.
1. Log in to Minecraft with your Mojang account and select MOVE MY ACCOUNT on the IT’S YOUR TURN TO MOVE! prompt from your profile page.
2. You’ll need to confirm your email address by getting a code to the email address associated with your Mojang account. Click GET CODE and look for the confirmation code in your email.
3. Click SUBMIT AND START MIGRATION after entering the code in the provided box.
4. You’ll be presented with a page that allows you to sign in using an existing Microsoft account.
5. You’ll be asked to authenticate your existing Gamertag/profile and enter your Microsoft account password.
Your Microsoft account will be automatically listed to pick if you use the same email address for your Microsoft account as you do for your Mojang account.
6. The last screen will ask you to COMPLETE MOVE and provide you with some further information.
If you’ve mistakenly used the wrong Microsoft account, you’ll also notice a link that allows you to go back and pick a different Microsoft account at this time.
7. That’s all there is to it once you’ve confirmed the transfer. You’ll get a confirmation message when your Minecraft account has been linked to your current Microsoft account.
Why is Mojang migrating to Microsoft?
Mojang Studios, the Minecraft creators, revealed their newest attempts to merge with their parent firm, Microsoft, near the end of 2020.
These accounts would be migrated to Microsoft accounts in order to strengthen security and add additional safety measures for users’ safety.
Minecraft: Java Edition gamers have previously accessed their game with customized Mojang Accounts with their unique usernames and passwords.
However, it appears that this is no longer a possibility since Mojang is working with a larger firm like Microsoft to safeguard its users’ credentials.
Even though the migration procedure appears to be simple, it will take a few minutes to complete and log in with Microsoft account into Minecraft.
This process is now mandatory for some players, but it will be for all in the near future when all Mojang accounts are switched to Microsoft accounts.
Norton antivirus is one of the most trusted options in the market and offers a bunch of features along with regular scanning for malware and virus. But, several of its users (and some non-users too) reported receiving Norton 360 scam emails.
Phishing has long been a problem that all three, users, companies, and authorities are facing. And, it poses a serious risk since people risk losing their money or might end up sharing sensitive information.
But, how do you spot a scam email? What are the various signs? Does Norton 360 send promotional emails or are these scams? Can just opening a scam email bring any trouble? These are some of the questions you may have.
We will take all these up individually in the following sections to help you spot a Norton protection scam email and stay safe.
What is the Norton 360 email scam?
The Norton 360 email scam is a part of elaborate phishing fraud that’s been going around for some time now. Here, you receive an unsuspecting email claiming that your Norton 360 subscription has automatically been renewed, or that your recent Norton 360 purchase will be activated soon.
This could be related to any of the products offered by Norton. For instance, Norton 360 Standard, Norton 360 Deluxe, Norton 360 Deluxe 3 devices, Norton 360 Premium, or Norton 360 for Gamers.
Such emails are meant to create panic. For instance, contact to cancel the purchase right away if you don’t want to be charged. Or, that you have already been charged and can get in touch with the helpline to request a refund.
As expected, at the end of the Norton 360 scam email is a phone number for the support helpline to contact, in case you want a refund. Users who called this number were asked to share banking data or credit card details in order to deposit the refund in their accounts.
As soon as they provided the details, a certain sum of money was immediately deducted. In such cases, getting your money back is the real challenge, so it’s best that you be wary initially and not fall for such scams.
In some cases, there were links and attachments in these emails, which if clicked on or downloaded, can infect the device. This is one of the common modus operandi for scammers. Once the malware is loaded into the system, it can access the files or track your activity.
There are several aspects that can help you spot a Norton 360 scam email. Some pointed out under a section from Reddit regarding the Norton 360 scam email, and others from different past scam experiences. Read the following section to find out.
Can I trust Norton 360?
Norton AntiVirus is not only safe to use, but it also has a lengthy history of providing flawless or almost perfect results when detecting viruses.
During the most recent period of testing conducted by an independent AV company (April 2022), it was able to get a maximum score of 6 points in each of the categories of usability, performance, and protection.
How do I spot a Norton 360 scam email?
1. Verify the sender’s address
The first sign to look out for in case you receive spam emails from Norton and McAfee is the sender’s address. Oftentimes, you would find these to be registered on Gmail, Yahoo, or other email services. And a company like Norton or any other major corporation would always use its domain.
In some cases, scammers also use a slight variation of Norton’s domain. They could add a letter or remove one, such that it isn’t easily noticeable. Norton has made a list of all the registered domains, so you can verify if the email is actually from Norton or a scam.
2. Look for grammatical or spelling errors
When an email is sent from an official source, you wouldn’t find any grammatical errors or spelling mistakes since the content goes through several checks before being sent out to users.
On the other hand, scam emails are generally sent out without any checks. Scammers don’t bother double-checking the content, and as a result, there could be a few typos. Take the below case of the Norton 360 scam email for instance:
Though it could look like a genuine one, the word Proforma (a type of invoice) has been misspelled as Performa. Other than that, there is no spacing after a comma or full stop in some places. So, have a keen eye for such stuff, otherwise, you won’t be able to spot a scam email.
Most of the phishing emails from Norton don’t have proper graphics or use the incorrect logo for Norton 360. The logo might either be hazy, a part of it missing, or it could be an outdated one.
You will have to head to Norton’s website to verify if the logo matches the one officially used. If you find any inconsistencies there, it’s most likely a Norton 360 scam email.
In this case, you should not share any personal information, click on any links, download attachments, or establish contact through the details provided.
4. Email tries to create an urgency
Scam emails work through a very simple technique, highlighting an emergency to manufacture a sense of urgency so that the person is unable to think clearly or realize that they are being scammed. To do this, scammers generally provide a small timeframe in the Norton 360 scam email, as is the case below:
When you see that the amount will be deducted in 24 hours or as the case may be, you suddenly panic and call the number provided there. Norton or any other large corporation wouldn’t use such antics, and this is an easy way to spot a scam or phishing email.
5. Includes suspicious-looking links
Always remember to not click on suspicious links in an email because these might contain files that could harm the computer, and you would end up losing critical data. And, a scam email might have one of these.
It could either ask you to download software or redirect you to another webpage in order to complete the payment. NEVER, click on these!
You can either hover the cursor over the link to preview it or copy it to a word processor. If there’s something suspicious about the link, contact Norton through official channels to verify if it’s a legit email.
6. Look how they address you
Another critical aspect that often gives away if it’s a Norton 360 scam email is the way it addresses the recipient. Corporations generally don’t use highly informal language, so that’s one way to identify.
Also, since the company already has your personal information, it would most likely use it to address you. If the email uses words like Dear Buyer, it’s a sign of a scam.
7. Offers huge discounts on products
Another way to scam users is by offering huge discounts on products. In the case of Norton 360, the scam email would highlight that your computer is at risk and that the antivirus is available at an unreasonably low price.
And most likely, it would ask you to make payments through services such as Western Union or use payment platforms like PayPal, Zelle, or CashApp. Norton has confirmed that it doesn’t accept payments through these platforms.
How do I report a phishing email to Norton?
Users can report email scams through Norton Support. So, if you believe to have received one, you now know where to send the fake Norton emails.
Apart from informing you whether it’s indeed a Norton 360 scam email after analysis, they will also take the necessary action.
1. Launch your web browser.
2. Navigate to your email address’s inbox.
3. Right-click on the email that you believe is a scam, and select Forward as Attachment from the menu.
4. Next, paste [email protected] in the text field meant for entering the details of the recipient.
5. In case you have contacted the support team earlier regarding this, make sure to enter theCase Numberprovided in theSubjectfield. If you haven’t, send the email without one.
NOTE
The steps listed here are for Gmail and should provide a basic understanding of the concept. In case you use a different email service, it too should have a similar process.
Can spammers tell if I open an email?
Yes, spammers can find if and when you open an email. Because, when you do, the email service will download graphics from the servers chosen by the sender. As soon as that happens, it will become clear that the email has been opened.
Gmail settings to disable the automatic download of images
To avoid that, users can disable the automatic download of images. This way, the sender cannot find out if you have opened the email.
Other than identifying that you have opened the email, scammers can also find out your location, IP address, the device used to view the email, OS, the browser used, and the screen size, amongst other aspects. So, think twice before opening a Norton 360 scam email!
Can I get hacked by opening an email?
No, that is not possible! Until some time ago, scammers could infect your computer or hack into it, but it’s simply not the case now. With recent changes in the way contents of the email are now fetched, you can open any email, though remember that some data will still be shared.
But, if you click on links on download attachments added to the scam email, there’s a good chance that your account or computer might get hacked.
That’s all there’s about Norton 360 scam emails, the ways to spot one, and how to be safe, in general, on the web.
Also, if you believe that such emails are only sent by scammers under the disguise of Norton, read about the McAfee email scams that work on similar lines.
Besides, if you want to stop Norton spam emails, do not hesitate to check the best spam filters that you can start using today.
If you’re worried by unknown files and threats, you also have a guide that answers what is Windoc.exe that can help you with that.
If you received any such emails, tell us how you identified that it was a scam, in the comments section.
Want to lock or unlock the Fn key on your Windows 10 laptop but don’t know where to start? Controlling the Fn key lets you decide how your function keys behave, whether you need to press Fn every time or have the shortcuts work instantly.
Locking or unlocking it can save you time, improve your workflow, and prevent accidental key presses. In this guide, I’ll show you simple step-by-step methods to toggle the Fn key exactly how you want it.
How can I utilize the Function key on a Windows 10 PC?
1. How do I enable Function lock on Windows 10?
Have a good look at the Fn key on your keyboard, which is usually at the bottom left of your keyboard. If you really can’t see it, maybe your keyboard doesn’t have one. However, most keyboards do have Fn keys for activating secondary key functions, such as volume controls on arrow keys.
When you’ve located Fn, press and hold that key. Then press one of the F1-F12 keys with a color symbol on it to activate its function. For example, pressing the Fn key and an F8 key with a mute icon on it will mute the sound.
You can also activate secondary multimedia functions for other keys with blue or green symbols on them. So, try pressing Fn simultaneously with any key that includes a blue or green function symbol it.
2. How do I lock and unlock the Function key on Windows 10?
Some keyboards enable users to lock the Fn key so they don’t have to always press Fn to activate secondary key functions. So, you might be able to press an Fn lock key on your keyboard. Look for a keyboard key with an Fn padlock icon on it.
Esc is an Fn padlock key on many keyboards. If you see an Fn padlock on your Esc key, press and hold the Fn key. Then press Esc while holding the Fn key. Thereafter, you won’t need to press the Fn key to active secondary key functions. To unlock Fn, press and hold Fn and the Esc key again.
If your Esc key is not working, check out our dedicated article to find out how to fix it.
3. How to disable the Fn key in Windows 10?
If you do not want to use the Fn key on your Windows 10 PC and want it gone, you can disable it via BIOS Settings. In doing so, you will no longer be able to use it on your device until you re-enable the setting.
1. Click the Type here to search taskbar button on your taskbar. Alternatively, press the Windows key on your keyboard to open the search box.
2. Typeadvanced startupin the search box and press Enter.
3. Click on Changed advanced startup options to open the window shown directly below.
4. Press the Restart now button for advanced startup.
5. When your desktop or laptop restarts at the blue Advanced Boot Options menu, select Troubleshoot and Advanced Options.
6. Then select UEFI Firmware Settings and Restart to enter the BIOS settings.
7. Thereafter, look for an Action Key Mode setting on the System Configuration or other tabs.
8. Disable the Action Key Mode setting.
Note: Users with older laptops and Windows platforms will need to enter the BIOS by pressing one of the F1-F12 keys during system startup. Check your PC’s manual, or its manufacturer’s website, to find what the BIOS key is for your PC.
So, that’s how you can utilize the Fn key, modify its behavior, and disable it if you prefer. Overall, Fn is an important key that provides numerous handy keyboard shortcuts for users.
We can all sigh of relief as the big day has finally come for Windows 11 users to get their first significant update.
The 2022 Windows 11 update is officially here and has something for everyone. Let us walk you through it; you should be excited.
What is the Windows 11 2022 Update?
This is a significant update packed with intriguing features for every user. For example, better touch gestures, Start menu folders, Live Captions throughout the entire OS, and a new Xbox controller bar are some exciting features now available via the Windows 11 2022 Update.
Additionally, it makes several significant accessibility enhancements and signals a change in how Microsoft views new features.
Now let us get to a review of this update.
What are the new features of the Windows 11 2022 Update?
The Settings app
Let us start here since the Settings are the powerhouse of most of our devices.
With the release of the Windows 11 2022 Update, Microsoft added several new settings pages to the Settings program, as it does with every new version of Windows.
The Accounts section now includes a new Microsoft Account page that summarizes your Microsoft 365 membership and provides quick access to other online options and services.
If you utilize that service, a new Family Safety page gives you rapid access to all the Family Safety options.
What we find most intriguing is the timed update. Your updates can now be auto-scheduled to follow your local electrical grid. These timed installs with your power grid make efficient use of renewable energy rather than installing updates as they become available.
Additionally, the number of pinned or suggested rows you see on Start can be changed. There are also new options to make the Bing daily image your desktop background or to disable the System Tray overflow menu, among other things.
Gaming features
This update gives you a new Controller Bar, optimizations for playing games in a windowed mode that was only available on full screen before, HDR optimizations, and much more.
As you would have imagined, this new Controller Bar overlay can be activated by pressing the Xbox Wireless Controller’s Xbox button or the equivalent button on a compatible third-party controller.
The tech giant has also improved how DirectX 10 and 11 games are handled by Windows 11 when playing in windowed and borderless modes. In addition, there is a real improvement in display latencies with the 2022 Update, similar to playing their games on full screen.
Auto HDR and Variable Refresh Rate features can now be used in games when using windowed modes, which were locked to full screen before.
Microsoft has also introduced an HDR Calibration app to help players improve their HDR displays’ color accuracy and consistency.
On MS Edge, we now have a new gaming homepage, Clarity Boost, for better cloud gameplay, tailored stories, quick Xbox Cloud Gaming library access, and an Efficiency mode for increased gaming performance.
Let’s start with a redesigned sidebar navigation interface that more effectively groups various shortcuts to frequently used file system locations, such OneDrive and user folders.
Microsoft has also enhanced the nearby Share function, and it now displays devices connected to a private network and Bluetooth-enabled devices. Additionally, you can use the file sharing UI to share local files to OneDrive immediately.
The File Explorer is not left out and features a fresh tabbed layout along the application’s top. In addition, you can now open multiple File Explorer paths in one window, the same way you would a web browser. This is an excellent organizational boost.
The app also has a new Pinned Files segment in Quick Access. Users can permanently keep files in this location by pinning them for easy access later.
Microsoft has restored several functions from the Windows 10 Start menu in the Start menu, including the capacity to create app folders and modify the area size for pinned apps.
Every time a user moves an app window, a new snapping layout menu appears at the screen’s top. In addition to the drop-down option that shows when hovering over the app’s window’s maximize buttons, this offers a more straightforward way to start Windows snapping.
Additionally, the update will ship a new Sound Recorder with an improved user interface, increased output options, and an audio visualizer.
Finally, a new interface has been added to Task Manager to better integrate it with Windows 11. When you minimize the window, its sidebar navigation Interface instantly collapses.
The Taskbar app has been upgraded with drag and drop functionality. For example, you can paste files by dragging them into program icons on the Taskbar.
New app additions
Two brand-new applications called Clipchamp and Family Safety are pre-installed with version 22H2.
The former is a web-based video editor. Although the free application, you may subscribe to paid monthly levels to access additional rendering options and effects.
The Family Safety app allows instant access to information about your family. These include where your kids are, scheduled events on a shared family calendar, and other utilities for managing your home.
Windows 11 2022 Update Security features
As expected, Microsoft has rolled out a few they can take pride in.
When you input your credentials into a malicious program, Microsoft Defender SmartScreen will detect it and notify you.
Additionally, the driver block list offers protection against ransomware attacks and advanced threats that take advantage of vulnerable drivers. For example, HVCI (Hypervisor-protected Code Integrity) prevents attacks that aim to modify the kernel mode code.
In addition, Smart App Control will now block harmful macros, script files, and untrusted or unsigned apps. Thanks to this tiny feature, you can engage with various programs and web resources more efficiently.
How do I update to Windows 11 version 22H2?
PressWindows+Ito access Settings.
Select the Windows updates tab and click Install all.
Press the Check for updates button if you have no queued updates for installation.
There is so much to love about the new update; it almost feels like we have a new OS. Features like the new System-wide Live Captions, natural narrators, and improved Air Pods support make it as exciting as predicted.
Have you already installed the Windows 2022 update (22H2)? Please share your experience with us in the comments section below.
Blizzard’s games are great, but many users may face Blizzard connection issues. Some reported There was a problem connecting to Blizzard services while trying to play them.
This issue affects the latest Blizzard games, namely the ones we play on Battle.net. Blizzard Battle.net is a pretty popular online gaming platform provided by Blizzard Entertainment.
The service allows online multiplayer for games such as Overwatch, StarCraft, World of Warcraft, Diablo, Hearthstone, and Heroes of the Storm.
I can’t even login to the battle net even though I have internet access. Whenever I tried logging in it shows up as could not connect to Blizzard services with the code BLZBNTBGS80000011 (1001). Please fix this as I can’t even login into overwatch manually as it’s connected to the battle net.
What causes Blizzard connection issues?
There can be several causes of connection issues with Blizzard games. However, here are a few common reasons:
Internet connection – Poor or unstable internet connections can cause issues with Blizzard games. It is recommended to use a wired connection instead of a wireless connection for better stability.
Firewall or antivirus – A firewall or antivirus software can sometimes block the game’s server connection, resulting in connection issues. Temporarily disabling the firewall or antivirus software can help troubleshoot the problem.
Router configuration – Incorrect router settings or outdated firmware can cause connection issues. Checking and updating the router settings and firmware can help resolve the issue.
Server status – Blizzard servers may occasionally experience high traffic or downtime, causing player connection issues. Checking the server status on the Blizzard website can help determine if this is the issue.
Game files – Corrupt or outdated game files can cause connection issues. Verifying the game files and updating the game to the latest version can help resolve the issue.
Third-party programs – Some third-party programs can interfere with the game’s server connection, resulting in connection issues. Disabling any unnecessary third-party programs can help to troubleshoot the problem.
That said, let us explore the best solutions.
How can I fix Blizzard connection issues?
Before trying any fixes, confirm that Battle.net is not down. To do so, you have two quick options. Firstly, it’s practical to check it with Downdetector.com to see the service status.
The alternative is to stay updated with Battle.net stories on social media like Blizzard CS and see the latest posts regarding the platform and games.
Now, click on All locations to choose different servers.
Press the Power button and connect to high-speed servers.
Go to Battle.net and play your games at maximum performance.
It’s just a matter of opening the recommended VPN software and choosing a remote server to connect to, closer to the Blizzard servers.
If you can’t connect to any game, here’s a list of IPs based on your location worldwide.
US West – 24.105.30.129
US Central – 24.105.62.129
Brazil – 54.207.107.12
Europe – 185.60.114.159
Europe – 185.60.112.157
Korea – 211.234.110.1
Taiwan – 203.66.81.98
Using a professional VPN while playing Battle.Net can enhance your gaming experience. When your PC is very far from a server, the VPN improves lag and reduces ping, helping you avoid network throttling.
ExpressVPN
Cherish any Battle.net game at high speeds using this VPN with optimized servers.
Open the WinMTR folder and select the 32 or 64-bit version according to your Windows version.
Run the WinMTR.exe.
Type the IP address you want to trace in the Host field.
Once you notice the connection issue while playing, play for a few more minutes, minimize the game, click on Stop, and save your results from tracking the problem.
Note: You must open the game and play the correct IP for a bit to get the correct IP. While running the game, press Ctrl + Shift + N, bringing up the in-game network diagnostic graph.
Alternatively, you can go to Video, then selectOptionsand click on Display Network Performance Graph. You will find the IP address you want to run WinMTR to in the top left corner.
Don’t hesitate to ask your Internet provider about the situation if you notice Blizzard connection issues or spikes.
On the other hand, you could use a third-party uninstaller to get rid of your old Battle.Net client since they also eliminate any residual data and files that generally don’t disappear after a typical uninstall.
Moreover, this program keeps your PC safe and clean with a single click and removes malicious browser plug-ins and toolbars, protecting your privacy while navigating online.
Without any cache and unused files, you will recover more space on your hard drive and reinstall Battle.Net problem-free.
Looking for a way to set up a shared channel in Slack? The thing is that sometimes it takes a little while to keep up with Slack’s features. Slack was meant to be a collaboration hub for the workgroups within a company.
With a continuously growing network of companies using it for internal work, Slack saw the need of allowing them to collaborate in one channel. Then, they made shared channels available to all customers.
What are shared channels in Slack?
Shared channels work pretty much like typical Slack channels, but span two organizations from their own Slack workspace.
Once the connection is established, members can share files, send direct messages, start calls, loop in coworkers, and more.
It’s all about enjoying time efficiency like they do with internal teams – all in a dedicated Slack space.
After reminding you of all these, let’s cut to the chase and see how you can create a brand new channel to share with another organization, or how you may share an existing channel.
How can I create a shared channel in Slack?
1. To create and share a brand new channel, first you need to click the plus button in your sidebar.
2. Give the channel a descriptive name.
3. After doing so, click Create.
4. Follow the prompts to share the channel outside of your workspace.
5. Copy the link provided and send it to your external partner.
6. After clicking it, you partner will be taken back to Slack to accept the invite and set up the shared channel.
7. The invitation is then sent to an admin on both teams for their approval.
8. Admins or org owners can later manage shared channels invitations. For that, click on workspace name > Administration > Manage shared channels.
9. When you enter a shared channel, you’ll see the connecting organization’s name just above the message input to remind you that you’re working with an external party.
You can easily create a Shared channel in Slack within a few minutes via the app’s built-in options, and then the channel will be ready to be shared via link with all your peers.
If you are new to Slack, see our Slack how to use guide for the basics before setting up shared channels.
To share an existing channel, click on the gear icon from the top of the channel. Then, select Add people to the channel and follow the prompts to share the channel with external companies.
The shared channel might turn into a common place for two separate companies to work together, but each workspace may keep its own identity.
Go for a different channel name, and purpose, or decide whether the channel is public or private.
By default, both owners and admins of a workspace can convert channels to private. Members aren’t allowed to do so.
Shift will launch automatically once the installation has been completed.
Using Slack in Shift, open the Slack channel you wish to make private.
Click the gears icon in the top right-hand corner.
Choose Additional options from the Channel Settings menu.
Select Change to a private channel.
Click Convert to private to confirm your action.
You should use Shift when deciding to make your Slack channel private. That’s a desktop app to manage Slack and other apps or email accounts in one place.
Converting a channel to private is permanent, so choose wisely. Even after making the change, files within the channel will not become private.
Once the installation has been completed, Shift will launch automatically.
Up next, launch Slack in Shift.
Open your Slack workplace.
In the sidebar, click the plus icon beside Channels.
Then, toggle the Public button to Private.
Enter a name for the new channel.
Under Purpose you can add an optional description of the channel.
Choose some members to invite by typing their names.
Finally, click Create channel.
There’s a first time for everything, and making a new private Slack channel from scratch isn’t at all difficult. We’ve detailed above a guide on how you can perform this task successfully.
Before you go, don’t miss our guide on how to create a poll in Slack, since it might come in handy to you someday.
If you’re dealing with lot of notifications, we also have a guide on how to mark all as read in Slack, so you might want to check it out. Additionally, you can learn how to leave channels.
Have you completed the procedure? Share your feedback by dropping us a note in the comments area below.
As a result, it’s impossible to use Microsoft’s email client to check the inbox, compose new messages, forward emails – anything that requires an Internet connection.
We’re showing you exactly what to do if Outlook won’t connect over a VPN.
Check out our step-by-step guide below to troubleshoot this problem, whether you have PC experience or not.
Does Outlook work with a VPN?
Yes, it’s possible to configure Outlook email to connect with a VPN on your device. What you need to know is that Outlook has an option for this.
In the email account, you have the option that allows you to connect to your VPN, and that is the Exchange server connection.
To have a better knowledge about this issue, these are the potential errors you can run into:
Outlook disconnects when connected to Cisco VPN,
Cisco Anyconnect Outlook disconnected
NordVPN Outlook issues
Outlook 365 not working over VPN
Outlook and teams not working over VPN
Outlook freezes on VPN
My Outlook account keep disconnecting
Why does my VPN block my Email
So, the final takeaway is that you should be able to use Outlook even connected to another IP address on a VPN.
Why does my Outlook disconnect when I connect to VPN?
This Outlook problem may have multiple factors for not connecting to the Internet when the VPN is on. It can be due to your connection or other causes like the ones presented here:
? The Microsoft Outlook is not updated to the latest version
? The wireless network adapter blocks Outlook connection with a VPN
? Your DNS address is not suited for the VPN connection
? The antivirus or firewall can block Outlook connection
How can I make Outlook connect over VPN?
1. Update and restart Microsoft Outlook
Disable the VPN connection.
Update Outlook to the latest version.
Exit Outlook.
Connect to a VPN server.
Launch Outlook.
Make sure you’re running the latest version of Microsoft Outlook. It could help resolve various compatibility issues with the software, including VPNs.
You should be able to enable updates from your Office account after opening the main menu in Microsoft Outlook.
2. Check your Internet connection
If your Internet connection isn’t stable enough, it could be the reason why Outlook won’t connect over a VPN.
Perhaps there’s a problem with your router or your laptop’s Wi-Fi is too slow. To quickly test this, you can restart your router or switch to wired mode.
It’s also a good idea to run an Internet speed test in two parts: while staying connected to the VPN and without an active VPN connection.
3. Use a reliable VPN
One of the greatest options you can count on is ExpressVPN. It is a VPN service that helps you secure your internet connection and private data, in this context, on Outlook email.
It can support multiple protocols that create secure tunnels without affecting your connection speed, DNS protection for each server, or streaming optimized servers for unrestricted web content.
Press the Start button, type firewall, and select Firewall & network protection.
Click Allow an app through the firewall.
Click Change settings (you need admin rights).
Find your VPN service on this list.
Enable the Private and Public options for its entry.
If your VPN isn’t here, click Allow another app to locate it.
If you follow these steps, you will fix firewall issues with VPN traffic. If Outlook connects over your VPN now, it means there was never a problem on the email client’s side, but with your firewall.
And, if you’re using a third-party firewall, make sure to adapt the instructions we provided for Windows Defender above.
A premium VPN service like ExpressVPN shouldn’t get blocked by your firewall because it automatically creates an exception for itself when you install it.
5. Disable the wireless network adapter
Go to Control Panel.
Select Network and Internet.
Go to Network and Sharing Center.
Click Change adapter settings.
Right-click your Wi-Fi connection and Disable.
Connect to the Internet in Ethernet mode.
If you’re connected to the Internet in both Wi-Fi and Ethernet mode, it could result in a conflict that causes the VPN connection error on Microsoft Outlook.
To easily fix this problem, simply deactivate your Wi-Fi connection and stick to wired mode.
It also indicates that you have Wi-Fi connectivity issues, which you should troubleshoot as soon as possible to continue using wireless mode.
6. Change your DNS settings
Go to Network Connections > Change adapter options.
Right-click your Internet connection and select Properties.
Double-click Internet Protocol Version 6 (TCP/IPv6).
Select Use the following DNS server addresses.
Set Preferred DNS server to 8.8.8.8
Set Alternate DNS server to 8.8.4.4
Click OK.
If your default DNS servers take too long to load pages, this could also cause VPN connection issues over Microsoft Outlook.
But you can solve this problem by changing the DNS servers. The servers we listed above are free, public, and belong to Google Public DNS. You can also try Cloudflare or OpenDNS.
However, if you have a reliable VPN service like ExpressVPN installed, you don’t have to worry about this issue.
7. Reset the network settings
Run Command Prompt with elevated rights: press Ctrl + R, type cmd, hold Ctrl + Shift, and press Enter
Copy and paste the next lines (press Enter between each line)
Restart your computer to finish the modifications.
You can easily reset network connectivity settings on your Windows computer by flushing DNS servers and resetting Winsock.
A lot of VPN connection problems can be fixed this way.
8. Allow VPN traffic on your router
If your router doesn’t allow VPN traffic, you wouldn’t be able to connect to a remote VPN server or accept VPN connections. It doesn’t matter if you’re trying to use Microsoft Outlook or any other tool.
In this case, you must access your router’s admin panel, look for a NAT Passthrough option, and enable it for your VPN protocol. Out-of-the-box router firmware typically supports PPTP and L2TP.
If you intend to use a VPN protocol that’s not supported by your router’s firmware (like OpenVPN), here’s what you can do:
➡️ Set up port forwarding at the router level* (not safe). But it only works with VPN server mode.
➡️ Check if your router allows you to install third-party firmware. If so, you can set up DD-WRT, Tomato, or OpenWRT (requires advanced skills). They support VPN client mode.
➡️ If your router doesn’t support third-party firmware, you can purchase a router with VPN client capability and then set up bridge mode to avoid Double NAT.
➡️ Instead of configuring router settings and risk messing up its functionality, you can just Express software to switch your protocol for OpenVPN or other within a few clicks.
Actually, a VPN can make an important difference while using email like Outlook or other providers. That means you have online identity safety and security for personal data sent on emails.
However, if your VPN interferes with mail connection and blocks it, you should try our solutions presented above.
To conclude, you can fix VPN connectivity issues with Office by updating and restarting MS Outlook, checking your Internet connection, and adding an exception to the Windows Firewall.
You can also disable the Wi-Fi network adapter, change your DNS servers, reset network settings, and allow VPN traffic on your router or set up port forwarding.
But one of the best ways to stay secure while using Microsoft Outlook is by turning to a reliable VPN service like ExpressVPN.
How do I fix Outlook connectivity problems? To fix Outlook connection errors, you can disable the AppData directory redirection, create a new Outlook profile, repair Office programs, and try other possible solutions.
How do I fix error 0x8004011d in Outlook? To repair Outlook error 0x8004011d, flush your DNS servers, verify add-in issues, repair the Outlook installation package, and so on.
Windows allows users to create multiple accounts in the computer system. However, the controlling account is known as the Administrator’s account.
An Administrator account has a higher privilege that allows users to make changes that require special permissions. Windows 11 locked out of the admin account is one of the issues you can encounter with the Administrator account.
As we go further into this article, we shall take you through how to unlock the administrator account in Windows 11.
Why is my Windows account locked out?
Users’ accounts can get locked out of Windows by forgetting the login information for a Windows 11 account. Windows provide users with many options for securing their account. These options are PIN, password, and biometrics.
However, your Windows account can be locked if you lose your login information. It can make the computer unresponsive until you bypass Windows 11 and sign into the Administrator’s account.
How long is a Windows account locked out?
The duration in the Account lockout duration policy determines how long the Windows account will be locked out.
However, the average range is from 1 min to 99,999 minutes. The user can specify how long the account will be locked out in the duration policy settings. If the threshold is set as 2 hours, Windows 11 will be locked out for 2 hours.
What do I do if my administrator account is locked in Windows 11?
1. Reboot the computer in Safe Mode
On the sign-in screen, press Shift while clicking the Power button.
Hold down the Shiftkey until the Advanced Recovery Options menu appears.
Click on Troubleshoot and select the Advanced options.
Click on Startup Settings and select Restart.
Press 4 to Enable Safe Mode.
The computer will restart in safe mode, then try to log in again. Rebooting in secure mode is the best fix for Windows 11 lock screen bugs.
Any trouble with Windows of Windows system files can be easily mended with the help of specialized repair software.
2. Use Local Windows Terminal
Press Ctrl + Shift + P keys to open the Windows Terminal (Admin).
Select Windows PowerShell or Command Prompt.
Type the following into the Windows Terminal (Admin) and press Enter: net user <username>" /active:yes
Then close the Windows Terminal.
Please restart the computer to help it sync the changes better.
3. Unlock Locked Out Account in Local Users and Groups
1. PressWindows+Rkeysto prompt theRun window.
2. Type in lusrmgr.msc and press Enter to open the Local Users and Groups window.
3. Click on Usersin the left pane.
4. Go toNamesand click onAdministrator.
5. Navigate to theGeneral taband uncheck theaccount is locked out.
6. Click onOK.
If you’re looking to bypass the Windows 11 login setup, you can also manually unlock a locked out account via Local Users and Groups.
This is the easiest method available and does not require a lot of tech knowledge, nor is it risky in any way for your PC.
4. Use the reset password option
On the account locked out screen, click the Reset Password option.
Follow the prompts and answer the recovery questions correctly.
It can help you reset the password if you set a recovery option in the Account lock policy.
5. Use Password Reset Disk
Insert your password reset disk and then click.
On the sign-in page, click on Reset password and select Use a password reset disk instead.
Click Next on the Password Reset Wizard page and select your password reset disk.
Click on Next and create a new password for the user account.
Tap on Next, then Finish.
It will help you get a new valid password for the Admin account.
We recommend you go to Microsoft’s help page to see how to get bootable Windows 10/11 files.
Can I enable an administrator account without admin rights?
On Windows 11, it can be difficult, if not impossible, to perform some actions that require a higher access level without having the admin right.
The only thing that can be done is to get a hold of the admin account to be able to enable an administrator account.
The fixes highlighted above are the most efficient ways to bypass Windows 11 when locked out of the admin account. Ensure to follow the steps holistically for optimal results.
Playing your favorite game on your PC doesn’t necessarily have to be done using a mouse and keyboard. In fact, many games are easier and a lot more fun to play with a controller.
And, if you are using a Windows PC, for optimal compatibility, you are most likely using an Xbox controller. The software for these devices can sometimes bug.
Windows 10, as well as Windows 11 users, have complained about not being able to remove the Xbox controller from their PC. Today, we are going to show you how.
Why can’t I remove my Xbox wireless controller device?
This mostly happens when there is an error with the current driver for the gaming device. Files associated with the controller might have become corrupted, again, triggering this error.
However, before updating the driver for the controller, you will need to remove it somehow. If you are unable to remove the Xbox wireless controller from your Windows 10/11 PC, stick around.
That being said, before we start, make sure you restart your PC. Many users claim that this was enough for the process to run as intended.
Do I need third-party software to remove the Xbox wireless controller?
No, you don’t need to go that far. We will show you exactly what you need to do in order to get this done without downloading and installing anything.
Only resort to third-party apps for the job when you’ve wasted all available paths to do it in-house, or so to speak.
How do I remove my Xbox wireless controller device?
1. Uninstall the Xbox wireless controller from Device Manager
Search for Device Manager and open the app.
Expand Sound, video and game controllers, right-click the Xbox controller, then select Uninstall device.
2. Remove the Xbox wireless controller from Devices and Printers
Press Win + R to bring out the Run box, then type Control Panel and press OK.
Click on View devices and printers.
Click on Devices.
Click on the three dots next to the Xbox wireless controller, then select Removedevice.
If you want to make sure that this procedure will be done safely, then you might try using third-party software. A system repair tool simplifies the process of protecting your PC from malware and optimizing it to perform flawlessly at all times.
3. Delete the registry key from Windows Registry
Press Win + R to bring out the Run box, then type regedit and press OK.
Type in the following path, then press the Enter key: Computer\HKEY_LOCAL_MACHINE\SYSTEM\CurrentControlSet\Services\BTHPORT\Parameters\Devices
Expand the Devices folder.
Delete the folder belonging to the Xbox wireless controller.
Each of the folders you find under Devices represents a different Bluetooth device currently connected to your system.
You have to delete the folder for the Xbox wireless controller, and to find it you have to select the first folder and look for the Value Name on the right side.
After you found it, double-click on it, and a window will open containing its Binary Value. You will see then be able to see your device’s name in the Value Data box.
After locating the Xbox wireless controller folder, right-click it and click delete it. Once you deleted the folder, close the Registry Editor and restart your PC.
You have now completely removed the Xbox Wireless Controller from your PC. You can reconnect it later if that is what you want.
Waze is a popular direction and traffic map app that saves time by showing real-time traffic and alerting users about potential traffic jams.
Sometimes, the voice direction feature may not work resulting in Waze audio not working issues.
Many users have reported similar issues with their iOS and Android devices. Apparently, the voice narration is not working even though the Sound settings are on.
Why is there no sound on my Waze?
There are plenty of reasons why the sound or the voice narration is not working on Waze but let’s go through some of the most important:
Incorrect audio settings
The Waze app is not updated
Your device is connected to a Bluetooth device that is not working
The smartphone was set on a Mute/Do not disturb profile
If you are also troubled by this issue, here are a couple of troubleshooting tips to fix the Waze audio not working glitch.
How do I fix Waze audio not working issues?
1. Make sure that the sound is On
Open the Wazeapp, tap on Settings, then access the Voice & sound menu.
Now, make sure that the Sounds are set to On.
Some of our readers also said that they managed to fix the problem just by turning the sound Off and then On again after a few seconds.
2. Unmute Waze during calls
Open the Waze app on your phone.
Tap on Setting and select Sound and Voice.
Make sure the option Mute Waze during calls option is turned off.
Also, turn the Guidance volume from the Sound menu to the maximum level.
Relaunch the Waze app and check for audio improvements.
If you have disabled sound and voice during voice calls, it can create issues with the Waze audio. Try to enable the option and check for any improvements.
Should the issue persist, make sure the volume is at maximum on your phone. Now open a video player and play any video from the gallery. Adjust the volume again and check for any improvements.
Also, make sure that your smartphone is not in a Mute or Do not disturb mode because that will also affect Waze.
3. Try the older version of Waze
If the issue started to occur after updating Waze to the newer version, try an older version of the app.
Doing so, you can resolve the issue temporarily until the bug is fixed in the new app.
Android users can download the older version of the app apk from third-party sites like apkpure.
Make sure you have enabled Install from unknown sources option in the Developer Options before installing the app using apk.
4. Upgrade or reinstall Waze
If the issue persists, try to uninstall the Waze app. Reinstalling the app will fix any file corruption that is creating issues with the app.
From the home screen, tap and hold on to the Waze app icon.
Choose Uninstall or Delete from the option and then tap on Yes to confirm the action.
Restart the phone after you have uninstalled the app.
Open the App Store or Play Store and install the latest version of Waze.
Log in and check if the Waze audio not working issue is resolved.
Where are the voice navigation settings on iPhone?
Open Waze on your iPhone.
Navigate to Settings.
Now, select Maps and tap on Navigation & Guidance.
The Waze sound issues usually occur due to incorrect configuration or software glitches. Follow the steps in this article one by one to fix the issue on your device.
Some of our readers also fixed the sound problem on Waze by turning off the Bluetooth connectivity and turning it back on so it’s worth a try.
Several Canon printer users have registered queries regarding specific errors they come across, such as the Canon printer not being encrypted while making efforts to secure printed information.
Printers are mostly neglected and even overlooked when it comes to security awareness. For the few that note this, Encrypted printing is a significant measure to take note of.
However, what to do when the printer no longer accepts encrypted jobs? Or what to do when encrypted credentials have expired?
This can be a problem and prevent you from printing, but in this article, we’ll discuss how to fix it.
What is encrypted secure print?
An encrypted secure print is a term used for printing tasks, usually those that meet a standard for privacy to prevent the unauthorized use of printed information.
With a secured print, print information is protected until it is released by a user who has access through password or card authentication.
A secure print is kept encrypted during transmission and storage.
How do I get the Canon printer encrypted?
1. Enable secure printing
1. Click on your PC’sStartbutton.
2. Search for Devices and Printers.
3. Open theprinter folder.
4. Right-click yourprintericon and selectprinter properties or Propertiesfrom the dialogue box.
5. Click the Device Settings tab and tick to mark the Allow Use of Secured Printcheck box.
6. Then, clickOK.
If you want to ensure your Canon printer is encrypted, you must first enable the secure printing option. This can be easily done via Printer properties within a few clicks.
2. Send secured documents from the computer to the printer
Open a document and display the Print dialogue box.
Select your printer, and click on Preferences.
Next, click on Secured Print, then selectYes in the information Pop-up box screen. (This will enable you to create a username and pin for the secured document)
You can use the Basic Settings, Page Setup, Finishing, Paper Source, or Quality tabs to specify the print settings on each page.
Click OK when you are done with the print settings.
Encrypted job is used to mean all print jobs which are readily encrypted but are stored on the disk of the print provider as they await printing.
Is encryption key the same as the password?
An encryption key is not the same as a password. The significant difference between the two is that passwords are humanly created, read, and remembered by a user.
At the same time, a key, on the other hand, is used by the software that implements the algorithm, meaning that it doesn’t have to be readable by a human.
Google Chrome is one of the best browsers for all devices, thanks to its excellent performance, speed, and availability of third-party extensions. But some users reported that they can’t print from Chrome making things a tad difficult.
This is a common problem; many users have shared instances when they can’t print from Chrome in Windows 10 or 11.
Before we tackle this issue, we advise you to read our guide on how to enable system print dialog in Chrome. Given the frequent encounters, we decided to list the solutions for users who can’t print from Chrome.
Why is my printer not printing from Chrome?
You might have asked yourself, why can’t I print from Chrome? The reason could have to do with corrupt browsing data, misconfigured settings, or conflicting applications and processes.
Also, for several users, the problem lay with the printer itself. So check if the printing issue is limited to Chrome or is present on other apps. In case it is, installing the printer driver should do the trick.
How do I enable print on Google Chrome?
Launch Chrome and open the file you want to print.
Press the Ctrl key + P to print.
Choose your preferred printing destination and other settings.
Finally, click the Print button.
What can I do if I can’t print from Chrome anymore?
1. Switch to a more reliable browser
If you notice that printing from the browser occurs only too frequently in Chrome, perhaps it’s time you tried an alternative browser.
At this stage, we recommend using OperaOne, to which you can add a Print add-on for ease of use.
It has many features that allow navigation between various tabs, workspaces, and built-in social media chat apps.
The Print Opera One add-on is a lightweight tool that adds a specific button to your browser, so you can easily print a page with one click.
Furthermore, this add-on can be installed on all systems (PC, Mac, Linux, Chromebooks) and is compatible with all other popular browsers, Chrome or Mozilla.
If you choose to print directly from the Opera One browser with the shortcut, you can do that with Ctrl+Shift+P.
For some other actions, though, add-ons are necessary, and you have many of them in the browser’s library.
For what is worth, the download option in Opera One is automatic, so you need to click on what you want without the hassle of also saving the file, program, or app. In addition, it scans those downloads very quickly because it’s a security-oriented browser.
Opera One
Try it and get the Print add-on to have your documents ready for print at any time.
Chrome offers a dedicated keyboard shortcut to print the web pages you are viewing at that very moment. Press Ctrl+Shift+P, make the necessary selections, and you should be good to go.
This is only a quick workaround, but if you want to solve the problem for good, you’ll have to eliminate the issues that caused the error by executing the other methods here.
If you can’t print in color from Chrome, be sure to try this quick solution.
3. Clear the browsing data
Open Google Chrome, and press Ctrl + Shift + Del to open the Clear browsing data window.
Select All time from the Time range dropdown menu.
Tick the checkboxes for Browsing History, Cookies and other site data, and Cached images and files.
Finally, click on Clear data.
Wait for the process to complete.
Often, the corrupt data causes issues, and users can’t print PDFs from Chrome even with the built-in viewer. Clearing the browsing data and starting fresh has helped many users solve the problem.
Additionally, many reported that the print popup is not working in Chrome which too should start working after you execute this method.
Press Windows + I to launch Settings, and select Bluetooth & devices from the tabs on the left.
Now, click on Printers & scanners on the right.
Click on the printer you don’t use anymore from the list.
Next, click Remove.
Click Yes in the confirmation prompt.
With many of these added, your HP printer might not print from Google Chrome. It could just as well be the case with other manufacturers. So it’s best to remove the ones not used anymore and check if you can print from Chrome.
5. Reset the Chrome settings
Launch Chrome, paste the following path in the address bar, and hit Enter:chrome://settings/reset
Next, click on Restore settings to their original defaults.
Finally, click on Reset settings and wait for the process to complete.
If none of the methods listed earlier have worked, this one would; if you can’t print on Chrome with the preview not loading, Chrome is printing blank pages, or it doesn’t recognize the printer.
Why can’t I print anything?
You can look at many things if you can’t print anything from your web browser or other apps. But, of course, it could be due to basic printer issues, like paper jams and low ink toner.
Also, it can be caused by issues with your browser or the app you are trying to print from. So, be sure to troubleshoot both the hardware and software components involved.
Printing failed. Please check your printer and try again in Chrome
This issue is primarily limited to Microsoft Edge, and a patch was released in Edge version 95. However, the problem continues to show up now and then.
The good part is that the problem has been acknowledged, and another patch to eliminate it should be released soon. Also, updating the browser or trying the methods here should do the trick if you encounter it in Chrome.
These are all the ways to quickly fix the problem and get things up and running in no time. If you can’t print from Chrome on Mac, the concept remains the same, and these fixes would help.
Emails are a huge part of our work-life. They have transformed communication into something instant and replaced the letters of olden times when people had to wait weeks if not months to get a reply to their messages.
But in this modern age, the information itself can get overwhelming. There is too much data to handle, and you need tools that make you better at doing your job.
Different Email clients always strive to be better than their competition. This make them bring innovative ideas to present you with all this information in a simple manner that you can easily go through at a glance.
Of course, when there are so many of them, it gets a bit hard to figure out which one to go for, and the same goes for apps.
Thus, we made this list here to help you sort out the top email clients and apps for Windows 10. If you’re using the latest OS by Microsoft, you might find it useful to have access to some great Windows 11 email clients.
Does Windows 10 have an email client?
Windows 10, like other recent releases from Microsoft, has a built-in email app. This app called Mail is preinstalled on your PC with Calendar and other important features.
This email app allows you to connect all your email accounts on one platform. With this, you can improve your productivity, thanks to the ease of use.
What are the best Windows 10 desktop email clients?
Mailbird – Overall best email client for Windows 10
Mailbird attempts to bring the intuitiveness of Sparrow to Windows. Sparrow was a Mac-only email client that was bought by Google before it was shut down and its development was abandoned.
Mailbird is quite possibly the simplest email client to use for Windows while supporting multiple email accounts. It is no wonder it is widely regarded as the best email client for Windows 10.
It also supports simple keyboard shortcuts, has an extensive label and folder search feature, and supports HTML emails.
Some of the special features that put Mailbird at the top of the list are:
Free visual customizing (choose from tons of free themes)
App integration: connect your LinkedIn, Facebook, Twitter, WhatsApp and Google Calendar to Mailbird
Speed reader for quicker mail reading
Attachment search feature
Multi-language support
Snooze less important emails for later
These are only a few of the multiple useful features that Mailbird has.
Mailbird
Feature-rich Mailbird will make your workload easier and faster in no time – give it a try!
eM Client has a basic interface that prioritizes usability above providing a plethora of functions. You may add numerous email accounts, but the free version is limited to only two.
What distinguishes this is the Skype connection, which allows you to utilize the same email interface.
Keeping up with the most recent security information and ensuring that new threats are adequately protected, eM Client provides a great email service.
It supports almost all email technologies (POP3, SMTP, IMAP, Exchange, Office365) and has a very well-organized UI. This is why eM Client is one of the best email providers on the market for Windows 10.
Here are the key features of eM Client:
Message encryption and digital signatures for a secured content guarantee
Instant translation
Snooze incoming messages for a better workflow efficiency
Keep track of replies so you won’t miss flagged information
Cloud storage support
In addition to these characteristics, eM has a calendar, tasks, sync contacts from other devices, organizers, templates, and much more.
eM Client
Boost productivity, manage emails, take notes, and chat. One email client that is simple and enjoyable to use.
Thunderbird – Extendable email client for Windows 10
Thunderbird email client is one of the freeware clients that you can extend like a web browser on Windows 10. If there is a feature that you really need, somebody has probably made an extension to add it to Thunderbird.
The new multi-process Thunderbird makes greater use of your computer’s processor. It does this by dividing the program into several smaller processes rather than operating as a single large one.
Thunderbird includes a PDF viewer, allowing you to read and even edit PDFs emailed to you as attachments. You can accomplish all of this without ever leaving Thunderbird, allowing you to quickly return to your email.
Depending on how you use Thunderbird, whether you’re using it on a huge desktop display or a tiny laptop touchscreen, you may adapt the interface’s icons and text to be larger, more spread out, or extremely compact.
The calendar sidebar enhancements in this edition make it easier to manage numerous calendars. Also, there is a fast enable button for calendars. There is also the show/hide icon for rapidly changing calendars are shown.
Lastly, Thunderbird should work flawlessly for you. But if you face any kind of problems, we have the perfect solutions for any problems reported with Thunderbird on Windows 10 in this article.
Inky stands out because of its well-polished UX – basically, it looks good. It also has mobile clients, and it can sync all your settings between them over the cloud.
INKY is a low-cost cloud-based email security technology that is considerably more than just artificial intelligence. It interprets emails, looks for indicators of fraud, and can detect imposters with a single pixel. It is also a lightweight email client you can always use on Windows 10.
That is why INKY is the only solution that can prevent phishing by capturing everything from spam and malware to the most insidious and dangerous threats.
INKY is the best investment you can make to defend your organization against zero-day phishing attacks. INKY’s artificial intelligence detects anything from spam and viruses to the most insidious phishing scams. It’s determined, inquisitive, and mobile, and it’s getting smarter by the topic line.
You can determine which threats are delivered to your users’ inboxes and know how to avoid them. You can automatically detect phishing and harmful email and route them to quarantine. This enables you to prevent known threats from reaching your end-to-end customers.
Setting up your different email accounts is simple as well as you don’t have to tinker around with settings.
Outlook is more of an all-in-one solution and comes as a part of Microsoft Office. You can also access it through a browser for free. This tool packs the most featured email client, a calendar, and the ability to store contacts, and even make notes.
Outlook makes it simple to engage with Word, PowerPoint, and Excel. You may use Skype to communicate in real-time straight from your Outlook account.
It works as everyone’s most accessible inbox, with simple, voice-controlled navigation, compatibility for numerous assistive devices, and inbox protection and data encryption after mail delivery.
The UX is as friendly as it can get for a client with these many features, but it might be a bit overwhelming to users who are not used to such a density of data and the number of options and settings.
Premium Outlook features like an ad-free interface, custom domains, better security, the complete desktop version of Office applications, and 1 TB of cloud storage are included with a Microsoft 365 subscription.
Outlook is a tool that is not easy to master, but it can be very powerful.
Windows 10 comes with its own email client made by Microsoft – not outlook, but a simpler one.
Obviously, it’s not as feature-packed as Outlook, but it features a UX that is easy to understand, and setting it up can’t get any easier. But it is probably the best email application for Windows 10.
With the familiar and extensive capabilities of Microsoft Word integrated into the writing experience, creating emails has never been easier or more powerful. Simply insert tables, images, and bullets to create lists.
Keep up with your inbox with new touch gestures that assist you in reading, sorting, and archiving your mail. The navigation bar provides a quick and simple toggle, enabling you to navigate freely between your email and your calendar to get things done.
The calendar is Exchange-optimized, with comprehensive support for scheduling meetings and managing a busy calendar, and it gives useful, powerful views of your schedule, such as day, week, and month.
The email client supports the rich notifications featured in Windows 10 that lets you reply to an email just from its notification.
TouchMail presents your emails in a unique yet simple fashion. You have your emails split by contacts and each email is highlighted as its own tile.
TouchMail is the quickest and simplest method to locate and tidy up what matters most in Gmail, Outlook.com, Yahoo Mail, iCloud, AOL, Office 365, and most IMAP email accounts.
Transform your email into a beautiful and colorful inbox that you can explore as you choose – using touch, mouse and keyboard, or pen – with rich visuals, resizable message tiles, and familiar interactions.
In only a few clicks, you’ll be clutter-free! Delete a message with a single tap or hundreds of messages at once. And, with just a few clicks, you can archive, flag, or transfer messages to manage your inbox, as well as quickly identify essential emails with unique color coding.
You can also preview the content of your messages without having to open them, you can easily zoom out to obtain a bird-eye perspective of where your messages are coming from.
TouchMail also supports multiple accounts and has full support for all the filters you could think of. It is primarily made for Windows 10 tablets, so the UI is designed for touch instead of mouse and keyboard, but you can always install those for your tablet.
Another great email app that you should try out is Flow Mail. The application has a beautiful design and is also quite fast. You can quickly check all your emails and take advantage of the integration offers with most email browser services like Gmail.
Regarding the features, here are some notable ones that Flow Mail offers:
Sleek user interface with Fluent Design
Support for Split View
Support all major webmail providers such as Outlook, Gmail, Yahoo, and more. Flow Mail operates in a sandboxed (secure) environment, far more secure than accessing the web. In addition, it does not collect or retain personal information such as logins or email addresses.
Advanced privacy protection with support for custom passwords and Windows Hello
Sandbox environment that won’t collect any personal information
Frequent updates
Jumplists
Native downloading support
Ability to quickly upload or download files
Flow Mail operates in a sandboxed (secure) environment, far more secure than accessing the web. In addition, it does not collect or retain personal information such as logins or email addresses.
While not as feature-rich as Outlook, the Windows 10 email client is still an excellent tool. It boasts an easy-to-use interface, as well as other superb features.
This is why it is a fitting mention on this list of the best email client and apps for Windows 10.
And these were some of the best Windows 10 desktop and apps email clients you could ask for. Each with its unique features and experiences.
While some borrow from others and refine the innovations, others think of something completely absurd and make it work with their experience in UX design and programming.
How an email client presents all the condensed information makes or breaks it – and it also depends on the user’s perspective. So do tell us what you think about these clients.
Playing games like Black Ops 3 on your computer requires enough resources and a stable system to run smoothly. It is a first-person shooter game and one of the Call of Duty series entries.
The most common issue players encounter on their computers when playing the game is FPS drops in Black Ops 3. It indicates that, for some reason, some actions on the game affect the FPS rate and prompt issues like the Black Ops 3 menu lag on PC, Black Ops 3 stuttering, and Black Ops 3 FPS cap.
However, Black Ops 3 PC frame rate issues can occur for several reasons that may vary on many computers.
The common causes are outdated drivers issue, system issues, or issues with the system DVR. Fortunately, fixing the FPS drop in Black Ops 3 is not difficult, and you can solve the problems by following the simple steps in this article.
Outdated Operating System: The computer may conflict with your game if the operating system is outdated. So, not keeping your operating system up to date may affect the Black Ops 3 PC performance.
Outdated graphics driver: An outdated graphics driver poses more threats than an outdated OS. Running an outdated graphics driver on your computer can affect the graphics performance of your games and cause the FPS to drop drastically.
Issues with the Game DVR: Users complain that whenever the Game DVR feature is on, they experience a drop in the FPS on their computer. So, the feature may be responsible for the problem you’re experiencing.
Black Ops 3 is capped because VSync defaults in the game settings. Hence, the game’s multiplayer is limited to 60 FPS by default due to VSync.
However, a reliable way of uncapping Black Ops 3 is by disabling VSync. It increases the FPS cap to 240 FPS max rate in Multiplayer using the in-game menu.
If you want to enable USB audio on Windows 11, whether for external speakers, headphones, or microphones, you need the right drivers installed.
This guide will show you how to download and install USB audio drivers, including how to reinstall the Realtek audio driver on Windows 11 if you run into issues.
We’ll also cover how to find the correct USB audio OEM device download so your system recognizes your hardware properly and plays sound without problems.
How do I download and install USB audio drivers for Windows?
Option 1: Download from the manufacturer’s website
Locate the manufacturer’s site to find the appropriate drivers for your computer.
Download the driver manually from the Downloads menu.
Launch the USB audio driver installer and follow the onscreen prompts to complete the installation.
Connect your USB audio device via the USB port.
Play your audio to check if it’s working.
For example, if you are using an audio interface like the Scarlett Solo, you can follow this Focusrite Scarlett Solo driver download guide to get the correct package and ensure smooth installation on Windows.
Option 2: Use Windows Updates
Connect your audio device to your PC.
Go to Settings.
Pick Windows Update from the left pane.
Select Advanced Options.
Select Optional Updates.
Locate the name of your USB audio device, tick the box next to it, and start downloading.
Option 3: Use a driver updater software
Alternatively, you can opt for a specialized program to update the drivers to precisely what your device needs. It can also help fix corrupt drivers on your PC.
It is a much safer process because this way you will know that your device drivers are updated with the latest version. Plus, you can automate the process so your USB audio device driver is not only installed, but also update whenever a new version is released.
They are drivers that provide support for audio devices that comply with the Universal Serial Bus. The driver helps the computer to accept the device, communicate with it, and control it.
The USB audio driver performs the role of a translator and enables the audio device and the OS to function coherently.
Is Realtek audio driver compatible with Windows 11?
Yes, Windows 11 supports Realtek audio drivers. The latest Realtek driver was released for Windows 11 on January 11, 2022. Hence, it works fine on Windows.
Although there are relatively complex issues with Windows 11, most are being rectified with driver updates. Hence, getting the correct audio drivers will make using USB audio devices easier.
If you’re running Windows 10 and run into issues, the Event Viewer can help you understand what’s going wrong. Many avoid it, thinking it’s only for tech experts, but it’s actually easy to access and use.
The Event Viewer logs everything that happens on your system, especially errors and warnings. For instance, if your network suddenly fails, it creates a log with an event ID and severity level.
Find below all you need to know to use it like a pro.
How do I open Event Manager in Windows 10?
1. Use the Search button
Click on the search icon in the lower-left corner of your task manager.
Type Viewer or Event Viewer.
Click on the application.
2. Use the Control Panel
Click on the search icon in the lower-left corner of your task manager.
Type control panel and select the control panel app.
Once opened, click on System and Security.
At the bottom, click on View event logs.
3. Use a keyboard shortcut
Click the Windows + Xkeys on your keyboard.
Click on the Event Viewer option provided.
4. Use the Run dialogue
Press the Windows + Rto open the Run box on your keyboard.
Type eventvwr in the Run box and hit Enter.
5. Use CMD prompt or Windows PowerShell
➡ CMD prompt
Click on the search icon in the lower-left corner of your task manager.
Type cmd or command and open the app.
On your cmd, type eventvwr.
➡ Windows PowerShell
Click the Windows + X keys on your keyboard to open the Winx menu.
Select the PowerShell option on the menu and type eventvwr.
Click on the search icon in the lower-left corner of your task manager.
Type computer management and open the resulting app.
You’ll see the Event Viewer link on the left side of the screen.
Click to access it.
7. Use the Task manager
Press your keyboard’s Ctrl + Shift + Esckeys to open the task manager.
Click File and select Run new task.
Type eventvwr in the field provided and select OK.
8. Use the File explorer
Select the file explorer icon on your Taskbar.
If you don’t have this icon, click on your keyboard’s Windows + E keys.
Go to your local disk (C:).
Then select Windows.
Once opened, look for your System32 folder and open it.
Please scroll down to your eventvwr.exe file and open it.
9. Use the Smart menu
Click on the Windows button on your keyboard.
You can also select the Windows icon on the bottom left side of your screen.
Scroll down to the Windows Administrative Tools section and click to open.
Select the Event Viewer app from the list.
What is the Event Viewer logs location?
By default, Event Viewer log files use the .evt extension and are located in the following folder: %SystemRoot%\System32\winevt\Logs
To access the folder, you may press the Windows + R keyboard shortcut to open the Run console, paste the path above, and press Enter. A File Manager window will open straight on the location of the logs.
What are some common Event Viewer Windows 10 errors?
As is the case in other circumstances, the Even Viewer app on Windows 10 has some commonly encountered issues affecting users over time.
Here are some of the most frequent errors:
Event ID 1000 error – Most commonly caused by some corrupt WRP system files, this error can be resolved by checking for software conflicts and updating drivers
Event ID 1001 error – Caused most often by various issues, including but not limited to high system resource usage and system file corruption.
Event ID 6008 error – Can be caused by a variety of reasons, including missing driver updates
Event ID 455 Esent error – Usually appears because of missing directories which are required by Windows 10 to create log files
Making sure to follow the guides presented above with attention will ensure that no other issues will be pestering your system, so make sure to go through the solutions one by one.
Did any of our methods help you find the Windows Event log location?
Windows users reported experiencing a frustrating issue with Outlook recently. When trying to connect their email to the app, the error message Something went wrong and Outlook couldn’t set up your account showed up.
The error can be encountered after making specific changes to Outlook or out of the blue, and users usually have no clue about solving it.
If you came across the Something went wrong and Outlook couldn’t set up account error on Office 365, here’s all you need to know and the solutions that would get things up and running.
Why does the Outlook couldn’t set up account message appear?
The issue usually arises when Autodiscover, a process employed by Outlook, receives an unexpected result. Also, your firewall or third-party antivirus may conflict with Outlook’s connection attempt, thus leading to the error.
Besides, as discussed earlier, making changes to the account can cause an error to appear. For instance, many saw the Something went wrong and Outlook couldn’t set up your account message after enabling MFA (Multi-Factor Authentication).
How can I fix the Something went wrong and Outlook couldn’t set up account error?
1. Create a profile through the Control Panel
Press Windows + S to open the Search menu, enter Control Panel in the text field, and then click on the relevant search result.
Click on the View by dropdown menu, and then select Large icons.
Now, click on Mail (Microsoft Outlook) here.
Click the Add button.
Enter a profile name and then click OK.
Now, select the Always use this profile option and click OK.
The first thing that you should do is add a mail profile to the system. This will make the system recognize it as an administrator and help you log into Outlook.
Once done, verify if you still see the Something went wrong and Outlook couldn’t set up your account message when trying with an Exchange account.
2. Tweak your Registry
Press Windows + R to open Run, type regedit, and click OK to access the Registry Editor.
Click Yes in the UAC prompt that appears.
Now, paste the following path in the address bar and hit Enter:HKEY_CURRENT_USER\Software\Microsoft\Exchange
Next, Right-click anywhere on the blank portion, hover the cursor over New, select DWORD (32-bit) Value, and name it as MapiHttpDisabled.
Double-click on the DWORD, set 1 as the Value data, and click OK to save the changes.
Now, navigate to the following address:Computer\HKEY_CURRENT_USER\SOFTWARE\ Microsoft\Office16.0\Outlook\AutoDiscover
Create a new DWORD (32-bit) Value here, and name it as ExcludeScpLookup.
Also, set its Value data to 1 and save the changes.
Similarly, create two more DWORD (32-bit) Value in the AutoDiscover folder, and name them ExcludeHttpsRootDomain and ExcludeHttpRedirect. Make sure to set 1 as both their Value data.
Close the Registry Editor and reboot your PC for the changes to come into effect.
Sometimes, your DNS might be broken, causing the Something went wrong and Outlook couldn’t set up your account error.
Fixing this issue requires you to make a few registry changes. Be careful when making these, as incorrect settings could cause severe system damage. Follow the steps here as it is to be on the safe side.
3. Disable Windows Firewall
Press Windows + R to open the Run command, enter Control Panel in the text field, and click OK.
Click on System and Security.
Next, click on Windows Defender Firewall here.
Next, select Turn Windows Defender Firewall on or off in the left pane.
Select Turn off Windows Defender Firewall (not recommended) for both Private network settings and Public network settings, and then click OK to save the changes.
Sometimes, Windows Defender Firewall blocks certain apps from accessing the Internet. In which case, you can disable it and verify if the Outlook 2016 Office 365 Something went wrong and Outlook couldn’t set up your account error is fixed.
Just like in the case of the Windows Defender Firewall, your third-party antivirus software could restrict certain apps from accessing the Internet. Open the antivirus, find the option to disable it, and check to see if this fixed the issue.
If it doesn’t work, turn the antivirus back on to avoid potential malware attacks. But, in case it did, the problem lies with the antivirus itself. Here, we recommend first uninstalling the program, you can easily use CCleaner to clean up, and then choosing an effective and reliable antivirus for your PC.
5. Run the troubleshooter
Press Windows + R, type control in the text field, and click OK.
Choose Large icons from the View by dropdown menu.
Click on Troubleshooting.
Click on Programs.
Next, click on the Program Compatibility Troubleshooter.
Follow the on-screen instructions and choose the appropriate response when prompted to complete the process.
That’s it! If the previous methods didn’t work, running the troubleshooter would fix the Something went wrong, check your account info, try again, or contact your IT admin.
How can I fix the Something went wrong and Outlook couldn’t set up account on Windows 11?
If you are encountering the error in Windows 11, we would first recommend trying the solutions listed in the previous section since these are the same for both iterations of the OS.
Now, first things first! Most users reported the Something went wrong and Outlook couldn’t set up your account error after enabling 2FA. And the best solution is to disable it for the time being while you set up the account, and after it’s done, re-enable the feature.
Also, check for DNS entries you are unaware of; if any are found, remove them. Besides, if nothing else work, try disabling IPv6.
How do I add email accounts to Outlook?
Adding an email account to Outlook in Windows 11 is pretty simple the first time. Then, on launching the app, you would be asked to provide the login credentials and complete the authentication if required, and things should be up and running.
Things aren’t difficult here for those who already have it set up and want to add multiple accounts to Outlook. Head to the File menu, click Add account, and follow the on-screen instructions to complete the process.
By the time you reach this part of the guide, the Something went wrong and Outlook couldn’t set up your account error should be gone for good.
A two-monitor setup certainly enhances the display and allows better productivity. Sometimes, you may need to change the primary and secondary monitors to get the desired results.
This is rather simple, and you can do it in a matter of moments. The best part, there is more than one way to do that, thus giving the option to choose whichever suits you the best.
If you don’t know how to change your primary and secondary monitor, this article will be perfect for you.
How do I change which monitor is primary in Windows 10?
1. Via Display Settings
1. Right-click on an empty space on the Desktop and choose the Display settings option from the menu.
2. Scroll down to Multiple displays. Your monitors should be displayed here.
3. If your secondary monitor is not visible here, click on Detect.
4. Select the monitor you want to be your primary one, scroll down and click onMake this my main display.
5. After doing that, the selected monitor will become the primary monitor.
If you own multiple monitors and want to change which one is the primary one and which one is the secondary one, you can do this through the Display Settings menu.
This is a fast and easy method which allows you to change the primary monitor in just a few clicks.
2. Set the main display in NVIDIA Control Panel
Open the NVIDIA Control Panel.
Under the Display option in the left pane, select Set up multiple displays.
Now, right-click on the display you want to use as primary and choose to Make primary. Note: the display number you can see with an asterisk (*) is the current monitor.
Then, click on Apply to save the changes.
Finally, confirm by clicking Yes.
If you can’t open Nvidia Control Panel, fix that first, and you can then find out how to change the primary monitor in Windows.
This is a slightly intricate method and would require you to use hit-and-trial while identifying the monitor to be set as primary. It’s because the tool (we will be downloading) doesn’t follow the same display configuration set by the OS.
Go to Nirsoft’s official website, scroll down to the bottom of the page, and click the download button, depending on your version of the OS.
Press Windows + E to open the File Explorer, head to the folder where the downloaded file is stored, right-click on it, and select Extract all.
Choose the location for the extracted files, and click on Extract.
Now, select the extracted folder, and click on Copy path in the Home menu.
Press Windows + R to open the Run command, type cmd in the text field, and then press Ctrl + Shift + Enter to open Command Prompt with administrative privileges.
Click Yes in the UAC prompt.
Now, paste the following command while replacing Path with the one you copied earlier, and hit Enter:cd /d Path
Next, paste the following command and hit Enter:nircmd.exe setprimarydisplay 1
The last command is the tricky part because the number 1 wouldn’t work for most of you. As stated earlier, the monitors are not identified the same in the Command Prompt as they were in the Nvidia Control Panel or Display settings.
So, you would have to follow a hit-and-trial approach. Start with 1 and then keep increasing until you identify the correct value to set the desired monitor as primary. And once you hit the bull’s eye, things will be much more seamless in the future.
Also, while you are at it, make sure to identify the values for all connected displays in case you want to change again in the coming days or revert to the previous configuration.
Changing primary and secondary monitor is quite simple to do on Windows 10. The fastest option is to do it from DisplaySettings, but you can also use the Nvidia Control Panel. However, using the Command Prompt method is a little too intricate for normal users.