VGA Only Mode is Not Enabled: How to Quickly Turn it On

The VGA-only mode is a unique way to access Windows if it locks or can’t function normally. However, it can be annoying if you encounter the VGA-only is not enabled problem.

Hence, this article will cover the basics of the VGA mode and how to enable it on your PC without hassles quickly.

What is the VGA-only mode?

The VGA mode is similar to launching the PC in safe mode. It offers a basic Windows view with a 640 x 480 pixels resolution.

In this mode, you can diagnose the PC’s or video card problems while having access to a minute functionality of the computer. Only the most basic video drivers will load during the VGA mode, and directional keys are used to navigate.

The VGA mode is often used when video cards or display issues, such as the PC not detecting GPU on Windows 11.

How can I enable VGA-only mode on my PC?

Before trying these steps, there are a few checks you need to perform:

If none of these restores your video card performance, apply the steps below to enable VGA mode.

1. Adjust BIOS settings

  1. Power on the computer and click F8, F2, F10, or F12 continuously on the Windows display, depending on your PC.
  2. Choose Troubleshoot to open the Advanced options tab.
  3. Click Startup Settings.
  4. Select Enable low-resolution video mode by pressing F1 and click Restart.

This will start Windows in VGA mode, using minimum drivers input similar to the Safe Mode. If you encounter difficulties accessing BIOS settings in Windows 11, our guide can help you solve it.

2. Force Windows to use standard VGA mode drivers

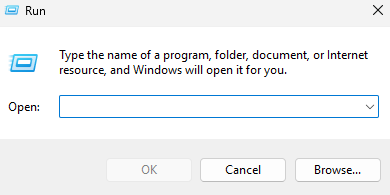
  1. Press the Windows + R keys to launch the Run windows box, input %Systemroot%\Inf folder, and click OK.
  2. Locate the Oemn.inf and Oemn.pnf files that correlate with the original Oemsetup.inf file for the OEM video driver.
  3. Move the two files into a different folder.
  4. Click the Start button, input Device Manager, and launch it.
  5. Expand Display adapters, right-click the Video adapter and select Uninstall device.
  6. Then restart your PC.
  7. Click the Starts button, input Command Prompt and launch it.
  8. Input the following and press Enter to launch the Add Hardware Wizard and click Next: hdwwiz.exe
  9. Select Search for and install the hardware automatically and click Next.
  10. Wait for the process to complete and click Finish.

Having completed this, Windows will use the Vga.sys generic video driver and doesn’t require starting in Safe Mode.

Further, our guide on installing drivers without EXE files has detailed information on using INF files for driver installation.

Follow the steps above for optimal results when trying to combat VGA only mode is not enabled problem.

However, if you encounter VGA issues on Windows, do not hesitate to check out our guide for the best ways to fix them.

Sometimes, your VGA card may not be supported by the UEFI driver. Although not rampant, if this is your problem, consider our article.

In case people tell you to ensure BIOS BBS is disabled, it’s valid advice since BBS can lead to vulnerabilities. And it’s for the same reason you should ensure Request Disk Topology is disabled. Only do that if you don’t need the features.

Conclusively, if this guide has been helpful, you can leave your comments and suggestions in the section below. We’d like a response from you.

Windows 7 Computer Freezes Randomly: 5 Ways to Fix It

Several readers have reported that their computer freezes randomly in Windows 7. These freezes occur a few times for some individuals, while others experience them randomly.

This computer problem, at times, can be very challenging to troubleshoot. Nevertheless, we have documented some potential solutions for freezing problems in Windows.

Why does my computer freeze randomly?

That your computer freezes randomly can be due to several reasons, and some users claim it can happen after an installation. Noting that there are certain times when some updates are buggy, which may affect the computer. Some other factors responsible for this are:

  • Missing or corrupt files – Many computer issues are caused by missing or corrupt files, which can cause corrupt registry.
  • Hardware problems – For many users, some hardware problems may make the laptop freeze after starting. The most common reasons are from overheating or accumulated dust in the computer’s cooling area.
  • Conflicting third-party programs – In some cases, it may be one of the third-party programs on your computer, and it may be the perfect time to remove some of them.
  • Internet connection – A poor reception can sometimes cause users to experience computer freezing when surfing the internet.
  • Running multiple programs at a time – On several occasions, users have reported that their computer was freezing due to multiple programs on their PC. You can read through our detailed guide on removing too many background processes on Windows.
  • Insufficient hard disk space – Regular access memory (RAM) is your computer’s memory. When your computer transfers memory to your hard drives, it may freeze due to cache issues, and hidden system files accumulated over time.

Now that you know some potential reasons why your computer may freeze in Windows 7, let’s proceed to how you can fix this problem.

How do you unfreeze a Windows 7 computer?

Before engaging in advanced troubleshooting steps, you should consider the following:

  • Disconnect all USB devices since, in rare instances, other USB devices can lead to conflicts and issues.
  • Remove background programs as long as they can cause slowdowns and, in some instances, freeze your PC.
  • A quick restart can sometimes fix bugs and glitches, so it’s worth trying out. Take immediate action if your PC is stuck on restarting.

If the problem persists, you can work your way through any of the advanced solutions below.

1. Update your drivers

  1. Right-click on My Computer, then click on Manage.
  2. From the list, click on Device Manager.
  3. Right-click on the hardware’s name or icon.
  4. Next, choose Properties, then click on the Update Driver button under the Driver tab.
  5. Then click Search automatically for drivers.

If this doesn’t do the trick, we recommend using a specialized tool to find and update outdated drivers automatically. Outbyte Driver Updater software is fast and safe since it uses its database of over 18 million driver files.

Outbyte Driver Updater

Have all your drivers updated in no time and get rid of random freezes.
Free Trial Download Now

2. Install missing updates

  1. Click on Start on your Taskbar and type Windows Update in the Search bar.
  2. Then select Check for updates from the menu.
  3. Once the new window is open, click on Check for updates button.
  4. Windows will automatically check for available updates and download in the background if any are available.

3. Run the SFC scan

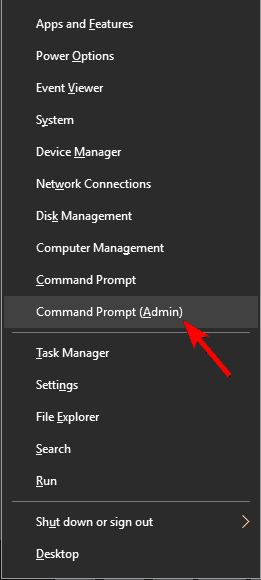
  1. Right-click the Start button to bring up the Command Prompt menu (Admin).
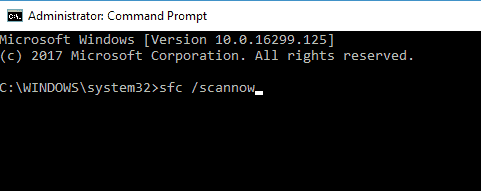
  2. Press Enter after entering the line below: sfc/scannow
  3. If the error is discovered, it will be fixed immediately. Then restart your computer after closing the Command Prompt.

The SFC scan is a command-line tool that thoroughly checks your system for potentially damaged files, and it can sometimes help with this problem.

4. Disable your graphics card

  1. Open Device Manager.
  2. After opening the Device Manager, check for your dedicated graphics card and right-click it.
  3. Then, select Disable from the menu.

5. Perform a Startup Repair

  1. Open the Start Menu, click the Power icon, and hold the Shift key while clicking on Restart.
  2. As soon as your PC restarts, you’ll be presented with options. Click Repair your computer.
  3. In System Recovery options, select Startup Repair. (The startup repair process will begin immediately)
  4. Click Finish to restart your PC.

Remember that the startup repair can take about 15 minutes or more, so don’t interrupt it. Once completed, the issue should be completely fixed.

Is computer freezing related to a virus?

There is a high probability that the virus starts several processes in the background, which ultimately hogs the system’s resources and causes the PC to freeze. Though it’s not the case with every virus, especially those designed to go unnoticed.

When the computer is infected with one, many also ask, can a virus completely destroy a PC? And the answer is Yes. If the virus manages to get hold of the drivers, it can cause the device to malfunction and, subsequently, the ones connected to it.

For instance, if the computer fan stops running due to a virus, it will lead to overheating in Windows, which will, in turn, damage the sensitive components in the PC.

Any of these fixes should prevent the computer to not freeze randomly on Windows 7 but ensure you work down this article to know which works for you.

In case the problem is still there, you might want to check our computer freezes and restarts guide for more potential solutions.

If you have any questions or suggestions, please feel free to use the comments section below.

Thread Stuck in Device Driver: How to Fix & Causes

Blue Screen of Death errors can be quite serious since they are caused by software or faulty hardware. Although these errors aren’t that common, it’s important to know how to fix them.

Therefore today we’re going to show you how to fix the THREAD STUCK IN DEVICE DRIVER_M error on Windows 10.

Why does Stop code Thread Stuck in Device Driver appear on Windows 10?

Thread stuck in device driver error is somewhat common, and it usually occurs if you have a driver issue on your PC. Incompatible drivers will cause this problem, so be sure to find and remove them.

Similar to the Driver Overran Stack Buffer error, this is a blue screen error, therefore it’s important that you fix it if you want to avoid file loss and other issues.

On other hand, it’s possible that this issue is caused by hardware, just like the Machine Check Exception error, so be sure to inspect your hardware. Before we dig in, here are more similar issues reported by our readers

Where does this error occur and what to expect?

  • On all OS versions (Thread Stuck in Device Driver Windows 7, 8,10,11)
  • Thread Stuck in Device Driver GPU (AMD/Ryzen)
  • Thread Stuck in Device Driver when playing games (Oculus is frequently impacted)
  • On most laptop brands (Thread Stuck in Device Driver HP/Dell/Lenovo)
  • Thread Stuck in Device Driver Netflix
  • Thread Stuck in Device Driver mining

How can I fix the Thread Stuck in Device Driver error?

1. Update your drivers

Blue Screen of Death errors can be caused by outdated or buggy drivers, therefore in order to fix THREAD STUCK IN DEVICE DRIVER M and many other BSoD errors, it’s important that you update your drivers.

Windows 10 relies heavily on drivers in order to work with your hardware, therefore it’s crucial that your drivers are up to date and compatible with Windows 10.

To update your drivers you can use Device Manager by following these steps:

  1. Press Windows Key + X on your keyboard to open Power User Menu and select Device Manager from the list.
    thread-stuck-in-device-driver-m-manager
  2. When Device Manager opens locate the driver you want to update, right-click it and choose Update Driver Software.
    thread-stuck-in-device-driver-m-update-driver-software
  3. Select Search automatically for updated driver software and wait for Windows 10 to download the appropriate driver.
    thread-stuck-in-device-driver-m-driver-software
  4. Repeat these steps for all drivers that you want to update.

Updating drivers with Device Manager is fairly simple, but you should know that the Device Manager doesn’t always download the latest drivers for your device.

To ensure that you have the latest drivers, we strongly advise that you download your drivers manually.

To update drivers manually you just need to visit your hardware manufacturer’s website and download the latest drivers for your device. Bear in mind that you might need to update all your drivers in order to fix this error.

Update drivers automatically

Searching for drivers on your own can be time-consuming. So, we advise you to use a tool that will do this for you automatically.

Using an automatic driver updater, such as Fortect Driver Updater will certainly save you from the hassle of searching for drivers manually, and it will always keep your system up to date with the latest drivers.

⇒ Get Fortect Driver Updater

2. Run the BSoD Troubleshooter 

If none of the previous solutions resolved the issue, let’s try a few troubleshooting tools. The first troubleshooter we’re going to try is Windows 10’s built-in BSoD troubleshooter.

As you can probably tell, this tool can address all sorts of BSoD problems. Hopefully, the THREAD STUCK IN DEVICE DRIVER M error is one of them.

Here’s how to run Windows 10’s built-in BSOD troubleshooter:

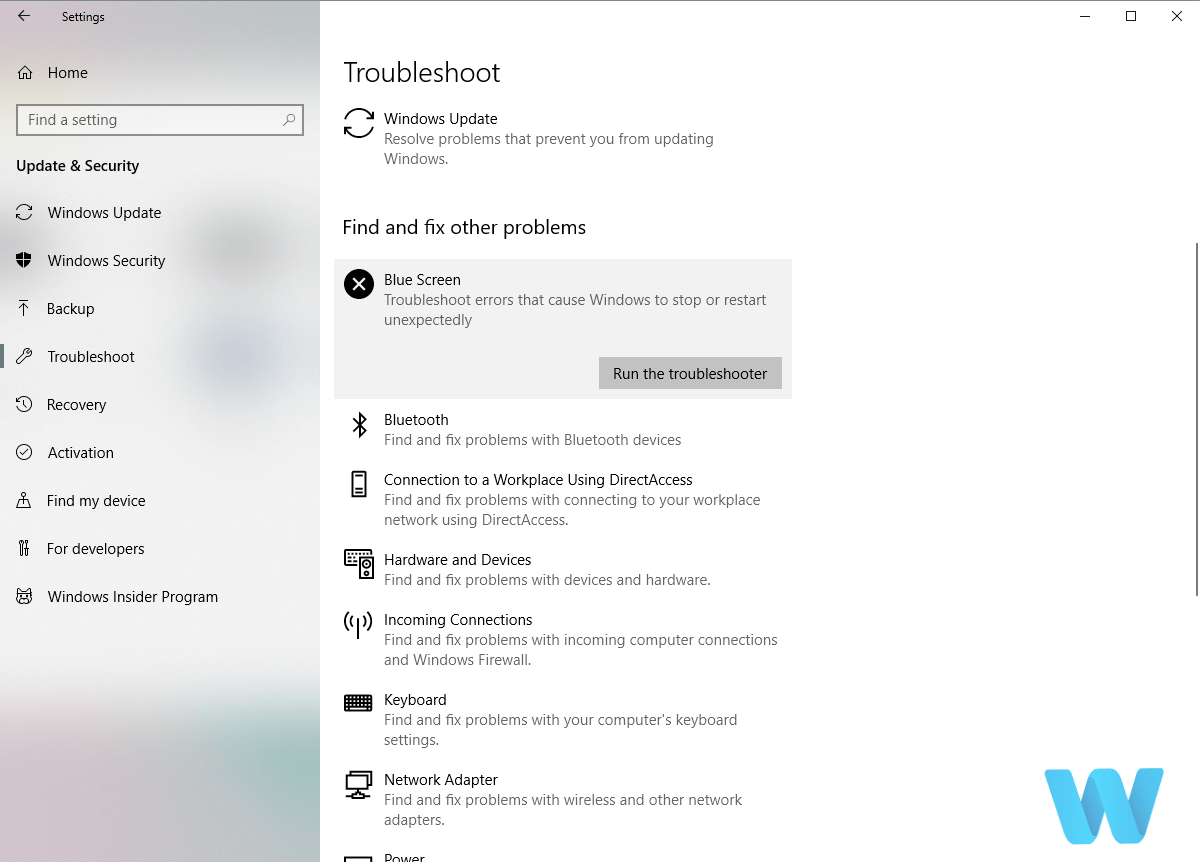
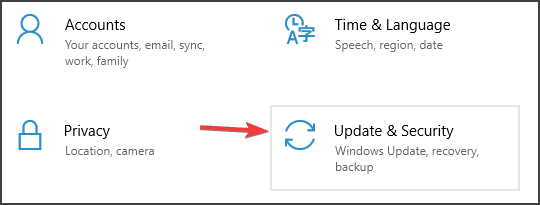
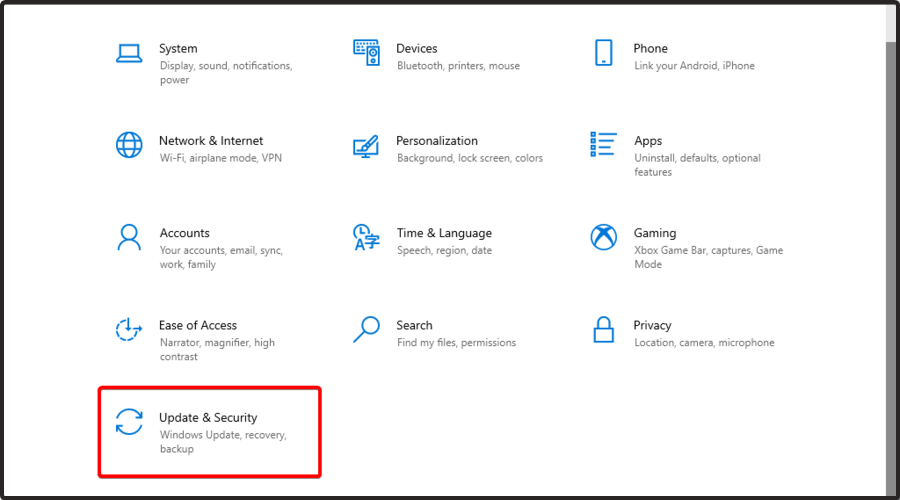
  1. Open the Settings app and go to Update & Security section.
  2. Select Troubleshoot from the menu on the left.
  3. Select BSOD from the right pane and click Run the troubleshooter.THREAD STUCK IN DEVICE_DRIVER M Windows 10 error
  4. Follow the instructions on the screen to complete the troubleshooter.

Now, problematic apps can obviously cause more than a few isolated glitches. In fact, due to recurrent interferences, your system can end up struggling with severe errors.

3. Run the SFC scan

The next troubleshooting tool we’re going to try here is the SFC scan. This is a command-line tool that scans your system for corrupt files and repairs them.

So, if a corrupt system file is the reason you’re getting the THREAD_STUCK_IN_DEVICE_DRIVER_M, the SFC scan will likely resolve the problem.

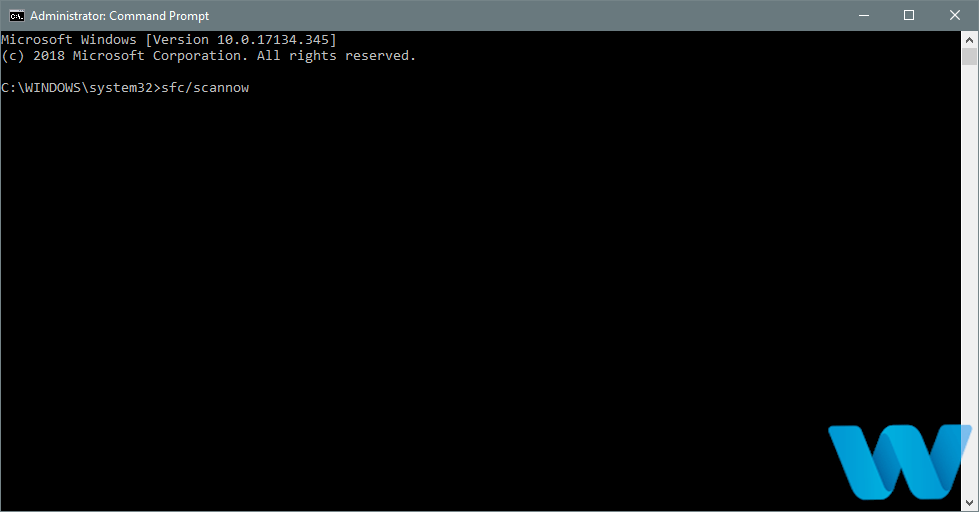
Here’s how to run the SFC scan in Windows 10:

  1. Right-click on the Start Menu button, and open Command Prompt (Admin).
  2. Enter the following line and press Enter: sfc/scannow.THREAD STUCK IN DEVICE_DRIVER M Windows 10 error
  3. Wait until the process is done (it may take a while).
  4. If the solution is found, it will automatically be applied.
  5. Now, close the Command Prompt and restart your computer.

4. Run DISM

Another troubleshooting option we’re going to try here is DISM. Deployment Image Servicing and Management (DISM) is a tool that re-deploys the system image.

That can usually lead to resolving various problems, including BSOD errors. We’ll walk you through both standard and the procedure that utilizes the installation media below:

  • Standard way
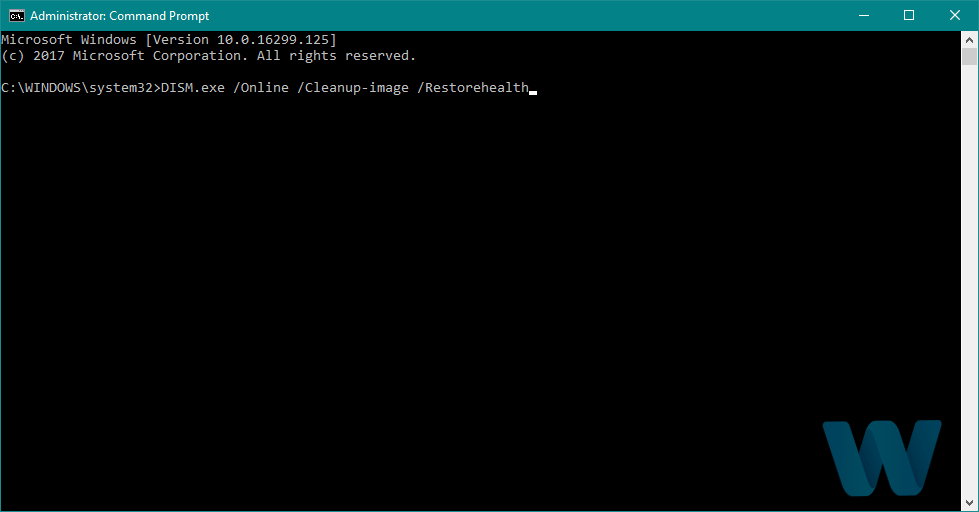
  1. Right-click Start and open Command Prompt (Admin).
  2. Paste the following command and press Enter:
    • DISM /Online /Cleanup-Image /RestoreHealthTHREAD STUCK IN DEVICE_DRIVER M Windows 10 error
  3. Wait until the scan is finished.
  4. Restart your computer and try updating again.
  • With the Windows installation media
  1. Insert your Windows installation media.
  2. Right-click the Start menu and, from the menu, choose the Command Prompt (Admin).
  3. In the command line, type the following commands and press Enter after each:
    • dism /online /cleanup-image /scanhealth
    • dism /online /cleanup-image /restorehealth
  4. Now, type the following command and press Enter:
    • DISM /Online /Cleanup-Image /RestoreHealth /source:WIM:X:SourcesInstall.wim:1 /LimitAccess
  5. Make sure to change an X value with the letter of the mounted drive with Windows 10 installation.
  6. After the procedure is finished, restart your computer.

5. Check the hard drive

A broken hard drive is alarming. And the first warning messages come in the form of BSOD issues. So, go and check the current state of your hard drive. To do that, you should run the chkdsk command.

This command will scan your partitions, and apply solutions, if possible. Here’s how to run the chkdsk command in Windows 10:

  1. Enter the Advanced Startup (Restart your computer while holding the Shift key).
  2. Choose Troubleshoot > Advanced Options.
  3. Select Command Prompt from the list of options.
  4. When Command Prompt appears, enter the following lines and press Enter after each line in order to run it:
    • bootrec.exe /rebuildbcdTHREAD STUCK IN DEVICE_DRIVER M Windows 10 error
    • bootrec.exe /fixmbr
    • bootrec.exe /fixboot
  5. Some users are also suggesting that you need to run additional chkdsk commands as well. To perform these commands, you need to know drive letters for all your hard drive partitions. In Command Prompt you should enter the following (but remember to use the letters that match your hard drive partitions on your PC):
    • chkdsk /r c:
    • chkdsk /r d:

    This is just our example, so keep in mind that you have to perform chkdsk command for every hard drive partition that you have.

  6. Restart your computer and check if the issue is resolved.

6. Install the latest updates

Certain hardware and software have an issue with Windows 10, and sometimes these issues can cause THREAD STUCK IN DEVICE DRIVER_M or any other Blue Screen of Death error to appear.

To fix this error, it’s recommended to use Windows Update to download the latest patches.

Many of these patches offer new features, security improvements, and various bug fixes related to both hardware and software, therefore we strongly suggest that you download the latest updates if you want to ensure that your PC is safe and free from errors.

7. Remove your antivirus and problematic applications

Even though Windows 10 comes with Windows Defender that works as a default antivirus program, many users tend to use third-party antivirus programs for extra protection.

To fix this problem, it’s advised that you temporarily remove all third-party antivirus tools from your PC.

We have to mention that uninstalling the antivirus software might not be enough since many antivirus tools tend to leave certain files behind even after you remove them.

To completely delete all files associated with your antivirus, we suggest that you download a dedicated removal tool. You may also check out this amazing list with the best uninstaller software you can use right now.

8. Update your BIOS

Few users claim that you can fix this error by performing BIOS update. By updating BIOS you’ll unlock new features of your motherboard as well as support for new hardware.

We have to warn you that BIOS update is somewhat an advanced procedure, and you can cause permanent damage to your PC if you’re not careful.

To see how to properly update BIOS, we advise that you check your motherboard manual for detailed instructions.

9. Remove overclock settings

Overclocking allows you to achieve better performance by changing the settings of your hardware. We have to mention that overclocking is potentially dangerous, and it can cause BSoD errors such as THREAD STUCK IN DEVICE DRIVER to appear.

In the worst-case scenario, overclocking can cause permanent damage to your hardware so keep that in mind.

Since overclocking can cause Blue Screen of Death errors, we advise you to remove any overclock settings and overclocking software that you have installed.

10. Check your hardware

Hardware issues and overheating can often cause BSoD errors, therefore we urge you to clean your PC with pressurized air. Also, be sure to check if your cards are properly seated and if your cables are properly connected.

If everything is connected properly, try to remove any recently installed hardware. Sometimes new hardware isn’t compatible with your configuration, and if that’s the case you should remove or replace the new hardware.

In addition to new hardware, be sure to check if your hardware is working properly. According to users, a faulty motherboard or graphics card can cause this error to appear, so be sure to check those components first.

Before you go, we also have a great guide on how to fix the Error Not Safe Mode Driver, so don’t miss it. We also have a new guide on Handle Error On Critical Thread.

This error can cause certain problems on your PC, but we hope that you managed to fix it by using some of our solutions.

Can’t Type in Windows Search Bar: Fix It With These Steps

The Windows Search bar makes it easy to search for the files and the apps installed on your computer. However, many users reported that they can’t type in Windows Search bar.

Several of our readers have reported they can’t type in the Windows 10 search bar a few days after they have updated their OS. In this article, we are exploring what to do if you can’t type in Windows 10 Start or Search bar.

Why can’t I type in my Windows search bar?

  • Issue with the File Explorer or Cortana that can be fixed with simple restart.
  • Corrupted Windows update package or installation process.
  • Corrupted user profile can prevent certain features from working.
  • The required processes, such as ctfmon.exe aren’t running.

Now that we know why typing is not possible in Windows Search, let’s go to the actual solutions.

How do I get my search bar to work again?

Before trying the solutions listed next, here are a few quick things you can do since these have worked for many users:

  • Check if you can type in another app or area, and if you can’t, verify the keyboard’s connection cable. Also, make sure that the keyboard has not been disabled from Device Manager or BIOS.
  • Restart the computer.
  • Install any pending Windows updates.

If the issue remains as it is, head to the next section.

https://youtu.be/IqUu1IP1-3s

1. Start CTFMon

  1. Press Windows + R to open the Run dialog box.
  2. Now, paste the following command:C:\Windows\system32\ctfmon.execommand to fix can't type in windows search bar
  3. Press Enter.

In case this issue reappears, you might have to add ctfmon shortcut to the Startup folder on Windows so it can always start with your PC.

2. Use a PowerShell command

  1. Press Windows + R to open Run, type powershell in the text field, and hit Ctrl + Shift + Enter.powershell
  2. Click Yes in the UAC prompt.
  3. In the PowerShell window, type the following command and press Enter: Get-AppXPackage -AllUsers |Where-Object {$_.InstallLocation -like "*SystemApps*"} | Foreach {Add-AppxPackage -DisableDevelopmentMode -Register "$($_.InstallLocation)AppXManifest.xml"}Windows 10 can't type in search box
  4. Once done, click the Start Menu and choose Power. Lastly, click on Restart. Once the PC restart, check if the issue is resolved.
  5. In case it’s not, again open PowerShell and run the following command: $manifest = (Get-AppxPackage Microsoft.WindowsStore).InstallLocation + 'AppxManifest.xml' ; Add-AppxPackage -DisableDevelopmentMode -Register $manifest

These two commands have fixed things for many when they can’t type in the Windows start menu. So, make sure to give it a try.

3. Use the Registry to reset the Search bar

  1. 1. Press Windows + R to open Run, type regedit in the text field, and click OK.

    regedit to fix can't type in windows search bar
  2. 2. Click Yes in the UAC prompt that appears.

    yes
  3. 3. Now, paste the following path in the address bar at the top and hit Enter:HKEY_LOCAL_MACHINE\SOFTWARE\Microsoft\Windows Search

    paste path
  4. 4. Double-click on the SetupCompletedSuccessfully entry.

    edit to fix can't type in windows search bar
  5. 5. Enter 0 under Value data and click OK to save the changes.

    change
  6. 6. Now, restart the computer for the changes to come into effect.

4. Use a dedicated file finder/search software

One of the most straightforward solutions to avoid such errors, especially when you need to find something very quickly on your PC, is to have third-party file finder software installed on your PC.

Third-party software apps come with up-to-date features like keyword maps that can search through unstructured data, giving you more results than your standard operating system search feature.

On top of that, dedicated file searchers can also look for keywords in your emails or document type of files to ensure you find what you are looking for.

Copernic Desktop Search is an excellent option because it can index and search over 150 file types and emails. On top of that, it has fast results and keeps your data extremely secure.

Copernic Desktop Search

Find relevant data effortlessly with this amazing search program.
Free Trial Visit Website

5. Restart the Windows File Explorer process

  1. Close all File Explorer tabs if you have any opened.
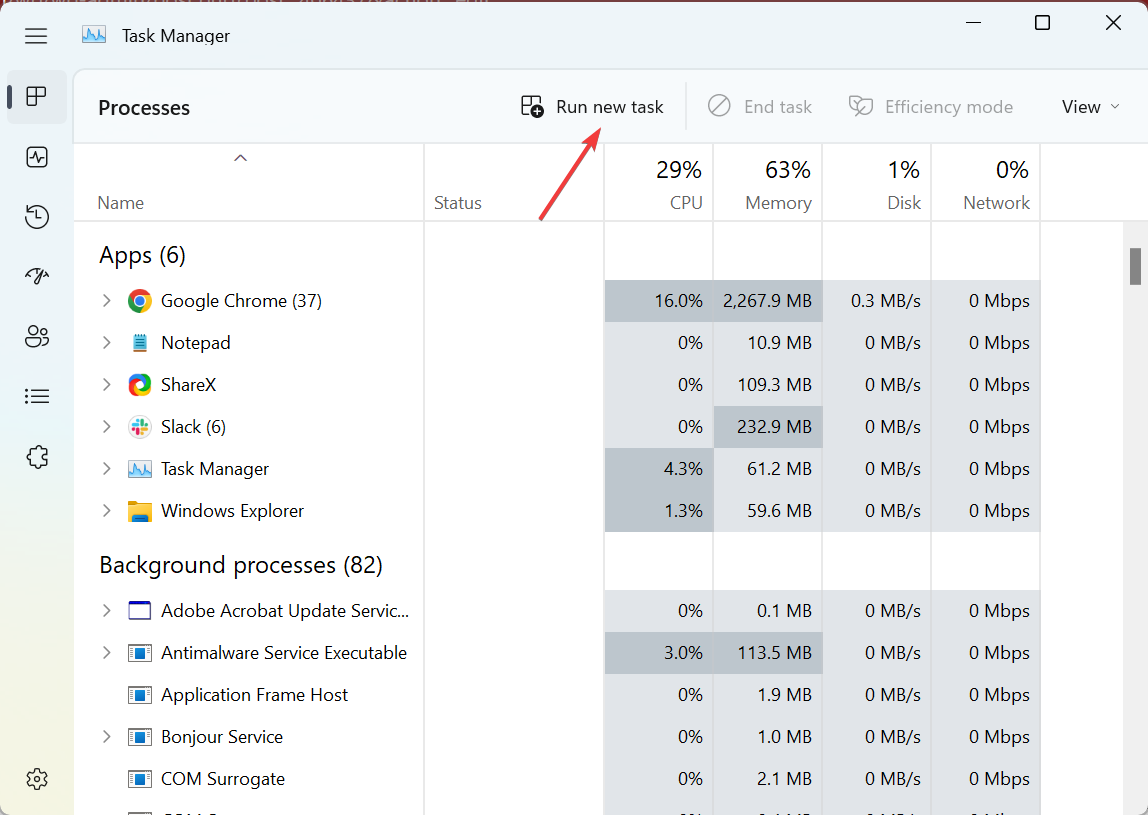
  2. Press Ctrl + Shift + Esc to open the Task Manager and click on Run new task.create new task to fix can't type in windows search bar
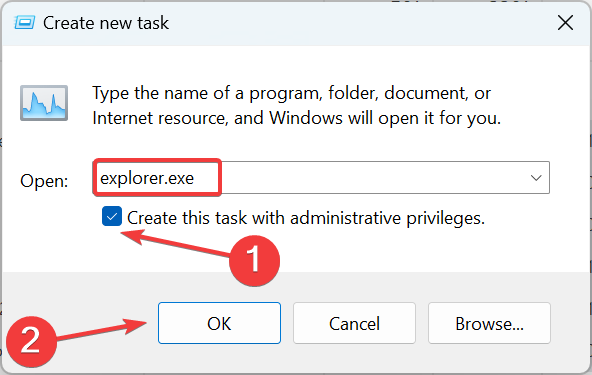
  3. Enter explorer.exe in the text field, tick the Create this task with administrative privileges checkbox, and click OK.explorer.exe

6. Run the Search and Indexing troubleshooter

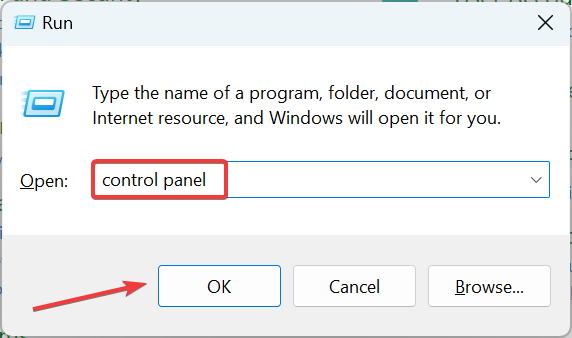
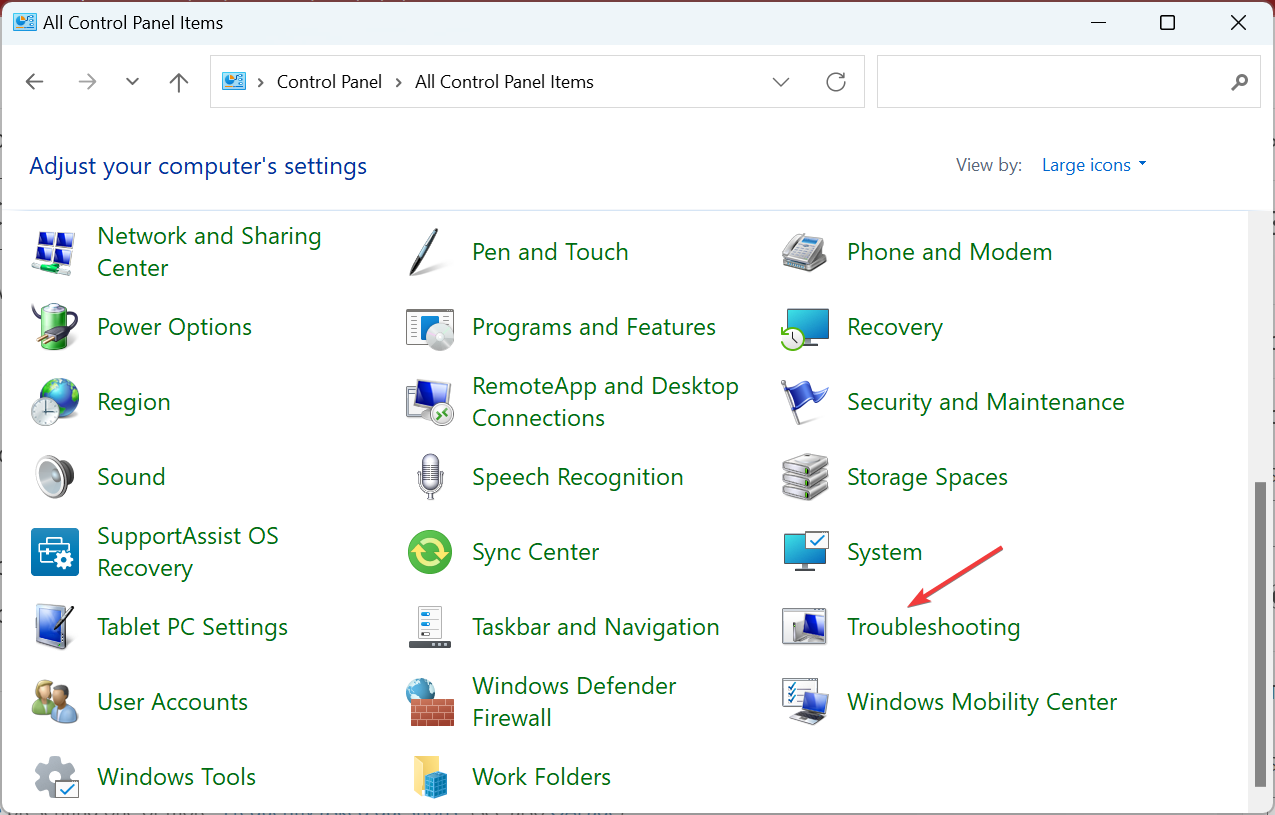
  1. Press Windows + R to open Run, type control panel in the text field, and click OK.control panel
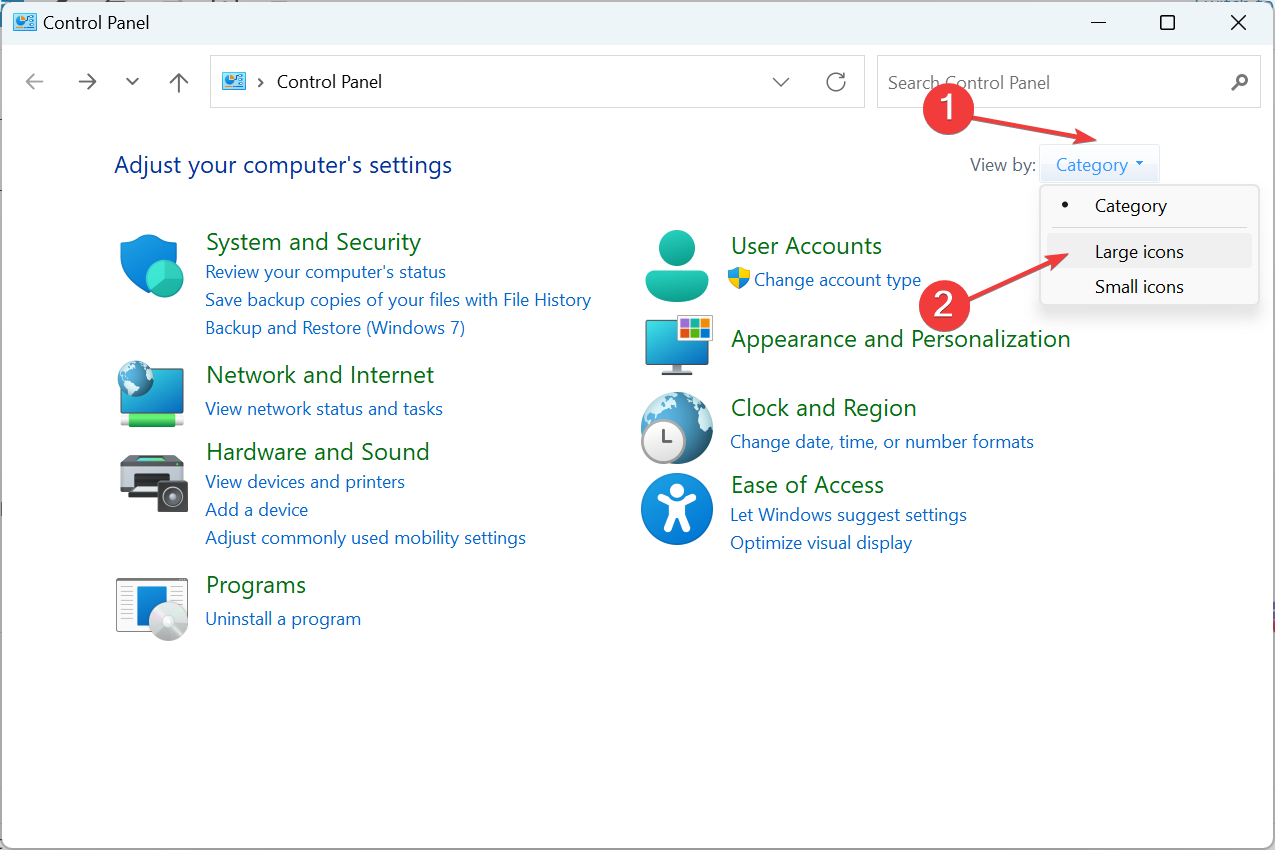
  2. Select Large icons from the View by dropdown menu.large icons
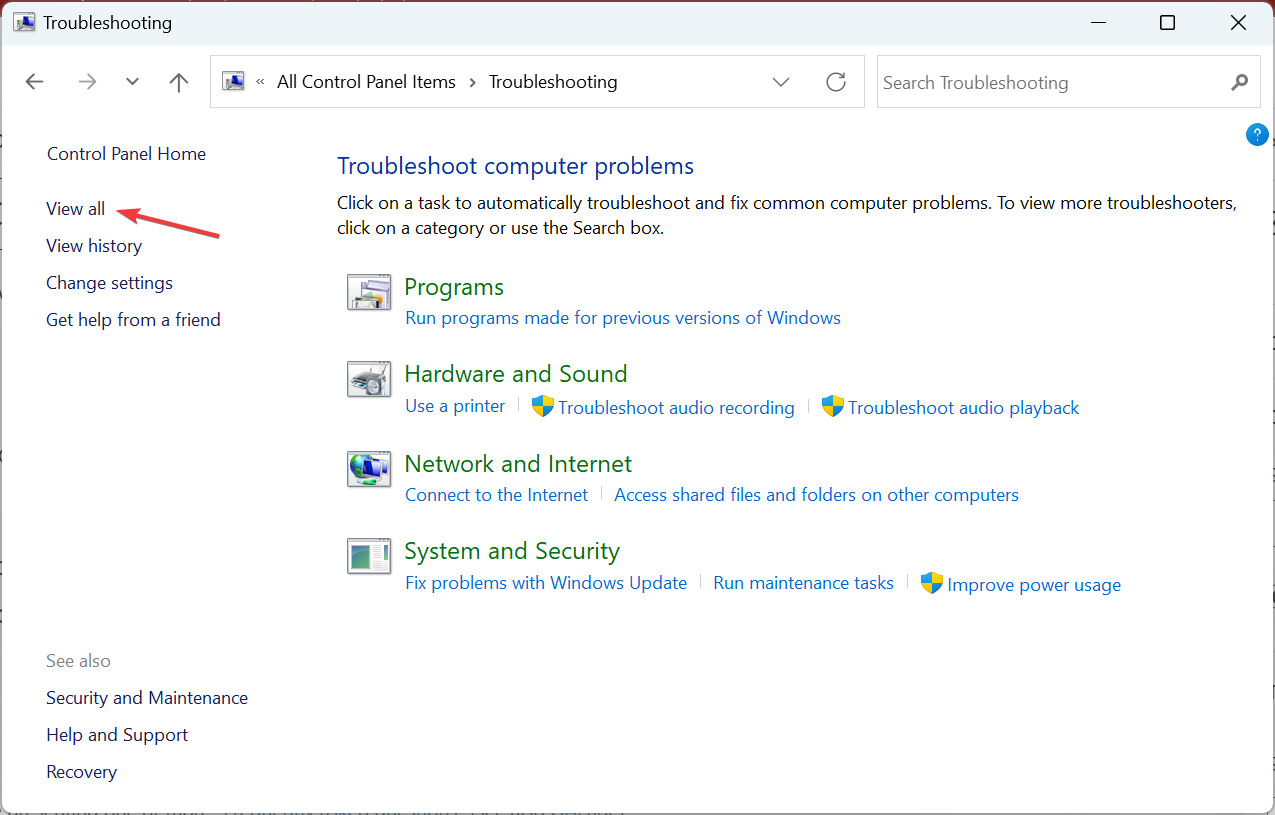
  3. Click on Troubleshooting.troubleshooting to fix can't type in windows search bar
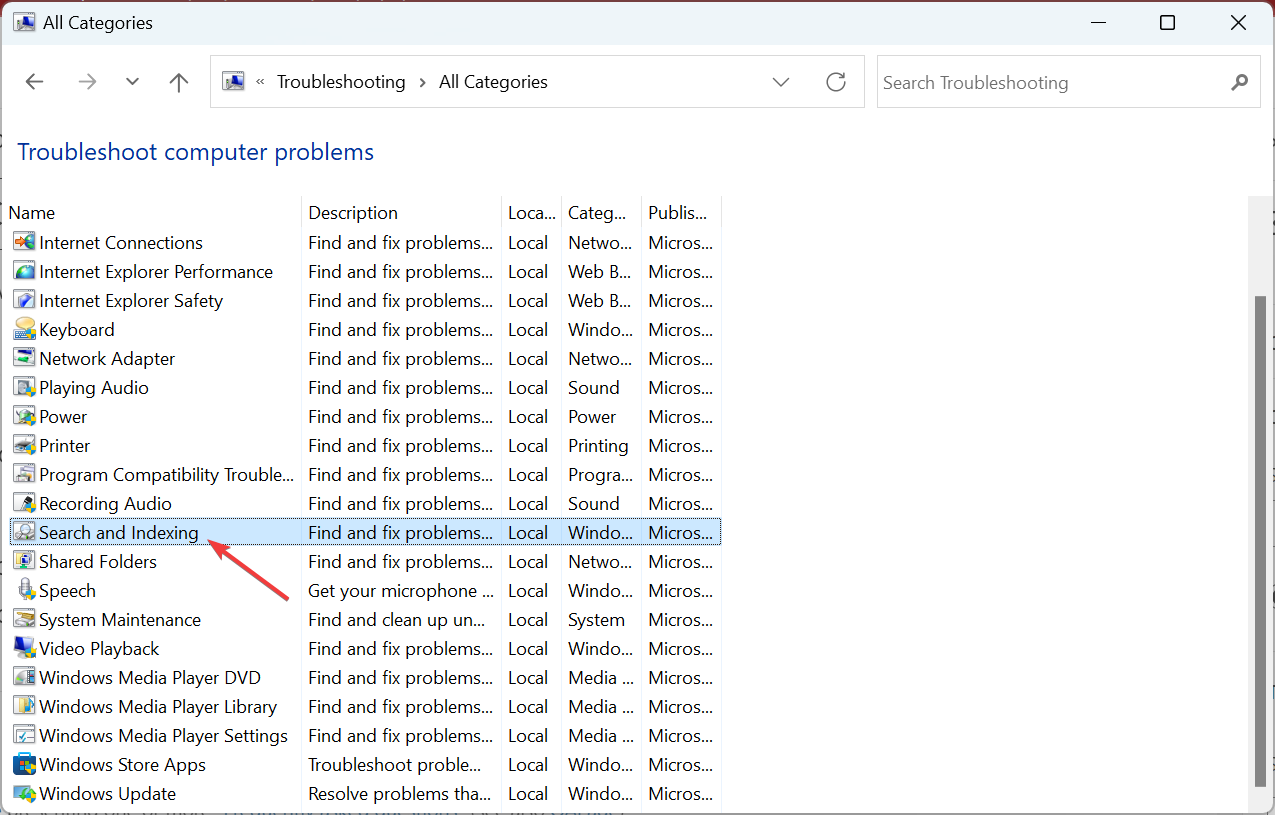
  4. Click on View all from the left.view all
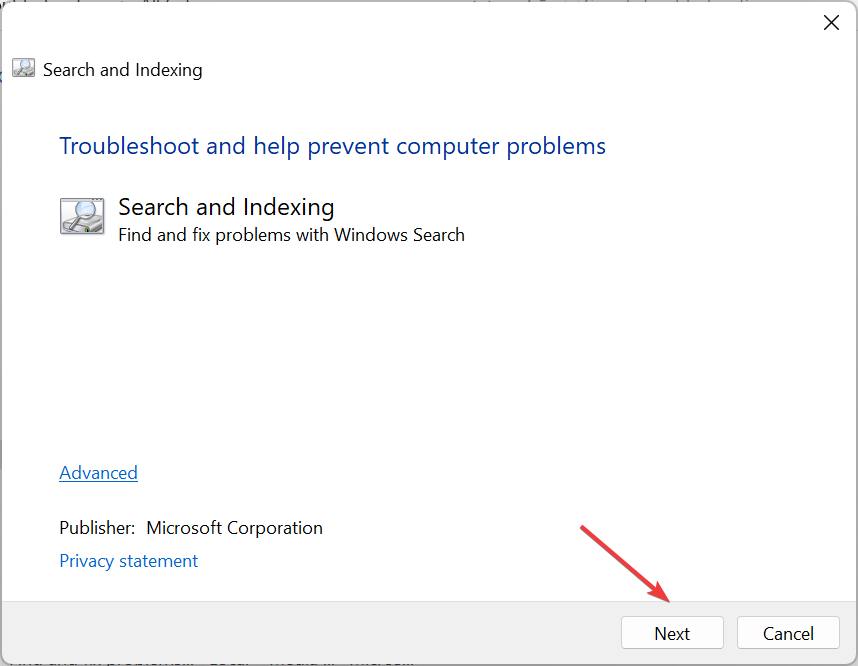
  5. Now, locate and click on the Search and Indexing troubleshooter.search and indexing to fix can't type in windows search bar
  6. Click Next.next
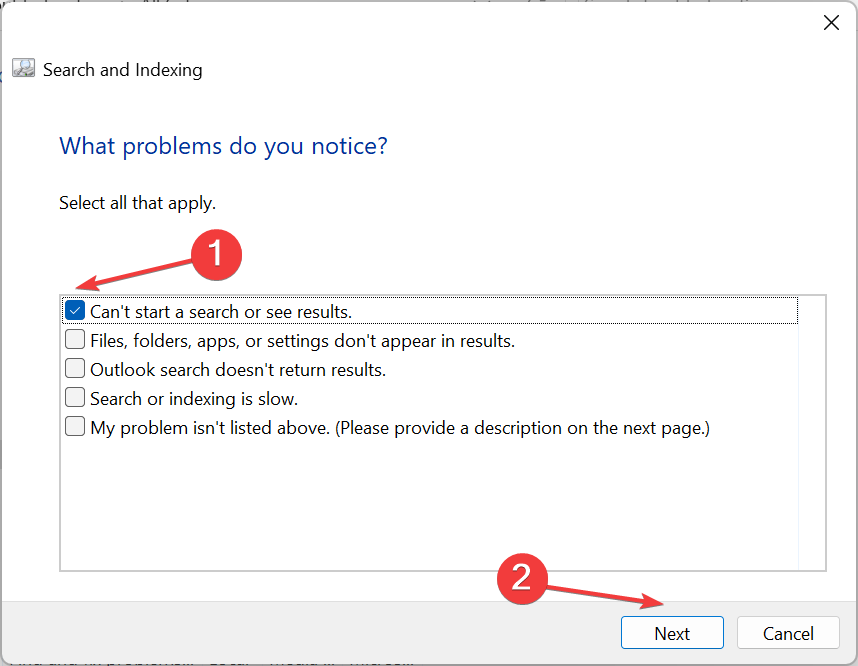
  7. Choose Can’t start a search or see results, and click Next.choose option
  8. Wait for the troubleshooter to run entirely. If the problem persists after that, choose the other options in the troubleshooter and rerun it.

7. Restart Windows Search process

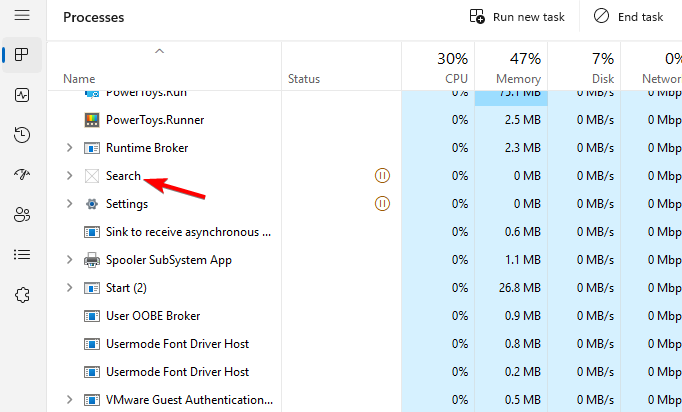
  1. Press Ctrl + Shift + Esc to open Task Manager.
  2. Locate Search in the list of processes.
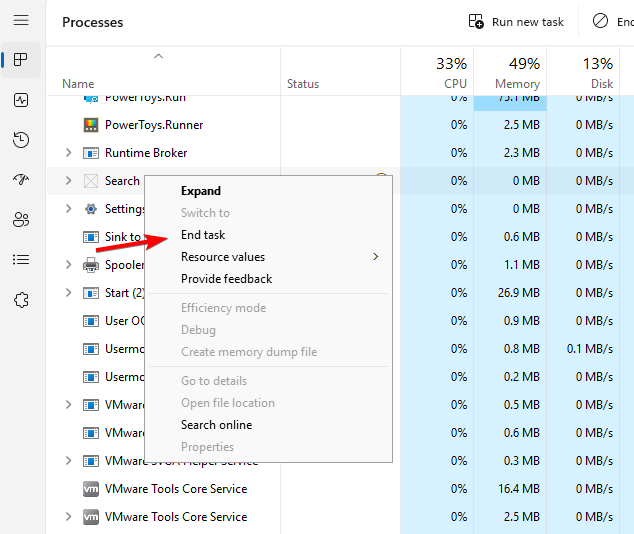
  3. Right-click it and choose End Task.

8. Restart Windows Search service

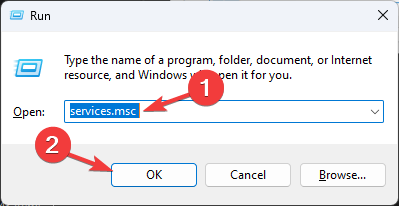
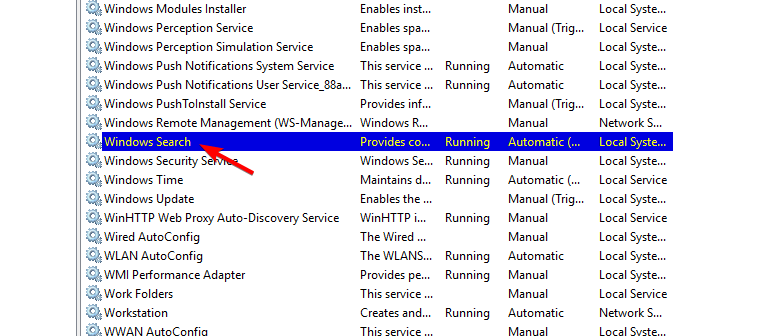
  1. Press Windows key + R and enter services.msc and click OK.
    Services RUn command - No Internet in Windows 11 Safe Mode With Networking
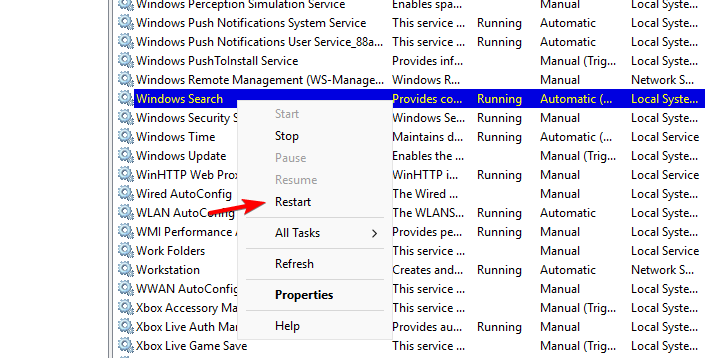
  2. Locate Windows Search service.
  3. Right-click it and choose Restart.

9. Create a new user account

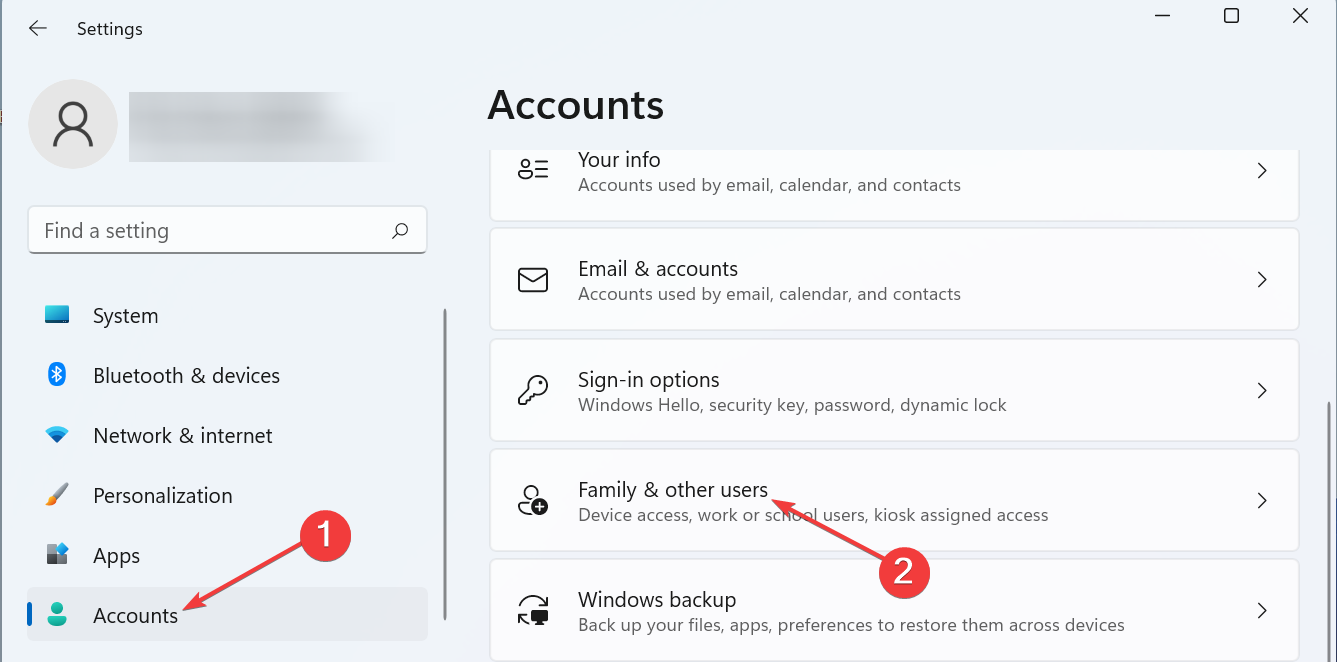
  1. Press Windows key + I to open the Settings app.
  2. Next, go to Accounts and then to Family & other users.
    accounts change user folder name windows 11
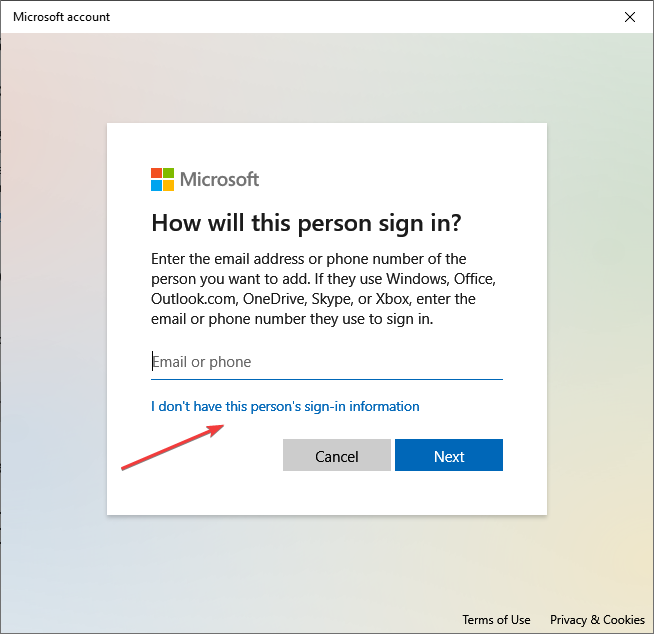
  3. Next to Add other user, click on Add account.
    0x8007042E
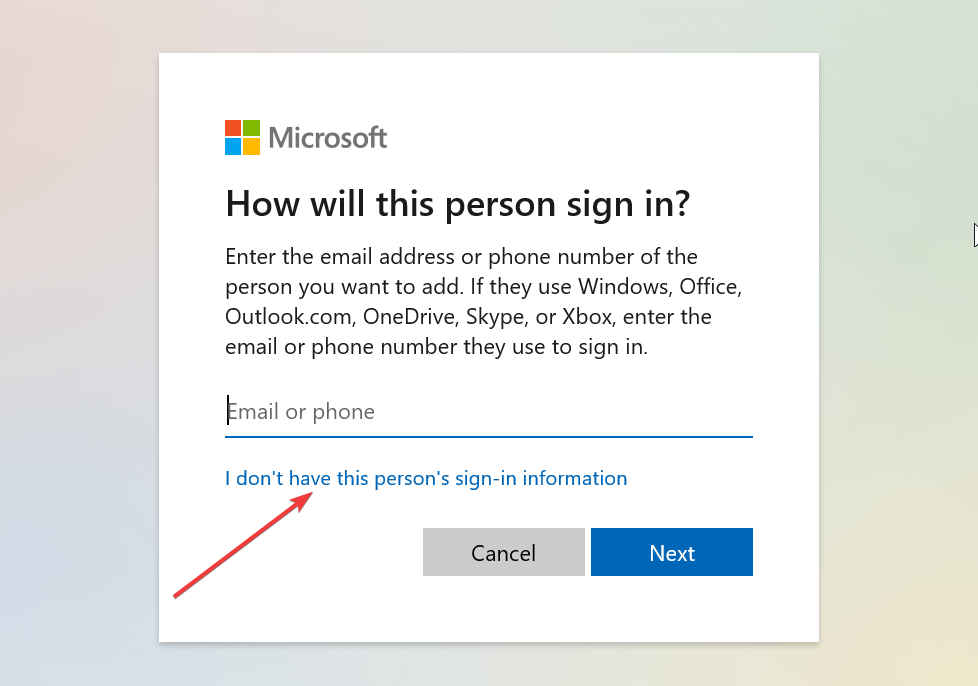
  4. Select I don’t have this person’s sign-in information.
    i dont
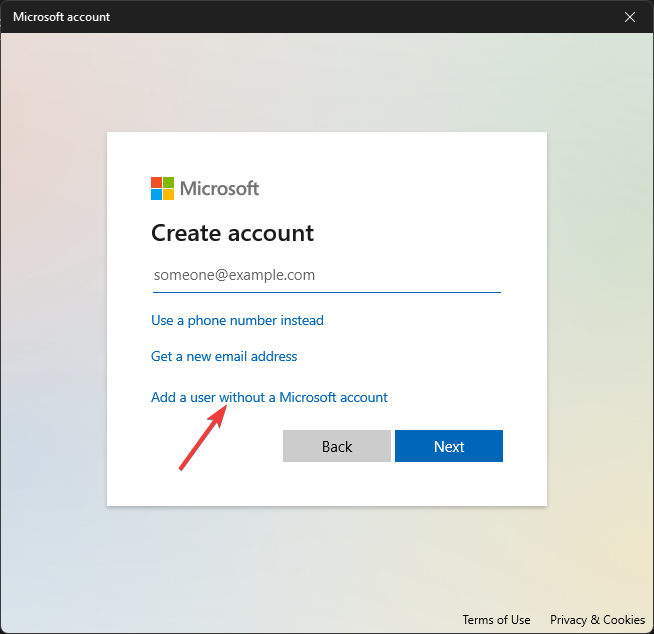
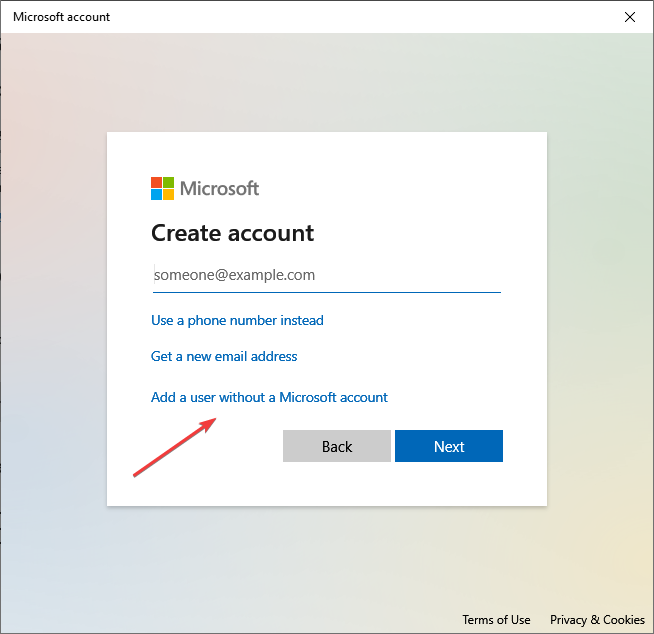
  5. Now choose Add a user without a Microsoft account.
    Add a user without Microsoft account
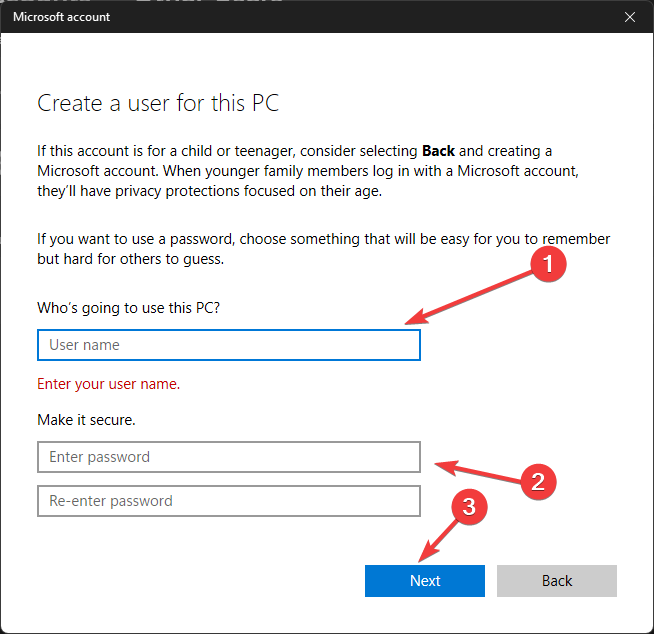
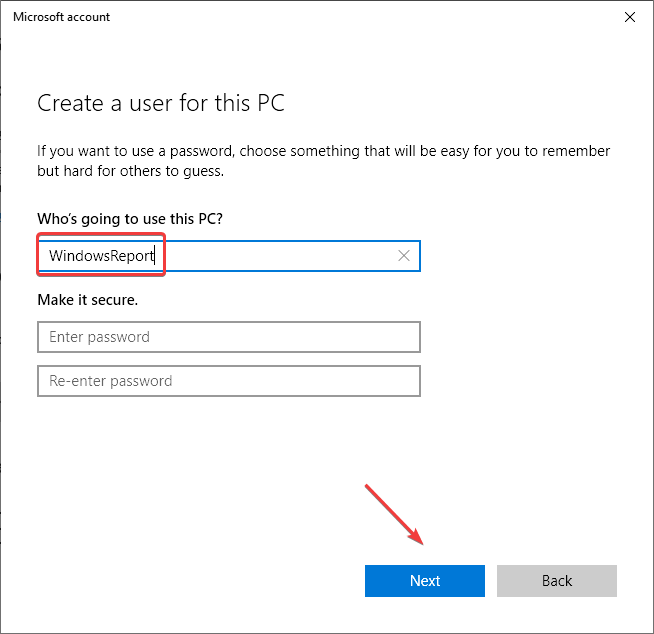
  6. Enter the desired username and password.
    Create a user
  7. Switch to the new account and check if the issue is gone.

Additional troubleshooting tips:

  • Search bar not working after update – Remove Windows update by going to Settings > Windows Update > Update history > Uninstall updates and selecting the most recent update.
  • Search bar not opening or loading – Press Ctrl + Shift + Esc to open Task Manager. Go to Details tab, locate explorer.exe right-click it and choose Restart.

This method will also help when the Windows 10 Explorer search bar is not typing. However, if this does not solve it, we prepared more solutions to revitalize the File Explorer’s search functionality.

If you couldn’t type in the Windows search bar until now, the problem would be resolved with our expert solutions.

Please tell us which fix worked for you in the comments section below.

More about the author

Tashreef Shareef is a software developer turned tech writer. He discovered his interest in technology after reading a tech magazine accidentally. Now he writes about everything tech from Windows to iOS and streaming services to IoT at WindowsReport.

Epson Software Updater: How to Download & Install It

Some of our readers have requested to know how to download and install the Epson Software Updater if there’s a need to fix driver problems for its products. In this article, we will explore what steps to take to enable you to download and install the Epson Software Updater on your PC.

What does Epson Software Updater do?

The Epson Software Updater, as its name implies, is a tool that allows users to update Epson software and drivers.

The tool was formerly known as Download Navigator. It analyzes the Epson software, such as drivers, utilities, firmware, etc., which are already installed on your computer, and notifies users whenever new updates are available for download.

Whenever you launch the tool, if any new update is available for already installed software, these will be listed in the window. This new software or updates will be divided into two groups:

  • The first is for Essential Product Updates that will be recommended to improve the performance of your Epson product.
  • In contrast, the second is tagged Other Useful Software, which will contain additional functionality.

Also, Epson Software Updater fixes the communication error with the printer and helps eliminate several other issues.

How do I download and install the Epson Software Updater?

1. Download the application

  1. Visit the Epson official support website, locate the Download button, and click on it.
  2. This immediately brings up the .exe file and requests you grant permission to download.
  3. Open File Explorer by pressing the Windows + E keys. By default, the file should be in the Downloads folder.
  4. Launch the .exe file and click Agree on the License Agreement page, then click OK.
  5. After the installation, click on your Epson product and wait for driver’s suggestions, then click Install.

Logically, before installing the updater for your device, you need to download it and then follow the on-screen installation wizard. It will install the software updater for you automatically.

How do I stop my Epson Software Updater?

Using Windows 11, you can easily disable Updater by launching the app from your desktop. Follow the steps below in this regard:

  1. Left-click the Start button on your desktop, type Epson Software Updater in the Windows search bar, and hit Enter.
  2. Select your printer model from the drop-down menu and click on Auto Update Settings.
  3. Under the Interval to Check menu, select Never.
  4. Then, save your settings and exit by clicking the OK button.

These are the steps to download and use this tool. Ensure to follow them strictly to avoid installation issues. If you get the Epson Software Updater is damaged and can’t be opened error, uninstall the program and download it all over again.

Besides, if Epson Software Updater cannot find the printer, ensure you are running the latest app version and that the printer and device are connected to the same network.

Epson’s products can be complicated to install. Hence, you can check our guide on how to install the Epson scanner driver for Windows 10 or the Epson L130 driver.

If you have further questions and suggestions, kindly leave them in the comments section below.

Microsoft admits to the CMA that “base game sales” could decline after a year on Game Pass

Following the decision by the UK’s Competition and Markets Authority to reject an initial purchase proposal for publisher Activision Blizzard, Microsoft finds itself scrambling to weigh concessions while adding nuance to concerns, such as the declining impact of Xbox Game Pass on base games sales.

Eurogame has been among the first to report that as part of its provisional rejection of the Activision Blizzard deal, the CMA cited Microsoft’s own transparent analysis which revealed when a game lands on its Game Pass service, it can result in an undisclosed percentage decline in base game sales twelve months following its addition.

5.61 Microsoft also submitted that its internal analysis shows a []% decline in base game sales twelve months following their addition on Game Pass.
• Our assessment
5.62 We consider that Microsoft’s telemetry data and internal analysis presented above have some limitations. The time period over which Microsoft appears to infer that a B2P purchase constitutes substitution is quite long (up to one year). Moreover, the observation that Game Pass customers continue to purchase B2P games during the period is more consistent with complementarity than substitutability. Given B2P purchases continue even during the subscription period, it is unclear from Microsoft’s submission whether and to what extent the proportion of consumers that make B2P purchases within a year of closing their subscription is different from the proportion of consumers making B2P purchases that never had a subscription in the first place.

In addition, Microsoft also peppers its reporting to the CMA with figures that undercut the buy-to-play B2P market as well, in which the specific cannibalization figures of streaming games over direct purchases were redacted.

Perhaps, in an effort to justify its own findings, Microsoft argues that there is a nuance in the fluidity in which gamers purchase games, shifting between console B2P and MGS options.

5.60 Microsoft also submitted that Xbox telemetry data shows that gamers frequently switch between the two payment options. In particular, Microsoft submitted that based on this data:
(a) Between []% and []% of Xbox gamers continue playing games purchased on a B2P basis in the 12 months after unsubscribing from Game Pass. Between []% and []% of gamers purchase a game on a B2P basis within a year after unsubscribing from Game Pass.

Furthermore, Microsoft also argues that while on the face of it, the telemetry shows a decline in base sales for studios and publishers, the company is also providing additional opportunities for gamers and game developers to “discover, experience, and deliver games.

Microsoft let the CMA know that it is working with developers and publishers to “build a custom program to reflect what they need,” as far as compensation and monetization is concerned. So, while adding a game-to-Game Pass “could” result in a decline in hard copy sales for the title after a year of being on the service, Microsoft appears ready to put in place a compensatory platform for the transition.

Anecdotally, there have been publishers who have advocated for Microsoft’s Game Pass service who saw interest and sales increase when added to the platform. Gameindustry.biz spoke with game publisher No More Robots about its title Descenders, which saw a significant increase in sales when added to Xbox Game Pass.

While not specifically addressing declining “base game sales” within the Xbox Game Pass platform, the CMA has offered come preliminary concessions for Microsoft to consider to reach an approval on the Activision deal that include excluding Call of Duty and the Activision portion of Activision Blizzard from the proposed buyout.

League of Legends Server Status: 3 Easy Ways to Check

It’s important to check the League of Legends server status, especially if there’s a problem with the game, and in this guide, we’ll show you the best ways to do that.

How do I check the League of Legends server status?

1. Check Riot’s official server status page

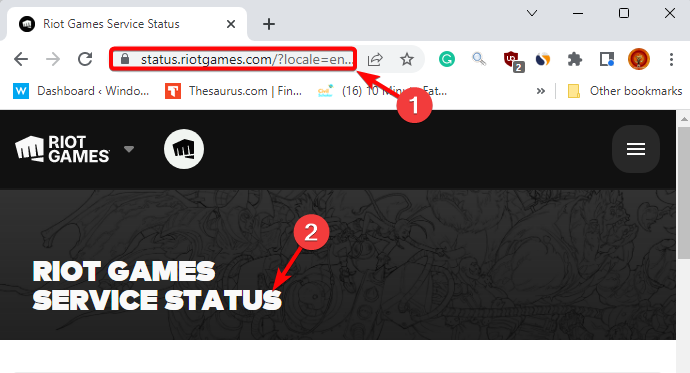
  1. Visit the official page for Riot Games Service Status. riot games server status page
  2. Select League of Legends from the game tiles. select league of legends
  3. Now, select your preferred region and language, and press Continue. select region and language
  4. If there’s an issue, you should see a notice under Current Messages as real-time server status.
  5. But, if there’s no server-related issue, you may see the message, No recent issues or events to report.

If it’s a server issue, you must wait until it is resolved. But if League of Legends is still not opening, you can use the methods in our detailed post.

In addition to the server status, it’s important to test League of Legends ping to ensure that there are no issues with the server or your connection.

2. Visit the Riot Games support Twitter account

  1. Visit the Riot Games support page on Twitter. riot games support twitter
  2. Check the latest tweets for any server downtime updates from the developer. check for server outage tweets
  3. If there’s no recent update related to the League’s server status, the issue is due to another reason.

The developer may post an update on Twitter on any significant issue, and before it can update the website, so keeping a check may help.

3. Check the League of Legends server status on a third-party site

Sometimes, if Riot’s official Server Status website fails to show results, you can try a trusted third-party alternative like the Downdetector.

On this website, you can find information related to League of Legends’ server outages in real-time for the last 24 hours and even keep a check.

It provides a detailed review of any server issues, even for a previous date. For this information, you may need to log in to the website.

When to check the League of Legends server status?

If you are dropped from the game out of nowhere, when the game slows down, if you are unable to log in, if the game fails to open, or if it doesn’t work, is when you know that you must check the server status.

If the server and game downtime is due to regular maintenance/official patches, for 12.6, 12.7, etc., it usually lasts about 3-6 hours.

However, at times, the downtime is completed in about 3 hours, but sometimes, it can be extended if something goes wrong.

For example, an in-game notification usually lasts for about 4-6 hours, but in some cases, it can range from 2-12 hours also.

Alternatively, you may simply submit a ticket on the Rio Games website, and wait for the officials to revert. But, if you encounter an issue like League of Legends could not connect to the HTTP server, you can refer to our detailed post for help.

To increase FPS in League of Legends, you can follow our comprehensive guide to achieve the results.

If you still face any issues with the League of Legends game, let us know in the comments section below.

Hogwarts Legacy review roundup – what are the critics saying?

After years of anticipation from Harry Potter fans and gamers alike, not to mention multiple delays and ongoing controversy, Hogwarts Legacy finally released last week for current-gen consoles and Windows PC. (The PS4 and Xbox One releases will arrive April 4th, while the Nintendo Switch release is set for July 25th).

As mentioned, Hogwarts Legacy has been the focus of controversy due to Harry Potter author J.K. Rowling’s views on transgender people. There have also been accusations of antisemitism in the Harry Potter books over their portrayal of the Goblin race, with some saying the depictions are based on anti-Semitic tropes. Many have called for a boycott of the game.

This action-RPG from Warner Bros. Games’ Portkey Games label and Avalanche Software puts players inside the most impressive video game adaptation of the Wizarding World to date, as a new student at the Hogwarts School of Witchcraft and Wizardry in the year 1899. From the description on the game’s official website:

Hogwarts Legacy is an immersive, open-world action RPG set in the world first introduced in the Harry Potter books. For the first time, experience Hogwarts in the 1800s. Your character is a student who holds the key to an ancient secret that threatens to tear the wizarding world apart. Now you can take control of the action and be at the center of your own adventure in the wizarding world. Your legacy is what you make of it.

Now that Hogwarts Legacy is finally out, how is the game being received by fans and critics?

Engadget calls it “A massive game, alive with magic” in its review, which goes on to describe Hogwarts Legacy as “a massive and gorgeous open-world RPG that extends far beyond the walls of the wizarding school, with mysteries, danger and cute creatures packed into every corner.”

Writing for IGN Travis Northup says,

With Hogwarts Legacy, I’m happy to say that we finally got a Harry Potter game that captures some of that magic. Its open world map absolutely nails the vibe of Hogwarts School of Witchcraft and Wizardry, it has spellcasting combat that’s stupefyingly good, the characters that inhabit it are charming and unforgettable, and it is positively brimming with countless diversions to soak up dozens of hours of your time. It may not be the most impressive technical achievement and it is certainly cursed with a lack of enemy variety, but none of Hogwarts Legacy’s issues can cast a Descendo charm on this triumphant visit to the Wizarding World.

GameInformer’s Matt Miller also heaped praise upon the game, saying “Hogwarts Legacy is a remarkable adventure into the wizarding world of Harry Potter, offering a clever mix of gameplay styles and experiences that keep things fresh for dozens of hours while always maintaining the magical touches that captivate fans.” Both GameInformer and IGN scored Hogwarts Legacy a 9/10, while Engadget doesn’t feature a numerical scoring system.

These reviewers were unanimous in praising the game’s combat, while noting the technical issues that dampened the experience. On OpenCritic Hogwarts Legacy is ranked in the 93rd percentile, while on Metacritic it enjoys rankings of 90, 85 and 84 respectively for Xbox Series X|S, PS5 and PC.

Wrap up

Judging by the game’s early reception it’s clear that Hogwarts Legacy is, at least for most, the Wizarding World experience gamers have been longing for, and appears poised as an early game of the year contender. One writer for Forbes is predicting that the game will have over 10 million sales in its initial launch period, and over 20 million by the end of the year.

With that said, what are your thoughts on Hogwarts Legacy? Let us know down in the comments.

Featured image via Xbox.com. 

Unable to Hang Up Call in Teams: How to Force End It

The Teams app is a great way to communicate with your team members and ensure everyone is on the same page. However, sometimes you may need to end a call before it’s over. You may have noticed that when you try to hang up a call, it doesn’t work. 

Although the Teams app has improved in many ways, it still suffers from some shortcomings from time to time. The inability to hang up is the latest conundrum, but let’s look at possible workarounds.

Why can’t I call out on Teams?

Usually, hanging up on Microsoft Teams is as simple as clicking a button. You just need to hit the Quit button, and you’ll be off the call. 

However, users have taken to community platforms and are complaining that they cannot hang up a call in Teams. The call is still active even though the button says to end the call. This can be quite annoying when you’re trying to end a call and find that it won’t end. 

Some of the possible triggers for this issue include:

  • You’re using an older version of the Microsoft Teams app – Microsoft confirmed that this anomaly only happens to a section of Teams users so it’s likely due to an outdated version.
  • Bug in the app – Sometimes Microsoft Teams is not working because of a bug in the Teams service, but it can also be caused by a bug in your software.
  • App cache – If you have a lot of accumulated cache, it may get corrupted over time and interfere with how the app behaves, making you unable to hang up a call in Teams.
  • Different app versions – If you’re using Teams and have multiple versions of the app installed, it can cause some confusion. Sometimes, when you download or update a new version of the app, the older version may have some remnant files that can cause problems.

How do you force end a team call?

Before you try out any of the solutions below, check the following:

  • Make sure that your computer meets the system requirements for Teams.
  • Ensure you’re using the latest release of Teams. You can see which version you have by clicking on your profile picture and going to About Microsoft Teams. If you’re running an older version, you need to update it.
  • Check the status of Microsoft Teams to establish whether it’s experiencing downtime.
  • Ensure that any third-party applications you have installed are compatible with the latest version of Microsoft Teams.
  • Log out and log back in.
  • Restart your PC.

1. Clear Teams cache

  1. Hit the Windows + R keys to open the Run command.
  2. Type %appdata%\Microsoft\Teams in the Run dialog box and then select OK.
  3. Select all files and folders in the %appdata%\Microsoft\Teams directory and hit the Delete button.
  4. Restart Teams and check if you’re now able to hang up calls.

App cache can be either a temporary cache, cleared when you restart your PC, or a persistent cache, which remains on a device until it’s manually cleared. If the cache is persistent, you need to do a Teams cleanup.

2. Make a test call

  1. Launch your Teams app and click on the three ellipses at the top right corner.
  2. Click on Settings.
  3. Select Devices and click on Make a test call.
  4. Wait for the call to start ringing then leave.

3. Repair/reset the Teams app

  1. Hit the Windows key and click on Settings.settings windows 11
  2. Click on Apps on the left pane then select Apps & features on the right pane.
  3. Navigate to Microsoft Teams app, click on the three ellipses and select Advanced options.
  4. Hit the Repair button.
  5. Try hanging up your Teams call and see if the issue persists.
  6. If you’re successful, there’s no need to reset, but if the issue is still present, repeat steps 1 to 3, and this time, hit the Reset button.

4. Reinstall Microsoft Teams

  1. Hit the Start Menu icon on the Taskbar and click on Settings.settings windows 11
  2. Click on Apps on the left pane, then select Apps & features on the right pane.
  3. Navigate to Microsoft Teams app, click on the three ellipses, and select Uninstall.uninstalling microsoft teams
  4. Launch the Microsoft Store, search for the Teams app, and click Install.
  5. Follow the on-screen prompts and try again.

A handful of users could also get around the issue using the web version. If you opt for the web version, use supported browsers to avoid running into error messages like your Teams browser version is not supported.

As such, we recommend using a fast browser like Opera that not only guarantees you an interactive experience but also comes with great features like ad-blocking.

If all else fails and you’re still unable to hang up a call in Teams, your last resort is to contact Microsoft support with a detailed account of the issue for further help.

Let us know of any additional solutions not mentioned here that have worked for you in the comment section below.

The February 2023 Patch Tuesday updates are rolling out today

Well, the new year feeling is all but gone by now and it’s time to focus on the important things that make up our day-to-day life.

And, now that the second Tuesday of February is here, we are getting another batch of Patch Tuesday updates that many users have been eagerly waiting for.

As with all the other Patch Tuesday updates of previous months, these bring a host of changes, fixes, and improvements to all supported versions of the Windows OS.

Last month’s update release included fixes for 98 vulnerabilities, so we could be looking at a pretty light month this time around.

What should I expect from the February 2023 Patch Tuesday?

Yes, this year’s Patch Tuesday rollout falls exactly on Valentine’s Day but will it really be a special date or just more of the regular?

While users have been dealing with ongoing cyber-attacks of all kinds, it has been relatively quiet on the release of new patches from Microsoft.

You might as well also expect that trend to continue next week though we may have some updates for the Dev and Beta Insider Channels.

The good news is that Microsoft managed to address a large number of CVEs last month for the Windows 7 and Server 2008 ESU closeout.

Even the newer OS versions, Windows 11 and Windows 10 had 66 and 64 CVEs addressed respectively, so there might be a need to include that as well.

Experts actually suspect there will be fewer CVEs addressed this month as they have caught up a bit, so expect a light set of updates for all the server and desktop operating systems.

All this mystery will dissipate in a few hours when we post the actual release, so we can all get a better idea of what Microsoft envisioned.

What issues do you think will be addressed in the February 2023 Patch Tuesday rollout? Share your thoughts with us in the comments section below.

Volume Mixer Settings Not Saving? 5 Ways to Fix it

Sometimes, when trying to lower the Skype sound in the volume mixer and save it for the future, you notice that it’s not saving the settings as soon as you close the window.

While there are ways to fix this issue, you may also refer to our detailed post for some quick workarounds if the sound volume is too low on your Windows PC.

Why doesn’t Windows save settings in the volume mixer? 

There could be different reasons why the volume mixer is not saving the settings, such as:

  • A hardware conflict – It could be possible that there’s a problem with the built-in audio device.
  • Outdated or corrupted audio drivers – If the drivers are not updated to the latest version or are damaged, it can interfere with the volume mixer functionality.
  • The app does not have exclusive control of the device – If it’s a problem with a specific app, it may not have exclusive control of the device.
  • Damaged system files – Corrupted system files can affect the various functions of the system, including sound. It may also lead to the volume mixer not showing sound.
  • A recent Windows update – It may be possible that the last Windows update is corrupt and hence, causing the volume mixer issue.
  • Windows Explorer not working properly – Chances are that the Windows Explore process is not functioning correctly.
  • A virus in the system – There could be a virus or other threats preventing the normal functioning of the volume mixer.

However, the good news is that we have a list of solutions that may help you fix the volume mixer not saving settings issue.

How do I fix the volume mixer if it’s not saving the settings?

Before you proceed with the main methods below, we suggest you try the following:

  • Install any pending Windows Update.
  • Run a virus scan and remove any threats.
  • Uninstall the recent Windows Update that may be causing the problem.
  • Remove any third-party apps that may be interfering with the volume mixer.

However, if the volume mixer still does not save the settings, you can follow the below methods to fix the issue.

1. Run the Windows audio troubleshooter

  1. Press the Win + I keys simultaneously to launch Windows Settings.
  2. Click on System on the left, and then click on Troubleshoot on the right.
    settings - troubleshoot
  3. On the next screen, under Options, click on Other trouble-shooters.
    Other trouble-shooters
  4. Next, go to Playing Audio and click on Run. Windows will now start looking for any issues, and if found, will apply the fix automatically.
    run audio troubleshooter

When you are done, you can check if the volume mixer is now saving the settings.

But, if the Windows troubleshooter has stopped working for some reason, you can refer to the solutions in our detailed post here.

2. Take actions related to the audio driver

2.1 Update audio driver

  1. Press the Win + R shortcut keys to open the Run console.
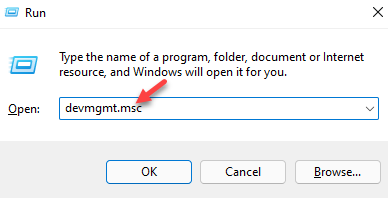
  2. Type devmgmt.msc in the search bar and hit Enter.
    write devmgmt.msc in the run command and press enter
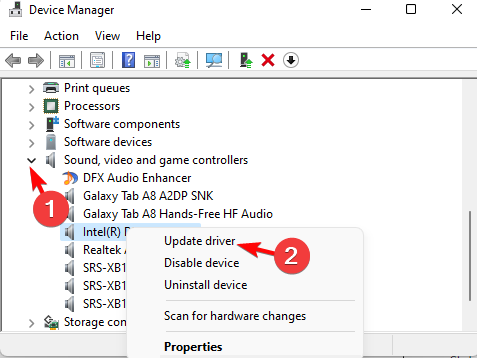
  3. Next, expand the Sound, video, and game controllers section, right-click on the device and select Update driver.
    update sound driver
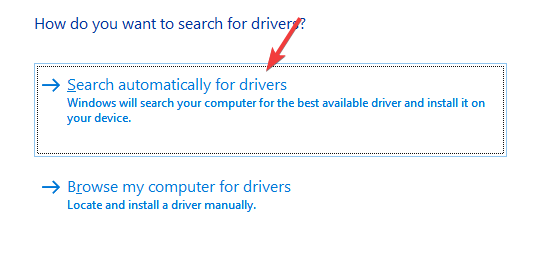
  4. Next, in the new window, click on Search automatically for drivers. Windows will detect the latest version and automatically install the driver.
    search for graphics drivers

In fact, you can also uninstall the driver and visit the manufacturer’s website to download & install the latest driver version manually to fix the issue.

Alternatively, you can use driver detector software for Windows 10/11 from our recommendations to help fix your device drivers quickly.

Another safe and fast way to update your drivers is with Outbyte Driver Updater. Outbyte Driver Updater is ​​a simple and powerful tool that finds all outdated drivers and updates them to the latest version.

Outbyte Driver Updater

Get your audio driver updated along with all other outdated drivers in no time
Free Trial Download Now

2.2 Roll Back the audio driver

  1. Open the Run console by pressing the Win + R keys simultaneously.
  2. In the search field, type devmgmt.msc and hit Enter.
    write devmgmt.msc in the run command and press enter
  3. Click to expand the Sound, video, and game controllers section, right-click on the device, and select Properties.
    Sound, video, and game controllers properties
  4. In the Properties dialog, go to the Driver tab and click on Roll Back Driver (if it’s highlighted).
    roll back driver

Once done, reboot your PC, and now, the volume mixer should be saving the settings.

3. Allow the application to take exclusive control of this device

  1. Press the Win + R hotkey to open the Run console.
  2. Type sndvol in the search box and hit Enter.
    run sndvol command
  3. This will open the classic Volume Mixer panel. Here, go to Device and click on the speaker icon.
    volume mixer
  4. In the Properties dialog, navigate to the Advanced tab, and select Allow applications to take exclusive control of this device and Give exclusive mode application priority.
    Give exclusive mode application priority
  5. Press Apply and OK to save the changes.

Now, open your volume mixer and check if it’s saving the settings or if you are still facing the issue.

4. Restart the Windows Explorer Process

  1. Press the Ctrl + Shift + Esc keys simultaneously to open Task Manager.
  2. Go to the Processes tab, and locate Windows Explorer under Windows processes.
  3. Right-click on Windows Explorer and click on Restart.
    restart windows explorer

You can now launch the volume mixer, modify the settings and check if it’s saving the changes.

5. Repair corrupted system files

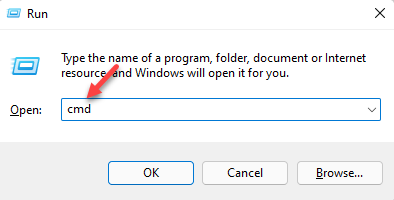
  1. Press the Win + R keys together to open the Run console, type cmd, and press the Ctrl + Shift + Enter hotkey to open the elevated Command Prompt.
    open elevated command prompt by pressing Ctrl + Shift + Enter together
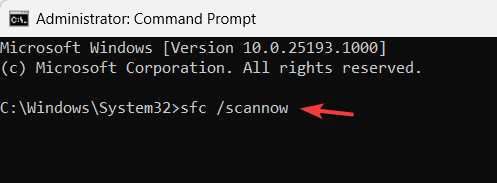
  2. Next, in the Command Prompt (Admin) window, run the below command and hit Enter: sfc /scannow
    run sfc /scannow command
  3. The scanning process takes a while so, wait till it’s over.

If you were wondering how do I make my volume mixer permanent when it’s not saving settings, one of these methods should have helped.

How to save volume mixer settings?

Nevertheless, in the usual circumstances, you can follow the below instructions to make sure that the volume mixer saves any changes in the settings:

  1. Press the Win + I keys together to open Windows Settings.
  2. Type sound mixer in the search box on the left and click on Sound mixer options.
    Sound mixer options
  3. On the next screen, go to the Apps section and move the slider under System sounds to the left or right to adjust the sound settings for your apps.
    move app sound slider

Alternatively, you must also check if the headset you are using is damaged or if the volume button is defective. In such cases, you can replace the headset with a new one.

But, if none of the above methods work, you can perform a factory reset of your Windows 11 PC, and this should help you fix the volume mixer not saving settings issue.

Make sure you know how to access the Volume Mixer properly after you fix the problem. Follow this easy guide on how to open the Sound Volume Mixer in Windows 11 or 10 and check if your app settings appear correctly.

For any other queries on the volume mixer or audio issues, do leave a message in the comments box below.

Reset Registry Permissions on Windows 10: 4 Ways to Do It

The Registry plays a vital role on the PC, though most users remain oblivious to this fact, only realizing it when things go out of hand. But fixing issues with the Registry is not that tricky, and a simple permissions reset should do the trick for most.

The Registry contains a significant amount of data concerning the OS and the various settings on the PC. And most changes we make to the PC are automatically loaded to the Registry, i.e., the current value is replaced with the new one.

In this process or due to some other reasons, the Registry goes corrupt, or the permissions get messed up. And that’s when you need to reset Registry permissions in Windows 10.

How do I reset Registry permissions on Windows 10?

Tip icon Tip
This is an advanced procedure, so we advise you to back up your registry and create a System Restore point. When modifying Registry keys, certain features may stop working. So it’s always a good idea to have a backup ready.

1. Make sure that specific groups have access to this key

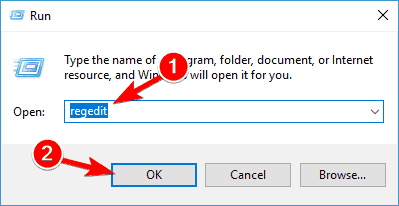
  1. Press Windows + R to open Run, type regedit, and click OK.
    fix windows 10 registry permissions
  2. Click Yes in the UAC prompt.
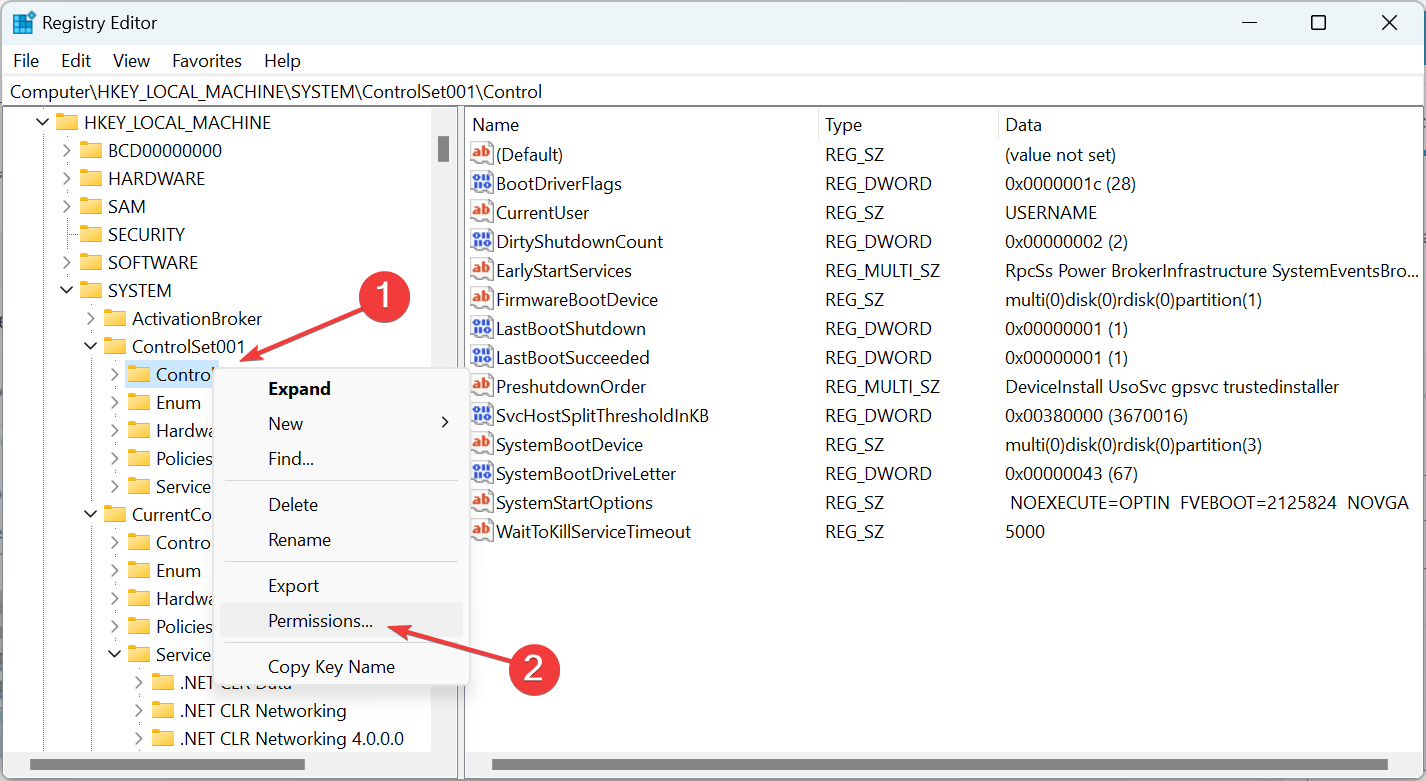
  3. Locate the problematic key in the left pane, right-click it, and choose Permissions.permissions
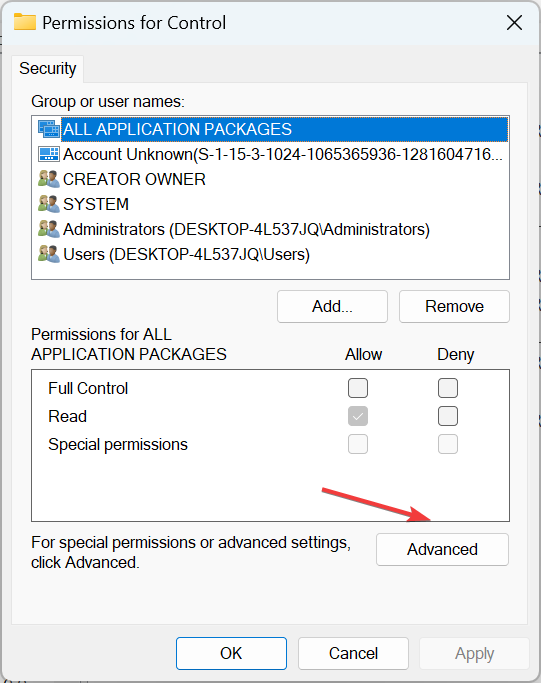
  4. Click the Advanced button.advanced to reset registry permissions windows 10
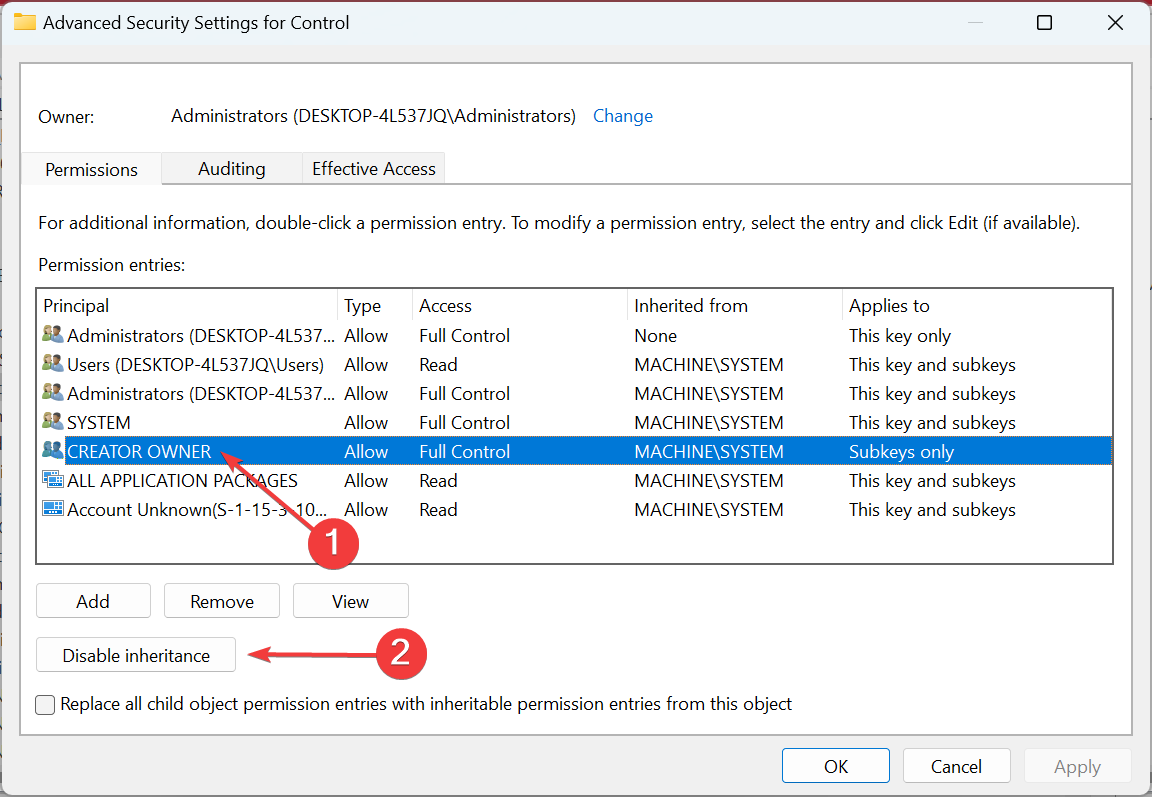
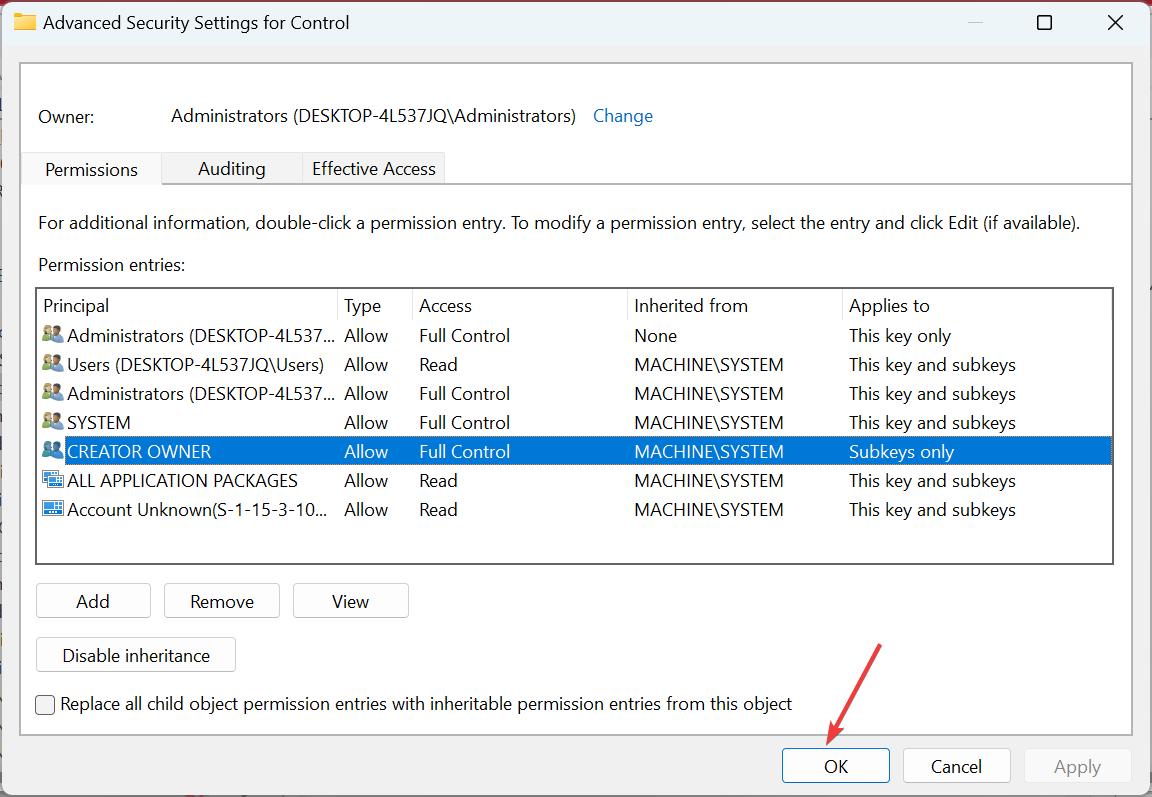
  5. Select Creator Owner and then click on click Disable inheritance.disable inheritance
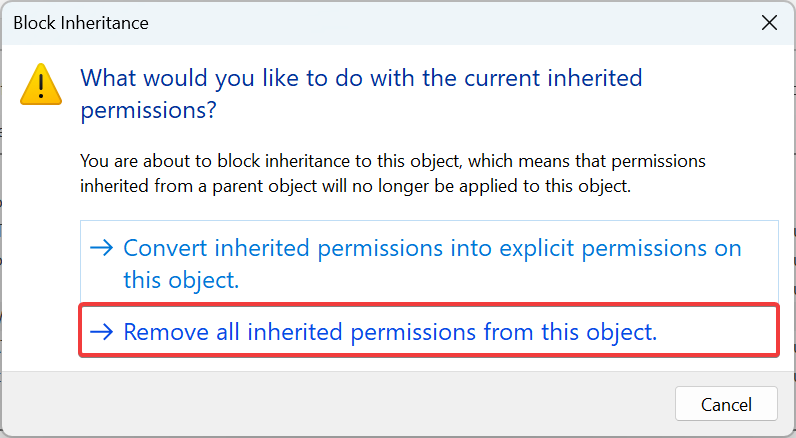
  6. Now, select Remove all inherited permissions from this object.remove permissions
  7. Click on OK to save the changes.save changes
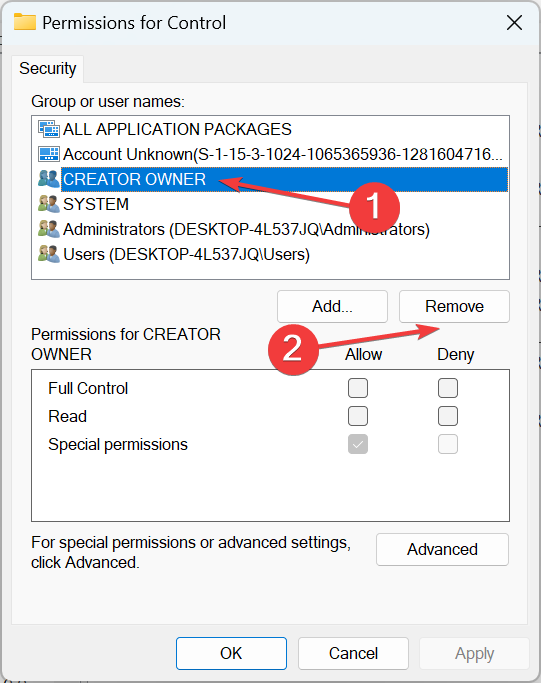
  8. Select CREATOR OWNER and click Remove.create owner
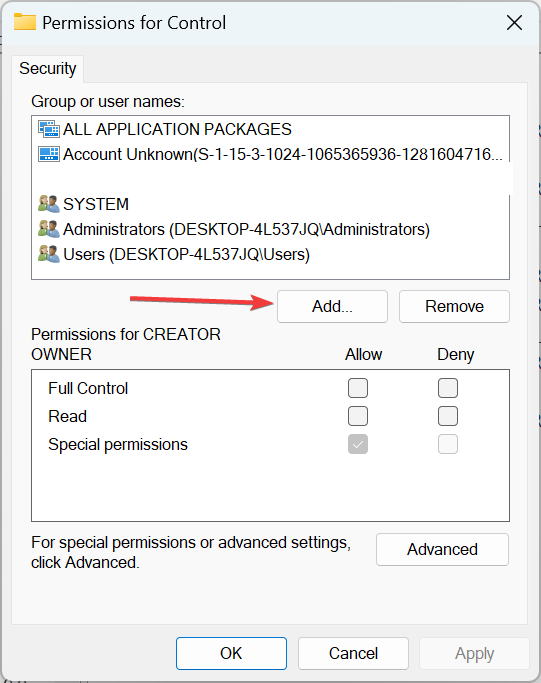
  9. Next, click the Add button.add
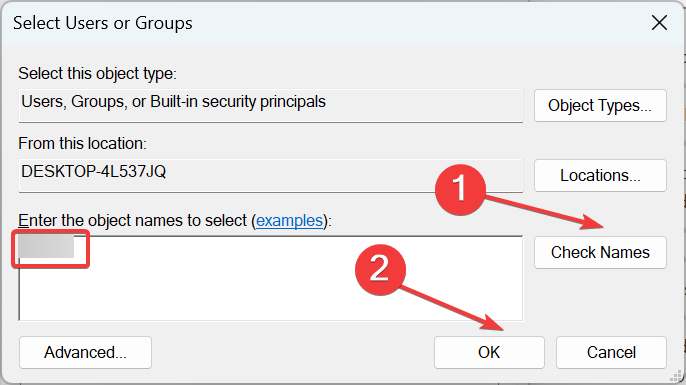
  10. Enter the current account name in the text field, click Check names, and then OK.check names
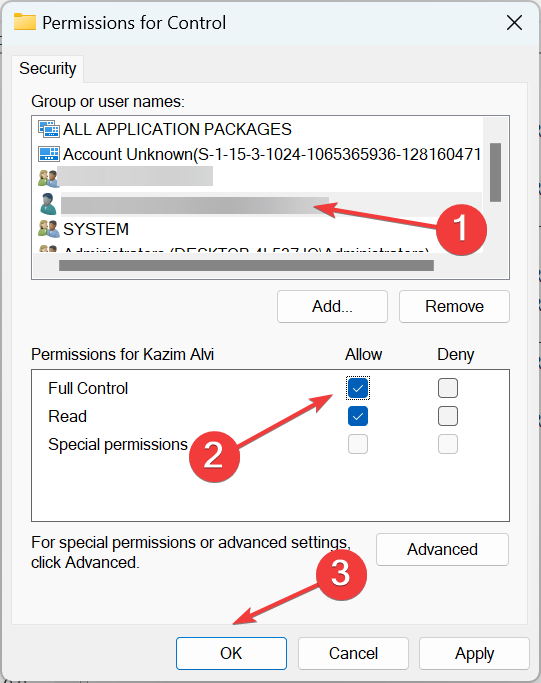
  11. Select your user account, check Full Control, and click on OK to save the changes.full control
  12. Similarly, provide Full Control to Authenticated Users (using steps 9 to 11).

After giving Full Control to your user account and Authenticated Users group, any issues with the Registry should be resolved, and you could reset permissions in Windows 10.

2. Create a new administrator account

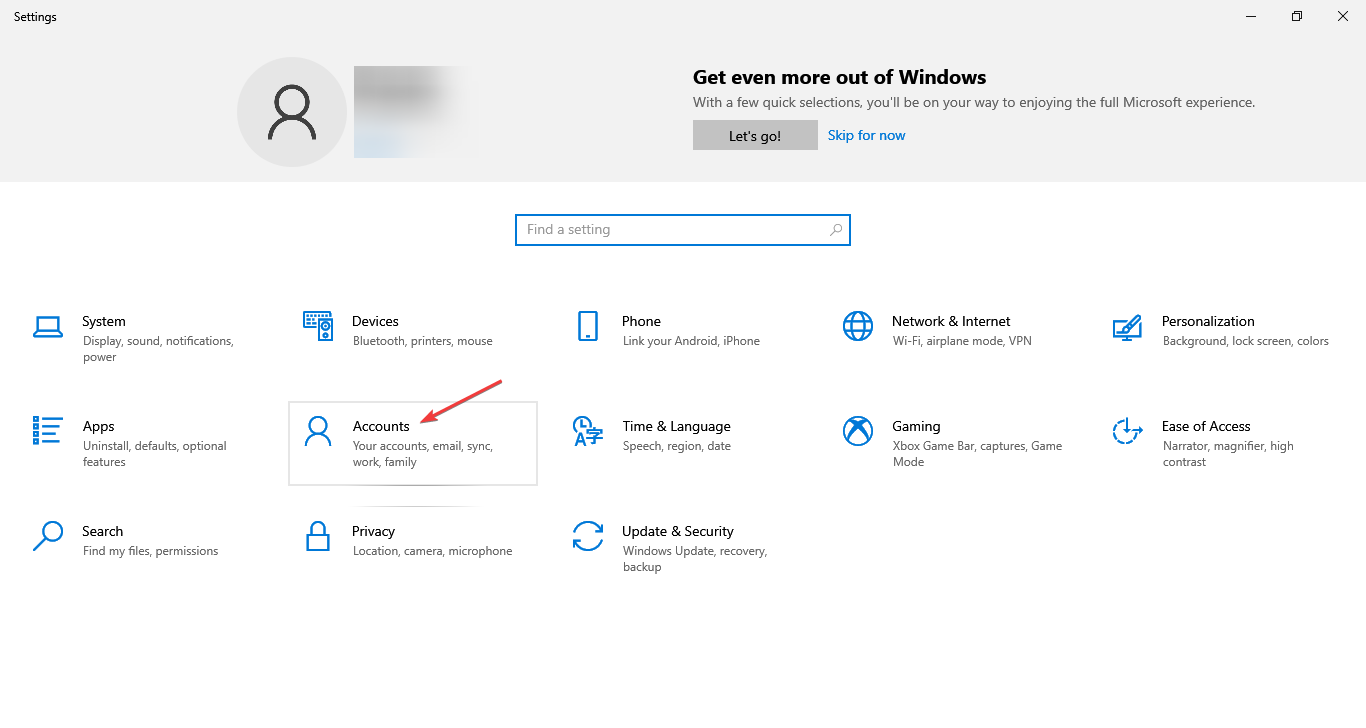
  1. Press Windows + I to open Settings, and click on Accounts.accounts
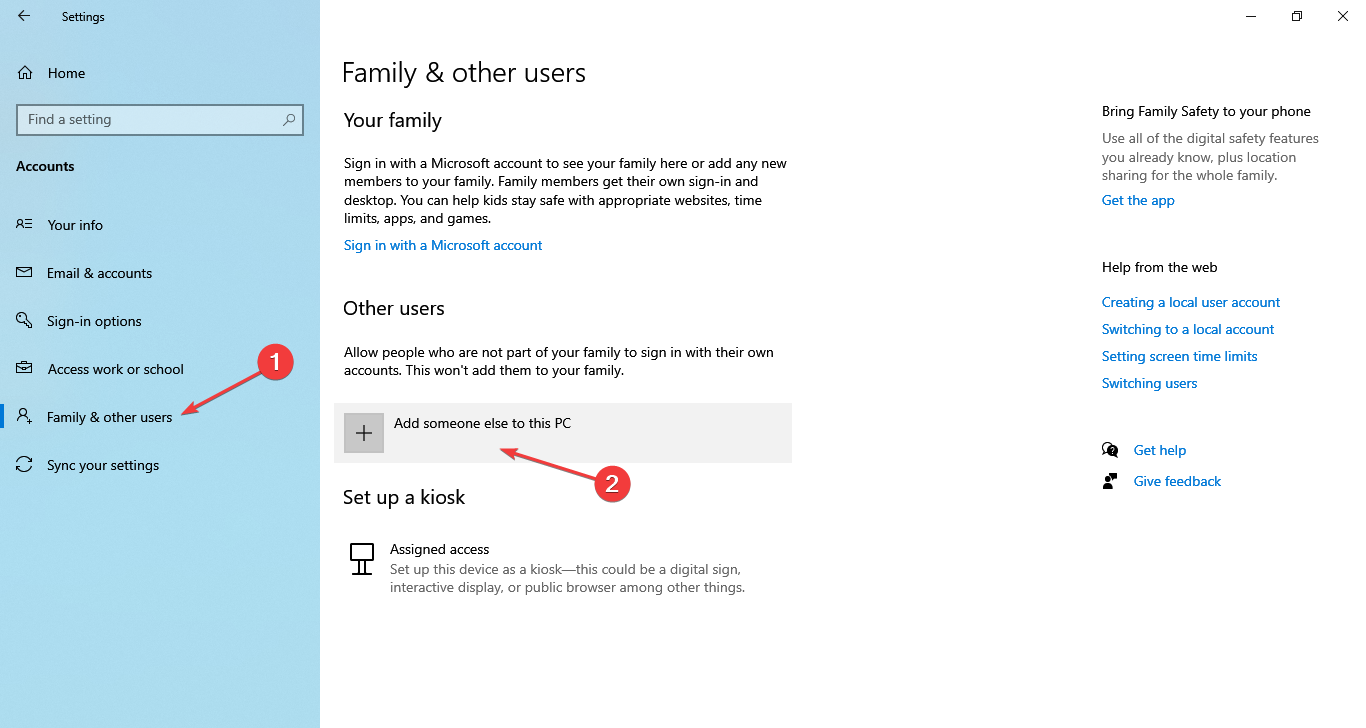
  2. Go to Family & other people from the navigation pane, and click Add someone else to this PC.add someone else to this PC
  3. Choose I don’t have this person’s sign-in information.sign in information
  4. Click on Add a user without a Microsoft account.add user
  5. Enter the desired username and password, and then click Next.create account to reset registry permissions windows 10
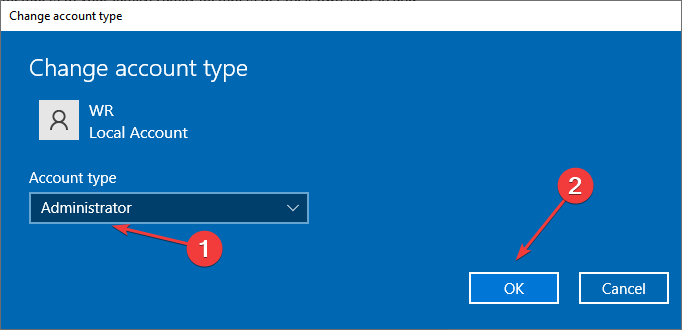
  6. Once done, click on the Change account type button under the newly created account.change account type to reset registry permissions windows 10
  7. Choose Administrator from the Account type dropdown menu, and click OK to save the changes.administrator to reset registry permissions windows 10

If you cannot reset Registry permissions in Windows 10, switching to another administrator account will work out fine.

3. Enable the hidden administrator account

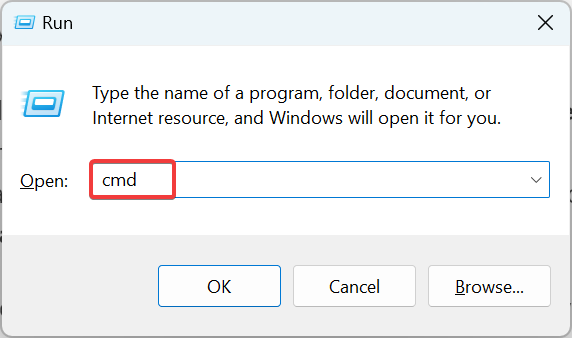
  1. Press Windows + R to open Run, type cmd, and hit Ctrl + Shift + Enter.cmd
  2. Click Yes in the UAC prompt.
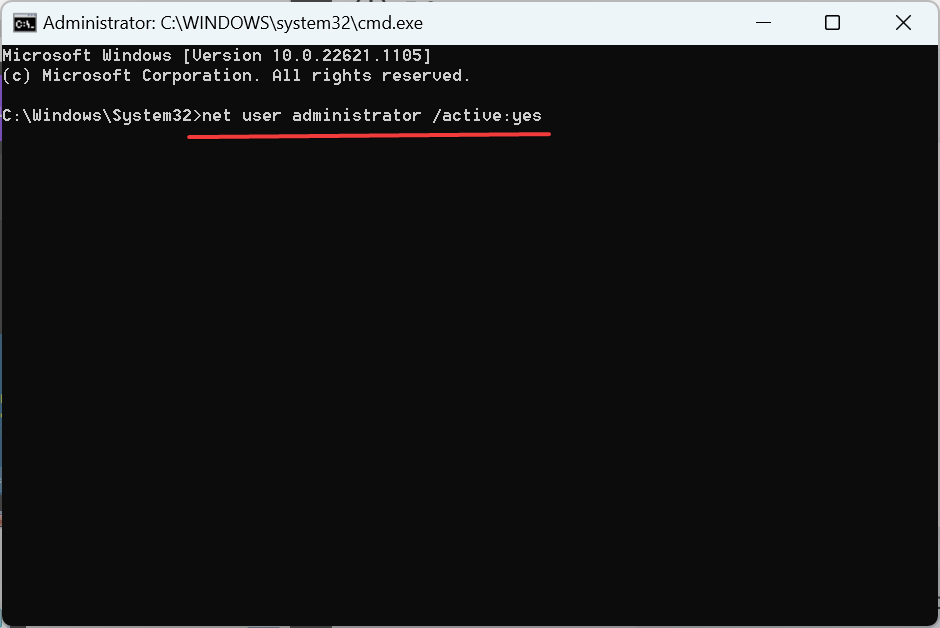
  3. Paste the following command and hit Enter:net user administrator /active:yesenable account
  4. Once done, sign out of the current account, then log in through the new administrator account, and reset the permissions.
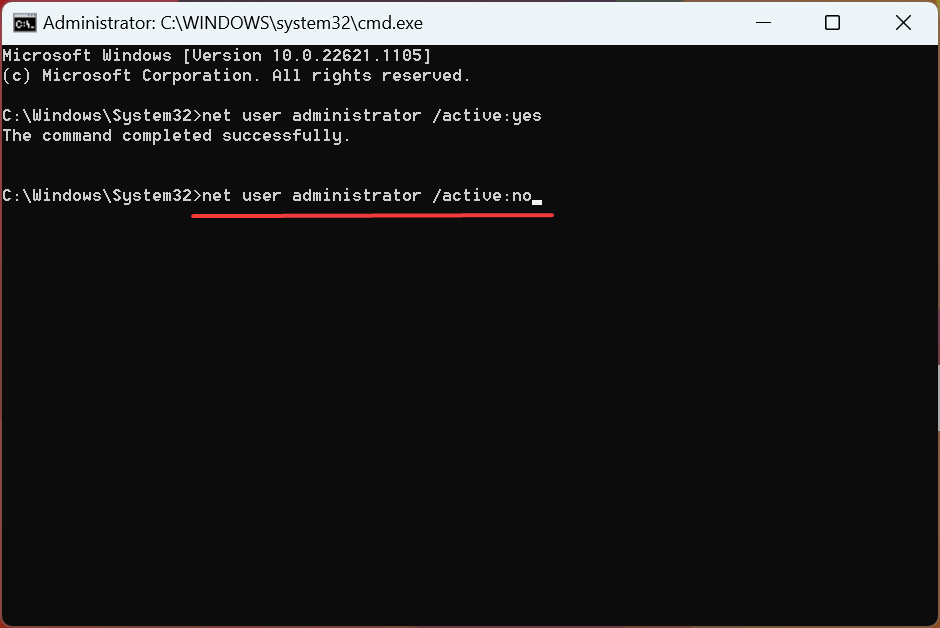
  5. Finally, head back to the original account and execute the following command to disable the hidden administrator account:net user administrator /active:nodisable

You can restore Registry in Windows 10 to default with cmd by enabling the hidden administrator account and making the required changes.

4. Use the SubInACL tool

To reset your registry permissions, you need to do the following:

  1. Download the SubInACL tool. Microsoft is no longer officially providing the tool, but you can get it from the archived link.
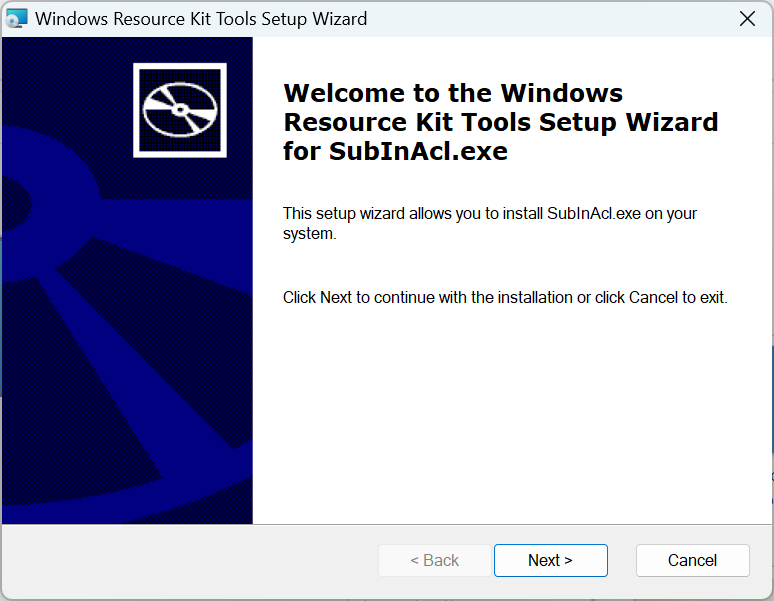
  2. Run the setup and follow the on-screen instructions to install the SubInACL tool.SubInAcl to reset registry permissions windows 10
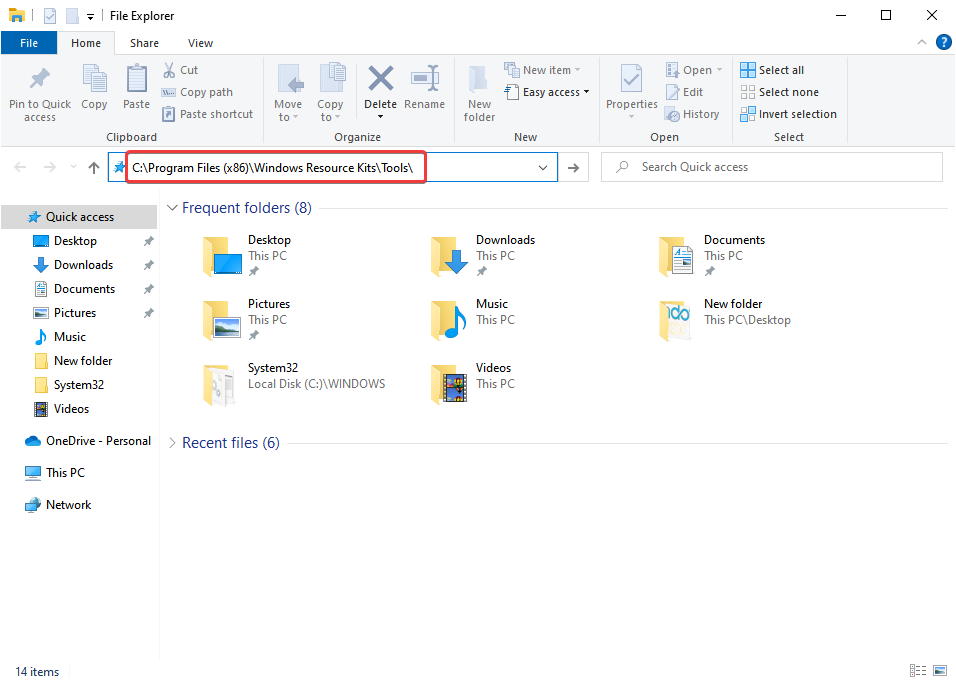
  3. Now, press Windows + E to open File Explorer, paste the following path in the address bar, and hit Enter:C:\Program Files (x86)\Windows Resource Kits\Tools\path
  4. Next, open a Notepad, and paste each of the following lines into it: subinacl /subkeyreg HKEY_LOCAL_MACHINE /grant=administrators=f subinacl /subkeyreg HKEY_CURRENT_USER /grant=administrators=f subinacl /subkeyreg HKEY_CLASSES_ROOT /grant=administrators=f subinacl /subdirectories %SystemDrive% /grant=administrators=f subinacl /subkeyreg HKEY_LOCAL_MACHINE /grant=system=f subinacl /subkeyreg HKEY_CURRENT_USER /grant=system=f subinacl /subkeyreg HKEY_CLASSES_ROOT /grant=system=f subinacl /subdirectories %SystemDrive% /grant=system=f
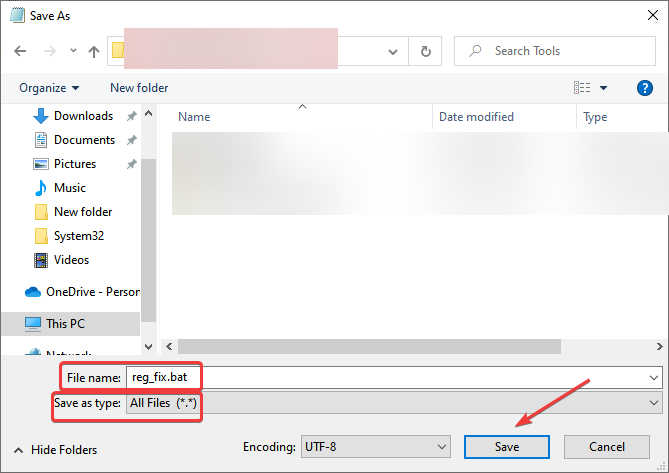
  5. Press Ctrl + S, navigate to the desired location (preferably desktop), enter reg_fix.bat as the File name, choose All files from the Save as type dropdown menu, and click on Save.save
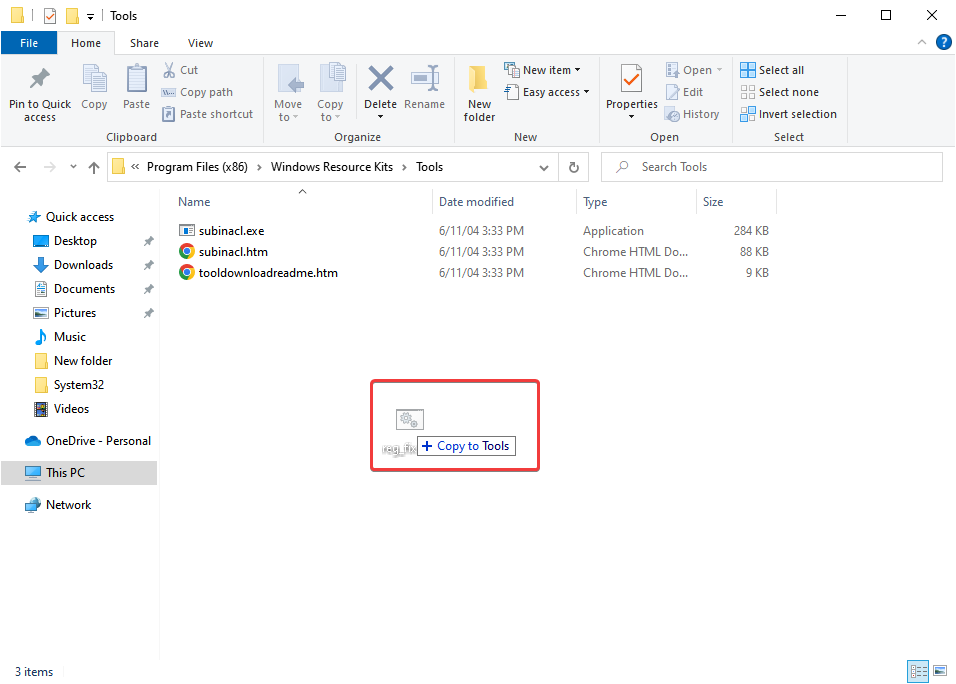
  6. Now, drop the reg_fix.bat file in the Tools folder already open in File Explorer.move to reset registry permissions windows 10
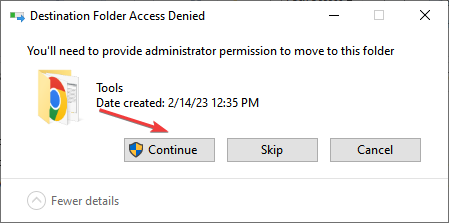
  7. Click Continue to provide permission.continue
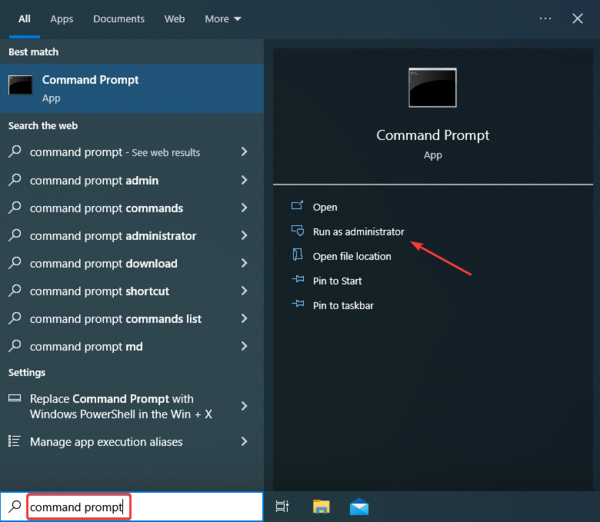
  8. Next, press Windows + S to open Search, type Command Prompt, and then click on Run as administrator on the right.command prompt
  9. Click Yes in the UAC prompt.
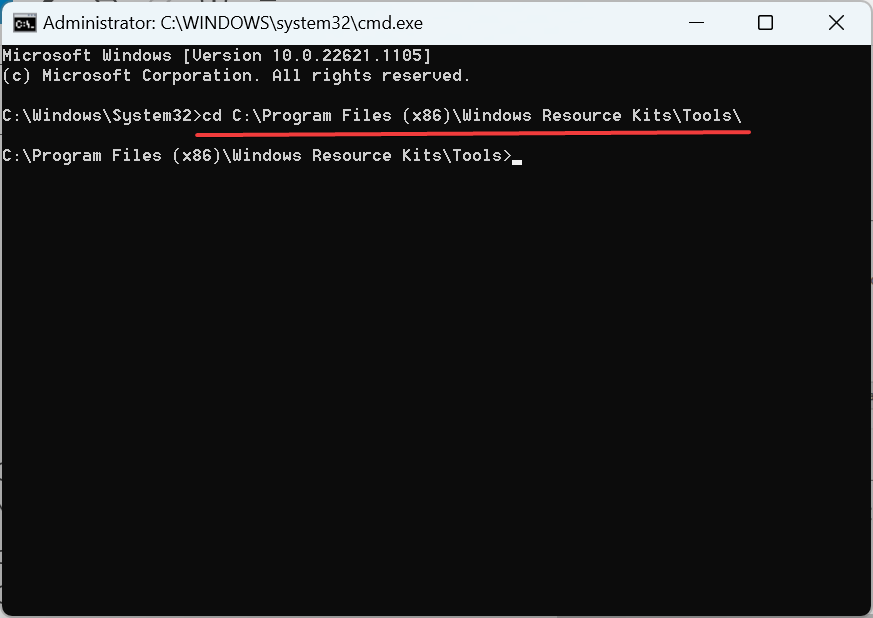
  10. Paste the following command and then press Enter:cd C:\Program Files (x86)\Windows Resource Kits\Tools\path
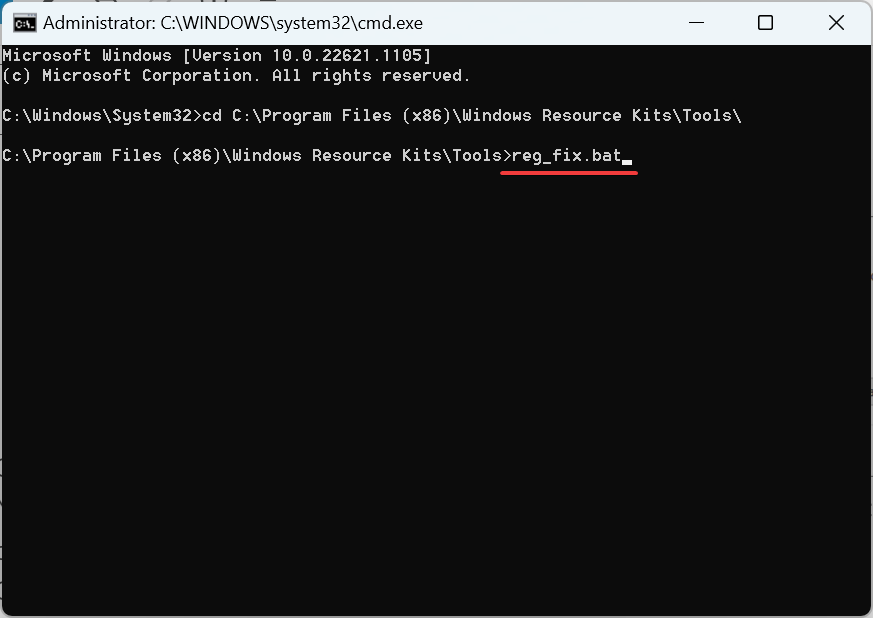
  11. Next, execute the following:reg_fix.batreg_fix.bat to reset registry permissions windows 10

SubInACL is a great Registry reset tool to get all the permissions to their default state in Windows 10. And though it has been taken off the official website, you can still get it from the archived link. But we recommend you be a bit cautious and follow the steps as it is.

These were the simplest and most effective ways to reset permissions for the Registry in Windows, and by now, you should have been successful in doing so.

Also, for other similar issues, do not forget to find out how to restore the Registry without backup in Windows.

If you have any queries or want to share your thoughts on the guide, drop a comment below.

3 Easy Ways to Remove Smartbyte From Your Windows PC

While a slow Internet speed usually points to issues with the network settings, there are certain apps to blame too, and one of them is Smartbyte.

This software comes from Dell, and it’s usually installed by default. It seems that these apps can cause issues, so this is why many choose to remove preinstalled software on their PCs.

In today’s guide, we’ll show you what this app is and how to properly remove it.

What is SmartByte, and do I need it?

SmartByte app is shipped along with Dell devices and can be categorized as bloatware in Windows. So, if you were wondering, SmartByte Drivers and Services are not viruses.

While the app’s objective is to optimally allocate bandwidth to various network-related processes, it often lowers the Internet speed.

A user reported that the Internet speed increased from 100 MBPS to 400+ MBPS after uninstalling SmartByte. For some, it may be available only as a SmartByte Network service and a driver, while others get a built-in app.

Most users don’t really need the app or even the related service and driver running. It’s usually found to affect the functioning of the computer, and it’s best that you uninstall SmartByte since updates released for it are yet to address the problem.

How do I remove Smartbyte.exe from my PC?

1. Via Settings

  1. Press Windows + I to open Settings, select Apps from the navigation pane, and click on Installed apps.installed app
  2. Now, find SmartByte, click on the ellipsis next to it, and select Uninstall.uninstall smartbyte
  3. Again, click Uninstall in the confirmation prompt.confirm

It’s one of the simplest ways to uninstall SmartByte in Windows and shouldn’t take you more than a minute. Also, if you were facing issues earlier, we recommend restarting the computer for the changes to come into effect and for the increased Internet speed to reflect.

2. Via the Control Panel

  1. Press Windows + R to open Run, type appwiz.cpl in the text field, and hit Enter.appwiz.cpl
  2. Select SmartByte, and click on Uninstall.uninstall smartbyte app
  3. Follow the on-screen instructions to complete the process.

Control Panel, too, offers an option to uninstall apps on the computer, but you would find a fairly smaller number listed here as compared to the Settings.

3. Use an uninstaller software

Another option, and often the preferred one, is to use an effective uninstaller software to remove SmartByte from Windows.

When you use software for the job, it will remove all related files, delete the registry entries and revert other changes made by SmartByte.

Removing the app helps fix things when you find SmartByte Telemetry to consume high disk. If you want to reinstall the app, all you need to do is perform a driver update on your Dell PC using the Dell Update feature or get it from the official website.

How do I turn off SmartByte on my Dell?

1. From the app

  1. Open the SmartByte software.
  2. Click the switch in the top right corner.
  3. After doing that, the application should be disabled.

2. Disable SmartByte services

  1. Press Windows key + R and enter services.msc.
  2. Now locate SmartByte services on the list. Next, double-click the desired service.
  3. Click the Stop button to stop the services. After that, set the Startup type to Disabled.
  4. Click Apply and OK to save changes.
  5. Do this for all SmartByte services that you have on your PC.

Also, if SmartByte keeps reinstalling every time, remove the program from Startup apps. Besides, find out how to increase the Wi-Fi speed on a laptop in case you are facing issues with that.

If you, too, have encountered issues with Smartbyte, tell us more about it in the comment section below.

How to Find BitLocker Recovery Key in 4 Easy Steps

If you’re using a Windows 11 PC, then BitLocker is one of the built-in security features that are built-in. It can help protect your data from unauthorized access. This feature allows you to encrypt your hard drive to prevent unauthorized access to your device.

However, even you, as the user, can get locked out of your account and need to use the recovery key. Sometimes Windows keeps asking for your BitLocker recovery key and other times, you may have lost it. We show you how you can find it in this article.

What do I do if I don’t have my BitLocker recovery key?

1. Use a Microsoft account

  1. Navigate to your browser and login into your Microsoft recovery page.sign in to microsft account
  2. Go to Devices and select the device whose key you want to find.view bitlocker recovery key in windows 11
  3. Click on your device, and you’ll find your BitLocker key.

Have you wondered where to find the BitLocker recovery key in your Microsoft account? If you use a Microsoft account for your Windows log-in, your recovery key will be stored on Microsoft’s servers.

Here, you will see a list of devices and their associated recovery keys, including laptop, desktop, and mobile devices. You can click on any of these devices to see more details and download their respective BitLocker recovery key files.

In tricky cases where neither the password nor the recovery key is available, our guide on unlocking BitLocker without password and recovery key explains what recovery and reset options you still have so you can decide the safest next step.

2. Use a removable drive

If you saved your recovery key to a removable drive, such as a USB flash drive or external hard disk, you could use it to recover your BitLocker key. You should keep this drive in a safe place. This is in case you need it to unlock your disk if you forget your password.

When retrieving it, insert the USB drive into your PC. You’ll need to search for a .txt or .pdf file written BitLocker to find your recovery key.

3. Use a printable document

If you choose to print your recovery key, it will be printed on paper left in an accessible location, such as your desk drawer.

This can be extremely helpful, especially when you need the recovery key immediately. If you have a printable version of the BitLocker recovery key, you can use it to unlock your computer in no time.

4. Use cloud storage

We all know that cloud storage can be the perfect place to store all your important files. But it’s also a great place to save your BitLocker Recovery Key if you forget or lose the password.

It could be a cloud storage service such as Dropbox or OneDrive. When searching for it in the cloud, use keywords such as BitLocker and recovery key to retrieve it quickly.

5. Use an AD account

You can use your Active Directory (AD) account to access Microsoft Azure. This allows you to access your organization’s resources in the cloud, including BitLocker recovery keys. 

You can use AD accounts to sign in to most Azure services, but not all services support this feature. If you can’t access it, contact your administrator to help you retrieve it.

If none of the above methods gets you your BitLocker recovery key, you may have to do a PC reset or clean install.

You can avoid future recovery problems by storing your BitLocker keys in Active Directory, and you can follow the steps in our guide on how to store BitLocker keys in Active Directory.

Why is Windows 11 asking for a BitLocker recovery key?

The BitLocker recovery key is a 48-digit code. It can unlock the drive if you lose your password or forget it. You need to keep this recovery key safe because if you don’t have it, you won’t be able to recover your data if something goes wrong.

  • You forgot your password or PIN – If you’ve forgotten your password or PIN, you will be asked for a recovery key when you try to log in.
  • PC reset – If you’ve recently reset your PC but chose to reinstall Windows from scratch by formatting the hard disk partition(s), you may be asked for the recovery key.
  • You’ve entered your PIN incorrectly – If you’ve entered your PIN incorrectly multiple times in a row, you may be prompted to use your recovery key.
  • Windows has been corrupted – A corrupted Windows 11 operating system may ask for a BitLocker recovery key.
  • Damaged hard drive – If your hard drive was damaged physically, your Windows 11 installation will be affected.
  • Hardware change – If you’ve recently changed your hardware, such as the motherboard, you may be prompted to enter your Recovery key as part of the Windows startup process.

FAQs

Where can I find my BitLocker recovery key?

You can find it in your Microsoft account, on a printed copy you saved, in an Azure AD or Active Directory account (for work or school devices), or in a .txt file you saved during setup.

Can I recover BitLocker without the recovery key?

No. BitLocker encryption cannot be bypassed. Without the correct recovery key, your data cannot be decrypted. This is a security measure to protect your files from unauthorized access.

Why is BitLocker asking for a recovery key on startup?

This can happen after hardware changes, firmware updates, incorrect shutdowns, TPM issues, or if Windows detects a security risk. It is a normal protection feature to ensure your data stays safe.

How do I stop BitLocker from asking for the recovery key every time?

Update your TPM drivers and BIOS, ensure Secure Boot is enabled, suspend and resume BitLocker protection, and avoid forced shutdowns. You can also run manage-bde -protectors -disable C: and then re-enable it to reset the key protectors.

However, before you take any drastic measures, we recommend you first get in touch with Microsoft and your PC’s manufacturer for additional help. They may have another option to recover your lost key.

If you find this situation tedious, consider disabling BitLocker on your Windows 11 to prevent issues like getting stuck on the Preparing BitLocker recovery screen in the future.

You may also find yourself in a predicament where you retrieve the recovery key, but the BitLocker key fails to unlock your PC. If this sounds familiar, please check out our helpful guide for some solutions. And if you happen to face another common issue, it’s time to learn how to retrieve the BitLocker Recovery Key using CMD.

Let us know which method you found easy to find your lost BitLocker recovery key in the comment section below.

Windows Time Service Missing: 8 Methods to Restore It

The Windows Time Service (W32Time) is a Microsoft service that synchronizes computer clock. The tool is implemented in the W32Time.dll file.

The Windows Time Service recently broke down, sending the wrong times to computers worldwide. Fortunately, Microsoft quickly fixed this problem, and your computer should now display the correct time.

Should the Windows Time Service break down again, we’ve covered you. In this article, we’ll list a series of workarounds that you can use to set the correct time on your computer.

Why is Windows Time Service missing?

  • Damaged installation – Sometimes, your installation can get damaged. To fix it, you need to repair corrupted system files.
  • Service settings – In case the service isn’t correctly configured, you can get this and many similar errors. Restarting it usually fixes the problem.
  • Improperly configured tasks – If the tasks aren’t scheduled properly, you need to manually schedule tasks related to date and time.
  • Time server issues – In some instances, there might be issues with the time server. Change the server and check if that helps.

What are other Windows Time Service issues?

Windows Time service can sometimes lead to certain issues if it’s not running properly. Speaking of this service, here are some similar issues that users reported:

  • Windows 10 time service not starting, access denied, not working, not found, not showing
    • There are various issues that can occur with Windows Time service on Windows 10, but you should be able to fix most of them by using one of our solutions.
  • Windows Time service keeps stopping
    • According to users, sometimes this service keeps stopping on your PC.
    • To fix this problem, be sure to run both SFC and DISM scans and check if that solves the issue.
  • Windows Time service missing, not installed
    • If this service is missing or if it’s not installed, be sure to reregister the service and check if that solves the problem.
  • Windows Time service not starting error 1792, 1290, 1079
    • There are various errors that can prevent this service from running, and if you encounter any of these issues, be sure to try some of our solutions.
  • Windows Time service could not be started
    • This is another common problem with Windows Time service.
    • If this issue occurs, you might have to change the Startup type of Windows Time service.
  • Windows Time not syncing
    • This is another common problem caused by Windows Time service.
    • However, you can fix it by checking your scheduled tasks.

How do I fix the Windows Time service if it’s missing?

Before we start fixing this issue, be sure to try the following:

  • Check motherboard battery – A faulty one often causes time and date issues. Consider replacement before trying other steps.

1. Perform SFC and DISM scans

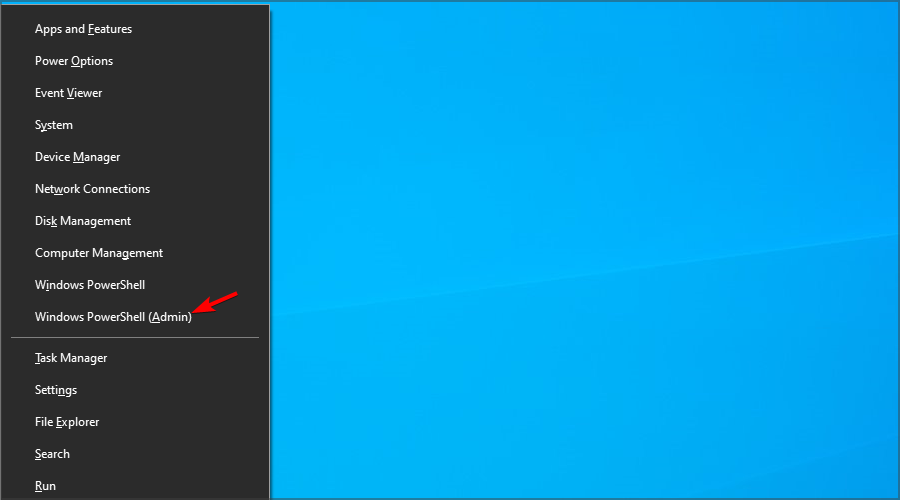
  1. Press Windows key + X to open Win + X menu.
  2. Now choose Command Prompt (Admin) or Powershell (Admin) from the menu.
    Windows Time service keeps stopping
  3. When Command Prompt opens, type the following and press Enter: sfc /scannow
    Windows 10 time service not starting
  4. SFC scan will now start. This scan can take up to 15 minutes, so don’t interfere with it or interrupt it.

If Windows Time service isn’t running, the problem might be your file corruption. Sometimes, your system files can get corrupted, leading to this and many other errors.

To fix the problem, you need to perform an SFC scan. Once the SFC scan is finished, check for the problem.

Windows Time service could not be started

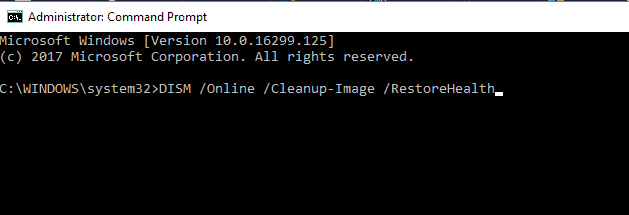
If the issue is still present, your next step would be to run a DISM scan. To do that, start Command Prompt as administrator and run the following command: DISM /Online /Cleanup-Image /RestoreHealth

Once the DISM scan is finished, check if the problem persists. If the issue is still present, repeat the SFC scan and check if that solves the issue. If this process seems too complicated or time-consuming, we recommend reliable repair software.

2. Set the Windows Time Service to automatic

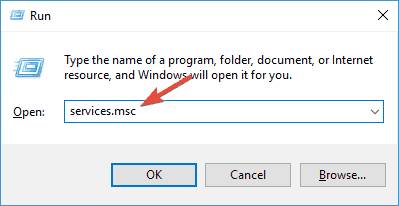
  1. Press Windows key + R and type services.msc. Next, press Enter.
    Windows 10 time service not starting
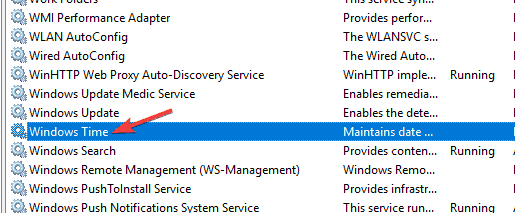
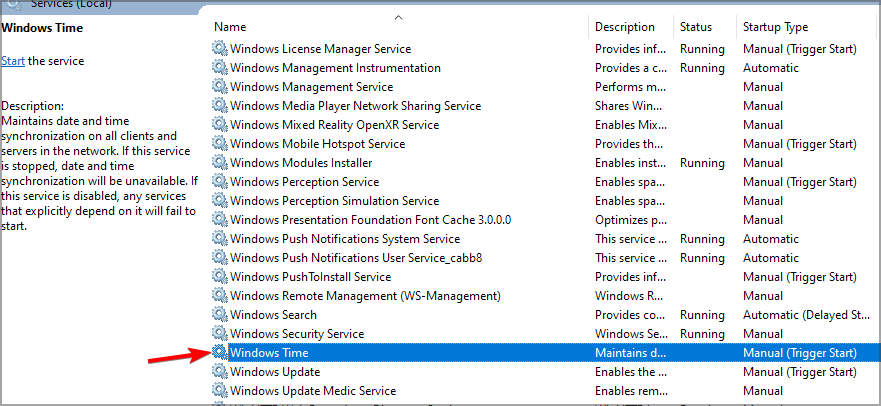
  2. Scroll down to Windows Time and double-click it.
    Windows Time service not installed
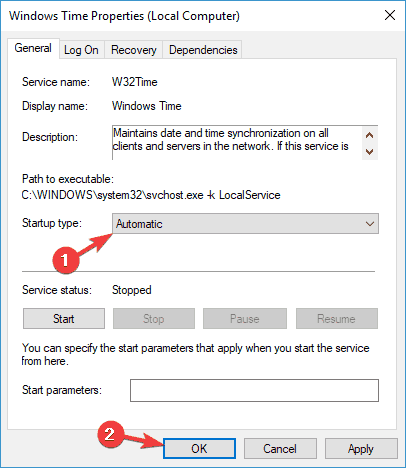
  3. Change the Startup type to Automatic. Lastly, click on Apply and OK.
    Windows Time service not starting error 1290

After you change the Startup type, the service should automatically start with Windows, and your problem should be resolved. If you have issues with Windows Time service, you need to ensure that the Startup type of the service is set to Automatic.

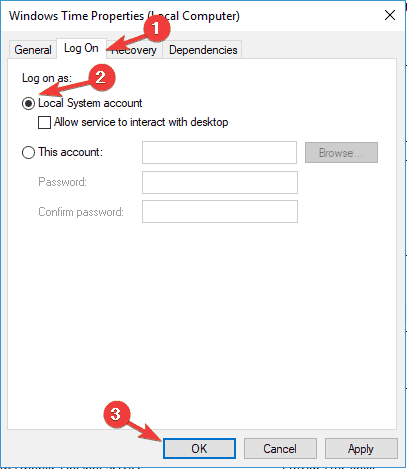
3. Make sure that the Local System account starts the Windows Time service

  1. Open the Services window.
  2. Scroll down to Windows Time and double-click it.
  3. Select the Log Ontab and check the Local System account. Lastly, click Apply and OK.
    Windows Time not syncing

According to users, sometimes issues Windows Time service can occur if it’s not being started properly. After making these changes, the problem should be resolved completely.

4. Register the W32Time file again

  1. Press Windows key + X and choose PowerShell (Admin).
  2. Run the following commands:
    net stop w32time
    w32tm /unregister
    w32tm /register
  3. Close PowerShell.

Sometimes this issue can occur if there’s a problem with the W32Time service. To fix the issue, you must stop the services and unregister it.

5. Check the Windows Time Service in the Task Scheduler

  1. Go to the Search menu, type task scheduler and select Task Scheduler.
  2. Expand the Task Scheduler Library tree. Next, go to Microsoft and select Windows. Lastly, choose Time Synchronization.
  3. Left-click each task and make sure it is enabled. To enable a task, right-click it and select Enable.

  4. Still in the center pane, check the settings from the Triggers tab and set the service to run automatically at startup.

For Windows Time Service to work properly, specific scheduled tasks must be running. If there’s an issue with one of these tasks, you might encounter some problems.

6. Use a different time server

  1. Press Windows key + R and enter control. Click OK.
  2. Go to Date and Time.
  3. Go to Internet Time and click the Change settings button.
    Windows Time service missing
  4. Select time.nist.gov as the Server and click the Update now button. Also, try using pool.ntp.org as the server, some users reported that this fixed the issue.
    Windows Time service not starting error 1792

In some cases, problems with Windows Time service can occur if there’s an issue with the time server. Check out our in-depth comparison of time.windows.com vs time.nist.gov for good measure. After changing the time server, check if the issue is still there.

You can also add more servers to the list. Here’s how to do this:

  1. Press Windows key + R and enter regedit. Press Enter.
  2. Once the Registry Editor opens, navigate to the following path:
    Computer\HKEY_LOCAL_MACHINE\SOFTWARE\Microsoft\Windows\CurrentVersion\DateTime\Servers
  3. To add a new time server, right-click the empty space and choose New and then String Value.
  4. Enter the appropriate number and double-click it. In the Value data field enter the server’s address.

    Here are some server examples:
    • time-a.nist.gov
    • time-b.nist.gov
    • 128.105.37.11
    • europe.pool.ntp.org
    • clock.isc.org
    • north-america.pool.ntp.org
    • time.windows.com
    • time.nist.gov
  5. After you add servers to the registry, simply go to Time and Date settings and choose any of the servers that you added.

You can improve time accuracy by adjusting your NTP configuration, and you can follow this detailed guide on how to configure an NTP server in Windows to make sure your system syncs correctly.

7. Force Windows to sync the time

  1. Start PowerShell as adminsitartor. Use Windows key + X and select PowerShell (Admin).

  2. Now run the following commands:
    net stop w32time
    w32tm /unregister
    w32tm /register
    net start w32time
    w32tm /resync

According to users, sometimes you might be able to solve this problem simply by forcing Windows to start the service and sync the time. After that, restart your PC and check if the problem is resolved.

8. Use the sc triggerinfo command

  1. Start Powershell as administrator.
  2. Now run the following command: sc triggerinfo w32time start/networkon stop/networkoff

According to users, sometimes Windows Time service isn’t triggered properly, and if that’s the case, the service won’t start at all. However, you can fix the problem simply by running a single command in Command Prompt.

After executing the command, the Windows Time service should be fixed and start automatically with your PC.

There you go. We hope one of these solutions helps you synchronize your Windows 10 clock. If the problem is still there, our Windows clock is falling behind guide should be able to help.

If you’ve encountered other workarounds to fix various Windows Time Service bugs, please list the troubleshooting steps in the comment section below.

Maximum & Minimum Processor State [What Is & Setup]

You have probably heard about minimum and maximum processor states while talking about the Windows OS, but probably never knew what it means.

That’s all about to change, however, as we are about to take a more in-depth look at this power setting and how to tweak it to our preference. If, by chance, you require information on how to fix high CPU usage on Windows 11, we got you covered as well.

What should I know about minimum and maximum processor states in Windows?

Let’s start by saying that the minimum processor state is the lowest power allotted to the CPU when the processor is performing minimal tasks or is inactive.

This is an option under Processor Power Management, and the default minimum processor state is 5%, which is also the best choice.

Thus, the maximum processor state should be set as 100%, so when processing power is needed, all the available processing resources can be used for the important task.

Furthermore, the Minimum Processor State setting in Power Options enables computer users to change the minimum percentage of the processor available for use.

That being said, a lower percentage of the minimum processor state saves battery life but may result in poor performance.

Tweaking these values isn’t something your average Windows user will do, but some people actually need to be very precise with power management details.

Don’t worry, it’s not a hard process, as it only requires a few minutes of your time. Naturally, your next question is how to change processor states.

If you are using a desktop computer, you have only one option. However, if you are using a laptop, it is possible to show or hide these options for On battery and Plugged in states.

You may also read our guide on how to get the Power Management tab back if it’s missing.

How do I set minimum & maximum processor state?

  1. Search for Control Panel and open the app.search for control panel
  2. Click on Power Options.power settings
  3. Click on Change plan settings.change plan settings
  4. Select Change advanced power settings.advanced power options
  5. Expand Processor power management.processor power management
  6. To modify a value, click on the percentage and type a new value or use the arrows to select.modify value

If you are wondering how the processor state will influence your gaming experience, it generally won’t affect the behavior of your PC while playing video games.

However, the thing it will interfere with is the power consumption when your machine is idle or handling small and simple processes.

Some users may rely on setting the Minimum Processor State to 0% to save battery life. The default, which is 5%, is already a minimal power consumption setting.

You should find other ways to save your power, like optimizing the sleep mode and changing your power plan.

And don’t set the Minimum Processor State to 100% either, unless you change the power plan to high performance, and it’s recommended with a good cooling system.

This means that a high-performance power plan won’t help much in improving computer performance but waste power quickly.

You might also be interested in our guide on what to do if the power plan keeps changing on Windows.

Leave a comment below if this article has helped you complete the task you were trying to get done.

5 Ways to Fix Server Error in ‘/’ Application in Chrome

Some Google Chrome, and other browser, users have posted on support forums about a Server Error in ‘/’ Application runtime issue that arises when they try to log in or open certain website pages.

Consequently, you can’t log in to or open specific web pages.

Why do I get a Server Error in ‘/’ Application?

While Chrome is a pretty responsive browser, and the Google page experience is satisfactory, for the most part, there are some straightforward causes for the Server Error in ‘/’ application:

  • Internal server issue – In this case, there’s nothing that you can do other than apprise the administrator and wait for the problem to be resolved.
  • Cookies or corrupt browsing data – If the error is encountered on all websites, it’s likely an issue at your end with the saved cookies or corrupt browsing data.
  • Misconfigured Chrome settings – Incorrect settings in Chrome can cause this issue, but one of the solutions below will help you fix it.

What are the other iterations of this error?

The error message states:

An application error occurred on the server. The current custom error settings for this application prevent the details of the application error from being viewed remotely (for security reasons). It could, however, be viewed by browsers running on the local server machine.

Some Server Error in ‘/’ Application runtime errors has different descriptions. However, they still occur in much the same way. Another Server Error description states:

An exception occurred while processing your request. Additionally, another exception occurred while executing the custom error page for the first exception.

Some users have been able to fix the Server Error in ‘/’ Application runtime error for Chrome with the resolutions listed in the following sections.

Quick Tip:

If you keep having problems with Chrome, try a more responsive browser, such as Opera One. It’s built on Chromium as well, which means all your favorite Chrome extensions are compatible.

Not only that but Opera One is updated very frequently, leaving no room for errors/bugs when you browse. It’s also very lightweight and packed with modern features.

Opera One

Browse the web securely, block ads, connect to VPN, and more!

How do I get rid of Server Error in ‘/’ Application?

Before started tweaking your browser, let’s make some preliminary checks that might fix the issue quicker:

  • Check if the website you are trying to access is down. Open the Downdetector website, select your country on the drop-down menu, and then input a website to check in the search box on Downdetector.
  • Update Google Chrome. It should be an automatic process, but then make sure you click on the update prompt and restart the browser to see if the error keeps popping up.

If the issue persists, start applying the solutions below to fix the problem.

1. Delete cookies for the page you can’t log in to

  1. First, open the website where the Server Error in ‘/’ Application issue arises.
  2. Click the padlock button on the left side of Chrome’s URL bar, and select Cookies.cookies
  3. Double-click the listed website where the issue arises.website
  4. Select Cookies and click Remove to delete them.remove to fix server error in '/' application chrome
  5. Next, click on the Done button.

Once done, check if the Server Error in ‘/’ Application – The resource cannot be found issue in Chrome is fixed. If not, head to the next method.

2. Clear Chrome’s browser data

  1. Launch Chrome and press Ctrl + Shift + Del to open the Clear browsing data utility.
  2. Select the All time option from the Time range drop-down menu.time range
  3. Next, select all three data options here, and then click the Clear data button.clear data

3. Reset Google Chrome

  1. Paste the following path in the address bar and hit Enter: chrome://settings/reset
  2. Click on the Restore settings to their original defaults option.reset settings to their original defaults
  3. Click Reset settings in the confirmation prompt that appears.reset settings to fix server error in '/' application chrome

Once done, verify if the Server Error in ‘/’ Application issue in Chrome is resolved. In case it persists, head to the next method.

4. Remove credentials

  1. Press Windows + R to launch Run, enter Control Panel in the text field, and click OK.control panel
  2. Click on User Accounts.user accounts
  3. Then click Manage Windows Credentials under Credential Manager.Windows Credential Manager
  4. Select a listed generic credential to expand it and click Remove to delete the credential.remove
  5. Click Yes in the Delete Generic Credential prompt window that opens.yes to fix server error in '/' application chrome
  6. Similarly, delete all the listed generic credentials.

If the previous methods haven’t worked, this one should fix the Server Error in ‘/’ Application issue in Chrome.

5. Reinstall Google Chrome

  1. Press Windows + R to launch the Run command, type appwiz.cpl, and click the OK button.appwiz.cpl to fix server error in '/' application chrome
  2. Select Google Chrome, and then click on Uninstall.uninstall to fix server error in '/' application chrome
  3. Follow the on-screen instructions to complete the process.
  4. Restart Windows after you’ve uninstalled the browser.
  5. Now, download Google Chrome once again, and run the setup to install it.

The above resolutions will fix Server Error in ‘/’ Application for some Chrome users. If you still see the error, consider emailing the website about the issue or try opening and logging in to the site with an alternative browser.

Also, find out how to fix the Page(s) Unresponsive error in Chrome. Tell us which fix worked for you in the comments section below.

Before you go, don’t miss our A padding to disable MSIE and Chrome friendly error page guide, since it’s another common server error.

Skype Share Screen Not Working: How to Enable It

Skype screen sharing is a feature that allows you to share the screen of your computer with other Skype users. It’s a great way to collaborate on projects, show off your desktop, or have fun.

However, sometimes it may not work as expected. Screen sharing may be unavailable, especially if you use an incompatible version. If you’re in a similar predicament, we unpack various ways to ensure you can share your Skype screen again.

Why is my Skype screen sharing not working?

There are a handful of reasons you may be unable to share your screen on Skype. Below are some of the most common ones:

  • Unsupported version of Skype – If one party has an older software version, it might not be compatible with screen sharing. Only select versions of Skype support screen sharing.
  • Weak connection – If one of you has a weak signal or the internet connection is slow, it may prevent Skype from working properly. 
  • System/hardware requirements – Your computer may not have adequate hardware or system requirements to support screen sharing.
  • Insufficient permissions – If you’ve tried to share your screen without having granted your webcam or access, then you may not be able to share. In some cases, your webcam is not working.
  • Your firewall may be blocking the connection – If you have a firewall or anti-virus software installed on your computer, it may be blocking Skype from accessing your webcam and microphone. 
  • Bugs in the software – Sometimes bugs in software can cause problems like this, so make sure that you update all of your software before trying anything else.
  • Unsupported OS – Make sure that you’re using a supported operating system. Screen sharing only works on select platforms.

How do I enable screen sharing on Skype?

Before you attempt any of the slightly technical solutions below, we recommend you try the following:

  • Verify that you have adequate bandwidth and that your network connection is stable and working correctly. 
  • Make sure your computer meets the minimum system requirements before trying to enable this feature in Skype. 
  • Check on Skype’s status page whether there’s communication on the disruption of services.
  • Close any background apps or processes that may be hogging the bandwidth. You can also choose to limit bandwidth.
  • Check for any available Skype updates.
  • Reboot both computers and restart Skype again before attempting another session.

1. Turn on camera permissions

  1. Hit the Windows key and click on Settings.settings windows 11
  2. Navigate to Privacy & security then scroll down to App permissions and click on Camera.
  3. Toggle Camera access on.
  4. Also under Let apps access your camera, ensure Skype option is On.

2. Disable the firewall temporarily 

  1. Press the Windows key, search Windows Security and click Open.
  2. Click on Firewall & network protection then select Public network.league of legends black screen after champion select
  3. Locate Microsoft Defender Firewall and toggle the off button.turning off Microsoft Defender Firewall Windows

If you have an antivirus enabled, you should also disable it temporarily and then try reconnecting.

3. Check for Updates 

  1. Hit the Windows key and select Settings.settings windows 11
  2. Click on Windows update, then select Check for updates.check-updates-w11 windows 11 blue screen
  3. Download and install if any are available.

4. Run a virus scan

  1. Press the Windows key, search Windows Security, and click Open.
  2. Select Virus & threat protection.
  3. Next, press Quick scan under Current threats.
  4. If you don’t find any threats, proceed to perform a full scan by clicking on the Scan options just below Quick scan.Scan options
  5. Click on Full scan then click on Scan now to perform a deep scan of your PC.Full Scan Scan Now
  6. Wait for the process to finish and restart your system.

Also, perform a virus scan if you have a third-party antivirus enabled to ensure you cover all the bases. There may be some vulnerabilities that Windows Security may miss as it is not as comprehensive.

Thus, an antivirus solution we strongly recommend is TotalAV because it has an advanced scanning option and multilayered security, including antivirus, antispyware, and ransomware shield, which will keep your PC safe from digital threats at all times.

5. Reinstall Skype

  1. Hit the Windows key and select Settings.settings windows 11
  2. Click on Apps on the left pane then select Apps & features on the right pane.
  3. Find Skype, click on the three ellipses and select Uninstall.uninstall-skype windows 11 skype crashing
  4. Launch the Microsoft Store app, search for Skype, and click Install.

You may also run into an issue where Skype fails to make calls but worry not, as our expert article has the solutions.

If Skype keeps crashing, we also have answers in our guide detailing why this happens and how to fix it. While you’re still here, you may be interested in screen-sharing tools that promise to be worth your while.

We’d love to hear from you, so please let us know in the comment section below what solution worked for you.

Windows 10 HomeGroup Missing: Get It Back in No Time

HomeGroup was a feature released by Microsoft, first with Windows 7, which further made its way to Windows 10 as well. But for many, HomeGroup in Windows 10 is now missing.

This presents a significant problem, especially for those who had HomeGroup set up and relied on it for printer and file sharing. So, let’s find out why HomeGroup is missing in Windows 10 and how you can get things up and running.

Why can’t I find HomeGroup in Windows 10?

Microsoft removed HomeGroup from Windows 10, starting with Version 1803. The reason, there are several other viable and secure alternatives. The functionality can be performed using OneDrive or the Share function found in Windows.

However, it didn’t go down well with the users who relied on the HomeGroup feature, and with it missing in Windows 10, they had to look for ways that suited their requirements. But before you do that, try our solution.

What can I do HomeGroup is missing in Windows 10?

  1. Open This PC, check the left pane if the Homegroup is available, right-click on it, and choose Change HomeGroup settings.change homegroup settings
  2. Click Leave the homegroup and save the changes.leave the homegroup
  3. Now, press Windows + R to open Run, type Control Panel, and hit Enter.control panel
  4. Click on Network and Internet.network and internet
  5. Choose Network and Sharing Center.network and sharing center
  6. Next, click on Change advanced sharing settings on the left.change advanced sharing settings to fix windows 10 homegroup missing
  7. Now, enable the Turn on network discovery and Turn on file and printer sharing options.enable network discovery to fix windows 10 homegroup missing
  8. Scroll down, expand All Networks, enable Turn on sharing so anyone with network access can read and write files in the Public folders, and then click on Save changes.public folder sharing to fix windows 10 homegroup missing
  9. Press Windows + S to open Search, type Services, and click on the relevant search result.services
  10. Double-click on the Function Discovery Provider Host entry here to open its Properties.Function Discovery provider host
  11. Choose Automatic from the Startup type dropdown menu, click on the Start button, and then on OK to save the changes.run service to fix windows 10 homegroup missing
  12. Similarly, get the following services running as well:
    • Function Discovery Resource Publication
    • SSDP Discovery 
    • UPnP Device Host
  13. Finally, press Windows + E to open File Explorer, paste the following path in the address bar, and hit Enter:\\localhostlocalhost
  14. Create a folder here, right-click on it, and choose Properties.
  15. Now, go to the Sharing tab, and click on Advanced Sharing.advanced sharing
  16. Tick the checkbox for Share this folder, and then click on Permissions.share this folder
  17. Make sure to provide Full control and click OK to save the changes.full control to fix windows 10 homegroup missing
  18. Remember that this method isn’t the safest, so you might want to adjust your settings and only share files with specific users.

That’s it! With this method, you should be able to reactivate the HomeGroup sharing capabilities on Windows 10 in case it’s missing. Remember to follow the steps in the listed sequence to avoid running into issues.

And do not forget to check the simplified steps to share data using OneDrive. Besides, find out the best software for remote printing.

Do tell us your thoughts on Microsoft shelving the HomeGroup feature in Windows 10 and the information presented in our guide.

How to Block GPO Inheritance [Quick Guide]

Administrators can apply hundreds of different settings to objects in AD by establishing Group Policy Objects (GPOs) and associating the GPO to domains, sites, and organizational units (OUs).

You might be wondering how to block inheritance for such groups, so we will show you. We can also show you how to block inheritance for Windows 10 if interested.

What is GPO inheritance, and how does it work?

Well, as you might know, in Active Directory, GPOs are inherited automatically throughout the GPO application order.

So, if a Group Policy setting is enabled at the highest domain level but is not configured at the OU level, the highest domain level setting takes precedence and is applied.

That being said, equally, if a setting is not configured at the domain level and is disabled at the OU level, the OU setting is inherited. 

But there’s also the situation when Group Policy is not applying, but this guide will help fix it.

If you were wondering about the order in which the Group Policy settings take effect, allow us to shed some light on that as well:

  • Local Group Policy settings are always applied first.
  • GPOs linked at the site level are applied next, followed by the GPOs linked at the domain level and OU level. Since GPOs linked to the OU are processed last, they have the highest precedence.
  • For nested OUs, GPOs linked to the parent OUs are applied first, followed by the GPOs linked to the child OU.
  • If multiple GPOs are linked to a container, then the GPO with the lowest link order will have the highest precedence.
  • To view the list of GPOs applied to a container, double-click the container and select the Group Policy Inheritance tab in the right pane.

You may also be interested in how to install Group Policy Management Console on Windows 11.

How do I block Group Policy inheritance for a Domain/OU?

  1. 1. Press the Windows key to open the search box. Alternatively, you can press the Start button on the taskbar.

  2. 2. Search for group policy, and select the first result to open the Edit Group Policy app.

    search for and launch gpedit
  3. 3. Go to Group Policy Management and locate the group policy, then access Domains and select your domain, and finally go to Default Domain Policy.

  4. 4. Under Domain Controllers, locate the domain you wish to stop inheriting settings.

  5. 5. Right-click on it and select Block Policy inheritance.

    block inheritance gpedit
  6. You can easily block the Group Policy inheritance for a specific Domain/OU via the Group Policy Editor. All you need to do is locate your domain in the list and apply the Block Inheritance setting to it.

If you have any trouble, you may also use our guide on how to fix Group Policy in Windows.

Can I disable a GPO entirely?

You should know that, by default, both the Computer Configuration and User Configuration policy settings of a GPO are enabled and applied to all users and computers in the container in which the GPO is linked.

That being said, situations may arise where the GPO has to be disabled for a particular period. So, the answer is yes, you absolutely can.

In case you’re wondering How do I disable a GPO?, take a closer look at our detailed procedure.

  1. Search for group policy, and open the Edit Group Policy app.edit policy
  2. After selecting the GPO you want disabled, select the Details tab on the right-hand side.all settings disabled group policy
  3. Under GPO status, select All settings disabled.
  4. Reboot your PC.

You can also modify such settings using PowerShell, if that is the software you are more comfortable with, just so you know.

If you’re interested, you may even add a VPN by using the Group Policy in Windows, so take a look at this guide.

This is all you need to know about this subject. We hope this article helped you solve whatever problems you are having. Leave a comment below and tell us how you feel about it.

Dead Island 2 release date gets bumped up to April 21st

Publisher Deep Silver has announced that the long-awaited Dead Island 2 will release on April 21st this year. That’s a week earlier than the previous April 28 launch date.

You’ll notice the team also mentions in the post that the game has already hit gold status. (This means the game has completed the development stage and been granted the “seal of approval” from the first-party hardware makers). This typically happens a few weeks before launch, so the fact that Dead Island 2 has already “hit gold” would facilitate the new release date.

Another potential reason for bumping up the game’s launch might be Star Wars Jedi: Survivor, which recently saw its March release window pushed back to April 28th. Likely the new release date for Dead Island 2 is not entirely unrelated.

Both games are currently available for pre-order.

Dead Island 2
Dead Island 2
Developer:
Deep Silver
Price:
Free


STAR WARS Jedi: Survivor™
Developer:
Electronic Arts
Price:
$31.49

Microsoft phases out Internet Explorer completely

Last year, Microsoft announced its plan to cut support for Internet Explorer via a Microsoft Edge update. The set cut-off date was scheduled for February 14, this year. This means that Microsoft has now cut support for IE indefinitely.

The initial plan was to disable Internet Explorer 11 in Windows 10 via a software update, but Microsoft restrategized and opted to kill it off using an Edge update instead to make the switch simpler. Microsoft has been urging users to switch to the new Edge for quite some time and even rolled out an IE Mode update to make the transition seamless. What’s more, while making the transition your browsing data will also be moved to Edge.

Microsoft is now rolling out this update simultaneously to both consumer and commercial devices. It should be noted that you won’t be able to roll back to the previous version once the update is installed.

Users who continue using Internet Explorer from today will start seeing a “The future of Internet Explorer is in Microsoft Edge” banner and get redirected to Edge. Microsoft had previously indicated that:

If your organization still has dependencies on IE11, you must take steps now to complete your transition before February 14, 2023, or risk business disruption at scale when users lose access to IE11-dependent applications.

Remnants of IE11 such as icons on the taskbar will continue lurking for a few months to aid with the transition. Microsoft plans to get rid of the icons via a Windows Security “B” release update in June. Alternatively, the user can opt to remove them by installing the optional, preview “C” release which will be available by late May.

Microsoft’s LinkedIn affected by massive layoffs

Microsoft’s employment-focused social network platform, LinkedIn becomes the latest tech firm to be affected by massive layoffs. The Information reports the platform’s recruitment department was hit by massive layoffs on Monday, though it doesn’t detail the exact number of people affected.

This news comes after Microsoft announced its plan to cut 10,000 jobs over the next three months in a bid to cut down on its expenditure. Last week, we saw the company’s plans begin to take shape where 617 employees reportedly lost their jobs across the Surface devices, HoloLens mixed reality hardware, and Xbox divisions.

343 Industries was also hit last month though Microsoft promised to continue supporting Halo Infinite. This isn’t the first time LinkedIn has had to lay off its employees, at the height of the pandemic, the company let go of some of its employees to restructure and adjust to the tough economic times it was facing.

We are likely to see more layoffs in the next few months across various divisions and departments at Microsoft. GitHub has already been hit by layoffs, and further announced that the hiring freeze is still in effect coupled with several changes geared toward cost saving.

Fix: Error Opening Installation Log File in Windows 10

Sometimes, when you try to uninstall any product in the Windows Programs and Features tool, a new Windows Installer window appears and gives the Windows 10 error opening the installation log file.

It is accompanied by the message: verify that the specified location exists and is writable. This guide will show you how to quickly fix this issue and get back to removing programs efficiently.

Why does an Error opening installation log file message appear?

There are several reasons for the error in opening the installation log file issue. Below are some of the notable causes:

  • Windows Installer logging is enabled: The first thing to check if you are getting the error opening the installation log file while uninstalling is if the Windows Installer logging is enabled. If it is, you need to disable it.
  • Corrupt system files: This issue can occur if the log files needed to delete your app are corrupt. You need to repair these corrupt system files to get past this error message.
  • Disabled service: In some cases, the error opening the installation log file and verify that the specified log file location exists can be because the Windows Installer service is disabled. The solution to this is to enable service.

How can I fix the Error opening installation log file?

1. Use Command Prompt

  1. Press the Windows key, type cmd, and select Run as administrator under Command Prompt.
    cmd admin error opening installation log file
  2. Type the command below and hit Enter: set TEMP+%tmp%set temp
  3. Finally, rerun the installation.

You can get Windows 10 error opening the installation log file if the TMP and TEMP directories of the file are different, resulting in installer files being written to TMP.

But when trying to read those files using the TEMP value, the error is displayed. In this case, you need to confirm that both values refer to the same path using the Command Prompt:

2. Stop and restart Explorer.exe using Task Manager

  1. Press the Ctrl + Alt + Del to launch Task Manager.
  2. Right-click the Windows Explorer option and select End task.
    end task
  3. Now, click File > Run new task at the top.
    run new error opening installation log file
  4. Finally, type explorer.exe in the run box and hit Enter.
    run explorer

To fix Windows 10 error opening installation log file problem, you need to restart Windows Explorer. This will clear any glitch preventing you from completing the installation or removal process.

3. Reregister Windows Installer

  1. Press the Windows key + R, type %windir%\system32, and click OK.
    win32
  2. Locate the Msiexec.exe file and note the path.
    msiexec error opening installation log file
  3. Now, launch the Run utility, type regedit, and click OK.
    regedit
  4. Next, navigate to the path below in the left pane: HKEY_LOCAL_MACHINE\SYSTEM\CurrentControlSet\Services
  5. Now, click MSIServer.
    imagepath
  6. In the right pane, right-click ImagePath, and then click Modify.
    modify error opening installation log file
  7. Now, set the Value data to the Msiexe.exe path you noted in step 2 and add /V. For example, if the path is C:\Windows\system32\Msiexec.exe, you need to set the value data to C:\WINDOWS\System32\msiexec.exe /V.
  8. Next, click the OK button and close the Registry Editor.
    value data
  9. Click the Start icon and select the Power option.
  10. Press and hold the Shift key and click Restart.
  11. When your PC restarts, choose Troubleshoot > Advanced options.
    advanced options
  12. Now, select Startup Settings.
    startup  error opening installation log file
  13. Next, click the Restart button.
    restart
  14. When your PC restarts, press 4 or F4 to Enable Safe Mode.
    enable safe
  15. After your PC boots up, press the Windows key + R, type msiexec /regserver, and click OK to reregister the MSI installer on a 32-bit PC. If you running 64-bit, type %windir%\Syswow64\Msiexec /regserver and click OK.
  16. Finally, restart your PC normally.

To reregister the Windows installer, verify the location of the Msiexec.exe file on your computer and in the Windows Registry. This should fix the error in opening the installation log file message.

4. Reinstall the Windows Installer

  1. Press the Windows key + S, type cmd, and select Run as administrator under Command Prompt.
    cmd admin  error opening installation log file
  2. Type the following commands and press Enter after each:  cd %windir%\system32 attrib -r -s -h dllcache ren msi.dll msi.old ren msiexec.exe msiexec.old ren msihnd.dll msihnd.old exit
  3. Now, restart your PC and download the latest version of Windows Installer.

To reinstall the Windows Installer, you first need to rename the damaged Windows Installer files and then reinstall the Windows Installer. With this, you should be able to fix the error opening installation log file issue.

5. Disable logging

  1. Press the Windows key + R, type regedit, and click OK.
    regedit
  2. Navigate to the path below in the left pane: HKEY_LOCAL_MACHINE\SOFTWARE\Policies\Microsoft\Windows\installer
  3. Now, right-click the Logging option and select Delete.

After doing this, restart your PC and check if the issue is fixed.

6. Run an SFC scan

  1. Launch Command Prompt as administrator.
  2. Type the command below and hit Enter: sfc/scannowsfc scan
  3. Finally, wait for the command to finish running and restart your PC.

Sometimes, the error opening installation log file issue might be because of broken system files. Running the SFC scan will repair any corrupt file and restore normalcy on your PC.

7. Start the Windows Installer service

  1. Press the Windows key + R, type services.msc, and click OK.
    services
  2. Right-click the Windows Installer service.
  3. Now, select the Start option.
    start

Another effective solution to explore if you are troubled by the error opening installation log file issue is to start the Windows Installer service. This is because the service is crucial to all file installation activities on your PC.

With this, we can end this detailed guide. Hopefully, you solved the problem with one of the fixes in this guide.

If you are facing a similar issue, like an error opening a file for writing, check our detailed guide to fix it.

Feel free to let us know the solution that helped you fix the issue in the comments below.

Windows Hello is Preventing Some Options: 11 Solutions to use

With Windows Hello, signing into PCs has become easier than ever. Unfortunately, this feature is not without flaws, as some users have reported that Windows hello is preventing some options from being shown.

Because of this, they cannot log in to their devices properly and instead have to use other log-in methods. If you also face this issue, be at ease, as this guide will show you how to get Windows Hello working quickly.

Why is Windows Hello preventing some sign-in options?

The Windows Hello preventing some sign-in options from showing can be caused by one of the following factors:

  • Outdated PC: This issue is usually caused by an outdated operating system. You can remedy this by updating your PC in the Settings app.
  • Fingerprint disabled: Sometimes, this error message can be because Biometrics is disabled on your PC. The solution to this is to enable the feature in Group Policy Editor.
  • Outdated driver: If your Biometrics drivers are outdated, you might get the Windows Hello is preventing some options from being shown error when you require it to sign in. The solution to this is to update your drivers to the latest version.

How can I fix the Windows Hello preventing sign-in options?

Below are some of the preliminary troubleshooting steps to try before delving into the solutions in this section:

  • Restarting your device or computer
  • Ensuring Windows Hello is correctly set up
  • Making sure you’re connected to the Internet
  • Turn Microsoft Modern Keyboard with Fingerprint ID off, then back on again
  • Redo your fingerprint

If these do not solve the problem, you can now proceed to the solutions below:

1. Set up Windows Hello again

  1. Press the Windows key + I to open the Settings app and select Accounts.
    accounts
  2. Click Sign in options in the left pane.
  3. Under Windows Hello, choose Fingerprint (you’ll get either face, fingerprint, or iris if your PC supports it).
    fingerprint
  4. Finally, sign in with a quick swipe.

The first thing to do if Windows Hello is preventing some options from being shown is to set up the whole thing again. This will clear up any roadblocks that may be causing the issue.

You may be asked to add a PIN before setting up Windows Hello.

2. Sign in with a PIN or password

  1. Press the Windows key + I and select Accounts.
    accounts
  2. Then, select Sign-in options.
  3. Now, follow the steps for each Sign-in method you wish to set up.
    password windows hello is preventing some options
  4. Try restarting your PC and see if everything works now.

If Windows Hello is preventing some options from being shown, your fingerprint didn’t scan correctly, or you used the wrong finger to sign in, you can use an alternative way to log in.

In this case, use a PIN or password to sign in and set up Windows Hello again, as in solution 1.

3. Run the Hardware and Devices troubleshooter

  1. Press the Windows key, type cmd, and select Run as administrator under Command Prompt.
    cmd admin
  2. Type the command below and hit Enter to run it: msdt.exe -id DeviceDiagnosticmsdt
  3. Then, finally, wait for the command to finish running.

Another cause of Windows Hello is preventing some options issues that could be hardware-related. To fix the hardware issues, run the Microsoft easy fix solution for devices and hardware that checks for common problems.

4. Remove the Windows Hello sign-in option

  1. Press the Windows key + I and select Accounts.
    accounts
  2. Go to the Sign-in options in the left pane.
    sign in windows hello is preventing some options
  3. Now, click the Remove button under Windows Hello.
  4. Finally, repeat the steps in solution 1 to set up Windows Hello again.

If the IR camera or fingerprint reader gives you errors, sign in using a PIN or password, then redo the fingerprint or scan.

If you’re using the Surface Pro 4, detach and reattach the cover, then try to use it again. Should reattaching the cover with Fingerprint ID not fix it, try typing or using the touchpad.

This should fix the Windows Hello is preventing some options issues on your Surface Pro 4.

5. Update your PC

  1. Press the Windows key + I and select Update & Security.
    update and
  2. Click the Check for updates button.
    check for
  3. Finally, install any available updates.

An outdated operating system can lead to different issues, including Windows Hello preventing some options from showing. Hence, you must ensure that the latest updates for your device and Windows Updates are installed.

6. Reset your system

  1. Press the Windows key + I and select Update & Security.
    update and
  2. Select Recovery on the left pane and click Get Started under Reset this PC.
    get started windows hello is preventing some options
  3. Finally, choose whether to Keep your files or Remove everything and follow the onscreen instructions to complete the process.
    keep or remove

If the solutions above prove abortive in fixing this issue, you might need to reset your PC to default. This is because you might have made some changes to your PC affecting the feature, leading to Windows Hello preventing some options from showing issue.

7. Perform a System Restore

  1. Press the Windows key + R, type rstrui.exe, and click OK.
    rstrui
  2. Click the Next button on the page that pops up.
    next windows hello is preventing some options
  3. Now, choose a restore point and click the Next button.
    restore point
  4. Finally, click the Finish button and follow the onscreen instructions to complete the process.
    fiinsh

If Windows Hello is preventing some options from showing on your PC, it might be due to some factors that are to trace. In this case, the best thing to do is restore your system to a point where everything works well.

Apart from manually performing a system restore, you can also use dedicated repair software to replace malfunctioning or corrupt system files with healthy parts after its in-depth scanning procedure.

8. Check if Biometrics is enabled

  1. Press the Windows key + R, type gpedit.msc, and click OK.
  2. Navigate to the path below in the left pane: Computer Configuration > Administrative Templates > Windows Components > Biometricswindows hello fingerprint
  3. Now, double-click Allow the use of biometrics.windows hello fingerprint
  4. Tick the Enabled radio button.windows hello fingerprint
  5. Next, click the Apply button followed by OK.
  6. Go back to the Biometrics window and double-click Allow users to log in using biometrics.windows hello fingerprint
  7. Tick the Enabled radio button.
    windows hello fingerprint
  8. Finally, click Apply, followed by Ok.

In some cases, Windows Hello prevents some options issuesbecauset the biometric setting is disabled. For example, this prevents your PC from registering your fingerprint.

You must enable the Group Policy Editor feature to get past the issue.

9. Update the fingerprint hardware driver

  1. Press the Windows key + X and select Device Manager.
    device manager windows hello is preventing some options
  2. Click the arrow next to Biometric devices to expand it and double-click the device there.
  3. Now, select the Driver tab at the top.
  4. Click the Update Driver button.
    update driver windows hello preventing some options
  5. Finally, choose Search automatically for drivers and install any available update.

Drivers serve as an essential linking block between your hardware and software. Hence, when your fingerprint sensor driver is outdated, you might get Windows Hello, which is preventing some options error.

Updating the driver to the latest version should do the trick here. If the Windows update can not get the latest driver, you can search for it on the manufacturer’s website.

Alternatively, you can use a specialized tool in Outbyte Driver Updater. This tool automatically updates your driver to make sure they never cause problems.

10. Perform a Clean Boot

  1. Press the Windows key + R, type msconfig, and click OK.
    msconfig
  2. Select the Services tab, check the Hide all Microsoft services box, and click Disable all.
    services
  3. Now, go to the Startup tab and click Open Task Manager.
    startup windows hello is preventing some options
  4. Right-click each of the apps there and select Disable.
    disable
  5. Go back to the System Configuration window and click the Apply button, followed by OK.
    apply ok
  6. Finally, restart your computer.

If you’re still unable to get the Windows Hello fingerprint error fixed, eliminate any software conflicts that may be causing the issue.

Performing a clean boot for your computer reduces software-related conflicts that can bring up the root causes of the Windows Hello fingerprint reader not working.

These conflicts can be caused by applications and services that start up and run in the background whenever you start Windows typically.

11. Install drivers in compatibility mode

  1. Download the latest driver from the manufacturer’s website.
  2. Save it on your local disk.
  3. Right-click on the setup file of the downloaded driver.
  4. Click Properties.
    properties
  5. Click the Compatibility tab.
  6. Check the box next to Run this program in Compatibility mode for.
    compatibility
  7. Select the Operating System from the drop-down list.
  8. The driver will install, then check its functionality.

With this, we can end this guide on the Windows Hello is preventing some options issues. You only need to follow the steps carefully, and things will return to normal.

Similarly, if you need a list of the common Windows Hello issues and how to fix them, check our detailed guide.

Were you able to get the Windows Hello fingerprint reader to work again using any of these solutions? Leave there any other suggestions or questions you may have, as well.

Dxgmms Error: 10 Methods to Fix it the Crash

Windows 10 is a great operating system, but it’s not perfect; you will experience an error sooner or later. For example, users reported a BSoD error on their PC caused by dxgmms, the .sys file.

This can be a big problem since your computer will restart every time you encounter this error, but you can fix this problem by using one of our solutions.

The dxgmms.sys error in Windows 10 can also occur due to hardware issues, similar to dxgmms2.sys. The latter one is more associated with your graphic driver.

There are several reasons for this problem, and in this article, we will explore some ways to help you fix it, so keep reading.

What causes dxgmms error?

If you have encountered this error., there are a few common triggers. Amongst these are the following:

  • Corrupted or outdated graphics card driver – If the driver is outdated, it may not be compatible with the latest version of DirectX, the software that the dxgmms error is related to.
  • DirectX version mismatch – The dxgmms error can also be caused by a mismatch between the version of DirectX installed on the computer and the version required by the game or application being run. 
  • Overheating graphics card – When the graphics card overheats, it can cause the graphics card to shut down or become unstable, leading to the dxgmms error.
  • Conflicts with other software or hardware – Conflicts between software or hardware on the computer can cause the dxgmms error. 
  • Windows operating system issues – A corrupted or damaged system file can interfere with the functioning of DirectX, causing the dxgmms error to occur.

What does dxgmms2 sys do?

Dxgmms2.sys is a Microsoft Windows system file that is part of the DirectX Graphics Infrastructure (DXGI).

It manages video memory and graphics card operations, including video display, memory management, and resource allocation.

The dxgmms2.sys file is crucial in ensuring the smooth and efficient operation of games, video playback, and other graphics-intensive applications.

Without the dxgmms2.sys file, these applications would not be able to access the graphics card resources they need to function correctly.

How can I fix dxgmms.sys error?

1. Use a dedicated tool for BSoD issues

Troubleshooting the causes and fixing computer errors such as BSoD can be difficult. Luckily, many software solutions were developed.

Specialized BSoD repair software is able to quickly scan your computer, identify the broken files and fix them or replace them with fresh ones.

2. Disable hardware acceleration in your browser

  1. Click the Menu button in your browser’s top right corner and choose Settings.
    dxgmms
  2. Scroll down to the System section and uncheck Use hardware acceleration when available option.
    dxgmms
  3. Restart your browser.

Note: We showed you how to disable hardware acceleration in Google Chrome, but every modern browser supports this feature, so be sure to disable it for your browser.

3. Disable your integrated graphics card

  1. Press Windows Key + X and select Device Manager from the list.
  2. Expand Display adapters, locate your onboard graphics card, right-click it, and choose Disable device from the menu.
  3. After doing that, close Device Manager and check if the problem persists.

Remember that this solution only applies if you have a dedicated and onboard graphics card. Another way to disable your onboard graphics is to use BIOS.

To see how to do that, we advise you to check your motherboard manual for detailed instructions. Then, if the problem still occurs, enable the graphic and follow the next solutions.

4. Update your graphics card driver

Few users reported that dxgmms2.sys error is related to your graphics card drivers. To fix this problem, it’s advised to download and install the latest drivers for your graphics card.

If you don’t want the hassle of searching for drivers on your own, you can use a tool that will do this for you automatically.

It will help you update drivers automatically and prevent PC damage caused by installing the wrong driver versions. Once installed, it will scan your PC for outdated drivers automatically.

⇒ Get Outbyte Driver Updater

5. Use Command Prompt to delete the problematic file

  1. Open the Start Menu, click the Power button, hold Shift on your keyboard, and click the Restart option.
    dxgmms
  2. Select Troubleshoot and select Advanced options.
    dxgmms
  3. Next, choose Command Prompt.
  4. Write and enter the following lines, hitting Enter after each one:
    • C:
    • cd windows
    • attrib -s -r -h DXGMMS1.sys /s
    • del DXGMMS1.sys /s /q
  5. Close Command Prompt and try to start Windows 10 again.

This solution requires you to find and delete the problematic file. Since you’ll be removing a Windows 10 file, you might experience stability issues or, in the worst-case scenario, prevent Windows 10 from starting.

Before trying this solution, you might want to back up essential files and prepare Windows 10 installation media so you can reinstall if you’re unable to boot.

Users reported that this solution worked for them, but remember that it has certain risks.

6. Delete HID mouse from Device Manager

  1. Press Windows Key + X and select Device Manager from the list.
  2. Go to the View menu and select Show hidden devices.
  3. Expand Mice and other pointing devices section. You should see several HID-compliant mouse devices, right-click each device, and choose Uninstall device from the menu.
  4. When the confirmation menu appears, click OK.
  5. Repeat these steps until you remove all HID-compliant mouse devices from your PC.
  6. Unplug your mouse and restart your PC.
  7. When the PC restarts, connect the mouse again. Windows 10 will automatically find and install the new drivers for it.

A few users reported that this solution worked for them, so we advise you to try it out on your PC and check if it solves your problem.

7. Disable your audio controller

  1. Press Windows Key + X and select Device Manager from the list.
  2. Expand the Display adapters section and double-click your graphics card.
  3. Go to the Details tab and select Hardware Ids in the Property menu.
    dxgmms
  4. Write down the Value section because you’ll need it later.
  5. Expand the System devices section in Device Manager and double-click the High Definition Audio Controller.
    dxgmms
  6. Go to the Details tab and select Hardware Ids from the Property menu.
    dxgmms
  7. Check the device’s Value section. If this device has the same values as your graphics card in Step 4, you need to disable this device. To do that, right-click the device and choose Disable from the menu.

    If you have multiple High Definition Audio Controllers, you need to check each and disable the one with the same values as your graphics card.

8. Change the TdrDelay value in your registry

  1. Press Windows Key + R and enter regedit, then press Enter.
    dxgmms
  2. When Registry Editor opens, navigate to the path below: Computer\HKEY_LOCAL_MACHINE\SYSTEM\CurrentControlSet\Control\GraphicsDrivers
  3. In the right pane, look for the TdrDelay value. If this value isn’t available, you need to create it.
  4. Right-click the space in the right pane, choose New, select DWORD (32-bit), then enter TdrDelay as the new value’s name.
  5. Double-click TdrDelay and set Base as Decimal and Value data to 10, then click OK to save changes.
    dxgmms
  6. Close Registry Editor.

By changing the TdrDelay value, your graphics card will reset only if the driver doesn’t respond after 10 seconds. In addition, by making these changes, you will prevent the dxgmms2.sys error from appearing.

9. Use –disable-gpu parameter

  1. Right-click on Chrome and choose Properties from the menu.
  2. Go to the Shortcut tab, locate the Target field, and add -disable-gpu at the end.
    dxgmms
  3. Click Apply and OK to save changes.
  4. After doing that, start Chrome using the same shortcut.

Although this solution will fix the dxgmm2s.sys error, we have to mention that you need to use this shortcut every time you want to start Chrome.

10. Uninstall Windows updates

  1. Press Windows Key + I to open the Settings app.
  2. Once the Settings app opens, navigate to Update & security section.
  3. Go to the Windows Update tab and click on Update history.
  4. Click on Uninstall updates.
  5. A list of installed updates will now appear.
  6. Select the problematic update you want to remove and click the Uninstall button.
  7. After removing the update, restart your PC.

Usually, Microsoft is frequently releasing new updates through Windows Update to address hardware and software issues, but sometimes an update can cause BSoD errors.

Blue Screen of Death errors can be severe if you have Windows 10 dxgmms2.sys error on your PC, try some of our solutions.

Please let us know in the comments section below if you have additional suggestions or recommendations.

Touchpad Keeps Freezing? Here’s Why & How to Fix

A freezing touchpad is a pretty common issue that can hinder even the simplest of tasks. The good news is that it’s easy to fix, and to cut your time in half, we outlined below step by step instructions.

The reasons why the touchpad keeps freezing vary from outdated or corrupted touchpad drivers, faulty or damaged hardware, and software conflicts, to power management settings.

Luckily, no matter the root cause, with the steps below you’ll be able to fix it ASAP.

What can I do if my touchpad keeps freezing?

Before trying any of the suggested solutions, Restart the computer. A simple reboot can sometimes resolve software conflicts that cause touchpad freezing.

1. Run the Hardware Troubleshooter

  1. Press Windows + X, type control, and hit Enter.
  2. Click on View By in the upper right corner of the window and select Large Icons.
    touchpad keeps freezing
  3. Select the Troubleshooting option.
  4. Click on View all on the left of the window.
    touchpad keeps freezing
  5. Now you only need to run the Hardware and devices troubleshooter, and Windows 10 will find and fix any issues regarding your laptop’s devices and reboot your PC.

The Hardware Troubleshooter in Windows is a built-in tool that can help diagnose and fix common hardware problems, including touchpad freezing issues. When you run the Hardware Troubleshooter, it will check for any common hardware issues and provide you with solutions to resolve the problem.

2. Uninstall recently installed software

  1. Press Windows + X, type appwiz.cpl, and hit Enter.
  2. Click on your most recently installed app from the program list and select the Uninstall option.
    touchpad keeps freezing
  3. Lastly, follow the wizard to complete the installation.

Uninstalling conflicting applications can potentially resolve touchpad freezing problems if the issue is caused by software compatibility. Sometimes, other software installed on your device can interfere with the proper functioning of your touchpad, causing it to freeze or not work correctly.

So, to determine if a conflicting application is causing the touchpad freezing problem, you can try uninstalling recently installed software, starting with the most recently installed and working your way back.

After uninstalling each program, restart your device and see if the touchpad freezing problem has been resolved.

3. Update your drivers

  1. Press Windows + X and select Device Manager.
    touchpad keeps freezing
  2. Expand Mice and other pointing devices, click your touchpad driver, and select the Update driver option.
  3. Finally, select the Search automatically for driver option.
    touchpad keeps freezing

Sometimes, the process of manually updating your drivers is not as straightforward as it looks because you may need to choose the correct driver version.

To facilitate this procedure, you can try a specialized application like Fortect Driver Updater to find the newest updates automatically after scanning your PC for outdated or missing drivers.

⇒ Get Fortect Driver Updater

4. Run the driver in compatibility mode

  1. Right-click the driver’s installation file and select from there the Properties feature.
    touchpad keeps freezing
  2. In the Properties window, click on the Compatibility tab on the window’s upper side.
  3. Tick the Run this program in compatibility mode feature, then click on the drop-down menu under Run this program in compatibility mode and click on Windows 7 or whichever Operating system you have the driver for.
  4. Click on OK.
  5. Now run the driver’s executable file and install it as you usually would.
  6. Reboot the Windows 10 PC.
  7. Finally, see if the touchpad freezes after the reboot.

5. Run a virus scan

  1. Type Windows Security in the Search bar, and click on the relevant search result.
    touchpad keeps freezing
  2. Now, click on Virus & threat protection here.
    touchpad keeps freezing
  3. Click on Scan options.
  4. Lastly, select Full scan and click on the Scan now button at the bottom.
    touchpad keeps freezing

Running a virus scan can potentially detect and remove malicious software that may be causing the problem.

Touchpad freezing is a common problem faced by many computer users. However, several easy solutions can fix it. So, these steps will resolve the issue, whether outdated drivers, conflicting applications, or hardware problems cause it.

If you’d like to switch off certain components of your Touchpad like disabling the Palmcheck feature, you can too and check for improvements.

Finally, let us know which of these fixes worked for you in the comments.

Network Resource Unavailable: Fix it With These 6 Methods

Computer errors will appear sooner or later on every PC, and while some errors are relatively harmless, others can prevent you from installing new applications.

In today’s article, we’re dealing with the Network resource unavailable error message that occurs on Windows 10 or iTunes.

This error prevents you from installing or updating specific applications, so fixing this problem on your device is essential.

What does network resource unavailable mean?

The error message network resource unavailable usually means that the device or computer you are trying to access is unavailable or unreachable over the network. This can occur for varying reasons, including but not limited to the following:

  • Network connectivity issues – This can occur if there is a problem with the network cable, the network is down, or there is a routing issue.
  • Device not connected to the network – If the device you are trying to access is not connected to the network, you will not be able to reach it.
  • Device is turned off – If the device you are trying to access is turned off, it will not be available on the network.
  • Limited access permissions – The device may be configured only to allow access from certain devices or IP addresses, causing the error message to appear for unauthorized users.
  • Device is busy – If the device you are trying to access is busy with other tasks, it may not be able to handle additional requests, resulting in the network resource unavailable error message.
  • Incorrect network settings – If the network settings on your device are incorrect, you may not be able to access the desired resource.
  • DNS resolution issues – If the domain name system (DNS) cannot resolve the hostname to an IP address, you will not be able to access the desired resource.
  • Software bugs – Sometimes, the error message may be caused by a software bug in your operating system or application.
  • Maintenance or upgrades – The device or resource may be undergoing maintenance or upgrades, causing it to be temporarily unavailable.

How do I fix the network resource unavailable error?

Firstly, before going into these fixes, we recommend restarting your devices. A reboot can force some problematic programs to end and may resolve the network resource issue.

Also, ensure that all devices are correctly turned on because, for some users, the error occurs when necessary devices are off.

Lastly, before going into the solutions, you may consider waiting a few minutes are retrying. This is because unresolved server issues could trigger it. So, waiting it out may pay off.

1. Update network drivers

  1. Press Windows + R, type devmgmt.msc, and hit Enter.
    network resource unavailable
  2. Expand any category with a yellow badge, right-click on the driver, and select Update driver.
  3. Click the Search automatically for drivers option and follow the instructions.
    network resource unavailable
  4. Finally, perform these steps for all outdated drivers.

Outdated network drivers are a particular source of connection errors. Driver updates are released periodically to fix bugs, help communication issues, add new features, and increase your computer’s stability.

You could download the latest drivers yourself. However, the safest method to keep your OS running smoothly is to use a dedicated tool that checks periodically for driver updates and suggests the necessary actions.

One such tool is Outbyte Driver Updater. You can download it for free, set it up in just a few clicks, and let it update and fix your damaged drivers.

The main benefit of Outbyte Driver Updater is that it is a smart utility with an extensive driver database. In addition, it is proven to always install the best driver version for your specific hardware, removing the risks that come with faulty driver versions.

The lightweight tool allows it to run in the background and keep your drivers in check without worrying about using too many resources.

⇒ Get Outbyte Driver Updater

2. Remove any leftover registry entries

Most applications add new values to your registry once you install them. However, once you remove those applications, their registry values can remain on your PC, causing errors such as Network resource unavailable.

To fix this problem, you must find and remove those entries from the registry. Of course, you can do that manually, but modifying the registry is a complicated and potentially dangerous process affecting your system’s stability.

For this reason, we recommend you try dedicated uninstaller software. This type of utility scans your system and only removes damaged or unnecessary files.

Uninstallers are created to remove files and apps that are typically difficult to remove without assistance. They automatically find all leftover entries in your registry and remove them safely without affecting your system or removing anything else.

3. Check the Windows Installer service

  1. Press Windows key + R and enter services.msc. Press Enter or click OK.
  2. Locate Windows Installer and double-click it.
  3. Set Startup Type to Manual or Automatic. Make sure that the service is running. If not, click the Start button to start it. Lastly, click Apply and OK to save changes.

After starting the Windows Installer service and making the required changes, check if the problem is resolved.

4. Download the Program Install and Uninstall Troubleshooter

  1. Launch a browser and navigate to the Troubleshooter website.
  2. Click on Download troubleshooter.
    network resource unavailable
  3. Double-click on the downloaded MicrosoftProgram_Install_and_Uninstall.meta file.
    network resource unavailable
  4. Follow the wizard to complete the troubleshooting process.

Many users reported that Program Install and Uninstall Troubleshooter fixed the Network resource unavailable error for them.

This tool will fix corrupted registry files or keys that control the updated data. In addition, it can fix many problems that prevent new applications from being installed.

5. Edit the registry

  1. Press Windows Key + R and enter regedit. Next, click OK or press Enter.
  2. In the left pane, navigate to:
    Computer\HKEY_LOCAL_MACHINE\SOFTWARE\Classes\Installer\Products
  3. Navigate through each subkey and look for the ProductName value in the right pane.
  4. ProductName value will tell you the application’s name associated with that key. If you find the key related to the problematic application, right-click it, and choose Delete.
  5. After doing that, close the Registry Editor and restart your PC.

After your PC restarts, check if the error is resolved. We have to mention that a few users reported that you can fix the problem by deleting the subkey related to Microsoft Security Client.

This solution might be a bit advanced, and if you don’t feel comfortable modifying the registry, you might skip it entirely.

6. Modify the installed applications

  1. Press Windows + X, type appwiz.cpl, and hit Enter.
  2. Select the application you think it’s problematic.
  3. Now choose the Change or Repair option from the menu on the top.
  4. Finally, follow the instructions on the screen to complete the process.

Nevertheless, this isn’t a universal solution since many applications don’t support this feature.

On the other hand, many applications misbehave once they are automatically updated. So you ensure they can’t interfere with the network settings by changing or even uninstalling them using the tool suggested in the 2nd solution.

The only problem is finding which app is causing the trouble, which can take a while.

Fix the network resource unavailable issue on iTunes

1. Delete iTunes entries from the registry

  1. Back up your registry before proceeding (as suggested above, in the 6th solution).
  2. Press Windows Key + R and enter regedit. Next, click OK or press Enter.
  3. Press Ctrl + F. Enter itunes6464.msi or the name of the missing file. Then, only check the Data checkbox and click on Find Next.
  4. Now you should find that file in one of the subkeys in the path below:
    Computer\HKEY_LOCAL_MACHINE\SOFTWARE\Classes\Installer\Products
  5. Locate the parent key and delete it.

The key you need to delete will have an array of letters and numbers in its name. In addition, you can check the ProductName value in the right pane to be sure that the key you’re about to delete is related to iTunes.

After you delete the problematic key, you need to restart your PC. After that, you should be able to reinstall iTunes without any issues.

2. Completely remove iTunes and QuickTime

According to users, you can fix Network resource unavailable error by removing iTunes and QuickTime. However, both of these applications tend to modify your registry, and sometimes they can leave leftover files on your PC.

To completely remove these applications, we suggest you use dedicated uninstaller software. As mentioned at the beginning of the troubleshooting steps, this tool specializes in completely removing unwanted apps from your device.

After removing both iTunes and QuickTime, you should be able to install iTunes again without any errors.

The Network resource unavailable error can affect almost any application on your PC. Unfortunately, this error can be hard to fix, but the solutions in this article should help.

Please let us know in the comments section below if you have further suggestions.

Fix: FDP System Message 4161 and Other Bugs in Sekiro

You just got the Sekiro: Shadows Die Twice FDP system message 4161 error message, so we will explore fixing this with you.

The game was only recently released, but players have reported various issues with the game.

They range from sound not playing correctly, the occasional crash, the black screen at launch, or the low framerate issue.

We’ve compiled a list of fixes that could help you and keep the fun going for hours.

What are common Sekiro PC issues?

Sekiro: Shadows Die Twice, like many other games, can experience various technical issues on PC. Some of the most common issues experienced by players include:

  • Sekiro FDP system message 401171 – is an error code in Sekiro: Shadows Die Twice, indicating that the game has detected an unauthorized or abnormal change to its code or data.
  • Sekiro won’t launch PC – It refers to a problem where the game fails to start or load correctly. Various factors, including compatibility issues with your PC and outdated graphics card drivers, can cause this issue.
  • Sekiro stuck on loading screen – It refers to an issue where the game fails to progress from the initial loading screen and becomes unresponsive. Compatibility issues with your PC and outdated graphics card drivers also cause it.
  • Sekiro sound not working – It refers to a problem where the game’s audio fails to play correctly, causing it to be silent or have other audio-related issues.

Now we have this out of the way, let us explore some fixes.

How can I fix FDP system message 4161 and other issues in Sekiro?

1. Verify game files

  1. Launch Steam, navigate to the Library, right-click on the game that’s not launching, and click on Properties.
  2. Now, go to the Local files tab, and click on Verify integrity of game files.
    fdp system message 4161 sekiro
  3. Wait for the process to complete.

2. Update drivers

  1. Press Windows + R, type devmgmt.msc, and hit Enter.
    fdp system message 4161 sekiro
  2. Expand the Display adapter, right-click your driver, and select Update driver.
    fdp system message 4161 sekiro
  3. Click Search automatically for drivers.
  4. Lastly, repeat the process for audio drivers.

Updating drivers can help resolve the FDP system message 4161 in Sekiro: Shadows Die Twice because it can ensure that the game runs with the most recent and compatible drivers for your hardware.

Drivers are software components that allow your computer to communicate with the hardware components, such as graphics cards, sound cards, and controllers.

If you want to completely simplify the process of updating your drivers, we recommend you try specially-designed apps like Outbyte Driver Updater.

It is a tool that finds the latest updates for your drivers from its vast repository after it scans your computers for outdated, malfunctioning, or missing drivers.

Outbyte Driver Updater

Give Outbyte Driver Updater a try and let it find the best updates for your drivers instantly.
Free Trial Download now

3. Run the game as an administrator

  1. Right-click on the game’s shortcut, and select Properties.
  2. Click on the Compatibility tab and check the box for Run as administrator.
  3. Finally, click Apply and OK.

Running the game as an administrator can help resolve the FDP system message 4161 in Sekiro: Shadows Die Twice because it can provide the game with the necessary permissions to access and modify the system resources required to function correctly.

Some game components may require elevated permissions, and running the game as an administrator can ensure that these components can run without encountering any permissions-related errors.

4. Reinstall the game

4.1 Uninstall the game

  1. Launch the Steam client.
  2. Right-click on Sekiro and select Properties.
    fdp system message 4161 sekiro
  3. Click on the Local Files tab, and select Uninstall Game.
  4. Follow the on-screen instructions to complete the uninstall process.
  5. Navigate to the game’s installation:
    C:\Users\[user name]\AppData\Roaming\Sekiro
  6. Delete all remaining files and folders, then restart your PC.
  7. Finally, reinstall the game.

Reinstalling the game can help resolve the FDP system message 4161 in Sekiro: Shadows Die Twice because it can remove any corrupted or damaged game files that may be causing the issue.

Over time, game files can become damaged or corrupted due to various reasons, such as hardware failures, software conflicts, or system crashes.

Also, when these files are damaged, they can cause problems with the game’s performance or stability, resulting in errors like the FDP system message 4161.

This is as far as we will go in this article. Any related issues should be fixed using our recommended solutions. First, however, we would like to know what exactly has worked for you.
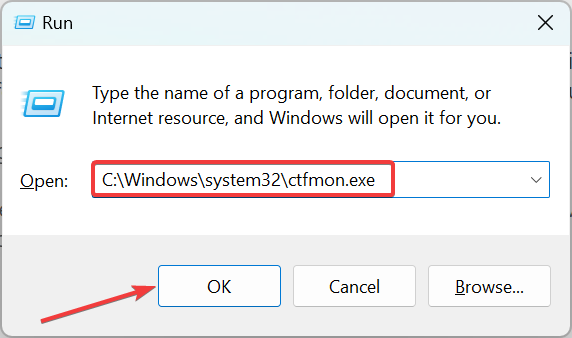
Posted in Fix

How to use mouse gestures on Edge [Native or Extension]

Good news for Microsoft users. The hotly anticipated Mouse Gestures feature on Edge will become available to all users starting from the week of March 14, 2023 (beta channel) and the week of April 6 (extended stable channel).

The Mouse Gestures feature allows users to perform better on the browser, scroll freely, and perform high multitasks. Surely, a piece of good news especially for big monitor users. 

“This feature provides an easy way for users to complete tasks like scroll forward or backward, open new tab, refresh page, etc. They can finish a task by pressing and holding the mouse right button to draw certain patterns on a webpage, instead of clicking the buttons or using keyboard shortcuts.”

The feature was previously present on Edge’s Spartan version before transitioning into a Microsoft-enhanced Chromium base starting in 2019. 

Users have surely been feeling its absence, and they’ve been asking for it for years. Since its disappearance, many have resorted to third-party extensions and add-ons to resolve the problem or even to competitors’ products with built-in mouse gestures feature like Opera.

At that time, however, the functionality worked in Basic and Advanced categories. Each command performs different tasks like scrolling, closing tabs, returning to the homepage, reopening closed tabs, etc. 

How to enable mouse gestures in Edge?

1. Natively

1. Open your Microsoft Edge browser.

edge mouse gestures

2. Go to the upper right corner of your screen and click the vertical ellipsis ➜ Mouse Gestures to enable the feature.

3. From here, you can see customizable gestures and how each of them works, which you can also turn off easily. 

In the meantime, if you want to try it out yourself, go to Microsoft’s page to become an Edge insider and experience all the planned features before they’re out.

2. With 3rd party add-ons

1. With your Edge browser open, click on the vertical ellipsis ➜ Extensions ➜ Open Microsoft Edge Add-ons website.

add-on microsoft edge

2. Using the search box on your left, type mouse gestures. Click Get on the desired add-on.

mouse gestures add-on microsoft edge

There are plenty of options to choose from, but we’re going with smartUp Gestures from zimocode, which has amassed 4.5 stars rating & over 100,000 users.

3. Click Add extension.

4. It will automatically redirect you to its setting page & activate it. From there, you can see all the features that it offers.

Are you excited about this feature? Let us know in the comments!

Audio Services Not Responding in Windows 10: How to Fix It

Sometimes, you may face a problem that shows a message like Windows 10 audio services is not responding. Fortunately, you can solve it easily.

If you encounter a sound-related problem on Windows 10, the first thing you may do is use the Playing Audio troubleshooter. However, it may fail by showing that the Audio services are not responding. This issue may indicate many things. But you can solve it by following the proper steps.

What causes Windows 10 audio services to be unresponsive?

There are several reasons that may cause this unwanted situation. It includes the following:

  • Sound driver problem: Outdated or corrupted audio drivers can be a prevalent reason behind this problem.
  • Windows is not up to date: Outdated Windows may not be compatible with modern software and driver.
  • Internal system files problem: If system components become corrupted, it may create sound problems too.
  • Audio services are not active: Some services are necessary to handle audio on Windows properly.
  • Problematic Windows update: If you encounter the problem right after installing an update, that may be the main reason.

Now that we know the causes for the unresponsive Windows audio services, let’s apply the solutions below to fix the problem.

How do I fix Windows 10 audio services not responding issue?

Before taking the main steps to fix this problem, we suggest you check the following aspects:

If the audio services are still not responding, proceed with the solutions below.

1. Update the audio driver

  1. Open the Start Menu, type Device Manager, and press Enter to open Windows Device Manager.
  2. Expand Sound, video & game controllers.
  3. Right-click on the Realtek Audio or whatever your audio driver is and choose Update.updating audio driver windows 11
  4. Pick the preferred method to update.
  5. Expand Audio inputs and outputs and update drivers from there as well, if needed.
  6. After that, restart your computer.

Now, try to play any audio file or anything that has audio. It should fix audio services not responding on Windows 10. If it didn’t work as intended, we recommend using a specialized tool.

2. Re-install the audio driver

2.1 Uninstall the audio driver

  1. Open the Device Manager like before.
  2. Find the audio driver, right-click on it, and choose Uninstall device.uninstalling audio driver windows 11 device manager
  3. Check Attempt to remove the driver for this device and click on Uninstall.
  4. Restart your PC.

2.2 Install the driver again

  1. Go to the sound card manufacturer’s website, like Realtek. If you have no idea, visit the motherboard manufacturer’s website.
  2. Choose the model and download the audio driver.downloading dell realtek audio driver
  3. Install the driver and restart Windows 10.

After completing the sound driver’s reinstallation, verify whether it has solved the Windows 10 audio services not responding issue or not.

3. Uninstall problematic update

  1. Open the Start Menu, type the control panel, and press Enter.
  2. Go to Uninstall a program, then click on View installed updates.clicking view installed updates uninstall or change a program control panel
  3. Now, uninstall the most recent update.
  4. Restart Windows.

Please remember that this method only helps when you encounter an audio problem after installing an update. If not, skip it and follow the next methods.

4. Start/Restart the audio services

  1. On the Start Menu, search for services.msc and press Enter.
  2. Find the Windows Audio, right-click on it, and choose Restart. If the restart option is not available, choose Start.restarting windows audio service
  3. Do the same for Windows Audio Endpoint Builder.

If the Windows 10 audio services not responding problem still persists, you may need to restart additional services.

It includes the DCOM Server Process Launcher, RPC Endpoint Mapper, and Remote Procedure Call (RPC).

5. Uninstall audio software

  1. Open the Start Menu, type the control panel, and press Enter.
  2. Click on Uninstall a program.going uninstall program control panel
  3. Find and uninstall any third-party audio software you have installed recently.

After uninstalling, restart Windows 10. It should help to get rid of the unresponsive audio services issues.

Following the above methods will indeed help. However, you also can consider doing a system restore. We also suggest you take steps to repair problematic system files if necessary.

If none of these things have fixed the audio services are not responding problem, consider doing a clean Windows installation.

One thing to keep in mind is that your audio services also may go through problems if there is a problem with any connected device that has the audio input or output feature. Some webcams may have a built-in mic, and that has problems. You can disconnect the webcam, too, in this case.

So, make sure to check these devices. If necessary, disconnect them and see if it helps.

This article has explained how to fix Windows 10 audio services not responding. If you know other better methods, feel free to let us know in the comments box.

7 Best Browsers that Support Gov.UK [Ranked by Security]

Some browsers are not supported by some services, and can’t access them. Such is the case with Gov.UK.

Gov.UK is a site for the United Kingdom’s Sector of Information that contains information about government services. However, it was created to ensure that all the services have a single access point.

Nevertheless, not all browsers can access the site because it requires a safe and stable connection. Hence, we’ll discuss some of the best browsers that support the Gov.UK.

What is the safest browser to use in the UK?

Opera One is the best browser when it comes to online security and privacy. Hence, we recommend it as the safest browser in the UK that supports Gov.UK.

Also, it is available across different operating systems. Some features are a fast and secure internet connection, an inbuilt Adblocker, and a reliable free VPN service.

Not far from its competitors, Bra also stands out thanks to the built-in security features and optimization for data management. So, you can use Brave as well to access Gov.UK.

What are the best browsers that support Gov.UK?

Opera One browser – Smart and dynamic data management

The top choice on our list is the Opera One browser, which may be used safely with the Gov.UK website. Few would argue that the Opera One browser is fully safe, considering its features and security safeguards.

Its primary security features are an integrated Adblocker that protects you from dangerous adverts, tracking protection, and a free proxy VPN. Its security protocols comply with the highest standards for your virtual life to be safeguarded.

These are the fundamental tools required for a secure online browser. Along with this, there are several additional features to make your browsing experience safe and secure, as well as the ability to install extensions from other web shops.

It implies you can tailor it to your threat model. Furthermore, it comes with a native AI and modular AI-ready design to help with the integration of other current or future AI technologies.

Opera One

Use it confidently on Gov.Uk and never miss anything from the news feed.
Free Download Visit website

AVG Secure Browser – Comprehensive security

Safety along with stability are the two main factors that drive AVG Secure Browser. This robust combination is what qualifies it to access government services effortlessly and securely.

So, what exactly does it bring to the table? What makes it so special besides supporting Gov.UK websites? To begin with, it provides ironclad HTTPS encryption.

Sure, it’s not as unique a feature as it used to be a while back, but here’s the interesting part. While other browsers will settle for an anemic warning meant to discourage you from pursuing an insecure connection, AVG Browser will enforce HTTPS connections anywhere it can.

More security features unfold as you use and get to know this useful navigator such as an ad-blocker, a stealth mode meant to simply forget browsing history or tracking cookies, and more.

AVG Browser does not fall short on safety and privacy-focused features. Among its valuable characteristics, we simply cannot ignore its anti-phishing, anti-tracking, and anti-fingerprinting modules. Plus, it fully supports Gov.UK.

AVG Secure Browser

Surf your favorite web pages worry-free using this compatible and speedy browser.

Brave browser – Simplicity in safe browsing

Brave browser is one of the best browsers regarding online security and privacy. Hence, we recommend it as one of the safest browsers in the UK that support Gov.UK. Also, it is available across different operating systems.

Some features of the Brave browser are a fast and secure internet connection, an inbuilt Adblocker, and a reliable data privacy system. Also, it is an open-source, Chromium-based browser that allows it to perform quickly.

Another pro is that it has an inbuilt tracker-blocking feature that prevents intruders from monitoring your browsing activities.

Furthermore, the Brave browser offers services, not in other browsers, such as free VPN access and HTTPS. Hence, it is one of the best browsers that support Gov.UK.

⇒ Get Brave browser

Safari – Trusted by high-security sites

Safari is one of the most resourceful browsers in the market. It is developed by Apple. It comes as the default browser for Apple devices.

Likewise, it is a reliable browser for accessing high-security sites like Gov.UK. Some notable features of Safari are lighting speed for loading websites, smooth internet access, and availability across different operating systems. These have made it a browser that supports Gov.UK.

Furthermore, the Safari browser has a user interface that makes your browsing experience remarkable. Also, it offers safe and private access to the internet without worrying about hijackers or intruders.

Moreover, the browser is easy to use for anyone, and it has a simple user interface. Likewise, it features a standard tab management system allowing users to control their browser tabs.

Note that the supported versions of the browser are Safari 12 and later. So, if your version is not supported, click the link below to get the latest version.

⇒ Get Safari

Microsoft Edge – Ideal for Windows users

For a long time, Microsoft Edge has been the fastest browser in the market and remains the best. It is notable for how fast and smoothly it loads websites.

This feature has made it one of the best options for advanced websites like Gov.UK. However, it is a browser that supports Gov.UK and allows users to access it easily.

Some other features of Microsoft Edge are a customizable user interface, reliable security and privacy system, and inbuilt support for JavaScript errors. It is the default browser for Windows devices.

Furthermore, it is regarded as a dev tool because it supports JavaScript.

⇒ Get Microsoft Edge

Google Chrome – Best inbuilt extensions

Google Chrome is a Chromium-based browser. It is one of the most relevant browsers in the world. Being a widely used browser, it offers several features that make it the best.

However, Chrome is a fast browser that offers a swift and smooth browsing experience. Also, it has a repository where users can download extensions to help them get more of the internet. Hence, it is one of the browsers that support Gov.UK and can safely help you navigate the site without errors.

Moreover, Chrome has standard security and privacy system. It helps protect user data and also blocks intruders from accessing your browser information.

Another tool in Chrome is the inspector. It allows you to access and debug your codes in the browser. Likewise, Chrome is available in different operating systems like Windows and macOS.

⇒ Get Google Chrome

Mozilla Firefox – Fast and reliable

Firefox is one of the oldest browsers in the market. It is a resourceful browser that offers many features to its users. However, it is one of the browsers that support Gov.UK.

Furthermore, Mozilla Firefox is a Chromium-based browser with many features. Some features are a fast and secure internet connection, a highly customizable browser interface, and an easy-to-navigate interface.

Also, the browser comes with an inbuilt Ad Blocker that allows you to surf the Internet without interruption. Likewise, there are several plug-ins and extensions you can download and use on Firefox. It helps you to download browser extensions from Chrome because it is also a Chromium-based browser.

⇒ Get Mozilla Firefox

Some of our readers asked: Why am I getting an unsupported browser error? The unsupported browser error always occurs when you try to access a specific website with a browser it doesn’t support.

As this article mentioned, not all browsers are authorized to access some websites like Gov.UK. So, you can encounter this error when the website doesn’t support your browser.

Users should note that the latest versions of the browsers listed above are authorized and can support Gov.UK. However, using an old version may result in errors.

However, we recommend you read through our article about bypassing the browser not supported by service portal issues.

Also, users can check our guide about some highly secure browsers for government websites.

You can leave your questions and suggestions below. We’d like to hear from you.

Top 5 Laptops with SSD and HDD for Speed and Performance

If you want the best from both worlds in terms of storage, you should use a laptop with SSD and HDD. Many users use SSDs for booting while the hard drive is used for file storage.

In today’s article, we’re going to show you the best laptop with both SSD and HDD that you can get, so let’s get started.

What is the best laptop with both SSD and HDD?

Dell Alienware Area 51M – Perfect intensive for gaming

  • Intel Core i7-9700K up to 4.9GHz
  • 17.3-inch, full HD, 144Hz display
  • GeForce RTX 2070 8GB GDDR6
  • 16GB (2x8GB) 2400MHz DDR4
  • 256GB PCIe SSD + 1TB hybrid drive
  • Pricey

If you’re looking for a powerful gaming laptop with SSD and HDD, then this is the right model for you. The device runs on Core i7-9700K CPU and it can achieve up to 4.9GHz with Turbo Boost.

The screen is 17.3 inches which should be enough for gaming sessions. Speaking of gaming, there’s GeForce RTX 2070 8GB GDDR6 available. Regarding the memory, there’s 16GB 2400MHz DDR4 available.
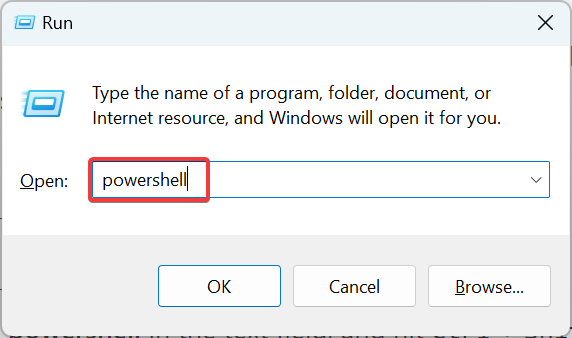
As for the storage, you can find 256GB PCIe SSD and 1TB Hybrid Drive which should be more than enough for all your files.

Overall, this is an incredibly powerful laptop, and if you need a device with lots of space to store your files, this is a perfect choice.

MSI GL73 8SE-010 – Solid gaming laptop

  • Intel Core i7-8750H up to 4.1GHz
  • NVIDIA GeForce RTX2060 6G GDDR6
  • 17.3-inch full HD display
  • 16GB DDR4 2666MHz RAM
  • 128GB NVMe + 1TB HDD
  • The keyboard gets hot during gaming
  • Battery life could be better

Another great laptop with SSD and HDD is MSI GL73 8SE-010. It’s powered by Intel Core i7-8750H that can go up to 4.1GHz. As for the GPU, NVIDIA GeForce RTX2060 6G is used.

The display is 17.3 with full HD resolution and 120Hz refresh rate. As for the memory, there’s a single 16GB DRR4 2666MHz stick, but it can be expanded up to 32GB.

As for the storage, there’s a 128GB NVMe SSD and a 1TB hard drive available. Overall, this is a great device that should be able to give you a lot of space and hardware power for all your tasks.

Acer Nitro 5 – For moderate gaming

  • 15.6 Full HD IPS display
  • AMD Ryzen 5-4600H
  • GeForce GTX 1650
  • 16GB DDR4
  • 1TB HDD and 512GB SSD
  • No major complaints

This is a 15.6-inch device and it comes with a full HD IPS  144Hz display. It runs on Ryzen 5 4600H up to 4.5GHz and NVIDIA GeForce GTX 1650Ti GB.

Regarding the memory, there’s 16GB DDR4 RAM which should be more than enough for multitasking and gaming. As for the storage, there’s 512GB NVMe SSD and 1TB HDD.

This model offers great storage capacity, so you won’t ever run out of space with it. As for the performance, it will be great for all tasks and moderate gaming.

HP 15.6 HD Laptop – For less demanding users

  • 15.6 HD screen
  • AMD Ryzen 3 3250U 3.5GHz CPU
  • 16GB of DRR4 RAM
  • 256GB SSD and 1TB hard drive
  • 3-cell, 41 Wh Li-ion battery
  • Doesn’t use full HD resolution
  • No touchscreen

This is a 15.6 HD device, and it comes powered by AMD Ryzen 3 3250U CPU that can go up to 3.5GHz.  With 16GB of DRR4 RAM, this model will be perfect for multitasking.

Regarding the storage, there’s a 256GB SSD and a 1TB hard drive so you should be able to store files without any issues.

Other features include a USB-C 5Gbps port, two Type-A 5Gbps ports, one RJ-45 port, HDMI 1.4b and a microphone/headphone combo. Overall, it’s a great laptop with SSD and HDD.

HP Pavilion – Great budget solution

  • 15.6 HD display
  • Ryzen 3 3250U up to 3.5GHz
  • 16GB DDR4
  • 256GB SSD and 1TB HDD
  • Windows 10 Home preinstalled
  • No major complaints

If you’re on a budget, this 15.6 HD laptop will be perfect for your needs. The device runs on Ryzen 3 3250U up to 3.5GHz. Regarding the memory, there’s 16GB DDR4 RAM, which is more than capable of multitasking.

As for the storage, there’s a 256GB SSD and a 1TB hard drive, so you’ll have more than enough space for all your files.

The laptop comes with Windows 10 Home preinstalled, and because it doesn’t have a dedicated GPU, it’s a perfect option for less demanding users.

Having a laptop with both SSD and HDD is great because you’re getting the best out of both worlds, and we hope that our guide helped you find the right model for your needs.

If you’re looking for a new drive, then consider getting one from our best SSDs to buy guide. What is your storage option of choice? Let us know in the comments below.

Error Performing Inpage Operation: 6 Tested Methods to use

When installing or uninstalling a program, you may encounter the Error performing inpage operation message.

This issue can also occur when performing a system restore using restore points, which is much more severe.

If you are also troubled by this error, this is the article you need. In this guide, we have listed some troubleshooting tips to help you resolve the Error performing inpage operation messages in Windows.

Why does the Error performing inpage operation appear?

Below are some of the causes of the error performing inpage operation issue:

  • Outdated driver: If your USB driver is outdated or faulty, you can experience the error performing inpage operation 0x3e7 or on SCCM. The solution to this is to update your drivers to the latest version.
  • Faulty hard disk: In some cases, this issue might be due to problems with your hard disk. You might need a new hard disk to restore normalcy on your PC.
  • Corrupt files on hard disk: Sometimes, the error performing inpage operation or Steam or Excel can be traced to corrupt files on your hard disk. The solution to this is to run the Check Disk utility.

How do I fix the Error performing inpage operation?

1. Use a reliable third-party tool for your Windows Registry

A practical solution would be using a professional PC repair tool designed for Windows OS issues that automatically scans your device and repairs faulty files.

Registry settings also play a crucial role in your system’s health and stability. Therefore, monitoring these elements and addressing them when they are in critical condition is essential.

2. Use a System Restore point

  1. Press the Windows key on your keyboard, type system restore, and click on Create a restore point option.
  2. In the System Properties window, click the System Restore button.
  3. Click Next when the System Restore window appears.
  4. Check the Show more restore points box if available. This will list all the available restore points.
  5. Select the most recent restore point and click Next.
  6. Read the description and click the Finish button.
  7. The restoring process may take a few minutes to complete depending on the restore point size.

3. Run the Check Disk utility

  1. Press Windows key + X and choose Windows PowerShell (Admin) from the menu.
  2. In the PowerShell window, type the following command and run it:
    CHKDSK /f C:
  3. The check disk utility will scan the hard disk for common errors and apply available fixes.
  4. After the scanning is finished, restart the computer.
  5. Now try to install or uninstall the program that was triggering the error performing inpage operation error and check for any improvements.

4. Reset Windows 10

  1. Press Windows key + I.
  2. Go to Update and Security.
  3. From the left pane, click on the Recovery tab. Then, under the Reset this PC section, click the Get started button.
  4. In the Choose an option window, you will be presented with two options:
    • Keep my files: This option will remove apps and settings but keeps your files.
    • Remove everything: This option will remove your files, apps, and settings.
  5. We recommend you select the Keep my files option first. This will reset the Windows OS while preserving the personal files.
  6. However, if the issue persists, perform a complete reset using the Remove everything option.
  7. Once done, check for any improvements.

If the issue persists, even after performing a complete reset, as a last resort, perform a clean install. Note that a clean installation will remove all the data from your computer.

5. Update the USB driver

  1. Right-click on the Start button and select Device Manager from the list.
  2. Click on the Universal Serial Bus controllers section to expand it, right-click on a driver, and select Update driver.
  3. Now you can select Search automatically for drivers, or if you already have one, pick the second option.
  4. If the system finds a new driver, it will install it. If not, that means the best one is already installed. However, you can click on Search for updated driver on Windows Update.
  5. In the next window, click on the Check for updates button.
  6. Install any new update, especially the optional driver updates.

Although it’s less likely, this issue can be caused by a problematic or old USB driver, updating them immediately would be a great idea.

If you didn’t follow this solution, we have a complete guide on updating drivers in Windows 10, and some tools can do that automatically.

6. Replace the hard disk

  1. If the issue persists, check your hard disk for hardware issues.
  2. Before replacing the hard disk, remove it from your computer and connect it to another computer.
  3. If the computer fails to boot from the hard drive, you may need to replace the hard disk.

How is the Error performing inpage operation message related to System Restore?

Windows automatically creates a System Restore point whenever you install or remove the software from your PC. By doing so, you can restore the computer if anything goes wrong after installing new software.

This error prevents this from happening, and since you can’t use System Restore, you cannot install or delete the desired application.

How does System Restore work?

System Restore is a restoration feature that affects installed applications, updates, and system files. In case anything software-related causes instability on your PC, you can use this feature to fix it quickly.

Remember that the restoration feature doesn’t affect personal files, so if you accidentally delete them, you can’t recover them with this method.

The Error performing inpage operation message can occur due to system file corruption or hard disk issues, so you might want to look into it with HDD health check software.

Since this error is related to System Restore, we suggest visiting our restore point not working guide for more helpful information.

Did you manage to fix this error on your own? If you did, feel free to share your solution with us in the comments section below.

Windows Found Errors on This Drive: 4 Ways to Repair Them

Hard drives are susceptible to occasional failures, some leading to a total hard disk crash and, subsequently, costly data losses. One prominent issue is the Windows found errors on this drive that need to be repaired warning message.

And just like the fatal error external hard drive problem, it’s essential to act before the disk suffers severe damage. So, to help you get past the error, we have prepared the solutions to help you solve this issue in this guide.

Why does Windows found errors on this drive message appear?

A series of factors can cause the Windows found errors on this drive warning message. Below are some of the prevalent causes:

  • Presence of corrupt files: Sometimes, you might we found errors on a drive to repair these errors and prevent loss of data prompt on your PC because of corrupt files. You need to eliminate these files to solve the issue.
  • Corrupt disk sectors: In some cases, this issue can be caused by bad disk sectors. The solution is to repair the corrupt sectors using the Check Disk utility.

How do I fix the Windows found errors on this drive that need to be repaired?

1. Run the CHKDSK utility

  1. Press the Windows key, type cmd, and click Run as administrator under Command Prompt.
    cmd admin
  2. Type the command (replace c with your drive letter) below and hit Enter to run it: chkdsk c: /f /rchkdsk Windows Found Errors on This Drive
  3. Finally, press Y when prompted and restart your PC to start the process.

The bad disk sector is the most prominent cause of this issue. Thankfully, the built-in CHKDSK utility on Windows PCs can fix this.

2. Use PowerShell

  1. Press the Windows key + X and select Windows PowerShell (Admin).
    powershell power Windows Found Errors on This Drive
  2. Type the command (replace C with your drive letter) below and hit Enter to run it: Repair-Volume C –Scanscan
  3. If any error is detected, run the command below: Repair-Volume C –OfflineScanAndFixscan and
  4. Finally, restart the PC and check if the problem has been fixed.

Another built-in tool you can use when you get the Windows found errors on this drive warning message is the repair feature. Running the command, as shown above, should fix the issue.

3. Security and Maintenance Check

  1. Press the Windows key, type control, and select Control Panel.
    control panel Windows Found Errors on This Drive
  2. Choose System and Security.
    system and
  3. Now, select the Security and Maintenance option.
    security and
  4. Click to expand the Maintenance.
    maintenance Windows Found Errors on This Drive
  5. Finally, select the Drive status option and check if any hard drive issues are reported.
    driver status

The Windows 10 Security and Maintenance section keeps you updated on issues affecting your computer’s general health.

It can thus help you identify problems with the hard drive hardware and software as long as your PC is booting. In addition, this helps detect the potential causes of the Windows found errors on this drive error message.

4. Using your installation disk

  1. Create and insert a Windows 10 installation disc/USB flash drive
  2. Boot your PC from the bootable drive. If your PC does not boot from the drive, you must enter BIOS to change the order.
  3. Now, select your Language and other information and click Next.
    language
  4. Select Repair your computer in the bottom left corner.
    repair computer Windows Found Errors on This Drive
  5. Choose the Troubleshoot option under Choose an option.
    troubleshoot
  6. Next, click Advanced Options.
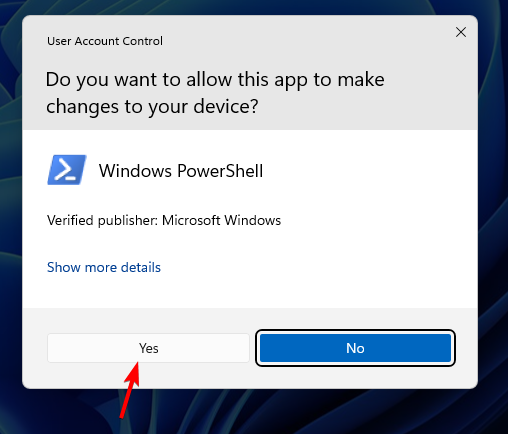
    advanced options
  7. Now, select the Command Prompt option.
    command prompt
  8. Finally, type the command below and hit Enter to run it: chkdsk c: /f /rchkdsk Windows Found Errors on This Drive

If you cannot boot into your PC because of the Windows found errors on this drive warning message, the easiest way to fix it is to use an installation media. This will allow you to boot from it and repair your PC.

For hard drive errors, once repaired, you can revert to previous versions to and restore but if you get the there are no previous versions available, we know how to get your backup.

With this, we can conclude this detailed guide. All you have to do now is follow the instructions carefully, and the issue should be fixed.

If you need a list of the best hard drive repair tools, check our guide for the top options. Keep in mind that some errors, such as Unable to determine volume version and state are indicators of a failing drive, and they need to be fixed immediately.
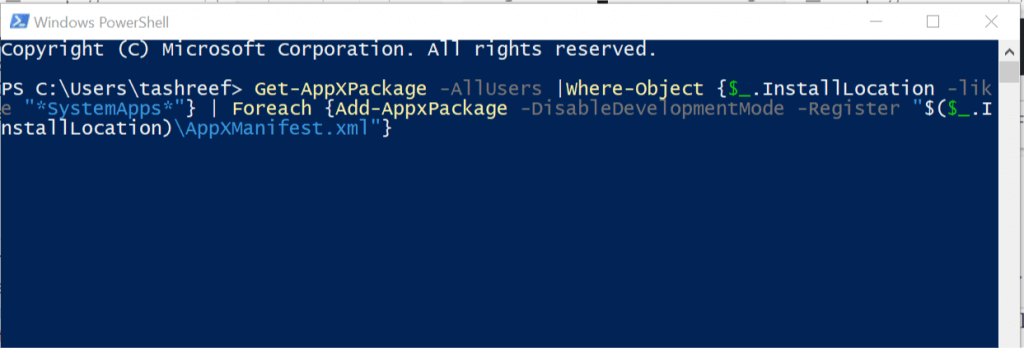
Have you had problems with Word not going to the next page? The highlighted guide will help you fix that.

Let us know the solution that helped you fix this issue in the comments below.

Fix: Sign-in Option Disabled Due to Failed Sign-in Attempts

Forgetting your login password is something that everybody does. Too many attempts can cause Windows to disable the sign-in option, but it can easily be overcome.
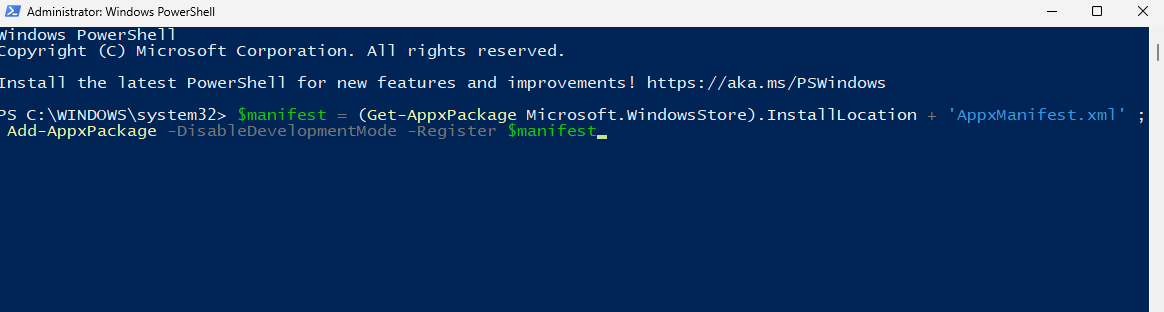
But let’s say you recover your password and try to log in again, only to be rejected once more. If this happens, this is a sign of a greater problem afflicting your computer.

Why did the sign-in option become disabled?

It’s rather rare for this problem to occur, so there aren’t a lot of culprits behind a disabled sign-in option. A lot of the time, it typically comes down to user error.

  • Too many failed sign-in attempts – If you try to sign in too many times, Windows will prevent you from doing so. It’s recommended that you wait for some time before trying again.
  • You have corrupted files on your system – Corrupt files can mess with system processes. Cleaning up your computer may require you to manually replace files.
  • Malware has infected your computer – Once you get access to your computer again, be sure to download some antivirus to thoroughly your computer.

How can I re-enable the sign-in option?

There are many different ways you can try to get past this error. But for the sake of brevity, we’re only going to cover the best 10. And that amount will be split across both easy and complex solutions:

  • If you forgot your password, all you have to do is select I forgot my PIN on the login screen. Follow the on-screen instruction to reset your information.
  • An error message may appear after repeated attempts to sign in, telling you to wait for two hours before trying again. Wait for that amount of time, then try logging in once more.
  • If you do manage to log into your account, it’s recommended that you create a new local account and use that one moving forward.

1. Restart Windows 11 in Safe Mode

  1. Click the Power icon in the bottom-right corner. Hold the Shift key down and select Restart. This will boot Windows 11 with advanced startup options.
  2. Under Choose an option, select Troubleshoot, then Advanced options.
  3. Select Startup Settings.
  4. On this final page, click Restart.
  5. Next, you will be asked to press one of the function keys on how you want Windows 11 to boot. Press F5 to enable Safe Mode with an internet connection.
  6. Windows 11 will boot in Safe Mode. Restart your computer and try logging in once more.

This solution is recommended to be done first as it allows you to bypass the error message and log into your computer. The following solutions aim to fix the problems causing this error in the first place.

2. Run System File Checker and DISM commands

  1. Bring up the Command Prompt on the Windows 11 search bar. Click Run as administrator.
  2. In the Command Prompt, type in the following command and hit Enter on your keyboard: sfc /scannow
  3. Give your computer enough time to finish scanning.
  4. Now type in the following commands, one after the other, and press Enter after each one: dism /online /cleanup-image /scanhealth dism /online /cleanup-image /checkhealth dism /online /cleanup-image /restorehealth
  5. Like before, give your computer enough time to finish scanning.
  6. Restart your computer when you’re done to finish up the process.

After applying the steps above, you must be able to access your device through the sign-in option. If that is not the case, you may need an alternative solution to fix it.

You can always rely on modern repair and optimization software that will fully diagnose your Windows OS and repair corrupted files, registry files, and other essential concerns.

3. Run the Check Disk command

  1. Like the previous solution, launch the Command Prompt with the same administrator permissions.
  2. Type the following command and hit Enter on your computer: chkdsk [driveletter] /f /r /x
  3. Where it states [driveletter], enter the letter of your hard drive as shown below.
  4. You might get a message stating the command cannot run because it’s in use. Schedule the scan for the next restart by pressing Y on your keyboard.

You should also perform the Check Disk scan on other hard drives if multiple drives are connected to your computer.

4. Adjust the account lock policy

  1. Right-click the Windows logo in the bottom right corner and select Run.
  2. In the Run command, enter gpedit.msc.
  3. Expand Windows Settings, and under this section, select Security Settings.
  4. Expand Account Policies, then select Account Lockout Policy.
  5. Double-click Account lockout threshold.
  6. In the new Properties window that appears, set the value to 0.
  7. Click Apply, then OK.

Configuring the Local Group Policy Editor is usually a feature exclusive to Windows 11 Pro, but it’s possible to get it running on the Home version.

Doing so requires you to run a specific batch file on the Notepad app.

5. Tweak AccountLockout in the Registry Editor

  1. Start by launching the Registry Editor. If a User Account Control window appears, select Yes.
  2. Expand HKEY_LOCAL_MACHINE, click SYSTEM, and then CurrentControlSet right after.
  3. Open Services, and in the vast list, scroll down until you find RemoteAccess. Expand that as well.
  4. Click Parameters, then select go to AccountLockout.
  5. Double-click MaxDenials. Set the value data to 0, then select OK.
  6. Restart your computer to apply the changes.

Facing similar issues like Account is disabled. Please see your administrator; take a look at this guide to find solutions.

6. Reset the account password

  1. Log into another account that has administrator permissions on your computer.
  2. Right-click the Windows logo in the bottom-left corner and select Run.
  3. Type in control userpasswords2, then click OK.
  4. Select the problematic account and click the Reset Password button.
  5. Enter and confirm a new password for the account. Click OK to close the window.
  6. Finish up by selecting Apply, then OK.

Be sure to check out Microsoft’s instructions on how to create administrator accounts on Windows 11 if you don’t have one or you don’t remember.

7. Delete the Ngc folder

  1. Launch File Explorer.
  2. Copy and paste the following address to the top bar of File Explorer: C:\Windows\ServiceProfiles\LocalService
  3. Double-click the AppData folder. Make sure you’re using an administrator account moving forward. If you see a window stating that you don’t have permission, click Continue.
  4. Open the Local folder, then double-click Microsoft.
  5. Delete the Ngc folder. If Windows 11 asks for permission, give it.
  6. Right-click on File Explorer. Hover over New and create a new folder. Name it Ngc.
  7. Once that’s done, go to the Accounts tab of the Settings menu. Select Sign-in options.
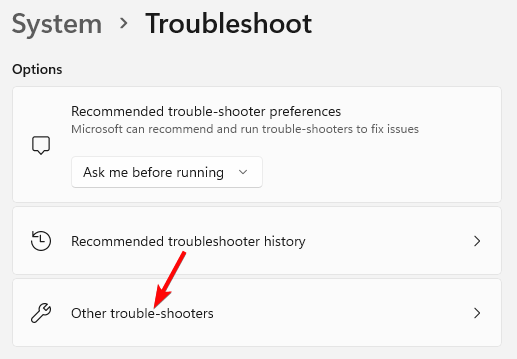
  8. Expand the PIN entry. Change your PIN.

Is it possible to run commands without being an administrator?

As you can see from the solutions, most of them require you to have admin-level permissions. This can make it difficult for users who aren’t admins to fix any error, but it is possible.

For example, if you want to flush out the DNS cache without admin rights, you can still open either the Command Prompt or PowerShell.

And be sure to check out our guide on what to do if registry editing has been disabled by the admin. The SFC scan mentioned earlier still works, regardless of the level of access you may have.

Feel free to comment below if you have questions about other Windows 11 errors. And please tell us if there’s a specific guide for any login or security issue you’d like to see.