Readiris has Stopped Working: 7 Easy Fixes That you can use

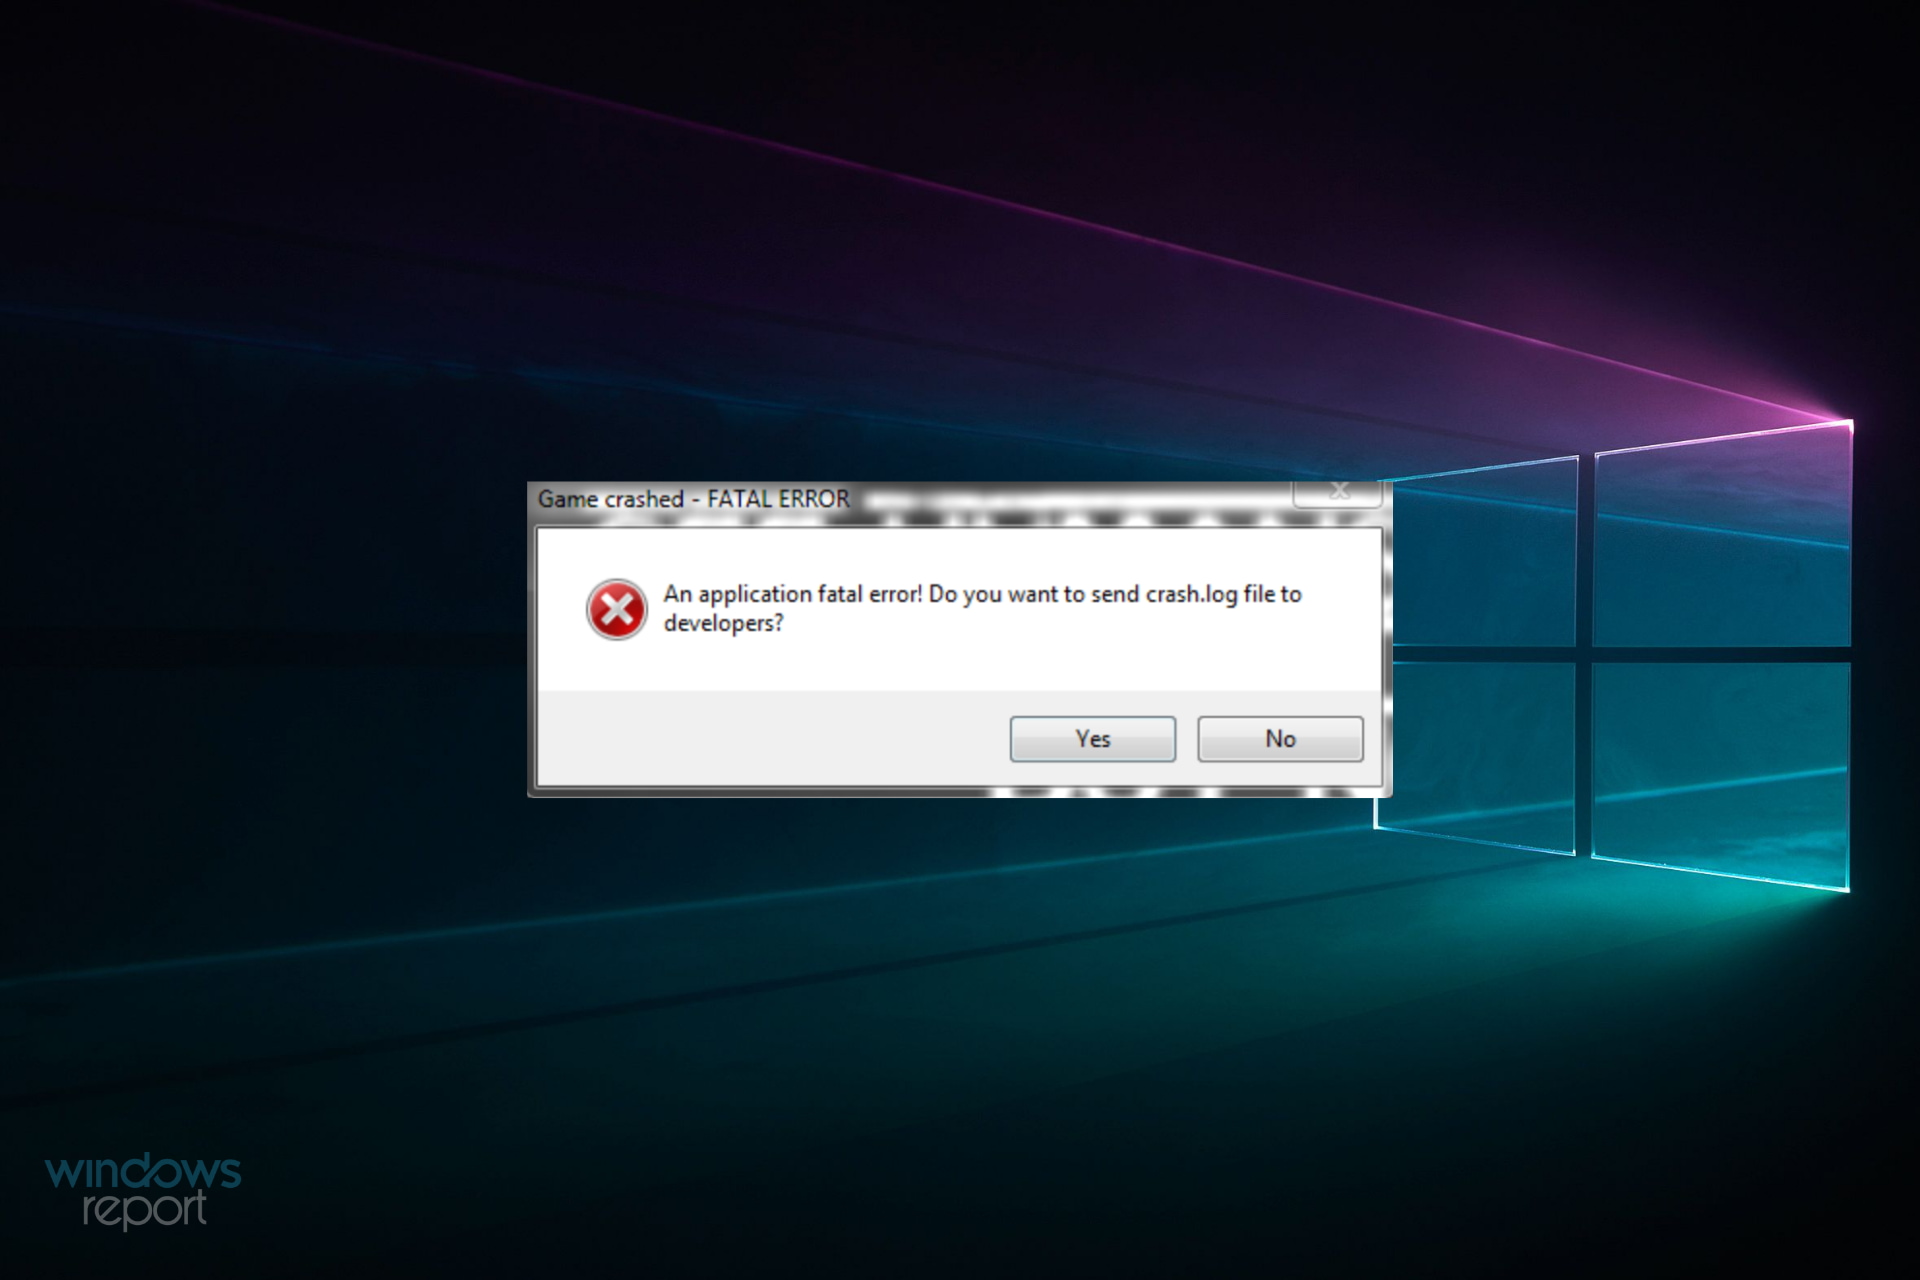
Readiris is OCR software with which you can edit the text in images. However, that software might throw up a Readiris has stopped working error message for some users.

Users have stated that they get error messages that usually say a problem caused the program to stop working correctly. If you are also facing this issue, this guide will show you how to fix it.

Tip icon Tip
If you face these issues regularly, try a different portable document software that offers full OCR support. Soda PDF stands out in this regard as it allows you to read, convert and edit handwritten and printed text from image sources and save it to the digital format of your choice.

Why has Readiris stopped working?

A series of factors can cause the Readiris to stop working. Below are some of them:

  • Outdated driver: An outdated driver is one of the prominent causes of this issue. You can quickly fix this by updating your drivers to the latest version.
  • Interference from third-party apps: If you have a third-party app running a counter-program to Readiris, you can encounter this error. The solution to this is to perform a clean boot.
  • Lack of privilege: Sometimes, Readiris can stop working if you don’t have administrative privileges. Running the app as an admin should get rid of this issue.

How can I fix the Readiris has stopped working error?

Before proceeding to the fixes in this section, try the following preliminary troubleshooting steps:

If this does not work, you can now proceed to the solutions below:

1. Update device drivers

1.1. Perform a manual update

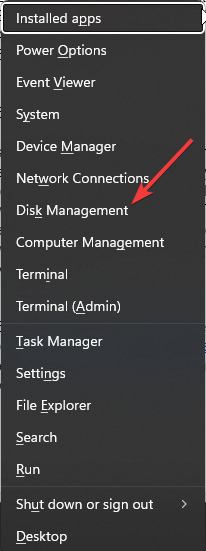
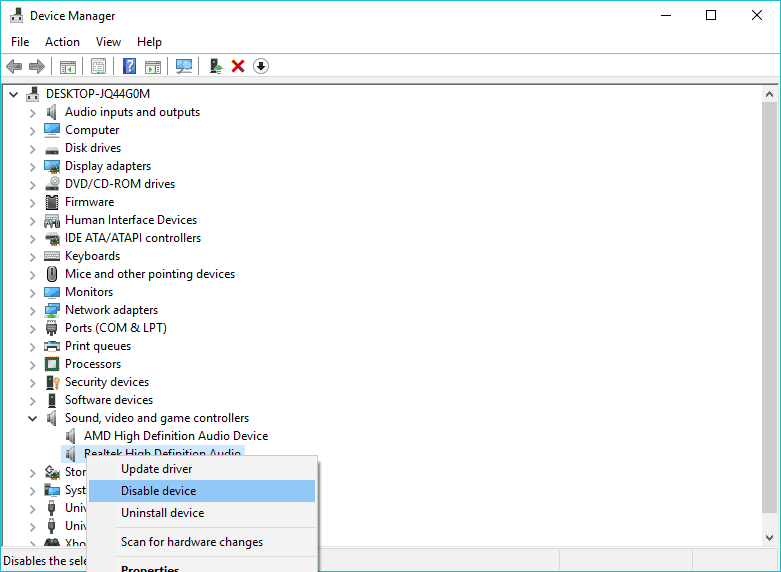
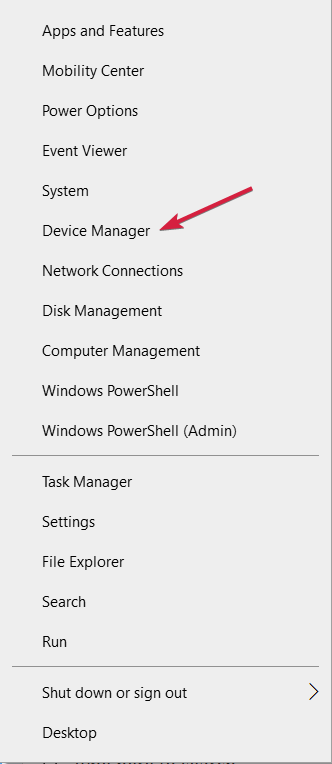
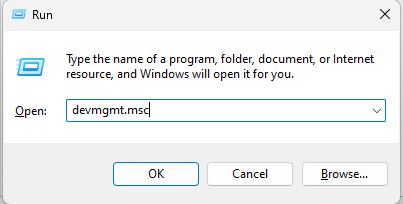
  1. Press the Windows key + X and select the Device Manager option.
    device manager readiris stopped working
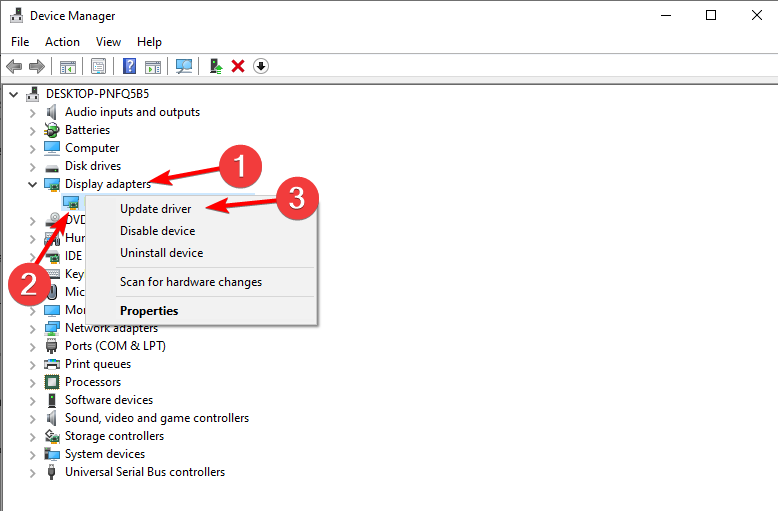
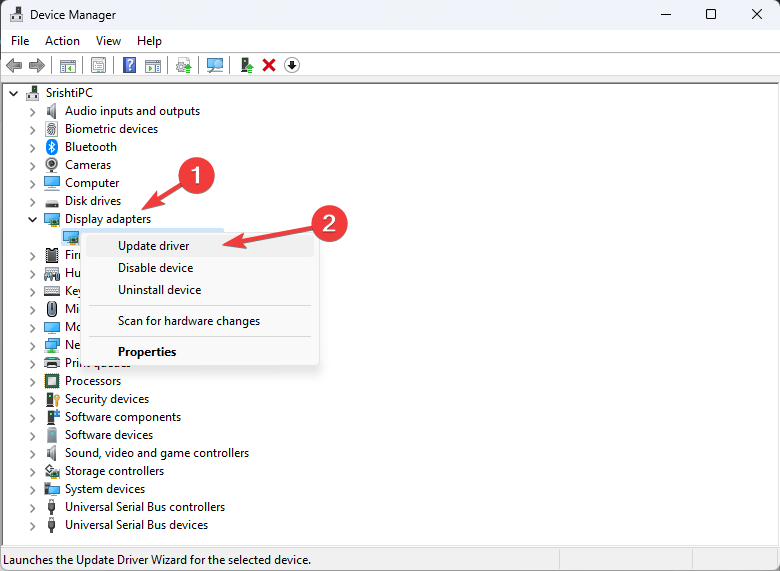
  2. Double-click the option you want to upload drivers for and right-click the device there.
  3. Now, select the Update driver option.
    update driver
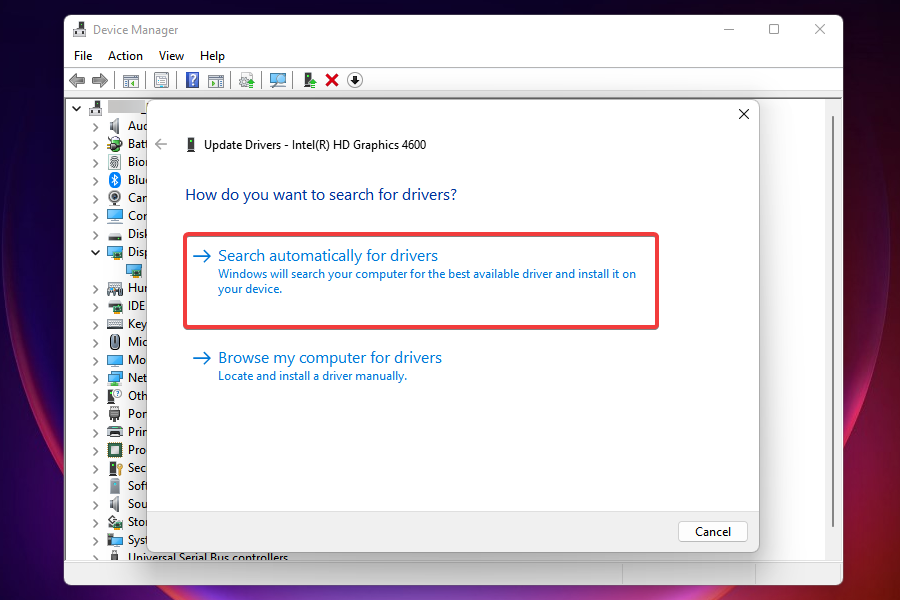
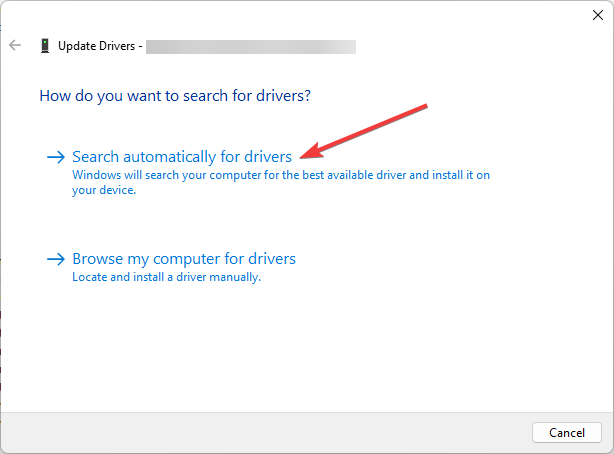
  4. Choose the Search automatically for drivers option.
    search auto
  5. Finally, install any available updates.

If Readiris stops working, a manual update can be a very efficient method to solve the problem. Just open the Device Manager and follow the easy steps mentioned above.

1.2. Use a dedicated tool

The Readiris has stopped working error might also be due to antiquated or incompatible drivers. For example, a computer cannot handle video cards, computer programs, sound cards, or other hardware; a driver must manage them.

You can manually update drivers if you thoroughly understand your PC’s requirements. The driver updater utility is the best alternative. Updating your drivers with a professional solution is a realistic choice for resolving Raediris issues on Windows.

Outbyte Driver Updater uses easy, quick, and safe technology, all wrapped up in one performant program that will also optimize your computer hardware. In addition, this solution has a sizeable daily-updated driver database, so it will provide the most recent drivers available after scanning your system.

⇒ Get Outbyte Driver Updater

2. Run Readiris as an Administrator

  1. Right-click the Readiris shortcut.
  2. Select the Run as administrator option.
    run as administrator readiris stopped working
  3. Now, try to rerun the app. If this fixes the issue, right-click the Readiris shortcut and select Properties.
  4. Click the Compatibility tab at the top.
  5. Finally, check the Run as administrator box and click the Apply button, followed by OK.
    run as admin

One of the quick ways to fix the Readiris app stopped working issue is to run it as an administrator.

3. Use a different portable document software

While Readiris offers users a comprehensive set of valuable features, you can try a different software if this one frequently crashes on you.

SodaPDF is a reliable and simple alternative with a powerful optical character recognition feature that can be used directly from your browser without any installation required.

You can then edit and merge your newly created documents and save them to multiple formats, including PDF, DOCX, and XLSX.

The tool has strong encryption and only stores the files you upload for 24 hours. It also allows you to download dedicated applications for multiple platforms if that is what you prefer.

SodaPDF is very resourceful, providing the tools to edit documents and e-sign, split, compress, and even password-secure them.

The tool also lets you create and fill forms, add annotations such as comments and sticker notes, and batch convert a more extensive set of files to the format of your choice.

⇒ Get Soda PDF

4. Select the Run this program in Compatibility Mode for: Option

  1. Right-click a Readiris program icon
  2. Select the Properties option.
    properties app
  3. Select the Compatibility tab at the top.
  4. Click the Run this program in compatibility mode setting.
    compatibility
  5. Select an earlier Windows platform from the drop-down menu.
  6. Select the Apply option on the Compatibility tab, and press the OK button.
    older readiris stopped working

If you’re utilizing an earlier version of Readiris (such as Readiris 10 or 11) that predates your Windows platform, you might need to run the software in compatibility mode.

Stopped working error can often be about software incompatibility with Windows.

5. Clean Boot Windows

  1. Press the Windows key + R, type msconfig, and click the OK button.
    msconfig
  2. Click the Services tab at the top.
  3. Now, check the Hide all Microsoft box and click the Disable all button.
    services readiris stopped working
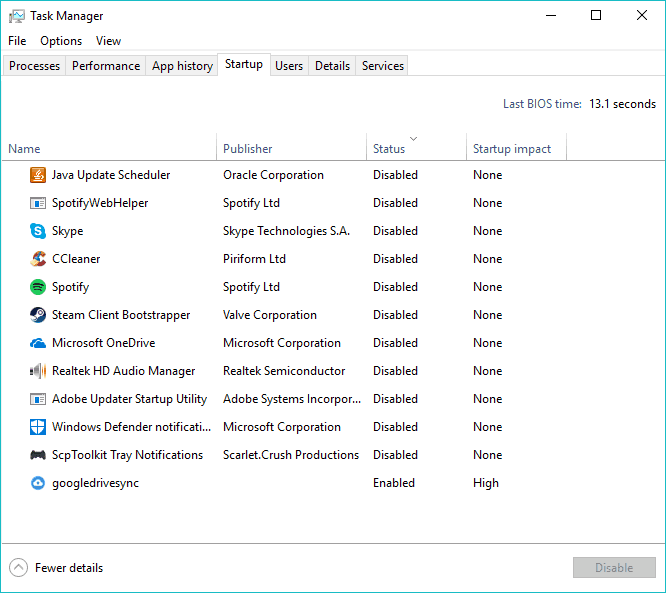
  4. Click the Startup tab at the top and select Open Task Manager.
    startup
  5. Right-click each of the apps there and select the Disable option.
    disable
  6. Finally, go back to the System Configuration window, click the Apply button, followed by OK, and restart your PC.
    apply ok readiris stopped working

The Stopped working error message windows can often pop up because of conflicting software.

For example, Norton Antivirus and EVGA Precision are two programs that users have discovered to be responsible for them. As such, clean booting Windows might fix the Readiris has stopped working error message. However, that will disable third-party startup software and services.

If Readiris runs after the clean boot, one of the programs included on Task Manager’s Startup tab is probably conflicting software.

You can undo the options above to restore Windows to the average startup. Then manually disable programs listed on Task Manager’s Startup tab one at a time to find which is the conflicting software.

6. Turn off Data Execution Prevention

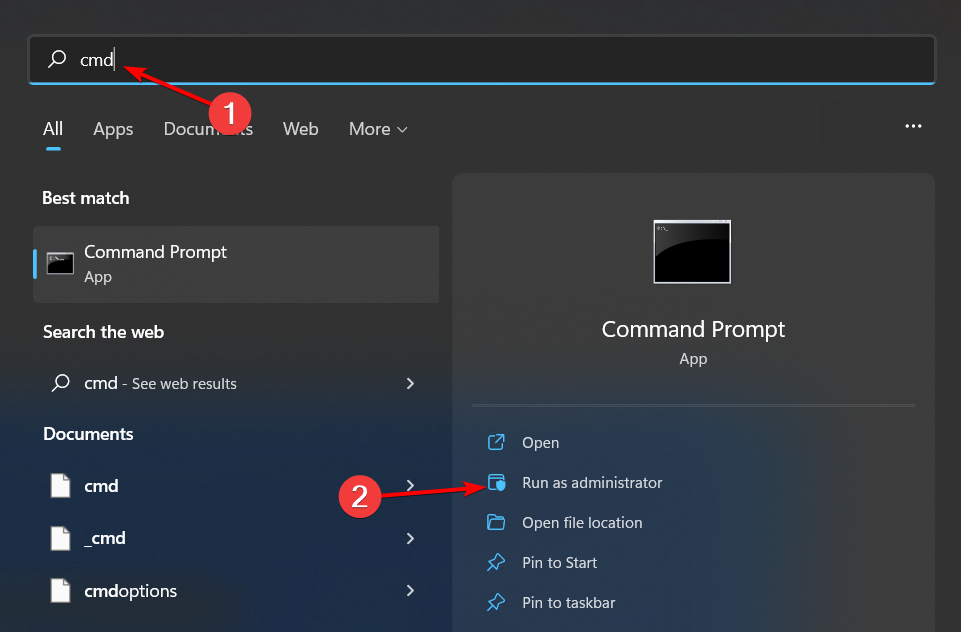
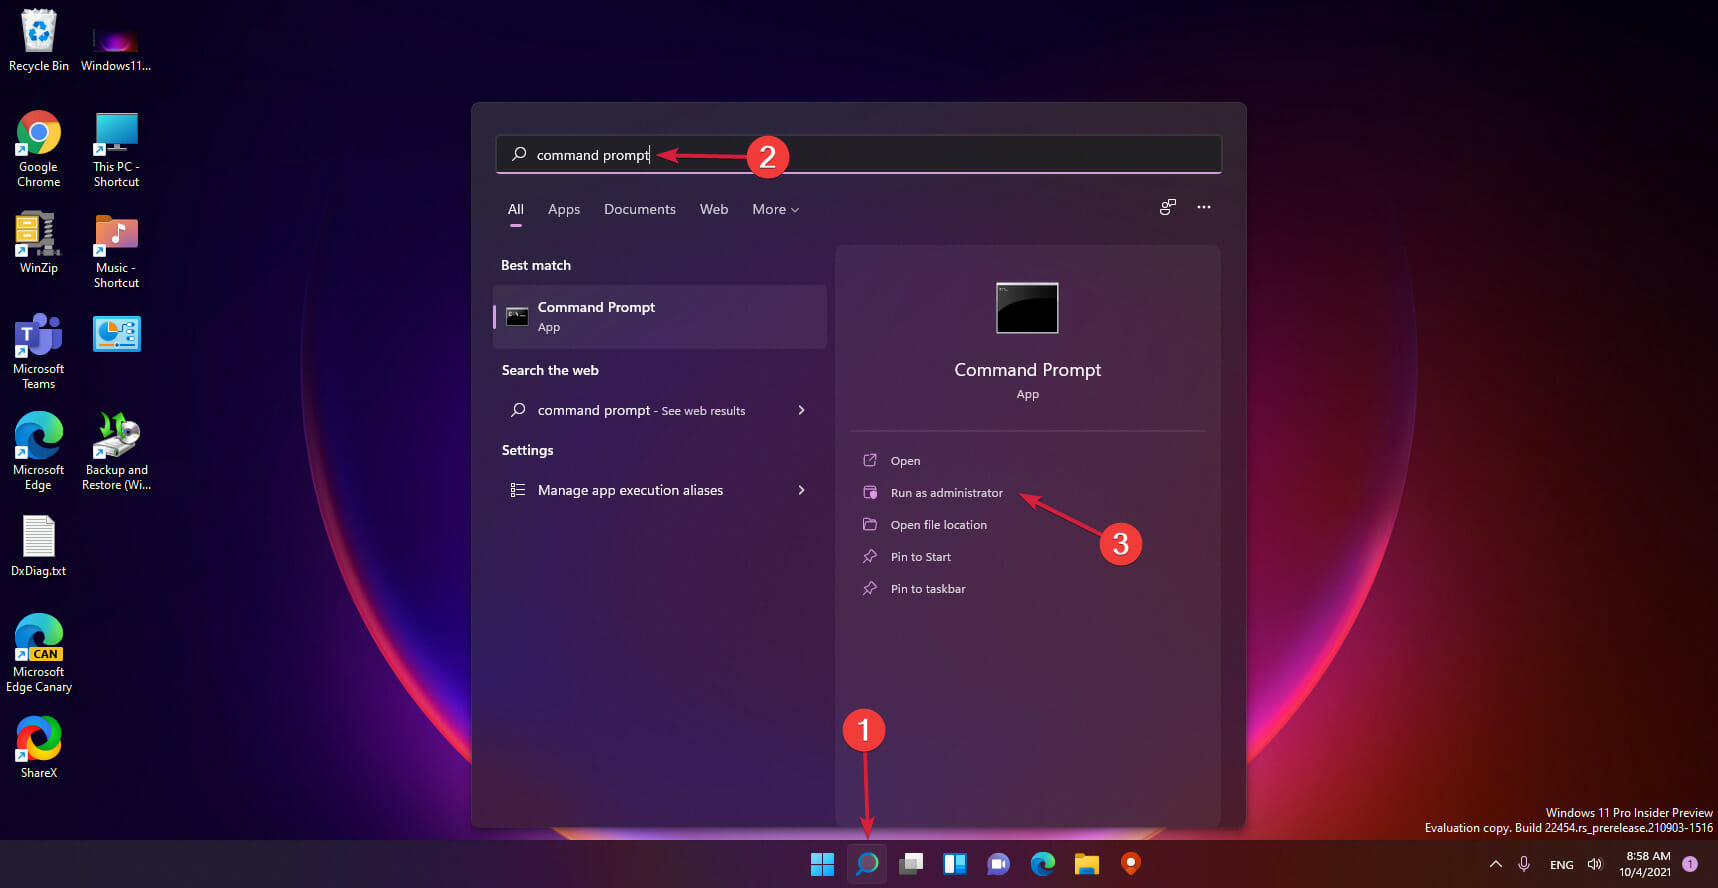
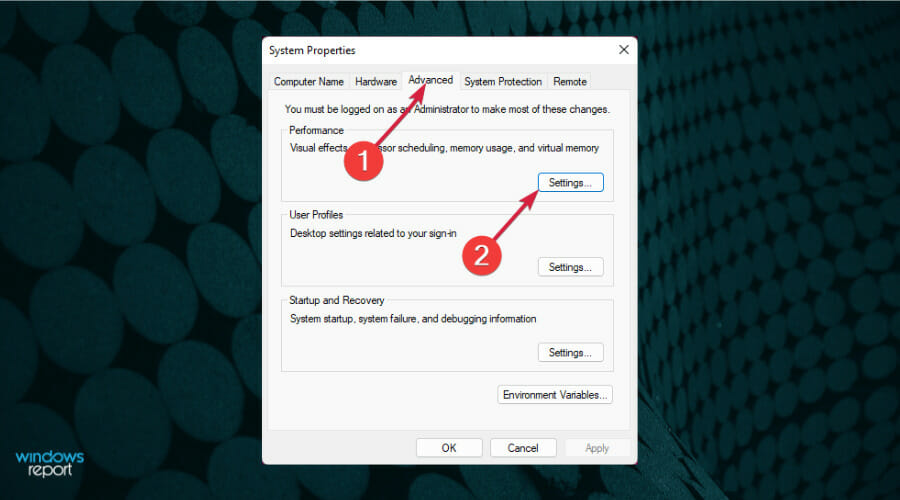
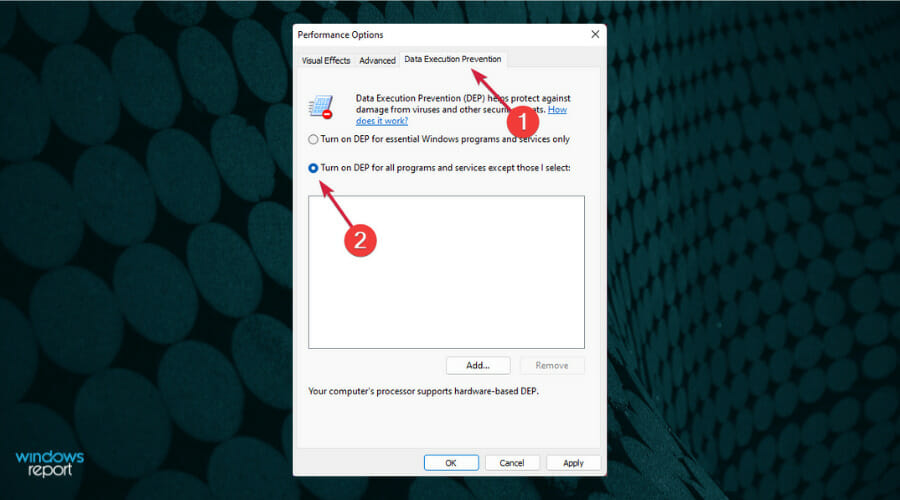
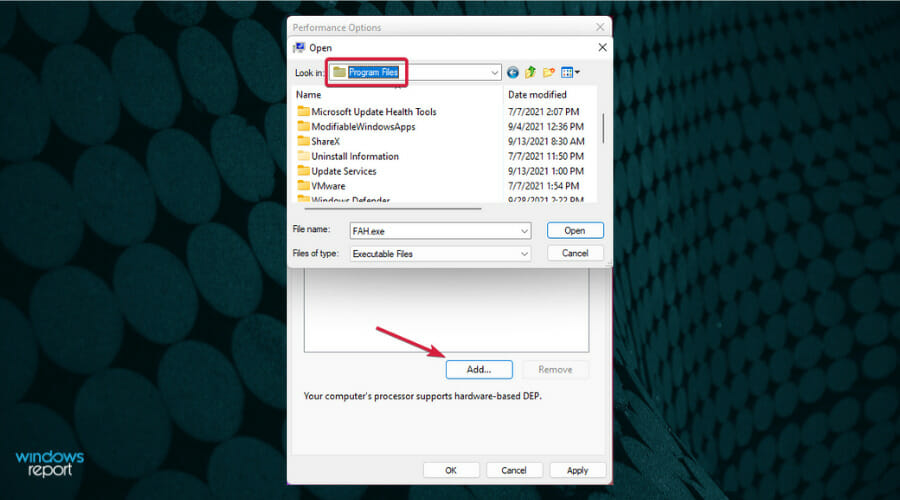
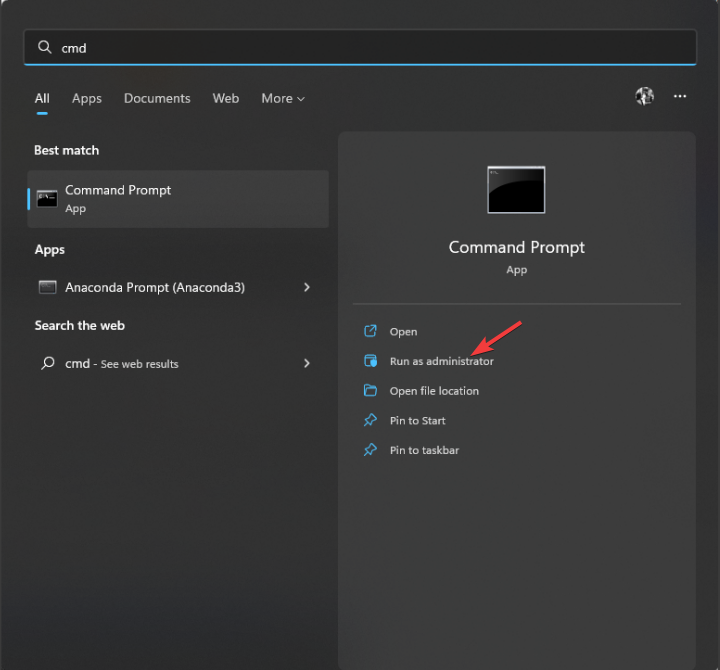
  1. Press the Windows key + S, type cmd, and select Run as administrator under Command Prompt.
    cmd admin
  2. Type the command below and hit Enter to run it: bcdedit.exe /set {current} nx AlwaysOffalways off
  3. Close the Command Prompt window, and then open the Readiris software.
  4. Finally, run the command below to turn DEP back on: bcdedit.exe /set {current} nx AlwaysOnalways on readiris stopped working

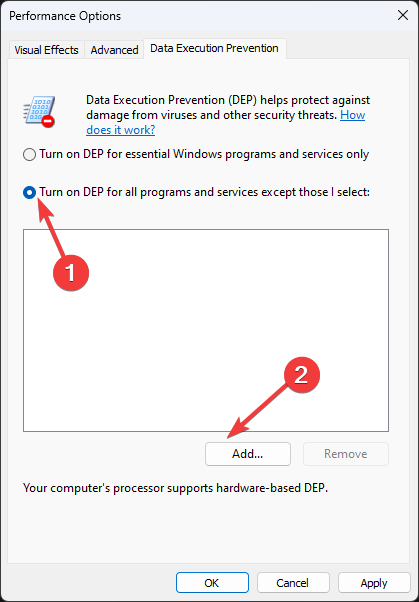
Data Execution Protection (DEP) can also block programs from starting. So, turning DEP off could also be a potential fix for the Readiris has stopped working error message.

7. Check the Windows Image Acquisition (WIA) Service

  1. Press the Windows key + R, type services.msc, and click the OK button.
    services
  2. Double-click Windows Image Acquisition (WIA) to open its properties.
    windows image
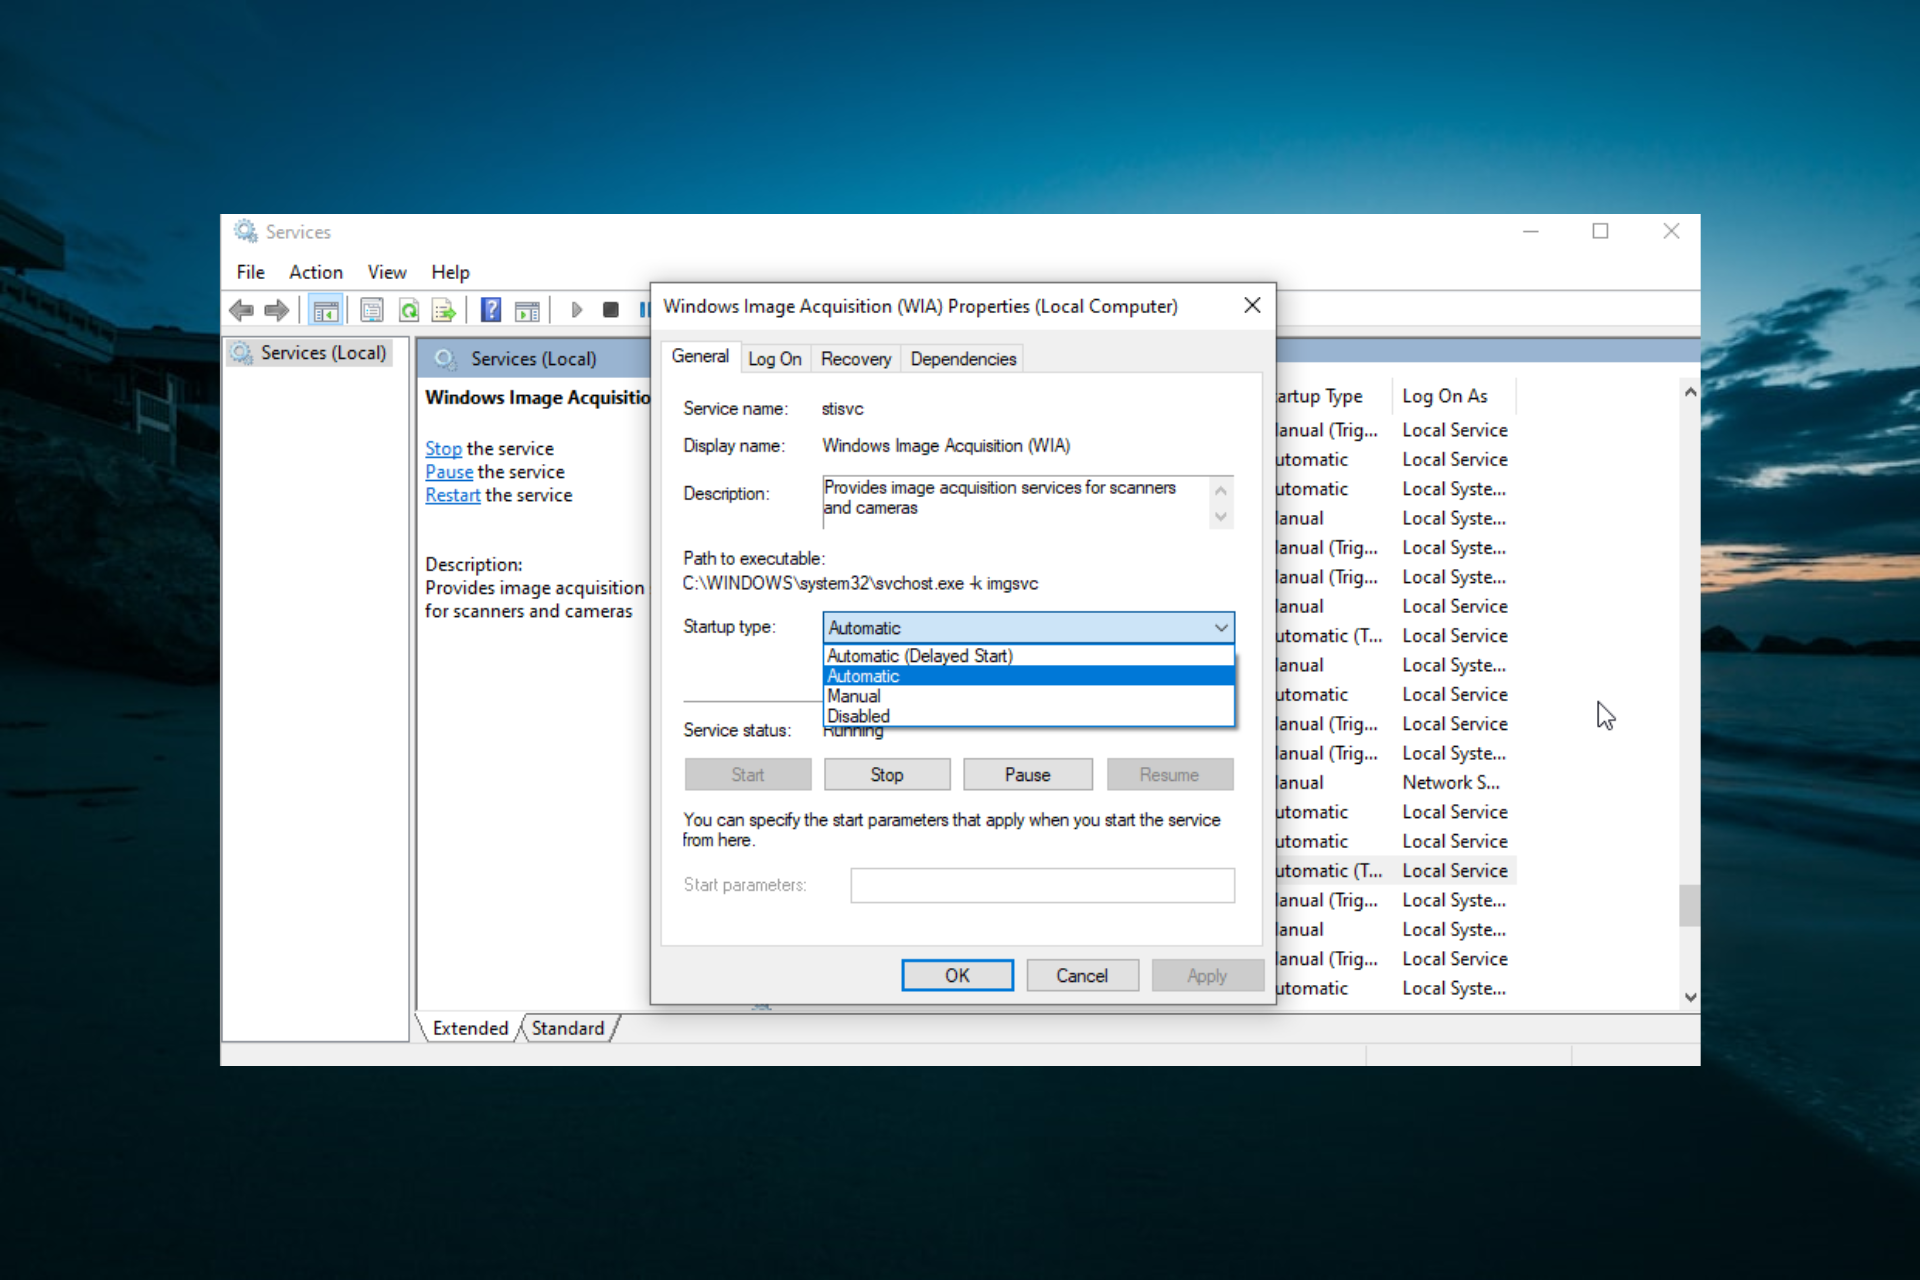
  3. Select Automatic from the Startup type drop-down menu if that option isn’t already selected.
    automatic
  4. Now, click the Recovery tab shown directly below.
  5. Select the Restart the Service option from the First Failure drop-down menu.
  6. Then select the Apply and OK options.
    recovery

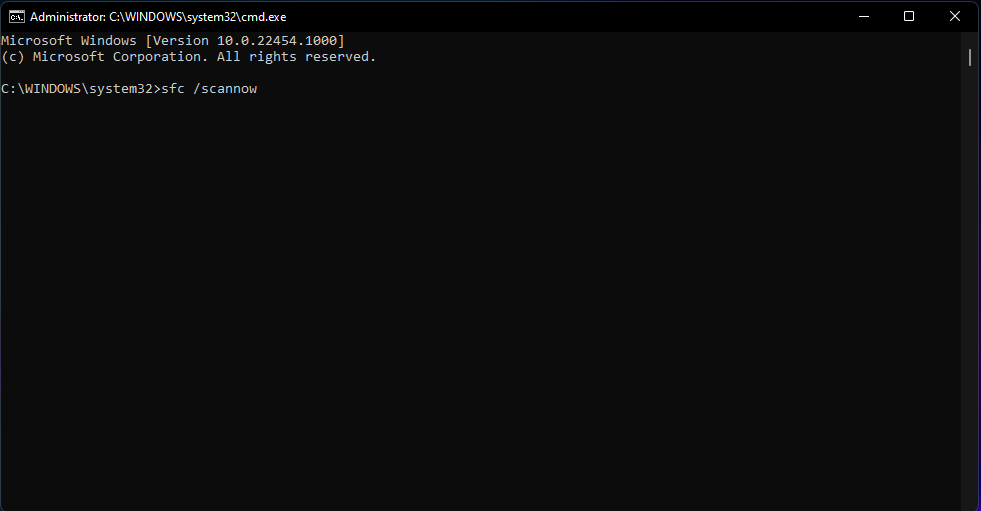
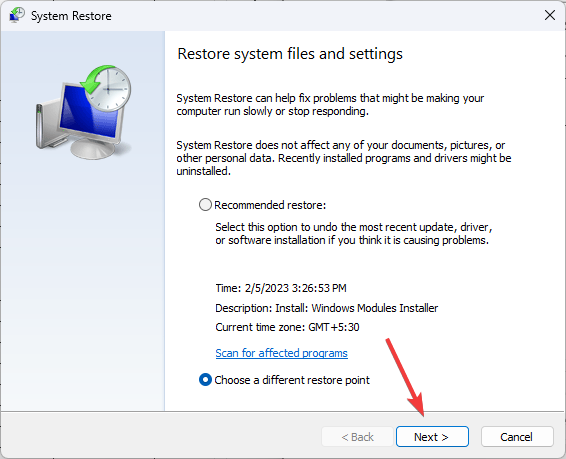
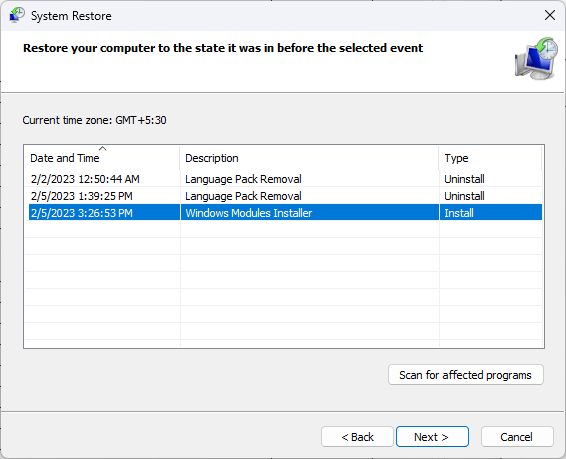
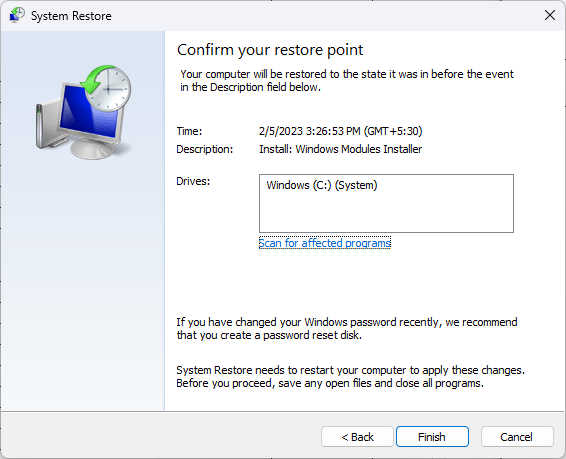
Those are some of the fixes that might get Readiris up and running. In addition, running a System File Checker scan and restoring Windows to a restore point might also fix the Readiris has stopped working error.

If you need a list of the best scanner software for Windows 10, check our detailed guide for the top options to choose today,

We’d like to hear more from you on this matter, so feel free to comment in the dedicated section below.

Steam Launch Options Windowed: 3 Easy Ways to Run This Option

The Windowed Mode feature in Steam allows users to run some legacy games on their computer, which otherwise won’t launch. It is also helpful in playing certain games with high system requirements on a low-end PC.

Besides, it helps eliminate a range of errors. But not all Steam games can be opened as easily in Windowed Mode. Each may require a unique method, so you must know them all. Let’s find out!

Why should I run Steam games in Windowed Mode?

Here are a few reasons why many prefer playing games in Windowed Mode:

  • Seamlessly switch between apps: The primary benefit of Windowed Mode is the ability to switch between apps or check notifications and other elements while gaming.
  • Eliminates problems with resolution: Some older games tend to run better when in Windowed Mode. Otherwise, the display quality is affected.
  • Best for multi-monitor setup: Gamers with a multi-monitor setup prefer Windowed Mode for games since it allows them to check things easily on the secondary monitor.

How do I launch Steam games in Windowed Mode?

Tip icon Tip
Before making changes to the game settings, try using the Alt + Enter keyboard shortcut. Though not a universal thing and applicable in every game, it might work for some. Also, some other solutions, too, won’t work for every game. So make sure to try them all and identify the one that does.

1. Modify game settings

  1. Launch Steam, navigate to the Library, right-click on the concerned game, and select Play.play
  2. Now, head to the Display (or similar) settings in the game.
  3. If there’s an option for it, turn on Window Mode.run Steam games in Windowed mode

If the Steam game doesn’t switch to Windowed Mode immediately, restart it for the changes to come into effect. Remember, not every game offers a built-in option to switch between display modes, so you may have to try the next method.

2. Change Steam launch parameters

  1. Open Steam, go to the Library from the top, right-click on the game, and choose Properties.properties
  2. In the General tab, enter the following under Launch Options:-windowedwindowed mode for steam games
  3. Once done, launch the game and check if it opens in Windowed Mode.
  4. If that doesn’t work, try entering the following instead to set the display resolution:-windowed -w 1024

If the Steam game doesn’t have a built-in setting to enable Windowed Mode, you can modify the launch options. Though, this, too, has been found to fail at times.

3. Change shortcut target

  1. Right-click on the game’s shortcut, and then select Properties.properties
  2. Now, enter the following in the Target field followed by a space, and click on OK to save the changes:-windowedmodify target

If the previous methods didn’t work, another way to open Steam games in Windowed Mode is to change the Target field for the shortcut.

And while you are at it, do not forget to check the best ways to boost gaming performance in Windows.

Tell us which method worked for you and the game you were trying to play in Windowed Mode. In case none worked, it’s likely that the developers didn’t add the functionality, and the game can’t run that way.

What is Amifldrv64.sys & How to Fix It?

The amifldrv64.sys is a system file created by the American Megatrends, Inc for strangers. Users can find the amifldrv64.sys file in the C:\Windows\Temp\ folder.

Also, amifldrv64.sys is one of the various blue screen of death (BSOD) errors encountered by users while updating the BIOS version on their PC. Therefore, this guide will put you through the causes and how to fix  amifldrv64.sys.

Also, users can read about how to fix BSoD error 0x00000154 on Windows.

What causes amifldrv64.sys?

The amifldrv64.sys error can occur due to several reasons, such as:

  • BIOS update conflict – amifldrv64.sys error occurs when a user tries to update the BIOS with Windows OS; there is a conflict between the update and OS.
  • Virus or malware attacks – a virus attack on the user’s PC can corrupt the C:\Windows\Temp\ folder, causing an amifldrv64.sys error.
  • Driver verifier error –  the Driver Verifier can be a threat to the system when it can not verify some third-party driver utility on your PC while updating BIOS prompts the error.
  • Systems interrupted during update – an interruption in the machine hardware while trying to update the BIOS can trigger an amifldrv64.sys error.

How can I fix the amifldrv64.sys?

Here are some preliminary checks you can try to fix amifldrv64.sys before any advanced troubleshooting steps.

If the error persists, you can proceed to the following advanced steps.

1. Disable driver verifier

  1. Press the Windows + R button to open the Run dialog box, type verifier.exe, and press Enter to open the Driver Verifier.
  2. Select the Create custom settings (for code developers) from the Select a task tab and click Next.
  3. Check the box in front of Force pending I/O requests and IRP Logging and click on Next.
  4. Click on the Select driver names from a list option from the new window and select the Next button.
  5. Select the Provider tab.
  6. Uncheck all drivers not supported by Microsoft Corporation, click on Finish and OK to save your selection.

Disabling the Driver Verifier will not allow the Driver Verifier to function. Check our guide on ways to fix Driver Verifier detected violation errors in Windows.

2. Reinstall the Wi-Fi adapter

  1. Left-click the Start button and choose Device Manager.
  2. Click on Network adapters to expand it, right-click on the Wireless device, then select Uninstall device from the drop-down.
  3. Check the box for the Attempt to remove the driver for this device option and click Uninstall.
  4. Reinstall the driver software.

Reinstalling the Wi-Fi adapter will fix Issues with amifldrv64.sys error after BIOS update. Read about how to fix a Wi-Fi adapter that is no longer working on your device.

In case your driver didn’t update accordingly by manually performing this, you can try a dedicated tool to update it automatically with the latest version from its repository.

⇒ Get Outbyte Driver Updater

3. Run Windows Memory Diagnostics

  1. Press the Windows button, type Windows Memory Diagnostics, and then press Enter to open it.
  2. Click on Restart now and check for problems (Recommended) to continue.
  3. Wait while the memory diagnostics run and log in after scanning to show all the detected results.

Running a Windows memory diagnostics will help identify corrupt or missing Windows files that can prompt the amifldrv64.sys error.

You can also read about how to fix Windows Memory Diagnostics shows no results after diagnostics.

4. Remove MSI live update program

  1. Press the Windows + R to open the Run dialog box, type appwiz.cpl, and press Enter to open it.
  2. Right-click on the MSI Live update program from the list of applications and select Uninstall from the pop-up menu.
  3. Follow the on-screen command to uninstall the MSI Live update program, then restart your PC to check if the issue persists.

A faulty MSI Live update program can trigger the amifldrv64.sys error. Therefore, removing the MSI Live update program can help fix it.

In conclusion, you can check our guide on the meaning of BIOS and its uses on your PC and how to fix ACPI BIOS errors on the Windows operating system.

Fix: BitLocker Password Prompt Screen Problem on Windows 10

One of the best ways to protect your data is to encrypt it, and many users use BitLocker. You may, however, run into problems with the Bitlocker password prompt screen.

Even though BitLocker is a great feature, we have had a few users who have reported issues.

We will explore some causes and recommend our top solutions to this problem.

Why does the BitLocker screen appear?

BitLocker is a security feature that encrypts the data on the hard drive and requires a password or a smart card to unlock it. The Bitlocker screen may appear for the following reasons:

  • Configuration type – The device is configured to use BitLocker Drive Encryption to protect the stored data.
  • Activation status – BitLocker is activated, and the drive is locked.
  • Status level – A user has enabled BitLocker on their device, and the encryption process is ongoing or has completed.
  • Unlock requirement – The device has restarted or been turned off and requests the BitLocker key or recovery password to unlock the drive.

BitLocker is a great feature if you want to encrypt your hard drive and protect it, but sometimes issues can occur. Speaking of issues, here are some common problems that users reported:

  • Windows 10 BitLocker black screen – This is a relatively common problem, and to fix it, you need to enter your password, even if the prompt screen isn’t visible.
  • BitLocker is asking for a recovery key instead of a password – To fix this issue, you can try using the Command Prompt to enter your recovery key and then encrypt your hard drive again.
  • BitLocker blue screen – This is a common problem, and outdated BIOS might cause it. Update your BIOS and check if that solves the issue.
  • BitLocker does not prompt for a password – If you encounter this issue, try switching to LegacyBoot and check if that solves your problem.
  • The BitLocker password prompt is not working – This problem can occur due to the Fast Startup feature, but once you disable it, you should be able to use the password prompt again.

How do I get past the BitLocker password prompt screen?

1. Enter your PIN blindly

Users reported that instead of BitLocker prompt screen, they are getting a solid blue screen with no input field to enter their PIN. This can be a bit daunting, but you should know that you can still enter your PIN on the solid screen even if you don’t see the password field.

Enter your PIN blindly, and you should log in to Windows 10 without problems.

2. Remove the problematic update and reinstall it

2.1 Remove updates

  1. Hold down the Power button for about ten seconds, then press the Power button to start the computer.
  2. On any indication that the computer has started, repeat step one.
  3. Once again, repeat step one a third time when the computer is about to start.
  4. The computer will enter winRE, and in the Choose an option windows select Troubleshoot.
    bitlocker password prompt screen
  5. Now navigate to Advanced options.
    Bitlocker password prompt screen
  6. Click Startup Settings.
    Bitlocker password prompt screen
  7. Then click the Restart button.
    bitlocker password prompt screen
  8. Press 5 or F5 for Safe Mode with Networking.
    Bitlocker password prompt screen
  9. Open the Settings app by pressing Windows + I and go to Update & security.
    BitLocker blue screen
  10. Now click on View your update history.
    BitLocker does not prompt for password
  11. You’ll see all installed updates in the Update history section. Click on Uninstall updates.
    BitLocker password prompt is not working
  12. Find the problematic update and double-click it to uninstall it. Users reported that the KB3172985 update caused the issue for them; therefore, be sure to remove it.
    Windows 10 BitLocker black screen
  13. Restart your computer.

After removing the update, you need to suspend BitLocker temporarily.

2.1 Suspend bitlocker

  1. Press Windows Key + S and enter BitLocker. Next, select Manage BitLocker from the list of results.
    BitLocker blue screen
  2. You should now see your encrypted drives. Select the Suspend protection option.

After suspending BitLocker protection, you need to reinstall the update. First, go to the Windows Update section in the Settings app and check for updates to download the missing update automatically. After reinstalling the update, the issue should be resolved, and you can turn on BitLocker protection.

3. Use Command Prompt

  1. Hold down the Power button for about ten seconds, then press the Power button to start the computer.
  2. On any indication that the computer has started, repeat step one.
  3. Once again, repeat step one a third time when the computer is about to start.
  4. The computer will enter winRE, and in the Choose an option windows select Troubleshoot.bitlocker password prompt screen
  5. Now navigate to Advanced options.Bitlocker password prompt screen
  6. Select Command Prompt. If you have access to the Windows login, jump to step 7 to access your Command Prompt.
  7. Start Command Prompt as administrator. You can do that by pressing Windows Key + X and selecting Command Prompt (Admin) from the menu.
    BitLocker asking for recovery key instead of password
  8. Once the Command Prompt opens, enter the script below and press Enter to run it.
    bfsvc.exe %windir%boot /v
    BitLocker asking for recovery key instead of password

After you execute the command, the issue with the BitLocker password prompt screen should be fixed completely.

4. Use legacy boot

  1. Press the Windows Key + X and select Command Prompt (Admin) from the menu.BitLocker asking for recovery key instead of password
  2. When Command Prompt starts, type the script below and hit Enter.
    bcdedit /set {default} bootmenupolicy legacy
    BitLocker blue screen

After enabling legacy boot, your boot screen might not look as pretty, but you should have no problems with the BitLocker password screen.

Windows 10 uses a new graphical boot menu, and sometimes that boot menu can lead to specific issues, such as problems with BitLocker password prompt screen. However, according to users, if you switch back to legacy boot, there are no problems with the BitLocker password screen.

5. Disable the Fast Startup feature

  1. Press Windows Key + S, enter power settings, and then choose Power & sleep settings from the results list.
    BitLocker does not prompt for password
  2. Click on Additional power settings in the Related settings section.
    BitLocker does not prompt for password
  3. The Power Options window will now open. Select Choose what the power button does option from the left pane.
    BitLocker password prompt is not working
  4. Click on Change settings that are currently unavailable.
    Windows 10 BitLocker black screen
  5. Uncheck Turn on fast startup (recommended) option and click Save changes.
    BitLocker asking for recovery key instead of password

Afterward, go to BIOS and look for the Fast Startup option there. After you disable Fast Startup in BIOS and Windows, the problem should be resolved entirely.

Fast Startup can be pretty valuable since it will allow your PC to boot faster, but this feature can sometimes cause problems with BitLocker password prompt screen despite its usefulness. Users recommend disabling Fast Startup on their PC and BIOS to fix this issue.

6. Update your BIOS

  1. Press the Windows Key + X and select Command Prompt (Admin) from the menu.BitLocker asking for recovery key instead of password
  2. When Command Prompt starts, type the script below and hit Enter.
    wmic bios get serialnumber
  3. Go to your manufacturer’s website and use the serial number to download your BIOS. This step will be different for brands.

If you’re having Bitlocker password prompt screen problems, the problem might be your BIOS. Several users reported fixing this issue simply by updating their BIOS to the latest version.

We also wrote a short guide on how to flash your BIOS, so you might want to check it out for some general instructions. Once you update BIOS, disable BitLocker and enable it again, and the issue will be resolved.

7. Use a Command Prompt outside of Windows 10

  1. Hold down the Power button for about ten seconds, then press the Power button to start the computer.
  2. On any indication that the computer has started, repeat step one.
  3. Once again, repeat step one a third time when the computer is about to start.
  4. The computer will enter winRE, and in the Choose an option windows select Troubleshoot.bitlocker password prompt screen
  5. Now navigate to Advanced options.Bitlocker password prompt screen
  6. Select Command Prompt. If you have access to the Windows login, jump to step 7 to access your Command Prompt.
  7. Start Command Prompt as administrator. You can do that by pressing Windows Key + X and selecting Command Prompt (Admin) from the menu.
    BitLocker asking for recovery key instead of password
  8. When Command Prompt opens, type the script below and hit Enter.
    manage-bde – status
  9. You should now see the list of volumes. Type the script below and hit Enter, replacing C with the letter of the encrypted drive.
    manage-bde -protectors - disable C:
    https://windowsreport.com/wp-content/uploads/2018/08/status-1.png
  10. Now run the command below as well.
    wpeutil reboot

After executing all commands, close Command Prompt, restart your PC and check if the problem is resolved.

Alternatively, you can use the following commands:

  • manage-bde -status c:
  • manage-bde -unlock c: -rp <your 48-digit recovery password>
  • manage-bde -protectors -disable c:

Remember that these commands might not fix the problem but will allow you to reaccess Windows 10.

According to users, if you have problems with BitLocker password prompt screen, you might be able to fix it simply by running a couple of commands outside of Windows. This is pretty simple, and you can do it by following these steps:

8. Disable Secure Boot

  1. Power on your device, and once it starts, press F10 (this works for HP and may be different in other brands).
  2. Use the Arrow key to navigate to the Boot option.
  3. Navigate to Secure boot, and change it to Disabled.
    wmic bios get serialnumber

If you’re having problems with BitLocker password prompt screen, you might be able to fix the issue by disabling the Secure Boot feature in BIOS.

To see how to access BIOS and disable this feature, we strongly advise you to check your motherboard or laptop manual for detailed instructions.

9. Run a bcedit command

  1. Start Command Prompt outside of Windows 10 as outlined in solution 7.
  2. When Command Prompt starts, run the script below and hit Enter.
    bcdedit /set {bootmgr} bootshutdowndisabled 1

After running this command, your PC won’t shut down during the password prompt screen.

According to users, their PC shuts down on BitLocker password prompt screen. This is somewhat normal and automatic, but you can fix the issue by running a single command.

10. Remove the hard drive and decrypt it on another PC

According to users, they fixed issues with BitLocker password prompt screen on their PC by removing their hard drive and decrypting it on another PC. To do that, you must turn off your PC, disconnect it from the power outlet, open the case, and remove your hard drive carefully.

Now connect your hard drive to a different PC and decrypt it. Once that is finished, insert the hard drive back into your PC. If everything works properly, it’s advised to update your system before you encrypt the hard drive again.

If any updates are available, they will be downloaded in the background and installed as soon as you restart your PC. Once your system is updated, you encrypt your hard drive again.

BitLocker is one of the simplest ways to encrypt and protect your hard drive, and if you’re having problems with BitLocker password prompt screen, be sure to try some of our solutions.

New Bing Review: How to get & use Microsoft’s ChatGPT

The search engine world is dominated by Google, and Microsoft Bing is in a distant second place holding just a fraction of a user base.

Microsoft plans to change that with the introduction of ChatGPT integration to Bing. In case you’re not familiar with it, read our guide on ChatGPT Professional to learn more.

Speaking of which, this feature is now available in a limited preview form to all users, so join us for a new Bing review to learn what it can offer.

How can I use the new Bing with ChatGPT?

Using the new Bing is simple, and you just have to visit the Bing homepage and you should see ChatGPT suggested queries available right below the search bar.

In our initial testing, these features weren’t available, but after changing the Bing region settings to the United States, the problem was resolved.

What can Bing with ChatGPT do?

Once you open Bing, you need to choose one of several available queries. At the moment, it’s not possible to input your queries, due to the nature of the limited preview.

Once your query has been processed by the AI, you’ll get the results in the right pane right next to regular search results.

If you want, you can check the source for each piece of information generated by ChatGPT simply by clicking the highlighted text in the response or picking the source from the list of sources at the bottom.

Of course, it’s possible to copy the entire response if you wish to save it or share it. However, we have to inform you that one of the most important features of ChatGPT isn’t currently available.

You can’t chat with the ChatGPT even though Bing gives you a list of potential responses you can use. This is because this is just a limited preview, and if you want to utilize ChatGPT to the fullest, you have to join the waitlist.

Currently, there are only four queries available from the main page and about 12 more from the Learn more page.

It’s worth mentioning that certain queries use a different layout and they will display the ChatGPT results before the actual search results.

If you use this layout, you’ll notice extra prompts available at your left, and you can use them to generate your story, tweet, summary, code, letter, or joke.

Do keep in mind that you’ll always get the same results, but it’s exciting to see what this feature will be able to do in the future.

Issues with Bing and ChatGPT

We have noticed several issues with this feature, most notably that text isn’t showing properly if it exceeds a certain length. Since there’s no scroll bar available, you can’t see it in its entirety.

The share feature is sometimes available, but it doesn’t work. However, we didn’t find this to be a dealbreaker. In a few instances, we got errors saying that there was a problem with the service, but that’s likely due to a high number of requests.

Conclusion

Bing with ChatGPT sounds like a revolutionary idea, especially if you’re a frequent ChatGPT user. However, since this is an early preview, you can only use predetermined queries.

Chatting features and custom queries aren’t available, and if you want to test them, you’ll have to join the waitlist.

It’s exciting to see that Microsoft is utilizing ChatGPT to enhance its search results, and we can’t wait to get access to all the features.

If you want to learn more about this feature, we suggest reading our ChatGPT vs Google guide and see how it compares to the world’s biggest search engine.

And with that, we conclude our new Bing review. Have you tried this feature yet, and are you excited about it? Let us know in the comments below.

Microsoft Device Association Root Enumerator [2026 Guide]

Windows 10 uses many different components and drivers in order to work properly. As expected, one of those components is none other than the Microsoft RRAS Root Enumerator.

This is a driver, and it’s used to ensure that certain legacy devices are working properly on your PC, especially while booting.

Many users aren’t familiar with this component, so in today’s article, we’re going to take a closer look at the Microsoft RRAS Root Enumerator and see what it does.

How does Microsoft RRAS Root Enumerator work?

Microsoft RRAS Root Enumerator driver works alongside your system, and it helps boot certain devices that are connected to your PC.

For example, if a device is trying to install drivers or software, and the device uses rooted software, the Root Enumerator will assign a specific value to this device.

By using Root Enumerator, the newly installed device can start automatically during the boot. In case the Enumerator isn’t working properly, your device might have issues starting.

Keep in mind that this isn’t an essential component, and few users reported issues with it, especially while gaming.

It is also important not to confuse it with the Microsoft Device Association Root Enumerator which is used to run old devices such as serial ports, TWAIN devices, and MIDI devices.

The easiest way to remedy those issues is to disable the driver, and in the next section, we’ll show you the proper way to do that. The process is simple, and it will take you only a couple of seconds to do it.

How can I disable Microsoft RRAS Root Enumerator?

  1. Press Windows key + X to open the administrative menu.
  2. Select Device Manager from the list of options.
    device manager
  3. Expand the Software devices section.
  4. Locate Microsoft RRAS Root Enumerator and right-click it, then choose Disable device from the menu.
  5. When the confirmation dialog appears, click on Yes.

After doing that, your Microsoft RRAS Root Enumerator will be disabled. Many users reported fps issues in games such as Tekken 7, Dark Souls 3, and Sekiro, and the issue was caused by the Microsoft RRAS Root Enumerator driver.

After disabling this device, the problem should be resolved, and the frame rate will return to normal.

You can also use a dedicated driver updater software like Outbyte Driver Updater to perform this task a lot quicker and safer.

Disabling Microsoft Device Association Root Enumerator usually doesn’t have any negative consequences, but if you’re using MIDI devices, TWAIN devices, or serial ports, those devices might not work with the Root Enumerator disabled.

To fix this problem, simply enable Root Enumerator by following the similar steps that we described here and then restart your PC to fix this issue.

How to disable the Microsoft Device Association Root Enumerator?

Some of our readers had problems while playing Elden Ring caused by another component called Microsoft Device Association Root Enumerator.

Uninstalling that device solved the issue with the game so you might want to try that also.

Fortunately, the previous solution works seamlessly to remove the Microsoft Device Association Root Enumerator.

These solutions also work for Windows 11 so if you’ve switched to the new OS and have the same problem, the guide will come in handy.

The Microsoft RRAS Root Enumerator and Microsoft Device Association Root Enumerator drivers have a certain purpose on your PC, but they are not essential in any way, and you can disable it if you want without any worries.

However, other drivers are essential, so make sure to use one of the best driver update software for Windows 10 to keep your system running smoothly all the time.

We hope that you learned a thing or two after reading this guide and that you have a better understanding of what is the Microsoft RRAS Root Enumerator and how it works.

Fix: Printer Driver is Unavailable Errors: HP, Canon, Brother

Drivers play important roles in the connection between your printer and PC. However, some users are complaining of a printer driver is unavailable error on Windows 10 for some reason.

This can be frustrating, as it renders your hardware useless. Fortunately, it is an issue that can be fixed easily by following the solutions in this guide.

How to fix printer driver is unavailable error?

General fixes

1. Update PC

  1. Press the Windows key + I to open the Settings app and select the Update & Security option.
    update and  printer driver unavailable
  2. Click the Check for updates button.
    check for
  3. Now, download and install any available updates.

In most cases, the printer driver is unavailable issue can be caused by an outdated PC. Windows updates are important for keeping your PC running smoothly and can sometimes include driver updates.

Hence, the first thing you need to do to fix this issue is to update your PC to the latest version.

2. Update the driver manually

  1. Go to your printer manufacturer’s website to download the latest driver. Below are the links you can use:
  2. Extract the downloaded file.
  3. Press the Windows key + X and select the Device Manager option.
    device manager
  4. Now, double-click the Print queues option to expand it and right-click your driver.
  5. Select the Update driver option.
    update driver printer driver unavailable
  6. Next, choose Browser my computer for drivers.
    browse my
  7. Now, click the Browse button.
    browse
  8. Finally, select the driver in Step 2 and follow the onscreen instructions to complete the process.

Another effective method of fixing this printer driver unavailable issue is installing the required drivers from the manufacturer’s website. This is because the generic drivers on Windows are sometimes not enough.

Downloading and installing drivers manually may be a big problem, especially when the wrong driver version is installed. This may lead to serious malfunctions.

We strongly suggest you update your driver automatically with a dedicated tool. All you need to do is to install it and let it scan your PC for missing and out-of-date device drivers. The best part is yet to come. You can choose to download all of your faulty device drivers at once.

Fix Canon printer driver is unavailable

  1. Press the Windows key + R, type devmgmt.msc, and click OK.
    devmgmt
  2. Expand the Print queues option and right-click your printer.
  3. Now, select the Update driver option.
    update driver printer driver unavailable
  4. Next, select Browser my computer for drivers.
    browse my
  5. Choose Let me pick from a list of available drivers on my computer.
    let me pick
  6. Finally, select the Generic software device and click the Next button.
    generic printer driver unavailable

If the Canon printer driver is unavailable, you might need to downgrade to the default Windows driver. This has fixed this issue for many users, and you can also use it for Brother and HP printers.

Fix the HP printer driver is unavailable

1. Uninstall and reinstall the printer using the Windows driver

  1. Press the Windows key + R, type control, and select the Control Panel option.
    control
  2. Click the View devices and Printers option under Hardware and Sound.
    view devices printer driver unavailable
  3. Now, right-click your printer and select Remove device.
    remove device
  4. Next, go back to the Control Panel window and choose to Uninstall a program under the Programs option.
    uninstall a printer driver unavailable
  5. Right-click all the HP printer options, select the Uninstall option and follow the onscreen instructions to complete the process.
    uninstall control
  6. Now, press the Windows key + X and choose Device Manager.
    device manager
  7. Expand the Print queue options and right-click your printer.
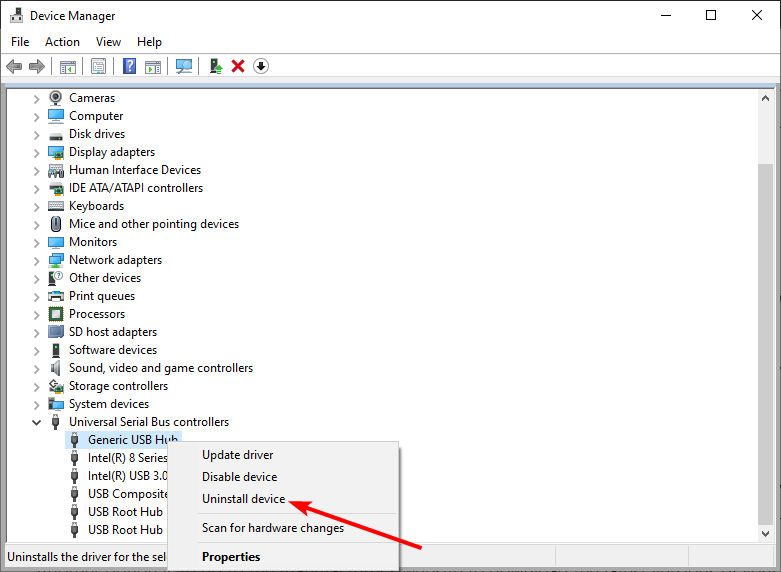
  8. Select the Uninstall device option.
    uninstall device
  9. Check the box for Delete the driver software for this device if it is available, and click the Uninstall button.
    uninstalll button
  10. Next, disconnect your PC and printer from the internet and restart them both.
  11. Now, repeat Steps 1 and 2 above and click the Add a printer option.
    add a printer driver unavailable
  12. Choose Windows update when prompted for drivers.
  13. Fill in the Manufacturer’s name appropriately and choose your printer in the Printers pane.
  14. Now, power your printer and connect to the network via a cable.
  15. Finally, follow the onscreen instruction to complete the process.

If your HP printer driver is unavailable on your PC, you need to uninstall the device completely and start the connection all over. This should clear any roadblock causing the issue.

2. Run the HP Printer Scan Doctor app

Another excellent option to try if you are getting the printer driver unavailable error on your HP printer is to use the official diagnosis app.

The HP Printer Scan Doctor app helps to troubleshoot and fix a series of issues and should be useful in this case too.

Fix Brother printer driver unavailable

1. Update driver using Windows update

  1. Right-click the Start icon and select the Device Manager option.
    device manager
  2. Expand the Print queue option and right-click your driver.
  3. Now, select the Update driver option.
    update driver printer driver unavailable
  4. Lastly, choose the Search automatically for drivers option and install any available update.
    search auto

If the printer driver is unavailable is troubling you on your Brother printer, it might be because of an outdated driver. You can update it using the Windows update feature or via the manufacturer’s website, as shown earlier in this guide.

2. Run the printer troubleshooter

  1. Press the Windows key + I and select the Update & Security option.
    update and printer driver unavailable
  2. Click Troubleshoot in the left pane and select Additional troubleshooters.
    troubleshoot
  3. Now, select the Printer option and click Run the troubleshooter.
    run the printer driver unavailable

Another effective method for fixing this issue on the Brother printer is to run the built-in troubleshooter. This should help diagnose the potential causes of the problem and suggest possible solutions.

With this, we can conclude this guide on the printer driver is unavailable error. It should be noted that the solutions in this guide can be used interchangeably for all the products listed.

So, you should be free to try them.

If you are unable to install your printer driver on Windows 10, check our detailed guide to fix it quickly.

Feel free to let us know the solution that helped you fix this issue in the comments below.

Windows 11 Clean Install vs Upgrade: Which is Better?

Are you split between a Windows 11 clean install vs. an upgrade? This guide should make a choice easier.

Windows 11 has been out for some time, and users are eager to switch and give it a try. Microsoft has streamlined this process so you can upgrade with just a few clicks.

However, many are worried about potential compatibility issues, so they prefer to do a clean install instead.

Today’s guide will look at Windows 11 upgrade and a clean install. Then, we will see which is a better method to use if you want to upgrade to the latest version.

Should I go for a Windows 11 upgrade or a clean install?

What does Windows upgrade do?

In essence, a Windows 11 upgrade may do the following:

  • Add features – Introduce new features and improvements to the operating system. This includes an updated user interface, improved performance, and enhanced security features.
  • File preservation – Preserves existing files, settings, and installed applications, allowing you to keep your current configuration. Also, you minimize the time spent reconfiguring your system after the upgrade.

The upgrade process is designed to be straightforward, and it allows you to upgrade to Windows 11 with ease. This makes upgrading to the latest version as simple as installing a system update.

Head to the Update & Security Settings section, where you can download and install the latest version. Then, click the button and follow the instructions on the screen.

To learn more about this process, visit our guide on upgrading to Windows 11 for step-by-step instructions.

If this method doesn’t work, you can use Windows 11 Installation Assistant tool to download the update and upgrade seamlessly.

What are the disadvantages of an upgrade?

The disadvantages of upgrading to Windows 11 as opposed to performing a clean install are:

  • Potential compatibility issues – Upgrading may not resolve all compatibility issues with older applications and hardware. So, some may still experience performance issues or become inoperable.
  • Risk of data loss or corruption – Upgrading carries a risk of data loss or corruption. This is more likely if there are issues with the upgrade process. However, the risk is lower with a clean install, but you’ll need to back up all your data beforehand.
  • Slower performance – The upgrade process can be resource-intensive and slow down your computer. However, a clean install often improves performance since it starts with a clean slate.
  • Storage – A main disadvantage of the upgrade is that it utilizes more of your storage space during the initial installation.

Although these issues aren’t common, some users reported them, so you should keep them in mind.

What should you perform before you do an upgrade installation?

If you are planning on an upgrade, you must do the following before trying the process:

  • Check hardware requirements – It’s advised to check the hardware requirements for Windows 11 using the PC Health Check app. If your hardware is supported, you can move to the next step. If not, there’s no need to worry since there are ways to install Windows 11 on unsupported hardware.
    Windows 11 clean install vs upgrade
  • Free up the drive – If possible, clean up your system drive and leave as much free space as possible. You’ll need at least 64GB, but it won’t hurt to have more available.
  • Back-up files – It’s highly advised that you back up your files. You can move them to an external drive, a different partition on your PC, or even to the cloud. To do this, we suggest using backup software since it will speed up and automate the entire process.

Backing up your files isn’t mandatory. However, if anything goes wrong, it’s always a good idea to have your essential files in a safe location.

What does a clean install do?

A clean install is a bit more complex. It requires you to download Windows 11 ISO from Microsoft’s website and create an installation media with third-party tools.

You can also use Media Creation Tool for Windows 11 to download and create installation media from a single application. However, this method is more straightforward, so we recommend using it instead.

Once installation media is created, you need to change your boot configuration and boot from it to start the Windows 11 setup.

By using this method, you’ll get the following:

  • An option to clean your system drive and install the new operating system from scratch without any performance or compatibility issues.
  • An option to circumvent specific requirements, such as TPM and Secure Boot, is helpful for users using older hardware.

If you can’t enable TPM 2.0 in BIOS, then your only option is to bypass the TPM requirement when installing Windows 11, which is possible with a clean install. To learn more, you should read our Windows 11 and TPM guide for in-depth information.

What are the disadvantages of a clean install?

Before performing a clean install, you should be aware of the following downsides:

  • Process complication – Clean install requires you to create a bootable media and use a USB flash drive to start the installation. If you have never done this, it might feel a bit complicated.
  • File loss – A clean install will also remove all your files and apps from the system drive, so you’ll need to back up important files beforehand.
    Windows 11 clean install vs upgrade
  • Time-consuming process – If you do a clean install, you need to install all your applications again, which can take a while, depending on the number of apps you use.

It’s worth mentioning that you can accidentally format a wrong partition and install Windows on it by mistake if you’re not careful, so this is why this method is recommended for more advanced users.

What should you perform before you do a clean installation?

If you are planning on a clean installation, you must do the following before trying the process:

  • Backup your data – This is the most crucial step, as a clean installation will erase all your data and settings. Ensure to back up all your important files, documents, photos, music, etc., to an external hard drive or cloud storage.
  • Make a list of installed applications – Write down the list of all the applications installed on your PC so you can easily reinstall them after the clean installation.
  • Check for Windows 11 compatibility – Ensure your computer meets Windows 11 minimum system requirements and that all your hardware and software are compatible with the new operating system.
  • Obtain the Windows 11 installation media – You can purchase Windows 11 from the Microsoft Store or create a bootable installation media using a Windows 11 ISO file.
  • Disable antivirus software – Temporarily disable any antivirus software you have installed, as it may interfere with the installation process.
  • Disconnect any unnecessary peripherals – During installation, disconnect any unnecessary peripherals such as external hard drives, printers, or other devices.
  • Transfer your settings – With a clean install, moving all your necessary settings to a different drive on your PC or, better yet, an external one is crucial. This is especially important because drives during the setup phase aren’t labeled, so you might accidentally select the wrong drive.

What is the difference between an upgrade installation vs. a clean installation?

The upgrade process is designed to be straightforward, so even if you’re not tech-savvy, you’ll be able to install Windows 11.

All your files will be there, so you can continue exactly where you left off. Plus, the upgrade is free for a limited time, so there’s no reason not to perform it.

The clean installation is a bit more complex, requiring you to create a bootable media and boot from it. This isn’t too complicated, but it does come with a learning curve.

The main benefit of the clean installation is that it will format your system drive, thus removing the previous installation and all your files and applications.

If you’re not tech-savvy and want to give Windows 11 a try without any file loss, the upgrade is the right choice for you.

On the other hand, if you’re an advanced user and you know what you’re doing, and you want a fresh start, you can use the clean install instead.

Is it better to upgrade or clean install Windows 11?

This depends entirely on your needs, but we suggest an upgrade for less experienced and advanced users.

By doing the upgrade, you’ll transfer the license to Windows 11, so you don’t have to deal with activation later.

Plus, the free upgrade process won’t last forever, and according to Microsoft, the free upgrade process should last at least until October 5th, 2022.

However, Panos Panay, chief product officer at Microsoft, stated that the upgrade offer to Windows 11 is reaching its final phase of availability, and many are speculating that the free upgrade period is quickly coming to an end.

If this turns out to be accurate, it might be a good idea to upgrade, save yourself the trouble, and use the free upgrade offer.

You can always roll back to your previous OS

If you run into any issues, you can always roll back to the previous version 10 days after the upgrade. To learn more, visit our guide on how to roll back to Windows 10 from Windows 11.

The main problem with the upgrade is that you’ll keep all your files, even those you don’t need, along with all apps and registry entries, which might negatively affect your performance.

However, we would go for an upgrade, and if any performance issues appear, you can always perform a clean install to fix them.

This is everything you need to know about the differences between Windows 11 setup and upgrade, and we hope this guide will help you make the right choice.

For more information about this subject, we suggest visiting our guide on installing Windows 11 without file loss.

If you have any questions, feel free to ask them in the comments section below.

Visual C++ Error 0x80070666: 4 Easy Ways to Fix it

0x80070666 is a Microsoft Visual C++ installation error. When trying to install Visual C++ Redistributables on Windows, the issue arises for some users. The full error message states this:

One or more issues caused the setup to fail… 0x80070666 – Another version of this product is already installed. Installation of this version cannot continue. To configure or remove an existing version of the product, use the Add/Remove Programs.

Users can’t install the required Microsoft Visual C++ package when this happens. The error message, however, does provide a subtle hint of how to fix the issue.

What is C++ redistributable error 0x80070666?

The error code 0x80070666 is a Microsoft Windows error code indicating a problem installing a Microsoft Visual C++ Redistributable package.

This error may occur for any of the following reasons:

  • Conflicting installations – If you have multiple versions of the same Microsoft Visual C++ Redistributable installed on your system, it can cause a conflict and result in the installation failing with error code 0x80070666.
  • Corrupted installation files – The error can also occur if the installation files for the Microsoft Visual C++ Redistributable package are corrupted or damaged.
  • System compatibility – If your system does not meet the minimum requirements for the Microsoft Visual C++ Redistributable package, the installation may fail with error code 0x80070666.
  • Registry issues – The error can also occur if there are issues with the registry settings or system files related to the Microsoft Visual C++ Redistributable package.
  • Antivirus software – The installation may also be blocked by antivirus software that is installed on your system.

Should I install all Visual C++ redistributable?

Whether or not you should install all Visual C++ Redistributable packages depends on your specific needs and computer usage. However, here are a few reasons why installing them may be the right choice:

  1. Required by some programs – Some programs, such as games or other applications, may require a specific version of the Microsoft Visual C++ Redistributable to be installed on your system to run correctly.
  2. Ensure compatibility – Installing the latest versions of the Microsoft Visual C++ Redistributable can ensure compatibility with the newest software and prevent compatibility issues.
  3. Fix errors – Installing the Microsoft Visual C++ Redistributable can help resolve error messages related to missing or outdated components.
  4. Improving performance – Installing the latest versions of the Microsoft Visual C++ Redistributable can sometimes enhance the performance of programs that use these components.
  5. Future-proofing – Installing the latest versions of the Microsoft Visual C++ Redistributable can help future-proof your system and ensure compatibility with future software releases.

However, keep in mind that installing multiple versions of the Microsoft Visual C++ Redistributable can take up considerable space on a PC. Therefore, you should only install the versions required by your programs. 

If you are still determining which version to install, it is best to check the system requirements for the software you are using or consult a professional.

How can I fix error 0x80070666?

1. Uninstall Visual C++ packages already installed

  1. Press the Windows key + R hotkey.
  2. Type appwiz.cpl in the Open text box and click OK.
  3. Select a Microsoft Visual C++ package to uninstall, then click Uninstall.
  4. Then go through the uninstall guidelines to remove the software.
  5. Repeat steps three to five to uninstall all Visual C++ packages.
  6. After doing that, restart your PC and try to install the desired package again.

2. Check for Windows updates

  1. Press the Windows key + S keyboard shortcut to check for Windows updates.
  2. Type the keyword updates in the search box. Click Check for updates.
  3. Then press the Check for updates button. Windows 10 will download pending updates.
  4. After that, you’ll need to restart Windows.

3. Repair the Visual C++ installer

  1. Press Windows key + R and enter appwiz.cpl. Press Enter.
  2. Select the version of Visual C++ Redistributable that you want to repair and click Change.
  3. Select Repair.
  4. Follow the instructions on the screen to complete the process.
  5. Do this for all other versions of Visual C++ Redistritubatbles.

4. Check out the Program Install and Uninstall troubleshooter

  1. Visit the Microsoft Installation Troubleshooter page.
  2. Click on Download troubleshooter.
  3. Open the troubleshooter’s window, and click Advanced.
  4. Select Apply repairs automatically and click Next.
  5. Now select the Installing option.
  6. Select the Visual C++ package where error 0x80070666 arises, and press the Next button.
  7. Wait for the process to finish.

Those are a few more widely confirmed resolutions with fixed error 0x80070666 for users. So, they’ll probably resolve the issue so you can install the required Visual C++ package.

If you still have problems, check our Cannot install Visual C++ 2015 Redistributable guide for more solutions.

If you are aware of another fix for this issue, help the other users by sharing it in the comments below.

How to Listen to Your Microphone in Windows 11

You must listen to a microphone when you buy one to test its quality. That way, you can discover and, subsequently, troubleshoot any audio problem you may come across.

For example, you may hear a high-pitched noise coming from your speakers. This can be the result of an improperly placed microphone. Maintaining your mic is a great way to ensure its longevity.

What may cause microphone problems?

Before learning to listen to your microphone, it’s essential to understand why you should do it. As stated, this can help you zero in on issues or malfunctions.

Below is a list of the most common mic problems, but it is by no means an exhaustive list:

  • Your computer has low volume, or your mic is muted – It may seem obvious here, but having little to no volume from your source means you can’t properly test the devices.
  • The mic has not been properly set up – Without a proper set up, your device will not work. Fortunately, it’s easy to do as you mainly have to tweak a few things in Settings.
  • There’s too much background noise – Background noise can interfere with the recording process. You should download some noise canceling software to stop this problem.
  • Devices are poorly connected – Bad connections can cause audio to become distorted. Double-check the cables and make sure everything’s plugged in all the way.
  • Static noise – Your microphone may produce some static noise if it’s damaged or enabled audio enhancements.

How can I listen to my mic on Windows 11?

You can listen to your microphone on Windows 11 to test it properly in two main ways. But before you do, it’s recommended that you do the following to ensure the mic will work correctly.

  • As alluded to earlier, make sure you increase the volume on your computer to the proper levels. This is a really common mistake that people often overlook when testing audio devices.
  • Update your microphone’s drivers to ensure good device performance. And to that extent, install any missing Windows 11 updates you may have lingering in the back.
  • Double-check if the mic is selected as the main audio input. You can do the latter by going into the Sound section of the Settings menu. See if it’s enabled.
  • Run the audio troubleshooter if you experience any trouble with the mic. Microsoft’s website provides instructions on how to find and locate the troubleshooter.
  • And if all else fails, you might need a new microphone. The only reason why a mic wouldn’t work after performing all these steps is due to malfunctioning parts.

1. Test via the Settings menu

  1. First, make sure your microphone is connected to your PC’s port.
  2. Next, launch the Settings menu and click Sound in the System tab.
  3. In the Input section, select the microphone you want to test.
  4. Under Input Settings, click the Start Test button at the bottom and speak into your microphone. You should see a bar moving as you speak.

See if your computer is picking up the audio. You must plug in your headphones to hear the microphone much better. If that doesn’t work, you can try out the following solution.

2. Listen through a playback device

  1. Right-click the Windows logo in the bottom-left corner and select Run.
  2. Enter mmsys.cpl, then click OK to open the Sound menu.
  3. Click the Recording tab, and double-click the microphone that you’re using.
  4. In this new window, go to the Listen tab.
  5. Enable Listen to this device.
  6. Expand the menu under Playback through this device and select an output for your microphone’s audio.
  7. Click Apply, then OK.
  8. Additionally, it’s recommended that you turn off audio enhancements which you can do by going to the Advanced tab.
  9. Under Signal Enhancement, select the box next to Enable audio enhancement to disable the feature.
  10. Click Apply, then OK.

When you’re done testing, be sure to turn this feature off. If you don’t, you may cause a feedback loop with another device. This can also occur if the settings aren’t correctly configured.

3. Listen through native Recorder ap

  1. In the Windows Search bar, type in Recorder and select the native Sound Recorder app.
  2. Plug in your microphone and hit the red Record button to begin recording your voice. If the app asks you for permission to access the mic, select Yes.
  3. Once you’re done recording, you can listen to the audio and hear how you sound.

Are there ways to improve my audio quality?

After you finish testing, you may begin wondering how you can improve the audio quality on your Windows 11 machine. Well, there are two main ways to do it.

You can download proper recording software, giving you better control over your audio and how it sounds. Some can professionally record, edit, and mix audio files like Adobe Audition.

We recommend restarting the Windows Audio Services on your computer or tweaking the audio settings. Some software adjustments may be all you need.

Feel free to comment below if you have questions about other microphone problems. And please tell us if there’s a specific guide for a Windows 11 error that you’d like to see.

OneDrive Files Not Syncing on iPad or iPhone: 4 Easy Fixes

In recent years, Apple added various productivity tweaks to its iOS operating system for mobile devices.

Among these tweaks is Files, a native file system that allows users to interact with documents and images without using third-party tools. This also means that OneDrive can be accessed through the Files app.

With these changes ongoing, it is possible that you’d have OneDrive files not syncing on iPad or iPhone. So let’s find out why you face the problem and the solutions that actually work.

Why are OneDrive files not syncing?

Here are a few reasons OneDrive files are syncing on iPad and iPhone:

  • Issues with the Internet connection: A stable Internet connection is a must for syncing. So your primary approach should be to check for that.
  • Running out of storage: If the OneDrive is full or low on storage, it will not be syncing files on iPad, or any other device, for that matter.
  • Misconfigured settings: Certain settings need to be enabled for syncing to work, as illustrated in the solutions below.
  • Outdated version: If you are running an outdated version of the OneDrive or iOS, chances are, you will encounter issues with syncing on OneDrive.

What can I do if OneDrive files are not syncing on iPad?

Before we head to the slightly complex fixes, here are a few quick ones to try first:

  • If you are using mobile data, switch to Wi-Fi, and verify if OneDrive is still not syncing files on iPad.
  • Check if there’s enough free storage on OneDrive for files to sync. If that’s not the case, delete some files or add storage to OneDrive.
  • Update both the iPad software and the OneDrive application on it.
  • Check if the file name contains any restricted characters and remove them. These include, /, <, >, :, *, “, ?, |, or periods at the start or end of the file name.
  • If you are facing issues accessing files on iPad that were synced on another device, make sure they were not deleted.

If none of these work, head to the solutions listed next.

1. Enable Background App Refresh

  1. Open iPhone Settings, and tap on OneDrive from the list of apps here.open
  2. Now, enable the toggle for Background App Refresh.background app refresh to fix OneDrive files not syncing on iPad
  3. If the toggle is greyed out, head to Background App Refresh under General settings, and enable it from there.background app refresh

2. Clear account settings for OneDrive

  1. Open the Settings app on your iPad or iPhone, locate OneDrive, and tap on it.OneDrive
  2. Now, enable the toggle for Clear Account Settings.clear account settings to fix OneDrive files not syncing on iPad
  3. Once done, press the Home button twice or scroll upwards from the bottom, as the case may be, and terminate the OneDrive application.
  4. Next, restart the device, log into OneDrive with your credentials, and it should now work fine.sign in

A quick fix shared by Microsoft support with one of the affected users when OneDrive files were not syncing on the iPad was to clear the account settings and re-login to the app. If that doesn’t work, head to the next solution.

3. Reset iPad settings

  1. Open Settings on your iPad, choose the General tab from the left, and tap on Transfer or Reset iPad.transfer or reset ipad
  2. Tap on Reset.reset
  3. Choose the Reset All Settings option here and wait for the process to complete.reset all settings to fix OneDrive files not syncing on iPad

Several users reported that resetting the iPad settings to their default state helped fix things when OneDrive was not syncing files on iPad. Remember, this also works on iPhones.

4. Reinstall OneDrive

  1. Locate the OneDrive app on the home screen, tap and hold it, and then choose Remove App.remove app to fix OneDrive files not syncing on iPad
  2. Now, tap on Delete App.delete app
  3. After it’s deleted, restart the device, then open the App Store, and download OneDrive all over again.OneDrive
  4. Sign in with your credentials, and you shouldn’t face issues with syncing anymore.

That’s all for now! One of these solutions should have helped you get things up and running if OneDrive is not syncing files on your iPad or iPhone. Make sure to try all the solutions and not miss any.

In case the problem persists, we recommend you switch to another, more reliable cloud storage service and get rid of such errors once and for all.

If you have any queries or know of another solution not listed here, drop a comment below.

0x80d02002: How to Fix This Update/Download Error

Windows updates are essential not only for the smooth running of your system but also to protect you from potential risks. However, users have, in several instances, been unable to complete their updates. Whenever you try to download a feature update, an error message appears. 

The error is related to Windows Update and is accompanied by a code 0x80d02002. This message usually appears when the update has not been fully downloaded and installed. A restart of your system should ideally resolve the issue, but if not, below, we have more solutions you can try.

What is Microsoft download error 0x80d02002?

The error 0x80d02002, also called the Windows update error, can be caused by various factors. Some of these reasons are the following:

  • Corrupted Windows update components – The 0x80d02002 sccm error may occur when the update is incompatible with your operating system, or there are some missing update files.
  • Contradicting software – It is possible that one or more applications on your computer may be incompatible with each other. This could cause problems when they both try to install an update simultaneously.
  • Damaged/missing drivers –  A driver is a piece of software required to run your device. If your drivers are not working properly, they may not communicate with the hardware properly.
  • Unstable internet – An unstable internet connection can affect the update process and cause the 0x80d02002 wsus error. You need to boost your internet speed if possible.

How do I fix error code 0x80d02002?

We recommend you check the following preliminary steps first before the main troubleshooting options:

1. Run the Windows Update troubleshooter

  1. Hit the Windows key and click on Settings.settings windows 11
  2. Click on System on the left pane then Troubleshoot on the right pane.Open system troubleshooter
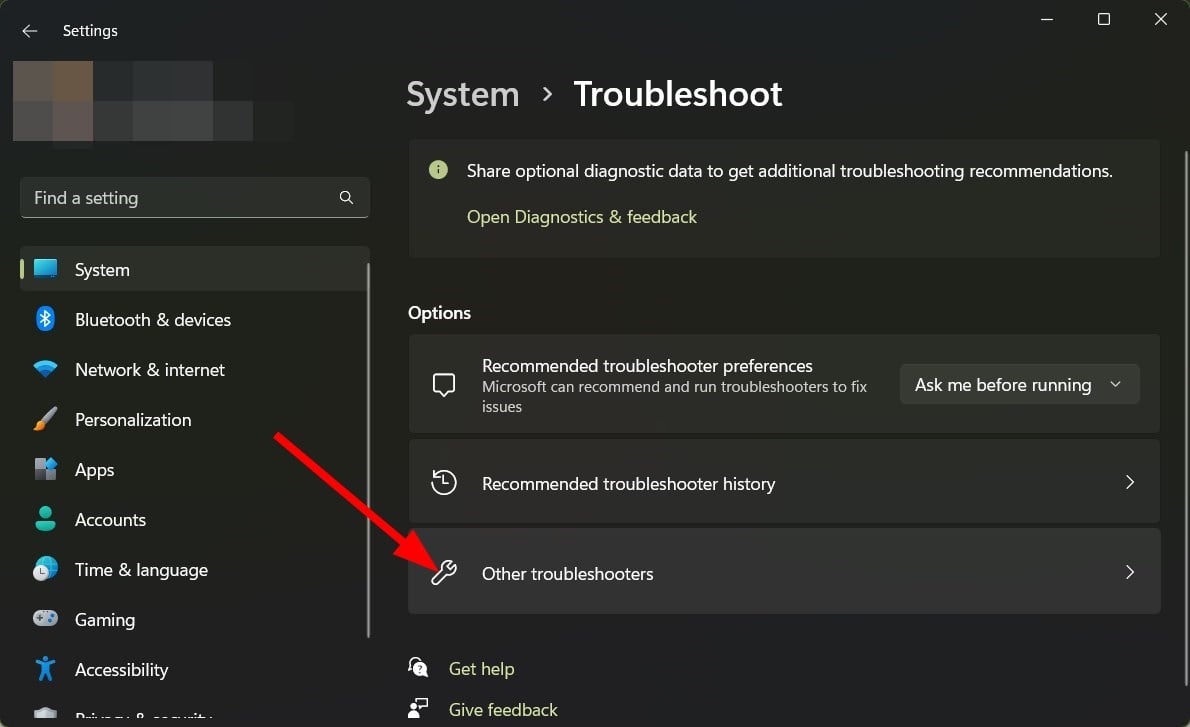
  3. Select Other troubleshooters.
  4. Scroll down, locate Windows Update, and click the Run button.windows-update-run-troubleshooter runtimebroker.exe error

Windows Update troubleshooter is used to troubleshoot problems with the Windows Update client in Windows 11. Using the troubleshooter, you can fix any issues that may prevent your computer from downloading updates or installing them.

Some users, they may find that the Windows Update is not working. Feel free to check out our article to resolve this issue.

2. Update Regional and language settings

  1. Hit the Windows key and click on Settings.settings windows 11
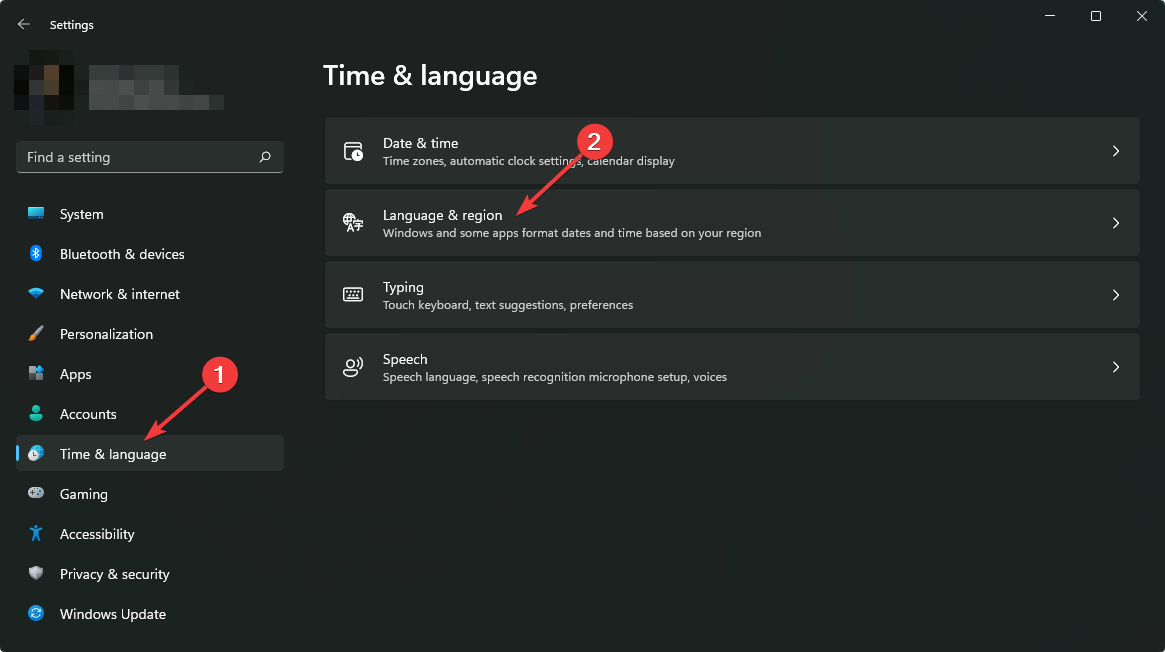
  2. Select Time & language then click on Language & region.going language and region windows 11 settings
  3. Under Windows display language, set it to English (United Kingdom).
  4. Next, under Preferred language, select a language of your choosing.
  5. Scroll to Region and enter the details of your country, then under Regional format, select English (United Kingdom).
  6. Restart your PC and check if the error persists.

According to Microsoft, the Region settings play a significant role in Windows updates. Windows may not allow you to install an update if the region settings do not approve it.

The region settings determine which updates your computer can receive and are controlled by the Microsoft Windows Update service. These regional settings can affect how Windows will download and install updates.

3. Reset Windows update components

  1. Hit the Windows key, type cmd in the search bar, and click Run as administrator.cmd-run-admin-w11 unexpected kernel mode trap windows 11
  2. Type in the following commands and press Enter after each one: net stop wuauserv net stop cryptsvc net stop bits net stop msiserver ren %systemroot%\softwaredistribution softwaredistribution.bak ren %systemroot%\system32\catroot2 catroot2.bak net start wuauserv net start cryptSvc net start bits net start msiserver

Most people are aware that Windows updates are a good thing. They keep your computer running reliably, protect it from malware, and help keep you secure. As such, you should always ensure that your PC is up-to-date.

If, at this point, none of the above methods has worked for you, we recommend performing an in-place upgrade. You can learn more about the differences between a clean install and an in-place upgrade in our comprehensive article.

Still, on update errors, you may come across the Windows Update Error 0xc1900204, so don’t hesitate to check our recommended fixes.

Let us know of any additional thoughts you may have on this topic in the comment section below.

High Ping & Lag in Call of Duty Vanguard: 5 Ways to Fix It

High ping and lag besides other Call of Duty bugs are some of the few glitches of online gaming that irritate gamers the most.

You can fix it by closing memory and bandwidth-intensive tasks running simultaneously with the game. Restarting your router and changing your DNS server can also help.

What causes high ping and lag in Call of Duty Vanguard?

The causes of lag and pings in firing games are the same everywhere. Some reasons you are seeing it in Call of Duty Vanguard include:

  • Using a VPN – Playing AAA games like CoD Vanguard with your VPN may cause connectivity issues like high latency, which ultimately leads to lagging. We have a dedicated guide on how to fix high ping when using a gaming VPN.
  • Network connection – According to many gamers, using a wireless network for Call of Duty Vanguard online results in high ping and lag.
  • Bandwidth competition – Several programs and applications consuming and competing for bandwidth on the same device may cause network congestion. Hence, high ping and lag in CoD Vanguard.
  • CoD Vanguard server issue – If the game server is down, high ping and lag are bound to happen. Then this is affecting not only you but all players.
  • System resources allocation – Multiple apps and programs sharing system resources with the game can also cause high ping and packet loss in Call of Duty Vanguard.

Irrespective of the reason, one or a combination of the fixes below should solve the problem for you.

How can I fix high ping and lag in Call of Duty Vanguard?

Before you proceed to the advanced solution in this article, try out the quick fixes below:

  • Check the game server status by visiting the Activision server page. If the game server is down, you need to wait till the server goes live again.
  • This improves performance as more system resources are committed to running the game. You can check out how to set task priority on Windows here.
  • Wireless networks are prone to interference and Wi-Fi packet loss. A wired network is more stable and can be all you need to eliminate all irritating pings and lags.
  • Do not connect multiple devices if you are keen on using a wireless network for gaming. This help avoids bandwidth competition.

If, in case, none of the above works for you, then try the following advanced troubleshooting methods to fix the problem.

1. Update the graphics driver

  1. Press Windows + R key to launch the Run window, type the following command in the text space, and click OK: devmgmt.msc
    update driver command
  2. Expand Display adapters to see the driver you want to update, right-click on it and select Update driver.
    update graphics driver
  3. Select Search automatically for drivers and follow the on-screen prompt to complete the process.

Restart your device and check if the high ping and lag have disappeared. If you want to know more methods to update the graphics driver, read this post about how to update graphics drivers on Windows 11.

2. Change your DNS server address

  1. Open the Windows Start menu and select Settings.
    Start Menu Windows 11
  2. Click on Network & internet on the left pane and select Ethernet.
    Network internet settings
  3. Navigate to DNS server assignment and click Edit.
    Edit server DNS
  4. Switch to Manual and toggle On the button under IPv4.
    Switch Manual DNS
  5. For Preferred DNS, input 8.8.8.8, for Alternate DNS, use 8.8.4.4, and click the Save button.
    Input DNS server

For these changes to be effective, you may need to clear the DNS cache. This guide on how to clear DNS server cache can be of help.

3. Turn off on-demand texture streaming

  1. Open SETTINGS on Call of Duty Vanguard and switch to the GRAPHICS tab.
    Cod settings
  2. Next, click on the Display sub menu and scroll down to select ON-DEMAND TEXTURE STREAMING.
    On demand texture settings
  3. Toggle off ON-DEMAND TEXTURE STREAMING and restart the game.

You might discover that your settings are not saved upon restarting the game. Call of Duty not saving settings is a common problem. Everything you need to correct is in our guide.

4. Disable VBS on Windows 11

  1. Click the Start menu on your taskbar and select Settings.
    Start Menu Windows 11
  2. Scroll down to Privacy & security and click on Windows Security.
    Windows Security
  3. Next, select Device security.
    Device security windows
  4. Under Core isolation, click on Core isolation details.
    Windows Core isolation
  5. Toggle Off the radio button under Memory integrity.
    Turn on VBS Windows 11

5. Disable Windows Security for Call of Duty Vanguard

  1. Click the Search button, type Windows Security in the search box and click the Best match result.
    Windows security
  2. Select Virus & threat protection and then choose Manage settings.
    disable windows security for Cod
  3. Scroll down to Exclusions, then click on Add or remove exclusions.
    Add Cod vanguard exclusion
  4. Select +Add an exclusion and add Vanguard Launcher.exe file.
    add cod vanguard exclusions list Windows defender
  5. Relaunch the game.

These are the best fixes for high ping and lag in Call of Duty Vanguard. If you follow the steps above, you should be able to fix the problem.

Call of Duty Vanguard Dev error is another issue you will likely encounter during your gaming journey. Ensure you read our linked guide to fix it.

We also have a detailed guide on how to fix mouse lag in Call of Duty for an optimal gaming experience and for accessing bot lobbies.

Kindly leave a message in the comments section below if you find this article helpful.

USB Drive Detected But Not Accessible: 7 Ways to Fix It

USB flash drives are portable memory devices you can easily plug in and use with any computer. You can use them to transfer files between computers, store documents, music, and photos, and install the software.

When you insert a USB drive into your computer, it will often automatically detect it if you plug it in correctly. If it does not detect the drive properly, you cannot access its files. Find out why this happens and how to resolve it.

Why is my USB drive detected but not accessible? 

USB drives are not always recognized by your computer, especially if they do not meet the device’s specifications. This can be due to several reasons, such as:

  • USB drive has been formatted – The drive may have been formatted with another operating system and doesn’t work with your computer.
  • Faulty USB drive – The USB drive may be damaged and therefore fail to be recognized by the computer. 
  • Unsupported USB port – The device may be plugged into a non-standard port. You may get an error that says the USB drive is not accessible, and access is denied altogether.
  • Wrongful removal – You should always ensure that when ejecting a USB device from your PC, you do so carefully to avoid damaging it.
  • Damaged USB port – Your computer may not recognize the USB device if the port is damaged or defective. 
  • Outdated drivers – If your USB drive is not being detected, you may want to check if you’re experiencing any driver errors on your system. The most common reason for this problem is that updated drivers are needed.
  • Missing updates – If your USB drive is not detected, it is because there are some missing updates that need to be installed. 
  • Virus infection – If you are using a computer that has been infected with a virus, the virus may prevent the computer from recognizing your USB drive. You need to install antivirus for USB drives to protect them from potential risks. 
  • Unreadable file system – If your USB drive has an unreadable file system, it will not be able to be read by anything on your computer. This is usually caused by a bad partition table or a corrupt MBR.

How do I fix a USB drive that is not accessible?

We recommend you try out the following first before jumping to the slightly technical solutions:

  • Try cleaning out any dust from inside your PC’s ports. Your USB may not be recognized if the ports have been dusty for a while.
  • Check to make sure that the device has been properly inserted.
  • Try with another USB port, as the one you’re using may be damaged.
  • Eject the USB drive safely, then plug it back. If you encounter issues ejecting your USB drive, check out our article.

1. Reinstall the USB driver 

  1. Hit the Windows button, type Device Manager in the search bar, and click Open.device manager
  2. Navigate to Universal Serial Bus controllers and click to expand, right-click on your USB drive and select Uninstall device.uninstall device
  3. Restart your PC and the drivers will automatically be reinstalled.

2. Update USB drivers

  1. Hit the Windows button, type Device Manager in the search bar, and click Open.device manager
  2. Navigate to Universal Serial Bus controllers and click to expand, right-click on your USB drive and select Update driver.update driver
  3. Select Search automatically for drivers.

Another potential method that is way faster would be to use a third-party driver updater tool.  Outbyte Driver Updater is a tool that makes it easy to update your drivers.

The software scans your computer in a matter of seconds and checks whether there are any issues with your USB drivers.

Outbyte Driver Updater

Use Outbyte Driver Updater to find the latest updates for your outdated or damaged drivers.
Free Trial Download now

3. Check for Windows updates 

  1. Hit the Windows key and click on Settings.settings windows 11
  2. Select Windows Update and click on Check for updates.check-updates-w11 windows 11 blue screen
  3. Download and install if available.

4. Run the CHKDSK command

  1. Hit the Windows key, type cmd in the search bar, and click Run as administrator.
  2. Type the following command, replace the C letter with your drive’s letter, and press Enter: chkdsk C: /f
  3. Restart your PC.

5. Rename the USB drive letter

  1. Right-click on the Windows key and select Disk Management.Disk Management
  2. Locate your USB drive in the list, right-click on it, and select Change Drive Letter and Paths.Change drive letter and paths
  3. Click on Change, then select a new letter.

6. Disable USB selective suspend settings

  1. Hit the Windows key, type Edit power plan in the search box, and click Open.
  2. Click on Change advanced power settings.
  3. Select Change plan settings.Change PLan settings Cyberpunk 2077 High CPU Usage
  4. In the Power Options dialog box that opens, click on USB settings to expand.
  5. Click on USB selective suspend setting, and in the drop-down menu, select Disabled.

7. Format the drive

If you’ve tried all the above, but your USB drive is still not accessible, it means that the file system on your drive is not recognized. This could be because the USB driver is corrupt or the disk has been damaged. 

To make your data accessible again, you must format the drive to another file system, such as FAT32 or NTFS. If you lose your files, there is a way to recover deleted files from your USB.

You should also consider getting a new USB flash drive if yours is faulty. Elsewhere, your TV may also not read your USB, so check out our informative article for possible fixes.

For any feedback on this topic, leave a comment down below.

Fix error code: status_breakpoint [5 Steps]

Microsoft Edge is a pretty reliable and easy-to-use browser but not one without one or two glitches. One of such problems is the Edge error code STATUS_BREAKPOINT.

The error can sometimes be caused by a weak internet connection or how the website you are trying to visit handles the webpage request. However, it isn’t easy to pinpoint its cause in some cases.

This article contains fixes that will solve the problem irrespective of the cause. All you need is to follow the instructions to the letter, and you should have Edge working again.

How can I fix the STATUS_BREAKPOINT Edge error code?

1. Update Edge

  1. Click the menu button (the three horizontal dots).settings-error-code-breakpoint-edge
  2. Select the Settings option.about app edge error status breakpoint code
  3. Scroll down to the About this app section. You will find updates here if they are available.

The STATUS_BREAKPOINT edge error code is associated with the functionality of your browser. And an outdated browser is sure to function sub-optimally.

You should close Edge and relaunch it after the update.

2. Rename Microsoft Edge’s .exe file

  1. Open File Explorer and click the Local Disk (C:).local edge error breakpoint code
  2. Select the Program Files (x86) folder, followed by the Microsoft folder.microsoft edge folder
  3. Select Edge from the options displayed.edge folder
  4. In the Edge folder, choose Application.
  5. Now, right-click the msedge option and rename it to any other name.rename msedge
  6. Finally, close the File Explorer and relaunch Edge to see if the problem has been solved.

3. Update Network Drivers

:arrow_right: Update drivers manually

  1. Press the Windows key + X and select the Device Manager option.device manager edge error code status_breakpoint
  2. Double-click the Network adapters option.network adapter
  3. Right-click on the wireless adapters available (e.g., Intel(R) Dual Band Wireless-AC 7260).update driver
  4. Select the Update driver option.search update automatically
  5. Choose the Search automatically for drivers option.

This will search and install available updates.

:arrow_right: Update drivers automatically

Instead of going through the steps above, you can automate the process with the Outbyte Driver Updater driver updater.

It is a reliable software that automatically scans for missing, outdated, and broken drivers and recommends original updates from trusted sources.

All these require just a click of the mouse from you to confirm the installation and nothing more. It just saves you a lot of time and trouble.

⇒ Get Outbyte Driver Updater

4. Clear Browser data

  1. Click the menu button.
  2. Select the Settings option followed by Privacy & Security on the left plane.choose what to clear edge error code status_breakpoint
  3. Click the Choose what to clear button.
  4. Check Browsing history, Cookies and saved website data, Cached data and files, Tabs I’ve set aside or recently closed checkboxes.clear browser data
  5. Finally, click the Clear button and restart Edge.

Browser data helps to improve user experience. It saves you time and stress, especially when you need to access a site or information you have used before.

However, this data can get corrupted. Corrupted browser data leads to all sorts of issues, among which is the Edge error code STATUS_BREAKPOINT problem.

Clearing your browser data will automatically eliminate the corrupt data and overwrite the changes it might have made to your browser.

5. Try an alternative browser

If you still can’t fix the Edge error code STATUS_BREAKPOINT problem after exhausting the fixes above, you can disable Microsoft Edge and try an alternative in Opera One.

Opera One is a high-performance browser that is endowed with stunning features. Starting from the free built-in VPN to Ads blocker and Crypto Wallets, it houses diverse integrations that will more than meet your browsing demands.

Whether speed or privacy, Opera One more than makes up for what other browsers do without the error troubles.

⇒ Get Opera One

The Edge error code STATUS_BREAKPOINT can be frustrating. But it is not the most difficult problem to solve, as proven in this article. Also, you can go for a better alternative if the problem persists after trying so many fixes.

If you were able to solve the issue successfully, you can check our list of Microsoft Edge tips and tricks for full optimization of your browser.

Feel free to share your experience with the error and the fix that helped you solve it in the comments section below.

This File Came From Another Computer: 4 Ways to Unblock It

This file came from another computer and might be blocked to help protect this computer message can appear while you’re trying to run a potentially dangerous file.

This isn’t the only error that you can encounter, and many reported The file being saved or retrieved has been blocked message as well.

Since this can be a problem, today’s guide will show you how to fix it properly on your PC.

How can I fix This file came from another computer and might be blocked?

1. Use Registry Editor

  1. Press Windows key + R to open the Run dialog box.
  2. In the box, key in regedit and click OK. This will open the Registry Editor.regedit this file came from another computer and might be blocked to help protect this computer windows 10
  3. In the next window (Registry Editor), go to the Policies path: Computer\HKEY_CURRENT_USER\Software\Microsoft\Windows\CurrentVersion\Policiespolicies registry this file came from another computer and might be blocked to help protect this computer windows 10
  4. Right-click on the Policies menu, select New and then click on Key. Name the new key Attachments.new key this file came from another computer and might be blocked to help protect this computer windows 10
  5. On the right-hand side, navigate to an unoccupied area and right-click.
  6. Select New and click on DWORD (32-bit) Value.
  7. Rename and save the new key as SaveZoneInformation.
  8. Double-click on it and set its value to 1.
  9. Exit the program and restart the PC.

Once this is done, check if the problem is resolved. If it persists, you can try the next fix.

Note icon NOTE
This only ensures that subsequent transfers/downloads are not affected or blocked. As such, previously saved files remain unfixed. The same applies to the next solution.

2. Change Group Policy

  1. Open the Run dialog box by pressing Windows key + R.
  2. In the popup dialog box, enter gpedit.msc and press Enter. This will take you to the Group Policy Editor.
  3. On the display window, expand User Configuration. Next, go to Administrative Templates. Lastly, select Windows Components.
  4. Select Attachment Manager in the left pane. Next, double-click Do not preserve zone information in file attachments option.
  5. Select Enabled and click Apply and OK to save changes.
  6. Exit the program and restart your PC.

Once your PC reboots, check if the issue is resolved. If it’s not, you can try the next solution.

3. Delete data streams

  1. Download streams (in executable ‘exe’ format).
  2. Run the extracted .exe file.
  3. In the next window, click on Browse and navigate to the affected folder or file directory.
  4. Click on the Scan.
  5. After the scan, locate and select all files with the tag: Zone:Identifier:$Data$.
  6. Right-click on the selection and select Delete Selected Streams from the list of options.
  7. Close the program and restart the PC.

This, if properly executed, should fix the error. Consequently, all affected files would be unblocked. If the issue remains unsolved, try the next solution.

4. Use PowerShell

  1. Launch Windows Powershell as an Administrator. To do that, press Windows key + X and choose PowerShell (Admin).
  2. Enter the following command and press Enter: dir C:\Downloads -Recurse|Unblock-File
  3. Close the program and restart your PC.

There you go; these are four simple solutions that should fix This file came from another computer and might be blocked to help protect this computer error on your PC, so be sure to try them all.

If you’re still having issues, be sure to read our PC has blocked access to certain file guide for more solutions.

Did you find a different solution? Share it with us in the comments section below.

Games Keep Crashing in Windows 11: How to Stop it

Windows 11 was touted as an excellent system for playing games, and although most users enjoy their titles, some of our readers complained about their games crashing. 

There are numerous representations for this issue, and a few of them even reported the 0x80000003 error when trying to play a game. In this guide, we will explain some solutions that will help you resolve the problem.

Why my games keep crashing on Windows 11?

If your game is freezing or just not loading at all, the first thing you need to check is if your PC has the correct configuration to play the game.

  • Ensure you have the required programs: Many games require additional software to run. For instance, DirectX is a must for the huge majority of games.
  • Check the required configuration: You will be able to check the game requirements on the developer’s website or even on the ones from the resellers.
  • Cross-check connected hardware: A game can crash after adding more RAM to your PC so you should also check this particular problem.
  • Verify if you have the latest drivers: If you don’t have the correct drivers or if you didn’t update them in a while, that can cause a lot of problems, and the game might not even run at all.

What can I do if games keep crashing on Windows 11?

1. Update the graphics card driver

1.1 Use Windows Update

  1. Click the Start button and choose Settings.
  2. Select the Windows Update option from the left.
  3. Click on the Check for updates button.
  4. If there are any new updates, the system will download and install them.
  5. Restart your PC.
  6. Click on the Advanced options to get to the optional updates.
  7. Select the Optional updates section.
  8. Select the available update and install it.

That’s the easiest method to update the drivers and especially the one for the graphics card, because usually, the manufacturers provide them for a system update.

However, it can be the case that it’s not published yet for your system, so you will need to navigate to the manufacturer’s website and get it yourself.

We also have plenty of solutions if the Settings app crashes on Windows 11 and you can’t perform this procedure.

1.2 Install the driver manually from the manufacturer’s website

  1. Go to the dedicated driver’s download page of the graphics card manufacturer. In our example, we went to NVIDIA’s webpage.
  2. Enter all the data about your graphics card and specify the Windows 11 OS in the list.
  3. Hit the Search button.
  4. Click the Download button.
  5. Select the Download button again.
  6. Run the EXE file you just downloaded.

1.3 Install the driver with a specialized tool

Sometimes, updating your drivers using Windows Update or installing them from the manufacturer’s website can be tedious.

You can opt for the quickest alternative which is dedicated software such as Fortect Driver Updater which is created to provide you with a complete list of outdated or missing drivers and then locate the latest updates from its database.

⇒ Get Fortect Driver Updater

2. Run an SFC Scan

  1. Open the Start menu by pressing the Win button.
  2. Type the command prompt.
  3. Run CMD as an administrator.
  4. Type the following command and press Enter to run it: sfc /scannow
  5. Wait until the scan is completed.
  6. Restart your PC.

3. Change video performance settings

  1. Open the Start menu by pressing the Win button.
  2. Type advanced system settings and open it.
  3. Select the Advanced tab.
  4. Click on Settings under the Performance section.
  5. Choose the Data Execution Prevention tab.
  6. Check the Turn on DEP for all programs except those I select option.
  7. Click the Add button and select the game EXE file that you have problems running.

This procedure will prevent the system from applying Data Execution Prevention to your game, and this basically adds an exclusion for it.

4. Uninstall Sonic Studio 3

  1. Click the Start button and select Settings.
  2. Choose Apps from the left pane, then click on Apps & features.
  3. Look for Sonic Studio 3 in the list of apps.
  4. Click the vertical dots and select Uninstall.

Some of our readers fixed this problem by uninstalling the Sonic Studio 3 app, so if you have that software installed, try removing it at least temporarily and see if the game runs well.

Also, if the game was working fine until you installed third-party software, try uninstalling it and try running the game again to see if it crashes again.

5. Uninstall and reinstall your game

  1. Select the Start button and choose Settings.
  2. Click on Apps from the left pane.
  3. Select Apps & features.
  4. Click on three vertical dots from the right and select Uninstall.
  5. Press Windows + E to open File Explorer.
  6. Delete the game’s installation folder.
  7. Install the game using the setup file you have stored on your drive.

Repeated game crashes and freezes may be caused by a problem with the initial installation or if you reinstalled it on top of an older version. You’ll likely get a libvorbisfile.dll error so, make sure you completely uninstall the game this time and delete its folders before installing it again.

If you have problems with Windows Explorer, see what to do if Explorer keeps crashing on Windows 11.

6. Turn off Hardware Acceleration

  1. Press Win + I keys to open Settings.
  2. Click on Display on the right side.
  3. Select Graphics under the Related settings section.
  4. Click on Change default graphics settings.
  5. Toggle off Hardware-acceleration GPU scheduling.
  6. Restart your PC to apply the changes.

This solution was suggested by one of our readers, and it’s confirmed to work.

7. Turn off the Game Mode

  1. Click the Start button and select Settings.
  2. Choose Gaming from the left pane.
  3. Click the Game Mode option.
  4. Toggle off Game Mode.

Often aggressive game settings can cause multiple issues with the game. The Game Mode is there to help boost gaming performance, but this could also be the culprit for this error. You can turn it off and check if this resolves the issue or not.

If you bought the game from Microsoft Store, this problem may be also caused by the app crashing during the download, although it says that it downloaded the game. In this case, we have a guide to deal with Microsoft Store crashing on Windows 11 that might help.

Also, you may face problems with titles downloaded from specific clients, say Steam games crashing on Windows 11, and it’s just as easy to fix. Besides, if the crash leads to a blue screen error, it’s likely the graphics driver, memory management, or hardware at fault.

We hope that our steps helped you fix the game issues you were experiencing, and now you can enjoy it without interruptions.

For any questions or suggestions, leave your comment in the dedicated section below, and we will get back to you as soon as possible.

Fix: The Local Device Name is Already in Use in Windows 10

Some users utilize drive mapping to access remotely hosted disk drives. While ideally, the process should be seamless, several reported getting The local device name is already in use error in Windows 10.

The complete error message reads An error occurred while reconnecting <drive letter> to <file path> Microsoft Windows Network: The local device name is already in use. So let’s find out all about it and the solutions that worked for others.

Why do I get The local device name is already in use error?

Here are a few reasons you might be getting The local device name is already in use error in Windows 10:

  • Misconfigured firewall settings: You need to have File and Printer sharing enabled on the Firewall. Otherwise, there is a good chance that the error might appear.
  • Drive letter not assigned: In case a drive letter is not assigned to the network drive, you might get the error.
  • Lack of storage space: Lack of storage is one of the most common reasons users encounter the error, and in this case, the usual solutions fail to work. So, you will have to verify this first.

How do I fix the device name already in use error?

Before heading to the slightly complex fixes, try these quick ones:

  • Restart the computer since, in most cases, a simple reboot helped users fix this problem.
  • Make sure you are not using a VPN. If that’s the case, disable it.
  • Verify that there’s sufficient free storage on the shared drive. If not, you will have to clear some files.
  • Check whether you are using the correct user account the drive was mapped to initially.

In case none worked, move to the solutions listed next.

1. Remap the drive

  1. Press Windows + R to open Run, type cmd, and hit Ctrl + Shift + Enter.command prompt
  2. Click Yes in the UAC prompt.
  3. Now, paste the following command while replacing X with the actual drive letter, and hit Enter:net use X /deleteremap to fix the local device name is already in use windows 10
  4. Next, execute this command while replacing X, the username, and the password with the actual ones:net use X: \server\share /user:username password

A quick fix and one recommended by Microsoft, when you get The local device name is already in use error in Windows 10 is to remap the drive. Often issues come up with the previous remapping, and simply doing it again should get things running.

2. Assign a drive letter

  1. Press Windows + X to open the Power User menu, and choose Disk Management.disk management
  2. If you find that the shared drive does not have a drive letter, right-click on it, and choose Change Drive Letter and Paths.change drive letter or paths to fix the local device name is already in use windows 10
  3. Now, click on Add.add
  4. Select Assign the following drive letter, choose one from the dropdown menu which is not already assigned, and click OK.assign drive letter to fix the local device name is already in use windows 10
  5. Again, click OK to save the changes.

Once done, verify whether The local device name is already in use error in Windows 10 is fixed. If not, head to the next solution.

3. Enable File and Printer Sharing

  1. Press Windows + R to open Run, type control panel, and click OK.control panel
  2. Click on System and Security.system and security
  3. Next, choose Allow an app through Windows Firewall under Windows Defender Firewall.allow an app
  4. Click on the Change settings button.change settings to fix the local device name is already in use windows 10
  5. Locate File and Printer Sharing, make sure the checkboxes under both Private and Public are ticked, and click OK to save the changes.enable to fix the local device name is already in use windows 10

Several users reported issues with network drives, and even The local device name is already in use error in Windows 10 when File and Printer Sharing was disabled in Firewall.

If you happen to use a third-party antivirus with a built-in firewall, make sure to verify the same there as well.

4. Modify the Registry

  1. Press Windows + R to open Run, type regedit, and press Enter.registry
  2. Click Yes in the prompt.
  3. Paste the following path in the address bar and hit Enter: HKEY_CURRENT_USER\Software\Microsoft\Windows\CurrentVersion\Explorerpath
  4. Locate the MountPoints2 key in the navigation pane, right-click on it, and choose Delete.delete key to fix the local device name is already in use windows 10
  5. Finally, click Yes in the confirmation box.yes
  6. Once done, restart the computer, and it shouldn’t throw an error when accessing the shared drive.

5. Restart the Computer Browser service

  1. Press Windows + S to open Search, type Command Prompt in the text field, and click on Run as administrator.command prompt
  2. Click Yes in the prompt that pops up.
  3. Now, paste the following command and hit Enter to stop the Computer Browser service:net stop "Computer Browser"computer browser service
  4. Next, execute the following command to start the service:net start "Computer Browser"

Issues with the Computer Browser service have often been linked to The local device name is already in use error in Windows 10, and restarting it should do the trick.

One of the solutions here should have helped you fix the error. And while you are at it, also find out what to do if the mapped network drive is missing in Windows.

If you know of another method of fixing this issue, let us and everyone else know by leaving us a message in the comments section below.

You might lose your data when transitioning to Microsoft Teams (free)

Microsoft rolled out Teams Premium, and with this, the current free version of Teams for small businesses is set to hit its end of support date on April 12, this year. Before then, users can transition to Microsoft Teams (free), but there’s a catch.

Besides the name change and access to a different set of features, users won’t be able to make the transition from the current free version of Teams to the new free version with their data. To avoid this, you’ll need to upgrade to the paid tier if you want to keep the chats, files, teams, and meetings that are currently stored on Microsoft Teams Free (classic).

You’ll either have to upgrade to the Microsoft 365 Business Basic tier which will cost you $6/month or opt for the Teams Essentials plan at $4/month. You can choose to simply transition to Microsoft Teams (free) if you don’t want to make the payment or don’t have important data you’d want to make the transition with.

Alternatively, you can save your files manually within the new free version of Teams which can be quite tedious especially if you have a lot of data stored thus making the paid tier more attractive and efficient.

You should consider making the transition to the new free version or upgrading to either of the paid tiers if you want to retain the data stored. It should be noted that you will no longer be able to access the legacy free version of Teams once it reaches its end of support date.

via: Windows Central

Why Does Yahoo Keep Opening In Chrome? How to Stop It

Sometimes Yahoo search acts like a browser hijacker and forces itself as the default search engine in Chrome. In this piece, we’ll explain why it happens and how to fix it.

This usually happens when malware infects your computer or when a program or browser extension changes your default search engine without your knowledge.

More details about common causes, below. But first, let’s fix it:

How do I stop Yahoo from hijacking my browser?

    1. How to get rid of Yahoo search using Settings

    The easiest method to get rid of Yahoo search from your Chrome browser is to manually remove it from your Search Engines Settings.

    Through Settings, you can configure which engines you want to set as default and which to delete.

  1. 1. Launch Google Chrome on your PC.

  2. 2. Paste the following path in the address bar:chrome://settings/searchEngines

  3. 3. Hit Enter to open the Settings menu.

  4. 4. Now, click on the ellipsis next to Yahoo, and select Delete from the menu.

    Delete to how to get rid of yahoo search
  5. 5. A confirmation prompt will appear. Select Delete again.

    Delete to how to get rid of yahoo search
  6. 6. Relaunch the browser and check if Yahoo keeps replacing Google as the search engine.

2. Run a malware scan to remove Yahoo Search from Chrome

This problem may be caused by the Search.yahoo.com redirect virus or the Yahoo redirect virus for short.

It is a browser hijacker that will change the search engine to Yahoo Search every time you look for a keyword in the address bar.

We recommend you install an antivirus for reliable security against hijackers.

For this task, ESET HOME Security Essential is an excellent choice. This is a robust security solution, it comes with a deeper and more comprehensive scan feature compared to the Windows default software.

Plus, with this tool, you will also have access to more advanced features, like real-time scanning, a powerful firewall, a ransomware shield, and many more.

ESET HOME Security Essential

Protect your computer and stay safe while browsing the internet with this complete security solution.
Check Price Visit Website

3. Reset Chrome

  1. If Yahoo keeps replacing Google, paste the following path in Chrome’s address bar and hit Enter:chrome://settings/reset
  2. Then click the Restore settings to their original defaults option.reset browser to default settings
  3. Click the Reset settings button to confirm.Reset settings to how to get rid of yahoo search

Some users have confirmed that turning extensions off fixes browsers that redirect to Yahoo search. Users can manually turn off their installed extensions.

However, resetting browsers will either disable or uninstall all extensions and restore their original settings. Therefore, that’s probably a better way to fix browser search redirects.

4. Uninstall recently added programs

  1. Press Windows + R to launch Run, enter appwiz.cpl, and click OK.appwiz.cpl
  2. Select Search Provided by Yahoo, and press the Uninstall/Change button.remove search yahoo
  3. Click Yes to provide further confirmation.
  4. If the uninstaller window doesn’t include Search Provided by Yahoo, look through the programs to check if there’s anything that looks a little dodgy.
  5. If so, uninstall the dodgy software as it might be a browser hijacker.

Once done, the problem should be resolved, and Yahoo would no more become the search engine. Also, you may use an effective uninstaller tool to completely remove the software causing the trouble since these delete all associated files.

One user also suggested checking if you have the Google Legacy Browser Support installed and then removing it. That will also solve the problem, so try it out.

How to get rid of Yahoo Search on Mac?

  1. Open the browser, choose Safari, then select Preferences.
  2. Go to the General tab and check the Homepage field.safari homepage mac
  3. If the homepage has been altered, change it and save the changes.
  4. You can also reset the browser by navigating to the Safari menu and selecting Reset Safari.
  5. Select all the available options and click on Reset.how to reset safari

This solution applies to Safari, the default Mac browser but if you’re using a different browser, you may change the homepage by following similar steps.

Why does Yahoo keep opening in Chrome?

If you haven’t set Yahoo search, your computer is likely infected with malware that’s changing the default search engine. It could be a program or an extension installed on the browser.

Generally, the malware doesn’t cause much harm but changing the default search engine every time can be frustrating. Also, the malware might collect critical data, which would invade privacy.

So, it’s best that you get rid of the malware and Yahoo Search using the methods listed in the next section.

What are the common iterations of Yahoo Search replacing Google?

Many of our readers are asking some questions about Yahoo Search replacing Google Search in Windows 10, 11, and Mac on their browsers.

So, don’t worry, we have answers and solutions in our guide if you are having one of these issues:

  • Why is Yahoo my default search engine? – You have probably installed a program that performed this change but one of the solutions below will fix this problem
  • How do I stop Yahoo from hijacking my browser? – In this case, scan and clean your computer and then change the settings; they will stick for good this time
  • Why does Yahoo keep opening in Google? – Malware issues and browser hijackers listed within Windows’ uninstaller may cause this
  • Why is Yahoo my default browser? – Some software that you installed might have made these changes, you can revert the settings and get things back to normal
  • How to get rid of Yahoo Search on Firefox? – Similarly to Chrome, open Preferences, go to Search, and there you can select a Default Search Engine

Wrapping up

If you were wondering how to get rid of Yahoo Search in Chrome The resolutions above will probably eliminate most Yahoo hijackers from your browser.

Then users can browse with the default search engines they originally selected. Also, find out how to remove Bing from Chrome.

If the above solutions helped or if you have any other suggestions we should add to our article, please comment below.

PC Crashes While Gaming: Why and How to Fix For Good

Windows 10 is a very gamer-friendly operating system, but many reported that GPU crashes when playing games.

Sometimes, things may not be as smooth as they should be, as there’s a chance that you could encounter game crashes in Windows 10.

Some gamers recently reported that their GPU crashes when playing games. And since this is a serious and annoying issue, we’ll discuss all the troubleshooting steps you can try.

Some users have reported that their monitor crashes when playing games. This occurs if the GPU can’t meet the game’s requirements.

In other situations, users encountered the same issue without the system overheating. This is usually an in-depth issue with the driver or GPU connectivity. This same principle applies if the computer crashes after a few minutes in the game.

Why do my games keep crashing on Windows 10?

Having your games crash is one of the worst feelings you can have as a gamer, especially if you have been waiting for the release of a game title for a long time.

More specifically, some users have reported their PC crashing while playing Overwatch, and others complain about PC crashes while playing League of Legends.

It is worth noting that these types of errors occur no matter what kind of system you’re using, with many users mentioning that their PC freezes while gaming on AMD platforms.

In other situations, it seems that the problem appears as a game crash after updating a driver.

Here are the common causes of GPU crashes when playing games:

  • Using outdated GPU drivers
  • Installed the wrong GPU drivers
  • Outdated Windows version
  • Outdated DirectX
  • PC overheating
  • GPU not powerful enough

Other possible situations in which you might find yourself are caused by installing new hardware on your PC.

Some users have experienced games crashing after installing new RAM, which can be caused either because the motherboard is not properly recognizing the new hardware or if the RAM connectors are not properly cleaned before the installation process starts.

The same principle also applies if you’ve recently installed a new GPU. If there’s any issue with the hardware, it will affect your performance.

As you can see, there are plenty of reasons for which your GPU might be having issues while playing games on a Windows PC, and while most of them will be covered in this guide, if your GPU is not powerful enough to run the game, then there are only a couple of options available for you.

You can either invest in a powerful eGPU or connect it externally to your system, thus improving your PC’s GPU processing capabilities considerably.

If you haven’t already and don’t mind spending some time setting up your new GPU, you could also invest in an internal GPU that is powerful enough, and go through the process of installing it on your motherboard.

The exact method for fixing game crashes in Windows 10 and 11 will depend on your specific situation, but some general solutions could prove helpful.

Why does my GPU keep crashing?

If the GPU crashes when playing games, check your drivers. Outdated or corrupted drivers will cause your system to crash when playing games.

In addition, overclocking can put extra stress on your graphics card and cause it to generate more heat. As a result, it will overheat and crash.

These are some of the common causes, but there are other ones as well.

How do I stop my GPU from crashing?

1. Install the latest drivers

  1. 1. Press Win key + X and choose Device Manager.

    device manager
  2. 2. Scroll through the list and toggle the Display Adapters option.

    click on display adapters
  3. 3. Right-click the entry or entries found in the list and choose Update Driver (Our system has two GPUs).

    update driver
  4. 4. Choose either Search automatically for drivers (if you don’t have the driver downloaded), or Browse my computer for drivers (if you do).

    search for drivers
  5. 5. Wait for the driver to be installed, then close the window and check whether the issue persists.

  6. Windows 10 had problems with drivers compatibility since day one, and those problems are not resolved yet. So, there’s a chance your current graphics card driver isn’t compatible with Windows 10. This might be why your PC is crashing while gaming.

    Many reported games crashing on Windows 10 with Nvidia GPU, but other brands also have this issue. As such, a driver update is mandatory.

2. Install the necessary software

Most of today’s games require some additional software to work properly and the best example is DirectX.

If GPU crashes when playing games, ensure you have the latest version on your PC.

If you’re unsure which programs you need to install to play your desired game, try searching for the information by exploring the game developer’s website or reading the game’s documentation.

Some games will not install if you don’t also have these specific programs. Most often than not, they will ask you to install them during the setup process.

If your PC crashes when playing games not overheating, check if you have all components installed.

3. Make sure the PC doesn’t overheat

Overheating is one of the most common instigators of sudden crashes on PCs. If games keep crashing on a high-end PC, it’s possible that your PC temperature is too high.

Your PC automatically shuts down if the CPU or GPU temperature hits critical levels. That way, it protects itself from major hardware failures.

These situations are quite common after extended exposure to the heat. So, you’ll need to check the cooling system, clean all fans, remove all dust and debris, and use a PC temperature monitoring tool.

Also, applying the thermal paste to the CPU is a must. It’ll reduce the overheating substantially. Moreover, you should also add some additional coolers if there’s free space to do it.

Just make sure that your power supply isn’t overwhelmed. If you need some software to follow the temperature changes, you can download SpeedFan and check the readings or even control the rotation of the main fans.

4. Disable background programs

  1. Right-click on the Taskbar and open Task Manager.
  2. Select the Startup tab.
  3. Disable all unimportant and resource-heavy applications.
  4. Restart your PC and look for changes.

In case GPU crashes when playing games, other apps are possibly interfering with it. Disable them and check if that helps.

Furthermore, you can also try using RAM optimizer software to ensure that all elements are checked and ready for gaming.

5. Disable the onboard sound device

  1. Press Win key + X, and open the Device Manager.
  2. Navigate to Sound, video, and Game controllers.
  3. Expand this section, right-click on the onboard sound device and Disable it.
  4. Close Device Manager and restart your PC.

The generic sound driver provided by Windows 10 Update for onboard sound devices occasionally collides with other devices, especially the one from the GPU.

That might lead to GPU failure, which will eventually cause it to crash and stop you from enjoying your games.

6. Scan for malware

  1. Click on the search button in your taskbar, type Defender, and open Windows Security.
  2. Choose Virus & threat protection.
  3. Select Quick scan.
  4. If you want a more thorough scan, select Scan options instead.
  5. Then, select Windows Defender Offline scan.
  6. Click Scan now.

There are only a few chances that malware would cause critical issues on your system, but because of the number of people doing crypto-mining lately, a wide range of crypto-related malware has been released.

For that purpose, we advise you to perform a thorough scan with either Windows Defender or any third-party antivirus you have at your disposal.

7.  Check your hardware

Maybe the problem isn’t related to the system at all, maybe it’s on your hardware. If games are crashing without error, it’s possible that there’s a hardware issue.

Namely, the power supply was not strong enough for his graphics card, and that caused him a lot of problems.

So, keep in mind to check if your computer is assembled correctly, and if you find out something’s wrong, just change your current components with the proper ones.

The special emphasis goes to RAM and HDD. Sometimes, the HDD gets corrupted, or the RAM stick gets broken.

So, make sure everything works fine to exclude the hardware as the possible reason for the crashes while gaming.

Useful tips to improve your system’s gaming performance

  • Ensure your Internet connection is stable – Internet speed is all about today’s games. Even if you have the best rig in the neighborhood, ensure a great Internet plan and connection.
  • Match the game’s system requirements – Every game has minimum system requirements, but barely meeting them sometimes doesn’t cut it. Sometimes, you must invest in a proper gaming rig to ensure no problems.
  • Switch to Performance mode – If you’re gaming on a laptop, always switch the Power Management settings to High performance to spare no resources for your gaming endeavor.
  • Adjust the game settings – Everybody wants to play with all the features tuned to maximum, but sometimes you have to be a little modest and cut down the quality of the game’s graphics settings to speed it up.
  • Invest in an SSD – All the game’s resources are on your hard drive, and an SSD is faster. Investing in an SSD will be a great solution to speed up your game.

Keeping these things in mind can help you fix issues related to Overwatch 2 keeps crashing on Windows 11.

We also have to mention the compatibility problems with the games themselves. Some older games (10+ years old) are simply incompatible with Windows 10. Therefore, there’s nothing you can do to play them on your PC.

How do I fix games crashing on Windows 11?

Windows 10 and 11 share many similarities as well as issues. Game crashes have been detected on both systems, and causes are usually related to the drivers or hardware issues.

Since both systems work similarly, almost all solutions are universal and will work on both operating systems.

We covered games crashing on Windows 11 in a separate guide, so if your PC crashes while gaming, we suggest you read that guide for more in-depth information.

Can a power supply cause games to crash?

A bad power supply can’t handle intensive tasks such as gaming, so it may cause your system to crash. This is especially true if the power supply doesn’t have enough power to handle other hardware.

Using an old power supply can also lead to stability issues, so if you’re having problems, perhaps you should consider replacing your power supply.

How to prevent game crashes in the future

1. Uninstall unwanted and unused apps

  1. Press Win key + X and choose Apps and features.
  2. Scroll down the list of installed applications and identify the ones that you don’t need.
  3. Select the applications which you want to remove and click the Uninstall button.
  4. Repeat these steps for uninstalling all the apps you don’t need anymore.

Bloatware is the biggest enemy when it comes to the performance of your PC. This can sometimes lead to computer crashes when playing games.

Therefore, try to uninstall as many programs as you don’t need or use. You will be surprised by how many of those you will find in the list of apps installed on your computer.

2. Close as many unnecessary processes

  1. Right-click your taskbar and choose Task Manager.gpu crash when playing games
  2. Click View and choose Group by type.gpu crash when playing games
  3. Inside the Processes tab, click the application you want to close.
  4. Click End Task to close it.gpu crash when playing games
  5. Repeat these steps for all unnecessary processes, without closing any system applications.

3. Clean your disk

  1. Click on the search button in the taskbar.
  2. Type Cleanup and choose the Disk Cleanup option from the results.gpu crash when playing games
  3. Tick the boxes to choose which files you want to delete and press OK to initiate the process.gpu crash when playing games

After performing this step, your PC will be in an optimal state to run games without any issues.

4. Set your antivirus to game mode

  1. Right-click the antivirus icon found next to your Windows clock, and click the Open TotalAV.
  2. Choose Setup from the software’s menu.gpu crash when playing games
  3. Click Computer protection.gpu crash when playing games
  4. Toggle the Gamer mode option.gpu crash when playing games

Many antiviruses nowadays have a built-in Game mode specially created to ensure the software doesn’t start crunching your drive for viruses during your game and eliminate other distractions.

It’s usually straightforward to activate from the main menu of the antivirus, and it’s worth switching that feature on for your peace of mind.

Even though the specific steps will depend on the antivirus software you’re using, above is how you can do it with TotalAV.

As you can see, it’s not hard to cover all the possible causes of your gaming session being interrupted by system crashes.

If you follow the steps described in this guide carefully, you will surely be one step closer to solving this issue and avoiding encountering it at a future date.

The best way to avoid this issue is to ensure that your PC runs optimally, that no unnecessary applications are running in the background, and that your antivirus software is not causing issues.

Game crashes can also be avoided by using one of the game booster software options, which can optimize your computer’s resources and make the most out of them.

We hope this article helped you solve the problems with games crashing on your Windows 10/11 PC.

If you have any comments or questions, use the comment section below this guide.

Fix: Games Keep Crashing Without Errors on Windows PCs

Despite being a leading OS for video games, Windows is no short of errors and bugs. A quite common issue people face across different games is they keep cashing without displaying errors.

Not only does the game crash, but it’s also leaving you in darkness when it comes to troubleshooting. However, we got a few tricks up our sleeves and managed to identify a few common culprits.

Follow the steps below to get rid of this error fast.

Why do my games keep crashing without error?

Some of the most common reasons why PC games crash include:

  • Malware infections
  • Game files problems
  • Incompatibility issues with the game
  • Interfering third-party applications
  • Outdated drivers, especially GPU, sound, and internet drivers
  • Hardware damage
  • Low system resources

Here’s how to address them:

How can I fix game crashes in Windows 10?

1. Update your display drivers

  1. 1. Right-click the Start icon then select Device Manager.

    open device manager in windows 10
  2. 2. Expand the Display adapters folder, right-click your AMD graphics card, and choose Update driver.

    update-driver-w10 amd driver install problems
  3. 3. Click Search automatically for drivers to let Windows select and install the best available GPU driver on the system.

    Search automatically for drivers
  4. 4. Wait for the drivers to be installed.

  5. 5. Once the installation is done, reboot your PC and check whether the games are still crashing.

  6. Depending on what type of graphics card you’re using, it’s always good to keep your drivers updated.

    You can automatically install the latest drivers via Device Manager. This is likely to prevent your games from crashing on your Windows 10 device, without you having to perform more complicated solutions.

2. Repair game files

Steam

  1. Open Steam and go to your Library.
  2. Right-click on the game you need to repair and choose Properties.
  3. Navigate to the Installed Files tab.
  4. Click Verify integrity of game files.verify integrity of game files steam
  5. Steam will check your game files and replace any that are missing or corrupted.

Epic Games Store

  1. Open the Epic Games Launcher.
  2. Go to your Library.
  3. Click on the three dots (…) next to the game you need to repair.
  4. Choose Manage.
  5. Click Verify under the Verify Files section.epic games verify files
  6. The launcher will scan for any issues and download the necessary files.

EA App

  1. Open the EA App.
  2. Go to My Library.
  3. Right-click on the game that needs repairing.
  4. Select Repair.repair ea games files
  5. The app will automatically scan and fix any issues with the game files.

Battle.net

  1. Open the Battle.net launcher.
  2. Select the game that needs repairing from the left-hand menu.
  3. Right-click on it.
  4. Choose Scan and Repair from the dropdown menu.battlenet scan and repair
  5. Click Begin Scan to start the process. Battle.net will check the files and repair them if necessary.

3. Run your games in window mode

If you experience crashes with your games on Windows 10 it doesn’t hurt to try running them in windowed mode.

To do this, you need to go to video settings in your game and find the option to run it in window mode.

4. Check your antivirus

Try enabling Gaming Mode in your antivirus settings to minimize interference. If that doesn’t work, temporarily disable or uninstall your antivirus to test if it resolves the issue.

If problems persist, consider switching to a different antivirus that better supports gaming.

5. Check your Windows Defender settings

  1. Open the Settings app. You can do that quickly by pressing Windows Key + I. When the Settings app opens, navigate to Update & Security section.update-security nmi hardware failure windows 10
  2. Select Windows Security from the left panel. From the right panel, choose Open Windows Security.
  3. Navigate to Virus & threat protection.
  4. Now navigate to Virus & threat protection settings.
    All games crashing
  5. Click Add or remove exclusions.
    Old games crash Windows 10
  6. Click Add an exclusion, select Folder, and select the game’s directory.
    Windows 10 crash when playing games
Steam games crash Windows 10

Now check if the problem is resolved. If the issue still persists, you might want to consider disabling Windows Defender. To do that, just follow steps 1-4 from above then disable Real-time protection.

Although Windows Defender is a solid application in terms of security, sometimes it can interfere with your games.

Keep in mind that disabling Windows Defender will leave your system vulnerable, so you might want to consider getting a new antivirus solution or a highly reliable VPN.

6. Remove overclock settings or underclock your graphics card

Many users tend to overclock their hardware in order to achieve better performance in games. However, sometimes your system can become unstable due to overclocking.

If your games are crashing, it could be due to overclocking. Try removing any overclock settings or underclocking your GPU to see if that helps. Be cautious, as overclocking and underclocking can cause system instability or hardware damage.

7. Update your operating system

  1. Click the Start menu and select Settings (the gear icon).
  2. In the Settings window, choose Update & Security.
  3. Click on Check for updates to see if there are any available updates.
  4. If updates are found, click Install now to start the update process.

Wrapping up

If the solutions above proved to be unsuccessful in your case, make sure to check out the official Microsoft Support page and try out their solutions.

That would be all if you have any comments, or suggestions, just leave your thoughts in the comments section, below.

Fix: Big Fish Games Not Working on Windows 11

Big Fish Games is the world’s largest producer of casual games, which claims to give you a new playable game every day.

You can play Big Fish Games on any device or web browser. While it works without any issues, there are several instances where users have reported Big Fish Games not working on Windows 11.

If you are an avid gamer and love playing Big Fish Games but are facing the Big Fish Games not working on Windows 11, then you have come to the right place. Here, in this guide, we will give you a bunch of solutions to help you resolve the problem.

Why is Big Fish Games not working on Windows 11?

After some research on the internet, we have created a list of the most common errors that could trigger the Big Fish Games not working on the Windows 11 issue.

  • There is some issue with the game: If you are running an outdated version of the game, then you will come across multiple issues.
  • Your graphics driver is outdated: You should make sure that all drivers, in our case, the GPU driver is running the latest version to avoid any gameplay issues.
  • You don’t have necessary permissions: Often, Big Fish Games require access to important files, and you might be running it with limited permissions.
  • Corrupt browser cache: If the cache files on the browser are corrupt, you will face issues.
  • Some important files are missing: Chances are that the game installation did not go as planned, and it skipped a few of the important files because of third-party interference.

How can I fix Big Fish Games not working on Windows 11?

1. Clear browser cache

1.1 Google Chrome

  1. Launch Google Chrome.
  2. Click on the 3-dot menu icon at the top.
  3. Choose Settings.
  4. Click on Privacy and Security.
  5. Choose Clear browsing data.
  6. Check the boxes for Cookies and other site data and Cached images and files options.
  7. Click on the Clear data button.

1.2 Mozilla Firefox

  1. Click on the 3-line menu icon.
  2. Select Settings.
  3. Click on the Privacy & Security.
  4. Under the Cookies and Site Data section, hit the Clear Data button.
  5. Check the boxes for Cookies, Site Data, and Cached Web Content options.
  6. Hit the Clear button.

Cache files keep all your personalized settings for the websites or the web apps you use on a browser. If these cache files go corrupt, they can cause the browser to misbehave and trigger issues such as Big Fish Games not working on Windows 11.

We suggest you clear the browser cache often to avoid such petty problems. Also, you can switch to a different browser, as the problem could be because of the browser itself. And for that, we have created a list of some of the best browsers you can try.

2. Update the graphics driver

  1. Press the Win key to open the Start menu.
  2. Open Device Manager.
  3. Expand Display adapters.
  4. Right-click on your graphics card and select Update driver.
  5. Choose Search automatically for drivers.
  6. Follow the on-screen prompts to install the latest graphics driver on your PC.
  7. Restart your PC.

You can update your drivers by following the above steps on the Device Manager. However, it could be cumbersome when you have to update many drivers.

In such a case, we recommend using a third-party tool called Outbyte Driver Updater. This software can help you schedule driver scans, create driver backups, an efficient download manager, etc.

Outbyte Driver Updater

You must always keep your drivers updated, and Outbyte Driver Updater will also make your PC faster!
Free trial Download now

3. Reinstall the Big Fish Games app

  1. Open the Start menu by pressing the Win key.
  2. Open Control Panel.
  3. Select Programs and Features.
  4. Select the Big Fish Games app and hit the Uninstall button.
  5. Download the Big Fish Games app.
  6. Install the program and see if this resolves the Big Fish Games not working on Windows 11.

You should uninstall the game from your PC. Next, restart it, reinstall the Big Fish Games launcher app, and hopefully fix the issue.

4. Disable Firewall

  1. Open the Start menu by pressing the Win key.
  2. Open Windows Defender Firewall.
  3. Select the Turn Windows Defender Firewall on or off option from the left pane.
  4. Check the boxes for the Turn off Windows Defender Firewall (not recommended) option for both Private and Public networks.
  5. Click OK.
  6. Run the Big Fish Games app and see if this fixes the issue or not.

Chances are that the Windows Firewall is blocking the application from running. But, of course, it could also happen with any of your third-party antivirus software.

In this case, disable the Firewall and check if this resolves the issue. If this doesn’t work, we recommend you turn on the Windows Defender Firewall, as leaving it off could expose your PC to threats.

5. Run the game as an administrator

  1. Right-click on the Big Fish Games Game Manager app.
  2. Select Properties.
  3. Switch to the Compatibility tab.
  4. Check the box for Run this program as an administrator.
  5. Click on Apply and OK.

When you run the program as an administrator, it gives the program access to all the critical system files it might need to run correctly.

That is it from us in this guide. Next, you can check out our guide that gives you the 7 best Windows 11 graphics settings for gaming. We also have a guide that will tell you whether Windows 11 is optimal for gaming. Spoiler alert! It is.

Feel free to let us know in the comments below which one of the above solutions helped you fix the Big Fish Games not working on the Windows 11 issue.

How to Play DVD on Laptop [Players, Setup & Troubleshooting]

Here’s all you need for playing DVDs on your laptop. From compatible software (built-in or third party -you pick), to what you can do if it’s not working on the first try.

How do I play DVDs on Windows 11?

First, make sure your computer’s codecs to decode DVD video and audio streams are installed. Next:

1. Use the Windows Media Player Legacy

1.1 Install Windows Media Player Legacy on Windows 11

  1. Press Windows + I to open Settings.
  2. Click Apps, then Optional features.Apps Optional features -play dvd windows 11
  3. Now, next to Add an optional feature, click View features.View features
  4. On the Add an optional feature window, type Windows Media Player Legacy, select the appropriate option and click Next.Add an optional feature
  5. Click Install.Install

1.2 Play the DVD

  1. Insert the DVD in your computer DVD’s slot.
  2. Launch the Windows Media Player. To do that, press Windows key + S and enter media player. Select Windows Media Player Legacy from the list of results.
  3. Go to the left pane, click the DVD option, and select your DVD drive 
    Windows Media Player Legacy - play DVD s on Windows 11
  4. Click the Play button to play the media.

If you can’t install Windows Media Player Legacy, it’s probably already available on your PC. If not, you can go ahead to the next solution.

2. Use a third-party app

  1. Download VLC from its official website.VLC media player -play dvd windows 11
  2. Double-click the installer to run the installation file.
  3. On the UAC prompt, click Yes.
  4. On the installer wizard, click Next.Next Installer wizard
  5. Follow the onscreen instructions, and on the last window, click Finish.Finish VLC
  6. Launch the VLC media player and click Media. From the options, click Open Disc. Open Disc
  7. On the Open Media window, switch to the Disc tab, go to Disc device, and select your DVD from the drop-down.Disc Device
  8. Click Play.

Why is my DVD not showing up in Windows 11?

  • Your registry isn’t configured properly.
  • Issues with DVD drive drivers.
  • The drive is faulty or not connected properly.

To learn how to fix this issue, we suggest reading our DVD drive is not detected guide for step-by-step instructions. This isn’t the only issue, and many reported that PC won’t read DVDs.

If you want to play DVD on Windows 11, you can use the built-in software as the default player, or you can use one of many DVD player apps. If you tend to play a lot of movies, perhaps you want to configure DVD autorun so that DVDs can play automatically.

So, these are methods that you can follow to play DVDs on your Windows 11 computer. Try them and let us know what worked for you in the comments section below.

How to Fix USB Error Code 43 on Windows 10

Most external devices, such as external hard drives, webcams, mice, and more depend on USB connectivity. However, some users are complaining of a code 43 USB error on Windows 10.

This error prevents you from connecting to your external devices. Thankfully, it is an error you can fix quickly with the solutions in this guide.

What is device status code 43 Windows 10?

Below are some of the factors that can cause the code 43 error for USB devices on Windows 10:

  • Outdated driver: In some cases, this issue is due to faulty or outdated USB drivers. The solution to this is to uninstall or update your drivers.
  • Issues with power settings: Sometimes, this issue can be due to the fast startup feature. Many users have been able to fix it by disabling the feature.
  • Hardware issues: On rare occasions, this error code might be due to problems with your hardware components. You can fix this by running the hardware and devices troubleshooter.

How do I solve Error Code 43 for USB devices on Windows 10?

Before delving into the solutions in this section of this guide, there are some preliminary troubleshooting steps that might fix this issue. They are listed below:

  • Insert the USB Device into an Alternative USB Slot
  • Restart Your Laptop or Desktop

If the steps above do not solve the problem, proceed to the solutions below:

1. Run the Hardware and Device Troubleshooter

  1. Press the Windows key, type cmd, and select Run as administrator under Command Prompt.
    cmd admin code 43 usb windows 10
  2. Type the command below and hit Enter to fix it: msdt.exe -id DeviceDiagnosticmsdt
  3. Finally, wait for the diagnosis to be complete and apply the recommended fixes.

If you are facing the code 43 USB error on Windows 10, it might be due to hardware issues. Running the Hardware and Devices troubleshooter should help you diagnose and fix this issue.

2. Update the USB device drivers

  1. Press the Windows key + R, type devmgmt.msc, and click the OK button.
    devmgmt
  2. Now, double-click the Universal Serial Bus controllers option to expand it and right-click each of the drivers there.
  3. Select the Update driver option.
    update drive code 43 usb windows 10
  4. Finally, select the Search automatically for drivers option and install any available update.
    search auto

It might be the case that the USB Device has an outdated driver. If that’s so, that’s probably why you’re getting this code 43 USB error on Windows 10.

You can update the driver by downloading it from the USB device manufacturer’s website or update it with the Device Manager by following the steps above.

3. Uninstall the USB Drivers

  1. Press the Windows key + X and select the Device Manager option.
    device manager
  2. Expand the Universal Serial Bus controllers option and right-click each of the drivers there.
  3. Now, select the Uninstall device option.
    uninstall device code 43 usb windows 10
  4. Next, click the Uninstall button to confirm the action.
    uninstall button
  5. Finally, restart your PC, and the drivers should be reinstalled automatically.

If updating your USB drivers does not fix the code 43 error on Windows 10, you need to uninstall the driver. This should eliminate any glitch causing the issue.

4. Restore Windows to the Previous Date

  1. Press the Windows key + R, type rstrui.exe, and click OK.
    rstrui
  2. Click the Next button.
    next code 43 usb windows 10
  3. Now, select a restore point and click the Next button.
    restore point code 43 usb windows 10
  4. Finally, click the Finish button to confirm the action and follow the onscreen instructions.
    finish

If the USB device worked fine a few weeks back, the System Restore tool in Windows 10 could feasibly fix error code 43. It could fix any hardware that Windows isn’t recognizing.

5. Switch off the Fast Startup

  1. Press the Windows key, type power plan, and select Choose a power plan.
    choose power
  2. Click Choose what the power buttons do on the left of the window.
    choose what  code 43 usb windows 10
  3. Now, select Change settings that are currently unavailable.
    change settings
  4. Uncheck the box for Turn on fast startup (recommended).
  5. Finally, click the Save Changes button and restart your PC.
    disable fast code 43 usb windows 10

At times, the code 43 USB error on Windows 10 can be due to the fast startup feature. While this feature improves your PC startup time considerably, it can sometimes lead to issues.

Hence, you need to disable the feature.

6. Adjust the USB Selective Suspend Settings

  1. Press the Windows key + S, type power plan, and select Edit power plan.
    edit power
  2. Now, select the Change advanced power settings option.
    change advanced
  3. Click the + beside USB settings and USB selective suspend settings.
    usb settings code 43 usb windows 10
  4. Next, set the On battery and Plugged in battery settings to Disabled.
  5. Finally, click the Apply button, followed by OK, and restart your PC.
    disabled

If the fixes above fail to solve the code 43 USB error on Windows 10, it might be because of your power settings. This is because your power setting might be set to suspend your USB to save power.

Hence, you need to change this feature to restore normalcy.

With this, we can conclude this guide on how to fix the code 43 USB error on Windows 10. You only need to follow the steps above and everything should be back to normal.

If you are facing the error code 43 on your graphics card, check our detailed guide to fix it.

Feel free to let us know the solution that helped you solve this issue in the comments below.

How to Fix Try Catch PowerShell Not Working?

The Try-Catch statement in PowerShell handles errors and exceptions in your code. If Try-Catch is not working as excepted on PowerShell, it can be frustrating. 

In this guide, we will cover all the ways to fix the issue along with the probable causes of the problem. Let’s start!

What causes the Try-Catch not working issue in PowerShell?

There could be various reasons why the statement is not working on PowerShell. Here are some of the most common ones: 

  • Default ErrorAction set – If the ErrorAction is set to Continue, then Try-Catch will not work as expected. 
  • Syntax errors – If the syntax used is improper, the formatting is incorrect, or it is missing keywords, Try-Catch will not work.
  • Cmdlet or function behavior – Some functions and cmdlets come with their error-handling behavior, which might not be compatible with Try-Catch.
  • Incorrect logic or use of variables – If there is an inappropriate use of variables or incorrect logic, then Try-Catch will not work. 

What can I do if the Try-Catch is not working on PowerShell?

1. Check Syntax

  1. First, you need to check if you have used the correct syntax for the version of PowerShell you are using.
  2. Next, verify that you have placed the Try and Catch blocks in the correct sequence.
  3. The basic syntax for Try-Catch is mentioned below. Replace # code to run here with the code and # error handling code here with the error handling code:

Try {
# code to run here
}
Catch {
# error handling code here
}

2. Check if you are trapping a specific error 

You need to verify if you are trapping specific errors you want to handle and not all the errors. Follow these steps to do the same:

  1. Press the Windows key, type PowerShell, and click Run as administrator.Script
  2. To trap an error, you need to use the $ variable in the Catch block to access information about the error that was thrown. Let’s check the example of the same to understand better: Try {
    Get-ChildItem -Path C:\DoesNotExist
    }
    Catch {
    if ($_.Exception.GetType().Name -eq "DirectoryNotFoundException") {
    Write-Output "Directory not found."
    }
    else {
    throw $_.Exception|
    }
    }

3. Set ErrorAction value 

The default value for ErrorAction is Continue; however, for Try-Catch to work, you need to set the ErrorAction value to Stop. To do this, follow these steps:

  1. Open PowerShell as administrator.
  2. You need to use the Set-StrictMode cmdlet or the ErrorAction parameter on individual cmdlets. To understand it better, let us look at an example: 
Try Catch with ErrorAction Stop PowerShell

Try {
Get-ChildItem -Path C:\DoesNotExist -ErrorAction Stop
}
Catch {
Write-Output $_.Exception.Message
}

4. Use the correct exception type

It is important to use correct exceptions when using Try-Catch, as it can only handle exceptions of the System.Exception type. If you have used non-System.Exception errors, then Try-Catch will not work.

As for non-System.Exception, you need to use the NET” framework’s error handling mechanism or catch the error.

5. Avoid script termination 

If your script is terminated before reaching the Catch block, Try-Cach will not get a chance to handle the error. To avoid script termination, follow these steps:

  1. Launch PowerShell with admin rights.
  2. You need to use the Continue statement after the Catch block. Let’s understand it by an example: 
try catch finally

Try {
Get-ChildItem -Path C:\DoesNotExist
}
Catch {
Write-Output $_.Exception.Message
Continue
}

6. Use the Try-Catch-Finally

 If the Try-Catch statement is still not working, you can use the Try-Catch-Finally construct instead. This ensures that your code runs to completion, even if an exception is raised.

  1. Open PowerShell as administrator.
  2. Type the command with Try-Catch-Finally. Here is an example to understand the script better: 

Try {
# Your code here
} 
Catch [System.Exception] {
# Exception handling code here
} 
Finally {
 # Clean-up code here
}

So, these are ways in which you can resolve the Try Catch not working issue on PowerShell. If you have any questions related to Try-Catch, please mention them in the comments section below. We will be happy to help!

If you want to know how to stop PowerShell from closing after running a script, you can read this.

How to Integrate ChatGPT with Discord [+ 5 Smart Tips]

Integrating ChatGPT with Discord allows you to add a conversational AI assistant to your Discord server to answer your queries and perform other tasks.

Integrating it is a bit tricky as it involves several steps. But don’t worry; we’ve got you covered! Let’s start!

 Best tips on using ChatGPT with Discord

  1. Use Discord API –  Discord API has excellent functionality and lets you interact with the Discord platform. Also, it makes using ChatGPT with Discord easier. 
  2. Clear input = correct output – While chatting with ChatGPT, you must use a concise input to get relevant output. 
  3. Keeping the bot secure – Ensure the ChatGPT bot you created is secured and is implementing security measures to protect user data. 
  4. Allow users to give feedback – It is essential to allow your users to provide feedback on their conversations with ChatGPT; this can help you improve user experience.
  5.  Check performance – You must regularly monitor the accuracy and response time of ChatGPT so that you can ensure it is functioning correctly. 

How can I integrate ChatGPT with Discord?

Before engaging in detailed steps, you should consider performing the following checks:

1. Create your server on Discord

  1. Log in to Discord with your username.
  2. Click on the + sign to create your server.
    Discord Server -integrate chat gpt with discord
  3. Click on Create My Own.
    Create My Own
  4. Now select For me and my friends.
    For me and my friends
  5. On the next screen, type in the name of your server and upload a picture if you click.  Then, click Create.
    ChatGPT for friends Create

2. Build a bot

  1. Go to Discord Developers Portal.
    Apps Developers portal -integrate chat gpt with discord
  2. Now click on Applications, then select Create Application.
    BOT APP
  3. Go to General Information, name the app, and add the App icon.
    Portal change image go to BOT
  4. Click Save Changes.
  5.  From the left pane, select Bot.
  6. Click Add Bot.
    Add BOT
  7. Now, click Yes do it on Add this bot to this app.
    Yes do it

3. Generate a URL

  1. Go to OAuth2, click URL Generator, and put a checkmark next to Bot.
    BOT Selected -integrate chat gpt with discord
  2. Scroll down and select Administrator.
  3. At the bottom of the page, you will get a URL, copy it and paste it on a notepad.
    ADMIN URL
  4. Now Go to OAuth2 again, then click General.
  5. Under Default Authorization Link, select Custom URL from the dropdown for Authorization Method.
  6. Paste the URL that you copied and click Save Changes.
    Save changes
  7. Go to Bot, toggle on the switch for Message Content, and click Save Changes.
    Message content

4. Reset Token

  1. Go to Bot, and click Reset Token.
    Reset Token
  2. Click Yes do it on Reset Bot’s Token.
    Yes do -integrate chat gpt with discord
  3. Now click Copy to copy the Token and paste it into a notepad for future use.
    Copy token

5. Authorize

  1. Paste the generated URL in the browser. From Add to Server, select the name of the server you created. Click Continue.
    Click Continue
  2. Put a checkmark next to Administrator and click Authorize.
    Click Authorize -integrate chat gpt with discord
  3. Verify that you are human.
    I am human
  4. Once you are Authorized, proceed.
    Authorized

6. Use the Command Prompt

  1. Press the Windows key, type CMD, and click Open.
  2. Copy and paste the following command and press Enter: Cd desktop mkdir ChatGPT_Friends cd ChatGPT_Friends code .
    Folder MKDIR

7. Create files and folders in Visual Studio Code

  1. Go to the left pane, click the Folder icon, and name it App.
    Folder structure
  2. Create a file and name it _init_.py.
  3. Next, create a folder and name it chatgpt_ai.
  4. Select chatgpt_ai and create a file and name it _init_.py.
  5. Create another file under chatgpt_ai and name it connect_openai.py.
  6. Now, create another folder under the App folder, and name it discord_bot.
  7. Select the discord_bot folder and create a file and name it connect_discord.py.
  8. Now outside the app folder, create a file and name it run.py.
  9. Create another file and name it .env.

8. Write code in the .env file

  1. Go to the .env file.
    Token added env
  2. Type the following command and mention the token that you copied from the Discord Developers portal next to Discord_Token and copy the API key next to OPENAI_Key: DISCORD_TOKEN=key
    #OPENAI_KEY=

9. Download modules

  1. Go to the terminal and copy and paste the following command, and press Enter: python -m pip install python-discord
    connect discord install
  2. Once installed, type the following command to install the dotenv module: python -m pip install python-dotenv
    install dotenv
  3. Now copy and paste the following command to install the Open API module: pip install openapi
  4. To install the request module, run this command – pip install requests

10. Write code in the connect_discord.py file

  1. Go to the connect_discord.py file.
  2. Copy and paste the following script as it is mentioned. Please don’t make changes: from dotenv import load_dotenv
    import os
    import discord
    load_dotenv()
    discord_token=os.getenv('DISCORD_TOKEN')
    class MyClient(discord.Client):
    async def on_ready(self):
        print('Logged in as: ', self.user)
    async def on_message(self, message):
       print(message.content)
    if message.author == self.user:
         return
    await message.channel.send(f"{message.content}")
      intents=discord.Intents.default()
     intents.message_content = True
    client=MyClient(intents=intents)
    client.run(discord_token)
  3. Once done, click on the Run icon to run the code.
    Script to run Discord
  4. In the Terminal, you will see that you are Logged in as the name of your primary folder.
  5. Go to the Discord app, and type Hi.
  6. The bot will respond. At this stage, it will only replicate what you type.

11. Get the API key from OpenAI

  1. Go to the OpenAI website.
  2. Log in and click on Personal.
  3. Click View API keys.
    ViewAPI keys
  4. Now click Create new secret key.
  5. Copy the key and paste it into a notepad.
    OpenAI key -integrate chat gpt with discord
  6. Also, paste it into the .env file next to OPENAI_KEY.

12. Check the model

  1. Go to the OpenAI website, and log in.
  2. Navigate to Documentation.
    Documentation
  3. Now under Get Started, click Models, then select GPT-3.
  4. Copy the name of the latest model from the right pane.

13. Write code in connect_openai.py

  1. Open connect_openai.py on Visual Studio Code.
    Connect_openai
  2. Copy and paste the following script: from dotenv import load_dotenv
    import openai
    import os
    load_dotenv()
    openai.api_key=os.getenv('OPENAI_KEY')
    def chatgpt_response(prompt):
        response = openai.Completion.create(
        engine='text-davinci-003',
         prompt=prompt,
         temperature=0.75,
         max_tokens=100
        )
        #print(response)
        return response ['choices'][0]['text']

14. Make changes to connect_discord.py

  1. Replace the command mentioned below with the following command: await message.channel.send(f"{message.content}")
    await message.channel.send(f"You said: {message.content} \n {chatgpt_response(message.content)}")
    Connect_Discord changed
  2. Add this command to line number 5: from app.openai_chat.connect_openai import chatgpt_response

15. Write code in run.py

  1. Go to the run.py file.
    Runpy file
  2. Type the following script: from app.Discord_bot.connect_discord import client, discord_token
    if  _name_ == '__main__':
  3. Now go to the connect_discord file, cut the following command from there, and paste it into the run.py script: client.run(discord_token)
  4. Now run the file by clicking the Play button located at the top of Visual Code Studio.

16. Chat with ChatBot

  1. Go to your channel.
    Chatbot chat - integrate chatGPT with discord
  2. You can see ChatBot is online.
  3. Type a question or start a conversation.

So, this is how you can integrate ChatGPT with Discord and begin a conversation with the bot—stuck somewhere during the process? Feel free to mention all your queries in the comments section below.

To enrich your new AI powered Discord server even more, you can also follow this guide on adding Arcane Bot to Discord and unlock powerful leveling and automation features for your community.

You can read this if you want to know how to use ChatGPT with Whatsapp.

WaasMedic Agent.exe High Disk Usage: How to Stop It?

WaasMedic Agent.exe is a legit process that runs in the background and plays an integral part in installing Windows updates smoothly.

If you see high disk usage due in Task Manager and the reason is WaasMedic Agent.exe, then you are not alone.

In this guide, we will cover some methods to fix high disk usage caused by WaasMedic Agent.exe after discussing the cause. Let’s begin!

Why is WaasMedic Agent.exe causing high disk usage?

There could be several reasons for the issue; some of the common ones are mentioned below: 

  • Conflict with security software – If misconfigured, the security software may conflict with third-party antivirus on your computer, causing this issue.
  • WassMedic Agent busy with updates – If WaasMedic Agent.exe is busy processing updates, you may also see a spike in your computer’s disk usage.
  • System files are damaged – If your system files are corrupt or damaged, you may experience high disk usage. To fix it, you need to repair the system files.

How do I fix WaasMedic Agent.exe, causing high disk usage?

Before moving on to the troubleshooting steps, you should consider performing the following checks:

1. Repair the system files

  1. Press the Windows key, type CMD, and click Run as administrator.DOS COmmand Prompt
  2. Type the following command and press Enter: sfc/scannowCMD sfc scan waasmedic agent exe high disk usage
  3. Once the process is complete, restart your computer.

2. Repair Windows Update components

  1. Press the Windows key, type CMD, and click Run as administrator.
  2. Copy and paste the following commands one by one and press Enter after each command: DISM /online /cleanup-image /checkhealth DISM /online /cleanup-image /scanhealth DISM /online /cleanup-image /restorehealthDISM command
  3. Once the process is complete, restart your PC.

3. Pause Windows Updates

  1. Press Windows + I to open Settings.
  2. Click Windows Update from the left pane, and go to Pause updates. Then, from the drop-down, select an appropriate option. Windows Update -waasmedic agent exe high disk usage
  3. Restart your computer and check if the issue persists. If it still causes high disk usage, resume the updates and proceed further.

4. Disable WaasMedic

  1. Press Windows + R to open the Run box.Services
  2. Type services.msc and press Enter to open Services.
  3. Locate and double-click the Windows Update Medic service to open Properties.
  4. For the Startup type, select Disabled from the drop-down.Disabled -waasmedic agent exe high disk usage
  5. If it is disabled, then restart your computer. However, if you get Access is denied error, proceed.
  6. Press Windows + R to open the Run box.REGEDIT RUN COMMAND
  7. Type regedit and hit Enter to open Registry Editor. 
  8. Follow this path: Computer\HKEY_LOCAL_MACHINE\SYSTEM\CurrentControlSet\Services\WaaSMedicSvcReg Start -waasmedic agent exe high disk usage
  9. From the right pane, locate and double-click Start, and modify the Value data from 3 to 4.
  10. Now go to Services again and try to disable the service. Once done, click Apply and OK.Disabled 2
  11. Restart your PC to save the changes.

5. Use the Disk Cleanup

  1. Press Windows + R to open the Run window. Run console -
  2. Type cleanmgr and press Enter to open Disk Cleanup.
  3. On the next window, select C drive and click OK.C
  4. Now click Clean up system files.Clean up -waasmedic agent exe high disk usage
  5. Again select C drive and click OK.
  6. Select the files listed under Files to delete option and click OK.Cleanmgr 4
  7. Click Delete Files to confirm.Cleanmgr 5

6. Enable DEP( Data Execution Prevention)

  1. Press the Windows key, type Adjust the appearance and performance of Windows and click Open.Adjust the appearance and performance of Windows
  2. Switch to the Data Execution Prevention tab and select the radio button next to Turn on DEP for all programs and services except those I select.
  3. Click Add.DEP -waasmedic agent exe high disk usage
  4. Select the file and click Open to add.
  5. Click Apply, then OK to save changes. 
  6. Restart your computer.

So, these are the methods to fix the WaasMedic Agent.exe causing high disk usage issues. If you have questions about WaasMedic Agent.exe, feel free to mention them in the comments below.

Group Policy Editor is Missing on Windows 10: How to Enable

Many users complained that their version of Windows 10 doesn’t have a Group Policy Editor. This can be an issue for some users, especially those that need to modify certain policies.

If that’s the case for you, in today’s article, we’ll show you how to fix this problem once and for all.

What to do if Local Group Policy Editor is missing?

1. Upgrade to the Pro version of Windows

  1. Press the Windows key + I to open the Settings app and select Update & Security.
    update and windows 10 group policy editor missing
  2. Click the Activation tab in the left pane.
    activation
  3. Now, select Go to Store.
  4. You’ll be asked to make a purchase of the Pro version of Windows 10.
  5. Once your system is upgraded to the Pro version, Group Policy should be natively available.

The Group Policy Editor will be missing on your PC if you are using a Windows 10 Home. This is because the tool is only available on the Pro versions of Windows.

Hence, if you want to use the Group Policy Editor natively, it’s advised to upgrade to the Pro version.

2. Use Policy Plus

policy plus Windows 10 Doesn't Have Group Policy Editor

If you don’t have Group Policy Editor on your PC and don’t want to upgrade to Windows 10 Pro, you might consider using Policy Plus.

This is a freeware application, and it works just like Group Policy Editor. The application is completely free and portable, so we strongly encourage you to try it out.

⇒ Get Policy Plus

If the Group Policy Editor is missing on your Windows 10 PC, it can be problematic. However, you should be able to fix it by upgrading to the Pro version and using a third-party tool.

If you want to know how to enable gpedit.msc on Windows 10, check our detailed guide to do it effortlessly.

Feel free to let us know the solution that helped you fix this issue in the comments below.

Ucrtbase DLL: What is It  & How to Fix It If It’s Missing?

Sometimes, you may encounter the ucrtbase.dll missing error while launching an app or software on your computer.

This can be pretty frustrating as it prevents you from running the app. The error indicates that ucrtbase.dll is either corrupted or damaged.

In this guide, we will discuss what ucrtbase.dll is, different methods to fix the issue, and the causes of the problem. Let’s begin! 

What is ucrtbase.dll?

Ucrtbase.dll is a software component of the Universal C Runtime Library. The ucrtbase.dll file contains several standard C library functions, including string manipulation, memory allocation, and more.

The file is essential for properly functioning Windows apps and is used by both Microsoft Store and desktop apps.

Whenever an application needs the  ucrtbase.dll file, the operating system loads it into the memory, and the app uses the functions and classes in the file.

If this DLL file is corrupted or missing, the apps that need it to function might not launch.

What causes the ucrtbase.dll is missing error?

There could be various reasons why you are facing this error; some of the common ones are mentioned below:

  • Outdated OS – Windows needs to be up to date to function properly; if there are pending updates, you may get all kinds of errors, including this one.
  • Incomplete installation of the program – If the program you are trying to launch is not installed correctly, it might not be able to use the ucrtbase.dll file, hence the error.
  • DLL file is corrupt – If the ucrtbase.dll file is corrupt, then the app depending on the file to function, won’t start and will show the error.
  • Obsolete drivers – If you don’t have the latest drivers installed on your computer, you might get this system error. Make sure drivers are updated.

What can I do to fix the Ucrtbase.dll is missing error?

Before engaging in advanced troubleshooting steps, you should consider performing the following checks:

 1. Repair system files

  1. Press the Windows key, type CMD, and click Run as administrator.CMD elevated
  2. Type the following command and press Enter to scan and repair the system files: sfc/scannowCMD sfc scan -ucrtbase dll
  3. If there is an error, copy and paste the following command and press Enter:  DISM.exe /Online /Cleanup-Image /RestorehealthCMD DISM
  4. Once done, restart your computer.

An even easier procedure for repairing your system files would be to use dedicated repair software that helps you run an in-depth scan to find corrupt, damaged, or missing files and automatically replace them with healthy units.

2. Reregister ucrtbase.dll file

  1. Open the Command Prompt with admin rights using the steps mentioned in the above method.
  2. Type the following command and press Enter to reregister the ucrtbase.dll file: regsvr32 ucrtbase.dll Reg
  3. Once the process gets completed, restart your PC to confirm the changes.

3. Repair/reinstall the Microsoft Visual C++ Redistributable

3.1 Repair Microsoft Visual C++ Redistributable

  1. Press Windows + I to open Settings.
  2. Go to Apps, then click Installed apps.Apps, installed apps -ucrtbase dll
  3. Locate Microsoft Visual C++ Redistributable, and click on the three dots next to it. Select Modify.Modify
  4. Click Yes on the UAC prompt.
  5. On the next window, click Repair. Repair

3.2 Reinstall the Microsoft Visual C++ Redistributable

  1. Open Settings. Go to Apps, then click Installed apps.
  2. Locate Microsoft Visual C++ Redistributable, click on three dots, and select Uninstall.UIninstall -ucrtbase dll
  3. Again, click Uninstall.
  4. Download the Microsoft Visual C++ Redistributable, and double-click the installer file.Uninstall step2
  5. Follow the on-screen instructions to install.

4. Update the graphics drivers

  1. Press Windows + R to open the Run console.Device Manager RUN COMMAND
  2. Type devmgmt.msc and hit Enter to open Device Manager.
  3. Click on Display adapters to expand it, right-click the graphics driver and select Update driver.Graphics Driver update
  4. On the next page, click Search automatically for drivers.Search automatically for drivers
  5. Follow the onscreen instructions to complete.
  6. Restart your computer.

5. Perform System Restore

  1. Press the Windows + R to open the Run window.Restore point -ucrtbase dll
  2. Type rstrui and press Enter to open System Restore.
  3. On the System Restore window, click Next.Next -ucrtbase dll
  4. Now, on the next page, place a checkmark next to Show more restore points.
  5. Select a restore point from the available list and click Next.Select Next
  6. Click Finish to restore the previous settings, and Windows will restart.Finish

So, these are methods that you need to follow to fix the ucrtbase.dll missing error. If you have any questions about  ucrtbase.dll, please feel free to mention them in the comments section below. 

Fix: Event ID 7023 Error in Windows 10 & 11 [& What Is]

Some users have posted on Microsoft’s forum about a Connected Devices Service error with event ID 7023. This happens when a service stops unexpectedly.

If you are also facing this issue, this guide contains the solution that will help you fix this issue for good.

What does the event ID 7023 indicate?

The event ID 7023 error means that the service specified in the error message stopped unexpectedly. This can be due to corrupt system files and some other factors.

Irrespective of the cause, the solutions in this guide should help you fix the issue quickly.

How can I fix the Event ID 7023 error in Windows 10?

1. Run a System File Checker scan

  1. Press the Windows key, type cmd, and click Run as administrator for Command Prompt.
    cmd event id 7023
  2. Before running an SFC scan, input this command and hit Enter: DISM.exe /Online /Cleanup-image /Restorehealthdism restore
  3. Then type in this SFC scan command and press Enter: sfc /scannowsfc scan
  4. Wait until the scan has reached 100 percent.
  5. When you have received a scan outcome, restart your desktop or laptop if the outcome says Windows Resource Protection repaired system files.

A few users reported nothing happening while using the SFC scan on their PCs. If that’s the case, try to use DISM commands in Windows 10 to fix the corrupt system files causing the event ID 7023.

2. Check the Connected Devices Platform Service is enabled and running

  1. Press the Windows key + R, type services.msc, and click OK.
    services event id 7023
  2. Then double-click Connected Devices Platform Service.
    connected platform
  3. If that service is disabled, select Automatic (delayed) in the Startup type drop-down menu.
    auto connected
  4. Now, click the Start button to run that service if it’s not running.
  5. Finally, click the Apply button, followed by OK to save the settings.
    start event id 7023

As mentioned earlier, the event ID 7023 might be due to a disabled service. The solution to this to set the service to run automatically.

3. Check that dependent Connected Devices Platform services are enabled

  1. Open the Services window as outlined within the first few steps of resolution one.
  2. Next, double-click Network Connection Broker to open the properties window for that service.
    network connection
  3. Select the Automatic option on the Startup type drop-down menu.
  4. If the service isn’t running, press the Start button.
  5. Now, click Apply, followed by OK to complete the process.
    auto network
  6. Next, double-click TCP/IP NetBIOS Helper to open its service window.
    tcp event id 7023
  7. Choose the Automatic startup option.
  8. Next, click the Start button (if needed).
  9. Select the Apply and OK options to finish.
    auto tcp

In some cases, this event ID 7023 issue can be down to services that are dependent on the Connected Devices Platform. You need to enable these services to fix this.

4. Select the Restart the Service option

  1. Open the Services window as outlined for the first resolution.
  2. Double-click Connected Devices Platform Service to open that service window.
    connected
  3. Now, select the Recovery tab.
  4. Select the Restart the service option for the First and Second Failures.
  5. Press the Apply button, followed by OK to close the Connected Devices Platform Service window.
    recovery

Sometimes, the Connected Devices Platform can fail for some reason, leading to the event ID 7023. To circumvent this, you need to set the service to restart when it fails.

5. Turn on the Share across devices option

  1. Press the Windows key + I to open the Settings app and select System.
    system event id 7023
  2. Next, click Shared experiences on the left pane.
  3. Toggle the Share across devices option on if it’s off.
    shared

Some users have found the Shared experiences feature to be the cause of the event ID 7023. Hence, you need to disable the feature and restart your PC.

6. Clean boot Windows 10

  1. Press the Windows key + R, type msconfig, and click OK.
    msconfig event ID 7023
  2. Click the Services tab at the top.
  3. Now, uncheck the Hide all Microsoft services checkbox and select Disable all.
    services hide
  4. Click the Startup tab and select Open Task Manager.
    startup task
  5. Next, right-click each of the apps there and select the Disable option.
    disable
  6. Finally, go back to the System Configuration window and click Apply, followed by OK.
    apply event ID 7023

This resolution will ensure no third-party programs can conflict with Connected Devices Platform Service.

A conflicting third-party program was most likely the culprit if this solution fixes the issue. If you restore your original boot settings, you’ll need to identify that program to uninstall it.

The above resolutions are among the most likely fixes for the event ID 7023 error that crashes Windows 10. Even more, use this guide on how to fix high CPU usage event ID error.

Before you go, don’t miss our guide on Event ID 7034 for more useful tips.

Note that there might still be other ways to fix the same issue; users who have resolved this error with other resolutions are welcome to share their fixes in the comments below.

How to Fix AnyDesk ID Not Showing in Windows 11?

If your AnyDesk ID isn’t showing, you’ll have trouble establishing a remote connection. Let’s see why this happens and how to fix it:

What causes the AnyDesk ID not showing error on Windows 11?

There could be various reasons for the AnyDesk ID not appearing; Here are some of the most commons ones: 

  • Outdated AnyDesk software – An outdated version of AnyDesk software can become incompatible; therefore, the ID won’t show. Check for updates or the latest version of the software.
  • AnyDesk incorrectly installed – If the software is not installed correctly or some configuration files are missing, you might face this issue.
  • Antivirus interference – Sometimes, security software can interfere, hampering the software’s functionality, hence the issue.
  • Misconfigured network settings – If the network settings on your computer are misconfigured, then you might not be able to use AnyDesk or see the ID.

How can I fix the AnyDesk ID not showing error on Windows 11?

Note icon NOTE
The first thing we advise is to install the AnyDesk desktop app if you’re using the portable version. If that doesn’t solve the problem, keep reading:

1. Check for Updates

  1. Launch AnyDesk on your computer. 
  2. Click the four horizontal lines and select Settings.Settings AnyDesk -anydesk id not showing in windows 11
  3. Go to About AnyDesk and check the version to ensure you have the latest.AnyDesk Version
  4. From the left pane, select Security. 
  5. Scroll through the options and go to Updates in the right pane.Update
  6. The Enable Auto-Update -Main Channel option should be selected to keep the app updated.

2. Get ID from Main Menu

  1. Launch AnyDesk.
  2. Locate and click on the New Session from the top bar on the software.AnyDesk ID
  3. Check This Desk space, and you can see your ID.

3. Use the Services

  1. Press Windows + R to open the Run console.Servicesmsc
  2. Type services.msc and press Enter to open Services. 
  3. Locate AnyDesk and double-click it to open Properties.AnyDesk Service -anydesk id not showing in windows 11
  4. Select Automatic for Startup Type, and click the Start button under Service status.AnyDesk Service Properties
  5. Click Apply and OK to complete the process.
  6. Restart your computer to let the changes take effect.

4. Check network settings 

  1. Press the Windows key, type Control Panel, and click Open.CP Control Panel
  2. Select View by as Large icons, and click Windows Defender Firewall.Windows Defender Firewall- anydesk id not showing in windows 11
  3. Select Allow an app or feature through Windows Defender Firewall from the left pane.Allow an app
  4. Scroll through the Allowed apps and features list to check if it has AnyDesk. If it doesn’t, then click Change Settings.Change settings
  5. Now, click Allow another app button.Allow another app
  6. On the next window, click the Browse button.Add
  7. Browse to the app’s location and click Open.Open
  8. Once the app is selected, click Add.Add browse
  9. On the Allowed apps window, click OK to confirm the changes.OK

5. Reinstall AnyDesk

  1. Press Windows + R to open the Run window.APPWIZ RUN COMMAND
  2. Type appwiz.cpl and hit Enter to open Programs and Features.
  3. From the list of installed programs, select AnyDesk, and click Uninstall.AnyDesk Uninstall  - anydesk id not showing in windows 11
  4. Now go to AnyDesk’s official website.Download AnyDesk
  5. Download the latest version, run the installer, and follow the onscreen instructions to fix the issue.

6. Try connecting using the AnyDesk address

  1. Log in to your my.AnyDesk II account.
  2. Navigate to the Address Books section.anydesk my address book
  3. In the Personal tab, open My Address Book to view your saved addresses.
  4. This will show your custom AnyDesk address, which you can use for remote connections.

If you’ve set up a custom AnyDesk address, use it if your ID isn’t showing. This won’t solve the underlying issue, but it’s a good backup for securing a remote connection.

7. Contact Support

anydesk id not showing in windows 11 - Contact Adobe Support

If nothing worked for you and you are stuck with the issue, then it is advised to contact AnyDesk support. Explain to them the whole scenario and steps taken to fix the case; this will help them better understand the situation and help you.

So, these are the methods you can follow to fix AnyDesk ID not showing on Windows 11. If you have questions or concerns about the issue, feel free to reach out in the comments section below. 

LenovoVantageService High CPU Usage: 2 Methods to Fix it

Let’s highlight the steps to fixing the LenovoVantageService high CPU problem.

The Lenovo brand is famous globally for its efforts at churning out a veritable line of quality electronics and PC hardware. Responsible for several tablets, workstations, storage devices, IT management programs/software, and servers, the System Update Service is of concern to us today.

Many Windows 10 users have complained about their PCs using a much higher CPU rate than usual upon using the System Update Service. Because this update is supposed to ease computer processes, it’s pretty worrying.

Why is LenovoVantageService causing high CPU usage?

There are several possible reasons why the Lenovo Vantage Service may be causing high CPU usage:

  1. Background updates – Lenovo Vantage Service may be downloading or installing updates in the background, which can consume significant resources and cause high CPU usage.
  2. Conflict with other software – If Lenovo Vantage Service conflicts with another program or application on your system, it can cause high CPU usage.
  3. Corrupted files – If the Lenovo Vantage Service files have become corrupted, it can cause the service to behave abnormally and consume high resources.
  4. Background scanning – The Lenovo Vantage Service may perform a background scan of your system, which can consume many resources and result in high CPU usage.
  5. Software bug – The Lenovo Vantage Service may have a software bug causing high CPU usage.

It is crucial to identify the cause of the high CPU usage and take the steps we recommend below to resolve the issue.

What is Lenovo Vantage?

Lenovo Vantage is a software tool provided by Lenovo for its Windows-based computers.

It offers a central location for managing various aspects of your Lenovo PC, including system updates, hardware scanning, system settings, support, and productivity tools.

Its centralized management approach makes keeping your system up-to-date and running smoothly easier.

How can I fix the LenovoVantageService’s high CPU usage?

1. Use the Task Manager

  1. Open the Task Manager by pressing Ctrl+ Shift + Esc.
  2. Under the processes tab, scroll down to the SUService.exe process and click the End Task button.
    lenovovantageservice high cpu

2. Uninstall the Lenovo System Update service

  1. Open the Windows tab by pressing Win + S.
  2. In the search bar, enter the term Lenovo, then click on Uninstall.
  3. On the next screen, click Lenovo System Update and click on Uninstall.
    lenovovantageservice high cpu

Unfortunately, there aren’t many fixes for this issue. So, short of uninstalling the app or ending the process from the Task Manager.

Finding quick software fixes for Lenovo devices is tricky because there’s no official customer support forum. Instead, they have an FAQ-style how-to page.

You can also check out some software to help fix CPU overuse issues.

You should note that the SUService.exe process is not unique. It’s possible to have malware disguising as the real thing especially. To be doubly sure, you can check out the local path; it’s advisable to run an antivirus scan.

Thank you for reading this article; we hope it’s been informative! Please share your thoughts on LenovoVantageService high CPU in the comments section below.

Best Drawing App for Surface Pro: Top 5 of 2026

The Surface Go, Pro, and Book are 2-in-1 tablets you can utilize with stylus pens. Since many utilize these devices for digital art, wanting to find the best Surface Go 2 drawing apps or the best drawing apps for Surface Pro makes total sense.

In fact, this is far from being a novelty as users have been searching for the best software for drawing tablets for a while now.

However, brands such as Huion, Gaomon, XP Pen, or Wacom seem to be preferred both by aspiring and consecrated digital artists. So, where does that leave our Surface devices?

Can you use the Surface Go 2 for drawing? How about the Surface Pro? If so, what app do you use to draw on Surface Pro? These are all legitimate questions that we shall try to address accordingly.

Is a Microsoft Surface good for drawing?

Users can draw more naturally with the stylus Surface Pens than with laptop mouse controls.

So, many digital artists love Microsoft Surface devices. However, it’s the great digital art toolkits included within the Surface tablets’ best drawing software that really enable artists to unleash their creativity.

These are some of the best drawing software for Microsoft Surface devices:

Software nameBrushes and pencil libraryKey feature
Adobe Photoshop✅Best drawing app for Surface Go 3 & 2
One-click edits
Adobe Illustrator✅Best digital art software for Surface Pro
Background remover
Clip Studio Paint✅3D, AI, Animation-capable
Various style brushes
Corel Painter✅Enhance painting responsiveness by reducing brush lag
Concept art drawing

What app can I use to draw on my Surface?

Adobe Photoshop – Best drawing app for Surface Go 3 & 2 (raster-based)

Adobe Photoshop - Best Painting Software

The world’s favorite image editor is also top-notch graphics & design software for painting and drawing.

Adobe Photoshop users can draw with its flexible Pen Tool, shape options, pencil and pen brushes, or the Freeform Pen utility. So, Photoshop offers almost limitless creative scope.

Adobe Photoshop includes more than 1,000 paint, pencil, pen, and marker brushes among others. Its users can create new pencil and pen brushes for illustrations via Photoshop’s Brush Settings panel.

There are also many custom brush packs available for download on numerous websites.

Adobe Photoshop also incorporates five pen tools for drawing. Users can draw naturally with the Freeform Pen Tool.

Its standard Pen utility enables users to draw lines and curves more precisely with anchor point paths. With those tools, users can manipulate path outlines in many ways to modify vector shapes.

Other useful features:

  • Photoshop’s Layer palette enables users to draw in layers
  • Includes 3D tools for animating three-dimensional models
  • Enables users to draw and paint symmetrically with symmetric options
  • Users can turn pictures into animations with Photoshop’s video layers

Adobe Photoshop

Don’t miss out on the best drawing app for Surface Go, Pro, and Book. Try it yourself today!
Free trial Visit website

Adobe Illustrator – Best digital art software for Surface Pro (vector-based)

Adobe Illustrator is an industry-standard application for vector artwork and the best digital art software for Surface Pro and Go.

If you need to lay down designs with more technical drawings generated from mathematical formulas, then this is the perfect drawing app for you.

With Illustrator, you can draw designs for logos, product packaging, billboards, icons, and much more.

It includes about 20 drawing tools with various types of shapes and unique effects. Its anchor point Pen tool is similar to Photoshop’s one, allowing users to draw as they would on paper with the Pencil utility.

Graphics designers will also greatly appreciate Illustrator’s Perspective Grid feature with 3 different presets.

Other useful features:

  • Enables users to generate large-scale art on a 100x canvas
  • Includes a pixel grid for aligning objects
  • Users can select a Scribble effect on Illustrator’s Stylize menu
  • Illustrator’s Adobe Color Themes panel provides appealing color combinations

Adobe Illustrator

In comes the best vector-based image editor. Try it now and see why!
Free trial Visit website

Clip Studio Paint – 3D, AI, Animation – Ideal for drawing on Surface Pro 7

The Clip Studio Paint software has had many rave user reviews. Users love CSP’s natural brush behavior, customizable brushes, and animation features.

This software is especially good for manga and comic drawing, but it’s suitable for a wide range of digital art.

Clip Studio Assets provides users with thousands of brush presets and other drawing materials. Users can directly download and import pencil and pen brush preset from the CSA community into their software.

Or they can set up custom brushes with Clip Studio Paint’s customization settings.

Clip Studio Paint also includes dedicated tools for comic creation. It incorporates numerous manga tools for adding speech balloons, effect lines, backgrounds, and frame borders to comic drawings.

The 3D manga-style figures CSP users can import to canvases are also handy reference materials for comic art. Users can also bring their pictures to life with Clip Studio’s Paint animation tools.

Other useful features:

  • Users can adjust tablet pen pressure via CSP’s Adjust pen pressure window
  • Enables users to draw with vector layers
  • Include AI-created coloring support
  • It supports the Kindle and EPUB e-book formats for digital books
  • CSP provides 3D previews for page layouts

Clip Studio Paint

If you want to have the power to create beautiful digital art in the palm of your hand, then you’ll need this.
Free trial Visit website

Corel Painter – Enhance painting responsiveness by reducing brush lag

Corel Painter is a complete digital arts studio for painting and drawing. Don’t be fooled by Painter’s title, as this software has an advanced toolkit for drawing as well as painting.

It boasts brush, color, and compositional tools few other digital art software can match.

Painter’s library of more than 900 brushes includes more than enough pens, pencils, liquid ink, and markers for illustrators to draw with. Users can also customize selected brushes to set up their own variants.

There are also handy compositional tools included in Corel Painter. Users can divide canvases with layout grids. Painter’s mirror and kaleidoscope tools enable users to draw and paint symmetric patterns.

With Painter’s Divine Proportion tool, users can also establish focal areas in their pictures.

The most unique Corel Painter feature, however, is its Brush Accelerator. The Brush Accelerator is a performance optimizer that chooses optimal settings for your PC’s hardware.

That feature enhances Painter’s drawing and painting responsiveness by reducing brush lag.

Other useful features:

  • Enables users to design mosaics from scratch or sources
  • Includes a Harmonies panel that displays effective color combinations
  • Corel Paint users can apply 12 AI styles to images
  • Users can select different paper textures for canvases

Corel Painter

Draw wonderful art on your Surface tablet effortlessly with Corel Painter.
Check price Visit website

Those are some of the best drawing packages for Surface devices to take your pick from.

Those digital art applications are optimized for drawing with Surface tables and include advanced creative tools few other software can match.

Rainbow Six Siege Slow Loading: 6 Ways to Make it Faster

We believe you have found this guide because you are experiencing Rainbow Six Siege’s slow loading. We explore this problem in detail in this guide.

Tom Clancy’s Rainbow Six Siege is a game that challenges players to engage in massive sieges. They’ll confront smart enemies who know how to transform their environments into strongholds and prevent breaches by Rainbow teams.

Rainbow Six Siege offers a series of exciting tools to players, allowing them to combine tactical maps, observation drones, and a new rappel system.

Why does my Rainbow Six Siege take so long to load?

There could be several reasons your Rainbow Six Siege takes a long time to load. Some common causes are:

  • Outdated graphics card – If your graphics card is not up-to-date, the game may not run as smoothly, causing longer load times.
  • Poor Internet connection – Online games like Rainbow Six Siege rely on a stable internet connection for updates, downloads, and online play. A slow or unstable connection can result in longer load times.
  • Hard drive speed – If the hard drive your game is installed on is slow, it may take longer to access the data required to run the game.
  • Overcrowded system memory – If there is more free memory on your system, the game may be able to run efficiently, resulting in longer load times.
  • Corrupted game files – If game files have become corrupted, the game may have trouble loading. This also triggers the Rainbow Six Siege error code 10-0x00000.
  • Overly demanding game settings – If graphics settings are high, the game may take longer to load as it requires more resources.

Regardless of what triggers the problem, the solutions below should help you through the problem.

How to speed up Rainbow Six Siege’s loading time?

Before going into any solutions, we suggest using an SSD. An SSD (Solid-State Drive) can help reduce load times in Rainbow Six Siege if the slow load times are due to the hard drive’s speed.

1. Run a malware scan

  1. Type Windows Security in the Search bar, and click on the relevant search result.
    rainbow six siege slow loading
  2. Now, click on Virus & threat protection here.
    rainbow six siege slow loading
  3. Click on Scan options.
  4. Now, select Full scan and click on the Scan now button at the bottom.

While Windows Security is a reliable method of scanning for malware, we recommend a more advanced tool like TotalAV to do the job.

Not only does this tool run a comprehensive scan of your computer to detect and successfully remove any cyber threats, but it also prevents them from entering and damaging it.

⇒ Get TotalAV

2. Delete unnecessary files and folders with Disk Cleanup

  1. Press the Windows key, type disk, and open the Disk Cleanup app.
    rainbow six siege slow loading
  2. Select your disk and hit Enter.
  3. Click on OK.

3. Defrag the hard drive

  1. Type defragment in the search and select the Defragment and optimize drives option.
  2. Select the drive that needs optimization; this should be the same drive where you have Rainbow Six Siege, then click Optimize.

4. Close the Uplay Overlay

  1. Launch Rainbow Six Siege.
  2. Open the Uplay Overlay and close it.
  3. Then press any key on the screen.

This solution helps you skip all the intro videos and could cut through the excess loading times.

5. Close all running background applications

  1. Press Windows + R, type msconfig, and hit Enter.
    rainbow six siege slow loading
  2. In the General tab, select Selective Startup, then uncheck Load Startup Items.
  3. Click Apply and OK, then reboot your computer.

Background apps can slow down the game-loading process. So, it would be best to close all running background apps before starting your game.

6. Flush your DNS

  1. Press Windows + X and select Command Prompt (Admin).
    rainbow six siege slow loading
  2. Type in the command below and hit Enter:
    ipconfig /flushdns
  3. Finally, renew your IP by running the command below:
    ipconfig /renew

The DNS cache stores the IP addresses of the websites you have recently viewed. Therefore, it would be best to clear them from time to time for your PC to communicate with game servers correctly. It can also help you fix the error code 3-0x000c0054 and error code 4-0xFFF0BE25 in the Rainbow Six Siege game.

In conclusion, you may adjust the frame limit. Turning on the frame limit to 120 FPS may improve the loading time. Even though this is a long shot, much of the CPU’s processing power is used to render frames instead of loading the game.

Also, you may consider lowering your game settings because the higher the settings, the longer the loading time.

We hope the tips above helped you improve Rainbow Six Siege’s loading time. If you’ve found other solutions to fix this issue, please share them in the comments section below.

Powershell Tutorial: How to Convert String to Date?

Dates are an essential part of several applications and scripts. Still, the date information is usually stored in string format, which makes it difficult to perform operations such as date arithmetic or comparison.
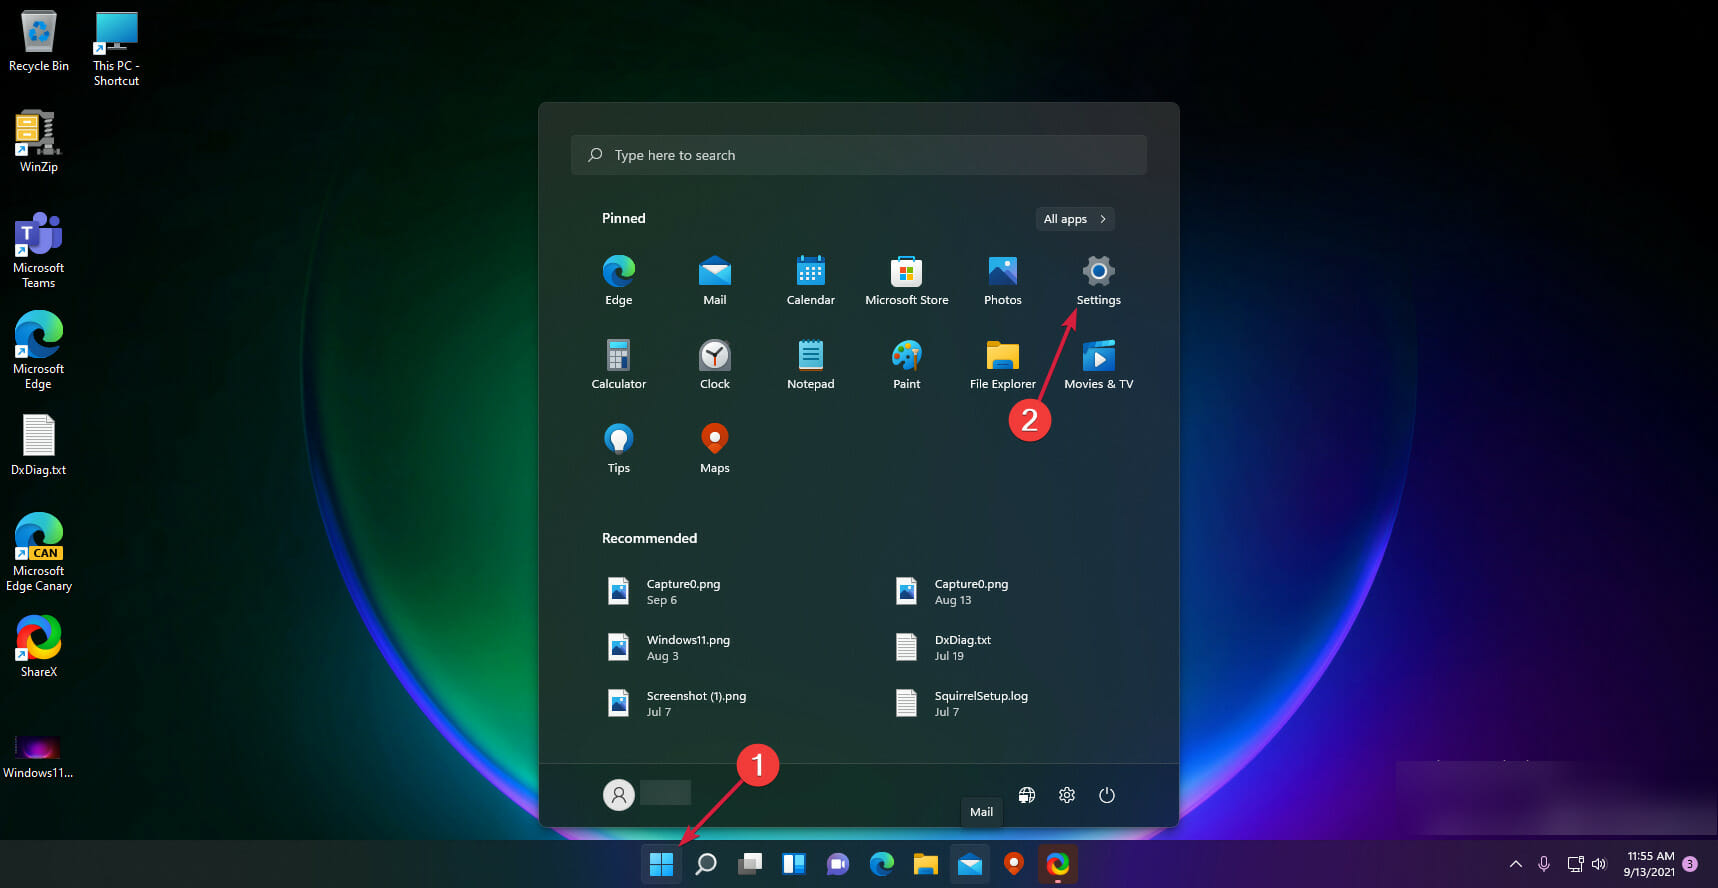
Therefore you need to convert strings to dates; this will make it easier to perform everyday tasks, such as retrieving information about the current date and time, calculating between two date values, and formatting them.
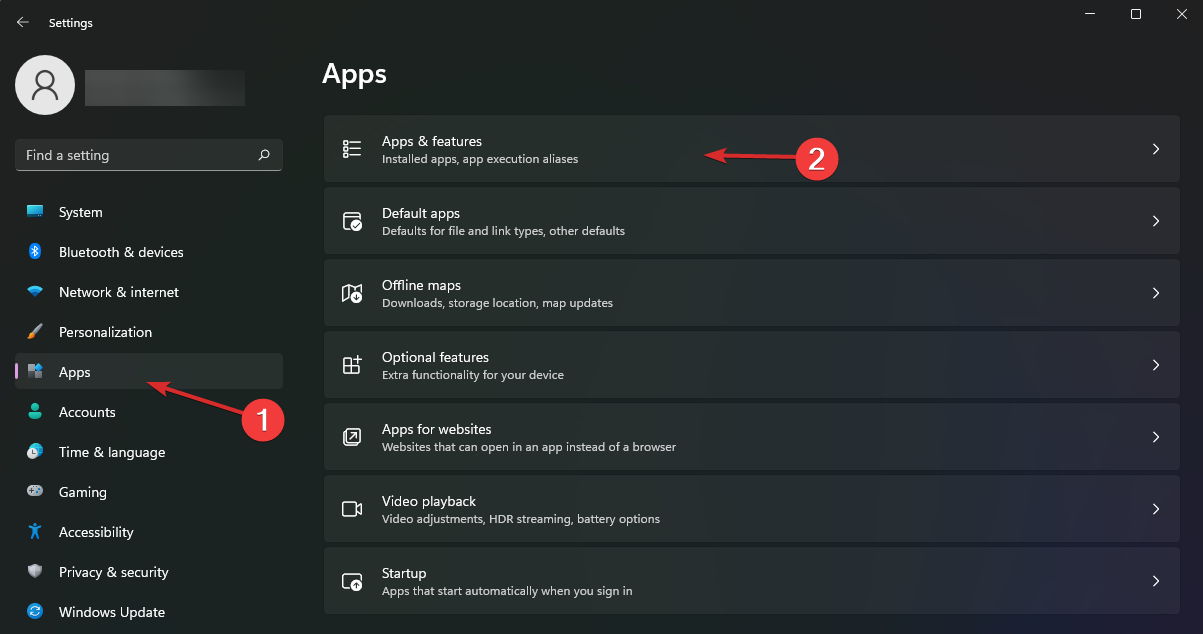
This guide will cover all the simple methods and commands to convert string to date in PowerShell. We will also include examples to make it even easier. Let’s start! 

How can I convert String to Date?

1. Use the Parse command

  1. Press the Windows key, type PowerShell, and click Run as administrator. Windows PowerShell -powershell convert string to date
  2. Type the following command after replacing  02/03/2023 with the date you want to convert and press Enter: $dateString = "02/03/2023"
    $parsedDate = [DateTime]::Parse($dateString)
    Write-Output $parsedDate
    powershell_Parse

2. Use the ParseExact command

  1. Launch PowerShell with admin rights.
  2. Copy and paste the following command after replacing  02/03/2023 with the date you want and Enter: $dateString = "02/03/2023"
    $format = "MM/dd/yyyy"
    $parsedDate = [DateTime]::ParseExact($dateString, $format, $null)
    Write-Output $parsedDate
    ParseExact -powershell convert string to date

3. Use the GetDate cmdlet

  1. Open PowerShell with administrator privileges. 
  2. Type the following command after replacing 02/03/2023 with the date you want to convert and Enter:$dateString = "02/03/2023"
    $parsedDate = Get-Date $dateString
    Write-Output $parsedDate
    Get DAte -powershell convert string to date

4. Use the DateTime Accelerator

  1. Launch PowerShell with admin rights. 
  2. Copy and paste the following command, but replace 02/03/2023 with the date you want and press Enter: $dateString = "02/03/2023"
    $parsedDate = [DateTime]$dateString
    Write-Output $parsedDate
    DateTime

5. Use the Cast function

  1. Open PowerShell with administrator rights. 
  2. Type the following command after replacing  02/03/2023 with the date you want and press Enter: $dateString = "02/03/2023"
    $parsedDate = [DateTime]$dateString
    Write-Output $parsedDate
    CAST

So, these are the standard methods you can use to convert string to date in PowerShell. If you have any questions or concerns about the process, feel free to mention them in the comments section below.