9 Best Tab Manager Extensions for Chrome [Better Performance]

However, it is easy to have one-too-many tabs opened at once. In such cases, having a means of intuitively managing or closing those tabs could be great.

A tab manager is your best bet, and we love to explore some of the best options available. You may explore using any of the best Password managers to get additional utility from your browsers.

Does Chrome have a tab manager?

Yes, Chrome has a tab manager and works to label, organize, and color-code tabs for easy management.

By right-clicking a tab and selecting the Add tab to new group option, the tab will get a colored dot that you can right-click on to give it a name and modify its color.

How do I change the tab layout in Chrome?

  1. Launch the Chrome browser.
  2. Right-click on a tab and select the Add tab to new group option.
    best tab manager chrome
  3. Name the tab group and select a color.
    best tab manager chrome

You can, however, get additional flexibility using any of the best tab manager options for Chrome in our list.

Quick Tip:

Before tweaking Chrome, we recommend switching to Opera One, which has a perfect tab management system.

You can find the Workspaces feature on the browser’s sidebar, and managing the tabs is child’s play. Add more workspaces, rename them, and add icons so that you can easily find them.

Opera One

Opera One’s Workspaces is the best tab organizer solution out there. It’s free and built-in so try it now.

What are the best new tab extensions for Chrome?

TooManyTabs – Great domain sorting

best tab managers TooManyTabs

The name of this extension says it all, as its primary purpose is the management of more tabs that you could typically handle by yourself. It is about the best tab management extension for Chrome.

Once installed, you can glimpse the contents of a tab just by hovering your mouse over it. This spares you the time wasted cycling through them manually.

The most iconic feature of TooManyTabs is that it can automatically backup/restore active tabs to your Google Drive account.

If you need a Chrome tab manager, this extension might be what you need.

Important features:

  • Automatically backup and restore active tabs
  • Bird’s eye view of opened tabs
  • Sorts by domain, title, and creation time

⇒ Get TooManyTabs

The Great Suspender – Best tab suspender

best tab manager tools for Chrome The Great Suspender

If you are looking for the best Chrome tab suspender that can suspend tabs after a set period, then The Great Suspender is the tool for you.

This extension lets you program a tab to shut down by itself after between 20 seconds and three days. It also allows you automatically suspend tabs if they meet specific criteria after a certain period.

More so, you can even whitelist certain websites so that they never get suspended.

Pros:

  • Tab tracking
  • URL and domain whitelist
  • Chrome performance boosting

⇒ Get The Great Suspender

BrainTool – Great topic manager

If you’re tired of having tabs all over the place in Chrome, BrainTool is a great management tool that organizes your tabs according to your topics.

When you find a page that fits a certain topic, just add it to that topic with a click and close it away.

This way, you will be able to open and close groups of tabs for a certain topic with a single click.

All the data about your tabs are stored and synced continuously in a plain text file, there are no servers so everything is private.

Moreover, the file can be edited, backed up, and shared with anyone. But the best part is that you won’t ever be afraid of closing tabs.

Take a look at its most important features:

  • Import and export to and from bookmarks or org-mode files
  • Topics within topics and searchable notes
  • Structured org-mode syntax
  • Complete privacy and plain text access.

⇒ Get BrainTool

Tabli – Most minimalistic

best tab manager tools for Chrome Tabli

Tabli is incredibly simplistic in terms of how it is designed. The UI is intuitive and minimalistic, making switching tabs enjoyable.

Additionally, Tabli can manage the tabs in different Chrome windows, which is something most of our other entries cannot. It does this by showing the tabs grouped up based on the windows they are opened in.

If you’re looking for the best tab organizer for Chrome, Tabli might be the right choice.

Pros:

  • Multiple tab control
  • Dark Mode
  • Save and restore windows

⇒ Get Tabli

Tab Manager Plus – Best for tab tracking

best tab manager tools for Chrome Tab Manager Plus

Tab Manager Plus has all of the essential elements that you could find in a tab management extension. This includes tools to close, rearrange, and switch between tabs more easily.

However, one feature that makes it stand apart is that the extension shows you the number of open tabs right on the icon.

This feature becomes most helpful when you reach several tabs that neither your eye nor your PC’s RAM can track.

Pros:

  • Tab rearranging
  • Duplicate tabs highlighting
  • Open tabs limiter

⇒ Get Tab Manager Plus

Cluster – Least impact on system resources

Managing many windows and tabs is simple using a window and tab manager like Cluster.

Cluster is a Chrome plugin that manages several open tabs while using the least amount of system resources.

Additionally, Cluster includes tools for speedy tab and window opening and a tab project manager that makes it simple to save or restore tab and window sessions as active projects.

When opening several tabs at once, Restored Windows opens them all in a suspended mode to save load time.

Pros:

  • Undo removed tab or window
  • Real tab URL display
  • Tab sorting

⇒ Get Cluster

Toby – Best for distraction-free focus

best tab manager tools for Chrome Toby

Toby’s functionality is somewhat similar to Cluster regarding tab displaying. While the extension lets you view all of your open tabs, it also enables you to group them into custom clusters called Collections.

Additionally, you can save these Collections for later use, and you can launch all of the tabs that belong to a Collection with a single click.

This allows excellent work flexibility, especially if you are the type that gets engaged in different projects simultaneously.

Overall, this is one of the best tab organizer options in Chrome, so it’s worth checking out.

Pros:

  • Group tabs by category
  • Web page extension access
  • Drag and drop functionality

⇒ Get Toby

Fruumo – Most user friendly

best tab manager tools for Chrome Fruumo

Fruumo is pretty much the most straightforward extension in the list as far as the interface goes, and it can show you how many tabs are open right on the icon.

It also features a search bar that lets you search through your history and bookmarks, not just the open tabs.

If you need a tab manager Chrome extension that is simple to use, be sure to consider Fruumo.

Pros:

  • Incredibly simple interface
  • History and bookmark management
  • Web search

⇒ Get Fruumo

Session Buddy – Steepest learning curve

best tab manager tools for Chrome Session Buddy

Session Buddy prides itself on being one of the best tab organizer extensions for Chrome on our list since it includes several extensive tweaking options.

You can configure anything from session names to maximum session counts that can be saved. Session information can be saved in many formats, such as JSON, HTML, and CSV.

However, this utility comes at the cost of simplicity, as it is a bit harder to use than other tab managers.

Pros:

  • Browsing session memory
  • Collections
  • Multiple customizations

⇒ Get Session Buddy

OneTab – Best for privacy

Onetab

OneTab is another Chrome tab manager with a unique twist: it converts all of your tabs into an easy and accessible list.

This makes the extension especially desirable if you are in the habit of losing count of tabs. You can even dismiss and restore them from the list all at once.

We love it because none of your user info is ever transferred to the developers. So your privacy is maintained at all times.

OneTab is the best way to manage tabs in Chrome and it’s also available on Firefox.

Pros:

  • Converts your tabs into a list
  • Saves up memory
  • Speed boosts

⇒ Get OneTab

Many of you are asking: What extensions should I have on Chrome? This is a difficult question because there are many great options, and it depends on what you expect to accomplish. However, here are a few of our favorite Chrome extensions:

  • Grammarly – Great for editing and proofreading
  • Loom – For screen video and audio capture and sharing
  • Hubspot Sales – Great for managing customer relations effectively
  • LastPass – Excellent for password management
  • Tab Manager Plus – While it did not make our list, it is a great option for tab management

In our opinion, if you’re the type of person who loves doing a lot of work but frequently gets lost in all the open tabs, then you definitely need a tab management extension.

This applies even more to anyone who uses Google Chrome but lacks the hardware to open too many tabs before issues occur.

You should also check our list of the best browsers with tab management you can use right now.

That said, try all the extensions listed above and pick the one that suits your work style best. Of course, we are curious to know which one you lean towards.
How to Fix Outlook Search not Showing Recent Emails

Outlook is an email client used frequently across the world, especially by businesses and other corporate entities, and like any other frequently used program, it can develop issues over time that require fixing and maintenance so it can continue working properly.

When using Outlook, there are times when you want to find some old mail from your folders, whether it is the Inbox or Sent folder.

However, if the search doesn’t yield the results you’re expecting, it could be that your Outlook data file isn’t checked for indexing, so you need to check that the search index works correctly.

Why is Outlook search not showing recent emails?

One of the most common reasons Outlook is not searching all emails is the indexing function in Windows operating system.

This is a common issue across all Outlook versions as each version uses a similar base to function called the Outlook Search Index.

The solutions presented above should also apply in these scenarios:

  • Outlook not searching recent emails – Setting the correct search scope might do the trick here.
  • Outlook search not finding recent emails – Make sure to check if the indexing operation is complete as instructed. Then try any of the other options available.

This and other issues can be resolved through a few solutions outlined below.

How do I fix Outlook search not showing recent emails?

1. Repair the PST file

  1. Open File Explorer by using the Windows key + E shortcut from your keyboard.
  2. Click on This PC.
  3. Type scanpst.exe in the address bar and press Enter or click the blue arrow to search for the file.
  4. Double-click the file to run the app.
  5. Now enter the PST file name. If you don’t know it, just click on the Browse button and locate it. You will usually find it in the Users folder under Office or just search for *.PST by using the File Explorer app.
  6. After you locate the file and click the Start button and the app will start recovering your data.

You should know that you will need to run the Inbox Repair Tool several times to fully repair your personal folder (.PST) file.

Also, the Inbox Repair Tool cannot repair every problem that is detected. In some cases, it will not be able to recover the files if they were permanently deleted or damaged beyond repair.

At the same time, if you need to recover all your email on the Outlook platform really easily, you have to choose the best Outlook email recovery software and save your work.

Sometimes Outlook’s search issue is related to file corruption, especially the .PST file which is the program’s database file.

However, we have an excellent guide on how to repair corrupted files on Windows 10 that may help you with that really fast! If the scanpst.exe could perform the operation, it’s time to take out the big guns.

Stellar Repair for Outlook will effectively solve .pst file corruption or damage. With a repaired .pst file you will not only have access to all the emails and contacts that may have been lost, but the indexing process will be complete successfully.

This means that future email searches will return the correct results. Basically, Outlook search will work once again as it should.

2. Perform an SFC scan

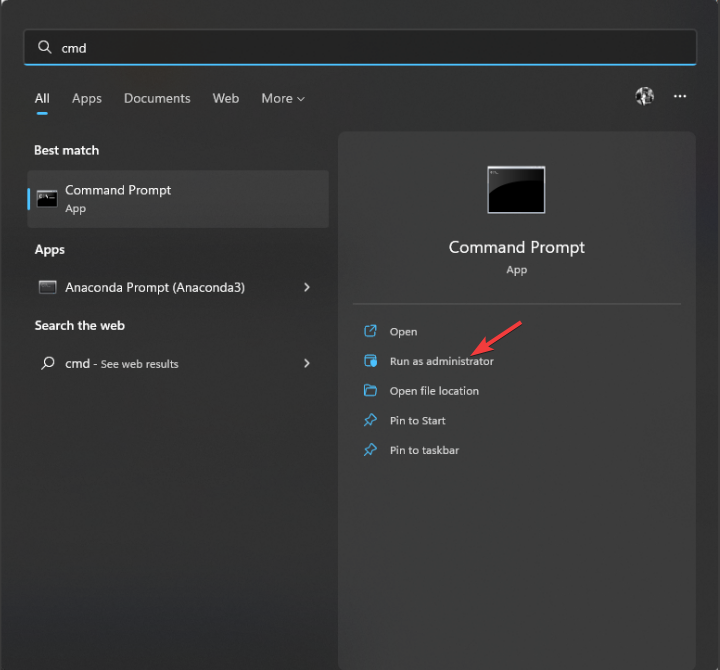
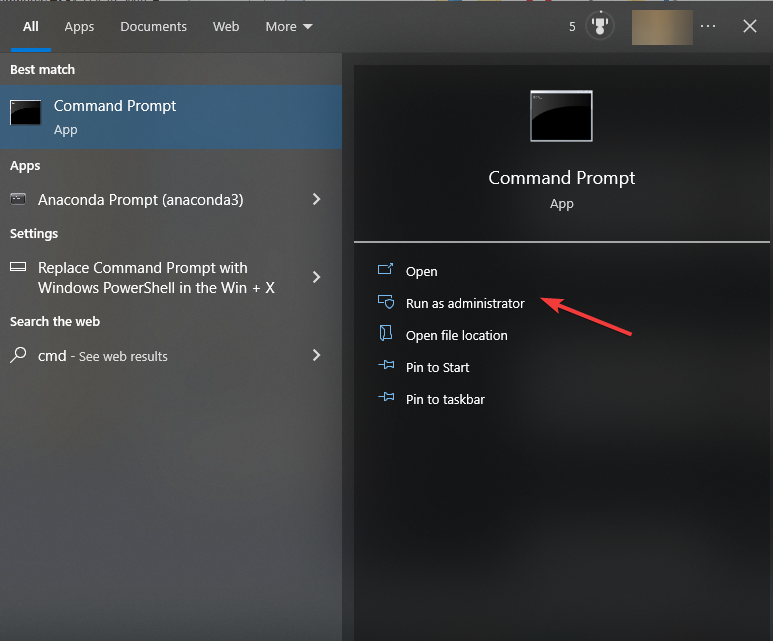
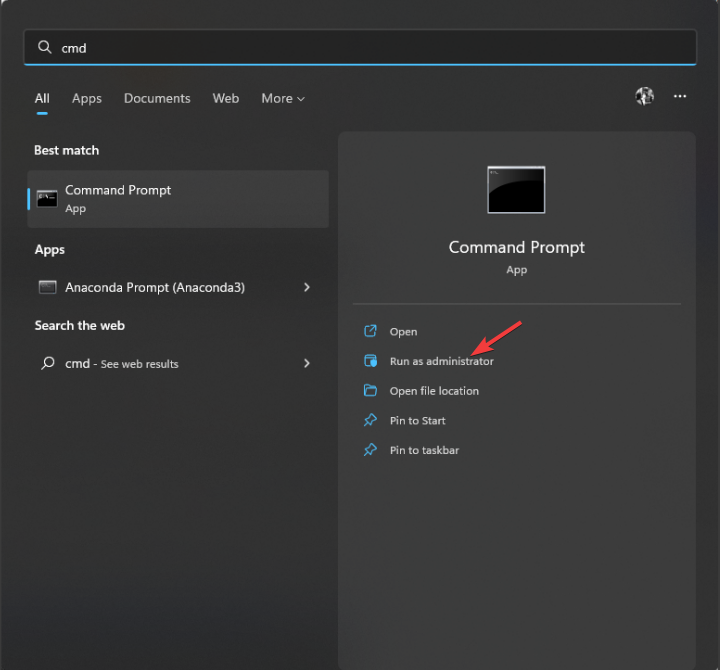
  1. Click Start and type cmd in the search box, then select Run as Administrator.
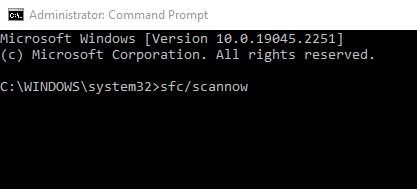
  2. Type this command and press Enter: sfc/scannow
  3. The process will take a bit of time and the tool will try to recover any corrupted files.

3. Run Outlook in Safe Mode

  1. Click on Start and select Settings.
  2. Click Update & Security.
  3. Select Recovery from the left pane and select Restart now under Advanced startup.
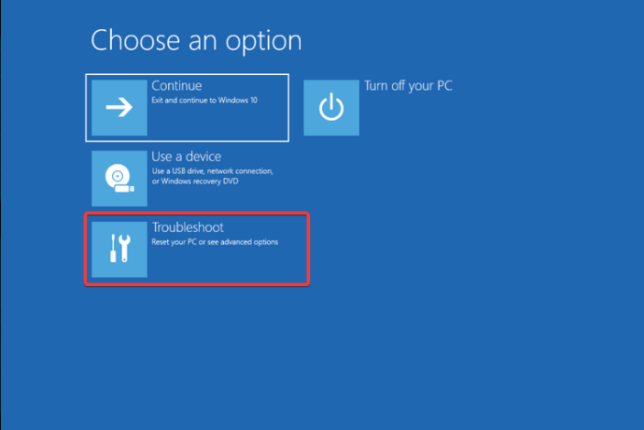
  4. Select Troubleshoot from the Choose an option screen.
  5. Then, click Advanced options.
  6. Go to Startup Settings.
  7. Now, click Restart.
  8. Choose 4 or F4 to start your computer in Safe Mode.

If Outlook not search emails doesn’t happen in Safe Mode, then the issue isn’t with your basic drivers, but if it does, then check your drivers and/or update or reinstall them.

4. Perform a System Restore

  1. Click Start and type system restore in the search box, then click on Create a restore point.
  2. Enter your administrator account password or grant permissions if prompted to.
  3. Hit the System restore button.
  4. Now select Choose a different restore point and click Next.
  5. Click a restore point created before you experienced the problem and select Next.

Hopefully, the system will restore to the point in time before the Outlook problem started manifesting, and now it works fine again.

5. Rebuild the Index

  1. Go to File and select Options.
  2. Click on Search from the left pane, then select Indexing Options.
  3. In the new window, click on Advanced.
  4. Go to Troubleshooting and click Rebuild. This will set off the indexing process, it may take time depending on the size of your system files.

Rebuilding the index of Outlook should also repair the Search function and after this process, the app should work smoothly again.

6. Repair or reset Microsoft Office

  1. Click the Start button and select Settings.
  2. Navigate to Apps.
  3. Look for Office or Microsoft Office in the list of aps, click on it to expand, and select Advanced options.
  4. Now scroll down and click on the Repair button. Check if Outlook is working well again. If not, come back to the window and click the Reset button.

7. Check the search scope in Outlook

  1. Click File, and then select Options.
  2. Click Search, then select All mailboxes from the Results section and click OK in the end.

By default, Outlook is set up to look in its current folder but by performing the steps above, you will make it look into all your mailboxes when searching for an email.

8. Check if the indexing is complete

  1. Open Outlook and select Search, then click on Search Tools, and pick Indexing status.
  2. When the dialog appears, check if it shows: Outlook has finished indexing all your items; 0 items remaining to be indexed.

If the indexing isn’t complete, check the remaining items and wait for about five minutes and check again. Assuming they don’t reduce, try the next solution.

9. Configure indexing options

  1. Click the Start button, type indexing options, and click on the app from the results.
  2. Under the Indexing Options, select Advanced.
  3. Select the File Types tab.
  4. Scroll down until you find msg in the Extension column, select it and make sure that the Index Properties and File Contents option is enabled. If not, click on its box to do so.

Make sure the Filter Description column shows Office Outlook MSG IFilter. If not, either the Windows Search service is not working correctly, or Outlook could not install the filters correctly. Check with Microsoft support for this issue.

If interested, read this guide to know how to find emails with empty subject lines on Outlook.

10. Rebuild the search catalog

  1. Click Start, type indexing options, and click on the app from the results.
  2. Ensure that Microsoft Outlook is listed in the included locations.
  3. If not, select Modify.
  4. Then, click to enable the checkbox next to Outlook.
  5. Next, click OK to get back to the previous window and click on Advanced.
  6. In the next window, select Rebuild.
  7. Select OK and close the window.

If indexing finishes without including Outlook data files or doesn’t finish, contact Microsoft support for help.

With this solution, we also conclude our guide on what to do if Outlook is not searching all emails, and we hope that our tips help you fix this annoying problem.

Another recommendation would be to delete the old emails you don’t need occasionally.

Sometimes, just that alone can make Outlook run faster and better and prevent such problems. Even more, don’t hesitate to take a closer look at our guide on how to use Search Folders in Outlook.

In the unlikely case that none of these fixes help, you should consider our selection, including the best Windows 10/11 email clients, and choose a better one.

In case you want to look for emails with special characters in Outlook, we have mentioned the steps in a separate guide; have a look!

Did any of these solutions help resolve Outlook not searching all emails? Let us know in the comments section below.

How to Make Outlook Calendar Private – Hide Appointments & More

If you want to make your Outlook Calendar information private, you’ll have to tweak some settings. This will come in handy if you use it at work and use a shared calendar. Just follow the steps below.

How can I make the Outlook calendar private?

1. Select the Private option for appointments

  1. With the Private option, you can hide calendar appointments, events, and task details from other users. To do that, open Outlook’s calendar view.
  2. Select the meeting appointment on the calendar.
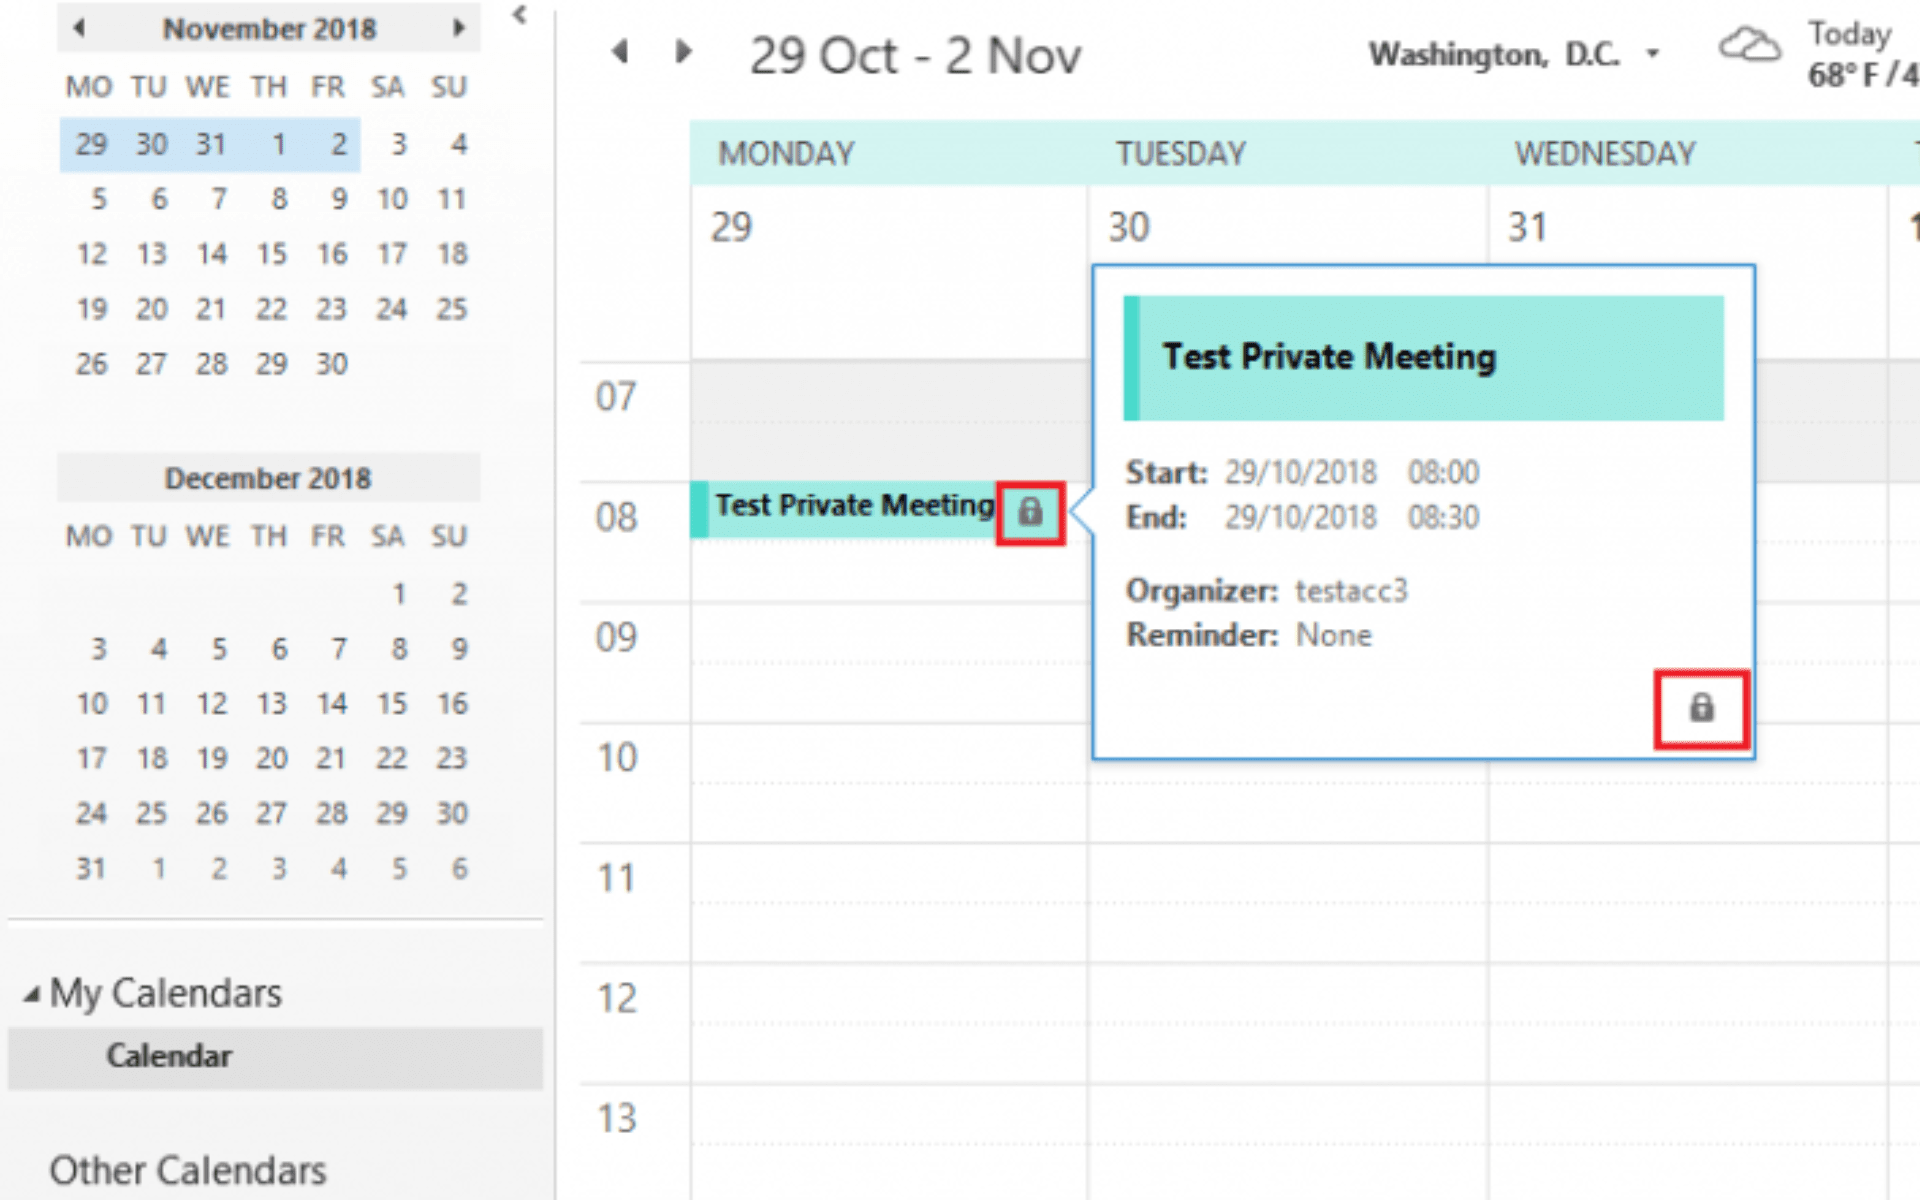
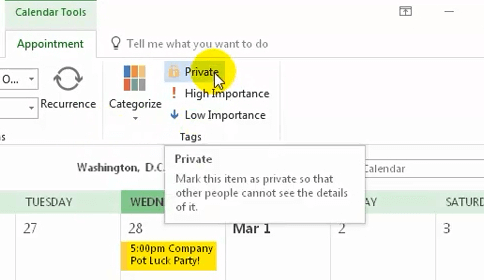
  3. Click the Private button on the Appointment tab. Then, users you share the calendar with (without Read permissions) can’t see the details for the padlocked appointment.Private option outlook how to hide calendar details from others
  4. Click the Private button again to remove the padlock from the appointment.

2. Adjust the permissions for shared calendars

  1. If you need to hide all appointment details on Outlook’s calendar, changing its permissions is better. To do so, click Outlook’s Calendar button.
  2. Select a calendar under My Calendars.
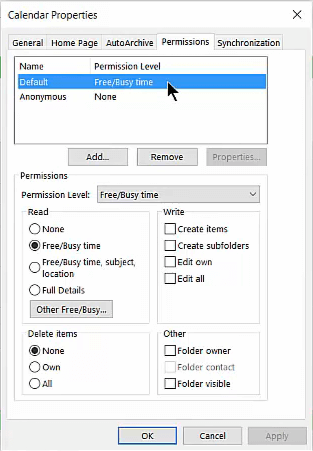
  3. Click the Change Permissions button to open the window shown directly below.Calendar Properties window outlook how to hide calendar details from others
  4. Choose a user you’re sharing the calendar with to adjust permissions for.
  5. Select the Reviewer option on the Permission Level drop-down menu.
  6. Select the Free/Busy time option.
  7. Click the Apply option.
  8. Click the OK button to exit the window.

3. Hide appointments in calendars shared via email

  1. Some Outlook users might need to share calendars via email. To remove appointment details from calendars shared by emails, right-click the calendar to share (under My Calendars) and select Share.
  2. Then select the Share Calendar option. That option will open the Share tab.
  3. Click the Limited details option in the Details drop-down menu.
  4. Select the Yes option.

So, that’s how you can ensure appointments, events, and task details aren’t visible to other users on shared Outlook calendars. Doing so will keep your calendar appointments more confidential.

If you have several calendars, you can view multiple calendars in Outlook to ensure you’re not missing out on any event that needs to be kept private.

You may also take a closer look at our detailed guide on how to keep Outlook’s calendars selected.

We also have a complete guide on how to add a holiday to your Outlook calendar if you’re interested in doing that.

If you have any more questions or suggestions, leave them in the comments section below, and we’ll check them out.

System Shock remake to launch in March according to latest developer update

After a long and apparently arduous development path, it looks like the System Shock remake is finally about to arrive in 2023. The team at Nightdive Studios shared a new developer update on January 2nd, in which was announced a new release window of March, 2023.

This isn’t the first time a launch window has been announced for System Shock, as the developer themselves pointed out in the update post. The game was first announced back in 2015 as a remaster of the 1994 cult-classic System Shock, which was a spiritual predecessor of the Bioshock franchise. The team took a hiatus from development of the game in 2018. The developers now consider the new System Shock “a faithful reboot” rather than a mere remaster, as it has been reworked with more “modern design principles.”

System Shock was showcased at Gamescom last year, and now appears to be finally in the last stretch of development. Preorders are currently available on Steam, GOG, and the Epic Games Store.


7 Solutions to Why Your GoPro Videos Won’t Play on Your Computer

GoPro is a high-resolution camera that can record 4K video. After recording footage, many GoPro users will transfer videos to their desktops or laptops so they can play the clips with Windows media players. But sometimes, GoPro videos won’t play on PC no matter what you do.

Don’t worry, we will show you how to play GoPro videos on PC or laptop even if they are reluctant at first. And speaking about firsts, we should definitely have a look at the causes for which GoPro video not playing on PC issues appear, to begin with.

Why won’t my GoPro videos play on my computer?

Let’s assume you already checked the official system requirements and that it’s a match. Even so, you might be struggling with different kinds of incompatibilities.

The media player or program you’re using might not fully support the needed formats or HEVC encoding and if such is the case, reliable software to watch GoPro videos will definitely come in handy.

If you can’t open GoPro files on PC, resolution differences can also be blamed, or even a shortage of memory. Finally, file corruption is a regular suspect when it comes to playing videos, so you mustn’t rule that out.

Let’s quickly go through some of the most common issues reported by users:

  • Can’t play GoPro video on computer
  • GoPro MP4 files not playing
  • How to play GoPro 4K video on PC
  • GoPro video won’t play on Windows 10, Windows 11
  • Can’t open GoPro files on PC
  • GoPro player not working

Without further ado, here are some quick and easy methods to help you fix GoPro video not playing on PC issues in no time.

How do I watch my GoPro videos on my computer?

1. Use a video-focused program

Adobe Premiere Pro takes center stage for many video editors these days and not only. Believe it or not, it does much more than high-quality audio and video editing.

If Windows 10 simply refuses to play GoPro videos, Adobe Premiere Pro can be a lifesaver. Downloading the free version is incredibly easy, and then all you have to do is to open the video file in it.

Don’t hesitate to export it to another popular format on your computer and open it in a player of your choice.

And if you’re still not convinced, remember that it integrates with other Adobe products that you already use daily.

Adobe Premiere Pro

Adobe Premiere Pro

Adobe Premiere Pro is world’s best video editing software that can easily open and edit GoPro videos.
Free trialVisit website

2. Check your system specifications

  1. Click the Type here to search button on the Windows 10 taskbar to open the search box.
  2. Enter system info in the search box and click System Information to open the window shown directly below.
    system information why won't my gopro videos play on my computer

GoPro users record their videos at the highest 4K resolution, which is exactly why GoPro videos are not playing on computers for some users.

GoPro users need higher specification laptops and desktops to play their 4K videos in Windows. Media software doesn’t play 4K videos for users with PCs that don’t meet these minimum system requirements for 4K:

  • Video RAM: One GB
  • RAM: Eight GB
  • CPU: Intel Core i7 quad-core or Intel Xeon E5 at minimum
  • GPU: Any GPU higher than GeForce GTX 650 Ti, AMD A10-7800 APU, Intel HD Graphics 5000, and AMD Radeon HD 7000.

Some users will probably need to upgrade their laptops and desktops to play 4K GoPro videos. Users can check their system specs via the System Info window.

3. Play GoPro Videos with a Media Player that supports HEVC

If you’re wondering how to play GoPro 4K video on a PC, you will need a media player that supports HEVC.

Windows Media Player doesn’t play 4K videos without the Media Player Codec Pack. 5K Player, KMPlayer, and VLC are three of the best media players for 4K clips. So, install one of those media players.

4. Open the Video Playback Troubleshooter

  1. Open Cortana by clicking the Type here to search button on the taskbar.
  2. Input troubleshoot in the search box.
  3. Select Troubleshoot to open the Settings app as in the shot below.
  4. Select Video Playback and click Run the troubleshooter.
  5. Then go through the troubleshooter’s suggested resolutions if it provides any.

The Video Playback troubleshooter in Windows 10 can fix video playback issues. Therefore, that troubleshooter might come in handy if GoPro videos are not playing on the computer.

5. Convert the GoPro Video to a lower-resolution format

  1. Click the Download Handbrake 1.2.0 button on Handbrake’s website to save the setup wizard to a folder.
  2. Open Handbrake’s installer to add the video optimizer to Windows 10.
  3. Press the Open Source button.
  4. Click File to select a 4K GoPro clip to convert to an alternative 1080p resolution.
  5. Click General on the Presets sidebar on the right of the Handbrake’s window.
  6. Then select the Fast 1080p30 preset to convert the video to an MP4 clip with 1080 resolution.
  7. Press the Browse button to choose an output folder to save the video.
  8. Then press the Start Encode button.

Those users who can’t play 4K GoPro videos in Windows 10 can convert them to 1080p clips with Handbrake.

That will probably ensure the videos’ resolutions aren’t too high for a desktop or laptop, but users can also convert their GoPro clips to ones with resolutions lower than 720p.

If you want to know how to play a GoPro 4K video on PC, converting it to a lower resolution with Handbrake might be the best option, especially if you’re using a lower-end PC.

6. Fix corrupted GoPro video files

If GoPro videos are not playing on your computer, it’s possible that the videos got corrupted during the recording process.

GoPro video files can get corrupted when the camera unexpectedly shuts down. Thus, some users might need to fix a corrupted GoPro video.

GoPro cameras display SOS repair icons that highlight corrupted files. Place the SD card that includes the video which doesn’t play within the camera.

Then the camera might display an SOS signal on its LCD display when switched on. If so, press any button when you see the Repair icon to fix a corrupted file.

7. Free up RAM and disk storage

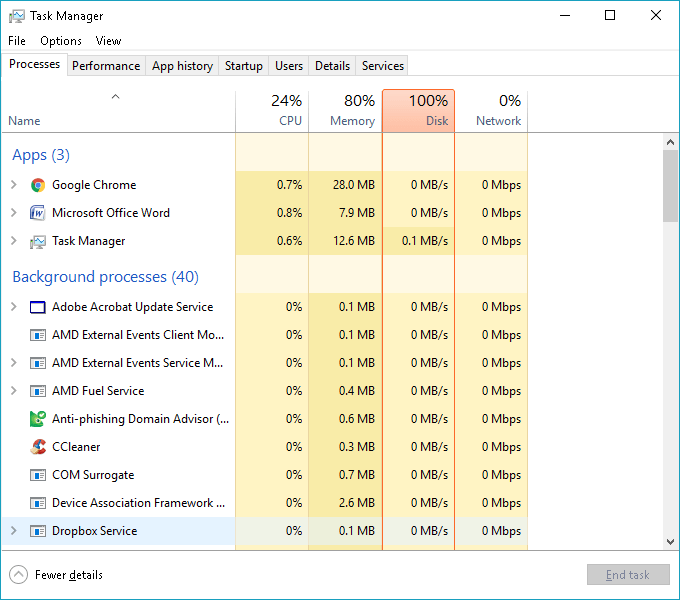
  1. To close third-party software, right-click the taskbar and select Task Manager.
  2. Then select superfluous third-party software listed under Apps on the Process tab.
  3. Click the End task button to close the selected software.
  4. To free up disk space, enter disk cleaner in Cortana’s search box. Then click Disk Clean-up to open the window shown below.
  5. Select the C: drive, and click the OK button.
  6. Select the Temporary files and Recycle Bin checkboxes. Users can also select some of the other checkboxes to free up more HDD space.
  7. Then press the OK button.

Windows 10 media players usually don’t play GoPro clips because their 4K resolutions are too high. Converting the videos to lower-resolution formats will usually ensure playback.

However, some users might need to free up RAM and hard drive storage (for 4K playback) or repair corrupted GoPro videos.

4K GoPro videos also hog a lot of system resources in Windows 10. Thus, some users might need to free up RAM and hard drive space (for virtual memory) to ensure there is sufficient space to play their 4K footage.

Power BI: How to Add Column from Another Table

Power BI has many great functions that make this Microsoft product one of the most desired tools for organizing and visualizing various sets of data, but Power BI is not so intuitive in some cases.

This issue was described by a user on the official Microsoft forum:

I have 2 tables: Table [A] and TimeZone. How do I add another colum in [A] that will use a column a vlaue in the TimeZone table without using a Merge Query? The Timezone table only contains one value which is the number of hours to offset. Ideally I would like to use this value as a parameter but have not figured out how to do it.

So, the OP wants to use the number of hours as a parameter but didn’t figure out how to do that.

If you find yourself in the same situation, here are some solutions that will work for you.

Steps to add a column from another table in Power BI

1. Add a column from another table when there is a relationship between tables

Add a calculated column on Table [A] using the syntax: New Column = RELATED(TimeZone[Value])

2. Add a column from another table when there is not a relationship between tables

If you don’t use relationships, here is an alternative:

New Column =
var JoinCol = ‘TableA'[ID]
var NewCol = CALCULATE(MAX(‘TimeZone'[Value]),’TimeZone'[ID]=JoinCol)
return NewCol

3. Add a column using Power Query

  1. Select Edit Queries. This will open a new window in Power BI.power b edit queries button
  2. Go to the Add Column tab.
  3. Add an Index Column and name it Index.power bi add index column
  4. Add a Custom Column with this expression: Table2[ColumnName]{[Index]}

Conclusion

The solutions seem a little bit technical, especially the first two. Still, the option of adding a column from another table is for advanced users.

Fortunately, there is more than one way to approach this issue, each one being adapted to the needs of every user.

Did you find our solutions useful? Do let us know in the comments section below!

Fix An Error Occurred While Connecting to Epic Servers on Xbox

Is An error occurred while connecting to epic servers message bugging you on Xbox? We have the solution to get rid of this problem. Some multiplayer games connect to the Epic servers to give you the best experience. However, for some gamers, it may fail by showing you some error messages.

This error is not like the Disconnected from the server on Xbox we have discussed in another article. Whatever it is, the good thing is you can quickly get rid of such errors.

Why is an error occurring while connecting to the Epic servers?

  • Network problem: If there is a problem with your network connection, you may encounter this error.
  • Proxy or VPN usage: Often using poor quality proxy or VPN triggers server connectivity issues in multiplay games.
  • Problematic DNS server: If you are using a very low-quality DNS, it can be the root of the problem.
  • Epic’s internal problem: If an error occurs while connecting to the Epic servers, it also can be because of an internal problem from Epic’s end rather than yours.
  • A problem with the Xbox console: Usually, it doesn’t happen. But, sometimes, problems or bugs with the console may trigger such connectivity errors.

How can I fix an error occurred while connecting to Epic servers on Xbox?

Before trying out the suggested methods, we recommend you do the following things to avoid unnecessary hassles:

  • Check the Epic Game status to know if there is an outage or not.
  • Make sure your internet connection is OK.
  • Use Ethernet, if possible, instead of Wi-Fi. If you are interested, learn the ways to fix Xbox won’t connect to Wi-Fi.
  • Update the problematic game to the latest version and see if it works.

After doing these things, you can go through these methods to solve Epic Game server connectivity errors while playing games like Fortnite on Xbox.

1. Change DNS

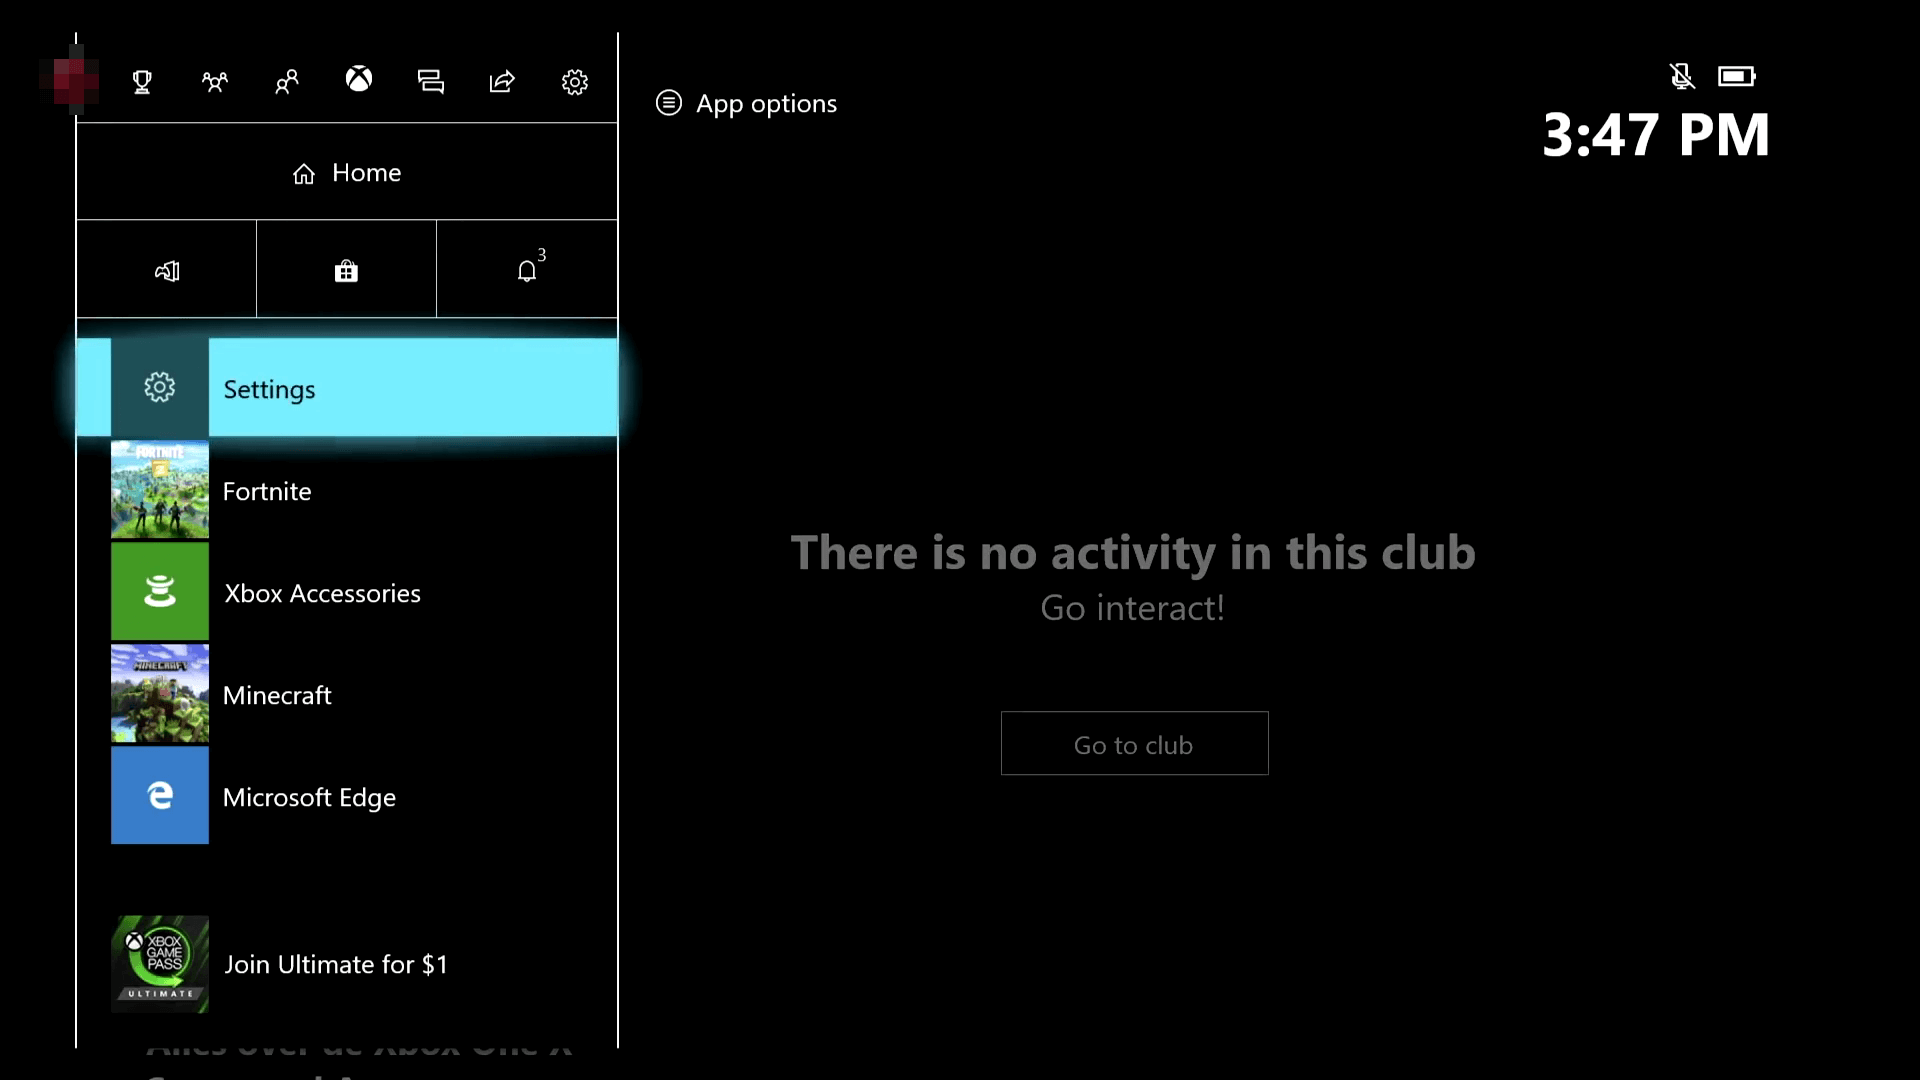
  1. Press the Xbox button.
  2. Open Settings.going settings xbox
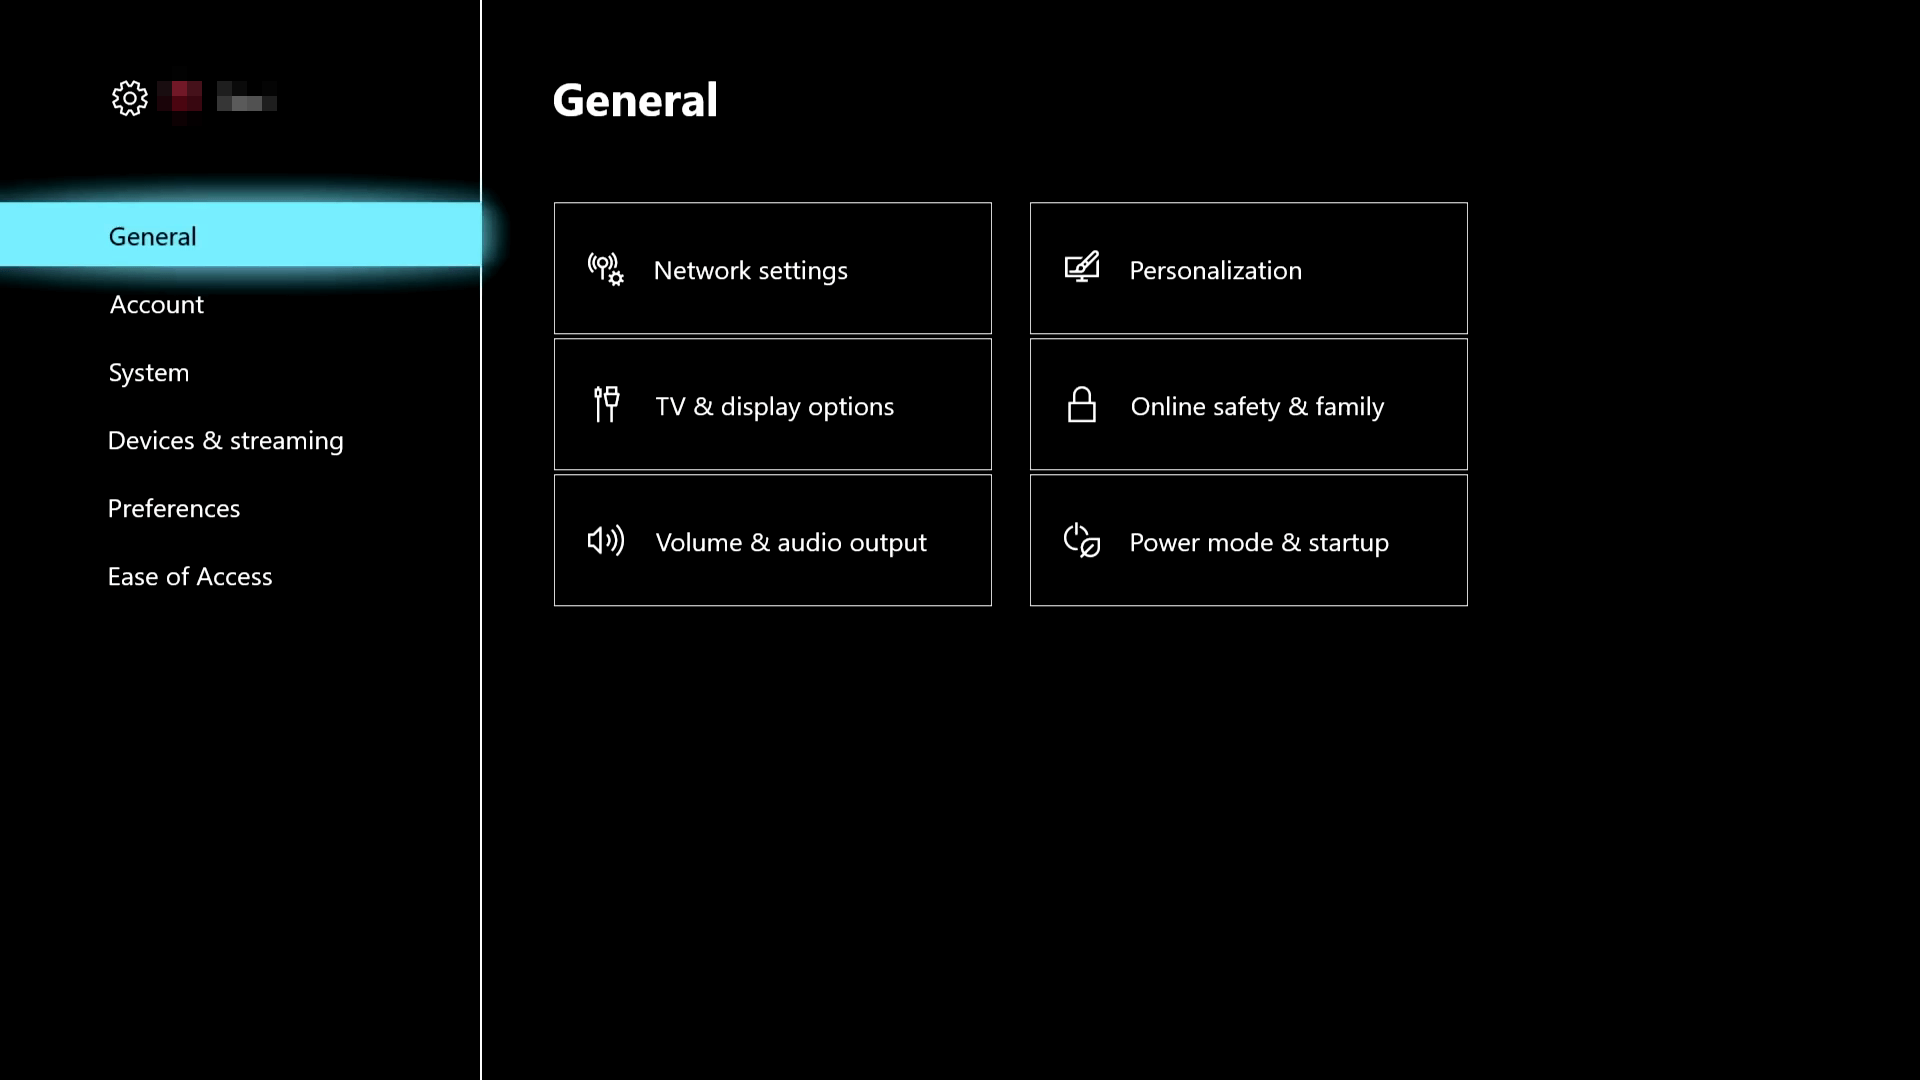
  3. Navigate to General.general settings xbox
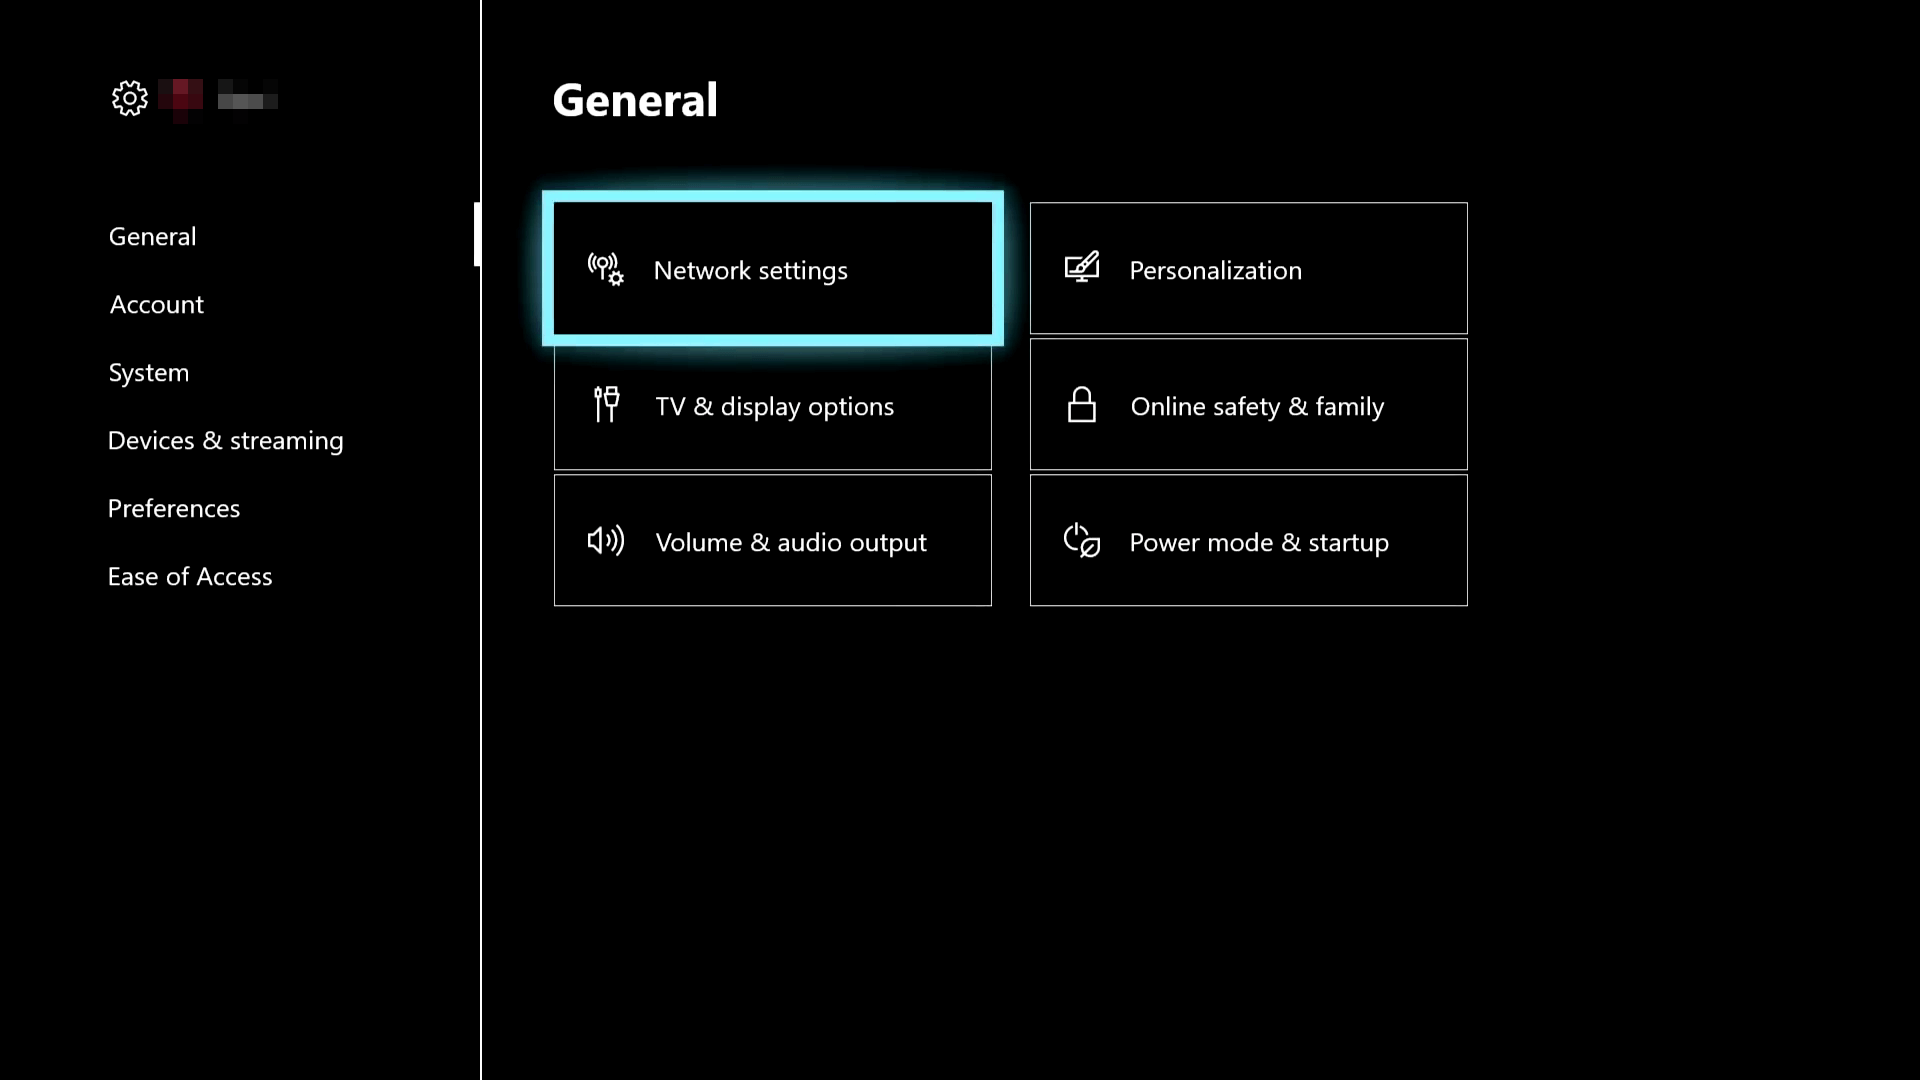
  4. Go to the Network settings.going network settings xbox
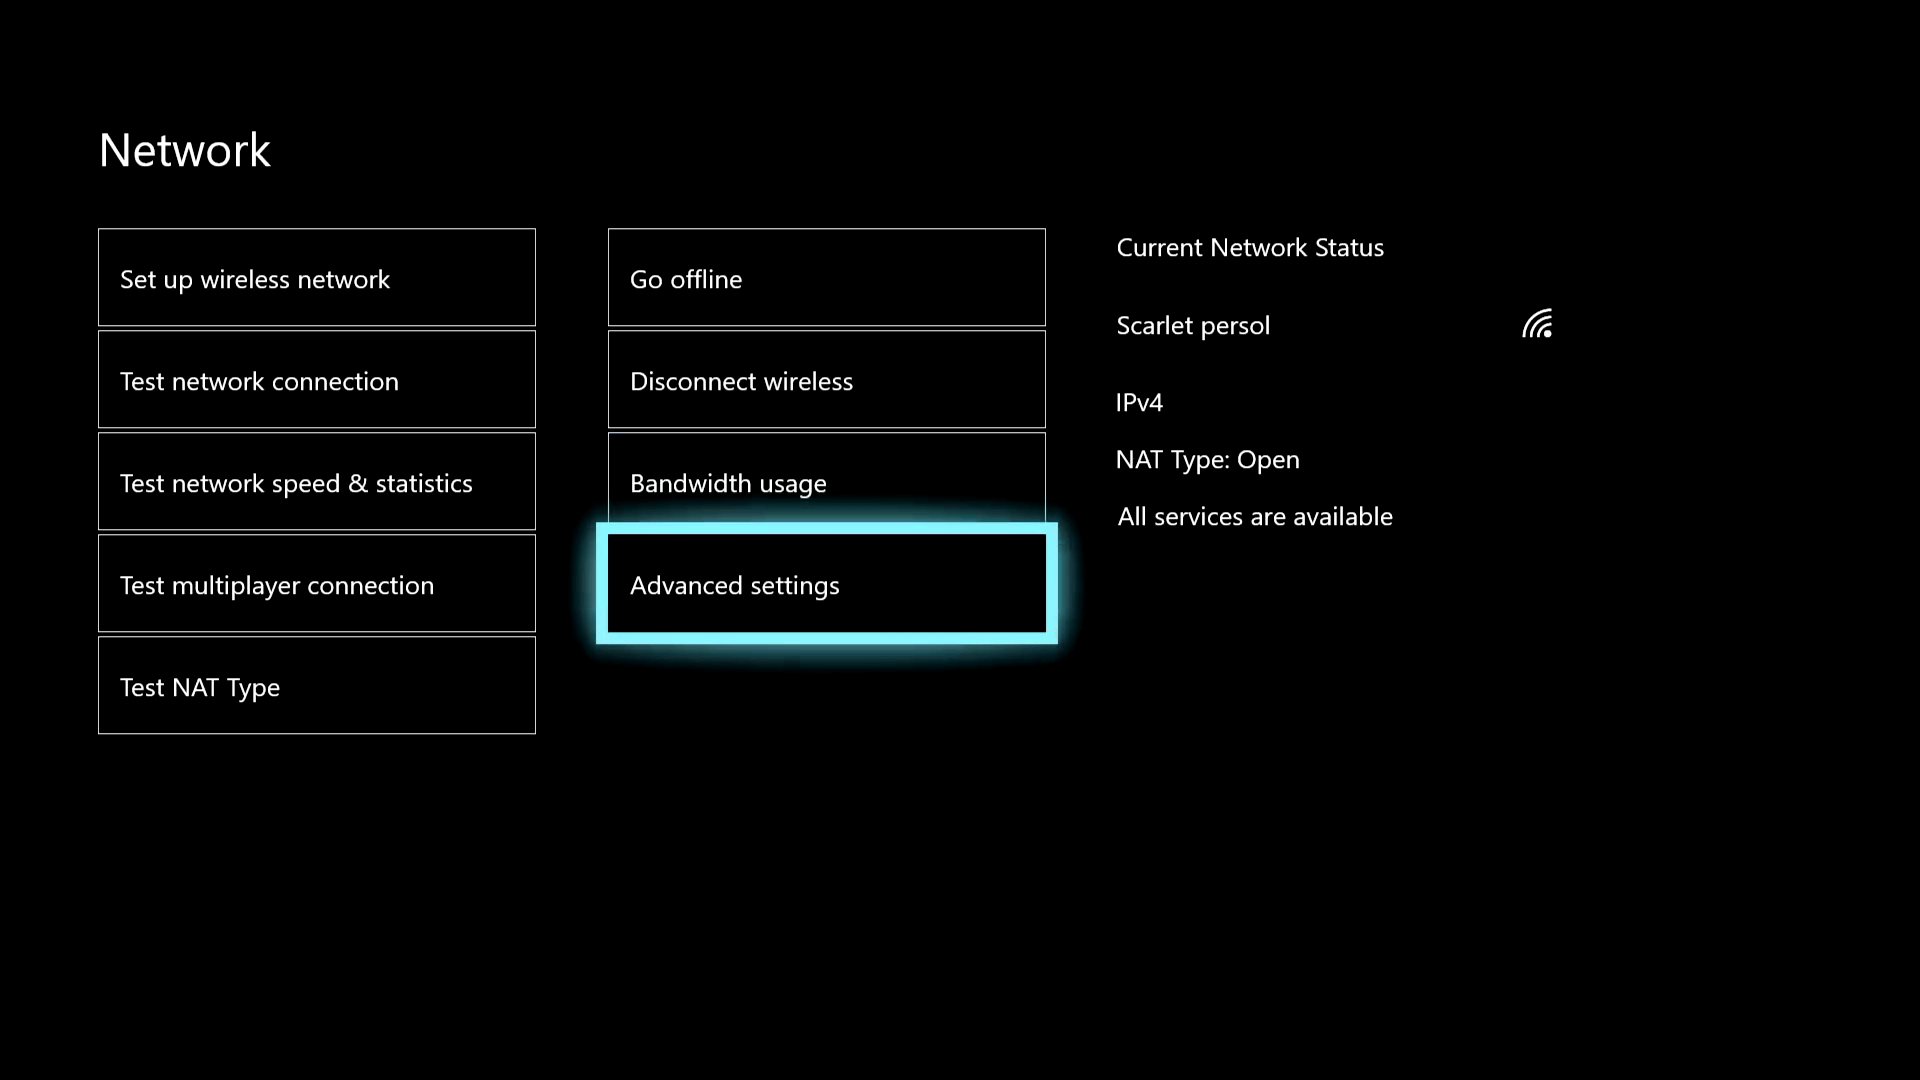
  5. Go to Advanced settings.going advanced settings xbox
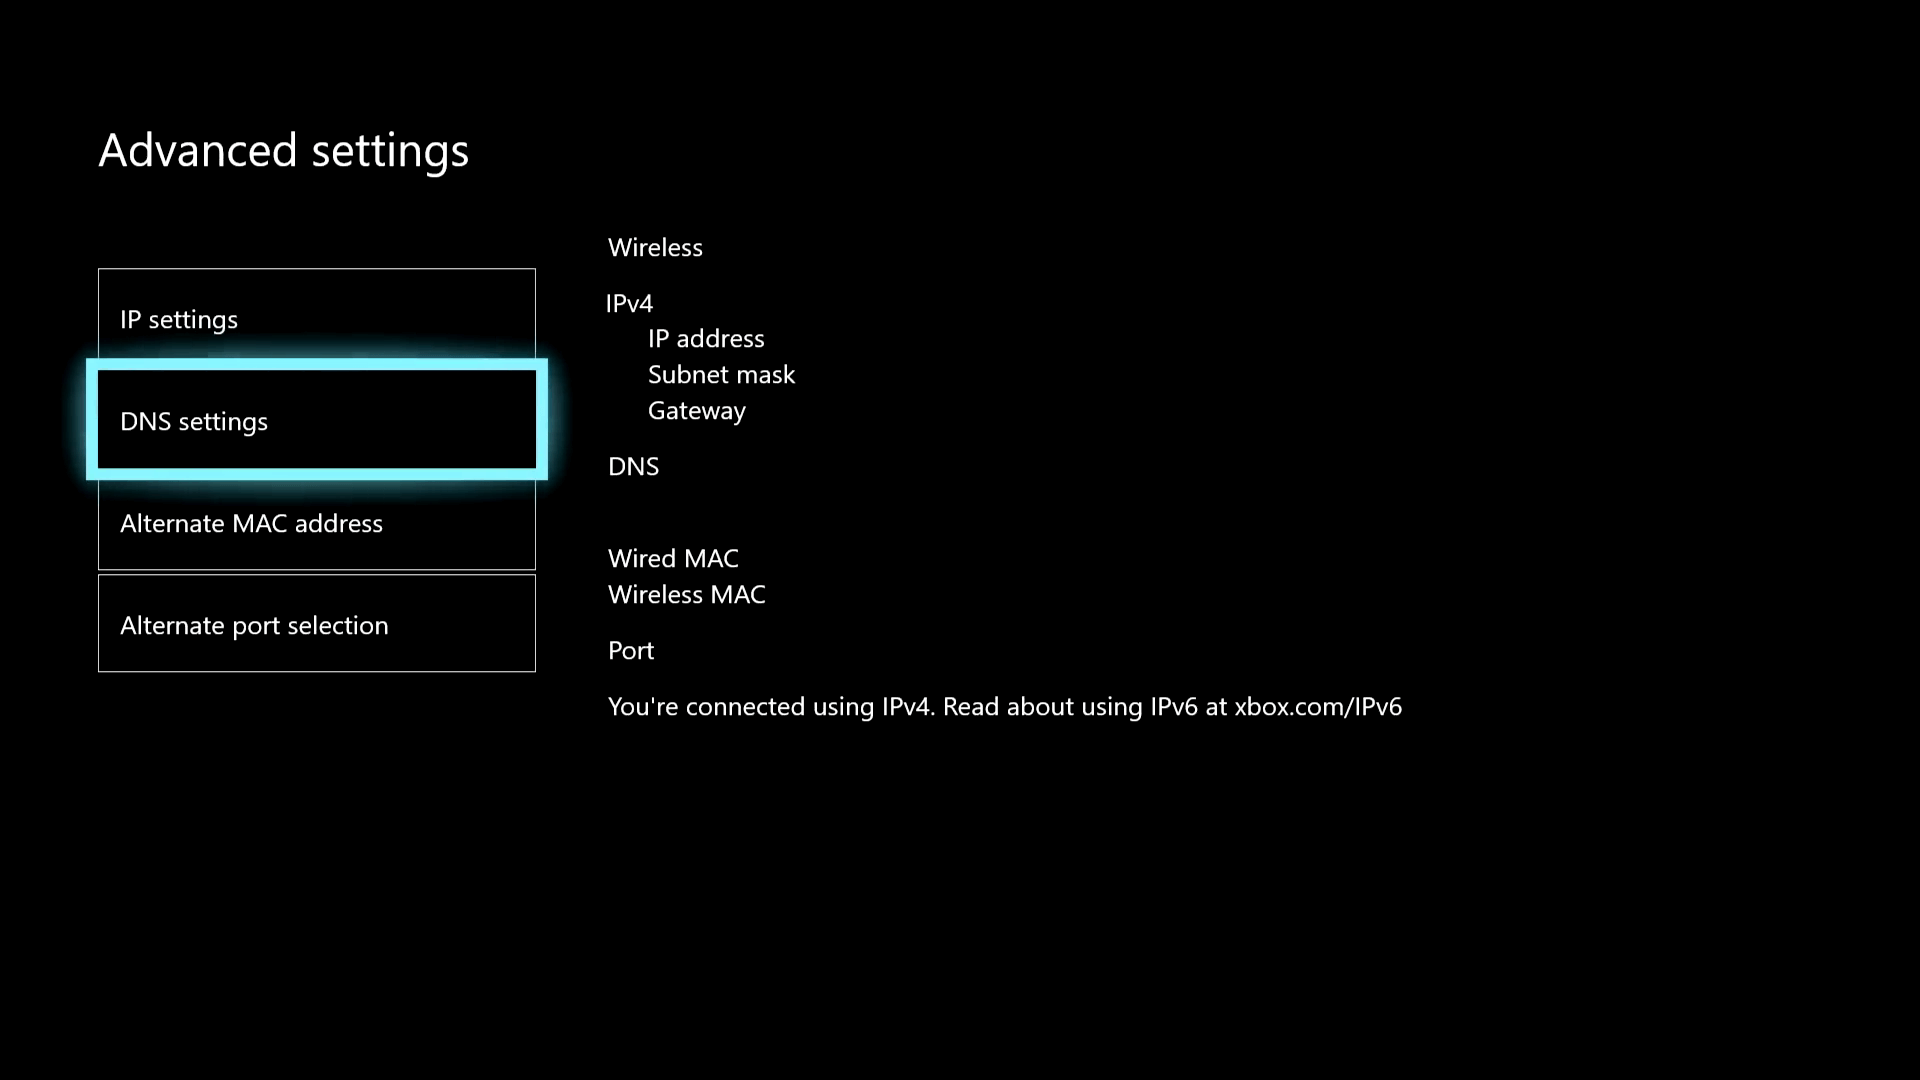
  6. Tap on DNS settings.choose dns settings xbox
  7. Click on Manual.choosing manual dns xbox
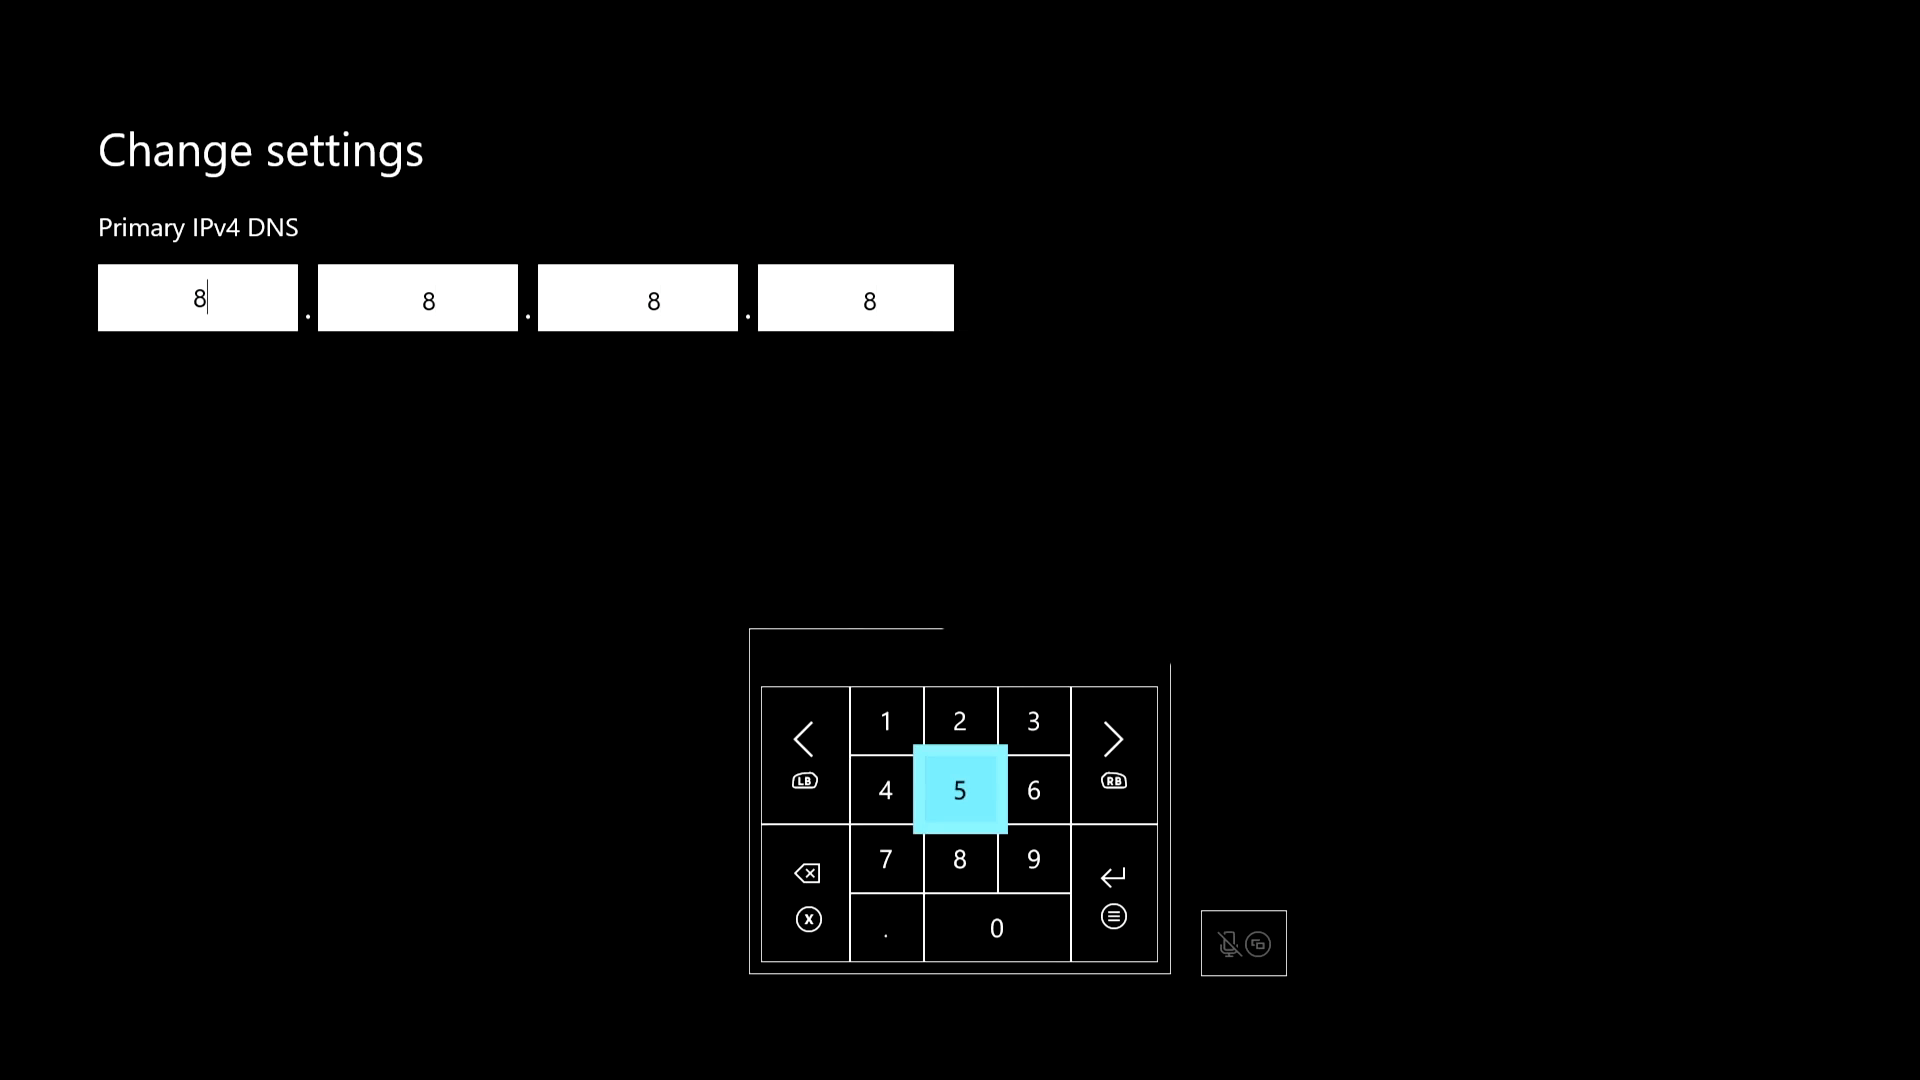
  8. Set the primary and secondary DNS servers.set primary dns xbox

You can use Google DNS (8.8.8.8 and 8.8.4.4) if you don’t know a quality DNS address. However, if you want, learn how to find the fastest DNS servers near you.

Using a better DNS server is a good way to solve an error occurred while connecting to the Epic servers in Xbox.

2. Go offline & online

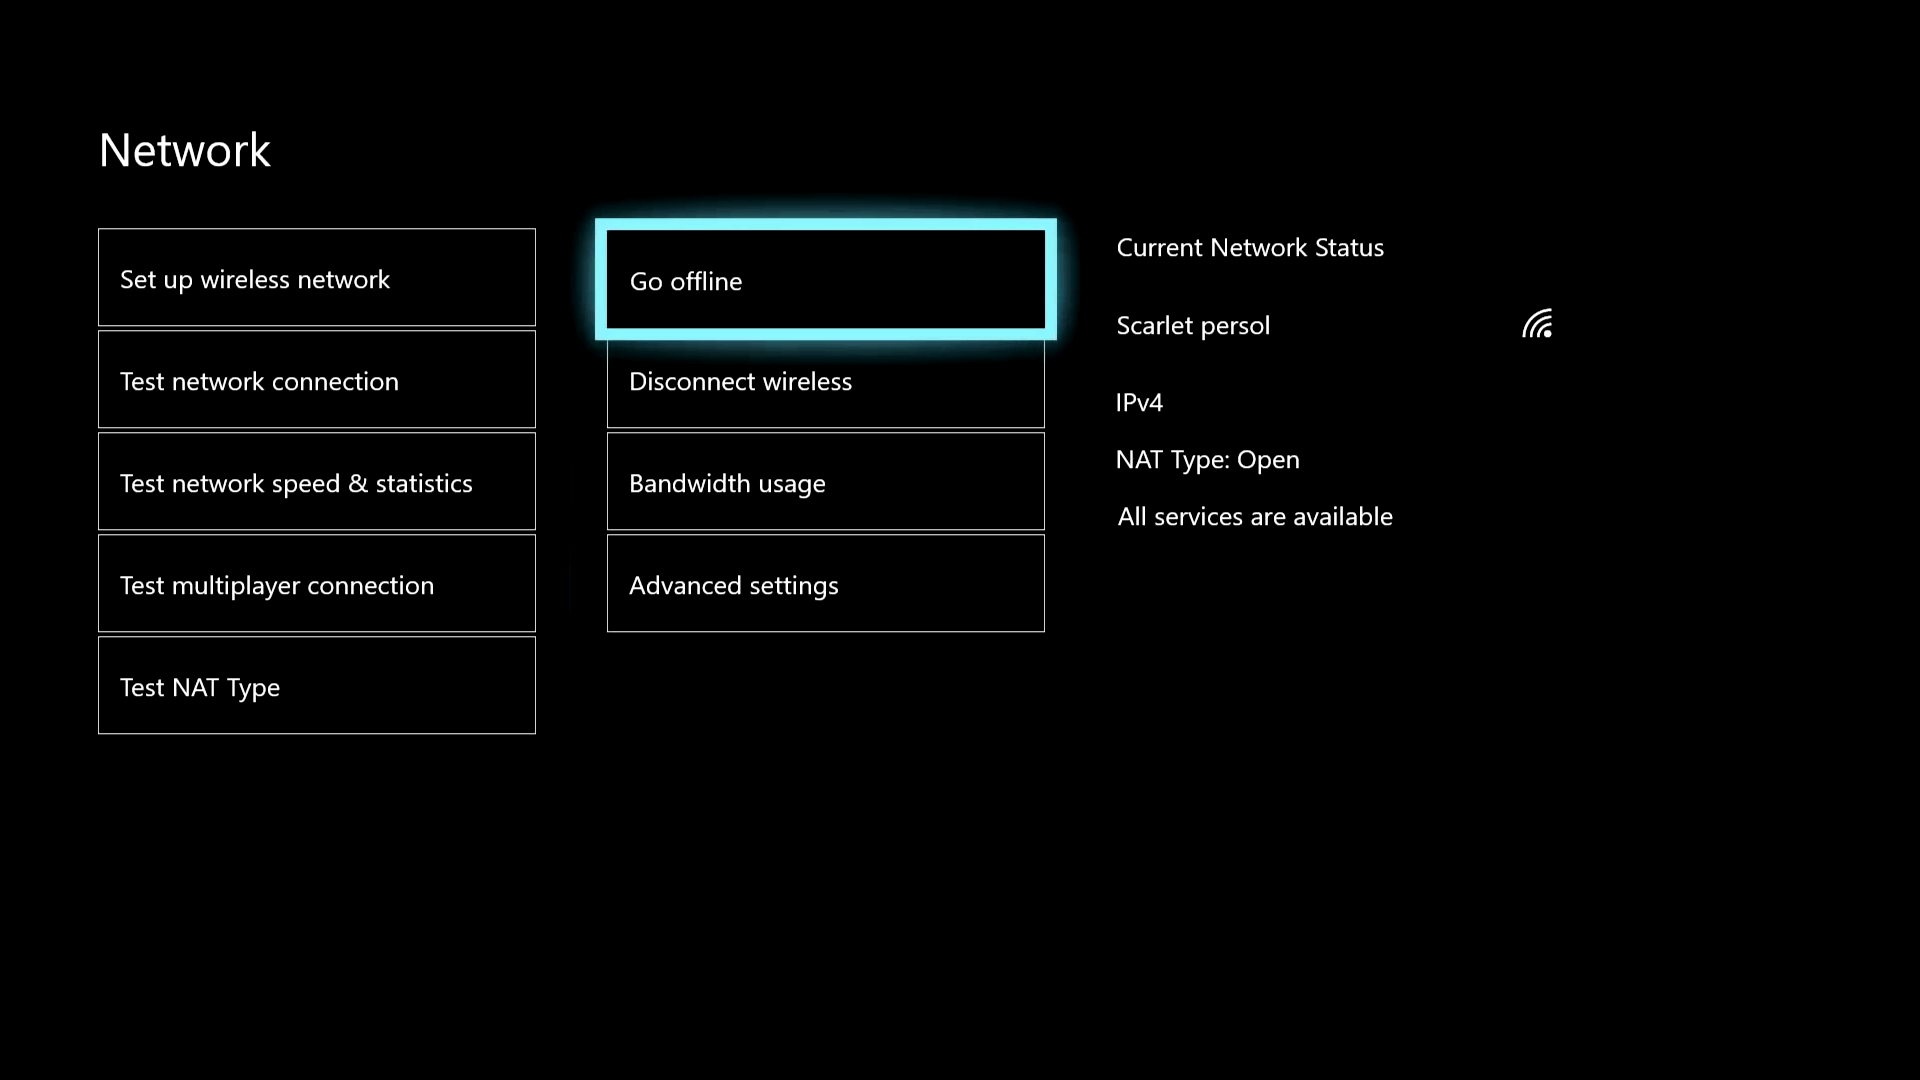
  1. Go to Network settings, as shown in the previous method.
  2. Tap on Go offline.going offline xbox
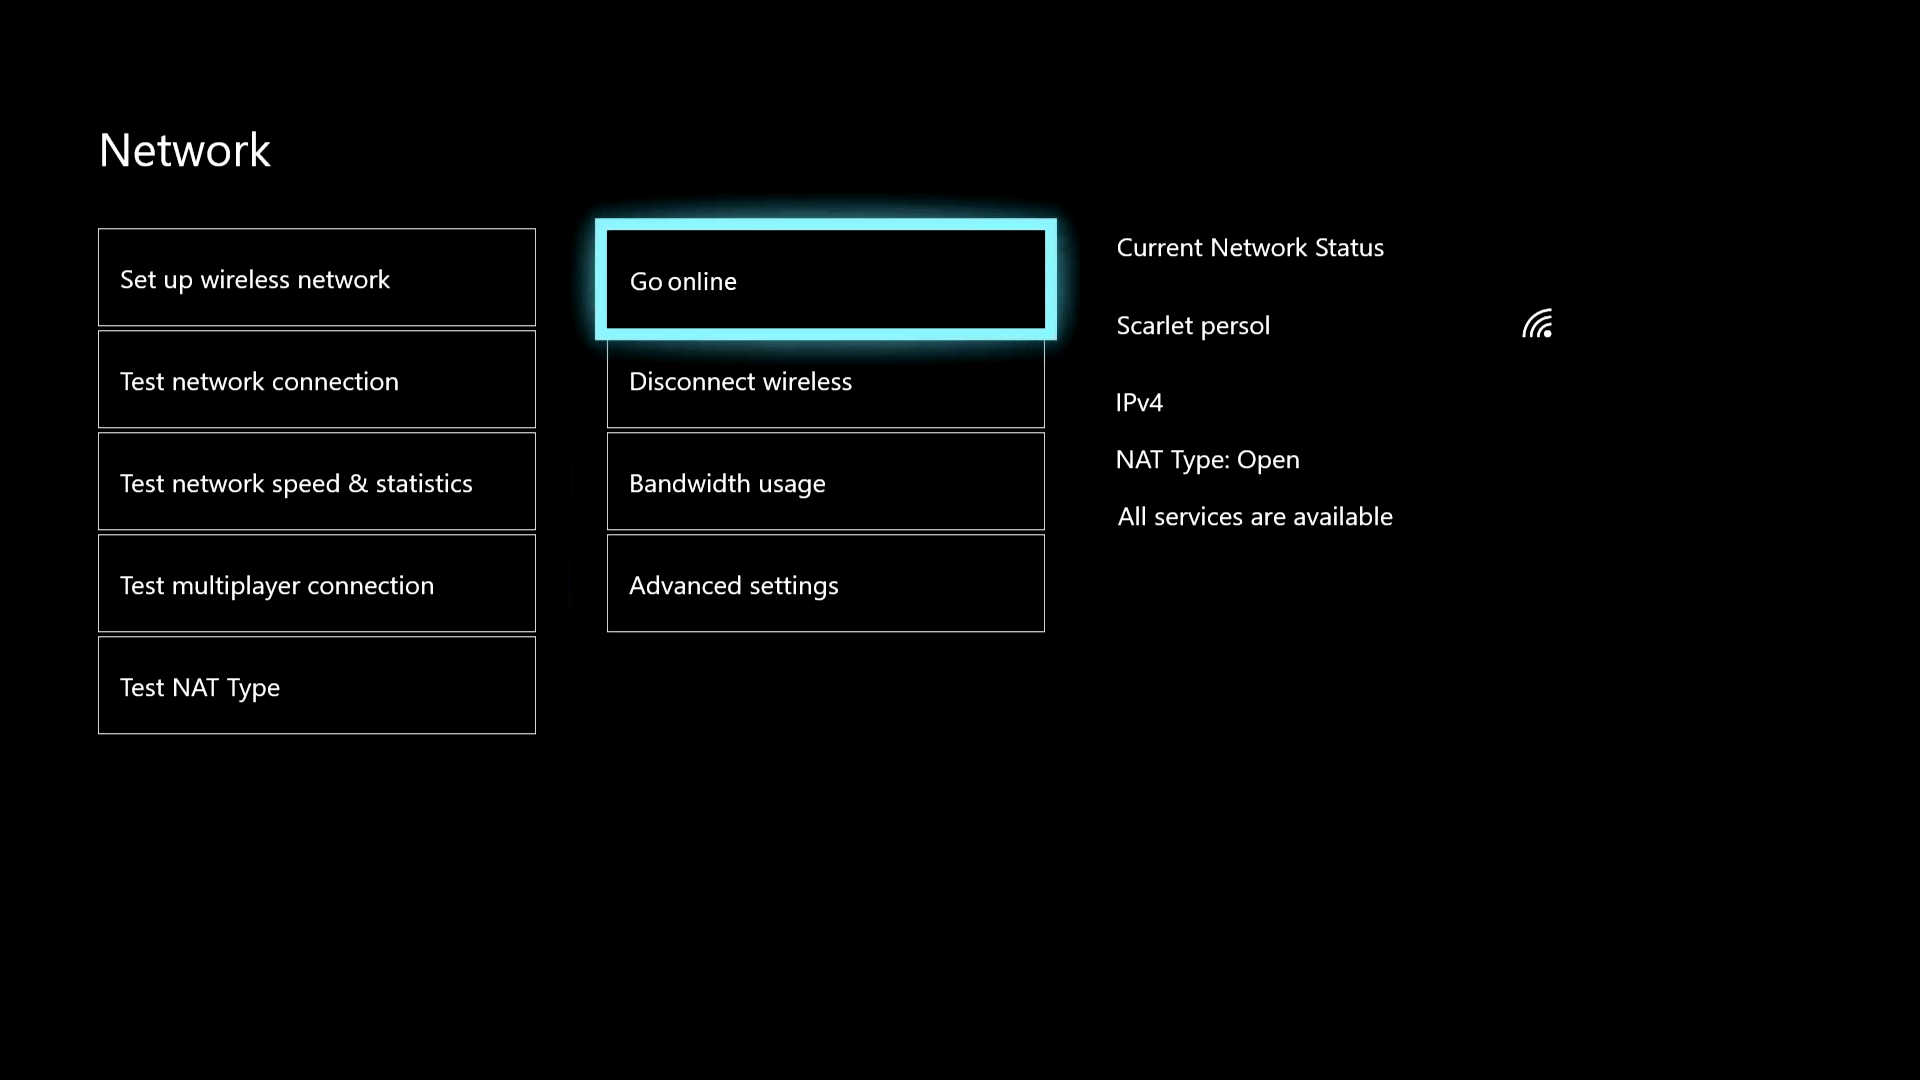
  3. After that, tap on Go online.going online xbox

Doing this will automatically reconnect your internet connection. Now, try to play the problematic game and see if it helps or not.

3. Reset the Xbox cache

3.1 Clear persistent cache

  1. Go to Settings like before.
  2. Tap on Devices & streaming and then on Blu-ray.going blue-ray xbox
  3. Go to Persistent Storage.
  4. Tap on Clear Persistent Storage.clearing persistent storage xbox

Some users may not find the Blu-Ray option. If it happens to you, too, use the physical button method as an alternative one.

3.2 Clear using the physical button

  1. Press and hold the Xbox button on your console for 10 seconds to turn it off.xbox button
  2. Unplug the power cable.
  3. Press and hold that button again. Repeat it several times.
  4. Wait one minute and plug in the power cable again.
  5. Wait another minute.
  6. At last, press the Xbox button again to turn on the console.

Clearing cache often comes in handy in fixing problems like an error occurred while connecting to the Epic game servers.

4. Clear alternate MAC address

  1. Navigate to Settings and go to the General tab.
  2. Go to Network Settings.going network settings xbox
  3. Tap on Advanced Settings.going advanced network settings xbox
  4. Go to Alternate Mac Address.going alternate mac address
  5. Tap on Clear.
  6. Restart your console.

5. Use an Xbox VPN

If you still encounter the problem, but Epic Game has no outages, it may be your internet connection that has some issues. In this case, a gaming VPN can help. We suggest you use Private Internet Access (PIA). If necessary, learn how to use a VPN on Xbox.

If the problem still persists, we suggest you update the Xbox firmware to the latest version and see if it helps. Are you also encountering login problems? Learn how to solve there was an error logging in to Epic Games.

This article has featured the most effective ways to fix an error occurred while connecting to Epic servers on Xbox game consoles like Xbox One, Series S, X, or 360. If you have any suggestions or opinions, you can let us know in the comment box.

How to Access ChatGPT If It’s Not Available in Your Region [6 Ways]

If ChatGPT is not available in your region, you can gain access if you circumvent your location. The AI chatbot identifies your location, but if you use a virtual IP from a different country, you can get past this and use it.

Belo,w we’ll show you a few tried and tested ways in which you can do just that.

How to use ChatGPT if it’s not available in your country?

1. Try using Chat GPT in private mode

Another fix that did the trick for many was coupling VPN with a private browsing mode (Incognito mode in Chrome).

Try using a server based in USA or France when configuring the VPN and a number from the same region to sign in, all while using Chrome’s Incognito Mode or a similar mode in another browser.

2. Contact the support team

If you are based in a country where Chat GPT is available, but the screen still reads, Open AI’s services are not available in your country, contact the OpenAI’s support team.

They should be able to help identify the underlying cause and provide a resolution. Until then, you can use a friend’s Open AI account and Chat GPT in your country, even if it’s unavailable. Just remember to use a VPN.

Once you have managed to access the AI-powered chatbot, increase the Internet speed on your PC for a better experience or you may experience other related issues like the error validating credentials.

We also have great guides on what to do if ChatGPT is not working or how to use ChatGPT without a phone, so don’t miss them.

3. Use a VPN

You can always use a VPN to bypass regional restrictions, but with Chat GPT, things are now trickier.

Earlier, users could access it through a server based in a country where the chatbot was available, but it now asks for a phone number. Unfortunately, the worst part is that it doesn’t seem to accept VoIP (Voice over Internet Protocol) numbers.

While some users managed to get things running with effective VoIP software and a reliable VPN, we will still recommend the latter coupled with an actual phone from a country where Chat GPT is available, if possible.

Our top recommendation for a VPN is ExpressVPN, known for its fast speeds and wide network of servers, making it popular for streaming and other high-bandwidth activities. It also offers additional security features, such as a kill switch and split tunneling.

⇒ Get ExpressVPN

4. Mobile Apps

Sometimes the official ChatGPT app is available even if the website isn’t:

  • iOS or Android app stores – Check if the OpenAI ChatGPT app is listed in your regional store.
  • Mobile apps may bypass some regional web restrictions and give full access.

5. Use API or Code Access

If you can code or use scripts:

  • OpenAI API – Sign up (if allowed) to use GPT models in your own applications.
  • Platforms like Replit or Hugging Face Spaces host GPT-based apps, which may be accessible globally.

6. Embedded in Other Services

Some mainstream apps integrate GPT models internally:

  • Notion AI – Writing assistant built into Notion.
  • Microsoft Bing Chat / Copilot – Often accessible in regions where ChatGPT isn’t.
  • Slack GPT / Discord bots – Many servers host GPT-powered bots.

Where is ChatGPT not supported?

The list of countries where ChatGPT is available can be found on Open AI’s official website. If you reside in any of these, ChatGPT should open right away. And if it doesn’t, it’s likely a network issue to blame.

ChatGPT is not available in the following countries:

  • Belarus,
  • China,
  • Cuba,
  • Iran,
  • North Korea,
  • Palestine State,
  • Russia,
  • Syria,
  • Ukraine,
  • Venezuela.

Do not forget to share your review of Chat GPT and any other solutions that helped you bypass geo-restrictions in the comments below.

And if you’re having trouble using the AI, check out our ChatGPT not working troubleshooting guide as well as our ChatGPT network error article.

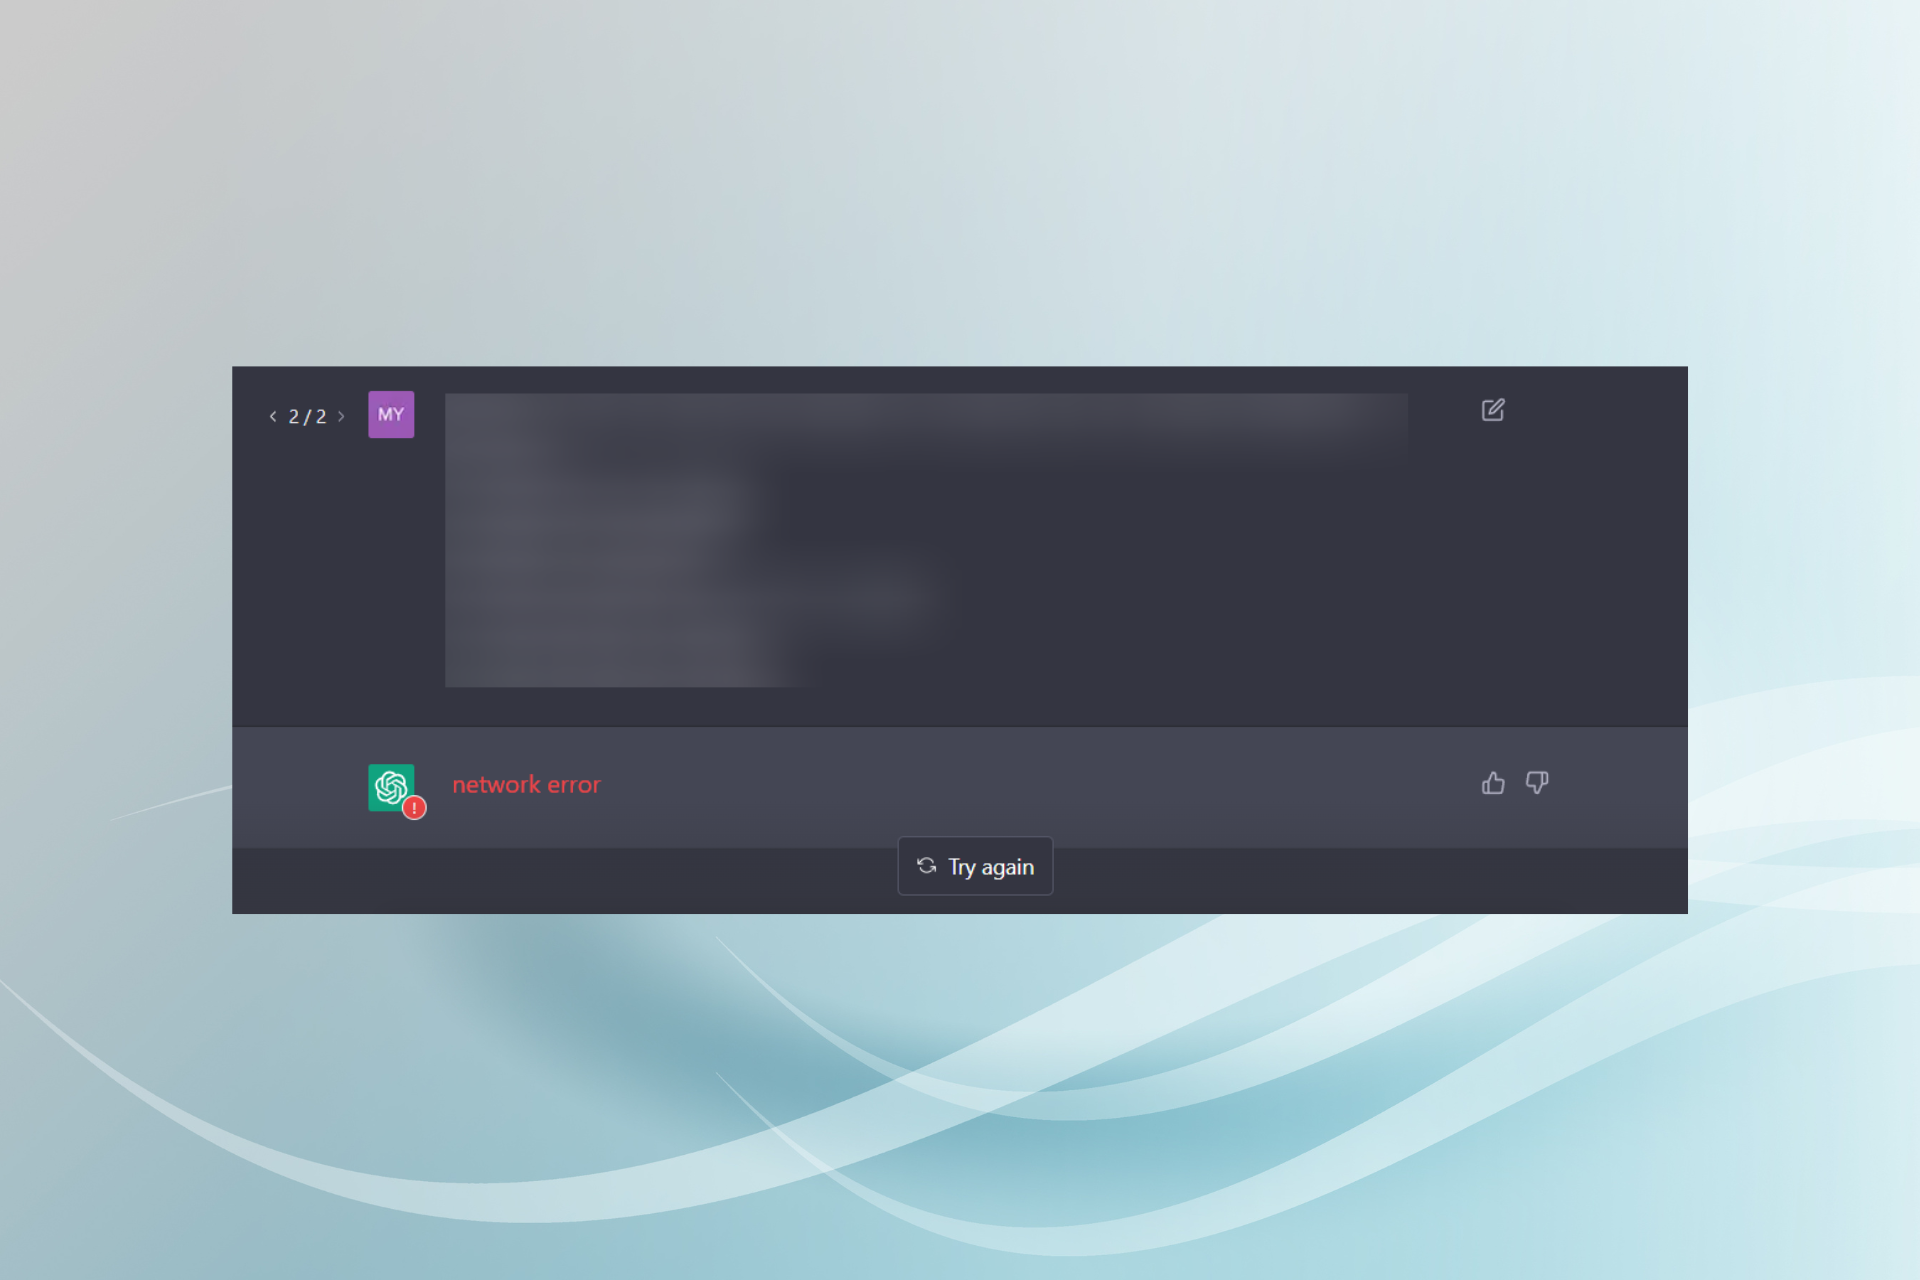
ChatGPT Network Error: 3 Quick Ways to Fix it

Below, we’ll explain why you get a ChatGPT error on long responses and show you a few ways in which you can fix it.

While the message signals a problem with your connection, that’s misleading and not always the case. Nevertheless, we’ll also show you some network tweaks.

Let’s get started. 

How do I fix the ChatGPT network error?

1. Limit the output from Chat GPT

  1. Open ChatGPT.
  2. Now enter your question, but be sure to set a limit. You can do that by asking ChatGPT to ask you for confirmation after every 100 words for example.
  3. Check if the problem is still there.

2. Try again in some time

If the network error doesn’t seem to disappear, your last option is to wait! The AI-powered chatbot is a massive hit and is witnessing high traffic. As such, issues like error validating credentials may appear. So, try using it in a few hours or so.

In some cases, you might also encounter the ChatGPT route error 400, which happens when invalid requests block the platform from responding correctly.

3. Use a VPN

  1. On your PC, start a VPN client (if you have one. If not, you can check our list of best VPN with a trial period while you can get your money back).
  2. Next, log in and select the desired server.
  3. Once you connect, try using ChatGPT again.

A VPN we use is ExpressVPN, which is a virtual private network service that encrypts internet connections and hides user IP addresses for online privacy and security. It’ll also help if ChatGPT is not available in your country.

ExpressVPN

It offers fast speeds, a wide network of servers, and additional security features.
Check price Visit Website

This isn’t the only issue you can encounter, and many reported that ChatGPT is not working at all, but we covered that one in one of our previous guides.

Another common issue users reported is the Chat GPT error in message stream, which can interrupt responses unexpectedly. We created a full guide to help you fix it.

Speaking of errors, many also experienced error 1015 in ChatGPT, and we already covered that one in the past, so don’t miss our guide on it.

If you know of other solutions to fix the network error in Chat GPT, drop them in the comments section below and help our readers.

DCOM Server Process Launcher High CPU Usage [Fix]

If you notice high CPU usage triggered by the DCOM server process, your computer might run slow. The issue is more common than you think and can be fixed easily.

Here, we will discuss the DCOM server process launcher, the reasons for high CPU usage due to the service, and the solutions to fix the issue.

What is the service host DCOM server process launcher?

DCOM server process launcher is a Win32 service that starts COM (Component Object Model) and DCOM (Distributed Component Object Model) servers along with activating remote COM objects. It is installed with Windows and launches as soon as your OS starts.

The DCOM Server Process Launcher service is essential for proper functioning COM and DCOM servers and applications that depend on them.

What causes DOCM server process launcher high CPU usage?

There can be several reasons for high CPU usage by the DCOM server process launcher. Some of the popular ones are mentioned here: 

  • COM/DCOM server using high CPU resources – If COM and DCOM servers use many system resources, then the DCOM server process launcher can use a high CPU. To fix it, end the process for COM or DCOM server,
  • Problem with DCOM server process launcher – If the DCOM server process launcher service has a problem, it could cause an issue. Try restarting the service.
  • System files are corrupt – If your Windows is missing some files or has damaged files, then you might have to face the issue. Try running your computer in a clean boot environment or resetting your Windows to solve it.

How can I fix the DOCM server process launcher’s high CPU usage?

Before engaging in advanced troubleshooting steps, you should consider performing the following checks:

  • First, make sure you have a stable internet connection.
  • Restart your PC and check your Windows for updates. Here’s what to do if your computer is stuck on restarting.
  • Remove all unnecessary external devices.
  • Ensure your hard drive is not complete.
  • Remove temporary files.
  • Update BIOS.
  • Disable third-party security apps and background apps.

If you are still facing the issue, move on to the below-mentioned troubleshooting methods.

1. Make a new user account with admin rights

  1. Press Windows + I to open Settings. 
  2. Click Accounts, then click Other users.Apps - Other users  -DCOM Server Process Launcher High CPU Usage
  3. Next to Add other user, click Add account button.Add other user
  4. On the next page, click I don’t have this person’s sign-in information. Microsoft Sign -in
  5. Click Add a user without a Microsoft account.Add a user without Microsoft account
  6. Next, on Create a user for this PC page, fill in the User name and other details, then click Next.Create a user
  7. The account will be created. Click on the drop-down menu for the newly created account and select Change account type.Change account type
  8. Change it to Administrator and click OK.
  9. Sign out from the current account and sign in using the new one to check if the problem persists.

2. Run the Process Explorer

Tip icon Tip
Ensure you have signed in using the user account with administrator privileges.
  1. Download Process Explorer.
  2. Open the zip file and extract it. Double-click the .exe file to run. 
  3. Go to File, then click Show Details for All Processes.Process Explorer -DCOM Server Process Launcher High CPU Usage
  4. Right-click svchost.exe and select Properties.SVC host
  5. Go to the Image tab and check which service is using it. SVC properties
  6. Now press Windows + R to open the Run window.
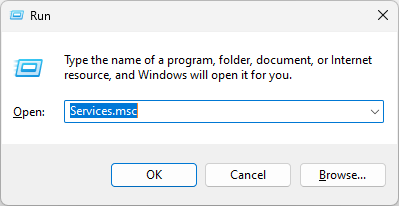
  7. Type services.msc and press Enter.
  8. Locate, and double-click the service. Now under Service status, click the Stop button. Click Apply and OK.Stop service

3. Run the DISM command

  1. Press the Windows key, type CMD and click Run as administrator.CMD elevated
  2. Type the following command and press Enter: sfc/scannow
  3. Once the scan is complete and if it comes up with an error. Copy and paste the following commands and press Enter after every command: DISM /Online /Cleanup-Image /CheckHealth DISM /Online /Cleanup-Image /ScanHealth DISM /Online /Cleanup-Image /RestoreHealth
  4. Restart your PC.

4. Adjust your PC to best performance

  1. Press Windows + I to open the Settings window.
  2. Go to System, then About.System about DCOM Server Process Launcher High CPU Usag
  3. Click Advanced system settings.Advanced system settings -DCOM Server Process Launcher High CPU Usage
  4. On the next window, on the Advanced tab, under Performance, select Settings.Advanced
  5. Now click on the radio button next to Adjust for best performance.Performance
  6. Click Apply and OK.

5. Clean boot your PC

  1. Press Windows + R to open the Run window.CLEAN BOOT 1
  2. Type msconfig and press Enter to open System Configuration.
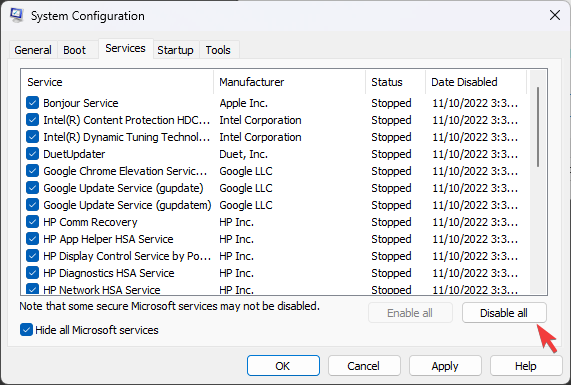
  3. Go to the Services tab, and click on Hide all Microsoft Services. Click Disable All.Clean BOOT 2
  4. Next, switch to the Startup tab, and click Open Task Manager.CLEAN BOOT 3 - DCOM Server Process Launcher High CPU Usage
  5. Now go to all the enabled items, right-click them, and select Disable.Clean BOOT 4
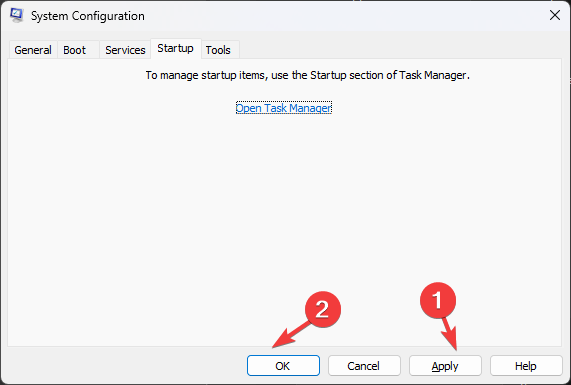
  6. Click Apply and OK to close the System configuration window.CLEAN BOOT 5
  7. Now, click Restart. Upon restart, check all the recently installed apps to know which is causing the issue.

6. Disable Live Tiles

Tip icon Tip
The method below only works for Windows 10, as Live Tiles was available until Windows 10. However, if you are using any software to get Live Tiles on Windows 11, you can proceed with the steps.
  1. Go to the Start menu to get all apps.
  2. Right-click on Tiles and select Unpin from Start.Unpin -DCOM Server Process Launcher High CPU Usage
  3. Do this for every tile.

So, these are methods that you need to follow to reduce CPU usage due to the DCOM server process launcher. If nothing has worked for you, try resetting your PC settings to resolve the problem.

If you think we have missed any solutions that worked for you, feel free to let, us know in the comments section below.

Apex Legends Is Not Using the GPU: 5 Ways to Fix It

Players have been noticing Apex Legends suddenly not using the graphics card to its fullest extent after a recent update. As a result of this error, gamers experience performance issues similar to packet loss.

Because this is a graphical error, solutions for this require you to go into the computer’s settings and make necessary adjustments. Don’t fret as this is all pretty easy to do.

What causes Apex Legends to not use my GPU?

There are a handful of reasons why Apex Legends has a compatibility problem with your graphics card:

  • Your GPU drivers are out of date: Always make sure you download the latest drivers from your GPU manufacturer to stay up to date.
  • The computer lacks RAM: Having too little RAM available can cause performance problems for video games. It’s important to increase virtual memory, in particular, to improve performance.
  • Apex Legends hasn’t verified: Verifying game files can clear up corrupt game files; however, there have been reports of this function not working right on Steam.
  • Computer configurations aren’t correctly set up: Your machine’s settings may not be conducive to Apex Legends causing the compatibility problem.

How can I address Apex Legends not using my graphics card?

We recommend trying the more simple solutions first:

  • The first thing that you should do is restart your computer. Rebooting is far and away the best fix to any software problem. It works the majority of the time.
  • Update your computer’s drivers. That should be the number one you do to fix any gaming performance problem. Manufacturers roll these out pretty frequently.
  • Close any extra apps or windows you have open. Too many pages can cause games to lag or not use the graphics card properly.

1. Manage 3D settings in NVIDIA Control Panel and AMD Radeon Settings

  1. Open the NVIDIA Control Panel and click Manage 3D settings under 3D Settings on the left-hand side.
  2. Go to the Program Settings tab and expand the menu under Select a program to customize.
  3. Choose Apex Legends in this drop-down list.
  4. Under Specify the settings for this program, scroll down until you locate OpenGL rendering GPU.
  5. Expand the settings next to it and choose the graphics card you want to use.

2. Manage settings in AMD Radeon Settings

  1. If you have a Radeon GPU, open the AMD Radeon Settings app, then go to the System tab.
  2. Now select Switchable Graphics.
  3. Click the arrow next to Apex Legends and choose a preferred graphical configuration for the title. The game isn’t available here so heaven.exe is chosen as an example.
  4. For Apex Legends, it’s recommended that you choose High Performance.
  5. If the game isn’t available, click Browse in the upper right-hand corner and locate Apex Legends so it can be added.

3. Change Windows Power Plan

  1. Open the Settings menu, stay on the System tab, and locate Power & battery.
  2. Select Power & battery to enter that section.
  3. Expand the menu next to Power mode and select Best performance.
  4. Alternatively, you can go into the Control Panel and select Power Options.
  5. Choose High performance in the power plan section. Selecting Change plan settings lets you adjust how your computer goes to sleep.

4. Tweak in-game settings

  1. In the Apex Legends main menu, click the gear icon in the bottom right corner. Select the Settings option.
  2. Go to the Video tab and located V-Sync under the Advanced section.
  3. Click the left arrows on V-Sync twice to disable it.
  4. Click Apply in the bottom right corner.
  5. If disabling V-Sync doesn’t work, you should also try lowering the resolution.
  6. Scroll further down Advanced and adjust the various textures and effects settings for Apex Legends to a lower quality. You can even disable some of them.

5. Reinstall Apex Legends

  1. Right-click Apex Legends, hover over Manage and click Uninstall. Give Steam enough time to complete uninstalling the game.
  2. Now click Install to add the game back.

Gamers on the internet have complained about their computer not recognizing the graphics card. It could be a hardware problem, and if it is, be sure to contact the manufacturer. See if you can get a new card.

There are multiple ways to fix software problems depending on which brand of GPU you have. If it’s an AMD card, we recommend installing the latest driver in Compatibility mode.

Nvidia cards are trickier to fix. You may have to update your computer’s BIOS or uninstall those updates; depending on the situation. Companies don’t always roll out updates that are 100 percent free of glitches.

But if all else fails, contact your GPU’s manufacturer. You may have faulty hardware.

For Apex Legends players also experiencing crashes due to memory problems, our comprehensive guide on how to fix Apex Legends crashes with memory issues offers targeted solutions to tackle these specific inconveniences.

Feel free to comment below if you have any questions on addressing GPU problems. Also, leave comments about guides you want or information on other video games.

IGCCTray.exe Entry Point Not Found: 4 Confirmed Fixes

With the help of the software entry point refers your operating system can, for example, launch a video game, making it an essential part of the entire process.

It appears as though one of the most common errors related to DLL files is the igcctray.exe entry point not found, and a faulty DLL file can cause the issue.

Why is the IGCCTray.exe Entry Point Not Found showing up?

The whole error message usually appears when you’re booting the system, and it reads Windows cannot find ‘C:/Program Files/WindowsApps/AppUp.IntelGraphicsExperience_1.100.2727.0_x64_8j3eq9…/IGCCTray.exe’ Make sure you typed the name correctly, and then try again.

As IGCCTray.exe is connected directly to Intel’s Graphics Control Panel or Intel Graphics Command Center apps, it’s not a system file so you shouldn’t worry too much about it. You should also consider these causes:

  • Intell app – This issue is most commonly caused by a problem with the Intel app itself so reinstalling it should fix it.
  • Malfunctions related to a system error, file corruption, or the result of another system failure.

That being said, let’s fix this problem quickly with the solutions below.

How can I fix the igcctray.exe entry point not found?

1. Repair and reset the Intel app

  1. Click the Start button and go to Settings.
  2. Select Apps from the menu.
  3. Select Intel Graphics Control Panel or Intel Graphics Command Center and click on Advanced options.
  4. Scroll down and hit the Repair button. After the procedure, reboot your PC and if the error persists, repeat the process and click on the Reset button this time.

2. Reinstall the Intel app

  1. Click the Start button and go to Settings.
  2. Select Apps from the menu.
  3. Select Intel Graphics Control Panel or Intel Graphics Command Center and click on Uninstall.
  4. After the process is finished, download the app from Microsoft Store: Intel Graphics Control Panel and Intel Graphics Command Center.
  5. Install the app, reboot your PC and see if the error shows up again.

3. Run a System File Checker and DISM scans

  1. In the Search bar type cmd and click on Run as administrator to launch Command Prompt with full privileges.
  2. Type the following command in the Prompt and press Enter: DISM.exe /Online /Cleanup-image /Restorehealth
  3. Next, write this SFC command and hit Enter: sfc /scannow
  4. Wait for the scan to complete and restart your device.

4. Restore your PC to a previous restore point

Note icon NOTE
This solution will only work if you have created a system restore point prior to the moment this error started occurring.
  1. Press the Windows Start button, type in system restore, and click on Create a restore point.
  2. Next, in the System Properties click on System Restore.
  3. Click next and select a previous restore point from the displayed list and hit Next.
  4. Click Finish to confirm your reset point and allow for the process to begin.

Restoring your system to a previous point in time is the last resort you can take to fix this problem.

We remind you that the IGCCTray.exe entry point not found error is not critical for the proper functioning of your PC.

With this last recommendation, we will conclude our list of the steps you need to take in order to solve this error.

If the problem extends to graphics malfunctioning, refer to our guide on how to fix the Intel graphics driver if it keeps failing.

Which one of the solutions presented in this article helped you solve the issue? Don’t hesitate to drop us a message in the dedicated section below.

iCloud Drive Not Showing Thumbnails Fixed: 4 Easy Methods

A number of users online have reported that their iCloud drive is not showing thumbnails. This can be extremely frustrating, especially if you have a huge selection of files.

Should you be worried if iCloud Drive is not displaying thumbnails? It’s a very annoying issue, but there are no reasons to worry.

Why isn’t iCloud Drive showing thumbnails?

Apple’s iCloud is an immensely popular and efficient way to store your data. But storing data is not enough. We also must be able to access that data.

This is where thumbnails come in. Instead of having to open each file individually, thumbnails provide us with a more efficient way of filtering necessary information.

Most of the time, the problem is caused either by an incorrect setup, wrong view option settings for your folders, or even problems on the provider’s part.

But don’t worry! As thumbnails are meant to help and guide, so will this article get you through the necessary steps to resolve this issue.

How do I fix thumbnails not showing for Windows and Mac?

Granted, this is just a preliminary step, but it’s one worth taking, regardless of your operating system. Try uploading different sizes and format files to see if the error occurs regardless of the value.

Upload jpeg. as well png. files, and set their size to vary between 100px and 2000px, for example. If only the larger files are missing the thumbnail, then chances are you are experiencing some issues with your internet connection.

The problem thus is not that iCloud drive is not displaying thumbnails, but that your Internet speed isn’t allowing it.

Remember that all files have to download and sync. The speed at which this happens is entirely dependent on your connection strength.

If this isn’t the case, and the issue appears regardless of size and format, then let’s move on to some more concrete solutions.

First, we will look at some troubleshooting methods for Windows, and then we will follow up with their macOS counterparts. By the end, you’ll get your thumbnails back in their place.

How do I restore iCloud Drive thumbnails on Windows?

1. Make sure iCloud Drive was set up correctly for Windows 10

  1. Download iCloud for Windows on your device.
  2. Install the app and restart your PC in order for iCloud to properly initialize.
  3. Open iCloud and log in with your Apple ID.
  4. Select from the list of features the ones most important to you that you want to keep up to date.
    icloud drive setup for windows
  5. Click Apply.

By selecting Photos from the list, iCloud Drive will automatically create a folder in your File Explorer.

To check if everything went right, try taking some photos. Every new photo that you take should automatically download to your iCloud Photos folder.

2. Change the folder View settings

  1. Access your iCloud folder, select View, and click Options.
  2. Under Folder Options, select View again.
  3. Under Advanced Settings check if the Always show icons, never thumbnails option is checked.
    windows folder view settings not showing thumbnails
  4. Un-check it and click Apply.
    folder view options set to show thumbnails

For one reason or another, it’s possible that iCloud Drive is not showing thumbnails because of your View Settings.

3. Delete the thumbnail cache

  1. Press Start, type disk cleanup, and select the app.
  2. Select your drive, then click OK or press Enter.
  3. Check the Thumbnails option and click OK.

Sometimes thumbnail cache can become corrupted, which in turn results to display problems. A simple deletion process can help you clear out this issue.

Windows keeps a copy of all your pictures, videos, document thumbnails, and so on. This action will force Windows to recreate thumbnails for all the files on the selected drive.

How do I restore iCloud Drive thumbnails on Mac?

1. Force sync your iCloud drive

Another reason why iCloud Drive is not displaying thumbnails is that you have the same file open on two or many different devices.

This syncing process should be automatic, but if this isn’t the case, you should try some different methods to manually sync iCloud with your Mac.

2. Try the dedicated Photos app

  1. Start iCloud and sign in with your Apple ID.
  2. From the list of features select Photos and click Options.
  3. Select iCloud Photos and click on Done.

You might also be interested in our guide on what to do if the iCloud Drive is not showing any files on Mac.

3. Restart your iCloud photo library

  1. Go to Settings.
  2. Access your account (under your name or Apple ID).
  3. Then go to iCloud and select Photos.
  4. Turn off iCloud Photo Library and turn it back on.
  5. Give it a few minutes to properly complete the process.

The process above will force iCloud to resync your files, automatically generating new thumbnails.

4. Make sure all your devices are properly synced

If you host multiple devices under the same Apple ID, you must ensure they are all properly synced.

Say, for instance, you have an iPhone and an iMac. The photos you take with your phone should automatically sync and be transferred to iCloud, so you can access them from your iMac.

To make sure, however, that this sync was performed completely. To do that, connect your device to your Mac. Then, locate and select your device from the Finder sidebar and select Photos.

If the Photos option doesn’t appear in the bar, that means iCloud Photos is turned on. To continue the process, toggle the Photos app off.

The last thing you need to do is to select Sync Photos to your device from the checkbox and make sure to tick All photos and albums.

How do I upload my pictures in the iCloud Photos app?

  1. Open the folder containing your photos.
  2. Open a separate window for iCloud Photos.
  3. Select the photos you want to add.
  4. Drag & drop them into the iCloud Photos folder.
Tip icon Tip
Another option you could try is going for an alternative for iCloud Photos. One such alternative comes in the form of Google Photos.
You may find that Google Photos is somewhat more consistent in terms of thumbnails, while at the same time also being easy to use in Windows 10.

iCloud Drive not showing thumbnails isn’t the end of the world, but it is highly annoying. One of the above solutions is guaranteed to solve this issue for you.

If you come to the conclusion that iCloud Drive is not the one for you, check our list of the best cloud storage services.

The only thing that remains is, which solution worked for you? Feel free to leave us a comment and tell us!

Avast Stuck on Installing Additional Definitions: Fixed in 3 Ways

Avast is one of the best antivirus software in the tech world. It has many users who enjoy its latest updates and features. However, users complain about getting stuck when Avast is installing additional definitions, causing problems for them.

Moreso, users report that Avast is not updating the virus definitions, resulting in issues with the antivirus.

Why is Avast stuck on installing additional definitions?

Avast stuck on installing additional definitions indicates that the software can’t install update virus definitions for some reason. It can cause security breaches and other issues on your PC because the software can’t access the definitions needed.

However, some factors can cause the Avast antivirus software to be stuck on installing additional definitions. Some are:

  • Outdated Avast software – When the Avast software is outdated, it prevents it from accessing the necessary definitions for its performance. So, you can encounter Avast stuck on installing additional definitions due to bugs affecting the current version.
  • Windows Defender Firewall interference – Users can experience difficulties using the Avast antivirus software if the Windows Defender Firewall is running on their PC. It can block the activities of the Avast software, causing it to run into problems with the definition installation process.
  • Corrupt Avast installation files – A corrupt Avast installation file can affect the antivirus software on your PC. It can cause it to malfunction or not respond to its normal functions and can result in problems when installing additional definitions.
  • Avast antivirus compatibility issues – When the version of Avast antivirus you have on your PC is not compatible with your computer, it may not work, seeming like it was blocked. So, you can run into issues with Avast not running on your PC or not installing definitions if you don’t install a usable version.

There are lots of other factors that may cause the problem on Avast. Fortunately, there are some general fixes to help you get the issue resolved.

What can I do if Avast is stuck on installing additional definitions?

Before proceeding with any advanced troubleshooting, try the following:

If you’re not able to fix the error, proceed with the detailed solutions below.

1. Disable Windows Firewall

  1. Click the Start button and type control panel, then open it.
  2. Click on the Windows Defender Firewall option.
  3. Select the Turn Windows Defender Firewall on or off option from the left side.
  4. Go to the Private and Public network settings, then click the radio buttons for the Turn off Windows Defender Firewall (not recommended) option.
  5. Close the Control Panel and restart your computer.

Disabling the Windows Defender Firewall can resolve any conflict between the service and Avast.

2. Update the Avast app

  1. Click on Start, type control, and click on Control Panel to open it.
  2. Go to Programs and select Programs and Features.
  3. Select Avast from the list of installed apps and click on Remove/Change.
  4. In the Avast Setup windows, click the Update button.
  5. Click Next and follow the on-screen instructions to install updates.
  6. Reboot the computer and check for any improvements. 

Running Avast as an administrator will fix any permissions issues preventing it from installing the definitions.

3. Uninstall the Avast antivirus with Utility

  1. Go to Avast’s official website and download the avastclear.exe file.
  2. Press Windows + R to launch the Run dialog box, type msconfig, then press Enter.
  3. Navigate to the Boot tab and check the box for Safe boot. Click Apply, then OK.
  4. Right-click on the downloaded .exe file and select Run as administrator from the drop-down.
  5. Click Uninstall at the bottom of the screen to remove Avast and clear all files.  
  6. Download the latest version of Avast and check if the problem persists.

The uninstall tool will uninstall the Avast app and clear any residue files on your PC. Also, reinstalling the Avast software allows you to install the latest version.

Alternatively, our readers can read our in-depth comparison of Windows Defender and Avast antivirus to know which is the most preferred.

Likewise, you can read our guide on how to fix Avast antivirus not opening on Windows 11.

If you have further questions, kindly drop them in the comments section below.

IPTV Not Working: 4 Ways to Fix When it Won’t Load Anything

If you’re dealing with IPTV problems like IPTV not working anymore, constant IPTV crashing, or other problems today, you’re not alone.

Common causes include poor internet, app glitches, server issues, or expired subscriptions.

Luckily, many issues can be fixed by checking your connection, updating or reinstalling the app, restarting your device, or contacting your provider. Keep reading to learn quick fixes that can get your IPTV working again.

How do I get IPTV to work?

1. Clear the IPTV cache

  1. Log out and close the IPTV app.
  2. Go to Settings and locate the list of installed apps.
  3. Scroll down until you find your IPTV app.
  4. Look for options that say delete or clear cache or data.
    clear cache firestick app

2. Use a VPN

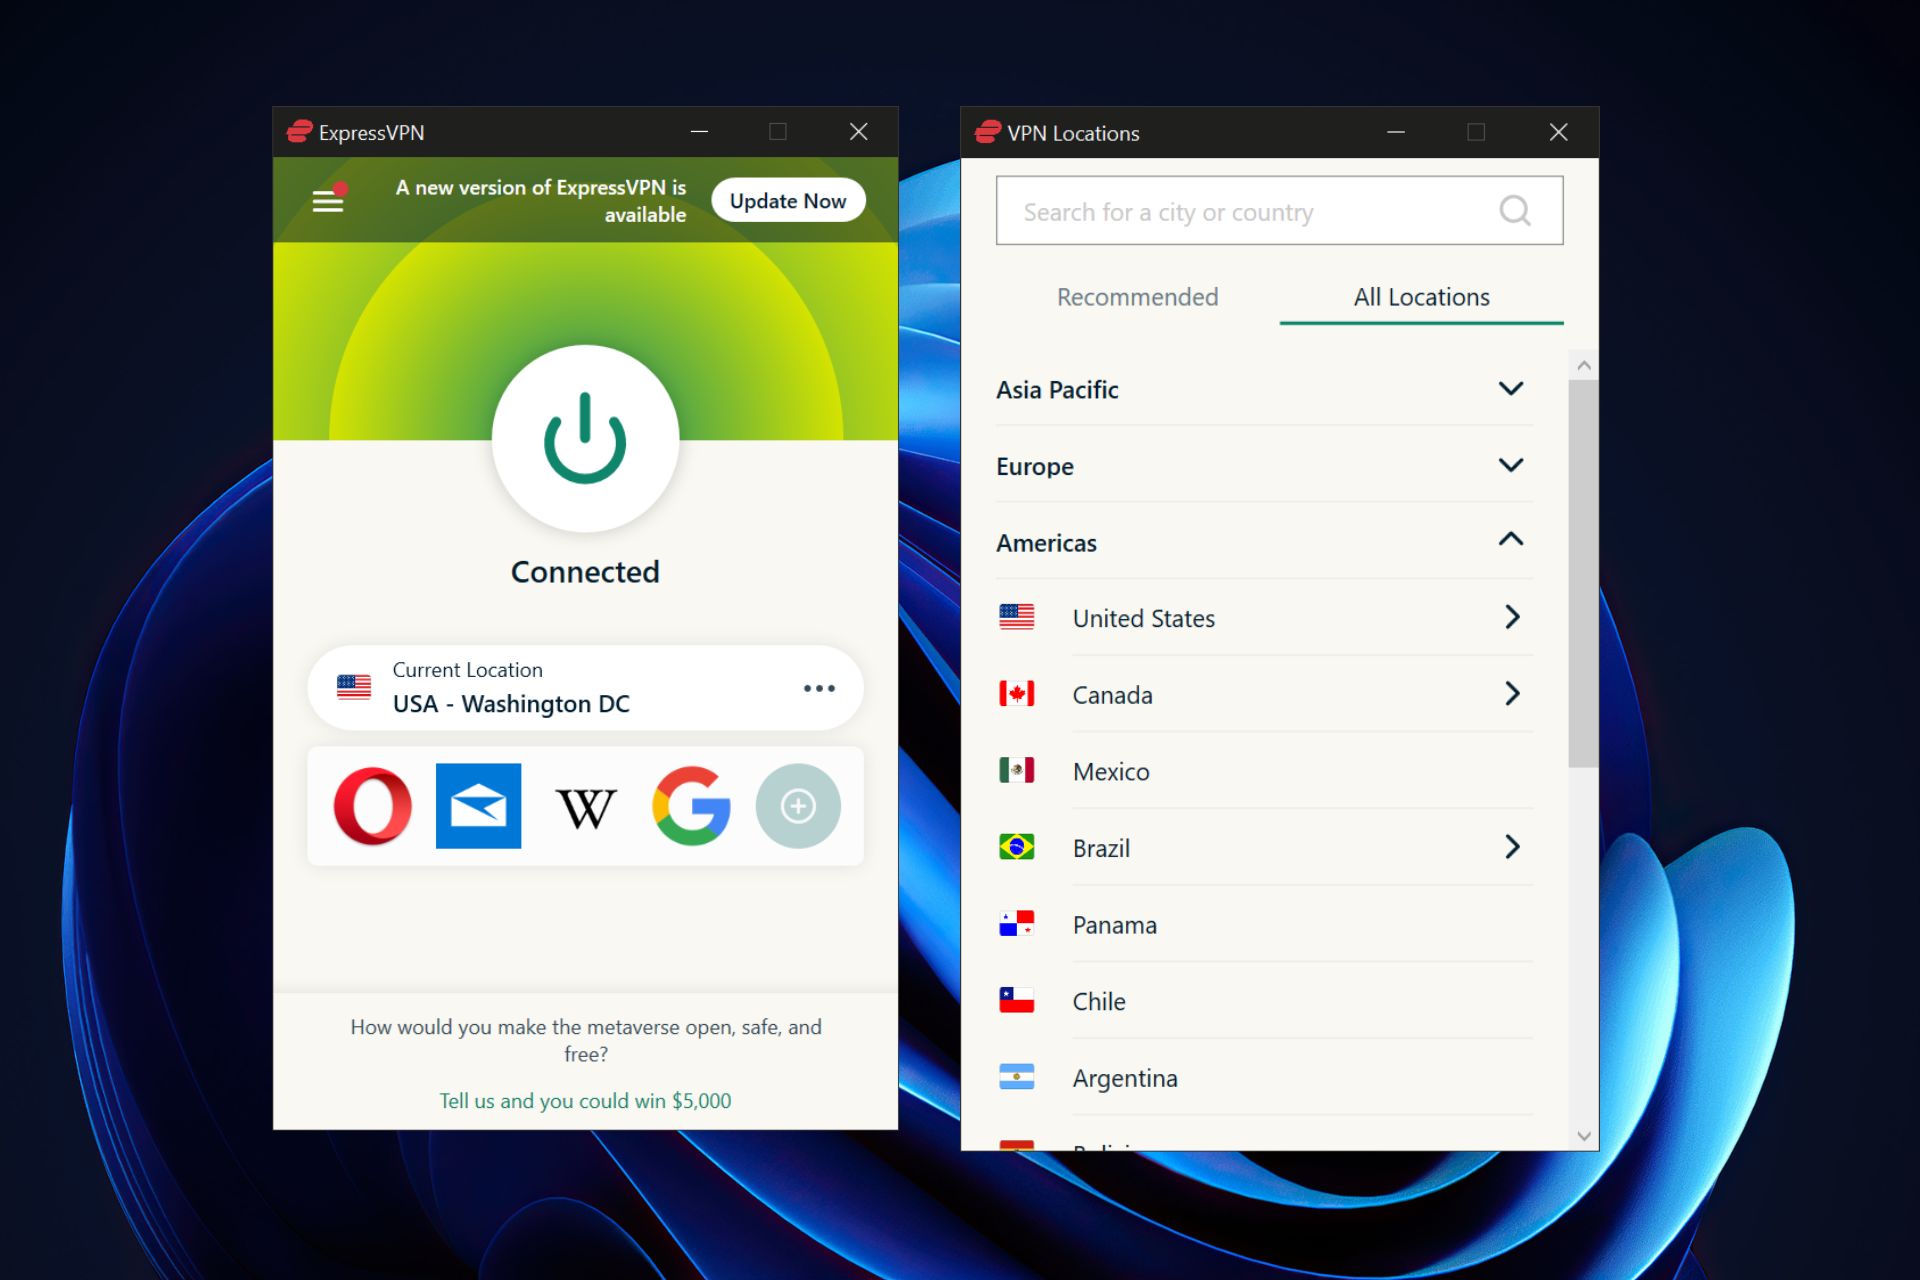
  1. Subscribe to Express VPN and download the relevant app for your desktop, mobile, IPTV box, or Smart TV.
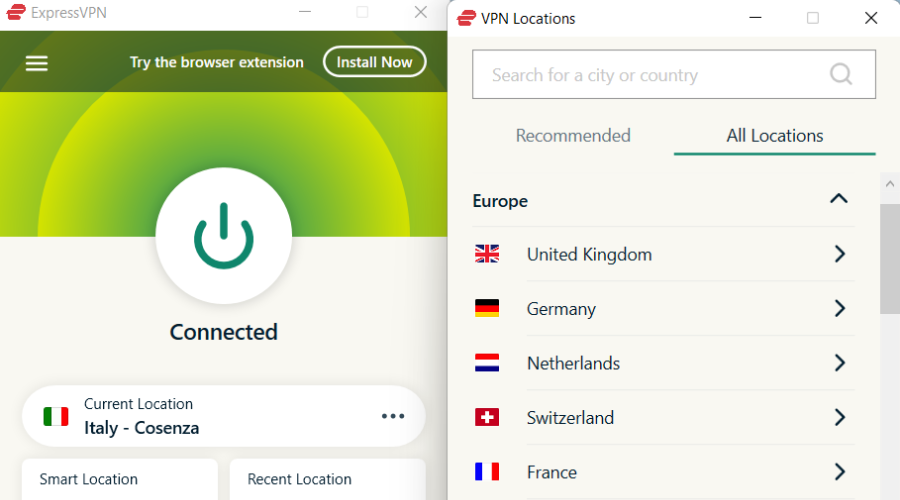
  2. Launch Express VPN and log in with your credentials.
  3. Use the three dots to open a list of server locations.
  4. Search or scroll to the country where the channel you want to watch is located.
    expressvpn windows
  5. Use the big on/off button and wait to be connected.
  6. Launch your IPTV app.

ExpressVPN will also prevent slowdowns and buffering if your ISP is throttling streaming speeds. And thanks to its vast server network, you’ll be able to access content from anywhere around the globe.

ExpressVPN

ExpressVPN

Unblock geo-restricted content and enjoy the highest streaming quality with ExpressVPN’s fast and reliable service.

3. Change the DNS

  1. On your device, go to Settings and choose My Fire TV. Next, go to About and select Network. Write down all the information.
  2. Go back to Network, locate your network open the options menu, and choose Forget this network.
     forget this network fire tv
  3. Select the network again, enter its password, and go to Advanced.
    advanced connection options fire tv
  4. Enter your IP address, Gateway, and Subnet Mask. They should be the same as the values from Step 1.
  5. Lastly, enter 8.8.8.8 as primary DNS and 8.8.4.4 and secondary DNS.
    dns fire tv
  6. Save changes.

4. Try a different playlist
  1. Search for a new playlist or sign up for a premium IPTV provider.
  2. Copy the M3U URL or download the file locally.
  3. Open your IPTV app and locate the Playlists section.
  4. Add a new playlist and paste the URL or choose the local M3U file.
  5. Your channels should now be updated based on the playlist.

Many are also advising to change the portal link, so be sure to try that as well.

If you managed to fix the IPTV issues, go ahead and check the best IPTV providers in the UK and enjoy your favorite TV channels.

The guidelines above should hep you fix various IPTV issues such as error code 404.

Speaking of IPTV issues, many reported that IPTV is not showing TV guide, but we tackled this issue in a separate guide. We also have a guide on what to do if IPTV not working on AT&T.

If you’re using a different provider, don’t miss our guide on how to stop your ISP from blocking IPTV, or our Orange Blocks IPTV article.

Other common IPTV issues you might want to learn more about include IPTV problems over Wi-Fi, error code 401, and error code 403. Check out detailed guides on these here: IPTV not working on Wi-Fi, IPTV error code 401, and IPTV error code 403.

Of course, this is especially true if content is blocked due to geo-restrictions, which is among the main reasons IPTV is not working.

[Fixed] Keyboard Keeps Connecting & Disconnecting in Windows

External keyboards for Windows PC have always been something many users love. However, some users are complaining that their keyboard keeps connecting & disconnecting for some reason.

This can be very unpleasant, as it disrupts your activities. Fortunately, it is an issue that can be fixed easily, as we will show in this guide.

Why does my keyboard keep disconnecting and reconnecting?

Listed below are some of the known reasons your keyboard keeps connecting & disconnecting:

  • Wrong power setting: Sometimes, this issue might be because your PC is set to disable your USB ports when it needs to save power. This can cause your keyboard to disconnect for some time and reconnect later.
  • Outdated PC: Windows updates are important for your PC’s smooth running and could be why your keyboard is misbehaving. The solution to this is to update Windows 10.
  • Faulty USB drivers: In some cases, your USB drivers might encounter issues, leading to this problem. Reinstalling or updating your drivers to the latest version should do the trick.

How do I fix keyboard disconnecting and connecting on Windows 10?

1. Turn off the power saving option

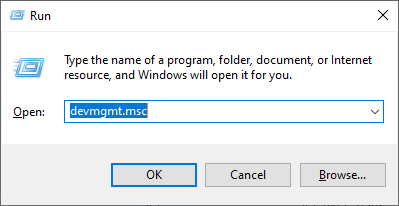
  1. Press the Windows key + R, type devmgmt.msc, and click OK.
    devmgmt keyboard keeps connecting & disconnecting
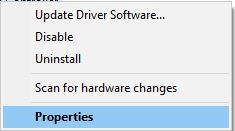
  2. Click the arrow next to the Keyboard option to expand it and right-click the device there.
  3. Now, select the Properties option.
    properties
  4. Click the Power Management tab at the top.
  5. Finally, uncheck the box for Allow the computer to turn off the device to save power and click OK to save the changes.
    allow keyboard keeps connecting & disconnecting

The power-saving option in Windows allows the computer to disconnect idle devices to conserve power. However, this can also cause the keyboard keeps connecting & disconnecting issue. Try disabling the option and check for any improvements.

2. Reinstall Universal Serial Bus controller driver

  1. Press the Windows key + X and select the Device Manager option.
    device  keyboard keeps connecting & disconnecting
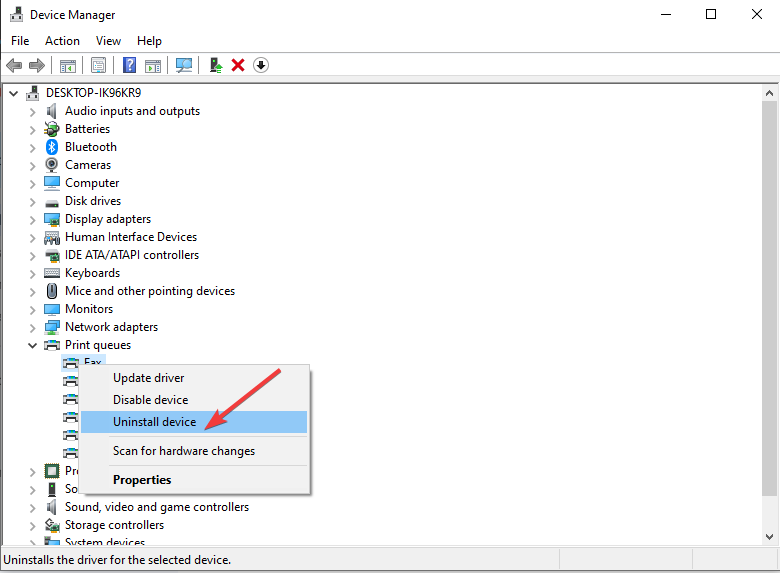
  2. Expand the Universal Serial Bus controllers section and right-click each of the devices there.
  3. Now, select the Uninstall device option.
    uninstall keyboard keeps connecting & disconnecting
  4. Finally, click the Uninstall button to confirm the action and restart your PC.
    uninstall button keyboard keeps connecting & disconnecting

If your keyboard keeps connecting & disconnecting, you can fix it by reinstalling the USB controller driver from the device manager.

If the manual steps seem difficult, you can always use an automated driver updater to scan your computer for outdated or malfunctioning drivers and immediately pick the latest update for a smooth performance.

⇒ Get Outbyte Driver Updater

3. Run the keyboard troubleshooter

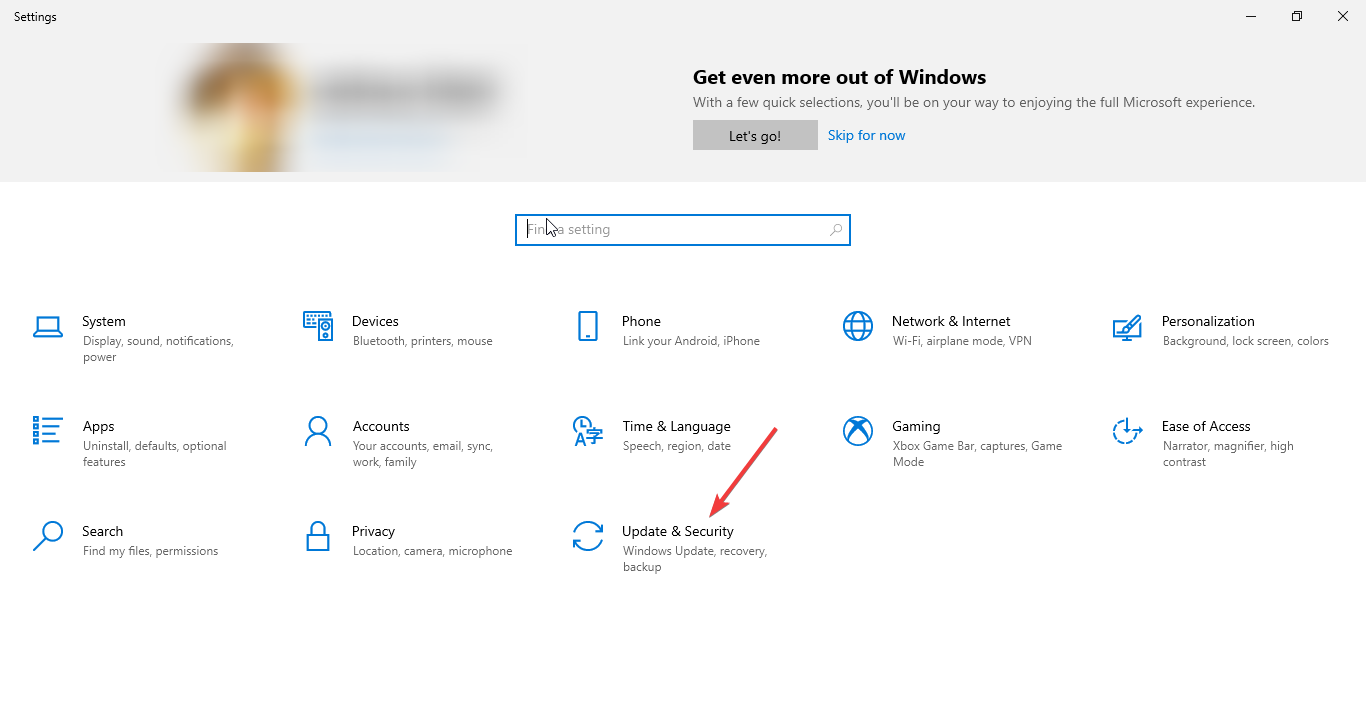
  1. Press the Windows key + I and select the Update & Security option.
    update and
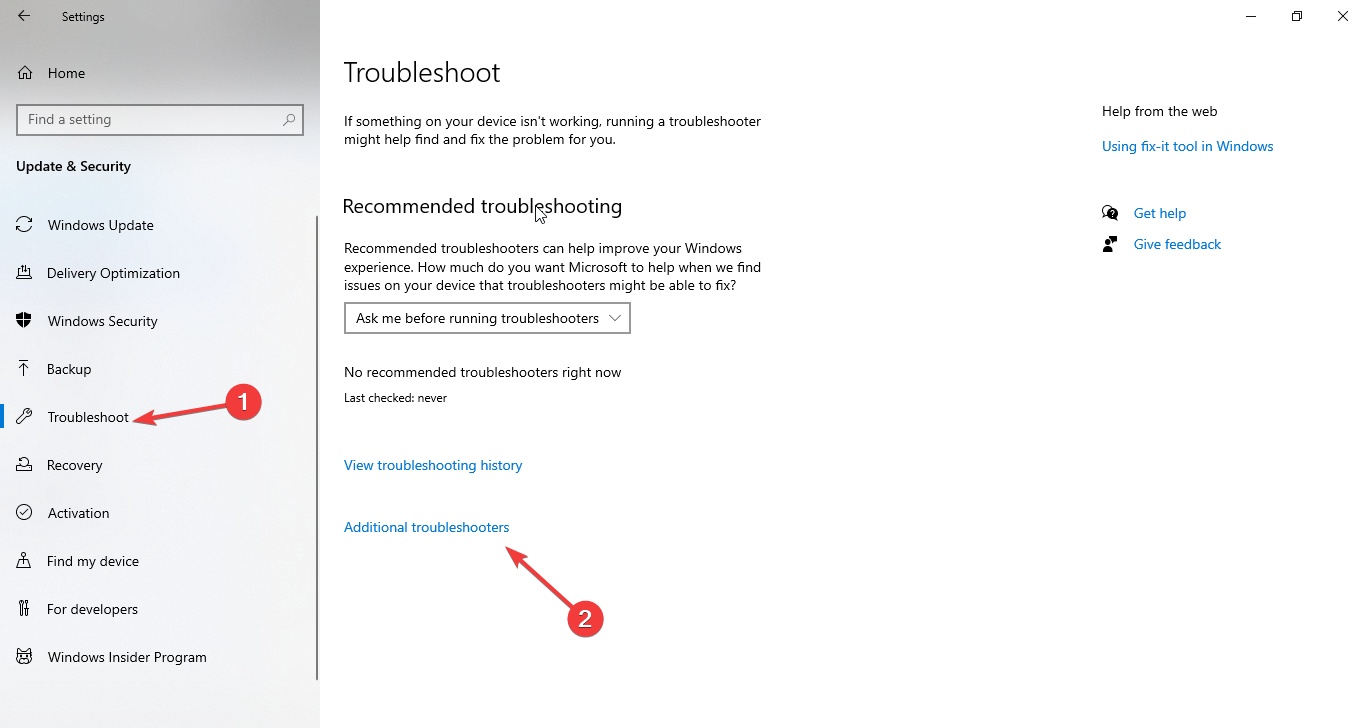
  2. Select Troubleshoot in the left pane and click Additional troubleshooters.
    additional trouble
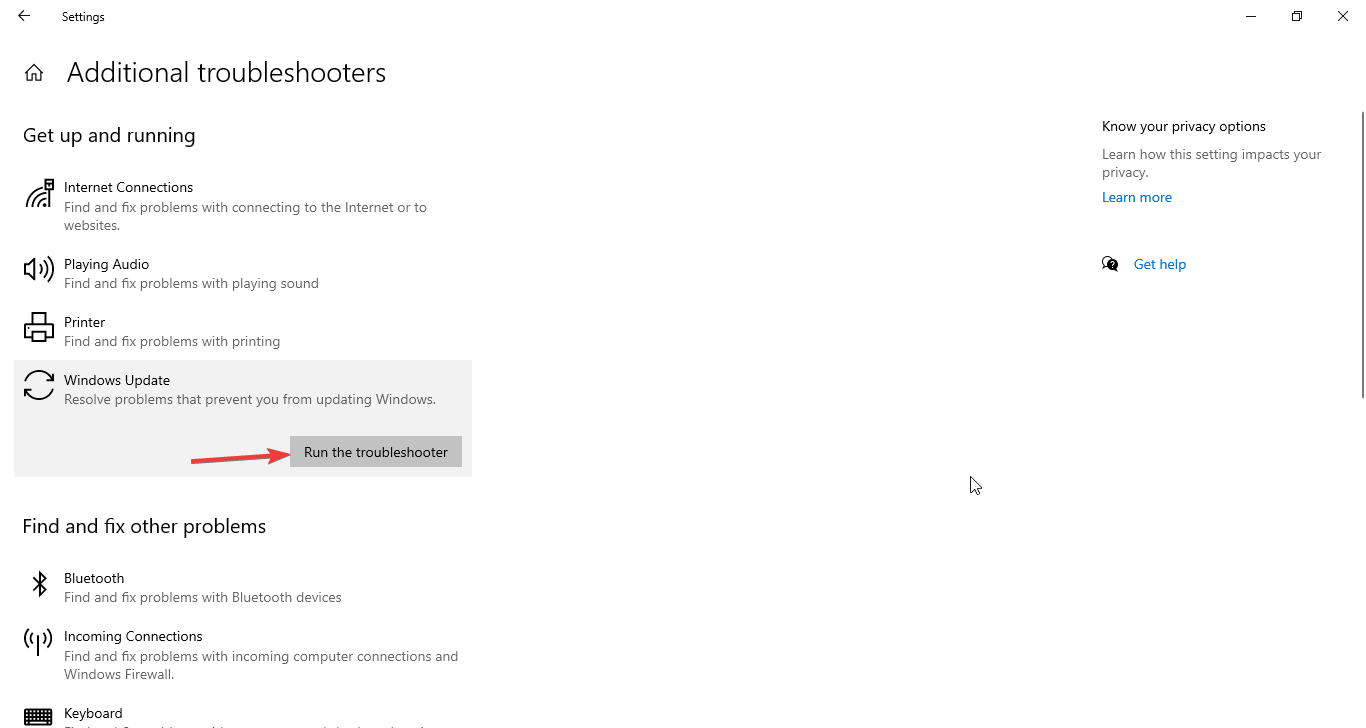
  3. Now, select the Keyboard option and click Run the troubleshooter.
    run trouble

Windows 10 comes with a built-in keyboard troubleshooter that can fix issues like when the device keeps connecting & disconnecting. This tool will diagnose the issue and recommend fixes to restore normalcy.

4. Update your PC

  1. Press the Windows key + I and select the Update & Security option.
    update and
  2. Click the Check for updates button.
    check for keyboard keeps connecting & disconnecting
  3. Now, wait for the scan to finish and install any available updates.

Microsoft releases new updates to fix bugs and security issues periodically. If you haven’t updated your computer for a long time now, it may be the right time to do so

The keyboard keeps connecting & disconnecting issue can be frustrating due to the importance of the peripheral. But you should be able to fix it by following the solutions in this guide.

Similarly, if your keyboard light is not working, check our detailed guide to fix it quickly.

Feel free to let us know the solution that helped you fix this issue in the comments below.

How to Run Trust Wallet on PC [Full Guide]

Trust Wallet is one of the most secure and trusted crypto wallets that allows you to easily buy, store, collect NFTs and perform many other cryptocurrencies actions.

If you are just now starting to use cryptocurrencies and related applications, don’t worry we will show you exactly how you can run Trust Wallet on your Windows 10 PC in a few easy steps.

Is there a Trust Wallet app for PC?

More than 5 million people are using Trust Wallet and thanks to it being such an easy-to-use mobile application, is expected that the number to keep on growing.

However, right now, there is no dedicated app for PC. However, you can still use it on your computer with a little help.

How can I run Trust Wallet on my PC?

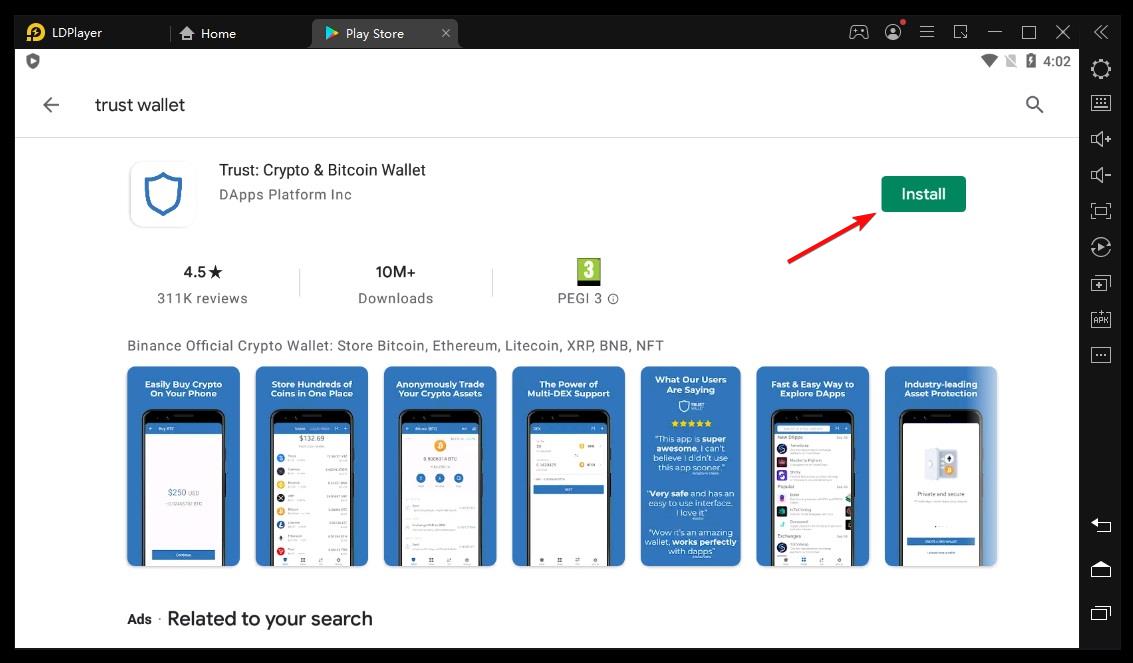
  1. Go to LD Player download page and click on Download.
  2. Once the downloading process has finished, launch the installer.
  3. Next, open LD Player and type TrustWallet in the search bar.
  4. Locate TrustWallet in the list and click on Install.
  5. After the installation process ends, locate TrustWallet on your desktop.
  6. Click on it to open it and simply follow the sign-in steps.

This is about all and by following the steps we have indicated in this article you should be able to run TrustWallet on your PC without a problem.

Trust Wallet is the perfect solution for having an easy and secure way of managing cryptocurrencies and performing several transactions.

You might also be interested in our article on how to make Trust Wallet work on your browser.

We hope that you have also managed to install Trust Wallet on your device effortlessly, so don’t hesitate to leave us a comment in the dedicated section below.

How to Fix Windows 10 Stuck on Spinning Circle [7 Ways]

If your Windows 10 laptop is stuck on the spinning circle after you’ve upgraded to Windows 10, you have come to the right place.

This error is more common than you might think. It happens when the installation process is completed successfully, but for some reason, the installation cannot continue.

This error occurs on various operating system versions and with a wide range of system configurations. This allows us to conclude that a faulty hardware piece inside your device does not cause the problem.

Some users have allowed Windows 10 to remain in the dreaded ‘spinning circle’ cycle for more than 3 hours. This didn’t change anything. After this result, users are usually forced to perform a hard shutdown (pressing the power button until PC turns off).

Today’s article will explore some of the best methods to fix this issue. Read on to find out more.

Why does the circle keep spinning on my computer?

Listed below are some of the causes of the Windows keeps spinning circle constantly issue:

  • Faulty driver: If Windows 10 is spinning circle and won’t boot, it is likely due to a faulty display driver. The solution is to reinstall or update your driver to the latest version.
  • Issues with USB devices: Many users have found this issue to be down to the USB devices connected to their PC. They could fix this by removing these devices and restarting their PC.

After knowing the causes of this issue, below are some variations you can expect to fix with this guide.

  • Windows 10 spinning circle on boot
  • Windows 10 spinning circle on taskbar
  • Windows 10 spinning circle freeze
  • Windows 10 spinning circle after login
  • Windows 10 spinning circle on startup
  • Windows 10 spinning circle black screen

What to do if Windows 10 laptop is getting stuck on spinning circle

1. Press the Ctrl+Alt+Del keys

keyboard - windows 10 laptop stuck on spinning circle


One simple solution for this issue is to press the Ctrl + Alt + Del keys at the same time. This will reload the login screen.

Hopefully, you should be able to boot your PC normally from here.

2. Disconnect all USB devices

Sometimes, the USD dongles you plugged into your PC can cause Windows 10 to keep spinning circle while showing, please wait. This is especially true for wireless mouse and keyboard receivers.

The quick way out of this is to remove these devices and restart your PC.

3. Reinstall drivers in Safe Mode

  1. Press and hold the power button to force shut down your PC. Power it on and shut it down again when your system starts spinning. Repeat this twice or thrice till the Windows Recovery Environment shows up.
  2. Now, select Advanced options > Troubleshoot.
    troubleshoot windows 10 spinning circle
  3. Choose the Advanced options.
    advanced options
  4. Next, select Startup Settings.
    startup settings
  5. Click the Restart button.
    restart windows 10 spinning circle
  6. When your PC restarts, press 5 or F5 to Enable Safe Mode with Networking.
    safe
  7. Now, press the Windows key + X and select Device Manager when your PC boots.
    device manager windows 10 spinning circle
  8. Double-click the Display adapters option to expand it and right-click the device there.
  9. Select Uninstall device.
    uninstall
  10. Next, check the box for Delete the driver software for this device and click the Uninstall button to confirm the action.
  11. Finally, restart your PC.

In some cases, the Windows 10 spinning circle issue is down to problems with your video card driver. This is more prominent for users with Intel-based drivers. So, you need to uninstall the driver in Safe Mode and let your PC reinstall it automatically after restart.

4. Use Startup Repair

  1. Repeat Steps 1 to 3 in Solution 3 above.
  2. Choose the Startup Repair option.
    startup repair
  3. Finally, follow the onscreen instructions to complete the process.

5. Use a Windows 10 Recovery Disk

Cd - Windows 10 laptop stuck on spinning circle


If you own a Windows 10 Recovery Disk, all you need to do in this situation is to insert the disk inside your laptop.

After you’ve done this, Windows will automatically boot to the advanced settings menu and start the recovery process for your PC.

6. Use System Restore to recover your OS

  1. Repeat Steps 1 and 2 in Solution 3.
  2. Select the Reset this PC option.
    reset windows 10 spinning circle
  3. Now, click on Keep my files.
    keep or remove
  4. Finally, follow the onscreen instructions to complete the process.

7. Reinstall Windows 10

laptop on desk with coffee - Windows 10 laptop stuck on spinning circle


If all of the above methods fail to solve your Windows 10 spinning circle, you might need to reinstall your OS completely.

For everything you need to reinstall Windows 10, including the requirements, check our detailed guide.

With this, we can conclude this guide on the Windows 10 laptop getting stuck on the spinning circle issue. Hopefully, you can solve the problem by following the steps therein.

If your Windows 10 is stuck on the welcome screen, check our detailed guide to fix it quickly.

Please feel free to let us know if this guide helped you. You can do so by simply using the comments below.

Xbox Error Code 0x87e10bef: How to Fix and What Caused It?

Is the Xbox error code 0x87e10bef bugging you? This article will give you hints about why it may happen and a guide on how to fix this problem.

Usually, when you launch a game on the Xbox console, it should start instantly without any error. But, for some users, an error code 0x87e10bef repeatedly appears for specific titles. It is one of the most common problems, like error 0x87e11838, that prevents Xbox games from opening.

Why does the Xbox error 0x87e10bef?

Usually, the error code 0x87e10bef occurs due to the following reasons:

  • Incompatibility: If the Xbox firmware version is very old, the problem may occur when you try to launch specific titles.
  • Poor network condition: Unstable network condition is one of the most common reasons behind this problem. It also may occurs if Xbox is not connect to WiFi or ethernet.
  • Xbox services status: If the required Xbox services are down, 0x87e10bef may appear.
  • Corrupted cache: If local data or cache becomes corrupted, you may face this problem.
  • Account problem: Sometimes, you may forget to sign in with the correct account to play specific games.
  • Internal issues: Else, some internal configurations can trigger this problem on your game console.

What is error code 0x8000ffff on Xbox One?

The error code 0x8000ffff is similar to the error code 0x87e10bef. Both appear when you try to launch specific games. In fact, both errors may appear at different times for the same game. However, the error 0x8000ffff appears usually when Xbox fails to access the live services while starting a title.

It occurs mostly when the Xbox live services are down, or you are not using the correct account. We already have an article on this error. Check out how to solve Xbox error 0x8000ffff.

How can I fix Xbox error code 0x87e10bef?

There are four different effective methods you can apply to get rid of this Xbox error. However, before trying these ways, we suggest you do the following things:

  • Restart your console and see if it helps.
  • Go and check out this official Xbox Status page and find out if the services are down or not. If yes, wait until the services become operational again.
  • You also can check for Xbox firmware updates and install any available ones. See how to solve Xbox won’t update if necessary.
  • Make sure you have a stable internet connection.
  • The Xbox error 0x87e10bef may appear if the account you are using doesn’t own the game you are trying to launch. So, we suggest you sign in with the correct account. Then, try to play the game again. If necessary, try the previous methods again after changing the account.

After doing the above things, if you still encounter the Xbox error code 0x87e10bef, go through these methods to fix it.

1. Clear persistent storage

  1. Press the Xbox button and then select Settings.
  2. Tap on Devices & streaming and then on Blu-ray.going blue-ray xbox
  3. Go to Persistent Storage.
  4. Tap on Clear Persistent Storage.clearing persistent storage xbox

Restart the console after clearing the persistent storage cache. Now, try to launch the game that was showing the error code 0x87e11838 and see if it has solved the problem or not.

2. Clear alternate Mac address

  1. Go to Settings and go to the General tab.
  2. Tap on Network Settings.going network settings xbox
  3. Go to Advanced Settings.going advanced network settings xbox
  4. Tap on Alternate Mac Address.going alternate mac address
  5. Tap on Clear.
  6. Restart your console.

After clearing the Mac address, try to relaunch the game. It should solve the error code 0x87e10bef on Xbox One/Series X or S.

3. Try in offline mode

  1. Go to Settings and then Network Settings, as shown before.
  2. Now, find and tap on the Offline mode option.going offline xbox
  3. After that, try to launch the problematic game and see if it helps.

Offline mode works for a significant number of users. So, if your situation is similar to theirs, it may work like a magic.

If necessary, you also can try to reset your Xbox game console. But, do it if no other methods solved the error.

This article has featured the methods that fix the Xbox error code 0x87e10bef, and it has also described why it happens. If you have any opinion on this, feel free to let us know in the comment box.

Payday 2 is Crashing on Startup or Not Launching [Fix]

Payday 2 is a first-person shooter game, but unlike many other shooters, this game puts you in the shoes of a bank robber.

Although the gameplay sounds fun, Payday 2 has certain issues on Windows 10. Namely, it frequently crashes or displays a black screen, and sometimes it won’t even launch.

So, without further delay, let’s fix these issues.

What can I do if Payday 2 is crashing on startup?

1. Update your drivers

If your graphics card drivers are outdated, you might experience Payday 2 crashes or low fps, and this is why it’s crucial that you always update your drivers.

Users have reported that the game ran smoothly after downloading and installing the latest drivers.

Thus, we recommend the Outbyte driver solution to automatically download all the outdated drivers on your PC. The tool will help with the entire process, ensuring that you get the right drivers.

Besides, once you install it, you can periodically run a system scan to rest assured that your PC’s essential components are in good shape. It will recommend the right driver options and all the available ones from a vast database.

➡️ Get Outbyte Driver Updater

2. Turn off the Steam Overlay

  1. Start Steam.
  2. Open Settings and click on the In-Game tab.
    steam-settings
  3. Find Enable Steam Community In-Game option and uncheck it. Doing this will disable Steam Overlay for all of your games.
    steam-in-game
  4. Click OK to save changes.

If you wish to disable Steam Overlay just for a specific game, in our case, Payday 2, follow these steps:

  1. Open your Steam Library and right-click Payday 2.
  2. From the menu, choose Properties.
  3. Go to the General tab and uncheck Enable Steam Community In-Game.

3. Run Payday 2 in Compatibility Mode

  1. Find the Payday 2 shortcut or go to the game installation directory and locate the Payday 2 .exe file. Right-click the file and choose Properties.
    properties-driver
  2. Next, go to the Compatibility tab.
  3. Check Run this program in compatibility mode for and choose one of the earlier versions of Windows.
    Payday 2 black screen
  4. Click Apply and OK to save changes.

4. Move the render_settings file

  1. Press Windows + R and type %appdata%. Click OK or press Enter.
    appdata-run
  2. Go to the AppData folder.
  3. You should see three folders available. Go to Local folder.
  4. Navigate to PAYDAY 2 folder.
  5. You should see the render_settings file. Move it to your Desktop.
  6. Optional: Verify the integrity of the game cache.
  7. Try running Payday 2.
  8. If the problem still persists, restart your computer and try running the game again.

Payday 2 crashes can be caused if a specific file gets corrupted. And it’s usually the specified file that is affected, and that causes crashing issues.

5. Disable mods

Disabling modes might help, too. Some of the mods might cause compatibility issues and thus crash the game in certain sequences. Because of that, we advise you to disable mods individually until you find out which one is the cause of the problem.

This can be done simply by navigating to the game’s installation folder and accessing the Mods folder. Once there, you can remove them all at once by simply deleting the complete folder or removing them individually and try running Payday 2 again.

6. Enable the Use HQ Weapons option

The most common reason for sudden crashes recently reported on the official Steam forum seems to be related to the Use HQ Weapons in-game option.

Luckily, a lot of users resolved the problem by simply enabling this option from the settings menu.

It seems that this is a common issue: the game crashes or freezes once this option is disabled and other players use new gadgets.

How do I fix Payday 2 not launching?

1. Verify game cache

  1. Start Steam.
  2. Go to your game library and locate Payday 2.
  3. Right-click Payday 2 and choose Properties.
    properties-steam
  4. Navigate to the Local files tab and click on Verify integrity of game cache button.
    Payday 2 not launching
  5. Wait for the process to complete, and try running the game again.

To make sure that the verification process is successful, it might be a good idea to delete a few files from Payday 2 installation directory before you verify the game cache.

2. Change the resolution

  1. Open Run and repeat the first three steps presented in the 4th solution above to get to the Local folder.
  2. Here, locate the Payday 2 folder and open it.
  3. Next, locate the render_settings file and open it with Notepad.
  4. When the render_settings file opens, locate the following line (it might look a bit different on your computer):
    • resolution=”1280 720″
  5. Change the value of quotes to a different resolution. Do not delete the quotation marks. Just change the value between them.
  6. Save changes and try running the game again.
  7. If the issue persists, try changing the resolution value again. You might have to do this a few times before you find the resolution that works for you.

3. Delete IPHLPAPI.dll

If you can’t launch Payday 2 on your computer, you might have to remove IPHLPAPI.dll file. It should be located somewhere in Payday 2 installation directory.

How do I fix Payday 2 black screen?

1. Run Payday 2 in windowed mode

  1. Go to the AppData\ Local folder and open Payday 2 directory. (If you don’t know how to access AppData folder, check the previous solutions.)
  2. Locate the render_settings file and open it with Notepad.
  3. Find the following line:
    • windowed=”false”
      and change it to:
    • windowed=”true”
  4. Save changes and try running the game again.

2. Reinstall the game

In case the game won’t start or/and it stops to a black screen, and after the validity check explained above, we advise you to perform a clean reinstall of Payday 2.

You can do so within the Steam client, but there’s a good chance that this procedure will skip on certain remaining files and registry inputs.

  1. Open the Steam Client.
  2. Navigate to Library.
  3. Right-click on Payday 2 and choose Uninstall.
  4. Navigate to the installation folder and the AppData folder and remove everything.
  5. Navigate to the Registry Editor and type Payday 2 to find the related registry keys. Delete them.

You can remove the files completely much quicker and with less fuss by using a dedicated uninstaller tool that will delete every file related to the game.

Besides, this is the surest way to know that when reinstalling, the old, unnecessary files won’t interfere with the new ones.

Afterward, restart your PC, reopen Steam, and locate Payday 2 to reinstall it.

So these are some of the most common issues and tricks to fix things when Payday 2 is crashing on startup.

There’s also a VR version of Payday 2, and many reported that Payday 2 VR is not working properly, but we covered that issue in a separate guide.

And before you leave, check some quick tips to optimize your PC for gaming and get the best experience.

Feel free to let us know in the comments below the issue you are facing and how you were able to fix it.

0x80073d05 Error on Microsoft Store: 5 Ways to Fix It

The 0x80073d05 error arises when some users try to install or uninstall Microsoft Store apps. Some users have mentioned that the issue occurs when trying to reinstall apps.

That error code’s message states: 0x80073D05, ERROR DELETING EXISTING APPLICATION DATA STORE FAILED, An error occurred while deleting the package’s previously existing application data.

How come the 0x80073d05 Microsoft Store error occurs?

The 0x80073d05 error is a bug that can arise because of Microsoft Store app issues. This error is attributed to the following causes:

  • Left behind app data: Old package data from previously installed versions of the same apps can generate reinstallation issues.
  • Corrupted Microsoft Store cache: If the cache from Microsoft Store is corrupted, error 0x80073d05 may occur.
  • Windows system file corruption: There might be a few corrupted system files causing the 0x80073d05 error.

Now that we know why this happens, let’s try to fix the problem with the solutions below.

How can I fix the 0x80073d05 Microsoft Store error?

We recommend carrying out a few preliminary checks:

  • Restart your PC and try installing/uninstalling the Microsoft Store apps again to check if it’s just a temporary glitch.
  • Check Windows 11 is fully updated. If not, download and install available updates.
  • Run an antivirus scan to check for and purge malware.

If you have cross-checked these simple methods, let’s go to the actual troubleshooting solutions.

1. Run the app troubleshooter

  1. Click the Search button, type control panel, and click on the app from the results.
  2. Then select the Large icons setting on the Control Panel’s View by menu.
    Large icons 0x80073d05
  3. Click Troubleshooting to bring up that applet.
  4. Select View all on the left of the Troubleshooting applet.
    View all option 0x80073d05
  5. Click Windows Store Apps to launch that troubleshooter.
    Windows Store Apps troubleshooter 0x80073d05
  6. Select Advanced and Apply repairs automatically.
    Apply repairs automatically option 0x80073d05
  7. Click Next to initiate the troubleshooting, and select to apply anything suggested.

2. Perform a System File Checker scan

  1. Click the Search button from the taskbar, type cmd, and click Run as administrator for that matching search result to launch Command Prompt as admin.
    Run as administrator option 0x80073d05
  2. Type in this text for the System File Checker command and press Return: sfc /scannow
    sfc scannow command 0x80073d05
  3. Leave the Command Prompt up until the scan has reached 100 percent and shown a completion message.

3. Clear Microsoft Store’s cached data

  1. Click the Search button, and type wsreset.exe to find that Run command.
    wsreset search result 0x80073d05
  2. Right-click wsreset and select Run as administrator on that search result’s context menu.

Resetting Microsoft Store via Settings will also have the same effect as running the wsreset.exe.

4. Edit the affected app’s data folder

  1. Press the Windows key + R to start the Run applet, input %localappdata%, and click the accessory’s OK option.The OK button 0x80073d05
  2. Double-click the Packages folder to open it up.
  3. Right-click the folder that includes the title of the app you can’t reinstall because of the 0x80073d05 error and select Rename.
    Rename option 0x80073d05
  4. Add an underscore (_) at the beginning of the folder’s title. For example, the edited folder for the Spotify app would then be _SpotifyAB.SpotifyMusic_zpdnekdrzrea0.
    A folder with underscore 0x80073d05
  5. Launch the Microsoft Store app.
  6. Click Microsoft Store’s Library tab to view updates and downloads.
    Library tab 0x80073d05
  7. Select the Get updates option there.
    The Get updates button 0x80073d05
  8. Press the Windows key to view your Start menu. Click the Power option there to select Restart.

5. Reinstall Microsoft Store

You can reinstall Microsoft Store by executing a relatively quick PowerShell command. Check out Windows Report’s guide for reinstalling Microsoft Store for further details.

Those potential 0x80073d05 error resolutions are certainly worth a try. The fourth method for renaming leftover app data folders is especially widely confirmed to work by users who’ve needed to fix this issue.

If the app is not working altogether, read our guide on how to fix Microsoft Store in Windows.

Feel free to discuss the 0x80073d05 error in this post’s comments section. That’s a good place to add any questions about the issue or even share other 0x80073d05 error fixes not specified in this guide.

Fix: DisplayLink Not Detecting Monitor / Not Working on PC

DisplayLink is a technology designed to connect two or more displays to your computer using a USB, but users are reporting some issues with DisplayLink and Windows 10, so let’s try to fix these issues.

Although this technology has its advantages, it is far from perfect, and from time to time issues can occur and cause you some inconvenience, but don’t worry, we have a few solutions that might help you.

Here are some of the common problems that users reported:

  • DisplayLink won’t work – Try reinstalling your DisplayLink drivers.
  • DisplayLink only shows one monitor –  Select Extend option from the display settings.
  • DisplayLink HDMI not working – Update all your drivers and check if that solves the problem.
  • DisplayLink video not working – Switch to the USB 3.0 port and check if the problem is still there.
  • DisplayLink black screen – Disable the Nvidia Share feature.

How can I fix DisplayLink not working / not displaying monitor on Windows 10?

1. Remove the DisplayLink driver and reconnect the docking station

In some cases, you might be able to fix the problem simply by uninstalling the DisplayLink driver. To do that, simply go to the Apps section in the Settings app and remove the DisplayLink driver.

After doing that, you need to disconnect your docking station, power it off, wait for a few minutes, and connect it again.

Once your docking station is connected, the required driver will be installed automatically and the issue should be resolved.

2. Reinstall DisplayLink drivers

Users have reported Blue Screen of Death errors while using two or more monitors on their PCs, and in this case, the cause of the problem is usually the DisplayLink driver, so let’s try to reinstall it:

  1. Download DisplayLink Installation Cleaner.
  2. Download the latest DisplayLink drivers.
  3. Run DisplayLink Installation Cleaner software.
  4. After the uninstall process is finished restart your computer.
  5. When your computer restarts install the downloaded DisplayLink drivers.
  6. After you have installed the drivers your computer will restart again.
  7. When Windows 10 boots again go to Settings and select System.
  8. Next, choose Display and configure your monitors.

3. Update your DisplayLink drivers

In some cases, in order to fix this problem, you just have to update your DisplayLink drivers. To do that, just download the latest driver from DisplayLink’s website and install it. Once your drivers are up to date, the issue should be permanently resolved.

Downloading drivers manually can be a bit tedious task, but you can easily update all your drivers automatically by using Outbyte Driver Updater. Simply run this tool and let it download and update all your drivers for you.

Outbyte Driver Updater is portable and very easy to use. The interface is intuitive and all you need to do is launch it and allow it to scan your PC.

After the system scan is finished, Outbyte Driver Updater will compare all the drivers with its built-in database and will make sure to fix the ones that are broken or corrupted.

Once your drivers are up to date, the issue should be completely resolved. In addition to the DisplayLink drivers, some users are also recommending to update your chipset drivers, so be sure to do that as well.

⇒ Get Outbyte Driver Updater

4. Check Extend these displays option

Users have reported that their display isn’t shown in Display Settings after they disabled it. This is normal behavior when you choose Show only on 1, or any other monitor in Display Settings.

This option is used when you want to work only on your larger display, but you won’t be able to see additional monitors in Display Settings.

To fix this issue you just need to check the Extend these displays option in Display Settings and click Apply to save changes.

5. Use USB 2.0 cable or USB 2.0 port

Users report some issues with DL-3xxx and DL-5xxx USB docking stations, as well. According to them, if you use a USB 3.0 cable you might experience some sound problems.

We have to mention that this issue only affects playback devices, such as headphones, speakers, and monitors, that are attached to your docking station.

As far as we know, this issue is caused by a problematic USB 3.0 driver in Windows 10, and the current workaround is to use a USB 2.0 cable to connect the docking station to your PC, or to use USB 2.0 port instead.

On the other hand, several users had issues with DisplayLink while using a USB 2.0 connection. After connecting their monitor to a USB 3.0 port, the problem was completely resolved and everything started working again.

6. Use Display Settings to change the resolution

In some cases, users cannot change the display mode or resolution of their external monitor using the DisplayLink icon menu.

This isn’t such a big problem, but in Windows 10 in order to change the display resolution of the external monitor, you have to use Display Settings from Windows 10.

7. Mirror the primary display

Users are also complaining that they are unable to enter Tablet Mode while the external monitors are connected, and this is a normal behavior while external monitors are extending the main display.

In order to enter Tablet Mode, your external monitors need to mirror the primary display.

8. Run the troubleshooter

  1. Open the Settings app. You can do that by using Windows Key + I shortcut.
  2. Now go to the Update & Security section.
    DisplayLink video not working
  3. Select Troubleshoot from the left pane.
  4. Now select Hardware and Devices from the list and click the Run the troubleshooter button.
    DisplayLink only shows one monitor
  5. Follow the instructions on the screen to complete the troubleshooter.

After the troubleshooter is finished, check if the problem with the DisplayLink monitor is still there. Keep in mind that this isn’t the most effective solution, but few users reported that it worked for them, so be sure to try it out.

9. Disable Nvidia Share feature

According to users, issues with DisplayLink can occur due to the Nvidia Share feature. In case you’re not familiar, this is Nvidia’s overlay that allows you to create video recordings and screenshots during gameplay sessions.

Although this feature is useful, it can sometimes cause issues with DisplayLink, and the only way to fix the problem is to disable Nvidia Share completely. To do that, follow these steps:

  1. Start the GeForce Experience app.
  2. Click the Settings icon in the top right corner.
  3. Go to the General tab and disable the Share feature.

After doing that, the problem should be completely resolved. Keep in mind that you need to keep this feature disabled at all times if you want to avoid any future issues with DisplayLink.

10. Update Universal Serial Bus drivers

  1. Press Windows Key + X to open Win + X menu.
  2. When the menu opens, choose Device Manager from the list.
    DisplayLink black screen
  3. Expand the Universal Serial Bus controllers section, right-click Universal Serial Bus controllers and choose Update driver for the menu.
    DisplayLink only shows one monitor
  4. Now select Search automatically for updated driver software.
    DisplayLink HDMI not working
  5. After the process is finished, your driver will be updated.
  6. Repeat the previous steps for all Universal Serial Bus devices on your PC.

Once all Universal Serial Bus drivers are updated, the problem should be completely resolved.

If the issue with DisplayLink is still there, you might be able to fix the problem simply by reinstalling the Universal Serial Bus controller drivers. To do that, follow these steps:

  1. Locate Universal Serial Bus controller driver, right-click it, and choose Uninstall device from the menu.
    DisplayLink HDMI not working
  2. When the confirmation dialog appears, click Uninstall.
    DisplayLink video not working
  3. After removing all drivers, click Scan for hardware changes icon.
    DisplayLink won't work
  4. The missing drivers will now be installed.

This is a simple solution, but it might work for some users, so be sure to try it out.

That would be all, I hope this article helped you to solve the problem with your DisplayLink connector in Windows 10. If you have any comments or questions, just write them down, below.

3 Ways to Disable the HP Support Assistant in Windows

HP Support Assistant is a troubleshooting utility that comes preinstalled on HP computers. But, some users have been looking for ways to disable quick access to HP Support Assistant.

It’s usually due to the abundance of effective troubleshooting tools, some of which are free. However, while some users switch to these, others may have their reasoning. If you fall into either of the two categories, here’s how you can disable HP Support Assistant.

Should I disable HP Support Assistant?

Here are a few reasons you may want to disable the HP Support Assistant:

  • Increases boot time – By default, the HP Support Assistant is configured to load at startup, thus increasing the load time of the OS at boot. You may also use the Startup Folder to remove the utility.
  • Consumes high resources – In some cases, users reported that the HP Support Assistant is consuming high resources, which may affect the PC’s performance.
  • Too many notifications – The utility may send far too many notifications to users, which is often a significant reason users uninstall the app.

How can I disable HP Support Assistant?

1. Disable HP Support Assistant from starting automatically

  1. Press Windows + S to open Search, type Task Scheduler in the text field, and click on the relevant search result.task scheduler
  2. From the navigation pane, locate Support Assistant under HP and double-click on a task from the right.support assistant
  3. Navigate to the Triggers tab, select the trigger, and click on Edit.edit to hp support assistant quick access disable
  4. Choose One-time, select a date in the future (say 20 years from now), and click OK to save the changes.one-time
  5. Similarly, reschedule the others triggers and tasks to make sure that HP Support Assistant doesn’t launch automatically.

2. Remove HP Support Assistant from the Taskbar

  1. Open HP Support Assistant, and click on the Settings option near the top-right.
  2. Now, uncheck the Display an icon in your taskbar option, and click on Save at the bottom.hp support assistant quick access disable
  3. Once done, restart the computer for the changes to come into effect.

That’s it! This method should be handy if you were wondering how to remove HP Support Assistant from the Taskbar.

3. Uninstall HP Support Assistant

  1. Press Windows + R to open Run, type appwiz.cpl in the text field, and hit Enter.appwiz.cpl
  2. Locate HP Support Assistant, select it, and then click on Uninstall.uninstall to hp support assistant quick access disable
  3. Now, follow the on-screen instructions to complete the process.

If the previous methods didn’t work out for you or the desired results were not achieved, you can always uninstall the HP Support Assistant from the PC.

Once you have disabled HP Support Assistant from quick access, also make sure to optimize the settings for the best performance on the PC.

If you have any other queries or want us to cover a specific topic, drop a comment in the section below.

How to Download Audio From Facebook Messenger on PC

As per statistics available from previous years, Facebook generates 4 Petabytes (4 million GigaBytes) of data per day. A part of it is data shared via Messenger, and a lot of users were wondering how to download audio from Facebook Messenger on a PC.

Can you download audio from Facebook Messenger?

Yes, you can! Facebook Messenger has a built-in option that allows users to seamlessly download audio files in a few clicks.

Once done, you can listen to the audio anytime and anywhere, no matter whether you are connected to the Internet. Remember, a faster Internet connection can significantly boost the download speed.

How can I download audio from Facebook Messenger on my PC?

1. Use the mobile version of the website

  1. Open a browser that works best with Facebook, head to the mobile version of Facebook, and sign in.facebook
  2. Now, select the Messenger option.messenger to download audio on PC
  3. Locate the audio file, click on the ellipsis next to it, and select Download.download

That’s it! This is the simplest method to download audio from Facebook Messenger on a PC, and it shouldn’t take more than a few seconds.

2. Use Chrome’s Developer Tools

  1. Open Chrome, and locate the audio you want to download from Facebook Messenger.
  2. Click on the ellipsis near the top-right corner, hover the cursor over More tools, and choose Developer tools.developers tools
  3. Next, click on the arrow to view more options and select the Network tab.network tab
  4. Now, play the audio file.
  5. Finally, double-click on the audio file in the Developers tools, which will have a name that starts with audioclip.download audio from Facebook messenger on PC

3. Use a third-party app

If you want a lot more than simply downloading the file, there are a bunch of third-party tools that come to aid. As such, you can use one that allows users to extract the audio from any video, including the ones from Facebook.

Luckily there are many online services and offline apps that are designed for this specific purpose, so make sure to select the one that works best for you.

There you go! These were the best methods to download audio from Facebook Messenger on a PC. Also, do not forget to check the best antivirus for Facebook to keep both your account and PC secure.

Tell us which fix worked for you in the comments section below.

Overwatch is Not Using my GPU: How to Fix It in 5 Steps

Several gamers have recently reported that they encountered Overwatch not using GPU error and requested to know how to fix it.

For some, this error occurs because Overwatch or other PC games fail to display on the monitor via the GPU; instead, the games run through the CPU.

Why is Overwatch not using GPU?

There can be several reasons you are experiencing the Overwatch not using GPU error. The following are some of the potential reasons reported by some users:

  • Your video card is not connected to the graphics card – This is one of the major reasons Overwatch uses CPU instead of GPU error. When your video output is connected to the motherboard instead of the GPU, it puts all the strain on your CPU and causes performance issues.
  • Your PC’s GPU is overheating – Try installing a resource monitor software to fix overheating issues in Windows 11.
  • Outdated Graphics card driver – You can update your graphics card to newer versions of Windows.
  • Virus infection – When a PC is infected with viruses, it can trigger several computer hardware errors. You can install antivirus programs to get rid of viruses on your computer.
  • Your System Graphics card has insufficient resources – Some readers claim their PC crashes while playing games. If you experience Overwatch using 0% GPU or your system crashes, it could be that your graphics card cannot handle the graphics processing power of your game.

Now that you know some of the possible reasons behind the Overwatch not using GPU error, you can proceed to our next section to know how to fix this problem.

What can I do if Overwatch fails to use GPU?

Before engaging in any troubleshooting or settings tweaks, you should check the following:

  • Confirm the recommended requirement for your game and compare it with what you’re running. Here are the minimum system requirements for the game:
Overwatch minimum requirements
CPUIntel Core i3 or AMD Phenom X3 8650
RAM4 GB
OSWindows Vista/7/ 8/10 64-bit (latest Service Pack)
VIDEO CARDNvidia GeForce GTX 460, ATI Radeon HD 4850, or Intel HD Graphics 4400
PIXEL SHADER4.0
VERTEX SHADER4.0
FREE DISK SPACE30 GB
DEDICATED VIDEO RAM768 MB
  • Confirm that your computer has recognized your graphics card.
  • If you’re experiencing overheating issues on your PC, follow this guide to troubleshoot it.
  • Check your task manager to close any background application that may take up resources.

Having confirmed the above checks, you can explore the advanced solutions below.

1. Update your GPU drivers

  1. Press the Windows key, type Device Manager in the search box, and click on the Open button.
  2. Navigate to Display adapters. Right-click on your graphics card and select Update driver.
  3. Select Search automatically for drivers.

Updating your drivers once a couple of months will enable you to get the best gaming performance.

We have articles on how to use the dedicated software for updating the AMD and NVIDIA drivers:

The articles will explain how to download, install and use the dedicated driver update utilities for these manufacturers.

Besides all, you can manage all your drivers by using an automated tool that will update the GPU drivers instantly and resolve Overwatch issues.

2. Set Overwatch to high performance

  1. Press the Windows key, type Graphics Settings in the search box, and click on it.
  2. Under Graphics performance preference, click on the Browse button.
  3. Locate the game folder. Select High performance and click on Save.

Repeating the steps above for your games will make your computer use the graphics card on a per-app basis in Windows.

3. Run an SFC Scan

  1. Press the Windows, type command prompt, and click Run as administrator.
  2. Type the following command line and press Enter: sfc / scannow
  3. Close the Command Prompt and restart your PC.

Running the SFC scan is one of the simplest fixes for several application errors. You can use the command-line tool to run the SFC scan to thoroughly check for errors.

4. Close startup programs in your Task Manager

  1. Press Ctrl + Shift + Esc to bring up Task Manager.
  2. Navigate to the Startup tab. Click on a program and press Disable. Repeat this for all programs on the list.
  3. Restart your computer.

If you still experience Overwatch 2 not using GPU after removing your startup programs, you can re-enable your startup programs as they’re not the cause.

5. Disable Dynamic Render Scale in Overwatch 2

  1. Launch Overwatch 2.
  2. Go to the Settings menu.
  3. Select Video, then look for Dynamic Render Scale and turn that setting to Off.
  4. Save the changes and try launching the game again.

Make sure you work through any of the above solutions to know which one works for you.

If you’re experiencing high CPU usage but low GPU usage, you can check our detailed guide to fix the issue.

Some readers also claim they experience Overwatch black screen on launch/while playing. We’ve provided potential fixes in our dedicated guide.

If you have any questions or suggestions, do not hesitate to use the comments section below.

Screenshot Not Working in Windows 10? Here are 5 Quick Fixes

Since Windows 8, users have been used to taking screenshots with the built-in feature on their PC. Unfortunately, some users are complaining that the screenshot feature is not working on Windows 10.

This can be pretty frustrating, especially if you don’t have a third-party tool for taking screenshots. Knowing the gravity of the issue, we have prepared this detailed guide to help you solve the problem quickly.

Why can’t I take a screenshot on Windows 10?

Below are some of the reasons you can’t take a screenshot on Windows 10:

  • Outdated drivers: One of the major causes of this issue is an outdated keyboard driver. You should be able to fix it quickly by updating your drivers.
  • Wrong key combinations: In some cases, the problem might appear because you used the wrong key combinations to take the screenshot. Knowing the key that works for PC is the only way out of this.
  • Faulty hardware: Sometimes, the screenshot not working on Windows 10 issue can be down to problematic hardware. To know this for sure and fix potential issues, you should run the hardware and devices troubleshooter.

How to fix print screen not working on Windows 10?

 1. Edit Registry

  1. Press the Windows key + R, type regedit, and click OK.
    regedit
  2. Navigate to the path below in the left pane: HKEY_CURRENT_USER/SOFTWARE/Microsoft/Windows/CurrentVersion/Explorer
  3. Now in the right pane, you need to find ScreenshotIndex. If you can’t find it, right-click the space there and choose New > DWORD (32-bit) Value.
    new dword
  4. Type ScreenshotIndex as the name of the new DWORD and double-click it.
  5. Now, set its Value data to 695 and click OK.
    value data screenshot not working windows 10
  6. Next, navigate to the path below in the left pane: HKEY_CURRENT_USER/SOFTWARE/Microsoft/Windows/CurrentVersion/Explorer/User Shell Folders
  7. Double-click the {B7BEDE81-DF94-4682-A7D8-57A52620B86F} entry on the right pane.
  8. Set its Value data to %USERPROFILE%PicturesScreenshots and click OK.
  9. Finally, close the Registry Editor and restart your PC.

2. Check if you’re using the correct key combination

If you’re using a Windows 10 laptop’s keyboard, the key combination for taking a screenshot is different. In most PCs, you must press the Fn key beside the usual Ctrl +PrtScr.

So, you have to note that. However, you will not need to use the Fn key on some PCs.

3. Update keyboard drivers

  1. Press the Windows key + X and select Device Manager.
    device manager
  2. Double-click the Keyboards option to expand it and right-click the device there.
  3. Now, choose the Update driver option.
    update driver
  4. Finally, choose the Search automatically for drivers option.
    search screenshot not working windows 10

We often point to outdated drivers if something’s wrong with your keyboard. Nevertheless, keeping all your drivers up to date is always a good idea.

So, if the screenshot feature is still not working on Windows 10 after tweaking the registry, go and update your keyboard drivers.

If you don’t want the hassle of searching for drivers on your own, you can use a tool in Outbyte Driver Updater that will do this for you automatically. This tool is very easy to use, lightweight, and reported to update and repair any driver without any issues successfully

4. Run the Hardware and Device troubleshooter

  1. Press the Windows key, type cmd, and select Run as administrator under Command Prompt.
    cmd admin
  2. Type the command below and hit Enter: msdt.exe -id DeviceDiagnosticmsdt
  3. Finally, wait for the command to finish running.

If none of the previous solutions resolved the issue, we would use Windows 10’s built-in troubleshooting tool. This tool can be used to address various kinds of issues, including hardware problems.

5. Use a dedicated tool

icecream screenshot not working windows 10

While there are a series of third-party screenshot tools you can use, we recommend using Icecream Screen Recorder. This is because it is a straightforward, simple, yet highly professional tool with enough features to accomplish what you want but not confuse you.

If you plan to capture an image to highlight particular areas or a specific section, this tool will be quite an innovative program. Also, it is the ideal solution if you use multiple browsers during your daily Internet sessions.

Feel free to check out more features on their official website. A fully-functional trial version is available, so you can try it out now.

⇒ Get Icecream Screen Recorder

The screenshot not working on Windows 10 issue can be pretty annoying. Fortunately, it is one that can be fixed, as we have shown in this guide.

If you are looking for ways to fix tinted screenshots on Windows 10, check our detailed guide for the steps you need to follow.

Feel free to let us know the solution that helped you fix this issue in the comments below.

Secure Boot Enabled but Not Active: 3 Windows 11 Fixes

If you see the Secure Boot option enabled in BIOS, but on the system information page, it shows Not Active, then you are not alone. Many users reported that it stopped them from updating on Windows 11, but don’t worry; it can be fixed with the tested solutions below. 

What can I do if Secure Boot is enabled but inactive on Windows 11?

Before engaging in advanced troubleshooting steps, you need to update BIOS if outdated. Once done, follow these steps in sequence as mentioned below:

1. Disable the Compatibility Support Module (CSM)

  1. Press Windows + I to open Settings.
  2. Go to System, then click Recovery.System - Recovery Window -secure boot enabled but not active windows 11s 11
  3. Now click Restart now beside Advanced startup.Advanced Startup
  4. From Choose an option, select Troubleshoot.Choose an option - Troubleshoot-secure boot enabled but not active windows 11
  5. Now click Advanced Options.Advanced options
  6. Select UEFI firmware settings, then click Restart. UEFI
  7. Now select the appropriate option to go into BIOS mode. 
  8. Go to the Boot or Security tab, navigate to CSM and select Disabled for it.secure boot enabled but not active windows 11UEFI with Compatibility Support Module
  9. Once done, click Save Changes & Reset.

2. Change the platform

  1. Go to BIOS mode by following the steps from method 1.
  2. Locate the System Mode, and select User instead of Setup.
  3. Go to Secure Boot Mode. If it stays Standard, switch it to Custom. SECURE BOOT MODE -secure boot enabled but not active windows 11
  4. Now change it back to Standard and accept Factory Defaults.

3. Enable Secure Boot 

  1. Go to BIOS mode by following the steps from method 1.
  2. From the Security or Boot menu, locate Secure Boot.Secure boot -secure boot enabled but not active windows 11
  3. Select Enabled. Now select Save changes and exit to confirm the changes.

Why is Secure Boot enabled but not active?

There could be various reasons why the error occurs on your computer, some of them are mentioned here: 

  • Secure Boot feature disabled –  If the Secure Boot option in UEFI firmware settings is set to Disabled, the feature will not work, even if it is technically enabled.
  • CSM enabled – If CSM is enabled in UEFI settings, you might face the error. You need to disable this setting to fix it.
  • BIOS is outdated – If BIOS is not up to date, it may not support the Secure boot feature. You need to update BIOS to get the feature enabled.

So, these are methods that you need to follow to fix secure boot enabled but not active on Windows 11. It is crucial that Secure Boot is enabled at all times otherwise, you’d be exposing your device to errors like the tpm-wmi 1796 or the SECURE_BOOT_VIOLATION error.

Some modern games now require Secure Boot to be active as part of their anti-cheat systems, for instance, Battlefield 2042 enforces Secure Boot to launch the game properly.

We also have a complete guide on how to deal with Secure boot enabled but not active on Windows 10 and what to do if Secure Boot is grayed out on Windows 11.

Try them and let us know what worked for you in the comments below.

Windows Update Error 0x80242017: 5 Ways to Fix it

Coming across an error while updating Windows is more common than you think. One of the popular ones is 0x80242017. It is imperative to fix such errors as they may affect your computer’s functioning. 

Here, in this guide, we will discuss some potential fixes to resolve the issue right after examining the reasons for its occurrence of it.

What causes Windows Update Error 0x80242017?

There are a few reasons for the issue to occur, below are listed some of the popular ones: 

  • Faulty entries in Registry Editor – If there are registry entries of uninstalled apps or corrupt registry entries in Registry Editor, it may cause the issue.
  • Missing system files – You might get an update error if the system files on your computer have become corrupt or been deleted accidentally.
  • Outdated drivers – If your computer has obsolete drivers, it might cause a lot of issues. And, one of them could be this error.
  • Infected with viruses – If your computer is infected with any malware or virus, then you might find it difficult to update your Windows. Run a malware scan to fix the issue before trying again.

What can I do to fix Windows Update Error 0x80242017?

Before engaging in advanced troubleshooting steps, you should consider performing the following checks:

If these primary checks didn’t work out for you, follow these methods:

1. Reset Windows Update components

  1. Go to the Search bar, type CMD and click Run as administrator.CMD elevated-0x80242017
  2. Copy and paste the following commands and press Enter after each command: net stop wuauserv net stop cryptSvc net stop bits net stop msiserver ren C:\Windows\SoftwareDistribution SoftwareDistribution.old ren C:\Windows\System32\catroot2 catroot2.old net start wuauserv net start cryptSvc net start bits net start msiserver

2. Run Windows Update troubleshooter

  1. Press Windows + I to open Settings.
  2. Go to Update & Security. Update & Security -0x80242017
  3. Now, select Troubleshooting from the left pane, and click Additional troubleshooters.Troubleshoot - Additional Troubleshooter
  4. From Get up and running, go to Windows Update and select Run the troubleshooter.Run the troubleshooter
  5. Follow the on-screen instructions to complete the process.

3. Delete the Software Distribution folder

  1. Press Windows + E to open Windows Explorer.
  2. Follow this path: C:\Windows\SoftwareDistribution\DownloadDelete Software Distribution - secure boot enabled but not active windows 11
  3. Press Ctrl + A to select all the files in the folder and click the Delete button from the menu.

4. Allow complete control of the System Volume Information directory

  1. Go to the Search bar, type CMD and click Run as administrator.CMD elevated-0x80242017
  2. Type the following commands and press Enter after every command: net stop sdrsvc takeown /F "C:System Volume Information" /A net start sdrsvc

5. Run SFC and DISM commands

  1. Launch Command Prompt using the steps mentioned in methods 1 or 4.SFC/scannow
  2. Copy and paste the following commands and press Enter after every command: sfc/scannow DISM /Online /Cleanup-Image /RestoreHealth

6. Update outdated drivers 

  1. Press Windows + R to open the Run window.Device manager RUN COMMAND WINDOWS 10 0x8024200b
  2. Type devmgmt.msc and press Enter. 
  3. Inspect all the drivers by selecting a driver one by one, right-clicking on them, and choosing Update driver. Update driver 0x80242017
  4. Follow the on-screen instructions to complete.
  5. Restart your computer.

Alternatively, to avoid the hassle of inspecting all drivers installed on your PC, use an automated tool like Outbyte Driver Updater. It will run a quick scan, then update and repair all drivers with just a few clicks.

Outbyte Driver Updater

Keep your drivers in check for peak PC performance and an error-free experience.
Free Trial Download now

So, these are methods you need to take to fix Windows update error 0x80242017. Try them and let us know in the comments section below.

Windows Update Error 0x80242016: 5 Ways to Fix it

If you fail to install 0x80242016, then you are not alone. Users often get such update errors while installing Windows updates on their computers. Luckily the issue can be fixed using simple methods. 

This guide will walk you through the steps to fix the issue right after discussing the causes. Let’s get started! 

What causes the failed to install 0x80242016 error?

There are a few reasons for the installation error to happen. Some of the popular ones are mentioned here: 

  • Wrong Registry values – If the values on your Registry Editor are corrupt, your computer might not work correctly. Hence you get an installation error when updating.
  • Damaged system files – You can get this error if your system files are damaged or corrupt. To fix it, you need to run an SFC scan.
  • Corrupt update component files – If the Windows update component is missing files or becomes corrupt, then it might trigger the error.
  • Corrupted temp files – Whenever you install updates, some temporary files are created on your PC. If these files get damaged, then you might see the error.
  • Computer infected with virus or malware – If your computer is infected with malware or virus, it might interfere with the update process, hence the issue. 
  • Not enough disk space – Before installing the update, you must check for sufficient hard disk space, as insufficient space could result in an error.

What can I do to fix Windows Update error 0x80242016?

Before engaging in advanced troubleshooting steps, you should consider performing the following checks:

  • Remove all the peripherals except the essential ones.
  • Disable Firewall.
  • Ensure you have a stable internet connection.
  • Check the date and time mentioned on the computer because an incorrect date and time can cause this issue.

1. Rename the Software Distribution folder & reset Windows Update components

  1. Go to the Search bar, type CMD and click Run as administrator.CMD elevated-the installation failed in the first boot phase with an error during sysprep operation WINDOWS 10-
  2. Copy and paste the following command to stop the Windows Update service and press Enter. You might have to do it a couple of times to ensure it is not running: taskkill /f /fi "SERVICES eq wuauserv"
  3. Type the following commands one after the other and press Enter after each command: net stop cryptSvc net stop bits net stop appidsvc net stop msiserver net stop wuauserv ren C:\Windows\SoftwareDistribution SoftwareDistribution.old rmdir C:\Windows\SoftwareDistribution\DataStore rmdir C:\Windows\SoftwareDistribution\Download Ren C:\Windows\System32\catroot2 Catroot2.old net start wuauserv net start cryptSvc net start appidsvc net start bits net start msiserver 
  4. Close the Command Prompt window and restart your PC when the process is complete.

2. Run Windows Update troubleshooter

  1. Press Windows + I to open Settings.
  2. Go to Update & Security. Update & Security -0x80242016
  3. Now go to Troubleshoot from the left pane, and click the Additional troubleshooters link.Troubleshoot - Additional Troubleshooter
  4. On the next page, select Windows Update and click Run the troubleshooter button.Run the troubleshooter
  5. Follow the on-screen instructions to complete the process.

3. Run the SFC and DISM commands

  1. Open Command Prompt using the steps mentioned in Method 1.CMD elevated-0x80242016
  2. Type the following commands and press Enter after every command: sfc/scannow dism /online /cleanup-image /scanhealth dism /online /cleanup-image /checkhealth dism /online /cleanup-image /restorehealth
  3. Once complete, reboot your computer.

4. Disable the Windows Search service

  1. Press Windows + R to open the Run window.Services.msc
  2. Type services.msc and press Enter to open Services.
  3. Locate and double-click the Windows Search service. Windows Search service - 0x80242016
  4. Select Startup type as Automatic. Automatic Startup type
  5. Click Apply and OK to confirm the changes.

5. Run Windows in a Clean boot environment

  1. Press Windows + R to open the Run window.CLEAN BOOT 1
  2. Type msconfig and press Enter.
  3. On the System Configuration window, go to the Services tab, place a checkmark next to Hide all Microsoft services, then click Disable all.Clean BOOT 2 -0x80242016
  4. Go to the Startup tab, and click Open in Task Manager.CLEAN BOOT 3 -
  5. Right-click on all Enabled items one by one and select Disable.Clean BOOT 4
  6. Click Apply and OK to confirm. CLEAN BOOT 5
  7. Select Restart. Once restarted, try to install updates again.

So, these are methods that you can use to fix installation error code 0x80242016. If nothing has helped you, you must consider resetting Windows to resolve the issue. 

If you have any questions or concerns about the process, feel free to let us know in the comments section below. 

Windows 10 Update Download Error 0x8024200B: 5 Ways to Fix It

Many users have reported getting the error code 0x8024200b when upgrading to Windows 10/11 from their previous versions. Don’t worry; we can fix this error in no time.

This guide contains all the methods to fix this error and install the Windows updates successfully. Let’s begin! 

What causes Windows 10 Update download error 0x8024200b?

There could be several reasons for the error code to appear when trying to upgrade; some of the popular ones are: 

  • Corrupted Windows Update – If the downloaded update files got damaged, then while installing these updates, you might get this error. You need to reset Windows update components to fix the issue.
  • Outdated printer driver – If your printer driver is obsolete, it might cause an issue. It is suggested to uninstall the driver to get rid of the problem.
  • Damaged temp files –  Your system stores temp files while updating your Windows. If these files get corrupted, then you might get this error code.
  • Windows hotfix missing – Microsoft came up with a hotfix for users switching to Windows 10 from an older version of the OS to fix issues due to incompatible drivers. If the update with the hotfix is missing, then you might get this error.
  • Missing system files – If your computer is missing important system files used for updating or upgrading Windows, then you can face the issue.

What can I do to fix Windows 10 Update download error 0x8024200b?

Before we go to the advanced fixes, here are a few preliminary checks you should do:

1. Reset Windows Update components

  1. Go to the Search bar, type CMD and click Run as administrator.CMD elevated-0x8024200b
  2. To stop BITS, Cryptographic, Windows Update and MSI Installer services, type all these commands one by one and press Enter after each command: net stop wuauserv net stop cryptSvc net stop bits net stop msiserver
  3. Now to rename SoftwareDistribution and Catroot2 folder, copy and paste these commands and press Enter after each command: ren C:\Windows\SoftwareDistribution SoftwareDistribution.old ren C:\Windows\System32\catroot2 Catroot2.old
  4. To restart the BITS, Cryptographic, Windows Update, and MSI Installer services, type all these commands one by one and press Enter after each command: net start wuauserv net start cryptSvc net start bits net start msiserver

2. Run the Windows Update troubleshooter

  1. Press Windows + I to get Settings.
  2. Go to Update & Security.Update & Security -0x8024200b
  3. Now, select Troubleshooting, and click Additional troubleshooters.Troubleshoot - Additional Troubleshooter
  4. Under Get up and running, click Windows Update and select Run the troubleshooter.Run the troubleshooter
  5. Follow the on-screen instructions to complete the process.

3. Use the SFC and DISM commands

  1. Open Command Prompt with admin rights using the steps mentioned in Method 1.
  2. Copy and paste the following commands and press Enter after every command: sfc/scannow DISM /Online /Cleanup-Image /RestoreHealthSFC/scannow
  3. Once the process is complete, restart your computer.

4. Uninstall printer drivers

  1. Press Windows + R to open the Run window.Device manager RUN COMMAND WINDOWS 10 0x8024200b
  2. Type devmgmt.msc and press Enter to open Device Manager.
  3. Go to the Print queues and expand it. Then, inspect all the listed drivers and locate the one with the yellow triangle beside it.Printer driver Uninstalled
  4. Right-click on that driver, and select Uninstall device.
  5. Restart your computer to let the changes take effect.

5. Clear the BITS queue 

  1. Launch Command Prompt with administrator privileges using the steps in Method 1.
  2. Copy and paste the following command to clear the BITS queue and press Enter: bitsadmin.exe /reset /alluserscmd_bits - 0x8024200b

So, these are methods that you need to follow to get rid of the error code 0x8024200b. Try them and let us know which worked for you in the comments below.

Event ID 86 CertificateServicesClient-CertEnroll [Error Solved]

Windows use requests and responses to enroll for a certificate from a certification authority (CA). The process can get interrupted by a series of problems. Hence, it can result in the Event ID 86: CertificateServicesClient-CertEnroll in Windows.

Likewise, users complain about running into the Event ID 41 error on Windows 11.

What is Event ID 86?

The Event ID 86 is a process in the Windows event log that provides an in-depth record of events concerning the system. It indicates the Active Directory Certificate Services can’t use the provider stated in the registry for encryption keys.

Furthermore, Event ID 86 is logged into the Event Log by the Certificate Services Client and contains the details about the certificate request.

However, the Event ID 86: CertificateServicesClient-CertEnroll in Windows 10 can occur for many reasons. Some are:

  • Issues with the certificate request or the Certificate Authority – If the Active Directory Certificate Services on your PC are faulty or not intact, it can cause its processes to run into issues.
  • Windows Updates or Drivers issues – Windows PCs can malfunction with their processes if a corrupt update is installed or a pending update is not installed. Likewise, outdated drivers on the PC may result in errors.
  • BIOS-related concerns – You can encounter the Event ID 86 on Windows 10 if you don’t have the latest BIOS installed on your PC. Likewise, other issues with the BIOS can affect the certificate processes on your PC.

Other factors can be responsible for the Event ID 86 on your PC. Nonetheless, you can fix it by troubleshooting your computer.

How can I fix Event ID 86 in Windows 10?

Before trying any advanced troubleshooting steps, apply the following:

If you can’t fix the error, proceed with the troubleshooting steps below.

1. Uninstall recent Windows updates

  1. Press Windows + I to open Settings and click Update & Security.
  2. Go to Windows Update and select View update history.
  3. Click the Uninstall updates button and select the most recent update.
  4. Click on Uninstall.

Uninstalling the recent Windows update should help fix any issue with the last build causing the error to occur.

2. Run System Restore

  1. Left-click the Start button, type Restore, and click on Create a Restore Point.
  2. Go to the System Protection tab and select System Restore.
  3. Choose a different system restore and click Next to select a specific Restore point.
  4. Select the last time your PC worked perfectly, and click Next.
  5. Click the Finish button.

System Restore backdates your PC to the last time it functioned properly, removing the corrupt files like updates.exe. Check how to fix Restore Point if it’s not working and if you have any issues running it.

3. Update your device drivers

  1. Press Windows + R keys to prompt the Run window, type devmgmt.msc, and click OK.
  2. Click on the Display adapters you want to update, select the driver, and click the Update driver option.
  3. Select the Search automatically for drivers option.
  4. Repeat the procedure for every driver.

Updating the device driver will fix bugs affecting them and install the latest features to improve system performance. Check other steps for updating drivers on Windows 10 if you have any issues.

And if you are looking for a shortcut and want to update all your drivers in once, Outbyte Driver Updater has your back. With this tool, you’ll be able to search, download and install the latest drivers for your pc specifics and bring them up to date.

⇒ Get Outbyte Driver Updater

4. Update your BIOS

Note icon NOTE
The steps may differ depending on your PC’s manufacturer.
  1. Go to the HP driver and software download website, select your product from the list, then input your serial number or exact computer model.
  2. Select your OS, and OS version, and click Submit.
  3. Click the plus (+) button against All drivers, then click the (+) button against BIOS to expand it and see available updates, then click on Download.
  4. Double-click the downloaded file to install the .exe file, then follow the on-screen instructions to complete the installation.
  5. Restart your PC.
  6. Select the Apply Update Now option during the startup to implement the installed BIOS update.

Updating the BIOS will improve compatibility and enhance system stability.

The updating process varies on different PCs, so we have a guide on how to check and update BIOS on various laptops.

In conclusion, our readers can check how to fix the Event Viewer reboot event ID error. Also, you can read our detailed guide on fixing Application popup event ID 1060 on Windows 10.

If you have further questions or suggestions, kindly drop them below.

How to Fix Windows Media Player Cannot Play the File Error

A lot of people still love to use Windows Media Player as their go-to player, but many users reported Windows Media Player cannot play the file error while trying to play certain files.

The full error message sometimes reads: Windows Media Player cannot play the file. The player might not support the file type or might not support the codec that was used to compress the file.

While the error can be due to a variety of factors, the solutions are not far off, as we will show in the next sections of this article.

Why Windows Media Player Cannot play the file?

The major reason for Windows Media Player cannot play the file error is the lack of the required codec to play the intended file. For instance, OPUS files may not open because they’re not supported.

In some cases, this issue might be because you selected the wrong device to play it. Lastly, if Windows Media Player does not support the file type you want to play, you are likely to get this error.

How can I fix Windows Media Player encountered a problem while playing the file error?

1. Wrong audio device fix

  1. Launch the Windows Media Player, right-click any space there, and choose Tools > Options.
    tools windows media player cannot play this file
  2. Click the Devices tab at the top and select Speakers.
  3. Now, select Properties.
    regedit
  4. Next, click the dropdown under Select the audio device and choose your preferred audio device.
  5. Finally, click the Apply and OK buttons to save your changes.
    select audio

Windows Media Player cannot play the file error can occur if you select the wrong device to play your file. The solution to this is to change the device from the app setting.

If interested, check out this guide to learn how to convert M4A to MP3 on your Windows computer.

2. Download codecs

  1. Right-click any space on the Windows Media Player and choose Tools > Options.
    tools windows media player cannot play this file
  2. Click the Player tab at the top.
  3. Now check the boxes for Connect to the Internet and Download Codecs Automatically.
  4. Finally, click the OK button to confirm your settings.
    player windows media player cannot play this file

Also, you can configure protocol settings.

  1. Repeat Step 1 in the solution above and select the Network tab.
    network
  2. In the Streaming protocols section, select all the protocol check boxes at hand.
  3. When you’re connecting to a server running Windows Media Services, your Windows Media Player attempts to use all the selected protocols.

The Windows Media Player can help you download the codecs automatically. However, this option might not be available on the latest versions of the app.

So, if you can’t find the Download Codecs Automatically option, you will need to download the K-Lite codec pack.

3. Registry fix

  1. Press the Windows key + R, type regedit, and hit Enter to open the Registry Editor.
    regedit
  2. Locate the following registry key: HKEY_CLASSES_ROOT\CLSID\{DA4E3DA0-D07D-11d0-BD50-00A0C911CE86}\Instance\{083863F1-70DE-11d0-BD40-00A0C911CE86}path windows media player cannot play this file
  3. Ensure the following in the right pane:
    • CLSID has a value of {083863F1-70DE-11d0-BD40-00A0C911CE86}
    • Merit is set to 00600000
    • FriendlyName is set to DirectShow Filters
      values
  4. If any of the above values are wrong, just right-click the key, select Modify, and enter the appropriate value.
    modify
  5. Finally, close the Registry Editor and restart your PC.

In some cases, this problem can occur due to wrong values in the registry. The solution to this is to correct these values and restart your PC.

4. Try using a different player

This error can also occur if the file you are trying to play is encoded. In this case, the Windows Media Player simply cannot play the file, and you need to use another media player for Windows 10.

It should be known that the affected media files include files that have the following extensions: .3gp, .3g2, .mp4, .mov, and .adts. Use the appropriate codec when playing these files.

Thankfully, there are various options available. So, you should not be short of quality ones to use.

With this, we can conclude this detailed guide. We believe you have the right information needed to fix it now, and you only need to follow it carefully.

If the Windows Media Player stopped working on your PC for some reason, check our detailed guide to fix that too.

Feel free to let us know the solution that helped you solve this issue in the comments below.

RogueKiller vs Malwarebytes: The best malware removal tools

Keeping your PC free from malware should be your number one priority, and applications such as RogueKiller and Malwarebytes are great options for malware removal.

Both of these applications can scan your PC and remove any malware that they find. However, the question remains, which one should you use? Here we’re going to answer this question.

What is RogueKiller?

RogueKiller is an anti-malware software that can find and remove all types of malware, from adware and viruses to rootkits.

The software also offers malware and ransomware protection, and it’s available as a portable application so that you can run it from a USB flash drive.

This is perfect if you need to scan an infected PC that doesn’t have Internet access. Regarding availability, RogueKiller is available only for Windows.

What is Malwarebytes?

Malwarebytes is a well-known malware removal software, and the first version of the software was released in 2006.

The software has evolved from a simple malware removal application to almost full-flagged antivirus software with real-time protection.

Currently, Malwarebytes is the most popular choice regarding malware removal software, and rightfully so.

Regarding availability, Malwarebytes is available on Windows, Mac, Android, iOS, and Chrome OS, so you should be able to run it on almost any platform.

RogueKiller vs. Malwarebytes, which is the better option?

Interface

RogueKiller: Simple and easy to use

The first time you start RogueKiller, you’ll be asked to configure your software, and you can choose between three different themes and choose which scanning and protection options you want to enable.

Remember that some of these options aren’t available in the free software version. Once you configure the software, you’ll be presented with a Dashboard.

From here, you can enable certain features and see information such as the current version of the software and the version of virus definitions you have.

There’s also an overview of the detected and quarantined files and a scanning option to perform a scan with just a few clicks.

The interface is easy to use, and you won’t have any issues using it. We did get a few notifications asking us to upgrade to the Premium version, but we didn’t mind them much.

Speaking of notifications, you’ll also get a banner while scanning asking you to download additional software from the same developer. Some users might not like this, but we didn’t find the banner too invasive.

Overall, RogueKiller has a solid user interface, and even first-time users won’t have any issues with it.

Malwarebytes: Incredibly simple to use

Malwarebytes comes with a straightforward interface, and the main window is divided into three sections so you can quickly perform a scan, modify protection settings or see scan reports.

You can see the notifications in the right pane so that you won’t miss a detected threat. In addition, the interface supports customization, and you can choose between two available themes or use a theme that matches your system theme.

There are also two backgrounds available, so you can spice up the look and feel of the software a bit if you want to.

While the interface is pretty simple to use, a few users might not like that a scanner has a banner reminding you to upgrade to the Premium version.

Speaking of other interface components, we also didn’t find the Security news section and the Global malware stats too helpful.

All these features don’t take away from the usability of Malwarebytes, but we doubt anyone would find them too helpful.

⇒ Get Malwarebytes Premium

Feature comparison

RogueKiller: A solid malware removal tool

RogueKiller is a malware removal software that will find and remove all types of malware from your PC.

The software uses artificial intelligence and cloud signatures to detect new malware types quickly. There are three scan types available, and you can create custom scans.

With this option, you can choose which file types you want to scan, and you can even pick individual drives and folders that you want to scan.

There’s a scan scheduling feature available, and although it gets the job done, it does seem a bit limited and clunky to set up.

It’s important to mention that RogueKiller also has built-in real-time malware protection, ransomware protection in the form of a Protected storage feature, and Data Leak protection.

Remember that real-time protection and malware protection are available only in the Premium version of the software.

The software comes in three plans, so we’ll give you a quick overview of each plan below.

RogueKiller Free:

  • Malware scanning and removal
  • Rootkit detection
  • Available only for personal use

RogueKiller Premium:

  • All features from the Free version
  • Malware and ransomware protection
  • Permission to be used in business environments
  • Email support

RogueKiller Technician:

  • All features from the premium version
  • Portable license
  • Can be used on an unlimited number of devices
  • Command-line support

Despite the limitations of the Free version, RogueKiller is still a reliable malware removal software that will surely come in handy when removing malware from your PC.

With real-time scanning, RogueKiller works almost like antivirus software, so consider it.

Malwarebytes: One of the best malware removal tools on the market

Malwarebytes is designed to remove malware from your PC quickly, and the scanning process is fast and straightforward.

Scan customization allows you to choose which drives or folders to scan. Moreover, you can scan memory objects, registry and startup items, and archives.

It’s important to mention that you can set the default action for all detected threats. You can quarantine them automatically or choose to select the desired action for each threat manually.

The report feature also allows you to read detailed reports about each scan you took. A whitelist feature is also available, so you can skip specific files or directories while scanning.

Malwarebytes also has a scan scheduling feature, but unfortunately, this feature is available only in the Premium version.

Speaking of the Premium version, Real-Time Protection is also available exclusively in the Premium version.

This means that features such as Web Protection, Malware Protection, Ransomware Protection, and Exploit Protection are exclusive to the Premium version.

Despite this limitation, Malwarebytes is still an excellent malware removal tool and is highly efficient even in the Free version.

Here’s a quick feature comparison between the Free and Premium versions of Malwarebytes.

Malwarebytes Free:

  • Ability to clean all types of malware from infected PC
  • Available on multiple platforms

Malwarebytes Premium:

  • All features from the Free version
  • Real-time malware protection
  • Protection against malicious websites
  • Ransomware protection
  • Exploit protection
  • Ability to schedule scans

If you want to learn more about the differences between these versions, we suggest you check our Malwarebytes Free vs. Premium article for an in-depth comparison.

Final thoughts

RogueKiller: Simple but solid malware removal software

RogueKiller is incredibly simple to use and should provide you with decent protection against all types of malware. Even in the Free version, the application is more than capable of dealing with all threats.

The visual interface could use a bit of improvement, especially the scheduling feature, but despite these minor complaints, the application is more capable of dealing with malware.

Specific features such as real-time and ransomware protection remain exclusively available in the Premium version, but even without them, RogueKiller is one pretty good malware removal tool.

Pros
Simple to use
Can remove all types of malware
Ransomware protection
Portable
Command-line support
Cons
Interface could be better

Malwarebytes: One of the best malware removal applications

Malwarebytes has a long history and has built its reputation as one of the most reliable malware removal tools.

The application is simple to use; the interface is friendly, so even first-time users should be able to find and remove malware from their PC with Malwarebytes.

The Free version has some limitations, but if you don’t need scan scheduling and real-time protection, then Malwarebytes is the perfect choice for malware removal on your PC.

Pros
Friendly user interface
Quick scan
Real-time malware protection
Phishing protection
Exploit protection
Cons
Some features are available only in the Premium version

To finish our RogueKiller vs. Malwarebytes comparison, we will answer a few of your frequent questions:

First, is RogueKiller safe to use?

Yes, RogueKiller is perfectly safe and legitimate software. However, the software will occasionally suggest you upgrade to the Premium version or try a similar software from the same developer.

While this isn’t an illegitimate practice, it is frowned upon by many users. However, despite these occasional promotions that may appear, RogueKiller is legitimate and safe to use.

Can I download RogueKiller portable version?

Yes, the portable version of RogueKiller is available from the developer’s website, meaning that you can download the tool and run it on your PC without installation.

You can also run the software from a flash drive, which can be extremely useful if you want to remove malware from a different PC.

When should I use the RougeKiller command-line tool?

The RougeKiller command-line tool is available only in the Technician version, and by using it, you can perform a malware scan from the command line.

This is extremely useful if you can’t boot to Windows due to malware infection and your only option is the command line.

You can also use the command line scan if you don’t want to use the graphical user interface or if you want to start a malware scan instantly.

Do RogueKiller and Malwarebytes have real-time scanning?

Yes, both RogueKiller and Malwarebytes support real-time scanning, but unfortunately, the real-time scanning feature is available only in the Premium version of the software.

However, both applications offer a free trial to test the Premium features, including real-time scanning.

While we’re on the subject, you might also be interested in checking our list of the best website malware removal tools.

Which one did you choose? Let us know your reasons in the comments section below.

Installation Failed in The FIRST BOOT Phase With An Error

Many people have reported that they were stuck with installation failed in the first boot phase with an error during Sysprep operation while updating their Windows computer. The issue could have been caused due several reasons. 

Here, in this guide, we will discuss the available fixes to resolve the Windows 10 first boot error right after examining the reasons for the same.

What causes the installation failed in the first boot phase error?

There could be several reasons for the error to occur; we have mentioned some of the popular ones here: 

  • Hardware issues – You might get this error if your RAM or hard drive is damaged or faulty. 
  • Wrong system configuration – If your computer has incorrect BIOS settings or bad drivers installed, you can get this error while updating your PC.
  • The installation process was interrupted – If there is a power failure or system crash during installation of the update, you might see this error.
  • Installation media is corrupt – The error could have appeared because of the corrupted installation drive or disc used to upgrade your Windows computer.
  • Computer infected with malware or virus – The malware or virus infection on your computer might corrupt the system files or configuration, hence the error.

How to fix the installation failed in the first boot phase error?

Before moving ahead with the troubleshooting steps, make sure you go through these preliminary checks: 

If none of these worked for you, let us check out the detailed troubleshooting methods to fix the issue:

1. Rename the Software distribution folder

  1. Go to the Search bar, type CMD and click Run as administrator.CMD elevated-the installation failed in the first boot phase with an error during sysprep operation WINDOWS 10-
  2. Copy and paste the following commands one by one and press Enter after every command: net stop wuauserv net stop cryptSvc net stop bits net stop msiserver rename c:\windows\SoftwareDistribution SoftwareDistribution.bak net start wuauserv net start cryptSvc net start bits net start msiserver
  3. Close the Command Prompt window.

2. Run the Windows Update troubleshooter

  1. Press Windows + I to get Settings.
  2. Go to Update & Security.Update & Securitythe installation failed in the first boot phase with an error during sysprep operation
  3. Now, select Troubleshooting from the left pane, and click Additional troubleshooters.Troubleshoot - Additional Troubleshooter
  4. Under Get up and running, select Windows Update and click Run the troubleshooter.Run the troubleshooter
  5. Follow the on-screen instructions to complete the process.

3. Make changes in Registry Editor

  1. Press Windows + R to open the Run window.Regedit - the installation failed in the first boot phase with an error during sysprep operation
  2. Type regedit and press Enter to open the Registry Editor.
  3. Go to the following path: Computer\HKEY_LOCAL_MACHINE\SOFTWARE\Microsoft\WindowsUpdate\OSUpgrade
  4. Right-click the OSUpgrade folder, select New, and then click DWORD (32-bit) Value.AllowOS upgrade
  5. Rename it AllowOSUpgrade. Double-click it and set the Value data to 1 and click OK.dword edit
  6. Close Registry Editor and restart your computer. 

4. Disable Secure Boot

  1. Press Windows + I to open Settings. Go to Update & Security.Update & Securitythe installation failed in the first boot phase with an error during sysprep operation
  2. Click on Recovery and go to Advanced startup and click Restart now.Advanced Startup
  3. From the Choose an option page, click Troubleshoot.Choose-an-option-Troubleshoot.=- Virtualbox won't show 64-bit
  4. Now click Advanced Settings.Advanced options -the installation failed in the first boot phase with an error during sysprep operation
  5. On the Advanced Settings page, click UEFI Firmware Settings.UEFI
  6. Click Restart from the next page.
  7. Now select the appropriate option to enter BIOS.
  8. Go to System configuration, then select Secure Boot and disable it.

5. Scan and fix corrupted files

  1. Go to the Search bar, type CMD and click Run as administrator.CMD elevated-the installation failed in the first boot phase with an error during sysprep operation WINDOWS 10-
  2. Type the following command and press Enter: chkdsk volume:/rCMD CHKDSK
  3. Once the process is complete, copy and paste the following command and press Enter: sfc/scannowSFC/scannow
  4. As the process completes, type the following commands and press Enter after every command: DISM /Online /Cleanup-Image /CheckHealth DISM/Online /Cleanup-Image /ScanHealth DISM/Online /Cleanup-Image /RestoreHealth

6. Perform old devices and drivers cleanup

  1. Go to the Search bar, type CMD and click Run as administrator.
  2. Type the following commands and press Enter after every command: rundll32.exe pnpclean.dll,RunDLL_PnpClean /DRIVERS /MAXCLEAN exit CMD - the installation failed in the first boot phase with an error during sysprep operation
  3. Restart your computer and try to update again.

So, you can use these methods to fix the installation that failed in the first boot phase with an error during the Sysprep operation. Try them and let us know what worked for you in the comments below.

Windows Remediation Service Failed to Start? 5 Fixes

Windows Remediation service (WRS) is an essential component of Windows OS and is designed for running Windows features and services. The Remediation services include executable files, Sedlauncher.exe, Rempl.exe, Waasmedic.exe, Remsh.exe, Disktoast.exe, Osrrb.exe, and Sedsvc.exe. 

If you see Windows Remediation Service failed to start to verify the error on your PC, it could mean a few things.

Here, in this guide, we will discuss the common causes of the error and provide you with fixes to resolve it. 

What causes Windows Remediation Service fail to start error?

There can be various reasons for the service failing to start; some of the popular ones are: 

  • Service dependencies are not functioning – The Windows Remediation Service needs other services to work correctly. If any dependencies have stopped, the service might fail to start. 
  • Corrupted system files – If your system files are somehow corrupted, you might face all kinds of issues, including this error.
  • The service has been uninstalled or damaged – If WRS has stopped or damaged, it might work properly, hence the issue.
  • PC is infected with malware – If your computer is infected with a virus or malware, you might face an issue with system services.
  • Configuration files missing – If WRS is not configured correctly or the configuration files related to the service are missing, the WRS service may fail to start.

What can I do to fix the Windows Remediation Service failed to start error?

The error can come up with various other error codes and messages, some of which are:

  • Error code 1053
  • Windows Remediation Service failed to start. Verify that you have sufficient privileges.
  • Error 0xc0000035 in event viewer.
  • Error 1920. Service Windows Remediation Service (sedsvc) failed to start.

Before engaging in advanced troubleshooting steps, you should consider performing the following checks:

  • First, ensure your Windows is up to date.
  • Reboot your computer.

If you are done with these checks, follow the troubleshooting methods to fix the issue:

1. Use the Group Policy Editor

  1. Press Windows + R to open the Run console.
    GPEDiT.msc -Windows Remediation Service Failed to Start?
  2. Type gpedit.msc and press Enter to open Group Policy Editor.
  3. Follow this path: Computer Configuration\Windows Settings\ Security Settings\Local Policies\User Rights Assignment
  4. From the Details pane, locate and double-click Log on as a service.Logon as service
  5. Click Add user or group.
    Add user or group
  6. Start typing your user name, then click Check Names.
  7. Select your user name or Authenticated users and click OK.
  8. Click OK, then close the Group Policy Editor. 
  9. Press the Windows + R key, type CMD, and hit Ctrl + Shift + Enter.
  10. Type the following command and press Enter: gpupdate /force

2. Check the service dependencies & restart WRS

  1. Press Windows + R to open the Run window.Services
  2. Type services.msc and press Enter to open Services.
  3. Locate and double-click Windows Remediation Service to open Properties.Windows-remediation-service-in-Windows-Services
  4. On its Properties window, click Dependencies.
  5. Check The service depends on the following system components section, and you will find the list of services. 
  6. Make sure all these services are working fine.
  7. Locate and right-click Windows Remediation Service. Select Restart.

3. Use the Registry Editor

  1. Press Windows + R to open the Run window.REGEDIT RUN COMMAND
  2. Type regedit and press Enter to open Registry Editor.
  3. Follow this path: Computer\HKEY_LOCAL_MACHINE\SYSTEM\CurrentControlSet\Control\WMI\Autologger\EventLog-System\{b675ec37-bdb6-4648-bc92-f3fdc74d3ca2}
  4. Locate Enabled, double-click on it, and change the Value data to 0. Next, change the Base to Hexadecimal. Click OK.Regedit Windows Remediation Service Failed to Start
  5. Now, locate EnabledProperty, double-click it, and change the Value data to 0. Next, change the Base to Hexadecimal. Click OK.ENABLED PROPERTY

4. Scan for infected files

  1. Press the Windows key, type CMD, and click Run as administrator.CMD elevated
  2. Type the following command and press Enter: sfc/scannow
  3. Once the scan is complete and there is an error, then copy and paste the following command and press Enter:DISM /Online /Cleanup-Image /RestoreHealth
  4. Once the process is complete, restart your computer.

5. Run a security scan

Tip icon Tip
If you have a third-party security tool on your computer, launch it and run a deep scan to find viruses or infected files on your PC.
  1. Press the Windows key, type Windows Security and click Open.Windows Security
  2. Go to Virus & threat protection. 
  3. Click Scan options.V& T -windows remediation service failed to start
  4. Choose Full scan and click Scan now.Full Scan Scan Now
  5. It will scan your computer for viruses or malware on your computer.

So, these are some of the methods you need to use to resolve the Windows Remediation Service failed to start error. Try them and let us know what worked for you in the comments below.

[Fixed] A Device Attached to The System is Not Functioning

Computer issues will occur sooner or later, and many users reported A device attached to the system is not functioning error message.

This can be a problem, especially if you want to transfer files from a storage device, such as your iPhone or a USB flash drive. Thankfully, there are different ways to fix this problem, and we will show you how to do it in this guide.

How can I fix A device attached to the system is not functioning error?

1. Try using a different USB port

Sometimes, you might not need to make any changes to your PC to fix the device attached to your system is not functioning issue. Instead, you can try changing USB ports and even using a different cable.

This is a simple solution, and several users reported that this issue was resolved after connecting your USB device to a USB 3.0 port, so be sure to try that as well.

2. Check the Keep Originals option on your iOS device

  1. On your iOS device, go to Settings > Photos.
  2. Navigate to the TRANSFER TO MAC OR PC section and choose Keep Originals.
    transfer to mac or PC a device attached to the system is not functioning

After doing that, check if the device attached to your system is not functioning error is resolved.

Keep in mind that your images will be transferred in HEIC format, so you’ll need to download HEIC and HEIF codecs in order to view them.

3. Free up space on your iOS device

  1. On your iOS device, go to Settings > General
  2. Select the iPhone Storage option.
    storage iphone a device attached to the system is not functioning
  3. Check the available storage space. Make sure that you have at least a couple of GBs available.
  4. If needed, delete any files you don’t need and check if that solves the problem.

4. Update iTunes

  1. Open iTunes on your PC and click the Help tab at the top.
  2. Select the Check for Updates option.
    check updates device attached to the system is not functioning error
  3. Once iTunes is updated to the latest version, check if the problem is still there.

In addition to iTunes, make sure that your iOS device is up to date.

5. Update outdated drivers

  1. Press the Windows key + X and select the Device Manager option.
    device manager device attached to the system is not functioning error
  2. Click the arrow next to the option you want to update drivers for and right-click the device there.
  3. Now. select the Update driver option.
    update driver
  4. Finally, choose the Search automatically for drivers option and install any available updates.
    search auto

If you’re getting A device attached to the system that is not functioning in error, the issue might be caused by outdated drivers. So, you need to update them to get past the issue.

To make things easier, we recommend using a dedicated tool in Outbyte Driver Updater to update your drivers automatically. This is because you might need to update more than one driver, and that won’t be easy manually.

⇒ Get Outbyte Driver Updater

6. Check for bad sectors

  1. Launch File Explorer and right-click your storage device.
  2. Select the Properties option.
    properties
  3. Now, click the Tools tab at the top, followed by the Check button.
    check device
  4. Finally, click the Scan drive option and wait for the scan to complete.
    scan drive device attached to the system is not functioning error

Bad sectors and partitions on your storage device can be the reason for a device attached to the system is not functioning error. To fix this, you can use the built-in tool on your PC to check and repair these sectors.

7. Reset Location & Privacy

  1. On your iOS device, navigate to Settings > General.
  2. Select Reset > Reset Location & Privacy.
    Reset location & privacy iphone a device attached to the system is not functioning
  3. Connect your iOS device again, and select the Trust This Computer option.

Sometimes, if your PC does not need permission to transfer and receive files from your device, you might get a device attached to the system is not functioning error. All you need to do now is to change your privacy settings to make it work.

8. Run SFC and DISM scans

  1. Press the Windows key + S, type cmd, and select Run as administrator under Command Prompt.
    cmd admin
  2. Type the command below and hit Enter to run it: sfc/scannowsfc
  3. Now, wait for the command to finish running and run the command below: DISM.exe /Online /Cleanup-image /Restorehealthdism device attached to the system is not functioning error
  4. Finally, wait for the command to finish running.

In some cases, the device attached to the system not functioning prompt might be due to broken or corrupt system files. Running the commands below is one of the quickest ways to fix these files.

9. Enable Safe Mode

  1. Press the Windows key + I and select the Update & Security option.
    update and
  2. Choose Recovery in the left pane and click the Restart now button under Advanced startup.
    restart now
  3. Choose Troubleshoot > Advanced options when your PC restarts.
    advanced options device attached to the system is not functioning error
  4. Now, select Startup settings.
    startup settings
  5. Click the Restart button.
    restart
  6. Finally, press the corresponding on your keyboard to Enable Safe Mode.
    enable safe

If the solutions above fail to fix this issue, you need to enable Safe Mode. Many users have confirmed that they could transfer their files in this mode.

A device attached to the system is not functioning error can prevent you from using your iPhone or other USB devices with your PC, but hopefully, you managed to fix this issue with our solutions.

If you need a list of the best tools to safely transfer files from your PC to your iPhone, check our guide for the top options available.