Although Microsoft does not provide support for the email client anymore, there are still ways to fix it, as shown in this guide.
Why is Windows Live Mail not working?
Several factors can be responsible for the Windows Live Mail not working issue. Below are some of them:
Wrong registry settings: Sometimes, Windows Live Mail might not receive emails because some registry files have the incorrect value. In some cases, these files might be completely missing. The fix for this is to tweak your registry and make sure the keys are assigned the correct value.
Faulty installation: If the Windows Live Mail is not displaying properly or connecting to the server, it might be because the installation is faulty. The quick way out of this is to repair your installation.
How can I fix Windows Live Mail if it’s not working?
1. Edit the registry
Press the Windows key + R, type regedit, and click OK.
Navigate to the path below in the left pane: Computer/HKEY_CURRENT_USER/SOFTWARE/Microsoft/Windows Live Mail
Now, check if the folders below are there:
RecreateFolderIndex
RecreateStreamIndex
RecreateUIDLIndex
If they are there, double-click each of them, set the Value data to 1, and click the OK button.
If none exist, right-click the Windows Live Mail folder and choose New > DWORD(32-bit).
Now, enter RecreateFolderIndex as the name of the new file. Next, repeat Step 5 to create the RecreateStreamIndex and RecreateUIDLIndex DWORDs.
Finally, double-click each new file, set the Value data to 1, and click the OK button.
If you noticed that Windows Live Mail is not working after updating your PC, the app might have been corrupted. You need to restart some of its processes in the registry or recreate them if they are missing.
2. Run the Windows Live Mail as Admin
Navigate to C:Program FilesWindows Live Mail or C:Program Files(x86)Windows LiveMail
Right-click on the wlmail.exe file and select Properties.
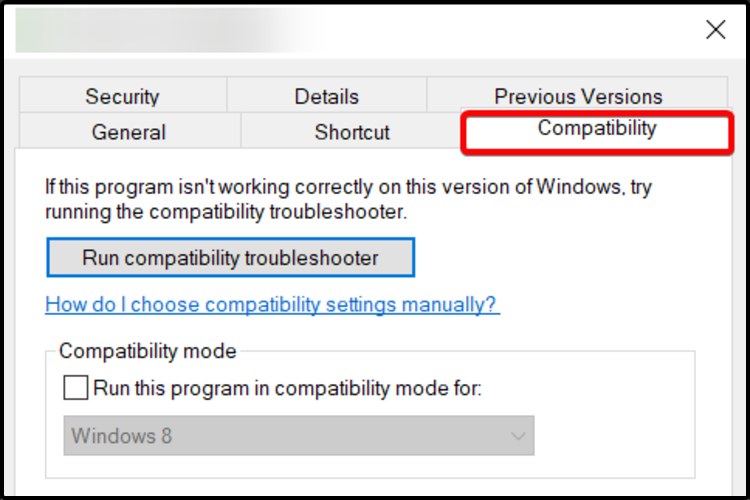
Now. select the Compatibility tab.
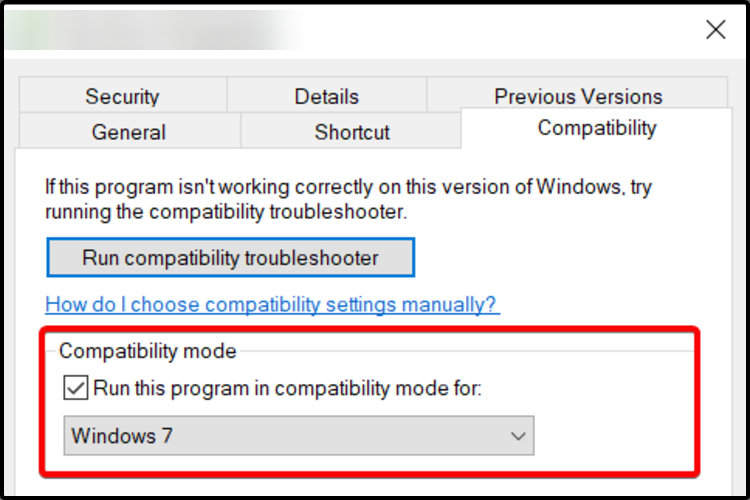
Check the Run this program in compatibility mode for box and, from the drop-down menu, select Windows 7.
Check the Run this program as an administrator box and click Apply, followed by OK.
Since Windows Live Mail is no longer supported on Windows 10, it is expected to stop working at some point due to compatibility issues. To prevent this, you must run the app as admin and in compatibility mode.
3. Repair installation
Press the Windows key, type control, and select Control Panel.
Choose Uninstall a program under the Programs option.
Double-click on Windows Essentials 2012.
Click on Repair all Windows Essential programs and wait for the procedure to end.
Restart your PC and look for changes.
The Windows Essentials Suite has a feature that allows you to repair your installation. For example, this can fix the Windows Live Mail app that is not working instead of reinstalling the suite.
So, you should try this and see if it restores the app’s full functionality.
4. Remove recent update
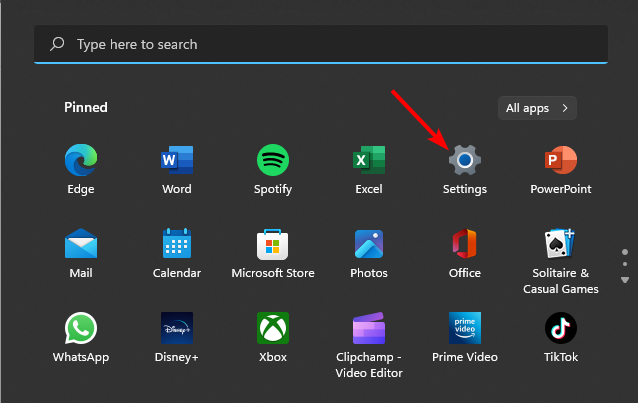
Press the Windows key + I and select the Update & Security option.
Click the View update history option.
Now, select Uninstall updates.
Finally, right-click the recent update, select Uninstall, and follow the onscreen instructions to complete the removal.
Most users started noticing that Windows Live Mail was not working after installing the latest Windows 10 updates. You might need to uninstall these updates to restore regular service on your PC.
However, there is a caveat to this, as you will be missing out on the latest Windows 10 features and maybe security enhancement by doing this.
If the solution mentioned above couldn’t resolve your issues with Windows Live Mail, we advise you to leave it be and check for alternative solutions.
There are many great email clients available that you might want to consider. However, the mail client below is our primary recommendation for today.
Since it is a leader in the market, it can meet all your needs in mailing management.
Its thoughtfully designed interface, the fact that it gathers all accounts in one place, and it includes Signature Management features should make a difference.
After all, like so many other programs from the past era, Windows Live Mail is discontinued. But unfortunately, the sole fact it still works for some users today is no guarantee for the future.
Mailbird
With its Archiving & Retention and Email Monitoring features, Mailbird will make you forget all about Windows Live Mail.
We have come to the end of this guide on how to fix the Windows Live Mail app if it is not working. We believe you now have everything required to resolve the issue for good.
However, some players have reported issues with Steam’s achievement feature not popping up. This is obviously the case if you’re in offline mode, which you can quickly switch.
Permission issues, conflicting software and outdated OS can also cause this. Follow the steps below to fix it.
How can I fix Steam achievements not showing up in games?
Before trying advanced fixes, just restart your PC. Also, close unused apps and make sure your Internet is up and running. If you tried these and still have no luck, go ahead and try the more complex options below:
1. Select the Go Online option
Open your Steam client software.
Click the Steam menu at the top left corner of the window and select the Go Online option.
Launch the game and see if now you can see the Steam achievements.
As we’ve mentioned above, the Steam achievements won’t show up if Steam is working in Offline mode so, changing this setting will fix the situation.
2. Make sure that Steam Overlay is enabled
Launch your Steam software.
Click the Steam menu and select Settings on the menu.
Next, click the In-Game tab, then select the Enable the Steam Overlay while in-game checkbox.
Press the OK button.
This resolution doesn’t fix Steam achievements not unlocking. It will, however, likely fix Steam achievements not showing up in games when the achievement feature is working.
Open this default Steam game installation folder (If you have installed Steam in another location, enter the correct path): C:\Program Files (x86)\Steam\steamapps
Next, click a game’s folder there to open it.
Right-click the game’s EXE file and select Properties.
Select the Compatibility tab and click Run this program as administrator to select it.
Press the Apply button, and click OK to exit.
Repeat the above steps for all Steam games where the achievements don’t show up for.
4. Remove installed mods for games
Bring up the Steam launcher window.
Click Community at the top of Steam and select Workshop.
Then click Your Files on the right side of the Workshop tab.
Next, click Subscribed items to open a list of mods you’ve subscribed to for Steam games.
Remove all the listed mods by clicking the Unsubscribe button.
An alternative method is to find the mod’s folder for the game in File Explorer. Then you can manually delete all the mods from a game’s modding folder.
5. Clean-boot Windows 10
Right-click the Start button to select Run on the menu.
Next, input this command and press Enter to start System Configuration: msconfig
If it’s not already selected, click the Selective startup radio button on the General tab, Then deselect the Load startup items checkbox.
Make sure the Use original boot configuration and Load system services checkboxes are both selected.
Next, deselect the checkbox for the Hide all Microsoft services option on the Services tab and click Disable all to deselect the remaining third-party services.
Then press the Apply and OK buttons to exit the window.
Press the Restart button to reboot Windows.
Thereafter, try playing some Steam games again to see if achievements for them show up.
To restore the original boot settings, simply select the Load startup items andEnable all options in System Configuration.
For further potential resolutions, submit a support ticket to Steam. You can submit a help request via Steam’s support page. First, however, you’ll need to sign in to Steam to do so.
Alternatively, you can add a post about the issue to Steam’s support forum. Log in to the forum with your Steam account. Then click the Start a New Discussion button on the Help and Tips section of that forum. The Steam community might then be able to suggest some potential fixes.
However, give the resolutions above a try before contacting Steam support. Those potential fixes aren’t necessarily guaranteed to work for everyone, but are still worth a try, nonetheless.
The Machine Check Exception error is another one of the frustrating BSOD errors that trouble users on Windows 11. Like others before it, this error can be traced to various factors.
However, it has a series of possible solutions. This guide will show you quick ways to fix this Blue Screen of Death error and restore regular service on your PC.
What causes a machine check exception?
Many issues cause the Machine Check Exception BSOD error in Windows 11, which concerns the PC’s hardware and software aspects. We have listed them below.
Corrupt system files: One of the prevalent causes of this error is corrupt system files. You must check and repair these files using the built-in repair tools or dedicated software.
Malfunctioning or outdated drivers: Sometimes, outdated drivers can cause the Machine Check Exception BSOD error on Windows 11 is faulty drivers. The solution is to reinstall or update your drivers to the latest version.
Problems with the hardware: Like the issues attempted switch from dpc and other BSOD errors, this issue can also be caused by hardware. Running the hardware and devices troubleshooter should solve the problem in this case.
How can I fix the Machine Check Exception error in Windows 11?
Below are some of the troubleshooting steps you should try before proceeding to the solutions in this guide:
Disable overclocking and remove related software
Disconnected non-critical hardware
If those prerequisite fixes do not fix the issue, you can now explore the solutions below:
1. Update drivers
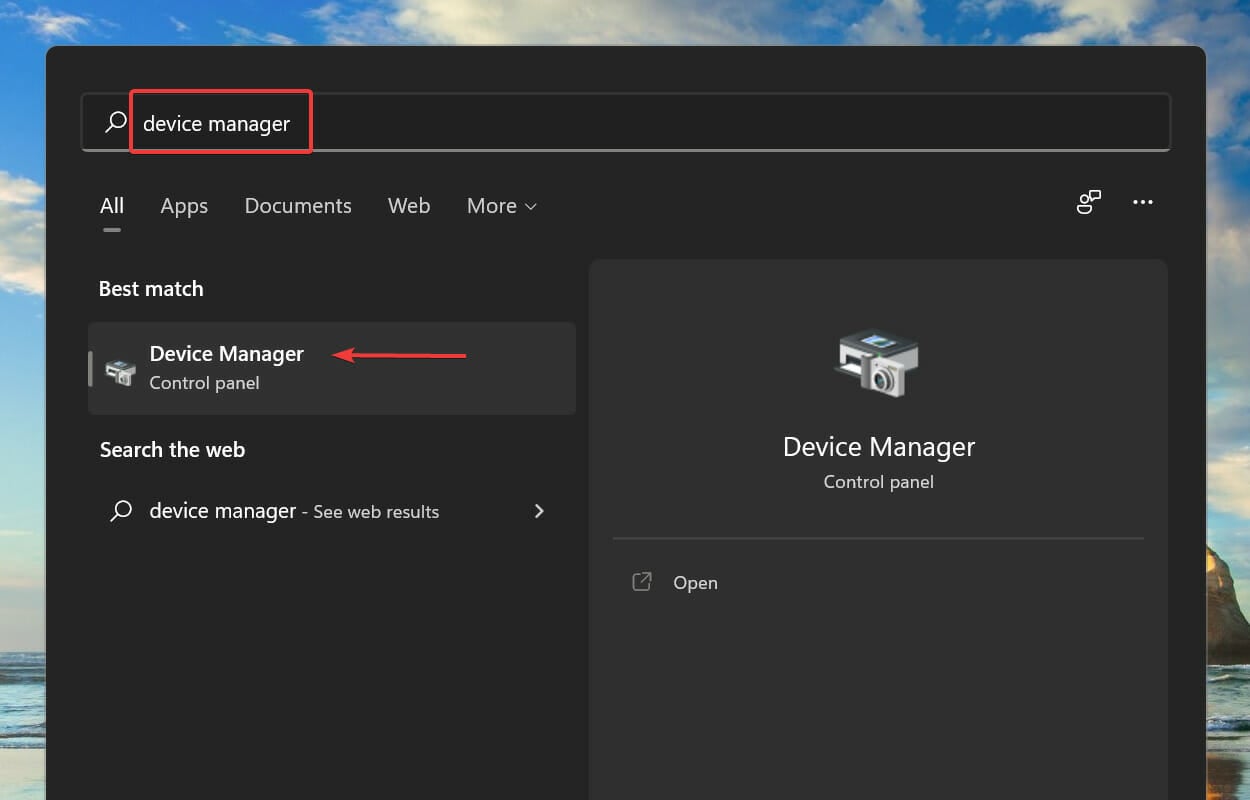
Press Windows + S to launch the Search menu. Enter Device Manager in the text field at the top, and click on the relevant search result that appears.
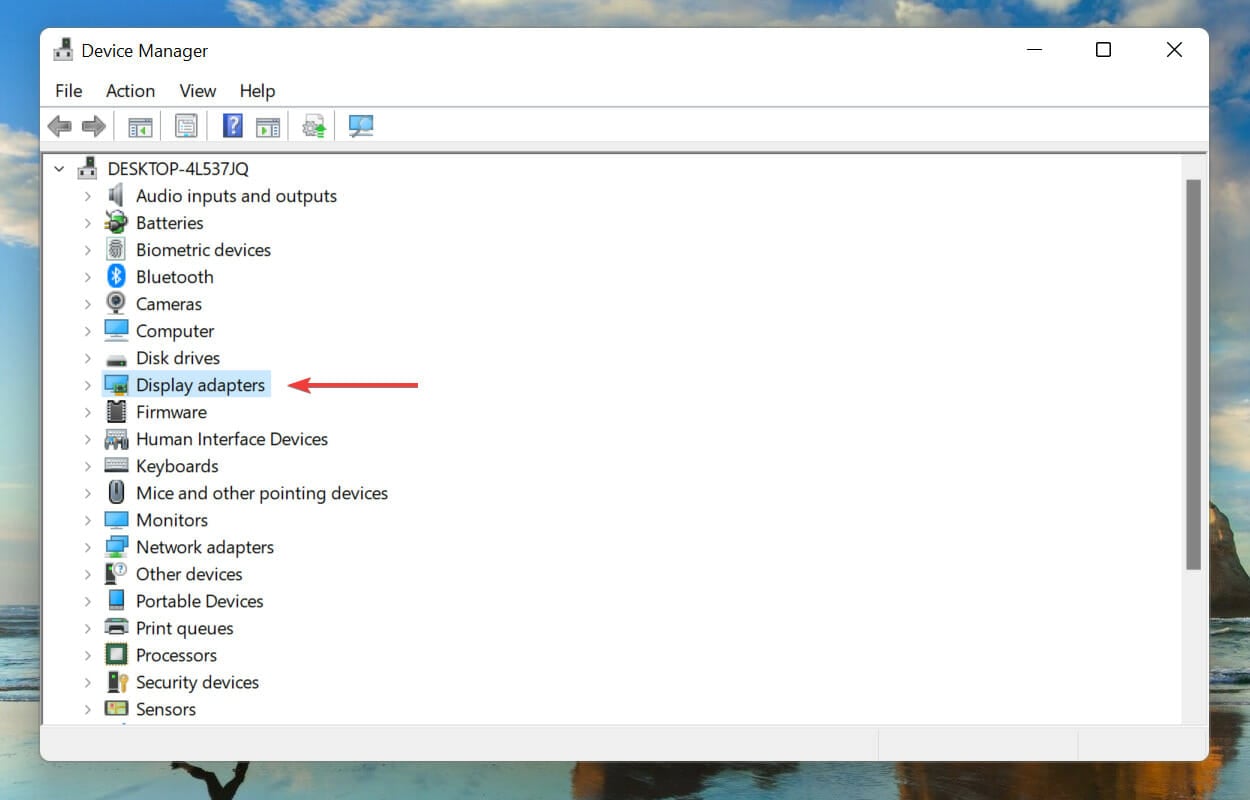
Next, double-click on the Display adapters entry to view the devices under it.
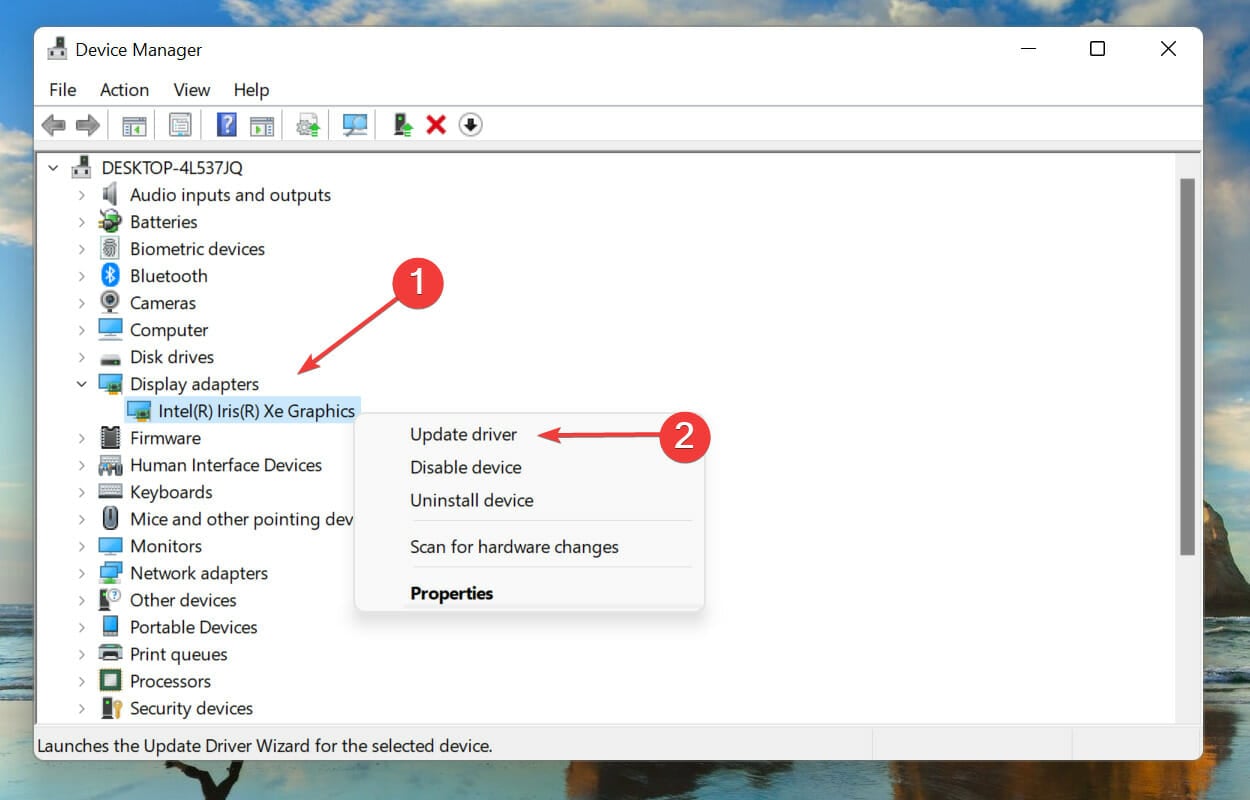
Right-click on the graphics adapter and select Update driver from the context menu.
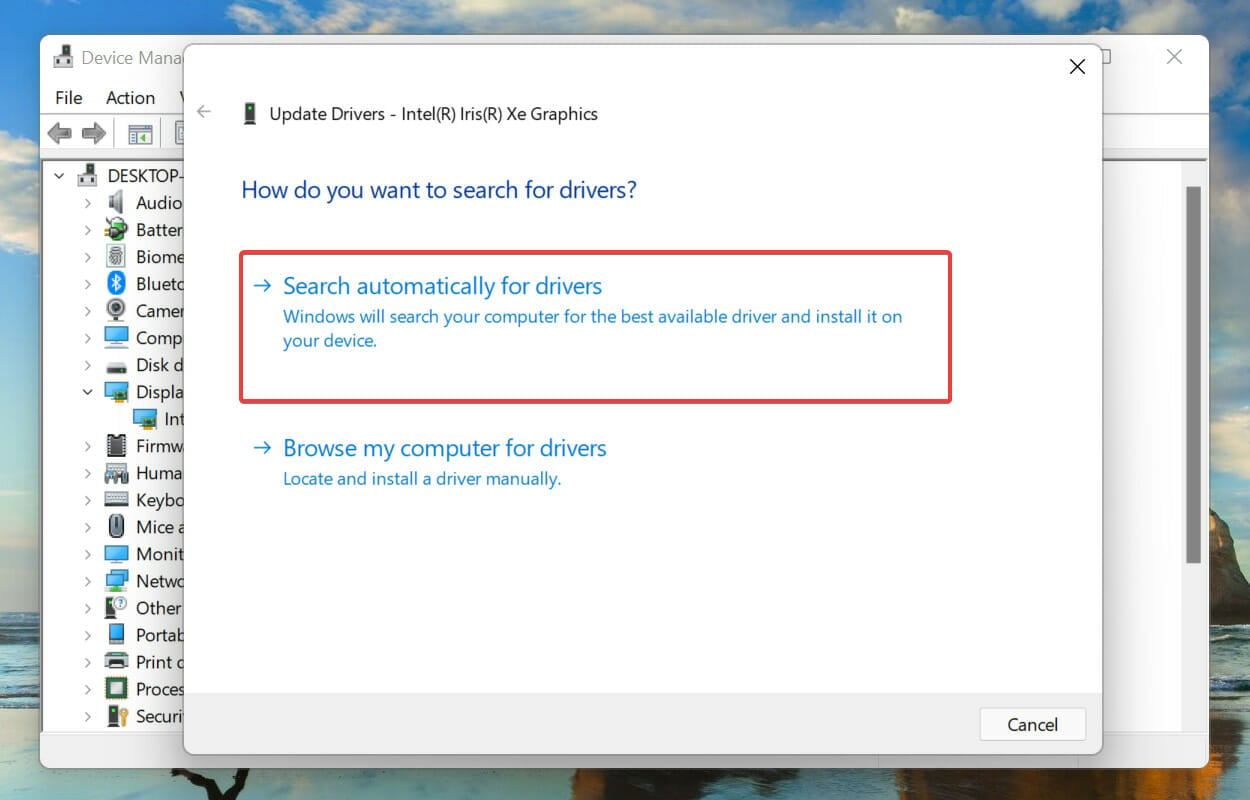
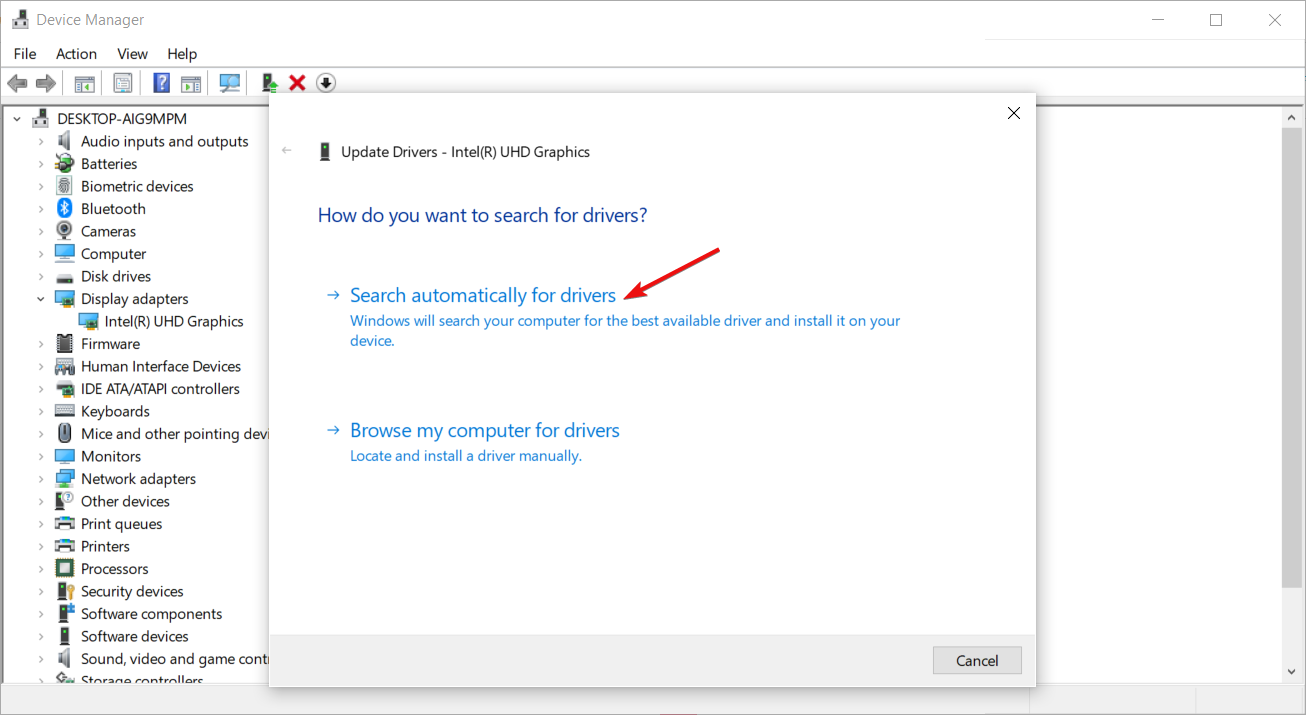
Now, select Search automatically for drivers from the two options in the Update Drivers window to scan for the best available driver on the system.
Outdated drivers are one of the prime causes of most BSOD errors, including the Machine Check Exception error on Windows 11. Updating the driver not only eliminates these errors but also enhances the performance of the device.
If you can’t get into your PC, you can enter Safe Mode and try to update the driver. Also, you can manually download and install it from the manufacturer’s website.
Similarly, you can update the drivers for other devices to fix the Windows Check Exception error in Windows 11.
You can use a third-party driver updating tool if that sounds like too much trouble. A dedicated utility that scans all available sources for the latest version and keeps the installed drivers up-to-date.
2. Run Windows Memory Diagnostic tool
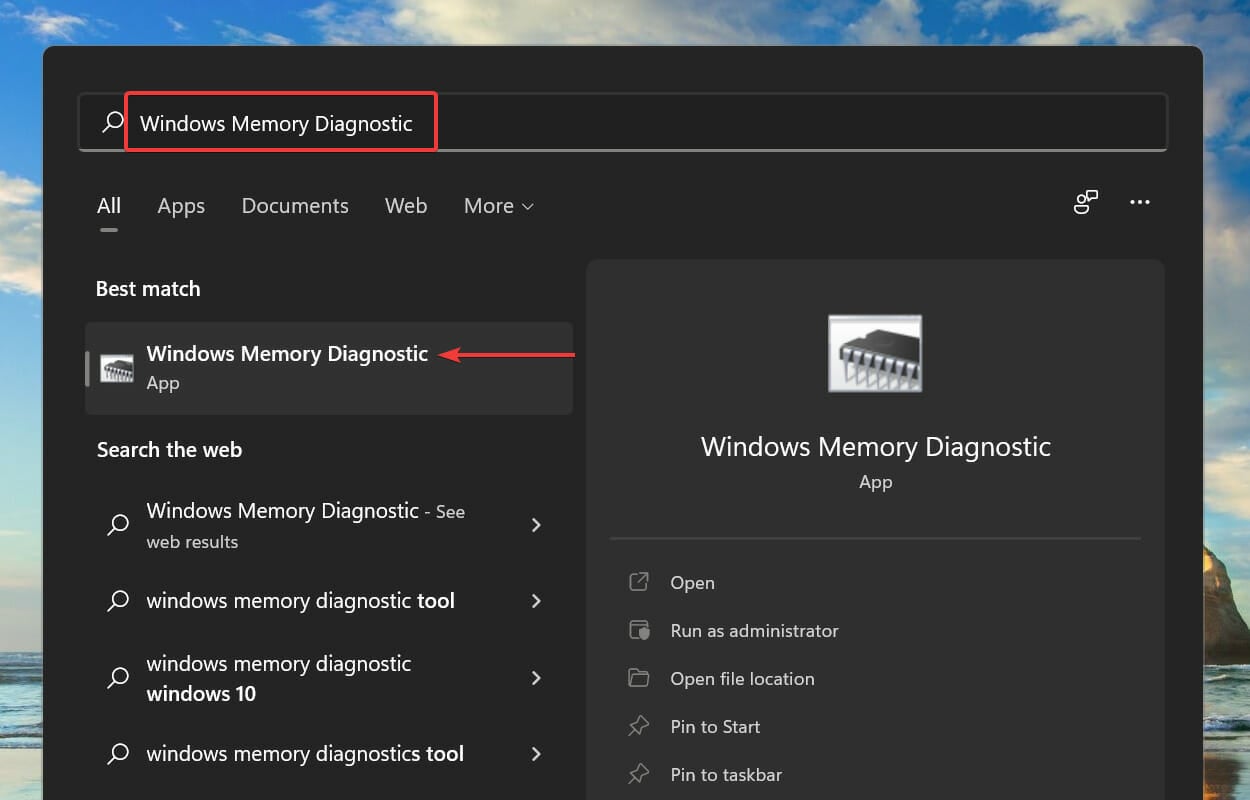
Press Windows + S to launch the Search menu. Enter Windows Memory Diagnostic in the text field at the top, and click on the relevant search result.
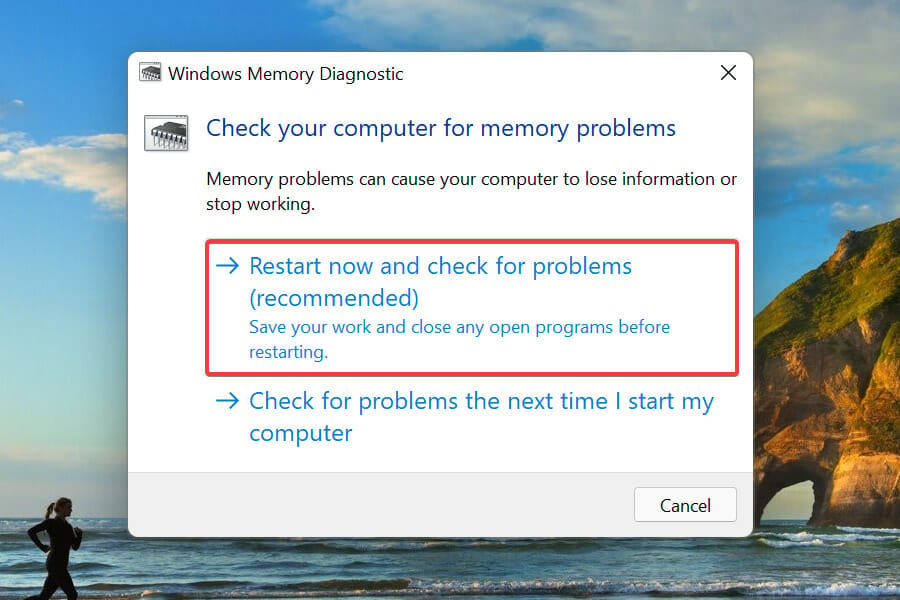
Next, select Restart now and check for problems (recommended) from two options.
Save any open work before running the memory diagnostic tool to avoid data loss. Then, after the system restarts, check if the Machine Check Exception error in Windows 11 is fixed. If not, head to the following method.
3. Perform SFC and Check Disk scan
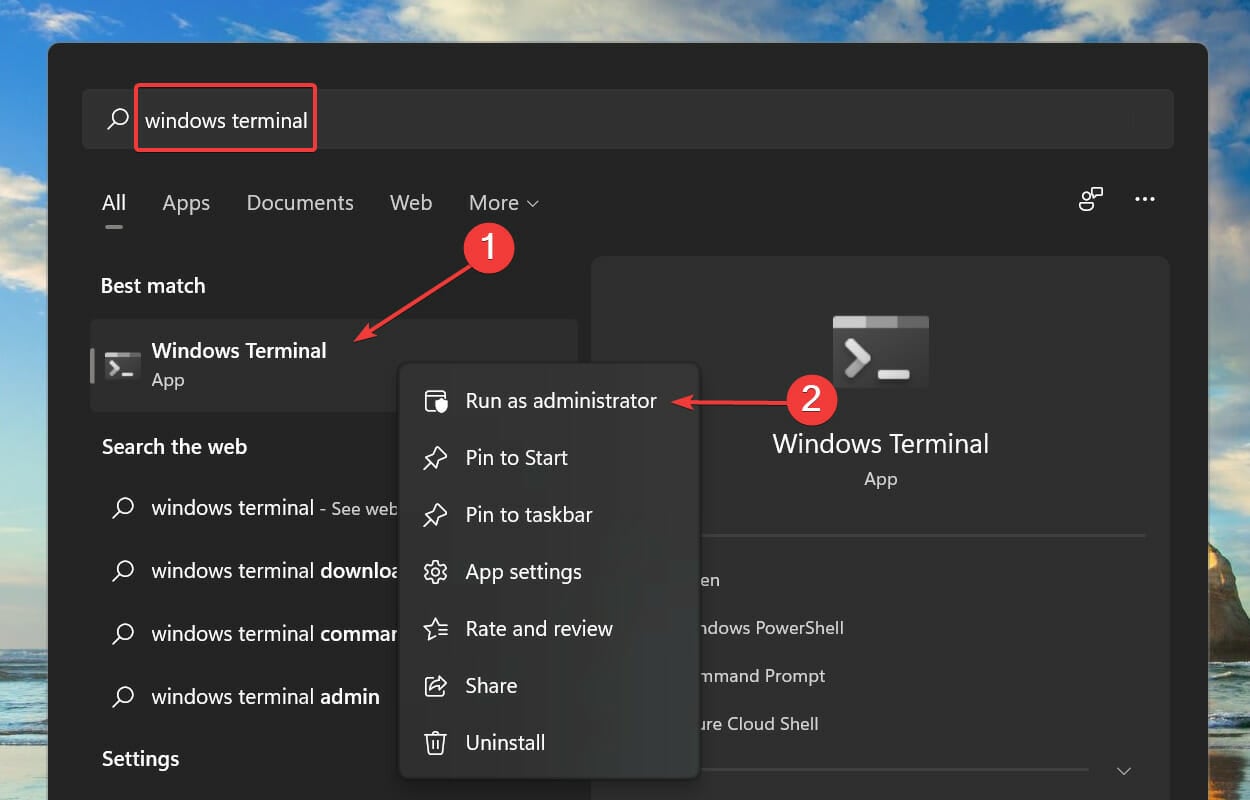
Press Windows + S to launch the Search menu. Enter Windows Terminal in the text field, right-click on the relevant search result, and select Run as administrator from the context menu.
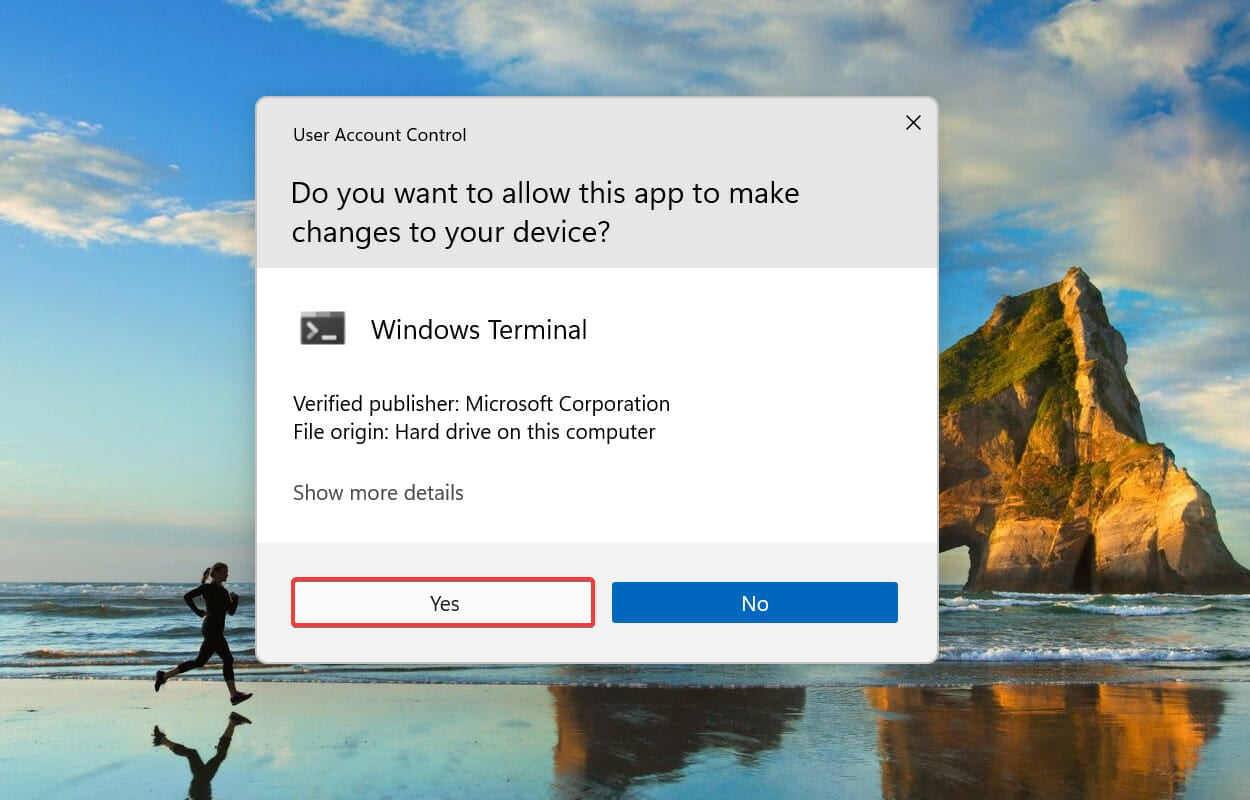
Click Yes on the UAC (User Account Control) prompt.
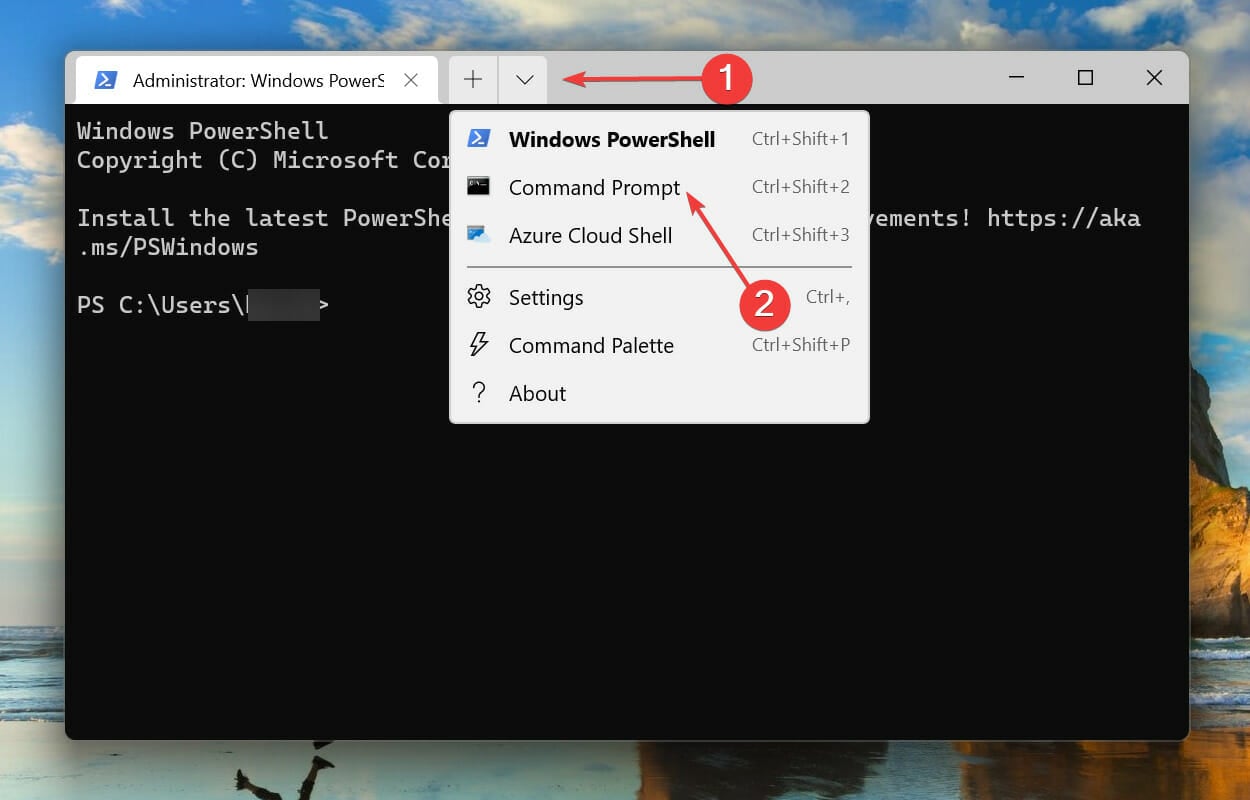
Next, click on the downward-facing arrow at the top and select Command Prompt from the list of options. Alternatively, you can hit Ctrl + Shift + 2 to launch the Command Prompt tab in Windows Terminal.
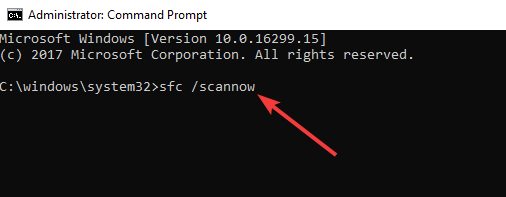
Type/paste the following command and hit Enter to run the SFC scan.sfc /scannow
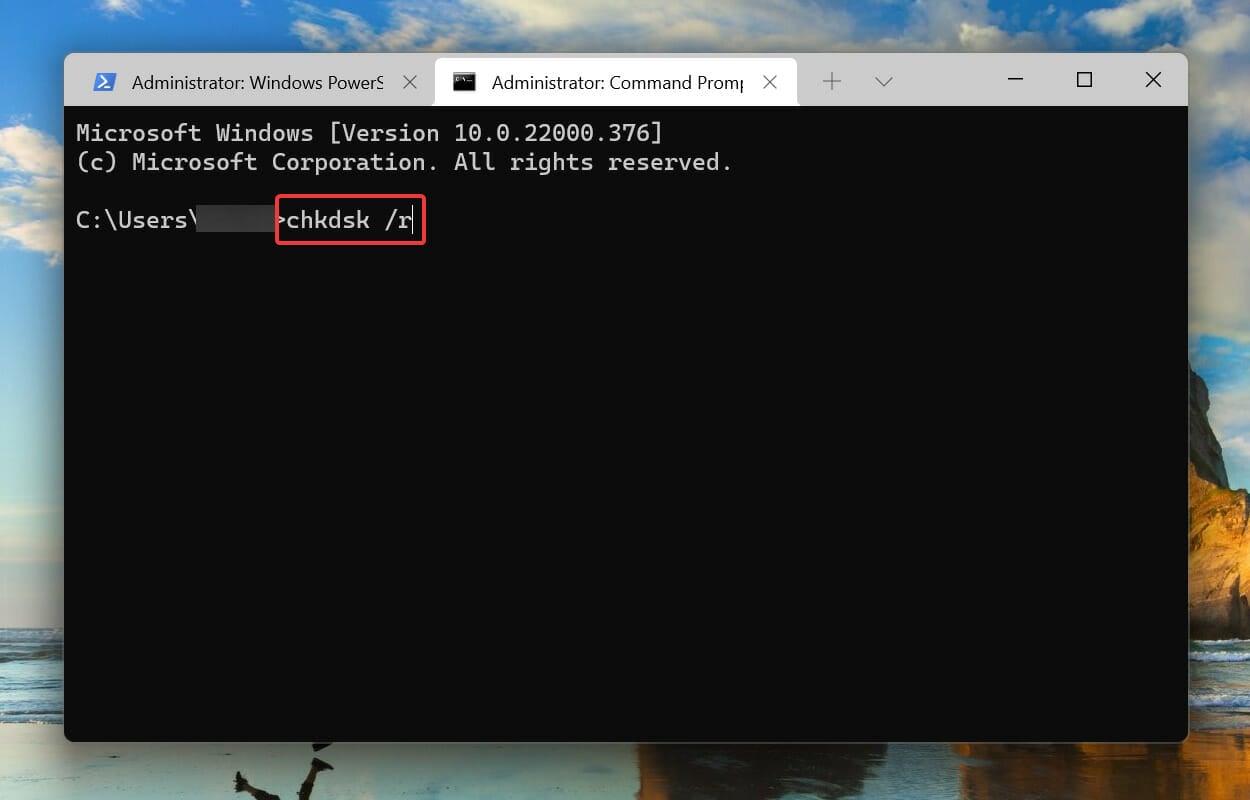
Once complete, execute the following command to run the Check Disk utility.chkdsk /r
Now, restart the computer.
The SFC (System File Checker) scan locates the corrupt system files on the system, and if any are found, replaces them with their cached copy stored on the system. If running this scan doesn’t help, Check Disk should come to your rescue.
The Check Disk is a built-in utility to identify and automatically fix any problems with the hard drive, including bad sectors and corrupt files. It scans the whole drive instead of just the Windows system files, as with the SFC scan. This handy utility is known to fix most errors on the storage drive.
After running both scans, check if the Machine Check Exception error in Windows 11 is eliminated
4. Run Startup Repair
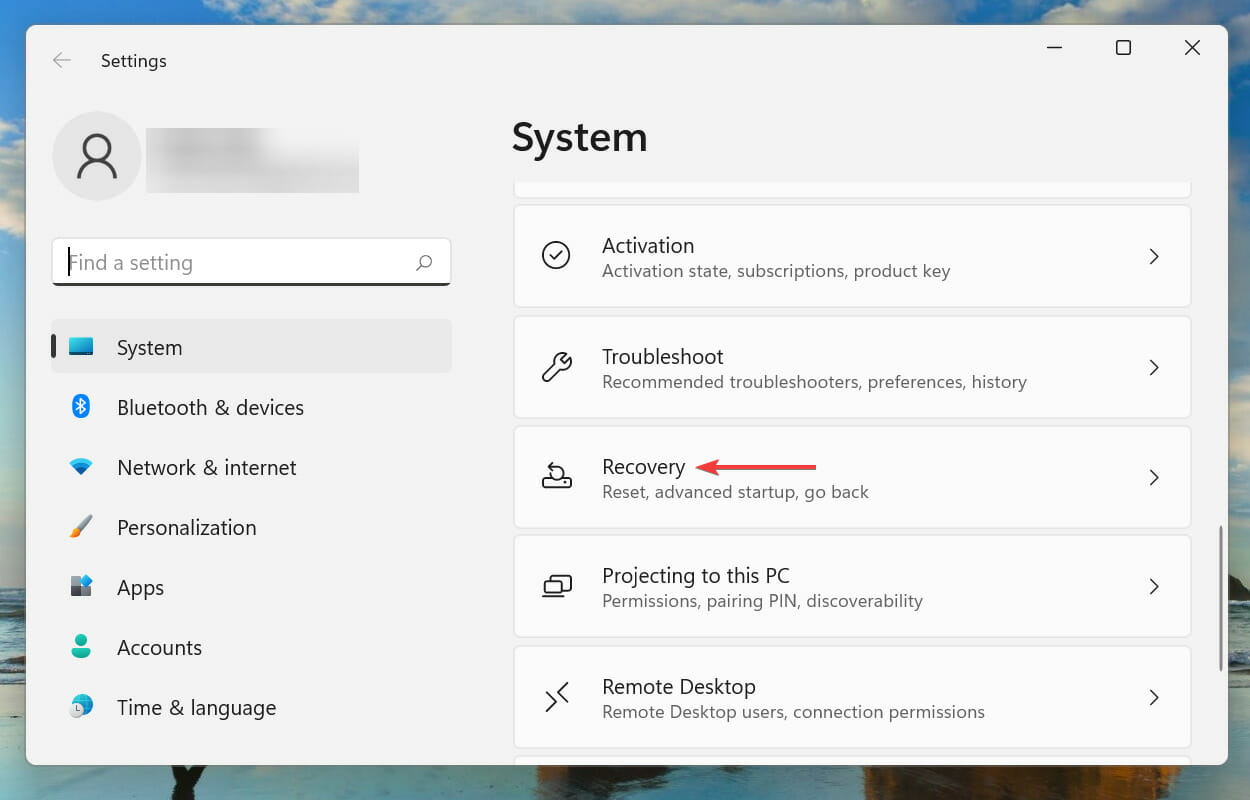
Press Windows + I to launch the Settings app, and then click on Recovery on the right in the System tab.
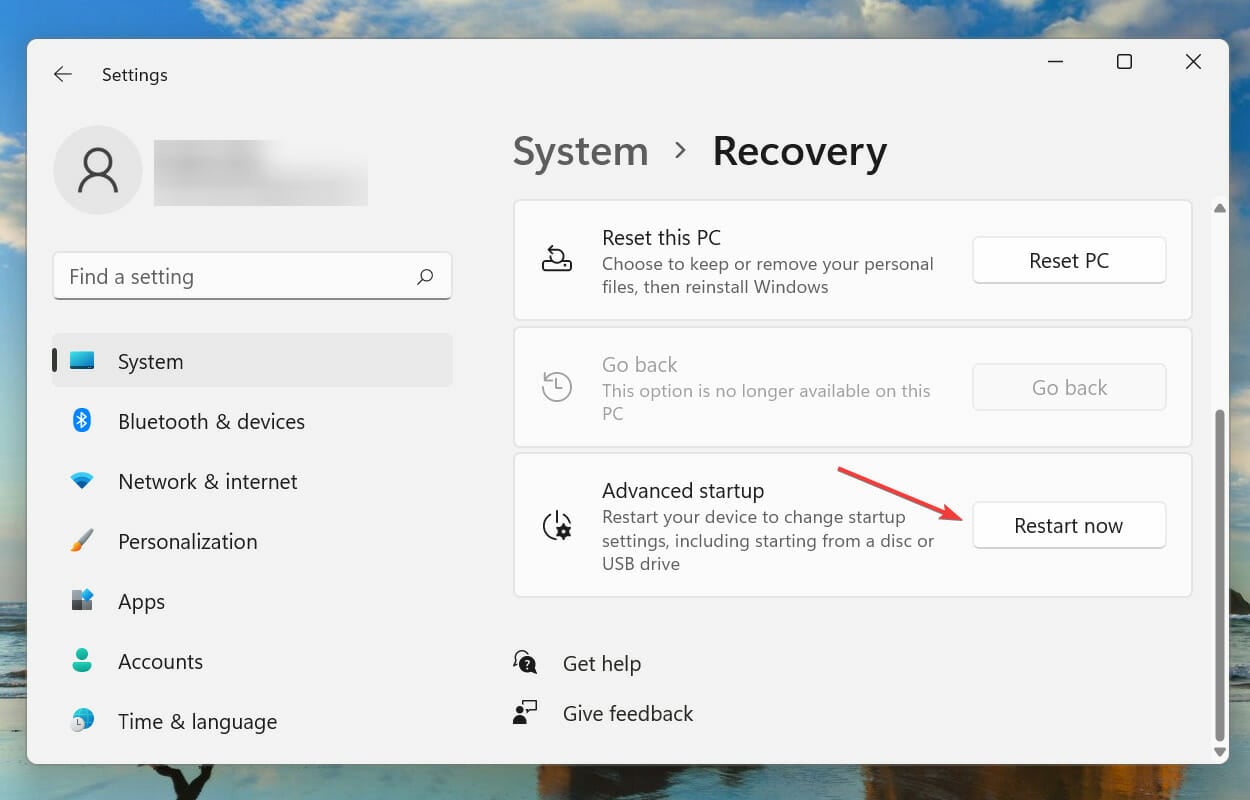
Next, click on the Restart now button next to Advanced startup.
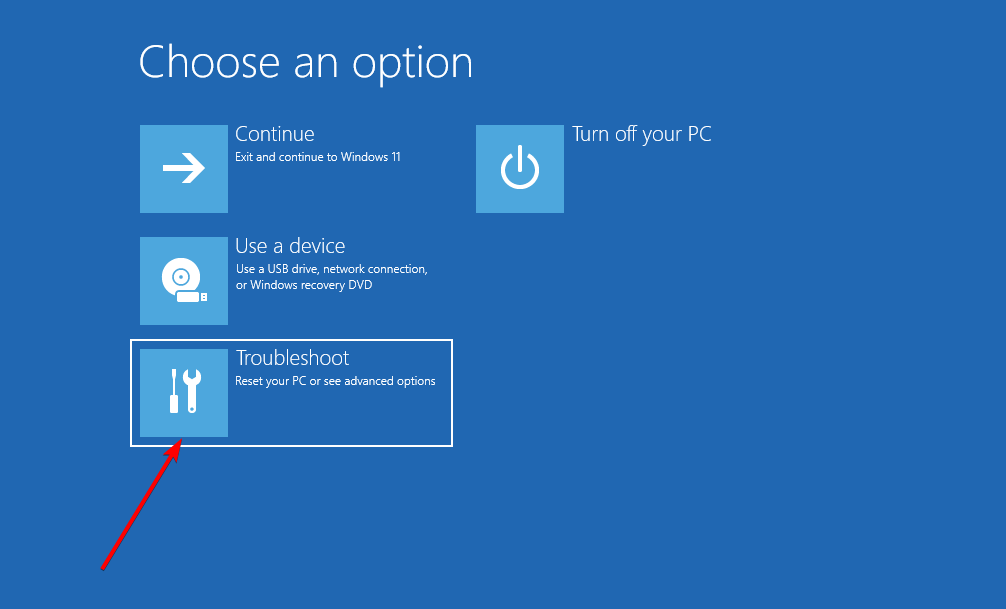
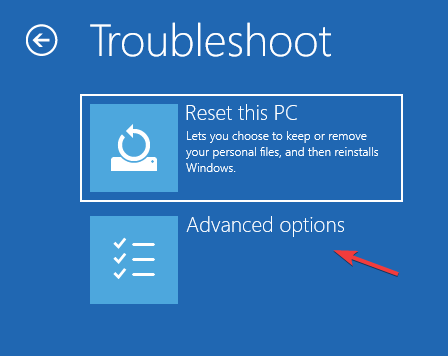
Wait for the computer to restart, enter Windows RE (Recovery Environment), and then select Troubleshoot.
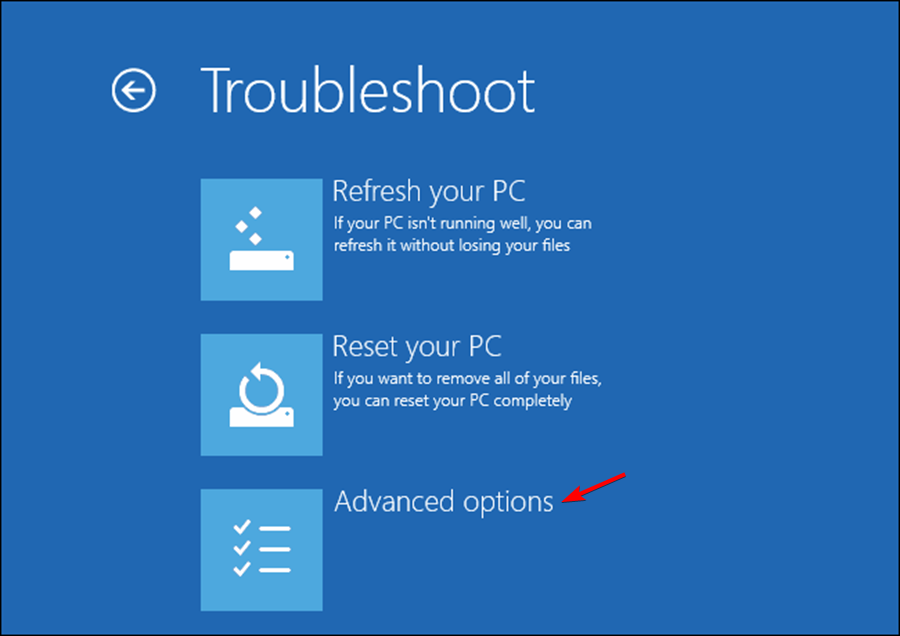
Next, select Advanced options.
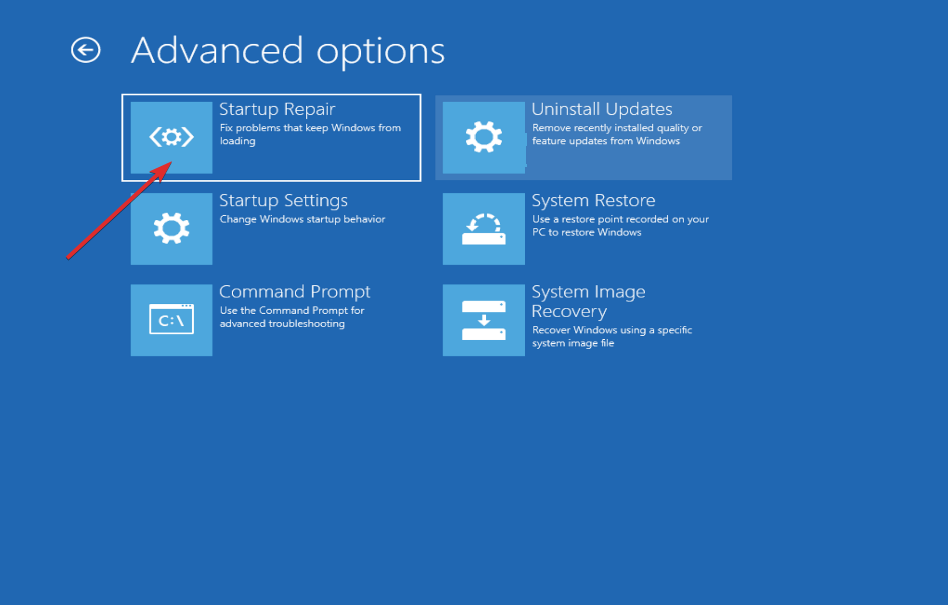
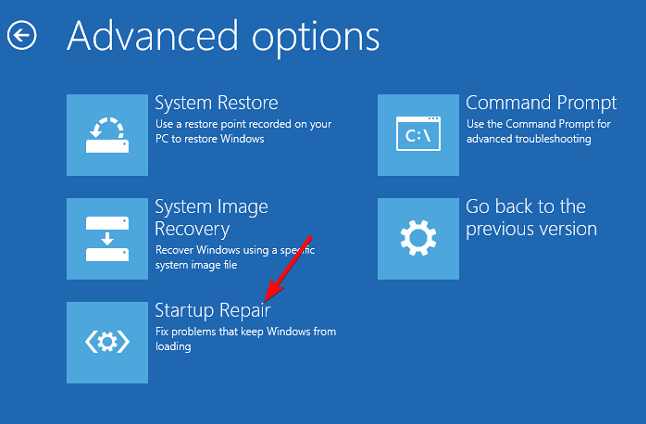
Finally, click on Startup Repair to fix issues with the OS causing the BSOD errors.
The Startup repair is known to diagnose and eliminate issues with the OS and other corruptions. Though it will take some time to complete, the process is known to fix many errors. Once the system restarts, check if the Machine Check Exception error in Windows 11 is resolved.
5. Run the Hardware and Devices troubleshooter
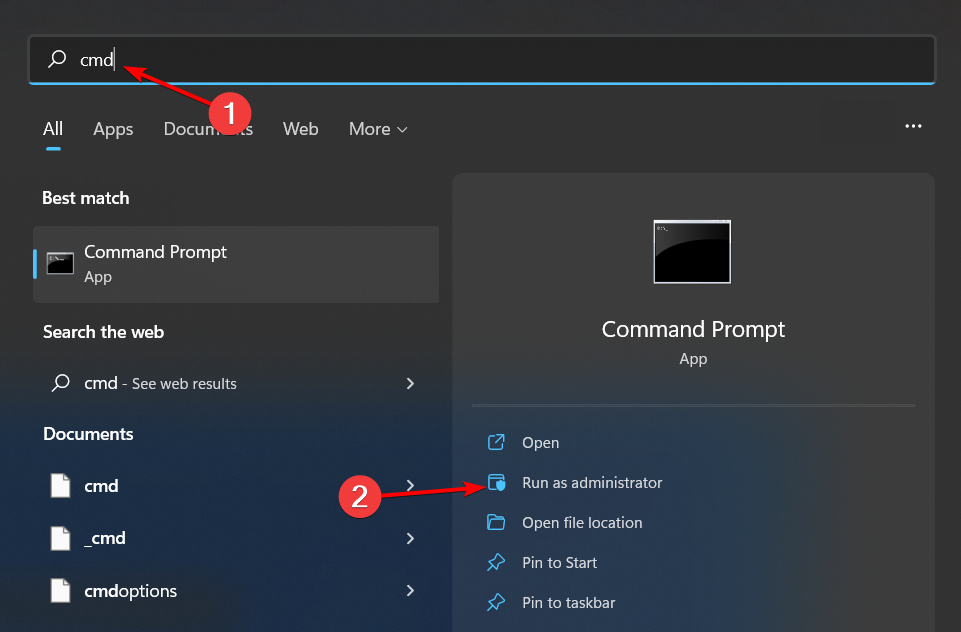
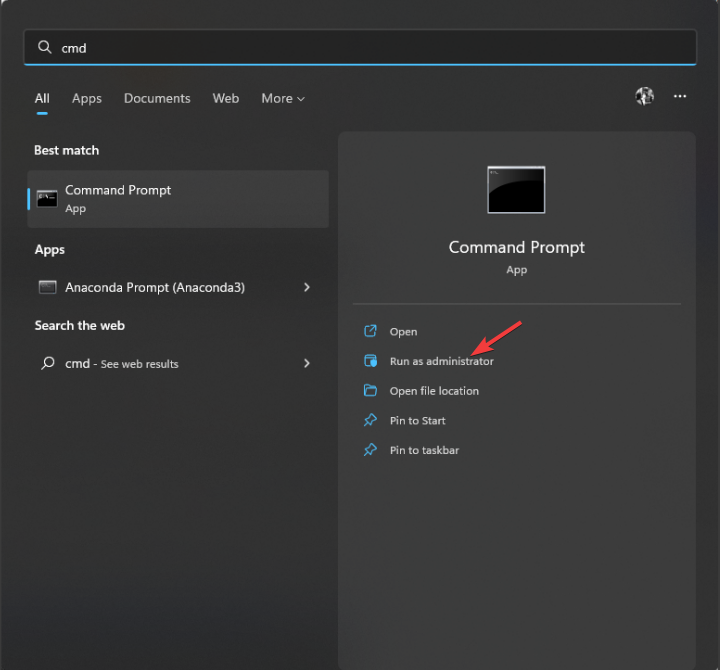
Press the Windows key, type cmd, and select Run as administrator under Command Prompt.
Type the command below and hit Enter: msdt.exe -id DeviceDiagnostic
Now, wait for the command to finish running.
Sometimes, the Machine Check Exception on Windows 11 can be down to hardware issues. Running the Hardware and Devices troubleshooter will fix this.
Create a media installation tool on another PC and insert it into your computer.
Boot your PC from the media tool, select your language, fill in the required information and click Next.
Now, click Repair your computer on the Install Windows page.
Next, select Choose an option in WinRE.
Choose Troubleshoot > Advanced options.
Finally, select the Automatic Repair option and follow the onscreen instructions to complete the process.
If you cannot boot into your PC normally, you might need to use an installation media. A series of options in the Windows Recovery Environment can fix the Machine Check Exception on Windows 11.
One excellent option is the Automatic Repair tool. This will fix the components that might be causing the problem.
In our digital age, the animation is a significant component of multimedia. So if you’re a digital artist, this best face animation software might be handy for you.
Don’t be confused, this type of software is different than face blurring software, and it’s intended for digital artists, and today we’ll show you the best tools to choose from.
What is the best face animation software out there?
By now Adobe has cemented its position as one of the top software companies.
Animate makes no exception. Formerly known as Flash, Animate is a new and more intuitive iteration of the same basic principle.
Ease of use and a nice learning curve, are some of the reasons why Animate can be a great option. On the downside, you will have to draw your characters by hand, which will require some time.
An alternative to this would be Adobe’s Character Animator, which relies on motion capture to generate a character. So, if you lack the drawing skills or the time, Character Animator is worth considering.
But, on the other side, if you are more into drawing, then know that with Animator, you can save and reuse your puppets/characters and automatically animate them through video performance capture.
Being part of the Adobe family, it’s not surprising that Animate can communicate with other programs from the Adobe suite.
Integration with tools such as Photoshop and Illustrator is, in fact, one of Animator’s strongest points.
Key features that make Character Animator worth considering:
Easy to pick up, even without previous experience with other animation software
Frame-by-frame animation feature
Integration with Photoshop, Illustrator, and After Effects for quick file transfer
Vector drawing tools far crisp animation
Video performance capture for automated animation
Adobe Animate
To take your facial animation skills to the next level, a tool like Adobe Animate can make a huge difference.
Autodesk Maya, or simply Maya, is one of the market’s complete 3D computer animation and rendering software.
Maya’s overall complexity definitely makes it one of the best face animation software out there, but it also makes it more challenging to learn.
But, if you are looking to animate a face for a more complex project, such as a short animated movie, then Maya is your answer. It’s perfectly compatible with Adobe Illustrator, meaning you can easily transfer your vectors.
This, paired with an extensive library of dynamic effects (the interactive hair grooming effect is just one of the jaw-dropping possibilities), will allow you to create close-to-life animations.
Maya comes with a generous 30-day free trial and supports an Educational Version. This means students can apply for a 3-year valid license.
Autodesk Maya also supports a geometry conversion option. Translated, this option means you can transform any complex geometrical layout into a topology.
Just be aware before stepping in that Maya doesn’t support the most friendly and modern UI. That’s partly what makes it more difficult to learn than other options in this list.
But, if you are willing to put in the time and the effort, then Maya is definitely one of the best choices.
Key features of Maya:
Create realistic, close-to-life characters
A library of preexisting templates to get your project started
Multiple viewing angles for more granular control over your character
3D environments to put your character into a world
Various animation effects to turn 3D models into moving objects
Different tools and brushes for drawing or sketching detail
Autodesk Maya
A complete solution for animating your ideas and rendering them into reality.
Blender is a free, open-source software that has gradually become one of the leading programs for anything related to computer graphics.
The free aspect is not the only appealing thing about Blender. Apart from being one of the best face animation software to date, you can do pretty much everything with it.
Unlike Adobe’s Character Animator, Blender also supports its drawing tool. Therefore, you won’t have to bother with installing other third-party apps for this.
The current version further simplifies the learning process by adding dozens of new nodes you can discover with a simple search inside the program.
Blender is especially great for creating animated characters. What makes Blender stand out from its competition are its lighting effects, textures, and different materials.
Speaking of materials, there is an immense library out there, so you can make your pick.
What’s also great is that Blender’s UI is customizable. This is excellent news for those who felt slightly intimidated by Maya.
For those with programming skills, Blender supports a Python API which can run scripts that can further customize your layout, colors, interface, etc.
In summary, because of its free, open-source nature, we can safely say Blender is easily one of the best face animation software to date.
Here are some of Blender’s key features:
Create poses for your character that you can store in your own library
Advanced sound synchronization
Sculpting with masks and dynamic topology
Motion tracking
Real-time preview of the tracked footage
Extensive node library to enhance your compositions
A titan amongst 3D animation software applications, Houdini is used by companies such as Disney, Pixar, and DreamWorks, just to name a few.
When deciding which is the best face animation software, a strong case can be made for Houdini. Why is that?
For starters, their character animation options are close to unparalleled. Not only can you animate your face, but you also have complete control over details such as muscles, flesh, fibers, hair, and others.
Also, their new patch introduced an additional feature called KineFX. So if motion detection is your thing, then your character’s place is definitely in Houdini’s Studio.
If you think Houdini is your answer, then you should know that a free option is also available. It’s not as potent as the paid one, but it’s enough to give a sense of how this software works.
Houdini is best for creating simulations of anything fluid. Some prime examples include smoke, fire, particle movement, hair, and everything that entails natural movement.
In a nutshell, Houdini is a fantastic tool for creating effects for a scene. Although you can make the whole scene in Houdini, most of the time the modeling and rigging of the character are done with other tools.
In a sense, Houdini is the best face animation out there, as it’s primarily used for creating effects and animating a scene or a character.
Some of Houdini’s key features include:
Advanced facial rigging software
Motion capture support
Keyframes for controlling your animations and geometric modeling
Cinema 4D is one of the leading software programs for 3D modeling and animation.
What makes Cinema 4D an amazing product is its optimization protocol. New features are added gradually every year, making Cinema one of the best face animation software programs to date.
The learning isn’t as steep as with Houdini, making it an ideal option even for beginners. In addition, there is also an unrestricted free trial, for you to try out all the features Cinema 4D offers.
Cinema 4D is best for photorealistic renders and 3D animations. What sets it apart from Blender and Maya is its user interface.
There is no denying that Cinema 4D sports one of the most intuitive and friendly interfaces in the 3D modeling industry.
It’s fast, flexible, and incredibly robust, making it a fantastic choice especially if you are just starting your journey into visual effects.
Another highlight is its procedural and polygonal modeling. This granular, node-based control, allows for precise control in creating demanding video game graphics, complex architectural landscapes, or motion graphics.
Talking about motion graphics, Cinema also has a built-in tool called Mograph. What Mograph does is speed up or accelerate your animations to the desired degree.
This is an incredible feature that further adds to Cinema’s flexibility and rationality. What do we mean by rationality? Mainly that Cinema is intuitive and very logically structured.
Cinema 4D key features:
Lens distortion support
Houdini engine integration
SketchUp integration
Easy-to-use, flexible interface great for beginners
Timeline view and filtering
Advanced pose library for creating dynamic characters
Choosing the best face animation software will largely depend on your goals. Another thing to take into consideration is time, as some of them have a pretty steep learning curve.
In terms of overall performance, features and cost, there is no denying that Houdini is a top choice. Although not as easy to learn as Cinema 4D and Adobe Character Animator, the result will be worth the effort.
And that’s about all from us. If you’re looking to get into the world of animation, consider using whiteboard animation software as well.
Feel free to leave us a comment and let us know what is your favorite software for animation.
System Idle Process helps to increase the efficiency and responsiveness of your computer by freeing up resources used by other programs and processes.
However, you may have noticed that your computer’s CPU usage for the System Idle Process is sometimes high. System Idle Process High CPU may consume many system resources instead of helping your system perform at its peak. This can be a problem for gamers who have limited hardware.
This problem can also occur when your PC runs for a long time or uses multiple programs simultaneously, and the CPU usage suddenly jumps up to 100%. Luckily, you can easily fix the high CPU in Windows 11.
Why is my CPU usage so high in Windows 11?
Your computer’s CPU usage measures how much your CPU is being used at any moment. High levels can cause lag or slow performance because it monopolizes your processor’s resources.
Some of the most common causes:
Programs running in the background – If you have too many programs running at once, some will be forced to the background, which means they’re not actively doing anything — but they still take up valuable memory.
Viruses and malware – If your computer is infected with a virus or malware, it can cause all kinds of problems. You’ll notice that the computer runs slow and programs take longer to load than they should. You need to scan and remove these viruses with the best antiviruses for Windows 11.
Excessive disk activity – With a high amount of disk activity, your computer will constantly be reading and writing data to the hard drive, which takes up a lot of CPU time.
Corrupted or damaged files – If you have corrupted or damaged files on your computer, they may be using up unnecessary processing power. You can repair these files manually or with dedicated software.
Bad hardware drivers – If you’ve recently installed new hardware, it’s possible that the drivers for that hardware aren’t working properly. To fix this, try uninstalling the faulty ones with a driver remover and reinstalling them.
If you see high CPU usage, it’s a good idea to initiate the System Idle Process to see what’s using up all that processing power so you can determine if it needs to be addressed.
So, Is System Idle Process important? It is responsible for monitoring your PC’s CPU and memory usage and, if necessary, will initiate additional processes to help increase performance.
How can I fix System Idle high CPU?
1. Disable Startup apps and programs
Hit the Windows key, type Task Manager in the search bar, and click Open.
Click on the Startup tab and right-click the unnecessary programs.
Select the Disable option.
Alternatively, you can uninstall an app you don’t need anymore to free up space and prevent it from taking up too much CPU.
2. Perform Disk fragmentation
1. Hit the Windows + E keys simultaneously to open File Explorer.
2. Right-click on the drive where Windows 11 is installed (in this case Drive C) and select Properties.
3. Select the Tools tab and then click Optimize under Optimize and defragment drive.
4. In the new window, select Drive C again and then click on Analyze then Optimize.
3. Perform a Clean Boot
Press Windows + R keys simultaneously to open the Run command.
Type msconfig in the dialog box and hit Enter.
Select the General tab in the System Configuration window that opens.
Check the Load system services box and uncheck the Load startup items box under Selective startup.
Click on the Services tab, check the Hide all Microsoft services box, click on Disable all, then click OK to save the changes.
Now, click the Startup tab at the top and select Open Task Manager.
Right-click each of the apps there and select Disable.
Finally, go back to the System Configuration window and click the Apply button, followed by OK.
After applying the last step, you can now restart your PC.
How do I disable System Idle Process in Windows 11?
If you feel that the System Idle Process is slowing down your PC, you can disable it. To do so, follow the steps below:
Hit the Windows key, type Task Manager in the search bar, and click Open.
Click on the Details tab, locate System Idle Process, and click on End task.
We hope this guide will assist you if you are facing this issue. Remember to refer to our fix article when you have an empty task manager with a high CPU.
If your CPU is on its last leg and is worn out, we also have a rich list of the best CPUs for Windows 11 you can choose from if you are in the market for an upgrade.
In the comment section below, let us know which solution worked best for you.
Most browsers, or any app, consume a certain amount of resources. But Google Chrome’s high CPU usage has troubled a lot of users.
Google Chrome is the most used browser, even though it uses a lot of CPU. But there are a lot of unanswered questions here. Is Chrome supposed to consume so many resources, or is it just the case with you? Would modifying the Chrome settings help?
Read the following sections to find out the answer to these and other questions, along with the most effective solutions if Chrome’s CPU usage is high.
Is it normal for Chrome to use a lot of CPU?
Google Chrome is known for high CPU and memory usage. So, if you ever see it doing that, fret not! Things are perfectly normal.
Chrome’s CPU Usage
But if the CPU usage goes past 70-80% or remains at that level even if you are not running several tabs simultaneously, there might be a problem.
It could be an installed extension, malware on your PC, the Chrome files may be corrupt, or you might be using Google Chrome on a virtual machine causing high CPU usage, among other reasons. Here are some of the cases:
Chrome has high CPU usage when playing video: Encountered when playing HD videos on Chrome
YouTube has high CPU usage on Chrome: Faced when running YouTube on the browser
Chrome has high CPU usage when closed: This happens when Chrome is configured to run in the background
Google Chrome has high CPU usage on startup: This is seen when you add Chrome to the list of startup apps
High CPU when browsing the Internet: The installed extensions are to blame here
Google Chrome high CPU on Zoom: This happens when you attend Zoom meetings on the browser
Facebook high CPU usage on Chrome: Encountered when there’s too much data to be loaded
Twitch high CPU usage on Chrome: This is the case when it’s the CPU decoding videos instead of the GPU
Google Chrome high CPU on Java: Encountered because an additional extension is required for it
Google Chrome high CPU usage on RDS server: Reinstalling Chrome or removing add-ons seems to be the only viable solutions
Quick Tip:
To overcome this issue faster, start surfing the web with a browser that is already way lighter, without any tweaking. We highly recommend Opera One as a great Chrome alternative.
It uses way less memory and CPU, even with multiple open tabs. Plus, it has a battery-save mode that restricts non-vital tasks, offering better performance.
Opera One
Enjoy fast browsing with this light tool with minimal CPU impact.
Why is my Chrome CPU usage so high when playing games?
The CPU usage might be high if you are playing a game on Chrome or somehow connected to the browser. Several online games lead could lead to the problem.
Another reason behind it is streaming high-quality content, so high CPU usage is not uncommon if the game has high specifications or very detailed graphics. Or it could just as well be an extension installed by the game or the user to boost its performance.
Here are some of the cases where the issue is reported:
Chrome high CPU usage in Neopets: Restarting the browser helped users in the case
Chrome high CPU usage in Geoguessr: Performance is affected, and the map starts to load slowly
High CPU usage Chrome in RuneScape: Generally has to do with the configured frame rate
High CPU usage Chrome in AdventureQuest: Switching to a lighter browser helped users here
Chrome high CPU usage in Pokemon Showdown: It’s a common problem and could have to do with the hardware
High CPU usage Chrome in Gartic: Modifying the settings would help
High CPU usage Chrome in Slither: Installed extensions generally lead to the issue
Chrome high CPU usage in Frogger: You can try relaunching the browser or disabling add-ons.
Why is Chrome always running in the background?
Some apps and extensions require Chrome to run in the background for effective functioning. These include email notifications or chat apps.
But you can always disable Chrome from running in the background by modifying the browser settings. Google Chrome does offer an option for it.
Here’s how you can disable that:
Launch Chrome, click on the ellipsis near the top-right, and select Settings from the flyout menu.
Select the System tab from the navigation pane on the left.
Now, turn off the toggle for Continue running background apps when Chrome is closed.
That’s it! Now, Google Chrome would no more run in the background after you close it, which should, to a certain extent, fix the high CPU usage issue.
What happens if you force stop Chrome?
When you force-stop Chrome, the browser, and all the related processes will terminate immediately. This should be avoided since force-stopping Chrome can affect the browser files, and the correct way is to terminate it using the Close button.
Force-stopping Google Chrome
But, if the browser is not responding and you can’t access the various controls, force-stopping Chrome is the only option. Though try to avoid doing it as far as possible.
Can high CPU usage damage your computer?
High CPU usage will certainly slow down the computer but wouldn’t damage it if you have the temperature under control. Many users who perform video rendering or are into extensive gaming run their CPU at 100% for hours without causing any damage to it.
So, keep the temperature under check, somewhere near 50 °C. As soon as the temperature goes beyond 75 °C, it could damage the computer.
But again, most modern computers would automatically shut down on reaching this level and wouldn’t turn on until the temperature returned to the normal range.
Locate the Chrome shortcut, right-click on it, and select Properties.
2. Navigate to the Compatibility tab.
3. Tick the checkbox for Run this program as an administrator and click on OK to save the changes.
2. Remove installed extensions
Launch Google Chrome, click on the Extensions icon in the Toolbar, and select Manage Extensions.
Now, click the Remove button for the extension causing all the trouble.
Again, click Remove in the confirmation prompt.
Restart the browser for the changes to come into effect fully.
If you started encountering Chrome’s high CPU usage after installing an extension, it could just as well be responsible for the issue. In this case, simply removing the extension should do the trick.
3. Update the graphics driver
Press Windows + S to launch the Search menu, enter Device Manager in the text field, and click on the relevant search result.
Double-click on the Display adapters entry.
Right-click on the graphics adapter, and select Update driver from the context menu.
Now, select Search automatically for drivers.
Windows will now scan and install the best available driver on the computer. This method is really simple and quick. Updating the graphics driver should fix Chrome’s high CPU usage and improve its performance, along with other programs.
Or, if you want quicker results and automate the task, so you’ll never have driver issues in the future, use Outbyte Driver Updater. It’s a light software that can find and install new driver versions as soon as they drop.
Chrome high CPU usage on Windows 10
1. Clear browsing data
Press Ctrl + H to launch Chrome’s History, and click on Clear browsing data on the left.
Now, click on the Time range dropdown menu, and select All time.
Tick the checkboxes for all three, Browsing history, Cookies and other site data, and Cached images and files, and then click on Clear data on the bottom.
A corrupt cache or other Chrome data often leads to high CPU usage. In this case, clearing all the data and starting fresh is the best way.
2. Scan for malware
Enter Windows Security in the Search bar, and then click on the relevant search result.
Click on Virus & threat protection from the options listed here.
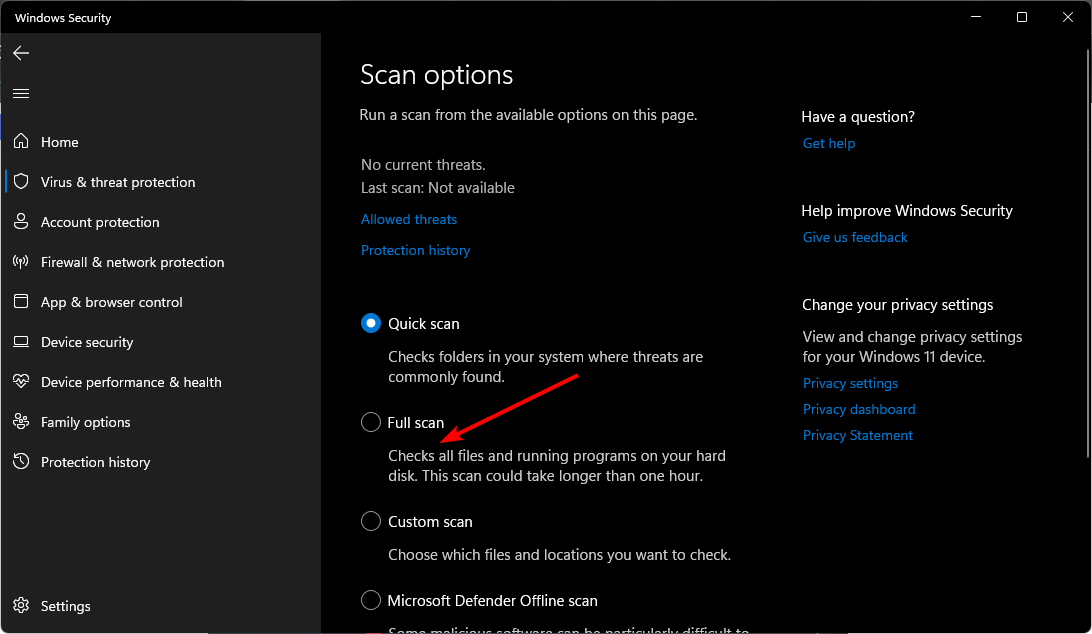
Click on Scan options.
Finally, select Full scan and then click on the Scan now button.
For many users, it was a virus behind Google Chrome’s high CPU usage, and running a full system scan did the trick. If you don’t use Windows Security, run the scan using any effective third-party antivirus.
3. Disable software reporter in Chrome
Press Windows + R to launch the Run command, enter regedit in the text field, and click OK to launch the Registry Editor.
Click Yes in the UAC (User Account Control) prompt that appears.
Now, paste the following path in the address bar at the top and hit Enter:HKEY_LOCAL_MACHINE\SOFTWARE\Policies
If Google and Chrome keys do not exist here, right-click on Policies, hover the cursor over New, select Key, and then name the one created as Google.
Now, right-click on the Google key, move the cursor over New, select Key, and name this one Chrome.
Next, right-click on the empty portion, hover the cursor over New, select DWORD (32-bit) Value, and then name it ChromeCleanupEnabled.
Right-click on the DWORD, and select Modify.
Finally, enter 0 under Value data and click OK to save the changes.
Software Reporter is a feature that comes bundled with Chrome. It collects data about harmful software, extensions, or processes on your computer and sends it to Google.
Many users mentioned that it was the Software Reporter tool behind Chrome’s high CPU usage in Windows. There are other ways to disable the feature, but the Registry method is by far the best though you will have to be careful while making the changes.
Chrome 100% CPU usage on Windows 7
1. Disable Hardware acceleration
Launch Chrome, click on the ellipsis near the top-right, and select Settings.
Select System from the tabs on the left.
Disable the toggle for Use hardware acceleration when available, and then click on Relaunch for the changes to effect.
2. Reset Chrome to its default settings
Click on the ellipsis, and select Settings.
Select the Reset and clean up tab from the left.
Click on Restore settings to their original defaults.
Finally, click on the Reset settings button.
If nothing else works in Windows to fix high Chrome CPU usage, you can always reset the browser to its default settings. This method has worked for the majority of users.
Click on the ellipsis near the top-right, select More tools from the flyout menu, and click on Task Manager.
Now, locate and select the process consuming maximum resources, and click on End Process.
If you don’t get the desired results after trying both solutions, use CCleaner. It’s a handy tool that will help you tweak some settings to speed up Windows 7 and stop high CPU.
Chrome high CPU usage on Ubuntu
Reinstall Google Chrome
Sometimes, problems with the browser arise due to issues that creep in during the installation, and the best way out of this is to reinstall Chrome itself.
After you have reinstalled Chrome, the high CPU usage problem should be fixed, and you wouldn’t notice any lag or issues with the computer related to Google Chrome from now on.
Chrome high CPU usage on Linux
Reinstall a previous version of Chrome
Open Terminal, and paste the following command to view all the versions of Chrome stored on the computer. Remember, the version currently installed will have three asterisks before it.sudo apt policy chrome
Now, note the desired version, and run the following command to install it. Just replace Version to install with the one you want to revert to.sudo apt install chrome=Version to install
How much CPU should Chrome use?
There is no definite answer to this. For some users, Google Chrome might use 30% of the CPU, while for others, the CPU usage would be high, somewhere between 60-80% or even 100% if multiple problematic extensions are installed.
So, it all depends on the browser settings and how you have set it up. To keep your computer’s performance unaffected, keep the CPU usage below 60%, and you should be good to go.
That’s all there is to high CPU usage issue with Chrome on every operating system, and by the time you reach this part of the article, the problem should be eliminated.
Are you unable to hear sound through your Xbox One headset? Or maybe the mic stopped working, the headset picks up other voices, or it keeps buzzing, and has bad lag and latency issues?
These are just some signs of the Xbox One headset not working, and it can get pretty frustrating while making the whole gameplay experience so not worth it – I mean, what’s a game without sound or feedback?
What you need to note, however, is that controllers connected via Bluetooth don’t support attachments such as headsets.
If you want to use one on your PC, connect the controller using a wireless adapter or USB, and then connect the headset directly to the controller.
We’ve listed several fixes to resolve this problem so you can get back to your game and enjoy every bit of it.
What can I do if my Xbox One headset is not working?
1. General troubleshooting solutions
Disconnect the headset or unplug the headset cable from the controller, and then reconnect it firmly to the controller
Check that the headset is not muted by checking the mute button on the headset controls
Increase the audio by going to Settings>Device & Accessories and select your controller to adjust audio settings
Use a different controller or headset to check for any malfunction on the hardware
Update your controller to get the latest software
Ensure you’re using the Xbox One headset with Xbox One controller only as it isn’t intended for use with other devices, plus the console doesn’t transmit game sounds or music through the headset
Clean your Xbox hardware by checking the headset, cord and connector for any defects. Ensure there’s no dirt/debris on the headset connector.
Check the controller’s batteries, if they’re low, they won’t provide power to the headset, so you need to charge it before using it.
Reboot your console by unplugging the power cord for 15 seconds.
If you cannot hear the sound, or others cannot hear you when using the headset, here are a few general fixes you can try before using any other solutions.
2. Check your profile/Configure privacy and online settings
Sign in using one of the following accounts: Your Xbox account, and the parent account of the child account you’re having problems with.
Open the guide and select Settings.
Under Account, select Privacy & online safety.
Select View details & customize.
Click Communicate with voice and text.
Choose specific friends or everybody, depending on who you want that profile to talk to.
Sometimes kid profiles prevent chatting, and if the profile you’re using has parental controls switch or change it. Once you’re done, you should fix the headset not working on Xbox One issue.
3. Power cycle your Xbox One console
Press the Xbox button to open the guide.
Select System, then Settings.
Select Power & Startup.
Then, select Power mode and startup.
Select Power mode.
Choose Energy saving.
Perform a hard power cycle by holding down the Xbox button for 10 seconds, then press the button again to restart it.
Try the disc again and wait to see if the Xbox One S console will read it. If it reads, revert back to Instant-On power mode.
4. Check your settings
On your console, go into the Home screen.
Select My Games and Apps.
Open Apps.
Select Party and then Start a Party.
Speak into the mic and if your mic/controller work, you’ll see a highlight next to your name.
Since your headset isn’t muted and you’ve turned your Xbox on and off; plus it’s unlikely your controller is not associated with your profile, it’s probably not related to your NAT settings.
5. Adjust game/chat balance
You can change the balance between the sound from the game and that of the chat room using the headset adapter.
If the balance for the game is 100 percent while chat is 0 percent, the sound you hear will only be from the game and not chat – and vice versa. You can change the balance by pressing the buttons on the adapter (left side).
6. Update firmware
To fix Xbox One headset not working, your controller’s firmware needs updating in order to be compatible with the headset’s adapter.
When your controller is updated with the latest software, you get full use of the headset adapter capabilities, including important controller improvements.
Updating can be done wirelessly, via USB, or via your PC.
6.1. Update firmware wirelessly
Sign in to Xbox Live on your Xbox One console and install the latest system update if prompted.
If you have a stereo headset adapter, plug it into the bottom of your controller so it can also get updates.
If you’re using a stereo headset adapter, plug in a headset (a headset must be plugged in so the adapter will turn on).
Open the guide.
Select System.
Open Kinect & devices.
Click Devices & accessories.
Select the controller you want to update.
Then choose Device info.
Click the Firmware version box.
Select Continue and let your Xbox one update the controller.
6.2. Update firmware via USB
If your controller can only be updated via USB do the following:
Sign in to Xbox Live on your Xbox One console and install the latest system update if prompted
If you have one, plug the stereo headset adapter into the bottom of your controller so it can also get updates.
If you’re using a stereo headset adapter, plug in a headset (a headset must be plugged in so the adapter will turn on).
Plug the big end of the included USB cable into the port on the left side of the console,
Plug the small end into the top of the controller.
Instructions to install the update will appear. If instructions to install the update don’t automatically appear, you can start the process manually by opening the guide then select System> Kinect & devices > Devices & accessories> controller you want to update.
Select Device info
Click the Firmware version box
Choose Continue.
Press the Xbox button on the wireless controller to turn it on. Your controller is now up to date, and you’re ready to use your Xbox One Stereo Headset Adapter.
6.3. Update firmware via PC using Xbox Accessories app
Search for Xbox Accessories and launch the Xbox Accessories app.
Connect your Xbox One Wireless Controller using a USB cable or the Xbox Wireless Adapter for Windows. You’ll be prompted to update to Windows 10 if you’ve not yet done so.
When the controller is connected, you’ll see the message Update Required if an update is mandatory.
Install the update. You can also go to Device Info to check for an update
7. Check the chat mixer
Open your Settings.
Then, go to General and select Volume and audio output.
Make sure your Headset audio is set to Stereo uncompressed.
Under Party chat output make sure you have Headphones & speakers selected.
Go to Chat mixer.
From the options, use the slider for the Chat Mixer and slide it to the middle so that other sounds aren’t muted.
If you’re unable to hear other people, check the chat mixer from the Xbox One settings on the left sidebar menu.
8. Replace your peripherics
Replace your controller
If you’ve followed these troubleshooting steps but your chat headset still doesn’t work, it may need to be replaced. You can order a replacement, through Device Support on the Xbox site.
Replace your headset
One of the most important things to consider when you pick a headset is how comfortable to wear they are. Even if you do not spend a lot of time gaming, a comfortable headset can significantly improve your experience.
You also need to make sure that both the sound quality of the headphones and the quality of your microphone are on point to ensure an immersive experience as well as good communication.
Other things to take into consideration when looking for the best gaming headset are the quality of the Bluetooth signal in the case of wireless headphones, noise-canceling, and good syncing with your output and input sources.
Were you able to get your Xbox One headset working again using any of these solutions? Let us know by leaving a comment in the section below.
Monitors are some of the essential hardware components of your PC. Thus, keeping them working in optimal conditions is mandatory. However, some users reported that their LG monitor is not detected on Windows 10. After doing the research, we discovered that this issue occurs for both primary and secondary monitors.
Usually, monitors are not working due to some defective video card or some troubles related to the graphics driver. Note that it is also possible to encounter monitor failures for no specific reason. Let us check out the solutions to resolve the LG monitor not detected in Windows 10 problem.
Why isn’t the LG monitor detected in Windows 10?
After some research, we have deduced a list of reasons are a few reasons why the LG monitor is not detected in Windows 10:
Your monitor isn’t connected to a power source: You should ensure that the monitor is connected to a power source for it to turn on. It may sound silly, but very often, silly things can be a reason for big problems.
There is some issue with your GPU: If there is some internal hardware issue with your GPU, then it will trigger multiple monitor issues.
How do I get my LG monitor recognized on Windows 10?
Before anything else, you have to:
Make sure that your monitor is powered correctly. If your PC’s power is working, but the monitor doesn’t, it could be related to the power cable for your LG monitor. You might check if there is a standby light when your monitor is plugged in.
In addition, you can also try to plug the monitor into other devices to see if it’s detected.
If none of these worked, we recommend you check if replacing the LG power cable will solve this annoying issue.
1. Update Windows
Press the Win + I buttons to open Settings.
Select Update & Security.
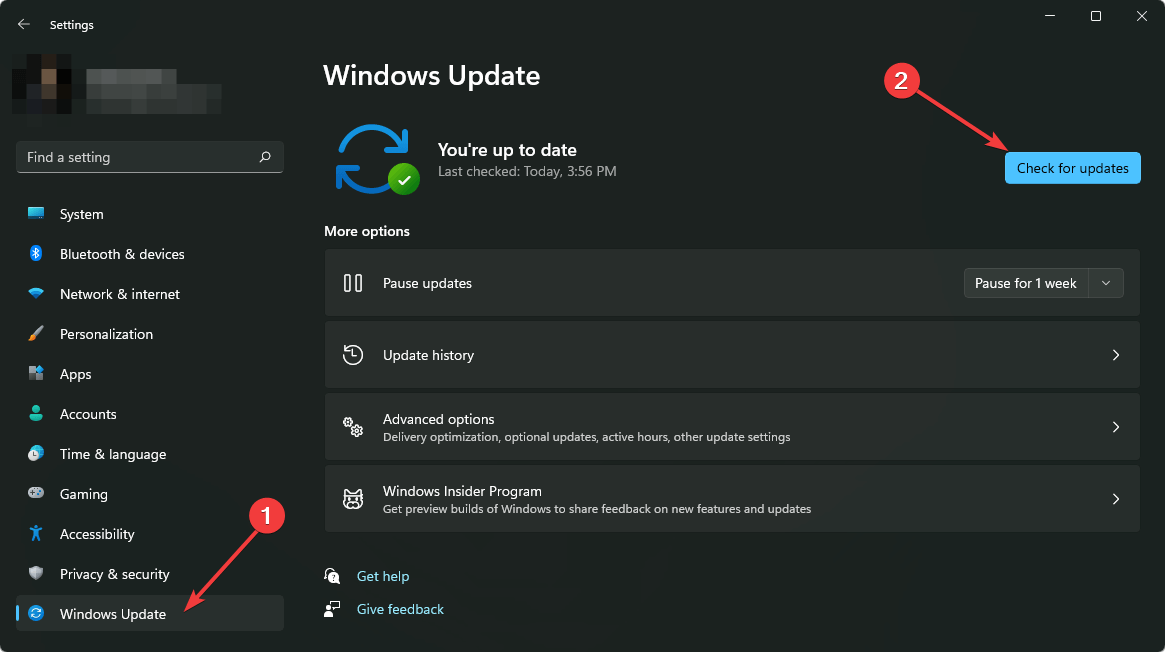
Click on Windows Update on the left pane.
Click on Check for updates on the right side.
If there is a new update available, then your system will prompt you to install it. Install the latest update right away and check if this resolves the issue or not. Sometimes, the best option to fix your hardware components is to keep your operating system always up to date.
2. Run the troubleshooter
2.1 Use Settings
Press the Win + I buttons to open Settings.
Click on Update & Security.
From the left pane, select Troubleshoot.
Click on Hardware and Devices on the right.
Follow the on-screen instructions to try the troubleshooter.
Windows will automatically search for troubles and fix them.
Type the following command and press Enter. msdt.exe -id DeviceDiagnostic
Click Next.
The Hardware and device troubleshooter will begin scanning your PC for any issues and will prompt you to apply the fixes.
NOTE
For those ones of you who didn’t manage to find the Hardware and Devices inside the Windows Settings menu, you should follow the above steps to run the troubleshooter via Command Prompt.
3. Update the display driver
Open the Start Menu.
Open Device Manager.
Expand the Monitors section.
Right-click on your LG monitor,and select Properties.
Select the Driver tab.
Click on Update Driver.
Click on Search automatically for drivers.
Windows will automatically search for the needed driver and will quickly update it.
Search for your LG monitor’s name, then select it from the shown list.
Click the red See More button, under the Windows Monitor Drivers.
Download the needed version.
Right-click on the driver set-up file, then selectProperties.
Click on theCompatibility tab.
Check the box next toRun this program in Compatibility mode for, and select an older OS version.
The driver will install it.
Restart the computer and check if the issue persists.
5. Use a dedicated tool
Considering your LG monitor is not detected on Windows 10 due to some driver-related problems, the options above might work, but they are time-consuming. Manual methods, might not be as useful as trying a dedicated tool.
Using third-party software will surely save much more of your time, installing, fixing, and updating any of your drivers in an automatic way. Thus, you’ll not have to bother yourself with these kinds of processes.
We would suggest you make use of a recommended software called Fortect Driver Updater. Using thistool, not only you can keep all of your drivers up to date with just a few clicks, but you can also schedule driver scans, and even create driver backups.
In the Appliances, TV/Audio/Video & Computers Repair, click on the Start a Service Request red button.
Log in to your LG account, or create a new one.
Follow the on-screen instructions.
If none of the listed solutions worked for your LG monitor, you’ll probably need to contact the LG support team. Thus, you’ll receive some more specialized information regarding your issue.
We made sure to select only the best options you should try if your LG monitor is not detected on Windows 10. We hope at least one of these solutions will help you to solve this irritating problem.
LG devices have their share of issues, and we wrote about LG error code 106 in a separate guide, so don’t miss it.
Also, you can always check a full guide for other efficient ways to fix the second monitor not detected on Windows 10 issue. Because your opinion is important to us, don’t hesitate to share your thoughts in the comment section below.
If you are getting a Duplicate unique key error in WoW, then you are not alone. This error can occur when you try to run the game or attempt to access the launcher. It’s no surprise as the multi-player game experiences high latency and frequently disconnects.
WoW is no stranger to errors as users have also experienced error BLZBNTAGT00000BB8 where they are prompted to update their game. However, as soon as they try to update, they are met with this error code.
What causes the duplicate unique key error in WoW?
If you’re wondering what triggered the duplicate unique key error in WoW, below are some possible causes:
Incompatible mods – If you have a mod installed incompatible with your version of World of Warcraft, or your addons have been reset after an update, this can also happen.
Cached files – WoW is a huge game with a lot of data, and it’s not uncommon for things to go wrong, especially when too much data accumulates over time.
Corrupt data – If you have recently installed any third-party applications or tools that may interfere with the Blizzard launcher, they may cause issues with WoW.
Compromised account – If you’re using the wrong account, or if your account has been compromised, you might see this error message when you try to log in to World of Warcraft.
Server conflicts – Sometimes, it has everything to do with Blizzard and nothing to do with you. In such cases, you can only wait.
How do I fix the duplicate unique key error in WoW?
To ensure that you have covered all the bases, check the following before proceeding to the advanced solutions:
Verify the server status and check for any maintenance schedules.
Log out and log back into your account.
Try restarting your PC to clear any temporary files.
1. Clear cache
Hit the Windows + E keys to open File Explorer.
Go to the World of Warcraft folder and locate the Cache file: C:\program Files (x86)\World of Warcraft\_retail_\
Right-click on it and select Delete.
2. Run WoW as administrator
Right-click on the Blizzard launcher and select Properties.
Navigate to the Compatibility tab and click on Change settings for all users.
Check the Run this program as administrator box under Settings.
Some applications require administrative access to function properly. If you’re using a local account, you need to log in using an administrator account or assign yourself some administrative privileges. Other errors that may require permissions include WoW fatal error 134.
3. Use the WoW scan and repair tool
Open your Blizzard account and click on Games.
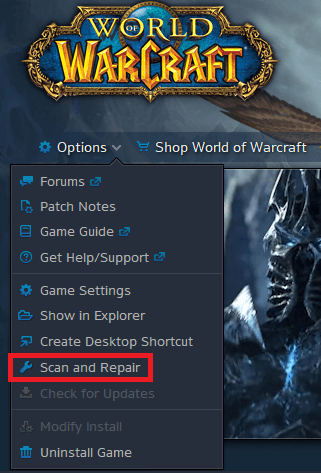
Select WoW, navigate to Options, and click on Scan and Repair.
Select Windows Update and click on Check for updates.
Download and install if available.
5. Contact Blizzard customer service
The Duplicate unique key 8783 error is a fairly new issue, so it is possible that the team at Blizzard is not yet aware. If you have tried all the steps above and have been unable to fix the issue on your own, then you should contact Blizzard customer service for help.
Since the error manifests itself in different forms such as:
Duplicate ‘unique key’ 8783 found for ID 1572 in table ItemBonusListGroupEntry
WoW error 134 duplicate ‘unique key’ 211489 found for id 1948 in dbfilesclient\pvptalent.db2
Ensure to include all the specifics when reporting so that Blizzard can be able to identify and respond to the problem faster.
It is also possible that your router has a build-up of cache that may have become corrupted over time. Resetting it or resetting your network will allow you to start up with no issues.
Aside from the duplicate unique key error in WoW, you may also encounter other related problems. These can include driver compatibility issues with WoW so ensure you check out our article on how to counter this hurdle.
Let us know of any additional thoughts you may have on this topic.
Although not all laptops support it, using the precision touchpad can make navigation in your computer more straightforward and quicker. This article looks at how you can customize your precision touchpads on Windows. So, let’s get started.
Make sure customize precision is supported on your PC
Most modern computers run Windows support customized precision touchpad by default. Microsoft introduced the upgraded utility of Precision Touch pad back in 2013 with Intel, and since then it has become a standard utility for almost all laptops.
When you’re looking to tweak your settings for precision touchpads, you first want to make sure your customized precision settings are enabled in the first place. So, here’s how you can do that:
Head to the Start menu search bar, type in ‘settings,’ and select the best match. Alternatively, press the Windows key + I shortcut.
Select Devices.
Click on Touchpad.
Under Touchpad, you should see the following “Your PC has a precision touchpad” setting on your PC.
How to customize precision touchpads on Windows
Now, moving on to the customization part, you’ll see many options to make your settings more useful. Here’s how you can get started with them:
Launch the Windows settings.
Click on Device > Touchpad.
Under the Taps section, click on the Touchpad sensitivity drop-down menu to alter the sensitivity level of your touchpad. You’ll have the following options to pick from:
Most sensitive
High sensitive
Medium sensitivity
Low sensitivity
Apart from tweaking the touchpad sensitivity, you can also change specific tap gestures, such as:
Tap with a single finger to single-click.
Tap with two fingers to right-click.
Tap twice and drag to multi-select.
Press the lower right corner of the touchpad to right-click.
Moreover, you can tweak your settings by using the gesture of scroll content, scrolling direction, etc. Here’s how:
Open the Settings.
Select Devices > Touchpad.
From the “Scroll and zoom” section, select the checkbox to use drag two finders to scroll gestures.
Click on the Scrolling direction drop-down menu to pick either of the two options:
Down motion scrolls up.
Down motion scrolls down.
Tweaking three or four-finger gestures with Precision Touchpad
If you’re using multiple apps or virtual desktops simultaneously, then using the three-finger gestures settings can be helpful when trying to control the audio and volume settings. Here’s how you can get started:
Head to the Start menu search bar, type in ‘settings,’ and select the best match.
Click on Devices > Touchpad.
From there, click on the “three-finger” section, and you’ll have the following options available:
Switch apps and show desktop
Change audio and volume
Change audio and volume
Custom
Now click on the drop-down menu below Taps to customize the three-finger tapping action. You’ll get the following options:
Nothing
Share with Cortana
Action Center
Play/pause
Middle mouse button
Customizing precision touchpads on Windows computers
Microsoft has made great strides in improving the Windows experience over the years. Adding a plethora of customization capabilities available with the touchpad has been one of many aspects of Microsoft’s improvement for Windows. For instance, you even go ahead and alter the entire UI of your Windows by changing everything from the system icons, boot logo, system language, and so on.
An active process that has a possible memory leak is not a new occurrence for PC users. This problem occurs when the system does not release memory that was used by an app or program after it has been closed. The message can be spotted on the popular Webroot program.
A memory leak is when the system uses more memory than it should, which can cause problems with apps and programs running simultaneously and with other processes on your computer.
What is a memory leak?
RAM is a crucial ingredient in both older and newer systems. You can never have too much RAM; the more you have, the better. This is because you cannot foresee your needs, or sometimes your PC is just not using all the available RAM.
When running out of RAM, your system will try to compensate for it by moving some files and processes to the virtual memory. Unfortunately, if this happens, there’s no guarantee that all your data will be safe.
An active Webroot process with a possible handle leak is still running after its last window was closed. This is not necessarily indicative of a leak, as there are many legitimate reasons a process might remain open even though no windows are open.
For example, when you close a window in Windows Explorer, the explorer.exe process remains active because it’s waiting for the following file operation to complete. You can use Task Manager to end the process, and Windows kills off any remaining threads, and the program exits gracefully.
How do I find out what is causing my memory leak?
Memory leaks are a tricky thing to track down. They’re usually caused by code that is not correctly releasing resources or is holding on to references to objects that are no longer needed.
To find the cause of a memory leak, there are two things you need to do. First, you need to make sure there is a leak. Second, you need to find out what is causing it.
Finding out if there is an actual memory leak can be done pretty quickly by using tools like the built-in Windows 11 Resource Monitor or Resource monitor software. To do so, follow the steps below:
Hit the Windows + R keys to open the Run command.
Type resmon in the dialog box and click OK.
Click on the Memory tab and compare the figures with what’s actually available on your PC.
The list of active processes will depend on the number of apps you have installed but some of the common ones include the following:
Chrome.exe
Explorer.exe
RuntimeBroker.exe
Svchost.exe
Spoolsv.exe
SearchHost.exe
dllhost.exe
How do I fix an active process has a possible memory leak?
Before any advanced troubleshooting can take place, try the following:
Press the Start Menu, search Windows Security, and click Open.
Select Virus & threat protection.
Next, press Quick scan under Current threats.
If you don’t find any threats, proceed to perform a full scan by clicking on Scan options just below Quick scan.
Click on Full scan to perform a deep scan of your PC.
Wait for the process to finish and restart your system.
2. Run the DISM command
Hit the Windows key, type cmd, and hit Run as administrator.
Type the following command and press Enter: DISM /Online /Cleanup-Image /RestoreHealth
3. Create a new user account
It’s not uncommon for a user account to be corrupt as unprotected accounts tend to open security holes to third parties. This could end up causing issues such as an active process has a possible memory leak error. The best thing would be to create a new user account.
If this fixes the problem, then there was probably an active process causing issues with your original user account.
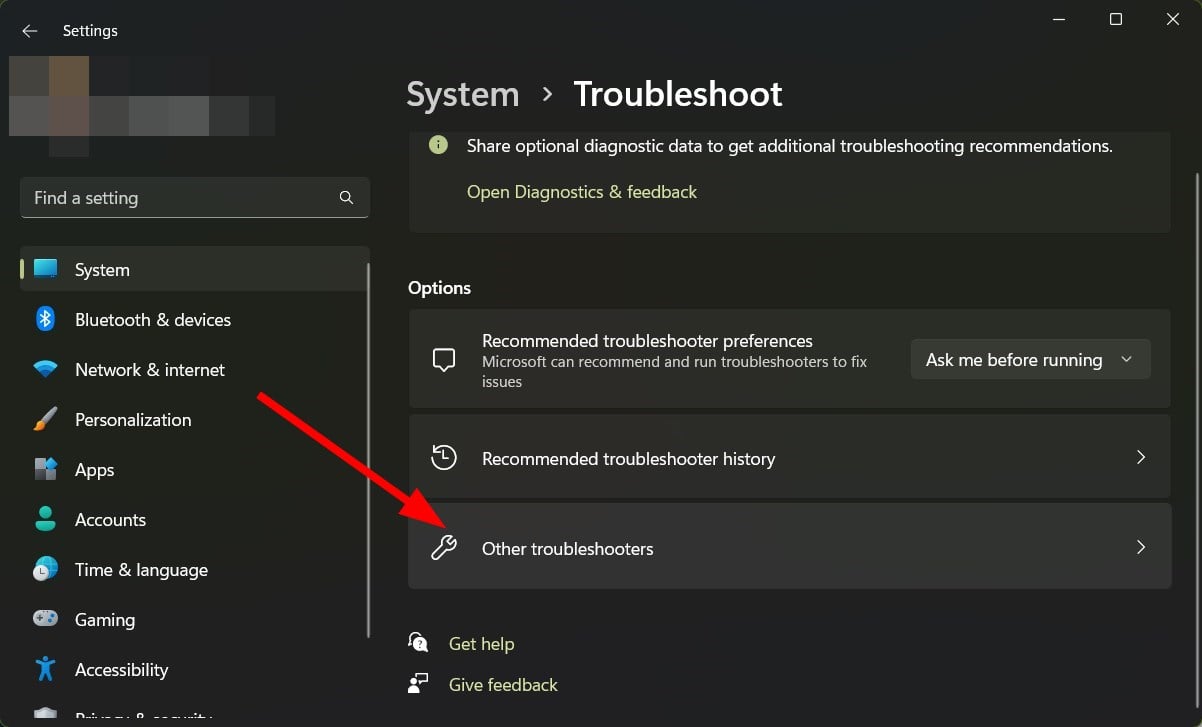
Click on System on the left pane then Troubleshoot on the right pane.
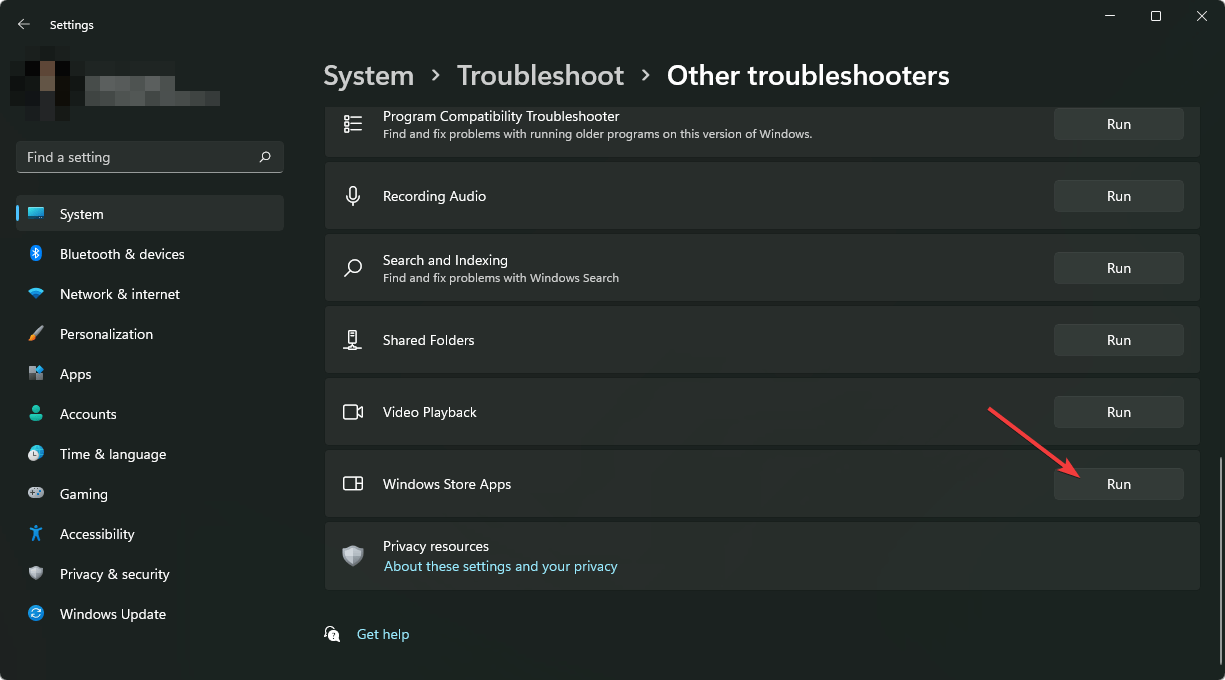
Select Other troubleshooters.
Scroll down, locate Windows Store Apps and click the Run button.
5. Check for Windows updates
Hit the Windows key and click on Settings.
Select Windows Update and click on Check for updates.
Download and install if available.
For browser-related processes, it would be best if you reset the browser or switch to another one with fewer issues. You can also borrow some tips on how to deal with memory leaks in Firefox and apply them to other browsers.
Limiting your RAM usage to slow down such issues can also help improve the general performance of your PC.
Do let us know which process has given you trouble in the past and how you were able to fix it in the comment section below.
If you are stuck with a DHCP not enabled for ethernet warning message on the Network troubleshooter window, your DHCP server cannot assign an IP address. No matter how complex that sounds, the fixes to the problem are relatively simple.
In this guide, we will walk you through some troubleshooting steps to resolve this error right after discussing the reasons for the issue’s occurrence.
How do I fix DHCP not enabled for ethernet?
Begin by restarting your PC and router. Next, disable any VPN or proxy and remove any network-related extensions from your browser. If the issue persists, follow the steps below.
1. Enable the Obtain an IP address and DNS server automatically option
Press Windows + R to open the Run window.
Type ncpa.cpl and hit Enter to open Network Connections.
Go to active connection, right-click it, and select Properties from the context menu.
From This connection uses the following items option, locate and double-click Internet Protocol Version 4 (TCP/IPv4).
From the next window, click on the radio buttons beside Obtain an IP address automatically and Obtain DNS server address automatically.
Click OK and then click OK.
2. Use the Command Prompt
2.1 Enable DHCP
Press the Windows key, type CMD, and click Run as administrator.
Type the following command and press Enter: Netsh Interface IP Set Address "Ethernet" DHCP
Once the process is complete, close the window. Restart your PC.
2.2 Reset the network
Press the Windows key, type CMD and click Run as administrator.
Copy and paste the following commands and press Enter after every command: ipconfig/releaseipconfig/flushdnsipconfig/renew
Type the following commands and press Enter after every command: netsh int ip resetnetsh winsock reset
Launch your preferred browser and go to your router settings page. Here we have used the TP-Link router settings to show you the process.
Enter your credentials to access router settings.
From the left pane, click DHCP.
Now select the radio button beside the Enabled option for the DHCP server.
Click Save or OK as per your router.
Restart your modem.
5. Update the Network driver
Press Windows + R to open the Run window.
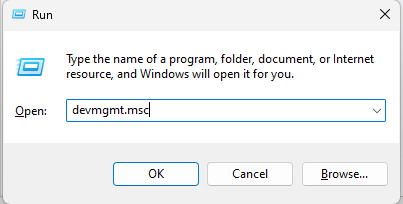
Type devmgmt.msc and hit Enter to press Device Manager.
Click on the arrow next to Network adapters to expand.
Right-click the Network adapter and click Update driver.
On the next window, click Search automatically for drivers.
Follow on-screen prompts to complete the process.
Restart your PC.
Other than updating your drivers manually, you can use a specialized tool like Fortect Driver Updater that can do that automatically by scanning your PC for outdated drivers and replacing them with the latest options.
The DHCP is not enabled for Ethernet means may occur if the DHCP is not configured correctly. Additionally, if your device is set to use a static IP address or DHCP is disabled, you may encounter this issue.
Regardless the steps above should help you fix this error. Feel free to let us know which worked for you in the comments section below.
Project: Playtime, a free-to-play multiplayer horror game, has been praised since its launch. However, like other games, it is also not free from bugs and errors.
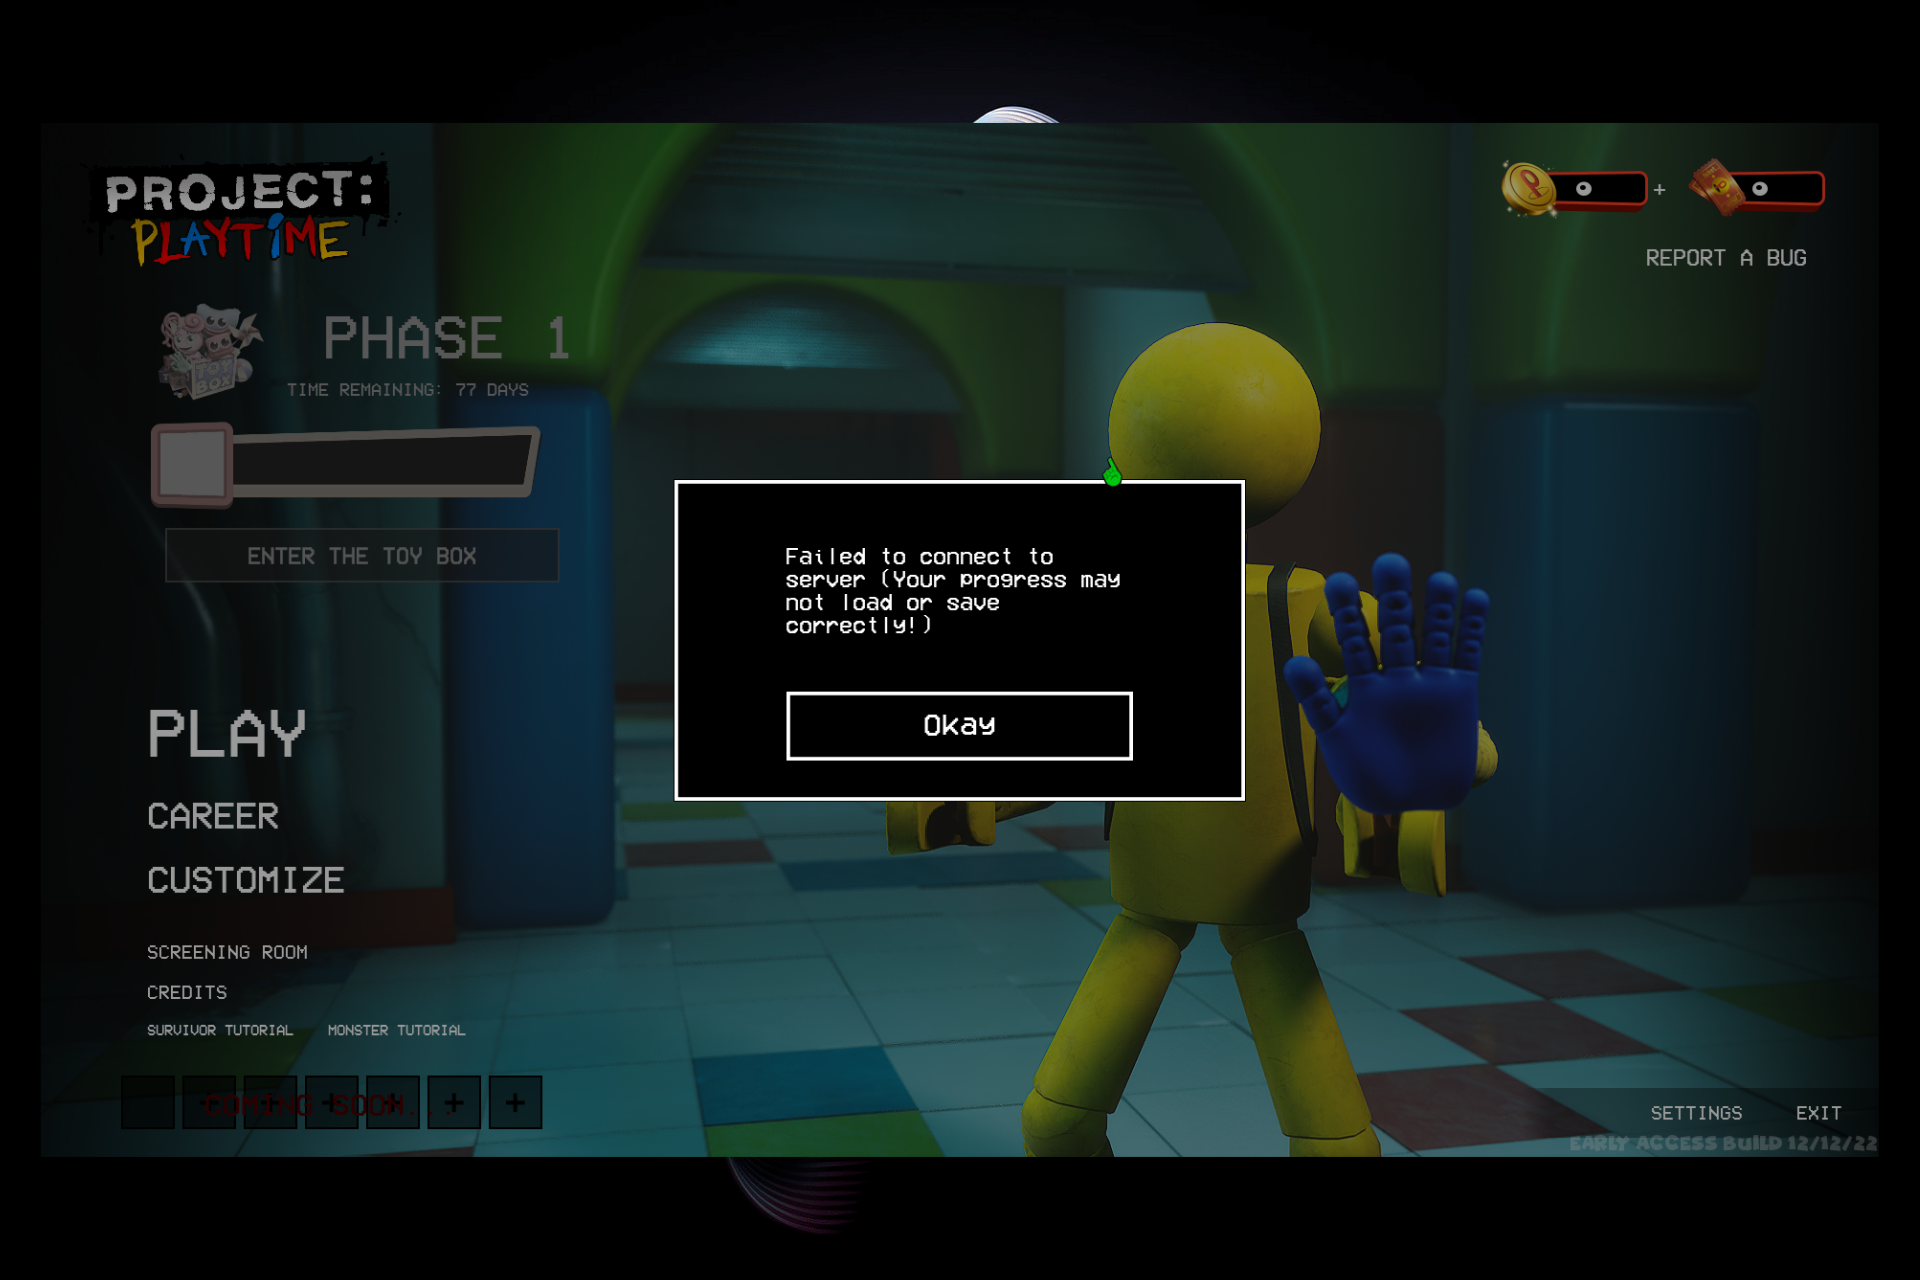
Many users have reported getting Failed to connect to the server. In addition, your progress may not load or save correctly on Project: Playtime when trying to launch the game.
This guide will discuss the reasons for the issue and different ways to fix the problem. Let’s get started!
What causes the Project: Playtime failed to connect to server error?
There can be various reasons why you get this error. We have listed some of the most popular ones:
Network issues – To play the game seamlessly, you need a steady internet connection. If your internet is shoddy, you might get this error while accessing Project: Playtime.
Server outages – If the game server is down due to maintenance or technical issues, you might get the error.
Firewall blocking the connection – Your firewall or antivirus tool might be blocking the connection to the server. It is recommended to add the game to the allowlist of the software.
Cache & cookies – If your browser has an old cache and cookies, these could also cause prevent you from accessing the server. Try clearing the browser cache.
Problem with the device – If the game works fine on a different computer, your PC might be the problem.
How to fix Project: Playtime failed to connect to the server?
Perform the following preparatory checks to ensure that the error is not a result of fundamental issues which may require only subtle tweaks:
If these fixes didn’t work for you, let us dive into the troubleshooting methods to resolve the issue:
1. Check server status
To server status for Project: Playtime, you must check its Twitter page. The developers post all the updates related to the server and bug fixes on Twitter. So if the server is down, they will post there to notify the gamers.
2. Disable IPv6
Press Windows + R to open the Run window.
Type ncpa.cpl and hit Enter to open Network Properties.
Go to active connection, right-click it and select Properties.
Now from This connection uses the following items section, locate and uncheck Internet Protocol Version 6 (TCP/IPv6).
Click OK to confirm.
3. Use Google DNS
Press Windows + R to open the Run window.
Type ncpa.cpl and hit Enter.
Right-click on active connection and select Properties.
Now from This connection uses the following items section, locate and double-click Internet Protocol Version 4 (TCP/IPv4).
Select Use the following DNS server addresses and type 8.8.8.8 and 8.8.4.4 as Preferred DNS server and Alternate DNS server, respectively.
Press the Windows key, type CMD, and click Run as administrator.
Type the following command and press Enter: ipconfig/flushdns
Restart your PC.
5. Verify the integrity game files
Launch Steam and click Library.
Scroll through the games list, select and right-click Project: Playtime
Select the Properties option.
Go to Local Files, and click on Verify Integrity of games files button.
The process might take a while to complete. Once done, relaunch the game to see if the issue persists.
6. Allow the app through the Firewall
Press Windows + I to get Settings.
Go to Privacy & security, and click Windows Security.
Now click Firewall & network protection.
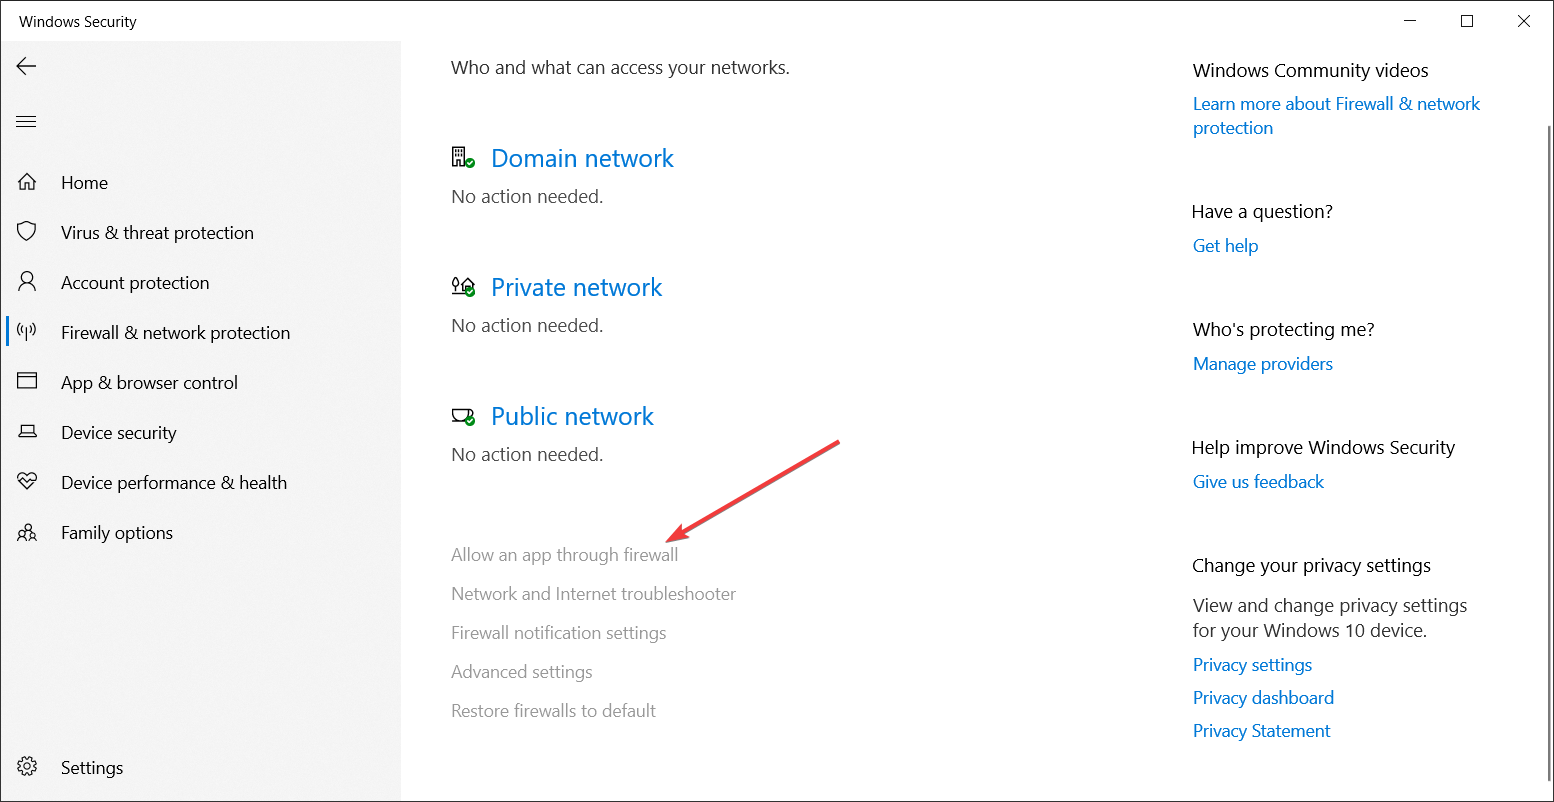
Click Allow an app through firewall link.
On the next window, click the Change Settings button and then click Allow another app.
Click Browse.
Scroll through the list, select the app, and click Open.
Click Add.
Now, click OK to complete the process.
7. Contact Project: Playtime support
If none of the suggested troubleshooting methods worked for you, then you need to contact Project: Playtime support for assistance. Explain the whole situation and all the troubleshooting steps you have used. They might help you with additional troubleshooting or inform you of the issues from their side.
So, these are the steps you need to follow to fix Project: Playtime failed to connect to a server error. Try them and let us know which worked for you in the comments below.
It can be frustrating to get the Authentication rejected error while connecting to the remote computer on TeamViewer. But don’t worry, it can be fixed in no time.
In this guide, we will talk about some tested methods to fix the issue right after discussing the potential reason behind it.
What does authentication rejected mean on TeamViewer?
If you are getting a TeamViewer authentication rejected error when connecting to a remote computer, the login attempt was unsuccessful. Some of the reasons for the same are:
Wrong login credentials – If you have input the incorrect username and password, you might get this issue. Double-check the credentials to rule out the possibility.
Interference by security software – The remote computer’s firewall or security software may be the reason for the issue. First, check the firewall settings on the remote computer and add TeamViewer to the allowlist.
Network issues – If you have a poor network connection, it could stop you from establishing a connection between two computers. Reset your router or check with your ISP for issues.
TeamViewer service stopped on a remote computer – If a service related to TeamViewer is not running on a remote computer, then you need to start it to fix the issue.
How to fix TeamViewer authentification rejected?
Before engaging in advanced troubleshooting steps, you should consider performing the following checks:
Restart your router.
Restart both remote and local computers.
Ensure the TeamViewer app is up to date on both devices.
If you are still stuck with the error, then try these troubleshooting steps:
1. Check login credentials
Launch the TeamViewer app.
Go to Computers & Contacts.
Check if your email address and password are correct.
2. Allow TeamViewer through the Firewall on the remote PC
Press Windows + I to open Settings.
Go to Privacy & Security, then click Windows Security.
Click Firewall & network protection.
Now click Allow an app through Firewall.
On the next window, click Change settings.
Put a checkmark beside TeamViewer Remote Control Application and TeamViewer Remote Control Service.
3. Start the TeamViewer service on the remote computer
Press Windows + R to open the Run window.
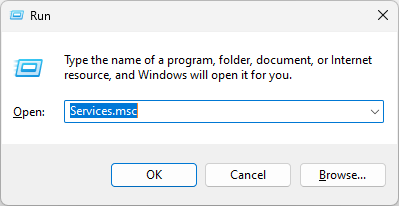
Type services.msc and hit Enter.
Locate TeamViewer and double-click on it.
Locate the Service status, and check if it is Running. If not, click the Start button.
Click Apply and OK.
4. Refresh your network
Press the Windows key, type CMD, and click Run as administrator.
Type the following command and press Enter: netsh winsock reset
Restart your device to let the changes take effect.
5. Contact TeamViewer support
If the issue persists after trying these steps, you can want to contact TeamViewer support for further assistance. Explain to them the scenarios and the troubleshooting you have attempted so far; this will help them understand the situation better.
So, these are the steps you need to follow to resolve the TeamViewer authentication rejected error. Try these methods and let us know which worked for you in the comments below.
Genshin Impact is an intense action-filled role-playing game published by miHoyo. It is visually appealing with a masterpiece storyline. Fans mostly love the collection of unique characters in the game.
But, just like with any other high-quality game, Genshin Impact comes with its issues. Gamers, especially those playing from phones, complain of facing high ping and stuttering while playing this game.
How do I fix Genshin Impact’s high ping issues?
It’s essential you figure out why the game has high ping in the first place. Most frequently, high ping issues in Genshin Impact are caused by:
Poor internet connection
Outdated game version
Problems with the network drivers
Firewall interference
Playing on a low-end device
Given that most of these are related either to your connection or setup, you’ll have to adjust accordingly. Make sure your Internet connection works well, otherwise consider contacting your provider.
Also, before moving on to actually fixing the issues that cause high ping, it’s worth making sure that the problem is not on their end.
With all that out of the way, you can move on and try true and tested fixes that will help you reduce ping in Genshin Impact:
How to fix Genshin Impact’s high ping?
1. Use a good VPN for gaming
Using a VPN will allow you to decrease high ping caused by network limitations or ISP throttling. It can also help you connect to a gaming server that’s less populated.
We recommend getting Private Internet Access because it has a strong server base in all the regions where the game is hosted. Here’s how to set it up:
Pick a server from the same region where your Genshin Impact server is located (Asia, Europe, or North America).
Connect.
Launch Genshin Impact and check your ping rates.
In general, it’s recommended that the location of your VPN server is close to your game’s server region. That can get you a faster connection and consequently reduce ping.
For instance, a lot of Genshin Impact players from Australia report having high ping on Asian servers. To overcome that, you can connect your VPN to an Asian server (PIA covers over 12 Asian countries).
With over 35 000 servers around the globe, PIA is a great option for those who play on North American and European servers as well.
It covers all 50 American states, as well as Canada, Mexico, and other North American regions. In Europe, the VPN has thousands of servers in 43 different countries.
Its powerful AES 256-bit encryption will also keep trackers at bay, protect against DDoS attacks and prevent ISP throttling.
Private Internet Access
Reduce high ping and enjoy seamless gaming with this fast and unlimited VPN!
To make your device function at its maximum potential, you will need to update your device drivers. If you keep experiencing high ping and latency while Genshin Impact, then maybe your drivers are outdated.
Windows can automatically search for the drivers on the internet and download them. Or you could just manually do it yourself.
To update your device drivers,
Go to your windows search bar, type Device Manager, and open the panel.
Click on Network adapters.
Expand the list and pick the Network adapter you’re currently using (if you have multiple installed).
Right-click on it and select Update driver.
Select automatically search for drivers.
Wait for the process to complete.
Alternatively, you can use driver updater software. Such tools have the extra benefit of automatically installing new drivers whenever they’re released, so you don’t have to manually check them.
3. Update Genshin Impact
The publishers of Genshin Impact, miHoYo constantly releases new and better update to the game to meet players’ demand for a bug-free game.
If you are still running an old version of the game, it is likely the latency you face is due to bugs. You will have to play an upgraded release of the game.
To fix this on Windows:
If you are playing the game right now, close it.
Open the game launcher after you have exited the game.
If a new update is available, you’ll have an Update button on the launcher’s home window.
Click on it to download and install the updates.
4. Allow Genshin Impact through firewall
For security reasons, your firewall may sometimes prevent an app from going online, which can happen to games like Genshin Impact.
To fix that, you’ll have to check your settings and add it as an exception:
Open Control Panel.
Head to System and Security, and select Windows Defender.
Pick Allow an app through Firewall.
Click o the Change settings button.
Then click on the Allow another app button.
Type the path of Genshin Impact’s exe file and confirm your settings.
Reboot your router: turn off your router device, wait 30 seconds and turn it back on again. It will give it a chance to refresh.
Close background apps that use: head to Task Manager and End any tasks that are not essential, especially those that need an Internet connection to run
Does high ping affect Genshin Impact?
Yes. high ping affects Genshin Impact and makes it difficult to play this game smoothly. Ping is the average number of times it takes your device to send and receive data from the Genshin Impact server.
The higher this ping, the slower your game will be. A ping of 100 ms is okay to play this game. However, a ping around 50 ms is the best if you want the Genshin Impact high ping to be a thing of the past.
There is an indicator at the top right corner of your game that shows you your ping. Green means it’s good, yellow equals a normal ping while red indicates a poor ping level.
We install many apps on Windows, and each of these gets updated every few months. Here, the OS stores the change in system information in a file to aid recovery in the Windows Installer folder, which might need a cleanup.
The OS stores these files to ensure that you can revert the changes. But, as many reported, the Windows Installation Folder takes up a lot of space, close to 30-50 GB for some users, and cleanup becomes imperative.
Can I clean up the Windows Installer folder?
The files are stored whenever an application is installed using the Windows Installer, and their size is usually small. But, over the course of time, as more apps are added and updated, the size of the Windows Installed folder increases.
Where exactly are Windows Installer files used? They come in handy when uninstalling an application or an update for it. Though experts recommend against deleting the files stored in the Windows Installer folder, if you run out of storage, try it.
Keep in mind that it’s safe to delete only the baseline cache:C:\Windows\Installer\$PatchCache$
Don’t remove anything that’s located directly under:C:\Windows\Installer
This way, you can free up some space from your hard drive (especially if the space is already limited). Over time these patches might become quite numerous.
Remember, these are system files that are hidden by default, so you will have to directly paste the path in the address bar to access it. Another way is to enable hidden system files in Windows.
How can I cleanup the Windows Installer Folder?
1. Manually delete Windows Installer Patch files
Press Windows + R to open Run, paste the following path, and hit Enter:C:\Windows\Installer\$PatchCache$
Press Ctrl + A to select all the files here and hit Del.
Choose the appropriate response if a confirmation prompt appears.
If required, empty the Recycle Bin as well, though we recommend waiting for a few days in case an issue pops up.
The manual way for Windows Installer Folder cleanup works well, but you will have to first make the hidden protected operating system files visible.
Now, follow the on-screen instructions to complete the installation process.
Next, launch PatchCleaner, and it will identify the files (orphaned ones) to be removed.
Click on Delete to proceed.
PatchCleaner is the preferred tool for many when it comes to Windows Installer Folder cleanup. The best part, it automatically identifies which files can be safely removed and clears disk storage without putting the PC at risk, though it may sometimes be inaccurate.
Some software helps where it counts the most, in the performance of any PC, with optimization utilities that prevent a lot of unwanted damage from a system failure.
These specialized repair tools examine and diagnose your damaged PC before repairing it using technology that not only restores your Windows Operating System but also reverses the damage done
While Google Docs remains a super powerful real-time document authoring and collaboration software, it occasionally has issues. One of the most common is Google Docs not printing anything.
The problem can arise for several reasons, and you will have to either identify the underlying cause and execute the relevant fix or try them all. Surprisingly, the latter turns out to be quicker. So, let’s find out all about the problem.
Why is my Google Docs not printing?
Here are a few reasons Google Docs is not printing:
Outdated printer driver – In some cases, users reported incompatible or outdated drivers because Google Docs is not printing clearly.
Problematic browser extensions – Some browser extensions can, too, conflict with the printing process. Remember, it’s not just the new ones; even an extension working fine until now could trigger the issue.
Corrupt browser cache – A corrupt browser cache can often lead to Google Docs not printing text, and clearing it should do the trick. This is also the reason behind Error 150 in Google Slides.
How can I fix Google Docs if it’s not printing?
Before heading to the slightly complex solutions, here are a few quick ones to try:
When Google Sheets or Docs is not printing images, check whether you are using a compatible browser, i.e., either Chrome or Safari. For example, when you try to print Google Docs in Firefox, it saves the file instead.
Restart the computer and the printer, and verify if the problem is resolved.
Ensure you are using the latest version of the browser since a bug in Chrome reportedly caused the issue, and a patch for it was released. In case you use another browser, update it as well.
If these don’t work, the ones listed next should.
NOTE
The steps listed here are for Google Chrome but also work as fixes on other browsers. If you want to learn the exact steps for another browser, head to its official website.
1. Disable extensions
Launch Chrome, paste the following path in the address bar, and then hit Enter:chrome://extensions/
Now, disable the toggle for individual extensions one at a time, restart the browser after each, and check whether the problem is resolved.
As soon as it is, click on Remove under the extension disabled last.
Again, click Remove in the confirmation prompt.
Several users reported that Google Docs was not printing a full page with the Awesome Print Extension installed. Some also reported issues with the Grammarly extension, so look out for these two, along with the others.
2. Clear browser cache
Launch Chrome, and press Ctrl + Shift + Del to open the Clear browsing data window.
Select All time from the Time range dropdown menu, tick all three checkboxes, and then click on Clear data.
Once done, relaunch the browser for the changes to appear and verify if the issue is resolved.
3. Update the printer driver
Press Windows + R to open Run, type devmgmt.msc in the text field, and hit Enter.
Now, expand the Printers section, right-click on the problematic printer, and select Update driver.
Next, select Search automatically for drivers and wait for Windows to install the best one.
Drivers are critical for the effective functioning of connected hardware, and if these are outdated, corrupt, or incompatible, updating the driver should do the trick.
You can also consider third-party solutions to install drivers safely and have the latest version of each driver installed. Therefore proceed and install your drivers with Outbyte Driver Updater.
Outbyte Driver Updater
Keep your computer safe and get the latest updates for your drivers with Outbyte Driver Updater.
Every browser has an Incognito or Private browsing mode, wherein the installed extensions, site cookies, and other similar aspects don’t work. And if these are causing the trouble, switching to the mode might work.
Incognito Mode in Chrome
For Google Chrome, hit Ctrl + Shift + N to open an Incognito window. The same shortcut works on Microsoft Edge as well. If Google Docs is still not printing in color, head to the last solution.
5. Download the document and then print it
In Google Docs, click on the File menu, hover the cursor over Download, and choose PDF Document (.pdf) from the list of options.
Once downloaded, open the document in a PDF viewer, and print it from here.
Remember that this should only be used as a last resort if the other solutions don’t fix things when Google Docs is printing blank pages or not printing at all. Also, we recommend you keep looking for browser updates.
Besides, if you are considering switching browsers for a better experience, check the best browsers for Windows.
If you have questions or fixed things with a solution not listed here, drop them in the comments section below.
Subnautica is a great game but some users reported issues with the game, and the most common issue with the game is crashing.
In today’s guide we’re going to show you how to fix Subnautica crashes on your PC, so let’s get started.
Why does Subnautica keeps crashing?
One of the most common reasons for Subnautica crashing is a large save folder which can lead to crashes or freezing issues. Other reasons include outdated graphics card or PC that does not meet game requirements.
How can I fix Subnautica crashes and freezes?
1. Update your graphics card drivers
If Subnautica crashes on startup, you should update your graphics card drivers. You can do that manually from the manufacturer’s website, but the process is faster and simpler if you use a specialized tool for that.
Outbyte Driver Updater will scan your system and let you know which drivers are out of date. The software will update your graphics card as well as other outdated drivers automatically with almost no input required.
Once you get a list of outdated drivers, you just need to select the ones that you want to update and click the button to download and install them automatically.
The software is fast and simple to use, and with a database that has more than 18 million driverfiles, you should be able to update your drivers in a matter of moments.
Other great features:
Fast scanning
Over 18 million driver files in the database
Download manager for drivers
Driver backup
Scheduled updates
Outbyte Driver Updater
Outbyte Driver Updater a simple to use driver updater software that can fix all your driver-related issues automatically.
Navigate to the game folder. By default it should be: SteamLibrarySteamAppscommonSubnautica
Locate the SNAppData directory and copy it to a safe location.
Navigate to your save folder. The location should be the following: SNAppDataSavedGamesslot0000
Now delete or rename the following folders: CellsCache and CompiledOctreesCache folders. They should be below the slot0000 folder.
This is a simple workaround, and it should help you if Subnautica keeps crashing. Few users reported that they had to reinstall their game as well, so you might try that if deleting the files doesn’t work.
Fixing Subnautica crashes and freezes is pretty simple, and in most cases, you just need to update your graphics card drivers or clear the cache files.
Windows 7 users might experience some issues regarding File Explorer frequently crashing.
In most cases, the program stays open for 10 or 20 minutes and after this, it closes on its own. Often times it will display an error message and disable your taskbar in the process.
There are several possibilities as to why your File Explorer is crashing in Windows 7.
For example, you installed a recent update for your Windows operating system. If the update has incompatibility issues with your system, then it will cause your File Explorer to crash.
So here are s few easy steps to follow in order to fix your system and prevent this from ever happening again.
In some cases, it is a virus that closes the File Explorer automatically. So you should scan your system using your antivirus. If you’re not using such a tool, we recommend TotalAV.
This reliable antivirus gives you multilayered protection against malware, ransomware, or spyware attacks that can infect your PC.
More so, it also comes with a lot of useful features that protect your privacy like downloading files scanning, machine learning in the cloud and locally, small system footprint, gamer mode, and much more.
Reboot your PC after the scan and try running File Explorer again to check if you have the same issue.
2. Relaunch File Explorer
Press and hold simultaneously Ctrl+Alt+Delete and open Task manager.
Click on the File menu.
Click onRun new task.
In the box you have in the newly opened window, you need to type explorer.exe.
Click OK.
For a quicker way, you can simply right-click on File Explorer and choose Restart.
3. Check your Registry
The third option is to verify your Registry for any errors. You may use a registry repair tool because you will get your system clean and optimized with just a few clicks.
Just download and install the tool of your choice using the button above, open it, find the Registry tab, and start the repair process. The tool will do the rest and all registry errors should be fixed.
4. Close incompatible apps
You might have some apps installed that are not compatible with your operating system.
In this case, you need to open the Task Manager again, as mentioned above, and close the apps that are not compatible.
Afterward, try running File Explorer again.
5. Find compatible drivers
If you updated some drivers lately, try disabling the respective apps or hardware. Run the File Explorer to see if it crashes.
If it doesn’t, then you need to find compatible drivers for your apps or pieces of hardware. The best solution is to simply download your drivers from your hardware manufacturer’s site.
6. Disable installed extensions
If you have any extensions installed such as Google Drive, DropBox, try to disable them and see if Explorer still crashes.
If it doesn’t, you can either update the extensions or disable them permanently. Faulty or incompatible extensions may interfere with your Windows operating system thus preventing you from using it correctly.
7. Run SFC
Open Command Prompt from the Start menu
Type sfc /scannow
After you type the command, press Enter.
Wait for the scan to complete and check if you have the same issues with file explorer
8. Refresh your PC
If you still didn’t fix your File Explorer issue with the solutions presented above, you need to use the Refresh your PC feature.
Before we start this process, back up all your personal data on a USB flash drive or external hard drive to prevent important information loss.
This feature will take your system settings back to default fixing any errors that might have appeared in the past.
From the PC Settings feature you have in your Charms bar/ Windows logo, choose to Refresh my PC. For this, you need to insert a Windows disk to copy files back to your system.
So after using the options above, you should be able to fix your file explorer and prevent it from ever crashing again.
If you’re experiencing the same issue in Windows 10, here is a guide on how to fix File Explorer crashes on the latest OS version.
Also if you have any new ideas on this subject or troubleshooting solution suggestions, let us know in the comments below.
The Quick Access Toolbar in Microsoft Excel brings the frequently used features to your fingertips. So, it is crucial to know how to customize the Quick Access Toolbar in Excel to create a more suitable user interface.
Can I customize the Quick Access Toolbar and the ribbon in Excel?
One beautiful thing about Microsoft Office is that users can import and export customized Quick Access Toolbar from one app to another. It helps you customize the apps.
Because Excel is highly customizable, there are a couple of options to use in its toolbar, to your preference. It allows you to hide and restore the Quick Access Toolbar when working. Also, you can change the order of the commands.
Furthermore, customizing your Excel Quick Access Toolbar allows you to add or remove commands from. There are other customization options you can use, and we’ll take you through some as we go into the guide.
How do I customize the Quick Access Toolbar in Excel?
Right-click on the Ribbon, then select either Hide Quick Access Toolbar, or Show Quick Access Toolbar.
It allows you to call for the Quick Access Toolbar when needed and not just lie around your workspace. So, you can retrieve it if it’s hidden or hidden if it’s available.
2. Change the Quick Access Toolbar location
Open Excel on your device.
Click the drop-down button in the top-left corner, then select Customize Quick Access Toolbar.
Select Show Below the Ribbon from the drop-down menu.
You can do the same to move it above the ribbon if the Quick Access Toolbar is below the ribbon.
Changing the location of the Excel Quick Access Toolbar lets you select where it is best suited for your activities.
3. Show or Hide command labels on the Quick Access Toolbar
Launch Excel on your device.
Click on the drop-down button, and click Customize Quick Access Toolbar.
Select either Show Command Labels or Hide Command Labels from the drop-down menu.
The condition for this customization process is that the Quick Access Toolbar must be set below the ribbon to show or hide the command labels.
Thunderbird is one of the best desktop email clients on Windows 10 thanks to its ease of use and efficiency. However, users have been complaining that Thunderbird is not responding on their PCs for some reason.
This can be annoying, as it renders the email client completely useless. Fortunately, it is not the most challenging issue, as it only requires a tweak or two.
Why does my Thunderbird keep freezing?
Problems with third-party apps can sometimes cause this issue to appear.
Antivirus interference can sometimes prevent Thunderbird from working properly
Tip
Before starting any troubleshooting steps on Thunderbird, you should avoid this problem altogether and try another email client. The solution recommended below is famous thanks to its clean and friendly interface and, more importantly, its error-free.
Below are some of the troubleshooting steps you should try before applying any of the fixes in this guide:
Restart your PC.
Make an exception for Thunderbird in your antivirus software.
1. Run Thunderbird from Safe Mode
Press the Windows key + I to open the Settings app and select the Update & Security option.
Choose the Recovery option in the left pane and click Restart now under Advanced startup.
When your PC restarts, choose to Troubleshoot > Advanced options.
Now, select the Startup Settings option.
Click the Restart button.
Finally, press the 5 or F5 to Enable Safe Mode with Networking.
If Thunderbird is not responding, it might be because of some apps or processes. Restarting your PC in Safe Mode will only enable the needed drivers and services to run your device.
If Thunderbird works in Safe Mode, then the problem is most likely caused by a third-party app.
2. Disable antivirus
Press the Windows key, type virus, and select Virus & threat protection.
Choose the Manage settings option.
Now, toggle the switch for Real-time protection backward to disable it.
In some cases, Thunderbird might not be responding because your antivirus is blocking it. The quick fix to this is to disable your antivirus temporarily.
The steps above only show how to disable Windows Defender. If you have any third-party antiviruses, you should disable them too.
NOTE
Disabling antivirus can put your system at risk since malware can spread via email, so use this solution only for troubleshooting purposes.
3. Uninstall third-party antivirus
Press the Windows key + I and select the Apps option.
Select your antivirus software and click the Uninstall button.
Finally, follow the onscreen instructions to complete the removal.
If disabling your antivirus does not fix the Thunderbird not responding issue, you might need to remove the software altogether. This is especially the case for AVG, as users have confirmed that it does not work well with Thunderbird.
That is all there is to fix the Thunderbird not working with Gmail, not responding, and other variations of the issue. All you need to do now is follow the instructions carefully, and things should return to normal.
Valheim is a very engaging survival game with great gameplay and mechanics. However, many users complain about Valheim crashing on startup and during the loading screen.
Here’s how a user expressing his disappointment on Reddit:
Hello, every time I start up valheim my game crashes when I try to join a new world and it says “valheim.exe has stopped working”.
Has anyone else had issues with this? I cannot find much because the game in brand new. i also don’t want to refund because it genuinely looks amazing but I cannot play it
This crashing error in Valheim can be pretty annoying, especially if you’re anticipating a great gaming session.
That is only one example of Valheim crashing on start and there is no official fix, but we have a couple of solutions that will solve the problem.
How can I fix the Valheim crashing on PC?
1. Run the game as an administrator
If the game is not starting at all, the main problem could be the lack of administrative rights.
So, first of all, make sure that you have full rights on your Windows 10 account that you’re using.
Another very common problem for such crushes is the antivirus that might be blocking your game because it sees it like a threat.
An obvious solution for this problem is to check the antivirus settings and allow Valheim to run without restrictions.
Another quick solution is to disable your antivirus temporarily. If the issue is caused by your antivirus, consider changing it with a better antivirus that doesn’t interfere with your important apps.
3. Launch the game in windowed mode
Launch Steam.
Locate Valheim in the library of games.
Right-click the game and select Properties.
Go to the General tab and click on Set launch options.
Type -windowed -noborder in the field.
Click the OK button and exit.
If Valheim keeps crashing, this might be caused by the fact that the resolution of the game doesn’t match the supported resolution of the screen.
This solution should start your game in a windowed mode and should bypass any problems with the resolution of the screen.
Of course, if that is the issue and the game is running fine, tweak the resolution on the game to match your monitor.
Despite all inherent problems, Valheim is still an awesome survival game for PC so check the link below to get it right now.
Valheim
Play Valheim to teleport into a fantasy survival game that will keep your thrills high all the time.
Users reported that File Explorer crashes when searching, which can be a big problem, especially if you use this feature frequently.
If you don’t fix the problem, you won’t be able to perform searches on your PC, which can negatively impact your workflow, so in today’s guide, we will show you how we can fix this problem.
What causes File Explorer to crash when searching?
File path length can sometimes cause problems with File Explorer since Windows doesn’t work well with long paths.
Improperly configured registry will cause crashes and registry problems.
In some rare instances, file corruption can lead to this problem.
How do I fix search crashes in Windows 10?
Before we start, checking the length of the file path you’re searching is advised. Windows has a limitation of 256 characters for paths, so you might want to try renaming specific folders or moving your files to a different directory as a workaround.
1. Delete registry keys
Press the Windows + R, type regedit, and press OK.
In the prompt asking for permission, don’t hesitate to click Yes.
Go to: HKEY_CURRENT_USER\Software\Classes\Local Settings\Software\Microsoft\Windows\Shell
Expand Shell and delete BagMRU and Bags by right-clicking the folders and choosing Delete.
Finally, you need to restart your computer and confirm that File Explorer no longer crashes.
2. Disable cloud storage extensions
Use the keyboard shortcut Windows key + R to launch the Run window on your computer.
On the Run box, type regedit and click OK.
From left panel of Registry Editor go to HKEY_CLASSES_ROOT\CLSID\{8E74D236-7F35-4720-B138-1FED0B85EA75}\ShellFolder
Right-click on the ShellFolder key, and choose Permissions.
Tap on the Owner and select Change. You should be the owner, so type in your username and confirm.
Under your username, check to Replace owner on sub containers and objects.
Furthermore, from the bottom of the same window check Replace all child object permissions with inheritable permissions from this subject, then click OK.
Select your username on the list, and check the Full Control box in the Allow column.
From the right pane of Registry Editor, click on the Attributeskey and set the value to 0.
Save your changes and reboot your Windows 10 device.
Press the Windows key + R key, which opens the Run dialog box.
On the Run box, type cmd and click OK.
Run the following command: sfc /scannow
Wait while the System File Checker is repairing your computer.
When it completes the procedure, restart your PC. Check if the issue is resolved at the next system startup.
How can I improve Windows search performance?
Make sure that the necessary files and folders are correctly indexed. Exclude folders that you don’t use.
If necessary, rebuild the search index to improve performance.
Limit your searches to specific folders to speed up the search process.
Use SSDs, if possible, since they offer far better performance.
We hope these solutions helped you fix the problem with File Explorer crashes when searching. In most cases, the issue is caused by bad registry values or file paths that are too long to handle correctly.
The Blue Screen of Death error is the widespread issue that users dread facing on Windows PC. However, many users are not experiencing an unpleasant black screen without a cursor on Windows 10.
This makes your PC useless at the time, with no troubleshooting direction. Thankfully, this issue has some solutions, as shown in this guide.
What causes a black screen without a cursor on Windows 10?
Below are some of the causes of the Windows 10 black screen without cursor issue:
Faulty display drivers: If you get a black screen without a cursor on Windows 10 before login, it is likely due to your graphic card drivers. The solution is to uninstall the drivers manually or use specialized software and reinstall them in Safe Mode.
Corrupt boot files: If you are getting the Windows 10 black screen without a cursor on startup, it might be due to issues with your boot files. You need to repair these files by running some commands or using a dedicated boot repair tool.
How can I fix the black screen without cursor on Windows 10?
Below are some of the troubleshooting steps you should perform before making changes to your PC in a bid to fix this issue:
Restart your system
Press the sleep button and resume Windows
Test your PC with a monitor
If these do not show any positive signs, you can delve into the fixes below:
1. Uninstall display drivers in Safe Mode
1.1. Enable Safe Mode
Restart your PC multiple times to enter the Windows Recovery Environment.
Select Troubleshoot > Advanced options.
Now, choose Startup Settings.
Next, click the Restart button.
Press 5 or F5 to Enable Safe Mode with Networking when your PC restarts.
The first step towards fixing the Windows 10 black screen without a cursor issue is to go into Safe Mode with Networking. This will start your PC with only the needed drivers and components.
1.2. Uninstall display and monitor drivers
Press the Windows key + R, type services.msc, and click OK.
Double-click the Windows Update service to open its properties.
Now, set its Startup type to Disabled and click the Stop button.
Click the Apply button followed by OK and close the Services window.
From here, press the Windows key + X and select the Device Manager option.
Next, expand the Monitors section, and right-click the Generic PnP Monitor option.
Now, select the Uninstall device option.
Click the Uninstall button.
Double-click the Display adapters option to expand it, and right-click each device.
Select the Uninstall device option.
Check the box for Delete the software for this device and click the Uninstall button.
Finally, restart your PC.
If you started noticing the Windows 10 black screen without a cursor after updating your drivers, it might be due to incompatible or faulty drivers. The solution is to remove the display and monitor drivers in Safe Mode.
Note that you need to disable the Windows update before uninstalling the drivers. Else, the drivers will be reinstalled automatically, causing a repeat of the issue.
2. Perform a Startup Repair
Restart your PC multiple times to enter the Windows Recovery Environment.
Select Troubleshoot > Advancedoptions.
Now, choose the Startup Repair option.
Finally, follow the onscreen instructions to complete the process.
If you are experiencing the Windows 10 black screen on startup with no cursor and you can enter the recovery environment, performing a Startup repair is your best bet.
Create a media installation tool on another PC and insert it into yours.
Boot your PC from the media tool and click Repair your computer on the Install Windows page.
Now, select Choose an option in WinRE.
From here, choose Troubleshoot > Advanced options.
Finally, select the Automatic Repair option and follow the onscreen instructions to complete the process.
You need to use a media creation tool to troubleshoot if you cannot enter the Windows Recovery Environment due to the black screen without a cursor on Windows 10. The first thing to do is to use the Automatic Repair tool to fix any failing components on your PC.
3.2. Repair system files
Repeat Steps 1 to 4 in Solution 3.1.
Select the Command Prompt option.
Now, type the command below and hit Enter: Bootrec /RebuildBcd
Sometimes, the Windows 10 black screen without a cursor can be caused by a corrupt boot file. The solution is to repair the boot files using a media installation tool.
3.3. Perform a system restore
Repeat Steps 1-4 in Solution 3.1.
Select the System Restore option.
Finally, follow the onscreen instructions to complete the process.
Finally, if the above steps cannot fix this issue, you must perform a system restore. This will help return the system to a time when it worked perfectly.
There you have everything you need to fix the Windows 10 black screen without a cursor issue. However, if the steps above do not work, you might need to reinstall Windows 10 or see a technician, as it might be a motherboard issue.
Feel free to let us know the solution that helped you fix this issue in the comments below.
Facing Dell dock Ethernet network problems? Whether it’s the WD19S, WD19TBS, or a Thunderbolt dock, many users report that the Ethernet adapter is not working. This guide shows how to fix Dell docking station network issues in minutes.
How can I fix the Dell Docking Station Ethernet not working?
Type devmgmt.msc and click OK to open the Device Manager.
Expand the Network adapters section in the Device Manager.
Right-click on the current network adapter and select Properties.
In the Properties window, open the Advanced tab.
Under Property, select Energy Efficient Ethernet.
Click the drop-down menu under Value and select Disabled / Off.
Click OK to save the changes.
Close the Device Manager and restart the computer.
Connect the dock to your PC and check for improvements.
3. Don’t close the lid fully
If you happen to fully close the laptop lid after docking the laptop, try to keep it partially open. This might solve the Dell Docking Station Ethernet not working issue.
Several users have reported that not closing the laptop lid after docking the laptop has resolved the issue as they are able to use the Ethernet though Dell dock.
If possible, leave the laptop screen fully open. If not, close it to the point where it can hold itself without collapsing. Modern laptops come with solid hinges that can hold the lid at any angle.
4. Check the USB ports
Dock stations have ample USB ports. However, if you have a device that has occupied the USB port just below or beside the Ethernet port, try vacating the USB port.
As strange as it may sound, vacating the USB port near the Ethernet port has helped several users fix the issue with their docking stations.
If you can’t afford to keep a USB port empty, simply try to swap the USB device with another USB device that is using some other port on the dock and check if that helps.
5. Check the Network Address
Press Windows key + R to open Run.
Type devmgmt.msc and click OK to open the Device Manager.
In the Device Manager, expand the Network adapter section.
Right-click on your currently active network and select Properties.
In the Properties window, open the Advanced tab.
Select Network address under the Property section.
If the Network address is set to Not Present, select the upper empty option under Value.
Enter the MAC address and click OK to save the changes.
Close the Device Manager and check for any improvements.
If the Ethernet is not working through the Dell dock, it can be due to several reasons including power output issues as well as network address misconfiguration. Follow the steps in this article to fix the problem.
We hope you managed to solve the Dell Docking Station Ethernet not working issue with our guide.
Don’t forget to leave any other questions or suggestions that you may have in the comments section below.
FAQs
Why does my Dell dock have no Ethernet connection?
It could be a driver or firmware issue. Update the dock drivers and check BIOS network settings.
Is Dell Thunderbolt dock Ethernet driver different?
Yes. Thunderbolt docks may require additional drivers and secure BIOS authorization.
Can I use Wi-Fi and Ethernet at the same time?
Yes, but it requires manual configuration and may not offer faster speeds unless balanced correctly.
Orange is one of the biggest telecommunication providers in the world. But in the past few years, it’s been cracking down on IPTV use.
You can unblock your favorite streaming service and regain your privacy with several workarounds.
Below, you can find detailed instructions. Let’s get to work!
How to unblock IPTV on Orange?
French ISPs are legally obligated to restrict access to unverified streaming services. That includes the following domains:
iptv-teli.com
king365-tv.com, king365-tv.cf, king365tv.com
ddnc.us
platineiptv.pro
premium-itv.com
primeplus.tv
xtream.ws
tvservice.pro
Orange, Free, BT, and Bouygues have been vehement in preventing access to similar sites and subdomains.
Additionally, IPTV allows you to watch foreign TV content whenever you want — which doesn’t comply with broadcasting rights. One of the most popular instances is live sports streaming.
Orange, as your ISP, can track your online activities, block websites, and even limit your bandwidth.
So, what can you do when Orange blocks your IPTV? Here are some suggestions.
1. Use a VPN
A dependable VPN will give you the best results in evading content restrictions. For this, we recommend ExpressVPN.
It’s one of the few services that can unblock even the trickiest streaming platforms.
1. Type Control Panel in the Windows search barand click on it.
2. Find Network and Sharing Center.
3. Select Change adapter settings on the left side of the screen.
4. Right-click the connection you want to alter and choose Properties.
5. Click on Internet Protocol Version 4 (TCIP/IPv4), then Properties.
6. In the new pop-up, select Use the following DNS server addresses. Type in the new addresses and click OK.
You can try these:
1.1.1.1 and 1.0.0.1 (Cloudflare)
8.8.8.8 and 8.8.4.4 (Google)
9.9.9.9 and 149.112.112.112 (Quad9)
76.76.2.0 and 76.76.10.0 (Control D).
7. Repeat the process for Internet Protocol Version 6 (TCIP/IPv6).
Why does this method work?
Usually, every time you visit a website, your DNS requests go to your ISP. It can then use that info to monitor you.
Luckily, you’re safe if you change to other DNS servers that won’t record the sites you’re visiting.
We recommend Cloudflare for privacy. It will never log your IP address or sell your data.
3. Use Smart DNS
Alternatively, you can use a Smart DNS service to continue streaming IPTV.
It reroutes your DNS queries to a server in another country. That way, you can gain access to content that’s otherwise unavailable.
It won’t provide advanced protection as a VPN would, though. On the brighter side, you can expect a speedier Internet connection.
Keep in mind that you can’t use both services at the same time as their protocols interfere with each other.
4. Use a proxy
Proxy servers will achieve similar results when Orange blocks your IPTV.
They send your traffic through remote servers so your location can’t be pinned down. Thanks to that sneaky mechanic, you can unblock the content you want to stream.
However, proxies work on the application level. That means they’ll only reroute the traffic from the app you’ve set them up with.
Additionally, they won’t encrypt your data — but that’s why they’re faster than VPNs.
Overall, it’s a good and free option to go around a block on your IPTV.
How to install a VPN on an IPTV box?
There’s a wide variety of devices that stream IPTV nowadays. However, there are subtle differences between them when it comes to running VPNs.
Chromecast, Android TV, and Amazon Firestick let you download VPNs directly via the Play Store or Amazon App Store. You’ll have to use your streaming device’s interface to connect to the VPN.
Meanwhile, Roku and Apple TVdon’t allow you to directly install a VPN on them. You’ll have to do it the roundabout way — on your router.
You can use a physical or virtual router.
With a physical one, you’ll need to ensure it has firmware supporting VPN connections. You can also get a pre-configured VPN router.
Alternatively, you can use your laptop (connected to a VPN) as a virtual router to broadcast a Wi-Fi hotspot to your IPTV box.
Why do IPTV providers block VPNs?
If, when trying to stream your IPTV, you get a black screen or an error message, then your VPN has been blocked.
Major IPTV providers have sophisticated security systems that detect VPN users and associated IP addresses. Free VPN services can’t stand a chance against them.
The reason lies in copyright laws.
In order to comply with copyright agreements, legal and verified streaming platforms have to restrict their viewership to certain regions. Sadly, licensing isn’t global — it’s territorial.
You can’t access any program that doesn’t have content licensing in your country.
IPTV providers block VPN services, as they allow you to bypass these restrictions.
Illegal platforms, on the other hand, provide you with pirated content that violates these agreements. They also won’t prevent you from using a VPN.
Wrap up
So, now you know what to do the next time you suspect Orange blocks your IPTV service.
In a nutshell, a VPN is the best solution because it prioritizes your privacy.
Proxies, Smart DNS services, and public DNS servers will also work — but won’t encrypt your traffic. To learn more about IPTV, we have a useful guide on what to do if IPTV is not showing TV guide, so be sure to check it out.
We also have a guide on what to do if IPTV is not working, so don’t hesitate to check it out for more potential solutions.
Either way, you can easily unblock your content. Happy streaming!
FAQ
1. How do I know if my ISP blocked my IPTV?
You’ll notice it as soon as you try loading up the app. You’ll get an infinite loading wheel and a message saying Playback Error.
2. Which VPN protocol to use for IPTV?
You’ll want the fastest protocols for streaming, such as Wireguard and PPTP. ExpressVPN’s Lightway is also a smart pick.
3. Which is a good free VPN for IPTV?
Generally, we don’t recommend free VPN services for IPTV as most major platforms quickly detect them.
4. How to make IPTV work with VPN?
The process will slightly differ depending on the device you use to stream.
It’s fairly straightforward for computers, mobile devices, and IPTV boxes that allow direct VPN installation.
You need to download the VPN onto the device, install it, and pick a suitable server.
If you’re using an IPTV box that doesn’t outright support VPNs, install it on your router. In all cases, you’ll bypass the Orange blocks of your IPTV.
If the above steps fail to fix the issue, here we have listed some of the workarounds that have been proven to resolve the 0x80073CFA error.
1. Uninstall the app or game via PowerShell
Press the Win + R keys to launch the Run console, type PowerShell, and press the Ctrl + Shift + Enter keys simultaneously to open elevated WindowsPowershell.
Next, run the below command in the Powershell (Admin) window and hit Enter to list the name of all the apps: Get-Appxpackage -Allusers
Now, from the list of all the apps, note down the PackageFullName of the app that you are unable to uninstall.
You should now run the below command and hit Enter to uninstall the app: Remove-AppxPackage -Package PackageFullName
Replace PackageFullName part with the name of the app you noted down in Step 3 that you want to uninstall.
The app should be successfully removed from your PC, and you should now be able to uninstall app/game without the error.
To open the Run console, press the Win + R shortcut keys. Type msconfig in the search bar and hit Enter to open the System Configuration window.
Select the Services tab, check the Hide all Microsoft services, and click on Disable all option. Press Apply.
Next, navigate to the Startup tab and click on Open Task Manager.
Select all the services in the Task Manager, right-click on each of them one by one, and select Disable.
Close the Task Manager window. Press Apply, then OK.
Select Restart in the new window that appears.
Once your PC enters the clean reboot state, you should be able to uninstall the Xbox Game Pass app or the game.
This method is also applicable if you see the error code 0x80073cfa on Xbox when you try to uninstall a game from the Gamepass on your PC or the Gamepass app itself.
According to Xbox users, can also power cycle the device, remove the profile, or reset the console to fix the 0x80073CFA error, and then try to uninstall the games.
However, if none of the above methods work, you can reinstall Microsoft Store, perform a factory reset of your Windows 11 PC, or perform a repair upgrade of your PC using this method (also applicable for Windows 11).
Wondershare Filmora is an easy-to-use and trendy video editing software that lets you empower your story and be amazed by results, regardless of your skill level. Filmora 12, the latest version of the app, will take your videos to the next level this season with 14 new features.
What is Wondershare Filmora 12 and how does it help you?
Filmora gives you a helping hand to get started with any new movie project by importing and editing your video, adding special effects and transitions, and sharing your final production on social media, mobile devices, or DVDs.
This tool is a cross-platform for making videos anywhere for all creators and you will experience brand-new ways to express yourself.
And if you have a powerful PC with NVIDIA’s latest RTX 40 GPUs will see immediate benefits with that enhancement from Filmora 12. The latest NVIDIA studio drivers are fully supported by the new Filmora update, which will greatly improve the speed at which your projects will become reality.
And as you will see, Wondershare added a whopping 14 new tools and functions and some of them are found in professional-level video editors.
What are the new features of Wondershare Filmora 12?
1. Multiple platform support
Now, Filmora 12 has dedicated apps for Windows and Mac, but also for iOS and Android mobiles, and even a dedicated app for iPad.
That means you can create and share your projects and videos on virtually any platform and thanks to cloud storage, move between them seamlessly.
2. Assets backup & sync
With the new Filmora 12, not only that you can upload your videos straight to your social media accounts or the cloud storage, but by default, you upload your projects straight to the Filmora Workspace.
This way, you may edit your videos anywhere with Filmora, whether on a desktop or on the go and everything will be stored in your dedicated personal cloud space.
For instance, if you’re editing a video on your PC at home, when you save it, it will automatically sync in the Wondershare Filmora Workspace.
Then, you may open your mobile or tablet when you’re away and find the project also synced there to continue the work.
3. Video review and collaboration
When you work with more Wondershare products or get Filmora 12 for studio creation, you can add more team members to your Wondershare ID.
This way, you may share your videos securely and invite your team to add time-coded notes and respond to comments via the Filmora Workspace cloud service.
So, although Filmora 12 is still a great tool for beginner video editors, it can still be used at a professional level.
4. Switchable workspace layouts
In the new Filmora 12, you may choose from 5 predefined workspace layouts that best fit your workflow and monitor size.
However, there is also a 6th, Dual Monitor layout to view media playback on an external monitor. The last one is activated only if you have a second monitor connected.
5. Enhanced keyframe
Another big improvement from Wondershare Filmora 12 is the keyframe which got very complex.
Now, it has been expanded to all parameters, including filters and color correction in addition to position, rotation, and scale.
The interface in Filmora 12 is starting to look more like the one in professional video editors.
6. Draw Mask
The masks in video editors are used to highlight or remove key objects from a clip and now, Filmora 12 has that option.
Create free-form shapes using the pen tool. It lets you freely draw complex mask shapes around objects, which can be either straight lines or curve segments with Bezier path.
Then you can extend the mask, blur the object within the mask, and if you invert it, you can highlight the object.
Of course, you can draw as many masks as you need for more objects and extend the effect to more frames.
7. Adjustment layer
Adjustment layers are another new improvement in Filmora 12. You can create adjustment layers to change the colors of your videos.
You should know that the effects applied to an adjustment layer affect all layers below it in the layer stacking order.
In other words, it will affect all the clips below it so you need to position it carefully. Of course, you may also include animations and transformations so it’s very helpful.
8. AI Smart Cutout
The new Smart Cutout tool allows quick AI-powered selections of both people and objects.
In fact, you may use a brush to highlight the exact portion that you need to cut out and the smart part is that the software tracks that part within all the frames.
Just like the Draw Mask, Smart Cutout is a tool that you usually find in pricy, more complex video editors.
9. AI Audio Stretch
With the AI-powered audio stretch tool, you can intelligently retime audio to match the duration of your video. No need to cut straight across or repeat the music again.
Of course, when you normally stretch an audio track, you will get a change in pitch but that’s where the AI comes into play.
No matter how much you time-stretch the audio, you won’t get any weird chipmunk effects, unless you really want to, of course.
But for that, you can speed up the audio because you have the setting for that within the audio adjusting options.
10. AI Audio Denoise
And as we’re still on the audio improvements side, getting rid of the unwanted noise in Filmora 12 has become more advanced.
The AI-powered audio denoise tool has a lot of layers of complexity. You may improve the speech, remove the wind effect, take out the reverb, remove the hum and hiss and set an overall effect of the Denoise.
However, you can’t listen to the track while you’re actually tweaking the levels. After each adjustment, you need to play the track again.
11. 3D Titles
Let’s face it! All the successful clips have awesome titles and animations and the new 3D Tiles in Filmora 12 will get you that splash of drama.
You can now choose from a library of 3D Titles but they also added Christmas and World Cup ones so you can spice up your videos.
12. More keyboard shortcut presets
If you’re a novice doing basic editing, you will not be probably interested in more shortcuts than saving your project.
However, if you’re all about productivity, you need fast navigation and operation.
For seasoned users, the software now offers the opportunity to use Adobe Premiere Pro and Apple Final Cut Pro sets of shortcuts.
Of course, you may also define your own shortcuts as you go. It’s only a matter of choosing the right ones for you.
13. Revamped Effects library
Wondershare always adds more and more video effects to Filmora and now, they restructured the Effects Library with more categories.
That will help you browse through effects quicker and find what you need a lot faster. For instance, now you’ve got them structured in categories like Utility, AI Portrait, Shake, Glitch, Distort, and more.
Of course, you still have access to the professional-level New Blue FX and Boris FX video effects that were introduced with Filmora 11.
14. New royalty-free music
There are now more than 100 new royalty-free background music tracks available in Filmora 12 and a lot of them are also free even if you’re using the trial version of the software.
We’re not talking about short audio effects. You can access, preview and download full songs from a lot of themes, including Christmas and World Cup.
What are the other key features of Filmora?
1. Huge library of content
It’s impressive how the library content of Filmora grew exponentially from one version to another.
Now, you have countless clips you can use, not only from the internal library but also from integrated sources like Pexels, Giphy, Pixabay, and Unsplash.
The music and audio FX libraries have grown too, and you may choose from hundreds of them.
We don’t even need to mention the thousands of objects, titles, stickers, and more elements you can add to your creations.
2. Steep learning curve
What was once a tool dedicated exclusively to beginners, Filmora 12 grew into a full-blown video editor for everyone.
The ease of use is still there, and although anyone can do simple video editing, Filmora has now a lot of advanced features that will cater to professional users.
For instance, by using Instant Mode, a beginner can create an amazing video in minutes just by using the huge assortment of templates and titles.
Just add at least 5 video clips, a soundtrack, and some transitional effects and that’s it, your video is ready to be uploaded to your social media page, shared, exported, or simply downloaded in amazing quality.
How much do I need to pay for Filmora 12?
For starters, Wondershare Filmora 12, comes with free testing version. That way, within certain limitations, everyone can test its features.
However, if you grow into it, you will need to pay for a plan to unlock all the features and content. There are a few plans to consider:
➡ Annual Plan – $49.99 for Filmora only and $70.99 for Filmora+Effects & Plug-ins
➡ Cross-Platform Plan – $69.99 for Filmora only and $90.98 for Filmora+Effects & Plug-ins
➡ Perpetual Plan – $79.99 for Filmora only and $100.98 for Filmora+Effects & Plug-ins
The addition of Effects & Plug-ins will add a slew of effects along with video, audio, and photo content you may include in your creations.
Wondershare Filmora 12
Create and edit beautiful videos by using a huge library of free content and video effects!
You know that the prices may change and Wondershare has the great habit of offering a lot of discounts on holidays, for students, and much more.
Pros
Easy to use by everyone
Huge library of free content
Cloud storage and collaboration
Dedicated apps for Windows, Mac, iOS and Android
Advanced AI-powered professional-level features
Cons
The content tends to load slower when you are using more apps at the same time
Final thoughts
We have tested the previous versions of Filmora and the latest version, Filmora 12, simply impressed us with its new features.
But we were expecting that. We’re talking about a product that received the Leader of Video Editing in the G2 Fall 2022 Report award and many other distinctions.
And the most important fact is that Wondershare managed to include so many advanced features without compromising the ease of use department.
The cloud sharing & collaboration, the multiple platform support, and the backup & sync features really stepped up the game for this software.
And even if it developed to be a strong video editor, Filmora 12 is still very accessible compared to other similar software on the market.
We strongly recommend downloading the tool and testing it for free so you may get to your own conclusions.
Lately, emails from outside your network can come into Outlook tagged or labeled with [EXTERNAL]. It indicates the email is coming from an External recipient.
However, some users dislike the labels, so they want to know how to remove External tags in Outlook. Likewise, users report the name cannot be resolved error they encounter on Outlook.
Why is Outlook showing an external tag?
There are some email security threats you should be worried about. Scammers send malicious or bad-willed emails to steal the recipient’s information or money.
So, external email tags are an essential security measure to help users identify threats like phishing, spam, and other malicious emails.
Why do my emails say external?
However, the External tag or label attached to Microsoft Outlook email is to warn users that the email did not originate from within the organization. So, it helps the admin track and identifies emails that are potentially dangerous or harmful.
Furthermore, not all Outlook emails with External tags or labels are suspicious or malicious.
1. Enable External email tags via Windows PowerShell
Left-click the Start button, type powershell, and click Run as administrator.
Click Yes on the User Account Control prompt.
Type the following lines and press Enter: Set-ExternalInOutlook -Enabled $true
Restart your PC and check Outlook after 24-48 hours to see if the External warning tag or label appears.
Users without the Outlook External tags can add it to their Outlook app. Note that it can take up to 48 hours for the External email warning to appear in Outlook after enabling it.
You already have Call of Duty installed on your Xbox console, but errors like code pilum and paging file error prevent users from enjoying the game.
When you see the error code pilum, you’re having trouble downloading or buying content on your Xbox.
The error code pilum doesn’t mean you don’t have Call of Duty on your Xbox, but sometimes it means there’s a conflict between the Call of Duty disc and your Xbox.
How can I fix the error code Pilum in Call of Duty MW and Warzone?
1. Restart your Xbox
Press and hold the Xbox button in the center of your Xbox controller to open the Power center.
Select Restart console.
Select Restart.
Restarting your Xbox is the quickest way to fix most problems with your Xbox console including the Purchase failed error code pilum.
2. Install the multiplayer pack
Completely uninstall all modern warfare content.
Select Network Settings.
Select Go Offline.
After downloading the disc content, go online and install the other items it prompted you to download. While you’re online, the Call of Duty purchase error will be gone.
3. Delete old data and clear the cache
Delete the marketplace system data
Press the Guide button on the controller.
Go to Settings, and select System Settings.
Select Storage, and then select your primary storage device.
Click on System Items.
Select Content Cache, and then select Delete.
Clear your console cache
Press the Guide button on the controller.
Go to Settings and then select System Settings.
Select Storage or Memory.
Highlight any storage device, and then press Y on the controller.
Select Clear System Cache.
When prompted to confirm storage device maintenance, select Yes.
Restart your Xbox console, and then retry your purchase or download.
4. Delete the content and download it again
Cancel all downloads
Press the Guide button on the controller.
Go to Games & Apps.
Select active downloads, and then select cancel all.
Delete partially downloaded content
Press the Guide button on the controller.
Select System Settings.
Click on Storage, and then select your storage device.
Press X on your controller for deletion suggestions.
Scroll through the suggestion and delete any content with a yellow exclamation mark.
Deleting partially downloaded content and clearing the system cache resolves the error code pilum in Modern Warfare and Warzone.
Click the game icon and then select all the data packs you want to install.
This will install all the packs missing without displaying the error code pilum.
6. Download the Call of Duty multiplayer pack
Go to Microsoft Store directly on your Xbox.
Search for Modern Warfare multiplayer pack.
Select the option that looks like the cover image of the box that came with the game.
Click on it. It’ll ask you if you want to install the pack.
Accept and install.
Use this method to install the multiplayer pack if you’ve tried to install it from the Xbox home page but weren’t successful. This solution will resolve the error code pilum.
7. Factory Reset your Xbox Console
Press the Xbox button to open the guide.
Select Profile & System.
Under Profile & Settings, choose System, then select Console info.
Select Reset Console.
On the Reset your consoles? Screen, you’ll see three reset options. Choose the one suitable for you. Here are the three options:
Reset and remove everything: This option removes everything from the console, including user data, saved accounts, apps and games. This is equivalent to buying a new Xbox console.
Reset and keep my games & apps: The second option resets the operating system and deletes all potentially corrupted data without deleting your apps and games.
However, if a significant corrupted file causes the Xbox error code pilum in the game, you’ll need to remove everything from your Xbox.
The factory reset method should be the last option because it deletes all your files that are not synced with the Xbox network. So, before you use this method, connect to the Xbox network and sync all your files.
As an Xbox user, you might encounter many Xbox errors aside from the Call of Duty errors while using this fantastic device.
We have many helpful articles to help you troubleshoot these errors. If you’ve been having Xbox One S errors this article will help you troubleshoot the issue.
Yesterday (4/5/2017), I successfully upgraded Windows 10 on two computers, but on my office desktop, it failed. It generated Windows Update error 0xc1900204 when trying to update from version 1607, OS build 14393.693. Searching for help on this error generated a number of pages relating to the Windows 10 preview or upgrading from Windows 7 to Windows 10, but I see nothing related to the newest upgrade.
In this article, we’re going to list a series of solutions to fix the 0xc1900204 Windows Update error.
What does error 0xc1900204 mean?
Error 0xc1900204 will appear while trying to download the latest system updates, and speaking of this error, here are some similar issues that users reported:
0xc1900204 upgrade – This error can appear while trying to upgrade system with the latest updates. If this happens, try running Windows Update troubleshooter and check if that helps.
Windows setup failed with hexadecimal exit code 0xc1900204 – Sometimes you might get this message while trying to install Windows. If you encounter this problem, you should be able to fix it by using one of our solutions.
Windows 10 Update Assistant 0xc1900204 – In some cases, users reported this error message while using Update Assistant, and to fix it, we recommend that you reset Windows Update components and check if that helps.
Windows Update requires certain services in order to work properly, and if there’s an issue with one of those services, you might encounter error 0xc1900204.
However, you can always fix the problem simply by resetting the required services. You can do that by following these simple steps:
Press Windows Key + X to open Win + X menu. Now select Command Prompt (Admin) or Powershell (Admin) from the list.
Type the following commands to stop the BITS, Cryptographic, MSI Installer and the Windows Update Services. Press ENTER each command:
Once these commands are executed, check if the problem with Windows Update still persists.
If you don’t want to manually run these commands, you can also create a Windows Update reset script that will reset the required services with just a single click.
3. Reset the registry
In some cases, error 0xc1900204 can be caused by your registry. Your registry holds all sorts of sensitive settings, and sometimes your settings might not be correct, causing the error to occur.
However, you can fix the problem simply by doing the following:
Type Windows Key + R. Type Regedit, then hit Enter.
Having a good third-party antivirus is important if you want to protect your PC from online threats, however, sometimes your antivirus can interfere with your system and prevent you from downloading updates.
It’s not uncommon for a third-party antivirus to cause error 0xc1900204, and in order to fix this issue, it’s recommended that you disable certain antivirus features and check if that helps.
If disabling antivirus features doesn’t solve the problem, your next step would be to completely disable your antivirus software.
In worst case scenario, you might have to completely remove your antivirus software. If removing the antivirus solves the problem, you should consider switching to a different antivirus software.
There are many great antivirus tools, but if you want great protection that won’t interfere with your system, you should consider Bitdefender.
5. Make sure that English is set as the default display language
According to users, sometimes error 0xc1900204 can occur because English isn’t set as your default display language. To fix this problem, you need to be sure that your registry is configured properly.
To check your settings, do the following:
Open Registry Editor.
Now navigate to HKEY_LOCAL_MACHINESYSTEMCurrentControlSetControlNlsLanguage key in the left pane. In the right pane, locate InstallLanguage string and make sure that its set to 0409. 0409 is EN-US, but if you’re using a different type of English, you might need to use a different number.
After doing that, you just need to check if English is installed as the display language. To do that, follow these steps:
Open the Settings app.
When Settings app opens, go to Time & Language section.
In the left pane, go to Region & language. Now make sure that English (United States) is available and set as default display language. If not, click Add a language in the right pane and install US English as a default display language.
After setting US English as your display language, the issue should be resolved and you’ll be able to install updates.
This is a peculiar solution, but few users claim that it works, so you might want to try it out.
6. Scan your system for file corruption
File corruption can also cause error 0xc1900204 to occur, and to fix this problem, it’s advised to perform SFC scan. By doing so, you’ll scan your Windows installation and fix any corruption problems.
To run an SFC scan, you need to do the following:
Start Command Prompt as administrator.
When Command Prompt starts, enter sfc /scannow and press Enter to run it.
SFC scan will now start. The scan can take about 10 minutes, so don’t interfere with it.
Once the scan is finished, check if the issue is still there. If the problem still persists, or if you couldn’t run SFC scan at all, your next step would be to run DISM scan.
To do that, start Command Prompt as administrator and run the following command:
DISM /Online /Cleanup-Image /RestoreHealth
Once the scan is finished, check if the problem is still there. If the issue is still present, repeat the SFC scan once again and check if that solves your problem.
If you can’t download the latest update due to error 0xc1900204, you might be able to fix the issue by manually installing the update. To do that, just follow these steps:
Find out the KB number of the update. You can do that from Windows Update section.
Go to Microsoft’s Update Catalog, and search of that KB number.
List of updates will appear. Download the update that matches your system architecture and install it.
After doing that, your PC will be updated, and the problem will be resolved.
If you can’t fix error 0xc1900204, you might want to try performing an in-place upgrade.
This process is relatively simple, and it will install the latest version of Windows while keeping all your files and apps intact.
To perform an in-place upgrade, do the following:
Download Media Creation Tool and run it.
Run Media Creation Tool and choose Upgrade this PC now option.
Once the setup is prepared, click Download and install updates (recommended).
Wait while the updates are downloaded. Follow the instructions on the screen until you get to Ready to install section.
Click Choose what to keep and make sure to select Keep personal files and apps.
Now follow the instructions on the screen to complete the setup.
Once the setup is done, you’ll have the latest version of Windows 10, and the issue should be resolved.
We hope the solutions listed above helped you to fix error 0xc1900204. If you’ve come across other solutions to fix this update problem, list the troubleshooting steps in the comment section below!
If you want to learn how to lower GPU usage in Minecraft, you’re in the right place. It’s no secret that the more powerful your GPU is, the better your gaming experience will be.
However, you can make some tweaks and adjustments that’ll help regardless of your GPU type. Below we’ll address common culprits like outdated graphics card, resolution settings, and OS problems.
How do I fix high GPU usage in Minecraft?
Try out the following first before the advanced solutions:
Shut down your PC to cool before turning it on again.
1. Adjust the graphics settings
Hit the Start menu icon and select Settings.
Click on System, then select Display.
Navigate to the Scale & layout section, then under Display resolution, click on the drop-down menu and pick a lower resolution setting than your current one.
Some games and applications use more of your GPU than others. You may find Minecraft GPU usage is up to 100. So, if you’re playing a game with lots of graphics, lowering these settings could help alleviate the issue.
2. Update your graphic drivers
Click on the Windows button, type Device Manager in the search bar, and click Open.
Navigate to Display adapters to expand, right-click on your graphics card, and select Update driver.
Select Search automatically for drivers.
For a more thorough job, you will need automatic driver updater software. Outbyte Driver Updater is a handy and very effective tool that can help you to update your computer’s graphics card drivers.
Plus, the software can detect outdated or missing drivers and install the latest versions.
Press theWindows key, search for Windows Security, and click Open.
Select Virus & threat protection.
Next, press Quick scan under Current threats.
If you don’t find any threats, proceed to perform a full scan by clicking on Scan options just below Quick scan.
Click on Full scan to perform a deep scan of your PC.
Wait for the process to finish and restart your system.
Malware can sometimes interfere with hardware and cause problems with games and other software on your PC. A proper scan should point you in the right direction in securing your system.
Select Windows Update and click on Check for updates.
Download and install if available.
Minecraft is one of the most popular games in the world, and it is easy to see why. Gamers can enjoy this game, but oftentimes, they’re plagued with high CPU usage in Minecraft or even high GPU usage.
Following the steps below will help you optimize your PC for gaming. Windows 11 has already been dubbed the best gaming OS yet, so if you have yet to upgrade, you should consider doing so as soon as possible.
This isn’t the only GPU issue, and many reported that Minecraft is not using GPU, so don’t miss our dedicated guide that tackles it. You may also face issues with Minecraft not responding at some point.
Let us know if these solutions have decreased GPU usage in the comment section below.
Windows 10 added some major features, such as Cortana and the ability to manage virtual desktops. However, not all users plan to use them, and many wonder how to remove the search bar in Windows 10.
This is relatively simple, and in today’s guide, we will show you how to do it in just a couple of steps.
How to remove the Search bar from the Taskbar in Windows 10?
1. Hide it from the Search menu
Right-click on an empty space on your Taskbar.
From the menu navigate to Search.
Select the option you want, in our case, it’s the Hidden option.
This is the simplest way to hide the search bar on Windows 10, so we encourage you to give it a try.
2. Disable the search bar from Windows 10 registry
Press the Windows key + R and then type regedit. Press Enter.
Navigate to the following address: Computer\HKEY_CURRENT_USER\SOFTWARE\Microsoft\Windows\CurrentVersion\Search
In the right pane, double-click the SearchboxTaskbarMode.
Set the Value data to 0 and save changes.
As you can see, it’s pretty simple to disable the search bar in Windows 10 from the registry, so you might want to try this method.
Of course, just by removing the Search box, you won’t also disable Cortana. If you want to completely turn off Microsoft’s assistant, check out this guide to learn how to uninstall Cortana.
It is not uncommon to encounter Xbox not syncing data. This can be outright frustrating, considering that each time you have to begin right from the start.
Fortunately, we have a couple of solutions to help you resolve this.
How can I fix Xbox One if it’s not syncing data or is stuck?
1. Test network connection
Press the Xbox button.
Select Settings > All Settings > Network > Network Settings.
In the Network Settings page, select Test network connection from the options on the left.
This will initiate the test, which will run automatically and will inform you if your Internet connection has any problems.
2. Perform a hard reset
This can be done by pressing and holding on to the Power button for eight seconds or till the device shuts down.
Unplug the power cord from the rear of the console. Don’t plug it back in till at least 5 mins.
Plug the cord back in and restart the console.
You should be able to sync your game progress as before. If not, follow the below-mentioned steps.
3. Clear the local saved games
On the console, click on System settings > System > Storage.
In the Storage section, select Clear local saved games.
Also, ensure you have at least 20 percent of free space on your console hard disk drive.
4. Contact the game developer
If you are facing a syncing issue with a particular game, try getting in touch with the developers and see if it has something to do with their end. See if this solves your problem.
Microsoft Word allows users to create documents, edit, view, and share files with other users. However, it can take a while to get around working on the app which is why you should learn how to customize the Quick Access Toolbar on Word.
What kind of customization can you do to toolbars?
Microsoft Word is highly customizable and allows users to personalize the interface to an extent. However, there’s a limit to the level of customization you can do on the app.
Furthermore, users use the customization features on Microsoft Word to tweak it to suit their needs. The toolbar contains a set of commands that are not affected or bound but the currently displayed tab on the ribbon. It allows you to move the toolbar to another location.
Another customization option you can do to the toolbar is to add buttons that represent the commands to the functions of the toolbar. Also, you can create shortcuts for the toolbar commands to hasten your work on the app.
Fortunately, any customization process initiated on the Quick Access Toolbar is not visible only in the document. It applies to the whole Word app, so you require not customize the Quick Access menu for each document or task.
How can I customize a Quick Access Toolbar in Microsoft Word?
1. Add and remove commands from the Quick Access Toolbar menu
Launch Microsoft Word on your PC.
Click the down arrow button close to the top-right corner of the screen.
From the commands on the Quick Access drop-down menu, check the commands you want to add and uncheck those to remove.
Another step for removing commands from the Quick Access Toolbar is:
On the Quick Access Toolbar menu, right-click the command you want to remove.
Select Remove from Quick Access Toolbar on the drop-down menu.
Adding or removing commands from the Quick Access Toolbar allows you to customize the menu. It lets you determine the functions you want to include or remove from the toolbar.
2. Add a command that’s not on the ribbon to the Quick Access Toolbar
Launch Microsoft Word on your PC.
Click the down arrow button close to the top-left corner of the screen. Click on Customize Quick Access Toolbar from the drop-down, then select More Commands.
Go to the Choose commands from list, select the command not in the Ribbon, then click the Add button.
Adding a command from the list will include it in the Quick Access Toolbar.
3. Change the arrangement of the commands
Open Microsoft Word on your computer.
Right-click the Quick Access Toolbar, then select Customize the Quick Access Toolbar from the drop-down menu.
Select the command you want to move. Click the arrow-up or down to change the position of the command.
The Move up and Move down option allows you to arrange the commands in the Quick Access Toolbar as you please. Further, you can read how to fix Microsoft Word not working on Windows.