Microsoft Store Error 0x87e10bcf [Solved]

Microsoft Store has a large collection of apps, be it games or dedicated tools, for users to download and install. But, several users have recently reported encountering the 0x87e10bcf error code in Microsoft Store.

The error is encountered while downloading or updating an app and does not let the process complete. This poses a major hurdle, and users have been looking for ways to eliminate the error.

Therefore we have decided to dedicate this guide to listing the causes and walk you through the most effective fixes for Microsoft Store error 0x87e10bcf in Windows.

What causes the 0x87e10bcf error in Microsoft Store?

There are various reasons behind this error. Since it has got to do with updating, there are a bunch of critical services that have to be running in the background, and in case they are not, you are likely to encounter the Microsoft Store error 0x87e10bcf.

Apart from that, corrupt Windows Update Components are also responsible for the error. Also, if the installation of the app that you are facing problems with did not go through properly, there is a likelihood of encountering the problem.

Since it could be any of these issues behind the Microsoft Store error 0x87e10bcf in Windows, we have listed the fix for each.

If you are able to identify the underlying cause, directly head to the relevant method and execute it. Otherwise, follow the steps below in the listed sequence to quickly and effectively eliminate the error.

How do I fix the 0x87e10bcf error in Microsoft Store?

1. Run the Windows Store Apps troubleshooter

  1. 1. Press Windows + I to launch the Settings app.

  2. 2. Click on Troubleshoot on the right in the System tab.

    Troubleshoot to fix microsoft store error 0x87e10bcf
  3. 3. Click on Other troubleshooters.

    Other troubleshooters
  4. 4. Now, locate the Windows Store Apps troubleshooter and click on the Run button next to it.

    Run troubleshooter to fix microsoft store error 0x87e10bcf
  5. 5. Follow the on-screen instructions and choose the appropriate response when prompted, to complete the troubleshooting.

  6. Microsoft offers several built-in troubleshooters for users to automatically diagnose and eliminate problems with the Windows device and connected peripherals.

    Your primary approach when encountering the 0x87e10bcf error should be to run a dedicated troubleshooter when facing an error.

2. Reset the Microsoft Store cache

  1. Press Windows + S to launch the Search menu, enter Windows Terminal in the text field at the top, and click on the relevant search result.Windows Terminal to fix microsoft store error 0x87e10bcf
  2. Now, click on the downward-facing arrow at the top, and select Command Prompt from the list of options. Alternatively, you can hit Ctrl + Shift + 2 to launch Command Prompt in a new tab.Open Command prompt
  3. Now, type/paste the following command and hit Enter to reset the Microsoft Store cache:wsresetReset Microsoft Store cache to fix microsoft store error 0x87e10bcf
  4. A new blank window will open and once the reset process is complete, the Microsoft Store will launch.Reset process

3. Change startup type for critical services

  1. Press Windows + R to launch the Run command, type services.msc in the text field, and either click on OK or hit Enter to launch the Services app.Services to fix microsoft store error 0x87e10bcf
  2. Locate the Background Intelligent Transfer Service, right-click on it and select Properties from the context menu.BITS properties
  3. Click on the Startup type dropdown menu and select Automatic from the list of options.Set Automatic to fix microsoft store error 0x87e10bcf
  4. If the service is not running, click on the Start button under Service status.Run service to fix microsoft store error 0x87e10bcf
  5. Click on OK at the bottom to save the changes.Save changes
  6. Similarly, change the Startup type to Automatic and click on Start to run the following services:
    • Crytographic Services
    • Windows Installer
    • Windows Update
  7. After making the changes, restart the computer for the changes to come into effect.

There are certain services that need to be running in order to download updates, be it for Windows or the apps installed via Microsoft Store. In case any of these are not running, get them to, and check if the Microsoft Store error 0x87e10bcf is eliminated.

4. Reinstall the conflicting app

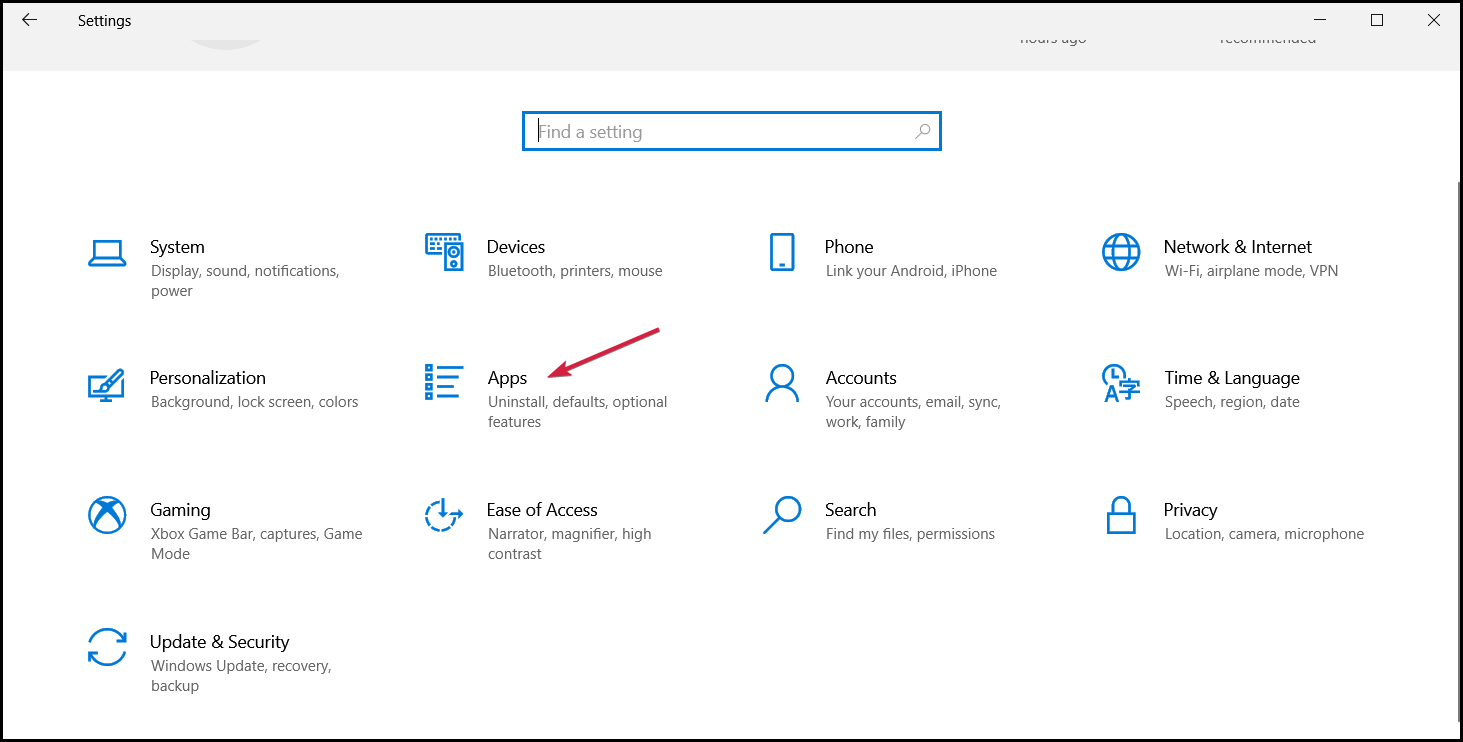
  1. Press Windows + I to launch Settings, and select Apps from the tabs listed in the navigation pane.Apps
  2. Next, click on Apps & features on the right.Apps & features to fix microsoft store error 0x87e10bcf
  3. Now, locate the conflicting app, click on the ellipsis next to it, and select Uninstall from the flyout menu.Uninstall app to fix microsoft store error 0x87e10bcf
  4. Again, click on Uninstall in the confirmation prompt that pops up.Confirm uninstall

If you are encountering the Microsoft Store error 0x87e10bcf while updating certain apps, it’s likely that their installation did not go through successfully. Or the last app that was installed misconfigured things, thus leading to the error.

In which case, the ideal fix would be to uninstall the conflicting app and then reinstall it from the Microsoft Store.

5. Repair/reset the Microsoft Store app

  1. Press Windows + I to launch Settings, and select the Apps tab from the ones listed in the navigation pane on the left.Apps tab
  2. Next, click on Apps & features on the right.Apps & features
  3. Now, locate the Microsoft Store app, click on the ellipsis to its right, and select Advanced options from the menu.Advanced options
  4. Next, click on the Repair button to start the process. Once the repair process is complete, restart the computer and check if the error is eliminated.Repair to fix microsoft store error 0x87e10bcf
  5. If you still encounter the Microsoft Store error 0x87e10bcf, again go the Advanced options for Microsoft Store and click on the Reset button.Reset to fix microsoft store error 0x87e10bcf
  6. Click on Reset in the confirmation prompt that pops up.Confirm reset

Repairing and resetting are two of the simplest troubleshooting methods that can fix most of the errors with any app.

When you repair an app, all its files are checked and the corrupt ones are replaced, the Registry entries are verified and the necessary changes are made. If repairing doesn’t work, the next option is to reset the app.

When you do that, the app practically becomes as good as new. Though, all the stored data and configured settings will be lost. But it’s most likely to fix the Microsoft Store error 0x87e10bcf in Windows 11.

6. Reset Windows Update Components

  1. Right-click on the Start icon or press Ctrl + X to launch the Quick Access menu, and select Windows Terminal (Admin) from the list of options.Launch Windows terminal (Admin)
  2. Click Yes on the UAC (User Account Control) prompt that pops up.Yes
  3. Next, click on the downward arrow at the top, and select Command Prompt from the menu.Open Command Prompt tab
  4. Type/paste the following commands and hit Enter to stop the BITS (Background Intelligent Transfer Service) and Windows Update service:net stop bits net stop wuauserv
  5. Next, paste the following command and hit Enter to delete the qmgr*.dat files:Del “%ALLUSERSPROFILE%Application DataMicrosoftNetworkDownloaderqmgr*.dat”
  6. Execute the following command to rename some critical folders and fix the Microsoft Store error 0x87e10bcf:Ren %Systemroot%\SoftwareDistribution\DataStore DataStore.bak Ren %Systemroot%\SoftwareDistribution\Download Download.bak Ren %Systemroot%\System32\catroot2 catroot2.bak
  7. Next, execute these two commands to reset the BITS and Windows Update service:sc.exe sdset bits D:(A;;CCLCSWRPWPDTLOCRRC;;;SY)(A;;CCDCLCSWRPWPDTLOCRSDRCWDWO;;;BA)(A;;CCLCSWLOCRRC;;;AU)(A;;CCLCSWRPWPDTLOCRRC;;;PU) sc.exe sdset wuauserv D:(A;;CCLCSWRPWPDTLOCRRC;;;SY)(A;;CCDCLCSWRPWPDTLOCRSDRCWDWO;;;BA)(A;;CCLCSWLOCRRC;;;AU)(A;;CCLCSWRPWPDTLOCRRC;;;PU)
  8. Paste the following command and hit Enter:cd /d %windir%\system32
  9. Next, execute each of these commands individually to reregister the files for BITS and Windows Update:

regsvr32.exe atl.dll
regsvr32.exe urlmon.dll
regsvr32.exe mshtml.dll
regsvr32.exe shdocvw.dll
regsvr32.exe browseui.dll
regsvr32.exe jscript.dll
regsvr32.exe vbscript.dll
regsvr32.exe scrrun.dll
regsvr32.exe msxml.dll
regsvr32.exe msxml3.dll
regsvr32.exe msxml6.dll
regsvr32.exe actxprxy.dll
regsvr32.exe softpub.dll
regsvr32.exe wintrust.dll
regsvr32.exe dssenh.dll
regsvr32.exe rsaenh.dll
regsvr32.exe gpkcsp.dll
regsvr32.exe sccbase.dll
regsvr32.exe slbcsp.dll
regsvr32.exe cryptdlg.dll
regsvr32.exe oleaut32.dll
regsvr32.exe ole32.dll
regsvr32.exe shell32.dll
regsvr32.exe initpki.dll
regsvr32.exe wuapi.dll
regsvr32.exe wuaueng.dll
regsvr32.exe wuaueng1.dll
regsvr32.exe wucltui.dll
regsvr32.exe wups.dll
regsvr32.exe wups2.dll
regsvr32.exe wuweb.dll
regsvr32.exe qmgr.dll
regsvr32.exe qmgrprxy.dll
regsvr32.exe wucltux.dll
regsvr32.exe muweb.dll
regsvr32.exe wuwebv.dll

9. Paste the following command and hit Enter in order to reset Winsock:netsh winsock reset

10. The last step is to execute the following two commands to restart the BITS and Windows Update services:net start bits net start wuauserv

If the Windows Update Components are corrupt, you may as well encounter the Microsoft Store error 0x87e10bcf in Windows. Follow the steps listed here to reset it and check if the error is fixed. If not, move to the last method.

7. Perform a system restore

Note icon NOTE
When you perform a system restore, the computer will restart. Therefore, make sure to save any open files to avoid losing critical data.
  1. Press Windows + S to launch the Search menu, enter Create a restore point in the text field at the top, and click on the relevant search result.Create a restore point
  2. Click on the System Restore button.System restore to fix microsoft store error 0x87e10bcf
  3. Select Choose a different restore point option and click on Next.Choose a different restore point
  4. Now, select a restore point created before you first encountered the error, and click on Next.Select restore point to fix microsoft store error 0x87e10bcf
  5. Finally, verify the restore details and click on Finish to start the process.Verify details

If none of the fixes listed above have worked, performing a system restore would eliminate the Microsoft Store error 0x87e10bcf.

When you restore the system, the idea is to basically take the computer back into time to a point when the error didn’t exist. So, it’s critical that you choose a restore point that was created before you first encountered the error.

Also, the restore process does not affect the files stored on the system, though installed apps or configured settings may be removed. In case the process doesn’t go as planned, learn how to undo a system restore in Windows 11.

What do I do if Microsoft Store keeps crashing in Windows 11?

Another issue that several users have reported is that the Microsoft Store keeps crashing ever since they upgraded to Windows 11. And, this is even worse than the Microsoft Store error 0x87e10bcf since you are unable to access the store altogether.

The problem with Microsoft Store could arise due to corrupt system files, problems with the cache, or if you have set an incorrect date and time on your computer.

If you too are facing it, find out how to fix issues causing the Microsoft Store to crash in Windows 11. Also, learn how to eliminate the 0x80131500 error code in Microsoft Store. Though the guide is for Windows 10, it works on the latest iteration as well.

These are all the ways you can fix the Microsoft Store error 0x87e10bcf in Windows 11. By the time you reach this part of the article, the error should be eliminated. In case it persists, reset Windows 11 to its factory settings.

Also, check our detailed guide on the Microsoft Store which also lists the various changes made to it in Windows 11.

Tell us which fix worked for you in the comments section below.
Fix: You Must Connect to Exchange With the Current Profile

Did you get the message you must connect to Microsoft exchange with the current profile? Let us tell you all you need to know about it.

Outlook might sometimes not synchronize if you’re using a Microsoft Exchange account if it was not set up correctly.

Users trying to synchronize a Microsoft Exchange Server mailbox with an offline folder (.ost) file in Outlook will receive this error message:

Cannot start Microsoft Outlook. Cannot open the Outlook window. The set of folders cannot be opened. You must connect to Microsoft Exchange with the current profile before you can synchronize your folders with your Outlook data file (.ost)

Let’s explore some common triggers and solutions.

What does the You must connect to Microsoft Exchange with the current profile message mean?

In most instances, this will mean that you cannot launch the Outlook client on your computer. Sometimes, it may demand you to connect to Microsoft Exchange without displaying the credential windows.

From users, we have gathered that the following elements mainly trigger this problem:

  • Conflict in services – This could mean that the Microsoft 365 Modern Authentication setting has been disabled while the Microsoft 365 MFA is enabled.
  • Synchronization issues – For some users, this may be because synchronization has not been correctly set up.
  • Damaged files – Most often this is related to corruption or damage to the .ost file.

Users may get any of the following messages – cannot expand the folder you must connect to Microsoft Exchange with the current profile, Outlook error you must connect to Microsoft Exchange with the current profile, or cannot start Microsoft Outlook you must connect to Microsoft Exchange at least once.

Regardless of the cause or error message, you should try the following solutions.

How can I fix You must connect to Microsoft exchange with the current profile?

1. Disable and enable MAPI

  1. Head to the Exchange admin center’s official Microsoft page, log in with your Microsoft Exchange account, and select Recipients and  Mailboxes.
    you must connect to microsoft exchange with the current profile
  2. In the mailbox list, choose the mailbox you need to modify, select the mailbox properties page, then choose Mailbox features.
  3. Under Email Connectivity, you can check the MAPI status. If it’s enabled, click on the Disable button, then select the Enable button; if it’s disabled, click on the Enable button, then select the Disable button.
    you must connect to microsoft exchange with the current profile

2. Check if Outlook synchronization is set up properly

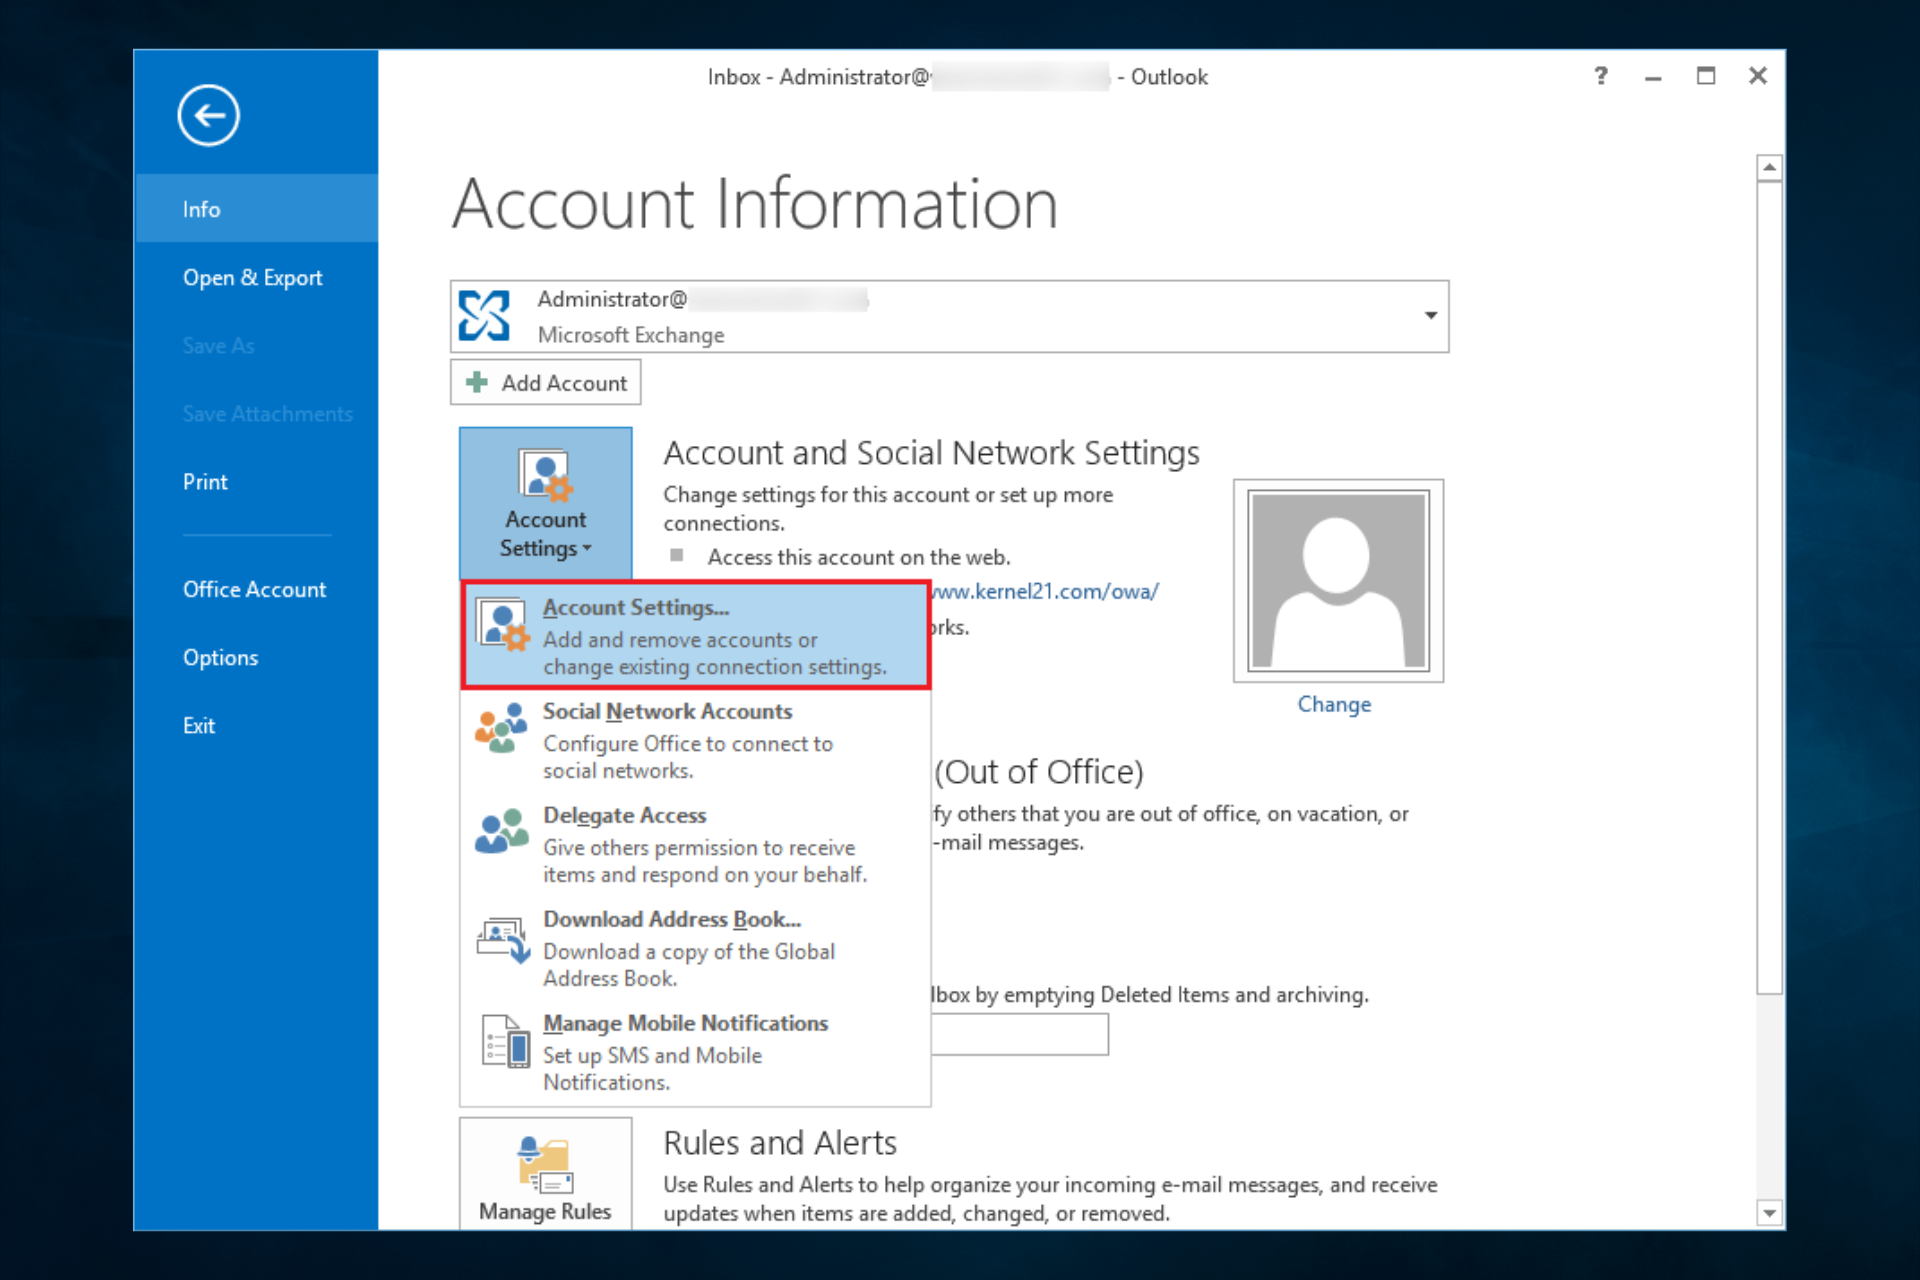
  1. Open your Outlook app, then click File, and select Account Settings.
  2. Choose Account Settings again, select Exchange or Microsoft 365, and click Change.
  3. At the Offline Settings section, ensure that Use Cached Exchange Mode is checked.
    you must connect to microsoft exchange with the current profile
  4. For Microsoft 365 subscribers, at Offline Settings, also enable Use Cached Exchange Mode to download email to an Outlook data file.
  5. Close the settings and the Outlook app, then restart the app.

3. Set your Outlook folders to synchronize automatically

  1. Head over to the Tools menu, then select Options or Outlook options.
    you must connect to microsoft exchange with the current profile
  2. Under the Mail Setup tab, look at the Send/Receive section and ensure that Send immediately when connected check box is checked.
  3. Click on Send/Receive, then in the Send/Receive pop-up, select Perform an automatic send/receive when exiting.
    you must connect to microsoft exchange with the current profile
  4. Click Close, then choose OK.

Following these steps, you should no longer have any issues connecting to the Microsoft Exchange server.

Let us know which methods helped you by leaving us a message in the comments below.

Geek Squad Scam Email: What is & How to Avoid it

We have all, at some point, received a scam email, though many might not have fallen for it. Unfortunately, phishing emails are one of the many disadvantages of the Internet’s vast reach. Geek Squad scam emails are the newest entrant to the list, with people losing thousands of dollars to it.

Geek Squad, a subsidiary of Best Buy, supports computer and other appliance-related issues for a small fee.

This includes both online and on-site support. It offers a $199 annual subscription package, and this very aspect is used to scam people.

If you have received an email from Geek Squad and are wondering if it’s a scam, read the following sections to find out all about it.

What is the Geek Squad scam?

The Geek Squad scam email is similar to other such scams. You receive an email from an account claiming that the annual membership has expired and a certain amount has been deducted from your account to auto-renew it.

To cancel the charge, there’s a customer support number provided. When users call the given number, they are asked to share sensitive information, including banking and credit card details.

In some cases, users may also be provided a link to download software that is then used to hack into their computers and steal critical data.

While the Geek Squad scam has been going on for some time, there has been a resurgence in such emails in the last couple of months. One user recently reported losing almost $100,000 after the scammer gained remote access to the computer.

To stay safe, never contact the numbers provided in the email, click on any links, or provide any information. Also, if you see an email from Geek Squad in your inbox, here’s how to find out if it’s a scam.

?️ Quick Tip!
You can use a good data removal tool with a built-in anti-phishing feature to protect yourself from such scams.

Incogni is a good option because it gives you full protection whenever you are about to access a suspicious page that might steal your data.

Incogni

Get a complete phishing shield with this intelligent antivirus software.
Check price Visit Website

How do I spot a Geek Squad scam email?

1. Check for grammatical and spelling mistakes

Grammatical errors or spelling mistakes are the first signs that often give away if an email is a part of an elaborate scam. Unfortunately, such emails generally have several of these, and if you have a keen eye for detail, it would be easy to spot Geek Squad scam emails.

For instance, you would find words misspelled, absent space after commas or full stops, or improper capitalization of terms.

Though some scam emails are well written, you would have to look at other aspects listed below to spot these.

2. See how the email is drafted

Another aspect to check out is how an email is drafted. For example, a giant corporation generally employs a dedicated team responsible for preparing emails to customers. Also, these go through several rounds of approval before being finally sent out.

So, if you find that the one from Geek Squad lacks good graphics, has items misplaced, or the general layout seems a little off, it could be a scam email. You can also compare it with emails from other official sources to spot a scam email.

3. Verify the sender’s email address

In most cases, Geek Squad scam emails come from addresses registered on services like Gmail or Yahoo, and this is a simple way to spot one. Big companies like Best Buy generally have written domain names, and you will find these suffixed to the end of the email address.

Several users have also reported receiving Geek Squad scam emails from addresses registered on Intuit. The address generally used here is [email protected]. So if you ever receive an email from this address, it is most likely a scam.

4. Check the graphics and logo

The graphics and logos used in scam emails are often either distorted, cropped, or unclear. In addition, these items are usually taken from unofficial sources, thus resulting in poor quality.

It’s also likely that the email would carry an outdated logo of Geek Squad. So, check the latest logo on the official Best Buy website and do not fall prey to the Geek Squad scam emails.

5. Identify any suspicious links

If an email that looks suspicious carries links, NEVER click on these! It could lead you to websites that ask for personal information or even automatically download malware to your computer.

Once the malware is loaded on the user’s computer, hackers can steal critical data or even remotely control the system. Unfortunately, many fell victim to this and lost thousands of dollars.

To determine where it redirects you, hover the cursor over the link to preview it. Also, you could copy the link and paste it into a word processor to analyze and identify if it’s legitimate.

6. See how the email addresses you

Companies you have purchased products or services from have your details stored and often use them to address you when sending an email to make the interaction seem more personal.

For instance, an email from PayPal mentions the user’s name to address them.

Since scammers don’t have this information, they would instead address users generally and use words like Dear Customer. Also, you would find things to be highly informal in some cases. These few points would help easily spot a Geek Squad scam email.

7. Check if the email tries to create an urgency

Scam emails work on a straightforward principle and create urgency and panic in the user. Because once these manage to panic the user, they cannot think clearly and end up falling prey to the scam.

Check if there’s a timeline provided in the email to contact customer support to waive the charge or request a refund. Scammers generally offer a 24-48 hours timeline because it makes things sound urgent.

So, if you ever see an email from Geek Squad that works on similar lines, it’s most likely a scam email.

8. Email requires you to submit personal information

Though these never ask directly, some Geek Squad scam emails have links that redirect to pages where you might be required to submit personal information. NEVER do that!

Best Buy has confirmed in its privacy policy that it doesn’t require users to submit their personal information, nor does it ever ask for it. So, any email that asks for it is a scam.

9. Information provided in the email doesn’t add up

Many users received the Geek Squad scam email addresses they never used to register on the platform. This helped them identify that the email was a part of the scam. So, look out for such minute details.

Also, one user claimed that the email mentioned Debit Card while she always used a Credit Card for such purchases. Besides, if you have never used the Geek Squad service or paid a subscription fee previously and still receive such emails, it’s a scam.

10. Search the web for similar scams

If you are still unsure whether the email is legit, try searching the web. Other users who have received these emails in the past might have shared a screenshot of it, and if the template matches the one you received, things will become clear.

If you cannot ascertain whether it’s a scam email, the last option is to contact Geek Squad through secure channels. But, first, go to the official website and check the various ways to contact Geek Squad.

How do I report phishing emails to Geek Squad or Best Buy?

Geek Squad has a dedicated helpline for users to register scams. Once they receive a complaint, a thorough investigation is launched to analyze the email, the sender, the included attachments, and the contact details provided.

If you have received a Geek Squad scam email, contact immediately at 1-888-237-8289 to report it.

Reporting a scam is one of the first steps to prevent others from becoming victims, so make sure to do your part.

What do I do if I receive a scam email?

If you have just received an email and haven’t shared any sensitive information or clicked on any suspicious link, there’s nothing to worry about!

However, if you have clicked on a link, make sure to scan your computer for malware using an effective antivirus. Then, if required, format the computer and restore it to the factory settings. Also, if you have submitted your banking details, contact your bank immediately.

That’s all there is to Geek Squad scam email, how it operates, and the ways to spot one. From now on, you will be far more informed on the subject and be able to spot a Geek Squad renewal scam email.

Also, Geek Squad is not the only company that has become the target of a scam. We have comprehensively covered the Norton 360 and McAfee email scams and how you can report an Amazon phishing email.

If you have any other queries or want us to cover more such topics, do not hesitate to drop a comment below.

Xbox One Not Loading Games: How to Fix & Enjoy Your Gameplay

If you’re an Xbox user, you’ll definitely understand the frustration felt when Xbox One is not letting you play games.

You probably also tried to figure out in your mind what could be the problem, or try to retrace your steps back to where it started, or what you could have done to set it off.

Most times, when you try to start the game and/or app, the splash screen displays for a few seconds before sending you back to the Home screen.

The good news is, you don’t need to scratch the hairs off your head trying to figure out how to fix it because we’ve got solutions that can help you when your Xbox One won’t let you play games.

If this describes what you’re going through, try these solutions to resolve the issue depending on whether it is the games or apps that won’t open.

Why won’t my Xbox let me play games?

If your Xbox is not letting you play any games, the causes could be that your console didn’t correctly download the games or an update is pending for them.

Check if this happens for all your games, then simply see if there is any update pending and update all games on your console.

If these fast fixes didn’t help, check out the complete solutions we provided below.

How can I do when Xbox One is not letting me play games:

Solution 1:  Restart the app

  1. Quit the app
  2. Check if the app is available on your Home screen in most recently used tiles, then highlight it with your controller without selecting it
  3. Press Menu on your controller
  4. If you get the Quit option, select it. When this option is not there, it means the app isn’t running
  5. Once the app is closed, go to recently used tiles, and select it from My games and apps
    1. Relaunch the app

If your app/apps don’t start, try the next solution.

Solution 2: Restart your console

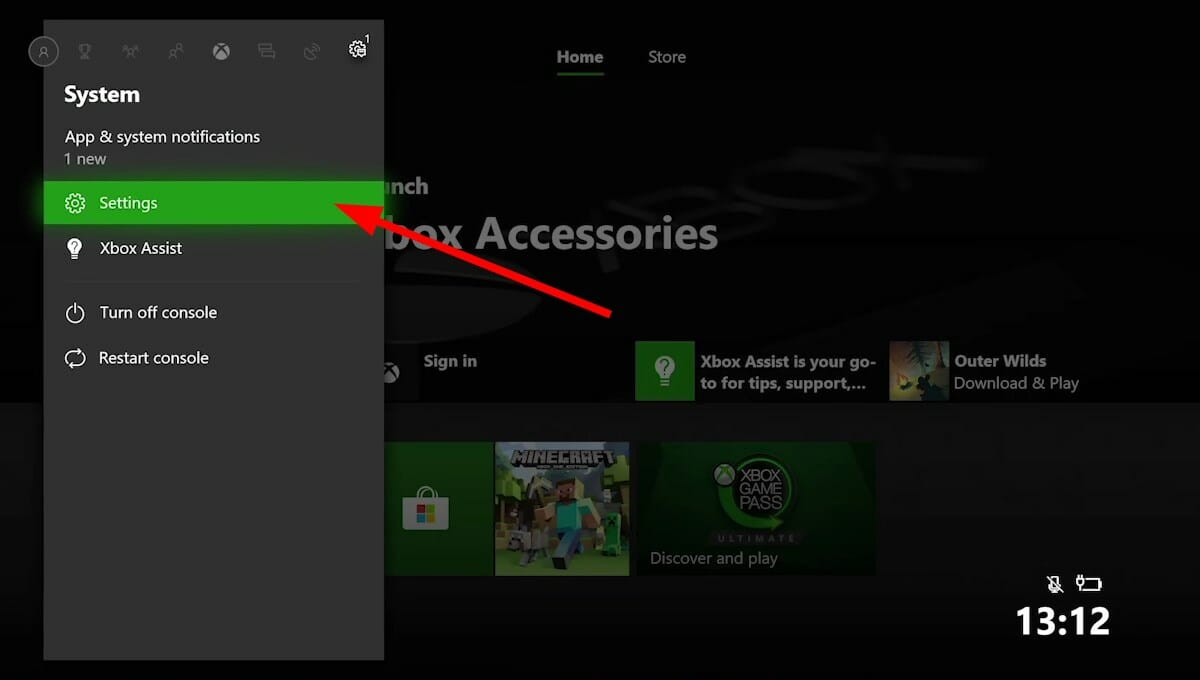
  1. Press the Xbox button to launch the guide
  2. Select Settings
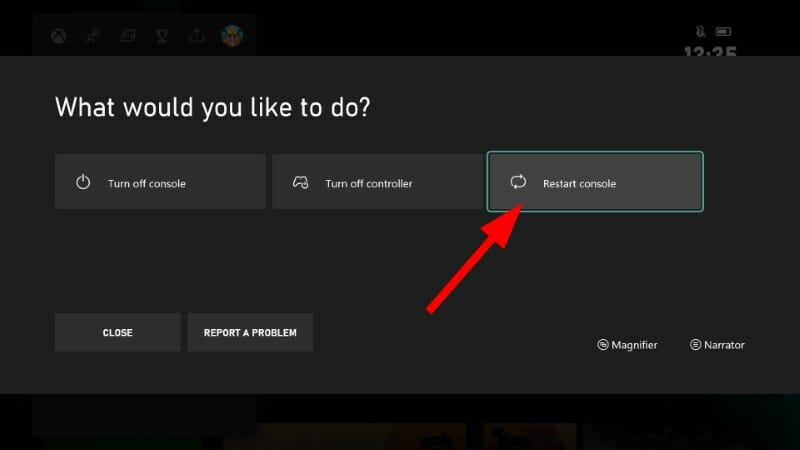
  3. Click Restart Console
  4. Select Yes to confirm
  5. Launch the app

If you cannot access the Xbox One guide or the console is frozen, press and hold the Xbox button for 10 seconds till it turns off, then touch the Xbox button again to restart the console, and launch the app.

Solution 3: Uninstall and reinstall app

If Xbox One is not letting you play games, you can try to uninstall and reinstall the app again using the steps below:

  1. Turn on Xbox One using the Xbox button
  2. Go to the Home screen
  3. Move right and select My games and apps
  4. Highlight what you want to uninstall
  5. Press Menu
  6. Select
  7. Reinstall the app then open it

Solution 4: Check Xbox Live service status/Restart app/Restart Xbox One console

If you see an error 8027025A, it may mean there’s a problem with Xbox Live service, the app didn’t load in good time, or there’s a login issue with your profile.

In this case, check the Xbox Live service status, restart the app, and/or restart your console.

  1. Go to the Xbox Live core services and check if it shows ‘up and running‘ in green color
  2. Restart the app by pressing the Xbox button to open the guide, select Home, select Menu while highlighting the app (don’t select it), then select Quit. Wait 10 seconds or so before restarting the app again.
  3. If your console is frozen (hangs), perform a hard reset then restart your console by pressing the Xbox button to open the guide, select Settings>Restart Console>Select Yes to confirm. This process resets the cache on your console.

If a certain game doesn’t allow sharing to Xbox Live, you can fix it by following the simple steps from this guide.

Solution 5: If games won’t open, exit the Home screen

  1. Press the Xbox button to open the guide
  2. Press Menu
  3. Quit the game
  4. Restart the game

Does the game open after exiting the Home screen? If not, try the next solution.

Solution 6: Reboot the console

xbox one console

A full power cycle could fix the problem when Xbox One is not letting you play games. Here’s what to do:

  1. Hold down the Xbox button for about 10 seconds
  2. The console will go off, then turn it on again by pressing Xbox button. The green boot-up animation should display on the screen. If it doesn’t, try the same steps again.
  3. Try playing the game again

Does this help? If not, you can try the next solution.

Solution 7: Test network connection

Sometimes network connections affect your ability to play games on Xbox One console. Follow the steps below to test your Xbox Live connection:

  1. Press Xbox button to open the guide
  2. Select System
  3. Open Settings
  4. Click on Network
  5. Then select Network Settings
  6. Go to the right panel under Network Settings and select Test Network Connection

If successful, your Xbox One console will connect to Xbox Live. If you are asked to update your console software, select Yes to confirm.

Solution 8: Delete your profile then add it back again

If your Xbox One My games and apps won’t open, the problem may be your profile or a profile on the console whose data may be corrupted.

To fix this, you can delete the profile, then add it back again using the steps below:

  1. Press Xbox button to open guide
  2. Select System
  3. Open Settings
  4. Click on Account
  5. Select Remove Accounts
  6. Then choose the account you want to remove, then select Remove

Once you remove the account, download the profile again to create a new, fresh version using the steps below:

  1. Press Xbox button to open guide
  2. Choose your gamerpic on the top left corner of the screen
  3. Go down and select Add new
  4. Type the email address and password for your Microsoft account (the one you removed)

Note: Do NOT select Get a new account, unless you want a completely new account.

Once you follow the steps above, the console will lead you through the account set up process. Follow the prompts until you get back to the Home screen, then try playing the game again.

If this doesn’t help, try the next solution.

Solution 9: Clear local save and re-sync with cloud

If Xbox One My games and apps won’t open, and the local save for your games is corrupted, delete it then re-sync with the cloud to fix the problem, using the steps below:

  1. Press Xbox button
  2. Select My games and apps
  3. Highlight (not select) the game title
  4. Press Menu
  5. Select Manage game
  6. Go to the right side of the screen and highlight saved data for your gamertag under Saved Data
  7. Press A on your controller
  8. Select Delete from console to remove local save for the game
  9. Once you delete local save, restart the console
  10. Press Xbox button
  11. Select System
  12. Open Settings
  13. Select System
  14. Then click Console info
  15. Select Restart console
  16. Then select Restart to confirm the action

Once you restart the console, re-sync the games you saved to the cloud, which automatically stores them as you’re connected to Xbox Live.

Try to play the game again.

Solution 10: Verify the game was bought under your account

If you’re playing a digital game, the account that bought the game should be the same one you use to sign in to Xbox Live. You can verify this by checking Xbox Live purchase history.

Solution 11: Check the license for the game

If you don’t have a license for the digital game, then it will not open. Similarly, if the account that was used to purchase the game is not on your console, then the game won’t open.

Solution 12: Reposition your Xbox One console to fix Xbox One My games and apps won’t open

Xbox One console and joypad

Is your console positioned on a flat, horizontal surface? If not, it is good to note that repositioning it means Xbox One games and apps won’t open. Position it on a level, stable surface without clutter, then try to play your game again.

Solution 13: Clean game disc and check for damages

If you’re not using digital games, but using a disc instead, games may not open because of a dirty disc, or a disc with too many fingerprints on it.

Try to clean the disc using a soft cloth, and see if it fixes the problem. Check game disc for damage at the back side, either scratches or other damages because this prevents the game from playing.

Solution 14: Try a different game disc

Xbox One games

If you have a clean disc, the issue may be your console’s disc drive. You can try playing a different disc and check if the problem recurs. If it plays, then the drive isn’t the cause.

We also have a great guide on what to do if Xbox One is stuck syncing data, so don’t miss it.

Did any of these solutions fix the Xbox One My games and apps won’t open problem? Share with us your experience in the comments section below.

RELATED STORIES TO CHECK OUT:

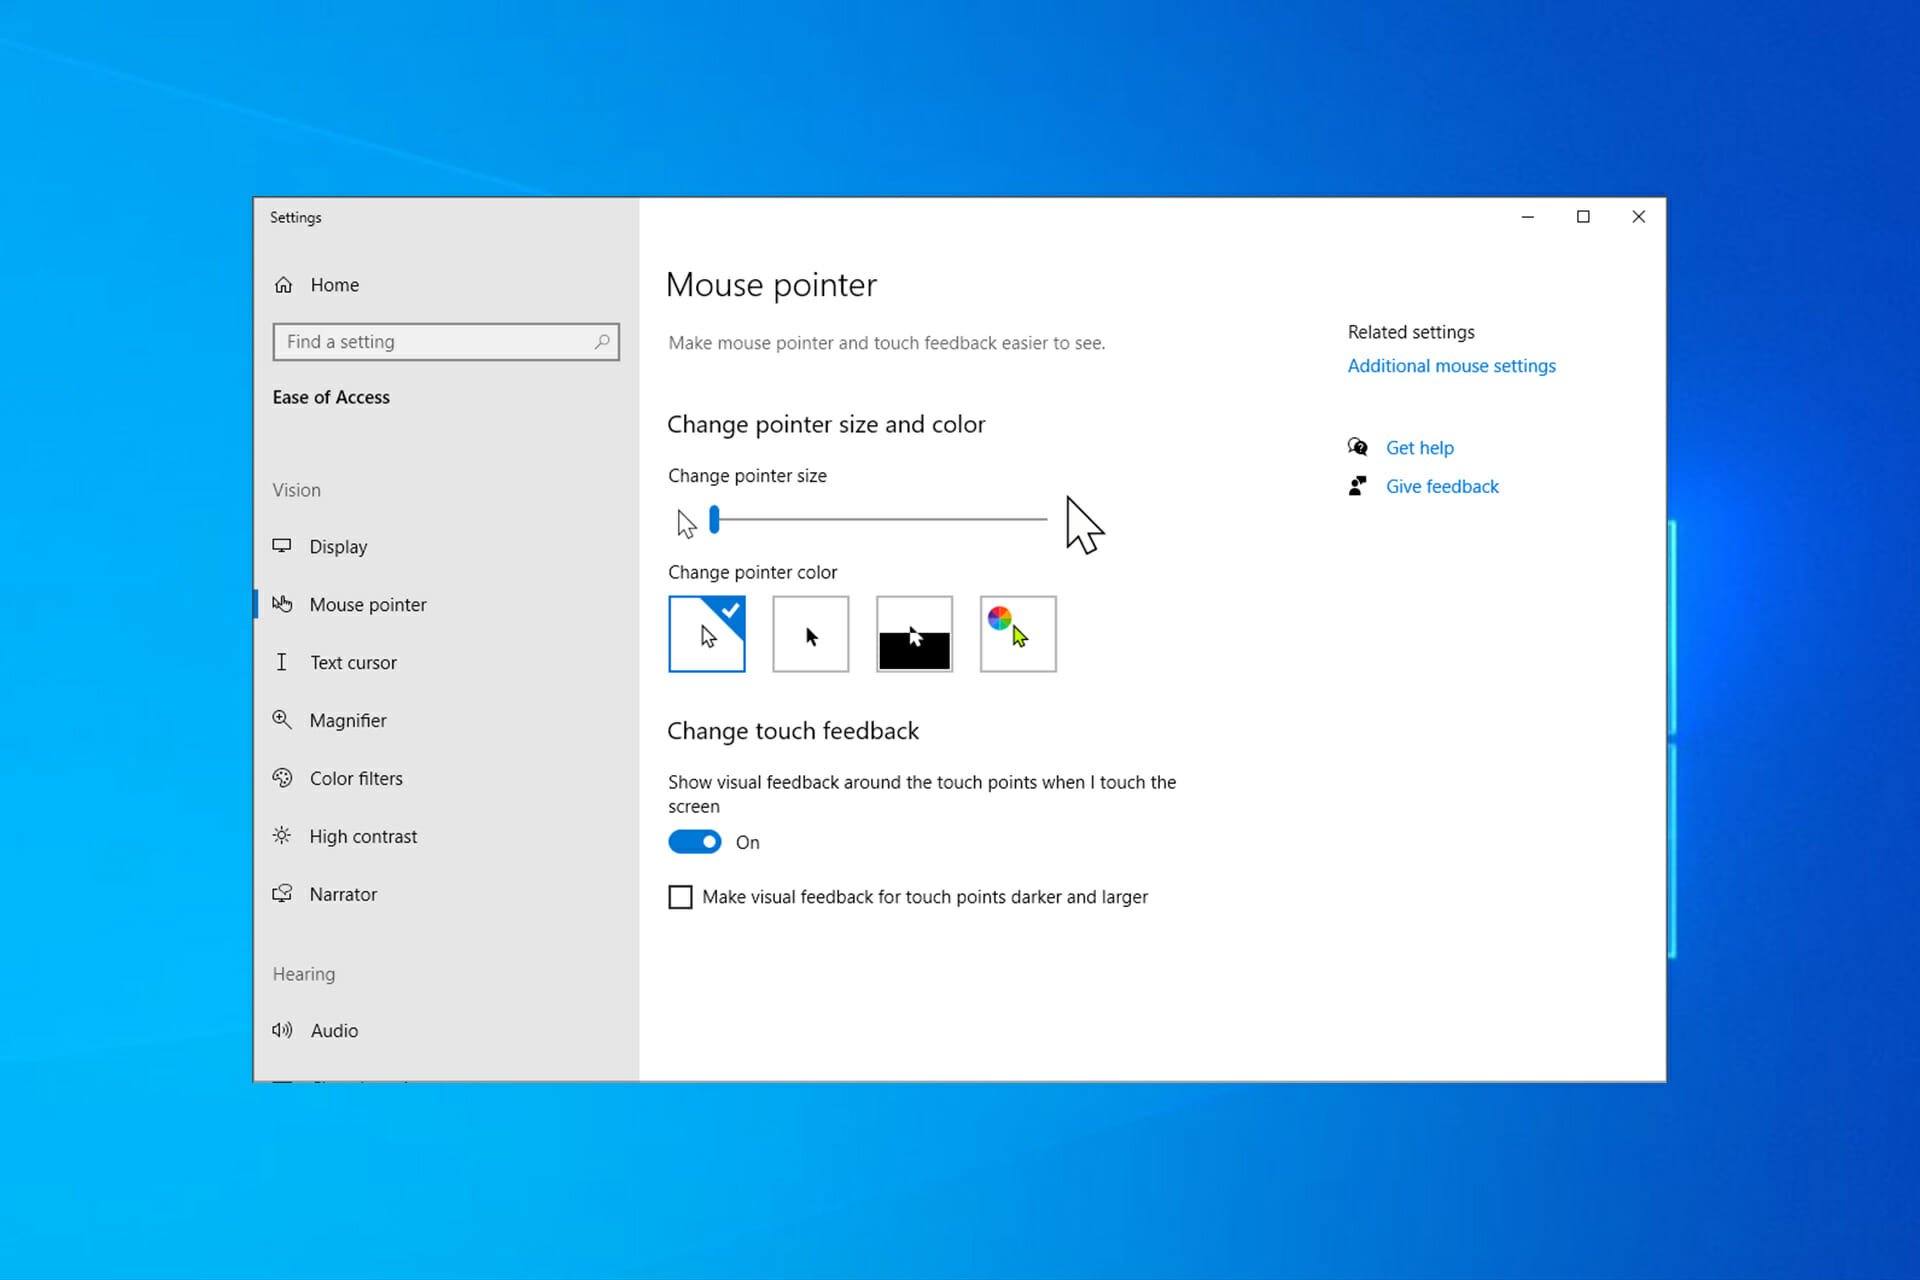
How to Get Cursor Back On Laptop If It Dissappeared

Cursor disappeared? You might have accidentally disabled it, your mouse cursor may be disappearing in Windows 11 when not moving, or your drivers might need an update. Whatever the case, mouse pointer issues usually aren’t a cause for concern.

Our team tested several reliable ways to fix the problem—here’s what worked.

How do I get my mouse pointer back?

1. Re-enable the mouse

More often than not, your mouse cursor won’t show up because you accidentally pressed key combinations that disable it.

So, before moving to any complicated steps, try re-enabling it. The exact keys depend on your device’s manufacturer, but try the following:

  • Fn + F3, Fn + F9, Fn + F11.
  • F5 (repeatedly)
  • Fn + F7 (ASUS Laptops)

2. Update or roll back the mouse driver

2.1 Updating the driver

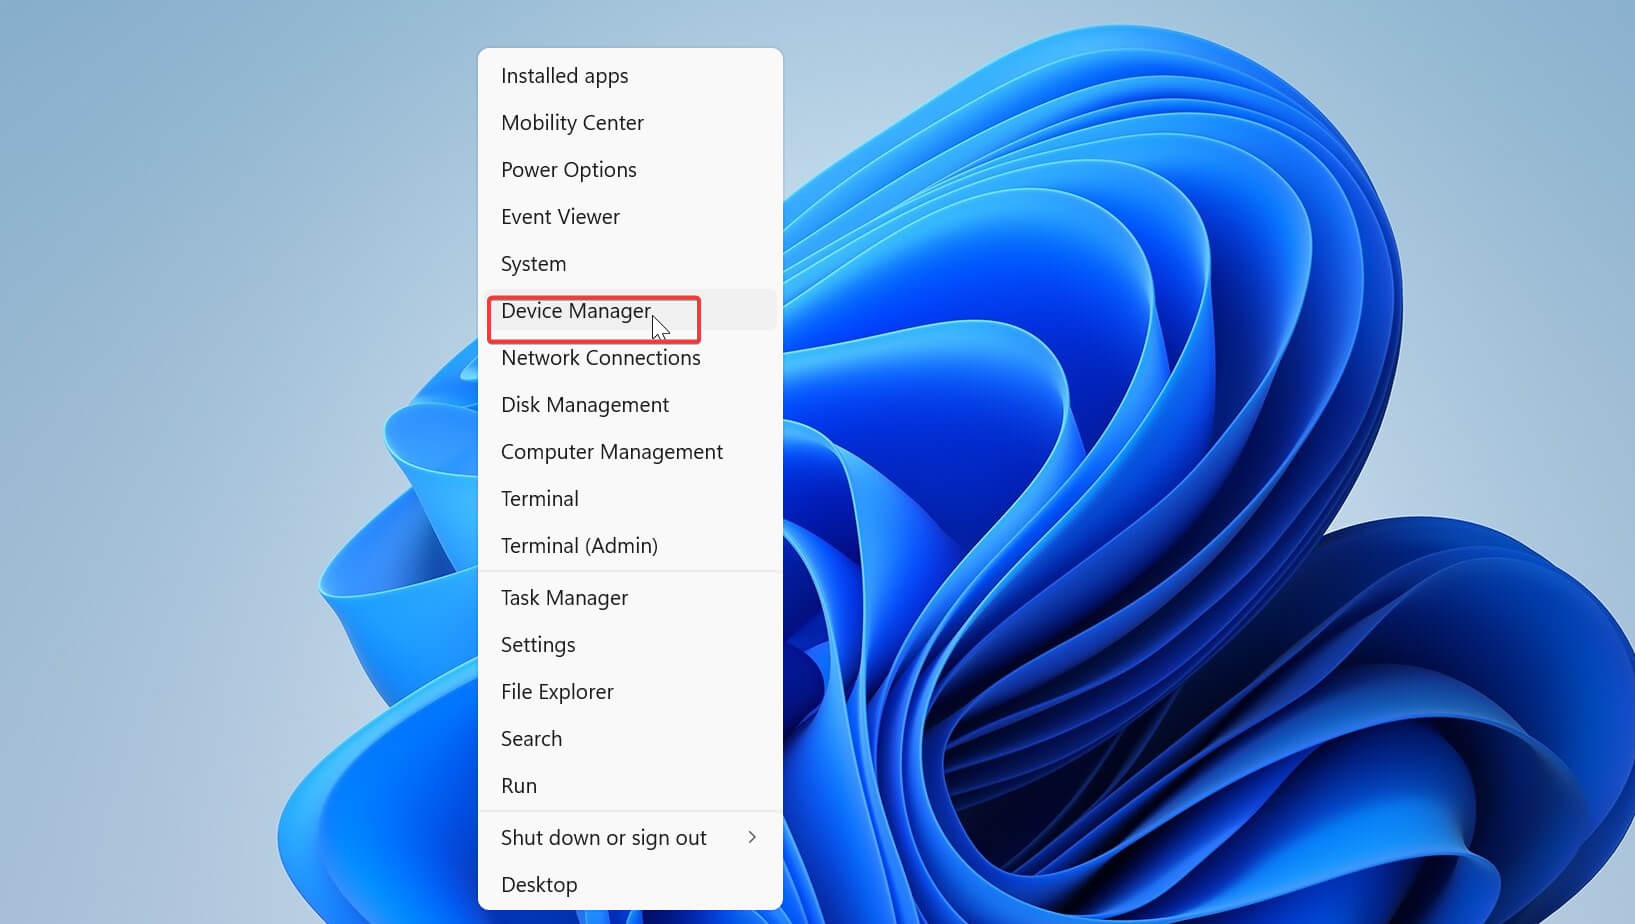
  1. Press the Windows key + X, and select Device Manager from the results list.device manager windows 11
  2. Press the Tab key to switch to the devices list.
  3. Use your arrow keys to navigate to Mice and other pointing devices, and press the Right arrow key to expand it.
  4. Press the Down arrow key to select your mouse.
  5. Press Shift + F10 to simulate the right-click, open the context menu, and select Update driver.
    update mouse driver
  6. Select Search automatically for drivers.search automatically for drivers
  7. Wait while Windows updates your driver.

If your driver is updated, the latest version isn’t compatible with Windows 10, so here’s how to roll back your mouse driver.

2.2 Rolling back the driver

  1. Repeat steps 1-4 from above
  2. Press Enter.
  3. Hit Tab a couple of times until the square is on General.
  4. Press the Right arrow key to go to Driver.
  5. Press Tab a couple more times until Roll back driver is selected, and then press Enter.
  6. Follow further on-screen instructions.

This process is pretty simple. However, if you want to keep your drivers in check and never run into similar issues again, we recommend installing an automatic driver updater.

This tool automatically finds and installs new drivers on your PC as soon as they’re released.

⇒ Get Fortect Driver Updater

3. Turn off Cortana

  1. Press the Windows key + S and enter voice activation. Next, select Voice activation privacy settings.
  2. Scroll down to the Choose switch apps can use voice activation.
  3. Locate Cortana and set Let Cortana respond to Cortana keyword and Use Cortana even when my device is locked and set them both to Off.

Sometimes, Cortana may interfere with other system processes and affect peripherals like your mouse or keyboard. Users reported getting their pointer back and even fixing mouse lag after disabling Cortana.

Uninstalling the virtual assistant for good might be a headache, but if you never use it, there’s no need to keep it on your PC.

4. Disable audio drivers

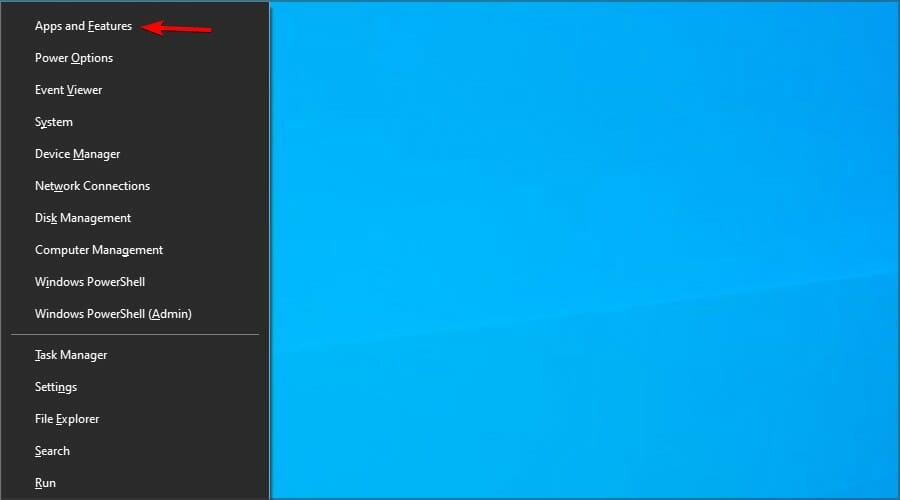
  1. Press the Windows key + X and navigate to Apps and Features.
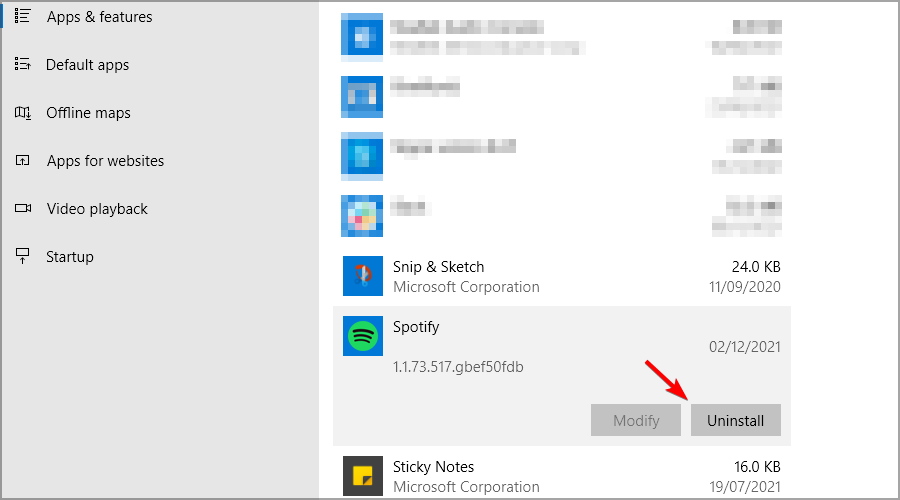
  2. Select the GeForce Experience app and click on Uninstall.
  3. Follow the instructions on the screen to remove it.
  4. Press the Windows key + X and select the Device Manager.
  5. Next, locate NVIDIA High Definition Audio and click Disable device.

Audio drivers might sometimes interfere with your mouse and cause the cursor to disappear, freeze, or lag. On that account, disabling them fixes the issue.

If this works, then you have found your culprit. However, this is just a temporary solution. You’ll have to fix it if you want to continue having audio on your PC.

We recommend you update your audio drivers to the latest versions.

5. Remove recently installed software

  1. Press the Windows key + X to open the Settings app.
  2. Navigate to the Apps section.
  3. Select any recently installed software and choose Uninstall.
  4. Follow the instructions on the screen to remove it.

To ensure that the selected application is completely removed, we recommend using uninstaller software to avoid leaving any files behind.

6. Scan for malware

  1. Press the Windows key and type defender, then select Windows Security.
  2. Navigate to Virus & threat protection and select Scan options.
  3. Select Full scan and click on Scan now.
  4. Wait for the process to finish. Keep in mind that this might take more than an hour.

If you wonder how to get your mouse pointer back, a virus scan is a good place to start. It can help you find the root cause of the error and help you fix it for good.

Run Windows Defender or any other third-party antivirus and check out the results. Remove all identified threats and check if you can now use your mouse pointer.

7. Change the power settings

  1. Press the Windows key + S and enter the power plan. Next, select Choose a power plan from the menu.
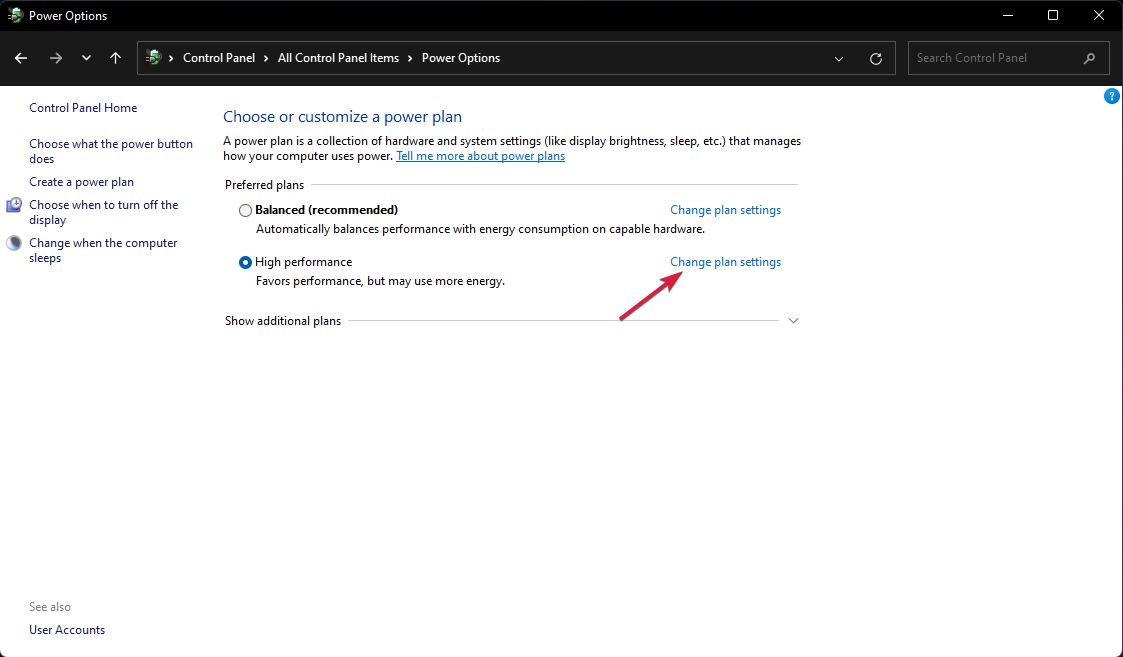
  2. Locate your current power plan and select the Change plan settings.
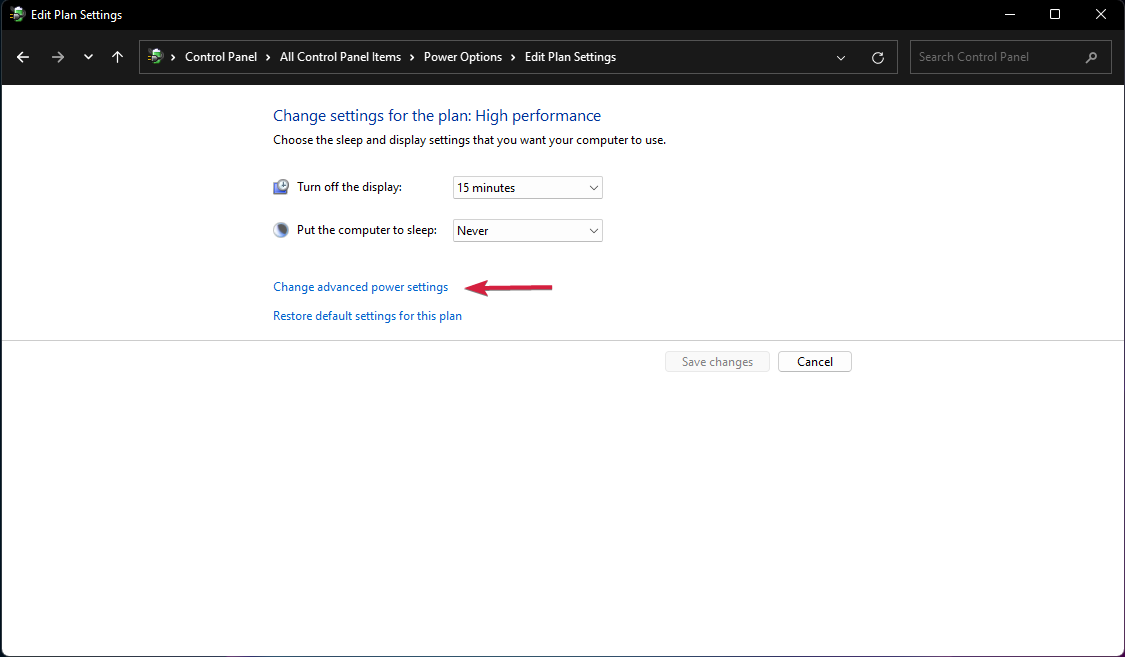
  3. Now select the Change advanced power settings.
  4. Find When I close the lid and Plugged in options and set them to Do nothing.
  5. Click Apply and OK to save changes.

Sometimes your cursor may not wake up when you open the lid of your laptop after Sleep Mode. Changing power settings should stop this.

8. Update your OS

  1. Press the Windows key + I to open the Settings app.
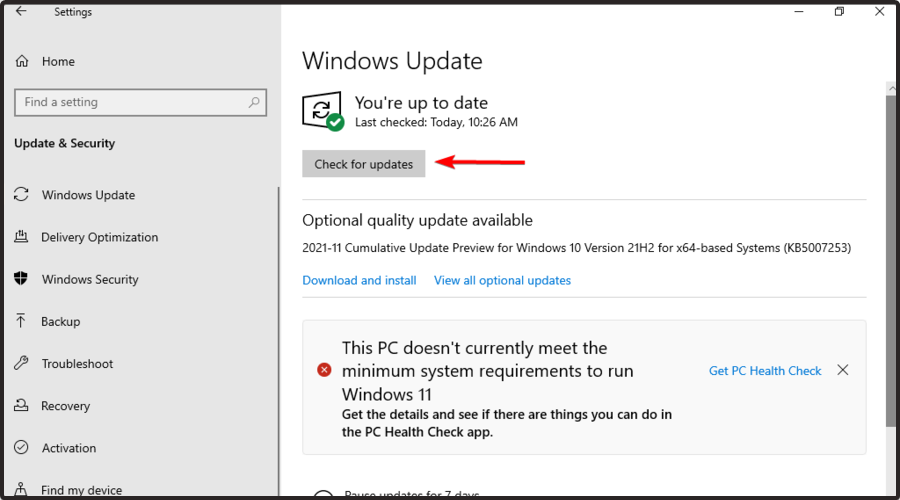
  2. Navigate to the Update & Security section.
  3. If any uploads are available, be sure to download them.

An OS update makes sure your PC is working at full performance and could help fix issues with your mouse and other hardware.

Why has my cursor disappeared?

From the experiences of different users, we gather that there are other triggers for this problem. However, here are a few common ones:

  • Driver issues – When these types of problems occur, the most likely cause is your driver, so you might have to reinstall or update it to fix the problem.
  • Wrong settings – Your settings can also lead to this problem, so check them and ensure that your peripherals are enabled.

Not being able to use your mouse can be a significant problem, but we hope these steps were easy enough. We also have guides on what to do if the mouse cursor is stuck in the corner, not going on second screen, keeps clicking without reason, so be sure to check it out.

Before you go, don’t miss our guide on what to do if the touchpad pointer has disappeared for more solutions.

Did you manage to fix this issue on your own? Feel free to share your solution with us in the comments section below.

Steam Library Folder is Not Writable: 5 Easy Fixes to Use

By default, Steam stores all games and the data in a standard directory where the installation is available. This can change only if you choose a specific location when installing the software.

The default installation location will be in the C partition, in the Program Files folder, while the bulk of data will be stored in the Steam folder.

However, the user can change the library location for Steam games manually. This can sometimes create issues with the Steam app resulting in the library folder not being writable.

Fortunately, we’ve compiled a list of practical solutions to fix this annoying problem.

What does it mean if a folder is not writable?

There are a few common causes, at the top of these are the following:

  • The SteamApp folder doesn’t have the necessary permissions – In this case, you should check if the folder has the Read-Only permission activated.
  • Hard drive issues – While we may be unable to pinpoint the specific problems, users with errors on the drive have also experienced this Steam problem.
  • Antivirus programs – Certain files are known to be blocked by your antivirus app even though they are perfectly safe. You should only use the best antivirus.
  • Temporary bugs in the game – These might determine the need to reinstall the Steam app. However, it would be best if you considered this as the last solution to try.

Users have also encountered the following errors.

  • Steam failed to add new library – This error can be problematic, and it can prevent you from playing your favorite games. Fortunately, we have the perfect solutions you can try to fix it.
  • Failed to load library steam.hdll in Dead Cells – This is a pretty popular error but can be easily solved by following our recommended steps.
  • Steam game doesn’t show up in the library – No matter what the exact circumstances are in your case, not being able to find your game in the Steam Library is incredibly infuriating for all users. So, if you face it, it is essential to have some options to help you fix it.

Regardless of your specific issue, it would be best to try the solutions below.

How do I fix the Steam library folder if it’s not writable?

1. Check if steamapps folder has Read-Only permission

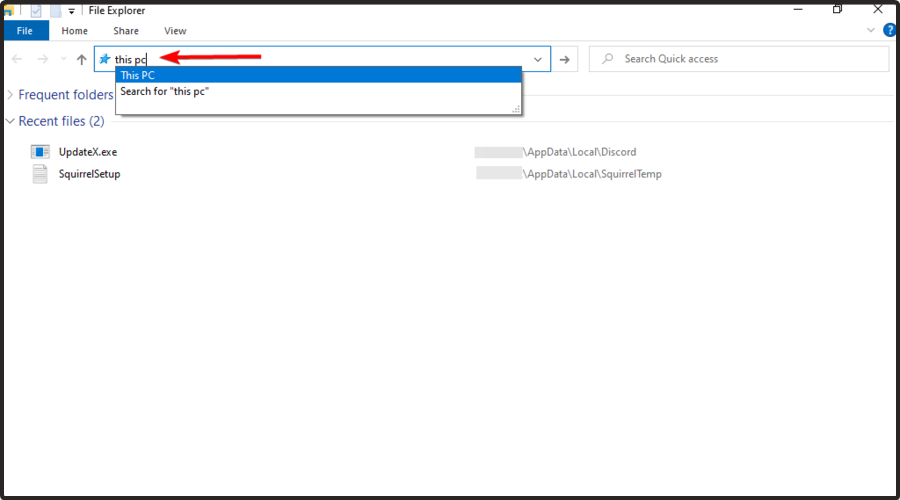
  1. Use the following keyboard shortcut to open File Explorer: Windows + E.
  2. In the search bar, type This PC, then hit the Enter key.
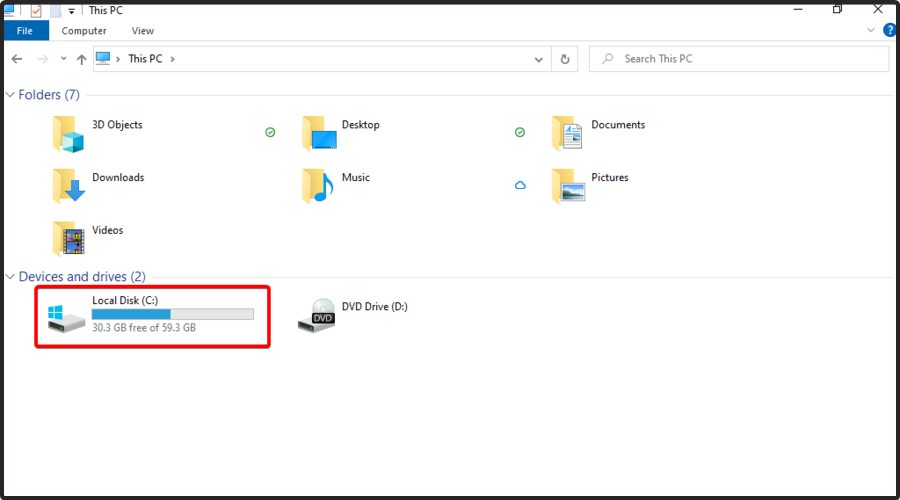
  3. Navigate to Local Disk (C:).
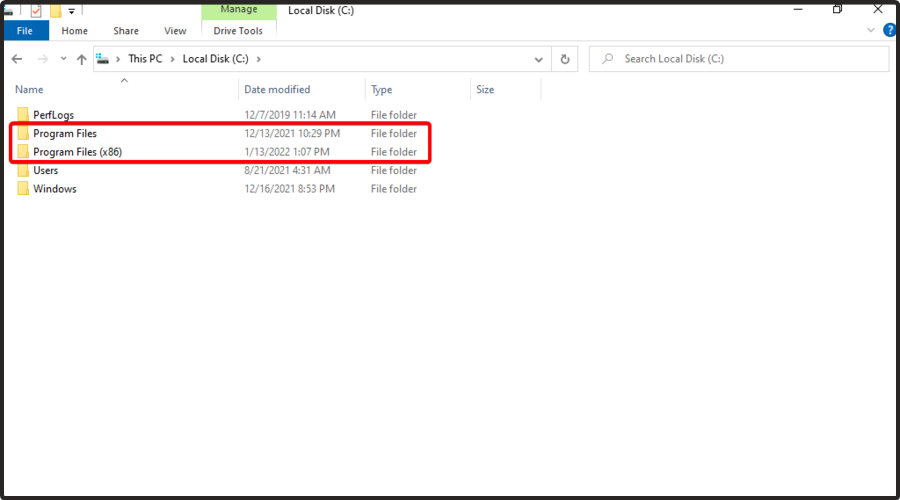
  4. Now, go to the Program files (x86).
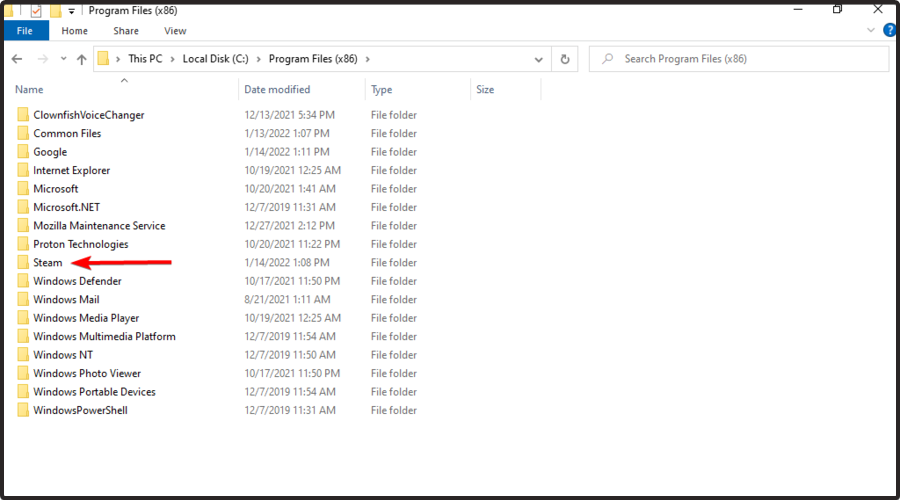
  5. Double-click on the Steam folder.
  6. Right-click on the steamapps folder and select Properties.
  7. In the General tab, under the Attributes section, uncheck the Read-only box.
    Steam library folder is not writable
  8. Click Apply and click OK to save the changes.

The error may occur if the Steamapps folder does not have the necessary permission to write into the folder and if the folder permission is set to write only. Here is how to fix it.

2. Repair the Library folder using Steam

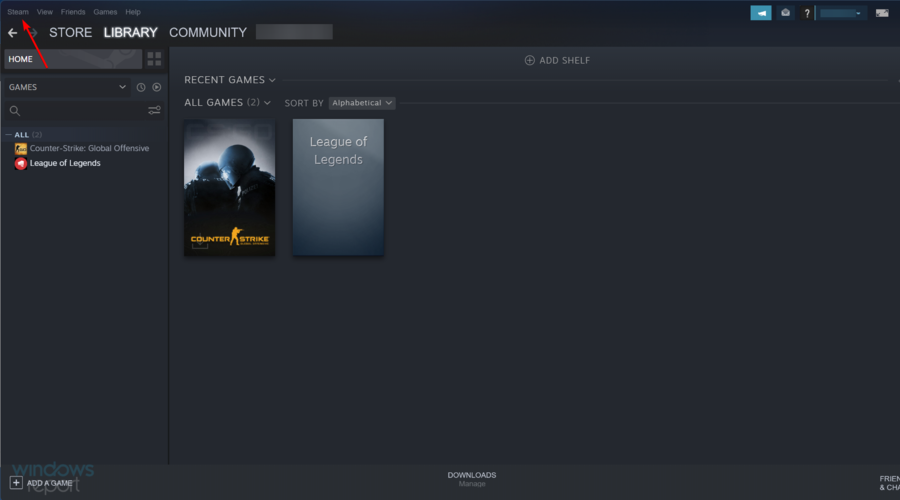
  1. Hit the Windows key, type Steam, then open the first result.
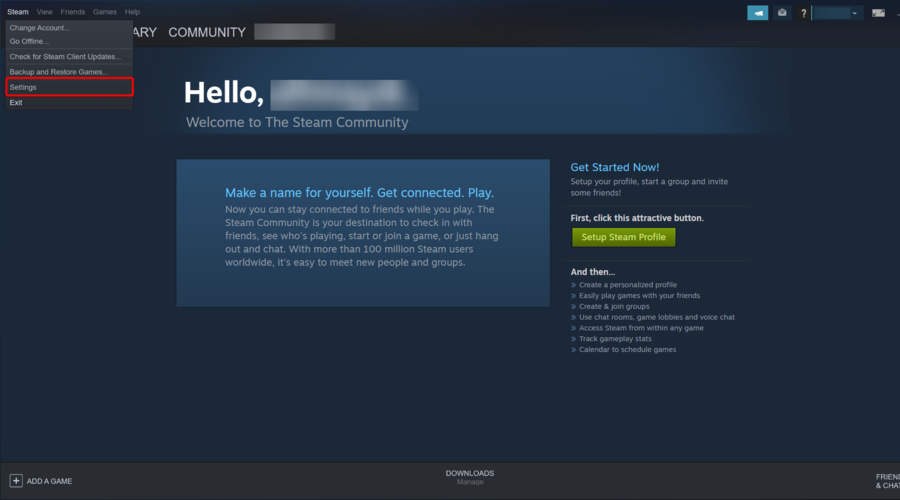
  2. From the top-left corner of the window, click on Steam.
  3. Go to Settings.
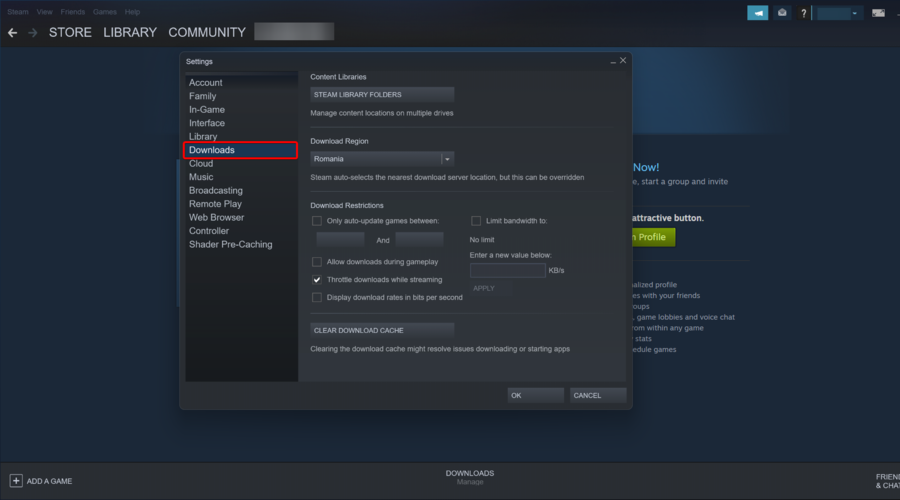
  4. Now, click on the Downloads tab.
  5. In the right pane, click on Steam Library Folder.
  6. Right-click on the folder that is giving the error and select Repair Library Folder.
  7. Steam will run the troubleshooter and fix any problem with the folder.

Your Steam app comes with a built-in library folder repair option that can be used to repair the game folder causing the error. Here is how to do it.

3. Clean Download Cache

  1. Hit the Windows key, search for Steam, then open the desktop client.
  2. From the top-left corner of the window, click on Steam.
  3. Now, navigate to Settings.
  4. From the left window pane, click on the Download tab.
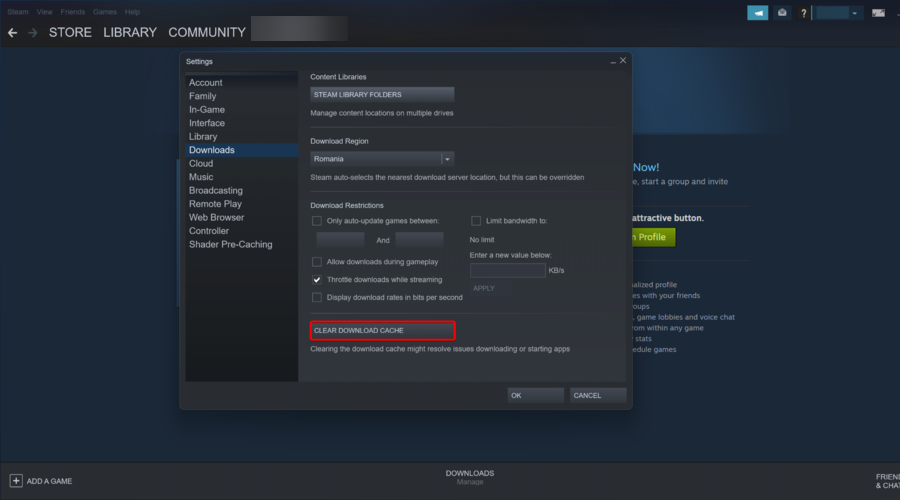
  5. In the right pane, click on the Clear Download Cache button at the bottom of the page.

The download cache in steam helps with a faster connection. However, the bad cache can create problems with the game starting and downloading. Try clearing the download cache and see if that resolves the error.

4. Change Steam Library Folder

  1. Press the Windows key, type Steam, and click on the first result.
  2. From the top-left corner of the window, click on Steam.
  3. Navigate to Settings.
  4. Go to the Downloads tab, then click on Steam Library Folders.
  5. Click on the Add icon. Here you can either select an existing folder or create a new folder.
  6. Select the folder and close the settings window. Ensure the select folder has enough free storage space to install the games.
  7. Now try to download the game again and check for any improvement.

If you haven’t changed the default Steam library folder yet, it might be time to do so. Some users have reported that changing the Steam library folder from default to custom has fixed the issue. Here is how to do it.

5. Reinstall the Game

  1. Hit the Windows key, type Steam, then open the app.
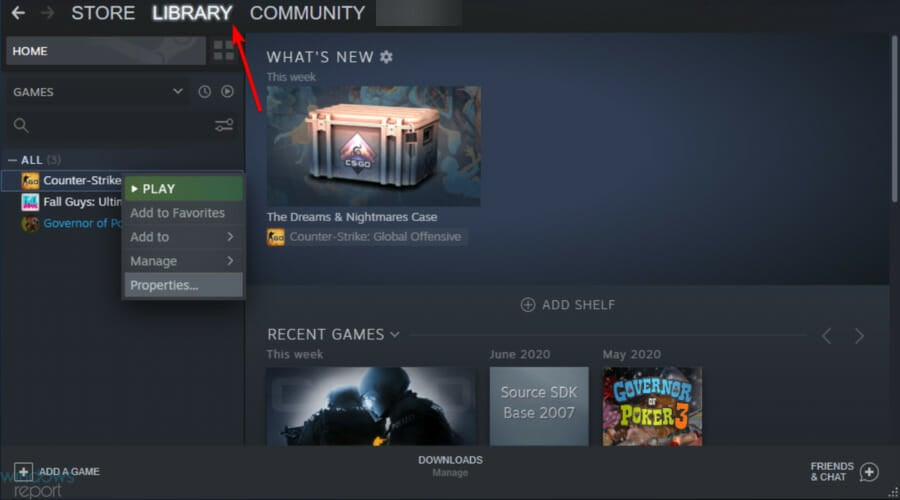
  2. From the main menu, click on Library.
  3. Right-click on the problematic game, then choose to Uninstall it.
  4. When asked to confirm, click on Delete to uninstall the game completely.
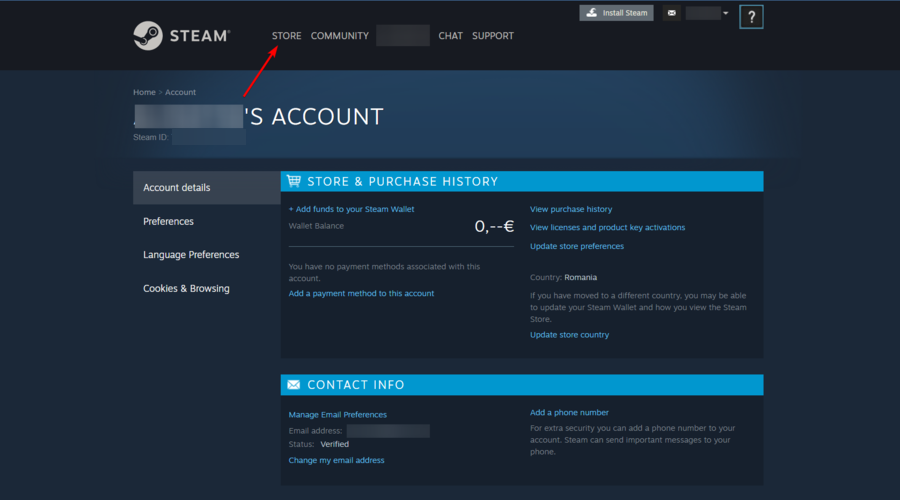
  5. Launch Steam again, and click on Store.
  6. Search for the game in the Steam store, then download and install the game to see if uninstalling the game fixed the error.

If the error occurs while trying to play the game or during the update, you can try uninstalling and reinstalling the game to fix the issue.

Uninstalling the game will not delete your game data as it is synced with your Steam account, but you will have to download the game files from scratch.

These were the best solutions you can try to make your library folder writable on Steam.

If you have additional questions, do not hesitate to comment in the section below.

Windows 11 User Profile Cannot be Loaded: How to Fix it

Users can encounter issues logging into their Microsoft account after resetting, making inaccessible their users’ profiles. The user profile cannot be loaded error initiates that the user’s profile is compromised.

Also, you can run into errors with a corrupt user profile on Windows 11.

Why can’t my user profile be loaded on my computer?

For some reason, you may experience the user profile cannot be loaded error on your PC. One of the reasons for this error is corrupt system files. Corrupt system files can impede the login process, resulting in errors.

Furthermore, the error may appear due to other reasons, such as:

  • Issues with User profile service – The error may occur if the user profile service on your computer is not working correctly. Also, a corrupt user profile affects the profile loading process, resulting in an error.
  • Startup errors on your PC – It is common to run into errors with a Microsoft account if the PC is not booted correctly. It affects its components, including the user profile service.

Depending on the instance, other factors can cause the error to appear on your computer. However, the error is fixable.

What to do if the user profile cannot be loaded in Windows 11?

Try the following preliminary checks:

If the error persists, proceed with the solutions below.

1. Restart Windows in Safe Mode

  1. Left-click the Start button, click the Power icon, hold the Shift key, and hit Restart.
  2. Click on Troubleshoot, then select the Advanced options.
  3. Click on Startup Settings and select Restart.
  4. Press 4 to Enable Safe Mode.  

Restarting Windows in Safe Mode will resolve startup issues that can cause user profile issues.

2. Modify Registry profile entry

  1. Press Windows + R key to open the Run dialog box, type regedit, then press Enter key to open the Registry Editor.
  2. Click on Yes on the UAC prompt.
  3. Navigate to the following path: Computer\HKEY_LOCAL_MACHINE\SOFTWARE\Microsoft\Windows NT\CurrentVersion\ProfileList
  4. Find any duplicate subkey with the .bak extension, right-click and select Rename.
  5. Remove the .bak, then right-click the subkey and select Rename.
  6. Add .bak or .ba at the end of the sub-key name, then press Enter to save.
  7. Click on the newly renamed subkey, right-click on State, then click on Modify from the drop-down, change the Value data to 0, and then click OK.
  8. Right-click on the key RefCount and change the Value data to 0, then click OK.
  9. Close the Registry Editor and restart your PC.

Modifying the ProfileList entry in the Registry Editor will troubleshoot the User profile. Read what to do if you can’t find the user profile in the Registry on your PC.

3. Move NTUSER.Dat File to Default Username folder

  1. Restart your PC in Safe Mode following the steps in the first solution.
  2. Press the Windows + E key to open File Explorer.
  3. Type C:\Users in the navigation bar, and double-click on the Local account folder.
  4. Select the NTUSER.dat file, then press Ctrl + X to cut it.
  5. Go to C:\Users, open the Default folder, and press Ctrl + V to paste the file into the Default username folder.
  6. Go to C:\Users, select the Local account folder, then press the Delete key.
  7. Restart your PC and check if the user profile is loaded.

4. Run an SFC scan

  1. Left-click the Start button, type Command Prompt, and click Run as administrator.
  2. Click Yes on the User Account Control prompt.
  3. Type the following command and press Enter: sfc /scannow
  4. Restart your PC and check if the error persists.

An SFC scan will detect corrupt system files that can prevent the user profile from loading. You can check how to fix the run as administrator option if it’s not working on your PC.

Alternatively, you can read about fixing the User Profile sync not currently provisioned issues on your device. Also, our readers can check how to fix the User Profile Service failed logon error.

You can also encounter various installation errors, and speaking of which, we covered error code 801c03ed in one of our previous guides.

Should you have more questions or suggestions, kindly use the comments section below.

Xbox Won’t Connect to WiFi: How to Fix It If Everything Else Does

Xbox consoles connect to Xbox Live service for features such as online gaming, video streaming and others, but this happens only when the connection is working well.

Unfortunately, due to different technical issues, sometimes your Xbox won’t connect to Wi-Fi or other internet connections you may be using, and these can prevent you from joining your console to a network, or to Xbox Live.

Usually, when Xbox won’t connect to Wi-Fi or to your wireless network, the error will appear on the Xbox screen recommending a power cycle for your router or gateway device to fix the issue.

But, if the administrator of the router changed the Wi-Fi password recently, then you’d have to update your console to avoid such failures in future.

Here’s a list of the solutions you can use when Xbox won’t connect to Wi-Fi.

What can I do if Xbox won’t connect to Wi-Fi but everything else does:

1. Rerun the Network Connection Test

Do this on your console to verify the specific error message you’re getting, by doing the following:

  1. Open Guide
  2. Select Settings.
  3. Click All Settings.
  4. Then go to Network.
  5. Select Network settings. Any known outages will appear in the middle of the screen.test network connection xbox one
  6. Select Test network connection on the right side of the Network settings screen. If the test is successful, your console will connect to Xbox Live. If not, the Network Connection Troubleshooter will try to identify the problem.

2. Power cycle your console and network hardware

Unplug the power cable from the back of the router, modem, or gateway for a few minutes. If you have a router and a modem, unplug their power cables then restart your Xbox One console by doing this:

  • Press the Xbox button  to open the guide.
  • Open Settings.
  • Click Restart console.
  • Select Yes to confirm. If you can’t access the guide, or if the console seems frozen, press and hold the Xbox button on the console for 10 seconds, until the console turns off. After the console shuts down, touch the Xbox button on the console again to restart.
  • Plug the modem or gateway in first and wait for all the lights to return to their normal state.
  • Plug in the router and wait for all the lights to return to their normal state.
  • Test your Xbox Live connection. If successful, your console will connect to Xbox Live.

Note If you are prompted to update your console software, select Yes.

3. Disconnect third-party headsets

These headsets can cause active interference because they broadcast on the same frequency as wireless routers. To find the problematic headset, do this:

  • Disconnect the power from the wireless headset.
  • Test your Xbox Live connection. If successful, your console will connect to Xbox Live

4. Make sure that the router is broadcasting the correct SSID

Verify that your console is connecting to the correct SSID, then test your Xbox Live connection again. If this solution worked, your console will connect to Xbox Live.

Otherwise, you might need to test your console in an alternate location, check your router connectivity issues or look for a new one.

5. Confirm the Wi-Fi password

To confirm the password for a wireless network using a Windows 10 computer that is already connected to the network, do this:

  • Click Start
  • Select Control Panel.
  • Then open Network and Internet.
  • Click Network and Sharing Center.
  • Then select Manage Wireless Networks.
  • Right-click the name of your wireless network, and then select Properties.xbox one wi-fi network
  • Click the Security tab, and then click the Show characters check box. Once you have verified the correct password for your wireless network, test your Xbox Live connection again

Note If the option to Show Characters is not available, you may not be logged in with the Administrator account on the computer.

Learn everything there is to know about the administrator account and how you can enable/disable it right here!

6. Check for other wireless interference

There are two types of interferences: active and passive. Active ones include electronic devices that broadcast a wireless signal or cause electromagnetic interference, while passive happens when a wireless signal passes through objects, causing the signal to be weak and refracted.

Remove devices such as microwaves, air conditioners, ovens, CRT televisions, baby monitors, other wireless networks, cordless phones, and wireless speakers, between your console and router, to minimize such interference.

Other objects like glass, lead, copper piping, concrete, insulation, mirrors, gun safes, filing cabinets, tile, and plaster should be discarded, however, the wireless signal also degrades over distance.

After you have determined the best line of sight configuration for your devices and have removed as many causes of interference as possible, test your Xbox Live connection.

7. Check for MAC filtering

    Wireless routers can prevent unauthorized network access by using a feature called MAC filtering. However, MAC filtering can also prevent your console from connecting to Xbox Live.

    If it is turned on, add your console’s MAC address to your router’s authorized list, or, turn off MAC filtering temporarily on your router to see if MAC filtering is preventing your console from connecting to Xbox Live.

    To add your console’s MAC address to your router’s authorized list, do this:

    • Get your console’s MAC address
    • On Xbox Home, navigate to the left until you reach Pins.
    • Select Settings.
    • Open Network.
    • Then click Advanced Settings.
    advanced wi-fi settings xbox one
    • Write down your Wireless MAC address.
    • Add your console’s MAC address to your router’s list of authorized MAC addresses
    • To change MAC filtering settings on your router, refer to your router documentation or the hardware manufacturer’s website.
    • If you change MAC filtering settings, restart your router before trying to connect to Xbox Live.

You can also set an alternate MAC address on Xbox to address this issue, so don’t hesitate to try that.

8. Change the wireless channel

A wireless router can broadcast on several different channels. If another nearby wireless network is broadcasting on the same channel, or if there is wireless interference from devices, you may experience poor signal strength from your wireless network.

To resolve this issue, try changing the channel on which your router broadcasts.

Note: Most wireless routers have a channel width of either 20 MHz or 40 MHz available as a configurable option. The Xbox One prefers a 20 MHz setting.

After you change your wireless channel, test your Xbox Live connection.

9. Check the wireless channel width

A wireless router can broadcast on different channel widths. Most wireless routers have a channel width of either 20 MHz or 40 MHz available as a configurable option. The Xbox One console prefers a 20 MHz setting.

To resolve your connection issue, first make sure that your wireless router is configured to broadcast on a 20 MHz setting. After you have verified your wireless router is set to a channel width of 20 MHz, test your Xbox Live connection.

10. Check for low wireless signal

A weak wireless signal can mean Xbox won’t connect to Wi-Fi. You can check your wireless signal strength on the Xbox One console by doing this:

  • Open Guide
  • Select Settings.
  • Click All Settings.
  • Then choose Network.
  • After that, select Network settings. Any known outages will appear in the middle of the screen.
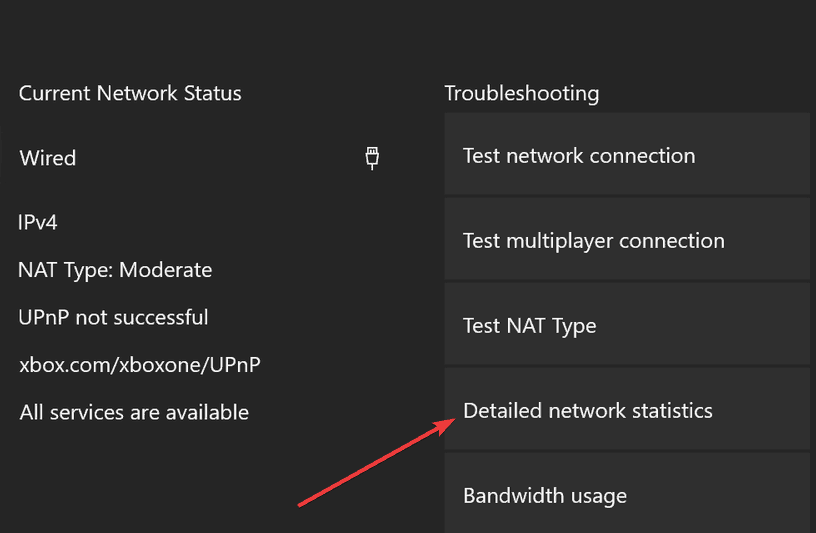
  • Select Detailed network statistics.detailed network statistics xbox one
  • Your wireless signal strength is indicated as a percentage on the Detailed network status A signal strength below 20% is considered low and may cause problems with your Xbox Live connection.

You can also try a wired connection to router, a direct-to-modem connection, or connect directly to your modem, then test your Xbox Live connection.

11. Test your connection in another location

  • Disconnect the Xbox console and all associated accessories.
  • Go with the Xbox and accessories to an alternate location where you can connect to an alternate network. This will determine whether the error is with your network or with your console.
  • At the alternate location, reconnect the Xbox console and all associated accessories.
  • Restart your console, and test your Xbox Live connection at the new location by trying to connect to the alternate network

In case your Xbox is connecting in a different location, you should consider replacing your router and fix network issues.

If Xbox won’t connect to Wi-Fi even after using the above solutions, there may be something wrong with the internal wireless adapter, or your console needs repair. You can submit an online repair request at the Xbox Online Service Center to get your console repaired.

Let us know if any of these solutions helped by leaving a comment in the section below.

Also, leave there any other questions or suggestions you may have and we’ll be sure to check them out.

RELATED STORIES TO CHECK OUT:

How to Fix the Blu-ray Player on Xbox One if not Working

Xbox is more than a gaming console, it’s a multimedia device that supports a wide range of media.

Since Xbox is a multimedia device, users use it to play Blu-rays, but sometimes errors while playing Blu-rays can occur, and today we’re going to show you how to fix those errors.

How to fix the Xbox Blu-ray player if it’s not working?

1. Check your parental controls

In most cases, these errors occur due to parental controls.

Parental control is a great feature that allows you to choose what kind of content can you access on Xbox, but sometimes it can happen that you accidentally blocked certain discs from playing.

To fix this problem we advise you to review your parental controls and check if everything is in order. To do that, follow these steps:

  1. Go to Settings > Family.
  2. Select the Gamertag whose settings you want to change.
  3. Under Privacy & Online Settings, choose Change Settings.
  4. Make the necessary changes.

If you prefer, you can also change parental controls through your PC by following these steps:

  1. Sign in to your Xbox account using any web browser.
  2. Click on My account > Security, family & forums.
  3. Now click on Xbox 360 Online Safety.
  4. Select the account whose settings you want to adjust.
  5. Make necessary changes and click Save.

After changing parental controls on your Xbox, check if the problem with playing Blu-rays is resolved.

2. Check the Blu-ray region

Some Blu-rays can only be played in a certain region and before playing them you need to check their region code. All Blu-rays have a region code on the disc case, and if you bought your Blu-ray in a different region, you might not be able to play it on your Xbox.

For example, if you bought your Xbox in the US, but you bought your Blu-ray in Europe or any other region, you most likely won’t be able to play it. If that’s the case, you can’t do much except for using a Blu-ray that is compatible with your region.

3. Clean your disc

Sometimes you can fix this problem simply by cleaning your disc. To do that use soft, clean, slightly wet cloth. Hold the disc by the edges and be sure not to touch its surface.

Use the cloth and clean the disc by wiping the disc from the center to the edges in a straight motion. After the disc is cleaned, make sure that it’s dry and try to play it again.

4. Try playing your disc on a different console

If you can’t play Blu-rays on your Xbox, you might want to try the disc on a different Xbox console.

By doing so you’ll be able to determine if the problem is your console or the disc. If your disc plays without any problems on a different console, it means that there might be an issue with your Xbox.

5. Check if the Blu-ray player app is installed

If you have problems playing Blu-ray discs, you have to check if the Blu-ray Player app is installed on your console. If you don’t have a Blu-ray app, you can install it by following these steps:

  1. On your Home screen, select Store.
  2. Now select Search.
  3. In the search bar enter Blu-ray and press the Menu button.
  4. Select Blu-ray Player app once it appears.
  5. Select Free or Install option to download and install the Blu-ray app.

Alternatively, you can install the Blu-ray app simply by inserting the disc. To do that, follow these steps:

  1. Insert a Blu-ray or DVD disc to your console.
  2. Select Blu-ray Player app.
  3. Select Free or Install option.
  4. Wait for the app to install and the disc should start playing automatically.

After you install the app, you should be able to watch Blu-rays simply by inserting the disc into your console and choosing the Blu-ray Player from the Home screen.

6. Change the power mode

    If you can’t play Blu-rays discs on your console, you might want to try changing your power mode.

    Users reported some issues with Instant-On power mode, so you might want to change that by following these steps:

  1. 1. On the Home screen scroll left to open the guide.

  2. 2. Select Settings > All Settings.

  3. 3. Now select Power > Power mode.

  4. 4. Select an Energy-saving option.

  5. 5. Now you need to perform a hard power cycle. To do that, press and hold the power button for 10 seconds.

  6. 6. After your console shuts down, turn it back on again by pressing the power button.

  7. 7. Insert the disc again and check if the problem is resolved.

7. Place your Xbox upright

Some users reported that they are unable to play games on their Xbox. After inserting the game disc, they would get an option to play Blu-ray thus making their games unable to run.

One suggested solution is to place your Xbox upright. After doing that, insert the game disc again and wait until Xbox recognizes it.

After that, your disc should be recognized and you’ll be able to play your game.

8. Clear Blu-ray disc persistent storage and MAC address

By default Xbox, One will automatically download content related to your Blu-ray discs, such as extra features for movies for example.

Sometimes this content can cause problems while playing Blu-rays, therefore you need to remove it.

To do that, follow these steps:

  1. Go to Settings > Disc & Blu-Ray.
  2. In the Blu-Ray section select Persistent Storage.
  3. Now select Clear persistent storage.
  4. Optional: Clear the persistent storage couple of times to fix the problem.

After doing that, you need to clear the MAC address by doing the following:

  1. Press Start on the Home screen.
  2. Navigate to Settings.
  3. Now go to Network Settings > Advanced Settings > Alternative Mac Address.
  4. Select the Clear option.
  5. Optional: Shut down your console and disconnect all cables. Leave your console for two minutes or more and than reconnect all the cables and restart your console.

9. Hold the disc tray for a few seconds

Few users reported that they managed to fix this problem simply by holding their disc tray for a few seconds when inserting the disc. This sometimes fixes the problem while playing Blu-rays, so you might want to try that.

10. Change the Blu-ray settings

According to users, you might be able to fix this problem simply by changing the Blu-ray settings. To do that, follow these steps:

  1. Go to Settings > Disc & Blu-ray.
  2. If you’re living in the US, make sure that the 120Hz option is checked. If you’re located in the UK or using a 220Hz, select the 24Hz option.
  3. After doing that, check if the problem is resolved.

Playing Blu-rays on Xbox isn’t always a smooth process, and sometimes certain errors can occur. If you encounter any errors while playing Blu-rays on your Xbox, be sure to try some of our solutions from this article.

Enter Your Search Term Stuck on Screen [Quick Fixes]

The search term is a word or group of words that an internet user types into the search space of any search engine. However, it may result in problems sometimes, causing the enter of your search term to be stuck on the screen.

Another problem you can encounter browsing the internet is Google search not working on Firefox on your computer.

Why is enter your search term box stuck on the screen?

The enter your search term box stuck on the screen can occur for many reasons. A common one is interference from other search tools. When you have a third-party search tool or bar running on your computer, it can interfere with the one you’re using.

Many other factors may be responsible for the search term box stuck on the screen. Some are:

  • Programs installed on the computer – Some programs like Web Bar are usually installed on your computer alongside other programs from the Internet. They can cause problems with the search activities on your search tool. This is also the reason behind a stuck crosshair on the screen.
  • Outdated browser – It is common to run into problems on the browser if it is not updated. So, you can experience the search term box stuck on your screen if you don’t update it.

The above causes are a few of the multitude that can be responsible for the problem. Fortunately, we have some fixes to help you resolve the problem and get your search term box working again.

How do I fix the enter your search term box if it is stuck on the screen?

Before proceeding with any fixes, try the following:

Go ahead with the solutions below if you can’t fix the problem.

1. Reboot your PC in Safe Mode

  1. On the sign-in screen, press the Shift key while holding the Power button.
  2. Press the shift key to prompt the Advanced Recovery Options page.
  3. Click on Troubleshoot, then select the Advanced options.
  4. Click on Startup Settings and select Restart.
  5. Press 4 to Enable Safe Mode.  

Windows will reboot in Safe Mode. Restarting Windows in Safe Mode will resolve startup issues affecting the search engine.

2. Uninstall the third-party search tool

  1. Right-click the Start button and click on the Control Panel.
  2. Select Programs and features, then click on the Uninstall a Program option.
  3. Under Uninstall Program, find the third-party search tool or bar, right-click on it, and select Uninstall from the drop-down.
  4. Restart your PC to effect the process smoothly.

Uninstalling other search tools or bars can stop any interference they may cause in your search term box.

3. Run Windows Defender and enable Real-time protection

  1. Left-click the Start button, type Windows Security, and then click Enter.
  2. Click on Virus & Threat Protection and select the Scan options.
  3. Then select Full scan to initiate an extensive scan and click the Scan now button.
  4. Go to the Virus & threat protection option and click Manage settings.
  5. Then toggle on the Real-time protection option to enable the Windows Defender Antivirus.

The Windows Defender scan will check for malware and viruses on your PC that can cause the problem. Read about fixing the Windows Virus and threat protection not working on Windows 10/11.

Third-party security software, such as TotalAV makes a much better alternative than the built-in tool. This software will provide you with real-time protection, a firewall, a ransomware shield, and more advanced scanning features, allowing you to intercept and eliminate any potential threat toward your computer while navigating the internet.

⇒ Get TotalAV

4. Update your browser

  1. Launch Chrome browser, click on the Menu button in the top right corner of the screen and click Settings.
  2. Select About Google Chrome, then click Update Google Chrome.

Chrome will check for updates, and if available, it’ll automatically install them.

Updating the browser has worked for many users as it will help fix bugs affecting the browser and its activities. You can also read about ways to get rid of the search bar on your computer’s top screen.

You can tell us which solutions worked best in the comments section.

What is Mic Monitoring on Xbox One? 7 Things to Know

Mic Monitoring on Xbox is a useful feature that helps users communicate with others. If you’re not familiar with it, this guide will tell you everything you need to know about it.

What is mic monitoring?

Mic monitoring allows you to hear yourself through the headphones. By doing so, you can identify the audio quality, detect and resolve issues, and more.

Everything you need to know about Xbox mic monitoring

1. Do all headsets support mic monitoring on Xbox One?

The answer here would be a big No! Many users try enabling the feature on Xbox One while the headset itself doesn’t support mic monitoring.

So, before you go around trying to use mic monitoring, check the headset’s manual or the official website to confirm if it supports the feature. No matter how fancy-looking the headset is, make it a habit to check the specifications before you purchase one.

Also, if your headset supports mic monitoring, the feature would be turned on by default though you would have to manually adjust it, in case the volume level doesn’t feel right.

2. Where is mic monitoring on the Xbox One?

  1. Firmly connect a compatible headset to the Xbox controller.
  2. Now, press the Xbox button on the controller to open the menu.
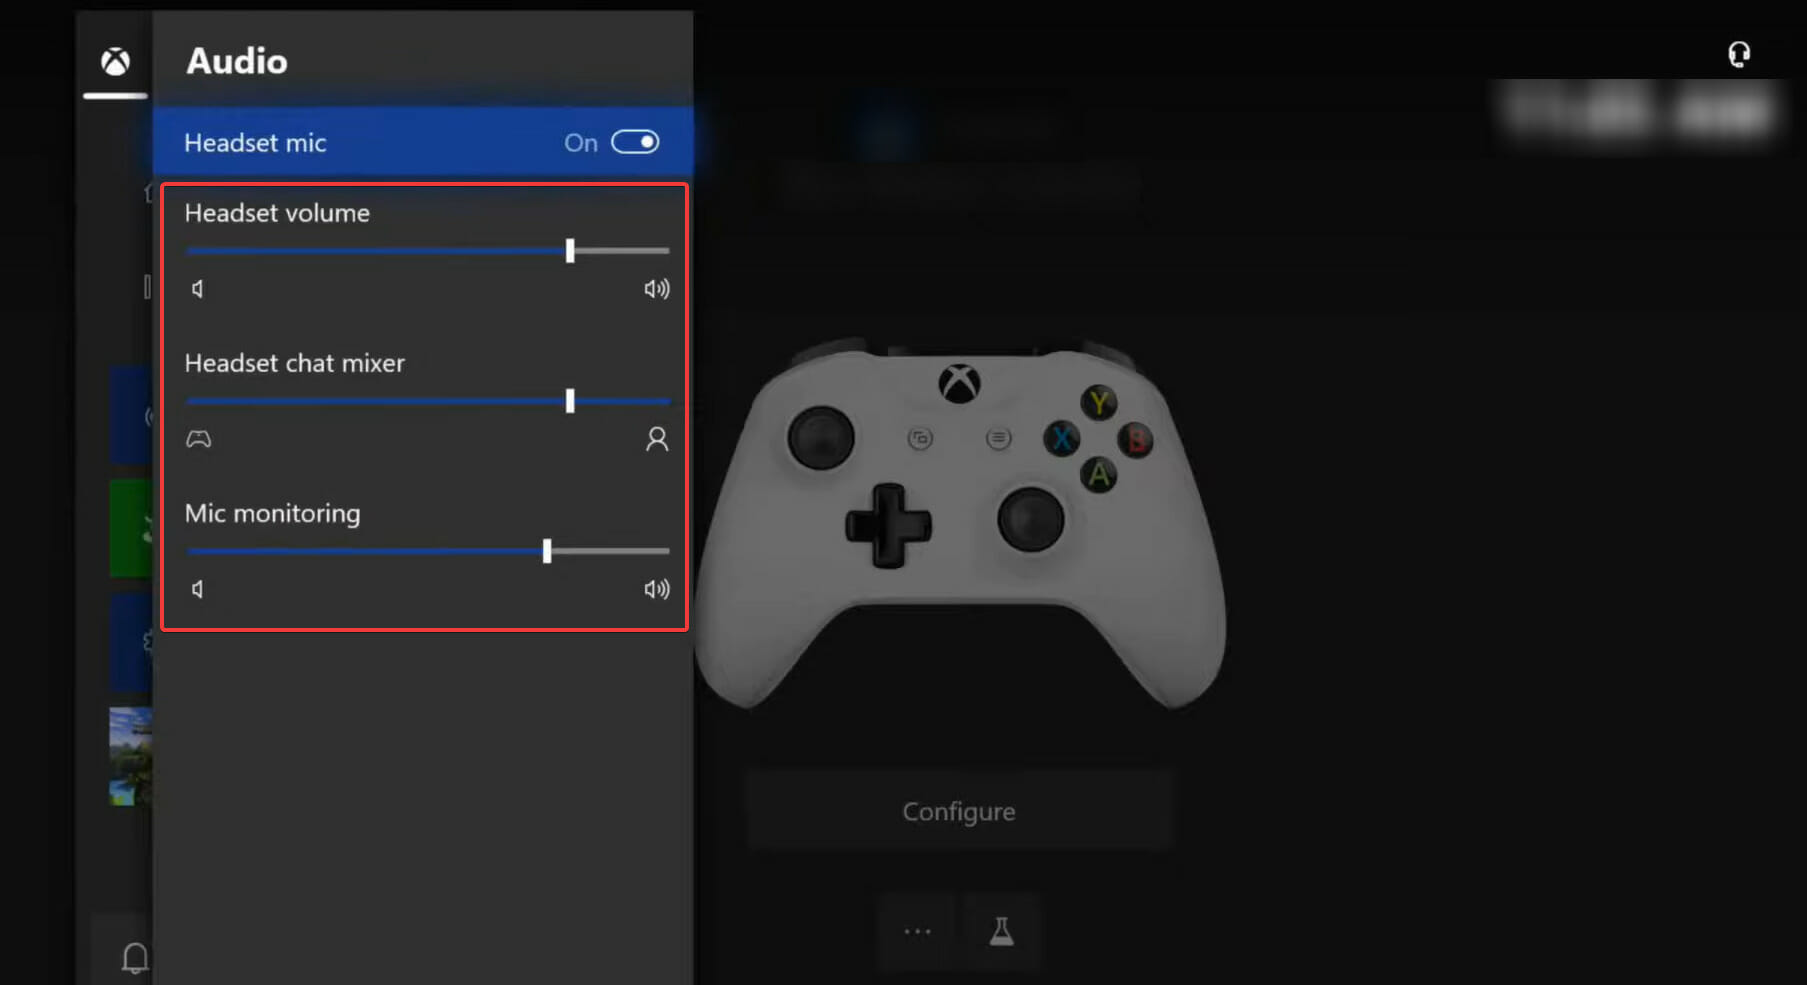
  3. Next, go all the way down and select the Audio icon to modify the settings.Audio settings to fix what is mic monitoring xbox one
  4. You will now find three different options listed here, Headset volume, Headset chat mixer, and, lastly, Mic monitoring.Adjust slider

If you have a compatible headset properly connected, you should be able to access three different options. Drag the sliders to adjust the level for each.

3. How to turn on mic monitoring on Xbox One?

  1. Open Settings on your console.
  2. Navigate to Audio settings.
  3. Drag the Mic monitoring to the right to enable it.

4. How to turn off mic monitoring on Xbox One?

Repeat the steps from the previous section, but this time move the Mic monitoring slider to the left.

5. Wired or wireless headset for Mic Monitoring?

Some argue that the sound in wired headsets is superior to that in wireless ones. Wired headsets are also easy to use because of the 3.5mm jack that is standard across devices.

Wired headsets are less prone to connectivity issues which gives them a slight advantage. Yet, it all comes down to personal preference, and whatever works best. Audio quality and latency are usually not an issue for most users because the difference is not apparent.

6. What do I do if my headset does not support mic monitoring?

Having established that there are specific headsets that do not support mic monitoring, it is important to note that there is a work-around to this situation. If you find yourself with a headset that does not support mic monitoring, you can use a headset with an amplifier.

An amp or amplifier allows you to tinker with the audio inputs and ensure optimal sound. Turtle Beach and Astro have a great collection of audio controllers.

7.  Does mic monitoring cause echo?

Unfortunately, this is one of the few disadvantages associated with the feature. If the mic monitoring level is set too high, the microphone might pick up the sound from the headset, leading to an echo.

Though the echo is generally minute and can be fixed by lowering the mic monitoring level or the headset’s volume.

What are some common mic monitoring issues on Xbox?

1. Mic monitoring on Xbox One is greyed out

This mostly happens when you use an adapter instead of a 3.5mm jack pin or your wireless headset is not connected correctly. To fix it, simply unplug the headset, clean the jack and port on both ends, and reconnect the headset or adapter to the controller.

2. Mic monitoring on Xbox One is not working

  1. Press the Xbox button on the controller to open the menu, go to Profile & system on the right, and then select Settings.Settings to fix what is mic monitoring xbox one
  2. Now, select Volume & audio output on the right in the General tab.Volume & audio output
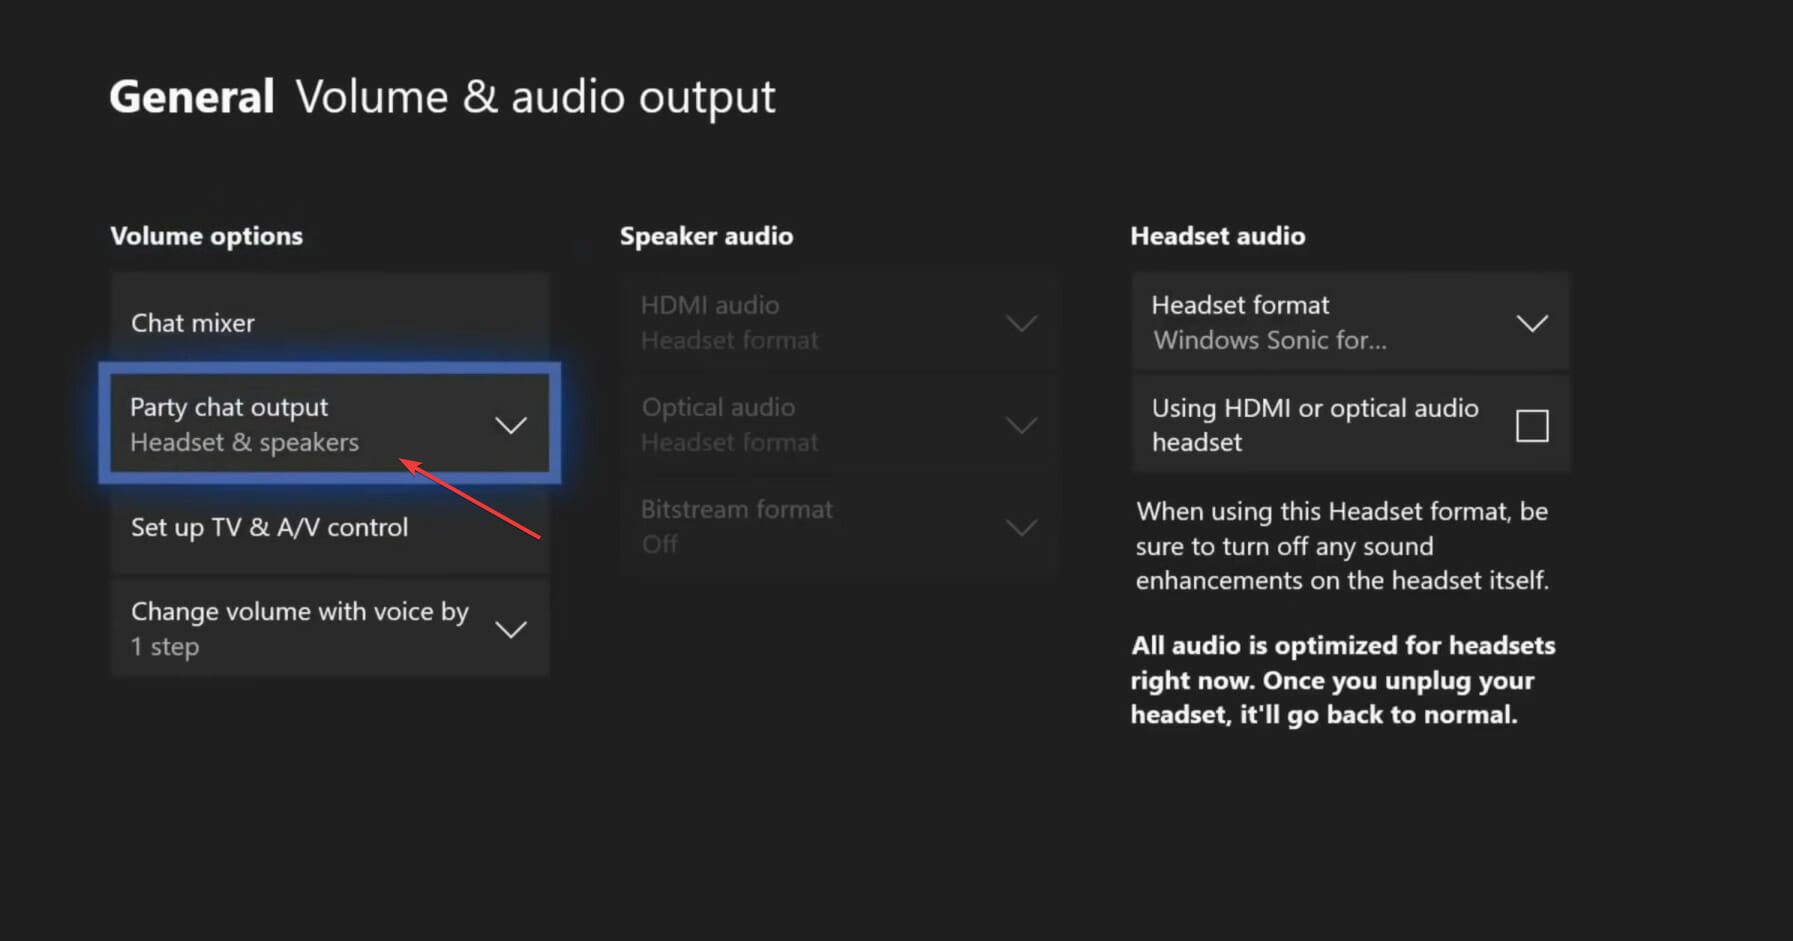
  3. Click on the Party chat output option.Party chat output to fix what is mic monitoring xbox one
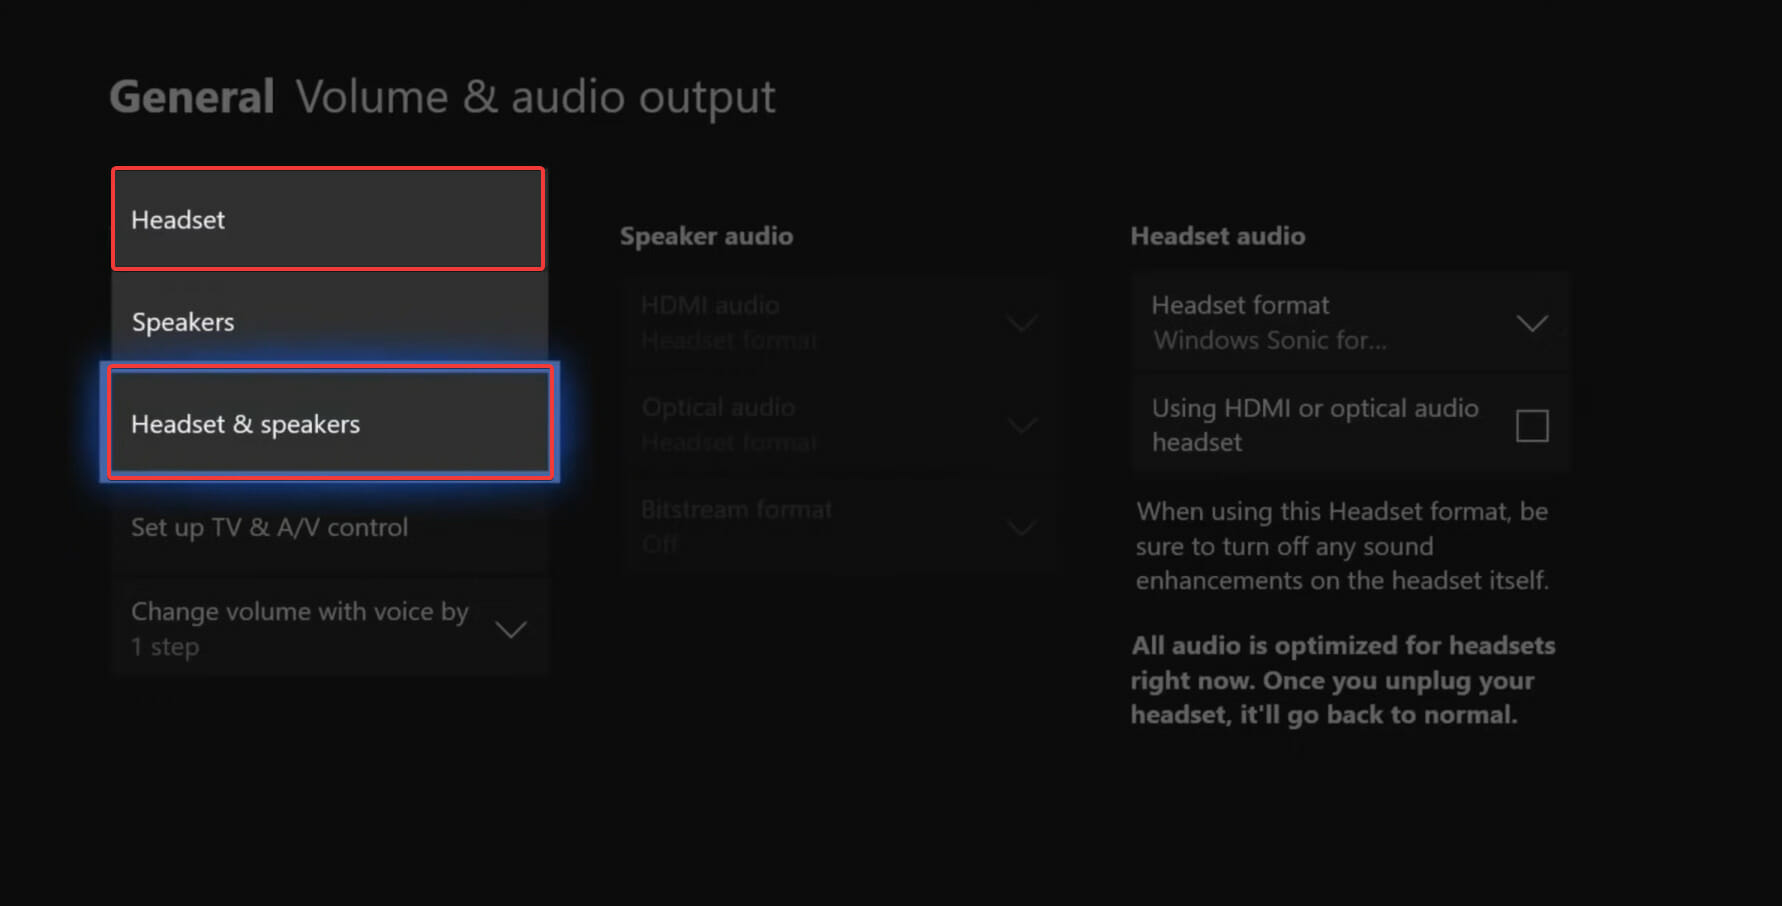
  4. Select Headsets and speakers or simply Headsets from the list of options.Select option

If the audio output is routed through the speakers, mic monitoring would not work on Xbox One. Make the necessary changes and check if it starts working. In case the problem persists, update the Xbox controller’s firmware.

3. Mic monitoring not showing on Xbox One

This generally happens due to an issue with the console, and resetting it should do the trick. But, before you do that, try connecting another headset to verify if the problem actually lies with the console settings or if it’s the headset to be blamed.

Also, make sure to check that the headset is properly connected since in that case too, the mic monitoring option is greyed out.

That’s all there’s to mic monitoring on Xbox One, and the various issues along with the most effective solutions for each. By the time you reach this part of the guide, you are well versed with the feature and can start using it on your Xbox One.

This feature can help you if your Xbox mic is quiet, so don’t hesitate to give it a try. Also, find out what to do if the Xbox One headset mic is not working but you can hear sounds.

In case you have further microphone issues, we have a guide that shows you what to do if Xbox is unable to find your mic, so don’t miss it.

Tell us your experience with mic monitoring on Xbox One, in the comments section below.

Xbox One Error: Game Took Too Long To Start

You can install all sorts of games and apps on your Xbox One, but unfortunately, certain errors can occur while starting those apps and games.

Users reported that some games took too long to start on their Xbox One console, and since this error can prevent you from playing them, today we’re going to show you how to fix it.

How to fix the game took too long to start on Xbox One?

1. Check the status of Xbox Live services

If you’re waiting an eternity and the game takes too long to start while trying to play on Xbox One, we advise you to check the status of Xbox Live services.

Some apps and games rely on Xbox Live in order to work properly, and if there’s an issue with Xbox Live services you might encounter this problem.

To check the status of Xbox Live services, simply visit the Xbox website and check if Xbox Live Core Services are running. If those services aren’t running, you’ll encounter this and many other Xbox errors.

Unfortunately, there’s not much that you can do in this situation, and you can only wait until Microsoft fixes the issue.

If your Xbox games and apps won’t open, this useful guide will certainly help you solve the problem.

2. Start the app again

According to users, sometimes you might be able to fix this problem simply by trying to start the app again. Before trying this be sure to stop the app first. To stop an app, do the following:

  1. Go to Home screen by pressing the Xbox button.
  2. Highlight the problematic app and press the Menu button.
  3. Select Quit.

Wait for 10 seconds or more, and try to start the same app again.

3. Restart your console

According to users, Took too long to start error can occur due to problems with your cache.

Xbox One stores all sorts of temporary files in your cache, and those files should help you start your apps faster, but sometimes certain files in your cache can get corrupted and cause this and many other errors to appear.

Fortunately, you can easily fix these types of errors simply by restarting your console. To do that, follow these steps:

  1. Scroll left on the Home screen to open the Guide.
  2. Select Settings.
  3. Choose Restart console option.
  4. Select Yes to confirm.

Alternatively, you can restart your console by holding the power button for 10 seconds until your console turns off. After the console turns off, press the power button to turn it back on again.

After restarting the console and clearing the cache check if the problem is resolved. Some users reported that you need to restart your console a few times before this error is fixed, so be sure to try that.

Few users are advising to unplug the power cable from your console once you turn it off and keep it unplugged for a minute or two. After that, connect the power cable again and wait until the light on power brick goes from white to orange.

Now press the power button on your console and your cache will be cleared and this problem should be resolved.

4. Change your region settings

Few users reported that you can fix Took too long to start error on your Xbox One simply by changing the region on your console. Apparently, you should be able to fix this problem simply by setting your region to USA on your console.

To do that on Xbox One, you need to follow these steps:

  1. Make sure that you’re signed in to your Xbox One.
  2. Scroll left on the Home screen to open the Guide.
  3. Select Settings > All Settings.
  4. Choose System > Language & location.
  5. Now choose a new location from the list and select Restart now option.

After your console restarts check if the problem is resolved. In addition, some users are recommending that you change your region once again after your console restarts.

Although changing your region is simple, there are few limitations that you should know about. You can change your region once every three months, so keep that in mind.

Also, you won’t be able to change your region if your account is currently suspended for any reason. Lastly, you can’t change your region if you have a balance due on your Xbox Live subscription.

Keep in mind that some services might not be available in certain regions, therefore be sure to choose your region carefully.

You should also know that money on your Microsoft account won’t be moved when you change your region, therefore we recommend that you spend it before changing the region. Keep in mind that this isn’t a universal solution since it works only for some regions.

5. Try installing apps and games on your internal hard drive

Few users reported that this issue occurs only if they try to run their games and apps from an external hard drive.

Using the external hard drive with your Xbox One is a great way to preserve space, but unfortunately, sometimes your external hard drive could be the main cause for this error.

To fix this problem you can try installing your applications and games to the internal hard drive and check if that solves the problem.

6. Remove the problematic game and your Xbox account

According to users, sometimes your installation might be corrupted and that can prevent applications from loading properly. To fix Took too long to start error, you need to remove the problematic game from your system.

Keep in mind that even if you remove the game from your system along with its files, you should be able to download them again, and all your files, including saved games, will be downloaded again, so you won’t lose any progress.

To uninstall a game, follow these steps:

  1. Make sure that there is no disc in the disc tray.
  2. On the Main screen, go to My Games & Apps.
  3. Select the problematic game, and press the Menu button. Choose Manage game from the menu.
  4. Select the game again, press the Menu button and select Uninstall.
  5. If you have Saved data or Reserved data for this game, be sure to remove it as well.

After uninstalling the game and all of its data, you need to remove your Xbox profile. Sometimes your Xbox profile might be corrupted and that can cause Took too long to start error message to appear. To remove your Xbox profile, do the following:

  1. Scroll left on the Home screen and choose Settings > All Settings.
  2. Select Remove accounts.
  3. Select the problematic account and choose Remove. Sometimes you need to remove the problematic account few times before it’s completely removed from your system, so be sure to do that.
  4. Keep repeating the previous step until the problematic account is removed from your console.

After that, restart your console by following these steps:

  1. Open the Settings menu and choose Power & startup.
  2. Select Turn off or restart.
  3. Now select Restart now and choose Yes.

Now you need to re-download your Xbox profile. To do that, follow these steps:

  1. On the Home screen scroll left.
  2. On the Sign in tab you should see the list of all available users. Scroll all the way down and choose Add & manage.
  3. Now select Add new option.
  4. Now you need to enter your Microsoft account login information.
  5. After your profile is downloaded, be sure to sign in to it.

Lastly, you need to reinstall the problematic game or application. To do that, do the following:

  1. Go to My Games & Apps.
  2. Scroll all the way to the right and you’ll see Ready to Install section.
  3. You should see the game that you removed at the beginning of this solution in the Ready to Install section. Simply select the game and wait until it downloads again.
  4. After the game is downloaded, try to start it again.

Some users reported that they were able to fix this problem simply by uninstalling and reinstalling the problematic game, so you might not have to remove your profile.

Other users reported that clearing the Reserved space fixed the problem for them, so you might want to try that before you uninstall the game.

7. Restore factory defaults

Sometimes a bad update or corrupted files can cause Took too long to start error message to appear on your Xbox One. According to users, you can fix this problem simply by resetting your console to factory defaults.

Keep in mind that resetting your console can delete all your files and games, so you might want to back them up. To reset your console to factory defaults, do the following:

  1. Scroll left on the Home screen to open the Guide.
  2. Choose Settings > All Settings.
  3. Now select System.
  4. Go to Console info & updates.
  5. Select Reset console.
  6. You should see two options available: Reset and remove everything and Reset and keep my games & apps. We suggest using the latter in order to reset your console and delete the corrupted files without affecting your games and apps.
  7. By using this option you won’t have to download all your games and you’ll be able to continue where you left off. Unfortunately, sometimes this option doesn’t fix the issue, and if that’s the case you’ll have to use Reset and remove everything option.

You can also restore factory defaults by using a USB flash drive. If your Xbox One isn’t responding or if you can’t access Settings, you can perform a factory reset by following these steps:

  1. Download Restore Factory Defaults files.
  2. Connect an empty USB flash drive to your computer.
  3. Factory reset files will be stored in a zip archive. Extract them.
  4. Move the $SystemUpdate file to the root directory of your USB flash drive.
  5. Disconnect the USB flash drive from your console.

Now you need to perform the reset on your Xbox One by following these steps:

  1. Unplug the network cable from your console if you’re using a wired network connection.
  2. Turn off your console and unplug the power cord.
  3. Wait for 30 seconds or more and plug in the power cord again.
  4. Connect the USB flash drive with your console.
  5. Press and hold the BIND button on the left side of the console and the EJECT button on the front side of the console. Now press the Xbox button on the console.
  6. Keep holding BIND and EJECT buttons for 15 sections.
  7. If you were successful you should hear two power-up sounds.
  8. After you hear two power-up sounds you can release BIND and EJECT buttons.
  9. You should now see instructions on the screen that will guide you through the reset process.

Keep in mind that it might take several minutes for the console to restart. During the restart process you can connect your Ethernet cable to the console.

It’s crucial that you hear two power-up sounds in Step 7 which indicates that the USB flash drive is detected and that the file is copied to your console. If you don’t hear two power-up sounds, you might want to repeat the process again.

Once again, resetting your console to factory defaults will remove your files, installed applications and games, therefore it’s crucial that you back up all important files that aren’t synchronized with your Microsoft account.

8. Clear Persistent Storage

According to some users, you might be able to fix this problem simply by clearing the Persistent Storage. Sometimes files in this section can get corrupted and that can lead to Took too long to start error to appear.

To fix this issue it’s recommended that you clear the Persistent Storage by following these steps:

  1. Go to Settings > Disc & Blu-ray.
  2. Navigate to Persistent Storage and select the Clear Persistent Storage option.

After clearing the Persistent Storage check if the issue is resolved.

9. Clear Alternate MAC address

Your network configuration can interfere with your apps and games, and in order to fix some issues, you might have to clear your Alternate MAC address. To do that, follow these simple steps:

  1. Go to Settings.
  2. Select Network > Advanced Settings.
  3. Choose Alternate MAC Address and then select Clear.
  4. After clearing the Alternate MAC Address your console will restart.
  5. After your console restarts check if the problem is resolved.

10. Go offline and try to start the game again

Apparently this issue can sometimes appear if you’re connected to the Internet on your Xbox One. One suggested workaround is to go offline on your Xbox One and try to start the game again. To do that, follow these steps:

  1. Press the Guide button on your controller.
  2. Go to Settings > All Settings.
  3. Select Network > Network Settings.
  4. Now choose Go Offline option.

After going offline you should be able to start your game without any problems.

Keep in mind that while you’re offline you can’t play multiplayer games or any other games that require constant Internet connection, but you should be able to play single player games without any problems.

This might not be a permanent solution, but it’s a decent workaround, so be sure to try it.

11. Disable Instant-On feature

Instant-On feature is designed to work as a sleep mode for your Xbox One thus allowing you to quickly start your Xbox One and continue playing. It’s a great feature, but some issue with it can occur.

First of all, this feature doesn’t completely turn off your Xbox, which means that your Xbox is still working and using some power.

In addition, users reported a problem with the TV app, and according to them, they are getting Took too long to start error message whenever they try to start the TV app.

The simplest way to fix this issue is to disable Instant-On mode by following these steps:

  1. Press the Menu button and go to Settings.
  2. Select Power and startup.
  3. Now select Power Options and switch from Instant-On mode to Energy-saving mode.

By turning this mode on you should be able to fix Took too long to start error message. Keep in mind that Energy-saving mode will completely turn off your Xbox One in order to preserve electricity.

This will cause your Xbox One to start a bit slower, but the problem should be resolved. If this solution fixes the problem, you can turn on the Instant-On mode again.

12. Stop Xbox from turning off your cable or satellite box

Xbox One works as a multimedia center and allows you to you watch live TV. However, sometimes issues with TV application can occur, and in order to fix them, you need to prevent your Xbox from turning your cable box on or off.

To that, follow these steps:

  1. Go to Settings and select TV & OneGuide.
  2. Under Power settings you should be able to choose which devices will be affected by Xbox on and Xbox turn off commands.

After disabling your Xbox from turning on and off your cable box, the issue with Took too long to start error and TV app should be resolved completely.

Keep in mind that after making these changes you’ll have to use your remote for cable box.

13. Sign out of your Xbox One profile and start the TV app again

If you’re having Took too long to start error while starting the TV app, you might want to try signing out of your Xbox One profile and starting the TV app again. To do that, follow these steps:

  1. Go to the Home screen.
  2. Select your gaming profile in the account list section in the top left corner.
  3. Select your account and press the A button on your controller.
  4. Choose Sign Out option.

After signing out of your profile, try to start the TV app again. You’ll be asked to sign in again so be sure that you do that. After doing that, the application should start without any problems.

Keep in mind that this is just a workaround, so you might have to repeat it every time you want to run TV app on your Xbox One. Of course, you can try this solution with other apps and games that are having this problem.

Took too long to start Xbox One error will prevent you from playing your games, and it can even prevent you from running certain applications.

This error message can be problematic, but you should be able to fix it by restarting your console and clearing the cache. If that doesn’t work, try your hand at any other solution from this article.

If you have any other questions or suggestions, feel free to leave them in the comments section below.

Windows 10 Startup/Shutdown Sound: 5 Ways to Change It

In earlier Windows editions, users could change Windows 10 shutdown sound easily. However, Microsoft sacrificed the sound settings for faster shutdown and the Fast Startup feature in Windows 10.

In the following section, we’ll walk you through the steps for changing your Windows 10 startup/shutdown sound.

Is there a Windows 10 startup sound?

No, Windows 10 doesn’t have a startup or shutdown sound. This is a design choice by Microsoft, and there are a few reasons for it:

  • Focus on mobility – Microsoft is focused on developing portable devices, such as Surface Book 3. With devices that you frequently start or wake up, the shutdown or startup sound could become irritating rather quickly.
  • Faster startup – In order to optimize startup speed, Microsoft removed certain functionality, including the one in charge of playing sounds.

How do I change the Windows 10 startup & shutdown sound?

1. Disable fast startup

  1. Right-click on the battery icon on your taskbar and select Power Options.
  2. Now, from the right window pane, click on Additional power settings.
  3. Select the Choose what the power button does option on the left.
  4. Click on Change settings that are currently unavailable.
  5. In Shutdown settings, unmark the checkbox beside Turn on fast startup (recommended).
  6. Hit the Save changes button below.

2. Turn on the startup sound

  1. Press the Windows + I keys combination.
  2. Go to Personalization.
  3. Select Themes from the left panel.
  4. Click on Sounds.
  5. Check the box beside Play Windows Start-up sound.
  6. Click on the OK button.

3. Enable the startup and shutdown sounds from Windows Registry

  1. Press the Windows + R to open the Run dialog box.
  2. There, type regedit and press Enter.
  3. Navigate to: HKEY_CURRENT_USER/AppEvents/EventLabels

At this point, the next step is to activate the startup and shutdown sounds.

3.1 Enable the startup sound

  1. Find WindowsLogon and double-click on ExcludeFromCPL.
  2. Modify the Value data from 1 to 0.
  3. Hit the OK button to save it.

3.2 Enable the shutdown sound

  1. Return to EventLabels.
  2. Click on the SystemExit subkey, then double-click on ExcludeFromCPL.
  3. Change the Value data from 1 to 0.
  4. Click on OK.

After doing that, check if your sounds are working properly.

4. Change the startup and shutdown sounds

  1. Press the Windows + I keys combination to open Settings.
  2. Navigate to Personalization.
  3. Go to Themes.
  4. Click on the Sounds option.
  5. Find the sound you want to customize from the Program Events list.
  6. For the startup sound, click on Windows Logon.
  7. If you need the option for the shutdown sound, click on Exit Windows.
  8. Pick the music that you want to set as your new startup sound.
  9. Hit Apply and then the OK button.

5. Create a batch file

  1. Create a new folder on your Desktop or any other location. You can use any name you want for it.
  2. Locate sndrec32.exe file and copy it to that directory. This file is available on older versions of Windows, such as Windows XP, so you’ll need a Windows XP or a reliable third-party source.
  3. Right-click the file and choose Properties.
    properties
  4. Go to the Compatibility tab. Check Run this program as an administrator and click OK to save changes.
  5. In the same directory, create a new Notepad file and paste the following lines: C:\PowerOff\sndrec32.exe /embedding /play /close “C:\Windows\Media\Windows Shutdown.wav”
    C:\Windows\System32\shutdown.exe /s /t 2
  6. Go to File and select Save as.
  7. Choose the save location. Set the Save as type to All files. Next, enter script.bat as the name. Lastly, save the file.
  8. Use the script.bat file to turn off your PC or create a shortcut on your Desktop for quick access.

So, these are the steps you can use to change the Windows 10 startup sound. Do not hesitate to save them somewhere to access the process whenever you feel like it easily.

Keep in mind that some users reported that sound is not working in Windows 10, and if you ever face the same issue, make sure you check our dedicated fixing guide.

Do you have any related questions? Feel free to share them with us by leaving a comment in the section below.

Xbox Won’t Turn on After Power Outage! How to Fix It?

Hardware issues are, plainly said, the worst. The worst thing that can happen to your Xbox One is to get broken after a power outage. A sudden Power outage and your Xbox One console refusing to restart no matter what is something no one wants to see.

If you are in a similar situation, not all hope is lost. In this article, we take a look at the best possible solutions to fix and revive the broken Xbox after a power outage.

What if Xbox One isn’t turning on after a power outage?

1. Reset the Power Supply Unit

  1. Unplug the cables from the console, wall outlet, and power supply (the power brick is connected two ways, so remove the power cord that goes to your Console from the Power brick as well).Xbox Power Outage Fix
  2. Now, wait for a minute. It is important that you wait for at least 30 seconds and 1 minute preferably to let the power supply reset properly.
  3. After 1 minute, firmly plug the power cable back into the power outlet. Also, connect the console cord to the power brick, but don’t connect to the console yet.
  4. Now check the LED light on the power brick. If it is blinking, connect the power cord to the Console. Do not turn on the console yet.
  5. If the light is still blinking or off, you may need to replace the power supply unit. You can order a replacement easily from the local store or Microsoft’s Official page.
  6. Now check the lights again. If it is not blinking, then turn on the console and check for any improvements.

2. Other Fixes to Try

  • Make sure that you are using the power cable that came with your console and it is supported in your region.
  • Use any other device to check if the power outlet is working with other devices as well.
  • Once again make sure that the power cable is firmly connected to the wall outlet and your console. Lose connection will not provide adequate power to run the console.Fix Xbox Power outage issue
  • Try directly connecting the power brick to the wall outlet instead of using a surge protector. The Xbox One power brick comes with a built-in surge protector, so you don’t need to worry about the sudden surge in power while diagnosing the console.

If your Xbox One is refusing to boot after the power outage, most of the time the fault is with the Power brick and not the console itself. If resetting the power brick did not resolve the issue, try to replace the power brick with a used one if you get it for cheap.

Were you able to fix your Xbox One by following these tips? Let us know in the comments below.

RELATED STORIES YOU MAY LIKE:

FIX: Xbox One Party Chat not Working if Blocked by Network

While playing multiplayer games online many users tend to use party chat for communication. This is a great feature that allows you to easily communicate with your friends in-game, but sometimes problems with this feature can occur.

Users reported Network settings are blocking party chat error messages on their Xbox One, and today we’re going to show you how to fix this problem.

How do I fix Xbox party chat not working? (blocked by network settings)

1.  Check if your NAT is set to Open

  1. Go to Settings > All Settings.
  2. Choose Network > Network Settings.
  3. Look for NAT type option.

In order to fix the problem with party chat and network settings, you need to ensure that your NAT type is set to Open. There are three types of NAT available: Strict, Moderate, and Open, and in order to enjoy online multiplayer you’ll need to set the NAT type to Open.

In fact, if you want to use party chat it’s recommended that both you and your friend set your NAT type to Open. If your NAT type is set to Moderate or Strict, you’ll need to set it to Open. You can do that by forwarding the ports, using DMZ or UPnP.

We explained what each of these features does in Your network is behind a port-restricted NAT article, so be sure to check it out. Since port forwarding, DMZ and UPnP are advanced features, be sure to check your router’s instruction manual for detailed instructions.

Network settings can be set up via a reliable VPN. We strongly recommend you to install CyberGhost VPN and establish a secure connection with it. It will allow you to have great gaming sessions and will keep you safe from different security-related errors. It will also allow you to access servers from countries where some features are cheaper or free.

Download now Cyberghost (currently 77% off) and get rid of these annoying errors while playing your favorite games.

2. Turn on the Energy-saving mode

  1. Press the Menu button on your Xbox One controller (learn everything about your controller from this complete guide).
  2. Go to Settings > Power & startup.
  3. In Power options section select the Power mode and press the A button on the controller.
  4. Now choose Energy-saving option.

According to users, you can fix Network settings are blocking party chat errors simply by turning on the Energy-saving option. By default, your Xbox One uses the Instant-on option that puts your Xbox One into standby mode.

This is great if you want to quickly turn on your Xbox One, but some issues with this feature can occur once in awhile. It seems that this feature can cause problems with your NAT, but you should be able to fix the problem simply by turning on Energy-saving mode.

By turning on Energy-saving your Xbox One will turn off completely and use almost no electric power while it’s turned off. Keep in mind that your Xbox One will turn on a bit slower than before by using this feature, but the issue with party chat should be fixed.

3. Turn off your console and unplug the power cable

  1. Press and hold the power button on your Xbox One to turn it off.
  2. After your Xbox One turns off, unplug the power cable.
  3. Keep the cable disconnected for a minute or two.
  4. Connect the power cable to your console and press the power button.

Your Xbox One stores all sorts of temporary files in its cache, and sometimes those files can get corrupted and cause this and many other errors to appear.

To fix this problem you need to turn off your Xbox One and unplug the power cable. After your console turns on, the cache will be cleared and the error with the party chat should be resolved.

4. Change your privacy settings and clear Persistent storage

  1. Select View details & customize.
  2. You should see several columns available. Make sure that each column is set to Everybody or Allow.

Your privacy settings can sometimes interfere with your network connection and cause Network settings are blocking party chat error messages to appear on your Xbox One.

After doing that, you’ll need to clear Persistent storage. Persistent storage holds files that are related to your Blu-ray discs. These discs can pose some problems that are discussed and solved in another guide.

Here, since these files can cause issues, you’ll need to remove them by following these steps:

  1. Open Settings and go to Disc & Blu-ray.
  2. Select Blu-ray.
  3. Select Persistent storage and choose Clear persistent storage. You might have to repeat this step a few times to completely delete the persistent storage.

5. Try restarting your modem

  1. Press the power button on your modem to turn it off.
  2. When your modem turns off, wait for 30 seconds or more.
  3. Press the power button again to turn on your modem.
  4. Wait until your modem turns on and check if the problem is resolved.

Since network configuration can cause this error message to appear, you might be able to fix it by restarting your modem.  If you use a wireless router along with your modem, be sure to restart both devices by following the steps above.

6. Add your friend to your allowed list

According to some users, you can fix this problem simply by adding your friend to your allowed list.

To do that, you need to select its circle, rate it 100% and enter its name and select Apply. After doing that, the issue should be completely resolved.

7. Close the party chat app and restart it

Users reported that you can fix this problem simply by closing the party chat app and restarting it. After the party chat app restarts, reconnect, and invite all the participants.

This isn’t the best solution, but it’s a decent workaround, so be sure to give it a try.

8. Change your router’s MTU settings

To fix Network settings are blocking party chat error messages, you might have to change your router’s settings.

Simply log in to your router’s configuration page and locate MTU settings. Set the MTU value around 1458 and save the changes. After that, check if the problem is resolved.

If you do not manage to perform any successful solution, we recommend you think seriously about getting a new router.

You can find lots of them on the internet and we suggest you check their features before buying them. To save you the trouble, we got your back with this fresh list of routers that will work well with your devices.

Improper router settings can cause issues with the Xbox One console’s Network settings. For more information on the Xbox and router incompatibilities, check out this detailed article.

Network settings are blocking party chat error messages can cause problems with communication on Xbox One, but we hope that you managed to solve this issue after using one of our solutions.

OpenJDK Platform Binary: How to Fix its High CPU Usage

Using the OpenJDK (Open Java Development Kit) platform to compile and execute your classes is beneficial as it guarantees security and performance. However, the OpenJDK platform binary using 100% CPU is an issue plaguing the platform.

Also, users complain about not knowing how to install Java JDK 11 on Windows 11, which is essential.

Why does the OpenJDK platform binary cause high CPU usage?

OpenJDK platform binary CPU usage can skyrocket in no time for many reasons. It mostly happens when playing some games on your PC, and the CPU works at 100% from the OpenJDK Platform Binary client.

However, an outdated driver is a notable cause of the OpenJDK platform binary using 100% CPU. When your drivers are outdated, they can’t run at full capacity, resulting in issues with other system components.

Other factors that can be responsible for the problem are:

  • Issues with the game prompting the problem – You may experience OpenJDK platform binary using 100% CPU if your game is not running properly. It can affect the OpenJDK Platform binary application.
  • Issues with integrated GPU – Users can also have an OpenJDK Platform binary high CPU usage due to the effect of the integrated GPU. Concerns with the integrated GPU can impact its functionality, causing it to use more CPU.

The causes of the problem may vary for different users. Nonetheless, we have some fixes to help you get around the problem.

How do I fix the OpenJDK platform binary when using 100 CPU?

Before trying any advanced troubleshooting, apply the following:

  • Free up enough disk space on your computer.
  • Turn off background apps running on your PC.
  • Restart your PC in Safe Mode and check if the problem persists.

If you can’t fix the problem, proceed with the solutions below.

1. Update your graphics driver

  1. Press Windows + R keys to prompt the Run dialog box, type devmgmt.msc, and click OK to open the Device Manager.
  2. Click on Display adapters, right-click the driver, and select the Update driver option.
  3. Select Search automatically for drivers.

After the update is complete, restart your device and check if the issue persists. You can read our guide about updating graphics drivers on Windows 11 if you have any issues with the steps above.

Another reliable and recommended option you can try is using a third-party software that can help you update your graphics driver automatically.

2. Disable Integrated GPU through BIOS

  1. Press Windows + I key to open Settings.
  2. Navigate to System and select Recovery.
  3. Go to the Advanced Startup tab, then click the Restart now button to reboot the PC into the advanced menu.
  4. On the Choose an options tab, select Troubleshoot, then click the Advanced options button.
  5. Select UEFI Firmware Settings and click the Restart button to prompt your PC to restart and launch BIOS.
  6. Find a setting with onboard, integrated video, VGA under Integrated Peripherals, Onboard Devices, or Built-in Devices.
  7. Choose Disable or Off for the Integrated graphics, then press Enter.
  8. Following the on-screen instructions, press the corresponding F-key to save your changes, then click Y to confirm the process.

Disabling the Integrated GPU will fix any issues it causes with the OpenJDK Platform binary and prevent conflicts with the Dedicated graphics cards.

Read through our article about the methods to enter BIOS on a Windows 7, 10 & 11 PC if you can’t open BIOS on your PC.

3. Run System Restore

  1. Left-click the Start button and type Restore, then click on Create a Restore Point.
  2. Go to the System Protection tab and select System Restore.
  3. Choose a different system restore and click Next to select a specific Restore Point.
  4. Select the last time your PC worked perfectly, and click Next.
  5. Click the Finish button.

Performing a system restore will backdate your PC to when it has no issues, removing the corrupt items causing problems.

If you have any issues running it, check how to fix Restore Point if it’s not working on your PC.

The above steps should fix the OpenJDK platform binary using 100% CPU. Conclusively, you can check our fixes for error 2 while loading the Java VM on Windows.

For further questions or suggestions, kindly drop them in the comment section.

Microsoft Edge Not Working on Xbox One? Here’s the Solution

Microsoft Edge is available on a wide array of platforms, and Xbox One is no exception. Sadly, many reported that Microsoft Edge is not working on Xbox One.

This can be a problem and prevent you from browsing the Web, however, you can fix this problem by using one of our solutions.

What do I do if Microsoft Edge is not working on Xbox One?

1. Use the InPrivate Browsing mode

xbox one controller microsoft edge xbox one not working
  1. Press the Menu button.
  2. Now select InPrivate Browsing mode.
  3. Now exit the InPrivate Browsing mode.

After doing that, you should be able to browse the web again. Keep in mind that this is just a workaround, so you’ll need to do it every time you start Edge.

2. Restart your console

xbox one restart microsoft edge xbox one not working
  1. Hold the Power button on your console to turn it off completely. You need to keep the button pressed for about 8 seconds.
  2. After the console powers down, you need to unplug the power cord from the console.
  3. Leave the cord disconnected for a couple of minutes. 5 minutes or so should be enough.
  4. Connect the power cord and start your console again.

Several users suggested this method, so you might want to try it out.

3. Factory reset your console

  1. Press the Xbox button on the controller to open the guide.
  2. Now navigate to Profile & system > Settings.
  3. Choose System > Console info.
  4. Now choose Reset console.
  5. Select Reset and keep my games & apps.
    reset and remove everything microsoft edge xbox one not working

By doing so, you’ll reset the OS and delete corrupted data, however, all your games and apps will remain on the console.

If the problem is still present even after using this method, you might want to consider using the Reset and remove everything option instead. Keep in mind that this option will remove all games and apps installed.

If Microsoft Edge isn’t working properly on Xbox One, be sure to try all solutions from this article and let us know if they worked for you.

Microsoft PowerToys could get a quick launcher soon

In the recent past, we’ve seen Microsoft add a ton of nifty features to PowerToys, for instance, the File Locksmith, settings backup, and a hosts file editor that were part of the version 0.64 release. And now, Microsoft seems to be working on a new feature, just like Windows 11’s Quick Settings launcher, this new feature will let users access utilities within the app.

PowerToys’ quick launcher will in turn make it easier for users to manage these tools, as it presents activated modules that can be accessed via the launcher. What’s more, it will present a neater and more focused general outlook of the app as it will hide the disabled modules. Here’s an illustration of how it is supposed to work:

A prototype of the upcoming quick launcher for PowerToys

Per GitHub’s specifications, here are PowerToys’ quick launcher functionalities:

  • Layout showing activated modules that can be launched using the launcher.
  • The tooltip of each module shows the activation shortcut.
  • Settings and docs can be opened.
  • Modules that are disabled will not be shown.
  • If there’s an update available, this will be shown for awareness.

The feature is still in the works, and it might be a while before it hits general availability. Let us know what you think in the comment section below.

via: Neowin.net

Microsoft’s Windows 10 OOBE update (KB5020683) will let you upgrade to Windows 11

Back in October last year, Microsoft launched Windows 11 and later announced that it was ready for broad deployment in May this year. Since then, Microsoft has pumped a ton of updates to the OS, for instance, the Windows 11 2022 Update in a bid to enhance its user experience and get more people to upgrade to it.

According to a survey conducted by Lansweeper, the Windows 11 minimum system requirements is one of the main reason why a lot of organizations have not upgraded to Windows 11. Per the company’s survey, 43% of Microsoft devices still can’t run Windows 11 based on 30 million Windows devices scanned at 60,000 enterprises.

That said, Microsoft released the KB5020683 out-of-band update for Windows 10, version 2004, 20H2, 21H1, 21H2, and 22H2 on November 30. What’s more, the update also features a Windows 11 upgrade option for eligible devices, though it will be available for users once they have installed the OOBE update.

Microsoft further introduced a “Meet Windows 11” video series that is designed to help users that are planning to transition to OS understand how it works as well as the perks it comes with. Be sure to check out Microsoft’s blog for more information on this update and how to install it in your PC.

Via: Neowin.net

How to add a transparent context menu on Windows 11


If there’s one thing you can’t ignore about Windows 11, it’s the evident progress in its design and user interface. Among a host of new features in its new iteration, Windows 11 also offers ways to make your context menu transparent.

In this article, we’ll go on a step-by-step detour on how to go on adding a transparent context menu on your Windows 11. So, let’s get started.

How to add a transparent context menu on Windows 11

For the uninitiated, a context menu on Windows refers to the shortcut menu in a graphical user interface that appears when you right-click your mouse. It’s also known as the right-click option.

While it’s interesting that Windows 11 gives you complete control to manage the transparency effects for your Start menu, taskbar, etc., there’s no clear-cut method to manually make your context menu transparent. And that’s why you’ll use an external third-party app.

In this example, we’ll make use of TranslucentFlyouts. Put briefly, TranslucentFlyouts is a free, open-source app specifically designed to make your popup menus transparent. You can download the official app from the official GitHub page of the app. On the GitHub page, click on Code and then select Download ZIP.

github page

After you’ve downloaded and installed the app, launch it. As soon as you open the app, you’ll see a new dialog box asking you to accept the permissions necessary to run your app. Click on I Accept, and the app will be launched.

From there, click on the drop-down menu for Effect, and you’ll see various options. Select Transparent and that’s about it. If you like, you can also tweak the Border and Opacity values from this dialog box.

You can safely click on Exit when you’re done, and your settings will be saved for the future.

Note: If you’re done with the transparency settings for your context menu, you can always bring the settings back to their original state by clicking on the Reset button.


Making the context menu transparent in Windows 11

That’s all about making your context menu transparent, folks. And while there might be a plethora of tools out there, like AcrylicMenus for instance, I’ve found that TranslucentFlyouts does the jobs well enough. We hope this method also did the trick for you as well.

FIX: All my desktop icons changed to Internet Explorer

Did you notice that all your software icons changed to a single icon (Internet Explorer)? This can happen suddenly and it is caused by a conflict with the .Ink extension, and also possibly the IconCache.db file.

One user shared his concerns on the Microsoft Answers forum.

Recently, all of my icons on my desktop and in the start menu have changed to the Internet Explorer icon.  Also, when I checked my administrator files, they all end in LNK.  I am not able to go into any of my programs through My Programs.

In this fix article, we will explore a few proven methods to solve this issue. Read on to find out how.

Why did all my icons turn to Internet Explorer icons?

1. Delete the .Ink key file from Registry Editor

  1. Press Windows + R key on your keyboard
  2. Type ‘regedit’ (without quotes) in the Run box, and then press Enter.
  3. Inside the Registry Editor, use the folder tree on the left side of the screen, and navigate to HKEY_CURRENT_USER>Software>Microsoft>Windows>CurrentVersion>Explorer>FileExts>Software>Microsoft>Windows>CurrentVersion>Explorer>FileExts> Icons changed to internet explorer” width=”697″ height=”518″>
  4. Inside the FileExts folder, search for the .Ink subfolder, and delete it.ink registry Icons changed to internet explorer
  5. Close the System Registry, and restart your PC
  6. Check to see if the problem persists, if it does, follow the next method

Are you tired of IE causing issues like this? Check out UR browser


2. Remove the IconCache.db file

  1. Close all open folders
  2. Click on the Start button
  3. Search for the folder Windows System > Right click on Command Prompt > More > Run as administratoropen CMD Icons changed to internet explorer
  4. To end the Explorer process, type in the following command taskkill /f /im explorer.exe , and press Enter
  5. Inside Command Prompt type CD /d %userprofile%AppDataLocal, and press Enter
  6. After this, type DEL IconCache.db /a ,and press Enter again
  7. Next, type ‘EXIT’ (without quotes) and press Enter 
  8. Next, we will restart the explorer process: go back to your Task Manager window, click on File, select Run new taskrun new task Icons changed to internet explorer
  9. In the pop-up window, type in ‘explorer.exe’ (without quotes), and press Enter
  10. Restart your computer

If you have any suggestions or want to give us your opinion on this fix, please use the comment section found below.

  • Where are Windows icons stored?

All Windows icons are stored and located in the system 32 folder. The patch to follow is this C:Windowssystem32SHELL32. dll location.

[wl_navigator]

Error: A JNI Error Has Occurred in Minecraft [Solved]

There are a couple of errors users can encounter with the Minecraft client. Recently, users report the -error: a JNI error has occurred, please check your installation and try again when starting the game client or server (.jar) on their computers.

Hence, knowing how to fix Java Virtual Machine launcher fatal exception errors will be beneficial.

Why do I get a JNI error in Minecraft?

Games like Minecraft depend on Java libraries to function on your PC. So, issues with the Java library will affect the game client. It can prompt Windows error 2 while loading the Java VM on the system.

Also, compatibility is a common cause of the problem. If you’re using a Minecraft server, mods, or a feature that is incompatible with the Java library, you will likely encounter this error.

Other factors that can cause the JNI error has occurred in Minecraft are:

  • The corrupt system path for Java – The Minecraft JNI error can occur if the Java system variable path is compromised. It can cause conflicts between the client and Java on your PC, resulting in a JNI error in the Minecraft server. Also, a wrong Java installation path can cause errors in Minecraft.
  • Outdated version of Java – Older versions of Java only support designated versions of clients. So, having an outdated version for your game client can cause errors. It means the Minecraft client is running on a Java version lower than it should be.

The above-listed causes may differ depending on the circumstances around the error. Nonetheless, you can fix the error by troubleshooting your PC.

How do I fix the error: JNI error has occurred issue?

Try the following preliminary checks:

If the error persists, go on with the solutions below.

1. Install the Latest Java Version

  1. Go to Oracle’s official website, and download the installation package for your OS.
  2. Click on the downloaded file, double-click the .exe file, and allow the installer to make changes when prompted.
  3. Follow the onscreen installation instructions to install the latest Java.
  4. Restart your PC after the installation and check if the error persists.

Installing the latest version of Java will fix any compatibility errors that can cause the error between the game client and Java. You can read about downloading Java on Windows 11 for more guidance.

2. Reset Java Path

  1. Press Windows + R to open the Run dialog box, type sysdm.cpl, and press Enter to open the System properties.
  2. Navigate to the Advanced tab and click the Environment Variables button.
  3. On the System Variables page, select Path and click the Edit button.
  4. Find the Java variable paths files and delete them.
  5. Restart your PC afterwards and check if the JNI error persists.

Resetting the Java path will fix Java runtime environment errors that can cause the error.

3. Uninstall Old Versions of Java

  1. Press Windows + R key to open the Run dialog window, type the control panel, and press Enter.
  2. Click on the View by option and select Category. Go to Programs and click on the Uninstall a Program link.
  3. Click on the older versions of Java and hit the Uninstall option.
  4. Close the Control Panel and restart your PC to check if the JNI error in Minecraft persists.

Some users still report not being able to fix the error after the two fixes above. So, uninstalling the old versions of Java on your PC will force Minecraft to use the latest version if it isn’t using it.

Alternatively, our readers can check ways to fix JAR files not opening on Windows 11. Also, you can read about fixing Java update/install not complete error 1603 on your PC.

If you have more questions or suggestions, do not hesitate to use the comments below.

Windows Update Code 9c59: How to Fix It

If you’re trying to install or update Internet Explorer 11, you might experience the error code 9c59. It usually occurs in Windows 7 OS, but a Windows 10 upgrade could also trigger this error. 

This article explores a few troubleshooting steps you can apply to help you resolve the 9c59 error. 

What causes the Windows Update code 9c59?

The following are some of the common causes of the Windows 7 update code 9c59 error:

  • Corrupted Windows files – A corrupted Windows update file is one of the most common causes of the 9c59 error. If you have a corrupted system file, you might run into errors while installing or updating IE 11. 
  • Antivirus restriction – Third-party antivirus software is commonly known to cause errors in Windows updates. In this instance, Kaspersky is a known culprit that usually prevents updates from installing successfully. 
  • Windows Update restrictions – Sometimes, updates to the Windows 7 OS can prevent Internet Explorer 11 from installing. A recent update to the OS could be the reason for the code 9c59 Windows update error. 

How do I fix the Windows Update code 9c59?

1. Install updates except IE 11 updates

  1. Press the Windows key + R to open the Run dialog box, type in wuapp.exe, and press Enter.
  2. Select the Check for Updates option and choose the important updates option.
  3. Then, uncheck the list of available updates and re-check the Name tab to select all important updates.
  4. Uncheck and recheck the Microsoft Internet Explorer 11 update tab and click on the Optional tab.
  5. Click on Install Updates.
  6. Make sure all available updates are installed except IE 11. 

After installing the updates, follow the next steps to install Internet Explorer 11 offline. 

2. Reinstall Internet Explorer

  1. Press the Windows key, type control panel, and press click Open.
  2. Then, click on Uninstall a program under the Programs option.
  3. Select Internet Explorer 11 and click Uninstall. 
  4. Visit the Internet Explorer download page for 32-bit and 64-bit and click on the Download button.
  5. Double-click the downloaded file directly from your browser and follow the prompts to install it.
  6. Run the downloaded Installer and check to see if the error is resolved.

Sometimes, Windows might run into update errors like the 9c47 during an online installation. The quickest way to solve this is by using an offline installer. You can follow this detailed article on how to download the update manually. 

3. Rename the software distribution file

  1. Press the Windows key and type in cmd and select the Run as Administrator option.
  2. Type in the following command and press Enter after each of them: net stop wuauserv net stop bits rename c:windowsSoftwareDistribution SoftwareDistribution.bak  net start wuauserv net start bits
  3. After the commands have been executed successfully, open File Explorer by pressing Windows + E keys.
  4. Navigate to the location: C:\Windows\SoftwareDistribution
  5. Locate the Software Distribution folder and rename it to SoftwareDistribution.bak.
  6. After renaming the folder, you need to download the KB update.

4. Uninstall third-party antivirus

  1. Press Windows key + R to open the Run dialog box, type in appwiz.cpl, and press Enter.
  2. Click on your Antivirus software and select Uninstall.
  3. Then, click on Yes to confirm your action and wait for the process to be completed. 

In Windows 7 OS, uninstalling third-party antivirus also resolved the Windows update error 9c48. So, this should be a good fit for the Windows Update code 9c59.

Resolving code 9c59 errors doesn’t require skilled troubleshooting. If you follow our detailed guide, we’re sure you can resolve the error quickly. Leave your questions and suggestions below in the comments section.

Fortnite Not Working On Xbox: Quick Ways to Fix

Fortnite may not work on your Xbox One due to bugs from recent updates, corrupt saved data, or server issues. Sometimes the game files conflict, or the servers are overloaded or down. A simple restart might fix it, but other solutions may be needed depending on the cause.

Follow the steps below to get it fixed ASAP.

How can I fix Fortnite not working on Xbox One?

fortnite not working on xbox one

1. Restart Fortnite

  1. Hit the Xbox button on your controller.
  2. Select Fortnite from the list of games that is running.
  3. Click on the Menu button on your controller.
  4. Choose Quit and press A button to close it.

Possibly, a brief error or glitch has caused the game to malfunction. In such a case, before trying advanced solutions, we advise you to restart Fortnite on your Xbox One console.

Restarting the game will help load all the game files and save data files from scratch. There is a chance that some of the essential files did not load up during the previous session.

So, try restarting the game and then check if this fixes the Fortnite not working on the Xbox One problem.

2. Restart Xbox One

  1. Press and hold the Xbox button on your controller.
  2. Select the Restart console option.xbox restart console
  3. Press A button on your controller to confirm the action.

Many underestimate the power of a simple restart. If you face any software issues, you should restart or power off your device.

The same goes for the case of Fortnite not working on Xbox One issue. There are chances that some important system files didn’t load during the previous session. This could also cause other problems, such as stutters or game lag.

Perform a simple restart and see if this fixes the Fortnite not working on the Xbox One problem.

3. Clear system cache

  1. Press the Xbox logo on your console to turn it off.Call of duty cold war not updating xbox console
  2. Unplug the power cable from Xbox One.
  3. Now wait for about 10-20 seconds.
  4. Plug the power cable into the Xbox One and power it back on.

Your Xbox console stores game data in the form of cache files. These files help the console open games faster by avoiding loading stored files again.

But if you play the game very often, over time, this game data could pile up and eat up a good amount of storage on your console.

Lack of storage space not only causes issues with already installed games, but it will also create issues when you are trying to install new updates or games.

Therefore, we advise you to perform this power cycle to clear the system cache and check if this solves the Fortnite not working on Xbox One problem.

4. Check Fortnite servers

fortnite not working on xbox one console

As already explained, Fortnite not working on Xbox One could be because of multiple issues. One of which is the server issue.

There are chances that the game servers are facing an outage and are down at the moment. If you are having trouble playing Fortnite on your Xbox One console, then you can check out the below-listed channels to keep tabs on the server status of the game.

5. Use a different profile

  1. Press the Xbox button on your controller.xbox controller
  2. Select Profile.fortnite not working xbox one
  3. Choose Add new.fornite not working xbox one
  4. Enter all the required details such as your first name, password, your birthdate, etc.create profile xbox one
  5. Select I accept.agree to terms

For many people, Fortnite keeps crashing on their Xbox One console because of corrupted profile data. In such a case, you can either try to log in using a different account or add a new one and see if this fixes the problem or not.

6. Clear local save data files

  1. Press the Xbox button on your controller.xbox controller
  2. Open My games & apps menu.
  3. Tap on See all.
  4. Highlight Fortnite and press the Menu button.
  5. Select Manage game and add-ons from drop-down menu.
  6. Choose Saved data.
  7. Select Delete all option to delete locally saved game files.

Similar to how cache files on your Xbox One can cause issues with games, the locally saved game data can also be the reason for such problems.

So, follow the steps above to clear all the locally saved game data. Do note that this may delete all the downloadable content for the game. Therefore, you may need to download them back again.

7. Reinstall Fortnite

  1. Head to the Homescreen.
  2. Press the Xbox button.
  3. Select My Games & Apps.
  4. Highlight Fortnite game and press Menu button.
  5. Press Manage Game option from the pop-up menu.
  6. Select Uninstall.

Try uninstalling the game following the above steps, and once the process is complete, install the game on your Xbox One.

Reinstalling the game lets it install all the files from scratch. It’s possible that some files were not installed during the previous installation.

This will solve the issue of Fortnite not working on Xbox One most of the time.

8. Reset Xbox

  1. Press the Xbox button on your controller.xbox controller
  2. Select System.xbox system
  3. Go to Settings.xbox settings
  4. Scroll down and select System from the left side.settings
  5. Choose Console Info.console info
  6. Choose Reset Console.reset xbox one console
  7. Select Reset and Keep my Games and Apps.reset

There is another option called Reset and remove everything. Choosing this option removes all of the data stored on your Xbox console.

Moreover, no warning message will prompt you to confirm this selection. So, ensure you know what you are doing when selecting this option.

Having trouble with in-game audio on Xbox? Check our dedicated guide to fix Fortnite sound not working on Xbox for quick volume, device, and settings checks.

What can I do to improve the performance of my Xbox One console?

If your console isn’t working as intended, you will face inevitable performance glitches during your gaming session.

Below are some tips you can apply to improve your Xbox One console’s performance further and possibly eliminate common problems such as stuttering, frozen gameplay, refresh rate issues, and more.

➡ Clear cache data

Clearing the cache data can be helpful to fix so many common Xbox One issues. You can follow the above steps to clear the cache files to free up some memory space and create fresh game files.

➡ Check your internet connection

A stable and fast internet connection is one of the most important things when using the Xbox One. It lets you connect faster to the game, download all the necessary resources, and update the game smoothly.

➡ Keep the surroundings free from obstacles

This applies to the area where you have kept your Xbox One console. Make sure the surrounding area is free of obstacles or other electronic devices.

This benefit is that your console can pick up an uninterrupted internet network. Moreover, more room means more air can go inside and out of the device, letting it stay cool.

➡ Keep the thermals clean

Your Xbox One generates a lot of heat during a gaming session. There is a heatsink that lets the device cool down.

Thermal paste ensures an excellent connection between the metal and the heatsink. This thermal paste can melt or break down after a lot of usage.

So, if you know what you are doing or have a trained service person nearby, you can change the thermal paste.

These issues affect PS5 consoles.

Other similar Fortnite issues—like missing skins, party join errors, high CPU usage, audio problems, and payment glitches—are covered in these helpful guides: skins gone, unable to join party, high CPU usage, game audio issues, and payment errors.

Let us know in the comments below if the above solutions helped you fix the problem. You can also share any other solutions that fixed the issue for you.

Fix: Malwarebytes is Unable to Connect The Service

Malwarebytes is a reliable antimalware that you can install on your PC to keep it safe from viruses and malware attacks. Lately, many users report having issues with the app. The Malwarebytes’ unable to connect the service error prevents users from accessing it.

Moreso, Malwarebytes not opening on your PC can stop you from using all of its services.

Why is Malwarebytes unable to connect the service?

Malwarebytes cannot connect the service error that appears when you click the app icon on your PC. It can occur due to any factors affecting the Malwarebytes software and your PC.

However, the common factor is installation file problems. When the antimalware client installation files on your computer are compromised, they can impact how the app works. Other factors that may cause Malwarebytes not to connect to the service are:

  • Conflict with other programs – Malwarebytes can run into several issues with other anti-malware apps running on your PC. Hence, it won’t work if they conflict or render the same services as the Windows Defender.
  • Outdated Malwarebytes software – This tool should automatically install updates and add the needed patches to improve performance. However, the software not being updated can cause it to crash or not open on your PC.

Nevertheless, the cause of Malwarebytes’ inability to connect the service error can differ on various PCs. Hence, we’ll take you through some fixes to generally resolve the issue.

How do I fix Malwarebytes if it’s unable to connect the service?

Before proceeding with any advanced troubleshooting, go through the following:

  • Temporarily disable antivirus software on your computer.
  • Turn off background apps running on your PC.
  • Restart your PC and check if the problem persists. This should be an intuitive task, yet if any issues occur, let us show you what to do when your computer is stuck on restarting.

If you can’t fix the problem, try the solutions listed below.

1. Check if there is something wrong with Malwarebytes Service

  1. Press Windows + R key to open the Run dialog box, type services.msc, then press Enter to open the list of services on your PC.
  2. Find and right-click Malwarebytes Service, then click Properties from the drop-down.
  3. Go to the Startup type tab and change it to Automatic.
  4. Check if the service is running. If not, click on Start until its status changes to Running.

2. Restart Malwarebytes in Safe Mode

  1. Press the Windows key, click the Power icon, hold the shift key and click on Restart.
  2. On the Advanced Recovery Options window, click on Troubleshoot and select the Advanced options.
  3. Click on Startup Settings and select Restart.
  4. Press 4 to Enable Safe Mode.  
  5. Then launch the Malwarebytes app in this mode.

Your PC will restart in Safe Mode. Restarting Windows in Safe Mode can resolve startup problems and app activities interfering with the Malwarebytes program.

3. Uninstall and reinstall Malwarebytes via the Malwarebytes Support Tool

  1. Launch your browser and download the Malwarebytes Support Tool on your PC.
  2. Double-click the mb-support-x.x.x.xxx.exe file to open it, then click Yes to continue the installation.
  3. Check the box for Accept License Agreement on the License agreement prompt and select Next to complete the installation.
  4. Choose the Advanced tab, then click on Clean.
  5. Click Yes on the Malwarebytes Cleanup pop-up and select OK to restart your PC on the Malwarebytes Cleanup prompt.
  6. Click Yes on the prompt after the computer restarts.
  7. Select Yes on the Reinstall Malwarebytes for Windows prompt.
  8. Click an option when asked Where are you installing Malwarebytes?
  9. Then click Install.

The Malwarebytes client will launch automatically and then check if the problem is resolved.

Reinstalling the Malwarebytes client will fix any corrupt files on it and update it to the latest Malwarebytes versions.

Also, take a look at our fixes for Malwarebytes blue screen of death error on Windows 11. Likewise, our readers can check how to fix Malwarebytes real-time protection not working on their PCs.

You can leave your questions and suggestions in the comments section below.

There Was a Problem Starting P17RunE.dll [Fix & Download]

Are you frequently seeing an error message like there was a problem starting p17rune.dll? If yes, this article has the solutions you have been looking for.

Usually, the problem related to the DLL file named p17rune.dll appears after Windows startup. It also may appear suddenly in the middle of work or in any other situation. Luckily, you can easily fix this problem. But, you should know about the reasons before knowing the solutions.

What causes the p17rune.dll file-related error on Windows?

Usually, the p17rune.dll file is an essential component used by software developed by Creative Technology Ltd. It is a well-known company in the audio industry. You may have been using their sound card and software like Sound Blaster, etc.

So, if the problem appears, it may be because of the following reasons:

  • The DLL file has a problem: The p17rune.dll file may be missing or has been corrupted.
  • Outdated software: If you have software that uses this file, it may be outdated and cannot function properly in the latest OS.
  • There is a leftover: You may have used software developed by Creative in the past, and that was not uninstalled properly.
  • Outdated driver: If there is an obsolete driver, especially for the sound card developed by Creative, it can be the reason.
  • Antivirus: Your antivirus may be interfering with something that is causing the problem, so make sure to choose a less intrusive one.
  • Corrupted system file: Sometimes, the problem with internal system files can be another thing that triggers this DLL file error.

How do I fix there was a problem starting p17rune.dll?

Before taking steps to solve this DLL file-related issue, we suggest you ensure the following things to avoid time wastage and unwanted hassles:

  • Update Windows to the latest version.
  • Make sure your sound card has no physical damage.
  • Disable the antivirus temporarily and see if it helps.

If the above things are OK, follow these methods to fix the p17rune.dll file problem.

1. Download and replace the p17rune.dll file

  1. Visit a trusted website from where you can find this DLL file.
  2. Download P17RunE.dll.downloading p17rune.dll file
  3. Copy the DLL file.
  4. Paste it in the following location: C:\Windows\System32

Please note that the location can be different in your case. It depends on the software that needs this file. The common place for such DLL files is the System32 folder. But, for some specific software, it can be in the installation directory or anywhere else.

2. Update the related software

2.1 Uninstall the software

  1. Press Win + I on the keyboard to launch Windows Settings.
  2. Navigate to Apps and click on Installed apps.going installed apps windows 11 settings
  3. Find the app you want to uninstall.
  4. Click on the three horizontal dots next to it and click on Uninstall.uninstalling fxsound audio software windows 11

To uninstall, we suggest you use a tool like IObit Uninstaller or Revo Uninstaller. These tools leave no leftovers while uninstalling anything, unlike the built-in uninstaller of Windows. Please keep in mind that the leftovers of specific software also may cause DLL file errors.

2.2 Install the latest version

  1. Go to the official software publisher site and download the software.download creative sound blaster free windows
  2. Install it on your PC.

Now, see if it has fixed the P17RuneE.DLL file error or not.

3. Update the sound driver

  1. Open the Start Menu.
  2. Type Device Manager and press Enter to launch Windows Device Manager.opening device manager windows 11
  3. Expand Sound, video & game controllers.
  4. Right-click on the audio driver and choose Update.updating audio driver windows 11
  5. Pick your preferred method to update.
  6. Restart your computer.

The above step may not be the best solution. So, we suggest you use Outbyte Driver Updater. This tool can find the latest driver and install it with just a single click.

Outbyte Driver Updater

The best driver-updating solution to use on your PC as it can find the latest updates from a vast database.
Free Trial Download now

4. Run the SFC command

  1. On the Start Menu and type CMD.
  2. Right-click on the Command Prompt and choose Run as administrator.
  3. Run the following command: sfc /scannowsfc scannow command
  4. Restart Windows.

5. Use a DLL repair tool

You can have a look at the list of best DLL repair tools that often come in handy when you get errors related to such Dynamic Link Library files.

This article has described how you can get rid of there was a problem starting P17RuneE.DLL on Windows. If you know any other better method, you can share it in the comment box.

Fix: EFI USB Device has Been Blocked by Security Policy

If you see the EFI USB device has been blocked by security policy error when trying to use a bootable USB drive on your Windows PC, it’s due to the Secure Boot feature blocking access.

To help you fix this, we’ll show you how to disable secure boot and reset BIOS. So, if you’re ready to get your system running the way you want, just keep reading.

How can I fix the device has been blocked error in Windows 11?

1. Disable Secure Boot

1.1 Restart the UEFI Firmware settings

  1. Hold down the Windows key and press I to launch Settings.
  2. Click the System tab’s Recovery navigation option. You’ll need to select Update & Security and Recovery in Windows 10’s Settings app.
    Recovery option efi usb device has been blocked by the current security policy
  3. Select the Restart now option to enter Advanced Startup.
    Restart now button efi usb device has been blocked by the current security policy
  4. Then choose the Troubleshoot option.
    Troubleshoot option efi usb device has been blocked by the current security policy
  5. Select Advanced options, then select UEFI Firmware Settings.UEFI Firmware Settings option
  6. Click the UEFI firmware Restart option.
    Restart option efi usb device has been blocked by the current security policy

1.2 Disable the Secure Boot setting

Note icon NOTE
BIOS/UEFI firmware layouts can vary between different PC models. So, the exact steps for accessing the disabling Secure Boot BIOS setting can also vary slightly.
  1. Select the Security (or a Boot) tab inside BIOS.
  2. Find and select the Secure Boot option with the keyboard.
  3. Press Enter to bring up a Disable option and select it.
  4. Next, press the F10 button to save and exit BIOS.
  5. Select Yes to confirm.

Some users may need to set an admin password to change the Secure Boot setting. If that option isn’t accessible, try selecting the Set Administrator Password option within the BIOS first.

2. Reset BIOS to default settings

  1. Enter your PC’s BIOS via Settings as outlined for the first fix or with a different method. Our how-to enter BIOS guide includes numerous methods for entering the BIOS on Windows PCs.
  2. Select the Exit tab in the BIOS.
  3. Press the F9 key to select the Load Default Settings option. Or select that option with the arrow keys and hit Enter.
    Load Startup Defaults option efi usb device has been blocked by the current security policy
  4. Then select Yes to confirm the selected option.
  5. Press the F10 key and select the Save option.

There aren’t many ways to fix the EFI USB device has been blocked by security policy error, but the options above are proven to work.

Because this issue appeared while trying to boot from a USB stick, here’s our guide on how to create a Windows 11 bootable USB drive.

Did you manage to clear this problem? If you have any issues, feel free to use the comments section below.

Run a Windows Update From Command Line [2 Different Ways]

Sometimes, running Windows updates the usual way may not work for you, so you need another way to go about it. However, an alternative is running Windows updates from the command line.

Also, it is possible for users to update Windows in Safe Mode on their devices.

Can I get all Windows updates at once?

Many users struggle to download a batch or all Windows updates because they don’t know the right way. However, it is possible to download all Windows updates at once on your PC.

Furthermore, before installing all Windows updates, you must be exposed to the right system environment. It is because the contemporary Windows update channels, such as Settings and others, don’t have the option to download all.

Hence, downloading Windows updates from the Command Prompt or Windows PowerShell makes it easier to install a batch or all updates at once. It is possible through designated command lines to invoke your Windows history and install all updates.

How do I run Windows updates using the command line?

We recommend you go through the following preliminary checks:

The above steps will prepare your PC for the update process and also provide a resolution if you encounter any problems.

1. Run Windows update via the Command Prompt

1.1 For Windows 11 and Windows 10

  1. Left-click the Start button, type the command prompt, and click Run as administrator.
  2. Click Yes on the User Account Control prompt.
  3. Type the following command to start checking for updates: UsoClient StartScan
  4. To download updates, input the following and click Enter: UsoClient StartDownload
  5. You can install the downloaded updates by running this command: UsoClient StartInstall
  6. Alternatively, you can use this command to check, download, and install updates: UsoClient ScanInstallWait
  7. Restart your PC after installing the updates.

1.2. For older versions of Windows

  1. Repeat steps 1 & 2 to open the Command Prompt.
  2. Type the following commands one by one to start checking for updates: wuauclt /detectnow  wuauclt /updatenow  wuauclt /detectnow /updatenow

The computer will restart after the installation, and your updates should be installed.

If you encounter issues running the Command Prompt as an administrator, read our guide for quick fixes.

2. Run Windows update via Windows PowerShell

  1. Left-click the Start button, type PowerShell, and click Run as administrator.
  2. Click Yes on the User Account Control prompt.
  3. Type the following command to install the Windows Update module and press Enter: Install-Module PSWindowsUpdate
  4. Run the following command to check for updates: Get-WindowsUpdate
  5. Type this command and press Enter to install the available updates: Install-WindowsUpdate

You should be able to install Windows updates via the above command lines without running into any problems.

You can check our guide about fixing Windows PowerShell if it stops working and PowerShell not showing full output on Windows 11.

The above steps are the two methods you can use to update Windows from the command line.

Conclusively, our readers can check some Windows update errors they can encounter. Read how to fix Windows update error code 0x800706BA and Windows Update error code 0X800f081f on your PC.

For more questions or suggestions, do not hesitate to use the comments section below.

3 Ways to Change the Icon Size on a Windows 11 Desktop

Some of our readers have requested to know how to change the desktop icon size in Windows 11 without changing the display resolution.

The size of desktop icons can be affected by other activities on the PC, thereby disrupting your personalization settings. Hence, we have outlined ways to change them.

Why are my icons so big in Windows 11?

There can be several reasons why your Windows 11 icons are so big. The following are some of the potential reasons:

  • After a Windows update – When Windows updates itself, various communication errors between drivers and between the old and new settings may occur, thereby enlarging the icons.
  • Your scaling settings – It is possible that your scaling settings have been changed, increasing or reducing the size of your desktop icons. Fixing this will only require you to reset your preferences.
  • Driver issues – If you wonder why are my desktop icons so big all of a sudden, it can be due to the absence of some necessary drivers on your computer.

Now that you know some potential reasons why your desktop icon size has increased, let’s proceed to how to change the desktop icon size in Windows 11.

How do I change my desktop icon size without affecting the resolution?

1. Change the icon size through the context menu

  1. Right-click anywhere on your desktop to open the context menu and select the View submenu.
  2. Then choose the icon size you want: Large icons/Medium icons/Small icons from the context menu.

The above fix is easy to access right from your desktop and does not affect its resolution.

If you also need to know how to change the desktop icon in Windows 11, you can follow the instructions provided in our dedicated guide.

For users who are still using Windows 10, check this detailed guide on how to reduce desktop icon size in Windows 10.

2. Change the icon size via keyboard/mouse shortcuts

  1. On your desktop, press the Ctrl + Shift + 2 buttons to make your icons Smaller.
  2. Press and hold the Ctrl + Shift + 3 keys to change the icon size to Medium.
  3. Hold the Ctrl + Shift + 4 keys to make your icons Larger.
  4. Press and hold the Ctrl and use your mouse wheel to adjust the size of your desktop icons.
  5. For laptop users, simply press the Ctrl key and perform the pinching gesture on your touchpad.

You can check our detailed guide to know more about keyboard shortcuts in Windows 11, too.

3. Change the font size on your desktop

  1. Left-click the Start button and select Settings app or press the Windows + I keys.
  2. Select the Accessibility tab and click on Text size.
  3. Locate the Text size slider, drag it in accordance to your preference, and click Apply.

After personalizing the settings, you can change the large desktop icons in Windows 11.

To improve your designs, you can explore our dedicated guide on how to change font size in Windows 11.

Meanwhile, if your Windows 11 taskbar is too large and you must adjust it to fit several icons, you can check out this guide.

If you haven’t upgraded your OS yet, here’s how to change icon size in Windows 10.

You can try any of the fixes in this article to know which works best for you. If you have any questions or suggestions, please use the comments section below.

How do I Clear Cache in Microsoft Teams?

Microsoft Teams is a communication and collaboration tool that comes built-in with Microsoft Windows 11. On other versions, you can install them separately.

However, users have complained a lot regarding some issues, such as the app running slow, being unable to access or send files, app crashes, and more.

While there are specific solutions to these issues, the culprit often is corrupt cache files. Cache files can often conflict with the app’s performance and cause multiple issues. In this guide, we will give you simple steps on how to clear the Microsoft Teams cache. Let’s get right into it.

How can I clear the cache in Microsoft Teams?

1. Use the Run dialogue

  1. Close Microsoft Teams.
  2. Press the Win + R keys to open the Run dialogue.
  3. Type the below command and press Enter: %appdata%\Microsoft\Teams
  4. Press Ctrl + A to select all files in the opened folder.
  5. Hit the Del button on your keyboard or right-click and select Delete from the context menu.
  6. Restart Microsoft Teams.

2. Use Command Prompt

  1. Open the Start menu.
  2. Search for Command Prompt and run it as an administrator.
  3. Type the below command and press Enter: rmdir /q /s %appdata%\Microsoft\Teams
  4. Let the command prompt do its job and clear the cache.
  5. Exit the command prompt and open Microsoft Teams.

You can also make use of the command prompt and clear the cache for Microsoft Teams. It is a bit easier as all you need to do is run a command and it will do its job.

What is cache, and how does clearing it fix things?

Cache are files that your browser or app will store so that it can load certain files related to the webpage or app faster on your PC.

The cache files could be anything ranging from images, clips, fonts, and other technical elements such as CSS, HTML, JavaScript, etc. All these files are stored locally to save downloading them again and again and speed up your browsing.

Now, many people have a question about how clearing an app or browser cache helps fix things. To simplify things, there are chances that the cache files stored on your PC locally are outdated and the website or app has been updated to a newer version.

Due to this mismatch, chances are that the app will misbehave or malfunction. This conflict can be easily avoided by clearing the app or browser cache.

Difference between Cookies and Cache

CookiesCache
Cache files save basic information about a website or app, such as fonts, images, clips, etc.Cache files save basic information about a website or app such as fonts, images, clips, etc.
Cookies keep a track of which website you interacted with.Cache files will remain the same even if someone other than you uses that app or website.
Cookies expire automatically.The cache needs to be cleared manually.
Cookies take up only a small amount of storage space.Cache eats up a good amount of storage if not cleaned regularly.
Cookies are more memory intensive.Cache is less memory intensive.

That is it from us in this guide. You can check out our guide that gives you stepwise instructions to record a Microsoft Teams meeting.

If you are having trouble using your Bluetooth headset with Microsoft Teams, check out our guide that will help you fix Teams if your Bluetooth headset isn’t working.

For those looking to optimize performance, we’ve outlined 3 Ways to Clear Cache on Xbox Series X in our article.

Also, you can check out our guide that will help you resolve audio issues with Microsoft Teams. Let us know in the comments below which one of the above methods you use to delete the cache files for Microsoft Teams.

Google Chrome OS Can’t Open This Page: How to Fix This Error

The Google Chrome OS can’t open this page error is pretty confusing as this has been reported by users on different brands’ Chromebooks. It can occur when you try to open certain programs, especially has been reported while running Roblox.

If you are also one of such users and facing the Google Chrome OS can’t open this page error and are looking for solutions then you are at the right place. Because in this guide, we will give you multiple solutions that will help you resolve the problem. Let us get right into it.

What causes Google Chrome OS can’t open this page error?

After some research, we have found some common reasons that usually trigger the Google Chrome OS can’t open this page error;

  • DNS issues: DNS stands for Domain Name System and it translates the domain names into IP addresses. If there is some issue with DNS then it could trigger multiple problems including the one at hand.
  • Weak internet connection: A webpage not loading is often because of a poor internet connection. You should check if the internet that you are connected to is working and there isn’t any problem.
  • Your antivirus is blocking the program: Due to aggressive antivirus software, certain applications are blocked by default, as the program reads them as a threat to your PC.
  • Problematic Chrome OS settings: You or a third-party app might have tweaked the Chrome OS settings, which is why you facing this issue.

How can I fix the Google Chrome OS can’t open this page error?

Before jumping to the advanced solutions, here are a few quick fixes that you can apply to resolve the error:

  • Restart your Chromebook and check if this fixes the issue or not. There might be a temporary glitch that is causing the problem.
  • Check the web address that you have entered in the address bar to make sure you’re going to the right webpage.
  • Try to open the same webpage on another Chromebook connected to the same network and check if the issue exists there or not.

Now let us take a look at the advanced solutions that could possibly help you resolve the problem.

1. Clear the cache and cookies of Chrome

  1. Open Chrome browser on your Chromebook.
  2. Click on the 3-dot menu icon.
  3. Select More tools and click on Clear browsing data.
  4. Check the boxes for Cookies and other site data and the Cached image and files option.
  5. Hit the Clear data button and see if this resolves the issue or not.

Often corrupt cache and cookies can cause the program to misbehave and throw multiple errors. You can simply clear the cache and cookies on your Chrome browser and check if this resolves the issue or not.

2. Restore Google Chrome to default settings

  1. Launch Google Chrome.
  2. Click the 3-dot menu icon.
  3. Select Settings.
  4. Expand the Advanced section and click on Reset settings.
  5. On the right side, click on the Restore settings to their original defaults option.
  6. Again select Reset settings.
  7. Restart your Chromebook and check if this resolves the issue or not.

Often extensions can tweak the Chrome setting which could result in the browser malfunctioning. In such a case, as advised by one of the users, it is best to reset the Chrome browser to its default settings as it will bring back the browser to its original state.

3. Check for updates

  1. Launch Google Chrome.
  2. Click on the 3-dot menu icon.
  3. Click on Settings.
  4. On the left side, select About Chrome.
  5. The browser will start looking for an update, and if it finds one, will install it on your PC.

There might be a bug in the current version of the browser that you are using and there is a new update pending to install. Simply check if there is a new update available and if yes, then you can download it and check if this resolves the issue or not.

4. Update Chromebook OS

  1. Click on the time icon at the bottom and select Settings.
  2. On the bottom left, click on About ChromeOS.
  3. Click on Check for updates.
  4. If there is a new update available, then your Chromebook will start downloading the update.

Often installing a new update fixes a bunch of petty issues that you might be experiencing on your Chromebook.

Check if there is a new update available for your ChromeOS and if yes, then install it right away and see if this resolves the issue.

That is it from us in this guide. We have a guide that gives you complete steps to run Windows 10 on a Chromebook.

You can also make use of one of our guides, which will help you get the Wi-Fi password on your Chromebook. For users having trouble connecting their Chromebooks to the Wi-Fi, they can refer to this guide. Moreover, if you want to know how to block adult websites on Google Chrome, we’ve got you covered.

Speaking of Chromebook issues, several users reported that the Chromebook keyboard isn’t working for them. However, we covered this issue in a recent article, so you might want to check it out.

Let us know in the comments below, which one of the above solutions helped you resolve the Google Chrome OS can’t open this page error.

How to Stop Pop-ups on Windows 10 & 11 Bottom Right Corner

Ads popping up in the bottom-right corner of the desktop can be disturbing sometimes because they interrupt your computer activities. It can occur due to a couple of reasons.

Also, you can experience ads popping up on Windows 11’s Lock Screen yet all these problems can reach an end.

Why do ads consistently pop up in my desktop’s bottom right corner?

The most common reason is that you have allowed some websites or online services to send notifications. So, not managing your browser notifications can prompt ads to pop up in the notification bar.

Other reasons that can be responsible for the ads frequently popping up in the bottom right corner of the desktop are:

  • Features added from the recent Windows update – Features like News and Interests can make it difficult to use your PC without sending a notification and can also prevent you from using it.
  • Programs notifications on your PC – The apps installed on your computer can send in ads at will if you have the notification feature enabled. It allows the app to send in ads about new products, updates, and other content. So, you can see ads popping up in the bottom right corner of the desktop if the app notification is on.
  • Adware on your PC – Users can experience ads popping up consistently from the bottom right corner due to adware on their browser or PC. They can be malicious and sometimes hard to get rid of.

What can I do if ads keep popping up in the bottom right corner of my desktop?

Before using any advanced troubleshooting steps, try to turn off background apps running on your computer and restart Windows in Safe Mode. If the ads keep popping up, try the solutions below.

1. Block pop-up ads in your browser

  1. Launch the Chrome browser on your PC, click the Menu button, and select Settings from the drop-down menu.
  2. Select click Privacy and security. Scroll down and click on the play button against the Site Settings option to expand it.
  3. Navigate to the Content tab, then click the Pop-ups and redirects option.
  4. On the Default behavior section, click the radio button next to the Don’t allow sites to send pop-ups or use the redirects option.
  5. Close your browser and check if the ads pop-up persists.

Disabling the option that blocks browser ads from showing on your desktop is a viable way to fix the issue.

2. Customize Windows notifications for specific or all apps

  1. Press Windows + I key to launch the Windows Settings app.
  2. Click on System, then select Notifications to expand it.
  3. Scroll down to the Notifications from apps and other senders tab, and toggle off the switch for apps you don’t want to receive notifications or toggle off the Notifications to disable the notifications from all your apps.
  4. Navigate to Tips and suggestions about Windows and uncheck the box.
  5. Close the Settings window and check if the problem persists.

The above settings will stop notifications from senders, preventing them from being able to send ads.

3. Use an ads blocking extension for your browser

  1. Launch Chrome and go to the Chrome Web Store Extensions page.
  2. Type AdBlock into the search box, select the AdBlock extension from the results, and click the Add to Chrome button.
  3. Click the Add extension button on the new prompt to confirm the action, then exit the Chrome web store page.

It will block websites from showing ads, fixing the ads popping up in the bottom right corner of the desktop. You can read our guide on fixing AdBlock if it’s not blocking any ads & pop-ups on your browser.

4. Turn off the advertising ID policy

  1. Press Windows + R to open the Run dialog box, type gpedit.msc, and click OK to open the Local Group Policy Editor.
  2. Navigate to the following folders to open the User Profile: Computer Configuration\Administrative Templates\SystemUser Profile
  3. Right-click Turn off the advertising ID policy option and select Edit.
  4. Select Disable, click Apply, then OK.

Alternatively, our readers can read about blocking personalized ads in Windows 11 apps on their PCs. We also have a great guide on how to remove Waisheph malware, so don’t miss it.

Ensure to follow the steps outlined for each solution strictly for optimal results.

If you have further questions or suggestions, kindly use the comments section below.

Microsoft news recap: concessions possible for EU regulators in Activision deal, LinkedIn gets a focused inbox, and more

Microsoft news recap is a weekly feature highlighting the top Microsoft news stories of the past week. Sit back, grab some coffee, and enjoy the read!

LinkedIn is rolling out a focused inbox, untainted by spam and scams

A focused inbox is being rolled out across LinkedIn that aims to reduce clutter in your inbox, by highlighting important messages and filtering out spam.

LinkedIn is rolling out a focused inbox, untainted by spam and scams - OnMSFT.com - December 2, 2022

Xbox Series X was a ‘hot’ item on Black Friday, report claims

According to data from Adobe, Xbox Series X was one of the top five hot products following Black Friday and Cyber Monday, a surprising change from expectations that the Xbox Series S would outperform, particularly as it was the only Xbox Series console to be discounted.

Xbox Series X was a 'hot' item on Black Friday, report claims - OnMSFT.com - December 1, 2022

Xbox Series X|S successor tentatively slated for a 2028 release

Hints about when the next generation of consoles may release are starting to drop, with Microsoft saying in response to a CMA issues statement, “Ineed (sic) the next new generation of consoles are not expected to be released before the fall of 2028 at the very earliest.”

Xbox Series X|S successor tentatively slated for a 2028 release - OnMSFT.com - November 29, 2022

Microsoft likely to offer EU regulators concessions in Activision Blizzard acquisition

Analysts are beginning to suggest that Microsoft might be ready to offer concessions to EU regulators in order to get its Activision Blizzard acquisition over the line.

Microsoft likely to offer EU regulators concessions in Activision Blizzard acquisition - OnMSFT.com - November 29, 2022

That’s it for this week. We will be back next week with more Microosft news.