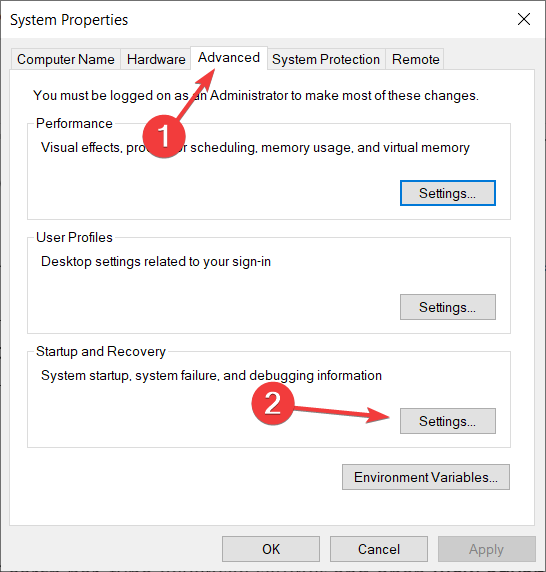
Many people reported that their printer fails to print with the following error: Printer cannot be contacted over the network. This issue affects those printers that are added as network printers.
If you are also dealing with this issue, try one of the following troubleshooting tips to eliminate this error.
Why is my printer not connecting to the network?
Below are some of the causes of the printer cannot be contacted over the network issue:
Disabled services: Sometimes, the Canon or Epson WF-3540 Series printer cannot be contacted over the network issue can be due to some disabled system services. The solution to this is to restart these services.
Connection issues: If your Sharp printer or other products cannot be contacted over the network, it might be down to minor connection issues. You can fix this by removing and adding the printer again.
What to do if the Printer cannot be contacted over the network
1. Remove the Printer and Add it Again
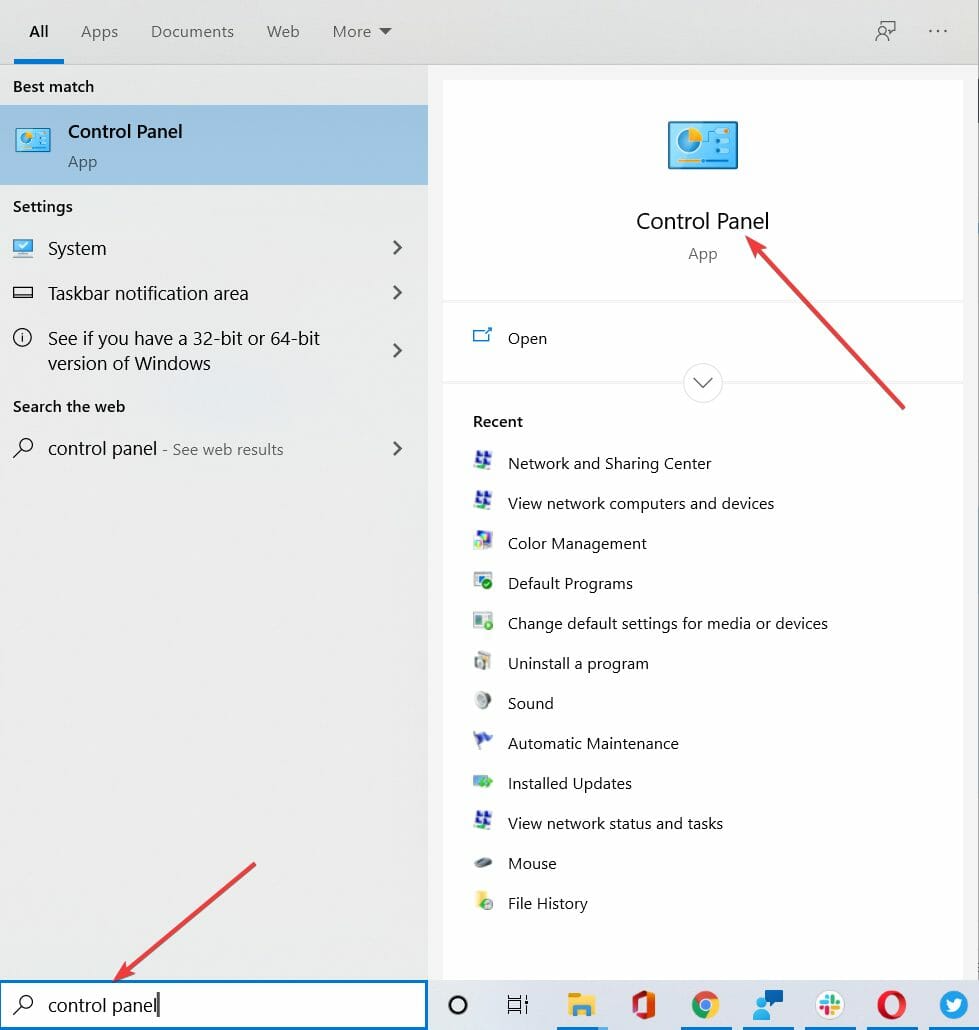
Press the Windows key, type control, and select Control Panel.
Choose View devices and printers under the Hardware and Sound section.
Now, right-click your printer and select the Remove device option.
Next, click the Yes button to confirm the action.
Wait for the process to complete and click Add a printer at the top.
Your system will now start looking for all the available printers. Click the one you want to add and click the Next button.
Finally, follow the onscreen instructions to complete the process.
Sometimes, the most straightforward fix might be the most effective. For example, if you are getting the printer cannot be contacted over the network prompt, the first thing to try is to remove the device and add it again.
This will clear up any glitch that might be causing the issue.
2. Enable certain services
Press the Windows key + R, type services.msc, and click OK.
Double-click the Remote Access Auto Connection Manager service to open its properties.
Now, click the Stop button to halt it.
Next, set its Startup type to Automatic and click the Start button.
Click the OK button to save the changes.
Now, repeat steps 2 to 5 for the services below:
Routing and Remote Access
Secure Socket Tunneling Protocol Service
Remote Access Connection Manager
After restarting these services, check if the printer cannot be contacted over the network error message that persists.
Follow the steps below if one of the services gives you this error: Windows could not start the service on Local Computer. Error 1079: The account specified for this service differs from the account specified for other services running in the same process.
Repeat steps 1 and 2 above for the faulty service.
Click the Log On tab at the top and tick the radio button for This account.
Now, click the Browse button.
Type your user account name in the Enter the object name to select box and click the Check names button.
Next, wait for the name to be confirmed and click the OK button.
Finally, type in your account password in the Password and Confirm password boxes and click OK.
With this, you should be able to eliminate the Printer cannot be detected over the network issue for good.
If you stumble upon the error 1005 Access Denied in a web browser, the website you’re trying to visit has banned your IP address.
Like many computing errors, this can be a very annoying situation to be stuck in. Sadly, it is peculiar to virtually all the best browsers for all devices, so Chrome, Edge, and Firefox users suffer from the error.
In this article, we explore the common causes and prefer the best solutions when you are faced with error 1005.
What is the meaning of error 1005?
This error can happen for many reasons. For example, too many requests from your IP address may be interpreted as spam and trigger the error.
Here are some of the primary causes for the Access Denied error with code 1005:
Website owner blocked your IP address: Sometimes, the website owner might have restricted access to users from a specific or a range of IP addresses due to security reasons like spam. You need to use one of the best VPNs for Windows PC to get past this restriction.
Webpage licensing issue: This error message can also pop up if the webpage is unavailable to all countries due to licensing or government issues (geoblocking).
Incorrect data and time: In some cases, the error 1005 might be down to incorrect settings on your computer, such as date and time. The way out here is to make the necessary change to your time and date accordingly.
Cloudflare blocked your IP address: Cloudflare can also block your IP address for security reasons.
The website blocks VPN traffic: Some websites disallow any traffic from a VPN. Therefore, it would be best if you disabled your VPN to access such sites.
Here are some variants to this error code:
Error 1005 Cloudflare, error 1006: Try adding an exception to your firewall or disabling your antivirus.
Error 1005 Crunchyroll, banned IP: Your IP address was banned, but you can fix this by changing your IP with a VPN or proxy.
The owner of this website has banned your IP address Cloudflare: The Crunchyroll solutions apply here, too.
Error 1005 VPN: Might be caused by your current VPN service, so try disabling your VPN or switching to another VPN app.
Error 1005 access denied: This may be triggered because you do not have access rights.
Unable to process your request at this time 1005: In this case, you may have to retry later.
Regions error code 1005: In this case, you must use a VPN because your geographical region has blocked you.
How do I fix the Access Denied error with code 1005?
1. Use a reliable VPN service
Drop your free VPN app for a reliable virtual private network service like ExpressVPN. It encrypts your data traffic, keeps you safe on the web, and helps you unblock websites like Crunchyroll.
Streaming content is the most geo-restricted content all over the world. Using this VPN will allow you to watch all your favorite TV shows, movies, and even anime that are locked to a specific country.
Gain access to any of this content in just a few seconds. You are connected to an IP location in another country with a few clicks.
Even if some of its IP addresses get exposed and blocked by other websites, you can always switch servers and get a new IP that’s not blacklisted.
Furthermore, ExpressVPN runs private DNS servers to protect your DNS queries. It also supports a malware blocker for web browsers, a kill switch, and split tunneling.
ExpressVPN
Enjoy gaining access to geo-restricted content and staying protected with ExpressVPN.
Click on the Start menu and select the Settings app.
Click on Network & internet on the left pane, then select the Proxy option on the right.
Under the Automatic proxy setup, ensure the Automatically detect settings option is turned off.
Turn off the Use a proxy server option under the Manual proxy setup section.
Nothing is stopping you from using a VPN and proxy at the same time. It’s an excellent way to amplify your online privacy, and you can still access blocked websites.
3. Clear your browsing cookies
3.1 Clear cache in Chrome
Click on the browser’s menu, select the More tools option, then click Clear browsing data.
Select the Basic tab, and choose a Time range.
Tick Browsing history, Cookies and other site data, and Cached images and files.
Now, hit the Clear data button.
3.2 Clear cache in Firefox
Click the menu at the top right corner and select Settings.
On the browser’s left pane, click the Privacy & Security option and scroll to the Cookies and Site Data section.
Next, click the Clear Data button.
Tick the Cookies and Site Data and Cached Web Content options.
Finally, click the Clear button.
Websites store information about your device in cookies, including your IP address. So, even if you try to change your IP address, you might still receive the Access Denied error with code 1005 due to those cookies.
A temporary fix is to try accessing the website in incognito/private / in-private browsing mode. But you must clear the cookies for regular browsing sessions and then restart the web browser.
4. Disable your free VPN service
If you’re using a free VPN app to protect your online privacy and access blocked content, you might get blocked by websites like Crunchyroll.
Remember that all users are connected to the same VPN server and can visit the same websites you do. Too many requests from the same IP likely result in banning that IP.
For instance, we used Opera One, turned on its built-in VPN service, connected to the American virtual location, and tried visiting Crunchyroll. However, as you can notice from the screenshot above, we were met with the Access Denied error 1005 instead.
Using Opera’s VPN will allow you to access a unique IP address that can be changed anytime. Access video content on any platform, any country, with Opera One.
Disable your free VPN service and try to reaccess the website. If you’re still keen on using a VPN for security and privacy (which we highly recommend), proceed to the next step.
5. Add an exception to the firewall
Click the Start menu, type firewall, and select Firewall & network protection.
Click Allow an app through firewall.
Now, click the Change settings button.
Locate your web browser on this list and enable the Private and Public options.
Click Allow another app to find it if it’s not on this list.
Your firewall settings could be why you keep getting the Access Denied error with code 1005 in your web browser.
Consider this solution only if you use an anti-malware solution, not Windows Defender.
Look under the hood of your antivirus tool and check if it’s blocking your web browser. If so, you must add your browser to a whitelist.
7. Set your system time settings to auto
Press the Windows key + I and select Time & language in the left pane.
Select the Date & time option.
Now, toggle the switch for Set time automatically forward to enable it.
As curious as it seems, your PC’s date and time settings could interfere with web browser traffic, resulting in various errors.
But you can fix this problem by setting the date and time to auto mode. It means allowing Microsoft to automatically retrieve the correct data from the web according to your time zone.
8. Change your DNS servers
Click on the Start menu, type control panel, and select the Network and Sharing Center option.
On the left pane, click on Change Adapter settings.
Right-click on your network and select Properties.
Double-click on Internet Protocol Version 4 (TCP/IPv4).
Tick the Use the following DNS server address radio button.
Finally, set the Preferred DNS server to 8.8.8.8 and the Alternate DNS server to 8.8.4.4.
If your DNS resolver fails at its job, it could result in a slow page loading time and insecure Internet settings, leaving you open for DDoS attacks.
Some websites might not even work. But you can fix this problem by changing the DNS servers of your PC. We suggest opting for the free, public, and super-secure DNS servers provided by Google Public DNS.
9. Contact the website admin
If everything else fails, it’s time to fire up your email client and contact the webmaster or site administrator.
It could simply be an error on their end that you can quickly resolve by requesting visitor privileges on their website.
With this, we have reached the end of the guide on fixing error 1005, Access Denied on your browser. We believe you now have everything needed to get past the error code and access your favorite websites.
Some of our readers who recently complained about the Windows failed to start a recent hardware or software change might be the cause error need to know that this error is inevitable if there is any hardware or software change to your computer.
This error affects the regular boot process of your computer and, at times, causes data loss. This article will teach you how to fix the error.
Why do I encounter Windows failed to start after hardware or software change?
One of the major reasons could be that you have installed hardware or software which has triggered the error. Below are some other factors reported by some users:
Corrupted BCD file – If you often experience power outages or there are disk write errors, it can cause your BCD file to become missing or corrupted, producing this issue.
Corrupted or damaged system files – System file corruption or damage is a common cause of starting failures. Read about how to repair damaged system files here.
Viruses and malware infections – Some viruses and malware may have affected the system files and triggered the error. Try one of the best antivirus software shortlisted in this article.
Conflicting third-party programs – Some readers claim the error occurred after installing a program that wasn’t compatible with one of the resident apps. Consider using one of these best uninstaller software to remove them.
Problems with connected devices – This error can manifest due to a conflict with an attached external device. Disconnect them and then reconnect them individually to know which is causing the issue.
Now that you know some of the potential reasons behind this issue, you can work your way through any of the fixes provided in this article.
What can I do if Windows failed to start due to hardware or software change?
It may be worth a simple fix for you if you consider performing the following preliminary checks:
Disconnect all peripheral devices such as a printer, scanner, camera, or any other USB devices (if any) except for your mouse and keyboard, which you’ll need for navigation.
Check the storage drive for any damage or connection problems.
Rebuilding BCD has been reported by several users to have proved a potential fix for the Windows failed to start a recent hardware or software change might be the cause error.
Alternatively, you can clearly repair this kind of error on Windows with a dedicated optimizing tool that will scan and fix corrupted files that result in Windows failed to start errors.
4. Perform a System Restore
Insert Windows bootable installation media and restart your PC.
After getting the prompt to Press any key to boot from CD or DVD, click on any key to continue.
Choose your language preferences and click on Next and then, choose the Repair your computer option.
Click on System Restore and follow the on-screen prompts to complete the restore.
Some users complain that the controller is not working when playing Elden Ring. Interfering apps and wrong settings could be at fault.
Luckily, there are some workarounds you can go through to fix this annoying issue, as we are about to show you.
What can I do if my controller won’t work with Elden Ring?
To start, disconnect other external devices like a mouse or keyboard and connect only the controller. Also, disconnect all Bluetooth devices and close other controller software.
If this still does not solve the problem, you can now proceed to the solutions below:
1. Disable HID-Compliant game controller
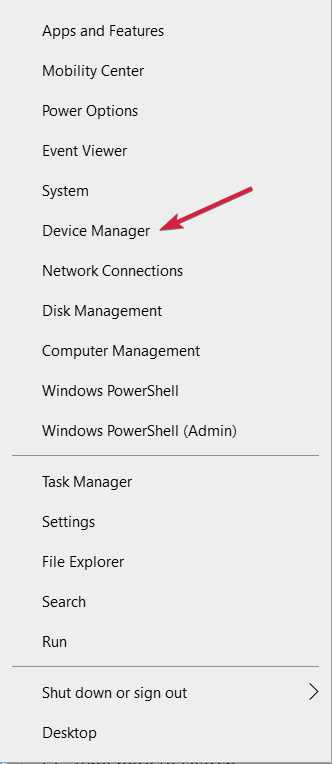
Press the Windows key + X and select the Device Manager option.
Double-click the Human Interface Devices option to expand it, and right-click the HID-Complaint game controller option.
Now, select the Disable device option.
Finally, click the Yes button when prompted to confirm the action.
Some users think the HID-Complaint game controller could be why the Eldn Ring controller is not working on Steam. However, they could fix it simply by disabling the device, as shown above.
2. Uninstall vJay software
Press the Windows key + R, type appwiz.cpl, and click OK.
Right-click the Vjay app and select Uninstall.
Finally, follow the onscreen instructions to complete the process.
The Vjay software is known to work against the Elden Ring controller on PC, leading to various issues. So, you need to remove it to fix this controller issue too.
3. Disable Steam Overlay
Launch Steam and click the Library option at the top.
Now, right the ELDEN RING game and select Properties.
Next, click the General tab in the left pane.
Finally, uncheck the box for Enable Steam Overlay while in-game.
The Steam Overlay feature facilitates easy game streaming. However, it can also be why Elden Ring controller is not working.
You need to disable the feature to get back to using your controller.
4. Change the Controller setting on Steam
Launch Steam and select the Settings option.
Choose Controller.
Now, select General controller settings.
Finally, check the box for the option you are using. Many users suggest choosing the Generic Gamepad Configuration option instead.
Sometimes, the Elden Ring controller might not work on your PC because you have not enabled the controller support. You should be able to do this by following the steps above.
Launch Steam and click the Big picture mode icon at the top.
Choose the Library option.
Now, select Games > Elden Ring.
Choose the Manage Games option.
Next, select From Steam Input.
Choose Controller options.
Finally, select the Forced On option under Steam Input Per-Game Setting and relaunch Steam.
The Steam Input Per-Game Setting feature allows you to play your game with the input setting you enabled. This has fixed the Elden Ring controller not working issue for many users. So, it would be best if you tried it too.
Lastly, if the feature is already activated, you can select the Force Off feature and check if that solves the problem.
With this, we can conclude this guide on fixing the Elden Ring controller is not working issue. Keeping your controller in check as well as other drivers ensures the game is error free.
WinZip is one of the best tools for archiving files, but many users reported specific issues. For example, WinZip is not opening at all for some users.
This can be a problem since you won’t be able to extract any archives, but in today’s article, we will show you how to fix this problem once and for all.
Why is WinZip not opening?
Several factors can cause WinZip not to open on your PC. Below are some of the notable ones, according to users:
Outdated app: If WinZip won’t open zip files on your PC, it might be because the app is outdated. The solution to this is to download the latest version of the app.
Faulty installation: An incomplete or faulty installation is another known cause of this problem. Also, WinZip files might not open because some app files were corrupted. The solution is to uninstall the app and reinstall the latest version.
What can I do if WinZip won’t open?
1. Update the app
You will likely encounter different errors if you run an outdated version of WinZip. Sometimes, the WinZip window might not show or won’t open if it does.
Hence, to prevent frequent issues, you should download and install the latest version of WinZip
2. Reinstall WinZip
Press the Windows key + I to open the Settings app and select the Apps option.
Select WinZip and click the Uninstall button.
Finally, follow the instructions on the screen to complete the process.
Once you remove WinZip, download it from the official source and install it again.
Hence, you can simply uninstall and then reinstall WinZip from its official website with one click. Doing this may also restore the corrupted files and fix the software on your PC.
For a complete removal process before reinstalling, see our step-by-step guide on how to uninstall WinZip on Windows 11 properly.
Now download the required version of the .NET Framework.
Start the downloaded file and follow the instructions on the screen.
WinZip relies on .NET Framework, and if you don’t have the required version available, you won’t be able to run it. Once the .NET Framework is installed, check if WinZip is now opening.
Click and hold WinZip, and select X in the upper left corner of the screen.
After you uninstall WinZip, you need to download and Reinstall WinZip.
Once the software is installed and activated, the issue should be resolved. For example, many users reported problems with Big Sur, but after updating WinZip to the latest version, the problem was entirely resolved.
WinZip is excellent software, and if it’s not opening on your PC, ensure your trial version hasn’t expired. In most cases, you can fix these problems simply by purchasing the WinZip license and reinstalling the software.
As you all know, the Redmond tech giant launched the new chatbot-AI based version of Bing earlier this month.
Fast forward to today and the company has also revealed it would be expanding the new Bing’s reach to mobile devices and to Skype.
That being said, know that one big aspect of the new Bing that hasn’t gotten as much attention is Microsoft’s in-house Prometheus technology.
To correct that, Jordi Ribas, the head of engineering for Microsoft’s Bing team, shared some information on Prometheus via a LinkedIn post.
What is Prometheus and how does it help Bing?
From reading the post we can learn that it all started in the summer of 2022, when OpenAI showed a demo of its chatbot AI technology to Microsoft, which would launch to the public just a few months later as ChatGPT.
Microsoft decided it could actually combine ChatGPT’s natural language with Bing’s up-to-date search information, and the result was Prometheus.
Now, with the Bing grounding technique, Prometheus is also able to integrate citations into sentences in the Chat answer so that users can easily click to access those sources and verify the information.
Thus, sending traffic to these sources is important for a healthy web ecosystem and remains one of top Bing team goals.
Please note that, since the new Bing went public earlier this month, Microsoft has obviously received a lot of feedback about its accuracy.
Redmond officials state that in the near future, the Prometheus model will increase the grounding data sent to it via Bing by four times the current amount which should make chat answers more accurate.
Another important aspect is that the design team took on the challenge and, after multiple iterations, developed a new UX that unified Search and Chat in a single interface.
With this, users could easily switch back and forth by clicking on UX elements on the page, or by simply scrolling or swiping up and down.
What is your opinion on the design process and capabilities of the new Bing? Share your thoughts with us in the comments section below.
Playing games like Modern Warfare 2 on the PC is something almost everyone does for relaxation or fun. However, it can be tragic to open your game library and discover that MW2 uninstalled itself. It is an unusual issue that some gamers have experienced.
The Modern Warfare 2 game uninstalling itself on Xbox or PC may seem like a mystery to some gamers, but it has underlying causes. However, some factors that can be responsible for the game uninstalling itself are:
Game update issues – Modern Warfare 2 is unavailable in your game library due to its updating process. The update replaces the original game file instead of applying a patch, and if you cancel the update, it’ll count as deleting the game.
Corrupt Modern Warfare 2 game files – If its game files are corrupt, they can alter the base file, causing it to remove itself.
Also, issues with Windows installation or your console can cause Modern Warfare 2 to uninstall itself. Fortunately, you can fix the problem by troubleshooting your console/PC.
What can I do if Modern Warfare 2 uninstalled itself?
Before trying any advanced fixes, go through the following:
Ensure to download all the updates completely to prevent the loss of the previously installed game.
Update your console. To update the Xbox console, check our detailed guide about updating the Xbox One console and try reinstalling the game to check if the error persists.
If you’re playing the game on a PC, install all the Windows updates.
If you can’t fix the problem, proceed with the solutions below.
1. Power cycle the Xbox console and reinstall the game
Hold the Power button on the Xbox console for about ten seconds to drain all power residue.
Unplug the power cable from the console, then wait for 2 minutes.
Connect the power cable back into the console, then press the Power button to turn it on.
After the Xbox is fully booted, reinstall Modern Warfare 2.
Left-click the Start button, type Battle.net, and click Open to launch the app.
Go to Settings.
Then, click the Downloads section. Click on the Default install location and ensure it is not set to a Battle.net version folder.
Change the location to a different folder and reinstall the Modern Warfare 2 app.
Since installing the game in a temp file can be problematic, we recommend reinstalling it separately from the Battle.net or Steam desktop app folder. It’ll help keep the game installation safe and secure against further update disparities.
Also, be sure to completely download the update without interrupting, as it can result in the game being cleared off your system.
Metro Exodus is an epic apocalyptic first-person shooter for Windows. Unfortunately, some Metro players have had a few blank screen issues with the game.
For some players, the screen goes blank just after the intro or launching of the game. Consequently, those players can’t get Metro Exodus up and running.
Why am I getting a black screen in Metro Exodus?
There could be several reasons why you are getting a black screen in Metro Exodus, and here are the most common ones and their solutions:
Graphics drivers – Outdated drivers are known to trigger many problems, so you should ensure they are always up to date.
Display resolution – If your resolution is too high, your system may struggle to run the game, which can cause a black screen.
Antivirus software – Some malware removal tools can interfere with the game’s performance and cause a black screen.
Overclocking – Overclocking your CPU or graphics card can cause stability issues in the game, leading to a black screen.
Hardware issues – If none of the above are responsible, it could be a hardware issue. So your system may not meet the minimum requirements to run the game.
How can I fix the Metro Exodus black screen problem?
1. Rename Metro files
Open File Explorer with the Windows key + E keyboard shortcut.
Steam users will need to open this path: C:\Program Files (x86)\Steam\steamapps\common\Metro Exodus
Epic Games users should open the folder: C:\Program Files\Epic Games\Metro Exodus
Then search for these game files in your Metro Exodus folder: Intro.webm, Legal.webm, and Credits.webm.
Edit those file titles by right-clicking them, selecting Rename, and entering .old at the end of the file name. The files should be intro.webma.old, legal.webm.old, and credits.webm.old.
This fix will work if you get the Metro Exodus black screen after the game intro.
2. Restart Metro in Safe Mode
Press the Alt + F4 hotkey when the Metro screen goes blank.
Next, right-click your Taskbar and select Task Manager.
Click the Metro.Exodus.exe process on the list of processes, then select the End task option.
Now click End process on the dialog box window to terminate the game.
Click Yes on the Metro Exodus dialog box to open the game in safe mode.
Next, click the Options box, and select Video.
Select the DX 11 (DirectX 11) option.
This fix will also work if you get the Metro Exodus black screen after the game intro.
3. Run in window mode
Launch Steam.
Click on Library.
Right-click the Metro Exodus game and click Properties.
Under Launch options input -windowed.
Alternatively, follow the steps below:
Press the Alt + Enter hotkey when Exodus starts.
Next, select Options, then Video to open the game’s graphical settings.
Next, select a resolution for the game that matches your Windows desktop’s resolution.
If you encounter the Metro Exodus black screen on launch, this fix should work.
Matter of fact, you’re in for a treat because Microsoft also announced that it comes to voice access that lets you speak to your phone to command searches. Although it starts a little slower in a robotic kind of voice, the functionality works just fine. The chatbot is also well integrated into Skype and you can invite it to conversations.
“In this spirit of learning and continuing to build new capabilities, we’re excited to share today the preview release of the new Bing and Edge mobile apps. We’re beginning to roll out the incredible capabilities of the new Bing and Edge on your smartphone along with some exciting new features, such as voice input. In addition, we are creating a new chat experience, beginning with Skype, to enhance your social communications with your friends and family.”
So, other than that, it shares the same functionality as its desktop counterpart. When typing a search/a command in the toolbar, you can do a complex search and make refinements. It can even create stories, poems, or ideas for a project in a ChatGPT-like experience.
How can I use Bing on Edge and Skype mobile?
1. Go to your mobile’s app store (Android or iOS). In this case, we’re on an iOS-supported device.
2. Click Get.
3. Only those who have been accepted from the waitlist can access the new. If you do, click this button to start the chat.
4. If not, you’ll see this screen pops up. Click Join the waitlist.
It seems like the recent controversy surrounding the new Bing does not phase Microsoft at all. Some users reported that they have been violated, gaslighted, and bullied, while others have gotten into a bizarre argument over the day’s date on top of being called a bad user.
Have you used the new Bing on desktop or mobile? Let us know in the comments!
Call of Duty: Modern Warfare 2 is one of the best first-person shooter games. Even though the game is quite pricey, a Vault edition is released and costs more money. However, users report Modern Warfare 2 Vault Edition not working after paying for it.
Why is Modern Warfare 2 Vault Edition not working?
Modern Warfare 2 Vault Edition not working is common to Xbox, PlayStation 4 & 5, and PCs. It can occur in variations like Modern Warfare 2 Vault Edition upgrade not working on PC and Modern Warfare 2 Vault Edition content not working on Xbox.
Furthermore, the error can occur on the device for many reasons. Some factors that may be responsible are:
Issues with Account licensing – If the license has expired or needs to be reactivated, the game will not work.
Using the New Zealand hack – Some players changed their time zone to New Zealand for early access, but that can trigger issues with the game not working.
These causes may vary on different devices. Nonetheless, we’ll take you through some basic troubleshooting steps for fixing the problem.
What can I do if Modern Warfare 2 Vault Edition is not working on Xbox/PC?
If you are using the Call of Duty: Modern Warfare 2 New Zealand hack, reset to your timezone and await the official launch.
Restart your PC/Xbox and check if the problem persists.
You may also request to repair your console. Do not hesitate to consult the Device service and repair page to submit a repair request.
The Modern Warfare 2 Vault Edition not working issue can be solved with the solutions below.
1. Install all available game files and add-ons on Xbox
Using your controller, select My Games and Apps from the Xbox menu.
Press the Menu button and go to the Manage gamesand add-ons tab.
Select the Modern Warfare 2 game.
Install all available game files and add-ons.
Press the Xbox button on your controller to open the guide, then select Profile & system, and select Settings.
Go to General, go to Power Options, and select Restart now.
Restart the console and check if the issue persists in the game.
Installing all game files will fix the problem if it is due to game installation files not being fully installed on your console. This solution will fix the Vault edition MW2 not working Xbox problem.
If the MW2 Vault Edition is not showing up in the store, you may change the region of your console and search again.
2. Restore licenses on PlayStation
Go to your PlayStation Settings.
Select Users and Accounts and choose Other.
Select Restore Licences.
On PlayStation consoles, the most common cause of Modern Warfare 2 Vault Edition not working is that the licenses are not loaded, and this solution will fix the problem.
3. Restart Windows in Safe Mode
On the sign-in screen, press the Shift key while holding the Power button.
Hold the shift key to open the Advanced Recovery Options page.
Click on Troubleshoot, then select the Advanced options.
Click on Startup Settings.
Press 4 to Enable Safe Mode and select Restart.
Restarting Windows in Safe Mode will fix any startup issues that may interrupt the game. It’ll resolve the Vault Edition Modern Warfare 2 not working.
Left-click the Start button, type Battle.net, then open the desktop app.
Select Modern Warfare 2 in your library and click Settings next to the Play button.
Click on the Scan and Repair option, then Begin Scan.
If the scan finds any corrupt or missing files, it’ll automatically repair them.
Restart your game and check if the issue persists.
Repairing your game files can fix corrupt installation files causing the Vault Edition not to work in your game. Check ways to repair Blizzard games with corrupt files for more information.
In case the MW2 Vault Edition upgrade is not working, you may also think about reinstalling the game with the previous version.
You’re probably asking: Is the MW2 Vault edition worth it? Many players say it does, but that only depends on your assessment.
Many users contacted us, reporting that the iCloud for Windows did not install correctly on Windows 10. They can’t install it even after multiple tries and with different client versions.
The iCloud for Windows software lets you sync Apple’s cloud storage with your Windows desktop or laptop. This is undoubtedly handy software for sharing documents, photos, videos, and calendars across multiple devices.
We will discuss the causes and the best solutions for installation problems.
Why won’t iCloud for Windows install on my PC?
There can be several reasons why iCloud for Windows may not install on your PC. Here are a few possible reasons:
Compatibility issues – iCloud for Windows may not be compatible with your PC’s operating system or hardware.
Outdated software – If your PC’s software is outdated, you may encounter issues while installing iCloud for Windows.
Firewall or antivirus software – Your PC’s firewall or antivirus software may be blocking the installation of iCloud for Windows.
Corrupted installation files – If the installation files for iCloud for Windows are corrupted, you may be unable to install the software.
Apple ID issues – iCloud for Windows requires an Apple ID to function. Ensure that you are signed in with the correct Apple ID and that it works properly.
What is the latest version of iCloud for Windows?
The latest version of iCloud for Windows was version 12.5. iCloud for Windows is regularly updated by Apple to ensure compatibility with the latest versions of Windows and to add new features and functionality.
If you’re getting any installer package error for iCloud, these are a few potential fixes that might get the software up and running.
What can I do if iCloud for Windows did not install properly?
Then you can select to download the KB3099229_x86.msu or KB3099229_x64.msu Media Feature Pack. The KB3099229_x64.msu option is for 64-bit Windows, and KB3099229_x86.msu is for 32-bit.
Press the Next button to download the Media Feature Pack.
Then you can open the installer to install the pack.
Windows Media Player is an essential requirement for the iCloud for Windows software. The WMP is widely included with most Windows 10 versions except N and KN.
So N and KN users might get an error message stating that media features are missing when installing iCloud, so you must install it as mentioned.
2. Uninstall the previous iCloud for the Windows version
Press Windows + R, type appwiz.cpl, and hit Enter.
Click on iCloud and select the Change button.
Select Remove and click Next.
If you’re attempting to install a more updated iCloud version to replace an older version, uninstall the outdated copy of the software first.
It’s also better to do that with a third-party uninstaller that removes leftover files, folders, and Registry entries. It is essential to remember that standard, simple uninstalling doesn’t remove all this data.
Not only will leftover files prevent you from installing an updated version of your app, but they will also take up storage space for no reason.
Uninstaller tools are easy to use. Most have an interface similar to Windows’s Add or remove programs panel. You get to a list with all the programs on your PC and select which one you want to uninstall.
Then allow the uninstaller to complete the process, reboot your PC and try to install iCloud again.
3. Turn Windows Media Player on
Type Windows features in the search box, and select Turn Windows features on or off to open the window below.
That window includes a Media Features checkbox. Click the + to expand Media Features. If that checkbox isn’t selected, select the Windows Media Player checkbox to turn the WMP on.
Press the OK button to close the Media Features window.
4. Run the Program Install and Uninstall Troubleshooter
First, open this webpage and press the Download troubleshooter button to save the Windows troubleshooter.
Select MicrosoftProgram_Install_and_Uninstall.meta to open the troubleshooter.
Click Advanced and select Apply repairs automatically.
Press the Next button to run the troubleshooter.
Select the Installing option to detect and fix software installation errors.
The troubleshooter asks you to select a program you’re trying to install. Select iCloud for Windows from that list, then press the Next button.
With any of these solutions, you can install iCloud for Windows. Then, when you’ve got the software up and running, check out this article that provides further details on how to set up iCloud for Windows 10.
Feedback is welcome, so don’t hesitate to use the comments section below and tell us which solution worked for you.
If you are a Windows user and have encountered the error message 0x80070015 Bitlocker The Device is not Ready, you may wonder what this message means and how to resolve it.
This error message can occur when trying to encrypt or decrypt a drive using Microsoft’s Bitlocker encryption software.
We will run you through common triggers and the best solutions to fix the error.
Why does error 0x80070015 in Bitlocker occur?
Error 0x80070015 in Bitlocker can occur due to a variety of reasons. Here we enumerate some of the primary triggers:
Hardware issues – If the drive you are trying to encrypt or decrypt has physical damage, it can cause the error. Additionally, if the drive is not connected correctly or is experiencing power issues, it may lead to an error.
Software conflicts – Conflicts between Bitlocker and other software on your system can cause the error. This can occur if you have recently installed or updated software that interacts with the drive you are encrypting or decrypting.
Malware or viruses – Malware or viruses can also cause the error. These malicious programs can interfere with the encryption or decryption process.
Corrupted system files – If system files on your computer become corrupted, it can cause various errors, including the Bitlocker error.
Drive format issues– If the drive you are trying to encrypt or decrypt has formatting issues, such as being formatted in a file system that Bitlocker does not support, it can lead to the error.
Overall, error 0x80070015 in Bitlocker can occur for various reasons, and identifying the root cause can be challenging. However, you can resolve the issue by troubleshooting.
How can I fix 0x80070015 in Bitlocker?
Before diving into any fixes, we suggest checking the drive connection. This error often occurs on external drives, so ensure the device is correctly connected to your computer. You can also unplug and plug it back in to establish the connection.
It would be best to close all the programs using the drive before jumping into any solutions.
1. Run the Hardware and Devices troubleshooter
Press Windows + I to open the Settings app.
Select Update & Security.
Select Troubleshoot in the left-hand pane, search for Hardware and Device, and click Run the troubleshooter.
Windows has its built-in hardware troubleshooter that can fix general issues causing your hardware to malfunction. If you’re having trouble with the troubleshooter itself, this fix guide might come in handy.
It is worth mentioning that some external drive manufacturers offer dedicated troubleshooters. If the device is not ready and the error persists, go to your drive manufacturer’s website and check if any drive troubleshooter is available.
If so, download and install the troubleshooter and run it to fix your drive.
2. Uninstall and reinstall the USB controller driver
Press the Windows key + X and select Device Manager.
Locate and expand Universal Serial Buscontrollers, right-click your driver, and select Uninstall device.
Restart your computer and check this action solves the problem.
You may want to repeat the process for all outdated drivers. It would be best to have a yellow mark on the obsolete drivers.
It’s also possible to update your drivers automatically by letting the Device Manager search for the newest updates.
If you want to apply this, you should simply select the Update driver option from the context menu and choose the method to automatically update the USB driver.
Otherwise you can always rely on an automated tool such as Outbyte Driver Updater which not only search, find and update the USB driver on your behalf, but will do it for any other outdated or missing driver on your device without hesitation.
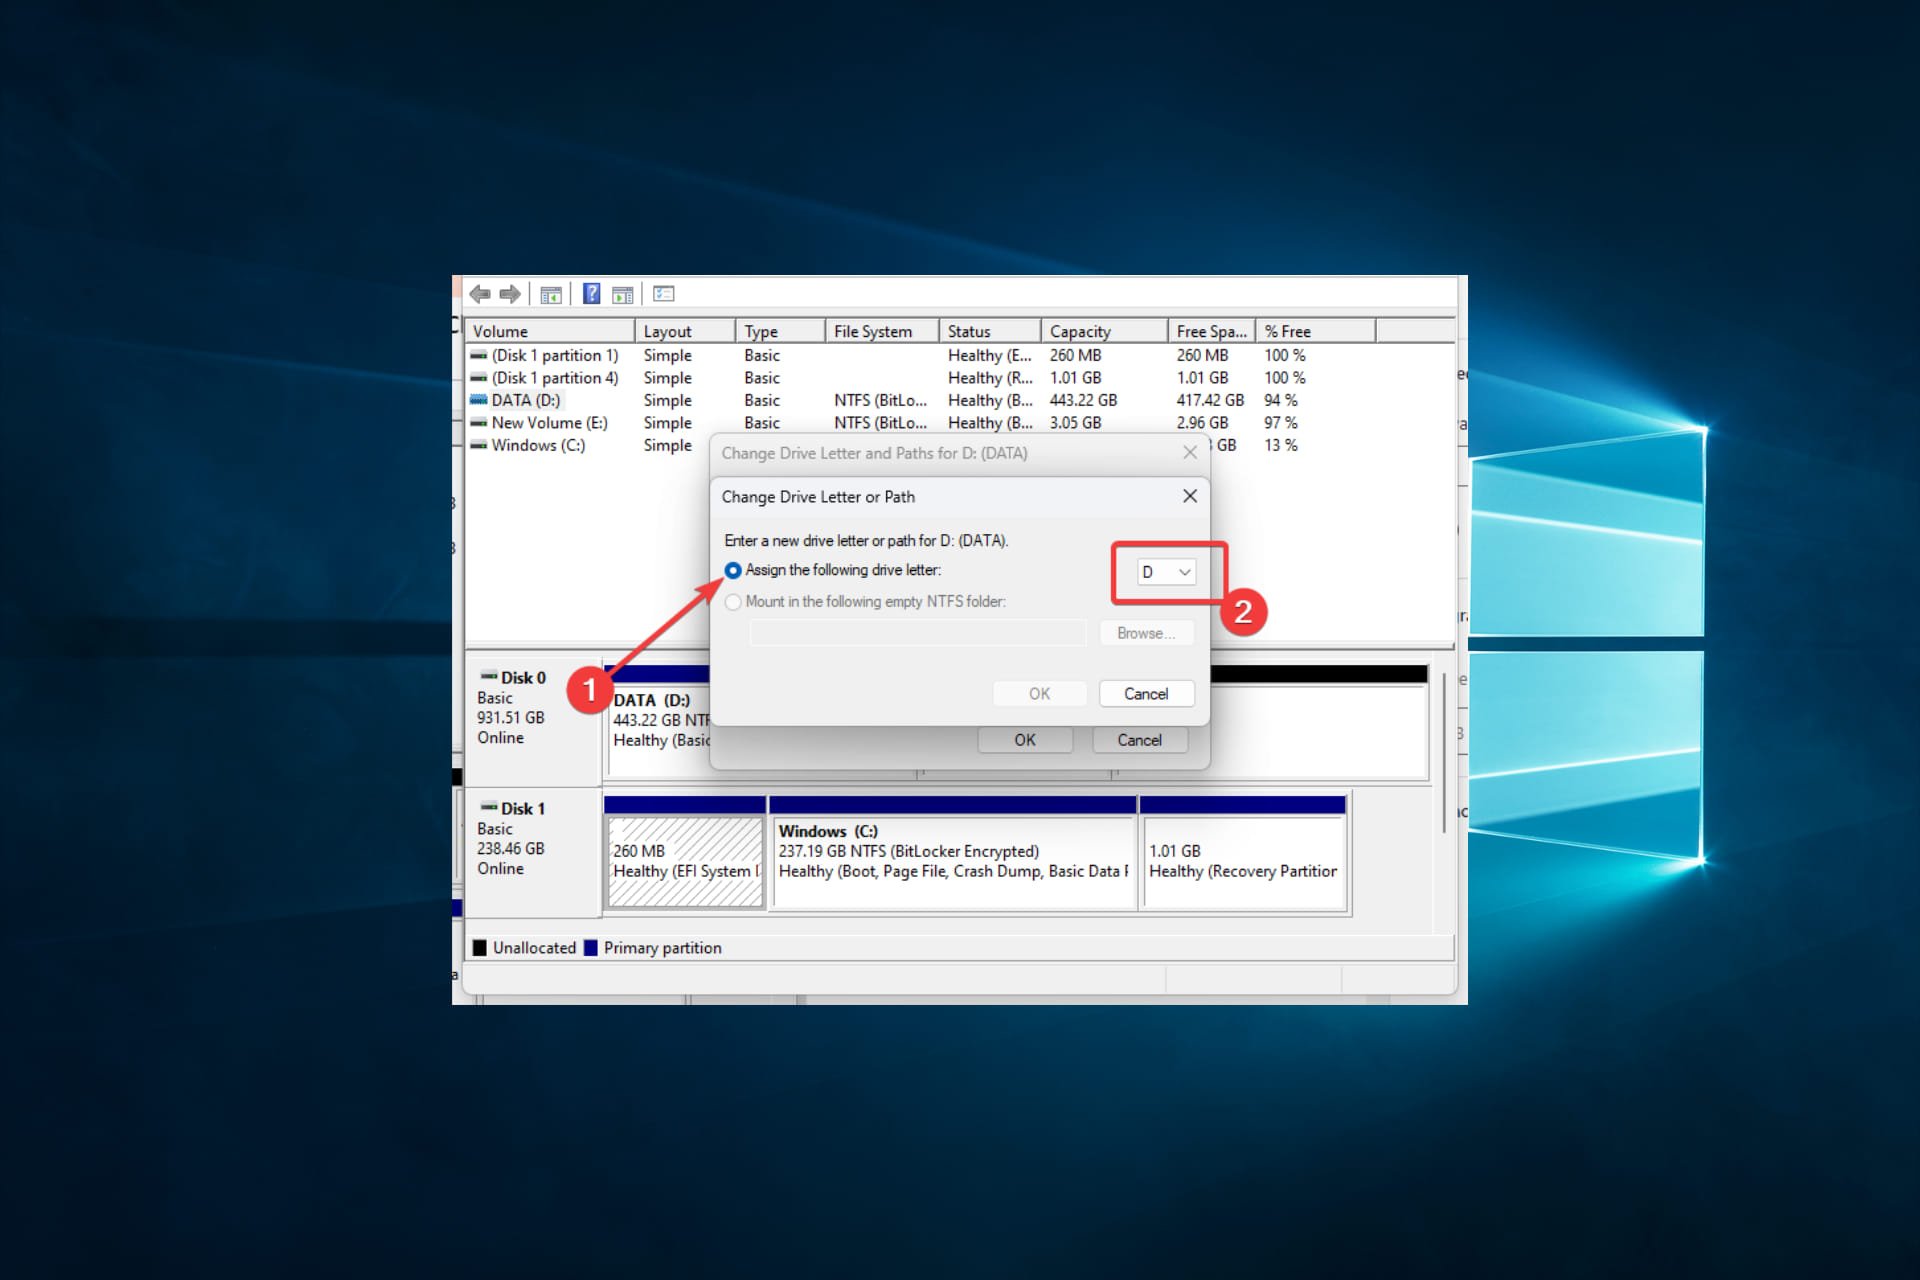
Press Windows Key + R to bring up the Run window, type diskmgmt.msc, and hit Enter to bring up the disk management console.
Right-click on the external drive to open the Drive menu, click Change Drive Letters and Paths, then click the Change button.
Click the Assign the Following Drive Letter radio button, then select the drop-down box to view the available drive letters.
Select the desired drive letter to assign to the external drive and click OK. A warning message will appear; click OK.
4. Install the latest drivers in compatibility mode
Download the driver from the manufacturer’s website.
Right-click on the driver setup file and select Properties.
Click on the Compatibility tab, check the box for Run this program in compatibility mode for, and select the OS version from the drop-down menu.
Once the installation completes, restart your computer and retry your command.
Install the latest driver for USB from your drive’s manufacturer website, and try installing it in Windows compatibility mode to run the program using settings from a previous Windows version.
5. Run a full system scan
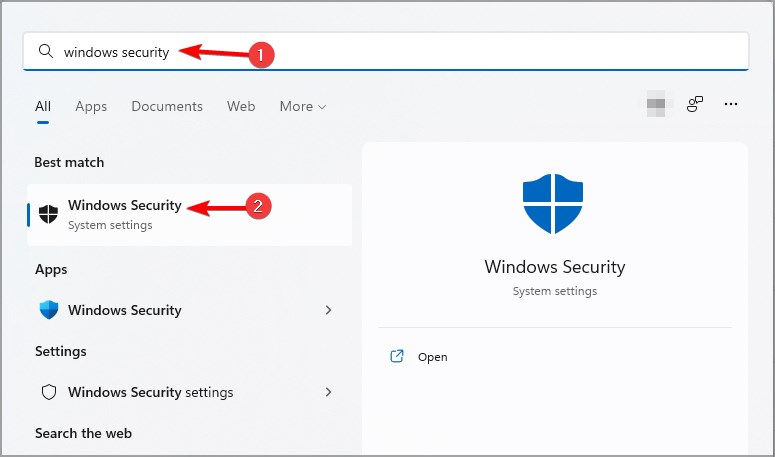
Type Windows Security in the Search bar, and click on the relevant search result.
Now, click on Virus & threat protection here.
Click on Scan options.
Select Full scan and click the Scan now button at the bottom.
Hit Start, type command, right-click the Command Prompt option and select Run as administrator.
Now type the script below and hit Enter. sfc /scannow
Wait for the scanning process to complete, and then restart your computer. All corrupted files will be replaced on reboot.
The simplest way to repair your registry is to use a dedicated tool, such as CCleaner. Remember to back up your registry first in case anything goes wrong.
You can also use Microsoft’s System File Checker to check for system file corruption. However, this utility is only available on Windows 10.
7. Update your OS
Press Windows + I to open the Settings app.
Click on Update & Security.
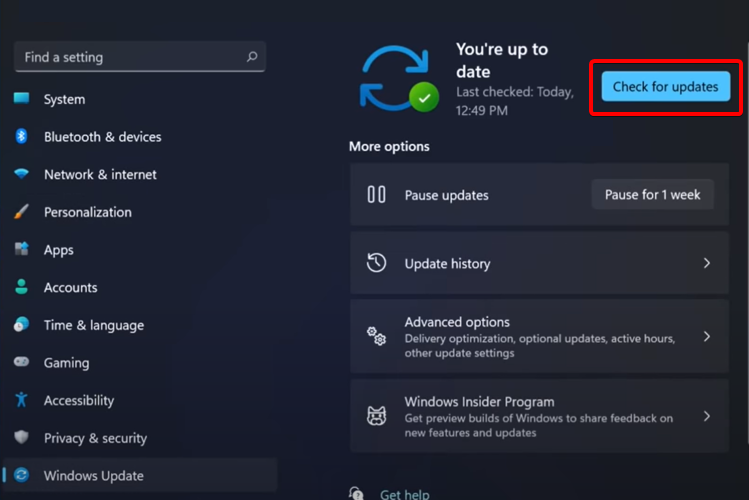
Select the Check for updates button and wait while updates are downloaded.
Ensure you’re running the latest Windows OS updates on your machine. As a quick reminder, Microsoft constantly rolls out Windows updates to improve the system’s stability and fix various issues. For example, an update may fix the Bitlocker error 0x80070015.
Press Windows + R, type msconfig, and hit the Enter key. This will open the System Configuration window.
Click the Services tab, tick the Hide all Microsoft services option, and click on the Disable all button.
Next, click on the Startup tab, and select Open Task Manager.
Click on each startup item in the Task Manager window and select Disable.
Close the Task Manager window and go back to the System Configuration window.
Click on OK and then click on Restart.
A clean boot starts Windows using a minimal set of drivers and startup programs to eliminate software conflicts that may occur when installing a program, updating it, or simply launching it.
The BitLocker error code 0x80070015 can be frustrating when accessing encrypted data on a BitLocker drive. However, our shared solutions will help you resolve the issue.
Lastly, please share what worked best for you in the comments section.
VirtualBox fatal error during installation is often menacing for people hoping to use the virtualization application. This error will suddenly terminate the installation, and you will not be able to run Windows 10 as a host.
While installing VirtualBox is straightforward, you may sometimes face this difficulty. So we will navigate through triggers and solutions to the installation error.
Why is VirtualBox not installing?
From user feedback, we gather that various elements may be responsible for VirtualBox not installing on your computer. A few of these include the following.
Insufficient system requirements – VirtualBox requires a 64-bit CPU and operating system and enough free disk space and memory to function correctly. If your computer does not meet these requirements, VirtualBox may not install.
Conflicting software – Other virtualization software, such as VMware or Hyper-V, can conflict with VirtualBox and prevent it from installing.
Lack of administrative privileges – If you don’t have the necessary administrative privileges to install software on your computer, VirtualBox may not install correctly.
Error messages – If you receive an error message during installation, take note of the error code and search for a solution online. The error message can help identify the specific problem preventing VirtualBox from installing.
Outdated drivers or software– VirtualBox may not install or function properly if your drivers or software are outdated.
Corrupted installer – If the VirtualBox installer file is corrupted or incomplete, it may not install correctly.
With these triggers out of the way, let us discuss some fixes.
How can I fix the VirtualBox fatal error during installation?
Before trying any solutions, try an alternative program that allows you to create multiple virtual environments on a single device or server.
VMware is an advanced tool with robust capabilities that enable you to deploy Kubernetes environments on the Desktop and run/build/push/pull OCI Containers with vctl. It has a customizable interface and supports the latest Windows 10 updates.
Run the Microsoft Program Install Troubleshooter tool and click on Next.
From the options, select Installing.
The tool will scan the system for problems and recommend appropriate action.
Lastly, reboot the system and check for improvements.
That is as far as we shall discuss in this guide. However, following the troubleshooting steps outlined in this article can increase your chances of successfully installing VirtualBox and enjoying its benefits.
Finally, in the comments section, let us know which solutions were most effective.
The Windows 11 Javascript error is a common occurrence, mainly if you use your browser a lot.
Javascript is a programming language that can be included on web pages to make them more interactive. When a user visits a webpage containing Javascript, the web browser executes (or runs) the script.
This means that websites can include programs running directly inside the browser rather than requiring the user to download and install an application on their computer.
When you encounter a Javascript error, it is likely your browser isn’t able to process the Javascript code. Most of the time, this is because of an outdated version of the software or browser.
Why I’m I experiencing the Windows 11 Javascript error?
The Windows 11 Javascript error may occur because of some of the reasons listed below:
Javascript is not enabled – When the error occurs, your browser is not allowing the particular website to run JavaScript. Web browsers allow you to access and enable or disable JavaScript through the browser settings. If you have problems using JavaScript on certain websites, this might help identify your issue.
Using an outdated browser – Occasionally, you may run into a JavaScript error in your web browser. This can happen when your browser is out of date. You’ll want to ensure you use your web browser’s latest version.
Antivirus is blocking Javascript – Antivirus software such as your Firewall can block Javascript for security reasons. Certain antivirus programs may cause it to crash while browsing the Internet since they block the execution of JavaScript code on specific sites. Try disabling the antivirus program and see if it works.
Browser extensions – Extensions and add-ons can cause problems accessing websites with effective JavaScript code. Disable browser extensions and add-ons, then rerun the site to see if you have resolved the issue.
Browser cache – Sometimes, an outdated browser cache can also lead to problems with JavaScript code in specific web browsers. Please clear your browser’s cache and cookies before restarting it to resolve this issue.
Corrupted files – If your operating system files are corrupted, it can also cause problems with loading pages that rely on effective JavaScript code. Run an SFC scan to replace corrupted system files with new ones and check if that fixes your problem.
If you suspect any of these could be the root cause of the Javascript error, proceed to try our solutions below.
How can I fix the Windows 11 Javascript error?
Before troubleshooting, consider switching to a different browser may be better. For example, most browsers support Javascript, and it might be easier to use a different one.
Sometimes, a simple switch-up can make all the difference when using another browser. For example, a different browser might have better Javascript support. Many browsers are available to choose from, and most are free.
Finding the most suited browser choice with built-in features and great practical navigation tools that work with Javascript language.
Hence, Opera One is one of the most popular browsers worldwide that can be used on various operating systems and devices. The browser is highly-customizable, and even comes with a built-in AI.
Opera One
Consider this fully secured browser with optimized navigation and error-free usage.
Restart your PC once the updates finish installing.
Regarding security risks, disabling JavaScript will not protect you from all possible threats. That doesn’t mean that JavaScript can’t be used maliciously, though.
Malicious JavaScript can be used to hijack cookies and other sensitive data or even to change the appearance of a Web page so that users unwittingly download malware or reveal personal information (such as bank details).
In addition, you may experience issues with your browser as sometimes Javascript is not supported but worry not, as we have an expert guide on how to fix it.
We hope you were able to find a solution if you were experiencing the Javascript error on your Windows 11 PC.
As always, share any thoughts or suggestions in the comments section below.
Windows 11 is a powerful operating system but doesn’t come with the most powerful graphics cards. The graphics card is the main component of your computer that helps you to display images on the monitor.
This is especially useful if your computer has a low resolution and you want the best experience possible. If you notice a bit of lagging and stuttering when playing games, enabling advanced graphics on your WIndows 11 PC could help you, and in this article, we show you how.
How can I improve my graphics card performance in Windows 11?
Most Windows devices come with an integrated GPU. Depending on the activities you perform on your PC, it could be enough for you. However, gamers will need a dedicated GPU. Still, even with an integrated graphics card, you can get more out of it.
Here’s what you can do to elevate your GPU’s performance:
Upgrade your RAM memory – RAM is a crucial hardware component to your computer’s performance. This is important because when you’re running a game or an application, the more memory you have, the faster you’ll be able to access that data.
Upgrade drivers – Upgrading your graphics card driver should be done regularly. This will ensure that your system continues to receive the latest updates from the manufacturer and eliminates any compatibility issues.
Change the display resolution – A higher resolution will help you enjoy better visual quality when playing games or watching videos on your computer. To that effect, we have some of the best display settings for better graphics.
Install a third-party graphic card driver – The integrated GPU has been designed as a low-cost option for users who do not want to spend money on a dedicated graphics card. But it’s not as powerful as the dedicated cards. You may notice that sometimes Windows 11 is not using the GPU, or your games run slowly and crash occasionally if you’re using this card.
Power settings – Your system’s power settings will also affect GPU performance. You will need to tweak your power settings to get a balance of efficiency and performance.
While all these may help you get the most out of your graphics card, it’s also important to consider the overall system configuration. This will ensure that your system has enough power to handle everything that you want it to do and that you’re not just overworking your GPU.
How do I enable advanced graphics in Windows 11?
1. Use Windows Security
Hit the Windows key, type Windows Security in the search bar, and click Open.
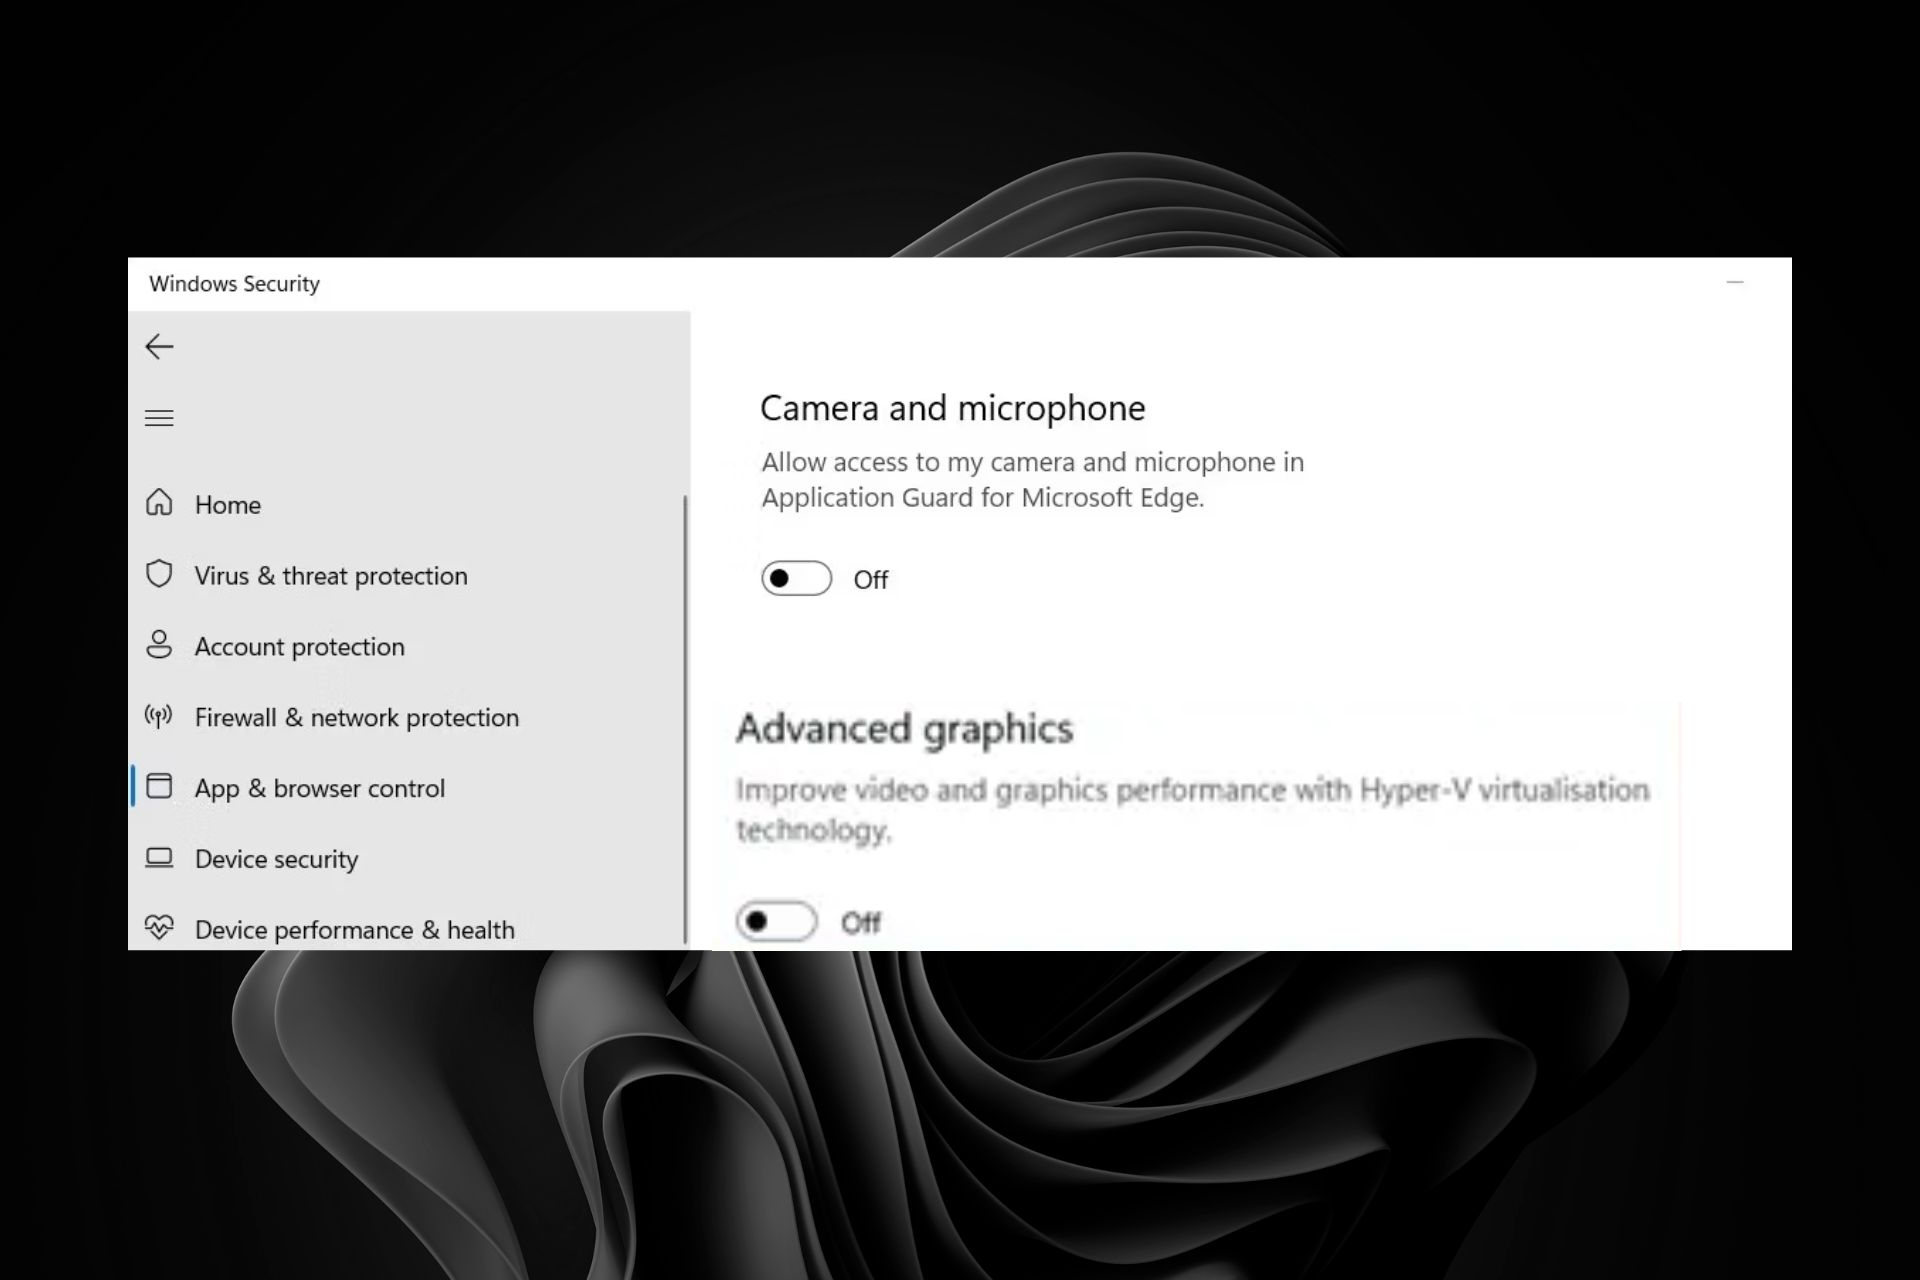
Click on App & browser control, then select Change Applications Guard settings under Isolated browsing.
Locate the Advanced graphics section and toggle it on.
Windows will restart, and this setting will now be activated.
2. Use the Registry Editor
Hit the Windows + R keys to open the Runcommand.
Type regedit in the dialog box to open the Registry Editor.
Navigate to the following location: Computer\HKEY_LOCAL_MACHINE\SOFTWARE\Microsoft\Hvsi
Double-click on EnableVirtualGPU, then set 1 as the Value data and hit OK.
If you prefer using this route, we must remind you that making edits to the Registry could have serious consequences. Your PC could be at risk of being unusable.
To cushion yourself from such eventualities, we recommend that you create a restore point first. This will allow you to return to a previous version if anything happens.
If you’d like to know how to maximize your gaming performance in Windows 11, we have a list of graphic settings that will offer you an unmatched gaming experience.
Microsoft account allows you to sign into Microsoft software such as Windows, Office, OneDrive, Skype, Xbox, and more. However, removing a device from a Microsoft account can sometimes be tricky. Thus, this article will guide users that can’t remove devices from a Microsoft account.
Why can’t I remove the device from my Microsoft account?
Below are different reasons why users can’t remove their device from their Microsoft account:
Device shared with multiple users – a device shared between multiple users or is set up with numerous Microsoft accounts will be difficult to remove from one specific Microsoft account.
Outdated Windows – With the release of the Windows 11 operating system, users who set up their Microsoft account with Windows 10 PCs may not allow the device to remove their account. You may need a factory reset of the device to remove it from the account.
A lost or stolen device – A device that has been lost or stolen may be flagged as such in your Microsoft account, preventing you from removing it until the reported issue is solved.
The reasons you can’t remove the Microsoft account from your device vary on different PCs. Regardless, we’ll take you through how to remove your device from Microsoft.
What do I do if I can’t remove the device from my Microsoft account?
Before proceeding to the advanced steps, try out the following preliminary checks:
If these preliminary methods didn’t solve the problem, let’s use the solutions below.
1. Remove the Microsoft account with Credential Manager
Left-click the Start button, type in credential manager, and click on it to open it.
Select the Windows Credentials, navigate to the Generic Credentials section, and click on it.
Select the Microsoft Account link.
Click on Remove to remove the account from the device.
The Credential Manager stores all account login Information on a device and makes it easy to manage. Also, you can read about how to fix Credential Manager not working on your PC.
2. Use a browser
Open your web browser, navigate to Microsoft Account web, and sign into your account.
Click on the Devices tab in the top right corner.
Find the device you want to remove from the list and select the Remove device option.
From the pop-up warning page, check the I’m ready to remove this device box and click on Remove.
A new confirmation page will show details about the device you remove, then click Back to Device.
You can use the web browser to access your Microsoft account and manage the devices within.
3. Change to a Local account to remove the Microsoft account on your device
Press the Windows + I key to open the Windows Settings app.
Select Account from the menu. Click on Your info, then sign in with a local account instead.
A page will prompt you to confirm you want to switch to a local account and click on Next.
Type in your Microsoft account password and click on the OK button.
Type in the username, password, and password hint for the local account, then click Next.
On the next page, click Sign out and Finish to sign out of your Microsoft account.
Go back to Settings, select the Account option, and click on Emails and accounts.
Select the drop-down arrow next to Microsoft account and select Remove.
Confirm your choice by clicking Yes from the pop-up menu.
Switching to a local account on your device will enable your device to use a local account and remove the Microsoft account on your PC. Find out easy ways to create a local account on your PC.
4. Remove Microsoft account from Access work or school
Press the Windows + I key to open the Windows Settings app.
Select the Account option and click on Access work or school.
Click the drop-down arrow next to the Microsoft account linked to work or school on your device and select Disconnect.
Click Yes from the pop-up confirmation page to remove the account from your device.
In conclusion, this guide should help if you can’t remove a device from your Microsoft account. Should you have any questions or suggestions on this guide, kindly drop them in the comments section.
Windows PCs store temporary data created by Windows or programs running on your computer in temporary files. Temporarily files (tmp or temp files) hold data while a permanent file is writing. They are stored in the Temp folder.
However, issues with the above process may result in the Make sure your temp folder is valid or Your temp folder must allow execution errors.
Why do I get the Make sure your temp folder is valid error?
Getting the error message Error writing temporary file: Make sure your temp folder is valid on your computer indicates that the Temporary folder can’t store the related data when it adjusts the registry. Some notable causes of the error are:
Corrupt temp files – Temporary files can corrupt the temp folder, causing issues with its activities.
Malware and viruses – Malware and virus infection can cause a temp folder error when running an installer file or uninstalling an app. Also, it may corrupt system files on your computer.
Wrong configuration in the Temp folder – Wrong configuration in the temp folder can cause problems storing related data as it writes the registry.
NSIS error – The error writing temporary file make sure temp folder is valid may come from an improper installer and it also appears as error writing temporary file NSIS.
Now that we know what causes this error, we’ll discuss ways to fix it and get your temp folder working again.
How can I fix the Make sure your temp folder is valid error?
Before trying any advanced troubleshooting steps, go through the following preliminary checks:
If these preliminary steps don’t fix the error, proceed with the following solutions.
1. Delete the temporary folder files
Press Windows + R keys to open the Run window, type %temp% in the search space, and press Enter.
Press Ctrl + A and right-click, then click on Delete from the drop-down.
Navigate to the following path: This PC\Local Disk (C):\Windows\Temp
Press Ctrl + A and delete all the temp files.
Restart the PC and check if the Temp folder error persists.
Deleting temp files on your PC will clear the corrupt files liable to cause the NSIS error writing temporary files. You can check our article about how to delete Temporary files on Windows 11 for more steps.
2. Perform a clean boot
Press Windows + R key to open the Run dialog box, type msconfig, and click OK.
Select the Services tab and check the box for the Hide all Microsoft services option, then click the Disable all button.
Go to the Startup tab and click Open Task Manager.
Select the startup programs and tap the Disable button.
Restart your PC and check if the temp folder error persists.
A clean boot prevents startup from running programs liable to cause the error from running when you start the system.
Left-click the Start button, type command prompt, and click the Run as administrator option.
Click Yes on the User Account Control prompt.
Type the following commands and press Enter: chkdsk C: /r
Restart your PC.
Running the chkdsk command examines disk space and disk use. Also, it provides a status report specific to each file system and shows the errors found in the system file.
4. Compress the installer file prompting the error
Press the Windows + E key to open File Explorer.
Navigate to the Downloads folder and find the installer file prompting the error.
Right-click on the installer file and click on Send from the drop-down. Click on the Compressed (Ziped) folder option to zip the installer file inside a folder.
Open the zipped folder and double-click the installer file to start the installation process.
The above steps should run the installer without any errors. Compressing the installer file prevents interference from other files.
Alternatively, you can read our guide about Temporary files and their functionality on Windows PCs.
In conclusion, if you have further questions or suggestions on what to do if you encounter the error: make sure your Temp folder is valid; kindly drop them in the comments section.
Sleep mode allows you to take a quick break from your PC, allowing the PC to rest while keeping your apps, pending the time you are away. Sadly, some users report that the Windows 11 Sleep mode closes all programs, making it impossible to retrieve any recent apps running before going to Standby or Sleep.
Does Sleep mode stop applications?
Placing your system in Sleep mode indicates that it is not engaging in any computation process but withholds the data currently running on it. Sleep mode doesn’t stop apps from running on the system. It only prevents any further processes until it is revived from the sleeping state.
Also, our readers reported that Microsoft Store apps close in sleep mode on Windows 11. Let’s see why.
Why do my apps close when my computer sleeps?
The PC closing apps when placed on Sleep mode can occur for many reasons; some are:
Issues with your PC’s Power plan – If there’s a misconfiguration with the power settings on your PC, it may result in data loss and your apps closing.
Issues with recent updates – Sometimes, newly installed updates and patches can change system settings, causing miscommunication between the PC and its components.
Corrupt system files – System files can become corrupt or missing, causing issues with how the system works. So, corrupt system files on Windows 11 can cause inconsistencies or malfunction in the sleep process.
These causes may vary on different devices. Fortunately, there are some fixes you can try to get it working. Also, if you’re asking if it’s better to shut down your PC at night, hit the highlighted link for the detailed answer.
How do I stop Windows 11 Sleep mode if it closes all programs?
Try the following preliminary checks:
Ensure your PC has enough power.
Disconnect unused external devices.
If these preliminary steps don’t fix the issue, proceed with the following solutions.
1. Uninstall recent Windows updates
Press Windows + I key to open the Settings app.
Go to Windows Update and select Update history.
Click the Uninstall updates button and select the most recent update.
Click on Uninstall.
Uninstalling the recent Windows update will resolve issues with the last build causing the Sleep mode to malfunction. Read our guide on how to uninstall updates on Windows 11 for more information.
2. Run the Power troubleshooter
Press Windows + I keys to open Windows Settings app.
Go to the System tab, then click on Troubleshoot in the right pane.
Click Other troubleshooters.
Find and select the Power option, then click the Run button to initiate the troubleshooter.
The Power troubleshooter will automatically find and fix problems with your PC’s power settings that cause your programs to close when the system is in Sleep mode.
If you want to opt for other methods than the manual one mentioned above, you can try specialized software.
4. Enable the Hybrid Sleep mode
Left-click the Start button, type control panel, and select it from the result.
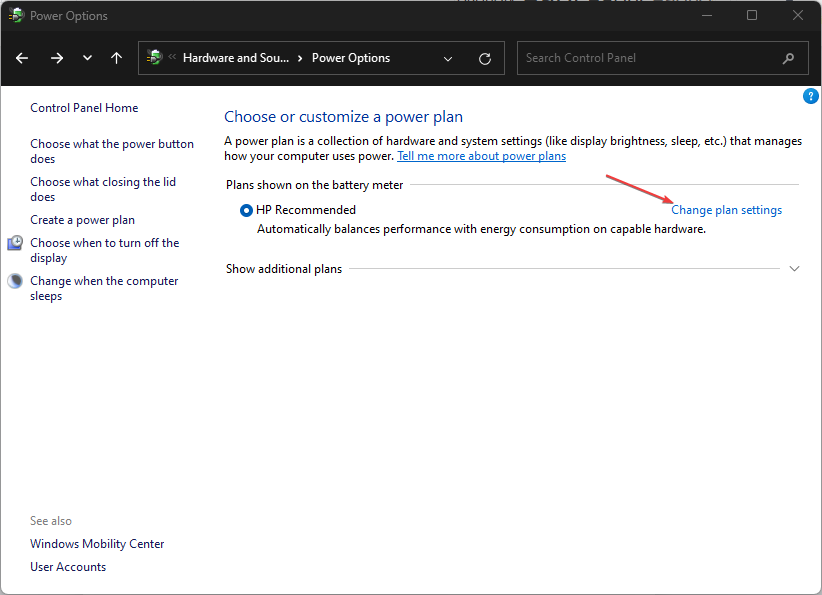
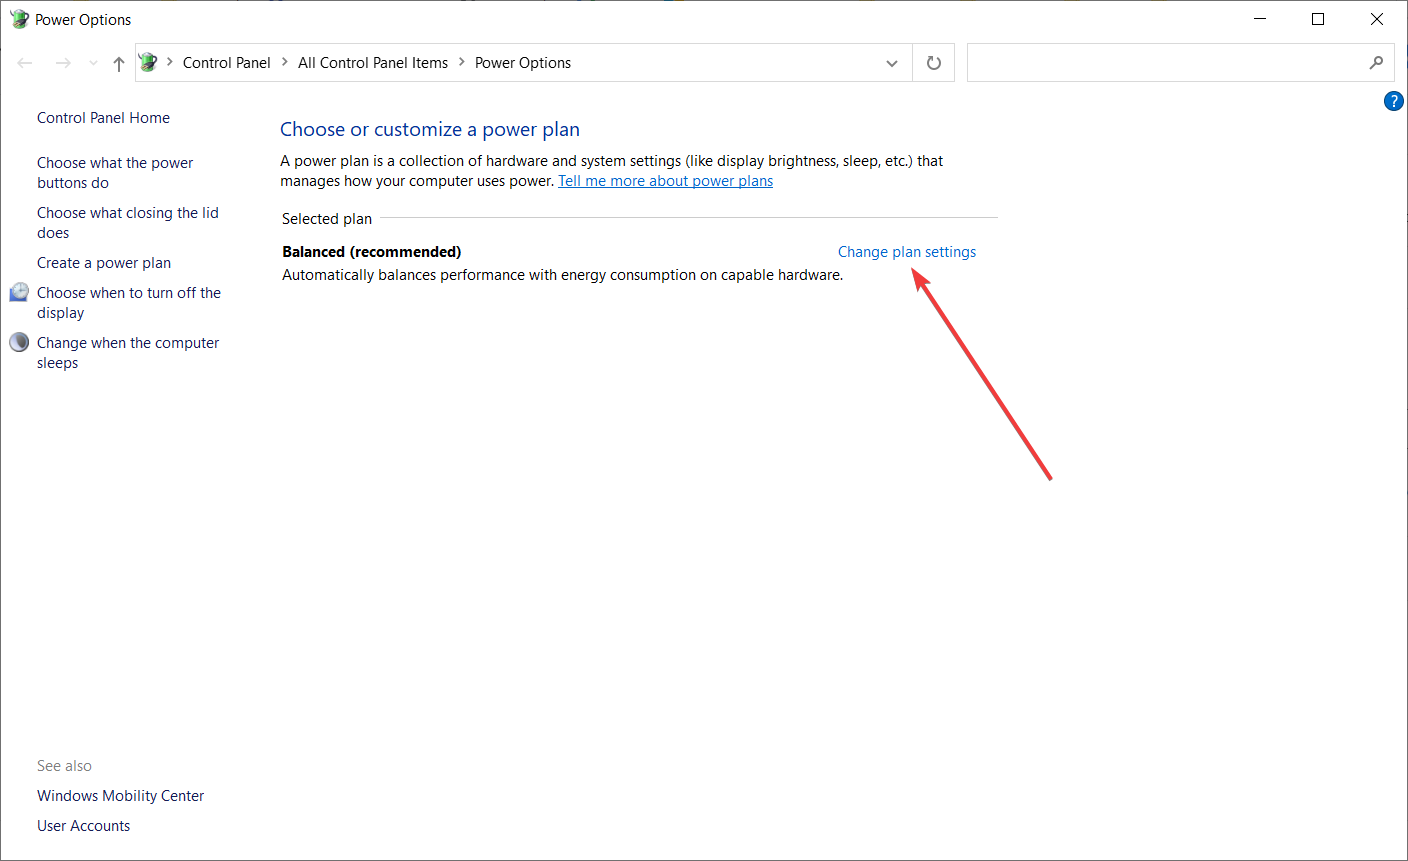
Navigate to Hardware and Sound and select Power Options.
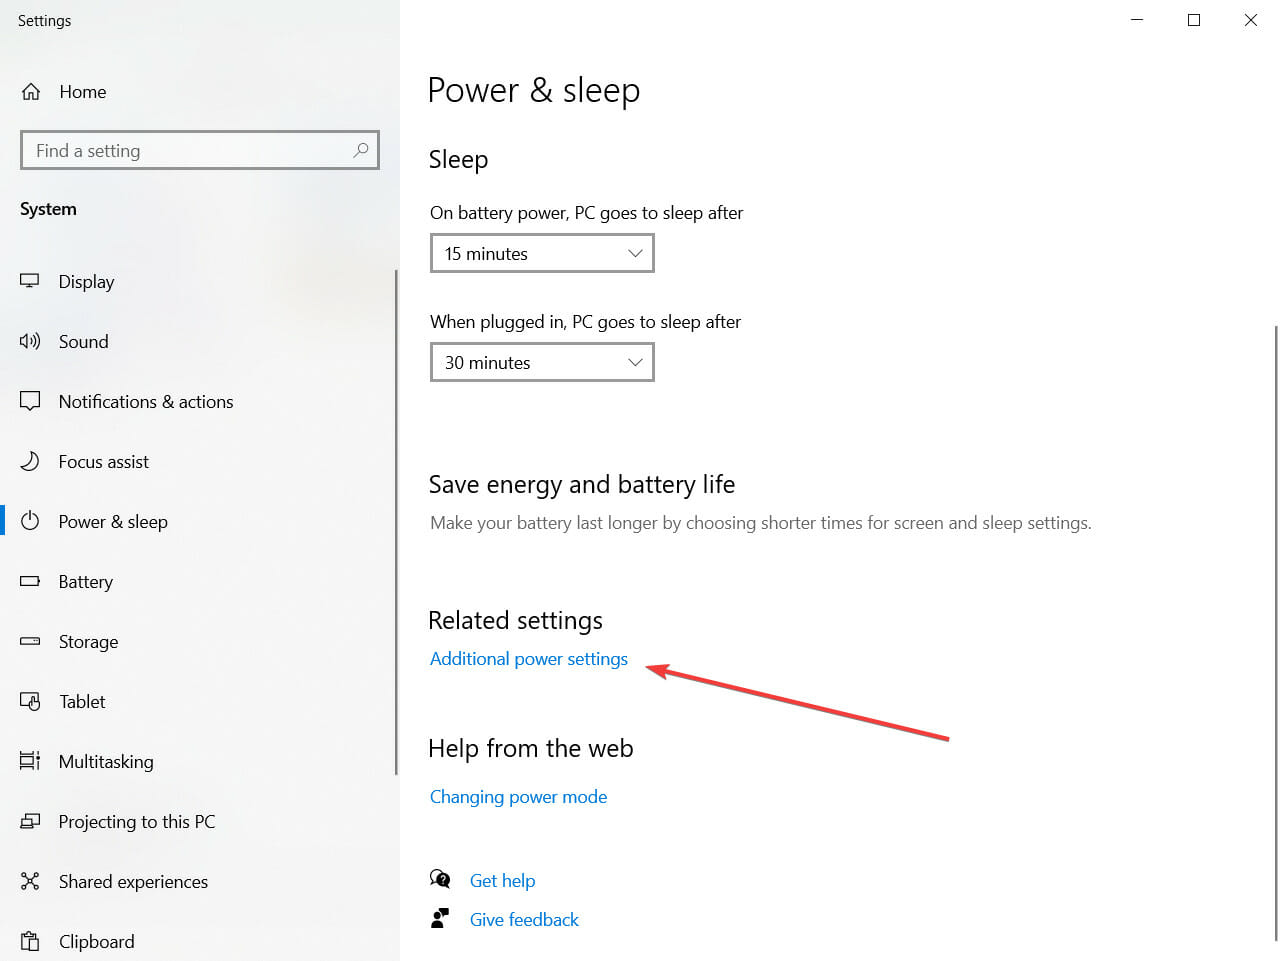
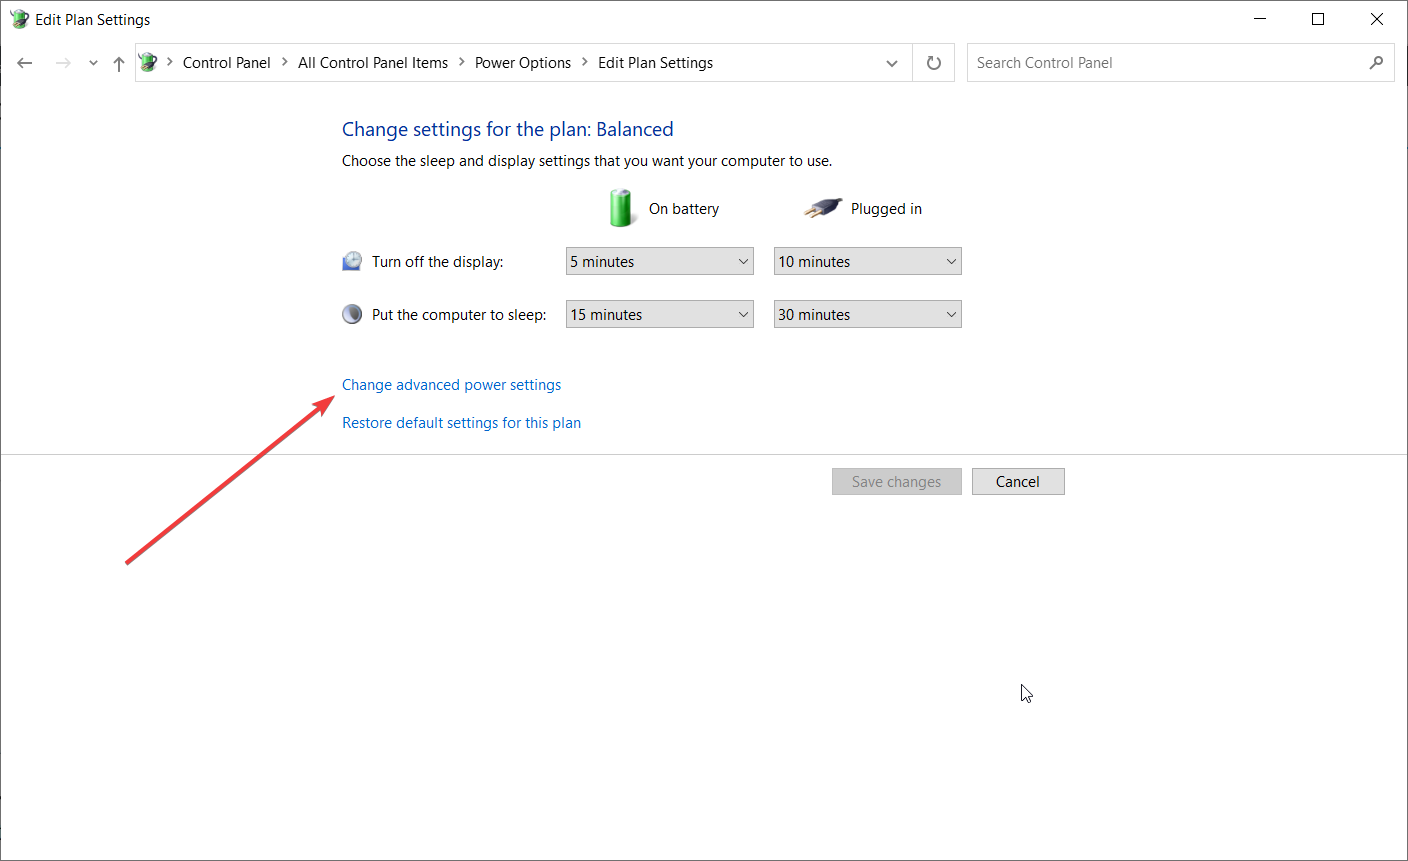
Click on Change plan settings, then select Change advanced power settings.
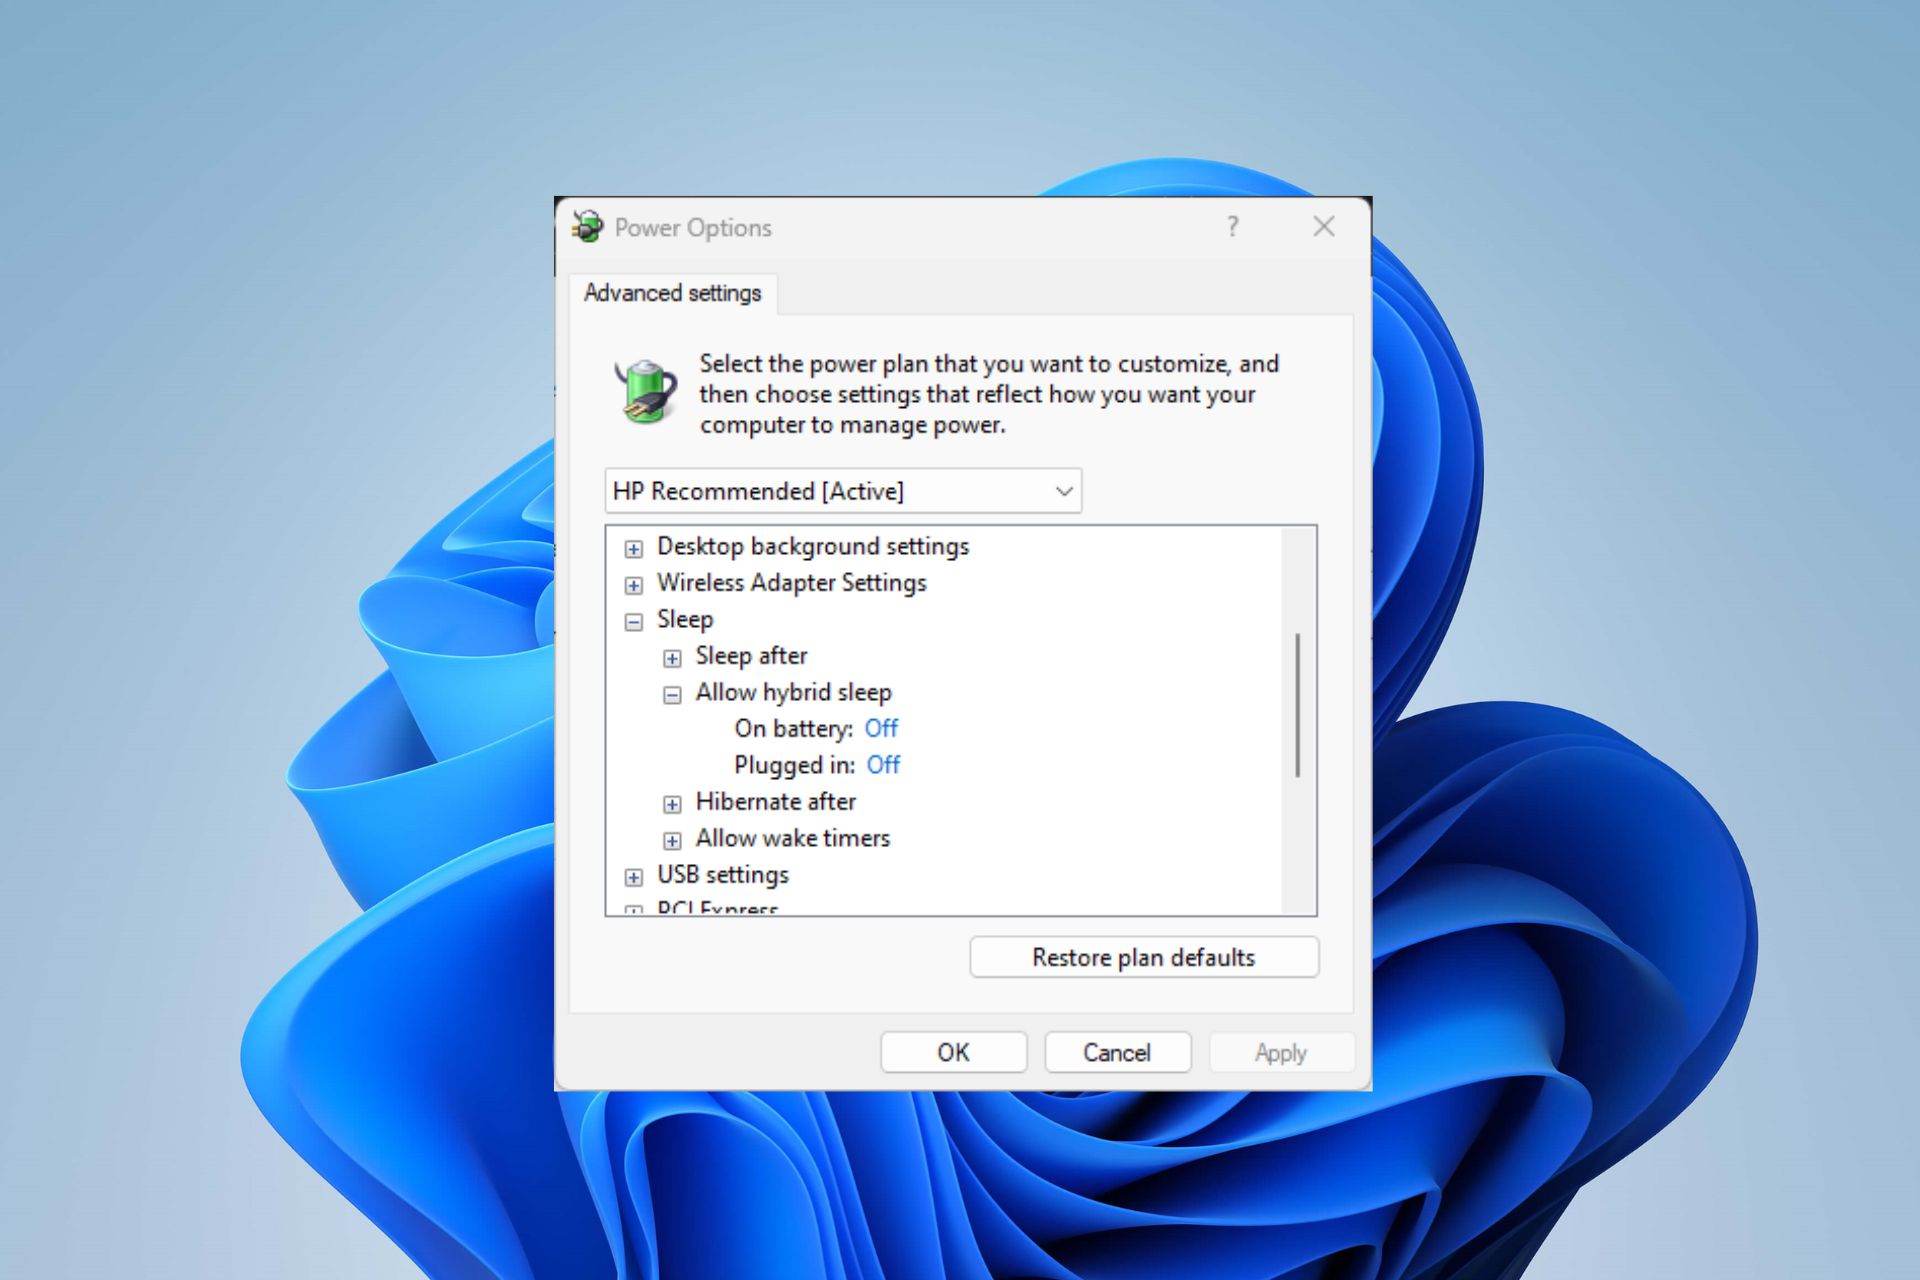
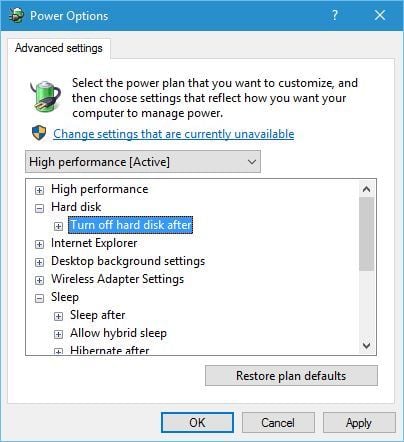
Tap on the + sign against Sleep to expand its menu, click on Allow hybrid sleep, and then set it to On for both On battery and Plugged in options.
Go to Hibernate after and set it to Never for both On battery and Plugged in options.
Click the Apply button, then OK.
Enabling the Hybrid Sleep mode on your PC allows it to put any open documents and programs in memory whenever it’s sleeping. It aids in quickly recovering your data and app activities after sleep.
In conclusion, this guide should help you troubleshoot Windows 11 Sleep mode if it closes all your programs. If you have more questions or suggestions, kindly drop them below.
Xbox Free Play Days returns with another round of games for subscribers of Xbox Live Gold and Xbox Game Pass Ultimate to play for free this weekend. The games will be available from Thursday, February 23 through Sunday, February 26. Check out the lineup below.
Bloodstained is an exploration-focused, side-scroller action RPG packing all of the best features you’ve come to know and love from the Metroidvania genre into a single, content-packed game.
Play as Miriam, an orphan scarred by an alchemist’s curse which slowly crystallizes her body. In order to save herself, and indeed, all of humanity, she must battle her way through a demon-infested castle summoned by Gebel, her old friend whose body and mind has become more crystal than flesh.
The Definitive Destiny Campaign Delve into Savathûn’s Throne World to uncover the mystery of how she and her Lucent Hive stole the Light. Learn the secrets to crafting new weapons, the new Glaive, and survive the truth within her web of lies.
DRAGON BALL: THE BREAKERS is an online asymmetrical action game in which a team of 7 ordinary citizens tries to survive the Raider (a classic DRAGON BALL rival such as Cell, Frieza, and Buu), who will hunt them down and evolve during the game into an unstoppable force. Escaping won’t be so easy!
Wrap up
It’s another solid lineup for Xbox Free Play Days this week. The best part is that some pretty sweet discounts usually come with the games featured during Xbox Play Days events. This week is no different: Bloodstained: Ritual of the Night is currently 65% off while Dragon Ball: The Breakers gets a 25% discount. If you would like to learn more, head on over to the Xbox Free Play Days FAQ page.
The Scansnap s1500 is a document scanner for small businesses and home offices. It also offers outstanding color accuracy and consistency, making it suitable for scanning photos and business documents.
For this scanner to function optimally, its drivers need to be up-to-date. If you’ve just gotten your scanner and are wondering how to download and install the correct ScanSnap s1500 driver, we show you how in this article.
How do I install the ScanSnap driver?
Before you install the driver, check the following:
ScanSnap drivers are installed automatically when you connect your device to your computer using the USB cable that came with the scanner. However, this is not always the case with most drivers.
If you have recently purchased a ScanSnap scanner, you will need to install the driver on your computer before you can use it. Instead of scouring the internet for drivers from different sites, you’ll find a third-party tool does it better.
2. Use the official site
While you may find a variety of ScanSnap scanner drivers available on the manufacturer’s website, some have been discontinued. Usually, you can download them without paying anything.
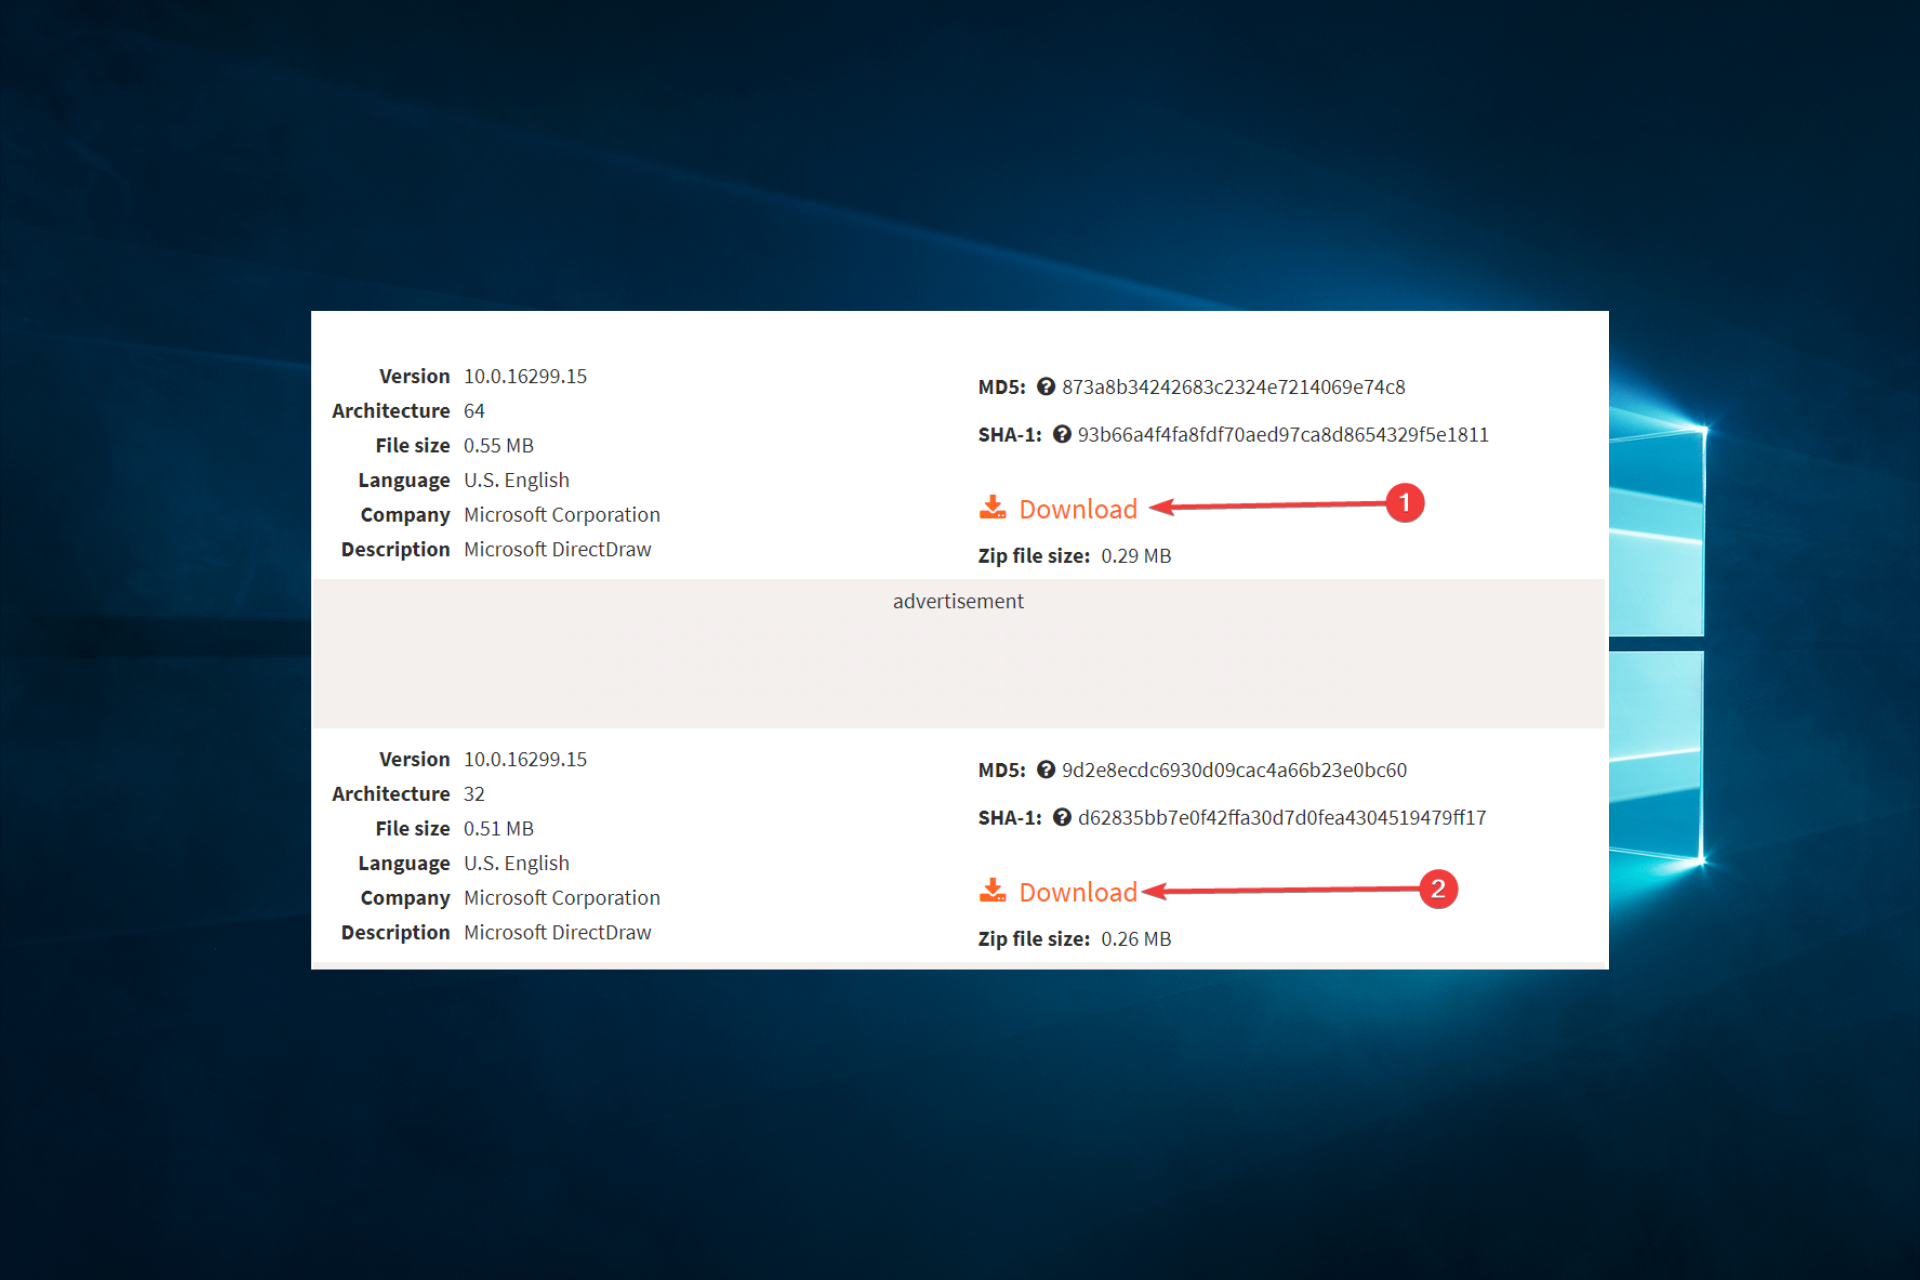
However, you must ensure you have downloaded the right one for your operating system. ScanSnap S1500 is a discontinued scanner, so you may not find the ScanSnap s1500 driver on the site. This also applies to the Fujitsu ScanSnap s1500 driver for Windows 10 and s1500 driver for Windows 7.
However, you can still find them on other sites. If you download them, ensure your antivirus program is up for the task and can detect any risks before they make it to your system.
Unsupported drivers can cause serious problems and even make your computer unusable. They might cause your computer to crash, freeze or even become infected with malicious software.
3. Use Device Manager
Hit the Windows key, type Device Manager in the search bar and click Open.
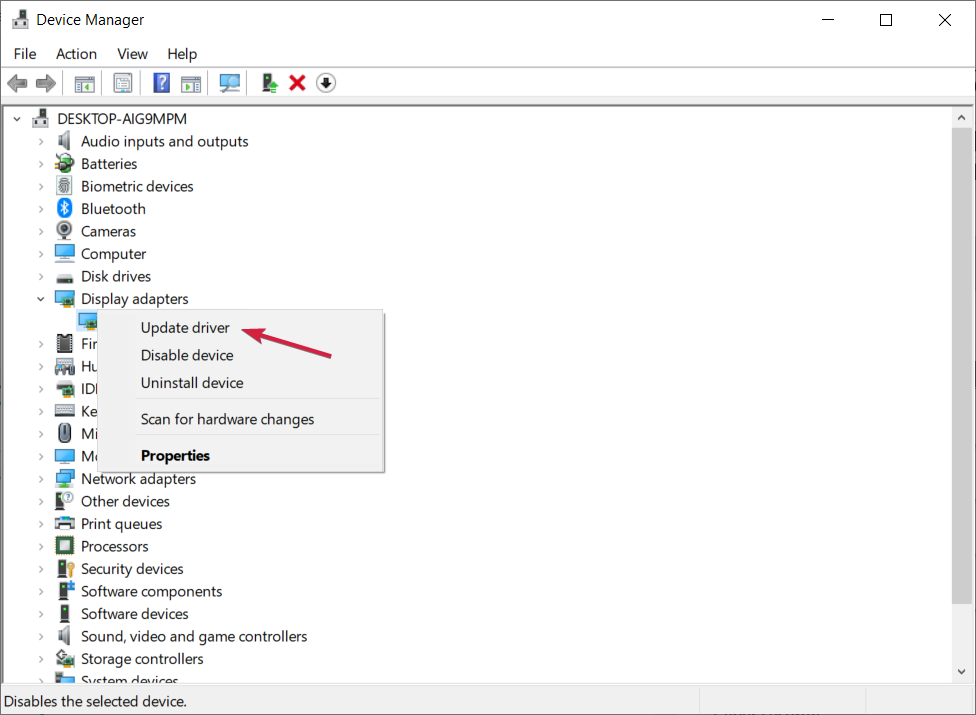
Navigate to the s1500 driver, right-click on it and select Update driver.
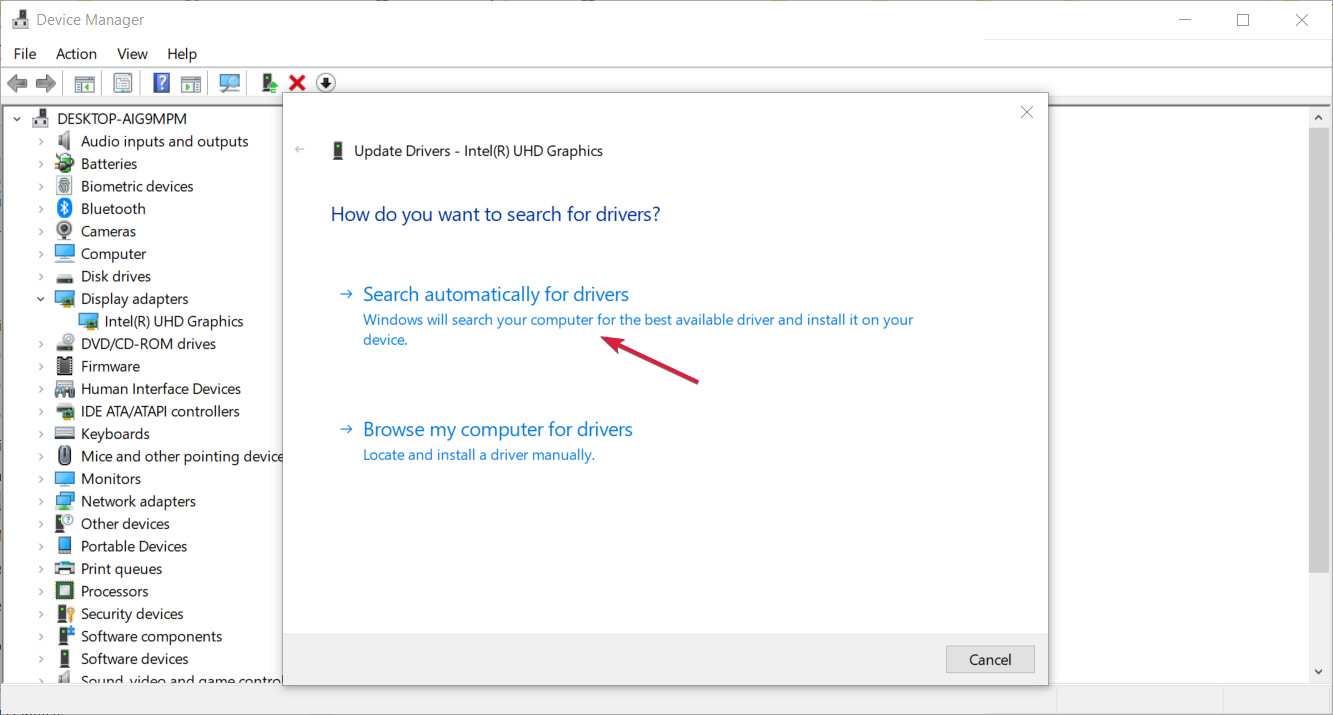
Click on Search automatically for updated drivers.
Wait for the scan to complete, and Windows will match you with the best driver available.
You may have trouble finding drivers for your device if you don’t know where to look for them. There are several places where you can find drivers for Fujitsu products:
Fujitsu website – The Fujitsu website offers downloads of drivers and firmware updates for many of its products. This site is easy to use because it contains links to all of their most popular products along with details on how to download the latest version of their product software.
Third-party sites – Another way to find out which driver site has what you need is to visit a driver’s website. Some companies, such as Driver guide compile drivers from different manufacturers.
It is important to note that the ScanSnap S1500 has since been discontinued, so although the ScanSnap s1500 driver for Windows 11 can be downloaded, it is not a guarantee that it will be at peak performance.
Many protocols and services are responsible for the communication between your computer and other destinations or devices on the internet. The TCP/IP (Transmission Control Protocol/Internet Protocol) is one of the essential elements.
However, it can get corrupted or encounter other network issues, causing you to reset TCP/IP Stack on Windows 11.
What does Reset TCP/IP Stack mean?
TCP/IP (Transmission Control Protocol/Internet Protocol) is a suite of communication protocols that controls how digital information is broken into packets. It is responsible for interconnecting network devices on the internet.
Also, it ensures packets are properly routed between your computer and its destinations. Furthermore, the Stack lodges these TCP/IP protocols.
The TCP/IP Stack processes data through layers and defines the interconnection between the Internet & other networks functions.
Sometimes, you may run into problems with the network connection on your PC if your packet size is larger than required. A quick change in your MTU size or resetting TCP/IP Stack will refactor the network configuration on your PC.
Also, it resets your computer’s Internet Protocol to default and fixes network issues on Windows 11.
Once your TCP/IP Stack is restored, you can further enhance network stability and speed by using the TCP Optimizer tool. It automatically refines your Internet settings for better connection quality and lower latency on Windows 11.
How can I reset TCP/IP Stack on Windows 11?
1. Use Windows PowerShell
Left-click the Start button, type powershell, and click Run as administrator.
Click Yes on the User Account Control prompt.
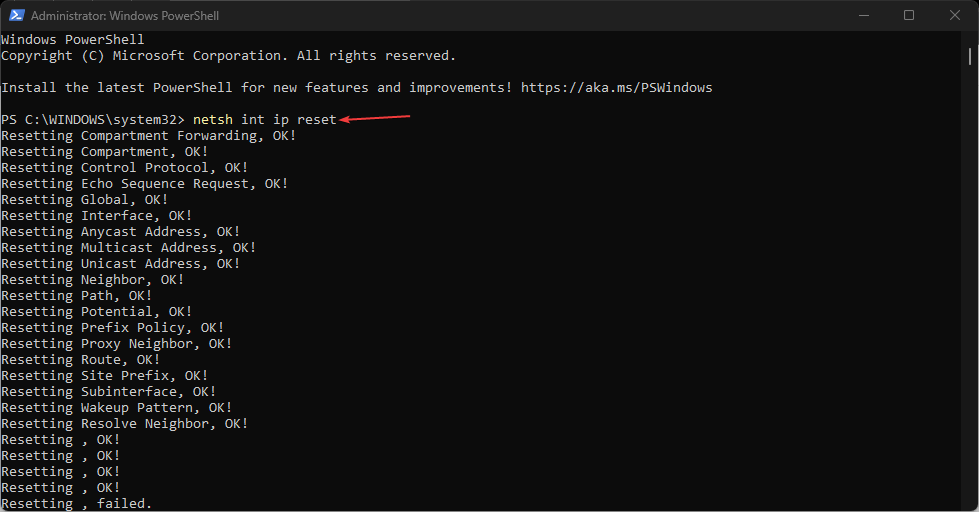
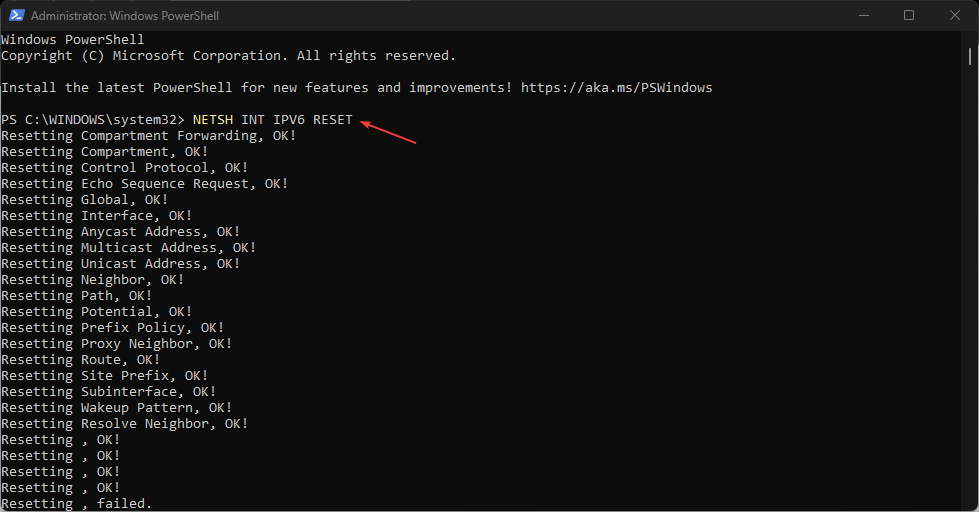
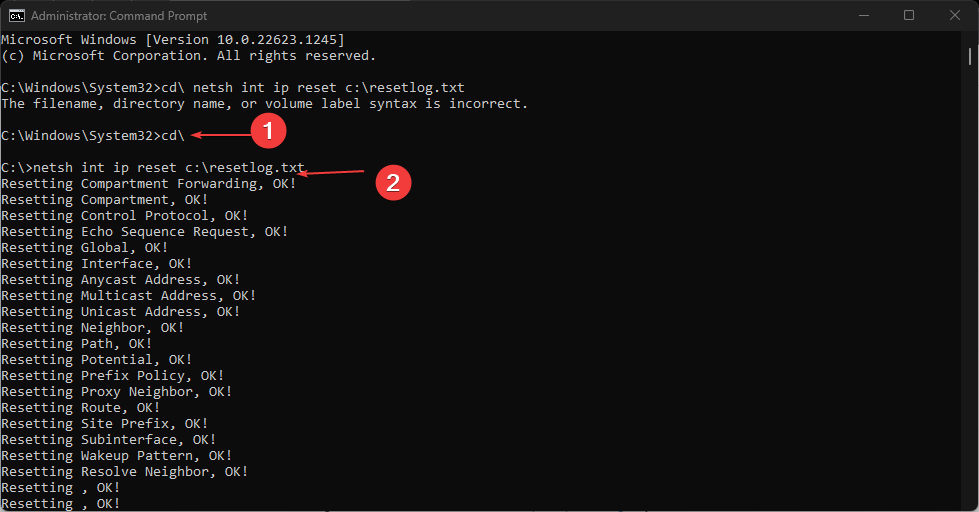
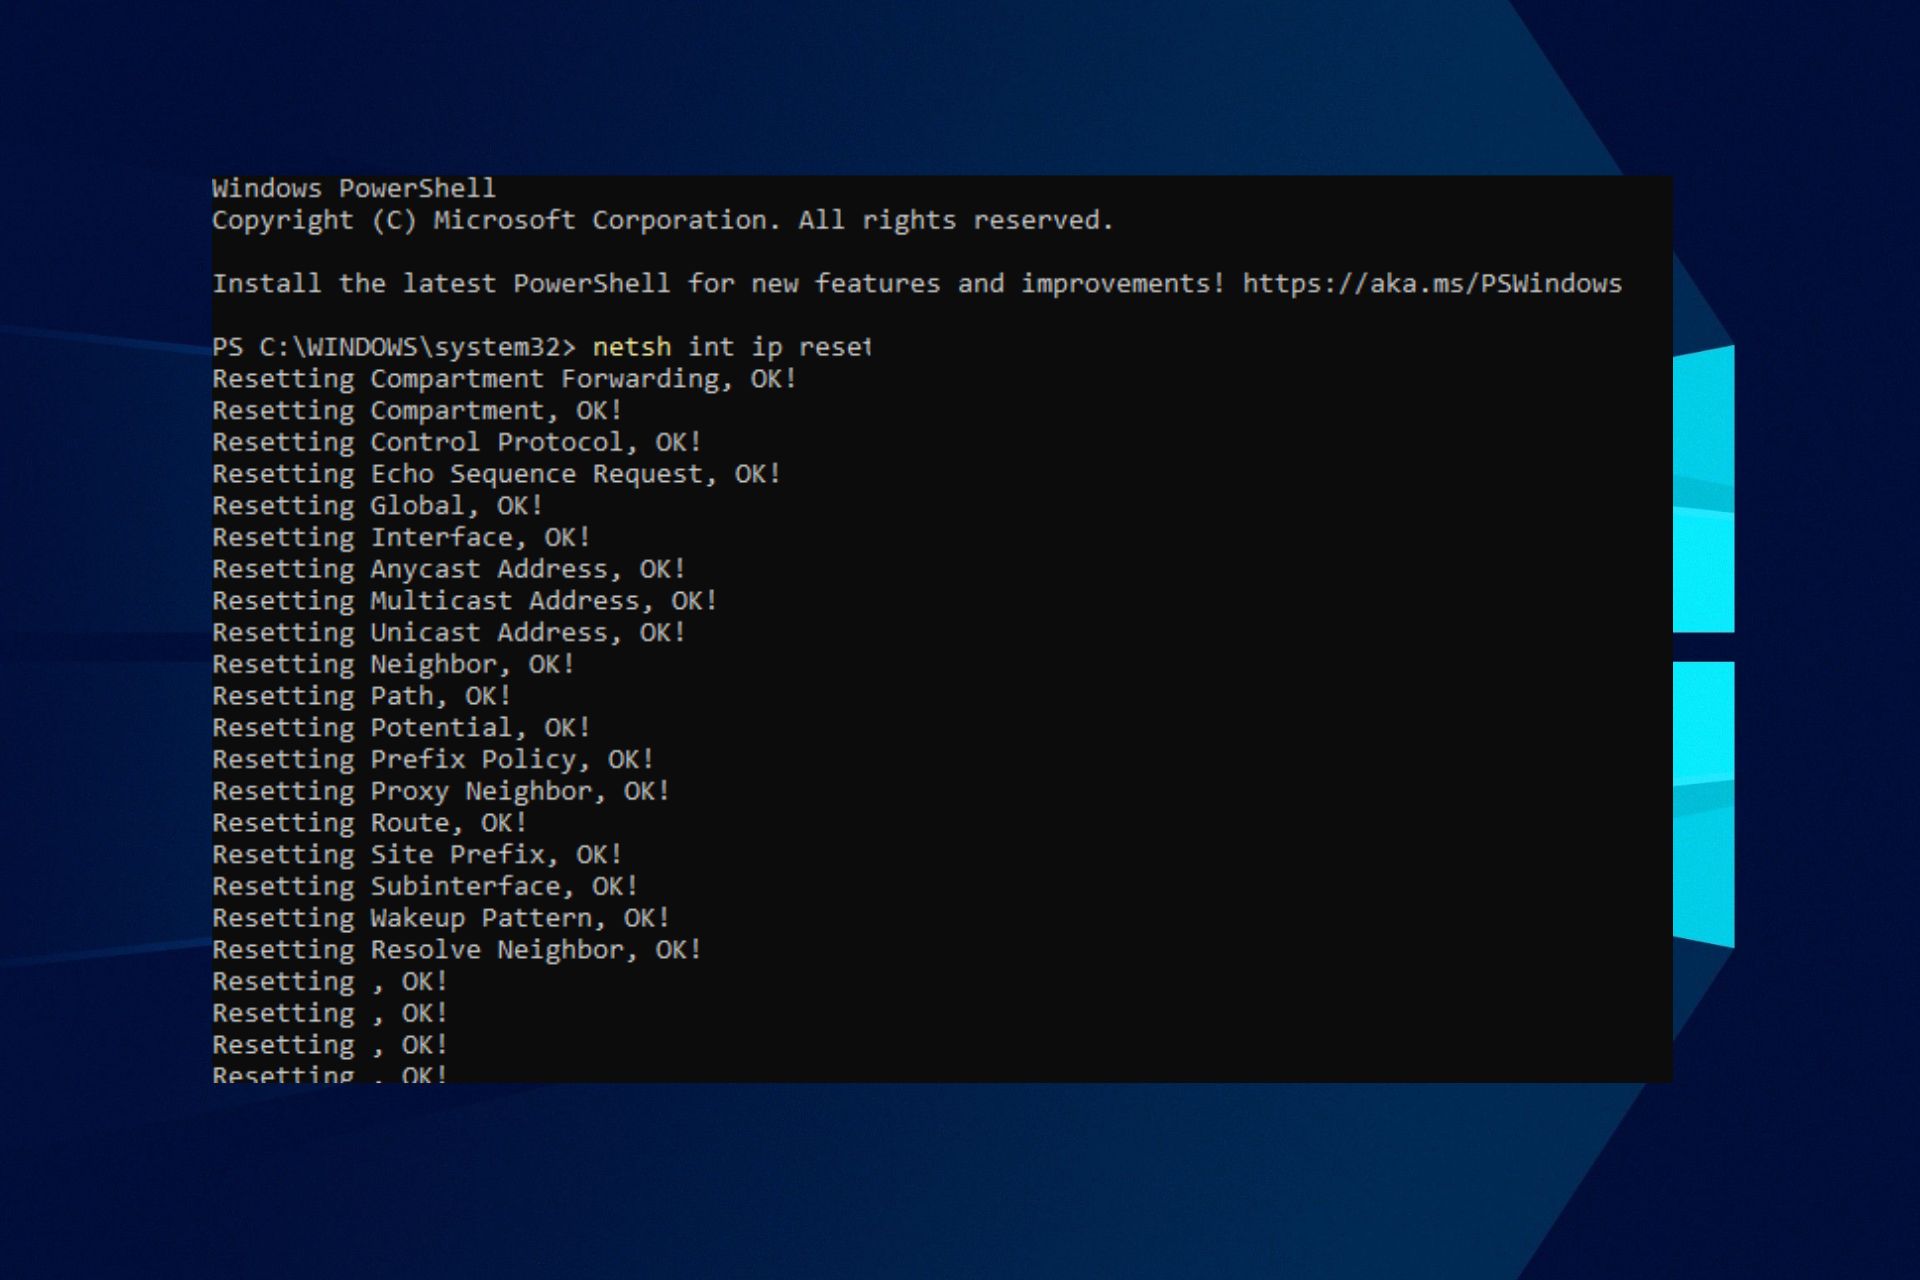
Then, copy and paste the following lines and press Enter: netsh int ip reset
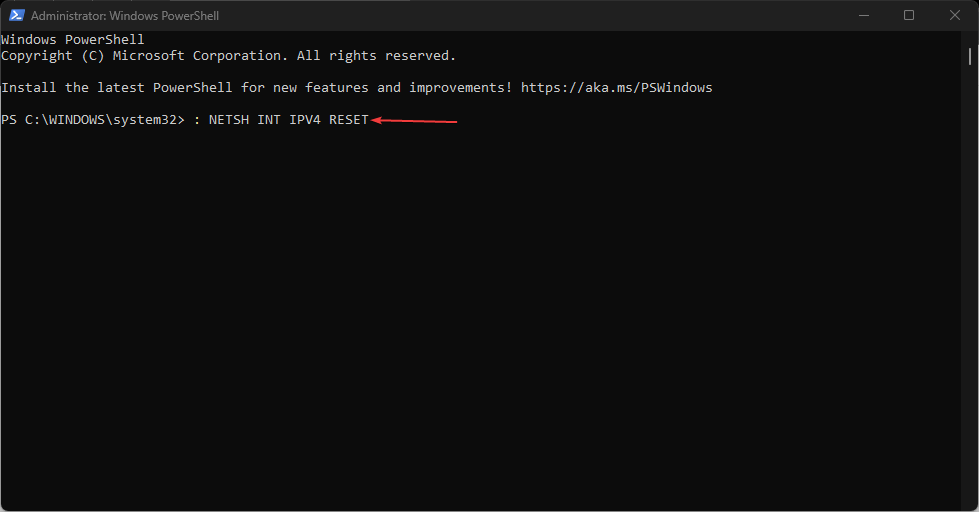
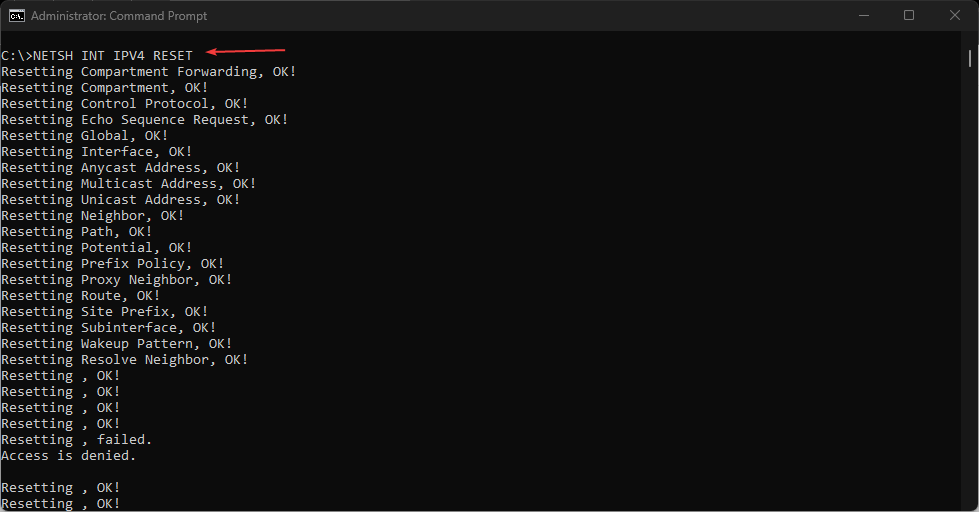
If you’re using IPv4, type the following command and press the Enter key: NETSH INT IPV4 RESET
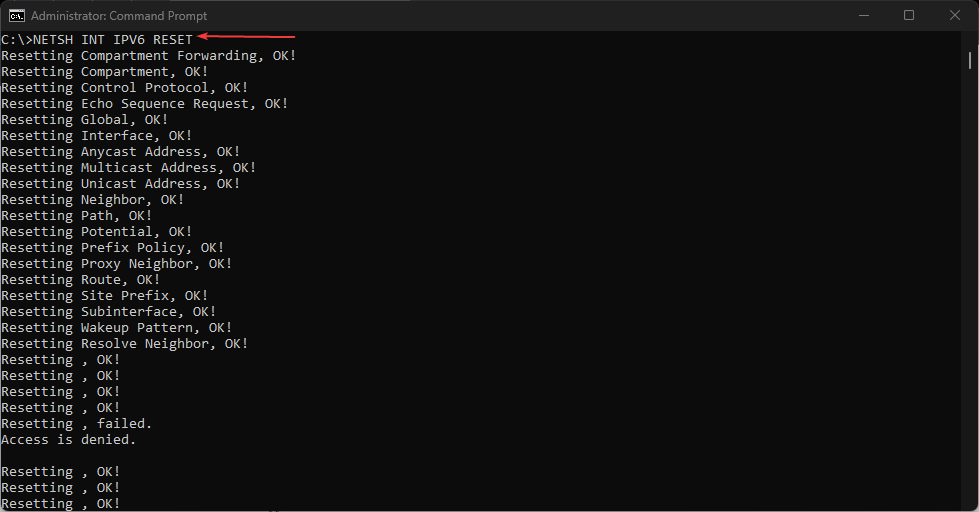
For IPv6 users, type this command and press the Enter key: NETSH INT IPV6 RESET
If the command executes successfully, you should see a repeated result on your screen saying Resetting, OK!
Then, restart your computer to sync the reset process with your network settings.
The above steps will reset the TCP/IP Stacks on your PC.
In conclusion, this guide should help you easily reset TCP/IP Stack on Windows 11. If you have further questions or suggestions concerning this guide, kindly leave them in the comments section.
Several services are running on your computer, ensuring every component works as expected. These services are allocated system resources to help them function. However, users report DsmSvc high CPU usage is causing issues with the system performance.
What is DsmSvc?
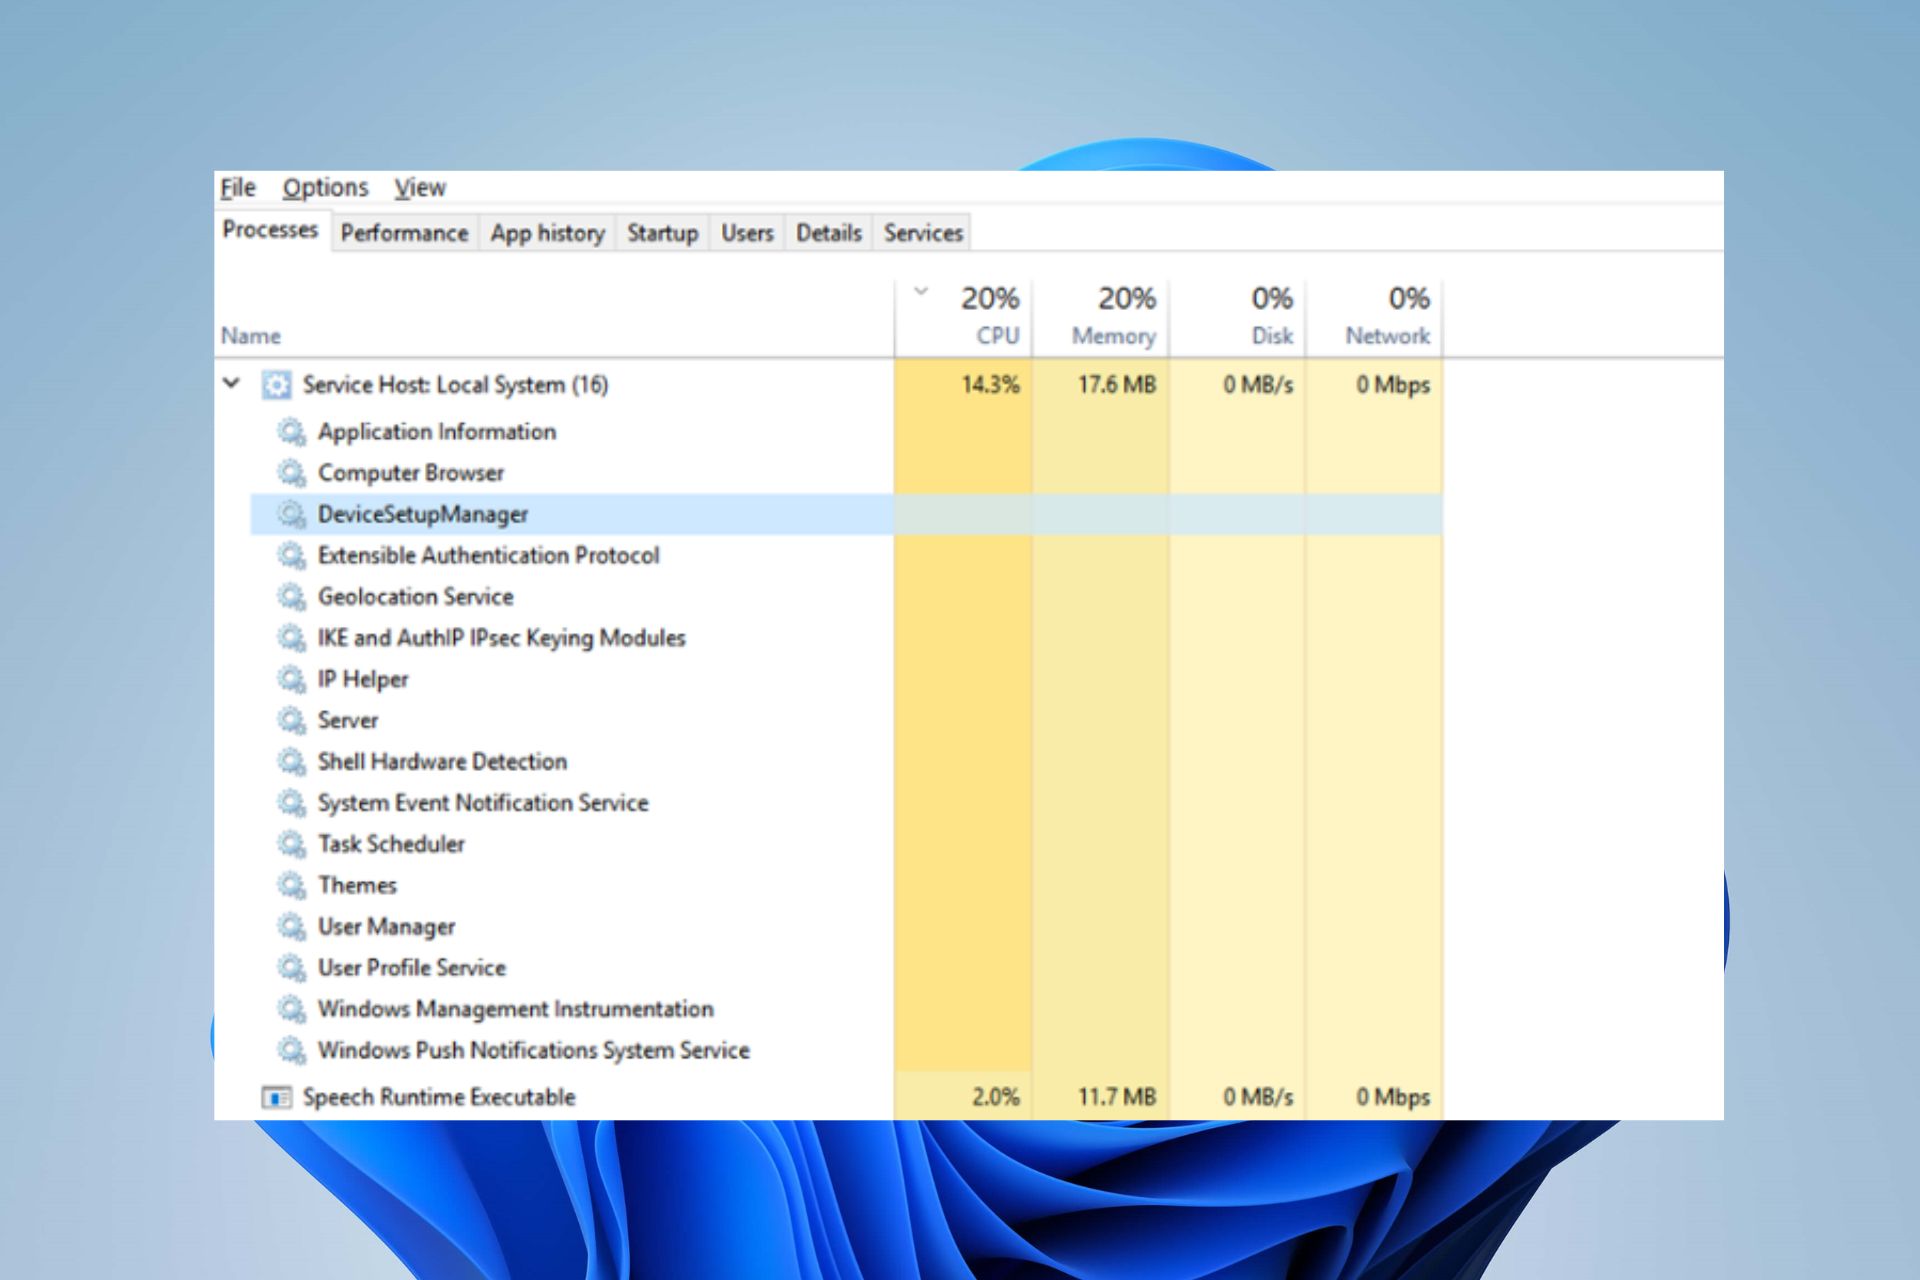
DsmSvc is also known as the Device Setup Manager service. It is a Windows PC service responsible for managing device installation and setup. It ensures devices are installed and configured correctly on the Windows PC.
Why does DsmSvc cause high CPU usage?
DsmSvc high CPU usage causes the system to be slow or laggy and can affect the programs running on the PC. The high CPU usage can occur for reasons such as:
Corrupt system files – When you have corrupt system files on your PC they can cause the services on your PC to malfunction and use more system resources than expected.
Malware and virus infection – If your system gets infected, Device Setup Manager service may use more system resources than allocated.
Issues with DsmSvc – It is possible that the Device Setup Manager service isn’t working correctly on your PC, causing high CPU usage.
If you can fix the issue, go ahead with the steps below.
1. Run the SFC and DISM to repair damaged system files
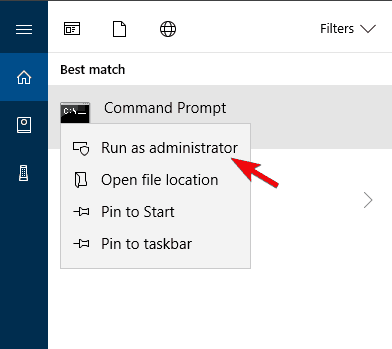
Left-click the Start button, type Command Prompt, and select Run as administrator.
Tap Yes on the User Account Control (UAC) prompt.
Type the following and press Enter: sfc /scannow
Type the following commands and press Enter: DISM /Online /Cleanup-Image /RestoreHealth
Restart your PC and check if the DsmSvc high CPU usage persists.
Running SFC and DISM scans will detect and repair corrupt system files causing DsmSvc high CPU usage on your PC. Check our guide on what to do if Command Prompt keeps crashing on your PC.
2. Run Windows Defender scan
Left-click the Start button, type Windows Security, then click Enter.
Click on Virus & Threat Protection from the menu and tap on Scan Options.
Then Full scan to begin an extensive scan. Click the Scan now button and wait while the scan completes.
Windows Defender scan will find and remove any malware and viruses on your PC that may cause the issue.
Sometimes, not even a full scan with Windows Defender can clean your PC, so we recommend running a full scan with a better third-party antivirus.
Click Run to initiate the Windows Update troubleshooter.
Follow the on-screen prompts and restart your PC afterward.
The troubleshooter will repair update issues causing the DsmSvc service high CPU usage on your PC. If you can’t get through the steps above, check other ways to run the Windows Update troubleshooter in Windows 10/11.
4. Disable the DsmSvc service
Left-click the Start button, type services in the text bar, and launch the Services utility.
Double-click on Device Setup Manager in the list of services.
Go to Startup type, set it to Disabled, and then click Apply to save the changes.
Disabling the DsmSvc service on your PC prevents it from using high system resources. Still, we recommend you only do this temporarily because the service is very important in properly functioning your PC.
In conclusion, fixing DsmSvc high CPU usage is tricky, but with our guide, you should troubleshoot it just fine. If you have further questions or suggestions, kindly leave them below.
Many of our readers encounter issues with their computer’s network connection and find it hard to resolve. A misconfiguration or faulty TCP/IP protocols most likely cause network issues. Hence, it is only reasonable to learn how to reset TCP/IP Stack on Windows 10 as it helps restore it to default settings.
Why do I need to reset the TCP/IP Stack on Windows 10?
All TCP/IP protocols on your PC are stored in a repository known as Stack, allowing the network to run on all protocols. The TCP/IP Stack processes data through layers and organizes the connections between the device and other internet network components.
However, resetting TCP/IP Stack will help with the following:
Improve the interconnection between network devices – Resetting TCP/IP Stack on your PC aids the interconnection between your system and network devices.
Reset TCP/IP Stack to fix network issues – Resetting TCP/IP Stack helps restore the network configuration on your computer and fix connection issues.
Remove faulty IP (Internet Protocol) – When you reset TCP/IP Stack on your computer, it restores Internet Protocol to default, removing faulty protocols and resolving network issues on Windows 10.
Since we have outlined the reasons, let us explore how to reset TCP/IP Stack below.
How can I reset TCP/IP Stack on Windows 10?
1. Through Windows PowerShell
Left-click the Start button, type powershell, and click Run as administrator.
Click Yes on the User Account Control (UAC) prompt.
Copy and paste the following lines of commands and press Enter to initiate them: netsh int ip reset
For users running IPv4, copy and paste the following command and press the Enter key: NETSH INT IPV4 RESET
If you are running IPv6, type this command and press the Enter key: NETSH INT IPV6 RESET
If the command executes successfully, you will see a repeated result on your screen saying Resetting, OK!
Restart your computer to complete the reset process with your network settings.
Running the above commands resets the TCP/IP Stacks on Windows 10 and fixes network problems. You can further enhance connection speed and stability by using the TCP Optimizer tool. It automatically adjusts advanced Internet parameters for smoother performance and reduced latency.
2. Via Command Prompt
Left-click the Start button, type command prompt, and click the Run as administrator option.
Click Yes on the User Account Control prompt.
Then, type the following commands and press Enter: cd\netsh int ip reset c:\resetlog.txt
If you’re using IPv4, type the following command and press the Enter key: NETSH INT IPV4 RESET
IPv6 users, type this command and press the Enter key: NETSH INT IPV6 RESET
Some users have reported that they encounter Discord robot voice when playing games, which is becoming frustrating as it dampens the perfect game experience.
If you are experiencing Discord voice/audio issues, worry less, as we will guide you through simplified, proven fixes for this error.
What causes the Discord robot voice?
In case you’re experiencing Discord voice sounds like a robot, there can be several reasons behind this error. The following are some of the potential reasons reported by some of our readers:
Improper Discord audio Settings – If your Discord audio settings are not correctly configured, you may encounter this issue. Make sure that the default and output devices are correctly set.
Server/Connection issues – You will experience the Discord robot voice issue if your connection to the server is lower than 5 Mbps. Try the fixes in this guide to solve Network congestion problem.
Broken or faulty peripherals – Discord robot voice can be triggered if your headset or microphone has sustained damage. Consider replacing your headset or microphone to see if the error is fixed.
Corrupt drivers – One of the significant reasons behind several audio errors is due to corrupt or missing drivers. Check this guide for ways to troubleshoot outdated driver errors on Windows.
Now that you know some factors responsible for the Discord robot voice, you can fix the problem. This will lead us to provide some solutions to apply in the next section.
How do I fix the Discord Robot Voice?
Consider observing the following preliminary checks before engaging in advanced troubleshooting steps:
If you’re using an external mic, try to connect through other ports.
Make sure your network usage isn’t limited. Restart your router.
Ensure that your audio drivers are up-to-date.
Turn off any interfering third-party voice software.
Restart Discord or your browser.
After confirming the above checks, if the problem persists, you can explore the advanced solutions provided below.
1. Check hardware utilization and end other processes in Task Manager
Right-click on the Start button, then select Task Manager.
Select the Performance tab if any component is hitting close to 100%, then end background apps.
Next, click the Processes tab and search for Discord. Select End task by clicking the application.
You can then relaunch Discord by navigating to its location on your computer’s hard drive.
Restarting your Discord app from your Task Manager should enable you to eliminate some random bugs and fix the error. However, if your Task Manager fails to work, check out our guide to troubleshoot it.
2. Change your Discord server region
Make sure you are the admin of the server. If you’re not, tell the admin to follow these steps on your behalf.
Click on the down arrow beside your server’s name to drop down and select Server settings.
In the server region’s box, select Change.
Next, choose the region you want to connect to. Make sure to select the nearest one to your audience.
Changing the server region may be a great Discord robot voice fix, so make sure to try it out.
Some of our readers have recently requested to know how to recover permanently deleted Google docs. There are possible instances when users later need some documents they had earlier deleted -and, at times, permanently deleted, for that matter.
Worry less; this article has provided some possible steps to recover your Google documents.
Where do permanently deleted documents go on Google Docs?
If you’ve recently deleted a file or folder and are wondering where to recover it, you can check the trash bin in your Google Drive.
Whenever you delete a Google document or file, the deleted file stays in the trash bin for 30 days before it is permanently deleted. Just like when you hide comments in Google Docs, they remain in the Resolved section.
Although Google Drive does not allow users to restore Google Docs that have been permanently deleted after 30 days, such Google Docs can also be recovered from a backup or offline copy, which was possibly once created or edited in the local folder before it was uploaded to Google Drive.
Now that you know where your permanently deleted documents will likely go on Google Docs, the next section will provide simplified steps to recover your files.
How do I recover permanently deleted Google Docs?
Before engaging in advanced troubleshooting steps, you should perform the following preliminary checks:
Perform a scan on the drive for the missing document.
Check to ensure that your data is regularly backed up.
After confirming the above checks and recovering permanently deleted Google docs, you can explore the advanced solutions below.
1. Visit your Google Drive trash folder
Login into your Google account and go to Google Drive by clicking on the Drive icon.
Open your Google Drive app and tap the Menu icon in the top-left corner.
Next, navigate to the Trash option and click on it.
Locate the file that you’ve lost, right-click on it, and select Restore.
This should be your first step when trying to recover your files. Your Google document may be in the trash folder, but if it’s not you can try the next fix.
2. Recover documents as an admin
Sign into your Google Admin console.
Click the Menu icon, go to Directory, and access the Users option.
Select the user that lost their documents, click the drop-down menu, and select Restore data.
However, remember that you need to be the administrator of a Google service to do that. If you work in an organization, ask the administrator to do that for you.
Also, keep in mind that you may only recover the data if they have been deleted within 30 days.
3. Recover your locally saved files
Left-click the Start menu, type restore files and hit Enter.
Then find the Google docs in the folder where you stored the files.
Click on Restore button to recover permanently deleted Google Docs on Windows.
Another way to restore your Google docs is by checking your computer for files automatically synced while configuring it.
One of the backup services offered by the G-suite that can enable you to recover your lost files is Google Takeout. Aside from this, you can also use third-party backup apps.
And that’s it! Ensure you work your way through the provided fixes one after the other to know which works for you.
Ddraw.dll is a Dynamic-Link Library file that DirectX needs for 2D graphics. It is a shared system file that is essential for multimedia software. If that file gets deleted or corrupted, you will encounter a missing ddraw.dll error code and software issues.
Some common DLL issues will return an error message stating, This application can’t start because ddraw.dll is missing from your computer.
This guide will explore possible causes for these errors and the most effective fixes.
What causes the ddraw.dll error code?
The ddraw.dll error code typically occurs when there is a problem with your computer’s Microsoft DirectX software component. DirectX is a set of APIs (application programming interfaces) allowing developers to create multimedia applications for Windows-based operating systems, such as games, video players, and graphic design software.
The ddraw.dll error code can be caused by a variety of issues, including:
Malware or virus infection – Malicious software can infect and damage system files, including ddraw.dll, causing errors.
Hardware issues – Issues with your computer’s hardware, such as a faulty RAm or failing hard drive, can cause the ddraw.dll error code.
Registry problems – The registry database stores configuration settings for your computer and applications. If there are issues with the registry, it can cause errors with system files like ddraw.dll.
Software conflicts – Conflicts between software programs installed on your computer can cause errors with system files like ddraw.dll.
What does Ddraw dll do?
Ddraw.dll is a dynamic link library file part of the DirectX software component for Windows-based operating systems.
Ddraw.dll specifically provides the DirectDraw API, which handles 2D graphics rendering, including image manipulation, display, and scaling. In addition, DirectDraw provides a high-performance interface between an application and the display device, allowing applications to access hardware acceleration features for improved performance.
In addition to DirectDraw, DirectX also includes other APIs for handling 3D graphics rendering (Direct3D), audio playback (DirectSound), input device management (DirectInput), and other multimedia functions.
Ddraw.dll is just one component of the larger DirectX software package and is crucial for many multimedia applications to function correctly on Windows-based computers.
How can I fix the ddraw.dll error code?
1. Run a third-party DLL fixer
A great solution for solving the ddraw.dll error code is to use a specialized repair tool that can help you address various computer issues promptly.
For example, you can use it for DLL errors, BSoD problems, or when your computer often freezes.
2. Run a System File Checker scan
PressWindows + Sto open the Windows Search bar.
Typecmd, right-click on Command Prompt, and Run as administrator.
Next, enter the command below and press the Enter key: DISM.exe /Online /Cleanup-image /Restorehealth
Also, type in the script below and hit Enter. sfc /scannow
The SFC scan could take up to half an hour. Restart Windows if the WRP does repair some files.
Note: If malware has indeed corrupted the ddraw file, the System File Checker might also repair it. The tool will scan system files and replace any corrupted ones with a cached copy.
3. Scan for malware
Type Windows Security in the Search bar, and click on the relevant search result.
Now, click on Virus & threat protection here.
Click on Scan options.
Select Full scan and click the Scan now button at the bottom.
DLL files are a frequent target for malware. As such, malware might be responsible for the missing ddraw.dll error. To purge malware from Windows, add an antivirus utility to the OS.
Hence, we advise you to download one of the top picks for security software and get excellent security against all threats, including malware, ransomware, and phishing attacks. In addition, you will have a constantly updated threat database, ensuring a high detection rate.
As a result of protecting your PC with such tools, you’re completely secured against complex malware or damaged system files compromised by viruses. Plus, you benefit from high data encryption so all your DLL files are safe.
4. Re-register the ddraw file
PressWindows + Sto open the Windows Search bar.
Typecmd, right-click on Command Prompt, and Run as administrator.
Enter the script below and hit Enter. regsvr32 /u ddraw.dll
Then input the following script and once again hit Enter. regsvr32 ddraw.dll
Regsvr32 is another Windows tool that can come in handy for fixing DLL errors. For example, it might be the case that the ddraw file has broken registry references, which regsvr32 can fix.
Open CCleaner’s installer to add the utility software to Windows.
Click the CCleaner icon to open the software’s window.
Click Registry.
Select Missing Shared DLLs and all the other checkboxes for the most thorough scan, then click the Scan for Issues option to scan for registry issues.
Then press the Fix selected issues button to repair the registry entries listed.
A dialog box opens that asks to back up the registry. Click Yes to create a backup, choose a folder for the file, and press the Save button.
Then press the Fix All Selected Issues button to give further confirmation to repair the registry.
The registry can often be the source of DLL file errors. For example, it might be the case that there are invalid registry entries for ddraw.dll. You can scan and repair registry entries with the most efficient third-party utility software.
6. Reinstall the software
Open Run by pressing the Win + R hotkey.
Enter appwiz.cpl in Run and press Enter to open the Control Panel.
Select the program that’s returning the DLL error.
Press the Uninstall button to remove the program.
Click Yes on the Programs and Features dialog box to confirm you’re sure about removing the software.
After that, reinstall the program with its setup wizard.
Reinstalling the software could fix the issue if one specific program returns the missing ddraw.dll error. The missing DLL error message also suggests that you reinstall the program.
Choose between the 64-bit and 32-bit architectures.
Unzip the file and move the ddraw.dll to the folder: C:WindowsSystem32
You might also need to register the ddraw file by entering regsvr32 ddraw.dll in the Command Prompt.
8. Rollback Windows
Press Windows + R, type rstrui, and hit Enter.
Click the Next button.
Select a restore point that predates the missing ddraw error and click Next.
Press the Scan for affected programs button to check what software will be lost after restoring Windows. That option will open the window below, showing you the software added after the restored point.
Press the Next button, and click the Finish and Yes options to confirm your selected system restore point.
System Restore provides one of the best fixes for DLL errors. This will undo changes made to system files and roll the registry settings back to a selected restore point date.
Those are some of the best remedies for the missing ddraw.dll issue. Aside from those resolutions, DLL fixer software such as DLL Suite, DLL Tool, and DLL-files Fixer might also resolve the issue.
We are curious to know what was most effective for you. So please leave us a message in the comments section below.
If you’ve been playing Lost Ark since it came out in 2019, you have a general idea of what users had to go through. And given that you went through all those errors and bugs and still find it within you to keep playing, it is an excellent title.
But even though developers constantly put in the work to keep the game playable and error-free, sometimes glitches find their way into our game and completely ruin everything.
Luckily, even though Smilegate has yet to release a fix for this error, Lost Ark players found some workarounds that will keep this issue at bay until an official solution is provided.
What causes Lost Ark w0x2-0pelpwn1n2nt error?
Several different factors can cause the w0x2-0pelpwn1n2nt error in Lost Ark. Here are a few possible reasons why you might be experiencing this error:
Server issues – Lost Ark is an online game, and if the game servers are experiencing problems or are down for maintenance, you may encounter the w0x2-0pelpwn1n2nt error.
Third-party software conflicts – Sometimes, other programs running on your computer can interfere with Lost Ark and cause the w0x2-0pelpwn1n2nt error. For example, antivirus software, firewalls, or other security software can sometimes cause conflicts.
Outdated drivers – If your computer’s drivers (especially your graphics card drivers) need to be updated, you may encounter issues with Lost Ark and see the w0x2-0pelpwn1n2nt error.
Corrupted game files – If corrupted game files are in your Lost Ark installation, this can also cause the w0x2-0pelpwn1n2nt error.
If you’re experiencing the error in Lost Ark, you can try a few things to resolve the issue. We have the most effective solutions listed below.
How can I fix the W0x2-0PELPWN1N2NT error?
Before trying any fixes, ensure you have a working internet connection. This is because a weak internet is often a trigger for this problem.
You should also check the server status because the error may result from a down server.
1. Run a Steam Integrity Check
Launch the Steam app.
Click on Library.
Right-click on the Lost Ark game and select Properties.
Select the Local Files tab, then Verify integrity of game files.
2. Use a VPN
Using a VPN can help with the Lost Ark W0x2-0PELPWN1N2NT Error by providing a new IP address and allowing you to bypass any network restrictions or limitations that may be causing the error.
Our recommendation is to try ExpressVPN which has a large number of servers around the world and has proven to be a safe and reliable VPN.
Here’s how you can easily get the ExpressVPN service:
Press Windows + R, type msconfig, and hit the Enter key. This will open the System Configuration window.
Click the Services tab, tick the Hide all Microsoft services option, and click on the Disable all button.
Next, click on the Startup tab, and select Open Task Manager.
Click on each startup item in the Task Manager window and select Disable.
Close the Task Manager window and go back to the System Configuration window.
Click on OK and then click on Restart.
Through these steps, Lost Ark users have indicated that the W0x2-0PELPWN1N2NTerror was fixed, and they could resume playing.
It will probably be a little while until Smilegate figures out how to solve this issue and provide availability for a patch permanently.
Until then, though, these workarounds should do, and we hope one is perfect for your situation.
Keep in mind that Lost Ark players are also dealing with Authentication Error 10010, and most also want to switch servers, so you should have a quick look into that.
Which steps above did the trick for you when dealing with this error? Let us know in the comments section below.
An updated Steam VR is the ultimate tool for experiencing VR content on your PC. However, updating the tool is easier said than done, as evident by numerous queries on how to go about it.
This guide will show quick and easy ways to update the tool without encountering common SteamVR errors.
Launch Steam VR and click the three horizontal lines.
Click the Devices option.
Finally, select the Update Firmware.
Suppose you want to update the Steam VR devices firmware software. The steps above are the most straightforward route to do so. With this, your device will always run smoothly.
We have reached the end of this guide on updating Steam VR. You are now equipped with the correct information to get the best virtual reality experience possible on your PC.
Many people report that their external drives don’t work on Windows 10 when using a Sabrent USB 3.0 to SATA/IDE adapter.
While this issue can be due to various factors, it is not the most difficult to fix, as shown in this guide.
Why is my USB SATA drive not detected?
Listed below are some of the prevalent causes of the Sabrent SATA to USB not working issue:
Connection issues: Sometimes, the USB to SATA adapter is not recognized on Windows 10 issue can be caused by a bad physical connection. You need to check the ports and cable and try to connect the adapter to another PC to fix the issue.
Insufficient power: In some cases, the SATA to USB adapter might not be showing up because the cable you are using for the connection is not supplying enough power. It would be best if you used the power cable that came with Sabarent SATA to restore normalcy.
What can I do if Sabrent SATA to USB is not working?
Below are some preliminary troubleshooting steps to try before exploring sophisticated solutions:
Connect to another port.
Connect the adapter to an older PC like Windows 7
1. Check the drive connection
One of the most common causes of the Sabrent USB 3.0 SATA HDD docking station not working is a bad physical connection.
To rule out this cause, it’s recommended to check if the USB port or the USB cable function as it should.
Check the USB cable and also search for a light indicator that will let you know the hard drive is working,
Additionally, you can check and see if the USB port on your computer is not by any chance damaged by unplugging the drive and using it on a different device or port on the same PC.
Press the Windows key + X and select the Device Manager option.
Click the View tab at the top and select Show hidden devices.
Now, double-click the Universal Series Bus controllers option to expand it.
Right-click the USB Attached SCSI (UAS) Mass Storage Device option and choose Update driver.
Next, select Browse my computer for drivers.
Choose Let me pick from a list of available drivers on my computer.
Finally, choose USB Mass Storage Device and click Next.
The Sabrent SATA to USB not working issue can sometimes be caused by an outdated or incompatible driver. To fix this, you should use the default drivers that came with your PC.
To make things easier, however, we recommend using a third-party driver updater such as Fortect Driver Updater.
Using this driver manager tool, you can access the online database containing thousands of authorized drivers ready to be installed for your devices.
It would be best if you thus benefited from this automated support to update, install, or fix any drivers with their latest versions in no time.
If the above steps did not help you solve the problem, we recommend you use the power supply module that came with the Sabrent unit.
The HDD you’ve prepared may have more power than can be supplied by a USB3 port. However, a USB3 port can only supply up to 0.9 amps.
It is usually indicated that an HDD needs 1 amp to start up and over 2 amps for reading and writing, which could be why you should use the power supply unit Sabrent came with.
That is all you should do to fix the Sabrent SATA to USB adapter not working issue. If you need a list of the best USB 3.0 external hard drive enclosures you can use, check our carefully-curated picks.
In the comments below, let us know the solution that helped you fix this issue.
Sometimes you might encounter There was an error opening this document access denied message. This issue can be pretty annoying since you won’t be able to view the desired document, but there’s a way to fix it.
This guide has gathered the best solutions to help you get your favorite PDF reader working as it should.
Why am I getting There was an error opening this document message?
There are a series of factors that can cause There was an error opening this document error message. Below are some of the notable ones:
Outdated app: Sometimes, you get There was an error opening this document; an updated version of Acrobat is needed prompt. This implies that your PDF reader is outdated and needs updating.
Security settings: The Adobe Reader has a Protected Mode enabled by default. This can prevent you from opening some old files.
Interference from antivirus software: Sometimes, your third-party antivirus software might flag the file you are trying to open. The solution is to disable the software temporarily if you trust the file.
Speaking of this issue, below are some of its variations, as reported by users:
Adobe Reader access denied when opening PDF: This issue can occur if Protected Mode is enabled in Adobe Reader. Simply disable this feature, and the problem should be gone.
There was an error opening this document there was a problem reading this document(57): This problem can occur due to your antivirus software, but you can fix the problem by disabling your antivirus temporarily.
Acrobat Reader DC there was an error opening this document. access denied: This issue can sometimes appear in Acrobat Reader DC. To fix the problem, update your reader to the latest version and check if that helps.
How do I fix There was an error opening this document?
Listed below are some troubleshooting steps to try before proceeding to the solutions in this section:
Rename long filenames to something shorter
Move the PDF file to a different directory
Save the PDF from your email and open it on your PC
If this does not solve the issue, you can delve into the fixes below:
1. Disable Protected Mode in Adobe Reader
Launch Adobe Reader and click the Edit tab at the top.
Select Preferences.
Now, choose Security (Enhanced).
Finally, uncheck the Enable protected mode at startup (Preview) checkbox.
According to users, There was an error opening this document access denied can appear in Adobe Reader when trying to view certain PDF documents. The Protected Mode mode in Adobe Reader usually causes this issue.
This can be useful since some PDF documents might be malicious. Therefore it’s good to have this feature enabled. But in this case, you need to disable it temporarily to get past this error.
2. Update Adobe Reader
Launch Adobe Reader and click the Help tab.
Select Check for updates.
Finally, click the Download and Install button if an update is available.
Sometimes, There was an error opening this document this file cannot be found caused by an outdated app. You can check for and install updates within the Adobe Acrobat app.
3. Reinstall Adobe Reader
Press the Windows key + R, type appwiz.cpl, and click OK.
Right the Adobe Acrobat Reader option and select Uninstall.
Now, follow the onscreen instructions to complete the process.
Sometimes There was an error opening this document access denied can appear if your Adobe Reader installation is corrupted. In this case, you should uninstall and reinstall the app.
If you want to uninstall an application for good and remove all its files and registry entries, we suggest using dedicated software such as CCleaner.
Using this software, you can uninstall and then delete registry entries associated with Adobe Reader, so it will be as if the application was never installed.
Launch Adobe Acrobat and click Edit > Preferences.
Select Security (Enhanced).
Now, choose Privileged Location.
Select Add Folder Path.
Finally, please navigate to the folder with the file you are trying to open, select it, and click OK.
If you are getting Adobe Reader – there was an error opening this document. Although the path does not exist error message, you can add the folder path as a privileged location. With this, you should be able to access the files in that folder.
6. Try out a different PDF reader
If you keep getting There was an error opening this document access denied in Adobe Reader; you should consider switching to a different PDF reader.
There are many great PDF readers besides Adobe Reader, and if you’re looking for a new tool for reading PDF files, we strongly suggest you try out Icecream PDF Editor.
It is lightweight and fast, but most importantly, it is very good at doing the job it was designed to do, which is pretty much all that matters.
This PDF reader is straightforward, providing a similar user experience to Adobe, making the transition smooth. Plus, it includes intuitive editing tools to manage everything PDF-related from one place.
With this, we can end this detailed guide on fixing There was an error opening this document error message. You should now be able to get rid of the message for good if you follow the steps in this guide carefully.
All sorts of errors can appear on your PC, but one of the most annoying ones is Windows Shell Common Dll has stopped working.
This error can prevent you from using standard Windows features and be problematic. So, in this article, keep reading to find additional solutions for this error.
Why does Windows Shell Common DLL has stopped working message appear?
Below are some of the factors that can cause the Windows Shell Common DLL error on your PC:
Faulty drivers: If the Windows Shell Common DLL stopped working while using your recording devices or microphone, it might be because of faulty audio drivers. You need to reinstall or update your driver to solve the problem.
Interference from third-party apps: Sometimes, this issue can be down to an app running a counter program to the software you are trying to open. This is especially true if you are getting the Windows Shell Common DLL has stopped working error on Outlook 2016 or 2013.
Faulty system files: Sometimes, this issue might be because some of your files are broken or missing. Repairing and restoring these files should restore normalcy.
Outdated PC: An outdated PC can cause several issues, including this DLL problem. Hence, you need to update your operating system.
How can I fix Windows Shell Common DLL has stopped working error?
Listed below are some of the preliminary troubleshooting steps to try before exploring the more sophisticated solutions:
If these steps do not fix the issue, proceed to the solutions below:
1. Reinstall your audio drivers
Press the Windows key + X and choose Device Manager.
Double-click the Sound, video and game controllers option to expand it and right-click the High Definition Audio Device.
Now, choose Uninstall device.
Check the box for Remove driver software for this device if available and click the Uninstall button.
Finally, restart your PC, and Windows will automatically reinstall the driver.
According to users, they managed to fix the Windows Shell Common Dll has stopped working error simply by reinstalling their audio drivers. However, your drivers can be buggy, and that can cause this error to appear.
To keep your drivers up to date at all times, we advise using specialized driver updater software such as Outbyte Driver Updater.
2. Uninstall Synaptics driver
Launch Device Manager.
Expand the Mice and other pointing devices option and right-click the Synaptics Touchpad.
Now, select Uninstall device.
Finally, click the Uninstall button to confirm the action.
According to users, Windows Shell Common Dll has stopped working error can appear due to Intellipoint software and Synaptics driver.
These two aren’t compatible, and to fix the problem, you need to remove one or both from your PC.
3. Repair system files
Press the Windows key + S, type cmd, and choose Run as administrator under Command Prompt.
Type the command below and hit Enter to run it: sfc /scannow
Finally, wait for the command to finish running and restart your PC.
Sometimes this error can appear if your system files are corrupted. File corruption can occur for various reasons, but you should be able to fix it by performing an SFC scan.
Once the scan is completed, check if the problem still appears. If the issue isn’t resolved or you can’t run an SFC scan, you might have to use a DISM scan instead.
However, if you want to effortlessly fix Windows Shell Common DLL issues, the simplest and fastest way would be to use a third-party DLL fixer.
4. Change the security permissions of the UserChoice key
Press the Windows key + R, type regedit, and click OK.
When Registry Editor opens, navigate to the path below in the left pane: ComputerHKEY_CURRENT_USERSoftwareMicrosoftWindowsCurrentVersionExplorerFileExts.txtUserChoice
Now right-click the UserChoice key and choose Permissions from the menu.
If Group or user names section is empty, your security permissions are missing, so you’ll need to add them again. This solution won’t apply to you if security permissions aren’t missing. So you can skip it.
To add missing permissions, click the Add button.
In Enter the object names to select field, enter Administrators, and click on Check Names.
If everything is in order, click on OK.
The Administrators group will be added to the Group or user names list.
Next, select Administrators from the list and check Full Control in the Allow column.
Finally, click Apply and OK to save changes.
Optional: Following the steps above, you might have to add SYSTEM, RESTRICTED, and your user name to the list.
Users reported Windows Shell Common Dll has stopped working error while trying to open .txt files on their PC.
After changing the security settings for the UserChoice key, the problem should be resolved entirely. However, remember that this solution applies only if this error appears while trying to open .txt files.
5. Copy necessary files to the System32 directory
Launch File Explorer and navigate to the following directory: C:WindowsSystem32
Locate joy.cpl and copy it to your Desktop.
Right-click joy.cpl and choose Properties from the menu.
Navigate to the Security tab and click on Advanced.
Locate the Owner section and click on Change.
Now, enter your username in the Enter the object name to select and click on Check Names.
If everything is in order, click on OK to save changes.
After doing that, click Apply and OK to save changes.
After taking ownership of joy.cpl, you can now delete it.
Once you delete the file, go to the following directory: C:WindowsSysWOW64
Locate joy.cpl and copy it to C:WindowsSystem32
Once you copy the file, the problem should be resolved, and you can access gamepad settings from Windows without any issues.
According to users, Windows Shell Common Dll is not responding error appears while trying to configure gamepad settings.
To fix the problem, copy a single file to your System32 directory, as we showed you above.
6. Disable the Hardware graphics accelerator in Office
Open Outlook or any other Office application.
Choose File > Options.
Now, select Advanced.
Finally, locate and disable the Hardware graphics accelerator option.
Windows Shell Common Dll is not responding error can affect almost any application, and Outlook is no exception. However, you can fix this problem simply by disabling the Hardware graphics accelerator.
After you disable this feature, the error message should stop appearing, and you’ll be able to use Outlook without any problems.
7. Configure Windows to accept certificates
Press the Windows key + S, type powershell, and select Run as administrator under Windows PowerShell.
Type the command below and hit Enter to run it: Set-ExecutionPolicy -ExecutionPolicy Unrestricted -Scope CurrentUser
The Windows Shell Common Dll is not responding error can appear because Windows isn’t configured to accept certificates. However, you can quickly fix this problem by using PowerShell.
8. Use System Maintenance
Press the Windows key + R and type the command below: %systemroot%system32msdt.exe -id MaintenanceDiagnostic
Now, click OK to run it.
The System Maintenance tool will now appear. Click on Next to continue and follow the instructions on the screen.
Few users claim they fixed the problem simply by running System Maintenance Troubleshooter. However, this is a built-in tool, and it can sometimes fix various issues with Windows.
9. Re-register your DLLs
Open Command Prompt as administrator.
Type the command below and hit Enter to run it: regsvr32 /i shell32.dll
Then, finally, wait for the command to finish running.
If you’re getting Windows Shell Common Dll has stopped working error message, the cause can sometimes be your DLL files, specifically shell32.dll.
This can be because the DLL files became unregistered for some unknown reason. To fix this problem, you have to re-register shell32.dll.
Press the Windows key + R, type msconfig, and click OK.
Select the Services tab, check the box for Hide all Microsoft services, and click Disable all.
Navigate to the Startup tab and click on Open Task Manager.
Right-click each of the apps there and choose Disable from the menu.
Afterward, return to the System Configuration window and click Apply and OK.
Finally, restart your PC.
If Windows Shell Common Dll has stopped working error message frequently appears on your PC, a third-party application may be causing it.
So, you need to perform a clean boot to start your PC with the required services and processes. If this solves the problem, you must enable the apps and services in batches to know the faulty ones.
11. Install the latest Windows updates
Press the Windows key + I to open the Settings app and select Update & security section.
Now, click the Check for updates button.
Finally, download and install any available updates.
After you download the updates, they’ll be installed automatically once you restart your PC. According to users, you might be able to fix this problem simply by installing the latest Windows updates.
We have come to the end of this detailed guide on fixing the Windows Shell Common DLL has stopped working issue. You should now be able to solve the problem if you follow the steps therein carefully.
First of all, Avast’s high CPU usage should be normal because the program can consume considerable resources while it’s scanning your system.
However, sometimes, it can be problematic because you get an error saying Avast service 32 bit high CPU even when Avast is idle.
Don’t uninstall Avast just yet before troubleshooting it with these solutions to fix Avast if the antivirus is using too much CPU resources.
Why is Avast using so much CPU?
Some of the main reasons for Avast using so much CPU are background virus scans as well as cleanup. All antivirus software does this, but the degree of usage varies.
How can I lower the Avast high CPU usage?
1. Uninstall the Avast Cleanup tool
Launch Avast on your computer.
In the Avast interface, click Menu and open Settings.
Next, navigate to Components on the left sidebar.
To remove Avast Cleanup, click on the downward-facing arrow beside the Components tab and hit uninstall component.
After that, confirm the operation by clicking on the OK button at the bottom of the page.
Finally, restart your computer.
When you successfully uninstall the Avast Cleanup tool, you should no longer get the Avast.exe high CPU problem. Otherwise, continue to the next solution.
2. Update Avast
Open Avast on your computer.
Next, click on Settings and select Menu from the dropdown list.
In the menu, navigate to the General tab and choose Update to the right of the page.
Now, what you want to do here is update the database, as well as Avast itself. On this page are two Check for Updates buttons for updating both.
If the virus definitions or application is not up to date, begin the update, and on completion, the update should clear the avastsvc.exe high CPU usage error.
Updating Avast and its virus definitions can definitely solve this problem so make sure you try it. It certainly can’t do any harm, that’s for sure.
3. Fix Avast service high CPU by editing avast5.ini
Next, navigate to the following location C:ProgramDataAvastSoftwareAvast
Next, from the Avast folder, open the file called avast5.ini and add the following line to the end of the file: [GrimeFighter] : ScanFrequency=999
Finally, save the avast5.ini file and then reboot your machine.
4. Repair the Avast program
Type control panel in Windows search and open Control Panel from the results.
Switch to the Category view of Control Panel by selecting it from the top right-hand corner, and then select Uninstall a Program in the Programs category.
Scroll down this list and locate Avast. Right-click on the Avast program and hit Change.
Next, you will see the Avast uninstallation wizard screen showing three options – Update, Repair, and Modify. Select Repair and hit Next.
Follow through with the wizard, and at the end, Avast will restart with the Avast high CPU usage fixed.
Repairing the Avast app can fix this high CPU usage problem and will improve the overall functionality of the app so try this without hesitation.
5. Stop Avast Screensaver scanning
On your computer, get any file at all and right-click on it. Next, from the options, click Scan selected items for viruses to scan this file with Avast.
On selecting to scan the file, Avast will display the result of the process after a while. Here also, you will see the results of other running scan operations.
Next, look for the Avast Screensaver scan and then hit Stop to end the process.
When the Avast service high CPU occurs, it hampers the performance of your PC and can cause overheating or similar issues. Some files like avastvboxsvc.exe can also consume system resources and slow down your PC.
For more options to pick from, you should also check out these best antiviruses with lifetime license so that you don’t need to constantly renew the agreement.
Hopefully, the solutions on this page have helped you fix the Avast antivirus engine server high CPU issue. Did it work? Let us know in the comments below.
We all experience computer errors from time to time, and some Windows 10 users have reported the Kernel Power 41 error on their devices. You might also get the 0x8000400000000002 error code with it, and face random restart issues.
The error comes with the following message: The system has rebooted without cleanly shutting down first. This error could be caused if the system stopped responding, crashed, or lost power unexpectedly. Let’s find out how to fix things!
Why does the Kernel Power 41 black screen appear?
The reasons behind this problem are vast, but we will highlight some main ones. We are firstly referring to improper shutdown – if this error appears right after a crash, clearly, the system failed to initialize some important components.
Here are some more variations and causes of the Kernel Power 41 problem:
Kernel Power 41 after sleep mode – If there are any errors with your power settings or a delayed Windows update that’s not properly installed, the error can happen after sleep or hibernation.
Kernel Power error when playing games – Some games are pretty resource-demanding. That’s why you can bump into kernel-power 41 (63) on Windows 10 while gaming.
Kernel Power 41 in Windows 7 – Although we’re talking about Windows 10 here, Kernel Power 41 is error is also common in Windows 7. Either way, you can use most solutions from this article.
Kernel Power event 41 task 63 in Windows 10 – Another variation of the Kernel Power 41 error.
Kernel Power 41 when using a Windows 10 laptop – This error is equally common on Windows PC and laptops.
BSOD 0x8000400000000002 – Kernel Power 41 error usually causes a BSOD followed by the 0x8000400000000002 error code.
Now that we know the reasons behind this issue and its possible iterations, let’s start fixing it.
How can I fix the Kernel Power 41 error on Windows 10?
Before getting into the actual tweaks, let’s go through some simple checks that might fix the problem quickly:
Check for any drivers that display a yellow exclamation mark in Device Manager. Just like with the Kernel Security Check Failure error, it’s recommended to make sure that your drivers are OK, and the exclamation mark to their right signals a possible problem.
Make sure that your Windows OS is updated.
Restart your PC. The system may recover without any intervention whatsoever.
Check your hardware for any damage and see if the fans inside the PC are working properly. This error may be triggered by hardware failure or overheating. If so, stop your machine and make the necessary repairs ASAP.
If you crosscheck the critical steps above, let’s fix this problem by using the solutions below.
1. Update your drivers
Right-click the Start button and select Device Manager.
Expand the sections one by one, and look if any of the drivers have an exclamation mark to their right.
Right-click the driver and select Update driver.
In the next window choose theSearch automatically for drivers option.
The system will look for any updates and install it.
If the problem still persists, instead of updating the driver in step 3, select Uninstall device.
Reboot your PC and the system will detect the device and install a generic driver for it.
If that doesn’t work either, go to the manufacturer’s website and download the driver for your OS.
Perform this solution especially for the audio and graphics drivers as they are the most prone to producing this error.
The kernel-power 41 (63) Windows 10 error is sometimes caused by outdated drivers, and if you want to fix it, make sure that you have the latest drivers installed.
You must keep your graphics drivers updated as it is known to prevent all the issues like LiveKernelEvent 144.
If you do not have the necessary computer skills to update/fix the drivers manually, we strongly suggest doing it automatically by using a third-party tool.
With a tool such as Fortect Driver Updater, you can scan for and update all your drivers. plus, this software will notify you when drivers go out of date, so you will never have to worry about this issue again.
Right-click the Start button and choose Device Manager from the menu.
When Device Manager opens, locate your audio drivers in the Sound, video and game controllers section.
If you see duplicate entries, right-click one of those duplicates and choose Disable device from the menu.
We already mentioned that Kernel Power 41 errors can be caused by your audio driver, so make sure that you check Device Manager for any duplicate driver entries.
Even if you don’t have duplicate audio drivers, you can try disabling one of the audio drivers that you have on the list.
Users have reported that the issue was resolved after disabling ATI High Definition Audio Device from Device Manager.
Even if you don’t have ATI High Definition Audio Device installed, you can try disabling any audio device that isn’t High Definition Audio Device.
3. Disable or uninstall your antivirus
Certain antivirus software, such as AVG, can cause Kernel Power 41 errors on your Windows 10 device. If you have AVG antivirus installed, try to temporarily disable or uninstall it and see if the issue is resolved. Sometimes, the event 41 kernel power fix is as simple as deleting/reinstalling your security software.
If the problem persists, you might want to consider switching to a different antivirus software that offers efficient protection.
For example, in MSI Afterburner, you need to access the Settings menu and adjust the voltage of the
Please note that although this solution worked for some of our readers, it’s a delicate procedure, so if you don’t do it properly, there is a chance you can damage your components.
5. Change your power settings
Press Windows key + S, type power, and choose Power & Sleep settings from the menu.
When Power Options window opens, click on Additional power settings.
Find your current plan and click on Change plan settings.
Now click on Change advanced power settings.
Locate Hard disk section and expand it. Click on Turn off hard disk after and set it to Never (You can do that by entering 0 as a value).
Find the Sleep section and set the sleep timer to 0 in order to turn it off.
Click Apply and OK to save the changes.
Kernel Power 41 blue screen errors can be caused by your power settings, so it might be best that you change some of those settings.
If you can’t find your Power Plans, get them back by following the easy steps in this comprehensive article.
6. Turn off Fast Startup
Press Windows key + S, type power, and select Power & Sleep settings from the menu.
When Power Options window opens, click on Additional power settings.
When Power Options window opens, click on Choose what the power buttons do.
Click on Change settings that are currently unavailable.
Scroll down to the Shutdown settings section.
Locate Turn on fast startup (recommended) and uncheck it.
Click Save changes.
You should know that this issue can be caused by the Fast Startup option. In order to fix this problem, it’s advised that you turn off the Fast Startup feature, and you can do that by following the steps above.
After you’ve turned off Fast Startup, your computer might start a bit slower, but the Kernel Power 41 error should be resolved.
2. Select Update & security and click on View update history.
3. Choose to Uninstall updates.
4. Look for the last update or any other recent update that might have caused the error.
5. Uninstall the latest update (and any other recent ones) and restart your PC.
We all know how Windows 10 mandatory updates can bring us a world of pain. Maybe the intentions were good, but the end results are preposterous for some users.
Some of them reported that the Kernel Power Error 41 started with the latest Windows Updates, which rendered the system completely unusable.
Now, since you can’t avoid updates completely, you can at least relieve yourself from the recent updates by uninstalling them from the system.
If you’re having trouble opening the Setting app, check out this complete guide to solve the issue.
9. Disable Auto-restart in the Advanced System settings
In the Windows Search bar, type advanced settings and open View advanced system settings.
Select theAdvanced tab, then select Settings under the Startup and Recovery section.
Uncheck the Automatically restart box and confirm the changes.
This workaround comes into play only and only if you’re 100% sure that your hardware is spot on.
The majority of affected users resolved the issue by replacing some of the key hardware components, with a special focus on the power supply and CPU.
You may increase the voltage towards your CPU in the BIOS. This way, the CPU will always have enough power and will not shut down.
Therefore, if you’re completely certain that everything is bread and butter concerning the hardware, but the sudden shutdowns with the same error reoccur frequently, you can try and disable the error-inflicted auto-restart.
In case it’s an electrical fault, and you are persistently getting the Kernel Power 41 error, the likelihood of damage to sensitive components is even higher. So, in all, the error is pretty bad, and you should get it fixed as soon as possible.
Because event 41 kernel power is pretty standard and many users complained, even Microsoft made a detailed document explaining the error. You can check out their advanced troubleshooting guide for more info on what it is and what causes it.
If you have any more questions about the event 41 Kernel Power, feel free to post them in the comments section below. Our latest guide tackles the Invalid_Kernel_Stack_Address error, so you might want to check it out.
The popular spreadsheet application is famous for its computing formula, but with this feature, you can sort, filter, calculate, and write formulas with pictures.
“We’ve received a lot of feedback about the wish to be able to insert images in cells, and we’re happy to deliver! Your images can now be part of the worksheet, instead of floating on top. You can move and resize cells, sort and filter, and work with images within an Excel table. This improvement unlocks and facilitates many new scenarios, such as tracking inventories, creating employee dashboards, or building games and brackets.”
There are a few possibilities that come with this formula, which also works in the Safe mode. You can fit the picture in the cell and maintain its aspect ratio or ignore it, maintain the original size which could exceed the cell boundary, or customize the height and the width.
Read along to find out how to do so in Excel.
How to insert images into cells in Microsoft Excel.
1 With your Microsoft Excel opens, type =IMAGE(source, [alt_text], [sizing], [height], [width]) into the desired cell.
Please be mindful that the function requires a web source location (BMP, JPG/JPEG, GIF, TIFF, PNG, ICO, and WEBP files with an HTTP protocol are supported).
2. Replace source with the web location, [alt_text] with the alt text, and so on.
However, it’s worth noticing that the URL limit is set to just 255 characters, you can do a workaround of it by putting the image link in another cell and then referencing that cell as a source.
Have you ever used this feature? Let us know in the comments!
Just a few days after the latest support for .NET 6 and .NET 7, Microsoft announced the release of .NET 8, and its first preview is ready to be downloaded for Windows, Linux, and macOS and promised to release new previews and candidate builds every month.
The announcement came three months after .NET 7 was launched in general availability, but this is the first preview release of the tech giant’s next LTS (long-term support) version of the framework.
Releases of .NET include products, libraries, runtime, and tooling, and represent a collaboration across multiple teams inside and outside Microsoft. The broader themes covered in this blog post do not encompass all of the key scenarios and investments for .NET 8. They represent large areas but are just a part of all the important work going into .NET 8.
Jeremy Likness, Principal Product Manager for .NET.
Microsoft .NET 8 brings several tools, but the tech giant highlights the Ahead-of-Time (AOT) compilation in Native AOT and .NET Container images, which improves startup time, battery life, and memory footprint.
Publishing app with Native AOT creates a fully self-contained version of your app that doesn’t need a separate runtime because everything is included in a single file. As of preview 1, this single file is smaller. In fact, Linux builds are now up to 50% smaller.
Read along to find out how you can download and install Microsoft .NET 8.
2. Depending on your need, you can choose Build apps – SDK or Run apps – Runtime.
3. Choose whichever platform you’ll be running it on. In this case, we’re choosing Windows x86 for app developers, which is compatible for Visual Studio 2022 (v17.6 Preview 1) users.
4. Double-click on the file once the download is finished.
5. Click Install.
What are your thoughts on Microsoft .NET 8? Let us know in the comments!
Microsoft just released Windows 11 Build 22621.1343 (KB5022913) to Insiders in the Release Preview Channel for version 22H2 users, bringing a plethora of updates to live. Once this feature comes stable, it could help you improve the energy efficiency of your device and reduce your carbon footprint.
As spotted by Windows enthusiast PhantomOcean3 (@PhantomOfEarth), additionally, the latest build also introduces a lot of nice additions to Windows 11, such as an addition of process filtering on task manager, a new start menu search box design, and a slight tweak in the taskbar, especially for tablet users.
New taskbar search experience and updated start menu search box design are officially coming to Windows 11, version 22H2 with the KB5022913 update, which should be available by the end of this month for stable pic.twitter.com/lXs32PUOLb
With that being said, however, these new features are still out for review by select users and aren’t out in the stable yet, so you may expect a few performance hiccups here and there. Features are usually rolled out for general users a month after their availability in the Release Preview Channel.
How to enable & use the energy recommendations on Windows 11?
1. Make sure to join the Insider program and have Windows 11 Build 22621.1343 installed in your system. If not, head over to Microsoft’s Preview Windows page to get started.
2. Go to Settings → System.
3. Scroll down a bit to Power & Battery → Energy Recommendations. Click Apply all to enable all the recommendations.
What other features and fixes are coming in KB5022913?
New features
New! This update provided access Windows Studio Effects directly from quick settings on the taskbar for devices that had a supported neural processing unit (NPU). This made it quick and easy to turn on and configure camera effects. Those effects included Background blur, Eye contact, Automatic framing, and Audio effects (Voice focus). You can still access these effects in the Settings pages.
New! This update made it easier to get help if you were having PC issues. It added a link to the Quick Assist app at the bottom of Settings > System > Troubleshooters. You could also find Quick Assist in the Start menu’s All apps list.
New! This update improved the search box experience on the taskbar. As you typed in the search box, search results appeared in the search box. You could also change the search experience you wanted for your taskbar by going to Settings > Personalization > Taskbar. For commercial customers, this update added a new policy for IT administrators to manage how the search box on the taskbar appears in your organization. For more information, see Customizing search on the Windows 11 taskbar.
New! This update provided energy recommendations. If you used them, they could help to improve the energy efficiency of your PC and reduce your carbon footprint. Go to Settings > System > Power & Battery > Energy Recommendations.
New! This update enhanced the system tray (formerly called the notification area). All icons had a rounded focus and hover treatment in the lower right, including the “Show hidden icons” flyout menu. You could move icons to rearrange them in the “Show hidden icons” flyout menu or move icons to the taskbar.
New! This update introduced a touch-optimized taskbar for 2-in-1 devices that you could use as a tablet. There were two states of this taskbar: collapsed and expanded. To switch between the two states, swipe up and down on the bottom of your screen. When collapsed in tablet mode, the taskbar receded to give you more screen space and kept you from accidentally opening the taskbar. When expanded in tablet mode, the taskbar was optimized to be easier to use with touch. Your taskbar automatically changed to this optimized version when you disconnected or folded back the keyboard.
This feature only worked on devices that could be used as tablets and was on by default. To change that, go to Settings > Personalization > Taskbar > Taskbar behaviors. The setting is called “Optimize taskbar for touch interactions when this device is used as a tablet.” If your company manages Windows updates for your device, this feature will be off by default. Administrators can turn it on using the new commercial control for continuous innovation.
New! This update provided enhanced support for braille devices. They continued working while you switched between Microsoft Narrator and third-party screen readers. Narrator automatically changed braille drivers. For more information, see Chapter 8: Using Narrator with braille.
New! This update also added support for new braille displays and new braille input and output languages in Narrator. Some of the new braille displays included the APH Chameleon, the APH Mantis Q40, the NLS eReader, and many more. For more information, see Chapter 8: Using Narrator with braille.
New! This update made voice access more flexible and supported interaction with more user interface (UI) controls. For example, voice interacted with controls that contained:
Names that had numbers, such as “Click 5”
Names without whitespaces between them, such as “click PivotTable” or “click PivotChart”
Names that had special characters, such as Bluetooth & devices (“click Bluetooth and devices”) or Dial – up (“click dial hyphen up”)
New! This update added voice access support for spin controls, thumb controls, and split buttons. You interact with these controls by using the “click” command or number overlays. This update also fixed issues that affected snapping commands that snapped a window left or right. Commands that moved the cursor in a text box ran instantly.
New! This update also provided voice scrolling enhancements. You could use voice to scroll to the extreme left and right on a page. You could also use continuous scrolling to the left or right like what is already present for vertical scrolling. For more information about the new voice access commands, see Voice access command list.
New! For devices that were joined to Azure Active Directory (AAD), this update provided AI-powered recommended content on your Start menu. On the Start menu, you found content to help you to prepare for meetings, quickly access files you were collaborating on, and more.
New! We added the new Tamil Anjal keyboard for the Tamil language. To add it, make sure Tamil (Singapore), Tamil (Malaysia), Tamil (Sri Lanka), or Tamil (India) appears in Settings > Time & Language > Language & Region. Select the ellipses (…) next to the language. Select Language Options. Add Tamil Anjal (QWERTY) to the list of keyboards.
Fixes
We fixed an issue that affected the Color filters setting. When you selected Inverted, the system set it to Grayscale instead.
We improved the reliability of Windows after you installed an update.
We supported the United Mexican States’ daylight-saving time change order for 2023.
We fixed a date information issue. It affected the format of dates sent between Windows and some versions of the Heimdal Kerberos library.
We fixed an issue that affected IE mode. The text on the status bar was not always visible.
We fixed compatibility issues that affected some printers. Those printers used Windows Graphical Device Interface (GDI) printer drivers. Those drivers did not completely adhere to GDI specifications.
We fixed an issue that affected the software keyboard. It did not appear in the Out-of-Box Experience (OOBE) after a Push-button reset (factory reset). This type of reset required an external keyboard to be attached to provide credentials.
We fixed an issue that displayed a blue screen during video playback. This occurred after you set high dynamic range (HDR) on your display.
We fixed an issue that might have affected the touch keyboard and the PIN entry keyboard. You might not have been able to use them to enter text when you signed in to your device.
We fixed an issue that affected AppV. It stopped file names from having the correct letter case (uppercase or lowercase).
We fixed an issue that affected Microsoft Edge. The issue removed conflicting policies for Microsoft Edge. This occurred when you set the MDMWinsOverGPFlag in a Microsoft Intune tenant and Intune detected a policy conflict.
We fixed an issue that affected provisioning packages. They failed to apply in certain circumstances when elevation was required.
We fixed an issue that affected Azure Active Directory (Azure AD). Using a provisioning package for bulk provisioning failed.
We fixed an issue that affected Universal Print’s Configuration Service Provider (CSP). A command prompt window appeared when you installed a printer.
We fixed a reliability issue that occurred when you used Task View.
We fixed an issue that affected which folders appeared in the Browse for Folder picker.
We fixed an issue that affected File Explorer. When you used Shift +Tab or Shift+F6, the input focus did not move.
We fixed an issue that affected the user interface (UI). The volume up and volume down commands from a Bluetooth keyboard did not display.
We fixed an issue that affected Xbox subscribers. If you purchased an Xbox subscription using the “Redeem code” option, the Xbox subscription card did not appear on the Settings Accounts page. This occurred when recurring billing was off.
We fixed an issue that might have affected lsass.exe. It might have stopped responding. This occurred when it sent a Lightweight Directory Access Protocol (LDAP) query to a domain controller that had a very large LDAP filter.
We fixed an issue that affected the Local Security Authority Subsystem Service (LSASS). LSASS might have stopped responding. This occurred after you ran Sysprep on a domain-joined machine.
We fixed an issue that affected copying from a network to a local drive. Copying was slower than expected for some users.
We fixed an issue that affected parity virtual disks. Using Server Manager to create them failed.
Are you excited about these features? Let us know in the comments!



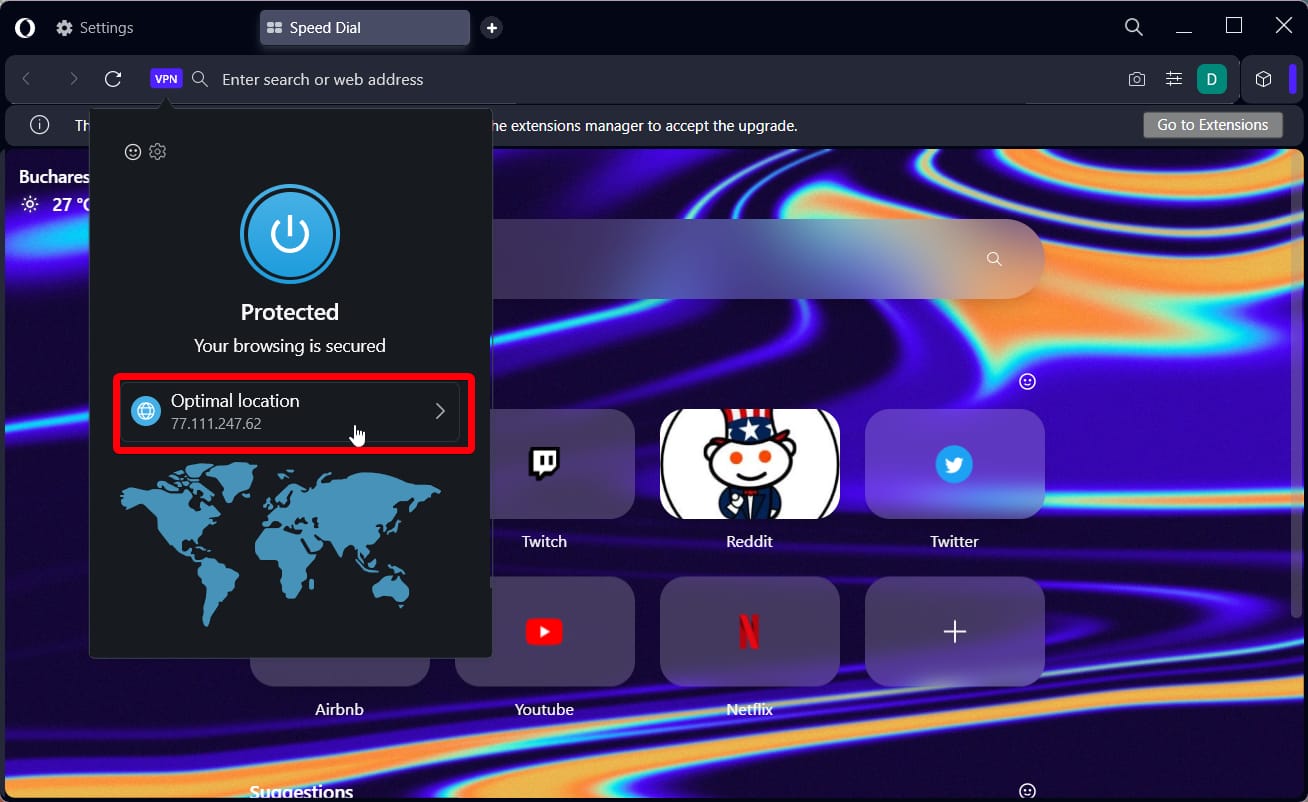


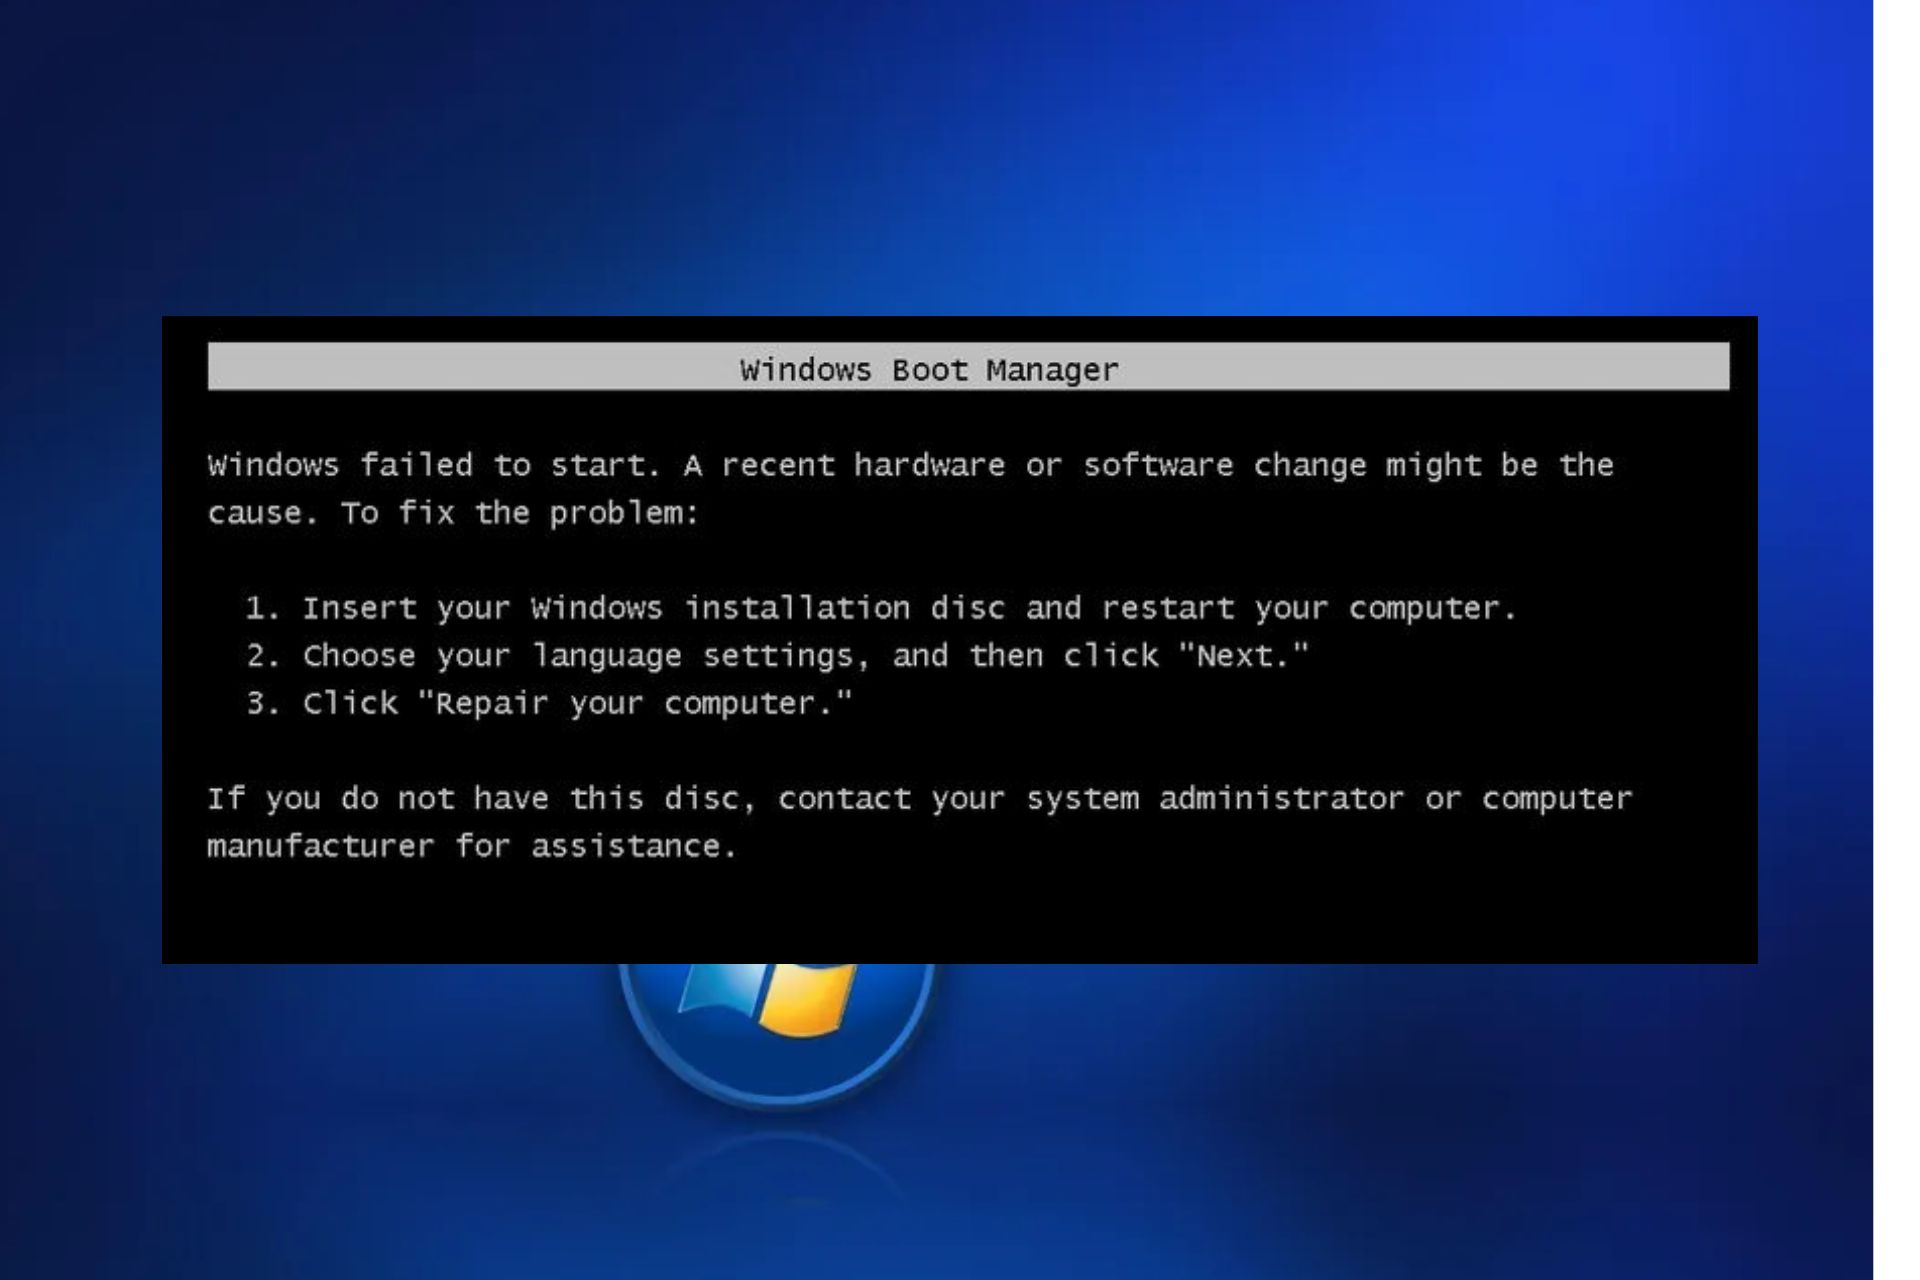


 The KB3099229_x64.msu option is for 64-bit Windows, and KB3099229_x86.msu is for 32-bit.