If the built-in Photos app doesn’t do it for you and you’re looking for a software that offers more options like image editing, support for multiple formats and photo management software features, keep reading.
Adobe Lightroom is for those who take their photos seriously. Whether you’re editing or organizing, this tool does it all.
It uses AI-powered sorting, tagging, and cloud storage, you can access your photos on any device. The editing suite is professional-grade, offering everything from exposure adjustments to color grading.
It’s not the cheapest, but if you want quality and features, this is the way to go.
Pros:
AI sorting and tagging for better photo organization
Cloud storage sync across devices
Powerful editing tools for exposure, color, and lens corrections
Non-destructive editing keeps your originals safe
Cons:
Expensive subscription model
Can be overwhelming for beginners
High system demands for smooth operation.
Adobe Lightroom
Want to take your photography seriously? Adobe Lightroom’s professional tools have you covered.
Movavi Photo Editor is the perfect balance of organization and editing.
It has smart features like face recognition and photo sorting by metadata, plus duplicate detection to clean up your library.
Editing-wise, it’s a step above basic viewers, allowing you to enhance your photos or remove unwanted objects. If you’re after a no-nonsense, yet feature-packed photo viewer, Movavi’s it.
Pros:
Face recognition for auto-sorting
Smart duplicate detection to clean up your library
Advanced editing tools like photo enhancement and object removal
Metadata sorting by date, location, and more
Cons:
More resource-heavy than simple viewers
Full features require a paid version
Slower performance with larger libraries
Movavi Photo Editor
Get Movavi if you want smart sorting and powerful editing all in one package!
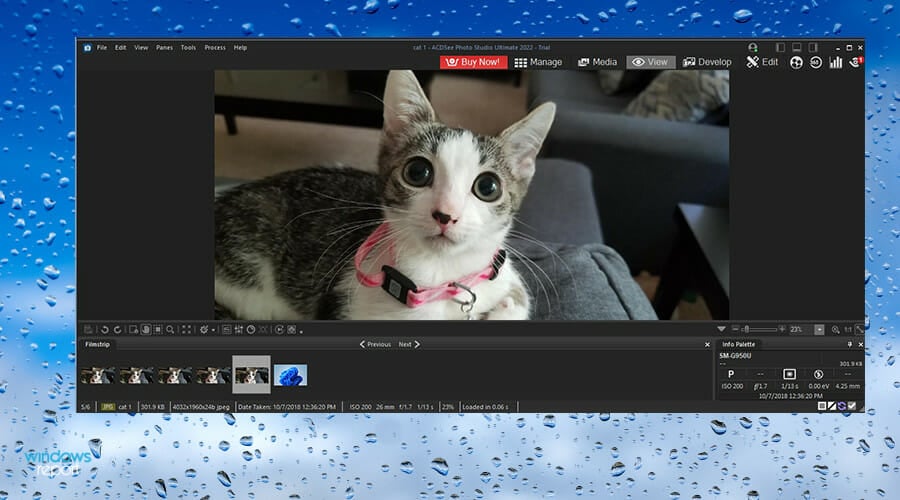
ACDSEE Photo Studio Ultimate is a powerhouse, designed for photographers who need AI-driven organization and advanced editing tools.
Face recognition and auto-tagging help you keep your photo collection in order, while editing tools like noise reduction and color correction let you fine-tune every shot.
It’s got all the features, but it’s also expensive and requires a hefty system to run smoothly.
Pros:
AI-powered face recognition and auto-tagging
Professional editing tools like noise reduction and color correction
Non-destructive editing preserves your originals
Great for managing large photo collections
Cons:
Expensive, not ideal for casual users
Steep learning curve for beginners
High system requirements for optimal performance
ACDSEE Photo Ultimate
If you’re serious about photography and need pro-level tools, ACDSEE Photo Studio won’t disappoint.
5. ImageGlass – fast, lightweight, and customizable
ImageGlass is the no-fuss, super lightweight viewer you need if speed is your priority. With support for over 70 formats and a clean, customizable interface, it’s fast and efficient.
There’s no bloat here—just pure image viewing. It’s great for those who want something that works without taking up too much system power.
Don’t expect editing features, though; this is strictly for viewing.
IrfanView is an oldie but goodie. It supports over 70 file formats, and with plugin support, you can expand it to handle even more.
The interface is basic, but it’s fast and light on system resources. You can batch convert and resize images, and the program even includes some editing tools.
It’s perfect for people who want reliability without the fluff.
Pros:
Supports 70+ formats, including rare ones like PSD and RAW
Batch processing for converting and resizing images
You’ve probably seen this problem before. You’re playing Fortnite, everything is fine, and then suddenly the frame rate drops like a rock. You look at your GPU usage and it is off the roof! What’s going on and why is the GPU usage so high?
GPU usage is a metric that describes how much a graphics card is being used. If you’re playing a game or watching a video and your GPU crashes frequently, it means that the computer is using all of the processing power of the graphics card. So how do you fix it? We have some answers below.
Why is my GPU usage suddenly so high?
If you suddenly start seeing high GPU usage, there are a few common causes:
Processor-intensive programs – If you see a jump in your GPU usage when you run an application, it means there’s an application using the graphics card for rendering.
Recent app updates – If you have recently updated any software on your computer or installed new programs, there could be conflicts between them that are causing high GPU usage.
Malware or viruses – Malware, viruses, and other types of malicious software can sometimes cause your computer to use more GPU power than it should. However, it’s nothing a good antivirus can’t handle.
Hardware issues – If your graphics card has been damaged by dust, water, or other environmental factors, it may not be operating at its full potential.
Driver issues – Many of today’s PC games require the latest graphics hardware to run smoothly without lag or stuttering issues.
Power settings – If you have turned on power-saving features, these settings might be causing your PC to use more GPU resources than usual. You need to find the perfect power efficiency settings.
GPU is overheating – You should try to check the temperature of your GPU and CPU. If it is too high, it might be caused by overheating.
How do I fix high GPU usage while gaming?
Some basic checks that could help reduce GPU usage include:
Verify that you are not running any resource-intensive applications in the background.
Check to make sure that your GPU isn’t overheating.
1. Turn down the graphics settings
Hit the Start menu icon and select Settings.
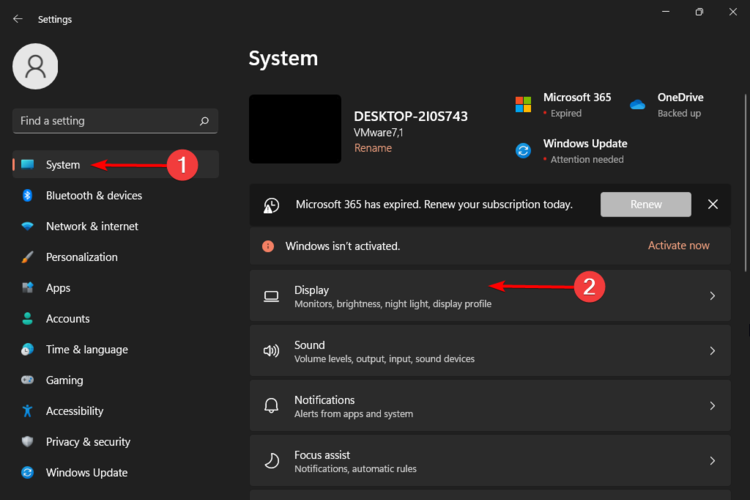
Click on System then select Display.
Navigate to the Scale & layout section then under Display resolution, click on the drop-down menu and pick a lower resolution setting than your current one.
2. Update your graphic drivers
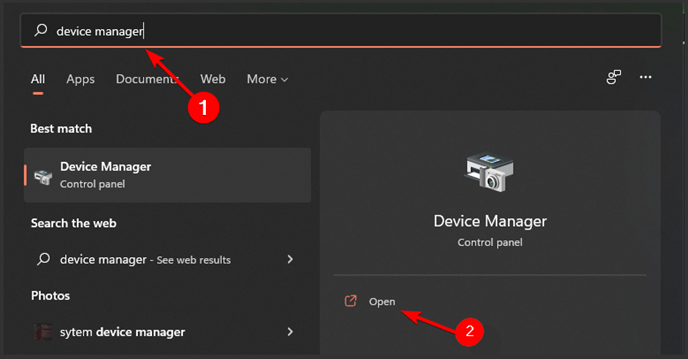
Click on the Windows button type Device Manager in the search bar and click Open.
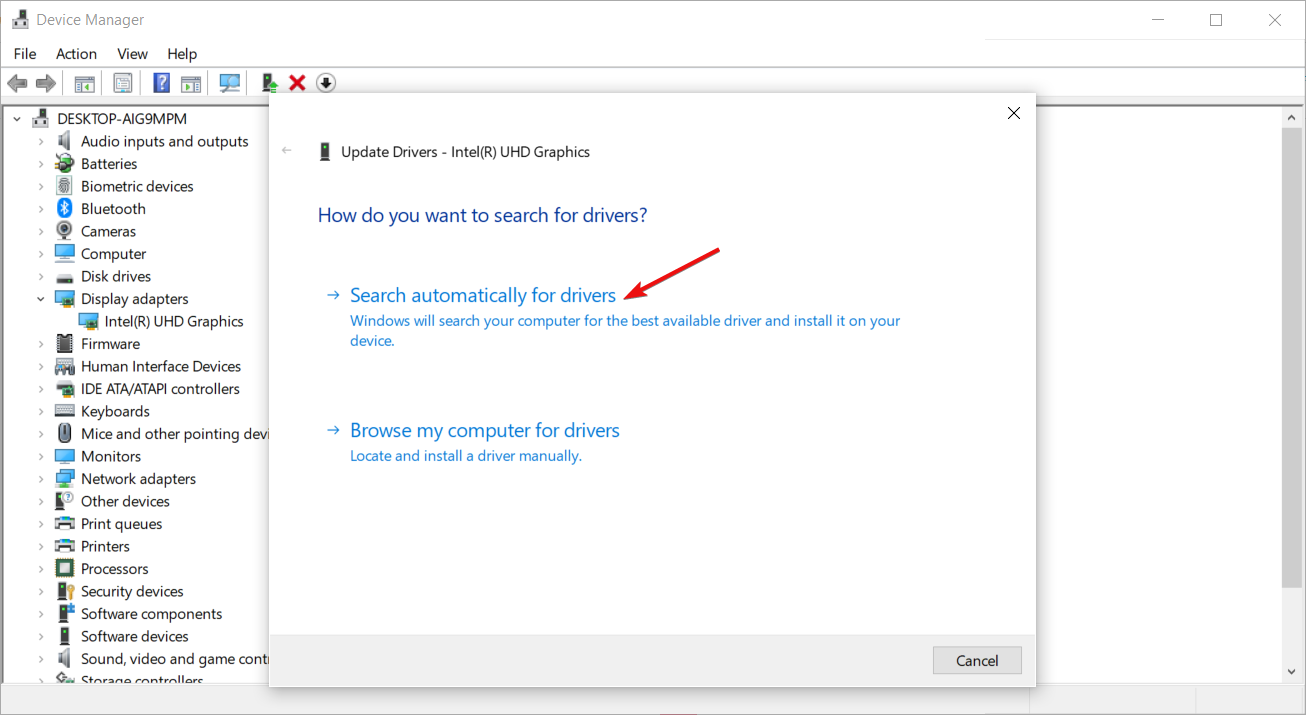
Navigate to Display adapters to expand, right-click on your graphics card, and select Update driver.
Select Search automatically for drivers.
If you’re not an expert in these matters, you should consider using a third-party tool. Outbyte Driver Updater will scan your computer for outdated or missing drivers and then automatically download and install the correct versions of those drivers. It’s a simple process that will take just minutes to complete.
Overclocking is a way to make your CPU run faster than it normally would, which can result in higher performance at the cost of higher temperatures and more power consumption. If you’re overclocking your graphics card, that can also contribute to high GPU usage while gaming.
The best thing to do is turn off any overclocking software before playing games so that it doesn’t interfere with how well they run on their own without any additional adjustments.
Is 100% GPU usage while gaming normal?
Yes, it’s normal for your GPU to be 100% maxed out during gaming. In fact, it’s a good thing. Your graphics card (or GPU) is the most important part of your computer when it comes to getting a good gaming experience.
If your GPU isn’t working at full capacity, then you’re not getting the best performance possible from your PC. With that said, your graphics card should not always be using 100% of its processing power while you are playing games especially if you have other programs open at the same time.
If your computer is showing 100% GPU usage, it means that your graphics card is being overworked and can’t handle the task at hand (in this case, the game). 100% GPU usage when idle or Fortnite not using your GPU is, however, a cause for concern.
Most modern games are very CPU-intensive and the GPU only needs to do a little work. However, if you’re using a laptop with an integrated GPU, it’s also possible that your CPU isn’t powerful enough to handle the game. It will then offload some of its work onto the GPU instead.
If all else fails, it may be time to throw in the towel and get yourself a new graphics card. Sometimes it has to do more with your hardware than Fortnite itself.
Hopefully, your GPU is no longer high when playing Fortnite. Elsewhere, if Fortnite settings are not saving, we have a solution for that.
Let us know if you have noticed any improvements after trying out these solutions in the comment section below.
Outlook is an email client for sending and receiving emails, managing personal information, managing calendar events, etc. However, working on Microsoft Outlook can be easier by customizing the Outlook Quick Access toolbar.
What does the Quick Access toolbar do in Microsoft Outlook?
Many users attest that the Quick Access toolbar is one of the best features. Microsoft Office apps. The Microsoft Quick Access toolbar is a menu usually found at the top-right or left corner of the Microsoft Outlook app.
Furthermore, the idea of the Quick Access toolbar depicts what the name suggests. It provides convenience and easy access to users, allowing them to use their most needed and commonly used features in Outlook.
Likewise, it contains features such as Undo, Save, New, Sort ascending and descending, etc., which are available at users’ reach. In short, the Quick Access toolbar contains the necessary commands for working with Microsoft Office apps.
Moreover, users can import and export the Quick Access toolbar settings from one Microsoft Office app to another for uniformity.
How can I customize Outlook’s Quick Access toolbar?
1. Add or remove commands to the Quick Access toolbar on Outlook
Launch Microsoft Outlook on your PC.
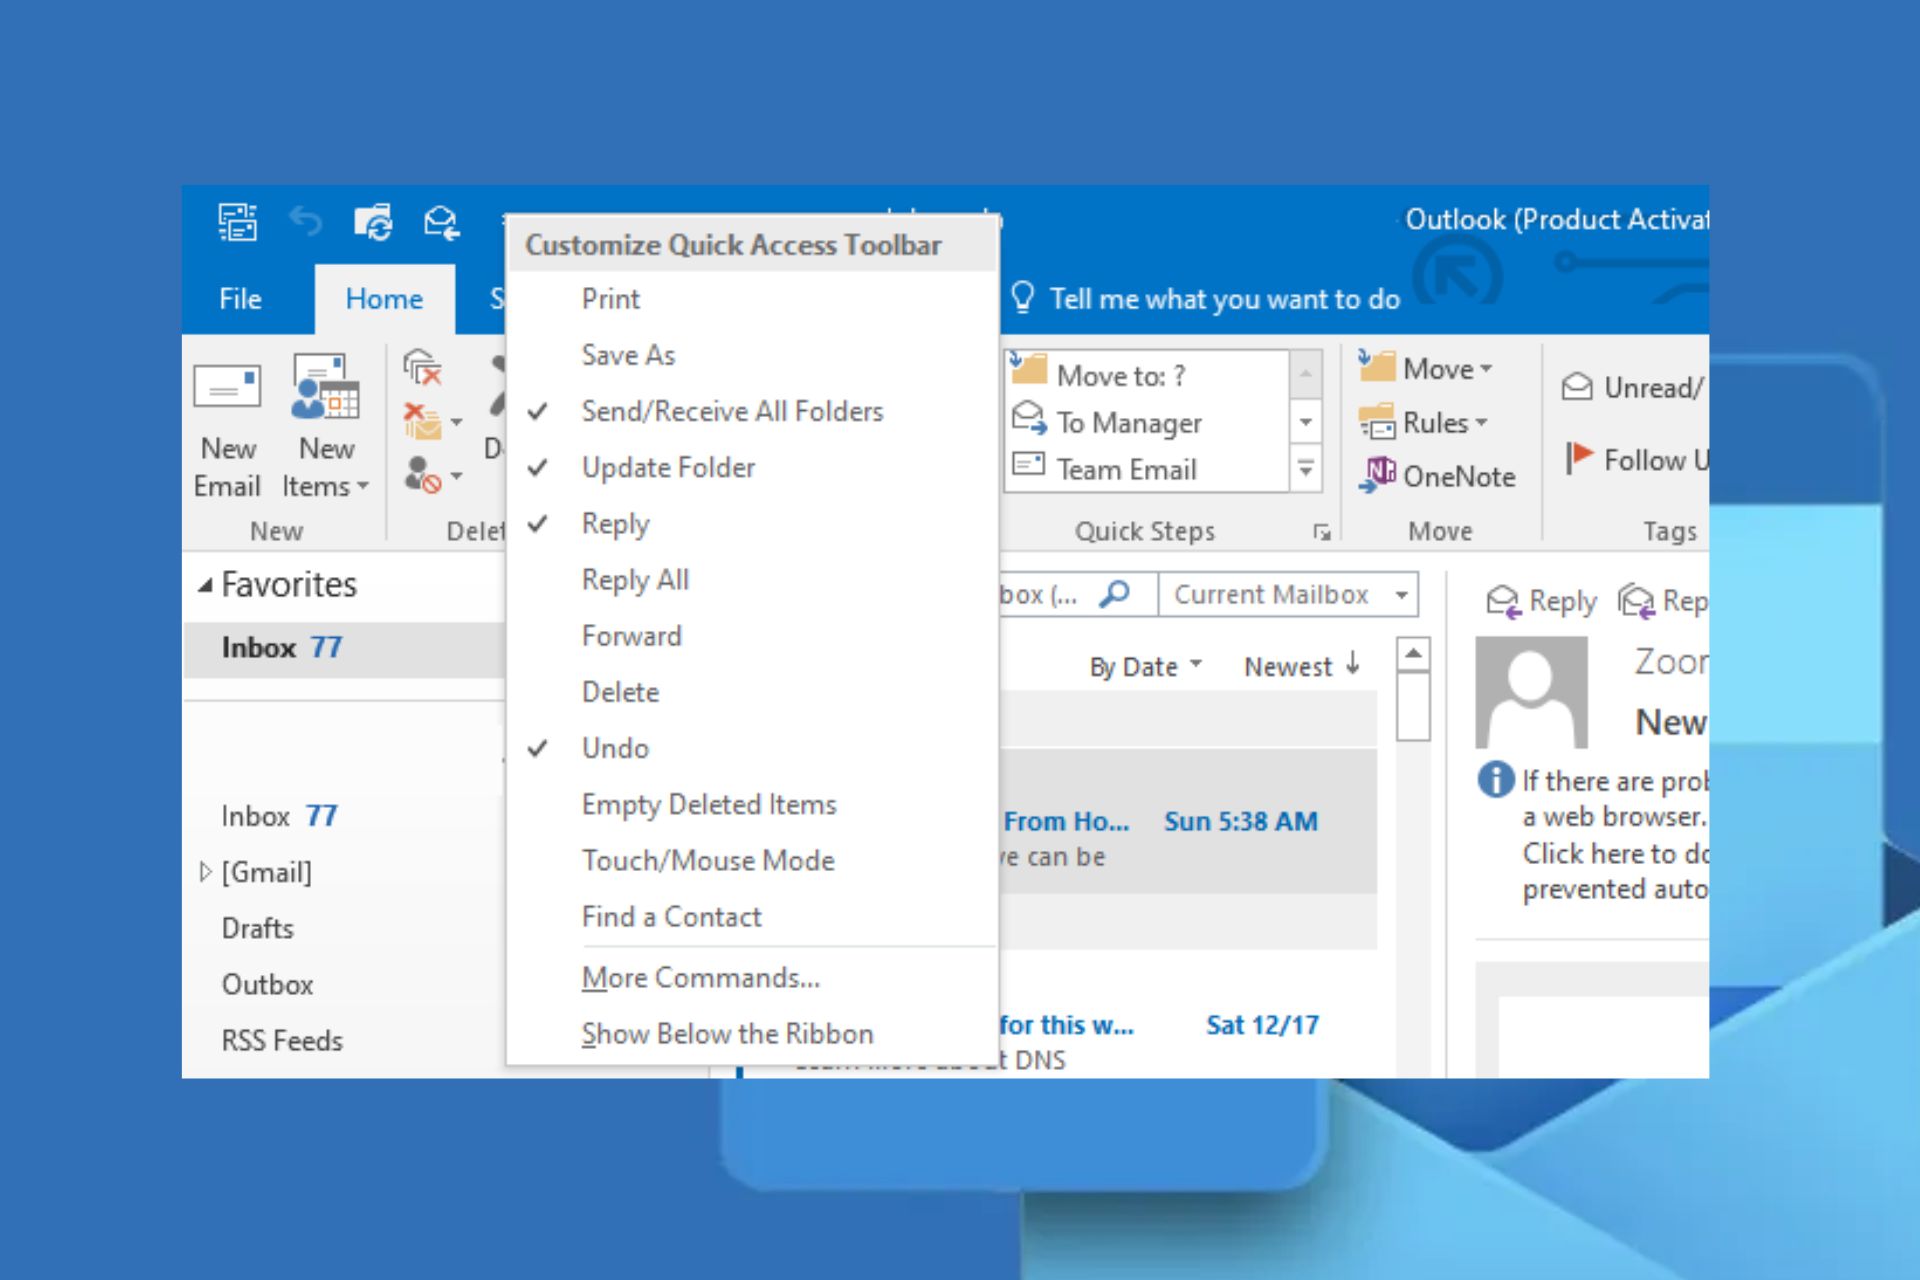
Click the drop arrow button, then select Customize Quick Access Toolbar from the drop-down.
Select a command to add to the Quick Access toolbar.
If you can’t find the command you want to add, click the More Commands button at the bottom of the drop-down menu.
Select the command you want to add, click Add between the two panes, then click OK.
However, click the Remove button if you want to remove commands from the Customize Quick Access Toolbar.
Adding or removing commands from the Quick Access toolbar allows you to select the commands that are to be in the Outlook toolbar.
Many Xbox users reported having audio issues when attempting to record their gameplay. Recording with Xbox Game DVR seems to leave the Xbox clips audio out of sync. According to users, gameplay clips generally registered a 3-second audio delay.
We found a series of solutions to fix this problem and we’ll list them below.
How do I fix Xbox game clips audio out of sync?
1. Do a hard reset on your Xbox
Hard resetting the console is a common solution for many issues. You can perform a hard reset by following these steps:
When the console is on, hold the Power button for several seconds until it turns off
Remove the power plug from the power socket. Wait at least one minute before plugging it back in
Plug it back in, turn on the console and see if it worked
If it didn’t work the first time, try doing it a few more times.
2. Switch the console to energy-saving mode
Apparently, this issue is caused due to a conflict between the power settings and network conditions. To fix the problem, follow these steps:
Set the console to Energy Saving mode
Keep the Power button pressed until the console shuts down
Turn the console back on
Play the recorded clips to see if the audio is now in-sync.
3. Convert the video file from a variable frame rate to a constant frame rate
When recording a clip, frame drops may occur due to low computer performance.
This may cause the audio to get out of sync.
Although it may seem that you are recording at a constant frame rate, short drops in frame rate could be the root cause of the issue.
Bringing the video to a constant frame rate requires you to get software capable to complete this task.
We recommend that WinX Video Converter will help you convert or compress various files at any time.
After installing the software, follow the next steps:
Open Handbrake > click Source > File
Go to the location of the video you want to convert, click on it and press Open
Select the Video tab, choose Constant Quality > select desired frame rate
Click the Start button
Wait for the process to finish
Open the newly created video file in a video player of choice to see if it worked
We hope that our solutions were of help. If any of our methods worked for you, or you came across additional solutions, do let us know in the comment section below.
Let’s check out the best Android emulators for your Windows 11 PC. Whether you want to run a game on your PC or access a really neat productivity app, you’ll find a reliable tool to do so below. Not all are made equal, so make sure to stay until the end to figure out which one is the best for you.
Running on the latest Android OS, it offers features like keyboard mapping, macros, high FPS, and multiple instances. You can game on one instance and use a productivity app on another.
Allocate CPU and RAM per instance, perfect for playing demanding games like PUBG Mobile alongside lighter apps.
LDPlayer also lets you tweak graphics settings for higher FPS and supports game controllers for flexible gameplay.
LDPlayer
This simple and modern emulator offers multiple Android games in the same session.
The Bluestacks Android emulator for Windows 11 is one of, if not the most popular Android emulators, and for a good reason.
It specializes in video games. The user interface makes it very easy to access games and supports all titles on the Google Play Store.
However, it’s not limited to the Google Play store. This is thanks to supporting APK files. Plus, Bluestacks offers custom key mapping so you can use your configurations.
The free version has advertisements throughout the app, while the paid version takes them away and gives access to new features like a special support channel.
The only negative thing you can say about Bluestacks is how slow it is when it comes to productivity apps and other non-video games software.
Bluestacks
Enjoy your favorite Android games and apps with this powerful emulator.
MEmu isan Android emulator for Windows 11 64-bit that is similar in speed and processing to Bluestacks.
And unlike Bluestacks, this emulator works well with non-gaming and productivity apps. You won’t see any slowdown with apps like Instagram or WhatsApp.
MEmu also supports running multiple instances simultaneously, so you can play multiple games or explore the emulator’s full capability.
You won’t have to be restricted to Google Play either, as you can drop and drop APKs from your computer onto MEmu and play it that way.
Next up is NoxPlayer, another well-known Android emulator for PC that has more than 150 million users. It’s built on Android Lollipop and has the Google Play store built into it.
Like some of the other apps on this list, you can upload APK files obtained from other sources and play them without issue. Nox has a lot of customization options and the ability to root your Android phone.
The point is to allow people to replace system apps and settings with specialized ones. It opens up new world possibilities.
Other notable features include recording macros for keys, adjusting FPS configuration, taking screenshots, and recording the screen. There’s a version for Macs if you have a Macbook.
Ko Player is a great Android emulator for how easy it is to set up and use. Its main purpose is to deliver the best gaming experience possible without lag.
It’s a lightweight app, making it a good Android emulator for low-end PCs. Ko Player is free to use, with a few ads here and there to support the developers, but it’s not as intrusive as Bluestacks.
The player has a great user interface, keyboard mapping, and controller support. You can also connect a microphone and camera to live stream while you play.
Be aware that people have complained about how buggy Ko Player can be, with some experiencing sudden crashes mid-game.
Gameloop is primarily used as a gaming platform, and it is used by tech giant Tencent’s official emulator. In fact, Tencent considers it to be the best emulator of Call of Duty: Mobile and PUBG Mobile.
The emulator takes full advantage of your CPU, GPU, and RAM to render Android games of the utmost quality. And it’s specially optimized for lag-free play.
It has keyboard and mouse integration and even an anti-cheat system. Since Gameloop is partnered with Tencent, the online mostly have games from that developer.
While its library isn’t the biggest, Gameloop supports major titles like Candy Crush Saga, Clash Royale, and more. Best of all, it’s free, with no extra feature hidden behind a premium version.
Android Studio is the closest thing to an official emulator since it comes from Google. The main purpose of Android Studio is app development.
So, while you can use the emulator built into the software and use it to play games, it’s not the easiest to use. The UI isn’t easy to use.
It supports the latest Android operating system, but you can also emulate older versions. Android Studio has various tools and plugins to test its apps.
Android Studio works on many desktop operating systems, from Windows 8 to 11, and even some Linux systems.
As such, Android Studio can be difficult to set up, plus there’s no direct access to an app store, but you can upload APKs. Some people have noted some difficulty with launching the app.
What is the best free Android emulator for Windows 11?
LDPlayer is the best free Android emulator for Windows 11. It packs in many gaming features that can not be found on some of the paid emulators.Also, it has many productivity-enhancing features, like handling multiple instances at once. To read more and download this app, check our detailed guide in the section above.
Is Nox or BlueStacks better?
Both Nox and Bluestacks are popular Android emulators and the better choice depends on what you want to use them for. Bluestacks is better for gaming, with features like multi-instance support and advanced key mapping. Nox is lighter and more customizable. And while it supports games too, it does a better job when it comes to running other types of apps, like productivity ones.
If you want to sideload apps, and create custom ROMs flash and firmware upgrades, you have to download and install the ADB drivers on your Windows 11 PC. Find below all you need to do to get started.
How can I download and set up ADB drivers on Windows 11?
2. When prompted, check the terms and condition checkbox and click the Download Android SDK Platform-Tools for Windows button.
3. Once the download is finished, locate the downloaded file and move it to the root folder of the C drive. If you’re not familiar, that’s C:\
4. Right-click the zip file and select Extract all.
5. Now, click on Extract to start the process.
6. Wait while the files are being extracted.
7. Go into the folder that you extracted.
8. Right-click the empty space and choose Open in Terminal.
9. Run the following commands: cmdadb devices
After doing that, you should see the list of all devices connected to your PC. That is how you can download and install the ADB drivers for a 64-bit Windows 11 system.
You can install ADB drivers manually and also check related tools such as the Google USB Driver available on this installation guide for users who need complete Android device support.
2. Download and install the ADB drivers automatically
You can also download the Windows 11 ADB driver automatically with a top-notch driver updater. This option saves you the stress of going through the enormous steps listed in the first solution.
With a large database of original drivers from thousands of developers, you are sure to get all the drivers you need to avoid errors on your PC.
ADB drivers are generally safe. They do not make unnecessary changes to your PC, as they only serve as a bridge between your system and the Android device.
ADB drivers can only become a problem if you use them wrongly. And that can also be salvaged by uninstalling the drivers.
Why is Windows 11 ADB not working?
It’s possible that your environment variables aren’t correct, so you need to adjust them if you want to fix this issue. You also need to check your phone settings and ensure that features such as USB Debugging are enabled before using ADB properly.
Some of our readers have recently reported that they encounter the Microsoft Store not enough space error. They claim they experience this error pop-up when downloading some applications from the Microsoft Store.
In case you’re experiencing this problem, you can explore any of the advanced solutions provided in this article.
What causes the Microsoft Store not enough space error?
There can be several reasons why you are experiencing the Microsoft Store not enough space error. The following are some of the potential reasons reported by some users:
Insufficient disk space – This error is mostly inevitable if your PC is low on disk space. You simply need to perform a Disk Cleanup to free some space on your PC.
Running an outdated OS or Microsoft Store – If either your operating system or Microsoft Store App is outdated, you may encounter this error. Hence, check out what to do if your Windows Update fails to work.
Your Temporary folder is full – Your temp folder may quickly be filled up with application (.appx) files used by Microsoft Store. If the Temporary files are not deleting, check out our recommended fixes in this guide.
Now that you know some of the possible reasons behind this error if your Microsoft Store says not enough space but there is, you can proceed to our next section to know how to fix this problem.
What can I do if there’s not enough space on Microsoft Store?
Below are some preliminary checks that may do the trick:
Install all pending Windows updates since it helped some users fix the error.
If the above checks don’t work for you, you can explore the advanced solutions provided below.
1. Clear the Microsoft Store cache
Press the Windows key + R keys to open the Run dialog box, type wsreset.exe in the dialog box, and select OK.
A blank Command Prompt window will open and close in about 10 seconds, and the Microsoft Store will open automatically.
It should take about 10 seconds to clear your Microsoft Store cache once you see the blank cmd window. Also, this fix can also troubleshoot the Microsoft Store if the cache is damaged.
2. Run the Microsoft Store Troubleshooter
Left-click on Start on your Taskbar and select Settings.
Under the System tab, click on Troubleshoot.
Next, click on Other troubleshooters.
Next to Windows Store Apps, select Run.
Follow the on-screen instructions to complete the process.
Using any virtualization software, your PC will run two operating systems simultaneously, so issues are bound to appear if the setup is not completed correctly.
Before you start using virtualization on your PC, be sure to check if your PC meets the VMware requirements.
What does the operating system wasn’t found error mean?
An Operating system error is displayed when the BIOS cannot find an operating system on a hard drive from your system. This is just one of many VMware Workstartion errors that you can encounter.
As you can see below, there are plenty of variations to this error, including some common types of devices and error formats.
What are the most common variations for this error?
An operating system wasn’t found; try disconnecting any drives from VMware – This issue can be caused by the virtual machine trying to boot from another drive.
Exiting Intel PXE Rom operating system not found VMware – It is the same error with the VMware Intel PXE ROM OS.
VMWare operating system not found VMDK – The VMDK (Virtual Machine Disk File) was not found and VMware is not booting.
Operating system not found in VMware Workstation 16 – This issue is present mostly on version 16 of the WMware Workstation.
The operating system was not found VMware ESXi – The ESXi is an optional component in WMware that partitions into multiple virtual machines.
VMware operating system not found on Mac – Of course, this error manifests itself on Mac as well.
The operating system was not found VMware on Ubuntu – You can create a virtual OS on Ubuntu and this error is also present.
Choose the Installer disc or Installer disc image file (ISO) if you face a disc drive or a file that contains the OS.
Set a name for your VM and a location where the file will be saved, and click Next again.
Define how storage should occur with this VM, and then press Next.
Adjust the hardware settings if needed and click Finish.
Follow any on-screen prompts to begin the OS installation.
Speaking of hardware customization, if you’re planning to run Windows 11 on a virtual machine, you need to enable TPM in VMware first. Don’t worry, it’s simpler than you think. Also, don’t hesitate to check out the best VMs that work perfectly on Windows 11.
Check the link below if you want to learn more about the VMware Workstation and how to download and install it.
Running into Ticketmaster Error 5005 can be frustrating, especially when you are in the middle of buying tickets and the site suddenly throws a credit card error code 5005 or the dreaded “Oops, something went wrong”. The good news? This is not a permanent block. It is a solvable issue once you know what is really causing it.
This error is not just a random glitch. It usually signals that Ticketmaster’s security system detected something unusual about your payment method or account activity.
Fraud protection kicks in when your bank has not approved 3D Secure verification by SMS or phone.
Silent payment blocks happen when your bank quietly rejects Ticketmaster charges, even if your account looks fine.
Outdated payment details such as a wrong billing address or expired card can cause the transaction to fail.
Account flags from refunds, disputes, or chargebacks may temporarily lock your account.
If you have seen issues like “pardon the interruption” or Ticketmaster not sending verification codes, these often come from the same fraud prevention filters at play.
How to Fix Ticketmaster Error 5005
Here is a step by step guide, with context for why each fix works.
1. Contact Your Bank or Card Issuer
Call your bank and ask if they blocked the charge.
Request them to whitelist Ticketmaster transactions.
Confirm that 3D Secure such as Verified by Visa or Mastercard SecureCode is enabled.
Banks often block Ticketmaster purchases because they can come through international processors or trigger anti fraud filters. Even if your account balance is fine, a silent block can still prevent the payment. Enabling 3D Secure ensures the transaction passes extra verification and clears the most common payment authorization issue.
2. Update or Re-Enter Payment Info
Log into your Ticketmaster account and open My Account > Payment Options.
Remove any old saved cards.
Manually add your card details again. Do not use browser autofill.
Match the billing address exactly with what your bank has on file.
Even tiny mismatches such as abbreviating “Street” as “St.” can trigger a block. Ticketmaster’s payment system is strict about billing details. Updating your card info forces a clean validation with your bank, which often clears a Ticketmaster purchase error message.
3. Try a Different Payment Method
Use another debit or credit card.
Switch to PayPal or Apple Pay if available.
Buy a Ticketmaster gift card and use it to complete the purchase.
Many users report that simply switching cards solves the issue instantly. PayPal often bypasses the bank’s card level fraud filter because it handles authorization differently. Gift cards work as a last resort when banks keep blocking your primary card, and they can help you avoid another ticketmaster unexpected error during checkout.
4. Clear Cache, Sign Out, and Retry
Log out of Ticketmaster on all devices.
Clear your browser cache and cookies.
Try again in Incognito or Private mode, or use a different browser.
Ticketmaster caches session data. If your payment attempt failed once, the site may remember the failed state and keep blocking you with a generic Ticketmaster error message such as “We’re sorry, something went wrong.” Clearing cookies resets the checkout session and removes stale tokens that can interfere with a fresh authorization attempt.
5. Disable VPNs, Proxies, or Apple Private Relay
Turn off any VPN or proxy apps on your device.
Disable Apple’s Private Relay if you are using iOS.
Retry the purchase without a masked IP address.
Ticketmaster’s fraud detection systems are sensitive to masked or frequently changing IP addresses. If you use a VPN, the system may treat your login as suspicious, especially if the IP shows a different country. Disabling these tools prevents a false positive that can lead to “Ticketmaster oops something went wrong”.
6. Resolve Account Flags With Ticketmaster
Check if you recently refunded or disputed tickets, or have a pending inquiry.
Contact Ticketmaster Support or the Fraud Department and request a manual review.
Ask if your account is flagged and confirm identity if needed.
If you have requested refunds or had repeated failed transactions, Ticketmaster can place a fraud hold on your account. A support agent can clear the hold once they verify your details. This directly addresses situations where you see “Ticketmaster an error has occurred” with no clear explanation.
7. Switch Device or Network
Try a different device such as switching from computer to phone, or the other way around.
Change your connection from Wi Fi to mobile data, or restart your router to refresh your IP.
Log in only on one device during checkout.
Sometimes, the block is tied to your IP address or browser fingerprint. A new device or network resets how Ticketmaster sees your connection. This can immediately bypass a persistent “something went wrong Ticketmaster” loop that is not related to your card limits.
Quick Fixes That Work for Most Users
Switch to PayPal or a different credit card.
Delete and re add payment details, then try again.
Ticketmaster throws different messages depending on what went wrong. Here are the most common ones tied to this error:
“We’re unable to process your request. Please try again later.”
“Your payment method was declined. Please use a different card.”
“Payment cannot be authorized. Please contact your bank.”
“We’re sorry, something went wrong. Please try again.”
“Error 5005: Unable to complete your purchase at this time.”
“Transaction failed. Please use another form of payment.”
If it says “declined”, your bank rejected the charge. If it says “unable to authorize”, 3D Secure failed. If it just says “something went wrong”, Ticketmaster itself flagged your account.
This is a catch all error that usually means your payment was blocked either by your bank or by Ticketmaster’s fraud filters.
Is Error 5005 permanent?
No. Once you clear the fraud check or update your payment method, you should be able to purchase tickets again without a Ticketmaster purchase error message.
Do I always need to call my bank?
Not always. Many users fix it by switching to PayPal or re entering their payment info. If your card keeps failing, your bank’s fraud department must clear the block.
Does changing devices really help?
Yes. Some users fixed the issue instantly by switching from desktop to mobile. Ticketmaster’s system can flag specific browser sessions, so a fresh device can reset your status.
Conclusion
Error 5005 on Ticketmaster is not just a glitch. It is a clear sign that your payment method or account was flagged for security reasons. The fixes above target both your bank’s side and Ticketmaster’s systems, covering payment verification, account flags, and technical issues. Start by confirming your card is authorized, re entering details, and trying another payment option like PayPal. If all else fails, contact Ticketmaster support directly. With a bit of persistence, you can clear this error and complete your purchase without losing your tickets.
Some users experience system error E101 on Xbox One when they try to update their consoles. The error message displays an E101 code that includes other numbers.
Consequently, users can’t play games on their Xbox One consoles. So, it’s a serious error code, but there aren’t many confirmed resolutions.
You can go straight for the Offline update, and we will guide you through the process step-by-step. If that does not work, follow the other solutions.
Press the Windows key + E keyboard shortcut to open File Explorer.
Open the OSU1 ZIP in File Explorer.
Select the Extract all option to open the window shown below.
Press the Browse button to select a path to extract the ZIP to.
Then click the Extract button.
Open the extracted OSU1 folder in File Explorer.
Select the $SystemUpdate file and click Copy to.
Click Choose location on the Copy to menu to open a Copy Items window.
Then select to copy $SystemUpdate to the USB drive.
Remove the USB drive from the laptop or desktop.
Unplug the Xbox One, and then plug it back in again after a few minutes.
Press the Bind and Eject buttons, and hold those buttons to keep them pressed. Then, with the Bind and Eject buttons held, press the Xbox button.
Let go the Bind and Eject buttons after the second power-up tone. Thereafter, the Xbox One should start up at the Xbox Startup Troubleshooter.
Next, insert the USB drive that includes the update files in an Xbox One USB slot.
Select the Offline system update option with the controller’s D-pad and A button to initiate the update.
Thereafter, wait for the console to update and restart.
Microsoft’s resolution for error code E101 is to update the Xbox One offline. Get an empty four to five-GB USB drive formatted with NTFS to do that.
2. Use the Xbox Startup Troubleshooter
Completely power off your console. Disconnect if from power.
Wait for 30 seconds, then plug it back into power.
Press and hold the Pair button (located below the Xbox button on the console) and the Eject button (located on the front of the console), and then press the Xbox buttonon the console.
Hold the Pair and Eject buttons for about 15 seconds.
Release the buttons after you hear 2 power-up tones.
The console should open directly to the Troubleshoot menu.
Plug the USB flash drive with the Offline System Update files into a USB port on your Xbox console.
Select the Offline System Update and update the console.
You can use the Xbox Startup Troubleshooter to update your console. You can access it from the Something went wrong screen by using the D-pad+ and A button on your controller.
If you can’t bring the Troubleshooter from the Something went wrong screen, where you should see the error, follow the steps above.
If the above resolutions don’t fix the system error E101, there might be a hardware issue. In this case, users will need to return their Xbox One consoles to Microsoft for repairs.
An update can break your Xbox One in such a way that you have to send it to the service. However, this is a rare event, so don’t be afraid to update your devices.
The big M offers a free repair service for Xbox One consoles still within their warranty periods.
These potential resolutions might fix the system error E101 Xbox One for you. Please feel free to write us any suggestions or if these solutions helped you in a comment below. And for more useful tips, don’t hesitate to check out our guide on solving system error code E106.
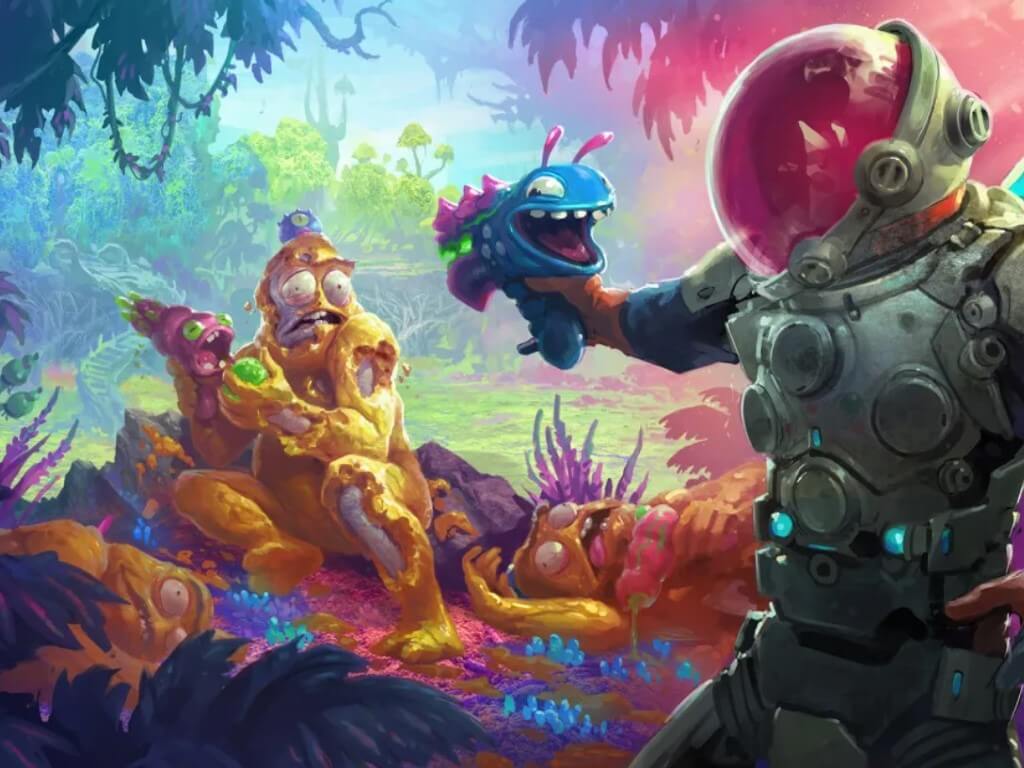
Squanch Games’ colorful and comedic first-person shooter High on Life released on December 12th for Xbox One and Series X|S consoles as well as on Windows. It was also a day one Game Pass release. Since that time High on Life has gone on to become the biggest Game Pass launch for 2022 in terms of the number of hours played in the first five days of release.
Not only that, but High on Life is now the biggest single-player game launch ever on Game Pass, as well as the biggest launch for a third-party game in the history of the service.
High on Life has become the biggest Game Pass launch of 2022, the biggest 3rd party Game Pass launch in history, and the biggest single-player Game Pass launch ever! https://t.co/6bVcUPbEXz
As you might imagine, the developers of High on Life are riding pretty high themselves right now over the game’s success, as are all those involved with bringing the game to Game Pass. General Manager of Content Planning at Xbox Matt Percy had this to say,
High On Life is an incredibly unique title that we’ve been excited about for a long time. It’s fantastic to see so many Game Pass members jump into it at launch to experience Squanch’s story for themselves ahead of the holidays.
High on Life follows the story of a human bounty hunter who teams up with talking, sentient weapons called “Gatlians” to take on an alien drug cartel called G3, with the drugs being humans. The game incorporates adventure and metroidvania elements into its shooting. The game was co-developed by Justin Roiland of Rick and Morty fame.
Core isolation’s Memory integrity feature on Windows 10 and Windows 11 helps enhance security. By enabling this feature, you can fight against extreme cybersecurity threats and malicious code. To enable memory integrity, you can use Windows Security, or make a quick edit to enable it via the Windows Registry Editor.
Why turn on Core isolation’s Memory integrity?
Memory integrity or Hypervisor-protected Code Integrity (HVCI) is a feature under Core isolation that is available on Windows 11. The core isolation technology contains the core processes of Windows but uses memory in a virtualized environment instead.
If Core isolation’s Memory integrity is turned off, you should enable it right away to protect your machine. Here are the benefits:
Protection against malicious code:
Prevent hackers from taking control: Enabling Memory integrity prevents unauthorized access to your PC, by hijacking unsecured drivers on your machine.
Enhances overall security: HVCI improves overall security and protects your privacy on a Windows 11 PC.
Turn on Memory Integrity on Windows 11
If you want to activate Core isolation’s Memory integrity feature on your Windows 11 PC, you have to make sure a couple of things are enabled first:
Enable virtualization on your PC. If it is disabled, you may need to enable it on your motherboard BIOS. Check your PC’s motherboard manufacturer for more information.
Update Windows to the latest version. Just to be on the safe side and ensure you have the latest updates, it’s important to keep your PC up-to-date.
After you have verified your machine has virtualization enabled and your Windows 11 version is updated, follow these methods to enable memory integrity on Windows 11.
1. Enable using Windows Security Defender
Here’s how to enable Core isolation’s Memory integrity using Windows Security Defender.
Click Windows 11 Start and type “Windows Security” and press Enter.
Go to Device security and click Core isolation details.
Under Core isolation, make sure the Memory integrity toggle is turned on.
You may need to restart your PC for the changes to take effect.
2. Enable using Registry Editor
Please note: Before using this method, make sure your PC and CPU are fully compatible with Windows 11. If you try to enable this feature on unsupported CPUs, you may run into trouble, so keep that in mind. Here’s what you need to do.
Click Windows 11 Start and type “regedit” and press Enter.
Navigate to the following location: HKEY_LOCAL_MACHINE\SYSTEM\CurrentControlSet\Control\DeviceGuard\Scenarios\HypervisorEnforcedCodeIntegrity.
Double-click on Enabled.
Set the value to 1 and click OK.
Restart your PC for the changes to take effect.
Editing the Windows Registry should be used as a last resort to force-enable Windows 11 features. If you installed Windows 11 without TPM 2.0, you may not be able to enable Core isolation’s Memory integrity feature.
Core isolation’s Memory Integrity
Core isolation is a revolutionary technology tool for Windows 10 and Windows 11. By default, Core isolation’s memory integrity feature should already be active and ready to use on your PC.
Do you have a different method to enable Core isolation on Windows? Let us know in the comments.
Witcher 3: Wild Hunt is a Windows game that has had rave reviews. However, some players have reported crashing issues because of which the game completely freezes, but you could hear the audio running in the background.
The Witcher 3 freeze with the sound problem is annoying as it doesn’t display any error message when a crash occurs. Consequently, players can’t continue to play Witcher 3 when it freezes.
What are the causes for Witcher 3 freezing with sound?
There are quite a few potential causes for Witcher 3 freezing. After some research, we have deduced a list that contains some of the most common reasons, you could face Witcher 3 freeze with sound error.
Outdated graphics driver: It can often be a graphics card driver issue. The game will likely crash on PCs with faulty graphics card drivers or ones that aren’t updated.
Corrupt of missing Witcher 3 games files: Games can become unstable when some of its game files are missing or corrupted. Therefore, verifying the integrity of the game’s files can sometimes help resolve crash issues.
High graphics settings: Overly high graphical settings might also cause Witcher 3 to freeze up as the settings might not be suitable for the processing available. However, some players’ PCs don’t have suitable video cards for supporting the highest graphical settings. Certain specific in-game graphical settings can also generate issues.
How can I fix Witcher 3 freezing then?
Here are a few preliminary solutions that we would suggest you apply:
Restart your PC. Chances are that there is a temporary glitch that is causing the Witcher 3 freeze with sound error. Restarting will help load all files from scratch.
Restart the game itself. The same thing can happen with the game files, and a simple restart can help you load all game files correctly.
Now, let us check out the advanced troubleshooting solutions and possibly fix the Witcher 3 freeze with sound error.
1. Verify the game’s file integrity on Steam
Open Steam.
Click Library.
Right-click Witcher 3 and select Properties.
Select the Local Files tab.
Click the Verify Integrity of Game Files option.
Wait for the file validation process to complete.
Click the Close button.
NOTE
The Epic Game, GOG.com, and Origin game launchers for Witcher 3 also include similar verification (or repair) options for games. So, players must also verify Witcher 3’s files with those game launchers.
2. Undo PC overclocking
Open the PredatorSense app.
Select Normal under Overclocking section.
Set the Fan control to Auto.
Close the app, relaunch the game and check if this resolves the issue or not.
The above steps are for users who have Acer Predator laptops. You can follow the same steps on your brand’s laptop.
If you’ve overclocked your PC with overclocking software, such as MSI Afterburner, undo all the overclocking applied. Restore all overclocked settings to their default values. It’s especially recommended to turn the Core Clock setting down in MSI Afterburner, and other overclock software.
3. Select the Prefer maximum performance power setting
Open the NVIDIA Settings system tray icon.
Select Manage 3D Settings on the left of the NVIDIA Control Panel window.
Select the Prefer maximum performance option on the Power management mode drop-down menu.
Select your PC’s graphics card and platform on the NVIDIA or AMD menus, and click the Search or Submit button.
Download the latest compatible driver for your PC’s GPU.
Install the NVIDIA or AMD graphics driver.
Go through the installer wizard to install the driver.
7. Uninstall NVIDIA GeForce Experience
Open the Start menu.
Open Control Panel.
Select Programs and Features.
Select the NVIDIA GeForce Experience software.
Press the Uninstall/Change button.
Follow the on-screen prompts to remove the GeForce driver from your PC.
You can more thoroughly remove software with third-party uninstaller utilities like IObit Uninstaller. IObit Uninstaller is a freely available utility that also erases all leftover files and registry entries from uninstalled software.
If nothing works, then you can contact the CD Projekt Red Support service for Witcher 3. To do that, open Witcher 3’s PC contact form page in your browser. Select your platform on that form, and then type a brief message that describes the issue in the text box. Click Submit to send the support ticket.
Players have confirmed the potential resolutions above can fix Witcher 3 freezing. So, there’s a pretty good chance those fixes will stop the game freeze crashes for most players. Some of the general resolutions in our fix game crashes guide might also be useful for fixing Witcher 3 freezing.
We are almost at the end of 2022, and Microsoft has been adding a plethora of features to Excel in a bid to enhance its user experience. And this month isn’t any different, Microsoft released a bunch of nifty features to Excel for the month of December. Here’s everything you need to know:
Excel for the web
Microsoft has incorporated a neat feature in Excel for web users, Formula suggestions. Essentially, after hitting the “=” sign in a cell or the formula bar, you’ll now get automatic suggestions for the best formula to use. This will be based on contextual insights from your data. At the moment, you’ll get suggestions for the following formulas: SUM, AVERAGE, COUNT, COUNTA, MIN, and MAX.
Next up is Formula by Example. This feature is designed to establish a pattern while users are performing manual and repetitive data entry in a column. In the event that Excel identifies one, it will suggest to the user to complete the entire column with a formula. Just like Flash Fill, but this time, its formulas being suggested not static text.
Moreover, users will now be able to correct broken links with the new Suggested Links feature. “Suggested Links allow for new cloud workbook storing for data that detects when an external link to a Cloud workbook is broken and suggests you a new location to fix the broken link,” says Microsoft. Suggested links is rolling out to Production at the moment.
Excel for web users will also be able to make queries easily with the newly added search bar in the queries pane. And finally, with the IMAGE function, users will be able to add images to cells from a source location together with the alternative text.
Thus making it easier to feature images in the worksheet instead of having them float at the top, what’s more, you can move, sort, filter as well as resize the images within the Excel table.
Excel for Windows
Microsoft has added a new shortcut for Excel for Windows that will allow them to open the Power Query Editor easily. That is: Press Alt + F12 (Win32).
Next up is the new capability to create nested Power Query data types that will allow users to arrange and manage their data better. Unfortunately, this feature is only rolling out to Insiders at the moment.
Furthermore, Microsoft has added support for Get Data from Table/Range. In turn, users can import data from Dynamic Arrays, thus allowing them to load them into Power Query and transform the data. At the moment this feature is rolling out to Windows Production. And finally, Excel for Windows is also getting the IMAGE function.
Excel for Mac
Excel for Mac now has a new shortcut that will help users to easily open the Power Query Editor. Simply press Option + F12. Likewise, Mac users will also be able to access the IMAGE function.
To get information on which features are available to you or find which version of Excel you’re on, you can visit the Excel Features Flyer site. That’s it for the month of December folks! Be sure to also check out last month’s post in case you missed it.
The technology behind headphones has evolved over the years and now users get to choose from wired vs wireless. When listening to music, you may encounter an issue where sound is not coming from your headphones. Nonetheless, there are a few factors to consider as such problems can happen to both.
This brings us to the question: Are wireless headphones really better than wired ones? Are they worth the extra money? In this article, we’ll take a look at the pros and cons of each type of headphone and decide which one is best for you.
Are wired headphones better than Bluetooth ones?
There are many factors to consider when buying a pair of headphones. But one of the most important one is the type of connection they use.
Bluetooth technology has become increasingly popular, thanks to its convenience and reliability. However, wired headphones still have their place in the market, especially for people who want more than just music.
So what makes one better than the other?
1. Battery life
The biggest advantage that wired headphones have over wireless ones is battery life. Therefore, if you’re traveling or exercising for long periods of time, it’s nice not to have to worry about your headphones dying on you.
With that said, wireless headphones are certainly better than the old wired models and are getting better every year. You may only get a few hours of continuous use from some wireless headsets, but some have quite an impressive battery life.
2. Sound quality
One of the most important factors when buying a pair of headphones is how they sound. You will want a pair that has clear bass, crisp mids and highs, and very little distortion at high volumes.
A common misconception is that Bluetooth technology always delivers high-quality sound. But it depends on a few factors: the codec (compression) used, the bitrate (data rate), and the sampling frequency (the number of times per second a digital signal is sampled).
The overall sound quality can vary from brand to brand, so it’s best to listen before making a purchase decision. Better yet, you can always incorporate headphone software to improve sound quality.
3. Durability
Most wired headphones last longer than wireless versions because there are fewer parts that can break down over time (such as batteries). Wireless headsets are more delicate and require more maintenance than wired ones.
This is because they contain batteries that must be charged regularly. Your pair is therefore at risk and could potentially break down while it’s charging or during use if you’re not careful with it on your desk.
You want to make sure that your product will last for a long time before it needs replacing or repairing because this will save you from having to spend more money in the future on another pair of headphones or earbuds.
4. Cost
The first thing that you should ask yourself is whether or not you can afford these products. If you cannot afford them, then it does not matter how good they are because you will not be able to buy them.
The cost of Bluetooth headphones is generally higher than that of wired headphones. This is because they require more functionality and technology than wired models do. However, also keep in mind that your headphones may stop working if you buy poor quality just to save on costs.
5. Comfort
Bluetooth headphones offer greater convenience than wired ones because they don’t require any cables or wires to connect them to your music player or phone — just switch them on, pair them with your device via Bluetooth and you’re good to go
Wired headphones can get tangled up easily and can be uncomfortable when they rub against your neck or face. Also, you risk damaging the cables if you easily get caught up in small accidents like falling or tripping over.
Are USB headphones better than 3.5mm audio jack ones?
The 3.5mm audio jack has been the standard for a long time, but USB-C is now taking over. If you’re looking for the best sound quality possible, then yes, you should definitely go with USB headphones.
However, keep in mind that there are many different types of headphones out there and some of them are not compatible with a USB connection. As for wireless, sometimes your Bluetooth headphones are undetectable on your device.
In conclusion, it can be difficult to find a pair of headphones that work well in every situation. The right pair will have a sound signature that matches your preferences, and they’ll also need to be comfortable enough to wear while working out or sitting at a desk all day.
Ultimately, the right pair of headphones is going to come down to your lifestyle and needs, as well as which features you value most. Whatever option you choose to go for, we have awesome recommendations for both wireless and wired headphones.
Google Drive is one of the leading cloud storage, and it has wide acceptance thanks to being free and easily accessible. However, it is not without issues, with users complaining that Google Drive is not showing all files.
Thankfully, it is an issue that can be easily fixed, as we will show in the subsequent sections of this guide.
Why are not all my files showing up in Google Drive?
Listed below are some of the reasons for the Google Drive Drive not showing all files issue:
Faulty browser cache: In some cases, this issue can be due to a corrupt browser cache. You need to clear the cache to solve this.
Firewall interference: Often, Google Drive files might not be showing up on your PC because your firewall is blocking it. You need to disable your firewall and antivirus software to eliminate the problem.
What can I do if Google Drive is not showing all files?
Before delving into the sophisticated solutions in this section, below are some preliminary steps to try:
Run Google backup as administrator and re-sign in
Restart your PC, and Google sync
Use incognito mode on your browser
Search for missing files
1. Pause and resume Google Drive
Click the Google Drive button on the Taskbar.
Select the menu button (three vertical dots) in the top right corner.
Now, choose Pause syncing.
Finally, wait a few seconds, then go back and press Resume syncing.
If Google Drive not showing all folders and files or just files with link on your PC, you should try to pause and resume sync. This will eliminate the glitches that might be causing it to misbehave.
2. View unsynced files online
Click the Google Drive icon in your Taskbar.
Choose View unsynced files.
Finally, click the Visit Google Drive on the web option.
In some cases, the Google Drive files that are not showing might not be synced. The solution is to open the files online and try to sync them again.
3. Make sure all folders are checked to sync
Open the Google Drive menu from the Taskbar.
Go to Preferences.
Finally, tick the radio button for Sync everything in My Drive.
4. Clear browser cache
Launch your browser and click the menu button.
Select the More tools option.
Now, choose Clear browsing data.
Click the Time range dropdown and select All time.
Check the boxes for the Cached images and files, and Cookies and other site data options.
Finally, click the Clear data button.
Sometimes, this issue can be due to corrupt browser data. This happens when your Google Drive cache and cookies accumulate on your browser.
Press the Windows key, type windows defender, and select the Windows Defender Firewall option.
Find and click Turn Windows Defender Firewall on or off on the left pane.
In the Customize Settings window, select the Turn off Windows Defender Firewall (not recommended) radio buttons for both the Private and Public network settings.
Click OK to disable Windows Firewall.
Now, press the Windows key, type virus, and select Virus & threat protection.
Click the Manage settings link.
Finally, toggle the switch under Real-time protection backward to disable it.
If the Google Drive folder is not showing all files, it might be because of your firewall or antivirus. The security tool might flag the files wrongly.
What you need to do here is to disable your antivirus and firewall temporarily.
With this, we can conclude this guide on Google Drive not showing all files issue. You should now be able to solve the problem for good, provided you follow the steps therein.
The Overwatch 2 video game’s Christmas event, Winter Wonderland 2022, is now live on Windows PC, Xbox consoles, and all other supported platforms until January 3rd.
Simply logging into Overwatch 2 will unlock the Festive Wreath weapon charm and 2023 player icon items. A number of additional festive items can also be unlocked for free by completing several in-game challenges. One such item is the Ice Queen Epic Brigitte skin which makes its debut during this event.
Another skin debuting in the game this week is the Legendary Gingerbread Bastion skin (see top image) which can be purchased in-game for just one Overwatch coin.
In addition to new items and skins, four special modes, Mei’s Snowball Offensive, Yeti Hunter, Snowball Deathmatch, and Freeze Thaw Elimination are now live and playable until the end of Winter Wonderland 2022.
Amazon Prime Video is available on multiple platforms, allowing users to watch their favorite shows on any device. However, sometimes, you may experience audio out-of-sync issues when watching TV shows or movies on your TV.
The Amazon Prime Video audio out-of-sync issue can occur due to incorrect frame-matching settings in Apple TV or issues with your streaming devices.
If you are also experiencing the Amazon Prime Video audio out-of-sync issue, follow the steps below. We have listed some known solutions to help you resolve the problem.
How do I fix the Amazon Prime Video audio out-of-sync problem?
1. Disable Frame Rate Matching in Apple TV
Press the Home button on your Apple TV remote.
Open Settings.
Select Video and Audio option.
Open Match Content.
Turn off the Match Frame Rate option.
Relaunch the Prime Video app and check if the audio out-of-sync issue is resolved.
The Match Frame Rate feature allows Apple TV to match its refresh rate to the original frame rate of content. However, this may create issues with some services resulting audio sync problem.
2. Turn off Volume Mode in Roku TV
Launch the Prime Video App and play the content that you want to watch.
While the content is playing, press the * Star button on your Roku TV remote.
Turn off the Volume Moden option. By default, it is set to Leveling or Night. Simply turn the Volume Mode option off.
Close and relaunch the Prime Video app on your Roku TV and check if the audio sync issue is resolved.
The Volume Mode option allows the users to balance volume while watching the content automatically. However, enabling or setting the option to Levelling or Night can also result in audio sync issues with apps like Prime Video.
3. Check your HDMI cable
Unplug the HDMI cable that is connecting your Roku or other streaming devices to the TV.
Make sure the HDMI cable is not faulty.
Broken or loose HDMI cable connections can cause audio sync issues.
Try playing content from another streaming service, such as Netflix, to see if the audio sync issue exists.
If you suspect the HDMI cable to be faulty, replace the cable even if other streaming apps play the content without any issues.
Replacing the HDMI cable has helped several Roku TV users fix the Prime Video audio sync issue.
Check your audio system
If you are using an external audio system like a soundbar and speakers, the problem can be with the audio system.
Try connecting your audio system to another device and check if you can reproduce the issue.
4. Restart or hard reset
Perform a power cycle
Power off all the devices, including your TV and the streaming device (Roku, Apple TV).
Unplug the device from the TV.
Unplug the power adapter from the power outlet.
Leave the devices idle for a few minutes.
Reconnect all the cables and then reboot the devices.
Launch the Prime Video app and check for any improvement.
Factory reset Roku TV
Press the Home button on your Roku remote.
Scroll down and select Setting.
Goto System > Advanced System Settings.
Open the Factory Reset option.
Factory resetting the device will remove all the settings and apps installed on your Roku TV. You will require to set up the device from scratch.
Select Factory reset everything.
Follow on-screen instructions to factory reset the device successfully.
Once done, install Prime Video and check if the audio out-of-sync issue is resolved. Resetting could also resolve the error 7136. If you have any other device, refer to the user manual for factory reset instructions.
The Amazon Prime Video audio out of sync can occur for different reasons depending on your streaming device.
Follow the steps in this article one by one to fix the issue with your Prime Video app. Let us know which method helped you resolve the issue in the comments.
Windows 10 tries to ensure a stable experience regardless of your system configuration or the type of processes and apps you choose to install and run daily.
However, from time to time, you can end up dealing with different issues. Fortunately, they can usually be addressed using built-in troubleshooters or applying easy-to-follow tweaks.
But things are slightly more complicated when you get the White Screen of Death. If you are currently dealing with a White Screen of Death situation on your Windows 10 system, you shouldn’t panic.
In this guide, we will show you different ways to fix the issue, just as we did with the Blue Screen of Death problem.
What causes the Windows 10 White Screen?
There are many reasons for this, but it’s not uncommon for your PC screen to turn white on startup if you’re having issues with drivers.
Another indication that you might have a driver or even a hardware problem is a white screen when playing games, so check your GPU to see if it’s working correctly.
In some instances, your PC screen can become black and white; if this happens, the issue is most likely your settings or even a problem with your monitor.
How can I fix the White Screen of Death on Windows 10?
1. Force restart your Windows 10 system
If you are receiving the White Screen of Death error while trying to boot your machine and the actual Windows login page isn’t displayed, the first thing you should try is a force-restart.
A fresh restart should fix everything if the problems were caused by a specific app or a minor system glitch.
In most situations, a force restart or a force reboot can be initiated by pressing and holding the Power key for a few seconds. Just keep pressing the Power key until the shutdown operation is completed.
Afterward, boot your Windows 10 device once again and see if the Windows 10 white screen problem persists.
2. Remove any peripherals connected through USB
If the White Screen of Death shows up with a cursor on Windows 10 after restarting your PC, you should remove the peripherals connected via USB.
Most likely, a particular external device is a reason for the problem. So, foremost, disconnect everything from your computer.
Unplug even the keyboard and the mouse. Then, force-restart your computer and see what happens.
If the Windows OS starts normally, start connecting your peripherals one at a time. You can now easily identify if a specific external device isn’t running as it should.
3. Go into Safe Mode
Press the Windows key + R to launch the Run utility.
Type msconfig in the run box and press Enter.
The System Configuration window will now be displayed on your computer.
From there, switch to the Boot tab.
Under Boot options, select Safe Boot.
Optional, you can also select Network if you want to use your Internet connection while running in Safe Mode.
That’s it; reboot your device as it will go straight to safe mode.
Sometimes a third-party app can be why you receive the White Screen of Death after login. You should access safe mode to isolate the problem and identify the app that isn’t running correctly.
In safe mode, by default, all third-party apps are disabled.
Thus, shortly, if in safe mode, your device is running without problems, it means that the problems were caused by a third-party process, which can now be easily removed.
4. Update your graphic drivers
4.1. Update drivers manually
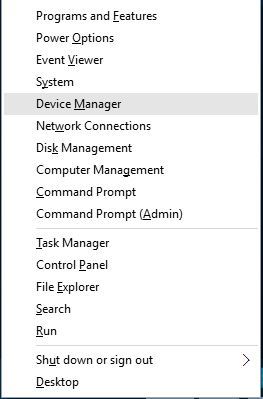
Press the Windows key + X and select Device Manager.
Double-click the Display adapters option to expand it.
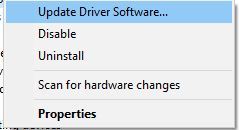
Right-click on each of the drivers there and select Update driver.
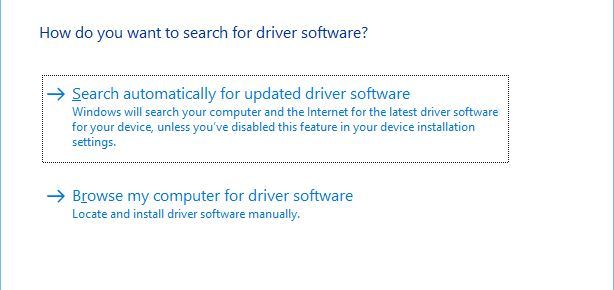
Select the Search automatically for drivers option.
Wait for the search to complete and install any available update.
An outdated graphic driver might bring out the White Screen of Death on Windows 10 and 11 while you try to use or run certain apps.
So, in that case, you should verify if the drivers can receive a new update.
4.2. Update drivers automatically
Updating your graphic drivers manually is tedious, so we recommend using a dedicated driver updating tool to do it automatically.
These tools are fast, updating, and repairing all of your drivers in a single action with minimum implications for you.
5. Apply the newest Windows update
Press the Windows key + I to open Settings.
Select the Update & Security.
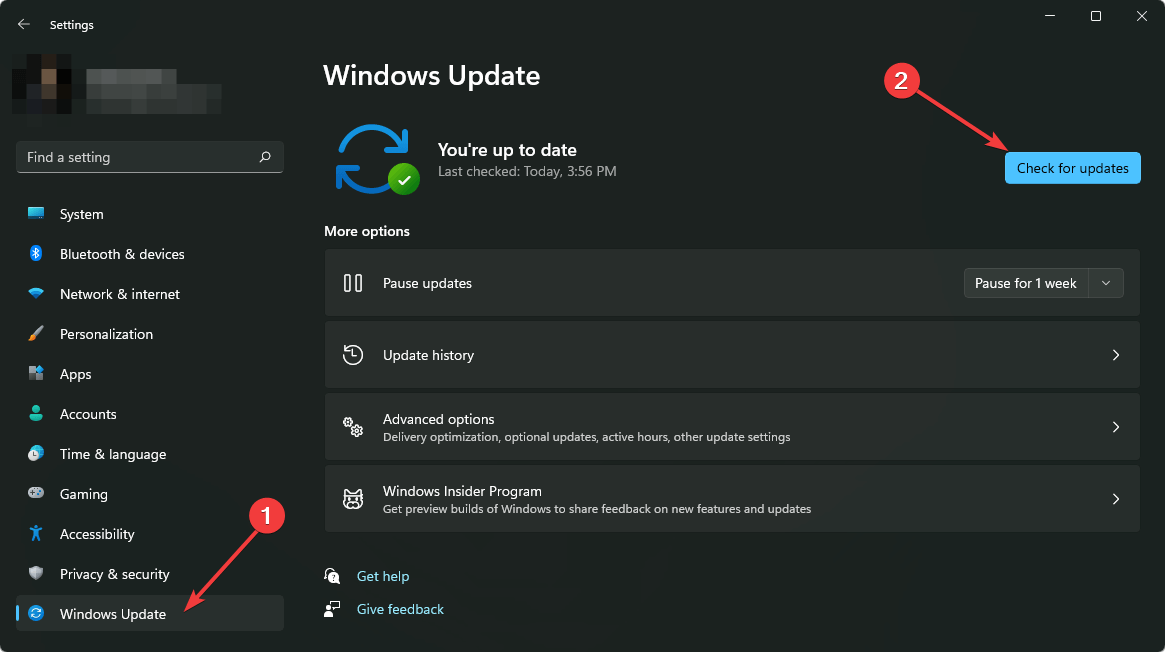
Click the Check for updates button.
Wait for the scan to complete and click the Install now button to install the new updates.
When done, reboot your computer.
Sometimes, your Windows 10 computer turns white and freezes suddenly. An outdated operating system might cause this.
After restarting your Windows 10 or 11 PC, check whether the White Screen of Death persists.
1. Open theSettingsapp and selectUpdate & Security.
2. Scroll down on the Windows Update page and click the View update history option.
3. Now, select the Uninstall updates option. This will open the Control Panel.
4. Now, click on the updates to remove.
5. Click the Uninstallbutton.
If you started to experience the White Screen of Death after installing a new Windows 10 update, the quickest fix is to remove that certain patch.
This can be done via the Installed Updates section on your PC.
7. Use System Restore Point
If you get a Windows 10 White Screen of Death after login, you should consider using a restore point. This way, you can restore your Windows system to a fully functional state.
However, it must be noted that this method requires utmost care. This is because everything that was installed after the restore point chosen will be lost. So, you need to be sure.
If the problem is still there, you should run some tests as there might be a problem with some hardware components.
Faulty hardware might be causing the white screen of death: it can be the graphics card, the monitor, the GPU, the hard disk, or even the motherboard.
Therefore, ensure everything is running correctly; otherwise, you will apply the troubleshooting methods from above in vain.
If you don’t know how to perform these hardware tests, the best will be to take your computer to an authorized service.
How do I restart my laptop when the screen is white?
Sometimes the white screen does not cause your PC to go blank or hang. In this case, you can use the usual restarting methods.
However, if you can’t see anything on the screen, the only option is to force restart or shut down your laptop. This can be done by pressing and holding the power button for a few seconds.
There you have it: Everything you need to know about fixing the White Screen of Death issue on Windows 10 and 11. All you need to do now is to follow the instructions carefully, and things should be back to normal.
If you have further questions or want to share your observations and experience with us, feel free to use the comments below.
There are several errors users encounter when using Outlook on their devices. Recently, Outlook error code CAA2000B is the most common, and it prevents users from signing into Microsoft Outlook.
Running into Outlook Error code CAA2000B on your PC indicates that something went wrong with the login process. So, it means you can’t log into your Microsoft Outlook account at the moment.
Furthermore, many factors can cause the error to appear in Outlook. Some of these factors include:
Network issues – An unstable network or network congestion on your PC can cause problems signing into your Outlook account. It can result in the Error code CAA2000B when you try to log in.
Outdated Outlook app – Many errors can occur when the Outlook app is not updated. It prevents the app from accessing the security patches and updates for fixing bugs that may cause errors. Also, it can cause Outlook not to open due to compatibility problems.
Corrupted Outlook cache – Keeping cache files for a long time can cause them to become old and corrupt, causing issues with Outlook functionality. It can prompt the Error code CAA2000B to occur.
Incorrect time and date – It is common for Microsoft apps to run into errors if the time and date are not correctly set. You can check this guide to change the time and date on your PC.
The cause of the error may vary with different users. So, we’ll take you through some general fixes for the error and get your Outlook account signed in.
How do I fix the Outlook error code CAA2000B?
Go through the following before trying any advanced fixes:
Keeping your Windows OS up to date is quite important because updates provide you with the latest security fixes and features. Several users have reported receiving the Windows Update error 80246007, so let’s see what you can do in case of being one of them.
What is Windows update error code 80246007? Well, it is usually related to downloading updates, but some people have been getting it while updating apps from Windows 10 store too. It can come up accompanied by this error message: failed [80246007] isusinternal:: iscommitrequired.
There are a few solutions that might help you out and we will walk you through them.
How can I fix the Windows Update error 80246007?
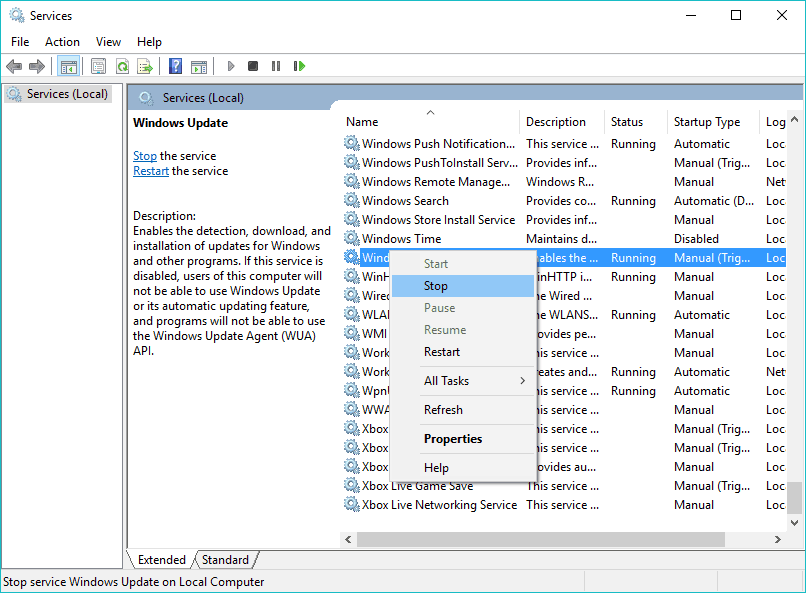
1. Restart Background Intelligent Transfer Service and Windows Event Log
Go to Control Panel and type administrative tools in the search box.
Choose Administrative Tools.
Double click Services. You might be asked to enter your administrator password.
Find Background Intelligent Transfer Service (BITS) service, right-click it and choose Properties.
In the General tab find Startup type and make sure that Automatic (Delayed Start) is selected.
Find Service status next and check if the service is started. If not, click Start.
Click OK and close the Properties dialog box.
Right-click Windows Event Log service and choose Properties.
In the General tab make sure that the Startup type option is set to Automatic.
Find Service status and check to see if the service is started. If not, click Start to turn it on.
2. Disable your antivirus/firewall tools
If you still face the Windows update error code 80246007, it is an excellent idea to take into consideration disabling your antivirus/firewall. These tools usually are a must in every system to protect against virus threats.
However, they sometimes prevent Windows Updates from working, as a result of which you will get annoying error messages. If this makes no difference, we have another suggestion.
To be more precise, you could also temporarily uninstall these programs. For the Norton users, we’ve got a dedicated guide on how to completely remove it from your PC. There’s a similar guide for McAffe users, as well.
3. Use PowerShell to reinstall the apps
Type PowerShell into the search bar, right-click it and tick Create this box with administrative privileges.
Now you need to create a new DWORD (32-bit) Value with Name = AllowOSUpgrade and set the Value = 0x00000001.
Once this key is added you can update your Windows access store and update your apps.
Before modifying the registry, note that any incorrect change you can cause further issues. Thus, be careful about each step you’re taking and create a backup of your registry, just in case.
As you can see, all the above solutions are straightforward and simple, so you’ll be able to fix the Windows Update error 80246007 without any major problems.
If you have any comments, questions or maybe some other solutions for this problem, write your thoughts down in the comments below.
IPTV is highly monitored and has faced massive blocks in Italy. This all stemmed from a lot of illegal providers broadcasting pretty much all TV content in Italy for a very low price or for free.
Fines go all the way up to 10 000 euros per IPTV service, and over 400 IPTV providers have been shut down. Individual users also risk getting fined and being called to court hearings.
Unfortunately, the restrictions seem to also affect people that use legit IPTV services, as ISPs’ blocks deem any activity as suspicious. Consequently, pretty much any type of IPTV no longer works in Italy.
Users report their IPTV does not load channels or is displaying an endless loop of errors.
Luckily there are ways to fix that and access IPTV without being blocked or detected. Check our instructions below to quickly get around this issue.
Which WiFi internet provider blocks IPTV in Italy?
ISPs do not have much of a say in this. They get court orders that force them to monitor and restrict IPTV usage on all their networks.
You can expect to be blocked out of your IPTV service if you use the following ISPs:
Wind
Tim
Cloudflare
Go Internet
Vodafone
Melita
The odds are that other providers will be required to do the same thing in the future. So if you want to keep using IPTV, simply switching your Internet provider may not do the trick.
You need to conceal your online activity, and we got several trustworthy things you can try to achieve that.
NOTE
This guide is for illustrative and informative purposes only. Windows Report declines any responsibility for incorrect use or use that goes against the laws in force in Italy.
How to fix IPTV not working on home WiFi?
1. Use a VPN
VPNs mask your IP and encrypt your traffic data. This makes you untraceable online, so your ISP won’t be able to monitor or block IPTV.
To use ExpressVPN in solving IPTV not working with WiFi:
In the VPN app, pick a server located outside Italy. ExpressVPN has servers in 94 different countries, so there are plenty of options.
Launch your IPTV service.
ExpressVPN is one of the most reliable VPNs on the market. It’s very stable and has a wide range of privacy-oriented features to ensure that none of your information is vulnerable.
It has 3000+ servers in 94 countries, so there are plenty of options you can use to safely connect to in order to get access to your IPTV channels.
ExpressVPN
Bypass the IPTV block using ExpressVPN and enjoy your favorite online content without any risk!
Using a different DNS than the one provided by your ISP makes it more difficult for them to track your activity and block you. The changes will apply to all the devices and IPTV software your use.
Here’s how to change your DNS server from your router’s admin panel:
In a web browser, launch your router settings panel.
Provide username and password to log in. To change DNS, you need to log in with the admin account.
Locate DNS settings and change your DNS addresses.
Save your settings and restart your router.
You can find high-quality DNS addresses for free which should do the job just fine. A reliable and stable option is the Google Public DNS service.
After you set up this new DNS server, try to launch your IPTV service again. At this point, it should work without restrictions.
3. Use a proxy
Proxies too hide your location and mask your IP, being another useful fix if your IPTV does not load the channel list. They can get rid of ISP monitoring that stops IPTV from working on your WiFi network.
Launch Windows Settings.
Select Network and Internet on the menu.
Select Proxy on the left-hand side menu.
Enable the Automatically detect settings toggle.
Under the Manual proxy setup section, turn on Use a Proxy Server.
Turn on the Use setup switch if Windows finds a PAC file already. You can find the switch under Automatic proxy setup.
Now click Save after inputting the proxy address.
You can get a dedicated proxy address online. There are many providers that offer them for free, or at least include a free trial so you can try them out and see if they really can unlock IPTV.
We advise you use a high-quality proxy if you want to stay anonymous, given these serious regulations happening in Italy.
4. Use Tor
Tor is a web browser that works similarly to a proxy. It reroutes your traffic through multiple nodes, making your online activity untraceable.
It’s easy to set up and a great option for those that use IPTV on a PC:
Get Torfrom its official download site and install it.
Launch the Tor app and click on the Connect button.
Wait for the browser to configure.
Type the web address of your IPTV provider and login into your account.
Browse the library and access your content.
Tor is a great free option you can use to bypass these ISP regulations that cause IPTV to not work on your WiFi home network.
Sometimes Tor can get detected, thus blocking your access, but if you enable all its privacy features, you should be fine. Your IP address and true identity won’t be visible even if Tor usage is detected.
Wrap Up
IPTV not working with Wifi is not a new issue. It’s a widespread issue, and major ISPs like Vodafone block IPTV usage in an attempt to comply with the law.
Other IPTV problems you may encounter include the app not working at all, in which case you can follow this IPTV not working guide for general troubleshooting. If you’re missing channel information, you might be dealing with the issue of IPTV not showing the TV guide, which is often tied to outdated EPG data. Additionally, specific errors like IPTV error code 401 or IPTV error code 403 can point to authentication or access problems that require more targeted fixes.
All of the above-mentioned solutions are reliable ways you can fix the IPTV not working with Wi-Fi issues, but that does not mean illegal use is condoned.
We advise you carefully check your IPTV provider’s credibility before you sign up for a subscription, to avoid getting scammed or using illegal services.
The Windows update error 0x80190001 is hindering Windows users from updating their PCs. This error affects every version of Windows and it’s usually due to connection issues, but it may also be caused by corrupted system files.
How do I fix the error code 0x80190001?
1. Run the Update Troubleshooter
Press the Windows key + I to open the Settings app.
Now go to the Update & Security section.
Select Troubleshoot from the menu on the left.
Choose the Additional troubleshooters option.
Now, select Windows Update.
Finally, click the Run the troubleshooter button.
Follow the instructions on the screen to complete the process.
The Windows Update troubleshooter is one of the built-in tools to fix update errors like 0x80190001. Once the troubleshooter is finished, try to update Windows again and check if the problem is still there.
2. Repair your system files
Press Windows key + X and choose Command Prompt (Admin) or Powershell (Admin).
When Command Prompt starts, run the sfc /scannow command.
SFC scan will now start. Remember that an SFC scan can take up to 10-15 minutes, so don’t interfere with it, and don’t run any other applications in the background.
Another cause for error 0x80190001 can be file corruption, and if your system files are damaged, you need to repair them using an SFC scan.
Once the SFC scan is finished, check if the problem is still there. If the issue persists or you could not run or complete the SFC scan, you need to use the DISM scan instead.
To do that, start Command Prompt as administrator and run the command below: DISM /Online /Cleanup-Image /RestoreHealth
This should fix the damaged files and solve any issue with the SFC scan
However, instead of going through the stress of repairing files manually, we recommend using a third-party repair application.
If your system files are faulty or missing, these tools can replace them, restore your registry, and even do a comprehensive hardware analysis of your Windows PC.
They repair and reverse damage on your Windows OS by replacing damaged and removed files with new Windows files and components from the constantly online databases.
3. Disable your Internet connection
According to users, you might be able to fix error 0x80190001 simply by disabling your Internet connection. Make sure that your update is downloaded and installed.
During the installation process, disable your Internet connection. After doing that, follow the instructions on the screen to complete the installation. Of course, this isn’t the best solution, but few users claim it works, so you might want to try it out.
4. Check your antivirus
The problem might be your antivirus software if you can’t update Windows due to error 0x80190001.
Although antivirus tools offer protection, they can often interfere with your system and cause various errors.
To fix this problem, many users suggest temporarily disabling some features or your antivirus. However, if removing the antivirus solves the issue, you should consider switching to a different antivirus solution.
There are many error-free antivirus options like the ESET NOD32 on the market. This software is your best bet to prevent future issues and keep your system running smoothly, as it is an antivirus with low CPU usage.
5. Disconnect all peripherals
If you have problems with error 0x80190001, the issue might be your USB devices. Sometimes USB devices can interfere with your system, leading to similar problems.
However, you might be able to fix the problem simply by disconnecting all USB devices before trying to install the update.
Disconnect all USB devices except for your mouse and keyboard. Once everything is disconnected, try to install the update again.
This isn’t the most efficient solution, but several users reported it works, so feel free to try it.
6. Download and install the update manually
Find the KB number of the problematic update. You can do that from the Windows Update section or the Update History website.
A list of results will appear. Download the update that matches your system architecture and install it.
Several users reported successfully circumventing error 0x80190001 simply by manually downloading the update. However, we must mention that this isn’t a permanent solution, and the issue might reappear when you try to update your system.
7. Make sure your date and time are correct
Right-click the clock in the bottom right corner and select Adjust the date/time.
Toggle switch for the Set time automatically option backward to disable it.
Wait for a few moments and then turn it back on again.
A couple of users reported that error 0x80190001 occurred due to incorrect date and time on their PC. Adjusting your time and date should fix the issue in this case.
After following the steps above, the date and time will be readjusted and synchronized. You can also click the Change button and manually adjust the date and time if you want.
Press Windows key + R, enter msconfig, and click OK.
Click the Services tab.
Check the box for Hide all Microsoft services.
Now, click the Disable all button.
Go to the Startup tab and click Open Task Manager.
Right-click on each application there and choose Disable from the menu.
Go back to the System Configuration window and click Apply, followed by OK, to save the changes.
This issue can sometimes occur due to third-party applications and services. However, you can fix that by performing a Clean boot. Then, make sure you restart your PC and check if the issue is resolved.
Click the Download Now button under the Create Windows 10 Installation Media option.
Now, click the downloaded tool and Accept the license terms.
Then, select Upgrade this PC now and click Next.
Check the Keep personal files and apps option to keep your apps, files, and settings.
Click Install to launch the upgrade process.
According to users, sometimes you can fix this problem simply by performing an in-place upgrade. However, performing an in-place upgrade will force Windows 10 to update to the latest version.
Once the setup is finished, you’ll have the latest version of Windows installed, and the problem will be resolved.
How can I fix error code 0x80190001 on Windows 11?
The main reason you are experiencing the update error 0x90190001 on Windows 11 is interference from your antivirus. You can solve this by disabling your antivirus or obliterating it.
Another known cause of the issue is incorrect time and date. We have shown how to change this earlier in this guide. Finally, you can use our other solutions to fix this error, as the causes are similar on all Windows PC.
Why does the Windows Update error 0x80190001 appear?
As mentioned earlier, there are various versions of this error, each with varying causes. Below are some of the popular ones:
Windows 10 upgrade failed – If your Windows 10 upgrade fails due to this error code, try some of our solutions and check if that solves the problem.
0x80190001 Creators Update, Windows 10 – Many users reported this error while trying to install Creators Update. Bear in mind that this issue can affect any Windows 10 update, but in most cases, you can solve this problem by disabling your antivirus.
How do I do a factory reset with Windows 10?
Press the Windows key + I to open the Settings app.
Choose the Update & Security option.
Click Recovery in the left pane.
Click the Get Started button under the Reset this PC option.
Choose to keep your files or wipe everything and click the Next button.
Now, follow the simple onscreen instructions to complete the process.
If you encounter this issue, the standard solutions listed above will assist you in resolving the Windows 10 update error code 0x80190001.
You should also verify the product key to determine if it is a valid version because this problem might occur even if you use a copy of Windows.
Many processes on the Windows PC. Some can’t be trusted, while some are marked as trusted by the Security Identifier. Event ID 4688 is a process creation command written in Windows viewer as Event ID 4688.
On a Windows computer, an event process is simply a running program. The Windows Event ViewerWindows event log provides an in-depth record of events concerning the system, security, and application stored on the windows operating system.
Many processes will be started as part of the operation on a standard workstation or server throughout a working day. Consequently, malware frequently starts one or more processes as part of its operation.
However, Event ID 4688 can log these malicious activities with process creation events. If their malware activities appear in log files, they can be detected and tracked using thread haunting.
So, it starts a new process that contains information such as time, process name, parent process, source, level, computer, etc.
How do I enable the event ID 4688?
1. Via the Group policy
Press the Windows + R keys to launch the Run window, type gpedit.msc, and click OK.
Navigate through this path: Windows Settings\ Security Settings\ Advanced Audit Policy Configuration\ Audit Policies\ Detailed Tracking\ Audit Process Creation
Also, double-click on the Include Command Line in Process Creation Events, select Enabled, and click OK.
Event viewer on Windows will record all process creation logs on Windows. Furthermore, you can read more on Event viewer on Windows.
2. Enabling Event ID 4688 with local policy
Left-click the Start button, search the Event viewer, and launch it.
Also, select the Windows Logs and click Security from the top left corner.
Choose the Event and click on the Filter Current log from the right side.
Select the Event ID bar from the pop-up menu, type in 4688, and click OK.
It will display the event process creation records.
Issues with domain certificates are quite common. If you’re getting the Windows doesn’t have enough information to verify this certificate error message, read on to find out how to get rid of it.
What causes this certificate error message?
In most cases, the problems with the certificate verification occur due to lack of proper certificates installed on your system. Consequently, the same goes for Windows doesn’t have enough information to verify this certificate error.
Basically, this problem occurs when either intermediate or root certificates are not installed as intended.
How can I fix Windows doesn’t have enough information to verify this certificate?
An obvious solution is to reinstall the certificates. This is easily by checking the state of certificates, where all Root and Intermediate certificates should come with the This digital signature is OK verification.
Since this usually appears on Internet Explorer, here’s the procedure how to install required certificates in no time:
Click on these 2 links respectively to download the necessary certificates. VeriSign_Class_1_Public_Primary_Certification_Authority _G3.cer Symantec Class 1 Individual Subscriber CA – G4.cer
Save the certificates to desktop.
Double-click on the certificate files one by one and run it.
Click Install Certificate.
In the Certificate Import Wizard, click Next, and select Place all certificates in the following store.
Click Browse.
Select Trusted Root Certification Authorities for Symantec_Class_1_Public_Primary_Certification_Authority _G3.cer
For the Symantec Class 1 Individual Subscriber CA – G4.cer, select Intermediate Certification Authorities.
Confirm the selection and click Next.
Click Finish and you are done.
If you want to check whether all certificates are properly installed, follow these steps:
Open Internet Explorer.
In the top right corner, click on the cog-like icon and open Internet Options.
Select the Content tab.
Choose Certificates.
Click on the Personal tab.
You should see all certificates and they should say This digital signature is OK.
We hope that the Windows does not have enough information to verify this certificate error message is now a thing of the past. Let us know your thoughts in the comments section below.
Symantec Service Framework, or ccSvcHst.exe, is a hidden service installed on your PC alongside the Norton security software. However, its process can cause Symantec Service Framework high CPU usage.
What causes the Symantec Service Framework’s high CPU usage?
Symantec Service Framework (ccSvcHst.exe) is an executable file displaying Norton products GUI (Graphical User Interface). It runs in the background alongside Norton security software. However, the ccSvcHst.exe process can cause high CPU usage on the PC.
Furthermore, in the Symantec Service Framework’s high disk usage can occur due to numerous factors. Some are:
Corrupt system files – Some users report not having any Symantec products installed on your computers but still experiencing high CPU usage by ccSvcHst.exe. It means it’s a corrupt system file issue and can affect other components on your PC.
Outdated Norton software – Since Symantec Service Framework (ccSvcHst.exe) belongs to Norton Security software, it can run into issues if Norton is outdated. It can be problems with bugs the software can’t fix because it can’t access patches and updates.
Norton security software activities – Activities like Floppy drive scanning on the computer can cause it to use a lot of system resources, resulting in Symantec Service Framework’s high CPU usage. Also, the security processes can be delayed for some reason, causing issues.
Virus or malware infections – The ccSvcHst.exe executable file on your PC may run into problems due to viruses and malware on your computer.
However, you may experience high CPU usage for a different reason. Regardless, we’ll discuss some easy fixes you can use to fix it.
How do I fix the Symantec Service Framework high CPU usage?
If the problem continues, proceed with the troubleshooting steps below.
1. Run the Norton product LiveUpdate
Launch the Norton security software on your PC.
On the My Norton window, next to Device Security, click Open.
Click LiveUpdate. It will download the update if any is available, then click OK.
Updating the Norton product will fix bugs causing it to use too much CPU and improve its performance. Check ways to fix Norton antivirus failing to update on your computer.
2. Run a System File Checker (SFC) scan
Left-click the Start button, type the command prompt, and select Run as administrator.
Click Yes on the User Account Control prompt.
Type the following and press Enter: sfc /scannow
Restart your PC and check if there is still a high CPU usage.
If the ccSvcHst.exe file is present without any Symantec products, it is most likely to be malicious. So, a System File Checker scan will check and remove corrupt system files on your computer.
3. Disallow Norton antivirus from scanning the floppy drive on your PC
Launch the Norton security software on your PC and go to Settings.
Select Automatic Protection, then click on the Configure button.
Select General settings under the Real-Time Protection tab.
Uncheck the Scan floppy disk in A: for boot viruses when shutting down option.
Disabling the settings will prevent Norton from scanning floppy disks as it can take time and resources. Read about fixing Norton security settings not opening when clicked.
4. End task for ccSvcHst.exe
Right-click the Start button and select Task Manager from the menu.
Navigate to the Processes tab. Select the ccSvcHst.exe from the list, right-click on it, click End Task from the drop-down menu, and click OK to confirm.
Restart your PC and check if the Symantec Service Framework high CPU persists.
Ending the ccSvcHst.exe process on your PC will kill its background activities that may cause high CPU or memory. You can check for shortcuts to open Task Manager on your PC.
When attempting to update Windows, you might encounter the error 0x8024001e, preventing system updates and application updates. This article provides troubleshooting steps to resolve this issue.
What is error 0x8024001e?
I’ve encountered error 0x8024001e, usually due to conflicts and restrictions, such as third-party antivirus interference or missing DLL files. This error can prevent Windows from installing updates successfully
How do I fix error code 0x8024001e?
Before moving on to more complex troubleshooting solutions, check your Internet connection and ensure it’s working. You can also try removing your third-party antivirus software.
1. Fix or replace missing DLL files
Missing .dll files can lead to system and update errors. Using an automated repair tool can scan your computer, identify missing or mismatched .dll files, and restore them to resolve the issue.
2. Restart the Windows Update service & replace SoftwareDistribution
Press the Windows key, type cmd, and select Run as administrator.
Type the following command, then press Enter to restart the Windows Update service and replace the Software Distribution folder: net stop wuauservrename c:\windows\SoftwareDistribution softwaredistribution.oldnet start wuauserv
Restart your computer afterward to see if the error has been resolved.
Several Windows 10 users who experience the error 0x80240034 reported that their Windows Update gets stuck at 1% and it fails entirely.
You can see the Windows Update error 0x80240034 when you view the update history which indicates that the update has failed, though downloading might be 100% complete.
You’ll find in this guide a few effective solutions that can be applied to fix the installerror 0x80240034 once and for all.
How can I fix the Windows Update error 0x80240034?
Free up some space by deleting unnecessary files or apps
Disconnect external hardware that you’re not using (peripherals, USB media)
Use the Get help option in Settings
Now let’s get down to the actual solutions. Take them one by one, and don’t forget to restart your device after each to apply the changes.
1. Use Windows Update troubleshooter
The built-in Windows Update troubleshooter effectively eliminates a lot of issues, and allows users to download updates that are throwing errors. And the best part, it’s all done automatically.
1. Go to Start, type Settings and then hit the Enter key.
2. Head over to Update & Security and choose Troubleshoot.
3. Find Windows Update, and click Run the troubleshooter.
4. Follow the on-screen instructions to complete the troubleshooting process.
5. Once done, restart the computer for the changes to come into effect.
2. Run SFC
Press Windows+Q and type cmd.
From the search results, right-click Command Prompt and choose Run as Administrator.
A new cmd window appears. Type sfc /scannow and then hit the Enter key.
Wait until the scan and repair process is finished.
It can happen that the SFC command will not bring useful results to completely fix this. Yet, there are alternative methods, such as professional repair tools that scan the Windows OS and restore it automatically.
3. Run DISM
Press Windows key + X and run Command Prompt (Admin).
Copy and paste the following command on the command line:
dism.exe /Online /Cleanup-image /Restorehealth
In case the DISM can’t obtain files online, try using your installation USB or DVD. Insert media and type the following command:
In the search box, type the update code in the search box and then hit the Enter key.
From the list of matching updates, locate the update that uses the same architecture as your system.
Click the Download button next to the update to download it.
Once you download the update, run the setup file and follow the instructions.
After the update is complete, restart your Windows PC.
5. Run a full system scan
Sometimes a malware infection can cause a 0x80240034 Windows update error. To fix the problem, we advise you to perform a full system scan with your antivirus.
In case you don’t have a reliable antivirus, we strongly recommend trying out a fast one that won’t interfere with your system in any way.
To find the most suitable choice in terms of antivirus protection, it is highly recommended to choose a professional solution from the best antivirus software for Windows 10.
6. Reset Windows Updates Components
Open Win + X menu and select Command Prompt (Admin) from the list. You can do that by pressing the Windows Key + X shortcut.
Once the Command Prompt opens, type the following commands:
net stop wuauserv
net stop cryptSvc
net stop bits
net stop msiserver
rmdir %windir%SoftwareDistribution /S /Q
net start wuauserv
net start cryptSvc
net start bits
net start msiserver
Hit the Enter key afterward and then check to see if the problem is resolved.
In addition, you can create a reset script using the steps outlined in our WUReset script guide.
The This is not the exe you are looking for error is usually encountered with Civilization 5 and Bioshock Infinite, amongst other games and apps. If you see this message, that usually means you have downloaded the game from a third-party website and it’s infected with a virus.
The This is not the .exe you are looking for error falls under the category of a dummy file. A dummy file is an application mimicking a real one but with no real output, and as a result, you can’t launch the app.
This is not the exe you are looking for is actually a pun from the Star Wars Ben Kenobi line These are not the droids you are looking for.
What to do is to immediately uninstall the game and manually delete any traces of the game files. Another important step is to use a reliable antivirus to scan your system and get rid of this dummy file.
How can I fix This is not the exe you are looking for error?
Perform a system restore
Press Windows + R to open the Run command, type rstrui, and click OK.
Select Choose a different restore point, and click on Next to proceed.
Now, select a restore point created before the error was first encountered, and click Next.
Click on Finish to start the restore process.
That’s it! If nothing so far has worked, a system restore should get things up and running. And you wouldn’t lose any files, though installed apps or configured settings might be lost.
That wraps it up for us! By now, you would have the This is not the .exe file you are looking for error fixed. In case it persists, reinstalling Windows is the only possible fix.
Virgin has been one of the leading traditional television services in the UK for many years. Now, its TV Go service lets you stream content over the internet using your Smart TV or mobile device.
You can watch live and on-demand TV, including free and premium channels, movies, full box sets, and more.
However, if you’re receiving an error message saying: Virgin TV Go not available in this region, you may need a virtual private network (VPN) to gain access.
Why is Virgin TV Go not available in your region?
Virgin TV Go is a UK-based service and is only officially available to customers streaming within the UK.
Of course, this isn’t ideal if you pay for the service but travel to different countries and still want to watch your favorite shows.
Moreover, there’s no doubt its impressive library draws the attention of users outside the UK as well.
However, without some extra steps, these users will face Virgin geo-blocking, which prevents streams from loading.
The good news is setting up a VPN is easy when you know how.
How to fix the Virgin TV Go not available in this region error?
A VPN works as a middleman between you, your ISP, and the internet. So, any request you make or data you receive is routed through a separate server and encrypted.
This means your browsing habits can’t be tracked. But, more importantly, your real location stays hidden as well.
In fact, the best VPN providers like Express VPN let you choose the server’s location, which makes it appear like you’re also residing there.
So, if you don’t live in the UK or are simply traveling abroad, you can set your location in the UK to unblock Virgin TV Go.
Here’s a simple step-by-step guide to getting the streaming service working in your region using ExpressVPN.
Log in with your details and press the three dots to open its available server locations.
Scroll down and select the UK to connect to the best server in the country or use the arrow to manually choose a different UK location.
Click the big on/off button and wait to be connected.
With the VPN active, launch the Virgin TV Go app and log in.
You should now be able to stream content as normal.
Now, if you’re still receiving the Virgin TV Go not available in this region error, it means Virgin has saved data suggesting you are still outside of the UK.
This could be in the form of cookies, the app cache, or your GPS location. To fix this, log out of the app and follow these steps:
Go to your browser settings and locate the Cookies section. Depending on the browser, this may be under Security and Privacy or its own tab.
Scroll down and click All Sites or See all site data.
Use the search bar to find Virgin and delete all the corresponding cookies.
Next, go to your device settings and locate the list of apps.
Navigate to Virgin TV Go.
Depending on your device, choose Force Stop, Clear Data, Clear Cache, or all of the above.
If on mobile, go to Settings > Location (Privacy on iOS), and toggle off location completely. Alternatively, locate Virgin TV Go and revoke the permission.
Launch the VPN and connect to a location in the UK.
Finally, relaunch Virgin TV Go.
Note: You may need to use a VPN to sign up for Virgin TV Go if you permanently reside in another region.
Which VPN works with Virgin TV Go?
Most premium VPN providers make quick work of the Virgin TV go is not available in this region error. We’ve narrowed down the 5 best, based on streaming speed and other features.
ExpressVPN takes the top spot for its super-fast servers and the ability to choose from four UK locations in London, the Docklands, and the Midlands. All currently work with Virgin TV Go.
Additionally, it has superior encryption and leak protection, which means your real location will never be revealed. If you ever become disconnected, the kill switch will halt all traffic until you reconnect.
ExpressVPN is great for streaming services, as it has mobile apps and can be configured on Smart TVs and routers.
You can connect 5 devices at once, so multiple people in the household can use the internet with a VPN.
ExpressVPN
Enjoy unrestricted access to Virgin TV Go and the highest streaming quality with ExpressVPN.
PIA VPN is one of the few providers to offer customers a dedicated IP address. This means Virgin TV Go cannot block you based on public server information, because it’s exclusive to you.
There are three UK locations to choose from: London, Manchester, and Southampton.
Moreover, it has dedicated apps for all your devices, including desktops, browsers, iOS, Android, gaming consoles, and Smart TVs.
There’s also no risk of accidentally leaking your real location because the multi-hop feature routes your traffic through an additional proxy.
You can connect up to 10 devices at once, so it can cover your entire home network.
Private Internet Access
Unblock Virgin TV Go and stream on all your devices, thanks to PIA’s vast global network.
CyberGhost has fast UK servers in Manchester, London, and Berkshire. Moreover, it has special options to optimize your connection for streaming services like Virgin TV Go.
It also has excellent leak prevention. For example, you can disable all IPv6 connections from within the app, instead of messing with your operating system.
Apps include desktop, mobile, Smart TV, and game consoles. And, up to 7 devices can use the VPN at the same time.
CyberGhost
Unblock Virgin TV Go and enjoy high-quality playbacks with CyberGhost’s streaming-optimized servers.
If you have a busy network, Surfshark offers unlimited connections and great speeds for streaming. It consistently supports 70 Mbps, so you’ll have no trouble watching Virgin TV Go in HD.
Additionally, you also have your pick of UK locations, including London, Manchester, Glasgow, and Edinburgh.
Surfshark excels at protecting your identity, offering a kill switch and IP rotation. This constantly changes your IP address to hide your location.
Surfshark
Watch Virgin TV Go without restrictions using this powerful and untraceable VPN!
NordVPN is another provider with quick servers in the UK. You can spoof your location to Manchester, London, Glasgow, and Edinburgh. If you prefer the Irish Virgin TV Anywhere service, there’s also a server in the Republic of Ireland.
Furthermore, NordVPN is perfect for streaming thanks to its Smart Play feature. This automatically performs optimal DNS routing.
Other useful features include a kill switch and multi-hop for an extra layer of privacy.
With 6 supported devices, households should have no trouble getting multiple users online.
NordVPN
Enjoy a seamless streaming experince and watch Virgin TV Go from anywhere with NordVPN.
When you get the Virgin TV Go not available in this region message, it means you’ve been caught accessing the service outside of the UK.
However, while you’re not technically allowed to watch from a different region, a good VPN makes geo-blockingeasy to bypass.
Our 5 picks guarantee enough speed for streaming, UK locations, and leading privacy.
FAQ
Why can’t I use Virgin TV Go abroad?
You’re not permitted to use Virgin TV abroad because it’s a UK-based service that digitizes traditional UK TV channels and content. Streaming services in other countries have their own rights agreements.
Because of this, Virgin TV Go monitors the IP address and location of its users and blocks anyone trying to log in from a location outside of the UK.
Fortunately, this is only a basic automated process, and a VPN can easily spoof your location to unblock access.
Where is Virgin TV Go available?
Currently, Virgin TV Go is only available in the UK. There’s a similar service for Irish customers called Virgin TV Anywhere.
However, anyone outside these regions is not officially permitted to use the service.
Is Virgin blocking VPN?
Virgin has been known to openly oppose the use of VPNs and has occasionally blocked specific servers. Fortunately, the top providers regularly change and update their systems, so this shouldn’t be a problem.
If you suspect Virgin has blocked a VPN location, all you have to do is disconnect and manually choose a different one. Remember to follow the above steps in case Virgin is temporarily using another method to identify your location.
Every time Microsoft rolls out a new Windows 10 build, many users can’t install the update due to various error codes.
The latest Windows 10 build is no exception to this rule, as users reported that the 0x80246019 error code prevented them from downloading and installing the build.
I tried to get the update to 14385 and got this Error 0x80246019. I ran the troubleshooter and it went through hoops stopping and restarting a variety of things, then rebooted. Now Windows update tells me I am up to date, but the feedback hub shows I still have 14383. Any help from an engineer would be gratefully received.
What causes the 0x80246019 error?
The Windows Update error 0x80246019 appears when the download failed because the user has no license to download the content.
Many users reported error 0x80246019 while downloading the latest Insider builds. This error is relatively common, and users reported it in the following instances as well:
0x80246019 Windows Update – This problem usually occurs while using Windows Update, and if you encounter it, be sure to try some of our solutions.
0x80246019 Microsoft Store – If you have this error message with Windows Store, you might be able to fix the problem using some of our solutions. For more in-depth solutions, we suggest you check out our Windows Store error 0x80246019 article.
How can I fix the Windows Update error 0x80246019?
1. Check your antivirus software
If you’re getting error 0x80246019 while trying to download the latest builds of Windows 10, the problem might be your antivirus.
To fix the problem, check your antivirus settings and try disabling certain features.
If that doesn’t work, you might have to disable your antivirus altogether.
In some instances, disabling the antivirus might not be enough, so we advise you to temporarily uninstall your antivirus.
Even if you remove your antivirus, you’ll be protected by Windows Defender for the time being until you install another third-party antivirus solution.
If removing the antivirus solves the problem, this might be a good time to consider a compatible antivirus software, that doesn’t interfere with any Windows updates.
2. Remove the $WINDOWS.~BT directory
According to users, sometimes $WINDOWS.~BT directory can cause error 0x80246019 to appear. This file is created by Windows Update and its purpose is to store temporary files.
However, these files can get corrupted and that can cause various issues to appear. To fix that problem, you need to remove $WINDOWS.~BT by doing the following:
Type disk in the Search bar. Select Disk Cleanup from the list of results.
Make sure that your System drive, is selected and click OK.
Wait while the PC scans the selected drive. This process usually takes a couple of seconds.
Now you just have to select the files you want to remove and click OK. Be sure to go to the Clean system files button and select Temporary Windows installation files.
After removing these files from your PC, check if the problem is still there. Many users reported that removing this directory fixed the issue for them, so be sure to try it out.
3. Unplug the USB devices
According to users, error 0x80246019 can appear due to your USB devices.
Sometimes certain USB peripherals can interfere with your system and prevent you from downloading the latest builds.
To fix that issue, it’s advised that you safely remove all unnecessary USB devices from your PC.
To fix the problem be sure to disconnect your webcam and printer and leave only the essential devices, such as your keyboard and mouse, connected.
After doing that, try to install the latest build again.
4. Change the Insider Program Settings in the Settings app
If you can’t download the latest builds due to error 0x80246019, the problem might be your settings. To fix the problem, you need to make a couple of changes to the Settings app.
To do that, follow these steps:
Press Windows Key + I to open the Settings app. Now go to the Update & Security section.
Locate and click the Stop receiving Insider Preview builds.
Now click the Cancel button to confirm.
After doing that, try to download the updates again.
5. Disable real-time security in Windows Defender
Sometimes error 0x80246019 can occur due to Windows Defender and its Real-time security feature.
According to users, Windows Defender can block certain files by mistake, and that can lead to this error.
To fix the problem, it’s advised to disable Real-time security in Windows Defender. To do that, just follow these steps:
Open the Settings app and go to Update & Security.
Navigate to Windows Defender in the menu on the left. Click the Open Windows Defender Security Center in the right pane.
Go to the Virus & threat protection.
Choose Virus & threat protection settings.
Now disable Real-time protection.
After doing that, Windows Defender protection will be disabled. Now try to install the new build and check if the problem is still there.
Keep in mind that disabling Windows Defender isn’t advised, so be sure to enable it once you install the latest build.
6. Run the SFC /Scannow command
According to users, sometimes the Windows Update error 0x80246019 can occur if your Windows installation is corrupted.
This issue can occur for various reasons, but you can fix it simply by performing an SFC scan.
To do that, just follow these steps:
Press Windows Key + X to open Win + X menu. Select Command Prompt (Admin) or PowerShell (Admin) from the menu.
Once Command Prompt opens, enter sfc /scannow and press Enter to run it.
The scan will now start. SFC scan can take about 15 minutes, so don’t interfere with it.
After the SFC scan finishes, check if the problem is still there. If the problem is still present or if you were unable to use the SFC scan, you need to run a DISM scan by doing the following:
Start Command Prompt as an administrator and enter DISM /Online /Cleanup-Image /RestoreHealth command. Press Enter to run it.
DISM scan will now start. Bear in mind that this scan can take about 20 minutes or more, so don’t interfere with it.
After the DISM scan is finished, check if the error is still there. If you were unable to run the SFC scan before, try running it now and check if that helps.
7. Run the Windows Update Troubleshooter
In some cases, you might be able to fix error 0x80246019 simply by running a Windows Update troubleshooter.
Windows comes with various troubleshooters that allow you to automatically fix some common problems.
To use Windows Update troubleshooter, do the following:
Open the Settings app and head over to the Update & Security section.
Select Troubleshoot from the menu on the left. Choose Windows Update from the list and click the Run the troubleshooter button.
Follow the instructions on the screen.
After the troubleshooter is finished, check if the problem is still there. This is a simple solution, but few users reported that it worked for them, so you might want to try it out.
If you encountered error 0x80246019 when trying to update your Windows, and used one of the workarounds listed above or even your own fix, tell us which solution worked for you in the comment section below.
Users have reported that the 0x80248014 download error appears in two cases – when they’re unable to check for updates and when they cannot complete a purchase in the Microsoft Store.
We have solutions for both problems, so just follow the instructions from this article.
How to fix Microsoft Store/Windows Update error code 0x80248014
1. Reset Network components
Right-click on the Start Menu button, and choose Command Prompt (Admin).
Enter the following command and press Enter: net stop WuAuServ
Now, past the following into Search and press Enter: %windir%
In Windows folder, find SoftwareDistribution folder, and rename it to SDold.
Open Command Prompt (Admin) again, and enter the following command: net start WuAuServ
Try to check for updates again
2. Delete the Software Distribution folder
Go to Search, type services.msc, and go to Services.
In the Services list, search for Windows Update.
Right-click and go to Properties, then choose Disable.
Restart your computer.
Now that the Windows Update service is disabled, let’s go and delete (rename) the SoftwareDistribution folder:
Navigate to C:\Windows and find the SoftwareDistribution folder.
Rename folder to SoftwareDistribution.OLD (you can delete it, but it’s safer if we just leave it there).
Restart your computer.
Once you do that, go and re-enable the Windows Update service:
Once again navigate to Services and find Windows Update and, in Properties, change from Disabled to Manual.
Restart your computer once again.
Check for updates.
3. Run the Troubleshooter
Go to Settings.
Head over to Updates & Security > Troubleshoot.
Now, click Windows Update, and choose Run the troubleshooter.
Follow further on-screen instructions.
Alternatively, you can use a third-party troubleshooting tool. Choose one from our great list.
Many gamers like to use their Xbox 360 Controller with Windows 10 while playing their favorite games.
This is great if you don’t want to spend money on an additional controller, but there have been reports that Xbox 360 Controller is not working with Windows 10, and today we’ll try to fix that.
There are many things that could go wrong, and we will try to focus on all of them:
How do I fix Xbox 360 controller driver issues on Windows 10?
1. Install the driver manually
If you’re using a wireless Xbox 360 Controller, you need to use a wireless receiver in order to connect it to your computer.
Sometimes, drivers for wireless receivers have to be updated, or your Xbox 360 Controller might not work on Windows 10.
To update the drivers for your receiver, follow these steps:
Open Device Manager. You can access Device Manager by pressing Windows Key + X and choosing Device Manager from the list.
When Device Manager opens, make sure that your receiver is connected to your PC. Navigate to Other Devices section and expand it. Right-click the Unknown device and choose Update Driver Software from the menu.
Click Browse my computer for driver software.
Now click on Let me pick from a list of device drivers on my computer.
You should see a list of device drivers. Select Xbox 360 peripherals and click Next.
Choose the latest Receiver driver that’s on the list and click Next. If you get a warning message, just click OK and wait for the driver to install.
Now you just need to hold the pairing button on your Bluetooth receiver and on your Xbox 360 Controller for about 3 seconds. After doing that, your computer should recognize your controller.
After the driver has been installed, your Xbox 360 Controller should start working on Windows 10 without any problems.
It has been reported that this solution works with third-party receivers as well, so even if you don’t use Microsoft receiver, it should work without any problems as long as you install Microsoft’s drivers.
2. Uninstall the driver
Sometimes Xbox 360 Controller might not work on Windows 10 due to bad driver, and if that’s the case, the best solution is to uninstall that driver and allow Windows to install it again.
To uninstall the driver, follow these steps:
Start Device Manager.
In Device Manager locate Xbox 360 Wireless Receiver for Windows and right-click it.
Choose Uninstall from the menu.
After the driver has been uninstalled, restart your computer. When your computer restarts, Windows 10 will automatically install the missing driver.
3. Install the latest drivers
Sometimes your Xbox 360 Controller might not be recognized due to outdated driver, and if that’s the case, make sure that your Windows 10 is up to date with latest patches.
In addition, you can also download the necessary drivers from this link. After you’ve downloaded and installed the appropriate driver, Xbox 360 Controller should start working again.
If this method doesn’t work or you do not have the necessary computer skills to update/fix the drivers manually, we strongly suggest doing it automatically by using an automated driver updater.
3 ways to fix Xbox 360 Controller Steam issues in Windows 10
1. Uncheck Remember this application is a game in Windows Game overlay
Press center button on your Xbox 360 Controller while you’re playing any Steam game.
When Windows Game overlay appears, uncheckRemember this application as a game.
After you’ve done that, Windows Game overlay will be disabled while you’re playing games on Steam, and the Steam overlay should be restored.
It has been reported that Xbox 360 Controller has some issues with Steam, and according to the users, they cannot access Steam functions by pressing the center button on Xbox 360 controller.
By default, pressing the center button on your Xbox 360 Controller should give you Steam overlay, but for some reason, Windows Game overlay appears instead.
2. Disable Game DVR in Xbox app
Press Windows Key + S and type Xbox. Choose Xbox app from the list of results.
When Xbox app starts, click Settings (gear icon).
Now go to Game DVR tab and make sure that Take screenshots using Game DVR option is disabled.
It has been reported that the Game DVR functionality of the Xbox app can sometimes create problems with Xbox 360 Controller and Steam.
Users report that the center button isn’t working properly, and it’s giving them Windows Game overlay while playing Steam games.
This isn’t a big problem, and it can be fixed by disabling the Game DVR functionality in the Xbox app.
After disabling the Game DVR option, Xbox 360 Controller should work with Steam without any problems.
By disabling the Game DVR option you won’t be able to record gameplay or take screenshots using the Xbox app, but you can always use alternative software to fix this problem.
3. Turn off the Game bar
Open the Windows 10 Settings app
Go to Gaming
Turn it off via the toggle switch at the top
How can I fix Xbox 360 controller blinking buttons?
1. Make sure that you have the latest updates installed
Open the Settings app and go to Update & Security section.
Go to Windows Update section and download all available updates. In addition, you might want to download optional updates as well because those updates are often designed to update your gaming devices and hardware.
After the updates have been downloaded, restart your computer.
After your computer restarts, check if the issue is resolved.
Users have reported blinking buttons on Xbox 360Controller, and if you have this issue, it’s advised that you install the latest updates for Windows 10.
2. Reconnect your controller
Users report that their wired Xbox 360 Controller is blinking after Windows 10 wakes up from Sleep Mode.
In order to fix the blinking Xbox 360 Controller, you just need to unplug it and connect it to your computer again.
According to users, this solution works if you’re using a wired Xbox 360 Controller, but if you’re using a wireless Xbox controller, you might want to unplug your Bluetooth receiver and connect it back again.
In addition, you might have to pair your wireless Xbox 360 Controller by pressing the pairing button on the Bluetooth receiver and Xbox 360 Controller.
How to fix Xbox 360 controller Play and Charge issues on Windows 10
If you have Play and Charge problems, the solution is to use a wired controller or purchase a Bluetooth receiver for Xbox 360 Controller.
Xbox 360 Play and Charge cable is designed to recharge your wireless Xbox 360 Controller while you play games on Xbox 360.
Play and Charge cable works with Windows 10, but using Play and Charge cable won’t allow you to play games on Windows 10 with a wireless Xbox 360 Controller.
The Play and Charge cable is designed just to recharge batteries on your wireless Xbox 360 Controller, and even if you have your controller connected to your console or PC, the controller still uses wireless signals to communicate with your PC / Xbox console.
Therefore, if you want to recharge your wireless Xbox 360 Controller while playing games on Windows 10, you’ll have to purchase a special Bluetooth receiver for Xbox 360 controller.
Fix Xbox 360 wired controller not working
The solution is pretty simple: you’ll have to make sure that you’re using a powered USB port.
Sometimes wired Xbox 360 Controller might not work with Windows 10 if you connect it to the USB port on the front of your computer.
In order to fix any potential issues with wired Xbox 360 Controller, it’s always better to connect it to the USB port on the back of your computer since those ports are usually powered USB ports.
If you’re using a USB hub, it’s also advised that you don’t connect the wired Xbox 360 Controller to it since most USB hubs don’t come with powered USB ports.
Using Xbox 360 controller on Windows 10 is a great way to save money since both wireless and wired Xbox 360 Controllers are compatible with Windows 10.
Although Xbox 360 Controller might have some issues on Windows 10, you can easily resolve most of them by following our solutions.
Don’t forget to share your problem and how you solved it in the comments section below.
Some users are reporting that their Cold War game is shutting off Xbox Series X every time they try to play the title, while the other games run just fine.
Though minor problems like issues with the frame rate in Xbox Series X are common, Cold War shutting it off unexpectedly had users all confused. And the worst part, nothing seemed to work. So, let’s find out how you can fix things.
Why is Xbox Series X shutting off when playing Cold War?
Here are a few reasons Cold War keeps crashing or turning off Xbox Series X:
Running an incorrect version of the game – Most users don’t know, but there are two versions of the game. And if you are running the wrong version, Xbox Series X might shut down.
Misconfigured settings – Misconfigured game or console settings can also trigger the shutdown.
Improper ventilation – When talking about hardware issues, improper ventilation leading to an increase in temperature is usually the reason behind Cold War shutting off Xbox Box Series X.
Bug in the game – The problem has been reported by many, so many believe it could be a bug in the game.
How can I fix Cold war shutting off Xbox Series X?
Before we head to the slightly complex fixes, here are a few quick ones you should try:
Make sure the console is not surrounded by objects and can effectively release the hot air.
Update Xbox Series X and verify whether it stops shutting off when playing Cold War.
Plug the console directly into a wall socket instead of a surge protector or a hub to ensure that it receives adequate power.
Once you identify signs that your game is about to crash, such as the frame rate acting weird or jittering, accompanied by the controller not vibrating, simply press the Power button, wait for Power menu to appear, and then hit the B button to close it. When the game begins, things should now work.
If none of these work, head to the solutions listed next.
1. Install the correct Xbox series
It seems that the problem occurs as a result of players accidentally downloading the Xbox One version of the game. You can easily solve this issue by making sure to download the correct version of Black Ops Cold War to your console.
Keep in mind that the Xbox Series X of the game is 130 GB, and it also features an X/S label on the game’s icon. These two characteristics will help you choose the right version.
Moreover, if you want to have Call of Duty: Black Ops Cold War on both consoles, it is available through the upgraded version of the game.
2. Disable Ray Tracing
Ray Tracing allows games to look more realistic, but it has been found to be the reason Xbox Series X keeps shutting off when playing Cold War.
A simple fix here would be to disable Ray Tracing in the Graphics tab of Cold War settings. Though not a sure-shot fix, this one has helped several users, and we recommend you give it a try.
3. Turn off Party Overlay
Party Overlay is one of the reasons the game is shutting off Xbox Series X. Though there’s no official confirmation for it, users who disabled Party Overlay reported better game performance and far lesser crashes, if not eliminated outright.
If nothing so far has worked, it’s recommended that you contact Xbox support since the problem might lie with the hardware and, as a result, Cold War is shutting off Xbox Series X.
With these solutions, your gaming console shouldn’t run into issues again. Also, find out the best Xbox games and play at least one of these today!
Tell us which fix worked or drop any other solution that did the trick for you in the comments section below.
If you’ve ever wondered if you can turn your Xbox into a PC, you came to the right place.
Because the Xbox console has the same hardware specifications as some older computer desktops, you will be able to convert it to a fully functioning PC. Unfortunately, you will not be able to install Windows on your console, but you can use the Linux operating system.
In this article you will find out what items you’re going to need in order to make this happen, and also the steps you need to follow to accomplish this.
Note: Please read through the instructions carefully before starting this process to make sure that you are able to manage all the steps required.
In the case that you’re not secure enough on your skills to achieve this, it is recommended that you don’t try it, as a mistake may result in making your Xbox console unusable.
How can you turn Xbox One into a PC?
1. Required items
Xbox console
Lexar JumpDrive Secure 128 and 256 MB or Kingston Data Traveler 32 and 256 MB
USB cable adapter
A Linux OS
Mechassault Xbox game
2. Get a bootable Linux image on your USB stick
Attach your USB memory device to your console by using the USB cable adapter.
Turn on your Xbox console (This will reformat your USB device in order to be recognized by the Xbox, and will display the device inside your dashboard).
Flash the FatX image (compatible Xbox format) to your USB stick by connecting it with your PC.
Transfer the Mechassault image to your USB device by dragging and dropping it inside of it.
3. Copy FatX image to your Xbox
Remove the USB device from your PC and connect it to your console.
The USB will appear inside your Xbox dashboard.
Open the USB device from your dashboard -> you will notice three options – Emergency Linux, Remove Linux, Install Linux.
Select Memory -> select USB device.
Click on the Install Linux entry and select Copy -> choose Xbox hard disk (repeat this step for all three entries).
4. Run the copied image to start Linux
Insert the game copy of Mechassault.
Navigate inside the Xbox dashboard hard-drive and select the Emergency Linux file copied earlier.
If all of the steps above were performed correctly, then your Xbox will restart and the TV will show a black screen with white letters. (that means Linux is booting)
Navigate to the address 192.168.0.3 and log in with root as username and Xbox as a password.
After logging in, type the following command xbox_tool-a to display the hard disk key (make a note of this key as it might be useful in the future).