Many Windows 10 users reported not being able to run WebGL supported websites. Error message WebGL is not supported pops up disallowing 2D and 3D graphics to run in Google Chrome.
In order to fix the WebGL issue, we managed to come up with a series of fixes described below.
Why is WebGL disabled in my browser?
WebGL is enabled by default in most modern browsers, and the only way for it to be disabled is if you changed your browser settings.
Sometimes you might experience problems while trying to run WebGL content, but our guide should be able to help you fix that.
How do I fix this browser does not support WebGL?
1. Make sure your browser is up to date
1. Launch your browser. In our case, we will be launching Google Chrome.
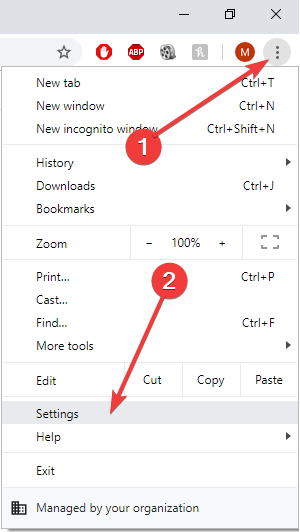
2. Click the Three button icon on the top right corner of the browser.
3. Scroll to the Help section and expand it.
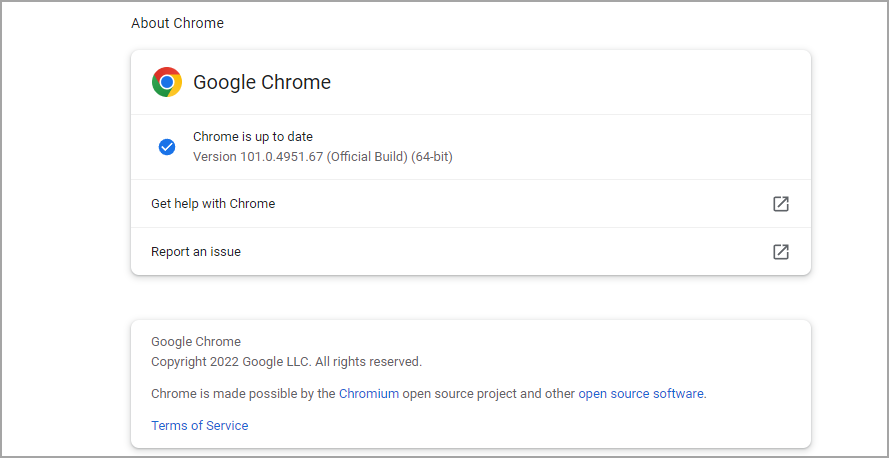
4. Click on About Google Chrome.
5. The update process will then start on its own.
If you’re getting Your browser does not support WebGL in Chrome then make sure that the browser is up to date.
By doing so, you’ll also fix Your browser does not support any of the required graphics API for this content error.
2. Try a different browser
If you keep having this issue with your browser, such as Your browser may not be compatible message when running WebGL content, perhaps switching to a new browser might help.
Opera One focuses heavily on user security and safety, and with built-in Adblock and tracking protection, it will make your browsing more enjoyable.
More so, the Chromium engine makes it extremely fast, reliable, and frequently updated, which helps users to browse the internet much more straightforwardly.
The looks are pretty impressive too, and those that put heavy emphasis on visuals will be overjoyed by what they can find there in terms of customization tools.
This browser is based on Chrome, so it will support the same features and extensions while providing support for WebGL.
Opera One
Surf the Internet at lightning-fast speeds and without much stress for your PC with this stable web browser.
Click the Three button icon on the top right corner of your browser.
Navigate to the System in the right pane.
Enable Use hardware acceleration when available toggle is on – it should be colored blue.
After making this change, click the Relaunch button to restart Google Chrome.
Although these steps are for Chrome, Your browser does not support WebGL in Firefox can be fixed by using similar solutions.
4. Disable installed extensions
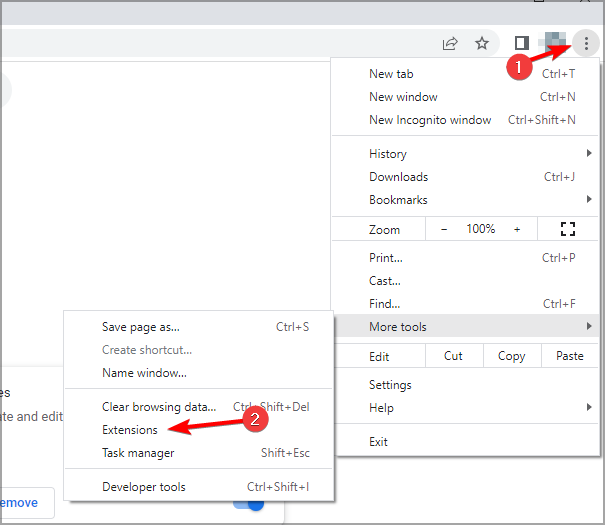
Click the Three button icon on the top right corner of the browser.
Expand the More tools menu and then select Extensions.
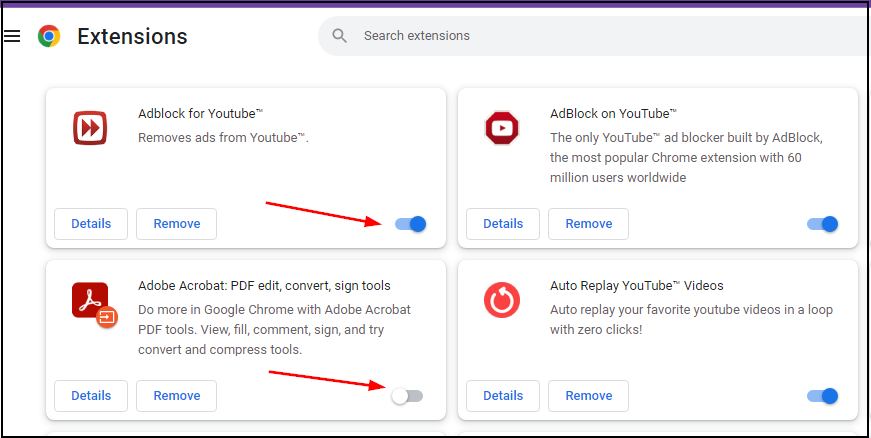
Disable the extensions by clicking the toggle switch next to their name – toggle turning gray means the extension is disabled.
Extensions can be a problem on any browser, and this solution should help you fix Your browser does not support WebGL on Edge.
5. Update your graphics drivers
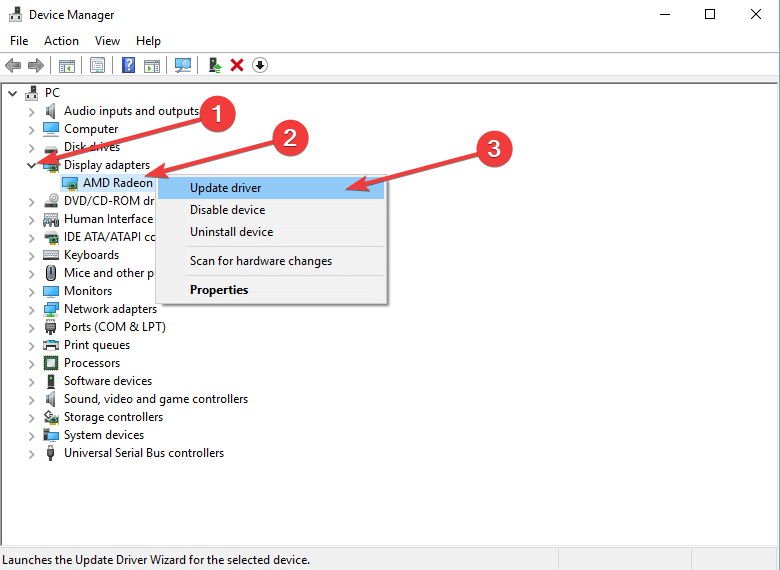
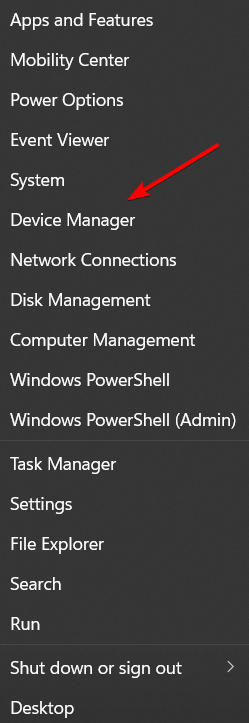
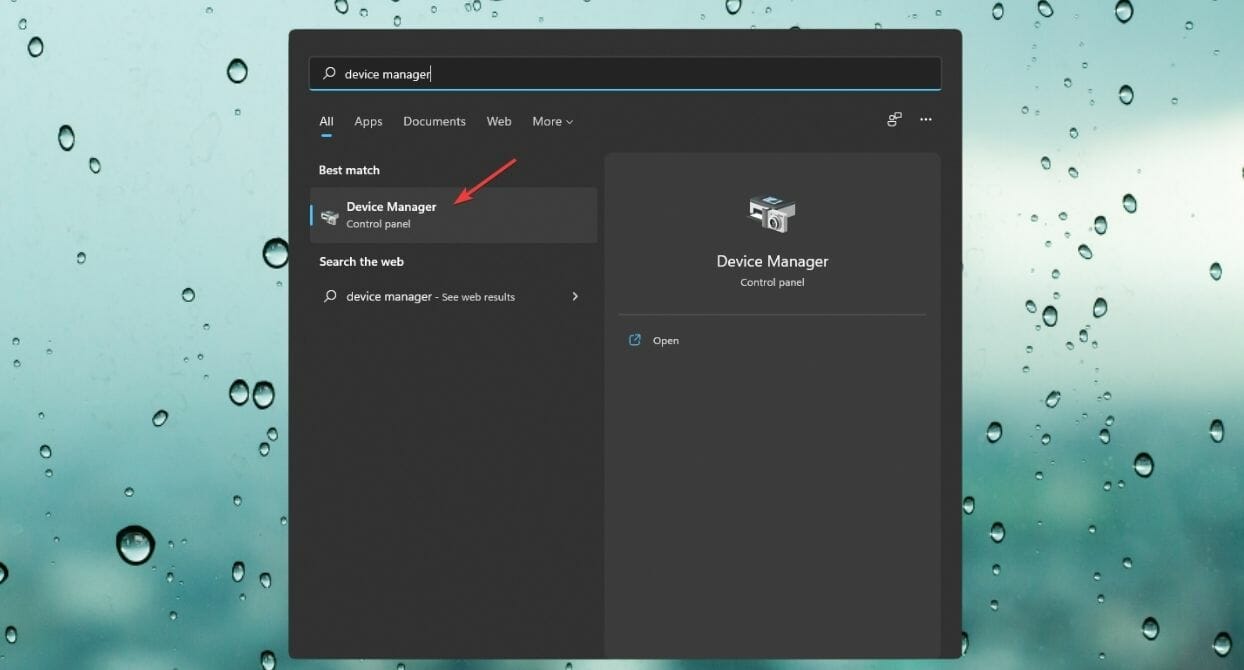
Open Device Manager. You can do that by pressing Windows key + X and selecting Device Manager from the list.
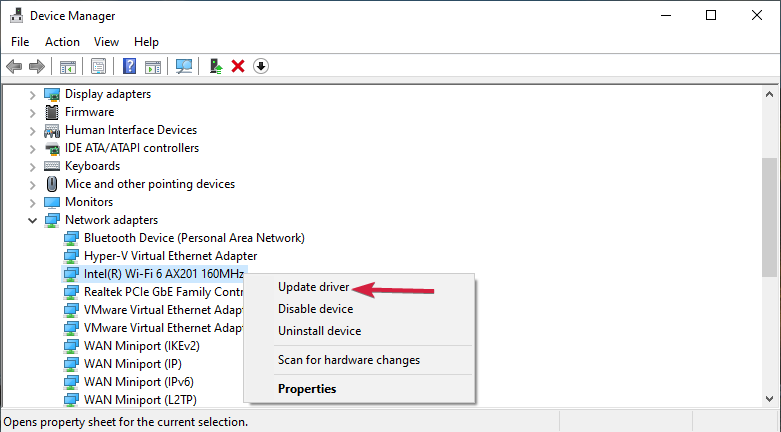
In the Device Manager click to expand the Display Adapters section.
Right click on your graphics card and select Update driver.
Click Search automatically for updated driver software.
Approve the download for the updated drivers, then wait for the installation to finish.
Restart your computer once the installation is finished.
Open the WebGL-supported website again to see if it worked.
Always check that you have the most recent versions of your drivers. There are third-party tools that can accomplish this for you automatically. The driver updater Outbyte Driver Updater can assist you in automatically updating drivers and preventing PC harm caused by installing the incorrect driver version.
If upgrading drivers isn’t your thing, this automatic solution will maintain a record of updated display adapter drivers for future needs.
This is a universal solution, and it will help you fix Your browser does not support WebGL in Opera One and Opera GX.
This can also help with a WebGL2 could not be created, it is necessary to make decentraland run error, so be sure to try it.
Can my PC run WebGL?
Most PCs can handle WebGL content without any issues. Even if your PC is couple of years old, it should be able to handle less demanding content with ease.
To check if your browser supports this coponent, just go to WebGL page and see if the content works for you.
What browser supports WebGL?
Almost all browsers support WebGL 1.0, so you can view WebGL content on both desktop and mobile. However, the situation with WebGL 2.0 is slightly different.
Most desktop browsers support WebGL 2.0, with the exception of Internet Explorer. As for mobile browsers, OpenGL is supported on most mobile browsers, but where are few that don’t support it.
How do I download WebGL?
WebGL is a built-in component of your browser, and it will be downloaded and installed along with your browser.
This means that you can’t download or install it separately. Everything is available out of the box, as soon as you start your browser.
As you can see, fixing this issue is pretty simple, so make sure that you keep your browser up to date and all the necessary components running.
We hope that our guide on how to fix WebGL on Google Chrome was of help for you. If you know any other working solutions, feel free to leave them in the comment section below.
Want to remove OneDrive from Windows 11, but it keeps coming back or syncing files? You’re not alone. Many users want to permanently remove OneDrive from Windows 11, either to free up system resources or to switch to another cloud solution.
Below are the most effective ways to completely uninstall OneDrive on Windows 11.
✅ Ideal if the Settings method doesn’t work or you want a deeper cleanup.
This method is particularly useful if OneDrive keeps launching unexpectedly or even opens in two instances on your system.
3. Delete OneDrive Folders and Registry Entries (Advanced Users)
To fully remove OneDrive from Windows 11, also clean up leftover files and registry keys.
Delete these folders (if they still exist):
C:\Users\<YourUsername>\OneDrive
C:\OneDriveTemp
Remove registry keys (caution):
Open Registry Editor (regedit)
Navigate to: HKEY_CLASSES_ROOT\CLSID
Search for and delete any entries related to OneDrive
⚠️ Backup your registry first. Registry changes can affect system stability.
Still seeing cloud-linked files or slow syncing before removal? You might’ve experienced slow OneDrive upload speeds on Windows, which is another reason many users look to uninstall it.
4. Disable OneDrive via Group Policy (Pro & Enterprise Only)
If you’re using Windows 11 Pro or Enterprise:
Press Win + R, type gpedit.msc, press Enter
Navigate to: Computer Configuration > Administrative Templates > Windows Components > OneDrive
Double-click Prevent the usage of OneDrive for file storage
Set it to Enabled > click Apply and OK
✅ This stops OneDrive from launching or syncing, even if it’s installed.
This step is particularly helpful if OneDrive was used for automatic cloud backups, like those from apps such as WhatsApp storing files to OneDrive.
5. Use PowerShell to Force Uninstall OneDrive
If all else fails, PowerShell can help when you can’t uninstall OneDrive on Windows 11.
✅ Useful when dealing with stubborn or reinstalled OneDrive apps.
Note that this won’t affect files you’ve backed up through other devices. If you’re using OneDrive on mobile, you may run into issues like files not showing up on iPhones or iPads.
Yes. You can reinstall it from the Microsoft Store or by running OneDriveSetup.exe again.
Does removing OneDrive delete my files?
No. Your local files remain, and your cloud files are still available on onedrive.live.com.
Why can’t I uninstall OneDrive from Settings?
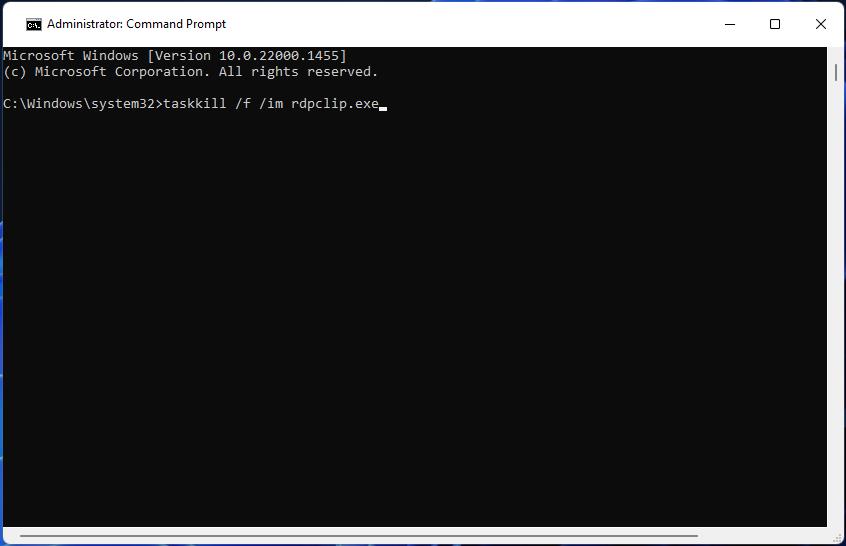
It may be running in the background. Use Task Manager or Command Prompt to terminate the process before uninstalling.
Conclusion
Whether you’re trying to stop sync issues or just clean up your PC, it’s possible to fully remove OneDrive from Windows 11 using built-in tools or advanced methods. Start with the Settings app, and if needed, escalate to Command Prompt or PowerShell to permanently uninstall OneDrive. If you’re facing additional issues tied to OneDrive, several workarounds linked above may help resolve them too.
You have just encountered the error message WSL something went wrong. A WSL error in Windows 11 might occur for a variety of reasons. The exact message is WslRegisterDistribution Failed with different error codes.
The Windows Subsystem for Linux (WSL) is a function that allows developers and typical users to install and work with Linux on their Windows computers.
Even though this functionality is precious for developers, it can occasionally cause mind-boggling complications that are difficult to fix.
Fortunately, these errors aren’t impossible; in this post, we’ll discuss all possible causes and solutions.
Why is WSL not working?
There are a few reasons why WSL may not work. Among these include the following:
Malware on the computer – Viruses may cause many PC problems and hinder WSL from working. We recommend using the best Windows 11 antivirus.
Disabled service – If you are using WSL for the first time, there are chances that the WSL service is turned off on your device.
Permission issues – You may have to fix file permission issues before using WSL on a Windows 11 device.
Errors with the LxssManager – LxssManager controls distribution operations in the background. If it fails to start or is stuck in the process, you may get the 0x80070032 error.
The WSL error in Windows 11 includes a variety of codes and warnings, and the most prevalent are WslRegisterDistribution Failed with errors: 0x80070032, 0x80370102, 0x8007023e, and 0x8007019e.
Now that we’ve covered the causes and error codes, let’s go into the solutions.
Press the Windows key, type Turn Windows features on or off, then click on the result to open it.
Find Windows Subsystem for Linux and enable it.
Click OK.
Let it search and install the required system files, restart your computer and check if the problem is solved.
Alternatively, you can enable WSL using Windows PowerShell by following the steps below:
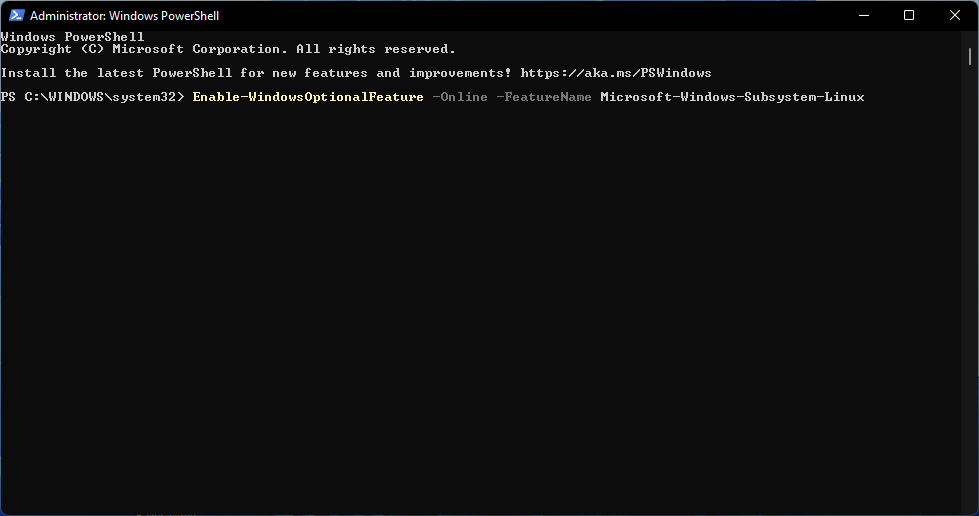
Click on the Start menu, type Windows PowerShell, right-click on it and select Run as administrator.
Copy and paste the following code: Enable-WindowsOptionalFeature -Online -FeatureName Microsoft-Windows-Subsystem-Linux
If needed, type the following letter to reboot your system: Y.
1.3 Enable Virtual Machine
Go to the Start menu and type Turn Windows Featureson or off, then click on the result to open it.
Find Virtual Machine Platform and enable it, then click OK.
The virtual machine installation is necessary for running WSL and is a good step if something goes wrong. If your system supports it, install it using Windows Features unless you encounter issues.
1.4 Fix file permission issue
Press Windows + R keys to open the Run dialog box.
Type %localappdata%\Packages\ and press Enter.
Find the Distro folder, right-click on it, and select Properties.
Go to the Security tab section, and click on the Advanced option.
Check to see if your account is on the list or not. If your account is on the list, proceed to the following method; if not, delete and install WSL again.
1.5 Restart the LxssManager Service
Press the Windows + R keys to open the Run.
Type Services.msc and press Enter.
Find LxssManager, right-click on it, and select Stop.
Relaunch WSL and check if the error is disappeared or not.
1.6 Launch WSL from Microsoft Store
Press the Windows key to open the Start menu, type Microsoft Store and press Enter.
Select My Library from the app’s bottom left corner.
Find the Linux distribution app, such as Ubuntu, then click Launch and check whether the problem is solved.
Sometimes Windows 11 WSL errors may happen because of a bug in your installed Linux distribution. To solve this issue, you can relaunch the WSL distribution app from the Microsoft Store.
2. Use a PC repair tool
It’s not uncommon for your computer to be the root of a problem, and it’s simple to fix using a third-party tool. These tools allow you to automatically scan for and replace any broken system files.
3. Fix WslRegisterDistribution Failed: 0x80040306 error on installation
Press the Windows + R keys to open the Run dialog box, then type cmd.exe.
Right-click on the title bar, and choose Properties.
Press the Windows key to open the Start menu, type Turn Windows Features on or off, and press the Enter key.
Find Hyper-V and enable it.
Now, click OK.
Restart your computer and check if the problem is solved or not.
If something goes wrong with WSL, you may only have to restart or enable Hyper-V.
4.2 Enable Hardware Virtualization
Right-click on the Start menu and open Task Manager.
Go to the Performance tab and check if Virtualization is enabled.
If Virtualization is not enabled, restart your computer and hit the BIOS key as soon as the computer starts up to enter your PC BIOS option. For example, the BIOS key could be F1, F2, F10, F12, or DEL.
Locate the CPU configuration section and enable Virtualization.
It would be best if you turned on the hardware Virtualization to use Hyper-V-powered WSL on your computer.
4.3. Turn on the Virtual Machine Platform (VMP)
Go to the Start menu, type Turn Windows Features on or off,then hit Enter.
Find Virtual Machine Platform and enable it, then click on OK.
Wait for the installation to complete and restart your computer.
VMP is one of the necessary features that must be enabled to fix the Windows 11 WSL error code 0x80370102.
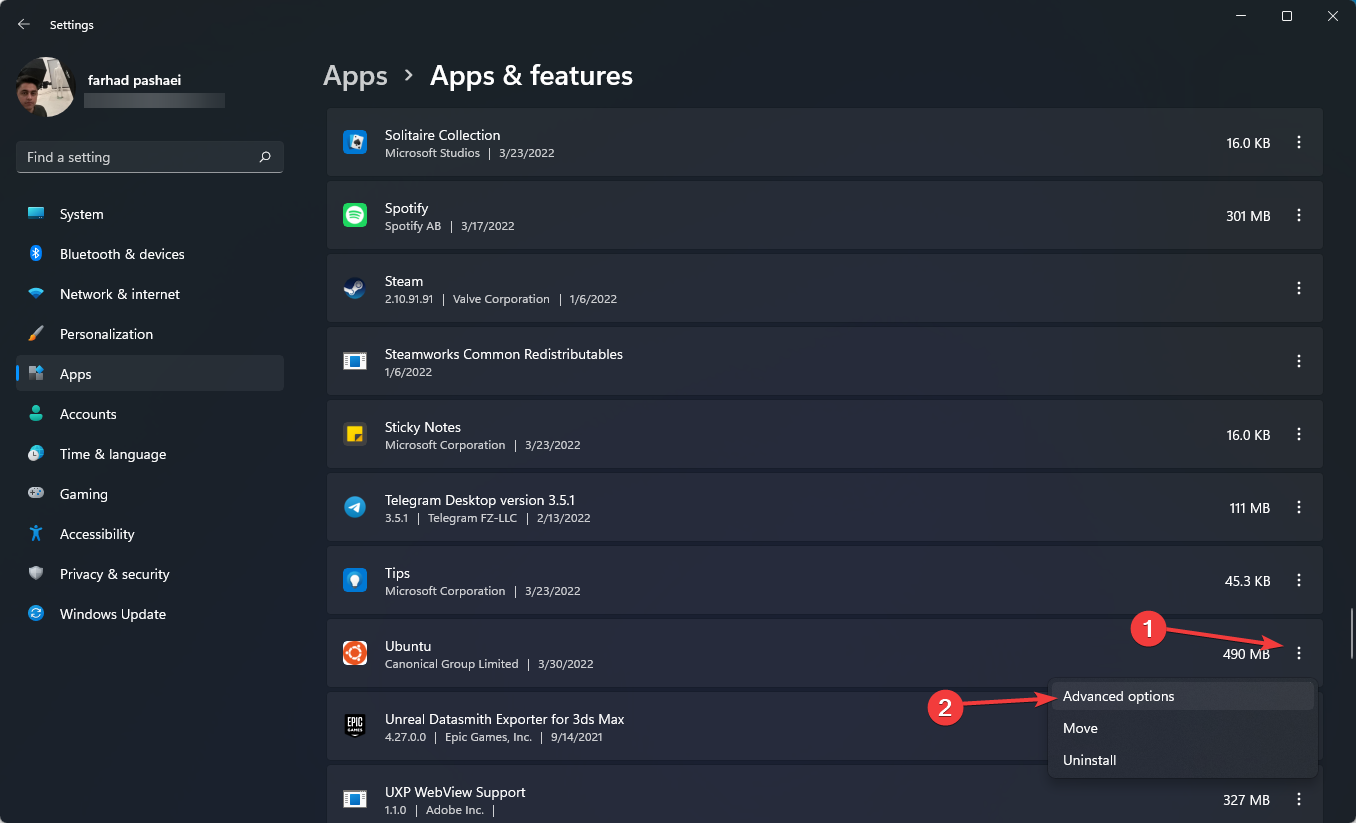
In the left pane, click Apps, then in the right pane, pick Apps & features.
Find a Linux Distribution Application such as Ubuntu, then click on the three-dot and select Advanced Options.
Please scroll down the page to find the Repair option, then click on it.
Check to ensure the error has been fixed; if not, proceed to the next solution.
6.3. Reset the Linux Terminal App
Press Windows + I keys to open Settings.
In the left pane, click Apps, then in the right pane, pick Apps & features.
Find a Linux Distribution Application such as Ubuntu, then click on the three-dot and select Advanced Options.
Please scroll down the page to find the Reset option, then click on it.
WslRegisterDistribution failed with error 0x8007019e may occur because of a corrupt installation of the Linux application. You can repair or reset the Linux Distribution Application to solve the problem.
If something goes wrong with WSL, faulty or incomplete WSL installation and a problem with Windows or WSL settings might be the problem.
While there are many WSL-related issues on Windows 11, fixing them is usually as simple as reinstalling WSL or making sure you’ve activated the appropriate feature.
Make sure hardware Virtualization, and Virtual Machine Platform are enabled on your PC before diving into any sophisticated methods.
If you successfully overcame WSL errors on Windows 11, please tell us what the problem was and how you fixed it.
Blue Screen of Death errors, such as NMI_HARDWARE_FAILURE, can cause many problems on Windows 10.
These types of errors will frequently restart your computer in order to prevent hardware damage. Therefore it’s crucial to know how to fix them.
But, being able to understand what NMI_HARDWARE_FAILURE is and what triggers it as well as knowing the most likely places to stumble across it are also essential for the troubleshooting process. So, here goes.
What is NMI_HARDWARE_FAILURE?
The NMI_HARDWARE_FAILURE error code manifests as a Blue Screen of Death, and it can lead to system crashes and other grave errors.
There are many potential culprits that can trigger this error, but the most common ones include:
Corrupted, outdated, or missing hardware drivers
Damaged or deprecated Registry keys
Conflicts and incompatibilities between different system components or programs
CPU overclocking (and overheating) issues
Other hardware-related glitches (water damage, dust damage, and so on)
You can encounter the stop code NMI Hardware Failure error on most Windows platforms (from Windows 7, 8, 8.1, 10 to Windows 11 and even on the Windows Server 2012) as well as on most major laptop brands such as HP or Dell. Users mostly reported the following cases:
NMI Hardware Failure in Windows 10 on HP laptop – Using a dedicated tool that fixes BSODs is the simplest and easiest solution you can implement.
NMI Hardware Failure in Windows 10 on Dell laptop – Dell users can make use of Windows’ troubleshooter in order to fix this issue.
NMI Hardware Failure in Windows 10 on Lenovo – Even on Lenovo computers, Windows scans and troubleshooters are sometimes enough to fix BSODs.
NMI Hardware Failure in Windows 10 on Acer Nitro 5 – Don’t forget to check your hard drive for any physical damage if none of the software solutions work.
NMI Hardware Failure HP ProLiant – Many reported the error when using the ProLiant brand of server computers
NMI stands for Non-Maskable Interrupt and it indicates a hardware-related issue that requests immediate attention on your part.
Here are the versions of Windows Server on which users reported encountering the error:
NMI Hardware Failure Windows Server 2019
NMI Hardware Failure Windows Server 2016
NMI_HARDWARE_FAILURE Windows Server 2012 R2
Can hardware failure be fixed?
The answer is that it can be repaired. Failures in hardware can be remedied in a variety of ways, including utilizing third-party software, operating a specialized troubleshooter, or performing system scans.
In this article, we will walk you through a thorough list of options that you may use in order to solve the NMI_HARDWARE_FAILURE (80) that occurs in Windows 10 and 11.
How can I fix NMI HARDWARE FAILURE?
1. Use a third-party BSOD fixer
With this kind of specialized tool, you prevent and fix BSOD errors and you can also replace damaged .dll files and clean your operating system from any side effects.
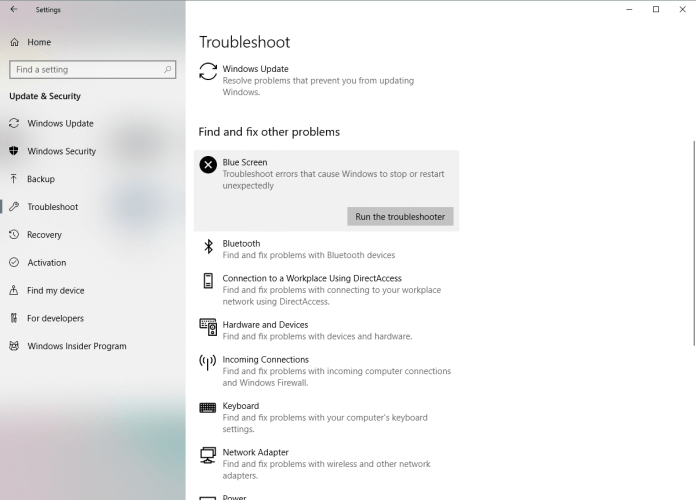
2. Run the BSOD troubleshooter
1. Open the Settingsapp.
2. Go to the Update & Security section.
3. SelectTroubleshoot from the menu on the left.
4. Select BSOD from the right pane and click Run the troubleshooter.
5. Follow the instructions on the screen to complete the troubleshooter.
Your Windows PC has a built-in BSOD troubleshooter that you can use to fix the nmi_hardware_failure BSOD.
This is a command-line tool that goes through your system searching for potential issues. Of course, if resolving these issues is possible, the SFC scan will do it automatically.
3. Make sure Windows 10 and all drivers are up to date
BSOD errors are often caused by certain hardware or software issues, and if you want to keep your Windows 10 system error-free, it’s highly advised that you update your OS on a regular basis.
By using Windows Update, you’ll download the latest security patches along with some new features. But most importantly, you’ll download many bug fixes that improve system stability.
These bug fixes often fix issues with certain hardware or software, therefore, if you wish to prevent BSOD errors such as NMI_HARDWARE_FAILURE, be sure to update Windows 10/11.
In addition to downloading Windows updates, it’s just as crucial to keep your drivers up to date. Drivers allow your OS to recognize and utilize your hardware, and if a certain driver is outdated.
To fix these types of errors it’s crucial to update your drivers. To do that you just need to visit your hardware manufacturer’s website and download the necessary drivers for your device.
This solution can help you solve the NMI_HARDWARE_FAILURE on your Windows 10/11 and it is efficient for any type of device, especially a Dell PC.
To completely fix Blue Screen of Death errors, be sure to update as many drivers as you can.
4. Update drivers automatically
Searching for drivers on your own can be time-consuming. So, we advise you to use a tool that will do this for you automatically.
Using an automatic driver updater will certainly save you from the hassle of searching for drivers manually, and it will always keep your system up to date with the latest drivers.
Thanks to an amazing database that includes over 18 million drivers and advanced scanning technology, you won’t have to confront those critical update errors.
Your PC will be running smoothly at all times and in addition, you can even back up all your drivers by compressing them into a single file.
We also recommended this solution for solving the BSOD NMI_HARDWARE_FAILURE error. After several tests, our team concluded that this is the best-automatized option.
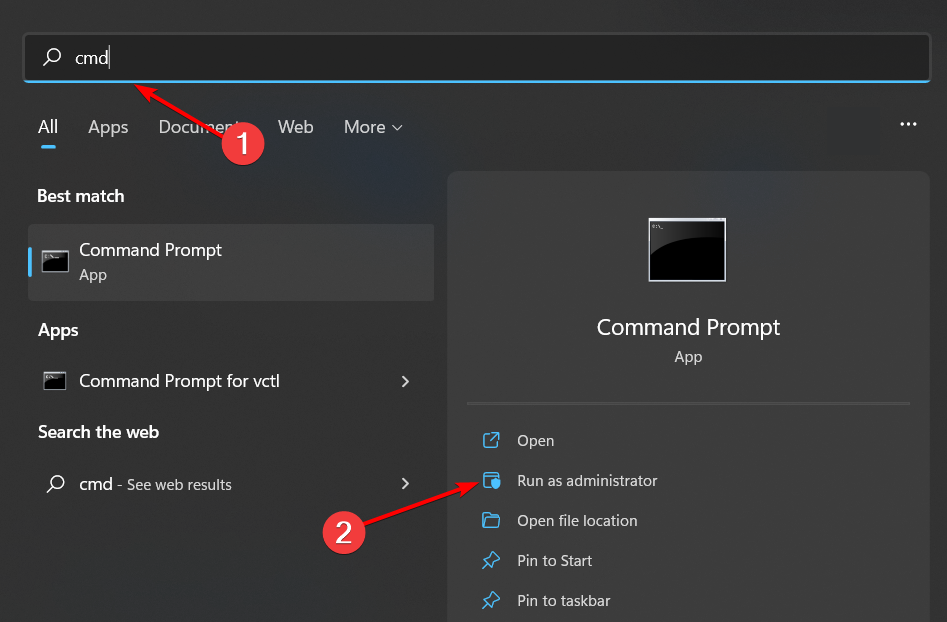
Press Windows then enter cmd and select Run as administrator.
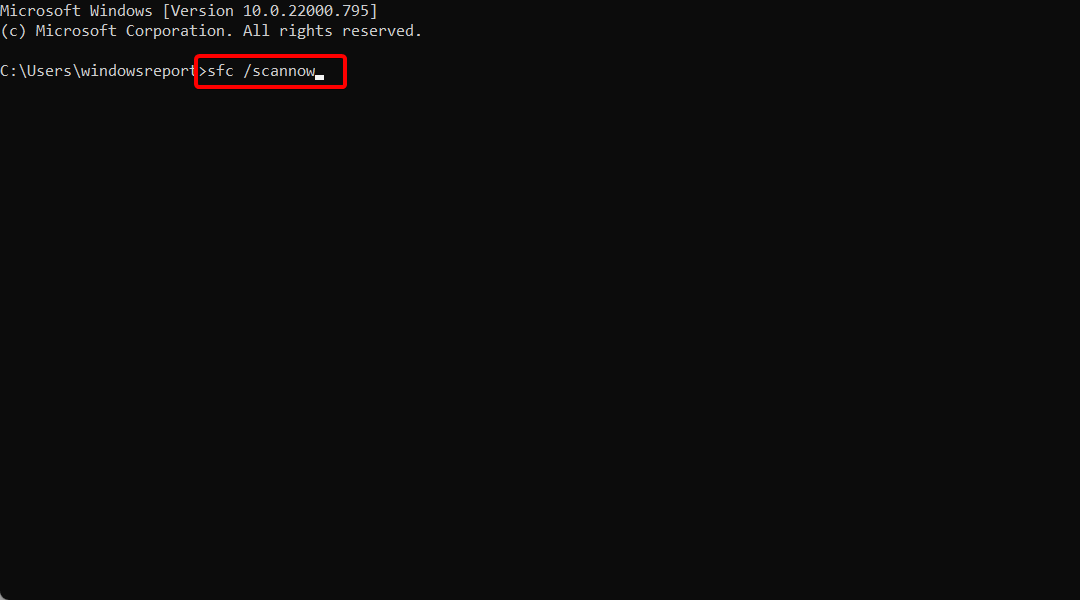
Enter the following line and press Enter: sfc /scannow
Wait until the process is done (it may take a while).
If the solution is found, it will automatically be applied.
Now, close the Command Prompt and restart your computer.
If the unified troubleshooter failed to resolve the problem, we’re going to run the SFC scan in Windows 10/11.
This tool scans your computer for potential issues, and delivers a solution, if possible, so, it might be helpful with solving the stop code NMI_HARDWARE_FAILURE error, as well.
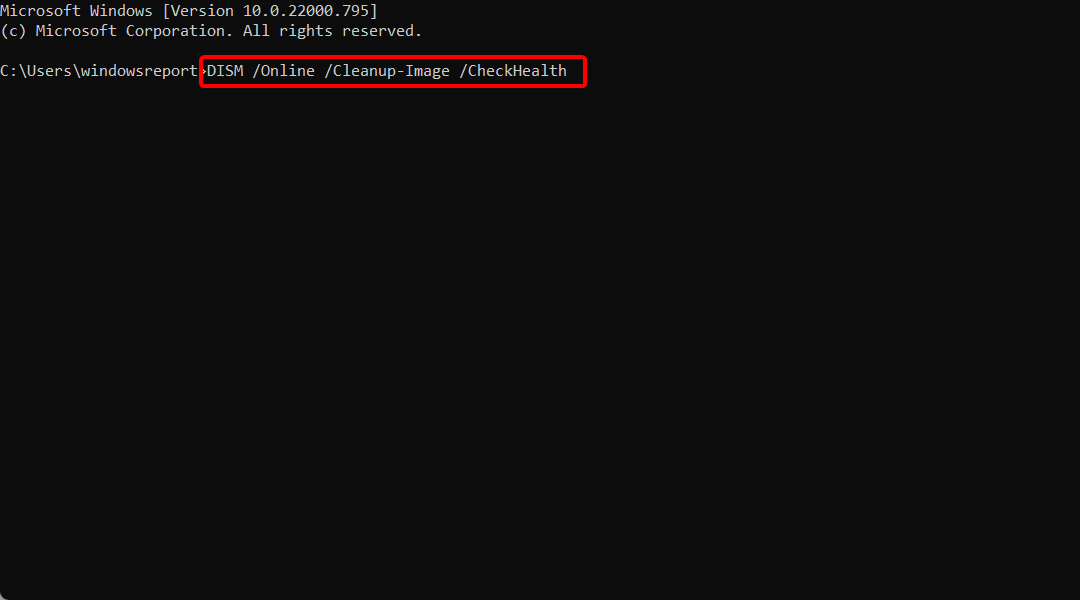
6. Run DISM
6.1. Standard way
Tap the Windows key, enter cmd,then select Run as administrator.
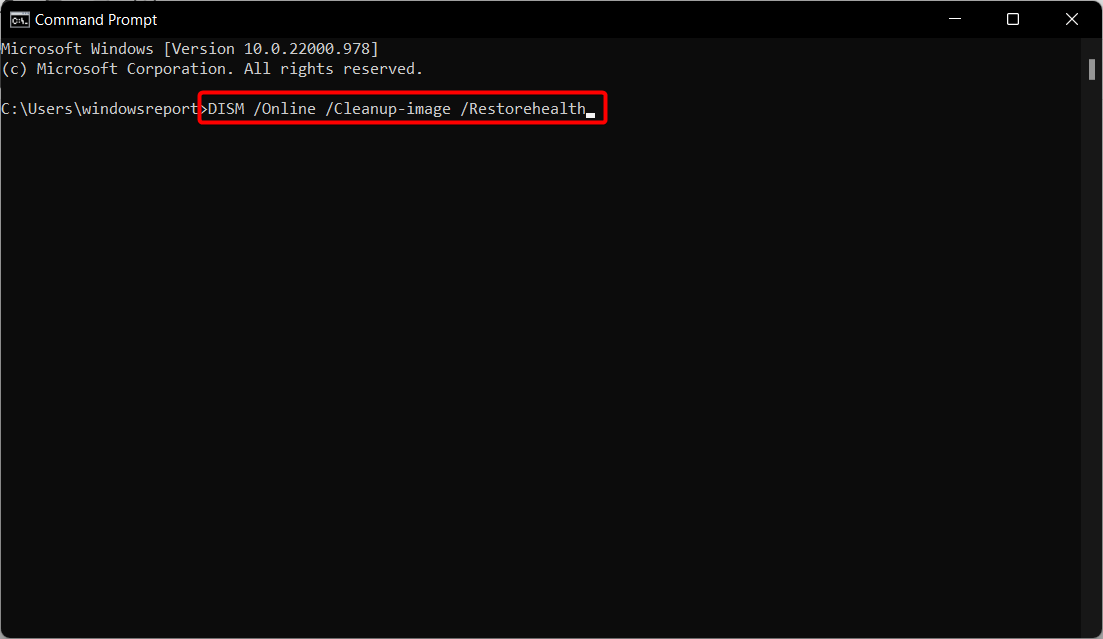
Paste the following command and press Enter: DISM /Online /Cleanup-Image /RestoreHealth
Wait until the scan is finished.
Restart your computer and try updating again.
Deployment Image Servicing and Management (DISM) is a tool that reloads the system image, and possible issues may get resolved along the way. So, running this tool may fix the NMI_HARDWARE_FAILURE error.
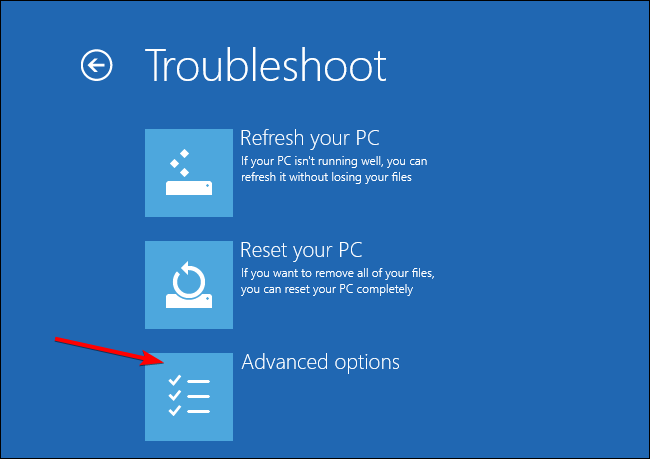
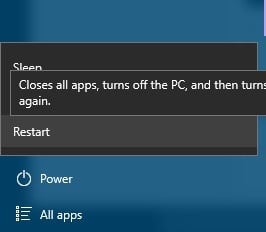
Enter the Advanced Startup (Restart your computer while holding the Shift key) in Windows 10/11.
Choose Troubleshoot, then choose Advanced Options.
Select Command Prompt from the list of options. When Command Prompt appears, enter the following lines and press Enter after each line in order to run it: bootrec.exe /rebuildbcdbootrec.exe /fixmbrbootrec.exe /fixboot
Some users are also suggesting that you need to run additional chkdsk commands as well. To perform these commands, you need to know the drive letters for all your hard drive partitions.
In Command Prompt you should enter the following (but remember to use the letters that match your hard drive partitions on your PC): chkdsk /r C: chkdsk /r D:
Restart your computer and check if the issue is resolved.
BSOD errors can be caused by corrupted files on your hard drive. In order to fix this issue, it’s advised to run the chkdsk scan.
8. Uninstall problematic software and antivirus
Software tools can often cause these types of errors, especially if the respective software isn’t fully compatible with your computer.
Programs such as VPN clients, or even antivirus programs can cause NMI_HARDWARE_FAILURE errors, so be sure to uninstall any problematic software.
It’s worth mentioning that recently installed software can cause these types of errors as well. If you installed or updated certain software before this error started appearing, be sure to uninstall it.
As we briefly mentioned, antivirus software can be the common cause of these types of errors, therefore be sure to uninstall all third-party antivirus software that you have installed.
Many antivirus programs will leave certain registry entries and files behind after you remove them, and those files can still cause BSOD errors to appear.
To completely remove antivirus software, it’s advised that you use a dedicated uninstaller tool for it. Many security companies offer these tools for their software, so be sure to download one for your antivirus program.
9. Use the bcdedit command
9.1. Use Command Prompt
Press Windows then type cmd and open the Command Prompt result as an administrator. Note that the steps are exactly the same in Windows 11.
Once the Command Prompt opens, insert the line below and then press Enter:bcdedit /set x2apicpolicy disable
9.2 Access Command Prompt with Automatic Repair
Access the Advanced Startup (Restart your computer while holding the Shift key).
Select Troubleshoot, then Advanced options and click Command Prompt.
When Command Prompt starts, enter the code below and press Enter: bcdedit /set x2apicpolicy disable
Close Command Prompt and restart your PC.
Few users reported that they have issues with the Kaspersky antivirus, and according to them, the only way to fix the NMI_HARDWARE_FAILURE error in Windows 10/11 is to use bcdedit command.
10. Disable early launch anti-malware protection
Press Windows and enter performance. Select Adjust the appearance and performance of Windows.
Go to the Data Execution Prevention tab and select Turn on DEP for essential Windows programs and services only.
Click Apply and OK to save changes.
Restart your computer a few times until you enter Automatic Repair mode, or you can just press and hold the Shift key and click the Restart button.
Select Troubleshoot, then Advanced options.
Click Startup Settings, and then the Restart button.
Once your computer restarts, you’ll see a list of options. Select Disable early launch anti-malware protection by pressing 8 or F8 on your keyboard.
First, you need to turn on No execution protection in BIOS. To do that, simply enter BIOS, locate the setting and turn it on.
Since there are many different versions of BIOS, be sure to check your motherboard‘s manual to see how to enter BIOS and enable No execution protection.
After doing that, you need to turn on DEP for essential Windows programs and services only.
Few users claim that they fixed the NMI_HARDWARE_FAILURE error by disabling the early launch anti-malware protection.
Before disabling early launch anti-malware protection, there are a few other settings that you need to change.
11. Check for faulty hardware
Faulty hardware can often cause BSOD errors, but sometimes recently installed hardware can cause the NMI_HARDWARE_FAILURE error to appear as well in Windows 10 or 11.
If you installed any new hardware recently be sure to remove it or replace it and check if your PC works well without it.
If the problem isn’t recently installed hardware, the cause may be a faulty hardware component. Users reported that a faulty sound card or PSU can cause these types of errors, so check these components.
In addition, check other major components such as your RAM, motherboard, graphic card, and hard drive.
How do I know if my hardware is failing Windows 10?
Right-click the Start menu and select Device Manager.
Expand one by one the folders with your hardware then right-click on the drive and select Properties.
Here, you will see a message under the Device status that will tell you whether the hardware is failing or not.
The NMI_HARDWARE_FAILURE error can cause certain problems on Windows 10/11, but it can be easily fixed by using one of our solutions.
We’d like to hear more from you so drop us a comment in the dedicated section below.
Installing any software on your computer adds new registry entries. When the user uninstalls the software, the registry entries are usually left out, intentionally or unintentionally. Best Windows 7 Registry cleaners can help you remove these entries.
Leftover registry entries, on some occasions, can make your system glitchy. Some system apps may take longer than usual if removing a program left behind an invalid registry entry. So, let’s find out how you can manually clean the Registry and the best tools for it.
How do I clean the registry in Windows 7?
There are a few quick ways to clean the Registry without using a third-party tool. For instance, you could run the DISM tool, and it will automatically identify and eliminate most issues and clean the Registry.
Another way is to run Disk Cleanup, a built-in utility to free storage space, and then clear the system files. These help clean Windows 7 registry as well as that on later iterations.
But both of these methods aren’t very effective primarily because they are not good at identifying what’s to be removed. A reliable Registry cleaner tool, on the other hand, knows where to look and which entries to delete, and is extremely good at finding invalid references.
What are the best registry cleaners for Windows 7?
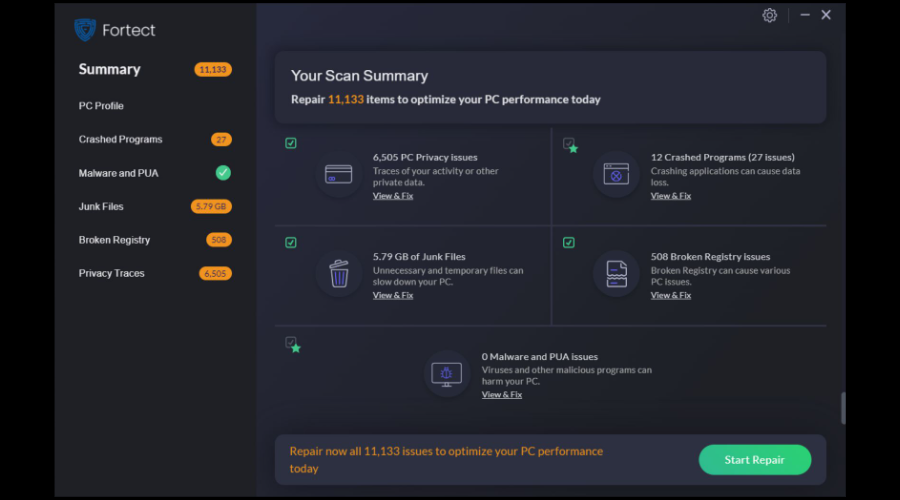
Fortect is one of the greatest optimizing tools that you can use to keep your Registry clean and boost your computer’s performance.
It helps you check for invalid or corrupt registry entries that often get left behind by numerous apps on your Windows Registry.
Fortect can repair damaged or missing OS files, including DLLs and registry keys, which will refresh your operating system and increase your device’s health.
Other key features of Fortect you should know about:
Browser Cleanup
Can repair files affected by digital threats
Complete scan and detailed diagnostic report
Junk files removal
Fortect
Speed up your computer and clean your Registry with this excellent program.
IObit Advanced SystemCare Free registry cleaner in Windows 7 is a reliable system scanning tool to repair system issues and clean leftover registry entries. It is available in both the Free and Pro version, with many features locked behind the paid subscription.
Similar to CCleaner, IObit Advanced SystemCare Free comes with features to improve system performance, such as disabling startup apps and hard disk defragmentation.
IObit Advanced SystemCare Free’s personalized plans can scan and clean junk files, unnecessary logs, cache, and leftovers from third-party software and web browsers. Internet Booster can help you maximize your Internet speed by closing unnecessary background apps using the Internet.
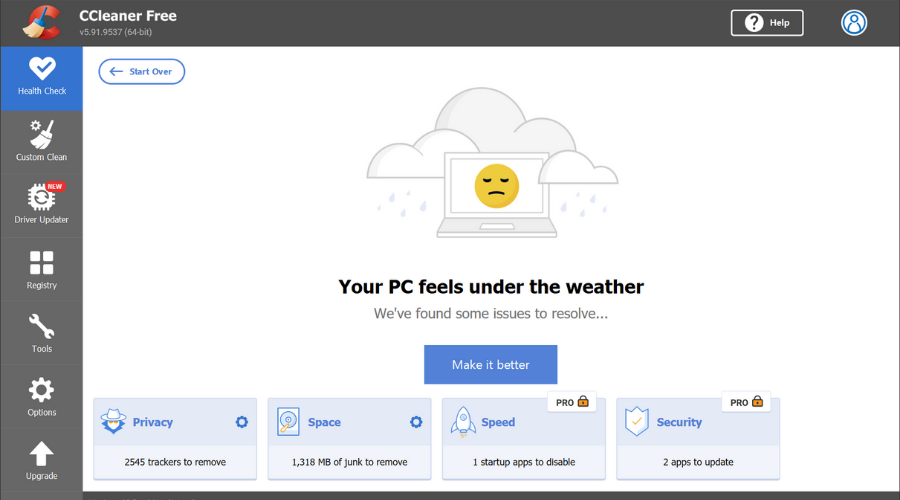
CCleaner is a feature-rich, all-in-one utility suite. It is popular for its system cleaning and software uninstallation features. Unlike other registry cleaners, CCleaner is unlikely to have any adverse effect on your system and does not remove essential entries.
CCleaner is available in both free and pro versions, where the latter offers additional features to the users. It can find old files that are taking up hard drive space and clean them with a click.
Other notable features offered by CCleaner include cleaning cookies for safer browsing, cleaning registry entries, speeding up system startup by disabling startup apps, disk defragmentation, file recovery, and a hardware inventory list.
Key features of CCleaner:
Automatically clean junk files and browser cookies
Wise Registry Cleaner has a free download option for the Windows platform. While it may not be as feature-rich as other tools listed earlier, it is effective in cleaning leftover registry entries and log files.
Wise Registry Cleaner automatically creates system restore points before performing a cleaning operation. This helps in restoring your system to a working state in case an incorrect registry entry is deleted.
It is compatible with all versions of Windows, from Windows XP to Windows 7 and 10. With scheduled automatic registry cleaning, you can customize the tool to perform daily, weekly, or monthly cleaning according to your requirements.
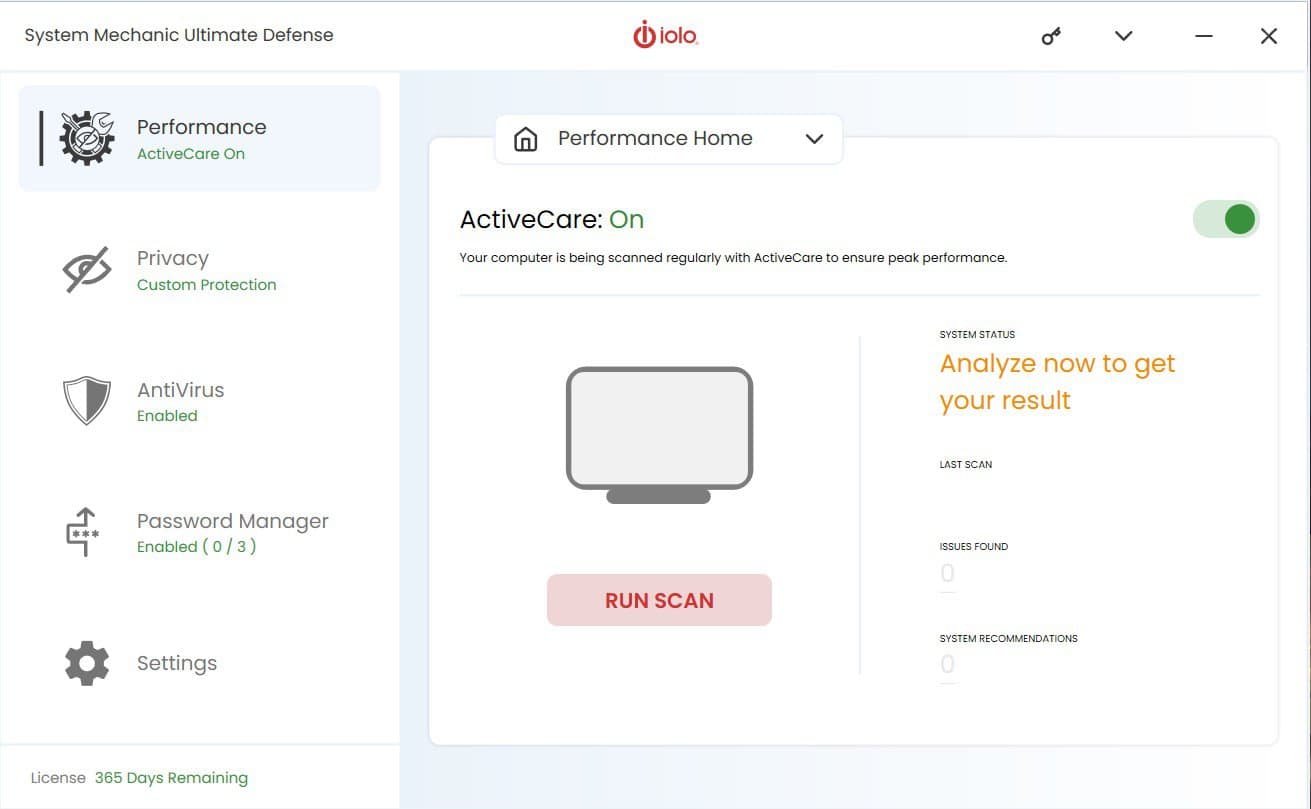
Iolo System Mechanic is a popular system tuneup utility and is more than just a registry cleaning utility. It digs deeper into your computer to find issues and recommends effective fixes.
Iolo System Mechanic deletes junk files that cause your system to slow and boosts performance for gaming, streaming, and downloading by throttling system resource usage by low-priority apps.
You can access the bloatware removal tool from the main interface and use disk defragmentation to speed up your hard drive. Included security features can help secure open router ports and connected home devices.
Key features of Iolo System Mechanic:
Clean out the clutter by removing junk files
Removes bloatware and stops unidentified startup apps
System repair tools
Optimizes Windows to improve Internet speed
Iolo System Mechanic
With Iolo System Mechanic you can easily optimize your registry and ensure that your PC works without any slowdowns.
All the Registry cleaner tools for Windows 7 in this article come in both free and premium plans. While the free version offers basic cleanup features, the premium version offers additional features to be used as a complete system solution.
So, tell us which one you choose from our list in the comments section below.
Error 0x80070780 arises for some users when they try to copy, delete, back up, or edit certain files in Windows 10.
The error message states: An unexpected error is keeping you from copying the file… Error 0x80070780: The file cannot be accessed by the system.
What does error code 0x80070780 mean?
The Error 0x80070780-The file cannot be accessed by the system occurs when you try to access some files on your system.
This means that you cannot copy, edit, modify, or delete the file. The most common cause for this issue is connected to file permissions.
In other words, you don’t have the rights to alter that particular file. However, it can also be due to bad sectors on your drive or file corruption.
Here are the most common iterations of error 0x80070780:
Error 0x80070780 on Windows 11 – This error was also inherited by the latest Windows OS but the solutions below also apply
Error 0x80070780 while using Dropbox – This error mostly occurs because you are not logged in to your Dropbox account
Error 0x80070780 while using OneDrive – Try to log out an in OneDrive, this should fix the problem
Error 0x80070780 delete – You are not allowed to delete a file but the solutions below will help you fix the issue
Error 0x80070780 in Safe Mode – It can happen in Safe Mode as well but it is probably because you don’t have the required privileges
That being said, here are a few resolutions that will help you fix the System Restore error 0x80070780 and let you handle the files as you wish.
How do I fix error 0x80070780?
1. Convert the User Account to an Admin Account
1. Press theWindowskey +Ihotkey to openSettings.
2. Click on Accounts and select Family & other users to open the options shown directly below.
3. Select a user account and press the Change account type button.
4. ChooseAdministratoron the drop-down menu.
5. Press theOKbutton.
Error code 0x80070780 can arise due to restricted permissions for certain files in non-admin user accounts.
So, some users might need to change their user accounts to admin alternatives. Follow the guidelines above to change a user account type.
2. Scan System Files
Open Cortana with the Windows key + Q keyboard shortcut.
Enter the keyword cmd, and select Run as administrator from the results.
Input the following command and press Enter: DISM.exe /Online /Cleanup-image /Restorehealth
After the process is over, type or paste the following command and press Enter to run a SFC scan: sfc /scannow
Restart the desktop or laptop if the scan does repair files.
Error 0x80070780 can also be due to corrupted system files. Therefore, the System File Checker utility, which repairs system files, might be a potential resolution.
The methods required to repair Windows issues vary depending on the situation. To solve Windows error 0x80070780, you might attempt a do-it-yourself way or a specialized third-party application built specifically for Windows failures.
3. Clean Boot Windows
To open the System Configuration window, press the Windows key + R hotkey, enter msconfig in Run, and click OK.
Click the Selective startup radio button, then select the Load system services and Use original boot configuration options but deselect the Load startup items option.
Select the Services tab and select the Hide all Microsoft services option.
Select the Disable all option and press the Apply and OK buttons.
A System Configuration dialog box will open. Select the Restart option on that window
It might be the case that third-party software is blocking access to files. That’s all the more likely when third-party antivirus software is installed.
A clean boot will ensure that third-party software and services don’t start with Windows and block file access.
Press the Windows key + E keyboard hotkey to open File Explorer.
Then right-click the hard drive icon and select Properties to open the window directly below.
Select the Tools tab and press the Check button...
A dialog box window will then request to scan the disk if Windows detects anything. You can still click Scan drive even if the dialog box says that a Chkdsk scan isn’t required.
Restart Windows if the Chkdsk scan does detect something.
Error 0x80070780 can also be a disk error. So, the Chkdsk utility, which fixes bad disk sectors, might also resolve the issue.
5. Check the Volume Shadow Copy Service is enabled
Press the Windows key + R to launch the Run accessory.
Input services.msc and select the OK option.
Double-click Volume Shadow Copy to open the window shown below.
Press the Start button if the service isn’t running.
Select the Automatic option on the Startup type drop-down menu.
Click the Apply button, then select the OK option.
The Volume Shadow Copy service enables users to take backup file copies manually and automatically. So, it might be worth checking if that service is enabled when error 0x80070780 arises.
6. Select the Clean Up Option for System Restore and Shadow Copies
Enter Disk Clean-up in Cortana’s search box and press Enter.
Select the C: drive and click OK.
Then press the Clean up system files button on the Disk clean-up window.
Select to clean the C: drive again.
Select the More Options tab.
Press the System Restore and Shadow Copies Clean up buttons.
Click Delete to confirm.
Some users have also said that they’ve fixed error 0x80070780 by erasing restore points and shadow copies with the Disk Cleanup utility.
Some Windows users reported that their PC does an auto Alt Tab, usually when playing games. This can be an issue because you’ll return to the desktop while playing your favorite game or while working on an important project.
Here’s how one user described the problem on the Microsoft Answers forum:
Hi all, I purchased a new computer earlier this month, and have been noticing a strange pop-up window that will either alt-tab any game that I have open in fullscreen or will overlay anything else i have open for half a second and then automatically close before I can do anything or even tell what it is. It happens every half hour to a few hours, seemingly at random.
However, we managed to come up with a series of solutions that should fix the different causes triggering the game keeps tabbing out issue.
Why does my game keep tabbing out?
There are various reasons behind it, ranging from simple software issues to incompatible or problematic hardware. Many have even reported bugs in the installed version of Windows behind the computer auto tabbing, and reverting to the previous version fixed things.
Also, installed third-party apps may modify the keyboard shortcuts, or create dialog boxes, and as a result, the game keeps tabbing out.
Besides, the issue may be with the keyboard itself or its drivers. A faulty or corrupt driver is likely to make fullscreen games keep tabbing out for many users. Below are some of the other variations of this issue reported by users that you should watch out for:
Auto alt-tab script
Computer alt tabbing on its own
Windows 10 auto tabbing
Games keep alt tabbing by themselves
Computer tabbing itself
Users have reported getting this error on both Windows 10 and Windows 11 devices. Our solutions below apply to both OSs and will show you how to stop games from tabbing out.
What can I do if my game keeps alt tabbing out?
1. Reconnect the keyboard
First of all, you should try unplugging and then re-plugging back your keyboard. If you’re using a USB keyboard, you can do it without turning off your PC.
In case you’re using a PS/2 keyboard, turn off your PC and then disconnect the keyboard. Once done, check if the auto Alt Tab issue is resolved.
2. Update keyboard and display drivers
1. Press the Windows + R to open the Run command.
2. In the Run box, type devmgmt.msc, and then hit Enter.
3. Expand theDisplay adapterssection, right-click on each listed device, and selectUpdate driver.
4. Select Search automatically for drivers.
5. Now, wait for Windows to locate and install the best available drivers on your computer.
6. Similarly, update the keyboard drivers as well.
7. After the downloading and installing of the new drivers, restart your computer and see if it made any difference.
Verify that you’re using the latest versions of the drivers, since this might be one of the primary causes of conflict between the system and the keyboard.
Once done, check if the Steam auto alt tab issue is resolved.
There are third-party software that can do this automatically, and fix several errors, including auto Alt-Tab on your computer.
In a matter of seconds, Outbyte Driver Updater will scan your system for errors or missing drivers and create a report, so it can make the necessary updates or installs.
The software will run immediately after installation, so you won’t have to seek its shortcut or the source folder.
Outbyte Driver Updater
A pro software that helps you scan all your device drivers thoroughly and always keep them updated.
Updating the graphics driver can also help you fix the Windows 10 Alt Tabbing issue; read this guide to learn about other solutions.
3. Perform a virus scan
Click the Start button, and open Settings.
Select Update & Security.
Choose the Windows Security tab, and then click on Virus & threat protection.
Click on Scan options.
Now, select Full scan, and then click Scan now at the bottom.
After the scan is finished, restart your computer and check if Alt Tab still keeps popping up.
Even though Windows Defender offers excellent from malware, you might want to try a third-party antivirus tool such as Bitdefender and scan your PC with it.
4. Run the game in Window mode or Borderless window mode
Launch the game you are facing the auto Alt Tab issue with, go to its graphic settings, and then set the game to run in Borderless Window mode.
If the borderless screen is not an option, try running the game in Window mode since it has a similar effect. Many users who reported that game keeps alt tabbing managed to fix the issue by changing the mode.
5. Disable a task in the Task Scheduler
Right-click the Start button to open the Power User menu, and select Computer Management.
Choose Task Scheduler from the left, expand Task Scheduler Library under it, and then double-click on Microsoft.
Select Office, right-click on OfficeBackgroundTaskHandlerRegistration, and then select Disable.
Once done, verify if the PC keeps tabbing out of games or the issue is resolved. In case it’s the latter, head to the next method.
6. Disable Startup and Service programs
Press the Windows + R, type msconfig in the text field, and hit Enter to open the System Configuration.
Navigate to the Services tab, click on Disable all, and then on Apply to save the changes.
Next, go to the Startup tab, and click on Open Task Manager.
Select all the programs configured to launch at startup individually, and click Disable.
Once done, close the Task Manager and restart your computer for the changes to come into effect, and verify if games keep Alt Tabbing by themselves.
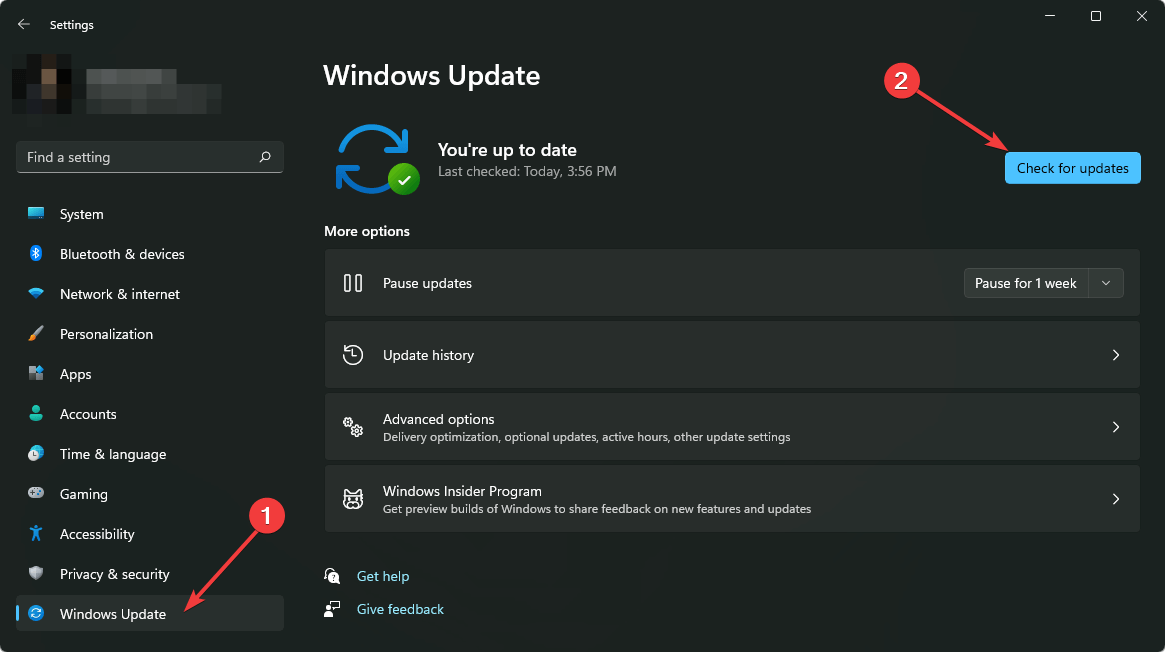
Press Windows + I to open Settings, and click on Update & Security.
In the Windows Update tab, click on Check for updates.
If it finds any updates, let the system complete the download and install process, and restart your computer
After rebooting your PC, check if updating the OS fixed the automatic Alt-Tab issue. Alternatively, you can download specific updates from the Microsoft Update Catalog website.
Can I Alt-Tab without minimizing the game?
Yes, you can! And the best part is that you don’t need to make excessive modifications to the system settings or install third-party apps.
All you have to do is switch to Windowed mode in the game. There’s usually an option for it in the game’s display setting.
Once done, you can use Alt Tab with the game minimizing anymore, though the changes made here might slightly affect the gaming experience.
That’s all there’s to auto Alt Tab in Windows, and the solutions listed here should have fixed the issue for you. Also, these would work if the games keep tabbing out in Windows 11.
We hope that you were able to find at least one solution for the game keeps tabbing out issue from our list that worked for you. If you found this article helpful, leave a comment in the comment section below.
The best DLL repair tool fixes missing or corrupted Windows DLL files, preventing software crashes and errors. Essential for system stability, these tools quickly restore damaged files, while general PC maintenance utilities can help resolve related issues, keeping your applications running smoothly. Take a look at the top options on the market, tested by our experts.
Fortect is a powerful repair software with various helpful characteristics that are designed to keep your PC in great condition.
It is a reliable application when it comes to fixing DLL files as it performs a meticulous scan of your device and successfully repairs all the damaged OS files.
The scanning process will identify broken or missing files and vulnerabilities such as registry keys, junk files, and other stability issues, and it should take no longer than five minutes.
Fortect comes with three pricing plans, all are affordable it only matters how many devices you want to deploy.
You can use this software in order to prevent BSoDs and also for OS recovery after virus damage. The software will point out faulty or incompatible software.
Moreover, you can free up space with the Fortect app by performing a cleanup process and removing build-ups and junk files from your folders, disk, and hard drive that can clog your computer.
Take a look at these other key features of Fortect:
Windows update fix
DLL repair
Detect and repair stability matters
Browser Cleanup
PC optimizer
Fortect
Make sure you boost your PC performance by fixing or replacing DLLs and other important files.
Glarysoft Registry Repair is one of the most highly-rated registry cleaner utilities that can fix many DLL errors that arise from invalid registry entries.
This freeware software analyzes many different registry areas and identities of more than 18 different error types. This is especially effective software as it can patch corrupted or incomplete DLLs.
As one of the best DLL repair tools, it is very secure. It creates automatic backups of any registry change so you can easily restore to a previous state if necessary.
The user interface is very simple to use. The utility scans your system and displays a list of all issues that can be fixed.
You can either let it fix them all in bulk or select particular areas you would like to exclude. Then you just have to start the repair process at the press of a button and wait for it to complete.
Useful Glarysoft Registry Repair features:
Glarysoft Registry Repair’s automatic registry backup feature backs up the registry
Incorporates one of the fastest and most efficient registry-scanning engines
Includes an ignore list users can add registry path exceptions to
Its users can select a Deep Scan checkbox
This is a free utility that is compatible with Windows operating systems. It is fully functional and up to the highest performance standards.
Glarysoft Registry Cleaner
Repair your DLL files and optimize your PC with this simple-to-use and secure utility.
The Advanced System Optimizer is a product that includes an extensive set of features that collectively work to boost your PC’s speed and performance.
Whether you have different issues with DLL missing or corrupted files this tool will scan your PC and recover them. It has powerful disk optimization tools, and defragmentation processes that will keep all your data organized, and the backup and restore procedure requires minimal manual intervention.
Advanced System Optimizer includes a tool to back up valuable data, documents, and other files and restore them at any time. It’s advisable to back up your PC regularly to minimize damage from possible data loss incidents.
The best main features that this software has are:
Disk and memory optimizer
User-friendly interface
Secure Encryptor
Memory Optimizer
There’s a free version of Advanced System Optimizer anyone can get. However, this version has limited features compared to the premium one that unlocks the software’s full functionality.
Advanced System Optimizer
Try this software that continuously takes care of your PC’s health.
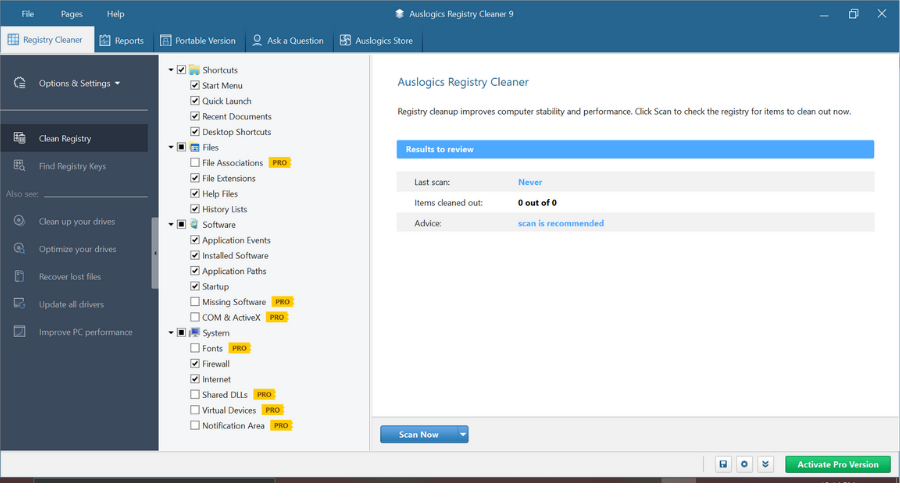
The Auslogics Registry Cleaner is another reliable software that guarantees to clean your PC and boost its performance.
This tool can fix system-related errors and remove unnecessary clutter, allowing your PC to function properly and seamlessly.
The tool has a powerful and fast scan engine that is able to detect all problems that have an impact on your PC’s performance.
These include corrupt DLL files, uninstalled software leftovers, temporary files, and more.
The tool has both basic and deep registry cleanup and optimization options. It cleans out and removes all unnecessary registry keys that take up space and use your resources without giving you any benefits.
Auslogics Registry Cleaner has a free version that can conduct basic PC scans and optimization features. If you want to benefit from more advanced features, you will have to get the pro version which is available under a subscription plan of one year.
Auslogics Registry Cleaner
Fix corrupt DLLs, remove leftover software files, and free up disk space with this powerful optimizer.
Many users will no doubt have heard of CCleaner. It is, after all, one of the world’s most loved freely available system optimizers having had more than 2.5 billion downloads.
That might be because CCleaner packs in very comprehensive and flexible hard disk and registry cleaners.
CCleaner’s registry repair utility is especially good for fixing DLL issues. Its registry cleaner includes a Missing Shared DLLs checkbox.
When you select that checkbox, CCleaner’s scan displays a list of missing or broken DLL files that its Fix selected issues option can resolve.
CCleaner is a very good choice for cleaning up and optimizing your software as well. It works especially well when it comes to cleaning your browser.
It can also detect whether you have any outdated software and help you update them directly from the app.
Other useful CCleaner features:
Enables users to search for and delete duplicate files
CCleaner includes a startup manager utility
Users can disable browser extensions with CCleaner’s Browser Plugins tab
It incorporates an Uninstall tab for removing software
CCleaner has a Free DLL Fixer and a paid version. The free version is enough to get started and optimize your PC for peak performance, but the paid version includes additional automation options meant to save you more time.
DLL Suite is a dedicated utility that has been specifically designed for optimization, especially for fixing dynamic link library issues.
It runs a quick scan on your system and is able to detect and fix a wide range of system-related issues, including DLL problems, registries, and system errors.
It also incorporates performance enhancer features, a startup manager, registry optimization, and system maintenance tools.
The full DLL Suite is not freeware, but users can still benefit from the free version. It has its limitations, but it can still be of great help.
With the demo version of the application, you can check for, search, and download missing DLL files.
The automatic repair of all detected DLL issues is only available for the premium version.
Other useful features:
Compresses registry hives
Incorporates a Registry Backup tab
Enables users to schedule automatic maintenance scans
Its scanner utility can also remove EXE virus/spyware files
DLL Suite is a powerful utility available for Windows operating systems.
DLL-Helper is ideal for fixing issues related to missing DLLs. The software is designed to identify whether there are any missing files on your machine and replace them.
It is an intuitive software that lets you quickly find, download, and register missing DLLs with its search tool.
This tool is a better and safer alternative to that of searching the files yourself. Browsing online for DLLs can lead you to many suspicious websites that should not necessarily be trusted.
This tool only installs safe files to your PC so you can rest assured that it will fix your problems in a secure manner.
With DLL-Helper, you can quickly and easily find and download legit dynamic link library files specified in error messages.
Just enter their names in its search box and wait for the program to unpack and register them.
Useful DLL-Helper features:
Includes an Advanced Mode that provides extra metadata and system info for files
By running the SFC scan you will find out whether you have corrupted DLL files or system files. To do this, press Windows and type cmd. Right-click on the top result and choose Run as administrator.
Here, type the following command and press Enter. Wait for the process to finish then check what DLL files are corrupted, missing or broken: sfc /scannow
Why should I use a DLL error fixing tool?
Due to the fact that any regular Windows user frequently adds new applications to the system and updates them, there is always the possibility that some DLLs may get corrupt or overwritten.
It is not only the case for malware-infected systems to face dynamic link library issues, but it is rather a common problem that occurs as a consequence of regular use.
For this reason, keeping an automatic repair tool in your system is important, as it will always make sure that your DLLs function properly, saving you the headache of having to deal with unresponsive applications.
What is the best tool for you is highly dependent on your exact needs, which is why we listed not only how these tools help with DLLs but also described other important optimization features that are integrated within them.
If you want more suggestions on this topic and are interested in optimizing your overall PC performance, check our suggestions for the best free PC optimization software.
Please let us know what you think about these products. If you have any other suggestions or questions, feel free to use the comment section below.
In this article, we will list out the most exciting browser FPS (First Person Shooter) games with controller support for you to try out today.
Browser games have become an alternative for many budget-conscious gamers. You don’t have to spend a lot to enjoy them. All you need is an average computer and a stable internet connection to get started.
Let’s check them out.
What browsers have controller support?
While there are several browsers that offer controller support, Opera GX is undoubtedly the best. It is the first browser dedicated to gaming and offers numerous features that transform an online gaming experience into a real treat.
Opera GX
You would love its advanced theme customization, video pop-out, and free unlimited bandwidth VPN.
Other than Opera GX, the regular Opera browser, Google Chrome, Mozilla Firefox, and Microsoft Edge to offer controller support for FPS and other online games.
What are the browser games with controller support?
Superhot is an action-adventure game. It’s important to remember that the online browser version is merely a trial with five levels, though it offers controller functionality.
Superhot immerses you in a sci-fi environment where they will manipulate time. As you fight against hordes of AI warriors in this FPS game, you gain the power of time.
You can now play the original Wolfenstein 3D, the best browser FPS game with controller support.
Wolfenstein 3D takes place in a World War II setting when Nazi Germany conquered the world. You play as a prisoner and must successfully escape the Nazi hideaway while fighting the opponents.
The devils have taken over Mars in the game, and all of your allies have died. The goal is for you to return to Earth and rescue Mars. However, there are stumbling blocks along the route and a pit stop in Hell.
Even after two decades, Doom aficionados will never be disappointed with the 3D edition. The visuals have a nostalgic feel to them and take you away from the current extremely high-resolution games.
Krunker is a free-for-all shooting game that supports controllers. It contains all of the elements you’d expect from a shooting game. The map colors are bright and have their original mappings.
In addition, as compared to other web-based games, its Aim mechanism is more smooth and responsive. It also has an ADS system, which seems similar to Call of Duty.
Krunker is one of the best controller games unblocked if you like customization and fast-paced action.
If you are a fan of Minecraft, War Broker is just the perfect browser FPS game for you with controller support. War Broker has already left the gaming community awestruck with thrilling and fast gameplay.
In War Broker, players start off in battle zones where they have to collect weapons and defeat the opponents. The last man standing wins!
Bullet Force is one of the best games on the list and offers everything you could ask for from a browser game. It’s seamless, has a plethora of in-game items, and the graphics are excellent, considering that it’s a browser-based game.
There are also various maps and modes available to keep the players glued. So, if you haven’t yet, try Bullet Force today. It is a great choice if you’re looking for unblocked controller games on the browser.
Another fast-paced battle royale game where only 10 players compete at a time on the map. Though the graphics aren’t great, they are comparable to the other FPS browser games with controller support.
You may encounter minor server-related issues, but these are generally resolved quickly, and shouldn’t affect the gaming experience.
It’s really simple and you don’t have to put in any extra effort whatsoever. Whether it be the Xbox controller or the PS4 controller, just connect it to the PC as you usually do, and it should start working on the browser games.
Also, this works for both the wired and wireless ones and on all browsers, including Chrome, Firefox, Edge, and Opera. You might have to reconfigure the in-game controller settings since several users reported the sensitivity to be low, but that’s up to you.
So, these were the best browser FPS games with controller support. Check them all out today!
Tell us your experience and review of the games listed here, in the comments section below.
Windows 11 has been out for a while, and it’s a great operating system, but every OS has its share of issues. While errors are prone to happen sooner or later, certain problems can be more serious. In this case, we’re referring to BSOD errors.
What are BSOD errors, and how can you fix them on your PC? Join us while we take a closer look and show you all the methods you can use to fix them. Use Microsoft’s BSOD troubleshooter to find a selection of effective solutions.
Why am I getting a Windows 11 BSOD?
BSOD stands for Blue Screen of Death and appears when your PC reaches a fatal system error. If this happens, your system will crash to prevent damage.
The following are the most common causes; however, check out our article on what can cause a BSOD for more information:
Hardware malfunction – A fault in the hardware might be brought on by components that are improperly connected to the motherboard, an abrupt disconnection brought on by a loss of power, or a damaged component.
Corrupted system files – Because DLL files contain the system’s instruction manual, the functionality of your personal computer may be negatively impacted if even one of these files becomes damaged.
Third-party applications – You may test to see if the problem is caused by a piece of software by uninstalling it briefly and then reinstalling it when you have established that your device is once again functioning normally.
A faulty Windows update – Following the installation of a certain update on your device, you may find that you see a blue screen problem. In this case, you will have to uninstall the latest Windows update.
Outdated drivers – Driver problems are another typical contributor to the dreaded Blue Screen of Death. Although outdated drivers may not directly contribute to BSOD errors, the interactions that these drivers have with your operating system do.
There are multiple scenarios in which a Windows 11 blue screen can happen, such as after an update, on startup, when idle, or even while gaming. Nonetheless, follow along to find out how to fix BSOD errors in Windows 11.
You can check the exact cause of a Windows 11 blue screen by reviewing the crash log, and this guide shows you how to find BSOD events in Event Viewer so you can identify the fault quickly.
How can I fix a blue screen in Windows 11?
Before beginning the troubleshooting process, make sure to follow these steps:
Remove any external storage devices, docks, and other unnecessary hardware, then reboot your PC.
Inspect your hardware, especially your RAM, if you get a memory management Windows 11 blue screen.
1. Use BSOD fixers
If you want to fix the Windows 11 BSOD you have encountered faster than usual, you should use a specialized Blue Screen of Death software that will fix the error for you.
2. Uninstall third-party applications in Safe Mode
1. Click the Start icon from your Taskbarand open Settings.
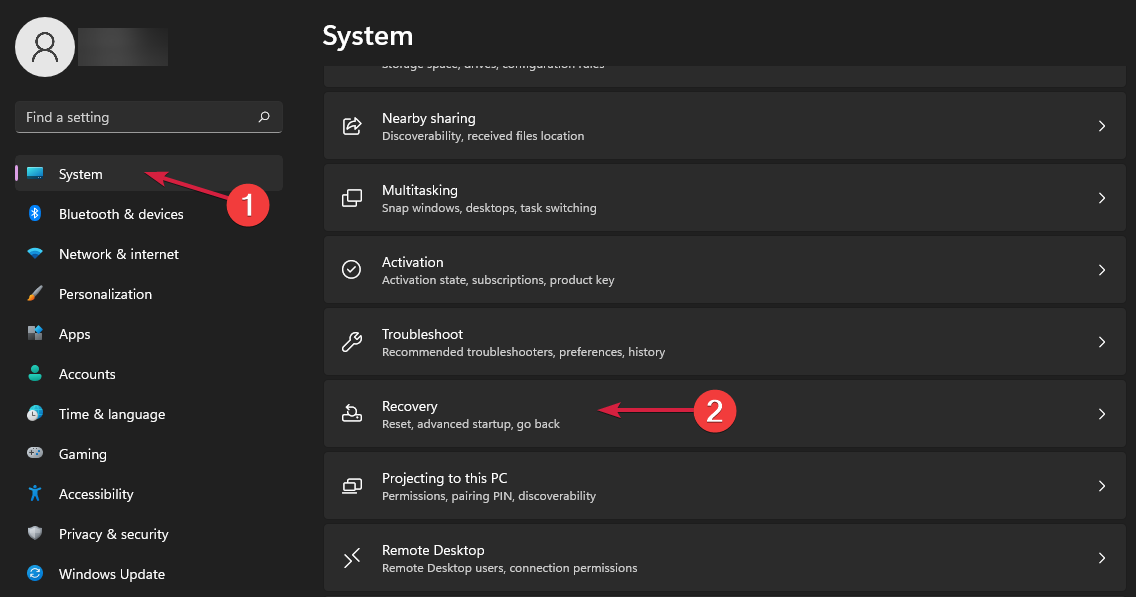
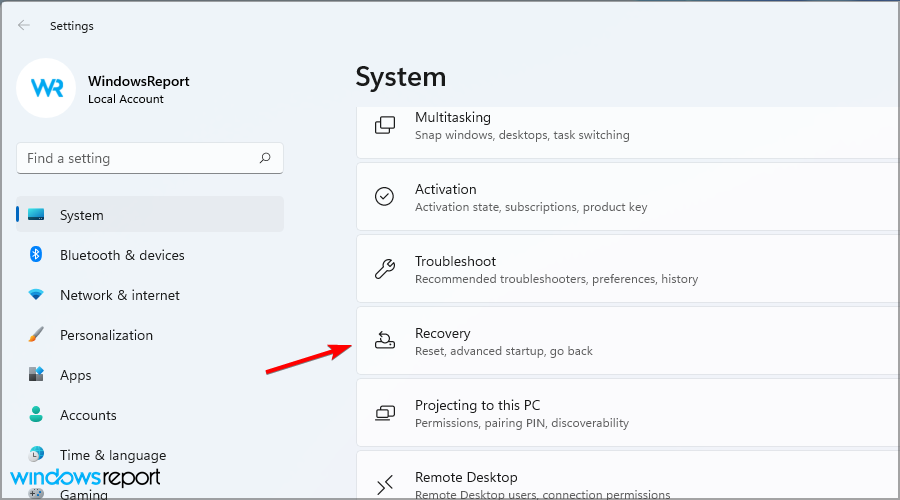
2. Click on System, then select Recovery.
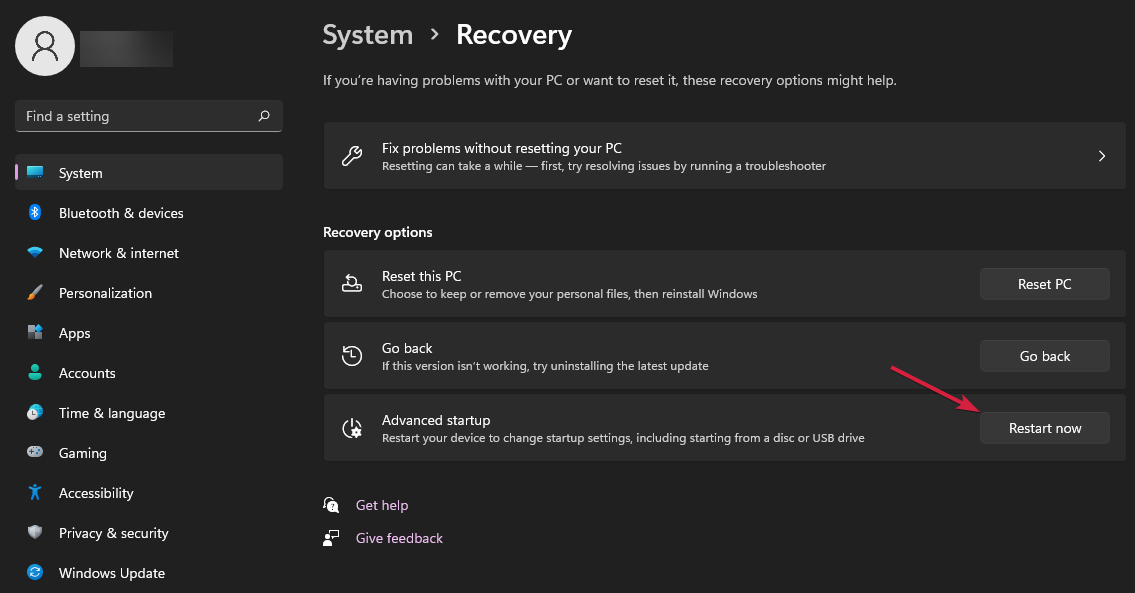
3. Select the Restartnow button next to the Advanced startup section.
4. Your computer will restart then show the Advanced options screen. Select Troubleshoot from the options displayed, by using the arrow keysfrom your keyboard.
5. Select Advanced options.
6. Choose Startup Settings.
7. Click the Restart button.
8. Press the F4 key to get into Safe Mode.
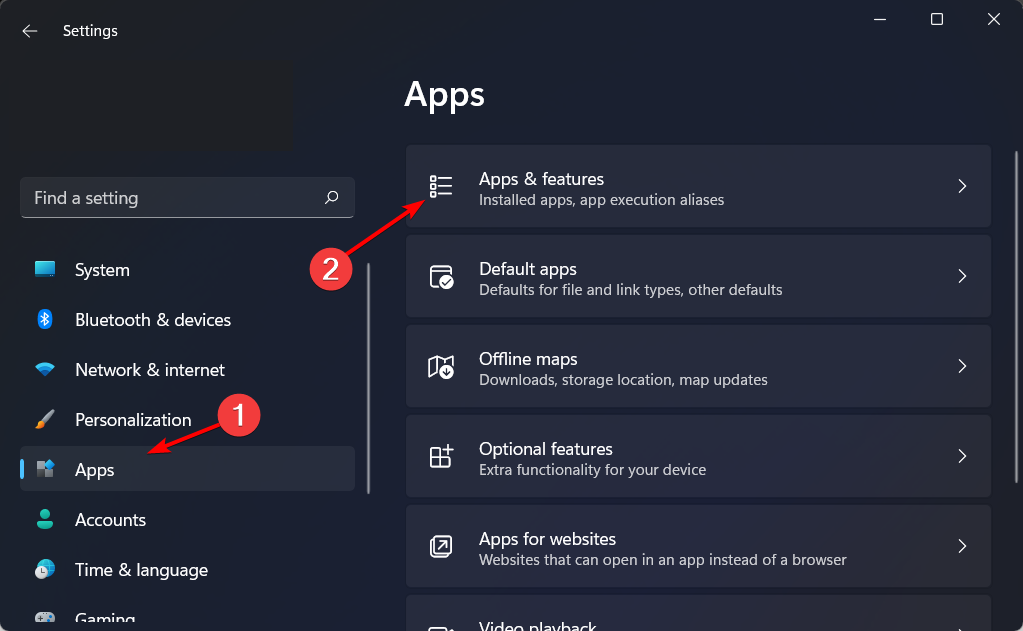
9. After your PC starts up, press Windows + I then navigate to Appsfollowed byApps and features.
10. Here, type the nameof your antivirus or application, then click thethree-dot iconnext to the result to choose Uninstall.
Third-party antiviruses are known to cause unwanted issues, thus as a first solution for getting the blue screen of death in Windows 11, we recommend that you remove them after entering Safe Mode.
Alternatively, you can use an uninstaller software in order to make sure the antivirus will be completely removed from your PC.
Moreover, if you have installed other third-party applications before getting the BSOD, uninstall them as well.
Once you’ve done this, the BSOD issue shouldn’t occur anymore. We recommend that you switch to a better antivirus that won’t interfere with your computer in negative ways.
3. Disable/uninstall/roll back your drivers
Disable the driver
Press Windows + X and choose Device Manager from the list.
Now locate the driver that you want to disable, right-click it, and choose Disable device.
Roll back the driver
Press Windows + X and choose Device Manager from the list.
Locate the driver that you want to roll back and double-click it.
Go to the Driver tab and click on Roll back driver.
Now follow the instructions on the screen to complete the process.
Keep in mind that you only need to update, uninstall or roll back the driver that is causing the issue, so pay attention to the driver name in the BSOD error.
Uninstall the driver
Press Windows + X and select Device Manager.
Locate the driver you want to uninstall, right-click it, and choose Uninstall device.
Click on Uninstall to confirm.
Now restart your PC and check if the problem is resolved.
Updating and reinstalling the drivers can help you fix the BSoD errors like 139, mainly caused due to corrupted drivers.
4. Uninstall recent updates
Press Windows key + I to open the Settings app then navigate to the Windows Update section and select Update history.
Click on Uninstall updates.
Double-click on the update you want to remove and follow the on-screen instructions to complete the process.
Keep in mind that this solution works only if the problems started appearing after installing a new update.
BSODs such as the Windows 11 blue screen critical process died one, require for you to fix system files. To do this, press Windows then type cmd and open the first result as an admin by clicking the Run as administrator option under the result.
Now type the following command and press Enter: sfc /scannow
Wait for the process to finish. then type the next command and press Enter: DISM.exe/Online/Cleanup-Image/ Restorehealth
To learn more about this feature, read our how to use DISM commands guide for more information. This is a Windows 10 guide, but all the information applies to Windows 11 as well.
6. Perform a clean boot
Press Windows key + R and enter msconfig. Press Enter.
Navigate to the Services tab and check Hide all Microsoft services. Now click on Disable all.
Go to the Startup tab then click Open Task Manager.
Navigate to the Startup tab, right-click the items in there one by one, and choose Disable.
Close Task Manager, click OK in the System Configuration window and reboot your PC.
Once your PC restarts, check if the problem is still there. If the issue doesn’t appear, enable services and startup apps one by one or in groups until you manage to find the culprit.
Press Windows key + R and enter rstrui. Press Enter.
Select the desired restore point and click on Next.
Click on Finish.
Wait while your PC restores your system.
Windows usually creates restore points automatically, but it’s also a good idea to do that manually from time to time. To learn more, check our guide on how to create Windows 11 restore points.
8. Go back to the previous build
Click the Start button and select Settings.
Now go to the Recovery section.
Click the Go back button and follow the instructions on the screen.
Keep in mind that this option is available only for a couple of days, so if problems started appearing after installing a new build, be sure to try this option.
This depends on the type of BSOD error. They will force your PC to restart, thus causing you to lose any unsaved data. This can be a problem since crashes can appear randomly several times daily.
If the error is caused by hardware failure, it’s advised to find the cause of the problem and replace the faulty component before the issue becomes more serious.
Is BSOD a virus?
No, BSOD is a system error, and it’s caused by faulty hardware or driver and software incompatibility, so it’s safe to assume that even if you get a BSOD, your PC isn’t affected by malware. Sometimes, you can even trigger a BSoD error to test for hardware defects.
These general solutions should help you fix a BSOD in Windows 11. However, the exact steps might be different depending on the issue that you’re having.
When your computer crashes with a Blue Screen of Death, the last thing you want is guesswork. A BSOD viewer app helps you read crash dumps and figure out why your system failed. Here are the best options for Windows 11:
BlueScreenView is a lightweight, free, and portable tool from NirSoft. It scans all your minidump files created during BSOD crashes and shows you a table with the crash date, stop code, and the driver likely causing the problem. It also color-codes the drivers involved so you can immediately spot troublemakers.
Tips & Features:
Can export crash reports as text, CSV, or HTML for sharing or documenting
Supports sorting by driver, stop code, or crash count
Works offline without installation
Pros: Free and portable, quick crash analysis, highlights culprit drivers Cons: Basic interface, technical info may confuse beginners
WhoCrashed takes the raw data from minidump files and explains it in plain English. It goes beyond listing drivers—it suggests probable causes like faulty drivers, hardware failures, or software conflicts. This makes it ideal for users who want clear answers without digging into hexadecimal memory addresses.
Tips & Features:
Provides a crash summary and probable cause
Free version sufficient for occasional use
Pro version offers real-time monitoring and advanced reports
Pros: User-friendly, readable explanations Cons: Less granular than advanced tools like WinDbg, Pro version is paid
WinDbg is Microsoft’s official tool for deep system analysis. It can read all types of crash dumps and provides a detailed breakdown of memory, driver states, and kernel errors. Using commands like !analyze -v, you can uncover the exact driver or process that triggered the crash.
Tips & Features:
Requires Windows SDK for installation
Can analyze live memory or stored dumps
Supports extensions and scripts for automated analysis
Pros: Extremely detailed and accurate Cons: Steep learning curve, not beginner-friendly
Download WinDbg here for professional-level BSOD analysis.
4. Built-in Crash Log Access Methods
Finding dump files on Windows 11: Minidump files are in %SystemRoot%\Minidump and full memory dumps in %SystemRoot%\MEMORY.DMP (Windows 11 BSOD dump file location).
How to check BSOD logs in Windows: Use Event Viewer, Reliability History, or Registry tweaks (BSOD log file location guide).
Closing Thoughts
A BSOD viewer can save you hours of trial-and-error. Quick insights? Use BlueScreenView or WhoCrashed. Deep dives? Go with WinDbg, Event Viewer, or DebugDiag. Knowing where crash files are located, like Minidump or MEMORY.DMP, is essential for accurate troubleshooting.
FAQs
1. Can BSOD viewers fix the crash automatically?
No. These tools only analyze the dumps and point to probable causes. You must update drivers, rollback software, or replace hardware yourself.
2. Are these tools safe?
Yes, reputable apps like NirSoft’s BlueScreenView or Microsoft’s WinDbg are completely safe.
3. Do I need admin rights?
For viewing minidumps, basic rights are enough. To capture live dumps or install some tools, administrator privileges are required.
All of us store our favorite photos on our PCs, but a number of users reported a strange issue on Windows 10 regarding the Windows Photo Viewer app.
When this happens, you can either opt to use another photo viewer program or troubleshoot the current software. Both scenarios will be covered in the list of solutions below.
Why is my Windows Photo Viewer not working?
The Windows Photo Viewer app can stop functioning properly due to various reasons. Here are the most common ones:
Corrupted Photo Viewer files – This can happen due to system bugs or newly installed applications. All of the files in the application’s folder will be inspected and any corrupted or missing files will be replaced when you will repair the app as we have shown below.
Running processes – Sometimes, closing an application will not end its process inside Task Manager. Consequently, the process will keep running and interfere with the new instances when you try to open the app. We have shown in the list below, how you can fix this situation.
Many reported that they can’t open pictures on Windows 10 and this can be frustrating. Speaking of photo issues, users reported the following problems as well:
Windows 10 Photo Viewer app didn’t start – If you encounter this issue, you might have to re-register the Photos app and check if that solves the problem.
Windows Photo Viewer not showing thumbnails – In this case, you can follow our dedicated guide where you will find optimal solutions, such as restoring the File Explorer settings to default.
Black screen Windows 10 Photo Viewer – This is another common problem in Windows, and it can be caused by a corrupted user profile. However, you can easily fix it by creating a new user account.
Scroll/slideshow not working in Windows Photo Viewer – One quick solution is to switch to a different photo management software; but you can also try a few fixes for when the photo gallery does not work.
Windows Photo Viewer print not working – It’s possible that the most recent Windows update is to blame when the Windows 10 Photo Viewer fails to produce the expected results when printing photos.
Windows Photo Viewer won’t open JPG – If you can’t view JPG files on your PC, you might be able to fix the problem simply by switching to a third-party photo viewer.
This being said, let’s just jump right into the list of solutions to the Windows 10 Photo Viewer not working issue and its related variations. Follow along!
How can I fix Windows 10 Photo Viewer not working?
Is Windows 10 Still Supported?
Security Updates
Feature Updates
Non-Security Updates
Annual Updates
Upgrade process for business customers
Manufacturer Warranty and Support
Before moving on to more complex solutions, make sure that you follow these troubleshooting steps:
If you’re having trouble viewing your photos, you might want to consider a completely different solution from the start. And why not choose one that has a plethora of advantages and bonus features?
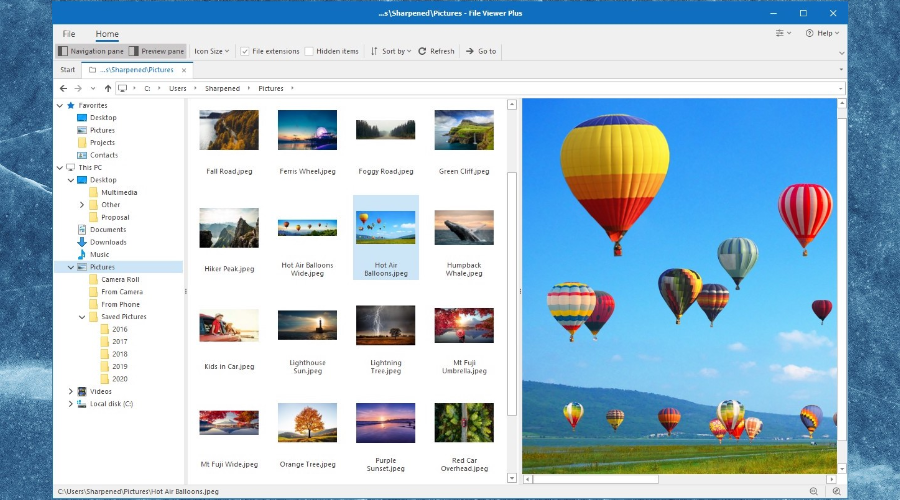
File Viewer Plus is a strong tool because it enables you to view over 400 file formats, such as images, Office documents, PDFs, and others all with just this program.
File Viewer Plus allows you to crop raw images from a digital camera and export them as a JPEG and convert various files at once with the built-in batch converter.
Moreover, this program has other interesting features, such as displaying file thumbnails, previewing before opening, and browsing files and folders.
File Viewer Plus
An amazing program that helps you view, edit, and convert hundreds of file formats with just a few clicks.
2. Select Windows Powershell (Admin) from the list.
3. Paste the following command: Get-AppxPackage -allusers Microsoft.Windows.Photos | Foreach {Add-AppxPackage -DisableDevelopmentMode -Register "$($_.InstallLocation)\AppXManifest.xml"}
4. Press Enter to run the command.
5. Check if the issue persists.
PowerShell is a powerful tool that allows you to do all sorts of different things on your PC. Since this is such a powerful tool bear in mind that using it can lead to system instability if you’re not careful.
You can fix the Windows Photo Viewer not working issue in PowerShell by re-registering the Photos App.
Here, type photo then click Microsoft photos and select Advanced options.
Scroll down and click the Repair button, then follow the on-screen steps to finish the process. Reboot your PC and check whether the Windows 10 image preview not working issue is gone.
4. Reset the app
Press Windows + I then click Apps.
Type photo then click Microsoft photos and choose Advanced options.
Click the Reset button, then follow the on-screen steps to finish the process.
5. Make sure that Photos isn’t running in the background
Press Ctrl + Shift + Esc to open Task Manager then search the Photos process, click it and select End task.
Restart your computer afterward and check whether the Microsoft Photos not working issue is gone.
Photos app and Windows Photo Viewer are decent photo viewing apps, but if you can’t view photos on Windows 10 you might want to consider using a third-party photo viewer.
Zoom has become a necessity of late to the increasing adoption of the hybrid workforce and learning method. However, some users complain that the Zoom microphone is not working on Windows 11.
This could be because you mistakenly muted the microphone or due to some more technical issue. Irrespective of the cause, we will show you how to get your Zoom microphone working again on your PC.
Why has my microphone stopped working on Zoom?
It will be a pretty long list if we start listing the complete list of possible causes for this problem. However, there are some common ones reported by users, and they are listed below:
Misconfigured settings: If the Zoom microphone audio is not working on Windows 11, it might be because of some settings on your PC. Users have especially pointed fingers at the enhanced audio feature. You need to turn this feature off to fix this issue.
Improper connections: Sometimes, this issue might be a simple connection problem. Ensure everything is correctly connected to your PC to prevent the microphone from not working.
Faulty Zoom installation: Some users have reported that Zoom failed to detect the microphone and speaker on Windows 11 due to a defective installation. The solution, in this case, is to remove Zoom manually or use one of the best uninstaller software.
Interference from other apps: Another known cause of the microphone not working on Zoom issue – especially on an HP laptop – is the noise cancellation feature of the Bang and Olufsen app. Turning off this feature has solved the problems for many users.
What can I do if Zoom failed to detect the microphone?
Before delving into the fixes in this guide, we advise you to check that your microphone is connected correctly. If it is a wireless microphone paired via Bluetooth, you can forget and repair it.
If you use a wired microphone, remove it, clean the port and jack/USB, and replug it properly. Should the problem persist, you can now proceed to the fixes below:
1. Verify that Zoom has access to the microphone
Press Windows + I to launch the Settings app, and select Privacy & security from the tabs listed in the navigation pane on the left.
Click on Microphone under App permissions.
Please scroll down to locate the Zoom app, and make sure the section it’s listed under has access to the microphone, apart from the app itself.
Without the required permissions, you are bound to encounter issues with any app; the same goes for Zoom. Once you have provided the relevant licenses, check if the error is fixed.
2. Turn off the Enhance audio setting
Press the Windows key + I to open the Settings app and select System in the left pane.
Choose the Sound option.
Now, select the Internal microphone.
Finally, toggle the switch for Enhance audio back under Input settings to disable it.
Users have reported that most Windows 11 Zoom audio issues, including this microphone, not working problem, are down to the Enhanced audio feature of the latest OS. Thus, you need to disable this feature and restart your PC.
3. Disable the Bang & Olufsen Noise Reduction feature
Press the Windows key, type bang, and select the Bang & Olufsen Audio Control Panel option.
Click the Recording Experience option at the top.
Now, uncheck the box for Enable HP Noise Reduction option.
The Bang & Olufsen app on HP laptops does an excellent job managing its speaker and microphone products. However, many users have complained that its noise cancellation feature stop is resembled the Zoom microphone not working on Windows 11 issue.
While some people could fix it by disabling the feature, others required the complete removal of the app.
Press the Windows key + I and select the Windows update option in the left pane.
Click Advanced options.
Now, click the Optional updates option.
Finally, install any available updates.
While the Windows updates are installed automatically, you need to install the optional updates yourself. These updates include driver updates and other crucial component updates.
Installing these updates has proved effective for some users in solving the Zoom microphone not working on Windows 11. Thus, it would be best if you tried to install them too.
5. Reinstall Zoom
Press Windows + I to launch Settings, and select the Apps tab from the navigation pane on the left.
Click on Apps & features on the right.
Next, locate the Zoom app, click on the ellipsis next to it, and select Uninstall from the menu.
Again, click Uninstall in the confirmation prompt that pops up.
If the above methods didn’t fix the Zoom microphone not working on Windows 11, it’s most likely a problem with the app itself. In this case, uninstalling the app and then reinstalling it would get things up and running.
These were the most effective methods to fix the Zoom failure to detect a microphone in Windows 11. Zoom being such a critical app in these work-from-home days, quickly troubleshooting issues with it becomes all the more important.
Besides, you can find out about Zoom connection issues especially when crashes occur during screen sharing and how to resolve them in this guide. Though the article is for Windows 10, the methods listed here also work fine on the latest iteration.
Please tell us which fix worked and your experience with Zoom in the comments section below.
Are you interested in converting your DVD to digital files? Have you ever asked yourself: How can I convert my DVD collection to digital files? The answer is DVD to digital format converters.
This software can convert a DVD or BD (Blu-ray Disc) video/movie into a file; in addition, you get to back up the converted digital file for safekeeping.
However, there are several programs out there that can convert DVDs to digital videos. In this post, we have compiled the best DVD to digital conversion software.
Premiere Pro is the industry-leading video editing software boasting a plethora of creative tools, integration with other apps and services, and support for every camera, format, and platform.
Adobe Premiere Pro supports numerous audio and video formats including M2V (DVD-compliant MPEG-2) and VOB (container format in DVD media), making your workflow compatible with the latest broadcast formats.
In addition, Adobe’s software has always brought top-notch quality to its audience, never failing to deliver on its promises and always improving itself with its constant updates.
Creating a DVD with Adobe Premiere Pro is as easy as it gets. To export files from Premiere, simply go to Select File > Export > Media.
Then choose MPEG2-DVD among the list of output format options for single-layer or dual-layer DVDs. All in all, Adobe is a great software to convert home movie DVDs to digital.
Let’s quickly look at its key features:
Auto Reframe
Import any format
Seamless integration with other Adobe Creative Cloud services
Cross-platform functionality thanks to the integrated Adobe Rush
Lumetri Color Panel (color grading and automate color correction with just one click)
Essential Sound Panel and Auto Duck feature to execute perfect audio
Essential Graphics Panel (Motion Graphics templates to create cutting-edge graphics)
Responsive Design
Adobe Premiere Pro
Digitalize your entire DVD collection and enjoy it forever with the Premiere Pro.
WinX DVD Ripper was developed by Digiarty Software. It is a totally free DVD ripping software available to remove UOP, DVD CSS, RCE, Sony ARccOS, and region code.
However, this free Windows software does not support DVDs encrypted by Disney X-project DRM adopted by Disney, Warner, and Paramount as its paid Platinum version does.
1. How can I convert DVD to digital with WinX?
1. Download and install WinX DVD Ripper Platinum from the official website.
2. Launch the app.
3. Click on theDVD Disc button to select the DVD you want to convert.
4. Choose the output format: MP4, AVI, H.264, MPEG, WMV, MOV, M2TS files, and more.
5. Click theRun button to start the conversion process.
WinX DVD Ripper Platinum is one tool with great inputs and advanced features which will pay off instantly. You can convert a DVD to digital in a few steps with WinX DVD Ripper Platinum.
Additionally, you can select a hardware accelerator to boost DVD converting speed. Lastly, know that the program can also convert DVD to streaming.
WinX DVD Ripper Platinum takes full advantage of the power of your PC and can convert a DVD to MP4 (or any other formats) in less than five minutes, making it one of the best DVD-to-digital converters.
Winx DVD Ripper
Convert your digital formats into DVD and burn them easily thanks to Winx DVD Ripper’s awesome features.
If you are looking for tools to convert your DVD collection to digital files, then Gilisoft Movie surely can take care of this for you. This program is also used by companies that convert DVDs to digital.
Firstly, use it to rip and convert DVDs, DVD folders, and DVD ISO image files to countless different video formats – AVI, MP4, WMV, DivX, MPEG, and not only.
To watch DVD movies on Android, you may simply convert to one of the Android-supported video formats. If you’re looking for a blu ray to digital converter, this is a great choice.
What’s more, Gilisoft Movie DVD Converter also lets you convert DVDs directly to some of the most popular devices, including iPhone, iPad, iPod, Apple TV, Nokia, or Motorola.
In case you need easy to use a DVD to digital file converter, be sure to consider this application.
Let’s quickly look at its key features:
User-friendly conversion features even for newbies
You may clone DVDs to ISO/ DVD folders
Burn ISO/DVD folders (VIDEO_TS) to all DVD discs with high speed
Enjoy extra editing tools: crop, adjust brightness, saturation, contrast, special effects, or watermark
Add subtitle track and language, as well as external subtitles to output videos
Includes lifetime free updates
Gilisoft Movie DVD Converter
Burn, clone, and convert all kinds of formats into ISO/DVD with high speed by using Gilisoft Movie DVD Converter.
With its simple user interface, DVDFab is one of the easiest tools to use to transfer a DVD to digital format. The software supports both DVDs and Blu-Ray disks, allowing you to easily copy any movie.
This feature works with encrypted discs, and it supports 6 different copying methods, allowing you to copy full discs, merge DVDs, or split them with ease.
The software has its own video editor, allowing you to rotate videos, add overlays, text, and filters. You can also trim videos, extract audio or subtitles or even create GIFs.
It’s important to mention that the converter is fast and easy to use, and it supports a wide array of formats, so your videos will work on any device without issues.
If you need a free DVD to digital converter, then this might be the right application for you.
Key features:
Easy to use
Supports both DVDs and Blu-Ray discs
Cloud Decryption Service
Built-in video editor
Great performance
DVDFab
Fast and incredibly versatile, DVDFab is one of the best tools for converting DVDs.
The Wondershare company has many years of experience in the video editing scene.
This program not only converts your videos into different formats – audio or video – but it also has a wide variety of customization and export tools not found in many of the competitors.
With Wonderfox, you can download any video in its native format and modify it to play on any screen or device you are using.
Downloading videos from YouTube is just as easy as copying the URL in the program. If you’re looking for DVD-to-digital converters, then be sure to consider this software.
The exporting feature is really seamless, you can transfer the files directly from your computer to the multimedia center at home, with a single click.
Although it has more complex features, it’s easy to learn and very quick to finish multiple videos. Its fast conversion time, high-quality output, and extra features make it the perfect choice for video converter software.
Overall, this is great software for DVD to digital transfer, so be sure to consider it.
Let’s quickly look at its key features:
Adding subtitles and details like buttons in your videos
Intuitive and multilingual user interface
Unique decryption technology
Enhance, rotate, crop videos, and apply effects
Cack up scratched DVD
Self-playing USB
Up to 50X faster conversion with no quality loss
WonderFox DVD Video Converter
WonderFox DVD Video Converter allows you to convert, burn, and customize your videos with a variety of awesome features and options.
This is one of the most powerful and convenient converter tools which features high conversion speeds and amazing output quality.
It allows you to use converted files on your iPod, TV, iPhone, mobile phone, Android phone, and more portable devices.
iSkysoft iMedia Converter gives you the possibility to customize and edit videos before conversion. You can also upload the final videos to websites such as Facebook, YouTube, and Vimeo.
It gives you the possibility to download videos from more than a thousand popular websites, and it’s compatible with the latest operating systems.
Key features:
Ability to easily convert video and audio files
Burn DVDs and create backups
Download online videos
Simple video editor
Fast conversion speed
iMedia Converter
iMedia Converter is the ultimate tool to convert more than 150 file formats into DVD easily.
We strongly believe these tools will help you convert DVDs to Digital videos effortlessly. There are many options here for all kinds of people, with different tastes and needs.
An exception is a known type of error. Normally, the Windows operating system is designed to deal with this type of issue. However, several users have reported receiving the Unhandled exception error in Windows.
The error can be encountered on a wide range of applications, including games, streaming apps, and other apps. Some users also saw the error message as soon as they turned on the computer, indicating that a startup program was most likely affected.
How do I fix the unhandled exception has occurred error?
2. Now, double-click on the downloaded file to run the tool.
3. ClickYesin theUACprompt.
4. Tick the I have read and accept the license terms checkbox and click Next.
5. Look at the recommended changes to get an understanding and click Next.
6. Once the changes are made, click on Finish.
7. Restart the computer, and you shouldn’t encounter theUnhandled exceptionerror with the concerned app anymore.
The first fix you need to try when you encounter the unhandled exception has occurred in your application error is run the Microsoft .NET Framework Repair Tool.
It is available for download on the official Microsoft website and should fix any errors in no time.
2. Re-enable NET Framework
Type Turn Windows features on or off in the Search bar, and click on the relevant result.
Now, uncheck all the entries for .NET Framework, and click OK.
Restart the computer for the changes to come into effect.
Head back to the Turn Windows features on or off window, check all the .NET Framework entries, and click on OK.
Now, wait for Windows to search for the required files and install them.
3. Run the SFC scan
Type Command Prompt in the Search menu, and then click on Run as administrator.
Click Yes in the UAC prompt.
Now, paste the following command and hit Enter:sfc /scannow
Wait for the scan to complete and let it run uninterrupted. It may take up to 30 minutes.
After running the SFC scan, restart the computer, and the Unhandled exception error should be fixed. This has resolved the issue for some users, and we recommend you try it.
Type Windows Security in the Search field, and click on the result by the same name.
Select Virus & threat protection here.
Click on Scan options.
Now, choose Full scan and click on the Scan now button.
Let the scan run, identify malware and virus on the computer, and remove any that are found.
Possible malware interference is a viable reason for the Unhandled exceptionerror. Making sure that your PC is protected from the effects of the malware presence is of utmost importance. In this case, we recommend a full scan.
There are many great antivirus tools on the market, but if you’re looking for a security solution that won’t interfere with your system, you might want to consider usingTotalAV.
This antivirus software is a next-generation security solution that is designed to be fast, lightweight, and keep your digital life safe.
This great tool blocks malicious activity, stops any spamming or data theft attempts, and warns you immediately.
Press Windows + R to open Run, type msconfig in the text field, and click OK.
Head to the Services tab, check the Hide all Microsoft services box, and then click on Disable all.
Now, navigate to the Startup tab, and click on Open Task Manager.
Select all the applications that read Enabled under the Status column, and click Disable.
Once done, head back to System Configuration, and then click on OK.
Click Restart in the confirmation prompt.
Your PC will now boot in a Clean boot environment. This will ensure that Windows starts with only a minimal set of drivers and programs.
You could also:
Restart the computer.
Disable any third-party antivirus or firewall software installed on the computer.
Try running the affected application as an administrator.
Note that this error appears when the code of an application or program is not adequately equipped to handle exceptions. As previously mentioned, the unhandled exception is one of the most common Microsoft .NET Framework errors.
Some of the reasons you may see the error message are as follows:
Corrupt system files – Corrupt system files are one of the most common reasons behind the Unhandled exception error and running the DISM tool, and SFC scan should fix things.
Conflicting program – If the error arises due to conflicts triggered by third-party programs, simply uninstall that application.
Issues with the .NET Framework – Oftentimes, corruption or improper installation of the .NET Framework can lead to issues.
System infected by malware – In many cases, users found out that it was malware or a virus on the computer that triggered the error.
Where does the Unhandled exception error occur?
There are plenty of apps and environments where you can encounter the error. Let’s quickly review some of them:
Unhandled exception in Potplayer
Unhandled exception in Flutter
Toolkit got an Unhandled exception
Unhandled exception error in JavaScript (A Javascript error occurred in the main process uncaught exception)
Unhandled exception in NodeJS
Inputmapper base error Unhandled exception
Unhandled exception error in AutoCad
3dxvirtuallcd Unhandled exception error
Unhandled exception error in GTA Vice City
Unhandled exception error in C++ (Visual Studio)
Krnl Unhandled exception
Unhandled exception error in HBO Max
Unhandled exception error in Outlook
If the unhandled exception error doesn’t appear now, it’s likely that one of the things you disabled earlier had to do with it.
We recommend first enabling the Startup apps disabled earlier one by one until the problematic one is found. In case that’s not to blame, start enabling the services next. Identifying the underlying cause may take time, but it will ensure that the problem is fixed forever.
The Windows Start Menu scrolling up the issue can quickly mar your user experience. It removes the ease of searching and quick access to apps on the Start Menu.
The causes of the auto-scrolling vary, with some users claiming that even the Windows Search bar keeps scrolling. Thankfully, this issue can be easily fixed, as shown in the following sections of this guide.
Why does my Windows Start Menu scroll up and down by itself?
The Windows Start Menu auto-scrolling up and down is usually due to hardware issues. However, you can’t rule out the possibility of software causing this problem. Below are some of the reasons your Start Menu is scrolling by itself:
Faulty game controller: Most users reported that their Windows Start Menu moved on their own because they had their Xbox game controller plugged in. This can be because something is pressing down some keys or the controller is malfunctioning. The solution here is to remove the controller.
Problematic system files: Corrupt or faulty system files are among the prominent causes of this issue. Repairing and restoring these files using the built-in tools or dedicated software should regain normalcy.
Faulty mouse driver: Your mouse drivers serve as the connecting medium between the hardware and your PC. When these wrong drivers lead to all sorts of problems, including this issue, uninstalling and reinstalling these drivers should fix the issue.
How can I fix the Windows Start menu scrolling up?
1. Repair system files
Press the Windows key + S, type cmd, and select Run as administrator under Command Prompt.
Type the commands below and press Enter after each: DISM.exe /Online /Cleanup-image /ScanhealthDISM.exe /Online /Cleanup-image /Restorehealth
Wait for the commands to finish running, type the command below, and hit Enter: sfc/scannow
Restart your PC when this command completes running.
Broken system files can cause the Windows Start Menu to scroll up the issue. Running the SFC and DiSM scans should help fix and restore these files.
Alternatively, you can use a dedicated tool to repair your PC. These tools save you the stress of typing commands, which always carries the risk of errors.
What’s more, they are lightweight, fast, and pretty effective because they replace all malfunctioning files with healthy elements. It might just be everything you need to get your PC working well.
2. Create a new Admin account
Press the Windows key + I and select Accounts.
Click on Family & other people and select Add someone else to this PC under Other people.
Click I don’t have this person’s sign-in information.
Select Add a user without a Microsoft account.
Enter the Username, and password, fill in other required fields, and click Next.
Now, sign out of your current account, sign in to the new one, and check if the issue persists.
Press the Windows key + X and select Device Manager.
Double-click the Mice and other pointing devices option and right-click your mouse driver.
Choose the Uninstall device option.
Now, click the Uninstall button.
Finally, go to your mouse manufacturer’s website to download the latest version of the driver.
A faulty mouse driver is another well-known cause of the Windows Start Menu scrolling up issue. This is especially true for an external mouse. Uninstalling and reinstalling the driver should fix this problem here.
4. Re-register Cortana
Press the Windows key, type powershell, and click Run as administrator under Windows Power Shell.
Copy and paste the command below and hit Enter: Get-AppXPackage -Name Microsoft.Windows.Cortana | Foreach {Add-AppxPackage -DisableDevelopmentMode -Register "$($_.InstallLocation)\AppXManifest.xml"}
Now, wait for the command to complete.
Sometimes, it is not only the Windows Start Menu that keeps scrolling up. It also affects Windows Search. In this case, you need to re-register Cortana using PowerShell and restart your PC.
5. Restart Windows Explorer
Press the Shift + Ctrl + Esc keys to launch the Task Manager.
Right-click on Windows Explorer and click Restart.
Now, check if the problem persists.
If your Windows menu keeps moving on its own, it might be due to problems with the Windows Explorer process. According to users, restarting the process should fix this issue
Even more, we recommend removing your Xbox controller or any other game controller. Another thing to try is to remove your wireless mouse’s USB receiver and connect it to another port. This might prompt your PC to reinstall the driver.
The Windows Start Menu scrolling up issue is a frustrating problem for users. Thankfully, it is one of the easiest to fix, as shown in this guide.
Many encountered 0x80070422 Windows Update error, and if this happens, you won’t be able to download the latest updates.
However, there is a way to fix this problem and in this guide, we’ll show you how to do that.
Why does the Windows Update Error 0x80070422 appear?
Disabled Windows services or corrupt system files can cause this problem. Network issues can also lead to Windows Update problems.
How can I fix error 0x80070422?
1. Enable the Windows Update service
1. Press the Windows key + R, type services.msc, and hit Enter.
2. Locate and double-click the Windows Update service to open its properties.
3. Click the dropdown nextStartup Typeand chooseAutomatic.
4. Now, check theStatusto see if it is running. If it is not click theStartbutton.
5. Click OK to save your settings and restart your computer.
6. You can also repeat Steps 2, 3, and 4 for the services below to make sure they are running:
Windows License Manager
Network List
Xbox Live Auth Manager
Xbox Live Networking
The Windows Update service being set to disabled is the main reason for the 0x80070422 error. Restarting it should be enough to fix this issue.
However, some users complained that other services being disabled also caused other variations of the error.
So, ensure to enable them too and restart your PC.
Lastly, you might get an access denied message while trying to enable the Windows Update. You only need to log in as an admin and you will be able to get past it.
2. Disable IPv6
Press the Windows key, type control, and select Control Panel.
Click the View network status and tasks option under Network and Internet.
From here, click the network you are connected to.
Now, click the Properties button.
Find and uncheck the box next to Internet Protocol Version 6 (TCP/IPv6) to disable it.
Press the Windows key type cmd and click Run as administrator under Command Prompt.
Type the command below and hit Enter. sfc/scannow
Wait for the scan to finish. Now, copy and paste the command below and hit Enter: DISM /Online /Cleanup-Image /RestoreHealth
Wait for the scan to complete.
Broken or corrupt system files can cause many problems including the error code 0x80070422. Thankfully, Windows has built-in repair tools that can help you fix these files.
Alternatively, you can use professional software that focuses on repairing your Windows OS and frees up space on your disk in order to help it function at full capacity.
This type of program can detect common issues that obstruct your Windows registry’s true performance and applies advanced system tweaks to fix them in real-time.
4. Run Windows update troubleshooter
Press the Windows key + I and select the Update & Security option.
Select Troubleshoot in the left pane and click Additional troubleshooters.
Finally, select the Windows Update option and click the Run the troubleshooter button.
As you can see error 0x80070422 can cause a lot of issues since it prevents you from performing Windows updates. Thankfully, the fixes are not far-fetched, as shown in this guide.
If you are facing other issues like update error 0x800f0988, check our detailed guide to fix it quickly.
This can be useful if you have multiple speakers or headphones connected to your computer and want to change each volume individually. But what if you can’t open it? Read on to find out how to approach this issue.
Why isn’t my Volume Mixer opening?
There are several reasons why your Volume Mixer won’t open in Windows 7. Below are some:
Insufficient space – If you don’t have enough space on your computer’s hard drive, you may not be able to open the Volume Mixer. You may want to consider freeing up some hard drive space.
Corrupt programs – If you recently installed a program, especially one that uses the Volume Mixer, it can cause such issues.
No sound card installed – Make sure you have a sound card installed on your computer. If you don’t, you won’t be able to access the Volume Mixer or any other sound applications.
Incompatible drivers – The Volume Mixer won’t open if you have incompatible drivers that don’t play well with Windows 7.
Virus/malware – If a virus has found its way to your system, it may interfere with how some features work. The best way to protect yourself against viruses and malware is to use an antivirus program.
Corrupt registry – In some cases, corrupt registry keys may cause issues with your Volume Mixer not opening. If this is the case, you’ll need to manually edit the registry or use a registry cleaner.
Incompatible version of Windows – The Volume Mixer is only compatible with some versions of Windows. If you are using a pirated copy of Windows, you may not be able to open the Volume Mixer.
How do I open the Volume Mixer in Windows 7?
The Volume Mixer is located in the system tray. You can open it by double-clicking on the speaker icon or by following the steps below:
Click on the speaker icon at the bottom right, then click on Mixer.
The Volume Mixer window will pop up.
You can now adjust the volume for all audio devices or per program.
Click and hold your mouse to move the slider to adjust the sound setting.
How can I fix my Volume Mixer if it won’t open in Windows 7?
Before attempting any technical solutions, try the following first:
First, check whether the Volume Mixer icon is in your system tray.
Hit the Windows key, type Disk cleanup, and click Open.
Select the drive you want to clean from the drop-down menu and click OK.
Check the folders you want to clean up and click OK.
Wait for the Disk cleanup process to complete.
2. Reinstall sound drivers
Click on the Windows key to launch the Start menu, and select Control Panel from the options on the right.
Select Hardware and Sound.
Click on Device Manager.
Expand Sound, video and game controllers, find your audio driver, right-click, and select Uninstall.
Restart your PC, and the drivers will automatically be reinstalled.
If Windows doesn’t find any update for your driver, we recommend you also try Outbyte Driver Updater, a tool specialized in finding and installing driver updates automatically.
Outbyte Driver Updater uses a database of over 18 million driver files that are regularly updated so your computer can receive updates in real-time.
Outbyte Driver Updater
Have your GPU driver updated along with all other outdated drivers for no more spikes.
Click on the Start icon or press the Windows key to launch the Start menu, and then select Control Panel from the options on the right.
Locate Programs and click on Uninstall a program.
Now, select the program you want to remove and click Uninstall at the top.
And that’s how you fix issues if your Volume Mixer doesn’t open on your Windows 7 PC. In other instances, users also complained of a situation where the Volume Mixer is not showing all programs. If that is the case, check out our comprehensive guide for easy fixes.
Should the issue persist, you can consider trying Volume Mixer alternatives that offer more features than the built-in Windows Volume Mixer.
Do let us know of any additional solutions you may have tried and not mentioned above in the comment section below.
If your laptop’s sound is very low, even with the volume at 100%, you’re in the right place. We figured out why it happens, and we’ll show you tested fixes.
While different speaker hardware can be at play, if your sound is suddenly weaker than usual, it’s likely due to faulty settings or outdated drivers.
Follow the steps below to tweak your Windows audio and maximize laptop sound.
What can I do if my laptop volume is low?
1. Check all the Volume Controls
Right-click the speaker icon on the system tray and select Open Volume Mixer.
Raise the audio slider for third-party software open.
Play the media file and check if it’s still low.
2. Try using a third-party equalizer
In case this first solution does not work to fix the problem of your computer volume being too low, we recommend you adjust the volume by using third-party equalizer software.
We recommend Bomm 3D. It easily lets you change your volume and manipulate frequencies. It’s a good option if you want to add special effects, increase the clarity of your sound or adjust sound based on output device
Press Win + I on the keyboard to open Windows Settings.
Go to System and click on Troubleshoot.
Go to Other troubleshooters.
Click on Run next to the Playing Audio.
Follow the on-screen steps and go ahead.
Then the troubleshooter might detect and fix the audio issue. If the troubleshooter fixes something, you might also need to restart Windows for the changes to take effect.
4. Update the audio driver
4.1 Update the driver manually
1. Open the Start Menu, type Device Manager, and hit Enter.
2. Double-click Sound, video, and game controllers to expand its pertinent devices.
3. Right-click on the sound device you are using and select Update driver.
4. Click Search automatically for updated driver software to automatically update the audio driver.
5. Reboot your laptop or desktop if Windows updates the driver.
It might be the case that your sound card’s driver needs updating. Updating an antiquated sound card driver can resolve numerous audio issues. Use the steps above to update an audio driver in Windows 10.
This is a great fix to use if your laptop volume is low and you want to increase it.
4.2 Get the newest driver from the manufacturer’s website
Even if Windows doesn’t update the driver, you might still find a more updated driver on the sound card manufacturer’s website.
Right-click the sound card listed in Device Manager and select Properties to open the window below.
See and remember the manufacturer’s name from the General tab.
Go to the manufacturer’s website by searching on Google or Bing.
Click a Download hyperlink on the site or enter your sound card in a driver search box to find a compatible audio driver.
Select to download an updated audio driver that’s compatible with your 32 or 64-bit Windows platform.
Add the updated audio driver to Windows by opening the folder you saved it to and launching its setup wizard.
Searching for the right driver version for each of your hardware components can become tedious. That’s why automated software can help you find and update your system with the correct drivers every time.
5. Check the Selected Playback Device
Go to Windows Settings.
Navigate to System and then Sound.
Go to the speaker you want to use primarily.
Set it as the default speaker.
6. Hoover your speakers
Dust might be clogging your desktop’s speakers and reducing their audio level. As such, cleaning speakers is another potential resolution for laptop volume too low.
If you can, hoover your speakers with a hoover pipe to give them a more thorough cleaning. Hand vacuum cleaners are the best for cleaning speakers as they have lighter suction.
Gently wipe over the speaker cones with a cotton swab to finish. Do not apply too much pressure because the speaker membrane is very sensitive, and you may damage it.
7. Select the Loudness Equalization Setting
Like method 4, go to the Sound settings.
Go to your primary speaker.
Click on Advanced under Enhance audio.
Select the Enhancements tab if not opened by default.
Select the Loudness Equalization option.
Click the Apply and OK buttons to close the window.
If the volume level is inconsistent in Windows, some software sound will be somewhat lower than what it could be. The Loudness Equalization setting can make a difference.
This option ensures a more consistent volume across all programs, which will increase the average audio level. This is one of the effective methods to fix the PC sound volume too low issue.
Go to Windows Update and click on Check for updates.
After updating, restart your PC.
The low volume could be due to sound card incompatibility with Windows 10/11, especially if you’ve recently upgraded to that platform. Updating Windows can resolve sound card compatibility issues.
9. Restart the Sound Controller
Restarting the sound controller might help resolve volume that’s too low in Windows.
You can restart the sound controller (or card) by pressing the Win key + X hotkey to open the Win + X menu.
Select Device Manager.
Double-click Sound, video, and game controllers to expand the list of audio devices.
Right-click your active sound controller and select Disable device.
Press the Yes button on the dialog box window to confirm the selected option.
Wait a few minutes, right-click the disabled sound controller, and select Enable.
Then restart the Windows OS.
So, there are numerous resolutions that might fix the Windows 10 low-volume problem. You can also try fixing the issue with some of these repair toolkits.
However, you might need replacement desktop speakers if none of the above fixes work. So, you should better verify if the speakers work with other devices.
Low sound on a Windows laptop or PC is often caused by misconfigured audio settings, outdated drivers, or background enhancements. Even when the volume is set to 100%, these hidden factors can limit your speaker output:
Incorrect Playback Device: Windows may default to a different output, like a disconnected monitor or Bluetooth device, lowering sound output.
Outdated or Glitched Audio Drivers: Old or buggy drivers can prevent your hardware from performing at full capacity.
Audio Enhancements Interference: Features like Spatial Sound or Loudness Equalization may dampen audio quality instead of improving it.
Low App Volume Settings: Windows lets you adjust volume per app. If an individual app is set too low in the Volume Mixer, you might not hear anything clearly.
Wrapping Up
Fixing these common issues usually restores normal volume and improves overall sound clarity.
This article has shown how you can fix PC sound volume too low on Windows 10. If you have any other suggestions or questions, drop them in the comments section below, and we’ll be sure to check them out.
HEVC is a popular video codec, but not all devices can support it, and this is why many users choose to use the H264 codec instead. If you want something more advanced, you might be interested in software to encode H.265 instead.
If that’s the case, you’ll need to convert the HEVC to H264 format, and in this article, we’re going to show you the best tools for this task.
If you’re looking for a different type of multimedia converter, then FlexClip might be what you need. Unlike other tools on our list, FlexClip is cloud-based, so you don’t need to install anything to use it.
FlexClip is a video editing web app, and you can use it to trim, merge, or rotate videos. The tool also lets you mute videos or add music to them. If needed, you can also add text or various video effects.
The editor offers an incredibly intuitive interface, so you can easily edit your videos, and with hundreds of video templates available, you can speed up the video creation process.
File conversion is also present, and you can easily convert HEVC videos to H264. Of course, other popular formats are also available.
Although FlexClip isn’t a file converter, it still offers solid features, and if you’re a fan of web apps, then you might want to try it out.
If you’re looking to convert HEVC to H.264, then the best tool for this task would be WinX HD Video Converter Deluxe. The application supports over 370 input and over 420 output formats.
In addition, there’s support for a wide array of devices, including PCs, surveillance cameras, camcorders, DSLR cameras, drones, action cams, etc.
WinX HD Video Converter Deluxe uses Level-3 Hardware Acceleration in order to process and encode files up to 47 times faster, without losing the video quality.
The application can also be used for basic video editing, so you can trim videos, crop them, combine videos, adjust the sound volume, and even correct or add subtitles.
Overall, WinX HD Video Converter Deluxe is a great tool, and if you need to convert HEVC to H264, then this will be the right tool for the task.
WinX HD Video Converter Deluxe features:
Over 370 input and 420 output formats
Supports a wide array of devices
Basic video editing features
Uses Level-3 Hardware Acceleration
Ability to download online videos
WinX HD Video Converter Deluxe
Convert HEVC to H264 or any other 420+ formats available with WinX HD Video Converter Deluxe.
Another great tool that can work with HEVC and H.264 files is Any Video Converter Ultimate. The software supports over 200 video formats, and it works with DVD, 4K UHD, H265, H264, and many others.
According to the developers, the software offers a 30x faster conversion speed than other traditional converters. Speaking of conversion, the software supports NVIDIA NVENC, AMD AMF, and Intel QSV hardware acceleration.
Any Video Converter Ultimate also supports video editing, so you can easily trim, merge, crop, and rotate your videos. You can also customize brightness, saturation, contrast, and other video options.
It’s important to mention that the software offers batch video conversion, which can be useful if you need to convert multiple files simultaneously.
Any Video Converter Ultimate offers great features, and with the wide array of supported formats, it’s a great tool for all your conversion needs.
Any Video Converter Ultimate features:
Support for over 200 video formats
Ability to convert DVDs and CDs to various formats
Ability to create DVDs
Screen recorder
Ability to download online videos
Any Video Converter Ultimate
Any Video Converter Ultimate is a powerful file conversion software that can easily convert HEVC to H264 files.
Movavi Video Converter is another great HEVC to H264 converter that you might want to try. The application supports over 180 different media formats, so you should be able to convert almost any multimedia file.
The software also offers presets for more than 200 devices, so you can easily optimize files for your phone, tablet, game console, etc.
In terms of speed, Movavi Video Converter uses the SuperSpeed technology that converts the media files faster than other similar applications. Of course, there’s support for hardware acceleration as well.
Speaking of hardware acceleration, NVIDIA NVENC, NVDEC, Intel HD Graphics, and AMD hardware acceleration is available.
The application can also extract audio from video files, and there’s also a built-in video editing feature available allowing you to easily edit your videos.
Movavi Video Converter is incredibly simple to use, so if you’re looking for a simple but powerful media converter, this might be the right tool for you.
Movavi Video Converter features:
Support for over 180 multimedia formats
Has over 200 presets for various devices
Offers basic video editing features
Supports NVIDIA NVENC, NVDEC, Intel HD Graphics, and AMD hardware acceleration
Optimized for multi-core processors
Movavi Video Converter
Movavi Video Converter is an advanced video converter software that can convert HEVC to H264 and many other formats.
Converting HEVC to H264 doesn’t have to be hard, especially if you’re using Video Converter Ultimate software. Regarding the supported formats, the application can handle over 200 popular file types.
The application comes with a built-in video editor so you can easily cut, merge, crop, or rotate your videos. As for editing, you should know that there’s a wide array of effects and filters available.
When it comes to file conversion, the software offers great speed, and thanks to the GPU hardware acceleration and multi-core CPU support, it’s 6 times faster than other similar software.
The software can also compress your videos, edit the video metadata, and there’s also a GIF maker feature that might come in handy to some users.
Overall, Video Converter Ultimate offers solid features, and with its simple user interface, it’s great for first time users and pros alike.
Video Converter Ultimate features:
Simple to use interface
Support for over 200 popular multimedia formats
Built-in video editor
6 times faster thanks to GPU hardware acceleration
If the error looks like we can’t connect to one of our services right now, you are not alone, especially if you are a Windows 10 user.
Windows users who get this error cannot carry out any downloads on Microsoft Store because they are never connected.
When an attempt is made to create a new user with their current Microsoft account, a green screen appears with a revolving disc accompanied by the respective error message.
However, the error message is a problem associated with the Microsoft account, primarily services such as Microsoft Store, Skype, OneDrive, Outlook, Xbox Live, Office 365, and Groove Music.
What causes the Looks like we can’t connect to one of our services right now error?
From user experience, we gather that a few factors might be responsible for this error. On top of this list are the following:
Bad or unstable internet – Before troubleshooting, ensure you have good internet. You may even try a wired internet connection.
Date and time settings – If your computer’s date and time are incorrect, you cannot connect to most internet services.
Proxy connections – Depending on your browser, you will need to force a system proxy server; if not, MS servers may not work.
There are a few variations to this error, including the looks like we can’t connect to one of our services right now error on Teams, error 0xcaa80000, HTTP 404, and error 0xcaa70004.
Fortunately, we have compiled some solutions to solve this problem.
How do I fix Can’t connect to Microsoft services error?
Before trying any of these fixes, you should do the following:
Double-check that your internet connection runs well.
Give it a few minutes and try again.
1. Synchronize your Microsoft Account
Sign up to create a Microsoft profile at Windows Live (If you already have a Microsoft account, proceed to the next step).
Click on Sign in, enter your email address and password, and click on login.
After inputting your login details, click Next and select the Send code option.
Enter the 6-digit code you will receive in your phone number or alternate email address and click Sign in.
Press Windows + I, and click on Accounts.
Enter your working email address and password in the Add user menu and follow the prompts.
Ensure you have a working Microsoft Account to access all Microsoft services. This error may be due to an invalid account or because you do not have a Microsoft Account.
Also, after following these steps, you can download the Windows store or access other Windows services on your PC to test this fix.
If the error message looks like we can’t connect to one of our services right now persists, try the next solution.
2. Use Microsoft Account Sign-in Assistant
Press the Windows + R, then in the Run box, type service.msc and click on OK.
In the Services window, please scroll down to Microsoft Account Sign-in Assistant and double-click on it to open properties.
Set the Startup type to manual.
In the lower left region, click on Start if the Startup status is Stopped, then click Apply and OK.
If the error message looks like we can’t connect to one of our services right now persists, try the next solution.
If you are using a browser like Firefox, click on the Hamburger icon, select Settings, then scroll down to click Settings under the Network Settings menu.
Select Use system proxy settings, then click on OK.
Another reason for the cannot connect to Microsoft services at the moment error problem is that the proxy server is enabled. Therefore, Microsoft services may not be accessible if the LAN connection is anonymous, i.e., proxy.
4. Run Network troubleshooter
In the Start menu, type network problems and select the Find and fix network problems app.
Click on Next to start troubleshooting.
Follow the promptings to complete the troubleshooting and apply the recommendations given.
In conclusion, if you get the error message looks like we can’t connect to one of our services right now, you can try out any of the fixes enumerated above to solve it.
Feel free to message us in the comments section below if you have more questions.
Are you trying to install Microsoft Train Simulator? Here is all you need to know.
Even though we’re witnessing the peak of gaming advancements, some users still prefer old, once-favorite titles like Microsoft’s Train Simulator.
The game created by Microsoft back in 2001 still has a place in its niche, with a formidable player base.
However, it’s not all bread and butter for those who, in reminiscence of the good old days, try to run Train Simulator on Windows 10.
Those who tried had a lot of issues with starting the game. The ones that sprang over the first obstacle experienced an abundance of crashes and various errors. So let us show you how to scale through on Windows 10.
Will Train Simulator run on Windows 10?
The simple answer is yes. However, you will have to follow some steps to ensure it is correctly installed before you can play on the OS.
However, after installation, you may have a few errors with the game; these are all easily fixable. For instance, the Train Simulator may be stuck on the loading screen; in this instance, after installation, you may not be able to get past the loading screen. With a few tweaks, many users have fixed this problem.
You should note that while installing on Windows 10 is possible; some users may prefer playing Train Simulator and other train games on the web browser.
But for now, get your dusty CD box out and follow the steps below to install Microsoft Train Simulator on Windows 10.
How can I install Microsoft Train Simulator on Windows 10?
Before you go further into the solutions, you must ensure that you do the following:
Check system requirements – It requires Nvidia graphics cards. So, if you pack a dual-GPU configuration with ATI and an integrated Intel combo, force it to run with the integrated GPU. That should eliminate the GPU-related obstacles.
Uninstall any older game installation – If you have an earlier game installation, you should uninstall it before moving ahead with a fresh installation.
Click the downloaded file, click Next and follow the installation wizard.
At the end of the installation, click on Turn UAC off now (Remember to undo this once you have installed Microsoft Train Stimulator).
Go to the next step to start the installation.
3. Installation
Insert the first installation disk in the CD-ROM compartment and, once prompted, select Run Setup.exe.
Click on Install.
Decline Adobe Acrobat Reader 4 offer politely by clicking on No.
Select Customize installation options and then on the right arrow again.
Select the Complete-install option, then under Train simulator will be installed in the folder below, click Change, then click the right arrow.
Under Drives, select a path different from your primary partition (Do not install the game on the system partition C:). Create the folder, name it whatever you like (MSTS suits it well, in our opinion), and under the Path option, type D:MSTS, then hit OK.
Clickthe right arrow again.
When prompted at 27%, insert the second disc and click OK.
Once the installation ends, click on the Restart button.
Don’t start the Train Simulator yet.
That should do it regarding installation. But, before we can start the game, there are still some additional steps you can’t skip for Train Simulator to work. So, continue to the updating phase.
Run the zipped installer and switch the default path with the path that leads to the Train Simulator installation folder (e.g., D:MSTS).
Click Unzip.
Updating is also essential; you’ll need to sort things out with updates before running the game. The official 1.4 update is what you’ll need.
Now, there’s a chance that your game is already up-to-date with version 1.4, and you can check that out quickly. Just navigate to the installation folder and locate the Transaction folder.
In there, you should see SD402 or Class50 inter alia. Hence, download and install the update if there are no such files.
In addition, you can download the additional patches here. They’re not as important, but we advise installing both (MSTS v1.4 Class 50 Content and MSTS v1.4 SD40-2 Content).
After that’s sorted out, still do not run the game. Let’s move to the configuring part of this epochal journey.
Please navigate the installation folder, right-click on it, and open Properties.
Under the General tab, uncheck the Read Only box, then click OK.
Now, open the installation folder, right-click on the train.exe file, and open Properties.
In the Compatibility tab, check the Run this program as an administrator and confirm changes.
Open the installation folder and rename Uninstall.exe to MSTS_Uninstal.exe.
While there, copy the Global folder and paste it somewhere as a backup. Just in case something goes wrong after the next step.
Open the Global folder and delete the startup.mpg video file.
Insert Disk 1 again and open its content. Open the File Explorer or This PC, right-click Disk 1 and choose Open.
Open the TechDocs folder and run the TechDocs.exe. Next, select the installation path and extract the files.
That’s it. Almost. We have a few more tweaks before you can finally start the game.
6. Final tweaks
6.1 Edit the Aspect Ratio
We must stress that a game like this will have a hard time with 16:9 widescreen monitors.
It’s designed for a 4:3 aspect ratio, so you’ll need to force the widescreen within the GPU settings.
This option is different on Nvidia and Intel graphics, but it’s enough to point you to the Image scaling option. Find that, and you’ll quickly set up the 16:9 aspect ratio.
6.2 Allocate RAM
Right-click the Train Simulator shortcut and open Properties.
Select the Shortcut tab, then in the Target section, change the default path to D:MSTSlauncher.exe -mem:xyz. Replace XYZ with half of the available RAM in megabytes. If you have, say, 8GB of RAM, the Target line should look something like this: D:MSTSlauncher.exe -mem: 4096
Confirm changes.
Furthermore, since this game works differently than modern games, one helpful tip is to assert RAM manually so it can use freely. That can be done by following the steps above.
Moreover, if you experience any errors when the game starts, download and run this installer which should fix most of them. That should do it. Now you can, finally, after immense effort, start the game.
As a side note, you may get some add-ons that should help you substantially with the overall gameplay and improve pure enjoyment.
Here they are, with their respective roles and download links:
Xtracks – large pack of track pieces, switches, and crossovers.
Newroads – more of those with some bonus surroundings.
ScaleRail – improved realism with better-scaled rails.
And that’s finally the closure. After all of this, we hope you’ll seamlessly embark on the nostalgia train and enjoy one of the ”founding fathers” of the simulation genre.
Bioware’s Dragon Age RPG is the latest video game franchise getting a Netflix streaming series adaptation. The new animated series, which releases on December 9th, will be titled Dragon Age: Absolution. The official synopsis reads thus,
With great power at stake, a group of rebel mages and thieves goes head-to-head against a sinister force possessing a dangerous artifact.
Season 1 of Dragon Age: Absolution will consist of six 30-minute episodes. Also revealed was the voice cast, with Kimberly Brooks in the lead role of Miriam. Brooks is a veteran actress and voice actress whose video game credits include Star Wars: Knights of the Old Republic, Halo 4, Bioshock Infinite, Psychonauts 2, Far Cry 5, and many others titles. Other cast members are Matthew Mercer (Falco in Cyberpunk 2077; Cole Cassidy in Overwatch 2) and Ashly Burch (Tiny Tina of Borderlands fame), among several other noteworthy names.
The next installment of the Dragon Age video game series, Dragon Age: Dreadwolf, is currently in development. You can check out a behind-the-scenes look at game’s early development stage below.
DLL files play a crucial role in Windows and often help more than one program run efficiently, and this very aspect (being shared by several programs) often leads to DLL errors. For example, many users reported that api-ms-win-core-path-l1-1-0.dll is missing.
The error arises when launching an application and reads, The program can’t start because api-ms-win-core-path-l1-1-0.dll is missing from your computer. Let’s find out how to fix things when the DLL file is missing.
What can I do if API-MS-Win-core-path-l1-1-0.dll is missing?
1. Use a repair tool
The simplest and quickest way to get things up and running when you get the api-ms-win-core-path-l1-1-0.dll error is to use a reliable DLL repair tool. These will identify any broken or missing DLLs and automatically replace them.
Also, never download a DLL from any website since these are often bundled with malware and can cause considerable harm, sometimes even leading to data loss.
2. Transfer the DLL file from another PC
If you don’t want to use a repair tool just yet, there is another solution that works flawlessly, but you will need another computer with api-ms-win-core-path-l1-1-0.dll stored on it.
You have to first navigate to the following address on the other computer:C:\Windows\System32\
Now, locate the DLL file (it could be in a subfolder here as well), copy it to a USB drive, and move it to the same folder on the computer throwing the error.
3. Disable Lync add-on in IE
Some users who had api-ms-win-core-path-l1-1-0.dll missing in Windows fixed things by disabling all the Lync add-ons in Internet Explorer. Unfortunately, the add-on, though beneficial, led to the error for users, and disabling it worked like a charm.
Press Windows + R to open Run, type appwiz.cpl in the text field, and hit Enter.
Locate the program that throws the error, select it, and then click Uninstall.
Now, follow the on-screen instructions to complete the uninstall process.
Once done, go to the program’s official website or launch the Microsoft Store and download it all over again.
A program usually comes bundled with the DLL files it needs; if only one throws the error, you could reinstall it. Also, this solution fixed things when API-Ms-Win-Crt-Runtime.dll was missing.
5. Upgrade the OS
If api-ms-win-core-path-l1-1-0.dll is missing in Windows 7 or a previous iteration, it is most likely that the application doesn’t support the iteration anymore. So here, it’s recommended that you upgrade to Windows 10.
The api-ms-win-core-path-l1-1-0.dll provides Windows applications with an API, and its presence is critical for their effective functioning. If the file is not available or corrupt, the application will likely fail to launch.
And as stated earlier, any program that needs the DLL file usually comes with it, so you shouldn’t have to download the file manually in most cases.
Also, before you leave, do not forget to find out how to fix missing DLLs in Windows 11, a vital piece of information that would come in handy in the long run. If you have a query or know another solution, drop it in the comments below.
The error code 43 on GPU is usually displayed in the Device status box on the hardware Properties window. If this happens, sometimes Windows will restart your GPU in order to fix the issue.
If you’re experiencing this problem, today’s guide will show you how to fix it properly.
What does code 43 mean for GPU?
Error code 43 indicates that there’s an issue with your GPU. The most common causes for this problem are the following:
Hardware – If your GPU isn’t connected properly, you might get this error. A damaged graphics card can also cause this problem. If this happens, your PC won’t detect your GPU.
Drivers – Sometimes latest drivers don’t work well with your GPU. Reinstalling drivers with Display Driver Uninstaller can help fix the problem.
What errors does GPU code 43 cause?
Error code 43 is related to your graphics card and causes various problems. Speaking of problems, here are some common issues that users reported:
Gtx 970, Gtx 1060 code 43, gtx 1070 error code 43 – This error can affect Nvidia graphics cards, and if you encounter it, be sure to run the Hardware troubleshoot and see if that helps.
Windows has stopped this device because it has reported problems. (code 43) Intel hd graphics – This problem can also affect Intel’s graphics cards, and if you encounter it, be sure that you have the latest drivers installed.
Nvidia Quadro error code 43 – This problem can appear while using Nvidia Quadro series and in order to fix it, you need to make sure that there aren’t any overheating issues.
Error code 43 Windows 10 GPU, AMD, Nvidia – According to users, this error can affect any brand of graphics cards, and if you encounter this issue, be sure to try the solutions from this article.
So if you’re getting error code 43 for your video card, this is how to fix it.
How can I fix Error code 43 for a video card on Windows 10?
Before we start fixing this issue, you do a couple of checks before proceeding:
Check the connection – If your GPU isn’t properly connected, you might get this error message. If the PCI-E 6-pin cable isn’t firmly connected, that can cause this issue to appear. It’s also advised to clean your connectors and make sure that there’s no dust in your PCI-E slot.
Check for hardware damage – Inspect your GPU. If you notice anything strange on the card, it might be damaged. Also look for any visual glitches, such as vertical lines. These are a common indicator that your GPU is faulty.
1. Update the Device Driver
Press the Windows key + X and select Device Manager from there.
Click Display adapter and then you should right-click your graphics card to open further context menu options as below.
Now select Update driver from there to open the window directly below.
Select the Search automatically for updated driver software option on that window to see if any updates are required. Now Windows will update the video card drivers if required.
In addition to your GPU, check drivers for any adapters that you may have. JUA370 USB to VGA adapter has been reported as a culprit for this issue, but after updating the drivers, the problem was gone.
Nevertheless, you can use third-party software to update your drivers automatically. Not only will professional software protect your PC from possible damage, but it will also select the correct version of drivers for your device.
They are built with up-to-date technologies meant to avoid any kind of errors and are easier to use than the inbuilt Windows utilities.
2. Re-install the Device Driver
In some cases, error code 43 can appear if your display drivers are corrupted, and the only way to fix that is to reinstall them.
We highly recommend that you perform a clean installation of the latest graphics drivers provided by your computer’s manufacturer because they are tailored to work specifically with your computer model.
1. Press the Windows Key and type in Device Manager, then click on the result.
2. Locate your graphics card driver, right-click it and choose Uninstall device from the menu.
3. When the confirmation dialog appears, check Remove driver software for this device and then click the Uninstall button.
4. After removing the driver, restart your PC and Windows 10 will automatically install the default display driver.
5. After the default driver is installed, check if the issue is still there. If everything works, you can also download the latest driver from your graphics card manufacturer.
Once the driver is removed, check if the Graphics device driver error Code 43 NVIDIA message on Windows 10 is still there.
So that’s how you can fix error code 43 for video cards in Windows. This isn’t the only problem, and many reported that their GPU usage is 0%, but we covered that issue in a separate guide.
If you’re aware of another way to solve the issue, please share it in the comments section below so that other users can try it as well.
While using the network troubleshooter users reported The remote device or resource won’t accept the connection message. This can be a problem and prevent you from fixing your initial issues, but you can fix that with this guide.
What does The remote device or resource won’t accept the connection error mean?
The error message indicates a problem with the network settings, which can be caused by incorrect proxy settings or third-party apps. Driver issues or bugs in your OS can also cause this.
How can I fix The remote device that won’t accept the connection error?
Before we head to the slightly longer solutions, try restarting your PC and router/modem. Disable third-party antivirus or firewall and check if the error appears on other devices on your network.
1. Turn off proxy settings
Press the Windows + R, type inetcpl.cpl, and press Enter.
Switch to the Connectionstab, and click on LAN settings.
Now, select the Automatically detect settings option, uncheck Use a proxy server for your LAN and click OK to save the changes.
If you can’t disable the proxy, our proxy won’t turn off guide should be able to help you.
2. Reset the affected browser
NOTE
We have listed the steps to reset Google Chrome. Since the steps remain similar for most, you can easily reset the other browsers.
Launch Chrome, paste the following path in the address bar, and hit Enter:chrome://settings/reset
Next, click on Restore settings to their original defaults.
Next, click on Reset settings in the confirmation prompt.
3. Reset IP
Press Windows + R to open Run, type cmd, and hit Ctrl + Shift + Enter.
Click Yes in the UAC prompt.
Now, paste the following command and hit Enter:ipconfig/release
Once done, execute the following command:ipconfig/renew
Press Windows + S to open the Search menu, type Command Prompt, and click on Run as administrator.
Click Yes in the User Account Control prompt.
Paste the following command and hit Enter:GPUPDATE /FORCE
5. Uninstall conflicting applications
Press Windows + R to open Run, type appwiz.cpl in the text field, and click OK.
Locate and select the program(s) installed around the same time the error first appeared, and click Uninstall.
Follow the on-screen instructions to complete the process.
If the problem first appeared after downloading a program, usually a security software or one that modifies the Internet settings, uninstalling the app should work.
You can surely opt for CCleaner here, as it is a great maintenance tool that has an uninstall feature to help you easily uninstall any conflicting app.
Press Windows + I to open Settings, navigate to Windows Update, and click on Update history.
Now, scroll down to the bottom and select Uninstall updates.
Click on Uninstall next to the last major update.
Again, click Uninstall in the confirmation prompt.
If nothing else has worked yet, your best bet to fix The remote device or resource won’t accept the connection error is to uninstall the recent updates. And once done, the problem should be gone for good.
Before you leave, do not forget to check the best ways to increase the Internet speed in Windows. Also, in the comments section, please tell us which fix worked for you.
Another week, another slew of new Xbox releases will arrive between November 14th and 18th. This includes a couple of day-one Game Pass additions. Without further ado, let’s check out the new games headed to Xbox next week.
So which of these upcoming new releases have got you excited? Let us know in the comments. For many, the two new Game Pass games will be the highlight of the week. Though Goat Simulator 3 is another noteworthy release, and Heidelberg 1693 is an intriguing action-horror indie game.
Error codes like NET HELPMSG 2185 can appear for many reasons. It is mainly related to Windows update issues and can occur in different instances. as well as corrupt system files.
The complete error message appears as More help is available by typing NET HELPMSG 2185. The service name is invalid.
Here’s how to make it go away:
How do I fix the NET HELPMSG 2185?
Before proceeding with any advanced troubleshooting for the error, go through the preliminary checks below:
Make sure you connect to a stable and fast network connection.
2. Run the BITS troubleshooter (Background Intelligent Transfer Service)
Left-click the Start button, type Control Panel in the text box, and select the OK button.
Click on Troubleshooting.
Expand Hardware and Sound.
Click on Background Intelligent Transfer Service to launch the troubleshooter.
Click Advanced to select the Apply repairs automatically option, then press the Next button.
Then close the troubleshooter after the process is complete or apply the fix.
Running the Background Intelligent Transfer Service troubleshooter will fix BITS issues affecting the Windows service and fix the errors.
3. Restart the Windows Update process
Press Windows + R keys to prompt the Run dialog box, type cmd, and then press Ctrl + Shift + ENTER to launch an elevated Command Prompt.
Input the following consecutively and press ENTER after each to stop Windows update services: net stop wuauservnet stop cryptSvcnet stop bitsnet stop msiserver
Input the command below to rename the SoftwareDistribution and press ENTER: C:\Windows\SoftwareDistribution SoftwareDistribution.old
Type the command below and press ENTER: ren C:\Windows\System32\catroot2 Catroot2.old
Run the command below to enable the earlier disabled services: net start wuauservnet start cryptSvcnet start bitsnet start msiserver
Restart your computer and check if the issue persists.
Restarting the Windows Update service can fix problems and corrupt files affecting its processes.
A prequel to Netflix’ hit series based on CD Projekt Red’s beloved fantasy action-RPGs (as well as Andrzej Sapkowski’s books), The Witcher: Blood Origin is one of the most anticipated TV events of 2022. The miniseries will consist of four episodes and is slated for a Christmas Day release.
Ahead of next month’s launch, Netflix has released the official teaser trailer for The Witcher: Blood Origin. The show is set 1,200 years before the events of The Witcher, and stars Michelle Yeoh. The Malaysian actress is best known for such action films as Tomorrow Never Dies (of the James Bond series) and Crouching Tiger, Hidden Dragon: Sword of Destiny.
And judging by the trailer, Yeoh will need to showcase those action chops, as it looks like the show will feature combat aplenty. Rounding out the show’s cast are Sophia Brown (Giri/Haji), Lenny Henry (Harry Potter and the Prisoner of Azkaban), and legendary British actress Minnie Driver, among others.
Windows have several services users can enable and disable by running the net start and net stop commands on the command prompt. However, these can result in errors, prompting codes such as the NET HELPMSG 3534.
Likewise, when tweaking the BITS Service on Windows, you may encounter the NET HELPMSG 2182 error.
What does the NET HELPMSG 3534 mean?
Running commands in the Command Prompt on Windows computers allows you to toggle on and off services on your PC. However, issues may occur during the process, resulting in numerous error codes like the NET HELPMSG 3534.
Furthermore, the NET HELPMSG is a command that decodes Windows error messages by attaching a code. It can come with many codes, such as NET HELPMSG 2191, 2185, 3523, etc.
The NET HELPMSG 3534 error code occurs when starting the MySQL service on Windows.
However, the error asks users to type NET HELPMSG 3534 in the Command Prompt to decode it. Decoding the error message NET HELPMSG 3534 will show you The service did not report an error message. Instead, it can be due to several factors affecting the program or Windows.
How do I fix the NET HELPMSG 3534?
There are a couple of fixes users can try to fix the NET HELPMSG 3534 error on their PCs. However, we recommend you go through the preliminary checks below before proceeding:
Disable antivirus software temporarily on your computer.
If the error persists after observing the check above, proceed with the solutions below to fix it:
1. End task for the service prompting the error
Right-click on the Start button and choose Task Manager from the menu or use the Task Manager shortcut by pressing CTRL + Shift + Esc keys simultaneously.
Click on the Processes tab, right-click theserviceprompting the error, and select the End task option from the drop-down.
Ending tasks for the service showing the NET HELPMSG 3534 error can fix issues with its process. In addition, it will help it close any background activities on it.
Press Windows + R keys to open the Run dialog box, type in services.msc, and press ENTER to open the Services window.
Right-click the MySQL service and select Properties from the drop-down.
Click on the General tab and then click on the path displayed under the path to executable.
Press and hold the arrow key pointing right, and stop moving the cursor when you find the my.ini in the path.
Copy and paste the path into the File Explorer address bar, then press ENTER to show the my.ini file.
Copy the my.ini file, navigate to the path below and paste it there: C:\Program Files\MySQL\MySQL Server 5.7
Press Windows + R keys to prompt the Run dialog box, type cmd in the text box, then press Ctrl + Shift + ENTER to launch an elevated Command Prompt.
Input the command below and press ENTER to start the MySQL services: net start mysql
Tip
Change the MySQL Server 5.7 in the above path to the version of MySQL installed on your device.
The MySQL service should start without prompting any error. Copying the my.ini file from the ProgramData directory to the Program Files directory will fix any file issues causing the error.
3. Clear the MySQL data directory
Click the File Explorer icon on the taskbar, then open your C drive.
Navigate to the path below: C:\Program Files\MySQL\MySQL Server 5.7
Open the Data folder, delete all the files, and then close the File Explorer.
Press Windows + R keys to prompt the Run dialog box, type cmd in the text box, and then press Ctrl + Shift + ENTER to launch an elevated Command Prompt.
Input the command below and press ENTER: mysqld --initialize
Input the command below and press ENTER to start the MySQL services. net start mysql
The MySQL service should start without running into any errors. For example, deleting the data directory will fix corrupt files in the MySQL directory.
USB 3.0 hard drives are becoming more and more popular over the past few years. However, since the introduction of Windows 10, some users have had problems connecting their USB drives to the computer.
Affected users state that their USB 3.0 external drives are not detected in Windows 10.
So, we came up with a few solutions for this problem, and you can check them out below.
Why does my computer not detect my external hard disk when plugged in?
WD devices are great, but many reported that WD My Passport Ultra isn’t detected on their PC. If this happens, the problem is most likely an improperly formatted drive.
Your drivers can also be one reason why an external hard drive is not showing up, and to fix that, you might have to reinstall the USB and the external drive drivers.
USB 3.0 drives offer high transfer speeds, but many users have reported issues with their USB 3.0 external drives. Speaking of issues, these are some of the common problems with external drives:
USB 3.0 flash drive not recognized in USB 3.0 port – Your USB 3.0 port can’t recognize flash drives, solved by updating your motherboard drivers.
External hard drive not showing up in Disk Management – Your cable causes this and can be solved by replacing it.
WD, Toshiba USB 3.0 external hard drive not recognized – Update the drivers and firmware for your drive.
USB 3.0 external drive not detected Seagate – Update your drivers and firmware and check if that solves the problem.
USB 3.0 external drive not detected laptop – Caused by outdated drivers, solved by updating them.
External hard disk not showing, working – Check if the hard disk is properly formatted. Set a different drive letter for it.
External drive not detected in BIOS – Usually caused by a faulty cable, but problems with the driver or the firmware can also cause this issue.
Problem ejecting USB attached SCSI – Update your USB driver inside Device Manager to fix this.
Ugreen storage device not recognized – Create a new partition on your drive as we have shown below.
USB 3.0 external hard drive not recognized in Windows 10 – Use the Disk Management tool in order to allow Windows 10 to recognize the external hard drive.
USB attached SCSI (UAS) mass storage device driver in Windows 11 – Try using a different cable before jumping into any complicated troubleshooting steps.
Without further ado, let’s see all the solutions in more detail!
How do I fix USB Mass Storage device not showing?
1. Update your USB 3.0 controller driver
If you can’t use your USB 3.0 external drive on your PC, the problem might be an outdated driver. That means you can fix the problem by downloading the latest driver for the USB 3.0 controller.
You can download the necessary driver right from your motherboard manufacturer’s website.
However, if you don’t know anything about your motherboard, here’s a list of the best software to get all the needed information.
It sounds easy, but it’s really not for many users. That’s why we recommend using specialized software to update your drivers automatically because it can find the newest driver versions from a huge database with one click.
Go to Search, type power management, and open Power & sleep settings.
Go to Additional power settings.
Click on Change plan settings, next to your selected power plan.
Go to Change advanced power settings.
Under USB settings, find USB selective suspend setting, and set it to Disabled. Click Apply and OK to save changes.
Restart your computer, and see if you’re able to connect your external USB drive again.
Note: Before changing your power settings, create a restore point in case something goes wrong.
3. Edit your registry
A great method which can be used to resolve USB 3.0 not detected on Windows 10 PC would be to edit your Registry entries. However, you should respect the steps below to keep your system safe.
5. Go to the following path:ComputerHKEY_LOCAL_MACHINESYSTEMCurrentControlSetEnumUSBVIDDevice Parameters
Note:VID_8564&PID_10005388DW3MEQ8HGRAXis just an example, so you need to use the value that you got inStep 4.
6. In the right pane of theDevice Parameterskey, look for the DWORD namedEnhancedPowerManagementEnabledwhich must be showing itsValue dataas 1. If this value isn’t available, you might have to create it manually.
7. Double-click on it, and change its value to 0. ClickOK.
8. Restart your computer and try to connect your drive again.
If you’re connecting your hard drive for the first time, there’s a chance that you don’t have any partitions created on it. Therefore, Windows 10 won’t recognize it as a hard drive.
Thus, your USB 3.0 external drive will not be detected in Windows 10.
But your disk will be recognized by the Windows Disk Management tool, so we will check if Disk Management recognizes the external hard drive, and our future actions will depend on the results.
Use the Disk Management tool
Type diskmgmt.msc in Windows Search and click on Disk Management.
See if your external drive is listed in the Disk Management window.
If it’s partitioned, you only need to format it by right-clicking and selecting Format.
If you are sure that you have data on that drive, try to connect it to another computer and back up the data first.Formatting will erase all data from the drive!
Create a new partition on your drive
Right-click on the Unallocated space, and go to New Simple Volume.
Set the new volume’s size, and you’re good to go.
Re-connect your USB 3.0 hard disk drive with your computer, which should be accessible.
Note: If even Disk Management can’t recognize the hard drive, your problem might be a little complicated.
First, try some basic solutions, like checking if the driver is up to date or trying to plug it into another USB port in case of a bad USB port.
If the Disk Management tool seems too complicated to use, there are third-party solutions that you can use to format your drive.
We recommend Paragon Hard Disk Manager, a simple application that can help you manage your disk partitions, backup data, and recover lost files.
This professional tool features integrated backup functions that allow you to save your data before working on a hard drive. That’s a very handy feature for unpredictable and unpleasant situations.
The software also comes with many other functions for partitioning, but it also optimizes your PC to use its resources efficiently.
If a USB 3.0 external drive isn’t detected in Windows 10, you might want to try this simple workaround. According to users, you just have to disconnect your drive, enter BIOS, and reconnect your drive.
After doing that, you can exit BIOS and start Windows 10 normally.
This sounds like an unusual solution, but a few users reported it worked for them, so you might want to try it out.
If you don’t know how to access the BIOS, here’s an expert guide on how to do that.
6. Try using a different cable
If your PC can’t detect a USB 3.0 external drive, the problem might be related to your cable. According to users, they fixed this issue simply by replacing their cable.
If you’re having this problem, your cable might be broken, so be sure to replace it and check if that solves the issue.
7. Update your drive’s firmware
Many users reported that their external drive is recognized only when using a USB 2.0 port. If you have this problem, you might want to try updating your device’s firmware.
To update your firmware, you need to connect your external drive to a USB 2.0 port, download the latest firmware from the drive’s manufacturer, and install it.
Once the firmware is installed, you should be able to use your external drive with a USB 3.0 port.
Remember that firmware update is an advanced and potentially dangerous procedure, and if you don’t do it properly, you might cause irreversible damage to your drive.
8. Update the USB Attached SCSI (UAS) Mass Storage Device driver manually
Press the Windows Key + X and choose Device Manager from the list.
Go to View and check Show hidden devices.
Now locate USB Attached SCSI (UAS) Mass Storage Device, right-click it, and choose to Update Driver.
Choose to Browse my computer for driver software.
Click Let me pick from a list of available drivers on my computer.
Select Show All Devices and click Next.
Select Mass Storage Device and click Next to install the driver.
9. Change the drive letter
Open Disk Management.
Locate your external drive, right-click it and choose Change Drive Letter and Paths from the menu.
Click the Change button.
Select the desired letter from the dropdown menu and click on OK to save changes.
10. Reinstall your drivers
Connect your device to a USB 2.0 port.
Open Device Manager.
Locate the device in Device Manager, right-click it, and choose Uninstall device from the menu.
Click the Uninstall button to confirm.
Disconnect your drive and restart your PC.
Connect the drive to a USB 3.0 port. Windows will now recognize the device and install the appropriate driver for it.
That’s about it; we hope at least one of these solutions helped you to solve the problem with the USB 3.0 external hard drive not being detected in Windows 10.
First announced in 2019 during the League of Legends 10-year anniversary celebration, Arcane has garnered much praise since its November 2021 debut on Netflix. It is based on the 2009 online battle arena game League of Legends from Riot Games, and produced by French animation studio Fortiche.Arcane’s story focuses on sisters Vi (Hailee Steinfeld) and Jinx (Ella Purnell)—”Champions” from series lore fighting “on rival sides of a war between magic technologies and clashing convictions.” The first season consists of nine episodes. A second season is in the works for a release sometime after 2022.
Arcane set the record as the highest-rated Netflix series to date within a week of its release. It is the first video game television adaptation to win both Annie Awards and Primetime Emmy Awards.
One of the best things about the show is that it appeals to those who have never played League of Legends as well as to veterans of the game. No prior knowledge of the LoL universe is necessary to watch the show. So if you have a Netflix subscription and love great video game adaptations—or just gorgeous animation and well-executed narrative in general—then you can mark this as a must-watch. Check out another riveting trailer below.
Overwatch 2 has no support for the Windows 7 OS because the minimum OS requirement for the game is Windows 11. Hence, our readers are unsure whether they can play Overwatch 2 on Windows 7 since it doesn’t meet the criteria.
So, this guide will provide possible tweaks to aid some of our readers in accessing Overwatch 2 without issues.
Furthermore, Overwatch 2 developers state that the game supports only Windows 10 Operating System upwards because they only tested it for those versions.
Nevertheless, other lower versions of Windows can still run the game. However, users can experience issues playing Overwatch 2 on Windows 7.
Nonetheless, Windows 7 is regarded as the best OS for gaming because it is strong enough to play games that are not built for it.
So, regardless of the recommended and minimum system requirements of Overwatch 2, you can play it on Windows 7.
What can I do to run Overwatch 2 on Windows 7?
You can use a couple of options to run and play Overwatch 2 on their Windows 7 OS. However, we recommend you check the following preliminary steps before proceeding:
Make sure you connect to a stable and fast internet connection.
The above steps will prepare your Windows 7 PC for running Overwatch 2. Follow the steps below to run the game on Windows 7:
1. Install Windows 7 update KB4534310
Left-click on the Start button, right-click on Computer from the menu, then select Properties from the drop-down.
Go to the System type and check if it indicates 32-bit or 64-bit Operating Systemversion. (Checking the System type will determine the update package to download)
Select the first download link for the 32-bit OS version and the fifth download link for the 64-bit OS version.
Double-click on the downloaded file to install the update.
Installing the KB4534310 update on Windows 7 will enhance its OS to run Overwatch 2 smoothly. If you encounter any Windows 7 update error code, check how to fix it in the guide.
Left-click on Start, search for Battle.net and launch the desktop client on your PC
Click on the Overwatch icon from the list of games.
Select the cogwheel icon next to the Play button to prompt the Settings menu.
Click the Check for Updates button to automatically download the update.
Wait for the process to be completed and install the game update.
Updating from Overwatch 1 to Overwatch 2 is an excellent way to run Overwatch 2 on Windows 11 without downloading the new game. In addition, you can read about how to fix Overwatch if its update is stuck at 0 b/s on your PC.
If this guide has been helpful to you, kindly drop your comments below. In addition, should you have further questions or suggestions, do not hesitate to use the comments section.
If a Couldn’t download virus detected message appears while downloading files, you won’t be able to complete the download, even if the file is 100% safe. Luckily, this can help you fix that.
How do I fix Couldn’t download virus detected error?
Before we try anything else, try using a different web browser and check for any issues with the download.
1. Restore quarantined files
1. Open Windows Security on your computer.
2. From the main window click on Protection history.
3. Locate the application that has been blocked on the list and expand it.
4. Expand the Actions menu and click on Allow.
NOTE
Do this only for files that you 100% trust to be safe.
Press the Windows key + I keyboard hotkeys to open the Settings app.
Choose Update & Security.
Click on Windows Security from the left pane, then click on Open Windows Security.
Now click on Virus & threat protection.
Under the Virus & threat protection settings click on Manage settings.
Toggle the Real-time protection button to Off.
Try to download the file again. If you’re not getting download failed virus detected message anymore, enable the antivirus as soon as the download is finished.
Click the Menu icon in the top right and choose Settings.
Now select Privacy and Security. Select Security in the right pane.
Select No protection (not recommended).
If the download completes, enable this feature again.
How do I disable a Virus scan when downloading?
To do this, you need to disable Safe Browsing in Chrome. Our Solution 3 goes into detail on how to do that.
In case the issue is still there, we have a great guide on how to keep a dangerous file in Chrome, so it should provide you with more useful information.
The League of Legends black screen after champion select usually means the client isn’t loading into the match. You’ll pick your champ, the timer hits zero, and then, nothing. Just a black screen. It’s often caused by broken game files, outdated drivers, or the client failing to connect properly. Here’s how to fix it fast and get back into the game.
How do I fix League of Legends not opening after champion select?
If you run intro trouble while playing League of Legends and receive black screen after champion select, you may reset the Network Adapter as demonstrated in the steps below.
1. Press Windows+ Rto open the Run Dialog box.
2. Type cmd and press OK to open the Command Prompt.
3. In the command prompt, enter the following command and hit Enter to execute. netsh winsock reset
4. Close the Command Prompt.
5. Now launch League of Legends with Champion Select and check for any improvements.
2. Turn off the Windows Firewall
Type Firewall in the Cortana/search bar and click on Firewall and Network Protection option.
If the User Account Control prompts for a confirmation, click on Yes.
Close the Settings window and launch League of Legends.
Select Champion Select and check if the game launched without any issues. If the problem persists, try to turn off any other firewall enabled on your system.
3. Update graphics card drivers
Open Device Manager.
Locate Display adapters and click the downward arrow to expand it.
Select your graphics card, right-click on it and select Update driver.
Select Search automatically for drivers. Wait for the process to complete.
Alternatively, you can go to your manufacturer’s website and download and install the drivers manually. Just pay close attention.
You have to pick the exact driver version for your device, otherwise you might do more harm than good.
4. Disable IPv6
Click on the Start menu, type Network Connection, and select the View Network Connection app.
Right-click on your network and select Properties.
Please scroll down to Internet Protocol Version 6 (TCP /IPv6), and uncheck it, then click the OK button.
Click on the Start menu, type Network Connection, and select the View Network Connection app.
Right-click on your network and select Properties.
Double-click on Internet Protocol Version 4 (TCP/IPv4) in the Properties window.
Select Use the following DNS server addresses option, then enter the two values below for Preferred DNS Server and Alternate DNS Server, respectively. 8.8.8.8 8.8.4.4
Click OK to save the changes.
6. Lower graphics settings
Start the game and go to the main menu.
Launch a game and hit the Esc key. This will open the Options menu.
Click on the Video tab.
In the Graphics section, move the slider towards the left. Medium High/Medium should display satisfactory graphics without hindering performance.
You can also set Character, Environment, Shadows, and Effects to Medium.
Hit Okay and relaunch the game.
It is not clear why this triggers the black screen on the game. And for most users, this occurrence is random. However, resetting the network adaptors and updating the graphics card drivers have efficiently solved this error.
That concludes our article today. First, however, you must note that none of these solutions are given in any particular order, so you should try what seems the most appropriate. For more potential solutions, check out what to do if LOL is not launching.
We hope these solutions fixed your League of Legends black screen after champion select problem. Feel free to give us any feedback regarding the subject in the comment section below.
Microsoft Surface is a great device, but many users reported the Surface Pen is not writing while the buttons on the pen work without any problems. This is a strange issue, and we’ll show you how to fix it in today’s article.
Why is my Surface Pen not working?
Numerous causes, such as drained batteries, driver changes, compatibility issues, etc, can impede Surface Pen’s functionality.
If a depleted battery causes it, replace the AAAA battery with a new one. The problem should then be resolved.
Various issues with Surface Pen can occur, and speaking of issues, here are some common problems reported by users:
Surface Pro 3, 4, 7 Pen not working – Sometimes your Surface Pro pen won’t work at all. Your battery usually causes this, so make sure that it isn’t empty.
Surface pen not working but connected – This problem can occur due to certain Bluetooth glitches. To fix the problem, simply unpair and pair your pen again.
Surface pen not working in Photoshop, in Word, or OneNote – Sometimes your pen might not write on the screen or in other applications such as Word and OneNote. To fix the problem, you need to disable Intel devices in Device Manager and enable them again.
Surface Pen is paired but not writing – This is a relatively common problem with Surface Pen, and you should be able to fix it using one of our solutions.
Surface pen not working after update, battery change – Battery changes can cause several system changes and driver bugs which you have to adress as we have shown below.
Surface pen tip/button not working – Check the pen’s battery then make sure it is paired correctly to your device.
Without further ado, let’s jump right into the list of solutions.
How do I get my Surface Pen to work?
1. Update your drivers
Sometimes, issues with the Surface Pen can occur if there’s a problem with your drivers. If one of your drivers is out of date, specific components might not work correctly, and that will cause this and many other problems to appear.
To ensure that everything is working properly, we strongly suggest keeping all your drivers up to date. You can download the latest drivers manually using Device Manager.
2. Unpair your pen with the Surface and connect it again
Open the Settings app. The fastest way to do that is to press the Windows Key + I.
When the Settings app opens, head over to the Devices section.
In the left pane, select Bluetooth. Locate your pen in the left pane and click the Remove button. Now click on Yes to confirm.
NOTE
Note: Once the pairing process is completed, your Surface Pen will start writing again. Bear in mind that this is just a workaround, so you might have to repeat this solution if the problem reappears.
3. Check your battery
If your Surface Pen is not writing, but other buttons work, the issue might be your battery.
In case you don’t know, Surface Pen uses two batteries, one of the pen and one for the buttons, so if the pen isn’t working, it’s rather likely that your battery is empty.
To fix this problem, simply replace the battery or charge your Surface pen and check if that solves the problem for you. Many users reported that the battery was the problem, but after replacing it, the issue was permanently resolved.
Press and hold the Power button on your Surface for 30 seconds. Make sure that the device is completely turned off.
Now press and hold the Volume Up and the Power button together for about 15 seconds. Your screen should flash the Surface logo. This is perfectly normal.
Release the buttons and wait for about 10 seconds. Press and release the power button to turn the Surface back on.
Open the Settings app. When the Settings app opens, head over to the Update & Security section.
Select Troubleshoot from the left pane. Choose Hardware and Devices from the list and click the Run the troubleshooter button.
Follow the instructions on the screen to complete the troubleshooting.
Note: If the issue persists, you might want to try running the Bluetooth troubleshooter as well. Keep in mind that troubleshooters are designed to fix some common problems and glitches so they might not be able to fix your problem.
6. Disable and re-enable Intel(R) HD Graphics 520
If you need to resolve your Surface Pen issues quickly, you can use the following method to disable and enable your graphics driver again.
Press Win + X menu and choose Device Manager from the list. You can do that simply by right-clicking the Start button.
2. Locate the Intel(R) HD Graphics 520 on the list, right-click it and choose Disable device from the menu.
3. Click Yes when the confirmation dialog will appear.
4. Wait for a few seconds after disabling the device, right-click it again, and choose Enable from the menu.
Note: Remember that you might have to repeat this solution whenever the issue appears.
Some users recommend disabling and enabling the Intel(R) Precise Touch Device and also disabling and enabling their Surface Pen, so you might want to try that as well.
7. Reboot the pen
If the Surface Pen is not writing but the buttons work, you might be able to fix the issue simply by rebooting the pen. This is incredibly simple to do, and you just need to press and hold the pen button for about 10 seconds.
After doing that, the pen will reboot and the problem should be resolved.
8. Install the latest updates
Open the Settings app and go to the Update & Security section.
In the right pane, click the Check for updates button.
Windows will now check for available updates and download them in the background. Once the updates are downloaded, restart your PC to install the updates. After installing the latest updates, check if the problem is still there.