Driver Power State Failure on Windows 11: How to Fix it

Not all BSOD errors are severe and some can be solved by simple troubleshooting. One such error is the driver power state failure in Windows 11.

Many users have reported encountering this issue when they boot Windows 11. It’s a common error and is easy to fix, as we will show in the following sections.

What causes a Windows driver power state failure?

  • Driver conflicts – Many of our readers also reported that the driver has stopped responding and has recovered after an update. Rolling back recently installed drivers is a way to get rid of the problem, as described below.
  • Misconfigured settings – Because this error is often related to misconfigured settings, make sure to use our detailed steps to switch to High-performance power plan and check the power settings.
  • Malware infection – If there is malware infection behind this issue, it’s time to use reliable antivirus software to scan your PC and remove all infected files. Refer to the below procedure in this regard.

How can I fix the Windows 11 driver power state failure error?

1. Run the power troubleshooter

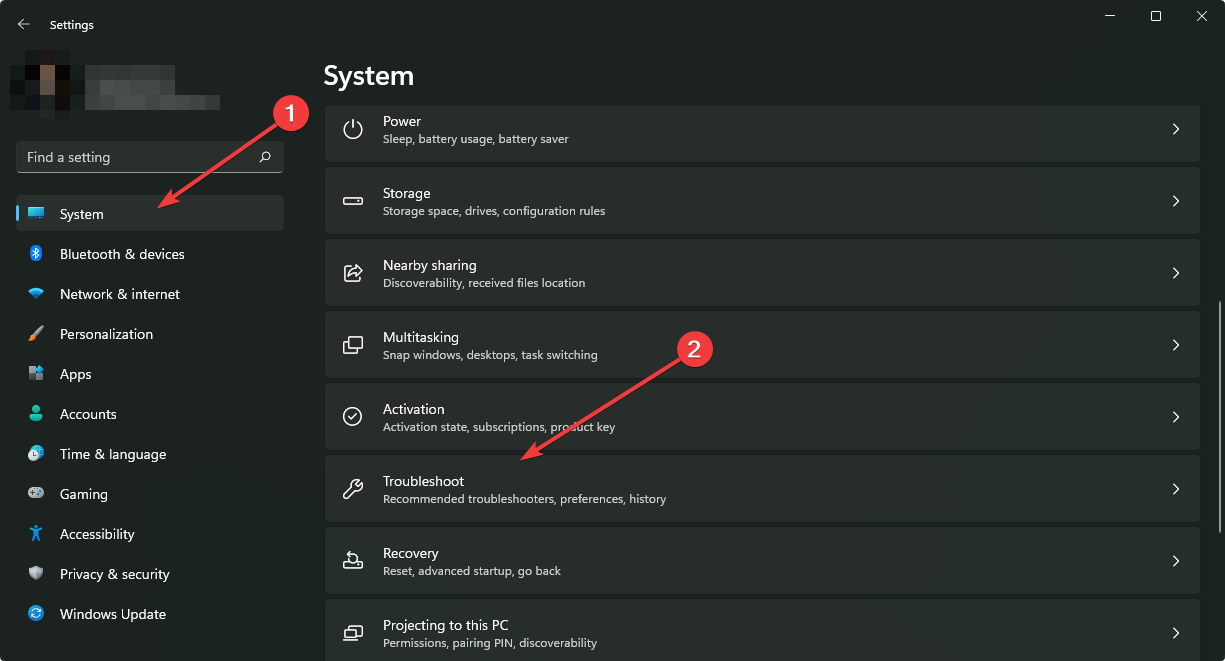
  1. Press the Windows key + I to open Settqings and choose Troubleshoot in the right pane.
    troubleshoot
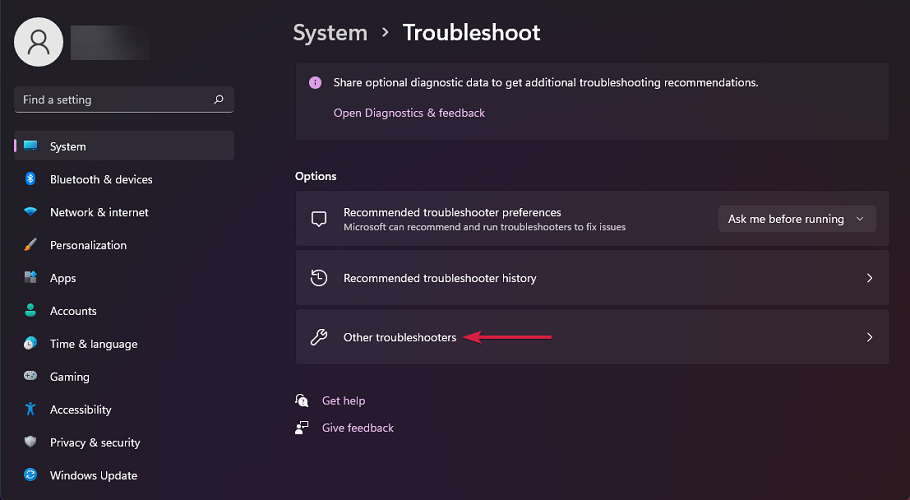
  2. Select Other troubleshooters.
    other troubleshooters
  3. Click the Run button before the Power option.
    run driver power state failure windows 11
  4. Wait for the check to complete and follow the onscreen instruction to make the necessary changes.
  5. Restart your PC.

Sometimes, the simplest fix is the most effective. Running the Windows power troubleshooter has proved to be effective in fixing driver power state failure issues for many users. Ensure to restart your PC after applying the fixes to effect the changes.

2. Install optional updates

    A lot of users overlook the optional updates when updating their PCs. This section carries some important updates like driver updates and other components.

  1. 1. Press Windows + I to launch the Settings app and select Windows Update from the tabs listed on the left.

    Windows Update tab
  2. 2. Next, click Windows Update on the right.

    Windows Update option
  3. 3. Select Advanced options from the ones listed here.

    Advanced options
  4. 4. Click on Optional updates under Additional options. You will find the number of updates available mentioned to the right of the option. If there are none (0) available, you can skip the following steps and directly head to the next method.

    Optional Updates to view driver updates
  5. 5. Finally, click on the available updates.

    Update driver to fix driver power state failure error
  6. 6. Now, tick the checkbox before the outdated device or component, and click on Download & install.

    Download & install driver

This has proved effective in fixing the Windows bluescreen driver power state failure error for ASUS users and some other PCs.

3. Rollback recently installed drivers

  1. Press Windows + I to launch the Settings app.
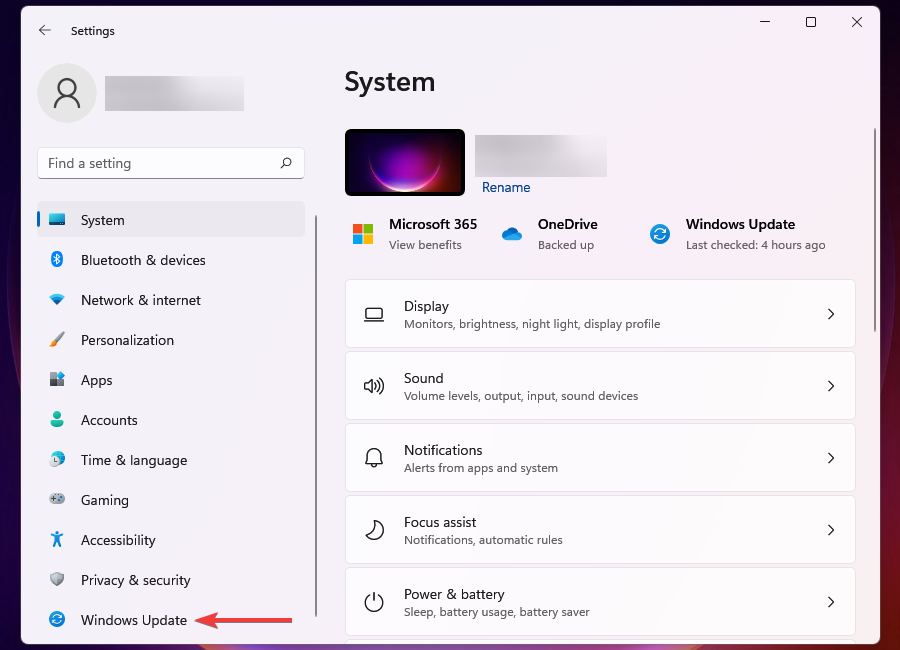
  2. Select Windows Update from the tabs listed in the navigation pane on the left.Windows Update
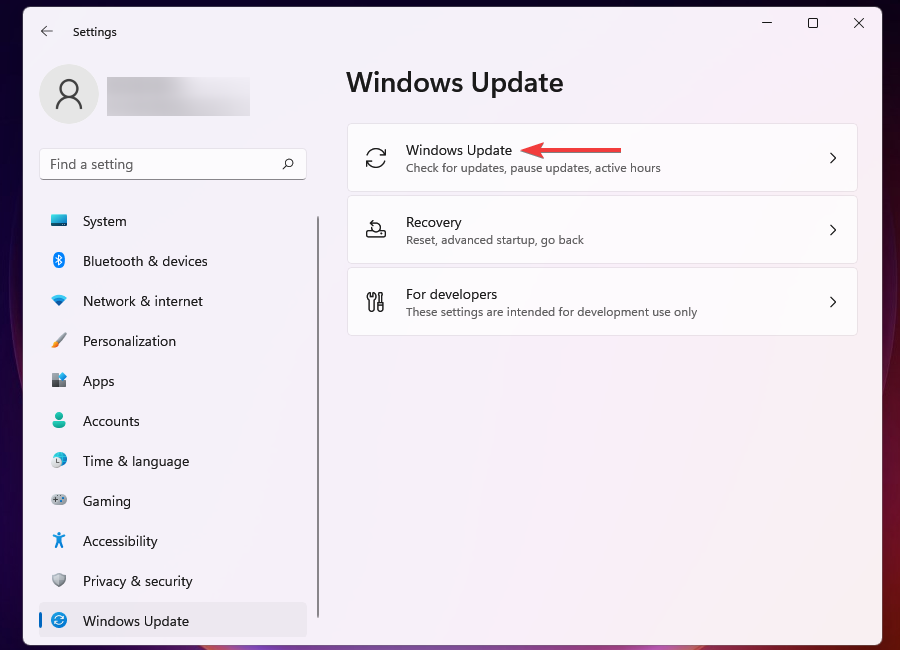
  3. Click on Windows Update on the right.Windows Update option
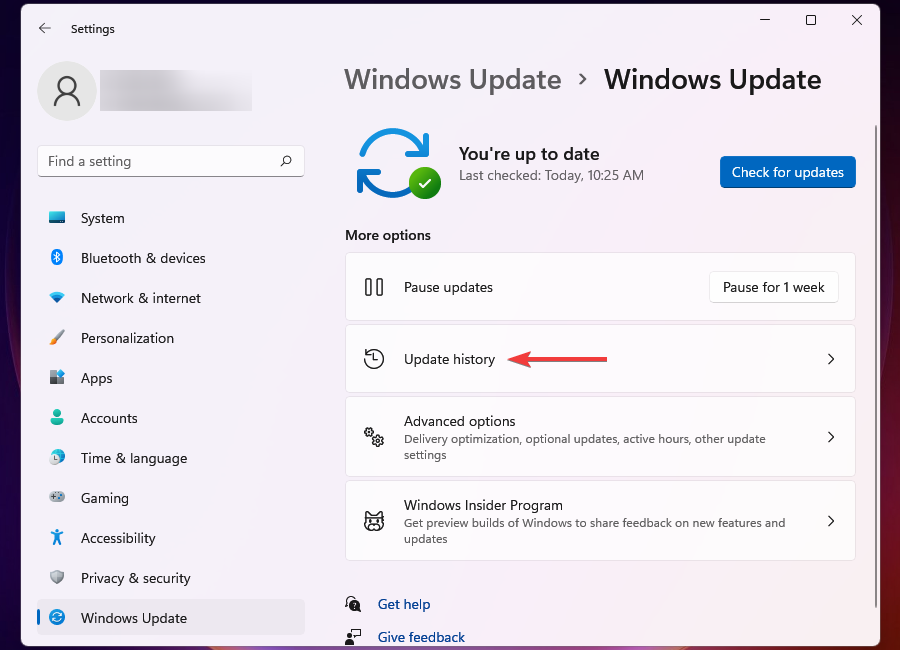
  4. Select Update history from the options listed here.Update History
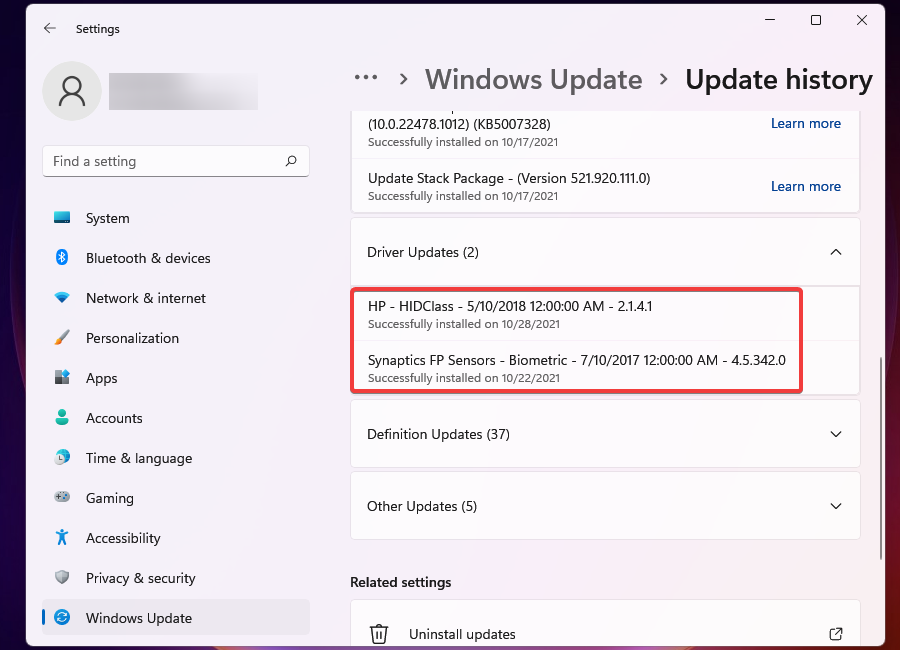
  5. Click on Driver updates to view the ones that have been automatically updated in the recent past and make a list of all the devices that appear here.List of devices recently updates
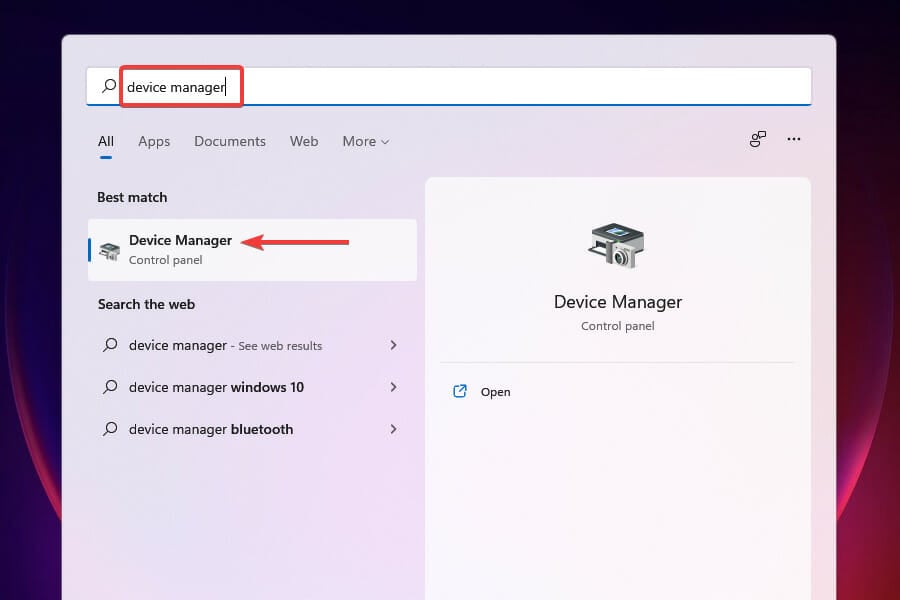
  6. Next, press Windows + S to launch the Search menu.
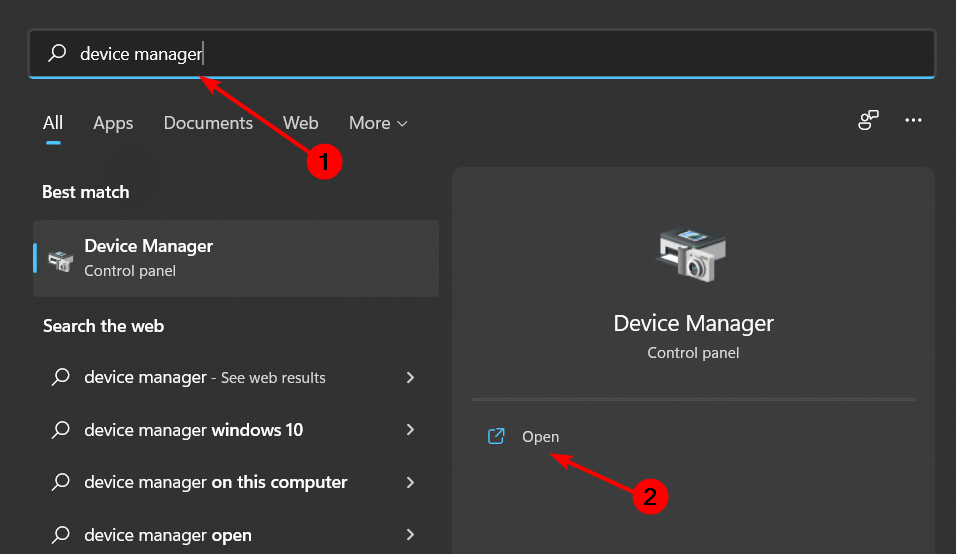
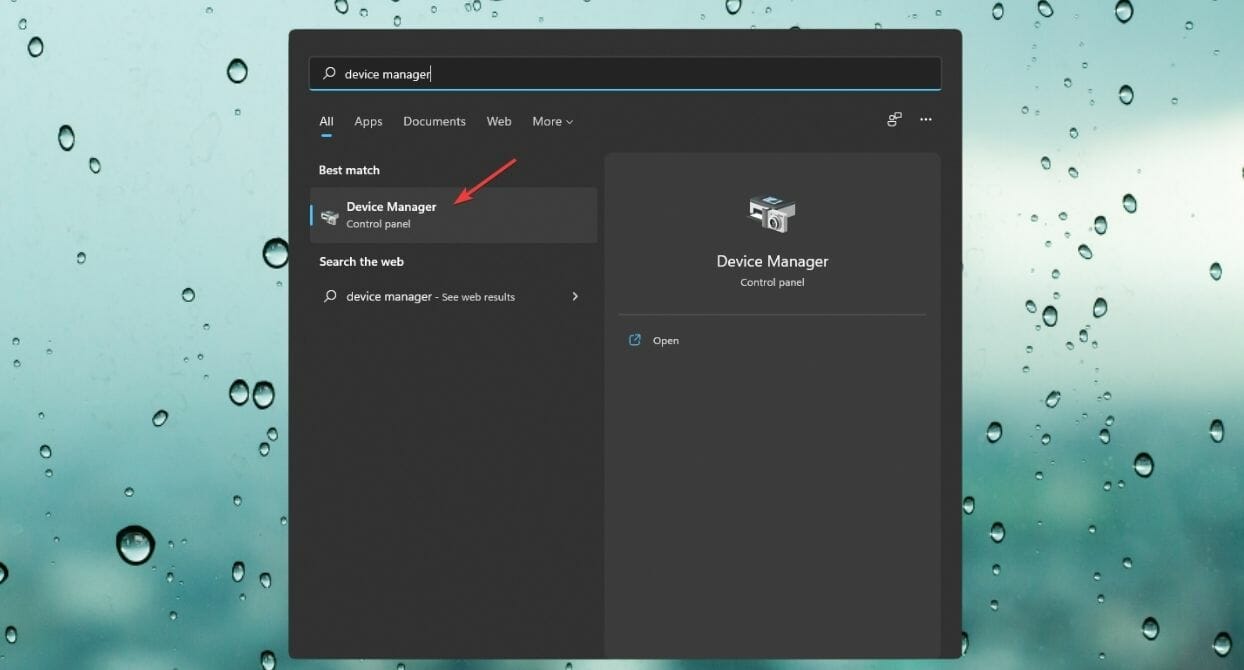
  7. Enter Device Manager in the text field at the top and click on the relevant search result.Launch Device Manager
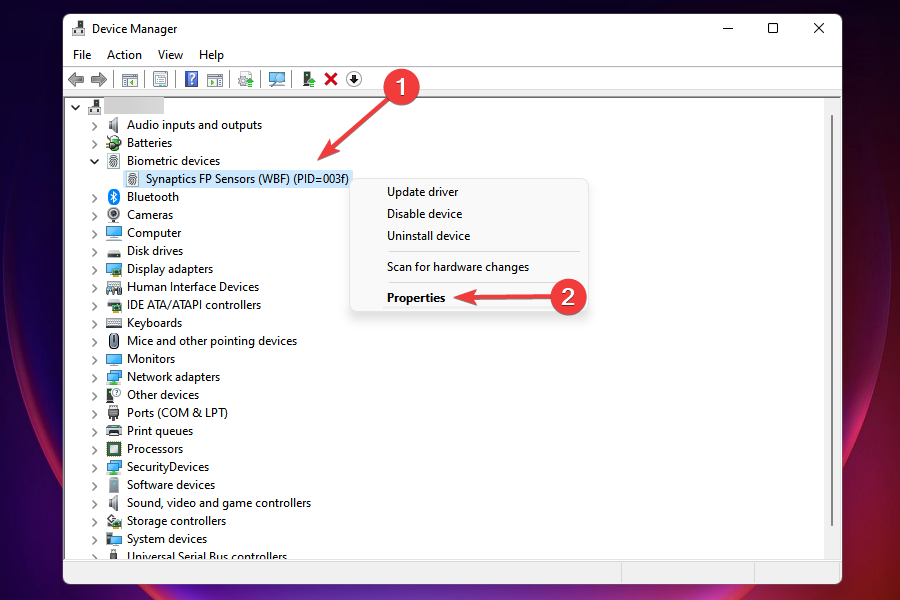
  8. Locate the devices, the drivers for which have been updated recently, as found in the Settings.
  9. Right-click on each device and select Properties from the context menu.Device Properties
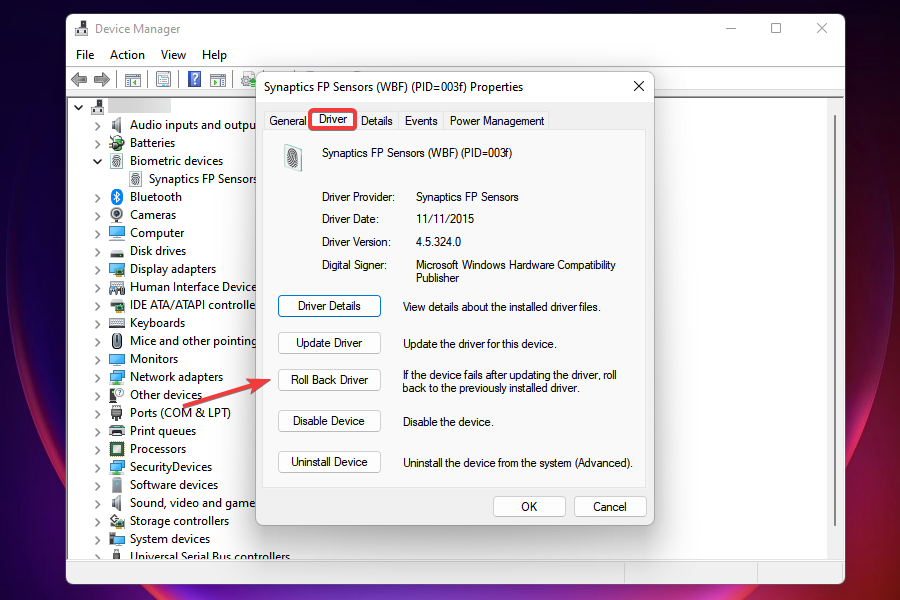
  10. Navigate to the Driver tab and click on Roll Back Driver.Roll back driver
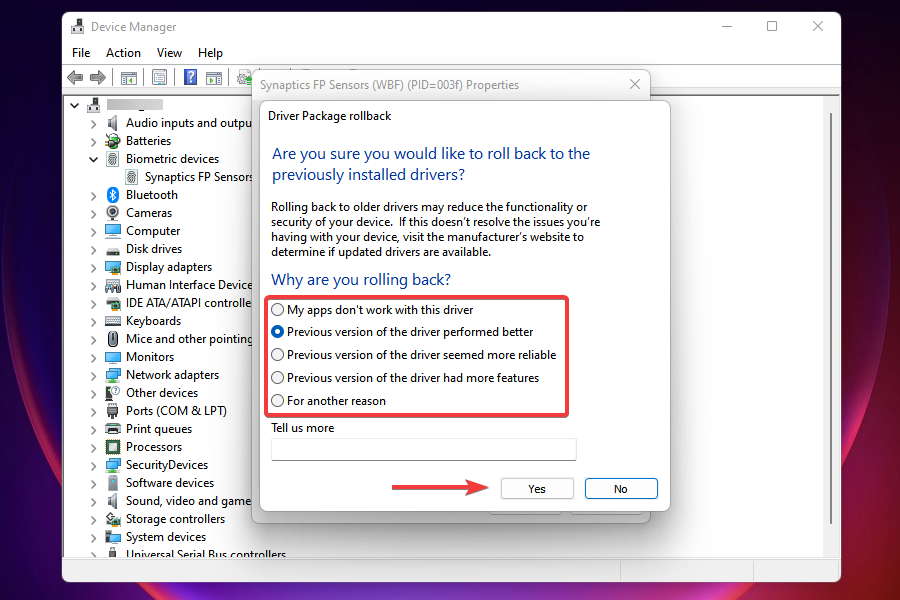
  11. Now, select a reason for removing the update and click on Yes at the bottom. In case you select For another reason, enter why you rolling back in the Tell us more field.Reason for rolling back

Wait for the roll-back process to complete. It should typically take a few seconds, but you wouldn’t receive a prompt or confirmation for the same. A quick way to identify is to look out for the Roll Back Driver option. When it’s greyed out, the previous version has successfully been installed.

When you encounter the driver power state failure error in Windows 11, the prime approach should be to look out for the recently installed drivers and remove them.

But, do remember that only the drivers updated via Windows Update will be listed under Update History. If you have manually updated any driver, be sure to roll back those too.

4. Update drivers

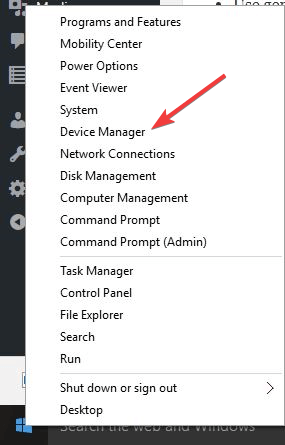
  1. Press the Windows key + X and select Device Manager.
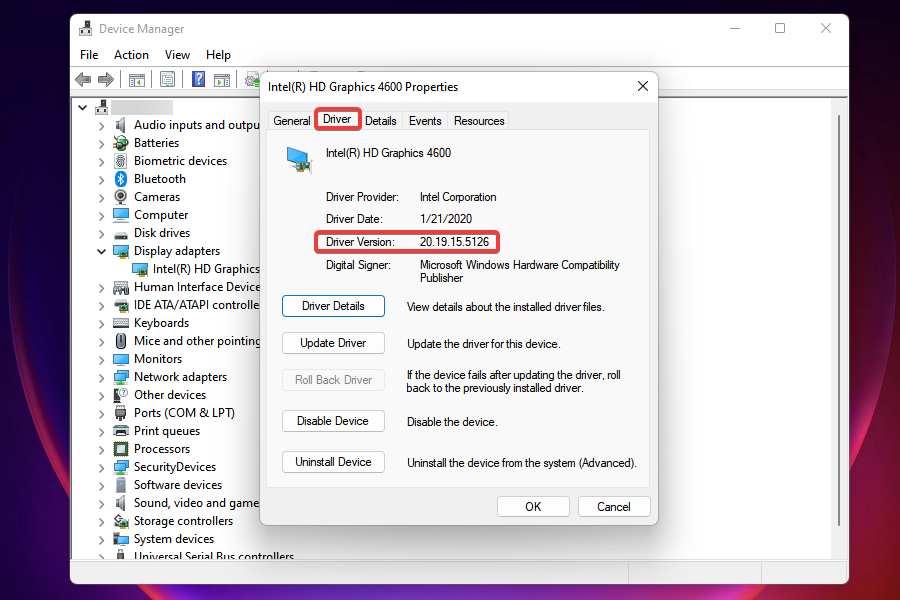
  2. Locate the problematic device, right-click on it, and select Properties from the context menu.Find current driver version
  3. Navigate to the Drivers tab and make a note of the Driver Version.Driver version
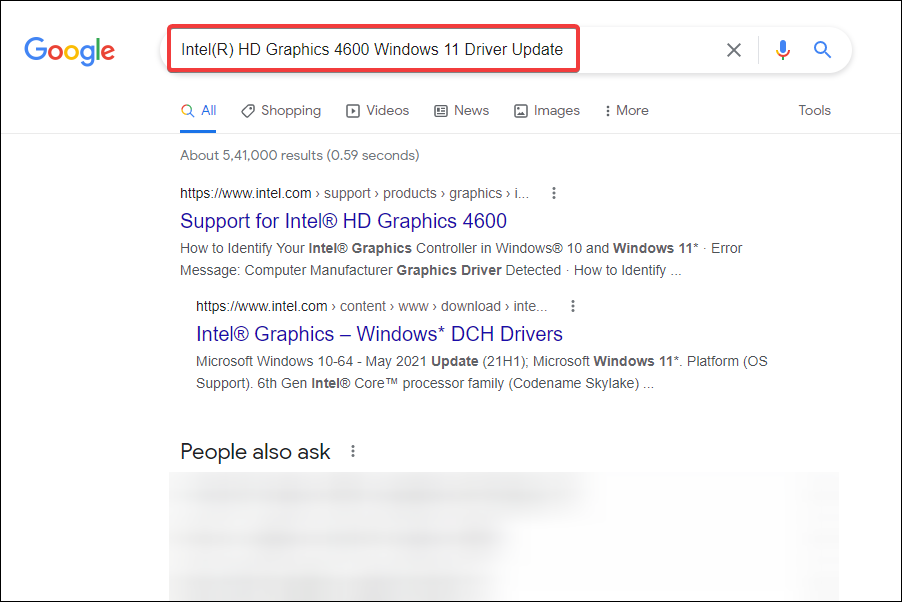
  4. Now, go to Google or any other secure search engine and search using Device Name, followed by Windows 11 and Driver Update.Search for driver update to fix driver power state failure error
  5. From the search results, locate and open the manufacturer’s website.
  6. Check if a newer version of the driver is listed here. You already have the current version and can identify from it if an update is available.
  7. In case an update is listed, download it. It is likely to be in the .exe format.
  8. Now, navigate to the folder where the downloaded file is stored and double-click on it to launch the installer.
  9. Follow the on-screen instructions to complete the installation process.
  10. After the update is installed, restart the computer for the changes to come into effect.
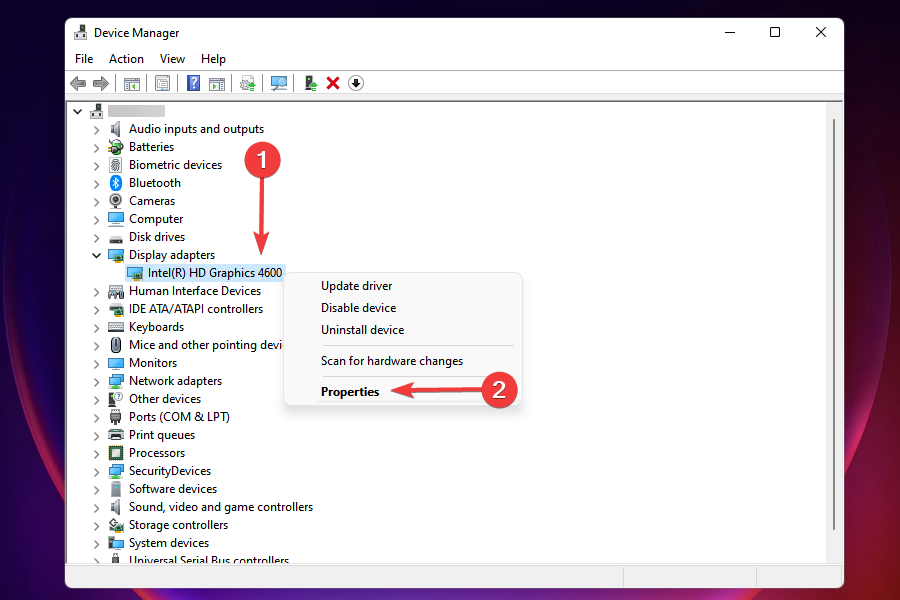
If rolling back to the previous version of the driver didn’t help, or the driver wasn’t updated recently, you can check if there’s an update available. Outdated drivers are as likely to cause the Windows 11 driver power state failure error on Dell XPS 15, HP, Lenovo, and other popular PCs.

Check if updating the driver from the manufacturer’s website fixed this issue for most users.

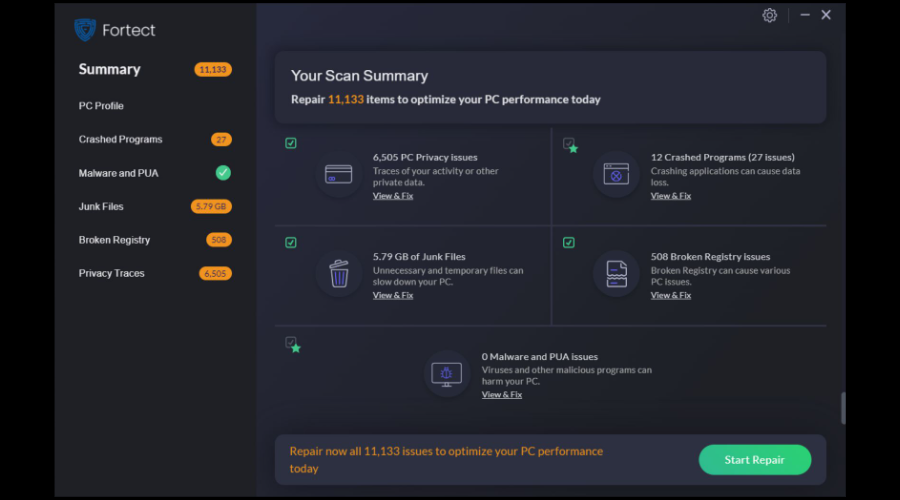
Another quick way to update the drivers installed on the computer is to use a third-party solution. We recommend Fortect Driver Updater, a dedicated tool that will automatically update the drivers and keep them all up-to-date.

⇒ Get Fortect Driver Updater

5. Disable fast startup

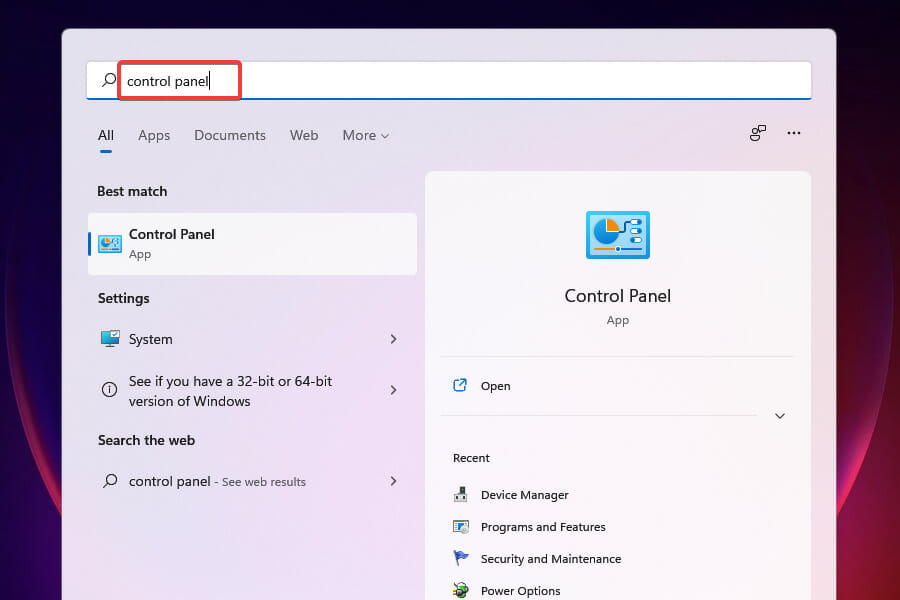
  1. Press Windows + S to launch the Search menu.
  2. Enter Control Panel in the search box at the top, and click on the relevant search result that appears.Launch Control Panel to fix driver power state failure error
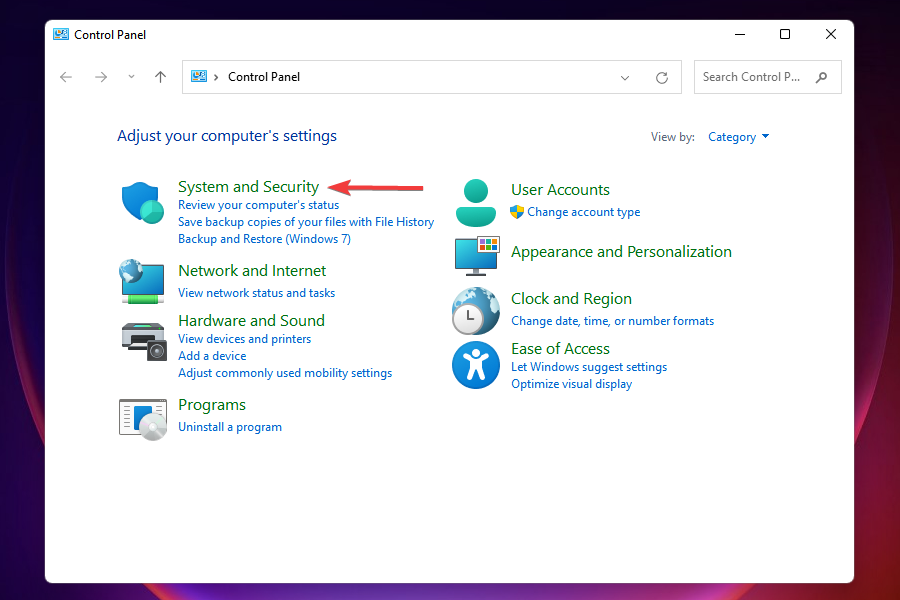
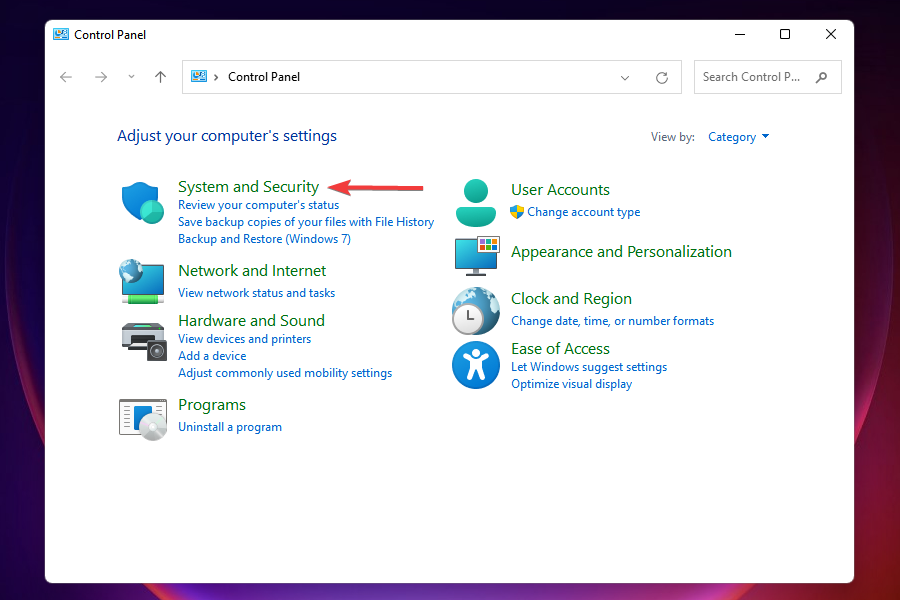
  3. Select System and Security from the option listed here.Go to System and Security to fix driver power state failure error
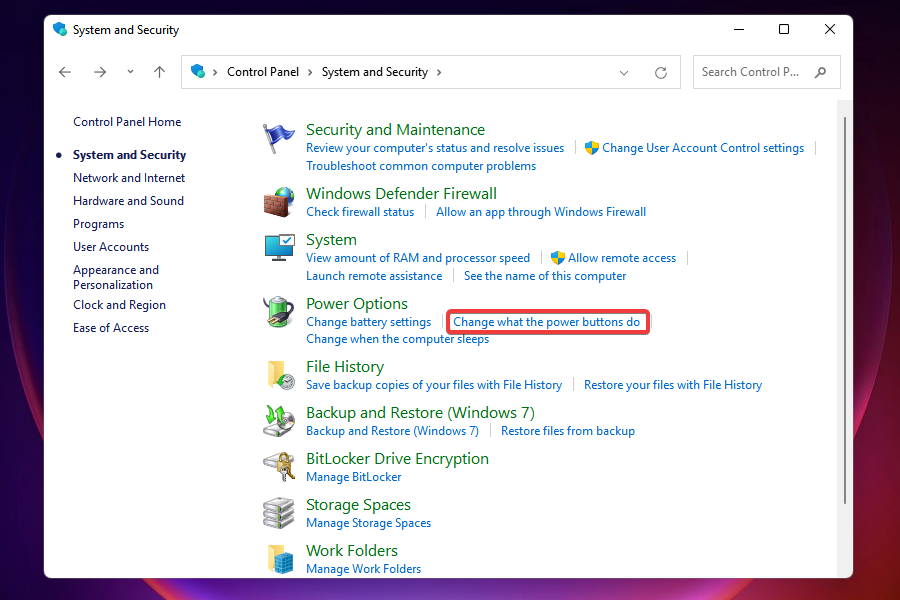
  4. Next, click on Change what the power button do under Power Options.Change what the power buttons do
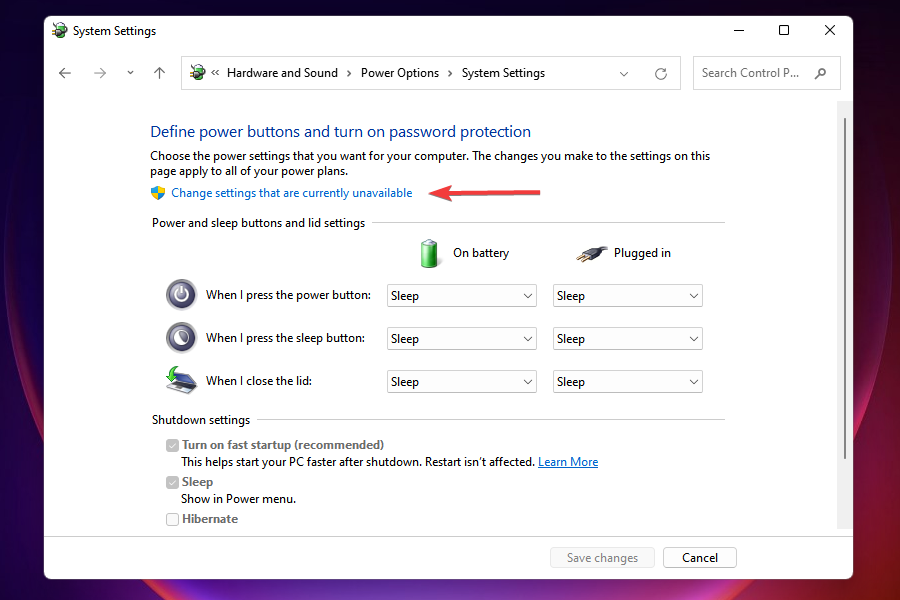
  5. Click on the Change settings that are currently unavailable option.Change settings that are currently unavailable
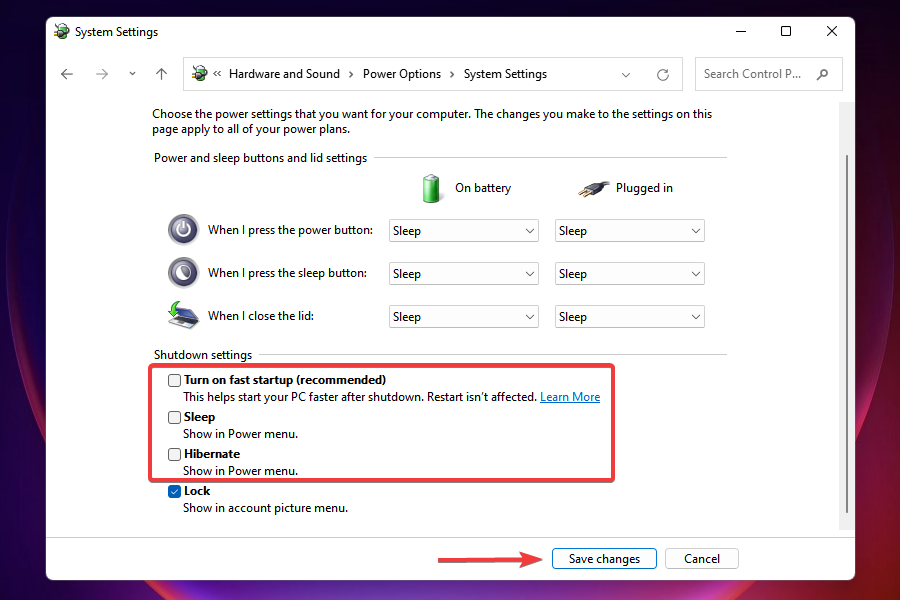
  6. Now, untick the checkboxes for Turn on fast startup, Sleep, and Hibernate, and click on Save Changes at the bottom.Disable fast startup to fix driver power state failure error
  7. Restart the computer for changes to come into effect.
Check if disabling fast startup fixed the driver power state failure error in Windows 11 on restart.

Fast startup is a feature that reduces the boot time for Windows by not completely shutting down the system. However, it’s known to cause compatibility issues with the connected device and lead to driver power state failure BSOD error.

6. Switch to High performance power plan

  1. Launch the Control Panel as discussed earlier.
  2. Click on System and Security.System and Security
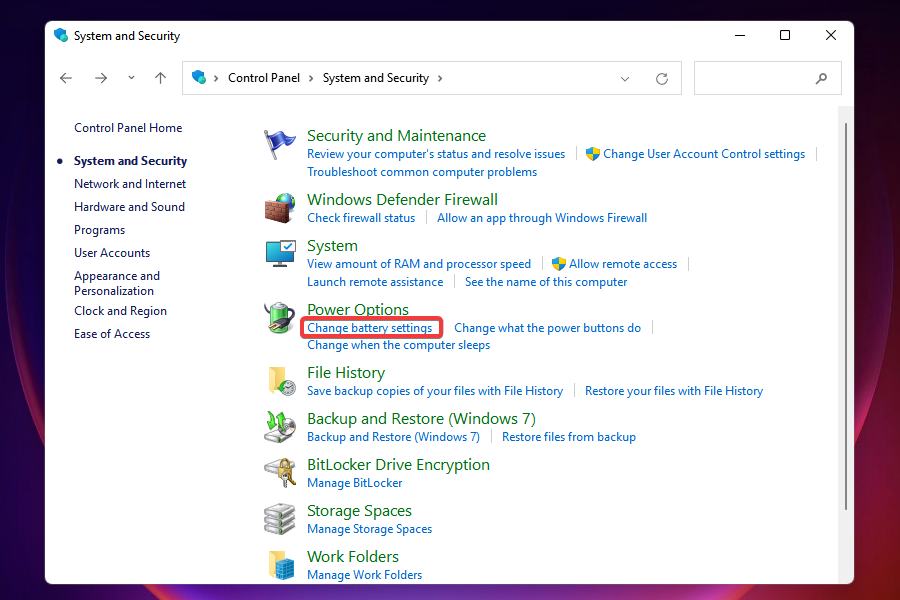
  3. Click on Change battery settings under Power options.Change power settings to fix driver power state failure error
  4. Select the High performance power plan.High Performance power plan to fix driver power state failure error

Simply switching the power plan to high performance has fixed the driver power state failure error in Windows 11 for many users. When the computer is in this mode, the connected devices do not go into sleep mode, thereby eliminating the occurrence of the error.

7. Change the device’s power settings

  1. Launch the Device Manager as discussed earlier.
  2. Locate the problematic device, right-click on it, and select Properties from the context menu.Change device power settings to fix driver power state failure error
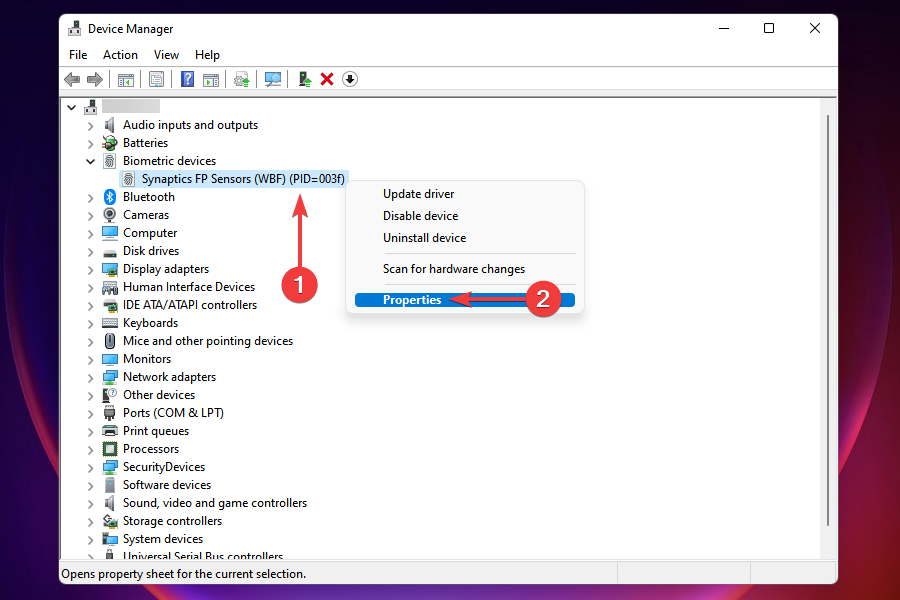
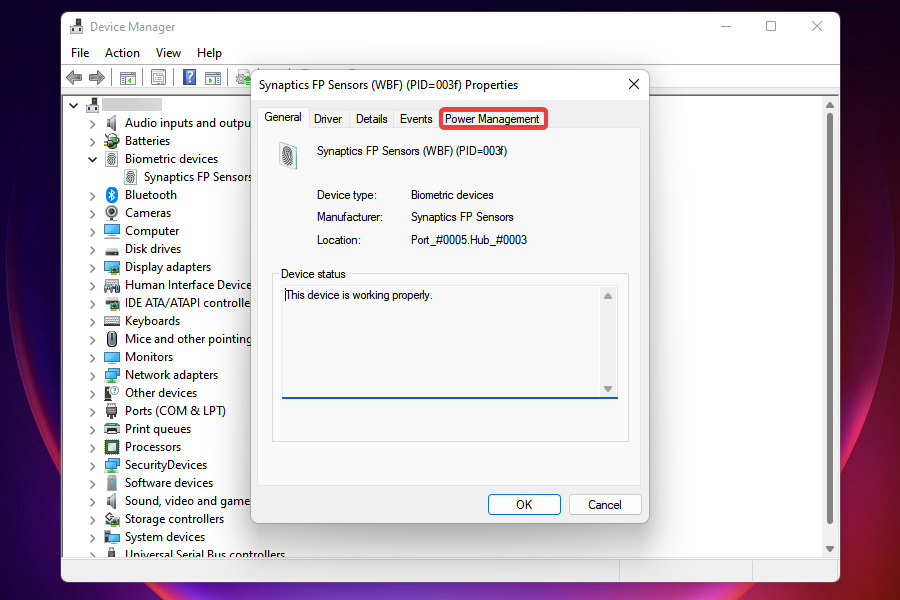
  3. Navigate to the Power Management tab.Power management
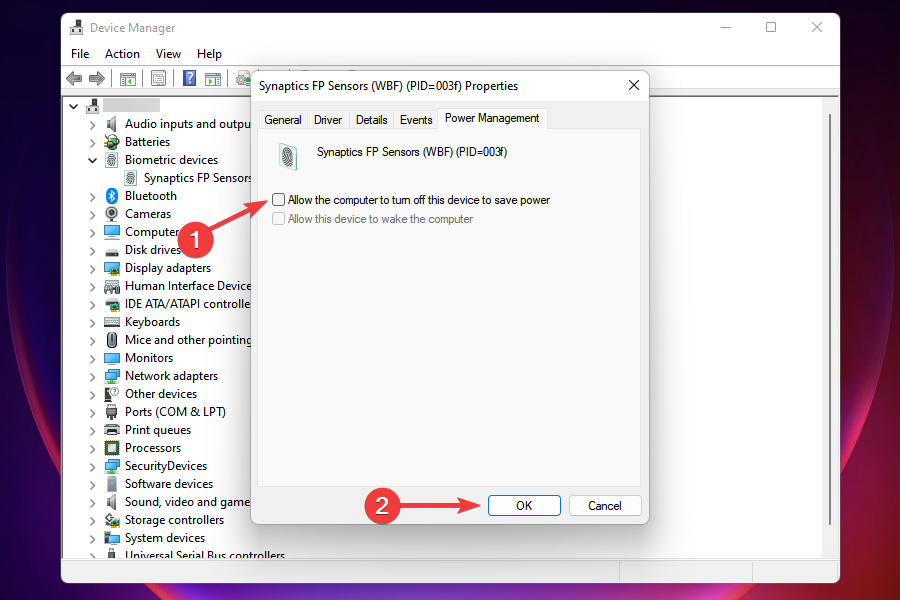
  4. Untick the checkbox for Allow the computer to turn off this device to save power and click on OK to save the changes.Allow the computer to turn off this device to save power

If nothing else worked, you can change the faulty device’s power setting. You will have to do it for all the devices that might be causing the error.

After you change the settings, restart the computer and check if the driver power state failure error in Windows 11 is fixed.

8. Scan for malware or virus

  1. Press Windows + S to launch the Search menu.
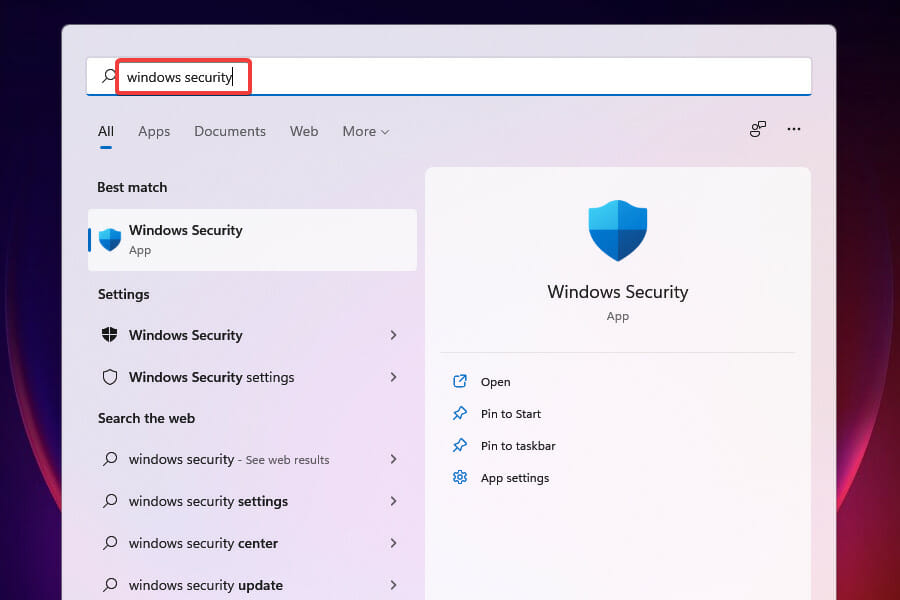
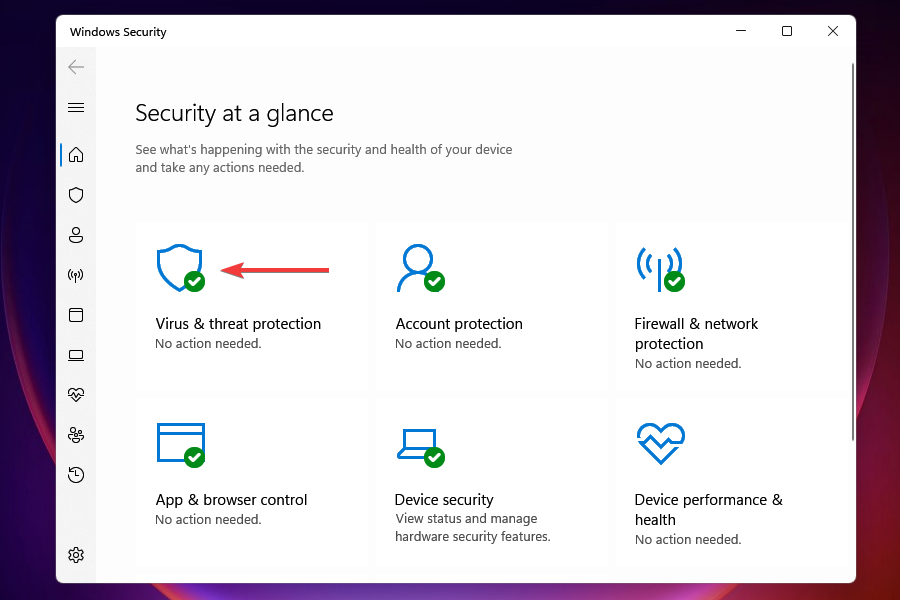
  2. Enter Windows Security in the text field at the top and click on the relevant search result that appears.Launch Windows Security to fix driver power state failure error
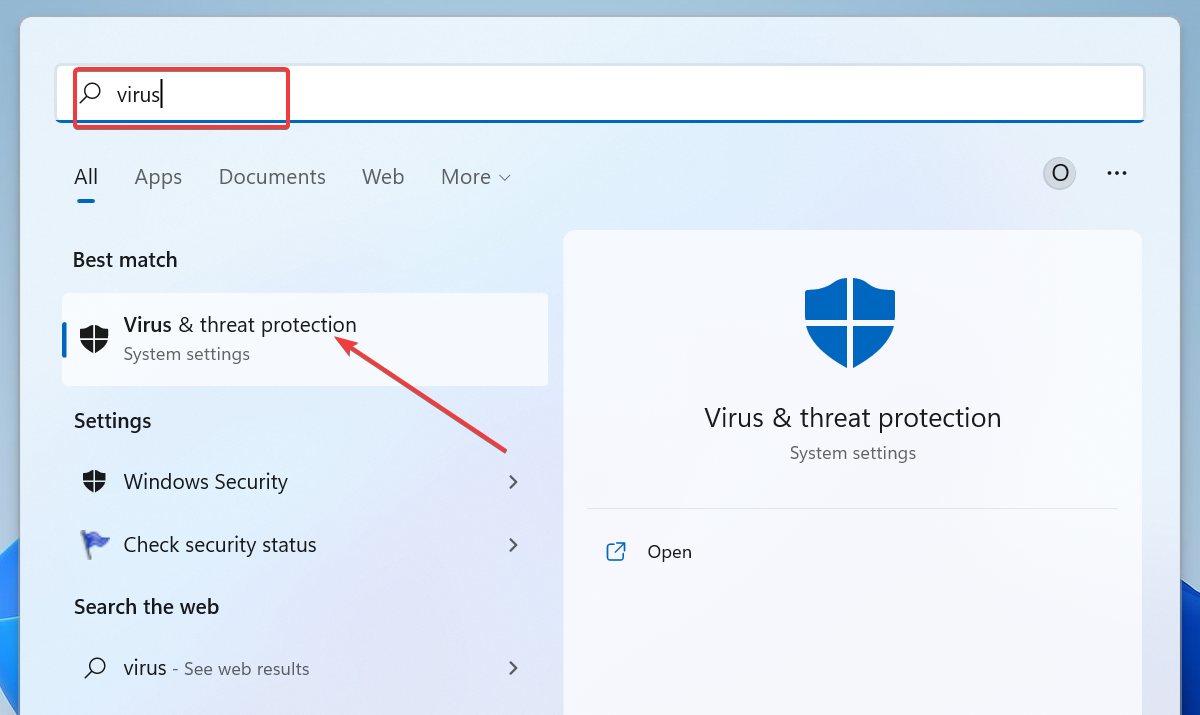
  3. Click on Virus & theat protection.Virus & threat protection
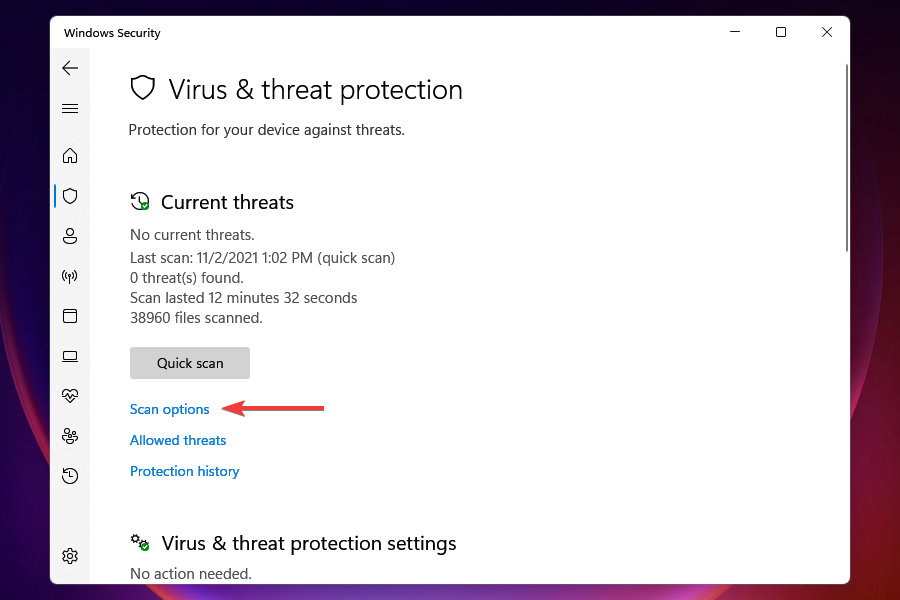
  4. Click on Scan options under the Quick scan button.Scan options
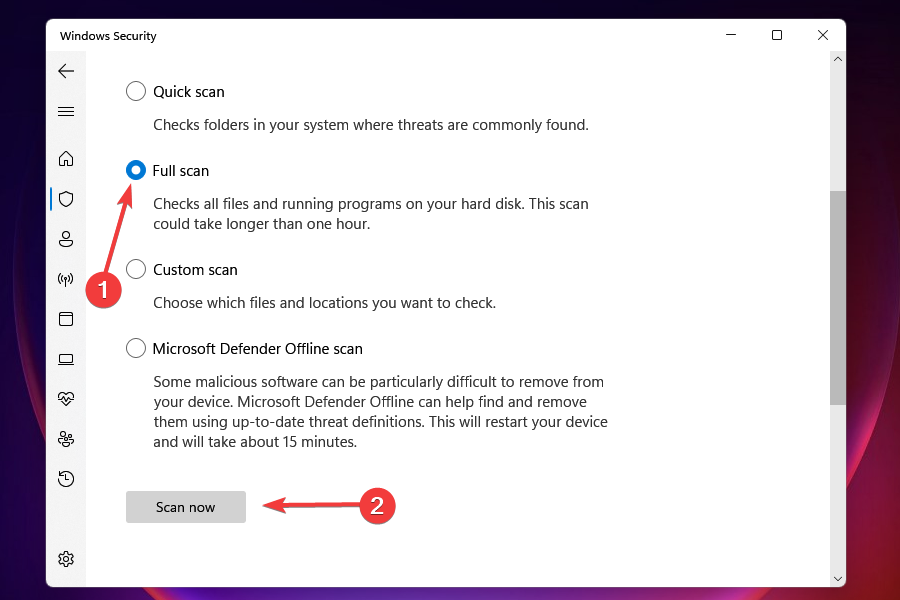
  5. Select the Full scan option and then click on Scan now.Run full scan to fix driver power state failure error

A system infected with malware or virus is also likely to exhibit the driver power state failure error in Windows 11. When you use Windows Security to run a scan, it not only identifies the malware or virus but also takes corrective measures to remove it.

While there are a bunch of other third-party antiviruses available out there, we choose Windows security for two reasons. First, it comes along with Windows and is free to use, and second, it offers the same level of protection as any other paid tool available in the market.

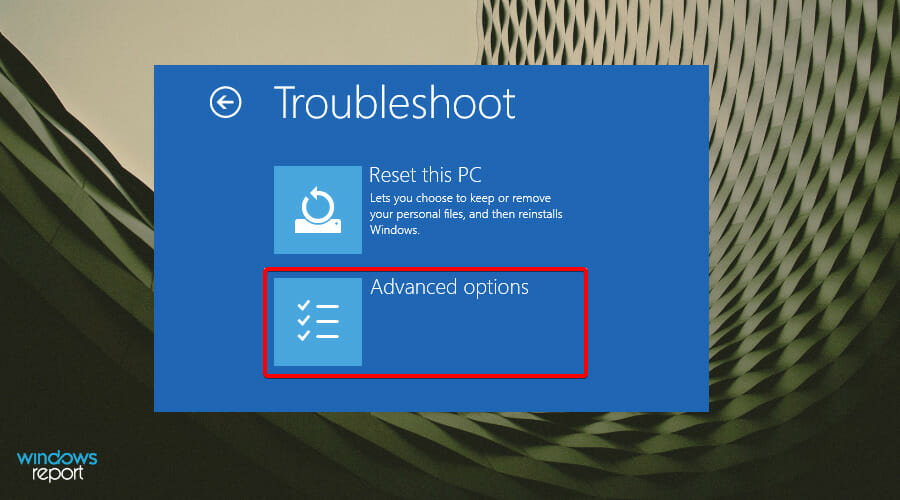
That’s all there is to fix the driver power state failure error in Windows 11. Execute the methods in the sequence that they are listed to solve the error in no time. Also, if none of them work, you always have the option to reset Windows 11 to its factory settings.

If you still use the previous operating system and need help with this issue, we have a separate guide on how to fix the driver power state failure in Windows 10. We also have an awesome guide about fixing the 0x0000009f Driver power state failure error that could help.

Let us know which fix worked for you in the comments section below, and the device or process that was causing the error.

11 Best Solitaire Apps for Windows PC [Completely Free]

Solitaire for Windows 10 is a great game to play if you have little time to spare. To help you out, we have selected the best Solitaire apps that you can download on your computer or play online.

Windows 10 already comes with the Solitaire collection. Our team also reviewed other classic Microsoft games, such as Minesweeper.

What makes a great Solitaire game?

While we can’t say that we agree with those who think that the best Solitaire app can come from another third-party developer, we did try out a few Solitaire apps for Windows 10 and 11.

You can notice some major differences between them. We compared them to the original Microsoft version in order to have the same starting point.

We analyzed the overall look and feel of the apps, as well as the gameplay and ease of use of the functions that come with each game.

Also, the games we tested were free versions, as we did not think it was necessary for someone to pay for an already free game. The games tested are as follows.

Which are the best free Solitaire apps for Windows PC?

Solitaired – Lots of customization options

Solitaired is a simple, yet elegant game of online solitaire that offers a lot of options in terms of gameplay and design.

For instance, you can change the front of the cards with lots of options to choose from and even change the backs.

You can even make your own card by adding crazy images on the backs like meowing cats, bunnies, flowers, and anything you may think of.

As for any solitaire game, you’ve got the option to draw one or three cards and there is even a multiplayer game. Who clears the deck first, wins!

If you’re competitive, you may track how many moves it takes to win a game, how long it takes, and how many times you pass through the deck.

⇒ Get Solitaired

SolitaireBliss – Double and triple modes

SolitaireBliss is another online solitaire game that features a lot of gameplay modes.

Except for the draw one and three cards, this game features Double and Triple Deck modes that add a whole level of complexity.

And it also features the Harp and Canfield modes that are a bit different, just in case you get bored with the classical mode.

If you want to brag about your skills or challenge a friend, SolitaireBliss also allows you to share the exact game you played.

For making the game really yours, you have the option to change the background, the deck, and even the backs from a wide selection of options.

⇒ Get SolitaireBliss

Online Solitaire – Best web-based Solitaire game

What if we told you that you don’t need to download anything and that you can play your favorite game directly from Online Solitaire.

As the name suggests you just need to click the link and boom, you’re in the game. By default, it’s a draw-three game but you can change that.

Just hit the Settings button from the bottom right and you will discover a lot of excellent options to play it exactly as you want.

You can draw just one card, show possible moves, autoplay when obvious, change the background, the card’s design, the animation speed, and a lot more.

The game even keeps your statistics and settings if you create an account but that is only up to you.

The developer writes that if you hit the Download button and install the desktop game, the play will be even better.

⇒ Get Online Solitaire

Simple Solitaire – Easy to download and install

The Simple Solitaire name is a bit confusing because the game itself is not as simple as we thought it would be.

We’re talking about the fact that you can change the settings for one and three-card draw, and you can change the scoring to Standard or Vegas modes.

The game has two difficulty settings and if you get stuck at any moment, you have the hint and undo options to help you.

Don’t expect much from the graphics, although there are some options to change the backgrounds and the images and backs of the cards.

⇒ Get Simple Solitaire

Spider Solitaire – Great card designs

Even if this is not an original Solitaire game, and it is the Spider version, Spider Solitaire comes in second place on this top.

The cards are pretty well visible, despite the fact that the color/sign of each card is massive and sometimes confusing.

However, you can change the theme and the colors so you will definitely find something that you like.

The game has three levels of difficulty, with one, two, and four suites, the latter being the most challenging.

⇒ Get Spider Solitaire

Solitaire Pro – Great gameplay

The app is created by the same developer who made the Spider Solitaire app that is featured in the number 2 position.

The game includes pretty nice card graphics, hints, undo, achievements, animations, a scoring system, and everything you’d expect from a good card game.

In order for users to unlock other themes, they must buy the premium app, which is not much.

⇒ Get Solitaire Pro

Solitaire HD – Great graphics card game

Of all the Solitaire games we’ve tested, Solitaire HD was one of the best when it comes to graphics.

It has very easily readable cards, easily movable, and with no problems whatsoever in the entire test.

There are options to change the layout of the app if one should choose so, and the different backgrounds and card styles were all very high quality.

Overall, we believe that Solitaire HD is one of the best alternatives for Microsoft Solitaire, even though it also shows ads.

⇒ Get Solitaire HD

Microsoft Solitaire Collection – Best Microsoft card games

best windows 10 solitaire apps

And now, here’s the game you’re probably reading this article for – Microsoft Solitaire Collection.

There’s no better Solitaire game in the Microsoft Store than Microsoft Solitaire Collection, bar none.

Sure, the game is not perfect. It has its flaws and some technical issues here and there. But when you compare it to other games, Microsoft’s game is light years ahead of the third-party competition.

Besides the regular Solitaire game mode, you can also play modes like Spider, FreeCell, Pyramid, and TriPeaks.

On top of that, there are various daily challenges to add liveliness to the game.

And you don’t even have to download this game, Microsoft Solitaire Collection now comes preinstalled in Windows 10.

⇒ Get the Microsoft Solitaire Collection

Klondike Solitaire Collection Free – Nice animations

Klondike solitaire collection free best solitaire windows 10

Klondike Solitaire Collection Free has a collection of solitaire versions, including Klondike, Klondike by Threes, Klondike Two Decks, and Easthaven.

It has smooth animations and multiple card sets and backgrounds to choose from.

You can also save your game progress, as well as undo or redo an unlimited number of times. Among the most important features are the Autoplay option and Statistics tracking.

If you’re a Solitaire fan, you certainly must try this one.

⇒ Get the Klondike Solitaire Collection Free

Pyramid Solitaire Saga – Best Solitaire puzzle game

Pyramid Solitaire Saga is not exactly a classic Solitaire game, but nonetheless, it has the same gameplay.

Besides the classic Solitaire gameplay, you will also have to find some clues, catch some scarabs, and complete each episode to reveal hidden treasures and explore new worlds.

There are all sorts of other things connected to the game except for the usual Solitaire card game.

You will get lots of different scenarios, puzzles, boosters, treasures, and lots and lots of levels.

Also, it’s easy to sync the game between devices and unlock full game features when connected to the Internet.

It’s worth noting that the app is also available on mobile phones and tablets, and it is completely free to play.

⇒ Get Pyramid Solitaire Saga

SolitaireCardGames – Great collection of games

Now, if you don’t want to download any Solitaire apps on your Windows computer, you can go to SolitaireCardGames and play the game you want online.

There are 15 Solitaire game versions that you can choose from such as Solitaire Big, Double Solitaire, Pasjans, Solitaire Time, Klondike Solitaire, Pyramid Solitaire, and more.

The website also offers useful information related to Solitaire, including details about the game’s history, how to play the game, as well as a series of Solitaire strategies that will come in handy. Enjoy it!

⇒ Get SolitaireCardGames

After testing these apps, we came to realize that the best Solitaire is the original Microsoft version but that is still debatable, right?

It has awesome graphics and very well-created gameplay and with the upgrades that it has received in Windows 10 and 11, it is better than ever.

So, a final response to the question Which is the best Solitaire app for Windows 10 & 11? – The one you have the most fun with.

And if you get bored with Solitaire, check our list including the best Rummy card games online.

If you have any other questions or suggestions, don’t hesitate to leave them in the comments section below.

Encrypt Contents to Secure Data Greyed Out [Windows 11 Fix]

Encrypting your files protects you from prying eyes and unauthorized access by individuals who are looking to access or steal your data. But recently, many Windows users have reported that the ability to encrypt contents to secure data is greyed out in Windows 11.

No more worries! We’ve got you covered and will help you resolve this issue by providing fixes allowing you to encrypt your files and folders again.

Why is the encryption option greyed out in Windows 11?

An error inside the registry value is the main cause of this issue. The error inside the registry value can be caused by the following:

  • Improperly uninstalled applications – Sometimes, uninstalling an application manually will leave some traces behind that interfere with your OS’s functionality.
  • Viruses, trojans, spyware – Viruses are known to cause a plethora of issues, and this is no exception. That’s why we strongly recommend choosing one of the best virus removal tools.
  • A large number of unnecessary files – Junk files not only slow down the PC but also cause bugs and errors.

For those who are reporting that the Encrypt contents to secure data is greyed out in Windows 11 Home, you should be aware that the Encrypted File System (EFS) is not included in the Windows Home edition of the operating system, so it’s normal for it to be greyed out.

To utilize EFS, you will first need to update your Windows to either the Education, Enterprise or Pro editions. Only then will you be able to encrypt your files.

What can I do if Encrypt contents to secure data option is greyed out?

1. Use Windows Registry to enable the EFS

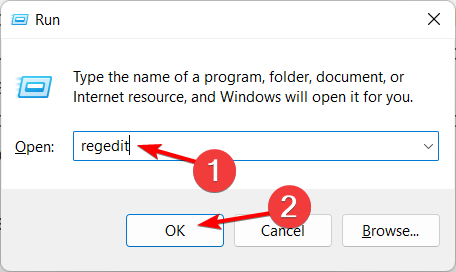
  1. Press Windows Key + R to open the Registry and enter regedit then click OK.regedit-ok how to clean registry windows 10
  2. Enter the following address inside the search bar at the top, then double-click the NtfsDisableEncryption key and set its Value data to 0 and click OK: HKEY_LOCAL_MACHINE\SYSTEM\CurrentControlSet\Control\FileSystemregistr-ntsf-0 encrypt contents to secure data greyed out windows 11
  3. Restart your computer to apply the changes made.

2. Use the command prompt to enable EFS

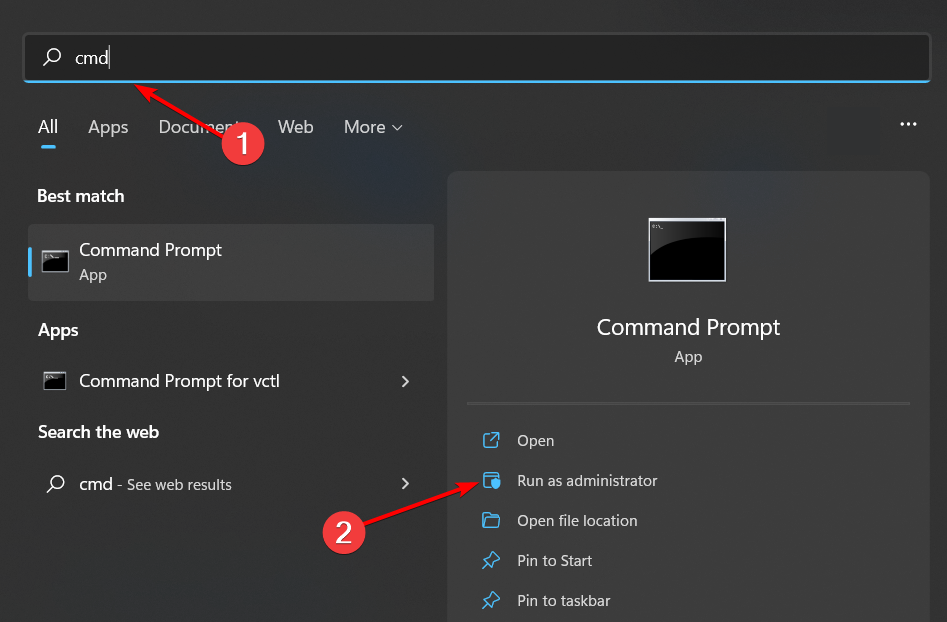
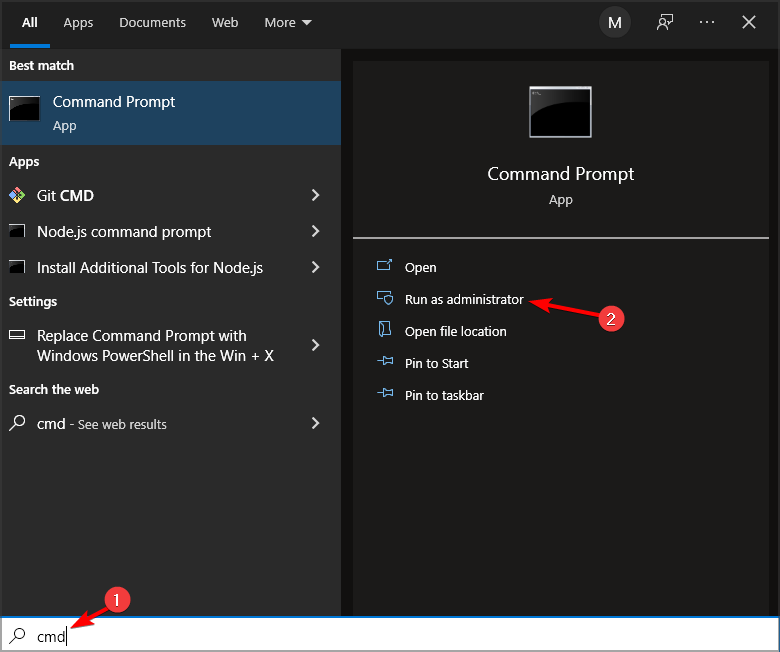
  1. Press Windows type cmd and click Run as administrator under the result on the right.cmd-admin hp printer won't scan
  2. Enter the following command and press Enter: fsutil behavior set disableencryption 0Executing a command in the command prompt windows screen
  3. Once the command has been executed, restart your computer. The Encrypt contents to secure data greyed out in Windows 11 issue will be solved.

3. Check if the Encryption File System (EFS) service is running

  1. Press the Windows and R keys at the same time to launch Run then input services.msc and hit Enter or click OK.services can't remove bluetooth device windows 10
  2. Locate the service named Encryption File System in the service window and double-click it.Opening EFS in services window
  3. Click on the Startup type and select Automatic. After that, click Apply and then OK.automatic-startup encrypt contents to secure data greyed out windows 11
  4. Reboot your computer once you’ve done this.

4. Confirm if you are using an NTFS drive

  1. Press Windows enter cmd and open the top result as an administrator.cmd-admin hp printer won't scan
  2. Enter the following command and press Enter. Note that you should change the drive letter in case you want to convert another one: convert C:/ fs:ntfsconvert-command encrypt contents to secure data greyed out windows 11

If you’re using FAT32 as your file system, change it to NTFS. As encryption can only be done on the NTFS file system.

5. Run DISM and SFC scans

  1. Press Windows enter cmd and click Run as administrator under the result.cmd-admin hp printer won't scan
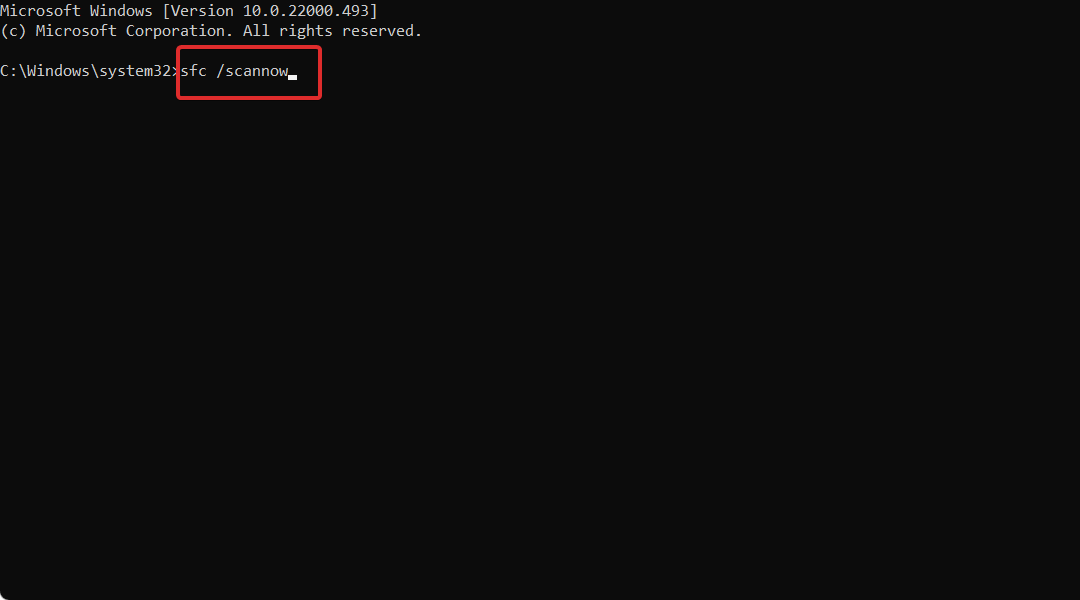
  2. Type the following command and press Enter: sfc /scannowscannow 0x80070002 windows update
  3. Once the scan is done, type the following command and press Enter again: DISM.exe /Online /Cleanup-image /scanhealthdism-scanhealth encrypt contents to secure data greyed out windows 11
  4. Reboot your computer afterward.

Doing this will repair all the corrupted files, and you can encrypt all your files and folders again.

Microsoft introduced the Encryption File System (EFS) with the launch of Windows 10, allowing you to encrypt your files and folders from being accessed by others.

But, since it isn’t available in the Home edition, you may opt for a third-party tool to encrypt your files and folders, such as Folder lock.

Also, you may come across a situation where Device Encryption is missing in Windows 11, but enabling TPM and Secure Boot should fix things. We also have a great guide on what to do if Secure Boot is grayed out on Windows 11, so don’t miss it.

Don’t forget to leave a comment in the section below and tell us whether you have thought of any more solutions for the Encrypt contents to secure data greyed out in Windows 11 issue. Thanks for reading!

6 Best Windows Troubleshooter Tools to Use

The Windows operating system, especially Windows 11, could have a lot of bugs, lags, and other annoying issues. And using specialised troubleshooters tools to help you solve problems with your PC such the one we present is essential to have a smooth pc experience.

Sometimes we have to perform various system tweaks to fix Windows problems, which could be very complicated and sometimes risky.

But luckily, there are a lot of troubleshooting tools out there that will do all the work for us. Using a troubleshooting tool could save us a lot of time and is safer than monkeying in our system or registry on our own.

So we’ll present you with the best troubleshooting software and tools for your Windows operating system, and we hope they will help you to solve all your problems.

Which is the best PC troubleshooting software on the market?

System Mechanic Ultimate Defense – One of the OGs

System Mechanic Ultimate Defense is another PC troubleshooting software. It is one of the most known and most ‘old but gold’ optimization and tuneup utilities on the market.

The most notorious features are Windows customization and various recovery tools, troubleshooting options that you can select and customize, an Internet connection tweaker, and even an antivirus.

Its interface is intuitive and highlights all the necessary processes you need to do to avoid system issues. You will know exactly when you will need to fix your registry, clean some junk files, or run an HDD defragmentation.

This software has a free version that can be used on every PC. However, the paid version includes all the necessary features to tweak your system.

We recommend the pro version, as it will help your PC improve its performance with all its available features. We also have to mention that it comes with a 30-day money-back guarantee. Thus we regarded it as one of the best Windows PC troubleshooting tools.

Most Important features:

  • Cleans out clutter
  • Removes bloatware
  • Privacy and security protection
  • Speed booster

System Mechanic Ultimate Defense

Don’t sit around with an error-filled PC. Get it fixed with the help of this incredibly handy software tool!
Free trial Download

Advanced System Care – Comes with many modules

There are a lot of third-party system troubleshooting tools for Windows, but we decided to also choose Advanced System Care, due to its trusted performance by users.

IOBIT Advanced SystemCare can assist you in optimizing your computer and keeping it free of faults and problems that damage its performance.

The application has a variety of modules that can help you Speed Up, Protect, Clean, and Optimize your PC.

It also features a Tool Box where you can find several IOBIT-based utilities to help you fix, tune, and care for your PC. It also has an Action Center where you may license and update other IOBIT products and key Windows components.

One of the most popular features of IOBIT Advanced SystemCare is the Performance Monitor.

Its new Resource Manager keeps track of your system components like CPU load, disk use, and RAM allocations. It allows you to terminate tasks, minimizing resource use and enhancing PC performance.

Most Important features:

  • AI-powered optimizer
  • Startup speed up
  • Gaming performance booster
  • DNS protector

IObit Advanced System Care

Advanced SystemCare is a more powerful PC optimization utility from the world’s leading system utilities and security software vendor.
Free trial Visit website

Tweaking Windows Repair – Boosts your PC to new highs

Simply stating that your Windows 10 PC has an issue is not exactly correct since hundreds of errors and things can go wrong in a system as complex as Windows 10.

However, this complex OS can be easily fixed by a simplistic third-party tool that is meant to fix pretty much anything on your PC software-wise and boost it to new heights.

Tweaking Windows Repair may seem dated, but rest assured that the features and tech that back it up are more than enough to get your error-filled PC up and running to levels comparable to when it was brand new.

The program is available in two versions, with the Pro version offering a higher variety of tools, although they are also more complex to use.

If you are ready to enjoy an error-free Windows 10 experience, go ahead and give Tweaking Windows Repair.

Most Important features:

  • Automatic updates
  • Memory cleaner
  • Windows quick link menu
  • Run speed tweaks

Tweaking Windows Repair

If your Windows 10 experience is interrupted by constant errors or slow response times, give Tweaking Windows Repair a go.
Free trial Visit website

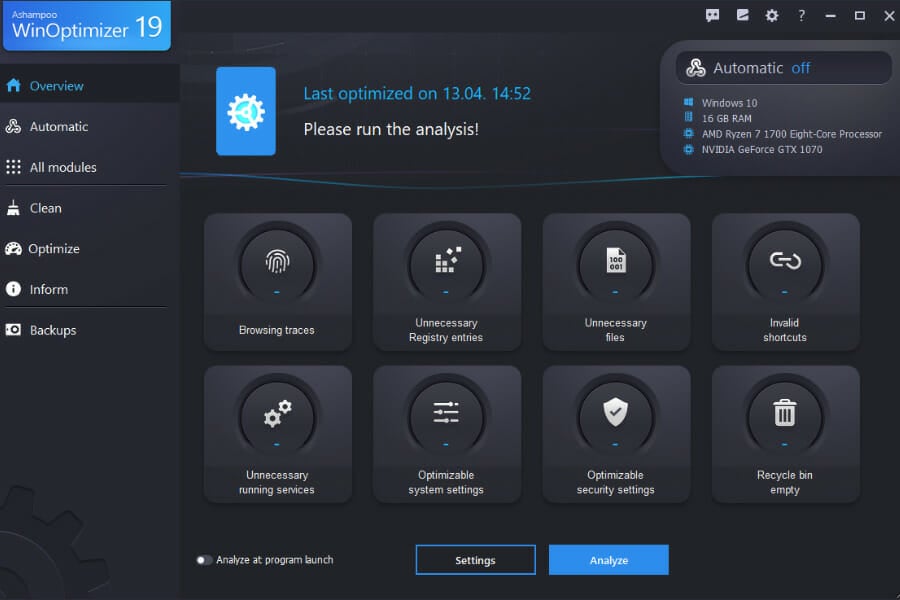
Ashampoo WinOptimizer – Comes with a 1-Click Optimizer

Ashampoo WinOptimizer pushes the strings to make your Windows PC faster and more private. It is a great PC troubleshooting software.

The new Boot Center deconstructs the boot process into component segments, including autorun entries and activities, plus it immediately identifies performance bottlenecks.

You’ll appreciate the new 1-Click Optimizer, which finds more online browsing traces, garbage files, and unnecessary Registry values and provides more details and features than before.

The powerful Privacy Manager prevents Windows from calling home and sharing sensitive user data with Microsoft and other software manufacturers.

The System Information module provides comprehensive information about your PC’s hard and software and assistance in locating hidden resource hogs on your hard disks.

WinOptimizer has data-rich dashboards that provide rapid shortcuts to essential modules for a more condensed but always up-to-date perspective.

The tweaking module enables individual Windows customization and will undoubtedly appeal to you if you are a PC tuning enthusiast.

Most Important features:

  • Old Windows versions deleting
  • Clear cleaner UI
  • Cookie manager
  • Window scaling and docking

Ashampoo WinOptimizer 19

This comprehensive software improves system efficiency, resolves system faults, and minimizes file clutter on a well-organized, customizable dashboard.
Check price Visit website

Wise Registry Cleaner – Provides safe registry cleaning

Wise Registry Cleaner should definitely be on your list of troubleshooting tools. There are a lot of registry cleaners and maintainers out there, but we decided to choose Wise Registry Cleaner.

This tool appears to be the best because it provides deep and safe cleaning of your registry, with many tweaking options.

Wise Registry Cleaner is also very well-designed, and you won’t have any problems finding and performing the desired task.

But cleaning your registry with Wise Registry Cleaner requires rebooting, which could be annoying sometimes, but it is often required to change the system and registry files properly.

Most Important features:

  • Multi-users Registry cleaning
  • PC performance booster
  • Windows backup and restore
  • Scheduled auto cleaning

Wise Registry Cleaner

Your registry can be the source of most of your PC-related problems. Tweak and fix them with Wise Registry Cleaner!
Check price Visit website

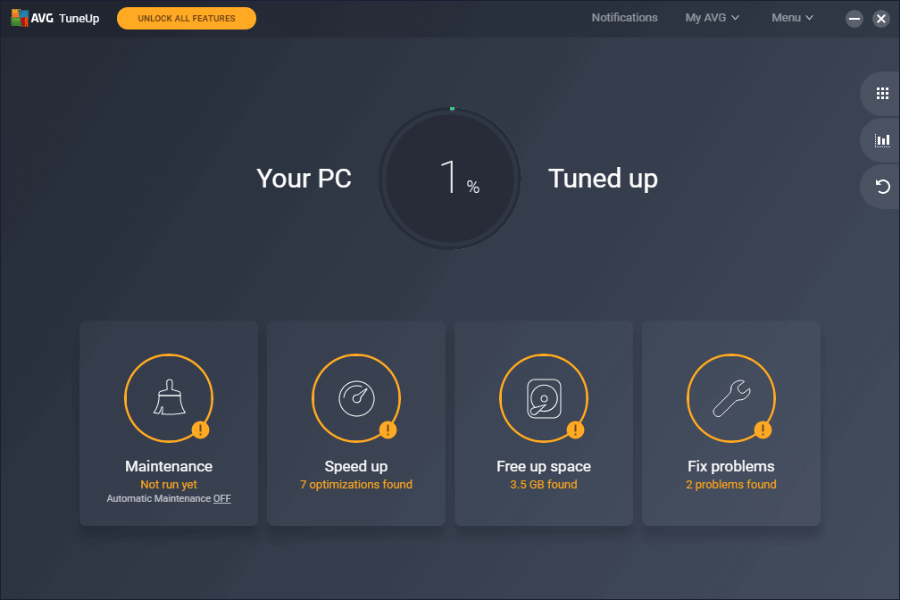
AVG PC Tuneup – Has a 1-Click Maintenance tool

AVG PC TuneUp is a troubleshooting tool that contains utilities for optimizing system startup, defragmenting the hard drive, and cleaning damaged keys in the Windows Registry.

This utility can also restore mistakenly deleted files, check your hard drive for faults, modify hidden settings, and customize the appearance of Windows.

AVG PC TuneUp also includes a file shredder, a thorough system report generator, and the great 1-Click Maintenance tool, which allows you to automatically and routinely scan for some of the most common issues that your computer may experience.

If your computer is always in use and the hardware consumes a lot of energy, there is a PC Mode in the software that decreases the energy consumption.

The AVG Tuneup duplication finder module searches for and removes duplicate files but does not remove them also.

This isn’t just another generic PC support tool, it’s innovative, perceptive, and packed with useful features.

Furthermore, if you’re looking for assistance in enhancing your framework, it’s most likely the ideal software you’ll get.

Most Important features:

  • Junk files remover
  • Auto program updater
  • Auto maintenance
  • PC speed up

AVG PC TuneUp

This comprehensive troubleshooter includes improved utilities to boost your PC’s speed and Disk and Browser Cleaners to free up hard disk space.
Free trial Visit website

What tool is used to troubleshoot problems with Windows?

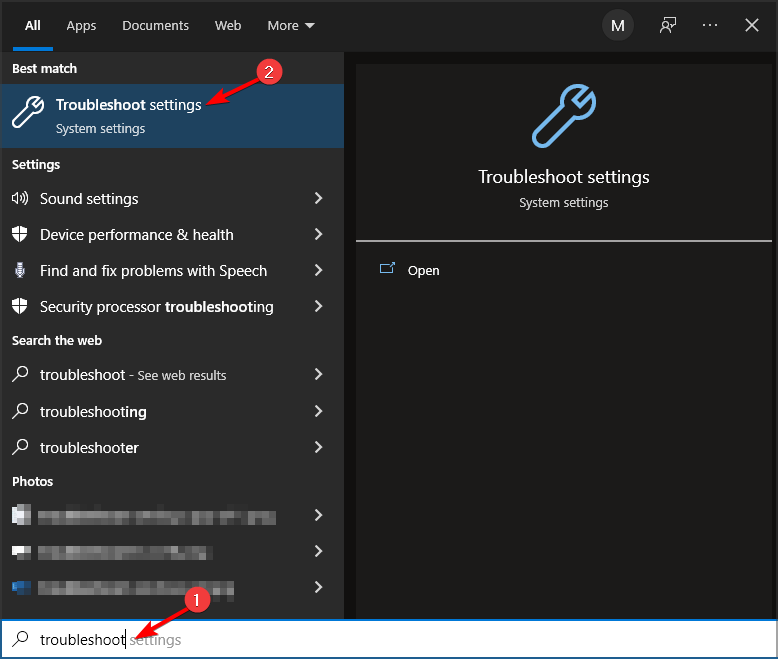
By default, users use the built-in troubleshooter in Windows, which you can access by doing the following:

  1. Press Windows key + S and enter troubleshoot. Select Troubleshoot settings from the menu.
  2. Click on Additional troubleshooters.
  3. Now select the troubleshooter that you want to run.

Using Windows Troubleshooter is sometimes the best choice because it doesn’t require downloading and installing any additional software.

Remember that this feature is designed to only run on local computers. So if you want to fix a PC remotely, you might need to use remote troubleshooter software instead.

If you’re dealing with more serious issues, we recommend using PC repair tools since they offer better features for advanced problems.

Hopefully, we helped you narrow your choices for a Windows PC optimizer troubleshooting tool because they are great assets for a performant device.

Moreover, you may want to check out our list of the five best BSoD fixers to solve yet another Windows issue.

We hope you have now installed any of these excellent PC troubleshooting software.

What’s your choice to troubleshoot your Windows PC? Leave us a comment in the area below.

Delete Unnecessary Files in Windows 10 with These Fast Tools

Your PC can sometimes be filled with unnecessary temporary files and programs that can slow it down. This is when you need to scan and delete the junk files on the computer.

You can take the manual approach, but it isn’t always very effective and is highly time-consuming and risky. Many inadvertently removed critical system files and had to reinstall the OS.

Use specialized software to clean up your PC to ensure you don’t delete anything valuable. And we have the perfect ones for you.

What files should I delete to free up space?

If you are wondering how to delete junk files from your PC, here are a few quick ways:

  • Empty the Recycle Bin: The Recycle Bin stores files for a certain period after they are deleted, but if you are certain about not needing them again, empty it right away.
  • Uninstall programs no longer useful: If there are programs installed that you don’t need anymore, uninstall them to clear some space.
  • Use Disk Cleanup: It’s a built-in utility that allows users to easily scan and delete junk files and necessary items on the computer.
  • Set up Storage Sense: It is another handy utility offered by Microsoft that automatically removes unnecessary items at a set frequency.

However, remember that none offer the same efficiency level as specialized software. These will find even the smallest of the files created by apps and remove them all. However, when it comes to scanning and deleting junk files, there’s no match for these.

Is it safe to delete junk files?

As long as you are careful not to delete any critical files, there’s no harm in it. And it’s recommended that you regularly scan and delete junk files in Windows. Moreover, you can choose to backup your system to make sure you can undo any damage.

If you don’t delete unwanted files in Windows 10, they will soon consume a large part of the storage, and you may run out of free space.

Follow along to find out more details about each software!

What is the fastest way to delete unnecessary files?

Revo Uninstaller – Offers a simple UI

Revo to scan and delete junk files

Another great application that can delete junk files is Revo Uninstaller. It’s considered one of the best junk file cleaners in the market and has been appreciated by users.

It has a very simplistic and straightforward UI, with various options placed systematically to allow quick access.

Regarding the features, here are some of the best features that this app has to offer:

  • Can uninstall any application and remove all files associated with it
  • Hunter Mode allows you to pinpoint and uninstall unknown applications
  • The autorun Manager feature allows you to control which applications start automatically with your PC
  • Ability to remove junk files and speed up your PC, and permanently delete files and folders

Pro version features:

  • Forced Uninstall – Remove leftover files from any application that wasn’t uninstalled properly
  • Quick/Multiple uninstall – Set a queue for applications you want to remove and remove them one by one
  • A real-time installation monitor allows you to see live changes on your PC while a certain application is being installed
  • Ability to create system and registry backup before making any changes

Revo Uninstaller

This practical tool will remove all the unnecessary files on your PC super fast and automated.
Check price Visit Website

Easy Duplicate Finder – Straightforward and efficient

easy duplicate finder to scan and delete junk files

Easy Duplicate Finder is another simple junk file cleaner for Windows 10. This application has a rather friendly user interface allowing you to find and remove duplicated files easily.

With efficient functioning and a simple interface, it’s bound to be one of the best tools for scanning and deleting junk files in Windows.

Regarding the features, here are a few notable ones this tool offers:

  • Extremely simple to use interface
  • Several scanning modes
  • Ability to remove duplicates from cloud storage services
  • Folder comparison mode
  • Ability to find true duplicates

Easy Duplicate Finder

Have a try with this appreciated tool that will eliminate all duplicate files to free up your disk space.
Check price Visit Website

Wise Registry Cleaner – Offers a free version

Wise to scan and delete junk files

If you need a junk file remover, you should try Wise Registry Cleaner. This software comes in two versions, Free and Pro, and they have very few differences.

So, if you are not yet ready for the paid version, go ahead with the free one. Though, most users prefer the paid version more.

Regarding the features, here are a few notable features that this tool offers:

  • Ability to scan the registry and remove the corrupted or unnecessary entries
  • Can quickly restore the registry to the previous state if you encounter any issues
  • You can add a Clean Registry shortcut on your desktop in order to clean the registry whenever you want
  • Three different modes of scanning: normal, safe, and deep
  • Support for exclusions allowing you to skip certain sensitive areas of your registry
  • Multi-user support (in Pro version only) – Thanks to this, you can clean the registry for all users on your PC, as long as you have administrative rights

Wise Registry Cleaner

Rely on this software to clean junk files, defragment the registry, or restore your system.
Check price Visit Website

AVG TuneUP – One of the biggest names in the space

AVG TuneUp

Finding the best PC cleaner isn’t always easy, but if you’re looking for software to delete junk files in Win 10, AVG TuneUP might be just what you need.

Developed by one of the biggest names in the market, AVG TuneUP boasts of highly efficient cleaning of junk files along with other performance enhancements.

As for the features, here’s what this tool has to offer:

  • It will automatically clean your registry and fix various issues
  • Automatic maintenance will clean browser leftovers, track cookies, cache files, etc.
  • Sleep Mode technology puts resource-intensive or background programs to sleep in order to improve your PC performance
  • Ability to find and remove unwanted software such as bloatware or old software
  • Remove cache files, old backups, and temporary files thanks to the Disk Cleaner feature
  • Browser Cleaner feature that will remove leftover files from all your browsers
  • Ability to update outdated software automatically

AVG TuneUp

Tune up your system efficiently by removing junk files to free up valuable space with AVG software.
Check price Visit Website

Wise Disk Cleaner – Offers advanced cleaning

Wise Disk Cleaner to scan and delete junk files

If you’re looking for the best PC cleaning tool, you might want to try Wise Disk Cleaner. The application is simple to use, but it also packs a lot of useful features.

In addition to boosting the computer’s performance, it can also improve your browsing experience.

Here are a few most notable features:

  • Ability to remove unnecessary files and free up precious disk space
  • Advanced options that allow you to remove all sorts of junk files
  • Ability to clean browsing history, cache files, and cookies of your browser
  • Can also clean various traces left by your operating system
  • Built-in defragmentation tool
  • Ability to schedule cleaning sessions

Wise Disk Cleaner

Get rid of all junk files from your PC and immediately increase your system’s speed performance.
Check price Visit Website

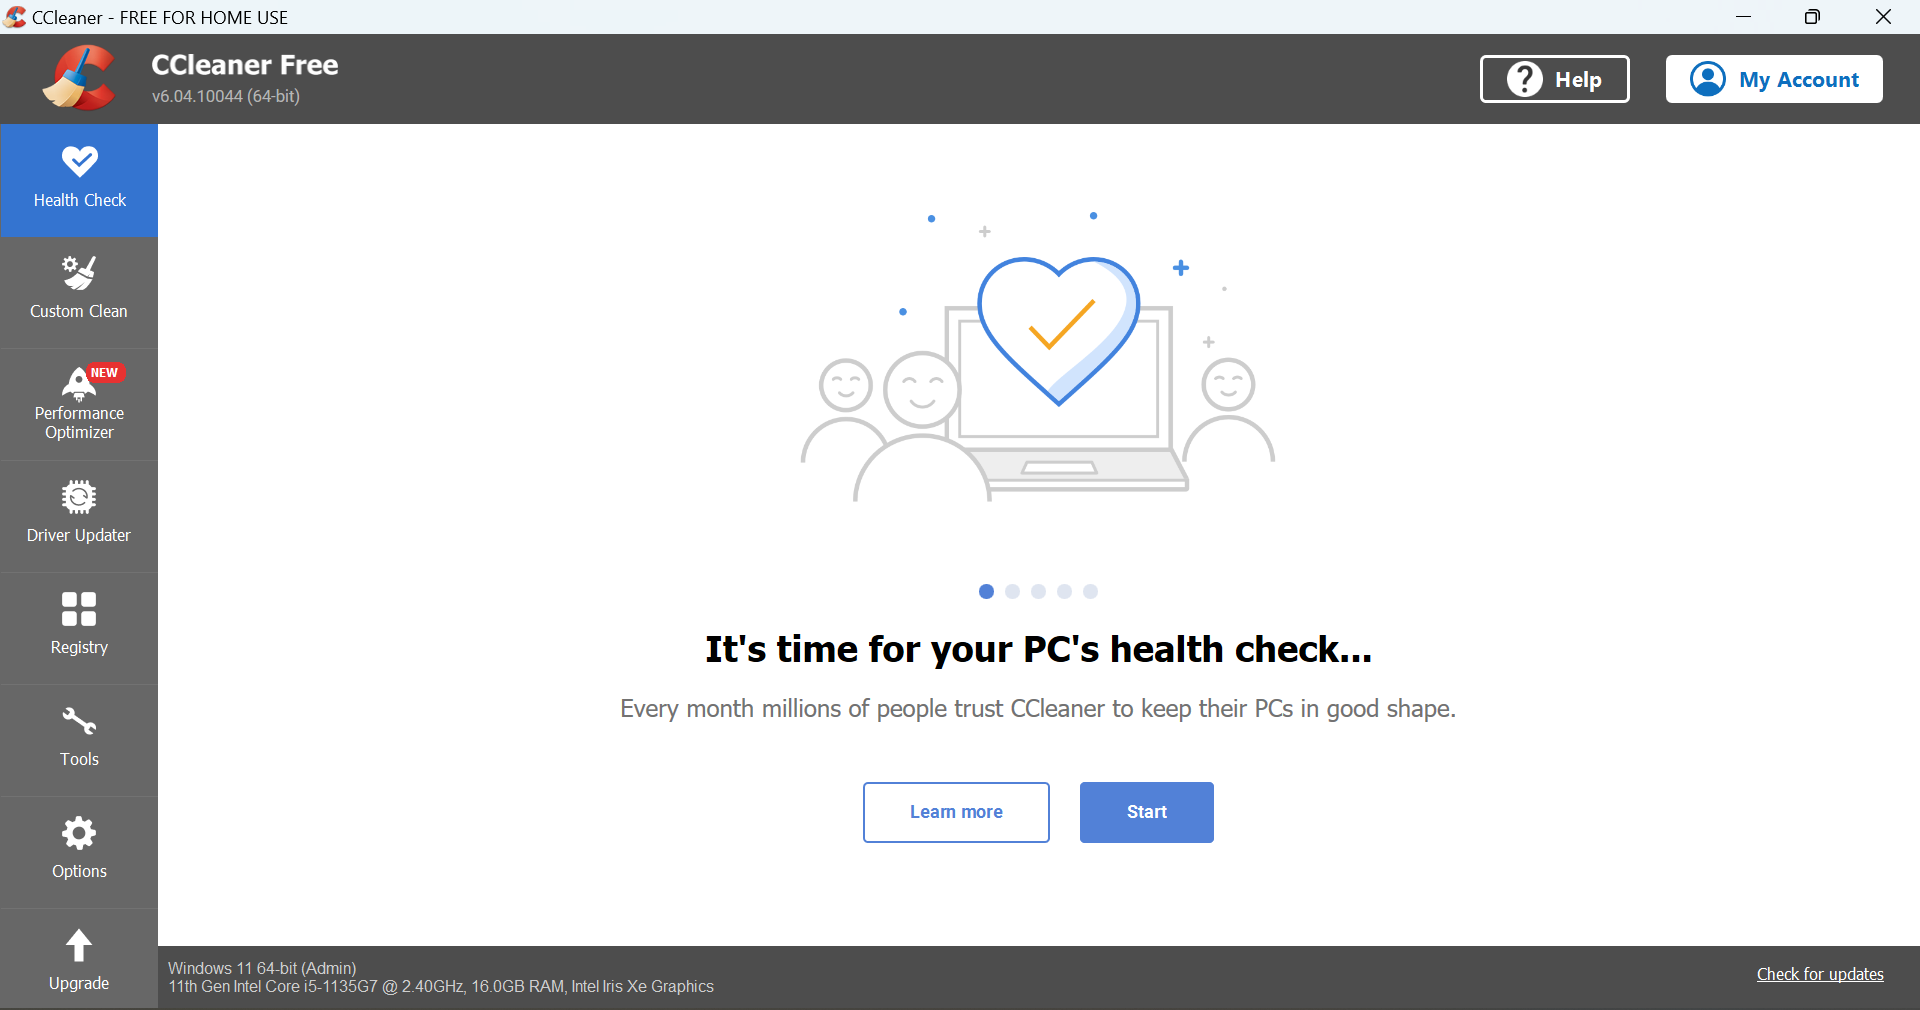
CCleaner – One of the most used tools

CCleaner to scan and delete junk files

CCleaner is probably one of the best software to delete unnecessary files in Windows 10. It seamlessly removes junk files and also has a plethora of other features.

Since it offers an unpaid version, you can clean junk files in Windows 10 for free.

Regarding the features, here are the most notable ones:

  • Ability to clean temporary files, cookies, history, and other files from all major and less popular browsers
  • Can clean Recycle Bin, recent documents, temporary files, log files, clipboard, DNS cache, error reports, memory dumps, and jump lists
  • Remove temporary files and recent file lists related to various third-party applications
  • Software Updater (Professional version only)
  • Real-time monitoring (Professional version only)
  • Scheduled cleaning (Professional version only)

CCleaner

Guard your PC using complete cleaning of useless files, junk files monitoring, or browser cache deleting.
Check price Visit Website

R-Wipe and Clean – Available on Windows and Mac

R-Wipe & Clean to scan and delete junk files

R-Wipe & Clean is another junk file remover that will delete all useless files in Windows 10. And it works with both Mac and Windows.

Though the tool has a slightly complex UI, the abundance of cleaning options and other features compensate for it.

Regarding the features, here are a few notable ones:

  • Ability to remove any activity traces from your browser and other communication programs
  • Can clean activity traces, including various lists, logs, cache, temporary files, etc.
  • Ability to remove registry entries, temporary files, system history, and logs
  • Can remove cache, temporary files, logs, other traces, and junk files left by third-party applications
  • Ability to easily delete files and free up disk space
  • Support for file wiping directly from File Explorer or the shortcut menu
  • Can work with SSDs while minimizing wear by cleaning only the necessary data

⇒ Get R-Wipe and Clean

CleanMyPC – Cleans like a pro

Developed by MacPaw, CleanMyPC is a great utility for scanning and deleting junk files on the computer. It doesn’t just help boost the PC’s performance but also offers the option to reduce boot time by listing all the startup items.

Also, with respect to uninstalling apps, it does so cleanly, and no trace of the app is left behind, not even the Registry entries.

Here are some of the benefits of using CleanMyPC:

  • Enhanced online security and privacy
  • Allows users to identify and disable irrelevant extensions easily
  • Shreds the deleted files, thus ensuring that others cannot recover and misuse them
  • Removes the hibernation files, usually one of the biggest files on the computer

⇒ Get CleanMyPC

FileCleaner – Offers scheduled cleaning

FileCleaner to scan and delete junk files

Another great tool that can help you delete junk files from your Windows 10 PC is FileCleaner.

According to the developers, this application will clear up space on your PC, while speeding up both your browser and PC.

As for the features, here are a few most notable features that FileCleaner offers:

  • Cleanup of junk files in real-time
  • Can easily clean both Internet and app history
  • Ability to remove search history, temporary files, and recent documents
  • Can clear browser extensions, toolbars, and cache
  • File shredder feature that will permanently delete the desired files
  • Scheduler for recurring optimization
  • Support for all major browsers

⇒ Get FileCleaner

That being said, we handpicked the most effective optimizing tools for Windows PCs to help you scan and delete junk files.

Additionally, there are efficient RAM cleaners and optimizers for Windows 10 that will aid boost performance, so try them as well.

If you have any other queries or want to share a review of these tools, drop a comment below.

Group Policy Registry Key Not Applying: 5 Ways to Force it

Group Policy is a feature in Windows that allows administrators to centrally manage settings and preferences for users in an Active Directory environment. But for some, the Group Policy is not creating a Registry key, and that’s what we will be fixing today.

The problem is slightly advanced in nature. Though most users don’t bother reconfiguring either the Registry or the Group Policy, owing to the intricacies involved and the risks associated with the changes.

Why is Group Policy not creating Registry keys?

There are different reasons why Group Policy is not creating Registry keys, and we have created a list of the common ones.

  • Presence of corrupt files: This one is not easily identifiable but caused the issue for many.
  • Authentication restrictions: Certain authentications must be cleared before the changes can be applied.
  • Misconfigured security settings: In many cases, it was a particular security setting that prevented policies from reflecting in the Registry.
  • Forced update is required for changes to apply: The changes to policies don’t reflect immediately (may take up to 2 hours), and a force update is required.
  • Broken Registry items: Problems with the Registry itself can be an underlying cause.

Does Group Policy affect Registry?

Yes, changes made it the Group Policy ideally reflect in the Registry. Though the inverse is not true, the changes you make to the Registry will not be seen in the Group Policy.

The Group Policy Editor doesn’t look through the Registry keys to identify the changes made here.

Also, another important point to be noted here is that Group Policy takes precedence over Registry. Simply put, if a particular setting is configured differently in both, the one in Group Policy is applied.

How do I fix Group Policy if it’s not creating Registry keys?

Before moving on to more technical solutions, here are some simple troubleshooting steps to try first:

If the two don’t work, you may need to take a more technical approach.

1. Force update the policies

  1. Press Windows + R to open Run, paste the following command in the text field, and hit Enter:gpupdate /forcegpupdate /force to fix group policy not creating registry key
  2. Once done, wait for the update to complete.update

The computer looks through the configured policies at a certain interval, but you can always force update them and have the changes reflect immediately. So, if Group Policy is not creating Registry keys, it should appear now.

2. Reconfigure the permissions

Oftentimes, it’s the lack of permissions that is responsible for Group Policy not creating a Registry Key in Windows.

So, make sure to allow Full control to both Admin and System for the required key in the GPO (Group Policy Objects).

3. Check the Hive

When creating a Registry key from the Group Policy Management Console, you are required to choose the Hive, and this is where most users make a mistake.

Verify that you have chosen the right Hive here, and only then proceed to save the changes. Any issues here and the changes wouldn’t reflect in the Registry.

4. Revert Security Filtering to default

Another common issue we noticed behind Group Policy not creating Registry key was the Security Filtering. Reverting it to default should get things running.

Also, check if the computer on the domain has Tamper Protection turned on. If that’s the case, disable it on all computers where you want the Group Policies to reflect.

5. Manually create the required key in Registry

  1. Press Windows + R to open Run, type regedit in the text field, and click OK.regedit
  2. Click Yes in the UAC prompt.yes
  3. Now, navigate to the desired location and create the required key.create key

If the other methods didn’t work, you can always manually create the necessary key followed by a DWORD or String Value in the Registry. However, it should always be used as a last resort.

Furthermore, find out how to fix a corrupt Registry. Besides, remember you can always restore the Registry without a backup.

So, give these fixes a try, and let us know your concerns and queries in the comment section. We will be happy to assist you.

7 Best Audio Editing Software for Podcasts

Whether you want to record a tech or sports podcast, recording a podcast is usually easy. Set up a mic, start the audio recorder, and you are good to record. However, the tough part comes after the podcast is recorded and goes on the editing table.

Why do I need an audio editor for podcasts?

Depending on the type of podcast, one may spend a good amount of time editing the podcast to keep only the best bits for the audience.

While we cannot help you with the editing work, what we can certainly do is help you find the best software for editing podcast that will make your work a little bit easier.

There are quite a few digital audio workstations available for you to edit podcasts, and some offer useful features like voice changer, text speech, and higher sample rates.

In this article, we have gathered some of the best podcast editing software that is easier to use while offering adequate tools to edit podcasts.

What is the best podcast editing software?

Adobe Audition – Best for professionals

Adobe acquired Cool Edit Pro in 2003 and renamed it Audition. Many professionals are currently using Adobe Audition alongside other Adobe editing software like Premiere Pro for video editing.

Adobe’s audio editor is immensely powerful yet intuitive to use at the same time. It is among the best Digital Audio Workstation you can buy for the money.

Adobe Audition offers features like multitrack recording that allows you to record on multiple tracks using multiple microphones for productivity.

It also has the ability to apply effects to clips or entire tracks, adaptive noise reduction, spectral analysis to rub out background sound, and batch processing to apply effects to multiple files with a single click.

The Essential Sound panel makes the process of adding an effect like in Make Distant or Over the Intercom much easier especially for beginners.

Besides, you can adjust and match loudness using the controls. It can also repair the audio using repair and restoration tools. Audition supports a good number of audio file inputs including AAC, AU, FLAC, MP4, MP3, etc.

However, for beginners, take a look at our next suggestion to learn the basics of audio editing before you try to upgrade to Adobe Audition.

Here are some of its key features:

  • Great integration with other Adobe tools
  • Wide array of effects to choose from
  • Professional-level multi-track editing
  • Vast support of audio file types
  • Advanced editing capabilities for professionals
Adobe Audition

Adobe Audition

Adobe Audition is a powerful tool and offers the flexibility required to edit podcasts and music, so try it out now!
Free trialVisit website

WavePad Audio Editor – Intuitive user interface

Wavepad Audio Editor- Windows 10

WavePad is a professional-grade audio editor coming from NCH software known for its excellent multimedia software.

This tool is feature-rich but doesn’t overwhelm the users with its feature thanks to its intuitive user interface.

The basic podcast editing tools include cut, copy, paste, insert, silence, auto-trim, compression, and pitch shifting.

You can add audio effects like amplify, normalize, equalizer, reverb, and more to the podcast as well.

It also supports audio formats like VOC, gsm, WMA, real audio, AU, AIF, etc. Wavepad makes the import process that much simpler.

The batch processing features enable you to apply effects and convert multiple files into a single function. Then there is a bookmark feature for easier recalling and assembling segments in the audio.

Advanced features in the tool include spectral analysis, text-to-speech, voice changer, and sample rates up to 192 KHz.

The free version of WavePad can be used for non-commercial use and includes many of the features from Master’s edition which can be easily upgraded to Master’s or Standard edition if needed for commercial use.

Take a look at its best features:

  • Batch processing audio files
  • Text-to-speech and voice changer
  • Audio spectral analysis
  • 192 KHz high sample rating
  • Easy to use for beginners

WavePad Audio Editor

Adjust your podcats with simple and advanced amplifiers for voice and audio in a complex environment.

Avid Pro Tools – Great multi-track representation

Pro Tools Avid

Pro Tools is an industry-standard professional audio recording and editing software that can be used by both professionals and home creators.

For traditional studio engineers, Pro tools offer the best upscale audio recording and manipulation tools for a long time now.

Over the years the developers added more advanced features to make it a complete DAW software package.

Avid also offers a free limited version of the tool called Pro Tools First that allows you to create up to 16 audio tracks for free.

It also gives access to all the music creation and editing tools along with 500 MB of loops and excellent sound effects.

Pro Tools is not just a podcast editing tool, but a music creation software as well. In addition, it also allows the pro users to collaborate with other Pro Tools users and create a collaboration project.

Being a DAW software, Pro Tools comes with tons of virtual instruments, MIDI enhancements, samples, sounds, and more to keep your creativity flowing.

Pro Tools supports a number of file formats including AAF file, XVAC Long GOP files, and 1080p50 files to make it easier for audio editing and mixing tasks in case the tracks use different formats.

The latest version comes with audio manipulation features such as batch fades, and commit. The lack of VST plugin support can be a deal-breaker for some audio producers.

Pro Tools certainly isn’t targeted at beginners, however, do give the Pro Tools a shot to see if it is something that you are looking for. You can always opt for the premium plan later.

These are some of its best features:

  • A lot of built-in virtual instruments
  • Great file format support
  • Access to a vast library of loops and effects
  • 16 audio tracks for free
  • Project collaboration features

Avid Pro Tools

As the name states, advanced software that triggers your utmost creative music podcasts.
Check price Visit website

Podcastle – Best free podcast editor

Podcastle is hard to ignore while you’re trying to edit your podcasts because this tool was made specifically for that.

And not only you can upload and edit your podcasts with a simple but effective set of tools, but you also have some special features along.

For instance, Podcastle helps you record your podcasts, it even has a text-to-speech function in case you’ve written it already.

Not only that, but you also have access to a library of songs you can set in the background and make it sound professional.

Of course, after you add a track, there are some essential effects to apply like a compressor or an equalizer to improve the sound quality.

But probably the best part of Potcastle is that it’s a cloud web-based app you can access from any device anywhere.

So you can start editing your podcast on your smartphone by recording something, and then come home and finish the project on your PC.

Apart from the music, there is a whole library of sound effects like explosions, beeps, swooshes, and other crazy sounds that will make your podcast a lot cooler.

Let’s review some of Podcastle’s best features:

  • Web-based app, accessible on any device
  • Great library of music and sound effects to choose from
  • Simple and efficient multi-track sound editor
  • Add effects on all the track or on some portions
  • Drag and drop functionality, easy-to-use interface

Podcastle

Edit and create new podcasts with a web-based tool that can be accessed on any device anywhere!

Audacity – Most popular free audio editor

Audacity

If there is a discussion on audio editors anywhere, Audacity will make the entrance by default. Audacity is a free open source audio editor developed by a group of volunteers.

The biggest strength of Audacity is its usability despite its huge collection of editing tools. Even a beginner can start using the tool for the basic audio editing task in no time.

If you dedicate more time, you can make use of its other advanced features as well. Like many DAW software, Audacity also comes with VST, LADSPA, LV2, Nyquist effects plugin support to extend the functionality.

You can use it to record podcasts, remove background noise, apply effects, cut and combine clips, and more.

The results show no compromise whatsoever and are on par with much premium software in the same category.

It is a multi-platform software, so you can use it on Windows, Linux as well as macOS.

Audacity also supports multiple file formats for import. You can further customize the track with smooth fading, humming, and syncing.

There is a batch processing option as well to apply effects to multiple tracks at once.

Audacity is an excellent audio editor and a great free alternative for beginners as well as professionals who can’t afford a premium audio editor yet.

Here are some of its key features:

  • VST, LADSPA, LV2, Nyquist effects plugin support
  • Available for Windows, Linux, and macOS
  • Professional-level detailed editing
  • Unlimited number of tracks
  • Great library of sound effects

⇒ Get Audacity

Hindenburg Journalist

Hindenburg Journalist Podcast Editor

Hindenburg Journalist is one of the underdogs in the podcast editing or even audio editing software market.

If you are into radio journalism, Hindenburg Journalist can be the right choice for editing and producing audio tracks.

It is a multitrack editor and looks like any other audio editor from the UI. Hindenburg Journalist can record uncompressed audio that can be used to produce the best quality tracks when on the editing table.

With support for multiple audio formats, Hindenburg can play any format while taking care of sample rates, bit rates, and stereo and mono files.

Apart from the basic editing features like cut, copy, paste, replace, insert, and other tools, it also comes with sound adjusting features that include the ability to create EQ for out-of-the-speaker sound.

Hindenburg also comes loaded with Sound Cloud and Libsyn integration for uploading podcasts directly from the software.

Hindenburg Journalist is an excellent tool and supports multiple platforms. Being a podcast editing software, it offers unmodified audio files, automated levels, and a voice profiler with other essential features.

⇒ Get Hindenburg Journalist

Reaper – Great for recording

Reaper Podcast Editor

Reaper is a multi-channel audio recording software that can be used for recording and mixing purposes. For the features on offer, Reaper is reasonably priced at $60 for individuals.

The user interface of Reaper is not the most intuitive as it starts with a blank canvas and leaves the user guessing where to start.

However, the software is fast and highly efficient when it comes to the editing and mixing of tracks.

Reaper offers all the basic audio editing features like copy, paste, insert, and effects. However, it does miss out on built-in virtual instruments and loops.

The latest version of the Reaper comes with new features that include Notation editor, support for VST3 plugin, FX browser improvements, FX parameter automation, and media explorer improvement, etc.

Reaper is a highly flexible software that offers some of the best tools for audio editing at a fraction of the cost when compared to another premium DAW software.

Make sure to grab the free evaluation copy before making the purchase.

Let’s see some its most important features:

  • Multi-channel recording
  • Advanced editing functions
  • VST3 plugin support
  • FX parameter automation

⇒ Get Reaper 

There are tons of DAW software, and we have mentioned a few of them earlier in other recommendations, however, for this guide, we tried to find the software that can help you edit a podcast or voice over for a video.

You could also be interested in our list that includes the best audio editors for Windows because it may provide other options.

Do you use any of the software mentioned above or prefer a different podcast editor? Do let us know your pick in the comments below.

Fix: High CPU Usage when Playing Call of Duty Vanguard

Gaming on a PC needs enough system resources to improve performance. Call of Duty Vanguard’s high CPU usage is a problem users encounter when playing the game. It results in in-game stuttering and lags on Windows 11.

Why does Call of Duty Vanguard cause high CPU usage?

Running outdated drivers on your PC is one of the primary causes of the problem. However, other factors can cause Call of Duty to use 100% CPU. Some of them are:

  • Many applications run simultaneously: Each application on your PC uses system resources to function smoothly. So, having several apps running simultaneously on your PC can consume the system resources, leaving little for your game.
  • Malware or adware attacks: Call of Duty Vanguard’s high CPU usage problem may occur if there’s a malware attack on your PC. You can check our recommendations for the best anti-malware to use in combating malware and adware attacks.
  • Outdated Call of Duty Vanguard client: Users can encounter difficulties with their games if the game client is outdated. It can make the game incompatible with the OS version on the PC.

Let’s proceed to the various ways to fix this issue.

How do I fix Call of Duty Vanguard’s high CPU usage?

Before proceeding with any advanced troubleshooting for fixing the COD Vanguard’s high CPU usage, observe these preliminary checks:

  • Close apps running on the PC that you’re not using.
  • Disable antivirus software activities on your PC to see if it improves the game.
  • Restart your PC and check if the high CPU usage problem is fixed.

Peradventure, you’re unable to fix the Call of Duty Vanguard’s high CPU usage after these checks, proceed with the solutions provided below:

1. Set application priority to Normal

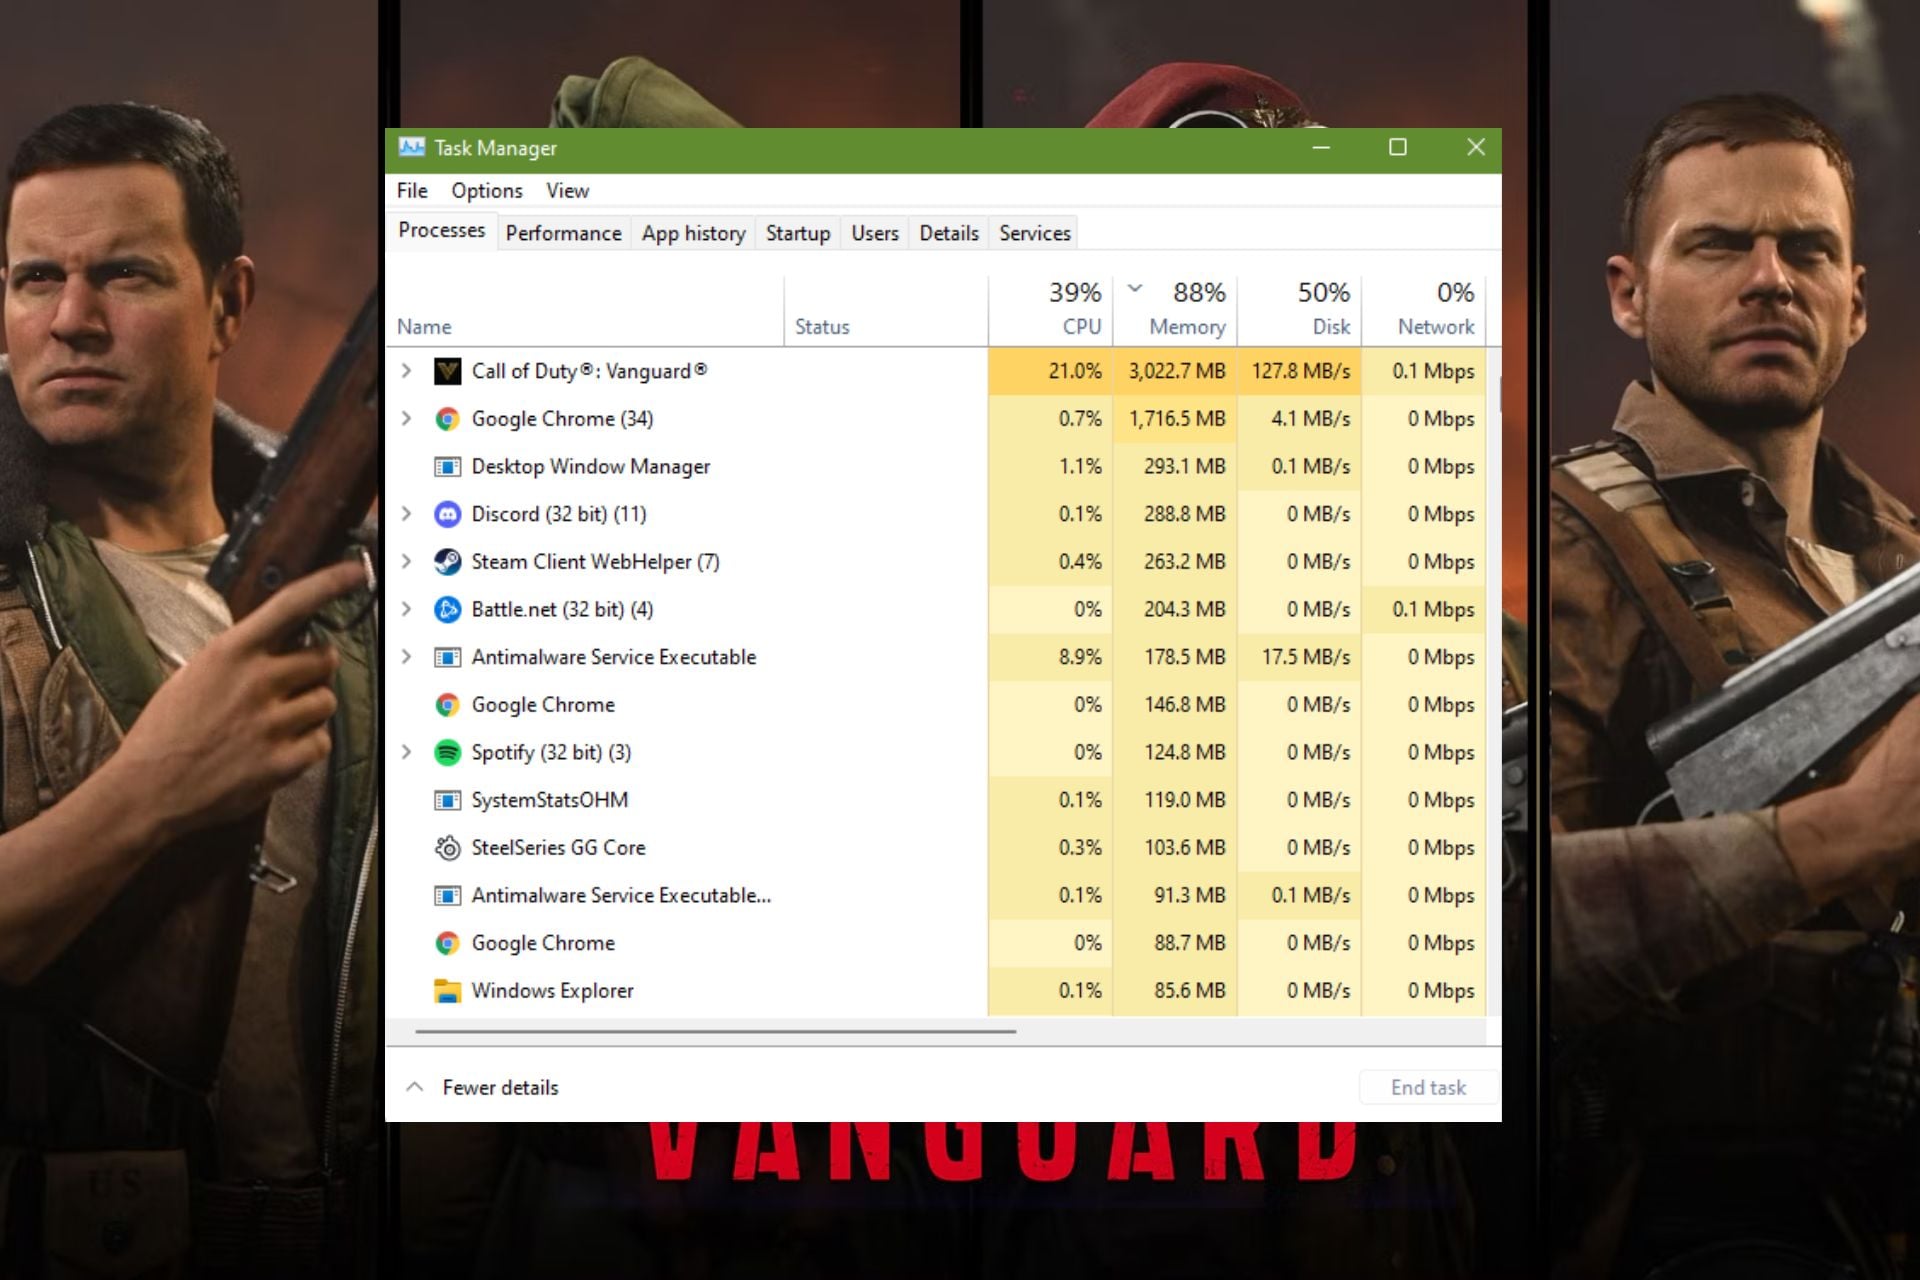
  1. Right-click on the Start button at the bottom of the screen and select Task Manager.
  2. Go to the Details tab and locate CODvanguard.exe.
  3. Right-click on it, select Set priority and choose Normal.
  4. Restart your PC and launch Vanguard to check if the problem is gone.

Restart your computer and launch the Call Of Duty Vanguard to see if the high CPU usage problem persists.

We recommend that you read about the best Task Manager software for Windows 11 to improve gaming performance.

2. Update your computer’s policy to speed up the CPU

  1. Press Ctrl + Shift + P keys to open the Windows Terminal (Admin).
  2. Type the following command and press Enter: gpupdate
  3. Wait for the process to complete; input the following, and press Enter to close the window: Exit

It will speed up your PC’s CPU performance and fix your game’s high CPU usage.

3. Scan your system for malware and adware

  1. Left-click on Start from the taskbar, type Windows Security in the search bar, and press ENTER.
  2. Select Windows Security from the search results and choose the Virus & threat protection option.
  3. Click on the Scan options blue link, tick the full scan option, click Scan now and wait for the process to complete.

The scan will detect any malware infection on your device. We recommend downloading the top-rated virus removal tools to help secure your device.

A great option you can try using is TotalAV because it offers a high detection rate and will successfully protect your device by removing any harmful threats, including malware and adware.

⇒ Get TotalAV

4. Disable background apps in your PC’s settings

  1. Press the Windows + I key to prompt the Windows Settings app.
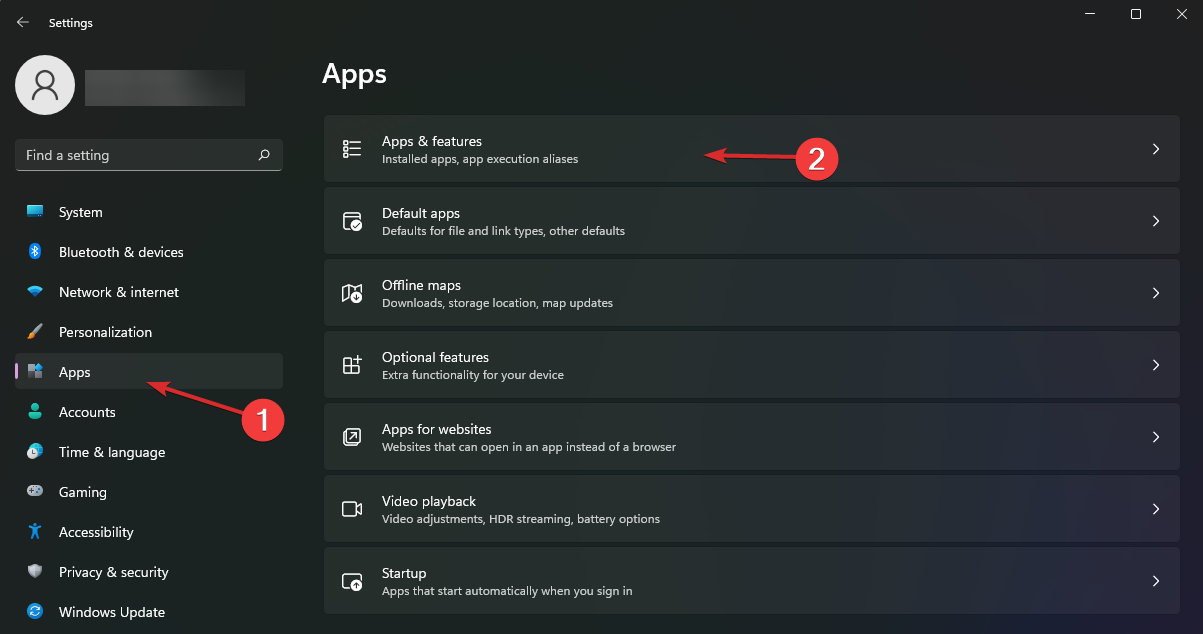
  2. Select Apps from the left pane and expand Installed apps.
  3. Click on Apps & features, select the apps you don’t need, then click the three dots and choose Advanced options.
  4. Then tap the drop-down button for Background app permissions and click on Never.
  5. Repeat the same process for all apps you want to restrict background permissions.

You can check our article about methods to turn off background apps in Windows 11 if you have issues using the steps above.

5. Update Windows

  1. Left-click the Start button, select Settings, and click on Windows Update.
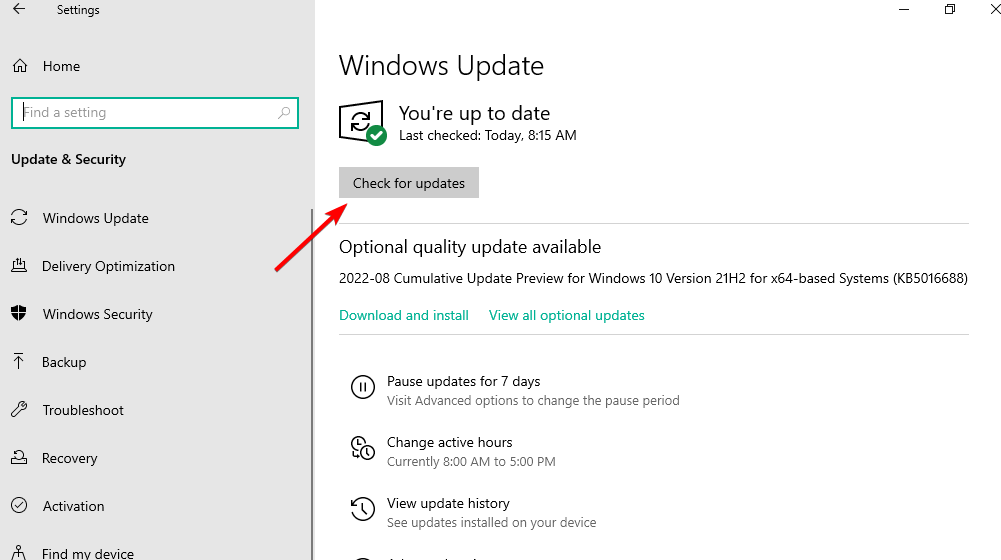
  2. On the Windows Update page, select Check for updates.

If there’s an update available, Windows will automatically search for it and install it. Restart your computer and see if the Call Of Duty high CPU usage issues persists.

Also, Windows Update will fix COD Warzone using 100% CPU. Refer to our article if Windows Update and Security is not working on your PC.

Alternatively, you can read about how to fix CPU usage in Windows 11. Also, we recommend you check our best picks of resource monitor software for Windows 11.

For further questions and suggestions, kindly leave them in the comments section.

Packet Loss in Call of Duty Vanguard: 4 Easy Ways to Fix It

Many users experience Call of Duty Vanguard packet loss, resulting in several other issues with the game. It impedes the game’s performance and causes it to lag significantly. Likewise, users can encounter Call of Duty bugs affecting their games.

Hence, this guide will explore the causes and provide possible solutions to fix the problem.

What causes packet loss in Call of Duty Vanguard?

Packet loss in Call of Duty Vanguard can occur for numerous reasons. Often, outdated network adapter drivers on your PC cause packet loss in your games.

However, some of these factors can also cause the Call of Duty Vanguard packet loss:

  • Network congestion: When the network is overloaded, it can affect the data exchanged between your computer and a game server. So, network congestion on your routers and servers can cause COD Vanguard packet bursts and packet loss.
  • Outdated router firmware: Issues with the network device affect every connection on the network, resulting in problems like packet loss in your games. So, keeping the router firmware up-to-date can guarantee how it works.
  • Issues with your hardware: You can experience packet loss in Call of Duty Vanguard if there is a glitch with your hardware. For instance, connecting your network with a low-quality cable, issues with network adapters, etc., can cause difficulties.
  • Unstable connections on the network: You can experience issues with your game if some devices on your network have overloaded the CPU. Thus, the device’s unable to process data, resulting in network issues for others.

How do I fix packet loss in Call of Duty Vanguard?

We recommend you go through the following preliminary checks before trying any solutions:

  • Disconnect every single device connected to the network or router.
  • Power cycle your router and connect only your device to preserve more internet speed.
  • A wired network connection for your gaming PC will significantly improve network performance and reduce packet loss on Call of Duty Vanguard. Also, there are tweaks available to optimize Ethernet settings for gaming. So, if you want to personalize your connection, it is advisable to check the article.
  • Close the game and restart your PC, then check if you can fix the packet loss in Call of Duty Vanguard.

If you’re unable to resolve the packet loss in your game, proceed to the fixes below.

1. Update the Network adapter

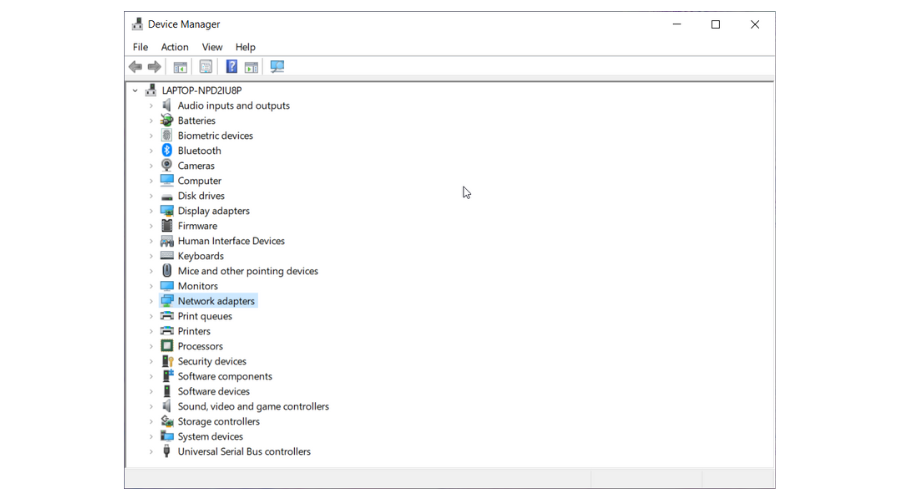
  1. Press Windows + R key simultaneously to prompt the Run window, type devmgmt.msc, and click Enter to open the Device Manager.
  2. Expand the Network adapters directory, right-click on your network card, and select Update driver.
  3. Click on the option Search automatically for drivers option. Follow the on-screen prompts to complete the update.

Restart your device to sync the update properly and check if that helps fix the issue. Read more about how to update network drivers on Windows 11 if you wish to try another method.

2. Use a VPN

Many users confirm that connecting to a VPN can drastically reduce packet loss in Call of Duty Vanguard. It helps secure your PC, improve the network quality and unlock geo-restrictions.

There are many excellent VPNs in the market, so check our guide to make an informed decision on the VPN to use on your Windows 11.

A top-notch VPN service is ExpressVPN because it can help you solve packet loss by reducing ping, resolving ISP throttling, and lowering latency.

Besides hiding your IP address and mixing your traffic with other users’ sources, ExpressVPN also encrypts your traffic between secure VPN servers and your device, thus third-parties can’t read your data and communications.

ExpressVPN

Make the most out of your gaming experience and let ExpressVPN fix the packet loss.
Check Price Visit Website

3. Troubleshoot the Network adapter

  1. Press the Windows key, type in Troubleshoot settings, and click on Open.
  2. Click on Other troubleshooters.
  3. Select the Network adapter and click on Run
  4. Select a network from the Select the network adapter to diagnose tab, then Next.
  5. Wait while it runs and check the diagnosis to see if it identifies the problem.

Troubleshooting the network adapter will help you detect if there are any issues with it

4. End tasks for background apps

  1. Right-click the Start button at the bottom of the screen and select Task Manager.
  2. Select the CPU and Memory usage option in the Task Manager.
  3. Select the applications using lots of CPU and memory space on your PC, then click on the End task option from the drop-down.

Restart your computer and launch your game to check if the high CPU usage problem persists. Ending tasks for background apps will close apps that could increase network congestion.

These are the best fixes for the Call of Duty Vanguard packet loss problem. Ensure to follow the steps for optimal results.

We also have a detailed guide on how to fix packet loss on Windows 11 to improve performance. Even more, you can check our list of the best packet loss monitoring tools to pick from.

Kindly leave your questions and suggestions in the comments section below.

How to use the Windows 11 HDR Calibration app for your monitor’s HDR display

The Windows 11 HDR Calibration app lets you calibrate your monitor’s HDR (high dynamic range) display to optimize it for playing games and other HDR content on your PC.

This app tests how your monitor’s display functions by going through a series of tests to set the minimum and maximum brightness levels, color saturation levels, and create a new color profile made specifically for your display.

The app also customizes how vividly you want colors to appear for both HDR and SDR (standard dynamic range) content when HDR is enabled. The tool is available via the Microsoft Store for 22H2 and 21H2, but you can’t use it on Windows 10.

Windows 11 HDR requirements

Obviously, besides running Windows 11 on your PC and having an HDR display, you also need to be running the latest Intel and AMD processors and have HDR turned on in Windows Settings (Settings > System > Display > Use HDR). You also need to have a decent GPU to run the app’s tests; at least NVIDIA GTX 10xx or later (Pascal+).

Download and install Windows 11 HDR Calibration app

Here’s what you need to do to install and use the Windows 11 HDR Calibration app to configure your monitor’s display:

  1. Open the Windows HDR Calibration app you installed from the Microsoft Store.
  2. Click Get started button.windows 11 hdr
  3. Once you click Get started, you will be taken directly into the first of the app’s three HDR tests. As you can see the directions displayed within the app. You will need to “drag the slider until the pattern is no longer visible on each screen.”
  4. The first HDR test checks for Minimum Luminance which detects the darkest visible details. Drag the slider until you can no longer see the pattern and click Next when you are ready for the next test.    windows 11 hdr
  5. The second test is for Maximum Luminance which detects the brightest visible details. Drag the slider until you can no longer see the pattern and click Next when you are ready for the next test. windows 11 hdr
  6.  The third test is the Max Full Frame Luminance Test, which detects how bright your display can get. Drag the slider until you can no longer see the pattern and click Next when you are ready for the next HDR test.windows 11 hdr
  7. The fourth and final test is for Color Saturation. Drag the slider to adjust the saturation from less saturated (default on the left) to more saturated (image represented on the right). The change for color saturation might be more subtle and depends on your display’s characteristics. Click Next when finished.
  8. Finally, you will be taken to the last screen. Here you can review and save your new color settings. Here you can indicate a profile name where you want your new settings to be saved. Click Finish when you are ready to use your new color profile.windows 11 hdr
  9. Once you click Finish, you will see a confirmation that your new color profile “has been successfully associated with this display.”windows 11 hdr
  10. Click OK when you are finished.

If at any time you want to delete a color profile that you created, you can do it by using Color Management in Control Panel. Here’s what you need to do to get there.

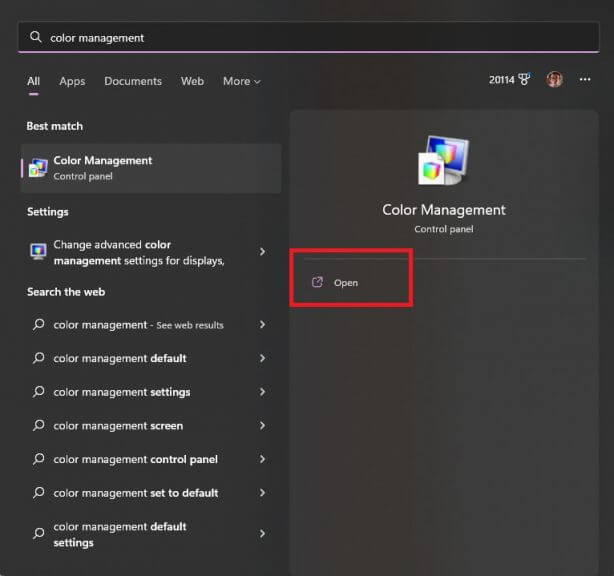
  1. Select the Start button and type “color management” and select it from the list of results.windows 11 hdr
  2. In Color Management, select the All Profiles and pick the color profile you want to delete and select Remove.
    windows 11 hdr
    3. Click Continue to confirm you want to delete and remove the indicated color profile. windows 11 hdr4. Close Color Management by selecting Close (located underneath the Remove button) when you are finished.

Microsoft notes that it is important to run the Windows 11 HDR Calibration app anytime you change your display setup. However, it is important to note that most HDR-certified displays typically work as intended right out of the box without any additional calibration. Check the display requirements for HDR video in Windows for more technical information.

If you have multiple displays, Microsoft notes that you should use the Windows 11 HDR Calibration app on your HDR-capable display first, before trying to calibrate other displays.

Do you think the Windows HDR Calibration app is a bad or good idea? Let us know in the comments!

Protected Content Cannot be Viewed on This Device [Fix]

If you’re getting an error that states Protected content cannot be viewed on this device when you try to project on a PC, we’re here to help. The project button can also be greyed out.

Protected content like movies or music may be restricted on your PC due to copyright, Windows Defender Firewall blocking access, incorrect pairing settings, or private/public access misconfiguration. Here’s how to fix it:

How to fix the Protected content can’t be viewed on this device error?

Start by making sure you’re in a region where the content you want to watch is available. Otherwise, try using a VPN. Also, disconnect remote connections and use your PC from an admin account.

If these won’t work, follow the steps below:

1. Allow Cast to Device functionality on your PC

  1. Click the Start button, type Allow an app through Windows Firewall in the search box, then press Enter.
  2. Locate Cast to Device functionality, Connect/Connected Devices Platform, then check the box for Private & Public.
  3. Click OK.

Restart your computer and check if the problem persists. If Cast to the Device fails to work after enabling it, check the fixes provided in this guide.

2. Add the Wireless Display optional feature

  1. Click the Start button and select Settings.
  2. Now, click on Apps from the left and select Optional features from the right.
  3. Next, click on View features to the right of the Add an optional feature menu.
  4. Type in wireless display, check its box, and click the Next button below.
  5. Lastly, hit the Install button.

We also have an extensive guide on how to use your laptop as a second monitor for more information.

3. Adjust projecting permissions

  1. Press Windows + I to open the Settings app.
  2. Select System from the left pane and click on Projecting to this PC on the System menu.
  3. Click the first text bar on the Projecting to this PC window and select Available everywhere.

Close the Settings app and check if you show protected content on your computer.

4. Turn on Private and Public networks in Windows Firewall

  1. Left-click Start to prompt the Start menu and select Settings.
  2. Select Network and Internet and choose Advanced network settings.
  3. Locate the Windows Firewall option.
  4. Select Private and Public networks on the Windows Firewall page and close.
  5. Then toggle on the Microsoft Defender Firewall.

We recommend you restart your computer and see if the issue is resolved. You may be interested in fixing the Windows Defender not working on Windows 11.

5. Turn on Media Streaming

  1. Open Control Panel.
  2. Click on Network and Internet and select Network and Sharing Center.network and sharing center control panel
  3. Click on Media streaming options in the left sidebar.media streaming options control panel
  4. Select Turn on media streaming.turn on media streaming
  5. Select the network and devices you want to give access to.
  6. Confirm your settings and try projecting again.

Still getting DRM or playback errors after enabling media streaming? Follow this guide to fix protected content not playing in Windows 11.

6. Update your router firmware

Many routers come with outdated firmware known to cause various problems. It can be responsible for issues with accessing protected content.

Hence, we recommend you contact the manufacturer for assistance on how to install the new firmware on your router. Check this guide for our recommended list of the best Wi-Fi routers.

Alternatively, you can read about protected content issues on streaming services. We recommend you check ways to fix Protected content errors on platforms like Roku and Disney+.

If you have further questions, you can leave them in the comments section. Also, if you have a suggestion on a solution that has worked for you and is omitted here, kindly comment.

Projecting to This PC is Always Off: 5 Ways to Fix it

Many users report that they can’t use the Projecting to this PC feature on their Windows 11 because it is always off.

Hence, it prevents users from accessing the feature on their computers. So, users have no choice but to find other screen mirroring software on their Windows 11 PCs.

Why is projecting to this PC always off?

The Projecting to this PC feature on Windows 11 mostly runs into problems because of an outdated or faulty wireless adapter driver.

However, a handful of other factors can cause the projection feature to be off. Some of these are:

  • Disabled Projection feature: When the quality is not enabled, it’ll display as always off, making it inaccessible to any wireless connection. Also, a disabled Project screen in Windows 11 can result in the feature being greyed out.
  • Issues with the wireless network adapter’s driver: The wireless network adapter’s driver is responsible for the activities of the Windows Projection. Hence, problems with it will impact the functionality of those features.
  • Outdated Windows: When Windows is outdated, it deprives the computer of updates and patches essential for its performance. So, issues similar to Projecting to this PC may arise, especially for Windows 11 users.

We’ll take you through how to fix the general issue regardless of the causes on your PC.

How do I fix Projecting to PC if it’s always off?

We recommend you go through the following preliminary checks before proceeding with any advanced troubleshooting:

  • Disconnect your PC from any remote connection.
  • Unplug external devices connected to your PC that can interfere with the wireless network connection.
  • Restart your PC to fix startup problems that may cause problems.

If these checks fail to fix it, advance to the options below.

1. Enable Projecting to this PC via Group Policy

  1. Press Windows + R keys to open the Run window, type gpedit.msc in the search space, and press Enter to open Local Group Policy.
  2. In the Local Group Policy Editor, navigate to the Computer Configuration directory, then select the Administrative Templates.
  3. Click on Windows Components from the drop-down folders, then open the Connect folder.
  4. Double-click on the Don’t allow this PC to be projected to policy in the Connect folder.
  5. On the right side of the screen, tick the Disabled option to allow this PC to be projected, then click OK.

Close the Local Group Policy Editor and restart your PC. If you encounter an issue editing your Group Policy, look at this guide to find out what to do.

2. Update your wireless network adapter driver

  1. Right-click the Start button, select the Device Manager, and double-click the Network adapters tab.
  2. Right-click your Wi-Fi network adapter and select the Update driver from the drop-down.
  3. Select the Search automatically for drivers and wait for the update process to complete.

Updating your PC’s wireless network adapter driver can fix issues causing the Projecting to this PC to be always off. We recommend you check other ways to update drivers on Windows 11 if this fails to work.

3. Update Windows

  1. Press Windows + I to prompt the Settings app.
  2. Click Windows Update and click the Check for updates button to allow Windows to search for available updates.
  3. Wait till it downloads and install the updates and restart your PC.

All faulty drivers and programs will be fixed or restored by updating the Windows. However, it isn’t uncommon for Windows Update not to open; so our guide should help fix that.

4. Reinstall the wireless network adapter’s driver

  1. Right-click Start to prompt the Start menu and select Device Manager.
  2. Double-click the Network adapters tab to expand the category, then right-click your wireless network adapter and select Uninstall device.
  3. Then Press the Uninstall button.
  4. Restart your device for the driver to re-install automatically.

Alternatively, you can follow this guide to download and install the Microsoft wireless display adapter manually.

5. Boot in Safe Mode

  1. Click the Start button, select the Power button, hold the shift key and click Restart to load the Advanced Startup menu.
  2. Select Troubleshoot.
  3. Click Startup Settings from the Advanced options.
  4. Press the F4 or 4 keys to Enable Safe Mode and click Restart.

After your PC reboot in Safe Mode, you should be able to access the feature without issues. Also, starting Windows 11 in Safe Mode may help fix system or boot errors responsible for the problem.

In conclusion, we hope you’ve been able to fix Projecting to this PC always off on Windows 11. You can read how to fix Projecting to this PC options are greyed out issue on your computer.

Also, we have a detailed guide on how to screen mirror an Acer laptop to a TV in a few steps, should you wish to learn an alternative to screen projection.

If you have more questions or suggestions, we’d love to hear them in the comments section.

Best PC Repair & Optimizer Tool [We Ranked 9 Repair Software]

This is as good a time as any to give your Windows desktop or laptop a well-deserved scrub with specialized PC repair and optimizer tools.

For some optimizer software, that can be exaggerated marketing hype. But the best system maintenance utilities do deliver an overall performance boost.

Most Windows repair and optimization software includes hard disk cleaners, registry cleaners, startup managers, RAM optimizers, and program uninstallers.

What is PC repair and optimizer tool?

PC repair and optimization tools are computer maintenance software that ensures your PC runs without any slowdowns. In time, negligible corrupted files, errors, and other issues pile up and slow down your computer.

That being said, our research has discovered some fantastic third-party software options that can help you with your PC endeavor:

The best third-party repair tools for Windows that we found are:

Does Windows 10 have a repair tool?

Yes, Windows 10 has many built-in tools that can help repair your PC in case of issues. For example, Startup Repair resolves problems preventing the OS from booting.

Besides, there are several others: DISM and SFC scan to fix corrupt system files and Windows images, Check Disk to identify and eliminate problems with the hard drive, and the System Restore utility.

Now let’s dive deeper into all the abovementioned options and understand what each software option offers.

What is the best PC repair & optimizer software?

Fortect – Best overall PC repair software

At the top of our list is a program that we consider a full-package deal, and that is Fortect because it can fix the damage caused by malware or file mishandling, and repair all other stability issues.

Often, malware is the leading cause of faulty registries, missing files, and an overall sluggish PC system. Fortect fixes that by removing all files affected by malware from your PC and replacing them with healthy files.

Not only will it look up your Registry and compare it to its built-in database, but it will also repair and replace the ones that it considers to be damaged.

The program can be set to monitor your system in real time, so any damage brought to your files will be fixed as soon as it appears.

The dashboard is incredibly sleek and easy to follow through, and otherwise complicated system repairs will now be reduced to a matter of pressing two or three buttons and just waiting for the program to work.

Perks of using Fortect:

  • Restore your PC to maximum performance
  • Free up disk space
  • Optimize the Registry
  • Restore and replace DLL files

That being said, if you want to truly get your money’s worth in terms of PC optimization and protection, then Fortect is the software for you.

Fortect

Fix any errors on your PC and bring it back to full speed with the help of this amazing PC optimizer!
Free Trial Download now

Glary Utilities Pro – Versatile PC repair software

Glary Utilities Pro 5 delivers a more significant overall performance boost for Windows desktops and laptops than most other system maintenance utilities.

Although the software has a freeware and Pro version, there’s little difference between them. The $27.96 Glary Utilities Pro is for commercial usage and has automatic updates, but the freeware package still includes all the tools in Pro.

As such, this is one of the best freeware system optimizers you can add to Windows platforms from Win 2K to 10.

Glary Utilities Pro boasts more than 20 system maintenance tools for Windows.

For system optimization, Glary Utilities includes disk cleanup, startup manager, RAM optimizer, disk defrag, duplicate file eraser, internet history cleaner, and registry defrag tools.

If you have issues with the disk defragmentation process, you should look at our comprehensive article on what to do when the disk defragmenter doesn’t run in Windows 10.

One thing it lacks is a system analyzer that suggests optimizations, but that aside there’s little missing. The software even includes a more novel Split files tool, which isn’t something you get in every system maintenance utility.

Glary Utilities also has some handy PC repair tools. For instance, its 1-Click Maintenance tab incorporates a registry cleaner, shortcut fixer, and disk repair tools.

You can utilize this software to repair system files and restore deleted files. Glary Utilities even has a malware remover, which is a rare tool for system maintenance software.

Glary Utilities

If your PC feels sluggish, you may need a little boost from a tool like Glary Utilities!
Check price Visit Website

Ashampoo WinOptimizer – Competent PC file repair tool

Ashampoo WinOptimizer for Windows 10 packs in most tools most users will need for general system maintenance and optimization.

WinOptimizer is now retailing at a discounted price, which is an absolute bargain for optimization software with many options to explore. There’s also a stripped-down WinOptimizer FREE; you can download it below from the official server.

WinOptimizer includes system maintenance, system analysis, optimization, customization, and file tools. In addition, it has a handy 1-Click Optimizer for system maintenance that incorporates the internet, registry, and hard drive cleaners.

WinOptimizer users can optimize their PCs with Internet Tuner, Service Manager, Startup Tuner, Uninstall Manager, and SDD Wizard tools. The software’s file tools enable you to thoroughly erase files, recover them, and check for disk errors.

System maintenance utilities aren’t usually suitable for customizing Windows. Still, WinOptimizer also has some handy Windows customization tools for adjusting system settings, saving desktop icon layouts, editing program shortcuts, and customizing context menus.

Ashampoo WinOptimizer

Clean your PC and make it run like it used to when it was brand-new with Ashampoo WinOptimizer!
Check price Visit Website

System Mechanic Ultimate Defense – Complete system repair

system mechanic free pc optimization software

System Mechanic Ultimate Defense is one of the most accessible optimization software to utilize and delivers a genuine system boost. In addition, the System Mechanic Pro package blocks malware and includes enhanced search and recovery tools.

Both software versions are compatible with Windows 10, and you can also download an unregistered version from this website page.

Iolo System Mechanic is one of the seven software products in the comprehensive security, privacy, and optimization package Phoenix 360.

System Mechanic Ultimate Defense has the full suite of system maintenance tools. In addition, it includes a registry, shortcut, hardware diagnostic, and HDD repair tools.

System Mechanic provides a RAM optimizer, registry defrag, duplicate file remover, driver update, extensive HDD cleaner, Windows optimizer, startup manager, and net booster tools for system optimization.

The best thing about this PC repair and optimizer tool is its system analyzer which provides you with system status and an overview of the essential maintenance required.

So this Windows optimizer doesn’t lack anything and can notably enhance startup speeds and repair thousands of software issues.

System Mechanic Ultimate Defense

Fix your PC and improve its speed and performance with Iolo System Mechanic!
Free trial Download Now

IObit Advanced SystemCare – Great repair and security software

iobit free pc optimization software

IObit Advanced SystemCare is an excellent PC repair software that provides a comprehensive suite of tools and a few novel features.

The Pro edition provides additional real-time protection, a more rigorous one-click maintenance tool, and combats malware. The Ultimate edition is almost both an antivirus and a system optimizer. You can run this software on your Windows 10 platform.

IObit Advanced SystemCare includes a great all-in-one Scan option incorporating various system optimizations.

Alternatively, you can utilize its disk cleaner, RAM optimizer, startup manager, internet, and program deactivator (Task Manager) tools separately.

The software comes with three separate optimization modes, including a Game Mode that automatically switches off superfluous processes and background software to free up RAM for games.

The Performance Monitor desktop widget is more novel addition to Advanced SystemCare Pro, which displays CPU, RAM, disk, and network usage resource monitors.

Advanced SystemCare is also a solid choice for PC repair. Unlike a lot of system maintenance packages, SystemCare combats malware. You can also utilize its Win Fix, Disk Doctor, Shortcut Fixer, and Registry Cleaner tools to fix Windows issues.

SystemCare Ultimate even has a full antivirus scanner. So this system optimizer package includes more maintenance tools than most alternatives.

IObit Advanced System Care

Optimize, repair, and clean your PC data in the safest way possible with Advanced System Care!
Check price Visit Website

Norton TuneUp – Great protection and system boost

Norton TuneUp is one of the most well-known antivirus and optimization software out there, used by millions worldwide.

This remote service will scan your PC files automatically and clean your PC of useless files, slowing it down.

Moreover, the software does all these with almost no input from the user because the process is automatized, only needing your permission before launching and doing everything by itself.

After you’ve installed the product on your PC, all you need to do is call the number from the page to get in touch with a Symantec Professional who will guide you and do everything needed.

TuneUp will also clean your Windows start-up of unnecessary processes that slow it down when it boots up and remove any leftover files from your installations.

It will check your entire system at a way lower price than some physical computer stores would charge to clean it for you.

Norton TuneUp

Make your computer feel brand new with Norton TuneUp by removing unwanted and leftover programs and files.
Check Price Visit Website

Tweaking Windows Repair – Most computer repair tools included

The next entry on our list is a software tool that is all about old-school design and efficiency, just as all Windows optimizer software should be.

That being said, if you try Tweaking Windows Repair and overlook the dated UI, you’ll be surprised at just how many tools will be available to clean up your PC.

The program is available in free and Pro versions, each with its various tools, although the Pro version is the one that can be considered a whole package deal.

It includes support for automatic Windows updates, a memory cleaner, a quick link menu, generic performance enhancement tools, and more.

All in all, if you notice your Windows 10 PC running a bit sluggish lately, go ahead and give it a boost by tweaking Windows Repair.

Tweaking Windows Repair

Need some good old-school PC tweaking? Then you need to add Tweaking Repair Tool to your digital library!
Free trial Visit Website

CCleaner – Best PC cleaning software

unable to launch java update installer

Another great software that can optimize your PC and help you deal with unnecessary files is CCleaner. This tool will ensure that your PC is faster and more stable with fewer crashes. 

The application is optimized for cleaning temporary files, so you can easily clean your Recycle Bin, recent documents, temporary files, and other files that might interfere with your PC’s performance.

In addition, the application has a built-in registry cleaner, so you can easily clean your registry and remove old and unused entries that are slowing down your PC.

CCleaner also works as a browser cleaner, allowing you to remove temporary files, history, and cache from all your browsers, right from this application.

The application also works as an uninstaller, allowing you to remove third-party software from your PC easily.

Another feature that users can find useful is the ability to manage startup items, so you can easily disable all unwanted applications that are starting automatically with your PC.

Overall, CCleaner is a great tool if you need to free up some space and remove old and temporary files from your PC.

The application also has other useful features that will help you optimize your PC, so if you want to make your PC faster and more stable, we suggest you try out CCleaner.

Overview:

  • Registry cleaner
  • Ability to remove old and temporary files
  • Browser cleaner
  • Startup manager
  • Uninstaller

CCleaner

Now you can clean and keep your computer safe with CCleaner, one of the best choices on the market!
Free Trial Visit Website

AVG PC TuneUp – Antivirus with great optimizer

AVG TuneUp is among the most highly rated multiplatform system optimizers you can use to optimize your desktop, laptop, tablet, or phone.

The software is compatible with Windows and Mac platforms, and you can add AVG Cleaner apps to Android and iOS devices.

You can also install this software on as many devices as required, so you won’t need to invest in more than one AVG TuneUp package for multiple desktops or laptops.

AVG PC TuneUp is an optimizer with not one but four all-in-one scans for general maintenance, speeding up Windows, increasing free disk space, and fixing software issues.

However, if required, you can also utilize the software’s 32 tools separately. AVG TuneUp boasts a full toolkit that includes the following: hard drive cleaner, duplicate file eraser, RAM optimizer, and registry cleaner.

This intelligent software also comes with a disk defragger, file recovery tool, uninstall manager, file shredder, shortcut fixer, and startup manager.

The latest version also comes with Programs-On-Demand technology that minimizes the resource usage of some programs and automatically updates third-party software.

AVG PC TuneUP

Give your PC a much-needed boost of speed with the help of this world-famous PC optimizer.
Check Price Visit Website

Those are some of the best PC optimizers to get your Windows desktop or laptop in shape for 2022.

Using any of these computer repair programs will give your PC a slight boost. The older the PC, the greater the growth. With time, errors and issues pile up, and we tend to avoid solving them.

These tools solve these errors in no time, find hidden mistakes that slow down your PC, and enjoy a better experience on your computer.

They can considerably boost overall system performance for more antiquated hardware. You can also utilize those maintenance utilities to resolve various Windows software issues.

For more options to pick from, don’t hesitate to take a look at our list including the best PC repair tools that are safe to use.

Let us know your choice in the comments area below.

Windows 11 Build 25227: A closer look at this Dev Channel update

If you are a Windows Insider then you surely know that it has now been almost two weeks since the last Dev Channel build dropped for Windows Insiders.

Why? Well, that was because the bits that were supposed to land last week had a blocking bug that they were chasing down.

That being said, starting today, Windows 11 Insiders can actually download and update to Windows 11 build 25227.

What should I look for in Windows 11 Build 25227?

Not long ago, Microsoft released Windows 11’s first major update, which is version 22H2. This update turned out to be full of bugs and upgrades to this version were even blocked at some point.

When talking about this new update, we have to remember that ensuring consistent and predictable timing of restarts for Windows updates is a key part of a successful update strategy.

Now, in order to actually improve the predictability of restarts, Microsoft has made the following changes to the Update Stack Orchestrator:

  • The Deadline calculation for both quality and feature updates is now based on the time the client’s update scan initially discovered the update. Previously, the Deadline was based on the release date of the update for quality updates and the reboot pending date for feature updates.
  • The Specify deadlines for automatic updates and restarts Group Policy setting was split into two separate settings to align with the existing configuration service provider (CSP) policies. The options in the Group Policy settings are the same for both feature and quality updates. Each of the new settings also has a Don’t auto-restart until end of grace period option. The new Group Policy settings are:
    • Specify deadlines for automatic updates and restarts for quality updates
    • Specify deadlines for automatic updates and restarts for feature updates
Screenshot of the Group Policy setting “Specify deadline for automatic updates and restarts for feature updates”.

Now that we know what constitutes the highlights of this new software release, let’s also have a more in-depth look at the changelog.

There are a lot of improvements, fixes, and known issues to go through still, so we might as well just do it together and help each other out.

Changes and Improvements

[Start menu]

  • Trying out a small change to the Start menu where some Insiders will see badging on their user profile notifying them that certain actions need to be taken.

[Widgets]

  • Trying out some different positions of the header with new icons for the Widgets board to learn how to best optimize the Widgets board for our users. By using monoline icons, our goal is to bring consistent, clean, and accessible icons to communicate action and features with simple visuals for users.
We’re trying out some different positions of the header with new icons for the Widgets board.

[Input]

  • The change to support the use of clipboard history (WIN + V) on password fields that began rolling out with Build 25206 is now available to all Windows Insiders in the Dev Channel.
  • We made a change to allow you to contribute your voice clips to Microsoft again even if on-device speech recognition is used.

[Voice typing]

  • Rolling out a change to sync voice typing settings, Automatic punctuation and Voice typing launcher, across all devices signed in using the same Microsoft account. You can toggle this feature via Settings > Accounts > Windows backup > Remember my preferences > Accessibility. This currently only works with Microsoft accounts today with AAD support coming later.

[Settings]

  • A new dialog will warn users of potential data loss if they elect to change the partition style of their storage drive under System > Storage > Disks & Volumes > Disk Properties.
  • Updated the ethernet and Wi-Fi property pages in Settings to now show gateway information in the network details summary.

Moving on from the long list of improvements and tweaks, let us also examine the Fixes list. By doing so, we can learn what Microsoft has managed to fix since the last Dev Channel build.

Fixes

[General]

  • Fixed an issue which was causing some Insiders to not be able to upgrade to recent Dev Channel builds, with error 0xC1900101. As a reminder, this is a generic rollback error code, so if you are continuing to see this error after today’s update you may be encountering a different issue. If you do, please file feedback about it under Install and Update > Downloading, installing, and configuring Windows Update in the Feedback Hub.

[Tablet-optimized taskbar]

  • Fixed an issue that was causing explorer.exe to crash while switching between apps on the tablet-optimized taskbar.
  • Start’s touch gesture should now follow your finger correctly with the tablet-optimized taskbar.
  • Improved how touch gestures and their animations with the tablet-optimized taskbar work with the touch keyboard.
  • You can now swipe up from within the taskbar with a pen to expand the tablet-optimized taskbar.

[System Tray Updates]

  • Fixed an issue causing explorer.exe to crash when dragging icons in the system tray.
  • Right-clicking system tray icons should no longer cause the auto-hidden taskbar to hide incorrectly.
  • The show hidden icons panel in the system tray should no longer block context menus opened after it.
  • Fixed an issue where the first time you tried to open Quick Settings from the system tray it wouldn’t work.
  • Fixed an issue that was preventing system tray icons from updating in real time.

[File Explorer]

  • When you scroll to the bottom of the navigation pane using a mouse wheel and try to scroll back up it should no longer get stuck at the bottom.
  • Fixed an issue which could cause certain apps to hang when opening the Open File Dialog or Save File Dialog.
  • Made another fix for a case which could lead to people seeing divider lines overlapping entries in the navigation pane.

[Start menu]

  • Fixed an issue where dragging content across an open Start menu folder could cause a crash.

[Search]

  • Made a fix to help address an issue where Search might not respond when clicking on the search icon in the taskbar.
  • Opening images from search should no longer unexpectedly open them in Print.

[Input]

  • Fixed an issue where over time you might lose the ability to interact with certain games using the mouse.
  • Fixed an issue where the multiplication sign (×, U+00D7) wasn’t displaying correctly in the Yu Gothic font family for people with high resolution screens.

[Settings]

  • The size of UWP app icons under Apps > Startup shouldn’t be so small now.

[Task Manager]

  • Dragging Task Manager from the bottom area of the title bar to move the window should work now.

[Other]

  • Fixed a couple issues causing certain apps to crash in recent builds, including OneNote. We are continuing to investigate feedback in this space.
  • Made a change to address an issue which could lead to performance degradation when using performance monitoring tools which leveraged the Microsoft-Windows-DxgKrnl ETW provider. This also impacted performance for Windows Mixed Reality. As a reminder, if you’re experiencing performance issues, please see here for steps on filing actionable performance feedback.
  • Fixed an issue where recording devices with “Listen to this device” enabled might not show in the volume mixer when they were playing sound.
  • If you reset your PC, the screen displayed while it’s resetting will now be black so it’s consistent with the upgrade screens.
  • If you were experiencing Gaming Services crashes while trying to play certain games in the previous Dev Channel flight, please check the Microsoft Store for Gaming Servicing updates, it should be resolved now.
  • Fixed an issue which was causing certain PCs to unexpectedly bugcheck on upgrade to the latest builds, with the error message saying “MULTIPROCESSOR_CONFIGURATION_NOT_SUPPORTED”.
  • Fixed an issue from the previous flight which could cause Miracast to unexpectedly not be able to connect.

Known issues

[General]

  • Looking into reports that audio stopped working for some Insiders after upgrading to the latest flights.
  • Investigating reports of crashes with a few different apps and games in recent builds.
  • Investigating reports that various UI elements in apps appear to be disappearing and reappearing sometimes in recent builds.

[Tablet-optimized taskbar]

  • The taskbar sometimes flashes when transitioning between desktop posture and tablet posture.
  • When using the bottom right edge gesture to see Quick Settings, the taskbar sometimes stays stuck in the expanded state, instead of dismissing to collapsed state.

[Input]

  • Investigating reports that the text cursor becomes white on white when hovering over text fields, making it difficult to see.

[Widgets]

  • In right-to-left display languages like Arabic, content animates out of view before the widgets board resizes when clicking to expanded view of the widgets board.

What can I do if I can’t install Windows 11 Build 25227?

  1. Press Win+ I to access Settings.
  2. Select the System category and click on Troubleshoot.w11 troubleshoot
  3. Press the Other troubleshooters button.other troubleshooters windows 11
  4. Press the Run button next to Windows Update.windows update troubleshooter

Don’t forget to report any other issues you might come across, in order for Microsoft to address and improve the overall OS experience for us all.

This is everything you can expect if you are a Windows 11 Dev Channel Insider. Leave a comment below if you found any issues since installing this cumulative update.

Not Enough Space to Reset PC? Here’s What to do

Did you encounter Windows Recovery not having enough space to perform tasks on your PC error? If so, then you’re not alone.

Some users have also complained that they can’t initiate a factory reset on their Windows 11 computers. Hence, this guide will cover the reasons and possible solutions for this issue.

Why does Windows say I don’t have enough memory space when I do?

This problem can be annoying, especially if your computer has enough memory. The primary cause of this is often traced to having too many background programs and processes running on the device. Other notable causes are:

  • Outdated Windows: Outdated OS prevents access to the necessary patches and updates for fixing bugs liable to cause problems for the proper functioning of the computer. Take a look at this guide should your Windows update fail to work.
  • Third-party app interference: Some software can impede the functionality of your computer. It can affect how it interacts with its components, including Windows Recovery.
  • Virus and malware infestation: When your PC is under a malicious attack, it will cause inefficiency in performance. So, you can encounter insufficient memory space despite having the space. You can select from our list of the best antivirus compatible with Windows 11.
  • Corrupted system files: Windows functions with the help of some files holding vital data about the system. If these files were corrupt or faulty, it could cause Windows Recovery not having enough space problems.

Why does Windows say I don’t have enough memory space to reset?

You should observe the following preliminary check before proceeding with any fixes:

  • Close every program on your PC that may consume lots of system memory.
  • Back up your files to an external hard drive and permanently delete them from the PC using the shift + delete keys.
  • Restart your PC as it can fix most of the issues you encounter on Windows, including Windows Recovery not having enough space.

If you’re unable to fix the problem after these checks, then proceed with the solutions below:

1. Repair corrupted system files through SFC scan from Safe Mode

  1. Right-click the Start button, select the Power button, press and hold the Shift key, then select Restart from the power options.
  2. Select Troubleshoot from the Advanced Startup option menu.
  3. Select the Advanced options tab and click the Startup Settings option.
  4. Click the Restart button on the Startup Settings window.
  5. Press the F4 or 4 to Enable Safe Mode.
  6. Right-click the Start button, type cmd, and click on Run as administrator.
  7. Input the following command and hit Enter: sfc /scannow
  8. Wait until you receive a success message.

Running an SFC scan will identify the problems and repair the missing or corrupted system files in Windows 11.

You can read our guide on repairing and restoring corrupted system files on Windows 11 if you have any concerns with the steps above.

We also recommend using third-party software for this scan so you can get more in-depth data about any possible errors or corrupted files.

2. Extend the C drive to create enough space

  1. Right-click on the Windows and select Disk Management from the drop-down.
  2. Right-click the C drive on Disk Management if there is unallocated space behind the C drive.
  3. Select Extend Volume from the drop-down to add the unallocated space.

Extending the C drive in the Disk Management can help create more memory space. Also, you can read about how to run disk cleanup in Windows 11 to free up memory space.

3. Uninstall the recent Windows update

  1. Press Windows + I key to open the Settings app.
  2. Navigate to the Windows Update tab and select Update history.
  3. Click on Uninstall updates and select the most recent update installed.
  4. Click on the Uninstall button.

Some users report that they encounter the problem after updating Windows. Hence, uninstalling the recent Windows update should help fix the issues.

4. End Tasks for unnecessary programs

  1. Right-click on the Start button and select Task Manager.
  2. Select CPU and Memory in the Task Manager.
  3. Click on the apps using lots of CPU and Memory on your PC and click on the End Task from the drop-down that pops up.
  4. Restart your computer.

5. Uninstall any software recently installed

  1. Press Windows + R keys to open the Run tab, type appwiz.cpl in the text space, and click OK to prompt the Program and Features.
  2. On the Uninstall/Change a program window, choose the program you want to remove, then click on the Uninstall button.

Follow the on-screen prompt to complete the uninstallation process, then restart your computer.

Recently installed apps can cause issues with your computer, causing not enough memory space to reset. So, uninstalling such apps can fix the problem.

These are the best solutions for Windows Recovery not having enough space to reset. Nevertheless, users can read about other ways to uninstall applications on Windows 11.

However, you can check out some quick ways to fix Windows needs more space to update errors on Windows 11. Also, we have a detailed guide on how to free up disk space on Windows 11 PCs.

If you have further questions or suggestions, kindly leave them in the comments section below. We’d like to hear from you.

Microsoft says cloud gaming is still “immature” and “unproven” in one of its latest filings to the CMA

With cloud gaming services popping up everywhere you look—with Netflix even getting in on the action, apparently—it’s easy to forget that cloud gaming as a technology is still very much in a nascent state.

Microsoft has been very much at the forefront of bringing cloud gaming to the masses with its Xbox Cloud Gaming. Not just a Game Pass Ultimate perk, Xbox Cloud Gaming is the centerpiece of the Xbox app on mobile and Samsung Smart TVs. It is also available on gaming handhelds like Valve’s Steam Deck and the Logitech Gaming Handheld.

So Microsoft’s recent remarks on the state of cloud gaming might come as a bit of surprise to some, as pointed out in Wednesday’s article in The Washington Post. As they reported, Microsoft called cloud gaming “a new and immature technology” in a filing to the U.K. Competition and Markets Authority, which is currently conducting a second round of investigation of Microsoft’s acquisition of Activision Blizzard.

Microsoft’s statements on cloud gaming were part of a recent filing pertaining to the Activision Blizzard deal.

In the filing, Microsoft also stated, “Today cloud gaming remains in its infancy and unproven as a consumer proposition.” Though it wasn’t mentioned in the filing, the recently-announced shuttering of Google Stadia is evidence of this. Still, the remarks serve up a bit of contrast to those that Microsoft has previously made pertaining to cloud gaming, often touting it as the next big thing in gaming.

As recently as earlier this month, Xbox Cloud Gaming vice president Catherine Gluckstein said in a statement to The Washington Post,

We’re eager to see how this space continues to grow and look forward to supporting development studios, our partners and others in the industry who are investing into cloud gaming as it invites more people to experience games.

The PR tone is much more optimistic here. With that said, we can enjoy the benefits that cloud gaming does offer at this early stage in its development. Just don’t expect it to become the standard way to play games anytime soon.

How to change the Windows 11 Terminal background image and icon for a more colorful workspace

Finally, Windows Terminal is the default command line tool experience on Windows 11 2022 Update. Now, you may want to spruce up your Terminal workspace on a new icon and background image that entertains you while you’re getting your work done.

Don’t worry, you won’t have to edit a single JSON file or anything too hard. In this guide, we will show you how to replace the default terminal background with just about any image file on your PC.

Without going into a deep dive on installing schemes, there’s an even quicker way to add some personality to Terminal without being an actual developer.

Change Windows 11 Terminal background image or icon

Once you set your background image in Windows Terminal, if you have a game or some other program that needs to have a Terminal Window open, you will see this image as a background until you change it. Nerd Fonts is an iconic font aggregator, collection and patcher resource for icons if you need it, but you can use any image you want, even gifs!

Here’s what you need to do to change your background image and icon on Windows 11 Terminal.

  1. Open Windows Terminal.
  2. Click the down arrow and click Settings (Ctrl + , keyboard shortcut in app).windows 11 terminal
  3. Select the profile you want to change the profile’s background image (or icon) from the left pane. Once you pick a profile, you can change the profile icon by indicating the emoji or image file location of the icon you want to use. Remember to click Save to save your changes.
  4. windows 11 terminalScroll to the bottom of the selected profile and click Appearance. windows 11 terminal
  5. Under Appearance, scroll down until you find Background Image. windows 11 terminal
  6. Under Background image, you can change the background image path by browsing your computer or opt to use your desktop wallpaper as your background image. Click Save to save your new background image on Windows 11 Terminal.

Additional background image settings include background image stretch mode to pick how you want the image to appear (Uniform to fill, Uniform, Fill, or None), image alignment to pick how you want the image to appear in Terminal and use the slider to choose image opacity.

Did you know you could change the background image and icon on Windows 11 Terminal? Let us know in the comments!

How to Fix Realtek Microphone Not Working: Step-by-Step

Have you ever had issues with the microphone not working on your PC? You just plugged your headset into your computer and didn’t hear anything. 

Sound cards are a bit finicky like that. Realtek is a very popular chipset manufacturer that consists of audio and video technologies. However, sometimes, the mic is not working. Let’s dive a bit into the causes and how to resolve the issue.

How can I fix my Realtek mic if it is not working?

1. Set Realtek as the default sound device

  1. Right-click the Speaker icon at the bottom right corner.
  2. Click on Sound.
    razer kraken drivers not working
  3. Navigate to the Recording tab, select Realtek and click on Set Default.

2. Update sound drivers

  1. Click on the Windows button, type Device Manager in the search bar, and click Open.
  2. Navigate to Sound, video, and game controllers to expand, right-click Realtek High Definition Audio and select Update driver.
  3. Select Search automatically for drivers.
    search auto realtek hd audio manager not opening

3. Run the sound troubleshooter

  1. Click on the Windows button and select Settings.
    settings windows 11
  2. Select System then click on Troubleshoot.
    going system and troubleshoot windows 11 settings
  3. Click on Other troubleshooters.
  4. Hit the Run button next to Playing Audio.
    playing-audio game audio stops working

4. Uninstall recent apps

  1. Hit the Windows key and select Settings.
    settings windows 11
  2. Click on Apps on the left pane then select Apps & features on the right pane.
  3. Locate the latest install, click on the three vertical ellipses and select Uninstall.

5. Update your OS

  1. Hit the Windows key and select Windows Update, click on Check for updates.
  2. If there are any updates, select Install now.

Why is the Realtek mic not working?

Below are reasons why your Realtek mic is not working:

  • Corrupted/faulty drivers – The Realtek microphone is a standard audio input device that can be used with Windows computers. It has a driver that allows it to work with Windows, but if your Realtek microphone is not working or the audio drivers keeps reinstalling, you may need to install the correct driver so that your computer will recognize it.
  • Mic not plugged in -The first thing that you want to check is if the mic is actually plugged in. A lot of people assume that they have their mic plugged in when they don’t. You have to securely plug it in.
  • Volume is muted – If you’re using headphones with a microphone, make sure that they aren’t muted.
  • Mic is disabled – Make sure that the microphone is enabled in the sound settings.
  • Incompatible applications – There can also be incompatibility between various applications and the device driver itself. You should try uninstalling any recent programs and see if it fixes the issue.
  • Audio port is not working – To check if your audio port is working or not, plug in a different pair of headphones or speakers and listen for any sound coming out from them. If there’s no sound coming out from them, then it may be damaged.
  • Compatibility issues – It is possible that your Realtek drivers are not compatible with your version of Windows. If this is the case, you need to update your OS and drivers.

Is the Realtek mic good?

If you are tired of the in-built sound in Windows or just want to explore other available options, you may be wondering whether to go for the Realtek mic. The Realtek HD Audio Codecs provide high-quality audio and video for your computer’s sound card to ensure that you get the best quality sound possible.

It is an excellent choice for gaming, voice chat, and other applications that require high-quality audio. The sound quality is crisp and clear, with very little background noise. What’s more, you can tweak the Realtek audio manager settings to improve the sound quality further.

Also, you may be in the market for the best sound cards to take your listening experience to a new level. If this is the case, don’t forget to check out our article on some worthy recommendations.

Should you experience any other issues such as the Realtek audio manager is missing, refer to our guide on how to fix it.

Also, take a look at this guide on fixing Realtek audio driver endless loop issues for tips on resolving common mic and driver problems.

Let us know of any additional thoughts you may have on this topic in the comments section below.

5 Best Online School Management Software

What software do you need to run a school? Word processors, databases, email, and spreadsheet applications are required for school administration.

In that respect, the Microsoft Office suite might be considered sufficient for school administration. Access and Excel are, after all, among the foremost database and spreadsheet applications for record-keeping and accountancy.

How can school management software help me?

The rise of cloud software has provided online school management software alternatives to office suites.

Online school management software is an all-in-one alternative to office suites that can automate all aspects of school management.

The best online school management software provides scheduling, record keeping, fee management, and payroll features specifically tailored for schools that MS Office can’t match.

What is the best online school management software?

Gradelink – Best school management platform

Gradelink is by far the best option you have if you want to cover all the school management features in one solution.

And that’s because it offers all the tools needed for this purpose, including site building, and administrative features, together with student and teacher management.

Gradelink is a cloud-based, web platform and which means it can be accessed from any device from any part of the world.

And probably the best part is the integration with a lot of other SIS platforms such as Google Classroom, Renaissance, NCEA, ClassLink, Office 365, and many more.

Parents and students will be happy to access their records and grades a lot quicker and find out about the latest school announcements.

On the other side, as the school admin, you will be able to keep advanced databases with classes, attendance, IEP tracking, just to name a few advantages.

You will get administrative reports about any data on your website, create and manage classes, schedules, and class calendars.

Communicating with students will never be easier because email blasting and even voice messaging are available in Gradelink.

Even the payments will be a lot easier with the tuition and billing features, doubled by automated notifications for the caretakers.

Gradelink simply has all the perks for school, class, student, and staff management that you can imagine so try out a demo on their official website.

Let’s review some of its most important features:

  • Integrates all the major SIS platforms and tools
  • Advanced site-building features
  • Web-based platform available on any device
  • Complete school management features
  • Tuition and billing with automated notifications

Gradelink

Get the best school management tools from a platform that offers all the necessary features.
Check price Get it now

Open EduCat – Great ERP tool

EduCat

Open EduCat is online school management software that has had some rave reviews. The software offers up to 26 different modules, each of which can be purchased separately so schools can get just the ones they need.

Some schools might prefer EduCat’s one-time on-premise payment option to the recurring monthly charges that other alternatives require.

EduCat’s core enterprise resource planning module incorporates accounting and payroll features. With that, schools can manage payrolls, invoicing, and inventories, and streamline sales processes.

However, this software has many more modules for things like admission, attendance, library, timetable, meeting, classroom, and facility management.

There are also additional OpenEduCat Android and iPhone mobile apps available for students.

Here are some of its key features:

  • Resource planning module
  • One-time on-premise payment option
  • Simple to access and use
  • 26 different management modules
  • Flexible plans

⇒ Get OpenEduCat.org

Ireava

Ireava

Ireava boasts more than 30 modules for online school management. The software includes Attendance Management, Fees Management, Admission Management, as well as HR (Human Resource) Management.

More so, you have sections dedicated to Homework and Download Center, Accounting, Reports, Management Inventory, Management Transport modules among others.

So, this is a comprehensive package that can automate pretty much every aspect of school management.

Take a look at some of its notable features:

  • Inventory and transport management
  • Admission and fees management
  • More than 30 available modules
  • HR advanced management
  • Demo available

⇒ Get Ireava

Schoolbic – Great charts and graphs

Schoolbic online school management software

Schoolbic is online school management with some innovative features. The software includes all the usual administrative modules, and it also provides extensive charts and graphs for the visualization of data.

Among its more novel features are its Gallery Module for sharing photos, poll generator, and SMS integration. In addition, Schoolbic has more than 12 predefined themes for users to choose from.

Here are a few of its notable features:

  • Highly configurable & customizable
  • Dedicated support & account manager
  • Free set-up, data migration, and training
  • Integrated with payment gateways

⇒ Get Schoolbic

QuickSchools – Flexible to your school’s needs

QuickSchools.com online school management software

QuickSchools is among the best established online school management systems that date back to about 2008.

The great thing about QuickSchools is how it can be reformatted so that it provides only the features specific schools need.

QuickSchools incorporates a wide range of customizable features that can be tailored to schools’ requirements.

It packs in interactive databases, customizable report cards, fully customizable transcript templates, and a Report Generator with which users can set up reports and carefully manage data analysis.

QuickSchools’ school notification feature enables users to send out texts and voice messages along with email and save communication templates for more regular announcements.

So, QS has some compelling that few other online school management software can match.

Take a look at its key features:

  • Customizable grade book tool
  • Homework and assignments management
  • Classroom and attendance management
  • Parents portal for student performance tracking

⇒ Get QuickSchools

School management software can ensure more efficient school administration. They’re fully equipped with the essential finance, record keeping, and human resource management features all schools require along with a lot more besides.

And while we’re on this subject, you may also be interested in our list of the best school admission software.

If you have any experience with the tools from our list, share your thoughts in the comments section below.

Download & Install GPU Drivers for Farming Simulator 22

When you are gaming you need a good graphics card that can handle an intensive game. The graphics card is responsible for the image quality of your game. If you don’t have a powerful card, any game, including Farming Simulator 22 will look blurry and pixelated.

Further, if your card doesn’t support certain features, such as DirectX, then you won’t be able to use those features. A good graphics card also needs drivers to function properly so if you are playing Farming Simulator, this article is for you.

What graphics card do I need for Farming Simulator 22?

Farming Simulator 22 is a very demanding game and requires a high-end graphics card to run at maximum settings.

The graphics card or video card is a processor that renders images on your computer screen. It’s one of the most important components of your PC and can affect performance as well as the gaming experience.

You don’t need the best one on the market, but in order to play the game at 60 fps, you should aim for at least a GeForce GTX 660 or AMD Radeon R7 265. If you find that Farming Simulator 22 keeps crashing, it could be your graphics card.

You can play the game on a wide range of PC hardware, from ultra-budget to high-end. However, there are some minimum specifications that you’ll need to meet in order to play the game.

How can I download and install GPU drivers for Farming Simulator 22?

1. Use the manufacturer’s site

  1. On your browser, navigate to the Farming Simulator 22 download page.
  2. Select your graphic card.
  3. From the drop-down sections listed, go through and select the appropriate information for your device.
  4. Click on the Search button and wait for the system to find you a match.
  5. Select Download.
  6. Click on Agree & Download in the next page.
  7. Open the file and click Yes on the installation wizard.
  8. Specify the folder where you want the file to be installed.
  9. A system compatibility check will begin.
  10. Click on Agree and continue to accept the terms and conditions.
  11. Select an installation option.
  12. Wait for the installation to finish and click Close.

2. Use Device Manager

  1. Hit the Windows key, type Device Manager and click Open.
  2. Navigate to Display adapters, right-click on your graphic card and select Update driver.update-nvidia-driver hp envy microphone not working
  3. Select Search automatically for drivers.

3. Use a dedicated tool

The latest graphics card drivers are important because they improve performance and stability. However, manually downloading from the site can be hard to keep up with, especially if you don’t know the right drivers that are needed.

That’s where an automated driver updater comes in. It doesn’t require any knowledge about computers or how they work and anyone can use it. It can scan, detect, and download the latest drivers for your computer. These tools will automatically recognize your system and find the correct drivers for it. Updates can be performed with just one click.

Is Farming Simulator GPU or CPU intensive?

Although Farming Simulator doesn’t have a lot of effects, it can still leave a large memory footprint on your CPU. If you have a lower-end processor, the game can be CPU intensive and make the game laggy. You can upgrade your CPU to boost performance.

Most of the time you will notice little difference between high-performance and low-performance CPUs, but there are some situations where this can make a big difference.

When it comes to GPU and CPU, you can say that the game equally requires both the CPU and GPU. There are some advanced effects in Farming Simulator that are more GPU intensive than CPU intensive.

The game will run fine on any modern PC with a decent graphics card. The only real limitation is how much RAM your computer has available — ideally 8GB+. If your computer has less, then you may find yourself having to turn down some settings to make sure everything runs smoothly.

Should you experience any other issues such as low FPS on Farming Simulator 22, don’t hesitate to check out our expert article on the same.

Let us know whether you have been able to download and install the drivers in the comments section below.

School Admission Software: 5 Top Picks for 2026

From the ecological perspective, school administration is far more efficient when it is performed by utilizing computer software.

In this article, we will explore some of the best software options for schools and universities to help you manage your students.

What is admission software and how does it work?

Admission software is a digital platform used by education organizations that offers a paperless admission process to their establishments.

By using such software, you offer the applicants the possibility to enroll and then apply and submit the required documents.

A good school admission app will allow future students to supply signatures, certificates, mark sheets, and more online.

It will also help them follow multiple steps processes of their application through online admission portals.

Now that we know their purpose, let’s go through some of the best school admission apps.

What are the best school admission software tools?

Gradelink – Best management platform

If you’re looking for a solution to cover all your school administration services, look no further than Gradelink.

And that’s because it covers every aspect, from website building to school admission and enrollment to teaching and learning tools and a lot more.

First of all, Gradelink is 100% web-based so all your solutions can be accessed from anywhere from virtually any device.

Another huge advantage is that it integrates all the major SIS platforms and tools like Google Classroom, ClassLink, NCEA, Schoology, FACTS, Renaissance, and a lot more.

Besides helping future and present students as well as parents with a lot of tools to monitor attendance, grading, and more useful information, it offers the schools a ton of features to integrate.

For instance, it can provide administrative reports about students, classes, attendance, IEP tracking staff roster, and a lot more.

Forget about charts and planning on paper because Gradelink has built-in block scheduling, class calendars, class creation, and management, and teacher schedules to name just a few of the options.

It also provides communication tools complete with email and voice messaging, email blasting service, and school announcements, just some of the options.

Moreover, schools may even have the option of implementing tuition and billing with automation features.

Gradelink simply ticks all the boxes for school, class, student, and staff management.

Let’s review some of its key features:

  • Accessible from any device anywhere with an Internet connection
  • Full integration with all the major SIS platforms and tools
  • Site-building features
  • Complete school management tool
  • Tuition and billing with automation

Gradelink

Upgrade your school with the best school admission software and integrated management!
Check price Get it now

Alma Suite – Great for all aspects of school management

Alma - school admin

Alma is an amazingly powerful admission and registration software that is designed with a very intuitive user interface that simplifies the process.

You can use the Alma for the management of applications, candidates, evaluations, fees that need to be paid, forms applied, scoring of your students, K-12 (school grades obtained prior to college), and even a self-service portal that allows you to customize your profile and interact with other users.

Alma can even be used by parents that want to make the process of choosing and applying for schools easier.

This software takes you through a step-by-step process that covers the process from inquiry to enrollment and even beyond.

One of the best features of Alma is the student information system. This element allows you to easily track students’ attendance, and class registration, manage classrooms, and even assign electronic tasks and tests to your students.

Alma is a cloud-based platform that contains a toolbox full of useful features that cover a wide range of uses.

Here are some of its best features:

  • Remote access/control, report cards, collaboration tools, etc.
  • Attendance tracking, class summary, lesson planning, etc.
  • Bookstore management, cafeteria management, curriculum management, etc.

⇒ Get Alma Suite

SchoolAdmin – Personalized email generator

School Admin - school admin software

SchoolAdmin is another great software option that offers customizable CRM (customer relationship management), by easily creating clean-looking records of all the information provided by your possible student in the admission process.

This software provides all the features needed in order for you to simply collect information about each candidate.

You can see the information stored in separate profiles that encompass data ranging from interests, who they last spoke with, what did they specifically talk about, and information regarding their process of admission until that point in time.

One of the best features of SchoolAdmin is the Enrollment Management option. This allows you quick access to any information you might need by keeping your workflow organized.

This software offers different tools that allow you to easily manage the enrollment process like – multiple checklists, filterable lists, applicants, enrollment data, etc.

If the amount of data your school has is overwhelmingly large, School Admin has a very sophisticated search engine that allows you to customize the search fields.

You can easily send personalized emails created specifically based on your analysis of the candidates, and even share information about the school with interested families by the use of automated communication plans.

Other notable features of SchoolAdmin include:

  • Personalized emails and letter generation
  • Instant text communication with candidates
  • Dynamic inquiry forms
  • Smart inquiry checklist
  • Easy application process
  • Appointment scheduling

⇒ Get SchoolAdmin

PowerSchool – Easy registration process

PowerSchool - school admin

PowerSchool is another great school administration software that makes it easy to manage the enrollment process of new students.

By using online forms, this tool allows administrators to gather data efficiently and at the same time makes the process of enrollment easier for parents and students.

This feature reduces the costs of administration, and also allows you and your applicants to save time by removing the need to fill forms out by hand.

Because of PowerSchool’s online features, the entire database of students and student information is protected.

For parents and students, easy access to this information is important because keeping this information updated can prevent unwanted situations like medical complications, emergency contact information, etc.

Other notable features include:

  • Easy registration process and tools that allow you to easily manage the acquired data
  • Simple to use inquiry and application forms
  • Can export standard and custom rapports of your data
  • School choice and lottery features

⇒ Get PowerSchool

Azorus – Great AI-powered search

Azorus - school admin

Azorus is an incredibly powerful CRM software and the company even offers you the possibility to consult them as a standard.

The platform has a wide range of features like filter engine and segmentation, email communications, event management, self-service web portal, tracking and reporting, sis integration, etc. If you want to see a detailed list of every feature’s ability, visit the Official Azorus Website.

Even though you can do so much more with Azorus, in this article we will focus only on Azorus’s ability to build forms and its digital recruitment features.

The Form Builder included in Azorus is specifically designed to allow easy admission by the use of professional-grade web forms. This feature makes it easy for the administrator to collect important information from the student.

You can even choose to see specific information about the student based on the way the applicant interacts with the form.

The Digital Recruit feature that can be found in Azorus allows you to collect data offline on your laptop, and then upload easily upload it to your CRM database.

You can use Digital Recruit with an unlimited number of sessions and on any number of devices. After the data is stored, this feature shows you specific and accurate results of the information-gathering process.

One of the most important services offered by Azorus is the assistance you can get from the site’s team. This makes this software one of the best options on the market for the CRM of your school.

Here are some of its best services:

  • Helps with managing accounts
  • Allows you to plan communications with a yearly review
  • Assistance with email development
  • Tests to see if the emails received are compliant with common email clients
  • Web and graphic services built into the platform
  • Re-training of older personnel or training of new staff
  • Reviews and assistance regarding form fields, search filters, links, data imports, event management, reporting, etc.

⇒ Get Azorus

In this article, we explored some of the best school admission software that allows you to streamline the admission process no matter how many students you might need to process.

You can find a wide range of features that allow you to easily keep in touch with the students and parents applying, keep up with grades in real time, and sort the student’s applications in an easy-to-understand way.

Some software options even allow both students and teachers/admins access to modify personal information like medical records and preferences in built-in questionnaires.

The features that the software in this list covers will surely allow you to cover all the needs of your institution.

You might also be interested to check our list of the best education software tools for Windows.

We would love to know what software you use for administrating your school admission process. Let us know in the comments section below.

Try F1 22 and two other games free with Xbox Free Play Days

Xbox Free Play Days is back with another round of games for subscribers of Xbox Live Gold and Xbox Game Pass to try out this weekend free of charge. And it’s a pretty sweet lineup too, with an excitingly eclectic trio. Let’s check them out below.

F1 22 

(Note that both the Xbox One and Series X|S versions are part of the Free Play Days event).

Enter the new era of Formula 1® in EA SPORTS™ F1® 22, the official videogame of the 2022 FIA Formula One World Championship™. Take your seat for a new season as redesigned cars and overhauled rules redefine race day, test your skills around the new Miami International Autodrome, and get a taste of the glitz and glamour in F1® Life.

Journey to the Savage Planet 

Journey to the Savage Planet
Developer:
505 Games
Price:
$8.99

WELCOME TO THE PIONEER PROGRAM! As the newest recruit of Kindred Aerospace – The 4th best interstellar space exploration company – Your job is to determine if the planet ARY-26 planet is fit for humans. You may be short on equipment and experience, but good luck!

Rogue Lords

Rogue Lords
Rogue Lords
Developer:
Nacon
Price:
$29.99

A dark fantasy roguelike where you play as the Devil!

The Xbox Free Play Days event starts on Thursday, October 20th and will continue through Sunday, October 23rd. Both versions of F1 22 as well as Journey to the Savage Planet are on sale right now. Learn more about Xbox Free Play Days by visiting its FAQ page.


You won’t need a phone to use Discord on Xbox Soon

Back in September Discord was made publicly available on Xbox.  However, in order to connect to Discord using your Xbox a mobile phone has been required, but that requirement will soon be going away.  Xbox Insiders in the Alpha and Skip Ahead Alpha rings can begin testing the feature today.  You’ll be able to see all the voice channels for all the Discord servers you are in, and you no longer need to transfer the call using either the Discord or Xbox app.

You still can’t participate in text chats on Discord directly from your Xbox, and there’s no sign when or if that feature will be added.  You would only need a phone now for Disord calls if you wanted to call a friend directly and not through a server.  You would still need the Discord app to transfer the call to your Xbox. As with most features in the Xbox testing rings, you can expect this to be publically available in a few weeks.

Via The Verge

VPN is Not Compatible with Windows 10: Here’s a Quick Fix

Generally speaking, you can face various VPN issues that generate incompatibility with your Windows 10 PC.

Most VPN users need this software because they remain anonymous while online staying safe from hacking or spying, and their information isn’t tracked or targeted by online marketers and other online stalkers.

So what happens when your PC blocked the VPN connection on Windows 10 operating system?

Some of the common and known problems with VPN connections include:

  • The connection is authorized but rejected
  • The connection is unauthorized but accepted
  • Inability to reach locations outside the VPN’s server
  • Cannot establish a tunnel

However, this article looks at some solutions you can try if your PC not connecting to VPN, whether you just installed, upgraded from an older version, or updated it on your computer.

Why is my VPN not working on Windows 10?

Essentially, your VPN stops working on your Windows PC because of network issues, bad settings configuration, or simply server connection malfunctions.

It can be as well due to incompatible VPN services that don’t have the right protocols for your Windows version. So, if you require more useful support and solutions, the guides below will help you resolve this error.

How can I fix VPN not compatible with Windows 10?

1. Correctly install and configure the VPN

A VPN connection depends both on your operating system and your Internet Service Provider.

If your VPN is not compatible with Windows 10, check first how you installed and configured the VPN, and then go to the VPN service’s website and install and configure it correctly.

Different ISPs usually have different internet service plans and limitations so it is important to contact and/or consult with your ISP for any persistent issues.

2. Try another compatible VPN

The best way to solve incompatibility issues is to ensure you possess efficient VPN software that is Windows 10 compatible from the beginning.

Our recommendation goes to ExpressVPN, a world-class VPN that runs perfectly with Windows devices and provides premium security and privacy-oriented features.

You have the strongest level of encryption to IP cloaking designed to anonymize your online presence, plus a strict no-logs policy meant to keep your data tracking-free.

Moreover, your traffic will be routed through secure VPN tunnels which create several layers of privacy around you.

You also benefit from a VPN test speed, servers in 94 countries, and secured access for multiple devices like PCs, mobiles, or Smart TVs and routers.

ExpressVPN

Use this VPN instead to ensure your high privacy and support for multiple devices.
Check price Visit website

3. Check if you have a VPN profile and try to connect again

  1. Click Start and select Settings.
  2. Click Network & Internet.
  3. Select VPN.VPN not compatible windows 10
  4. Click Add a VPN connection.VPN is not compatible windows 10
  5. Under Add a VPN connection, do the following:
  6. Go to the VPN provider.
    VPN is not compatible windows 10
  7. Click on it and select Windows (built-in).VPN is not compatible windows 10
  8. In the Connection name, type any name of your choice for the VPN connection profile, which is what you’ll look for when trying to connect in the server name or address box.VPN is not compatible windows 10
  9. Then type the address for the VPN server.
  10. For VPN type, choose the type of connection you want to create. You can check which one your company or VPN service uses.

  11. Under Type of sign-in info, choose the info to use like a username or password, one-time password, certificate, or smart card if it’s VPN for work.VPN is not compatible windows 10
  12. Select Save.
  13. If you need to edit the VPN connection information or specify additional settings, choose the VPN connection and then click Advanced options.

If you don’t already have a VPN profile, then you may think that your VPN is not compatible with Windows 10, but you need a profile in order to connect.

If it’s for work, check the VPN settings or VPN app on your company’s intranet or check with the dedicated support person within the company.

If it’s for personal use, go to the Microsoft Store and check if there’s an app for that service, then go to the VPN service’s website and see if the connection settings are listed therein.

Here’s how to create a VPN profile:

Once you have a VPN profile, you can launch the VPN by clicking the Network icon on the taskbar, selecting the VPN connection, and clicking Connect. You can type your username or password or other sign-in if prompted to.

4. Scan for hardware changes

Here’s how to do this:

  1. Right-click Start.
  2. Select Device Manager.
  3. Go to Network Adapters.
  4. Right-click again on Network Adapters.
  5. Click on Network Adapters to expand the list.
    vpn-not-compatible-windows-10
  6. Right-click on each entry under Network Adapters and Uninstall all adapters starting with WAN Miniport.
    vpn-not-compatible-windows-10
  7. Right-click again on Network Adapters.
  8. Select Scan for Hardware Changes.
    vpn-not-compatible-windows-10

The adapters will reinstall automatically without restarting your computer.

5. Check for any updates for your VPN or Windows Updates

Different VPNs have their updates and/or releases, for example, Cisco pushes its own solutions so you may have to wait for Cisco to release a compatible solution if your VPN is not compatible with Windows 10.

If your business supports L2TP/IPsec connections, check with your IT admin for assistance.

Note: Windows only runs apps from the Windows Store, so you need to contact your VPN service to see if they have an available app for VPN with Windows.

6. Ensure routing and remote access service are running

This is done by opening the Control Panel of the server, then clicking Administrative Tools, and then Services.

After confirming that both are running, try to ping the VPN server by the IP address from the VPN client. Initially, you should do this in order to verify that the TCP/IP connectivity is in existence.

Ping once, then if successful, ping again with the FQDN of the server, not its address.

If the ping fails yet the IP address ping was successful, then there’s a DNS problem as the VPN client cannot resolve the server’s name to the IP address.

7. Check the authentication process

Different methods of authentication exist for VPN connections, and both VPN clients and servers need to have at least one method that is common to each.

In order to check the authentication process, do the following:

  1. Right-click the Start button.
  2. Select Run.

  3. Type MMC and press Enter or click OK.
  4. An empty Microsoft Management Console session will open.

  5. Select Add/Remove Snap-In command from the File menu.

  6. Click Add to display the available snap-ins.
  7. Select Routing and Remote Access.
  8. Click Add.
  9. Click Close and This will add the Routing and Remote Access snap-in to the MMC.
  10. Right-click on the VPN server’s listing.
  11. Select Properties.
  12. Under the Security tab, click Authentication Methods – a dialog box will open with available methods of authentication.
  13. Enable or disable the methods by selecting/deselecting the related checkboxes.

8. Check your connection to the VPN server

If you’re using a dial-up connection to the internet, your remote user may not have dial-up privileges, which may be why your VPN is not compatible with Windows 10.

In this case, check your dial-up privileges from the Dial-In tab under User properties in the Active Directory Users and Computers, or check from the domain Remote Access Policy.

If your domain runs in Windows 2000 Native Mode, then the VPN server must be a member, otherwise, the logins will not be authenticated.

Also check the IP addresses as web-based VPN connections use two different addresses for a VPN client, one from the ISP, and another from the VPN server.

Let us know if your VPN is still not compatible with Windows 10 after trying these solutions. If they worked for you, share with us your experience in the comments section below. Additionally, if you’re experiencing these issues specifically with VyprVPN, we’ve got you covered.

Windows File Explorer Crashes on Right-Click: 5 Ways to Fix

When Windows Explorer crashes on right click you won’t be able to use your context menu at all. This can be quite limiting since you won’t be able to open certain file types quickly.

In some rare cases, you won’t be able to use the context menu at all and you’ll lose access to basic Windows functions. However, there are ways to fix this problem permanently.

Why does Explorer crash when I right-click on a file?

In most cases, third-party apps and their context menu extensions cause this issue. Sometimes a missing update or a system glitch can be responsible for this problem as well.

How do I fix a Windows Explorer that crashes on a right-click?

Before getting into the software troubleshooting, be sure to check for the latest updates since they can often fix these kinds of issues.

1. Disable third-party shell extensions

  1. Visit ShellExView page and download the software.
  2. Run the software, go to Options, and select Filter by extension type.
     
  3. Select only the Context Menu and click on OK.
  4. Look for entries that have a pink background. Select the desired entry, right-click it, and choose Disable selected items. You can also use the F7 shortcut.
  5. Repeat the previous step for all entries that have a pink background.
  6. Next, go to Options and select Restart Explorer.
  7. Check if the right-click is working. If it does, it means that one of the disabled entries was causing the problem.
  8. To pinpoint the cause, right-click the disabled pink entry, and choose Enable selected items.
  9. After enabling an entry, restart File Explorer by following the instructions from Step 6.
  10. Repeat the steps until you find the cause of the problem. Once you find it, disable it and the issue will be gone.

Users reported issues with the following apps: PicoPDFEditingSoftware.exe, NVIDIA CPL Context Menu Extension, Virtual Clone Drive, and Foxit phantom PDF.

2. Remove any recently installed applications

  1. Press the Windows key + X and choose Apps and Features.
  2. Next, locate any recently installed app, click three dots next to it, and then choose Uninstall.
  3. Follow the instructions on the screen to remove it.

In most cases, the problems are caused by the same applications from the previous solution.

3. Use the command line to modify the registry

  1. Press the Windows key + S and search for cmd. Select Run as administrator.
    CMD elevated
  2. Next, run the following command: reg.exe add "HKCU\Software\Classes\CLSID\{86ca1aa0-34aa-4e8b-a509-50c905bae2a2}\InprocServer32" /f /ve
  3. The command should disable the new context menu and fix the issue.

4. Use a third-party file manager

When File Explorer crashes by right-clicking, you’ll need to install one third-party software that can manage your files instead of the built-in tool.

This tool can view and manage all of your installed software and files. So not only will this app help you drastically, but it is also straightforward to use and doesn’t require any previous experience.

The interface is self-explanatory and simplistic, giving you a minimalist look while helping you find your files quickly. Finding relevant data has never been easier with this excellent app.

⇒ Get Glarysoft Quick Search

5. Perform in-place upgrade

  1. Download Windows 11 ISO from Microsoft’s website.
  2. Double-click the ISO file and run the setup.exe.
    Launch setup
  3. Accept the terms of service and follow the instructions on the screen.
    SetupHost_Accept - DTS:X Ultra Not Working
  4. Choose not to download optional updates if asked.
  5. Follow the instructions on the screen until you see Choose what to keep screen. Select Keep personal files and apps.
  6. Click Next and follow the instructions on the screen to complete the upgrade.

Why does Windows Explorer keep crashing?

There are several reasons, the most common being system corruption, your settings, or missing updates. We covered this issue in our File Explorer crashing in Windows 11 guide, so be sure to check it out.

All the solutions we listed above work if Windows Explorer crashes on right-click. In most cases, this issue is caused by third-party apps, so you might have to disable or remove them.

You might also be interested in our guide on what to do if File Explorer is slow on Windows or if File Explorer is freezing.

Do let us know which of our solutions helped you fix the problem with the File Explorer app in the comments section below.

This App Can’t Run on Your PC: 5 Tested Ways to Fix on Windows

Although Windows 11 is a unique operating system, it has a few flaws, most related to the older software. Several Windows 11 users reported that this app can’t run on your PC error message.

Before moving on to more advanced troubleshooting solutions, make sure to check if you’re logged in as administrator, try reinstalling the app and scan your PC for viruses.

How do you fix this app can’t run on your PC?

1. Check the System Type

  1. Press Windows, then type system information and click the top result.system-info-search this app can't run on your pc
  2. Here, check the System Type you have, then make sure to download software that uses the same architecture, 32-bit or 64-bit.system-type this app can't run on your pc

2. Create an administrator account

    The next guide below will show you the potential solution to resolve this issue by changing the user settings and create an admin account.

    1. Press Windows + I, then go to Accounts from the left menu, followed by Family & other users.
    accounts-family-other this app can't run on your pc
  1. 2. Click the Add account next to Add other user.

    add-account this app can't run on your pc
  2. 3. Choose I don’t have this person’s sign-in information.

    don-t-have-account this app can't run on your pc
  3. 4. Now, choose Add a user without a Microsoft account.

    add-user-no-microsoft this app can't run on your pc
  4. 5. Enter the username and password for the new administrator account, then click Next.

    user-pass-next this app can't run on your pc
  5. 6. You should see a new account in the Other users section. Click it, then select Change account type. Select Administrator under Account type and click OK.

    change-acc this app can't run on your pc
  6. 7. Lastly, press Windows, right-click your account name, and select the newly created admin account to log into.

    new-admin-switch this app can't run on your pc

3. Use specialized software

Sometimes, if your registry is faulty or corrupted, this may cause different errors to appear. You may also encounter the error message: this app can’t run on your PC on Windows 11.

The registry issue is something that many Windows users have to deal with. It would help if you used a dedicated tool that will repair the registry of your operating system.

4. Run the SFC scan

  1. Press the Windows key input cmd and open the top result as an administrator.cmd-admin hp printer won't scan
  2. Paste or type the following command and press Enter to run it: sfc /scannowscannow 0x80070002 windows update

The System File Checker will look for any system files that are damaged or corrupted and will immediately replace them if it finds any.

5. Use a reliable antivirus

There were instances when users encountered This app can’t run on your PC in Windows 11 because their operating system was infected with viruses.

We recommend powerful software that will offer unbeatable protection for your computer against viruses. After installing this program, it will detect, isolate, and neutralize any virus.

With its Dynamic Machine Learning feature, this software will monitor your entire device activity.

At the same time, this performant antivirus offers you real-time virus detection and blocks malicious software before affecting your computer.

⇒ Get TotalAV

Fix – This app can’t run on your PC for Windows 10 64 bit

One or more solutions already presented above are likely to work for both 32 and 64-bit versions of Windows.

If despite your best efforts, you keep seeing this app can’t run on your PC. To find a version for your PC, check with the software publisher on your Windows 64 bit OS, try running the app in compatibility mode.

The easiest way to determine if there are conflictual versions involved is to use the Microsoft Program Compatibility Troubleshooter which you can easily find by typing its name in the Windows search bar next to your Start menu.


Fix – This app can’t run on your PC for Windows 10 AMD

A number of users reported This app can’t run on your PC error message while trying to install AMD graphic card drivers.

Apparently, the problem was caused by a corrupted download. After switching to a different browser and redownloading the same file again, the issue was permanently resolved.

If you want the latest and greatest browser available right now, check out our best pick in this article.


Fix – This app can’t run on your PC for Broadcom 802.11

  1. Press Ctrl + Shift + Esc to open Task Manager, then navigate to the Startup tab. startup this app can't run on your pc
  2. Find Broadcom Network Adapter Wireless Network Tray Applet then choose Disable.disable this app can't run on your pc

This app can’t run on your PC error message can be a problem since it can affect almost any application on your Windows 11 PC.

Why does my PC say this app can’t open?

You could come into this warning if the app you are attempting to execute needs specific rights to function correctly, but your user account does not have such permissions. It’s also possible that faulty or damaged registry entries prevent applications from executing on your computer.

There are various variations of this error message. However, here are the most common ones that we will address today:

  • This app can’t run on your PC when opening Google Chrome -You should enable compatibility mode from the app’s properties.
  • Command Prompt access is denied, this app can’t run on your PC – This error usually occurs if your user account is not properly configured.
  • This app can’t run on your PC, old game error – Most gamers are already familiar with this error message.
  • This app can’t run on your PC – Microsoft Store error, Windows 10, Office 2016 – As you must have already guessed by now, this error is prevalent for Microsoft Store apps, but it also affects the Microsoft Store app itself and the Office package.
  • Batch file, this app can’t run on your PC – A batch file is an unformatted text file that PC users create to store and run various commands.
  • This app can’t run on your PC, check with the software publisher (Windows 10/11) – Many users reported that they can’t open particular apps due to an error message asking them to contact the software publisher.
  • This app can’t run on your PC (Kaspersky, Bitdefender, Avast, ASDM) – Most likely, the download and install process got corrupted and the quickest way to fix this problem is to uninstall and then reinstall the respective tools. Also, you should take immediate action if Windows prevents the antivirus installation.
  • Windows 10 bypass fail, this app can’t run on your PC – The solutions below will also work in Windows 10.
  • This app can’t run on your PC (Steam, Valorant) – Steam games can be affected by this compatibility error.
  • This app can’t run on your PC when using Broadcom 802.11 network adapters – You will have to uninstall your Network adapters and reinstall them.

For more potential troubleshooting steps, check out our guide on what to do if Windows 11 apps are not opening.

If you have any more questions, don’t hesitate to drop them in the comments section below.

Reset This PC Button Not Working: 6 Ways to Force it

Resetting this PC in Windows 10 allows you to choose whether you’ll keep your files or remove them altogether. The reset option is perfect if you encounter severe problems since it will reinstall your operating system without performing the clean install.

However, some users are complaining that resetting their PC is not working. This can be a big problem and prevent you from resetting your Windows installation, but in this article, we’ll try to fix this problem.

Why can’t I factory reset my PC?

This is a pretty common problem, and it’s usually followed by There was a problem resetting your PC message. The message appears on multiple operating systems, including Windows 11, 10, 8, and 7.

Lastly, let’s look at the variations of this error message to figure out the causes behind it:

  • There was a problem resetting your PC. No changes were made – It is a generic message that occurs if the reset process isn’t successful.
  • Required files are not trusted – This message appears if the recovery image you’re using is corrupted or modified in some way.
  • If you’re performing a reset from USB, a bad flash drive or ISO file can cause all sorts of problems
  • Blue screen errors followed by There was a problem resetting your PC. No changes were made message is usually an indication of a hardware error – In case, you need to enter the administrator password to reset the PC

How do you force a factory reset on a PC?

1. Run SFC and DISM Scan

    The practical example below briefly describes you how to run the SFC or DISM Scan using the Windows PowerShell tool.

    1. Press Windows + X keys simultaneously and click on Windows PowerShell (Admin).
    windows-powershell-admin check network card speed
  1. 2. If prompted for permissions, click Yes.

  2. 3. Now run the following command: sfc/scannow

    fix-pc-reset-fails
  3. 4. Now, type the command below and hit Enter: DISM /Online /Cleanup-Image /RestoreHealth

    fix-pc-reset-fails

If the reset of this PC feature is not responding, you may also use a dedicated registry cleaner software to clean your registry.

2. Use the Media Creation Tool

  1. Visit Windows 10 download page.
  2. Select the Download tool now option.
    download now reset this pc not working
  3. Run the application.
  4. Under the License terms page, select Accept.
  5. On What do you want to do page, choose Upgrade this PC now.
  6. The tool will start downloading and installing Windows 10.
  7. Follow the instructions on setting up Windows 10 on your computer.
  8. When ready to install, Windows 10 summarizes your choices and what will remain through the upgrade. Select Change what to keep.
  9. Set your preferences on Keep personal files and apps, Keep personal files only, or keep Nothing during the upgrade.
  10. Save and close open applications and files that are running and select Install.
Note icon NOTE
The installation will take some time, and your computer will restart a few times, so make sure not to turn it off.

3. Use System Image Recovery

  1. Open the Start Menu and click the Power button. Next, press and hold the Shift key and click the Restart button.
  2. Select Troubleshoot, then click on Advanced Options.
  3. Now select System image recovery.
  4. Follow the instructions on the screen to complete the process.

4. Set your computer for Clean Boot

  1. Go to the Search box, type msconfig, and select System Configuration.
  2. Find the Services tab. Select Hide all Microsoft services box. Click Disable all.
  3. Go to the Startup tab. Click Open Task Manager.
  4. Right-click the first item and choose Disable. Repeat that for all items on the list.
  5. Go back to the System Configuration window and click on Apply and OK.
  6. Reboot your computer

Performing a clean boot for your computer reduces software-related conflicts that can bring up the root causes of the PC reset bluescreen error issue.

These conflicts can be caused by applications and services that typically start up and run in the background when you start Windows.

You will have a clean boot environment after all these steps are carefully followed, after which you can try the PC reset again.

5. Perform a Refresh/Reset from WinRE

  1. Insert a USB or DVD of Windows 10 media.
  2. Restart your computer.
  3. Press F4 or the appropriate key to open the boot menu.
  4. Select the drive you inserted your USB or DVD into.
  5. Click Next.
  6. Choose to Repair your computer.
  7. A blue screen will come up with options.
  8. Choose Troubleshoot, then select Advanced options.
  9. Choose Automatic Repair from the Advanced boot option.

If you still experience the PC reset error, try booting from Windows 10 media, then perform Automatic repair from Windows Recovery Environment (WinRE).

Once the repair is complete, try performing the PC reset to see whether the issue persists.

However, if Automatic Repair won’t work, check out this troubleshooting guide to fix the problem.

6. Perform a clean install

Note icon NOTE
This will remove all personal files, apps, or drivers installed and any changes to your settings. Then, it restores the computer to a factory-like state.
  1. Go to the Windows 10 download page.
  2. Click the Download Now button and run the program.
    download now reset this pc not working
  3. Click Accept option on the license page.
    accept reset this pc not working
  4. Choose Create installation media for another PC on the What do you want to do page and click the Next button.
    create media reset this pc not working
  5. Choose your language, system version, and architecture from here and click Next.
    next reset this pc not working
  6. Connect the drive and select the USB flash drive option. Note that it must be at least 8GB.
  7. Now, with the drive still connected, restart your PC.
    flash drive reset this pc not working
  8. Your PC should automatically boot to the drive. If it does not, you need to press a key (Esc, F12, F2, or Delete, depending on your PC) immediately after it turns on to open the boot menu.
  9. Choose your language and other preferred settings on the Install Windows page and click Next.
  10. Finally, click Install Windows.

If the reset this PC option is not working, or you are wondering how to force reset Windows 10, you might need to insert an installation media to perform a clean install.

Also, this last solution is important if you can’t reset the PC without a recovery key.

If your PC doesn’t reset, you should check your installation media, ensure it’s properly configured, and try all other solutions from this guide.

What are other problems with resetting your PC?

  • Can’t reset pc from cloud – In this case, you may need to download the installation file, rather than do it from the cloud.
  • Reset PC not showing in Advanced options – If you encounter this problem, your only option would be to perform a clean install of the OS.
  • Can’t reset PC on battery power – This is not really a big deal, because all you have to do is plug in the power outlet.
  • No Reset PC option in Troubleshoot – This is a similar problem to the previous one, which means that your recovery file is damaged.
  • Can’t reset pc to factory settings – You may have to restore the PC to a different time before attempting the reset.
  • Reset this PC keep my files failed – Sometimes the reset process isn’t successful and even if you choose the option to keep your files, you might lose them. Therefore, always create a backup when using this feature.
  • Can’t reset pc because of space – It is a common problem on PCs with small storage. You must ensure the PC meets minimum storage requirements before resetting it.
  • There was a problem resetting your PC from USB – The error is encountered when you try to reset the Windows computer using a USB device with the installation media.
  • There was a problem resetting your PC in Windows 11 – It’s a variation of the error. This affects Windows 11 users.
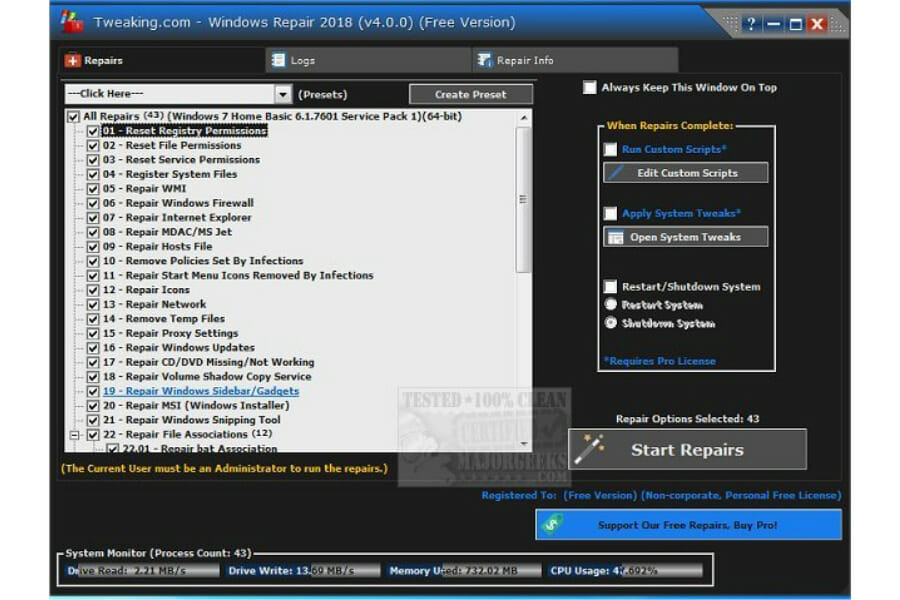
  • Unable to reset PC – Follow the solutions below, which should work fine.
  • There was problem resetting your PC. No changes were made – You see this error code when the reset process starts but is unable to go through due to an issue.
  • There was a problem resetting your PC without password – You would need to try with the installation media in most cases.
  • Unable to download please try Reset this PC using the local reinstall option – Once again, if you have an installation DVD or USB, it should solve the problem.

These aren’t the only issues; several users reported that Windows gets stuck during the factory reset process

If you didn’t fix the problem, your only option might be a complete reinstall. To learn more, read our how to clean install Windows 10 guide for detailed instructions.

For Windows 11 users, we also have a select Reset this PC feature not working guide that addresses similar problems on that version.

Let us know whether any of the above solutions worked for you by dropping your comment below.

VAN 1067 Valorant Error Code: How to Fix it on Windows 11

In this article, we shall explore the van 1067 error on Windows 11 since this error has prevented many from playing the game. However, we have a few solutions that can help.

What does error code VAN 1067 mean?

This error appears if you don’t meet the hardware requirements, most notably TPM 2.0.

How do I fix the error code Van 1067 on Windows 11?

1. Enable TPM 2.0 and Secure Boot

    The following guide offers you the practical steps to enable your Trusted Platform Module (TPM) in order to fix your Van 1067 error on Windows 11 computers.

  1. 1. Click the Start button, click the Power icon, and press the Shift key + Restart to reboot your PC to Windows Recovery Environment (WinRE).

    van-1067-windows-11
  2. 2. Navigate to Troubleshoot.

    van-1067-windows-11
  3. 3. Select Advanced options.

    van-1067-windows-11
  4. 4. Click on UEFI Firmware Settings.

    van-1067-windows-11
  5. 5. Go to the Security tab, locate the Trusted Platform Module (TPM) and enable it.

    van-1067-windows-11
  6. 6. Also, find Secure Boot and enable it. Based on different PCs, the UEFI settings are usually different.

    van-1067-windows-11

2. Check for Windows updates

  1. Press the Windows key and search Check for updates in the Search bar.check for updates
  2. Hit Check for updates. Windows update
  3. If you have any pending updates, proceed to install and restart your system.

3. Disable Discord

  1. Head to the Settings menu in Discord. Settings
  2. Click on Windows Settings.Discord settings
  3. Turn off Open Discord.discord
  4. Restart your computer.

4. Restart VGC Service

  1. Press the Window + R keys to open the Run dialog, type the script below, and hit Enter.
    services.mscmsc cmd
  2. Find vgc. vgc
  3. Double-click on it, and choose Start. vgc
  4. Click on Startup type and select Automatic, save the changes by clicking Apply, and then OK.apply settings

5. Disable CSM

5.1 Disable CSM on Gigabyte

  1. Enter the BIOS screen or Security menu by pressing the Del key while the computer is on boot.BIOS
  2. Locate CSM Support under the BIOS tab, double-click on it, then select Disabled. disable CSM
  3. Save the changes, click on the Power tab, then go to Save & Exit Setup.CSM
  4. Reboot the system again and enter the BIOS screen.
  5. Double-click on Secure Boot in the BIOS tab and select Enabled.secure boot
  6. Once again, go to the Power tab and click Save & Exit Setup.CSM
  7. Click on Yes and reboot the system one final time. Disable csm
  8. Enter the BIOS screen again and go to the Peripherals tab. CSM periphals
  9. Double-click on Intel Platform Trust Technology (PTT) and select Enabled. Enable PTT
  10. Save these changes by going to the Power tab and clicking on Save & Exit Setup.Disable CSM

5.2 Disable CSM on MSI

  1. Enter the BIOS screen by pressing the Del key. Enter BIOS menu
  2. Once on the menu, click the Boot tab at the top of the screen. Locate Boot tab
  3. Locate Boot mode select and UEFI. settings
  4. Save these changes by pressing the F10 key and exit BIOS.
  5. Your computer will restart automatically. 

5.3 Disable CSM on Biostar

  1. Enter the BIOS screen by pressing the F12 key.
  2. Go to the Boot tab. Locate Boot tab
  3. Locate CSM Support and set it as Disabled.Locate CSM
  4. Exit and reboot the system. 
Tip icon Tip
The above steps only apply to the VAN 1067 error Windows 11-gigabyte motherboard, VAN 1067 error Windows 11 MSI motherboard, and VAN 1067 error Windows 11 Biostar motherboards.

Should you find yourself stuck with this error on your screen, we hope one of the solutions we have discussed will be able to resolve the problem. We also have other fixes for Valorant Windows 11 errors, so check out our guides.

If you need more solutions, we also have a guide that will help you solve the VAN9003 problem in Valorant on Windows 11, so don’t miss it.

We also covered VAN 152 on Valorant as well as Valorant error 84, so be sure not to miss them.

This error can also appear on previous versions of Windows, and we have a great guide on VAN 1067 Valorant error on Windows 10 that you might want to check out.

We also have a guide on what to do if Valorant is not working, so don’t miss it.

Have you come across the VAN 1067 error in Valorant? What are some of the fixes that worked for you? Share your comments down below.

Posted in PC

Laptop Keeps Refreshing the Desktop in Windows 10: How to Fix it

Many Windows users reported the laptop auto refresh problem. This can be caused by various factors, from third-party apps to driver problems. Usually, the desktop keeps refreshing on your laptop because of corrupted system files. If desktop icons are flashing on Windows 10, your display driver may be the culprit.

Before applying the solutions below, try removing any external storage and devices like printers and others and restart your laptop or PC. If your PC still uses IDT audio driver, remove it.

How do I stop Windows 10 laptop from refreshing the desktop?

1. Copy all icons to a folder

    Sometimes, if your desktop screen refreshes every 5 seconds, it is due to problems with the icon cache. Many users have found a solution to solve this issue for good on their PC. You can simply copy them to a folder as shown in the guide below.

  1. 1. Press the Ctrl + Shift + N shortcut on the desktop to create a new folder.

  2. 2. Select and copy all icons on the desktop and paste them into the new folder.

    windows-10-keeps-refreshing
  3. 3. Now, right-click on each icon on the desktop, except the folder, and select the Delete option.

    delete desktop keeps refreshing
  4. 4. Right-click on any space on the desktop and select Refresh.

    refresh desktop keeps refreshing
  5. 5. Finally, copy the icons from the folder and paste them on the desktop.

2. Uninstall and reinstall Adobe Reader

  1. Press the Windows key + I to open the Settings app and select the Apps option.
    apps
  2. Click on the Adobe Reader app, select Uninstall and follow the instructions to complete the process.
    adobe desktop keeps refreshing
  3. Go to the official website to download the app, click the download file and follow the simple instructions to complete the installation.

Many users reported that the Windows desktop keeps refreshing issue was caused by the PDFShell64.dll file that is part of the Adobe Reader package. To fix this problem, you need to uninstall and reinstall the app.

Another workaround is to move all the PDF files on your desktop to a subfolder somewhere else.

3. Perform an SFC or DISM scan

  1. Press the Windows key + X and choose Command Prompt (Admin) or PowerShell (Admin).
    Windows 10 keeps refreshing command prompt
  2. Type the command below and press Enter to run it. sfc /scannowsfc scan
  3. Wait for the scan to complete and check if the problem persists.
  4. If the SFC scan does not solve the issue, launch Command Prompt as admin again, type the command below, and hit Enter to run it: DISM /Online /Cleanup-Image /RestoreHealthdism

One of the prominent causes of the desktop keeps refreshing issue is corrupt system files. You can fix this by running the two built-in system file repair tools.

Alternatively, you can repair these files with dedicated repair software. These tools restore the corrupt system files and replace the broken ones. Also, it does not take much time and does not require you to enter any code.

You only need a few mouse clicks to restore your PC to top shape.

4. Run Chkdsk

  1. Press the Windows key + S, type cmd, and click Run as administrator under Command Prompt.
    cmd desktop keeps crashing
  2. Type the command below and hit Enter: Chkdsk/fchkdsk
  3. The command might ask you to type Y; make sure you do so and wait for the check to complete.

Another known reason your Windows 10 desktop refreshes after a few seconds is a corrupt memory partition. Running the command above has effectively fixed this issue for many users.

5. Perform a clean boot

  1. Press the Windows key + R, type msconfig, and click the OK button.
    msconfig
  2. Click the Services tab at the top, check the box for Hide all Microsoft services, and click the Disable button.
    services desktop keeps crashing
  3. Click the Startup tab at the top and select Open Task Manager.
    open task manager
  4. Right-click each of the services there and select Disable.
    disable
  5. Return to the System configuration window and click the Apply button, following OK.
    ok apply desktop keeps crashing
  6. Finally, restart your PC.

The desktop keeps refreshing issue has been traced to third-party apps, especially those that sync frequently. Performing a clean boot allows you to start your PC without these apps and processes.

6. Restart your PC in Safe Mode

  1. Press the Windows key to launch the Start Menu.
  2. Press and hold the Shift key, click the Power option, and select Restart.
    power restart
  3. Once your PC restarts on the Choose Option page, select the Troubleshoot option.
    troubleshoot
  4. Choose Advanced options.
    advanced option desktop keeps crashing
  5. Select the Startup Settings option.
    startup settings desktop keeps crashing
  6. Finally, click the Restart button.
    restart button

The Safe Mode allows you to narrow down the cause of an issue, allowing your PC to work only with limited files and drivers. This has proved effective in solving the Windows 10 desktop keeps refreshing point.

7. Disable the Windows Error Reporting feature

  1. Press the Windows key + R, enter services.msc, and click OK.
  2. When the Services window opens, locate Windows Errors Reporting Service and double-click it.
  3. Set the Startup type to Disabled and click on Apply and OK to save changes.

If Windows 10 desktop keeps refreshing, that might be due to the Windows Error Reporting feature. This is a core Windows feature, but few users claim that it can cause specific issues to appear.

After disabling the Windows Error Reporting feature, the problem should be resolved entirely.

8. Stop iCloud Photos and disable OneDrive

  1. Press Ctrl + Shift + Esc to open Task Manager.
  2. Right-click iCloud Photos in the Processes tab and select End Task. Now, check if your desktop is still refreshing.
    restart icloud desktop app
  3. If the issue persists, right-click the Microsoft OneDrive icon in the Taskbar and select Settings.
    settings onedrive
  4. Now, go to the Settings tab and uncheck Start OneDrive automatically when I sign in to Windows.
  5. Click OK to save changes.
    start desktop keeps crashing

If Windows 10 keeps refreshing, it might be due to apps that need continuous sync, like OneDrive, iCloud Photos, and sometimes Skype. So, it is recommended to disable and even remove this app if the problem persists.

9. Rollback your graphics drivers

  1. Press the Windows key + X and select Device Manager.
    device manager desktop keeps crashing
  2. Click the arrow next to the Display adapters option to expand it and double-click the driver.
    display adapters
  3. Click the Driver tab at the top and select the Roll Back Driver button.
    rollback driver
  4. If the option is blurred out, you have not updated your driver in recent times. Click the Update Driver option instead.
    update driver
  5. Select the Search automatically for drivers option and wait for the scan to complete.
    search auto desktop keeps crashing

If your Windows 10 desktop started refreshing after you updated your drivers, you would need to roll back to the previous version to solve the issue. Also, updating your driver should fix this issue if you have not updated your driver recently.

Preferably, you can update your graphics driver using a reliable tool in Outbyte Driver Updater. This tool saves you the stress of searching for drivers on your manufacturer’s website or with the built-in driver updater.

It does the job for you and installs the original drivers automatically. And with some users reporting that the audio and Bluetooth drivers can cause this issue, it will be stressful to update them all manually.

⇒ Get Outbyte Driver Updater

10. Restart Windows Explorer

  1. Press Ctrl + Shift + Esc to open Task Manager.
  2. When Task Manager opens, select Windows Explorer on the list and click the Restart button.

If Windows 10 desktop keeps refreshing, it might be due to problems with Windows Explorer. You can temporarily fix this problem by restarting Windows Explorer.

After performing the steps above, Task Manager will restart, and the problem will be temporarily solved. Unfortunately, the issue will reappear once you restart your PC.

On the other hand, by using this workaround, you’ll be able to temporarily fix the problem and use your PC to find a permanent solution.

Problems with Windows 10 and refreshing can seriously affect your PC, but we hope you managed to solve them by using one of our solutions.

Unfortunately, this isn’t the only UI issue, and sometimes even your Taskbar icons can start flashing or flickering. However, there’s a way to fix this problem, and today we’ll show you how.

If you have any other suggestions or questions, don’t hesitate to leave them in the comments section below, and we’ll be sure to check them out.

Fix Green Screen of Death & Prevent Windows PC Crashes

Windows’ infamous Blue Screen of Death has resulted from many crippled computers over the years, but the Redmond giant decided to change things a bit with the Green Screen of Death.

This error is similar to the Blue Screen of Death because it crashes your device. However, if you’re experiencing Green Screen of Death issues, do not worry because this post contains many solutions that will help you fix this problem.

What can cause green screen?

Unlike Critical Process Died BSOD, this type of screen error isn’t that common, and it’s usually caused by system damage or corrupted files. In that regard, it’s similar to Orange Screen of Death.

In addition, if you overclock your device, you might even encounter a Brown Screen of Death on your PC or similar errors. Therefore it’s advised to remove any overclock settings that you have.

Some of the causes of this error include:

  • Corrupt or broken system files – Corrupt files often affect PC settings and cause green screen crashes. Don’t hesitate to learn how to repair and restore corrupted system files.
  • Outdated drivers – Drivers may become corrupt in time, leading to such issues. Take a closer look at our guide on how to update Windows drivers.
  • Issues with connected peripherals – In this case, don’t hesitate to pay attention to the preliminary steps below.

 How do I stop the Green Screen of Death?

Before making changes to your PC to fix this issue, there are a few checks you should perform:

  • Disconnect any peripherals connected to your PC and check if the green screen is still showing.
  • Restart your PC and see if the problem persists. If your computer fails to restart, then take a closer look at our quick solutions.

If you are still experiencing the problem, proceed to advanced troubleshooting.

1. Update your drivers

  1. Press the Windows key + X and select Device Manager.
    devicce green screen of death
  2. Double-click on the option to update drivers to expand it.
  3. Check for drivers with either a yellow exclamation mark/ question mark/ down-arrow mark/ error notification and right-click it.
  4. Choose Update driver.
    update driver
  5. Now, select the Search automatically for drivers option and wait for the scan to complete.
    search auto

Alternatively, you can search your driver manufacturer’s website to download the latest version of the needed driver.

If the Green Screen of Death is preventing you from updating your driver, follow the steps below to boot into Safe Mode:

  1. Restart your computer a few times during the boot to start Automatic Repair.
  2. Choose Troubleshoot > Advanced options > Startup Settings.
    startupp settings
  3. Now, click the Restart button.
    restart green screen of death
  4. After your PC restarts, press the numbers corresponding to Enable Safe Mode with Networking and Enable Safe Mode with Command Prompt.
    enable

After this, you can now try to update your drivers again. Also, you should perform the other fixes in this guide while in Safe Mode.

Lastly, if updating drivers manually seems a bit tedious, you might be able to fix this problem by using a third-party tool that automatically does it.

You won’t have to worry about downloading the wrong driver versions or not finding the drivers at all anymore. This tool will automatically scan your system and do it for you.

Outbyte Driver Updater

Update your drivers automatically and let Outbyte Driver Updater choose the latest version for them.
Free Trial Download now

2. Run SFC and DISM scans

    The Green Screen of Death is likely to be caused by system files corruption. Therefore, running SFC and DISM scans through Command Prompt can fix the issue.

  1. 1. Press the Windows Key and type cmd in the search bar.

  2. 2. Command Prompt will appear in the results. Run it as an administrator.

    cmd admin
  3. 3. Input the following command and press Enter after: sfc /scannow

    sfc-scannow ImportError: DLL load failed: The specified module could not be found
  4. 4. Wait for the command to run. This can take a while.

  5. 5. Restart your PC and check if the Green Screen issue persists. If it does, go to step 6.

  6. 6. Open cmd as an admin once more.

  7. 7. Input the following commands one by one, and press Enter after each one:

    • Dism /Online /Cleanup-Image /ScanHealth
    • Dism /Online /Cleanup-Image /CheckHealth
    • Dism /Online /Cleanup-Image /RestoreHealth

Alternatively, you can install a dedicated third-party tool to fix your computer’s Green Screen of Death issue.

Not only will the software scan your computer for problematic or missing files, but it will also restore or replace them by itself, keeping it healthy.

3. Remove third-party antivirus tools

  1. Press the Windows key + I to open Settings and select the Apps option.
    apps
  2. Click the antivirus to uninstall and select the Uninstall option.
    uninstall
  3. Finally, follow the onscreen instructions to complete the process.

If you’re using a third-party antivirus tool, remove it and use Windows’ built-in antivirus instead.

In addition to uninstalling the antivirus software, use a dedicated removal tool in CCleaner to ensure all the files and folders associated with the program have been removed.

4. Reset your PC

  1. Press the Windows key + I to open the Settings app and choose Update & Security.
    update and security
  2. Choose Recovery in the left pane and click on the Get Started button under Reset this PC.
    get started green screen of death
  3. Choose whether to keep your files or delete everything and click the Next button.
    keep  green screen of death
  4. From here, follow the onscreen instructions to complete the reset.

5. Perform a clean install

  1. Go to Windows 10 official download website, click the Download Now button, and click the downloaded file to run the program.
    download now green screen of death
  2. Click the Accept button on the license page.
    accept
  3. Select the Create installation media for another PC option on the What do you want to do page and click Next.
    create media green screen of death
  4. Select your language, system version, and architecture, and click Next.
    next
  5. From here, connect your drive and select the USB flash drive option. The flash drive must be at least 8GB and is recommended to be clean.
    flash
  6. Restart your PC with the drive still connected. This should boot your PC automatically to the drive.
  7. If it does not, you need to press Esc, F12, F2, or Delete, depending on your PC, immediately after it opens the boot menu.
  8. Select your language and other preferred settings on the Install Windows page and click Next.
  9. Lastly, click Install Windows.

We hope the above solutions helped you fix the GSOD error you encountered on your PC because such errors will interfere with your daily activities and tasks.

Check out five best Blue Screen of Death fixers or alternatively take a look at our comprehensive guide on how to fix a Black Screen of Death for more solutions.

If you have subject-related questions or suggestions, we’ll be glad to hear from you. You can post them in the comments section below.

EXE File Not Opening in Windows 10/11? Try These Fixes

If an EXE file is not opening on your PC, you may encounter error messages, no response when double-clicking, or a prompt to choose another app. This issue can occur in both Windows 10 and 11 and typically points to system misconfigurations, broken file associations, or malware.

This guide will walk you through the exact steps to fix EXE file not opening in just a few simple steps.

Why Is the EXE File Not Opening in Windows?

Common reasons include:

  • The .exe file association in the registry is corrupted
  • Third-party apps or antivirus tools block execution
  • The EXE file is incomplete or not downloaded correctly
  • System file errors after a recent update

How do I force an exe file to open?

1. Edit the registry

1.1 Apply the change in normal mode

    Not being able to open .exe files can be a big problem, but you should be able to fix it simply by changing your registry.

  1. 1. Press the Windows + R keys, type regedit, and click OK.

    regedit exe file not opening
  2. 2. Go to HKEY_CLASSES_ROOT/.exe and double-click the (Default) key in the left pane.

    exe-files-not-opening-windows-10
  3. 3. Set the Value data to exefile and click OK.

    exe-files-not-opening-windows-10
  4. 4. Now, go to the path below in the left pane and double-click (Default) In the right pane: HKEY_CLASSES_ROOT\exefile\shell\open\command

    default exe file not opening
  5. 5. Set its Value data to “%1” %* and click OK.

    exe-files-not-opening-windows-10
  6. 6. After that, restart your computer and check if the problem is resolved.

If the registry values are changed from the default, that can prevent .exe files from opening.

If you can’t access the Registry settings, try doing the steps above from Safe Mode:

1.2 Apply the change in Safe Mode

  1. Click the Start icon on the Taskbar.
  2. Hold the Shift key on your keyboard and click the Power icon, followed by the Restart option.
    power restart
  3. Select Troubleshoot > Advanced options > Startup Settings.
    startup exe file not opening
  4. Hit the Restart button.
    restart button
  5. When your computer restarts, a list of options will appear, select any version of Safe Mode by pressing the appropriate key.
    startup exe file not opening

After you boot the system in Safe mode, perform step 1.1 above.

2. Scan for malware

  1. Click the Start button, type virus, and click on Virus & threat protection from the results.
    virus and threat exe file not opening
  2. Select Scan options.
    scan options
  3. Choose your desired scan option and click the Scan now option.
    scan now exe file not opening

As mentioned, the exe file not opening issue can be due to malware infections. A simple virus scan should help you locate and eliminate potential threats.

For more thorough protection, we recommend using a trusted third-party antivirus like TotalAV. It’s lightweight, fast, and designed to catch threats that Windows Defender might miss.

Total AV

Total AV

Eliminate malware, ransomware, and other cyber threats while improving your PC’s performance with TotalAV.
Try it now! Visit website

3. Change the location of the Program Files folder to default

  1. Press the Windows +R keys to launch the Run console, type regedit, and click OK.
    regedit exe file not opening
  2. Go to the following key in the left pane and Double-click on ProgramFilesDir in the right pane: HKEY_LOCAL_MACHINE\SOFTWARE\Microsoft\Windows\CurrentVersionprogramdir exe file not opening
  3. Change its Value data to C:\Program Files and click OK.
    program value
  4. If you have ProgramFilesDir (x86) entry available, change its Value data to C:\Program Files (x86).
    program 86 value
  5. After you’re done, close Registry Editor and restart your PC.

Program Files is a default installation directory for all third-party applications, and by default, it’s located on your System drive along with the Windows installation.

To save space, some users change the location of this folder.

Unfortunately, this can sometimes cause problems and prevent .exe files from opening.

4. Turn off Windows Firewall

  1. Press Windows key + S, enter windows defender, and select Windows Defender Firewall from the list of results.
    windows defender
  2. In the menu on the left select Turn Windows Firewall on or off.
    turn off
  3. Select Turn off Windows Firewall (not recommended) for both Private network settings and Public network settings.
    ok
  4. Click OK to save changes.

If you do this, make sure the exe file you want to open is from a reputable source and you know for a fact it won’t cause harm to your machine.

Though this works as a temporary solution and helps you locate the source of the problem, disabling security features is never a good idea.

Either switch to a better security software or check your settings and whitelist the apps it stops you from using.

5. Create a new user account

  1. Press the Windows key + I to open the Settings app and select Accounts in the left pane.
  2. Choose the Family & other users option.
    accounts
  3. Click the Add account button in the Other users section.
    add account exe file not opening
  4. Select I don’t have this person’s sign-in information.
    i dont have
  5. Now, click on Add a user without a Microsoft account.
    add a new user
  6. Enter the username, password, and security questions, and click Next.
    next
  7. Finally, log in to the account and try to access the exe file from there.

If everything works without problems, you’ll have to copy all your files from your original account to the new one and continue using the new account.

6. Fix file association problem using Command Prompt

  1. Click the Start button, type cmd, and click Run as administrator under Command Prompt.
    cmd  exe file not opening
  2. Now, paste the following command and press Enter to run it: assoc .exe=exefileassociated file
  3. After that, restart your PC and see if the problem is fixed.

7. Perform a SFC scan

  1. Type CMD in the Start bar, double-click on Command Prompt, and select Run as Administrator.Command Prompt Windows Run as Administrator
  2. In the Command Prompt window, type the following command and press Enter:
    sfc /scannow
  3. Wait for the process to complete and Restart your PC.cmd sfc scan result

Running a SFC (System File Checker) scan can identify and fix corrupted files. This could fix exe files not opening.

That’s it! We hope our solutions helped you fix the exe file without opening the problem, and now you can run your .exe file without problems.

Not being able to open .exe files in Windows 11 can be a big problem and prevent you from running all applications normally, but as you can see, this problem can be easily solved.

Some of our readers reported that .exe files are self-deleting from Windows so read our guide if you want to fix this problem. And do find out why music.ui.exe crashes and the solutions for it!

For any issues with the setc.exe, we have a complete guide on how to fix setc.exe errors.

If you have any questions or suggestions, don’t hesitate to write them in the comments below.

Raid Controller Driver for Windows 11: Download & Install

If you want to download the RAID controller driver for Windows 11, you can do it easily. There are multiple ways to download this driver for your Windows PC.

And then, you can manage your RAID configuration with dedicated software.

Here’s how to do it:

How do I download the RAID controller driver for Windows 11?

1. Download manually

1.1 From Intel

  1. Go to Intel Download Center.
  2. Search for Raid Controller and download the appropriate item for your PC.download intel rst win11

1.2 From AMD

  1. Go to AMD Driver & Support page.
  2. Select Chipsets and choose the correct socket.
  3. Then, choose the motherboard chipset model and click on Submit.submitting cheapset model amd driver download
  4. Expand Windows 11.
  5. Download the AMD RAID Driver.downloading amd raid installer driver

1.3 From another manufacturer’s website

You also can consider downloading the RAID driver from your PC or motherboard manufacturer’s website. That will be easier to do in many situations.

After downloading, you can install the driver by double-clicking on the installer file.

2. Use third-party tools

Some tools can automatically find and install any missing drivers on Windows 11 computers. These specialized tools are very easy to use and fast, in just a few minutes they will scan your computer, identify the broken, outdated, or missing drivers, and download fresh versions for them

3. Use Device Manager

  1. Open the Start Menu, type device manager, and click on Device Manager from the results.opening device manager windows 11
  2. Expand Other devices.
  3. Right-click on Raid controller or similar driver name and choose Update driver.updating raid controller device manager
  4. Click on Search automatically for drivers.
  5. Follow the on-screen steps to complete the process.

If you face problems with this process, you may need to learn how to solve Windows cannot download driver.

Why do I need a RAID controller driver?

The full form of RAID is the Redundant Array of Independent Disks. The primary purpose of this technology is the following:

  • For better performance: To use the disks together efficiently and effectively for better performance and reliability.
  • For better protection: It offers additional protection against data loss.

Wrapping up

Missing the RAID driver or an outdated version may cause various disk problems on Windows 11 for specific cases. Else, it may decrease your disk performance as well.

For enterprise or personal usage, downloading and installing the RAID controller driver is important to enhance performance, reliability, and flexibility.

For a RAID configuration, you will also need one of the best dual-bay hard drive enclosures and select a RAID level as per your hardware requirements and needs.

Please let us know in the comments box if you have any suggestions or opinions.

Fix Socket Open Error on Epic Games & Connect in 2 Steps

If you love to play online games on the Epic Games launcher, you may often experience the open socket error. This prevents you from logging in to the launcher.
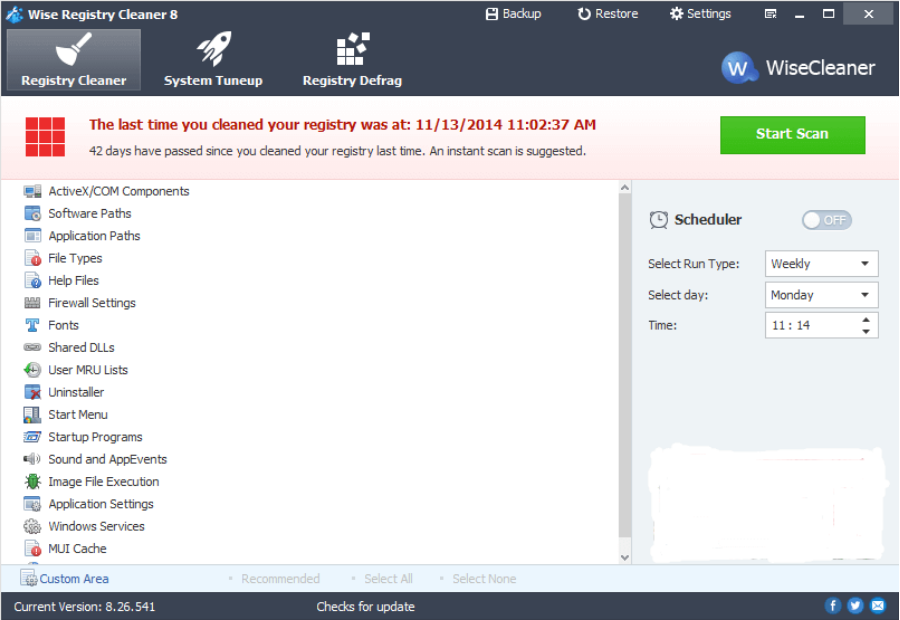
While it mainly occurs with the Fortnite game, it can occasionally happen with other Epic games. For more such login errors and solutions, you can refer to our detailed guide on some quick fixes for your Epic Games login woes.

What is a socket open error Epic Games?

A socket helps to create a two-way communication bridge between two programs running on the network.

An FTP server responds to the socket when a client makes a connection request on the server’s machine and port.

If the server accepts the connection request, the client can then communicate with the server once the connection is successfully accepted on his end. However, a socket error can occur if there is no response from either the client’s end or the server.

What would cause a socket error?

Socket errors can be brought on by various factors, but let’s see what are the main triggers:

Now that we know what the main reasons for this problem are, let’s start troubleshooting and fixing it.

How do you fix an open socket error?

1. Check the Epic Games server status

  1. Before you try any other troubleshooting method for the Epic Games connection error, check the Epic Games server status, which can be offline for maintenance at regular intervals. status-epic socket open error epic games
  2. If the status next to the game you are having issues with says Operational, then the server might not be the cause. However, some users reported that even though the server was Operational, in reality, it was down.operational socket open error epic games
  3. If it is down, you should wait between 10 minutes and a few hours before rechecking the status.

2. Run Epic Games as an administrator

    This method helps you skip UAC (User Access Control) to bypass the feature sets’ restrictions and eliminate the Sorry there was a socket open error in the Epic Games launcher.

  1. 1. Go to the desktop and right-click the Epic Games launcher shortcut to select Run.

    epic-run-admin socket open error epic games
  2. 2. Alternatively, you can press Windows, type Epic Games inside the search box, and select Run as administrator under the result on the right side.

    epic-games-run socket open error epic games
  3. 3. Now check if you can log in and launch the Fornite game.

How do I allow Epic Games through the Firewall?

If the Epic Games servers are up and running, the Firewall could be blocking the launcher, and you cannot log in.

In this case, follow the below instructions to add it to the exceptions list and allow Epic Games through the Firewall:

  1. Press Windows, type Firewall and network protection, and click the top result.firewall-network socket open error epic games
  2. Next, click Allow an app through the Firewall.Firewall & network protection - Allow an app through the firewall
  3. In the Allowed applications window, click on Change settings. Click on change settings
  4. Now, under Allowed apps and features, look for UnrealEngineLauncherProxy. If you can’t find it, click on Allow another app. Click on Allow another app
  5. A new window with the name – Add an app will open. Click on Browse. browse for epic games launcher
  6. Select the Epic Games launcher and click on Add. Add Epic Games Launcher
  7. Check the Private and Public boxes next to the UnrealEngineLauncherProxy option, then press OK to save the changes made.check UnrealEngineLauncherProxy

You can also uninstall and reinstall the Epic Games launcher to check if this helps fix the issue. However, if you can’t uninstall Epic Games Launcher, try the simple steps in our detailed guide.

If you found a workaround for the open socket error, let us know in the comments box below. Thanks for reading!

Programs Keep Crashing on Windows 10? Try These 4 Solutions

There are lots of reasons why some or all apps keep crashing on Windows 10. Lack of resources and app conflicts are the top causes. Also, some antiviruses may block apps from opening. System file corruption and faulty Windows updates are other culprits for app crashing or malfunctioning.

What do I do if programs keep crashing on Windows 10?

1. Run the SFC scan

  1. To fix APPCRASH in Windows 10, press Windows, then type cmd and select the Run as administrator option from the right side.cmd-run-admin 0x80070002 windows update
  2. Next, type or paste the following command and press Enter to run it: sfc /scannowscannow 0x80070002 windows update

The SFC scan will scan all of the protected system files and, if any are found to be corrupted, will replace them with a cached duplicate stored in a compressed folder. Thus, the Programs randomly crashing issue in Windows 10 will be fixed.

2. Uninstall the latest update

    By removing the latest Windows update, you will also delete the bugs and errors that it caused. Then, wait for a few days until a new update appears and install it as we have shown below
  1. 1. Press Windows + I ,then when the Settings app opens, select Update & security.
    bluetooth-wont-turn-on-windows-8
  2. 2. Select View update history.

    update-history-w10 programs keep crashing windows 10
  3. 3. Select Uninstall updates.

    uninstall-updates-w10 programs keep crashing windows 10
  4. 4. Select the top Windows update from the new window, then click Uninstall to remove it from your computer. After that, the Applications keep closing error in Windows 10 will be solved.

    update-uninstall programs keep crashing windows 10

3. Disable your antivirus

  1. Click the arrow from your Taskbar to show the antivirus icon.arrow-w10 programs keep crashing windows 10
  2. Right-click the antivirus icon from your Taskbar, then select Disable for 1 hour.disable-1h-w10 programs keep crashing windows 10

After the major update is installed, your system will timely update the pre-installed apps. And that’s where some users can get into trouble.

Your antivirus can occasionally block some update features, resulting in app instability and frequent crashes, such as the Windows 10 programs keep closing problems reported by users.

Moreover, you may want to replace your antivirus software with a better one that won’t cause any interference.

4. Check for Windows updates

  1. Press Windows + I to open the Settings app, then click on Update & security.update-security nmi hardware failure windows 10
  2. Lastly, click the Check for updates button to find any new OS updates and install them.check-updates searchui windows 10

By updating your OS, you will solve any compatibility issues between Windows 10 and the crashing apps that occurred after the update.

When are programs crashing?

Programs may crash in the following scenarios, as well as in others that we will cover in the list of solutions below:

  • Programs crashing on startup/on launch – It’s just a variation of our main issue in this article.
  • Apps keep crashing even after reinstall – The problem may be caused by an incompatibility with the system or not meeting the requirements to run.
  • Program crashes at specific time/programs keeps crashing at a certain date – After a Windows update, the program might not be compatible anymore or the app just needs an update.
  • Programs keep crashing at the same spot – Which points to a recurrent malfunction of the app and the best solution is to reinstall it or troubleshoot the action that is causing it.
  • Applications keep freezing/closing unexpectedly – We have a dedicated guide to fix the freezing problem.
  • Apps keep crashing after the update – This signals a but with the system or the app that is probably no longer supported.

Whatever the problem listed above, you will find the proper solution below.

Some users reported that they couldn’t update Windows 10 due to a bug. Therefore, we recommend you check out our dedicated guide to fix it. With that, we should wrap it up.

Also, tell us in the comments section if you have alternative solutions or questions. We’ll be glad to hear from you.

4 VPNs with Pennsylvania Servers – Pittsburgh, Philadelphia, Scranton & More

Looking for the best VPNs with servers in Pennsylvania? Whether you want to watch local TV shows, keep up with Phillies matches, or securely access your work network, getting a Pennsylvania IP address is essential.

Below we’ll show you the top VPN services with servers in key PA cities, including Philadelphia, Scranton, and Pittsburgh.

What are the best VPN services with Pennsylvania servers?

The market is pretty scarce for VPNs with Pennsylvania servers, but there are a few solid options—some even free. Check them out:

1. Private Internet Access – Fastest server connection of all

pia vpn pennsylvania server

Not only does PIA have servers in Pennsylvania, but it is your go-to VPN if you need any location in the US. Covering all 50 states, this fast client lets you access any website, app, or content without a hitch.

What we like about PIA is that it doesn’t compromise when it comes to privacy and security. It uses AES-256-bit encryption and a strict no-logs policy.

At the same time, your network has no bandwidth limitations, so you can change your location and navigate the web with your PA IP address for as long as you like.

Take a look at its key features:

  • Split tunneling
  • Open source software
  • Dedicated IP
  • Largest server network in the world
  • SOCKS5 proxy support
  • Unlimited simultaneous connection
  • Compatible with all major operating systems
  • WireGuard and OpenVPN protocol

Private Internet Access

Try out a complex VPN software with numerous servers in almost all US areas, including Pennsylvania.
Check price Visit Website

2. Windscribe – Reliable free option with servers in Philadelphia

windscribe pennsylvania servers

If you’re looking to access content from Pennsylvania, Windscribe has you covered. It offers reliable connections in Philadelphia, making it easy to unblock local content. Just keep in mind that the free version has limited locations and data.

With servers in 70+ countries and 110 cities, you can connect to various regions, including the USA, giving you plenty of options for streaming and browsing.

One cool feature is R.O.B.E.R.T, which blocks ads and unwanted IP addresses on any device. Plus, the user-friendly interface makes it easy to use features like static IPs and split tunneling.

Check out some key features:

  • Reliable servers in many regions
  • Handy split tunneling options
  • OpenVPN and IKEv2 setup generators
  • Team account features
  • Easy-to-use free plans

Windscribe

Use this VPN to get your content from specific regions like Pennsylvania.
Check price Visit website

3. ProtonVPN – budget-friendly Philadelphia VPN

ProtonVPN offers 9 servers in Philadelphia, making it a solid choice for anyone looking for reliable access to local content. With its focus on security and privacy, it uses strong encryption methods like OpenVPN and IKEv2.

So, if you want to enjoy local news, you can easily tune into CBS Philadelphia without worrying about data breaches

This service gives you a Philadelphia IP and ensures that all your connections stay secure, which is a huge win when browsing or streaming in the region.

Key features:

  • 9 servers in Philadelphia
  • Strong security with AES-256-bit encryption
  • OpenVPN and IKEv2 support
  • No-logs policy for privacy
  • Reliable connections for streaming local content
  • Access to local news and channels like CBS Philadelphia
ProtonVPN

ProtonVPN

Browse securely and stream local content? Try ProtonVPN’s Philadelphia servers today!
Check price Visit Website

4. HMA VPN – reliable Scranton, PA servers

hma vpn scranton pennsylvania

Hidemyass VPN may not have the most servers in Pennsylvania, but it does offer one server in Scranton with 3 available IP addresses.

It’s great if you’re looking to access local news or catch up on Pennsylvania-based TV, especially if you’re outside of the state. With its simple setup, it can help you securely use state government services or access other Pennsylvania-specific resources, like Department of Revenue portals.

And although it’s a smaller player, it’s still considered one of the best Pennsylvania VPNs for anyone who needs flexibility and privacy while browsing locally.

Key features:

  • 1 server in Scranton with 3 IP addresses
  • Access to Pennsylvania-based TV and local news
  • Simple setup for secure connections
  • Privacy-focused with strong encryption
  • Flexible for browsing and accessing local resources

Try HMA VPN

Tip icon Tip
Alternatively, if you have access to devices located in Pennsylvania, you can use NordVPN’s Meshnet feature to get a Pennsylvania IP address for free. While Meshnet itself is free, you would need to set up a device in Pennsylvania to connect to it. This allows you to create a secure, private network between your devices, letting you access local content and services as if you were in the state.

Summary

To wrap it up, if you need VPNs with Pennsylvania servers, PIA, Windscribe, ProtonVPN and HMA are reliable options. You can also try creating your own network with NordVPN’s Meshnet.

All being said, don’t forget to check out the best VPNs for Windows 10 that can keep your privacy safe 24/7.

And you can also choose according to your laptop: there are some great VPNs for Acer laptops, other VPNs for Toshiba laptops, just as you can take a closer look at our guides including the best VPNs for Asus laptops or even for MacBook users.

Let us know which Pennsylvania VPN work for you and whether it was easy or difficult to connect and get a PA IP address.