There have been reports of Hulu error code p-dev310 and p-dev320 while using the streaming service. Hulu error code P-DEV310 can occur due to network connection issues, including problems with the Hulu’s servers being down or under maintenance. There might also be due to an outdated app or account-related issues. Here’s what we did to fix it!
What can I do to fix the Hulu error code p-dev310?
1. Reset your Hulu app
Right-click on the Windows icon and select the Installed apps option.
Scroll to the Hulu app, click on the More button, and click on the Advance options link.
Select the Repair button, wait for the process to complete, and reopen the Hulu app.
Resetting the software will troubleshoot issues with its performance. Check our guide about ways to fix Windows Settings not opening if you have difficulty accessing it.
2. Clear browser cache and cookies
Launch the browser app on your device. Click on the three dots on the top right side and select Settings.
Select the Privacy and Security option and click the Clear browsing data.
Then, choose All Time from the Time range at the top, check the boxes next to Cookies and other site data, and the Cached images and files option. Then click on Clear now.
Clearing the browser cache and cookies will remove all pre-store data and refresh the Hulu website if you are using a browser. Check our guide about how to fix Hulu not working on chrome in Windows.
Press the Windows + X and select the Installed apps option.
Scroll to the Hulu app, select the More button, and click the Uninstall option.
Then, select Uninstall to confirm your choice.
Close the Settings Window and open the Microsoft Store on your computer.
Click on the Search field, type Hulu, and press Enter.
Select Hulu from the search result and click Get to download and install it.
Wait for the process to complete, open the app and sign in with your credentials.
Reinstalling Hulu will fix bugs and corrupt setup files that can affect the app’s functionality. You can read about how to solve Microsoft Store not working on Windows.
Game Pass Perks are free content Microsoft gives away to Game Pass subscribers. However, you may encounter an error saying Sorry, we’re having trouble showing the details of this perk when trying to see it. Fortunately, there are some easy steps you can follow to fix it.
You might get Sorry, we’re having trouble showing the details of this perk error for some of the following reasons:
Outdated Xbox app – If the Xbox app on your PC is outdated, it can cause compatibility issues with the system and impede the app’s communication with its servers.
Xbox app and Microsoft Store corrupt installation files – If the installation files for Microsoft Store are corrupted, it will likely affect the services running under it. Likewise, the Xbox app performance may be interfered with due to the corrupt installation, resulting in trouble showing the details of the perk you’re trying to access.
Microsoft Account issues – For any Microsoft account user that is less than 18 years or whose location is in a country where the game’s perks are not supported, perks issue in the Game Pass may pop up.
Change your date of birth and country/region, then click the Save button.
Close the browser and launch the Xbox app to see if the issue persists.
Changing the location and age of your Microsoft account will fix account requirement issues that may pop the error, Sorry, we’re having trouble showing the details of this perk.
4. Repair the Microsoft Store app
Press Windows + R keys to open the Run dialogue box, type ms-settings:appsfeatures, then press Enter.
Select the Microsoft Store, then click on the Advanced options.
Go to the Reset tab and click the Repair button.
Restart your PC after the repair process and check if the perk issue is resolved.
Repairing the Microsoft Store app will fix any configuration issues and corrupt app files, causing your perks details not to show.
Sometimes when you try to open a PowerPoint presentation, you might an error message stating something along the lines of PowerPoint ‘hlink.dll’ can’t be loaded.
This happens due to one of three things; either the PowerPoint presentation file is missing, damaged in some way, or the wrong version. Luckily, it’s possible to fix this error.
What causes Hlink.dll files to not load?
There are only a handful of reasons why hlink.dll files would not work, and we’re going to cover every single one in the list below;
Corrupt files weigh down your computer – Corrupted files can cause all sorts of compatibility problems. You can clean up the corruption by running a DISM scan.
Microsoft Office 365 is out of date – Be sure to download the latest Windows and Office 365 updates from Microsoft. They typically bring all manner of patches and bug fixes.
One of the Office 365 apps is faulty – Even if PowerPoint runs fine, malfunctioning apps can negatively affect each other. It’s recommended that you reinstall the problematic app.
How can I fix a malfunctioning Hlink.dll file?
Luckily for everyone, there are multiple ways to fix malfunctioning Hlink.dll files. You have your fair share of simple-to-do solutions to more complex ones if the easy ones don’t work:
Run a PC repair tool to seek out and repair missing or corrupt files. Windows 11 has a native app that does this, but it’s not very good. It’s better to use a third-party app.
If you previously created a restore point, run it to bring your Windows 11 computer back to an earlier state. Be sure to check out our guide on how to create a restore point if you don’t have one.
Also, be mindful of websites online claiming to have a new DLL for you to download. More often than not, this is malware, so be wary of these pages.
You can delete the file from your hard drive. See if it’s possible to replace the file. Otherwise, you’ll have to recreate your PowerPoint presentation from scratch.
1. Re-register the DLL file
Bring up the Command Prompt on the Windows Search bar and select Run as administrator.
If a User Account Control window appears asking if you want to make changes, click Yes.
Type in the following command: regsvr32 Hlink.dll
Hit Enter on your keyboard. Wait for the Command Prompt to finish its process.
Restart your computer. Upon reboot, check the .dll file and see if it works.
2. Run PowerPoint in Clean Boot Mode
Launch System Configuration from the Windows Search.
On the General tab, choose Selective startup.
Make sure the Load system services option is checked off.
Now go to the Services tab. Check off Hide all Microsoft services.
Click the Disable all button. Afterward, select Apply, then OK.
Restart your computer.
After rebooting, see if the problem persists. Check to see if PowerPoint works fine or if it’s another app.
Once you’ve discovered the problematic software, uninstall it, then restart your computer again to return to normal.
3. Repair Microsoft Office
Launch the Control Panel and select Programs and Features. If you don’t see that entry, make sure View By is set to Large Icons.
Right-click Microsoft Office, and in the context menu, select Change.
If a User Access Control window appears, select Yes.
If your computer is connected to the internet, choose Online Repair. If not, click Quick Repair instead.
Select Repair.
Click Repair again on the new window that appears. The whole process may take some time.
Follow the steps as they appear. Once done, run setup.exe.
Go through the installation wizard by clicking next. Accept the license terms as well.
Give Windows 11 Setup enough time to finish.
Once it finishes, select Install to repair the operating system. If you select Change what to keep, you can choose which apps and files are saved from deletion.
You can choose to keep personal files and apps, for example.
What can I do if PowerPoint won’t insert videos from a chosen file?
Some users have experienced an error with PowerPoint where the software will refuse to insert certain videos. This may be because the file is corrupted, the format isn’t supported, or it’s too big.
There are a number of things that you can do to fix this, like going to an online video converter to change the video format to enable Windows Media Player controls on PowerPoint.
In the same vein, you should also learn what to do if PowerPoint is unable to play media on Windows 11. Make sure the file format is supported first. Then check the codecs and see if you have the right ones.
Feel free to comment below if you have questions about other PowerPoint errors. Also, leave comments about reviews you’d like to see or information on other Microsoft Office apps.
The Dynamic Mirror setup offers a certain level of protection for the data available on the disks. However, it is common for users to run into the Dynamic Mirror showing failed, making it impossible to use its features.
So, we will explore the general steps to fix this issue if you encounter it. Alternatively, you should check our guide on the best Mirror backup software.
Why is the Dynamic Mirror showing failed?
When Dynamic Mirror shows failed on your PC, the following are the probable causes:
The Dynamic disk is offline – Dynamic disks allow volumes to have noncontiguous extents on one or more physical disks. If these disks are offline, they will be inaccessible.
Corrupted system files – System files are responsible for the services and processes running on the computer. Hence, your system’s performance can easily be affected if the system files are corrupted.
Damaged or compromised Dynamic disks – The dynamic disks becoming damaged can affect the volumes it operates and manages. So, you may encounter the Dynamic Mirror showing failed if the disk is damaged, preventing it from functioning correctly.
Power outage issues – Abrupt system shutdowns, power failure, or unexpected shutdowns during the mirroring process can cause the dynamic disk status to show failure.
These factors may vary on different computers. Nonetheless, we’ll discuss some basic steps to fix the issue and get the dynamic disk to work correctly.
What can I do if the Dynamic Mirror showing failed?
Proceed with the following preliminary checks before trying any advanced troubleshooting steps:
Left-click the Start button, type Command Prompt, and click the Run as administrator option.
Click Yes on the User Account Control prompt.
Type the following commands and press Enter: chkdsk C: /r
Restart your PC.
Running the chkdsk command examines your disk volume and disk use. Also, it provides a status report specific to each partition and shows the errors found in the system file.
Some of our readers have complained that they encountered the cloud operation was unsuccessful error when trying to access or upload files on OneDrive. Hence, we will address this by exploring the potential causes of the error and providing solutions to fix it.
What causes cloud operation to be unsuccessful on OneDrive?
There could be various reasons for cloud operation on OneDrive to be unsuccessful. Most of them are:
Network connection issues – When your computer cannot connect to a network, it results in errors such as network connection timeout or unstable network. Hence, leading to interruptions or timeouts during the file upload.
Firewall interference – Windows Firewall is a network security system that monitors and controls incoming and outgoing network traffic based on predetermined security rules. However, the Windows firewall can mistakenly block OneDrive’s network activities.
Windows Registry issue – Windows operating system has a centralized database system that stores software configuration settings and user preferences known as the Windows Registry. If there is a corrupt registry issue, it can cause Outlook to malfunction.
Irrespective of the causes, we will take you through the steps to fix them below.
How can I fix the Cloud operation that was unsuccessful in OneDrive?
If the error persists after trying the preliminary checks, try the fixes below:
1. Relog in your account
Right-click the OneDrive app icon and select the Help & Settings gear icon.
Click on Settings and select the Account tab.
Click the Unlink this PC option and select the Unlink account to sign out.
Input your OneDrive email and click the sign-in button.
Type in your password and select the sign-in button.
Follow the on-screen instructions till you get to the last setup and select the Open my OneDrive folder option.
Re-linking your account will fix any login credentials issues causing the error and refresh the account setup.
2. Reset the OneDrive app
Press Windows + R key to open the Run dialog box. Copy and paste the following into the box %localappdata%\Microsoft\OneDrive\OneDrive.exe /reset and press Enter.
The OneDrive icon will reappear when the process is complete.
If the icon doesn’t reappear, open the Run dialog box, copy and paste the following strings: %localappdata%\Microsoft\OneDrive\OneDrive.exe, and press Enter.
Resetting the app will fix corrupt cache data that can cause OneDrive not to sync to the Cloud. Also, it creates a new data factory for the app.
You can read about how to reset an app in Windows 11 if you have issues with the above steps.
3. Enable the Always keep on this device option
Press the Windows + E key to open Windows Explorer.
Find the OneDrive folder and click on the drop-down button before the folder.
Right-click the affected file and select Always keep on this device from the context menu.
Right-click the affected file again and select Free up space.
Enabling the Always keep on this device option allows you to access your data while offline.
Reinstalling the OneDrive app troubleshoots issues with bugs and corrupt installation files that can affect the app’s functionality. For a more comprehensive approach to reinstalling OneDrive on Windows, kindly follow the steps in this guide.
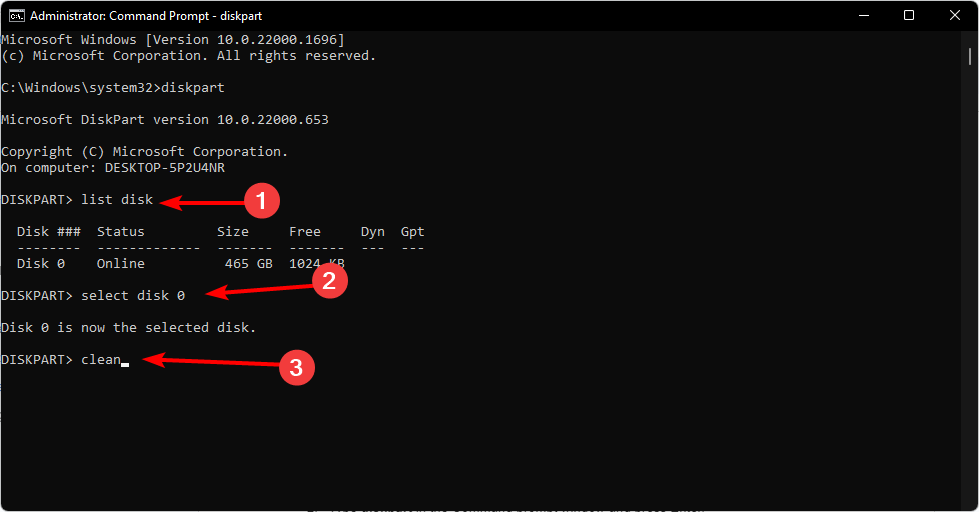
Diskpart is a command-line utility that allows you to manage your computer’s storage devices. However, people may accidentally execute the Diskpart clean command erasing all data on the selected disk. If you are in this situation, we will explore how to undo Diskpart clean and recover your partition.
It is possible to recover files after a Diskpart clean, but it depends on the extent of the damage done to the disk. When you run the clean command in Diskpart, it removes all partition and volume information from the selected disk, wiping it clean.
However, some data recovery tools help you recover lost files. Additionally, if you had previously created a backup of the disk, you may be able to restore your lost files via the backup.
Furthermore, it’s worth noting that the chances of successfully recovering data after a Diskpart clean are not guaranteed and will depend on factors such as the severity of the damage and how soon you attempt to recover the data.
How can I undo a Diskpart clean?
Apply the following before proceeding with advanced troubleshooting:
The following check will aid in undoing the erased partition.
1. Undo Diskpart clean via Command Prompt
Right-click the Start icon, and click on Run. Type diskmgmt.msc and press Enter.
Locate your deleted partition and remember its size. The deleted partition will be an unallocated space.
Press the Windows key, type cmd, and select Run as Administrator from the right pane.
Type the following in the Command Prompt and press Enter: diskpart
Then, input the next command and press Enter to show the disk partition: list disk
Input the next command and press Enter: select disk X
Type the following in the Command Prompt and press Enter: list volume
Next, input the line and press Enter (Y signifies the number of the lost partition): select volume Y
Lastly, type the following and press Enter (H signifies the drive letter that is unallocated): assign letter H
The steps will undo the Diskpart clean command on Windows 11 PC and restore the deleted data. Check our guide on how to fix Command Prompt not working on your PC.
2. Via the third-party app
You can recover Diskpart clean using a third-party partition tool. Most third-party software tools available in the market are free, although you can get paid ones as well for more efficiency.
We have a recommended list of the best file recovery software for Windows 11 here. Do not hesitate to check it out.
If you want to know how to clear or remove the recent files in Windows 11, you’re in the right place.
Normally, this feature enables quick access to your files, but if you’re sharing your PC with someone else and don’t want to expose recent activities, keep reading.
How can I clear recent files in Windows 11?
1. Clear File Explorer history
Left-click the Start button, type File Explorer Options, and select the first result that appears.
Click on the General tab, go to the Privacy menu, and click the Clear button.
Close the File Explorer Options window and check if your recent files are still available.
The recently opened files list in File Explorer will delete when you clear File Explorer history. Read about some fixes for Windows Explorer running slowly on your computer.
2. Delete search history
Left-click the Start button and click the gear-shaped icon to open the Settings app.
Select the Privacy & security tab on the left pane and click on Search permissions.
Under the History tab, click on the Clear device search history button.
Deleting your search history clears the list of apps and files you recently searched about, preventing intruders from knowing. You can also clear the search history from your browser.
3. Delete activity history for your account
Press Windows + I key to launch the Windows Settings app.
Select the Privacy & security tab on the left pane and click on Activity history.
Click the Clear history button to delete your activity history from all your devices.
To prevent the further storage of activity history for your account, toggle off the switch for the Activity history option.
The activity history for your account can also store lists of recent activities and files you’ve engaged on your system. So, cleaning it will remove the list of recent files on Windows 11.
Press Windows + R key to open the Run dialog box, type Regedit, and press OK to launch the Registry Editor.
Navigate to the following path: HKEY_CURRENT_USER\Software\Microsoft\Windows\CurrentVersion\Explorer\TypedPaths
Right-click the url1, url2, url3 files and select the Delete option from the drop-down menu.
Deleting the following keys will clear any recent files listed on the PC. Read about how to fix a corrupt Registry Editor on Windows 11 if you encounter a problem.
5. Delete File Explorer’s Address bar history
Press the Windows + E key to open File Explorer.
Right-click on the Explorer address bar and select the Delete History option from the drop-down menu.
Click OK to confirm it.
The address bar history contains the files you searched for recently depending on how long it stores. So, clearing it will remove any information about recent files in Windows 11.
Check your recently opened files under the Recent section in Quick Access.
If your recent files don’t show in the Recent section, left-click the Start button, type File Exploreroptions, and select the first result that appears.
Go to the General tab, check the box next to the Show recently used files option, and click Apply.
Open some files and repeat steps 1-2 to see if you can find your recent files.
Deleting recent file history for a specific app will clear the details of recent activities and the files you used.
Device Manager is a powerful inbuilt tool with Windows operating system that enables users to manage hardware devices connected to their computer.
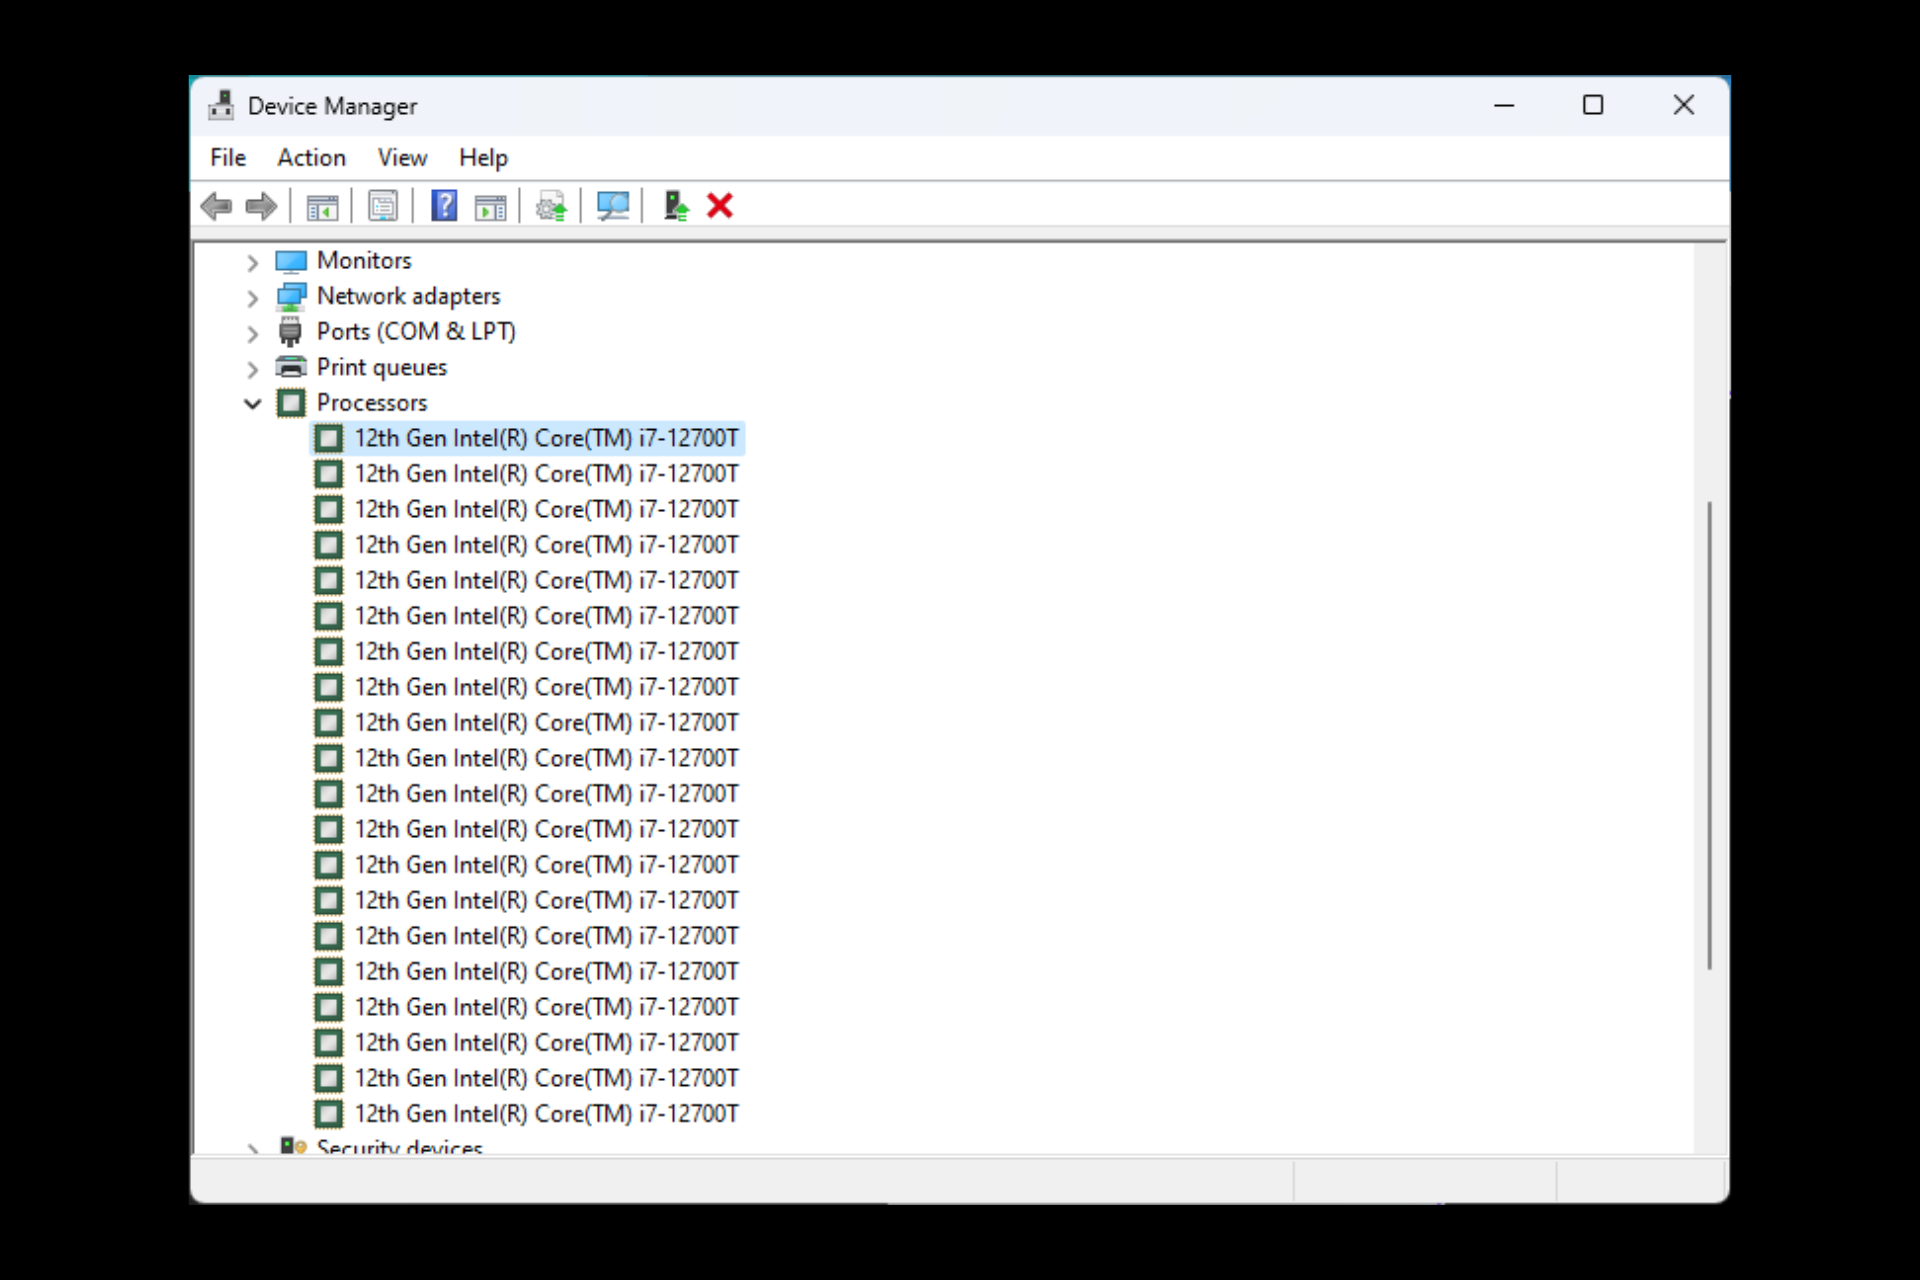
Modern processors have multiple cores and threads; if a processor has 8 cores with 2 threads per core, that means 16 threads. You will see 16 processors in Device Manager, as Windows treats every thread on the processor as a separate small processor.
If you see a list of processors on Device Manager and want to see if these are legit, then this guide can help! We will also mention how to fix the problem if processors are not working properly and have compatibility issues. Let’s get started!
Why does my Device Manager have multiple processors?
There could be various reasons for multiple processors showing in Device Manager; some of the common ones are:
Multi-core processors – Modern processors come with multiple cores, which are individual processing units within a single physical processor. Hence you see multiple processors.
Hyperthreading – If your processors use hyperthreading, which enables a single physical processor core to act as two virtual cores, the operating system sees two processors instead of one.
Multiple physical processors – If you have a high-end system, it could have multiple physical processors installed. Hence you will see multiple processors in Device Manager.
Virtualization – If your computer has virtual machines, you can see multiple processors in Device Manager, and each reflects the virtual processors allocated to each virtual machine.
What can I do if Device Manager has multiple processors?
Before moving to the actual steps, you should go through the preliminary checks:
Restart your computer.
Check your PC for overheating.
1. Check if the processors are legit
1.1 Use the Boot menu
Press Windows + R to open the Run box.
Type msconfig and click OK to open System Configuration.
On the System Configuration page, go to Boot.
Click Advanced options.
Remove the checkmark next to the Number of processors.
Click OK.
Click Apply and OK to confirm the changes.
1.2 Check cores are enabled, and the CPU uses Hyperthreading
Press Windows + I to open Settings.
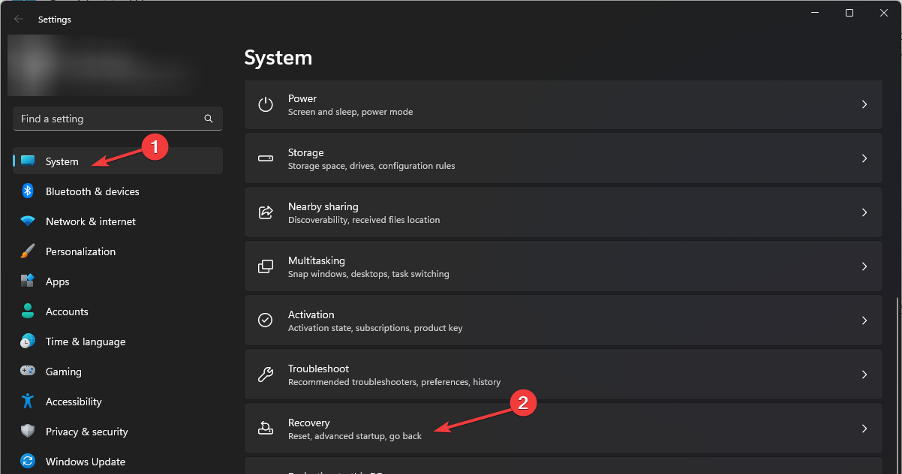
Go to System, then click Recovery.
Under Advanced options, click Restart now.
Now under Choose an option page, click Troubleshoot.
Select Advanced options.
On the Advanced options page, select UEFI Firmware Settings.
Click Restart.
Select the appropriate option to reach BIOS.
Locate and click System Configuration, then select BIOS Configuration.
Click Processor options, and select Enabled Cores per Processor. Enter the number of cores to enable. To enable all cores, enter 0 and save it.
Now go to Intel (R) Hyperthreading Options, click Enabled and press F10.
2. Fix issues with the processor if any
2.1 Scan for malware
Press the Windows key, type Windows Security, and click Open.
Go to Virus & threat protection and click Scan options.
Select Full scan and Scan now.
It will scan your computer, look for infections and delete them if prompted.
Type devmgmt.msc and click OK to open Device Manager.
Go to Processors and expand it. Select the processor and click Update driver.
Click Search automatically for drivers.
Follow the on-screen instructions to complete the process.
If you don’t get the best results by updating your drivers manually, you can try automatic assistants like Outbyte Driver Updater, specially created to locate the latest versions for peak PC performance.
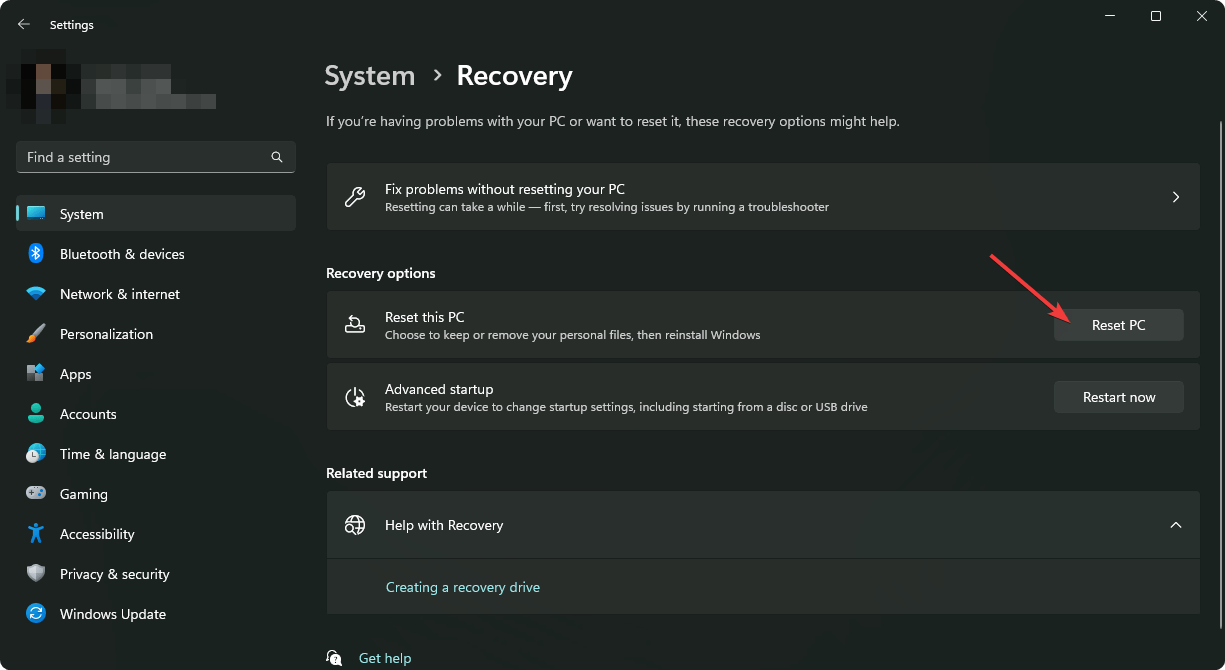
Under Recovery options, go to Reset this PC, and click Reset PC.
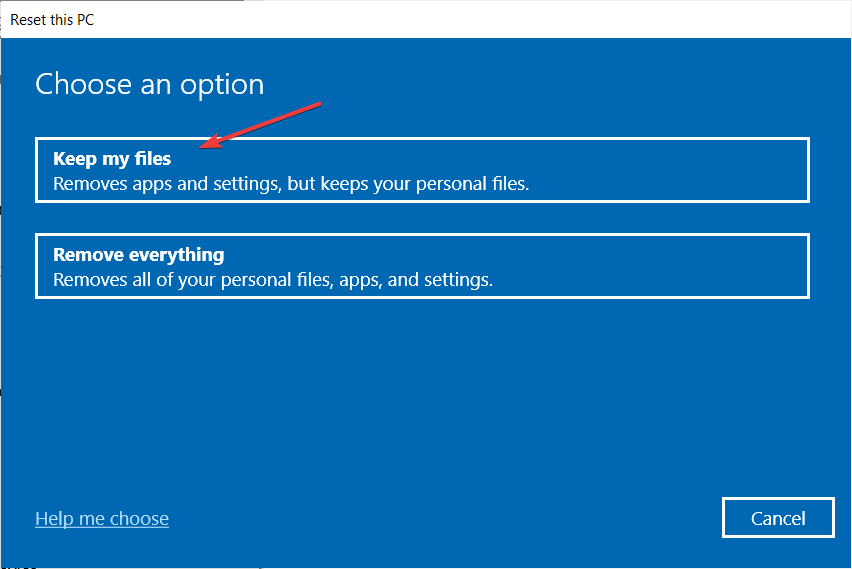
On the Choose an option screen, select Keep my files.
Now, click Cloud download and click Next.
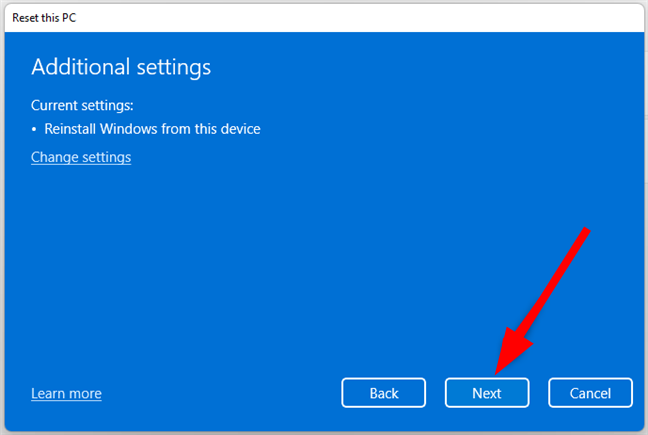
the Additional settings page, click Next.
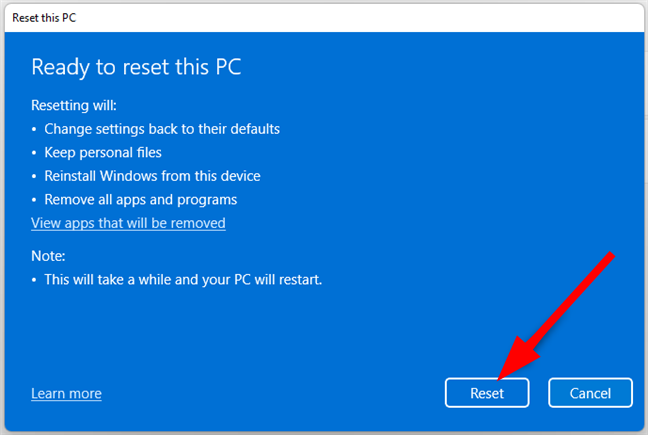
On the Ready to reset this PC screen, click Reset.
The repairing process will start, and your PC will be rebooted several times.
So, this is how you can check why you see multiple processors on your Device Manager and if they are legit. If you have any questions or concerns, please let us know what worked in the comments section below.
If you are also experiencing the same issue and are looking for ways to fix the slowdown of your PC after the Windows update, then you are in the right place. This guide will show you how to do that in some simple steps. Let us get right into it.
Why has the Windows update slowed down my PC?
Well, there are several reasons your PC could slow down after installing the latest Windows update. Some of them are listed below.
Overheating: Your PC might be overheating because some apps might consume too many resources.
Virus or malware: The presence of viruses or malware can not only be harmful to your data, but it could also slow down your PC by injecting multiple infected files.
Old PC or laptop: The time has come for your PC or laptop to be replaced as they might be running too old hardware.
How can I fix my PC if the Windows update has slowed it down?
1. Uninstall the update
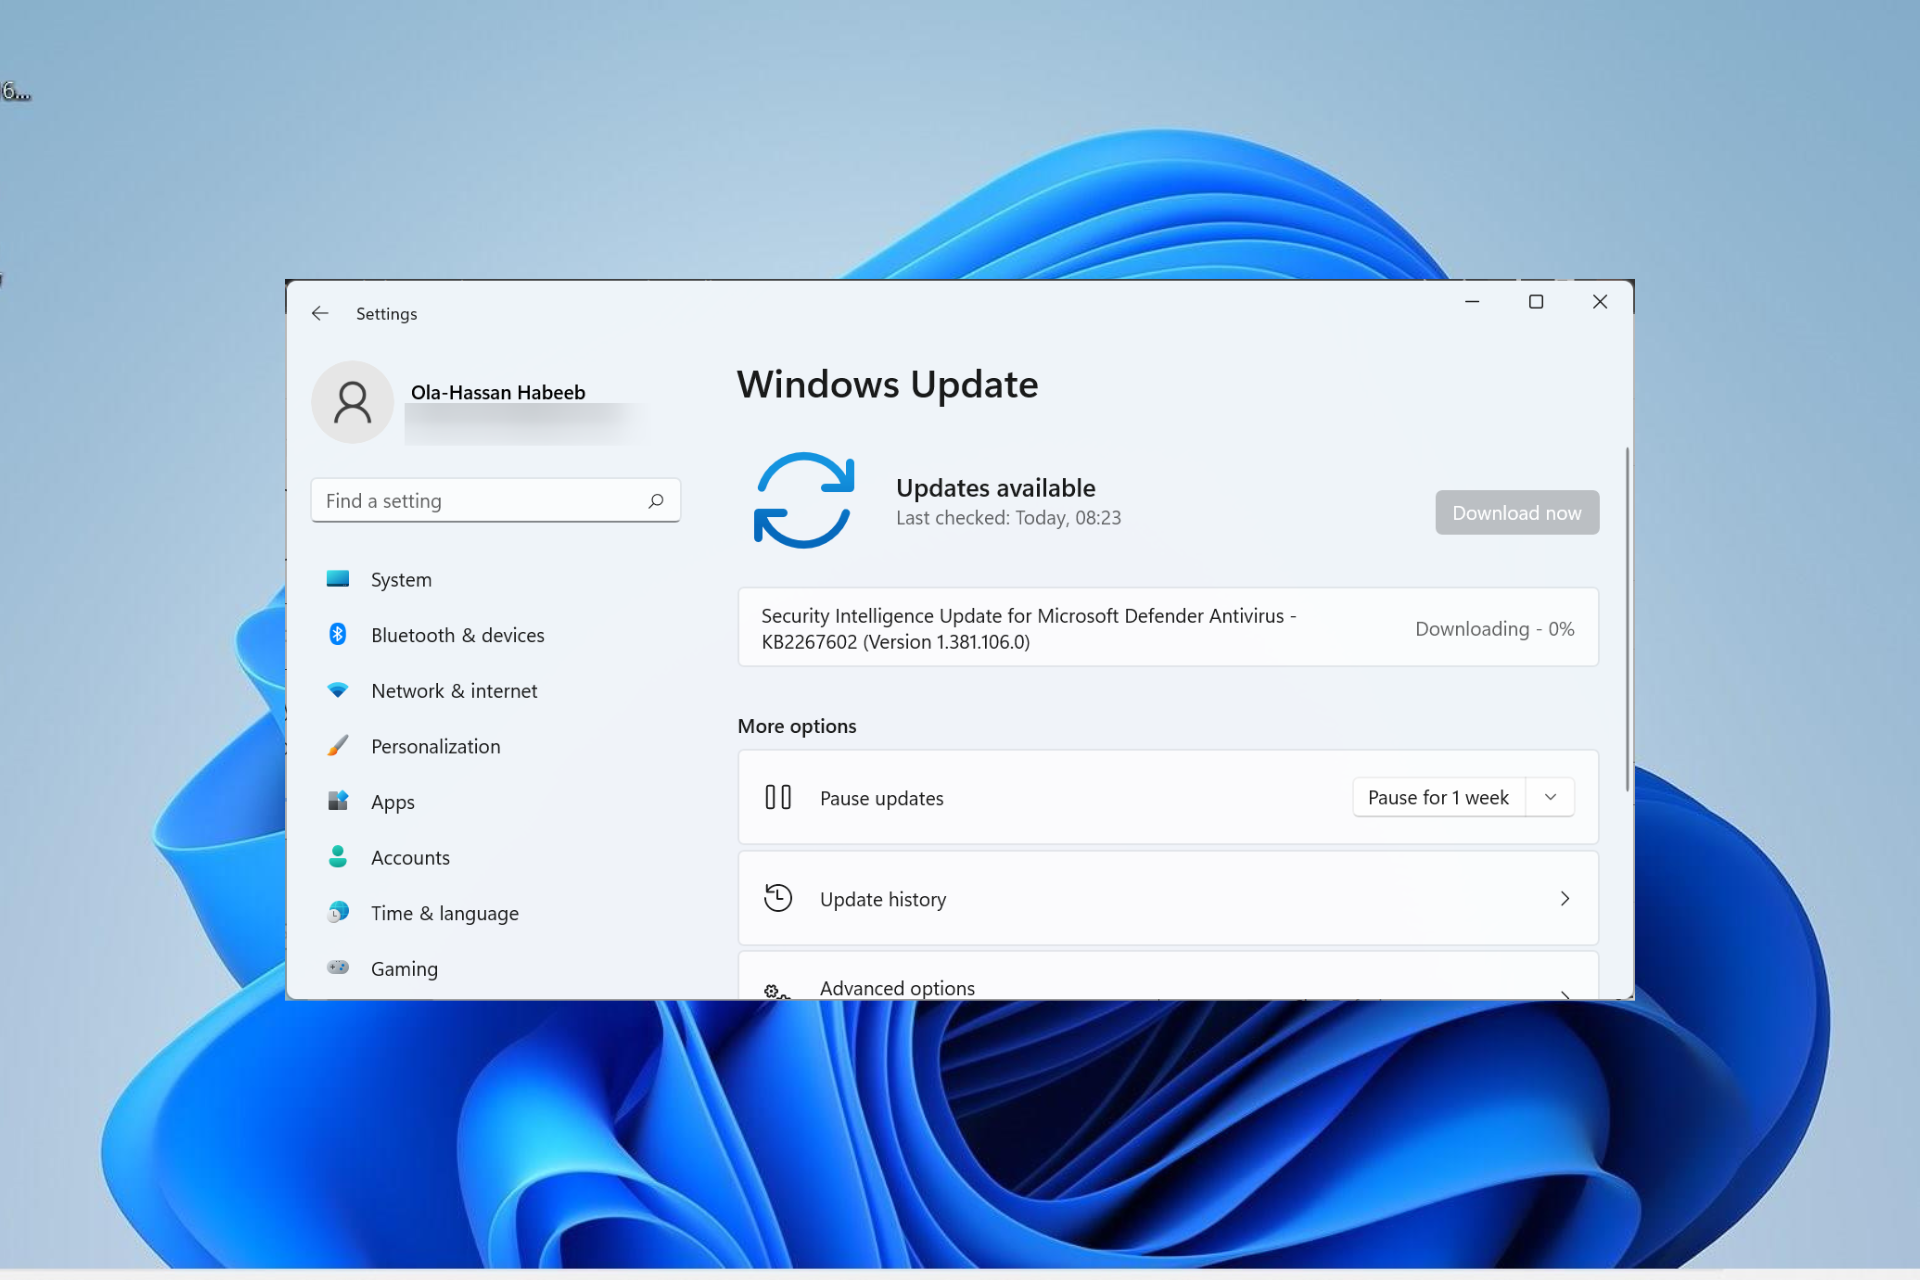
Press the Win + I keys to open the Settings menu.
Click on Windows update on the left pane.
Select Update history on the right.
Under Related settings, select Uninstall updates.
Choose the recently installed update and hit the Uninstall button.
Follow the on-screen prompts.
Restart your PC and see if it helps.
Uninstalling the problematic update is your best option if your PC has slowed down after installing it. You can easily do that by following the above steps.
2. Repair corrupt system files
Open the Start menu by pressing the Win key.
Open Command Prompt as an admin.
Type the below command and press Enter. sfc /scannow
Wait for the process to complete.
Restart your PC.
With the SFC Scan tool, you can quickly fix all the corrupt or missing system files on your PC that might have been affected by the latest Windows update.
Of course, this process can be greatly simplified when using a specialized dedicated tool that scans your system, identifies any broken files, and replaces them with healthy files from a significant database.
3. Clear Windows Update cache
Press the Win + R keys to open the Run dialogue.
Type services.msc and press Enter.
Open Windows Update.
Select Stop.
Click Apply and OK.
Press Win + R keys to open the Run dialogue.
Type C:\Windows\SoftwareDistribution and hit OK.
Delete all the files inside the folder.
Restart your PC.
The Windows update cache files might have gone corrupt, because of which you are facing a slow down of your PC after the Windows update. Clear it and check if this fixes the issue or not.
Type Optimize drives and open the appropriate app.
Select your system disk.
Click Optimize.
The Disk Optimizer helps improve the computer speed by optimizing the disk to some extent. Therefore, you can try using it to speed up your PC.
5. Disable background apps
Press Ctrl + Shift + Del to open the Task Manager.
Go to the Startup apps tab.
Locate all the apps that you wish to disable, and hit the Disable button.
If you have multiple background apps running on your PC, then your PC will slow down irrespective of the Windows update installed. Disable all the unnecessary apps and check whether this fixes the issue.
6. Turn off visual effects and transparency
Press Win + I keys to open Settings.
Click on Personalization.
Click on Colors.
Turn off the Transparency effect.
Restart your PC.
Several users have reported that after the Windows update, they turned off the transparency effect, eliminating the PC slow-down issue.
7. Scan for virus
Open the Start menu by pressing the Win key.
Open Windows Security.
Click on Virus & threat protection.
Click on Quick Scan.
Wait for the scan to complete.
Apply the prompted fixes.
You can also click on Scan options and select Full scan for an in-depth scan.
If you are looking for a dedicated antivirus tool, look no further. We have listed some of the best antivirus tools you can have on your PC and protect your PC from viruses or malware.
8. Reset your PC
Press the Win + I keys to open Settings.
Click on Recovery on the right side.
Under Recovery options, select Reset PC.
Choose the Keep my files option.
Hit Next.
Let your system reset.
If nothing works, then you should resort to resetting your PC. This will eliminate all the viruses or malware, infected files, or corrupt system files that may be causing the issue of slowing down your PC after the Windows update.
That is it from us in this guide. If your Windows 10 PC is running slow, you can check out our guide and fix the problem among the 12 solutions mentioned.
As we’re sure you know, a few weeks ago, the Redmond tech company revealed a significant redesign idea for its browser.
This idea features reworked tabs, a large Bing Chat button, rounded corners for web pages, and other changes.
However, the redesigned Edge browser turned out to be a bit controversial, as users quickly jumped on Microsoft for enforcing questionable design choices with no options to disable them.
Thus, after dealing with huge amounts of customer feedback, Microsoft has decided to do something and is now fixing the situation.
Note that the tech giant has already addressed the problem around the Bing button, since one of the recent Edge Canary updates brought the option to disable it with a single click.
Now, Microsoft is making another move to show it listens to consumer feedback. Edge Canary 113.0.1743.0 lets you toggle off rounded corners for web pages.
An easy way to toggle rounded corners in Edge browser windows (likely the ones seen in Dev) is coming soon. Seems like this was added in Canary 113.0.1743.0. Neat! https://t.co/HtDV8bqHaPpic.twitter.com/UIpNnvm1tZ
Thus, you can toggle on or off rounded corners for browser windows in the Appearance settings section. Simply access the Settings app, then go to the Appearance section.
It is there that you’ll find the Use rounded corners for browser window option, and restart your browser to apply the changes.
Exactly like with other new features in Edge, you can help Microsoft better understand what users think about changes in the browser by giving the option a thumbs up or down.
You might even think that it’s safe to say that the rounded corners for websites, or browser windows, as Microsoft calls them, are the most hated part of the redesign.
Many think that this design robs you of screen space and creates visual confusion since most computer screens are still perfectly squared, not rounded.
That being said, some people have no problem with spicing things up a bit, so Microsoft has decided to do the only right thing and let users decide for themselves.
What is your opinion on this design choice for the Edge browser? Share your thoughts and opinions with us in the comments section below
Why does the World of Warships error connecting to the server appear?
Below are some of the causes of the World of Warships error connecting to the server message:
Corrupt game files: Sometimes, World of Warships can’t connect to the server because your game file is corrupt. You need to verify the integrity of the files on Steam to solve this problem.
Outdated network driver: If your network driver is outdated or faulty, you might experience this issue. You need to update your driver to the latest version to solve this problem.
Issues with location server: In some cases, this issue might occur because the World of Warships server is temporarily unavailable in your region. This has happened to some EU servers and might be the case for you too. The solution to this is to try another game server.
How do you change servers in World of Warships?
Know that you can always change the region on the log-in screen. So, once you have logged out of your account, click the little arrow in the top left corner.
Next, click on the currently selected region, which will give you the option to switch from one server to another.
Creators have also recently offered India-based players on the Asia server an opportunity to transfer to the EU server, making the game even more diverse.
How can I fix the World of Warships Error connecting server message?
1. Reinstall your game
Press Windows + I to access Settings.
Select the Apps category, then Installed Apps.
Locate World of Warships, click on the three dots next to it, and select Uninstall.
Now you have to download the game again, and the issue should be resolved.
2. Verify the integrity of the game files
Launch Steam.
From your Library section, right-click on the game and select Properties from the menu.
Select the Local files tab and click Verify integrity of game files.
Steam will now verify your game‘s files.
Once it’s done, launch World of Warships.
If you’re using the Steam client to access your game, this error might be related to corrupted files in your Steam library. To do the check-up, follow the above steps.
3. Allow some apps through your firewall
Open your Start Menu.
Now select Control Panel.
Then click on Windows Defender Firewall.
Now, click on Allow an app or feature through Windows Firewall.
Click on the Change Settings.
Check the boxes next to the applications you want to allow to access the Internet.
Click OK to save your new settings.
Error connecting server message can appear due to problems with your firewall. To fix it, add World of Warships to the list of exceptions.
4. Try another game server alternative
If World of Warships does not connect with the server, maybe you want to try another game server alternative that can help you provide the best game experience.
We suggest you try Host Havoc, a high-performance server with excellent 24/7 technical support that helps you fix the issues quickly and fast.
Host Havoc has a custom control panel that is very easy to use to change maps and install further modifications to your server.
Here are some of its main features:
24/7 Customer Support
Daily Backups Available
Complete Control of Your Server
Full FTP Access
Instant Server Setup
Easy Configuration
Switch Games Any Time
Steam Workshop Availability
Free DDoS Protection
With a powerful control suite and unique features and installers, this server hosting is quite simple for novice and advanced users.
Host Havoc
High-performance hosting services with DDoS-protected networks and 24/7 support.
In the search box on the taskbar, select Device Manager.
Select a category to see the names of devices, then right-click on the one you’d like to update.
Select Update driver.
Now, click on Search automatically for drivers.
Once it’s done updating, you’re all set.
If all else failed and you’re still getting an Error connecting the server in World of Warships, you can try updating/reinstalling your network drivers.
To reinstall your network drivers, follow these steps:
Open the Device Manager.
Right-click on the name of the device and select Uninstall.
Now restart your machine.
Windows will attempt to reinstall the driver at start-up.
This guide will help with issues such as World of Warships can’t connect to a server, Code 1021 World of Warships, or Wargaming being unable to connect to the content service.
It is also helpful in situations like World of Warships code 526 and other types of World of Warships connection issues.
Not only PC players have trouble playing this game, as World of Warships Legends errors connecting to a server on PS4 and World of Warships legends errors connecting to a server on Xbox One have also been reported.
That being said, the most common error code you could get for this title is a World of Warships error connecting server update client. But now you know how to deal with it, so it’s already looking better.
We hope you managed to fix the Error connecting server error using our solutions. If you found our solutions helpful, let us know in the comments section below.
Microsoft promotes its in-house Photos app as the best possible solution for storing your photos in Windows. While Microsoft is a solid option, some users might want an alternative photo app. And this is where Google Photos for Windows 10 comes into the picture.
Google Photos natively works the best on Android devices, where it’s also most used. But not many users know that you can use Google’s photo-storing service on Windows desktops, too. So, here we are with all the information you need
Can I get Google Photos on my PC?
Yes, you can easily get a Google Photos download for PC running Windows 10 or other recent iterations. Remember, it’s not the Google Photos standalone app but the Google Drive that allows users to have automatic Google Photos backup to save all their photos.
Though the download link is not difficult to find, many users had trouble locating it and were, as a result, unable to experience the Google Photos app on Windows 10.
How can I download Google Photos on Windows 10?
To download the Google Photos app, simply head to the official website, and click on the Download button.
Once the setup is downloaded, run it, and follow the on-screen instructions to complete the installation.
Now, run the tool, complete the Google Photos login, and things should be all set.
How do I use Google Photos in Windows 10?
Tip
Google Photos doesn’t yet have a desktop app for viewing and downloading images, but the official website works just as well.
1. View images on Google Photos
Open a reliable web browser, head to the Google Photos website, and sign in.
You will now have all the previously uploaded photos, whether manually or automatically across devices, appear here.
To find a photo, simply use the text field at the top, or select a recognized face from the list to perform a dedicated search.
That’s how you can view and perform images and perform a Google Photos search on the website.
2. Create an album
Open Google Photos, and navigate to the Albums tab from the left.
Click on the Create album button.
Now, add a title and choose a method to upload photos to the album from the following two:
Select people and pets: Google will list out the faces it has identified from the images already uploaded to Google Photos. The one(s) you select will be automatically added to the album. Also, if new images uploaded to Google Photos contain the same face, these two will be included in the album.
Select photos: You will have to manually select and upload photos to the album.
That’s how you can create a Google Photos album and add photos to it. Besides, the process is much more seamless on Google Photos, given the automatic detection of faces.
3. Upload images to Google Photos
Open the Google Photos website, sign in, and then click on the Import button near the top-right.
You will now have two options, either to upload photos from the Computer or Google Drive.
3.1 From computer
When you select the Computer option, navigate to the folder/path the photo is stored, select it, and click Open.
The upload status will now be listed at the bottom left.
3.2 From Google Drive
After you select Google Drive from the upload options, choose the desired photo(s), and then click Upload.
It will now list the upload status in a small box in the center.
Since it serves as a great backup tool, many prefer uploading images to Google Photos, and syncing them across devices for enhanced accessibility.
Select the image you want to download in Google Photos.
Click on the ellipsis near the top-right.
Now, select Download from the flyout menu.
Alternatively, you can select an image and press Shift + D to download images from Google Photos.
That’s how you can easily download images saved on Google Photos to any of the devices.
What is the alternative to Google Photos in Windows 10?
While Google Photos is a great way to save and access photos across devices, you may want to check the other options. Apple users have iCloud as an option, and even for Windows PC users, there is a bunch of reliable photo backup software.
These may not provide as simple an interface as Google Photos, but they are just as effective and used by people worldwide. The benefit of third-party backup software is that it allows you to save much more than simply photos and comes in handy when your PC won’t turn on.
We will keep adding information as new features are added to Google Photos to help users access it seamlessly in Windows 10. You can also learn how to add Google Photos to Windows 11 Photos app to manage your cloud images alongside your local library.
Installing new applications on Windows 10 is pretty simple, and the installation process usually goes without any problems.
However, our readers reported The installer has insufficient privileges to access this directory error that occurs while installing certain applications, so let’s see how to fix this error.
What causes The installer has insufficient privileges to access this directory error?
The error is caused by a lack of privileges for the installer to modify certain resources. However, there are some other reasons to take into account:
App interference – Other software competing for the same resources can cause this issue. Identifying and disabling them can fix the problem quickly.
Certain services are not running – If the Windows Installer service can’t be accessed or fails to start, it will trigger Error 1303. The installer has insufficient privileges to access this directory.
A required file is read-only – Installer has insufficient privileges to modify this file is a variation of this error that a read-only file may cause that the installer can’t edit.
Now that we know what we’re facing, let’s follow the solutions below to fix it for good.
How can I fix The installer has insufficient privileges to access this directory error?
1. Check your permissions
Press the Windows key + E to start File Explorer and locate the installation directory of the software you are trying to install.
Right-click it and choose Properties. Keep in mind that sometimes you might have to change the security permissions for the parent folder as well to fix this problem.
Go to the Security tab and click Edit.
In Group or user names section, select SYSTEM or Everyone and click the Full control in the Allow column.
If you don’t have SYSTEM or Everyone available, you’ll need to add it. To do that, click the Add button.
In the Enter the object names to select field enter Everyone or SYSTEM and click the Check Names button. If your input is valid, click the OK button.
The SYSTEM or Everyone group will now be added. Select it and check Full control in the Allow column.
Click Apply and OK to save the changes.
Sometimes this error can be caused if you don’t have the necessary permissions over the installation directory. According to Microsoft, to install certain software, the SYSTEM group or Everyone group needs full control over the installation directory.
For instance, if you’re trying to install an application to Program Files/My_Application directory, you might have to change the permissions for Program Files directory.
After making the necessary changes, try to install the application again and check if the problem is resolved.
2. Disable or remove third-party software
Third-party applications can sometimes interfere with your setup process, but you can fix this problem simply by closing them. One common cause for this error can be your security software, therefore, we advise you to disable it and check if that solves the issue temporarily.
Users reported that tools such as MyWinLocker can also interfere with the setup process and cause this error to appear. Therefore, if you have this tool installed, remove it.
Now you can do this the old-fashioned way or by using specialized uninstaller software to ensure no software traces are left behind to tamper with your activity.
Press the Windows + E key combination to start File Explorer and locate the parent folder of the application, right-click it, and choose Properties.
Go to the Security tab and click Advanced.
Next to the owner’s name click the Change link.
In the Enter the object names to select field enter Administrators, and click Check Names. If your input is valid, click OK.
The owner should now be changed to Administrators. Check Replace owner on subcontainers and objects and click Apply and OK to save changes.
You’ll get a message to close the current window and open it again. Be sure to do that.
Once the window opens again, check if Administrators and SYSTEM group have full control over this folder. If these groups aren’t available, you’ll have to add them.
Click Select a principal.
In the Enter the object name to select field enter Administrators or SYSTEM and click Check Names. If your input is correct, click OK to save changes. You might have to repeat this step to add both Administrators and SYSTEM group.
Select Full control and click Apply and OK.
Check Replace all child object permissions entries with inheritable permission entries from this object and click Apply and OK.
If you’re getting The installer has insufficient privileges to access this directory error, you might be able to fix it simply by changing the owner of the parent directory.
For example, if you’re getting this error while trying to install a certain application in your Program Files directory, you need to take ownership of the Program Files directory.
Remember that you might have to take ownership of a different directory depending on where you want to install the desired application.
Keep in mind that changing ownership over certain folders, such as Program Files, can be potentially dangerous, therefore create a backup and System Restore point before starting this process.
4. Run the setup as an administrator
Press the Windows + E key combination to start File Explorer and locate the installer file.
Right-click on it and select Run as administrator.
Click Yes in the UAC prompt.
Our readers reported that The installer has insufficient privileges to access this directory error appears if you don’t have administrator privileges while installing certain software.
By choosing the Run as administrator option, you should be able to install the application without any problems.
5. Check if Windows Install Service is running
Press Windows key + R and enter services.msc. Press Enter or click OK.
When the Services window opens, locate Windows Installer, right-click it and choose Start.
After starting this service, you should be able to install all applications without any problems.
6. Uninstall all previous versions of Cisco AnyConnect VPN
Click the Start button and select Settings.
Choose Apps.
Look for Cisco AnyConnect VPN within the app list, click on it, and select Uninstall.
Perform the action for all the older iterations of the app if there are any others.
According to some of our readers, this error can sometimes appear if you’re trying to install a newer version of the Cisco AnyConnect VPN software. To fix this problem, you need to completely remove all previous versions of this software.
After doing that, you should be able to install this application without any further errors.
7. Stop the TSVNCache.exe process
Right-click the Start button and select Task Manager.
In the Details tab locate TSVNCache.exe, right-click it, and choose End task option.
After the process stops, try to perform the installation again.
Sometimes the installation process will try to replace certain files even if they are still running, and that will cause The installer has insufficient privileges to access this directory error to appear.
Some readers reported this error while installing TortoiseSVN. According to them, the installation was trying to replace TSVNCache.exe file with a newer version, but it couldn’t complete the process because the TSVNCache.exe was still running in the background.
Keep in mind that this problem can occur with any application, and any file related to that application can cause this problem to appear.
TSVNCache.exe affects only TortoiseSVN, but if you’re installing a different application you need to find out on your own which file is preventing the installation process.
8. Perform a level-three uninstall
Press Windows key + R, enter %temp% and press Enter.
When Temp folder opens, open the 7zXXX.tmp folder. XXX will be replaced by a number that represents the driver version.
Navigate to Util and open theccc directory.
Run Uninstall_L3.bat or Uninstall_L3_64.bat.
Click OK and follow the instructions on the screen to complete the uninstall.
After the uninstall is completed, try to install the software again.
9. Use the MSfixit tool
The installer has insufficient privileges to access this directory error can prevent you from installing applications on your Windows 10 PC, but you can fix this problem by running MSfixit tool.
This tool is designed to automatically fix problems with corrupted registry keys and many other installation problems with just a single click. Download and run this tool, which should fix this problem.
10. Delete all Autodesk folders
Click the Start button and select Settings.
Navigate to Apps.
Look for any Autodesk software in the list of apps, select it, and choose Uninstall.
Press the Windows key + E to launch File Explorer.
Navigate to the following folders, one by one, select all the contents, and delete them:
This problem can occur if you’re trying to install Autodesk software, but you still have Autodesk folders on your PC.
11. Turn off User Account Control
11.1 Never notify about changes
Press Windows key + S, type user accounts, and select Change User Account Control settings.
Lower the slider all the way down to Never notify and hit OK to save the changes.
After that, restart your PC.
11.2 Edit the Group policy
Press Windows key + S and type group policy, then select Edit group policy from the menu.
In the left pane navigate to the following path: Computer Configuration\Windows Settings\Security Settings\Local Policies\Security Options
In the right pane locate all User Account Control settings and Disable them. To do that, you’ll have to double-click each User Account Control setting and select Disabled option if available.
User Account Control is a useful feature designed to alert you whenever you perform an action that requires administrator privileges.
This feature can protect you from malicious software, but it can also interfere with the installation process and cause certain errors, therefore, you might want to disable it. After turning this feature off, try to install the same application again.
Other known solutions for iTunes and Skype
Some of our readers also encountered The installer has insufficient privileges to access this directory iTunes error. The solution is to right-click the installer file and select Properties. Then, click Unblock, Apply, and OK to save the changes.
In addition, you may also apply Solution 11 and run the installer as an administrator as we described in Solution 4. Some of our readers also fixed the problem by changing the installation directory during the installation process.
If you’re getting The installer has insufficient privileges to access this directory error while installing Skype, it might be because certain services or processes are using the Skype folder.
To see which services are using this directory, simply use procexp tool from Sysinternals, that will show you exactly which processes are accessing the Skype folder. After that, simply disable those processes and check if that solves the error.
Of course, you may also use the portable version of Skype as a workaround. After downloading it, double-click it in order to run it.
Many readers reported that they can’t sign into iCloud on Windows. Some received the message Cannot sign in to iCloud. You cannot sign in to iCloud because there was a problem verifying the identity of this Mac. Try restarting your Mac and signing in again. Nevertheless, we have the right solutions to fix it!
Why can’t I sign in to iCloud on Windows?
Undisputably, the main reason why you can’t sign into iCloud is that you have entered the incorrect credentials, but there are a few other causes:
Inconsistent connection – iCloud needs to connect with a server online; if your internet connection is limited, you won’t be able to sign in.
The service is down – The iCloud service may be down, or under maintenance, so you might try to wait a few minutes and try to connect later.
The account is not set up – To sign in to iCloud on Windows, you must first set up your account on a Mac or an iOS device, otherwise, you won’t be able to use it on Windows.
Software interference – Some apps like antiviruses and firewalls may be blocking iCloud’s access to the server, thus blocking you from signing in.
App bugs – Any app can be bugged, especially after a Windows update, but we have a solution for this situation below.
Now that we know the main causes of this issue, let’s fix it with the solutions below.
What can I do if I can’t sign into iCloud on Windows?
Before getting to more complicated solutions, let’s perform some quick fixes to tackle this issue:
Check your internet connection by trying to log in to your Apple account on your browser.
Disable your antivirus and try signing in again. If it helps, you should think about switching to a better antivirus that won’t interfere with your apps.
Click the Sign in button from the top right of the page.
Enter your Apple ID in the form, then input the password.
Now, if you entered the correct Apple ID and password, you will have to enter the 6-digit code sent to the device you have set up.
If all is correct, you will see your Apple ID account page, where you will be able to make any changes to the password, the two-factor authentication, and more.
If you can’t remember your Apple ID or password and you can’t log in, click on the Forgot Apple ID or Password? option from the sign-in window to retrieve the data.
Here, you will be able to reset your password or find your correct Apple ID.
This account is used to sign in, so if you forgot it, you can reset your password to regain access or see if you’re already signed in on other devices.
If you can’t log into your Apple ID, most likely you have lost the password or entered the wrong ID, and that’s why you can’t sign into iCloud for Windows as well.
Contact the Apple support team for further details if you can’t retrieve your credentials.
2. End all iCloud processes
Right-click the Start button and select Task Manager.
Find all items indicating Apple or iTunes, or iCloud, right-click on them, and select End task.
Go back to iCloud for Windows and try opening and signing in again.
One of the iCloud processes might be stuck and it is running in the background without you seeing it. That’s why ending all the iCloud tasks and restarting the app may help you sign in again.
Log into your account using your Apple ID and the interface should open within the browser.
You should be able to see the same contents as on your iCloud app on Windows and manage the files.
This is a workaround since you can’t use the desktop app. Nevertheless, you have the same features and functions as you do on the desktop app.
5. Use an iCloud alternative
If you continue to have issues repairing or using iCloud, it may be time to consider an alternative software solution.
One such service that can quickly fill in iCloud’s shoes is Sync.com. It makes it easy to store, share, and access your files from just about anywhere, and it also protects your privacy with end-to-end encryption, thus ensuring that your data in the cloud is safe, secure, and fully private.
The service comes in several pricing plans, but you can benefit from this service at a discount for a limited time only.
Sync
Try this amazing cloud storage service that can easily replace iCloud if it becomes unavailable.
A read-only document can’t be edited, but what if all your documents are set to read-only? This can be a problem we will tackle in today’s article.
This is how one user described the issue on Superuser forums:
Restarting my computer one day, most of my files in my folders were switched to read-only. I’ve changed the permissions to allow everyone full control, as well as going through each user.
While read-only files can be helpful, sometimes your documents can become read-only, which can be an issue. In this article, we’ll try to show you how to fix this problem.
Why are all of my files read-only?
Here are a few reasons why all of your files might be marked as read-only. A few possible reasons could be the following:
File settings – Your files were set to read-only mode by mistake or third-party software, especially antivirus.
PC settings – Your computer’s operating system or security settings prevent you from modifying or deleting the files.
Device type – Your files are stored on a read-only device, such as a CD or DVD.
File damage – The file system on your hard drive may have become corrupt or damaged, causing all files to be marked as read-only.
Permission issues – Your user account may not have the necessary permissions to modify or delete the files.
What can I do if all files are read-only?
1. Change the file properties
First, go to your Documents and find the file you want to change.
Right-click the file and pick the Properties option from the menu.
Go to the Attributes tab below the Properties tab and disable the Read-only option.
Click on the Apply option.
Then, click OK.
Now, try to edit the file and check if the problem remains.
2. Change permissions
Locate the folder that holds the read-only files and right-click it.
Select Properties.
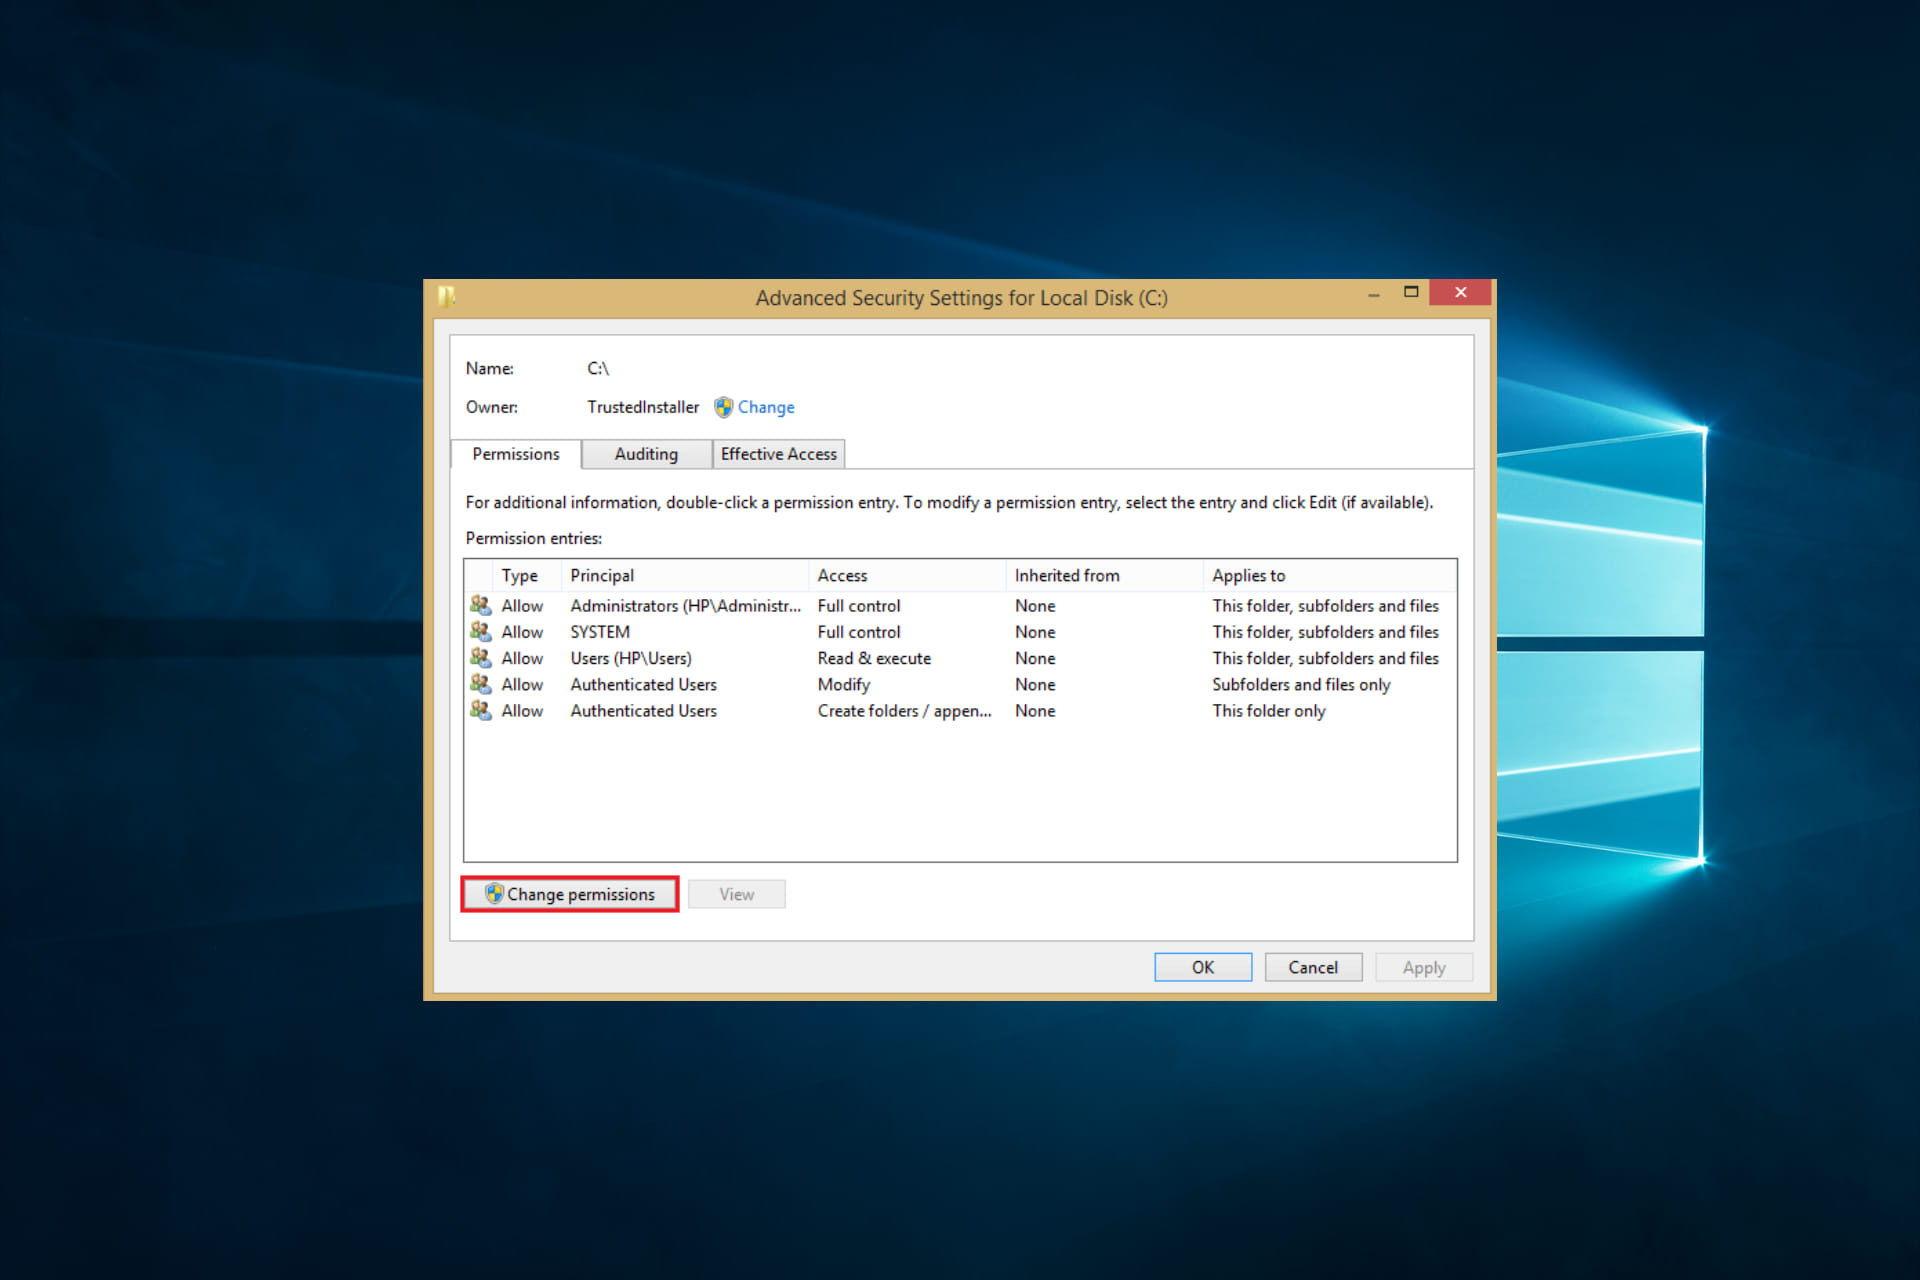
Navigate to the Security tab and then click on the Advanced button.
Click on Change permissions.
Highlight your user name and then click on Edit.
Under Applies to, select This folder, subfolders, and files.
Under Basic Permissions, select Full Control.
Press OK.
3. Delete recently added software
Press Windows + R, type appwiz.cpl, and hit Enter.
Under the list of applications, click on your recently added app, and select Uninstall.
Follow the prompt to complete the uninstallation.
You may have to repeat this step if you have many recently added applications.
Since a non-compatible application may trigger this problem, uninstalling your recently added apps may resolve it.
The best KaiOS browser must be the safest one around but it should also focus on cutting back on battery and data consumption. So, agility is key and that’s what we’re going to deliver.
So, does KaiOS have a web browser? If you’re already familiar with this Linux-generated mobile OS, you probably know KaiOS comes with its browser, known as the KaiOS browser.
You can use the search bar just like any other browser while the top sites show you the commonly visited websites. History shows your browsing history, of course, sorted by time.
What’s more, KaiOS is based on a Firefox OS open-source project, which implies that the KaiOS web browser is based on the Firefox browser. Without surprise, KaiOS supports Firefox.
However, there are a few other great web browsers options you mustn’t miss:
Opera Mini for KaiOS – Best personal browser (part of the well-established Opera Browser branch)
KaiOS Browser – Great features included
K-Pocket Browser – Best for offline use
UC Browser – First third-party browser for KaiOS
Firefox – Best for older devices
↪️ Can you install apps on KaiOS?
The KaiOS operating system runs web-based applications only, aka programs written in CSS, JavaScript, HTML5, and other web technologies.
This means that there are no binary or native applications that can be installed by the cell phone user. Access to the system is done exclusively through web APIs (Applications Programming Interfaces).
So, one might wonder what can you do with KaiOS. The truth is there still is a lot to be done with this smartphone OS catering to low to mid-range keypad feature devices that lack touchscreen capabilities.
What apps work on KaiOS? ?
While it does not support Android apps, it supports VoLTE, over-the-air updates, and HTML5-based apps.
The OS comes with a KaiStore where you can download popular applications such as Google Maps, YouTube, Google Assistant, YouTube, WhatsApp, Facebook, and Google Duo, among others.
Some of the best KaiOS apps include games, messaging, social, entertainment, or shopping applications (among others), and of course, browsers.
Opera Mini is part of the well-established Opera Browser branch. Without surprise, it is one of the best personal browsers for millions of people across the globe.
It is also fast and comes with less processing capacity compared to other browsers.
With Opera, you get a free integrated VPN and a built-in ad blocker to help you load your pages faster. This is one of the best browsers for KaiOS.
KaiOS also comes with its own browser known as the KaiOS Browser. As discussed above, the homepage of this browser resembles some of the most popular browsers we have for mobile phones.
In addition, it comes with other features such as the ability to zoom in or out, scroll mode and cursor mode, go to the top/end, and pin apps on the menu.
However, this browser comes pre-installed on the KaiOS device.
The K-Pocket browser provides you with a reader view mode. It parses HTML text and returns the main text as well as titles.
This means that you do not get footers, ads, navigation bars, and anything else that does not make up the main body of your text. You can also save content for offline usage without internet access.
4. UC Browser – First third-party browser for KaiOS
UC Browser was the first third-party mobile browser to be released for KaiOS. The browser has been running on other operating systems for years and is developed by UCWeb from Alibaba.
KaiOS is clearly an interesting alternative to mainstream phone OS such as Android and iOS. It’s also one of the most secure OSs out there thanks to its API-based infrastructure that makes it pretty much impossible to get hacked.
So, is KaiOS a good operating system? When combined with the fact that it caters to some budget and legacy phone brands such as Alcatel, Energizer, CAT, and Nokia, among others, KaiOS might be on to something.
It’s too soon to tell if it would be better than Android in time, but for now, it makes an interesting niche choice and it seems that it might truly have a future especially after Mozilla started endorsing it in 2020.
Mozilla is officially supporting the operating system, and its updates have already started rolling out to KaiOS.
However, Google, which is one of the biggest tech giants when it comes to mobile applications, has stopped supporting some of its applications such as Voice typing on Google Assistant.
This might end up affecting KaiOS not to mention that other operating systems are doing everything they can to outshine each other.
All in all, KaiOS is seen as one of the operating systems to give Android a run for its money. This is because it targeted and still targets cheaper cell phones that can be afforded by the majority of people in the world.
What are your thoughts on this topic? Feel Free to share with us via the comments section below.
Windows Panther is a folder that houses all the log files for Windows 11 installation, setup, and updates. You can delete it without any adverse effects. These are temporary files, so there’s no problem.
However, there is one instance in which you shouldn’t delete the folder, and that’s if you plan on rolling back to a previous Windows build. Without the Panther folder, the rollback will not work.
Why I should delete temporary files on my Windows computer?
Apart from that scenario, deleting the folder is a perfectly okay thing to do. There are several benefits to getting rid of those temporary files.
It can free up a ton of space on your hard drive – Deleting unnecessary files is a great way to free up space. It’s recommended that you do this frequently.
Deleting files can improve system performance – By getting rid of the extra fluff, you may start to experience your computer running much faster and smoother than before.
Reduces the chances of errors and crashes from happening – An overburdened computer can have multiple performance problems, including constant crashing. Deleting temporary files can solve this.
Reduces the length of load times – Being able to shorten load times should be music to the ears of gamers who want to get their favorite game as soon as possible.
How can I delete the Windows Panther folder?
There’s only one way to do it when deleting the Windows Panther folder. In addition to showing that method, we’re also going to show you alternate ways to delete temporary files on Windows.
First, you can use a third-party cleanup tool like CleanMyPC. Software like this will go through your hard drive, find temporary files, and delete them automatically.
If you want to take things a step further, you can use memory cleaner software like Ashampoo WinOptimizer to free up memory and boost system performance.
It’s also recommended that you turn on Storage Sense on your Windows 11 computer. It’s a feature that will automatically delete temporary files.
1. Delete the folder via File Explorer
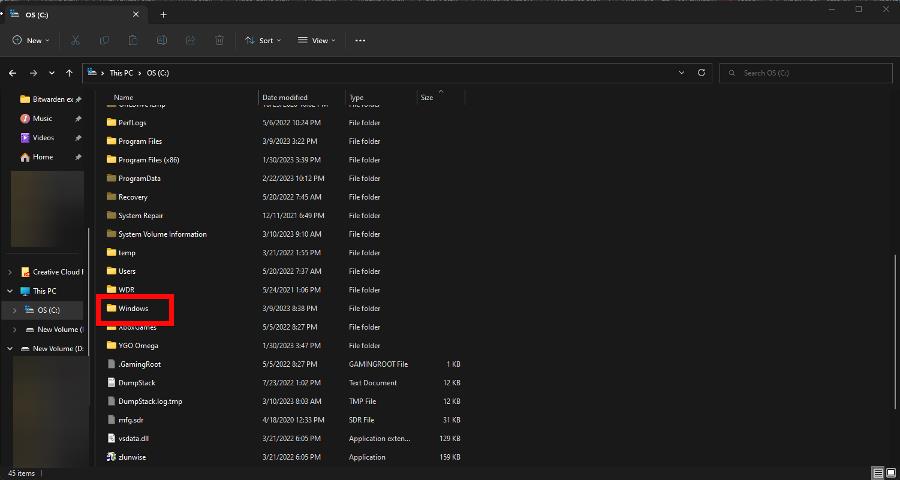
Launch the File Explorer and go to your computer’s main drive. It’s usually the C: Drive.
Scroll down until you locate the Windows folder. Double-click it to open.
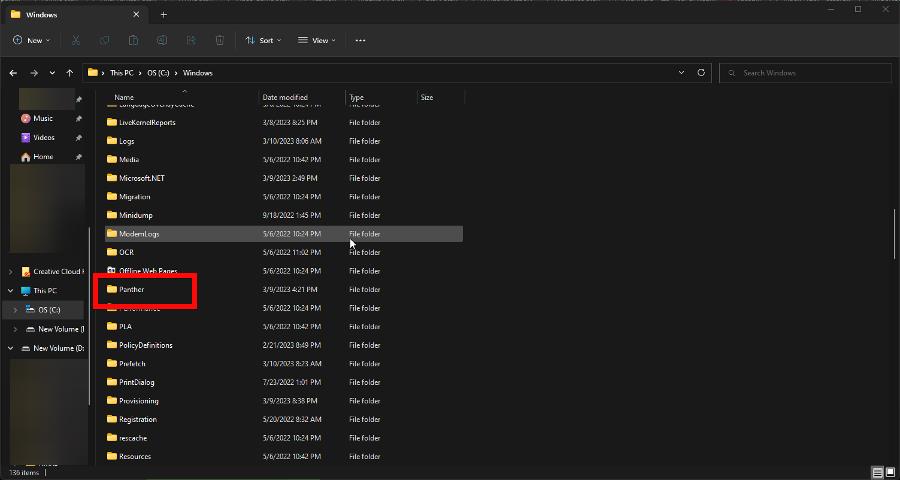
In this new window, scroll down until you locate Panther. Delete it.
2. Clean up files via Disk Cleanup
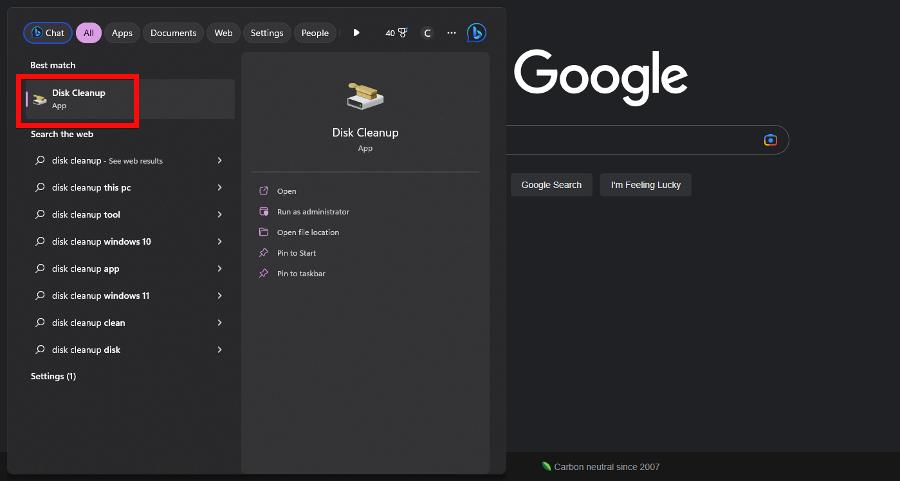
Search for Disk Cleanup in the Windows Search bar. Click the first entry you see.
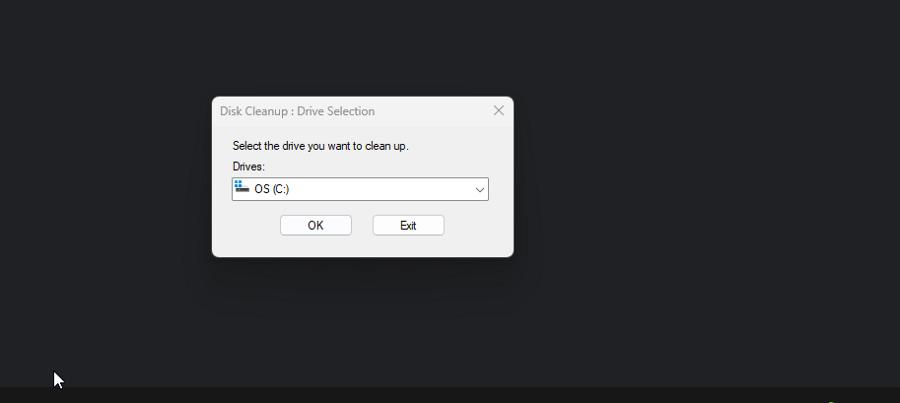
Select the drive that has the Windows Panther folder. Click OK.
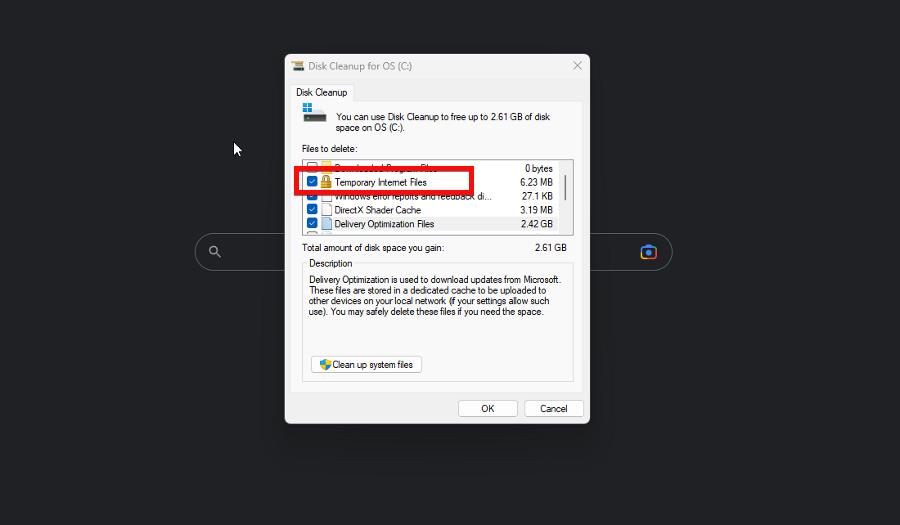
In the new window that appears, make sure the box next to Temporary Internet Files is checked off. Click OK to delete them. This will include Windows Panther.
3. Delete Panther in $Windows folder
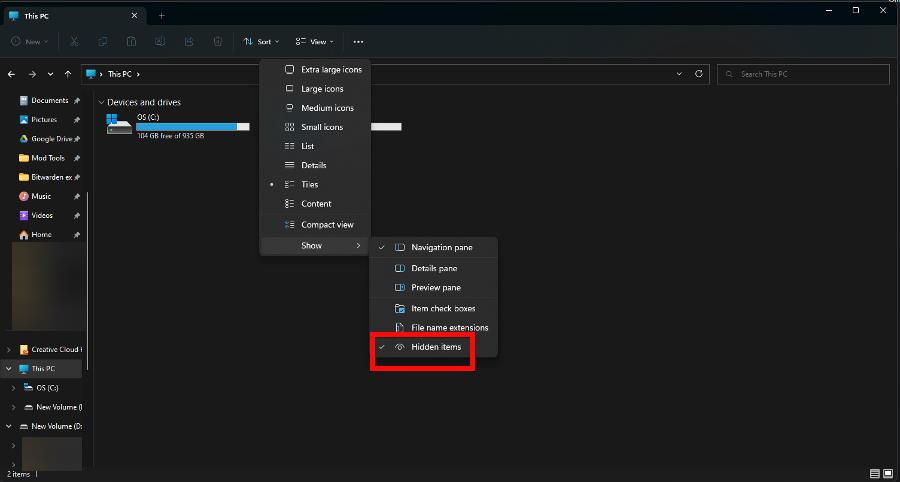
First, you will need to make the $Windows folder appear. Start by expanding View at the top of File Explorer, then hover over Show, and select Hidden items.
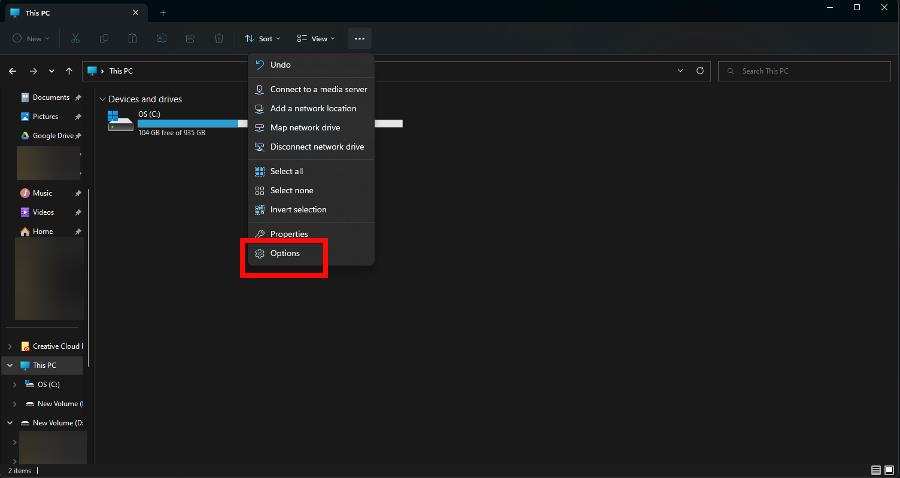
Click the three dots at the top of the File Explorer. Select Options.
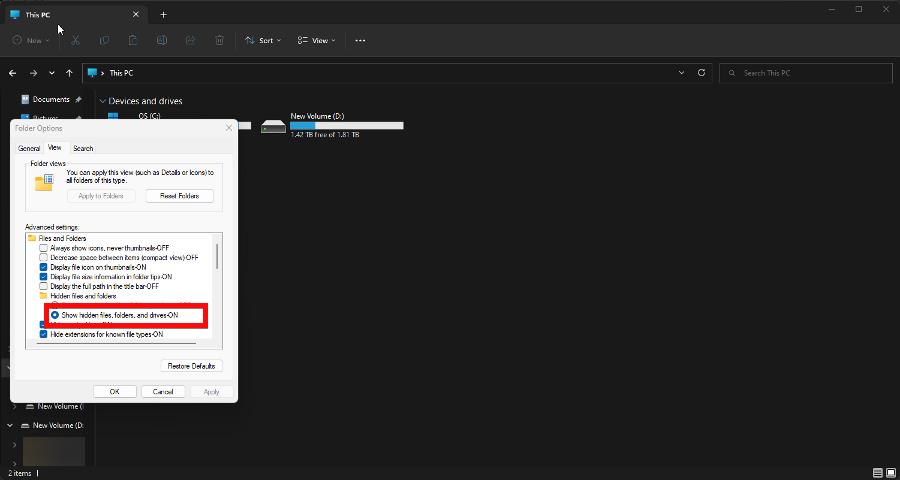
Go to the View tab. Scroll down and check off Show hidden files, folders, and drives.
Scroll down even further and uncheck the box next to Hide protected operating system files. If a warning message appears, select Yes.
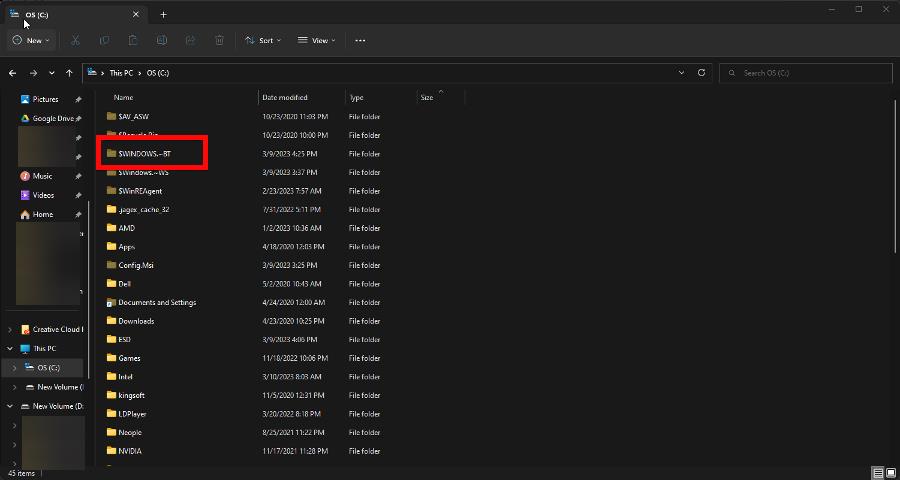
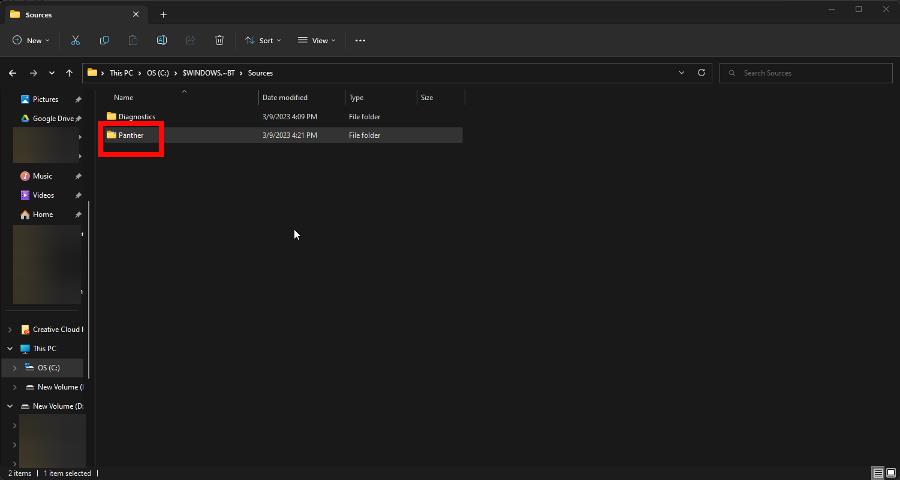
Now go to your C: Drive, as shown earlier. Double-click $WINDOWS.~BT.
Double-click Sources. Delete the Panther folder.
What can I do if Windows Manager is taking up a lot of GPU resources?
Windows Manager is a system manager that is the main force behind rendering a computer’s user interface by using your machine’s graphics card onto the monitor.
There is an issue with this function in that it’ll suddenly take up a lot of resources bringing computer performance down to a crawl. It’s recommended that you turn off visual effects on Windows 11.
Additionally, we recommend installing some PC performance monitoring software to help you see which areas your computer may be weak in. You can also use the app to keep an eye out for damaged parts.
Feel free to comment below if you have questions about other ways to improve performance. Also, leave comments about reviews you’d like to see or information on other Windows 11 functions.
The Epson printer error, Windows doesn’t have a network profile for this device, is a wireless connection issue that can arise for some users.
Some users have stated that error messages pop up when connecting new wireless devices, such as Epson printers, to Windows desktops or laptops.
This guide shows you the best steps to resolve this error.
Why do I see the Windows doesn’t have a network profile for this device Epson printer message?
There are varying reasons why you may experience this error. However, from interactions with users, we gather that the top triggers include the following:
Missing or outdated printer drivers – If the necessary drivers are not installed, or if the installed drivers are outdated, Windows may be unable to recognize the printer and create a network profile for it.
Network connectivity issues – If the printer’s connection to the network is bad, or if there are issues with the network itself, Windows may be unable to detect the printer.
Firewall or security software – Sometimes, firewall or security software can interfere with Windows’ ability to detect and install printer drivers, especially if the printer is connected to a network.
Incorrect printer settings – If the printer configuration is incorrect, Windows may be unable to install the necessary drivers and create a network profile.
Network discovery settings – Windows relies on network discovery settings to locate and install printers on the network. So, if network discovery is disabled or not correctly configured, the OS may be unable to detect the printer.
There are a couple of ways to resolve the issue. Let us take you through the most efficient.
What can I do if Windows doesn’t have a network profile for this device Epson printer?
Before going into any solutions, double-check the printer’s Windows compatibility. Users can enter their printer model in the Enter Product Name search box on Epson’s website. Then click Search on the printer’s page to check its platform compatibility.
1. Update your printer drivers
Go to Windows Settings by pressing Windows + I.
Select Update & Security and go to the Windows Update section.
Click on Check for updates.
Select the printer drivers you want to install.
Outdated or damaged drivers stop devices from functioning adequately, so it’s essential to ensure your printer benefits from the latest driver and its correct version.
We recommend using reliable third-party software that performs this action automatically and securely.
2. Select the Private network option
Open Cortana’s search by pressing the Windows key + S hotkey.
Enter wifi in the search box, then select WiFi Settings to open the below window.
Click the network listed and select the Private button.
This fix is often effective for Windows doesn’t have a network profile for this device on an Epson printer.
3. Open the Network Adapter troubleshooter
Open Cortana’s search box.
Enter troubleshoot as the search keyword and select Troubleshoot settings.
Under Additional troubleshooter, select Network Adapter and click Run the troubleshooter.
Select the required network adapter option, and press the Next button.
Then users can go through the Network Adapter troubleshooter’s fixes.
4. Configure the Printer’s Port
Launch Run by pressing the Windows key and R.
Input control in Run’s text box, and hit Enter.
Next, enter printer in the Control Panel’s search box and click View devices and printers.
Right-click the grayed-out Epson printer that the Windows doesn’t have a network profile for this device error arises for and select Printer properties.
Next, select the Ports tab, then select the Configure Port option.
Then deselect the SNMP Status Enabled option on the Port Settings tab.
You must have found this guide because your speakers are not working on Windows 10. This can be a big problem since you won’t be able to hear anything.
Not everyone likes to listen to audio files, whether music, audiobooks, or podcasts, from earphones or headsets. Some prefer speakers.
There is a wide array of speakers that you can choose from; however, sometimes you’ll encounter speaker issues on your PC or laptop, so you’ll need quick fixes to resolve the issue and get back to enjoying your audio listening.
Why is my computer not detecting my speakers?
Users have experienced this problem for varying reasons. We not that the most common triggers include the following:
Speakers not correctly plugged – This is one of the most common causes why a computer is not detecting speakers. If the speakers are not plugged in or turned on, the computer cannot detect them.
Damaged speaker cables – If the speaker cables are damaged or not correctly connected, the computer may be unable to detect the speakers. This can happen if the cables are frayed or plugged in incorrectly.
Sound settings – If the sound settings on the computer are not configured correctly, the computer may not be able to detect the speakers. This can happen if the volume is turned down, the speakers are muted, or the sound is directed to another output device.
Outdated or corrupted drivers – If the sound drivers on the computer are outdated or corrupted, the computer may not be able to detect the speakers. This can happen if the drivers are not updated or become corrupted due to malware or other issues.
Playback device settings – The error is often triggered by the Playback device settings. Another device may be the default playback device, such as headphones or a different set of speakers.
Faulty hardware – If the computer’s hardware is defective, such as the sound card or audio chipset, you may expect the error.
We will now explore some solutions which would work regardless of the cause of the problem.
What can I do if speakers are not working on Windows 10?
Before going through these fixes, restart the PC. Also, check your cables to make sure they cause no connection problems. Finally, ensure they are correctly fitted.
Expand Audio inputs and outputs, right-click your audio device, and select Update Driver.
Click Search automatically for drivers.
Restart your computer to check if the problem has gone away.
Repeat the same process for the Sound card drivers.
You can also update your drivers by using third-party tools such as Outbyte Driver Updater.
This tool will scan your system for outdated drivers and update them automatically with just a few clicks, so it’s helpful if you don’t want to search for drivers manually.
This is portable software with an intuitive and easy-to-use interface. After you run it, Outbyte Driver Updater will scan your system, identify all broken or missing drivers, and replace or fix them accordingly.
Moreover, it will compare the found drivers with the ones from its built-in database, so you can rest assured that they will be updated with the latest versions.
Outbyte Driver Updater
Let Outbyte Driver Updater update your drivers with the best versions and see instant results.
Go to the View by option in the top right corner and select Large icons.
Click the drop-down arrow and select Large icons, then click Troubleshooting.
Select the View all option on the left pane.
Click on System Maintenance, then click Next.
Follow the instructions to run the system maintenance troubleshooter.
11. Run System File Checker
Press Windows + R, type cmd, and hit Ctrl + Shift + Enter.
Type the script below and hit Enter. sfc/scannow
Wait for the command to execute.
12. Perform a clean boot
Press Windows + R, type msconfig, and hit Enter.
Find the Services tab, select the Hide all Microsoft services box, and click Disable all.
Go to the Startup tab, and click Open Task Manager.
Right-click on the Startup processes and disable them.
Reboot your computer.
Performing a clean boot for your computer reduces software-related conflicts that can bring up the root causes of the speakers stop working Windows 10 issue.
These conflicts can be caused by applications and services that start running in the background when you start Windows normally.
You will have a clean boot environment after all these steps are carefully followed, after which you can try and check if the speakers stop working Windows 10 problem is still there.
Let us know if these solutions worked by commenting in the section below.
Some World of Warcraft players have posted on Microsoft, and Blizzard forums about a World of Warcraft was unable to start up 3D acceleration issue. Have you also received this error message?
Users can’t start World of Warcraft when that error message pops up. Do you need to fix that error? If so, check out these potential resolutions for it.
Why is my 3D accelerator not supported by WoW?
There could be several reasons why World of Warcraft (WoW) does not support your 3D accelerator:
Incompatibility – Your 3D accelerator may not be compatible with WoW. WoW requires a certain level of graphics capability to run smoothly, and if your 3D accelerator doesn’t meet these requirements, it may not be able to handle the game’s graphics.
Outdated drivers – If your 3D accelerator has outdated drivers, it may need to be able to support WoW. Updating your drivers can help resolve this issue.
Insufficient system resources – If your computer needs more RAM or processing power, your 3D accelerator may be unable to support WoW. Upgrading your computer’s hardware can help improve performance.
Unsupported hardware – WoW may not support your 3D accelerator because it is an older or less common model. In this case, you should upgrade your hardware to a more widely supported 3D accelerator.
Below, we discuss some of the most reliable fixes for this issue.
What can I do if World of Warcraft is unable to start up 3D acceleration?
1. Update your graphics card driver
In World of Warcraft, 3D acceleration issues are often related to outdated drivers. That is why we recommend ruling out this option from the start.
To verify if your graphics card driver needs to be updated, don’t hesitate to take advantage of a dedicated tool such as Outbyte Driver Updater.
To make the next step in overall hardware performance, install it immediately and have patience while it completes a full scan.
Don’t worry, as Outbyte Driver Updater quickly discovers missing drivers in seconds. Unfortunately, things are not much different for outdated ones, so feel free to install all of your out-of-date drivers or simply the graphics card driver.
You’ll have your computer running like new, and you’ll be able to get back to enjoying World of Warcraft.
Outbyte Driver Updater
Outbyte will help you update your graphics card driver and get back to your favorite game.
Then, open your World of Warcraft game folder in File Explorer. It is usually found in the path below: C:\Program Files\World of Warcraft\
Right-click the Wow-64.exe or WoW.exe in the World of Warcraft folder to select Properties.
Select the Compatibility tab, uncheck the Disable full-screen optimizations, and select the Run this program as administrator option.
Click Apply to save the settings.
Click OK to exit the window.
Numerous players have confirmed that turning off full-screen optimization for World of Warcraft fixes this error.
3. Reset World of Warcraft to default
First, open your Blizzard Battle.net software.
Click Blizzard at the top left of the software’s window.
Click Options on the menu.
Then select Game Settings for further options, and click Reset In-Game Options for World of Warcraft.
Press the Reset button.
After that, click the Done button.
Resetting World of Warcraft via the Blizzard software to default might resolve incompatible game settings. Therefore, complete the above procedure in that regard.
4. Select the Scan and Repair option
Open the Blizzard Battle.net software.
Select World of Warcraft on the left of the Blizzard window, click Options to open that menu, and select Scan and Repair on the Options menu.
Select the Begin Scan option to confirm.
Blizzard Battle.net’s Scan and Repair option might fix the World of Warcraft was unable to startup error for some users. However, make sure to follow the above steps as well.
5. Turn off SLI for NVIDIA GPUs
First, right-click the desktop and select NVIDIA Control Panel.
Expand the 3D Settings category.
Click Set PhysX configuration on the left of the window.
Then select the Do not use SLI radio button.
Turning off SLI (Scaleable Link Interface) for NVIDIA GPUs might fix the World of Warcraft was unable to startup error. To see if it also works for you, apply the above steps.
6. Select the High-performance graphics option for World of Warcraft
Right-click the desktop and select NVIDIA Control Panel on the open context menu .
Click 3D Settings, then Manage 3D Settings on the NVIDIA Control Panel.
Select the Program Settings tab, then click the Add button.
Click Browse to open an Add folder window. Next, select the Wow.exe on that window, and click the Open button.
With World of Warcraft, the selected program, select High-performance NVIDIA processor on the Select the preferred graphics processor drop-down menu.
Users with dual graphics laptops should ensure that World of Warcraft is assigned to a dedicated NVIDIA GPU. If that’s your case, too, refer to the above steps.
Those are some potential fixes for the World of Warcraft was unable to start up 3D acceleration error.
In addition, make sure that your Windows 10 is fully updated by clicking Check for Windows updates on that platform’s update page.
Have the above fixes proved to be helpful? Let us know in the comments area below.
Hard drives are one of the most important components of a computer. They store all your information and data, so you must ensure your hard drive works properly.
In a peculiar case, you may find that your 4TB hard drive only shows 2TB. If your hard drive isn’t showing its full capacity or it doesn’t show any capacity at all, then there might be an issue with the hard drive itself. Luckily, this is easily fixable, as you shall see below.
Why is my hard drive not showing its full capacity?
You might be wondering why your 2TB drive only shows 200GB. There are several reasons why your hard drive may not be showing its full capacity:
Configuration error in partition table – If you have changed the partition layout of your computer’s hard drive or deleted any existing partitions, it may cause problems with accessing data.
Improper formatting – If you have a new hard drive, it is important to format it before using it. Wrongly formatting a hard drive can lead to issues such as these.
Damaged hard drive – If you have a damaged hard drive, it won’t show its full capacity. This can be due to various reasons like virus infection, physical damage, etc.
Wrong file system – The file system is a protocol that determines how files are stored on your hard drive. If you apply the wrong one, your drive may have trouble showing full capacity.
Bad sectors – If there are bad sectors on your hard drive, you might see problems when trying to access them because they will give errors when reading or writing data.
Faulty software – If you’ve recently upgraded your operating system or installed new software on your computer, it may be incompatible with your hard drive.
How do I restore my hard drive to full capacity?
If you have a hard drive that shows less space than it should, there are a few things you can do to fix the problem before moving to the more complex solutions:
Check for physical damage to your hard drive. Also, check the cables that connect your computer to its hard drive. Make sure they’re secure and not damaged in any way.
Disconnect the hard drive, then connect it again. Also, disconnect other peripherals from your PC and only connect your hard drive.
Make sure you’re using a compatible operating system for your hard drive.
Ensure your operating system is running properly and hasn’t been corrupted by malware or viruses.
Run the chkdsk utility on your PC with administrator rights.
1. Update the hard drive driver
Hit the Windows key, type Device Manager in the search bar, and click Open.
Navigate to Disk drives, click to expand, right-click on the problematic drive, then select Update driver.
Select Search automatically for drivers.
Wait for Windows to find you the best driver, then check if your hard drive shows full capacity.
Besides using Device Manager to update your drivers, you can also let third-party software like Outbyte Driver Updater scan your PC for outdated or missing drivers and automatically detect the newest updates from its database.
2. Format the hard drive
Click on the Start Menu icon, type cmd in the search bar, and click Run as administrator.
Type diskpart in the Command prompt window and press Enter.
Next, type list disk and press Enter. This will list all drives on your PC.
Type the following commands and press Enter after each one: Remember to replace X with the corresponding number matching the hard drive you wish to format. You can also replace ntfs with another file system, such as fat32, if it matches with your drive: select disk Xcleancreate partitionprimary format fs=ntfs quick
3. Change the partition table
Hit the Windows key, type cmd in the search bar, and click Run as administrator.
Type diskpart in the Command prompt window and press Enter.
Next, type list disk and press Enter. This will list all drives on your PC.
Type the following commands and press Enter after each one: Remember to replace X with the corresponding number matching the hard drive you wish to convert: select disk Xcleanconvert gpt
Now check whether your disk is showing full capacity.
The partition table is the first sector of a hard drive. It tells the computer how to divide the drive storage into separate parts or partitions. The problem with the MBR partition table is that it supports only 2TB drives and has a limitation.
Therefore if you see that your 3TB hard drive is only showing 2TB or your 2TB hard drive is only showing 1TB, therein lies the problem. That’s why you need to convert to GPT, which allows for more partitions.
In case you have trouble converting your drive to GPT, we have an excellent guide to help you bypass any errors. If none of the above methods work for you, it may be a problem with your hard drive.
Error 1935 is a frequent error message on all Windows versions when installing third-party apps, programs, and games. Most often, you get error 1935 when you try to install Microsoft Office some of our readers also reported the error 1935 on Adobe products.
What is a Windows 1935 error?
Error 1935 is a problem with the Microsoft Installer that is directly connected to the permissions required during software installation. You don’t have the right permissions to install it, or some other software is blocking it.
Here are some other important causes why you can get the Microsoft Office error 1935 on Windows 10 or 11:
Services are not started – If the Microsoft Installer services are not working or don’t start, you may get error 1935 in Office 2007 and related problems.
Missing .NET Framework components – This problem occurs if you don’t have the necessary C++ Redistributables. However, you can download them from Microsoft’s website and install them manually, as shown in one of our solutions below.
Software is blocking the installation – This issue can sometimes occur due to your antivirus; to fix it, it’s advised to disable its firewall or your entire antivirus.
Assembly component problem – The installation of Office 2010 Error 1935 appears with the message An error occurred during the installation of the assembly component. Try to restart the PC and try the installation again.
Now that we know what can cause the error 1935, let’s fix the problem with the solutions below.
How can I fix error 1935?
Before getting into more complicated troubleshooting solutions, let’s try a few quick fixes that might solve the problem quickly:
Restart your PC and retry the installation. As simple as it may seem, it worked for a lot of our readers.
Disable your third-party antivirus temporarily and try to install the software. If that was the problem, try a better antivirus that won’t interfere with running your software.
2. Make sure that Windows Modules Installer service is running
Press Windows key + R, type services.msc and press Enter or click OK.
When Services window opens, locate Windows Modules Installer and right-click it. Choose Start from the menu.
After starting the service, try to install the problematic application once again and check if the problem is resolved. Another service that can cause this issue is Trustedinstaller Service, so be sure to enable it as well.
3. Perform SFC and DISM scans
Click the Start button, type cmd and select Run as administrator from the results.
Type or paste the following command and press Enter to run it: sfc /scannow
After it completes the scanning, type the following command and press Enter to run it: DISM /Online /Cleanup-Image /RestoreHealth
DISM scan will now start and take about 20 minutes or more to complete.
Once the SFC and DISM scans are completed, check if the problem is resolved. If you want, you can repeat the SFC scan and check if that helps.
4. Repair the Transaction support using Command Prompt
Click the Windows button, type cmd, and select Run as administrator from the results.
Type the following command and press Enter to run it (where C is the drive where Windows is installed): fsutil resource setautoreset true C:\
You will receive a message that the operation was successful. Restart the system.
First of all, it is good to know that if you receive a 1935 error when you try to install software, this means that the Windows file system transaction is corrupted.
Click on the right link to download the right version of Visual C++ for your system.
Once the package is downloaded, install the software on your PC, then retry installing the software that previously returned the error 1935.
According to some of our readers, error 1935 can appear if Visual C++ Redistributables aren’t installed on your PC. To fix this problem, it’s advised that you install the missing components manually.
Keep in mind that there are several versions of Visual C++ Redistributables available, and in order to fix the problem, you’ll need to install the correct version.
If you don’t know which version you need to install, you can install the latest available version and check if that helps.
Click on the Download button to get the Microsoft .NET Framework Repair Tool.
Double-click the executable file, accept the license terms, and hit Next.
The tool will automatically run a test on your .NET Framework components and if there are any issues, it will recommend the required fixes. Hit Next to correct the problems.
Click the Finish button after the fixes have been applied.
Restart your PC and try to install the software that was failing before.
Our readers have reported that after repairing the .NET Framework components, they were able to install the software without receiving the error 1935.
Fortunately, Microsoft has a very small and efficient app called the .NET Framework Repair Tool that helps you repair .NET Framework easily so try it out.
If that doesn’t solve the problem, you can also download the latest .NET Framework and reinstall it. This will particularly fix error 1935 when installing Adobe Creative Suite 5.5, CS5, or CS4 applications.
7. Run the application in Compatibility mode
Locate the problematic installer file, right-click it, and choose Properties from the menu.
Now go to Compatibility tab and check Run this program in compatibility modefor. Select the desired version of Windows and click Apply and OK to save changes.
If you’re getting error 1935, you might be able to fix the problem simply by running the application in Compatibility mode.
If you’re not familiar, Compatibility mode is a special feature that optimizes older applications for newer versions of Windows.
Despite being designed for older applications, you can also use Compatibility mode for newer applications.
After setting the application to run in Compatibility Mode, the issue should be completely resolved.
8. Remove the OfficeSoftwareProtectioPlatform key
Press the Windows + R key to open Run, type regedit, and press Enter to start Registry Editor.
Navigate to the following key: HKEY_LOCAL_MACHINE\SOFTWARE\Microsoft
Locate the OfficeSoftwareProtectionPlatform key and delete it.
After removing the key, restart your PC and check if the problem is still there.
League of Legends error code 1935 is one of the most common errors affecting players, and now you can fix it in less than 5 minutes thanks to the solution listed above.
We hope that our guide helped you fix the error 1935 and now you have managed to install the desired software.
When installing software on your computer, you may encounter an error message that reads Error 1327 invalid drive.
This error indicates that the installer cannot access a particular drive on your system, which can prevent the installation process from proceeding.
This article will explore some of the most common solutions for the error.
What is invalid drive error 1327 Windows 10?
Error 1327 invalid drive is a Windows 10 error during software installation when the installer cannot access a particular drive on your system.
The causes of the error in Windows 10 can include any of the following:
Incorrect drive letter – If the installer tries to access a drive letter that doesn’t exist on your system, it will trigger this error.
Corrupted or outdated registry settings – Issues with your system’s registry can cause this error, mainly if the registry contains outdated or incorrect information about your system’s drives.
Missing or disconnected network drive – If the installer is trying to access a network drive that is no longer available or has been disconnected, it will trigger this error.
User profile issues – Problems with your user profile, such as a corrupted profile or incorrect permissions, can cause this error.
Some variants of this error include trying to install WiFi dongle error 1327 invalid drive F, error 1327 invalid drive on Quickbooks, and invalid drive G.
You should be able to fix the problem using the suggested solutions below.
Press Windows + R, type cmd, and hit Ctrl + Shift + Enter.
In the Command Prompt, type the following line and press Enter (Substitute your drive letter for P): subst /P
Close Command Prompt and try to install your program.
Your command will allow you to connect and disconnect the drive letter to a virtual location. Disconnecting a letter should allow your program to install without generating an error message.
2. Reinstall the program
If this error occurs when you are trying to install previously removed software, then some of the leftovers of the old program might create a conflict.
You should clean the system from old or unused software thoroughly. There are specialized tools to scan every part and detect and remove leftovers.
We recommend you use one of the best uninstaller software as they can remove every file related to the app you want to delete, thus allowing you to reinstall with no issues.
3. Disconnect the network drive
Press Windows + E to open File Explorer.
Find the Network drive.
Right-click it and select Disconnect.
Try to install your program again.
This solution will work only if a network drive appears in the File Explorer; otherwise, stick with the previous solution.
4. Reassociate the drive letter with a temporary location
Press Windows + R, type cmd, and hit Ctrl + Shift + Enter.
Type the script below and hit Enter (replace Drive Letter with your actual drive letter). subst [Driver Letter]: C:temp
Close Command Prompt and reinstall the software.
Again press Windows + R, type cmd, and hit Ctrl + Shift + Enter.
Type the command below and hit Enter to remove the software’s association with the temporary path: subst /D [Driver Letter]
This method lets you link a drive letter to a virtual drive location. In this manner, the installer will locate the respective temporary path and use it to install the problematic software.
Note: If the temporary path doesn’t exist, you must create it.
These solutions should suffice. However, in some extreme situations, you must create another user to correct the problem. You can also try signing in to another user account to see if the error still occurs.
Did some of these fixes work for you? Tell us more about your experience with this issue in the comments. We want to learn more about it and maybe provide you with some additional solutions if the methods mentioned above aren’t enough.
If you have faced the error 0x800f0845 while installing your windows update, you should know what’s causing the error in the first place before trying to fix it.
Usually, the error shows up when you try to install the updated component KB4056892, and you can also face this error when installing other updated components.
However, the error 0x800f0845 isn’t as rare as other websites claim on the internet. Many AMD system users have been encountering this problem through BSOD errors.
So, if you are one of those working around fixing the error, we suggest you keep reading this article.
Why am I getting a 0x800f0845 Windows 10 update error?
The error code 0x800f0845 typically indicates a problem with your Windows Update settings or the files required to install the update. Here are some common triggers:
Connectivity issues – The update error can occur due to poor or intermittent internet connectivity. This can cause the update process to fail, resulting in the error code 0x800f0845.
Third-party antivirus software – Antivirus software can sometimes interfere with the Windows Update process, causing errors like 0x800f0845.
Corrupted or missing system files – The update error can occur if some of the system files required to install the update are missing or corrupted.
Incompatible hardware or drivers – The update error can occur if your system hardware or drivers are incompatible with the update you are trying to install.
Windows Update settings – The error can occur due to incorrect or outdated Windows Update settings. This can prevent the update from being installed successfully.
You will find a resolution using any of the solutions we discuss below.
How can I fix the 0x800f0845 Windows 10 update error?
1. Uninstall Windows Updates in Safe Mode
Restart windows a few times consecutively to enter an automatic repair screen.
Click the Advanced Options in the Troubleshoot window.
In the Advanced Options, click Startup Settings.
Now reboot the windows on Safe Mode using the F4 key.
Once in Safe Mode, open Settings by holding Windows Key and I.
In Settings, click Update & Security section and select View update history.
Select Update history and uninstall the KB405692 update.
2. Try Windows Update Troubleshooter
Press Windows + I to open Settings.
In Settings, click on Update & Security.
Click Troubleshoot on the left pane, then on the right, select Windows update.
Now click on Run the Troubleshooter to start the troubleshooting.
Press Windows + R, type cmd, and hit Ctrl + Shift + Enter.
Type the below commands hitting Enter after each one. dir d: dism /image:d /remove-package /packagename:Package_for_RollupFix~31bf3856ad364e35~aamd64~~7601.24002.1.4 /norestart
When done, restart your computer for the changes to apply. Let us know if these fixes work for you. The solutions mentioned above should help you fix the error 0x800f0845 and put it to rest.
It’s essential to keep your Windows 10 system up to date to ensure the best performance and security, and these methods should help you overcome any issues with the update process. However, if you continue to experience problems, it may be worth contacting Microsoft support for further assistance.
We love to hear from you in the comments section below, so please tell us which solutions worked for you.
Runtime error 217 is a standard error that occurs when you try to run a program or open an app on your PC. This problem is usually due to incorrect installation of the application.
Installing and uninstalling apps in Windows 11 can be tricky, especially if they’re not from the Microsoft Store. In this article, we will tell you what causes runtime error 217 and how to fix it.
What is Runtime error 217?
Runtime Error 217 is a standard error that occurs during the installation of some programs and applications. It means that the application is trying to access an object that does not exist.
The error may come accompanied by various codes, such as runtime error 217 at 02524611 or runtime error 217 at 004963f9. It’s usually triggered by an incompatible application or bad settings in your computer, but below are some common causes:
Improper installation of an app – This can happen if you install faulty software or third-party apps on your PC with incomplete installation packages. It’s also the reason behind Run-time error 76.
Missing or damaged system files – These files are required for programs to run on your computer, and if they’re missing or faulty, the program won’t work properly.
Damaged Windows registry – If there is any corruption in this registry file, it will result in an error 217 message on your screen.
Hardware failure – If there is a problem with any hardware connected to your PC from your hard drive, CD/DVD drive, or any other piece of hardware, there’s a chance the Runtime error 217 will appear on your screen.
Incomplete uninstallation of an app – The uninstall process of any application is not always perfect. There are times when some files and registry entries are left behind after the uninstalling process.
How do I fix Runtime error 217?
If your computer is experiencing Error 217, there are some basic things you can try before moving on to the more advanced solutions:
Stop all running applications and close all the windows on your computer screen.
Make sure that your hardware and software are all up to date. You should always keep your computer’s firmware updated to run smoothly with any new updates from Microsoft or other developers.
Reinstall the particular program that is causing the runtime error. Also, ensure to get rid of software leftovers in case they are corrupt.
Uninstall any recently installed application or software from your computer if you’re unsure what application is responsible for the runtime 217 error.
Run a DLL-fixer tool and attempt to repair or replace any missing or damaged DLL files.
1. Run the DISM and SFC scans
Hit the Windows key, type cmd, and hit Run as administrator.
Type the following commands and press Enter after each one: DISM /Online /Cleanup-Image /RestoreHealthsfc /scannow
This can be done automatically with dedicated repair software. These kinds of tools are able to scan your computer, identify any broken files, and replace them, all in just a few minutes.
2. Perform a clean boot
Hit the Windows key, type msconfig, and open System Configuration.
Switch to the Services tab and select Hide all Microsoft services.
Click on the Disable all button, then hit the Apply button to save the changes.
Go back and click on the Startup tab and select Open Task Manager.
In the Startup tab of the Task Manager, Disable all the Enabled startup items.
In the left window pane, select System, then click on Recovery on the right pane.
Click on Reset PC from the right side.
Choose the type of factory reset you need. You can keep your files or completely delete all the files, apps, and settings on the PC.
Select the option you want to reinstall Windows: Cloud download or Local reinstall.
Click on Next.
Finally, press the Reset button.
Other errors of a similar kind that you may encounter include the Runtime error R6025, but we have already addressed how to bypass it in our comprehensive guide.
If these errors appear often enough on your PC, it may be time to acquaint yourself with a runtime error repair tool. Such errors can significantly affect the performance of your PC, causing it to slow down.
That brings us to the end of this guide, and hopefully, you’ve been able to resolve the issue with runtime error 217.
Feel free to let us know what solution came through for you if you encountered this error.
AnthemScore 4 uses AI to transcribe MP3s and WAVs into sheet music or guitar tabs. It’s great for musicians who don’t want to commit to a subscription.
The tool detects notes and arranges them into a score, and you can adjust the note density.
It’s not perfect for highly complex music, but it gets the job done for most standard pieces.
4. Tunescribers – simple and user-friendly music transcription
TuneScribers is an easy-to-use tool for transcribing MP3s, WAVs, and even YouTube videos.
It uses AI to convert audio into sheet music or guitar tabs, and while it’s quick for simple tracks, it might need some manual tweaking for more complex pieces.
If you need quick transcriptions, it’s a solid and reliable choice.
NCH TwelveKeys is a music program designed to assist musicians as they transcribe MP3 to sheet music. The tool works with many instruments playing simultaneously.
This program is perfect for musicians trying to learn how to play a piece of recorded music without having the sheet notation or to assist in noting other compositions and improvisations.
If you want to convert audio to sheet music for free, be sure to give this tool a try.
6. Melody Scanner – Supports MP3 files and YouTube videos
Melody Scanner might be handy if you want to transcribe an MP3 file. The software supports several input methods, and you can easily import your recordings.
Alternatively, you can import MIDI, MusicXML, or MP3 files. Lastly, there’s even support for YouTube videos, so you can use them to generate sheet music.
The software has 3 different views; you can view the classical score, piano roll, or guitar tabs. Regarding the support instruments, the software can work with 8 different types.
Transcribing music doesn’t have to be hard; it can even be performed in your web browser. This service supports MP3 files but also works with YouTube videos and other video files.
With it, you can easily slow recordings and loop them to notate. In addition to transcribing, you can use this service to practice playing.
It’s worth mentioning that Soundslice helps you transcribe music, but it won’t do it automatically.
Pros:
Works in the browser, no download needed
Great for slowing down and looping sections
Easy sharing options
Cons:
Doesn’t automatically transcribe music
Better suited for practice than full transcriptions
Lenovo Power Manager is a tool that comes with a series of power-related features. However, users often reported that the Lenovo Power Manager is not working on their Windows 10 devices.
This can be frustrating, as it takes away the ease of accessing everything power in a single location on their PC. If you also face this issue, this guide will show how to fix it quickly.
Why is Lenovo Power Manager not working on Windows 10?
Below are some of the reasons the Lenovo Power Manager is not working on Windows 10:
Compatibility issues: Some users have found this issue to be down to compatibility problems. The solution is to run the executable file in compatibility mode for Windows 7.
Outdated PC: Sometimes, this problem might be due to an outdated operating system. Updating your PC to the latest version should solve the problem.
Faulty driver: At times, the Lenovo Power Manager might not open because of an outdated or faulty driver. You need to reinstall or update the driver to fix this.
How do I open Lenovo Power Manager in Windows 10?
The easiest way to open the Lenovo Power Manager in Windows 10 is to click on the icon on your Taskbar. This will start the app and display the full power management options.
How can I fix Lenovo Power Manager if it’s not working on Windows 10?
1. Change compatibility mode
Press the Windows key + E to open File Explorer and follow the path below: C:\Program Files (x86)\ThinkPad\Utilities
Right-click PWMUI.exe and select Properties. If you can’t find that file, you can right-click the shortcut icon and choose the Properties option.
On the Properties window, click on the Compatibility tab.
Checkmark the Run this program in compatibility mode for box and select Windows 7.
The first thing to do if the Lenovo Power Manager is not working on Windows 10 is to run the executable file in compatibility mode. This eliminates any compatibility issue that might be causing the problem.
2. Use Microsoft Store
Go to Microsoft Store.
Search for Lenovo Settings.
Download and install Lenovo Settings.
Once the installation process is completed, restart your PC.
Go to Search and typeLenovo Settings to launch the apps.
On the left side, click on Windows Update, then, on the right side, select Check for updates.
4. Use a third-party software
According to some users, the Lenovo Power Manager might not work on Windows 10 due to an outdated driver.
While you can easily update your drivers manually, a faster and more reliable way to fix this is to use a dedicated tool because it allows you to do that automatically.
A dependable tool we recommend is Outbyte Driver Updater, as it can help you scan your PC for outdated or missing drivers and locate the newest update from its repository.
If something unexpected happens, you can also create a backup for your driver’s devices. You can also repair damaged drivers or find missing ones to optimize the system.
These tips and tricks are for fixing your Lenovo Power Manager if it is not working on Windows 10.
Skype is one of the top VoIP-based tools with excellent features. Unfortunately, like other apps, it has flaws, too, with users reporting that Skype won’t open on their PC.
While various factors can cause this, it is usually easy to fix, as shown in this guide.
Why won’t Skype open?
Listed below are some of the reasons Skype won’t open on Windows 10:
Interference from the antivirus or firewall: If Skype won’t open on your computer, you need to check if your antivirus or firewall does not block it. The quickest way to do this is to disable the security features temporarily.
Issues with Skype version: Some users have reported problems with specific versions of Skype. You need to remove these faulty apps and reinstall a working version of Skype.
Faulty system files: This issue may be due to corrupt or missing system files. Repairing these files should restore normalcy in no time.
What can I do if Skype won’t open?
1. Rename Skype Folder in Safe Boot mode
Press the Windows key + I and select Update & Security.
Select Recovery in the left pane and click the Restart now button under Advanced startup.
When your PC restarts, choose Troubleshoot > Advanced options.
Now, select the Startup Settings option.
Click the Restart button.
Press 5 or F5 to Enable Safe Mode with Networking when your PC restarts.
After your PC boots up, press the Windows key + R, type %appdata%, and click OK.
Now, right-click the Skype app and select the Rename option.
Finally, type Skype 1 or Skype 3 and press Enter.
Sometimes, Skype might not open because the app folder might be corrupt. The solution is to rename the app and let the app create another one.
2. Grant Skype access to the microphone and camera
Press the Windows key + I and select the Privacy option.
Select the Camera option.
Now, toggle the switch before Skype forward to permit it.
Go back to the Privacy page and select the Microphone option.
Finally, toggle the switch before Skype forward to enable it.
Some users have reported that Skype is not opening on Windows 10 because it is not granted the appropriate permission. You need to allow it access to your microphone and camera to fix this issue.
3. Run Skype in compatibility mode
Right-click the Skype icon and select the Properties option.
Click the Compatibility tab at the top.
Now, check the Run this program in compatibility mode for box.
Select Windows 8 from the dropdown.
Finally, click the Apply button followed by OK to save the changes made.
If the Skype version on your PC runs into compatibility issues, it might not open. However, running the app in compatibility mode for older Windows versions should solve the problem.
4. Temporarily disable antivirus and firewall
Press the Windows key, type virus, and select Virus & threat protection.
Click the Manage settings link.
Now, toggle the switch for Real-time protection backward to disable it.
Next, press the Windows key + S, type windows defender, and select the Windows Defender Firewall option.
Select Turn Windows Defender Firewall on or off in the left pane.
Finally, tick the radio button for Turn off Windows Defender Firewall (not recommended) under the Private and Public sections.
Sometimes, Skype might not open because your antivirus or firewall blocks it. To be sure this is not the case, you need to disable the security features on your PC temporarily.
If you are using a third-party antivirus, right-click the icon on the taskbar and select the Disable option. Note that you need to re-enable your antivirus and firewall after signing in to Skype.
Finally, select the Get Skype for Windows option and double-click the downloaded app to complete the onscreen instructions.
For more information, we have a detailed guide on how to uninstall Skype, so don’t miss it.
Sometimes, the Skype won’t open issue might be limited to the app’s Desktop version. Hence, you need to download the specific Windows version.
With this, we can conclude this detailed guide on Skype won’t open issues. You should be able to fix the problem quickly, provided you follow the instructions carefully.
The Kernelbase.dll caused a breakpoint in Windows 10 error occurs when launching the Steam client or a game from Steam.
The error occurs on Windows 10 and is triggered when saving or loading a game. This guide will show you how to fix this error effortlessly.
What causes a Kernelbase.dll error?
A series of factors can cause the Kernelbase.dll to cause a breakpoint error. Below are some of the potential causes of the issue:
Corrupt system files: One of the major causes of the Kernelbase.dll crash is a missing or broken system file. The only way around this is to repair and restore these files.
Antivirus interference: Sometimes, this issue might occur because your antivirus or firewall is blocking Steam or the game you are trying to open. The solution is to disable your security software and maybe switch to reliable antivirus for Windows 10.
How do I fix the Kernelbase.dll caused a breakpoint error?
1. Repair files with a specialized tool
If the Kernelbase.dll caused a breakpoint error is occurring due to file corruption, try repairing the file with a file repair software for Windows. One of the best choices is to choose a tool that can help you manage your PC’s system better, and replace damaged Windows files with new components.
2. Run your game in Compatibility mode
Right-click on the game shortcut from the desktop.
Select Open file location.
Next, locate and right-click on your game’s main .exe file and select Properties.
In the Properties window, open the Compatibility tab.
Under the Compatibility mode section, check Run this program in compatibility mode for box.
Click the drop-down menu and choose Windows 7 from the list.
Now, check the Run this program as an administrator checkbox.
Finally, click Apply and OK to save the changes.
Close the Properties window, and run the shortcut. Check if the Kernelbase.dll caused a breakpoint error is resolved. Running the Steam games in compatibility mode will fix the crashing and freezing problems.
If the issue persists, try running the game as an administrator to fix the error. Here’s how to do it.
3. Disable antivirus software
Press the Windows key, type virus, and select Virus & threat protection.
Click the Manage settings link.
Now, toggle the switch for Real-time protection backward to disable it.
If you use third-party antivirus software, right-click its icon on the taskbar and select Disable or Quit.
Next, press the Windows key + S, type windows defender, and select the Windows Defender Firewall option.
Select Turn Windows Defender Firewall on or off in the left pane.
Finally, tick the radio button for Turn off Windows Defender Firewall (not recommended) under the Private and Public sections.
Third-party antivirus software can trigger freezing and crash with the error kernelbase.dll caused an access violation. To fix the error, temporarily close your antivirus and firewall software on your system.
Press the Windows key + R, type sysdm.cpl, and click OK.
Select the Advanced tab at the top and click the Settingsbutton under the Performance section.
Now, click the Advanced tab in the Performance Options window.
Click the Change button under the Virtual memory section.
Uncheck the Automatically manage paging file size for all drives box.
Choose your Windows installation drive.
Now, select the Custom Size option.
Next, set the Initial Size value and the Maximum size value. Make sure to set a higher value for the Maximum size than its current value.
Finally, click Apply and OK to save the changes.
Once the changes are applied, close the Properties window, relaunch the game triggering the error and check if the kernelbase.dll error is resolved.
Is it safe to download Kernelbase.dll?
Yes, you can always download the Kernelbase.dll file manually. However, you must be careful, as installing a wrong or faulty DLL file on your PC can cause problems.
So, the ideal thing to do is to repair the Kernelbase.dll file using the dedicated tool we discussed in the guide.
Insufficient system memory, corrupted system files, missing DLL files, and incompatibility issues can cause the kernelbase.dll to produce a breakpoint error in Windows 10 computers. But with the fixes in this guide, you should be able to solve the problem effortlessly.
If your ACER computer overheats you may be able to manage that through Acer fan control. Keeping it cool protects your CPU and prevents overheating issues like system slowness and automatic shutdowns. You can find below 3 simple ways to adjust your fan settings, explained step by step.
Acer fan control software helps you control Acer laptop fan speed inside your Windows environment.
However, its effectiveness is limited by your firmware and sometimes, these tools fail. Not all Acer laptops have the same control fan software and some won’t support one at all.
For example, to control fan speed in an Acer Nitro laptop, and monitor GPU and CPU temperature, you can use NitroSense.
If you use Acer Aspire 7 laptop, you should use the Acer Aspire fan control utility called Acer Quick Access.
Then, based on your motherboard manufacturer, you will need to repeatedly press the Del, F2, F10, and F12 keys to load the BIOS menu.
Using the arrow keys, head over to the Monitor orStatus option.
Next, open Fan Speed Control and select Fan Control Setting.
Choose the fan whose speed you want to change, andchoose your desired speed from the list. Finally, press Enter and save the settings.
The second method on this list is to use the Acer BIOS smart fan control. This method requires you to know what you are doing and avoid making unnecessary changes to your BIOS settings.
4. Maintain and Clean the Cooling System
Dust and debris inside your laptop reduce cooling efficiency and force the fans to work harder.
Power off and unplug your Acer laptop.
Use a can of compressed air to gently clean the vents.
Keep the device on a hard, flat surface to allow proper airflow. A clean cooling system often reduces noise and improves temperature control.
5. Use a Cooling Pad for Better Airflow
An external cooling pad helps draw heat away from your laptop.
Choose a model with adjustable fan speeds.
Position the pad so its airflow aligns with your Acer’s intake vents.
USB-powered pads are ideal for portability. This passive method supports Acer laptop fan control without modifying internal settings.
6. Monitor Temperatures and Adjust Usage
Keeping an eye on internal temperatures helps you understand when your fans need support.
Use software like HWMonitor or Argus Monitor to track CPU and GPU temps.
Close heavy applications when temps exceed 85°C.
Reduce graphics settings in games to lower heat output.
7. Update System Drivers for Stable Fan Behavior
Outdated or faulty drivers can cause inconsistent fan speeds. You can update them in several ways:
Via Device Manager:
Press Windows + X and select Device Manager.
Expand System devices or Display adapters.
Right-click the device and select Update driver.
Choose Search automatically for drivers and follow the prompts.
Via Acer’s Website:
Visit Acer’s Support page and enter your model number.
Download and install the latest chipset and graphics drivers.
Restart your laptop to apply changes.
Using Fortect Driver Updater: If you prefer an automated option, Fortect Driver Updater can scan your system and install the latest compatible drivers with minimal effort. This is useful if you want to avoid manual searches.
Can I manually control my laptop fan speed?
Yes, there are various methods for controlling your laptop fan speed manually. For example, you can use the Control Panel and tweak the settings in BIOS.
Benefits of controlling fan speed
Increases reliability: If you want to ensure the reliability and longevity of your processor, you need to control the fan speed accordingly. This is because it can reduce overheating and provide the necessary cooling for your processor to run smoothly.
Decreases system noise: Another benefit of fan speed control is reducing unnecessary Acer fan noise.
Reduces power consumption: If your PC is overheating, it consumes more power. This is why you must control your fan speed to minimize overheating and its effect. When the control feature is coupled with a fan speed monitor, you can effectively increase your PC’s battery life.
We have reached the end of this article on controlling Acer fan speed. Also, if your CPU fan is not spinning, check out this article.
Let us know whether you can control the fan speed on your Acer laptop in the comments section below.
Do you want unlimited free storage space to save your data in good and secured conditions? In that case, you need to use a cloud storage service for Windows 10.
Luckily for you, if you search for cloud storage apps for PC on the Microsoft Store, you can find some interesting options. However, choosing the ideal one is not all that straightforward.
This is why we have prepared this guide to ease the selection process.
Does Windows 10 have cloud storage?
Windows 10 does have built-in cloud storage that is free to use. Below are the options available to you on your PC.
Use the default app: The built-in cloud storage on Windows 10 is OneDrive. It is a pretty secure app that is easy to use and free.
Third-party apps: While OneDrive is an excellent cloud storage option, it still leaves a lot to be desired. Thankfully, numerous dedicated third-party apps have picked up the slack to produce exceptional storage options for personal and official use.
What are the best cloud storage apps for Windows 10?
You probably don’t know much about Sync.com, and that’s because it’s not as popular as the top commercial solutions from the major brands out there.
However, this solution quickly became a strong cloud storage service on the market, banking on a user-friendly interface and easy access.
It comes with end-to-end encryption, and it can back up all the data on all your devices in only one place where you can access them safely and quickly.
You can even use it collaboratively thanks to its Slack and Asana integration, which can ensure easy access for your peers in your organization.
Other security features include password-protecting your files and recovering any deleted files or their previous versions.
Check out some of Sync.com’s top features:
End-to-end encryption for your data
Sharing and collaboration features
Password protects your files and grant permission only to certain users
Access your data from anywhere and on any platform
5GB of storage on the free version
Sync.com
Keep all your data into the same place, but securely enough so you don’t need to worry anymore.
If you’re looking for an excellent cloud backup solution, pCloud might be the right choice. The service is available on all platforms, and it can even back up your data from OneDrive, Google Drive, and DropBox.
Being a cloud backup service, it’s normal to have some privacy concerns, but this Switzerland-based solution provides strict user privacy and has a zero-knowledge policy.
It also comes with TLS/SSL encryption for file transfer, so security is of no concern. What you need to opt for is the space allocated for your data.
You need to choose from a 500 GB Premium option or a 2 TB Premium Plus option if you have an extended backup to the store.
Let’s go through some of pCloud’s key features:
Compatible with any desktop or mobile platforms
Focused on privacy and security with TLS/SSL encryption
Strict zero-knowledge policy
Simple and convenient usage
Included collaboration features
pCloud
Try this Swiss privacy and security-oriented cloud back-up solution to back up your data right now.
Genie Backup Manager Home 9.0. Uitgebreide back-up oplossing voor thuisgebruikers
Genie Backup Manager from Zools is perfect if you want to back up all your data in the cloud while the PC performance is unaffected.
And not only that, you can use the cloud and back up your data on all media, including FTP/FTPS, network, CD, DVD, and Blu-ray.
However, the most useful feature is the Disaster Recovery tool that does exactly what you would imagine it does: it recovers all of your systems in case of any issues.
As for the data, your backup will be safe with 256-AES military-grade encryption, and they can even back up encrypted drives.
Let’s quickly look at its key features:
Automatic and scheduled backups
Military-grade encryption for safe backup
Clean and simple interface
Supports virtually any media for backup
Swift Restore restores your backup without installing software
Genie Backup Manager
Backup all your data with military-grade encryption on virtually any media with Genie Backup Manager.
If you want one-touch access to your media and data, Western Digital is the perfect cloud storage app for your Windows 10 device.
Western Digital is more than just a regular cloud storage service; this tool implies using or connecting an external hard drive to your Windows 10 device.
Western Digital features a live tile on the Windows 10 Start Screen displaying your data. You can then easily access your files or share your data with friends or other Windows 10 devices.
This app is free via Microsoft Store, so don’t hesitate to test it. If you need additional information about the tool, look at our dedicated review of the app.
Take a look at some of its best features:
Totally free solution
Easy data management across devices
Great Windows integration
One-touch access to your media from the Start screen
Works with all media, not only WD
Western Digital
Western Digital is a top storage media manufacturer, and this app will help you manage your data flawlessly.
You don’t need to do a thing to get OneDrive, as it’s the default cloud storage service if you have Windows 10 installed on your PC.
The high advantage of this embedded solution is that you can transfer your files from OneDrive straight from the Windows 10 device, while others need a browser to do so.
Another top feature is the Office 360 integration, which means you can back up your data immediately and work seamlessly across platforms.
The only possible disadvantage is the free version’s relatively small 5GB storage capacity. However, you can easily expand it at an affordable cost.
Key features of OneDrive:
Seamless integration with Office 360 and Windows
Already integrated into Windows 10
5GB of storage capacity in the free version
Easy to use and configure
OneDrive
Microsoft OneDrive is the default cloud storage solution for your Windows 10 device and it’s also the most convenient to use.
This cloud storage service for Windows 10 offers 10 GB of storage space, so Box is better than OneDrive when it comes to the free storage space available – on OneDrive you only have 5 GB of free storage.
Box can be downloaded for free from the official website, but the app still needs some improvements as the same OneDrive offers more features and better possibilities for managing files.
A Personal Plan offers 100 GB of storage and a 5 GB file upload limit, but you need to commit to a monthly subscription for that plan.
Box is a good solution to consider, especially when you need more free space.
Dropbox is maybe the most popular cloud storage service used by Windows 10 users. The free app can be downloaded from the Microsoft Store and has great features and possibilities.
The tool features an intuitive and easy-to-use UI, saving files with Dropbox being suitable even for a newbie. With Dropbox, you can save, move or share files via Email or within the app.
You can also edit or modify your data directly from Dropbox, so you don’t have to download and upload the files you want to change permanently.
As you can see, Dropbox is a little bit more specialized in cloud storage services than other solutions, and it is also free for those interested in using such services.
If you’re interested in a full review of Dropbox, look at the helpful article and find out everything you need to know.
If you are interested in blockchain technology and decentralized solutions, you can support the concepts using this cloud storage.
The storage space is created using smart technology, creating a storage market with more advantages than traditional cloud storage solutions.
Security is its best with Sia. The service encrypts all your data and distributes it where it can be stored in the network.
Only the user receives the encryption key, and even if some super-hackers can retrieve a piece of your data, it will do nothing with it as it will be like a single piece from a big puzzle.
All the mentioned cloud storage services for Windows 10 can be used similarly. However, they still differ in some ways and offer a series of excellent features.
Epic Games is one of the popular gaming clients hosting a range of exciting titles, for instance, Fortnite. Despite being a polished and tuned launcher, many reported getting the Unsupported Graphics Card error when opening the Epic Games Launcher.
The complete error message reads, There is a problem with your graphics card. Please ensure your card meets the minimum system requirements and that you have the latest drivers installed.
Though Epic Games acknowledged the error on Windows 7, other iterations of the OS, too, are affected with no end to it in sight. So, we went through several forums, recreated the error, tried the various troubleshooting methods, and are now presenting them to you.
Why does it say Unsupported Graphics Card?
Here are a few reasons you are getting the error:
PC does not meet the minimum requirements: The primary reason you see the error message is that your PC does not meet the minimum requirements for the Epic Games launcher.
Running an older OS version: When Windows hasn’t been updated in a while, it could affect the core functioning and lead to issues running apps and games.
Using corrupt or outdated drivers: A corrupt or outdated driver, usually the one for the graphics adapter, was found to be the underlying cause for many.
Conflicts triggered by third-party apps: Several third-party apps have also been identified that could trigger the Unsupported Graphics Card error.
How can I fix Epic Games Launcher unsupported graphics card error?
Before we head to the slightly complex solutions, here are a few quick ones to try:
Restart the computer and check whether the NVIDIA Unsupported Graphics Card error disappears.
Verify that the dedicated graphics card is plugged in properly. You could remove it, wipe any dust particles, and reconnect the graphics card.
Check for Windows updates, and install any pending ones.
If none work, move to the fixes listed next.
1. Change the graphics preference for Epic Games
Press Windows + I to open Settings, and click on Display on the right in the System tab.
Click on Graphics under Related settings.
Select Desktop app from the dropdown menu, and click on Browse under it.
Navigate to the path for Epic Games Launcher, select it, and click on Add.
Now, choose the Epic Games launcher from the list underneath, and click Options.
Select High performance (if the dedicated GPU is listed here), and click on Save.
Changing the graphics preference worked for most users in the case of the Unsupported Graphics Driver error with Epic Games. Also, if the issue persists, make sure to run the game using the dedicated graphics as well.
2. Update GPU drivers
2.1. Update manually
Press Windows + X to open the Power User menu, and select Device Manager.
Expand the Display adapters section.
Right-click on the graphics adapters listed here and select Update Driver.
Select Search automatically for drivers and wait for Windows to install the best available drivers.
For many users, disabling their dedicated GPU and opening the Epic Games launcher have resolved the issue. Enabling the dedicated GPU again results in the unsupported graphics card error.
If you are in the same boat, this could be due to a graphic card driver glitch. Try updating your GPU to the latest version using a third-party tool to resolve the issue. Whether it is NVIDIA or AMD GPU, such tools will indeed help.
While you can manually update the GPU and display driver, driver updater utilities like Outbyte Driver Updater can help you automate this process.
The software can handle all your drivers automatically, installing new drivers and updating the old ones to optimize the PC performance.
You should therefore fix your driver-related issues with such a practical tool, plus enhance the system performance by getting the latest version of your GPU driver.
Outbyte Driver Updater
Meet a dedicated driver tool you can make use of and update any drivers with one click.
Press Windows + R to open Run, type devmgmt.msc, and hit Enter.
Expand Display adapters, right-click on the integrated graphics adapter, and select Uninstall device.
Tick the checkbox for Attempt to remove the driver for this device, and click Uninstall.
Once done, restart the computer, and Windows will automatically a fresh driver.
When encountering the Unsupported Graphics Card message with Epic Games due to a corrupt driver, a viable solution is to reinstall the graphics driver.
Press Windows + S to open the Search menu, type Device Manager, and click on the relevant search result.
Locate the dedicated GPU, right-click on it, and select Disable device.
Click Yes in the confirmation prompt.
A solution shared by many is to disable the dedicated GPU and run Epic Launcher on the integrated one. Though you may witness slightly reduced graphics and performance, it’s still not a bad option given the situation.
5. Uninstall conflicting applications
Press Windows + R to open Run, type appwiz.cpl in the text field, and hit Enter.
Locate any applications installed around the same time the error first appeared, select them individually, and click Uninstall.
Follow the on-screen instructions to complete the process.
Based on our research, we found the following two apps trigger the Unsupported Graphics Driver error on Epic Games:
ActiveInspire
Duet
If you have either on the PC, uninstall the app right away. Or follow the hit-and-trial method until you find the conflicting program.
6. Force open the launcher with OpenGL
NOTE
The solution was shared by Epic Games for Windows 7 in a blog post, though it should work on other iterations as well.
Press Ctrl + Alt + Del to open Task Manager, select the EpicGameLauncher process, and click on End task.
Right-click on the Epic Games Launcher shortcut on your desktop and go to Properties.
Go to the Shortcut tab, add -opengl at the end (after a space) in the Target field, and then click on Apply and OK to save the changes.
7. Repair Epic Games
Press Windows + R to open Run, type appwiz.cpl, and click OK.
Select Epic Games Launcher, and click the Repair button.
Click Yes in the UAC prompt.
Wait for the repair to complete.
That’s it! If the solutions listed previously didn’t work, repairing the Epic Games Launcher should help eliminate the Unsupported Graphics Card error. You could also reinstall the game launcher as a last resort.
Before you leave, check the best tips and tricks to optimize the PC for gaming and get the best performance.
If you have any queries or want to share other solutions with us, use the comments section below.
The Internet is an everyday part of our lives, and most of us use it daily. And one of the common problems we encounter is An error occurred while processing your request issue on different browsers and apps.
The worst part is that the error message doesn’t divulge what’s actually causing it, making it all the more difficult to resolve things.
If you have been trying to find a solution, read the following sections for fixes that worked for users.
Why am I getting An error occurred while processing your request?
Several factors can cause this error message. Below are some of the potential causes:
Server issue: When you encounter this error, it’s most likely that the application or website’s network is down. And there’s nothing you can do but wait until it gets fixed.
Corrupt browser data: Corrupt browser cache or cookies can lead to this error, along with a few extensions. You need to clear these data and disable your extensions temporarily.
Faulty certificate: Sometimes, you can encounter this error because your SSL certificate has expired. You need to delete the certificate and recreate it to solve the problem.
How do you fix An error has occurred while processing your request?
An error occurred while processing your request on Chrome
1. Try another browser
If your current web browser continues to give you a hard time with error messages, we recommend you try another one until you remediate the problem.
One tool that scores high marks in the stability department is Opera One, thanks to the ultra-modern Chromium engine that it uses, which it shares with Google Chrome and Edge.
It is lightweight and can be significantly altered visually and functionally via extensions. If that isn’t enough, then maybe the built-in VPN and ad-blocker will convince you to give this browser a shot.
Opera One
Enjoy a stable and error-free browsing experience with this fantastic and enhanced web browser.
Launch Chrome, and press Ctrl + Shift + Delete to open the Clear browsing data window.
Select All time from the Time range dropdown menu.
Now, tick all the checkboxes here, and click on Clear data.
Users reported this error while trying to access certain websites, and according to them, the solution was to remove browsing cookies.
After clearing the cache, restart your browser and check if an error occurred while processing your request on Chrome is resolved.
If the problem persists, there might be an issue with the website itself, and the only thing you can do is contact the website administrator.
3. Delete the SSL certificate
This error can appear if your SSL certificate is expired, and one way to fix it is to delete the certificate and recreate it again.
Users reported that after deleting and recreating the security certificate, the issue was entirely resolved, so be sure to try that.
According to users, specific certificates will last only a year, so you’ll have to remove them manually and recreate them.
4. Try visiting a non-encrypted version of the website
Many websites use HTTPS protocol to encrypt their traffic and protect their users’ privacy.
Unfortunately, some websites might have problems with HTTPS protocol, so you might want to use unencrypted HTTP protocol instead.
To do that, look at your website’s address, and if it has https at the beginning, change it to HTTP and press Enter.
5. Disable the HTTPS Everywhere extension
As we already mentioned, the HTTPS protocol encrypts your data and protects your privacy, but not all websites support HTTPS.
To avoid this limitation, many users rely on third-party browser extensions such as HTTPS Everywhere.
This extension forces websites to use HTTPS protocol instead of HTTP, which can lead to problems.
Some websites don’t support HTTPS protocol, and by forcefully using this protocol, you can cause An error occurred while processing your request error to appear.
One of the simplest ways to fix this problem is to disable the HTTPS Everywhere extension for the website that gives you this problem.
Alternatively, you can remove the extension from the browser altogether, which would fix An error occurred while processing your request issue.
An error occurred while processing your request. Please try again later on OpenSea
The first thing you should do here is to wait for a while and let the backend team fix any issues with the platform. Then, if that doesn’t work, you may try clearing the browsing data.
Also, ensure that the NFT you add is part of a collection, though OpenSea should do that automatically.
If you are receiving the error when accessing or using your wallet, try removing and reconnecting it to the OpenSea account, and An error occurred while processing your request issue will be resolved.
An error occurred while processing your request on TikTok
When encountering An error occurred while processing your request message, your primary approach should be to check if TikTok’s services are down, though that’s rare. To do that, use DownDetector, or other similar platforms available.
Also, simply logging out of your account and signing back in is known to fix several problems. Besides, you can restart the device or reinstall the app if nothing else works.
An error occurred while processing your request on Steam
Although this error appears on certain websites, many Steam games use a web launcher to start, so it’s not uncommon to see this error while trying to start certain games on Steam.
Therefore, if you’re getting An error occurred while processing your request error while trying to start a game using the web launcher, you might want to try running the game directly from your Steam folder.
Users reported that they could circumvent this problem simply by using the game’s .exe file to start it directly.
An error occurred while processing your request on Xbox
The error is encountered when accessing the official Xbox website and is mainly limited to European users. Though there have been instances of other users coming across it.
To fix the error, the best solution would be to use effective VPN software to reroute your connection. If that doesn’t work, you may switch to the Xbox app while the backend team resolves the error.
An error occurred while processing your request. Reference #30
This is encountered while using the web version of a game and trying to log in via the Xbox account. When the game redirects you to the official Xbox website, the error appears after you enter the login credentials.
A simple fix would be to clear the browsing data or use another device. Also, it could be a browser-related issue, and switching to another practical browser, like Opera GX, which is developed for gaming and offers various customizations to boost the experience, would do the trick.
An error occurred while processing your request on Facebook
1. Log out and log back into your account
One of the most straightforward solutions you can try if you’re getting An error occurred while processing your request error on Facebook is to log out and log back in after a few seconds.
This is a simple solution, and it might not work for everyone, but you can still try it out.
2. Clear your phone’s browsing data
A few users reported that they cannot link their Facebook account with other third-party services due to this error, and one way to fix this problem is to go to your Facebook Mobile app and look for the Clear your phone’s browsing data option.
After clearing the browsing data, this error should be fixed, and linking to third-party applications should work without any problems.
An error occurred while processing your request reference 97
Wait for the website administrator to fix this problem
Users reported An error occurred while processing your request reference 97 error while using Steam’s website. And according to them, it seems that this issue is related to Steam and not to their computer.
If you encounter this error on Steam, wait a couple of hours for the website administrator to fix it.
An error occurred while processing your request error can be problematic and prevent you from accessing your favorite websites. We hope you managed to fix this problem by using one of our solutions.
Also, if you are using a free VPN, the IP address might be marked as having suspicious activity. In this case, change it to a recommended VPN service.
Also, read our in-depth review of Opera GX, which explores every intricate detail of the browser.
If you have any other queries or know of a method not listed here, drop a comment below.
Keeping your PC folders locked from unauthorized users is essential; to do that, you need specialized software such as IObit Protected Folder.
This simple yet powerful software uses a master password to protect your folders. However, forgetting the password can be a problem and cause many issues.
In today’s guide, we will show you how to access IObit Protected Folder if you forgot the password. So, make sure that you keep on reading.
What is IObit Protected Folder?
The IObit Protected Folder software protects your file from unauthorized users. It is a pretty powerful tool that is difficult to bypass that gives you complete control over your files.
Below are some of the benefits of this tool:
Hides and protects files: One of the significant advantages of this tool is that it can hide any file of your choice. Also, it can simply password-protect it without hiding it from other users.
Manages user permission: Sometimes, you might want users to have restricted access to a file. With this tool, you can enable only read or write permission without making the file completely unavailable.
What can I do if I forgot the IObit Protected Folder password?
1. Remove your password with a specialized tool
Open the Start menu. Click the Power button, then press and hold the Shift key and choose Restart from the menu.
Now select Troubleshoot. Navigate to Advanced options.
Choose Startup Settings and click on Restart.
Once your PC restarts, you’ll be presented with a list of options. First, select Enable Safe Mode with Networking by pressing 5 or F5 on your keyboard.
Run the application and follow the instructions on the screen.
IObit designed this tool, and it should help you reset your IObit Protected Folder password if you forgot it. Once the password is reset, you can set it again.
As it happens, the experience has already started shipping to some users as part of Microsoft’s latest update to the Stable Channel, Microsoft Edge version 111.0.1661.44. According to Microsoft:
New Microsoft Edge PDF experience policy. As part of the Adobe and Microsoft collaboration to re-envision the future workplace and your digital experiences, we are natively embedding the Adobe Acrobat PDF engine into the Microsoft Edge built-in PDF reader, with a release scheduled in March 2023.
We invite you to check out Microsofts’s full changelog for more details. Be sure to also check out our separate post where we share nifty tips and tricks highlighting how you can use Adobe Acrobat in Microsoft Edge such as converting your screenshots into PDFs, combining multiple files into a single PDF, and more.
Microsoft Edge should auto-update to the latest version, but if it does not, you can trigger it manually. Just head to the browser’s menu, choose Help and Feedback then About Microsoft Edge and wait for the update to download, and then restart.
Earlier this week, Microsoft Edge 111 hit the Stable Channel featuring a copilot designed to boost your productivity and efficiency by providing intelligent suggestions and insights based on the context of the web page and the user’s goals.
AWS (Amazon Web Services) is one of the most popular cloud storage services that make storing and retrieving files easy.
However, just like all the cloud platforms, it is not free from errors, and one of the common ones is an uploaded file not showing up in the S3 bucket.
In this guide, we will discuss ways to fix the issue right after talking about the causes. Let’s start!
What causes the AWS S3 uploaded file not showing issue?
There could be various reasons for the error message to come up; some of the common ones are mentioned here:
Incorrect Permissions – If the file is set to private, it may not be accessible. You must ensure that the proper permissions are set for the file.
Incorrect object key – If the object key used to upload the key is wrong, the file may get uploaded to a different location in the bucket, which makes it difficult to locate, hence the error.
Bucket policy – A bucket policy may prevent the object from being displayed. If the bucket policy doesn’t allow the object to be accessed or listed, it may not appear.
Object ACL – If the object access control list is not set correctly or doesn’t have correct permissions; you might get this error.
Wrong region – If you selected the wrong region, the uploaded file might not appear. Make sure you have set the correct region to access the file.
What can I do if the AWS S3 uploaded file not showing?
Before moving to the actual troubleshooting steps, make sure you go through these preliminary checks:
Check if the file type is supported.
Make sure the file is not too large.
1. Check the object key
The object key is the unique identifier of an object stored in an S3 bucket. If the object key used to upload the file is not correct, the file may get uploaded to a different location in the bucket, making it hard to locate. To fix this, you can follow these steps:
Double-check the object key used to upload the file to the S3 bucket. Then, use the correct object key to locate the file in the bucket.
Also, use the AWS CLI or SDKs to query the bucket for the object key.
2. Modify the bucket policy
If a bucket policy prevents the object from being displayed, you need to modify the policy to allow the object to be listed and accessed. To fix this, follow these steps:
Go to the S3 console and select the bucket where the file is stored. Next, click on the Permissions tab.
Navigate to Bucket Policy and click Edit.
Change the policy to allow the object to be accessed and listed, and click Save changes.
The Object Access control list might not be set correctly. If the object ACL doesn’t allow the correct permissions, the object may not show up. To fix this, follow these steps:
First, go to the S3 console and select the bucket where the file is stored.
Click the object that’s not showing up and switch to the Permissions tab. Next, go to Object Ownership and click Edit.
Click the radio button for ACLs enabled and click Save Changes.
Go to the Access control list, and click Edit.
Verify the permissions to ensure the correct ones are set for the object. If not, modify the ACL to allow the proper permissions. Click Save Changes.
4. Check the permissions
Make sure the appropriate permissions are set for the file to be accessed. To fix this, you can follow these steps:
Navigate to the S3 console, and choose the bucket where the file is stored.
Click on the object that is not showing up. Then, click Permissions.
Verify the permissions are set for the object. If not, change the ACL to allow the correct permissions, then click Save Changes.
5. Check the region
Ensure you are checking the correct region in which the file was uploaded. If you contain the wrong region, the uploaded file may not appear. To fix this, you can follow these steps:
Navigate to the S3 console and select the bucket where the file is stored. Next, go to the top right-hand corner and check the region displayed.
Switch to the correct region to find the file if the region is incorrect.
So, these are the steps you must follow to fix the uploaded file not showing in the S3 bucket list. Try them and let us know what worked for you in the comments section below.