Conan Exiles is a multiplayer survival game with numerous graphical, server, audio, and gameplay settings players can configure. However, several users reported that Conan Exiles is not saving settings.
The problem has been there for quite a while, but most users managed to fix things in no time. So, let’s find out why Conan Exiles settings are not saving and the solutions that work.
Why are Conan Exiles settings not saving?
Here are the primary reasons Conan Exiles settings are not saving:
Bug in the game – For most users, it was a bug in the game that triggered the error. The developers acknowledged the same, and a patch is to be released.
Issues with permissions – In some cases, it was misconfigured permissions behind Conan Exiles settings not saving. This is when the game doesn’t have access to the relevant files, and, as a result, the changes don’t reflect.
Problems with the game files – The issue can also arise due to problems with the game files, and repairing it should do the trick.
If these don’t work, head to the solutions listed next.
1. Update the game
Since the devs have acknowledged the bug, a patch for it is expected in future updates. So, keep checking for updates in Steam, and install each that shows up.
If installing the updates doesn’t fix things, and Conan Exiles settings are still not saving, head to the next method.
2. Save network setting with a workaround
If the Conan Exiles server settings are not saving and they keep reverting to default, make the desired changes, head to the Gameplay tab, change the Nudity settings to anything else, and then go back to the previous value.
Once done, you can now save the new server settings, and these should apply effectively. Remember, this is just a workaround shared by a user, which did the trick for others but might not work in every case. In case it doesn’t help you, head to the next solution.
3. Modify the attributes for Conan Exiles’ installation folder
Press Windows + E to open File Explorer, paste the following path in the address bar, and hit Enter:C:\Program Files (x86)\Steam\steamapps\common\
Right-click the Conan Exiles folder to select Properties.
Now, uncheck the Read-only option, and click Apply to save the changes.
Next, select Apply changes to this folder, subfolders and files, and then click OK.
Again, click OK in the Properties window.
If it was the Read-only folder attributes that triggered problems responsible for Conan Exiles settings not saving, this should do.
When nothing works, and you are facing issues with nudity settings and other similar ones, a quick trick is to delete the modlist.txt file. It can be found in the following location:C:\Program Files (x86)\Steam>steamapps>common>Conan Exiles> ConanSandbox>Mods>modlist.txt
After you have deleted it, restart the game, and the new settings should apply. A user also reported configuring its attribute to Read-only, the opposite of what we did in the last solution.
By the time you reach this part, you will have realized that there’s no single solution that works for everyone. So, try all our recommendations, and one of these should do it.
Microsoft launched Windows 10 in 2015 with a one-year free upgrade offer for Win 7 users. But now, you need to pay to activate Windows 10 from the start.
So, some users might assume that they can no longer freely upgrade from previous Windows platforms to Windows 10.
However, users can freely download the Windows 10 disc image (ISO) file from Microsoft’s website with the media creation utility. Users can upgrade to Win 10 with that file.
During the Win 10 installation, users will be asked to enter a product key. Then they can click I don’t have a product key to install the OS without a product key.
Users will have then upgraded to an unactivated Windows 10. The unactivated version comes with some relatively minor restrictions. For example, users can’t change desktop wallpapers or themes within the unactivated Windows 10; and some of the platform’s apps will not work.
Most users have no idea that they can still upgrade to Windows 10 free of charge. Learn how to do that from this excellent guide.
Do you need to activate Windows 10?
You can download and install Windows 10 without having an activation key. In fact, you can use the OS forever without having to activate it.
However, you need to activate it to get the best value from it and enjoy its full features.
How long can I run Windows 10 without activation?
Some users might then wonder how long they can continue to run Windows 10 without activating the OS with a product key.
Users can utilize an unactivated Windows 10 without any restrictions for one month after installing it. However, that only means the user restrictions come into effect after one month.
Thereafter, users will see some Activate Windows now notifications. Windows will send out regular notifications requesting that users activate an unactivated Windows 10.
Furthermore, the Activation tab in Settings will include a notification requesting that users activate the OS with a product key. Their users can click Change product key to activate Windows 10 or change the product key with another one.
However, users can leave Windows 10 unactivated. In fact, users can continue to utilize the unactivated Win 10 with the few restrictions it has. Thus, Windows 10 can run indefinitely without activation.
So, users can utilize the unactivated platform for as long as they wish. Note, however, that Microsoft’s retail agreement only authorizes users to utilize Windows 10 with a valid product key.
What happens if you don’t activate Windows 10 after 30 days?
Windows 10 has a trial period of 30 days for which you can use the OS without a product key. During this period, you will have access to all its features and get a feel of what you will get in the full package.
After that trial period, you will still be able to use Windows 10 but now with restrictions. Some features and customizations will not be available to you until you activate the OS.
What happens I use Windows 10 without a product key?
Using Windows 10 without a product key is not such a big deal. You will still be able to use most of the features with the exception of few advanced ones and customizations.
Also, a permanent watermark will be displayed in bottom right corner of your screen to indicate that the OS is not activated.
Below are are some of the disadvantages of using an unactivated version of Windows 10
Frequent notifications to activate the OS
A permanent Windows not activated watermark in the bottom right corner of your screen
Limited security patches
Inability to customize and personalize your display
How many times can you activate Windows 10?
You only need to activate a Windows 10 PC once. However, if you want to reinstall Windows 10 for some reason, you will need to provide the activation key again.
Also, it should be noted that you have the liberty to use an activation key on more than one PC. But, you can’t use it simultaneously.
More and more Windows 7 users are upgrading to Windows 10 as Microsoft stopped supporting Windows 7 in 2020.
Some are probably purchasing the OS from Amazon or Microsoft, but remember that you can also use Windows 10 without a product key.
Instead, users can freely download the Windows 10 ISO to upgrade to a slightly restricted Win 10 without needing a product key.
Sims 4 is a free social simulation game that allows players to create unique characters, build dream homes, and simultaneously live events. However, players complain about Sims 4 low GPU usage.
Also, some report the white screen on Sims 4 that usually appears when starting or during the game.
What causes low GPU usage in Sims 4?
Games like Sims 4 require a stable and high GPU performance to run. Issues with the GPU can result in several other problems like the low Frame Per Second (FPS) in the game.
However, many may be responsible for the low GPU usage in Sims 4. Some factors are:
Outdated graphics drivers – You may experience low GPU usage of your game if graphics cards are outdated. It is because the game requires a stable graphic device to run.
Third-party app interference – Other programs running on your PC can cause issues with the Sims 4 game. So, it can experience low GPU usage if another app conflicts with its activities.
Issues with the In-game settings – You may run into low GPU and FPS usage in Sims 4 due to some in-game settings. They may conflict with your system settings, resulting in issues.
Outdated game client – Not updating the Sims 4 client can cause problems. It can affect its performance and cause low GPU usage and FPS.
The cause of the problem may vary on different computers. Nonetheless, we’ll take you through how to fix it.
How do I fix low GPU usage & FPS in Sims 4?
Before proceeding with any advanced troubleshooting, go through the following:
1. End tasks for background apps via Windows Settings
Press the Windows + I key to open the Windows Settings app.
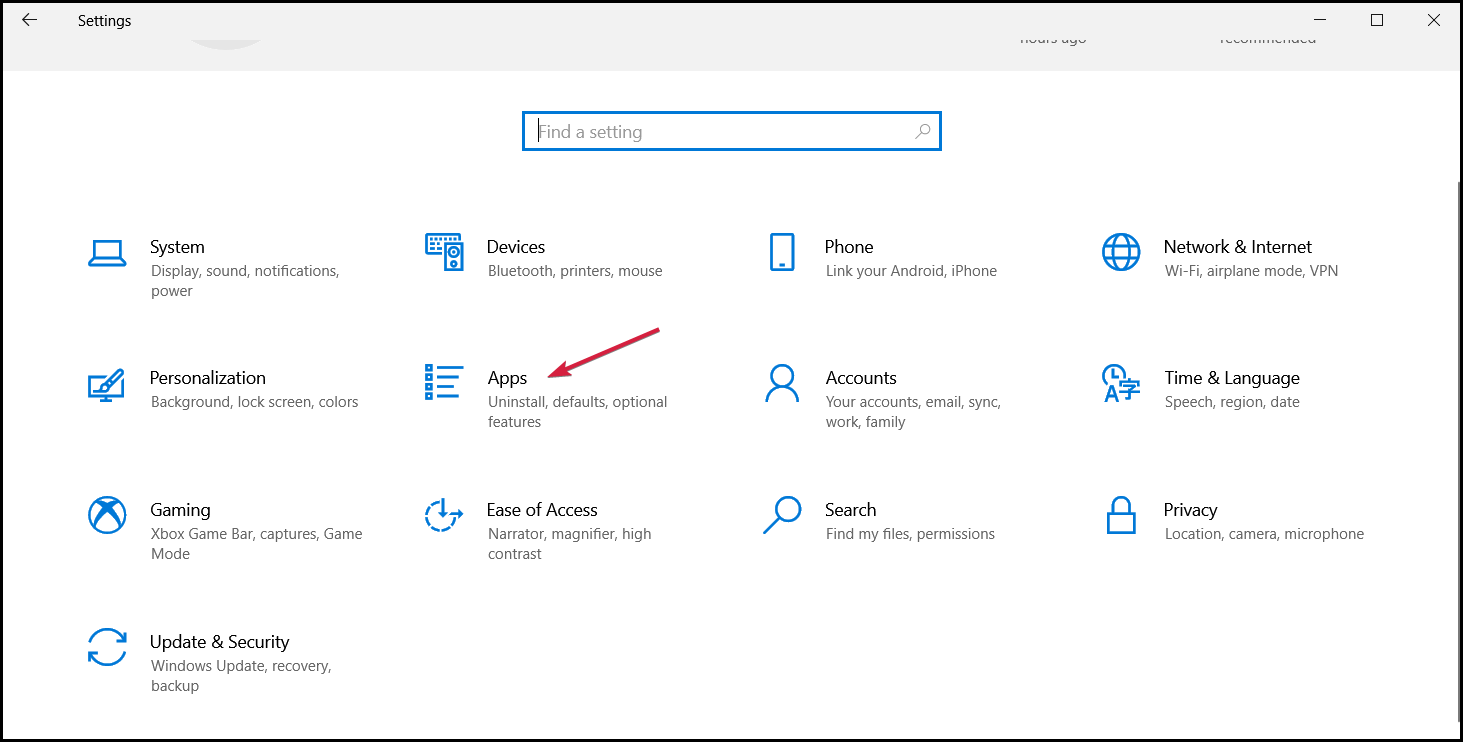
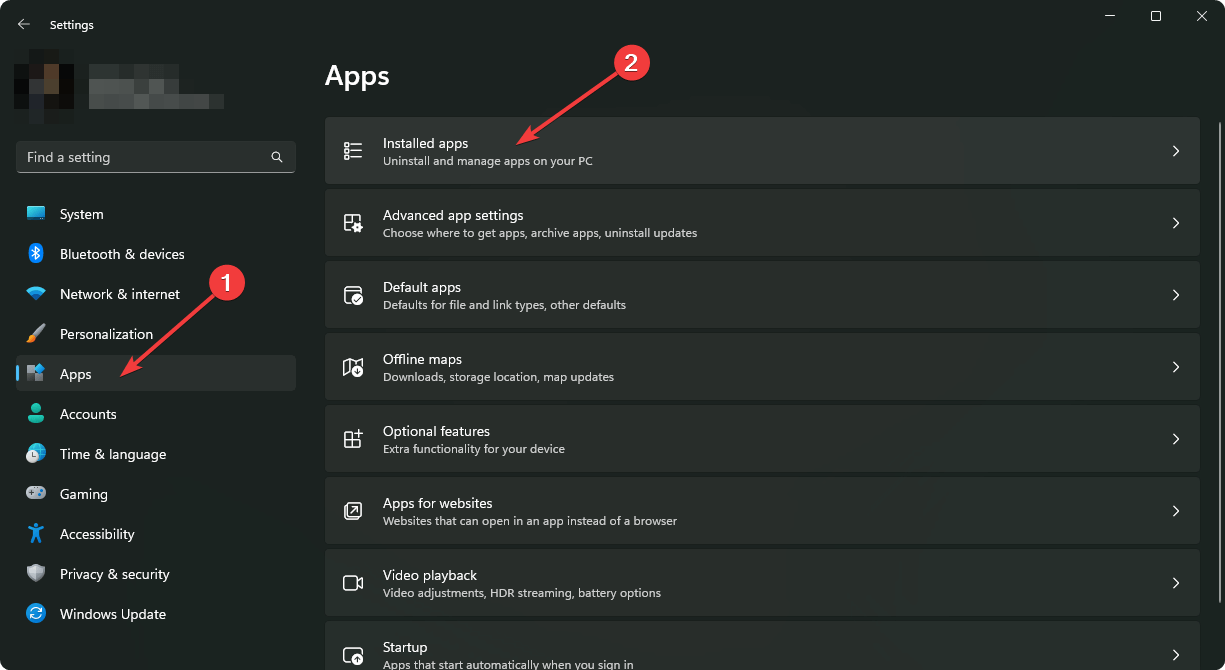
Select Apps from the left pane of the screen and click Installed apps.
Locate the apps you want to end the task for, click the three dots option, and select Advanced options.
Go to Background app permissions, tap the drop-down button, and click Never.
Repeat the process for all apps you want to restrict background permissions. Check our article about ways to turn off background apps in Windows 11 if you have issues using the steps above.
2. Update the Nvidia graphics driver
Press Windows + R keys to prompt the Run window, type devmgmt.msc, and click OK.
Click on Display adapters, right-click the driver, and click the Update driver.
Select the Search automatically for drivers option.
Restart your PC and launch Sims 4 to check if the GPU issue persists.
Updating the graphics driver will fix bugs affecting it and install the latest features to improve game performance. Check other steps for updating graphics drivers on Windows 11 if you have any issues.
If you want an easier alternative than the manual procedure, we recommend you use the Outbyte Driver Updater app because it scans your PC for outdated drivers and immediately updates them with the newest options.
Outbyte Driver Updater
The most efficient tool you can use to automatically update your drivers.
Is Microsoft Office 365 update failing by showing the error code 0x80200061? You can easily get rid of this issue if you follow the instructions from this article.
In general, Updating Microsoft 365 apps is straightforward. You can do it via Windows Update or directly from the Office applications. In both cases, you can encounter different errors. Before going through the real solutions, you should also know about the reasons.
Why is Microsoft (Office) 365 update failing?
Office 365 is called Microsoft 365 now. Whatever it is, if you see the update error 0x80200061(-2145386399), it may be because of the following things:
Office application is not genuine: If you are using a pirated copy of an Office application, it may show different errors.
Updating in the wrong way: For office 365 business, there are additional ways to update the apps. Maybe you are choosing the wrong way.
Temporarily disable your antivirus to see if it helps.
Make sure the Internet you are using is stable enough.
Often checking these things can save you from trying out other methods. If you still get the error 0x80200061(-2145386399), do the following things to solve it.
1. End the problematic background service
Press CTRL + ALT + Del on the keyboard and click on Task Manager.
Find and select the ClickToRunSvc process, and click on End Task.
If necessary, end office-related processes as well.
Try updating Microsoft 365 again and see if it helps.
In most cases, the click-to-run service is responsible for causing update or installation errors. If this is the case for you, it will surely help.
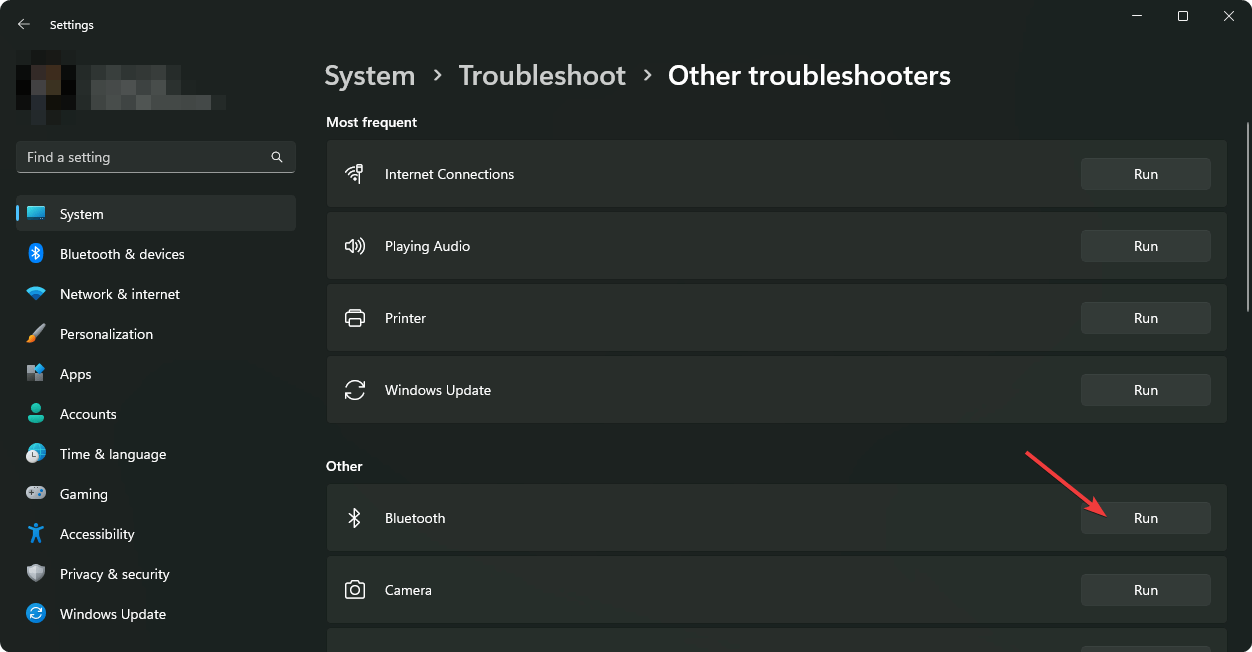
2. Run the Update troubleshooter
Press Win + I on the keyboard to open Windows Settings.
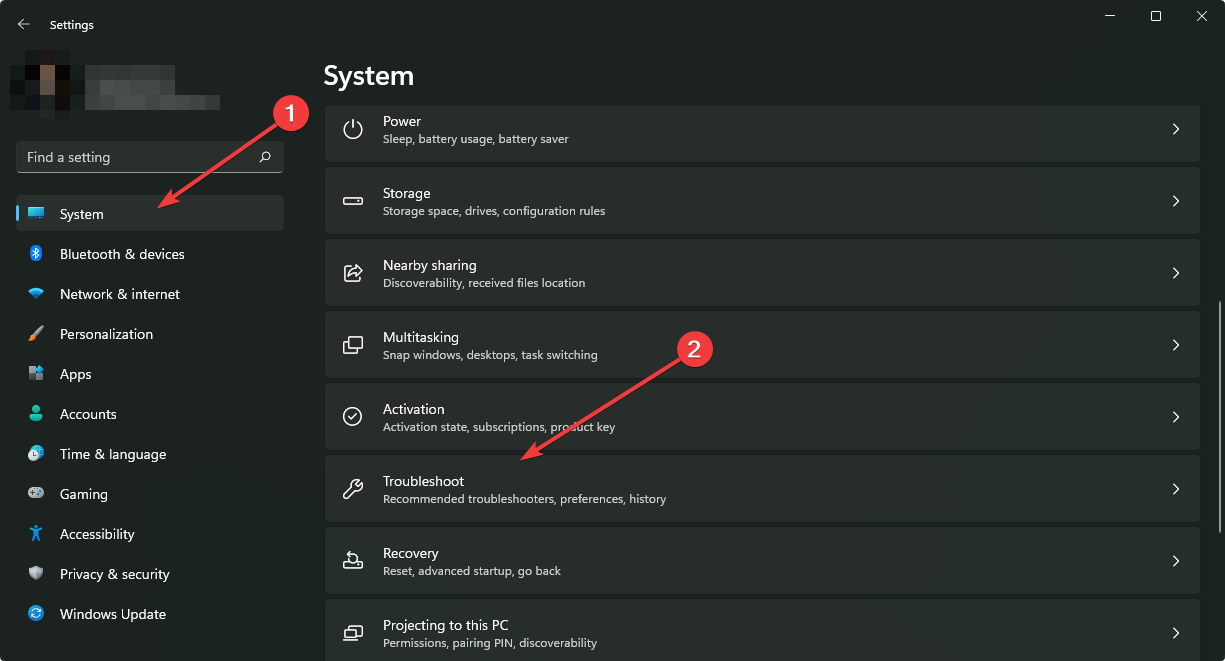
Go to System and click on Troubleshoot.
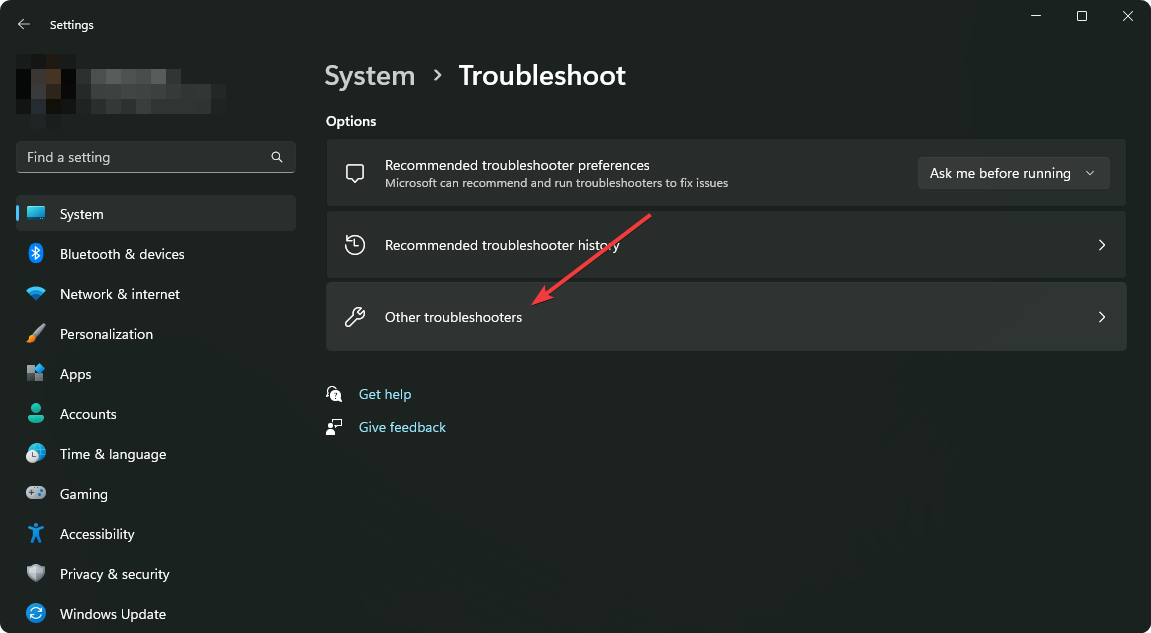
Go to Other troubleshooters.
Click on Run next to the Windows Update.
If you encounter the error 0x80200061 when you try to install the update using the Windows update feature, the above steps will solve the problem.
3. Select the correct languages on ADR
If you are using SCCM, open the ADR – Microsoft365/Office365 Apps Update Properties.
Go to Language Selection.
Select the correct languages and click on OK.
Try to update again.
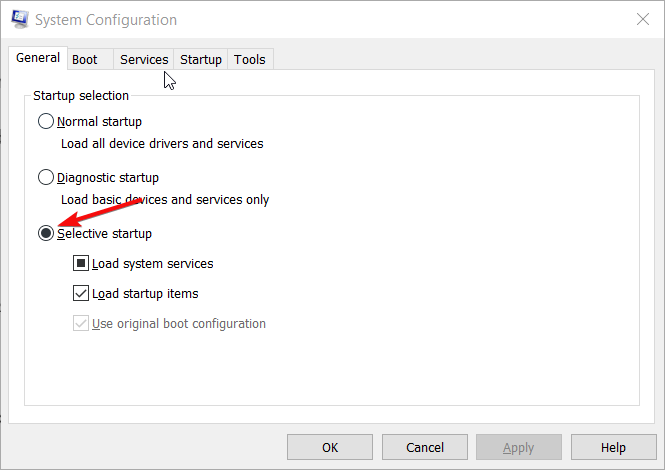
4. Update in Clean boot
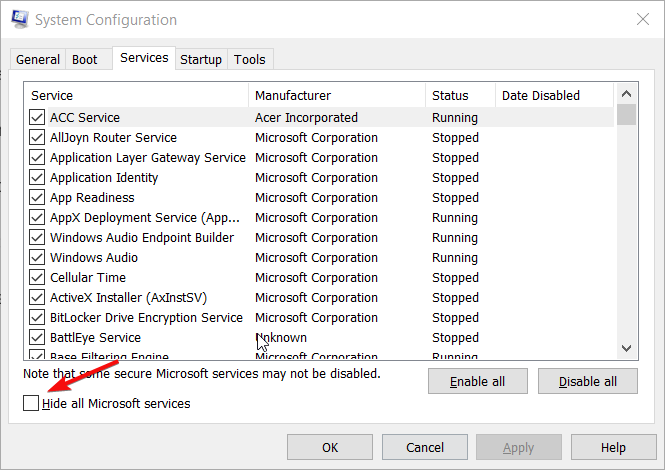
Search for msconfig on the Start Menu, and hit Enter when you see the System Configuration.
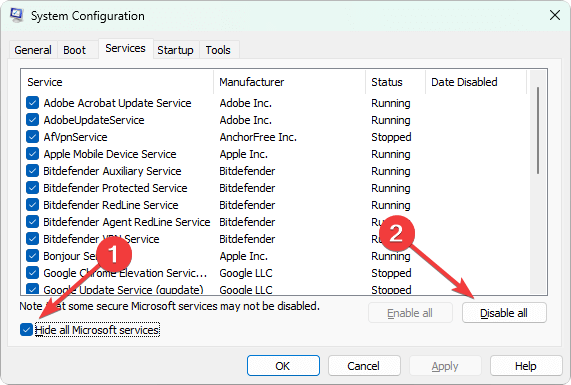
Go to the Services tab.
Click on Hide all Microsoft services and click on Disable all.
Then, click on Apply and OK.
Restart your PC.
Update Office 365 again.
After updating, undo the changes.
If any background services are responsible for the problem you are facing, the clean boot will fix it.
Click on the three horizontal dots next to Microsoft 365 and choose Modify.
At last, select your preferred option and click on Repair.
You may face update errors if the Office 365 installation files get corrupted. Repairing will solve the problem.
Not only this error, but it will also help to solve problems like PowerPoint not opening.
6. Re-Install Microsoft 365 with the latest version
6.1 Uninstall Microsoft Office
Go to Installed apps on the Settings like before.
Click on three horizontal dots and then on Uninstall for Microsoft 365.
Finish the process
After that, restart your PC.
You also can use Revo or IObit Uninstaller to uninstall Microsoft 365 completely. Windows uninstaller cannot remove software perfectly in most cases. As a result, re-installation may bring back the old problems.
So, these third-party tools can be beneficial in this type of situation. In fact, we suggest you use them over the built-in uninstaller.
6.2 Install again
Go to the Microsoft website and sign in.
Click to View all subscriptions.
Go to Manage next to the Microsoft Office or Microsoft 365 subscription.
Click on Install Office.
Then, click on Download when this option appears.
After downloading, install it on your PC.
If you are using Microsoft 365 business, the download process may be a bit different. You can figure it out very easily. For details, we suggest you read how to download and install Microsoft 365.
Surely, re-installing can help you to update Office by avoiding the error 0x80200061(-2145386399). But, if the problem still persists, you clean unnecessary files from your PC using CCleaner or any other similar software. In many cases, it also helps.
This article has featured the methods to troubleshoot Microsoft 365 update error 0x80200061. If you have any helpful suggestions on this, feel free to write them down in the comment box.
Keeping your IT infrastructure up and running requires constant vigilance and detection of all the possible problems within.
It is achieved with the help of network management solutions, including network device log file analysis tools. They help you make better sense of the data generated and saved in the log file.
What is network log analysis?
Network log analysis is the process that allows you to visualize the performance of your network. This is done via the analysis of the log files generated by network components.
PRTG Network Monitor is an all-in-one network monitoring solution that also offers a system log analyzer to manage your system messages effectively.
It can detect potential issues quickly and send alerts before the issue arises, analyze system messages on one central server and effectively manage your network.
PRTG Network Monitor’s syslog analyzer protocols provide a wide range of system information. It gathers and processes the log information of your network device.
You can customize the warning system to send SNMP traps and messages to inform system administrators.
Key features of PRTG Network Monitor:
Offers an overview of incoming system messages
Automatic notifications when an error occurs via email, SMS, and external program
Provides a wide range of system information
Detects loopholes quickly and sends alerts
PRTG Network Monitor
Maintain an efficient overview about the details of your network with this powerful software today.
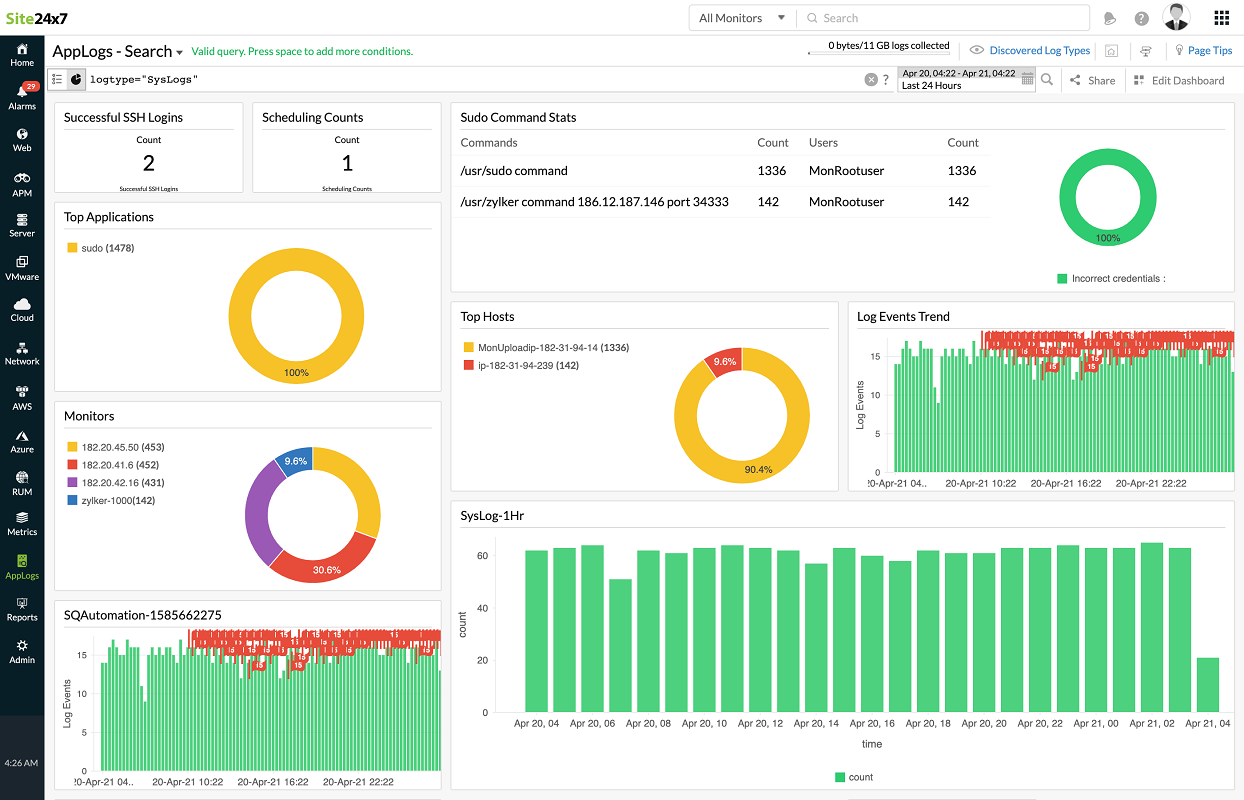
When it comes to network log file analysis tools Site24x7 fits right in the right spot because it can supply all the data in a very comprehensible manner.
The syslogs are detailed and charted information displayed in an editable dashboard so you can select only the data you want to compile.
And after you get the report, feel free to share it anytime with the team to describe a special situation or just to present the current state of a server health status.
Truth be told, the report will be able to compile a lot of information because Site24x7 follows more than 60 performance metrics and inventory reports of up to ten servers at once.
It’s a complex and powerful tool that caters to all types of servers, from application servers, to mail, web, virtual, or database servers.
The tool can be accessed in the cloud so your IT staff will be able to monitor and perform actions on the go, even by using a dedicated mobile app.
Key features of Site24x7:
Detailed graphical syslog data overview and sharing
Monitors more than 60 performance metrics
Tracks Microsoft applications like Exchange, IIS, SQL and more
Cloud-based editable dashboards
Available to access from everywhere in the world, even with a mobile app
Site24x7
Manage all the syslogs with over 60 performance metrics and share them instantly.
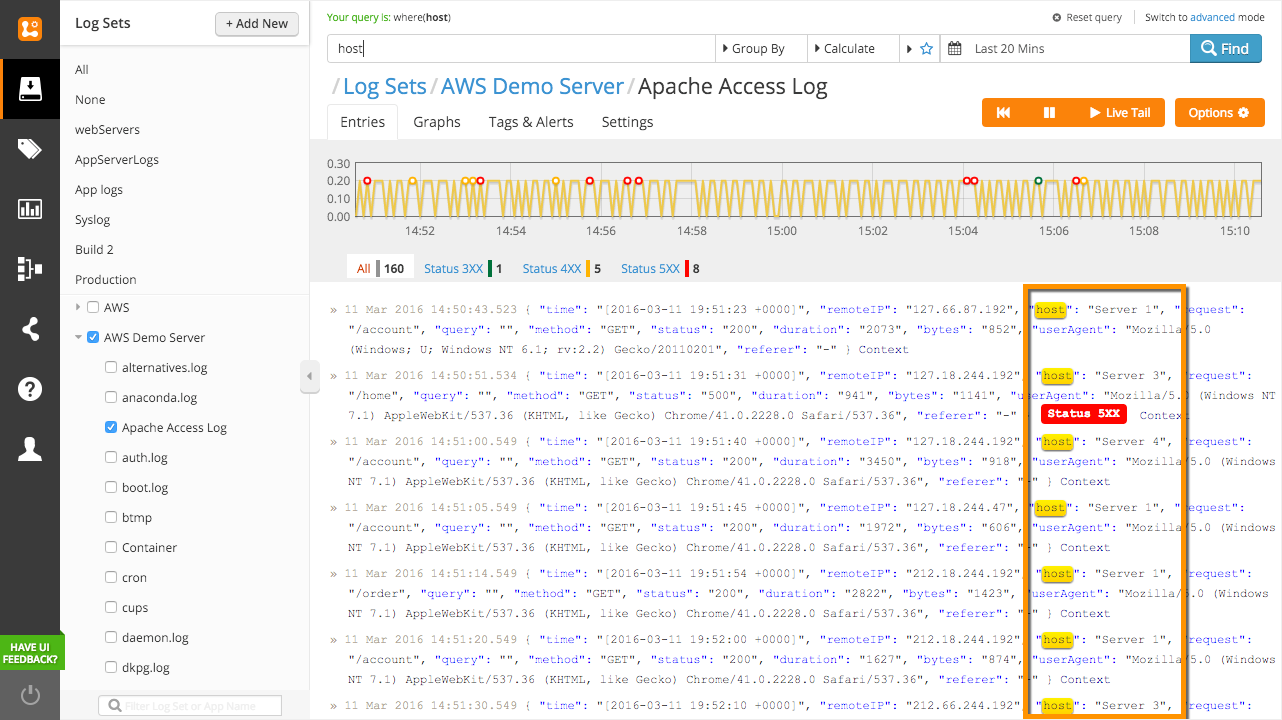
Whether your data is in structured JSON or plain text, Logentries offers immediate search, visualization, monitoring, and API options.
All the log data can be quickly sent to this network log file analysis tool to organize logs from servers, applications, routers, containers, and more in one central location.
Logentries comes with powerful analytics functions. The robust visualization allows you to analyze log data with line graphs, bar charts, multi-line reports, and more.
It also supports third-party exporting, live monitoring, anomaly detection, interactive alerts, and API support.
Key features of Logentries:
Live log management and analytics solutions
Support all the data formats with instant centralization
Powerful analytics tools, robust visualization, and live monitoring support
API support for Rest Query API and User Management API
Graylog is a log management solution that offers seamless log data collection, faster analysis, and insights to help you determine the cause and rectify the error before it occurs.
You can combine, enrich, correlate, query, and visualize all your log data in one place. Graylog’s security solution can help you identify & stop threats, make audits to meet compliance, prevent downtime for IT operations and eliminate complexity for developers and IT administrators.
From gaining insight into your data by building and combining multiple searches for customized analysis and reports and building complex alerts based on a relationship between multiple events or even missing events, Graylog helps you explore your data with ease.
Key features of Graylog:
Excellent log analysis and management solution for DevOps
Threat-hunting and root-cause analysis workflow with chain queries
Multithreaded and distributed search workflow
Customizable and complex alerts for multiple events
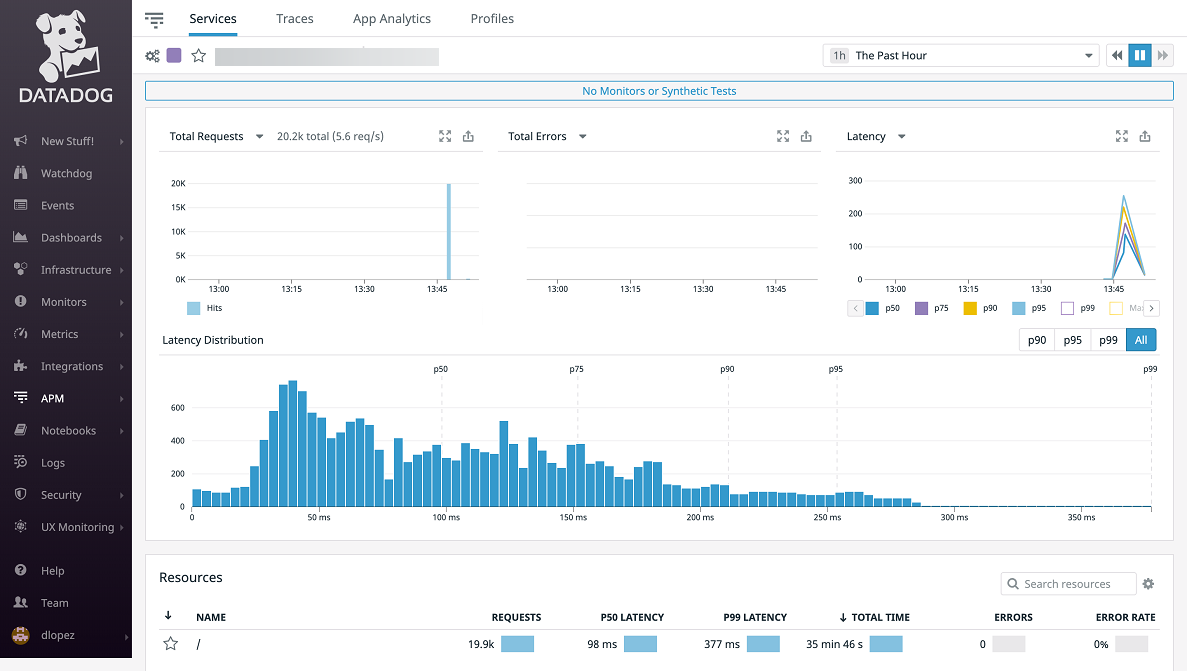
Datadog Log Analysis allows you to seamlessly analyze logs from your critical applications and services to increase troubleshooting efficiency.
IT admins can visualize and explore collected logs using intuitive, facet-driven navigation designed for outage responders and seamless connect logs with host metrics and application data.
You can discover log patterns and errors rapidly without requiring investigating every log file.
Create log analytics dashboards with Datadog’s dashboard builder and analyze all your logs even if you don’t know the query language.
Key features of Datadog Log Analysis:
Discover and analyze log patterns and eros rapidly without requiring investigating individual log file
Real-time monitoring, dynamic index filters, history archive
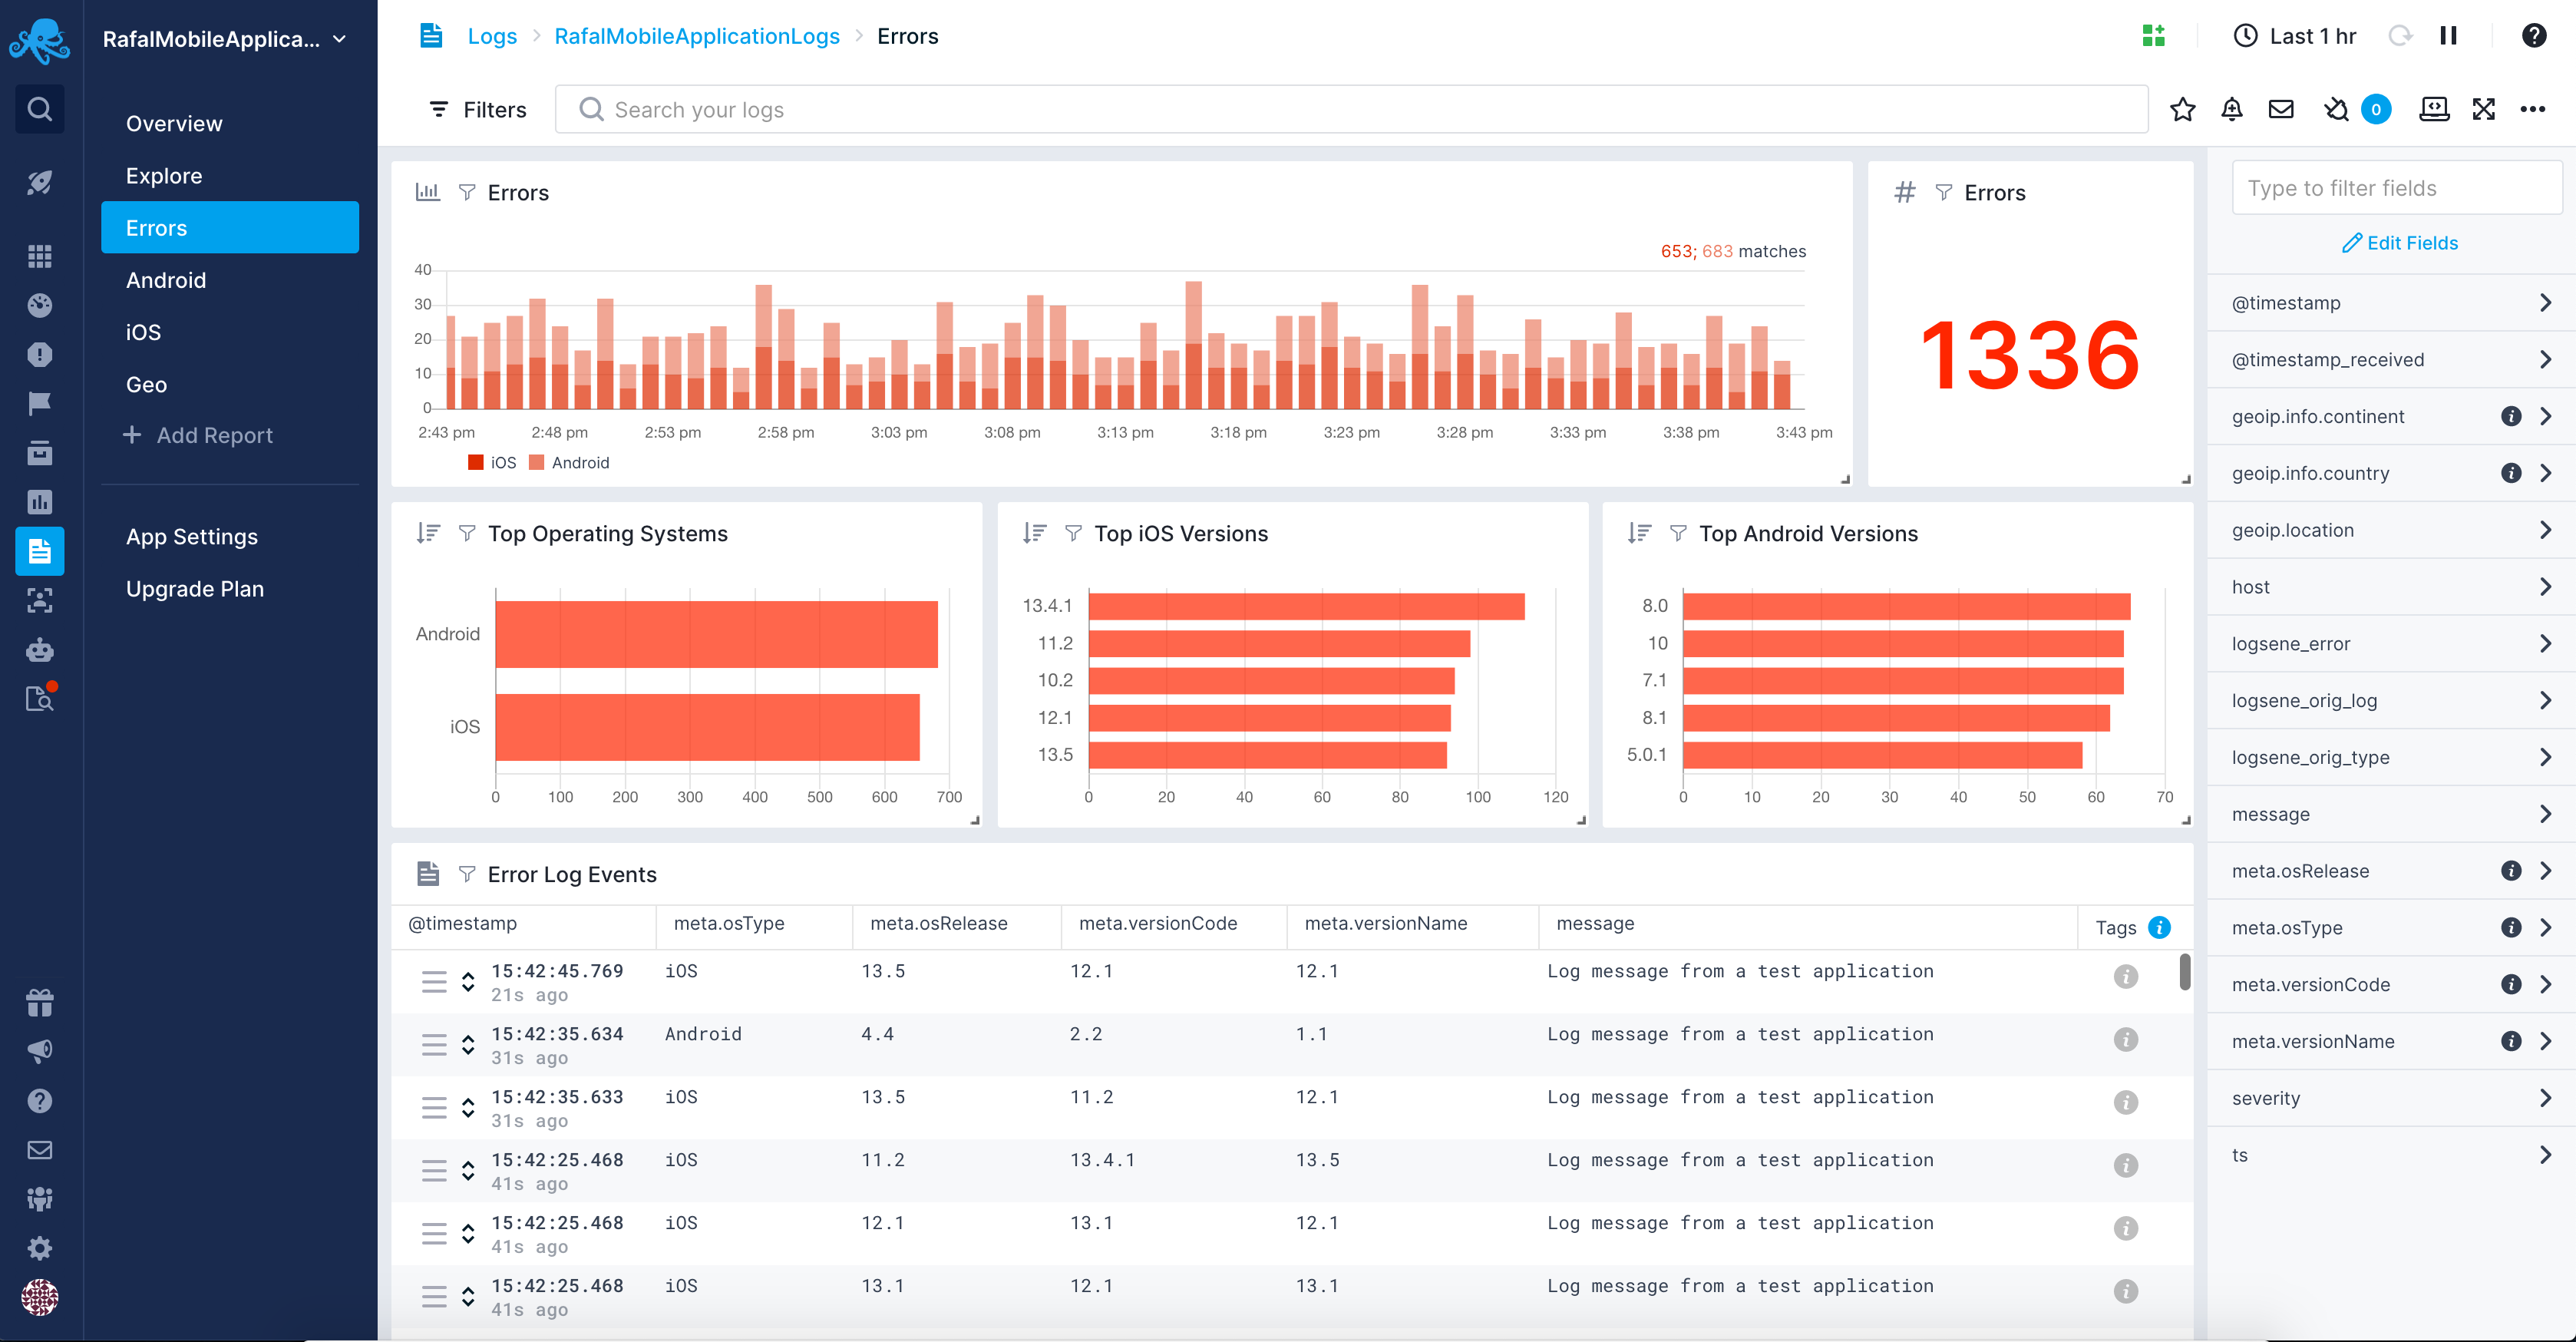
Logsene by Sematext is a popular log management and analysis software for IT operations and development teams.
Being a part of Sematext Logs, it offers secure and scalable monitoring solutions with features like centralized logging, customizable alerts, log security, and multi-user RBAC support.
Logsene supports over 75 services and allows you to combine metrics, logs, and real user monitoring from a single dashboard.
The powerful searching and filtering feature allows you to use query and filter to analyze log data with fast search to detect and fix issues.
Key features of Logsene by Sematext:
Powerful search and filtering for easy threat detection
Nagios log server is one of the best open source network traffic log analysis tools designed to simplify data collection and presentation. It collects your data in real-time and sends it to a search tool.
One of the major advantages of this Nagios is that you can integrate it with an endpoint application. This allows you to use an data interpretation tool of your choice.
Another strong point of this tool is that it can be used for network security and log analysis. This makes it one of the go-to tools for organizations that need to monitor the level of security of the networks.
How can the network log file analysis tools help you?
Network log file analysis tools can simplify complex data and show them in graphic display formats.
Visualized performance data offered by log analysis tools are easier to comprehend than sifting through text-based information directly.
And after that, it’s easy to use the syslogs to create detailed reports and present them to your peers.
The right network log file analysis tools can help you maintain an overview of the system messages sent by the network devices continuously via Syslog.
Only then can you quickly spot and fix any issues detected by the system before the network is compromised.
Minecraft is a world-building game that millions of players across the planet play online together. However, multiplayer crossplay issues arise for some Minecraft players. The Unable to connect to world error is one such issue that sometimes arises when some players try to connect with worlds.
What exactly is Minecraft crossplay?
Minecraft crossplay is a feature that enables cross-platform multiplayer gaming for Minecraft. Crossplay means Windows players can play multiplayer Minecraft games with console and mobile device players. These are the Minecraft Bedrock game editions with crossplay compatibility:
Minecraft for Windows 10
Minecraft for Mobile Devices
Minecraft for Xbox
Minecraft for Nintendo Switch
Minecraft for PlayStation
With those Bedrock editions, Minecraft’s multiplayer crossplay extends across many gaming platforms. You can play crossplay multiplayer Minecraft games with Windows 10 PCs, PlayStation 4 & 5, Xbox One, Xbox Series, Switch, Android, and iOS gaming platforms.
However, crossplay doesn’t extend to older Windows platforms and other consoles. Minecraft: Java Edition doesn’t support crossplay compatibility for older Windows platforms. Nor is crossplay applicable for PlayStation 3, Wii U, Vita, 3DS, and Xbox 360 players.
What causes this Unable to connect to world Minecraft error?
There are a few reasons why this error occurs, and we will outline the most important of those:
Not connected to the same hotspot – If you’re playing Minecraft with connected devices on the same Microsoft account, make sure you also connect the devices to the same hotspot.
Antiviruses are blocking the connection – Firewalls can block Minecraft from connecting with the Bedrock server. Third-party antiviruses can sometimes wrongly flag reputable software like Minecraft as malware or at least block certain features.
Incorrect home network configurations – Some router configuration settings can restrict online multiplayer for Minecraft and other games. Therefore, changing certain router settings can also fix the Unable to connect to world error.
Now that we know why this error occurs, let’s proceed with the solutions to fix the problem.
How can I fix the Unable to connect to world error?
1. Run the CheckNetIsolation PowerShell command
Click the Start button, type the keywordpowershell within the text box and click the Run as administrator option for the Window PowerShell search result.
Type this command and press Enter to run it: CheckNetIsolation LoopbackExempt -a -n="Microsoft.MinecraftUWP_8wekyb3d8bbwe"
CheckNetIsolation.exe is a diagnostic tool in Windows that tests and troubleshoots a Windows Store app that needs network capabilities.
In other words, if Minecraft has any trouble connecting to the Internet, this tool will identify and fix it.
2. Select the join multiplayer games Xbox account settings
Sign in to your Xbox account on a browser.
Select the Xbox One/Windows 10 Online Safety tab.
Make sure the You can join multiplayer games option is enabled. If not, select the Allow option for it.
Select the Allow radio buttons for all the other options on the Xbox One/Windows 10 Online Safety as well.
Press the Submit button.
Also, make sure the Multiplayer Game option is enabled for the Minecraft world you can’t connect to. To do so, click the edit (pencil) button for a world on Minecraft’s World tab. Then toggle the Multiplayer Game option to On if it’s disabled.
3. Update Windows 10 and Minecraft to the latest versions
3.1 Update Windows 10
Open Settings with the Windows key + I keyboard shortcut.
Click Update & Security to open the tab shown directly below.
If a feature update is available, you might see a Download and install option for it in Settings. Click the Download and install option for an available build update if you can.
Press the Check for updates button if you can’t click a Download and install feature update option. Select to install any available Windows 10 updates.
3.2 Update Minecraft
Click the Start button and select the Microsoft Store shortcut.
Then click the Account button (your picture) at the top right corner and select App settings.
Now, make sure that the App updates function is On.
If the App updates option is enabled, Minecraft will be updated automatically.
4. Update your PC’s network device driver
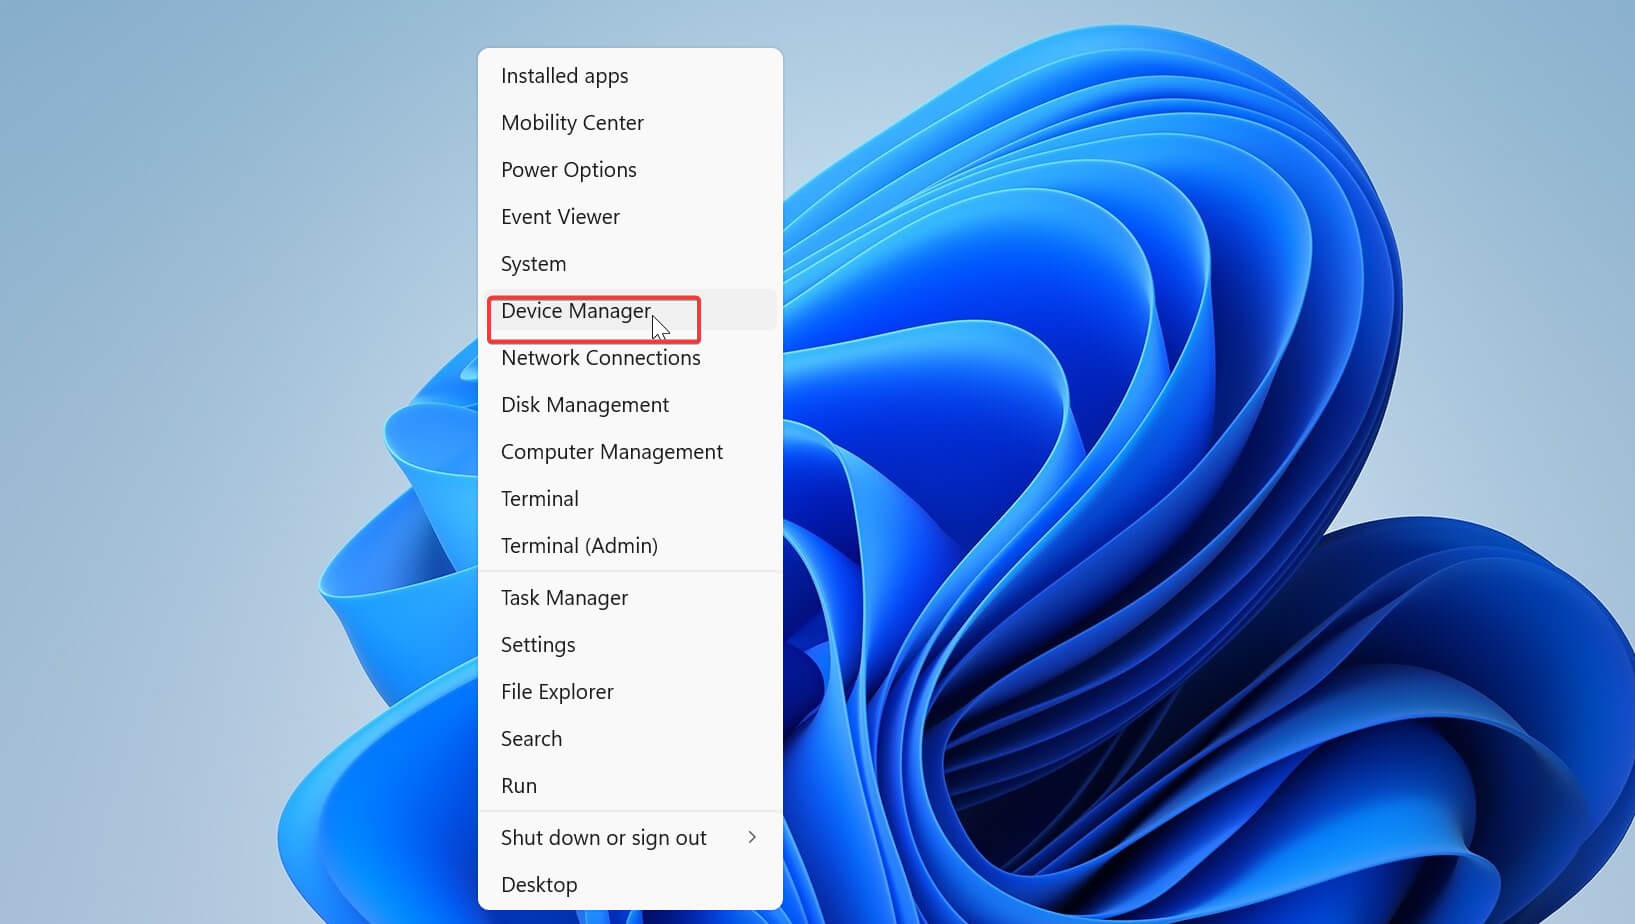
Right-click the Start button to select Device Manager on the Win + X menu.
Next, double-click the Network adapters category.
Right-click your PC’s network adapter device and select Update driver.
Click Search automatically for drivers within the Update Drivers window that opens. Thereafter, Windows might update your PC’s driver.
The Update Drivers utility in Windows isn’t always entirely reliable for updating drivers. If that utility doesn’t find and install a new driver, consider trying a third-party driver updater utility like Outbyte Driver Updater.
Outbyte Driver Updater will scan your PC, list devices with outdated drivers, and enable you to update their drivers.
Outbyte Driver Updater
Find instantly the latest updates for your drivers by using this excellent tool.
Click the Start button, type cmd in the search box, and click on Run as administrator to launch Command Prompt.
Type this command in the prompt’s window and press Enter: ipconfig
Look for the Default Gateway (IP address) number like 192.168.0.1. Note down that IP address number.
Now type your PC’s IP address number in a browser’s URL bar, and press the Enter key. A router firmware login page should open in your browser.
Enter the required login details for your router’s Settings page. If you’re not sure what to enter, select your router’s manufacturer on the Router passwords website and click Find Password.
Then look for a UPnP setting in your router’s firmware options, which might be on an Advanced or Advanced Setup.
Turn on the UPnP setting if it’s disabled.
Make sure you save the new settings by selecting an Apply or Save option.
6. Turn off Windows Defender Firewall
Click the Start icon, type firewall in the search box, and click Windows Defender Firewall to open that Control Panel applet.
Next, click Turn Windows Defender Firewall on or off to bring up Customize Settings.
Select both the Turn off Windows Defender Firewall options there.
Press the OK option to save the settings.
Then try connecting to a Minecraft world with the firewall disabled.
If this solution resolves the issue, the firewall was blocking Minecraft’s server. Click Allow an app or feature through Windows Defender Firewall and select all the bedrock_server checkboxes to allow Minecraft through WDF. Then you can turn the firewall back on.
Also, try disabling any third-party antivirus utility installed on your desktop or laptop before launching Minecraft. To do so, right-click your antivirus utility’s system tray icon to select a turn off or disable shield option of some kind. Choose to turn off the shield for a few hours if you can.
It’s only advised to temporarily disable your antivirus utility. Remember to turn it back on after you’ve finished playing Minecraft. Alternatively, consider adding Minecraft to your antivirus utility’s exclusion list.
7. Allow local network access for Minecraft (iOS fix)
To fix the Unable to connect to world error for Minecraft for Mobile on iOS devices, tap Settings on your tablet or phone. Then tap the Privacy and Local Network to view a list of apps that have requested permission to find local area network devices.
Within the Local Network menu, look for Minecraft and enable its access. This worked for a lot of our readers so try it out.
The Minecraft Help Center page includes the contact form players can fill out. Input all the required details for your Minecraft game issue in that form. Then click the Submit button to send.
Minecraft’s support forum also helps players fix issues with that game. You can sign in to that forum with a Microsoft or Google account. Then click the Minecraft (Bedrock) Support section to add a post about the Unable to connect to World error there.
The resolutions above are some of the more widely confirmed fixes for the Unable to connect to world crossplay error. So, those potential fixes will probably be enough to kick-start crossplay multiplayer Minecraft games for most players.
If you have any other suggestions or questions, feel free to write them in the comments section below.
Dropbox is a cloud-based file hosting platform that allows you to store and share files, collaborate on projects, etc. Lately, many users report Dropbox’s high CPU usage causing their PCs to be slow and unstable.
Dropbox is a high-process platform because it takes a lot of resources and time f to load its files, sync and update them, and share them. Also, it undergoes a self-monitoring process that helps it check for version updates. So, many activities and requests on Dropbox may cause high CPU usage.
However, some notable factors may cause Dropbox to take so much CPU. Some are:
Dropbox syncing process – When the files that Dropbox is syncing are large and consume a lot of space, it can result in high CPU usage. Also, Dropbox syncing many files simultaneously can cause it to use a lot of CPU.
Interference from other apps – Dropbox may be interrupted by the activities of other apps on your PC, such as backup programs, antivirus software, and others. They can cause problems with Dropbox downloading files and sync.
Size and number of files stored on Dropbox – Having so many files in your Dropbox folder can cause it to use lots of CPU on your computer. So, the higher the number of files in the folder, the higher the system resources needed to take them.
Symlink issues – The presence of Symlink and its activities on Dropbox can cause problems. If the Dropbox app isn’t able to access files linked to the Symlink shortcut, it can run into difficulties, resulting in Dropbox causing 100% disk usage.
These causes may vary in different PCs. Nonetheless, you can fix them by troubleshooting Dropbox and your PC.
How do I fix the high CPU usage on Dropbox?
Go through these preliminary checks:
Close unnecessary apps on your computer.
Restart Windows in Safe Mode and check if Dropbox still uses more CPU.
If the problem persists, go ahead with the fixes below.
1. Use Selective Sync to choose folders to store on your hard drive
Click the Dropbox icon on your desktop to launch it.
Tap on the profile picture icon in the top-right corner and click on Preferences.
Click the Sync tab, go to Selective Sync, then click Select folders.
Check the box for folders to be saved on your hard drive, then uncheck the box for the folders you’d like removed.
Click the Update button.
Selective sync lets you select the folders to store on your computer’s hard drive among the folders stored in your Dropbox account. Read about how to use Selective sync on Dropbox for more information.
2. Disable background apps
Press the Windows + I key to open Windows Settings.
Select Apps and click on Installed apps.
Select an app, click the three dots, and choose Advanced options.
Then tap the drop-down button for Background app permissions and click on Never.
Repeat the same process for all apps you want to restrict background permissions. Check our article for other methods to turn off background apps in Windows 11 if you have issues using the steps above.
Left-click the Start button, type Control Panel, and then press OK to open it.
Click on Programs and Features.
Find Dropbox, right-click on it, and then select Uninstall from the drop-down.
Follow the onscreen prompts to complete the uninstallation.
Download Dropbox and install it on your PC, then sign in to Dropbox.
Restart your PC and check if high CPU usage persists in Dropbox.
It will fix corrupt installation files and other issues that can cause the issue. You can check our guide on what to do if Dropbox fails to uninstall on Windows 11.
4. Add Dropbox as an exception in Firewall settings
Left-click the Start button, type firewall, and open Windows Defender Firewall.
Go to Allow an app or feature through Windows Defender Firewall.
Scroll down and select Dropbox from the list of apps. Check the boxes for both Private and Public.
Click OK to save the changes and restart your PC.
Allowing Dropbox as an exception in Windows Firewall prevents the firewall from checking or delaying its processes.
Open File Explorer and navigate to the following path: C:Program/Files/Rockstar Games/Grand Theft Auto/San Andreas
Right-click on the Gta_sa.exe file and select Properties.
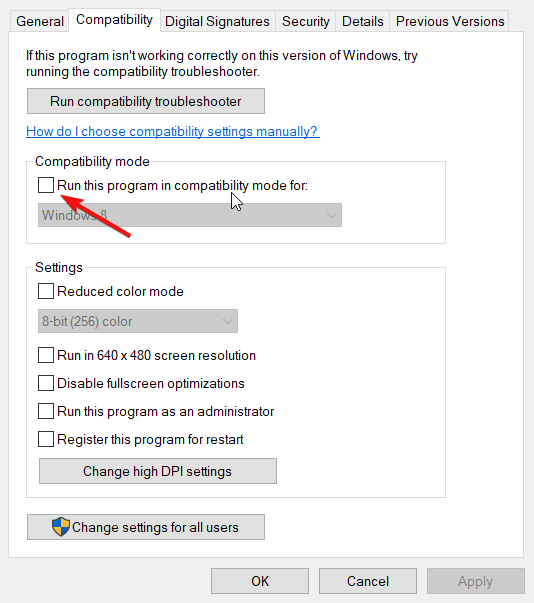
Now, click the Compatability tab at the top.
Check the box for Run this program in compatibility mode for.
Next, click the Compatibility mode dropdown and select Windows 7 or 8.1.
Finally, click the Apply button, followed by OK to save the changes.
Launch the game from the Rockstar Game Launcher and check if the GTA San Andreas mouse is not working or spinning issue is resolved.
4. Reinstall mouse drivers
Press Windows + X and select Device Manager.
Expand the Mice and other pointing devices section.
Right-click your mouse and select Uninstall device.
Restart your computer, and Windows will automatically reinstall the mouse driver.
5. Disable visual themes
Right-click the GTA San Andreas shortcut or executable file.
Select Properties.
Go to the Compatibility tab.
.Check the boxes for Disable visual themes and Disable desktop composition.
Click Apply and OK.
GTA San Andreas can have mouse issues due to Windows’ visual themes and desktop composition. These features add graphical enhancements, but older games like San Andreas aren’t built for them.
Wrapping up
There you have everything you need to fix your mouse if it is not working on GTA San Andreas. You only need to follow the instructions to the letter, and everything should be back to normal.
Recently, different Netflix users have complained about encountering Netflix error code tvq-st-106. The Netflix error code tvq-st-106 is a network connection issue stopping your device from a secure network connection to the Netflix server.
Different factors can account for users encountering Netflix tvq-st-106 errors code while trying to access the Netflix server. The common factor is network issues affecting a service network connection.
Network connection issues – A low bandwidth connection can hinder the Netflix app and secure network connections to the server. Also, network congestion can leave little network resources for Netflix, causing issues.
Corrupts Netflix files – Netflix error code tvq-st-106 can occur when the file is missing or corrupt due to bugs in its files.
Wrong DNS settings – DNS translates human language website text into an IP address that allows the PC’s on a network to communicate with each other. Therefore, issues with the DNS server or settings on a network will result in issues with connection on the PC and apps running on it.
How do I fix Netflix error code tvq-st-106 on Netflix?
Before attempting any advanced fix, do as described below:
Press Windows + R keys to open the Run window, type cmd in the text space, and press Enter to open the Command Prompt.
Type the following and press Enter: ipconfig/flushdns
Restart your PC and check if the error persists.
Flushing or clearing the DNS record on your PC can help fix issues with the DNS server that may prompt the error. It can also resolve the DNS server not unavailable on Windows 10/11.
Click on the three dots beside Netflix and select Advanced Options from the drop-down.
Click Reset and confirm by clicking on Reset.
Open Netflix after resetting to check if the error is fixed.
Resetting the Netflix app settings will restore all settings to default and resolve all problems that could hinder connectivity. Furthermore, you can read about how to reset apps in Windows.
4. Stop background app permission
Press the Windows + I to Launch the Windows Settings.
Click Apps, then Installed apps.
Locate the app, click the three-dots menu button and select Advanced options.
Under the section Background app permissions, select Never.
Netflix error code tvq-st-106 can occur as a result of temporary server downtime. Thus, waiting can be the last resort after trying all the aforementioned fixes. Also, our readers can read about Netflix error 0x80240014 they can run into on their PC.
Whether we discuss web design or editing product images, Photoshop is one of the best photo editing tools that you can use. However, it is not free from issues, with users reporting that Photoshop crashes when printing.
This can be frustrating, but it is not an issue without a solution, as we will show in the ensuing sections of this guide.
Why does Photoshop crashes when I print?
Listed below are some of the reasons Photoshop crashes when you are printing:
Faulty driver: Sometimes, this issue might occur because your printer driver is faulty or corrupt. To fix this issue, you need to reinstall or update this driver to the latest version.
Disabled service: If Photoshop encounters an issue because the Printer Spooler service is disabled. Also, it might occur because the service encountered some issues. The fix to this is to restart the Printer Spooler service.
Outdated app: In most cases, this issue is caused by an outdated Photoshop app. The quick way around this is to update the app to the latest version.
How can I fix Photoshop printing crashes in Windows 10?
1. Update Adobe Photoshop
Launch the Adobe Photoshop app and click the Help tab at the top.
Click the Updates option.
Finally, follow the onscreen instructions to install any available updates.
If Adobe Photoshop is outdated, it is likely it crashes while you are printing. So, you need to check for available updates.
If you can’t find the latest version on the app, you can go to the manufacturer’s website to download the latest version of Adobe Photoshop.
2. Remove all printers
Press the Windows key, type control, and select Control Panel.
Click View devices and printers under the Hardware and Sound option.
Right-click each of the printers there and select Remove device.
We also recommend you clear the subsystem that is related to your printer. Here’s how you can do that:
Press the Windows key + E to open File Explorer and navigate to the path below: C:/Windows/ystem32/spool/drivers/w32x86
Now, rename all the files in the folder.
Next, press the Windows key + R, type regedit, and click OK.
Navigate to the path below in the left pane: HKEY_LOCAL_MACHINE/SYSTEM/CurrentControlSet/Control/Print/Environments/Windows NT x86
Check if you have Drivers and Print Processors in the subkeys. If there are any other entries, you should delete them.
Now, navigate to the path below: HKEY_LOCAL_MACHINE/SYSTEM/CurrentControlSet/Control/Print/Monitors
Check the sub-key lists for the following entries: BJ Language Monitor; Local Port; Microsoft Document Imaging Writer Monitor; Microsoft Shared Fax Monitor; Standard TCP/IP Port; USB Monitor; WSD Port.
Finally, delete all other entries.
If your computer is connected to your printer through a USB cable, unplug it; otherwise, turn off the Wi-Fi connection through which your printer is connected to your computer.
Restart your Windows 10 machine. Reconnect your printer with your computer and follow the on-screen prompts for installing your printer and its official drivers.
On the same page, if the steps from above didn’t solve the Photoshop crashes when printing on Windows 10 error, try installing the drivers for Windows 8.
That might work, as there might be compatibility problems between Photoshop and Windows 10.
3. Remove the Photoshop Preference
Hold down the Alt + Ctrl + Shift keys while your start the Photoshop program.
A warning message should be displayed asking if you want to delete Photoshop Settings files.
Click on Yes.
Note: Before starting the steps from this section, save your work from Photoshop. Also, a general backup of PS is highly recommended.
4. Uninstall and reinstall printer drivers
Press the Windows key + X and select Device Manager.
Click the arrow next to Print queues and right-click each device there.
Now, select Uninstall device.
Click the Uninstall button to confirm the action.
Finally, use the disk that came with your printer to reinstall the drivers or go to the manufacturer’s website.
In some cases, this issue might be caused by a malfunctioning or faulty printer driver. You should be able;e to fix this by uninstalling the driver and installing the latest version.
5. Uninstall Lavasoft Web Companion
Press the Windows key + S, type control, and choose the Control Panel option.
Select Uninstall a program under the Programs option.
Now, right-click the Lavasoft Web Companion and click Uninstall.
Finally, follow the onscreen instructions to complete the removal process.
Some users reported that they managed to fix the printing errors while using Photoshop after uninstalling Lavasoft Web Companion.
Press the Windows key + I and select the Update and Security option.
Choose Troubleshoot in the left pane and click the Additional troubleshooters option.
Now, select Printer and click Run the troubleshooter.
If Photoshop crashes when printing, it might be due to some minor glitches with the process. One effective tool to clear up these glitches is the built-in troubleshooter.
So, you need to run it and apply the recommended troubleshooting steps.
7. Restart the Printer Spooler service
Press the Windows key + R, type services.msc, and click OK.
Double-click the Print Spooler service to open its properties.
Now, set its Startup type to Automatic and click the Stop button.
Wait for some time and click the Start button.
Finally, click the Apply button, followed by OK, to complete the process.
If all the fixes above do not work, one of the essential printer services might misbehave. You need to restart this process to clear up anything that might be wrong with it.
Those are the solutions that can help you fix Photoshop crashes. You only need to follow the instructions carefully, and things should the back to normal.
If you are facing other Photoshop problems, check our detailed guide to clear them all.
Feel free to let us know the solution that helped you fix this issue in the comments below.
Many are wondering how to livestream Xbox One on Facebook, and since Facebook gaming is becoming more popular nowadays, and with the downfall of Mixer, that is a legitimate question.
If you’ve set your mind on Facebook live gaming, then you will require some additional hardware, streaming software a computer to act as the middleman. In this guide, we will explore the setup you will need, so simply follow the steps, and you’ll be good to go.
Do you need a capture card to stream on Facebook?
If you’re planning to livestream Xbox One on Facebook, you need a capture card and a PC that will act as a middleman and stream the output from your capture card.
How can I livestream Xbox One on Facebook?
To achieve that smooth, unified experience for your viewers, you will want to ensure you have the right tools. These include:
You will need a strong Internet connection. To give you an idea, you should aim for at least 15 to 20 MB/s download speed, and 6 MB/s upload speed.
Your PC should be a decent i5, powered by a GTX 1050 Ti, with 8GB of RAM since most of the heavy lifting will be carried by your console.
A good capture card for better picture quality and overall reliability. An option you might consider is Elgato. If you don’t want to invest heavily in this, there are also cheaper alternatives out there.
And a third-party app that can record and transmit to Facebook live. OBS is a choice for many, so we’ll use it for this guide.
That’s all in terms of hardware and software. To stream from Xbox to Facebook, we will need to connect all of them for that unified streaming experience. Now it’s time to create that link to Facebook live.
Type in your page name, select the category as Gaming video creator and click on Continue.
Add your Profile and Cover photos.
After you have created your Facebook Creator page, it’s time to connect it to your hardware and software components. The good news is, at least for now, you will have to do this only once.
Later, as your stream progresses, you might consider making some adjustments. But for now, it’s essential to ensure that your streaming environment is up and running.
2. Connect your hardware and software components
Download and Install the software of your capture card of choice on your PC (in this case Elgato).
Install your broadcasting software, such as OBS or Wirecast.
Connect the capture card to your Xbox via an HDMI cable.
Use a second HDMI cable and connect the capture card to your monitor or TV. This will ensure that the console will send a video signal directly to your monitor.
You should see the image directly on your monitor. The only thing that remains is to configure our streaming software so that it records the action on the monitor.
Now that you have all the necessary hardware and software, you need a bit more configuration to livestream Xbox One on Facebook.
Choose the H264 video encoder from the Encoder menu.
Set the desired Bitrate. For best results, it should be 20% less than your actual upload speed.
Set the Keyframe interval to 2.
Go to Settings and navigate to Video. Set the resolution to 1280×720.
Go to Stream and set Service to Facebook Live and paste the Stream key that you got from the previous section.
Create a scene
In OBS, right-click the Scenes box and click the plus icon.
Name your scene.
If needed, create multiple scenes.
Add a gaming source
Select the scene in OBS.
In the Sources panel click the plus icon.
Select the your capture card stream/window.
After doing that, test if everything works, and you should be able to livestream Xbox One on Facebook.
Is streaming to Facebook worth it?
The first reason is the most obvious one, audience reach. Facebook is an immensely popular app, registering approximately 2.8 billion monthly users.
What is worth noting is that the vast majority of those people use Facebook daily. Regarding exposure, there may not be a better platform to stream on.
That statistic alone can be enough if you are thinking about monetization. Video consumption is at an all-time high, streaming making no exception.
In 2020 Facebook Live was the most popular streaming service for concerts, sports games, and press events. Given the fact that the majority of users are between the 18 to 34 age range, it’s safe to assume that Gaming will also jump out of proportion.
To conclude, streaming to Facebook has the potential to help your stream get noticed. So, the answer is yes, it’s worth investing in Facebook as a streaming service.
Most likely than not, Facebook will develop its Gaming app for a more streamlined experience. But until then, these are the necessary steps to take to get your stream up and running.
Elsewhere, you can also add Xbox games to Steam if you wish to add a little more variety to the games you play.
That wraps it up for us. We hope that you found this article both helpful and insightful and until later, feel free to leave us a comment on how your streaming process is going!
Steam VR is an app from the Steam gaming platform that allows you to play virtual reality games from your computer on various headsets like the Oculus Rift.
As high-tech as virtual reality platforms may be, games in this space do run into some performance issues. This guide will show you different ways to ensure your game run smoothly on Steam VR.
What Steam games can you play in VR?
Before you download any of these games, you should check if your PC can handle them. The Oculus Rift, for example, requires certain system requirements to run.
Steam has a page on its website listing every single one of its virtual reality titles on its platform. Not every game is made equally as some are better than others. Below are a few highlights:
Keep Talking and Nobody Explodes: This game involves defusing a bomb in a pretty intense scenario while another player gives you instructions on how to disarm it safely.
Raw Data: You have to survive wave after wave of robots coming after you with various weapons at your disposal. An intense shooter; definitely for the hardcore audience.
Tilt Brush: If intense gameplay isn’t your style, Tilt Brush allows you to create gorgeous pieces of art in a variety of styles from sketching pens, oil paintings, and watercolor.
How do I get better performance at Steam VR?
There are some solutions you can do pretty quickly, while the ones detailed below require a bit more extra work:
Restart both your computer and VR headset. This is the tried and true method of fixing any software. Rebooting should work the majority of the time.
Try changing the refresh rate on your VR headset. You can do this by going into the settings menu of your headset and making the adjustments. There isn’t much you can do from the side of Steam VR.
Double-check your wires and cables. Perhaps you’re using a faulty cable on your VR headset that’s malfunctioning. Also, make sure you’re using USB3.0 or higher
Close any extra windows or apps you have running in the background. Having too many apps open can take up CPU resources or RAM leading to poor-performing VR games.
Reinstall Steam VR. It’s possible something went wrong during the installation process
1. Underclock your GPU
Go to the MSI Afterburner website and download the app.
Go to the downloaded file’s location on your computer and double-click it to run the installation wizard.
Check if MSI Afterburner is detecting the graphics card you want to underclock. If it isn’t, click the arrow under the Clock section and choose the correct GPU.
To underclock, drag the knob in Core Clock to a lower quantity. This will slow down the GPU’s clock speed.
Click the checkmark at the bottom to apply the settings.
Underclocking your GPU will reduce the amount of work it has to do to render Steam VR on your headset allowing them to run better. There are other ways to underclock which we recommend learning about.
You can try undervolting, but that comes with a greater performance cost. Undervolting is best used to reduce internal temperatures.
2. Change the computer refresh rate
Open the Settings menu, stay on the System tab, and select Display.
Scroll down and click Advanced display under Related settings.
Expand the menu next to Choose a refresh rate and select a different rate.
If you want choices, click Display adapter properties for Display 1.
Go to the Monitor tab in this new window.
Expand the menu under Screen refresh rate and choose a different quantity.
Click Apply then OK to finish up.
3. Disable GeForce Experience Overlay
Bring up the GeForce Experience app if you have it on your computer and click the cog icon in the upper right corner.
Scroll down to In Game Overlay and click the toggle switch to turn off the feature.
4. Update GPU drivers
On the Windows Search bar, bring up the Device Manager and expand the Display adapters entry.
Right-click the entry and select Update drivers.
Select Search automatically for drivers and the update will instantly be installed. Do the same for other GPUs if you have them on your computer.
Conversely, you can update manually by going to the website of your GPU’s manufacturer (like NVIDIA or AMD) and downloading the drivers from there.
Enter the information NVIDIA is asking you, click Search, and then download the drivers.
Go to the location of the newly downloaded drivers and double-click it to begin the installation process.
5. Defragment your disk drive
Open the File Explorer and go to This PC.
Right-click your main drive, then select Properties in the context menu.
Select the Toolstab and click the Optimize button under Optimize and defragment drive.
Highlight the drive you want to optimize and click the Optimize button. Give your computer time to finish up.
Next, bring up the Settings menu and select Storage in the System tab.
Select Storage Sense.
Click the box next to Keep Windows running smoothly by automatically cleaning up temporary system and app files.
Then toggle the switch under Automatic User content cleanup.
You can set a time for how often Storage Sense will run. It’s recommended you set it to Every Month.
There are multiple reasons why Steam VR (or any game from the platform, for that matter) would lag. It’s possible your browser cache is full, and you’ll need to clear it out.
Or perhaps the game’s settings are too high for your computer. As a result of being unable to handle the workload, Steam VR subsequently runs terribly.
If this is the reason, we recommend lowering the graphical settings, like the resolution, on whatever title you’re playing via Steam VR.
How to add Steam VR to Oculus Library?
In order to connect Steam VR to your Oculus headset, you have to go into your Oculus account’s settings. From there, you allow third-party apps to connect to your Oculus library and install Steam VR immediately. Be aware there have been reports of Steam VR not working right with the Oculus Quest.
To fix this problem, it’s recommended that you first update Steam to see if that works. If not, add an exception to it on Windows Firewall.
Feel free to comment below if you have questions about other Steam games or apps. Also, leave comments about guides you’d like to see information on other gaming software.
Accessing HP Support Assistant for a BIOS update can be extremely useful in several scenarios. It relieves the stress of going to the manufacturer’s website to search for updates.
However, carrying out the process is simple, but you still need a guide to show you how. And that is what this detailed article will take you through in the next sections.
Is it safe to update the BIOS from HP Support Assistant?
It is safe to update your BIOS from the HP Support Assistant. It can provide bug fixes, enhanced hardware compatibility, and performance improvement, to name a few.
However, you can sometimes run into problems during and after the process. That is why some people advise that you update your BIOS manually.
To give you that diversity, the next section will show you how to update your BIOS using the two methods.
How do I update my HP Support Assistant BIOS?
1. Update your BIOS automatically with HP’s Support Assistant
Open the HP Support Assistant. and log in with your account or continue as a guest.
Right under your device picture, you will find an Updates option.
Click on it to check if you are up-to-date or have any pending updates.
If you see a new BIOS update available, click Download and install.
Wait for the Support Assistant to finish the job and close the application.
HP Support Assistant should notify you whenever a BIOS update becomes available. And you should always download and install it.
Although the process is fairly straightforward, users have reported some problems along the way, including the Support Assistant not opening issue. Recurrent issues include:
Tip
Before testing various solutions, ensure that your antivirus or Windows Firewall isn’t blocking Support Assistant from running. Disable your Firewall or grant special permissions for the software and perform a check afterward.
1.1 HP Support Assistant BIOS update fails in the process
If this happens, or HP Support Assistant can’t check for updates, try uninstalling the application and reinstalling it.
Click the Windows Start button and type HP Support Assistant.
In the right column, select Uninstall.
You will be asked to confirm you wish to uninstall the software, so press Yes.
Restart your device when the process has been completed.
Next, go to the HP Support Assistant website and download the application again.
Follow the on-screen instructions to complete the installation.
Restart your PC and repeat the steps in the first method to update your BIOS again.
This solution also works if the HP Support Assistant can’t check for updates, is canceling updates, or the update is stuck repeatedly.
You can perform a system restore if the HP Support Assistant BIOS update still encounters problems.
1.2 Error: HPSF.exe has stopped working
This is another common error that people encounter with the Support Assistant. What causes this error is an outdated version of the software.
To correct it, the easiest and quickest way is to uninstall and reinstall the software.
Always download your software, especially when it comes to BIOS, directly from the manufacturer’s official website. A corrupted BIOS file has the potential to disrupt the functionality of your entire laptop or PC.
Press the Windows key, type System Information, and hit Enter.
Copy the product name, number, motherboard ID, BIOS version, and processor name in a separate document.
Fill in your device name in the search bar and click Search.
Select BIOS from the list and download the available update.
Note: Before going further, read the update’s Details to ensure that it is a newer version than the one currently installed on your device.
If the version is newer, click Download and Save.
Temporarily disable your antivirus software.
Next, you will also have to temporarily disable Bitlocker.
Go to your download location and double-click the BIOS installation file.
Click Yes to start the installation.
Click Next, select I accept the terms in the license agreement, and click Next again.
From the HP BIOS Update and Recovery window, select Update.
Click Restart now.
An HP BIOS Update screen will appear. Wait a couple of moments for the update to start automatically. If it doesn’t, simply select Apply Update Now.
Wait for the update to finish and click Continue Startup.
Sign in back to your computer.
Reenable your antivirus and Bitlocker protection.
Tip
If, during the process, the HP BIOS update fails, do not turn off or restart your computer. HP will automatically try a recovery process.
Knowing that you can go through this update process independently may be handy. Regardless of why the HP Support Assistant fails to download updates, we want you to have complete control over your BIOS.
That is all there is to update your BIOS from the HP Support Assistant plus extras. With the information in this guide, you now have everything to complete the process without additional help.
Keeping your drivers updated is important, and the Acer monitor is no different. This ensures proper functionality and prevents issues from occurring.
However, it is one thing to know you need the driver, it is another thing to install it. This guide will show you how to install the latest version of your Acer monitor driver.
Do I need an Acer monitor driver?
You can benefit from the best device performance only if the associated drivers are fully updated.
However, Acer only advises downloading and installing a driver or updating to the latest version if you are having issues with the plug-and-play driver.
Also, you can install the Acer monitor driver if you have issues with the color quality. Else, the plug-and-play driver should do.
Type your device details in the search box and press Enter.
Download the latest available driver for your device.
Now, unzip the download file.
From here, press the Windows key + X and select Device Manager.
Click the arrow next to the Monitors option to expand it, and right-click your Acer device.
Choose the Update driver option.
Select the Browse my computer for drivers option.
Now, click the Browse button.
Next, select the folder with the extracted files and click OK.
Finally, wait for the installation to complete.
2. Use Device Manager
Press the Windows key + R, type devmgmt.msc, and click OK.
Expand the Monitors section and right-click your Acer monitor.
Now, select Update driver.
Finally, click on Search automatically for drivers and install any available updates.
Windows has a feature that allows you to install the latest version of your drivers, including the Acer monitor driver. While this option might not find the update needed sometimes, it is usually reliable.
Correctly updating the drivers is essential to ensure that the system will work properly and there will be no long-term damages made.
Manually installing your Acer monitor driver can be prone to human errors. Also, it can be time-consuming, which many users complain about.
Thus, using a dedicated third-party tool that automatically updates all faulty drivers and install the missing ones is the most reliable and efficient method.
With this last recommendation, we will conclude our article. We hope the information above helped you successfully download and install the Acer monitor driver.
Does your PC freeze or crash quite often with the nvlddmkm Event ID 14 error? This error usually shows up while playing a game or running a graphic-intensive program.
Re-install the latest version of the driver from the manufacturer’s website.
If the above steps do not help you resolve The description for Event ID 14 from the source nvlddmkm cannot be found error, we have some user-tested solutions to your rescue.
1. Use PC diagnostic tools
1.1 Run a memory test
Press the Win + R keys simultaneously to launch the Run console.
Type mdsched.exe in the search box, and hit Enter to run the Windows Memory Diagnostic tool.
You can now select the option Restart nowand check for problems (recommended).
This will take time, so wait patiently as the PC restarts, and the tool will test the RAM for any defects. If found, it will display the results, and you can then fix the nvlddmkm Event ID 14 error accordingly.
1.2 Perform a stress test
You can also stress test the GPU to check if your laptop is stable and this may fix The description for Event ID 14 from the source nvlddmkm cannot be found error.
We also recommend some of the best hardware diagnostic tools to perform the System Stability Test of the RAM, CPU, and GPU of your Windows 11 PC.
Are you getting error code 8-0x00003700 when playing Rainbow Six Siege on your console? If yes, then you aren’t alone as this issue has been troubling users across the globe. In fact, this error has been raised by so many users that Ubisoft has also acknowledged it.
The Rainbow Six Siege error code 8-0x00003700 pops up when players are trying to play a ranked game, launch the game, create squads, etc. Fortunately, we have several solutions to help you resolve the problem. Let us take a look at the guide.
Why am I getting Rainbow Six Siege error code 8-0x00003700?
Well, there aren’t too many reasons you will get the Rainbow Six Siege error code 8-0x00003700 while playing the game. Here are a few reasons that will trigger this error:
Server error: The main reason you are getting this Rainbow Six Siege error code 8-0x00003700 is that there is some official game server issue.
Problems with the game files: The game file might have gotten corrupted, or some important files are missing.
Faulty internet connection: You should check if your internet is working properly in order to resolve the problem.
Antivirus blocking the game: Your antivirus is blocking the game as it might be falsely detecting the game as a threat to your PC.
Problems with your network driver: You should make sure that the network driver in your PC is up to date.
How to solve error code 8-0x00003700 in Rainbow Six Siege?
Here are a few things that you can do before applying advanced troubleshooting solutions:
Restart your PC as this would make sure that all the system files are loaded from scratch.
Make sure that your internet connection is working. You can make use of websites such as Fast and Speedtest.
Make sure to check the official Ubisoft service status website. Here, you can check out the server status for all consoles. If you see any issues in the official servers, then all you can do is wait for the server to go up. Chances are that the servers are pulled down for maintenance, or a new feature is getting added.
Let us check out the advanced solutions to resolve the problem.
1. Verify the integrity of game files
Open the Steam client.
Click the Library tab.
Right-click on the game and select Properties.
Click on LOCAL FILES.
Click on Verify integrity of game files.
Steam will begin verifying the game process and will repair missing or corrupt game files.
We have shown the process of verifying the integrity of game files for a different game, but the process is the same for all games on Steam.
You can check once the verification is complete if the Rainbow Six Siege error code 8-0x00003700 is resolved. If yes, then there was a game file corrupt or missing.
2. Allow the app through a Firewall
Open the Start menu.
Open Windows Security.
Click on Virus & threat protection.
Under Virus & threat protection settings, click on Manage settings.
Under Exclusions, clickAdd or remove exclusions.
Press the Add an exclusion button.
Select the File option.
Locate the EXE file and add it.
Relaunch the game and check if this resolves the issue or not.
Chances are that the antivirus software in your PC is blocking the game from launching, as this error message has been reported by Rainbow Six Seige players while launching the game as well.
Follow the above steps and add it to the exclusions list and check if this resolves the problem at your end or not.
Type the below command and press Enter. ipconfig /flushdns
Execute the below commands one by one. ipconfig /releaseipconfig /renew
Exit CMD.
Launch the game and check if this fixes the issue or not.
4. Use flushconfig
Press the Win + R keys to open the Run dialogue.
Type the below command and press Enter. steam://flushconfig
Wait for some time for the process to complete.
Restart your PC.
Open the Steam installation folder.
Run the Steam.EXE file from the installation folder.
There are a few different ways to run the steam://flushconfig command, one of which is presented above. You can refer to our guide on how to run steam://flushconfig command to learn the other ways.
In case you cannot find the Steam folder on your PC, you can either right-click on the desktop shortcut and select the Open file location option or check out our guide and learn how you can find steam folder.
5. Reinstall the game
Launch the Steam app.
Click the Library tab.
Right-click on the game and select Manage.
Select Uninstall.
Go to the Library tab.
Select Rainbox Six Siege and hit the Install button.
There might be a few files that are missing or got corrupted because of which you are getting the Rainbow Six Siege error code 8-0x00003700. Try reinstalling the game and checking if this resolves the issue or not.
Let us know in the comments below, which one of the above solutions resolves the problem for you. You can also let us know if there is another way that fixed the problem for you.
Are you trying to factory reset your Windows 7 computer to troubleshoot a problem, improve the performance, or install the updated Windows version but don’t have a password?
We have 3 tested ways to do it:
How can I reset my computer without the administrator password?
1. Repair your computer to perform a factory reset
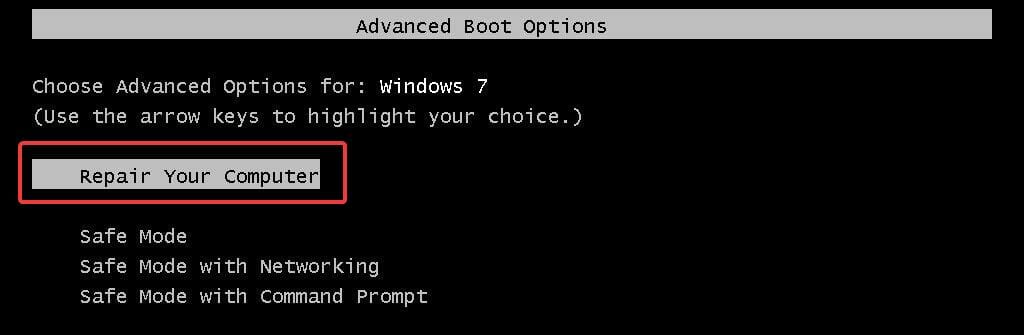
Restart your computer and press the F8 key repeatedly until you enter the Advanced Boot Options menu.
Choose the Repair Your Computer option and press Enter.
Now the System Recovery Options screen will open. Select the keyboard’s layout and click on Next.
Click on Restore, and allow some time for it to check the Restore Partition for your data and factory reset your computer without a password.
If you lose the password or cannot access the laptop for any other reason, use the steps to factory reset a Windows 7 Dell, Acer, and Lenovo PC without a password.
2. Perform the Factory Reset in Safe Mode
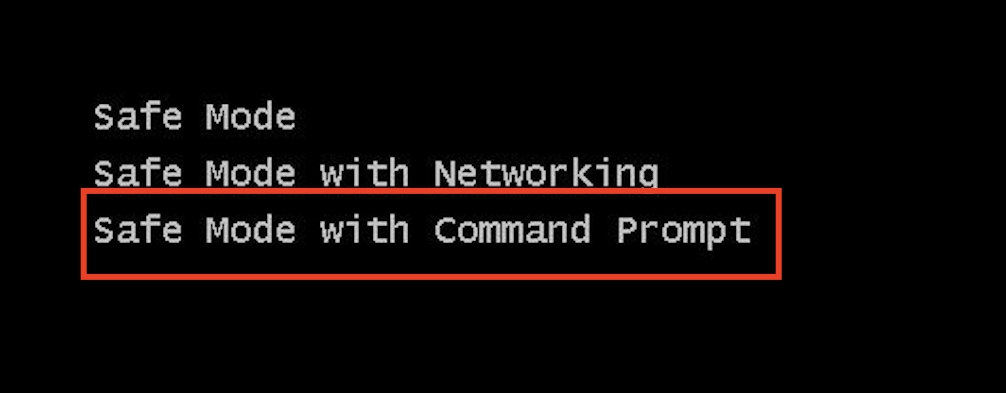
Turn on your Windows 7 computer and hit the F8 key multiple times.
Next, select Safe Mode with Command Prompt inside the Advanced Boot Options and press Enter.
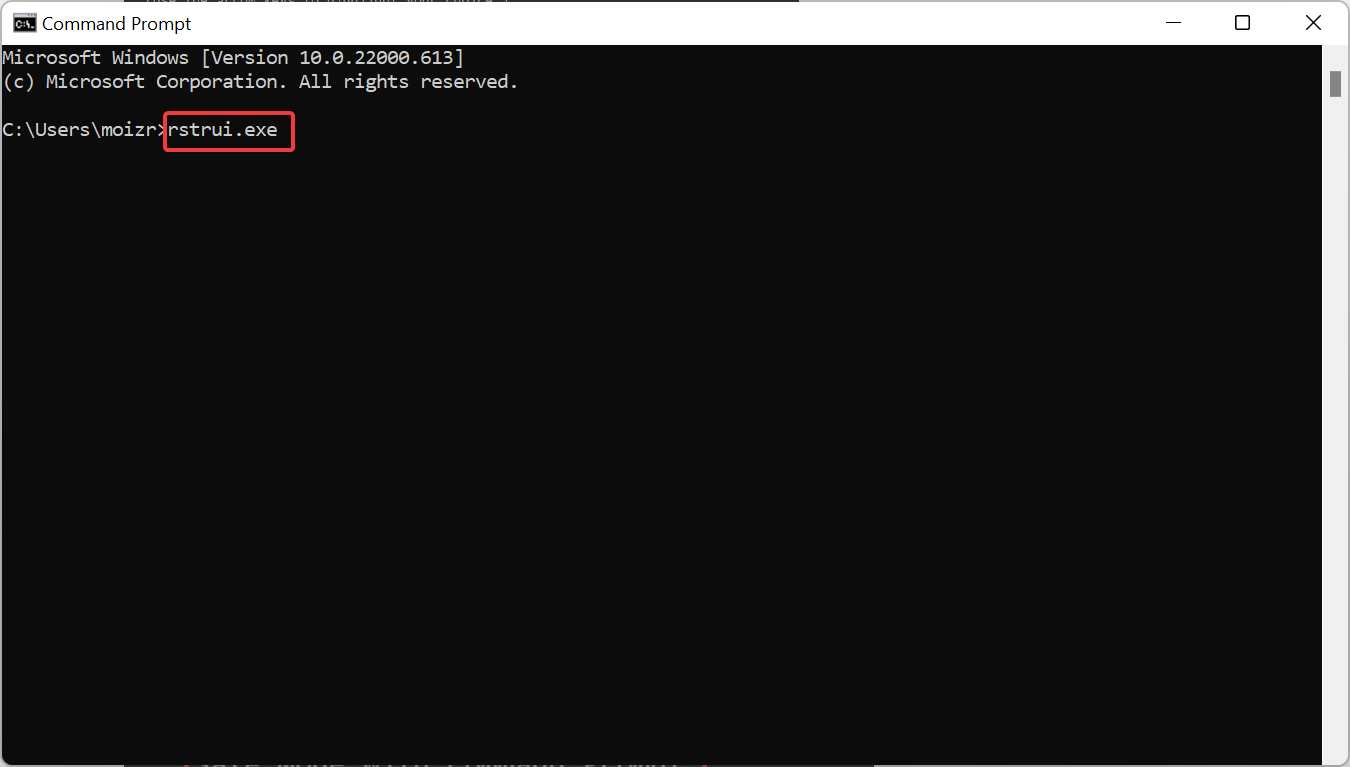
In the Command Prompt, paste the following command and hit Enter:rstrui.exe
Click Next, and follow the on-screen instructions to complete the restore process.
After the restore is complete, restart the computer for the changes to come into effect.
If you were wondering how to factory reset a Windows 7 Lenovo PC without password, this method should do the trick.
3. Use the Recovery Partition
NOTE
The steps here are for an HP computer and should help get an idea of the process. In case you are using a PC developed by another manufacturer, check the official website or the exact steps.
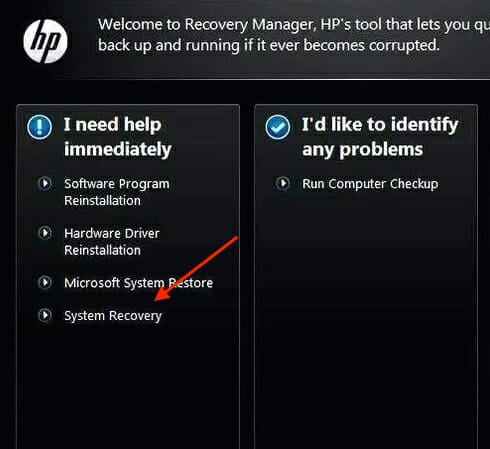
Turn on your computer and repeatedly hit the F11 key to open the Recovery manager.
Next, select System Recovery under I need help immediately.
Once the process is complete, restart your computer.
These are the best ways you can factory reset Windows 7 without a password on Acer, Dell, and Lenovo computers without much trouble.
For a complete step by step walkthrough on different reset methods, check out this guide on how to factory reset Windows 7.
In case this sounds like too much trouble, you can always use reliable password recovery software for Windows 7 and get things done automatically.
If you have any queries regarding the information presented here, drop a comment, and we will get back at the earliest.
A laptop battery calibration software does great wonders when it comes to extending the battery life and improving the health of the devices.
If you were wondering how to calibrate the laptop battery, there are built-in options. But a laptop battery calibration software stands to offer a plethora of benefits. So, let’s find out these benefits and the best options in the market.
Why should you use battery calibration software for your laptop?
Think of a laptop battery calibration software as a sort of forensic analysis of your device. Using such software can give you detailed information about battery statistics. Here are a few benefits of using one:
Testing and repair – The software does a range of tests and is capable of several repairs, thus making things easier for you.
Accurate insight into battery life – A good software will help provide better projections as to how much longer the battery can run without being plugged in.
Improve the battery’s life span – Calibrating helps extend the battery life. So you will be saving big bucks in the long run.
Optimize battery – The software allows users to optimize the battery and get it to deliver the desired performance.
Create a custom plan – A laptop battery calibration software enables users to create a custom plan that best meets their requirements.
How to check the battery status in Windows?
Press Windows + R to open Run, type cmd, and hit Ctrl + Shift + Enter.
Click Yes in the UAC prompt.
Paste the following command and hit Enter: powercfg /batteryreport
Navigate to the path listed after running the command, locate the battery-report.html file, and double-click on it.
The battery report will now open in a browser.
Upon scrolling, you will find a detailed laptop battery health check. The most notable one, in our opinion, is the current capacity vs the design capacity of your battery.
The battery report provided by Windows is a good starting point, but the main difference between this and the dedicated software on our list is that this report doesn’t allow for any future optimization. So, let’s find out the best laptop battery calibration software.
What is the best laptop battery calibration software?
BatteryInfoView is one of the most popular laptop battery repair and calibration software on the Internet. There are many good reasons for this.
Firstly, it has a very intuitive UI, so it won’t require much digging through the application to find the various options and settings.
It works on basically every version of Windows, both the 32-bit and the 64-bit one. So, you don’t have to worry that BatteryInfoView will drain your resources in terms of system requirements. You can leave the app running and will hardly notice it.
Another essential feature of BatterInfoView is that it allows saving battery reports on your disk. This can be useful if you plan to analyze different laptop brands in terms of battery performance. And BatteryInfoView is also free.
Battery Optimizer is Another user-friendly application that offers to prolong the laptop’s battery life. How exactly does it do it? Firstly, Battery Optimizer will ask you to run a diagnostic to see precisely how and what affects the battery.
After analyzing your system and peripherals, the software will give an estimate of how much battery time can be won by following its recommendations.
Things like Bluetooth, Wi-Fi, screen brightness, and all the usual passive consumers will be dimmed down. Apart from these, Battery Optimizer will also target some CPU applications that run in the background with no effective use other than draining your battery.
What do we especially like about this software? All the operations it performs can be done manually but take longer and require effort. With this laptop battery calibration software, it only takes a few clicks. So convenience is definitely an aspect.
You also have the possibility to enable warning messages. This can be useful in situations where you are caught up with other tasks but still want to keep an eye out for the battery.
BatteryMon can be another incredibly useful laptop battery calibration software. This one won’t have the same easy-to-use, intuitive interface as the previous ones, but it will come with a few added features.
One of the main selling points for us is that with BatteryMon, you can easily monitor the discharge points of your battery. When talking about these, there’s always an actual discharge and an expected one.
The software will calculate an expected discharge rate based on your device’s age and wear. This can be extremely useful as it offers you a more in-depth look at how your battery performs and, more importantly, at how it should and could perform.
All of this can be later logged and saved for future reference.
Also worth mentioning is that BatteryMon is capable of monitoring multiple batteries at the same time. The graphs and charts do require little time to get used to, but you’ll find the effort worthwhile.
BatteryMon is a great laptop battery health and repair software. We especially recommend it for those who use multiple batteries or want more technical and in-depth reports.
Smarter Battery works similarly to BatteryMon, in the sense that it evaluates your battery performance based on charge-discharge cycles.
A unique feature to be found is deterioration level evaluation. Given that batteries have a chemical composition, they are prone to corrosion and damage over time.
BatteryMon can’t solve this for you, but it will prompt you as to how serious the situation is. Apart from this, you still get classical information such as the battery’s manufacturer, cycle count, charge percentage, overall health, and much more.
On the downside, if you want access to this complete battery profile, you will need to upgrade to the Pro level. This will cost you $14. But, for normal use, the free version will do just fine.
Microsoft is the brain behind Pure Battery Analytics. So if you had the chance to play around and felt like it was a child of Windows, that’s no accident.
Pure Battery is as close to a complete laptop battery calibration software as one can get. You have complete access to comprehensive reports showcasing charge and discharge analytics.
You can also create a custom battery plan. This is similar to a Windows power plan, but it offers so much more customizations. For instance, you can even set night mode settings to turn off battery notifications at night.
We decided to conclude our list with Pure Battery Analytics because, although the others are equally potent in some regards, one distinctive factor that makes Pure Battery unique is its customization options.
Not only do you have complete and utter control over the battery’s health, but you can personalize the process to fit the operating system’s theme. You can even set up alarms for a full charge and separate notifications for low battery.
Pure Battery Analytics is free, but if you want to further enhance it with other features and add-ons, in-app purchases are possible.
The best part is that every laptop battery calibration software listed above won’t throw annoying pop-ups or create potential performance issues. They require minimum resources, so you can literally activate them and leave them running in the background.
Is YouTube music not working on PC? Undoubtedly, the solutions, along with some information from this article, will help you.
There are many types of problems you may experience with this service. But, frequently pausing or not playing or working at all are the most common. You may have preferred it over Spotify or other similar services. This type of issue can ruin your experience indeed.
Why does YouTube Music keep pausing on PC?
Usually, on your PC, to download YouTube Music, you use a browser or Progressive Web App (PWA). There are some third-party apps, too. If the playback freezes or it keeps pausing, it may be because of the following things:
Third-party extensions: Some third-party extensions may interrupt YouTube playback.
Device settings: If you have enabled some settings to power saving or anything else, that may stop YouTube music due to inactivity to save power.
Browser settings: There are browser settings like enabling efficiency mode, sleeping tabs, or anything similar that is known to shut down the YouTube Music tab, which stops the playback.
Subscription issue: Does your YouTube subscription allow ad-free unlimited playback? If not, you cannot always overcome this situation using an ad blocker.
Browser problem: If there is something wrong with the browser you are using to play YouTube music, it may not work correctly.
Geo-restriction: Not all places have access to YouTube Premium or Music. If you are from such a place, you can expect different types of problems, even with an unblocker.
How do I turn off auto-pause on YouTube on PC?
Before trying the main methods, we suggest you take some steps. These are:
Update your web browsers to the latest version.
Makes sure you have a stable internet connection.
Clear browsing data, including temporary files and cookies, to see if it helps. You can use CCleaner for this type of thing.
Update drivers, especially the Video and Audio drivers on your PC. Use Outbyte Driver Updater to do it easily.
Make sure YouTube Music is available in your region. Otherwise, Use a VPN like Private Internet Access.
After ensuring the above things, follow these methods to solve the YouTube Music not working issue on PC.
1. Disable efficient mode
Open Microsoft Edge or open any other browser you are using for YT Music that has an efficient mode.
Go to the following location using the address bar: edge://settings/system
Turn off efficiency mode by toggling the appropriate switch.
Relaunch your browser.
The above steps are applicable to Microsoft Edge. Chrome doesn’t have such a feature. If you are using Opera, disable the battery saver from its settings. It will do the job perfectly.
2. Disable the sleeping tab
From the same settings shown in the previous method, toggle the switch next to the Save resources with sleeping tabs.
You also can configure a time limit for the sleeping tab instead of disabling it.
On Opera, you can find an option: Snooze inactive tabs to save memory and disable it.
After installation, start enjoying YouTube without interruption.
You can use this plugin on Chromium browsers like Chrome, Opera, Edge, etc. only.
4. Check for problematic extensions
4.1. On Chrome
Go to the following address using your address bar: chrome://extensions/
Toggle the switch off next to the items you want to disable.
4.2 On Firefox
Go to the following location using the Firefox address bar: about:addons
Click on Extensions and turn off the items you want.
Disable extensions like ad blockers and any other items that can control or interfere with audio or video playback. For best, you can disable all of the add-ons or extensions. Then, enable one by one to find out the problematic one.
5. Solve Wireless Speaker/Headphone issues
Press Win + I on the keyboard to open Windows Settings.
Go to System and Click on Troubleshoot.
Go to Other Troubleshooters.
Click on Run next to Bluetooth.
Restart your PC once the process is done.
In many cases, Bluetooth speaker gets disconnected and connected again frequently, which may stop any type of music or video playback on your PC. In this type of case, the above steps will help.
You also can run the Audio troubleshooter to see if it helps.
Currently, Opera is considered one of the best web browsers for streaming. If YouTube Music is not working properly on your current web browser, indeed Opera can give you a better experience.
Why is YouTube Music randomly stopping?
If YouTube Music is randomly stopping on your PC, the reasons are obviously the ones we mentioned at the beginning of this article. However, it also may be due to the following issues as well:
Speaker or headphone issues: If something is wrong with your speaker or sound system, it may randomly stop YouTube Music or other multimedia playbacks on your PC. Method 5 has the solution for this.
The app problem you are using: Even though YouTube Music doesn’t have an official app for PC, you may be using PWA or a third-party app that contains the problem.
Proxy or unblocker: Poor-quality unblockers cannot provide a smooth streaming experience.
Besides these reasons, there may be unknown issues as well. But you can always overcome these problems easily.
What can I do if YouTube Music is not playing in the background?
You should not encounter background Playback issues on a PC using a browser. If you are using an app, use a browser in this case. Ensure any power saving mode or features like efficiency mode mentioned in methods 1 and 2 are inactive.
On smartphones, background playback from an unsupported region is not available. In this case, we suggest you use one of the best VPNs for streaming. If you use a VPN extension on a PC browser, we suggest you use a native desktop app for the VPN.
In case you are having the same issue on your Android or iOS device, we have a detailed guide on solutions to fix YouTube Music keeps pausing.
This article has described how you can solve YouTube Music not working issue on a PC. If you have other solutions, please let us know in the comment box.
Tooltips are usually handy GUI (Graphical User Interface) elements that provide additional info for elements users hover their cursors over. Windows 10 and lots of third-party software incorporate tooltips. However, tooltips can sometimes get stuck on screens.
How do GUI tooltips get stuck?
Users told us about tooltips getting stuck. For some users, tooltips from apps’ notification messages get stuck on screens. In this case, the tooltip info stays on the screen until users restart their PCs.
In other cases, users have said that tooltip shadows get stuck. When that happens, the tooltips’ text disappears, but their shadow effects remain visible. Thus, the tooltips’ shadow effects, not their text, get stuck.
It’s not entirely uncommon for tooltips to get stuck, which can be considered a minor bug. Most users might restart Windows when tooltips get stuck. However, you don’t have to restart Windows to fix stuck tooltips. These are some of the methods for fixing stuck tooltips without restarting Windows.
How can I fix stuck tooltips without restarting Windows?
Before starting the advanced procedure:
Minimizing all windows at the same time is one way users can fix stuck tooltips. Press the Windows key + D hotkey to minimize all windows when a tooltip is stuck. Then, you can press that hotkey again to restore all the minimized windows, hopefully without any stuck tooltips.
1. Reset Desktop Windows Manager
Right-click Windows 10’s Start menu button to bring up a shortcut menu and select Run.
Type this command into Run’s text box: tskill dwm
Then press the OK button.
The Desktop Window Manager is a system process that manages desktop visual effects. Resetting the Desktop Window Manager with the tskill dwm command often fixes stuck tooltips.
Changing the color depth and resolution settings, as outlined in other resolutions, also resets the DWM.
2. Close the app with the stuck tooltip
Right-click the taskbar and select Task Manager.
Select the program under Apps, and click the End task button.
If you can’t find the program listed under Apps, look for it under Background processes. Then right-click the program and select End task to close it.
After that, you can restart the program you just closed.
To bring up Settings, press the Windows and I keyboard keys simultaneously.
Click System.
Then click Advanced display settings on the Display tab.
Next, click Display adapter properties for Display 1.
Press the List All Modes button to open a list of valid modes.
Select an alternative color depth option there, then click the OK button.
Thereafter, you can restore your original color depth setting whether selecting a different option there fixes the stuck tooltip or not.
4. Change the VDU’s resolution
Click Start and the Settings button on the menu.
Then select System to open a Display tab.
Click the Display resolution drop-down menu.
Select a different resolution setting there.
If the stuck tooltip disappears, you don’t need to keep the new resolution setting. So, go ahead and restore your PC’s original resolution setting after applying this fix.
If tooltips get stuck with regularity, consider updating your graphics card’s driver. You can update drivers more quickly with driver updater software.
A driver updater software will scan your PC and list devices with outdated drivers. Then you can update your GPU’s driver by selecting an update option.
So, don’t click the Restart option when tooltips get stuck in Windows. You might be able to fix stuck tooltips in Windows with some of the above potential resolutions without needing to restart your desktop or laptop.
BlueStacks is a cross-platform emulator that allows Android apps to run on PCs running Microsoft Windows or macOS. Because of what it does, users often experience BlueStacks s high CPU usage on their PCs.
Bluestacks uses a lot of CPU power and memory (RAM) to run its processes. It is because running an Android app on Windows requires more system resources, resulting in BlueStacks s high memory usage.
However, many factors may add to the CPU usage problem on BlueStacks. Some are:
Outdated BlueStacks software – Bugs can cause issues with the BlueStacks software if it’s outdated. The bugs can affect its performance and cause it to utilize more resources than expected.
System Requirements issues – BlueStacks consumes lots of CPU resources because its activities require more resources to run Android apps. So, if your system doesn’t meet the requirements, it won’t run BlueStacks smoothly.
Other apps – Background apps running on your computer can cause low system resources in BlueStacks.
Other factors, including wrong display settings and a disabled Virtualization feature on your PC, can cause the problem. Nevertheless, you can limit BlueStacks CPU usage by tweaking your PC.
How do I stop BlueStacks from using so much CPU?
Before trying any advanced troubleshooting, go through the following:
Close unnecessary apps on your computer.
Temporarily disable antivirus software on your PC.
Because BlueStacks is a CPU-intensive program, it requires a system that can run without stress. So, check the minimum and recommended system requirements for BlueStacks to determine whether your PC meets them.
However, if your PC isn’t compatible after checking the system requirements, switch to a PC that meets them. Also, you can upgrade the required resources.
If you can’t fix it, use the following solutions to stop CPU usage.
1. Set RAM priority for BlueStacks
Press the Ctrl + Shift + Esc to open Task Manager.
Right-click on BlueStacks, then select Go To Details to open the Details tab.
Right-click the highlighted process, and select Set priority from the drop-down. Set the priority level to Realtime or High.
Close the Task Manager and check if the problem persists.
Setting a high or real-time priority will allocate more RAM resources and limit the CPU usage of BlueStacks.
2. Enable virtualization on
Press Windows + I key to open Settings.
Select System and select Recovery.
Go to the Advanced Startup tab, then click the Restart now button to reboot the PC into the advanced menu.
On the Choose an options tab, select Troubleshoot, then click the Advanced options button.
Select UEFI Firmware Settings and click the Restart button to prompt your PC to restart and launch BIOS.
After enabling virtualization, left-click the Start button, type Windows features, and select Turn Windows features on or off.
Find Virtual Machine Platform and click on it, then click OK.
Restart your PC and launch BlueStacks to check if the CPU usage persists.
It helps the virtualization process on BlueStacks run smoothly. It also allows you to allocate more CPU cores to Bluestacks. You can read more about BIOS and how to use it on your PC.
Launch the BlueStacks emulator. Click the gear icon in the top-right corner to open Settings.
Go to the About tab, then click Check for updates to search for available updates.
Click Download update if there’s any update available for the software.
After the update downloads, click Install Now and relaunch BlueStacks.
Updating BlueStacks fixes bugs that can cause issues, and it can improve its performance and reduce its CPU usage. Read about fixing BlueStacks update errors if you encounter any.
4. Disable background apps
Press the Windows + I key to open Windows Settings.
Select Apps and click on Installed apps.
Select an app, then click the three dots and choose Advanced options.
Then tap the drop-down button for Background app permissions and click on Never.
If you’re not a fan of the recent Outlook update, keep reading: this guide will show you how to move the sidebar from the left to the bottom for a layout that suits you better.
This is a part of the redesign that was introduced in version 2207. Navigation and App Bar design was introduced to make the interface of Outlook similar to the interface of other Office apps.
But if you’re not used to it or worked better with the bottom setup, follow the steps below to move the navigation bar.
How to move the navigation bar in Outlook
1. Move the navigation bar from side to bottom in Outlook Options
Launch Microsoft Outlook.
Click File in the top-right corner, select Options, then click on Advanced.
Uncheck the box for the Show Apps in Outlook option under the Outlook panes tab, then click OK to save the changes.
Click Yes when prompted to restart Outlook.
2. Run Outlook in Safe Mode
Close the Microsoft Outlook app on your computer.
Press Windows + R key to open the Run window, type outlook.exe /safe, and press Enter.
In the Choose Profile window, select the default Outlook option and choose OK to open that profile.
Toggle off the Coming soon option. If there is no feature for Coming soon on the screen, exit the Safe Mode Outlook.
Launch Outlook and check if you can move your Outlook toolbar from side to bottom.
Strong passwords are critical to online security, but it seems that many are yet to realize the fact. The statistics say it all! So let’s find out how many passwords are hacked every day and maybe, get you to choose a stronger password if you don’t have one already.
Password managers are one of the ways to create a strong password, but not many use them. We believe that by the time you are done with this article, you will either be choosing a stronger password, relying on a password manager, or using an anti-hacking tool.
How many passwords are hacked daily?
According to research from the University of Maryland in 2007, hackers attacked every 39 seconds, meaning a total of 2,244 times each day. And, mind you, that was in 2007. The Internet today is far more expansive, with an exponentially higher user base.
Every other day, we hear about a multinational company losing access to its servers due to hacking or confidential customer information being leaked.
Imagine, if a corporation with vast resources can’t eliminate the threat of hacking, do individual users with fairly easy passwords even stand a chance? That’s a topic for another day, but the recent password-hacking statistics will surely baffle you.
Estimated number of passwords hacked each day
According to the Inc. Magazine, experts estimate that 100 passwords get stolen every 1 second, around 8 million per day. In reality, it can be even worse.
Some sources stated that at least 8 billion passwords were exposed online within the last ten years. Considering that number, it is almost 2.2 million daily on average!
As per a report published in 2019, hackers uploaded 2.2 billion login credentials (email addresses and passwords) to the dark web.
A 2019 study found around 143000 passwords are stolen per day
Another study in 2019 by Breach Alarm (discontinued) found that more than one million passwords are stolen weekly, thus translating to approximately 142,857+ passwords daily.
This one is the most accurate statistic about daily successful password hacking activity from any organization. Given it’s from 2019, the numbers today would be much higher.
How many passwords were stolen each day in 2018?
The above one is not the actual situation for every year. If we look at the different sources, we will find various statistics. In 2018, attackers exposed 2.5 billion accounts online.
If we consider that number, we can say that hackers exposed about 6.85 million accounts on the open internet or dark web daily in 2018. So though there were passwordless accounts, that may be pretty low in number.
36 billion records, including passwords, were stolen in 2020
In 2020, according to Security Magazine, there were 36 billion records stolen by hackers. It is unknown how many of them were passwords.
Unfortunately, 2020 was one of the worst years for the Internet world. During the pandemic, people started working remotely and heavily relied on the Internet for almost everything, which made it easier for hackers to target accounts.
There were around 99 million accounts exposed online each day in 2022. So even though we are not sure about how many of these records were user credentials, one thing we can be sure of is the number may be alarmingly high.
Attackers exposed 9 million hacked passwords each day in 2021
If we look at the most recent data, which is about the year 2021, the number is very alarming. CyberNews said that cybercriminals leaked about 3.27 billion unique pairs of passwords on a popular forum.
But, the number of hacked passwords could be even more than that number.
Based on 2021’s data, we can see that approximately 9 million hacked passwords were exposed each day last year. So it is more than the estimation made by the experts.
There is no official data on the daily number of hacked passwords, and we can only estimate based on the publicly available statistics online.
More than 80% of successful hacks were due to weak passwords
This highlights the importance of using a strong password for all accounts, be it work or personal. About 50% of people use the same password for their official and personal accounts.
It remains a matter of concern for experts in the field of cyber security. Remember, using a different password for each account could go a long way in preventing cyber attacks.
59% of users include their birthday or name in the password
Another common concern shared by experts is people using easily identifiable information as their passwords, be it birthdays, their own name, or that of relatives and pets.
As a result, the number of successful hacking attempts has increased tremendously in the last few years, with social media accounts being one of the prime targets.
A hacking attempt using scripts takes place every 39 seconds
Scripts are deployed to guess the username (or email address) and password, and their use has increased exponentially in the last few years.
Hacking is getting more advanced with each passing day, and so should you to ensure online security.
Most users have passwords with 8 characters or less
Shorter passwords are usually easy to crack, and as per recent statistics, more than 50% of passwords have 8 characters or less, making these users more vulnerable to attacks.
30% of the users don’t lock their mobile phones
According to available data collected from reliable sources, close to 30% of mobile users never lock their devices because entering the password each time seems like a task to them.
Devices like these are more prone to attack, not just through the web but also physically. Anyone with physical access to the device can easily find critical information, including usernames and passwords.
Younger generations are more prone to hacking, with 78% using the same password for several accounts
When it comes to online security, the younger generation, contrary to popular belief, seems to be falling behind. Close to 78% use the same password for multiple accounts.
In a recent survey, 44% of those interviewed in the age group of 16-24 couldn’t define Phishing, yet 71% are confident of not falling for a phishing attempt. If these numbers are anywhere close to the on-ground situation, it’s time they are more careful.
57% percent use Sticky Notes to store passwords
Sticky Notes, though a handy app, should be in no way used for jotting down passwords since anyone with access to the computer, be it physically or virtually, can find them.
Also, 49% use text documents for storing passwords which is again a big NO.
Hacked passwords in 2021 and 2022
We have already mentioned that 3.27 billion passwords were hacked in 2021, which is about 9 million daily if we do the average.
Unfortunately, it’s impossible to feature that enormous number of credentials in this article. But we can give you the list of the worst password-hacking incidents.
After doing some research, we found the top 10 worst password breaches in 2021 and 2022.
1. Twitter
Twitter suffered one of the biggest-ever data breaches, with login credentials of more than 5.4 million users acquired by a hacker who goes by the alias Devil.
Also, Twitter confirmed the same and advised users to enable 2FA (Two Factor Authentication) to secure their accounts.
2. Credit card details of 1.2 million users were posted online
In another significant hacking incident in 2022, the credit card details of more than 1.2 million users were posted online and were available for free.
It had all the critical details required to make online transactions, putting the users who owned them at a major risk.
3. SolarWinds
SolarWinds’s password breach incident was the dumbest one in February 2021. According to the company, foreign hackers were behind the hacking activity.
The company also blamed an intern for creating a weak password of “solarwinds123,” exposed online.
4. COMB
COMB stands for the term Compilation of Many Breaches. It comprises a group of data breaches (approximately 252) that occurred in recent years.
The criminals posted the hacked data on a popular hacking forum. The alarming matter is it had 3 billion unique login credentials from popular websites like Netflix, Linkedin, Bitcoin, etc.
5. Verkada
A group of international hackers found an admin username and password leaked online. Then, they accessed more than 5000 Verkada cameras.
It helped them get a live view of the locations where people or organizations put these cameras. Surprisingly, hackers could get the idea from Tesla factories, warehouses, hospitals, gyms, schools, jails, etc.
6. RockYou2021
The RockYou2021 is another significant data breach that revealed a 100 GB text file that contained about 8.4 billion passwords. However, not all of these were hacked in 2021. Instead, most of its data came from past breaches.
7. Microsoft
In March 2021, Microsoft mentioned a cyberattack by a group of Chinese hackers called Hafnium. The attackers were able to gain access to some servers by using stolen passwords.
However, Microsoft released patches to fix the vulnerabilities and suggested the users change their login credentials after the incident.
8. Ticketmaster
At the beginning of 2021, the news of this hacking incident came to the mainstream media. Some employees at Ticketmaster hacked into a rival company’s computer to collect business intelligence.
It helped them to take the commercial advantages in many ways. However, later, the company had to pay a fine of $10 million.
9. GoDaddy
The famous hosting company GoDaddy suffered a data breach last year. In November 2021, this company stated that more than 1.2 million of its customers were affected by a security breach.
Hackers were able to gain access to its managed WordPress hosting environment using a compromised password. Attackers exposed many Godaddy customers’ WordPress Admin passwords, email addresses, SSL private keys, etc.
10. New York City Law Department
In June 2021, the New York City Law Department suffered a severe cyberattack. Hackers could access sensitive information, including evidence of police misconduct, medical records, personal data of city employees, etc.
It happened due to just one employee’s stolen email account password. This incident has been one of the most mentionable password breach incidents in 2021.
Most common passwords in 2022
People used a similar set of passwords in 2022 as the years before, and the most common ones were the easiest to crack, some requiring even less than a second. Here is the list of the top 15 most common passwords in 2022:
password
123456
123456789
guest
qwerty
12345678
111111
12345
col123456
123123
1234
1234567890
000000
555555
666666
Hacked passwords list
After attackers hack a password, then they store it in a database. Later, they expose it on the Internet. So, we have tried to look at the most common leaked passwords on the dark web.
According to our findings, these are the most hacked passwords in 2022:
password
123456
123456789
guest
qwerty
12345678
111111
12345
col123456
123123
Are you using any of these silly passwords? If yes, please don’t! Go and set a solid password for your online accounts. Otherwise, you are at high risk.
Most common hacked password categories
A recent study based on the breached passwords from the National Counterintelligence and Security Center (NCSC) revealed 30 categories of passwords.
Based on that, we have listed the top 10 of these hacked password 2021 categories. Here are they:
Serial
Category
Total breached passwords
1
Pet names/terms of endearment
4,032
2
Names
3,913
3
Animals
2,112
4
Emotions
1,917
5
Food
1,662
6
Colors
1,450
7
Swear words
1,268
8
Actions
991
9
Family Members
723
10
Car Brands
606
If you have a password that contains a phrase that fits under any of these categories, it’s time to change it.
Worldwide spending on cyber security is $36.44 million per day
According to some data, experts predicted that worldwide spending on cyber security could reach up to 133 billion US dollars in 2022. We can say it may be $36.44 million each day based on the prediction.
Hackers create 300,000 new malware daily to steal password
According to McAfee, an anti-malware and antivirus developer, everyday hackers have made around 300 thousand unique pieces of malware that can steal your personal information, including passwords.
How many passwords are created each day?
We already got an idea about how many passwords are hacked each day. But what about the number of passwords created daily? Let’s find it out.
According to data from SC Magazine, there will be 300 billion passwords in 2020. Another data source says there were 4.5 billion Internet users in 2020.
According to a password manager, NordPass, an average Internet user had 80 passwords to remember in that year. It means the total number of passwords was 360 billion, higher than SC Magazine’s prediction.
However, in 2022, average users have 100 passwords, and there are 4.95 billion internet users. That means there are 495 billion passwords. In the last two years, we saw a 135 billion increase in the last two years.
According to this estimated data, we can say that there are 180 million passwords created each day. Note that most of them are machine passwords, not human passwords. So, the number may seem excessively high.
How frequently should people reset passwords?
Unfortunately, most people don’t take action even after knowing about the risk. More than 60% of people don’t update their passwords regularly. Only 31.3% of users update their passwords at least once a year.
If you want to protect your online accounts, experts recommend updating the passwords at least once every 60-90 days.
How to create a strong password?
1. Include numbers, upper & lower case, and special characters
The first step to creating a strong password is the combination of numbers, capital letters, smaller letters, and symbols.
An example of a strong password with this combination can be the following one: OnLA8b91@m&W
2. Make the password length atleast 12 characters
Many people tend to keep the password smaller to remember it easily. But it would be best if you made it long enough. Usually, between 12 to 16 characters should be the standard length.
3. Avoid the common phrases
One of the bad practices of creating a password is using common phrases. Do not use your name, English words, or popular terms in the password.
4. Use words that are not in the dictionary
A quick and simple tip while creating passwords is to have one that doesn’t use phrases or words found in the dictionary. It would be even better if the phrase used is grammatically incorrect.
5. Use a password generator
Sometimes, it can be tricky to create a strong and unique password yourself. In this case, you can use a reliable tool that automatically generates passwords.
0x80073cf3 is an error code that sometimes appears when updating the Microsoft Store on either Windows 10 or 11. Basically, the update failed to finish up for whatever reason.
The error can also appear whenever you try to download a game from the Microsoft Store. Either way, fixing this problem is quite easy to do in multiple ways.
Why did this error appear on my Windows computer?
It’s important to narrow things down before going on with the solutions. When it comes to software errors on Windows computers, it always has to do with some kind of bug or corruption:.
Your Windows 11 computer is out of date: We strongly recommend keeping up to date with all the updates Microsoft rolls out, so you don’t miss out on any new fixes.
Corrupt files are present in your system: Files such as these can mess with basic functions on Windows so you should clean them out as soon as possible.
A recent update may be flawed: Microsoft doesn’t always get them right. If the problems started happening after a recent update, you should roll it back to a previous one.
How can I fix this Microsoft Store error?
The following complex solutions are your best bet in solving the 0x80073cf3 error. However, there are a few easy fixes that you can try and see if they work instead:
Disable your antivirus software temporarily. Sometimes antivirus apps can be overzealous and block more than they should. Turning them off should work.
Download and install the latest Windows Update. On the second Tuesday of every month, Microsoft has Patch Tuesday where it releases the latest software fixes. Keep an eye out for that.
Run the Windows Troubleshooter. This can be done by going into the Settings menu, selecting Other Troubleshooter, and choosing the one specifically for Windows Store apps.
Reinstall the offending app. If the error appeared after downloading a specific app, it could be that piece of software causing all the headaches.
1. Check location settings
Open the Windows 11 Settings menu and go to the Time & language tab.
Make sure the time zone and region reflect where you live. If not, you correct things by first expanding the Time Zone menu and choosing the right one.
Next select Region in the upper right corner, and in the following section, change your country or region to where you live.
2. Reset the Microsoft Store cache
Bring up the Settings menu and click the Apps tab on the left-hand side.
Click Installed Apps and search for the Microsoft Store in the list.
Click the three dots off to the right and select Advanced options.
Scroll down to the Reset section. Click the Repair option. If that doesn’t work, select the Reset button instead.
Conversely, bring up the Command Prompt on Windows Search and select Run as administrator.
Type the following command in and hit Enterwsreset.exe
Afterward, the Microsoft Store will open newly reset. Restart your computer to finish the process.
3. Clear out the Local Cache folder
Right-click the Windows symbol in the bottom left corner and select Run.
Type in %appdata%. Then click OK.
Open the Local folder. If you end up in the Roaming folder, exit it and then select Local.
Scroll down and open the Packages folder.
Scroll down in this new window until you locate a folder titled Microsoft.WindowsStore_8wekyb3d8bbwe. Open it once you find it.
Open the LocalCache folder and delete everything inside.
4. Reinstall Microsoft Store
Bring up Command Prompt in Windows and select Run as Administrator.
Copy and paste the following command into Command Prompt then press Enter: PowerShell -ExecutionPolicy Unrestricted -Command "& {$manifest = (Get-AppxPackage *WindowsStore*).InstallLocation + '\AppxManifest.xml' ; Add-AppxPackage -DisableDevelopmentMode -Register $manifest}"
The command may flash blue momentarily. Once it’s done, Microsoft Store has finished being reinstalled.
There are other errors that can ruin your experience. One of them is Error Code 0x80131500 which is a generic error meaning it can be anything from an outdated version of the Microsoft Store to a corrupt app cache.
Fixing this can be as simple as setting the time and region correctly, as shown earlier, to more complex solutions like reconfiguring internet properties.
You may also experience the Microsoft Store suddenly not loading. Connection issues are by and large the most likely reason why this happens. We recommend changing the DNS server to fix this.
Feel free to comment below if you have any other Microsoft Store issues and need our help.
The Witcher: Enhanced Edition is an old game that’s available on Steam. However, some players have said on Steam’s forum that Witcher: Enhanced Edition crashes on startup for them. Consequently, players can’t play the game when it doesn’t launch.
Why doesn’t Witcher: Enhanced Edition start?
There are myriad causes for Windows game startup issues. Here are some of the possible scenarios:
Conflicting software – Games can fail to launch because of conflicting programs that interfere with the loading process.
Missing or corrupted files – If the game was not installed properly or interrupted during installation, this issue may occur.
Outdated GPU drivers – A lot of the problems with games start from incorrect or old graphics card drivers. Updating them may fix the problems entirely.
Incorrect detection of hardware – The game often fails to start because it doesn’t correctly recognize user hardware, more likely on lower-spec PCs.
Witcher: Enhanced Edition also has a fullscreen crash that stops it from starting. The game also has some compatibility issues with Windows 10 because it’s an old game.
Windows XP and Vista are the game’s specified supported platforms. However, it does work on Windows 10 and other more recent platforms.
What are Witcher: Enhanced Edition’s system requirements?
The game’s system requirements aren’t very high. However, players with old Windows desktops and laptops should check the game’s minimum system requirements to be sure their PCs meet them. The game’s minimum system requirements are shown in the screenshot directly below.
If your PC doesn’t meet those system requirements, Witcher: Enhanced Edition won’t run on it. Note that an NVIDIA or ATI Radeon GPU is required. Double-check your PC meets those minimum system requirements if you’ve recently installed and never played the game before.
How can I fix Witcher: Enhanced Edition crashing on startup?
Before continuing with the more complex solutions, let’s go through a few easy tweaks:
Restart the game and the PC. This might do magic for a lot of systems, and the game will run just fine.
Make sure that DirectX 9 is properly installed. You’ll need DirectX 9 installed on your desktop or laptop to play Witcher. Click the Download button on its DirectX End-User Runtimes webpage to get it.
If you can, check the cooling system of the graphics card and stop all the other software and processes you don’t need.
Now that we’ve cross-checked these preliminary measures, let’s go to the actual solutions.
1. Run Witcher Enhanced Edition in Compatibility Mode
Press the Windows key + E to start File Explorer.
Open the game folder that includes the Witcher Enhanced Edition EXE game file. You will usually find it in the Program Files folder.
Right-click the Witcher Enhanced Edition EXE game file and select Properties.
Then click the Compatibility tab and select the Run this program in compatibility mode checkbox.
Choose an older Windows OS on the compatibility drop-down menu. As the game predates Windows 7, it would make sense to select XP or Vista.
Select the Run this program as administrator checkbox.
Click Apply to save the settings and select the OK option to close the window.
2. Change the game’s launch options
Click Library in Steam.
Right-click the Witcher game to select its Properties option and click the Set Launch Options button.
Type -dontForceMinReqs in the Launch Options window’s text box.
Click OK, then try launching Witcher again after restarting Steam.
3. Disable Steam beta
Click the Steam menu at the top-left of Steam’s window and select Settings.
Click the Account tab to select it and press the Change button to open the Beta participation drop-down menu.
Select the NONE – Opt out of all beta programs option.
Click the OK button to exit, then select the Restart Steam option that pops up.
4. Start the game with D’jinni Adventure Editor
Select the Library tab within Steam.
Click the Play button for Witcher: Enhanced Edition to open the window shown directly below.
Then select the Launch Adventure Editor option on the small window to open D’jinni.
Click the Game menu within the D’jinni editor that opens.
Select the Play option on the menu. The game might start when you select the Play option within the D’jinni editor.
If it starts ok, make sure you disable fullscreen from Witcher’s main menu. Then try starting the game without launching D’jinni first.
5. Clean boot Windows
Bring up Run with its Windows + R keyboard shortcut.
To open System Configuration, type this Run command in the Open box and click OK: msconfig
Click the Selective startup radio button on the General tab.
Uncheck the Load startup items checkbox.
Make sure the Load system services and Use original boot configuration options are selected.
Select the Hide all Microsoft services checkbox on MSConfig’s Services tab.
Click the Disable all option.
Press the Apply and OK options.
Click Restart on the dialog box window that opens.
Try launching Witcher: Enhanced Edition after Windows restart.
You can restore Windows’ original boot configuration by selecting Load startup items and clicking Enable all within MSConfig.
6. Reinstall Witcher: Enhanced Edition
Click the Start button and select Settings.
Choose the Apps option.
Find Witcher: Enhanced Edition on the list, click on it, then select Uninstall.
You may also do that from Steam. To reinstall the app, open Steam and reinstall the game or use the original installer.
You can uninstall the game more cleanly with third-party uninstaller software, such as IOBit Uninstaller. IOBit Uninstaller is freely available and provides additional options to erase leftovers from removed software.
Furthermore, IOBit Uninstaller comes with some handy browser features. You can remove Internet Explorer, Chrome, Opera, Edge, and Firefox browser plug-ins and toolbars with IOBit Uninstaller. This software also includes options for restoring default browser settings.
IOBit Uninstaller
This tool will uninstall any program perfectly clean, without leaving anything behind.
Your best bet is to send a message to CD Projekt Red’s support service for Witcher. You can do that via CD Projekt Red’s support website. Fill out the support contact form on that website, and click the Submit button.
So, give those potential resolutions a shot when Witcher: Enhanced Edition doesn’t start. Some of the resolutions within our Steam game not launching and GOG games won’t launch guides might also help players fix Witcher startup issues.
If you have other confirmed solutions, don’t hesitate to let us know about them in the comments section below.
Your laptop battery communicates with the Windows system through the Microsoft ACPI-Compliant Control Method Battery driver, making it a critical driver to work properly. However, you might need to reinstall or update your battery driver sometimes for some reason.
It might be due to error messages like the battery is plugged in but not charging, among others. This guide will show you the best ways to reinstall your battery driver to ensure you get the best performance.
How do I reinstall the battery drivers on my laptop?
1. Update the driver manually
Press the Windows key + R, type devmgmt.msc, and click OK.
Double-click the Batteries option to expand it and right-click the Microsoft ACPI-Compliant Control Method Battery device.
Now, select Uninstalldevice.
Finally, click the Uninstall button and restart your PC to reinstall the driver.
The first method to reinstall your battery driver is to uninstall it via the Device Manager. Restarting your PC will reinstall the driver automatically.
2. Use a dedicated tool
If you want to make sure that your battery driver will be updated automatically without you having to spend any time on it, then using dedicated software is recommended.
Using such a tool does not require advanced technical skills since the software will scan and identify the proper driver to install on your device.
Manual installation of a driver is prone to errors, and there is a chance that if you install the wrong driver, there will be some negative effects on your device.
With this, we can effectively conclude this guide. We believe you now know how to reinstall your battery drivers without breaking a sweat.
Many users complain in different forums that streaming a game in Discord seems to be impossible, as the game crashes right after the start button is clicked.
There is no need to worry, though, as solving this game crashing when trying to stream it on Discord is pretty simple, and in this article, we will explore the exact steps you need to take.
Why does my game crash when I stream on Discord?
Below are some of the prevalent factors that can cause your game crashes when streaming on Discord:
Wrong setting: The first factor that users have noticed to be the cause of this issue is your in-app settings. Some found the problem to be due to the hardware acceleration feature. You need to disable these features to enjoy a faultless streaming experience.
Interference from other apps: Sometimes, apps like MSI Afterburner can mess with your streaming on Discord. The solution to this is to close these apps.
Corrupt app data: A corrupt Discord cache can sometimes cause this problem. Clearing the junk files manually or using dedicated software should do the trick.
How can I fix my game crashes when streaming on Discord?
Before proceeding to the fixes in this guide, try the following troubleshooting steps:
Relaunch Discord.
Close Rivatuner Statistics and MSI Afterburner apps if they are open.
1. Disable Use our latest technology
Launch the Discord app and click the Gear icon in the bottom left corner.
Select the Voice and Video option in the left pane.
Now, toggle the switch for Use our latest technology to capture your screen backward to disable it.
Finally, disable the Use an experimental method to capture audio from applications option.
According to some users, some in-app features can cause the game crashes when streaming on Discord. The easy way around this is to disable the features.
2. Disable the Hardware acceleration
Open Discord and go to User Settings.
In the APP SETTINGS section, locate Advanced and click on it.
Next, toggle the switch for Hardware Acceleration backward to turn it off.
Restart your device and try streaming the game again.
While the hardware acceleration feature helps improve your overall experience, it can cause your game to crash while streaming on Discord. Disabling the feature fixed this issue for many users.
Next, go to the Discord folder and double-click on the Cache folder to open it.
Press Ctrl + A to select all the files and right-click to Delete them.
Return to the Discord folder and click on the Local Storage folder.
Select and delete all the files from this folder.
Finally, restart your device and try to open the game.
Sometimes, the game crashes when streaming on Discord issue can also be triggered by faulty app data. Following the steps above should help you fix this quickly.
There you go. These are the best solutions to help you solve the game crashing issue while streaming on Discord.
If you are into video editing, whether you are a professional or just a casual editor, you might have heard about Vegas Pro. Recently, some users have reported coming across a Vegas Pro error code 59 that prevents them from starting the program.
The complete error message reads An error starting Vegas Pro. There is no License to use this software. For users facing this issue, this guide will help you resolve the problem and also let you start the program so that you can start video editing. Let us get right into it.
Why am I getting An error starting Vegas Pro. There is no License to use this software?
We did some research and found out that there are a few common reasons that could trigger the Vegas Pro error code 59 which reads An error starting Vegas Pro. There is no License to use this software:
Corrupt system files: Missing or corrupt system files can not only cause problems with the software installed in it but the entire functioning of the system.
How can I fix Vegas Pro error code 59?
Here are a few preliminary solutions that we would like you to apply:
Restart your PC as there might be a few files that couldn’t load during the previous session.
Check that your internet connection is working perfectly fine as it is required for you to launch the program.
To be on the safe side, perform an antivirus scan and see if a virus was causing the problem or not.
Now let us check out the advanced solutions and possibly fix the Vegas Pro error code 59 An error starting Vegas Pro. There is no License to use this software problem.
1. Launch the program as administrator
Right-click on the desktop icon of the Vegas Pro app.
Select Properties.
Switch to the Compatibility tab.
Check the box for Run this program as an administrator option under the Settings section. This will make sure that Vegas Pro opens in admin mode whenever you launch it.
Click Apply and OK.
Close the Properties window.
Launch Vegas Pro and check if this resolves the issue or not.
By granting sufficient privileges you are ensuring that the Vegas Pro software gets access to all the files and system-related processes to run smoothly.
2. Run SFC Scan and DISM
Open the Start menu.
Run Command Prompt as an administrator.
Type the below command and press Enter. sfc /scannow
Once the process completes, type the below command and press Enter. DISM /Online /Cleanup-Image /RestoreHealth
Wait for the process to complete.
Exit Command Prompt.
Restartyour PC.
Launch Vegas Pro and check if this fixes the issue or not.
If system files are missing or corrupted, then your system will not be able to run all programs smoothly. You can easily fix it using the Windows in-built SFC Scan and DISM commands and fixing problems.
Another way of fixing system-related issues is to make use of specialized third-party tools. These tools will help you to fix DLL-related issues, system crashes, BSOD errors, remove spyware, etc.
3. Reinstall Vegas Pro
Open the Start menu.
Open the Control Panel.
Click on Programs and Features.
Select Vegas Pro from the list of apps and click on Uninstall at the top.
Navigate to the below path and press Enter. HKEY_LOCAL_MACHINE > SOFTWARE > Wow6432Node > Sony
Delete Vegas Pro entries.
Close Registry Editor.
Open File Explorer.
Navigate to the below path. C:\Program Files(x86)\Steam\SteamApps/common
Install the Vegas Pro back.
You can perform reinstallation by following solution 3. However, if that doesn’t work, we suggest you perform a clean install.
And by clean install, we mean deleting the registry entries of the previous installation and completely removing it from your PC. Then install the program and check if this fixes the issue.
Let us know in the comments below, which one of the above solutions helped you resolve the Vegas Pro error code 59 An error starting Vegas Pro. There is no License to use this software problem.
Minecraft is, without a doubt, one of the most played games. However, it is not without its fair share of problems, with some users reporting that Minecraft sound is not working on their PC.
, So whenever I open up Minecraft, (this is since I got Windows 10- I have never had this problem before) the sound for Minecraft isn’t working.
Fortunately, it is an issue that can be fixed easily. And we will show you the steps to follow in this guide.
Why is Minecraft sound not working?
Below are some of the potential factors that can cause the Minecraft sound not working issue:
Outdated or faulty drivers: One of the first things to check if Minecraft sound is not working on headphones is your sound drivers. If they are outdated or malfunctioning, you have found the cause of the issue. The solution to this is to reinstall or update your drivers.
Sound enhancement settings: If you have enabled some sound enhancement features, they might cause this issue. You need to disable everything to get restore normal service.
Issues with the game: If Minecrafty sound is not working with Discord, it might be because your game files are corrupt. Reinstalling the game should do the trick here.
Check out these potential fixes for Minecraft’s sound not working
1. Press Minecraft’s F3 hotkeys
Minecraft has a couple of F3 debug hotkeys that refresh the game and can also fix its audio. First, open Minecraft; and press the F3 + S keyboard keys simultaneously. Then try pressing the F3 + T hotkey, which reloads game textures and sounds.
Maybe you can give a shot to a dedicated gaming browser with built-in controls to ease this process.
2. Reinstall the sound driver
Right-click the Start button and select Device Manager.
Double-click the Audio inputs and outputs option to expand it, and right-click your speaker device.
Now, select the Uninstall device option.
Click Uninstall on the dialog box that opens.
Finally, click the Scan for hardware changes icon at the top and restart your PC.
If your sound drivers are faulty, your Minecraft sound might not work. You need to uninstall and reinstall the drivers to get past this issue.
Regardless, you can solve annoying sound issues by updating your sound driver automatically, without long steps or risky methods. The software below will do it for you.
3. Check if Minecraft has been muted
Right-click the speaker icon on your Taskbar.
Select Open Volumemixer.
Now, click the Speaker icon under Minecraft to unmute it if it is muted.
You can now check if the Minecraft sound is working.
4. Check Minecraft’s audio settings
Click Options on Minecraft’s title screen.
Click the Settings button.
Now, click the Music & Sounds option (some users will need to click Audio).
Increase all the game’s audio settings to 100 percent if they’re less than that.
Click the Done button.
5. Disable sound enhancements
Right-click the Speaker icon on your Taskbar and select Sounds.
Click the Playback tab at the top of the Sound window.
Now, right-click your default sound device and select Properties.
Next, select the Enhancements tab.
Select the Disable all enhancements option. Note, however, that not all Speaker Properties windows include that option.
Now, click the Advanced tab at the top.
Check the box for Allow applications to take exclusive control of this device.
Finally, click the Apply button, followed by OK to save the changes.
Some Minecraft players have said they’ve fixed the game’s sound by disabling the sound enhancement feature. So, you should try it too.
6. Reinstall Minecraft
Press the Windows key + R keyboard, type appwiz.cpl, and click OK.
Right-click the Minecraft app and select Uninstall.
Now, follow the onscreen instructions to complete the process.
Finally, visit the Minecraft website to download and install the latest version of the game.
Those are some of the best resolutions for fixing Minecraft’s sound. If Minecraft’s sound still doesn’t work, there might be a more general audio issue. Check that the sound is ok for alternative games.
Darktide backend error will prevent you from signing in and playing the game. Luckily, there are a couple of solutions that you can use to fix this.
What does a backend error mean in Darktide?
This issue is most likely caused by server issues, but it can sometimes appear due to connection issues.
How do I fix Darktide backend error signing in?
Before we start, check the server status. You can also restart your router or try switching to a wired connection. You can also try restarting Steam as a workaround.
1. Verify the game files’ integrity
Start the Steam app.
Go to Library.
Right-click on Warhammer 40K Darktide and select Properties.
Select Local Files and click on the Verify the Integrity of game files option.
If there are any issues with the game files, the app will fix the problem.
2. Use a VPN
Some of our readers fixed this problem by using a VPN. Since this is a backend server problem and there are different servers for different regions, this might work just fine.
For this purpose, we recommend NordVPN which is the best right now for gaming. It’s extremely fast, has worldwide coverage, and unlocks any restricted content.
After you install the VPN, change the country or region and see if the Backend error, Error signing in error in Warhammer 40K Darktide is still there.
NordVPN
A great VPN source that helps you unlock any restricted content and provide lightning-fast speeds.
Many users report running into error 628: The connection was terminated by the Remote computer before it could be completed on their PC. It occurs when connecting to the Internet and there’s an issue with the connection.
When trying to establish or set up a VPN connection, you may run into Error 628. It accompanies the message: The Remote computer terminated the connection before it could be completed.
The VPN Error 628 is a Point-to-Point Tunneling Protocol (PPTP) error that can appear when port 1723 is inaccessible on your PC. It means the remote computer fails to establish a connection successfully.
However, the error can occur for some reasons, some are:
Issues with the router or modem – Issues with the router can affect the connection your system is trying to establish. Also, outdated router firmware can cause problems with its network connection.
Windows Firewall interference – The connection error can occur if the Windows Firewall is blocking a port and interrupts the VPN connection. It impedes the connection if it perceives it as a threat or malicious activity.
Unstable Network connection – Network congestion and slow internet connections on your PC can cause the error 628 to occur if it can’t set up a connection. Also, issues with the network components, like network adapters, can result in an error.
Nevertheless, you can fix Error 628 by using some troubleshooting steps on your PC.
How to fix the Connection was terminated by the remote computer before it could be completed error?
Before proceeding with any advanced troubleshooting steps, follow these preliminary checks:
Restart your router or modem.
Temporarily disable antivirus software on your computer.
Routers can get outdated and suffer from bugs that can cause their network to be unstable. Hence, updating its firmware to provide the needed patches to fix these bugs is crucial.
Hence, go through the router manual and check for router firmware update procedures. Also, you can contact the manufacturer for guidance on how to update your router.
3. Use Microsoft CHAP version 2 protocols in the Network settings
Right-click on the Wi-Fi icon in the bottom right-hand corner, then select Open Network and Sharing Center from the drop-down.
Click on Change adapter options.
Right-click on the VPN connection and select Properties from the drop-down.
Navigate to the Security tab, tick the radio button for the Allow these protocols option, check the box for Microsoft CHAP version 2, and then click OK to save the changes.
As you can tell by the title, Error 700003 occurs whenever your workplace or school has removed your device from its network. It can also happen if the organization removes your Office 365 account.
It’s not a super common error, but it can really hamper your user experience when it does happen. But before going into the fixes, it’s essential to understand why this happens first.
Why does Error 700003 occur?
The network may be going through some downtime, or someone may have accidentally kicked you off. Outside of things you can’t control, there are several other reasons.
The internet connection is bad: You may be experiencing an internet service interruption. We recommend contacting your ISP or resetting your Wi-Fi adapter.
You’re running an old version of Microsoft Office:Downgrading may have its benefits, but running an older version can cause compatibility issues, so you should state up to date.
The firewall prevents the apps from connecting: An overzealous firewall has been the source of many user headaches. Reconfigure the firewall to stop it from blocking apps.
Your computer is being hampered by a glitch: Not everything works perfectly right off the bat. Try installing the latest Windows Update. It may instantly fix the current problem.
How can I fix Error 700003 on my Windows 11 computer?
The first thing that you should do is contact the network administrator. Ask them if they can reinstate you. If that doesn’t work, below is a series of quick solutions followed by more complex ones.
Restart your computer. The error could be a spur-of-the-moment thing that’ll go away after a quick reboot. This should be the first thing that you should do.
Use Microsoft Office online. Microsoft has a version of its Office suite of apps on its website. You can use this in the meantime while everything gets sorted out.
Close the other apps you have open in the background. Having so many windows open cause performance problems.
1. Disconnect your account
Open the Settings app and click the Accounts tab on the left-hand side.
Scroll down, then select Access work or school.
Expand your connected account and click Disconnect. Wait for your computer to finish disconnecting.
Afterward, reconnect your account once more with your same credentials to see if it’s been fixed.
2. Remove credentials
In the Windows Search bar, bring up the Credential Manager. It’ll be the first one that appears.
Select Windows Credentials in the new window that appears.
Scroll down until you find the offending network. Expand it and select Remove to get rid of those credentials.
Like the previous solution, log into the same network again to see if the connection works.
3. Force recovery or deregister with the Command Prompt
Use the Command Prompt in the Windows Search bar and select Run as administrator.
Type in the following command and hit the Enter key after dsregcmd /forcerecovery
Click Sign In in the new window to access your organization’s resources. After this, you may need the help of the network admin.
If that doesn’t work, type the following command in, and press Enter on your keyboard dsregcmd.exe /leave
Finally, enter the following command and see if your computer has genuinely left the network dsregcmd /status
After this, register your account to the network again. Error 700003 should be gone.
What other errors can occur on Office 365, and how can I address them?
Office 365 doesn’t get errors very often, but there is one we want to mention: Error Code 0x426-0x0. It prevents you from using the apps because of corrupt files.
You can either repair the suite with a utility app or enable Click-to-Run. As something about a specific Office app, we recommend learning about Microcosft blocking Excel macros.
Macros can be a great way to speed up data entry; however, the software may think it’s untrustworthy. In addition, unblocking macros can be a little tricky as it’ll require you to go through specific menus.
Feel free to comment below if you have any questions on other Microsoft Office 365. Also, leave comments about guides you want or information on other Windows 11 apps.
Many users reported that Fallout New Vegas is crashing on Windows 11 and that they are unable to play the game. However, this can be fixed and this guide will show you how to do it.
Why is Fallout New Vegas crashing?
Sometimes GPU drivers or exploit protection features can cause issues. Not using proper optimization mods can also cause crashes.
How do I fix Fallout New Vegas crashing on Windows 11?
Before we start, try using the GOG version since this one is the most stable. Keeping your GRPU drivers up to date can also prevent issues with the game.
1. Install older GPU drivers
Press the Windows key + X and choose Device Manager.
Locate your graphics card driver, right-click it and choose Uninstall device.
Click Uninstall to confirm.
Once uninstalled, download and install an older version of the driver.
According to the community, the latest AMD drivers are causing this issue, so be sure to reinstall them. To see how to do that, don’t miss our guide on how to update the graphics card driver on Windows 11.
2. Disable security features
Open Windows Security.
In the left pane, navigate to App & browser control.
Next, select Exploit protection settings.
Under the system settings tab, under Force randomization for images (Mandatory ASLR) select Off by default.
Disabling this feature might make your PC less secure, but it will help if Fallout New Vegas is crashing on the loading screen or not launching at all.
Open the directory that has FalloutNV.exe, for many users that’s: C:\XboxGames\Fallout- New Vegas Ultimate Edition (PC)\Content\Fallout New Vegas English
Paste the .dll and .conf files from the archive you downloaded in Step 1.
Many are also recommending using Viva New Vegas since it fixes various issues with the game, so be sure to try it.
Does Fallout New Vegas work on Windows 11?
The game works on Windows 11, however, it’s not optimized for it, so you’ll likely experience issues unless you use mods to fix the various Fallout New Vegas problems on Windows 11.
These fixes should help you restore normalcy to the game on Windows 11 in no time. Keep in mind that outdated mods such as NVSR and Project Nevada should be removed since they are outdated.
Those are some resolutions players have fixed Fallout: New Vegas crashing and freezing with. In the same vein, if you are experiencing FPS drop, lag, and stuttering on Fallout New Vegas, check our guide to fix it quickly.
Some of the biggest online multiplayer titles are from EA games. However, various connection issues can arise that prevent players from accessing online features for their EA games. Fortunately, this guide has listed a lot of tested solutions to help you resolve the can’t play any EA games online issue.
Before applying the solutions below, restart your PC and your router, to make sure that your local connection is fine.
What can I do if I can’t play any EA games online?
Select the game from the list to go to the main page.
Look for the Server Status icon at the top.
The above steps will allow you to check the server status for specific games. Alternatively, you can check for any EA server outage by opening the DownDetector page for EA. That page will tell you whether there’s a general EA server outage. If there is an available EA server issue, you’ll need to wait for EA to get it sorted.
Under the Infraction History section, you will see the history of your account bans and suspensions.
EA will also inform you if your account has been suspended or banned, as noted in the My Ban History section of that website. If EA has suspended or terminated your account, you’ll need to contact Electronics Arts for further details.
3. Run Origin as an administrator
Right-click on the Origin launcher app and select Properties.
Click the Compatibility tab.
Select the Run this program as administrator checkbox.
Type the below commands and press Enter after each one. ipconfig/flushdns ipconfig /registerdns ipconfig /release ipconfig /renew netsh winsock reset
Restart your PC.
5. Switch to Google DNS
Open the Start menu.
Type Control Panel and open it.
Click View by and select Category.
Select Network and Internet.
Select Network Connections.
Right-click your internet connection and select Properties.
Select Internet Protocol Version 4 on the Networking tab.
Click Properties.
Click the Use the following DNS server addresses radio button.
Input the value 8.8.8.8 within the Preferred DNS server box.
Then enter 8.8.4.4 in the Alternative DNS server box.
Press OK.
6. Disable Windows Defender Firewall
Open the Start menu.
Type Windows Defender Firewall and open it.
Next, click Turn Windows Defender Firewall on or off.
Select the Turn off Windows Defender Firewall radio buttons.
Click OK.
If this solution allows you to play EA games on your PC, then you can keep the Windows Defender Firewall off till the time you play the game.
Once you are done playing, you should turn the Windows Defender Firewall back on because this will ensure that you are safe when accessing the internet and dealing with third-party software.
Select both the Load system services and Use original boot configuration options.
Click the Hide all Microsoft services checkbox on the Services tab to select that setting.
Press the Disable all button to deselect all remaining services.
Click Apply and OK options.
Restart your PC.
Tip
Note: You can restore the original boot configuration by selecting the Load startup items and Enable all options in the System Configuration window. If the clean boot fixes the issue, you’ll need to figure out what program or service conflicts with Origin and your EA games.
8. Make sure UPnP is enabled for your router
Open the Start menu.
Open Command Prompt as an administrator.
Type ipconfig and press Enter.
Note down the default gateway number, which will be something like 192.168.0.1.
Close the Command Prompt.
Open your web browser.
Input your gateway number in the browser’s URL bar, and hit Enter.
Sign in to your router’s settings page. You can find the required username and password for your router’s settings on the Router Passwords website.
Find an Enable UPnP option in your router’s settings. Usually, that option is on the Advanced Network or Misc tab, but it varies between routers.
Select the Enable UPnP setting if it’s not selected.
Select Apply or Save Settings option.
Tip
Note: Network Discovery also needs to be turned on for UPnP to be enabled for Windows. You can turn on Network Discovery via the Network and Sharing Center Control Panel applet.
9. Disable the Use a proxy server option
Press the Win + R keys to open the Run dialogue.
Type inetcpl.cpl and press Enter.
Select the Connections tab.
Click LAN settings.
Uncheck the Use a proxy server for your LAN option if it’s selected.
Select the Automatically detect settings checkbox.
Press the OK button on the Local Area Network (LAN) Settings window.
Next, click OK on the Internet Properties window.
Why can’t I play EA games online?
After careful research of user reports on various forums, here are a few of the most common reasons you can’t play any EA games online;
An issue with your account: When you can’t play any of your EA games online, there might be an issue with your account. For instance, your account might have been suspended or deactivated for some reason. Under such circumstances, online features will become generally unavailable for EA games and you may keep getting the oops, an error occurred message.
Server issues: A more general networking issue could stop the game from connecting with servers.
DNS problem: An unreliable DNS (Domain Name System) can also cause connectivity woes for gaming. In this case, changing DNS can sometimes help resolve such gaming issues.
Your antivirus is blocking the game: Security features for Windows and antivirus software can also generate issues for playing EA games online. In addition, such features can impede server connectivity for online EA games. So, disabling firewalls and antivirus software can also fix general online gaming issues for EA titles.
If none of the above solutions resolve your problem, then as a last resort, we suggest you contact EA support. You can contact EA support’s service via the EA Help site. Log in and select the game you are having trouble with.
The potential resolutions above can feasibly fix various issues that prevent players from playing EA games online via Origin client. So, those resolutions are worth a try if you can’t play any EA games online.
Click the Choose Files button to select an AVI video that doesn’t play.
Select a resolution on the Choose a Preset drop-down menu that matches your VDU’s resolution.
Then click Start conversion.
Select the Download option.
Error 0xc00d5212 will pop up when the correct codec required to support the AVI file isn’t installed. Thus, converting the AVI video to an alternative format Windows Media Player will likely play is one way to fix the issue.
MP4 is among the most universal video file format that most media players play.
2. Install K-Lite Codec
As error 0xc00d5212 can be a codec issue, installing the all-in-one K-Lite Codec pack might fix the error. Users can do that by clicking Download on the Contents of K-Lite Codec Pack page.
Then open the K-Lite setup wizard to install the pack. That should ensure there aren’t any codecs missing.
3. Update the display adapter driver
Error 0xc00d5212 can also be due to an incompatible graphics card driver. Therefore, updating the display adapter’s driver might resolve the issue.
The easiest way to do so is to use a third-party driver updater and fixer that will scan and then show users what devices, if any, require a driver update.
We recommend Outbyte Driver Updater because it has a high rate of accuracy when it comes to matching your hardware with its corresponding driver. It is also very lightweight, so it can work on pretty much any PC.
Users can fix corrupted AVI files with Remo Repair AV.
To try out the demo version, click Free Download (for Windows) on the software’s page.
Open Remo Repair’s setup wizard to install the software.
Launch Remo Repair, and click its Browse button to select the AVI video to fix.
Then press the Repair button.
Thereafter, users can select Preview to check the repaired video.
In the registered Remo Repair, users can also click Save to save the video.
If the error 0xc00d5212 error message occurs for one specific AVI file, that might be a corrupted file. Try playing alternative AVI videos in Windows Media Player to check if they play.
5. Play the Video With VLC
VLC is a better media player than WMP that incorporates more built-in codecs. Thus, it’s an altogether more reliable video player than Windows Media Player.
Some WMP users have also confirmed that their AVI videos that didn’t play in Windows Media Player played fine in VLC.
Users can add VLC to Windows 10 by clicking Download VLC on this webpage.
VLC media player users can also fix corrupted AVI files. So, before splashing out on Remo Repair, try fixing an AVI with VLC. To do that, click Tools > Preferences in VLC. Select Input & Codecs on the left of the Preferences window.
Select Always Fix on the Damaged or incomplete AVI file drop-down menu, and select the Save option. Thereafter, VLC might fix corrupted AVI clips when users play the videos.
Those resolutions will usually fix error 0xc00d5212 for most WMP users so they can play AVI videos. Switching to an alternative media player is probably the most straightforward, and best, resolution.
As Microsoft hasn’t released a new WMP version since 2009, Windows Media Player is becoming increasingly antiquated media player software.
How do I fix error codec?
To solve this problem you need to set the player to Download codecs automatically. Then, when you try again to play the file, you will be prompted to install the codec. You can also install a codec pack.
How do I fix an unsupported video format?
One of the solutions is to install the proper codec for the video file. You can also read our article about software that will play almost all video files.