Windows 11 Desktop Icons are Spaced Out? How to Change it

Windows 7 had the option to allow change the icon spacing. However, with the Windows 11 OS, you don’t get the option to change the icon spacing, but you do get a bunch of customization options. You can read more about them in our Windows 11 review.

While you cannot do that officially, there are a few tricks that you can apply and use to change the icon spacing on your Windows 11 PC. Using these tips, you can easily change the vertical and horizontal icon spacing in Windows 11. Let us check it out.

Why are my desktop icons spaced so far apart Windows 11?

This is a design choice by Microsoft and unfortunately, it’s not customizable from the settings. However, there are a couple of methods you can use:

  • Modify the registry – You can adjust the icon spacing by changing the registry. Be sure to create a backup and restore the registry if anything goes wrong when using this method.
  • Third-party software – A safer option would be to use customization software to change the icon spacing and other visual settings.

How can I change the icon spacing in Windows 11?

1. Use Registry Editor

  1. Press Win + R to open the Run dialogue.
  2. Type regedit and hit Enter.regedit
  3. Navigate to the below-mentioned path. HKEY_CURRENT_USER\Control Panel\Desktop\WindowMetrics
  4. There will be two registry items:
    • IconSpacing: Changes the icon spacing horizontally.
    • IconVerticalSpacing: Changes the icon spacing vertically.
  5. The default value of both the registry items is -1125 (mine had -1128 for some reason) and the range is -480 to -2730. Increasing the value will decrease the icon spacing while lowering the value will increase the icon spacing.
  6. Make changes as per your need and click OK.
  7. Sign out of your user account and restart your computer.
  8. Once the computer boots, sign in with your account.
  9. You will see the changes as per the values that you have inputted.
  10. To revert back to the default icon spacing, you need to follow all the steps and enter the default value for both registry items. Restart your PC and everything will be back to normal.

2. Use a third-party tool

  1. Download the Desktop Icon Spacing tool.
  2. Launch the program.
  3. You will see two sliders, i.e., Horizontal and Vertical.
  4. Simply move the sliders for either of the two as per the icon spacing you need.
  5. Check the boxes for All data saved and All other windows closed.
  6. Select Apply.
  7. The File Explorer will restart automatically and your changes will reflect.

The Desktop Icon Spacing is a lightweight and easy-to-use application that will help you with icon spacing on your Windows 11 PC.

The best part about the Desktop Icon Spacing tool is that it is available for free and it does not require any activation.

In case you want to learn how you can create an icon on your PC, then we have a guide that gives you a comprehensive guide on how you can create an icon on your Windows PC. Also, we have some effective solutions for corrupt desktop icons issues in Windows.

Let us know in the comments below, which one of the above options did you choose for icon spacing on your Windows PC.

What is Ntkrnlmp.exe and How to Fix It [BSoD Repair Guide]

Numerous system files like ntkrnlmp.exe are responsible for Windows being able to perform its tasks correctly. However, many users attribute BSoD issues to ntkrnimp.exe as the cause. For instance, the BSoD error 0x000000f7 on Windows PCs.

What is NtkrnImp.exe?

The ntkrnlmp.exe (NT Kernel Multiprocessor Version) is an executable system file found on Windows OS hard drives.

Furthermore, it is an essential Windows file executed whenever Windows OS starts running. It is loaded into RAM and runs as an NT Kernel & System process.

What are the causes of the NtkrnImp.exe?

Numerous factors can prompt the ntkrnlmp.exe error on your Windows computer. However, having corrupt system files on your PC is the main reason for the error. They affect the components running in your system, resulting in BSoD crashing.

Moreso, a couple of other factors can be responsible for the ntkrnlmp.exe. Some are:

  • Outdated graphics driver – The ntkrnlmp.exe error prompts a blue screen, which can be due to outdated graphics drivers on your PC. Also, corrupt or missing graphics drivers can cause the issue.
  • A damaged adapter or insufficient power supply to the PC – You can encounter the ntkrnlmp.exe if there isn’t enough power supply going into your PC. Likewise, charging it with a faulty or unsupported adapter can cause a problem.
  • Virus and malware infections – They can cause problems with how the system works, so you should always use a powerful antivirus.

These causes are a few factors that can cause the problem, and they are liable to vary in numerous computers.

How do I fix the Ntkrnlmp.exe?

We recommend you go through the following preliminary checks:

Proceed with the following solutions if the ntkrnlmp.exe error persists.

1. Update your graphics driver

  1. Press Windows + R key to open the Run window, type devmgmt.msc, and click OK to launch the Device Manager.
  2. Click on Display adapters, right-click the display driver you want to update, and click the Update driver option.
  3. Select Search automatically for drivers, restart your PC, and check if the issue persists.

Read our guide on updating drivers on Windows 11 if you can’t get through the steps above.

2. Repair corrupted system files through SFC scan from Safe Mode

  1. Left-click the Start button, click on Power, press and hold the Shift key, then select Restart from the power options.
  2. Select Troubleshoot from the Choose an option menu prompt.
  3. Select the Advanced options tab and click the Startup Settings option.
  4. Press the F4 to Enable the Safe Mode option and click the Restart button.
  5. Left-click the Start button, type cmd in the box, and click on Run as Administrator.
  6. Copy and paste the command bar and press Enter: sfc /scannow

Wait until the Command Prompt completes the process. Running an SFC scan will identify and repair the missing or corrupted system files in Windows 11.

Read our guide on repairing and restoring corrupted system files on Windows 11 if you have any concerns with the steps above.

3. Disable C-states and EIST in BIOS

  1. Press the Power button to turn on the PC.
  2. Tap F2 repeatedly when the Windows logo attaches your computer to BIOS.
  3. Go to the Advanced menu and select CPU configuration.
  4. Select CPU Power Management and set C-state and Intel EIST to disabled.
  5. Save the changes and restart your PC.

Disabling the C-states and EIST in BIOS will stop them from controlling the clock speed of Intel processor cores and can fix the problem.

You can also read about the UNEXPECTED_KERNEL_MODE_TRAP_M error on Windows 11 and ways to fix it. Likewise, you may be interested in fixing the Critical Process Died BSoD error in Windows 11.

Do not hesitate to use the comments section if you have further questions or suggestions.

Steam Client Bootstrapper Not Responding: How to Fix It

Regardless of Steam’s esteemed reputation, it has its flaws. The Steam client bootstrapper not responding is common issue Steam users complain about.

Also, users report the Unable to initialize Steam API error they get when running games from the Steam game library without any response.

Why is the Steam client bootstrapper not responding?

Issues like the Steam client bootstrapper not responding will cause the app not to work on your device. Many factors may be responsible for the problem.

However, the Steam download cache is the most popular culprit for the Steam bootstrapper not responding. Steam caches can become corrupt when they are old and cause the Steam client not to work on your PC.

Other factors that are likely to cause the Steam client bootstrapper not to respond are:

  • Windows Defender or third-party antivirus software interference – Windows Defender can interfere with the Steam client’s activities on your PC, causing the bootstrapper not to respond. Also, other antivirus software may block the bootstrapper, causing the Steam client not to work as it should on your PC.
  • Internet connection issues – The Steam client bootstrapper needs a fast and reliable network connection. So, it may not work or be responsible if your PC has network congestion.
  • Running Steam in Compatibility Mode – This mode helps your PC handle older Steam versions. However, it can cause issues with the Steam client on your PC if running a newer version.

The causes for the Steam client bootstrapper not responding may vary on different devices. Nevertheless, you can fix the problem by tweaking your system.

How do I fix the Steam client bootstrapper if it’s not responding?

Go through the following preliminary checks right away:

If the issue persists, proceed with the following troubleshooting procedures.

1. Clear the Steam client’s download cache

  1. Left-click the Start button and type Steam in the search bar, and launch it.
  2. Click the Steam Menu and select Settings.
  3. Hit on Downloads and click the Clear Download Cache button.
  4. Click OK until Steam prompts you to log in to your account.

After login into your Steam account, check if the bootstrapper responds.

Clearing your download cache will delete the corrupt update or download files that can cause issues with Steam. Check what to do if the Start button is not working on Windows 11.

2. Run Steam Client as an Administrator

  1. Right-click on the Steam client icon and select Properties from the drop-down.
  2. On the Steam properties window, go to Compatibility and check the box for Run this program as an administrator.
  3. Click OK, restart your PC, and launch Steam to see if the issue persists.

Running Steam as an administrator can resolve any permissions issues affecting its performance. Check what to do if you can’t run apps as administrators on your PC.

3. Disable Windows Defender

  1. Left-click the Start button, type Windows Security in the search box, and launch it.
  2. Select the Virus & threat protection option, and click Manage settings.
  3. Toggle off the Real-time protection option to turn off Windows Defender Antivirus.

4. Check if Steam is running in Compatibility Mode

  1. Press Windows + R to open the Run dialog box.
  2. Copy and paste C:\Program Files (x86)\Steam in the text bar and click OK.
  3. In the Steam directory, find the Steam.exe file, right-click, and select Properties from the drop-down.
  4. Click the Compatibility tab to check if the Compatibility Mode box is checked. If it is, uncheck it and save the changes.
  5. Restart the Steam client and check if the problem persists.

Disabling the Steam Compatibility Mode will solve any confusion prompting the issue.

5. Reset Winsock

  1. Left-click the Start button, type Command Prompt, and select Run as administrator from the drop-down.
  2. Click Yes when the User Account Control prompt appears.
  3. Type the following and press Enter to start the resetting process: netsh winsock reset
  4. Restart your PC and check if the issue persists.

Resetting Winsock can fix issues that may interfere with the Steam client on your PC.

Nevertheless, you can read how to fix Steam file sync issues on your device. Also, if you are having difficulties running Steam on Windows 10, check our guide for tips on what to do.

For further questions or suggestions, kindly use the comments section.

The Feature is on a Network Resource That is Unavailable [Fix]

Every time you try to install or uninstall an app, you encounter the feature you are trying to use is on a network resource that is unavailable error. Well, you are not the only one. This error is relatively standard and can be fixed in no time. 

In this guide, we will discuss all the possible methods to eliminate the issue. Let’s get started! 

What causes the feature you are trying to use is on a network resource that is unavailable error?

  • Windows Installer Service not working – If there are glitches in the computer, then there are chances that Windows Installer Service stopped working, causing the issue.
  • Registry value hindering the process – Sometimes, some registry entries are left behind when you uninstall the previous software version. This causes conflict and hence the error. 
  • The installation package is corrupt – The installation package of the affected app could be corrupt or missing a file, hence the issue.
  • Location of the installation file has changed – If the location of the installation file is changed while updating, the file can’t be called; therefore, you get the error.

How do I fix the feature is on an unavailable network resource?

Before moving forward, it is essential to create a restore point so we can revert to the Last known exemplary configuration in case of a mishap.

1. Use Microsoft Program Install & Uninstall Troubleshooter

  1. Download and install Program Install & Uninstall troubleshooter.
  2. Double-click on the installation file and click on Next.Windows Installer
  3. On the next screen, you will get Are you having a problem installing or uninstalling a program?Installer 2
  4. Click Accordingly.
  5. From the list of programs, select the one that you are trying to install.Installer 3
  6. Choose the app and click Next.Installer
  7. Follow the on-screen instructions to complete the process.

2. Use Registry Editor

Tip icon Tip
It is essential to back up your Registry Editor before making any changes. For that, go to File, then click Export. Now, the .reg file is in the desired location.
  1. Press Windows + R to get the Run console.
  2. Then, type Regedit to open Registry Editor.Registry
  3. Now copy and paste the following path into the address bar: HKEY_LOCAL_MACHINE\SOFTWARE\Classes\Installer\ProductsREG 2
  4. Look through all the entries and the YouProduct Name for each key.
  5. You will get the product’s name under the Value data option on the Edit String box.REG 3
  6. Find the affected program and locate its sub-key. 
  7. Right-click on the sub-key folder and select Delete.REG 4
  8. Restart your computer.

3. Ensure Windows Installer Service is Running

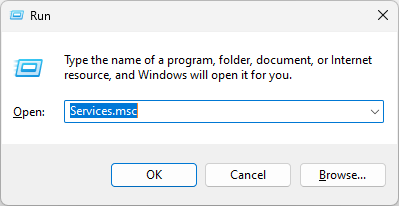
  1. Press Windows + R to get the Run box.
  2. Type services.msc to open Services.Services
  3. In the Services window, navigate to Windows Installer service.Windows Installer
  4. Double-click on the service to open Properties
  5. In the General tab, for Startup type, select Automatic from the drop-down menu.
  6. Check the Service status. If it is stopped, click on Start.Services Start
  7. Click Apply and OK
  8. Exit Services.

4. Download Installer to other location

If the installer you are using is corrupted or damaged, you should try reinstalling a fresh copy of the installer and saving it to a different location. This could resolve the issue. But before downloading the installer, check your System specifications and install the one that fits the specifications of your PC

5. End Task

  1. Press Windows + R to open the Run window.
  2. Type taskmgr and press Enter.Taskmgr
  3. Look for msiexec.exe and right click on it, and select End Task.Taskmgr 2
  4. Restart your computer and try to install the app.

6. Register for Windows Installer service

  1. Press the Windows key and type CMD and click Run as Administrator.
  2. Copy and paste the following command one by one and press Enter after every command: CMD%windir%\system32\msiexec.exe /unregister %windir%\system32\msiexec.exe /regserver %windir%\syswow64\msiexec.exe /unregister %windir%\syswow64\msiexec.exe /regserver
  3. Once done, restart your computer.

So, these are the troubleshooting steps to resolve the feature you are trying to use is on a network resource that is unavailable error. Try them and let us know what worked for you in the comments section.

IBA Launcher Not Working: 5 Ways to Get It to Launch

Some users have reported the IBA launcher not opening in Windows 11. This is a common problem that can be seriously annoying for several Windows users who are unable to launch certain applications on their computers.

If you are facing this issue, work through any of the fixes provided in this article.

Why is the IBA launcher not opening in Windows 11?

There can be several reasons behind the IBA launcher not working error on your computer. Below are some of the factors responsible for this error:

  • Corrupt Launcher files – There are some times when system files get corrupted. Whenever this happens, it can also affect the IBA launcher.
  • Corrupt app version – In other instances, the version you’re running may have a bug preventing the app from functioning correctly.
  • Incompatible OS version – The operating system version is incompatible with the installed software. You can troubleshoot Windows Update errors with the help of our guide.
  • Internet connection issues – This problem may also arise if you are not correctly connected. Firewall/anti-virus software – Your Firewall or antivirus software may be blocking the IBA launcher from accessing the Internet.
  • Outdated device drivers – If some of your system’s drivers are outdated, you likely experience this issue. A simple fix is to update your drivers.

Now that you know some of the potential reasons behind the IBA launcher not working in Windows 11, let’s proceed to how you can fix this problem.

What can I do if the IBA launcher is not opening in Windows 11?

Before seeking to conduct advanced solutions regarding how to fix your IBA not working in Windows 11, apply some simple checks. Some of these tweaks are:

  • Make sure that you are properly connected to a stable network.
  • Confirm if your computer’s operating system is compatible with the IBA software.
  • Disable or uninstall conflicting programs.

Having confirmed the above checks if the problem persists, you can work your way through any of the advanced solutions provided below.

1. Run the IBA application as an administrator

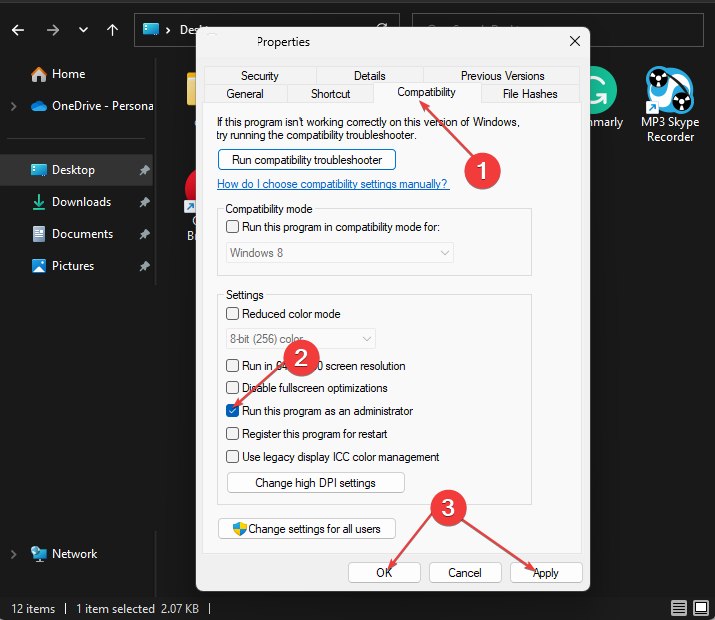
  1. Right-click the IBA Launcher shortcut on your desktop, then select Properties from the drop-down menu.
  2. Click on Compatibility tab and click on Run this program as an administrator.
  3. Then, press the Apply button to apply the settings and click OK to exit the properties window.

2. Disable firewalls and antivirus software

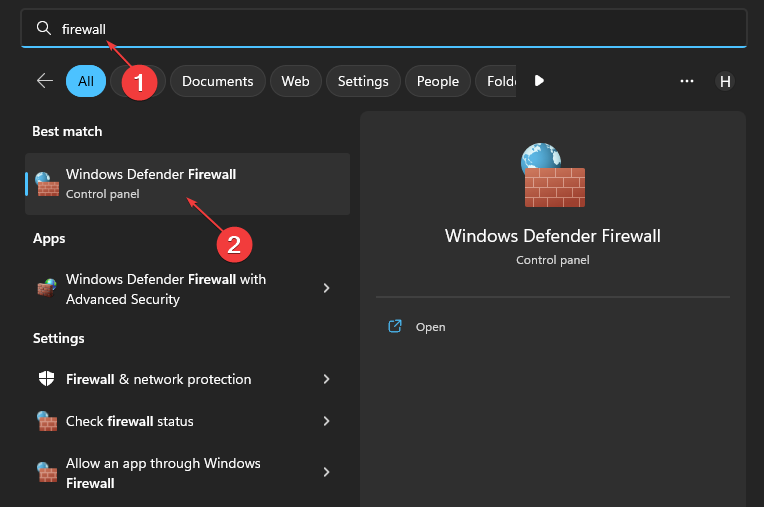
  1. Left-click on Start, type firewall in the search bar, and select the Windows Defender Firewall.
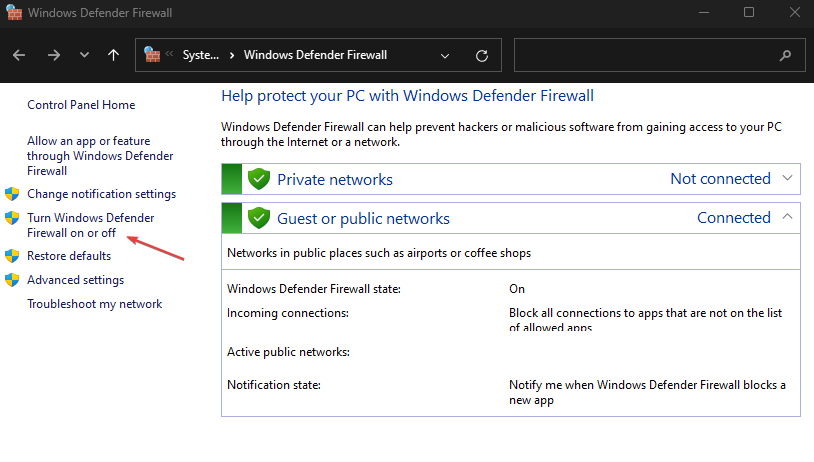
  2. Click the Turn Windows Defender Firewall on or off navigation option.
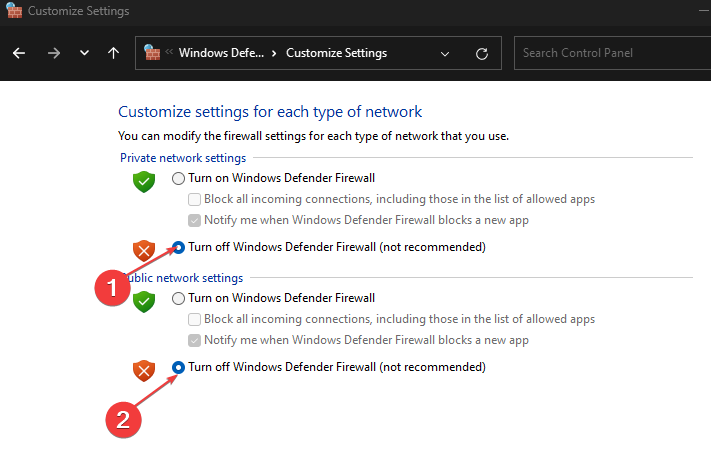
  3. Click the Turn off Windows Defender Firewall radio buttons, then select OK to confirm.
  4. Now try to open the IBA launcher with the firewall disabled.

Having disabled your firewall, you can disable other third-party antivirus software if you have them installed by using the disable utility. You need not worry about losing them as you can disable them temporarily.

You can also decide to use a third-party software uninstaller.

3. Clean-boot your PC

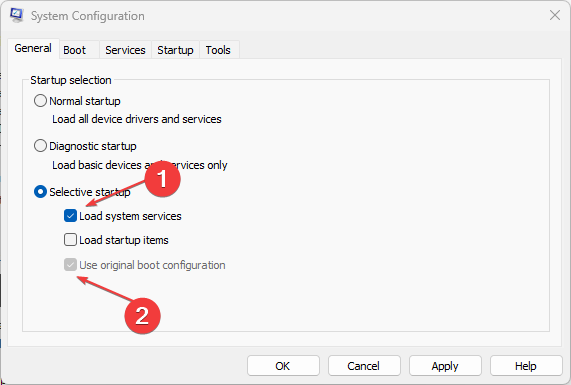
  1. Press the Windows + R keys select Run, type msconfig, and click OK or press Enter.
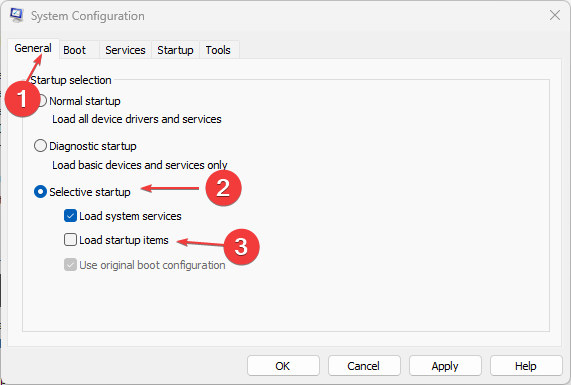
  2. Click the General tab, choose Selective startup to deselect the Load startup items checkbox.
  3. Select the Use original boot configuration and Load system services options.
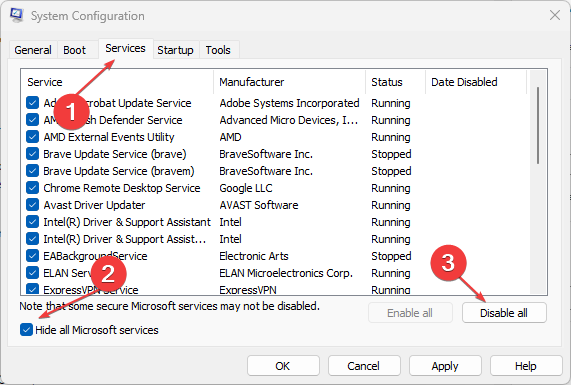
  4. Then, click Services at the top of the window, select the checkbox for the Hide all Microsoft services option, and click Disable all.
  5. Press Apply and click on OK to save the new startup settings.
  6. Press Restart on the dialog box that opens after closing MSConfig.

After the restart, try to open the IBA Launcher. If the problem is not resolved after the restart, try the next step. You can also look at other ways to clean boot your PC should the steps fail.

4. Erase the IBA Launcher profile file

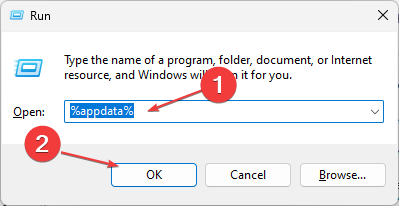
  1. Press the Windows + R key to bring up the Run shortcut, type %AppData%, and press Enter.
  2. Then click the .iba subfolder to open it.
  3. Right-click the launcher_profiles.json file and click on the trash can button to Delete it.

By deleting the launcher profile, you should be able to access the Launcher afresh.

5. Update Windows

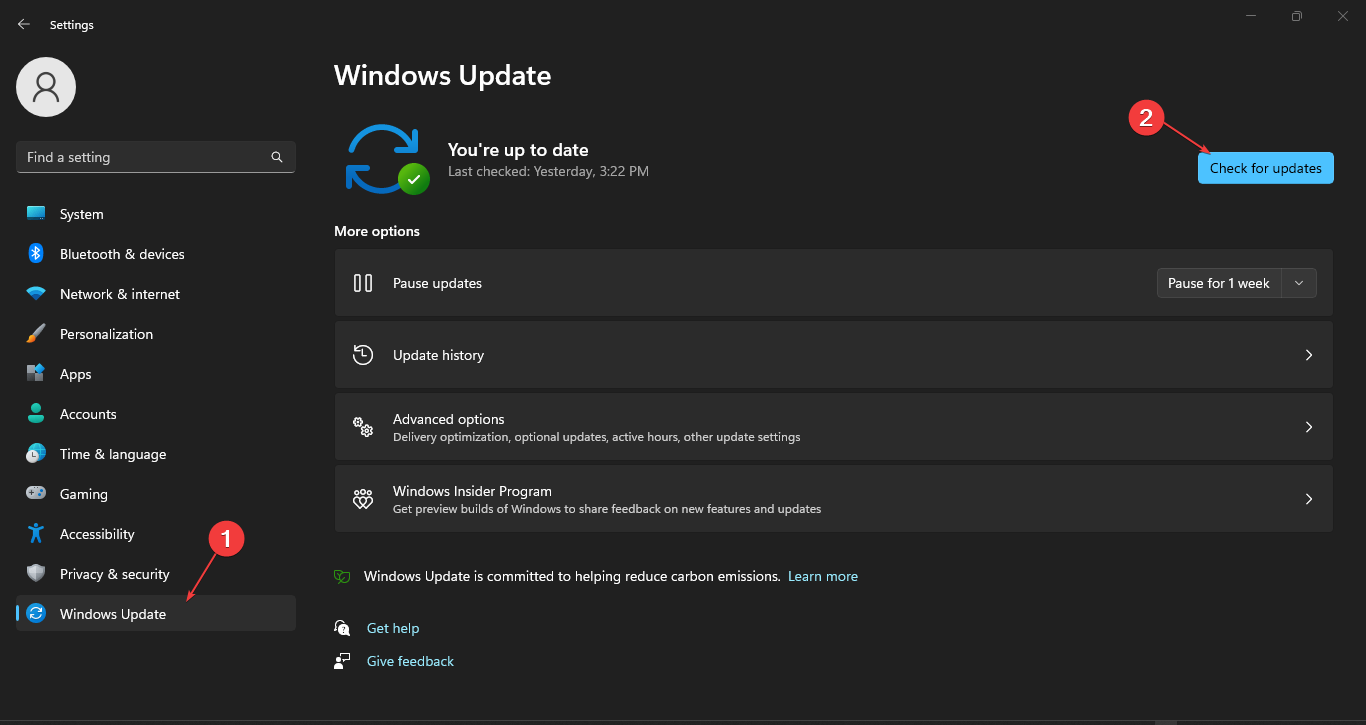
  1. Press the Windows key + I to open the Settings app.
  2. Click the Windows Update and select Check for updates.

Installing the latest updates of Windows should erase the IBA Launcher not working in Windows 11 problem.

However, if the Windows update fails to work, then check this guide for the best ways to troubleshoot it.

Please feel free to use the comments section below if you have any questions or suggestions.

How to Remove a Work or School Account from Windows 10

Many users have old work or school accounts on their PCs. There’s little point in keeping such accounts, so today we’ll show you how to remove your work or school account from Windows 10.

If work or school account problem keeps popping up, then it’s the right time to delete them. Sometimes you are unable to log in with a Microsoft account, and if that’s the case, you’ll need to remove it with steps from this guide.

What’s a work or school account?

A work or school account is a type of organizational Microsoft account set up via one of Microsoft’s cloud services. You can set up such an account with Skype for Business, Office 365, or Azure Active directory.

The advantages of having a work or school account are the following:

  • It syncs with Microsoft services between an organization (or school) and a user’s PC. That account links your PC with the organization’s network.
  • Allows you to separate school or work files and your personal data on the same PC.

This is beneficial since Microsoft Office lets you switch between personal and work accounts, so you can keep your personal and work files separate.

How can I remove a work or school account from Windows 10?

Use the Settings app

  1. To quickly access the Settings app, hold the Windows key and press I.
  2. Then select the Accounts category.
    Accounts category remove a work or school account from Windows 10
  3. Click the Access work or school tab on the left of Settings.
    Access work or school tab remove a work or school account from Windows 10
  4. Select the work or school account listed there.
  5. Press the Disconnect button.
  6. Click Yes when prompted to confirm if you’re sure about removing the account.

As you can see, it’s incredibly simple to remove a work or school account from your PC by following these steps.

Leaving the old school or work accounts on PCs can cause sign-in messages to randomly pop up. So, it’s better to disconnect such accounts in Windows 10 when they’re no longer needed.

In case you’re not able to remove the account, perhaps our Microsoft account doesn’t exist guide can help you fix the issue.

If you have any questions about removing work or school accounts in Windows, feel free to add them below. Click the Comment button to add any relevant questions about deleting work or school accounts.

Razer Headphones Mic Not Working: 5 Ways to Get It to Work

Several of our readers have recently reported that they encounter the Razer headphones mic not working issue when they try to use their Razer Kraken headphones on their PC.

For game enthusiasts, we understand this can be pretty frustrating. Hence, we’ve provided several fixes for this problem.

Why is the Razer headphones mic not working?

There can be several reasons why your Razer Kraken headphones mic may not work properly. Some of the factors responsible for this are:

  • Your microphone is muted – There are several cases whereby users forget to unmute their microphone. If your Kraken headphone’s mic is muted, it will not work unless you unmute it.
  • Your headphone is physically damaged – It is possible that it is broken or the microphone extension has developed a fault. Try to inspect your headphones to ensure they are in good condition.
  • Presence of viruses on your PC – Malware on your computer can wreak more havoc than imaginable. You can take a look at a list of our best anti-malware software to combat it.
  • Problems with your computer sound control – There is the possibility that your microphone is not working due to your computer sound settings.

Now that you know some of the potential reasons behind the razer headphones mic not working, let’s proceed to how you can fix this problem.

What can I do if the Razer headphones mic is not working?

Before engaging in advanced solutions, let’s consider some notable checks you should conduct:

  • Check if your headphone is well-connected to your computer or well-paired as a Bluetooth device.
  • Set your headphone as the default audio device.
  • Unmute your microphone.
  • Check if your computer’s basic audio settings are correct.

After confirming the reasons and observing the preliminary checks, if the problem persists, you can explore the advanced solutions to know which works for you.

1. Allow access to your microphone

  1. Click on Start on your Taskbar, type microphone privacy, and choose Microphone privacy settings in the new tab.
  2. Make sure the option for the Let apps access your microphone is toggled on.
  3. Next, scroll down to ensure to turn on the microphone access to all the apps that you wish to grant permission to use the microphone.

After granting access to your microphone, your Razer Kraken headphones mic should work. However, if it does not work, try the next fix.

2. Set your Razer microphone as a default recording device

  1. Right-click the Sound icon in your system’s notification icon area and click Sound settings.
  2. Next, navigate to the Recording tab to see all the available audio recording devices on your computer.
  3. Right-click any space in the Recording tab, then select Show Disabled Devices.
  4. Right-click the Razer Headphone Microphone and select the Enable option.
  5. Click the Headset Microphone and select both the Set as Default Device option.
  6. Click on Apply and OK to close the window.
  7. Speak into your headphone microphone to see if the level indicator is sending audio output as you speak.
  8. If not, right-click your Razer headphone icon to open Properties to boost the sensitivity of your microphone.
  9. In the Properties window, go to the Levels tab and drag the microphone slider to 100%. 

In case this does not work for you, it could be that your audio drivers are outdated.

3. Update your audio drivers

  1. Left-click the Start button and select Device Manager.
  2. Expand the Audio inputs and outputs, right-click the Microphone, and select Update driver.
  3. Then select Search automatically for driver.

Immediately you plug your Razer headphone into your computer, all related audio drivers are instantly installed automatically. Try out these alternatives to fix audio driver if it keeps crashing.

An alternative such as a tool like Outbyte Driver Updater can easily help you update not only your audio drivers but all your drivers as well by scanning your device and locating the most recent updates from its database.

Outbyte Driver Updater

Keep your audio drivers at their peak performance by letting Outbyte Driver Updater find the right updates.
Free Trial Download now

4. Run the software in Administrator mode

  1. Right-click the program’s shortcut or the .exe icon and select Properties.
  2. Next, click the Compatibility tab to open the options, and select the Run this program as an administrator setting.
  3. Click Apply then OK to apply the new option.

Running the software in administration mode will ensure the software can access your microphone.

5. Run the audio troubleshooter

  1. Press the Windows key + I to open Settings.
  2. Choose System from the options and click on Troubleshoot on the left pane.
  3. Select Other troubleshooters.
  4. Scroll down to the Recording Audio section, then click on the Run button.
  5. Follow on-screen instructions and apply recommended fixes.

If after applying all the fixes above, none works for you, you may be required to perform hardware repairs to fix the issue.

You can also check our complete guide for other ways to fix your Razer headphones if they are not working.

Do not forget to use the comments section if you have any questions or suggestions.

Microsoft news recap: Xbox Cloud Gaming expanding to older Samsung TVs, Teams gets sign language view, and more

Microsoft news recap is a weekly feature highlighting the top Microsoft news stories of the past week. Sit back, grab some coffee, and enjoy the read!

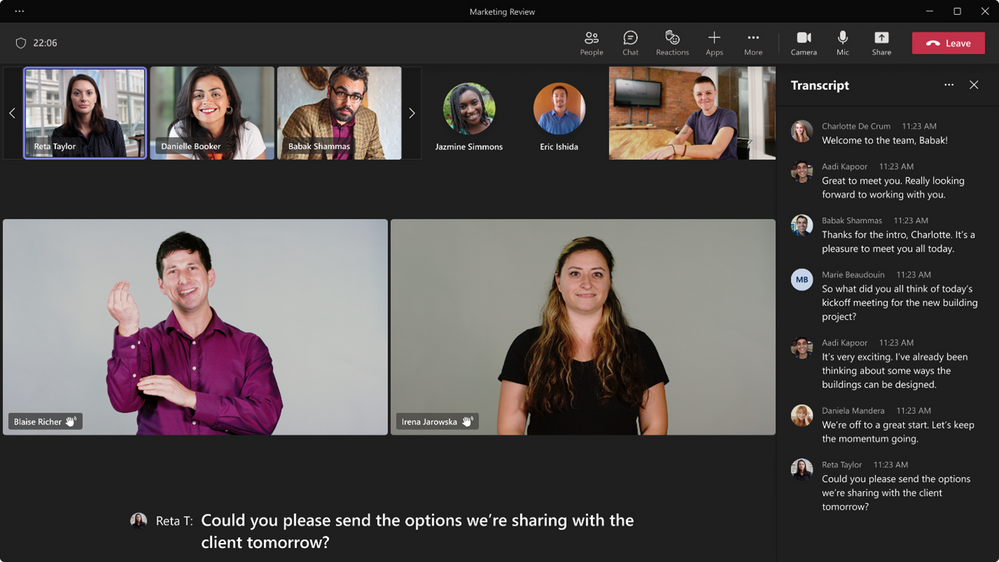
Microsoft Teams adds sign language view

A new Sign Language View has arrived on Microsoft Teams in public preview. The view is aimed at supporting those who are hearing impaired, and enables the ability to priotise the video feed of two other participants and maintains that feed in a consistent position.

thumbnail image 1 of blog post titled Introducing Sign Language View for Teams Meetings

Samsung expanding Xbox Cloud Gaming to some of its older smart TVs

Game streaming services on Samsung TVs are currently supported on its newest 2022 TVs, but the company is now preparing to expand services such as Xbox Cloud Gaming to its older models, beginning with some select models from 2021.

Samsung expanding Xbox Cloud Gaming to some of its older smart TVs - OnMSFT.com - November 16, 2022

Microsoft starts rolling out the Microsoft 365 app for the web

Microsoft 365 for the web has begun rolling out this week. Microsoft says that it “enables you to create, share, and collaborate all in one place. You can create new content using a wide variety of apps and templates, access your files and apps, and leverage the intelligence of Microsoft Graph to deliver insights and recommendations for making work easier.”

Microsoft 365 App logo

Microsoft and NVIDIA to work together on new cloud AI project

NVIDIA and Microsoft are partnering to build “one of the most powerful” supercomputers in the world, formed upon a multi-year collaboration on the project, and making use of NVIDIA’s GPUs and Microsoft Azure’s supercomputer infrastructure.

Microsoft and NVIDIA to work together on new cloud AI project - OnMSFT.com - November 18, 2022

That’s it for this week. We will be back next week with more Microsoft news.

Windows 11 Taskbar Flickering? 5 Ways to Stop it

The Windows 11 taskbar has been known to have its fair share of troubles from it being totally blank to a strange flickering. As the name suggests, a flickering taskbar is when the bottom bar begins to flash

This is something that’s been affecting Windows 10 and now we have Windows 11 going through the same thing. This guide will break down why this happens and what you can do about it.

What is causing the taskbar to act strangely on my computer?

When it comes to weirdly acting apps or user interfaces, there are three main culprits and it’s important to identify them before going through with the solutions.

  • The most likely reason is because of a glitch or bug present in the latest version of Windows 11. Something like this happened on Windows 22H2.
  • There could be something wrong with an app on your computer. It could be malware, corrupted files, or just poorly programmed. Be sure to uninstall them if this is the case.
  • Corrupted system files are also likely culprits. We recommend repairing and restoring those files to fix a flickering taskbar.

How do I stop my taskbar from flickering?

Before going into the more complex solutions, there are a handful of simple fixes that you can try out. These take almost no time at all to complete.

1. Uninstall the most recent update

  1. Open up the Settings menu and click the Windows Update tab on the left-hand side.
  2. In this new tab, click Update history then scroll down until you see Uninstall updates.
  3. Locate the most recently installed update and click Uninstall to get rid of it.

2. Disable flashing apps

  1. In the Settings app, click Personalization on the left-hand side and select Taskbar.
  2. Expand Taskbar behaviors and click the box next to Show flashing on taskbar apps to turn this feature off.

3. Use Command Prompt to fix an unresponsive Taskbar

  1. If you can’t open the Settings menu because the Taskbar is not responding to clicks, you will need to open the Task Manager.
  2. Press the CTRL, Shift, and ESC keys at the same time then click Task Manager.
  3. In Task Manager, click Run new task in the upper right-hand menu. Check under File if it’s not located on the main page.
  4. Type cmd in the new window and click the OK button.
  5. Type the following command into Command Prompt and hit Enter when finished: reg delete HKCU\SOFTWARE\Microsoft\Windows\CurrentVersion\IrisService /f && shutdown -r -t 0
  6. This will restart Windows 11 and should fix the flickering taskbar.

4. Use Command Prompt to repair system files

  1. Open the Command Prompt using the steps from the previous solution.
  2. In Command Prompt, type in this command then hit Enter: Dism /Online /Cleanup-Image /ScanHealth
  3. Give your computer time to finish scanning. It may take several minutes.
  4. Next, type in this command and hit Enter: Dism /Online /Cleanup-Image /RestoreHealth
  5. Give your computer time to finish the process. When it’s done, type in the following and hit Enter: sfc /scannow

5. Perform a clean boot

  1. Open the Search bar and type in msconfig. Select the System Configuration entry that appears.
  2. In the new window, click the Services tab.
  3. Click the box next to Hide all Microsoft services and then select Disable all.
  4. Click Apply then head over to the Startup tab where you click on Open Task Manager.
  5. Click the Startup icon on the left-hand side. Highlight every app you see there and select Disable.
  6. Close the Task Manager, restart your computer, and check if the taskbar is no longer flickering.

In this guide, we showed a solution of opening the Task Manager to deal with an unresponsive taskbar, but there are others. Other fixes include performing a System Restore and disabling your antivirus.

We also recommend learning how to deal with disappearing items in the taskbar. In our guide, we reveal that moving the taskbar to the left works and changing some things in the group policy settings.

Feel free to comment below if you have any questions about any native apps.

The Configuration Registry Database Is Corrupt [Error Fix]

Many Windows users report that they receive The Configuration Registry Database Is Corrupt error when they attempt to open Microsoft Office programs. Likewise, it appears when users use certain native utilities or programs available on Windows. It indicates issues relating to a corrupt Registry on Windows.

Why is the Configuration Registry Database Corrupt?

The most common cause is System file corruption on your PC. When you have corrupt system files on your PC, it can affect other programs running on your PC.

Furthermore, other factors can be responsible for corrupting the Configuration Registry Database. Some are:

  • Third-party app interference – You may encounter the Configuration Registry Database corrupt error due to third-party apps interfering with the process. These apps may impede the performance of native utilities like DISM or SFC, resulting in errors.
  • Corrupt Office installation – Issues regarding the corrupt installation of Microsoft Office on your PC will impact its functionality and prompt it to run into errors. So, you can encounter the Configuration Registry Database corrupt error if there are corrupt files or dependencies belonging to Microsoft Office.
  • Broken System Registry structures – Broken System Registry items on your computer can cause the Configuration Registry Database corrupt error. They affect your system’s performance and other programs on it.

However, the mentioned causes may vary on different computers but can be fixed by trying some general troubleshooting steps.

What can I do if the Registry database is corrupt?

We recommend you apply the following preliminary checks:

  • Disconnect any external devices plugged into your PC.
  • Turn off background programs on your computer.
  • Restart your PC in Safe Mode and check if the error persists.

If the corrupt Registry database error persists, try the solutions below.

1. Run the SFC and DISM

  1. Left-click the Start button, type Comm into the search box, then select Run as administrator from the drop-down.
  2. Click Yes on the User Account Control prompt.
  3. Type the following and press ENTER: sfc /scannow
  4. Restart your PC and check if the error persists. If not, run the DISM tool.
  5. Repeat steps 1-4.
  6. Type the following and press ENTER: Dism /Online /Cleanup-Image /Restorehealth
  7. Restart your PC.

The Configuration Registry database is corrupted error should be fixed.

Running the SFC and DISM scan will detect corruptions in Windows system files and restore corrupted files. You can check what to do if the Run as administrator option is not working on your device..

2. Repair Office suite installation

  1. Press Windows + I to open Windows Settings.
  2. Select Apps and click Installed apps.
  3. Click on the menu button against the Microsoft Office 365 app to open more options, then select Modify.
  4. Select a repair option: Quick Repair or Online Repair.
  5. Restart your PC after the repair is completed.

Repairing the installation file will clear the corrupt files causing the error without affecting your app data.

3. Perform a Clean Boot

  1. Press Windows + R key to open the Run dialog box, type msconfig, and click OK.
  2. Go to the Services tab and check the box for Hide all Microsoft services, then tap Disable all.
  3. Navigate to the Startup tab and click Open Task Manager.
  4. Select the unnecessary startup programs and click the Disable button.
  5. Restart your PC and check if the error persists.

A clean boot will stop any interference with third-party apps and disable startup apps that may prompt the error.

4. Update Windows OS

  1. Left-click the Start button on your taskbar and select the Windows Settings app and
  2. Click on Windows update and hit the Check for updates option. (If there are any updates available, Windows will search for and install them)

Windows updates will resolve bugs affecting your computer, causing the Corrupt Configuration Registry Database error. Check this guide for what to do if Windows is not connecting to update services on your PC.

5. Run System Restore

  1. Left-click the Start button and type Restore, then click on Create a Restore Point.
  2. Go to the System Protection tab and click System Restore.
  3. Select Choose a different system restore option and click Next to choose a specific Restore Point.
  4. Select the last time your system worked fine, and click Next.
  5. Click the Finish button.

Performing a system restore will backdate your computer, removing the corrupt item affecting it. If you have any issues starting the Restore point on your device, check this guide for the best fixes.

Alternatively, our guide on how to clean the Registry on Windows PC may come in handy if you ever need to.

Also, we have a detailed article on fixing errors accessing the Registry on your computer.

Do not hesitate to leave your suggestions or questions in the comments section. Also, if you have further queries about this guide, kindly drop them.

PC Ran Into a Problem and Needs to Restart is Stuck at 100 [Fix]

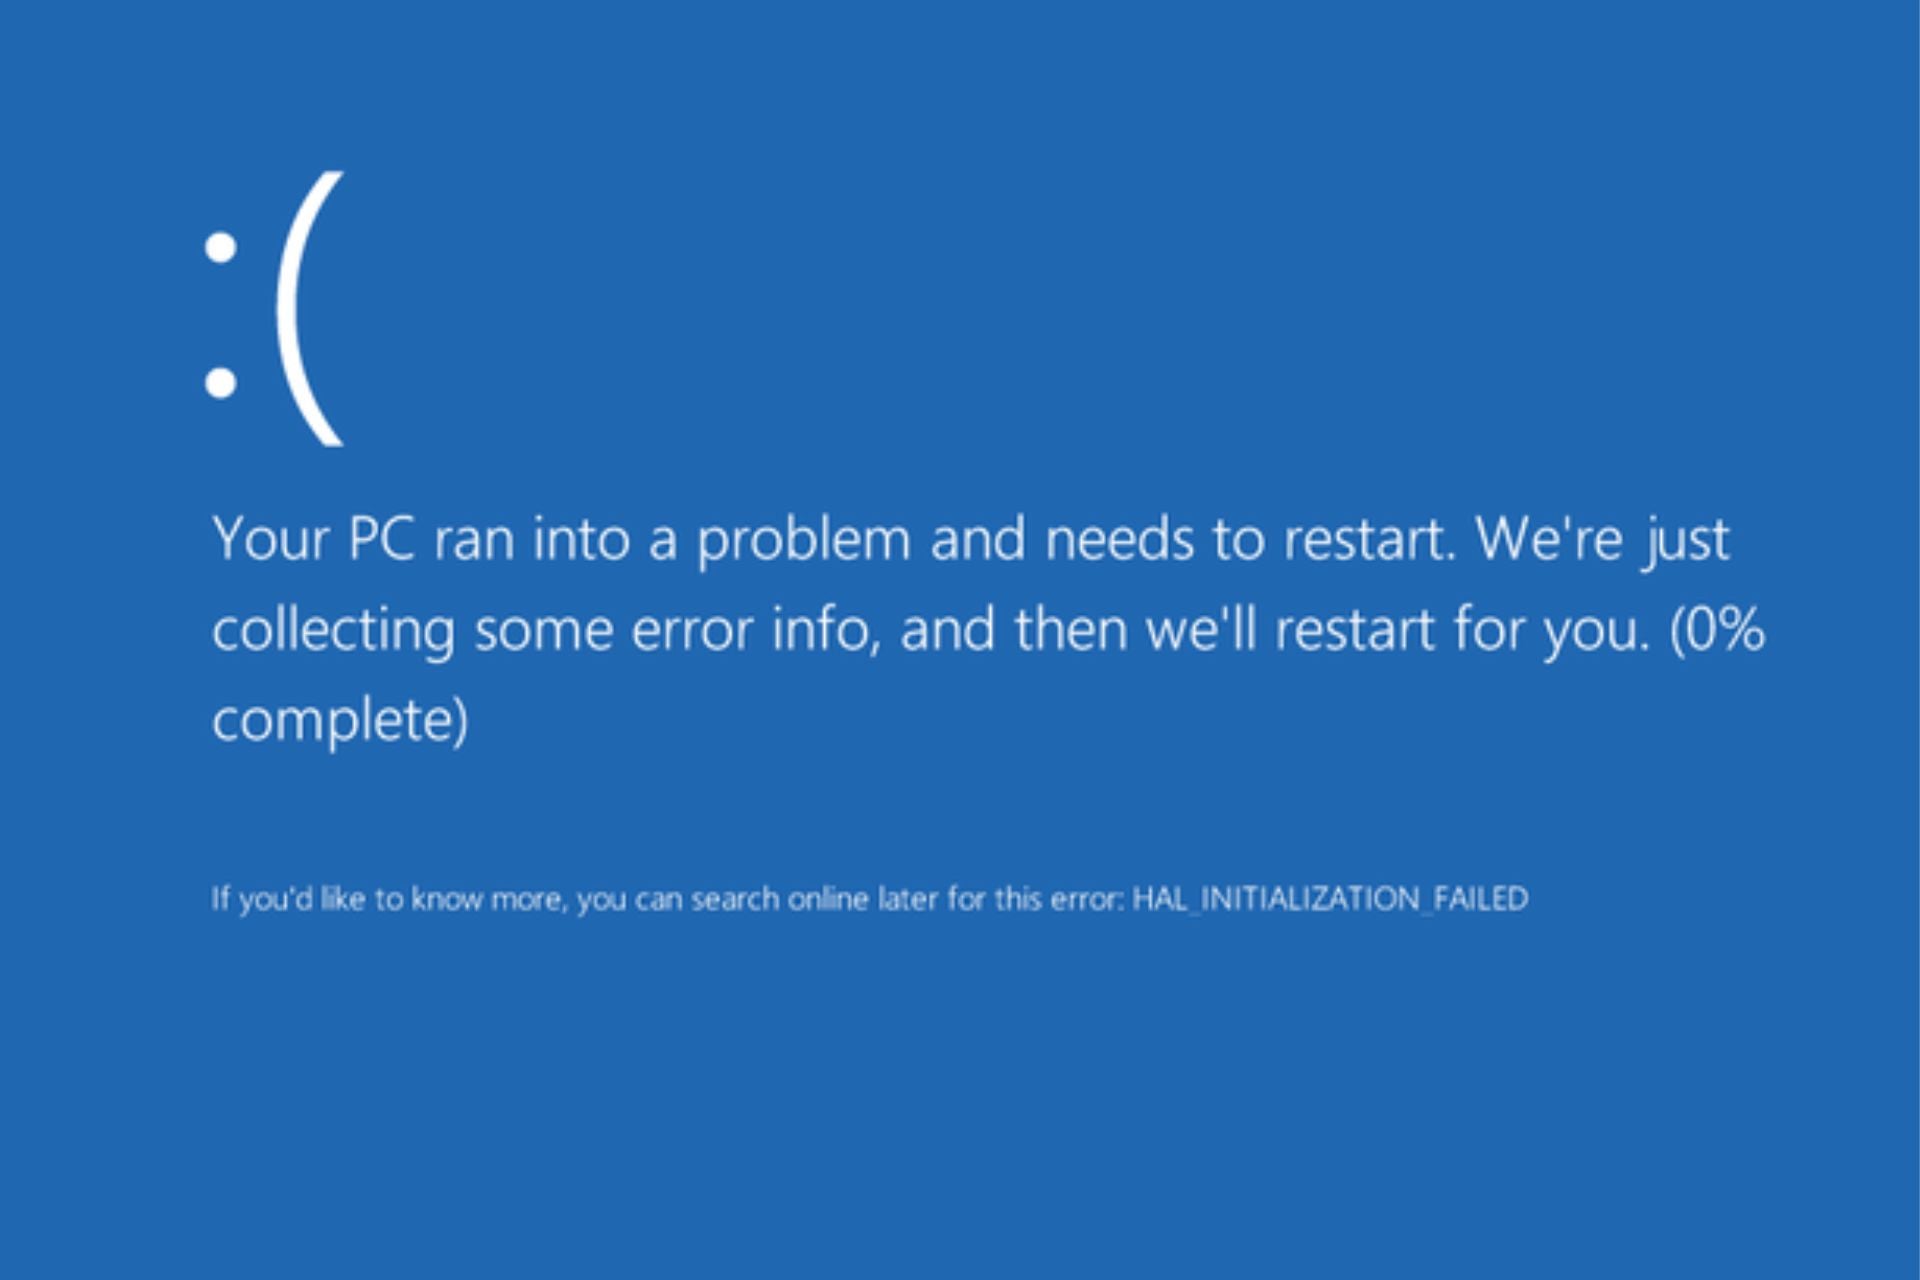
Several users have reported that their PC ran into a problem and needs to restart and this error is stuck at 100 percent. This error isn’t specific to a particular OS version. This BSOD error appears out of nowhere and the annoying part is that it doesn’t let you access your PC.

If you are also facing a similar PC ran into a problem and needs to restart error and the progress bar is stuck at 100 percent, then you have come to the right place.

What causes the PC to run into a problem and restart?

Here are a few of the most common reasons that can trigger the PC to run into a problem and needs to restart and be stuck at 100 percent.

  • There is a temporary glitch: Often because of using the internet or installing a third-party tool, a temporary glitch or bug in them can cause the system to crash.
  • Because of hardware issues: Loose connection or dirt on RAM, or any other hardware issues, can often trigger multiple errors on your PC.
  • System files: Missing or corrupt system files can trigger multiple errors on your PC.
  • Driver is missing or outdated: If the driver on your system is outdated or missing, then your hardware will have issues communicating with your PC, ultimately showing multiple errors.
  • Virus attacks: If your PC is infected by a virus or malware, then your PC performance will slow down and will also trigger multiple errors.

How can I fix the PC that ran into a problem and needs to restart?

Note icon NOTE
Since the issue at hand tells us that the PC ran into a problem and needs to restart error is stuck at 100 percent, we would assume that you are not able to boot into your PC in normal mode. In such a case we would suggest you go over the advanced troubleshooting methods.

One of the most straightforward procedures is the following:

  • Try entering recovery mode by pressing the F11 key shortly after you turn on your PCs to enter recovery mode. However, this method might not work on all PCs. For those computers, you can try pressing the F8, F9, or F12 keys. You can also check that detail with the PC manufacturer.

Now apply the below-advanced troubleshooting methods and possibly resolve the error.

1. Run the Startup Repair tool

  1. When the Advanced startup environment appears, select Troubleshoot.
  2. Click on the Advanced options button.
  3. Hit the Startup Repair button.
  4. Let your PC repair itself and see if this resolves the problem or not.

The startup repair tool will scan your PC for any issues and will try to fix the problem. If everything is successful then you will be able to log in to your PC normally.

2. Perform System Restore

  1. In the Advanced startup environment appears, select Troubleshoot.
  2. Click on the Advanced options button.
  3. Click on System Restore.
  4. Select an account to continue.
  5. Enter the password and click on Next.
  6. In the System Restore window, click Next.
  7. Select the restore point you wish to go back to and hit Next.
  8. Click on Finish to confirm the restore.
  9. Your PC will try to revert back to the selected restore point when everything was working normally.

One important thing that you should do on your PC is to create a system restore point. Because during a situation such as the BSOD error, it helps you to revert back to the normal settings.

You can refer to our guide and learn how you can create a system restore point on your PC. In case the system restore point doesn’t work, you can check out this guide that lists a bunch of solutions to resolve the restore point not working issue.

3. Uninstall updates

  1. In the Advanced startup environment appears, select Troubleshoot.
  2. Click on the Advanced options button.
  3. Select Uninstall updates option.
  4. Click on Uninstall latest feature update option.

4. Run SFC Scan and DISM commands

  1. In the Advanced startup environment appears, select Troubleshoot.
  2. Click on the Advanced options button.
  3. Select Command Prompt option.
  4. Type the below command and press Enter. sfc /scannow
  5. Your system will scan your PC for errors and if found, will try to fix them.
  6. Execute the below command. DISM /Online /Cleanup-Image /RestoreHealth

5. Reset your PC

  1. In the Advanced startup environment appears, select Troubleshoot.
  2. Click on the Reset this PC button.

Do note that using this option you can either proceed with the option to remove all files from your PC or keep your personal files and only replace the system files.

Mostly, the latter does the job, because it is often the problem with the system files. However, make sure to select to keep your personal files, and better yet, create a backup of all your files.

That is it from us in this guide. Let us know in the comments below, which one of the above solutions helped you resolve the problem at hand.

3 Different Ways to Rename a Bluetooth Device on Windows 11

Several users pair and utilize Bluetooth devices with their Windows 11 PCs. But many wonder if changing the Bluetooth name on Windows 11 is possible.

This is relatively simple to do, so make sure you download the latest Bluetooth driver and follow these steps to change the names of your devices.

Can I rename a Bluetooth device on Windows?

Yes, changing the name of Bluetooth devices is possible in Windows. There are a few available methods that you can use:

  • Device settings – Once your Bluetooth device is connected to your PC, you can change its name from the Devices and Printers applet. If you’re having issues with it, visit our Devices and Printers won’t open guide.
  • Device Manager – After connecting your Bluetooth device, changing its name is possible from the Advanced tab in Device Manager. If the device isn’t connected, you might have to show hidden devices in Device Manager to reveal it.

How can I change a Bluetooth device’s name in Windows 11?

1. Use Devices and Printers

  1. First, make sure there’s a Bluetooth device paired with your Windows 11PC.
  2. Press the Windows button + X for showing the Power User menu, and click the Run option.
    Run option windows 11 change bluetooth name
  3. Type Control Panel inside Run’s Open command box.
  4. Select OK to view the Control Panel.
  5. Click View devices and printers to bring up that applet.
    View devices and printers option windows 11 change bluetooth name
  6. Right-click a paired Bluetooth device there and select Properties.
    Properties option windows 11 change bluetooth name
  7. Select the Bluetooth tab.
  8. Click inside the textbox at the top of the Bluetooth tab.
  9. Then enter an alternative title for the Bluetooth device in the text box.
    Bluetooth tab windows 11 change bluetooth name
  10. Select Apply to save the new device name.
  11. Turn your Bluetooth device off and then back on.

2. Change a Bluetooth device’s name from Device Manager

  1. Bring up Windows 11’s Power User menu by right-clicking the Taskbar Start button.
  2. Select Device Manager to view that applet’s window.
    Device Manager option windows 11 change bluetooth name
  3. Double-click Bluetooth to view devices for that category.
  4. Right-click your Bluetooth adapter there to select Properties.
    Properties context menu option windows 11 change bluetooth name
  5. Click the Advanced tab.
  6. Then input a new Bluetooth adapter title in the Name box.
    Advanced tab windows 11 change bluetooth name
  7. Select OK on the Bluetooth adapter’s Properties window.

3. Rename your PC

  1. Click the Settings app that’s pinned on Windows 11’s Start menu.
  2. Select About from the System tab.
    The About option windows 11 change bluetooth name
  3. Press the Rename this PC button.
    Rename this PC button windows 11 change bluetooth name
  4. Input a new PC name in the text box, and select the Next option.
    Rename your PC window windows 11 change bluetooth name
  5. Click the Restart now button.

A Bluetooth adapter shares the same name as its Windows PC. Thus, renaming the PC will also rename the Bluetooth adapter.

It’s relatively straightforward to rename paired devices and the Bluetooth adapter in Windows 11 with those methods. You can also make other devices easier to identify, such as renaming your printer.

What method do you use to change the name of your Bluetooth devices? Let us know in the comments below.

3 Ways to Change HDMI Output to Input on a Laptop (With/Without Capture Card)

HDMI output problems can sometimes occur, therefore it’s important to know how to change HDMI output to input on a laptop in order to fix those issues. This is relatively simple to do, and in this guide, we’re going to show you the course of action.

How can I change HDMI output to input on a laptop?

1. Use the HDMI switcher

  1. Connect the switcher to the input port of your laptop.
  2. Connect the desired device to the input port.
  3. Lastly, connect the laptop to the output port of the switcher.

2. Use a capture card

  1. Insert the first HDMI cable into the HDMI IN port of the USB capture card.
  2. Plug in the other end of the first HDMI cable into the HDMI OUT port of the device from which you wish to view content. This could be your gaming console, etc.
  3. Insert the second HDMI cable into the HDMI OUT port on the USB capture card.
  4. Plug in the other end of the second HDMI cable into the HDMI IN port of your laptop.
  5. Connect the USB cable to your laptop. (You may need to connect additional cables for audio recording)

3. Use dedicated software

Purchasing a capture card or a converter can be pretty expensive just for the sake of viewing content from another device on your laptop.

In this case, what you can actually do is make use of software such as the Miracast function. We have a dedicated guide that will help you with downloading Miracast on your PC and how you can use it.

How to choose the best HDMI cable?

Here are a few quick tips that you can go through to select the best HDMI cable for yourself:

  • HDMI version: HDMI, just like USB has a different version of it. With each new version, there are various improvements, especially in terms of speed and reliability. So, always look out for the latest version. If you’re not using the latest version your HDMI won’t allow 144Hz or other features.
  • Compatibility: Although you might have picked up the latest version of the HDMI cable available, if your device doesn’t support it, it is totally useless. So, make sure to check your device’s manuals to avoid no HDMI signal issues on your PC.
  • Reliability: HDMI lets you enjoy your media without any compression. So, they are going to be used for a long time. Make sure that the build quality is good. Braided HDMI cables are the way forward.
  • HDMI connector style: There are different types of HDMI connectors in use, standard, mini, and micro. Ensure you are buying the correct connecter-style HDMI cable that fits in your device.

In case you are confused about which HDMI cable should you go for, we have a list of some of the best HDMI cables that you can buy.

You can also refer to our guide if you are having trouble with your HDMI port not working on your PC. These solutions when applied can also allow you to connect your Xbox to your laptop via HDMI.

Let us know in the comments below, which one of the above methods you opted to change HDMI output to the input on your laptop.

How to Change Sleep Setting in Windows 7

Some users claim they’ve forgotten how to change the sleep setting in Windows 7. If you’re one, worry less, as we’ve got you covered.

If you don’t have issues with PC not staying in Sleep Mode, keep on reading to find out how to properly adjust the sleep settings.

What is the Sleep Mode on Windows?

The Sleep Mode on Windows is a valuable part controlled by the system’s display driver, which allows users to put their computer in low-power mode. It allows them to get back where they left it exactly.

Here are the benefits of Sleep Mode are:

  • For laptop users, it helps to conserve the battery.
  • For PC and laptops, it helps prevent burn-in for the monitor screen.
  • The Sleep Mode allows you to grant your system a respite.
  • For people whose system overheats, the Sleep Mode helps to cool off your system without losing the progress of your work.
  • Whether you have a laptop, desktop, or workstation, switching to Sleep Mode on your computer will reduce your electric cost and help you save money.

You can use the change sleep setting in Windows 7 to enjoy the above benefits.

How do I change the sleep settings in Windows 7?

1. Edit Power plan settings

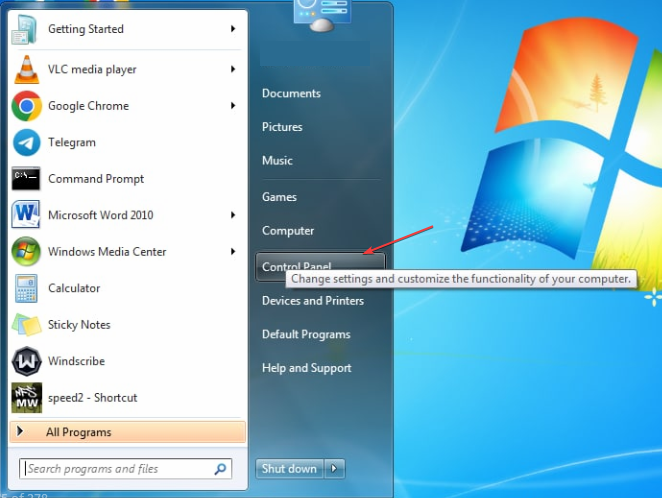
  1. Click on Start on your Taskbar, type Control panel, and launch it.
  2. Select the Power Options icon.
  3. Click on Change plan settings next to your power plan.
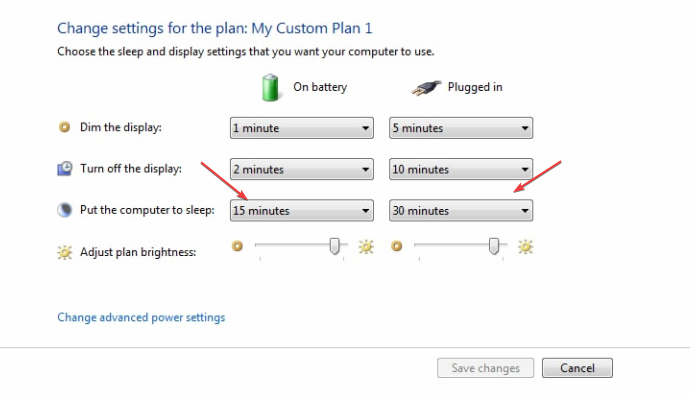
  4. Next, under the Put the computer to sleep settings, choose how long you want the PC to wait before going to sleep while on battery power, and when plugged in.
  5. Then select Save changes.

Once you’ve saved the changes made, whenever your computer stays idle for the long time that you set it at, it goes to sleep. This makes your computer sleep automatically so that power can be saved.

2. Via the Command Prompt

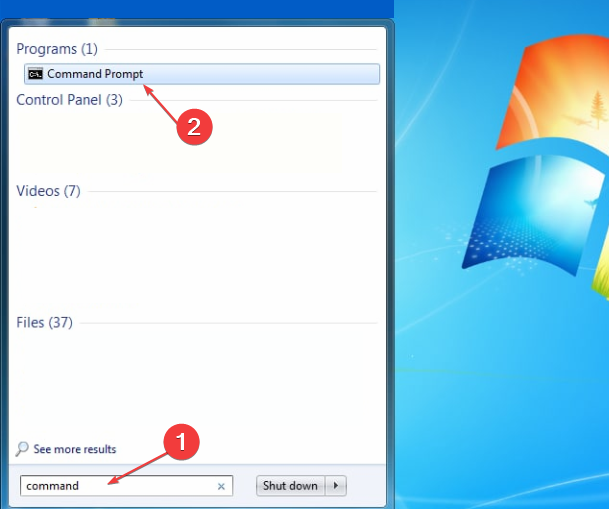
  1. Left-click Start and type command in the text box, and open it.
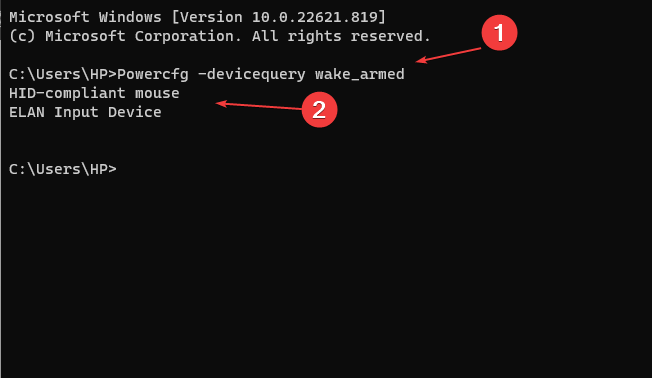
  2. Run the following command to show the devices that can wake the computer: Powercfg -devicequery wake_armed
  3. Then run the following command and press Enter: Powercfg -devicedisablewake devicename

If the issue is not resolved, run the following command to enable the disabled device: Powercfg -deviceenablewake devicename

3. Force your Windows 7 to Sleep Mode

The power button or a keyboard shortcut can put your Windows 7 computer into Sleep Mode if it doesn’t do so automatically.

Using the Alt + F4 keyboard shortcut you can put Windows 7 to sleep. A single press of the power button will put it into Sleep Mode depending on your settings.

If your computer turns off instead of entering Sleep mode, you check our article on how to fix the issue.

And that’s it on how to change sleep settings in Windows 7 and the benefits of doing so. You can also check our article on how to fix Sleep Mode on Windows 10 for other relative information.

If you have any questions or suggestions, do not hesitate to comment below.

Mouse Keeps Disconnecting: How to Fix Your Wireless Link

Everyone knows how frustrating it is to experience a mouse to keep disconnecting while you are using it for work or other purposes. It makes your work slow and tiring. Also, mouse lag on Windows 11 is another issue you can experience.

Why does my mouse keep disconnecting?

The most common cause of this problem is outdated mouse drivers on your computer. Running devices with external drivers can make them malfunction and be prone to bug attacks.

Furthermore, other factors that may be causing the mouse to keep disconnecting are:

  • Physical damage to the mouse – External devices like a mouse wirelessly connected to your PC can become faulty if they incur physical damage. It may affect some of its hardware components, causing it not to work correctly.
  • Interference with other devices – Sometimes, devices connected to your computer can conflict with each other and misbehave in the process. Also, having many external devices connected to a system can cause the wireless connection to fail.
  • Damaged/low battery issues – Most mice are prone to disconnecting when not charged or the battery is damaged. You can try these best practices to improve the mouse’s battery life.

The causes listed above may vary on different mice and PCs. Nonetheless, you can fix the problem by troubleshooting your mouse and settings on your PC.

What can I do if my mouse keeps disconnecting?

Go through the following preliminary checks right away:

  • Disconnect any USB and wireless devices plugged into the computer.
  • Toggle on and off Bluetooth on your PC and reconnect the mouse.
  • To fix the wireless mouse frequently disconnecting issue, replacing the battery with a new one will fix the problem if the battery is weak.
  • Restart your PC in Safe Mode and check if the issue persists.

If you can’t fix the problem, try the solutions that follow.

1. Uninstall the mouse in the Device Manager

  1. Press Windows + R key to open the Run window, type devmgmt.msc, and press Enter to launch the Device Manager.
  2. Expand Mice and other pointing devices, right-click on the mouse driver and click on Uninstall device from the drop-down.
  3. Click Uninstall.
  4. Restart your PC and reconnect the mouse.

Your computer will install the mouse driver automatically. Uninstalling the mouse driver from your PC will automatically update and fix issues.

2. Disable Windows Power Management

  1. Press Windows + R key to open the Run window, type devmgmt.msc in the command box, and press Enter to open the Device Manager.
  2. Right-click the wireless mouse and select Properties.
  3. Navigate to the Power Management tab and uncheck the Allow the computer to turn off this device to save power option.
  4. Click OK to save the changes, restart your PC, and see if the issue persists.

Disabling your device’s Power Management settings will prevent Windows from killing its process to save power.

3. Disable USB selective suspend

  1. Press Windows + S keys to prompt the Search menu, type Edit power plan, and click Enter.
  2. Click on Edit power plan from the result and select Change advanced power settings.
  3. Double-click on USB settings, select the USB selective suspend setting, and click on the drop-down button.
  4. Click on Disabled, then Apply.
  5. Click on OK to save the modifications.

Read about other ways to disable Windows USB Selective Suspend if you have problems with the steps above.

4. Troubleshoot Bluetooth

  1. Right-click the Start button and select Settings.
  2. Click on System and select Troubleshoot.
  3. Select Other troubleshooters.
  4. Locate Bluetooth and click Run beside it.

 Follow the on-screen instructions to complete the troubleshooting. Running a Bluetooth troubleshooter will help diagnose where the issue is per adventure there is any.

Alternatively, you can read about Bluetooth mouse disconnecting on Windows 11 and what to do to fix it.

Also, we recommend you check how to fix mouse settings that keep resetting or changing by themselves on your PC.

If you have further questions or suggestions, kindly drop them in the comments section below.

Black Screen On Steam Library? 5 Ways To Fix It

Not being able to access your Steam library is one frustrating thing that can happen to any gamer. However, many gamers complain about the Steam library showing a black screen, making it impossible to access.

Likewise, some report that the Steam game launches, but nothing happens after pressing the play button.

Why is there a black screen on the Steam library?

Many factors may be responsible for a black screen showing when accessing your Steam library instead of your games. Most times, not keeping the graphics driver updated on your computer can cause issues with apps like Steam.

However, other causes may prompt the problem with the Steam library showing a black screen. Some are:

  • Issues with Steam servers – There are times when Steam servers are down for maintenance or due to some issues. The Steam client may not work or be accessible at the time so you can encounter problems. Check what to do if you encounter errors connecting to the Steam server.
  • Steam cache files – The Steam cache files on your PC can corrupt, causing performance issues. So, you can experience some glitches when using the Steam client on your PC if you have old cache files.
  • Outdated Steam client – Many issues may occur when Steam can’t fix bugs affecting it. It means it can’t get access to the needed patches and updates for fixing bugs and improving its performance.

The cause of the Steam client black screen issue can differ for various users. However, we’ll show you how to fix it.

How do I fix the black screen on the Steam library?

Before proceeding with any advanced troubleshooting, here’s what you should do:

If you can’t resolve the problem, try the solutions below.

1. Update the Steam client on your PC

  1. Left-click the Start button, type Steam in the search bar, and launch it.
  2. Click the Steam Menu and select the Check for Steam client update option.
  3. Click on Update.

If there are updates available for your app, Steam will automatically install them. Updating the Steam client will fix bugs that can affect its performance.

If your Steam update is stuck, check how to resolve it following this guide.

2. Update your graphics driver

  1. Press the Windows + R key to open the Run window, type devmgmt.msc and click OK to open the Device Manager.
  2. Click on Display adapters, right-click the display driver you want to update, and click the Update driver option.
  3. Then select Search automatically for drivers, restart your computer, and check if the issue persists.

Check our guide on updating drivers on Windows 11 if you can’t get through the steps above.

Although updating your drivers manually is helpful, the easiest method is to use a dedicated tool because it can do this automatically.

Outbyte Driver Updater is our top pick here as it is capable of running a scan to see which drivers need to be updated and then show you the list and finally locate the correct and newest options for them.

Outbyte Driver Updater

Keep your graphics driver in a good shape by choosing Outbyte Driver Updater to find the most recent updates.
Free Trial Download now

3. Delete the Steam app cache

  1. Press the Windows + E key to open File Explorer.
  2. Navigate to Windows (C:), and select the Program Files (×86) folder.
  3. Then click Steam to go to the Steam directory.
  4. Right-click the appcache folder and select Delete from the drop-down.
  5. Close the File Explorer and launch the Steam client to check if the issue persists.

4. Run Steam Client as an Administrator

  1. Right-click on the Steam client icon and select Properties from the drop-down.
  2. On the Steam properties tab, go to Compatibility and check the box for Run this program as an administrator.
  3. Click OK to save the changes, restart your PC, and launch Steam to see if the issue persists.

Running Steam as an administrator will fix any permissions issues that impede its functionality. Check what to do if you can’t run apps as administrators on your PC.

5. Check Steam platforms for server updates

During a maintenance session or when there’s an issue with Steam servers, there will be an update on Steam’s Twitter page notifying users.

Hence, check if there’s any information about it. Peradventure there’s any, the only solution is to wait till the issue is resolved.

In conclusion, you can read our guide on permanently fixing the slow download speed on the Steam client on your PC.

Also, if you are having difficulties running Steam on Windows 10, check our guide for some quick fixes as well.

Let us know which solution worked for you in the comments area below.

How to Add Album Art to MP3 on Windows 11

Adding album art to your music album is a great way to organize your music collection. You can add a cover to your MP3 files via music players or online. Here we have listed some of the best ways to add album art to your MP3 files.

How can I add album art to MP3?

Before diving into the solutions, we recommend having the album cover images handy for all the music albums. If you need help finding the album cover, you can go to either Discogs or MusicBrainz to find album art for your music.

1. Use the Groove Music built-in app

  1. Press the Windows key and type Groove Music, and press Enter.
  2. Click the Music Library and then click Albums.Albums
  3. Select the album and open it.
  4. Select Edit Info.Edit Info
  5. Click on the Edit icon for the album cover.Edit INFO @
  6. Browse your computer and choose the image. 
  7. Click Save.

2. Use VLC Player

  1. Download the VLC media player.
  2. Go to the MP3 file and right-click on it.VLC media player
  3. Now choose Open With and select VLC media player.
  4. On the VLC, go to Tools, then Media Information. VLC media player 1
  5. If there is a cover, it will be visible there. 
  6. Choose Add Cover Art from the file or download the cover file. If you have cover art, then go with the former.VLC3
  7. Select the desired photo and click Close. 

3. Use MP3tag

3.1 No album cover

  1. Download and install MP3tag.
  2. Launch MP3tag, click on the File menu, and then Add directory. 
  3. Now click Select Folder, and choose the songs. 
  4. Click Tag Sources, then Cover Art.MP3 Album art
  5. Click MusicBrainz or Discogs.
  6. Choose the album name and click Next.mp3 3
  7. You will get results, click on Preview and select it if suitable.Add cover
  8. Click OK. 

3.2 With an album cover 

  1. Click Tag Sources, locate and right-click on Cover Art.
  2. Select Add cover. Add cover
  3. Choose the desired image and click Open. 

4. Using an online tool

  1. Visit the itunemachine website.
  2. Drag & drop the music file.
  3. When uploaded, click on Change/ Add cover and choose the image you want as the cover.IITUNE 2
  4. Now on the next page, click Download MP3 with cover.

So, these are ways to add album art to your MP3 files and organize your music collection. Try them and let us know which one you prefer to use in the comments section below.

The Selected Disk is Not a Fixed MBR Disk: How to Fix it

You may come across The selected disk is not a fixed MBR disk error in Windows 10 when you try to mark a partition on a disk as active on a UEFI System Partition in the Diskpart utility.

BIOS needs an MBR disk type and UEFI needs a GPT disk type, but problems can occur if MBR is missing. In this guide, we will give you a bunch of fixes that can help fix this error for good.

What causes the selected disk is not a fixed MBR disk error?

After some research, we have found out some of the most common reasons that could trigger The selected disk is not a fixed MBR disk error:

  • The drive is in a different format: It can occur when you try to add a primary partition or set a primary partition as active which is formatted in GPT.
  • Issue with the Boot Manager: If the Boot Manager itself has some problems then, you will come across multiple boot-related errors.
  • Boot mode is UEFI: In case your Boot Mode is UEFI, then you will come across this issue.

How to convert MBR to GPT or vice versa?

We have a dedicated guide that lists some of the best methods that will help you to convert MBR to GPT disk.

You can also check out our guide that lists 5+ best disk management tools that not only will let you convert disk partitions but also do tasks such as create, resize, rename, delete partitions, and also include PC optimization features.

What can I do when getting the selected disk is not a fixed MBR disk error?

1. Fix Boot Manager

  1. Create Windows 10 bootable drive.
  2. During the initial boot screen, press the boot menu key. The key changes depend on your motherboard manufacturer.
  3. Select your USB drive.
  4. Click the Next button on the Windows 10 startup page.
  5. Hit the Repair your computer button.repair-your-computer-menu windows 10 error netio sys
  6. Select Troubleshoot.
  7. Choose Advanced options.
  8. Select Command Prompt.
  9. Type the below commands and press Enter after each one. Bootrec /fixMbr
    Bootrec /fixBoot
    Bootrec /ScanOS
    Bootrec /RebuildBcd
  10. Close Command Prompt.
  11. Reboot your PC.

2. Disable UEFI in BIOS

  1. Turn off your PC.
  2. During the initial boot screen, press ESC, F1, F2, F8, or F10. The buttons depend on your PC’s manufacturer.
  3. Use the arrow keys to choose the Security tab.
  4. Select the Secure Boot Configuration option and press Enter.
  5. Choose Secure Boot. Use the arrow keys to select Disable.
  6. Switch to the Boot tab using the arrow keys.
  7. Locate Boot Mode and change its value to Legacy.
  8. Exit and save the changes.

Since GPT is related to UEFI, you should disable UEFI and change the Boot Mode to Legacy. Doing this has resolved The selected disk is not a fixed MBR disk error in Windows 10.

3. Convert Disk to MBR (Using Advanced Recovery Mode)

Note icon NOTE
This method will delete all files from the selected disk. Back them up before you proceed.
  1. Insert the installation media into your PC and boot your PC.
  2. Select Troubleshoot.
  3. Choose Advanced options.
  4. Select Command Prompt.
  5. Type the below command and press Enter. diskpart
  6. Execute each command one by one and press Enter after each command.
    list disk
    select disk X


    Be sure to select the disk that has Windows installed on it.
  7. Type the below command and press Enter. clean (Do note that once you execute this command all the data in the selected volume or drive will be wiped off. So, proceed carefully.)
  8. Now enter the below command and press Enter to convert the volume to MBR. Convert MBR
  9. Reboot your PC and check if this resolves the error or not.

4. Convert GBT to MBR (Using a third-party tool)

  1. Download AOMEI Partition Assistant and install it.
  2. Launch the application.
  3. Select your disk.
  4. Choose Convert to MBR from the menu on the left.
  5. Click on OK.
  6. Click on Apply.
  7. The conversion process will start.
  8. Wait for the process to finish.

Another freeware solution that can help you convert your MBR hard drive to GPT without file loss is AOMEI Partition Assistant. The application is relatively simple to use, and you can convert your drive by following these steps:

After the process is completed your drive will be converted to GPT. This application won’t delete your files during the conversion so you can use it without fear.

Fixing this problem is easy, but if you have additional issues, visit our guide on how to fix MBR without an installation disc.

That is it from us in this guide. Let us know in the comments below, which one of the above solutions helped you resolve The selected disk is not a fixed MBR disk error in Windows 10.

How to Quickly Fix Any Multiplayer Errors on NASCAR Heat 5

NASCAR Heat 5 is one of the most popular sports racing video games available for PlayStation 4, Xbox One, and Microsoft Windows via Steam. Being a widely played game, it has a multiplayer feature that allows up to 40 players to compete online.

The NASCAR Heat 5 multiplayer error can happen due to various reasons. It can occur due to server, network, or other problems. Fortunately, there are ways you can fix the issues and be able to play with your friends again.

Does NASCAR Heat 5 have multiplayer?

NASCAR Heat 5 has one of the best and largest joining spaces when it comes to video game multiplayer joining. The game has an offline split-screen multiple for two players.

Likewise, NASCAR Heat 5 has an online multiplayer option that allows up to 40 players to join a game simultaneously without issues.

However, multiplayer in NASCAR Heat 5 allows you to compete with many other players like you are playing in real life. So, the game has multiplayer modes that are available offline and online.

Why am I getting a multiplayer error on NASCAR Heat 5?

  • Network connection issues: A reliable and fast internet connection helps you enjoy a smooth and fun game. Here’s what to do if your Internet connection is limited.
  • Game Server issues: Players need to connect to the game server to connect with other players. However, various issues can occur with the servers, like server overload or server breakdown. Likewise, the NASCAR Heat 5 multiplayer error can pop up if there’s a maintenance session on the game server.
  • Issues with the computer: Having a rough boot-up can affect the activities on your computer, and it can be responsible for the NASCAR Heat 5 multiplayer error. However, if your PC encounters some difficulties while booting up, it can impede the performance of game clients.

How do I fix the multiplayer error in NASCAR Heat 5?

Here’s what you should do before applying the detailed solutions below:

  • We recommend that you perform a power cycle on your router to help it connect to the internet smoothly.
  • You can switch to a wireless internet connection if your computer is connected with a cable internet connection. Wireless connections are faster and more reliable.

1. Restart your console

  1. Press and hold the Xbox button at the controller’s center to prompt the Power center tab.
  2. Select Restart console.
  3. Click on Restart.

2. Check if there’s a server breakdown

The NASCAR Heat 5 game functions by having a smooth connection to its servers. So, you should consider checking if there is any information about a maintenance session or server issues on their social media platforms.

However, the only way to fix this is to wait while they resolve the issue. Users can go to the NASCAR Heat Twitter status page for updates.

How many players can play at once in NASCAR Heat 5?

Playing multiplayer games on NASCAR Heat 5 can accommodate two friends for an offline split-screen multiplayer mode. Likewise, the game supports up to 40 players in an online multiplayer game.

Leave your suggestions and feedback in the comments if this guide has helped you. We’d like to hear from you.

How To Watch Portugal Vs Uruguay Live For Free [Fifa World Cup]

Fifa World Cup is all the rage right now, but only a handful of digital and regular TV channels have broadcasting rights for the matches, but we got a solution on how you can watch Portugal vs Uruguay live for free.

Most digital hubs demand money, except the Spanish broadcaster RTVE. The only problem is that the channel is only available to those physically located in Spain.

However, there is a foolproof way to bypass this geo block and watch the upcoming competition for free, regardless of your location.

How to Watch Portugal vs Uruguay Live for Free?

The most foolproof way that ensures you won’t disconnect in the middle of the match due to poor connection or IP leaks is to use a reputable VPN.

With a VPN you can mask your IP address and make it appear as if you are browsing from any country of your choice.

We use ExpressVPN because it’s fast and has multiple servers in Barcelona and Madrid, making it ideal to unlock RTVE.

Here’s how to configure it to watch Portugal vs Uruguay live on RTVE:

  1. Get an ExpressVPN subscription and download the dedicated app. ExpressVPN download to watch Uruguay vs Portugal live for free
  2. Follow the installation prompts.
  3. Launch the app and search for a Spanish server in the location list and connect. Search for Spanish server and connect
  4. Go ahead and access RTVE. Stream Uruguay vs Portugal live after connecting to ExpressVPN

Spoofing your IP is what can get you access to RTVE from outside Spain. We recommend ExpressVPN for its stable servers that are paired with advanced privacy features.

The VPN ensures no data leaks occur when you’re connected.

ISPs or the RTVE will not flag your connection since they cannot trace you, all thanks to the powerful AES-256-bit encryption.

Its unlimited bandwidth makes sure you don’t run out of data all month, and its no-lag lets you catch all the action with lightning connection speed.

ExpressVPN

Connect to a server from Spain to watch buffer-free Fifa World Cup matches on RTVE!
Check price Visit website

Wrap Up

Watching all matches in the World Cup for free is possible. The Spanish television, RTVE holds broadcasting rights

Apart from IP-spoofing strength, users also need to be wary of security challenges and prioritize only reliable VPNs.

DNS, IPV6, and WebRTC leaks will reveal your location and could get you yanked off. Worry not about those as you watch the live match for free with our recommended VPN.

Black Screen on FFXIV Launcher: 5 Ways to Fix It

Final Fantasy XIV provides an enjoyable gaming experience and has amazed players across the globe. However, there is one issue that has troubled all those users, which is the black screen in the FFXIV launcher.

Because of this problem, the game becomes completely unplayable. When launched, it simply opens a black screen and nothing else happens. If you are facing a similar issue, we will give you a bunch of methods to resolve FFXIV launcher black screen problem.

What causes the black screen issue in the FFXIV launcher?

After some research, we found out some of the most common reasons that trigger the black screen issue in the FFXIV launcher.

  • Related to Internet Explorer: Strange it may sound, but the FFXIV launcher depends on Internet Explorer for launching. Some issues in the browser can trigger problems with the FFXIV launcher.
  • Firewall is blocking internet access: Your PC’s firewall may be blocking internet access to the game’s launcher.
  • Antivirus is blocking the game: Due to aggressive antivirus, your game might have been added to the blocking list. You can switch over to a different antivirus on your PC.
  • Issues with the FFXIV config: There might be some issues with the FFXIV configuration file, because of which you are getting a black screen FFXIV launcher.
  • Some game files are missing: If game files are missing, then this could cause multiple issues with the game.

How can I fix the black screen issue in the FFXIV launcher?

Before applying the advanced troubleshooting methods, check if the below solutions resolve the problem for you or not.

  • Restart your PC. There might be a temporary glitch or bug that is causing the black screen issue in the FFXIV launcher, which can be easily fixed by a simple restart.
  • There are chances that some game files are missing. You can resolve it by reinstalling the game.
  • Close all background applications. Some apps running in the background might be causing trouble triggering the error.

1. Add the game to the exclusion list

  1. Open the Start menu by pressing the Windows button.
  2. Type Windows Defender Firewall and open it.opening windows defender firewall windows 11
  3. From the left, click on Allow an app or feature through Windows Defender Firewall.
  4. Click on Change settings.
  5. Check both the Public and Private boxes for Final Fantasy XIV.
  6. Click OK.
  7. Restart your PC and see if this resolves the error or not.

If you have a third-party antivirus app installed on your PC, then you can follow the steps for them accordingly.

2. Delete the ffxivboot.bck file from the Game folder

  1. Right-click on the FFXIV shortcut on your desktop and select Open file location.
  2. Inside the game folder, locate ffxivboot.bck file.
  3. Right-click on ffxivboot.bck and select Delete.

The ffxivboot.bck is a boot file that is available inside the Final Fantasy XIV game folder. There might be some issue with this file that is causing the boot issue with the launcher.

You can delete this file and do not worry as it will get replaced with the working on as soon as you launch the game again.

3. Remove Steamclient64.dll

  1. Open the Steam installation folder.
  2. Locate the Steamclient64.dll file.
  3. Rename it to anything else or remove it.
  4. Launch the game and it should fix the black screen issue.

4. Edit the FFXIV.cfg file

  1. Open This PC.
  2. Navigate to the below path: Users > Libraries > Documents > My Games > FINAL FANTASY XIV > A Realm Reborn
  3. Right-click on the FFXIV.cfg file, select Open with and choose Notepad.
  4. Press Ctrl + F to open the Find box.
  5. Type CutsceneMovieOpening and hit Next.
  6. Change the value next to CutsceneMovieOpening from 0 to 1.
  7. Save the changes to the Notepad.
  8. Relaunch the game and see if this resolves the issue or not.

A bunch of Final Fantasy XIV players have suggested changing the CutsceneMovieOpening value from 0 to 1 to resolve the black screen issue with the FFXIV launcher.

The file is located inside the Documents folder and can be easily edited using Notepad by following the above-mentioned steps.

5. Reset Internet settings

  1. Open the Start menu by pressing the Windows key.
  2. Type Internet options and open it.
  3. Click on the Advanced tab.
  4. Click on Reset.
  5. Check the box for Delete personal settings.
  6. Hit the Reset button.
  7. Click OK.
  8. Restart your PC and see if this resolves the issue or not.

Internet options and settings when tweaked can cause multiple issues with the program related to it. You can reset everything back to normal by following the above steps.

That is it from us in this guide. Well, the black screen issue with the FFXIV launcher isn’t the only problem that Final Fantasy users come across.

If you are facing error 1014 in Final Fantasy XIV, then we have a guide that gives you a set of solutions aimed to resolve the problem easily.

Users have reported facing lobby server connection errors. We have a dedicated guide that gives you solutions to resolve the FFXIV error 2002.

For users facing packet data loss issues with the FFXIV, you can check out our guide to resolve the issue and get back to gaming.

ePSXe Keeps Crashing: 5 Ways to Get It to Work

ePSXe is a PlayStation video game console emulator for Windows. It is considered the best emulator for Windows PCs. Regardless, many users complain that the ePSXe keeps crashing or stops working when loading a game. Likewise, users complain about other emulators not running fast on Windows.

Why is ePSXe not working?

The most common cause is the outdated graphics driver on your PC. When your graphics cards are not updated, they can affect the emulator you’re trying to play.

Furthermore, other factors that may be responsible for ePSXe crashing or not working on your PC are:

  • CPU overclock issues on your PC – You can experience ePSXe crashing or not working due to issues with your CPU Overclocking system. Setting a limit that is too high for your CPU can cause it to crash, causing the emulator to crash.
  • Interference with newly installed drivers – Users can encounter ePSXe crashing frequently on their devices if it is not compatible with new drivers installed on the device. If the drivers don’t support the emulator program, it can cause it to crash or not work.

The causes listed above are common factors that can cause ePSXe to keep crashing. Nonetheless, we’ll take you through some general fixes as we go forward.

What can I do if ePSXe keeps crashing?

Before trying any advanced troubleshooting on your PC, we recommend you go through the following quick methods:

If you’re not able to fix the issue, try the solutions below.

1. Run ePSXe as an administrator and compatibility mode

  1. Open File Explorer by clicking the Windows + E keys.
  2. Locate the ePSXe client, right-click it, and select properties from the drop-down.
  3. Navigate to the Compatibility tab, check the box for the Run this program as an administrator, Run this program in compatibility mode for option, and choose a Windows version.
  4. Click OK to save the changes.

Running ePSXe as an administrator will fix permission issues or settings affecting it. Check what to do if running as administrator is not working on Windows 10/11.

Before trying any advanced troubleshooting steps, you can also read our complete guide on how to run ePSXe on Windows to make sure your emulator is configured correctly and ready to perform at its best.

2. Reset the CPU Overclock on your PC

  1. Left-click the Start button, type ePSXe main execution in the search space, and launch it.
  2. Click the Options button at the top bar, then click on the CPU overclocking entry.
  3. Click on the x1 option to mark it.
  4. Close the window and check if the issue persists.

Setting Overclock to x1 will fix issues triggered by the CPU overclocking option in the in-app settings.

Readers can check our recommendations for the best Overclocking stress test software to download in 2022.

3. Update your graphics driver

  1. Press Windows + R key to prompt the Run dialog box, type devmgmt.msc in the text box, and click OK.
  2. Click on the Display adapters, right-click on your graphics card, and select Update driver from the drop-down.
  3. Select Search automatically for drivers.
  4. Restart your computer after the update process is complete, then check if the issue persists.

If you can’t update your driver through the steps above, check how to update drivers on Windows 11 for other methods.

Outbyte Driver Updater can be a great method because it is an automatic tool that scans your device for outdated drivers and eventually finds the latest updates from its repository.

Outbyte Driver Updater

Try this reliable tool when you want to easily update your device drivers with the newest updates.
Free Trial Download now

4. Run System Restore

  1. Left-click the Start button and type Restore, then click ENTER.
  2. Click the System Protection tab and hit the System Restore button.
  3. Select the Choose a different system restore option and click Next to choose a specific Restore Point.
  4. Select the last time ePSXe worked on your PC, and click Next.
  5. Click the Finish button.

Performing a system restore will backdate your computer and remove the issues affecting ePSXe. Should the Restore Point fails to work, check our guide for ways to fix it.

5. Uninstall the recent Windows update

  1. Press Windows + I key to open the Settings app.
  2. Go to the Windows Update tab and select Update history.
  3. Click Uninstall updates.
  4. Select the most recent update and click on Uninstall.

Uninstalling the recent Windows update can help fix the issue for some users. You can also check for other ways to uninstall an update on Windows 11 if you can get through the steps above.

In conclusion, we have a detailed list of the best PS4 emulators you can download on your PC.

If you have questions or suggestions, kindly drop them in the comments section.

Windows 10 Shows Notifications, But There Are None [Fix]

Receiving notifications on your PC makes you anxious to know what is being delivered. However, it becomes annoying when Windows 10 shows notifications but there are none. So, many users opt for turning off notification sound on their PCs which doesn’t fix the issue.

Hence, it is essential to find out how to resolve the issue.

Why does my Windows 10 computer keep making notification sounds when there are none?

When Windows 10 computers keep making notification sounds when there are none, it indicates that it has an issue. An outdated Windows operating system is the most common problem.

When a Windows PC lacks the necessary updates and patches for fixing bugs, it tends to malfunction and cause issues.

Furthermore, other factors that may be responsible for the issue are:

  • Latest Windows updates – While an outdated Windows PC can cause problems for some users, updating to Windows’ latest builds can affect some. Many users complain about issues after updating to the latest build. So, the notification error may occur due to your recent update.
  • Corrupt system files – Corrupt system files can also cause Windows 10 computers to keep making notification sounds when there are none. Old caches and app files can become corrupt and affect your PC.
  • Issues with notification settings – Window notifications may pop up when there are no notifications due to configuration issues. Notification is a component of the computer that can malfunction if not configured.
  • Third-party app interference – Some programs can interfere with the notification on your PC. So, it is possible to encounter issues like receiving alerts when there is none if a third-party app controls your notifications.

Other reasons can cause Windows 10 computers to keep making notification sounds when there are none.

What can I do if Windows 10 shows notifications when there are none?

Before proceeding with any advanced troubleshooting, go through the following:

If you’re unable to get around the issue, try the solutions below.

1. Reconfigure background access for apps

  1. Press Windows + I key to open the Windows Settings app.
  2. Select Privacy from the menu.
  3. Click on Background apps from the left pane, then toggle on the Let Apps run in the background option.
  4. Select the apps that you want to get the notifications.
  5. Close Settings and restart your PC.

Enabling this feature on your computer allows the app that you’ve selected only send in notifications with content.

2. Re-register the Action Center via Windows PowerShell

  1. Left-click the Start button, type PowerShell in the text box, and launch it.
  2. Copy and paste the following command in and press Enter: Get-AppxPackage | % {Add-AppxPackage -DisableDevelopmentMode -Register "$($_.InstallLocation)\AppxManifest.xml" -verbose}
  3. Wait for the process to finish, then restart your PC when you see a blinking cursor.

Re-registering the Windows 10 Action Center will fix any issues prompting it to show notifications with no content.

Also, you can check what to do if Windows PowerShell stops working.

3. Run System File Checker

  1. Left-click the Start button, type Comm into the search box, then select Run as administrator from the drop-down.
  2. Click Yes on the User Account Control prompt.
  3. Type the following and press Enter: sfc /scannow
  4. Restart your PC and check if the error persists. If not, run the DISM tool.
  5. Repeat steps 1-4.
  6. Type the following and press Enter: Dism /Online /Cleanup-Image /Restorehealth
  7. Restart your PC.

Running System File Checker will help detect and remove corrupt files on your PC that are causing problems with notifications.

4. Reconfigure Registry Settings

  1. Press Windows + R to open the Run dialog window, type Regedit, and press Enter to open the Registry Editor.
  2. Navigate to the following path: HKEY_CURRENT_USER\Software\Microsoft\Windows\CurrentVersion\PushNotifications
  3. Double-click the ToastEnabled entry in the right pane and change its value to 1.
  4. Restart your PC.

Reconfiguring some registry settings can fix the notifications issues on your PC.

Conclusively, you can check how to manage browser notifications on your PCs to prevent annoying pop-ups.

You can kindly tell us which of the solutions worked for you in the comments section. Also, do not hesitate to leave your questions and suggestions.

How to Configure your Firewall Rules for Windows Activation

If you are facing difficulties during Windows activation, it could be due to the firewall blocking the port or the program, and hence, it’s recommended to configure the rules.

When the Windows Firewall is turned on, it tries to protect your device from any external threats by disabling the internet connection, hence preventing the activation process.

What ports need to be open for Windows activation?

The ports that need to be enabled for Windows activation are as follows:

  • TCP port 80 – The default port for HTTP.
  • TCP port 443 – This is the default port for HTTPS.
  • UDP port 3478 – One of the default ports for UDP.
  • UDP port 3479 – Another default port for UDP.

The above are the default ports required for the Windows activation process; however, if you are facing an issue, chances are that the administrator has changed the port values.

If you want to use WSUS for tasks like deployment or patch management while upgrading Windows 11, you can configure the server to use alternate ports.

In this post, we will guide you on configuring the firewall rules for Windows activation.

How do I enable Firewall rules for Windows activation?

Before you proceed with the below process, make sure that you run the below checks to rule out other issues:

If none of the above steps help you to fix the issue, you can try configuring the Firewall rules to facilitate Windows activation as shown below.

  1. Press the Win + R keys to launch the Run console, type firewall.cpl in the search bar, and hit Enter. type firewall.cpl in run console
  2. Next, on the Windows Defender Firewall screen, click on Advanced settings on the left. advanced settings
  3. In the Windows Defender Firewall with Advanced Security screen, select Inbound Rules on the left and click on New Rule under Action on the right. new inbound rule
  4. You will now see the New Inbound Rule Wizard window. Here, select Port and press Next. select port in New Inbound Rule Wizard
  5. On the next screen, go to does this rule apply to TCP or UDP? and select TCP.
  6. Next, under Does this rule apply to all local ports or specific local ports?, select Specific local ports and enter the port value. Press Next. enter port value
  7. Now, on the next page, select Allow the connection and click on Next. Allow the connection
  8. Next, select all the profiles Domain, Private and Public, and press Next. Domain, Private and Public
  9. On the next page, name the new rule, for example, something like, allow Windows activation, add a description (optional), and click on Finish. name new rule as allow Windows activation

This way, you can successfully create Windows Defender Firewall rules to allow Windows activation.

What are the default Windows Firewall rules?

By default, the Windows Defender Firewall will block everything unless there’s an exception rule created. This setting overrides the exceptions.

For example, the Remote Desktop feature automatically creates firewall rules when enabled.

How to configure Windows Firewall?

  1. Launch the Run console by pressing the Win + R keys simultaneously.
  2. Type firewall.cpl in the search bar and hit Enter to open the Windows Defender Firewall screen. type firewall.cpl in run console
  3. Here, click on Turn Windows Defender Firewall on or off on the left. turn windows defender firewall on or off
  4. Next, in the Customise Settings window, select Turn off Windows Defender Firewall for both Private and Public network settings. Press OK. turn off windows defender firewall
  5. Once done, return to Windows Defender Firewall home page. Here, click on Advanced settings. advanced settings
  6. Next, in the Windows Defender Firewall with Advanced Security screen, select Inbound Rules on the left. inbound rules
  7. On the right, check for a rule that doesn’t have a green tick next to it, and click on Enable Rule on the right. Repeat this for all the rules with no green tick. enable rule without green tick
  8. Now, on the left, select Outbound Rules and repeat this process for all the rules with no green tick.

You have successfully configured the Windows Firewall rules, and there should be no problem during Windows Activation.

At the same time, you may want to confirm if the Firewall is blocking a port or a program, and hence, we guide you on how to check the firewall settings and configure them. For more information about firewalls, check our guide on how to remove duplicate rules in Windows Firewall.

However, if it’s the Windows activation key that’s not working, you can refer to our comprehensive guide for some practical solutions.

If you encounter any other issues during Windows activation, do let us know in the comments box below.

How do I Test my Webcam on Windows 7?

The webcam has become an essential part of everyone’s life, be it for work or just for a simple chit-chat with family and friends. If you are still using Windows 7, and have bought a new webcam, then you may want to test it on your PC.

In this guide, we will give you some of the best ways via which you will be able to test the webcam on your Windows 7 PC. Let us take a look at each option, one by one.

Can you use a webcam with Windows 7?

The answer to this question is yes. You can very easily use a webcam on your Windows 7 PC. If you are using Windows 7 on your laptop, then you may take advantage of the Camera app to access the in-built webcam.

Also, if you have plugged in a third-party webcam to your Windows 7 PC, then it should be accessible using the Camera app or the dedicated app for your webcam.

Simply press the Windows button to open the Start menu, and click on All Programs. Search for Camera and select it, and you can access your webcam on your PC.

Is the Logitech camera compatible with Windows 7?

Yes, the Logitech camera is compatible with Windows 7 OS. However, you need to make sure to install the correct driver meant for Windows 7 in order to use its features.

How can I test the webcam on my Windows 7 PC?

Before using the advanced methods, try these solutions and see if they help you test your webcam on your PC or not:

  • See if the webcam supports plug-n-play or not. Most webcams do come with plug-n-play support.
  • Install the official driver and check if this helps you test your webcam on your Windows 7 PC or not.

1. Use OnlineMicTest (Online)

  1. Visit the OnlineMicTest website.
  2. Connect your webcam, if you are using an external webcam.
  3. Click the Play button.
  4. Hit the Allow button at the top if your browser asks a question to allow the webcam.
  5. Check if you can see yourself on the webcam or not.

Using the OnlineMicTest website, you can easily test out your webcam. There is no question of compatibility with Windows 7 as it makes use of your web browser.

You can view the fullscreen or windowed preview of your feed and also get a live framerate count on the top-left corner of the page.

2. Use Skype

  1. Install Skype on your PC.
  2. Launch Skype.
  3. Login with your Microsoft Account.
  4. Click on the 3-dot icon next to your profile name.
  5. Select Settings.
  6. Open Audio & Video.
  7. You will see a preview of your webcam feed live.

Skype is a nice video calling tool that you can not only use to make video calls but also use it to test out your webcam on Windows 7.

The setup is easy, and the testing process is also simple. In place of Skype, you can also try out Zoom app.

3. Use the VLC media player

  1. Download VLC player.
  2. Install it.
  3. Launch VLC.
  4. Click on Media at the top toolbar.
  5. Select Open capture device option.
  6. Under Device Selection, select your webcam from the Video device name drop-down.
  7. Hit the Play button.
  8. Your webcam preview will start showing on the VLC media player.

That is it from us in this guide. The above methods are sufficient to test your webcam on Windows 7 PC.

If you really make use of a webcam and want some more options for it, then you can check out our guide on the 10+ best webcam software to get more out of your webcam.

Several users have reported facing black screen issues on their webcam when they turn it on. Thankfully, we have a guide that gives you a bunch of solutions to resolve the problem.

Also, if your PC isn’t detecting the camera that you have connected, then you can refer to our guide on 4 ways to fix the camera not showing in Windows.

Let us know in the comments below, which method you opted for to test the webcam on your Windows 7 PC.

Black Friday Microsoft deal can save you $50 on Kano Bundle

Black Friday is now closer than ever, with some countries already embracing the worldwide phenomena that we all learned to patiently wait for. The good news is that Microsoft doesn’t just sit around and wait.

In fact, it already let us in on some of their most anticipated offers. For instance, you can save $50 on the Kano Remote Learning Bundle.

Although we’ve got a sneak preview of the offer, you should know that it’s not live yet. The Black Friday deal for the Kano Remote Learning Bundle will be available starting 11/26/2020, so you better be prepared.

Kano PC special price

Kano PC is a student-oriented laptop that is both affordable and fast. As a teacher, Kano can help you manage your class and deliver education material to your students without skipping a beat.

Kano PC lets you organize remote learning in a simple manner, but you can also use it to work on projects and set tests.

It’s a fun and interactive way for your students to discover the fascinating world of computers, and see how each device works. Kano PC lets them manipulate sound, pixels, play with the processor, and even create emojis using binary code.

The Kano PC comes with Windows 10 Pro and Microsoft-verified applications, so you won’t have to worry about security or compatibility issues.

Currently, a single Kano PC can be purchased at the low price of $299.99. However, eligible military, teachers, parents, and students have a special discount of $269.99. You can check your eligibility on Microsoft’s official website.

  • Organize remote learning sessions
  • Affordable, yet fast
  • Touch-screen
  • Can be used as a tablet and as a laptop
  • Long battery life
  • Quite limited in tablet mode

Select Kano accessories

If you choose the bundle, you can save on additional accessories for your Kano PC, and PerformanceGuard, which can provide you with extended protection for hardware components (including accidental hardware damage).

The best Kano accessories deals are as follows:


What do you think about Microsoft’s Black Friday deal on the Kano Remote Learning Bundle? Tell us your opinion in the comments section below.

Never Lose Your Documents with SOS Click: Now 50% Off

Keeping your documents safe is paramount, and sometimes you can lose your files even if you save them properly. Messages such as error occurred while accessing Office documents can cause you to lose your files, so it’s important to prevent that.

The best way to prevent unintentional file loss is by making multiple copies on multiple locations and SOS Click can help you with that.

What is SOS Click and how can it protect my documents?

Save files on up to 8 different locations

With SOS Click all your documents will be saved on multiple locations, thus ensuring that if one file is corrupted or deleted, the rest will remain intact.

You can save files to several destinations, including the following:

  • Local folders
  • Removable storage
  • Network drivers
  • Network shares
  • Dropbox, Google Drive, Microsoft OneDrive

Once you have everything set up, the software will save files automatically to multiple locations, making sure you have multiple copies of your files.

SOS Click relies exclusively on the graphics interface for configuration, so you don’t have to create any macros or write VBA code. The setup process is fully automated and simple, so even less experienced users won’t have problems configuring the software.

Multiple auto-save options

The software comes with three different auto-save options:

  • Classic auto-save – The software will save your files automatically on multiple locations to prevent file loss.
  • Auto-save with historic version – By using this save option you’ll create multiple versions of the same document, allowing you to access previous versions easily.
  • Auto-send backup copies – If you want to ensure that you don’t ever lose any unsaved documents, this option will auto-send backup copies to your email address.

Ability to share your settings

Once you configure SOS Click, you can easily share your settings between multiple Office applications. That way you don’t have to configure your cloud storage settings or the destination directories.

This is perfect if you’re working with multiple Office applications. Just configure SOS Click once, and you’re good to go.

Compatibility with multiple Office versions

The software works with Word, Excel, and PowerPoint documents. Regarding the supported versions, you can use this software with all editions of Office starting from 2007 to Office 365.

Regarding the operating systems, SOS Click will work perfectly on Windows 7 and newer editions of Windows.

Get SOS Click for 50% off

SOS Client is available as an add-in for each Office application, but you can also get in a bundle if you own an entire Office suite.

Currently, the all-in-one bundle is available at 50% off, so if you want to make sure that you never lose any important documents, make sure you get it for this shopping season.

⇒ Get SOS Click

SOS Click is a small but incredibly useful software, especially if you’re working on important documents and you want to ensure not to lose them by accident.

The software is perfect for both home users and businesses, so make sure you give it a try.

Best Deals On Wi-Fi Digital Photo Frames

Choosing which vacation picture to hang on your wall or set on your nightstand is no longer something that you have to do these days. A high-tech, Wi-Fi digital photo frame is an easy way to avoid picking a limited number of photos to enjoy.

These frames give you the chance to further organize the pictures even after they’ve been uploaded and set up a unique slideshow with photos of your loved ones and other fond memories.

Even more, they usually come with apps compatible with photo-sharing services such as Facebook, Dropbox, and Instagram.

You may even connect to multiple frames at once, so friends and family members can add more images to your photo reel by uploading them using Wi-Fi.

Before getting a new digital frame, there are a few key factors to consider:

➡️ size & display quality

➡️ variety of extra features included: an alarm, a calendar, the weather, companion apps, and not only

? sleep modes, motion-detection sensors

? special border designs, brightness adjustments

What is the most popular digital photo frame?

All these items have special Cyber Monday prices:

Note: All the prices and offers in this article are subject to change, so be sure to check the official product page to get the latest deal. If the product or offer you’re looking for is no longer available, you can try to find it on its official manufacturer page or get another one from our list.

We chose a handful of top-rated digital picture frame deals, so don’t hesitate to pick one that’s suited to your needs. For more options, also check out this list including great digital frames with Wi-Fi.

As you can see, these digital picture frames might be perfect not just for yourself but could turn into a thoughtful gift for your grandparents or tech geek friends.

If you have any suggestions or if you made a choice already, leave us a note in the comments section below.

3 Easy Steps on How to Use a DMP File Viewer

Let us talk about the DMP file viewer.

There’s a large portion of Windows system files that are not as easily accessed as some others. One of those Windows-exclusive extensions is known as DMP (.dmp) or Windows Memory Dump files.

Today, we explain these files’ value and, most importantly, the means to open them in Windows 10.

How can I use DMP file viewer?

1. Use a DMP file viewer online

  1. Visit the DMP online site. In this case, we will use File Pro.
  2. Click on Select the dump file.
    dmp file viewer
  3. Wait for the dump file analyzer to complete the upload, and you can view the dump files.

2. Use WhoCrashed

  1. Visit the Who Crashed website.
  2. Scroll down and click Download Free Home Edition in the Who Crashed section.
  3. Click on the downloaded file to install it.
  4. Click Next and follow the wizard to complete the installation.
    dmp file viewer
  5. After installation, click on Analyze.

This tool requires installation, but it’s fairly usable and has all the features you’ll need. You can even simulate the system crash (do this with caution) with certain parameters.

3. Use NirSoft DMP file viewer

  1. Visit the NirSoft website.
  2. Scroll down and click on Download BlueScreenView.
    dmp file viewer
  3. Extract the Zip file.
  4. Double-click on BlueScreenView to start the application.
  5. Click on the Analyze icon, select Load from the following MiniDump folder, select Browse and choose your dump file, then click OK.

The app is a portable small-sized application, so it doesn’t require installation. Once you get it, just extract it and run the EXE file. However, we’re rushing. Firstly, you must let the system create the dump files readable by the third-party software.3. Use WinDbg.

    The latest Windows packages are equipped with debugging tools that often include a DMP file viewer. The most popular ones are WinDbg.exe (the Windows Debugger), KD.exe, CDB, and NTSD. They are also part of the WDK (Windows Driver Kit). The one we recommend to open DMP files is WinDbg.

  1. 1. Download and install WDK from the Microsoft official page (When doing so, you can also choose to install only Debugging Tools for Windows as a standalone package).

  2. 2. Press the Windows key to open the search bar.

  3. 3. Type WinDbg in the search bar and open it with admin rights.

  4. 4. Next, navigate to the File menu.

  5. 5. Click on Start debugging.

  6. 6. Moreover, select Open Dump file.

  7. 7. Browse your PC for the DMP file you want to open.

  8. 8. Click on Open after you select it.

  9. 9. The DMP file will now be opened and you can read it.

What is .DMP file?

Windows Memory Dump files with the .dmp extension are system files stored in a binary format. These files are automatically created if there’s an error or sudden crash of the third-party program or system feature.

They store the details about the crash, so most seasoned users will utilize .dmp files to troubleshoot the affected programs.

If there’s a BSOD (Blue Screen of Death), the details about the possible causes (drivers or other software are usual suspects) must be found in the automatically-generated .dmp file.

For obvious reasons, they are mostly named Memory.dmp or Crash.dmp, respectively. Size-wise, they might be small individually.

However, as they tend to pile up over time, DMP files can take up a lot of storage space when bundled. So, you can clean them up with ease with the Disk Cleanup utility.

Now, opening DMP files isn’t exactly simple since Windows 10 doesn’t offer a built-in tool. There’s a good reason for this, as most common users will not need or want to access them in the first place.

However, a few third-party utility tools should enable you to open and read DMP files.

Conclusion

After analyses of dump files, you often have to fix the corrupted memory dump. Deleting these files will have no negative effect on your computer. They are mainly used for debugging purposes.

You might want to keep them in case of errors or bugs. They will provide information about who is responsible for a crash or an error message.

That should do it. If you have alternative ways to open and read DMP files, tell us in the comment section below. We’ll be glad to hear from you.

Opera GX Keeps Crashing: How to Stop it

Users reported that Opera GX keeps crashing making them unable to browse the web. Browser crashes manifest in a few different ways, but the common culprit is usually a faulty configuration.

Today, we’ll show you a few ways to deal with Opera crashes that we tested ourselves and were proven to work.

What can I do if Opera GX keeps crashing?

1. Update the browser

  1. Click the Opera logo from the top left corner and choose Update & Recovery.
    update and recovery opera gx
  2. Opera GX will now automatically check for updates.
  3. After the update is downloaded, click the a Relaunch Now button.
    opera gx checking for updates

Some users are suggesting downloading and running the Opera GX setup file and choosing the Accept and Upgrade option instead.

2. Disable unnecessary add-ons and plug-ins

  1. Click on the Opera icon from the top-left corner of Opera, then select Extensions followed by Extensions.
    extensions opera gx menu
  2. Next, click the Disable button to turn off this extension. Repeat the process for all extensions.
    opera gx disable extension
  3. Check if the issue is gone. If so, enable extensions one by one until you find the culprit. After you do, remove it from Opera.

Few users reported that the Cashback extension caused the problem, but almost any extension can lead to this issue.

3. Clear cache and cookies

Another reason why Opera GX keeps crashing is interference with cookies and cached files. That’s why clearing your cache should fix the problem:

  1. Open Opera GX and click the Opera icon in the upper left corner to open Settings.opera gx settings
  2. Select Privacy and Security.opera gx privacy and security settings
  3. Scroll down to Clear browsing data.scroll down to clear browsing data
  4. Select the type of data you want to clear, and the time range, then click Clear data.clear data opera gx

So, those are a few ways you can fix Opera crashes. Just make sure you apply them as listed, and you should be able to get your browser working normally again.

If you are facing other issues like Opera not closing, or Opera GX not responding, check our dedicated articles to see how to fix it.

This isn’t the only issue, and many reported that Opera isn’t working on Windows 11, but we have an entire guide dedicated to that issue.

If nothing else works, you might have to reinstall Opera. If you don’t want to lose your files, check our guide on how to install Opera without losing data.

Was this guide helpful to you? Don’t hesitate to comment in the section below and tell us what you think. Thanks for reading!

6 Best Refurbished Laptop Deals on Cyber Monday

Buying a refurbished laptop is a tricky business. You never really know what you could end up with. It’s really a gamble most of the time.

However, even if you end up with something you’re not satisfied with, at least you didn’t pay the full price.

But to minimize the risk, we compiled a list of the best-refurbished laptop deals you can get at this time of the year. Of course, these aren’t the best available laptops out there, only the devices users have praised for their specs and functionalities.

The list includes something for everyone’s budget and needs. So, all you have to do is browse through deals, and find the perfect one for you.

Note: All the prices and offers in this article are subject to change, so be sure to check the official product page to get the latest deal. If the product or offer you’re looking for is no longer available, you can try to find it on its official manufacturer page or get another one from our list.

Which laptop is best for refurbished?

Dell Latitude 5580

  • More power-efficient than other business notebooks with Intel U-class processors
  • 1366 x 768 Anti-Glare Non-touch Display
  • Integrated Intel HD Graphics 620
  • Compact size: ‎9.87 x 14.8 x 0.9 inches
  • Minor display graininess issues

It would be a shame not to take a closer look at this excellent Dell Latitude refurbished model – an item that would usually sell for over $1000.

If you choose this offer, you will get a perfectly functional device, as compact as expected, with a battery life that works almost as if brand new, and a crisp-clear 15,6-inches display.

Even more, Dell has equipped the system with a very fast SD reader capable of transfer rates of around 250 MB/s.

Apple MacBook Pro MGXA2LL/A

  • Haswell/Crystalwell 2.2 GHz Intel Core i7 processor
  • The case weighs just less than 4.5 pounds (2.02 kg)
  • An SDXC card slot included
  • Battery life of 8 hours
  • It does not have an internal optical drive

New laptops clearly are the most expensive option. This one is an unbeatable offer for a laptop that you’ve heard about as managing to be compact and powerful at the same time (2.2 GHz Quad-Core Intel Core i7 processor) even if part of the oldie category.

It also has an integrated 720p FaceTime HD webcam and a high-resolution LED-backlit 15.4″ widescreen 2880×1800 (220 PPI) Retina display.

The multitude of ports and slots that come with this model is impressive: MagSafe 2 power ports, two Thunderbolt 2 ports, two USB 3 ports (up to 5 Gbps), a headphone port, and more.

Microsoft Surface 2

  • 8GB RAM, 256 GB SSD
  • Intel Core i5
  • 13.50 x 2.00 x 10.00 inches
  • No CD/DVD slot

Do not hesitate to also check out this refurbished Microsoft Surface 2, a device worthy of your attention.

With a clean, elegant design, starting at just 2.76 pounds, rest assured that it fits easily in your bag. Some packages also include original cables and an original Microsoft box.

However, do note that accessories such as mice are not included. Keep in mind that certain users who ran a battery test after running the plethora of Windows updates discovered that the battery was new and was happier than ever with their choice.

HP Elitebook 840 G3

  • 16GB DDR4 RAM, 265GB SSD
  • 14-inch FHD display
  • Windows 10 Professional 64-bit
  • The occasional scratches that might come with a renewed laptop

Cheaper than the previously presented models, this EliteBook is compact and powerful enough for business and gaming purposes alike.

It comes with an i5-6300U 2.4Ghz processor and Intel HD Graphics 520 for excellent image quality. Depending on the seller, some models come with backlit keys.

Lenovo Thinkpad Yoga

  • 2-in-1 convertible ultrabook
  • LED-backlit IPS Touchscreen
  • Dolby Advanced Audio v2
  • Users complained about various issues, shortly after the warranty expired

While it won’t keep up with gaming requirements, this reliable 11-inch ThinkPad Yoga 2-in-1 ultrabook can successfully be used for business, educational or streaming purposes.

It comes with an Intel N3150 Processor (1. 6GHz, 4GB DDR3 memory that can be extended to up to 8GB) and 128GB SSD storage.

As usual with refurbished laptops, in case you are not satisfied with the performance, you can return the product within 90 days.

Dell Latitude E6540

  • The product works and looks like new
  • Backed by the 90-day Amazon Renewed Guarantee
  • No visible cosmetic imperfections
  • Intel Quad-Core i7-4800MQ processor
  • Minor cooling issues

This notebook features a 15.6-inch FHD (1920 x 1080) anti-glare LED Backlit display and is powered by an Intel Quad-Core i7-4800MQ processor.

Even if certain accessories may not be original, rest assured that they will be compatible and fully functional. Also, note that the product may come in a generic box.

In spite of that, there are plenty of other advantages to take into consideration: optical drive, number pad, very good speed, and it arrives well packed.

How we chose the best refurbished laptop deals

Our team of expert testers, with a combined experience of 15 years, has tackled a variety of testing tasks for any device you could imagine.

Their experience comes into play as a very important element when choosing the products we described in this guide, and a large variety of factors have been taken into consideration.

The options that have been chosen offer great quality and cover the entire spectrum of price ranges, thus enabling everybody to find something that fits their needs both financially and otherwise.

If you’d like more options to pick from, check out this list including the best cheap Windows 10 laptops. Even if your budget is limited, these models are perfectly reliable.

Is anything particularly interesting for you? Make sure to tell us about your favorite refurbished laptop deal in the comments below.

@ Not Working On Keyboard: 6 Ways to Fix Unresponsive Keys

A few users may have encountered the problem of the @ key not working on the keyboard. We’ll quickly show you how to fix this problem on your Windows 10 laptop.

The at or @ sign on your keyboard has been used since yesteryears for commercial purposes in accounting and invoicing to mean at the rate of, but today it is widely used in emails and social media handles.

This means we’re not dropping it any time soon, but what happens when you experience @ key not working in Windows 10 laptop keyboard?

It can be devastating, especially for social media enthusiasts, and if you’re a frequent sender of emails, because you may not be able to use the keyboard shortcuts, and the process of finding it from the symbols option is just too long.

Worry not; there are solutions to fix the issue and get your ampersat key working again.

Why is my AT symbol not working on my keyboard?

Users who have experienced this problem have linked it to a few different things. On the top of the list are the following:

  • Dust or dirt – This may be the first call, as tiny particles stuck under the key may stop the @ key from functioning correctly. Some easy maintenance routings would help prevent this.
  • Language settings – Sometimes, when you find @ key not working on Windows 10 laptop keyboard, it may have something to do with your Language settings.
  • Driver issues – In most cases, this will affect a few other keys or the entire keyboard on your computer.
  • Hardware failure – There are chances that the keyboard is bad and ripe for a replacement.

Whatever the case, we have prepared a few potent fixes that you must try.

What can I do if @ is not working on the keyboard?

We recommend that before you go into any of the fixes in this article, you may consider the following:

  • Try the on-screen keyboard – While this is not a fix, it is an alternative if you do not want to go through the rigors of troubleshooting.
  • Use a different keyboard – Since you could get some keyboards at meager prices, you may consider a cheap replacement or any excellent Windows-compatible keyboard.
  1. Change Language in Control Panel
  2. Update keyboard and chipset drivers
  3. Use Two button reset (for Surface laptops)
  4. Reinstall keyboard driver
  5. Run Hardware and Devices troubleshooter
  6. Disable Filter keys settings

1. Change Language in Control Panel

  1. Click the Start menu and click on the Settings icon.
    @ not working on keyboard
  2. Select Time and Language.
  3. Click Region and Language.
  4. Under Country or Region, click on English (United Kingdom), and if not there, you can add it using Add a Language button.
  5. Under Languages, click Windows display language, then select Options.
  6. Check what keyboard is selected under the Keyboards option.
    language options keyboard @ key not working
  7. Change the input language to English for your location.

Did this resolve the @ key not working in Windows 10 laptop keyboard problem? If not, try the next solution.

2. Update chipset drivers

The simplest method you can use to update your drivers is third-party tools that will allow you to update all outdated drivers on your PC automatically.

Specialized software, such as Fortect Driver Updater will also allow you to set up regular scans of your system which will notify you if any drivers are going out of date.

⇒ Get Fortect Driver Updater

Once you update your drivers, check if the problem is still there.

3. Use Two-button reset (for Surface laptops)

  1. Turn on the Surface and log in.
  2. Attach the type or touch cover that isn’t working.
  3. Hold the Volume Up and Power keys for 30 seconds, then let go.
  4. This will reboot the Surface and force it to reset all drivers – also called a Two-button reset.
  5. Once you are back on the login screen, use your keyboard.

If you’re using a Surface laptop, take the steps above to fix @ key not working in Windows 10 laptop keyboard problem:

4. Reinstall the keyboard driver

  1. Right-click Start, and select Device Manager.
  2. Find Keyboards and click on it to expand the list, then right-click on your Keyboard driver, and select Uninstall.
    @ not working on keyboard
  3. Click on Uninstall to confirm your choice.
  4. On the Device Manager, click on the Scan for hardware changes icon.

5. Run Hardware and Devices troubleshooter

  1. Press Windows + R, type control panel, and hit Enter.
  2. Go to the View by option on the top right corner, and select Large icons.
  3. Click Troubleshooting.
  4. Select the View all option on the left pane.
  5. Click Hardware and Devices.
    @ not working on keyboard
  6. Finally, click Next to run the troubleshooter.

Follow the instructions to run the Hardware and Devices troubleshooter. The troubleshooter will begin detecting any issues that may be the cause of @ key not working on the Windows 10 laptop keyboard.

6. Disable Filter keys settings

  1. Press Windows + R, type control panel, and hit Enter.
  2. Select Ease of Access.
  3. Click on Change how your keyboard works.
  4. Find the checkbox for Turn on Filter Keys, uncheck if it has a mark, and see if your keyboard works again.
    @ not working on keyboard

Remember that we have not written these fixes in any particular order. Therefore, trying what seems most relevant to your situation would be best.

Did any of these solutions help you fix @ key not working in Windows 10 laptop keyboard issue? Let us know in the comments section below.

The Best Audio Technica Deals You Don’t Want To Miss

Audio Technica is a Japanese audio equipment manufacturer that provides professional-level headphones, microphones, turntables, and more.

All categories of products provided by them are very well received because they meet the quality requirements of audio aficionados.

If you want to get professional audio tools such as a low operating noise microphone or noise-canceling headphones, you will be glad to know that several Audio Technica products are sold under great deals this season.

Note: All the prices and offers in this article are subject to change, so be sure to check the official product page to get the latest deal. If the product/offer you’re looking for is no longer available, you can try to find it on its official manufacturer page or get another one from our list.

What are the best deals on Audio Technica equipment?

All these items have special season prices.

All listings are top-quality audio devices. The microphones can be great for streaming and podcast recording, whereas the headphones are proven to be very comfortable and provide great sound quality. The turntables also provide great sound, built under the anti-resonance principle.

Most of these devices are compatible with all major operating systems and input devices but make sure to fully read the description of each listing in order to make an informed decision.

Which Audio Technica audio device is your favorite? What do you plan to use it for? Please let us know in the comments below.

Fix the Outlook Cannot Log On Verify You Are Connected Error

Many people use Outlook as their preferred email client, but sometimes errors such as Outlook cannot log on can appear.

As you can see from the example presented above, the central part of the error reads: Outlook cannot log on. First, verify you are connected to the network.

Why is my Outlook not connecting to the network?

  • Corrupted installation – If even one of the constituent parts of Outlook was wrongly installed, this issue might occur. It is worth noting that reinstalling the software could be helpful.
  • Faulty software update – If an update process has been stopped suddenly or the connection to the server was severed, this problem can pop up.
  • Problems with the Microsoft Exchange information service – If the information added to your profile might conflict with the MS Exchange capabilities.
  • Badly set up Outlook profile – This can be the cause if you’ve recently modified any information on your profile.

Users have also reported some variations in the way the error is presented:

  • Outlook cannot log on verify you are connected system resources are critically low – Even though this issue is most likely caused by some resource-hogging applications running in the background of your PC, the solutions in this guide will resolve the problem.
  • Outlook cannot log on to Microsoft Exchange – A close cousin of our main topic of this guide, users have reported issues while trying to log into their Microsoft Exchange accounts.
  • Outlook won’t open on Windows 10 – Windows 10 users specifically have encountered the same issue but dealing with not being able to open Outlook.

These two variations are caused by the same issues with your network configuration, so the fixes should also cover them.

To analyze this issue further, we suggest enabling Outlook logging. This isn’t mandatory, but it can help you while troubleshooting.

How do I fix Outlook cannot log on verify you are connected?

Before diving into the solutions for this problem, there are a few elements that we suggest you consider:

  • First, try logging onto your account from another device.
  • Check your password and log-in information, and reset the password if needed.
  • Next, ensure your antivirus is updated, and run a full system scan.
  • Check if your OS and the Office Suite are updated.
  • Finally, temporarily close any VPN service, and check if the antivirus is blocking access for Outlook.

1. Use the /resetnavpane parameter

  1. If you can’t sign into Outlook app in Windows 10, press Windows + R at the same time to open the Run dialog.
  2. Copy the following command inside the Run dialog, and hit Enter: Outlook.exe /resetnavpane

After doing that, Outlook will start, and the problem should be resolved. If that’s not the case, please try the following methods.

2. Stop Outlook from responding to AutoDiscover

2.1. Use an .XML file

  1. Open Notepad.
  2. Copy and then paste the following lines inside the text file:
<?xml version="1.0" encoding="utf-8"?> 

<Autodiscover xmlns="https://schemas.microsoft.com/exchange/autodiscover/responseschema/2006"> 

  <Response xmlns="https://schemas.microsoft.com/exchange/autodiscover/outlook/responseschema/2006a"> 

    <Account> 

      <AccountType>email</AccountType> 

      <Action>redirectUrl</Action>
      <RedirectUrl>https://YOUR_CAS_SERVER_NAME_HERE/autodiscover/autodiscover.xml</RedirectUrl>

    </Account> 

  </Response> 

</Autodiscover> 

After the text file was created, and the information pasted there, follow the next steps to save the new document:

  1. Now go to File, and choose Save as.
    save as notepad Outlook won't log on
  2. Set Save as type to All Files. Now enter test.xml as the File name. Next, choose the desired location and click on Save.
    save as settings can't log on in outlook

2.2. Modify your registry

Tip icon Tip
Modifying the registry can be potentially dangerous. To prevent any additional problems from appearing, it’s always a good idea to back up your registry:

1. Click on File, and choose Export.
2. Select All as Export range, and choose a location for your file,
3. Choose the desired name and click Save.
  1. If you are unable to login to Outlook, press the Windows + R key combination and type regedit, then press Enter.
    regedit run window Outlook cannot log on errors
  2. In the left pane, navigate to the following location: HKEY_CURRENT_USER\SOFTWARE\Microsoft\Office\16.0\Outlook\AutoDiscover
  3. Next, right-click the entry on the right side, choose New, and set the DWORD 32-bit Value.
  4. Name the value ExcludeHttpsRootDomain, and add it.
  5. After the value has been added, double-click it, and set the Value data to 1 (without modifying the Base and Hexadecimal).
  6. Navigate to the following location on your PC, and remove or rename the entry: %USERPROFILE%\Appdata\Local\Microsoft\Outlook
  7. Now you can recreate your Outlook profile and use the software normally.

3. Remove your email account and re-create your Outlook profile

  1. Press the Windows + R key combination, type control, and press Enter.
  2. Navigate to Mail.
  3. Click on the Email accounts button.
  4. Locate the problematic account, select it and click on the Remove button.
  5. A confirmation message will now appear. Click on Yes to continue.
  6. Once you remove your profile, click on Add.
  7. Choose another name for your profile, like Outlook1.

Several users reported that this is just a temporary solution, so you might have to repeat it if the error message appears again.

4. Delete the Outlook key from the registry

  1. Press and hold the Windows + R keys.
  2. Type regedit in the Run dialog.
  3. Depending on the version of Outlook, there will be some differences in the path itself: Outlook 2007 -> \12.0\ Outlook 2010 -> \14.0\ Outlook 2013 -> \15.0\ Outlook 2016 -> \16.0\
  4. Using the navigation pane on the left side, go to: HKEY_CURRENT_USER\SOFTWARE\Microsoft\Office\16.0\Outlook\Profiles\Outlook
  5. Delete all the keys found in that folder.
  6. Then, click on Yes to proceed.
    delete key confirm Outlook cannot log on errors

Outlook cannot log on can prevent you from starting Outlook and reading your emails, but you should be able to fix it using one of our solutions.

Best Acer laptops Cyber Monday deals [Nitro, Aspire, Swift]

If your old computer is showing signs of aging, it is time to bid goodbye to your old friend and bring home a new shining Acer laptop. The manufacturer often offers sweet irresistible deals on new laptops.


They’re not available all the time, but if you’re patient you might just find the right laptop for you.
Acer is famous for its Aspire and Swift laptops, and as well as its gaming devices.

Acer is releasing Windows 11 laptops as well, and even the older models are fully compatible with the new OS, so you won’t have any issues upgrading.

Note: All the prices and offers in this article are subject to change, so be sure to check the official product page to get the latest deal. If the product/offer you’re looking for is no longer available, you can try to find it on its official manufacturer page or get another one from our list.

Which is the best Acer laptop to buy?

  • ConceptD 3 Pro CN315-71P-58N0 Creator – best for content creators
  • Acer Nitro 5 AN515-55-53E5 – great pick for gamers
  • Acer Predator Helios 300 PH315-54-760S – 144Hz display
  • Acer Chromebook 15.6 – best pick for students
  • Acer Predator Triton 500 PT515-52-73L3 – has an RTX 2070
  • Acer Swift 3 SF314-43-R2YY – works great out and about

For an in-depth look at the pros and cons of each Acer laptop, take a look at the list below.

ConceptD 3 Pro CN315-71P-58N0 Creator – best for content creators

  • 15.6-inch LED-backlit display, full HD resolution
  • Intel Core i5-9300H 4.1 GHz processor
  • NVIDIA Quadro T1000
  • 16GB DDR4 at 2666MHz
  • 512GB PCIe NVMe SSD
  • Limited storage space

If you’re looking for a new laptop, this model from Acer might be what you need. The device is powered by a 9th generation Intel Core i5-9300H 4-Core processor, up to 4.1GHz.

NVIDIA Quadro T1000 with 4 GB is the available GPU, meaning that this device is more than capable of handling multimedia and other demanding tasks.

With a 15.6-inch LED-backlit IPS display and full HD resolution, this model will be perfect for all sorts of tasks. As for memory, there’s 16GB DDR4 running at 2666MHz.

For storage, this model uses 512GB PCIe NVMe SSD, which should be enough for most basic users. ConceptD 3 Pro CN315-71P-58N0 Creator is a solid laptop, and if you want a device that can handle multitasking and multimedia, this is the right model for you.

Acer Nitro 5 AN515-55-53E5 – great pick for gamers

  • 15.6-inch, 1920×1080
  • Intel Core i5-10300H CPU
  • NVIDIA GeForce RTX 3050 4GB GDDR6
  • 8GB DDR4 2933MHz, expandable up to 32GB
  • 256GB NVMe SSD
  • The touchpad doesn’t feel accurate
  • Battery life could be better

Buying a new laptop can be a daunting task, but if you want a capable device you might want to consider getting Acer Nitro 5 this Cyber Monday

With a 10th-generation Intel Core i5-10300H processor, you can use this device for both gaming and other multimedia tasks.

To take your gaming to the next level, there’s NVIDIA GeForce RTX 3050 with 4GB of GDDR6 VRAM. The device is 15.6 inches, and it comes with full HD resolution and a 144Hz refresh rate for a smooth multimedia experience.

The memory is set at 8GB of DDR4 at 2933MHz, which should provide you with great performance at all times. As for the storage, there’s 256GB NVMe SSD with additional slots for expansion.

Acer Nitro 5 AN515-55-53E5 is a great laptop for both multitasking and gaming, so it’s worth checking out.

Acer Predator Helios 300 PH315-54-760S – 144Hz display

  • 15.6-inch IPS display, Full HD resolution
  • 144Hz refresh rate, 3ms response time
  • Intel Core i7-11800H, 8 cores, 16 threads
  • 16GB DDR4 3200MHz
  • 512 PCIe Gen 4 SSD
  • Minor screen bleed
  • The fan can be loud in automatic mode

This is a gaming laptop, and it comes with a 15.6-inch IPS display and full HD resolution. The refresh rate is set at 144Hz, so you won’t even miss a frame during the intense action.

RTX 3060 with 6GB of GDDR6 VRAM is present, and it should give you enough hardware power to handle the latest titles with ease.

Intel Core i7-11800H CPU powers the laptop, so you’ll experience maximum performance when gaming or multitasking.

Regarding the memory, you can find 16GB DDR4 3200MHz memory, which should be more than enough for all your multitasking needs.

Lastly, there’s 512GB PCIe Gen 4 SSD for storage, as well as additional expansion slots and a hard drive bay.

Acer Predator Helios 300 PH315-54-760S offers great features, and if you want to play the latest titles, this is the right device for it.

Acer Chromebook 15.6 – best pick for students

  • 15.6-inch IPS LED-backlit multitouch display
  • Intel Celeron N4020 dual core CPU 1.1GHz (2.4GHz)
  • 4GB DDR4 RAM
  • 64GB eMMC
  • 3-cell Lithium-Ion battery
  • No backlit keyboard
  • Volume could be louder

If you need a device for web browsing and casual use, then this model might be perfect for you. This Chromebook comes with a 15.6-inch display, IPS LED-backlit multi-touch display and full HD resolution.

The device is powered by Intel Celeron N4020 dual-core processor at a 1.1GHz base and maximum 2.4GHz frequency, which should be enough for most everyday tasks.

4GB DDR4 RAM is available, so you should be to multitask without too much hassle. Regarding the storage, there’s a 64GB eMMC flash memory.

The battery is a 3-cell Lithium-Ion, and it should last up to 12.5 hours on a single charge. Acer Chromebook 15.6 might not have the best hardware specs, but it’s a great Chromebook device, so be sure to consider it.

Acer Predator Triton 500 PT515-52-73L3 – has an RTX 2070

  • 15.6-inch IPS LED-backlit display, 300Hz refresh rate
  • i7-10750H 6-core CPU up to 5GHz
  • NVIDIA GeForce RTX 2070 Super 8GB
  • 16GB DDR4 2933MHz
  • 512GB PCIe NVMe SSD
  • Temperature can get high
  • Loud fans

If you’re looking for an Acer gaming laptop for this Cyber Monday this model might be just what you need. The device is powered by an i7-10750H 6-core CPU up to 5GHz.

Regarding the GPU, NVIDIA GeForce RTX 2070 Super with 8GB of GDDR6 VRAM is present and it should be able to handle all the recent games with relative ease.

This is a 15.6-inch device, and it comes with an LED-backlit IPS display and Full HD resolution. Nvidia G-Sync is fully supported, and with a 300Hz refresh rate and 3ms response time, you’ll experience high-intensity smooth gameplay.

Multitasking is also a breeze with 16GB DDR4 2933MHz memory and the 512GB PCIe NVMe SSD should be enough for basic needs.

Acer Predator Triton 500 PT515-52-73L3 isn’t the most powerful laptop on your list, but it’s more than capable for most gaming tasks, so it’s worth considering.

Acer Swift 3 SF314-43-R2YY – works great out and about

  • 14-inch display, full HD resolution
  • AMD Ryzen 7 5700U with Radeon graphics
  • 8GB LPDDR4X
  • 512GB NVMe solid-state drive
  • 12.5 hours of battery life on a single charge
  • Comes with bloatware
  • Quiet speakers

This is a 14-inch device, so it’s a bit smaller than our other entries, but it still features a full-screen resolution.

AMD Ryzen 7 5700U with eight cores and Radeon graphics is powering the laptop making it more than capable for multitasking and some light gaming.

There is 8GB LPDDR4X memory, which should be enough for all sorts of tasks and multimedia. Regarding the storage, you can find a 512GB NVMe solid-state drive present.

The built-in battery can last up to 12.5 hours on a single charge, and there’s even a fingerprint reader for extra security.

Acer Swift 3 SF314-43-R2YY might not be the best gaming laptop, but it’s more than capable for most tasks.

That’s about it! Acer makes some of the best gaming laptops in the market but doesn’t forget the Acer Swift lineup if you want an ultraportable Windows laptop for work.

So, which of these laptops are you taking home today? Do let us know in the comments below.

Logitech G230 Mic Not Working: 5 Quick Ways to Fix It

Logitech G230 Stereo gaming headphone is one of the best in the market. Sadly, many users complain about the Logitech G230 mic not working.

However, it may be that the PC is not using the headset mic or the headset mic is not working. This article will help you detect the problem and fix it for you.

Why is the Logitech G230 mic not working?

The Logitech G230 headphone microphone not working can range from problems with the headphone to issues with the computer.

When your PC isn’t configured to use the headphone mic, it won’t work regardless of how you tweak it. Other factors responsible for the LogitechG230 mic not working are:

  • Outdated audio drivers – If your audio drivers are outdated, it can cause your audio devices to not communicate properly with the PC. Take a look at the various ways to update your drivers in this guide.
  • Issues with the Logitech G230 headphone – Users may also encounter problems with the headphone microphone if there is physical damage or fault with it. It may be that the headphone has broken or are not connected.
  • Outdated Windows OS – Running an outdated Windows operating system on your PC can result in numerous issues. Because your PC cannot fix bugs affecting it, it can cause problems with connected devices. This guide can help if you encounter a Windows update error.

These causes can vary on different computers and devices. Nonetheless, you should be able to resolve the problem by troubleshooting your PC.

What can I do if the Logitech G230 mic is not working?

There are a couple of fixes for the problem, but we recommend you go through the following preliminary checks:

  • Make sure your headphone is connected correctly to your computer.
  • Disconnect other audio devices liable to use the mic.
  • Restart your PC in Safe Mode and check if it resolves the problem.

If the Logitech G230 mic doesn’t work, then proceed with the following solutions.

1. Update your audio driver

  1. Press Windows + R to open the Run command, type in devmgmt.msc, and press Enter to open the Device Manager.
  2. Expand the Audio inputs and outputs, right-click your Audio device, and select Update driver from the options.
  3. Click the Search for drivers automatically option and restart your PC after completing the process.

Updating your audio driver will fix bugs that are affecting your device. It can fix the Logitech G230 mic not working. If you can’t get around the above steps, read about ways to update headphone drivers on your PC.

Your audio driver can also be updated with a third-party tool, which is a quicker and more efficient option than the manual process.

Outbyte Driver Updater can scan your PC and provide you with a list of outdated or missing drivers to eventually update them automatically with the latest picks from its extensive database.

Outbyte Driver Updater

A dependable program that has a massive database of all the latest updates for your drivers.
Free Trial Download now

2. Update Windows OS

  1. Left-click the Start button and select Settings or press the Windows + I keys
  2. Click on Windows Update, then select Check for updates.

Windows will automatically search and download updates if there are any available.

Updating your OS will allow you to access patches and updates that’ll help you fix bugs that may cause the issue. Read what to do if the Windows update is not working on your PC.

3. Check the Microphone slider

  1. Press Windows + I key to open the Windows Settings app.
  2. Click on the System tab and select the Sound option.
  3. Go to Input and check if the Microphone slider is set to full. Tap and drag the slider to the extreme right to unmute and increase the volume.

4. Allow access to your headset microphone

  1. Press Windows + I key to open the Windows Settings app.
  2. Select Privacy & Security and click on Microphone on the left menu.
  3. Check if the Microphone access for this device option is on/off. Toggle it on if it is off.
  4. Go to Let apps to access your microphone and toggle it On.

Close Settings and check if you’re able to fix the problem. Enabling Microphone access will allow your headphones to use their mic and other apps.

5. Troubleshoot hardware issues

  1. Left-click the Start button and select Settings or press Windows + I keys.
  2. Click on System and click on Troubleshoot.
  3. Click Other troubleshooters.
  4. Select the Recording Audio and click the Run button beside it.

Follow the on-screen prompt to complete the troubleshooting process. Running the Windows troubleshooter will find and fix any hardware issues on your PC.

Conclusively, our readers can check our article about no speaker or headphones plugged-in issues on Windows computers.

Also, if you experience no sound from headphones on Windows 11, check how to fix it.

You can leave your suggestions or questions in the comments section below. We’d definitely get back to you.