Being unable to ping other computers in your network can be a big problem for every user who has a home or a business network. Here’s how to make the problem go away:
What can I do if I can’t ping other computers in Windows?
1. Disable IPv6
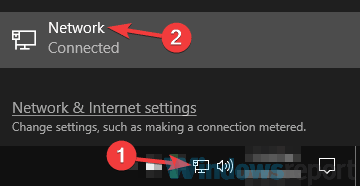
Click the network icon on your Taskbar and choose your network from the list.
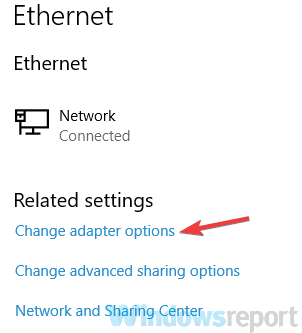
Select Change adapter options in the right pane.
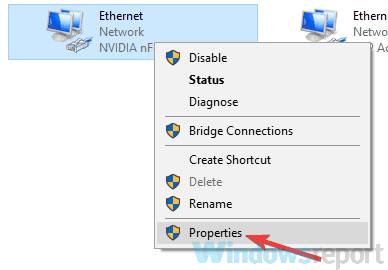
Right-click your network connection and choose Properties.
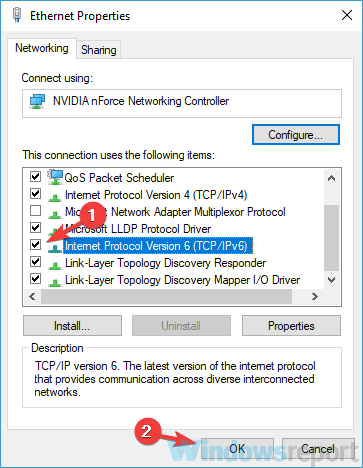
Locate Internet Protocol Version 6 (TCP/IPv6) and disable it. Click OK to save the changes.
Note: Keep in mind that you might have to disable IPv6 on other computers in your network in order to fix the problem.
2. Use the netcfg -d command
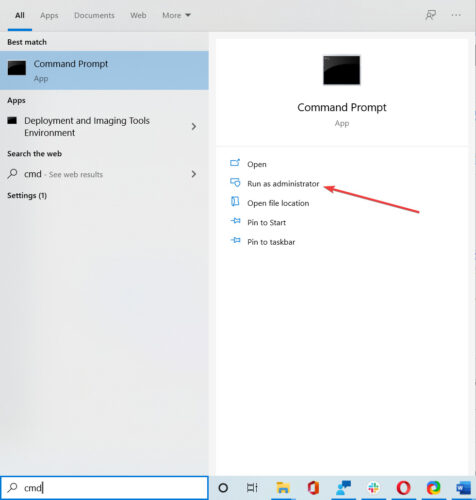
Type cmd in Windows Search and click on Run as administrator under Command Prompt.
Enter the netcfg -d command and press Enter to run it.
3. Restart the Function Discovery Provider and Function Discovery Host
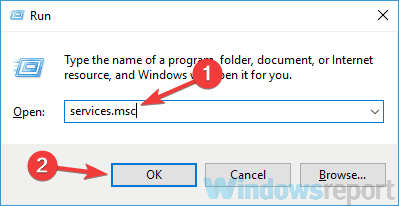
Press Windows Key + R and enter services.msc. Now press Enter or click OK.
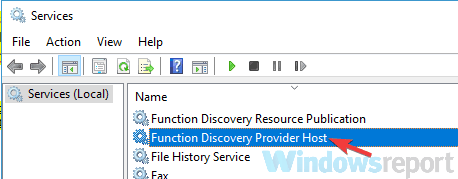
Locate Function Discovery Provider Host and double-click it.
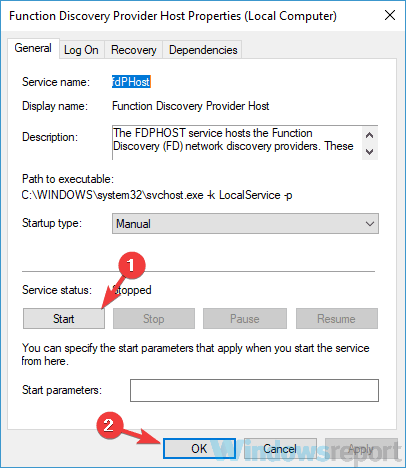
When the Properties window opens, click the Stop button to stop the service.
Click the Start button to start it and then click Apply and OK to save changes.
Do the same for the Function Discovery Provider service.
Note: Keep in mind that you need to apply this solution to all PCs in your network. If you want, you could set these services to start automatically with your PC and the problem should be resolved for good.
4. Make sure that the SMB 1.0/CIFS File Sharing Support is installed
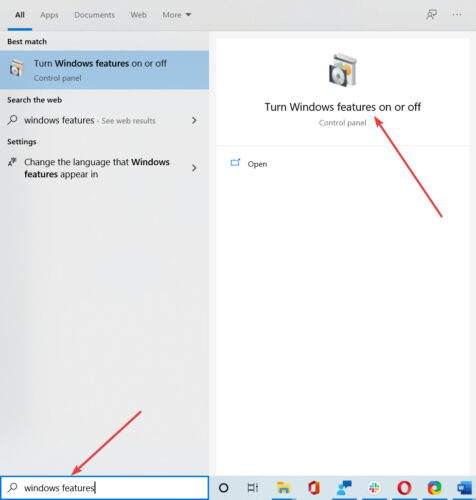
Press Windows Key + S, type windows features, and click on Turn Windows features on or off from the results.
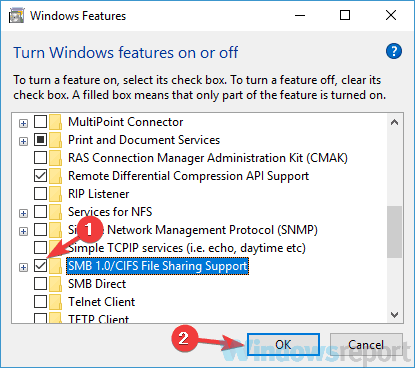
Check theSMB 1.0/CIFS File Sharing Support and then click OK to save changes.
Note: You might need to enable this feature on all PCs in your network in order to fix the problem.
5. Be sure that the PC is a member of the same domain
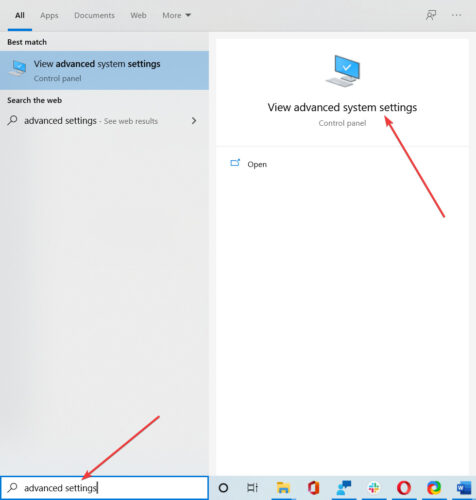
Press Windows Key + S, type advanced settings, and select View advanced system settings.
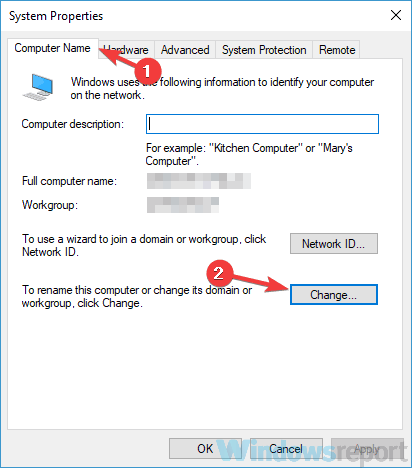
Go to the Computer name tab and click Change.
Make sure that the PC is a member of the same domain and click OK.
6. Check your antivirus and firewall
If you’re unable to ping other computers in your network, the issue might be your antivirus or the Windows firewall.
We recommend temporarily disabling them and see if the issue persists. If you’re able to ping your computers once you do this, consider switching to a different antivirus.
7. Disable your VPN
Sometimes your VPN can make you unable to ping other computers in your network.
To fix this problem, users are suggesting disabling your VPN and checking if that helps. If this solves your problem,consider switching to a different one.
This might also be an issue, but if you’re using VPN software that provides private DNS or specific IP addresses, it shouldn’t happen.
8. Install the latest updates
Open the Settings app, go to the Update & Security section.
Click on the Check for updates button.
Any available updates will be downloaded automatically.
After you download the updates, restart your PC in order to install the updates. Once the updates are installed, check if the problem is still there.
Being unable to ping other computers can be a big issue, but we hope that you managed to solve this annoying problem by using the solutions from this article.
Leave us a line in the comments section below if you have any additions or suggestions.
Chrome offers various extensions that simplify dealing with PDF documents. Some simplify PDF reading in your Gmail account, for instance.
Others, such as a PDF editor Chrome extension, allow you to write on your PDF, fill it and make it editable, e-sign and save it locally on your hard drive.
Let’s take a closer look at each one. The first set of tools directly adds PDF documents to the Cloud and uses GViewer to display PDF forms so that you don’t have to download and view them.
Other extensions allow you to save a webpage in PDF format after editing. But what extension allows you to write on a PDF? Read on and find out.
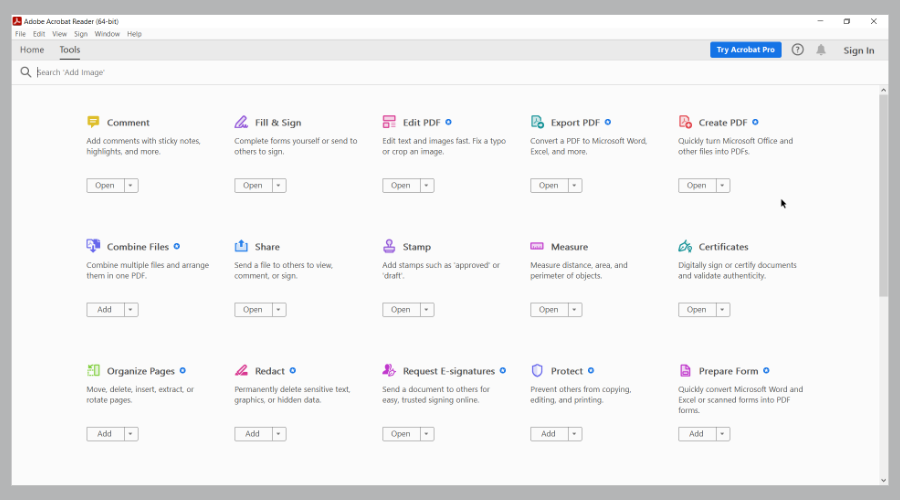
Adobe Acrobat Reader is a great software tool that helps individuals and small businesses to view files that have been stored in Adobe’s Portable Document Format.
Now, we know it’s an actual program that needs downloading and not an add-on but hear us out. By using it, you will also be able to get Adobe PDF Editor Online, free of charge.
In order to view and further manipulate PDFs directly in your Chrome browser, make sure you choose to install the Chrome Extension for Acrobat Reader.
To do this, follow the easy steps described below:
Follow the steps prompted on-screen to complete the installation process.
If Adobe Reader becomes your choice as well, you may also create, reorder, and crop, any of your PDF files with ease. It’s also an excellent PDF encryption program to strengthen the security of your files.
These are some of the Adobe Reader key features that you’ll probably enjoy using:
Incredible OCR scan function to convert documents into readable, searchable, and editable text
Intuitive Read Out Loud functionality (designed for people with hearing disabilities and not only)
You may share documents to collect comments from multiple reviewers
It is connected to Adobe Document Cloud, so you may easily access different files from various devices
The Acrobat Reader mobile app lets you convert, edit, and sign PDFs on the fly
Kami is a reliable PDF tool that allows users to view, share, annotate, and collaborate on PDFs.
This is an extension for Chrome as well as an app, and you’ll see that this particular tool works well with Firefox, Safari, and Internet Explorer.
Begin by dragging and dropping a file from your desktop or importing one from Google Drive, Dropbox, or Box.
After that, take advantage of annotation features which include highlighting, strikethrough, underlining, Adding comments, Adding or selecting the text, Drawing and erasing, Split or merging, and Shareexport, or printing.
Kami Chrome extension is a fantastic tool for working with PDF files and offers more features if you upgrade to a premium plan.
The free version of the tool will provide you with all the basics that you need for viewing and editing your PDFs.
This tool automatically previews PDFs, PowerPoint presentations, and other documents.
With it by your side, you won’t need to download third-party apps to view your documents.
In this manner, you’ll use fewer resources and reduce the risk of downloading malicious documents. Docs Online Viewer is lightweight and tightly packed and doesn’t slow down your browser.
PDF Buddy is perfect for viewing and editing PDF files online. After you upload a file from your computer, you’ll be presented with editing options similar to Microsoft Word’s editor.
You can change the font size and style, use bold and italics, align your paragraphs, and pick font colors.
It also includes the following features: highlight, whiteout, transform, pen support, customizable shapes and symbols, and more.
With some neat features and a clean workspace, PDF Buddy is an excellent choice for viewing, editing, and annotating your PDFs.
The Sejda Chrome extension needs no introduction. This impressive add-on allows you to upload files to your machine, Dropbox, or Google Drive.
Then, you can easily combine PDF files at your convenience. To merge files, all you have to do is drag and drop the documents in the order you want them or you can sort them alphabetically.
The tool offers options for bookmarks, pages, and a table of contents based on your documents.
To split, you just have to upload your docs the same way and then choose how to split the files. You can also compress, crop, and rotate the documents.
This is the most convenient tool available if you only want to split some PDF files.
You can drop a document on the page or you can upload one from Dropbox, Google Drive, or your PC and either choose a range of pages or extract them to separate files.
You can also customize the name of each file. For more security, you can click the link to enable a more secure connection.
This easy-to-use tool allows you to download a web page as a PDF. You can then adjust text size, remove images, and select page size between letters or A4.
If you want to eliminate some parts of the page, you can delete them. This Chrome application offers an email feature to send the page digitally that also happens to be print-friendly.
For something as simple as downloading a web page as a PDF, Print Friendly & PDF gets the job done.
If you have to compress a PDF before sending or sharing it, this is a great tool for you. To use it, you have to upload a document from your computer, drag and drop it into the box or import it from a cloud service.
You can see the original size and the new size of the document, as well. You can download it just by clicking the button, and you’ll be redirected to Xodo.
You can also use the tool to merge, split, and protect a document.
This is a popular tool for viewing a PDF on a website without downloading it. You just have to enter the URL of the PDF and it will display within the browser menu without needing to use a reader.
If you also want to download the file after reading it, you can do so as well. PDF Viewer also supports Word and Excel docs, text files, and images that can all be viewed without the need for more software.
This tool also allows you to upload a file from your computer OneDrive, Google Drive, Dropbox, or Box.
But the tool’s convenience mostly comes in when all you need to do is just view an online file.
In comes the third category of add-ons, which is also the ones that we will tackle today. You can even use a Chrome extension to edit PDFs directly in your browser.
This is much more convenient in comparison to filling a PDF form offline. And we gathered the best PDF editor Chrome extension options for your convenience.
Here’s a quick preview:
Adobe Acrobat Reader – Easily edit & sign PDFs, add notes & remove text or images ?
Kami for Google Chrome – Top-notch PDF and Document Markup features ?
Docs Online Viewer – Lightweight Chrome extension to edit PDF
PDF Buddy – Quick & easy online PDF editor for home use
PDFescape Free PDF Editor – Free online PDF editor for Chrome & more
Merge PDF – Split PDF – Easy PDF upload to G Drive or Dropbox
There are more interesting categories of PDF-focused extensions for Chrome, with equally exciting capabilities. We made sure to include at least one sample from each section, as follows:
➡️ Bookmarking extensions are essential when you’re reading a lengthy PDF and you have to stop in the middle of it.
You can essentially save the bookmark and later open the PDF in Google Docs from where you left off.
➡️ Extensions that allow you to download web pages in PDF format will save you the trouble of opening the page in your browser.
➡️ Finally, extensions that store the PDF in the Cloud allow you to edit your documents with ease.
Working with PDF files can be pretty difficult if you lack the proper software. If you’re a Chrome user, you can install one of the extensions listed above and your work will be much simpler.
If you’re looking for something different, we have a new guide on the best fill & sign PDF tools you can use, so don’t miss it.
VLC media player is one of the best media players in the world. This payer is available on a wide range of platforms, but Windows 10 users reported some issues with it.
According to them, the VLC media player is lagging during video playback.
What can I do if VLC media player is lagging?
VLC media player lagging video
1. Change caching value
If the VLC media player is lagging while playing video, you can fix this problem by changing the caching value. To do that, follow these steps:
Open VLC player and go to Tools > Preferences. Alternatively, you can press Ctrl + P shortcut.
When Preferences window opens, go to the bottom of the page, and under Show settings select All. The look of your Preferences window will now change.
Go to Input / Codes section and locate File caching (ms) option. Change the value from 300 to 600 or 1000 and click Save.
The aforementioned solution works for local files on your PC, but if you’re trying to view a file that is shared on the network, you need to do the following:
Repeat all steps above.
Locate Network caching (ms) value and increase it.
Click Save to apply changes.
To be sure that your problems are not caused by an outdated version of the program, download and install the latest VLC version.
2. Consider using an alternative to VLC
If not of the following solutions manage to fix your issue, then maybe it would be a good time to consider using an alternative to VLC Media Player.
The aims and feature sets of various media players vary. You could choose from general-purpose media players, audio players, video players, and even 3D media players depending on your preferences.
If you’re not sure which is more useful, we’ve got you covered with the best universal media players featuring a variety of functionalities.
Some of these provide advanced features for both audio and video material, such as automatically locating movie subtitles, online radio, audiobook indexing, color correction, recording, and much more.
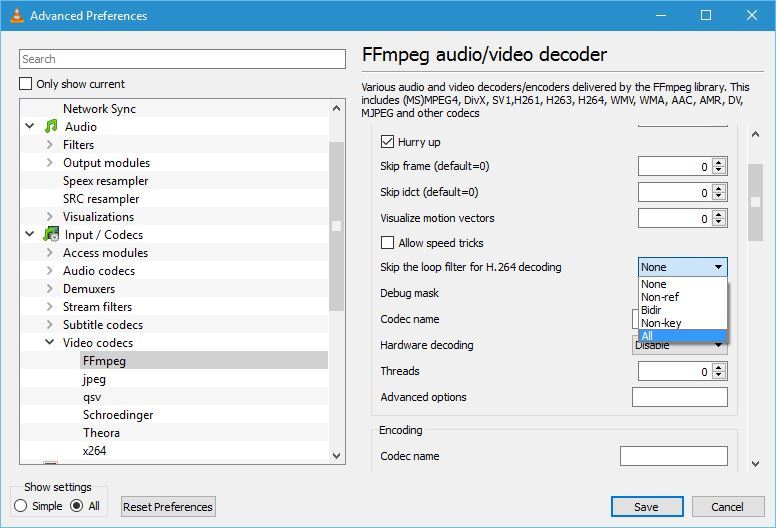
3. Change Skip the loop filter for H.264 decoding
Users reported that you can fix lagging video issues in VLC by changing the Skip the loop filter for H.264 decoding option. To do that, follow these steps:
Open all Preferences window in VLC.
Go to Input / Codecs > Video codecs > FFmpeg.
Locate Skip the loop filter for H.264decoding option and set it to All.
Click the Save button.
Keep in mind that this option will slightly degrade the quality of the video in order to improve your playback. If you want to keep the quality of your video, be sure to try different options first.
Some users are also suggesting checking Allow speed tricks option in FFmpeg settings menu, so you might want to try that as well.
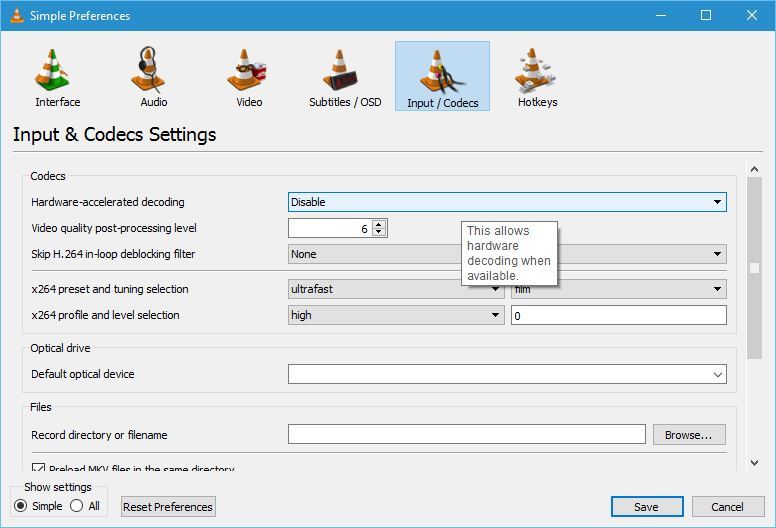
In Codecs section locate Hardware-accelerated decoding and set it to Disable.
Click Save.
Users reported that in some cases turning on Hardware decoding can fix this issue, so you might want to try turning it on.
Interested in some more codec options? Read this article to find out how to download more codecs and install them properly.
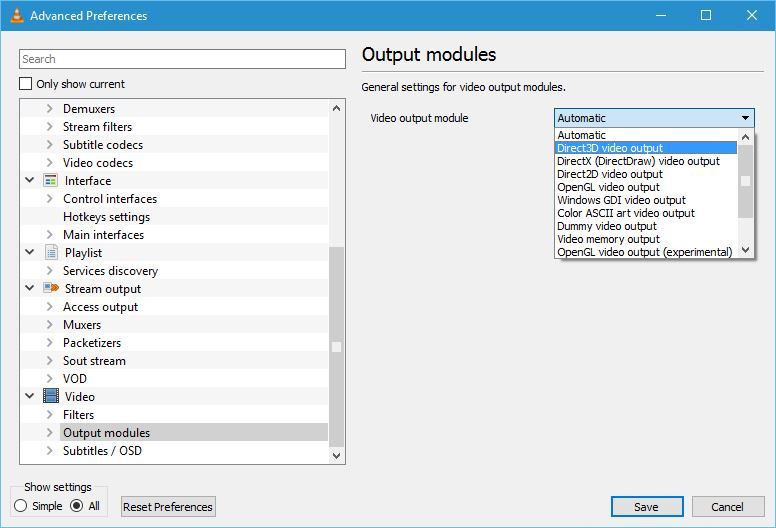
5. Change the video output module
Open all Preferences.
Go to Video > Output modules.
Experiment with different output modules until you find the one that works for you.
If you’re having problems with video lagging in the VLC player, you can fix that issue simply by changing the output module.
VLC media player lagging 1080p
1. Change the power settings
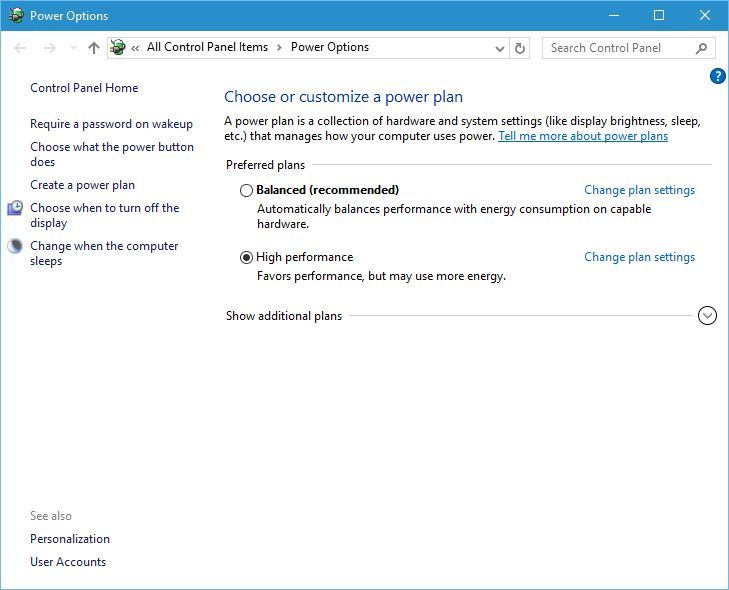
Press Windows Key + S and enter power options. Select Power Options from the menu.
Select High performance profile.
Sometimes your power settings can cause this issue to appear especially if you’re using Battery Saver or Power Saver profile on your laptop.
These two profiles are designed to lower power consumption by reducing the performance of your hardware. HD video is demanding and it requires hardware power in order to play smoothly.
Keep in mind that using a High-performance power profile will consume more power and drain your battery faster, but the issues with 1080p video should be fixed.
2. Assign the proper GPU to VLC
If you have a laptop that has both an integrated and dedicated graphic card, be sure to assign the right card to VLC. To do that, simply open your graphic card configuration tool such as Nvidia Control Panel or Catalyst Control Center, and assign the appropriate card to VLC.
Although assigning a dedicated graphics card to VLC is usually better, several users reported that using an integrated graphics card with VLC fixed the problem for them, so you might want to try that.
VLC media player lagging mkv
1. Change FFmpeg threads to 2
If VLC is lagging while playing mkv files, you might want to try changing the number of FFmpeg threads. According to users, you can do that by following these steps:
Open all Preferences window in VLC.
Go to Input / Codecs section > Video codecs > FFmpeg.
2. Make sure that your drivers are properly installed
VLC uses your GPU for video processing and if you want to properly view mkv videos without any lag, you should install the complete driver package.
Some drivers allow you to choose between full installation or minimal installation, therefore be sure to download and install the full version of graphic card drivers.
In addition, some users recommend that you download the ATI Avivo tool in order to fix mkv lagging issues in VLC.
3. Convert to a different format
Sometimes the best solution is to convert the .mkv file to a different format. Mkv files can be demanding, therefore you might want to use a video converter and convert them to any other less demanding format.
Problems with the VLC media player and lagging can somewhat ruin your multimedia experience, but you should be able to fix this problem by changing VLC settings.
We strongly recommend you to switch your player in case VLC is still lagging as it can cause possible malfunction to your system.
If the Xbox app isn’t working on your PC, it’s most likely due to regional settings, driver problems, or glitches within the app. Nothing that a few simple tweaks can’t fix.
Follow the steps below and get rid of issues like the Xbox app not launching or crashing.
What can I do if my Xbox App doesn’t open in Windows 10?
Before we start fixing this issue, try restarting your PC and updating Windows and the Xbox app. In some instances, it might be necessary to disable third-party antivirus.
1. Reset the Xbox app and Windows Store
Press Windows key + X and select Apps and features.
Select Xbox app on the list and click on Advanced options.
Click on the Reset button and then click Reset again to confirm.
Now go back and select Microsoft Store. Now choose Advanced options.
Repeat the steps from Step 3 to reset the app.
2. Change regional settings
Press the Windows key + I to open the Settings app. Next, go to Time & language.
Select a Region and change your country or region to the United States.
Restart your computer and check if the issue persists.
This is a quick and easy way to fix Xbox app launch issues, especially if you’re living outside of United States.
There you go, we hope that these solutions helped you fix the Xbox App issues that you encountered. If you have more problems, our Xbox app closes immediately guide should be able to help you.
Problems with WiFi and the internet connection are probably the most common issues Windows 10 users face. And we’ll agree that there’s nothing more annoying for an average user than Wi-Fi issues while browsing the internet.
There are various Wi-Fi errors that can eventually occur, and in this article, we’ll try to address as many as possible.
There are literally tens if not hundreds of various Wi-Fi issues you can encounter while using Windows 10. Here are some of the most common issues:
Windows 10 won’t show available networks – This error shows up when a network problem prevents available WiFi networks from showing.
Windows 10: No connections are available – This error shows up when no connections are available to connect to. It tends to show up, even if you know there are actually some available connections.
Can’t connect to this networkin Windows 10 -This error shows up when you cannot connect to a certain WiFi network. We have an article dedicated to this issue so that you can combine solutions from that article with solutions from this article. Hopefully, you’ll find a proper solution.
Windows 10: No WiFi icon – This error appears when there’s no WiFi icon in the taskbar at all.
Windows 10: WiFi quit working – This error appears when your WiFi connection stops working suddenly.
Windows 10: WiFi won’t turn on – This error means you can turn WiFi on from your taskbar.
Windows 10: WiFi yellow triangle – This problem tells us there’s something wrong with the connection itself. You can connect to it, but the bandwidth is usually the problem.
Windows 10: WiFi freeze greyed out – This problem prevents you from doing anything with your WiFi connection. You can’t turn it on, access settings, etc.
I can’t see my wireless network on the list
This is a rather peculiar case, but not impossible to tackle. While for some users, their Windows 10 laptops can’t find WiFi at all, for others, the issue is contained at their home network level.
One user has reported the following: laptop not detecting my WiFi but detecting others. Don’t worry, the solutions below will also work when Windows 10 does not show all WiFi networks available.
So, let’s get to it, shall we?
What can I do if my computer/laptop can’t find the WiFi network?
1. Update network drivers
Another common solution for various network issues is to update your WiFi driver. In case you don’t know how to do that, follow these instructions:
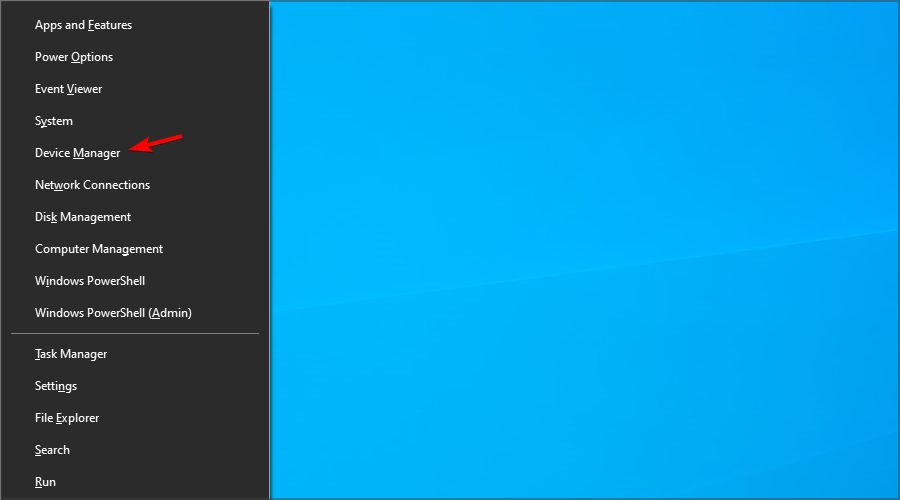
Right-click the Start button and open the Device Manager.
Locate and expand Network Adapters.
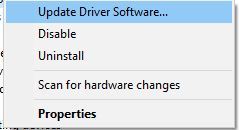
Right-click your network adapters and click Update driver software. Make sure to do it with both LAN and WLAN adapters.
Wait for the process to finish, restart your PC, and try connecting.
If the problem is still there, go back to Device Manager > Network Adapters, and do the following:
Right-click Network Adapters and open Properties.
In the driver tab, click Uninstall.
Now, open the Details tab and locate Hardware Ids in the drop-down list.
Copy the first line and paste it into the browser.
Find proper drivers provided by the official hardware manufacturer.
Download and install those drivers for both LAN and WLAN respectively.
Restart your PC and check the connection again.
In addition, another helpful way to resolve driver issues is with the help of specialized programs. You can thus update drivers automatically after scanning your PC and see which drivers are out of date and which are not.
In order to do so, you can rely on a third-party solution that will do it for you in minutes. Driver issues are the perfect task for a powerful solution.
The first thing we’re going to try is resetting the TCP/IP stack. This is, indeed, one of the most common solutions for network problems in Windows, and can be helpful with other internet issues.
3. Change the wireless SSID and password on your modem
Another solution that’s quite common when troubleshooting WiFi and network issues are changing the wireless SSID and password of your modem.
Even though we’re talking about resolving the problem with your wireless network, for this workaround you’ll have to connect your computer to the modem using the Ethernet cable.
Since changing the SSID varies from modem to modem, we can’t tell you what to do precisely. Therefore, we recommend you check your modem’s manual or look online for more info.
4. Check for malware
Contrary to the previous workaround, some malware may corrupt your connection. So, it would be a good idea to run your security scan once again.
If your computer has connection-blocking malware, your antivirus will surely eliminate it.
Choosing a powerful antivirus that can eliminate advanced types of malware is highly recommended. Hence, to secure your system more, you can choose from the best antivirus software available for Windows 10 PC.
5. Reset your modem (and more)
Now, let’s switch to more basic solutions, which are probably the first thing you’ll do anyway. Here are some of the actions you need to do to troubleshoot your modem/router:
Shut down your router or modem. Wait a minute and power it on.
Disable the modem/router’s built-in firewall temporarily.
Reset the modem/router to factory settings
Make sure your router/modem isn’t overheating. Place it far from temperature sources.
Once again, if you’re not sure how to do any of this, check your router/modem manual for more detailed instructions.
You can also try to update your router’s firmware. If you don’t know how to do that, we’ve prepared a nifty guide that will help you.
6. Use the Internet Connection troubleshooter
Go to Settings.
Open Update & Security.
Navigate to Troubleshoot.
Click on the Internet Connection Troubleshooter.
Now, follow further on-screen instructions, and wait for the wizard to finish
Restart your computer
If you’re on at least Windows 10 version 1703 (Creators Update), you have a new troubleshooting option on the Settings app. This Troubleshooter can be used for resolving various problems within the system, including the WiFi issue we’re talking about.
Now, let’s talk about DHCP. In short words, DHCP is a Windows process that assigns the IP address to your computer when you connect to a network.
So, if this process is disabled, your computer won’t be able to obtain the IP address, and therefore, you won’t be able to connect to the internet using your WiFi connection.
So, the first thing we’re going to do is make sure if this process is running. And here’s how to do that:
OpenNetwork Connections.
Locate your network adapter, right-click it, and choose Diagnose.
Wait for the process to finish. If the DHCP process was disabled, this will enable it once again.
8. Set your IP address manually
Go to Settings and chooseNetwork Connections.
Right-click your wireless network and choosePropertiesfrom the menu
Select Internet Protocol Version 4 (TCP/IPv4) and go to Properties.
Now, select the Use the following IP address option and enter the IP address, Subnet mask, and Default gateway.
We used settings that work for our configuration, but you might have to enter a different number (see the screenshot).
In addition, you’ll have to enter the DNS server manually.
In our example, we used Google’s Public DNS, but you can also use 192.168.1.1 as your Preferred DNS server.
After you’re done, click theOKbutton.
9. Change the number of DHCP users
And finally, the last solution that involves the DHCP process is changing the number of DHCP users. More precisely, you’ll have to increase the number of DHCP users in your router settings. Usually, the limit is 50 DHCP users, and if you go over, WiFi issues may occur.
Once again, since the process of changing the number of DHCP users varies from router to router, it’s better to check the manual for detailed instructions.
10. Disable Windows Firewall temporarily
Even though Windows Firewall is a useful feature for the overall security of your system, it can cause issues with your network connection. Because of that, we’re going to disable Firewall temporarily and see if there are any changes. Here’s how to do that:
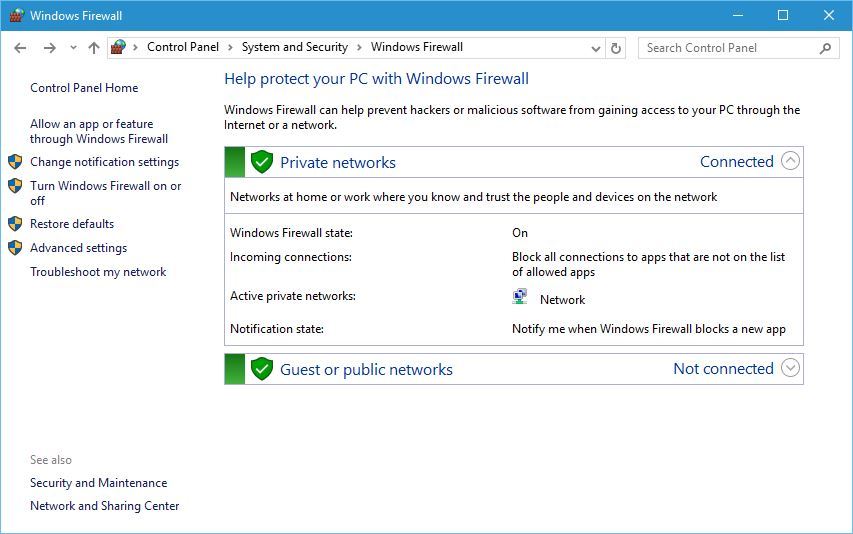
Open Control Panel.
Go to System and Security.
Click on Windows Firewall.
Select Turn Windows Firewall on or off from the left side.
Turn off Windows Firewall for both Private and Public networks and confirm the selection.
As unlikely as it seems, many people have reported that the Airplane mode blocked their WiFi connection. So, make sure the Airplane mode is disabled.
You can find the Airplane mode icon in the Notification panel in the right corner of the taskbar. However, if the icon is missing, there’s an alternative way to disable it:
Open Settings.
Click the Network & Internet.
Click Airplane mode.
Toggle Airplane mode off.
12. Use ipconfig /release command
Go to Search, type cmd, and open Command Prompt (Administrator)
WhenCommand Prompt starts, enter the following lines and after each line pressEnter to run it:
ipconfig /release
ipconfig /renew
Restart your computer, and try to connect again.
13. Set the channel width to Auto
Right-click the Start Menu button and select Network Connections from the menu.
When Network Connections window opens, right-click your wireless connection and choose Properties from the menu.
Click the Configure button and go to the Advanced tab.
Locate802.11n Channel Widthfor band2.4and set it toAuto.
ClickOKto save changes.
14. Disable IPv6 on your computer and router
OpenNetwork and Sharing Center.
Go to Connections and click your current connection.
The connection status window will open. Click the Properties button.
Find Internet Protocol Version 6 (TCP /IPv6) and uncheckit.
ClickOKbutton to save the changes.
Restart your computer in order to apply the changes.
In some cases, enabling the IPv6 protocol solves internet issues, but sometimes this protocol can cause problems.
15. Delete your wireless profile
Go to Search, type cmd, right-click it and run the Command Prompt (Admin).
When Command Prompt stats enter netsh wlan delete profile name=WirelessProfileName and press Enter.
Be sure to replace WirelessProfileName with the actual name of your wireless connection.
When the process is finished, you need to reconnect and reconfigure your network, in order to establish the connection once again.
If your Wireless Profile got corrupted, the best way to get things back to where they used to be is to simply delete your Wireless Profile, and create it once again.
Locate the account that you want to remove and click theRemovebutton. To remove the adult account, be sure to remove all child accounts beforehand.
If there’s a need for the Family Safety feature, we don’t recommend disabling it. However, there’s a chance this very feature blocks your wireless connection. In that case, you have no other choice than to disable it.
17. Disable your antivirus software
You’ve probably heard about this one before. Windows 10 and its components and features don’t get along with third-party antivirus programs.
Because of that interference, various problems may occur. Including our problem with the WiFi network. So, go and temporarily disable your antivirus program and check if the connection is working.
If you’re able to normally connect to your WiFi network with your antivirus program disabled, consider changing your antivirus solution or switching to Windows Defender completely.
ClickChange adapter settings, locate your wireless network adapter, right-click it and choosePropertiesfrom the menu.
When the Properties window opens, click theConfigurebutton.
Go to Advanced tab and from the list select Wireless mode.
Now change the value of Wireless mode so it matches the value of Wireless mode on your router. In most cases, 802.11b(or 802.11g) should work, but if not, try experimenting with different options.
Your router and wireless adapter need to be on the same network mode to work seamlessly. If that’s not the case, you’ll experience problems with your WiFi connection.
So, you should check the wireless networking mode on your computer in order to make the connection work again.
19. Change Fiddler settings
This one, obviously, only applies to Fiddler users. Some users suggest that changing Fiddler settings can also resolve this issue. Here’s how to do that:
ClickTools > Fiddler Options.
Navigate to theHTTPS tab.
Make sure that the text saysCertificates generated by CertEnroll engine.
Click onActions > Reset Certificates. Wait for the process to complete.
Accept all prompts.
20. Check that all required services for Internet connection sharing are Enabled
To do so, go to Search > type services.msc > open Services. And now, just make sure these services are running:
Plug And Play
Application Layer Gateway Service
Remote Procedure Call (RPC)
Network Connections
Network Location Awareness (NLA)
Telephony
Remote Access Connection Manager
Remote Access Auto Connection Manager
Windows Firewall
As mentioned in some previous solutions, the WiFi network requires certain services to work properly. So, you need to make sure each one of these services is running.
Users also reported that the laptop won’t connect to Wi-Fi but other devices will, however, we have a guide that tackles this issue.
That’s about it. We certainly hope at least one of these solutions helped you resolve the problem with your WiFi connection. If you have any additional comments, questions, or suggestions, please let us know in the comments below!
SketchUp is an important 3D program used in modeling a wide range of drawing applications.
This includes architecture, interior design, and landscape architecture which are used to make designs and impressions of idealistic prototypes. It is also used extensively in filming and video game makeup.
However, it is important to use good rendering software to improve the quality of models created from SketchUp. There are various rendering software plugins that are integrated into SketchUp.
This article highlights six of the best software to render SketchUp available in terms of functionality, features, and price.
You might recall this software by its former name: 3D Studio Max. A very popular option back in the day, now it continues to be a very strong performer for all your 3D modeling, animation, and rendering needs.
Under the Autodesk umbrella, 3ds Max features Arnold GPU Renderer which allows you to view changes that you make to the scene in real time.
The good news is that you can import your SketchUp file into 3ds Max even if your scene already has existing content.
They will remain intact, and new ones will appear from the .skp file. The SketchUp importer works with files from version 6 up to SketchUp 2015. Are you using a newer version? Save the file to a 2015 file format and it should work.
Here are the top features of Autodesk 3Ds Max:
Use it as a command-line tool to process content in bulk
Create custom workspaces
Display procedural maps made with OSL using Nitrous viewport
Use motion paths to manipulate animations
Use real-life camera simulated settings, such as aperture, shutter speed, exposure, and depth of field
If you have only used SketchUp before, don’t feel overwhelmed by the huge differences between them. Make no mistake, this software is very powerful and provides you with many tools. It has a bit of a learning curve, but the results are amazing.
Autodesk 3Ds Max
Give 3ds Max a try to import your SketchUp files and take the rendering to the next level!
Chaos V-Ray 5 provides all the tools you need to visualize your SketchUp rendering projects from beginning to end, whether you’re a novice or a professional.
Rendering using V-Ray is as realistic as it gets, with true-to-life lighting, cameras, and materials. You can preview precisely how any project will appear. It’s as close to the genuine thing as you can get before it’s created.
A new function called Chaos Cosmos viewer makes it simple to insert render-ready 3D material into your SketchUp creations.
With a collection of render-ready models and stunning HDR sky, you can quickly stage your architectural and interior ideas. V-Ray, V-Ray GPU, V-Ray Vision, and Vantage assets are all rendered reliably with Cosmos assets.
The Cosmos assets feature automated LODs, and precise scale, and are compatible with 3ds Max, Rhino, and Revit.
Let’s dive into the key features of V-Ray SketchUp:
CPU, GPU & Hybrid rendering
V-Ray Denoiser used in post-production to denoise each rendered element
Fine-tune the lighting and materials and immediately see the effects
The V-Ray Render nodes provide an additional speed boost
While working in SketchUp, you may use V-Ray Vision to observe your work in real time.
V-Ray has hundreds of ready-to-render materials that can be applied to any scene, as well as access to a large collection of video lessons, free technical support, and helpful forums.
The rendering plugin utilizes the power of your system GPU to accelerate renderings and is a GPU-based rendering plugin for SketchUp. Allura GPU uses the video GPU to create amazing rendering images with high speed and excellent overall rendering experience
Allura GPU for SketchUp is powered by NVIDIA Iray which gives it all the qualities of an excellent SketchUp renderer.
This software uses computing light paths with simple settings that are automatic. It is one of the best software to render SketchUp on the market.
In addition, some of its features include indirect illumination, color bleeding, reflections, refractions, soft shadows, blurry reflections, reflective and refractive caustics, and volume scattering; users just need to edit the materials and click render for amazing results.
This software gives a realistic rendering of objects and models inside SketchUp. It creates wonderfully rendered images without using complex settings which is ideal for designers. The plugin is powerful yet maintains a clean and easy user interface.
Ariel Vision has many unique features that include one-click rendering with great results from pre-defined settings, seamless integration with SketchUp full Reflection, and transparency controls for more realistic materials.
Direct and indirect lighting using both natural and artificial lights. In addition, it also has beautiful HDRi skies and backgrounds to complete the look of your model.
Furthermore, this software has two wizards which are Material and Light wizards. The Material wizard enables easy application reflection and transparency directly to SketchUp materials.
While the Light wizard enables you to complete interior scenes with custom lamps, ceiling lights, and more.
IRender nXt is a powerful plugin that creates photorealistic renderings directly inside Trimble SketchUp. The plugin easily turns designs and models into superior images.
This is an ideal tool for architects exhibiting their building plans. This software is ideal to render SketchUp files.
This software is also ideal for landscape designers and set designers needing quality images to showcase their designs by optimizing users’ workflow by saving settings inside the SketchUp model which allows users to post-render updates without beginning over.
IRender nXt is available in both Windows 32-bit and 64-bit. Some of the features include rendering at any resolution and quality. In addition, it packs fine-tuned lighting and transparency in lighting capabilities.
If you desire a plugin that gives simplicity in rendering with beautiful photo-like results then Raylectron is the right plugin for you.
Users can edit how the model should be with various lighting settings, from the sun, sky, and other settings. The X-ray vision feature enables you to view the interior render without removing the exterior.
You can also monitor the progress while rendering and change the quality of models. Some of the main features include the ability to stop the render, save it, reopen it later, and resume the render.
Users can rotate, pan, zoom, and modify the materials and lights right from the Raylectron viewer.
Raylectron also supports HDR maps and can save the rendered image as an HDR, it can also save in jpg, png, and many other formats.
Another unique feature is the rendering processes that happen outside of SketchUp in order to allow continuous work on the model being rendered.
This software gives a different more realistic rendering for SketchUp with lots of options via various modes and tools which simplifies and keeps your work models.
Shaderlight gives a unique blend with users having the option to choose between progressive rendering and single-shot rendering.
The plugin also utilizes advanced lightning features to give your models a clean and quality look.
Users can use the default resolution settings or edit this setting to give the right blend of Sharon and concise images which makes it the ideal software for designers, architects, and other landscape designers.
The application plugin is compatible with both Windows 32bit and 64-bit. In addition, Shaderlight Cloud enables you to render on the web at a premium price.
If you need versatile software to render SketchUp files, Thea Renderer is one of the best software around featuring a quality state-of-the-art photorealistic engine.
This is one of the major renderer software with a unique standalone studio and library of editors for materials texture and color which gives for unique rendering.
The software uses a unique engine technique called biased and unbiased render modes to achieve these quality results.
Some of the features of this rendering software include the use of Instancing of External Models (as Proxies), integrated & external Thea material editor, darkroom with multiple controls, advanced camera settings, and render channels. This allows you to create your models with more detailed three-dimensional results.
This is where our best software to render SketchUp lists comes to an end. Make sure to head over to all these programs’ official websites in order to be able to analyze more in-depth details on all these tools before making the right decision for your SketchUp works.
This list will answer all your questions related to:
➡️ SketchUp rendering programs – All of the software recommended here can be used to render SketchUp files.
➡️ If you are interested, visit the design software section on our website for similar articles.
➡️ Find the perfect tool for your job as a designer, illustrator, graphic artist, and more in our Graphic & Design Hub.
The WHEA UNCORRECTABLE ERROR is a Blue Screen error that can appear on any version of Windows.
This issue, you either have a hardware failure or problems with your driver, or it might be that the service is incompatible with your operating system. However, this could also be caused by overclocking, SSD, RAM or mainboard issues.
Before anything else, go to Settings > Update & Security and install all the latest Windows updates.
How do I fix the WHEA UNCORRECTABLE ERROR BSoD?
1. Disable overclocking to fix Whea Uncorrectable Error
WHEA Uncorrectable Error is often caused by overclocking. Here are the steps to disable it from BIOS:
1. Press Windows key + I to open the Settings app.
2. Go to Update and Security.
3. Navigate to the Recovery tab. Click on Restart now in Advanced startup.
4. On Advanced startup, go to Troubleshoot, then Advanced options.
5. Select UEFI Firmware Settings. Click Restart.
6. After the computer is restarted, it should open BIOS automatically, so go to Advanced tab.
7. Navigate to Performance, and look for Overclocking.
8. Check if overclocking is disabled. If it is not, disable it.
9. Save changes to BIOS (by pressing F10 on your keyboard), and start your computer normally.
Press the Windows key + X and select Device Manager.
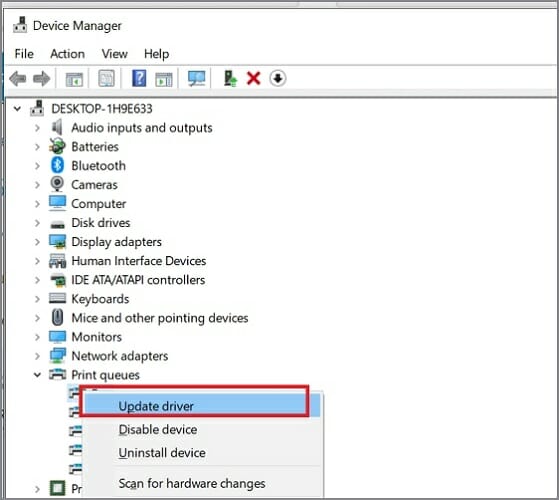
Locate the driver you think is causing the problem, right-click it, and choose Update driver.
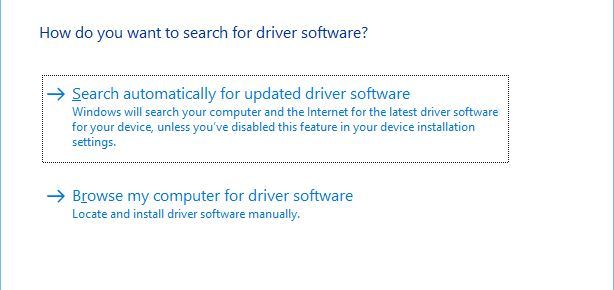
Select Search automatically for drivers and wait for the process to finish.
Repeat this for all drivers that you believe are responsible for this issue.
Drivers can lead to BSOD Whea Uncorrectable Error, so keeping them up to date is crucial.
Updating drivers manually can be tedious, especially if you need to update several of them. Still, you can make this process a lot faster by using driver updater software.
Outbyte Driver Updater is a diagnostic application designed to help you download and update Windows drivers automatically.
Unlike security or system optimization programs, this utility is an excellent choice to find and replace corrupted, missing or outdated drivers for graphics cards, controllers, printers and other hardware components.
Press the Windows key + I to open the Settings app.
Now go to the Update & security section.
Click on View update history.
Now click on Uninstall updates.
A list of updates will now appear.
Double-click on a specific update to remove it.
According to users, the Whea Uncorrectable Error can sometimes appear due to problematic Windows updates. For more information, visit our guide on how to remove failed Windows updates.
Restart your PC and keep pressing F2 to enter BIOS.
Once you enter it, look for the Turbo Boost option.
Disable it and save changes.
NOTE
We suggest checking your motherboard manual to see how to find this feature.
7. Disable additional audio devices
Press Windows key + S and enter sound. Now pick Change system sounds.
When the Sound window opens, go to the Playback tab. Next, right-click each non-default audio device and choose Disable.
Repeat the same steps for all recording devices as well.
After doing that, click on Apply and OK to save changes.
Some users are also recommending disabling additional audio devices from Device Manager. To do that, follow these steps:
First, press Windows key + X and choose Device Manager.
Locate your audio devices and disable all devices except your default one.
To disable a device, right-click it and choose Disable device from the menu.
When the confirmation message appears, click on Yes.
According to users, the Whea Uncorrectable Error message can appear due to your audio devices. Therefore, you need to find and disable additional audio output and input devices to fix the problem.
After disabling all non-default devices, the problem should be resolved.
How can I fix the Whea Uncorrectable Error on Windows 11?
Use System Restore
Press Windows key + R and type rstui.
Now click Next to proceed.
Select the desired restore point and click Next.
Follow the instructions on the screen to complete the process.
Moreover, here are some error variations that you may encounter, but nonetheless, fix with the solutions provided:
WHEA_UNCORRECTABLE_ERROR Windows 10 Sysprep – According to users, sometimes this error can occur while using Sysprep.
OverclockWHEA_UNCORRECTABLE_ERROR – Many users reported that this error started appearing after overclocking. To fix the problem, try changing or removing your overclock settings.
WHEA_UNCORRECTABLE_ERROR hal.dll, ntoskrnl exe, msdn bugcheck – In some cases, this error can be caused by specific files.
OverheatWHEA_UNCORRECTABLE_ERROR – WHEA uncorrectable error overheating – Can WHEA uncorrectable error be caused by overheating? Yes, it can. If your PC overheats, try cleaning it or check if your fan is working correctly.
WHEA_UNCORRECTABLE_ERROR startup – To fix this problem, you’ll need to use one of our solutions above while in Safe Mode.
BIOS updateWHEA_UNCORRECTABLE_ERROR – Can BIOS cause WHEA uncorrectable error? Yes, ti can. To fix the problem, you might have to go back to the older version of BIOS.
WHEA_UNCORRECTABLE_ERROR in Windows 11 on MSI – MSI users can attend to all the above solutions to fix this issue.
Windows 10 SSDWHEA_UNCORRECTABLE_ERROR – SSD components can become corrupt or damaged due to lousy laptop handling.
WHEA_UNCORRECTABLE_ERROR in Windows 10 on HP,Dell laptop – This is the general error message our users reported to us. Don’t worry, as one of the above solutions will do the trick.
WHEA Uncorrectable Error while gaming, Warzone – While there are many potential culprits ranging from driver conflicts to faulty RAM and everything in between, gamers are a particularly vulnerable category of users.
Whea Uncorrectable Error appear on startup – Sometimes this issue will prevent you from booting to Windows. However, there are ways to fix that, and to learn more, visit our guide on the blue screen loop.
Whea Uncorrectable Errorstuck at 0 – Check for hardware issues before moving on to more complex solutions.
Is WHEA’s uncorrectable error serious?
If you have any physical hardware damage, the error could have catastrophic consequences. If this is the case, you will need to fix or replace your components with new ones.
Aside from that, the problem can be fixed, and we have compiled a list of eight potential alternatives for you to consider.
The WHEA uncorrectable issue may manifest on your computer if the memory stick is not inserted into the RAM slot in the correct orientation.
When the computer casing is opened, you should be able to gain access to the motherboard. Thereafter, you can remove the RAM sticks from the contact points on your motherboard using alcohol and cotton. Do this as cautiously as possible.
Besides the physical cleaning of your RAM, you should also ensure its software. Thus check out our post with the seven best RAM cleaners and optimizers for Windows 10 & 11.
Let us know which methods worked best for you by leaving us a message in the comments below.
Internet access is crucial for many people today, and there have been reports that users are getting Windows 10 can’t connect to this network message while trying to establish an Internet connection.
This, in turn, can cause a wide range of problems, including not being able to work remotely, stopping you from researching a problem, and even not allowing you to enjoy a relaxing time with your family watching your favorite shows.
No matter which category you fit in, solving network issues as fast and securely as possible is paramount.
In this guide, we will cover every way of dealing with network issues, including the most common solutions for general problems and also step-by-step information for troubleshooting specific issues.
Why is my laptop showing Can’t connect to this network?
This issue can occur if your PC isn’t connected to the Internet there are multiple causes for this issue, but the most common is your adapter settings.
In some instances, it’s possible that Windows can’t find the Wi-Fi network, and that’s usually caused by a problem with your adapter, so you need to check it.
The most common solutions to dealing with network issues
➡ Check for a faulty connection
A problem with your actual network connection is one of the most common issues, and it can be split into two categories:
Setup-related issues
As you might expect, not having the correct login details will cause connectivity issues, so it is best to check beforehand that the credentials you used are correct.
To check for physical problems, ensure that the router is running optimally and that all the respective lights are turned on.
Furthermore, it would be recommended that you check if the cables are cut, or have any other damage (both to and from your router/ethernet port, etc.).
➡ Check your drivers
As we all know by now, drivers are an essential element to any hardware that we use, bridging the gap between software and the device itself, and having issues with drivers is not going to help.
If this important element is not fully updated, or if the driver gets corrupted, a full re-install should resolve this issue. (more details about this step in the guide below).
➡ Make sure the ISP has a good connection
In some cases, you might find that even if the above-mentioned elements are all ticked without problems, the ISP might have problems with the distribution of the Internet on their network.
To find out if that is the case, you should contact your ISP by phone and ask if everything is running smoothly on their side.
If they don’t report any issues, then it is safe to assume that the issue is local, so let’s dive into the steps you need to follow in order to resolve this annoying problem once and for all.
How can I fix Windows 10 can’t connect to a wireless network?
1. Modify network adapter settings
Change the channel width for your network adapter
Press Win Key + X and choose Settings.
Choose Network & Internet.
Click Change adapter options.
Locate your wireless adapter and right-click it. Choose Properties from the menu.
Click the Configure button.
Choose the Advanced tab.
Select the 802.11d from the Property list and set the value to Enabled.
Click OK to save the changes.
Update your network adapter drivermanually
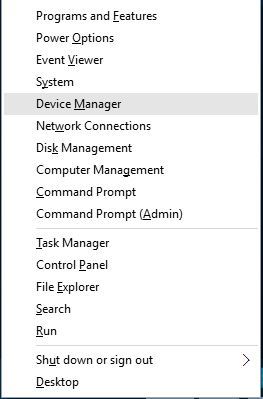
Press theWin Key + X, and choose Device Manager from the list.
Under the Network adapters dropped-down, find the wireless network adapter in the list (The exact name will depend on your system configuration).
Right-click it and choose Update Driver Software.
Click Browse my computer for driver software.
Now click on Let me pick from a list of device drivers on my computer.
Make sure that Show compatible hardware is not checked.
Find your network adapter manufacturer and select the driver you wish to install.
After you’ve installed the driver, restart your computer.
Did you know that you can update drivers automatically? Updating drivers manually can be tedious and a bit hard to follow, but there’s a way to automate this process.
By using specialized driver updater software like Outbyte Driver Updater, you can automatically update all drivers on your PC with just a few clicks.
Make sure that your adapter and router are using the same security type
In order to protect your data, wireless connections come with certain security types such as WPA2-PSK (AES) or WPA-PSK (AES).
For your network connection to work correctly, your router and computer must use the same security type.
You can set the security type for your router by following the instructions from your router’s instruction manual.
After you’ve set a specific security type on your router, you need to check if the same security type is also being used on your computer.
To do that, you need to follow these steps:
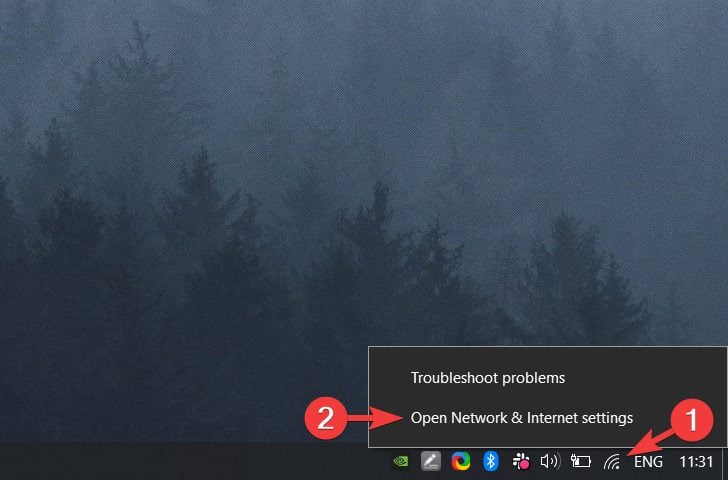
Right-click the network connection icon next to your clock, and choose Open Network & Internet settings.
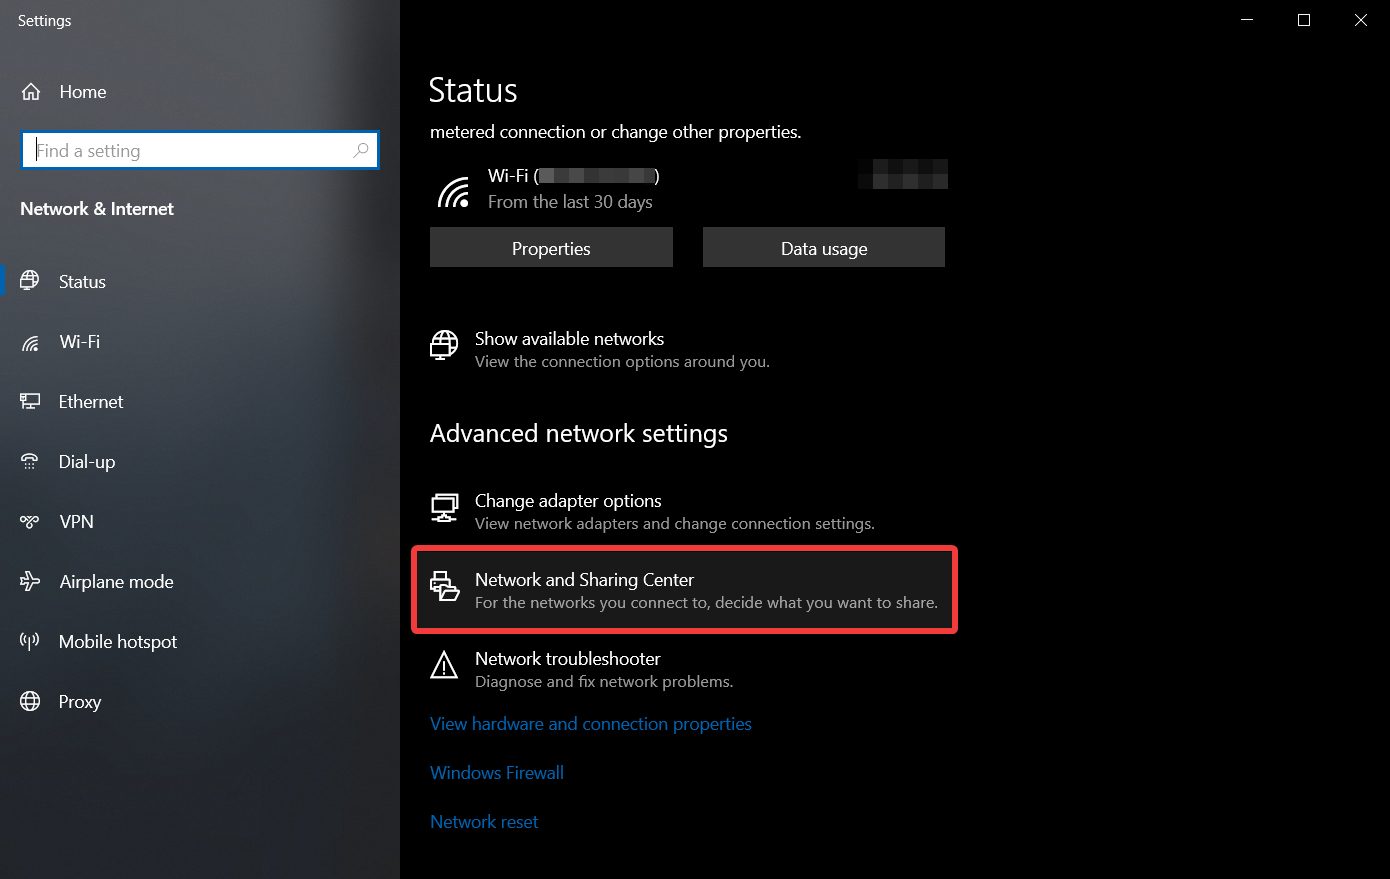
Choose Network and Sharing Center.
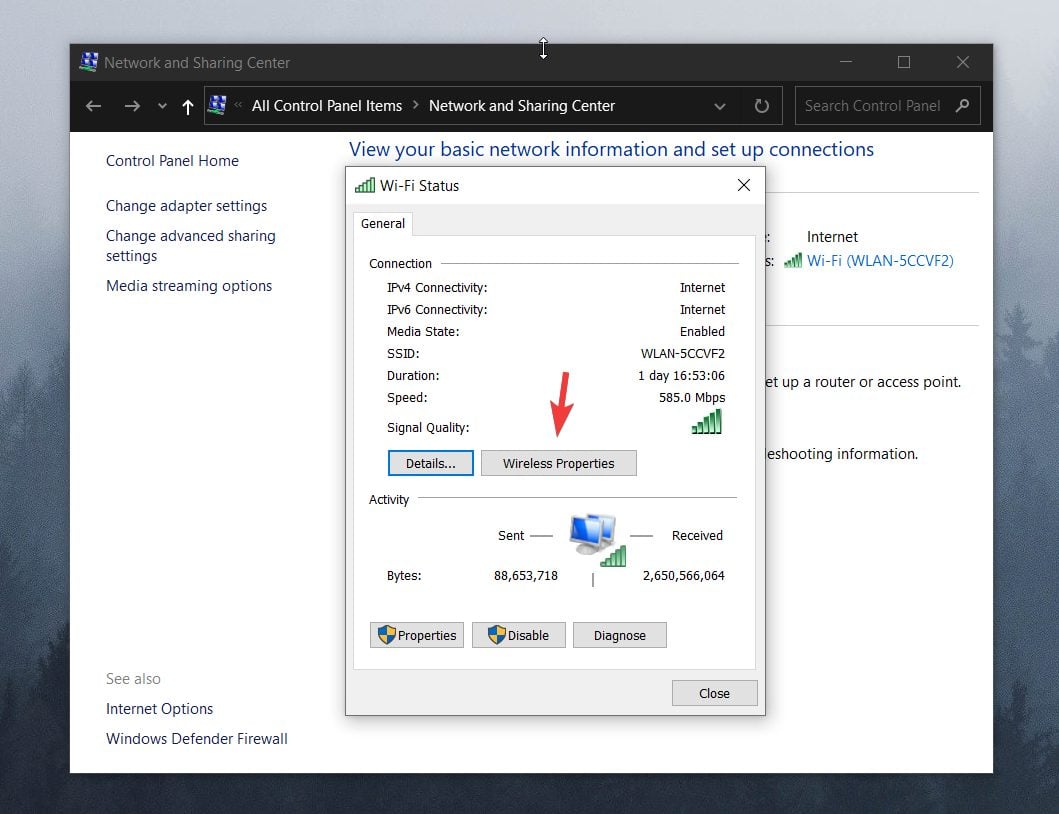
Click on your connection link.
Choose Wireless Properties.
In the Security tab, you should see your connection security type.
After choosing the correct one, simply click OK.
NOTE
The security type section should show the same security type that your router is using. You might have to try several different security types before you find the right one.
Uninstall your network adapter
Press Win Key + Xand choose Device Manager from the list.
Locate your network adapter and right-click it.
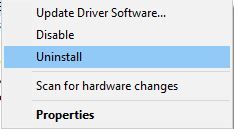
Choose Uninstall. (If asked, check to Delete the driver software for this device and click OK.)
After the driver has been uninstalled, restart your computer and Windows 10 will automatically install the new driver.
If you find that Windows didn’t install the drivers automatically after the restart process, follow these steps.
Change your network adapter
If nothing else works, maybe you should change your network adapter.
Right-click the network connection icon from the taskbar and choose Open Network & Internet settings.
Choose Network and Sharing Center.
Click Change adapter settings, locate your wireless network adapter, right-click it and choose Properties from the menu.
When the Properties window opens, click the Configure button.
Go to the Advanced tab.
Select Wireless mode from the Property list and modify its value from the drop-down menu. (In most cases IEEE 802.11b/g should work, but if it doesn’t, try experimenting with different options.)
Press OK.
You can change the wireless network mode for your router and your wireless adapter. In order for your network to work, your router and network adapter need to use the same or similar network mode.
If you want to change the network mode of your router, you’ll need to check the instruction manual, but in most cases, it won’t be necessary to change the wireless network mode on your router.
Disable IPv6 on your computer and router
Open Network & Internet settings by right-clicking your network icon in the taskbar.
Click the Network and Sharing Center option.
Click on your current connection.
In the Connection status window, click the Properties button.
Find Internet Protocol Version 6 (TCP /IPv6) and uncheck it.
Click OK button to save the changes.
Restart your computer in order to apply the changes.
If the problem still persists, you might have to disable IPv6 on your router.
Disabling IPv6 on your router is a complicated process, and it’s different for every type of router, so before you do that, check your router’s instruction manual.
If you encounter any issues or if your network protocol is missing, be sure to check out this guide that will help you get back on track.
3. Manage wireless connections
Disable and enable your wireless connection
Click the search button and input Network.
Choose Settings from the list.
Choose Network & Internet.
Click Change adapter options.
Locate your wireless connection, right-click it and choose Disable.
Right-click the same connection again and choose Enable.
Forget the wireless connection
Press Win + Xkeys and click on Settings.
Navigate to Network & Internet.
Go to Wi-Fi section.
Click on Manage known networks.
Select your Wireless network and click Forget.
After you’ve done that, connect to the same wireless network again.
Add the connection manually
Right-click the network icon next to your clock.
Choose Open Network & Internet settings.
Open the Network and Sharing Center.
Click Set up a new connection or network.
Choose Manually connect to a wireless network and click Next.
Enter the requested information such as network name, security key, and security type.
Click Next to finish the process.
After you’ve created a new network connection, everything should be working without any problems. If the issue persists, try changing the security type of your new network.
Use ipconfig /release command
Press the Win Key + Xand from the list choose Command Prompt (Admin).
When Command Prompt starts, enter the following lines and after each line press Enter to run it:
ipconfig /release
ipconfig /renew
Close Command Prompt and try to connect to the network again.
If your network connection starts working, you can install your antivirus software again, making sure to allow the Internet connection through the settings of the app.
3. Check if IPv4 and IPv6 protocols are enabled
Right-click the network icon next to your Windows clock and click Open Network & Internet settings.
Choose the Network and Sharing Center.
Click Change adapter options.
Find your adapter, right-click it and choose Properties.
Make sure that IPv4 and IPv6 protocols are enabled.
Click OK and check if the issue has been resolved.
Windows 10 can’t connect to this network, enter APN and try again
This error occurs when trying to use your Windows 10 device to connect to a cellular network, and will stop you from accessing data altogether.
To eliminate the possibility of having network issues that stem from your PC, follow these steps:
Connect your PC to an Ethernet or Wi-Fi network.
Open a browser and check to see if web pages are loading.
If the Internet is connected, then contact your mobile ISP and ask for APN credentials.
Use the credentials to sign into the mobile network.
If the Internet doesn’t connect through Ethernet or Wi-Fi, then it is safe to assume that your PC is not set up properly. To resolve this, follow the other methods described in this guide.
Windows 10 can’t connect to this network, and WEP problems
We have already covered how to create a wireless connection manually in this article, but to connect to the network that uses WEP security, you have to set the Security type to WEP for your new connection.
Follow these steps to do so:
Right-click the network connection icon and click on Open Network & Internet settings.
Choose Network and Sharing Center from the menu that appears.
Click on the link of your Internet connection.
Click on the Wireless Properties button.
Open the Security tab, and choose WEP as your network security type.
Click OK.
We should also mention that the WEP security type isn’t the safest, and it’s advised that you switch to the WPA2 security type.
Windows 10 can’t connect to the network after waking from Sleep Mode
1. Disable IPv6 / Change Power Management settings
We have already explained how to disable IPv6 in this article, under the Modify internet properties settings solution.
If you’re getting Windows 10 can’t connect to this network message after your computer wakes up from Sleep Mode, you need to do check the Power Management settings for your adapter.
To do that, follow these steps:
Press Win Key+ Xand open the Device Manager.
Navigate to the Network Adapters section.
Locate your wireless adapter and right-click it. Choose Properties from the menu.
Navigate to the Power Management tab.
Uncheck Allow the computer to turn off this device to save power and save the changes.
If you use a USB network adapter, you’ll have to repeat this step for all USB devices in Device Manager.
5.4. Disable and enable your network connection / turn on and off Airplane mode
In order to fix Windows 10 can’t connect to this network error, you can disable and enable your network connection to fix the problem.
In addition, you can try turning the Airplane mode on and off in order to fix this problem.
For any Airplane mode errors, you may encounter there’s this awesome guide that can be of help.
Windows 10 can’t connect to the network after a password change
If you’ve recently changed your password for the wireless network and now can’t connect to your network, you might want to forget the connection, as shown in a previous solution.
In addition, you need to check if your computer’s security type matches your router’s security type (also described above).
Additionally, toggle the option to connect automatically to your network to Off. This will allow you to input your new password.
What can I do to prevent these issues from occurring again?
➡ Keep your OS updated
Keeping your Windows 10 OS updated at all times not only protects you from encountering network issues but also keeps you safe.
Windows 10 downloading and installing updates
The latest Windows 10 release, updates the security features of your PC that will keep third parties away from your personal data, while also improving and fixing known bugs.
➡ Ensure that all drivers are updated constantly
Update menu for Network drivers in Device Manager
To achieve this, you should either regularly use the Device Manager to manually search for updates for each of the important drivers, or you can use automatic and specialized software to do this job for you.
➡ Keep your network login credentials accessible
Losing your network credentials is not a huge problem, but it is enough to cause you unnecessary stress when dealing with network issues.
If you have this information easily accessible, you can first test out if the credentials were used correctly, and if not, contact your ISP provider for more details.
Dealing with network issues is never pleasant, especially if you were getting ready for a Netflix binge-watch session with your loved ones or require your Internet connection for online gaming.
Following our advice will certainly offer you a fighting chance in solving these issues as fast as possible, and once you do, our recommendations for preventing them from ever bothering you again can also come in very handy,
There can be many causes that can result in your device not being able to connect to the Internet. We truly hope that our solutions have been helpful and that you’ve resolved this issue.
If you have any questions, feel free to contact us in the comments section below.
If you want to logout from your mail account on your PC, keep reading. Removing an account you no longer use or signing out on a shared computer is helpful if you want to preserve privacy.
Obviously, you can choose to disable the Windows 10 Mail app altogether, but that’s not an option if you share your PC or use other email addresses.
So, let’s see how to sign out of your Windows Mail account:
How do I sign out of the Mail app on my computer?
1. How to sign out of mail on Windows 11
Open the Mail app on your computer and access Settings by clicking on the gear icon.
Select Manage accounts and click the email account from which you want to log out.
Next, choose the Delete account from this device option.
Finally, confirm the action by clicking the Delete button.
Launch the Mail app, and select the Settings icon.
Go to Manage Accounts to see the accounts added to the Mail app.
Select the account that you want to sign out of.
A new Account settings dialog will appear on the screen.
Select Delete account to delete the respective account, signing you out of the Mail App.
Hit the Delete button to confirm your choice.
3. How to sign out of Mail app in Windows 8
Open your email client – it should be located right on your home screen.
Open the Settings by launching the Charms bar (while you are using the email app, swipe the mouse in the bottom right corner of your screen).
From the Charms bar, select Settings, and then choose Account Options.
From that point, you will be able to choose whether to stay logged in or to temporarily disable your Microsoft account.
All you have to do to protect your email account in Windows 8 is to remove (don’t worry, it will be only temporarily) your Microsoft account.
With these simple ways, you get rid of the worries and sign out of the Mail app in Windows 10, 11, or 8. This ensures that you protect and secure your data from others who may have access to your device.
We hope that these recommendations from our list were helpful. For more suggestions or other questions, please access the comments section below.
Today, most of us access the internet on daily basis, and although our internet connections are created automatically by Windows 10, sometimes you need to change your network settings and make certain adjustments.
The simplest way to do that is to use Network and Sharing Center, so today we’re going to explain to you what is Network and Sharing Center and how to use it.
What is Network and Sharing Center and how does it work?
Network and Sharing Center was first introduced in Windows 7, as a part of the Control Panel, and it has remained a part of Windows through Windows 8 and Windows 10.
If you ever used Network and Sharing Center in Windows 7, you should know that it looks almost the same in Windows 10.
The only option that you might miss is the Manage wireless networks option which is now moved to a different place in order to allow users to connect quickly to a certain wireless network or change the wireless settings.
If you never used Network and Sharing Center before, you should know that you can access it with just a few clicks.
How to open the Network and Sharing Center in Windows 10?
1. From the taskbar
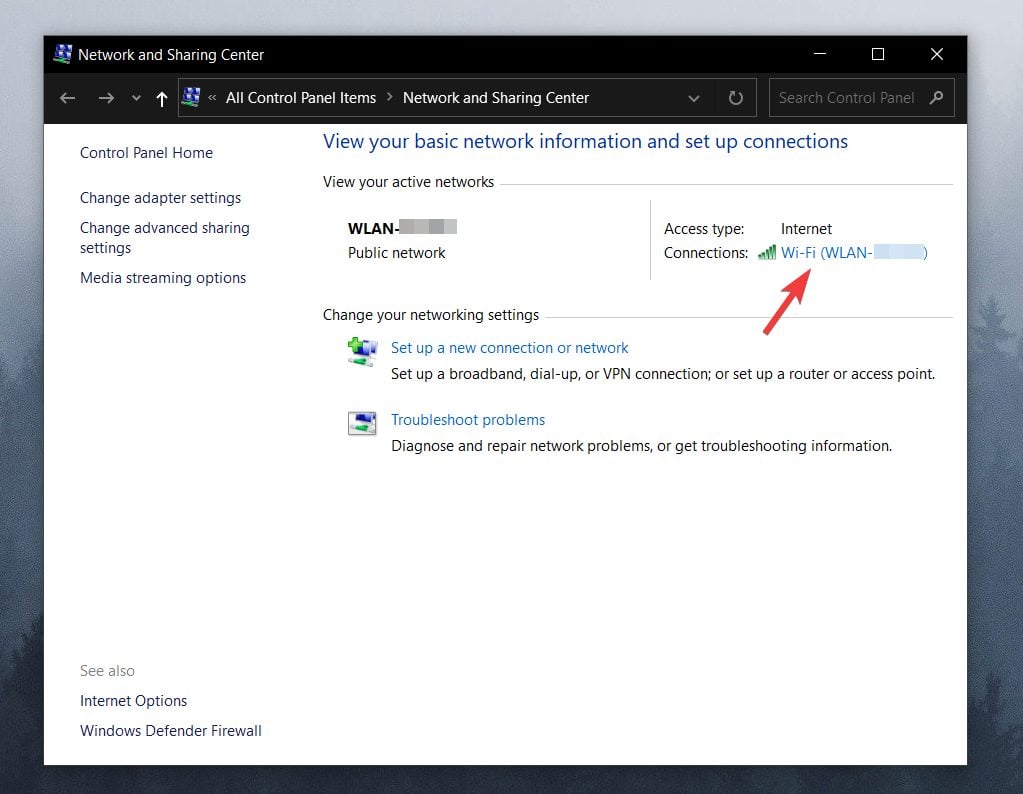
The simplest way to open Network and Sharing Center is to right-click your network icon in the bottom right corner and select Open Network and Sharing Center.
Another way to open Network and Sharing Center is to use Control Panel. To access Control Panel and Network and Sharing Center do the following:
Press Windows Key + X to open Power User Menu. Select Control Panel from the list.
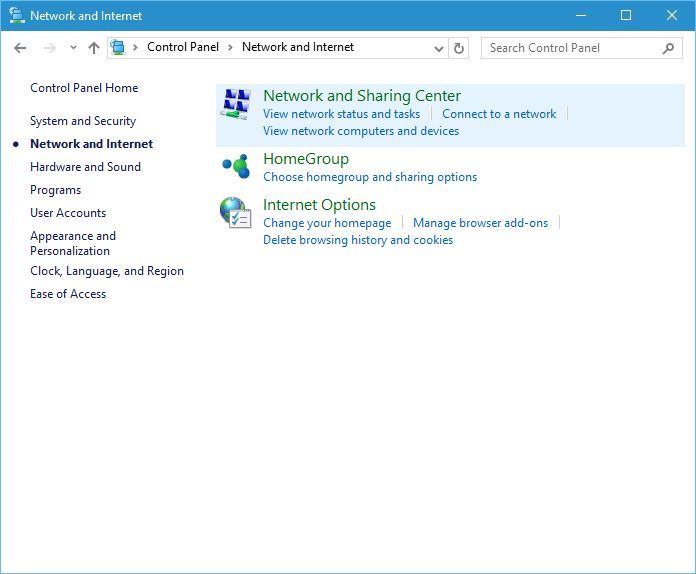
When Control Panel opens, click on Network and Internet section.
Now select Network and Sharing Center.
3. By searching with the search bar
You can also access Network and Sharing Center by using the Search bar. To do that just press Windows Key + S, enter Network, and select Network and Sharing Center from the list of results.
Most users don’t know what to do when the Windows search box goes missing. Readthis article to learn how you can get it back in just a couple of steps.
What are the things that you can do in the network and sharing center?
The first thing that you’ll notice when you open Network and Sharing Center is the View your active networks section.
This section gives you all the important information such as the name of your currently connected network as well as the type of network you’re connected to.
From this section, you can also use create your Homegroup by clicking Ready to create a link.
Homegroups allow computers on the same network to quickly and easily share files and printers, so if you have several computers connected to a network, you might want to create a Homegroup.
Next, there’s a Connections section, and you can click the connection that is listed there to see its details. For example, you can see the speed of your network connection and the number of received or sent bytes.
If you want to know more about your connection, there’s a Details section that shows you the name of the network adapter, your current IP address, as well as your MAC address.
If you want to know more about IP addresses, we already answered what is an IP address in one of our previous articles.
Due to privacy and security concerns, we strongly recommend to secure your network with a reliable VPN (Virtual Private Network). Get now Cyberghost VPN, a leader in the VPN market. It protects your PC from attacks while browsing, masks your IP address, and blocks all unwanted access.
We should also mention that you can disable your network connection from this window by clicking the Disable button.
Sometimes your network connection might have certain problems, and one of the simplest solutions is to disable your network connection and enable it again.
If disabling the connection doesn’t work, you can always use the Diagnose button that will scan for problems and automatically repair them.
Lastly, there’s a Properties button that allows you to update or remove your network driver and configure your network adapter. In addition, by using this window you can also set your IP address to be dynamic or static in your network.
Next, we have changed your networking settings section. In this section, you can create a new connection by using the Set up a new connection or network link.
When creating a new connection you’ll have three options: Connect to the Internet, Set up a new network, and Connect to a workplace.
Depending on what you need, you just need to click one of the options and follow the instructions in order to create a new connection.
If you have issues with your network adapter, there’s a Troubleshoot problems section that allows you to automatically fix various problems.
When you open Troubleshoot problems section you’ll see Internet Connections, Shared Folders, HomeGroup, Network Adapter, Incoming Connections, and Printer options.
By choosing one of these options you’ll run a troubleshooter for a specific option that will automatically scan and fix problems for you.
Does the troubleshooter fail to load with an error? Follow thisuseful guide and fix it in just a couple of simple steps.
There are also several options available in the sidebar. The change adapter settings option will list all network adapters that you have and allow you to quickly disable them, rename them or change any of their settings.
The next option is Change advanced sharing settings, and this option allows you to change how certain network profile works.
For example, you can turn network discovery on or off, thus allowing your computer to see other network devices that are connected to this network.
You can also turn on or off file and printer sharing, and change the way how homegroups work.
The next option is Internet Options, and from here you can change various settings related to your internet connection and Microsoft Edge or Internet Explorer.
The last option is Windows Firewall, and by using this option you can turn Windows Firewall on or off, change firewall rules or block a certain application from accessing the Internet.
Network and Sharing Center on Windows 10 allows you to quickly access both basic and advanced options, and we hope that you now better understand how Network and Sharing Center works on Windows 10 after reading this article.
If you have any other questions, feel free to leave them in the comments section below.
Windows 10’s Calculator app is an invaluable tool that includes scientific and programming modes along with more basic math options.
Yet, some users have said on the Microsoft forum that their Windows 10 Calculator app has disappeared.
The Calculator app can go missing after users upgrade from Windows 7 to 10 or after Windows Updates. These are some of the resolutions that might restore a missing Windows 10 Calculator app.
Click Turn Windows Defender Firewall on or off on the left of the Control Panel applet
Select both the Turn on Windows Defender Firewall checkboxes if WDF isn’t enabled
Click the OK button
4. Reset Calculator’s data
Open the search box in Windows 10
Enter the keyword apps in the search box
Click Apps & features to open the window shown directly below
Select the Calculator
Click Advanced options to open the options shown directly below
Press the Reset button, and click Reset again to confirm
Restart Windows
5. Reset Windows 10
Enter reset in Windows 10’s search utility
Click Reset this PC to open the Settings window as in the snapshot directly below
Select the Get started option.
Select the Keep my files option
Click the Next and Reset buttons to confirm
Need more info on how to factory reset your PC? Readthis article and find out everything you need to know.
Note that you’ll need to reinstall third-party software after resetting the OS. You can also reinstall Windows 10 with the Windows Media Creation Tool.
Select the Upgrade this PC Now option in the Media Creation Tool to reinstall Windows 10 with both your own files and apps retained.
So, that’s how users can restore a missing Calculator app in Windows 10. Remember, however, that there are numerous Windows Calculator app alternatives on the MS Store, such as Calculator X8.
So, you don’t necessarily really need to restore the default Calculator app. You can also check how the Calculator works in Windows 11, including standard, scientific, programmer, and converter modes, by reading our full guide on how to use Calculator on Windows 11.
Do you use Windows 10’s Calculator app, or do you have any third-party software? Tell us about your preferences in the comment section below.
Also since many folks have asked our show is tracking 43 mins long. As outlined in this announcement our goal has been to be as transparent as possible on what dev teams/games to expect to see in the show. Be sure to read the details from the 4 teams:https://t.co/PfitWOIsX5
— Aaron Greenberg ????????♂️????U (@aarongreenberg) January 12, 2023
Note that this runtime does not include the ESO Chapter Reveal Event, which is considered a standalone show. It also does not include anything from the highly-anticipated Starfield, which will get its own standalone event at some as-yet unannounced time.
While 43 minutes may sound like a short amount of time to show off what Xbox fans have to look forward to in 2023, the Developer_Direct showcase will likely eschew any fluff or talking heads and likely feature nothing but in-depth, developer-curated looks at Redfall, Forza Motorsport, Minecraft Legends and, who knows, maybe even a surprise or two.
The Xbox and Bethesda Developer_Direct will livestream on Wednesday, January 25th at 12pm PST/3pm EST. Watch links are below.
Want to learn about SOX compliance tools? Here is all you should know. The Sarbanes-Oxley Act (SOX), passed in 2002, set regulations to safeguard the general public against deceptive or exploitative company activities.
The legislation created a system of internal company checks and balances and promoted openness in corporate financial reporting. We shall examine various SOX-compliant tools in this tutorial that you ought to use.
What is a SOX compliance tool?
A SOX compliance tool is a software tool that helps organizations comply with the Sarbanes-Oxley Act (SOX). SOX is a federal law passed in the United States in 2002.
The law requires companies to maintain accurate financial records and to have internal controls in place to ensure the integrity of their financial reporting.
A few advantages of using these tools include the following:
Automation – These tools automate the process of tracking and reporting financial data, making it easier for companies to maintain accurate records and meet compliance requirements.
Improved internal controls – SOX compliance tools provide tools for monitoring and testing internal controls, which can help companies identify and address potential issues before they become significant problems.
Increased transparency – SOX compliance tools help companies provide more transparent financial reporting by providing detailed information about their financial data and internal controls.
Reduced risk – By using a SOX compliance tool, companies can reduce their risk of non-compliance with the Sarbanes-Oxley Act, which can result in fines and penalties.
Better risk management – These tools also provide features like automated risk management and auditing capabilities, which can help companies better identify, assess, and mitigate risks related to financial reporting.
Now let us introduce you to our favorite SOX compliance tools.
ADSelfService Plus is a self-service password management software with features like single sign-on and multi-factor authentication.
It can help organizations comply with certain aspects of SOX compliance, like secure access to the company’s financial data, by enforcing more robust password policies and protecting against unauthorized access.
It isn’t explicitly advertised as a SOX compliance tool, however. Password management is just one aspect of SOX compliance; other aspects include risk management, financial reporting, internal controls, and regulatory reporting.
Additionally, SOX compliance systems often include built-in reporting capabilities and may assist firms in automating and verifying compliance with the numerous SOX rules. So, we recommend using it in conjunction with other SOX-compliant tools.
Some features that we love include the following:
Password policy enforcer
Enterprise single sign-on
Email group subscription
Self Directory Update
ADSelfService Plus
Simplistic Active Directory (AD) password management<br>with self-service.
ADAudit Plus – Perfect for AD monitoring and auditing
ADAudit Plus is a software tool for monitoring and auditing Active Directory, file servers, and other network resources.
It provides real-time alerts, reporting, forensic analysis of Active Directory user and group activities, and changes to permissions, file access, and other security-related data.
It can help organizations comply with certain aspects of SOX compliance by providing detailed information on user and group activity, password policies, access controls, and other security-related data.
However, it’s not explicitly marketed as a SOX compliance tool. SOX compliance requires organizations to have a robust set of internal controls to ensure the accuracy of financial reporting. This is broader than just monitoring and auditing AD and network resources.
lastly, it can assist with compliance reporting and auditing. Still, to have a complete compliance program, it’s essential to validate that it meets all of the requirements for your organization’s SOX compliance program in conjunction with other tools specifically marketed as SOX compliance solutions.
Some features that we love include the following:
Historical reporting
Compliance reporting
Alerting and notifications
Delegated auditing
ADAudit Plus
Meet SOX compliance by providing detailed information on user and group activity and other security-related data.
Firstly, SolarWinds Security Event Manager (SEM) is a security information and event management (SIEM) solution that provides real-time monitoring, threat detection, and incident response capabilities.
It can help organizations comply with certain aspects of SOX compliance by providing detailed information about network activity, security events, and user activity.
The tool can be a valuable tool for SOX compliance as it provides real-time monitoring and alerts of security-related events, detailed reporting and forensic analysis of user activity, and access to sensitive financial data.
It can also help organizations maintain a comprehensive security audit log, which can be used to demonstrate compliance with SOX regulations.
However, to have a complete compliance program, it’s essential to validate that it meets your organization’s SOX compliance program requirements. Lastly, you can use it with other tools specifically marketed as SOX compliance solutions.
Netwrix Auditor is a platform for IT compliance and risk management that provides a range of features for monitoring, reporting, and alerting on changes to IT systems and data.
It can include auditing and reporting on financial systems and data changes, which can be helpful for organizations trying to comply with the Sarbanes-Oxley Act (SOX) and other regulations.
It’s specifically marketed as a tool that helps organizations to maintain compliance with various regulations, including SOX, HIPAA, PCI-DSS, and others.
Also, the tool provides detailed information on changes to financial systems and data to demonstrate compliance with SOX regulations. In addition, it can help identify and track potential regulatory compliance issues before they become significant problems.
Netwrix Auditor also provides automated compliance reporting, which can help organizations save time and resources.
Furthermore, it can be a valuable tool for SOX compliance by helping to automate and verify compliance with SOX regulations and providing built-in reporting capabilities, typically a requirement for SOX compliance.
But as always, it’s essential to confirm that it meets all of the specific requirements for your organization’s SOX compliance program.
Xbox Free Play Days is back this week. This time around things are a bit different with a sole game offered for this week’s Free Play Days event instead of the typical three. This week from Thursday, January 12th through Sunday, January 15th, subscribers of Xbox Live Gold and Xbox Game Pass Ultimate can install and play I Am Fish to their heart’s content. Let’s take a closer look at the game below.
I am Fish is a charming, physics-based adventure starring four intrepid fish friends, forcibly separated from their home in a pet shop fish tank. Over the course of the game you join them as they swim, fly, roll and chomp their way to the open ocean from the far-flung corners of Barnardshire (the smallest county in England) in their bid for freedom and to re-unite once again.
Games featured in Xbox Free Play Days events are available for purchase at discounts. As you can see above, this week’s selection can be had at a pretty handsome price, especially after the Free Play Days discount.
Some users got stuck in the UEFI Shell after rebooting their PC. For some, the error was preceded by a sudden shutdown while others haven’t experienced anything unusual prior to the EFI Shell error.
Boot loops and BSODs are something every PC user will run into eventually. Below, we’ll explain how to get rid of the UEFI shell error in just a few steps.
How to fix UEFI Shell errors when booting up the PC
1. Plug HDD into a different port
Seemingly, by switching SATA ports some users managed to get out the UEFI. This, of course, points towards some hardware-based issues, so even though your PC might boot into the system, there’s always a fear of HDD or, less likely, motherboard issues.
Try booting again and look for changes. If you’re able to access the Boot settings, make sure that the HDD is at the top of the list. If you can’t see your HDD in the list of bootable drives, we’re most likely looking at a hardware issue.
2. Disable MSI Fast Boot or UEFI Boot in BIOS
Every motherboard OEM has a few specific settings. Albeit, some of them are gimmicks, features like MSI Fast Boot are frequently used to speed up booting into the system.
However, it seems that this feature doesn’t work as intended with Windows 10. Some users were able to get out of the UEFI Shell when it’s stuck by disabling this feature.
Alternatively, if you have UEFI boot somewhere within the UEFI settings, do disable it. This is another possible reason for the issue at hand. In addition, try resetting UEFI settings to factory defaults. That way you’ll be sure no changes were made.
3. Remove the CMOS battery
If the BIOS/UEFI configuration is corrupt, you have to remove the CMOS battery.
That way, all cached configurations will be reset and you should be able to boot into the system
Just power off your PC and remove all cables. Access the inside of the case and, somewhere in the middle of the motherboard, you should see a hand watch battery. Remove it and re-insert it.
In case you have alternative solutions when your UEFI Shell is stuck on boot, we forgot to mention, make sure to tell us in the comments section below.
Are you looking for the best tools to password lock .exe files? We’ve got the best tools enlisted for you in this post.
There are times when people like their privacy and choose to keep their personal things safe and secure, but they don’t know how to go about this.
Our computers and other digital devices have over the years become a very important part of our day-to-day activities, due to the frequent use of certain programs, we keep personal files on them and sometimes want to keep them password-secured.
Keeping files secure is one of the safest ways to protect them from alterations of any kind. Files like .exe files are no exception but not everyone keeps their .exe files secure.
A lot of tools are available for download to keep these files but only a few really take the time to secure and protect them against any third-party influence.
We have carefully highlighted the best software to lock your .exe files and they are professionally trusted and recommended, check below:
Password lock executable files using any of these tools
Topping off our list is a software tool that many would not think about when it comes to file protection.
WinZip is probably known by most of you for its ability to compress and unzip files, but it has evolved to be much more than just that.
For example, not only can it now compress your data into the most size-efficient formats, but they are also encrypted and locked, so only the one that knows the password will ever get to see the contents.
More so, after the program is done compressing and password-protecting the file, you can go ahead and share it either on cloud storage services like Google Drive or OneDrive or send it to social media platforms.
Here are some of the perks of using WinZip:
Best compression technology around
Password-protection for archives
Makes it easy to share your data
Banking-level encryption
Easy-to-use
Winzip
Password-protect your data, encrypt it, compress it, and allow it with this amazing multi-purpose tool.
Gilsoft EXE Lock is quite a useful tool that blocks any unauthorized access to .exe files whenever an attempt is made to launch the executable files.
The tool is also built to enable you to give access to certain people to your files. On the other hand, the simple interface of this tool makes it easy for anyone without a technical background to password lock .exe files.
The software protects you as well from any spyware or other viruses that may infect your computer. So it can efficiently lock your executable files while protecting you from serious damages provoked by malware.
Gilsoft EXE Lock features:
Command-line support.
Lock with a secure cryptographic algorithm.
Eliminate viruses modifying software.
Secure access to personal files.
Gilisoft EXE Lock
Eliminate the risk of exposing important data from your PC and get password locking with Gilisoft EXE Lock.
This is an easy-to-use freeware program that makes it easy for Windows users to password lock .exe files and applications.
KakaExeLock runs an algorithm that modifies the binary to be executable such that only if a valid password is put in will the file be opened. However, It works basically on Windows XP up to Windows 10.
Therefore, with its practical features, this software is best suited to prevent risky access to your EXE files and also helps with restricting access to your files by the command line.
KakaExeLock features:
Protected .exe files still work fine on a different machine.
This is an easy-to-use tool that helps Windows users to lock .exe files with a secure password. Renee File Protector requires first-time users to set a master password and email address; this will give them secure access to password lock .exe files.
This loud software can provide great assistance with your PC files, helping with protection for external disk data as folders in external memory devices.
Hence it will guard your system with shared data security using passwords for shared files or folders. Plus, you can hide a lot of files, protect them from unauthorized changes, or safely delete the files.
Renee File Protector features:
Ability to password-protect data in the shared folder
A guest password is provided for access to others.
Provide other functions like hiding, protecting, lock, monitoring, encrypt,ing and also safe delete functions
Aptio Setup Utility can sometimes get stuck on your ASUS laptop and this can be a major issue. However, there’s a way to deal with it, and today we’re going to show you how to fix Aptio Setup Utility.
But first, let’s have a closer look at the various issues that can arise in connection to it:
Aptio Setup Utility stuck
Asus laptop stuck in Aptio Setup Utility – In this case, we are talking about an Asus laptop stuck in Aptio Setup Utility loop
Aptio Setup Utility keeps popping up
Aptio Setup Utility no CSM option
Now, the issue is by no means exclusive to a particular laptop model, however, Asus Ultrabook and Asus Vivobook seem to be more prone to the Aptio Setup Utility stuck issue.
Furthermore, you are likely to encounter this anomaly across all Windows versions. Don’t worry, though, we’ll show you how to exit Aptio Setup Utility on Windows 10, 11, or 7. But why does Aptio Setup Utility appear?
What is Aptio Setup Utility?
Custom BIOS options are not a rarity. AMI has its own BIOSUEFI called Aptio Setup Utility and it mostly comes with ASUS desktop computers and laptops. This is commonly known as Aptio Setup Utility American Megatrends INC.
Now, there’s not a large difference between this and other BIOS setups, if it’s not for the one isolated problem that bothers a multitude of Asus users.
And that’s a sudden halt that prevents them from booting into Windows 10.
Allegedly, they’re stuck in this setup utility with every new restart which results in a never-ending loop. Our first thought in this matter is an HDD malfunction which can be caused by:
A faulty HDD that won’t boot
Non-factory HDD replacement won’t boot
On the contrary, if you’re 100% sure that your HDD is working fine or that its replacement is supported and connected properly, there are some steps you can take to overcome the Aptio Setup Utility Asus stuck issue.
In order to help you, we provided a few solutions to show you how to get past Aptio Setup Utility. Make sure to check them out.
How do I fix my ASUS computer stuck on the boot screen with Aptio Setup Utility?
1. Restart your computer to fix Aptio Setup Utility
Sometimes the simplest solutions are the best, and several users reported that they fixed the problem with Aptio Setup Utility simply by restarting their PC.
This sounds like an obvious solution, but several users claim that this fix worked for them, so you might want to try it out.
Now, it’s true that Aptio Setup Utility stuck is a severe and widely recognized problem, but, sometimes, the most complex issues can be resolved in a simple manner.
Just reset your computer several times and look for changes. In case you’re still stuck in BIOS limbo state, make sure to check the additional steps. We provided those below.
Enter Settings and look for the Reset Configuration Data or Factory reset options.
Reset BIOS to factory data and save changes.
Exit Aptio and reboot your PC.
If the previous solution didn’t work for you, you might want to try resetting your Aptio Setup Utility BIOS. By doing so, you might be able to fix this and other problems caused by improper BIOS configuration.
How do I reset my computer from Aptio Setup Utility? If you’re not sure how to reset BIOS settings, follow the instructions listed above.
The Aptio Setup Utility Factory Reset, respectively Aptio Setup Utility Restore Defaults (Reset Configuration) options should work just fine.
However, in case you’re unable to access these settings, there’s an additional, manual way to do it.
By removing the CMOS battery from the motherboard, you’ll most certainly restore your BIOS to factory configuration and thus resolve issues.
Turn off your computer.
Turn off the power switch on the back and unplug the power cord. If you’re using a laptop, make sure toremove the battery.
Press and hold the power button for a minute or so to completely discharge your PC.
Before you continue with the hardware meddling, make sure to touch the metal surface in order to discharge your body’s static electricity.
The CMOS battery should be a standard wristwatch flat battery. Remove it carefully by moving the side pin.
Wait for a short period of time and put the battery back in its socket.
Turn on your PC and look for changes.
This is how you perform a CMOS reset. Don’t forget to reinstall the battery and restart your Asus laptop when you’re done.
3. Enable CSM and disable Secure Boot
Restart your PC and enter Aptio Utility settings.
Select Security, then Secure boot.
Choose Disable Secure boot.
Save and exit.
Now, this won’t resolve your Asus laptop stuck Aptio Setup Utility loop, so restart your PC once more.
Wait for it to load Aptio Utility settings again and open the Boot section.
Navigate to both Secure boot and Fast boot and disable them respectively.
From the same menu, enable CSM and save changes.
Restart your PC and wait until it boots into Windows.
Some users also mentioned the Aptio Setup Utility no CSM option issue.
How do I get out of Aptio Setup Utility no launch CSM? It’s easy to leave the Aptio setup even in this case. All you need to do is disable both Secure and Fast boot and re-enable CSM (Compatibility Support Module).
Namely, both Secure boot and Fast boot can instigate problems with HDD, especially if you replaced the factory HDD and placed an alternative storage device.
This goes especially for Asus-produced laptops and it’s a security measure with the main purpose to protect your data.
Insert the blank DVD or plug in thecompatible USB flash drive(4GB).
RunMedia Creation Tool and accept the License Terms.
Choose Create installation media (USB flash drive, DVD, or ISO file) for another PC and click Next.
Choose the preferred language, architecture, and edition, and click Next. Make sure to select the version you have the license key for.
Select USB flash drive or ISO depending on your media of choice and click Next.
Once the setup download is completed, you can either continue with the procedure with USB or burn the ISO file to DVD and move from there.
Finally, once we prepared everything,restart your PC.
In the Aptio Utility BIOS settings, navigate to the Boot section.
ChooseUSB flash drive or DVD-ROM as the primary boot device. Save changes and restart your PC again.
From here, your Windows setup files should start loading. Just follow the instructions and you should be good to go.
Finally, If you’re positive about your HDD health status, you can reinstall the system again. If not, you can easily check your HDD health with specialized tools to be absolutely sure.
Basically, what you’ll need to do is to use an alternative PC to create a bootable media (USB or DVD) and try to boot from it.
Finally, as we already stated, these solutions count only if your HDD is completely functional. If that’s not the case, you might want to replace it accordingly and start from there.
We hope this was a helpful read. In case you have questions, suggestions, or alternative solutions we haven’t mentioned, feel free to tell us in the comments below.
Titled “Humanity Ends Here,” the trailer shows off both cutscene clips and gameplay footage, all of which is utterly stunning (and also not for the squeamish, so be warned).
The original Dead Space from 2008 is considered among the greatest survival horror games ever made. We even featured it on our Game Pass horror games recommendations post. Set on the Ishimura—a spaceship overrun with monstrous Necromorphs—the game was lauded for its spine-tingling atmosphere. Creator Glen Schofield has moved on to other things, specifically the recently released The Callisto Protocol. However, the remake is likely in good hands over at EA Motive Studios.
You can use them to play mobile games, run apps from the Google Play store, and even test your apps if you’re a developer.
The emulator market is huge. Choosing the best one for you can be challenging. That’s where we come into play. In this article, we will show you the best lag free Android emulators. Let’s check them out.
What are the best Android emulators that don’t cause lag?
LDPlayer is at the top of our list because playing Android games on your PC will feel seamless.
Your games will run as smoothly as possible. The only limit is how big and complex the game is, and how powerful your PC is. But the emulator will not be a hindrance in any way.
More so, the software is completely free. It won’t show you any ads, and it supports all but the latest games added on Google Play, but its library is constantly updated to include those as well.
LDPlayer
Lag-free gaming from an emulator is only possible if the emulator is top-tier, and that’s exactly what LDPlayer is!
BlueStacks – ultimate gaming with customizable controls
BlueStacks is another extremely popular emulation software that allows you to run a virtual device with an Android OS running.
This software can be used for a wide range of tasks. The most popular by far is the playing of Android games on a bigger screen.
You can also install any app from the Play Store or Bluestacks Apps Store, and use them the same way you would if you had a physical device in your hands.
You can easily customize gaming controls, can run multiple instances of BlueStacks. And if your computer’s hardware is up to par, can even run multiple games at once.
BlueStacks
Lagging during games isn’t fun at all. Get the best out of your online gaming with BlueStacks!
NoxPlayer – powerful emulator with extensive customization
NoxPlayer is an incredibly powerful Android emulator with a user-friendly and easy-to-understand interface.
It gives you the ability to play your favorite Android games on your PC with a bigger screen and has a wide range of customization options.
You can customize the settings of NoxPlayer, including the size of the screen (full-screen 720p and Full HD capabilities), DirectX, and OpenGL features.
This software also has a great set of features that are organized into a toolbar on the right side of your screen.
You can use the options found on this toolbar to modify the orientation of your screen (from portrait to landscape), transfer files between your virtual device and PC hard drive, take screenshots, and many other options.
NoxPlayer supports 3 different Android versions: Android 4.4.2, Android 5.1.1, and Android 7.1.2.
You can find a very useful list of information on how to use NoxPlayer on the official FAQ page.
MEMU Play – versatile with custom controls and 4K support
MeMu Play is a powerful Android emulator for PC that excels in both app and game emulation, comparable to NoxPlayer and BlueStacks.
Tailored for gaming, it provides extensive customization options, including keyboard mapping for touch screen games.
The Smart Keymapping feature is particularly useful for MOBA and FPS games, making it ideal for titles like PUBG Mobile and Mobile Legends.
MeMu Play supports both Intel and AMD chipsets and is compatible with Windows 7 through 10.
It also allows easy APK installation, screen recording, and macro automation. Developers benefit from advanced options like virtual device model customization.
Ko Player – fast, lightweight, with multi-account support
Ko Player is another great contender for the best software option that allows you to emulate Android OS on your Windows PC. After the emulation, you can access any android apps or games, and play/use them on a bigger resolution screen.
This software is built on x86 Architecture, supports OpenGL and hardware acceleration, and offers great stability.
You can use multiple accounts with this software, has video recording capabilities, and also allows the use of both gamepads and keyboards.
Because this is a lightweight software option and doesn’t have the same amount of features as NoxPlayer or BlueStacks, makes Ko Player one of the fastest emulation software on the market.
Droid4X is another lightweight and free android emulator that works perfectly on Windows operating systems. You can use this software to easily play your favorite games and apps on a bigger screen.
One of the most interesting features of Droid4X is the number of resources it needs to run. Compared with NoxPlayer and BlueStacks, this software offers great emulation capabilities even for low-end computers.
You can easily record your emulated device’s screen, and can also configure gamepads and keyboards to suit your needs perfectly.
Android is one of the most popular mobile operating systems in the world and it is used on a wide range of phones, tablets, etc.
In this article, we explored some of the best Android-emulating software on the market in 2019. If you have a powerful computer with lots of RAM and processing power, the best option for you would be NoxPlayer.
Otherwise, if your computer is average in its performance, we would recommend that you try out BlueStacks or MeMu Play. If your computer is not very powerful, you might want to check out Ko Player, or Droid4X.
For users operating on the latest systems, our updated guide on the best Android emulators for Windows 11 offers insights into emulators optimized for the newest OS.
If you’re working with older hardware, consider exploring our recommendations for Android emulators suitable for old PCs, ensuring smooth performance without taxing your system. Additionally, for those seeking an uninterrupted experience, our list of Android emulators without ads highlights options that prioritize a clean user interface.
The features found in the software presented above will surely cover all your needs regarding playing games or running any Android application on an emulated virtual device.
We would love to know what your opinion about this software is. Please feel free to let us know in the comments section below.
You must have found this guide because you are considering using some File Integrity Monitoring software.
In this article, we have explored all the options and have arrived at some that you should prioritize. So without wasting much time, let us take you through all you need to know.
What is a file integrity monitoring tool?
FIM (File integrity monitoring) is a security tool that monitors and tracks changes you make to files on a computer or network. This can include file permissions, ownership, content, and metadata changes.
FIM tools can alert administrators of unauthorized file changes, helping to detect and prevent potential security threats such as malware or insider attacks.
Benefits of file integrity monitoring include:
Detecting malicious changes – FIM can help detect malicious changes to files. These are those made by malware or an attacker who has gained unauthorized access to a system.
Compliance – FIM can help organizations comply with regulations that require them to keep track of changes, such as financial records.
Identifying configuration errors – FIM can help identify configuration errors. Examples are the accidental deletion of important files that could cause a system or application to malfunction.
Auditing – FIM is useful for monitoring a system’s changes. They also keep track of any changes made over some time.
Real-time monitoring– Some FIM tools support real-time monitoring that alerts when changes are detected. Others are schedule-based, so the administrator can decide when the check should be run.
It’s a good security practice to use file integrity monitoring to ensure network security for important files and systems.
What Windows File Integrity Monitoring software should I use?
ADAudit Plus is a commercial, web-based Active Directory (AD) auditing and reporting tool. It monitors and tracks changes to AD and Windows-based systems, such as file and Exchange servers.
This tool offers real-time auditing and reporting of AD changes such as user account creations, deletions, modifications, group policy changes, and security settings.
It also provides detailed information about the changes, such as who made the change, when it was made, and the specific attributes that were modified.
Additionally, it offers historical reporting because it stores all the AD audit data in a database, allowing you to generate historical reports on changes made over a specified period.
Finally, ADAudit Plus is available for Windows-based systems and requires a Windows-based server.
Some features that we love:
Compliance reporting
Delegated auditing
Alerting and notifications
Historical reporting
ADAudit Plus
Great audit tool that offers comprehensive file audit and monitoring.
AD Manager Plus – Web-based Active Directory (AD) management tool
AD Manager Plus is a commercial, web-based Active Directory (AD) management and reporting tool. It provides a centralized platform for managing and reporting on AD and Windows-based systems, such as file and Exchange servers.
The tool offers Active Directory management with elements like managing and creating user accounts, groups, and organizational units (OUs), resetting user passwords, and managing group policy objects (GPOs).
Also, AD Manager Plus can perform bulk management tasks, such as creating or deleting multiple user accounts, resetting multiple user passwords, and moving numerous user accounts between OUs.
Furthermore, it provides a variety of built-in reports for auditing and reporting on AD, such as reports on inactive user accounts, locked-out user accounts, and GPO usage.
We like it because it allows you to delegate AD management tasks to other users, such as helpdesk administrators or departmental managers while maintaining central control and oversight.
Like ADAudit Plus, AD Manager Plus is available for Windows-based systems and requires a Windows-based server.
Some features that we love:
Active Directory management
Bulk management
Reporting
Delegated administration
AD Manager Plus
An integrated tool for AD (Active Directory), Skype for Business, Exchange, Office 365, and G Suite management and reporting.
Tripwire – Great in preventing unauthorized changes
Tripwire is a well-established file integrity monitoring (FIM) tool designed to help organizations detect and prevent unauthorized changes to files and directories on their systems. In addition, it can monitor files and directories on both Windows and Linux systems.
One of the main features of Tripwire is its ability to take a snapshot of a system’s files and directories and then compare this snapshot to the current state of the system to detect any changes.
This can include file permissions, ownership, content, and metadata changes. When changes are detected, Tripwire can generate alerts, create detailed reports, and even take automated actions to remedy the issue, such as rolling back changes or quarantining affected files.
Tripwire can be configured to monitor specific files or directories. It can also be integrated with other security tools, such as intrusion detection systems and log management tools, to provide a more comprehensive security solution. It also has a command-line interface and API, allowing programmatic access and integration with other tools.
Tripwire is available in two versions: Tripwire Enterprise, which is a commercial product that offers additional features such as centralized management and reporting, and Tripwire Open Source, which is a free, open-source version that provides basic FIM capabilities.
Overall, Tripwire is a widely used and respected FIM tool designed to detect and prevent unauthorized changes to files and directories. Hence, it helps to detect and prevent potential security threats such as malware or insider attacks.
Some features that we love:
Security monitoring for hybrid environments
Automatic on and offboarding for Cloud Assets
Automated, flexible multi-policy compliance
Managing failed configurations with workflow tools
OSSEC (Open Source Security) is an open-source intrusion detection system (IDS) and intrusion prevention system (IPS).
the tool will provide a centralized platform for analyzing security-related data, such as system logs and network traffic. OSSEC can detect and respond to various security threats, including unauthorized access attempts, malicious software, and system misconfigurations.
One of the critical features of OSSEC is its ability to perform log analysis and event correlation in real time. This allows the system to detect and alert potential security incidents as they happen rather than relying on historical data.
OSSEC includes several built-in security rules and is configurable for integration with third-party security tools. These, in most cases, are antivirus software and firewalls.
OSSEC is available for many operating systems, including Windows, Linux, and macOS. Also, you can install it on servers, workstations, and network devices.
CrowdStrike Falcon FileVantage is a feature of the CrowdStrike Falcon platform that allows organizations to quickly and easily search, identify, and manage sensitive files across their network.
It uses advanced machine learning and data classification techniques to automatically identify and classify sensitive files, such as those containing personally identifiable information (PII) or other types of sensitive data.
This allows organizations to manage and secure their sensitive data more effectively, reducing the risk of data breaches and other security incidents.
Lastly, Falcon FileVantage can also perform eDiscovery, compliance reporting, and data leak detection.
To summarize, file integrity monitoring solutions are crucial to your company’s security. They guarantee that your important files and their data are secure from internal and external threats.
Therefore, it is a crucial line of defense in your company’s security and is necessary for all businesses.
Lastly, we have not made this list in any particular order, so you should use what seems best.
Windows 10 displays shortcuts on its desktop with icons, which are a significant aspect of the platform’s themes, and you can always change Windows file icons if you want to customize it further.
If you fancy giving Windows a bit of a makeover, customizing desktop icons is an excellent way. You can create your own custom icons for desktop shortcuts. All you’ll need to set up your own icons is one art (or graphic) design application and this guide, so let’s get started, shall we?
What do I need to know before I make an icon?
Before you create an icon, you need to follow the following guidelines:
Use the proper software – You can create icons in any drawing software, but for simplicity, you might want to use icon maker software instead.
Set the correct size – Icons require you to use a certain size, and the best results are achieved when using 16x16px, 20x20px, 24x24px, and 32x32px sizes.
Use the ICO format – All icons require ICO format to work, so be sure to save them in that format. You can also use convert icon software to transform them to the desired format.
You can draw a picture on your icon’s canvas by selecting Brushes. You’ll need to select Marker or Pixel Pen at a 1 px weighting.
To add lines and two-dimensional shapes, select the 2D shapes tab. Then select a line, curve, or shape option there.
Paint 3D’s 3D shapes tab includes various options for adding three-dimensional shapes and models to your icon. Click 3D shapes to open that tab.
Select a 3D object or model option on the sidebar. Then hold the left mouse button and drag the cursor right to expand the selected shape, so it fits within your icon’s canvas.
Click the shape on the canvas to open its rotation options as in the shot directly below.
Save the icon design as an image
When you’ve finished your icon design, click Menu and then select Save As. Lastly, choose Image.
If you added a 3D model to your icon, an image preview will open as in the snapshot directly below. Select PNG on the Save as type menu.
Press the Save button.
Select a folder to save the PNG image in.
Select 2D – PNG as the file format.
Enter a title for the image, and click the Save option.
How do I convert a JPEG to an icon in Windows 10?
You can convert PNG, JPEG, and JPG files to icons at the Online-Convert website. So, open that website’s Online image convert page in a browser.
Click Choose files to select the icon PNG you set up in Paint 3D.
As you can see, creating an icon is simple; once you’re done, you just need to change the icon manually. If you don’t know how to do that, we have a special guide on how to change icons in Windows, so be sure to check it out.
Raspberry Pi allows users to connect third-party cameras that plug directly into the CSI connector on the Raspberry Pi. However, at times you may encounter the Raspberry Pi camera not detected issue after installing a new one or accessing the existing camera hardware.
This problem can occur due to several reasons including a faulty camera, incorrect installation of the capturing device, loose connection, and incorrectly configured raspi-config file.
I have Picamera v1 which I have been using Rpi3 for a while now and it has been working properly. Yesterday I updated RASPBIAN and now the camera doesn’t work.
If you are also troubled by this issue, here are a couple of troubleshooting tips to help you resolve the Raspberry Pi camera not detecting a problem.
What to do if my Raspberry Pi does not detect the camera?
1. Perform a power cycle
Power off your Raspberry Pi device and disconnect the HDMI and other cables that are connected.
Press gently on the SUNNY connection on the camera until you hear a click that will reseat the connector.
To keep the device powered off, check the ribbon cable, and make sure it is connected the right way and in the right socket. The cable is connected to the socket next to the HDMI and Ethernet ports.
Also, make sure the camera is fully home in the connectors on the Raspberry Pi and the camera.
Make sure the lens is not detached from the camera board.
Power on the device and test again to see if the error is resolved.
2. Enable the camera from the Raspi-config file
For the camera to work, you must enable it from the Raspi-config > Interfacing options.
Go to Raspi-config and open Interfacing Options.
Select Camera and follow the prompt to enable the camera.
Next, go to Raspi-config > Interfacing Options and then enable I2C.
Exit Raspi-config and check if the issue with your camera is resolved.
Check for hardware issues
If the issue persists, and you have made sure the camera is enabled in the raspi-config file as well the camera is seated correctly, check if the camera has hardware faults.
For testing, connect the camera to another Raspberry Pi device and connect it to your PC.
Test the camera to see if it is working.
If the issue persists, you may have a faulty camera unit that requires replacement.
The Raspberry Pi camera not detected issue usually occurs if the device is not enabled from the Raspi-config section.
In other cases, Raspberry Pi may fail to detect the camera if it is not correctly seated or has a loose connection. Follow the steps in the article and let us know which method helped you resolve the issue in the comments.
Telegram Desktop for both Windows 10 and 11 has gotten an update in the Microsoft Store moving the app version to 4.5.3. With the new version, numbers come a few notable feature enhancements as well.
You can now hide media by wrapping your photos and videos in a “fuzzy cover” meaning users have to click on them before seeing their content. You also have the ability to set your own picture for each contact, and only you will be able to see those pictures on their profiles. Those using Telegram for large group chats now have more privacy options, the group owner can hide the list of participants in the group from view.
Recent updates and features also include the ability to create an @username from the settings page, a download manager, and new features for live streaming. If you want more there is a Telegram Premium offering that offers free storage in the Telegram Cloud and the ability to send files up to 4GB in size. You can learn more about those options here.
Magic Mouse is an Apple mouse that users can also utilize within Windows 10. However, some users have stated in forums that Magic Mouse scrolling doesn’t work in Windows 10. Those users can move the cursor with the mouse but can’t scroll down windows.
Why Apple’s Magic Mouse 2 scroll is not working?
Firstly, install the AppleWirelessMouse64.exe driver from Boot Camp. These drivers seemingly work with Windows 10 perfectly and make the mouse fully functional in Windows 10. If that doesn’t help, install the Magic Utilities client application or uninstall conflicting software.
See the instructions for the aforementioned solutions below.
Fix Magic Mouse 2’s scrolling not working in Windows 10
1. Install AppleWirelessMouse64.exe From Boot Camp
A lot of users have fixed Magic Mouse scrolling by reinstalling the driver for the mouse from Boot Camp. To do that, users will need to download Boot Camp by clicking Download on the Boot Camp Support software page.
Open File Explorer’s window by pressing the Windows key + E hotkey.
Next, open the folder that includes the downloaded BootCamp ZIP.
Select the BootCamp ZIP, and click the Extract all button.
Click Browse to choose a folder to extract the ZIP file to.
Select the Extract option.
Open the \BootCamp5.1.5621\BootCamp\Drivers\Apple path in File Explorer.
Click AppleWirelessMouse64.exe in the Apple folder to reinstall the driver.
2. Install Magic Utilities
Users have confirmed they’ve fixed Magic Mouse 2 scrolling with Magic Utilities. There’s a 28-day trial package of Magic Utilities users can try out. After that, however, users will need to purchase a one or two-year subscription for the software. This is how users can add Magic Utilities to Windows.
Click MagicUtilities-Setup-3.0.7.0-Win10.exe on the software’s download page to get the installer for Windows 10.
Open the Magic Utilities setup wizard.
Select the NO, my computer is not an Apple computer option.
Restart Windows after installing Magic Utilities.
3. Uninstall Conflicting Software
More general mouse scrolling errors can be due to conflicting third-party software. So, some users might need to uninstall conflicting third-party mouse software to fix Magic Mouse 2’s scrolling. Follow the guidelines below to remove conflicting software.
Right-click the Start button and select Run.
Enter ‘appwiz.cpl’ in Run and click OK to open the uninstaller window.
Then selecting any third-party mouse software listed there that might conflict with Magic Mouse.
Select the Uninstall button to remove the selected software.
Alternatively, users can clean boot Windows to ensure there isn’t any software conflicting with Magic Mouse. To do that, enter ‘msconfig’ in Run and click OK.
Select the Selective startup, Load system services, and Use the original boot configuration options on the General tab.
Deselect the Load startup items check box.
Select Hide all Microsoft services check box on the Services tab.
Then press the Enable all button, and select the Apply option.
The above resolutions will probably fix Magic Mouse 2 scrolling for most users. If further fixes are needed, however, it might be a hardware issue. In this case, users can return Magic Mouse 2 peripherals to Apple for repairs so long as they fall within their one-year warranty period.
Quick Access on Windows is a feature giving fast access to folders and files that are frequently used. It’s a holdover tool from Windows 10 but had its start on Windows 7 when it was known as Favorites.
It’s a pretty ubiquitous feature that many use quite often. As you can imagine, Quick Access not working can be pretty annoying. Fortunately, fixing it is really easy to do.
What causes Quick Access to malfunction?
Now before we go into the fixes, it’s important that you understand why it happens in the first place. That way, if it happens again, you know what to look out for and what to do.
Windows 11’s cache is full: Caches are temporary files that Windows keeps in case it needs them again in the future. But too many can cause performance problems.
Your computer is not up to date: Not downloading the latest updates can also cause performance problems which is why it’s important to keep up with all Windows updates.
What can I do if Quick Access is not working properly on Windows 11?
There are five main ways to fix a malfunctioning Quick Access feature, but before going into what they are, we recommend trying out a few faster ones. These will only take a few seconds:
Remove the offending pinned folder by right-clicking it and selecting Unpin from Quick Access. Then repin that same folder.
If that doesn’t work, make a new folder with the same name in the same location as the problematic folder. Unpin the offending folder and see if Quick Access connects to the new one.
Create a new user account for Windows. When you do this, make you change the account type to Administrator and not the Standard user so you can make future changes.
1. Delete a corrupt file in the App Data folder
Open File Explorer, then copy and paste the following into the address bar: %AppData%\Microsoft\Windows\Recent\AutomaticDestinations
Locate the file called f01b4d95cf55d32a.automaticDestinations-ms as shown in the image below.
Delete that file.
After you delete that file, it should automatically remake itself shortly afterward free of its corruption.
2. Clear out File Explorer history
Open File Explorer and click the three dots at the top of the window.
Select Options.
Under the Privacy section, check off all boxes and click the Clear button underneath.
Click OK to close the page.
Now return to the Options window you just closed.
Check the boxes under Privacy, then click Apply and OK right after.
Additionally, select Restore Defaults at the bottom of Options, but this is optional.
Performing that last step will reset the File Explorer’s options to their default setting which will resolve files and folders not appearing on Quick Access.
However, it does have the additional effect of removing any and all customizations you may have made.
Launch the Settings menu and click the Personalization tab.
Under Personalization, go to Start.
Turn on the toggle switch next to Show recently opened items in Start, Jump Lists, and File Explorer.
4. Clear out Quick Access corruption
Use the Command Prompt on the Windows Search bar and select Run as administrator.
In the Command Prompt, type in the following three commands, one after the other, and press Enter on your keyboard after each one: del /F /Q %APPDATA%\Microsoft\Windows\Recent\*del /F /Q %APPDATA%\Microsoft\Windows\Recent\AutomaticDestinations\*del /F /Q %APPDATA%\Microsoft\Windows\Recent\CustomDestinations\
Close the Command Prompt and restart your computer.
5. Reset Quick Access
Launch the Windows 11 Registry Editor from the Search bar.
If a User Account Control window appears, select Yes.
Type the following into the address bar of the Registry Editor and press Enter on your keyboard: HKEY_CURRENT_USER\Software\Microsoft\Windows\CurrentVersion\Explorer\Ribbon
Delete the binary DWORD QatItems.
Close the Registry Editor once you’re done and restart your PC.
The data that’s inside QatItem helps Windows to remember the preferences you have for the Quick Access Toolbar. Deleting it resets the data.
Interestingly enough, for such a simple feature, Quick Access has been known to have several errors associated with it. One involves folders not unpinning from Quick Access.
News of this error cropped up a few years ago but has been known to continue on Windows 10. You should reset the Quick Access Recent Items list to solve this.
Other users have reported Quick Access has disappeared from their File Explorer; that it’s been deleted. You can either restore Quick Access itself or reset File Explorer altogether.
Feel free to leave a comment below if you have any questions about other Windows 11 problems. Leave a suggestion about guides that you’d like to see or information on other Windows errors.
Microsoft dropped a hefty update for its Q&A platform that brings new UI, new functionality and new features for anyone who is seeking information about the company’s multitude of services, software, hardware and platforms.
We launched Microsoft Q&A v2 last night and you can now find improvements to Q&A on Microsoft Learn that make it easier than ever to get high-quality answers to your questions about Microsoft technologies through a global, community-driven platform.
An improved user experience that is optimized for readability, improved workflows and efficiency.
There is now support for themes. The view will default to following the one in place by the operating system but users can manually change the setting with support for those making use of High Contrast for accessibility.
The team also updated its web editor for entering questions and answers with a new feature loaded Markdown interface. Users can drag/drop, copy/paste, or browse for image attachments to include their posts as well as entering preserved formatted content pulled from other places.
Users will now note there is a unified search option across Microsoft Learn content and the Q&A platform for quicker access to solutions. The new Search will show a question preview of up to 255 characters which should be enough to know whether links are useful before clicking. The Q&A team is looking to revise the filtering and sorting capabilities of Search soon.
The team introduced a content rating system that users can utilize to identify useful answers as well as a mechanism for switching ratings to better answers down the road. Any authenticated user can click on I have the same question control, so users answering can find out the most popular questions.
For the social butterflies out there, the Q&A team added support for sharing answers outside of the Q&A platform.
Steps to share:
Go to a question.
Click on the overflow menu (the icon with three vertical dots) at the top of the page.
Select the option to share the content to Twitter, Facebook, LinkedIn, or Mail.
Users can opt for site-wide banner notifications or platform announcements as well as receiving info via email.
User reputation enhancements now include affiliation, reputation points, and follows.
Lastly, there is the list of features that have been swapped with newer solutions as well as those that are unsupported at this time.
The following is a list of features that are no longer supported:
Posting feedback. Microsoft is in the process of unifying product feedback and will be moving Learn platform there in the future, this includes Q&A. In the meantime, you can provide us feedback by using the Microsoft Q&A tag.
Threaded comments (a comment on a comment). This is to ensure a more focused conversation to get the question answered as improve readability.
User’s page
Ability to see revisions
RSS Feeds
As someone who used to frequent forums, communities and feedback hubs for several products and software, these new features are a welcome addition. Hopefully, I won’t have to use them often.
Using the best network monitoring tool is essential for any business, be it big or small. This allows the business to keep all the information centralized and access all those who need it, with proper authorization. Also, a network monitoring tool lets you know the health, availability, and performance of your network.
In this guide, we will list down some of the best open-source network monitoring tools that you can use or suggest to use in an organization and help better manage the network as per their needs. Let us take a look at the list.
Why use a network monitoring tool and what are its benefits?
Before jumping ahead with the list of the best open-source network monitoring tools, you should first understand what is a network monitoring tool and what are the advantages that you get out of it.
In simple words, the network monitoring tool gives you insights into the network elements, performance, health, security, and more about your network.
It can also help you identify security risks and mitigate them before disastrous happen. Security also includes monitoring threats such as cybercrime, insider threats, and unauthorized access.
Now, using an open-source network monitoring tool gets you a bunch of benefits. Among these, the best one is that they are copyright free and available for all organizations.
Here are some of the benefits of using an open-source network monitoring tool:
Real-time monitoring of the network’s health and performance.
Prevent unauthorized access.
Improve security.
Get information about uptime and downtime.
Information about outages and bandwidth usage.
These tools are customizable and scalable.
Measure over-used and under-used network elements to avoid the wastage of valuable resources.
What are the best open-source network monitoring tools?
Icinga is another one of the popular open-source network monitoring tools that come with a bunch of options.
It has granular controls allowing you to gain complete network and infrastructure visibility. The tool receives continuous updates and is used by popular brands such as Adobe, Audi, T-Mobile, Vodafone, and others.
You can monitor your infrastructure-based and cloud-based solutions using the same platform, Icinga. You can configure Icinga using GUI or DSL. The interface is easy-to-understand and supports visual reporting.
The tool also lets you customize it to monitor devices, databases, applications, cloud services, websites, and more. It comes with SSL encryption for advanced security.
Here are some of the best features of the Icinga tool:
Prometheus – Sleek interface and highly customizable
Using Prometheus, you can get information about all kinds of network issues. These issues include low latency, memory issues, cybercrime, etc.
It uses a high-dimensional data model and PromQL for powerful queries to showcase the data in an easy-to-understand dashboard.
Since it is a popular open-source network monitoring tool, the integrations are more widespread. The data it collects can be stored locally on a disk and in remote locations, including cloud storage.
There is an alert manager that manages all the alerts, and notifications and silences them. Alerts can be fine-tuned as per needs as well. It could prove to be a bit complex for smaller organizations, but you can reap the benefits of it in the long run.
Some of the highlights of the Prometheus tool are:
ManageEngine OpManager is one of the best open-source network monitoring tools you can opt for, no matter the size of your business.
It can help you monitor all the aspects of the network, be it routers, servers, WLC, load balancers, VPNs, printers, firewalls, and more. In short, anything that has an IP and is connected to the network can be monitored using ManageEngine OpManager.
Some of the key highlights of this tool are that you can monitor routers and switches from top names such as CISCO, Juniper, ZTE, and more. It will help you monitor their health based on 2000+ parameters.
All details are available in a single-view dashboard, making information consumption much easier. It also makes monitoring easy to access via its mobile application, which is available for Android and iOS.
Here are some of the best features of the ManageEngine OpManager:
Network interface monitoring.
Monitor network health based on 2000+ parameters.
Easy to view and use dashboard.
Allows connections through VPN for a remote workforce.
Monitor VMware, Hyper-V, etc., from a unified console.
Manage the network using the mobile app.
ManageEngine OpManager
Monitor any aspects of your network with this powerful and professional software
Nagios is a suite of open-source tools, that also help you with network monitoring. The graphical representation is visually great.
You can try the free version of this tool and then opt for the upgrade. Nagios can help you with Windows monitoring, Linux monitoring, server monitoring, application monitoring, and much more.
The best thing about this tool is that it represents data in different varieties of representations and reports. It can help you monitor your network for problems related to overloaded data links or network connections.
There are a total of 50 crore plugins, and you can use community-created add-ins, which will get you additional graphics and reporting features.
Zabbix – Offers templates for product integrations
Zabbix is a very popular open-source network monitoring tool available in the market. It makes use of agents to collect SNMP and IPMP data and helps provide insight, in a granular manner.
There is an auto-discovery feature that detects connected devices and starts monitoring assets. It supports significant vendors, including Cisco, Dell, Intel, and Netgear, just to name a few.
There is no issue of scalability, as small organizations and even big enterprises can use it. You can customize it to monitor whatever aspect of the network you want.
There are preconfigured templates that you can use for quick insights. The notification system is robust and alerts you for issues such as network over-use/under-use.
Here are some key features of Zabbix:
The monitoring range expands through the usage of SNMP and IPMP.
Powerful customer support and community.
Can auto-detect connected devices and start monitoring.
Useful pre-configured templates for quick insights.
What is the best integrated tool for Active Directory (AD)?
Apart from networking monitoring tools, you also need to have a streamlined solution for all your web-based needs. You can use ManageEngine ADManager Plus for this purpose.
It helps you to manage all your web-based solutions such as AD, Exchange, Microsoft 365, and Microsoft Teams management and reportingneeds all from a single and unified console, which is web-based.
It helps you automate user accounting provisions in tools such as Office 365, Exchange, G Suite, Skype, etc. You can also use ManageEngine ADManager Plus for assigning, modifying, and revoking users’ from groups.
Offers reports on various tools based on SOX, GLBA, PCI DSS, and HIPAA compliances. You can even automate the routines such as user provisioning and AD cleanup.
ManageEngine ADManager Plus
Integrated tool for streamlining web-based solutions.
If you cannot map a network drive in Windows 11, then check out our guide which will give you all the steps needed to resolve your issue.
PC audit software is very important if you wish to quickly and safely monitor your system performance. You can check out the best software for PC auditing, but we would recommend you check out ADAudit Plus.
Feel free to drop a comment and let us know which one of the above software you used for network monitoring on your Windows PC.
If Vuze magnet links are not working, you might experience some issues while downloading torrents. Instead of Vuze opening automatically, nothing will happen when you encounter a magnet link.
This isn’t a major issue, but it will make the download process less intuitive and slightly more complicated. Luckily, there are a few solutions that can help you fix this issue.
Why does nothing happen when I click on a magnet link?
This problem appears if your browser doesn’t have the necessary permissions or if an extension is causing interference. In some instances, registry configuration can cause this issue as well.
What can I do if Vuze magnet links are not working?
Before we start fixing the issue:
Make sure that VPN binding isn’t switched off for the TAP adapter. You can also try highlighting the magnet link before clicking it as a workaround.
1. Adjust your browser settings
First, click the three dots in the top-right corner and go to Settings.
Select Privacy and security. Next, scroll down toSite Settings.
Go to Additional permissions.
Click Handlers and make sure the toggle is turned On.
Try opening the link again.
2. Remove conflicting browser extensions
In Chrome, click the Menu button in the top right corner. After that, go to More tools and select Extensions.
Locate the extension that might be causing the problem and disable it.
Now check if the problem is resolved.
According to users, the culprit is usually Remote Torrent Adder or a similar torrent extension, so if you have one installed, be sure to disable it and check if Vuze is still not downloading metadata.
Press the Windows key + R keys together. Next, type regedit and press OK or Enter.
You will see many registries, but you will need to access only HKEY_CLASSES_ROOT.
Scroll until you find a subfolder named Magnet or magnet, with lowercases.
Sometimes magnet key will have subkeys, but if it doesn’t move to the next step. If it has subkeys, expand the magnet key and navigate to shell\open\command
Now right-click the (Default) value in the right pane and choose Modify.
In the Value data, there should be a path to the Azureus file. If not, you need to manually add it. Be sure that the file path is in quotes.
Lastly, add the following at the end: "%1" /SHELLASSOC
After making the changes, the Value data should look like this: "C:\Program Files\Vuze\Azureus.exe" "%1" /SHELLASSOC
Restart your PC.
How do I change the default app for magnet links?
Press the Windows key + S and type default apps. Select Default apps from the list of results.
Next, scroll all the way down and select Choose default apps by protocol.
Locate for Magnet on the list and click the app assigned to it. Lastly, choose the desired app you want to use for magnet links.
If Vuze magnet links are not working, adjusting the browser or registry settings will surely fix the problem. This issue can affect other apps, but we have a guide that shows you what to do if magnet links aren’t working, so don’t miss it.
You can also visit our guide on how to open torrent files on Windows for more potential solutions. And if you’re still having problems with Vuze, consider using one of these great free torrent clients.
Did you manage to fix this issue? Let us know which solution worked for you!
To christen the launch of Microsoft’s Premium edition of Teams, the company is stuffing some previously licensed versions of features behind the new offering’s paywall.
In February, Microsoft plans to flip a switch and move over a handful of features that have been prominent through Teams licenses to its new Teams Premium license.
The news follows a month-long trial period of Teams Premium that offered users a taste of new features for the communications platform that included live translation of 40 different languages, custom meeting templates, end-to-end encryption, and more.
In a little less than a month, regular Teams users will need to figure out how to get back the following:
Live translated captions
Timeline markers in Teams meeting recordings for when a user leaves or joins a meeting
Custom organization Together Mode scenes
Virtual appointments: SMS notifications
Virtual appointments: organizational analytics in the Teams admin center
Virtual appointments: scheduled queue view
Per Microsoft’s licensing guide for Teams, users of regular Teams will retain its Teams Premium leveraged features for 30 days following the transition, at which point, the features become a Premium edition exclusive.
For users who were highly dependent on the siphoned feature set, Microsoft suggest admins purchase the Premium add-on and assign Teams Premium licenses for that unfortunate group.
Admins can pick up a Microsoft Teams Premium license for roughly $10 per user starting in Feburary and gain access to content watermarking, labels during meetings, and user-based restrictions among other features.
The Dell XPS 17 laptop is one of the best-selling brands in the market. It’s widely acclaimed for its display, compact design, and more. But despite its perfect design, some setbacks may happen. One of them is Dell XPS brightness not working.
However, it is a common issue that can be fixed easily. The Dell XPS laptop has a feature called adaptive brightness, which automatically adjusts the screen brightness based on the ambient light.
So, let’s find out why Dell XPS 17 brightness is not working and the most effective solutions for it.
Why is the Dell XPS 17 brightness not working?
Dell XPS brightness not working is a frequent problem faced by many users. Usually, it is caused due to one of the following reasons:
A pending Windows Update – If you haven’t installed the latest updates to your OS, it’s time to do so because that’s where the problem may arise from.
Faulty screen – If the screen is malfunctioning, you will not be able to change its brightness. Unfortunately, that would be a job for the repair shop.
Old or corrupt display adapter drivers – A malfunctioning driver can be the source of many issues, including this brightness problem.
Misconfigured BIOS Settings – Some BIOS settings like Secure Boot can lead to this problem but one of the solutions below will help you fix it.
Many people complain about the Dell XPS brightness slider not working, but there are other ways to adjust your screen’s display.
You can also manually adjust the screen brightness using keyboard shortcuts or with the help of software settings.
Some Dell XPS models have a brightness control that doesn’t work. This is because the brightness control button is not connected to the screen, but to the keyboard backlighting.
The brightness will work if you press Fn + F11, which will toggle the backlighting on and off.
Now that we know why this happens, let’s fix the problem using the solutions below.
What can I do if my Dell XPS brightness settings stop working?
Whenever you notice that your screen has turned into a pitch-dark dungeon, or your laptop is too bright for your environment, don’t hesitate to:
Check for physical damage to your screen. A quick search should help in diagnosing the cause of your problem.
If there isn’t any physical damage, you can use our tips below to remedy the Dell XPS brightness not changing issue.
1. Update the display adapter driver
Click the Searchbutton, type Device Manager in the text field, and then click on the app from the results.
Expand the Display Adapters list, then right-click the available graphics adapter, and select Update driver.
Then, select Search automatically for drivers.
Windows will now scan your system for driver updates to install. If a new version is found, it will automatically install them and prompt you to restart the PC.
Installing the appropriate drivers will likely fix the Dell XPS brightness not working issue. If this method doesn’t work, there are other ways to manually update the drivers in Windows.
You can also update graphics drivers via Outbyte Driver Updater. It is a third-party app that allows you to update, maintain, and fix your drivers.
Outbyte Driver Updater quickly and easily updates your drivers and restores them if something goes wrong. Additionally, it can help resolve hardware conflict errors and missing drivers.
Outbyte Driver Updater
Update your device drivers in a much safer way with Outbyte Driver Updater’s helpful features.
Press Windows + S, type Windows Update Settings, and click on the relevant search result.
Click on Check for updates, and then click on Download & install, if a newer version is listed after the scan.
Once done, restart your computer.
Windows Update is a core part of the Windows operating system that installs updates and downloads new features to keep the operating system running well.
Press Windows + R, type in devmgmt.msc, and hit Enter to open the Device Manager.
In the Device Manager, expand the menu for Monitors.
Right-click the PnP Monitor, then choose Update driver.
Select Search automatically for drivers here.
After the update goes through, restart your PC for the changes to take effect.
There might be something wrong with your Generic PnP Monitor that will disrupt your ability to adjust the screen brightness. If this is the case with you, updating the PnP Monitor’s driver should take care of the issue, as long as it’s a software problem.
Once done, verify if the Dell XPS brightness not working problem is resolved. If it persists, head to the last method.
4. Change BIOS Settings
Reboot your PC.
Once the Dell logo appears on the screen, repeatedly press the F2 key until the PC enters the BIOS environment.
Find the Secure boot option. You should find it in the Security tab, but that can be different in your BIOS.
Disable Secure boot.
Enable the UEFI boot mode.
Save and exit the configuration, then boot the PC normally.
At times, you may encounter the Dell XPS brightness not working issue due to misconfigured BIOS settings. Therefore, this method should help resolve the problem.
But remember, disabling Secure Boot will make you lose out on some features in Windows and be unable to launch a few programs and games.
We know that Dell XPS brightness not changing is frustrating, but with the solutions listed here, you can get things up and running in no time.
Also, check the best Dell devices to buy today if you plan to switch to a newer model.
We hope our tips have helped you out, and we’d love to hear how your screen looks now. Do leave your comments below.
Hearthstone is a free-to-play online fast-paced strategy card game from Blizzard Entertainment. It is available across different platforms. However, players report running into the There was an error starting your game message on Hearthstone.
What causes there was an error starting your game on Hearthstone?
Running into the Hearthstone: There was an error starting your game. Please wait a few minutes and try again can be the result of certain issues affecting the Hearthstone client or your PC. It prevents players from joining duels or playing the game.
Furthermore, the error can occur when launching or during the game. Some of the factors that can cause the error are:
Issues with Hearthstone servers – When there is a problem with the game servers, the game client may not work. It can impede the game activities and prevent players from playing the game. Server errors occur during routine maintenance or server downtime.
Problem with the Network connection – Hearthstone may not be able to connect with its servers if there is network congestion or low bandwidth available. So, network issues on your device can cause the error.
Outdated Hearthstone client – Hearthstone errors can occur if it is not up-to-date. It prevents the game from accessing needed updates for fixing bugs and improving performance.
Incorrect game settings – Players may run into errors due to some game settings and components. It can occur after joining an upcoming Fireside Gathering event when you queue for a game or during a Solo adventure.
Other factors can also cause the error starting your game message in Hearthstone. Hence, we’ll discuss some general fixes for the error.
How do I fix There was an error starting your game on Hearthstone?
Proceed with the following preliminary checks:
Connect to a stable and fast network connection.
Restart the Hearthstone client on your PC.
This might indicate server issues. So, checking the server status for the game will help determine if the error is from Hearthstone or your end. However, you can visit Hearthstone’s Twitter platform to check for server updates.
If you can’t fix the issue, try the solutions below.
1. Leave the Fireside Gathering in Hearthstone
Launch the Hearthstone client on your PC and go to the
Select the Fireside Gathering event and click on Leave from the drop-down menu.
Close and reopen the Hearthstone client to check if the error persists.
2. Add Hearthstone as an exception in Firewall settings
Left-click the Start button, type firewall, and open Windows Defender Firewall.
Click on Allow an app or feature through Windows Defender Firewall.
Select Hearthstone from the list of apps and check the boxes for both Private and Public.
Click OK to save the changes and restart your PC.
Adding the Hearthstone game as an exception in Windows Firewall prevents the Firewall from interfering with its processes. Read about how to fix Windows Firewall blocking app features on Windows 11.
Left-click the Start button and type Battle.net, then open the desktop app.
Select Hearthstone in your library and click Settings next to the Play button.
Click on the Scan and Repair option, then Begin Scan. If the scan finds any corrupt or missing files, it’ll automatically repair them.
Restart your game and check if the issue persists.
Repairing your game files can fix corrupt installation files causing the error to interrupt your game. Check ways to repair Blizzard games with corrupt files for more information.
From games to animated clips or movies, animated characters are everywhere. The animation is created for kids and adults alike, so you need the best 3d character creator.
Designers need to be super skilled in 3D designing to be able to use 3D modeling software, along with the right budget and required skills.
Video games and animation are serious business these days, worldwide. 3D design software programs are the best tools to create photorealistic graphics.
From beginners trying to up their 3D skills to professionals trying to upgrade their tools, there’s software for everyone. Here is a list of the best software to create 3d characters.
Product name
Motion character setup
Main features
Adobe Dimension
❌
– 3D interactive objects – Lighting and materials
Autodesk Maya
✅
– 3D modeling and VFX – Realistic explosions & clothes
Daz3D
✅
– Free 3D models – Various figures and artists
Adobe Character Animator
✅
– Emotions and facial triggers – Different puppets and movements
Poser
✅
– Human figures and modeling – Character illustration tools
Blender
✅
– Sculpting designs – Hair assets
ZBRUSH
✅
– Virtual clay animation – Brushes and textures
What is the best software to create 3D characters?
If you want to add a 3D character to your design or prototype, installing this app to model your new realistic character would be best.
You will already have available a ton of high-quality 3D content available so that you can customize your characters’ bodies, hair, eyes, and clothes.
This makes the process much faster than starting from scratch and it lets you focus on the details that matter for your project. It also has an integrated Creative Cloud Suite.
This way, once you save your character to the Creative Cloud Library, it will automatically be available in other Adobe apps.
The good news is that Adobe Dimension is for beginners too. When it comes to animating your 3D character, it offers interactive content models and patterns suitable for animations.
Therefore, the end result is quite realistic. This tight integration enables you to work much quicker than if you were using a different application.
It is also important to note that 3D characters made in one software and imported into another might not look identical.
The reason has to do with the different 3D packages where materials, lights, and such are different.
To recap, here are the strengths of this solution:
Interactive tools for motion images
3D basic shapes and text models
Multiple perspective rendition
Various materials types
Adobe Dimension
Bring your imagination to your desktop PC by creating the 3D models of your dreams.
Maya by Autodesk is the best 3D modeling software in our category. Along with 3D animation, it also provides services for 3D modeling, simulation, and rendering equipped with a combined and robust toolset.
From animations or environments to virtual reality, creating characters, or motion graphics, the software can be used for all of these.
Apart from stunning VFX effects, it also offers a super easy and faster way to create animations using the Time Editor feature.
The Arnold RenderView on the other hand, helps users see the changes in scenes in real-time that includes lights, materials, and camera.
Moreover, the motion graphics toolset helps create animations with quoted objects and complicated routine effects.
The software also allows users to design and edit UVs collaboratively using the UV toolset offering similar processes as Maya modeling workflows.
Cached playback, responsive performance, and an attractive working environment are some of its other major features.
Autodesk Maya
Create animations, virtual reality, and creative 3d models with motion graphics by using Autodesk Maya
Daz3D is one of the best software to create characters for games and videos. It provides assistance to create realistic characters for free.
It helps users to create exclusive digital art and animations using virtual characters like humans, environments, props, animals, and more.
To create beautiful animations, users simply need to pick their subject, or choose settings, organize accessories, and fix the lighting.
Daz3D combines a couple of different technologies: dForce is a physics technology that simulates hair movement. Its natural cloth applies stretches and bends when the character is moving.
Then we have Genesis 8, the latest figure platform which received numerous improvements that increased its versatility.
If you combine these technologies with Nvidia Iray render engine option, it means you can use Daz3D to create rendered images quickly and with a very realistic feel.
While it looks more polished than its previous version, it has also become much easier to use. For the newbies, they have added fresh video guides.
The current version works perfectly well with the previous 3D models and plug-in and boasts a range of next-gen figures.
Daz3D
Create wonderful 3D models with realistic hair and clothing physics thanks to Daz3D and its plethora of features.
Another essential animation tool is Adobe Character Animation, presenting you with professional motion character animations.
There aren’t other character animation tools like this one because it comes with face and expression functionality.
So, you can utilize this software to animate any character according to your personality. How? You can use the webcam and microphone to bring the character to life.
Moreover, you have gestures and trigger options to create specific live actions with your character.
You also have tons of graphics and customizing tools in order to craft realistic personas out of the editing panel.
It’s worth knowing that you can use standard puppet templates for getting more inspiration and animate characters in your own way.
Adobe Character Animation
Model your animated character to your personality using highly professional tools.
Poser is leading software for 3D animation and rendering. It offers a total solution for creating art and animation using 3D characters.
From human forms to animals or 3D elements, the software transforms images into photorealistic visuals and videos, ready for use in films, web, and prints.
It offers a perfect way to include pre-rigged, completely textured, and prepared animated 3D characters in the production channel.
In the more advanced version, users can unlock the confidential process of how to create a realistic human figure, by styling its hair and dressing it up with clothes and accessories.
It also empowers the users to create figures that can walk, run, or dance for animated or short movies. The animations are also great and fluid.
Whether it’s creating photorealistic visuals or cartoons, there’s a lot that a creative professional can do with this tool.
Free and open-source software to create 3D characters, Blender is one of the best 3D modeling software around.
It provides support for complete 3D channel animation, modeling, rendering, video editing, rigging, game creation, and more.
It comes with a powerful integrated path-tracking engine, Cycles, that helps users with a wide range of modeling tools that help users create, change, and edit the models easily.
Moreover, its production-ready camera offers object tracing, allowing users to import raw footage, track this footage, cover areas, and view the live camera shifts on the 3D scene.
Blender offers superior quality tools for animation and rigging that are used to make several TV commercials, TV series, and short films.
Users can even draw right on the 3D viewport offering unparalleled workflow liberty, especially for 2D designers and story-boarders.
It features a Python-based interface and a layout that’s flexible in terms of fonts, size, and colors. The numerous add-ons are a bonus for the users helping them design their own Python API.
ZBRUSH gives a fun angle to the creation of 3D characters. It offers digital sculpting using customizable brushes that help shape, create texture, and paint virtual clay.
It’s all done in a real-time environment that offers immediate feedback. The software offers the same tools that are used by game developers, jewelry designers, illustrators, and artists across the world, film studios, and more.
It offers a unique feature like Project Primitive, which helps blend several pieces of geometry in one place in a new way. Polygroupit is another feature that helps create the polygon groupings crucial for the smooth process.
Sculptris Pro, on the other hand, allows users to easily brush across the surface. Using this tool, users can powerfully induce and reduce polygons at any place and time it’s required.
These tools are also great recommendations in case you are looking for:
character creation software – You can get the job done with any one of the tools found here
3D character modeling software – Some tools include all the bells and whistles while others focus more on modeling, so choose whatever is best for you from this list
Whether it’s creating characters for games, videos, or movies, creating 3D visuals is an art. Any art needs the right kind of skills but also needs the support of the best software to create characters.
So, choose wisely, from the above list and get going with your designing skills. Do let us know in the comments section below which is the best software to create 3D characters for you.
Contact Mojang support team via the contact page on Mojang’s website.
Be sure to get your transaction ID. This value is stored in the Minecraft purchase confirmation email message.
Send the ID along with other required information to the Mojang team and let them do the rest.
There you go, these are three quick and easy ways to transfer your Minecraftaccount. As you can see, this can be done quickly from the settings page of your current account, but if you run into any trouble, be sure to contact Mojang support.
We hope that you found our quick guide useful and managed to transfer Minecraft account to another email. If any of these solutions helped you fix your problem, feel free to let us know in the comments section below.
Using the good ol’ msconfig in Windows 10 is very, very simple; read our basic advice to learn how easy it is to access this useful function.
MsConfig is one of the most used commands for Windows. It allows users to modify settings regarding Windows boot and what programs launch at startup. By controlling these startup programs, users will be able to improve the startup time of their devices.
How can I access MsConfig in Windows 10?
1. Use the Run command
Press Windows key + R.
Run window will now open.
Enter msconfig.msc and press Enter or click OK.
2. Use Windows Search
Press Windows key + S to open Windows Search.
Type msconfig. Now select System Configuration from the list.
The System Configuration window will now open.
3. Use CMD
Go to Search, type command prompt, and select Run as administrator.
Enter msconfig and press Enter.
System Configuration window will now open.
NOTE
You can also use PowerShell to start msconfig, so you’re not limited just to Command Prompt.
4. Use File Explorer
Open File Explorer with Windows key + E.
In the address bar, enter msconfig and press Enter.
If you’re unable to zoom in in Word, we’re here to help. Side by Side mode is by far the most common cause for this issue. Today, we’ll show you how to disable it and give you a few extra tips.
Ready? Let’s get started.
What do I do when I can’t zoom in Word?
1. Disable Side to Side mode
OpenMicrosoft Word.
Click on the View tab.
Select Vertical.
Now you should be able to zoom in and out without any issues whatsoever.
2. Repair Microsoft Office
In the Windows Search bar, type Control and open Control Panel.
Choose Uninstall a program.
Right-click on Microsoft Office and choose Change.
In the next dialog box, select Repair to repair the installation.
Navigate to Program Files and remove the Microsoft Office folder and all associated files within.
Reboot your PC.
Reinstall Microsoft Office and open Word again. Check for improvements.
Hopefully, these solutions helped you address the Word can’t zoom issue In case you are still stuck with it, consider contacting Microsoft support and asking for the resolution.
Furthermore, don’t forget to share your thoughts with us in the comments section below. We always look forward to hearing from you.
A lot of printers can automatically print on both sides of the paper. While that is definitely a feature and not a bug, many users claimed that the printer keeps printing double sided even when it’s not supposed to.
Printing on both sides of the paper is otherwise known as automatic duplex printing, which has become a standard printer option. But if the printer defaults to double sided without specific indications, then it becomes a problem.
And speaking about problems, let’s have a quick look at some of the most common situations reported by users worldwide:
Printer defaults to double sided – When this happens, the printer is printing double sided automatically.
Printer printing 2 sided instead of 1 – Users also mentioned that sometimes, printers prints 2 copies instead of one.
In comes the big question: Why does my printer keep printing double sided? If you’re wondering the same thing, read on, and let’s find out.
Why is my printer printing double sided?
If your printer keeps printing double sided, the first thing you need to need is to check the print settings and make sure duplex printing is disabled.
There are various print setting windows, tabs, and menus that can include duplex print options. Consequently, users may need to configure more than one duplex print option to ensure that their printers don’t always print double-sided.
Now, settings are obviously at the very top of our list and this may concern printer, file, or even device configuration. But what if the option is already disabled or grayed out?
If such is the case, you may also be dealing with a severe case of driver mismatch. Read on to find out more.
How do I turn off double sided printing manually?
1. Turn Off the Printer’s Default Duplex Printing Option
First, make sure the default duplex printing option is off on the printer’s print preferences window. To do that in Windows 10, click the Start menu’s Settings button.
Click Devices, then open the Bluetooth & other devices tab.
Click Devices and printers to open the Control Panel window in the snapshot directly below.
Right-click the default printer and select the Printing preferences option, which will open the printer’s settings window.
Then look for a two-sided duplex printing option on one of that window’s tabs. The printing preferences window’s Page Layout or Advanced tabs might include the two-sided printing option.
2. Disable Double-sided printing on Microsoft documents
Open the file you want to print (preferably in Word).
Next, click on the File menu and select Print.
If there are more devices, make sure you select the printer that keeps printing double-sided from the drop-down menu.
Now, open the Copies & Pages section and select Layout.
Look for the Two-Sided option (or anything similar) and make sure you disable it.
You can also choose to save this setup as preset in order to turn off double-sided printing permanently.
3. Deselect Duplex Printing Within the Third-Party Software’s Print Settings
A lot of third-party software also includes a two-sided print option within their printing settings. For example, Google Chrome includes the Two-sided option shown directly below.
Word includes a Print on Both sides option under Settings for printers that support duplex printing. So, users also need to deselect the duplex printing setting within the software they print from to ensure their printers don’t print double-sided.
4. Deselect Duplex Printing on the Printer’s Menu Screen
Furthermore, a lot of printers also include their own menu screens that are completely separate from Windows.
Some users might also need to disable duplex printing via their printers‘ menu screens.
Look for the two-sided print options on the menu screen’s general or ECO (Environmental) settings menus.
5. Make sure the printer driver matches your printer’s manufacturer
Finally, open the Device Manager and expand the Print Queues section.
Select the printer that defaults to double-sided and make sure it matches your official manufacturer’s drivers.
While you’re at it, also make sure that the (correct) driver is up to date.
Using the wrong driver or having the wrong version of drivers installed can cause a lot of havoc. If your printer keeps printing double sided, it is possible that a different driver is installed, thus causing this setting to switch on by itself.
This is how to stop printers from printing double sided. That’s pretty much it! If you have any comments or further suggestions, feel free to reach out anytime!