How to Fix Minecraft LAN Not Showing Up on Windows

Minecraft LAN not showing up is one of the most common multiplayer issues players face. If you’re trying to play Minecraft with friends on the same Wi-Fi but the LAN world isn’t showing or connecting, it usually comes down to network settings, firewalls, or version mismatches. Here’s how you fix it, step-by-step:

Why Isn’t My Minecraft LAN Showing Up?

If your Minecraft LAN world isn’t showing up, it’s usually because of one of these reasons:

  • Devices aren’t on the same Wi-Fi or local network
  • Network Discovery is turned off
  • Firewall or antivirus is blocking Minecraft
  • Different Minecraft versions or editions
  • The game wasn’t properly opened to LAN

Fixing these usually gets LAN working again in just a few minutes.

How can I fix Minecraft LAN not showing up?

1. Make sure the firewall isn’t blocking Java

  1. The Windows Defender Firewall will block Minecraft’s network features when you’ve clicked Cancel on the UAC Java permission prompt.
  2. To fix that, right-click Windows 10’s Start button to select Run.
  3. Input Control Panel in Run, and press the Enter key.
  4. Type allow an app in the Control Panel’s search box.
    Control Panel search minecraft lan not showing up
  5. Click Allow an app through Windows Firewall to open the settings shown directly below.
    Allowed applications window minecraft lan not showing up
  6. Click the Change settings option.
  7. Then select all the Public & Private check boxes for Java (TM) Platform SE binary, javaw.exe, and Minecraft if they’re not selected.
  8. If you can’t find Minecraft listed, click the Allow another app button. Then click Browse to select Minecraft, and press the Add button.
    Add an app window minecraft lan not showing up
  9. Click the OK button.

2. Turn off Windows Defender Firewall

Alternatively, you could just turn off Windows Defender Firewall before playing the game to fix the Minecraft LAN server not showing up issue.

  1. To do that, click the Type here to search button on Windows 10’s taskbar.
  2. Enter firewall in the search box that opens, and click Windows Defender Firewall to open that applet.
  3. Click Turn Windows Defender Firewall on or off to open further options.Firewall settings minecraft lan not showing up
  4. Then you can select the Turn off Windows Defender Firewall options. Select both turn off firewall options.
  5. Click the OK button to close the window.

3. Disable third-party antivirus software

Users with third-party antivirus utilities might need to disable them if their Minecraft LAN world is not showing up. Most third-party antivirus software will include disable options on their context menus for users to select.

So, right-click the system tray icon for an antivirus utility to open its context menu. Then select a disable shield option there to turn it off for a least an hour. Select a turn off firewall option if the context menu includes one.

An antivirus utility's context menu minecraft lan not showing up

4. Turn on Network Discovery

Network Discovery needs to enabled for players to play Minecraft via LANs. Otherwise, they are prone to encountering the issue of Minecraft not finding LAN games.

  1. To check that option is enabled on your PC, open Windows’ search box.
  2. Enter advanced sharing settings in the search box.
  3. Click Manage advanced sharing settings to open the Control Panel window as in the shot directly below.
    Turn off network discovery option minecraft lan not showing up
  4. Select the Turn on network discovery radio button.
  5. Click Save changes to apply the new setting.

5. Turn off AP Isolation

  1. To turn off AP isolation, you’ll need to open your router’s browser configuration page by entering your IP address in a browser’s URL bar.
  2. If you’re not sure what your IP address is, open the Command Prompt.
  3. Then enter ipconfig in the Command Prompt, and press the Return key. Then you’ll see a list that shows you your Default Gateway, which is the IP address.
    ipconfig command minecraft lan not showing up
  4. Log in to your router’s configuration page after entering IP address in the URL bar.
  5. Look for an Enable Wireless Access Point or AP Isolation setting of some description. The Wireless Setting tab within a router’s browser setup page will typically include an AP isolation setting.
  6. Deselect the AP isolation setting for your router.
  7. Restart your router after disabling AP isolation.
  8. If you’re not the host player, tell the host to check his own AP isolation setting as outlined above.

Those are some of the more likely fixes for Minecraft LAN not showing up. If those resolutions aren’t enough, try the Direct Connect method for Minecraft LAN games. For that, you’ll need to manually enter the host’s IP address and port number to join the server.

We hope you managed to connect to your friends’ LAN sessions without issues after reading our article. Write down in the comments section below any thoughts on the topic that you want to share with us.

Media Creation Tool Cannot Find USB: How to Fix This Error

The Media Creation Tool is software that burns a copy of Windows 10 onto a bootable USB drive. Sometimes you may get an error message stating the USB drive cannot be found.

To give you an example, you can get a Windows Media Creation tool cannot find a USB message when trying to utilize your flash drive.

Other similar errors regarding this error may come as Windows installation Media Creation Tool cannot find a USB flash drive or cannot find a USB SanDisk.

This may be because there’s something wrong that must be fixed. Or perhaps the problem lies with the USB drive itself. If that is the case, the error appears as Media Creation Tool not working.

What causes Media Creation Tool to be unable to find my USB?

Problems between the Media Creation Tools and external drivers usually come down to something being corrupted. The following list mentioned the more likely culprits of this error.

  • Your USB drive is infected with malware: Your computer may be trying to protect you from something malicious. Fortunately, there are antivirus apps that can clean up infected USB drives.
  • The USB drive is damaged in some way: Files in the drive may have gotten damaged beyond repair. This can be caused by pulling the drive out without going through the proper procedure.
  • The system files on your computer are corrupted: This results from malware going from the USB drive to your computer. You’ll have to run the SFC scan to fix that.
  • Your antivirus software is preventing the port from being used: Some antivirus apps can be overzealous and stop certain functions on your computer from working properly.

How can I fix the Media Creation Tool error?

The more complex solutions will require you to go into your computer’s menus to update some things or create a bootable version of the USB, so that it can get a little complicated.

Before moving forward, we recommend trying one of the more straightforward fixes and seeing if it works.

  • Restart your computer. That’s one of the easiest and best things you can do to fix any error.
  • Use a different USB drive. Cleaning one out can take some time. Switching to another device is much faster.
  • Plug your USB device into a different port. For example, many computers typically have USB ports with different standards: USB 2.0 vs. 3.0. The latter is more recent, faster, and less prone to problems.

1. Update drivers

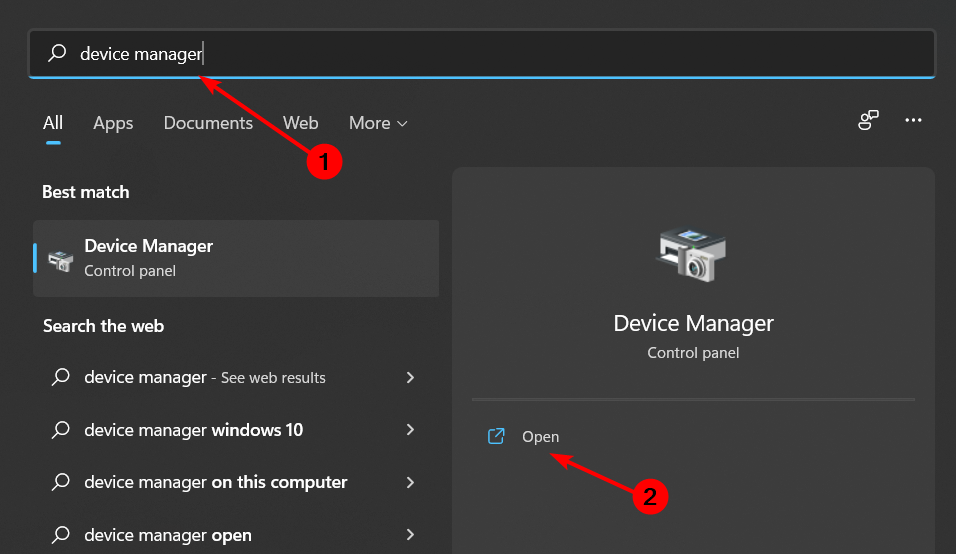
  1. Search for the Device Manager in the Windows 10 menu and select the first entry you see.
  2. Expand Universal Serial Bus and right-click the specifically named entries. Or, at the very least, the ones with the minor generic names like Standard USB.3.1 eXtensible Host Controller.
  3. Select Update driver in the new window that appears.
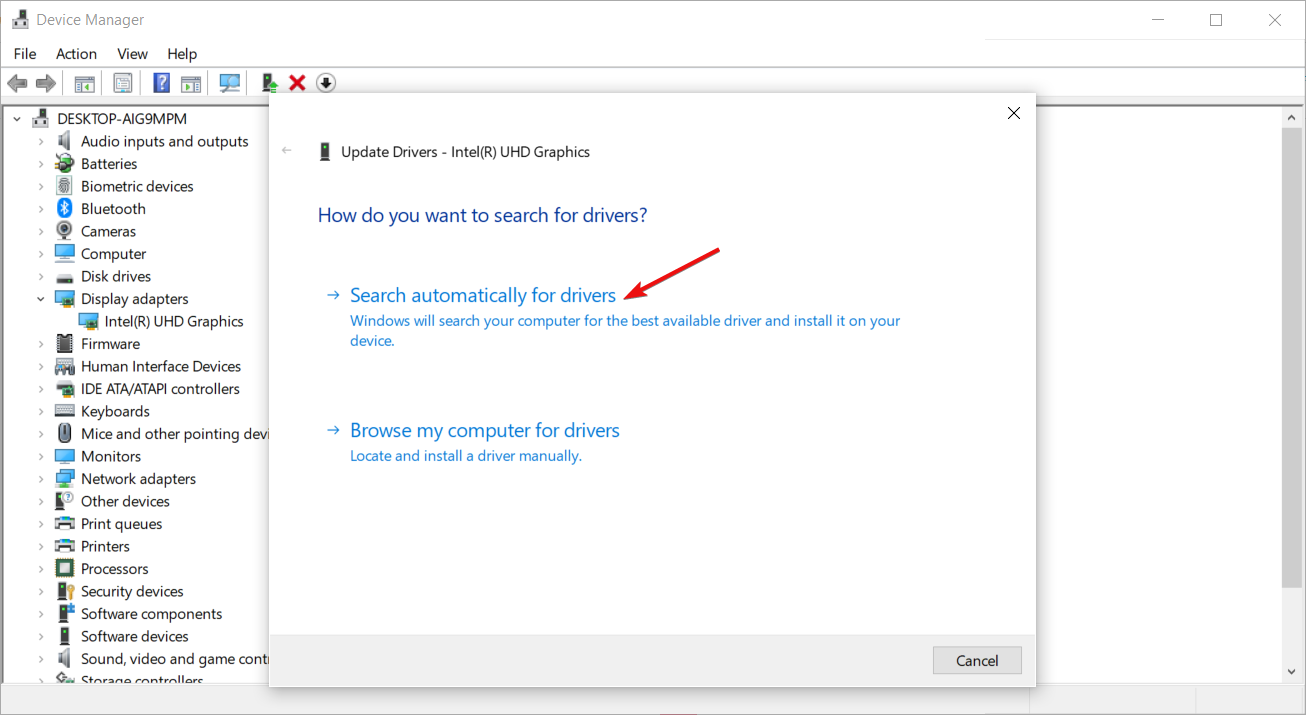
  4. Click Search automatically for drivers in the new window to automatically install the software.

If this method didn’t work as planned, we recommend you use a specialized tool that will automatically find all outdated drivers and updated them to their latest versions.

Users on Arm64 PCs can encounter a separate issue where the tool will not run at all; for that scenario, see this guide on fixing Media Creation Tool not working on Arm64.

2. Run Diskpart

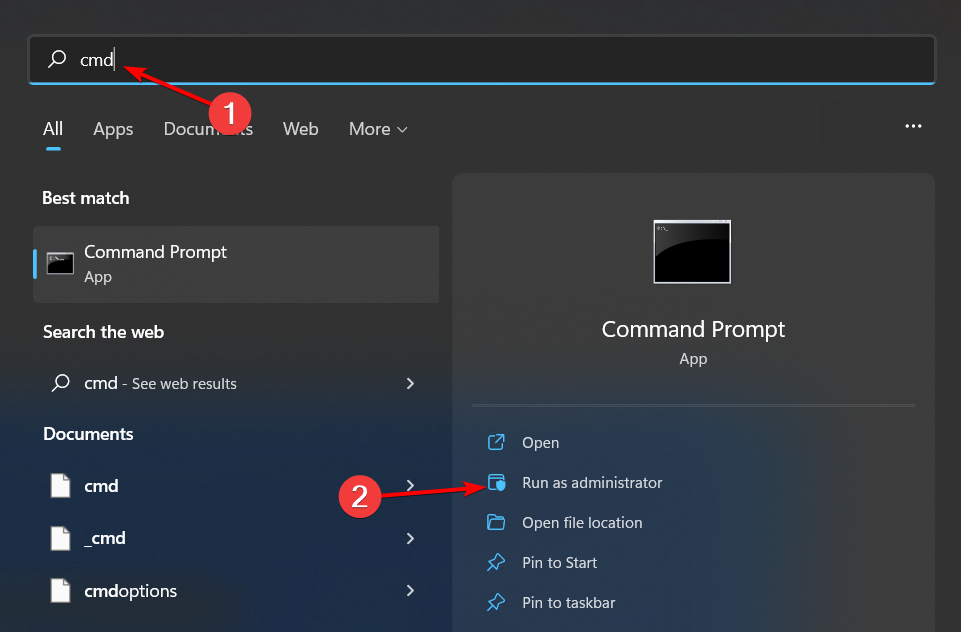
  1. Bring up the Windows 10 menu and search for the Command Prompt.
  2. Select Run as administrator when it appears as an entry.
  3. Select Yes if a User Access Control window asks you if you want to make changes.
  4. Type diskpart in your Command Prompt and hit Enter on your keyboard. This will allow your computer to run Diskpart commands.
  5. In the same line as DISKPART, type list volume and hit Enter.
  6. Take note of your USB driver’s volume number and designated letter. In this example, it’s Volume 4 and the letter E.
  7. Type select and then the volume where your USB device is connected to. In this case, it would be select volume 4.
  8. Hit Enter to select the USB volume.
  9. Now type Clean on the Diskpart line in the Command Prompt and hit Enter.
  10. Then type Create Partition Primary and hit Enter.
  11. Type Exit to leave Diskpart.
  12. Restart your computer to finish.

3. Create a bootable drive

  1. First, go to Microsoft’s Windows 10 installation media page.
  2. Select Download Now to download the latest version of Windows 10.
  3. Run the installation media you just downloaded and wait for it to finish setting up.
  4. Click Create installation media when the selection appears and continue with the installation wizard.
  5. Ensure the box next to Use the recommended options for this PC is checked. Click Next to continue.
  6. Select the ISO file, then continue.
  7. Find a place on your computer to save the ISO file. Then, give the software time to finish the process.
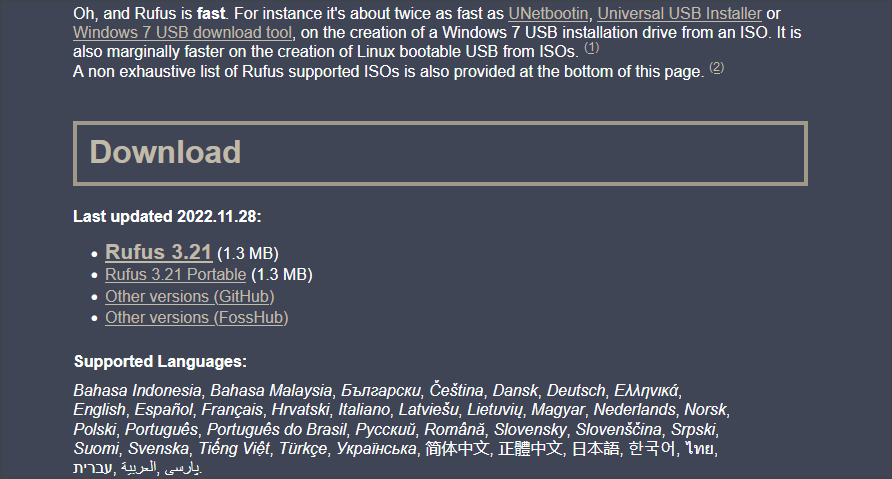
  8. Now go to the Rufus download page and click the Download button to get the software.
  9. After downloading Rufus, please open the file to install it. It will launch automatically.
  10. If you haven’t plugged in your USB drive, do it now. Rufus will automatically detect it.
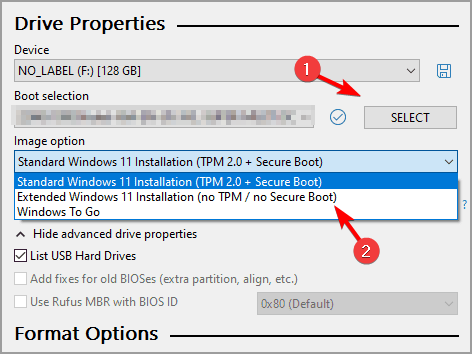
  11. Under Boot Selection, click the SELECT button and connect the Windows 10 ISO file you created.
  12. Expand the File System menu and select FAT32.
  13. Click the Start button to begin the process. It may take a while, so give your computer time to finish.

What are other problems that Windows 10 users may face?

There are a few worth mentioning because of how annoying they are. For example, some people have complained about being unable to turn off Sticky Keys on Windows 10.

Your computer may have been infected with malware causing these problems, or your keyboard drivers are out of whack. We also recommend learning about missing brightness sliders.

Microsoft has been seen removing this particular control from specific Windows 10 builds. However, it is possible to put it back by either changing drivers or with a third-party app.

Feel free to comment below if you have questions about other Windows 10 problems. And please tell us if there’s a specific guide for any Windows operating system you’d like to see.

5 Best VPN for LAN Gaming [LAN Party + Virtual LAN Gaming]

Are you looking for a VPN to play Dota 2, League of Legends, Starcraft 2, World of Warcraft, Counter-Strike, Fortnite, Overwatch, or other LAN games?

Read on to find out which is the best VPN for LAN gaming that you can use right now to enhance your gaming experience.

Can you play LAN games with VPN?

Yes, it is possible to perform this task on your Windows device. There are players that cherish multiplayer games and need to make a LAN connection for public games.

In order to do this, all the players have to be connected to the same network using the VPN for the LAN game to work.

What are the best VPNs for LAN gaming?

  • NordVPN
  • ExpressVPN
  • Private Internet Access
  • Surfshark
  • CyberGhost

NordVPN – Extensive server network

NordVPN is a VPN service developed by Tefincom & Co., S.A. and it boasts 5000+ server locations in 60 countries on all continents except Antarctica.

Some of these are equipped with an integrated DDoS protection system to guarantee super stable connections.

In the app, next to each server, is specified server load and how many kilometers is, information that should give you some indication of how it could be pinged.

Unfortunately, no specific cities are listed, so it’s impossible to know, for example, if you connect to a server on the east or west coast of the United States.

To find a fast one, you will most likely need to make several attempts, but once you find it you can add it to your favorites so you can find it more easily the next time.

NordVPN

Not only can NordVPN curb LAN gaming connectivity issues, but it also protects your privacy like no other.
Check price Visit website

ExpressVPN – Optimized for shared games

ExpressVPN software manages servers in 94 countries worldwide with high-speed connections.

The desktop application is equipped with a built-in speed tester, which allows you to quickly find the servers that have the lowest ping in milliseconds.

This VPN is consistently among the best in our speed tests and offers enough bandwidth to keep up with online opponents.

If you’re a console player and you’re using a PlayStation or an Xbox that does not support VPN applications, ExpressVPN provides pre-configured routers and provides free firmware for some router models, which will allow you to route all traffic through the VPN.

This is much easier than installing open-source firmware such as DD-WRT or Tomato on your router and manually configuring the VPN, which must be repeated whenever you want to change servers.

ExpressVPN

This VPN can eliminate connectivity issues that may arise during LAN gaming.
Check price Visit website

Private Internet Access – Secured public network

Playing LAN games isn’t all that simple, especially when you aren’t physically within the LAN itself. Thus, a VPN is your best bet, but you’ll still need to watch out for which ones you pick.

As mentioned earlier, geo-blocking and latency are issues that your VPN must face, and few can do it better than Private Internet Access.

This high-quality VPN service from Kape Technologies will offer near-global coverage thanks to the 3200 servers located in 46 countries around the world, making it one of the best VPNs for gaming in general.

More so, the fact that it is so widespread means less latency for your games, so LAN games will feel like you are playing with someone within the same room.

The UI is simple to use, and the program itself is easy to set up, allowing users of all experience levels to use it.

You also benefit from P2P support which is extremely necessary for LAN games in order to be fully secured.

More so, a single subscription will grant you VPN coverage for up to 10 devices, so you and your gaming buddies can all play together.

Private Internet Access

Worried about LAN gaming connectivity issues? Try PIA and forget all about that
Check price Visit website

Surfshark – Hotspot VPN tools

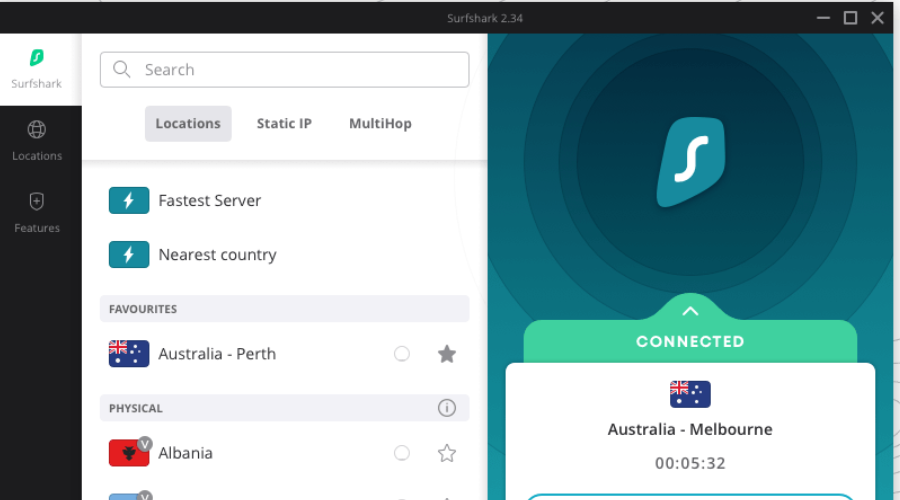
Surfshark is an affordable yet advanced VPN software that has great capabilities for sharing the VPN network in order to create a LAN connection for gaming.

This fully private software covers all your needs for online privacy, complete data encryption or fast protocols that speed up your device’s performance.

A practical feature is also the Cleanweb for stopping online trackers on your browser. Plus, it provides malware security with unbeatable privacy benefits.

In addition, there is a private DNS and leaks protection so you don’t encounter unsafe behaviors on your PC.

Plus, the NoBorders Mode is developed to give you unrestricted access to web content or game features from all over the world.

It’s worth knowing that you have secured VPN protocols like OpenVPN UDP or IKEv2 that assure you high security and fast speeds.

Surfshark

Use this compatible VPN for playing famous LAN games entirely secured online.
Check price Visit website

CyberGhost – Best anonymity tools

CyberGhost is an easy-to-use VPN that offers all the features necessary to customize the service according to the needs of your favorite games.

All servers available on the CyberGhost premium tier have DDoS protection and the NAT firewall is integrated.

CyberGhost Pro, in our speed tests, scored above average. It is also very reliable and offers stable connections to 850 servers in 27 countries.

Enable or disable useful settings such as extra speed and data compression. It has an integrated NAT firewall and uses 256-bit encryption and a no-log policy to ensure data security.

CyberGhost VPN

This solution helps you achieve a smooth LAN gaming experience while also protecting your privacy.
Check price Visit website

Should I LAN through VPN?

A VPN, short for Virtual Private Network, encrypts all traffic on a device and directs it to an intermediate server in a user-selected geographic location.

Online players always try to get the fastest possible connection to the game server, so using a VPN might seem contradictory at first.

The encryption and routing process usually tends to slow down links and increase the lag.

If we analyze a little more in detail, however, the players have good reasons to want to use a VPN, being able to take advantage of the following:

  • Bypass the IP ban.
  • Protection against DDoS attacks.
  • Protection from hackers and onlookers.
  • Access to game servers in other regions.
  • Access games not yet released in your country.
  • Log in to Steam and other marketplaces when traveling abroad.
  • Access geo-blocked games, inaccessible from your country of residence.

Some VPN providers claim to lower ping and lag, but we recommend that you take this statement with pliers.

However, the 4 solutions we suggested below should not affect your bandwidth negatively and you should be able to play LAN games over VPN without any issues.

Do you need a VPN with Ethernet?

Usually, using an Ethernet cable is more secure than a Wi-Fi connection and it brings you more Internet speed.

That doesn’t necessarily mean you don’t need a VPN for protecting your online privacy and personal data used on the Internet.

How can I play old LAN games over the Internet?

It is possible to enjoy old times games together with your friends, using the same network. To do this, you can use a VPN connection and connect your PC to the same local network.

This process should be quite easy as you only have to create a VPN connection on your computer, or even use a VPN software that offers servers globally in seconds.

Should I allow LAN access when using VPN?

It is actually more beneficial to use a VPN to connect on LAN configuration. That is because you get traffic encryption and better online privacy.

Another reason is the connection speed, as it can boost your Internet network with a rapid server network and improved protocols.

Can I use LogMeIn Hamachi for Virtual LAN?

Yes, you can use LogMeIn Hamachi for Virtual LAN. The tool can create virtual network adapters for all the computers connected, enabling LAN-like communication between them.

As opposed to regular gaming VPNs, this setup should have lower latency. That’s because you won’t have to connect to a distant server. It’s also completely free for up to 5 devices.

However, it won’t give you the possibility to access region-locked games and may not be suitable for a bigger gaming network. Adding any new device on top of the 5 free ones can get costly.

Compare the best VPNs and read the reviews to find the one that best suits your needs or visit the websites of each Virtual Private Network to learn all the features, prices and subscriptions available in addition to any discount codes to save on the final cost of your VPN.

If your Wake on LAN is not working while using a VPN, check out our dedicated guide for more info.

Moreover, if Minecraft LAN is not showing up, find out what to do by reading our article.

We also have dedicated guides on the best LAN monitoring software and the best LAN emulators to use.

Have you used and tried other VPNs that you think are better than those listed on this page? Share your experience in the comments.

How to Fix No Sound on Windows 11: 8 Quick Solutions

Windows 11 no sound issues can occur after system updates, Realtek driver failures, or when your PC wakes from sleep. In some cases, sound output devices appear connected, but there’s still no audio, whether through internal speakers, HDMI, or headphones.

Even if the issue appeared after you upgraded from Windows 10, most issues can be fixed without reverting back. Find below reliable fixes that address everything from no audio on YouTube, browser playback issues and hardware coflicts in brands like Lenovo or MSI.

Why Can’t I Hear Anything on My Windows 11 Laptop?

You might be dealing with no sound on your computer running Windows 11 due to several possible reasons:

  • Corrupted or outdated drivers (Realtek, USB, or HDMI)
  • Your PC’s internal speakers are not working due to wrong default settings
  • Audio services are not responding or are disabled
  • The volume is muted or routing to the wrong output
  • A recent Windows update disrupted audio configurations
  • Specific apps like OBS or web browsers fail to output sound

Fix Audio Not Working On Windows 11

1. Check That Your Audio Output Is Connected Properly

Before diving into advanced settings, confirm your headphones, HDMI cable, or external speaker is securely plugged in. A loose connection may cause errors like no output devices found in Windows 11.

Switch USB ports if you’re using a USB audio device, especially if you’re experiencing audio distortion or crackling.

2. Use the Built-In Audio Troubleshooter

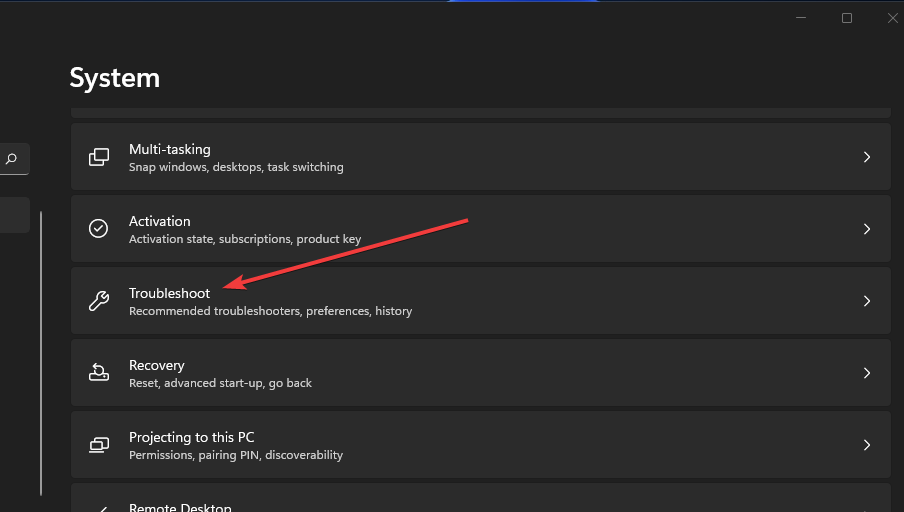
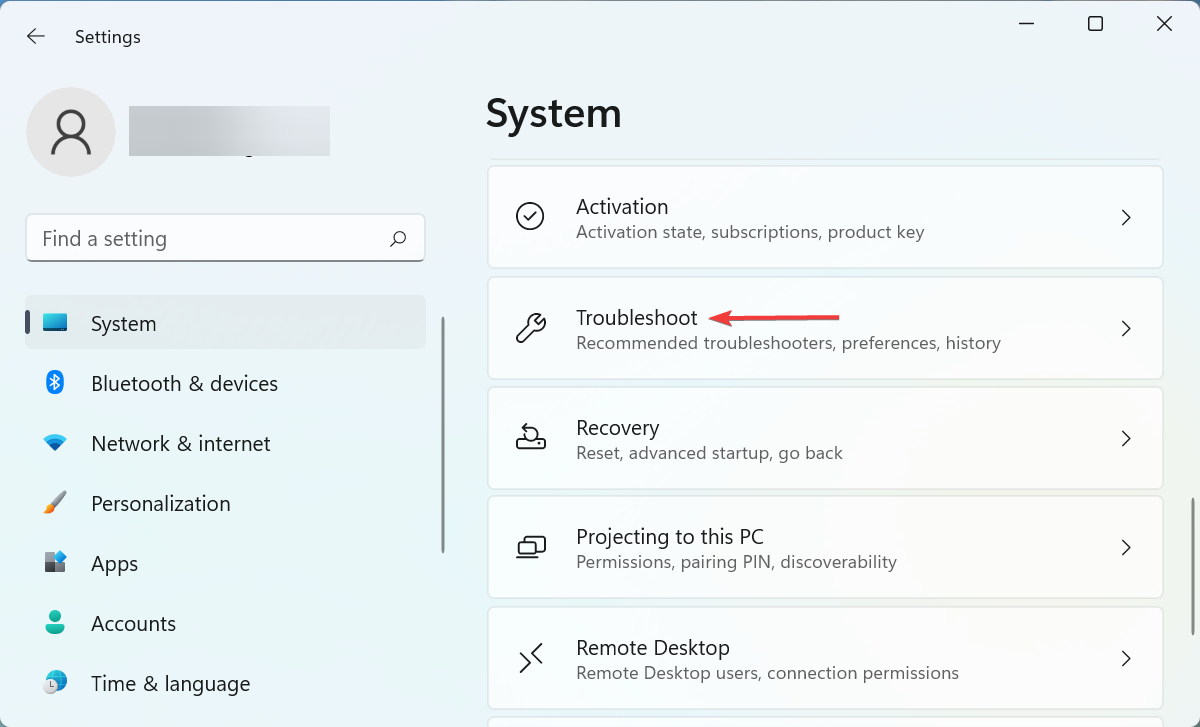
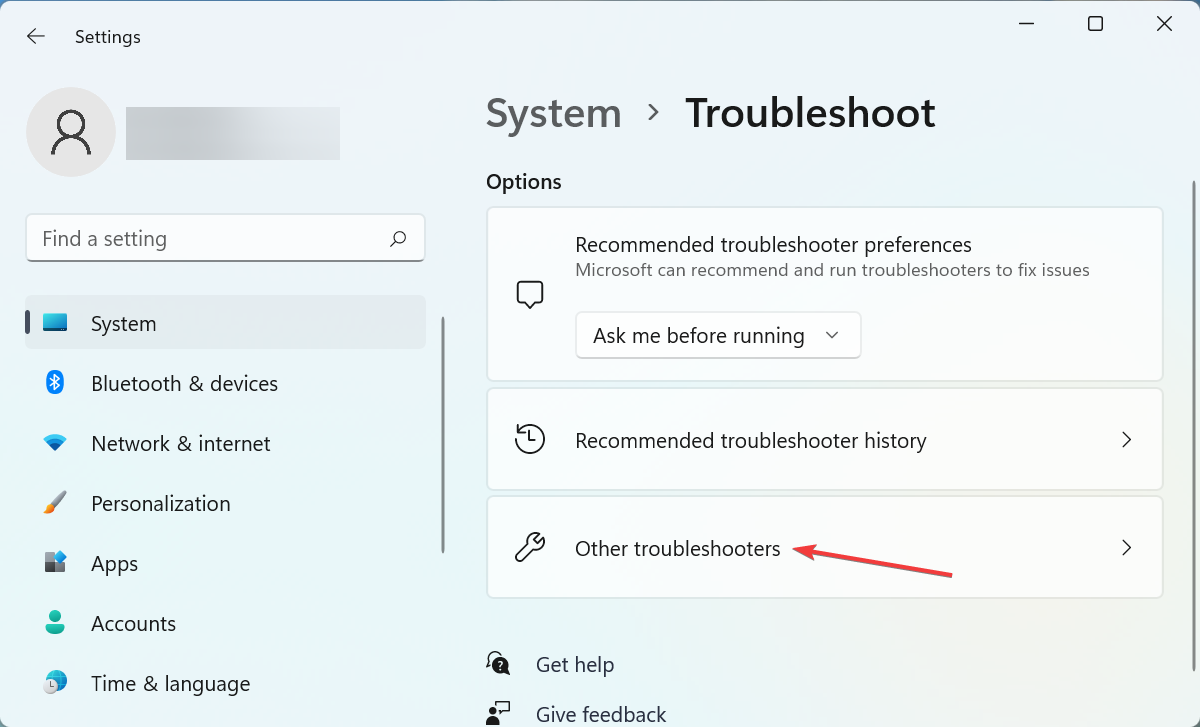
  1. Press Start > Settings > System > Troubleshoot
    System tab windows 11 no sound
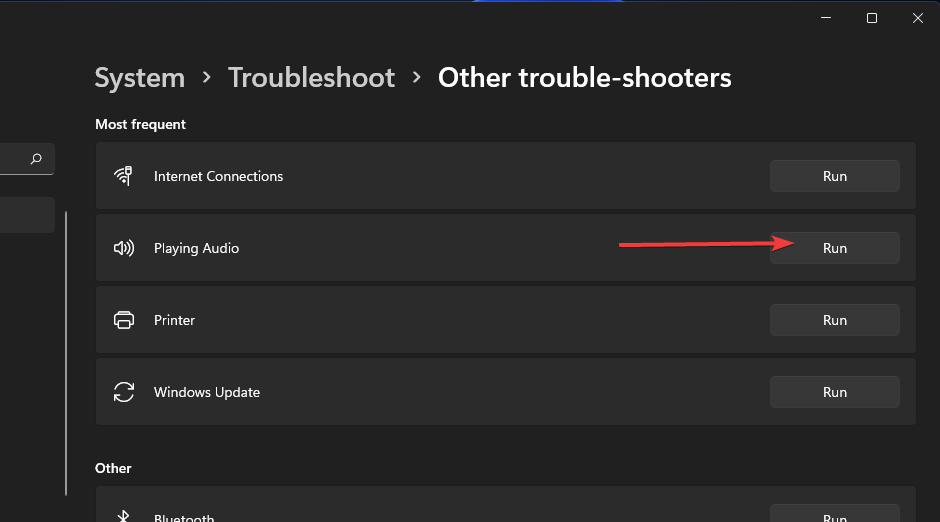
  2. Select Other troubleshooters
    Other trouble-shooters windows 11 no sound
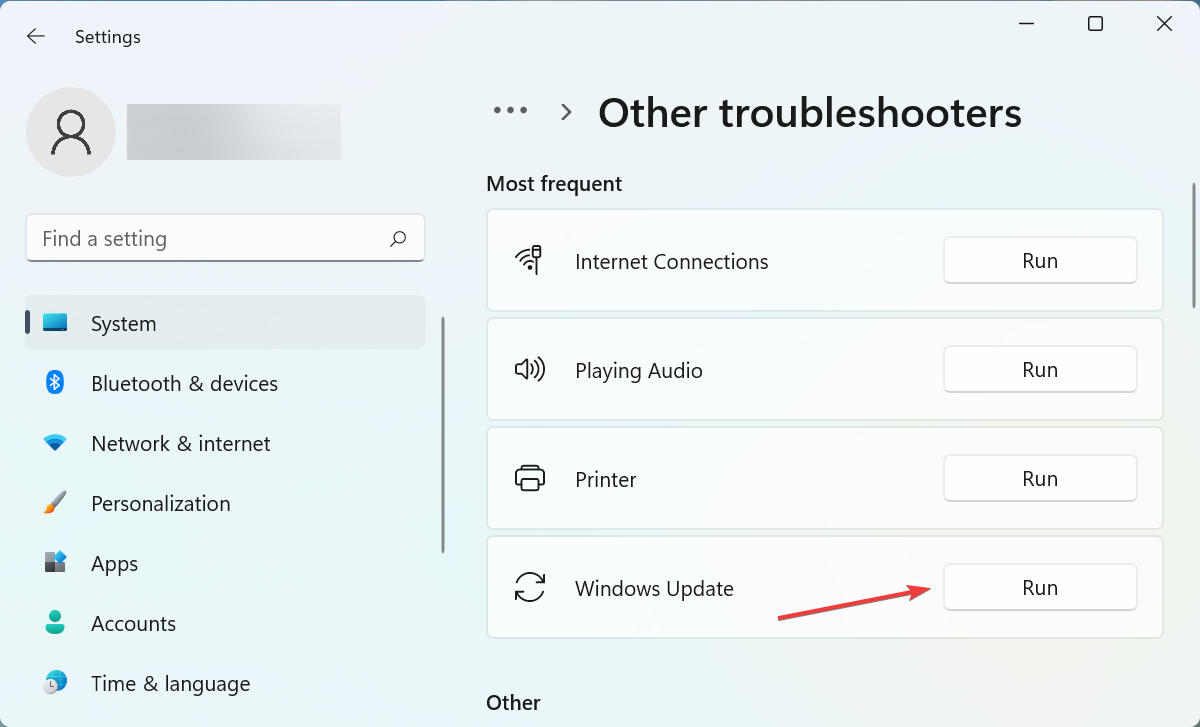
  3. Click Run next to Play Audio
    Run button windows 11 no sound

This tool can fix browser or YouTube sound issues as well as system-level playback errors.

3. Update Your Sound Drivers (Realtek or Others)

3.1 Update via Device Manager

  1. Open Device Manager
  2. Expand Audio inputs and outputs
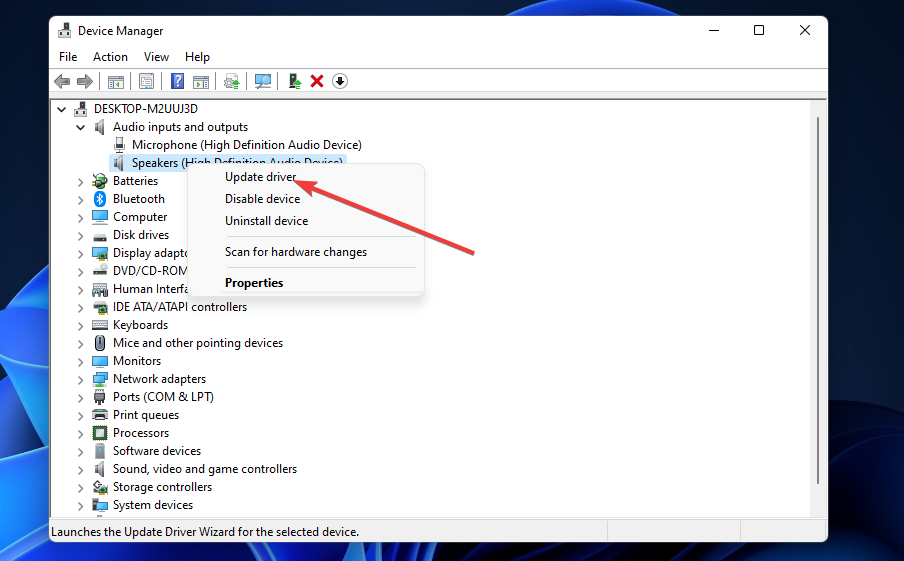
  3. Right-click your sound device > Update driver
    Update driver option windows 11 no sound
  4. Select Search automatically for drivers
    Search for drivers windows 11 no sound

3.2 Use a Driver Update Tool

We recommend using Fortect Driver Updater to fix missing or faulty drivers without manual risk:

Download Fortect Driver Updater

4. Install Windows 11 Updates

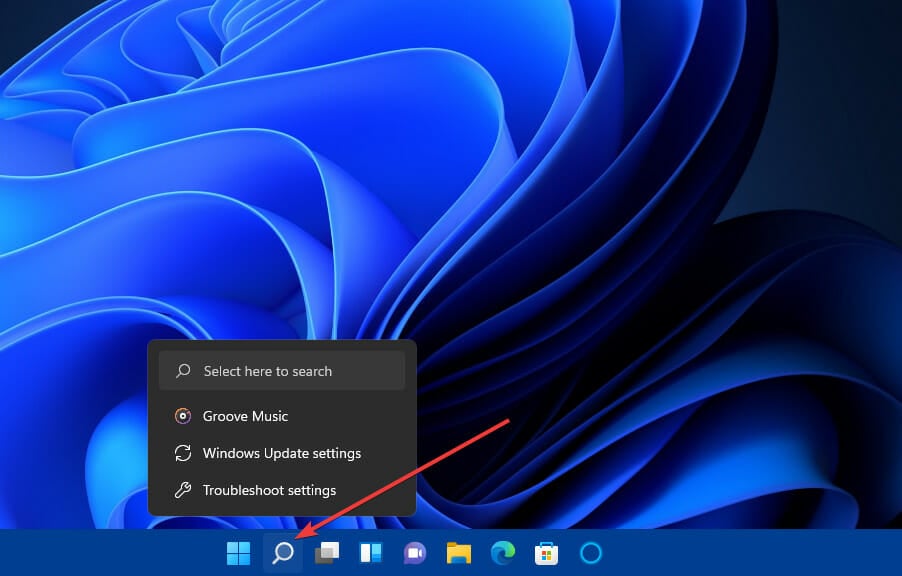
  1. Click the Search icon
    Search icon windows 11 no sound
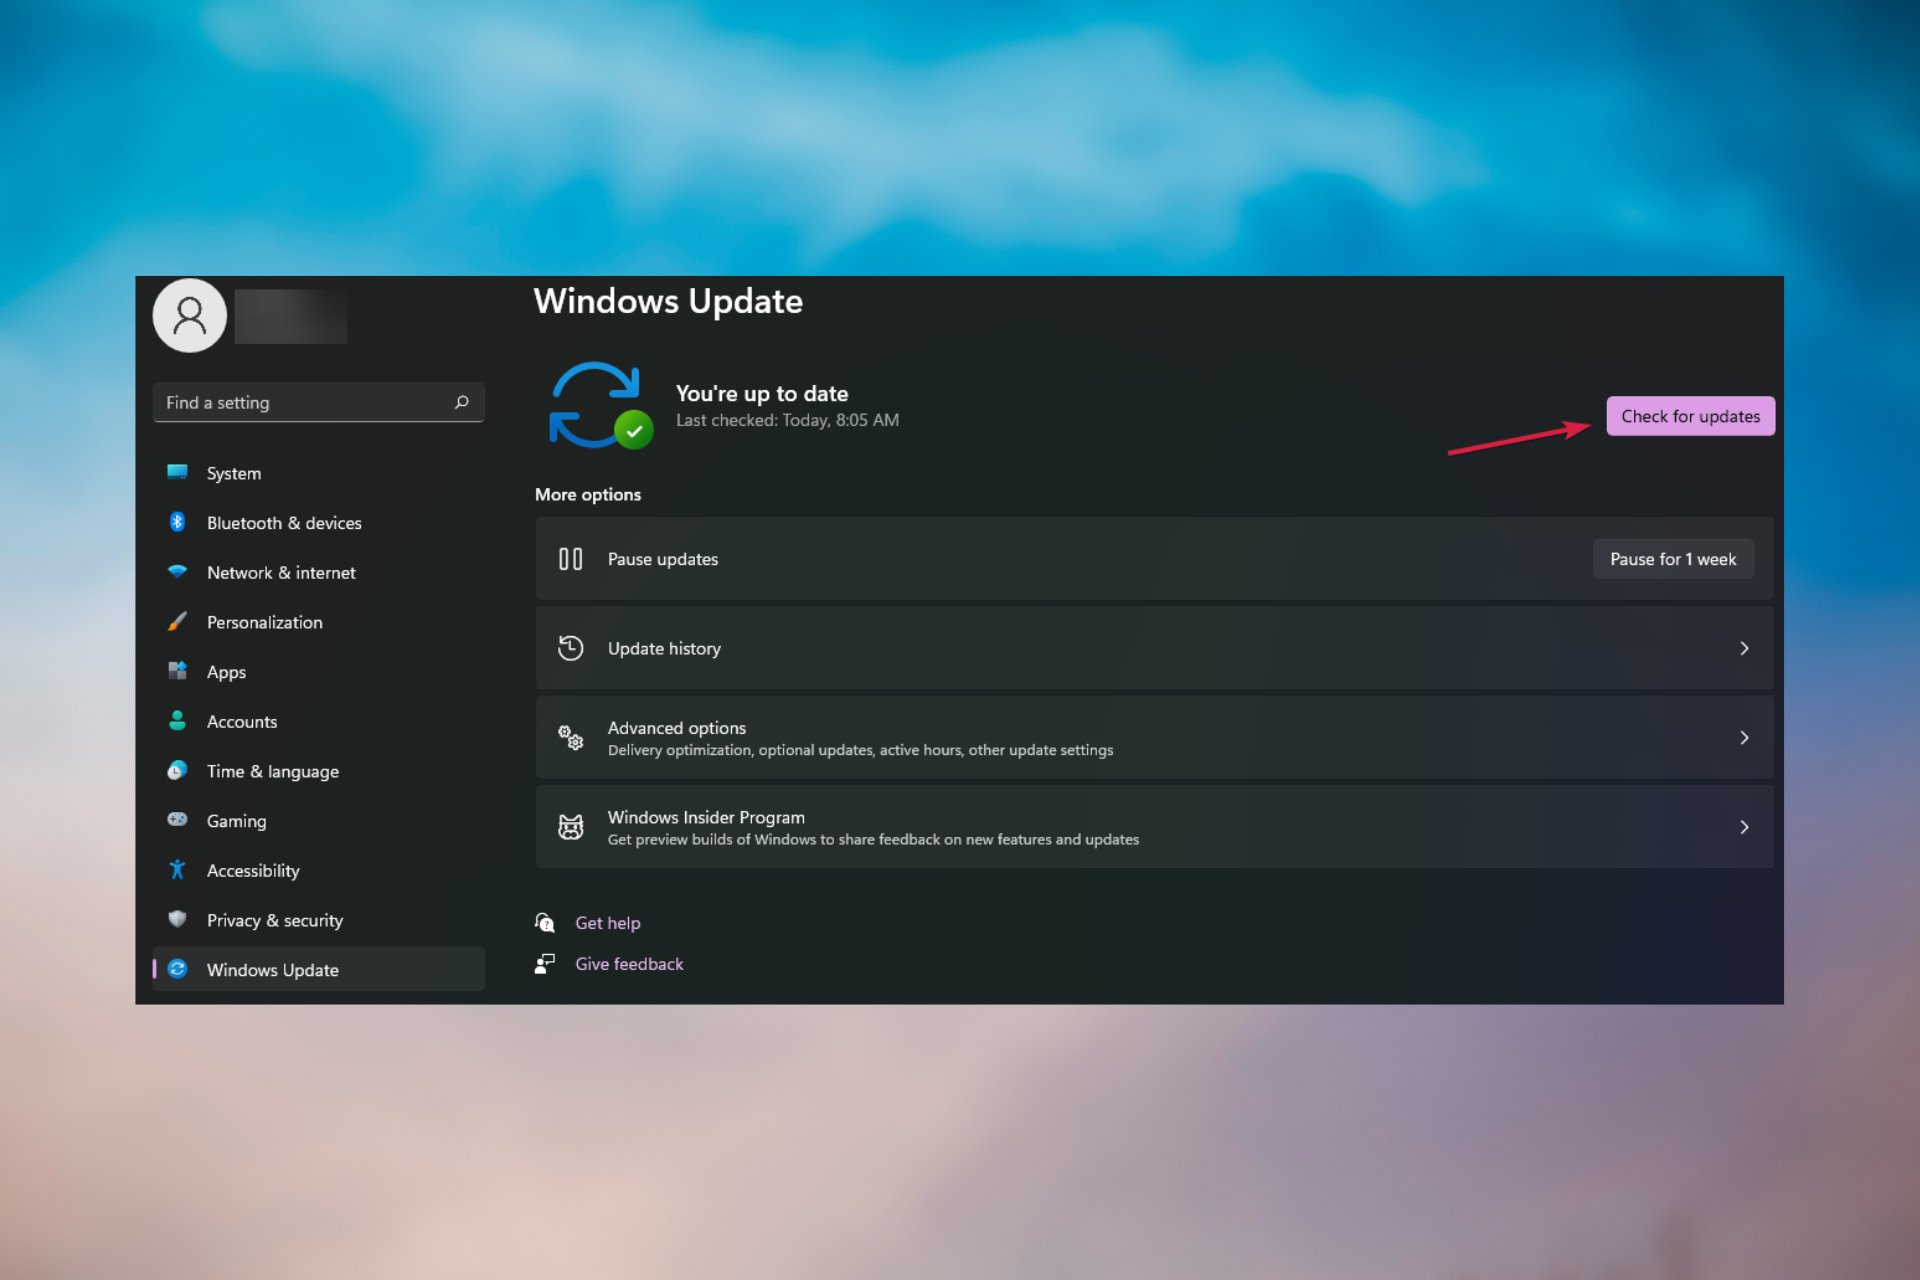
  2. Search for Windows Update and open settings
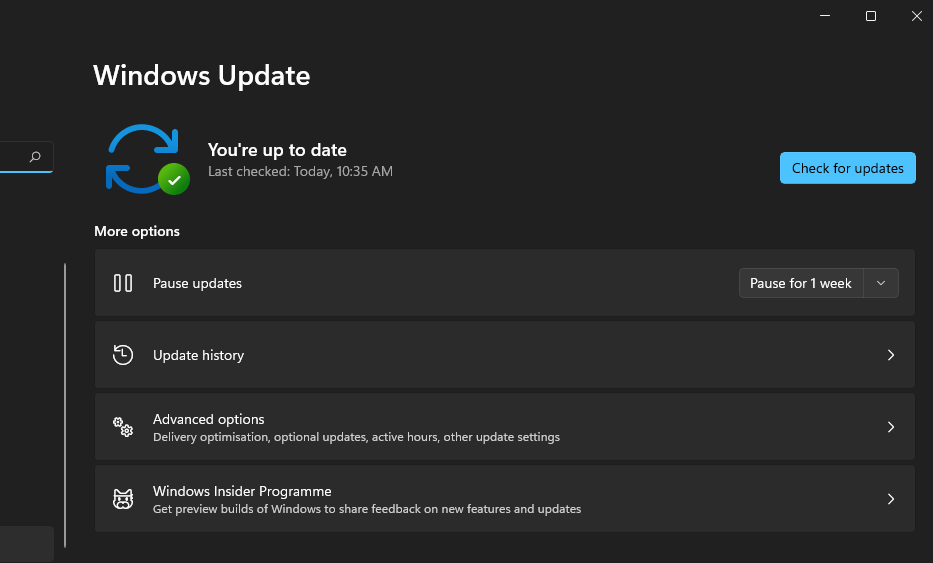
  3. Click Check for updates
    Check for updates button windows 11 no sound

5. Restart Windows Audio Services

  1. Open Run (Win + R) and type services.msc
    Run shortcut windows 11 no sound
  2. Right-click Windows Audio > Restart
    Restart audio service windows 11 no sound

Restart Windows Audio Endpoint Builder and Remote Procedure Call (RPC) services as well.

6. Review Sound Output Settings

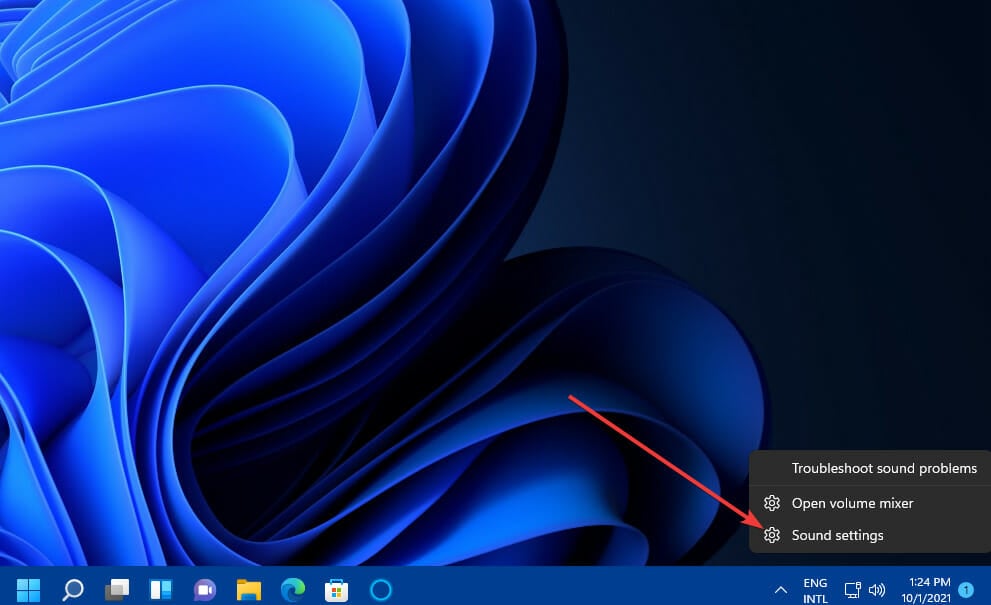
  1. Right-click the speaker icon > Sound settings
    Sound settings windows 11 no sound
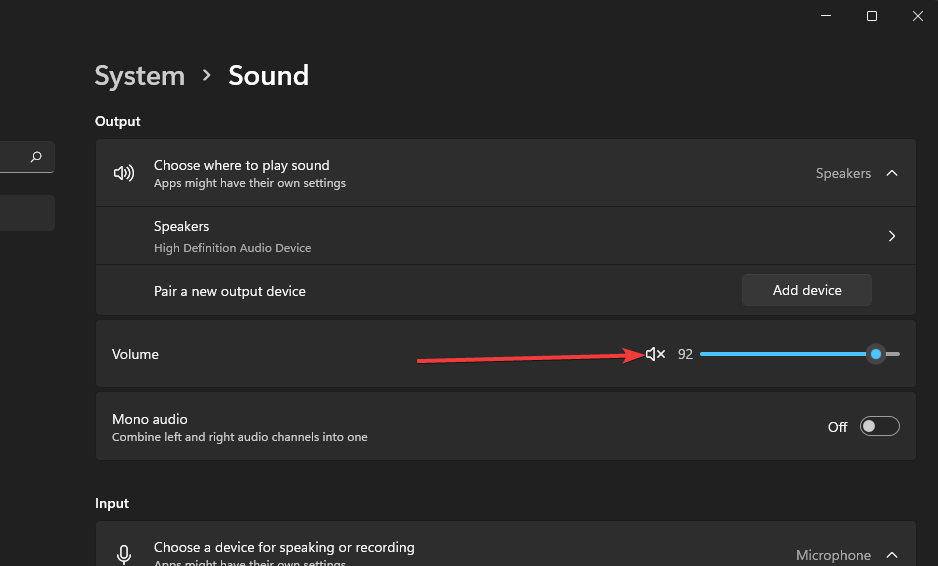
  2. Choose the right playback device and unmute if needed
    Unmute button windows 11 no sound
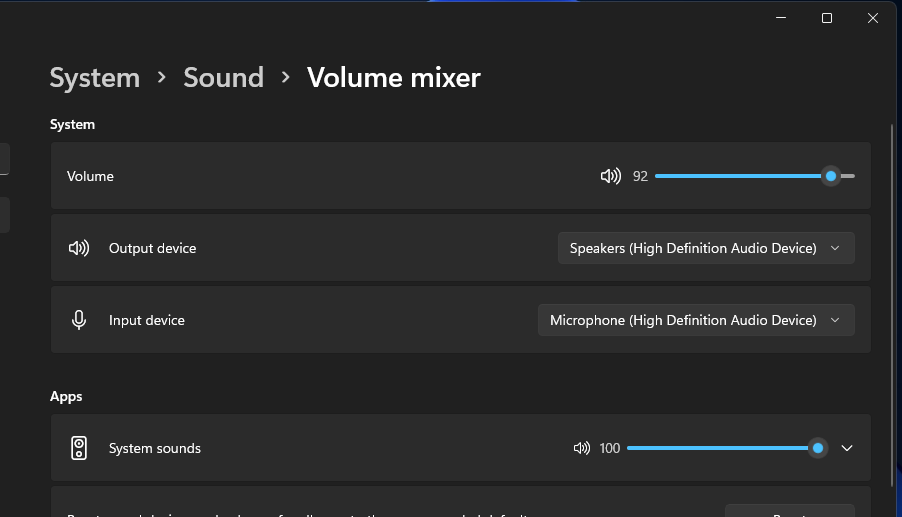
  3. Adjust sliders in Volume mixer
    Volume mixer windows 11 no sound
  4. Ensure System sounds is routed to the default output
    Output device drop-down menu windows 11 no sound

For HDMI or dual-monitor sound fixes, check out our full dual-monitor audio troubleshooting guide.

7. Reinstall the Sound Driver

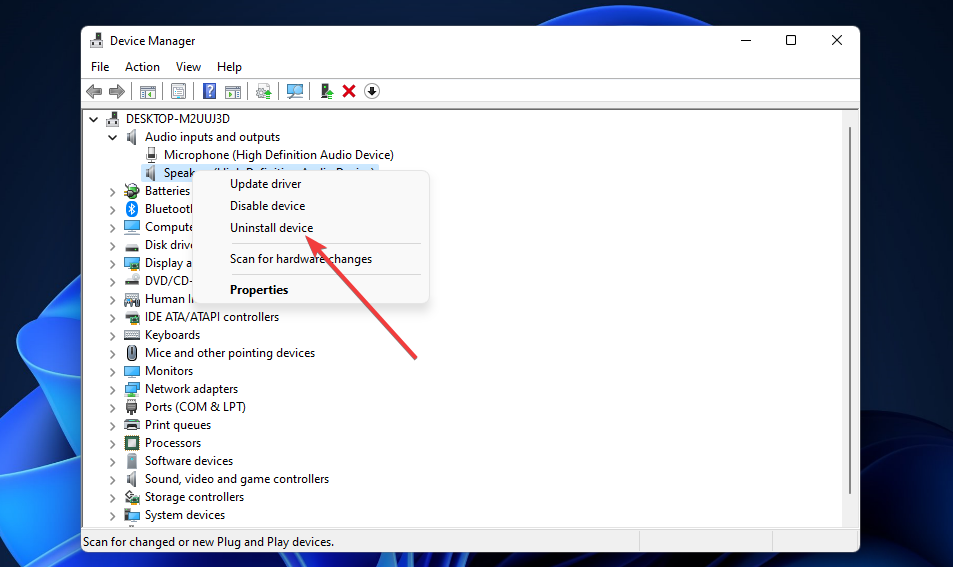
  1. Open Device Manager
    Device Manager windows 11 no sound
  2. Right-click the faulty device > Uninstall
    Uninstall device windows 11 no sound
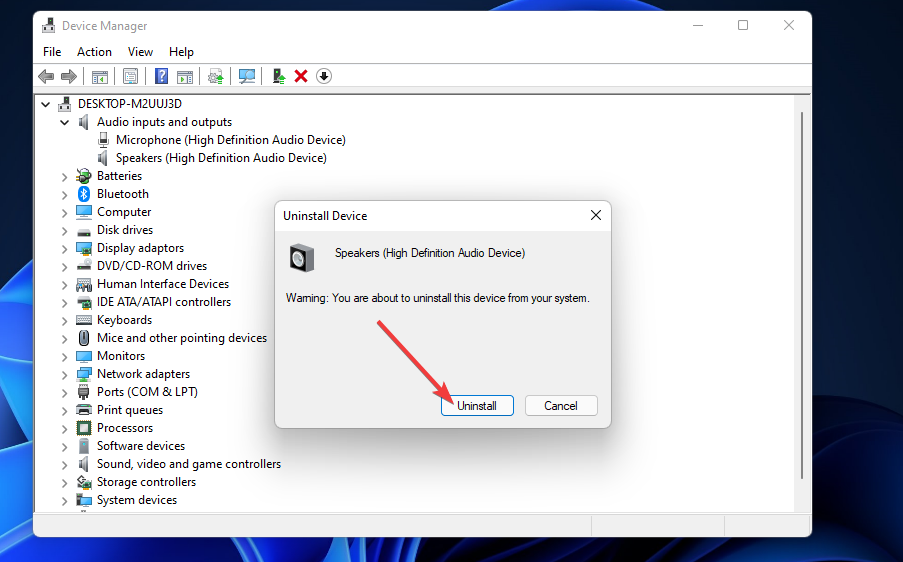
  3. Confirm removal
    Uninstall button windows 11 no sound
  4. Restart your PC to reinstall the driver automatically

8. Reset Windows 11 (Advanced Users Only)

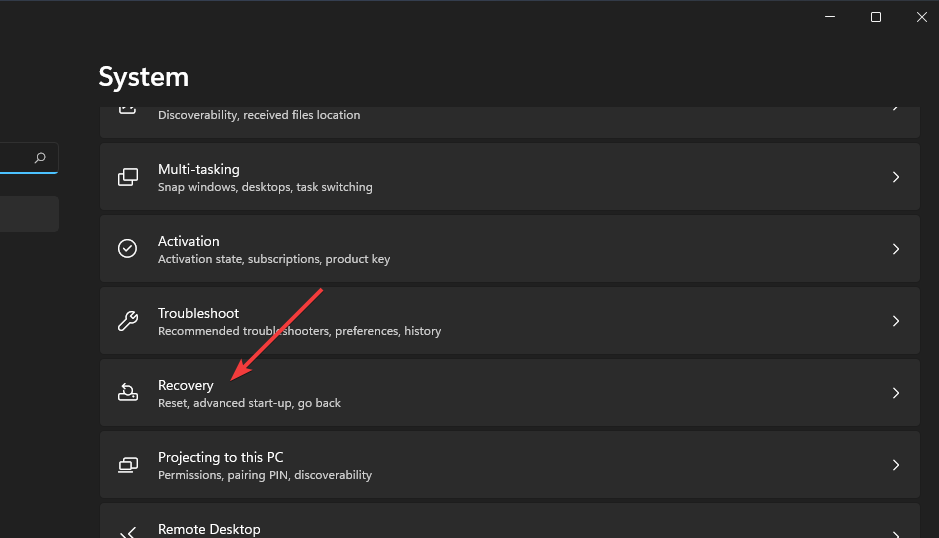
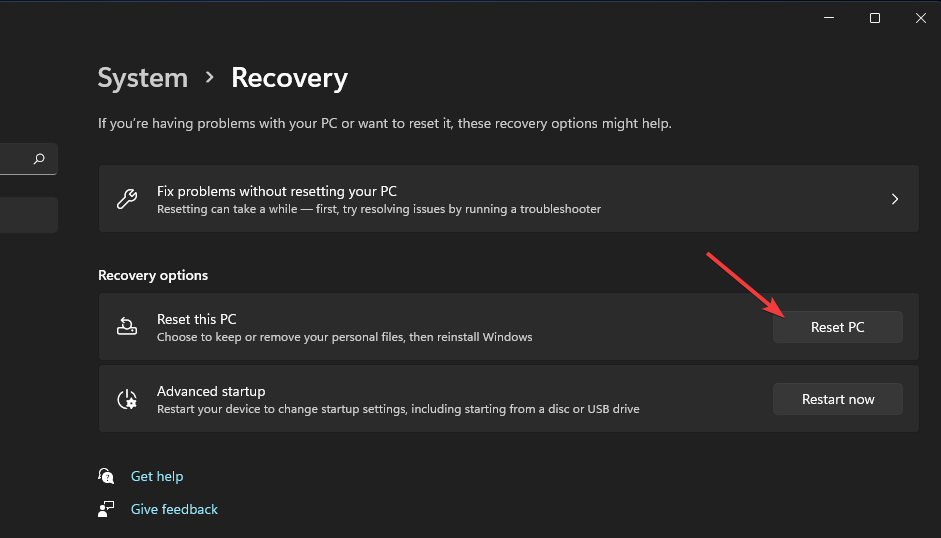
  1. Navigate to Settings > System > Recovery
    System tab windows 11 no sound
  2. Click Reset PC
    Reset PC button windows 11 no sound
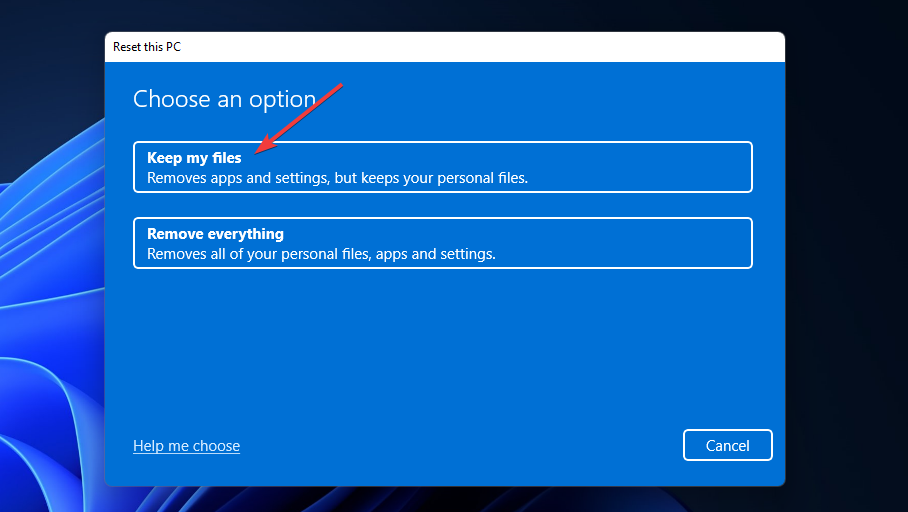
  3. Select Keep my files
    Keep my files windows 11 no sound

Still No Audio? Consider Expert Support

If your speakers or HDMI output still don’t work, it may be a hardware problem. Try:

You can also refer to our complete sound troubleshooting guide that covers both Windows 10 and 11 issues.

Conclusion

If you’re dealing with Windows 11 no sound problems, the solutions above cover all common causes—from Realtek driver failures to muted outputs and browser playback errors. Try each fix step-by-step, especially after an update or sleep mode. In most cases, your sound will be restored without needing a full reset.

FAQs

Why is there no sound after a Windows 11 update?

Updates can sometimes reset or corrupt your audio driver settings. Reinstalling drivers or running the Play Audio troubleshooter often helps.v

How do I fix Realtek no sound on Windows 11?

Update or reinstall the Realtek audio driver using Device Manager or a trusted driver updater tool.

Why is there no sound from my laptop’s internal speakers?

Your internal speakers might be disabled, not set as default, or muted. Check Sound settings and ensure the correct output is selected.

6 Ways To Fix Fallout 3 Not Launching On Windows [Step-by-Step]

Having a hard time with Fallout not starting on Windows? You’re in the right place. Today we’ll show you how to fix common crashes or launch issues.

They usually stem from compatibility problems with newer operating systems, outdated graphics card drivers, or corrupt game files. We’ll address all these causes and more below. Just follow the instructions.

What can I do if Fallout 3 keeps crashing on Windows 11?

1. Run Fallout 3 in compatibility mode

  1. Open File Explorer with the Windows key + E hotkey for it.
  2. Open Fallout 3’s Steam folder within File Explorer using this path: C:Program Files (x86)SteamsteamappscommonFallout 3
  3. Then right-click the Fallout 3 EXE file to select Properties.
  4. Next, select the Compatibility tab on the game’s properties window.
  5. Select the Run this program in compatibility mode for the setting.
  6. Then select Windows XP (Service Pack 3) on the platform drop-down menu.
  7. In addition, select the checkbox for the Run this program as an administrator option.
  8. Click Apply to save settings and click the OK button to exit.

When Fallout 3 doesn’t work in Windows 11, it’s often a compatibility issue that can be resolved with compatibility mode. However, should your Fallout 3 still crash, try the next fix.

2. Update graphics card driver

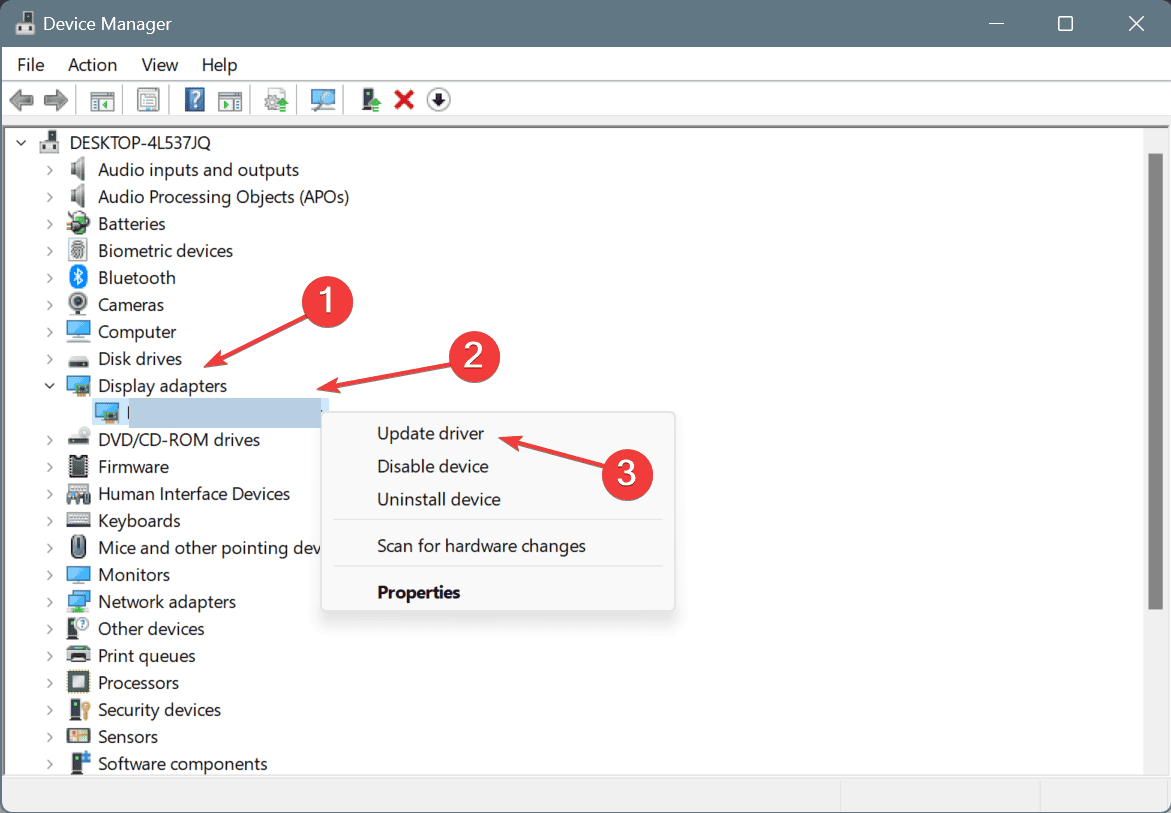
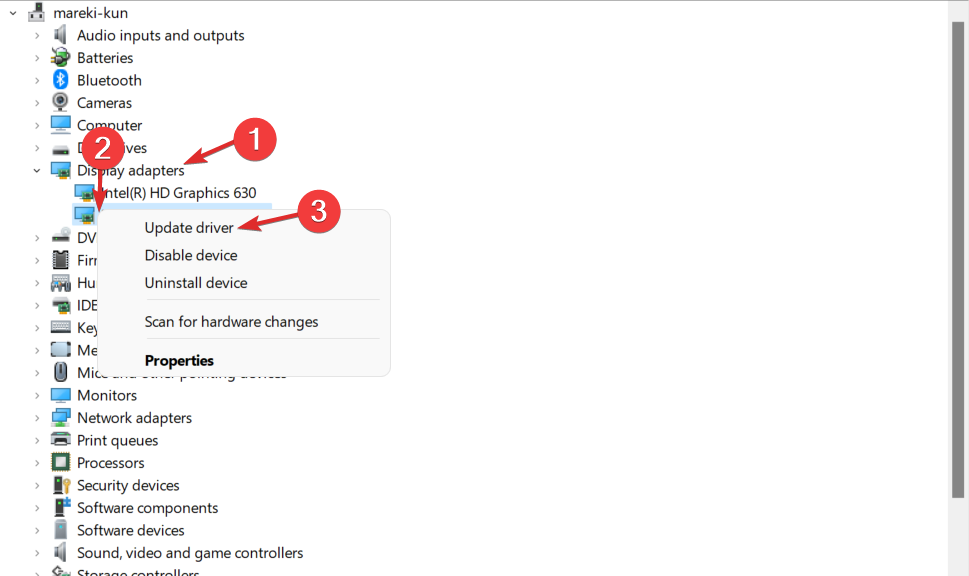
  1. Open Device Manager and go to Display Adapters.
  2. Locate your graphics card driver. The name usually contains the hardware company’s name (e.g. NVIDIA).
  3. Right-click on it and select Update.

Alternatively, if Device Manager can’t identify a new driver, you can update it with a third-party tool like Fortect Driver Updater.

This product is extremely lightweight and will find all of your outdated, broken, or missing drivers within seconds of scanning your PC.

⇒ Use Outbyte Driver Updater

3. Install Windows Game Live

  1. Enter Games for Windows Live in Google, as seen below.
  2. Then click the GFWL – Microsoft link near the top of the search results. (doing so will download the installer for Games for Windows Live)
  3. Open the folder Games for Windows Live downloaded to.
  4. Then click gfwlivesetup.exe to open the installer for that software and follow the onscreen prompts.
  5. Launch the Games for Windows Live software when you’ve installed it and wait for it to download all needed additional files.

4. Verify game files

  1. In Steam, go to your Library.
  2. Right-click Fallout 3 and select Properties.
  3. Go to the Local Files tab.
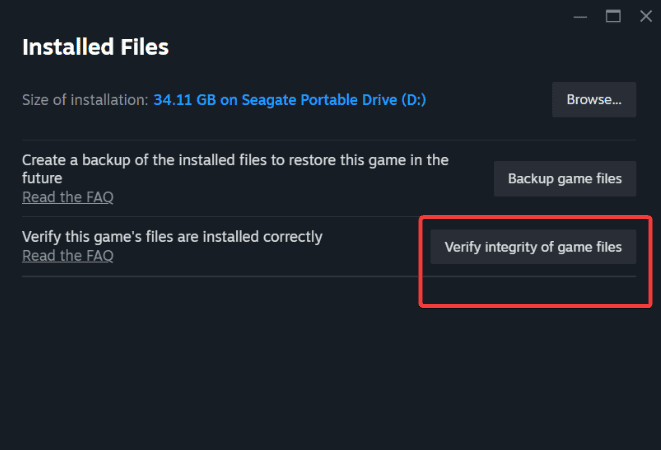
  4. Click Verify Integrity of Game Files.verify integrity of game files steam

Corrupted or missing game files can lead to crashes. Steam can verify & automatically fix any identified issues.

5.Check in-game display settings

  1. Launch Fallout 3
  2. Ensure the resolution matches your monitor’s native resolution.falout 3 resolution
  3. Apply Changes
  4. Restart Fallout 3.

6. Modify FalloutPrefs.ini File

  1. Go to C:\Program Files (x86)\Steam\steamapps\common\Fallout 3.
  2. Locate FalloutPrefs.ini
  3. Right click on it and open FalloutPrefs.ini in a Text Editor (Like Notepad).
  4. Adjust Resolution Settings
    • Modify iSize W and iSize H to match your monitor’s resolution (e.g., iSize W=1920 and iSize H=1080).falout prefs text file
  5. Save Changes

Give each of the above fixes a trial (do not bother going to the next if you are satisfied using one). Those are some of the likely resolutions that will kick-start Fallout 3, so you can play the game on Windows 11.

Our article on how to play old games also provides further tips for running antiquated games in Windows 11.

Were the above solutions efficient? Let us know in the comments area below.

Wake On LAN Not Working on Windows [Solved]

Your Windows device can be used in different ways and for various tasks since Microsoft added useful built-in features that can ease your daily schedule.

But, maybe the most popular feature that can be used in Windows 10 and Windows 11 is Wake-on-LAN. Unfortunately, more and more users are complaining about WOL issues, so we must find a way to fix these problems.

So, due to some reasons, if the Wake on LAN is not working on your device, try to use the guidelines from below in order to easily correct that.

Why is my Wake-On-LAN not working?

  • Wake-on-LAN not working after shutdown, over Internet, after a long sleep – Various problems with Wake-on-LAN can occur, and users reported that they are unable to wake their PC over the Internet or after a long sleep.
  • ASUS Wake-on-LAN not working – This problem can appear on almost any PC and many ASUS users reported it. You need to update your driver or BIOS to fix the issue.
  • GIGABYTE Wake on LAN not working – This issue can also arise on PCs that run GIGABYTE hardware.
  • Shutdown Wake-on-LAN Realtek – Many Realtek owners reported this issue with Realtek network adapters. In most cases, you can fix this problem by updating your drivers or by making a few changes in your registry.
  • Wake-on-LAN in BIOS – To use the Wake-on-LAN feature, first you need to enable it in BIOS. In addition, you also have to disable Deep Sleep mode as well. If you don’t see these options, update your BIOS to the latest version.

How can I fix Wake On LAN not working on my PC?

[wr_toc]

1. Disable Fast Startup

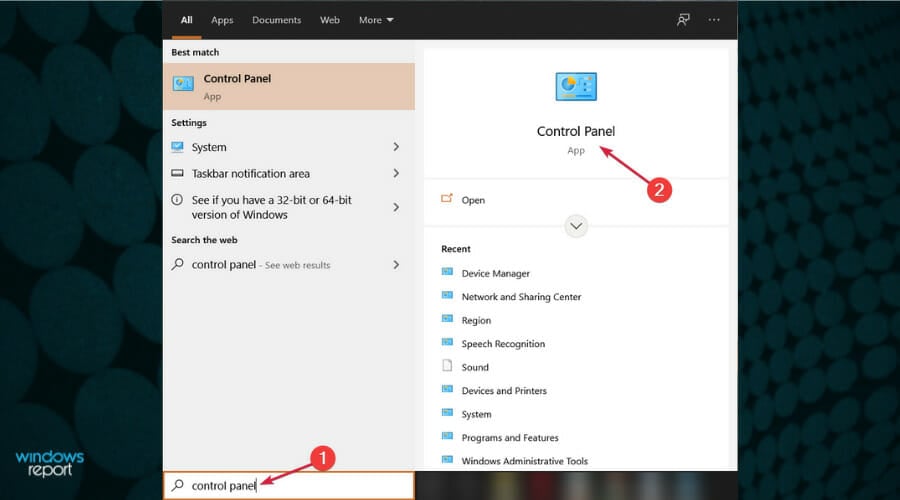
  1. In the Search bar enter control panel. Select Control Panel from the list of results.
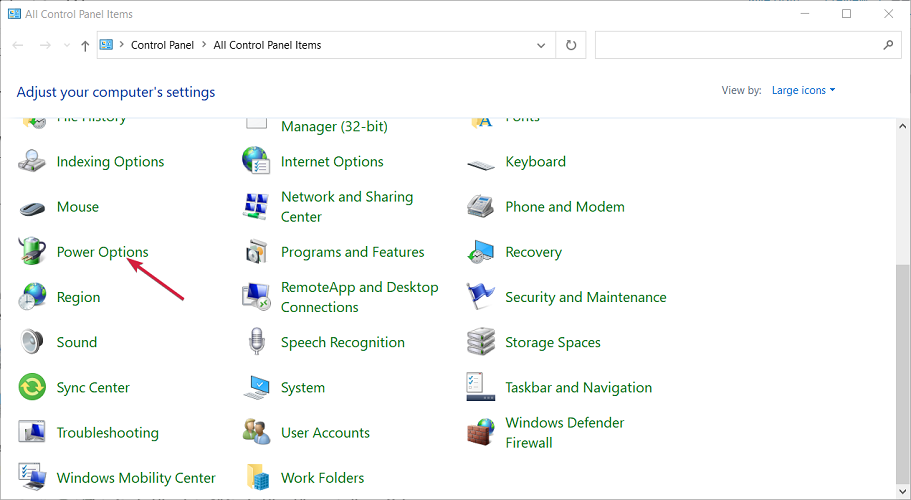
  2. When Control Panel opens, select Power Options from the menu.
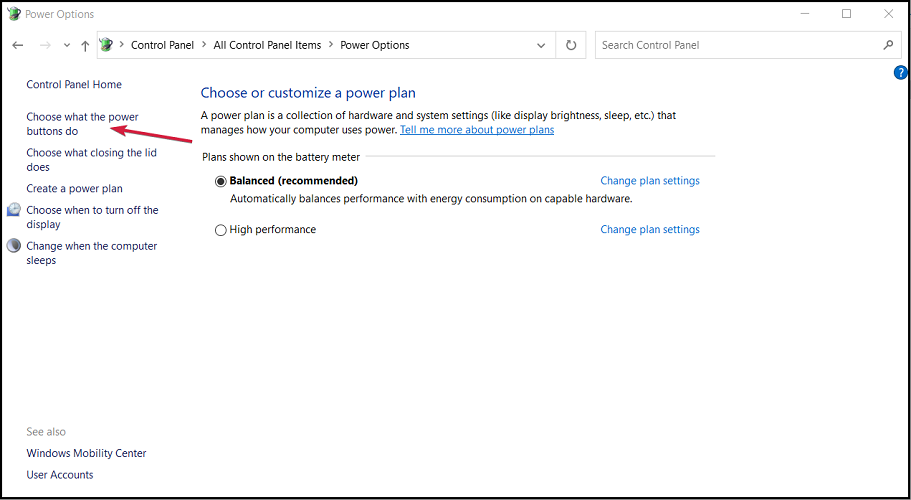
  3. Power Options window will now appear. Click on Choose what the power button does from the menu on the left.
  4. Now click on Change settings that are currently unavailable.
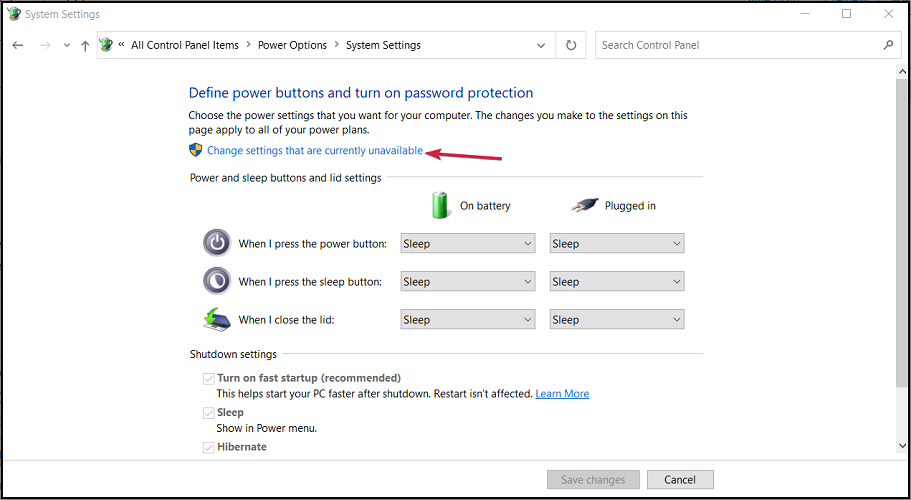
  5. Uncheck Turn on fast startup option and click on Save changes.
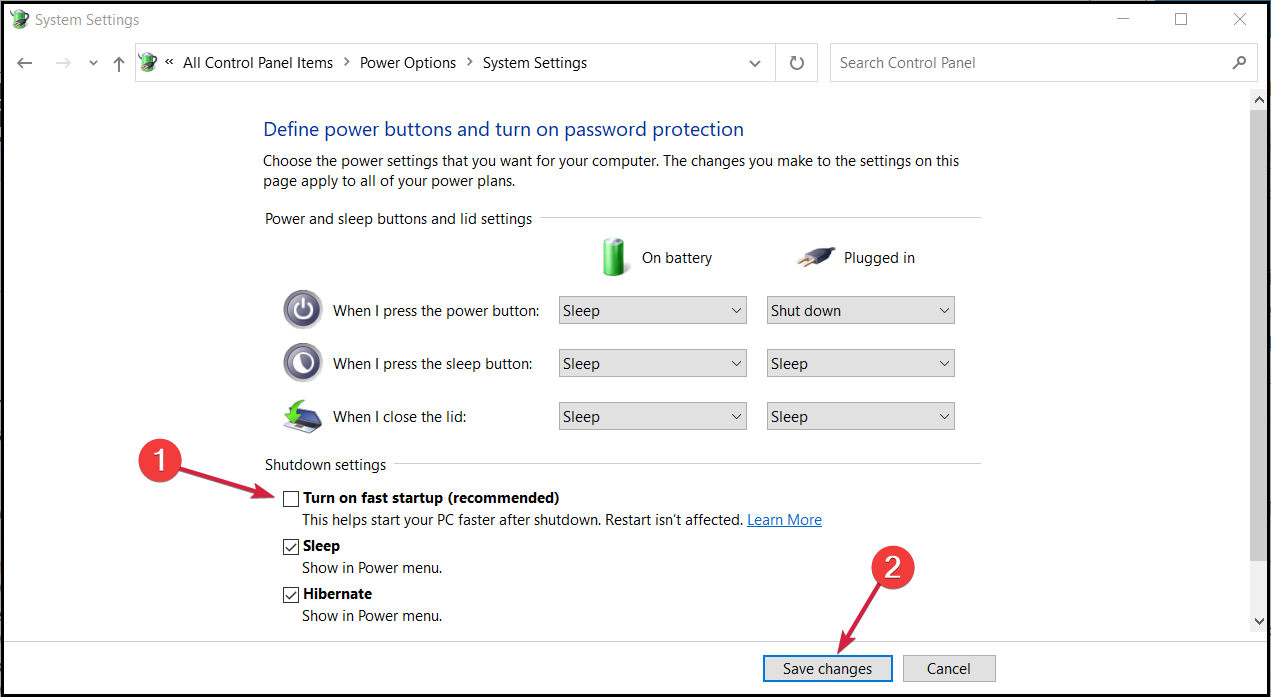
Fast Startup is a feature that can be activated or disabled from your Windows 10 settings. When enabled, you will be able to power off your device faster than usual. But, in some cases, the WOL protocol will not work when the mentioned feature is activated. Therefore, you need to disable it to fix the problem.

After making these changes, check if the Wake-on-LAN feature is working. This also helps when Wake on Magic Packet is missing.

When you can’t perform this procedure, learn how to fix Control Panel if it’s not opening.

2. Use Network Configuration Settings

  1. From the Start screen use Win + R keyboard buttons in order to launch the Run console.
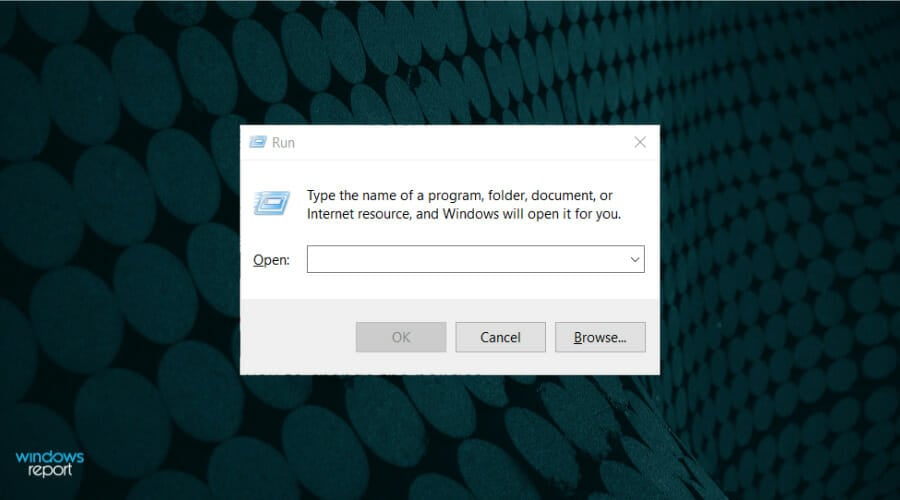
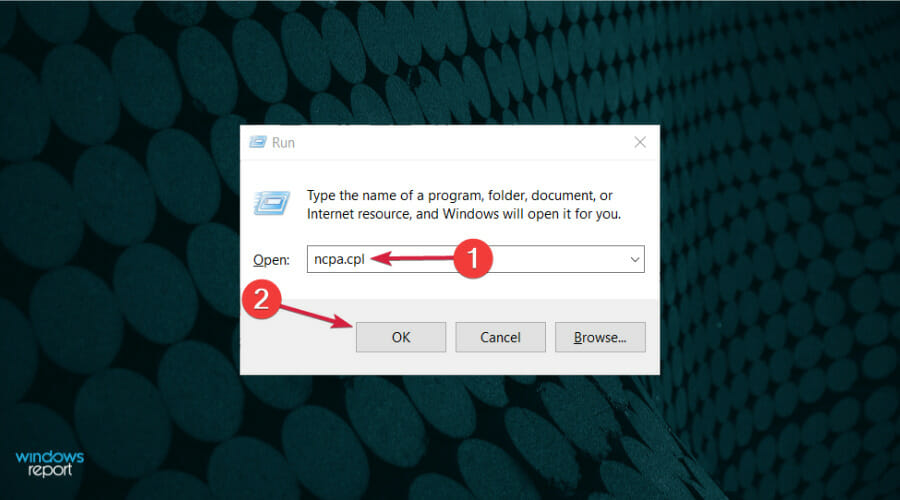
  2. In the Run box type ncpa.cpl and click OK.
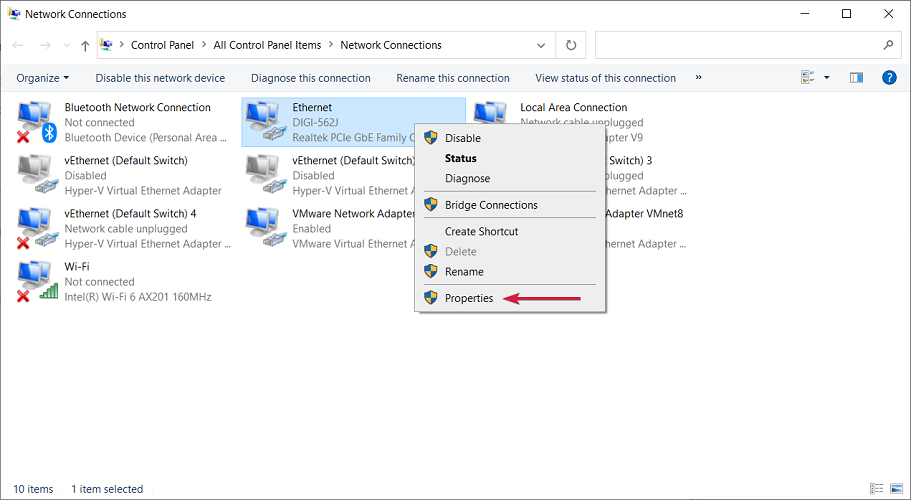
  3. Right click your connection and choose Properties from the menu.
  4. When Properties window opens click on Configure.
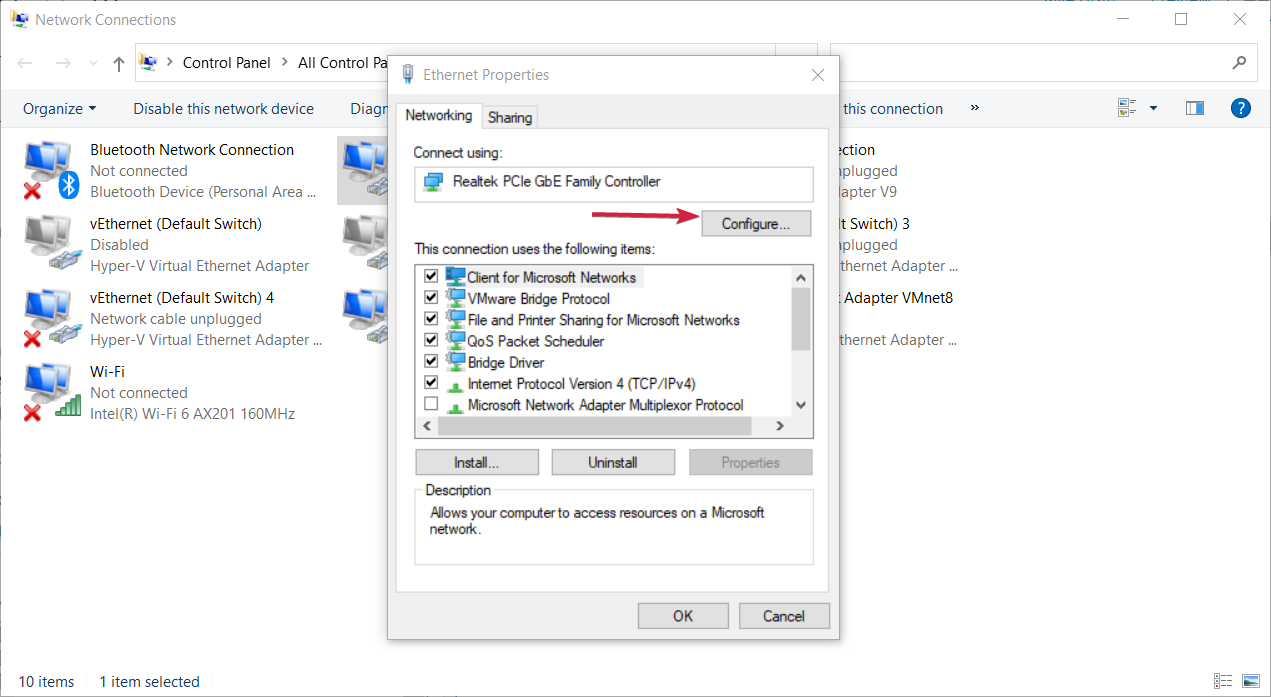
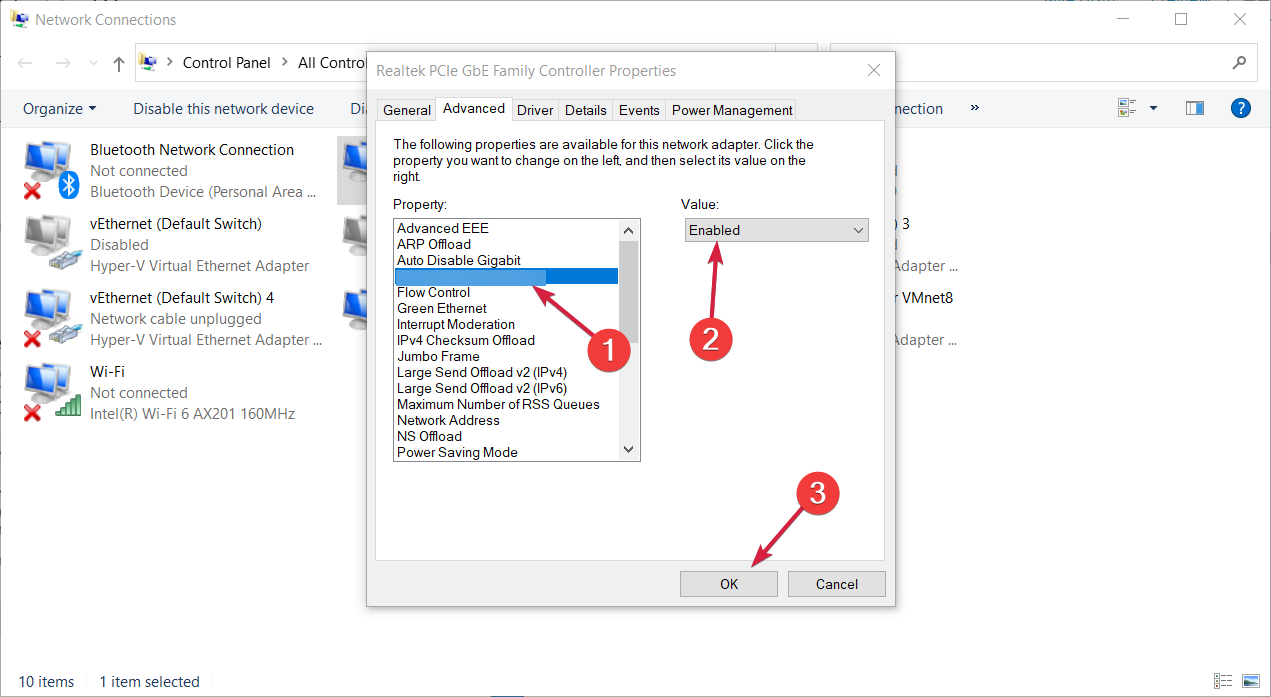
  5. Go to Advanced tab and select the Enable PME option. Change the value into to Enabled and save changes. For some adapters the function is called Shutdown Wake-On-Lan so if you can’t see the Enable PME, you should enable this instead.
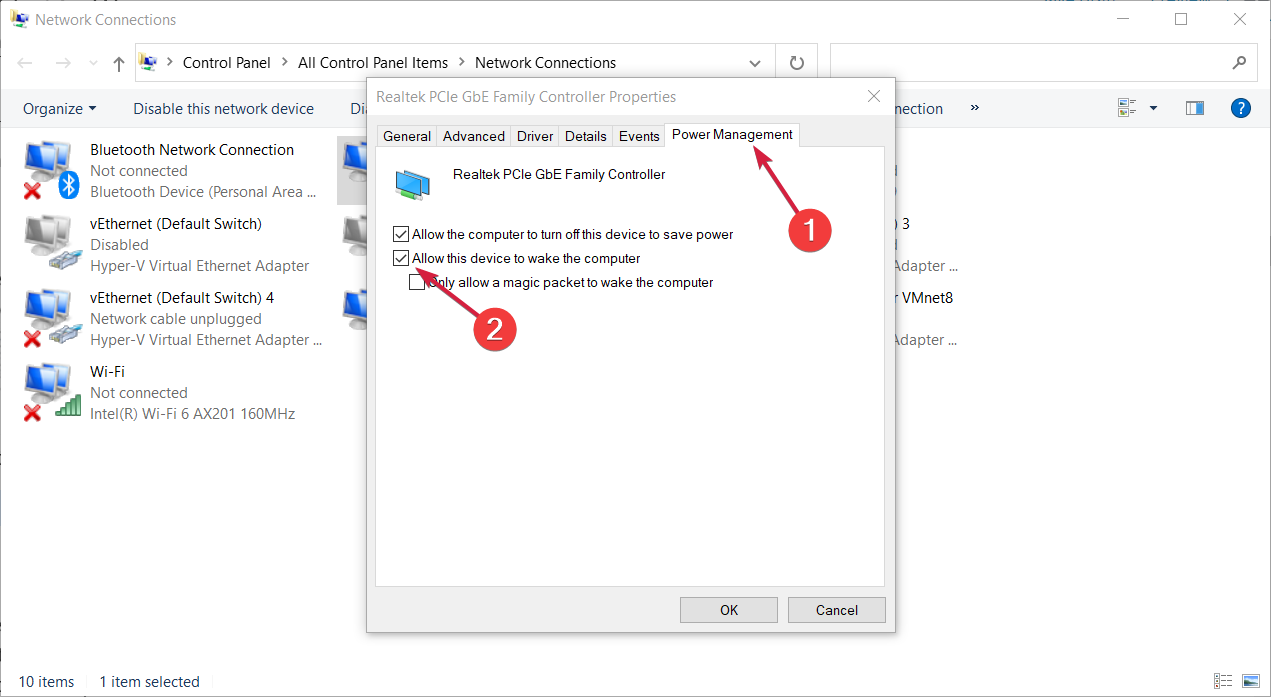
  6. Next, click the Power Management tab and check the Allow this device to wake the computer.
If you can’t perform this method our solutions on how to fix the Start button will help you solve this problem right away. Most users don’t know what to do when the Windows key stops working.

3. Install the older network driver

  1. Go to your network adapter or motherboard manufacturer’s website, locate the driver for your device, and download it.
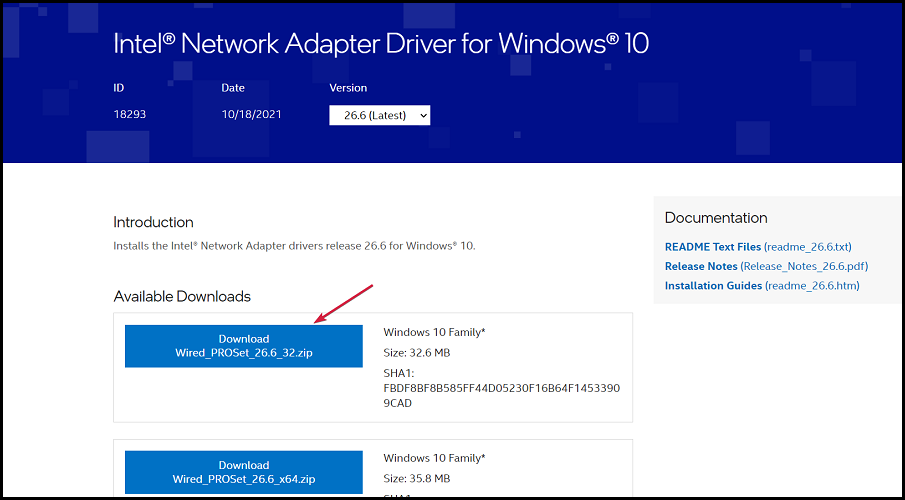
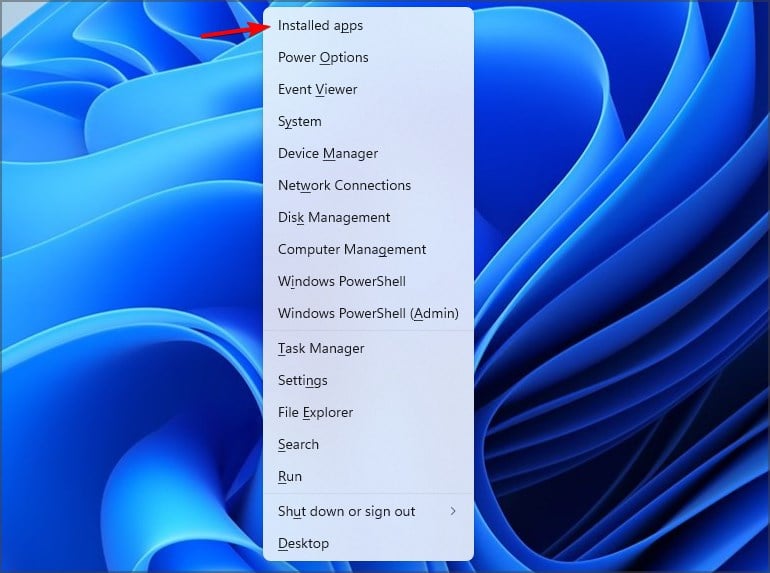
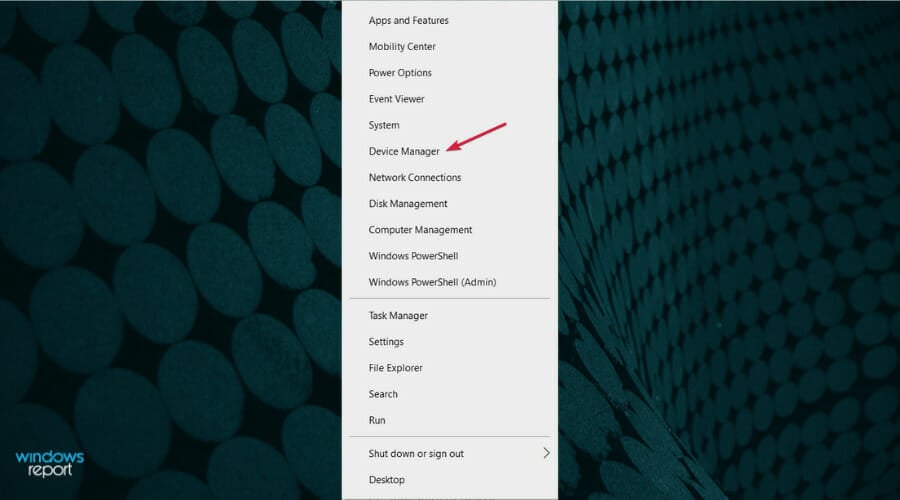
  2. Now press Windows key + X to open Win + X menu and choose Device Manager from the list.
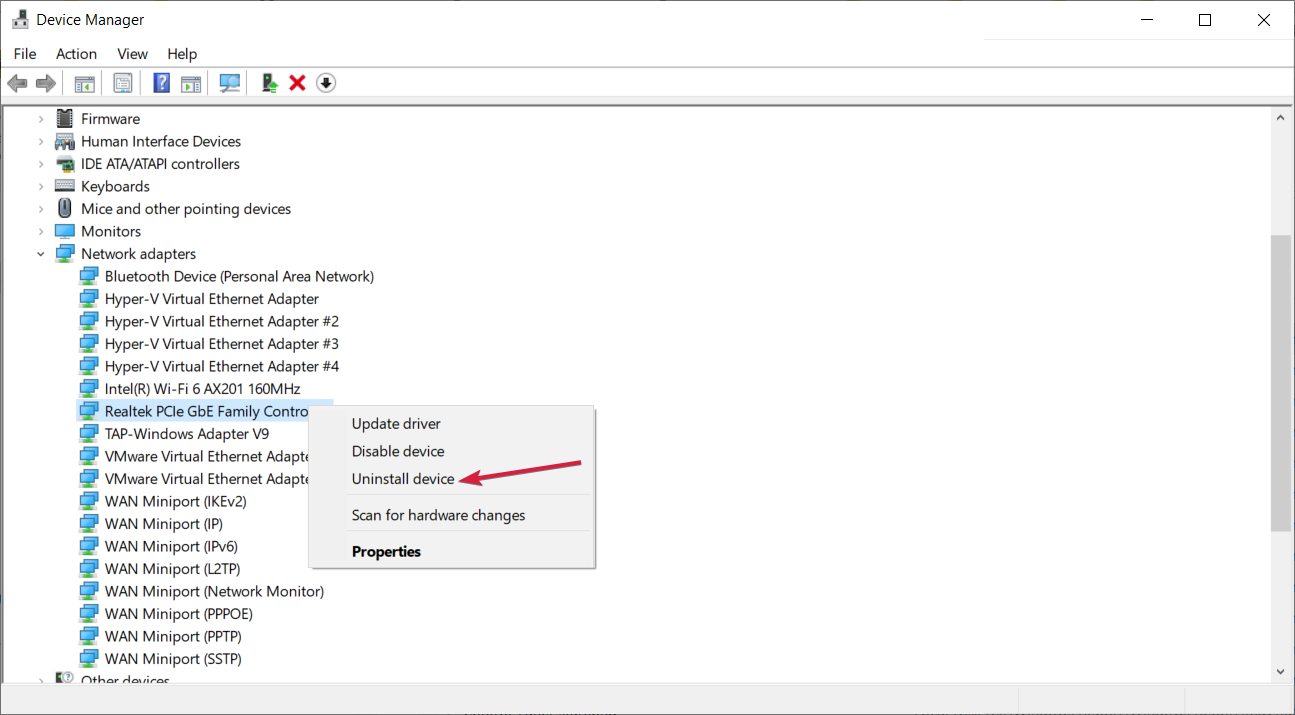
  3. Once Device Manager opens, locate your network adapter, right click it and choose Uninstall device.
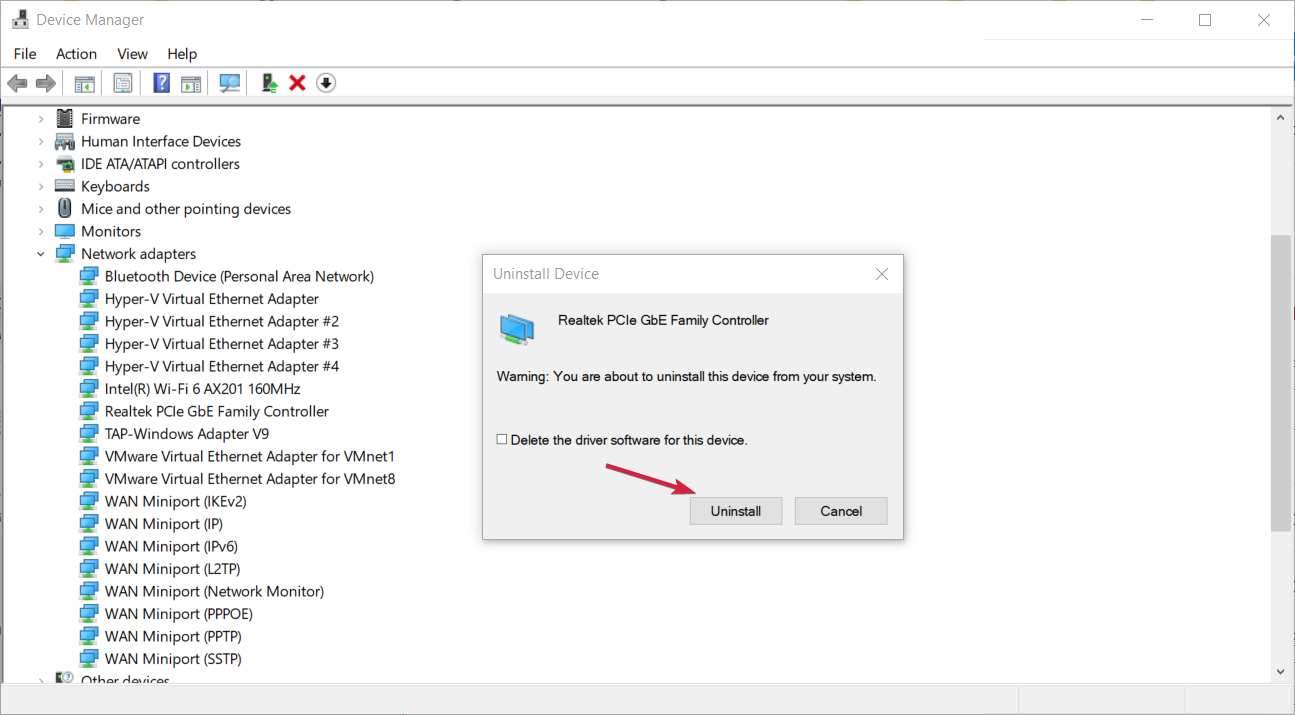
  4. When the confirmation dialog appears, click on Uninstall.
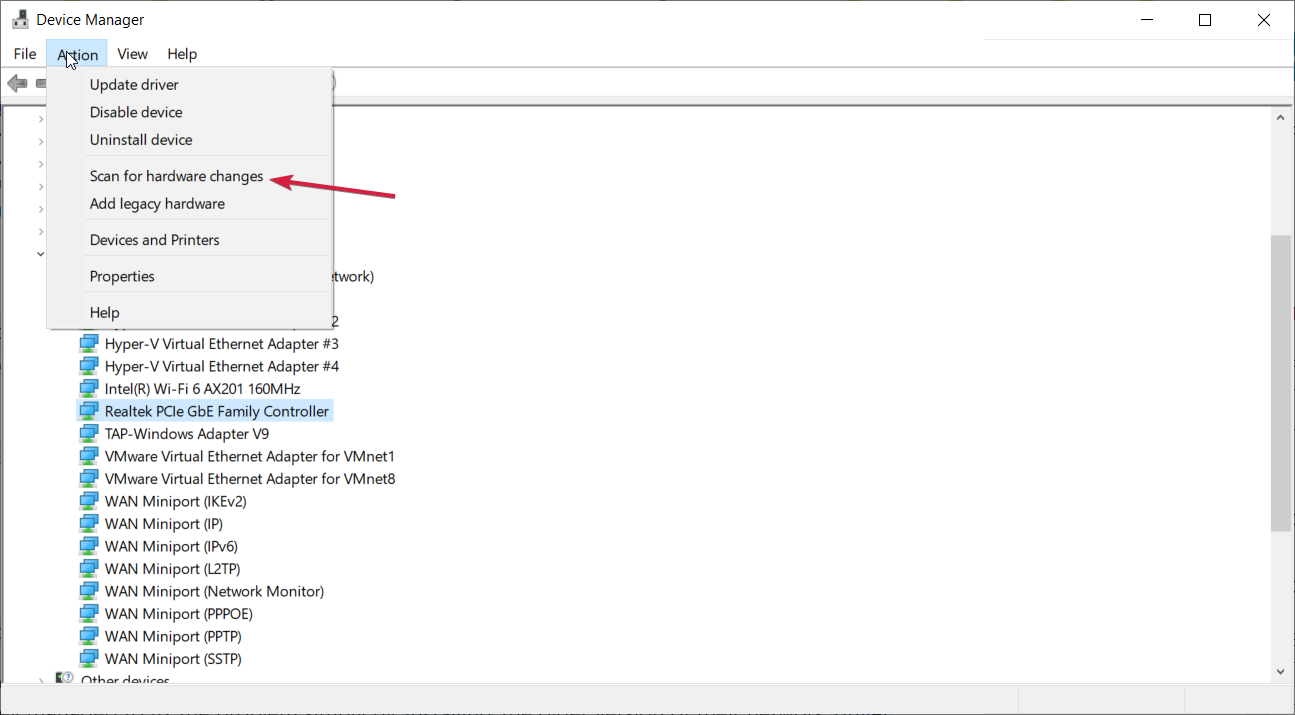
  5. Now click on Scan for hardware changes icon. Windows will now try to install the default driver.
If Wake-on-LAN is not working in Windows 10, the problem might be related to your network driver.

According to users, they managed to fix the issue simply by installing the older version of their network driver.

Once the default driver is installed, check if the problem is resolved. If the issue persists or if that default driver doesn’t work at all, install the driver that you downloaded in Step 1.

After installing the older driver, check if the Wake-on-LAN feature works. If the older driver solves the problem, you’ll have to prevent Windows from automatically updating it in the future.

In case the manual process doesn’t work out and you need a more streamlined method, the standalone driver manager will help you in any matter.

4. Install the latest network driver

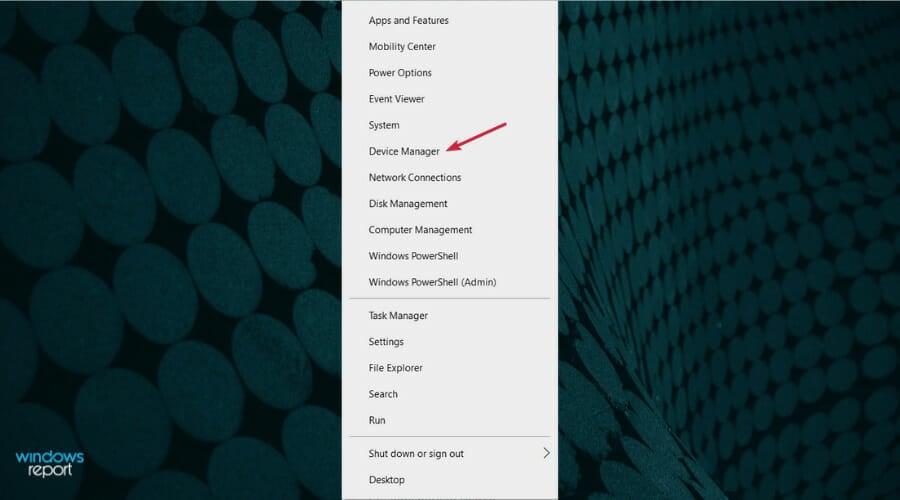
  1. Press the Windows key + X and select Device Manager from the list.
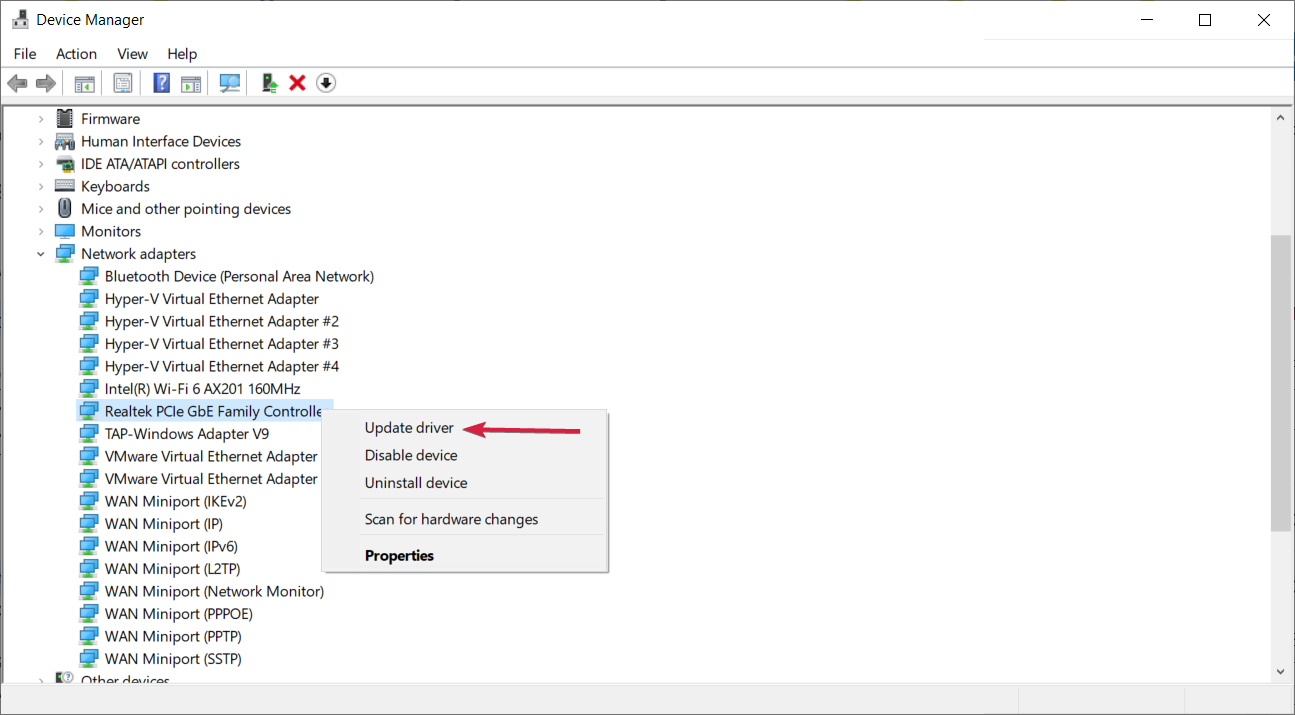
  2. Expand the Network adapters section, right click the device and select Update driver.
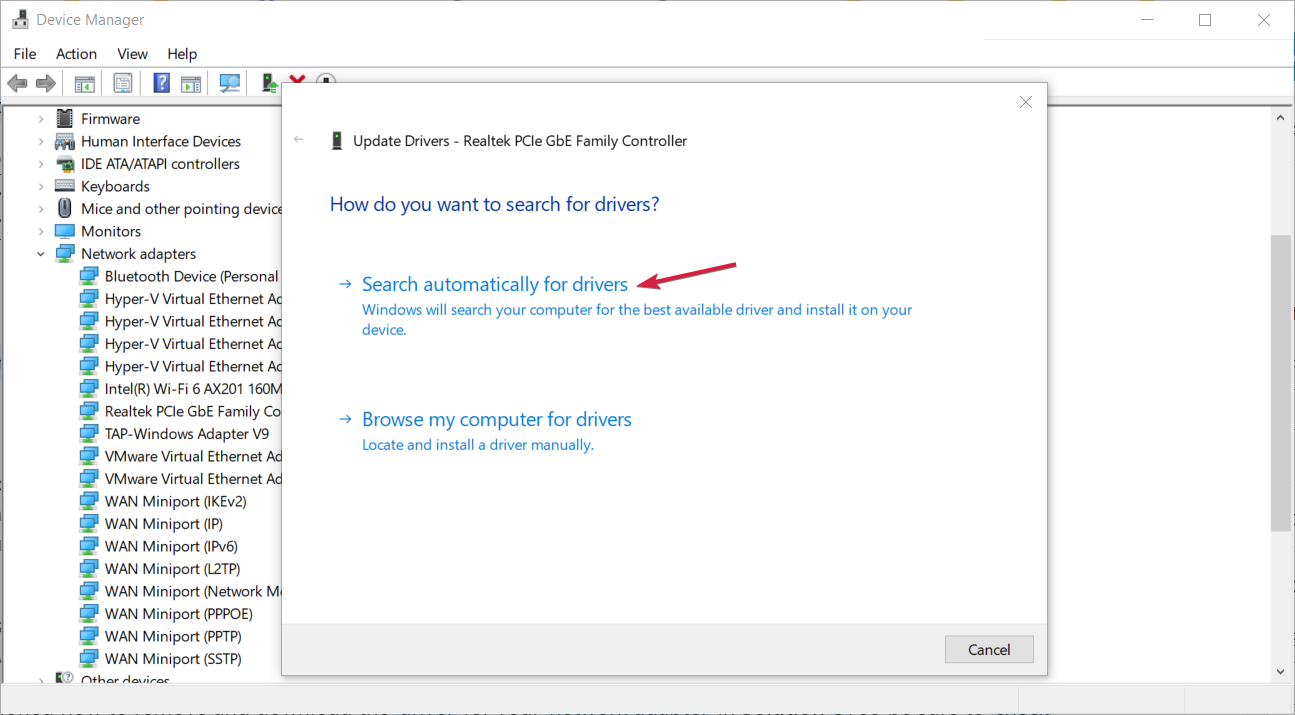
  3. You can click on Search automatically for drivers of if you downloaded the latest driver from the manufacturer you can opt for the second choice and indicate its location on your PC.
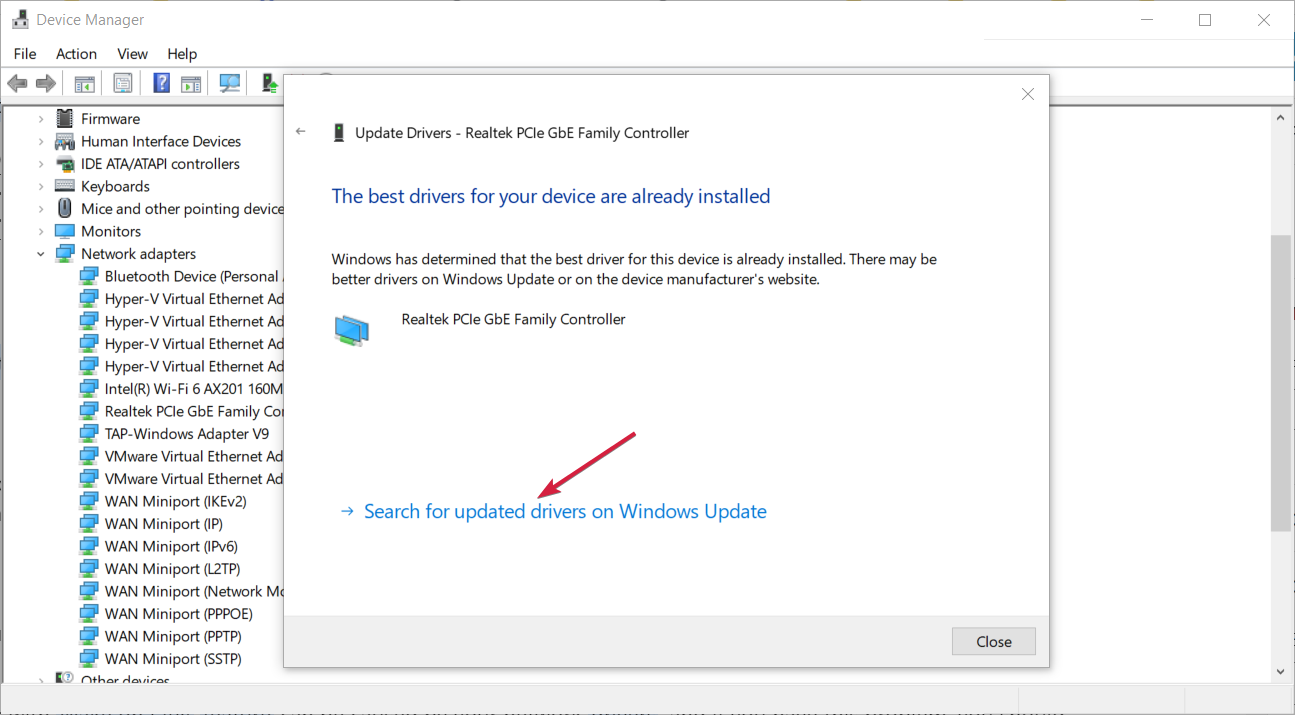
  4. If the system finds a new one, it will install it and you will be prompted for a restart. If not, click on Search for updated drivers on Windows Update.
  5. Hit the Check for updates button and if there are any, download and install them. Also, check the Optional updates if the system finds any.
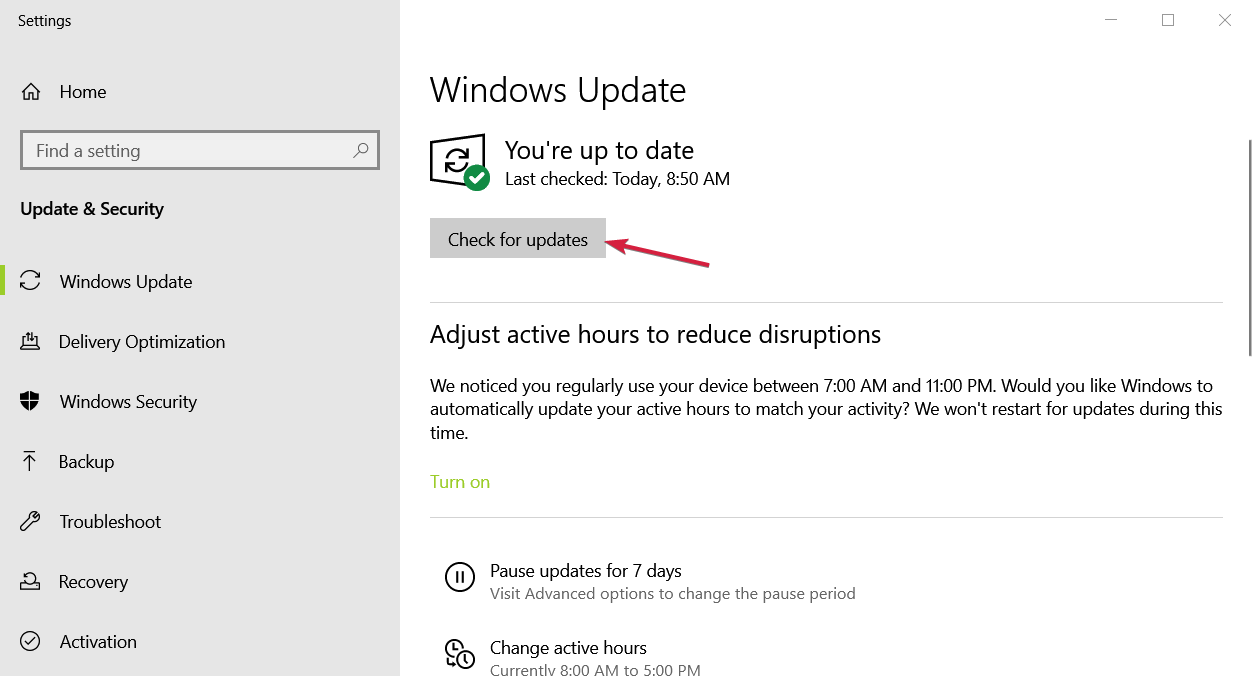
Your network drivers can cause problems with the Wake-on-LAN feature, and if you have this issue, you should try removing your current network driver and updating it to the latest version.

We mentioned how to remove and download the driver for your network adapter in Solution 3, so be sure to check it out for detailed instructions.

Once your network driver is up to date, the issue should be completely resolved, and you’ll be able to use the Wake-on-LAN feature again.

If you don’t want to fix the drivers manually, we suggest doing it automatically by using third-party software that will download and update the drivers that better match your needs.

These applications have been developed to prevent PC damage due to incorrect driver version installations. After you select the drivers to update, the software will do all the work on your behalf automatically.

5. Check your BIOS settings

  1. Restart your PC and press an F, Del, or Enter keys according to your settings to enter BIOS. This can be different for every manufacturer so look for your PC instructions or the indications on your screen.
  2. Now look for the Power management section and enable the Wake-on-LAN feature. This may be called differently on each version of BIOS and motherboard. In our example it’s PME Event Wake Up.
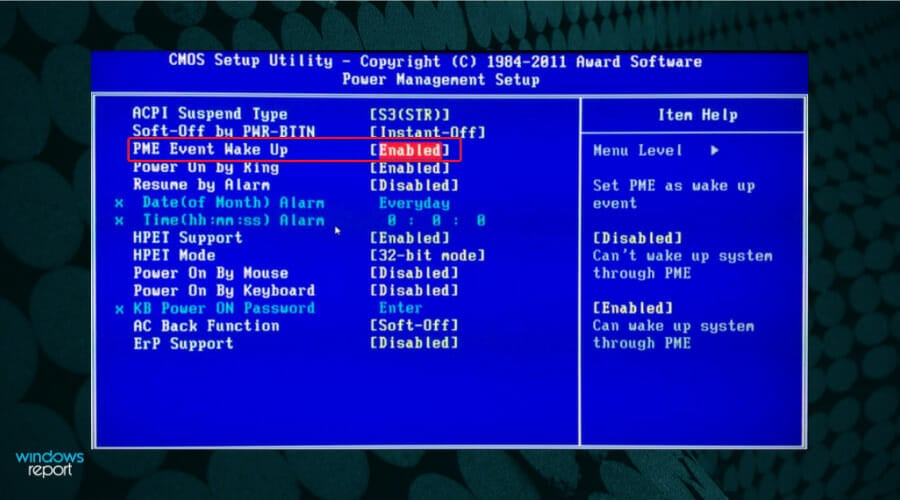
  3. Also, if you have a DELL PC or laptop, try to locate the Deep Sleep Control feature and disable it. If you don’t have it, move on and press the F10 key to save the changes and exit.

After enabling these features the problem should be resolved. If you can’t enter BIOS, follow our solutions on what to do if your PC skips BIOS.

6. Modify your registry

6.1 Find the Registry key for your network adapter

  1. Press the Windows key + X and select Device Manager from the list.
  2. Click the Network adapters section to expand it, right-click the adapter and select Properties.
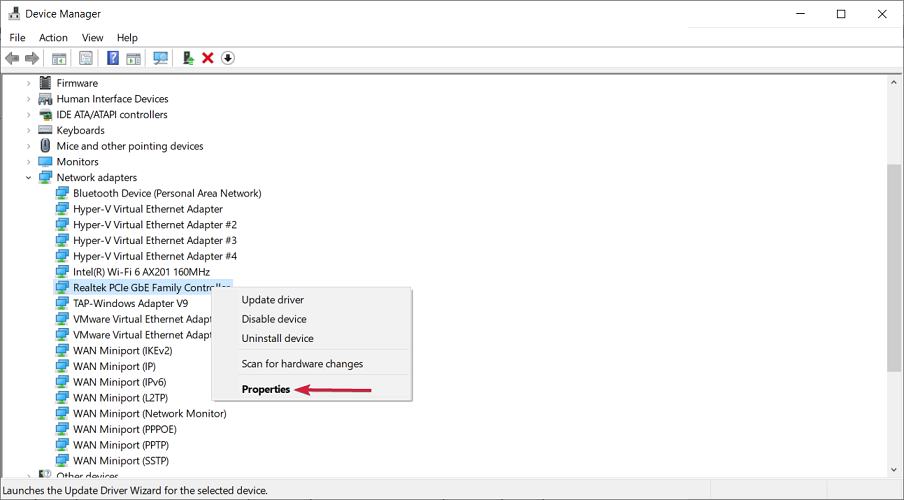
  3. Now click on the Details tab, select Driver key from the drop-down menu and you now know what is the key for your network adapter.
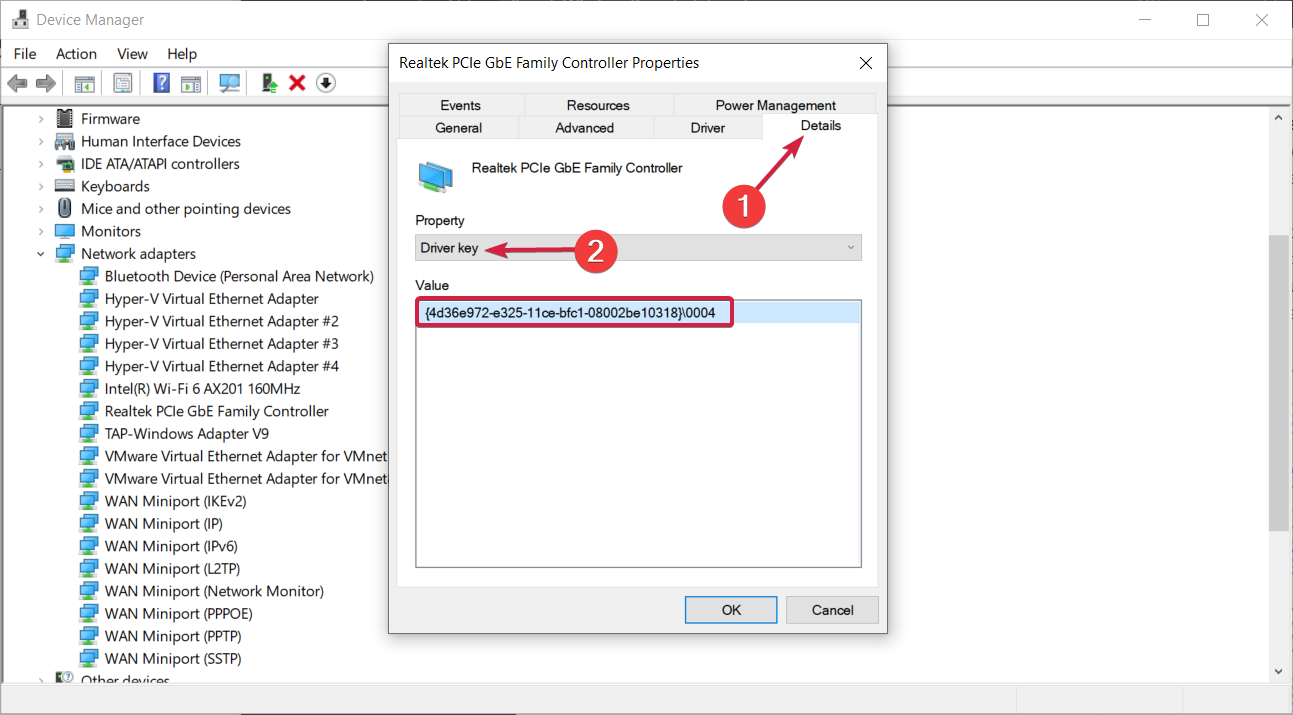
6.2 Change the network adapter Registry key values

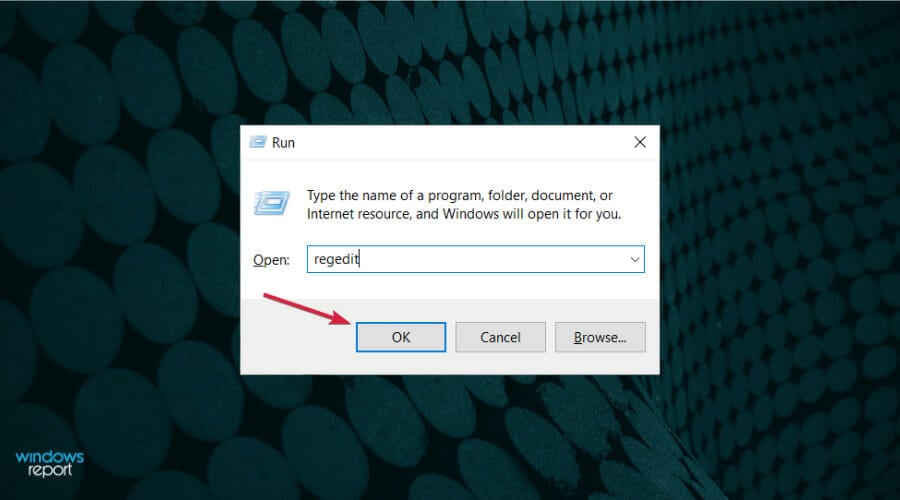
  1. Press Windows key + R and enter regedit. Press Enter or click on OK.
  2. When Registry Editor opens in the left panel navigate to the following key (keep in mind that the last part might be different on your PC, so you might need to manually find your network adapter):Computer\HKEY_LOCAL_MACHINE\SYSTEM\CurrentControlSet\Control\Class\4de3e972-e325-11ce-bfc1-08002be10318
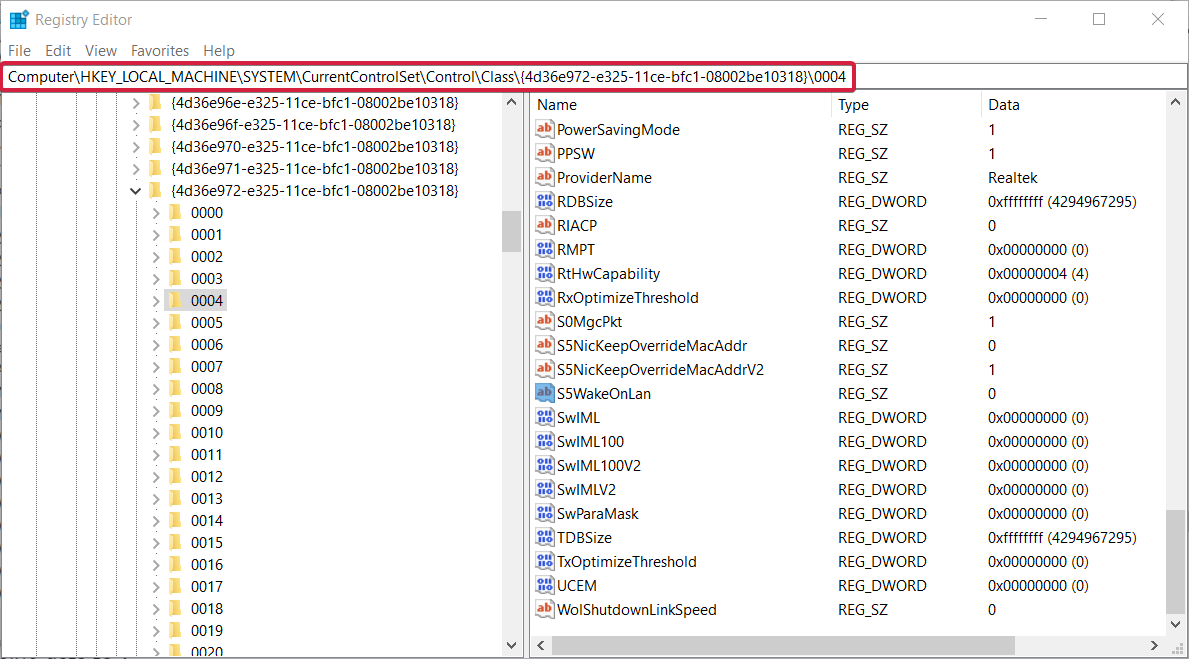
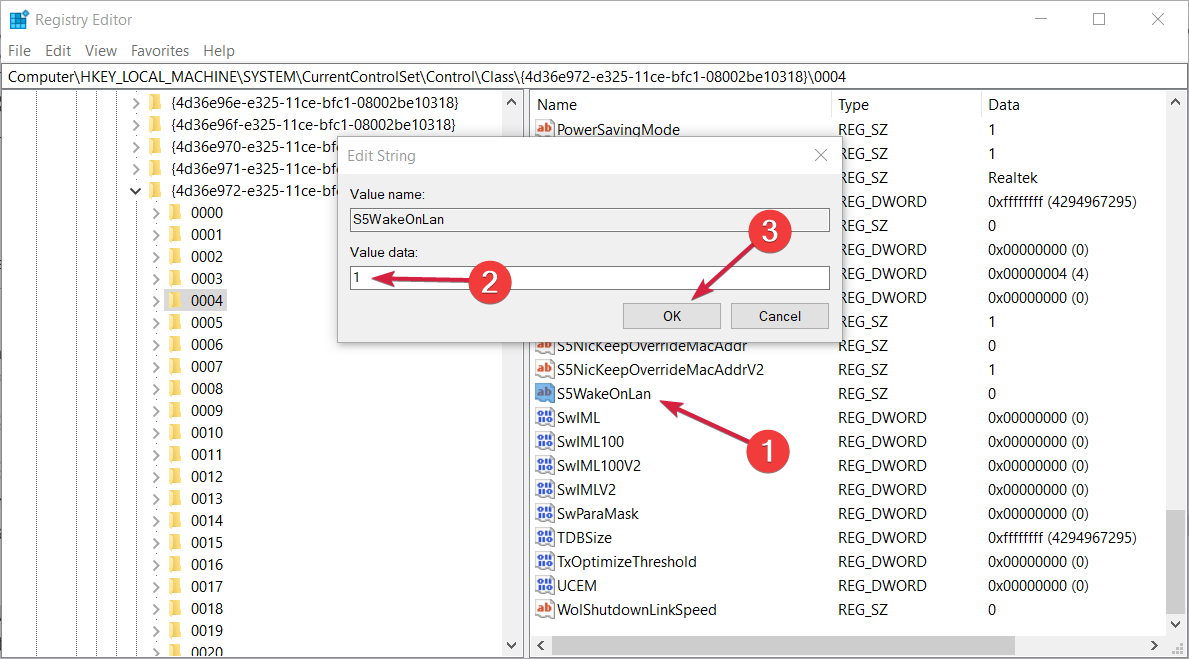
  3. Once you find your Realtek adapter, in the right pane you should see S5WakeOnLAN DWORD. Double click it and change its Value data to 1.
  4. Now, double click PowerDownPll DWORD and set its Value data to 0.
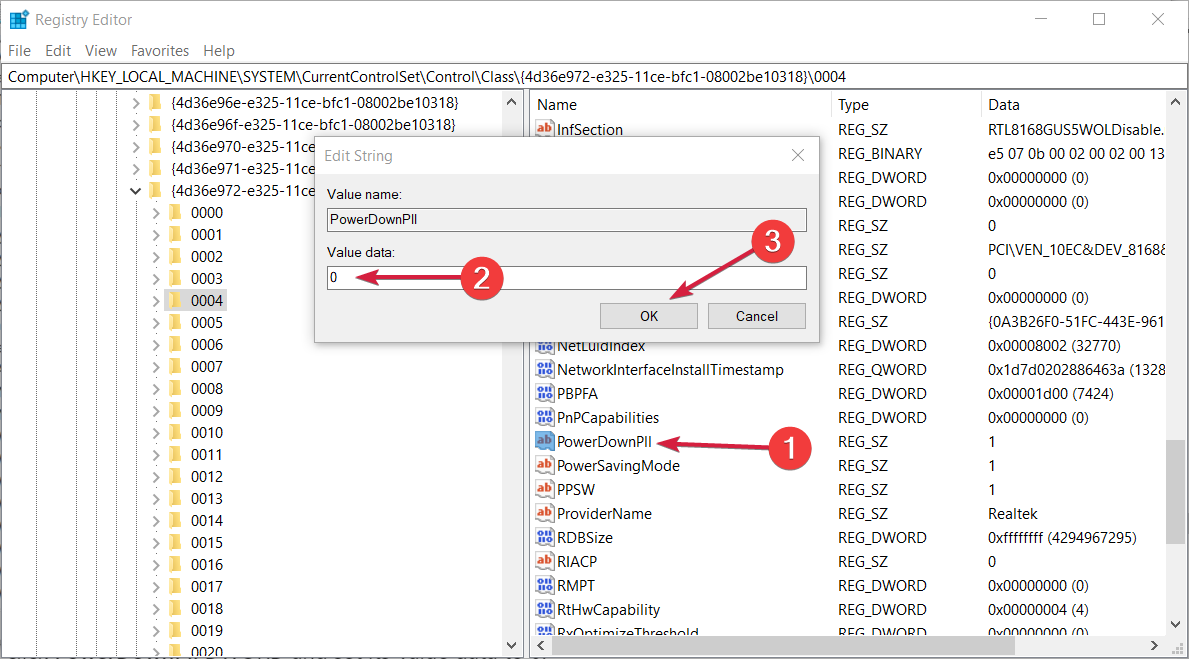
If Wake on LAN isn’t working in Windows 10, the problem might be related to your registry. To fix the issue, you need to find your network device and change its settings.

6.3 Change the NDIS Parameters key

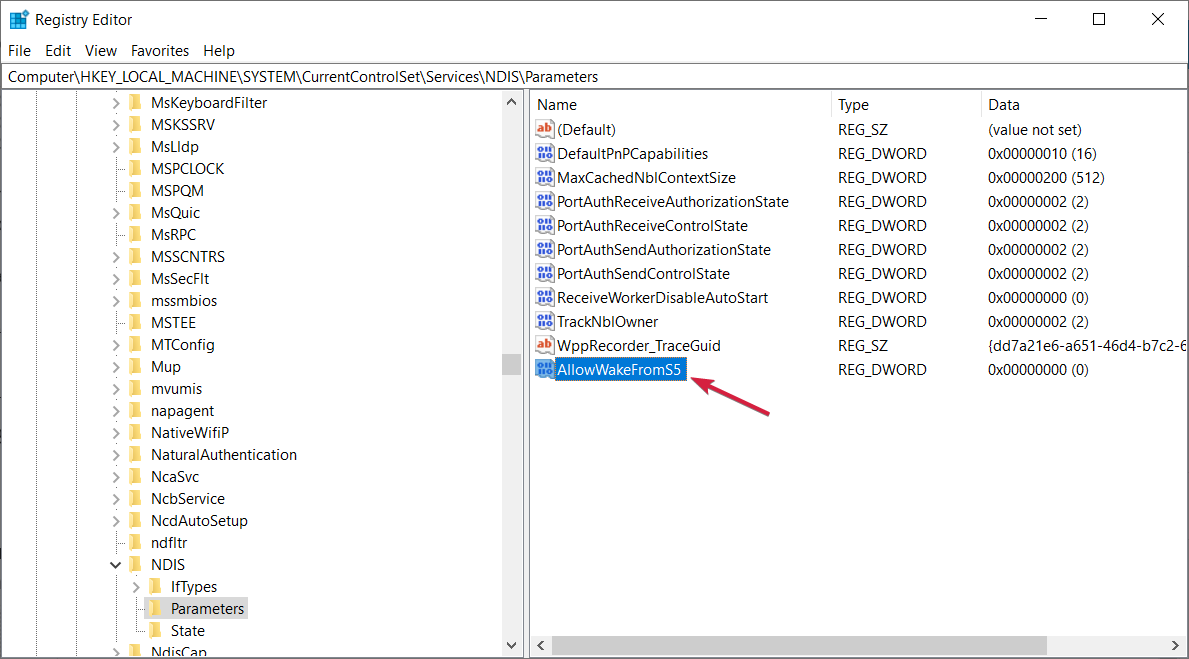
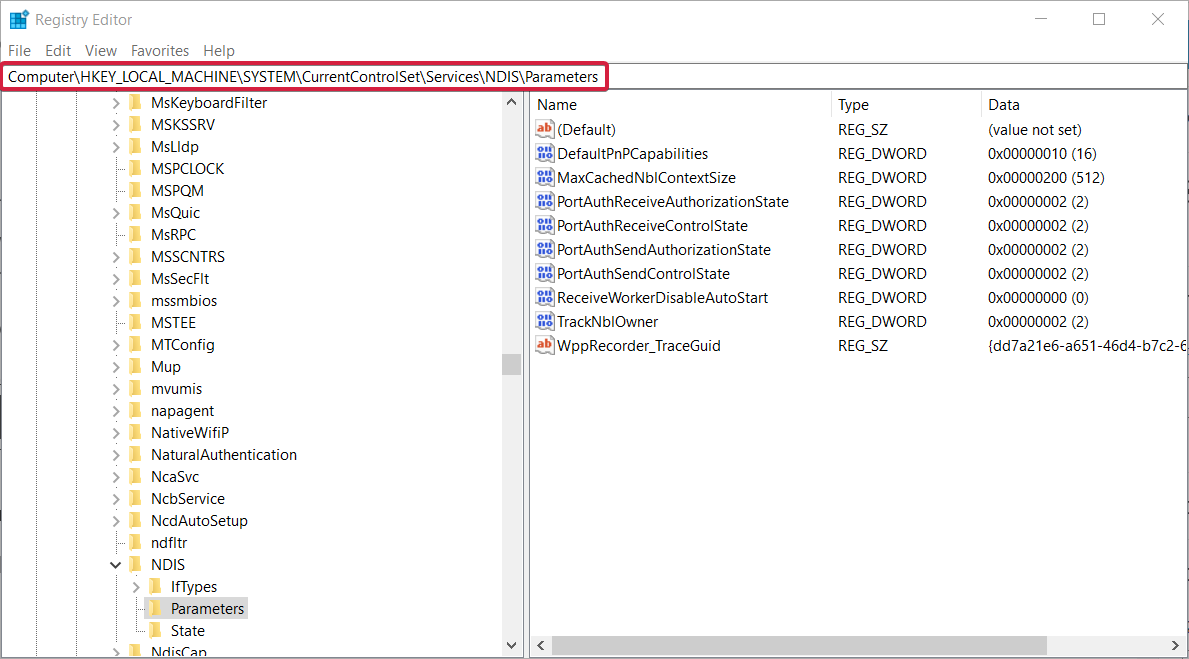
  1. While in the Registry Editor, navigate to the following key: KEY_LOCAL_MACHINE\SYSTEM\CurrentControlSet\Services\NDIS\Parameters
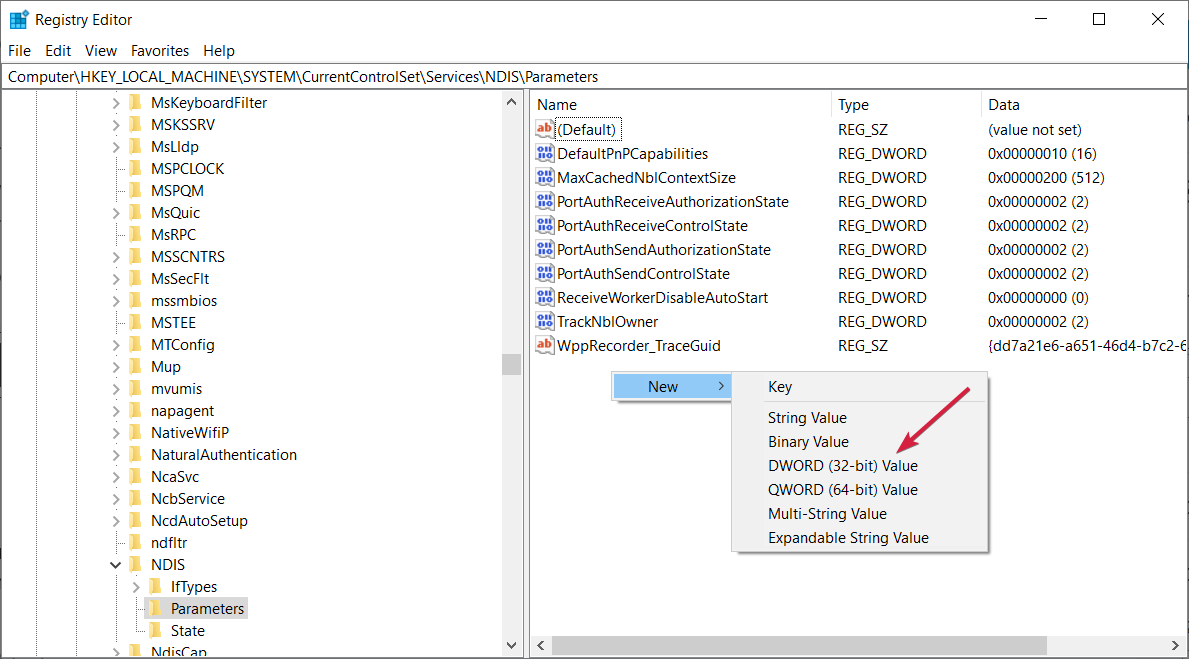
  2. Right-click on an empty space from the right pane, select New, and then choose DWORD (32-bit) Value.
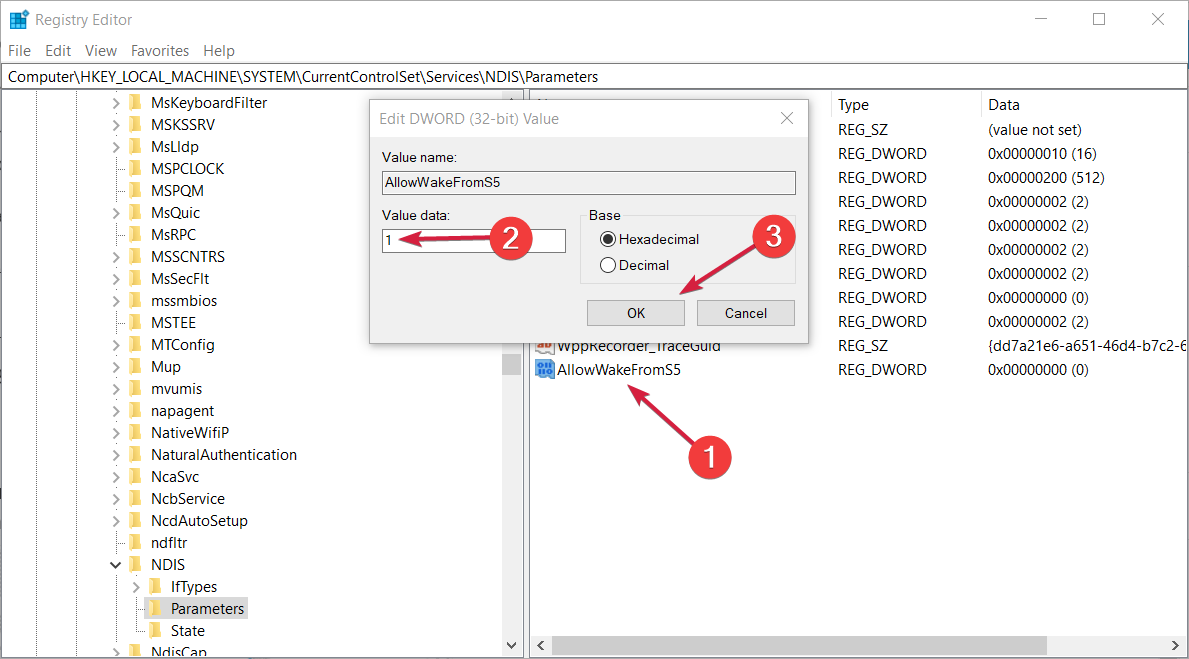
  3. Name the new value AllowWakeFromS5.
  4. Double click the item and set its Value data to 1, then hit the OK button.
  5. Exit the Registry Editor and restart your PC.

7. Change your power plan settings

  1. In the Search bar enter control panel. Select Control Panel from the list of results.
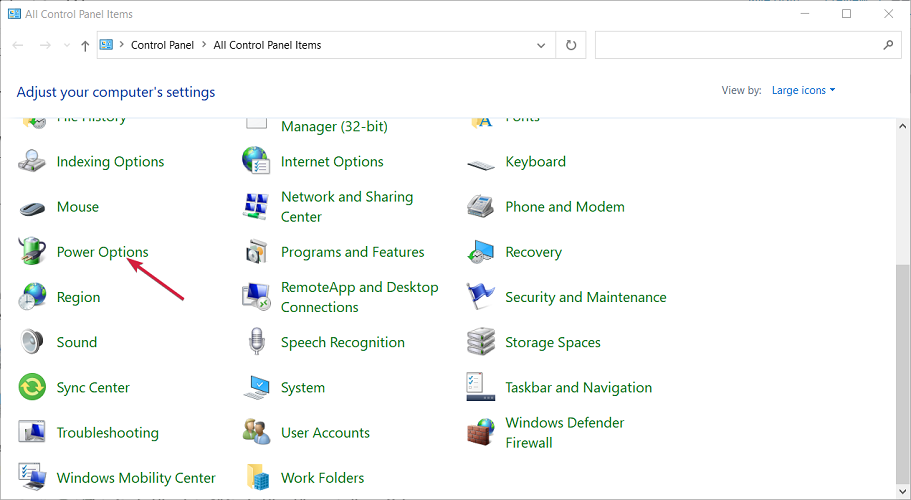
  2. When Control Panel opens, select Power Options from the menu.
  3. When it opens, locate your power plan and click on Change plan settings next to it.
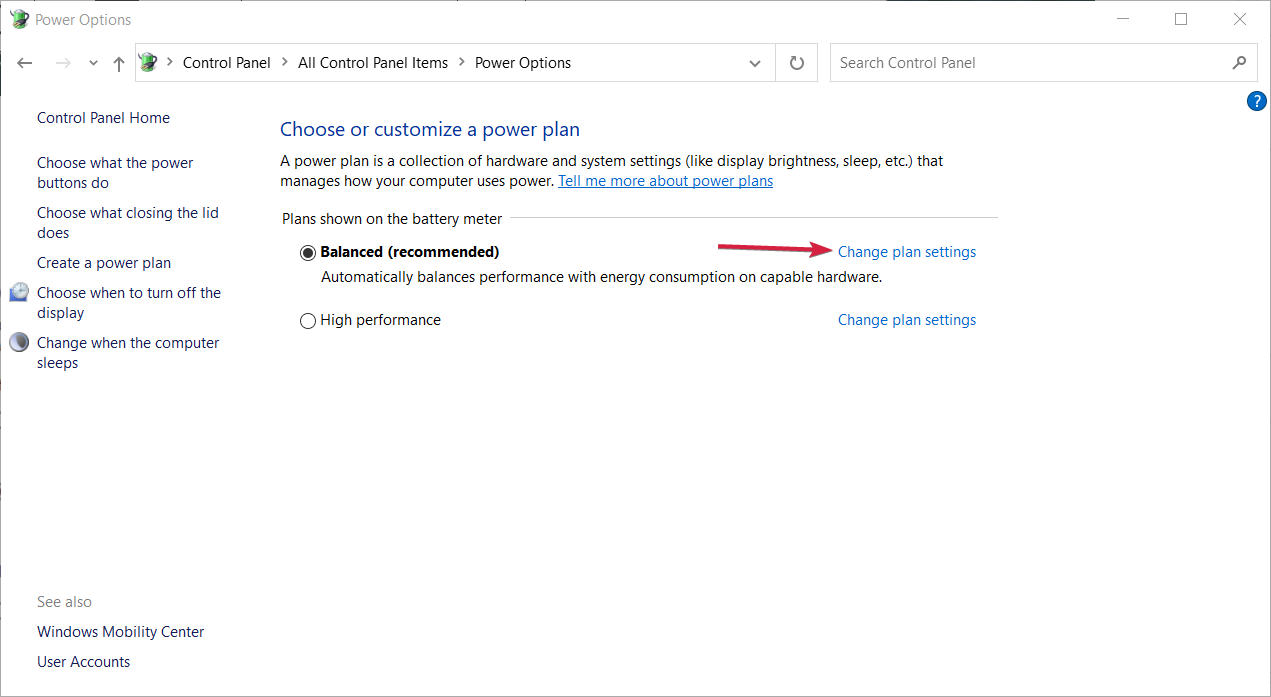
  4. Now click on Change advanced power settings.
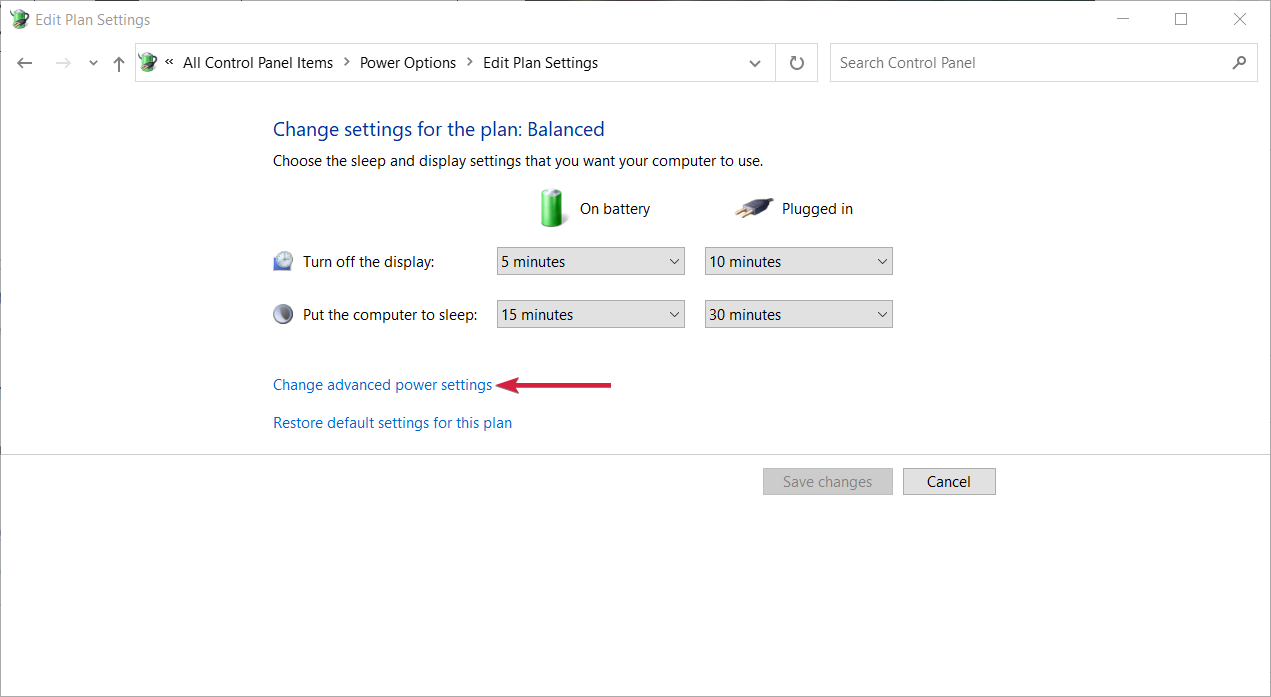
  5. Expand PCI Express section and set power saving to Off. Now click on Apply and OK to save the changes.
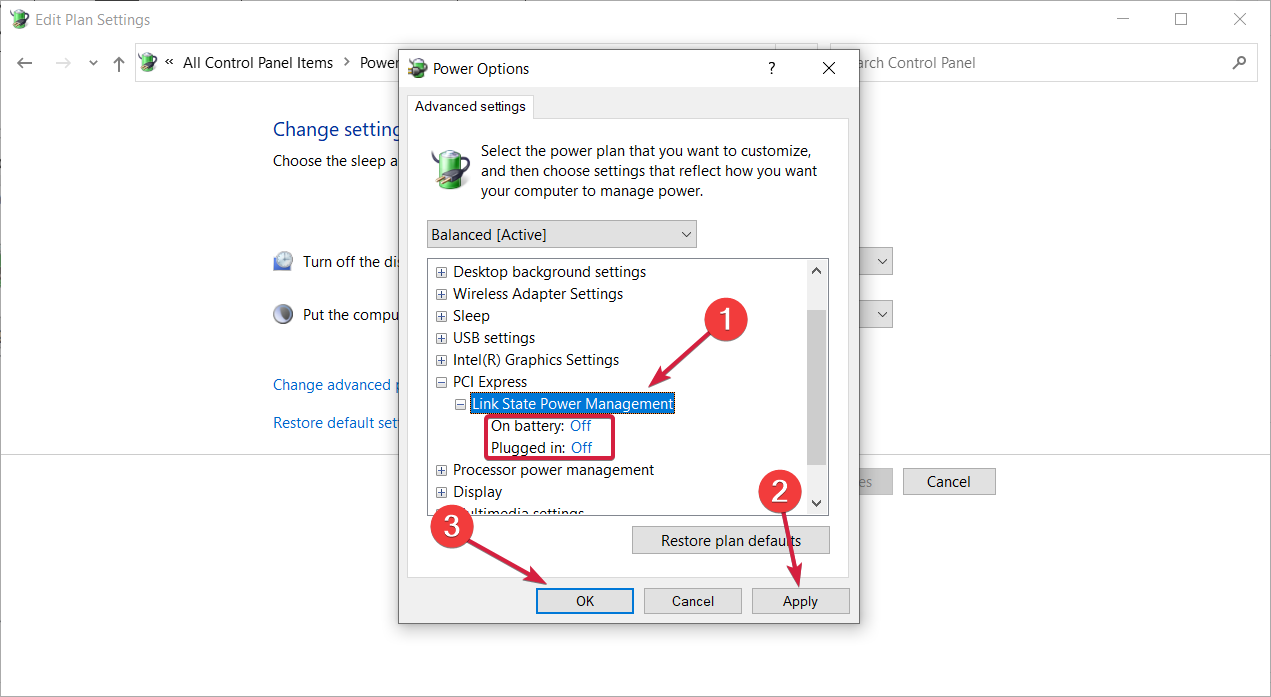
According to our readers, you might be able to fix the problems with the WOL not working simply by changing your Power Settings so follow the steps above to do that.

8. Upgrade BIOS

If you’re having problems with Wake-on-LAN, you might be able to solve them by updating BIOS to the latest version. BIOS update is a complicated procedure that can be potentially dangerous if you don’t perform it properly.

To see how to properly update your BIOS, check your motherboard manual for detailed instructions.

In addition to upgrading BIOS, a few of our readers reported that downgrading BIOS to the older version fixed the problem for them, so you might want to try that if the BIOS upgrade doesn’t work.

9. Reset BIOS and enable APM

If Wake-on-LAN isn’t working, you might be able to fix the problem simply by resetting your BIOS. You can do that from BIOS or by removing your battery from the motherboard for a few minutes.

Again, this is a delicate procedure, so you should check the precise instructions from your manufacturer or leave this for professionals. If opening the PC case voids your warranty, do not attempt this.

After resetting your BIOS, be sure to enable APM in BIOS. You can do that by going to the Advanced section. Once you do all that, Wake-on-LAN should start working.

What can I do if Wake On LAN is not working on Windows 11?

Although the solutions above are technically for Windows 10, you can safely use them on a Windows 11 PC as well to solve WOL issues.

The steps to solve Wake on LAN not working on Windows 11 are mostly the same, and the best solution remains tweaking your Power Settings.

What is Wake-on-LAN?

Wake-on-LAN is a Windows default feature that basically allows a computer to be turned on by a network message.

This awakening message will be sent from a program running on another computer, laptop, tablet, or desktop located on the same local area network.

Wake-on-LAN can be easily and safely used on any Windows 10-based device, though in rare cases, you might notice that you can’t use this protocol.

This is a useful feature that allows you to wake up your PC remotely, but sometimes issues with it can occur. To learn more, we have a great guide on how to enable wake on LAN in Windows 11, so don’t miss it.

How can I find the MAC address on Windows 10?

To use the Wake-on-LAN feature and wake up your or another PC from sleep, you will need its Mac address, a unique 12-digit code for any network adapter.

There are a few ways to find out that information but we’re going to show you only the easiest method below:

  1. Click the Start button, type cmd, and select Run as administrator to launch Command Prompt with full privileges.
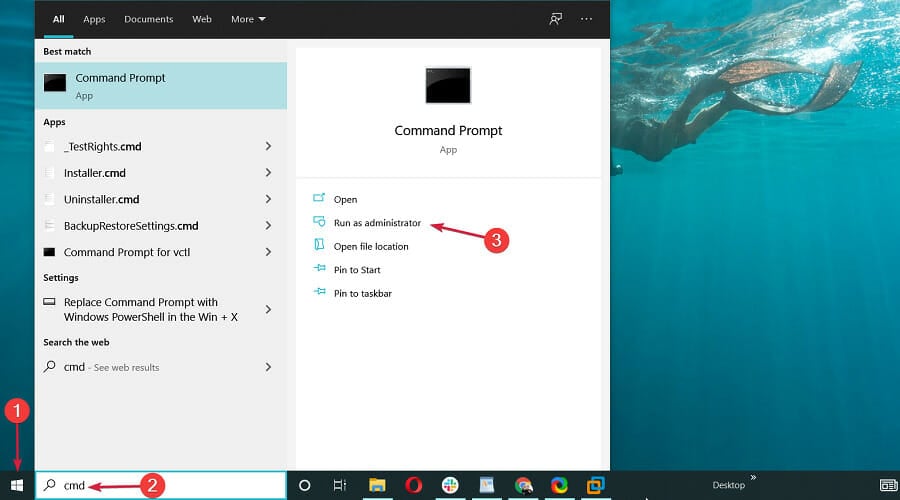
  2. Now type or paste the following command and press Enter to run it: ipconfig /all
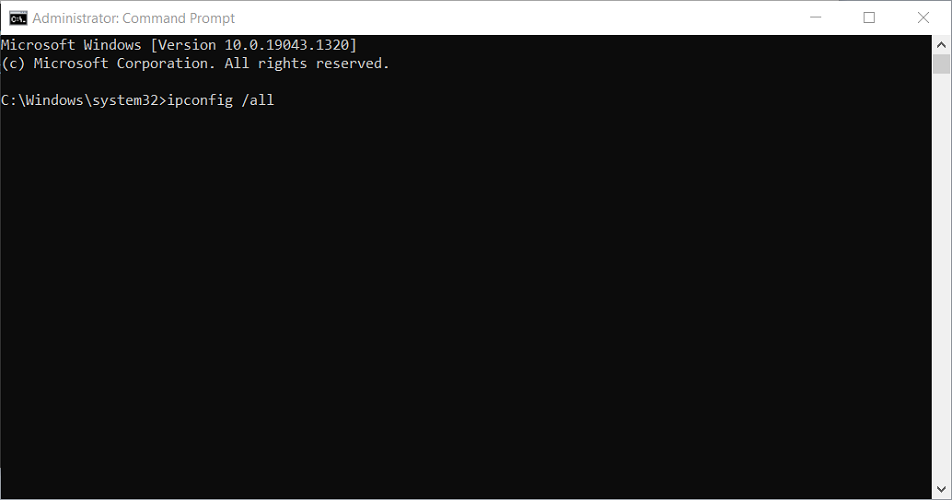
  3. The command will display a lot of network adapter settings. Look for the Ethernet adapter and you will find its physical address that you will have to use to wake this PC up using the LAN connection.
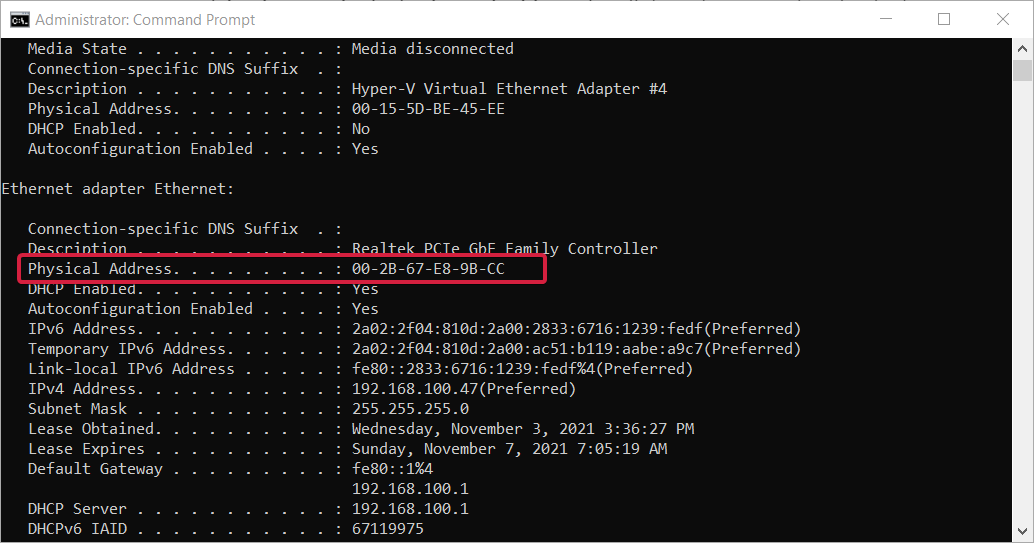
Now, the Wake-on-Lan feature should work just fine on your Windows device.

If these steps aren’t helpful for you, try to put your computer to hibernate instead of shutting it off – usually, this resolves all the problems.

And while we are on the subject, you might be interested in the best remote PC wake-up software to use right now.

We also have a list of the best VPN for LAN that you can use right now to ensure your privacy.

Be careful because the Wake-on-LAN is a two-way street feature. If someone has physical access to your PC, it can set it up to be awakened and control it afterward with remote software.

This can cause a major data breach, so if it’s not absolutely necessary to enable the Wake-on-LAN, don’t do it.

Also, use the comments field below if you have questions regarding the Wake On LAN not working issue or if you need our assistance, and we will get back to you as soon as possible.

Dota 2 Packet Loss: How to Fix it? [Simplified]

Packet loss in Dota 2 is no different than with other services. Certain packets that you and the server send to each other never make it to the destination. In turn, you experience horrible lagging, rubberbanding, and possibly timeouts.

There are quite a lot of factors that can cause packet loss in Dota 2 including overloaded servers, outdated software, an unstable connection, or ISP throttling.

How do I fix packet loss in Dota 2?

1. Use a VPN

  1. Download Private Internet Access and install it
  2. Launch the VPN and select a destination server
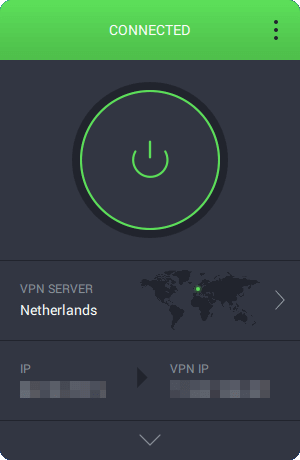
  3. Click the Go button to connect to the secure serverPIA is connected to Netherlands
  4. Check if the packet loss issue still persists

Private Internet Access is a great VPN service from Kape Technologies that can help you reduce packet loss. However, for it to work, your ISP must be the cause of your packet leaks.

If the issue is on your side or if the game server itself triggers the loss of packets, using a VPN won’t do much good. In fact, it can even complicate things by choosing a longer route between you and the Dota 2 server.

Just to be on the safe side, run a packet loss test before you turn to VPNs. You can do so easily by pinging google.com and checking if there’s any high ping issue. If everything seems to be alright, the Dota 2 server might be the culprit.

2. Troubleshoot your connection and isolate the issue

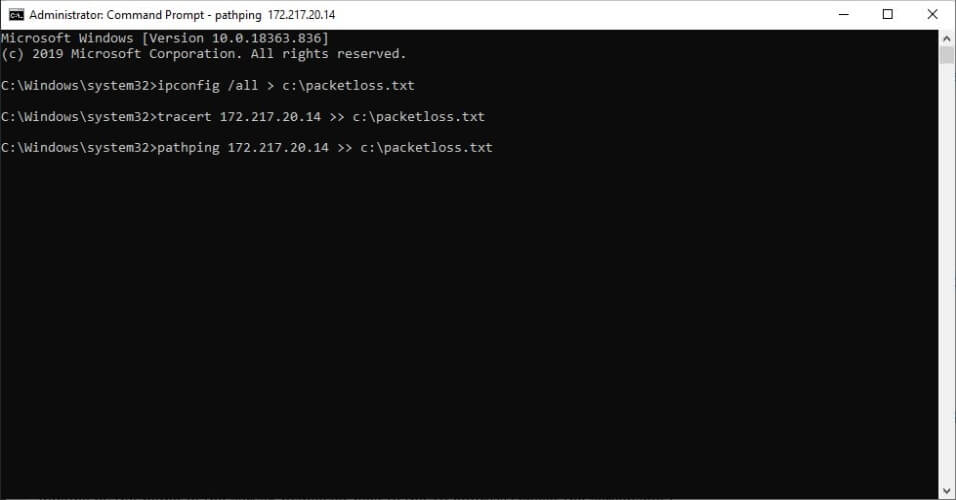
  1. Use our guide to help you run a packet loss test.Packet loss analysis Windows with tracert and pathping
  2. Check what node has the highest ping value.
  3. Try to fix the issue according to the troublesome node your test has highlighted.

3. Refresh server with console commands

  1. Locate Dota 2 in your Steam Library.
  2. Go to the General tab and select Set Launch Options.
  3. Type the following:
    -console
  4. Launch Dota 2.
  5. Go to Settings> Hotskeys.
  6. Find Command and assign a keyboard key that you’ll use to display the command console.
  7. Use this keyboard key while in the game to open the command prompt.
  8. Type the following command:
    sdr SDRClient_ForceRelayCluster mad 

The mad from the command corresponds to the server in Madrid. If you are closer to another location, you can use the code from a different Dota 2 server location.

Here are all the locations available:

LocationCodeLocationCode
Atlanta, USatlMumbai, Indiabom
CanadacanWashington, USeat
Dubai, UAEdxbFrankfurt, Germanyfra
Sao Paulo, BrazilgruHong Konghkg
Sterling, USiadJohannesburg, South Africajnb
London, UKlhrLima, Perulim
Luxembourg, BelgiumluxChennai, Indiamaa
Madrid, SpainmanOklahoma City, USokc
Chigaco, USordParis, Francepar
Seattle, USseaSingaporesgp
Shanghai, ChinashaStockholm, Swedensto
Sydney, AustraliasydTokyo, Japantyo
Warsaw, Polandwaw

Note that while this will decrease packet loss, it may increase ping. So using VPN is still the best solution.

If you paid attention to our guide, you probably know that packet loss can occur in 4 different locations:

  • Your PC, router, or home network
  • Your ISP (and its network)
  • The big network distribution company
  • The Dota 2 game server you connect to

Thus, depending on the location of the packet leak, there are different actions you can take to alleviate the problem. Namely:

  • Check if your PC, router, and cables are working properly, not damaged, or outdated
  • Contact your ISP if the trouble seems to be on its side (or the big network distributor)
  • Reach out to Dota 2’s support team if the issue seems to be triggered by the game server

Packet loss often solves by itself, but sometimes it doesn’t

With these solutions, you should be able to fix packet loss in/out Dota 2.

All things considered, it’s worth noting that packet loss doesn’t have an exact cause most of the time. Additionally, it can occur randomly and disappear just as easily, without you even noticing.

However, sometimes there might be an underlying issue, and leaving it like that won’t do you any better. Thus, you might want to try the fixes we’ve suggested and don’t be afraid to ask for help if you think you can’t handle it.

Wlanext.exe: What it is & Fix High CPU

Wlanext.exe can sometimes appear on your PC and can lead to various issues when it uses a lot of CPU, mostly to network connection problems.

Here are some of the most common issues related to wlanext.exe:

  • Windows Wireless Lan 802.11 Extensibility Framework stopped working – This problem can sometimes occur due to your antivirus settings.
  • exe Windows 10 high CPU – This problem occurs if your drivers are out of date.
  • exe crash Windows 10/ stopped working/ keeps crashing – The built-in troubleshooter might help you solve any of these issues.
  • exe application error/ event id 1000 – According to users, sometimes these problems can occur due to missing system updates.

And now, let’s find out what it is and get to the more specific solutions to fix wlanext.exe issues.

What is Wlan.exe?

Wlan.exe, also called Windows Wireless LAN, is a process associated with the built-in wireless networking feature on Windows operating systems.

It is used to manage wireless network connections on a Windows computer. This process can manage wireless network settings, connect to wireless networks, and diagnose and troubleshoot wireless connectivity issues.

It is located in the System32 folder and is a legitimate file required for the functioning of the Windows wireless network service. However, it is also a common target for malware, so it’s essential to ensure that the copy of wlan.exe on your system is legitimate and not a malicious imposter.

It is not harmful to the performance of your computer unless it is malware infected, but it may consume some of the memory and CPU usages.

Is Wlanext exe a virus?

Wlanext.exe is not a known virus but is associated with software installed on some PCs, but the file can also be used by malware to camouflage itself, which makes it hard to distinguish it as a genuine or malicious one.

It’s best to verify whether the Wlanext.exe file on your system is legitimate by checking its location and properties. The honest version of Wlanext.exe should be located in the C:\Program Files\Intel\WiFi\bin folder and signed by the Intel Corporation.

If you find a copy of Wlanext.exe located in a different folder, or if Intel Corporation does not sign it, it may be a malicious file that disguises itself as the legitimate version. In this case, you should run a full system scan with an antivirus or anti-malware program to check for any malicious software.

Also, you can check the process details and any other information that the task manager provides, which can help you determine if it is legitimate.

It is essential to keep your system and antivirus software updated to prevent possible malware attacks.

How can I fix wlanext.exe high CPU issues?

1. Update your drivers

Wlanext.exe can cause high CPU usage if some drivers, such as the wireless driver, are out of date.

If you’re using a laptop with a built-in wireless adapter, you should be able to get all the necessary drivers from the laptop manufacturer’s website.

Alternatively, you can use third-party tools such as Outbyte Driver Updater to automatically update all your drivers.

With just one click, the tool scans your PC, finds the problematic software. It then lists new compatible drivers, from a huge database of compatible programs.

We should mention that using this tool is completely safe. Besides, it only suggests drivers that are compatible with your device, so if you’re unsure about what to choose on your own, Outbyte Driver Updater can help you.

Plus you can perform any driver-related action you need to repair your system, for example installing or updating drivers, fixing corrupted ones, or finding missing drivers.

2. Check your antivirus

If you’re getting Wlanext.exe error on your PC, it’s possible that your antivirus is causing this issue.

In order to fix this problem, be sure to add wlanext.exe to the list of exclusions in your antivirus.

If that doesn’t work, you can try disabling certain antivirus features or disabling the software altogether. In case the problem is still there, you might be able to fix it simply by removing the tool.

If this solves the problem, this might be a good time to consider switching to a more reliable antivirus.

There are many great tools on the market, but if you’re looking for a reliable antivirus that won’t interfere with your system in any way. To find the fittest solution, you should see the best antivirus programs out there now.

The latest antivirus software will provide rounded anti-malware, anti-spyware removal, or ransomware security to actively detect viruses and clean up your PC.

3. Disable your wireless adapter

  1. Press Windows Key + X and select Device Manager.
    device manager win + x menu wlanext.exe
  2. Locate your wireless adapter on the light, right-click it, and choose Disable device.
    disable device wlanext.exe
  3. Now wait for a few moments, right-click the disabled adapter, then choose Enable device.

After doing that, check if the problem with the wireless adapter is still there.

4. Run the Network troubleshooter

  1. Open the Settings app by pressing Windows Key + I.
  2. Now navigate to the Update & Security section.
    update and security wlanext.exe
  3. Choose Troubleshoot from the left pane.
  4. Select the Network adapter and click Run the troubleshooter button.
    troubleshoot network adapter wlanext.exe
  5. Follow the instructions to complete the process.

Afterward, check if the problem is still there. If it is, you can try running Internet Connections troubleshooter and check once again if you can use the mobile hotspot now.

5. Enter Safe Mode

  1. Open the Settings app and navigate to the Update & Security section.
  2. Select Recovery from the menu on the left. In the right pane, click the Restart now button.
    restart now button wlanext.exe problems
  3. Head over to Troubleshoot > Advanced options > Startup Settings and click the Restart button.
  4. Once your PC reboots, a list of options will appear.
  5. Select the Safe Mode with Networking option by pressing the corresponding keyboard key.

After entering Safe Mode, check if the problem still appears.

In case you’re not familiar, Safe Mode is a special segment of Windows that runs with default applications and drivers, and it can be useful for troubleshooting various problems.

If you’re getting a wlanext.exe error, you might be able to fix the problem by using Safe Mode.

6. Perform a Clean boot

  1. Press Windows Key + R to open the Run dialog.
  2. Enter msconfig in the input field and click OK or press Enter.
    msconfig run dialog wlanext.exe
  3. The System Configuration window will now start.
  4. Head over to the Services tab and check Hide all Microsoft services checkbox.
  5. Click Disable all.
    disable all services wlanext.exe error
  6. Navigate to the Startup tab and click the Open Task Manager.
    open task manager wlanext.exe
  7. Right-click the first entry on the list and choose Disable. Do this for all startup applications on the list.
    disable startup applications wlanext.exe problems
  8. Head back to the System Configuration window.
  9. Now click Apply and OK to save changes and restart your PC.
    clean boot save changes wlanext.exe

Once your PC restarts, check if the problem is still there. If the issue doesn’t appear, it means that one of the disabled applications/services was causing it.

Remember that you’ll have to restart your PC, or at least log out and log back to apply changes. Once you find the problematic application or a service, keep it removed or uninstall it and the problem should be permanently resolved.

7. Temporarily disable your wireless connection

  1. Open the Settings app and navigate to the Network & Internet section.
    network and internet wlanext.exe problem
  2. Now click on Change adapter options in the right pane.
    change adapter options wlanext.exe errors
  3. Locate your wireless connection on the displayed list, right-click it, and choose Disable from the menu.
    disable adapter wlanext.exe error
  4. Once the connection is disabled, wait for about 30 seconds, right-click the connection and choose Enable.

After restarting the connection, check if the problem is still there.

8. Roll back or reinstall your drivers

  1. Open Device Manager.
  2. Locate your wireless adapter and double-click it.
  3. Navigate to the Driver tab and click the Roll Back Driver button.
    roll back driver wlanext.exe errors
  4. Now follow the instructions on the screen to roll back your driver to the previous version.

After doing that, check if the problem is resolved.

You can fix the problem by reinstalling your wireless driver if the rollback option is unavailable. To do that, follow these steps:

  1. Open the Device Manager and locate the wireless adapter driver.
  2. Right-click it and choose Uninstall device from the menu.
    uninstall device wlanext.exe error
  3. Check Remove driver software for this device option, if it’s available.
  4. Then, click the Uninstall button.
    uninstall confirm wlanext.exe error
  5. After the driver is removed, click on Scan for hardware changes icon.
    scan for hardware changes wlanext.exe error

This will install the default driver and the problem should be resolved entirely.

9. Make sure that your system is up to date

  1. Open the Settings app and navigate to the Update & Security section.
  2. In the right pane, click the Check for updates button.
    check for updates wlanext.exe error
  3. If any updates are available, they should be downloaded automatically in the background and installed as soon as you restart your PC.

Once your system is updated, check if the problem is still there.

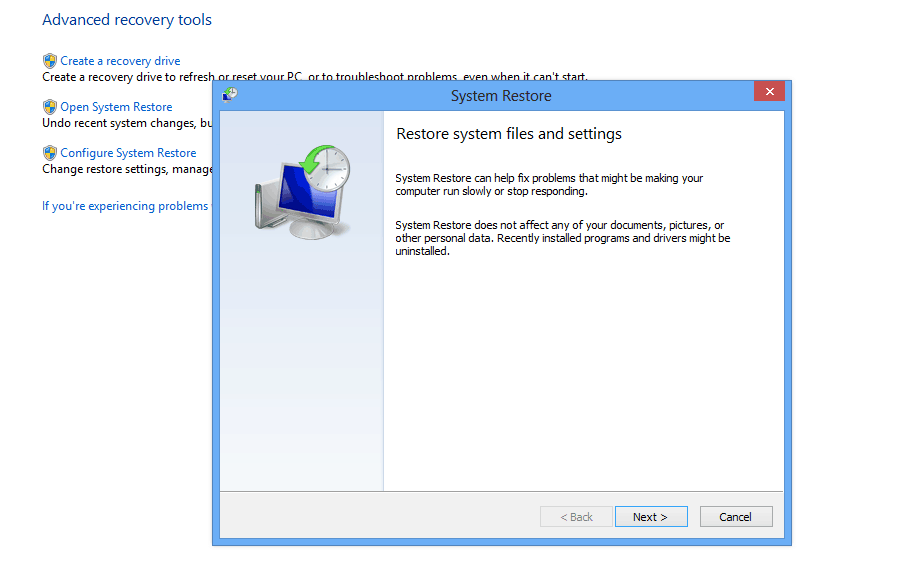
10. Perform a System Restore

  1. Press Windows Key + S and type system restore.
  2. Select Create a restore point from the list.
    create a restore point wlanext.exe
  3. Click the System Restore button.
    system restore button wlanext.exe
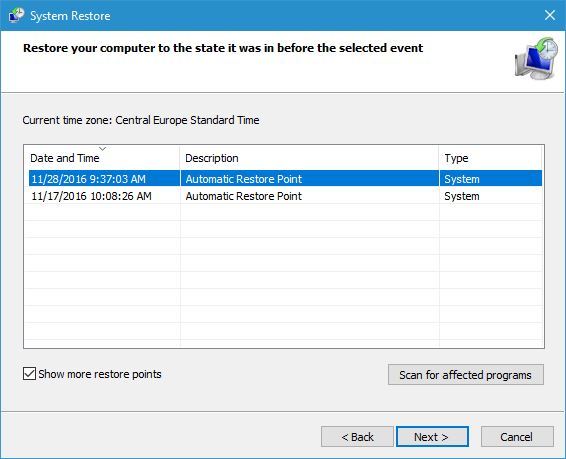
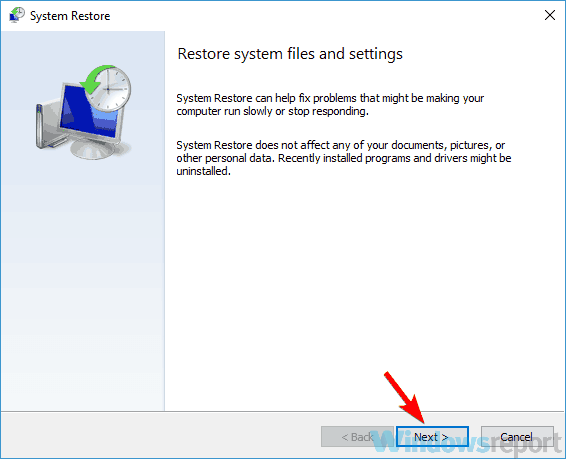
  4. Once the System Restore window opens, click the Next button.
    main window system restore wlanext.exe
  5. Check Show more restore points option, if available.
  6. Select the desired restore point and click Next to proceed.
    restore points wlanext.exe problems
  7. Follow the instructions on the screen to complete the process.

After restoring your system to an earlier state, the problem should be resolved entirely.

We hope these methods worked for you and you got rid of the wlanext.exe high CPU issue on your Windows 10 device.

Note that there are other similar problems users face, like Ethernet spiking in the task manager; resolving this will increase the Ethernet speed on your device.

If you have further suggestions on this topic, contact us using the comments below.

6 Best Game Recording Software & Devices for Xbox One

Xbox One fans would love to do a lot more with their games. Recording and streaming games using game recording software are some such activities that allow them to capture in-game footage from the game while it’s on.

This is a major interest seen in most professional-level Xbox gamers. They create an entire community on this topic and even YouTube channels for the same.

While Xbox One does come with a built-in feature that allows users to record game clips and stream on Twitch or Mixer for creating a high-quality video, you would need raw shots on your PC.

Therefore, using a game capture card would be your best bet here.

These are must-have tools that work as an interface for your console and your computer. It simply attaches to your console or PC, and offers you a superior experience with rich graphics overlays, stream live, save footage easily, and more.

So, for those avid gamers looking for the best Xbox One screen recorder, here we have a filtered list.

Best software to record Xbox gameplay

Icecream Screen Recorder

When it comes to screen recording software, Icecream Screen Recorder is your best bet. This tool takes the beauty of simplicity to the art level and it does so without compromising on features or compatibility.

Speaking about compatibility, the Icecream recorder can easily blend with Windows (even older versions such as Win 7 or Vista), Mac or Android architectures to allow you to record any area of your screen.

What’s more, you can even use it to simultaneously record your screen with audio and webcam. And all that comes absolutely free of charge.

Let’s quickly look at its key features:

  • Record your full screen or specific areas only, according to your needs
  • Add text, arrows, shapes, and watermarks to your screen recording
  • Record full-screen 3D games or only audio
  • Shareware and easy uploading options (to YouTube, Dropbox and Google Drive)
  • Video editing tools to trim recordings, change the speed or add mouse click animation effects
  • Conversion tools to change the format of your recordings
  • Screen recording scheduler and Copy to clipboard

IceCream Screen Recorder

Capture your gameplay and tweak it to perfection before sharing it with the entire world!
Try it now Visit website

Apowersoft Screen Recorder Pro

Best Game Recording Software for Xbox One

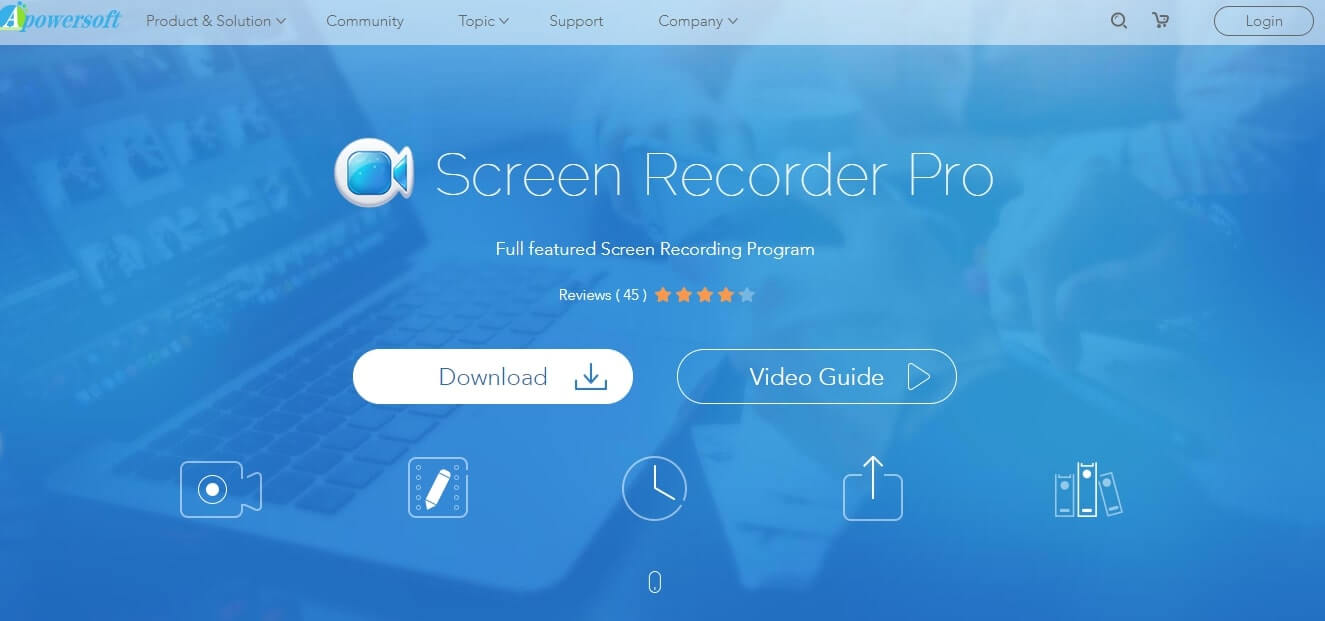
Apowersoft Screen Recorder Pro is a user-friendly and expert game recording tool for your desktop. While it helps capture screen and sound concurrently, users can also save their videos in MP4 format.

The tool also comes with an integrated converter that converts the MP4 recordings into different formats such as, AVI, SWG, WMV, FLV, and more, without compromising on quality.

Its feature-packed yet responsive interface offers flexible recording techniques that allow users to get screen captures for a selected area, entire page, and more.

Moreover, users can also insert webcam video into the screen capture to obtain the video-in-video effect.

Let’s quickly look at its key features:

  • Multiple recording modes,
  • Capturing screen video with the webcam for Skype, MSN, and GTalk
  • Editing screen capture in real-time or later
  • Allows users to create a scheduled task by setting the start time in advance and modify the duration
  • Records live stream videos from Twitch, Livestream, BBC, CNN, etc.
  • Records webinar by setting a task
  • Pre-sets all the tasks to be worked upon in future in just a few clicks
  • Records screen for real-time monitoring purposes

Apowersoft Screen Recorder Pro

Recording your screen and audio during gameplay and share your best moments with the entire world!
Check price Visit website

Elgato Game Capture

elgato game recording

Elgato Game Capture tool is a studio software that helps users bring their creativity to reality.

While it gives that authority and inspiration to create and perform, it also provides the users with the tools to make their creativity shine on Xbox One.

For instance, it allows users to control what happens next using capture settings, modify image settings, save profiles, monitor the performance of the hardware and set the bit rates.

With Elgato, you can go live by simply choosing the bitrate and adding a title. Users can also change to any of their saved platforms instantly, change the title while on air, and more.

Let’s quickly look at its key features:

  • Real-time audio levels that help users decide their preferred volume, and adjust the radial dial for spotting precision;
  • Live commentary option, so the users can simply choose their mic and get going;
  • Sound capture facility that allows users to make the best use of the several audio sources;
  • Allows users to sort their files by game titles, and videos by name, date, and time of creation;
  • Add a webcam, promote to social media channels, and more;
  • Flashback recording that temporarily stores your game in progress

⇒ Get Elgato Game Capture

⇒ Get Elgato Game Capture – physical game recorder on Amazon

Best capture cards for Xbox One

Roxio Game Capture

Best Game Recording Software for Xbox One

Roxio Game Capture is a budget-friendly game capture card provider for Xbox One. The device enables users to record gaming screenshots in HD.

To capture games at a rate of 1080p, one can use HDMI ports. The best part is, users can have uninterrupted and smooth gameplay with no external power required.

Let’s quickly look at its key features:

  • The device focuses on live streaming of gameplay and lives commentary on YouTube and Twitch.
  • Users can also edit game videos that are H.264-encoded, add special effects, text overlays, and much more.
  • Share videos to both Facebook and YouTube in just one click.
  • Record PC gameplay with the graphics card using HDMI ports to the game capture tool.

⇒ Get Roxio Game Capture

Avermedia Live Gamer Portable 2 Plus [Bonus]

Best Game Recording Software for Xbox One

The topic of this article is game recording software but we had to include the following two physical game recorders on this list. They’re simply too impressive not to mention them. Enjoy!

As the name suggests, Avermedia Live Gamer Portable 2 Plus, is a compact device that can be easily carried in the pocket. This handy 1080p device streams without a computer.

Let’s quickly look at its key features:

  • Three integrated modes, different audio feed-ins, and audio mixer options
  • Supports Ultra HD 4K resolution at a neat 60 frames per second rate
  • Record on the go at 1080p60 with just a click on the hot button
  • All the games are stored in the microSD chip
  • Shares file directly, plug and play facility, and live streaming and commentary

⇒ Get Avermedia from Amazon

Hauppauge HD PVR Rocket [Bonus]

Hauppauge---Game-Recorder

Hauppauge HD PVR Rocket is an easy-to-set-up game capture device that also fits the size of a pocket.

This portable device is powered by USB cable and to start capturing the gameplay from the Xbox One, one needs to simply plug the USB thumb drive in the front of the device.

The device comes equipped with an integrated audio mixer that helps users to record game commentary while the video gameplay recording is on.

It allows the users to capture videos to a USB thumb drive or an external hardware device.

Let’s quickly look at its key features:

  • Create their own YouTube channel and share their best game plays with others
  • Stream the gameplay with YouTube and Twitch
  • Splendid audio and HD quality
  • Options to connect the device to the PC to carry out the game recordings straight on the PC disk
  • Record gameplay in HD

⇒ Get Hauppauge from Amazon

Recording gameplay is fun, but you also need robust and skilled software to bring it to reality.

While there are many game recording software available for Xbox One online, choosing the right one with the right abilities will ensure perfection.

So, spruce up your gameplay recording session to the next level with these chosen tools.

How to Stop Virgin Media from Blocking Sites [Step-by-Step]

Virgin Media offers fast and affordable telecom plans, including a full range of television, internet, and phone services. But if you’re struggling with Virgin blocking sites, you aren’t the only one.

As an ISP, it’s one of the more overzealous when it comes to blocking so-called dangerous, hateful, or copyright-infringing sites. So, if you’re wondering how to bypass Virgin Media block lists, we’ve tested various methods.

Why is Virgin Media blocking sites?

There are three main reasons why Virgin Media blocks sites. 

The first, which affects most ISPs, is due to directions from the UK government. 

Some particularly dangerous or criminal sites are blocked wholesale because it’s illegal to access them, or they promote illegal activity.

Secondly, Virgin Media uses a Web Safe feature, which is often turned on by default. It blocks potentially harmful sites, such as those that may contain viruses or extreme content that isn’t necessarily illegal to view. 

Web Safe occasionally flags innocent content as well, which is why so many people want to know how to bypass Virgin Media’s block features.

Thirdly, Virgin Media uses a Child Safe feature that lets you restrict websites unsuitable for children.

And lastly, the company might also slow down access to certain streaming and file-sharing traffic, even if it doesn’t block them outright.

How to bypass Virgin Media block?

No matter the reason why Virgin is blocking sites, the best solution is a VPN

This will encrypt and hide your traffic from Virgin, so it won’t know what you’re browsing and, therefore, won’t be able to enforce blocks. However, it’s possible to fix this issue, but first, you need to learn how to unblock Virgin Media with VPNs.

Use a VPN app

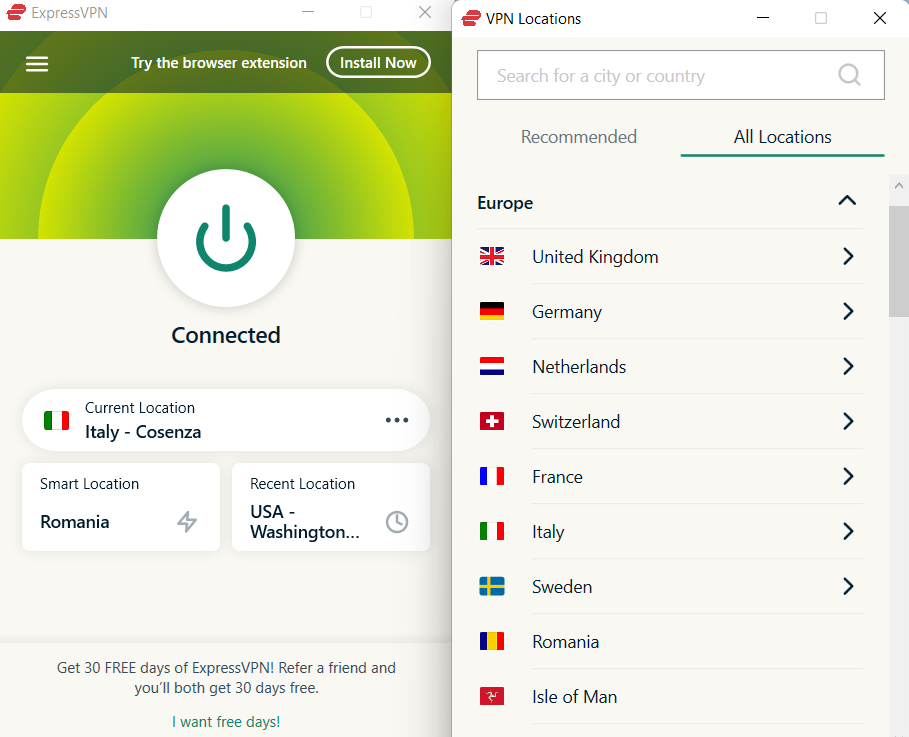
Setting up a VPN is easy if you use a premium provider. We went with ExpressVPN as it offers fast speeds and strong encryption, plus it has proven to work quite well with Virgin Media.

Here’s how to set it up:

  1. Visit ExpressVPN’s website and create an account. 
  2. Download the apps suitable for your system – they’re available for desktop, mobile, and other smart devices.
express vpn apps for top devices
  1. Open the app and log in with your credentials.
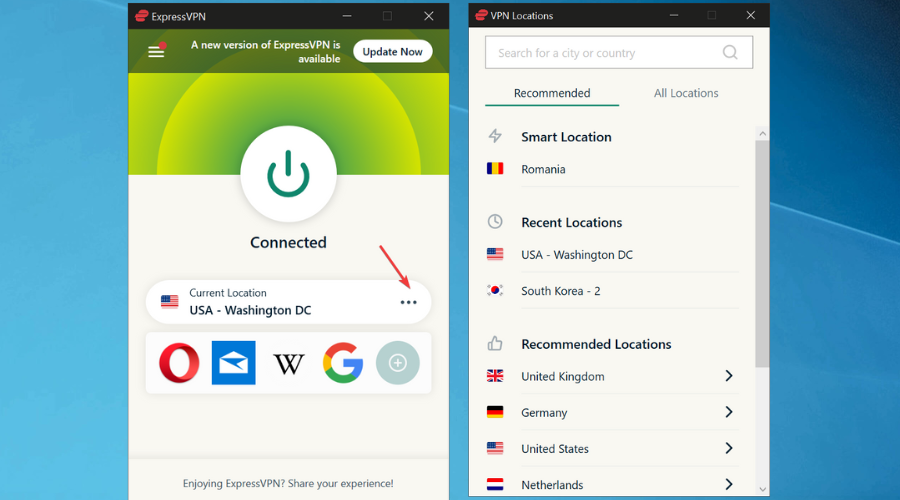
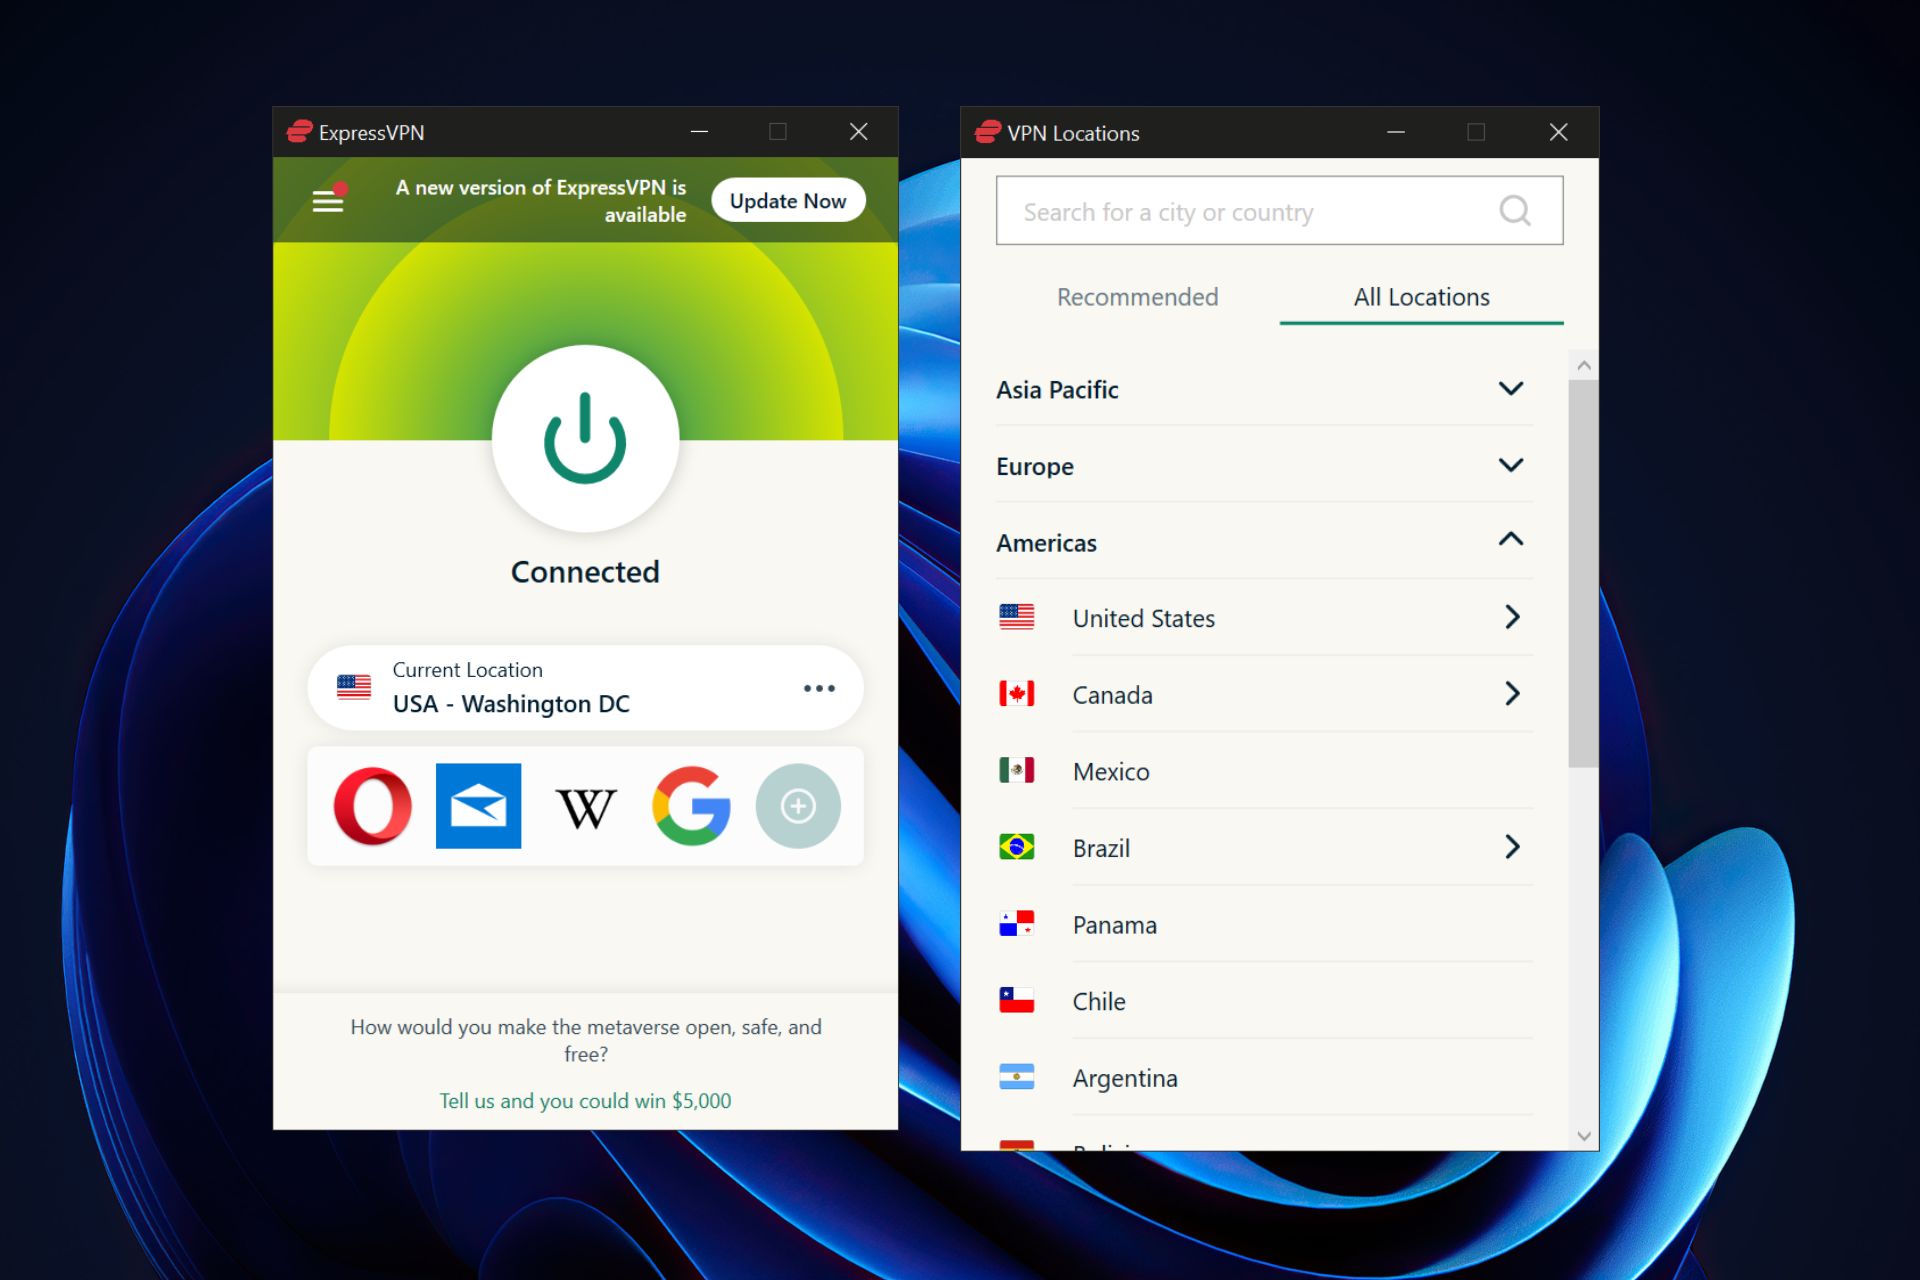
  1. For the fastest experience, choose the recommended or Smart Location, which is usually the closest server to your actual whereabouts.
expressvpn smart location uk london
  1. Alternatively, if you want to access content blocked in your region – I.e., the US version of Netflix if you’re in the UK – browse the locations to find the relevant region.
expressvpn list of recommended locations
  1. Click the big on/off icon to connect.
  1. Once you’re done, launch your browser, and you’ll be able to access previously blocked sites.

The process will be similar for other top VPNs like PIA, CyberGhost, NordVPN, and Surfshark.

Use a VPN router

ExpressVPN and other VPN providers can be installed on common Asus, Linksys, and Netgear routers. This routes any device on the network through the VPN, so you don’t have to download individual apps. We’ve also ranked the best VPN routers for your convenience.

Here’s how to set everything up:

  1. Download the firmware for your router from the ExpressVPN website using the dropdown menu.
expressvpn download router firmware
  1. An activation code will appear in your browser, so make note of it or keep the window open for later.
set up expressvpn activation code
  1. Enter the router’s address, which you can usually find on a sticker at its back. You can also get it online if you search for your model.
  1. Log in with your username and password. If they’re still the default ones, you can look for them online as well.
sign into router settings
  1. Browse through to find the Firmware settings page. 
router settings firmware upgrade
  1. Select the Upload option and choose the file downloaded earlier.
  1. You may now be asked for the activation code. 
  1. Then, you may need to reconnect your devices to the router.
  1. After that, your router will automatically connect to the fastest server or Smart Location.
  1. Alternatively, you can select a different server from the router settings.
expressvpn connected to washington dc

How do I turn Virgin Media restrictions off?

Before you jump to using a VPN, it’s worth checking what block features are turned on and whether you can access your chosen site with them turned off.

Follow these steps to turn off Virgin Web Safe:

  1. Log in to your My Virgin Media account.
virgin media web safe feature
  1. Click the My Apps tab and select Web Safe.
  1. Click Overview to see all the options.
  1. Toggle off any categories you don’t want. Child Safe is one of the settings.
virgin media web safe turn off/on
  1. You can turn off Child Safe completely, or you can choose individual categories to allow/block.
virgin media child safe categories
  1. It may take several minutes for the new settings to take effect.

Note: Even with these settings turned on, you can use a VPN to bypass them. You might choose to have strict Child-safe settings to protect your children, but use a VPN app on your device.

ExpressVPN

Unblock geo-restricted content and enjoy the highest streaming quality with ExpressVPN’s fast and reliable service.

If you want to get around Virgin blocking sites, it doesn’t take long to configure its built-in safety features from your account page. 

If you are facing Virgin Media Error Code w02 on your Virgin Media TV box, read this guide to find the solutions. And don’t forget that you can always use a good VPN to bypass geo-blocks and protect data, even if Virgin Media is known for blocking VPNs.

Just know that some sites are still blocked regardless of these settings, which is why a VPN is useful.

How to Install Windows 11 on Unsupported CPUs [Simple Tips]

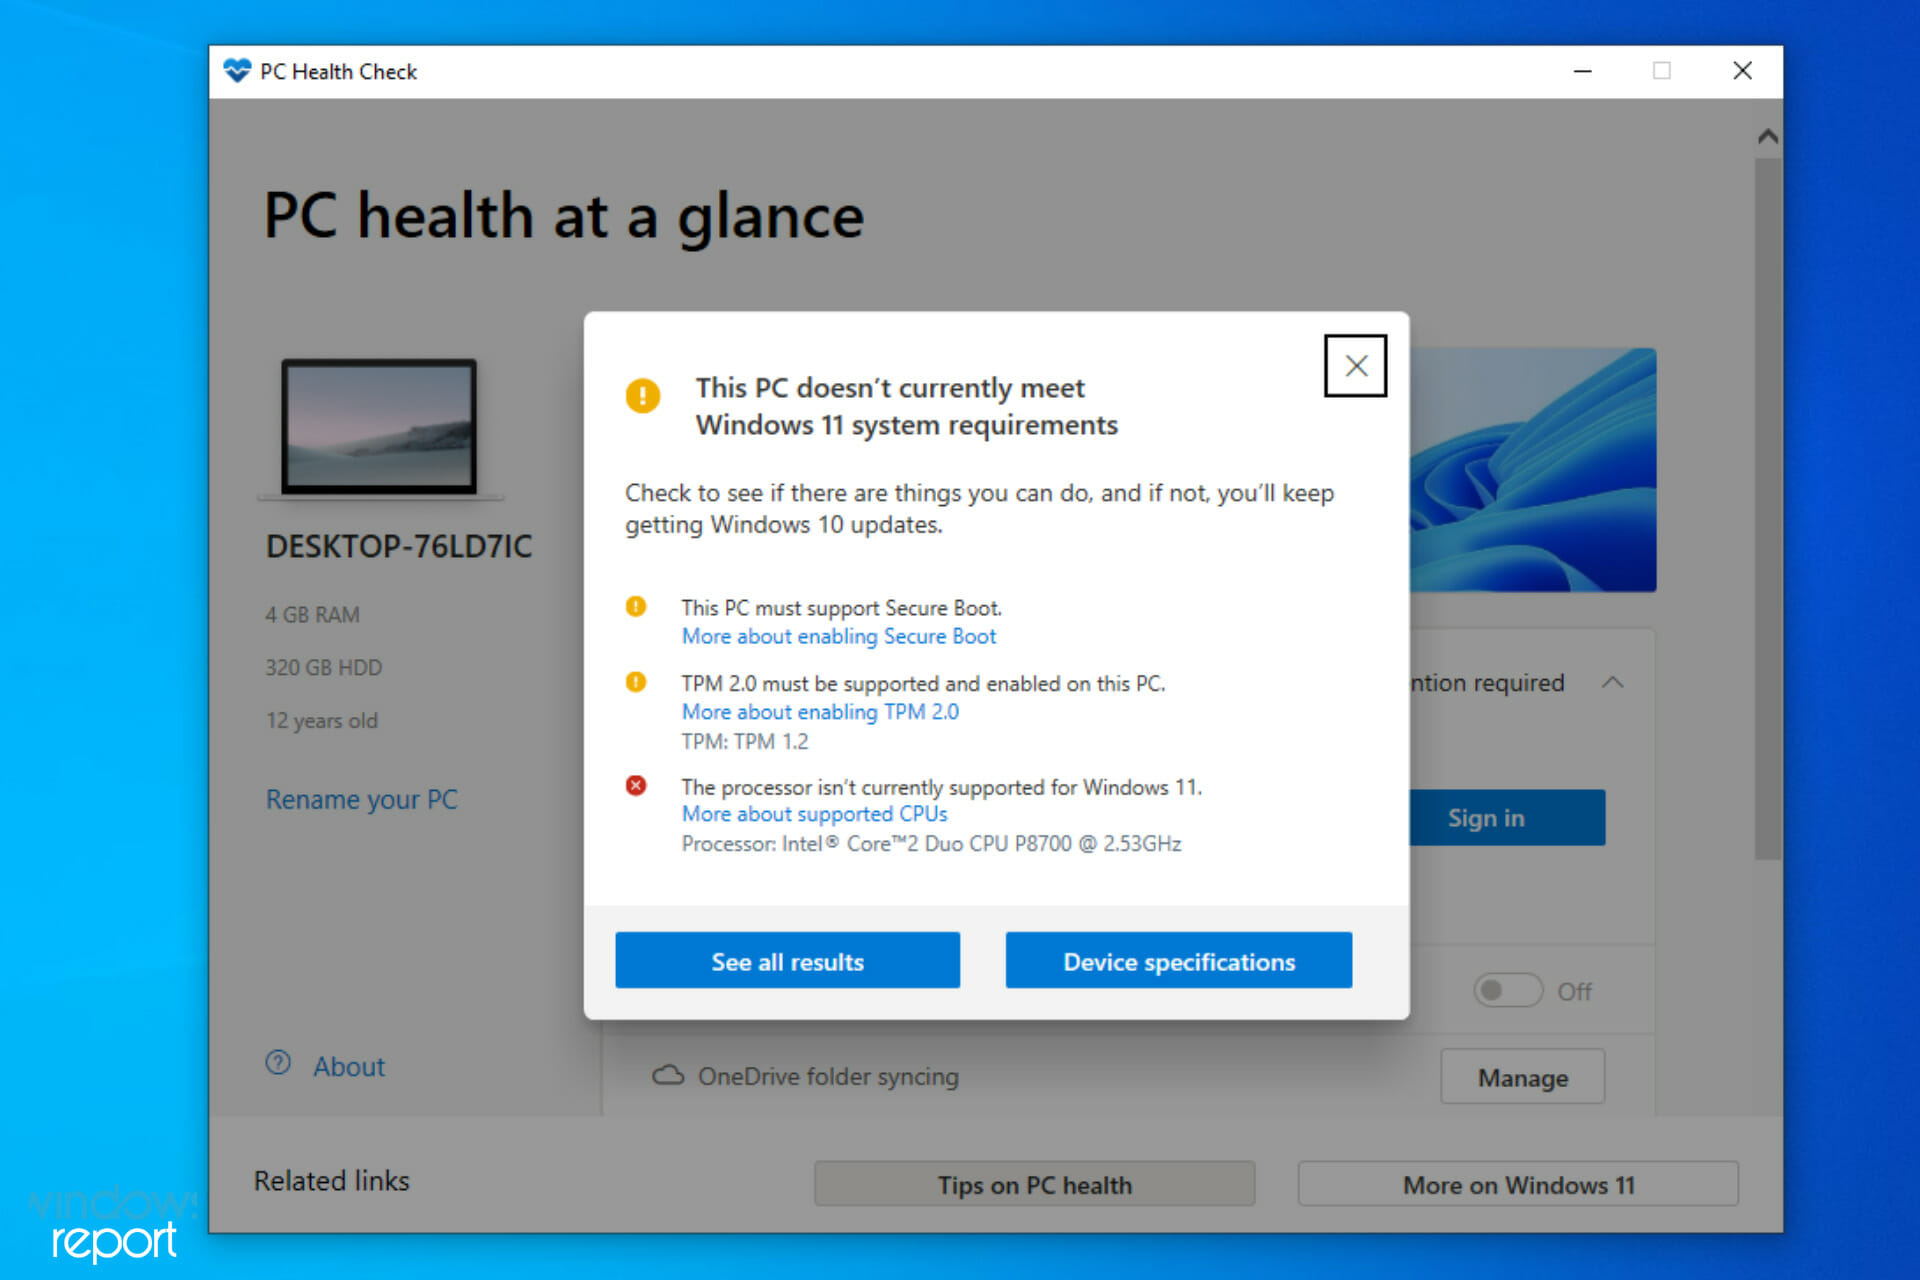
Windows 11 system requirements are somewhat high, and many are wondering if it is possible to install Windows 11 on an unsupported CPU.

There is a way to bypass the CPU check when installing Windows, and today we’re going to show you the best ways to do that.

Just in case you want to know what the minimum system requirements for Windows 11 are, here’s a checklist you look through:

  • Processor: Your computer’s processor should be one gigahertz (GHz) or faster with two or more cores on a compatible 64-bit processor or system on a chip (SoC)
  • RAM: The PC’s ram size should be 4 gigabytes (GB) or greater
  • Storage: A storage size of 64 GB* or greater is required to install this Windows
  • You should note that additional storage space might be required to download updates and enable specific features
  • Graphics card: Should be compatible with DirectX 12 or later, with a WDDM 2.0 driver
  • System firmware: UEFI, Secure Boot capable
  • TPM: Trusted Platform Module (TPM) version 2.0
  • Display: High definition (720p) display, 9” or greater monitor, 8 bits per color channel

We also have an article detailing the Windows 11 technical specifications that might offer more information about this.

Can I install Windows 11 on unsupported CPU?

The good news is that there is a way to install Windows 11 on an unsupported CPU. However, users do have a few concerns:

  • Safety – Microsoft has advised against it since you’re missing important features such as TPM 2.0. For more information, our Windows 11 and TPM guide.
  • Compatibility issues – According to Microsoft, running Windows 11 on unsupported devices can lead to compatibility or performance issues in the feature. Speaking of performance, you can make Windows 11 faster with a couple of quick tweaks.

However, if you are interested in learning how to install Windows 11 on an unsupported PC, we will show you how. We’ve broken down the entire process from start to finish into simple steps.

What happens if you install Windows 11 on unsupported CPU?

It is not recommended to install Windows 11 on an unsupported CPU computer since there may be compatibility difficulties caused by doing so.

Your personal computer’s warranty will not cover any damage that occurs as a result of software or hardware incompatibility.

Will unsupported CPU get Windows 11 updates?

If you continue with the installation of Windows 11, Microsoft will stop providing support for your computer and you will no longer be able to get updates.

How do I install Windows 11 on an unsupported computer?

Note icon NOTE
Before installing Windows 11 on unsupported machines, we recommend you back up important data first. AOMEI Backupper is an excellent solution; it will keep your system safe and prevent data loss.

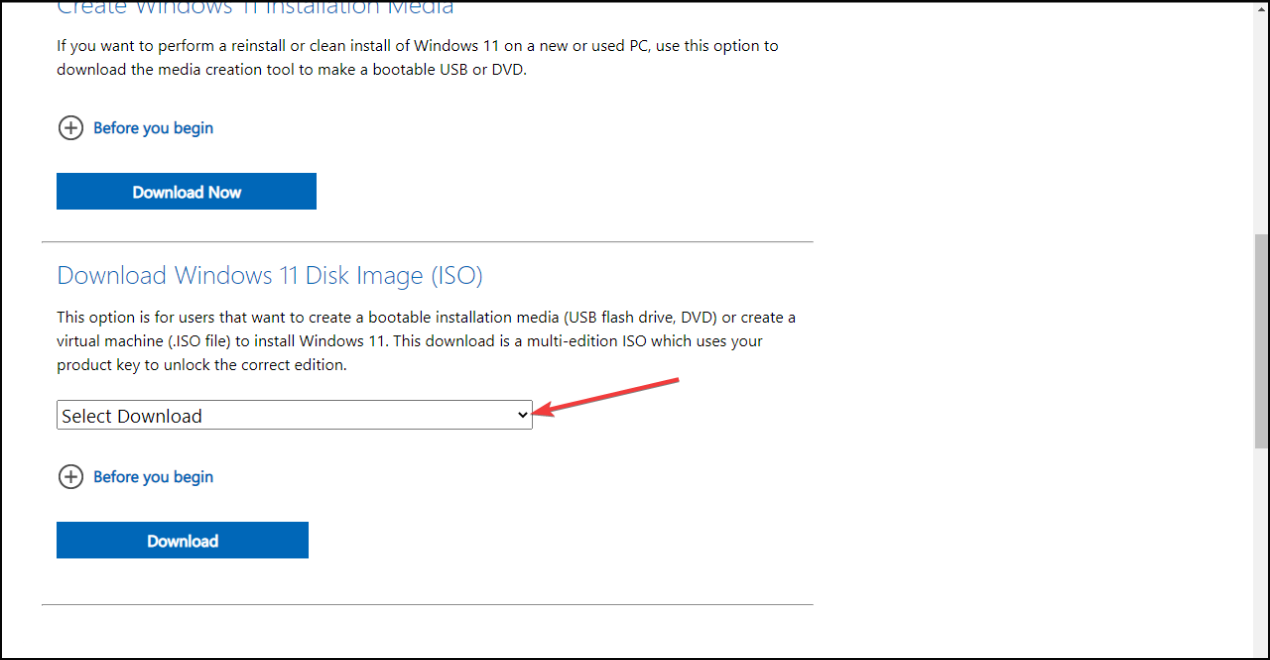
1. Download the Windows 11 ISO

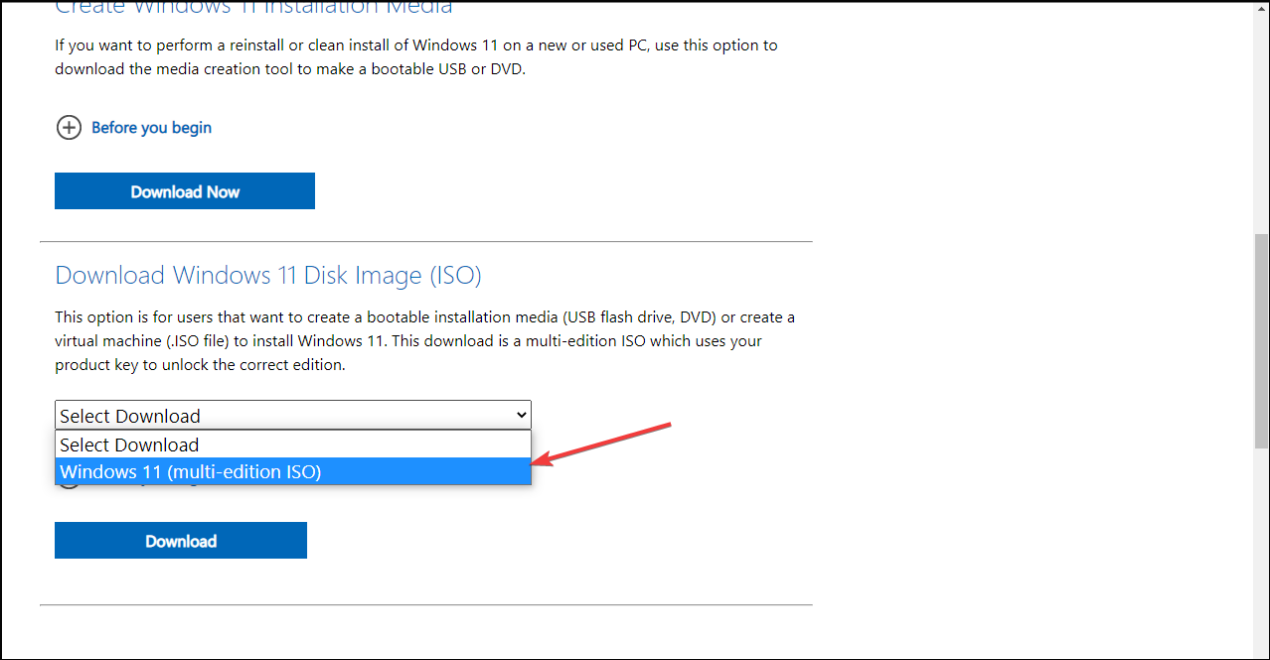
  1. If you wonder How do I bypass the CPU isn’t supported Windows 11?, download Windows 11 Disk Image (ISO).
  2. Open the Select Download dropdown.
  3. Select Windows 11.
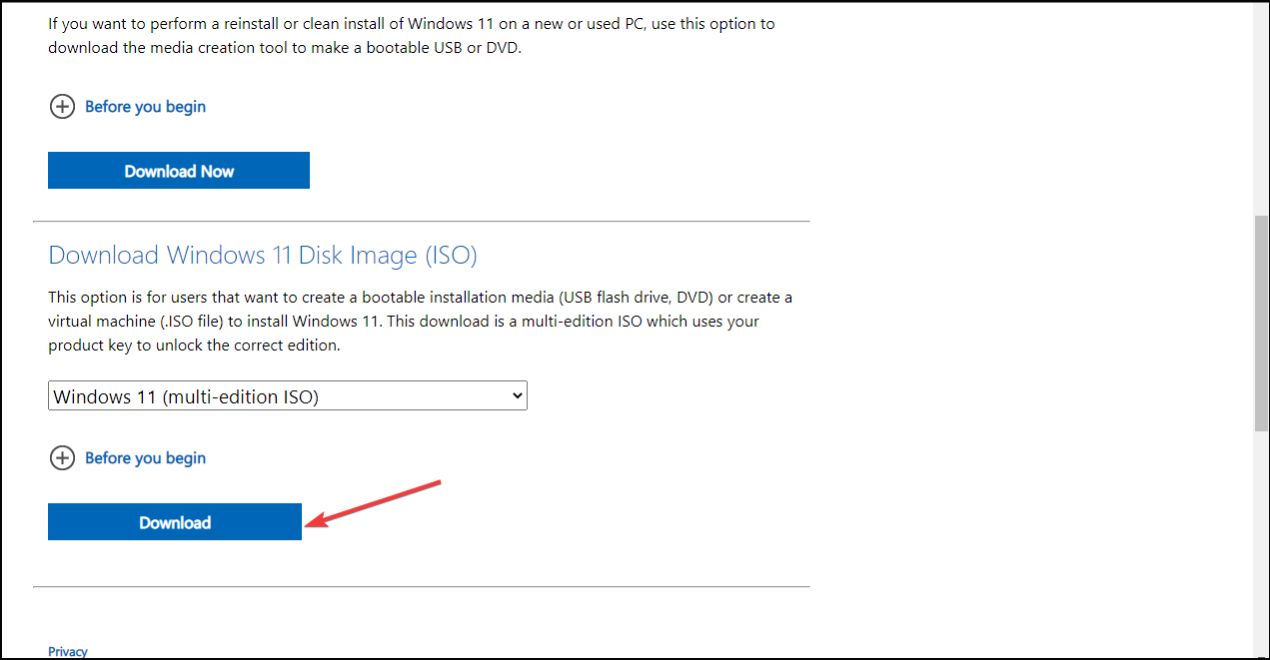
  4. Hit the Download button.
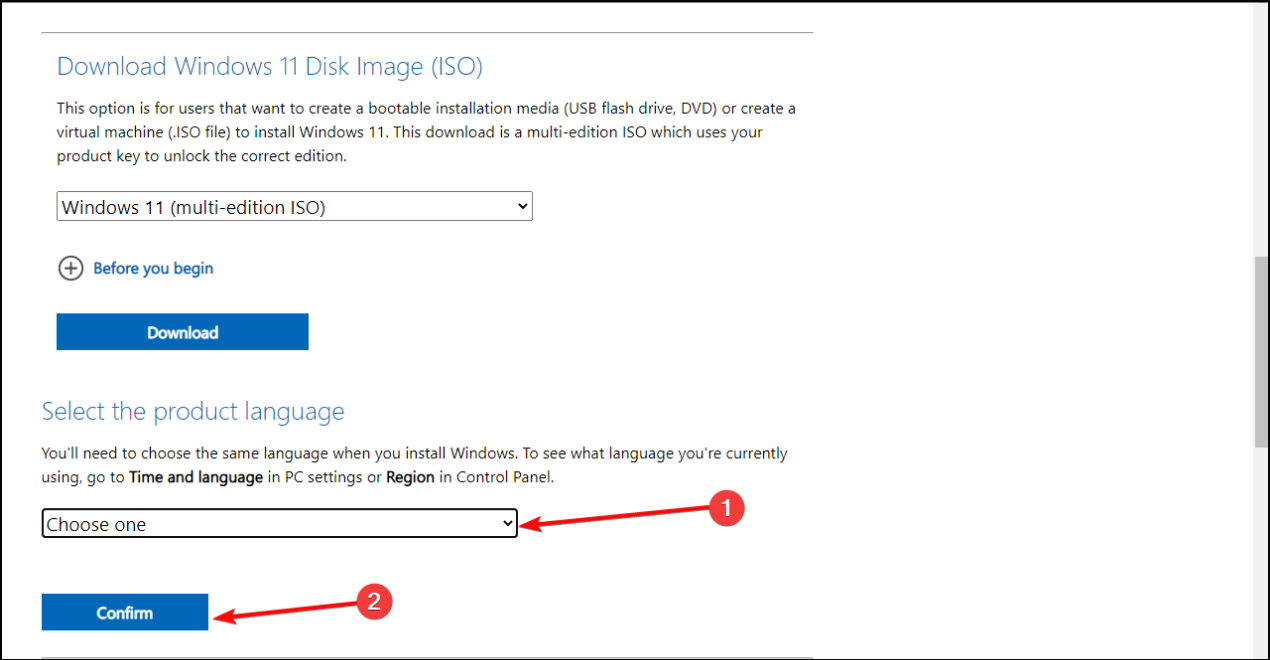
  5. Click the Choose one dropdown, select your product language, and then hit Confirm.Select product language to Download Windows 11
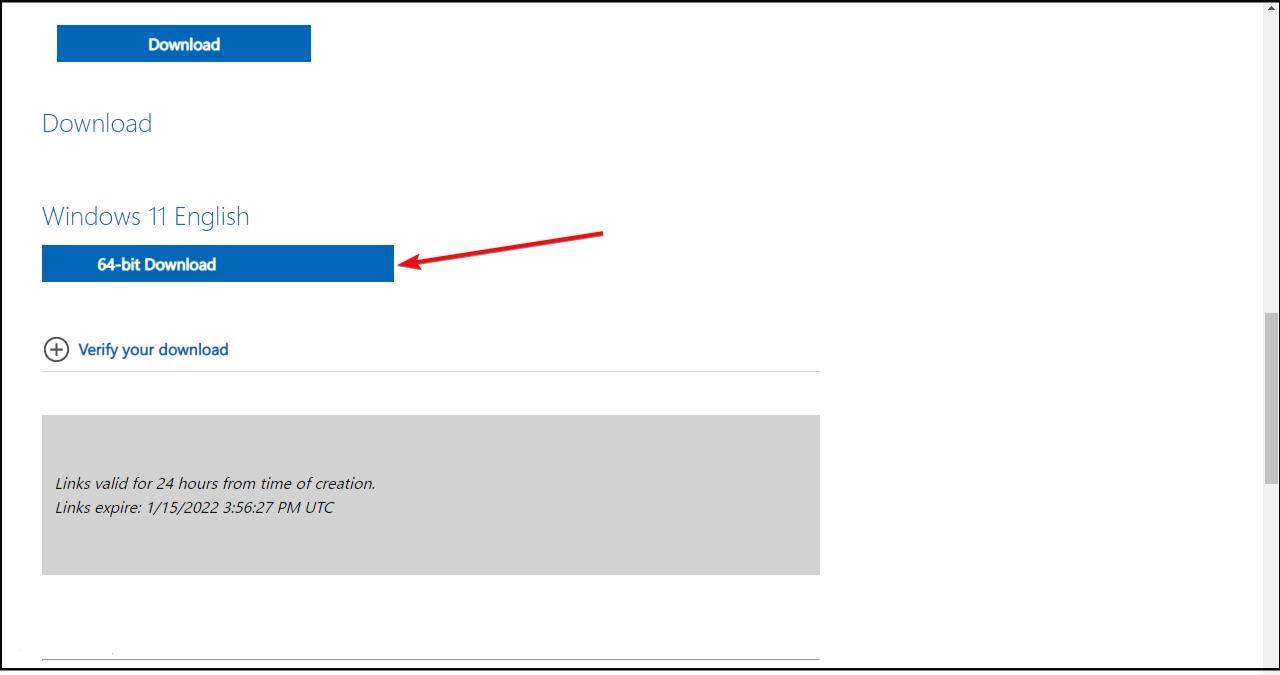
  6. Click 64-bit Download. This is how to install Windows 11 on unsupported CPU via ISO.
Note icon NOTE
The typical way to update your PC to the latest update is by using the Windows 11 Installation Assistant. Unfortunately, this doesn’t work in this case because your system doesn’t meet the minimum requirement.

The first to install Windows 11 on an unsupported CPU is to download the Disk Image (ISO) from the official website. The file should be around 5.1GB.

While the ISO file is downloading, you can move on to the next step.

2. Bypass the CPU check by editing the Windows Registry

  1. Press the Windows key + R to start Run, type regedit, and click OK to launch the Registry Editor.
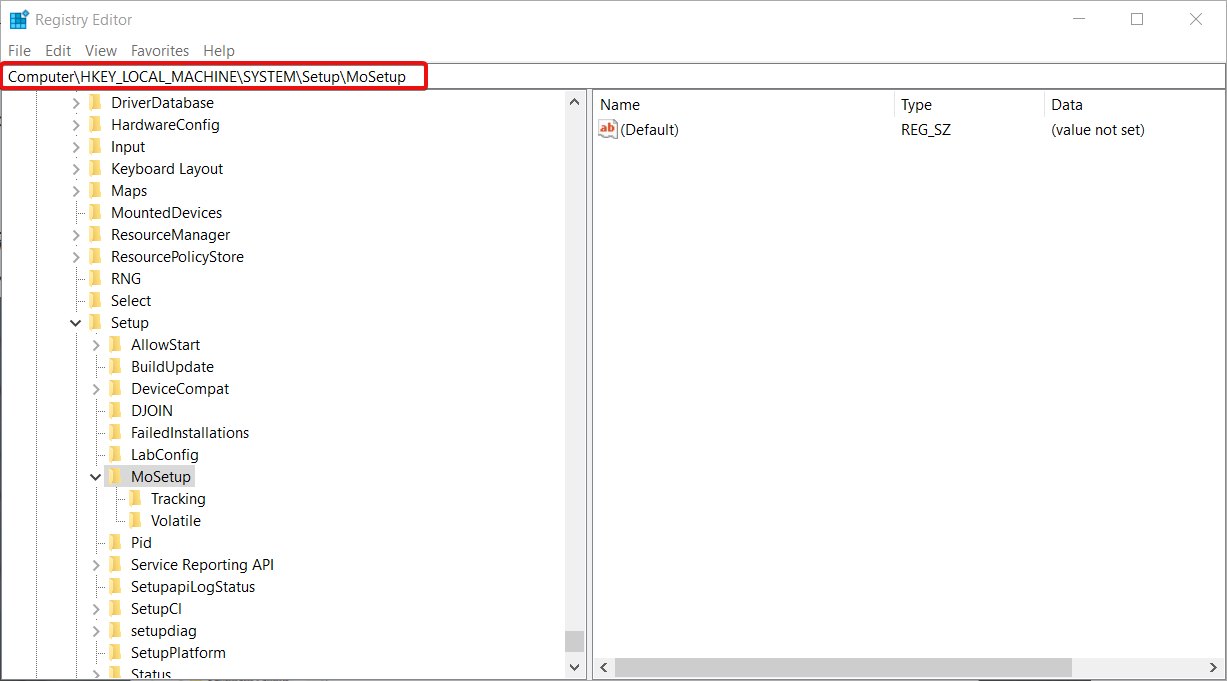
  2. Navigate to the following path: HKEY_LOCAL_MACHINE\SYSTEM\Setup\MoSetup
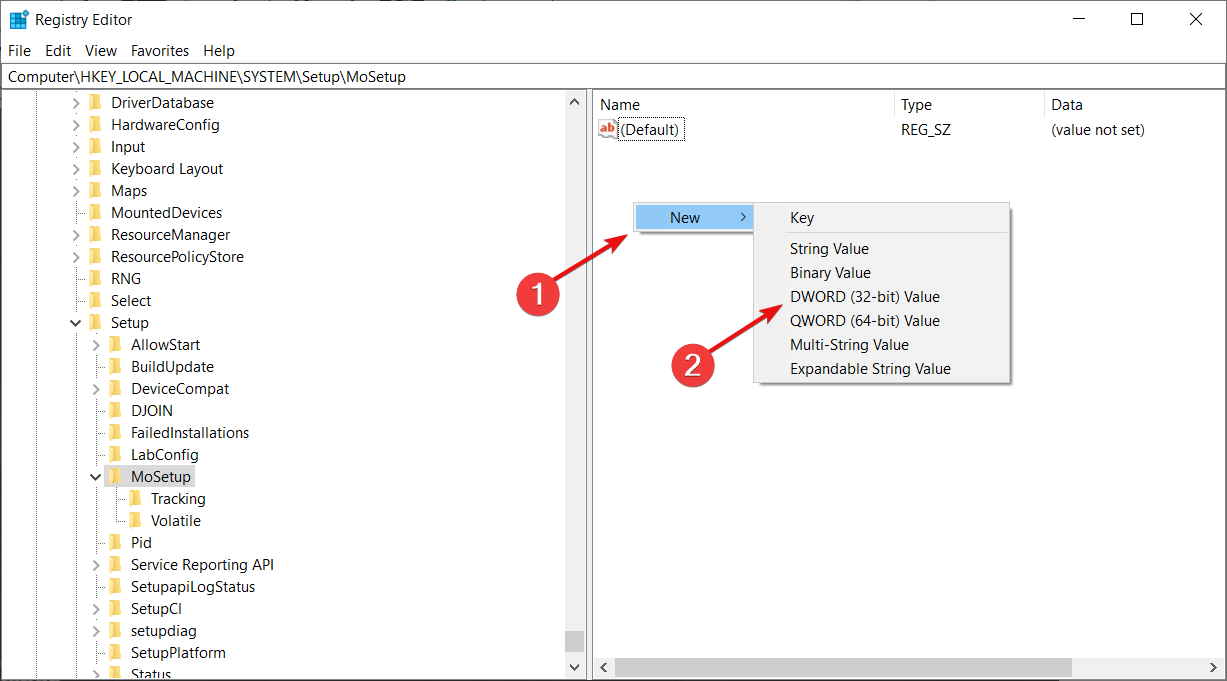
  3.  In the right pane, you can right-click, select New and then select the DWORD (32-bit) Value.
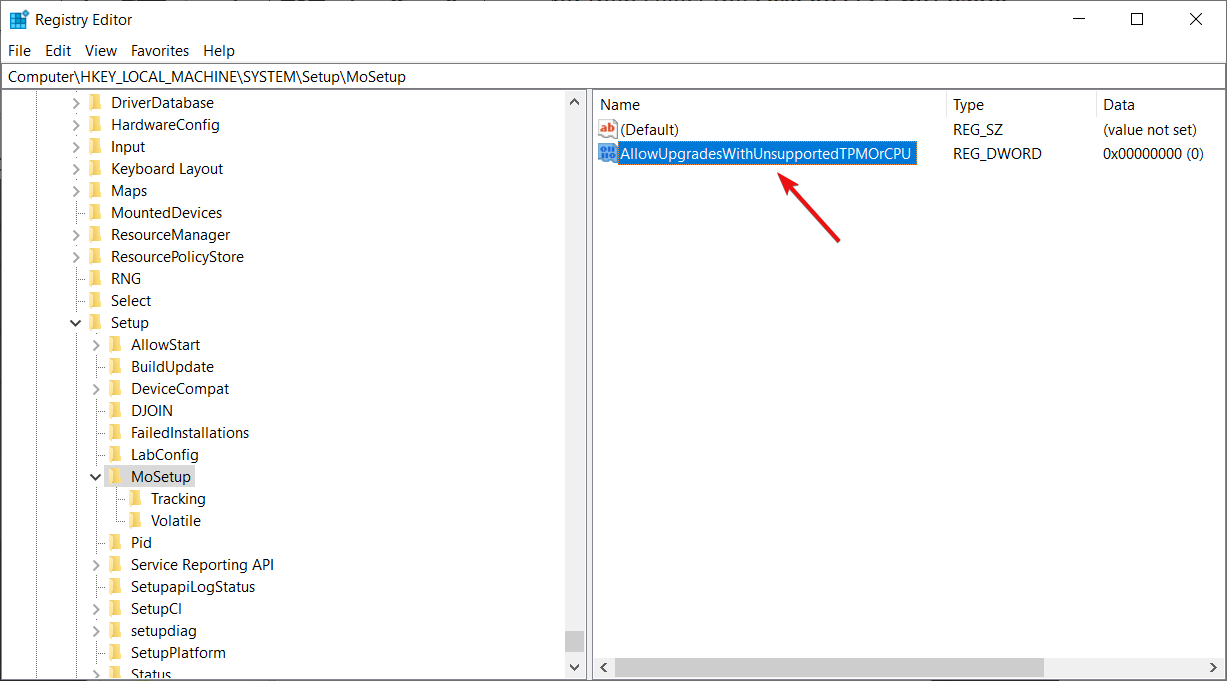
  4. Once the value is created, you can rename it to AllowUpgradesWithUnsupportedTPMOrCPU.
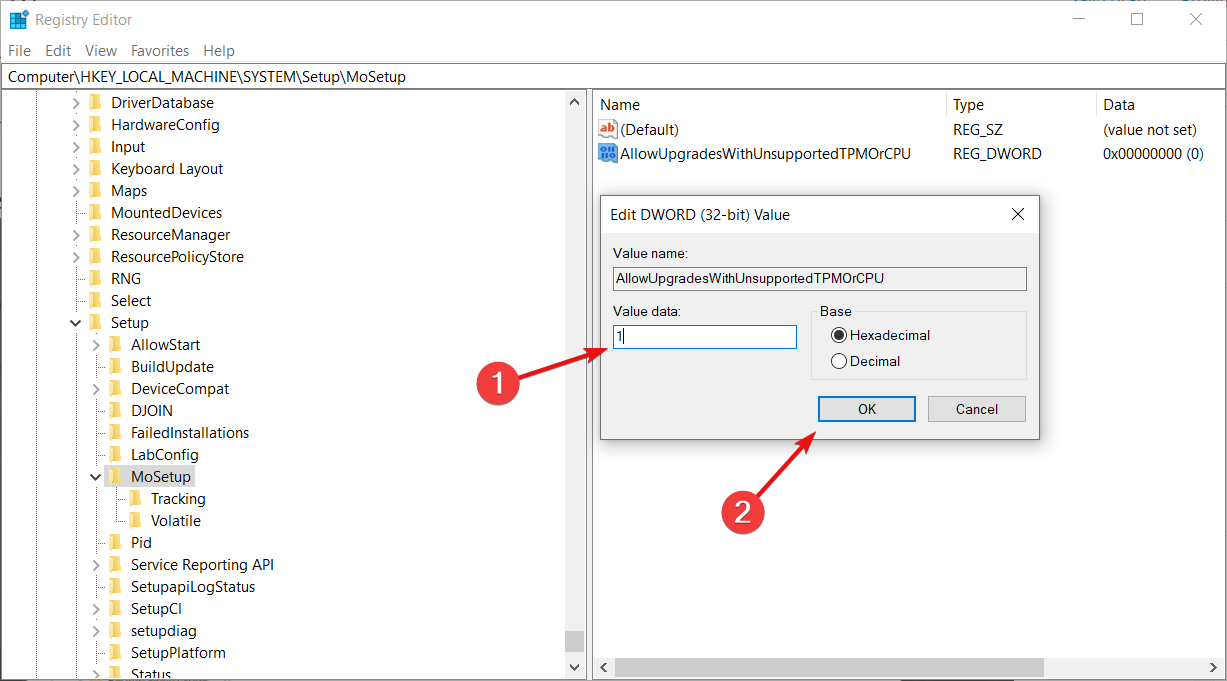
  5. You can now double-click on this new value and enter 1 into the Value data field. Then, finally, hit OK and close the registry editor. This is how to install Windows 11 on unsupported CPU via regedit.

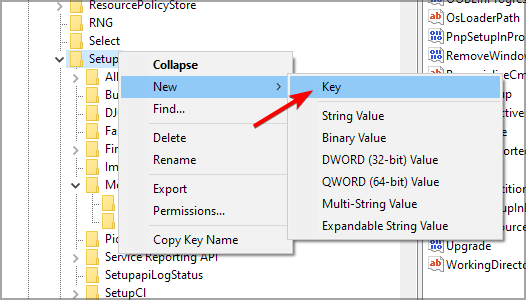
A few users reported that MoSetup key is hidden. To fix that, right-click it’s parent key, in this case it’s Setup, and choose the option to create a new key.

Name the key MoSetup, and you’ll get a message that the key is already available. Now you should be able to access it.

Once you restart your PC and go for the following solution, the system will ignore any shortcomings regarding your CPU, even with the TPM 2.0 requirement.

3. Install Windows 11 from the ISO image

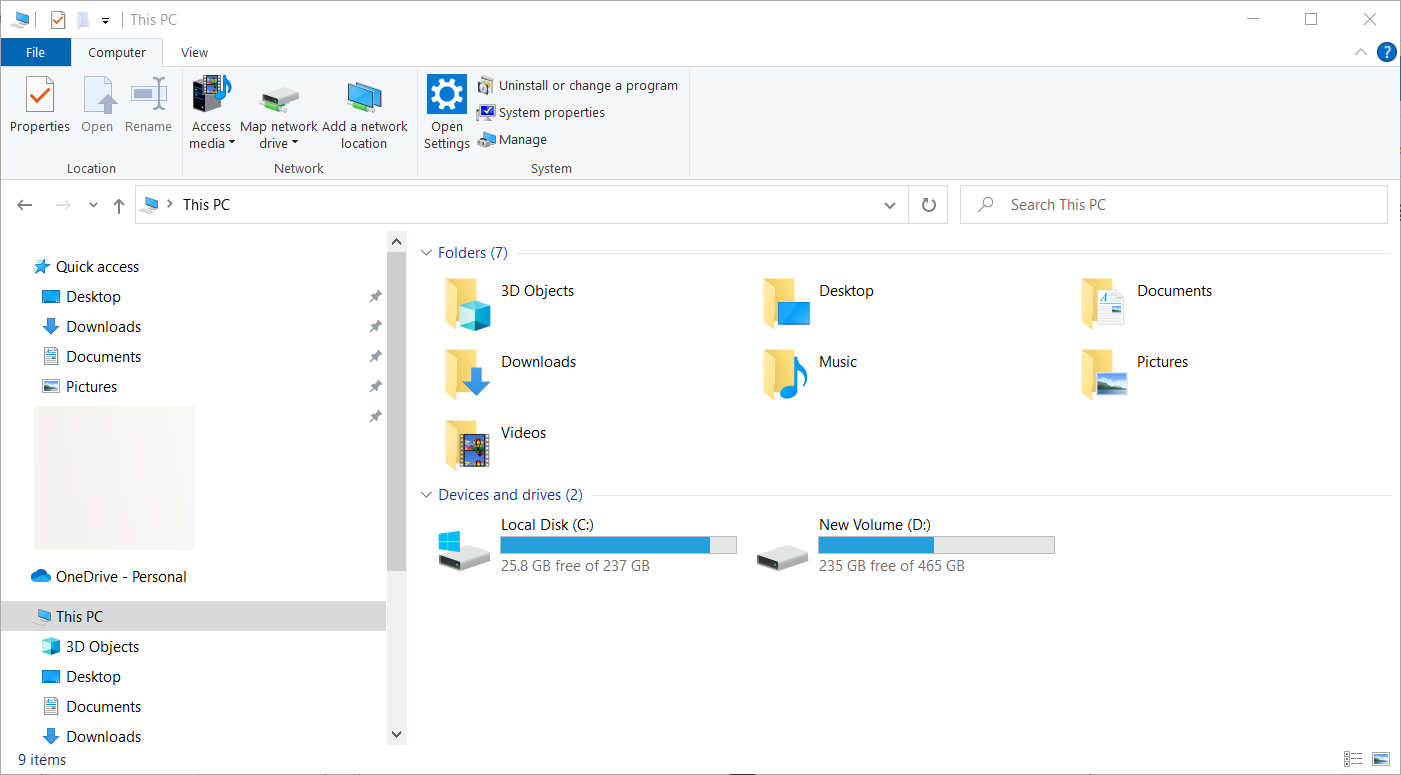
  1. After downloading the ISO, press Windows key + E to launch File Explorer.
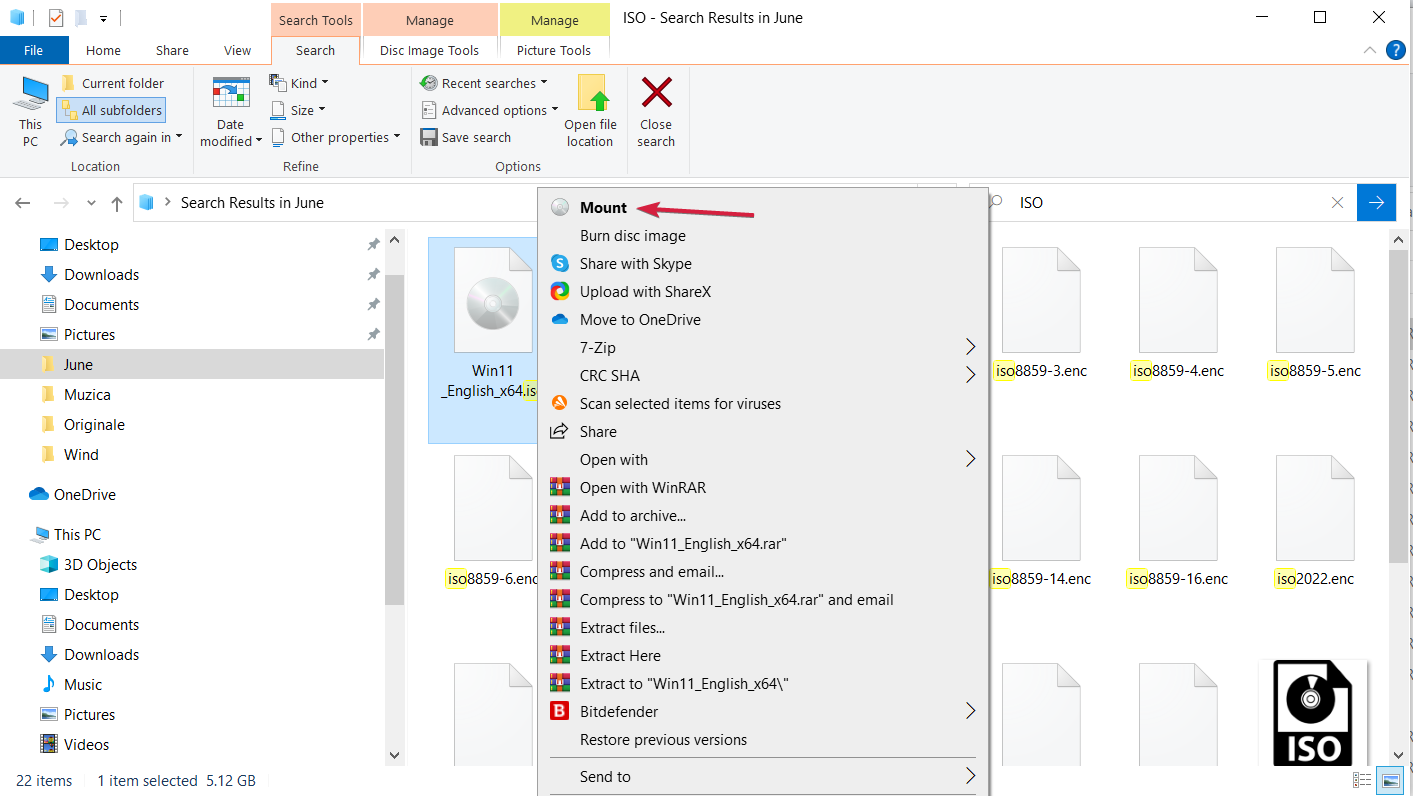
  2. Locate the ISO, right-click on it and select Mount.
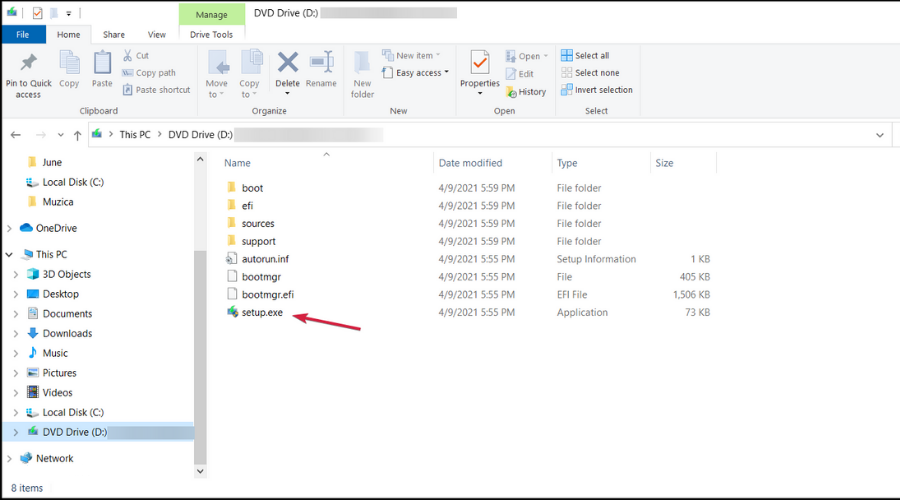
  3. A new virtual drive will appear on your PC. Access it and double-click on the setup.exe file to start the installation process.

After installation, you should see a warning message instead of a rejection one. This message offers an option to install Windows 11 without losing your data.

Again, we must reiterate that you back up your important data before starting this process.

4. Install Windows 11 on unsupported CPU from USB

Note icon NOTE
If you choose this method, make sure to back up all important files from the destination drive, in order to prevent file loss.
  1. Download Windows 11 ISO.
  2. Download Rufus.
  3. Start the application.
  4. Click on Select and pick your Windows 11 ISO file. Next set Image option to Extended Windows 11 Installation.
  5. Click on Start. When asked to format the drive click OK.
  6. Wait for the process to finish.
  7. Once the process is done, boot from the USB drive and install Windows 11. This is how to install Windows 11 on unsupported CPU with Rufus.

What happens if you run Windows 11 on unsupported hardware?

While Microsoft allows you to install Windows 11 on an unsupported PC, it does not come without risks. For example, after the installation, you might notice that your PC might start to malfunction due to compatibility issues.

Also, your PC will stop receiving updates, mainly but not limited to only security updates. Lastly, if your system crashes because of this installation, it will not be covered by the manufacturer’s warranty.

Should you upgrade an unsupported CPU?

Let’s be clear about this. If you’re still yet to decide if you want to go through with the procedure to install Windows 11 on an unsupported laptop, we recommend against doing so.

This is because Microsoft warns that there is a high tendency to experience bugs. They have also warned that they may eventually stop rendering security updates for unsupported PCs running this OS.

So, it might not be ideal for upgrading to the new OS if you don’t have said requirements. However, if you don’t mind a bit of lagging here and there, feel free to follow the steps we’ve provided above.

To avoid any issues, you may also install Windows 11 on a virtual machine and test it to its full extent before loading it onto your primary device.

If you’re still experiencing problems with installing this recent OS, then you can take a look at our piece on how to install Windows 11 on unsupported TPM besides the CPU that we have covered today.

As you probably know, another essential requirement for installing Windows 11 is for your PC to support the Secure Boot feature.

If you get an error regarding that, we can help you with a guide on bypassing the Secure Boot requirement and going on with the installation.

You’re welcome to comment to let us know if our solution was helpful or if you have other tips on installing Windows 11 on an unsupported device that you feel should be added to the list.

Fix: Windows 11 Headphones not Working [Audio Jack / USB]

For a full-on PC experience, it’s best to use headphones, but many reported that headphones are not working in Windows 11.

As not all devices are perfect, you are bound to find some issues while using them, with different levels of complexity.

Sometimes, it might be just a headphone connection problem, or the earphones are not working in others. This issue can appear on any OS, and many reported that headphones aren’t detected on Windows 10 either.

That being said, generally speaking, headphone issues can be split into two categories:

  • Physical damage
  • Software-related issues

Physical damage to your headphones can vary from dropping them on the floor to damaging the cable connection or submerging them into the water.

To avoid issues relating to water, it is recommended that you invest in a good set of sweat and waterproof headphones.

There are situations in which the OS causes inconveniences you’re running on your device, and to that effect, some users have complained about encountering them on their Windows 11 devices.

Why are my headphones not working on Windows 11?

When your headphones are not working in Windows 11, it’s a software-related issue. For example, it could be due to an outdated or corrupt Windows 11 headphones driver, misconfigured sound settings, or the headphones not being set as the primary output device.

Besides, you can’t rule out the hardware aspect completely. If it’s an old wired headphone, check the cable for damages, especially near the part with the jack or USB. Lines are prone to damage at that end due to excessive bending.

You can connect the headphones to another computer to verify if the problem lies with it or the system it was connected to earlier.

If there’s a hardware problem, you might get No jack information available message on Windows 11.

Moreover, the following are common error variations that you may encounter, but nonetheless, fix with the solutions provided below:

  • Headphone jack is not working in Windows 11
  • Wired headphones not working in Windows 11
  • Computer not recognizing headphones in Windows 11
  • Headphones not working on laptops in Windows 11
  • Windows 11 earbuds not working
  • Headset not working in Windows 11
  • Windows 11 Jabra headset not working
  • Razer headset not working in Windows 11
  • Windows 11 Bluetooth headphones are not working
  • Windows 11 wireless headphones are not working
  • Windows 11 headphones mic not working
  • Windows 11 Realtek headphones are not working
  • Dell Windows 11 headphones are not working
  • USB-C headphones not working in Windows 11
  • Speakers not working after unplugging headphones in Windows 11

How do I get Windows 11 to recognize my headphones?

1. Update your audio drivers

  1. Press Windows key + X and choose Device Manager from the pop-up.
  2. Expand Audio inputs and outputs, right-click on your headphones, and select Update driver.
  3. Click on Search automatically for drivers.

With this option, Windows will search your PC for the best available driver and install it on the computer. Installing the updated drivers can help fix issues like Windows 11 can’t switch audio devices automatically. Also update your chipset drivers if the playback device is missing.

To eliminate the possibility of causing even more issues, a more straightforward way to deal with this problem is to use specialized software such as Outbyte Driver Updater.

⇒ Get Outbyte Driver Updater

2. Ensure that the headphones are connected properly

Some users forget to check the cable connections, which can sometimes cause no sound on Windows.

When headphones are not working in Windows 11, you should ensure that the cable is connected correctly to your PC.

You should also consider restarting your headset and the computer if this doesn’t do the trick. This way, you will be able to notice if the audio jack stops working, and it will help fix things if the headphone jack is not working in Windows 11 on Dell.

3. Set the headphones as a default sound output

  1. Right-click on the Sound icon from the taskbar and select Sound settings.
  2. In the Output section, selects the Headphones option.
  3. Test if your headphones are working correctly, and if they aren’t, follow the next method.

This is a simple solution, but it can work if the Corsair headset is not working on Windows 11 and other headphone manufacturers.

4. Run the sound troubleshooter

  1. Press Windows Key + X and choose Settings from the pop-up that appears.
  2. Select System, then click on Troubleshoot.
  3. Select Other troubleshooters.
  4. Search for Playing Audio, then click on the Run button.

Sometimes a simple solution is all it takes if headphones are not detected in Windows 11 on Dell devices. Keep in mind that this solution also works for other brands.

5. Update your OS

  1. Click the Search icon found in your Windows Taskbar.
  2. Type update and choose the Check for updates option from the list.
  3. Once the Settings app opens, click the blue Check for updates button.
  4. Wait for the process to complete and the update to be installed.
  5. After the installation is completed, restart your computer to apply the changes.

That’s it! By now, you would have the headphones working fine on Windows 11.

How do I reset my headphones on Windows 11?

  1. Press Windows + S to open the Search menu, enter Sound Settings in the text field, and click on the relevant search result.sound settings for headphones not working windows 11
  2. Scroll down and click on More sound settings.more sound settings to fix headphones not working windows 11
  3. Right-click on the headphones you want to reset, and select Properties.properties to fix headphones not working windows 11
  4. Navigate to the Enhancements tab, and click on the Restore Defaults button.restore defaults to fix headphones not working windows 11
  5. Similarly, head to the other tabs with the Restore Defaults button and click on it to reset the headphones.reset to fix headphones not working windows 11

What issues may you encounter while using headphones?

  • Damaging the cable

One of the most common signs of using your headphones wrong is not taking care of the cable. This can cause distorted audio, audio buzzing, or crackling noise, resulting in a bad experience.

  • Over-using the sound volume

Drivers can sometimes fail, whether talking about wireless in-ear or other headphones. This issue may occur due to a driver setup that doesn’t have a long life by design.

  • Not respecting the Ingress Protection Code (IP Rating)

Some users misunderstand the IP ratings of their headphones. The Ingress Protection rating tells you if your device is resistant to interactions.

Do headphones require special drivers to work?

Most headphones are plug-and-play, meaning you need to connect them to your PC, and they should start working automatically.

However, high-end models, USB or Bluetooth headphones, might require special drivers to work correctly.

If your Windows 11 is not detecting the headphone mic, there may be a hardware issue.

As you can see, there are plenty of solutions you can choose if your headphones aren’t working on your Windows 11 device. Since these are the best available options, our article should prove helpful.

In most cases, the issue is related to your configuration or drivers, but sometimes, your sound card can be the source of the problem.

If you managed to fix the problem, why not use headphone software to boost your audio quality?

Also, find out what to do if Bluetooth headphones are not working or keep disconnecting in Windows 11.

Because your opinion is important to us, please share it in the section below. Also, subscribe to our newsletter for the most exciting Windows 11-related subjects.

This game doesn’t allow live streaming on Xbox One [QUICK FIX]

Xbox One is a powerful gaming console and one of the things that makes it a go-to console for many is its ability to live stream games on Twitch, Mixer, and other platforms. It’s hardly flawless, though.

The full error reads This game doesn’t allow live streaming and it appears when the user tries to live stream any game using their Xbox console. The reason for this error can be many including a temporary glitch in the console or the game, file corruption, etc.

Fix the live streaming problem by following the instructions below.

Why this game does not allow live streaming?

1. Change the Game

  1. If you are still playing the problematic title, simply exit and open a new different game.Swap the Xbox games to resolve Broadcasting error
  2. Then exit the new game and reload the problematic game. The error should automatically resolve if it was a temporary glitch.
  3. Alternatively, you can also stop and restart the streaming. Simply exit the streaming app and restart it for live streaming. Re-starting the streaming app has resolved the error for many as well.

2. Create New Gamer Tag

Create new gamer tag Xbox console
  1. As strange as it may sound, users have reported that changing the gamer tag has helped them resolve the error. So, try to create a new gamer tag and then log in to your Xbox with it. Here is how to do it.
  2. First, create a new Microsoft Account. Once it is ready, proceed with the steps below.
  3. Click the bar on the upper left of the home screen or on the Profile picture.
  4. It will show you all the profiles that are on the console. Choose “Add new“option.
  5. Now you need to enter your Microsoft Account details that you created above or you can create a new Microsoft account by clicking “get a new Email”.
  6. After setting up the account, you should be able to live stream the game without any error.

3. Reset Xbox Console

Reset Xbox console fix broadcasting error
  1. As a last resort, you can try to reset the Xbox Console to fix any issues with the Console. Here is how to do it.
  2. Press the Xbox button to open the Guide.
  3. Go to System > Settings.
  4. Select System and then Console Info.
  5. Select “Reset Console”.
  6. Here you have two options as listed below.
    Reset and Remove Everything: This option removes all the game data and files from your Xbox and resets the Console to factory default.
    Reset and keep my games and apps: This option only resets the settings and the OS. While it will delete any corrupt data, all your games and media files will not be deleted.
  7. So, select “Reset and keep my games and apps” option and wait for the console to restart.

RELATED STORIES YOU MAY LIKE:

3 Tips on How to Reinstall the Settings App in Windows 11

The Settings app is one of the most important additions to Windows 11 alongside File Explorer. Settings is a preinstalled app that includes most of Windows 11’s configuration options.

If the Settings app stops working right, you can’t access many Windows 11 options. Some users wonder how they can reinstall the Settings app for the sake of fixing it.

Can I reinstall Settings in Windows 11?

Settings is one of Windows 11’s built-in apps you can’t select to uninstall. The Uninstall option for that app is greyed out. So, you can’t reinstall Settings in the same way as apps on Microsoft Store.

However, there is a command for reinstalling all default apps that come with Windows, which includes Settings. So, running that command would effectively reinstall Settings along with others.

Aside from that, there are also ways you can reset and register Settings in Windows 11. Resetting an app isn’t quite the same as reinstalling it, but it will refresh its data, nonetheless.

How do I reinstall the Settings app?

Before getting into the actual troubleshooting steps, make sure you cover a few methods:

  • Restart your PC and see if the problem reappears. Sometimes, this can be extremely effective.
  • Try to open Settings by pressing Win + A key combination and clicking on All settings afterward. If that works, go to Update & Security and check for any new updates.

If you’ve cross-checked these from your list, fix the Settings problem using the solutions below.

1. Reset the Settings app

  1. Press the Win key + S and type in settings to find that app.
  2. Select App settings on the right of the search tool.
    App settings option reinstall windows settings app
  3. Click Reset to clear data for the Settings app.
    Reset button reinstall windows settings app

2. Re-register the Settings app

  1. Press Start and click inside the search text box at the top of that menu.
  2. Input Windows PowerShell within the app search box to find that command-line shell
  3. Right-click Windows PowerShell to select its Run as administrator option.
    Run as administrator option reinstall windows settings app
  4. Type in this command for registering PowerShell: Get-AppxPackage *windows.immersivecontrolpanel* | Reset-AppxPackage
    Reregister command reinstall windows settings app
  5. Press Enter on your keyboard.

3. Reinstall Windows 11’s built-in apps

  1. Make sure Settings is closed before reinstalling that app.
  2. Launch an elevated PowerShell app as instructed in steps one to three in this guide’s second method.
  3. Then input this command: Get-AppXPackage | Foreach {Add-AppxPackage -DisableDevelopmentMode -Register "$($_.InstallLocation)\AppXManifest.xml"}
    Reinstall Settings command reinstall windows settings app
  4. Hit Return to reinstall the Settings app and others.
  5. Wait for the command to finish before closing PowerShell.
  6. Press the Alt + F4 key combination and select Restart on the drop-down menu.
    Restart option reinstall windows settings app

You can also reinstall Settings and other apps for all users with an alternative command. Execute this command to apply the command for all user accounts:

Get-AppxPackage -AllUsers *WindowsStore* | Foreach {Add-AppxPackage -DisableDevelopmentMode -Register "$($_.InstallLocation)\AppXManifest.xml"}

Those are three of the more effective troubleshooting methods for fixing the Settings app. So, try reinstalling/refreshing Settings with any of the methods above whenever it isn’t working right.

Of course, there are also many other ways you can feasibly fix Settings when it’s not opening. Check out our guide to fixing Settings in Windows 11 for full details.

To learn more about Settings app, check out our complete guide on System Settings in Windows 11.

If you have any questions or suggestions, let us know in the comments section below.


How to Fix CAA50021 Login Error in Microsoft 365 Apps

Many have encountered CAA50021 error while trying to use various Microsoft services, so today we’re going to take a closer look at this error and show you how to fix it.

How do I fix Microsoft error code CAA50021?

  1. Hit the Windows key and select Settings.settings windows 11
  2. Select Accounts on the left pane and tap on Access work or school on the right pane.
  3. If you have work or school account connected, disconnect it.
  4. Click on Connect next to Add a work or school account.
  5. Now follow the on-screen prompts to connect your device with Azure.

A few users also suggested deleting your device from the Azure Admin Center, so try that as well.

2. Re-register your device with Azure

  1. Hit the Windows key, type cmd in the search bar, and click Run as administrator.
  2. Type and Enter the following command: dsregcmd /leave 
  3. Navigate to the following location and delete the MS-Organization-Access and MS-Organization-P2P-Access entries: Current User\Personal\Certificates
  4. Go back to the Command Prompt window and type the following command: dsregcmd /status
  5. The AzureAdJoined status should read No.
  6. Go back hit the Windows key, type Task Scheduler in the search bar, and click Open.
  7. Navigate to the Task Scheduler Library and select Microsoft.
  8. Select the Windows option and tap on Workplace Join under it.
  9. Launch the Automatic-Device-Join task by right-clicking on it and select Enable.

3. Change CA policy settings

  1. Open the CA policy settings.
  2. Next, exclude the following from All cloud apps:
    • Microsoft Command Service
    • Microsoft Activity Feed Service
    • Microsoft Directory Device Service
  3. Save changes.

4. Change Azure settings

  1. Go to Azure AD Admin Center and choose Devices. Next, select Devices.
  2. Enable the Users may register their devices with Azure AD.
    users may register their device
  3. Save changes and try again.
  4. Alternatively, select This app only when launching the app if you don’t want to register with Azure.

5. Reinstall Office

  1. Remove your email account from Outlook settings.
  2. Next, press the Windows key + X and choose Installed apps.
    installed apps windows 11
  3. Locate Office on the list, click the three dots next to it, and choose Modify.
    disable onenote startup
  4. Follow the steps to reinstall it.
  5. Open Outlook again and connect to Exchange.

This is a drastic solution, but it can help with caa50021 error in Outlook.

You may also come across an issue where Microsoft Teams status is stuck on updating so be sure to check out our helpful guide on how to proceed.

If you’d like to try out other collaboration software, especially for small-sized businesses, we have a couple that we can recommend.

Other errors you may encounter include CAA30194, CAA50024, and CAA70007, each with its own troubleshooting steps.

Keep in mind that caa50021 can appear in Intune, OneDrive, Teams, and other Microsoft services, but these solutions should help regardless of the service that is giving you the error.

Let us know if you have been able to solve this error in the comment section below.

KB5021304 brings end-of-the-year changes to the Beta Channel

We’ve already peeked at the last Dev Channel Insider Build for 2022, which is Build 25267, so it was only natural we’d also have a look at the Beta Channel as well.

However, before we do, we want to remind you about the latest Patch Tuesday rollout, which you should definitely check out.

As you would have expected, these security updates managed to break features as well as fix some of the vulnerabilities still exploited.

Let’s move on now and look at the most recent release to the Windows 11 Insiders Beta Channel and see what we’re getting these holidays.

What should I look for in builds 22621.1037 and 22623.1037?

You should know that today, Microsoft released builds 22621.1037, and 22623.1037 to the Beta Channel for Windows Insiders.

The 22623.1037 build includes a bunch of new voice access improvements and commands which are listed below so that you can use many aspects of Windows 11 just with your voice.

Before we get into it, keep in mind that Insiders who were previously on Build 22622 will automatically get moved to Build 22623 via an enablement package.

The above-mentioned enablement package artificially increments the build number for the update with new features getting rolled out and turned on to make it easier to differentiate from devices with the update with features off by default.

Furthermore, Microsoft is continuing to tweak Search on the taskbar, trying to make it a much more reliable and stable experience.

Through this recent software release, Microsoft has fixed an issue that might have affected Data Protection Application Programming Interface (DPAPI) decryption.

In case you didn’t know, the decryption of a certificate private key might have failed, so virtual private network (VPN) and other 802.1 certificate-based authentications might have failed.

The tech giant also specified that this issue might have occurred when you encrypted the DPAPI master key with a wrong value.

In addition, the Redmond-based tech company has added support for the following commands:

To do thisSay this
Close the voice access applicationClose voice access, Exit voice access, Quit voice access
Open a new applicationShow [application name] , e.g., Show Edge
Close an applicationExit/Quit [application name], e.g., Exit Word, Quit Edge
Show grid overlay on your screenShow window grid
Pull up the command help listShow command list, Show commands
Release a held down keyRelease
Move cursor in a text boxMove forward 5 characters, Go back 2 lines, Go to start of document, Move to beginning of line
Select the desired no. of characters/linesSelect forward/backward [count] characters/lines, e.g., Select forward 5 characters
Delete selected text or last dictated textStrike that
Paste text in a text boxPaste here, paste that
Apply bold formatting to specific textBoldface [text], e.g., boldface hello world
Capitalize selected text or last dictated textCap that

Fixes in Build 22623.1037

[Taskbar & System Tray]

  • Updated the Quick Settings icons in the taskbar when using a screen reader so if you set focus to each of the icons it no longer includes the words system state and instead just says what the icon is (for example instead of “system volume state” it just says “volume”).
  • Fixed a few more explorer.exe crashes relating to recent taskbar changes.

[Task Manager]

  • We fixed the issue causing Task Manager to become unresponsive when using the search box at the top of Task Manager.

Fixes for BOTH Build 22621.1037 & Build 22623.1037

  • Fixed a known issue that might have affected Task Manager. It might have displayed certain elements in the user interface (UI) in unexpected colors. Some parts of the UI might not have been readable. This issue might have occurred if you had “Choose your mode” set to “Custom” in the Personalization > Colors section of Settings.
  • Fixed an issue that might have affected Data Protection Application Programming Interface (DPAPI) decryption. The decryption of a certificate private key might have failed. Because of that, virtual private network (VPN) and other 802.1 certificate-based authentication might have failed. This issue might have occurred when you encrypted the DPAPI master key with a wrong value.

Known issues

[Search on the Taskbar]

  • You may see issues with the search box on taskbar not rendering correctly and displaying visual artifacts.

[Task Manager]

  • Filtering by publisher name does not match correctly on the Processes page.
  • Some services may not show in the Services page after filtering is applied.
  • If a new process is starting while a filter is set, then that process may appear for a split second in the filtered list.
  • Some dialogs may not render in the correct theme when applied from Task Manager Settings page.
  • The data content area of the Processes page may flash once when theme changes are applied in the Task Manager Settings page.
  • The Startup apps page in Task manager does not list any apps for some Insiders. If you are impacted, please use Settings > Apps > Startup for the time being.

What can I do if I can’t install KB5021304?

  1. Press Win+ I to access Settings.
  2. Select the System category and click on Troubleshoot.w11 troubleshoot
  3. Press the Other troubleshooters button.other troubleshooters windows 11
  4. Press the Run button next to Windows Update.windows update troubleshooter

Please be sure to report any other issues you might come across, in order for Microsoft to address and improve the overall OS experience for us all.

This is everything you can expect if you are a Windows Insider for the end of 2022. Leave a comment below if you found any issues since installing this build.

How to Fix “the game couldn’t start” Xbox 360 Game Error

Playing games on Xbox is great, but sometimes certain errors can occur that prevent you from enjoying in your favorite games.

Users reported The game couldn’t start Xbox 360 error on their console, so today we’re going to show you how to fix this error.

“Game couldn’t start” Xbox 360 error, how to fix it?

1 – Delete the latest system update

Users reported this error message while using Xbox Dashboard features, and this usually means that there’s a problem with the latest console software update.

To fix this problem, you need to delete the last update and download it again.

To do that, follow these steps:

  1. Go to Settings and select System Settings.
  2. Choose Storage.
  3. Now press the left bumper, right bumper, X. Repeat this step one more time.
  4. If you performed the previous step correctly, you’ll see Delete System Update message. Select Yes.
  5. Console will now remove the latest update and restart itself.
  6. After the console restarts, you need to download the latest update again.

Keep in mind that you don’t have to download the update immediately, but you won’t be able to sign in to Xbox Live until you do.

2 – Install the latest Xbox update

If you’re getting Game could not start error, you might want to try updating your Xbox. The easiest way to do that is to connect to Xbox Live.

This is a simple process and you can do it by following these steps:

  1. Press the Guide button on your controller.
  2. Choose Settings > System Settings.
  3. Select Wired Network or the name of your wireless network.
  4. Now choose Test Xbox Live Connection.
  5. If prompted to instal the update, select Yes.

If you can’t access Xbox Live for some reason, you can download the update on your PC and move it to a USB flash drive. To do that, follow these steps:

  1. Download the latest Xbox update on your PC.
  2. The update will be stored in a .zip file, therefore you need to extract it first.
  3. After that, copy the contents of the .zip file to the root directory of your USB flash drive.
  4. Connect the USB flash drive to your console and restart it.
  5. After your console restarts the update installation process should start immediately.

If you decide to use a USB flash drive to install the update, keep in mind that you’ll need to use a USB flash drive with FAT32 file system.

Also, if your USB flash drive isn’t FAT32, you’ll need to reformat it as a FAT32 device.

If you don’t have an extra USB flash drive, you can also download the update and burn it to a DVD or CD and install it that way.

The process is almost identical, except you have to use a CD/DVD burning software.

3 – Make sure that you’re using an official Xbox hard drive

If you try to play Xbox games on Xbox 360 you might get Game could not start error. To fix this error you need to be sure that you’re using an original Xbox 360 hard drive.

Most Xbox games will work on your Xbox 360 as long as you have the original hard drive.

If you get an error message while trying to run Xbox games on Xbox 360, it might be that the game just isn’t compatible with your console.

4 – Replace your hard drive

Sometimes this error can occur due to problems with the hard drive, and if that’s the case, you might want to try replacing the hard drive. To do that, follow these steps:

  1. Turn off your console.
  2. Position your console horizontally.
  3. Locate the hard drive cover and open it.
  4. Remove your hard drive.

After removing the hard drive, try replacing your hard drive with a different one. In these types of situations it might be the best that you borrow a hard drive from a friend and test it on your console.

If the problem doesn’t appear with a different hard drive, you’ll have to purchase a new hard drive for your Xbox.

5 – Try cleaning the game disc

Game could not start error can appear if your disc has scratches, and to fix this problem it’s recommended that you clean your game disc. To do that, follow these steps:

  1. Hold the disc by the edges without touching the top or bottom surface.
  2. Use a soft, clean, slightly damp cloth to clean your disc from center to edges.

You can also take your disc to a store that has a disc polishing machine and ask them to polish your disc.

If that doesn’t work you might want to ask your friend to borrow you his game disc and check if it works on your console.

If the other game disc works without problems, it means that your game disc is damaged and you might want to consider replacement.

6 – Check your hard drive

Users reported this error while trying to run backward compatible games on their console.

According to them, it seems that the problem can be caused by your hard drive, especially if you purchased a hard drive from a third-party.

According to users, their hard drive works without any problems with newer games, but backward compatible games can’t run on third-party hard drives.

If you have a third-party hard drive, you’ll have to replace it with original Xbox hard drive whenever you want to play a backward compatible game.

7 – Delete the game from your hard drive and reinstall it

Users reported this issue with certain games, and in order to fix it you need to delete the installed game from your hard drive.

To do that on Xbox One, follow these steps:

  1. From the Dashboard select My Games & Apps.
  2. Highlight the game that you want to remove and press the Menu button on the controller.
  3. Select Manage game option from the menu.
  4. Now you should see the installed game along with its save game files. Select the Uninstall option to uninstall the game from your hard drive.

To reinstall a game on Xbox One simply go to Games & Apps section. You’ll see Ready to install list that includes games that you own but you don’t have installed on your hard drive.

Select the game that you want to install and wait until the game is installed.

To delete a game from Xbox 360, do the following:

  1. Insert the disc of the game that you want to delete.
  2. Select the game in the drive tray on the Home screen and press Y.
  3. Select Delete.

To install the game again, do the following:

  1. Insert the game disc. If the game automatically starts, close it.
  2. On the Home screen select the game in the drive tray and press X on the controller.
  3. Select Install option.
  4. Wait until the game is installed to your hard drive. Keep in mind that installation process can last more than 10 minutes.

If your disc is damaged and you can’t install it to your hard drive, you might want to borrow your friend’s disc and use it for the installation.

After that you just need to insert your game disc and you should be able to run the game without any problems.

8 – Format the hard drive

According to users, you might be able to fix Game couldn’t start error on your Xbox 360 simply by formatting your hard drive. To do that, follow these steps:

  1. Press the Guide button and navigate to Settings > System Settings.
  2. Select Storage or Memory.
  3. Choose the storage device that you want to format. Select Format option
  4. You should see a confirmation message on the screen. Select Yes.
  5. You might be prompted to enter your console serial number before you can format the hard drive. You can find the console serial number on the back of the console. After entering the serial number, select Done.
  6. Wait until the formatting process is completed.

Formatting your hard drive will delete all files from your hard drive, including installed games, DLCs and saved games, therefore be sure to back up all important files before formatting your hard drive.

9 – Clear the cache

Sometimes cache files on your Xbox can cause this and many other errors to appear.

To fix this problem, you need to clear the cache, and you can do that on Xbox 360 by following these steps:

  1. Press the Guide button on your controller and choose Settings > System Settings.
  2. Select Storage.
  3. Highlight any storage device and press the Y button on the controller.
  4. Select Clear System Cache. If you get the confirmation message, select Yes.
  5. Wait while your console clears the cache.

To clear cache on Xbox One, you need to do the following:

  1. Press and hold the power button on your console to turn it off.
  2. After the console turns off, unplug the power cable from the console.
  3. Now press the power button on the console few times to drain the battery completely.
  4. After that, connect the power cable to the console.
  5. Wait until the light on power brick changes from white to orange.
  6. Press the power button on your console to turn it back on again.

After clearing the cache, check if the error is resolved.

10 – Remove any USB flash drives

Game could not start error can sometimes appear if you have a USB flash drive attached to your console.

To fix this error you just need to remove any external storage devices and restart your console. After doing that, check if the problem is resolved.

Game couldn’t start Xbox 360 error can prevent you from playing your favorite game on Xbox, but you should be able to fix this error by using one of our solutions.

READ ALSO:

TPM 2.0 chip price: Where to buy & price comparison

With all the excitement present in the air, since the launch of Microsoft’s new operating system, we’ve all ignored an important factor that is about to change the rules of the game.

To be more exact, the new OS reveal has nearly quadrupled prices for a little-known security chip on eBay. The main reason behind this is that this same chip is necessary to run Windows 11.

The price quadrupled in a matter of hours

The above-mentioned chip is called the Trusted Platform Module (TPM) version 2.0. After Microsoft revealed, on Thursday, that PCs will need this in order to run Windows 11, everything changed.

This new hardware requirement is pushing customers to flock to eBay, in order to obtain TPM 2.0 modules for their PCs. Needless to say that at least one vendor is capitalizing on the outrageous demand. 

Thursday, there were two listings for Gigabyte TPM 2.0 modules, posted by an Israeli electronics shop called KSMTop, which increased in price dramatically from $24.90 to $99.00. 

However, that was Thursday. If you are planning on buying one of these chips now, be ready to empty your savings, as the price already increased to $199.90.

And this is just after a few days since Microsoft made the great announcement. Imagine how much these chips will go for in the near future.

Where can I buy a TPM 2.0 chip from?

For those of you looking to get your hands on one of these much desired chips, know that you can do so by visiting:

  1. eBay
  2. Amazon
  3. Gigabyte
  4. MSI

Note that, while some of these stores might still have an available batch of these coveted chips, others can no longer provide them at the moment, as they are out of stock.

Source: Gigabyte

And, as we mentioned above, choose your seller wisely, as the TPM 2.0 chips cost a lot more than they did just a few days ago.

Last week, if you wanted such a piece of hardware, you only had to pay $25. The story is a bit different now, after Microsoft announced Windows 11.

Getting a chip for the same amount of money nowadays is matter of extreme luck. On eBay, a TPM 2.0 chip is now going for as much as $199.90.

Source: Gigabyte

And the prices are much likely to keep growing so you should also keep that in mind while hunting for components.

We will keep an eye out for any changes that may occur, related to the TPM chips, and keep you informed.

Your computer may already have a TPM 2.0 chip installed

Before you panic and throw a fortune out the window, you have to know that your PC may already have a TPM 2.0 chip built in.

As you might know, the technology was first introduced in October 2014, meaning that a laptop or desktop from the last five to seven should have a TPM 2.0 function.

Also worth mentioning is that the security chip isn’t always turned on by default. In order to actually enable it, you’ll need to go into your PC’s BIOS settings and search for this feature.

An easier way to find out whether your PC has the security chip is by going to the Windows 10 search bar and typing in tpm.msc.

If by chance you have the chip, you should see an option for tpm.msc Microsoft Common Console Document.

What a lot of users are more curious about, is whether Microsoft is going to help them in any way, with this whole chip madness.

Just to be on the safe side, you can download and run the PC Health Check app, which tells you if the device is compatible with Windows 11.

We’ll just have to wait and see how this situation evolves in the near future. One thing is sure though, the price for these security chips is not likely to drop anytime soon.

Make sure you keep yourself informed on everything that happens with Windows 11, by checking our Windows 11 news thread.

What is your opinion on this matter? Share your thoughts with us in the comments section below.

Fix Folder Keeps Reverting to Read Only with 3 Easy Tips

You have found this article because your folder reverts to read-only constantly; here is all you should know.

Windows keep file and folder attributes in the file system. They are stored in the respective location with the file and folder name, extension, date and time stamp, and other information.

If you right-click on any given time on a folder and go to its proprieties, you’ll see a Read-Only check mark.

Many users reported that the folder reverts to the Read-Only status after they clear the check mark.

This problem occurs after installing Windows 10 updates, sometimes because of account permissions.

Why have all my files changed to read-only?

If your folder constantly reverses to read-only, there could be a few factors responsible, including:

  • A recent OS upgrade – This can happen due to your system’s recent update to Windows 10 since your account rights may have been changed.
  • Your account permissions – Without your knowledge, the problem may sometimes be caused by nothing more complicated than your account permissions, which is the most frequent reason.
Note icon NOTE
A shared folder keeps resetting to read-only.

Speaking about updates, shared folders are more prone to be impacted by this erratic behavior than others.

Thus, if a shared folder keeps resetting to read-only after installing a Windows update, you might want to revert that problematic file.

In addition, running SFC and DISM scans to ensure you address any potential signs of corruption can prove very useful.

An issue like this is very annoying and must be dealt with. Many users wonder: How do I stop a folder from being read-only?

The simplest solution is to change the permissions. Most of the time, some changes in permissions can make a folder read-only.

Additionally, you can log in as an administrator or change the attribute of the folders. For more info on how to do that, check the steps below.

Moreover, here are some error variations that you may encounter, but nonetheless, fix with the solutions below:

  • Windows read-only folder cannot be changed
  • Windows 10 read-only attribute keeps coming back
  • Uncheck read-only, but comes back
  • Unset read only not working
  • Folder keeps reverting to read-only Windows 10, Windows 11, Windows 7
  • Folder keeps reverting to read-only Windows server 2016, 2012
  • This folder is read-only; you cannot select it
  • All folders are read-only

Without further ado, let’s jump right into the list of solutions!

How do I get my folder out of read-only mode?

1. Change permissions

1.1 For single users on the PC

  1. Find your C Drive, right-click it, and then choose Properties.
    folder reverts to read only
  2. A new window will appear; click on the Security tab.
    folder reverts to read only
  3. In the bottom right, click Advanced.
  4. Then, click on Change permissions.change permissions folder read only
  5.  Choose the user that interests you, and then click Edit.
    folder reverts to read only
  6. Under Applies to: drop-menu, choose This folder, subfolders and files, then under Basic permissions, check Full control and click OK.

1.2 For multiple users on the PC

  1. Find your C Drive and double-click on it.
  2. You will see a Users folder, double-click on it.users folder read only folder windows 10
  3. Now you should see your user name, right-click it and choose Proprieties.
  4. Go to the Security tab, and in the bottom-right, click Advanced.folder changes to read only windows 10
  5. In the new window, at the bottom-left should see an Enable inheritance button. Click it.enable inheritance folder keeps reverting to read only

After changing the permissions, the issue should be gone; if you still have problems, go to the next solution.

2. Change the attributes

  1. In the Windows search box, type cmd, right-click the result, and choose Run as administrator.folder reverts to read only
  2. Type in the following command to remove the Read-only attribute and set the System attribute. attrib -r +s drive:<path><foldername>
  3. Customize folders, as some programs may not operate correctly with folders that have these attributes. To remove them, type the command below.
    attrib -r -s c:<foldername>

A program can’t save files or change if a particular folder has the Read-only attribute.

Keep in mind that removing the Read-only or the System attribute of a folder can cause some customization loss. Still, it’s not particularly important unless you have something specific in mind.

3. Disable controlled access

  1. Open the Search menu, type windows security, then click on the Windows Security app.
    folder reverts to read only
  2. On the left pane, click on Manage Settings.
    folder reverts to read only
  3. Scroll down and click on Manage Controlled folder access.
  4. Finally, turn off Controlled folder access.

How do I reset permissions in Windows 10?

  1. Right-click on the Start menu and select Windows Terminal (Admin).
  2. Type in the script below and hit Enter. Replacing the full path to your file with the file path.
    icacls full path to your file /reset
  3. Check that the file permission is reset.

In our guide, you can learn more about resetting external drive permission issues in Windows 10.

If you are still experiencing issues with permission to open files, this guide may help you fix the problem.

We hope these solutions worked for you, as many other Windows 10 users confirmed them. Also, note that the issue is not unique to Windows 10, and users have noticed that the folder keeps reverting to read-only in Windows Server 2012.

To fully use File Explorer, consider adding comments to folders in Windows 11.

Don’t forget to leave any other questions in the comments section below, and we’ll be sure to take a look.

Craftopia Keeps Crashing on Xbox: 4 Ways to Fix It

With so many features and upgrades that Xbox has released, it can sometimes be easy to forget that there are still bugs in the game. If you play Craftopia on Xbox, then you might have experienced crashing issues.

Most players who encounter this problem report that the game keeps crashing after a few minutes of playing or even before they get a chance to play. 

Why does Craftopia keep crashing on Xbox One?

There are many reasons why you might be experiencing issues with the game crashing on your console. These include:

  • Outdated game – The game may not be optimized and has a lot of bugs because you’re still using an old version.
  • Insufficient RAM – Make sure that you have enough RAM (memory) for your operating system and any other applications you’re using at the same time as this game. The more RAM you have, the better.
  • Intermittent internet connection – When you are playing online games like this one, an unstable internet connection just won’t cut it.
  • Outdated/old graphics card – Once your GPU goes bad, you’ll start seeing symptoms like Craftopia crashing every few minutes or so. A new graphics card should be on the horizon.
  • Game cache buildup – Games get larger and more complex as they age, which means they require more resources from your console’s hard drive while they’re being played.
  • Overheating – If your console heats up quickly and doesn’t have much airflow inside its case, it can cause it to shut down unexpectedly.

How can I stop Craftopia from crashing on my Xbox?

We recommend that you check the following first before proceeding to the advanced troubleshooting:

  • Make sure your game is updated.
  • Ensure that your router and modem are turned on and that there aren’t any other devices using bandwidth simultaneously.
  • Check whether your console is having trouble connecting to the internet.
  • If you have multiple profiles on your console and you are having trouble with one of them, then you can switch to another profile and see if it helps.
  • Ensure your controller firmware is up-to-date and here’s what to do if your Xbox won’t update.
  • Visit the Xbox Live Service Status page to check if there is downtime.
  • Turn off your console and let it sit for a while. Sometimes all you need is a little fresh air.

1. Update your graphics card

  1. Click on the Windows button type Device Manager in the search bar and click Open.
  2. Navigate to Display adapters to expand, right-click on your graphics card, and select Update driver.update-graphics-driver-device windows 11 graphics driver amd
  3. Select Search automatically for drivers.

Most people don’t know much about upgrading their computers, but they fear messing with their system and breaking something in the process. If you’re one of these people and don’t want to take the risk of upgrading yourself, then Outbyte Driver Updater is here to help.

Outbyte Driver Updater is a simple and powerful tool that can help you update your drivers easily. It can scan and detect outdated or missing drivers on your PC, and then install them for you.

Outbyte Driver Updater

Let Outbyte Driver Updater locate the latest updates for your drivers with just a few clicks.
Free Trial Download now

2. Clear system cache 

  1. Press the Guide button on your controller.
  2. Navigate to Settings and select System Settings.
  3. Click on Storage.
  4. Highlight a storage device then press the Y button on your controller to open Device Options.
  5. Click on Clear System Cache under Device Options screen.

Clearing temporary files can help resolve issues with games and apps crashing or freezing on Xbox One consoles.

3. Reset your Xbox console

  1. On your controller, press the Xbox button and on the menu, click the System tab to open Settings.call of duty errors
  2. Select System then click on Console info and hit Reset console.
  3. Choose Reset and keep my games & apps.

4. Uninstall and reinstall Craftopia

If you’re still having issues with Craftopia crashing on Xbox after trying all these steps, try uninstalling and reinstalling the game from the Microsoft Store. 

This will clear all cached data from your console and may fix this issue for you as well. Make sure that you delete all saved data before reinstalling the game as it can cause more harm than good if not done correctly. 

We may also be able to help you fix error 0x8027025a on your Xbox so don’t hesitate to check out our comprehensive article on the same.

Also, if your Xbox S keeps disconnecting from Wi-Fi, we know just how to fix it and you should too once you take a look at our detailed guide.

Let us know what other tips you use to stop your games from constantly crashing in the comment section below.

FIX: Xbox One wireless controller not connecting to PC

The Xbox One controller can be used to play games on the PC. Using a controller on a PC can give you a whole new way to experience your games. In this article, we will discuss issues that are related to the wireless controller and its adapter. If you are having trouble with your Xbox One wireless controller not connecting to PC, then the below fixes will help you.

But first, to ensure that your controller is working properly, we will show instructions on how to properly connect an Xbox One wireless controller to your Windows 10 PC.

How to connect your Xbox One wireless controller to PC

There are two types of controllers that do not use a USB cable to connect to a PC. One type is called a wireless controller while the other type uses Bluetooth to make a connection. Below are instructions on how to set up both your wireless controllers and Bluetooth controllers.

Xbox One controller not connecting to PC

If your Xbox One controller can use a USB cable, then all you have to do is plug it into the PC. Microsoft has optimized Windows 10 to immediately detect your controller. However, if you are using a wireless controller, then you will need to take a few extra steps. Here’s how you connect a wireless controller to your Windows 10 PC:

  1. Go to settings. Do this by pressing the windows key and then clicking on the geared icon located on the left side of start menu. This will bring up the settings window.
  2. Next, click on the device section in the settings window.
  3. On the top of the Window you should see an option called ‘Add Bluetooth & other device’. Select that option.
  4. Once you are inside the new dialog, select the option called ‘Select everything else‘. There should be a large plus sign next to it. Click on it.
  5. You should see your Xbox One controller device, click on it and press done.

It is important to note that you can only connect up to 8 normal controllers at a time to one PC. If your controllers have Xbox Chat headsets then you can only connect 4 controllers at a time. Furthermore, if they have stereo Xbox headsets, then you can only connect two at a time.

Xbox One wireless controller not connecting to PC

It is important to note that only certain controllers have Bluetooth capabilities. If you are unsure whether or not you have a controller with Bluetooth features then you can look at the picture below for reference.

In the picture, the bottom controller has Bluetooth capabilities. Notice how the Xbox button on the bottom is part of the controller’s face. While, the one on top has it’s Xbox button on the top part of the controller. This is how you differentiate between a normal wireless controller and a Bluetooth wireless controller.

It is essential to know that you will need to have the Windows 10 Anniversary Update on your PC in order for Bluetooth controllers to work. You also might only be able to connect one Bluetooth controller at a time. Here is how you can connect your Bluetooth controller:

  1. Update your PC to the Anniversary update if you haven’t already.
  2. Turn on your controller by pressing the big Xbox button in the middle of your controller.
  3. There will be a controller bind button on the top of your controller. You will need to press and hold it for about three seconds.
  4. On your computer you will need to go to Settings>Device> Bluetooth & other device
  5. Click on add Bluetooth, then on the Bluetooth section on the new Window.
  6. You should be able to find your Xbox One Controller if it is turner on.

How to fix common Xbox One wireless controller connection issues on Windows 10

Now that you know how to connect your controllers to your Windows 10 PC properly, we will discuss other issues that you may face when your Xbox One controller is not working. The majority of the time, a connectivity issue is caused by the wireless adapter not working properly. So, below is a list of troubleshoots that will help fix adapter issues you may have on your Windows 10 PC.

  1. Install the latest updates and reinstall your drivers
  2. Check your settings and make your wireless adapter turn on by default
  3. Test the controller on another device
  4. Check for interference from metallic objects.

The wireless adapter didn’t automatically install

If your wireless adapter doesn’t automatically install on your Windows 10 PC, then you will need to first see if your computer is connected to the Internet and has the latest updates. You will also want to try reinstalling your drivers just in case they are not completely installed.  To reinstall your drivers take these steps:

  1. Access your Device manager(Type it in when your start menu is opened).
  2. locate the section called ‘Network adapters’.
  3. Expand it, and locate ‘Xbox Wireless Adapter for Windows’ or something similar to that. Click on it.
  4. You should have a properties dialog open up for you. Select the ‘driver‘ tab in the window and you should see an uninstall option located at the bottom of the dialog. Click on uninstall.
  5. A confirmation window should appear. Check the box next to the words ‘Delete the drivers’ software for this device’.
  6. Press OK.
  7. Unplug the wireless adapter for Xbox and then restart Windows.
  8. Plug in your adapter once it has restarted and your wireless adapter should reinstall.

Xbox Wireless adapter is not responding anymore

If your Xbox wireless adapter was working before but is not responding anymore, then you may have certain settings improperly configured. For example, there is an option that does not wake your adapter after waking your computer. You can of course make your wireless adapter turn on by default. You can simply try unplugging and re-plugging your adapter back in. But if that is unsuccessful, then you will just need to follow these easy steps:

  1. Go to Device manager again.
  2. Select the Wireless Adapter for Window option, which is located in the section called Network adapters.
  3. Locate the Wireless Xbox Adapter for Windows option and click on it to bring up a properties dialog.
  4. You should see a tab called ‘Power management‘ located on the dialog.
  5. Go to that tab and you should see an option that says ‘ Allow the device to wake up the computer’. Select it and press OK.

Binding you controller

A good way to determine whether or not your connectivity issues have to do with your adapter or your controller is to bind your controller to an Xbox One console. If you successfully bind your controller to your console, then your connectivity issues are probably caused by your wireless adapter. Try rebooting your device, and unplugging and plugging it back in. It is also important to note that Wireless adapters typically only have a max range of 6 meters. Therefore, make sure you are close enough to the adapter in order for it to work properly.

Frequent disconnects

This issue can also be remedied by playing closer to your adapter. Furthermore, you will want to ensure that there isn’t any interference from metallic objects. In fact, it is advised not to even put your adapter on a metal object. Your controllers will also need a good line of sight in order for them to operate properly. Perhaps, investing in a USB cable extender will make your connection more stable.

Conclusion

So if your Xbox One wireless controller not working on Windows 10, then you will want to first see if you took the correct steps to connect your controller to your PC. Afterward, if the problem still persists, then you will want to try the troubleshoots mentioned in this article. If you are still unable to connect, then you may need to replace your devices.

Related articles:

Posted in Fix

Fix Temporary Files not Deleting [Automatically, Disk Cleanup]

Temporary files are generated when users create a new file, and their role is to temporarily retain the information until the file users are working on is saved.

Why are temporary files taking up space? Temporary files should be deleted from time to time. Otherwise, they unnecessarily load your computer’s drive, reducing your system’s overall performance.

However, there are situations when users cannot delete temporary files.

This is quite a complicated situation because temporary files can sometimes use hundreds of gigabytes of your computer’s memory.

Here’s how users describe this issue:

here you can see in this snapshot that there is 5.49GB temporary files. but I’m unable to delete them I had tried this serval times but its not performing any deletion operation. it shows that we are cleaning up your temporary files come back in a bit to check out result. but no result I got.

kindly help me to solve this issue. my c driver is getting full day by day.

Users tried various methods to clean temporary files: ranging from running the Disk CleanupWizard to performing clean boots and drive error searches, but nothing worked.

If you’re having trouble deleting temporary files on your Windows 10 computer, follow the below steps to solve this problem.

Why some temp files cannot be deleted?

There are multiple reasons why the TMP files or the temporary files don’t get deleted automatically. Here are some of the common causes:

  • Your PC did not shut down properly.
  • Some programs use files stored in the Temp folder, not allowing deletion of all files.
  • The account you are logged in with does not have the necessary permissions to clear the temporary folder.

You can try turning on the option under the Storage Sense settings that says Keep Windows running smoothly by automatically cleaning up temporary system and app files option.

Temporary files can take a lot of space on your PC, and according to users, sometimes you might have issues removing these files. Speaking of issues, these are some problems that users reported:

  • Can’t delete temporary Internet files Windows 10 – If you’re unable to delete temporary Internet files, you might be able to do that using the DiskCleanup tool.
  • Disk Cleanup won’t delete/not deleting temporary Internet files – If Disk Cleanup is not deleting files, you might be able to fix the problem by using a third-party application.
  • Unable to delete temporary files Windows 10, 7, 11 – Temporary files not deleting – Issues while removing temporary files can appear, but if you encounter any issues, you might be able to solve the problem by using one of our solutions.
  • Word temporary files not deleting – You can opt to use a third-party software solution that we have listed below, in order to end this issue as quickly as possible.
  • Temp files not deleting automatically – You can use Command Prompt to delete the files manually in case they won’t delete automatically.

What happens if you delete temporary files?

Deleting temporary files is a fantastic method to reclaim storage space, but it’s also likely that doing so can assist boost the performance of your computer if it’s operating a little bit slower.

If achieving that is your objective and removing the temporary files didn’t help, you should try clearing the cache on your computer.

Without further ado, let’s just jump right in!

How do I force delete temporary files?

1. Delete the files manually

  1. Press Windows + R.
  2. Type %temp% and click OK.
    Unable to delete temporary files Windows 10
  3. Press Ctrl + A to select all files. 
  4. Click Delete.
  5. Press Windows + R.
  6. Type prefetch and click OK.
    Can't delete temporary Internet files Windows 10
  7. Select all and click Delete.

When using the delete option, you can also press Shift+Del, instead of a regular delete, to permanently delete files and not just send them to the recycle bin.

This issue related to temporary files has been plaguing users for more than a year, yet Microsoft hasn’t rolled out any official fixes to solve this problem, as users will remark:

This forum is a year old now with many followers all with the same problem and no one from Microsoft has stepped forward with a solution that actually works.  So I do not believe you when you say “We will be glad to assist you.”

If I am wrong and Microsoft is working on solving this problem, then enlighten me regarding what is being done and I will gladly stand cotterted.

2. Use a third-party software

According to users, if you can’t delete temporary files on Windows 10/11, you might want to try using specialized repair software.

If you are unfamiliar, these tools can help you scan your PC and remove unnecessary files that take up space for no reason. Thanks to this kind of software you can quickly free up space and remove temporary files.

3. Use Command Prompt

According to users, if you can’t delete temporary files, you might be able to do so by using Command Prompt. To do that, you need to follow these steps:

  1. Press Win + X to open the Windows menu.
  2. Now choose Command Prompt (Admin) or PowerShell (Admin) from the list.
  3. When Command Prompt opens, enter del /q/f/s %TEMP%* and press Enter to run this command.
    Delete temporary files Windows 10 manually

Once the command is executed, all your temporary files should be deleted, and the problem will be resolved.

This is a quick and relatively simple solution, and if you don’t want to delete your temporary files manually, be sure to try this solution.

4. Install the latest updates

According to users, sometimes, the inability to remove temporary files is caused by a bug in your system.

Bugs can interfere with your system and prevent you from performing certain operations. Therefore you must keep your system up to date.

By default, Windows 10 automatically installs the missing updates, but sometimes you might miss an update or two. However, you can always check for updates manually by doing the following:

  1. Open the Settings app by pressing Windows + I.
  2. When the Settings app opens, go to the Update & Security section.
    Delete temporary files Windows 10 manually
  3. Now click the Check for updates button.
    Disk Cleanup won't delete temporary Internet files

Windows 10 will check for available updates. Updates will be downloaded automatically in the background if any updates are available. As for the updates, they will be installed as soon as you restart your PC.

Once your PC is up to date, the problem should be resolved, and you’ll be able to remove temporary files without any issues.

5. Delete the contents of the SoftwareDistribution directory

Several users reported that they could not delete temporary files due to the SoftwareDistribution directory. This folder holds Windows Update files, which can sometimes prevent you from deleting specific files.

However, you can quickly solve this issue by deleting the contents of this directory. To do that, just follow these steps:

  1. Make sure that Windows Update isn’t downloading any updates. To do that, check for available updates. If no updates are available, you can proceed to the next step.
  2. Press Windows + R and enter %WINDIR%SoftwareDistributionDownload.
  3. Press Enter or click OK
    Disk Cleanup won't delete temporary Internet files
  4. Select all files inside the Download directory and delete them.

After doing that, you should be able to remove temporary files without any issues.

6. Uninstall Skype and Spotify

According to users, sometimes third-party applications such as Skype and Spotify can interfere with your system and cause problems with temporary files.

According to users, the issue started appearing after the update when these two applications were installed automatically.

However, you can fix the problem simply by removing these apps. To do that, just follow these steps:

  1. Open the Settings app
  2. Go to the Apps section.
    Unable to delete temporary files Windows 10
  3. A list of installed applications will appear.
  4. Select Skype on the list and click Uninstall.
    Temporary files not deleting

Now follow the instructions on the screen to remove the application. Next, repeat the same steps for the Spotify app. This is a strange problem, but several users solved it by removing these two apps, so feel free to try it out.

7. Remove the temporary files from Safe Mode

If you’re having problems with temporary files, you might want to try removing them from Safe Mode. To access Safe Mode, do the following:

  1. Open the Start Menu.
  2. Click the Power button, press and hold the Shift key and choose Restart from the menu.
    Delete temporary files Windows 10 manually
  3. Choose Troubleshoot.
  4. Select Advanced options.
  5. Click on Startup Settings.
  6. Press the Restart button.
  7. Once your PC restarts, you’ll be presented with options. Select any version of Safe Mode by pressing the corresponding key.

Once you enter Safe Mode, you should be able to remove temporary files without any issues.

Why does my computer keep making temporary files?

The computer makes temporary files to load all your settings for your PC or a program faster. Temporary files are a program’s settings files that remember your selection for a specific program.

So, using these files, your PC can load programs and other system tasks much more efficiently and faster.

Let us say an editing tool when you use any program; then your PC will store a temporary file for your created work. Temporary files are created as a part of the internal process of the program or in situations when the program cannot allocate enough memory for the tasks.

Why can’t I delete temp files on Windows 11?

If you want to delete temporary files in Windows 11, you need to use the built-in tools, or if you’re an experienced user, you can do that manually.

If a file is open in another program, that might prevent you from deleting it, so you need to find the application using it and turn it off.

If you need administrator permission to delete folder message, it means you don’t have the necessary privileges, so try switching to administrative account and try again. And if you keep getting the temp folder access is denied, see how to bypass this restriction.

Most of the temporary files are deleted automatically once the task is complete. However, there are temporary files that continue to stay on your PC for future use. It is safe to delete temporary files, though.

Not being able to remove temporary files can be a big problem sometimes, but you should be able to fix it with one of our solutions.

How to fix lost signal on TV or connection on Xbox Series X|S

The two next-gen Microsoft game consoles Xbox Series X and Xbox Series S have been long-awaited. Now that they are fresh from the box, they come buggy, mostly showing n signal when laughing games.

Microsoft has warned since a few days ago about issues that might spoil the gaming experience for several users. Luckily, they also offer reliable fixes.

If you’re connecting the console to a 4K/120hz smart TV, using the EA Play/BBC iPlayer app, or trying a DVD/Blu-ray into the console, you might encounter on Xbox Series X|S no signal on TV, see this troubleshooting advice first.

How do I fix Xbox console common issues?

fix Xbox Series X bugs

1. Lost signal to TV HDMI error with 4K 120Hz + VRR 

According to Microsoft, on 4K 120Hz TVs that also support VRR, one might encounter signal failures or corrupted images when the Xbox is configured for 4K120+VRR. The issue occurs with LG, Samsung, or Vizio TVs, but not exclusively.

Solution:

  1. Make sure your TV has the latest firmware installed. Also, check that your TV is connected to the Internet and that Automatic Updates are enabled.
  2. Try resolution variations with/without VRR:
    • Go to Setting > General > TV & display options> Video Modes and check/uncheck the box for Allow variable refresh rate.
    • Modify the resolution and refresh rate from TV & Display options > Display section.
    • Try 1080p/120hz + VRR or 1440p/120hz + VRR.
  3. Disable VRR on the TV altogether if the corrupted image persists.
  4. Additionally, you can perform a video mode reset and reset your resolution as shown in this troubleshooting article.

2. EA Play or BBC iPlayer app won’t launch/install

In case the EA Play or BBC iPlayer app won’t launch or install on your new console, there is no fix, unfortunately. It seems that this is a matter of compatibility.

However, Microsoft is working with its app partners for a quick solution.

Want to play full games included with your EA Play subscription? No problem; access them in My Games & Apps > Full Library > EA Play.

3. Dark HDR captures

Another known issue is that HDR captures might appear too dark on the two consoles.

Once again, there is no workaround suggested yet, only a promise for a future fix.

4. Black screen when inserting DVD/ Blue-ray

This is actually a recurring issue with Xbox consoles: the screen turns black after inserting a DVD or Blu-ray disc.

Solution:

Just remove the disc from the console, restart your Xbox Series X|S, and then re-insert the disc. The issue should be fixed.

5. Pixelated frames on the PeacockTV app

Last but not least, users might see occasional pixelated frames when using the PeacockTV app on their console.

This is yet another unsolved issue, that Microsoft experts are still trying to fix in a future update.

As seen, some of the problems are acknowledged by Microsoft, yet with no workaround. This can only mean that manufacturer will release patches pretty soon, with one of the updates to come.

Until then, we hope that your gaming experience won’t suffer much. If you do manage to bypass any of these issues, tell us how you did it in the comments.

[wl_navigator]

Touchpad not Showing in Device Manager: Steps to Add It Back

The Touchpad not showing in Device Manager can be a big problem. Without it, you can’t manage, update, remove, or reinstall these drivers.

If you’re dealing with this problem, follow the quick steps below to fix it.

What do I do if the touchpad is not showing in Device Manager?

Note icon NOTE
If your touchpad is disabled, try pressing Fn+ F9 to enable it.

1. Enable touchpad in BIOS

  1. Shut down your PC.
  2. Next, you need to boot into BIOS. To do this, press the Power button to restart and F2 as soon as your laptop manufacturer logo appears.
    Touchpad driver missing in Device Manager
  3. Once in the BIOS menu, open the Main tab.
  4. Locate the Touchpad and set it to Advanced from Basic.
  5. Save the changes and exit BIOS.
  6. Restart your PC and check if the Touchpad not showing up in the Device Manager on Dell issue is resolved. 

2. Check hidden devices

  1. Press Win + X on your keyboard and select Device Manager from the list.
  2. In Device Manager, click on the View menu at the top.
  3. Select Show hidden devices. show hidden devices device manager
  4. Look under Mice and other pointing devices to see if the touchpad appears as a hidden device. It may be listed as a HID-compliant touchpad, PS/2 Compatible Mouse, or a device with “touchpad” in its name.mice and other devices
  5. If you find it, right-click the touchpad entry and select Enable device if it’s disabled.
  6. If it’s already enabled but still not working, try Update driver or Uninstall device and restart your computer.update uninstall hid compliant

3. Scan for hardware changes

  1. While still in Device Manager, right-click on Mice and other pointing devices.
  2. Select Scan for hardware changes. scan for hardware changes
  3. Windows will search for any new hardware, which might help it detect the touchpad if it wasn’t recognized before.
  4. If the touchpad appears after this scan, you may need to update its driver by right-clicking on it and selecting Update driver.

4. Use the Windows generic device driver 

  1. Press the Windows key + R, type devmgmt.msc, and click OK.
    devmgmt
  2. Expand the Mice and other pointing devices option.
    mice and other touchpad not showing in device manager
  3. Right-click on your touchpad driver and choose Update driver.
    update driver
  4. Next, choose Browser my computer for drivers.
    browse my touchpad not showing in device manager
  5. Click Let me pick from a list of available drivers on my computer.
    let me pick
  6. Choose the PS/2 Compatible mouse and click Next. Windows will install the generic driver.
    next

5. Install driver from the manufacturer’s website

  1. Identify your laptop model from a label or in Settings > System > About under Device specifications.device type settings
  2. Go to the manufacturer’s support page:
  3. Search for your model number and go to the Drivers & Downloads section or something of the sort.
  4. Find the touchpad driver labeled as Touchpad, Synaptics, ELAN, or similar.
  5. Download the latest driver, open the file, and follow the installation instructions. Restart your laptop to apply the changes.

If you’re using a Lenovo device, we have a dedicated guide on how to download the touchpad driver for Lenovo laptops on Windows 11, so don’t miss it.

You can also check dedicated brand troubleshooting such as the Dell laptop touchpad not working guide which explains additional driver fixes and detection issues that may help when the touchpad does not appear in Device Manager.

Note that it’s essential to back up your drivers constantly. So do not hesitate to use only the best driver backup software for Windows 10 to make that happen.

You can also disable Palmcheck if it is a nuisance by turning off or adjusting the Touchpad sensitivity settings.

So, these are some of the confirmed solutions for touchpad driver missing issues. Tell us more in the comments below if you know any other tips.

How to enable and install hidden education themes on Windows 11 to brighten your desktop background

Microsoft includes some hidden education themes on Windows 11 2022. The themes were originally designed for students to use on Windows 11 SE, but using a simple registry trick, you can decorate your desktop with some truly out-of-this-world and abstract images and designs. This registry trick to enable education themes on Windows 11 comes from @PhantomOcean3.

If you are looking to spruce up your desktop, it’s easy to enable and install these themes on any Windows 11 version. Here’s what you need to do.

Enable hidden Windows 11 education themes

Microsoft didn’t make it easy for people who use Windows 11 to enable or install these themes. Here’s the registry edit you need to enable them.

  1. Use the Windows key + R keyboard shortcut to open Run.
  2. Type (or copy and paste) regedit and click Yes at the User Account Control (UAC) prompt.
  3. Navigate to HKEY_LOCAL_MACHINE\SOFTWARE\Microsoft\PolicyManager\current\device.
  4. Right-click the device folder and select New > Key.
  5. Rename the new key to “Education.”
  6. Inside the newly created Education key, right-click and select New > DWORD (32-bit) Value.
  7. Rename the new DWORD to “EnableEduThemes.” Double-click the DWORD and set its value to 1. education themes on windows 11
  8. Restart your computer for the changes to take effect.

Install Windows 11 education themes

Once your Windows 11 system reboots, you might not see the education theme background images right away. But you may need to wait an extended time to start using them on your PC. Take a look at the background images for the education themes on Windows 11 in the gallery below.

If you just want the background images, head on over to the background images link.

What do you use as a background or theme on Windows 11? Let us know in the comments!

Fix: PowerPoint Is Not Opening in Windows 11

Is Microsoft PowerPoint not opening on Windows 11? This problem is happening with many users. PowerPoint is an excellent presentation program being widely used for business, academic and other sectors.

But it can be frustrating if it doesn’t run at a crucial moment. You may have tried other Office alternatives. But MS PowerPoint is exceptional as no better options are there. If you are interested, learn how to solve PowerPoint file is corrupted.

Why is PowerPoint not opening in Windows 11?

When this app doesn’t open on the latest Windows, it can be due to the following reasons:

  • Problematic PowerPoint app: If you are not using the official version of the app or your MS Office application has some problems, it may crash when you try to launch it on Windows 11.
  • Existing background process: Some background processes may also cause PowerPoint not opening problems.
  • PowerPoint app: If you are using a very old version of PowerPoint, it won’t work on the latest Windows builds.
  • An internal problem: Sometimes, internal problems with your OS can trigger this type of problem.
  • Misconfiguration in PowerPoint: If there is something wrong with the settings on your PowerPoint app, you will face the problem.
  • Add-ins: Third-party add-ins are helpful. But, sometimes, these can be problematic too.

What can I do if Microsoft PowerPoint is not opening in Windows 11?

Before taking the key steps to solve the problem, we suggest you check out the following suggestions to avoid confusion:

  • Make sure Windows is up to date.
  • Ensure both Microsoft Office and Windows are genuine and properly activated.
  • Disable the antivirus and see what happens.

After doing the above things, if you still experience Microsoft PowerPoint launching problems, go through these methods.

1. End background process

  1. Right-click on the Taskbar and click on Task Manager.
  2. Find the ClickToRunSvc process, select it and click on End Task.ending click to run process task manager windows
  3. Dp the same for any other Microsoft PowerPoint and office-related processes.
  4. Try to relaunch PowerPoint.

2. Run in Safe Mode

  1. Press Win + R on the keyboard to open Run.
  2. Type the following command and click on OK: powerpnt /saferunning powerpoint safe mode run command

If there is something wrong with the configuration, Safe Mode will surely help.

3. Disable add-ins

  1. Open Microsoft PowerPoint and go to Options.going powerpoint options
  2. Go to the Add-ins tab, as shown in the screenshot.
  3. Choose COM Add-ins on the Manage and click on Go.going com add-ins powerpoint
  4. Uncheck the add-ins you want to disable and click on OK.disabling excel add-ins and clicking ok

4. Update PowerPoint

  1. Open PowerPoint.
  2. Go to Account.going account powerpoint
  3. Click on Update options and then on Update now.updating microsoft powerpoint

As the outdated version of the Office app may not work on the latest Windows 11, we suggest you follow the above steps to update it to fix PowerPoint not opening problems.

5. Repair PowerPoint

  1. Go to Windows 11 Settings.
  2. Navigate to Apps and click on Installed apps.going installed apps windows 11 settings
  3. Click on the three horizontal dots next to Microsoft Office and choose Modify.clicking modify windows 11 settings microsoft office
  4. Select your preferred option and click on Repair.repairing Microsoft Office quick repair

Repairing PowerPoint as well as Office on Windows 11 will fix any misconfigurations and internal issues with this business solution. This is an excellent way to get rid of PowerPoint launching issues.

6. Changing the default printer

  1. Press Win + I to open Windows 11 Settings.
  2. Go to Bluetooth & devices and click on Printers & scanners.going printers and scanners windows 11 settings
  3. Toggle the switch off next to the Let Windows manage my default printer.disabling let windows manage my default printer
  4. Go Microsoft Print to PDF or OneNote printer.
  5. Click on Set as default.setting default printer windows
  6. Restart your PC.

7. Re-install PowerPoint

7.1 Uninstall Microsoft Office

  1. Go to Installed apps on the Settings like the previous method.
  2. Choose Uninstall for Microsoft Office by clicking on the three horizontal dots.uninstalling microsoft office 365 windows 11
  3. Finish the uninstallation process.
  4. After that, restart your PC.

To uninstall any application entirely and in a better way, you can use Revo or IObit Uninstaller. Windows uninstaller always leaves some registry entries and files on your PC that may create future problems.

But, these tools delete everything related to the uninstalled app, which saves you time, speeds up the computer, and solves many unwanted issues.

7.2 Install again

  1. Go to the Microsoft website and sign in.
  2. Go to View all subscriptions.
  3. Click on Manage next to the Microsoft Office or Microsoft 365 subscription.
  4. Click on Install Office.clicking install office Microsoft website
  5. Then, click on Download when this option appears.
  6. After downloading, install it on your PC.

8. Use PowerPoint online

  1. Go to PowerPoint online website.
  2. Sign in if necessary.
  3. Start using the online version.powerpoint online

Alternatively, you can try any other PowerPoint alternatives.

If the problem still persists, we suggest you take steps to repair some corrupted system files on Windows 11. Then, see if it helps.

This article has shown how you can get rid of PowerPoint not opening on Windows 11. If you have any suggestions or opinions, write in the comment box.

Microsoft Store Package Dependency Installer Not Working [Fix]

Dependency installers help install software requirements and scripts on the host to run the software properly. However, users complain about Microsoft Store Package Dependency Installer not working, causing errors when launching apps.

Moreso, you can encounter dependency installer issues like Failed to install dependency error on Kodi and other apps.

Why is Microsoft Store Package Dependency Installer preventing games from launching?

Many users ask what Microsoft Store Package Dependency Installer is and why it prompts errors when they want to launch games.

As said earlier, it simply contains scripts needed to help games and apps run smoothly on the host. Unfortunately, it can run into some errors and prevent your games from launching.

However, many factors can cause the Microsoft Store Package Dependency Installer error to appear when playing games. A common one is related to issues with Microsoft store client updates. The error is liable to pop up after installing an update for an app in the store.

Other factors that may cause the Microsoft Store Package Dependency Installer to prevent games from launching are:

  • Permission issues – Some users may run into the error because of not having enough permissions for the Microsoft store to access the game. Also, the Dependency Installer may need to be allowed before accessing the game.
  • Game registration issues – The Microsoft Store Package Dependency Installer error may occur when launching a game if it can’t access the game’s registration. It doesn’t happen often, but it can be an issue.

There are no definite causes for Microsoft Store Package Dependency Installer blocking games from launching. That is, the cause may vary in different PCs.

What can I do if Microsoft Store Package Dependency Installer is not working?

Apply the following preliminary checks:

If the error persists, proceed with the solutions below.

1. Sign out and sign in to Microsoft Store

  1. Left-click the Start button, type Microsoft Store, then press Enter to open it.
  2. Click on the user icon in the top-right corner of the screen, select your username, and click on the Sign out button.
  3. Restart the Microsoft Store app and check if it’s logged out.
  4. Click on the user icon in the top-right corner of the screen, click on Sign in, enter the credentials for the logging service, then tap on Next.
  5. Type your password, select the Keep me signed in option, and then click on Sign in.
  6. Close Microsoft Store and restart your computer.

Re-signing into Microsoft Store can help fix account issues that may cause the issue.

2. Run the Windows Store Apps Troubleshooter

  1. Press Windows + I key to open the Settings app.
  2. Click on System and select Troubleshoot.
  3. Choose Other troubleshooters.
  4. Then on the Run button beside the Windows Store Apps.

Running the Troubleshooter will fix issues with Microsoft Store apps that may interfere when launching the game.

3. Re-register all Store apps

  1. Left-click the Start button, type PowerShell, and click Run as administrator.
  2. Click Yes on the User Account Control prompt.
  3. Copy and paste the following lines and press Enter: Get-AppXPackage -AllUsers | Foreach {Add-AppxPackage -DisableDevelopmentMode -Register "$($_.InstallLocation)\AppXManifest.xml"}

After running the command line, exit the PowerShell window, then restart your PC to check if the error appears when you launch your games.

Read our guide on what to do if Windows PowerShell stops working when executing the steps above.

4. Uninstall & reinstall Store via PowerShell

  1. Left-click the Start button, type PowerShell, and select Run as administrator.
  2. Tap Yes on the User Account Control prompt.
  3. Copy and paste the following lines and press Enter: Get-AppxPackage -allusers *WindowsStore* | Remove-AppxPackage
  4. Copy and paste the following lines and press Enter: Get-AppxPackage -allusers *WindowsStore* | Foreach {Add-AppxPackage -DisableDevelopmentMode -Register “$($_.InstallLocation)\AppXManifest.xml”}
  5. Restart your PC and check if the error persists.

Reinstalling the Windows Store via PowerShell will check its root installation file and install it afresh.

Alternatively, our readers can check our article on stuck Microsoft Store app download and some fixes for it. Likewise, you can read our guide about fixing Microsoft Store if you can’t install the app from it on your PC.

Do not hesitate to comment if you have any suggestions or questions concerning this guide.

Windows 11 Remote Desktop Not Working: 6 Ways to Fix It

Having trouble with Remote Desktop not working on Windows 11? We’ll show you how to deal with it. Problems usually stem from permissions, firewalls, and sometimes faulty updates.

Below, we’ll walk you through all possible fixes no matter the underlying issue. Just follow the step-by-step instructions.

How to fix Remote Desktop not working in Windows 11?

1. Edit your registry

  1. Press the Windows key + R, type regedit, and click OK.
    regedit windows 11 remote desktop not working
  2. Follow the path below in the left pane: Computer\HKEY_LOCAL_MACHINE\SOFTWARE\Policies\Microsoft\Windows NT\Terminal Services\Client
  3. Now, right-click the Client folder and choose New > DWORD (32-bit) Value.
    new dword
  4. Type fClientDisableUDP as the name of the new item.
    fclient
  5. Finally, double-click it, set its Value data to 1 and click the OK button.
    value data

If you noticed that the Windows 11 Remote Desktop is not working after installing the 22H2 update, it is because the feature is trying to connect with UDP.

The solution here is to disable UDP by creating a new registry value.

2. Turn off UDP in Group Policy

  1. Press the Windows key + R, type gpedit.msc, and click OK.
    gpedit windows 11 remote desktop not working
  2. Navigate to the path below in the left pane: Computer Configuration > Administration Templates > Windows Components > Remote Desktop Services > Remote Desktop Connection Client
  3. Now, double-click Turn Off UDP On Client in the right pane.
    turn off
  4. Finally, tick the Enabled radio button and click OK.
    enabled

This is another excellent solution if the Windows 11 Remote Desktop feature stops working after the 2022 update. With the above steps, the UDP client should be completely disabled and allow your PC to connect.

3. Make sure Remote Desktop is enabled

3.1. Enable Remote Desktop in Settings

  1. First, click Start on the Taskbar and select the Settings option.
  2. Click Remote Desktop on the System tab.
    option windows 11 remote desktop not working
  3. Then, toggle the switch for Remote Desktop forward to enable it.
    toggle
  4. Select the Confirm option on the dialog box that opens.
    confirm

After enabling this, you will be able to use the Remote Desktop feature, and other PCs will also be able to access your PC remotely.

3.2. Check Remote Assistance is enabled in System Properties

Note icon NOTE
Make sure Remote Desktop is enabled on both the remote PC you’re trying to connect to and on the client. Note that you can’t enable that feature via Settings in Windows 11 Home. The remote host PC you’re trying to connect with must have Windows 11 Pro.
  1. Open the search utility by clicking the magnifying glass button on Windows 11’s taskbar.
    The Search button windows 11 remote desktop not working
  2. Type Control Panel within the search tool’s box.
  3. Next, click the View drop-down menu’ and select the Category option.
  4. Select System and Security in the Control Panel.
  5. Then click Allow remote access.
    Allow remote access option windows 11 remote desktop not working
  6. Select the Allow Remote Assistance connections to this computer checkbox if it’s unchecked.
    The Allow Remote Assistance connections to this computer option windows 11 remote desktop not working
  7. Also, click the Allow remote connections to this computer setting radio button to select it.
  8. Click Apply to save the new settings.
  9. Then press the OK button to exit System Properties.

If the Windows 11 Remote Desktop is still not working after the first two solutions, you need to check if the feature is enabled. You might have mistakenly disabled it in the process of troubleshooting.

4. Check that Remote Desktop Services is enabled and running

  1. Right-click the Start menu’s taskbar button and select Run to launch that accessory.
    Run shortcut windows 11 remote desktop not working
  2. Type this Run command within the Open text box: services.msc
  3. Select the OK option.
  4. Then double-click Remote Desktop Services to bring up its properties window.
    Remote Desktop Services windows 11 remote desktop not working
  5. Select the Automatic option on the Startup type drop-down menu if the service is disabled.
    The Automatic option windows 11 remote desktop not working
  6. Press the Apply button.
  7. Now, click the Start button and select OK to exit the window.
  8. Repeat steps five to seven for the Remote Desktop Services UserMode Port Redirector service afterward.

Another factor that can stop the Windows 11 Remote Desktop from working is if it is disabled in Services. You need the service to run and startup automatically to enjoy a smooth connection.

5. Allow Remote Desktop through Windows Defender Firewall

  1. Press the Windows key + S, type firewall, and select Windows Defender Firewall.
  2. Then click Allow an app or feature through Windows Defender Firewall on the left side of the Control Panel.
    The Allow app or feature through option windows 11 remote desktop not working
  3. Press the Change settings button.
    The Change settings button windows 11 remote desktop not working
  4. Select the Private checkbox for Remote Desktop if it’s unchecked.
  5. Thereafter, click OK to exit.

6. Turn on network discovery

  1. Type Control Panel in the taskbar and open it.open control panel
  2. Select Network and Internet.network and internet settings
  3. Click on Network and Sharing Center.network and sharing center
  4. Select Change Advanced sharing settings.change advanced sharing settings
  5. Pick toggle on the button next to Network Discovery.enable network discovery

For the RDP feature to work, you must let it pass through your Firewall. Hence, if the Windows 11 Remote Desktop is working or responding on your PC, check if your Windows Defender Firewall is not blocking it.

We have come to the end of this detailed guide. We believe you now have everything to connect to your computer remotely from your comfort zone.

Similarly, check our excellent guide to get it working quickly if the Remote Desktop is greyed out on Windows 11.

Feel free to share the solution that helped you fix this issue in the comments below.

0x8024a205: What is it & How to Fix it

Windows is prone to errors. The frequency of encountering these may have reduced, but some still exist. In the following guide, we will take up the Windows update error – 0x8024a205.

This is generally encountered when you try to update or upgrade Windows, though it’s generally the former. The full error message reads: We couldn’t install this update, but you can try again (0x8024a205). So, let’s find out how you can fix 0x8024a205 in Windows 11.

What causes 0x8024a205 error?

Here are a few reasons you might be getting the install error 0x8024a205:

  • Device not compatible – Many users reported 0x8024a205 on Surface laptops, particularly because the SSD was not compatible.
  • Not enough space – Updates require certain free storage to download, so you may need to check that and free up disk space on the computer.
  • Issues with Windows – If the Windows Update Components or the system files are corrupt, you might come across update errors from time to time.

How can I fix 0x8024a205 error?

Before we head to the slightly intricate solutions, here are a few quick ones you can try:

  • Restart the computer and check whether you still receive the 0x8024a205 error in Windows.
  • Make sure your computer has enough free space, especially the C: drive where the Windows Updates are downloaded. You can use Disk Cleanup to clear storage space.
  • Check if your device is compatible with the update. A quick way to do that is to search the web. In case the device is not compatible, others using it, too, would be getting the same error. To confirm the same, you can also contact Microsoft Support.

If none of the work, head to the solutions listed next.

1. Pause and unpause Windows update

  1. Press Windows + I to launch the Settings app, and select Windows Update from the tabs listed in the navigation pane on the left.Windows Update to fix windows 11 update error 0x8024a205
  2. Next, click on the Pause for 1 week button.Pause for 1 week
  3. Once done, restart the computer for the changes to come into effect.
  4. Now, again navigate to the Windows Update tab, and click on the Resume updates button.Resume update to fix windows 11 update error 0x8024a205
  5. Finally, check for updates and try installing it again.

Oftentimes, it’s a minor bug that’s causing the Windows 11 update error code 0x8024a205, and simply pausing and unpausing it should fix the problem.

2. Run the Windows Update troubleshooter

  1. Press Windows + I to launch the Settings app, and click on Troubleshoot on the right in the System tab.Troubleshoot to fix windows 11 update error 0x8024a205
  2. Click on Other troubleshooters from the options listed here.Other troubleshooters to fix windows 11 update error 0x8024a205
  3. Next, locate the Windows Update troubleshooter, and click on the Run button next to it.Windows Update to fix windows 11 update error 0x8024a205
  4. Now, follow the on-screen instructions and choose the necessary response when prompted to complete the troubleshooting process.

The built-in troubleshooters are one of the quickest ways to eliminate a plethora of issues. So it’s recommended that you always run the relevant troubleshooter to automatically identify and fix problems, including the Windows 11 update error 0x8024a205.

3. Manually install the update

  1. Note down the KB (Knowledge Base) number for the update you are having trouble downloading.
  2. Go to the Microsoft Update Catalog, enter the KB number in the search box, and either click on Search or hit Enter.Search for update
  3. Click on the Download button next to the relevant update.Download to fix windows 11 update error 0x8024a205
  4. Now, right-click on the link, and select Save link as from the context menu.Save link as
  5. Choose the desired location for the update, and click on Save.Choose location to fix windows 11 update error 0x8024a205
  6. If required, approve the download.
  7. Once the update is downloaded, double-click on it to launch the installer, and follow the on-screen instructions to complete the process.

If you can’t get the update to install automatically, manually download it from Microsoft Update Catalog and then install it on the system. But sometimes, this, too, can throw errors, and that’s when an in-place upgrade comes to the rescue.

4. Perform an in-place upgrade

  1. Go to Microsoft’s official website, and download the ISO file for Windows 11. You may have to choose a few options before securing the download link. In the case of Windows 10, you can also get the tool from the official download page.windows 11 iso
  2. Now, launch the ISO file, and click on Open in the prompt.open
  3. Once you have the Windows files open, run setup.exe.setup.exe to fix 0x8024a205
  4. Click on Next to proceed.next
  5. Now, click Accept to agree to the license terms.accept
  6. Finally, verify whether the setup lists Keep personal files are apps, and click on Install to continue.install to fix 0x8024a205

When nothing works, an in-place upgrade usually does the trick and fixes the Windows update error 0x8024a205, irrespective of whether it’s encountered while updating or upgrading the OS.

In case you frequently face issues while updating Windows, use a reliable update repair tool and get rid of these errors for good.

Tell us which fix worked and the update for which you encountered the 0x8024a205 error code, in the comments section below.

OneNote for Windows 11: How to Download, Install & Use it

With Windows 11’s official launch, most users had some important questions. What are the newest features and what will happen to the old apps that everybody used on a day-to-day basis were some of the most important?

That’s also the case with OneNote and we are here to answer those questions.

Some of the new features for Windows 11 include a complete user interface redesign with a focus on improved user experience, a centered Start menu, and better virtual desktop support.

And because Microsoft is aiming to also improve the overall gaming experience on the new OS, you’ll now find integrated Android apps in the App Store, and Xbox tech for better gaming.

If you want to check them all out, know that Microsoft has released a new OS build and we covered it all.

Now, on the opposite pole, Microsoft also shared details on features that will be removed, and OneNote for Windows 10 is one of them.

Why has Microsoft removed OneNote from Windows 11?

While there is no clear answer to this question, according to Microsoft, there will be many feature deprecations and removals when making the jump to Windows 11. 

Feature deprecation and removal
Features deprecated or removed in Windows 11, as officially revealed (Microsoft)

OneNote is just one of them alongside 3D Viewer, Paint 3D, Cortana, Internet Explorer, and Math Input Panel.

Fortunately, there are ways to enable OneNote in Windows 11 after the upgrade, you just need to follow our quick guide right here.

How can I enable OneNote in Windows 11?

1. Install it from Microsoft Store

  1. Click on the Microsoft Store icon from the taskbar to launch the app.Microsoft Store Icon
  2. Now go to the search tab, type OneNote and hit Enter.
  3. Select OneNote from the list of results.OneNote - app store
  4. Click on the Free button to start the download.click on Free
  5. Use your Microsoft account to log in and start using the app.

2. Download and install OneNote from the official website

  1. Download OneNote from the official page.Download OneNote from website
  2. Click on Open file to begin the setup.Click on Open File
  3. Allow Microsoft to make changes to your device by selecting Yes on the pop-up.select yes to make changes
  4. The setup will automatically detect what version of Microsoft 365 you’re running on and match your OneNote installation to the correct version.
  5. Wait until the installation is complete as it might take a while.wait until the download is complete
  6. After the setup is complete, you can log in with your Microsoft account and start using OneNote.sign in with microsoft account

There you have it, two simple ways to install OneNote on your device even after the upgrade to Windows 11.

What are some of OneNote’s best features?

While you can think of OneNote like a normal digital notebook, it can surprise you as it has way more options than you can imagine.

The app doesn’t expire, so you can use OneNote for as long as you like on any device as long as you have a Microsoft account.

This app is ideal for keeping all of your notes, research, plans, and information regarding your life at home, your life at work, or at school in one place.

Want to keep up with your renovations and share your ideas? Add images, comments, drawings, then easily share them and you can all view and contribute at the same time.

OneNote - preview

Another one of its best features is its ability to back up all your notes in the cloud, even if your device is not connected to the Internet.

You’ll just need to sync your notebook with OneDrive before going offline. Also, if at any time you lose your Wi-Fi connection, know that any pending changes will sync as soon as you’re back online.

OneNote also lets you create notes using just your voice. Take advantage of Dictation while signed in to your Microsoft account on a mic-enabled device and create drafts, notes, or comments.

Even though you’ll have to enable OneNote on your device once you make the switch to the new Windows 11, it is definitely worth it as this app will make your everyday life much easier.

That’s the case with many of Windows 10’s apps, but Microsoft’s newest OS brings a lot of other interesting features that aim to improve your productivity.

If you want to learn more about the differences between Windows 10 and Windows 11, check out our detailed comparison and decide for yourself if it’s worth the upgrade or not.

Feel free to use the comments section below if you have any further questions regarding OneNote or other apps you don’t know how to enable on the new OS.

How to Change Screen Brightness In Windows 11 (Step-by-Step)

Changing screen brightness on Windows 11 is one of the most common adjustments users make when trying to reduce eye strain, save battery, or enhance display visibility. No matter if you’re using a slider, shortcut, or the settings menu, this guide walks you through every method to adjust brightness effectively on your laptop screen or external monitor.

All Methods to Adjust Screen Brightness in Windows 11

1. Quick Settings Brightness Slider

  • Press Windows + A to open the Quick Settings panel
  • Move the brightness slider left or right to adjust the level
  • Only works on internal displays like laptops or tablets
  • If the slider is not available, it could be a driver issue similar to what affected screen brightness controls in Windows 7

2. Settings Menu Brightness Control

3. Enable Auto-Brightness (If Available)

  • Go to Settings > System > Display > Brightness
  • Check “Change brightness automatically when lighting changes”
  • Auto-adjust issues can also be caused by system bugs; see how to fix Windows 11 screen dimming problems

4. Manual Brightness via Monitor Buttons

  • Use physical buttons on the side or bottom of your monitor
  • Navigate to the on-screen display (OSD) menu
  • Adjust the Brightness or Contrast settings manually

5. Adjust Brightness via GPU Control Panel

  • NVIDIA: Right-click desktop > NVIDIA Control Panel > Display > Adjust desktop color settings
  • Intel: Open Intel Graphics Command Center > Display > Brightness
  • AMD: Use AMD Radeon Software > Display tab to control brightness

6. Use Monitor Manufacturer Software

  • Install software from your monitor brand:
    • Dell Display Manager
    • HP Display Center
    • LG OnScreen Control
    • Lenovo Vantage
  • These apps allow on-screen brightness adjustments directly in Windows

7. Use Keyboard Brightness Keys

8. Adjust Brightness in Windows Mobility Center

  • Right-click the Start button
  • Select Mobility Center
  • Use the Display brightness slider for manual control

9. Set Brightness by Power Plan

  • Open Control Panel > Power Options
  • Click Change plan settings for your current power plan
  • Set different brightness levels for On battery and Plugged in

10. Adjust Brightness via Command Line

Command Prompt:

powershell (Get-WmiObject -Namespace root/WMI -Class WmiMonitorBrightnessMethods).WmiSetBrightness(1, 50)

PowerShell:

(Get-CimInstance -Namespace root/wmi -ClassName WmiMonitorBrightnessMethods).WmiSetBrightness(1, 70)
  • Replace the number with the desired brightness level
  • These commands only work for internal laptop displays

FAQs

How do I reduce brightness using keyboard in Windows 11?

Press Fn + Brightness keys (usually F1–F12 with sun icons). On some laptops, it might be Fn + F2 or Fn + F3.

Why is the brightness slider missing in Windows?

It usually happens when display drivers are outdated or missing. Try updating your display adapter through Device Manager. Check out this more in-depth guide for step-by-step instructions if your brightness option is missing in Windows.

Can I adjust brightness on an external monitor?

Yes, but not through Windows settings. Use physical buttons, GPU control panels, or manufacturer software like Dell Display Manager.

Is there a brightness shortcut in Windows 11?

Yes. Press Windows + A to open Quick Settings, then move the brightness slider.

How to automatically adjust brightness based on light?

Go to Settings > System > Display > Brightness, then enable Change brightness automatically when lighting changes. This requires a light sensor.

Wrapping up

Adjusting screen brightness in Windows 11 is key to making your display easier on the eyes and saving battery life. You can change brightness using the settings menu, quick brightness slider, keyboard keys, or monitor buttons.

If the slider is missing or doesn’t work, updating display drivers or using your GPU’s control panel can fix the problem. Auto brightness settings can also be turned on or off depending on your needs. With these screen brightness control methods, you can easily find what works best for you.

Event ID 41: What is it?

Event ID 41 is a PC error reported on all recent iterations of the OS. That issue is also known as the Kernel-Power 41 error. When that error occurs, Windows randomly restarts without properly shutting down first.

Event Viewer logs the error as critical, and the description reads, The system has rebooted without cleanly shutting down first. Some users have also reported it as a Blue Screen error. So, let’s find out how you can fix Event ID 41 BugcheckCode 0 in Windows.

What is Event ID 41 Task Category 63?

The Event ID 41 Category 63 usually has to do with the power supply or a malfunctioning component and causes the screen to go either wholly black or white. For most users, this happens when running resource-intensive tasks or gaming.

Here are a few reasons you might be getting the error:

  • Faulty power supply – In most cases, it was the faulty power supply that triggered the error. So, you will have to check for that.
  • Overclocking – When the PC is overclocked, you might encounter issues, including BSOD errors and Event ID 41.
  • Corrupt or outdated drivers – Corrupt, incompatible, or outdated drivers are just as likely to cause the error, as reported by several users.
  • Issues with the RAM – Another reason you may get the error is a faulty RAM module or when it’s not connected properly.

How can I fix Event ID 41?

Before we head to the slightly complex solutions, here are a few quick ones that did the trick for some users:

  • Make sure you are running the latest version of Windows. Oftentimes, the error is caused by a bug, and a patch is later released for it, so it’s important that you update the OS.
  • Plug the computer directly into a power socket instead of a surge protector or a hub of some kind.
  • Although strange, users reported that the error didn’t appear when they first plugged in the cable and then turned on the laptop. Remember, this is a workaround and won’t really eliminate the underlying cause.
  • In case you have overclocked the PC, remove all such settings right away and uninstall the app used for overclocking, if any.
  • Check the temperature and if it’s high, take measures to reduce overheating. An effective way to do it would be to manually control the CPU fan speed.

If none of the solutions work, the ones listed next should.

1. Disable Fast Startup

  1. Press Windows + S to open Search, type Control Panel in the text field, and click on the relevant search result.control panel
  2. Click on System and Security.system and security
  3. Click on Change what the power buttons do under Power Options.change what the power buttons do
  4. Next, click on Change settings that are currently unavailable.change settings that are currently unavailable to fix event id 41
  5. Untick the checkbox for Turn on fast startup (recommended) and click on Save changes.disable to fix event id 41
  6. Also, if there’s an option for Fast Startup or Fast Boot in the BIOS, make sure to disable it as well.

Many users managed to eliminate Event ID 41 by simply disabling Fast Startup, a feature meant to quickly load the OS when the computer is turned on. So try it, and if things don’t work out, head to the next solution.

2. Update the drivers

  1. Press Windows + R to open Run, type devmgmt.msc in the text field, and hit Enter.device manager
  2. Expand Display adapters, right-click on the video card, and choose Update driver.update driver to fix event id 41
  3. Now, select Search automatically for drivers and wait for Windows to update it.search automatically for drivers

The video card was the underlying cause, as reported by many, and updating the graphics driver did the trick. Also, if Windows is unable to find a newer version, you can always manually update the driver in no time.

If you want a quicker solution for updating your drivers, you can try a specialized tool that can do this automatically by scanning your PC for outdated drivers and finding the latest updates from its vault.

⇒ Get Outbyte Driver Updater

3. Switch to the High Performance power plan

  1. Press Windows + R to open Run, type control panel, and then click OK.control panel
  2. Click on System and Security.system and security
  3. Now, click on Power Options.power options to fix event id 41
  4. Select the High Performance power plan here, and restart the computer.

Switching to a performance-oriented power plan fixed Event ID 41 for many. Also, instead of High Performance, you could also enable the Ultimate Performance power plan for even better results.

4. Run tests on RAM

If the solutions listed previously didn’t work, it’s likely hardware at fault, and we start with the RAM. First, make sure all the RAM modules are properly seated. Also, you can run the PC using one module at a time to identify the faulty one.

Besides, run the Windows Memory Diagnostic, a built-in tool that scans the RAM for issues and fixes most of these. Though, you can’t rely solely on it to get things up and running.

That’s why we recommend users go with MemTest86+, an open-source tool that runs a wide range of tests on the memory, identifies the issue, and eliminates it. If the tool comes up with a clean report, you can be certain the RAM is not triggering Event ID 41.

5. Get the hardware checked

The last option is to get the hardware checked by a professional, including the CPU, motherboard, and PSU. These three were usually found to be malfunctioning and led to Event ID 41. Do not forget to get connections and capacitors inspected as well.

If any of the items turn out to be faulty, first replace them with a spare product, and only if it works out, buy a new one.

With the Event ID 41 fixed by now, your computer won’t crash anymore or hang with a black screen in Windows for extended periods.

In case you got the error while playing games, check the best settings to optimize Windows for gaming.

You can discuss the Event ID 41 error in the comments section below, and share any other solutions or post queries.

Top Best Antivirus For Windows 10 In 2026: No 1 Is A Must

In this guide, let us explore the best antivirus for Windows 10.

The digital world is becoming increasingly part of our lives, but that also means that cyber threats are just as abundant.

Malware is evolving increasingly, and antivirus tools are keeping up, constantly updating their libraries to recognize as many new threats as possible.

If your computer, phone, or tablet has an operating system update that you haven’t yet installed, don’t put it off. Additionally, you should maintain any antivirus software up to date.

That being said, let us now explore some fundamental benefits.

Does Windows 10 2022 need antivirus?

Using a computer without an antivirus is not recommended because while you may get by, there is a higher probability that your computer will be compromised in no time. The dangers associated with such a compromise can not be overstated.

Here are some reasons why you must use an antivirus:

  • Virus protection and transmission – A significant role of antivirus software is prevention. When a virus is detected, it immediately begins working.
  • Prevention from data thieves and hackers – Malware and virus programs are often used by hackers to get access to their victim’s computers. Without the user’s awareness, they implant malicious software onto the compromised machine.
  • Prevents spam and ads – Most infections exploit pop-up advertising as well as malicious websites to infiltrate their victims’ systems. However, an antivirus will guard against this.
  • Protection from removable devices – Also, if you use USB drives or external storage devices, an antivirus can scan them and ensure they are free from viruses.
  • Firewall protection from phishing attacks and spyware – Generally speaking, a firewall keeps tabs on every data that enters and leaves your network. When used with antivirus software, firewalls perform a secondary check on any data or files you transmit over the internet.

Now let us explore the best antivirus options you should try.

Antivirus?Key features?Security enhancements
ESET Internet SecurityMinimal power usage
Lightweight antivirus
Gamer Mode
Active web-browsing protection
Online banking & payment protection
Total AV Boost up the PC performance
Compatibility with Mac, Android, and iOS
Data breach monitoring
WebShield for browser protection
Guard.io Lightweight Chrome extension
Install with just a click right into the browser
Real-time protection against any threats
Links, emails, and web pages verification before you open them
Bitdefender Antivirus Plus Cutting-edge lightweight technology Protection against unauthorized use of your microphone and webcam
Anti-theft features for your devices’ protection
Premium-class VPN (limited)
Norton Antivirus Plus Low system impact
Frequently updated
Built-in password manager
Comes with a built-in VPN
Vipre Low impact Home and Business subscription plan Remote employees protection
Real-time protection using threat intelligence
Data loss prevention
Kaspersky Light resource usage
Works for PC, Mac, and mobile devices
Built-in password manager
Transaction protection
Avast Free Antivirus Limited resource footprint
Frequently updated
Best antivirus for Windows 10 with a free download
Works silently during gaming and movie-watching sessions
Monitors the behavior of individual apps
Avira Antivirus Premium Uses low resources
Tune-up tools
Advanced web & ransomware protection
Software and driver patching Built-in VPN

Which antivirus is best for Windows 10 not slowing down?

Total AV – Great for browsing security

best antivirus for windows 10

Firstly, Total AV is an award-winning antivirus and security software that protects every aspect of your PC. It offers virus protection, safe web surfing, block tracking cookies, as well as verification for breach attempts. Thus we ranked it as one of the best antivirus for a Windows 10 Home user.

Additionally, you get real-time protection from threats by checking all downloads, installs, and executables for any scripts or viruses.

Furthermore, its bright protection system keeps you safe from ransomware and phishing software that wants to lay hands on your data.

Total AV also provides WebShield in your browser to browse the web safely and securely. Hence, it is a defense against fake, scam, or phishing websites that exploit unknowing users. Also, this means that Total AV lets you take control of the browsing experience for browsers.

Lastly, with a built-in ad blocker for websites and videos, you will never see those annoying ads again.

Here are the perks of using Total AV:

  • Great real-time protection
  • WebShield for browser protection
  • Data breach monitoring
  • Compatibility with Mac, Android, and iOS
  • Blocking of tracking cookies

Total AV

A simple solution for a complete package of protection.
Check Price Visit Website

ESET Internet Security – Best overall

best antivirus for windows 10

ESET is ranked as one of the best antivirus for Windows 10 in 2022. Their antivirus solutions protect against malware, including viruses, ransomware, worms, as well as spyware.

So, the most modern assaults and harmful activity on your PC are no match for LiveGuard from ESET Internet Security, which integrates well in 2022.

Additionally, ESET offers military-grade encryption for all your passcodes when your device is lost or destroyed, so nothing leaks or gets stolen.

It is critical to prevent unauthorized access and exploitation of your data and camera, as well as to secure online payments and safeguard your online experience. This is where ESET shines; therefore, your virtual identity is always shielded.

Here are the perks of using Internet Security:

  • Install & forget the antivirus model
  • Active web-browsing protection
  • Minimal power usage
  • Ransomware and spyware shield
  • Gamer Mode
  • Online banking & payment protection
  • Suitable for Windows, macOS, and Linux

ESET Internet Security

A lightweight antivirus that offers just the protection all your devices need against the latest malware.
Check price Visit Website

Guard.io – Best for internet browsing

best antivirus for windows 10

Firstly, Guard.io is a lightweight chrome extension that is one of the best antivirus for Windows 10. It’s built to create the safest way of browsing the internet.

Additionally, since it takes seconds to add to your browser, it provides immediate online security. Your browsing experience will be smoother with no annoying pop-ups and scam notifications.

Also, harmful sites will be blocked immediately, while advanced anti-phishing protection will prevent all attempts to steal your data.

Furthermore, Guardio acts as your online bodyguard. Hence, its machine learning integrations, cloud infrastructure, and security research bring state-of-the-art web browsing protection.

Lastly, you can keep your whole organization safe by having unlimited licenses within one subscription plan.

Here are the perks of using Guard.io:

  • Install with just a click right into the browser
  • Real-time protection against any threats
  • Malicious site blocking
  • Links, emails, and web pages verification before you open them
  • Personal data security and breaches notifications
  • Malicious Extension Removal

Guard.io

Your browsing bodyguard for any online threats.
Free Trial Visit Website

Bitdefender Antivirus Plus – Most security features

best antivirus for windows 10

Bitdefender has an excellent antivirus technology approach proven to be a cutting-edge solution on Windows, even in 2022. You will soon see why we ranked it as the best antivirus for Windows 10 that doesn’t slow down your computer.

It’s an award-winning antivirus developer that has garnered wide appraisal over the years. This is thanks to its efficiency in fighting off malware balanced with a low system impact.

Also, Bitdefender antivirus products are an entire security suite filled with tools that make using your PC a worry-free experience.

Furthermore, the Bitdefender family comprises five products. These are Bitdefender Antivirus Plus, Bitdefender Internet Security, Bitdefender Total Security, Bitdefender Family Pack, and Bitdefender Premium Security.

These five entries share one common goal: they hold your PC’s security as their top priority.

Finally, those interested in Mobile security should also know that Bitdefender hasn’t forgotten about them, providing them with Bitdefender Mobile Security (Available for Android and iOS), a product just for them.

Here are the perks of using Bitdefender Antivirus Plus:

  • Protection against unauthorized use of your microphone and webcam
  • A single subscription gives you protection for multiple devices
  • You gain real-time protection against cyber-threats
  • Anti-theft features for your devices’ protection
  • You are provided with a premium-class VPN (limited)
  • Gives you anonymity on public Wi-Fi
  • Built-in browser protection
  • Built-in password manager

Bitdefender Antivirus Plus

Get the best antivirus tool of the year 2022, now available at a discount for a limited time!
Check price Visit Website

Norton Antivirus Plus – Best for home PC

best antivirus for windows 10

Norton does a fantastic job updating its virus databases and is one of the best antivirus apps for Windows 10.

Also, it works silently in the background, having minimum impact on your system’s resources.

What distinguishes Norton is the multi-layered approach to protecting your device from assaults by identifying hazardous files, preventing the download, and removing viruses or malware such as worms and trojan viruses.

Email scanning is essential for protecting against malicious emails. So, Norton Antivirus checks outgoing and incoming emails to guarantee that no potentially harmful emails are sent or downloaded.

Additionally, you receive up to 2GB of cloud backup space to save and defend essential files and documents from hard disk failure and hardware theft.

The drawback of Norton is that it is pricey per device. However, it also provides excellent performance when gaming in silent mode.

Here are the perks of using Norton antivirus products:

  • Efficient real-time protection
  • Built-in password manager
  • Comes with a built-in VPN
  • Frequently updated
  • Low system impact

Norton AntiVirus Plus

Multi-layered, smart encryption helps safeguard your devices from arising from various malware threats.
Check price Visit Website

Vipre – Best email security

best antivirus for windows 10

Vipre is among the best antivirus apps for Windows 10 for every aspect of your PC and online surfing. It is excellent for both home and business use.

Also, with award-winning endpoint protection, email security, and data loss prevention, Vipre is one of the industry leaders. It creates security layers from every possible angle to ensure your data is safe.

Additionally, the anti-malware, anti-phishing, and smart email verification protect all online activities from threats.

Furthermore, you will experience web browsing without ads, unnecessary notifications, and spam pop-ups for the time being. Vipre works to create the best user experience.

Also, Vipre has unparalleled engine systems for the business side that give you complete insights into your security strengths and weaknesses and deliver ways to improve them.

No matter how big your organization is, data security is critical. So, avoid data breaches with Vipre’s patch management, ransomware protection, and endpoint malware protection.

Since your employees receive hundreds of emails daily, a layer of security is essential. Hence, VIPRE Email Security solutions ensure that all inbound messages are scanned for suspicious content.

Here are the perks of using Vipre:

  • Data loss prevention
  • Email verification before opening
  • Prevention of sending emails to the wrong person
  • Malware, ransomware, phishing protection
  • Home and business subscription plan
  • Real-time protection using threat intelligence
  • Remote employees protection

Vipre

Keep your business protected and your email secured.
Free Trial Visit Website

Kaspersky – Best malware protection

best antivirus for windows 10

Kaspersky Antivirus is one of the best antivirus apps for Windows 10. It is an anti-malware tool with a long history in the industry.

This software tool has evolved for some time now, providing anti-malware solutions for home and much larger business environments, each tool being adapted specifically for its job.

Kaspersky’s antivirus disinfection feature may be disappointing. When a file becomes infected with a virus, most antivirus programs delete the entire file; however, Kaspersky does not.

This may be troublesome in the future because of the clutter on your PC if the corrupted file is not completely removed.

However, on the bright side, Kaspersky was once used to uncover a kind of malware called MiniDuke.

According to a Kaspersky specialist in spy gear examination, MiniDuke hails from a school of modern espionage software created for snooping.

So, it is useful if you work remotely and suspect someone is spying on you and intends to steal your work.

Get a year-long license, and you never have to worry about malware regarding your home and business.

Lastly, among all its strengths and weaknesses, Kasperky prides itself on its products’ transparency and efficiency.

Here are the perks of using Kaspersky:

  • Easy-to-use
  • Light resource usage
  • Transaction protection
  • Built-in password manager
  • Works for PC, Mac, and mobile devices

Kaspersky

Kaspersky uses advanced monitoring systems to detect both known and unknown harmful spyware.
Free trial Visit website

Avast Free Antivirus – Best free antivirus option

best antivirus for windows 10

Firstly, This antivirus tool is one of the best for Windows 10.

First, we love the Behavior Shield. With this function, Avast monitors the behavior of individual apps on a computer to counter anything suspicious.

Also, Avast Omni, Premium Security, and Free Antivirus have CyberCapture, which automatically detects questionable files and sends them to the cloud for review.

Additionally, the free version may assist with password management, browser cleansing, and network security. It also has a Do Not Disturb mode, preventing popups when viewing movies or playing games.

However, the downside is that it has a lousy track record for detecting and eradicating malware, spyware, and trojans.

Despite its excellent antivirus protection, we would not rely on Avast free antivirus since we require continuous protection against additional dangers.

Finally, you get what you pay for, and upgrading to the premium version will unlock this tool’s full potential.

Here are the perks of using Avast Free Antivirus:

  • Frequently updated
  • Limited resource footprint
  • Efficient virus removal
  • Works silently during gaming and movie-watching sessions

Avast Free Antivirus

Avast scores first in malware blocking and anti-phishing testing and scanning the network.
Free Download Visit Website

Avira Antivirus – Great free protection

best antivirus for windows 10

Avira is one of the best antivirus apps for Windows 10. The developer has improved the software significantly over the past year to be competitive enough.

As such, the Avira security suite now includes several products, among which three stand out.

Avira provides a free solution with the basics, a traditional antivirus, and a premium product: Free Security, Internet Security, and Prime.

Additionally, Avira Free Security can detect and prevent emerging threats and zero-day exploits.

Also, you receive several privacy and performance utilities, including a VPN and password manager, driver updates, and memory optimization.

Lastly, Avira’s disadvantage is that it consumes more resources than its competitors. As a result, this may not be ideal for you if you have a PC that quickly drains its battery.

Here are the perks of using Avira:

  • Advanced web & ransomware protection
  • Premium tune-up tools
  • Built-in VPN
  • Software and driver patching
  • VIP customer support

Avira Antivirus

Best free antivirus software with enticing upgrade options if you want better protection.
Free download Visit Website

That concludes our list of the best antivirus tools for Windows 10. We will update the list once more information is uncovered to provide you with the most updated and relevant information.

Did you download the best antivirus for Windows 10? Let us know by leaving your feedback in the comments below.

Fix: Firefox keeps asking for password no matter what I do

Firefox is a popular browser for the Windows platform. If you’re using it to access your IAS (Microsft Security and Acceleration Server) or Intranet web or Sharepoint site, the browser will use the saved credentials to log the users.

However, some reported that the Firefox browser keeps asking for the password despite having the login credentials saved. This is a known behavior and can occur due to many reasons.

Here are a couple of troubleshooting tips to fix this error in Firefox.

Why does Firefox keep asking for password?

1. Try a different browser

The most straightforward solution is usually the best one: maybe the problem is in Firefox itself and an alternative browser would never run into a similar issue.

Let us introduce you to fresh blood. With an abundance of privacy and security tools, Chromium-based Opera One is definitely something you shouldn’t sleep on.

Just make sure to enable the privacy level that suits you the best, and stay anonymous online. Activate the built-in VPN to hide your IP and avoid geo-restrictions or dirty ISP’s bandwidth throttling.

To further protect your online identity and data, Opera One also delivers an integrated adblocker to keep invisible trackers at bay and prevent you from being targeted by tedious advertisers.

Needless to say that this browser is as powerful as it is versatile, offering countless customization options in terms of functions, plugin and apps integrations, and design.

Let’s quickly look at its key features:

  • It also comes with support for VR Players, standard security protocols
  • Instant search and integrated ad-blocker
  • New readers, battery saver mode, currency unit, and time zone converters, etc.
  • Built-in AI and modular AI-ready design
  • Speed tab to further accelerate your workflows and more

Opera One

Avoid encountering the inline PDF error in the long run by using this capable and fast browser.
Free Download Visit website

2. Disable Network Negotiate Auth Allow Proxies

  1. Launch Firefox if not already running.
  2. In the address bar type the following and hit enter: about:config
  3. Click on I accept the risk! button to proceed.
  4. In the search bar, type network.negotiate.
  5. Under Preference Name, network.negotiate-auth.allow-proxies is set to True.
  6. To fix the error, you need to set it to false.
  7. Double-click on network.negotiate-auth.allow-proxies to change the value to False.
    etwork.negotiate-auth.allow-proxies False Firefox keeps asking for password
  8. Quit and relaunch Firefox.
  9. Try to connect to the ISA server and check if it still asking for the password.

Setting network.negotiate-auth.allow-proxies from true to false may seem counterintuitive but to make it work with ISA proxy, you need to set it to False.

3. Enable AutoLogin

  1. Launch Firefox.
  2. In the address bar type the following and hit enter: About:config
  3. Search for Signon.autologin.proxy.
  4. Signon.autologin.proxy is by default set to False.
  5. Double-click on Signon.autologin.proxy and the value will change to True.
    Signon.autologin.proxy Firefox keeps asking for password
  6. Quit and relaunch Firefox. Try to open the website again and enter the login credentials. Once saved, Firefox should stop asking for the login details again.

4. Try Safe Mode  / Reset Firefox

  1. Launch Firefox. Save and close all the open tabs.
  2. Click on the Menu.
  3. Select Help and click on Troubleshooting Information.
  4. Click on Restart with Add-ons Disabled.
    Firefox Safe Mode Restart with Add ons disabled Firefox keeps asking for password
  5. Click on Restart to confirm the action.
  6. After the restart check if Firefox still asks for the password repeatedly.

Reset Firefox

  1. In Firefox, click on Menu and select Help.
  2. Click on Troubleshooting Information.
  3. Click on the Refresh button.
  4. Read the warning message and click on Refresh Firefox.
  5. Wait for the Firefox to restart.
    Firefox Reset - Refresh Firefox keeps asking for password
  6. Now try to access the website that was asking for the password and check for any improvements.

Note: Refresh Firefox option will remove your add-ons and customization as well as restore your browser settings to default.

Firefox keeps asking for a password is a common issue and most of the time can be resolved by making small tweaks to the configuration and settings.

However, if the issue persists, contacting your administrator can help you resolve this issue faster.

Did any of these solutions work for you? Let us know in the comments.

Chrome Opening a New Window Every With Every Click? Here’s the Fix!

Many readers reported that Chrome keeps opening new windows instead of tabs every time they click. There are multiple reasons for this: interfering extensions, hardware problems, or even malware.

Let’s take a look at what you have to do to fix this issue:

How do I stop Chrome from opening new tabs?

1. Adjust your Search settings

  1. Type any website in the address bar and press enter. Chrome will open a list of search results.
    chrome search results
  2. On top of the search results, click on the Settings bar. A drop-down menu will open with a list of menu options.
    Google Chrome search settings
  3. Click Search settings. You will be directed to a page with search filters.
  4. Scroll down to the setting that says Where results open, Open each selected result in a new browser window.
    Google Chrome search history
  5. Uncheck the box and click Save. Chrome will now open each result in the same tab unless specified otherwise.Chrome open each selected result in a new browser window

2. Clear cookies and cache

  1. Click on the three dots and select Settings.chrome settings
  2. Navigate to Privacy and security and click on Clear browsing data.
  3. Choose a time range (e.g., All time) and check the boxes for Cookies and other site data and Cached images and files.
  4. Click Clear data.Cookies and other site data, and Cache images and files, then click Clear data.

3. Reinstall Chrome

  1. Press Windows key + X and choose Apps and features.
    apps and features
  2. Select Chrome on the list.
  3. Now click Uninstall.
    uninstall chrome
  4. Wait for the process to finish and then install Chrome again.

4. Remove PUP, malware, pop-ups, and ads from Chrome

  1. Press Windows key + R and enter appwiz.cpl.
     appwiz.cpl
  2. Locate any suspicious applications that you don’t remember installing.
  3. Double-click them to remove them.
    remove installed software
  4. Check if the problem is still there.

Also, it’s advised to remove all the unknown extensions in Chrome by doing the following:

  1. Open Chrome.
  2. Enter the following in the address bar: chrome://extensions/
    chrome extensions
  3. Now remove or disable any extensions that you don’t recognize.
    remove or disable extensions

It seems like VPN extensions are the main culprit when this happens, but another extension could cause it too.

If you want to keep using a VPN, try switching to another option or install a VPN app on your device instead of a browser add-on.

5. Disable background apps

  1. In Chrome, click the Menu icon in the top right corner and open the Settings.
    disable background apps
  2. Now scroll down to the System section and disable Continue running background apps when Google Chrome is closed option.
    continue running background apps chrome
  3. Restart your browser.

6. Cleanup Chrome malware

  1. In Chrome, navigate to the Settings tab.
  2. Go down to the Reset and clean up section.
  3. Click on the Clean up computer option.
    Google Chrome clean up computer
  4. Wait for the process to finish and follow the instructions on the screen.

If new tabs keep opening in Chrome, it might be due to Chrome-specific malware. Use Chrome’s built-in Cleanup tool to to fix the issue.

7. Scan your PC for malware

  1. Press Windows key + S and enter defender. Select Windows Security.
  2. Go to Virus and threat protection. Next select Scan options.
  3. Select the type of scan and click on Scan.

We recommend you look into the best antivirus software options and pick one that fits your system resources and your budget. You can find plenty of budget-friendly or even free well-performing antivirus software.

8. Create a new Chrome profile

  1. Open Chrome Settings.google chrome settings menu
  2. Select You and Google.

  3. Click on Customize Profiles.
  4. Create a new profile and see if the issue persists.

9. Reset Chrome to default

  1. Open the Settings.
  2. Go to Reset and clean up.
  3. Now click on Restore settings to their original defaults.
  4. Confirm that you want to reset them.

By doing so, you’ll remove all extensions, cache, and history. Of course, if you’re signed in to Chrome with your Google account, you can easily restore your files and continue where you left off.

Want to learn more about Chrome tabs? Check our guide on how to fix it when it won’t load tabs in the background.

There you go, this should do it. If Chrome keeps opening new tabs by itself, make sure you don’t skip any advice from this guide.

Other users have different issues, and some have reported that tabs won’t open in Chrome. However, we covered that issue in a separate guide.

Do let us know which method worked for you by reaching for the comments section below.