Windows 11 Can’ t Connect to Organization’s Server [Fix]

Windows 11 cannot connect to the organization’s activation server – that’s a common problem that users face after upgrading their OS. The error occurs when the Windows Activation server fails to recognize the license tied to the user’s account.

Why can’t Windows 11 connect to the organization’s activation server?

There can be many reasons why Windows 11 is not connecting to your organization’s activation server. To save time, check for the following:

  • Connecting to an incorrect system – You should verify whether the system was activated through a Volume licensing agreement. If it didn’t, it’s time for you to activate your Windows again.
  • Ex-employee – If you’re no longer a part of the organization, then you cannot activate your copy of Windows anyway.
  • Remote work set up – Your computer needs to stay connected with the organization network at least once in 180 days to maintain its license. This could pose an issue for employees who work remotely, as they might not be able to connect to the company network and activate their OS.

What can I do if Windows 11 cannot connect to the organization’s activation server?

To fix the issue, try the following things first:

  • Check if the activation servers are reachable from your current location.
  • Try disabling your VPN network and see if that resolves the problem after some time. Even if this is the cause of the issue, it won’t be fixed instantly. Keep the Privacy option disabled and see if Windows can activate itself.
Note icon NOTE
The solutions provided in this article are for those who have a legal version of Windows 11. If you’re receiving a message that reads This copy of Windows is not genuine, even though you have a valid version of the OS, please go through our guide.

1. Change the license key

If you are not a part of the organization that purchased the product through Volume licensing, you would have to buy a new license and/or a new copy of Windows 11.

Also, be sure to get the same version of Windows to avoid formatting your computer.

2. Run the Network Adaptor Troubleshooter

  1. Press the Windows key + I to launch the Settings app.
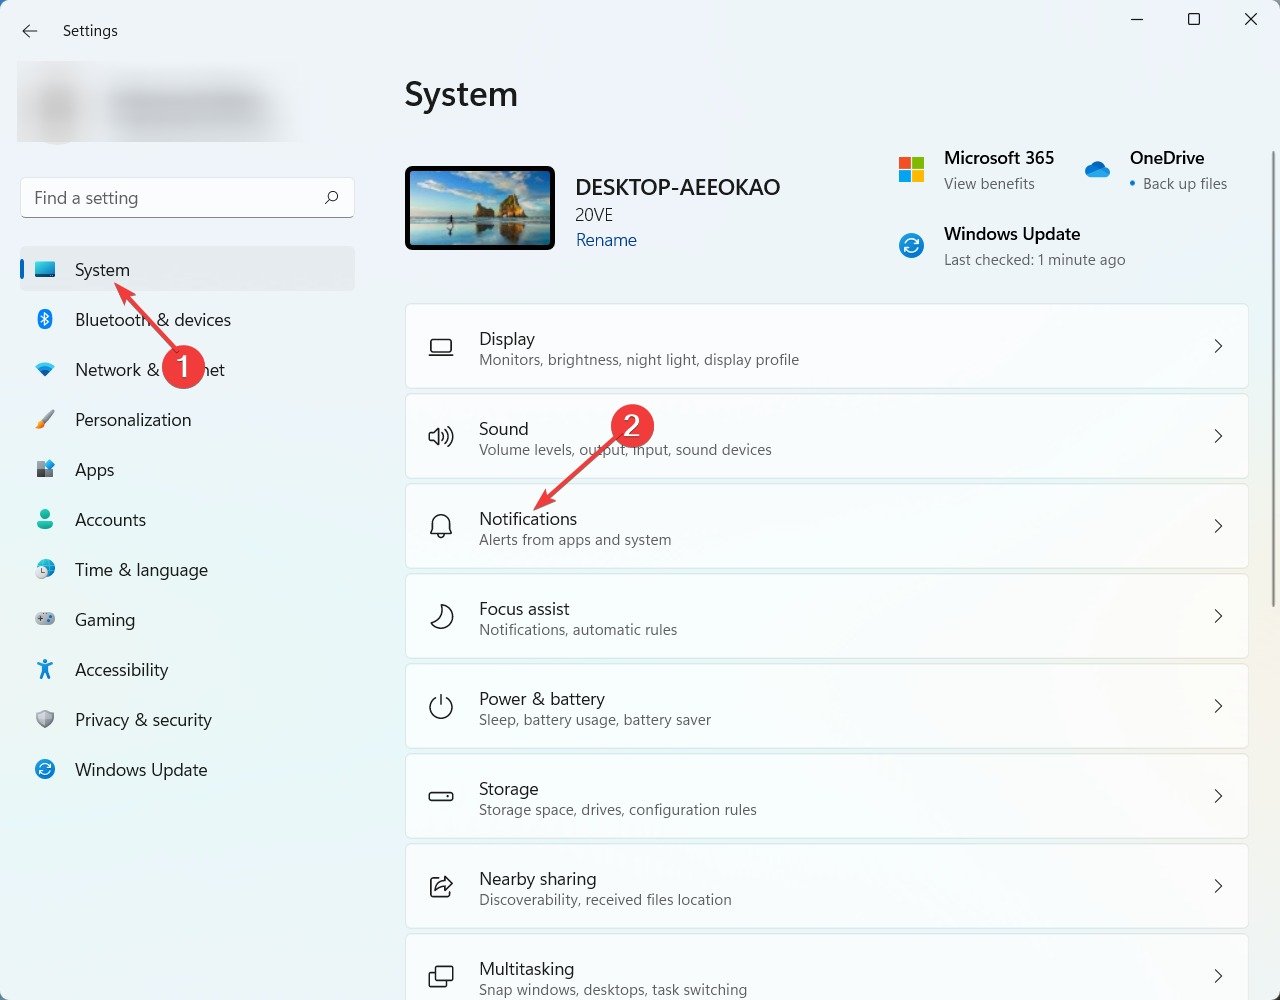
  2. Under System, scroll down and select Troubleshoot from the list of options.
  3. Once inside the Troubleshoot menu, click on the Other Troubleshooters option.
  4. Now, scroll down until you find the Network Adapter troubleshooter.
  5. Click on the Run button next to it.
  6. After identifying the cause of the problem, the troubleshooter will provide you with instructions on how to fix the issue.

Be sure to read and follow the instructions on your computer screen carefully.

3. Verify if the system was activated through a Volume licensing agreement

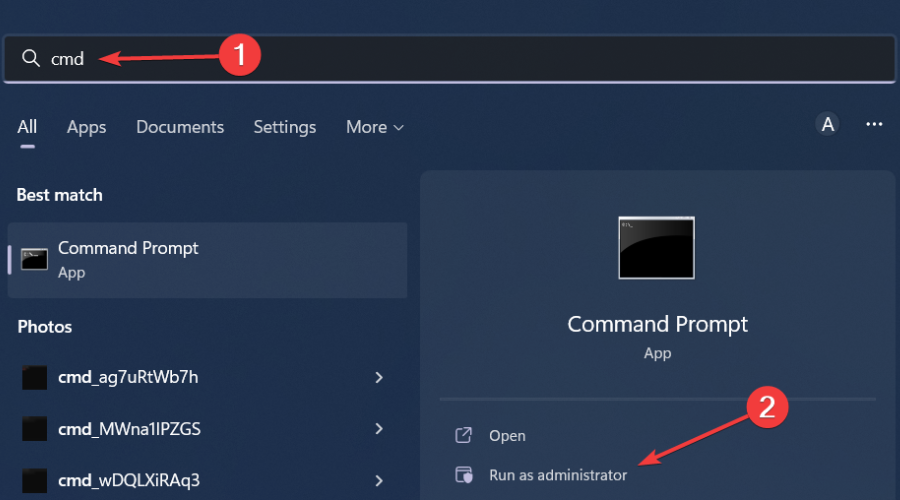
  1. In the Windows Search Bar, type Command Prompt, and click on Run as administrator.
  2. Type or copy-paste the following command and press Enter: slmgr.vbs /dlv
  3. If the value of the Product Key Channel says GVLK, it reflects that the system was activated via a Volume licensing agreement.

4. Activate Windows 11 via phone

  1. Press the Windows key + R simultaneously to open the Run dialog box.
  2. In the Run box, type in the following and hit Enter. slui.exe 4
  3. Select your country from the drop-down menu and click Next to continue.
  4. Dial up the toll-free number.
  5. The automated phone system will ask for the Installation ID numbers mentioned in step 2 and, in turn, give you a Confirmation ID.
  6. Once you have received the Confirmation ID, enter it into the required field and click Activate.

You could also alleviate the stress by contacting Microsoft’s customer support to get your Windows 11 activated. Alternatively, if you notice that your Windows 10 Activation key is not working, we have created a quick guide to help you fix the issue.

Thank you for reading this guide; we hope it helped solve your problem. Please let us know in the comments section below if you have any additional questions.

Microsoft enhances support for Intel and AMD processors on Windows 11 22H2

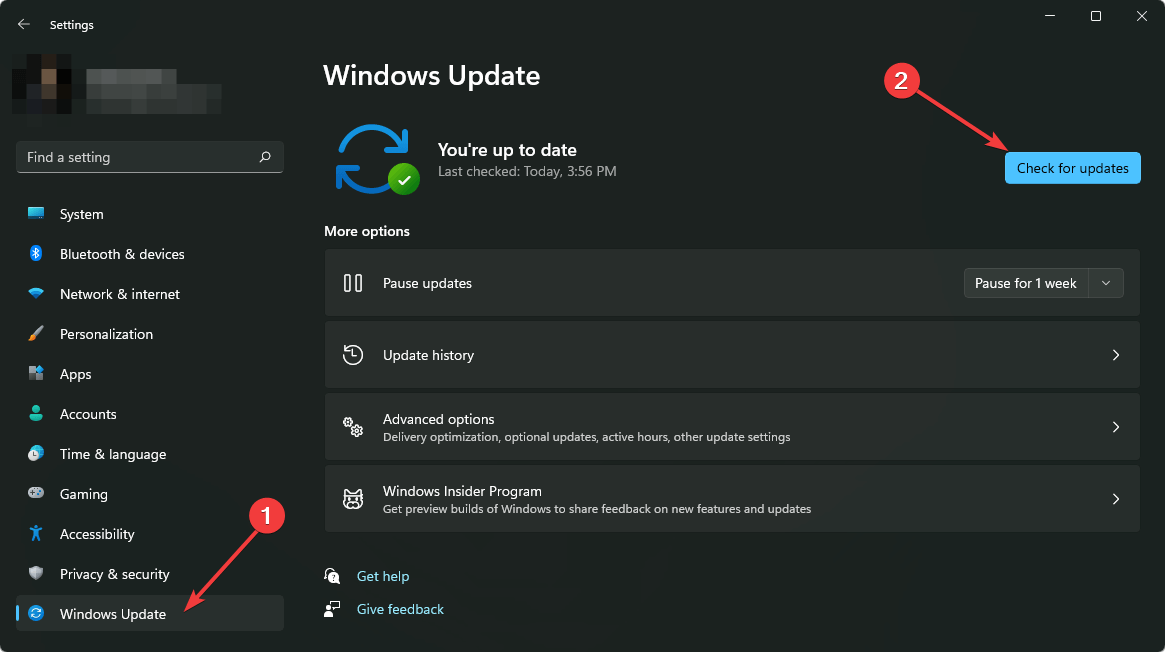
In September, Microsoft started rolling out Windows 11 22H2 which featured a ton of enhancements geared toward enhancing the user’s experience. The company then announced that it would hasten the process by availing the update to those clicking on the Check for updates after launching Windows Update Settings.

And now, Microsoft has broaden its list of supported processors for both Intel and AMD. According to Microsoft, “The processors listed represent the processor models which meet the minimum floor for the supported processor generations and up through the latest processors at the time of publication. These processors meet the design principles around security, reliability, and the minimum system requirements for Windows 11″.

If you are not already running Windows 11 22H2, and have found that your processor features in either one of the lists, then you can make the update. However, you should note that some users have encountered some issues with the update, such as, printer compatibility issues and a file copy bug that slows down the OS. Be sure to also check out Microsoft’s list of supported Qualcomm processors.

via Neowin.net


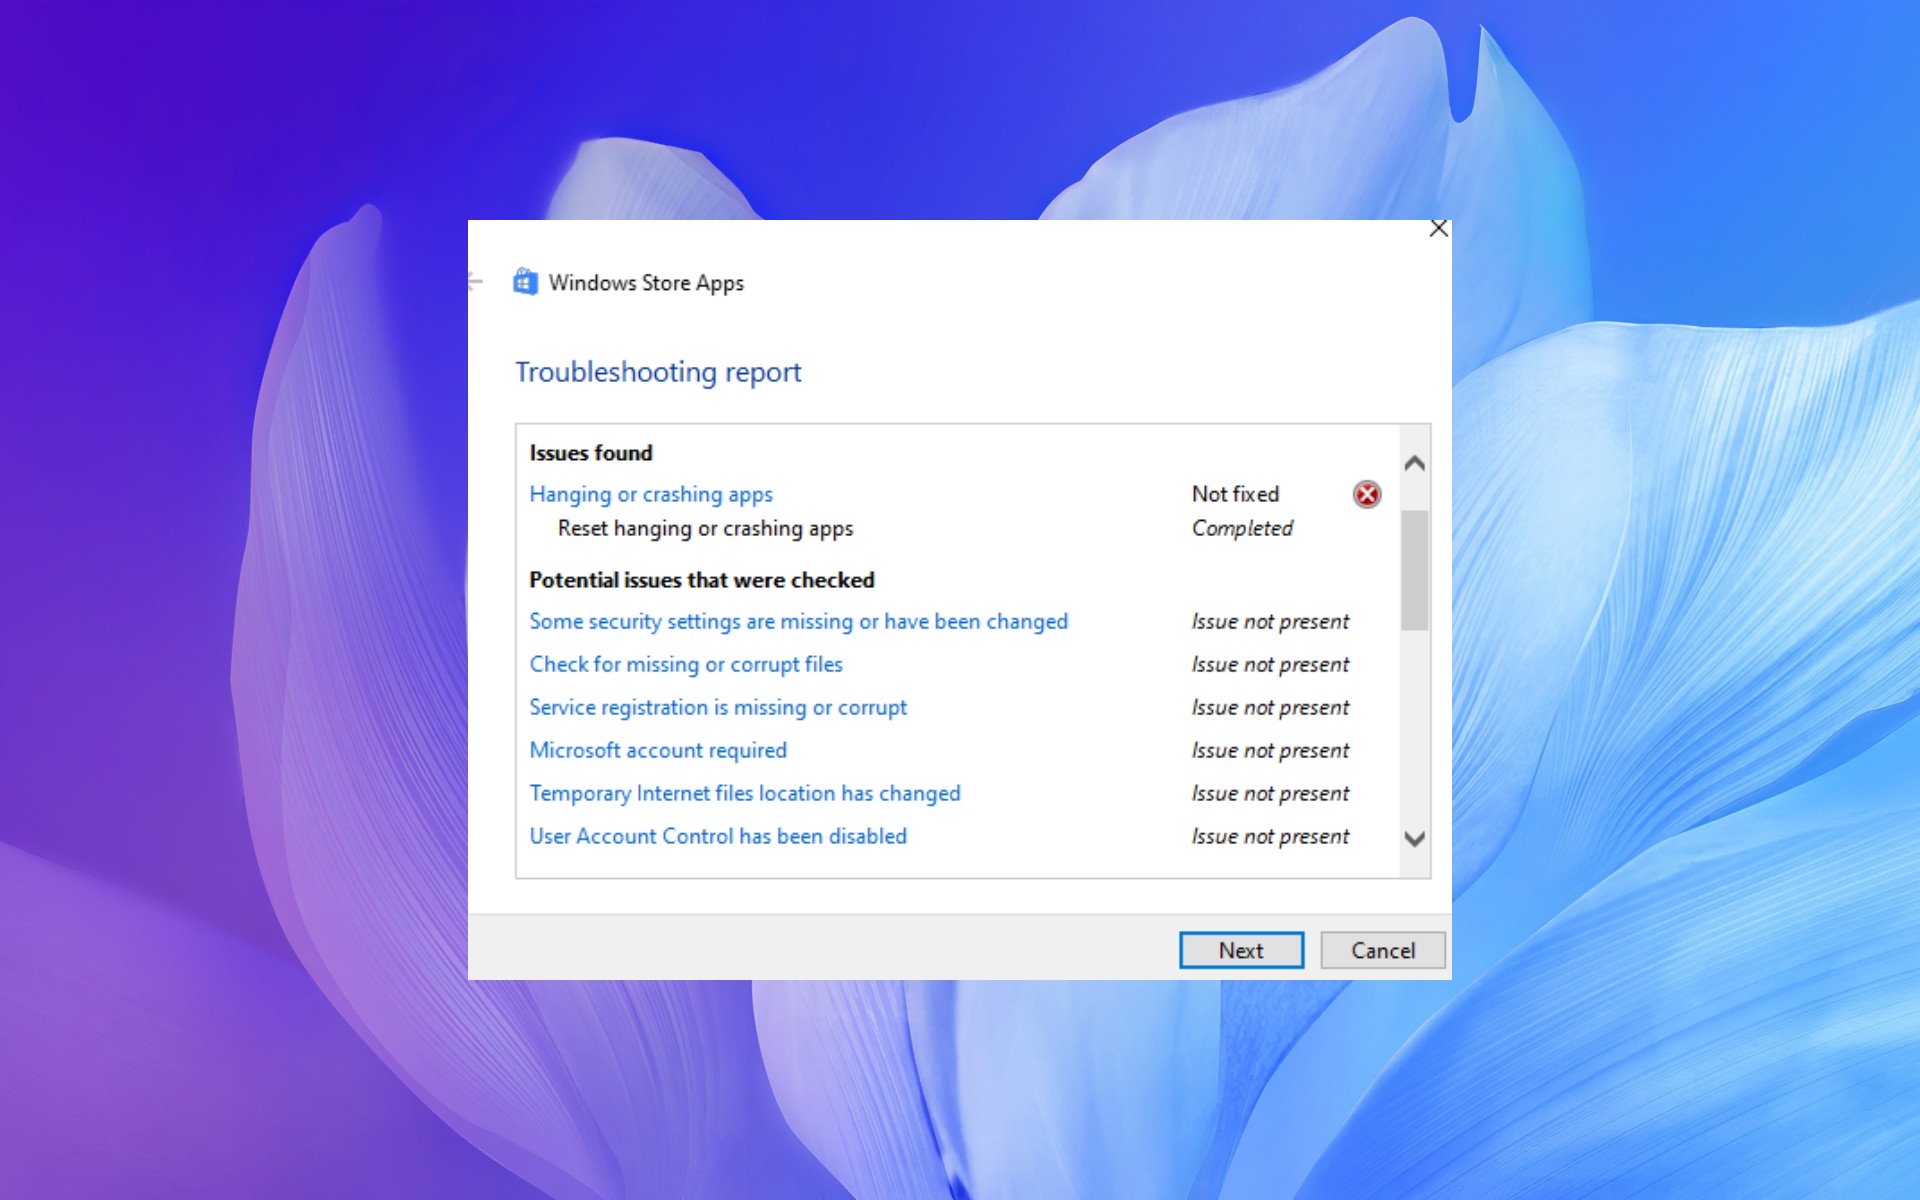
Hanging or Crashing Apps: 6 Ways That Can Fix Them

Multiple users say that starting the troubleshooter for a program didn’t help them fix hanging or crashing apps issue on their PC.

If you are also experiencing Windows troubleshooter hanging or crashing apps issues on your Windows 11 PC, then you are at the right place.

If you want to learn more about crashing programs on Windows and how to fix them, we have a special guide dedicated just to that.

Why can’t Windows troubleshooter fix hanging or crashing apps?

There are a few common reasons behind the Windows troubleshooter hanging or crashing apps problem:

  • Your PC is missing some important files – If some important system files get corrupted or go missing, then you would come across such issues and you need to take immediate action.
  • You haven’t updated your PC – You should keep your PC up to date in order to fix the bugs or glitches present in your PC because of the previous update.
  • The app itself is buggy – There are chances that the app that you are having trouble with is faulty and not your PC.
  • There is some issue with the Microsoft Store – Since this issue is popping up on apps downloaded from the Microsoft Store, it could be an issue with the Store itself. Here is how you can fix issues with the Microsoft Store.
  • Your PC is infected by a virus or malware – A virus or malware could very well affect the smooth performance of your PC. Check out some of the best antivirus software that you can get for your Windows 11 PC to keep it protected.

Now that you are aware of some of the common reasons that could trigger the Windows troubleshooter hanging or crashing apps problem, check out the easiest ways to resolve it.

What can I do if the Windows troubleshooter is hanging or crashing apps?

  • There might be a temporary error or glitch that is causing the issue, which can be fixed by a simple restart.
  • A clean install could help you restore important files for the program that might have gone missing.
  • If the issue is from Windows’ end, then the best way to fix it is to install the latest Windows update as it might have brought a bug fix that gets rid of the error.

1. Perform SFC and DISM scans

  1. Press the Windows key on your keyboard to open the Start menu.
  2. Search for Command Prompt and open it as an administrator.
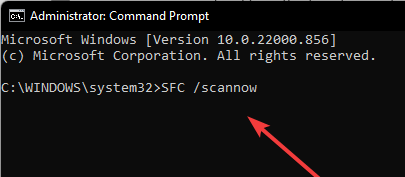
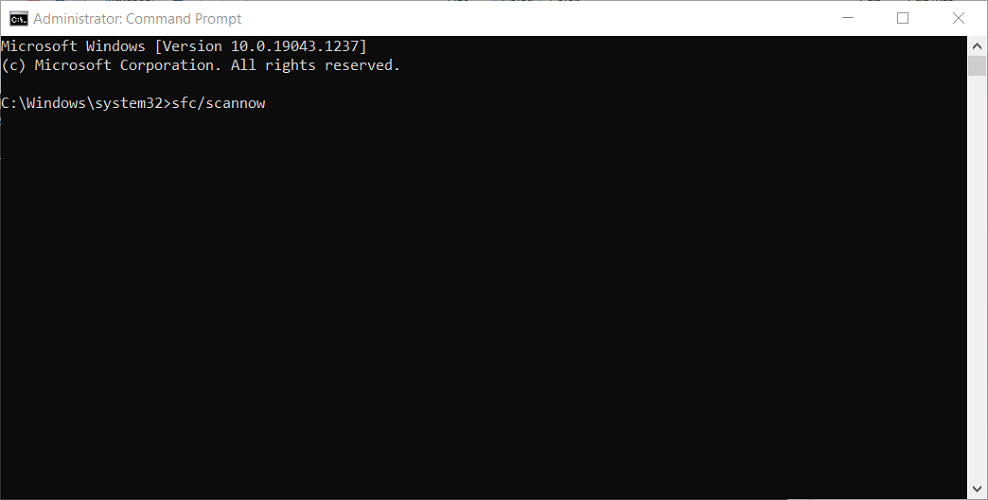
  3. Type the below command and press Enter: sfc /scannowsfc scan command in command prompt
  4. Wait for the process to complete.
  5. After that, type the below command and press Enter: DISM.exe /Online /Cleanup-image /Restorehealthdism

You can also use an automated solution to perform an in-depth scan of your device to find broken components.

2. Reset Microsoft Store

  1. Press the Windows key on your keyboard to open the Start menu.
  2. Search for Command Prompt and open it as an administrator.
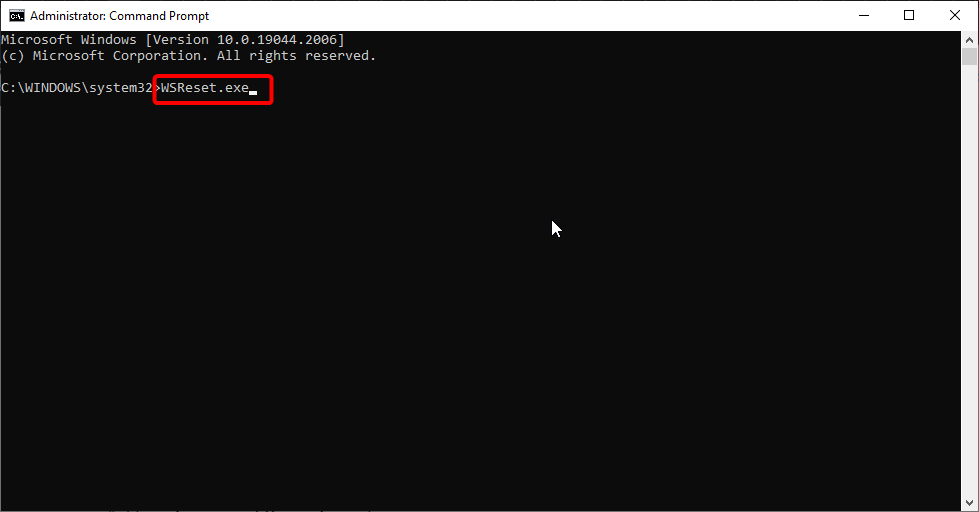
  3. Type the below command and press Enter: WSReset.exewsreset

WSReset is a troubleshooting tool or a command that is used to reset or clear the Microsoft Store. It does not affect or change your account settings or delete installed apps.

Moreover, it is an executable file located in the C:\Windows\System32 directory. Try running the command and check if this fixes the issue or not.

3. Check the time and date

  1. Press the Windows button to open the Start menu.
  2. Search for the Date and time and open the appropriate option.
  3. Make sure the Set time automatically toggle is set to on.
  4. Also make sure that under Time zone, the correct time zone for your country is selected.
  5. Once selected, hit the Sync now button.

4. Re-register Store apps

  1. Press the Windows key on your keyboard to open the Start menu.
  2. Search for PowerShell and open it as an administrator.
  3. Type the below command and press Enter: Get-AppXPackage | Foreach {Add-AppxPackage -DisableDevelopmentMode -Register "$($_.InstallLocation)\AppXManifest.xml"}
  4. Let the command complete its process.
  5. Close Windows PowerShell and check if this fixes the issue or not.

5. Clear Microsoft Store cache

  1. Open File Explorer.
  2. Hit the View button at the top menu, select Show, and click on Hidden items.
  3. Navigate to this path: C:\Users\:your username:\AppData\Local\Packages\Microsoft\WindowsApps\Microsoft.WindowsStore_8wekyb3d8bbwe\LocalCache
  4. Delete the LocalCache folder.
  5. Restart your PC and check if this resolves the issue or not.

6. Reset your PC

  1. Press Windows + I buttons to open Settings.
  2. Select System from the left side.
  3. Click on Recovery on the right.
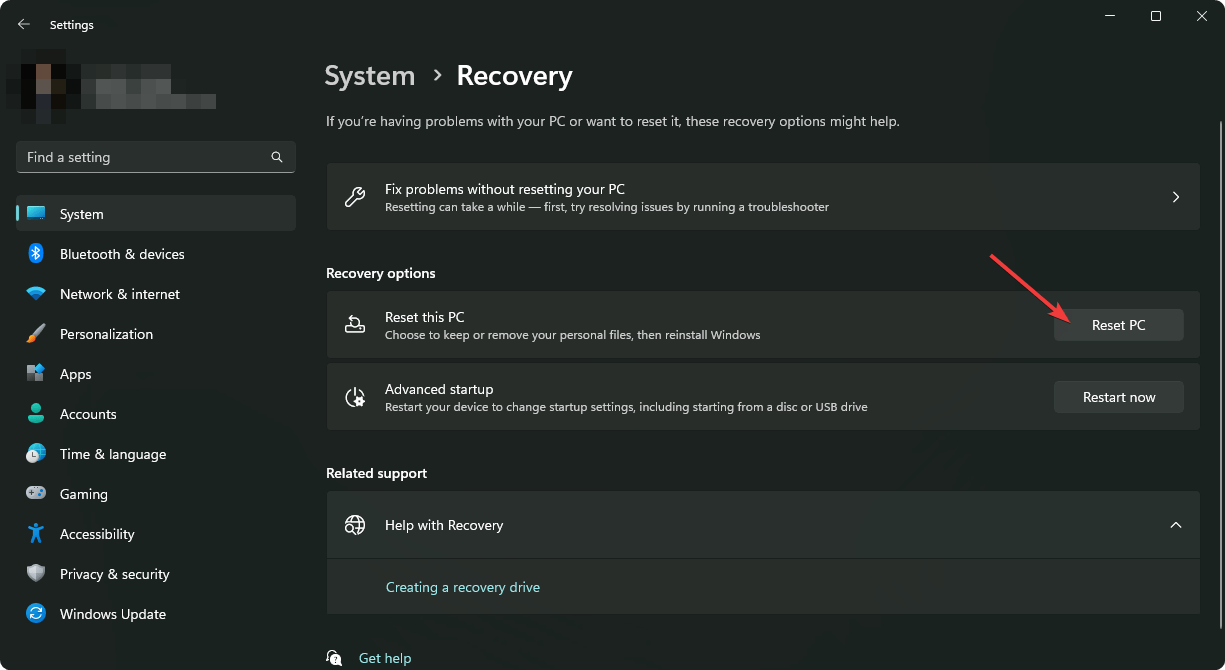
  4. Under Recovery options, hit the Reset PC button.clicking reset PC win11 settings
  5. Choose the option to Keep my files.keep files dism error 1392
  6. Follow the on-screen prompts and complete the reset process.
  7. Once done, try using the problematic app and check if this fixes the issue or not.

Resetting your PC will replace all the corrupt or missing system files and will bring your PC back to a state where everything was running smoothly.

It is also advised that you should keep your copy of Windows up to date with the latest version available. You can check out our guide if you are having issues with Windows update not working.

You can also try creating a new user account and loading the program using that account. If there is no issue with the newly created account, then you can go ahead and delete the previous account.

Well, if nothing works, then as a last resort, you can go ahead and install a fresh copy of Windows 11. We have a guide that guides you on how you can install Windows 11.

Let us know in the comments below, which one of the solutions helped you resolve the Windows troubleshooter hanging or crashing apps problem.

Windows 11 Dump File Location: How to Easily Find it

Windows 11 dump file location is one of the first things you’ll need to know when troubleshooting a system crash or Blue Screen of Death. These files are snapshots of your computer’s memory at the time of failure, and they can point you straight to the cause of the problem, whether it’s faulty drivers, bad hardware, or a software conflict. In this guide, we’ll show you where to find them, the types of dump files Windows 11 creates, and how to read them so you can get your PC back in working order.

What is a BSoD dump file in Windows 11?

In simple terms, the BSoD dump file is a log file of your PC’s memory at the time it experienced the BSoD error.

This crash file contains information about what exactly was in your computer’s memory before it crashed and could help you locate the possible reason that caused the error in the first place.

There are basically three types of memory dump files:

  • Complete memory dump – It contains all the information of your PC’s physical memory at the time it crashed. A complete memory dump is the most ideal dump file for troubleshooting errors.
  • Automatic memory dump – By default, your Windows 11 PC is set to Automatic memory dump, which contains basic information such as loaded drivers, kernel info, and processes.
  • Small memory dump: Small memory dumps or minidump contains the kernel stack information for the thread that caused the particular crash.

How can I find the Windows 11 BSoD dump file?

  1. In your homescreen, right-click on This PC and select Properties.
  2. Under Related links, select Advanced system settings.
  3. Click on Settings under the Startup and Recovery section.
  4. If under Write debugging information is selected as Automatic memory dump, then you need to select Complete memory dump for the dump file that contains all information for troubleshooting.
  5. The memory dump file is typically located in %SystemRoot%\MEMORY.DMP with system root is typically C:\Windows.
  6. You can locate the Small memory dump or Minidump file in %SystemRoot%\Minidump location.

How can I read the Memory.DMP file in Windows 11?

  1. Visit the official Microsoft WinDbg download page.
  2. Hit the Get in Store app button.
  3. Click on the Open Microsoft Store button in the dialogue box that appears.
  4. Click the Get button.
  5. Once the installation is complete, click on Open.
  6. Click on File.
  7. Select Start debugging and then click on Open Dump file.
  8. Locate the dump file in the folder %SystemRoot%\MEMORY.DMP which is usually found in the C Drive.
  9. Click Open.
  10. Do note that opening the dump file may take some time. So, you need to wait.
  11. In the run command, type the below and press Enter: !analyze -v
  12. The process will start and you can keep an eye on the progress bar to know when the process will be complete.
  13. After completion, the WinDbg will show you the results, and based on that you can take further troubleshooting steps.

You can review the dump file, and as you go through it, you will also find more information. Notably, the FAILURE_BUCKET_ID and MODULE_NAME are the ones where you need to keep an eye out, which could indicate what is causing the problem.

While this report can be overwhelming for regular users, as it is not meant for them, you can always take cues from the report or search the hints mentioned in the report and search it over the internet to get help online.

If you have BSOD issues with your system, you should consider employing the help of specialized tools that allow you to clean your computer and replace any broken system files.

How to delete system error dump files in Windows 11?

Use Windows Settings

  1. Press the Win + I buttons to open Settings.
  2. Click on System then select Storage.
  3. Click on Temporary files.
  4. Check the box for the System error memory dump files option.
  5. Hit the Remove files button.

Use Disk Cleanup

  1. Press the Windows button to open the Start menu.
  2. Search for Disk Cleanup and open it.
  3. Select the drive where the system dump file is located and press OK.
  4. Click the Clean up system files option.
  5. Check the box for System error memory dump files.
  6. Hit the OK button.

Use Command Prompt

  1. Press Windows button to open the Start menu.
  2. Search for Command Prompt and click on Run as administrator option.
  3. Type the below command and press Enter: del /f /s /q %systemroot%\memory.dmp

If you are coming across BSoD error, and want to fix it without going through the fuss of manually doing it, then you can check out our guide that lists some of the best BSoD fixers for Windows 11.

Moreover, before going ahead and fixing the problem, it is very important to know the root cause of it. If you want some behind-the-scenes knowledge on what causes BSoD error, then you can check out this article including the main BSoD causes.

That is it from us in this guide. Let us know in the comments below if you were able to locate the system crash memory dump file on your Windows 11 PC.

Windows 11 Apps Not Opening: 7 Steps to Fix it

We have all got a bunch of apps installed on the PC for various tasks, and most perform one critical function or the other. However, many users have reported that Windows 11 apps are not opening, no matter how many times they try.

Unsurprisingly, this erratic behavior can be traced back to previous OSs, and it’s still not uncommon to struggle with apps that won’t open in Windows 10.

Why do programs not open when I click on them?

There are a few issues that would lead to apps not opening on the computer after you install Windows 11. They include:

  • An older version of the app is installed – If Windows 11 apps are not loading after the upgrade, it likely points to incompatibility. Updating the app should do the trick here.
  • Critical services not running– There are certain services that need to be running for apps to work, in the absence of which, these may crash.
  • Presence of malware or virus – A malware or virus is often found to be the reason why a Windows 11 application is not opening.
  • A bug in the installed version of Windows – In some cases, the installed version has a bug that triggers the error and leads to Windows 11 apps not responding or crashing.
  • Issues with the user account – A corrupt user account seemed to have affected most users, and creating a new user profile worked. Also, it could be the reason why games not opening in Windows 11.

Speaking of the error, here are a few possible situations you may find yourself in:

  • Windows 11 default apps not working – If there were issues with the installation, the default apps might not work.
  • Windows 11 apps not opening from Taskbar – Many users reported that they couldn’t open the apps pinned to the Taskbar. In this case, try opening it directly from the launcher.
  • Windows 11 apps open, but not visible – This is usually due to misconfigured graphics settings or running an outdated driver. Updating the graphics driver should work.
  • Windows 11 Settings not opening – It is a common issue reported by many and includes both, the Settings app crashing or not opening in Windows.

Why are none of my Microsoft apps working?

If apps downloaded from the Microsoft Store are not working, it could be a problem with the Microsoft Store, and resetting its cache usually work.

In case of wondering Why are all my programs not responding?, note that it points to a critical issue with the hardware. You should check the RAM and CPU.

Also, certain third-party apps are known to trigger conflicts and cause all programs to stop responding. Besides, the presence of malware or virus is just as likely to be the underlying cause here.

What can I do if Windows 11 apps are not opening?

Here are a few quick tricks and workarounds that may work, and it’s recommended that you try these first:

  • Restart the computer.
  • Make sure you are running the latest version of Windows 11. If not, update the OS.
  • Scan the PC for malware with the built-in Windows Security or an effective third-party antivirus.
  • Launch the Task Manager and verify that your PC has sufficient free resources to run apps.
  • Check for overheating.
  • Disconnect all non-critical peripherals, including external microphone, speaker, and printer, amongst others.

If these don’t work, the following definitely would.

1. Terminate all app-related process

  1. Press Ctrl + Shift + Esc to open the Task Manager, and locate all processes for the app that’s not opening or responding.
  2. Right-click on each process and select End task from the context menu.end task to fix windows 11 apps not opening
  3. After all the processes have been terminated, relaunch the app.

This method has worked for a few users, particularly those who reported that Discord is not opening.

2. Update the app

Note icon NOTE
If the problematic app has been downloaded from the official website or a third-party source, check the built-in app settings for the option to update. In case you can’t find one, check the FAQ section. For apps downloaded and installed from the Microsoft Store, follow the steps listed below to update.
  1. Press Windows + S to launch the Search menu, enter Microsoft Store in the text field, and click on the relevant search result.Launch Microsoft Store to update apps
  2. Click on the Library icon near the bottom-left corner.Open Library to view the installed apps
  3. Next, click on Get Updates to download any available updates for the apps.Download the available updates for apps not working
  4. Wait for the updates to download and install.Wait for the installation to complete

Running an older version may also lead to Windows 11 apps not opening on your PC. Hence, it’s recommended that you update the app as soon as a newer version is launched.

3. Repair/reset the Windows 11 apps that won’t open

  1. Press Windows + I to launch Settings, and select the Apps tab.Select Apps tab in Settings
  2. Click on Apps and features to view the apps installed on your computer.Apps & features
  3. Locate the app that you are facing trouble launching, click on the ellipsis next to it, and select Advanced options.Locate the Windows 11 app that won't open
  4. Click on Repair under Reset and wait for the process to complete. It would take a few moments.Repair the app that won't open
  5. Click on Reset, if the Repair button is not accessible or repairing the app didn’t fix the problem.Reset the app that won't open
  6. Again, click on Reset in the pop up that appears.Confirm reset

Repairing an app is a simple yet effective way of fixing issues affecting its functioning. And the best part, it does not affect the stored data, thereby ensuring that you don’t lose any.

Resetting, however, will delete any stored data and changes you made to the app setting. Thus, it should be your secondary approach in case repairing doesn’t work. After repair/reset, check if the Windows 11 apps finally open if they were not opening earlier.

4. Reinstall the app that won’t open in Windows 11

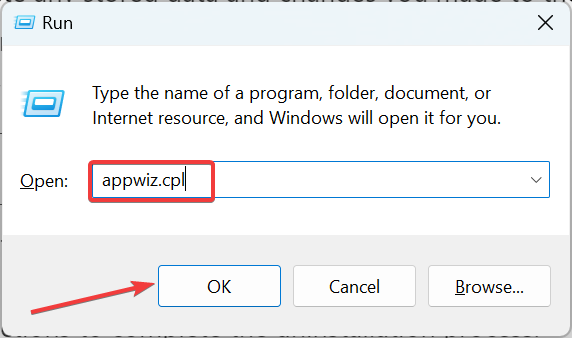
  1. Press Windows + R to open Run, type appwiz.cpl and click OK.appwiz.cpl
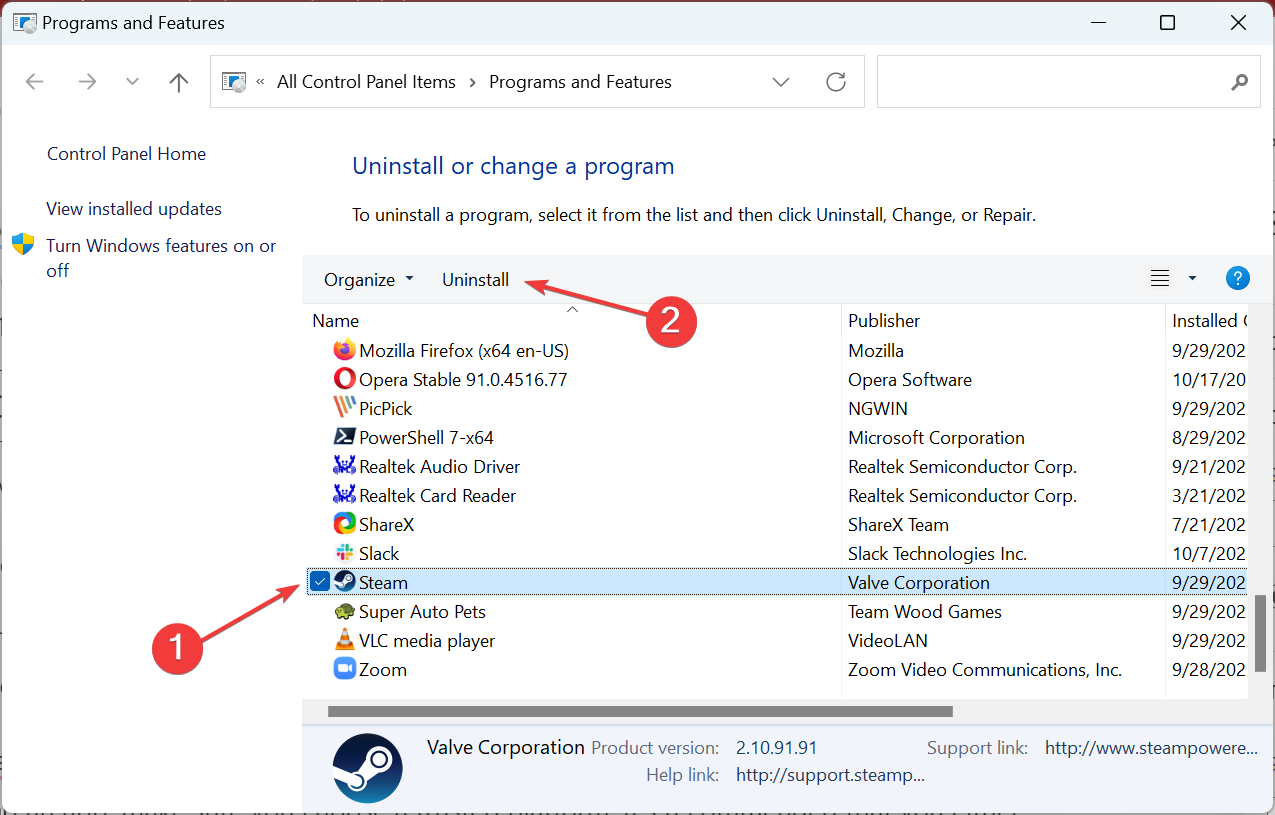
  2. Locate and select the problematic application, and then click on Uninstall.uninstall to fix windows 11 apps not opening
  3. Now, follow the on-screen instructions to complete the uninstallation process.

If none of the methods listed above have fixed the issue, the problem may lie with the app itself, one that could not be resolved by either repairing or resetting it. In which case, you will have to reinstall it. Make sure to do that from the official source.

5. Run the critical services

  1. Press Windows + R to launch the Run command, type services.msc, and click on OK.Launch the Service app
  2. Locate and double-click on the Application Identity service. Open service properties
  3. Check the Service status. If it stays Stopped, execute the other steps listed here. In case it reads Running, head to the next fix.Check service status
  4. Click on Start under Service status to run the service.Start the service
  5. Click on OK to save the changes.Save changes
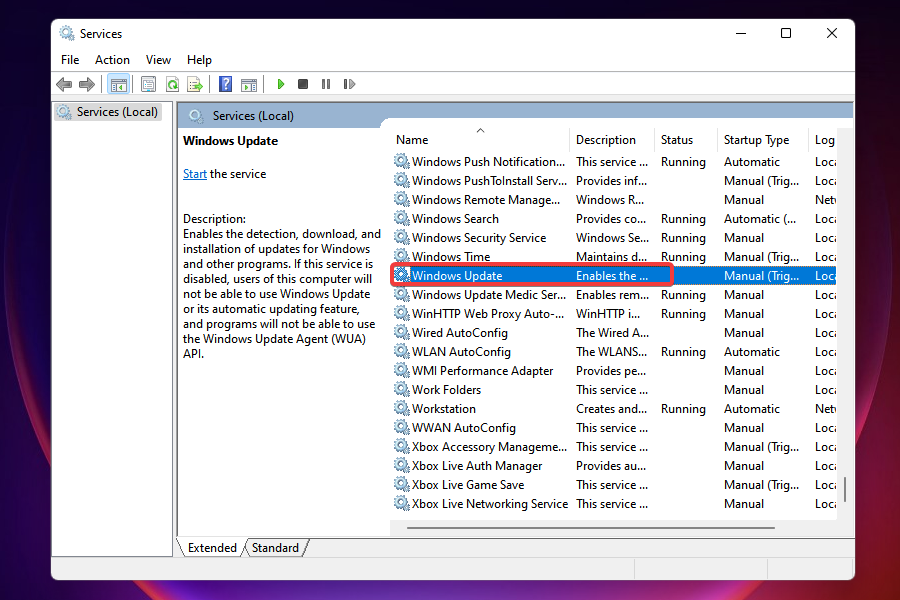
  6. Similarly, run the Windows Update service.run Windows update service

After starting the Application Identity and Windows Update services, the Windows 11 apps not opening earlier shouldn’t throw any more issues.

6. Modify the Registry

Note icon NOTE
Modifying the Registry is a critical process, and any lapse on your end can affect the functioning of the computer. Therefore, we recommend that you follow the steps listed here as is without making any other changes.
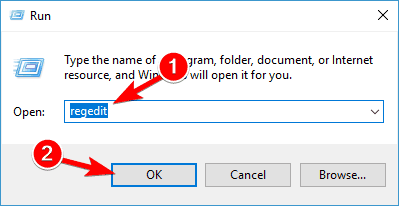
  1. Press Windows + R to launch Run, type regedit in the text field, and click on OK.Launch registry editor
  2. Click Yes on the UAC prompt that appears.
  3. In the Registry, paste the following path into the address bar at the top and hit Enter: HKEY_LOCAL_MACHINE\SOFTWARE\Microsoft\Windows\CurrentVersion\Policies\SystemNavigate to the path
  4. Locate and double-click on the FilterAdministratorToken key.
  5. If the key doesn’t exist, right-click on the empty space, hover the cursor over New, and select DWORD (32-bit) Value from the context menu. Name the key as FilterAdministratorToken.Create new key
  6. Right-click on the key and select Modify from the context menu.Modify key
  7. Enter 1 under Value data and click on OK to save the changes.Modify value data
  8. Close the Registry and restart your PC.

7. Create a new user account

Most of you would have been able to fix the issue with the methods listed earlier. However, if it persists, you are left with no option but to create a new user account.

In some cases, the current user account may corrupt, leading to various issues, including one where the apps are not opening in Windows 11.

For user accounts, you have two options, either log in with a Microsoft account or create a new local account. Both have their sets of pros and cons, and choosing one is an individual decision based on your requirements.

The above methods are likely to fix the issue when apps are not opening in Windows 11. If they don’t, you can perform a system restore, and in case nothing else works, reinstall Windows 11.

Also, if you recently upgraded, roll back to the previous iteration when facing issues with the OS, though the option is available for a limited period.

Besides, if you were wondering how to force open an app on Windows 11 every time it boots, simply add it to the Startup folder. Before you go, don’t forget to check our guide on Settings app not opening on Windows 11 for more solutions.

Let’s know which solution worked for you in the comments section below and whether the problem was limited to a single app or all of them.

Fix Programs Closing by Themselves in Windows 10 [5 Steps]

After certain Windows 10 updates, many users have reported that apps open and close immediately.

When Windows 10 apps are not opening, it points to a deeper problem that needs to be identified and eliminated. Also, for many, it is only the Microsoft Store apps that open and close immediately.

Why are my applications randomly closing?

Here are some of the reasons why you are encountering the issue:

  • Third-party apps creating conflicts – Several third-party apps and processes have been found to conflict with the functioning of the OS and cause other apps to crash.
  • Corrupt system files – A major reason behind apps crashing in Windows and a few scans should get things running.
  • Issues with the user profile – Corrupt user profile can cause a range of issues, including programs closing by themselves.
  • Bugs in the last installed version of OS – Oftentimes, it was a bug in the recently installed version of OS that caused the problem. Apply the below procedure for Windows 10 or check this guide on how to uninstall an update on Windows 11 if you are using this OS.

How do I stop apps from closing in Windows?

Let’s first try a few quick checks that have worked for users.

  • If this is the first time you are encountering this problem, restart the computer. In many cases, it was a one-off issue and didn’t appear again.
  • Try logging in with another user profile, preferably an Administrator account.
  • Check for overheating.
  • Make sure the RAM is properly seated.

If these methods didn’t work, the next few solutions surely would.

1. Disable and uninstall Asus GPU Tweak 

  1. To fix the Microsoft apps close immediately issue, click the System Tray icon, right-click on Asus GPU Tweak 2/3, and choose Close/Exit.
  2. After closing it, relaunch any app on your PC and check if it stays open without any issues. 

If the problem seems to have disappeared, you should uninstall Asus GPU Tweak.

Uninstall Asus GPU Tweak 

  1. Press Windows + R to open Run, type appwiz.cpl in the text field, and click OK.appwiz.cpl to fix windows 10 apps open and close immediately
  2. Locate the Asus Tweak GPU app and click Uninstall.
  3. Follow the on-screen instructions to complete the process.
  4. Once done with the uninstallation, restart the computer.

The Asus GPU Tweak app has been reported to conflict with other Windows apps, and because of it, your game opens and closes immediately in Windows 10.

Keep in mind that other apps, too, can cause this problem, so you might have to remove them as well. To make sure that an application is completely removed, we suggest using a dedicated utility such as CCleaner.

CCleaner is a tool that specializes in cleaning junk files, finding and uninstalling old and unused apps, and scanning your computer deeply for other errors.

CCleaner

Give your system the cleaning it deserves to keep it in top shape.
Free Trial Visit Website

2. Disable startup apps

  1. To fix the Office apps close immediately after opening issue, press Ctrl + Shift + Esc to open the Task Manager, and head to the Startup tab.task manager
  2. Locate every single program that reads Enabled under the Status column, select it, and then click on Disable.disable startup apps to fix windows 10 apps open and close immediately
  3. Once done, restart the computer.

If Windows 10 apps open and close immediately on startup, it could be one of the other startup apps that caused the issue. So, disable every one of these and check if the problem is resolved.

3. Boot in Safe Mode

    The Safe Mode would provide you with an optimal environment to troubleshoot the problem.

    1. Press Windows + I to open Settings, and click on Update & Security.
    update & security
  1. 2. Navigate to the Recovery tab, and click on the Restart now button under Advanced startup.

    get started to fix windows 10 apps open and close immediately
  2. 3. Click on Troubleshoot.

  3. 4. Select Advanced options.

    advanced options
  4. 5. Now, choose Startup Settings.

    startup settings to fix windows 10 apps open and close immediately
  5. 6. Click the Restart button.

    restart to fix windows 10 apps open and close immediately
  6. 7. You will now find display multiple boot options. Press either 4–6 or F4–F6 to boot into the desired Safe Mode.

    safe mode to fix windows 10 apps open and close immediately

Once in Safe Mode, launch any app on your PC and check if programs are closing by themselves issue in Windows 7/10/11 is gone.

Also, you can also safely uninstall the problematic app causing the error in Safe Mode if it wasn’t possible earlier.

4. Uninstall the latest Windows update

  1. To fix the Windows 10 apps open and close immediately issue, press Windows + I to open Settings, and click on Update & Security.update & security
  2. Click on View update history.view update history to fix windows 10 apps open and close immediately
  3. Choose Uninstall updates.uninstall updates to fix windows 10 apps open and close immediately
  4. Now, select the last installed update, and then click Uninstall.uninstall to fix windows 10 apps open and close immediately
  5. Click Yes in the confirmation prompt.confirm change

Do note that you will have to disable Windows 10 updates to stop these from installing automatically until a newer version with a patch is released. And once it’s available, go ahead and install it.

5. Reinstall Windows

When nothing else works, you have no option but to reinstall Windows 10. We recommend creating a bootable USB drive using Rufus and then installing the OS through it.

A clean install is usually the best choice since new Windows files are installed, and everything on the PC is wiped clean. For most users, reinstalling Windows 10 is what finally fixes things when apps open and close immediately.

Alternatively, if a virus is closing programs automatically, check out how to recover your computer after a malware infection.

That’s all the solutions you will ever need to eliminate the problem, and it should certainly be fixed by now.

Also, find the best software to install on Windows 10 and improve your work efficiency.

If the solutions from this guide helped you fix the issue, let us know in the comments below.

The Display Settings Could Not be Saved [Error Fix]

Display-related issues are undoubtedly the most annoying because of the many problems users are prone to discover while dealing with the Windows 11 operating system.

Many of us are unfortunate enough to run into display issues or binging our favorite shows in the middle of work.

However, we are always here to help with such problems, so don’t worry. And, if your PC shuts down instead of sleeping, you will also find that answer here.

We also have a guide that covers autorun.dll errors on Windows 10/11, just in case you or one of your friends need such knowledge.

Why weren’t my display settings saved?

Don’t worry, we’re not talking about any severe or system-breaking bugs, so your PC is not even close to becoming bricked or unusable.

However, the causes triggering The display settings could not be saved and have to be dealt with swiftly to avoid future unpleasant surprises.

And before we get into how we can fix this, let’s see exactly what triggers it:

Now that we know what causes this erratic behavior let’s get to why we are here and find out how we can eliminate this problem.

How can I fix the display settings could not be saved error?

1. Change the display resolution

  1. Press Win + I to access Settings.
  2. Select the System tab, then click on Display.display settings
  3. Select the desired resolution, then close the Settings window.windows 11 resolution

2. Update the graphics driver

  1. Search for Device Manager and open the app.device manager
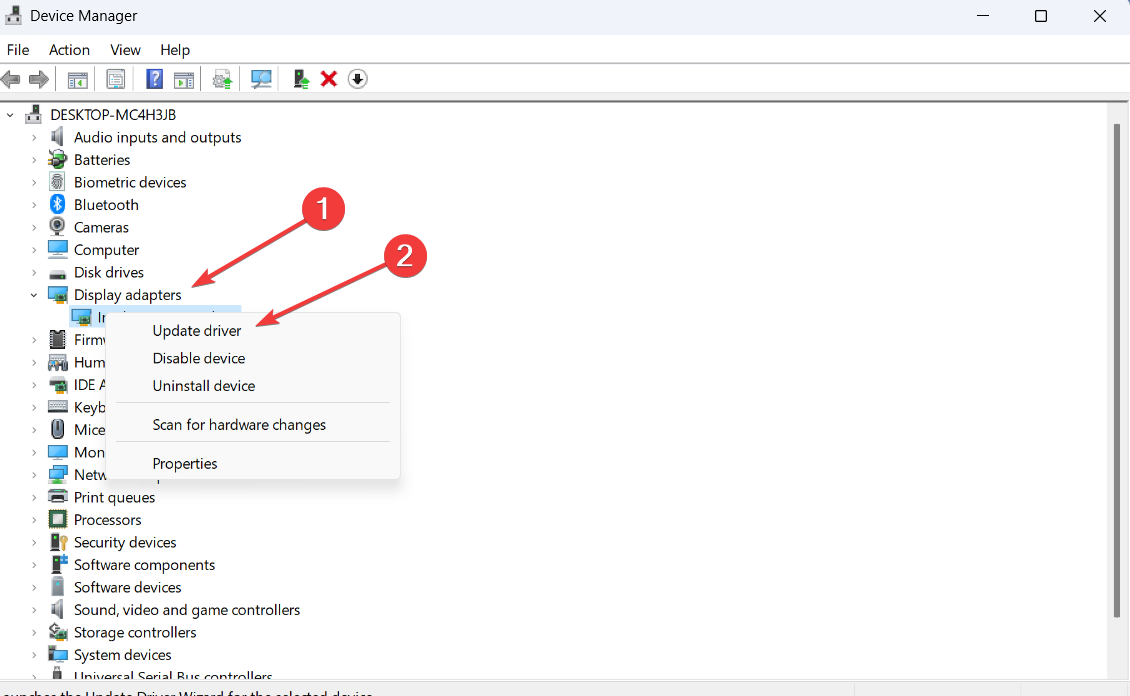
  2. Expand Display adapters, right-click the one you are using, then select Update driver.update display driver
  3. Select Search automatically for drivers.search automatically for display drivers

3. Change monitor order

  1. Press Win + I to access Settings.
  2. Select the System tab, then click on Display.display
  3. Click on Identify to display a number on each screen to identify which screen is primary and which is secondary.multiple displays
  4. Now click on the screen number you want to make primary, expand Multiple displays and then check the box next to Make this my main display.make this my primary monitor

4. Run the troubleshooter

  1. Search for cmd, then click Run as administrator to open Command Prompt with administrator privileges. cmd
  2. Type in the following command, then press the Enter button on your keyboard: exe -id DeviceDiagnosticcmd
  3. Click on Hardware and Devices troubleshooter, run the tool and restart your PC.

5. Reinstall the graphics card driver

  1. Search for Device Manager and open the app.device manager
  2. Expand Display adapters, right-click on the one you are using, then select Uninstall device.uninstall device
  3. Your PC will automatically search for the latest drivers and install them.

After reading this article, you will be much more prepared and knowledgeable when such a situation arises.

Remember that not all issues are as severe and need a clean reinstall for Windows 11. Sometimes, the most straightforward solutions are the most effective ones.

Leave a comment below if this simple guide has also helped you fix this annoying display issue for the latest Microsoft-designed operating system.

Windows Explorer is Slow: 8 Ways to Make It Fast Again

The good old File Explorer has been around for a long time and is still one of the few programs we integrate into our daily routines. Unfortunately, users have been complaining that Windows Explorer becomes slow and laggy on Windows 10 for some reason.

This can be frustrating, as it takes up to four or five minutes to load for some users. Fortunately, the issue can be fixed easily, as we will show in this guide.

Why is my Windows File Explorer so slow?

There are a series of reasons the Windows Explorer can be slow on Windows 10. Below are some of the popular causes:

  • Unavailability of enough free system resources – This is the main cause of apps and processes slowing down on PC. You may try to disable unnecessary startup apps and processes.
  • Activities of the Windows Explorer process – The Windows Explorer process in the Task Manager might be carrying out too many tasks. To restore normal service in this case, you need to restart the process.
  • Corrupt system files – Faulty or broken system files can affect your PC in different ways, including causing the File Explorer to be slow. You can fix this by running SFC and DISM scans to repair and restore these system files.
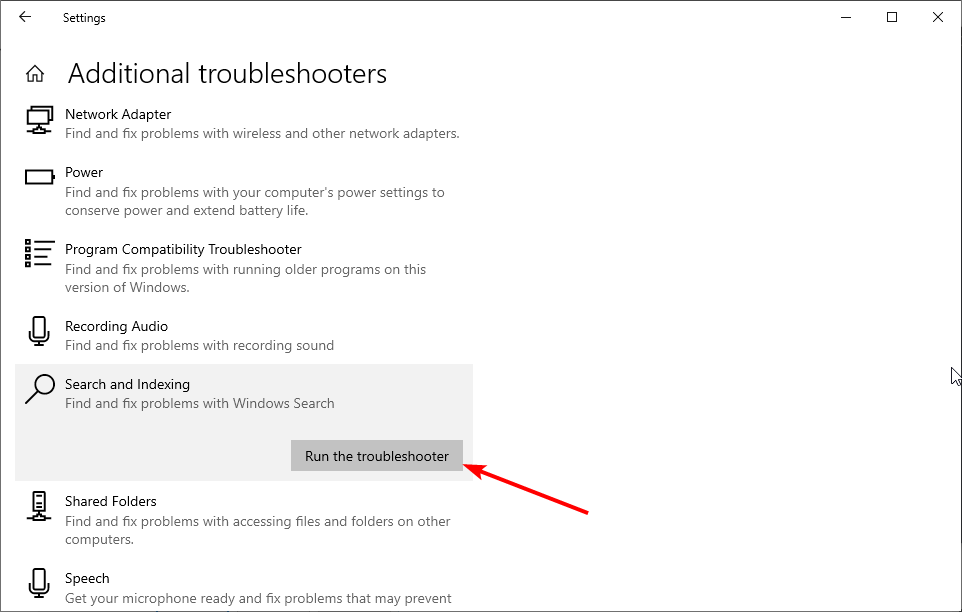
  • Issues with search and indexing – Sometimes, Windows Explorer is slow because of glitches with search and indexing on your PC. One way to solve the problem here is to run the appropriate troubleshooter.
  • Wrong folder optimization setting – In some cases, the folder that is causing Windows Explorer to be slow might be optimized for an unsuitable parameter. To make things run smoothly again, you need to change the folder optimization setting.

How do I speed up File Explorer?

1. Restart File Explorer

    If Windows Explorer is slow when loading with the green bar taking time to complete, it might be because it has run into some temporary issues. The easiest solution is to restart the process from the Task Manager.

    1. Press Ctrl + Shift + Esc on your keyboard to start Task Manager.
  1. 2. Once Task Manager starts, locate Windows Explorer and right-click it.

  2. 3. Choose Restart from the menu.

    file-explorer-slow-windows-10

Another solution that we strongly recommend is to install a dedicated third-party file manager which is designed to work fast on slow PCs.

We recommend WinZip in regards to its performant engine that optimizes the process and allows you to compress your files in several known formats.

2. Run the search and indexing troubleshooter

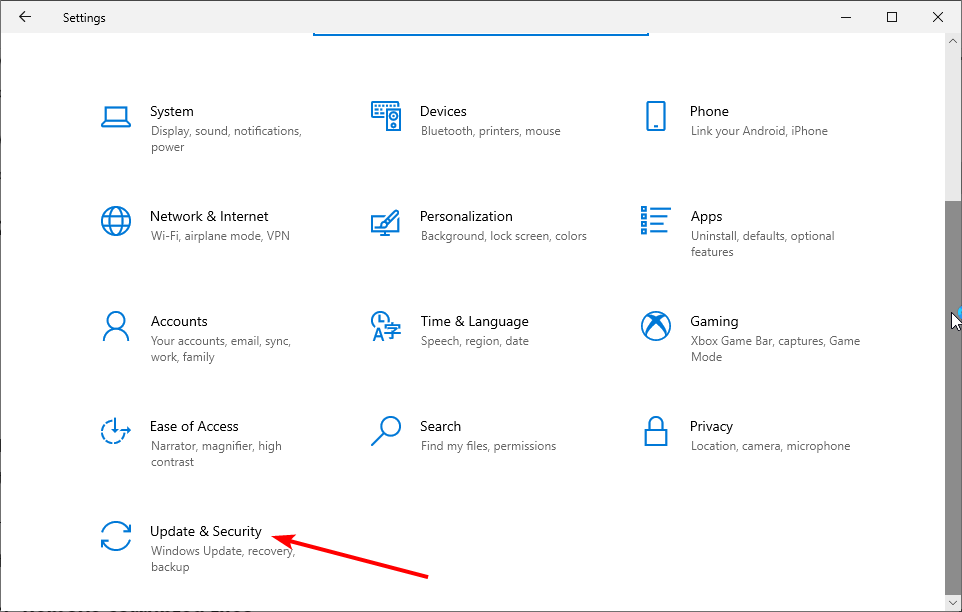
  1. Press the Windows key + I and select the Update & Security option.
    update and security windows explorer slow
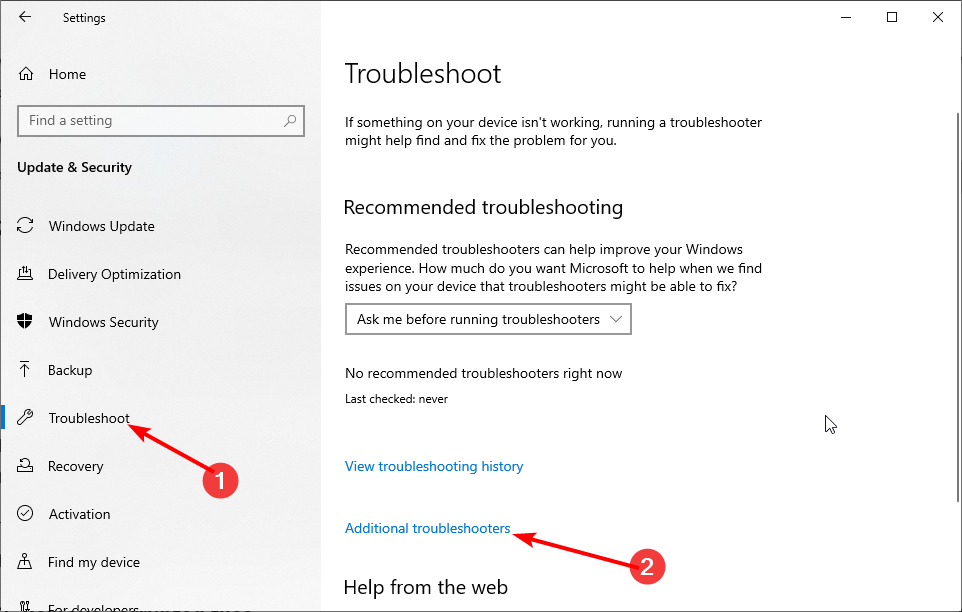
  2. Choose Troubleshoot in the left pane and click Additional troubleshooters in the right pane.
    troubleshoot windows explorer slow
  3. Select the Search and Indexing option and click the Run troubleshooter button.
    run troubleshooter
  4. Follow the simple onscreen instructions to apply the recommended fixes.

If the Windows Explorer is slow to copy files after an update or you are having trouble tracing the cause of the issue, it is recommended to run the search and indexing troubleshooter.

This will detect and recommend any issue that might be causing problems with the indexing and loading of files in Explorer.

3. Remove corrupted files

  1. Press the Windows key + S, type cmd, and click Run as administrator under Command Prompt.
  2. When Command Prompt starts, type the command below and hit Enter. sfc/scannow
  3. Wait for the scan to complete.
  4. If SFC scans fails, type the commands below and hit Enter after each: DISM /Online /Cleanup-Image /CheckHealth DISM /Online /Cleanup-Image /ScanHealth DISM /Online /Cleanup-Image /RestoreHealth
  5. Wait for the DISM to finish and try to perform the SFC scan again.

Corrupt or broken system files are part of the reasons Windows Explorer might be running slowly. Running the SFC and DISM scans should help you detect and repair the files. In case you require specialized support, there is an alternative method.

4. Disable unnecessary startup tasks

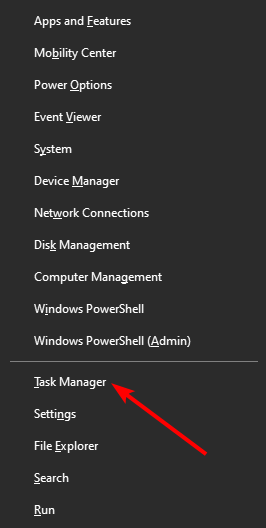
  1. Press the Windows key + X and select Task Manager.
    task manager
  2. Choose the Startup tab at the top.
  3. Right-click the unnecessary apps there and select Disable.
    disable windows explorer slow

Insufficient system resources is one of the reasons Windows Explorer might be slow when loading a folder on startup. To create enough resources for it, you need to disable the unnecessary startup apps. Also, close any app that you are not using at the moment.

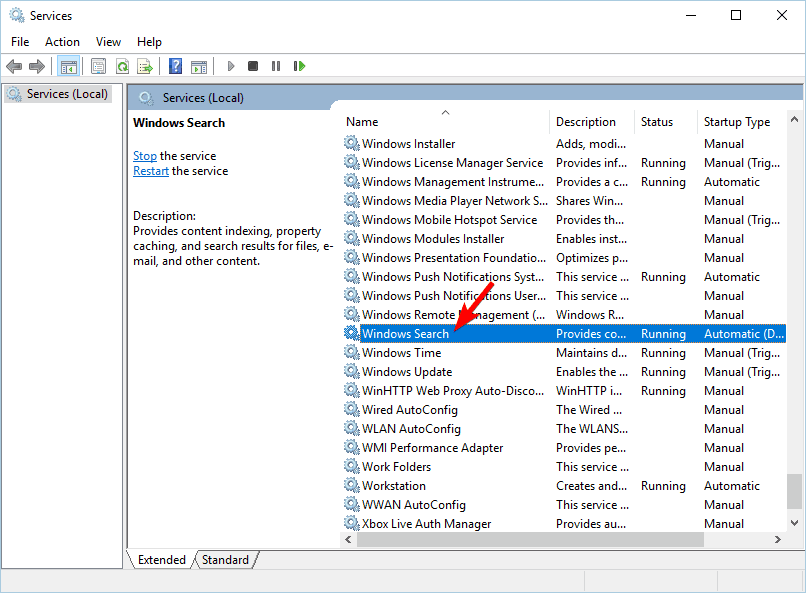
5. Disable the Windows Search service

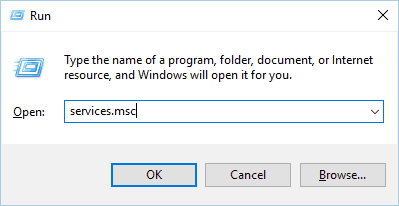
  1. Press Windows Key + R and enter services.msc. Press Enter or click OK.
  2. When the Services window opens, locate Windows Search and double-click it.
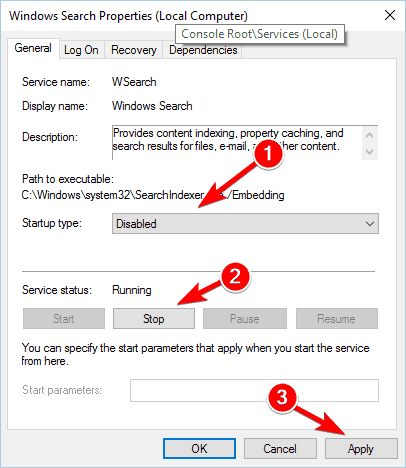
  3. Once the Properties window opens, set the Startup type to Disabled. If the service is running, click the Stop button to stop it.
  4. Now click Apply and OK to save changes.

Windows 10 uses all sorts of services in order to run, but sometimes certain services can cause problems. If File Explorer is slow on your PC, that might be due to the Windows Search service.

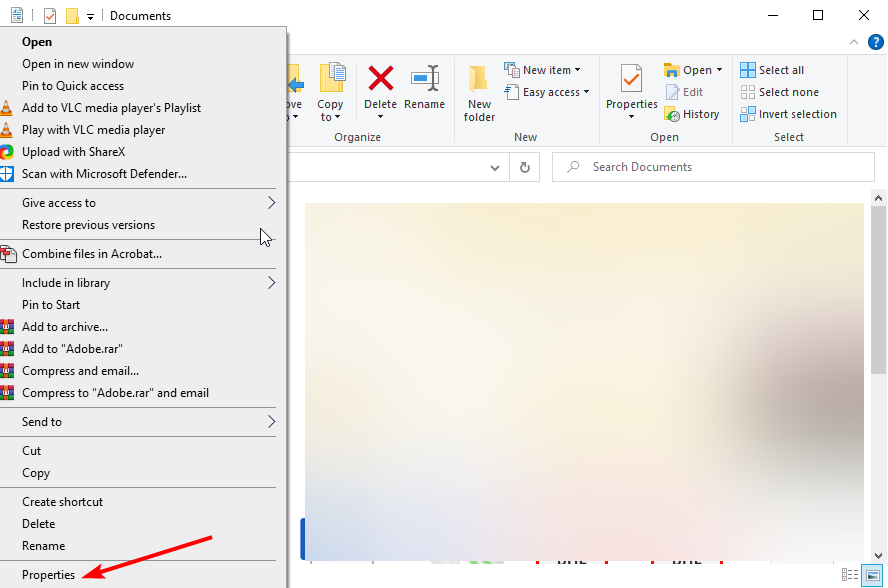
6. Change folder optimization

  1. Right-click the folder that’s slowing down File Explorer and Choose Properties from the menu.
    properties
  2. Go to the Customize tab and set Optimize this folder for to General items.
  3. Check Also apply this template to all subfolders.
  4. Click Apply and OK to save changes.

Windows 10 frequently performs optimization in the background, and that can cause File Explorer to be slow.

If Windows 10 File Explorer’s slow green bar is seen when trying to access a specific folder, you might want to change that folder’s optimization.

Note that if multiple folders are involved, you’ll have to repeat this solution for every affected item.

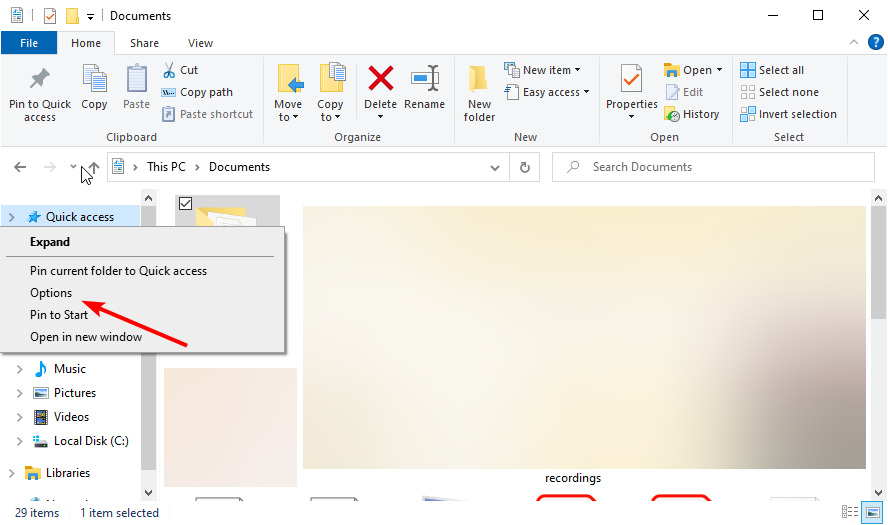
7. Check your Quick access list and clear File Explorer history

  1. Open File Explorer, right-click Quick access, and choose Options from the menu.
    options
  2. Under the General tab, change Open File Explorer to This PC.
    this pc windows explorer slow
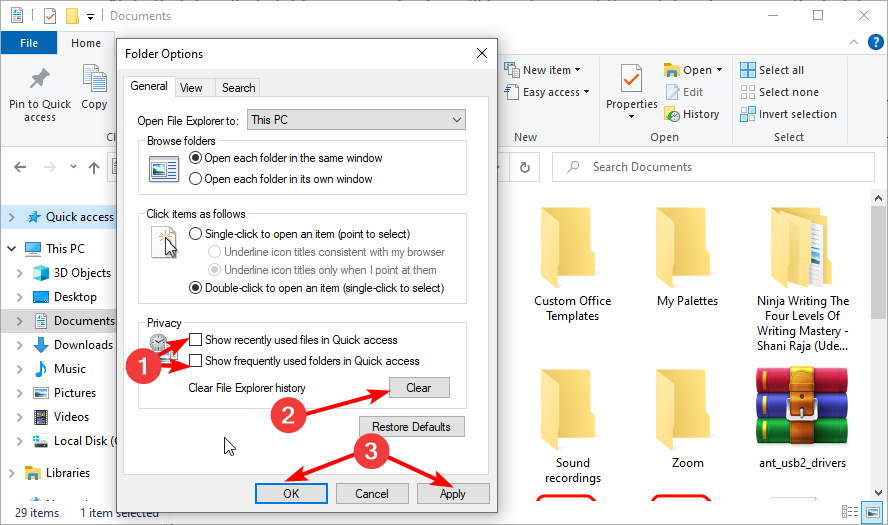
  3. Uncheck the two boxes under the Privacy section and click the Clear button to clear File Explorer history.
  4. Click Apply and OK to save changes.
    ok apply

If Windows Explorer is slow when you are on network drives, you might want to clear its history as shown in the steps above.

8. Replace the date column

  1. Press the Windows key + E to open File Explorer.
  2. Right-click one of the classification columns and select More…
    more windows explorer slow
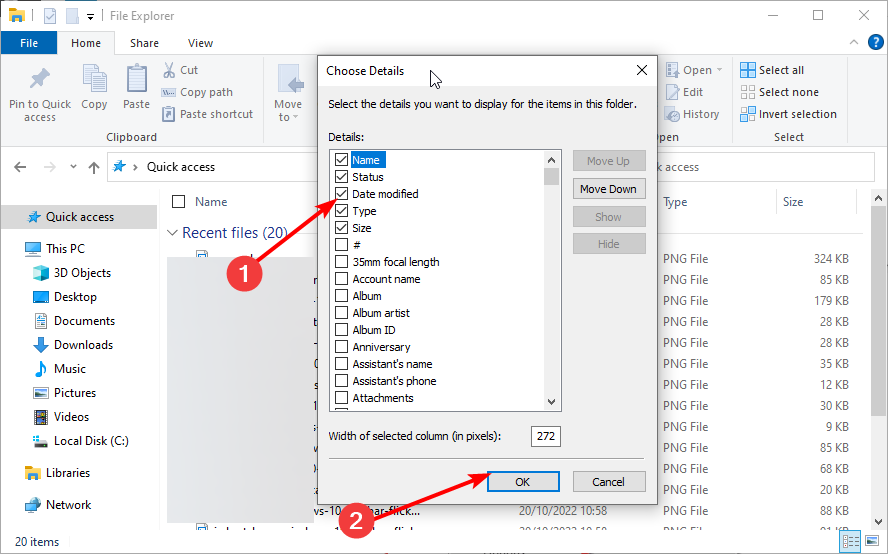
  3. Now, uncheck the box for Date and check the box Date modified.
  4. Click the OK button to save the changes.
    date modified

The classification columns go a long to determine how fast Windows Explorer loads. Using the Date as one of the columns makes Windows Explorer load slowly because it (Date) is not available in the file system metadata.

Instead, it will be extracted from the individual files to be loaded which causes Explorer to be slow.

Having to deal with a slow Windows Explorer is exasperating as it wastes valuable time. But we hope you managed to take your File Explorer to a snappier state with the help of our tips.

If you want to know how to fix most File Explorer issues on Windows, check our detailed guide on the topic to keep the app running smoothly.

Feel free to let us know the solution that helped you fix the issue in the comments below.

How to Run Hardware Diagnostics on Windows 10 [5 Ways]

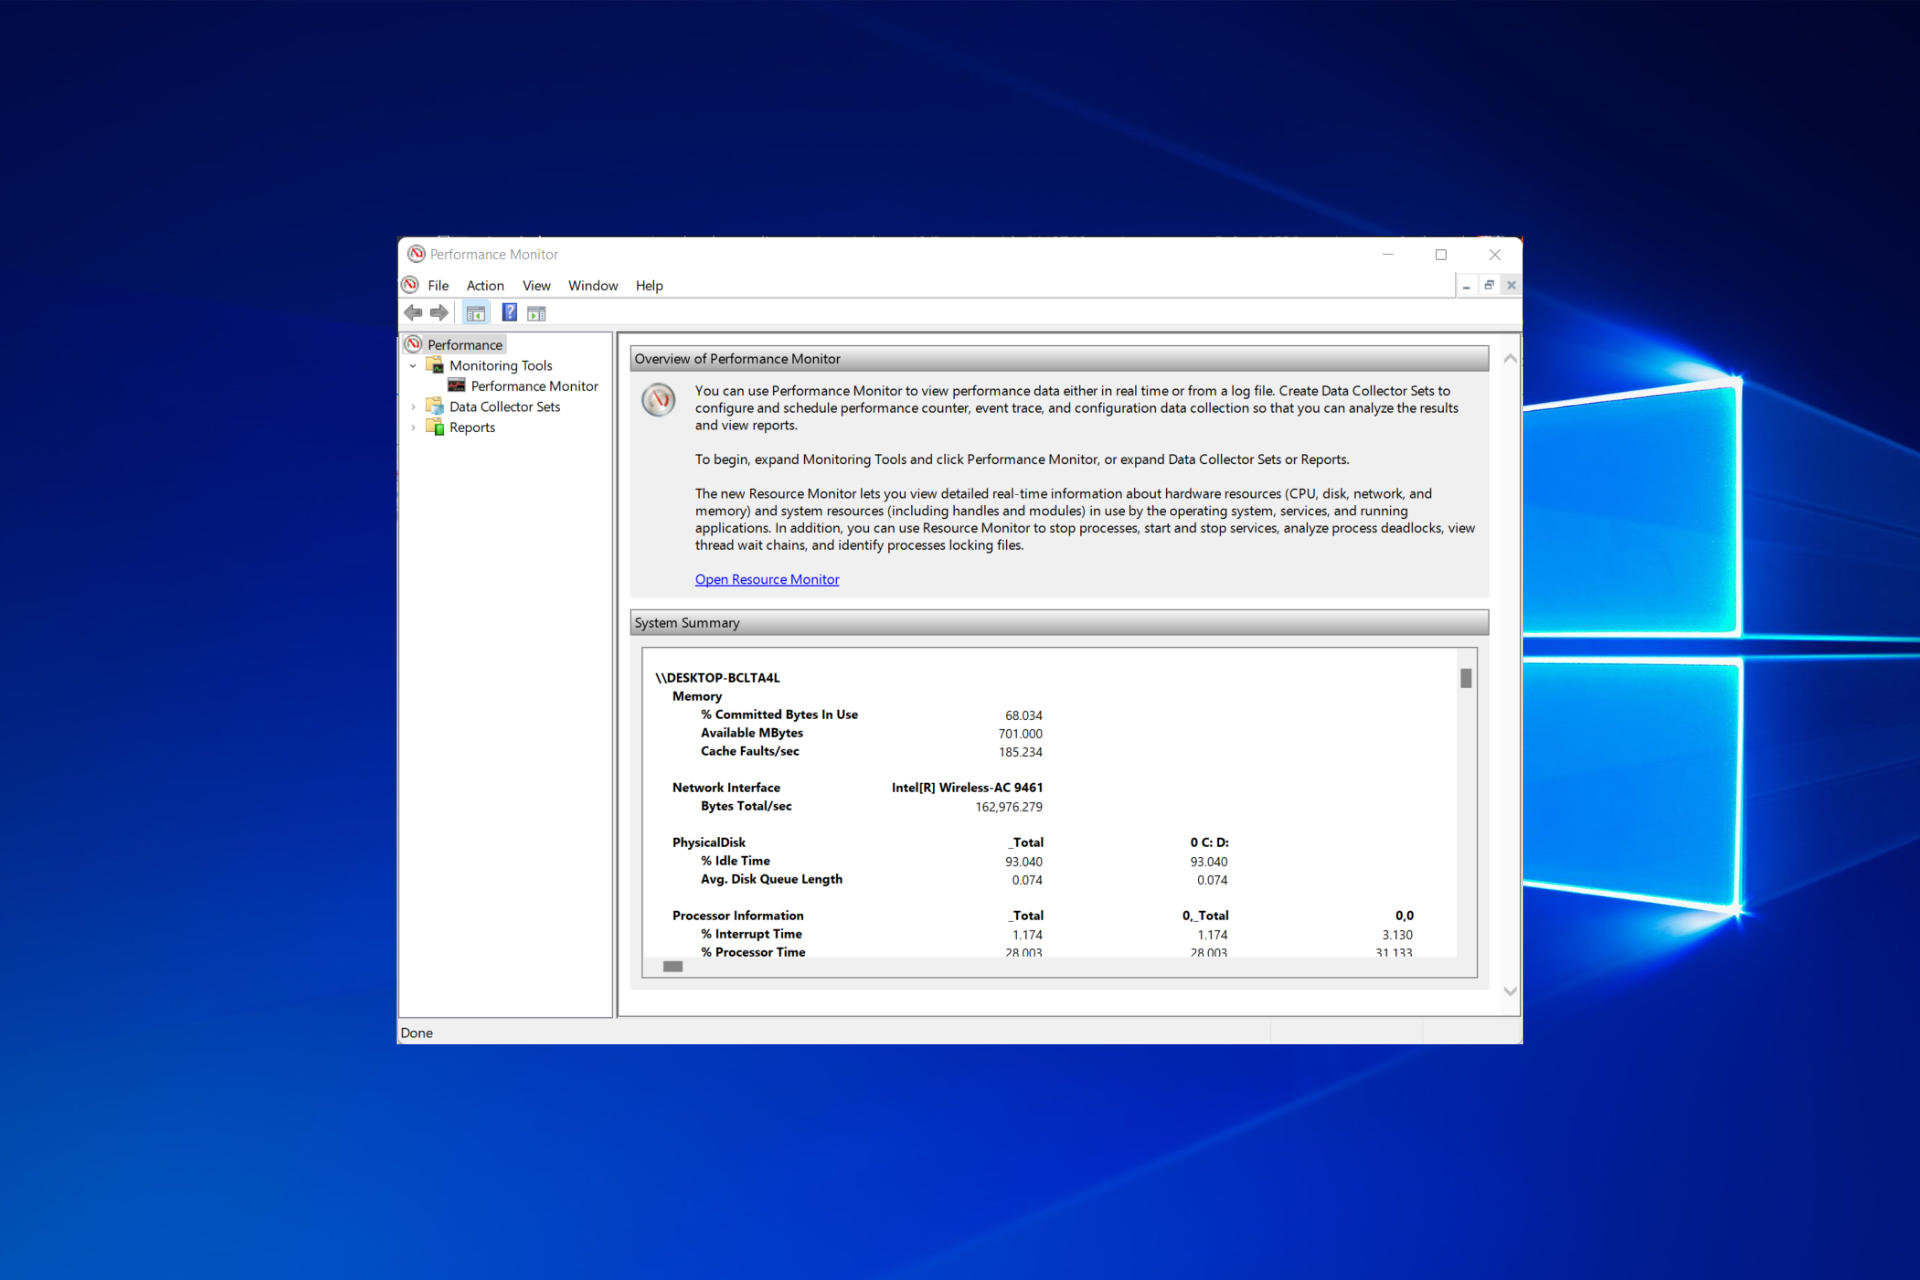
To prevent and troubleshoot issues, important to know how to run hardware diagnostics on Windows 10. You can use tools like Performance Monitor, Windows Memory Diagnostic, or specialized commands.

Wee cover these methods and other solutions to help you troubleshoot your system. Just follow the steps below.

How do I run hardware diagnostics on Windows 10?

1. Use the Performance Monitor tool

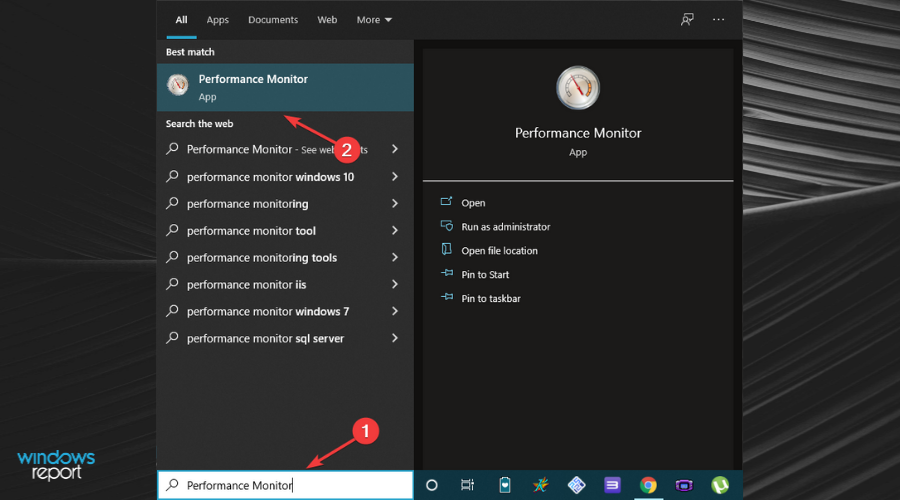
  1. Press the Windows key and search for Performance Monitor. Open the top result.
    Searching for Performance Monitor in Windows Search Bar
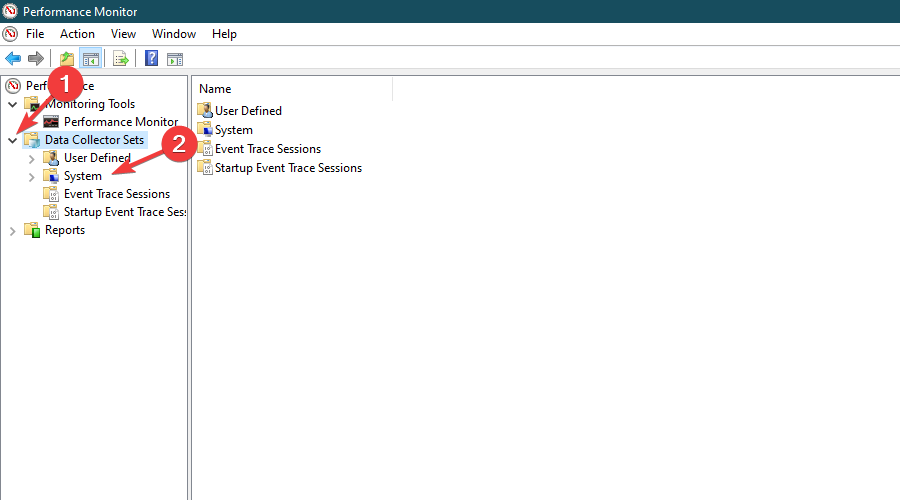
  2. From the left pane menu, expand the Data Collector Sets section. Click on the System option.
    Navigating Performance Monitor Hardware Diagnostics App
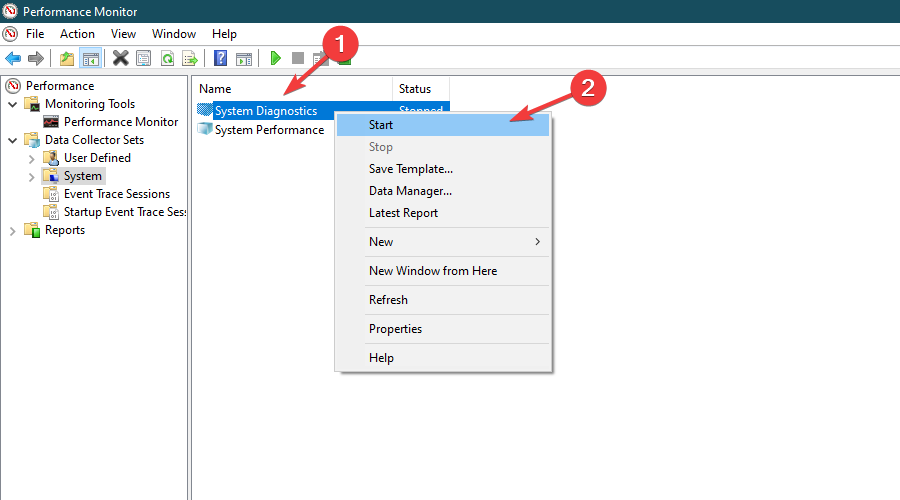
  3. Right-click System Diagnostics and select Start to begin system diagnostics tests.
    Starting System Diagnostics Test in Performance Monitor
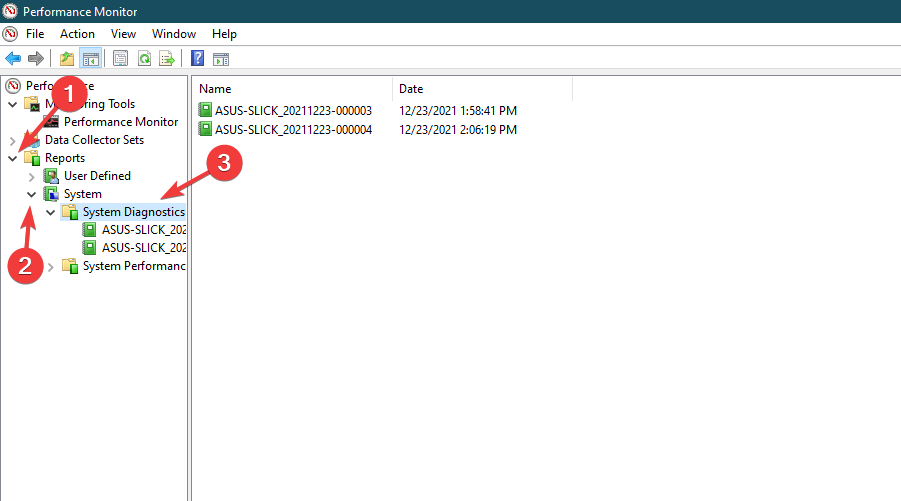
  4. Now, from the left pane menu, expand the Reports section, expand the System section, and open the System Diagnostics section.
    Searching for System Diagnostics Test Results in Performance Monitor
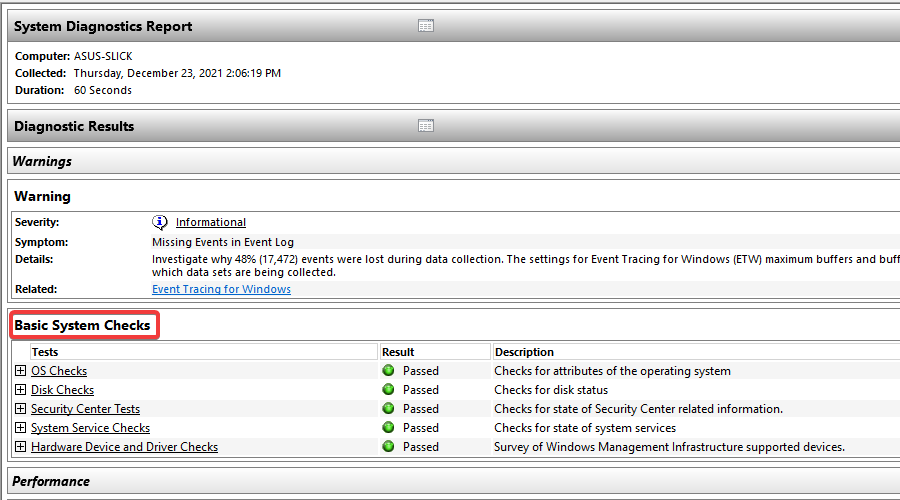
  5. You will find the generated system diagnostics test report here. Simply double-click the report to view it. Check out your PC’s Diagnostic Results.
    Viewing System Diagnostics Test Results in Performance Monitor

Need a quick primer before diving into your results? Read our guide on system diagnostics for a clear overview.

2. Use the Windows Memory Diagnostic app

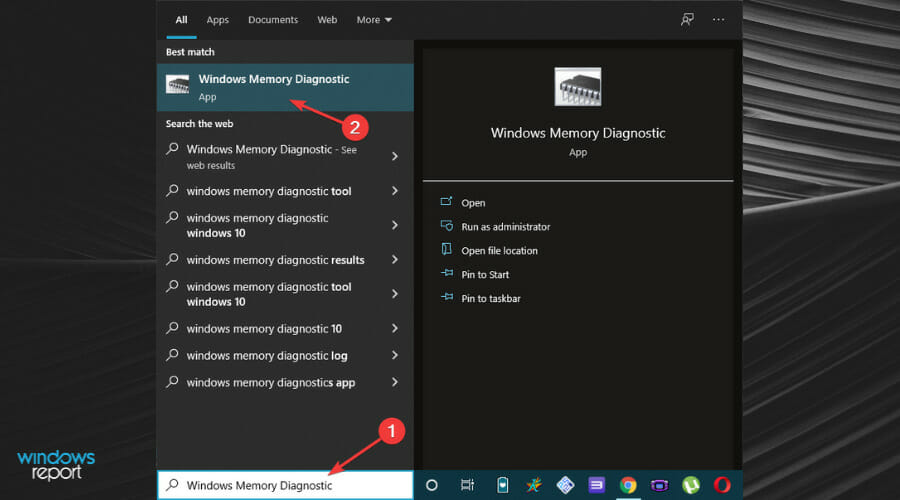
  1. Press Windows and search for Windows Memory Diagnostic. Click the first result to open it.Searching for Windows Memory Diagnostic in Windows Search Bar
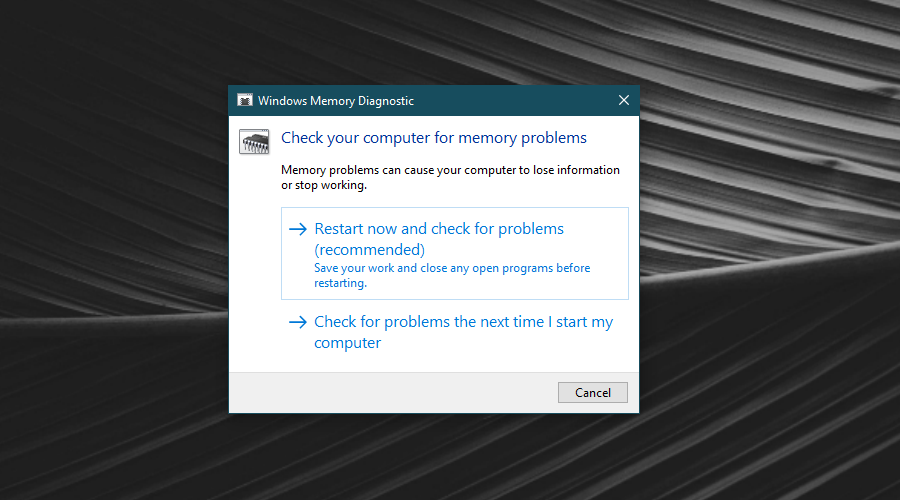
  2. Select the option Restart now and check for problems (recommended).Windows Memory Diagnostic Options
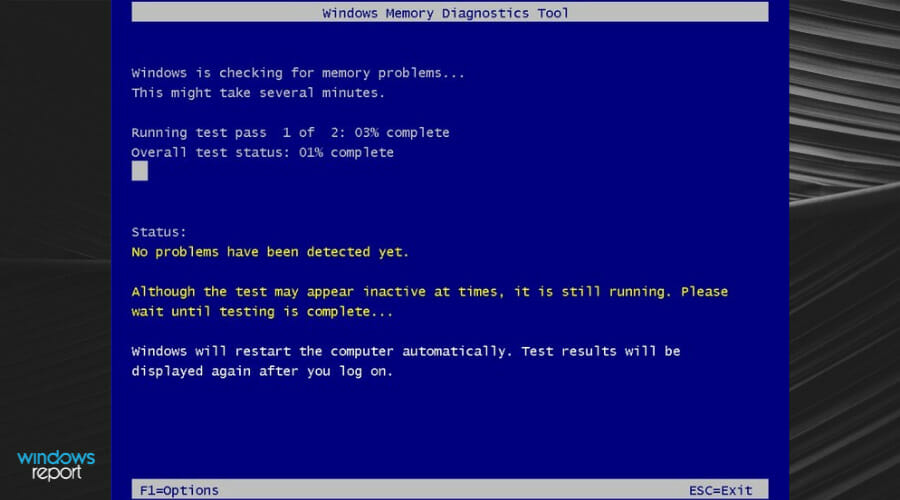
  3. Let the PC restart. Once the PC is restarted, the memory diagnostic scan will automatically begin. Wait for the process to finish. Your PC will reboot automatically afterward.Windows Memory Diagnostics Scan Window
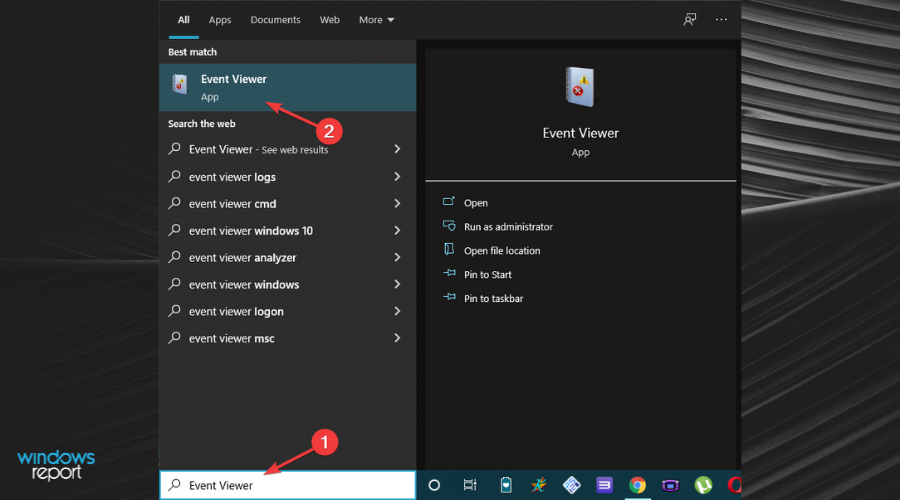
  4. After logging in, the results will be displayed on the desktop. In case the test results fail to show on the screen automatically, use the Event Viewer app to check the scan results. Thus, press Windows and search for Event Viewer in the Search bar. Open the first app.Searching for Event Viewer in Windows Search Bar
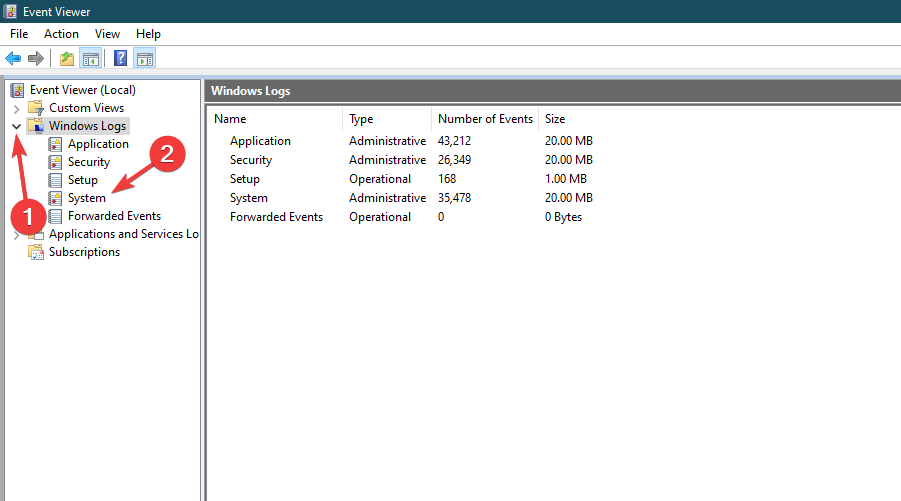
  5. From the left pane menu, expand the Windows Logs section and click on the System option.Navigating Windows Memory Diagnostic Menu
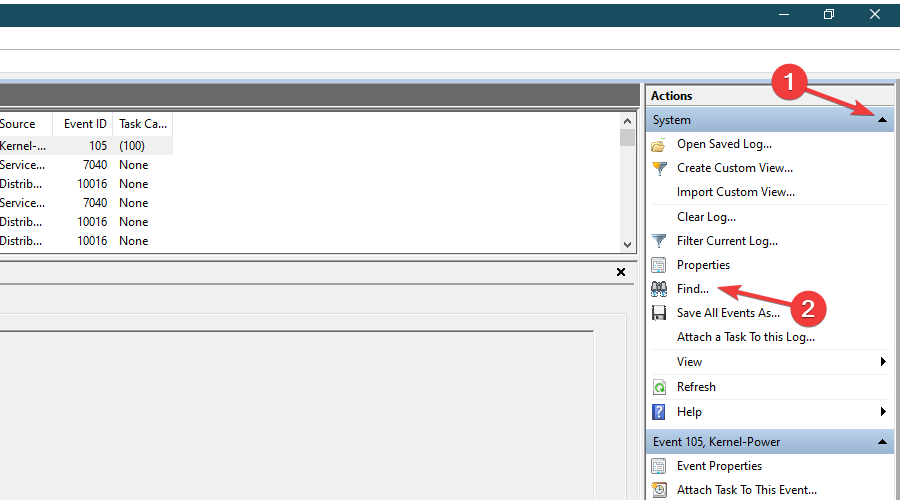
  6. In the right pane Actions menu, expand the System section. Click on the Find… option.Using the 'Find' option in Event Viewer
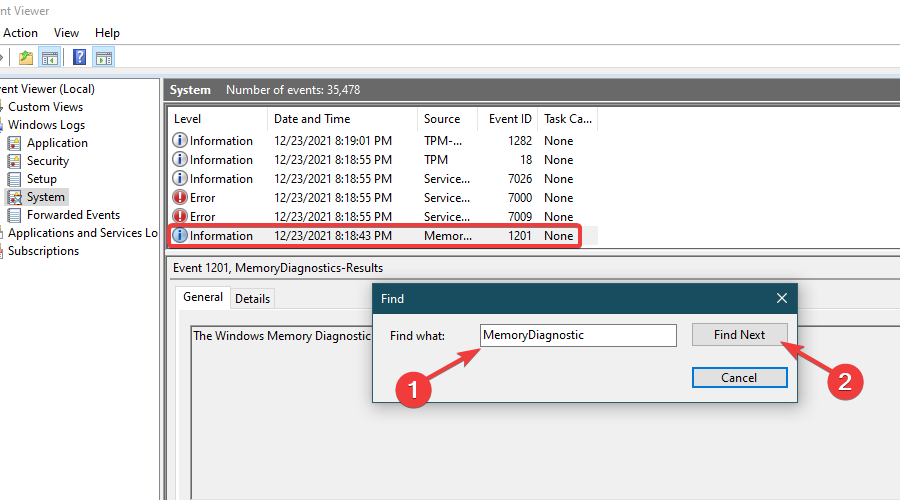
  7. In the text field, type MemoryDiagnostic and click on Find Next to look for the memory diagnostic scan log.Searching for the Windows Memory Diagnostic Scan Event in Event Viewer Log
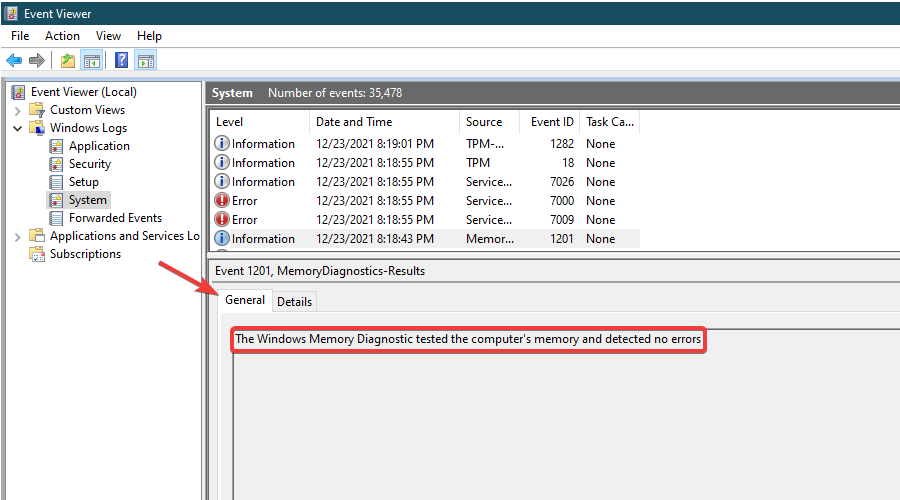
  8. View the results of the memory diagnostic scan in the General tab.Viewing the Windows Memory Diagnostic Scan Result in Event Viewer

Unless you find any errors, your PC’s RAM is not a cause for concern. Check out more details on the Windows Memory Diagnostic Tool and how it can help keep your PC’s memory in check.

3. Run a CHKDSK scan to check for bad sectors

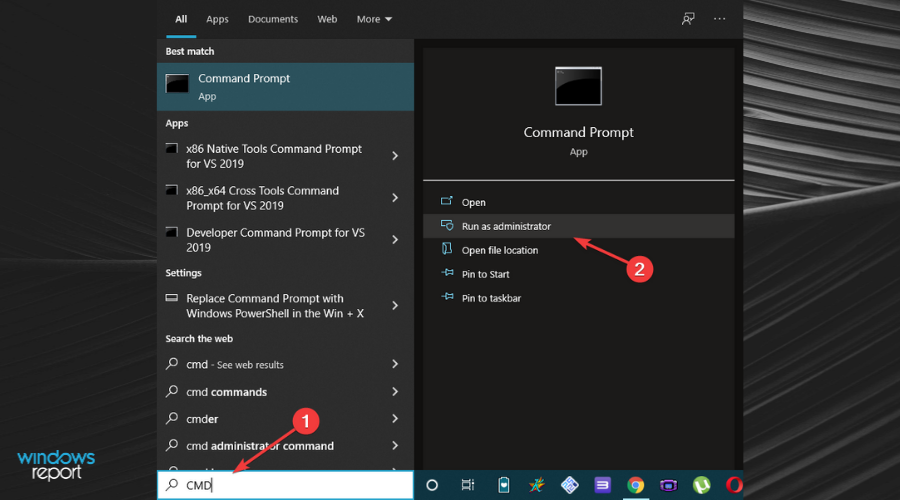
  1. Press the Windows key and search for CMD in the Search bar. Choose the Run as administrator option under the result.Opening Command Prompt for CHKDSK Scan
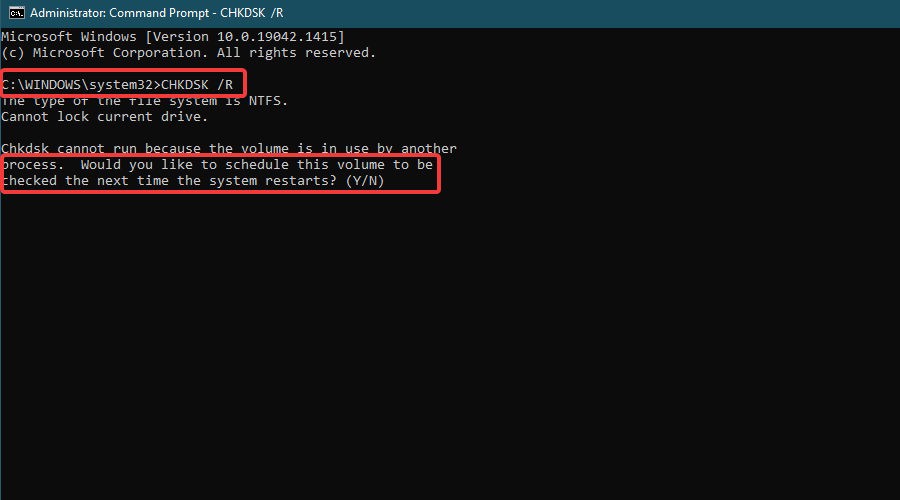
  2. Type the following command and run it by pressing Enter. A prompt will appear asking you to schedule the scan on the next restart. Type Y and then press Enter: CHKDSK /RRunning CHKDSK Scan on Command Prompt
  3. Restart your PC. Once the PC restarts, the CHKDSK scan will begin automatically. Wait while hardware diagnostics is ran in Command Prompt.
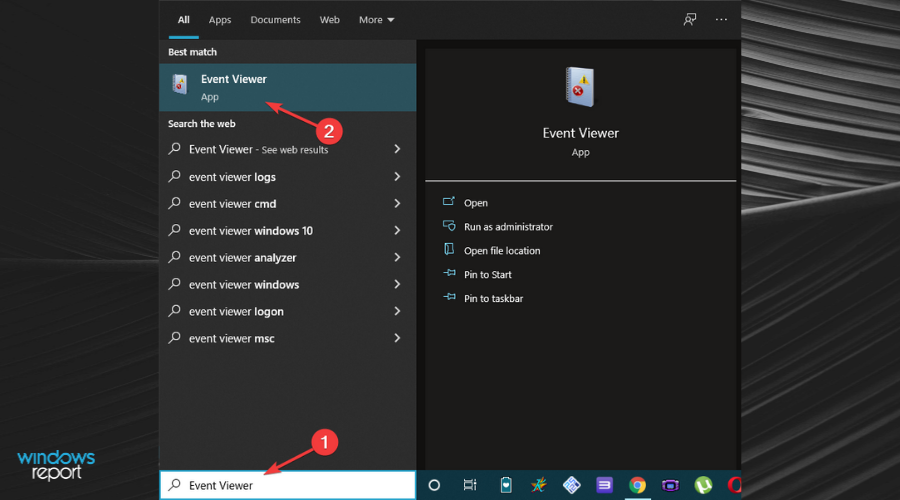
  4. Once the scan is complete and you log in, press Windows and search for Event Viewer in the Search bar. Open the app.Opening Event Viewer to check CHKDSK Scan Results
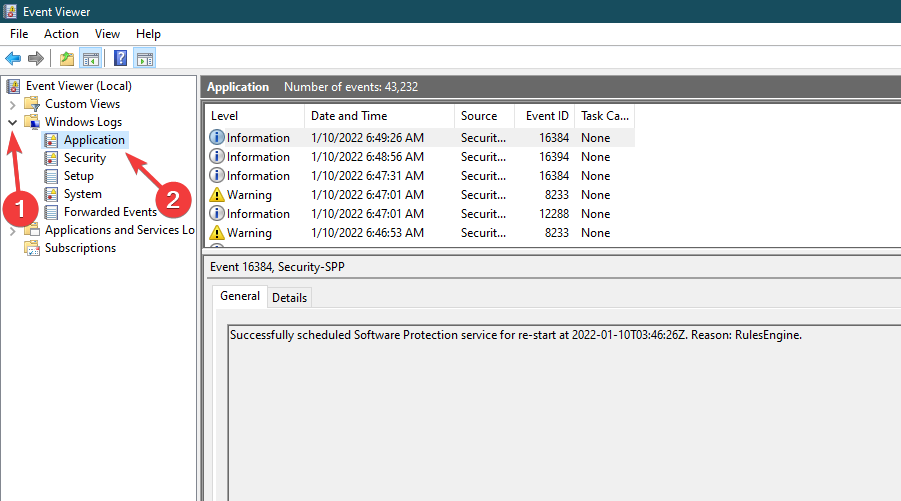
  5. From the left pane menu, expand the Windows Logs section and click on the Application option.Navigating the Event Viewer App
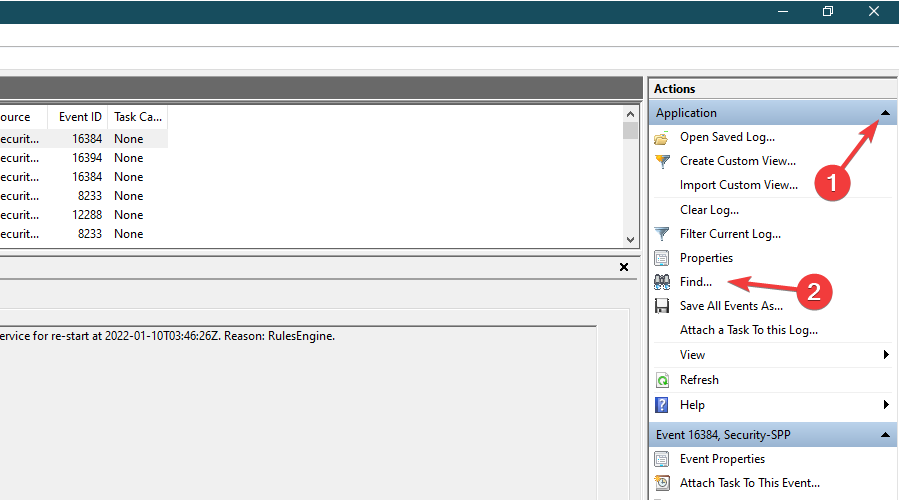
  6. In the right pane Actions menu, expand the Application section. Click on the Find… option.Using the Find Option in Event Viewer App
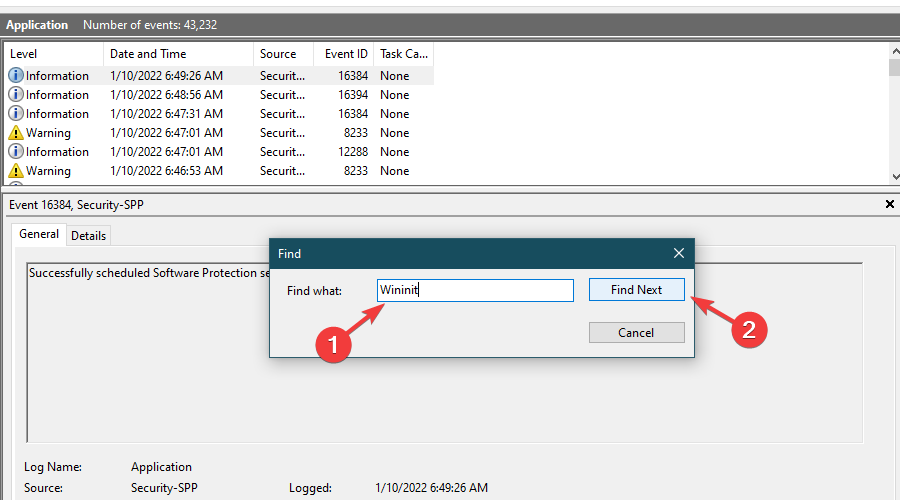
  7. In the text field, type Wininit and click on Find Next to look for the CHKDSK scan log.Searching for the CHKDSK Scan Results in Event Viewer Log
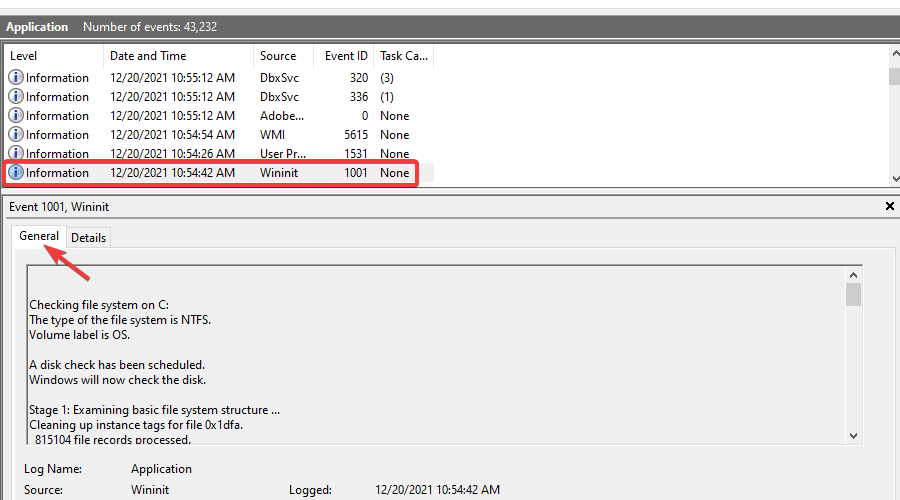
  8. View the results of the CHKDSK scan in the General tab.Viewing the CHKDSK Scan Results in the Event Viewer App

Click inside the text box in the General tab. Press Ctrl+A to select all of the text, copy, and paste it onto a new text file. This will make viewing the results quite convenient.

To learn more, we have a great guide on how to run chkdsk on Windows 11, so you might want to check it out.

Note icon NOTE
The CHKDSK scan can end up taking a lot of time. A good estimate is probably around 2-3 hours.

4. Run the Battery diagnostics command

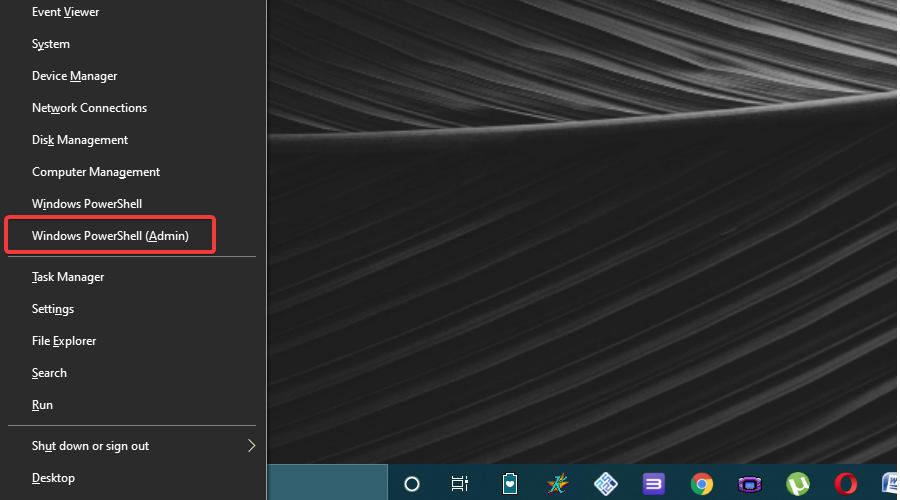
  1. Right-click the Start icon then select the Command Prompt or Windows PowerShell (Admin) option from the menu.Windows + X Command
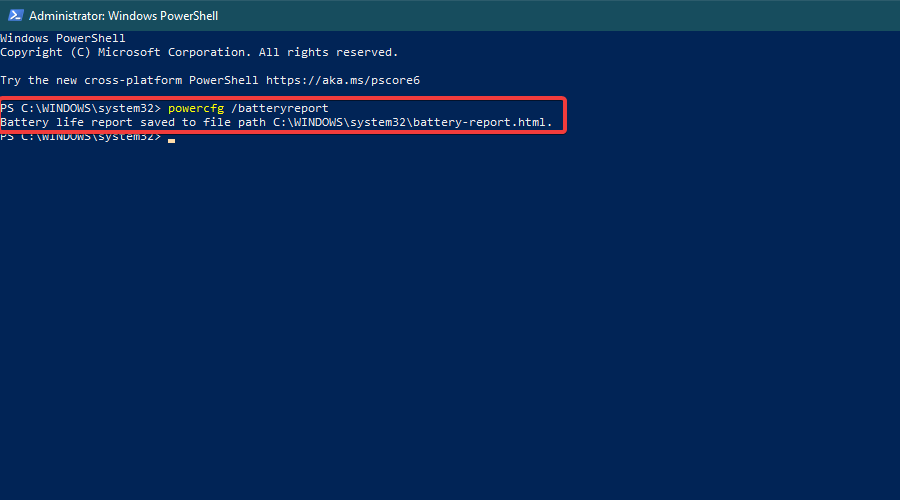
  2. Once the Command Prompt/ Windows PowerShell loads, type in the following command and run it by pressing Enter: powercfg /batteryreportWindows PowerShell Running Battery Diagnostics
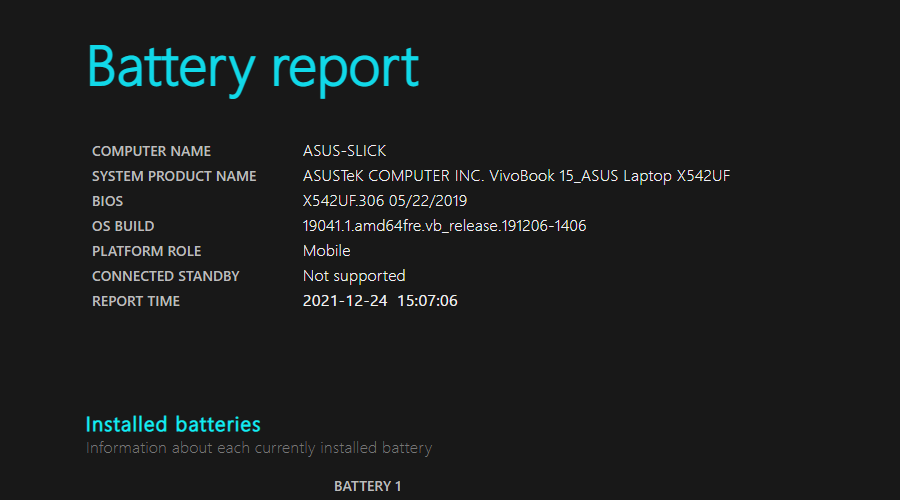
  3. An HTML file will be generated in a specified location. Open the file (in a browser) and view the results.Battery Diagnostics Battery Report

For an even deeper analysis, check out the 10 best tools for checking battery health on Windows 10.

5. Use a third-party diagnostics tool

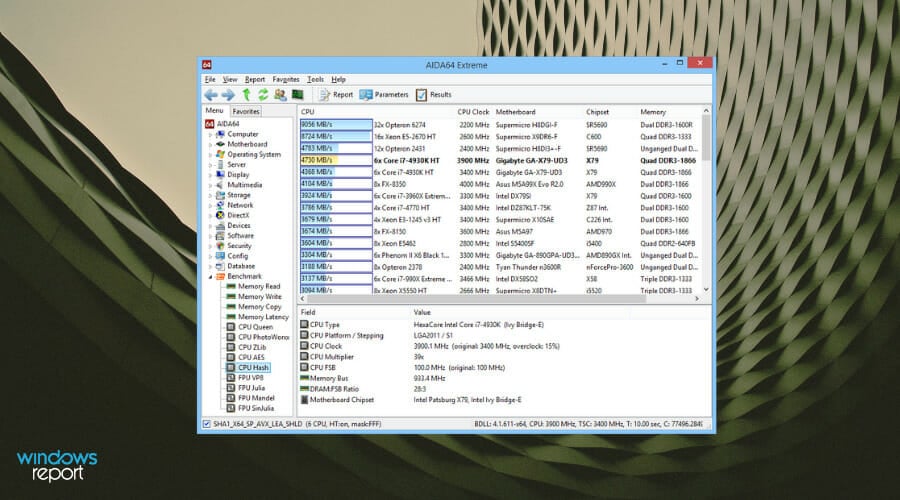
If you’re looking for a more detailed look at your system, a third-party tool like AIDA64 Extreme can give you all the info you need.

It checks everything from temperature and voltage to performance, and even lets you stress test your PC to uncover hidden issues.

AIDA64 Extreme

AIDA64 Extreme

Troubleshoot your device with tests for temperature, performance, and hardware stability using AIDA64 Extreme.
Check price Visit website

If you have a diagnostic tool from your manufacturer, then you can use it as well.

Moreover, you might want to use PC maintenance software and motherboard diagnostic software in order to help your computer perform optimally all the time.

Feel free to ask us questions in the comments section below. Let us know which method you used to run a hardware diagnostic test.

How to Disconnect a Display From Windows Display Settings

Knowing exactly what you need to do when you run into trouble on your Windows 11 PC can save time and make your life much easier.

Actions such as disconnecting a display from your Windows 11 PC can be done without having to unplug the cable itself necessarily.

Look at the best resource monitor software for your Windows 11 PC if we are discussing monitors and the new OS.

Why do I need to disconnect the display from Windows settings?

Well, one scenario that comes to mind involves an environment with too many cables to successfully or safely disconnect the cable.

Not wanting to plug, unplug constantly, and re-plug cables can make someone want to pursue an alternative to disconnecting a display.

Yes, you can do so from the display settings, the same place you use to change your Windows 11 device’s resolution.

How can I disconnect a display from Windows display settings?

  1. 1. Press Win + I to access Settings.

  2. 2. Select the System tab, then click on Display.

    go to display settings
  3. 3. Choose the monitor you want to disconnect.

  4. 4. Select the Show only on X option to connect to only one display and disconnect the other.

    click to disconnect display
  5. 5. Close the Settings window.

  6. You can easily disconnect a display via Windows Settings in just a few clicks, from the Display section.

    That being said, after you complete the steps, the desktop contents will only appear on the display you selected while disconnecting the other monitor.

    Also, if you want to re-connect the display, you can use the exact instructions, only this time select the Extend these displays option or any other.

There is an easier way to choose what display you are using everything on without having to open the Settings app.

Press Win + P, then select PC Screen Only to achieve the same goal as the process we’ve presented above.

project pc screen only

That’s all you need to do if you want to disconnect a display on Windows 11 directly from the Display section of the Settings app.

So, if you don’t feel like manually unplugging the display’s cable from the PC, follow the above solutions, and everything will be fine.

Leave a comment below if this guide has assisted you in achieving your goal on your Windows 11-powered PC.

5 Best PSU Test Software for Your Computer’s Power Supply

Using PSU test software is probably the best method to diagnose your power supply.

Testing your computer’s power supply is especially helpful when diagnosing startup failures, crashes, or sudden shutdowns, all common symptoms of a power supply problem in Windows.

Let’s take a quick look at our top picks (more details below):

SoftwareFeaturesUsage and menusFunctionalityEfficiency
AIDA64 ExtremeAll-in-one PC diagnostic toolFriendly and customizable UI9/1010/10
Iolo System MechanicPC optimization toolsModern design, easy to use10/108/10
Open Hardware MonitorFree PSU test softwareCompressed view, minimal interface8/109/10
HWMonitorDiagnostics and monitoringLightweight, straightforward information9/108/10
Sidebar DiagnosticsBuilt-in diagnostic toolMinimal, graph design8/107/10

Best PC Power Supply Monitoring Software

AIDA64 Extreme – Professional PC power supply tester with CPU power monitoring.

AIDA64 Extreme is an advanced system diagnostics utility that functions as an effective PSU test software.

It provides information about your system hardware and identifies the voltage or temperature status of your PC. In addition, you can learn about your PC performance limits with a 64-bit stress testing module.

All in all, such complex software can offer you overclocking support or extensive information about hardware performance in minutes.

Tools like AIDA64 Extreme can help you understand system demands, but if you’re unsure how much power your system needs, here’s a guide on how to check your PSU wattage.

Check out other exciting features that come with AIDA64 Extreme:

  • Thesystem memory, FPU, and CPU
  • The setup process is fast and straightforward
  • AIDA64 Extreme comes with a user-friendly interface with an organized layout
  • All the computer component-related data are broken down into separate categories
  • The information covers general areas of your system such as power management, sensors, and overclocking
  • The tool runs benchmarks and generates reports
AIDA64 Extreme

AIDA64 Extreme

Find your PC’s performance limits with advanced diagnostics and stress testing tools!
Check price Visit website

Iolo System Mechanic – Computer power supply tester software optimizing PC performance

Iolo System Mechanic is an all-in-one PC optimizer with versatile features. It focuses on improving the overall performance of your device.

It has PC cleaning features and will help you get rid of bloatware and useless startup programs. In fact, it has the ability to remove 50 different types of junk files.

More so, if you need to boost your PC performance by increasing CPU and RAM resources, this software is your chance. It can therefore help your system to run high-demanding programs and function as power supply stress test software.

Other key features of this software are:

  • Defragments drives and frees memory
  • Protects router ports and other connected devices
  • Removes bloatware
  • Improves RAM usage in real-time
  • User-friendly and modern interface
  • Boosts internet speed
Iolo System Mechanic

Iolo System Mechanic

Use Iolo to automate complex processes and speed up functions while maintaining high security.
Check price Visit website

Open Hardware Monitor – Free power supply test and monitoring software tool.

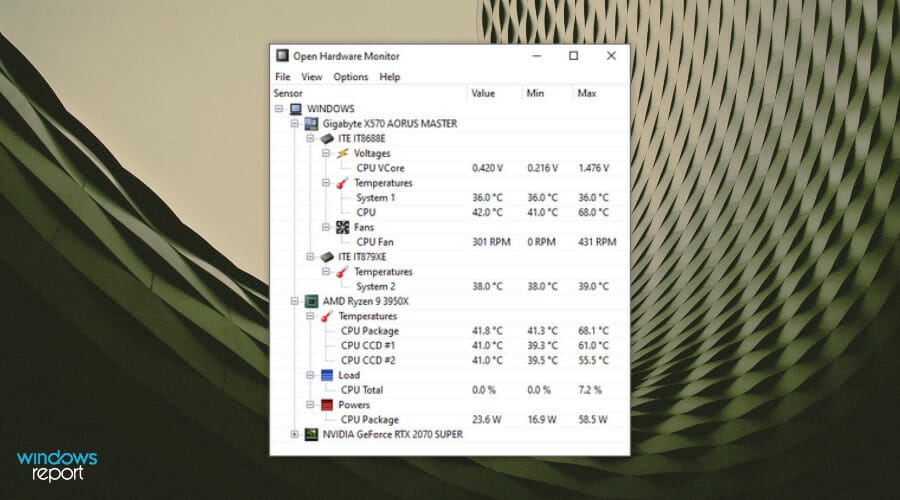
open hardware psu test software

Open Hardware Monitor is a free open-source tool that can monitor temperature sensors, fan speeds, load, and voltages, and serve as PSU test software.

It is very useful if you require information about temperature sensors, fan speed, load, and clock speeds or voltages of your computer.

It can as well monitor any other hardware resources and read data about your chips found on almost every mainboard. So you can discover data about CPU temperature by reading the sensors of multiple processors like AMD or Intel.

Check out the best features included in this software:

  • Check system power supply
  • Monitor CPU temperature
  • Check GPU systems

⇒ Get Open Hardware Monitor

HWMonitor – Lightweight check power supply PC software with sensor monitoring.

Hwmonitor psu test software

HWMonitor is a lightweight system monitoring tool. This hardware monitoring software will read your system’s primary health sensors for the most common chips.

You can monitor voltages or hardware resources’ temperature at a glance and see how the system reacts. With this, you can always use it as PSU test software.

If your motherboard isn’t receiving power properly, PSU monitoring tools like HWMonitor can help you detect voltage issues. Learn more about how to fix a motherboard not getting power.

You can thus see detailed reports of your system, regarding the CPU, hard disk, or graphics card.

Check out its essential features:

  • HWMonitor’s job is to keep track of the most critical sensors on your computer and find out live readings for the HDD temperature and fan speed
  • It provides accurate data regarding your power supply
  • Setting up the program is an effortless task, and it will not require any particular configuration
  • Lists all the components in a hierarchical order so that you’ll be able to sport them more easier
  • It provides data revolving around the CPU, GPU, and HDD

⇒ Get HWMonitor

Sidebar Diagnostics – Customizable power supply software monitor and hardware tool

sidebar PSU test software

When it comes to analyzing the resource consumption figures Windows itself provides a competent tool named Resource Monitor that can work as PSU test software.

This utility has all the basics covered when it comes to data about the system’s memory, CPU, disk, and network stats but it’s not entirely convenient when you have tons of running apps.

Sidebar Diagnostics, on the other hand, provides a more convenient solution for viewing and analyzing hardware data.

Check out its best features below:

  • This is a lightweight tool that does mainly what the native Resource Monitor does, but it displays data more attractively
  • It comes with a sidebar that is integrated into your desktop
  • It displays data about RAM, CPU, GOU, active drivers, power supply, network, and more
  • The tool is really customizable allowing you to set things according to your preferences

⇒ Get Sidebar Diagnostics

These are the best programs that can function as PSU test software. It’s best to head over to their official websites to check out the complete set of features and see which one seems the best for your skill level and your system’s needs.

Once you’ve confirmed your PSU is stable, you can run a computer performance test online to evaluate how your hardware performs under load.

Moreover, if you’re looking for the best PSU for the 4090 series of NVIDIA GeForce RTX, we can help out!

If you need more info about a PSU Tester or two, don’t hesitate to reach for the comments section below.

How to Fix Gpedit.msc Not Found in Windows 11 – 5 Tested Ways

Dealing with gpedit.msc missing? You’re not alone, and you’re not doing anything wrong. Gpedit.msc (Group Policy Editor) is a powerful Windows tool used to control advanced system settings like updates, user permissions, and security restrictions.

But on Windows 11 Home, it’s missing by design. Try to launch it (Win + R > gpedit.msc), and you’ll likely get the error: “Windows cannot find ‘gpedit.msc’. Make sure you typed the name correctly…”

The good news? You can still enable it manually, without having to upgrade. Check the methods below to see how.

How to fix gpedit missing in Windows 11

1. Enable Group Policy Editor with a batch file

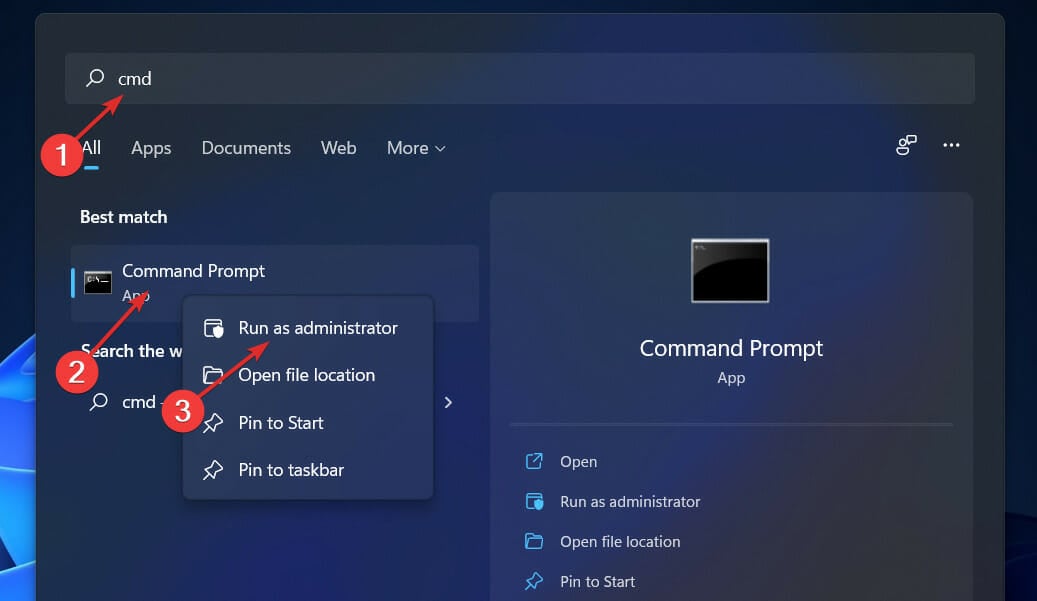
  1. Press the Windows + S key to open the Search bar, then type cmd and right-click on the most relevant result to run it as an administrator.
  2. Now type or paste in the following commands and press Enter after each:

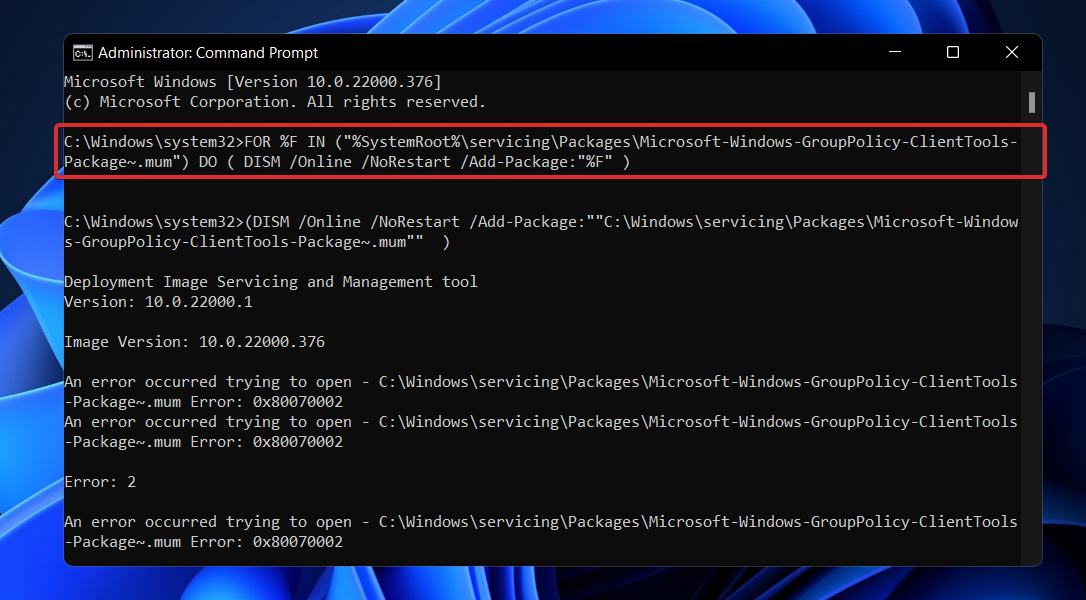
FOR %F IN ("%SystemRoot%\servicing\Packages\Microsoft-Windows-GroupPolicy-ClientTools-Package~*.mum") DO ( DISM /Online /NoRestart /Add-Package:"%F" )

FOR %F IN ("%SystemRoot%\servicing\Packages\Microsoft-Windows-GroupPolicy-ClientExtensions-Package~*.mum") DO (
DISM /Online /NoRestart /Add-Package:"%F"
)

Once the processes are complete and reach 100 percent, you can close the Command Prompt window and try to open Gpedit.msc again.

A Command Prompt window will appear at this point. Wait until it says 100 percent before continuing. Before you close that window, be sure that this operation was accomplished correctly.

A simpler and safer way to restore missing Windows files is with the help of specialized software.

2. Enable Group Policy Editor via the Command Prompt

  1. Press the Windows + S key to open the Search bar, then type cmd and right-click on the most relevant result to run it as an administrator.cmd-run-as-admin avast high cpu windows 11
  2. Now type or paste in the following commands and press Enter after each:

FOR %F IN ("%SystemRoot%\servicing\Packages\Microsoft-Windows-GroupPolicy-ClientTools-Package~*.mum") DO ( DISM /Online /NoRestart /Add-Package:"%F" )

FOR %F IN ("%SystemRoot%\servicing\Packages\Microsoft-Windows-GroupPolicy-ClientExtensions-Package~*.mum") DO (
DISM /Online /NoRestart /Add-Package:"%F"
)
gpedit-install-command windows cannot find gpedit.msc windows 11

Once the processes are complete and reach 100 percent, you can close the Command Prompt window and try to open Gpedit.msc again.

3. Download gpedit-main zip file

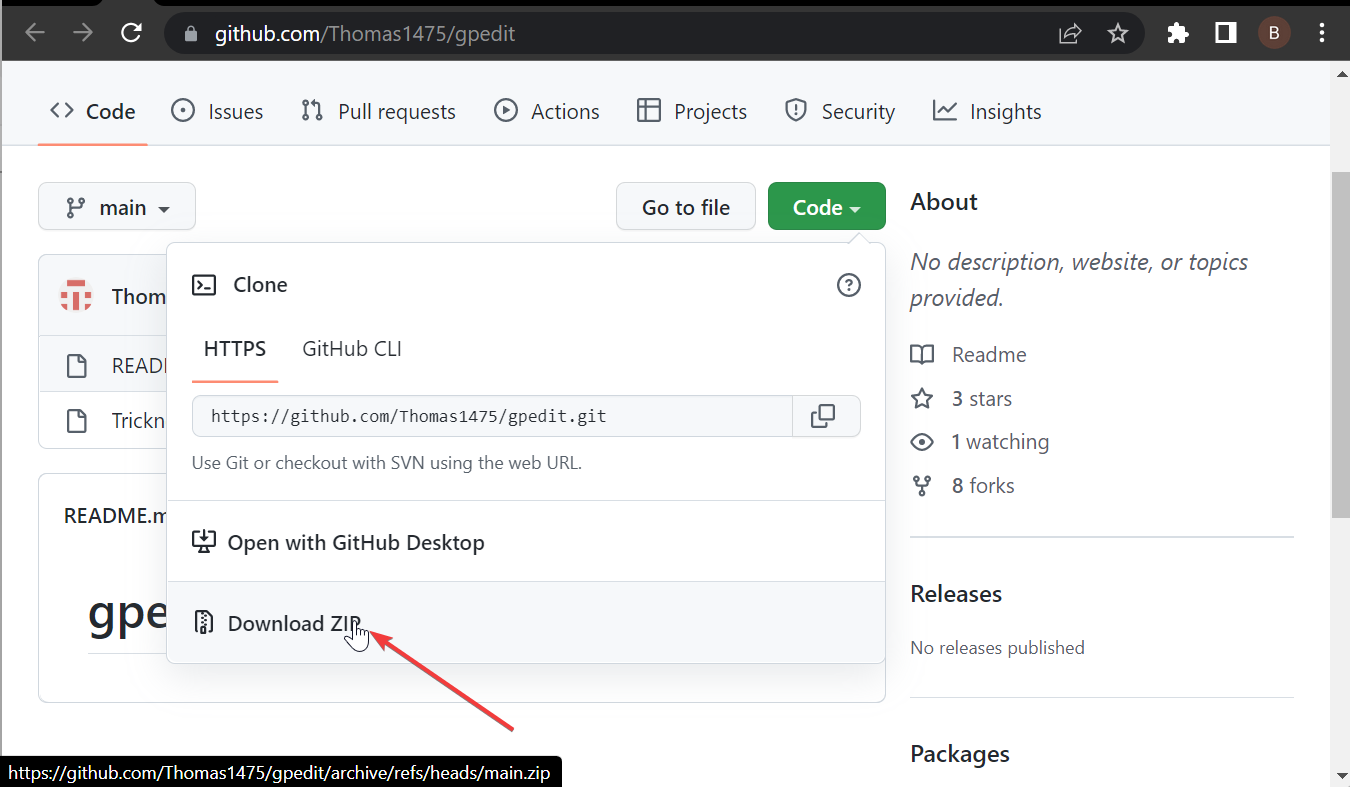
  1. Go to the Gpedit-main Github page to download the zip.
    download gpedit.msc windows 11 download
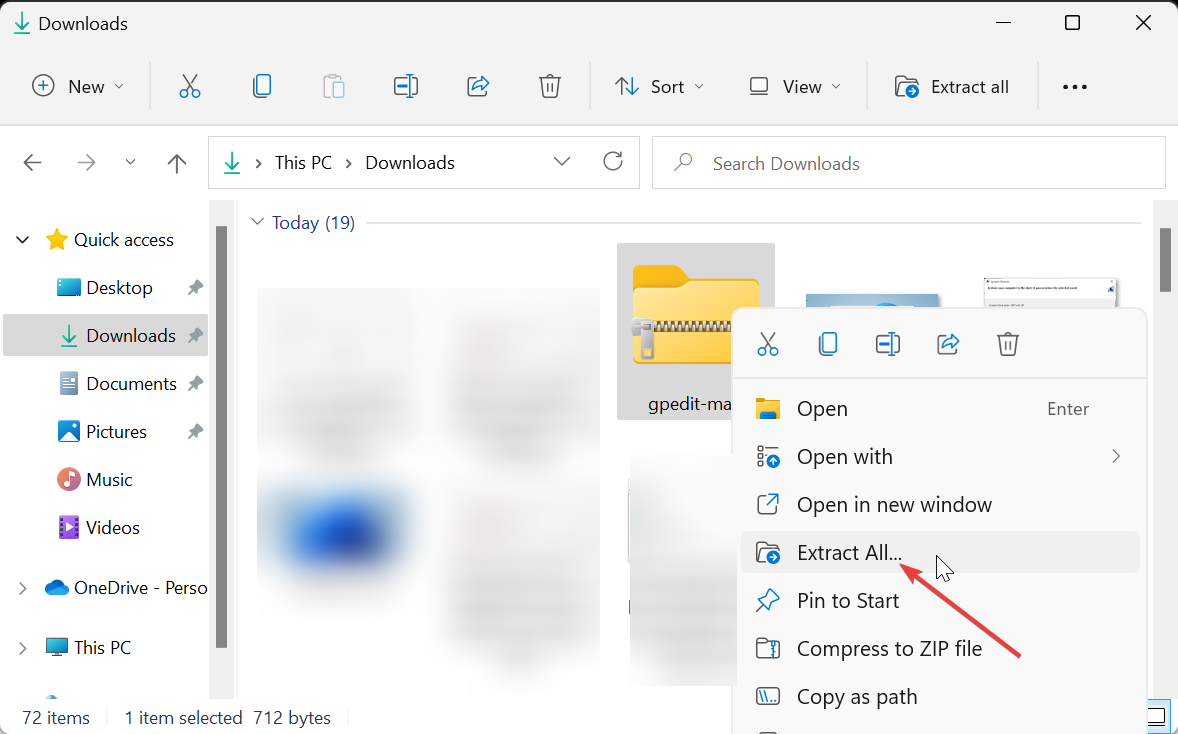
  2. Right-click the zip folder and select the Extract All… option. Choose a location to extract the files to complete the process.
    extract all gpedit.msc windows 11 download
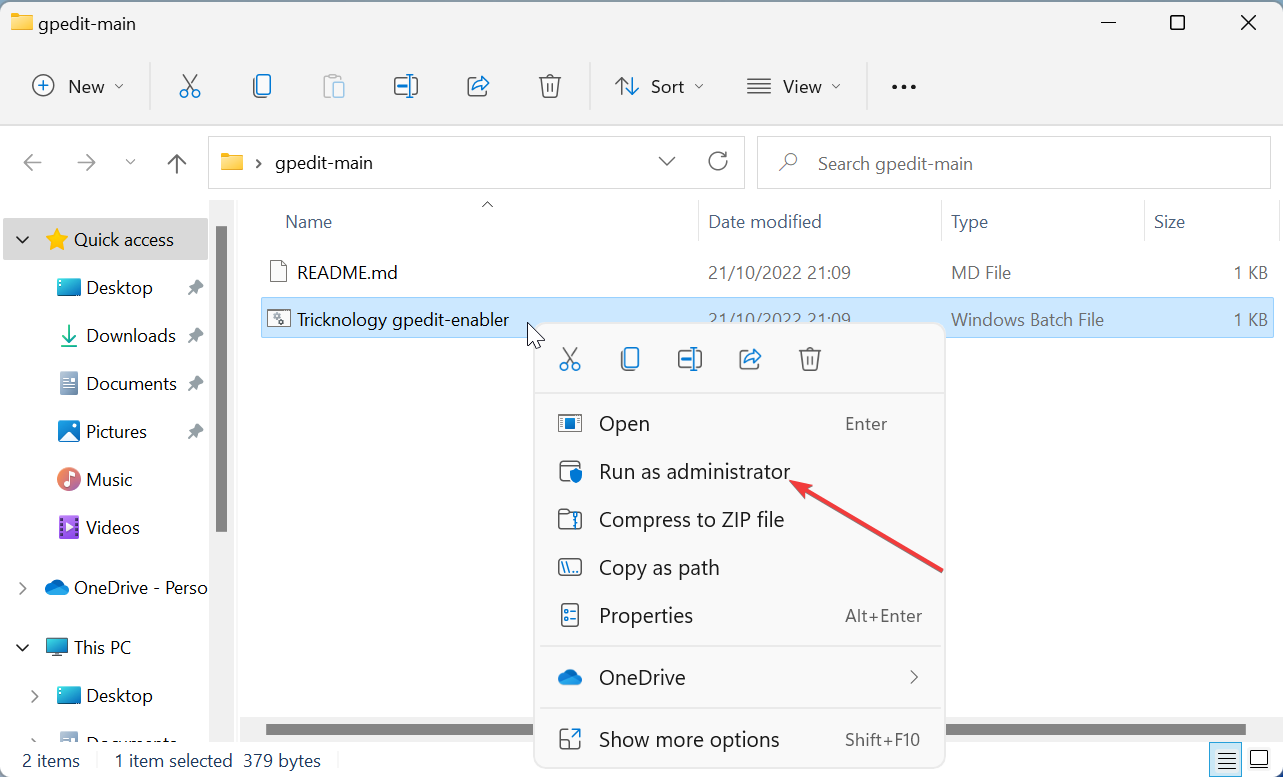
  3. Now, open the extracted folder, right-click on the .bat file there, and select Run as administrator.
    run as gpedit.msc windows 11 download
  4. Wait for Command Prompt to open and install the needed extensions. Close CMD once it shows The operation completed successfully message.
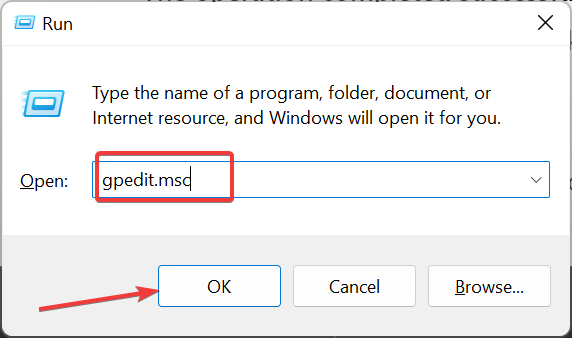
  5. Finally, you now press the Windows key + R, type gpedit.msc, and click OK to access the Group Policy Editor.
    run option gpedit.msc windows 11 download

Another way around the Gpedit.msc not found on Windows 11 is to download the .bat file as shown above. This method also works on Windows 11 Home Edition, so be sure to try it.

4. Update Windows

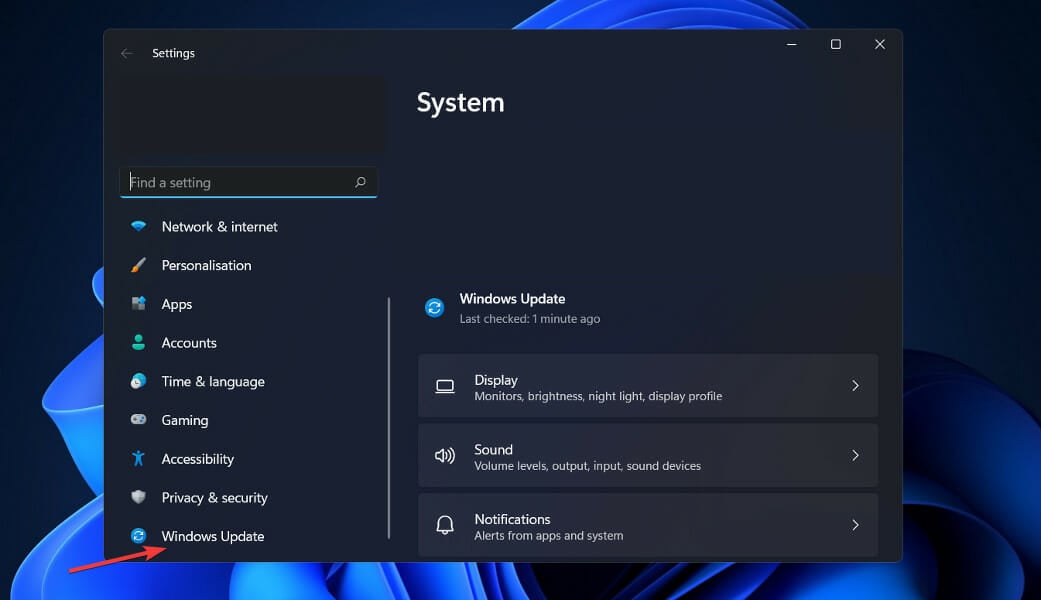
  1. Press the Windows key + I and click on Windows Update from the left side menu.windows-update-settings kernel security check failure windows 11
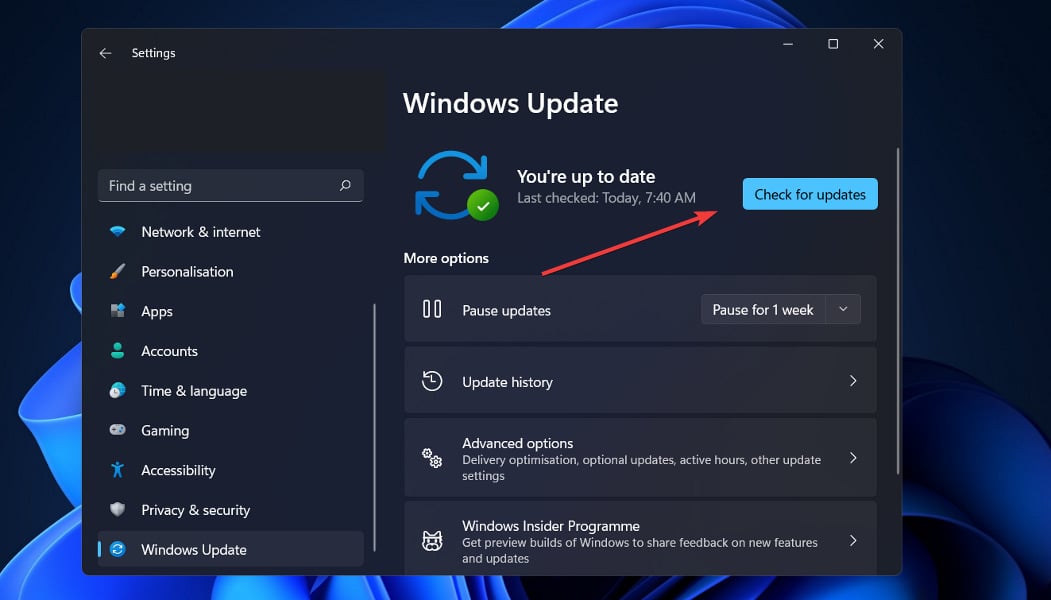
  2. Click on Check for updates.checl-for-updates kernel security check failure windows 11

If you’re using an earlier version of Windows, this could be a contributing factor to the error, which can be fixed by updating the operating system. They should probably fix this error in a subsequent software release.

5. Use the Microsoft Management Console

  1. Press Win + R to open the Run dialog.
  2. Type mmc and press Enter.mmc command
  3. In the Microsoft Management Console, click File at the top-left.
  4. Select Add/Remove Snap-in from the dropdown.mmc file
  5. Scroll down and select Group Policy Object Editor and click on it.
  6. In the new window, choose Local Computer and click Finish.local computer policy
  7. Click OK to return to the console.
  8. Go to File and choose Save As, name the file and save it to a preferred location.save group policy editor file
  9. When you want to open to Group Policy Editor, just double-click the saved file

That’s about it on the Gpedit.msc not found on Windows 11 issue and how to download it.

Alternatively, you can learn how to edit the Group Policy in Windows 10 and use the same procedures in Windows 11, as they are similar.

You can also use gpedit.msc on Server 2019, and we have a great guide on how to do it.

Let us know in the comments section below which solution worked best for you as well as how often you use Group Policy Editor.

Reset All Audio Settings on Windows 11 [Quick Steps]

While your Windows OS is more than capable of managing sound on your PC, you will still need to intervene and reset sound settings in case you are facing audio issues or glitches. 

That being said, with the aesthetic changes made by Microsoft in Windows 11, it has become harder for some users to zero in on these settings.

Before we dive into the solutions, know that we can also offer assistance if your Windows 11 PC has no sound at all.

Why do I need to reset my Windows 11 sound settings?

You don’t necessarily need to do so, but when problems start interfering with how you do things on your PC, you might want to do something about it.

Like when your Windows 11 OS doesn’t recognize your headphones, there are some causes that trigger this behavior.

If you have sound problems, know that it can happen because:

  • Your drivers have become corrupt or are outdated
  • Operating system errors and glitches

But don’t worry, after going through this guide all your Windows 11 sound-related problems will surely be history.

How do I reset all the sound settings on Windows 11?

1. Reset from the Settings app

  1. 1. Press Win + I to access Settings.

  2. 2. Click on the System tab, then select Sound.

    sound settings windows 11
  3. 3. Go to Volume Mixer.

    volume mixer
  4. 4. Press the Reset button.

    reset sound settings windows 11
  5. 5. Close the window.

  6. If you’re looking to reset all sound settings on your Windows 11 PC, you need to look no further than Windows Settings. From the Volume Mixer section, you can complete the reset in a few clicks.

2. Uninstall/re-install the audio driver

  1. Search for Device Manager and open the app.device manager
  2. Expand Sound, video & game controllers, then right-click on the audio driver and select Uninstall device.uninstall audio driver
  3. After uninstalling the audio driver, your system will re-install it automatically.

3. Restart Windows audio services

  1. Search for Services and open the app.services
  2. Right-click on Windows Audio and select Restart.windows audio

4. Use Windows troubleshooter

  1. Search for Troubleshooting settings and open the app.troubleshooting settings
  2. Click on Other troubleshooters.other troubleshooters
  3. Next to Playing Audio, click on the Run button.run troubleshooter

5. Reset system sounds to default

  1. Search for Change system sounds and open the Control Panel app.change sound system
  2. Under Sound scheme, select Windows default.1
  3. Click on Apply, then click OK to close the window.2

These are the process you are looking at when you are having issues with the sound on your Windows 11-powered PC or laptop.

We’ve also prepared an interesting article bout what you can do if your gaming sounds simply stop on your Windows 11 device.

Leave a comment below and tell us if this article has helped you fix your sound-related Windows 11 problems.

How to Deploy/Change Folder Redirection Path in Group Policy

You are clearly interested in knowing more about how the Group Policy editors work, thus you came here to learn a lot more on the subject.

And, as always, we will oblige and offer the most accurate information. You might also be interested in Group Policy drive mapping, so we got you covered on that as well.

How does Group Policy folder redirection work?

You should definitely know that, in the Windows Server 2012 R2 environment, redirecting users’ files to a common storage area is sometimes the most practical path of action.

On the off chance, you are still learning the OS for the first time, enabling folder redirection might not be so intuitive.

But don’t worry, as Microsoft has provided a simple and easy way to do this on the domain or OU level, and we are also going to assist you step by step.

Before we do so though, we have to remind you that you will also find information on how to block Group Policy inheritance for a domain/OU right here.

So, without any further ado, let’s have a closer look at how you can activate folder redirection for the Group Policy Editor.

How do I deploy/change folder redirection paths in Group Policy?

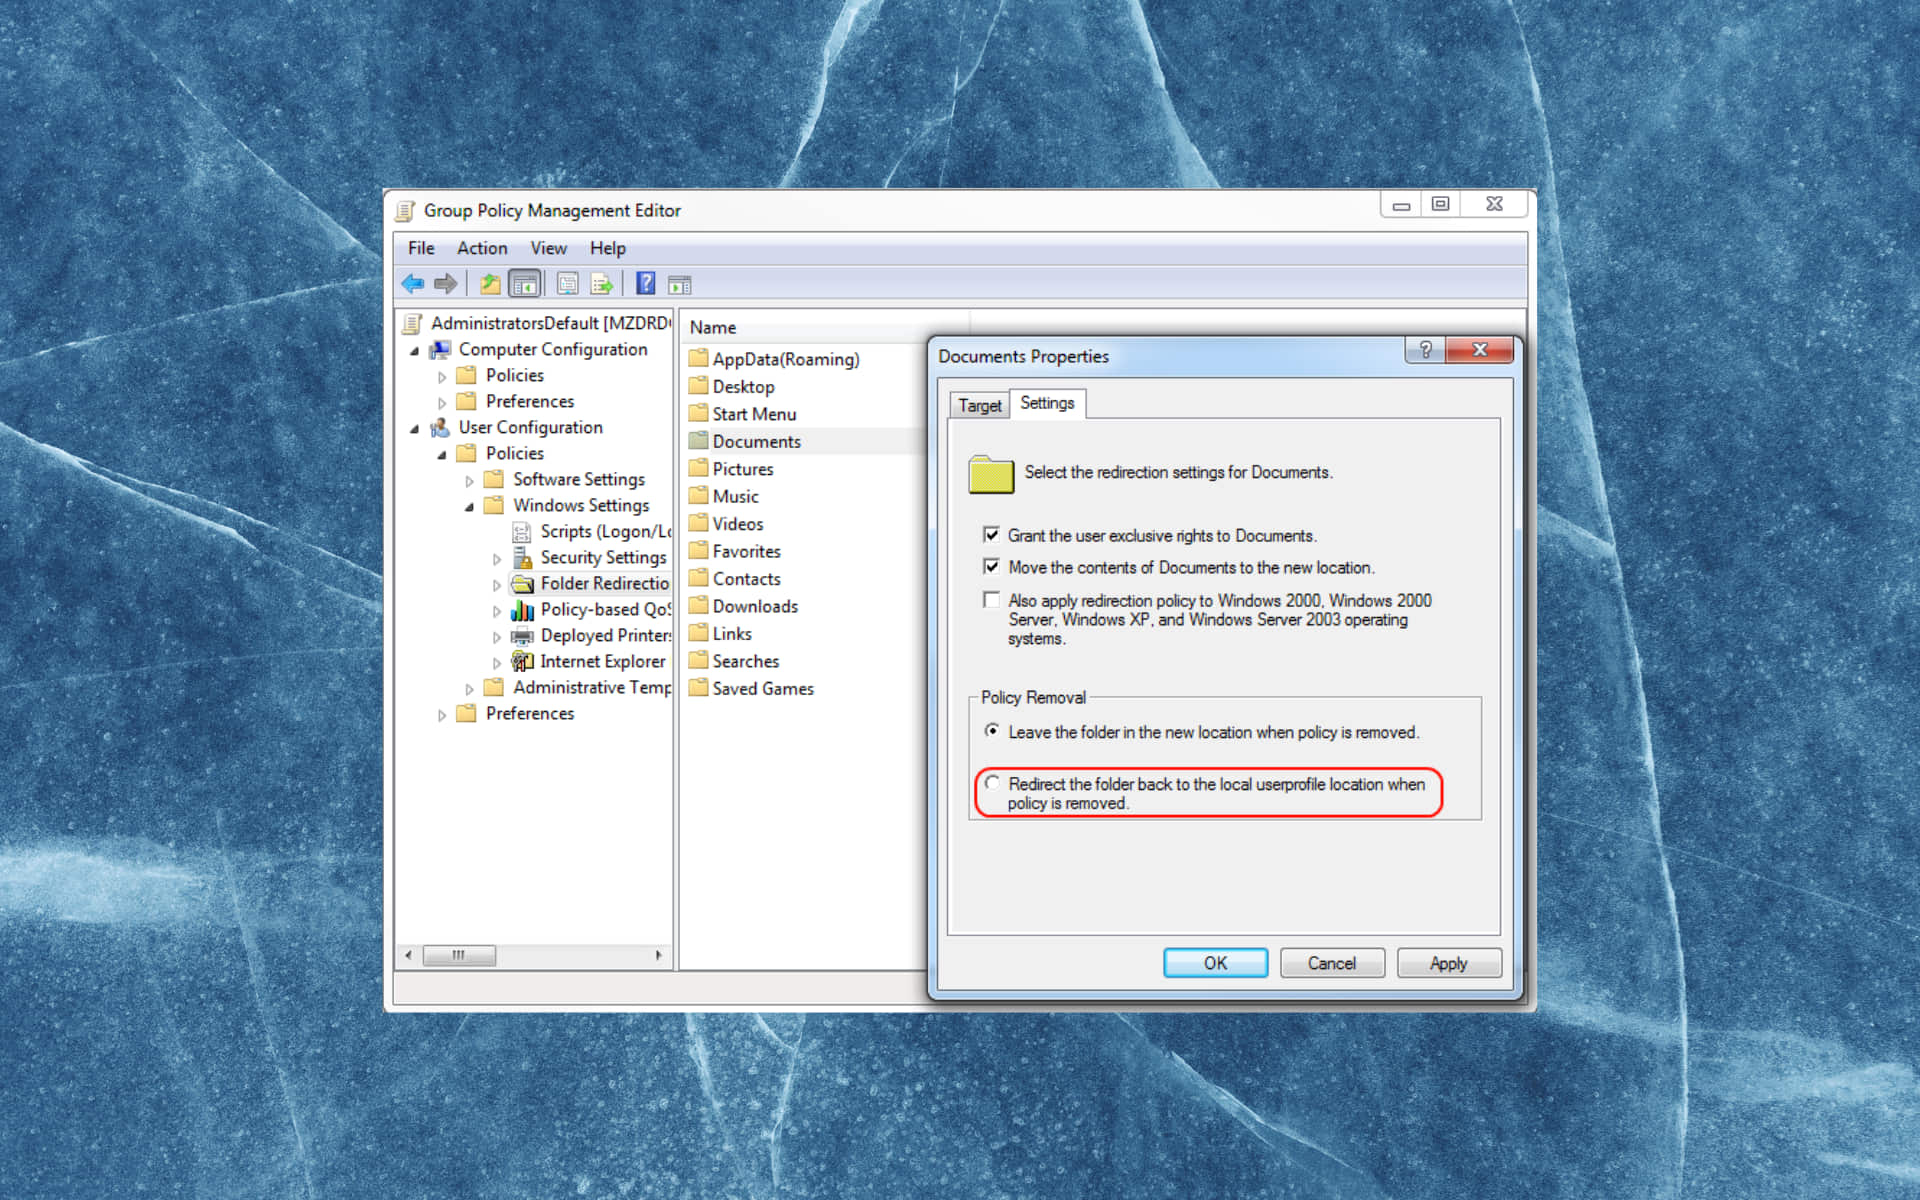
  1. 1. In Server Manager, click on Tools, then access the Group Policy Management in an account that has permission to edit Group Policy.

  2. 2. Right-click on Group Policy Objects OU and select New, then select a name.

    create new
  3. 3. Right-click on the folder you want to change the path for, then click on Properties.

  4. 4. Select the redirect destination, then click on Apply.

  5. 5. Return to the Group Policy Management Console and right-click on a domain/ OU.

  6. 6. Select Link an Existing GPO and then choose the Group Policy Object that you just created.

    link an existing gpo setting
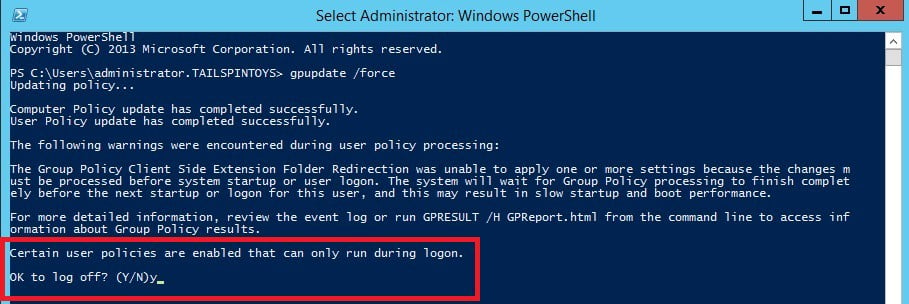
  7. 7. Run PowerShell, then type in the following command and press Enter: gpupdate /force

    insert the gpuupdate command
  8. 8. For the changes to take effect, you will need to log off and log back in so press Y and Enter.

  9. Performing a Group Policy folder path redirection is simple and can be done within a few minutes with the help of Group Policy Management and a command-line tool.

    Know that, if your new file doesn’t appear, consider going back to your new GPO and making sure that the file path is correct. Also, make sure that the folder you are redirecting it to actually exists.

    In order to change the root path destination, follow the exact same process from above, and only modify the destination folder when that step comes.

Is it absolutely necessary to perform a Group Policy folder path redirection?

No, this isn’t some type of written or even unwritten rule. You only need to perform a Group Policy folder redirection if you absolutely need to do so.

Otherwise, in many circumstances, it’s better to use the existing folder or provide access to a new folder instead.

That being said, using our guide, even beginners can easily complete it, provided they also understand the implicated factors.

If you need to switch more things around, keep in mind that you can also delete and recreate a mapped drive for the users.

The replace action overwrites all existing settings that are associated with the mapped drive. In case the mapped drive does not exist, the Replace action will create the drive.

That being said, you might also be interested in how to install Group Policy Management Console on Windows 11.

Be sure to leave a comment down below if this article has helped you with your Group Policy folder patch redirection.

How to Roll Back Drivers on Windows 11

Some users may seek to roll back driver updates to resolve issues arising after recent device driver updates. Rolling back a device’s driver will restore the previous one that the new one replaced.

There’s more than one way you can roll back a Windows 11 update. Below are four methods for reverting driver updates on Windows 11 PCs.

What is a device driver?

A driver is software that facilitates communication between Windows 11 (or other OS) and its associated hardware device. They’re kind of like language translators between hardware and computer platforms.

Companies frequently release new driver versions for their hardware. More essential system drivers will often be updated automatically with Windows updates.

You should confirm your current driver version before applying any rollback method, so you can use this guide to check driver version in Windows 11 before proceeding.

How can I roll back driver updates in Windows 11?

1. Select the Roll Back Driver option

  1. 1. Right-click the button for opening the Start menu and select Device Manager.

    open device manager
  2. 2. Double-click whatever hardware category includes the device for which you want to roll back a driver.

  3. 3. Right-click a device for which to roll back the driver and select Properties.

    select properties
  4. 4. Select the window’s Driver tab.

  5. 5. Then click the Roll Back Driver button.

    click to roll back driver windows 11
  6. 6. Select a reason for rolling back the driver.

    select a reason why you want to rollback driver windows 11
  7. 7. Press Yes to restore the previous driver.

  8. 8. Click Start and Power on the menu. Then select the Restart option.

    restart pc
  9. You can easily roll back recent drivers on your Windows 11 PC via Device Manager. This built-in tool on your computer allows you to manually choose which drivers you want to roll back from your list of available devices.

2. Reinstall old driver packs

  1. Right-click the Start button and select Device Manager and navigate to a hardware device category.
  2. Then right-click a hardware device and select Uninstall device.
    Uninstall device option roll back driver windows 11
  3. Select the Attempt to remove driver for this device option if there is one.
  4. Click Uninstall to confirm.
    Uninstall Device window roll back driver windows 11

When you’ve uninstalled a device driver, you can manually reinstall an older one to roll back to. Many device manufacturer websites will include old drivers as well as the latest ones.

For example, you can download old drivers for NVIDIA GPUs from the Advanced Driver Search page. Select your GPU model, All on the Recommended menu, and click Search to view a list of downloadable drivers.

When you’ve downloaded the previous driver version, open the folder that contains the driver package in Explorer. Double-click its setup package to install the driver.

You can also uninstall some drivers via Programs and Features or with third-party uninstallers.

3. Roll back driver updates with System Restore

  1. Click the Search tool on your taskbar (it has a magnifying glass icon) type recovery and select Recovery to bring up a Control Panel applet.
    A Recovery search  roll back driver windows 11
  2. Select the Open System Restore option.
    Open System Restore option roll back driver windows 11
  3. If a Choose a different system restore option is available, select that radio button.
  4. Click Next to view your PC’s available restore points and select one that predates the driver update on your PC.
  5. Click the Scan for affected programs button to view a list of programs and drivers the restore point will remove. If you can see the recent driver update listed, the restore point will remove it.
    Scan for affected programs button roll back driver windows 11
  6. Select Close to return to the restore point list.
    Affected programs info roll back driver windows 11
  7. Press Next to go to the confirmation stage.
  8. Then click Finish to roll back the driver and Windows.
    The Finish option roll back driver windows 11

4. Back up and restore drivers

4.1 Back up all drivers

  1. Press the Windows key + E to start File Explorer.
  2. Right-click the C: drive and select Show more options.
    Show more options option roll back driver windows 11
  3. Hover your mouse pointer over New and select the Folder option.
  4. Input Driver Backup Folder for the directory’s name. That new folder will include your driver backups.
  5. Click in the Search box at the top of Windows 11’s Start menu, type cmd, and select Run as administrator from there.
    The Run as administrator option roll back driver windows 11
  6. Input and execute this command with the actual folder path you just created, included at end: dism /online /export-driver /destination:C:\Driver Backup Folder
    The backup driver command roll back driver windows 11

4.2 Restore old drivers from the backup folder

  1. Right-click the Start button and select Device Manager.
  2. Right-click a device for which to restore a driver and select Update driver.
    Update driver roll back driver windows 11
  3. Select the Browse my computer option.
    Browse my computer for drivers option roll back driver windows 11
  4. Make sure that the Include subfolders checkbox is selected.
  5. Click Browse to select the Driver Backup Folder.
    Include subfolders option
  6. Then click the OK option.
  7. Select Next to start a driver search in your selected folder.

Some third-party driver updater tools also incorporate backup features for drivers. For example, Outbyte Driver Updater enables you to back up drivers with compressed ZIP archives.

Is there a way I can disable automatic driver updates?

You can disable automatic driver updates via the Control Panel. Press your keyboard’s Windows key + S. Type change device in the text box and select Change device installation settings.

A Device installation window will then open. Select the No option on that window. Press the Save Changes button to apply.

Many readers asked us: Why can’t I roll back my driver? Well, the Roll Back Driver option won’t be available when your PC hasn’t, or no longer, retained a previous driver version for a device.

However, you can still manually reinstall a previous driver version, as outlined for method two.

You can roll back to previous drivers in Windows 11 with any of the above methods. The first method is the fastest, but that option isn’t always available.

If you’re not using the latest version, we also have a guide on how to roll back the driver on Windows 7, so you might want to check it out.

Try the second, third, or fourth methods when you can’t select to roll back a driver. You’ll need to have enabled System Restore and backed up all drivers for the third and fourth methods to be valid.

How to Boot Into Dell Recovery Mode on Windows 11

Some of us might want Microsoft Surface laptops and tablets, while others go for devices from manufacturers such as HP, Asus, Razer, Lenovo, or Dell.

If you chose Dell, you might want to know what to do when the Dell update is not working. Also, we recommend having a look at what to do in situations when the Dell XPS 13 battery is not detected.

What options do I get if I boot into Dell Recovery Mode?

Dell users have been reporting problems for as long as the company has existed, so there’s really not a shock factor when you hear something like that.

In this article, you will find the exact steps you need to go through in order to complete this. However, before we get into that, let’s discover what the benefits of putting your PC into Recovery Mode can have:

System recovery optionDescription
Startup RepairFixes certain problems, such as missing or damaged system files, that might prevent Windows from starting correctly.               
System RestoreRestores your computer’s system files to an earlier point in time without affecting your files, such as e-mails, documents, or photos. If you use System Restore from the System Recovery Options menu, you cannot undo the restore operation. However, you can run System Restore again and choose a different restore point, if one exists.              
System Image RecoveryYou need to have created a system image beforehand to use this option. A system image is a personalized backup of the partition that contains Windows and includes programs and user data, like documents, pictures, and music.
Windows Memory Diagnostic ToolScans your computer’s memory for errors.
Command PromptAdvanced users can use Command Prompt to perform recovery-related operations and also run other command line tools for diagnosing and troubleshooting problems.

If any of the actions in the table above is what you are actually after, follow the solutions below to properly complete this process.

How can I boot into Dell Recovery Mode on Windows 11?

Note icon NOTE
Remember to save any work you are doing or important files before you engage in booting your Dell into Recovery Mode.
  1. 1. Press Win + I to access Settings.

  2. 2. Select the System tab, then click on Recovery.

    recovery
  3. 3. Next to Advanced setup, click the Restart now button.

    restart now
  4. 4. Click on Restart now.

    restart now
  5. 5. After the system has rebooted, select Troubleshoot.

    troubleshooting
  6. 6. Select Advanced options.

    advanced options
  7. 7. Click on Startup Settings.

    startup settings
  8. 8. Press the Restart button.

    restart
  9. 9. Use the number keys (4/5/6) to select which Safe Mode version you want to boot into.

    safe mode
  10. It is quite simple to boot your Windows 11 Dell device into Recovery Mode. The entire process can be done from the built-in Settings on your PC.

    Basically, you need to navigate to the Recovery section, restart your PC, and then choose the preferred Startup Setting via Advanced Settings.

Don’t worry, there is absolutely no rush. Take your time and complete this process properly, as seen in the screenshots above.

Speaking of Dell machines, we can also show you how to tackle scenarios where your external monitor is not working on your Dell laptop.

Furthermore, if you are in need of assistance with a Dell device when Miracast is not working, you will find the solutions here as well.

Has this guide been helpful to you? Leave a comment below and share your thoughts and opinions with us.

Fix: Realtek Audio Manager Keeps Popping Up

Trying to get your work done, but the Realtek Audio Manager keeps popping up constantly to annoy you and disturb the overall workflow?

If you don’t know about the installation of audio drivers, do check our complete guide on how to install any audio drivers in Windows 11.

What causes the Realtek Audio Manager to pop up?

With the popping up error, if you are getting the not supported message, then you should check our guide on fixing the device type not supported error Realtek Audio Manager.

Mostly an issue with the driver can result in Realtek Audio Manager behaving like this. Apart from this, the following causes can potentially cause the Realtek Manager to pop up.

  • Incompatible plugged audio device – One possibility is that you have an audio device plugged into your computer that is not compatible with the Realtek sound drivers.
  • Outdated Realtek drivers – Another possibility is that your Realtek drivers are outdated and need to be updated.
  • Windows might need an update – It is also possible that your Window needs to be updated.

Now that you can identify the causes behind this issue let’s move on to possible solutions that can help you keep the Realtek Audio Manager from popping.

To troubleshoot further issues that can occur with the Realtek audio manager or having no sound problem, you can have help from our guide to fixing no sound problems in Windows 11.

How do I keep Realtek Audio Manager from popping up?

Before moving towards detailed solutions, here are some quick checks that you can do to keep Realtek Audio Manager from popping up.

  • Check the audio device connector that is not loose. Realtek Audio Manager will pop up if the connector is not tight.
  • Make sure that the cables are properly intact and that there is no issue with the hardware.
  • Restarting your computer can also help because restarting will reinitialize the sound drivers.
  • If you have installed any new programs or updates, try uninstalling them by following the given method to uninstall updates in Windows 11.

Now that we have gone through some quick checks let’s move on to the detailed solutions.

1. Disable notifications via Settings

  1. Click on the Start button at the bottom of your screen and select the Settings option.
  2. Click on System in the side panel and then click on Notifications.
  3. Turn the Notifications toggle button of Realtek Audio Manager to Off.

Turning off all notifications via settings will keep the Realtek Audio Manager from popping on the screen.

If you do not see the Realtek Audio Manager in your Windows 11, check the article comprising solutions for missing Realtek Audio Manager in Windows 11.

2. Check for Windows updates

  1. Click on the Start button at the bottom of the screen and select the Settings option.
  2. Click on the Windows Update from the right sidebar and then click on Check for updates.
  3. If updates are available, then install them, and hopefully, your issue will be resolved.

3. Update the Realtek audio drivers 

  1. Type device manager in the search bar and click on Open.
  2. Then, click on Sound, video and game controllers, right-click on Realtek(R) Audio and click on Update driver.
  3. A confirmation prompt will open up again; click on Search automatically for drivers to automatically search and install the updated drivers.

Uninstalling the Realtek Audio Manager from your system will definitely resolve this issue. If you wish to reinstall the Realtek driver, then check this article on how to download Realtek audio drivers in Windows 11.

4. Enable the Remove Ballon Tips

  1. Press the Windows + R button to open the run box, type the following command to open the Local Group Policy Editor, and click on the OK button. gpedit.msc
  2. Click on Administrative Template and then click on Start Menu and Taskbar.
  3. Double-click on Remove Balloon Tips on Startup Menu items.
  4. Then, select the Enabled option and click on the OK button.

5. Uninstall and reinstall the Realtek Audio software

  1. Click on the Start button and select the Settings option.
  2. Click on Apps and then click on the Apps and features option.
  3. Type Realtek, click on the three dots of Realtek Audio Console, and click on Uninstall option from the dropdown.
  4. Again click on the Uninstall option on the confirmation popup.
  5. Once the Realtek software is uninstalled, install it again and check whether the issue is resolved or not.

However, if you think Realtek Audio Manager is necessary, then you should check this guide to know why I should need Realtek Audio Manager.

We hope this guide helped you immensely in clearing the issue of the Realtek Audio Manager popping up on the screen for a smooth workflow.

Before you go, don’t miss out on our RtkAudUService64 guide that explains more about this file and Realtek Manager.

If you have any further queries or suggestions or facing any other problem regarding Windows 11, do let us know in the comments section below.

Windows Activation Notice Keeps Popping Up: 5 Ways to Fix it

Many Windows users have expressed discontent with the pesky Windows Activation notice that keeps popping up on their computer screens. If you face the same issue, this guide is for you.

Windows Activation is an anti-piracy feature by Microsoft that checks to see if your copy of Windows is legitimate. However, the tech giant has become less strict about this policy. So, even if your PC fails the activation process, Windows will continue to work normally until you solve the issue.

Why does the Windows Activation notice keep popping up?

  • Windows license expired – The Windows Activation notice may keep popping up if your Windows license has expired. This is a common issue that we’ve seen on many Windows computers that were activated using a KMS or Windows 10/11 product key. You may receive a message from Microsoft that reads your Windows license will expire soon.
  • Invalid license -If you input a key that you got from an online source, it might not work because it has been used by others and Microsoft’s online activation technology blocks users who try to use the same product key. Make sure you’re using a valid activation key to avoid this issue.

In some cases, Microsoft will keep asking for activation even though your version of the OS is already activated.

Below we have compiled five different methods to help you get rid of the Windows Activation notice that keeps popping up on your computer screen. So, let us get started.

What can I do if the Windows Activation notice keeps popping up?

This guide will cover five of the most common practical solutions to the Windows Activation notice that keeps popping up. But please verify the following before moving forward:

  • First, verify that your copy of Windows is legitimate.
  • Look for key features that will help you verify its authenticity, like the Certificate of Authenticity (COA), proof of license label, and an edge-to-edge hologram.

1. Remove background images via Control Panel

  1. Go to the Windows Search bar, type Control Panel, and Enter.
  2. Hover over to Ease of Access Center and click on Optimize visual display option.
  3. Now, under the Make the computer easy to see section, scroll down and tick the box next to Remove Background Images (Where Possible)
  4. Click on Apply and restart your device.

2. Execute a script through Windows Powershell

  1. Go to the Windows Search bar, type in Windows Powershell, and click on Run as Administrator on the right.
  2. In the window that opens, type or copy-paste the following script and hit Enter.slmgr /renew
  3. Lastly, restart your computer.

3. Activate Windows

  1. Press the Windows key + I simultaneously to open the Settings app.
  2. Under Systems, please scroll down to Activation and click it.
  3. Expand the Upgrade your edition of Windows section and click the Change Product key option.
  4. Enter your 24-character alphanumeric product key and click Next.
  5. Microsoft will now activate your Windows OS.

4. Disable Windows Tips

  1. Press the Windows key + I simultaneously to open the Settings app.
  2. Under Systems, go to Notifications.
  3. Please uncheck the box next to Get tips and suggestions when I use Windows and Show me the Windows welcome experience after updates and occasionally when I sign in to highlight what’s new and suggested.

5. Edit Registry Key

  1. Press the Windows key + R to open the Run dialog box.
  2. Type regedit and hit Enter to launch the Registry Editor.
  3. Click on File and then Export.
  4. Choose a secure location on your computer to save the backup, and name it Original Registry.
  5. Now, in the Registry Editor, locate or copy-paste the following: HKEY_LOCAL_MACHINE\SOFTWARE\Microsoft\Windows NT\CurrentVersion\SoftwareProtectionPlatform\Activation
  6. In the right pane, right-click on Manual and select Modify.
  7. Change the value data from 0 to 1 and click Ok.
  8. Restart your computer for changes to take effect.

You can get rid of the Activate Windows notice by simply changing the Registry. However, if none of the solutions work for you, try contacting the Microsoft customer support team to resolve your issue.

We hope one of these methods finally works for you to eliminate that irritating Windows activation notice. Alternatively, you can also go through our guide on Windows 10/11 Pro activation error 0xc004f014.

If you have questions or need clarification on anything, please reach out to us in the comments section below. We’ll be happy to help.

Fix: Logitech G HUB is Not Downloading Presets

Logitech G HUB not downloading presets is a known issue that has been widely reported on the Logitech forums. If you are facing the same problem, then you are in the right place.

This article will provide you with some effective methods on how to fix the issue. So, let us get started without wasting any time.

Why are presets not downloading in Logitech G HUB?

The presets are not available for download could be due to one of these reasons:

  • No internet: The device does not have an internet connection. To fix this, you will need to contact your ISP and ask for help.
  • Storage space issue: Not having enough storage space available on your computer can cause a variety of issues, including conflicts when trying to run the Logitech G Hub. To fix this, you will need to make some more space on your HDD.
  • Profile settings: Updating your profile name and picture is important if you want to download presets.
  • Firewall block: Your firewall settings are blocking downloads from the Logitech website.

How do I fix the preset not downloading in Logitech G HUB?

When downloading presets from G Hub, make sure you do the following:

  • Update your profile name and picture.
  • Download the presets for the same device model as the one you have. Otherwise, the preset won’t work.
  • Check the ports. Make sure they’re properly plugged in and that the connections are tight.
  • Ensure that you have the correct device selected in Logitech G HUB. If you have any doubts, consult the documentation that came with your product.
  • Try downloading the latest version of the software.
  • If everything fails, restart your computer.

1. Allow the app through Windows Firewall

  1. Go to the Start menu and search for Firewall.
  2. Then, click on the Allow an app or feature through Windows Firewall option.
  3. Click the Change settings button at the top.
  4. Scroll down to the bottom and click Allow another app.
  5. Click Browse and search for Logitech G HUB.
  6. Next, click on the app and select the Add button option.
  7. Once Logitech G HUB has been given permission, click OK.

Sometimes, The Windows Firewall can prevent Logitech G HUB from working properly. if you find that your firewall is still blocking apps even after you’ve tried disabling it, don’t hesitate to go through our guide on the same.

2. Update device drivers

  1. Go to the Windows Search Bar, type in Device Manager, and hit Enter.
  2. Expand the Sound Videos and Game section.
  3. Right-click on your sound device and select Update driver.

Aside from protecting you against malicious software, your device drivers also help eliminate bugs and glitches. Thus, updating them could potentially fix your issue.

3. Reinstall Logitech G HUB

  1. First press the Win + R keys on your keyboard to open the Run box.
  2. Type or paste control appwiz.cpl and press Enter.
  3. Click the Logitech G HUB app icon and select Uninstall.
  4. Once done, restart your computer.
  5. Now, visit the Logitech G HUB download page and select the Download for Windows option.
  6. Follow the on-screen instructions to proceed.

4. Set LGHUB Updater Service Startup type to Automatic

  1. Press the Win + R keys on your keyboard to open the Run box.
  2. Type Services.msc in the search bar and press Enter.
  3. Find LGHUB Updater Service in the list of Services.
  4. Right-click on it and select Properties.
  5. On the General tab, set the Startup type to Automatic using the dropdown button next to it.
  6. Click OK and restart your PC for changes to take effect.

The LGHUB Updater Service should not be disabled as it is essential for the G HUB to function properly. You will need to set its startup type to Automatic from either Manual or Disabled and see if it fixes your issue.

Alternatively, you can directly reach out to Logitech G HUB customer support if none of the solutions work for you. Also, we have a few recommendations for fixing the most common problems like the Logitech G HUB not working in Windows 11.

If you have any questions about the above processes, feel free to leave a comment below. We would love to hear from you.

Posted in Fix

Display Settings are Greyed Out? How to Get Them Back

Windows users can experience many issues without necessarily being tied to just one part of the operating system.

If you need to reset the sound settings on your Windows 11, our guide will surely be of assistance. But you can also run into display problems, and we’ll help you with those.

Why are my display settings greyed out on Windows 11?

Simple actions, such as switching wallpapers, or changing the system’s resolution, can prove impossible if you get a bug many users spoke about on forums and social media platforms.

Responsible for the Windows 11 display settings being greyed out include:

  • Malicious software and viruses – Having any software that endangers your system installed can cause a variety of issues, and in order to fix this, you will need to use good antivirus software.
  • Corrupted or outdated drivers – Drivers are the basis of every software running on your PC, so updating drivers is of paramount importance.
  • Too many junk files – Having a regular system cleanup is extremely important, but you can simplify the process by using specialized software.

Speaking purely based on the reports, most users facing this issue have recently upgraded to Windows 10/11 or installed specific system updates.

Without any double, this could be causing incompatibility between the operating system and outdated drivers, causing the affected PC to disable some functions related to the misconfigured drivers.

Before we start this troubleshooting process, though, be sure to make the first steps towards fixing the problem, such as:

  • Restart your PC
  • Scan your PC for malware
  • Clean junk files from your PC

How can I fix the Windows 11 display settings when greyed out?

1. Enable GPU Scaling

1.1. Intel

  1. Click on Intel HD Graphics located in the Notification Area of the Taskbar.
  2. Click Display.
  3. Click Maintain Display Scaling, then click Apply.
  4. Finally, restart your Windows 11 PC.

1.2. AMD

  1. Open your AMD Radeon control panel from the Taskbar.
  2. Click Display.
  3. Look for GPU Scaling and turn it on.
  4. Restart your Windows 11 PC.

1.3. Nvidia

  1. Click NVIDIA from the Taskbar to open its settings.
  2. Click on Adjust Desktop Size and Position from the left menu.
  3. Select your scaling mode: Full Screen, Aspect Ratio, or No Scaling.
  4. Choose GPU in the dropdown under Perform scaling on.
  5. Save your settings and restart your system.

2. Update your display driver

  1. Search for Device Manager and open the app.device manager
  2. Extend Display adapters, right-click on your GPU and select Update driver.display drivers
  3. Click on Search automatically for drivers.search automatically for drivers

3. Remove malware from your PC

  1. Press Win + I to access Settings.
  2. Select the Privacy & Security tab, then click on Windows Security.windows security
  3. Click on the Open Windows Security button.ope windows security
  4. Click on Virus & threat protection.virus and threat protection
  5. Click the Quick Scan button.quick scan
  6. If your PC finds any threats, click on the Remove button.

4. Update Windows to the latest version

  1. Press Win + I to access Settings.
  2. Click on the Windows update tab, then click on Search for updates.windows update
  3. If Windows found any updates, click on the Install now button.

5. Reset your PC

  1. Press Win + I to access Settings.
  2. Select the System tab, then click on Recovery.recovery windows 11
  3. Click on the Reset PC button.reset this pc

6. Install display drivers in compatibility mode

  1. Manually download the display driver you need from the manufacturer’s website.
  2. Right-click on the setup file and select Properties.properties
  3. Select the Compatibility tab, then select Windows 8 from the dropdown, click on the OK button, and then on Apply.compatibility mode
  4. Reboot your PC.

Windows 11 users who reported their display settings getting greyed out and becoming inaccessible have also said that these solutions helped them fix the problem.

Make sure to follow each step, and you will be back to normal in no time. Leave a comment below if this guide has helped you as well.

How to Boot Lenovo into Recovery Mode on Windows 11

Booting into a Lenovo Recovery mode on Windows 11 allows you to access the Windows Recovery Environment (WinRE). It repairs many factors causing unbootable operating systems.

However, users complain about not being able to find the Recovery Environment on Windows 11.

Why should I boot Lenovo into Recovery Mode on Windows 11?

The Lenovo Recovery mode gives users Windows Recovery Environment (WinRE) access. It is a pre-installed troubleshooting tool that accompanies the Windows operating system.

Furthermore, it offers a series of Recovery options that allows you to perform advanced troubleshooting on your PC. Some features are:

  • Running startup repairs: When you run into startup errors in your Lenovo PC, booting into the Recovery mode allows you access repair tools to fix the startup bug affecting your PC.
  • Resetting your PC: You can use the Lenovo Recovery mode to restore factory settings and reinstall Windows. However, if the factory reset is not working, try the fixes in this guide.
  • Access the Command Prompt: The Windows Recovery Environment on Lenovo allows users to use the Command Prompt to access the Registry Editor and copy system files. Also, you can perform an SFC scan to verify the status of protected files on your computer.
  • System restores: Booting Lenovo into Recovery mode allows you to restore your PC to a previous point.

Also, the Windows Recovery Environment (WinRE) allows you to boot your PC from a bootable USB drive.

How can I boot my Lenovo PC into Recovery mode on Windows 11?

Before booting your Lenovo PC into Recovery mode, we recommend you go through the following preliminary checks:

Follow the steps below to boot your Lenovo PC into Recovery mode on Windows 11.

1. Via the Settings app

  1. Press the Windows + I keys to prompt the Windows Settings app.
  2. Go to System or select Recovery.
  3. Navigate to the Advanced startup section and select the Restart now option to boot your Lenovo PC in Recovery mode.

If Advanced startup is missing from your PC, you can learn how to add it through this guide.

2. Use the Start menu

  1. Press the Start button on your keyboard and click on the Power option.
  2. Then press and hold the Shift key on your keyboard as you select the Restart option.

You may also check this guide on fixing the Start menu when it’s not working on Windows 11.

3. Use Windows PowerShell command

  1. 1. Click on the Start button to open the Windows Search box.

  2. 2. Type PowerShell in the search box, and select Run as administrator.

    run powershell as administrator
  3. 3. Input the following command: shutdown /r /o

  4. 4. Press Enter to run the command.

    boot lenovo into recovery mode windows 11
  5. 5. Alternatively, input this command, then press Enter:shutdown /r /o /f /t 0

  6. A very quick and easy way to boot your Lenovo device into Recovery Mode is via a command-line tool such as Powershell. All you need to do is input a command and run it.

    You should only force Windows 11 to boot into Recovery mode using the second command if the first fails. Windows will boot into Windows Recovery Environment (WinRE) in a few seconds.

4. Boot your Lenovo PC into Recovery mode via Security Screen

  1. Press the Ctrl + Alt + Del keys on the desktop to prompt the Windows Security Screen.
  2. Select the Power button in the bottom-right corner of the screen.
  3. Press and hold the Shift key, then choose the Restart option.

You can read our guide on what to do if Windows 11 won’t enter Recovery mode on your PC.

5. Via Automatic Repair

  1. Press and hold the Power button on your Lenovo PC until the screen goes off.
  2. A Preparing Automatic Repair option should appear below the Windows logo; wait while it loads.
  3. Select Advanced Options on the next prompt to launch the Windows Recovery Environment (WinRE).

You can read about how to fix Automatic Repair when it’s not working in Windows 11.

Nonetheless, you can refer to our article on how to enter recovery mode on Windows 11 for more details on accessing the Windows Recovery Environment.

Also, users can check our guide for fixing the Windows 11 Error Recovery screen on boot issues in a few steps.

If you have further questions, kindly leave them in the comments below. We’d appreciate a response from you.

Realtek Audio Driver Install Loop: 5 Quick Ways to Fix It

Realtek Audio Driver is key for sound on your PC, letting you hear through speakers or headphones. Sometimes, though, it gets stuck in an endless loop—super frustrating. This article shows how to fix that, and you can also learn why the Realtek audio driver matters.

What causes the endless loop?

When installing the Realtek driver on Windows 11, an endless loop can happen due to:

  • Windows update glitches causing conflicts.
  • Disabled Microsoft UAA Bus, which the driver needs to work.
  • Outdated or corrupt drivers that aren’t compatible with Windows.

Now that you know the causes, let’s explore fixes to solve the issue.

How do I fix the Realtek audio driver’s endless loop?

1. Update the Realtek audio driver

  1. Type Device Manager in the search panel below and click on Open.
  2. Click on Sound, video, and game controllers in the Device Manager window, then right-click on Realtek High Definition Audio, and from the drop-down, click on Update driver.
  3. Click on the option to Search automatically for drivers.
  4. It will update the drivers automatically; hopefully, your problem has been resolved too.
  5. If it doesn’t work, manually uninstall the drivers and install them again by typing the Device Manager in the search panel below and clicking on Open.
  6. Click on Sound, video, and game controllers in the Device Manager window, then right-click on Realtek High Definition Audio, and from the drop-down, click on Uninstall device.
  7. A confirmation prompt will open up, check the Delete the driver software for this device option and click on Uninstall.
  8. Once the driver has been uninstalled, a confirmation prompt will ask you to restart the PC. Click on Yes.
  9. Then, install the drivers again and see whether the issue is resolved or not.

If you don’t know how to download the Realtek drivers in Windows 11, then check our guide to downloading Realtek drivers in Windows 11.

Now that you have installed the pre-existing Realtek audio driver, the endless loop is likely to subside; if the problem continues, move on to further solutions given below.

2. Run Microsoft audio troubleshooter 

  1. Type Troubleshoot settings in the search bar present at the bottom of the screen, and click on Open.
  2. Then, click on Other troubleshooters.
  3. Click on the Run button of the Playing Audio option.

Manually running troubleshooting on audio settings is likely to resolve your problem. If you’re still experiencing the same issue, you can try other solutions given below.

If you are using Dolby Atmos sound in your system and it is not working in Windows 11 then you should read our article on fixing Dolby Atmos not working in Windows 11.

3. Disable audio enhancements

  1. Click on the Audio icon, right-click on the Audio icon again and select Go to Settings.
  2. Then, click on the Speakers option.
  3. Turn the option of Enhance audio to Off.

By doing this, you will be able to reduce the number of processes that the Realtek audio driver has to go through, which might fix the problem.

4. Check for driver updates in Windows Update

  1. Click on the Start button at the bottom of the screen and select Settings.
  2. Click on the Windows Update from the sidebar and then click on Advanced options.
  3. Then, click on Optional updates.
  4. Click on Driver updates, check the pending driver updates and click on Download and Install button.

If you are facing the Realtek audio error code 0001 on Windows 11, then you must follow our guide to fix Realtek error code 0001.

5. Turn the mono audio option Off

  1. Click on the Start button from the bottom of the screen and select the Settings option.
  2. Click on the System option, and then click on Sound.
  3. Scroll down and make sure the toggle button of the Mono audio is off.

Along with the above error, if you ever face an audio rendering error in Windows 11, our article on fixing audio rendering errors in Windows 11 might help you.

For a step-by-step fix for the Realtek audio driver endless loop issue, see how to resolve Realtek audio driver endless loop errors.

We hope that this article helped you in solving your problem. If you have any further queries, feel free to reach out to us in the comments section below.

Not Enough Memory in the System to Start Virtual Machine [Fix]

Creating any virtual machines may be impossible due to Hyper-V not having enough memory. It can sometimes lead to data loss; hence, you must fix the problem.

Also, users often encounter variations of this memory error and prevent the reinstallation of Hyper-V virtual machines on Windows.

What causes not enough memory to start a virtual machine error?

According to the Hyper-V general requirements, at least 4 GB RAM is required for the host and other virtual machines. Once this is filled up, other VMs will not start.

Also, you can encounter the virtual machine failing to start because of insufficient disk space. Other likely causes for the error are:

  • Over-allocation of RAM: You can encounter Hyper-V not enough memory issues if the allocated memory for the virtual machine is more than the available RAM.
  • The memory cache: Hyper-V virtual machines collect and store cache data in the memory cache. However, it can take up a lot of memory space because it runs many programs concurrently.
  • Requirement issues: Because Hyper-V has memory capacity requirements, you may encounter problems if you don’t meet the requirements.

Various other factors can prompt the Hyper-V memory not to have enough error.

How do I fix Hyper-V not enough memory to start VM?

Users fix Hyper-V not having enough memory to start Virtual Machine by troubleshooting some settings. However, follow these preliminary checks before proceeding:

  • Check Hyper-V general requirements to see if your device meets the expected specifications.
  • Ensure that no RAM-heavy-dependent programs or apps are running in the background.
  • Check the running VMs to see if they are not consuming more than you allocated.
  • Reboot your PC to fix any startup error that might cause the issue.

Some advanced solutions you can try if the issue persists are as follows:

1. Restart your PC in Safe mode

  1. Press the power button to turn on the PC and keep pressing the F2, F8, F10, or F12 keys to open the Advanced Boot Options menu (different keys work for different PCs).
  2. Click on Troubleshoot option.
  3. Select Startup Settings on the Advanced option.
  4. Press 4 to Enable Safe Mode and click to Restart.

Restarting your device in safe mode should fix bugs and errors causing memory issues with Hyper-V. If you’re having trouble with these steps, check out ways to start Windows 11 in Safe Mode without difficulties.

2. Assign less memory to Hyper-V VM

  1. Click Start, type hyper-V in the search box, and open the Hyper-V Manager from the search results.
  2. Right-click the virtual machine prompting the not enough memory error, then select Settings.
  3. Click on Memory, then go to the RAM and Minimum RAM tabs on the right pane of the screen.
  4. If the minimum RAM is higher than the Start RAM, set a new RAM value.
  5. Navigate to the Hyper-V Manager homepage and replicate the steps for all other VMs.

Exit the Hyper-V Manager and restart your device to sync the changes. Check if the problems persist.

3. End Tasks for unnecessary programs

  1. Left-click the Start button, then select Task Manager.
  2. Select CPU and Memory usage in the Task Manager.
  3. Select the programs using more CPU and memory space on your PC.
  4. Click on the End Task option from the drop-down, then close the Task Manager.

Ending tasks for programs you don’t need presently can free up RAM on your device, creating more memory for Hyper-V to use.

However, if you encounter difficulties accessing the Task Manager via the steps above, look at the other ways to open Task Manager as specified in our guide.

4. Enable the Dynamic Memory option

  1. Right-click the Start button, type hyper-V in the search box, and select the Hyper-V Manager from the search results.
  2. Right-click on the virtual machine showing the memory error, then select Settings.
  3. Click on Memory and locate the Dynamic Memory tab on the right pane of the screen.
  4. Check the box for Enable Dynamic Memory.

The Dynamic Memory option allows the allocated memory for the virtual memory to change between the range you set.

We hope our solutions are resourceful and that you’re able to fix the Hyper-V not enough memory error.

Alternatively, you can read our extensive guide on fixing the Hyper-V ran out of memory error. Likewise, some users complain about experiencing Hyper-V high CPU usage on their PCs. If you encounter this, check our article for quick fixes.

For further queries and suggestions, kindly drop them in the comments below. We’d like to hear from you.

Microsoft will launch PC Manager, its own alternative to CCleaner

If you are a Microsoft product fan, then you will surely get a kick out of what we are about to share with you in this article.

We’re going to focus on the Windows 10/11 operating systems, where Microsoft is about to introduce an app that should have been added years ago.

In case you didn’t know, the tech giant known as Microsoft is working on a PC Manager app that’s designed to boost your computer’s performance.

The Beta for Microsoft’s PC Manager is out now

Much like the popular CCleaner, the beta version of Microsoft’s PC Manager includes storage management and the ability to end tasks quickly and control which apps start up with Windows.

The source code is already baked into Windows, but this PC Manager app puts it all in one useful location, which is really advantageous.

And, to make it better, there’s even a browser protection section that makes it easier to change default browsers than what exists in Windows right now.

The application itself displays in English so it is unclear if it supports other languages besides Chinese and English and Microsoft has yet to make an announcement regarding it.

Note that most web browsers support translations, but you may also activate the first button on the page to start the 5 Megabyte download of the app.

However, the app checks out fine on Virustotal there is only one hit by CrowdStrike Falcon, and it is labeled grayware.

PC Manager’s storage feature includes the ability to manage apps or remove those that are rarely used, and there’s also a full cleanup scan available or a scan to find large files on your drives.

Furthermore, the process management feature is a more simplified version of the Task Manager so you can quickly kill processes that might be eating up RAM.

When you press the main boost button the PC Manager will clear temporary files and free up memory, which could be useful on older PCs.

As we’ve mentioned, the public beta of PC Manager has appeared on an official Microsoft site, but the site is Chinese, which suggests that this app is designed for a very specific market.

Also, if you were planning on getting this for Windows 7 or Windows 8, you won’t be able to.PC Manager is designed for Windows 10 and above and is targeted more at low-spec laptops and PCs.

Have you already tried the PC Manager Beta? Share your experience with us in the dedicated comments section located below.

Bluestacks is Crashing my PC: 7 Ways to Fix Blue Screen issues

Android emulation is possible on Windows, but many users reported Blue Screen of Death errors while using the BlueStacks software.

This can be a big problem and cause stability issues with your PC, but in this article, we’ll show you how to fix this problem.

Why does Bluestacks keep crashing?

Users have noticed this error, and it is triggered by a few different elements, the most common being:

  • Outdated or corrupted drivers – Curropt drivers are a huge factor and sometimes will even mean that the BlueStacks engine won’t start. We discuss how to fix this below.
  • Errors in the Hyper-V feature – If the BlueStacks isn’t opening or constantly crashing, it’s possible that there’s an issue with the virtualization and everything is not configured correctly.
  • Third-party applications – Third-party applications can cause this error to appear, which will require a detailed fix in some cases.
  • Compatibility issues with antivirus – While antivirus software keeps you safe, it may not interact with some legitimate applications in some cases. You should use only the best antivirus software.

Blue Screen of Death errors can be pretty problematic, and sometimes these errors can appear in different variations while using BlueStacks, including:

  • BlueStacks keeps crashing Windows 10 – Sometimes BlueStacks can keep crashing on your PC. This can occur due to the Hyper-V feature, so be sure to disable it.
  • BlueStacks BSOD memory_management – Third-party applications can cause this error to appear. You will have to identify and eliminate the trigger applications.
  • Blue screen after installing BlueStacks – Your antivirus can also cause problems with BlueStacks to appear.
  • BlueStacks quit unexpectedly – This is very similar to the restarting error, and just like it is with other variations, you should try some of the solutions recommended below.

How can I fix Bluestacks crashes on PC?

Before you go into any of these solutions, you may decide to change emulators altogether. However, many users who have switched to get LD Player have had a positive experience.

  1. Use a professional solution
  2. Disable the Hyper-V feature
  3. Reinstall the BlueStacks software
  4. Reinstall your graphics card drivers
  5. Check your antivirus
  6. Use an alternative android emulator software
  7. Try running BlueStacks in Safe Mode
  8. Perform a Clean boot

1. Use a professional solution

The BlueStacks Blue Screen of Death error will prevent you from having an excellent gaming experience. However, after fixing this problem, you can enjoy playing the best Android games on your computer.

We recommend you use a professional solution that offers you many benefits. First, it safely repairs and secures your computer, bringing it into an optimized state.

2. Disable the Hyper-V feature

    A tested and reliable solution is to disable Hyper-V Windows feature on your device in order to repair Bluestacks crashing errors really fast.

  1. 1. In the Search field, enter Windows Features. Select Turn Windows features on or off.

    bluestacks-blue-screen-death
  2. 2. When the Windows Features window appears, locate Hyper-V and disable it. After doing that, click OK to save the changes.

    bluestacks-blue-screen-death
  3. 3. Restart your PC to apply the changes.

3. Reinstall the BlueStacks software

A Blue Screen of Death can sometimes appear while using BlueStacks if the installation is damaged. To fix this problem, users are suggesting reinstalling the software entirely.

There are several ways to do that, but if you want to remove BlueStacks, you need to use third-party software.

This is an excellent uninstaller software, and it can remove any application from your PC and all its files and registry entries.

By using the uninstaller software, you’ll ensure that there will be no traces of Bluestacks on your computer, and you will be ready for a fresh install.

4. Reinstall your graphics card drivers

  1. Press Windows Key + X and choose Device Manager from the list.
  2. When Device Manager opens, expand Display adapters, right-click your graphics card and choose Uninstall device.
  3. If available, check to Remove driver software for this device option and click on Uninstall.
    bluestacks crashing pc
  4. Restart your PC to apply the changes, then run Bluestacks and verify if it is still crashing your PC.

If you find this process tedious, you can always use third-party tools to update all your drivers automatically.

Try out a highly-efficient software such as Outbyte Driver Updater that updates all your drivers, including the ones for your graphics card. It’s simple, fast and secure technology allows it to improve the performance of your graphic card.

5. Disable or uninstall your antivirus

  1. Click on the hidden access arrow in the Taskbar.
  2. Click on your antivirus icon, hover over Avast shields Control and select Disable for 10 minutes (This step varies for different antivirus software).
  3. Run Bluestacks and verify if it is still crashing your PC.

If you’re getting Blue Screen of Death on your PC while using BlueStacks, the problem might be related to your antivirus software.

If the problem is still there, you must uninstall your antivirus and try rerunning BlueStacks.

6. Try running BlueStacks in Safe Mode

  1. Open the Settings app using the Windows Key + I shortcut.
  2. Navigate to the Update & Security section.
  3. Select Recovery from the left pane. Click the Restart now button in the right pane.
  4. Choose Troubleshoot > Advanced options > Startup Settings. Click the Restart button.
    bluestacks crashing pc
  5. You should now see a list of options. Select the Safe Mode with Networking by pressing the corresponding keyboard key.
    bluestacks crashing pc
  6. Run Bluestacks and verify if it is still crashing your PC.

7. Perform a Clean boot

  1. Press Windows Key + R to open the Run dialog.
  2. Type msconfig, and click OK.
    bluestacks crashing pc
  3. Navigate to the Services tab and check to Hide all Microsoft services checkbox, then click the Disable all button to disable the services.
  4. Head over to the Startup tab and click Open Task Manager.
  5. Right-click the first entry on the list and select Disable from the menu. Do this for all entries on the list.
  6. Go back to the System Configuration window.
  7. Click Apply and OK to save changes and restart your PC.

Once your PC restarts, check if the problem is still there. If the Blue Screen of Death doesn’t appear anymore, one of your startup applications or services was certainly causing the issue.

To pinpoint the cause, you must enable the disabled applications and services.

Once you find the problematic application, remove it, or keep it disabled to prevent this issue from reappearing.

You should note that there are a few variants to this error, including, BlueStacks crashing on Windows 11 and BlueStacks 5 crashing on Windows 11. But these solutions should work for any of these.

We hope that our solutions helped you solve this problem and if you have any suggestions, please let us know in the Comments section below.

Windows 11 Wireless Display Lag: 5 Ways to Fix it

When you face problems like Projecting to This PC lag, don’t worry. You can easily get rid of this problem and enhance your experience with Windows 11.

We also have solutions to solve Wireless Display install failure. However, this article will show you the ways to troubleshoot the lagging problems with the Projecting to This PC feature.

Why does Projecting to This PC lag?

Projecting to This PC feature is indeed a great feature on Windows 11. However, sometimes, it may not work because of the following reasons:

  • Outdated drivers – If the display driver, network driver, and some other chipset drivers are not up to date, this problem may appear.
  • Outdated version of Windows – A problematic version of Windows may be a major reason.
  • Poor Wi-Fi – If the Wi-Fi signal is very weak or there are network overlaps, any wireless display will struggle to deliver a smooth experience.
  • Problematic system components – Corrupted system components on Windows may make it unstable and problematic.
  • Problematic BIOS/Motherboard firmware – If your motherboard BIOS or firmware software is outdated, the latest features and updates on your PC will not deliver enough performance.

The way to solve this problem is to sort out these reasons first. Then, you can take steps to fix that you can find the next part of this article.

How do you fix Projecting to This PC lag?

Before trying the actual steps, we suggest you do a few things first. These are:

  • Restart your PC.
  • Make sure you are using Wi-Fi rather than an Ethernet connection.
  • Use a 5 GHz WiFi connection rather than 2.4 GHz. If necessary, check out these best 5 GHz routers.

Now, you can try these methods to solve lag issues with the Projecting to This PC feature.

1. Check for Windows Update

  1. Press Windows + I on the keyboard to open Windows 11 Settings.
  2. Go to Windows Update and click on Check for updates.check for updates windows 11 settings
  3. If any updates are available, click on Install/Download button.

2. Update display and network drivers

2.1 Use the Device Manager

  1. Open the Start Menu.
  2. Type Device Manager and press Enter.opening device manager windows 11
  3. Right-click on the Display Driver and choose Update.clicking update driver on graphics card on windows device manager
  4. Choose the preferred method to update.
  5. Do the same for Network adapters and other chipset drivers.

2.2 Driver updater automatically

To update drivers on Windows, Outbyte Driver Updater is one of the best tools available. It can automatically detect outdated or missing drivers and install them with just a single click.

To solve Projecting to This PC lag, updating all of the drivers using Outbyte Driver Updater will be the best idea.

Outbyte Driver Updater

Update all drivers in a few clicks to keep your system in top condition.
Free Trial Download Now

3. Update BIOS

  1. Turn off your PC.
  2. Power it on and press F8 or F2, or Del, depending on the motherboard you are using when it shows the logo on the monitor.
  3. In your BIOS/UEFI settings, figure out the option to update the firmware.accessing asus ez flash 3 utility
  4. After that, try to use the Miracast feature again and see if it has fixed the problem or not.

We already have a guide on how to update BIOS. Follow that if necessary. To know how you can access the BIOS or UEFI dashboard of your PC, search for the instructions on the PC/Motherboard manufacturer’s website.

4. Try in Clean Boot

  1. On Start Menu, type the following text and hit Enter to open the System Configuration tool. msconfig
  2. Go to the Services tab.
  3. Check on Hide all Microsoft services and click on Disable all.disabling non microsoft background items system config windows
  4. Restart your PC.
  5. Try to use the Projecting to This PC feature again and see if it has fixed the problem or not.

If you don’t find this feature helpful, you can undo the changes you have made in this method.

5. Repair system components

  1. Open the Start Menu.
  2. Type cmd, right-click on the Command Prompt, and choose Run as administrator.running command prompt as administrator
  3. Type the following command and hit Enter to execute it. sfc /scannowsfc scannow command windows 11
  4. Wait a bit to complete the process.

We already have a guide on it with more details. Learn how you can repair corrupted system components on Windows.

Many users have reported repairing these components has fixed their problem with the Miracast feature on Windows 11.

Doing these things will surely solve the lag in the Projecting to This PC feature. However, if the problem still persists, you can reduce active background tasks and see if it helps.

This article has featured the best method to fix the lagging issue while using Project to This PC feature on Windows 11. If you have any questions or suggestions, you can write them down in the comment box.

Steam Game Launches Then Closes: 7 Ways to Fix it

Some Steam users have reported on the Steam forum that some games instantly close on loading screens.

Consequently, the games aren’t starting for them. Also, it happens that the Steam game launches and then closes with no error message.

Why does my game keep closing on Steam?

The Steam game keeps crashing issue can be caused by a plethora of reasons, but the most common ones are the following:

  • Game integrity – Sometimes, specific files can become damaged or corrupted during the installation process of an application or game. In this case, you will have to reinstall the game altogether.
  • Third-party antivirus software – Antiviruses are known to interfere with applications that they wrongly deem as harmful. Such might be the case with the Steam games crashing error in Windows 11. You may want to change to a better antivirus that won’t cause issues.
  • Outdated graphics drivers – Driver updates resolve issues with compatibility and security, as well as errors and faulty code, and they can even occasionally add functionality to the underlying hardware. Thus when one driver is outdated, it can cause problems across applications and games.
  • ClientRegistry.blob – ClientRegistry.blob is the file that Steam uses to store the registration data of the games that you have installed on your computer. Sometimes, the file can get corrupted and thus affect Steam games.

Follow along to find out what to do to fix the Steam preparing to launch, and then nothing happens.

How do I fix a Steam game that keeps crashing on startup?

Before following the solutions below, make sure to check out the following aspects:

  • Check the game’s system requirements to ensure your PC supports it.
  • Temporarily disable your antivirus or add your game to its whitelist.

1. Update the graphics card driver

1.1 Update it manually

  1. Right-click the Start icon, then select Device Manager.device-manager bluetooth won't turn on windows 10
  2. Expand the Display adapters folder, right-click your graphics card, and select Update driver.update-driver-w10 amd driver install problems
  3. Select the Search automatically for drivers option then reboot your PC once the process ends.search-automatiicaly steam game launches then closes

1.2 Update it automatically

A more efficient way to keep all your drivers up to date, including the graphics card driver, is to use software that does this automatically.

This way, you will significantly reduce the number of errors associated with drivers, which will impact your productivity and mood.

Outbyte Driver Updater is a great tool to have when speaking about updating drivers. They use rich database driver files ready to be installed.

Outbyte Driver Updater

Automatically keep all drivers updated so you avoid these kinds of errors.
Free trial Download now

2. Delete ClientRegistry.blob

Note icon NOTE
If you are running a new version of Steam, you won’t find the ClientRegistry.blob because Steam doesn’t use it anymore.
  1. Open File Explorer by pressing Windows + E, then go to the Steam folder. The location will usually be: C:\Program Files (x86)\Steamsteam-location steam game launches then closes
  2. Next, find the ClientRegistry.blob file, right-click it, and select Delete or the Bin icon.delete-steam-file steam game launches then closes

Games might not run if Steam’s ClientRegistry.blob file is corrupted. As such, deleting a corrupted ClientRegistrty.blob file is another potential resolution for Steam games that instantly close upon launch.

Remember that you’ll also lose local Steam settings after deleting that file. 

3. Run the game in Compatibility Mode

  1. Press Windows, type Steam, then select the Open file location option under the result.open-steam steam game launches then closes
  2. Right-click Steam and select Properties.steam-prop steam game launches then closes
  3. Here, navigate to the Compatibility tab and select Run this program in compatibility mode for, followed by Windows 8, from the drop-down menu. Then, click the Apply and OK buttons to save the new setting.compatibility-w8 steam game launches then closes
  4. Then open Steam to relaunch the game.

Running it in compatibility mode might fix the issue if it’s a slightly older game title. Compatibility mode runs software with settings from a previous Windows platform. This also helps when Jedi Survivor is crashing on startup.

4. Verify the game’s cache

    Verifying game caches can fix corrupted game files. As such, this might be a potential fix for Steam games that instantly close when you run them.

  1. 1. Open Steam, then right-click the game you are having issues with and select Properties.

    properties-install steam game launches then closes
  2. 2. Click the Local Files tab, which includes four options. Then select the Verify Integrity Of Game Files option to validate the cache.

    Integrity -local steam game launches then closes

5. Delete the appcache folder

  1. Open File Explorer by pressing Windows + E, then go to the Steam folder. The location will usually be: C:\Program Files (x86)\Steamsteam-location steam game launches then closes
  2. Next, find the appcache folder, right-click it and select Delete or the Bin icon.appcache-delete steam game launches then closes
  3. Then relaunch Steam as an administrator by pressing Windows, typing steam, and selecting Run as administrator under the result on the right.steam-admin steam game launches then closes

In Windows, applications receive additional rights when run with the administrator account. This grants them the ability to make changes to the system files, update the registry, and access other areas that are typically off-limits.

Some readers suggested cutting the internet connectivity completely before running the game. This, of course, is only a temporary solution.

Also, restart your PC and listen for any unusual beeping from your motherboard. In that case, the GPU or CPU are overheating and you should address the problem quickly.

The above solutions will fix the Steam causing PC to crash issue in Windows 10 as well as 11. But for more methods, you can check out our guide on what to do if Steam games won’t launch.

If you have further questions about the resolutions, or perhaps even your fixes, please post them below.

AI Antivirus: 8 Best Picks of 2026 with Improved Detection

The antivirus market is quite huge and you can find a multitude of software nowadays. What you must know is that you can use traditional antivirus tools or enhanced AI antiviruses, which are more reliable.

According to experts, the sphere that needs AI’s help desperately is Internet security. In that manner, the big players in the antivirus business are steadily turning to this new technology.

Since artificial intelligence itself is a young technology, its implementation in modern antivirus solutions is still in the early stage. However, you can easily find machine learning engines that detects new emerging malware.

So it is not rushed to compile a list of the best AI-powered antivirus programs, and we’ll take the risk to discover which of them is the antivirus of the future.

All said here, this list should be your starting point when choosing your first behaviour-based AI antivirus for Windows 10.

Which antivirus uses AI?

Simply said, many antivirus software have AI technology and provide reliable malware protection. Among the most popular AI-based antivirus are TotalAV or Bitdefender software.

Hence, you can benefit from advanced antivirus shield and behaviour-based threats detection to get enhanced web security. Let’s see which are the most beneficial ones in the following list.

What is the best artificial intelligence antivirus to get?

TotalAV – Cloud-assisted detection

TotalAV antivirus scan

TotalAV combines a local antivirus engine with cloud-based threat intelligence, so new malware samples are recognised quickly without waiting for a large definitions update. Unknown files are checked against continuously updated data, and known threats are stopped in real time.

It is a simpler product than TotalAV and does not publish details of its detection model, so the text does not claim neural networks or classification algorithms. What you get is real-time protection, WebShield for phishing and malicious sites, and a password vault in the higher plans.

  • Local engine plus cloud threat intelligence
  • Real-time protection
  • WebShield for phishing and malicious sites
  • Password vault in the higher plans
TotalAV

TotalAV

Use one of the best AI-powered antivirus, to keep you safe from existing and upcoming computer threats.
Free Trial Visit Website

Bitdefender Total Security – Full protection against malware

While Bitdefender’s developers don’t market their product as an ultimate AI antivirus, it certainly stands out as one of the premier solutions on the market.

For example, Bitdefender has nearly perfect scores from AV-TEST and its top virus detection rate. And there’s a big reason for that.

Bitdefender combines functionality, effectiveness, and simplicity. So, you’ll get strong antivirus protection, along with firewall and file security, packed in a simple and easy-to-use package.

And if you’re worried about spreading ransomware attacks, Bitdefender got you covered. This security solution features an advanced anti-ransomware shield, that will keep your data safe.

If we solely talk about artificial intelligence, Bitdefender wants to base its whole service on this technology in the near future.

According to the company, it invests a solid part of its yearly budget into artificial intelligence research.

The company claims it already uses advanced artificial intelligence features in its antivirus scans and security solutions.

Bitdefender Total Security

An AI-powered antivirus, Bitdefender does a very good job of delivering unmatched protection services.
Check price Visit website

Guard.io – Flawless speeds

Guard.io is an AI-based extension designed to protect your private information while you browse more securely and quickly.

It has advanced anti-phishing protection that blocks harmful sites, including emails or websites that tries to steal your payment or personal data.

It can also help you stop unwanted notifications and eliminate malicious and invasive ads that can be damaging to your device.

Guard.io removes malicious extensions that control browser settings, invade privacy, and install malware, adware, or spyware.

Furthermore, it protects your identity at all costs because it alerts you in real time when your information is leaked online in a data breach. This allows you to act in time to protect your identity from being stolen, manage your digital footprint, and control which sites have access to your personal details.

Guard.io

Keep your online browsing safe and secure with Guard.io’s beneficent features.

Avira – Most innovative AI protection

Avira is one of the best free AI antivirus tools that applies several unsupervised and supervised AI and machine learning techniques to aid malware analysis.

For malware analysis, it uses the coarse-to-fine strategy, exploring the data from clusters, and through the complex techniques of supervised learning, determining if the data is malware or not.

In addition to these AI techniques, the free version of Avira can also update your software and work as a basic password manager.

This complete antivirus tool comes with clever ad-tracking functionality, a shield for email and social network scams, or cleaning features to erase your digital traces. 

You also benefit from free VPN protection that can hide your online behaviors and secure sensitive information online. 

In the end, it’s worth knowing that Avira also contributes to speeding up your system and increasing overall performance. 

Avira

Use a comprehensive cybersecurity solution that is based on AI technologies to protect your computer.

Avast Free Antivirus – Most advanced network security

antivirus old pc

Even the free version of Avast antivirus benefits from the advanced intelligence system, which is using machine learning to automatically collect and extract data from the entire user base.

After finding a new malware sample, Avast antivirus is automatically updated with new models, providing crucial, up-to-the-second protection.

In addition, with the Behavior Shield tool, Avast Free Antivirus will keep an eye on your installed applications and report to you any new suspicious behavior.

Besides that, Avira includes strong network security that can encrypt your connection and filter malicious websites before any action. 

Plus, you’re entirely secured from elaborate phishing attacks or scams that may steal important data. 

It’s also worth noting that you have VPN support with the SecureLine VPN that anonymizes all your data online. 

Avast Free Antivirus

New security threats can appear suddenly, block them with this free antivirus with an AI engine.
Free Download Visit Website

Cylance Protect – Best endpoint and IoT security

Reviewers and people who know their antiviruses agree that Cylance Protect is the future of this industry.

And indeed, Cylance is marketed as the first full-fledged artificial intelligence-powered antivirus.

But first of all, Cylance is mainly for business users, as it’s client-oriented protection. The administrative console is entirely cloud-based, but all the decisions are made on the endpoint.

Cylance technicians brag about the high accuracy of malware removal, as the software caught all random virus samples, including some ransomware.

Cylence’s approach to dealing with malware is quite unique, and that’s where machine learning comes in. It uses about 6.2 billion indicators to determine whether an application or executable is malware or not.

If only one requirement is met, Protect will recognize it as malware. This can lead to some false positives, but it’s rather unlikely to happen.

⇒ Get Cylance Protect

DeepArmor – Powerful machine learning security

As we already said, artificial intelligence is still an emerging feature of the antivirus industry.

Hence, we still don’t have enough material, or enough software to write a top-notch, deep review of each product.

Additionally, there are many new players in the field, which yet have to catch the attention of the general public.

That’s exactly the case with DeepArmor. This is the youngest member of our list, but a very promising one.

Similar to Cylence, DeepArmor breaks each file on your computer into thousands of pieces. And if one piece appears to be threatening, DeepArmor will wipe it away.

This method applies to each unscanned file on your computer. So, as soon as you download a new file, it will go through DeepArmor.

Also, to cover already present files on your computer, run a deep scan as soon as you install this antivirus.

So, DeepArmor isn’t the immediate choice as your primary antivirus solution but definitely is something to look for in the future.

⇒ Get DeepArmor

Windows Defender – Best tracking prevention

Which antivirus protects you using AI and machine learning?

AI-based antivirus software can make decisions based on what it learns or experiences. It is very effective as a part of the safekeeping platform because it can use reason to analyze network threats.

It can manage a huge amount of information and based on its data, it can create threat models and prevent possible damage. It can also identify a threat long before it happens.

Another advantage is that it can work 24/7. Thus, you can choose to use any AI antivirus solution from the list below and be sure that it can protect your device successfully.

Microsoft recognized the importance of artificial intelligence in the antivirus industry and included some essential AI features in Windows 10’s built-in guard.

Windows Defender uses machine learning to prevent malware attacks. This approach is much needed since it’s expected from Microsoft to deliver a reliable security solution.

It goes without saying that Windows Defender indeed deserves to be on the list of the best AI antivirus software for Windows.

We conclude our list now, but it’s far from finished. We’re only at the beginning. As technology advances, we’ll get more and more new features, and ways to keep our computers safe.

That means there probably are some yet-to-be-released antivirus programs that deserve to be in this conversation.

As we already mentioned a couple of times throughout this article, this list should head you in the right direction for choosing your future antivirus, rather than give you an immediate answer.

In addition to any of the above antiviruses, we recommend you use one of these best firewall devices to protect your home network.

What do you think about our list, and do you have any antivirus solutions to add to it? Let us know in the comments below.

How to Disable VPN on Windows 10: Temporarily or for Good

Today we’ll show you easy steps for disabling the VPN on Windows 10.

Whether you use the built-in feature or a third party VPN, sometimes these tools keep running in the background even when you try to turn them off.

If can’t disconnect your VPN, this guide can also help you. Sounds good? Let’s get started.

How to disable VPN on Windows 11

1. On Windows VPN settings

  1. Launch the Settings app in Windows 10.
    settings app windows 10
  2. Click the Network & Internet button.
    doom eternal can't connect to bethesda
  3. Select the VPN category in the left-hand menu
  4. On the right, select the VPN connection you want to disable
  5. Click Disconnect if you want to disconnect or Remove if you want to delete it.

Alternatively, you can delete it by accessing the Adapter Settings window, right-clicking the VPN connection you want to remove, and selecting Delete from the context menu.

2. On a third-party VPN software

  1. Launch your VPN client. (We typically use ExpressVPN)
  2. Check if you’re connected to any server.
  3. Click on the Power button to disable the connection.
  4. Close the VPN interface.
  5. Open Task Manager and go to the Processes tab.task manager processes
  6. Make sure all tasks related to the VPN are closed. This could include ExpressVPN.exe ExpressVPN.AppService, ExpressVPN System Service (or something similar if you use another VPN. Right-click on all related processes and hit End Task.ending expressvpn task in task manager

Why should I disable a VPN?

In terms of digital security and privacy, there’s no reason to turn off your VPN. You can only disable your VPN connection in specific situations like your VPN slows down your Internet connection.

Plus, in case you’re setting up the Internet connection on your Windows, it’s better to keep the VPN disconnected.

Disabling or removing VPN connections on Windows 10 couldn’t be easier

All things considered, if you follow the steps in our guide, you’ll be able to remove or disable VPN connections on Windows 10 even if you’re not exactly tech-savvy.

Although disabling or removing a manual VPN connection might seem a bit complicated, it’s not.

Stop Outlook From Repeatedly Asking for Password like this

Many reported that Outlook keeps asking for a password, and this prevents users from checking their emails and using the software.

This is a serious issue, so it’s crucial to fix this problem, and we have the perfect solutions for you.

Why is Outlook asking for password repeatedly?

Issues with the server are the common cause of this error. Login settings and issues with your password can also cause this issue.

How do I get Outlook to stop asking for my password?

1. Manually disconnect your Microsoft Account from your Office apps

  1. 1. Press Windows + I to open the Settings app and select Accounts.

    office-keeps-asking-for-password
  2. 2. Choose Email & accounts.

    office-keeps-asking-for-password
  3. 3. Locate Accounts used for other apps section.

    office-keeps-asking-for-password
  4. 4. If you see your email addresses listed there, disconnect them.

  5. 5. Restart Outlook.

2. Reset the login settings for Outlook

  1. Press Windows + S and enter credentials. Select Credentials Manager.
  2. Navigate to Windows Credentials and locate stored credentials referencing Office 365 or Microsoft Outlook email addresses.
  3. Click on Details, remove from vaults, and then click Yes on the warning box.
  4. Repeat the steps until you remove all the credentials associated with your email address.

3. Check the credential settings

  1. Start Outlook and go to File. 
    outlook keeps asking for password
  2. Choose Account settings in the Account settings section.
  3. Select your exchange account.
  4. Click the Change button and go to More settings.outlook account settings change
  5. Select the Security tab, and under the user identification, ensure the Always prompt for logon credentials option is not selected.
  6. Click OK and restart Outlook.

In case this option is checked, it’s no wonder Outlook keeps asking for passwords and won’t connect.

4. Clear the cached passwords

  1. Exit Outlook.
  2. Type control and click on Control Panel from the results.
  3. Navigate to Credential Manager and locate the credentials with Outlook in the name.
  4. Click the name to expand the set of credentials, and then click Remove from Vault.

5. Enable Remember password

  1. Click on the File tab and go to Account settings.
  2. Double-click the account under the Email tab.
  3. A new window will appear, and you should check the Remember password option.putlook remember password

Another suggestion is to verify whether you have selected the option to save the username and password in Outlook.

6. Outlook Anywhere is not configured to use NTLM Authentication

  1. Navigate to File and click on Account Settings choosing the Account Settings option again.
  2. Select the Exchange account and click Change.
  3. Click on More settings and then go to the Connection tab.
  4. Click the Exchange Proxy settings button, and under Proxy authentication settings, choose NTLM Authentication.

The Outlook Anywhere feature allows you to access your Exchange account remotely from the Internet while working outside your organization’s firewall.

When using Outlook Anywhere to connect to your Exchange server, we need to choose the authentication method among Basic Authentication, NTLM Authentication and Negotiate Authentication.

Users reported that using NTLM Authentication can significantly reduce the number of password prompts.

Did the solutions described above help you solve this Outlook issue? Please let us know in the comments section below, as your feedback is critical to us.

For more information, we have a guide on how to change the Outlook password, so don’t miss it. In case you don’t remember your password, we have a guide on the best Outlook password recovery tools.

This isn’t the only password issue, and many reported that the Outlook password prompt has disappeared, but we tackled this issue in another guide.

Also, if Outlook seems so full of issues, you can try a more straightforward method of communication, like automated chat software, to improve business communication.

Windows.storage.dll Missing: How to Download & Fix it

Some users have claimed that they encountered an error message that reads The program can’t start because Windows.Storage.dll is missing from your computer.

However, encountering a missing DLL file is a common error. Hence, we will provide a detailed guide to downloading and fixing the problem.

What happens if DLL files are missing?

DLL (Dynamic Link Library) files are essential for running programs and apps on the computer. These files contain instructions other programs use to perform certain operations, such as locating free space on the device, storing saved changes in the programs, etc.

Hence, when the DLL file needed for a program goes missing, the app will fail to work, and an error message will be displayed. The error message can appear in any of these instances:

  • Error loading WINDOWS.STORAGE.DLL. The specified module could not be found – As stated, the file is missing from your computer and can not be located.
  • There was a problem starting WINDOWS.STORAGE.DLL – This error case indicates that the Windows.storage.dll file is faulty or corrupt.
  • WINDOWS.STORAGE.DLL could not be located – If the Windows.storage.dll is not included in the app/program folder, this error message will pop up.
  • Cannot register WINDOWS.STORAGE.DLL – This means that the file is registered wrongly and needs to be in the System registry.

What causes missing Windows.storage.DLL files?

Firstly, the primary cause of the missing Windows storage DLL error is a corrupt or faulty file caused by an overwrite of the DLL file.

Also, the Windows.storage.dll file may be missing on your device if there was a mistake in the installation process. Also, uninstalling an app or program might delete the files.

The antivirus may sometimes flag the DLL files as malicious and whitelist them to protect the PC if installed from an untrusted site.

This can also cause your device to be ridden with malware and viruses. However, you can fix them using anti-malware and antivirus tools.

Meanwhile, the Windows.storage.dll error will occur if the file is not registered either to the system or application folder. Take a look at this guide if you encounter a corrupt registry in Windows 11.

Let’s proceed to the various ways to download and troubleshoot the Windows.storage.dll error.

How do I download and fix missing windows storage DLL files in Windows?

Before anything, try to perform the following preliminary checks:

  • Ensure you download the latest version of the application or software that’s missing the Windows.storage.dll file.
  • Check for updates on the Windows Update page. If Windows Update fails to work, look at this guide to fix it.
  • Consider using a DLL repair tool if you don’t know the exact causes of the Windows.dstorage.dll error.

After performing these checks, you may proceed to the fixes below if the error persists.

1. Install and register Windows.storage.dll on the System folder

Note icon NOTE
We don’t recommend downloading the Windows.storage.dll file from untrusted sources. The solution below was tested and approved by our experts.
  1. Download the Windows.storage.dll file according to your OS (64-bit/32-bit).
  2. Press the Windows + E to open the File Explorer.
  3. By default, you should find the file in the Download folder. Extract it inside another folder.
  4. Copy and paste the DLL file into the following directory: C:\WINDOWS\System32
  5. Then left-click the Start button, search cmd, and Run as administrator.
  6. Input this command and press Enter: regsvr32 windows.storage.dll
  7. Restart your PC for the changes to effect.

Downloading DLL files online can be dangerous due to many unreliable sites. Ensure your antivirus is on before attempting this to safe keep your PC.

Sometimes, the application that is missing this DLL file, can’t find it in the System 32 folder so you will need to paste it directly into the app’s main folder.

So, if the issue persists after performing the solution above, locate the program in the Program Files folder on your PC and paste the DLL file there.

2. Run a quick SFC scan

  1. Press the Windows key, type command in the search bar, and select Run as administrator.
  2. Enter the following command into the Command Prompt and press Enter: sfc/scannow
  3. Wait for the scan process to complete and restart your computer.
  4. Check if your DLL file has been restored.

If you encounter second thoughts about doing this manually, you can try using a dedicated tool to perform an extensive scan of your device and eventually fix or replace not only Windows files, and registry keys but DLLs as well.

If you are having trouble accessing the Command Prompt as an administrator via this step, then you need to check the other ways in our guide.

3. Run DISM

  1. Press the Windows key, type command in the Search bar, and select Run as administrator.
  2. Copy & paste the following command and press Enter: DISM /Online /Cleanup-Image /RestoreHealth
  3. Wait patiently until the process is complete.
  4. Restart your computer.

If the SFC Scanner fails to restore your missing Windows Storage DLL files, the DISM (Deployment Image & Servicing Management) tool is another solution similar to SFC Scanner.

However, if you encounter an error with the DISM when using the command line, you should consider checking the fixes in the guide.

These are the best ways to download and fix the WIndows.storage.dll issues. Ensure to follow the steps for optimal results.

As you consider downloading your DLL files, remember to protect your computer with antivirus solutions against malware and viruses.

Also, we have a comprehensive guide on fixing any DLL errors on Windows 11. This might come in handy should you need to download files apart from the Windows.storage.dll.

If you have any questions or suggestions, please do not hesitate to use the comments section below.

Fix Driver Overran Stack Buffer BSoD in 7 Easy Steps

The DRIVER_OVERRAN_STACK_BUFFER blue screen can appear on both Windows 10 and Windows 11. Many users reported the error while gaming or right after startup, but the troubleshooting steps below should help you fix it.

How can I fix Driver Overran Stack Buffer?

1. Make sure that you have the latest drivers installed

Drivers are a key part of the operating system because Windows 10 uses drivers to work with the hardware.

Users reported issues with Atheros wireless driver, so update this driver first and then move to other drivers. Also, many attributed Driver Overran Stack Buffer to Nvidia, so update it as well.

Using the Device Manager to update your drivers is simple, but that might not be the best solution.

According to users, Device Manager doesn’t always download the latest drivers, so if you want to have the latest drivers installed, it’s advised that you download the necessary drivers manually.

To do that, simply visit your hardware manufacturer’s website and download the latest drivers for your device. But that would take time, especially when updating many drivers.

Alternatively, you can use an automatic driver updater that will certainly save you from the hassle of searching for drivers manually, and it will always keep your system up to date with the latest drivers.

Updating key drivers is the first fix to try when you see the driver overran stack buffer Windows 11 error. The same approach applies to driver overran stack buffer Windows 10, especially with graphics or wireless drivers, which are the most common culprits.

2. Run the Hardware and Devices troubleshooter

  1. Press Windows + R to open Run, paste the following in the text field, and hit Enter:msdt.exe -id DeviceDiagnostichardware and devices troubleshooter to fix driver overran stack buffer
  2. Now, follow the on-screen instructions in the troubleshooter to complete the process.troubleshooter

Once done, verify if the Driver Overran Stack Buffer while playing Valorant is fixed. If not, the next solution should help.

3. Use a third-party repair tool

DRIVER OVERRAN STACK BUFFER is a pretty scary BSoD error but you don’t have to get discouraged because you can solve this issue in multiple ways. However, manual tweaking solutions can take time and imply skills.

However, there’s a quicker and faster way of repairing your system in the form of specialized system repair tools which will fix your BSOD automatically by replacing the broken files with new ones.

4. Run tests on system memory

The installed RAM can also be the reason behind Driver Overran Stack Buffer, and there are a few tools that could fix things. But before you run these, remove the RAM sticks and then reseat them.

After that, run Windows Memory Diagnostic to identify issues with the RAM. It’s a built-in tool that can find several problems with the RAM.

In case that doesn’t work, you can run Memtest86+, a highly-effective third-party tool to find and fix problems with the RAM. If it highlights any issues, look for its resolution or replace the RAM stick(s) altogether.

5. Update the BIOS

Many users who reported Driver Overran Stack Buffer during Windows 10 install managed to get things up and running after updating the BIOS. Also, this is an effective fix, even in other situations, so make sure to give it a try.

Though, remember that this is an advanced process, and you will have to be extra cautious. Make sure to read the instructions available on the manufacturer’s website before the update.

6. Uninstall the problematic software

  1. Press Windows + R to open Run, type appwiz.cpl in the text field, and click OK.appwiz.cpl
  2. Locate and select the problematic program and then click on Uninstall.uninstall app to fix driver overran stack buffer
  3. Now, follow the on-screen instructions to complete the process.

Third-party software can also cause BSoD errors to appear, therefore it’s important that you find and remove the problematic software.

Users found the following to cause the error, so if you have any of these, uninstall it.

  • Daemon Tools
  • Rapport plug-in for Internet Explorer
  • Folder Lock

Bear in mind that uninstalling the program might not fix the error since many antivirus programs tend to leave certain files behind once you uninstall them.

To ensure that your antivirus is completely removed from your system, we advise that you use dedicated removal tool. Many antivirus companies have these tools available for download, so be sure to download one for your antivirus software.

7. Reset Windows 10

If none of the methods so far have worked, as a last resort, factory reset Windows 10. This would help identify if the problem is related to the software or the hardware. In case it’s the latter, the DRIVER OVERRAN STACK BUFFER would reappear.

This is when you will have to find out the malfunctioning hardware and get it repaired or replaced. If you can’t do it, consult a professional or contact the computer manufacturer.

If you still encounter the driver overran stack buffer Windows 10 error after multiple fixes, consider performing a reset to rule out software conflicts. On the other hand, for driver overran stack buffer Windows 11, a combination of system file repair and memory tests usually resolves the crash without requiring a reset.

DRIVER OVERRAN STACK BUFFER Blue Screen of Death error is usually caused by problematic applications or outdated drivers, and you can easily fix it by using one of our solutions.

Other issues and cases related to the DRIVER OVERRAN STACK BUFFER error

  • Driver overran stack buffer on startup: According to users, sometimes this error occurs right on startup. This can be a big problem since you won’t be able to use your PC at all.
  • Driver_overran_stack_buffer ntoskrnl.exe, tcpip.sys, asustp.sys, nvlddmkm.sys, ntfs.sys, win32k.sys, fltmgr.sys, netwsw00.sys, hal.dll, halmacpi.dll: Usually, this error message will show you the name of the file that is causing the problem. Once you know the file name, you need to do a bit of research and see how to fix the problem.
  • Driver overran stack buffer crash: Users reported that once this error appears on your PC, your computer will crash and automatically restart.
  • DRIVER_OVERRAN_STACK_BUFFER Visual Studio: Encountered when trying to attach the IIS process w3wp.exe in Visual Studio.
  • Driver overran stack buffer Nvidia: In this case, you will have to update the Nvidia drivers specifically.
  • Driver overran stack buffer overclock: Removing any overclock software that you may had installed will do the trick.
  • Driver overran stack buffer while installing Windows 10: Either Reset Windows 10 as we have shown below, or update the BIOS.
  • Driver overran stack buffer while gaming, Valorant: Run tests on your RAM to check whether it is faulty or not.

This error is similar to the system detecting an overrun of a stack-based buffer, and it’s usually caused by corrupted drivers, so you need to check them first.

In some cases, just like with the Driver power state failure error, the issue may lie with the hardware, so we encourage you to check it and ensure it’s working properly.

This isn’t the only driver-related issue and many reported DRIVER VIOLATION errors on their PCs. Luckily, there are ways to fix all of these issues.

Our latest article covers Dma_Common_Buffer_Vector_Error, so don’t miss it for more information.

What causes the driver overran stack buffer error?

This blue screen usually happens when a driver writes outside its memory buffer. Common triggers include outdated drivers, corrupt system files, faulty RAM, or disk errors.

Can hardware cause this error?

Yes. Faulty RAM or a failing SSD/HDD are common hardware causes. Running Windows Memory Diagnostic or MemTest86+ helps identify memory problems.

Can overclocking cause driver overran stack buffer?

Yes. Overclocking tools can destabilize system memory and GPU drivers, leading to the error. Disabling the overclock and restoring default settings usually fixes it.

If the driver overran stack buffer crash points to stack or file integrity problems, check related guidance on the exception on invalid file error in Windows 11 and the unwind on invalid stack bug, since both stem from similar low‑level faults that drivers can trigger.

When debugging recurring BSODs after updates or driver changes, also review the kernel stack locked at exit issue; its fixes (driver rollbacks, integrity checks, and safe‑boot isolation) often overlap with the steps that resolve driver overran stack buffer.

If you have any other suggestions or questions, don’t hesitate to drop them in the comments section below, and we’ll be sure to take a look.

OBS Keeps Crashing: How to Stop it [Steps Vetted by Gamers]

OBS, or Open Source Broadcaster, is a free and open-source software tool that can be used to stream and record programs. It’s pretty popular, and users love it.

Despite that, as with any other program, OBS isn’t immune to errors and glitches. Unfortunately, one of the most common is that none other than the OBS has crashed error.

While some manage to access the platform, they are abruptly interrupted when they start to stream.

Why does OBS keep crashing my PC?

There are a handful of factors that will make your OBS stream crash. Amongst these include:

  • Faulty or out-of-date OBS software – When you have faulty or corrupted software, there are chances that certain parts of the application will stop functioning normally or even cause crashes.
  • Outdated hardware drivers – This is a common cause of program crashes in the Windows OS. Updated RAM ensures that there is proper sync in program usage.
  • Overclocking of RAM -Your device will generally crash when it is pushed beyond its limit. And this is not peculiar to the use of OBS.
  • Conflicts with 3rd party apps – In some cases, OBS may not interact with other tools on your device, especially antiviruses, leading to crashes.

Some of the other variations of this issue, as stated by users worldwide, include OBS crashing while streaming 2022, OBS crashing when I start streaming, OBS crashing games, and OBS crashing on Discord.

You can use specialized software to troubleshoot these potential issues, such as bandwidth monitoring programs and dedicated hardware diagnostics tools for the latter.

However, several workarounds can help you if OBS keeps crashing while streaming.

How do I stop OBS from crashing?

1. Reset the graphics card app

  1. Press the keyboard hotkey Windows + Ctrl + Shift + B.
  2. This should initiate the reset process for the GPU.

Methods differ with the various apps though they usually involve opening the app and hitting the Reset button, which is most likely housed within the Settings section.

2. Change OBS compatibility

  1. Right-click on OBS and click Properties.
    obs keeps crashing
  2. In the Properties dialog box, select Compatibility.
  3. Select the Run the program in compatibility mode for checkbox, and from the dropdown box that gets enabled, select Windows 10.
  4. Click on Apply and OK.
  5. Also, click the button at the bottom of the Change settings for all users.
    obs keeps crashing
  6. Change the Compatibility mode to Windows 10 using the same process mentioned above.
  7. Click on Apply and OK for the Properties dialog box to close.
  8. Also, right-click on the OBS program and select Troubleshoot compatibility. Then, follow the on-screen instruction to rule out incompatibility as one reason the program behaves erroneously.

This can be another way to deal with the error, as compatibility conflicts often result in mistakes cropping up. 

All you need to do is apply the above procedure, then try relaunching the OBS program. There shouldn’t be any errors this time.

3. Uninstall and reinstall OBS

    You shouldn’t be having any issues with a fresh installation of OBS on your PC. This is why you can apply these steps and fix your software issues fast.

  1. 1. First, open the Run accessory by pressing the Windows key + R.

  2. 2. Type the command below and hit Enter.
    appwiz.cpl

    obs-crashed
  3. 3. Select OBS from the program list and click Uninstall.

    obs-crashed
  4. 4. Follow the on-screen instructions to obliterate the app from your PC.

  5. 5. To reinstall the app, go to the official OBS download page.

  6. 6. There you will see the download link for Windows PC. Click on it to download the .exe file.

    obs-crashed
  7. 7. Double-click on the downloaded file and follow the on-screen instructions to install OBS on your PC.

4. Disable the Windows 10 Game mode

  1. Access the Settings menu.
  2. Click on the Gaming button.
  3. Select Game Mode from the left side pane and switch the feature to Off.
    obs keeps crashing

This might seem odd as the Game mode that comes with Windows 10 Creators Updates and OBS are not likely to have any direct link between them.

Despite that, some said disabling the Game mode on their PC did help get rid of the OBS crashed error. Therefore, don’t hesitate to apply the above steps too.

If you have read till this point, we hope the constant OBS crashing problem has been solved.

Have you applied the above tips? Let us know which one worked for you in the comments area below. 

Windows Update Repair Tool for Windows 10 & 11 [2026 Guide]

Sometimes, you may get stuck on the Checking for updates message, or the update doesn’t go as planned. This is where a Windows Update Repair Tool comes to your aid.

These are highly effective at their job and can fix a plethora of update-related issues, ones arising both before and after an update.

To make things easier for you, we have listed only the best Windows Update repair tools, and you can choose one based on the features offered by it:

  • Outbyte Driver Updater – Quick and seamless
  • Acronis True Image – Offers a plethora of repair options
  • Tweaking Windows Repair – Simple and effective
  • Windows Update Troubleshooter – A free built-in tool
  • Deployment Image Servicing and Management – Does a lot more

What is Windows Update repair tool?

A Windows Update repair tool deals with everything pertaining to updates on the PC. Some of these take care of installing the latest driver version for each device, while others eliminate errors that may arise after an update.

Also, you may have encountered cases where a particular update simply doesn’t install, no matter what. The repair tool will come in handy here as well.

You can easily find a repair tool here for these versions of Windows:

  • Windows Update Repair Tool Server 2012: Update errors are common here, but one of the tools will get things running, as they did for other users.
  • Windows Update Repair Tool Server 2016: Though support has ended for this edition of Windows, a reliable repair tool would still fix things like always.
  • Windows Update Repair Tool Windows 10: One of the most used OS, though notorious for update errors. But a dedicated tool can fix issues while installing updates and after it.
  • Windows Update Repair Tool Windows 11: The latest iteration from Microsoft often throws the Windows Update error, but repair tools have already been optimized for it and have performed well so far.

Is the Microsoft Fix it tool for Windows 10 available to download?

No, the Microsoft Fix it tool for Windows 10 isn’t available for download anymore, but you can still access all the required troubleshooters from the Settings app.

Moreover, for update-related issues, you can run the Windows Update troubleshooter. The best part, it comes built-in, and you don’t have to download the Windows Update troubleshooter manually.

Although troubleshooters can be useful, they can’t fix corrupted system files in Windows after a bad update. You can also use specialized Windows repair software to fix potential issues. If you’re having more serious problems, use Blue Screen of Death repair software.

What is the best Windows Update repair tool for Windows?

Acronis True Image – Offers a plethora of repair options

acronis True Image

If the issue is unrelated to the driver, you must take a different approach. In fact, before getting to issues in the first place, why not use Acronis True Image?

This is the best backup tool that you can try out and avoid any unpleasant situations from the very start. You may do so for full system images or individual files.

Then, a few clicks are more than enough in order to restore your entire system to the same or even different hardware. The choice is always yours to make.

These are some of the main features that this Acronis program brings to the table:

  • Comprehensive tools to create a mirror image of your system
  • Backup options for individual files and folders
  • Malware scanning features
  • Great features to stop the latest cyberattacks
  • Active disk cloning

Acronis True Image

Be one step ahead and use Acronis True Image. For complete backups, this is the undisputed choice.
Check price Visit website

Outbyte Driver Updater – Quick and seamless

Updating all your drivers with just a simple click and having complete access to a huge database of drivers sound too good to be true. Even so, that’s precisely what you’re about to get from Outbyte Driver Updater.

Moreover, you’ll see a detailed report of all of your out-of-date device drivers to know where the issues may come from.

However, do note that Outbyte Driver Updater doesn’t simply update outdated and missing drivers but also fixes corrupted ones.

On top of that, this program has a user interface that’s easier to use than most competitors.

Outbyte Driver Updater key features that you’re about to take advantage of:

  • Accurate scans for out-of-date or missing drivers
  • Reveals lots of detail on your drivers
  • Generous database of 18 million driver files
  • Drivers backup options
  • Engaging user interface

Outbyte Driver Updater

Outbyte Driver Updater is the best tool to help you find and update the drivers on your PC. Ready to give it a try?
Free Trial Download Now

Tweaking Windows Repair – Simple and effective

windows update repair tool

Windows update errors are some of the most common errors encountered, and they are usually categorized by when they actually trigger:

  • Some usually prevent you from updating your PC
  • Some appear while you’re trying to update your PC
  • A few appear after you finish updating your PC

Whichever ones you are currently facing, know that one tool can easily handle them all, and it is called Tweaking Windows Repair.

Not only does it specifically say that it can handle Windows Update errors, it can also help with optimizing the process as well, allowing you a better experience updating your OS.

Here are the benefits offered by Tweaking Windows Repair:

  • Optimized for Windows 10
  • Easy-to-use interface
  • Can fix almost every update-related issue

⇒ Get Tweaking Windows Repair

Windows Update Troubleshooter – A free built-in tool

This tool is the default troubleshooter on Windows 10. You have the ability to open this tool from the search bar by just writing troubleshoot in the search area.

From the troubleshooting window, all you have to do is select Fix Problems with Windows Update, and this handy tool will simply and automatically resolve the update issue.

Here are the best parts of using this small but useful tool:

  • If you’re experiencing troubles with Windows Update, all you have to do is make sure that you’re connected to the Internet and then download the Windows Update Troubleshooter for the version of Windows that’s running on your computer.
  • To use this tool on Windows 10, simply head over to Settings > Update & Security > Troubleshoot and then select the Windows Update Troubleshooter.
  • After the troubleshooter does its magic, you have to try running the Windows Update again and then install all available updates.

We can only assume that things are better now.

Deployment Image Servicing and Management – Does a lot more

dism command

Deployment Image Servicing and Management, aka DISM, is a command-line tool used to mount and service Windows images before deployment.

This handy tool will help you fix Windows Update troubleshooters and files that got corrupted during installation.

Check out the most valuable features that are included in this small tool:

  • You will be able to use DISM image management commands to mount and get data about the Windows image files or virtual hard disks.
  • You can also use this tool to capture, split, and manage Windows image (.wim) files.
  • DISM can install, uninstall, configure, and update Windows features, packages, drivers, and international settings in a .wim file or VHD (virtual hard disks) via the DISM servicing commands.
  • The DISM commands are used on offline images, but the subsets of the DISM commands are also available to service a running operating system.
  • DISM is installed with Windows and distributed in the Windows Assessment and Deployment Kit.

DISM replaces various deployment tools, including PEimg, ImageX, Intlcfg, and Package Manager.

These are some of the best and quickest ways that you can use to get rid of the annoying problems related to Windows updates. So, make sure to download one today!

Also, don’t miss out on the most excellent repair tool software for Windows 10 and 11 PCs to quickly and easily fix all problems.

Besides, if you have any other queries or want to share your experience with these Windows Update Repair Tools, drop a comment below.

ALT TAB not Working: Diagnose & Fix in 7 Easy Steps

Many users reported that Alt Tab is not working, and that can prevent users from switching between apps quickly. However, there are few ways that can fix this issue.

 Why is Alt Tab not working?

Problems with Windows Explorer or your settings can cause this issue. In some cases, your keyboard or other peripherals can lead to this problem.

How do I fix Alt-Tab if it’s not working in Windows 10?

Before trying the slightly complex solutions, restart your PC and ensure that your keyboard is properly connected. Disconnect other peripherals and try if other shortcuts are working.

1. Restart Windows Explorer

  1. Press Ctrl + Shift + Esc to open the Task Manager.
  2. Now locate the Windows Explorer process, right-click it and choose Restart from the menu.how to restart explorer from task manager

2. Fix the problem by modifying Registry Values

  1. 1. Press Windows + R to open Run, type regedit in the input field, and press Enter or click OK.

    alt-tab-not-working-windows-8
  2. 2. Paste the following path in the address bar and hit Enter:
    HKEY_CURRENT_USER\Software\Microsoft\Windows\CurrentVersion\Explorer

  3. 3. In the right pane, look for AltTabSettings DWORD.

  4. 4. If this DWORD isn’t available, you need to create it. Right-click on the right pane, hover the cursor over New, select DWORD (32-bit) Value, and name it AltTabSettings.

    alt-tab-not-working-windows-8/
  5. 5. Double-click the AltTabSettings DWORD and change its Value Data to 1. After doing that, click on OK to save the changes.

    edit value data to fix alt tab not working

Several users reported that they already had this value in their registry, and they fixed the problem simply by deleting the AltTabSettings DWORD. 

To delete, right-click it and choose Delete from the menu. When the confirmation prompt appears, click on Yes to proceed.

3. Make sure you have enabled the App Switching feature

  1. Press Windows + I to open Settings, then click on System.system
  2. Choose Multitasking from the left, and then select the desired option from the two drop-down menus about Alt-Tab.multitasking

4. Use an alternative software solution

Another option is to use a dedicated clipboard manager tool. These can remove the function of the Alt-Tab shortcut.

Such software such as allows you to create a clipboard history by saving, organizing, and accessing files, folders, or text from the same place.

You can use it to save texts, links, files, or images into a dedicated space that you can customize and access with just one click.

You can save an unlimited number of fragments in the clipboard history. Moreover, you can customize your favorite clipboard fragments and set sound alarms for specific processes.

Comfort Clipboard is such a software that additionally creates a safety net in case of crashes for all already copied items. It’s compatible with all clipboard formats so you can use it with any other software.

Comfort Clipboard

Keep all your important data in one place and smartly organised.
Free trial Visit Website

5. Make sure that the Peek option is enabled

  1. In the Search bar, enter advanced, and select View advanced system settings.
    Alt Tab not working with Excel
  2. Click the Settings button in the Performance section.
    Alt Tab Aero Peek not working
  3. Now make sure that Enable Peek option is checked. Finally, click on OK to save changes.
    Alt Tab not showing preview

6. Disable/enable the hotkeys

  1. Press Windows + R, enter gpedit.msc and click OK.
  2. Group Policy Editor will now start. In the left pane, navigate the following path: User Configuration \ Administrative Templates \ Windows Components \ File Explorer
  3. In the right pane, double-click on Turn off Windows Key hotkeys.turn off windows hotkeys
  4. Next, select Enabled and click on OK to save changes.enable

If that doesn’t work, repeat the same steps, but this time select Disabled. Now check if your hotkeys work. Again, if nothing works, select Not Configured and save changes.

If you can’t access Group Policy or want to make these changes quickly, you can perform them using a registry file.

To do that, you need to download the registry files for disabling the Windows hotkeys and also for enabling the Windows hotkeys back. (You would need to sign up to download the registry files)

After downloading the registry files, double-click the registry file to run it. When the confirmation dialog appears, click on Yes.

Alt Tab not working properly

7. Reset Windows

If none of the methods work, performing a factory reset for Windows 10 might do the trick, though it should rarely come to that.

You will lose app installed apps and configured settings after the reset, and even personal files when doing a complete reset. So, make sure to back up your files.

Note icon NOTE
➡ There are several ways to update your drivers in Windows 11, but we reckon the easiest one is to use a specialized tool that does all the hard work for you.
➡ Simply install Outbyte Driver Updater and run a full scan to have it display all the drivers that require updating, repairing, or replacing.
➡ You can specifically select the ones you want (such as the keyboard and graphics driver in this case) or update all of them in just one go.

Running outdated versions of the keyboard and/or graphics driver can have unwanted effects. It’s time you take care of this, and using the driver updater makes the whole process quick and effortless.

That was all! Now you know how to quickly fix the Alt-Tab not working issue in Windows 10. If you’re on the latest version, we have a guide on what to do if Alt Tab is not working on Windows 11, so don’t miss it.

You can also disable Alt Tab on Windows 11 if you don’t want to use it. Do keep in mind that problems with this feature can occur, and we have a guide on how to fix slow Alt-Tab, so don’t miss it.

If nothing else works, you can always use Alt Tab alternatives, until you manage to fix the issue.

Also, before you leave, learn some quick ways to boost Windows performance.

Which method worked for you? Feel free to share with us in the comments section below.

Quickest Steps to Boot into Asus Recovery on Windows 11

Not all of us have or use the same brand of gadgets( PCs, laptops, tablets, etc.), so knowing how to navigate the specifics of the brand you are using is of the utmost importance.

As an example, checking and updating BIOS is a process that is a bit different from manufacturer to manufacturer. Even accessing it differs from one brand to another. But we are going to focus on Asus for the time being.

What should I be booting into Windows Recovery Environment?

Well, the System Recovery Options menu, which you will see in a minute, contains several tools, such as Startup Repair, that can help you recover Windows from a serious error.

Also, this set of tools can be found on your computer’s hard disk and on the Windows installation disc as well. You are probably wondering about each individual option and its purpose, so we are about to shed some more light on that.

System recovery optionDescription
Startup RepairFixes certain problems, such as missing or damaged system files, that might prevent Windows from starting correctly.               
System RestoreRestores your computer’s system files to an earlier point in time without affecting your files. If you use System Restore from the System Recovery Options menu, you cannot undo the restore operation. However, you can run System Restore again and choose a different restore point, if one exists.              
System Image RecoveryYou need to have created a system image beforehand to use this option. A system image is a personalized backup of the partition that contains Windows and includes programs and user data, like documents, pictures, and music.
Windows Memory Diagnostic ToolScans your PC’s memory for errors.
Command PromptAdvanced users can use Command Prompt to perform recovery-related operations and also run other command line tools for diagnosing and troubleshooting problems.

Now that we know what we are dealing with, let’s get to the important part and show you how you can boot your Asus device in Recovery Mode on Windows 11.

How can I boot into Asus Recovery Mode on Windows 11?

  1. 1. Press Win + I to access Settings.

  2. 2. Select the System tab, then click on Recovery.

    recovery
  3. 3. Next to Advanced setup, click the Restart now button.

    restart now
  4. 4. Click on Restart now.

    restart now
  5. 5. After the system has rebooted, select Troubleshoot.

  6. 6. Select Advanced options.

    advanced options
  7. 7. Click on Startup Settings.

    startup settings
  8. 8. Press the Restart button.

    restart
  9. 9. Use the number keys (4/5/6) to select which Safe Mode version you want.

    safe mode
  10. The process for booting your Windows 11 Asus device into Safe Mode is simple and can be done within minutes.

    What you need to do is restart your PC, and then choose your desired Safe Mode to boot into from the list in the Advanced Options section.

This is the entire process. Pretty easy, right? Indeed, this is all you need to know about booting into Asus Recovery Mode on your Windows 11 device.

Users that have completed this guide are now satisfied and have managed to complete whatever task required them to boot into Safe Mode.

That being said, there have been cases where users said they couldn’t find Recovery Environment on Windows 11. That’s fine, you came to the right place to get that fixed as well.

Leave a comment below if this article has also assisted you in achieving the same goal.