Can’t Connect to Microsoft Services Error: Use These 4 Fixes

If the error looks like we can’t connect to one of our services right now, you are not alone, especially if you are a Windows 10 user.

Windows users who get this error cannot carry out any downloads on Microsoft Store because they are never connected.

When an attempt is made to create a new user with their current Microsoft account, a green screen appears with a revolving disc accompanied by the respective error message.

However, the error message is a problem associated with the Microsoft account, primarily services such as Microsoft Store, Skype, OneDrive, Outlook, Xbox Live, Office 365, and Groove Music.

What causes the Looks like we can’t connect to one of our services right now error?

From user experience, we gather that a few factors might be responsible for this error. On top of this list are the following:

  • Bad or unstable internet – Before troubleshooting, ensure you have good internet. You may even try a wired internet connection.
  • Issues with your MS account – There may be minor issues with your account on Windows that need to be fixed before you can connect.
  • Date and time settings – If your computer’s date and time are incorrect, you cannot connect to most internet services.
  • Proxy connections – Depending on your browser, you will need to force a system proxy server; if not, MS servers may not work.

There are a few variations to this error, including the looks like we can’t connect to one of our services right now error on Teams, error 0xcaa80000, HTTP 404, and error 0xcaa70004.

Fortunately, we have compiled some solutions to solve this problem.

How do I fix Can’t connect to Microsoft services error?

Before trying any of these fixes, you should do the following:

  • Double-check that your internet connection runs well.
  • Give it a few minutes and try again.

1. Synchronize your Microsoft Account

  1. Sign up to create a Microsoft profile at Windows Live (If you already have a Microsoft account, proceed to the next step). cannot connect to Microsoft services at the moment
  2. Go to Windows Live Account
  3. Click on Sign in, enter your email address and password, and click on login.
  4. After inputting your login details, click Next and select the Send code option.
    looks like we can't connect to one of our services right now
  5. Enter the 6-digit code you will receive in your phone number or alternate email address and click Sign in.
  6. Press Windows + I, and click on Accounts.
    looks like we can't connect to one of our services right now
  7. Enter your working email address and password in the Add user menu and follow the prompts.

Ensure you have a working Microsoft Account to access all Microsoft services. This error may be due to an invalid account or because you do not have a Microsoft Account.

Also, after following these steps, you can download the Windows store or access other Windows services on your PC to test this fix.

If the error message looks like we can’t connect to one of our services right now persists, try the next solution.

2. Use Microsoft Account Sign-in Assistant

  1. Press the Windows + R, then in the Run box, type service.msc and click on OK.
  2. In the Services window, please scroll down to Microsoft Account Sign-in Assistant and double-click on it to open properties.
  3. Set the Startup type to manual.
  4. In the lower left region, click on Start if the Startup status is Stopped, then click Apply and OK.
    looks like we can't connect to one of our services right now

If the error message looks like we can’t connect to one of our services right now persists, try the next solution.

3. Disable the Proxy server on your web browsers

  1. If you are using a browser like Firefox, click on the Hamburger icon, select Settings, then scroll down to click Settings under the Network Settings menu.
    looks like we can't connect to one of our services right now
  2. Select Use system proxy settings, then click on OK.

Another reason for the cannot connect to Microsoft services at the moment error problem is that the proxy server is enabled. Therefore, Microsoft services may not be accessible if the LAN connection is anonymous, i.e., proxy.

4. Run Network troubleshooter

  1. In the Start menu, type network problems and select the Find and fix network problems app.
    looks like we can't connect to one of our services right now
  2. Click on Next to start troubleshooting.
  3. Follow the promptings to complete the troubleshooting and apply the recommendations given.

In conclusion, if you get the error message looks like we can’t connect to one of our services right now, you can try out any of the fixes enumerated above to solve it.

Feel free to message us in the comments section below if you have more questions.

Microsoft Train Simulator Install Guide: Easiest Ways

Are you trying to install Microsoft Train Simulator? Here is all you need to know.

Even though we’re witnessing the peak of gaming advancements, some users still prefer old, once-favorite titles like Microsoft’s Train Simulator.

The game created by Microsoft back in 2001 still has a place in its niche, with a formidable player base.

However, it’s not all bread and butter for those who, in reminiscence of the good old days, try to run Train Simulator on Windows 10.

Those who tried had a lot of issues with starting the game. The ones that sprang over the first obstacle experienced an abundance of crashes and various errors. So let us show you how to scale through on Windows 10.

Will Train Simulator run on Windows 10?

The simple answer is yes. However, you will have to follow some steps to ensure it is correctly installed before you can play on the OS.

However, after installation, you may have a few errors with the game; these are all easily fixable. For instance, the Train Simulator may be stuck on the loading screen; in this instance, after installation, you may not be able to get past the loading screen. With a few tweaks, many users have fixed this problem.

You should note that while installing on Windows 10 is possible; some users may prefer playing Train Simulator and other train games on the web browser.

But for now, get your dusty CD box out and follow the steps below to install Microsoft Train Simulator on Windows 10.

How can I install Microsoft Train Simulator on Windows 10?

Before you go further into the solutions, you must ensure that you do the following:

  • Check system requirements – It requires Nvidia graphics cards. So, if you pack a dual-GPU configuration with ATI and an integrated Intel combo, force it to run with the integrated GPU. That should eliminate the GPU-related obstacles.
  • Uninstall any older game installation – If you have an earlier game installation, you should uninstall it before moving ahead with a fresh installation.
  1. Turn off or silence UAC
  2. Installation
  3. Updating
  4. Configuring
  5. Final tweaks
  6. Important Add-ons

2. Turn off or silence UAC

  1. Download the Tweak UAC for Windows app.
  2. Click the downloaded file, click Next and follow the installation wizard.
    Microsoft Train simulator install
  3. At the end of the installation, click on Turn UAC off now (Remember to undo this once you have installed Microsoft Train Stimulator).
    Microsoft Train simulator install
  4. Go to the next step to start the installation.

3. Installation

  1. Insert the first installation disk in the CD-ROM compartment and, once prompted, select Run Setup.exe.
  2. Click on Install.
  3. Decline Adobe Acrobat Reader 4 offer politely by clicking on No.
    Microsoft Train simulator install
  4. Select Customize installation options and then on the right arrow again.
    Microsoft Train simulator install
  5. Select the Complete-install option, then under Train simulator will be installed in the folder below, click Change, then click the right arrow.
  6. Under Drives, select a path different from your primary partition (Do not install the game on the system partition C:). Create the folder, name it whatever you like (MSTS suits it well, in our opinion), and under the Path option, type D:MSTS, then hit OK.
  7. Click the right arrow again.
  8. When prompted at 27%, insert the second disc and click OK.
  9. Once the installation ends, click on the Restart button.
  10. Don’t start the Train Simulator yet.

That should do it regarding installation. But, before we can start the game, there are still some additional steps you can’t skip for Train Simulator to work. So, continue to the updating phase.

4. Updating

  1. Download the update 1.4 by clicking on this link.
  2. Run the zipped installer and switch the default path with the path that leads to the Train Simulator installation folder (e.g., D:MSTS).
    Microsoft Train simulator install
  3. Click Unzip.

Updating is also essential; you’ll need to sort things out with updates before running the game. The official 1.4 update is what you’ll need.

Now, there’s a chance that your game is already up-to-date with version 1.4, and you can check that out quickly. Just navigate to the installation folder and locate the Transaction folder.

In there, you should see SD402 or Class50 inter alia. Hence, download and install the update if there are no such files.

In addition, you can download the additional patches here. They’re not as important, but we advise installing both (MSTS v1.4 Class 50 Content and MSTS v1.4 SD40-2 Content).

After that’s sorted out, still do not run the game. Let’s move to the configuring part of this epochal journey.

5. Configuring Train Simulator

  1.  Please navigate the installation folder, right-click on it, and open Properties.
  2. Under the General tab, uncheck the Read Only box, then click OK.
  3. Now, open the installation folder, right-click on the train.exe file, and open Properties.
  4. In the Compatibility tab, check the Run this program as an administrator and confirm changes.
  5. Open the installation folder and rename Uninstall.exe to MSTS_Uninstal.exe.
    Microsoft Train simulator install
  6. While there, copy the Global folder and paste it somewhere as a backup. Just in case something goes wrong after the next step.
  7. Open the Global folder and delete the startup.mpg video file.
  8. Insert Disk 1 again and open its content. Open the File Explorer or This PC, right-click Disk 1 and choose Open.
  9. Open the TechDocs folder and run the TechDocs.exe. Next, select the installation path and extract the files.microsoft train simulator windows 10: how to install and run

That’s it. Almost. We have a few more tweaks before you can finally start the game.

6. Final tweaks

6.1 Edit the Aspect Ratio

We must stress that a game like this will have a hard time with 16:9 widescreen monitors.

It’s designed for a 4:3 aspect ratio, so you’ll need to force the widescreen within the GPU settings.

This option is different on Nvidia and Intel graphics, but it’s enough to point you to the Image scaling option. Find that, and you’ll quickly set up the 16:9 aspect ratio.

6.2 Allocate RAM

  1. Right-click the Train Simulator shortcut and open Properties.
  2. Select the Shortcut tab, then in the Target section, change the default path to D:MSTSlauncher.exe -mem:xyz. Replace XYZ with half of the available RAM in megabytes. If you have, say, 8GB of RAM, the Target line should look something like this:
    D:MSTSlauncher.exe -mem: 4096
  3. Confirm changes.

Furthermore, since this game works differently than modern games, one helpful tip is to assert RAM manually so it can use freely. That can be done by following the steps above.

Moreover, if you experience any errors when the game starts, download and run this installer which should fix most of them. That should do it. Now you can, finally, after immense effort, start the game.

As a side note, you may get some add-ons that should help you substantially with the overall gameplay and improve pure enjoyment.

Here they are, with their respective roles and download links:

  • Xtracks – large pack of track pieces, switches, and crossovers.
  • Newroads – more of those with some bonus surroundings.
  • ScaleRail – improved realism with better-scaled rails.

And that’s finally the closure. After all of this, we hope you’ll seamlessly embark on the nostalgia train and enjoy one of the ”founding fathers” of the simulation genre.

Netflix releases Dragon Age: Absolution trailer, cast and release date revealed

Bioware’s Dragon Age RPG is the latest video game franchise getting a Netflix streaming series adaptation. The new animated series, which releases on December 9th, will be titled Dragon Age: Absolution. The official synopsis reads thus,

With great power at stake, a group of rebel mages and thieves goes head-to-head against a sinister force possessing a dangerous artifact.

Season 1 of Dragon Age: Absolution will consist of six 30-minute episodes. Also revealed was the voice cast, with Kimberly Brooks in the lead role of Miriam. Brooks is a veteran actress and voice actress whose video game credits include Star Wars: Knights of the Old Republic, Halo 4, Bioshock Infinite, Psychonauts 2, Far Cry 5, and many others titles. Other cast members are Matthew Mercer (Falco in Cyberpunk 2077; Cole Cassidy in Overwatch 2) and Ashly Burch (Tiny Tina of Borderlands fame), among several other noteworthy names.

Dragon Age: Absolution is developed by Red Dog Culture House, a Korean studio also responsible for another Netflix animated series: 2021’s The Witcher: Nightmare of the Wolf, with Graham McTavish (Castlevania) and Theo James.

The next installment of the Dragon Age video game series, Dragon Age: Dreadwolf, is currently in development. You can check out a behind-the-scenes look at game’s early development stage below.

Featured image via Buzzwebzine. 

api-ms-win-core-path-l1-1-0.dll: How to Download & Fix it

DLL files play a crucial role in Windows and often help more than one program run efficiently, and this very aspect (being shared by several programs) often leads to DLL errors. For example, many users reported that api-ms-win-core-path-l1-1-0.dll is missing.

The error arises when launching an application and reads, The program can’t start because api-ms-win-core-path-l1-1-0.dll is missing from your computer. Let’s find out how to fix things when the DLL file is missing.

What can I do if API-MS-Win-core-path-l1-1-0.dll is missing?

1. Use a repair tool

The simplest and quickest way to get things up and running when you get the api-ms-win-core-path-l1-1-0.dll error is to use a reliable DLL repair tool. These will identify any broken or missing DLLs and automatically replace them.

Also, never download a DLL from any website since these are often bundled with malware and can cause considerable harm, sometimes even leading to data loss.

2. Transfer the DLL file from another PC

If you don’t want to use a repair tool just yet, there is another solution that works flawlessly, but you will need another computer with api-ms-win-core-path-l1-1-0.dll stored on it.

You have to first navigate to the following address on the other computer:C:\Windows\System32\

Now, locate the DLL file (it could be in a subfolder here as well), copy it to a USB drive, and move it to the same folder on the computer throwing the error.

3. Disable Lync add-on in IE

Some users who had api-ms-win-core-path-l1-1-0.dll missing in Windows fixed things by disabling all the Lync add-ons in Internet Explorer. Unfortunately, the add-on, though beneficial, led to the error for users, and disabling it worked like a charm.

Since Microsoft discontinued support for Internet Explorer, we recommend you switch to a user-friendly browser to eliminate such errors and enjoy a better experience.

4. Reinstall the program

  1. Press Windows + R to open Run, type appwiz.cpl in the text field, and hit Enter.appwiz.cpl
  2. Locate the program that throws the error, select it, and then click Uninstall.uninstall app to fix api-ms-win-core-path-l1-1-0.dll missing
  3. Now, follow the on-screen instructions to complete the uninstall process.
  4. Once done, go to the program’s official website or launch the Microsoft Store and download it all over again.

A program usually comes bundled with the DLL files it needs; if only one throws the error, you could reinstall it. Also, this solution fixed things when API-Ms-Win-Crt-Runtime.dll was missing.

5. Upgrade the OS

If api-ms-win-core-path-l1-1-0.dll is missing in Windows 7 or a previous iteration, it is most likely that the application doesn’t support the iteration anymore. So here, it’s recommended that you upgrade to Windows 10.

You can download the Windows 10 installation media and finish the process. Besides, if your computer meets the requirements for Windows 11, directly upgrading to the latest iteration should also work.

What does API-MS-Win-core-path-l1-1-0 dll do?

The api-ms-win-core-path-l1-1-0.dll provides Windows applications with an API, and its presence is critical for their effective functioning. If the file is not available or corrupt, the application will likely fail to launch.

And as stated earlier, any program that needs the DLL file usually comes with it, so you shouldn’t have to download the file manually in most cases.

We also have a great guide on api-ms-win-core-localization-l1-2-0.dll error, so don’t miss it.

Also, before you leave, do not forget to find out how to fix missing DLLs in Windows 11, a vital piece of information that would come in handy in the long run. If you have a query or know another solution, drop it in the comments below.

3 Easy Ways to Fix Error Code 43 Graphics Card

The error code 43 on GPU is usually displayed in the Device status box on the hardware Properties window. If this happens, sometimes Windows will restart your GPU in order to fix the issue.

If you’re experiencing this problem, today’s guide will show you how to fix it properly.

What does code 43 mean for GPU?

Error code 43 indicates that there’s an issue with your GPU. The most common causes for this problem are the following:

  • Hardware – If your GPU isn’t connected properly, you might get this error. A damaged graphics card can also cause this problem. If this happens, your PC won’t detect your GPU.
  • Drivers – Sometimes latest drivers don’t work well with your GPU. Reinstalling drivers with Display Driver Uninstaller can help fix the problem.

What errors does GPU code 43 cause?

Error code 43 is related to your graphics card and causes various problems. Speaking of problems, here are some common issues that users reported:

  • Gtx 970, Gtx 1060 code 43, gtx 1070 error code 43 – This error can affect Nvidia graphics cards, and if you encounter it, be sure to run the Hardware troubleshoot and see if that helps.
  • Windows has stopped this device because it has reported problems. (code 43) Intel hd graphics – This problem can also affect Intel’s graphics cards, and if you encounter it, be sure that you have the latest drivers installed.
  • Nvidia Quadro error code 43 – This problem can appear while using Nvidia Quadro series and in order to fix it, you need to make sure that there aren’t any overheating issues.
  • Error code 43 Windows 10 GPU, AMD, Nvidia – According to users, this error can affect any brand of graphics cards, and if you encounter this issue, be sure to try the solutions from this article.

So if you’re getting error code 43 for your video card, this is how to fix it.

How can I fix Error code 43 for a video card on Windows 10?

Before we start fixing this issue, you do a couple of checks before proceeding:

  • Check the connection – If your GPU isn’t properly connected, you might get this error message. If the PCI-E 6-pin cable isn’t firmly connected, that can cause this issue to appear. It’s also advised to clean your connectors and make sure that there’s no dust in your PCI-E slot.
  • Check for hardware damage – Inspect your GPU. If you notice anything strange on the card, it might be damaged. Also look for any visual glitches, such as vertical lines. These are a common indicator that your GPU is faulty.

1. Update the Device Driver

  1. Press the Windows key + X and select Device Manager from there.
    Windows has stopped this device because it has reported problems. (code 43) Intel hd graphics
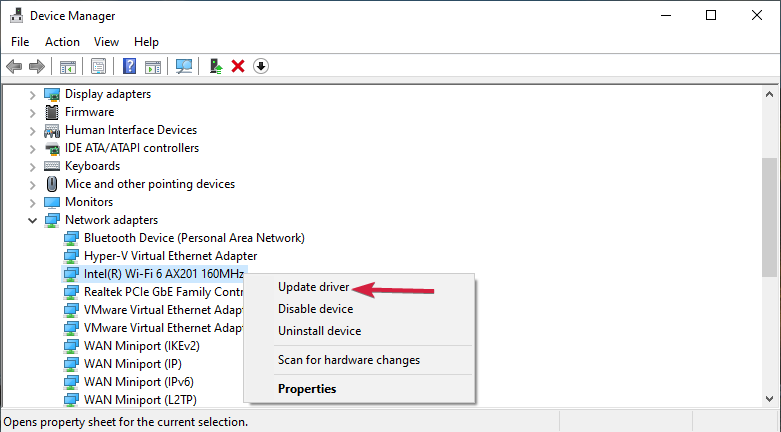
  2. Click Display adapter and then you should right-click your graphics card to open further context menu options as below.
  3. Now select Update driver from there to open the window directly below.
  4. Select the Search automatically for updated driver software option on that window to see if any updates are required. Now Windows will update the video card drivers if required.
    gtx 1070 code 43

You can also go to the Manufacturer’s website and download the driver but some of our readers reported problems with the NVIDIA driver being not compatible with the Windows version so proceed with caution.

In addition to your GPU, check drivers for any adapters that you may have. JUA370 USB to VGA adapter has been reported as a culprit for this issue, but after updating the drivers, the problem was gone.

Nevertheless, you can use third-party software to update your drivers automatically. Not only will professional software protect your PC from possible damage, but it will also select the correct version of drivers for your device.

They are built with up-to-date technologies meant to avoid any kind of errors and are easier to use than the inbuilt Windows utilities.

2. Re-install the Device Driver

    In some cases, error code 43 can appear if your display drivers are corrupted, and the only way to fix that is to reinstall them.

    We highly recommend that you perform a clean installation of the latest graphics drivers provided by your computer’s manufacturer because they are tailored to work specifically with your computer model.

  1. 1. Press the Windows Key and type in Device Manager, then click on the result.

  2. 2. Locate your graphics card driver, right-click it and choose Uninstall device from the menu.

    Error code 43 Windows 10 AMD
  3. 3. When the confirmation dialog appears, check Remove driver software for this device and then click the Uninstall button.

    Gtx 1060 code 43
  4. 4. After removing the driver, restart your PC and Windows 10 will automatically install the default display driver.

  5. 5. After the default driver is installed, check if the issue is still there. If everything works, you can also download the latest driver from your graphics card manufacturer.

Once the driver is removed, check if the Graphics device driver error Code 43 NVIDIA message on Windows 10 is still there.

3. Check the GPU temperature

  1. Use any CPU temperature software to check the temperature of your PC.
  2. If there are any temperature issues, open your case and clean it.
  3. Consider installing additional cooling.
  4. Removing overclock settings can also reduce temperature.

If you want to keep your device temperature in check, but don’t want the hassle of doing it manually, you should consider dedicated utilities. 

There are many good CPU & GPU temperature software that provide professional-level solutions to optimize your device.

Utilities such as AIDA64 Extreme offer industry-leading technologies to measure the performance of your hardware, including your GPU temperature.

They can also assess your installed software and give handy solutions on how you can improve overall PC performance.

Check out our article on the best ATX cooling cases for your PC for more information.

So that’s how you can fix error code 43 for video cards in Windows. This isn’t the only problem, and many reported that their GPU usage is 0%, but we covered that issue in a separate guide.

If you’re aware of another way to solve the issue, please share it in the comments section below so that other users can try it as well.

Fix: The Remote Device or Resource Won’t Accept the Connection

While using the network troubleshooter users reported The remote device or resource won’t accept the connection message. This can be a problem and prevent you from fixing your initial issues, but you can fix that with this guide.

What does The remote device or resource won’t accept the connection error mean?

The error message indicates a problem with the network settings, which can be caused by incorrect proxy settings or third-party apps. Driver issues or bugs in your OS can also cause this.

How can I fix The remote device that won’t accept the connection error?

Before we head to the slightly longer solutions, try restarting your PC and router/modem. Disable third-party antivirus or firewall and check if the error appears on other devices on your network.

1. Turn off proxy settings

  1. Press the Windows + R, type inetcpl.cpl, and press Enter.internet properties windows 10
  2. Switch to the Connections tab, and click on LAN settings.
  3. Now, select the Automatically detect settings option, uncheck Use a proxy server for your LAN and click OK to save the changes.disable proxy to fix the remote device won't accept the connection

If you can’t disable the proxy, our proxy won’t turn off guide should be able to help you.

2. Reset the affected browser

Note icon NOTE
We have listed the steps to reset Google Chrome. Since the steps remain similar for most, you can easily reset the other browsers.
  1. Launch Chrome, paste the following path in the address bar, and hit Enter:chrome://settings/resetreset
  2. Next, click on Restore settings to their original defaults.restore settings to their original defaults to fix the remote device won't accept the connection
  3. Next, click on Reset settings in the confirmation prompt.reset settings

3. Reset IP

  1. Press Windows + R to open Run, type cmd, and hit Ctrl + Shift + Enter.cmd
  2. Click Yes in the UAC prompt.
  3. Now, paste the following command and hit Enter:ipconfig/releasecommand to fix the remote device won't accept the connection
  4. Once done, execute the following command:ipconfig/renew

4. Force update Group Policies

  1. Press Windows + S to open the Search menu, type Command Prompt, and click on Run as administrator.command prompt
  2. Click Yes in the User Account Control prompt.
  3. Paste the following command and hit Enter:GPUPDATE /FORCEupdate policies to fix the remote device won't accept the connection

5. Uninstall conflicting applications

  1. Press Windows + R to open Run, type appwiz.cpl in the text field, and click OK.appwiz.cpl
  2. Locate and select the program(s) installed around the same time the error first appeared, and click Uninstall.uninstall app to fix the remote device won't accept the connection
  3. Follow the on-screen instructions to complete the process.

If the problem first appeared after downloading a program, usually a security software or one that modifies the Internet settings, uninstalling the app should work.

You can surely opt for CCleaner here, as it is a great maintenance tool that has an uninstall feature to help you easily uninstall any conflicting app.

⇒ Get CCleaner

6. Uninstall recent Windows updates

  1. Press Windows + I to open Settings, navigate to Windows Update, and click on Update history.update history
  2. Now, scroll down to the bottom and select Uninstall updates.uninstall updates to fix the remote device won't accept the connection
  3. Click on Uninstall next to the last major update.uninstall
  4. Again, click Uninstall in the confirmation prompt.confirm uninstall

If nothing else has worked yet, your best bet to fix The remote device or resource won’t accept the connection error is to uninstall the recent updates. And once done, the problem should be gone for good.

Before you leave, do not forget to check the best ways to increase the Internet speed in Windows. Also, in the comments section, please tell us which fix worked for you.

This isn’t the only connection problem, many reported The connection has timed out and Something went wrong, your device couldn’t connect errors.

We also encountered an issue where the website is online but not responding to connection attempts, but we have another guide addressing this.

Here is next week’s lineup of new Xbox releases

Another week, another slew of new Xbox releases will arrive between November 14th and 18th. This includes a couple of day-one Game Pass additions. Without further ado, let’s check out the new games headed to Xbox next week.

So which of these upcoming new releases have got you excited? Let us know in the comments. For many, the two new Game Pass games will be the highlight of the week. Though Goat Simulator 3 is another noteworthy release, and Heidelberg 1693 is an intriguing action-horror indie game.

2 Ways to Fix NET HELPMSG 2185 Error

Error codes like NET HELPMSG 2185 can appear for many reasons. It is mainly related to Windows update issues and can occur in different instances. as well as corrupt system files.

The complete error message appears as More help is available by typing NET HELPMSG 2185. The service name is invalid.

Here’s how to make it go away:

How do I fix the NET HELPMSG 2185?

Before proceeding with any advanced troubleshooting for the error, go through the preliminary checks below:

If you’re unable to fix the error, proceed with the solutions provided below:

1. Run the Windows Update troubleshooter

  1. Press Windows + I key to open the Settings app.
  2. Click System and select Troubleshoot.
  3. Click Other troubleshooters.
  4. Select Windows Update and click Run to initiate the Windows Update troubleshooter.

Follow the on-screen prompts to complete the troubleshooting process.

The troubleshooter will help you detect and fix issues prompting the Windows update error on your PC.

You can check how to use the Windows Update troubleshooter in Windows 10/11 if you have issues with the steps above.

2. Run the BITS troubleshooter (Background Intelligent Transfer Service)

  1. Left-click the Start button, type Control Panel in the text box, and select the OK button.
  2. Click on Troubleshooting.
  3. Expand Hardware and Sound.
  4. Click on Background Intelligent Transfer Service to launch the troubleshooter.
  5. Click Advanced to select the Apply repairs automatically option, then press the Next button.
  6. Then close the troubleshooter after the process is complete or apply the fix.

Running the Background Intelligent Transfer Service troubleshooter will fix BITS issues affecting the Windows service and fix the errors.

3. Restart the Windows Update process

  1. Press Windows + R keys to prompt the Run dialog box, type cmd, and then press Ctrl + Shift + ENTER to launch an elevated Command Prompt.
  2. Input the following consecutively and press ENTER after each to stop Windows update services: net stop wuauserv net stop cryptSvc net stop bits net stop msiserver
  3. Input the command below to rename the SoftwareDistribution and press ENTER: C:\Windows\SoftwareDistribution SoftwareDistribution.old
  4. Type the command below and press ENTER: ren C:\Windows\System32\catroot2 Catroot2.old
  5. Run the command below to enable the earlier disabled services: net start wuauserv net start cryptSvc net start bits net start msiserver
  6. Restart your computer and check if the issue persists.

Restarting the Windows Update service can fix problems and corrupt files affecting its processes.

Nevertheless, you can read more about how to fix Windows Update Service registration missing or corrupt on your PC. Likewise, the NET HELPMSG 2182 error can occur on Windows due to BITS Service activities.

We recommend you read how to delete the Software Distribution folder on your PC if renaming it doesn’t work.

Do not hesitate to use the comments section if you have further queries. Also, we entertain other questions and suggestions.

Netflix releases official trailer for Witcher prequel “Blood Origin”

A prequel to Netflix’ hit series based on CD Projekt Red’s beloved fantasy action-RPGs (as well as Andrzej Sapkowski’s books), The Witcher: Blood Origin is one of the most anticipated TV events of 2022. The miniseries will consist of four episodes and is slated for a Christmas Day release.

Ahead of next month’s launch, Netflix has released the official teaser trailer for The Witcher: Blood Origin. The show is set 1,200 years before the events of The Witcher, and stars Michelle Yeoh. The Malaysian actress is best known for such action films as Tomorrow Never Dies (of the James Bond series) and Crouching Tiger, Hidden Dragon: Sword of Destiny.

And judging by the trailer, Yeoh will need to showcase those action chops, as it looks like the show will feature combat aplenty. Rounding out the show’s cast are Sophia Brown (Giri/Haji), Lenny Henry (Harry Potter and the Prisoner of Azkaban), and legendary British actress Minnie Driver, among others.

Featured image via Digital Spy. 

NET HELPMSG 3534: What Does It Mean & How to Fix It

Windows have several services users can enable and disable by running the net start and net stop commands on the command prompt. However, these can result in errors, prompting codes such as the NET HELPMSG 3534.

Likewise, when tweaking the BITS Service on Windows, you may encounter the NET HELPMSG 2182 error.

What does the NET HELPMSG 3534 mean?

Running commands in the Command Prompt on Windows computers allows you to toggle on and off services on your PC. However, issues may occur during the process, resulting in numerous error codes like the NET HELPMSG 3534.

Furthermore, the NET HELPMSG is a command that decodes Windows error messages by attaching a code. It can come with many codes, such as NET HELPMSG 2191, 2185, 3523, etc.

The NET HELPMSG 3534 error code occurs when starting the MySQL service on Windows.

However, the error asks users to type NET HELPMSG 3534 in the Command Prompt to decode it. Decoding the error message NET HELPMSG 3534 will show you The service did not report an error message. Instead, it can be due to several factors affecting the program or Windows.

How do I fix the NET HELPMSG 3534?

There are a couple of fixes users can try to fix the NET HELPMSG 3534 error on their PCs. However, we recommend you go through the preliminary checks below before proceeding:

If the error persists after observing the check above, proceed with the solutions below to fix it:

1. End task for the service prompting the error

  1. Right-click on the Start button and choose Task Manager from the menu or use the Task Manager shortcut by pressing CTRL + Shift + Esc keys simultaneously.
  2. Click on the Processes tab, right-click the service prompting the error, and select the End task option from the drop-down.

Ending tasks for the service showing the NET HELPMSG 3534 error can fix issues with its process. In addition, it will help it close any background activities on it.

If you have difficulties using the taskbar, check how to fix an unresponsive taskbar on Windows 10/11.

2. Use the Program files directory

  1. Press Windows + R keys to open the Run dialog box, type in services.msc, and press ENTER to open the Services window.
  2. Right-click the MySQL service and select Properties from the drop-down.
  3. Click on the General tab and then click on the path displayed under the path to executable.
  4. Press and hold the arrow key pointing right, and stop moving the cursor when you find the my.ini in the path.
  5. Copy and paste the path into the File Explorer address bar, then press ENTER to show the my.ini file.
  6. Copy the my.ini file, navigate to the path below and paste it there: C:\Program Files\MySQL\MySQL Server 5.7
  7. Press Windows + R keys to prompt the Run dialog box, type cmd in the text box, then press Ctrl + Shift + ENTER to launch an elevated Command Prompt.
  8. Input the command below and press ENTER to start the MySQL services: net start mysql
Tip icon Tip
Change the MySQL Server 5.7 in the above path to the version of MySQL installed on your device.

The MySQL service should start without prompting any error. Copying the my.ini file from the ProgramData directory to the Program Files directory will fix any file issues causing the error.

3. Clear the MySQL data directory

  1. Click the File Explorer icon on the taskbar, then open your C drive.
  2. Navigate to the path below: C:\Program Files\MySQL\MySQL Server 5.7
  3. Open the Data folder, delete all the files, and then close the File Explorer.
  4. Press Windows + R keys to prompt the Run dialog box, type cmd in the text box, and then press Ctrl + Shift + ENTER to launch an elevated Command Prompt.
  5. Input the command below and press ENTER: mysqld --initialize
  6. Input the command below and press ENTER to start the MySQL services. net start mysql

The MySQL service should start without running into any errors. For example, deleting the data directory will fix corrupt files in the MySQL directory.

Alternatively, you can read how to repair a corrupted database in an SQL server for more guidance.

Conclusively, users may be interested in how to add the Run command to the Start menu on their Windows 10/11 PCs for easy access.

For further questions and suggestions, kindly leave them in the comments below.

Fix: USB Attached SCSI (UAS) Mass Storage Device not Showing

USB 3.0 hard drives are becoming more and more popular over the past few years. However, since the introduction of Windows 10, some users have had problems connecting their USB drives to the computer.

Affected users state that their USB 3.0 external drives are not detected in Windows 10.

So, we came up with a few solutions for this problem, and you can check them out below.

Why does my computer not detect my external hard disk when plugged in?

WD devices are great, but many reported that WD My Passport Ultra isn’t detected on their PC. If this happens, the problem is most likely an improperly formatted drive.

Your drivers can also be one reason why an external hard drive is not showing up, and to fix that, you might have to reinstall the USB and the external drive drivers.

In some rare cases, it’s possible that you have fatal errors on the external hard drive, but that can be fixed by following the solutions from this guide.

USB 3.0 drives offer high transfer speeds, but many users have reported issues with their USB 3.0 external drives. Speaking of issues, these are some of the common problems with external drives:

  • USB 3.0 flash drive not recognized in USB 3.0 port – Your USB 3.0 port can’t recognize flash drives, solved by updating your motherboard drivers.
  • External hard drive not showing up in Disk Management – Your cable causes this and can be solved by replacing it.
  • WD, Toshiba USB 3.0 external hard drive not recognized – Update the drivers and firmware for your drive.
  • USB 3.0 external drive not detected Seagate – Update your drivers and firmware and check if that solves the problem.
  • USB 3.0 external drive not detected laptop – Caused by outdated drivers, solved by updating them.
  • External hard disk not showing, working – Check if the hard disk is properly formatted. Set a different drive letter for it.
  • External drive not detected in BIOS – Usually caused by a faulty cable, but problems with the driver or the firmware can also cause this issue.
  • Problem ejecting USB attached SCSI – Update your USB driver inside Device Manager to fix this.
  • Ugreen storage device not recognized – Create a new partition on your drive as we have shown below.
  • USB 3.0 external hard drive not recognized in Windows 10 – Use the Disk Management tool in order to allow Windows 10 to recognize the external hard drive.
  • USB attached SCSI (UAS) mass storage device driver in Windows 11 – Try using a different cable before jumping into any complicated troubleshooting steps.

Without further ado, let’s see all the solutions in more detail!

How do I fix USB Mass Storage device not showing?

1. Update your USB 3.0 controller driver

If you can’t use your USB 3.0 external drive on your PC, the problem might be an outdated driver. That means you can fix the problem by downloading the latest driver for the USB 3.0 controller.

You can download the necessary driver right from your motherboard manufacturer’s website.

However, if you don’t know anything about your motherboard, here’s a list of the best software to get all the needed information.

It sounds easy, but it’s really not for many users. That’s why we recommend using specialized software to update your drivers automatically because it can find the newest driver versions from a huge database with one click.

⇒ Get IObit Driver Booster

2. Disable the USB selective suspend setting

  1. Go to Search, type power management, and open Power & sleep settings.
  2. Go to Additional power settings.
    additional power settings USB 3.0 external drive not detected Seagate
  3. Click on Change plan settings, next to your selected power plan.
    change plan settings USB 3.0 external drive not detected laptop
  4. Go to Change advanced power settings.
    change advanced power settings External hard disk not working
  5. Under USB settings, find USB selective suspend setting, and set it to Disabled. Click Apply and OK to save changes.USB selective suspend disabled External drive not detected in BIOS
  6. Restart your computer, and see if you’re able to connect your external USB drive again.

Note: Before changing your power settings, create a restore point in case something goes wrong.

3. Edit your registry

    A great method which can be used to resolve USB 3.0 not detected on Windows 10 PC would be to edit your Registry entries. However, you should respect the steps below to keep your system safe.

    1. Go to Device Manager.
    Open Device manager | change default camera windows 10
  1. 2. Under Universal Serial Bus Controllers, find USB Mass Storage Device. Right-click on it and select Properties.

    USB 3.0 flash drive not recognized in USB 3.0 port
  2. 3. Go to Details tab, and from Property, choose Device instance path. Right-click on the path, and choose Copy.

    USB 3.0 flash drive not recognized in USB 3.0 port
  3. 4. Open Registry Editor.

  4. 5. Go to the following path:ComputerHKEY_LOCAL_MACHINESYSTEMCurrentControlSetEnumUSBVIDDevice Parameters 

    • Note: VID_8564&PID_10005388DW3MEQ8HGRAX is just an example, so you need to use the value that you got in Step 4.
    External hard drive not showing up in Disk Management
  5. 6. In the right pane of the Device Parameters key, look for the DWORD named EnhancedPowerManagementEnabled which must be showing its Value data as 1. If this value isn’t available, you might have to create it manually.

    windows 11 touch screen won't calibrate
  6. 7. Double-click on it, and change its value to 0. Click OK.

  7. 8. Restart your computer and try to connect your drive again.

Note: If you can’t edit your Windows 10 registry, read this handy guide and find the quickest solutions to the issue.

4. Set the new partition on your removable drive

If you’re connecting your hard drive for the first time, there’s a chance that you don’t have any partitions created on it. Therefore, Windows 10 won’t recognize it as a hard drive.

Thus, your USB 3.0 external drive will not be detected in Windows 10.

But your disk will be recognized by the Windows Disk Management tool, so we will check if Disk Management recognizes the external hard drive, and our future actions will depend on the results.

Use the Disk Management tool

  1. Type diskmgmt.msc in Windows Search and click on Disk Management.
  2. See if your external drive is listed in the Disk Management window.
  3. If it’s partitioned, you only need to format it by right-clicking and selecting Format.

If you are sure that you have data on that drive, try to connect it to another computer and back up the data first. Formatting will erase all data from the drive!

Create a new partition on your drive

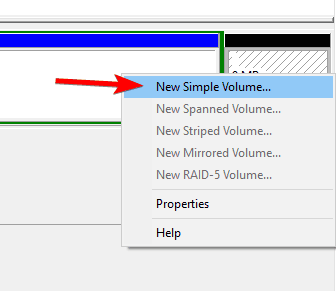
  1. Right-click on the Unallocated space, and go to New Simple Volume.
    new simple volume disk management External hard disk not showing
  2. Set the new volume’s size, and you’re good to go.
  3. Re-connect your USB 3.0 hard disk drive with your computer, which should be accessible.

Note: If even Disk Management can’t recognize the hard drive, your problem might be a little complicated.

First, try some basic solutions, like checking if the driver is up to date or trying to plug it into another USB port in case of a bad USB port.

If the Disk Management tool seems too complicated to use, there are third-party solutions that you can use to format your drive.

We recommend Paragon Hard Disk Manager, a simple application that can help you manage your disk partitions, backup data, and recover lost files.

This professional tool features integrated backup functions that allow you to save your data before working on a hard drive. That’s a very handy feature for unpredictable and unpleasant situations.

The software also comes with many other functions for partitioning, but it also optimizes your PC to use its resources efficiently.

5. Disconnect your drive and go to BIOS

If a USB 3.0 external drive isn’t detected in Windows 10, you might want to try this simple workaround. According to users, you just have to disconnect your drive, enter BIOS, and reconnect your drive.

After doing that, you can exit BIOS and start Windows 10 normally.

This sounds like an unusual solution, but a few users reported it worked for them, so you might want to try it out.

If you don’t know how to access the BIOS, here’s an expert guide on how to do that.

6. Try using a different cable

If your PC can’t detect a USB 3.0 external drive, the problem might be related to your cable. According to users, they fixed this issue simply by replacing their cable.

If you’re having this problem, your cable might be broken, so be sure to replace it and check if that solves the issue.

7. Update your drive’s firmware

Many users reported that their external drive is recognized only when using a USB 2.0 port. If you have this problem, you might want to try updating your device’s firmware.

To update your firmware, you need to connect your external drive to a USB 2.0 port, download the latest firmware from the drive’s manufacturer, and install it.

Once the firmware is installed, you should be able to use your external drive with a USB 3.0 port.

Remember that firmware update is an advanced and potentially dangerous procedure, and if you don’t do it properly, you might cause irreversible damage to your drive.

8. Update the USB Attached SCSI (UAS) Mass Storage Device driver manually

  1. Press the Windows Key + X and choose Device Manager from the list.
    device manager win + x menu USB 3.0 external drive not detected laptop
  2. Go to View and check Show hidden devices.
    device manager show hidden devices External hard disk not showing
  3. Now locate USB Attached SCSI (UAS) Mass Storage Device, right-click it, and choose to Update Driver.
    update driver device manager External drive not detected in BIOS
  4. Choose to Browse my computer for driver software.
    browse my computer for driver software USB 3.0 flash drive not recognized in USB 3.0 port
  5. Click Let me pick from a list of available drivers on my computer.
    let me pick from a list of available drivers on my computer External hard drive not showing up in Disk Management
  6. Select Show All Devices and click Next.
    show all devices WD USB 3.0 external hard drive not recognized
  7. Select Mass Storage Device and click Next to install the driver.
    mass storage device USB 3.0 external drive not detected Seagate

9. Change the drive letter

  1. Open Disk Management.
  2. Locate your external drive, right-click it and choose Change Drive Letter and Paths from the menu.
    disk management change drive letter External drive not detected in BIOS
  3. Click the Change button.
    change button USB 3.0 flash drive not recognized in USB 3.0 port
  4. Select the desired letter from the dropdown menu and click on OK to save changes.
    assign the following drive letter External hard drive not showing up in Disk Management

10. Reinstall your drivers

  1. Connect your device to a USB 2.0 port.
  2. Open Device Manager.
  3. Locate the device in Device Manager, right-click it, and choose Uninstall device from the menu.
    uninstall device device manager Toshiba USB 3.0 external hard drive not recognized
  4. Click the Uninstall button to confirm.
    uninstall driver confirm USB 3.0 external drive not detected Seagate
  5. Disconnect your drive and restart your PC.
  6. Connect the drive to a USB 3.0 port. Windows will now recognize the device and install the appropriate driver for it.

That’s about it; we hope at least one of these solutions helped you to solve the problem with the USB 3.0 external hard drive not being detected in Windows 10.

For more solutions, check out our guide on what to do if your external hard drive is not showing up in Windows 10/11.

In case you see Restart Required – Your PC Needs to be restarted to finish setting up this device: Xvdd SCSI Miniport pop-up, read this guide for help!

If you have any other questions or suggestions, please leave them in the comments section below, and we’ll surely check them out.

Best television shows based on video games: Arcane: League of Legends

First announced in 2019 during the League of Legends 10-year anniversary celebration, Arcane has garnered much praise since its November 2021 debut on Netflix. It is based on the 2009 online battle arena game League of Legends from Riot Games, and produced by French animation studio Fortiche. Arcane’s story focuses on sisters Vi (Hailee Steinfeld) and Jinx (Ella Purnell)—”Champions” from series lore fighting “on rival sides of a war between magic technologies and clashing convictions.” The first season consists of nine episodes. A second season is in the works for a release sometime after 2022.  

Via Film Affinity.

Arcane: League of Legends has received accolades for its story and worldbuilding as well as for its characters, voice acting, and soundtrack. Upon release it garnered a 100% approval rating on Rotten Tomatoes. Rafael Motamayor of IGN said of the show’s first season, “(it is a) classic in the making, and the nail in the coffin of the so-called video game curse.” He also went on to call it a “once-in-a-generation masterpiece,” awarding it 10 out of 10 stars. The show very recently got a glowing review from none other than The Witcher star Henry Cavill. 

Arcane set the record as the highest-rated Netflix series to date within a week of its release. It is the first video game television adaptation to win both Annie Awards and Primetime Emmy Awards. 

One of the best things about the show is that it appeals to those who have never played League of Legends as well as to veterans of the game. No prior knowledge of the LoL universe is necessary to watch the show. So if you have a Netflix subscription and love great video game adaptations—or just gorgeous animation and well-executed narrative in general—then you can mark this as a must-watch. Check out another riveting trailer below. 

Featured image via Rotten Tomatoes. 

Does Overwatch 2 Work on Windows 7? (+Tips on How to Run It)

Overwatch 2 has no support for the Windows 7 OS because the minimum OS requirement for the game is Windows 11. Hence, our readers are unsure whether they can play Overwatch 2 on Windows 7 since it doesn’t meet the criteria.

So, this guide will provide possible tweaks to aid some of our readers in accessing Overwatch 2 without issues.

Can you play Overwatch on Windows 7?

Considering Overwatch 2 recommended and the minimum system requirements, many will conclude that it’s not playable on Windows 7. However, you can play Overwatch 2 on Windows 7 without having to worry about running into problems.

Furthermore, Overwatch 2 developers state that the game supports only Windows 10 Operating System upwards because they only tested it for those versions.

Nevertheless, other lower versions of Windows can still run the game. However, users can experience issues playing Overwatch 2 on Windows 7.

Nonetheless, Windows 7 is regarded as the best OS for gaming because it is strong enough to play games that are not built for it.

So, regardless of the recommended and minimum system requirements of Overwatch 2, you can play it on Windows 7.

What can I do to run Overwatch 2 on Windows 7?

You can use a couple of options to run and play Overwatch 2 on their Windows 7 OS. However, we recommend you check the following preliminary steps before proceeding:

The above steps will prepare your Windows 7 PC for running Overwatch 2. Follow the steps below to run the game on Windows 7:

1. Install Windows 7 update KB4534310

  1. Left-click on the Start button, right-click on Computer from the menu, then select Properties from the drop-down.
  2. Go to the System type and check if it indicates 32-bit or 64-bit Operating System version. (Checking the System type will determine the update package to download)
  3. Launch your browser and go to the Official Microsoft Update Catalog page to download the update package.
  4. Select the first download link for the 32-bit OS version and the fifth download link for the 64-bit OS version.
  5. Double-click on the downloaded file to install the update.

Installing the KB4534310 update on Windows 7 will enhance its OS to run Overwatch 2 smoothly. If you encounter any Windows 7 update error code, check how to fix it in the guide.

2. Update Overwatch 1 to Overwatch 2

  1. Left-click on Start, search for Battle.net and launch the desktop client on your PC
  2. Click on the Overwatch icon from the list of games.
  3. Select the cogwheel icon next to the Play button to prompt the Settings menu.
  4. Click the Check for Updates button to automatically download the update.
  5. Wait for the process to be completed and install the game update.

Updating from Overwatch 1 to Overwatch 2 is an excellent way to run Overwatch 2 on Windows 11 without downloading the new game. In addition, you can read about how to fix Overwatch if its update is stuck at 0 b/s on your PC.

3. Update your PC’s BIOS

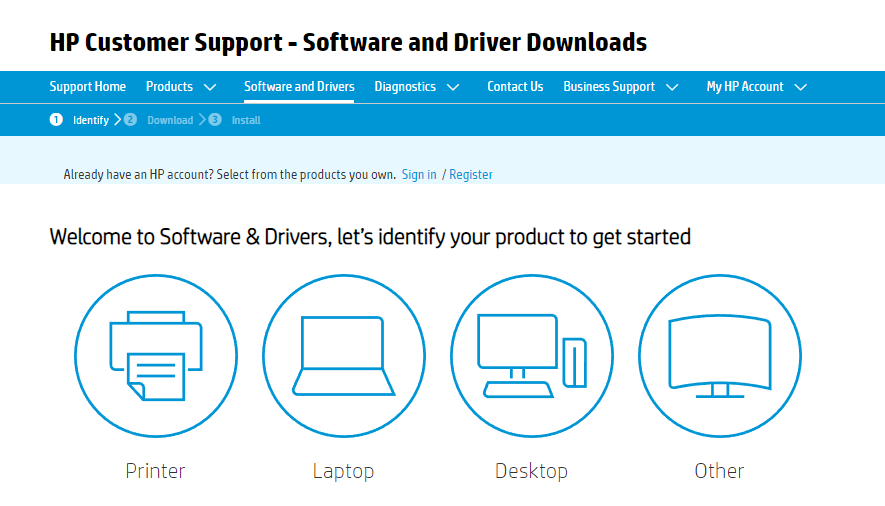
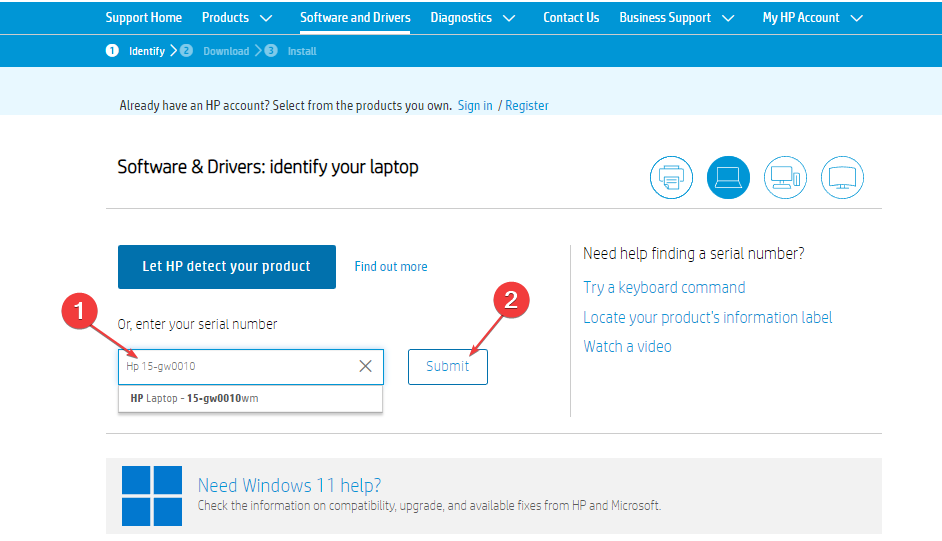
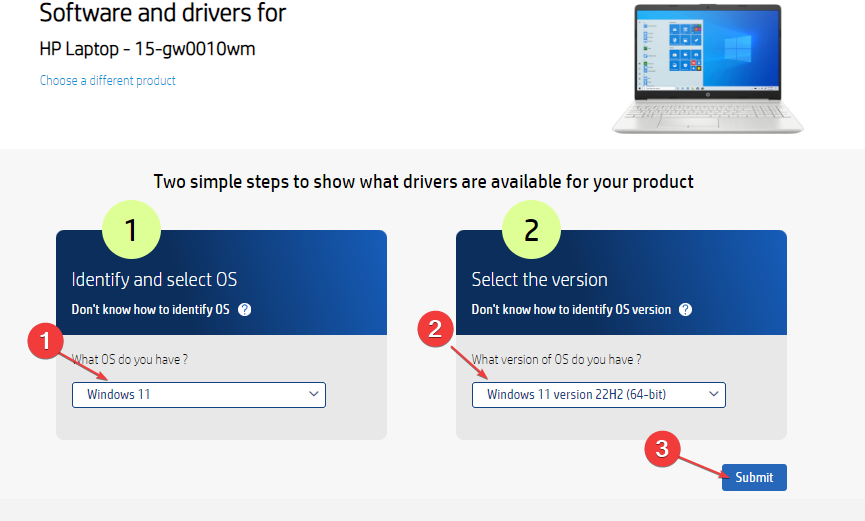
  1. Go to the HP driver and software download website and select your device from the list.
  2. Input your serial number or the computer model.
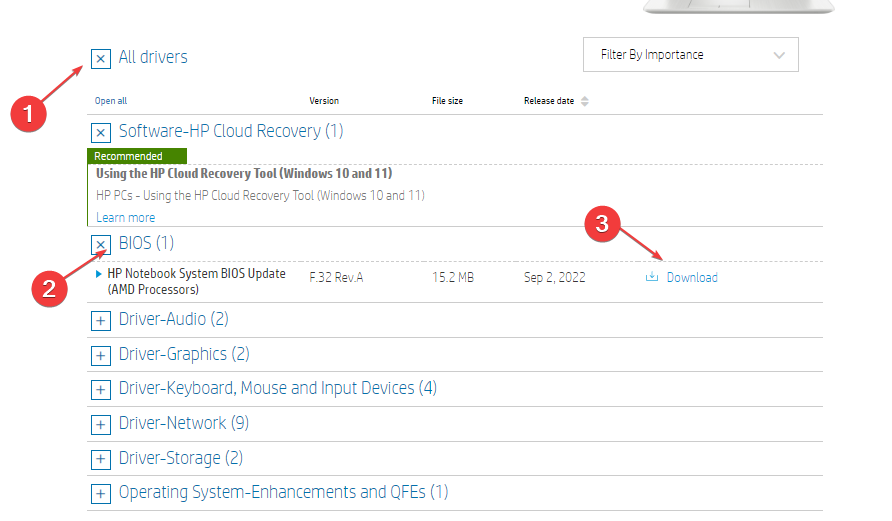
  3. Click the plus + button at the front of All drivers, then click the + button against BIOS to see available updates.
  4. Click on Download.
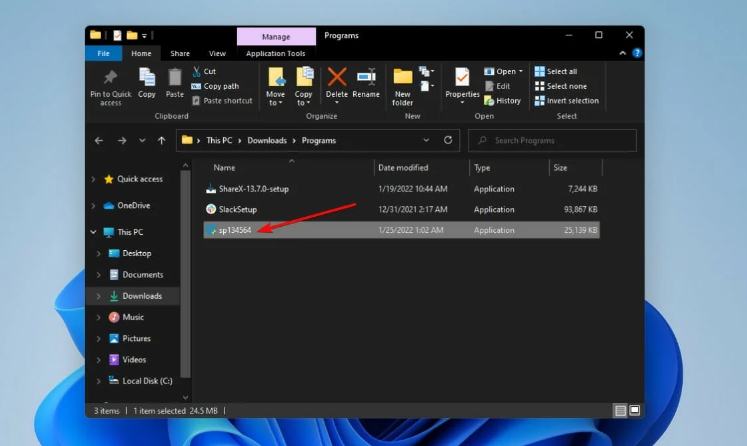
  5. Double-click the downloaded file to install the .exe file, then follow the on-screen instructions to complete the installation.
  6. Restart your PC and click the Apply Update Now option during the startup to run the installed BIOS update.

Updating your BIOS improves the compatibility rate of your Operating System with new hardware versions and games like Overwatch 2.

Depending on your manufacturer, the download process will differ for each device.

The updating process varies on different devices. Hence, we recommend you read how to check and update BIOS on various laptops to help.

Nevertheless, you can check how to fix Overwatch if it loses connection to the game server and gets it working again.

If this guide has been helpful to you, kindly drop your comments below. In addition, should you have further questions or suggestions, do not hesitate to use the comments section.

Couldn’t Download Virus Detected: 3 Ways to Bypass it

If a Couldn’t download virus detected message appears while downloading files, you won’t be able to complete the download, even if the file is 100% safe. Luckily, this can help you fix that.

How do I fix Couldn’t download virus detected error?

Before we try anything else, try using a different web browser and check for any issues with the download.

1. Restore quarantined files

  1. 1. Open Windows Security on your computer.

    windows security open windows search
  2. 2. From the main window click on Protection history.

    protection history windows defender
  3. 3. Locate the application that has been blocked on the list and expand it.

    select quarantined threat windows defender
  4. 4. Expand the Actions menu and click on Allow.

    allow quarantined threat windows defender
Note icon NOTE
Do this only for files that you 100% trust to be safe.

If you’re using a different antivirus, we have a great guide on what to do if the antivirus is blocking exe files.

2. Disable Windows Defender

  1. Press the Windows key + I keyboard hotkeys to open the Settings app.
  2. Choose Update & Security.update and security settings app
  3. Click on Windows Security from the left pane, then click on Open Windows Security.windows security open windows security button
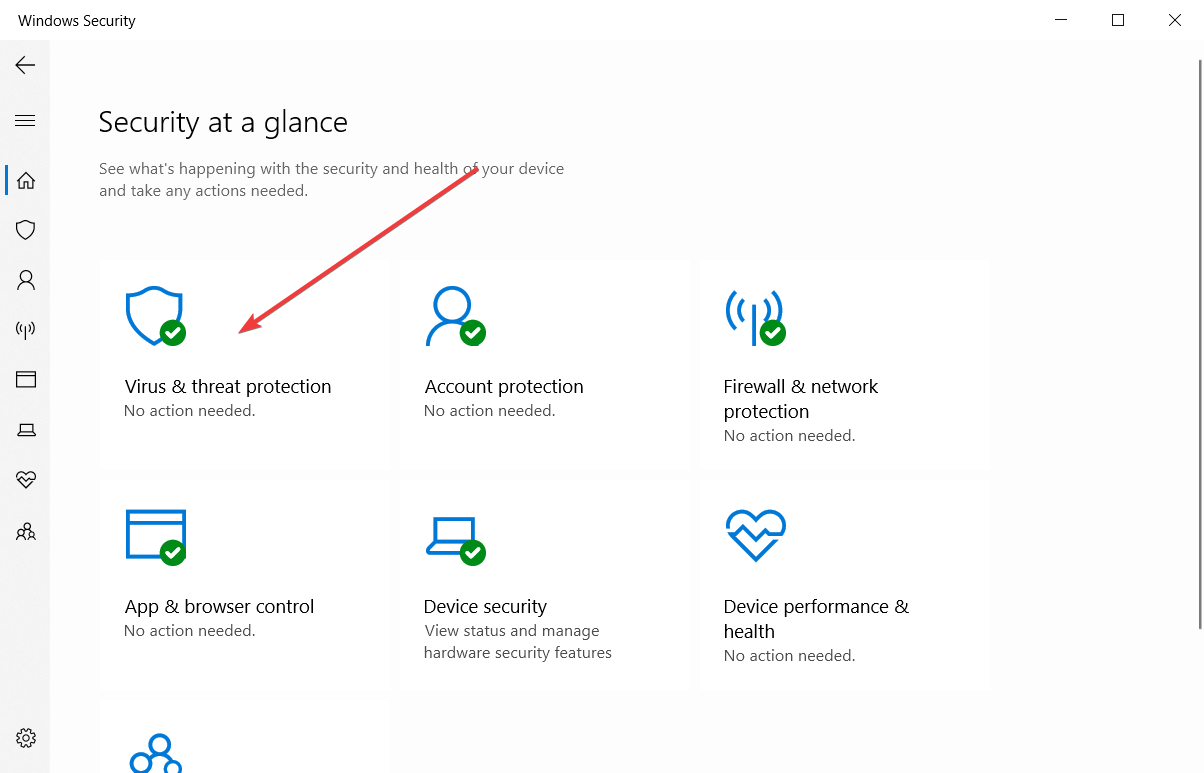
  4. Now click on Virus & threat protection.virus and threat protection selected
  5. Under the Virus & threat protection settings click on Manage settings.virus and threat protection settings manage settings
  6. Toggle the Real-time protection button to Off.windows defender real-time protection off

Try to download the file again. If you’re not getting download failed virus detected message anymore, enable the antivirus as soon as the download is finished.

3. Turn off Chrome Safe Browsing

  1. Click the Menu icon in the top right and choose Settings.
    settings chrome menu
  2. Now select Privacy and Security. Select Security in the right pane.
    privacy and security chrome settings
  3. Select No protection (not recommended).
    no protection chrome settings

If the download completes, enable this feature again.

How do I disable a Virus scan when downloading?

To do this, you need to disable Safe Browsing in Chrome. Our Solution 3 goes into detail on how to do that.

In case the issue is still there, we have a great guide on how to keep a dangerous file in Chrome, so it should provide you with more useful information.

If you use Opera, we covered Download failed, virus detected error in Opera, in another guide, so don’t miss it.

With that said, we can conclude this article. Don’t forget to share your thoughts in the comments section below.

How to Fix League of Legends Black Screen After Champion Select

The League of Legends black screen after champion select usually means the client isn’t loading into the match. You’ll pick your champ, the timer hits zero, and then, nothing. Just a black screen. It’s often caused by broken game files, outdated drivers, or the client failing to connect properly. Here’s how to fix it fast and get back into the game.

    How do I fix League of Legends not opening after champion select?

    1. Reset the Network Adapter

      If you run intro trouble while playing League of Legends and receive black screen after champion select, you may reset the Network Adapter as demonstrated in the steps below.

    1. 1. Press Windows + R to open the Run Dialog box.

    2. 2. Type cmd and press OK to open the Command Prompt.

      league of legends black screen after champion select
    3. 3. In the command prompt, enter the following command and hit Enter to execute.
      netsh winsock reset

      Reset Winsock
    4. 4. Close the Command Prompt.

    5. 5. Now launch League of Legends with Champion Select and check for any improvements.

    2. Turn off the Windows Firewall

    1. Type Firewall in the Cortana/search bar and click on Firewall and Network Protection option.
    2. Click on Public network (active).
      league of legends black screen after champion select
    3. Now turn off the Microsoft Defender Firewall by clicking on the toggle switch.
      league of legends black screen after champion select
    4. If the User Account Control prompts for a confirmation, click on Yes.
    5. Close the Settings window and launch League of Legends.

    Select Champion Select and check if the game launched without any issues. If the problem persists, try to turn off any other firewall enabled on your system.

    3. Update graphics card drivers

    1. Open Device Manager.
    2. Locate Display adapters and click the downward arrow to expand it.
    3. Select your graphics card, right-click on it and select Update driver.choose update driver for NVIDIA graphics card device manager
    4. Select Search automatically for drivers. Wait for the process to complete.

    Alternatively, you can go to your manufacturer’s website and download and install the drivers manually. Just pay close attention.

    You have to pick the exact driver version for your device, otherwise you might do more harm than good.

    4. Disable IPv6

    1. Click on the Start menu, type Network Connection, and select the View Network Connection app.
      league of legends black screen after champion select
    2. Right-click on your network and select Properties.
    3. Please scroll down to Internet Protocol Version 6 (TCP /IPv6), and uncheck it, then click the OK button.

    5. Change DNS Server

    1. Click on the Start menu, type Network Connection, and select the View Network Connection app.
      league of legends black screen after champion select
    2. Right-click on your network and select Properties.
    3. Double-click on Internet Protocol Version 4 (TCP/IPv4) in the Properties window.
    4. Select Use the following DNS server addresses option, then enter the two values below for Preferred DNS Server and Alternate DNS Server, respectively.
      8.8.8.8
      8.8.4.4
    5. Click OK to save the changes.

    6. Lower graphics settings

    1. Start the game and go to the main menu.league of legends main menu
    2. Launch a game and hit the Esc key. This will open the Options menu.
    3. Click on the Video tab. video setting league of legends
    4. In the Graphics section, move the slider towards the left. Medium High/Medium should display satisfactory graphics without hindering performance. lol graphics settings slider
    5. You can also set Character, Environment, Shadows, and Effects to Medium.
    6. Hit Okay and relaunch the game.

    It is not clear why this triggers the black screen on the game. And for most users, this occurrence is random. However, resetting the network adaptors and updating the graphics card drivers have efficiently solved this error.

    That concludes our article today. First, however, you must note that none of these solutions are given in any particular order, so you should try what seems the most appropriate. For more potential solutions, check out what to do if LOL is not launching.

    We hope these solutions fixed your League of Legends black screen after champion select problem. Feel free to give us any feedback regarding the subject in the comment section below.

    Surface Pen not Working: Troubleshoot & Fix in 8 Easy Steps

    Microsoft Surface is a great device, but many users reported the Surface Pen is not writing while the buttons on the pen work without any problems. This is a strange issue, and we’ll show you how to fix it in today’s article.

    Why is my Surface Pen not working?

    Numerous causes, such as drained batteries, driver changes, compatibility issues, etc, can impede Surface Pen’s functionality.

    If a depleted battery causes it, replace the AAAA battery with a new one. The problem should then be resolved.

    Various issues with Surface Pen can occur, and speaking of issues, here are some common problems reported by users:

    • Surface Pro 3, 4, 7 Pen not working – Sometimes your Surface Pro pen won’t work at all. Your battery usually causes this, so make sure that it isn’t empty.
    • Surface pen not working but connected – This problem can occur due to certain Bluetooth glitches. To fix the problem, simply unpair and pair your pen again.
    • Surface pen not working in Photoshop, in Word, or OneNote – Sometimes your pen might not write on the screen or in other applications such as Word and OneNote. To fix the problem, you need to disable Intel devices in Device Manager and enable them again.
    • Surface Pen is paired but not writing – This is a relatively common problem with Surface Pen, and you should be able to fix it using one of our solutions.
    • Surface pen not working after update, battery change – Battery changes can cause several system changes and driver bugs which you have to adress as we have shown below.
    • Surface pen not working but eraser is – Resetting your pen, as we have shown below, will make sure all its components work properly.
    • Surface pen not showing up in Bluetooth – Updating your Bluetooth and pen drivers is one way to address this issue.
    • Surface pen not working in Windows 10, 11 – Luckily the solutions below work in both OSs.
    • Surface pen not writing but buttons work – Reboot the pen in order to start from a blank slate and see if the pen will work as well.
    • Surface pen tip/button not working – Check the pen’s battery then make sure it is paired correctly to your device.

    Without further ado, let’s jump right into the list of solutions.

    How do I get my Surface Pen to work?

    1. Update your drivers

    Sometimes, issues with the Surface Pen can occur if there’s a problem with your drivers. If one of your drivers is out of date, specific components might not work correctly, and that will cause this and many other problems to appear.

    To ensure that everything is working properly, we strongly suggest keeping all your drivers up to date. You can download the latest drivers manually using Device Manager.

    2. Unpair your pen with the Surface and connect it again

    1. Open the Settings app. The fastest way to do that is to press the Windows Key + I.
    2. When the Settings app opens, head over to the Devices section.
      Surface Pro 4 Pen not working
    3. In the left pane, select Bluetooth. Locate your pen in the left pane and click the Remove button. Now click on Yes to confirm.
    Note icon NOTE
    Note: Once the pairing process is completed, your Surface Pen will start writing again. Bear in mind that this is just a workaround, so you might have to repeat this solution if the problem reappears.

    3. Check your battery

    If your Surface Pen is not writing, but other buttons work, the issue might be your battery.

    In case you don’t know, Surface Pen uses two batteries, one of the pen and one for the buttons, so if the pen isn’t working, it’s rather likely that your battery is empty.

    To fix this problem, simply replace the battery or charge your Surface pen and check if that solves the problem for you. Many users reported that the battery was the problem, but after replacing it, the issue was permanently resolved.

    4. Restart your Surface device

    Perform a force restart
    1. Press and hold the Power button on your Surface for 30 seconds. Make sure that the device is completely turned off.
    2. Now press and hold the Volume Up and the Power button together for about 15 seconds. Your screen should flash the Surface logo. This is perfectly normal.
    3. Release the buttons and wait for about 10 seconds. Press and release the power button to turn the Surface back on.

    For more advanced restart or boot options, you can also learn how to get to BIOS on Microsoft Surface and adjust system settings directly from UEFI.

    5. Run the troubleshooter

    1. Open the Settings app. When the Settings app opens, head over to the Update & Security section.
      Surface Pen not writing on screen
    2. Select Troubleshoot from the left pane. Choose Hardware and Devices from the list and click the Run the troubleshooter button.
      Surface Pro 3 Pen not working
    3. Follow the instructions on the screen to complete the troubleshooting.

    Note: If the issue persists, you might want to try running the Bluetooth troubleshooter as well. Keep in mind that troubleshooters are designed to fix some common problems and glitches so they might not be able to fix your problem.

    6. Disable and re-enable Intel(R) HD Graphics 520

      If you need to resolve your Surface Pen issues quickly, you can use the following method to disable and enable your graphics driver again.

      1. Press Win + X menu and choose Device Manager from the list. You can do that simply by right-clicking the Start button.
      Surface Pen is paired but not writing
    1. 2. Locate the Intel(R) HD Graphics 520 on the list, right-click it and choose Disable device from the menu.

      Surface Pen not writing in Word
    2. 3. Click Yes when the confirmation dialog will appear.

      Surface Pen not writing in Word
    3. 4. Wait for a few seconds after disabling the device, right-click it again, and choose Enable from the menu.

    Note: Remember that you might have to repeat this solution whenever the issue appears.

    Some users recommend disabling and enabling the Intel(R) Precise Touch Device and also disabling and enabling their Surface Pen, so you might want to try that as well.

    7. Reboot the pen

    Surface pen bugs


    If the Surface Pen is not writing but the buttons work, you might be able to fix the issue simply by rebooting the pen. This is incredibly simple to do, and you just need to press and hold the pen button for about 10 seconds.

    After doing that, the pen will reboot and the problem should be resolved.

    8. Install the latest updates

    1. Open the Settings app and go to the Update & Security section.
    2. In the right pane, click the Check for updates button.
      Surface Pro 4 Pen connected but not writing

    Windows will now check for available updates and download them in the background. Once the updates are downloaded, restart your PC to install the updates. After installing the latest updates, check if the problem is still there.

    If Surface Pen is not working on your PC, that can be a big problem, but we hope that you managed to fix this issue by using one of our solutions. A few of the solutions here also work when XP Pen is detected as a keyboard.

    Other brands can also experience issues, and recently we wrote about XP-PEN calibration not working, so be sure not to miss it.

    If you have any questions or suggestions, please leave us a line in the Comments section below.

    Windows Journal Cannot Open: How to Fix This Unexpected Error

    Microsoft Journal is one of the essential Windows apps that recently received a significant upgrade and now delivers a more user-friendly and feature-loaded experience. But, many report that Windows Journal cannot open specific files on their PC.

    The error message, in this case, reads, There was a problem trying to open the journal followed by the file name. It lists two possible causes, file corruption and change of location, and we will be looking at that and other possible solutions.

    What can I do if Windows Journal cannot open?

    Note icon NOTE
    Before you proceed, verify if the problem lies with just one file or all of them. In case it’s the former, start from Solution 1, while for the latter, directly head to Solution 3.

    1. Check if the file exists in the location

    1. Press Windows + E to open File Explorer, paste the following path in the address bar while replacing the username with the current one, and hit Enter:C:\Users\Username\OneDrive\Documents\Journalsnavigate
    2. Check if the file you are having trouble opening is saved here.verify file location to fix windows journal cannot open
    3. If not, find it and move the file back here.

    Your primary approach when Windows Journal cannot open is to verify that the file is stored in the default location. If this doesn’t help, head to the following method.

    2. Move the file to another location

    1. Navigate to the Journals folder by navigating the following path:C:\Users\Username\OneDrive\Documents\Journals
    2. Select the file throwing the error, and press Ctrl + X.cut file
    3. Now, go to any folder, preferably on another partition (create a partition if required), and press Ctrl + V to paste the file.
    4. Open the file from here, and click on No Thanks in the prompt in Windows Journal.no thanks

    Several users fixed the problem by moving the problematic file to another folder when Windows Journal could not open it. So, make sure to give it a try.

    3. Reinstall Windows Journal

    1. Press Windows + I to open Settings, select Apps from the navigation pane, and click on Installed apps on the right.installed apps
    2. Locate Journal here, click on the ellipsis next to it, and select Uninstall.uninstall to fix windows journal cannot open
    3. Again, click on Uninstall in the prompt, and wait for the process to complete.uninstall
    4. Now, go to the Microsoft Store, click on Get in Store app, and download Journal.download to fix windows journal cannot open
    5. Once done, launch Microsoft Journal, and open the file that earlier threw the error.

    If nothing so far has worked, it’s likely a problem with the Windows Journal app itself when it cannot open files, and reinstalling it should do the trick. You can also download Windows Journal from the official website.

    4. Go with a similar app

    When all else fails to work, the last option is to use an alternative to Journal. There are several useful journal-keeping apps that work pretty similarly to the one offered by Microsoft.

    Also, several users went for diary apps in Windows since these are slightly more straightforward. But the eJournal app, after receiving updates, has become the user’s first choice.

    If Windows Journal cannot open files, you know how to fix things quickly. And in case you were looking for academic writing software, we have just the ones. Besides, do not forget to share which solution worked for you in the comments section.

    3 Ways to Change Files and Folders Icon on Windows 10 & 11

    Windows has default icons for files and folders displayed in File Explorer and other programs. These icons serve their purposes but can become tiresome to look at. Hence, understanding how to change file icons on Windows will help you customize the file’s appearance to a desirable one.

    Also, you can make Windows 10 icons look like Windows 8 icons for more aesthetics.

    Can you customize folder icons on Windows 10?

    One of the best things about Windows is that it is highly customizable and allows users to create their desired display features. Hence, you can customize and change folder icons to something else, making them more appealing.

    Furthermore, customizing your files by adding file tags and changing folder icons helps you locate your files faster and makes your computer more personal.

    Likewise, you can customize the icons of specific files and folders for distinctiveness, providing an easy way to arrange your icons on your PC.

    Nonetheless, you can customize other icons on your computer to suit your preferences. For instance, users can change the recycle bin icon on Windows 10/11 to another icon to make it look more appealing.

    How do I change the file and folder icons on Windows?

    1. Change folder icons to a new Windows icon

    1. Click the File Explorer icon on the taskbar or press the Windows + E keys simultaneously to launch the app.
    2. Navigate to the folder to customize, right-click on it, and select Properties from the drop-down.
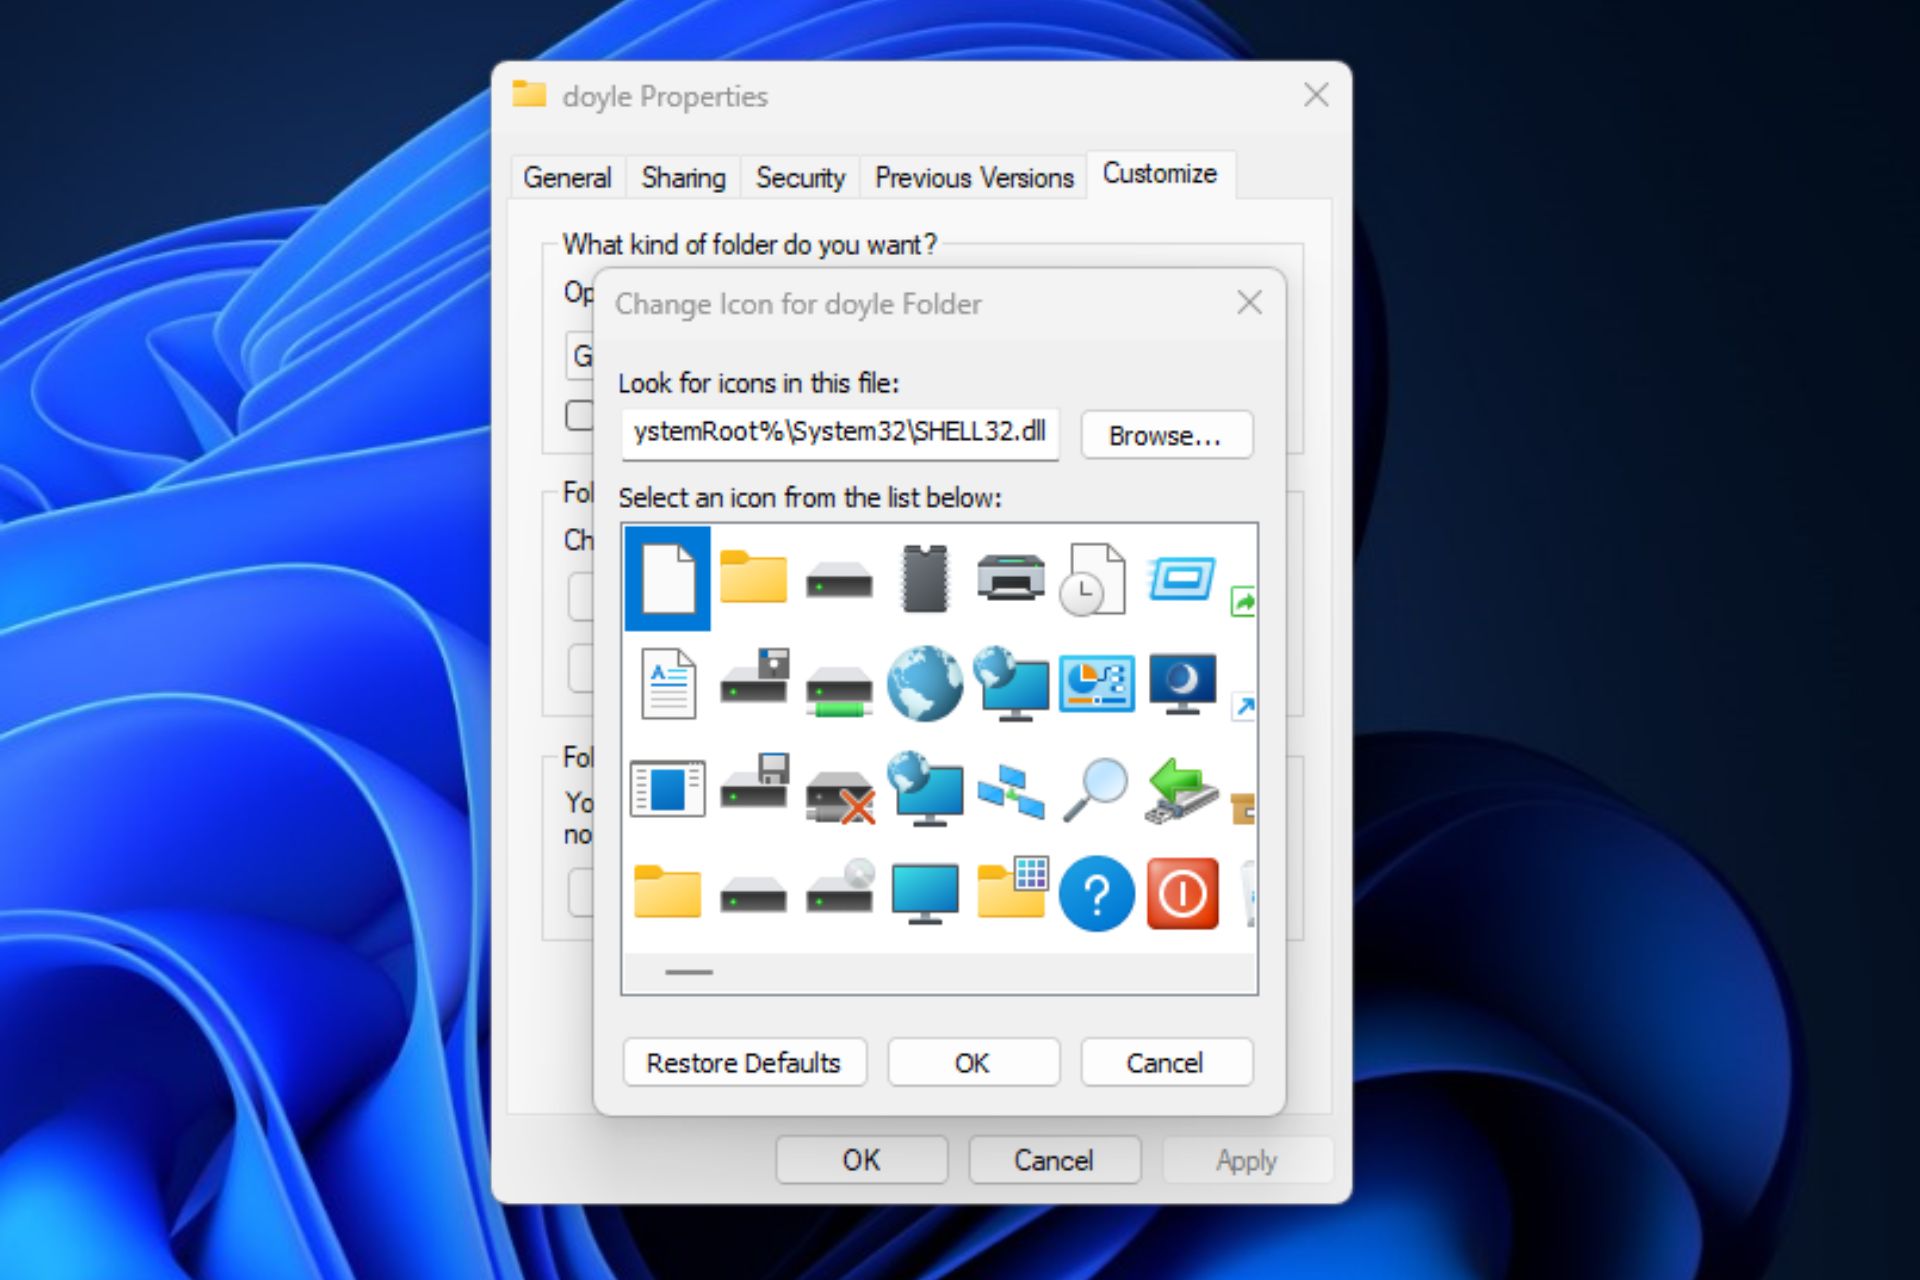
    3. Click the Customize tab and the Change Icon button on the Folder icons window.
    4. Select an icon from the list and click OK to save the changes.

    There are times when you encounter issues with the File Explorer. Try out the solutions in this guide to fix File Explorer crashes on Windows 11.

    2. Change a desktop icon

    1. Right-click on any space on the desktop and click on Personalize from the drop-down.
    2. Click on the Themes option from the right side of the screen.
    3. Scroll down to the Related settings tab and click on Desktop icon settings to open its window.
    4. Click on the Desktop icon you want to change and click on the Change Icon button.
    5. Scroll to the right to view all icons on the list provided by Windows, or click the Browse button to select an icon from Files.
    6. Click on your desired icon from the list, then click on the OK button to confirm the process.
    7. Click on Apply to save the changes, then click on the OK button to exit the Desktop icon Settings window.

    The desktop icon should change. Changing a Desktop icon like Recycle Bin, Control Panel, Network, and User’s Files, allows users to personalize their Desktop.

    Also, you can further customize your desktop icons bringing back old desktop icons on Windows 11.

    3. Change the icon of a file’s shortcut

    1. Right-click on the shortcut you want to personalize and click on Properties from the drop-down.
    2. Click on the Shortcut tab under Pictures Properties and the Change Icon button.
    3. Scroll to the right to view all icons on the list provided by Windows, or click the Browse button to select an icon from Files.
    4. Click on your desired icon from the list, then click on the OK button to confirm the selection.
    5. Click on Apply to save the changes, then click on the OK button to exit the Shortcut properties window.

    These steps allow you to change the shortcut icon for your apps, folders, etc., to suit your preferences.

    If there is any issue with the steps above, you may refer to our article on how to change icons on Windows 11.

    Read how to download Windows 10 icon packs if you have problems getting newer packs.

    In conclusion, we have a detailed guide on how to fix Windows 10 icons not working on your PC. Likewise, read how to extract multiple zip files on your PC.

    How to Download All Windows 7 Updates: Offline Install

    You can download Windows 7 updates only through offline install options. However, the chances are that you can encounter Windows 7 update error codes during the process.

    If you have Windows 7 Service Pack 1 installed on your PC, you need to download and install each update. Thus, Microsoft has considered how time-consuming and expensive it can be to install each update independently.

    In short, Windows 7 updates are still available for download for users running the Windows 7 Service Pack 1 on their PCs.

    How do I download all Windows 7 updates offline?

    1. Install Windows 7 Service Pack 1

    1. Launch a browser on your PC and go to the Windows 7 Service Pack 1 download page on the Microsoft official website.
    2. Click the Download link that matches your version of Windows 7.
    3. Double-click the .exe file you downloaded and followed the instructions to install SP 1. Windows may restart a couple of times.

    Before downloading and installing all the Windows 7 updates, you must have Windows 7 Service Pack 1 installed on your PC. It’ll allow you to access the Windows 7 SP1 Convenience Rollup and download all updates.

    2. Check if you’re using a 32-bit or 64-bit version of Windows 7

    1. Left-click on the Start button, right-click on Computer from the menu, and select Properties from the drop-down.
    2. Go to the System type field and check if it indicates 32-bit or 64-bit Operating System.

    Checking the System type will help determine which Convenience Rollup to download.

    3. Download and install the April 2015 Servicing Stack Update

    1. Go to the April 2015 Servicing Stack Update download page and scroll down to Method 2: Microsoft Download Center.
    2. Click the first Download the package now link if you use a 32-bit version of Windows 7.
    3. Select the second Download the package now link if you use a 64-bit version of Windows 7.
    4. Click Download on the prompt.
    5. Double-click on the downloaded file and follow the onscreen prompts to install.

    Microsoft requires users to install the April 2015 Servicing Stack Update before downloading the Convenience Rollup.

    4. Download and install the Convenience Rollup

    1. Click the link for your System type to download the appropriate update: 64-bit version Download or 32-bit version Download.
    2. Go to the downloaded file, double-click on it to run it, and follow the installation wizard to install the Convenience Rollup.

    Please note that the update may take a while, so wait patiently. This option is the last approach to downloading all Windows 7 updates with the offline install.

    Conclusively, you can check how to upgrade from Windows 7 to Windows 10 on your PC without having any problems.

    Likewise, we have a detailed guide on how to keep your Windows 7 updated and download Service Pack 2.

    Do not hesitate to use the comments section if you have further questions or suggestions.

    How to Download And Use Leaf Browser For Unblocking All Sites

    Accessing blocked sites can be hectic sometimes if you don’t have the right tool or browser to unblock them. Thus, users sort out unblocked browsers for open blocked websites and games for help. However, the Leaf browser is one of the best-unblocked browsers for unblocking sites with restricted access.

    What is a Leaf browser clone, and why do I need it?

    Clones are experimental browsers designed to run on another browser as an extension or plugin. They are not independently available as a sole browser. However, the Leaf browser clone is an unblocked browser that you can add to your Chrome extension to access blocked sites.

    Furthermore, many features make the Leaf browser a choice to consider. Some are:

    • Secure internet access – Leaf browser clone is a secure browser that allows users to surf the internet unnoticed. Also, users can access sites through secure networks that prevent any risk of data loss online while preventing online tracking when you browse.
    • Online anonymity and privacy – Users can browse through the internet with the Leaf browser while hiding their IP addresses and masking their online presence. It gives you access to websites with geographical restrictions.
    • Unblock restricted websites– Surfing the internet with Leaf browser helps break through site restrictions preventing you from accessing content on the site. So, it is a browser to open blocked websites inaccessible with a standard browser.
    • Fast internet access – Leaf browser offers a quick and efficient internet experience. It allows users to surf the internet swiftly while unblocking blocked sites.
    • Multiple tabs – Users can access numerous sites concurrently on the Leaf browser clone without experiencing any problems or lag.

    There are many other features that users get to enjoy from adding the Leaf browser clone to their Chrome browser.

    How do I download and use the Leaf browser for sites unblocking?

    Users can download and add the Leaf browser to Chrome as an extension to unblock websites. First, however, we recommend you follow the preliminary steps below to prepare your device for the process:

    • Connect to a stable and fast network connection.
    • Turn off background apps running on your PC.
    • Make sure your Operating System and your Chrome browser are updated.
    • Temporarily disable antivirus software on your PC.

    After going through the steps listed above, proceed with the instructions below to download the Leaf browser.

    1. Download as an extension

    1. Double-click on the Chrome browser icon.
    2. Go to the Chrome Webstore, type Leaf browser into the search space, and select the first search result.
    3. Click the Add to Chrome button.
    4. Click the Add extension button on the new prompt to confirm the action, then exit the Chrome web store page.
    5. Click the Extension center button in the top-right corner of the screen, select Manage Extensions, then click on the Leaf browser from installed extensions.
    6. Input the URL and search.

    Clicking the Leaf browser extension will automatically enable and allow you to unblock blocked sites.

    Also, you can stop the browser by clicking on the Leaf browser extension icon in the Extension Center.

    2. Download the app

    1. Go to the Playstore, search for the Leaf browser, and click Install.
    2. Select Open after the installation is complete.
    3. Input the URL and search.

    Alternatively, we have a detailed guide on accessing blocked websites on your Mac’s Safari browser.

    If you have further questions and suggestions, kindly drop them in the comments below.

    Opera for Chromebook: How to Download & Install It

    Opera is the first alternative browser fully optimized for Chromebooks. It offers users another choice other than Google Chrome.

    The browser introduced its unique features previously unavailable for Chromebooks, such as the free VPN, ad blocker, and themes.

    Opera for Chromebook is very similar to the standard Opera browser with some tweaks to make it refined for Chrome OS. The Chromebook version of the browser is closer to the Opera browser offered for Android devices.

    Keep reading for a closer look at Opera’s best features and discover why it’s the perfect alternative browser for Chromebooks.

    If you don’t prefer Opera, maybe consider one of these portable browsers for Chromebook.

    Can you get Opera on a Chromebook?

    Even though Chromebook runs mostly web apps from Google, you can also install Opera on it. As you may know, many Chromebooks can run Android apps.

    As a result, you can install Android apps on Chromebook, including Opera. The process is more straightforward than you think, and in today’s guide, we’ll show you how to do it.

    Our readers also asked about Opera for Acer Chromebook. The installation process is the same for any Chromebook, whether it is manufactured by Acer or any other brand.

    Opera

    Surf the web safely with this flexible browser and have enhanced navigation on your Chromebook device.

    How to install Opera on Chromebook?

    Use Google Play

    1. Go to Opera’s homepage.
    2. Under Browsers, select Opera for Chromebook. Under browsers, select Opera for Chromebook.
    3. Click Get it on Google Play. Get Opera on Google Play.
    4. Install Opera Browser. Install Opera on Google Play.

    You are now ready to explore all the great features Opera for Chromebook offers. If you’re interested in downloading Opera for Windows 11, we have a guide on that as well.

    Should I use Opera over Chrome?

    Opera has a wider range of features which makes it a better browser than Chrome. Here are the main ones:

    ➡ Productivity

    Opera for Chromebook has all the unique features of Opera that users know and love, such as the integrated messaging system. Users have access to WhatsApp, Telegram, and Facebook Messenger run from the sidebar.

    Opera Flow on Chromebook.

    With Flow, users can switch between devices with the ability to instantly share files, videos, links, and more across all platforms. This feature is perfect for users on the go who often switch between their smartphone and PC when browsing.

    Reading mode is incorporated into Opera for Chromebook, allowing users to zoom in easily and present a reader-friendly experience. Users can also adjust the background color to make it easier to read at night or in the dark.

    ➡ Interface

    Chromebooks are known for their user-friendly and sleek interfaces, and Opera is the perfect browser to go along with it. The browser allows room for customization without going overboard. For example, users can adjust between light and dark mode and choose from various colors to personalize their theme.

    Opera on Chromebook has a handy sidebar feature so users can easily access features. This allows users can add or remove features to the sidebar for a fully personalized web browser.

    opera Browser for Chromebook interface.

    ➡ Speed and security

    Like the mobile app for Android, Opera for Chromebook has a data-saving mode that compresses data to speed up web surfing. This feature is perfect for those using Chromebooks who don’t want their browser to consume PC resources.

    The adblocker prevents ads and cookies from weighing down web pages and speeds up browsing. Moreover, this feature also helps block annoying cookie dialogs from popping up on most websites.

    Opera VPN is free and protects user data on public networks. Users can browse with peace of mind using the unlimited VPN.

    Private mode allows users to surf the web and leave no trace on their devices. In addition, history and data are not stored when browsing in private mode.

    Opera Chrome OS VPN.

    This browser is the perfect alternative browser for Chrome OS because it’s lightweight and easy to use. If you’re someone looking for a browser option that’s not Google Chrome for your Chromebook, then Opera is the perfect fit.

    Opera Browser

    Try Opera’s fully optimized browser for Chromebook.

    How do I make Opera my default browser on my Chromebook?

    1. Open Opera. 
    2. Click the Menu button in the top-left corner (the Opera icon) and select Settings. 
    3. Scroll down to Default browser, and click Make default.

    How do I download Opera for my Chromebook for school?

    This, unfortunately, isn’t possible by default, depending on your school policy. Your administrator manages which applications can be installed on school devices; only he can manage apps.

    To install Opera, you need to contact the administrator and wait for him to approve Opera.

    As you can see, installing Opera on Chromebook is pretty simple, as long as you have the necessary privileges.

    If you haven’t tried Chromebooks yet, check our affordable Chromebook models article for more information.

    We hope you enjoyed this look at Opera Browser for Chromebook. Let us know in the comments below what you think of Opera.

    How to Enable or Disable Aero in Windows 11

    Windows is a highly customizable Operating System with many appearance features that give your PC a unique appearance. The Aero theme is one of the features users can use. Hence, we’ll take you through how to enable Aero on Windows 11. Also, users can download Windows themes from here.

    What is the Windows Aero theme?

    Windows Aero (Authentic, Energetic, Reflective, and Open) is a GUI (Graphic User Interface) introduced for Windows Vista and found in Windows 7. It helps users enhance graphical effects on their PCs.

    However, the Windows Aero theme is a component of Windows Aero that uses numerous Windows animations and transparency effects on your PC. It creates transparent decoration effects and also changes your desktop’s background color, transparency, brightness, and screensaver.

    Why is Windows Aero not working?

    A couple of factors can cause Windows Aero not to work on your PC. Some are:

    • Your version of Windows doesn’t support the Aero feature – Windows Aero won’t work on your computer if the version running in it doesn’t. So, users need to confirm if their Windows can work with the Aero feature.
    • Desktop Windows Manager is disabled – The DWM is a component that helps create a graphical user interface (GUI) on Windows and enables the operating system to use visual effects. So, Windows Aero can stop working due to Desktop Windows Manager issues on your PC.
    • Transparency is disabled – Windows Aero may not work if the transparency effects are disabled on your PC. Transparency is an essential feature needed to use Aero because it uses it for transparency effects. Thus, Windows Aero won’t work if it can access the transparency effects option.
    • Issues with Windows Aero cache – Users can experience problems using Windows Aero if its cache file is corrupt. It’ll affect its performance and may prevent it from working.

    How do I enable or disable Aero in Windows 11?

    1. Enable/Disable Aero lite

    1. Press the Windows + E to open FIle Explorer and navigate the following path: C:\Windows\Resources\Themes
    2. Copy and paste the Aero theme file to a new location.
    3. Right-click the file, select Rename and change the file from aero.theme to aerolite.theme.
    4. Right-click the file, click Open with, and select Notepad.
    5. Replace the following lines: ; Windows - IDS_THEME_DISPLAYNAME_AERO_LIGHT, DisplayName=@%SystemRoot%\System32\themeui.dll,-2060 with DisplayName=Aero Lite
    6. Replace this line: Path=%ResourceDir%\Themes\Aero\Aero.msstyles with Path=%ResourceDir%\Themes\Aero\Aerolite.msstyles
    7. Click File and Save.
    8. Double-click the Aerolite.theme file to enable the theme.

    To disable the Aero lite theme, follow these steps:

    1. First, press Windows + I to open Settings.
    2. Select Personalization and choose Themes.
    3. Locate the Aero lite theme, right-click and delete it.

    Check our article on what to do if themes keep changing on Windows 11.

    2. Enable/disable Aero Peek via System Properties

    1. Press the Windows + R keys to open the Run dialog, type sysdm.cpl, and hit Enter.
    2. On the System Properties dialog box, select the Advanced tab. Next, click the Settings button under the Performance section.
    3. Select the Visual Effects tab, and look for the option Enable Peek.
    4. Click Apply and then OK.
    5. Restart the PC.

    3. Disable/enable Aero Shake

    1. Press the Windows + I keys to open Settings.
    2. Select System and click Multitasking.
    3. Toggle on or off the Title bar Windows shake.

    The Aero shake is another feature that declutters the desktop by grabbing and shaking a window to minimize all other windows in the background.

    However, the causes may vary in numerous Windows computers and are not limited to a specific Windows version.

    Nevertheless, you may experience numerous problems with Windows themes and graphics customization. Hence, we recommend you read how to fix themes not syncing on Windows 11.

    Also, check how to install third-party themes on Windows 10/11 and how to fix the Windows can’t find files in the theme error on your computer.

    If you have further questions or suggestions, kindly drop them in the comments below.

    Top 4 Adblock Browsers for PC: Get the Best Browser Without Ads

    Having an adblocker these days is crucial to having a good experience online. The number of ads that some websites use can become annoying, affecting even the most patient users.

    Some adblockers are better than others, though, and some browsers are more efficient at using them.

    This article will explore some of the best AdBlock browsers for Windows with powerful and merciless adblockers.

    Is there a browser that blocks all ads?

    Without any extra extensions, your browser will probably block 99% of the ads. Opera One is one of the few browsers that have a built-in adblocker and that can still perform wonderfully.

    Here are all the browsers that can block ads:

    • Opera One – Best browser with a built-in ad blocker
    • UR Browser – 3 privacy levels and built-in ad blocker
    • Epic Browser – Great ad-blocking features
    • Avast Secure Browser – Stable browser with ad block but slow speed

    Does Windows 10/11 have a built-in ad blocker?

    If you were wondering about built-in ad blockers, you should know that neither Windows 10 nor Windows 11 have one. But you can circumvent that issue by installing a browser with a VPN already ready to be used.

    Alternatively, you could invest in a wonderful stand-alone VPN service that will protect your device no matter your OS.

    Below you can see some of the best browsers that can help you to avoid annoying ads.

    What browser has built-in AdBlock?

    Opera One – Best browser with a built-in ad blocker

    Opera One has a dedicated built-in ad blocker that detects and blocks ad scripts when you request a webpage. As a result, web pages load faster, and users no longer need to install third-party addons.

    According to tests, content-rich pages load up to 90% faster when the adblocker is enabled. As you can see, these numbers are pretty impressive. This means that you can use Opera One even on an old PC.

    Opera One’s robust and reliable adblocker can also block malicious ads enhancing browser security.

    If you want to support your favorite websites, you can add them to your list of exceptions, and the browser will allow them to load ads.

    Another critical aspect of Opera One is that you can customize it almost endlessly, with themes, modes, sidebar display, and keyboard combo.

    To round this browser off even better, Turbo Mode will ensure that the best possible speeds are attained, depending on the task. Choosing an AdBlock browser for PC has never been easier.

    Moreover, Opera One is now rebranded with an interesting-chromatic interface and built-in AI assistant called Aria to help users with all kinds of information.

    Additional features:

    • Integrated adblocker to eliminate distractions, optimize web pages loading times and streamline your browsing experience
    • Integrated VPN tool to anonymize your browsing and unblock geo-restricted content
    • Integrated snapshot tool to capture your screen effortlessly
    • Customizable workflow and workspaces with instant messaging and social media apps like Twitter, Facebook, or Instagram to chat, explore and stay in touch with the latest news without leaving your browser’s windows

    Opera One

    Get 0 interruptions with Opera’s powerful built-in adblocker!

    AVG Secure Browser – Integrated adblocker

    If this browser rings a bell, it is due to its adware security and malware protection. The UI is quite simple and also focuses on privacy ad security.

    AVG browser can give you seamless integration with the antivirus and you can pair the two tools together for maximum security.

    Among its many features is the built-in adblocker. This means you will enjoy distraction-free surfing on any websites out there.

    You can also use the browser Bank Mode if you’re shopping online or making transactions, thus securing the financial data with high-end defense.

    Even more, there is fingerprinting security that stops unsafe sites to collect personal information about you depending on your queries.

    In addition, the browser forces every supported website to use HTTPS encryption and has privacy cleaning tools to remove browsing data instantly.

    Additional features:

    • AVG VPN integration
    • Webcam safeguarding
    • Stealth mode for blocking cookies
    • 4x faster and no slow times

    AVG Secure Browser

    Forget about ads from now on, this browser blocks every annoying ad for smooth navigation.

    UR Browser – 3 privacy levels and built-in ad blocker

    UR Browser is one of the best browsers available on the market.

    This software option stands out from the crowd because of its incredibly versatile user interface, fast loading speeds, and access to a wide range of customization tools, including add-ons and extensions.

    You can find a great range of specific and powerful adblockers to use with UR Browser, and once you install them, the annoying pop-ups and ads will be gone completely.

    This software option is one of the best ad-free browsers for Windows 10 and 11.

    One of the most important factors when judging browsers on their usability level is the speed for loading webpages, how well they perform streaming, and how fast they can download files.

    Additional features:

    • Extremely fast at loading webpages no matter their complexity
    • Performs downloads up to 4 times faster than other browsers
    • Streams online video perfectly without any lag
    • Offers compelling encryption services

    UR Browser

    Enjoy fast, private, and ad-free browsing with a top-range browsing solution!

    Epic Browser – Great ad-blocking features

    This browser is as private as private can be. It makes a list for its top-notch ad blocking features, but in reality, it does much more.

    The Epic browser uses Chromium to power its incredible performance and rendering and blocks fingerprinting, trackers, ultrasound signaling, crypto mining, and more.

    With a focus on privacy and security, it is not surprising that it comes equipped with a VPN. You would be able to pick from browsers in 8 countries.

    You can access blocked sites like Pandora regardless of your location. Also, your privacy is guaranteed because the browser uses top-of-the-class encryption tech to encrypt your information.

    Additional features:

    • No DNS Cache
    • Installation-ID removed
    • No navigation error suggestions
    • Extension states deletion on close

    ⇒ Get Epic Browser

    Do any browsers have a built-in VPN & also an ad blocker?

    Yes, some great browser options include a VPN service and an ad blocker, and the most useful is at the top of our list in this guide: Opera One.

    Opera One not only provides you with these two elements but also integrates a quick access toolbar for social media and messenger while also ensuring that no pop-ups bother you.

    Another alternative is UR Browser, which, even though it can not be compared directly to the number of built-in features of Opera One, still provides some excellent capabilities and is worth a try.

    In this article, we found out why Opera One and UR Browser are the best options if you want a stable, fast, secure, and dependable browser.

    These two browsers give you the speed of Chrome and Firefox combined, with a lower system impact than in both options. For a cross-platform adblocker, try Total Adblock.

    Please let us know your opinion about these browsers with adblocking capabilities using the comment section below.

    A Web Page is Slowing Down Firefox: Fixed

    Firefox is a great browser, but many users reported getting the message: A web page is slowing down your browser.

    This message will slow down your browser or make it unresponsive, thus affecting the whole browsing experience, which makes it imperative to resolve or eliminate the underlying cause at the earliest.

    In today’s article, we’ll show you the best ways to solve the problem, so keep reading.

    Quick Tip:

    If you keep getting A web page is slowing down your browser message, maybe you should consider switching to Opera One. This web browser is light on your resources, and it can handle multiple tabs.

    Speaking of tabs, Opera One has the ability to organize your tabs in workspaces and tab islands. Also the browser comes with a native AI and a modular AI-ready design.

    Opera One

    Browse the web faster with no delays thanks to different settings you can apply.
    Free Download Visit website

    Why is the web slowing down?

    There are several reasons why a web page is slowing down your Firefox browser. In most cases, it is the corrupt or excessive cache files causing the issue. Or, the webpage might not be optimized well and lead to A web page is slowing down your browser.

    Oftentimes, the webpage might have certain large files or excessive ads, loading which will take time, and it would appear as if the browser is slowing down. Besides, the installed conflicting extensions might also be the culprit.

    What is slowing down my Firefox browser?

    The easiest way to tell what’s slowing down Firefox is to look through the Task Manager and identify the processes consuming the maximum resources.

    Some of these would be tabs, while others are the extensions installed on the browser. Once you have identified the resource-consuming processes, terminate them, and things should start working fine on Firefox and other browsers.

    How can I fix A web page is slowing down your browser error on Firefox?

    1. Make sure that tracking protection is enabled

    1. 1. Launch Firefox.

    2. 2. Click the Menu button.

    3. 3. Choose Settings from the list.

      settings
    4. 4. Go to Privacy & Security in the left pane.

      Privacy & Security to fix
    5. 5. In the right pane, select Strict.

    6. A few users reported that the problem was caused because tracking scripts were slowing down certain pages, but after switching to the Strict mode, the A web page is slowing down your browser problem was resolved.

    2. Change the hidden Firefox settings

    1. Paste the following path in Firefox’s address bar and hit Enter:about:config
    2. Click on Accept the Risk and Continue.accept the risk and continue
    3. Search for dom.ipc.processHangMonitor, click on the toggle next to it to set the configuration to False.false to fix web page slowing down browser

    Once done, check if the web page slowing down issue in your browser is fixed. If it persists, head to the final solution.

    3. Refresh Firefox

    1. Click the hamburger icon button, and select Help.Helps
    2. Next, click on Troubleshoot Mode.Troubleshoot mode
    3. Click on Refresh Firefox in the prompt.refresh firefox
    4. Again, click on Refresh Firefox to confirm.refresh firefox to fix web page slowing down browser

    Once done, the web page slowing down the problem in the browser would be fixed.

    Why is the Firefox browser so slow?

    Firefox is generally slow when you have an unstable Internet connection or the ISP is unable to deliver the promised speed. Though Firefox is much better, you are less likely to come across A web page is slowing down your browser problem here than in Chrome.

    Also, if the browser hasn’t been updated in a while and you are using an outdated version, performance issues are bound to come up after a while. Besides, having too many extensions or even a few problematic extensions could cause the browser to slow down.

    A web page is slowing down your browser message can appear for various reasons, but we hope that you solved that issue using one of our solutions.

    Also, find out how to fix things when Firefox is running slow in Windows.

    If you have any other queries or know of a method that’s not listed here, drop a comment below.

    What’s the Best Browsers for Extened Battery Life in Windows 11?

    We tested the most battery-friendly browsers and will share the results, explaining what affects battery usage.

    Before we dive in, remember that, while the numbers are important, it’s not just about the math. Consider the features each browser offers.

    Sometimes, a bit more battery use is worth the extra tools and extensions.

    Which browser uses the least battery? Test Results

    ▶ TLDR: our general conclusion is:

    • Opera One: Best all-around choice with great speed and performance without compromising on features.
    • Microsoft Edge: Ideal for situations where every minute counts, but with fewer features.

    Now, let’s check out the test.

    • Test Type: Battery consumption with multiple browser tabs
    • Device Used: ASUS TUF Gaming F17 laptop
    • Screen Brightness: 200 nits
    • Testing Process: Varied web workloads, repeated until battery depletion
    • Measurement: Minutes of operation (higher is better)
    BrowserTest score in minutes
    Microsoft Edge529
    Opera One521
    UR Browser496
    Brave Browser485
    Firefox471
    Chrome452

    As you can see from the table presented above, at the top of the list, we have Microsoft Edge with a score of 529, followed closely by Opera One, which scored 521.

    Since the difference between the first 2 is quite small (8 minutes) and even the gap between Edge and Chrome isn’t huge, we suggest you consider the following factors when you decide which one to use:

    • Edge is objectively faster, but has far fewer features than Opera One
    • UR Browser is not that far away from Opera One either. What might slow it down are its more rigorous (and adjustable) security and privacy features
    • Close behind we have Brave Browser, which focuses on speed and privacy with aggressive ad-blocking and Tor integration
    • Firefox is quite down the line but it’s still a great choice if you want privacy
    • Chrome was the least performant, losing 77 minutes to Edge, but it has a lot more features than Edge and much more room for integrating productivity and work tools

    Now, let’s discuss the features and benefits each of these browsers includes.

    1. Opera One – The most battery-efficient browser

    Opera One browser is known for its integrated ad-blocking feature and VPN. That adds to its speed and performance while still being secure and private.

    Whether it’s streaming games or video, the browser can keep you going for a really long time.

    It enforces security by protecting it from fraudulent sites, malware, and phishing attacks. The built-in ad blocker limits the ads which, in turn, leads to a really fast browsing experience.

    Opera One CTA

    Opera

    Enjoy built-in ad-blocking, VPN, and privacy features without draining your device’s resources.
    Check price Visit website

    2. UR Browser – Optimized for privacy and low impact on resources

    UR browser is among the safest and most secure browsers out there. Itcomes with a simple user interface that is easily customizable as well.

    You’ll get used to the UR browser easily given that it’s based on Chromium.

    It also comes with a media center to help organize all the stuff that you have downloaded. What’s more, UR Browser also comes with built-in games .

    UR Browser

    UR Browser

    Open as many tabs as you like in this browser. It won’t slow down your device, nor will it eat up much battery life.
    Download free Visit website

    3. Microsoft Edge – Fastest browser with a low amount of features

    Even though it is not the most energy-efficient browser, Edge is better than its predecessor.

    It is safe and secure too, having enough protection and privacy features onboard for you to carry on sensitive tasks.

    It can ward off phishing or malware attacks and has the least likelihood of being hacked.

    Edge is also constantly being upgraded to offer its users a smart experience. Developers too will find it easy to test their websites and online apps, besides allowing for a consistent experience across the board.

    ⇒ Get Microsoft Edge

    4. Brave Browser – Stable browser that doesn’t affect your CPU that much

    Brave is a free web browser with ad-blocking being its biggest USP, something that naturally translates to better browsing speeds.

    No wonder the company claims to have up to 8-times the speed advantage over contemporary browsers such as Chrome. That said, the browser is also known to provide an extended battery experience as well.

    Another key feature of Brave is the secured environment it provides for you to carry on with your browsing. Apart from ads, Brave also blocks the tens of trackers that are often present on even the most popular of sites.

    ⇒ Get Brave Browser

    5. Mozilla Firefox – Expanded customization with a large number of addons

    Firefox, developed by Mozilla Foundation and Mozilla Corp., is among the most popular browsers today.

    The browser also supports a host of plugins that further adds to the browser’s appeal.

    It also offers several themes that allow you to personalize your browsing experience, while the thousands of extensions it supports only adds to the browser’s appeal.

    ⇒ Get Mozilla Firefox

    What is the best browser for battery life on Windows 11?

    The best browser that can extend your Windows 11 device’s battery life is Microsoft Edge, which was capable of running our benchmark tests for 529 minutes. Close behind, we have Opera One with 521 minutes of operating time for the same test.

    Even though Edge scored better running times than its competitor, when considering all aspects of what the browsers offer, we suggest you use Opera One for better results. In addition, the built-in VPN and adblocker ensure your online security is respected at all times.

    What is the best browser for battery life on Mac?

    Our testers have concluded that the best browser to use on Mac regarding battery life is Opera One, followed close behind by Safari.

    Their recommendation is based on the amount of incredibly-useful features that it has, making the Mac experience more immersive and readily customized.

    If you don’t want to optimize your online experience, Safari is still an excellent native browser for Mac devices.

    What is the best browser for battery life on Android?

    To answer this question, we must first clarify what you will use your phone for, as this significantly influences the result.

    To understand what parameters need to be considered when figuring out how will you predominantly use your Android device, please read on:

    Browser typeSuggestionsFunctions and featuresUtility
    Normal– Opera One

    – Brave
    A more significant number of featuresPro: Usage versatility is considerably extended

    Con: Larger impact on system resources
    Lightweight – Opera MiniFewer functions and featuresPro: Faster processing speed and lower resource impact

    Con: Functionality is reduced but still great
    General browser categories

    Looking at the table above, try and figure out what needs you want to cover with your choice of browser.

    If you are interested in versatility, customization, and a variety of useful features, then going for a so-called normal browser is the best option.

    If you are only interested in speed and longer battery life, then going for a lightweight browser will ensure that will happen.

    For more detailed information regarding this topic, don’t hesitate to explore some of the best browsers with low-system resource consumption.

    Does Firefox use less battery than Chrome?

    To answer this question with confidence, our team of testers has taken both of these browsers through rigorous benchmark tests and will present the results to you.

    Their tests were performed in the same exact OS conditions, on a separate system, with a fresh installation of the respective browser being used.

    Each browser was tested with 10 identical tabs open, and here are the results:

    BrowsersCPURAM
    Chrome5 – 13 %1783MB
    Firefox3.1 – 4%847MB

    As you can see, Firefox uses 3.1 to 4% of the CPU, and 847MB of RAM, thus clearly taking the lead when it comes to resource consumption.

    Chrome uses 5 to 13% of the CPU in the test and a whopping 1783MB of RAM, making it too resource-intensive if your goal is to save battery.

    So, if you’ve been looking for the most power-efficient browser, give it a shot with one of these.

    What is the best browser for battery life on iOS?

    Regarding iOS devices, the best browser for battery life is Safari. This native browser ensures your device can browse the internet efficiently and doesn’t affect your battery levels.

    As an alternative to that, you could also try downloading Dolphin Browser. Even though some users have complained about stability issues, some are very happy with their choice.

    This makes for a list of browsers that are among the most energy-efficient. We hope that you’ve found the best one for your needs.

    If your device is discharging fast, here’s how to fix Windows 11 battery drain issues and get your device to run better.

    What’s your weapon of choice for browsing? Tell us in the comments section below.

    Oil Painting Software for PC: 3 Best Expert-Tested Apps

    It can definitely take time to find the most suited and advantageous oil painting software that will allow you to create fantastic works of art.

    If you are looking for ways to take your art to the next level while maintaining the natural and classic touch of oil painting, we have some oil painting software recommendations for you that are worth giving a try.

    In this article, we’ve put together a list of the best oil painting apps that you can use on your Windows 10 or Mac PC, so make sure to keep on reading.

    What is the best oil painting software for PC?

    Adobe Fresco – Stylus and touch devices

    try out Adobe Fresco

    Adobe Fresco offers a larger collection of vectors and brushes that help you deliver a natural painting. Moreover, the drawing experience offered by this software is close to the classic way of drawing with oil.

    If you are a beginner or a professional, Adobe Fresco comes with such tools that will help you discover, or why not, rediscover the joy of painting.

    Thanks to the world’s largest selection of brushes available through Adobe Fresco you can work with watercolors and oil in order to create fantastic works of art.

    You can isolate parts of a layer and turn selections into masks, which will enhance your productivity visibly.

    Adobe Fresco

    Adobe Fresco

    Start your work on any oil painting project with this reliable tool and create amazing works of art!
    Free trialVisit website

    Clip Studio Paint – Illustration and comics

    clip studio paint logo

    With an approach that will help you create unique oil paintings, Clip Studio Paint will definitely stand out from the rest.

    Thanks to the highly customizable degree of the app, you will be able to create the exact brushes and other tools you feel are necessary and in the manner that will best fit your painting needs.

    This app is one of the number one choices for many professionals thanks to the incorporated workflow, which will enhance your productivity and its elegant and intuitive interface.

    Clip Studio Paint

    Create unique oil paintings with a tool that has the exact features you need. Ready to give it a try?
    Free trial Visit website

    Corel Painter – Natural Media awards

    enjoy Corel Painter

    The appearance and feel of the classic way of the painting are perfectly emulated by Corel Painter.

    All the available brushes and canvas textures are designed to help you achieve the most natural alike oil painting image.

    With a modern, easy-to-navigate interface, you will not spend a lot of time learning your way around the app and creating a productive workflow.

    Moreover, Corel Painter is based on a powerful learning system that enhances your work and it’s also compatible with other Photoshop apps that you use daily.

    Corel Painter

    Corel Painter

    Create amazing oil paintings with this powerful and complex software. Try it out right away!
    Free trialVisit website

    With this last one, we will conclude our list of recommendations for the best oil painting software.

    We hope that all the information you gathered from this article will help you make an informed decision about which oil painting software is the best.

    We would love to know your choice for an oil painting app. Therefore, don’t hesitate to share it by using the comments section below.

    Fix: Windows Cannot Boot Into The Next Phase of Installation

    Some of our readers have complained about errors they encounter when installing or upgrading an existing version of Windows. The error message saying Windows could not prepare the computer to boot into the next installation phase is one of these errors.

    You can also experience the Installation failing on the Safe_os Phase on Windows 11.

    Why can’t Windows boot into the next installation phase?

    The main culprit for this error is BIOS not supporting the version of Windows you’re installing. It indicates that your hardware is not compatible with the version of the OS it’s trying to install.

    Furthermore, other factors that may prompt Windows not to boot into the next phase of installation are:

    • Corrupt system files or software – When you have a corrupt system file or software on your PC, it can affect the installation of Windows or upgrade an existing version of Windows.
    • Issues with BIOS settings – Windows installation on your PC can run into errors due to some file corruption in the BIOS. It causes problems with your computer and the new OS you’re installing on it.
    • Many unnecessary devices plugged in – Sometimes, having many nonessential devices connected to your PC can affect the installation or upgrading process. Likewise, if the BIOS version isn’t strong enough, it’ll act up if it’s overworked by these devices, resulting in Windows not being able to boot to the next installation phase.

    However, these causes may vary on numerous PCs but can be resolved by troubleshooting some settings on your computer.

    What can I do if Windows cannot boot into the next phase of installation?

    Before proceeding with any advanced troubleshooting steps for fixing the error, go through the preliminary check below:

    If you’re unable to fix the issues, proceed with the solutions below:

    1. Update your BIOS

    1. Go to the HP driver and software download website and identify your product by selecting from the list.
    2. Click on the Serial number box, input your serial number or exact computer model, and select Submit.
    3. Select your OS and your OS version.
    4. Click the plus All drivers, then click BIOS to expand it, see available updates, and click on Download.
    5. Double-click the downloaded file to install the .exe file, then follow the on-screen instructions to complete the installation.
    6. Restart your PC and select the Apply Update Now option to implement the installed BIOS update during the startup.

    Updating the BIOS improves its compatibility, making it compatible with new hardware versions. Also, it enhances its stability and prevents crashing.

    The updating process varies on different PCs, so we have a guide on how to check and update BIOS on various laptops.

    2. Delete partitions on your computer

    1. Left-click the Start button, search for Disk Management and launch the Create and format hard disk partition.
    2. Right-click the drive with the Partition you want to delete and click on the Delete Volume option from the drop-down.
    3. Click the Yes button to confirm that you want to delete the selected partition data.

    Deleting the partitions on your PC allows it to recreate and reformat. Likewise, it frees up memory space for installing a new OS. So, you can fix the Windows but cannot prepare the computer to boot into the next installation phase.

    Check what to do if you accidentally delete the recovery/boot partition on Windows 10/11.

    3. Create Installation Media properly

    1. Download and launch Windows 11 Media Creation Tool on this PC.
    2. Select Create installation media (USB flash drive, DVD, or ISO file) for another PC option and click Next.
    3. Select the language, architecture, and edition of Windows 10. It’s essential to choose the correct architecture, 64-bit or 32-bit, or you can select both.
    4. Select the USB flash drive option.
    5. Select the removable drive you want to use from the list.

    After the Windows 10 installation files have been downloaded, your computer will create a bootable USB that will be compatible with devices using UEFI or BIOS.

    Installing Windows via a bootable USB drive can fix the problem. If you encounter any issues creating the drive, read how to create a bootable USB drive for Windows 11

    Nevertheless, we have a detailed guide on how to fix issues with Windows installation on your PC.

    You can also read how to fix Windows 11 installation that has failed: error 0xc1900101 on your computer.

    This Stock is Not Supported on Robinhood

    Robinhood is a popular American financial services company. It operates as Robinhood Financial, trading commission-free stocks, ETFs, and options, and Robinhood Crypto, used to buy and sell cryptocurrency.

    The platform trades only US-listed stock; namely, they trade only what can be found in the American exchanges.

    According to Robinhood, they don’t support stocks that trade on foreign exchanges. That being said,  they do support certain American Depository Receipts (ADRs) and some stocks that trade on Canadian and Israeli exchanges.

    It is also worth noting that depending on your location, you may also be eligible to trade certain cryptocurrencies through Robinhood Crypto.

    Why do I get This stock is not supported on Robinhood message?

    On fri i bought 9 shares of vtl. Now today it doesnt show in my list of stocks i own. When i went to look at my buy sell list it shows there i bought it and i went to veiw it and it doesnt say its supported on robinhood.

    This is a common situation when trading stock – namely, users buy stock that becomes unavailable on the platform they are using.

    As mentioned before, Robinhood only trades US stock. However, if a certain stock is unavailable from the very beginning, the user should not see a Buy button.

    As it is, this particular user might have had the option to buy, but then the not supported message appeared after a few days.

    Also according to Robinhood, this might happen for a few reasons:

    • The exchange has paused trading.
    • The stock was delisted from the major exchanges and trades in the OTC market.
    • It’s a foreign security, which we don’t support.
    • The security is undergoing a corporate action (i.e. merger).

    What can I do if my stock is no longer supported?

    If a stock is delisted and no longer supported by Robinhood, users are able to sell it in the market, without being able to purchase additional shares.

    Also, since trading prices are no longer visible for that stock, users have to find references elsewhere.

    If you have problems with supported stocks on Robinhood, there’s no need to worry since it isn’t the only service of its kind on the market, with many more being available that can do the same thing as Robinhood, or more.

    For example, TradingView is also perfectly capable of free stock trading, it has a fast and easy account opening process, it is a great mobile trading platform that is also available as a web app.

    TradingView

    Stock trading can be done from the safety and comfort of your own home. Enjoy the benefits of TradingView!
    Free trial Visit website

    We hope our answer was helpful and that your portfolio was not affected to a high extent. Feel free to give us your feedback in the comments section below.

    Acronis Special Sale: UP TO 50%[Limited Time Offer]

    In a world where pretty much everything exists in a digital format, keeping all of your data safe is your biggest concern.

    It doesn’t matter if you want to keep it safe or want to have it available in multiple locations, keeping your data is of the utmost importance.

    That is why dedicated software programs such as ACRONIS Cyber Protect Home Office exist. This handy little tool will quickly restore your files or the entire system at any time.

    More so, if backing up data is something you need, then with this ACRONIS tool, you’ll be just two clicks to start a full disk image backup.

    Additionally, AI-based technology stops ransomware and cryptojacking, so you don’t have to worry about your information getting into the wrong hands.

    Read on to find out which Acronis Black Friday sale deals you can get this year.

    What are the best Acronis BlackFriday & CyberMonday deals in 2023?

    ACRONIS Cyber Protect Home Office Offer

    ACRONIS Cyber Protect Home Office is a product worthy of your attention. This is an innovative solution that natively integrates cybersecurity and data management to protect endpoints, systems, and data.

    Why it is innovative? Well, we are talking about full-image and file-level backup, along with automated URL filtering and patch management.

    As for the advanced AI-based behavioral detection engine, it makes a statement on its own when it comes to zero-day attack prevention.

    Acronis Cyber Protection Operation Centers use a unique technique to continually monitor the cybersecurity landscape and issue notifications on possible threats of any sort.

    You will receive real-time notifications on malware, vulnerabilities, natural disasters, and other worldwide events that may have an impact on data security, allowing you to avoid them.

    Using the data protection map, you can rest assured that vital data is safeguarded for compliance reporting. Get detailed information about stored data and utilize automated data classification to track the status of crucial files security. You will be notified whether or not your files have been backed up, allowing you to better secure your data.

    Acronis Cyber Protect Home Office

    From all current ACRONIS promotions, find the one that suits your needs right away!
    SAVE UP TO 50% OFF Visit website

    Acronis Cyber Protect Home Office for Business

    Eliminate the cost and complexity of administering several programs by combining dependable backup and powerful anti-malware in a single full-featured solution.

    It basically protects everything – photographs, data, apps, systems, and the devices they’re on – with an easy-to-use interface that can be accessed from anywhere.

    Furthermore, it stops any danger from disturbing your digital life, from disk failure to lost/stolen devices to the most recent cyberattacks — even never-before-seen ones.

    When you are on a tight budget, it’s time to take advantage of some great offers. Yes, you can purchase this data protection and file recovery tool for a great price tag. 

    These Acronis Cyber Protect Home Office deals are simply unbeatable.

    • ACRONIS Essentials – for flexible backups, active disk cloning, and ransomware protection
    • ACRONIS Advanced – for quick recovery, cloud backup and features, automatic replication of data in the cloud, Microsoft 365 backups
    • ACRONIS Premium – for blockchain certification of files, electronic signatures on files, ability to add up to 5TB of cloud storage

    Acronis Cyber Protect for Business

    Every organization needs comprehensive cyber security. Acronis’ vision and solutions are built upon balancing the Five Vectors of Cyber Protection, abbreviated SAPAS.
    Check price Visit website

    Overall, having a modern cyber security deal it’s the best decision to take nowadays, especially when dangers are just around the corner regarding online transactions and files transfer.

    Don’t hesitate to take advantage of 2023’s Acronis deals. Which one of these Acronis options meets your demands? Let us know your choice in the comments area below. 

    What is the Windows Security Button and How to Use it

    For tablets, the Windows Security button is a physical control located on the device. When pressed, it starts a secure attention sequence, the same as when you press Ctrl+Alt+Delete.

    For Windows desktops and laptops, this is a secure sign-in setting that needs to be activated. Here’s all you need to know about enabling it:

    How can I enable Windows Security on a PC?

    1. Tablet computers

    1. Tap on Start to get Settings, then Control Panel.
    2. Go to Mobile PC, followed by Tablet PC Settings.
    3. On the Tablet PC Settings page, tap on Buttons, then Button Settings For.
    4. Now look for the Screen orientation of your button.
    5. Go to the Tablet button list, tap Windows Security, then Change.
    6. From the Press options, choose Log On option to set the action for the button.
    7. Tap OK when prompted and close the settings windows. You can now press the button to get the login screen.

    2. Desktops & laptops

    2.1 Using Group Policy Editor

    1. Press Windows + R to get the Run console.
    2. Type gpedit.msc and then hit Enter to open Group Policy Editor.
    3. Navigate the following path: Local Computer Policy/Computer Configuration/Windows Settings/Security Settings/Local Policies/Security Options
    4. On the right side pane, look for Interactive logon: Do not require CTRL + ALT+ DEL.
    5. Double-click it, and you will get the Enabled and Disabled options on the next screen. Windows security button
    6. Put a checkmark on the radio button beside the Disabled option to enable a secure login.

    2.2 Using User Accounts settings

    1. Press Windows + R to get the Run console.
    2. Type netplwiz and hit Enter.Windows security button
    3. On the User Accounts page, click on the Advanced tab.Windows Security button enable
    4. Under Secure sign-in, put a checkmark beside Require users to press Ctrl+Alt+Delete.

    How do I use the Windows Security button to log in?

    1. Press the Security button if available, or press the Ctrl + Alt + Delete option to bring up the login screen.
    2. Enter your credentials to log in to your computer.

    So, this is how you can use the security button on Windows to secure your device and also for easy and fast login.

    To make your PC even more secure, you can create a USB security key. If you already have one and you’re not pleased with it, you can easily disable the insert your security key into the USB port message.

    Are you stuck somewhere while following the process? Please mention your queries in the comments section, and we will try to help you with that. 

    Programs Closing by Themselves on Windows 11 [Fix]

    The programs closing by themselves issue is another one on the long list of problems on Windows 11. This issue can be incredibly frustrating as it prevents users from using most third-party apps.

    The causes of the problem vary, with different variations reported by users. To make things easy, we have gathered encompassing and surefire solutions that can quickly get rid of the apps closing immediately after opening issue on Windows 11 in this guide.

    Why does Windows 11 keep closing programs?

    There are different reasons for the programs closing by themselves issue on Windows 11. It can be down to a system fault or some problems with third-party apps.

    Below are some of the prevalent causes:

    • Problems with third-party apps: If Windows 11 keeps your programs, it could be because an app is running a counter-program. You can fix this by enabling Safe Mode and try using the app that keeps closing again. If you are able to pinpoint the faulty app, you can now remove it using one of the best uninstaller software.
    • Faulty system files: System files are important in the smooth running of programs and apps on your PC. Thus, if they are faulty or corrupt, you can encounter this issue. Your one-way ticket out of this is to repair and restore these corrupt system files.
    • Presence of malware: A virus can continue closing your programs automatically. This is because they are built to disturb your activities and cause problems on your PC. You need to quickly perform a deep virus scan either with Windows Defender or one of the best antivirus software.

    How do I stop apps from automatically closing on Windows 11?

    1. Run the Windows Apps troubleshooter

    1. Press the Windows key + I and select System in the left pane.
    2. Choose the Troubleshoot option.
      troubleshoot
    3. Now, select Other troubleshooters.
      other trouble
    4. Finally, click the Run button before the Windows Store Apps option.
      run programs closing by themselves windows 11

    At times the reason your programs keep closing by themselves on Windows 11 issues with apps from the Microsoft Store. To correct this, you must run the Windows Store Apps troubleshooter and apply the recommended fixes.

    2. Repair system files

    1. Press the Windows key, type cmd, and select Run as administrator under Command Prompt.
      cmd
    2. Type the command below and press Enter: sfc/scannowsfc scan
    3. Wait for the command to finish running, then copy and paste the commands below and press Enter after each: DISM.exe /Online /Cleanup-image /Scanhealthscan health programs closing by themselves windows 11 DISM.exe /Online /Cleanup-image /Restorehealthdism restore
    4. Wait for the commands to finish running and restart your PC.

    SFC and DISM scans are built-in tools that can fix corrupt or broken system files that might cause your programs to close on Windows 11. Sometimes, the SFC scan alone should do. However, you can still run the DISM scan to be sure.

    Alternatively, you can use a professional system file fixer to scan and repair these files that do not require you to type any command.

    3. Scan for malware

    1. Press the Windows key, type virus, and select Virus & threat protection.
      virus and threat
    2. Click Scan options.
      scan options programs closing by themselves windows 11
    3. Choose your preferred scan option and click the Scan now button.
      scan now

    A virus can cause all sorts of issues on your PC and can be the reason your programs are closing by themselves. Choose the Full Scan or Microsoft Defender Offline option to run a deep scan.

    Another option is to use a third-party antivirus like TotalAV to remove even the most stubborn malware. The good thing about this tool is that it is lightweight, fast, and effective.

    It might be all you need to secure your digital life.

    TotalAV

    It protects your computer from all types of malware and gets rid of all related issues.
    Free trial Visit Website

    4. Enable Safe Mode

    1. Press the Windows key + I to open the Settings app and select the System option in the left pane.
    2. Choose the Recovery option.
      recovery
    3. Click the Restart now button before the Advanced startup option.
      restart now programs closing by themselves windows 11
    4. Now, when your system restarts, choose to Troubleshoot > Advanced options.
      advanced programs closing by themselves
    5. Select the Startup settings option.
      startup settings
    6. From here, click the Restart button.
      restart button
    7. When your PC restarts, press the appropriate key to enable Safe Mode with the desired feature.
      safe programs closing by themselves

    The Safe Mode helps narrow down the possible factors causing the programs to close by themselves on Windows 11. If this issue does not occur here, you should know the problem is not a system fault.

    So, you can restart your PC and perform a clean boot to know the third-party app or process causing your programs to restart.

    5. Perform a clean boot

    1. Press the Windows key + R, type msconfig, and hit Enter.
      msconfig
    2. Choose the Services tab at the top, check the box for Hide all Microsoft services, and click Disable all.
      hide all programs closing by themselves windows 11
    3. Select the Startup tab and click Open Task Manager.
      startup
    4. Right-click each of the apps there and select Disable.
      disable
    5. Return to the System configuration window and click the Apply button followed by OK.
      ok-apply
    6. Finally, restart your PC.

    The programs closing by themselves issue can be down to the activities of third-party apps and processes. Performing a clean boot allows you to start your PC with only the necessary services.

    If this fixes the issue, you can enable these apps and services in batches to know the faulty one.

    6. Uninstall recent Windows updates

    1. Press the Windows key + I and select Windows Update in the left pane.
    2. Choose the Update history option.
      windows update programs closing by themselves windows 11
    3. Select Uninstall updates.
      uninstall updates
    4. Finally, select the update to remove and click the Uninstall button at the top.
      uninstall option programs closing by themselves windows 11

    If your apps started closing automatically after updating your PC, you might need to remove the update to make it work.

    Should things get back to normal after removing it, you will need to wait till another batch of updates is rolled out before applying them.

    The programs closing by themselves issue can be pretty annoying. Thankfully, it is not an issue that is impossible to fix, as evidenced by the fixes in this guide.

    If you encounter other issues like Windows 11 apps not opening, check our well-detailed guide to fix it effortlessly.

    Please let us know the solution that helped your programs usually work in the comments below.

    Driver Cleaner Softwre: Best Tools to Use in 2026

    Removing unwanted drivers from your Windows PC can save time and prevent technical issues. To make the process smoother, you can use a driver uninstaller tool.

    This type of software scans your system and identifies old drivers, driver duplicates, or corrupt versions. It can automatically remove leftover files, ensuring proper functionality and freeing up space.

    Below, we’ll show you the best options on the market.

    1. Fortect Driver Updater – Complete Driver Management Solution

    Fortect Driver Updater is a robust tool designed to manage and update drivers. It has a built-in scanner and quick, one-click solutions.

    Before each update/removal it automatically creates backups, making it great option for data safety.

    With its user-friendly interface, even beginners can easily manage their drivers without hassle.

    Key features of Fortect Driver Updater include:

    • Comprehensive scanning and updating of drivers.
    • Automatic backup and restore options.
    • Easy-to-use interface with one-click updates.
    • Ensures system stability and optimal performance.

    Fortect

    Remove drivers and install fresh ones with this powerful software.
    Free Trial Visit Website

    2. IObit Uninstaller – most complete and easy to use

    IObit Uninstaller provides an easy and secure way to thoroughly remove unwanted programs and apps resulting in a clean and well-functioning PC.

    The software has a real-time Install Monitor which detects and then informs you about any changes made to your system during a program installation.

    It also has a Software Health option that optimizes your installed software, making sure they run smoothly, are up-to-date, and are corruption-free.

    Other key features of IObit include:

    • Prompt & thorough uninstallation
    • One-click removal of software leftovers like empty files 
    • Increased Database for Better PC Protection and a deeper cleaning
    •  Windows Software Management
    • Easy-to-use PC Toolkit
    • System Security Protection
    • Integrated software updater which checks for updates and installs them as needed
    • Toolbars and Plug-ins removal
    • Forced uninstall for stubborn software that displays errors anytime you attempt uninstallation
    IObit Uninstaller

    IObit Uninstaller

    Remove unwanted drivers, leftover files & more in just one click!
    Check price Visit website

    3. Driver Booster – includes a game optimizer

    driver booster

    Driver Booster is one of the best driver updater tools. In addition to removing old and outdated drivers from our PC, you can use this software solution to find the newest drivers online that are compatible with your devices and operating system.

    Here are the key features of Driver Booster:

    • Find and remove outdated device drivers from your PC
    • Optimize your computer for gaming using Game Boost
    • Inspect driver information suc as publisher, date and associated device
    • Create driver backups and system restore points as a precaution
    • Update drivers at an accelerated rate
    • Set your PC to auto-shutdown or restart after the drivers are updated
    • Schedule Driver Booster to automatically scan drivers
    Driver booster

    Driver booster

    Download Driver Booster for faster, hassle-free driver updates!
    Check price Visit website

    4. Revo Uninstaller Pro – has a portable version

    black screen after installing graphics card

    Revo Uninstaller Pro, and it can be used to remove anything, from generic programs, to Windows Apps, browser extensions, drivers, and more, all without leaving a trace that they were ever there.

    In the case of drivers, you know how important it is when reinstalling a driver that the previous install needs to be completely gone.

    With Revo Uninstaller Pro, you don’t have to worry about residual data and files, since it will all be deleted along with the driver itself, turning your PC into a completely clean slate.

    Here are some of the perks of using Revo Uninstaller Pro:

    • Removes programs, Windows apps, browser extensions, drivers, and more.
    • Offers two kinds of uninstalling processes for you to choose from
    • Deletes programs and drivers without leaving a trace
    • Comes in both a normal and a portable version
    • Can force-uninstall stubborn programs
    Revo Uninstaller

    Revo Uninstaller

    Uninstall programs completely and optimize your PC!
    Check price Visit website

    5. Driver Fusion – specific PC health features

    Driver Fusion is a driver uninstaller that provides a complete solution for your system to help you update, monitor, and manage your drivers and devices as well.

    Using the health check option, you will be able to analyze your system’s health, and the program can automatically fix all detected issues.

    Here are the key features of Driver Fusion:

    • Updates drivers
    • Create a backup for all of your installed drivers at once
    • The device control feature allows you to backup, download and uninstalls drivers
    • Troubleshooting
    Driver Fusion

    Driver Fusion

    The best solution to update, backup, clean and monitor the drivers & devices of your PC
    Free download Visit website

    6. Driver Magician – has backup for drivers

    Driver Magician is a driver removal software that will help you uninstall unnecessary drivers from your system effortlessly and this way you will be able to save some valuable time.

    This program offers a professional solution for device drivers backup, update, removal and restoration as well. It’s compatible with Windows operating system.

    The program works by identifying all the hardware that you have installed on your computer, and it extracts the associated drivers from the hard disk, backing them up to a location that you chose.

    Here are the key features of Driver Magician:

    • Driver Magician comes with a built-in database of the latest drivers with the ability to go online and receive the driver updates.
    • You will be able to back up device drivers of your system in four modes.
    • The tool lets you restore device drivers from backup with a simple click.
    • You will be able to update device drivers of your PC to improve system performance and stability.
    • There’s also the option of Live Update device identifier database and driver update database.
    • You will be able to back up more items such as Desktop and My Documents.
    • With this tool, you can restore more items from the backup, and you will also get detailed information of the hardware drivers.

    ⇒ Get Driver Magician

    7. Guru3D Driver Sweeper – basic features and a clean interface

    Guru3D Driver Sweeper is a great remove driver software that will sweep all driver leftovers from your computer. Removing your drivers on a correct way is essential because driver leftovers are able to cause stability-related issues and startup problems.

    You can use Guru3D Driver Sweeper if you want to update and remove drivers from the computer.v

    Here are the key features of Guru3D Driver Sweeper:

    • Guru3D Driver Sweeper can be used in two ways, and both of them will clean all the files.
    • You can use the official uninstaller of the drivers, and you can also run this program to select what to clean.
    • You will be able to select more drivers at the same time for cleaning.
    • The current supported drivers are NVIDIA (Display and Chipset), ATI (Display), Creative (Sound) Realtek (Sound), Ageia (PhysX) and Microsoft (Mouse).
    • This software can be used in Normal mode, but for absolute stability, it’s recommended to use the Safe mode.

    It’s also recommended to make a backup or a system restore before using this tool.

    ⇒ Get Guru3D Driver Sweeper

    8. Device Cleanup Tool – has a command line version

    Device Cleanup Tool removes drivers for non-present devices from the Windows, device manager. It’s critical to remove these drivers because each device that was once attached to your system leaves an entry in the Device Manager.

    When you are using the Windows Device Manager, you will be able to delete drivers only one by one. But, with Device Cleanup Tool you can delete multiple drivers or all the non-present devices.

    Here are the key features of Device Cleanup Tool:

    • View a list of all devices and uninstall drivers
    • The “last used time” comes from the write time of the device’s registry key
    • Using Device Cleanup Tool will save you space, time and effort as well
    • There’s also a command line version of Device Cleanup Tool called Device Cleanup Cmd

    ⇒ Get Device Cleanup Tool

    These are the top picks for the best driver removal tools and no matter which one you decide to get, you’ll be able to keep your system clean and running smoother.

    However, if you want a faster and more reliable solution, then you might want to use the one of the driver uninstaller software from this guide.

    If you have any other suggestions or questions, don’t hesitate to leave them in the comments section below.

    Fix: GPU Spikes When Idle [From 0% To 100%]

    You may notice that your GPU often spikes when in an idle state. This may happen on the Windows operating system.

    Usually, when this problem occurs, you may notice that the GPU usage jumps from 0% to 100%. You may have seen 100% CPU usage in idle. That is somehow common. But, the problem with the graphics card is rare. This article will help you to solve the high GPU usage issue in an idle state on Windows.

    Why does GPU utilization spike when it is in an idle state?

    Usually, high GPU usage problems may occur for varieties of reasons. However, if you dig deeper, you will find these as the most common culprits:

    • GPU-hungry background apps: Even though your PC is idle, there may be some background tasks utilizing a lot of GPU power.
    • Software Bug: Some software may have bugs that trigger this problem.
    • Old graphics driver: Incompatible or outdated graphics drivers may not be able to handle modern Windows or other processes properly.
    • Malware problem: Malware or virus issues also may trigger this problem if you don’t have good antivirus software.

    How do I fix GPU spikes when in an idle state?

    Before trying the actual methods, we suggest you check the following things:

    • Make sure your graphics card is not physically damaged.
    • You are not using any GPU tweaker, or you have not made any bad configuration using such tools.

    After ensuring these steps, go through the following methods to fix high GPU usage issues when you are not doing anything on your PC.

    1. Update Windows

    1. Press Windows + I on the keyboard.
    2. Go to Windows Update and click on Check for updates.check for updates windows 11 settings
    3. If any updates are available, click on Install/Download button.

    If necessary, restart your PC after updating.

    2. Update graphics card

    1. Open the Start Menu.
    2. Type Device Manager and press Enter.opening device manager windows 11
    3. Right-click on the Display Driver and choose Update.clicking update driver on graphics card on windows device manager
    4. Choose the preferred method to update.

    The bad thing is Windows Device Manager often fails to detect the latest driver for the graphics card. As a result, the above steps may not be practical. So, we suggest you use an automated driver updating tool.

    These tools can scan and detect outdated or missing drivers on your PC. You can update them with just a single click using this tool. Otherwise, they can do this thing automatically according to your preferred schedule.

    Updating drivers doesn’t only solve 100% GPU utilization issue in an idle state but also solves GPU crash issues while gaming.

    3. End background tasks

    1. Press CTRL + ALT + Del and click on Task Manager.
    2. Find the most power-hungry task, select it and click on End process.ending process windows 11 task manager
    3. Do the same for all other resource-hungry processes.

    This process may temporarily fix the sudden GPU spikes problem that appears in an idle state. However, after the next bootup, it may return. So, the better idea is to update the software or uninstall it completely.

    4. Uninstall problematic software

    1. Open Windows Settings.
    2. Go to Apps and click on Apps & features.going apps & features Microsoft windows 11
    3. Search for the problematic software.
    4. Click on the three vertical dots and choose Uninstall.uninstalling smart game booster win11 settings

    The built-in uninstaller always leaves some leftovers on your PC. So, you can consider using a tool like IObit Uninstaller. It can altogether remove any software from your computer.

    Problematic software can cause various problems, like high CPU usage when GPU usage is low or vice versa. Uninstalling them will solve such situations.

    5. Re-install the graphics driver

    5.1 Uninstall graphics driver

    1. Open the Device Manager like before.
    2. Find the display adapter, right-click on it and choose Uninstall device.uninstalling graphics card device manager
    3. Check Attempt to remove the driver for this device and click on Uninstall.
    4. Restart your PC.

    5.2 Install the driver again

    1. Go to the NVIDIA or AMD driver download page.nvidia download page
    2. Download the appropriate item and install it on your PC.

    To install more conveniently, you can also depend on specialized driver updating software. After installing the appropriate driver, restart Windows. It should solve the GPU spikes issue when idle state.

    6. Scan the PC with a good antivirus/malware software

    1. Install any of these best antivirus tools if you don’t have one already.
    2. Open it.
    3. Scan your whole computer.bitdefender scanning
    4. Remove any detected malware.

    If you see a malicious program, uninstall it, as shown in method 4. Virus issues often cause your computer to have high GPU and CPU usage problems.

    For best security, you can consider using TotalAV which is currently the best choice for PC users. If necessary, you also can know about the best antimalware tools and use any of them you want.

    This article has featured the best methods to solve GPU spikes when idle on Windows. If you know any better method, you can write it down in the comment box.

    Ntoskrnl.exe BSoD on Windows 11: Causes & How to Fix

    Have you ever gotten a Blue Screen of Death? If you have, then you know just how frustrating it can be. Well, there are different variations of the error, and the ntoskrnl.exe BSOD in Windows 11 seems to be bugging users more recently.

    The ntoskrnl.exe BSOD crash error can occur for several reasons, including hardware and software issues, as well as driver problems. This article will provide useful information on how to fix the ntoskrnl.exe BSOD error in Windows 11.

    What is Ntoskrnl.exe BSOD?

    Misconfigured system files in your Windows OS usually cause a ntoskrnl.exe BSOD error. The ntoskrnl.exe file is part of the Microsoft Windows NT kernel (NTOSKRNL), and it’s used to control access to several resources, including memory and processor time. 

    One of the most common causes of a ntoskrnl.exe BSOD error is a damaged or missing system file. Various events, including malware infections and hardware failures can cause these.

    Other causes include:

    • Hardware issues – You may have a faulty CPU or GPU in your hands and have no option but to upgrade your graphics card.
    • Outdated drivers – Using old drivers can cause issues such as BSOD. The best solution is to use a specialized tool.
    • Corrupted BIOS settings – You may end up with a corrupt BIOS if you’ve changed the settings recently and didn’t properly save them before rebooting Windows.
    • Virus or malware infection – It’s always recommended to have a good anti-malware program to scan your computer for malware.
    • Corrupted system files – Windows relies on many files to run smoothly, and if one of these files gets corrupted or damaged, you need to repair the corrupt system files, or the entire system will crash.

    Symptoms of this problem include:

    • You experience frequent crashes and system slowdowns.
    • Unusual error messages may appear on the screen, such as driver_power_state_failure ntoskrnl.exe.
    • The system hangs while starting up, shutting down, or when you are trying to open a program.

    Is Ntoskrnl.exe necessary?

    The ntoskrnl.exe process is an executable file that belongs to Windows Kernel-Mode Drivers developed by Microsoft Corporation for the Windows NT operating system family as well as subsequent server versions. 

    The kernel is the core of Microsoft Windows and is responsible for handling hardware requests and allocating resources to applications.

    It’s also responsible for managing memory on your PC. This means that any errors with this file can cause a range of problems for your computer.

    While the file process may be necessary, you must also know that Ntoskrnl.exe can cause high CPU usage.

    What can I do to fix the Ntoskrnl.exe BSOD error in Windows 11?

    Here’s what you should first do:

    1. Check for Windows updates 

    1. Hit the Windows key and select Settings.settings windows 11
    2. Click on Windows update, then select Check for updates.check-updates lenovo-ideapad-keyboard-not-working
    3. Download and install if any are available.

    2. Run a System File Checker scan

    1. Hit the Windows key, type cmd in the search bar, and click Run as administrator.
    2. Type the following command and press Enter: sfc /scannowsfc scan

    Running the SFC scan will repair/replace any corrupt system files and should get things up and running in the case of ntoskrnl.exe BSOD IRQL_NOT_LESS_OR_EQUAL in Windows 10.

    3. Run the CHKDSK command

    1. Hit the Windows key, type cmd in the search bar, and click Run as administrator.
    2. Type the following command, replace the C letter with your drive’s letter, and press Enter: chkdsk C: /f

    4. Disable overclocking

    Overclocking is a process in which you increase the performance of your CPU by increasing its clock speed. However, if you have overclocked your CPU too much, then your computer might crash due to overheating.

    The problem with overclocking is that it puts more stress on your system’s hardware and may cause instability or crashes. If you’re getting BSOD errors after overclocking, you should try reducing the frequency of your processor and see if that fixes the problem.

    5. Boot to Safe Mode

    If you’re having issues with your PC, it’s always best to start in Safe Mode. This will stop all non-essential processes and services from running, which may help reduce the chance of running into this error. 

    By doing so, you can scan for viruses or malware on your computer and see if it is causing issues. 

    Aside from BSOD errors, the file can also cause a Driver power state failure, so we recommend that you always keep your drivers up-to-date.

    How do I fix Ntoskrnl exe missing or corrupt?

    Here are a few ways you can fix a missing or corrupt Ntoskrnl.exe:

    • Run the Check Disk tool: If the file exists but can’t be accessed due to issues with the drive, running the Check Disk utility should do the trick.
    • Restore to the last know good boot configuration: When you are unable to boot the PC due to a missing or corrupt Ntoskrnl.exe, the best option is to boot into the last known good configuration from the BIOS.
    • Unplug peripherals: Certain peripherals, especially keyboards, are found to trigger the error. Some users shared that unplugging the keyboard when the PC is being turned on and then reconnecting it after Windows boots helps.

    Hopefully, these solutions have been able to resolve the issue, and the ntoskrnl.exe BSOD error is a thing of the past in your Windows 11.

    Feel free to drop us a comment down below if you have tried any additional solutions that we have not mentioned.

    Windows 11 not Responding or Frozen: 10 Thorough Solutions

    If Windows 11 is not responding or keeps freezing, you’re not alone. Many people experience similar issues, with the most common causes being outdated OS and corrupt system files.

    Memory issues and outdated drivers can also be at fault. Luckily, none of these are critical problems, and with a few tweaks, you’ll be able to fix them. Check out our tested solutions below.

    How to fix Windows 11 not responding

    We advise you to restart or force shut down your PC before trying other fixes. This is because the issue might be a minor glitch with some processes, which a simple restart can fix.

    If that does nothing and Windows 11 stays completely unresponsive, follow the more advanced steps below.

    1. Disable the Search icon on Taskbar

    1. Right-click the Taskbar and choose Taskbar settings.
      taskbar settings windows 11 not responding
    2. Toggle the switch for the Search option backward to disable it.
      search
    3. Now, restart your PC.

    If your Windows 11 desktop screen is not responding, it might be down to the Search icon on the Taskbar. Some users reported that removing the icon solved the issue quickly.

    2. Update Windows 11

    1. Press Windows + I to launch the Settings app, and select Windows Update from the tabs listed in the navigation pane on the left.Windows Updates
    2. Click on the Check for updates button on the right to scan for any available newer versions of Windows 11.Check for updates to fix windows 11 desktop not responding
    3. If an update is listed after the scan, click on the Download & install button.Download & install

    3. Perform a clean boot

    1. Press the Windows key + R, type msconfig, and press Enter.
      msconfig
    2. Click the Services tab at the top, check the box for Hide all Microsoft services, and click Disable all.
      hide all windows 11 not responding
    3. Select the Startup tab at the top and click Open Task Manager.
      startup task manager
    4. Right-click each of the apps there and select Disable.
      disable
    5. Go back to the System Configuration window and click Apply, followed by OK.
      apply ok
    6. Finally, restart your PC.

    Performing a clean boot disables all third-party apps and services from starting up. This should fix the Windows 11 not responding on startup issue.

    If your PC typically works on a clean boot, you can now start enabling the apps and services in batches to know the one causing the problem.

    4. Uninstall conflicting programs

    1. Press Windows + I to launch Settings, and select the Apps tab from the left.Apps
    2. Click on Apps & features on the right.Apps & features to fix windows 11 desktop not responding
    3. Now, locate the problematic app, click on the ellipsis next to it, and select Uninstall from the flyout menu.
      Uninstall to fix windows 11 desktop not responding
    4. Again, click Uninstall in the confirmation prompt that pops up.Uninstall

    5. Update the drivers

    1. Press Windows + S to launch the Search menu, enter Device Manager in the text field, and click on the relevant search result.Device Manager
    2. Double-click on the Display adapters entry here.Display adapters to fix windows 11 desktop not responding
    3. Right-click on the graphics adapter, and select Update driver from the context menu.Update driver to fix windows 11 desktop not responding
    4. Select Search automatically for drivers from the two options in the Update Drivers window.Search automatically for drivers
    5. Wait for your system to install the best driver available on the computer for the graphics adapters.

    It’s recommended that you update the graphics driver in Windows 11 to eliminate the desktop not responding issue. If you haven’t previously downloaded the latest version, find out how to manually install the drivers in Windows 11.

    6. Run a malware scan

    1. Press Windows + S to launch the Search menu, enter Windows Security in the text field, and click on the relevant search result that appears.Windows Security
    2. Click on the Virus & threat protection option.Privacy & threat protection
    3. Now, click on Scan options to view all the different types of scans available.Scan options
    4. Select the Full scan option and then click on the Scan now button at the bottom.Full scan to fix windows 11 desktop not responding

    Now, wait for the scan to complete, and once it’s done, check if the Windows 11 desktop not responding issue is resolved. Also, while we have used the built-in Windows Security to scan for malware, you can use any reliable third-party antivirus for Windows 11.

    7. Perform DISM and SFC scan

    1. Press Windows + S to launch the Search menu, enter Windows Terminal in the text field, right-click on the relevant search result, and select Run as administrator from the context menu.Windows Terminal to fix windows 11 desktop not responding
    2. Click Yes in the UAC (User Account Control) prompt that pops up.Click Yes
    3. Next, click on the downward-facing arrow near the top and select Command Prompt from the list of options. Alternatively, you can hit Ctrl + Shift + 2 to launch Command Prompt in a new tab.Command Prompt
    4. Now, type/paste the following command and hit Enter to run the DISM tool:Dism /Online /Cleanup-Image /RestoreHealthDISM to fix windows 11 desktop not responding
    5. Next, execute the following command to perform the SFC scan:sfc /scannowSFC scan to fix windows 11 desktop not responding

    The DISM (Deployment Image Servicing and Management) tool and SFC (System File Checker) scan can fix many errors arising due to corrupt or missing system files, problems with the Windows image, or installation files.

    8. Run the Windows Memory Diagnostic tool

    1. Press Windows + S to launch the Search menu, enter Windows Memory Diagnostic in the text field, and click on the relevant search result.Windows Memory Diagnostic to fix windows 11 desktop not responding
    2. Click on the Restart now and check for problems (recommended) option.Restart now and check for problems

    9. Uninstall recent updates

    1. Go to Settings.
    2. Select Windows Update.windows update settings
    3. Pick the Update History section.update history
    4. Click Uninstall updates and remove the most recent updates.windows 11 uninstall updates

    Keeping the system up to date is essential, but if the issue only appeared after you updated Windows, consider reverting. Sometimes, updates get buggy and until that’s addressed by Microsoft, you can fix the freezing issues by going back to a previous version.

    10. Run a CHKDSK scan

    1. Press Windows + S, type cmd, right-click Command Prompt, and select Run as administrator.run cmd as admin
    2. Type this command and press enter: chkdsk /f /r /x.Run checkdisk
    3. Once the process is complete, restart your PC.

    That’s it! By the time you execute the methods listed here, the desktop not responding problem in Windows 11 should be fixed. Unfortunately, if that’s not the case, you are left with no option but to reset Windows 11 to its factory settings.

    If it’s not just the desktop but the whole computer, learn what to do if Windows 11 keeps freezing randomly.

    Tell us which fix worked for you in the comments section below.

    Combine TIFF Files Into One: Best Software

    TIFF is a non-compressed image file format that preserves picture quality. It’s a good file format for storing photos.

    Some users might need to combine multiple TIFF images into single multi-page TIFF files for cataloging and sharing. This is how you can merge TIFF files with alternative tools on a Windows PC.

    How can I merge TIFF files?

    1. Combine TIFF files with general image-editing software

    Photoshop combine tiff files

    Some image editors, like Adobe Photoshop, enable users to combine multiple images into single PDF documents. Adobe Photoshop incorporates a PDF Presentation feature that’s ideal for combining TIFF images within a single output document. Its users can also combine multiple photos into one image.

    Aside from its PDF features, Photoshop incorporates a multitude of advanced image-editing features few other software can match. It enables users to replace backgrounds, add duotone effects, move and duplicate objects, create double exposure effects, and much, much more!

    Other Adobe Photoshop features

    • It enables users to set up amazing slideshows for images
    • Users can add visually appealing quote graphics to images
    • Adobe Photoshop’s text and border guided edit enables users to add border overlays to pictures
    • The Smart Sharpen feature in Photoshop quickly reduces halo and noice effects in images
    Adobe Photoshop

    Adobe Photoshop

    Easily and efficiently combine TIFF files by using this powerful image processing tool.
    Check priceVisit website

    2. Combine TIFF files with Online TIFF Combine

    1. First, open the Online TIFF Combine tool in your browser.
    2. Click the Choose file buttons to select TIFF images to combine. You can combine up to five TIFF images with this tool.
        The Online TIFF Combine utility combine tiff files  
    3. Press the Combine My File button.
    4. A Save As window will automatically open when it’s finished combining images. Select a folder to save the multipage TIFF file to.
    5. Then select the Save option to download the file.
    6. Open the folder you saved the multi-page TIFF file to in File Explorer.
    7. Then right-click the TIFF file and select Open with.
    8. Select to open the file with Windows Photo Viewer, which is a multi-page image viewer.
      Windows Photo Viewer combine tiff files
    9. You can click the left and right arrow buttons to flick through the image pages.

    Note: You’ll need to open the combined image file with a multi-page image viewer to view all pictures incorporated within the file.

    Software like Windows Photo Viewer, IrfanView, and XnView will display all picture pages within a combined image file. However, Photos only display one image.

    3. Combine TIFF files into a single PDF

    1. Open the TIFF to PDF utility in a web browser.
      The TIFF to PDF utility combine tiff files
    2. Then click the Upload Files button.
    3. Hold the Ctrl key and select multiple TIFF files to include within the PDF.
    4. Press the Open button to upload them.
    5. When the images have uploaded, click the Combined button.
    6. Next, select a folder to save the PDF to.
    7. Press the Save button.
    8. Thereafter, open the folder you saved the TIFF image PDF file to.
    9. Double-click the PDF to open it with your default Portable Document Format software.

    4. Merge TIFF files into one with TIFF-editing software

    You can also create multipage TIFF files with dedicated TIFF-editing software. Advanced TIFF Editor Plus is one such utility for viewing, converting, and editing TIFFs, and other image formats..

    It also packs in text recognition (OCR) and virtual printer features to boot.

    1. Click File > Merge Files.
    2. Choose Add Files to choose the images to include within the multipage TIFF.
    3. Select a folder to save your files to.
    4. Click OK to combine the selected files.
    A Files Merge window combine tiff files

    Advanced TIFF Editor Plus is not freeware software. However, you can still utilize its trial package for one month. You can combine many TIFF images without getting the registered Advanced TIFF Editor Plus if you make the most of its one-month trial package.

    ⇒ Get Advanced TIFF Editor Plus

    So, there are a few different ways you can combine your TIFF images with online tools and offline software.

    You can utilize Online TIFF Combine and Advanced TIFF Editor for creating multipage TIFF image files.

    To combine TIFF files into one PDF, check out Photoshop or the TIFF to PDF utility.