In case you want to free up some space on your primary hard disk, or you simply bought another hard drive, you might consider moving your entire Windows 10 operating system to a new space.
However, this is not such an easy task, and it requires you to know what you are doing to prevent data loss. In this guide, we have detailed the steps you need to follow to make the process successful the first time you try.
How to migrate Windows 10 to another drive?
1. Use the system image
1.1. Create a new system image
Plug the new drive into your PC.
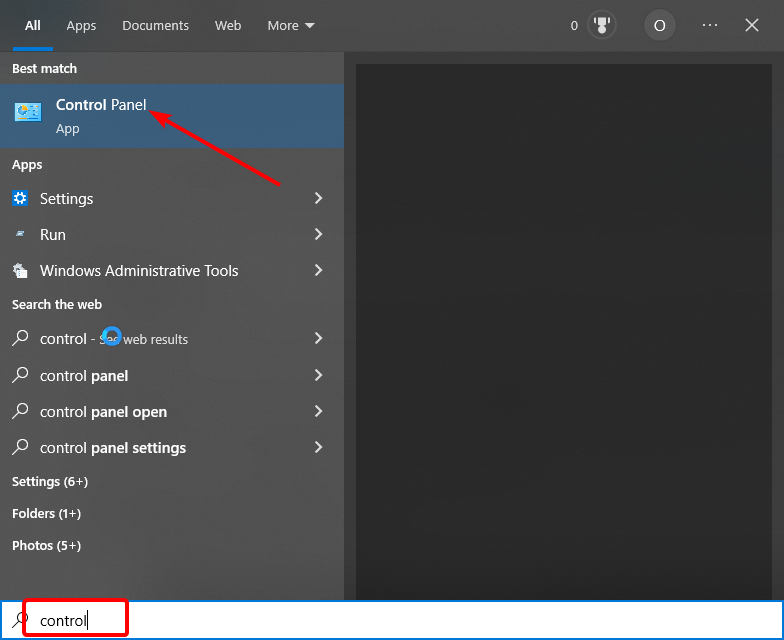
2. Press the Windows key, type control, and click the Control Panel option.
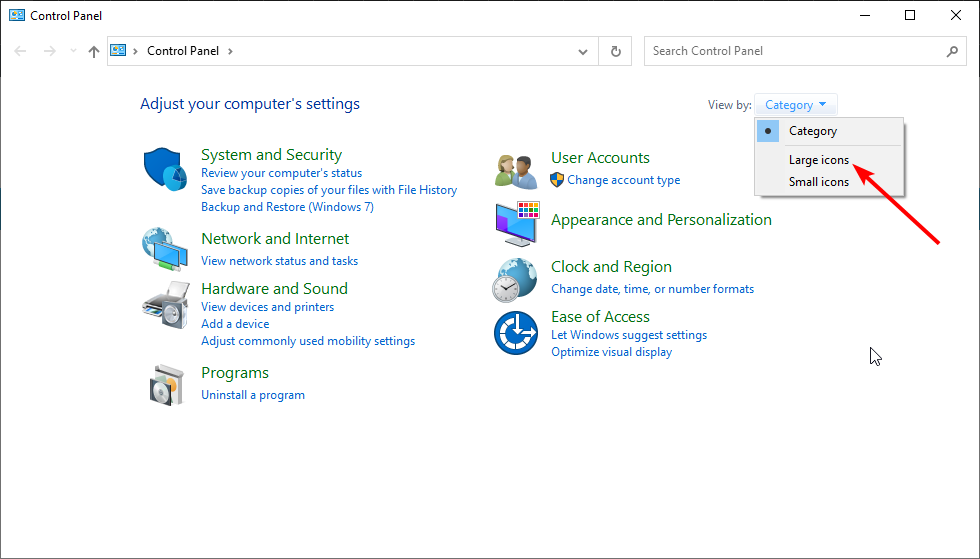
3. Click the dropdown next to View by and select the Large icons option.
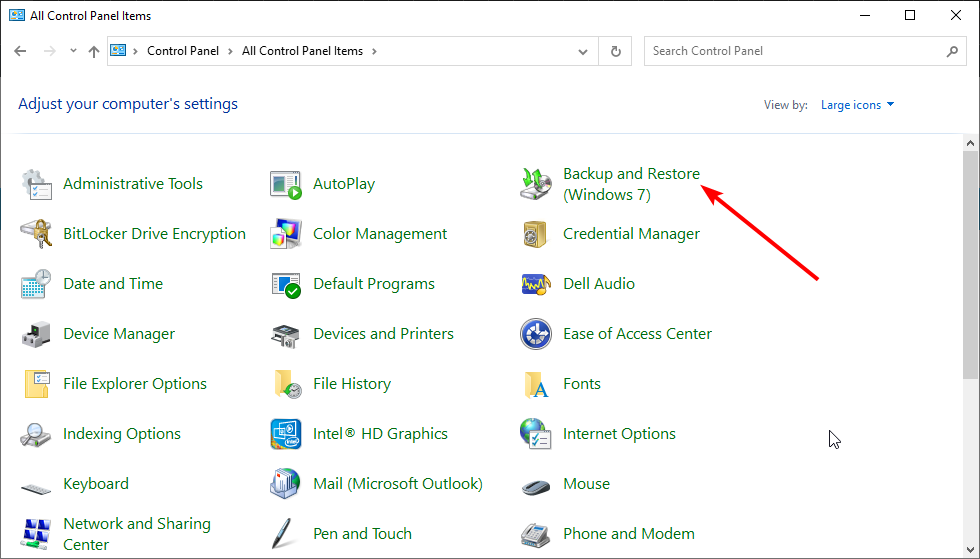
4. Now, choose Backup and Restore (Windows 7).
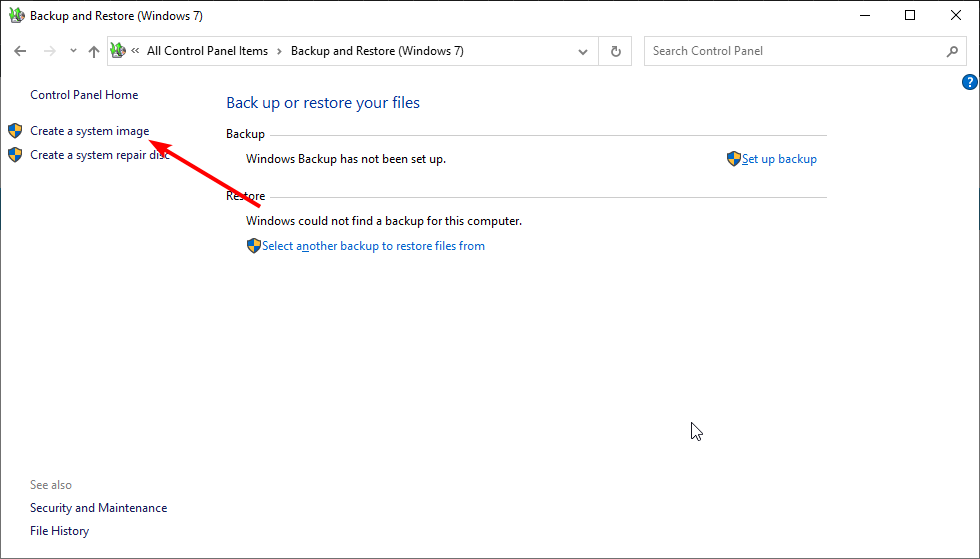
5. Click Create a system image.
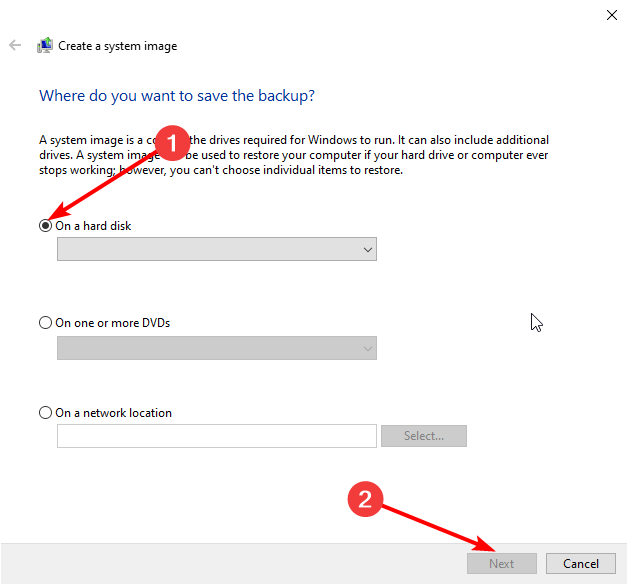
6. Tick the radio button On a hard disk and select your drive.
7. Now, click the Next button.
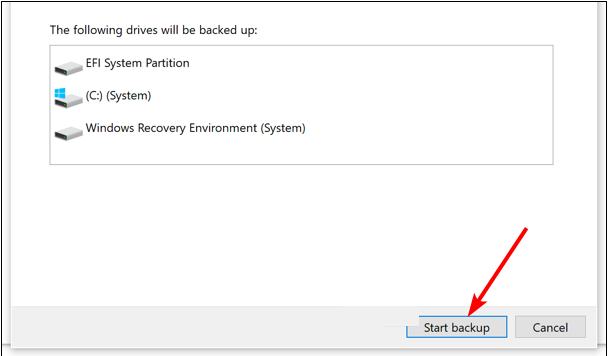
8. Next, select the Start Backup option and wait for the process to finish.
9. Finally, you will get a prompt to confirm if you want to create a recovery image disk. You can choose either Yes or No for this.
The first thing you need to do to move Windows 10 to another drive is create a system image. This will essentially create a backup of your PC to the new hard drive.
It is important to note that this method will only work if the external hard drive is the same size or larger than the primary drive. If it is lower, this process is bound to fail.
After creating a system image, you can proceed to stage 2 below.
1.2. Move the system image to another disk
Create and insert a Windows installation media into your PC and the new drive containing the System image.
Power on your PC, press F1, F2, or Del to bring up the BIOS, and set the installation media drive as the boot drive.
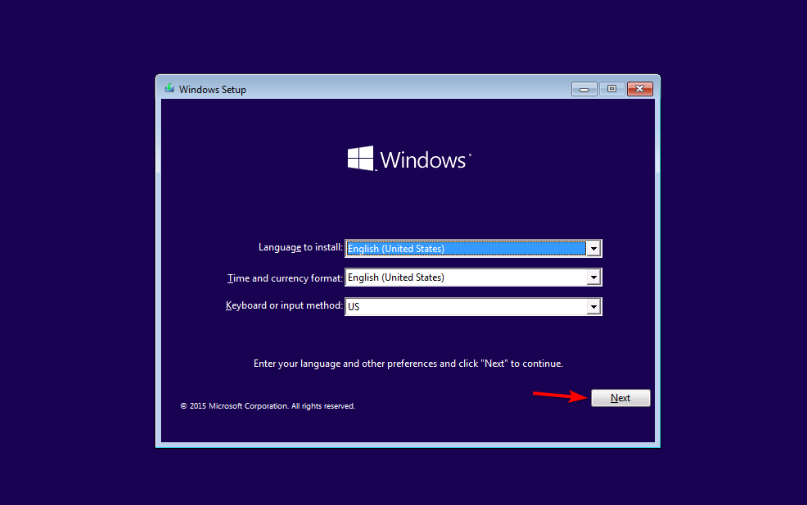
Now, enter your language and other info when the media installation page comes up and click Next.
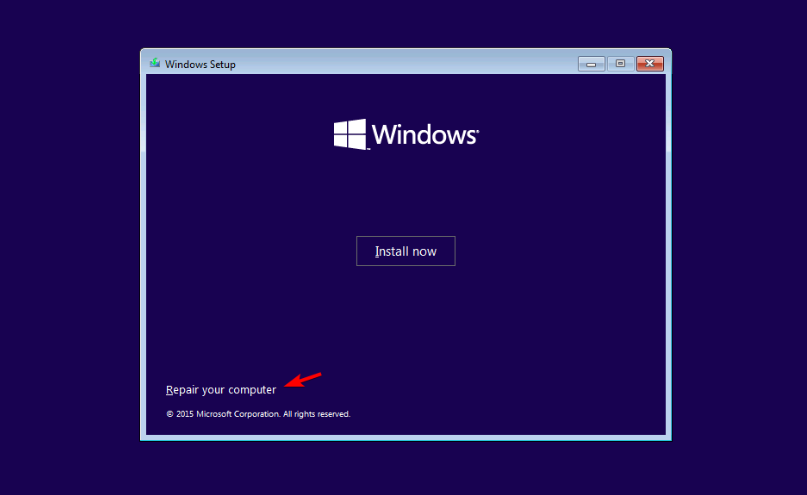
Select, Repair your computer.
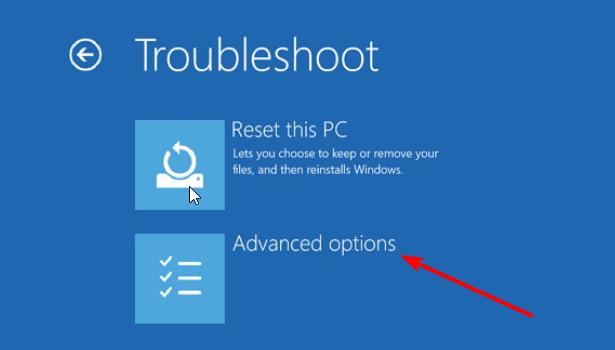
Next, choose Troubleshoot > Advanced options.
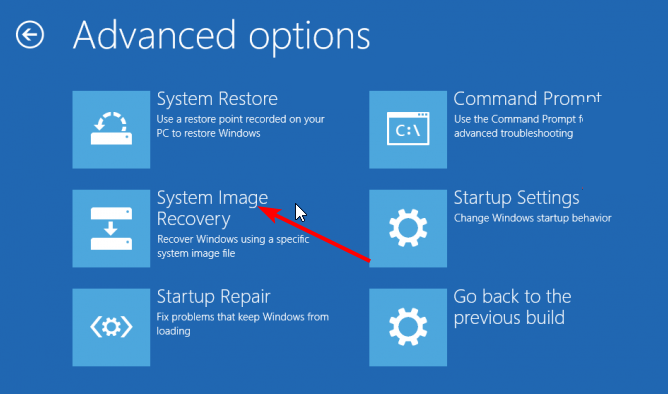
Select System Image Recovery.
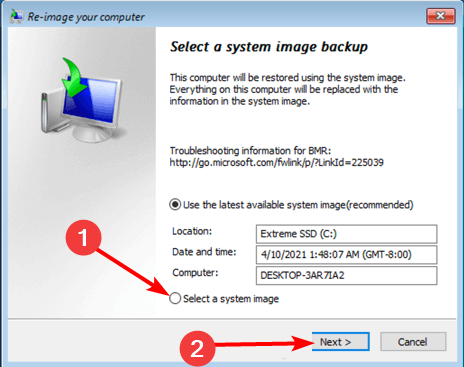
Now, tick the radio button for Select a system image and choose the new hard drive.
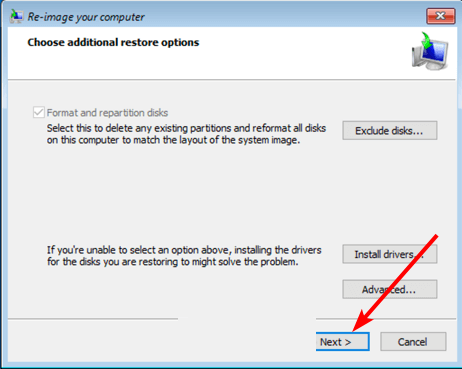
Click the Exclude disks… button to exempt your original system disk and click OK.
Click the Next button.
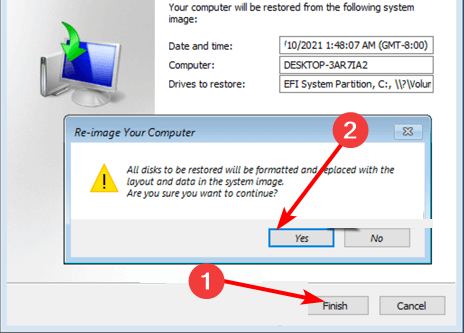
From here, click the Finish button, followed by Yes, to complete the restoration process.
Finally, click the Restart Now button.
With this, you have successfully moved Windows 10 to an external drive. As we have mentioned earlier, this method works if you use a disk of the same or larger size as your original disk.
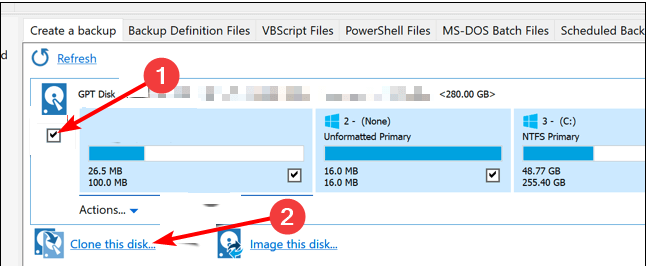
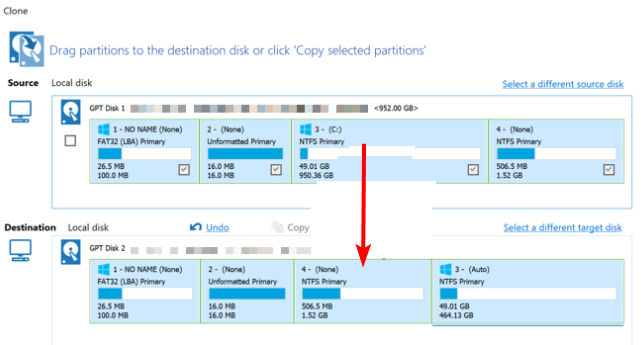
Check the box next to the disk containing Windows 10 and click the Clone this disk option.
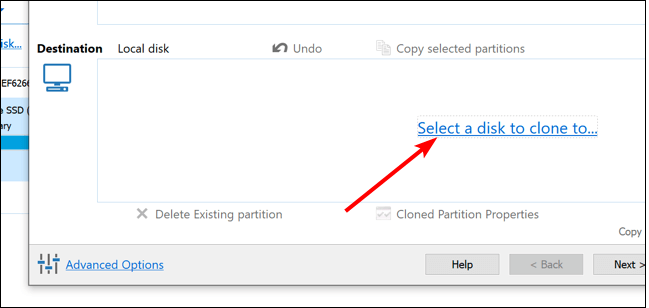
Now, click Select a disk to clone to and select your new drive under the Destination section.
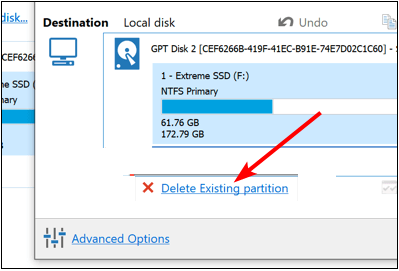
From here, select all the partitions on the new disk and click Delete Existing partition.
Next, drag all the partitions (except the C: drive) on the Source drive to the Destination.
To make changes to your new drive, you can select it and choose Cloned Partition properties.
Now, click the Finish button to complete the process.
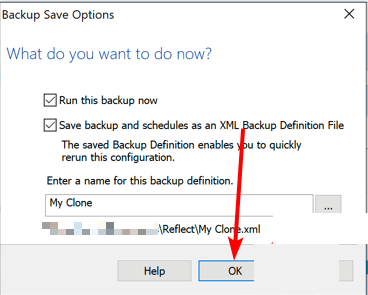
Click OK on the Backup Save Options page.
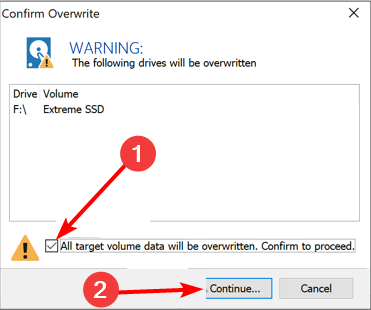
Finally, check the box for Confirm to proceed and click the Continue… button.
We have come to the end of this detailed guide. You now have everything you need to move Windows 10 to an external drive.
If you need a list of the best partition manager software to partition the new drive, check our excellent guide for the top options that are currently available.
Feel free to let us know the solution that helped you fix this issue in the comments below.
If you don’t want to use the DS4Windows application anymore and looking for a way to uninstall it, you are in the right place.
DS4Windows is a portable application. Therefore, it doesn’t need uninstallation. However, remove the files and associated drivers to remove the app. Here, this guide will walk you through the steps to uninstall the DS4Windows. Let’s start!
How can I uninstall DS4Windows completely from Windows 11?
Before uninstalling the program, make sure you have closed the app from System Tray and ended the task related to the program from Task Manager. Then, follow all the steps to get the work done.
1. Uninstall DS4Windows manually
1.1 Uninstall ViGEm, FakerInput and HidHide
Press the Windows key, type Control Panel, and click Open.
Select View by as Category.
Click on Uninstall a program.
Navigate to ViGEm Bus Driver and select Uninstall. Now click Yes to continue.
You need to locate the apps named FakerInput and HidHide. Then, select them one by one and click Uninstall.
Follow the on-screen prompts and wait for the process to complete.
1.2 Change the settings on the DS4Windows app
Launch the app.
Go to Settings, and remove the checkmark beside Run at Startup.
Exit the app.
1.3 Delete the associated files
Go to the DS4Windows app, right-click it, and select Properties.
Click Open File Location.
Delete all the files under DS4Windows.
To delete the profile directory, press Windows + R to open the Run window.
Type %appdata% and press Enter.
On the Roaming folder, locate DS4Windows and click Delete.
2. Use a third-party tool to uninstall DS4Windows and its drivers
You can use a third-party tool ScpToolkit to remove DS4Windows and everything it installs with it. This tool is an XInput wrapper for DualShock controllers. Before getting this tool, ensure you have NET Framework 4.5 and the Visual C++ 2010 and 2013 packages installed on your PC. Follow these steps to uninstall:
So, these are the methods that you can use to uninstall DS4Windows from your Windows 11 and 10 PC completely. You can remove DS4Windows and its associated files manually; however, if you want to get the work done without wasting time, you can use a third-party tool to get the job done.
If you have questions or concerns about uninstalling DS4Windows, feel free to mention them in the comments section below.
If being in a video meeting or live recording sessions is a significant part of your job, then you must know the importance of a webcam. Most modern laptops and All-in-ones come with integrated webcams built into the display. However, you always have the option to get an external webcam for your device.
Here, in this guide, we will compare integrated webcams to external ones to help you decide which is best. Let’s get started!
What is the difference between an external webcam and an in-built webcam?
There are a few differences between an external webcam and an integrated webcam, some of which are listed below:
An inbuilt webcam is integrated into your laptop body. It is generally on the bezel’s top edge around the screen, which is the right height for video calls. An external webcam is a small camera mounted on your laptop or desk.
The integrated webcams don’t require additional setup as they come with all the relevant software and drivers installed by the manufacturer. However, you need to install it manually, which may require a little configuration.
Is an integrated webcam better than an external webcam?
1. Webcam image and video quality
The integrated camera fits into a compact place on the top of your laptop, giving less space for the lens, resulting in low camera performance and grainy image quality. Now with modern laptops, manufacturers have tried to improve performance by providing a resolution of up to 5MP, but the results are not also satisfying.
With an external webcam, there is more space for multiple lenses, with gives you the scope of better image quality, light sensitivity, and focusing abilities. They offer at least 1080p Full HD and often 4K resolution. You can opt for high-end expensive external webcams available to give you maximum clarity and sound quality or choose the budget-friendly ones to get the job done.
2. Setup and cost
In-built webcams are included within the laptop or the device; that’s why it doesn’t require extra cost and additional setup. Instead, the manufacturer makes them available with preinstalled relevant drivers and software.
On the other hand, for external webcams, you need to spend extra money between $10 and $200, depending on your requirements. You need to configure them initially, but most are ready to use when plugged in.
An external webcam is easier to replace or upgrade than an internal one. However, if anything goes wrong with an in-built webcam, you need to open the display to check the lens and wiring.
If something is wrong with the webcam, you can quickly troubleshoot the external webcam. You can check it by plugging it into a different device. However, it is impossible to do with an integrated webcam.
4. Portability
Placing an external webcam can be a task sometimes, but on the other hand, it can be great if you want to shoot or record from different angles. You can bend it or twist its head to adjust the view easily.
However, with an internal webcam, you don’t have the scope to change the position of the lens without changing the placement of your laptop or computer monitor. And that, too, has limitations.
If you are on the move, an integrated camera is preferred as, unlike external ones; you don’t have to set it up every time you hop in a video call. Thus, making it less time taking and more convenient.
5. Range of features
With wide-angle lenses, stereo microphones, and advanced auto-focus capabilities external webcam has superior image, audio, and video quality with wide angle and zoom options than an integrated webcam.
The external ones have an extensive range of default features, including facial tracking, exposure, smart focus, etc. Most external webcams also can adjust for poor lighting to get you a better picture or video quality, even if the light is not ideal.
On the other hand, a high-end computer or laptop can also provide you with a better-quality integrated camera. And with advanced software, you can get better results than external webcams.
Quick comparison: Integrated webcam Vs. External webcam
Parameters
Integrated Camera
External Webcam
Lens
Doesn’t have space to fit a multi-piece lens, thus affecting image quality
It has a multi-piece lens, which gives better-quality images and video
Cost
No additional cost, as it comes with your laptop or device
You need to spend $50 or more to get a high-end device.
Setup
Drivers and software are already installed in the device, so no additional setup is required.
You need to configure the webcam with your device initially
Maintenance
You can’t replace or upgrade the lens without opening the laptop or device it is installed in
You can easily upgrade to a better one without disturbing your device.
Portability
You don’t need to set up if you are on the move but don’t have the liberty to change the placement as you like
Setting it up may require an extra effort, but it can be great for capturing different angles and views as you can set it up anywhere.
Features
Limited features but has scope to enhance the quality with software available.
It has a wide range of features to capture images and videos with supreme-quality audio.
Choosing between an integrated webcam and an external one all comes down to your needs and the product’s price. One gives you portability and flexibility, and the other gives you better picture and sound quality.
If picture quality is what you need, you can either buy a high-end webcam for your computer to get clearer video and audio quality while streaming or recording. Else, invest in a high-end computer or laptop to fulfill your needs.
So, integrated webcam vs. external, if given a choice, what would you choose? Feel free to let us know in the comments section below.
Audio production is one of the most important parts of media production. Most professionals are already used to a certain set of recording software for Windows that they feel comfortable with.
Although, knowing all options is critical for anyone who wants to improve over time. This list will cover both types of users. Those who want something more advanced, probably need premium music production solutions.
Alternatively, there are recording studio software tools free to download. They are ideal for those who want something very basic and barebone.
We will be highlighting some of the best recording software for Windows 10. Some of them you might already know of, but some might enlarge your perspective:
?️ WavePad – Speech synthesis and voice changer capabilities
?️ GiliSoft Audio Recorder Pro – Linear recording & support for all sound formats
?️ Sound Forge Pro – Multi-channel recording & VST3 effect support
? Audials One – Best streaming recorder for music & audiobooks
? Leawo Music Recorder – Built-in recordings library
?️ PreSonus Studio One – Intuitive drag-and-drop-based workflows
How do I record for free on Windows 10?
Although the software in our list can offer you high-quality audio recording, if you just want to take a quick vocal note for personal use, you can try that with the built-in Voice Recorder in Windows.
Without further ado, here’s how to record music on Windows 10 directly:
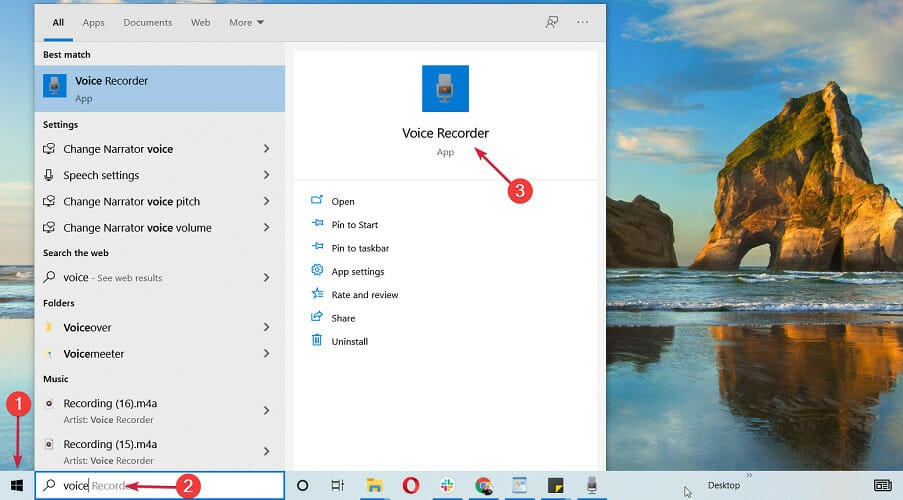
Click the Start button, type voice, and click on the Voice Recorder app from the results.
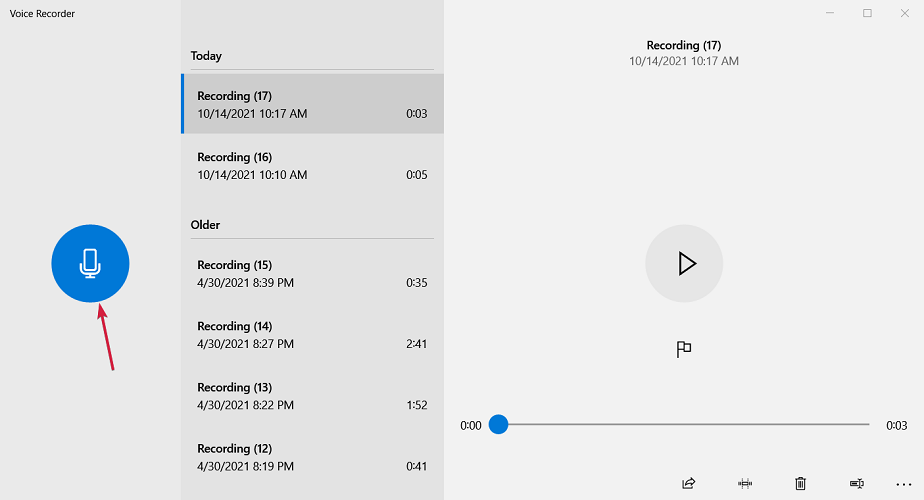
Hit the big Record button from the left.
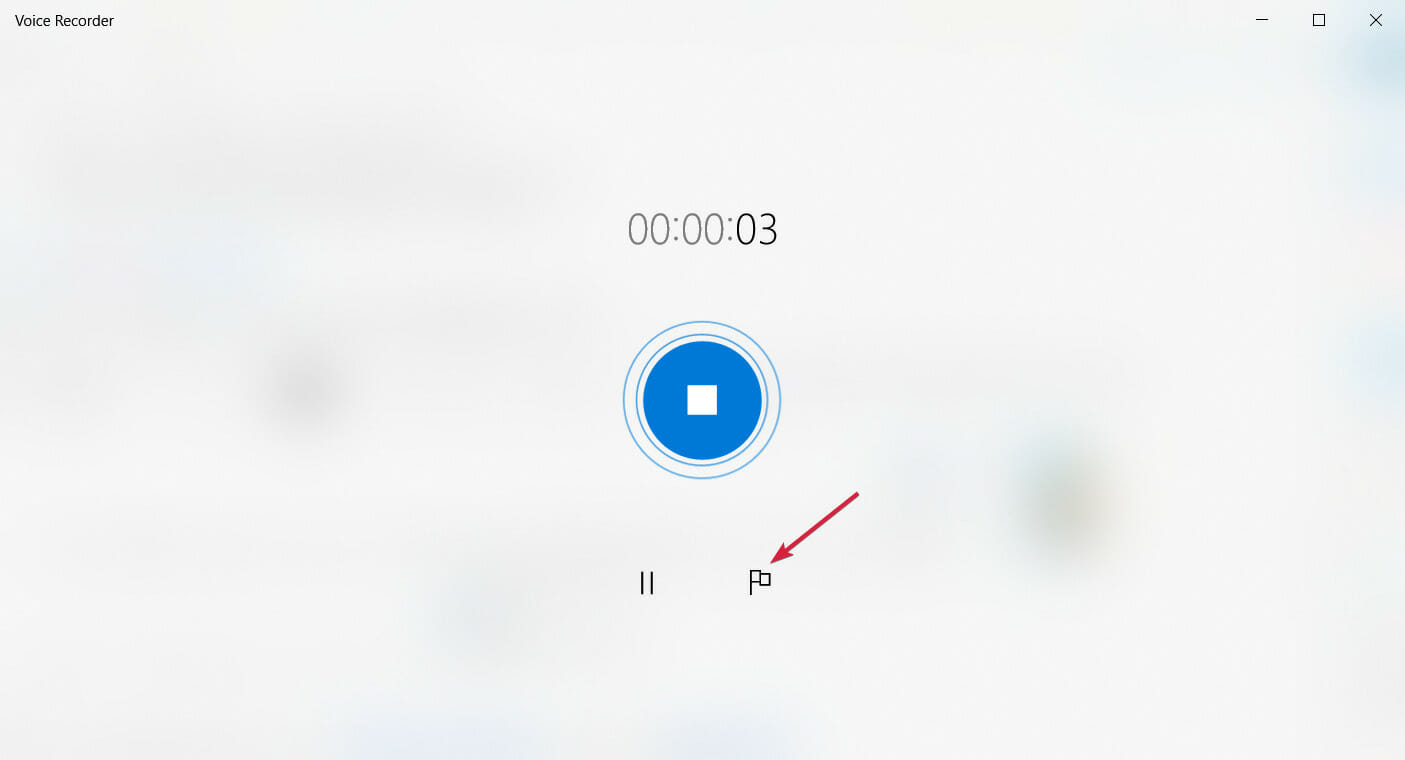
The tool will start recording and you will see a time counter. You can also click the Flag icon below to add a marker to your audio.
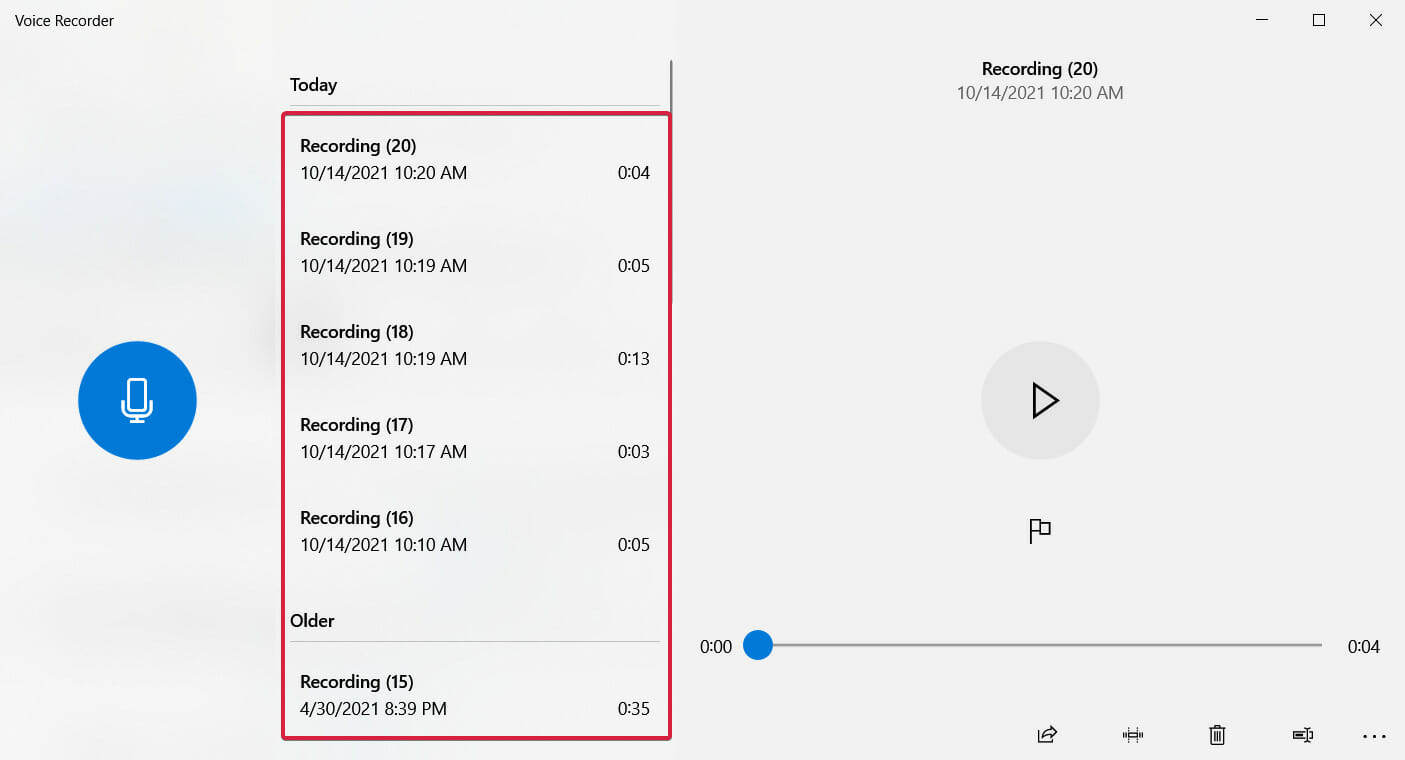
After you finish recording and press the Stop button, you will see all your recordings on the left and click the one that you want to play.
It cannot get more simple than that. And you also have some basic editing features below the player like sharing, trimming, deleting, and renaming the audio track.
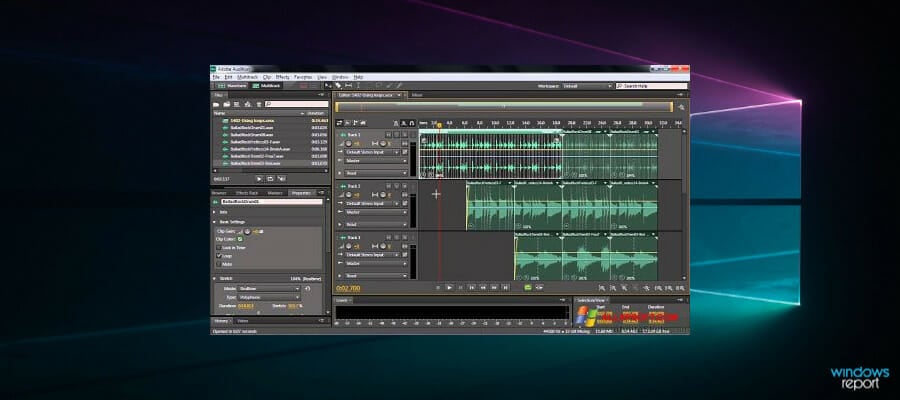
Adobe Audition is a versatile software that you can use to record, edit, mix, and repair your audio files.
You can enjoy Audition for a wide variety of purposes, ranging from recording podcasts and interviews to recording vocals.
Once you’ve recorded your track, you can polish it and use the built-in tools to change the volume, apply various effects, maybe add a Studio Reverb effect if you fancy it, and more.
You can also use the Multitrack Editor to combine several audio recordings into a single piece. This is an excellent tool for podcasters to use.
The Dynamics Processing features automatically lower the volume on the other tracks if it detects a voiceover track. It integrates perfectly with Premiere Pro allowing you to add your own audio to videos.
Another interesting function is Strip Silence which identifies and removes silent or inactive portions of the track automatically, without losing synchronization in multitrack audio.
You will really appreciate that you are able to apply effects to each clip, track, and tweak them even while playing the mix.
Let’s take a look at some of its best features:
Complete integration with other Adobe products like Premiere Pro
Automatically rearrange any song to fit any duration
Excellent tools to create podcasts
Friendly interface even for non-professionals
Includes precision editing tool for videos
Adobe Audition
This tool includes everything you’d need as a professional for your audio projects. Give it a try!
WavePad – Speech synthesis and voice changer capabilities
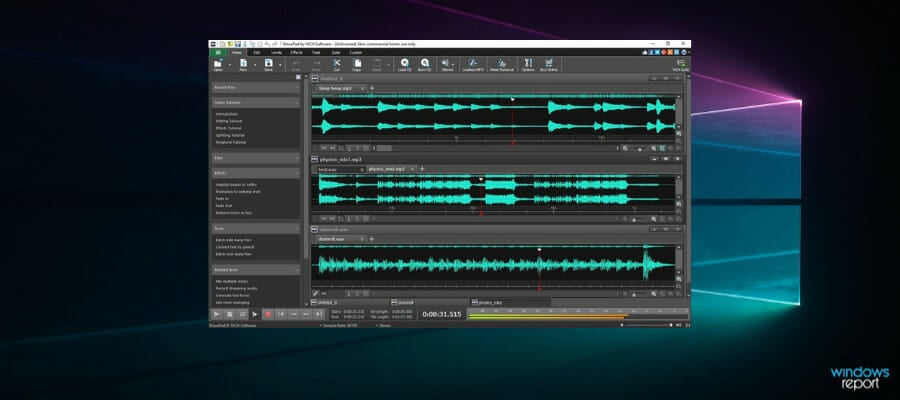
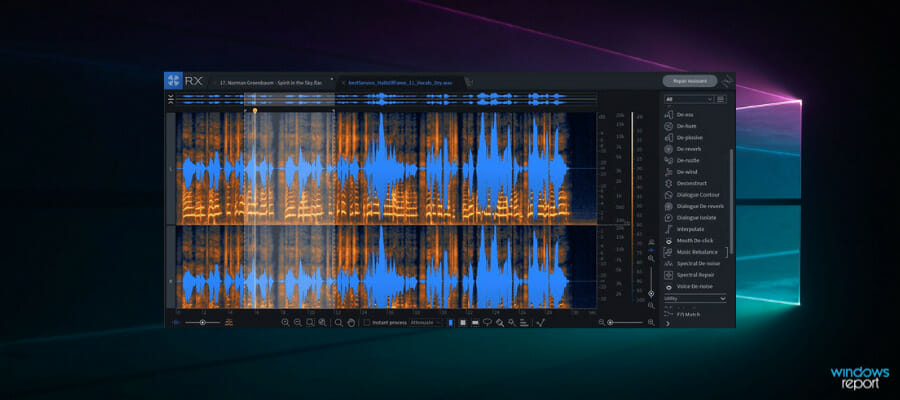
WavePad is a professional audio recording and editing software that offers more features than you’ll possibly have the time to test.
You can record, cut, copy and paste sounds, and then add effects like echo, amplification, and noise reduction.
WavePad supports almost all audio files which means you can always rely on this tool to edit even the most obscure file types – WavePad can handle it.
This tool is particularly great for vocals editing because it comes with advanced tools like spectral analysis (FFT), speech synthesis (text-to-speech), and voice changer.
Of course, you can play with audio effects like amplify, normalize, equalizer, envelope, reverb, echo, reverse, and many more.
It can also help you to restore a track with the built-in noise reduction function as well as the click pop removal. In other words, it cleans the recording of any unpleasant sounds.
WavePad can work with any mono or stereo audio track with sample rates from 6 to 192 kHz, and 8, 16, 24, or 32 bits.
The key features of WavePad are:
Separated and multichannel recording
Integrated VST plugin support for access to thousands of additional tools and effects
Batch processing allows you to apply effects and/or convert thousands of files as a single function
Scrub, search, and bookmark audio for precise editing
Create bookmarks and regions to find, recall and assemble segments of long audio files
Spectral analysis (FFT), speech synthesis (text-to-speech), and voice changer
WavePad
Full features for audio and music editing, compatible with Windows and Mac OS – eager to enjoy it?
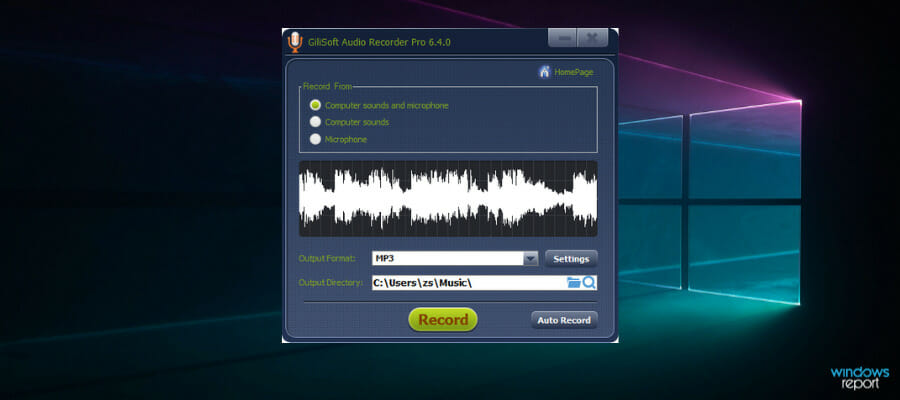
GiliSoft Audio Recorder Pro is a great tool for all novices and average audio software users who want to record certain sounds.
However, do not get confused as it quickly transforms into a high-tech tool for professional users too.
Its functionalities allow you to record a lot of audio material like instant messaging talks (Skype, Yahoo Messenger, Google Talks), Internet broadcasts, and simple voice.
You can use it to record voice and convert it to MP3, WMA, and WAV. It supports multiple sound cards so most definitely it will work on your PC.
It has a preset for all sound formats so you can get a smooth and linear sound when recording to different file formats, but you also can play with the presets if you need it.
This tool includes an advanced automatic recording that helps you schedule recording for a website or anything that runs on your PC to start or stop at a certain time.
Resuming, this audio recording software is the best for home use and for beginners and it works perfectly on Windows 10.
Take a look at its best features below:
Recording Skype, Yahoo Messenger, and Google Talk
Friendly interface with simple controls
Great file type support
Automatic recording scheduling
High quality recordings
Gilisoft Audio Recorder Pro
A simple and reliable audio software to record sounds to MP3, AAC, M4R, or WMA audio files.
Sound Forge Pro – Multi-channel recording & VST3 effect support
If you want professional audio recording software, Sound Forge Pro might be just what you need.
The application supports multi-channel recording, powerful editing features, and an array of plugins to choose from.
Sound Forge Pro has a professional user interface, and thanks to the 64-bit support, you’ll achieve maximum performance during audio processing.
There’s also VST3 effect support, allowing you to use all sorts of plug-ins for your audio creations. Of course, the application comes with three noise reduction effects allowing you to create clear audio recordings.
Note that it can work with 32 channels of recorded audio, and it also allows you to easily edit or convert your audio in a multichannel environment.
In order to streamline the recording process, it supports a one-touch recording feature, and there’s also support for high-quality Direct Stream Digital files.
There’s also support for MIDI timecodes, so you can trigger playback or recording by receiving the timecode from another device.
Let’s review some of its best features:
As for audio editing, all standard features are available, and you can use the Event tool to edit multiple audio events in a single window. You may also edit the waveform simply by redrawing it with the Pencil tool.
If you use other Magix software, you’ll be pleased to hear that you can create ACID loops using this tool.
You can create ACID loops
MIDI timecodes support
Professional user interface
Simple edit of the waveform by using the Pencil tool
VST3 plugin supports a lot of effects
Sound Forge Pro
Try out the industry-standard tool for recording and mastering tracks, and go beyond musically right away.
Audials One – Best streaming recorder for music & audiobooks
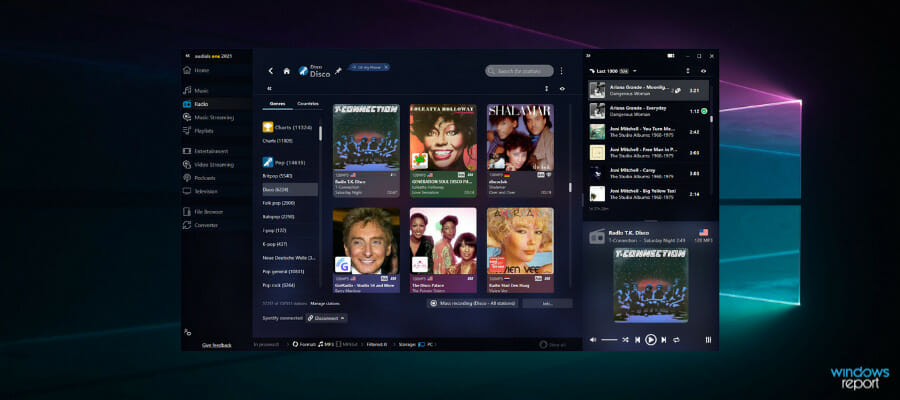
Music, charts, videos, movies, TV series, live TV, and more can be saved fast and in the best quality with the new Audials One!
Audials One offers the largest music database with 12,000,000 MP3s and provides you legally and for free with each piece of music by 3,000,000 musicians.
Simply enter the title, album, or artist and Audials One will find the music in just a few seconds from the connected music video portals like YouTube, Spotify, or from the 100,000 monitored Internet radio stations.
This means for you: all the pieces of music that you always wanted to have plus always the latest charts are at your disposal.
Audials One is also the best streaming recorder for music and audiobooks on Spotify and Amazon Music, or to build your own home video library with films and series from Amazon, Netflix & Co.
333 live TV streams from around the world make television an experience. You always have the program of all your favorite channels with you and can even record it with one click.
Let’s see some of its most important features:
If you’re missing a live stream channel, just add it manually. With the online TV in Audials One, you are far ahead of other providers and enjoy conveniently thousands of programs.
No software offers so many additional features: podcasts, music TV, player, music management, video library, ID3 Tagger, DVD copier, universal converter for all file formats, and all devices.
Streaming recorder for audiobooks on Spotify and Amazon Music
Record live TV streams from around the world
100,000 monitored Internet radio stations
Huge music library with over 12 million MP3s
Great music and video management
Audials One
Need all-in-one service? Recording, movies, or music streaming are all there with this stunning software.
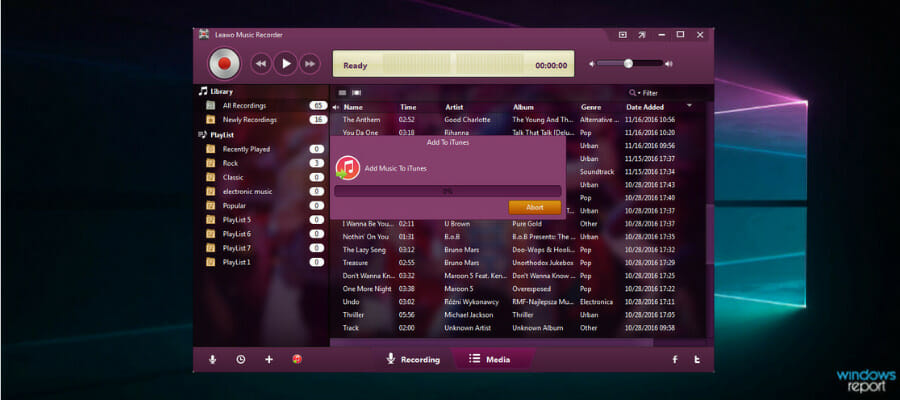
Leawo Music Recorder is a friendly music recording software that helps you record free music from any built-in input audio, computer audio (including Windows and macOS), and online music sources, like YouTube, Spotify, AOL Music, Last.FM, etc.
And then, you can easily save them in MP3 or WAV file format with lossless quality so you can use them in your playlists or musical projects.
Also, the tool supports a variety of online radio stations and Podcasts like AOL Radio, Sound Cloud, NPC, iHeartRadio, RTVE, 8 Tracks, RDIO, iTunes Radio, BBC Radio Audio, and many others.
Of course, you can use it to record your microphone or any input audio streams from the built-in or discrete computer soundcard.
Leawo Music Recorder can even record the music or audio that is playing on your computer locally.
Take a look at some of the most important features:
And to keep all recordings organized, the software can automatically add tags, that’s if you’re not doing it yourself in the dedicated music tag editor.
To up the ante, the app comes with a built-in library that helps you keep track of and manage all the recordings with ease.
Record any sound from your computer and online music sources
Save your recording in MP3 or WAV formats with lossless quality
Add tags automatically or manually to keep track of your recordings
Built-in library for track management
Windows PC and macOS seamless compatibility
Leawo Music Recorder
Record and edit any sounds and music online, from your computer and its inputs with this great tool!
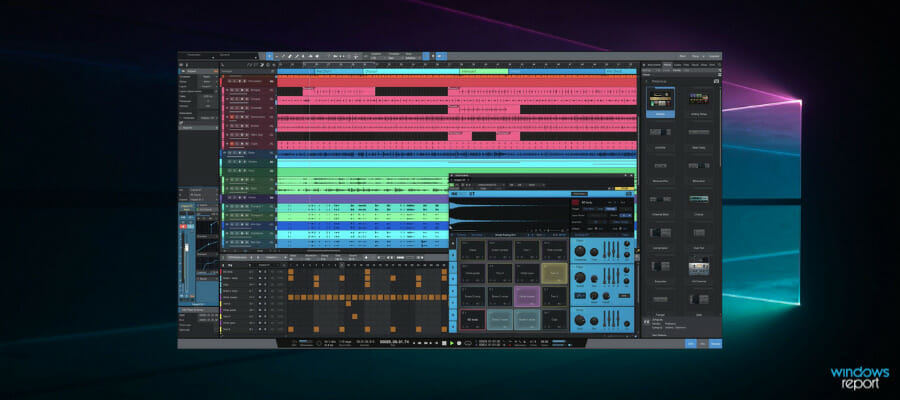
PreSonus Studio One comes in various paid versions, plus a free version, but the latter is rather restrictive.
The free option does not let you import or export MP3 – for obvious reasons – it also won’t let you upload directly to SoundCloud, a feature that is liked very much in its paid versions.
While this sounds very limiting in terms of features, the free version will not alter your projects or reduce their quality because you didn’t pay up.
Although it might lack certain obvious features, it still continues to include other advanced tools such as time-stretching, latency compensation, etc. that can help you create the track as you like.
The free version acts more like a demo rather than a full software, and ideally, you should consider paying for it after trying out the free one.
Let’s briefly go through its most important features:
Otherwise, Studio One is also friendly to beginners because the workflow is based on the drag-and-drop method for tracks, plug-ins, effects, and presets, so it’s pretty straightforward.
You can even convert MIDI to audio or audio to MIDI by dragging and dropping. It cannot get easier than that, right?
Friendly interface and simple, drag-and-drop functionality
Extract chord notes directly from the audio
Advanced plug-ins for sound processing
Multi-source processing for analog and digital sound
What should you look for in audio recording software?
Whether you want to have your personal recording studio or you’re into podcasting, there are different solutions out there that will fit perfectly.
However, we have a few pointers on how to choose the audio recording software for your needs.
➡ Match the tool to your needs
If you’re recording some audio podcasts, you will just need a good vocal editor with basic effects and noise reduction features.
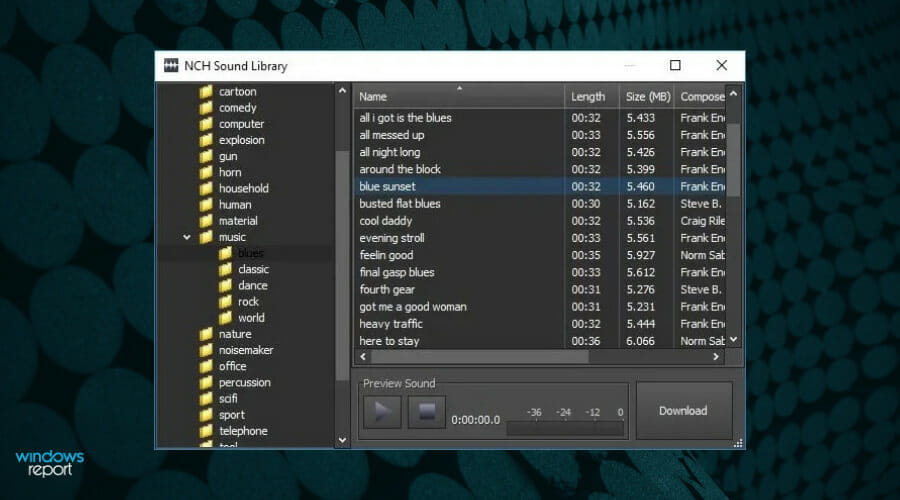
WavePad’s huge sound effects database
Any tool on our list will help you with that, but if you’re into studio-quality recordings for vocals and instruments, you will also need powerful plug-in support and effects.
➡ Test the software interface
It’s important to get a tool that matches your level of knowledge. A professional audio studio may be too complicated for a beginner.
Most of the tools have a demo or trial version so you can test them and see if the features you’re going to use the most are accessible and if the interface is intuitive.
➡ Look for plug-in support
Audio recording software tools usually come with basic effects and samples and rely on plug-ins for extra features. Therefore, it’s important to verify if you can install your necessary add-ons.
We hope that our list including the best audio recording software available for Windows 10 helped you find what you were looking for.
Some are complicated and suited for an extremely professional environment while the others are basic and can be used for simpler things like your weekly podcast.
They don’t even do anything except record your voice and save it in a file, just like the Voice Recorder app in Windows 10 but you can agree that they are extremely easy to use.
Did you try any of these tools? If so, tell us about your experience in a comment in the dedicated section below.
The need for a powerful backup software solution for servers is obvious for any business. They became known as a great way to avoid sudden data loss issues.
They are also powerful enough to face severe virus attacks, yet don’t take these servers for granted.
How can backup software for servers protect my business?
It is still essential to ensure your data is securely backed up, as all kinds of events may happen out of the blue.
With so many backup programs in the market being too expensive or having extra features that are not user-friendly, making a choice isn’t always easy.
Following is a list of top-budget backup software tools for servers, so rest assured that your hard earned money is safe.
What’s the best backup software for servers on a low budget?
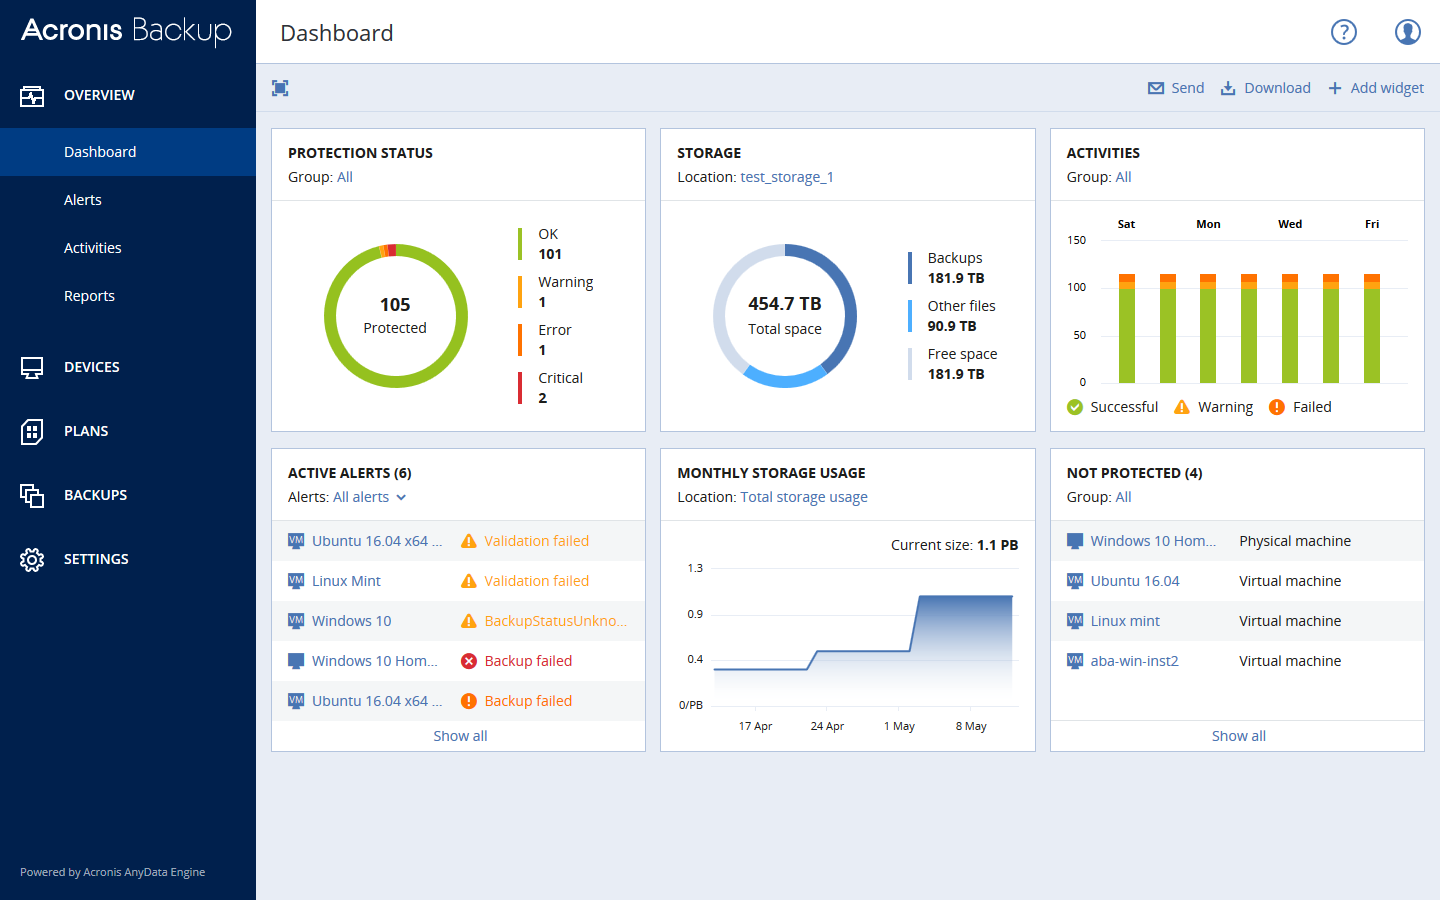
That’s our top pick for a good reason. As a top-tier suite of backup solutions, it’s rock-solid when it comes to backing up data to a storage location of your choice, including Acronis Cloud or Azure.
Acronis Cyber Backup promises a full-featured backup solution for the entire Windows Server environment, so you’ll be pleased to hear that it covers cloud accounts, phones, laptops, and more.
It is also incredibly simple to restore backups in the unfortunate event of a crash, not to mention the built-in protection against malware and ransomware.
Lastly, keep in mind that there’s a full use period of no less than 30 days to decide if Acronis Cyber Backup ticks all the boxes or not.
These are some key features that Acronis Cyber Backup brings to the table:
Data management is easily done through a web browser
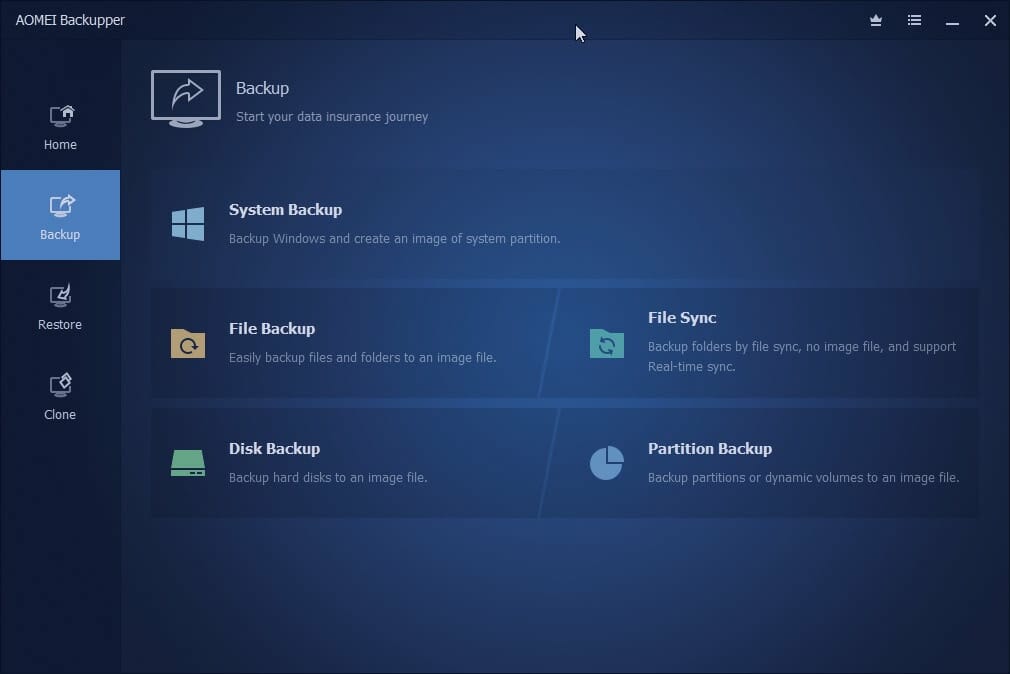
Managing backups is just one of your countless responsibilities, so consider Aomei Backuper Server for all-in-one easy installation and various specialized tools for data protection.
Do keep in mind that Aomei Backupper Server is targeting both small and mid-size businesses, so it provides detailed backup reports of successes and failures.
Therefore, it is incredibly easy to troubleshoot issues and make sure that all backups follow the plan.
On top of these, it’s more than a solution for data protection. It specializes in disaster recovery as well and it offers a wealth of powerful Universal Restore tools.
These are some key features that Aomei Server Backuper brings to the table:
We have taken into account multiple circumstances that any business would be in when needing to back up a server.
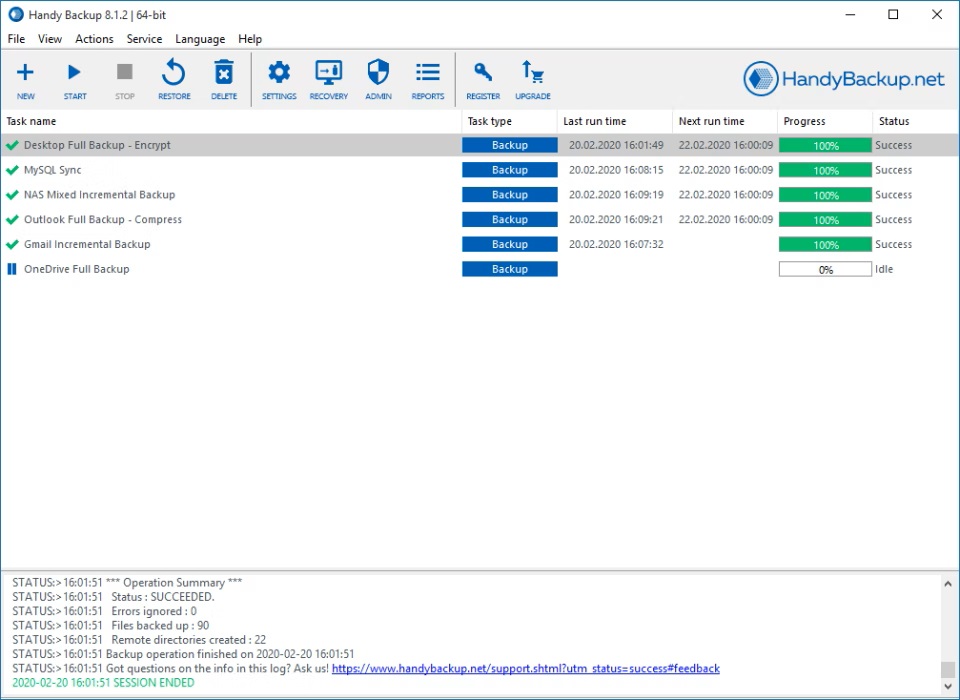
Handy Backup easily stands out as one of the best software tools for servers.
Firstly, it offers countless client and server backup solutions to back up Hyper-V images on local machines and even VMware virtual machines.
Even more, the Management Panel will make you feel right at home any time you want to set up, schedule, and control server backup and recovery tasks in your domain.
These are some key features that Handy Backup brings to the table:
Backs up websites, cloud accounts, MS Exchange, FTP storages, and more
Carbonite has lots of bases covered too when it comes to looking for the best budget backup software for servers.
Known as one of the most reliable backup services available to Windows and Mac OS users, Carbonite promises automatic cloud backup for all data on your server.
One of the benefits of using it includes the fact that it also protects photos, video files, tax forms, and not only against ransomware attacks.
No less important, you’re about to enjoy backup software and unlimited cloud storage service for one PC.
These are some key features that Carbonite brings to the table:
Very intuitive UI
Backups from the entire computer or server
Countless backup destinations, including external hard drives
While we’ve seen other backup solutions that are indeed more polished than Backup Exec, that’s one of the few cost-effective protection and recovery solutions for your data.
Since it is a reliable solution to manage your entire data ecosystem from a single console, it can help you save valuable resources with easy deployment.
Despite the strong reliability of backups, you need to consider the risk of failure through malicious activity and not only.
To let you know in time, Backup Exec helps you track every backup, replication, and recovery procedure.
These are some key features that Backup Exec brings to the table:
Backup procedures done in a few clicks
SaaS workloads protection
Certified cloud connectors for popular cloud vendors
Some NBA 2K23 players are getting error code 56d85bb8 on Xbox One, PlayStation, and PC. The error, as stated, is usually related to the internet connection you are using, and there is no update from the developers on how to fix it. However, there are specific workarounds to fix this problem.
This guide will discuss the popular reasons for the issue and the available fixes to resolve the error here. Let’s start!
What causes the error 56d85bb8?
There are various reasons for the error code 56d85bb8. Some of the popular ones are mentioned here:
The game server is down: If the NBA game server is down due to outage issues or if there is a problem with the online servers, then you might get this error.
Slow internet connection – You need a steady internet connection to run the game smoothly. If your internet connectivity is poor, you can see this error.
The device has pending updates – Be it your PS, Xbox, or your PC, if the device is not up to date, it might cause all kinds of issues. Check for updates for your device and if available, install them.
How do I fix error 56d85bb8?
Before engaging in advanced troubleshooting steps, you should consider performing the following checks:
To disable an internet connection on PlayStation, you can go to Settings, then click Network. Next, remove the checkmark for Connect to the Internet. Then, to enable it, place the checkmark again.
Go to Settings on Xbox.
Click Network Settings.
On the next screen, select Go offline.
Now wait for 2-3 minutes, and select Go online.
Close the Settings app and launch NBA.
3. Set static IP & Port Forwarding
3.1 Find IP and MAC address
Go to Settings on Xbox.
Select NetworkSettings, then Advanced Settings.
Locate theIP address section and note the IP and MAC addresses.
Tip
To find MAC and IP addresses on PlayStation, navigate to Settings, then Network. Next, go to View Connection Status, and note them down.
3.2 Add Static IP to the router
Go to your preferred browser.
Enter the IP address for your router—login using your credentials.
Locate and click IP & MAC Binding.
Click Add New.
Enter the IP and MAC addresses you noted in the previous step.
Click Save.
3.3 Port Forwarding
Now go to Forwarding/Port Forwarding section.
Click Add New.
Type the Service port you want to open and the IP Address of your device(PC, Xbox, PlayStation).
Select Protocol to TCP, UDP, or ALL; Change Status to Enabled.
Click Save.
The ports that you can use for your devices, including PlayStation, Xbox, Steam, etc.:
Device Name
TCP
UDP
PlayStation 4
1935,3478-3480
3074,3478-3479
Steam
27015-27030,27036-27037
4380,27000-27031,27036
Xbox One
3074
88,500,3074,3544,4500
Switch
6667,12400,28910,29900,29901,29920
1-65535
So, these are methods that you can use to fix error code 56d85bb8 NBA 2K21. If none of the above methods worked for you, try reinstalling the game.
If you have any questions or concerns about the error, feel free to mention them in the comments below.
Omegle is a popular chatting service that lets you match with other random participants and engage in conversation.
On the downside, Omegle doesn’t encrypt chat data and keeps it on a server, so it’s possible for malevolent agents to access it.
The obvious solution is to use a VPN. Unfortunately, many VPNs are not working with Omegle.
If you want to find out more about this issue and learn how to make VPNs work with Omegle, keep on reading.
Why does my VPN not work on Omegle?
The main reason why you have the Omegle error connecting to the server VPN is that your IP address was identified and blocked.
Some privacy software had the error connecting to server VPN, such as Surfshark or ProtonVPN.
NOTE
It’s known that Omegle bans VPNs from different people by their IP addresses for various reasons, so you might want to check your VPN client and reconnect on another server.
Even more, the Omegle error connecting to servercan happen for other reasons and leads to the website not working, so you need to take immediate action.
➡️ How to use Omegle with VPN?
If you need to bypass this unpleasant event on this conversational video chat website, be sure to use the right VPN software that offers secured servers with blazing-fast speed.
Thus, you can follow the next steps to connect to your VPN and start chatting on Omegle:
If the VPN service comes with Private DNS servers, it would be wise to use this feature.
As far as bypassing geo-restrictions goes, enabling Private DNS does a better job than using a VPN that lacks this option.
Aside from preventing DNS leaks that could compromise your privacy, Private DNS also reduces VPN detection/blocking rate.
4. Consider VPN browser addons
Use the VPN’s web browser extension to prevent WebRTC leaks if possible. As we briefly explained above, leaks are bad for VPN detection rates.
Whether it’s IPv4, IPv6, DNS, or WebRTC leaks, they make it possible for various online systems to detect VPN traffic and successfully block it.
Omegle makes no exception. So, to make your VPN connection airtight, we recommend using the VPN’s browser extension to eliminate WebRTC leaks.
5. Get VPNs with multi-hop connections
Certain VPN services provide their customers with a useful feature that lets them bounce their connections through more than just one location.
For instance, NordVPN has a feature called Double VPN, which bounces your connection through two secure servers. You can read all about it in our in-depth NordVPN review.
However, using proxy servers such as Shadowsocks or SOCKS5 also grants the same effect.
The bottom line is that you’re less likely to be blocked if your connection is not tied to just one location.
Switch the VPN server if Omegle rejects your current one
Best VPNs for Omegle
In this day and age, the VPN market offers an overwhelming amount of options. But as we mentioned, not all VPNs are made equal.
So how do you pick the best one for Omegle?
Luckily, we took it upon ourselves to find out. We tested top-ranking VPNs to make sure they’re error-free on Omegle. Additionally, we made sure they offer great speed, privacy features, and ease of use.
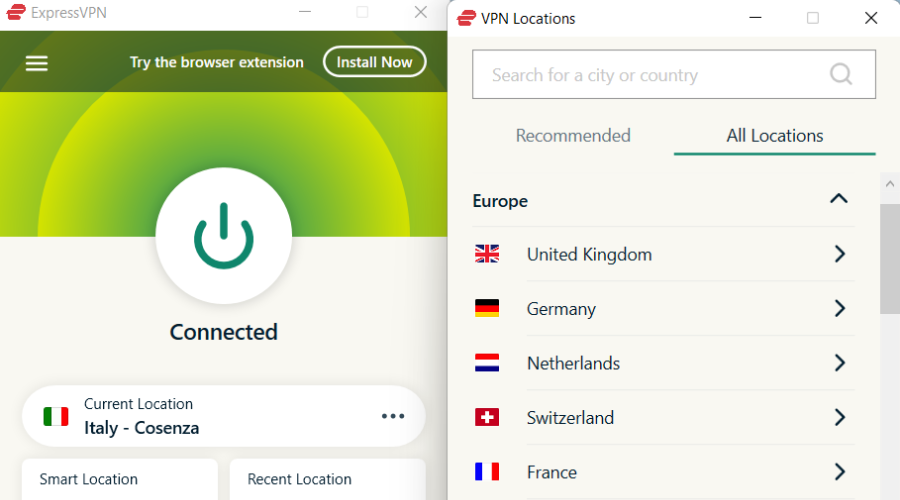
ExpressVPN has servers in 94 countries. With this coverage, you can rest assured that you have plenty of options to securely access Omegle.
Just like PIA, this VPN has excellent speed rates. We registered The lowest rate on a US server – 72.93 Mbps (download).
This speed easily supports heavy-duty tasks like gaming, so connecting to Omegle will be a breeze.
On top of that, ExpressVPN has built-in obfuscation on all servers. This means your VPN traffic is undetectable. Therefore, you won’t have to deal with VPN errors like Omegle not connecting to servers.
✅ Pros:
Shields data with AES-256-bit encryption and obfuscation
5000+ servers worldwide
Easy-to-use apps on all major devices
Tested zero-logs policy
❌ Cons:
Pricier than competitors
ExpressVPN
Upgrade to this reliable VPN for an error-free experience on Omegle!
PIA has a huge network of 35,000+ VPN servers in 80+ countries. So you can securely access Omegle from anywhere without worrying about overcrowding and slowdowns.
The lowest speed we registered when we tested it with Omegle was 78.89 Mbps (download), on a New York server. That’s more than plenty to maintain a good connection with excellent video quality.
Also worth noting are its obfuscation and multi-hop features. When you use them, your VPN traffic looks like regular HTTPS.
Therefore, you’ll have no issues bypassing Omegle IP bans or accessing it from restricted countries like Qatar or the UAE.
✅ Pros:
Top-level encryption for unbreakable privacy on Omegle
Dedicated apps for all platforms
DNS and IP leak protection features
45-day refund time
Security kill switch to prevent data leaks
❌ Cons:
The app is slightly outdated
Based in the US (not the most privacy-friendly country)
Private Internet Access?
Looking for a VPN that works on Omegle? PIA might be the one.
This tool has 5000+ servers in 60 countries. It stands out because it has specialty servers for different purposes: obfuscated servers, double VPN, P2P, and more.
Now, we all know Omegle tries to ban VPNs, and it’s getting really good at it. But if you use NordVPN’s obfuscated servers or double VPN, you won’t have to worry.
You’ll remain under the radar. No server errors when connected to Omegle, and certainly no You’ve been banned pop-ups.
Moreover, when we tested NordVPN on Omegle, the lowest speed we registered was 59.86Mbps (download) on a Swiss server. That’s more than excellent speed for Omegle, whether for texting or video.
✅ Pros:
Advanced security features
Military-grade encryption
Fast connection speeds
Large network of servers
❌ Cons:
Due to its popularity, some regular servers were blocked by Omegle
NordVPN
Lift bans and protect your Omegle data with NordVPN!
If Omegle blocks your VPN address it means that your server address was detected and banned so you can’t hide your real location.
So if Omegle doesn’t work with VPN software means that its server network is easy to identify. Omegle can detect and block that by tracking multiple connections using only one IP address.
How to use VPN on Omegle without a ban?
To use a VPN on Omegle without getting a ban, you have to enable security features that disguise VPN traffic. Using them, it’s less likely that Omegle will know you use a VPN.
Most VPN apps call these obfuscation features.
Usually, you can easily enable them from your VPN’s settings. For instance, in PIA you have to go to Settings> Multi-Hop> Check Multi-hop and Obfuscation.
Alternatively, you can use a dedicated IP. As opposed to regular VPN IP addresses, this one’s only yours, no other VPN users will share it.
The benefit of this is that Omegle won’t get multiple connections incoming from the same IP/IP range. This makes it more difficult for the platform to associate your traffic with VPN use.
The only drawback here is that most VPNscharge extra for dedicated IPs.
If your VPN is not working on Omegle, there might be hope for you.
Discover Omegle and check out the best tips, tricks, solutions, and guides we offer you. Also, visit our VPN Troubleshooting section if you want to read more user-friendly VPN tutorials.
However, note that our suggested fixes may not work all the time or for everyone.
If that’s the case and you can’t find a working suggestion, please get in touch with your VPN provider’s support team for a fix.
Many users frequently print documents on Windows, but unfortunately, certain problems can occur from time to time.
One recurring issue is the printer stuck on spooling case. And you guessed it, whenever this happens, the printer keeps spooling endlessly. In other words, the printer says spooling but never prints.
Before we go any further, what does spooling mean on printer? The spooling status on a printer basically indicates that your job is in a queue while other documents are being printed.
While it is normal for spooling to take a bit longer since the software handles two tasks simultaneously, it shouldn’t be spooling forever.
Here’s the big question: Why does my printer get stuck on spooling? Let’s find out together.
Why is my printer spooling and not printing?
From software conflicts due to incompatible versions to deprecated or damaged drivers, glitchy Windows accounts of profiles, file corruption, and overzealous security programs, there can be many culprits behind this issue.
Now, users repeatedly reported the printer status spooling on Windows 10. However, that is far from being the only platform impacted, or the only manifestation of the issue, as follows:
Printer stuck on spooling Windows 11, Windows 7
Printer spooling but not printing, printer status spooling but not printing
Network printer spooling but not printing
Printer spooling forever – printer says spooling but never prints
Print job stuck on spooling, checking the spooler service
1. Move files and restart the Print Spooler service
1.1 Move the files to a different folder
Open File Explorer and go to the following folder: C:\Windows\system32\spool\drivers
You should see three folders available: IA64, W32X86, and x64.
Open each of these folders and search for a directory called 3. This directory should have a large number of number folders inside it. For example, W32X8631, W32X8632, etc.
Select all the numbered directories inside the 3 folders, right-click them and choose Cut.
Now paste those folders to a different directory. For example, you can move them to your Desktop or any other folder.
During the printing process, the files will be sent to the printing queue, but sometimes there can be a problem with those files or with the Print Spooler service, so you’ll need to move those files and restart the service.
Press Windows Key + R and enter services.msc. Press Enter or click OK.
Locate the Print Spooler service and check its status.
If the Print Spooler service isn’t running, you can start it by right-clicking it and choosing Start from the menu.
After moving the numbered folders to a different location, you’ll need to restart the Print Spooler service. To do that, follow the steps above.
You can follow this in depth print spooler repair guide to apply more fixes when your printer stays stuck on spooling.
1.3 Restart the co-dependant services
In the Services window locate Print Spooler, right-click it and choose Properties.
Look for available services in This service depends on the following system components field. Print Spooler service is dependent on those services and in order to start it you need to enable those services first.
In addition to enabling the services, you need to set their Startup Type as Automatic. After the depending services are enabled, try to start Print Spooler again.
Sometimes, the Print Spooler service can’t start due to problems with dependent services, and if that happens, you need to perform the steps above.
1.4 Restart the Print Spooler service using Command Prompt
Open Command Prompt as administrator. You can do that by pressing Windows Key + S and typing cmd, then clicking on Run as administrator.
When Command Prompt opens, you can enter net stop spooler command to stop Print Spooler and net start spooler to start the Print Spooler service.
If you don’t want to use the Services window, you can easily restart the Print Spooler service by using Command Prompt. Some users prefer this approach since it’s faster, but you can use any method that works for you.
To restart Print Spooler using Command Prompt, perform the previous steps above.
After moving the numbered folders to a different location and restarting the Print Spooler service, the issue should be completely resolved.
Need to turn the service back on in Windows 11? Follow our guide to enable Print Spooler and restore printing quickly.
2. Reinstall the printer driver
2.1 Update drivers manually
Press Windows Key + X and select Device Manager from the list.
When Device Manager opens, locate your printer. If you can’t find it, go to the View tab and check Show hidden devices.
Locate your printer, right-click it and choose Uninstall.
Check Delete Driver Softwarefor this device and click OK.
After the uninstall process is completed, restart your PC.
Sometimes problems with printing stuck on spooling can occur due to your drivers, and one way to fix that problem is to reinstall your printer driver. To do that, follow the steps above.
Now that the printer driver is uninstalled, go to your printer manufacturer’s website, locate your printer model and download the latest driver for it.
Run the setup file and wait until the driver is installed. After that, check if the error is resolved.
2.2 Update drivers automatically
After you have uninstalled your drivers, we recommend reinstalling/updating them automatically with a specialized driver updating tool.
Downloading and installing drivers manually is a process that carries the risk of getting the wrong driver installed, which may lead to serious malfunctions in your system.
Drivers can then be updated in batches or one at a time, without requiring the user to make any complex decisions in the process.
3. Downgrade to the older version of Office
Many users use Microsoft Office to edit and print their documents, but according to some users, printing can get stuck on spooling due to problems with Office.
One suggested solution that worked for some users is to downgrade their Office installation to the previous version. After doing that, the issues with printing were completely resolved.
4. Delete all pending documents
Go to the following folder: C:\Windows\System32\Spool\Printers
You should see all pending print jobs inside the Printers folder. Delete all the files inside it and restart your PC.
All your documents are moved to a specific folder before they are printed, but sometimes certain issues can occur with Print Spooler that can prevent the printing process on your PC.
To do that, simply open the Services window and locate the Print Spooler service.
Right-click it and choose to Stop from the menu.
In addition, be sure to set the Startup Type for Print Spooler to Automatic.
After doing that, you need to delete all queued printing jobs. To do that, follow the easy steps above.
After your PC restarts, navigate to the Services window and check if the Print Spooler service is running.
If everything is working correctly and if its Startup Type is set to Automatic, the Print Spooler service should start automatically with your Windows 10.
After removing the pending documents and checking the status of the Print Spooler service, try to print your documents again.
5. Disable Bidirectional support for your printer
Press Windows Key + S and enter printers. Choose Printers& scanners from the menu.
When the window opens, locate your printer, click on it and choose Manage from the menu.
From the left, click on Printer properties.
Go to the Ports tab and at the bottom of the window you’ll see Enable bidirectional support option. Uncheck it and click Apply and OK.
If you have a local network in your home or in your office, you’re probably sharing a printer with other users.
This is usually the most convenient way to print documents because it allows users to print documents from their PC remotely.
Although the printer-sharing feature is convenient, certain issues with it can appear. If printing gets stuck on spooling while using a shared printer, you might want to check the printer’s properties and disable Bidirectional support.
After disabling the Bidirectional support, check if the problem is resolved.
6. Disable your antivirus/firewall
Security software is important, but sometimes these tools can interfere with your printer and cause printing to get stuck on spooling.
To fix this problem you need to temporarily disable your antivirus and firewall software.
Keep in mind that Windows 10 comes with Windows Defender which works as a default antivirus, so even if you disable your third-party antivirus software your PC won’t be completely defenseless.
After disabling your antivirus or firewall, check if the problem is resolved.
Editor’s tip
Many users are affected by the PrintNightmare vulnerability. If you’re one of them, read our guide on how to download the KB5004945 patch and fix the problem.
7. Try using a different Windows account
Sometimes printing can get stuck on spooling due to problems with your Windows account.
To see if your account is the problem, we advise that you switch to a different Windows account and check if printing works on that account.
If that fixes the problem, you need to check if your account has the necessary permissions to print.
When Command Prompt starts, enter sfc /scannow and press Enter.
Wait until the scanning process is completed.
After the scanning process finishes, check if the problem is resolved.
Your files and your Windows installation can sometimes get corrupted, and that can cause issues with printing. If you have problems with printing stuck on spooling, you might be able to fix them simply by performing an SFC scan.
SFC scan will scan your PC for any corrupted files and try to fix them. To perform an SFC scan on your PC, you need to do the above.
9. Disable Allow the service to interact with desktop option
Open the Services window, locate the Print Spooler service, and double-click it.
When the Print Spooler Properties window opens, go to Log On tab.
Locate Allow the service to interact with the desktop option and make sure that it’s disabled.
Click Apply and OK.
A few users reported that the problem with printing stuck on spooling can be resolved simply by disabling Allow the service to interact with the desktop option.
After disabling this option, check if the printing issues are resolved.
10. Disable printer status notification
Open the Printers & scanners section. For more information on how to do that be sure to check Solution 5.
When the Printers& scanners window opens, select your printer and choose Manage.
Now click on Printer properties from the left.
Go to the Advanced tab and uncheck Show informational notifications for local printers and Show informational notifications for network printers.
After that, select Apply and OK to save the changes.
11. Print PDF files as images
Users reported that printing gets stuck on spooling on their PC whenever they try to print a PDF file. Thus, cases in which documents cannot be printed from Adobe Acrobat are quite common.
Apparently, this issue affects only low-end and personal printers, and if you’re having this problem, we advise you to try to print your PDF documents as images.
To do that, simply try to print a PDF document and look for Print as image option. Sometimes this option can be hidden in the advanced settings section, so you’ll have to look for it.
After choosing this option simply click the Print button and your document will be printed without any problems.
12. Try to print PDF files from Adobe Acrobat
According to users, this issue can occur if you try to print a PDF document from Chrome.
Apparently, there’s an issue with the built-in PDF viewer in Chrome, and in order to circumvent this issue, you need to download the PDF file first and try to print it from Adobe Acrobat or any other PDF viewer.
This is just a workaround, but it works according to users, so be sure to try it out. It seems that this is an issue related to Google Chrome, and until Google addresses this issue you’ll have to rely on this workaround.
13. Restart Chrome
As we already mentioned in our previous solution, sometimes the printing process can get stuck on spooling if you try to print a PDF document from Chrome.
In addition to downloading the PDF file and printing it from PDF viewer software, you can simply fix this problem by restarting your browser.
Users reported that after restarting Chrome the issue with printing was completely resolved, so be sure to try it out if you can’t print from Chrome.
Keep in mind that this isn’t a permanent solution, so you’ll have to repeat it every time this issue occurs.
14. Modify your registry
Press Windows Key + R and enter regedit. Press Enter or click OK.
When Registry Editor opens, navigate to the following key in theleft pane: HKEY_LOCAL_MACHINE\SYSTEM\CurrentControlSet\ControlPrintMonitors
Expand the Monitors key and locate your printer. Right-click it and choose Delete from the menu.
After deleting your printer key from the registry, close Registry Editor.
Printing can get stuck on spooling if you’re sharing your printer on a local network, but you should be able to fix it simply by deleting one value from your registry.
Keep in mind that you need to modify the registry on the PC that has the printer connected to it. We have to warn you that modifying your registry can lead to certain issues if you don’t do it properly, so use extra caution.
In order to prevent damage, it’s advised that you create a backup of your registry and use it in case anything goes wrong. To modify your registry, perform the previous steps.
If you encounter any problems on your PC after removing this key from your registry, be sure to restore your registry by using its backup file.
Printing stuck on spooling can prevent you from printing documents on your PC, but we hope that you managed to fix this issue by using one of our solutions.
If you have any additional suggestions or questions, don’t hesitate to leave them in the comments section below and we’ll be sure to check them out.
However, making the best choice for your business is not an obvious task. Your needs will definitely determine most of the features you are looking for and ultimately which backup software you’ll settle on.
You may also be wondering why to get enterprise backup software in the first place since today’s storage comes with backup capability.
What should I look for in an enterprise backup tool?
Besides backup, the question is what more the tool can do for you. Besides data protection, you will also benefit from replication and recovery, scheduled backups, and cloud functionality.
Further considerations you need to keep in mind when choosing the best enterprise software include training, customer support, plus the kind of environments and apps supported by the top backup software Suite.
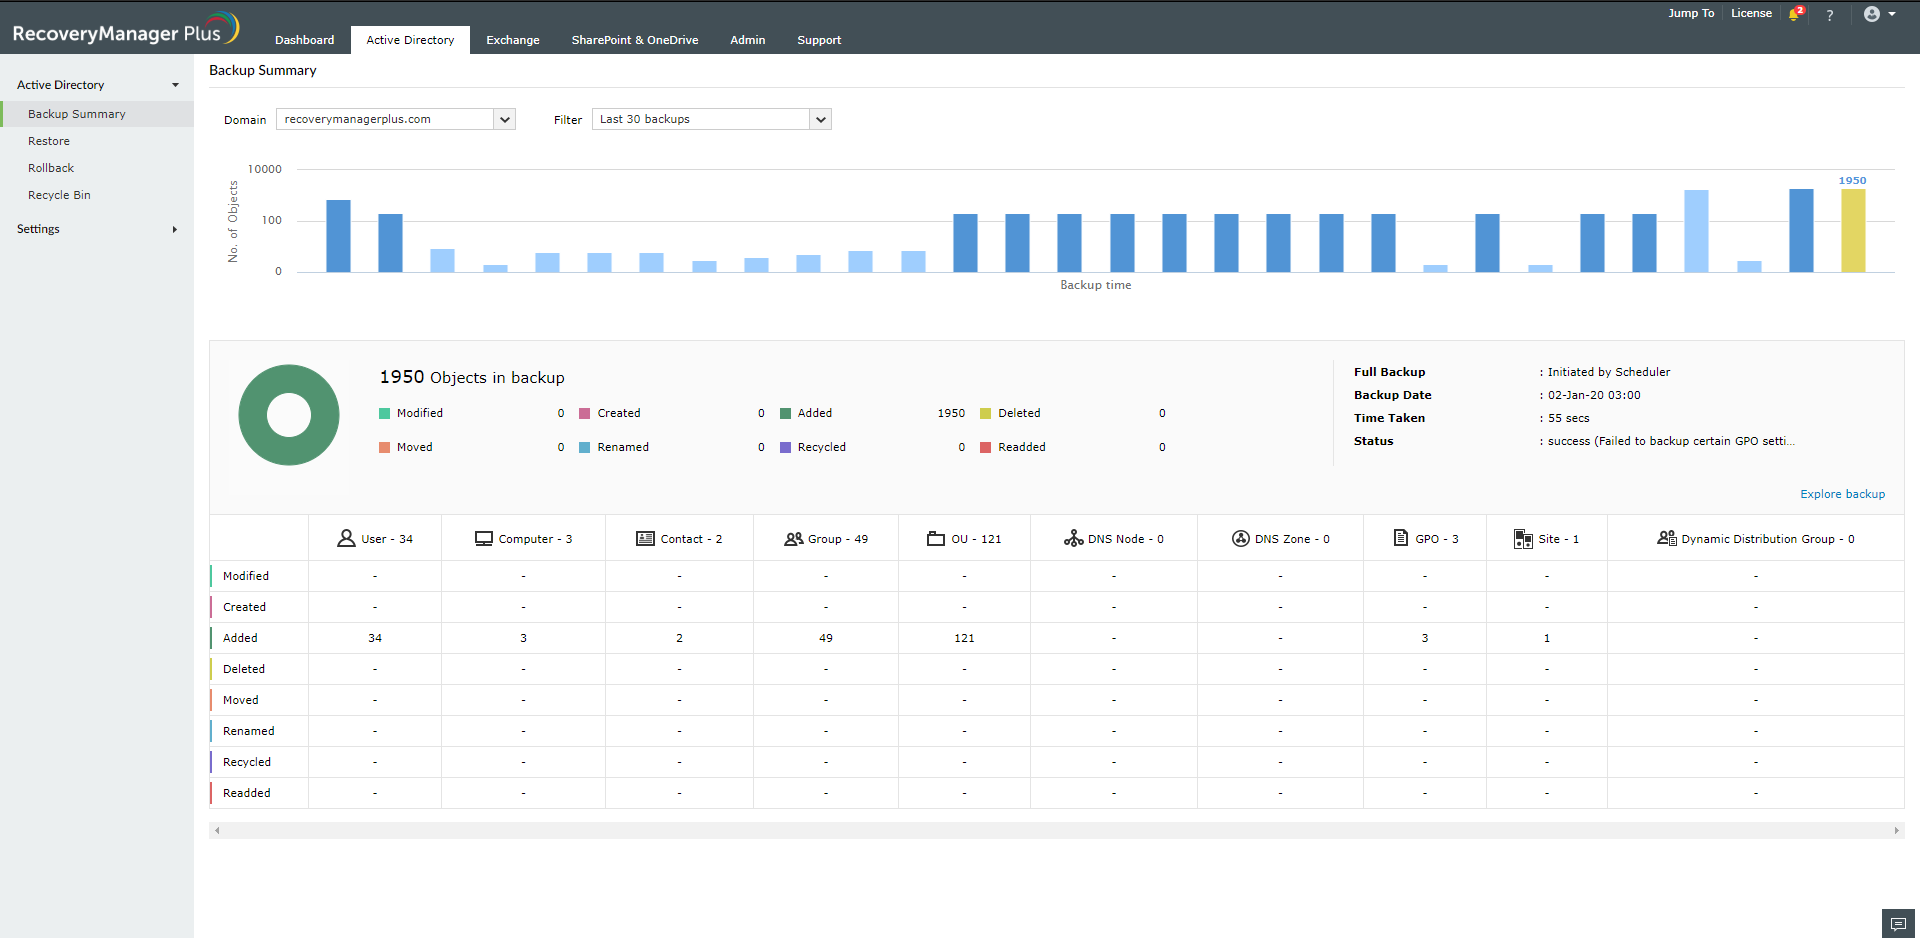
If you’re looking for a unified backup solution for all the enterprise data, look no further than RecoveryManager Plus because it will save you a lot of time and effort.
For instance, it offers incremental backups. That means it will only backup the changes made to your Active Directory, Exchange Servers, and Office365 environments since the last cycle.
Plus, with this solution, it’s possible to export entire Exchange mailboxes (local or online) or just a part of them to PST format for secure archival.
There is no need to invest in huge storage spaces because you can define a retention period for your backups, and automatically delete the ones that exceeded it.
Additionally, the backups will be compressed to a fourth of their original size, securing them at the same time with powerful AES-256 bit encryption.
It’s very easy to back up all files in your SharePoint Online and OneDrive for Business accounts so that you can restore them in case of disasters or ransomware attacks.
Of course, you don’t need to do that manually because the action can be scheduled at specific times and dates of your choosing.
There is a free trial available, enough to test if the solution is up to the expectations of your business needs.
Take a look at RecoveryManager Plus’ key features:
Extreme backup compression and AES-256 bit encryption
Backup for entire or partial Exchange mailboxes
Online cloud backup
Automatic backup scheduling
Total and incremental backups
RecoveryManager Plus
Backup and recover all your data at any time with this tool that offers compression and AES-256-bit encryption.
Protect your company’s future by securing all workloads. Acronis Cyber Backup provides the cyber protection that today’s companies require to avoid costly downtime, angry customers, and lost income by combining backup and anti-ransomware technologies.
It safeguards any workload, scales without limitations, and saves you money by supporting over 20 platforms.
Reduce the possibility of data loss by backing up as frequently as you choose without affecting system performance or productivity.
Reduce costly downtime by running your backup as a virtual machine to get your system up and running in seconds.
Maintain a minimum level of investment while balancing data value, recovery times, protection costs, and resource efficiency with Acronis Cyber Backup.
Let’s go through Acronis Cyber Backup key features:
Protects data in physical, virtual, cloud, and mobile environments on 20+ platforms
The backup industry’s first AI-powered anti-ransomware security is included.
Cloud-to-cloud backup of Microsoft 365 data
With the capacity to conduct frequent backups, you may improve your recovery point objectives (RPO).
24/7 technical support from the customer care team
High-performance deduplication solutions that lead to better storage usage and internet management
Acronis Cyber Backup
Keep all of your data safe, no matter what technology you use or how much data you create!
For easy backup and flexible restoration of your data, Paragon is the best enterprise backup software for the job.
Enjoy worry-free data and system backup, solid time-tested enterprise-class technologies, backup strategies for customized backup automation, flexible system recovery, and free online support.
Set and run technology with quick and advanced backups (without the need for deep IT skills or advanced computing knowledge to protect your data and system)
This is one of the best enterprise backup software solutions for any size of the business, which keeps systems protected and ensures business continuity.
You can go for Aomei Backupper Professional to backup, sync, restore and clone data on desktop and laptop computers, plus use in a backup system, hard disk, files, and partition.
There is also the Aomei Backupper Server with which you can backup data files stored in Windows Server (2003-2011), protect the system, and sync files.
Finally, the Aomei Backupper Technician provides an easy-to-use backup and disaster recovery toolkit for unlimited computers in one enterprise.
Let’s quickly look at its key features:
System/disk/file/folder and partition backup and restore
Scheduled/incremental or differential backups
Disk and system clone for upgrade and migration
Support for the latest technologies such as cloud drive, hardware RAID, dynamic disk, and others
Creation of Windows PE and universal restore for transferring of systems
Added image deploy tool and added real-time file sync
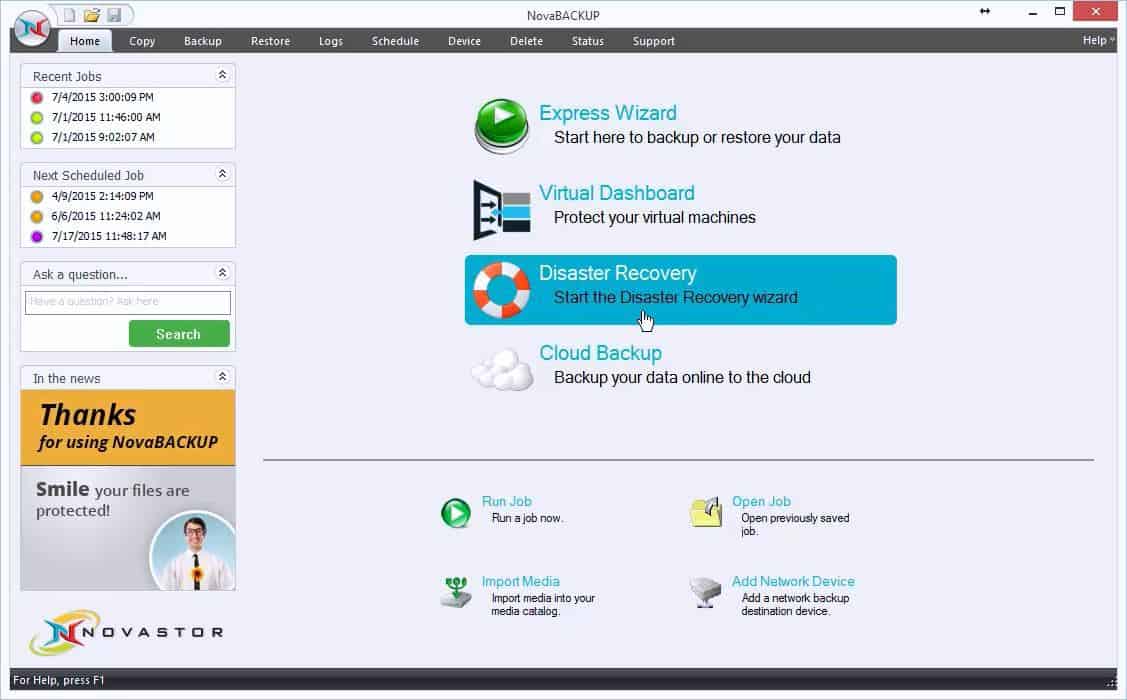
This brand touts itself as the backup software expert who makes it easy for you to protect critical data that is at the heart of your company, so you don’t have to worry about backup.
It comes with unmatched support, and award-winning backup tools, making it one of the best enterprise backup software in the market.
With NovaBACKUP, you get the advantage of live and local support from experts ready to help you select the right fit for your business, reliable, scalable, and easily configurable solutions, plus budget-friendly pricing.
Veeam Backup and Replication is ranked as the best enterprise backup software with its award-winning platform for backup, recovery, and replication of virtualized apps, and data.
With Veeam, you can backup, recover, and restore your data in minutes. If you want high-speed recovery, data loss avoidance, verified recoverability, complete visibility, and a robust backup solution, Veeam is your best bet.
Let’s quickly look at its key features:
Lightning-fast and reliable restoration
SureBackup tool for verifying the recoverability of your data
Instant VM Recovery to recover files effortlessly and quickly
Advanced, image-based replication of your data while streamlining availability and recovery
Fully integrated, fast, and secure cloud-based Veeam Cloud Connect option
When you use an electronic gadget, especially a laptop, you should ensure that you have the best privacy settings applied. Apart from manually locking your PC, did you know that you can perform auto logoff after inactivity on your Windows 10 PC?
You can use the Dynamic Lock feature in Windows 10 to automatically lock your computer when you leave the room. Alternatively, here, in this guide, we will give you a comprehensive explanation of how you can set up your Windows 10 PC to auto logoff after inactivity.
How can I set auto logoff after inactivity on my Windows 10 PC?
3. Create GPO to set automatic logout after inactivity/idle
Press Win + R keys to open the Run dialogue.
Type gpmc.msc and press Enter to open Group Policy Management.
Expand Forest: XXX.LOCAL.
Double-click Domains.
Expand XXX.LOCAL.
Right-click Client and select Create a GPO in this domain, and Link it here option.
Enter the name for the new GPO, example, MY-GPO.
Right-click on MY-GPO and select Edit.
In the Group Policy Editor screen, navigate to the below path. User Configuration > Policies > Administrative Templates > Windows Components > Remote Desktop Services > Remote Desktop Session Host > Session Time Limits
On the right-side open the Set time limit for active but IDLE Remote desktop service sessions item.
Select Enable.
Under Idle session limit, select the desired time limit.
Click OK.
Open End session when time limits are reached item and enable it.
Click OK.
Close Group Policy Editor.
The system will show a warning message 2 minutes before logging off your PC.
In case group policy management isn’t available on your PC, then you can check out our guide that lists two methods that will help you install group policy management on your PC.
Select the System idle for option and set the time limit. In our case, set 10 minutes.
Click the Start button.
If you do not want to go through the hassle of creating a GPO to logoff your PC after a certain time, you can make use of a dedicated tool called Apowersoft Windows Shutdown Assistant.
This tool not only helps you accomplish the task of Windows 10 auto logoff after inactivity, but you can also perform other tasks such as turning off the computer automatically in various situations, locking, restarting, hibernating, and logging off the computer at a specific time, and much more.
That is it from us in this guide. Let us know in the comments below, which one of the above solutions you applied for Windows 10 auto logoff after inactivity.
Worried about the safety of your data? This is where network backup software steps in on its own, as it allows you to easily manage and automate backing-up tasks.
You’re supposed to let everything run and save in the background while you’re on the go or completing other tasks on both Windows 10 & Mac PCs.
How can network backup software help you?
Below, we have outlined the best network backup software that will use your Internet connection to secure your data on the cloud or other network-related storage solutions.
However, our software recommendations also cover the following criteria and functions:
Free network backup software – Even if it doesn’t offer a choice of wizards, Cobian Backup is a reliable free network backup software tool.
Home network backup software – Your searches aren’t always about which backup system is best. If ease of use is what matters too, our above picks won’t let you down.
Network PLC backup software – Backing up PLC programs isn’t a challenge when having the right tools. Take a peek above and become a master at replicating and backing up PLC programs into a single computer network.
Backup software that works with network drive – Most of the tools below will help you easily back up all the network drive shared files.
PC local software to back up the home network – The best PC backup software for the home network should be capable and flexible. Vembu, Acronis, and others provide such backup solutions that are adequate for the average user.
That’s why we have handpicked the best network backup software for both small offices and large corporations. Ready to discover them all?
What’s the best home & local network backup software to use?
You clearly haven’t tried out Acronis Cyber Backup if you still think that there’s no foolproof network backup software.
Acronis Cyber Backup adheres to the principle of zero downtime with efficient recovery tools that work impeccably all the time.
Most of all, it is very easy to operate, and you can back up data to the storage location (NAS, SAN, Acronis Cloud, or any private or public cloud) by following just a few simple steps.
Rest assured that you can easily recover specific Microsoft application data or even complete systems with ease, all from a single backup.
You can also get this software on a 30-day free trial since it is known as a solution for confident users who never settle for less than what they truly deserve.
Here are some Acronis Cyber Backup key features that you’re about to enjoy:
Manages both small and large Windows server environments
Handy Backup is in the backup field for a long time. You need to know from the start that we’re talking about a flexible solution for people looking for power and reliability.
This server backup software controls the entire network backup over the one console that functions with no interruption.
Even more, you can even set up other programs to run before or after a particular backup server task, turning Handy Backup into an active part of integrated data workflow.
No less important, what truly makes Handy Backup to stand out is its continuous focus on customer satisfaction, by offering free, yet reliable tech support.
Here are some Handy Backup key features that you’re about to enjoy:
Aomei Server Backuper is another network backup software tool that meets users’ expectations in terms of safeguarding their operating systems.
As you can imagine, it is embedded with backup, restore, and cloning features, giving you the flexibility you need.
It can be easily used to create and schedule backup procedures, not to mention all those cloning tools that are useful in upgrading hard drives or migrating operating systems.
Here are some Aomei Server Backuper key features that you’re about to enjoy:
NAKIVO Backup & Replication can be easily operated, yet it doesn’t mean that it falls short in terms of network backup tools.
After all, it has gained popularity thanks to its wide range of features dedicated to protecting and backing up your virtual, physical, cloud, and SaaS environments.
The company prides itself on its customer support department. With helpful technical support engineers that can be easily contacted right from the product’s web interface, you’re never alone in times of need.
Even better, you’ve got the chance to choose from multiple pricing options that include per-socket perpetual, per-workload subscription, as well as SaaS subscription.
Here are some NAKIVO Backup & Replication key features that you’re about to enjoy:
Minimal backup size
Built-in disaster recovery solution
Multiple backup options, including cloud platforms
The primary feature of this network backup software is the backup flexibility that it offers. Users worldwide schedule multiple backup procedures with Cobian Backup.
Moreover, files can be archived on another local hard drive, network location, or even FTP servers. Therefore, we’d say that it’s designed for both small business and home use.
One of the major downsides of using Cobian Backup is the fact that it lacks an intuitive wizard to automate the process. Decrypting/decompressing files can turn into a challenge if you lack certain skills.
Otherwise, most things are relatively straightforward and even encryption is easily applied.
Here are some Cobian Backup key features that you’re about to enjoy:
OverDrive is an extensive digital book distribution platform for libraries and schools worldwide. However, some of our readers can’t use the app because of an OverDrive error obtaining license issue.
The error message for that issue states: Unable to acquire license to play selected title. The requested license is either invalid or already acquired.
What causes OverDrive’s error obtaining license issue?
The quoted error above highlights an audiobook’s temporary ODM license file has expired. ODM files for audiobooks that aren’t opened with the OverDrive app within a few hours of downloading can become invalid.
The issue can arise because of an inaccurate system clock. If your PC’s system time isn’t entirely right, that’s probably what needs fixing. So, checking your PC’s system time settings in Windows 10 can resolve the issue.
How can I fix Overdrive’s error in obtaining license issue?
1. Correct Windows 10’s date and time settings
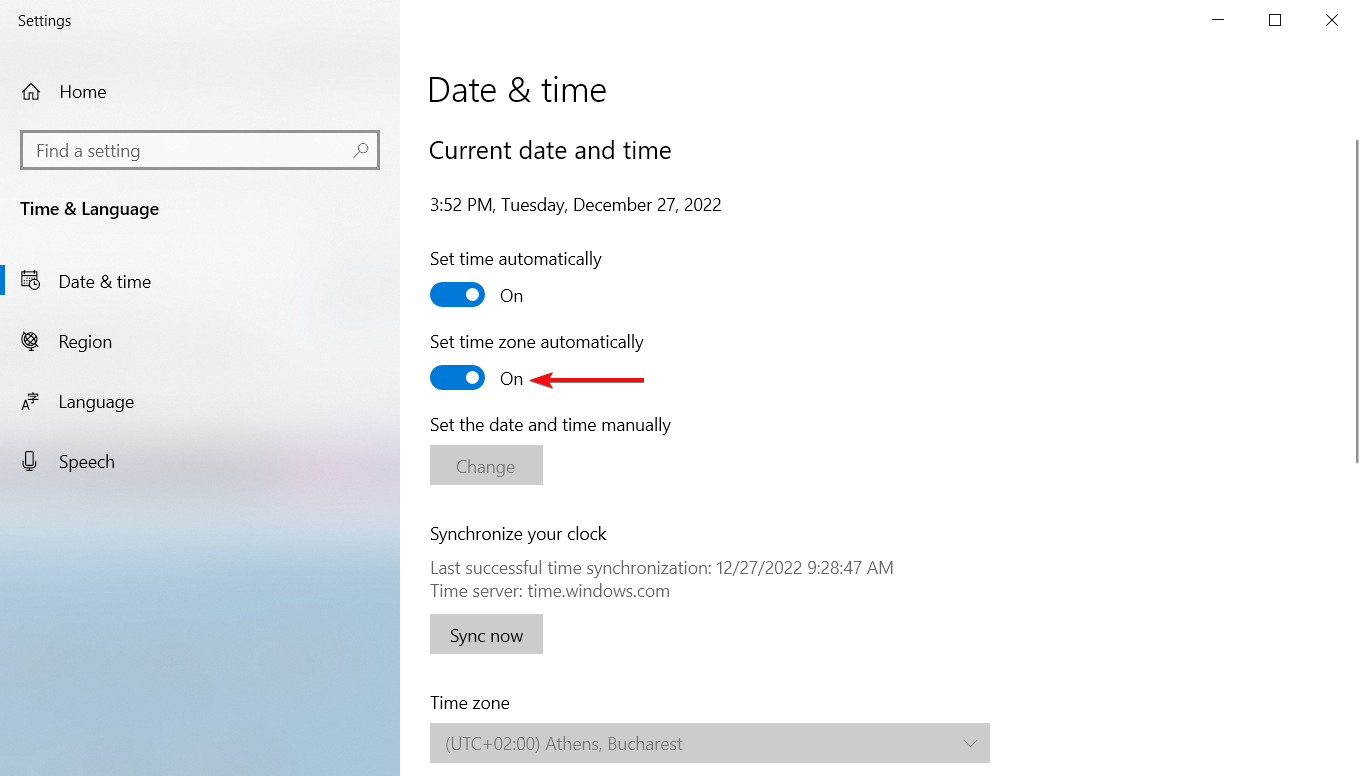
Right-click Windows 10’s system tray clock and select Adjust date/time.
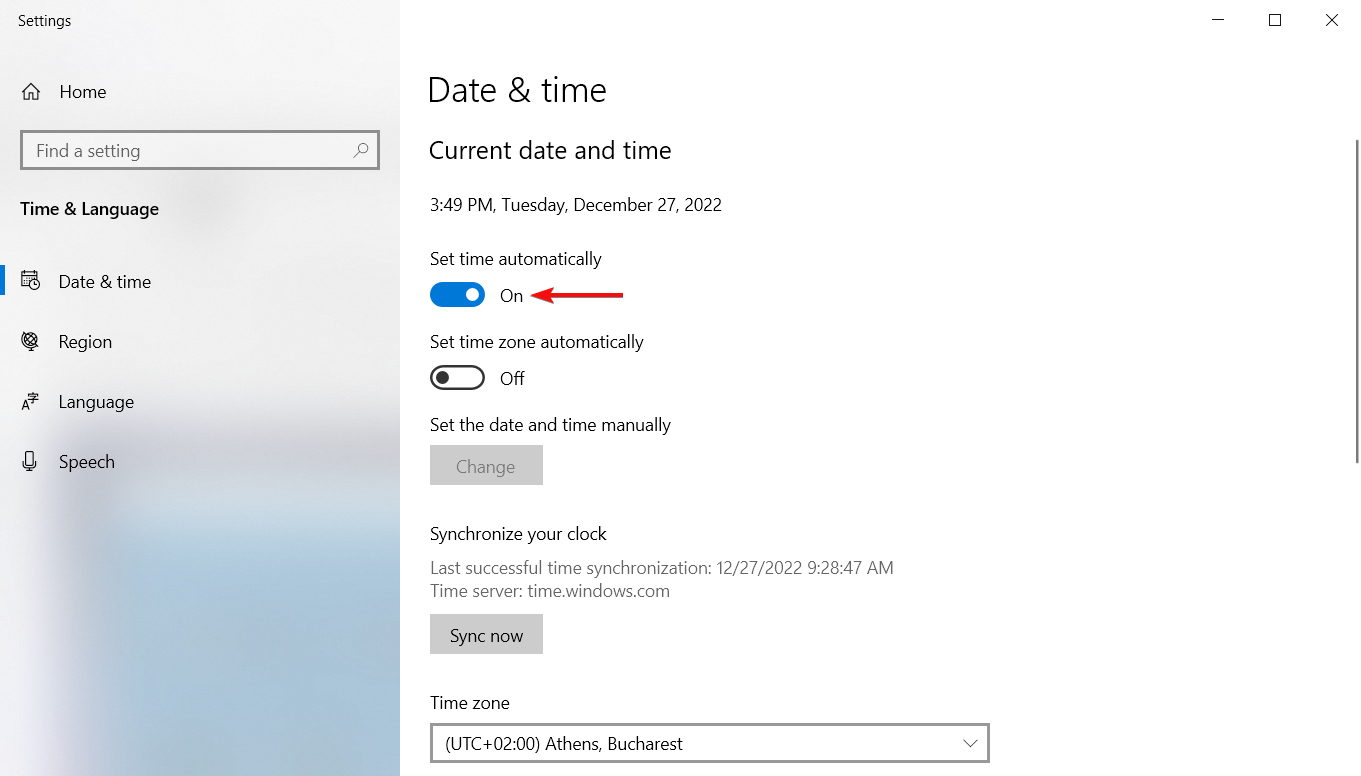
Toggle the Set time automatically option On if it’s Off.
Now, also turn On the Set time zone automatically button.
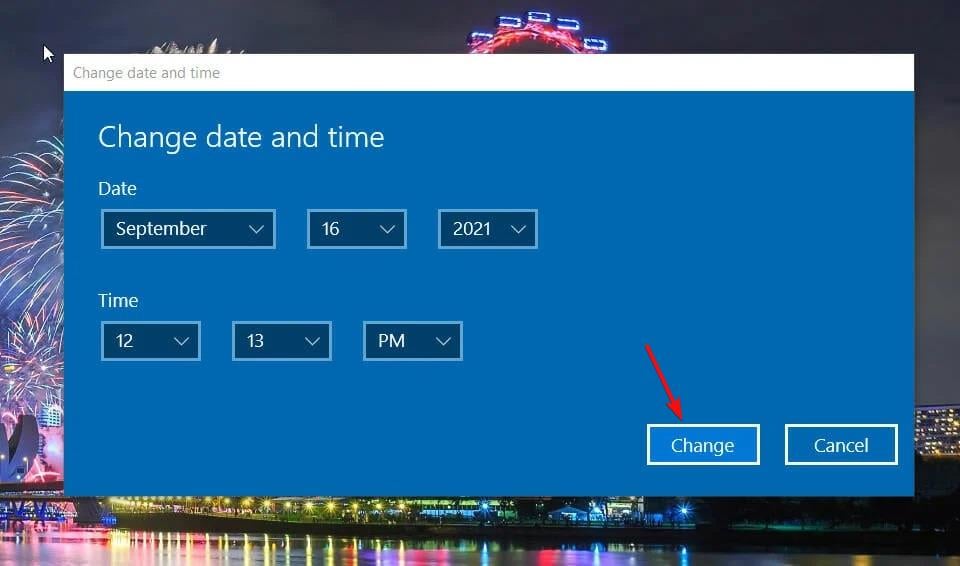
If your PC’s time and date still don’t seem entirely right for your location, you can manually adjust the clock by clicking the Change button. Both the automatic options need to be disabled to click that button.
Enter a time and date within the Change date and time window that opens and press the Change button.
If your PC defaults to a wrong time after restarting Windows 10, it might have a bad CMOS battery. You’ll need to replace the PC’s CMOS battery with a new one.
2. Clear temporary internet files
Google Chrome
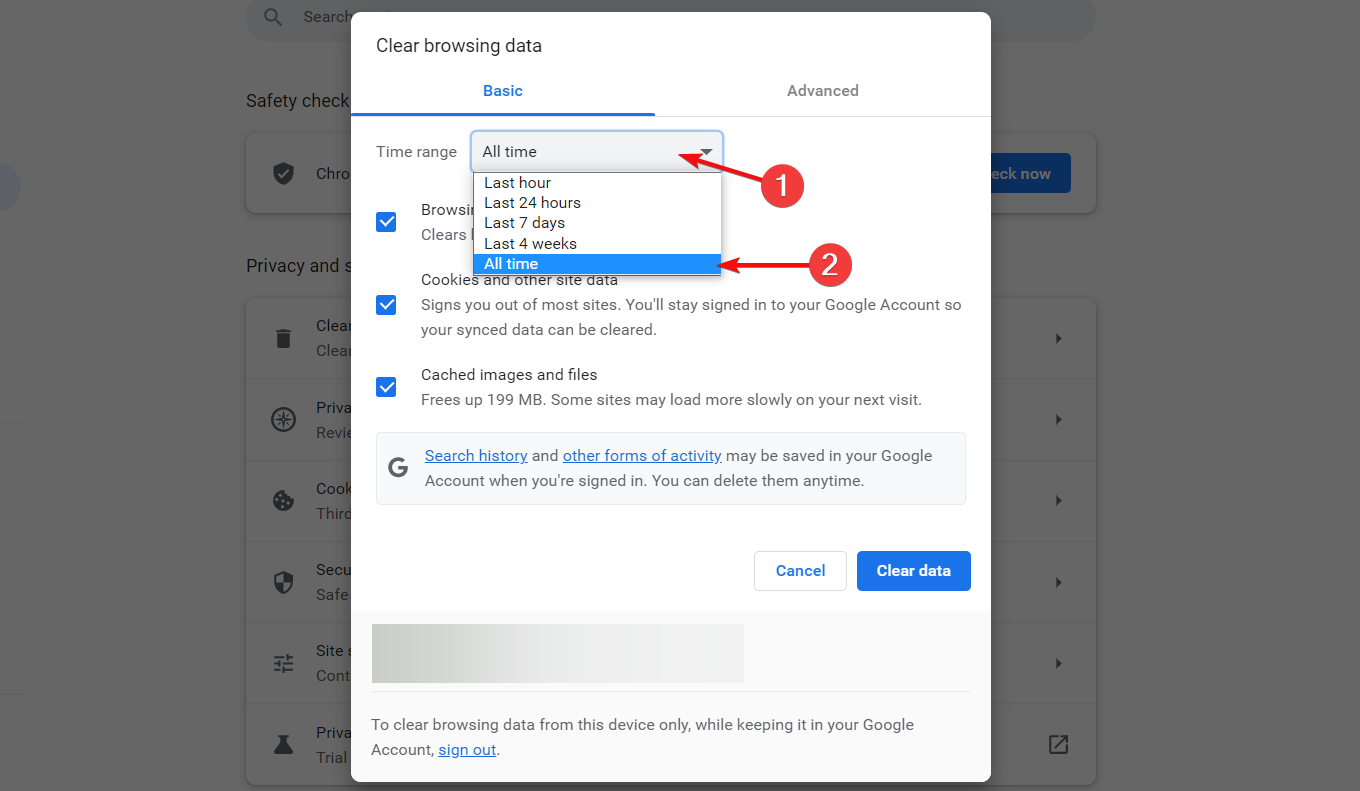
Press the Ctrl + Shift + Del hotkey in Chrome to open the Clear browsing data window.
Select the All time option.
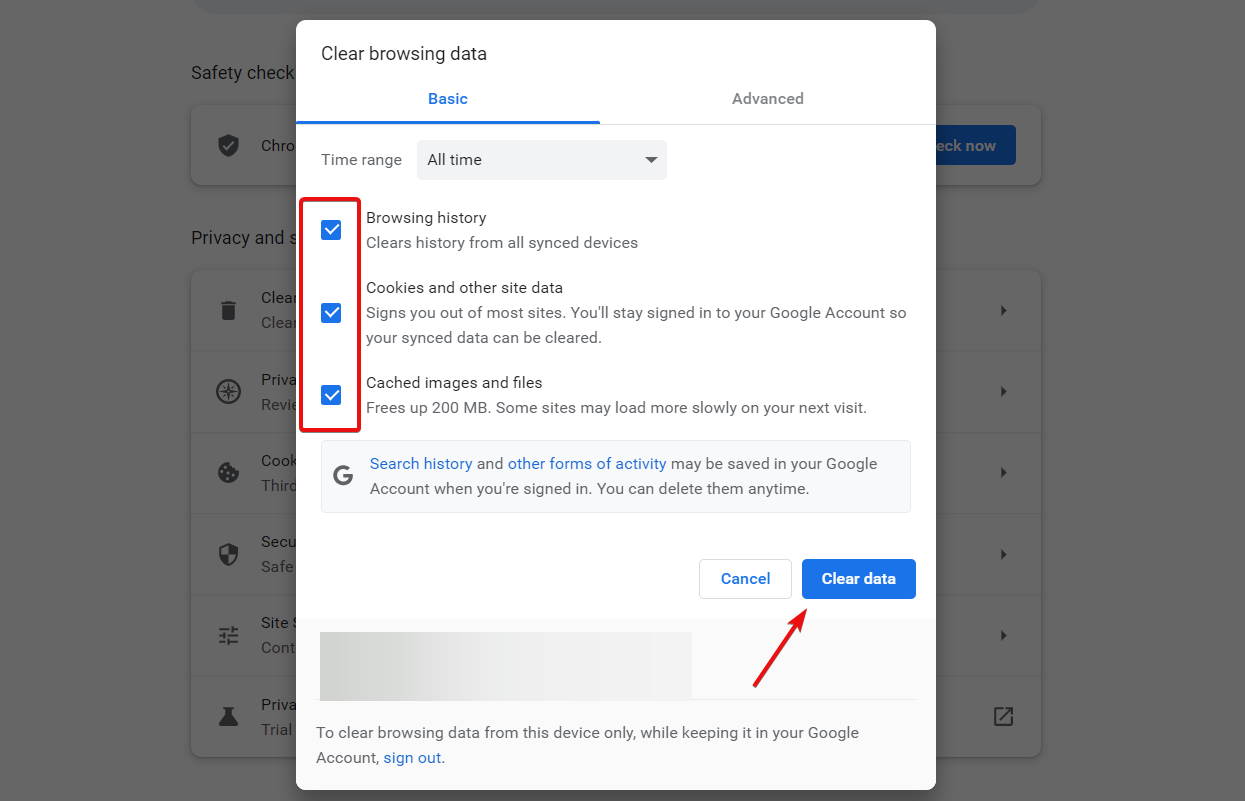
Next, select the checkbox options for cookies, cached, and browsing history.
Press the Clear data button to clear the temporary internet files.
Firefox
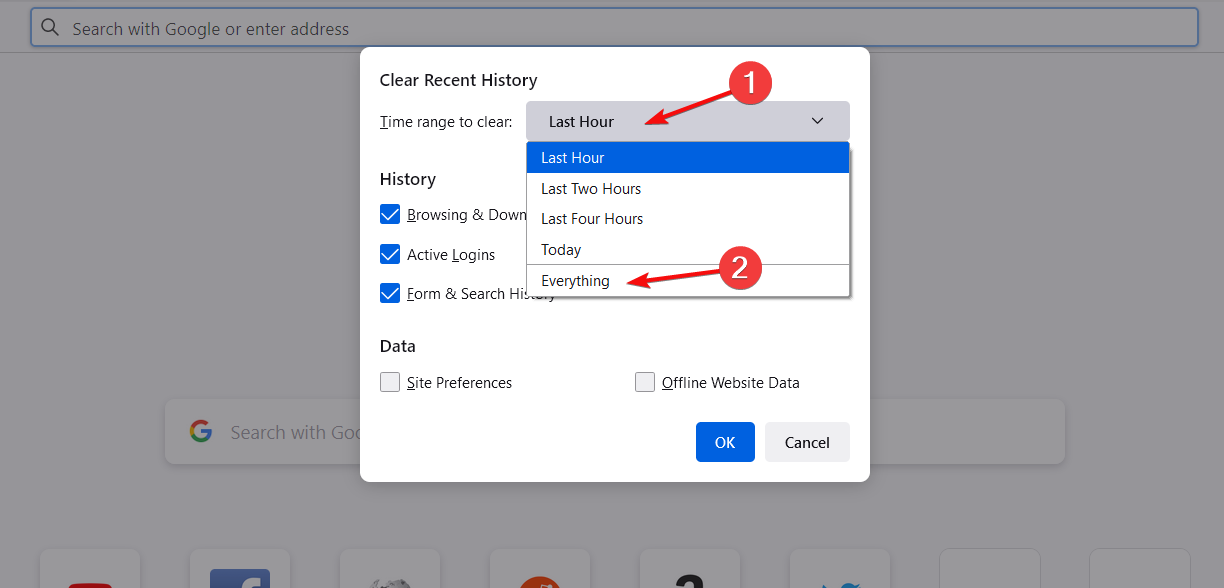
Press the Ctrl, Shift, and Delete keys at the same in Firefox to bring up the Clear Recent History window.
Select the Everything option in the Time range to clear drop-down menu.
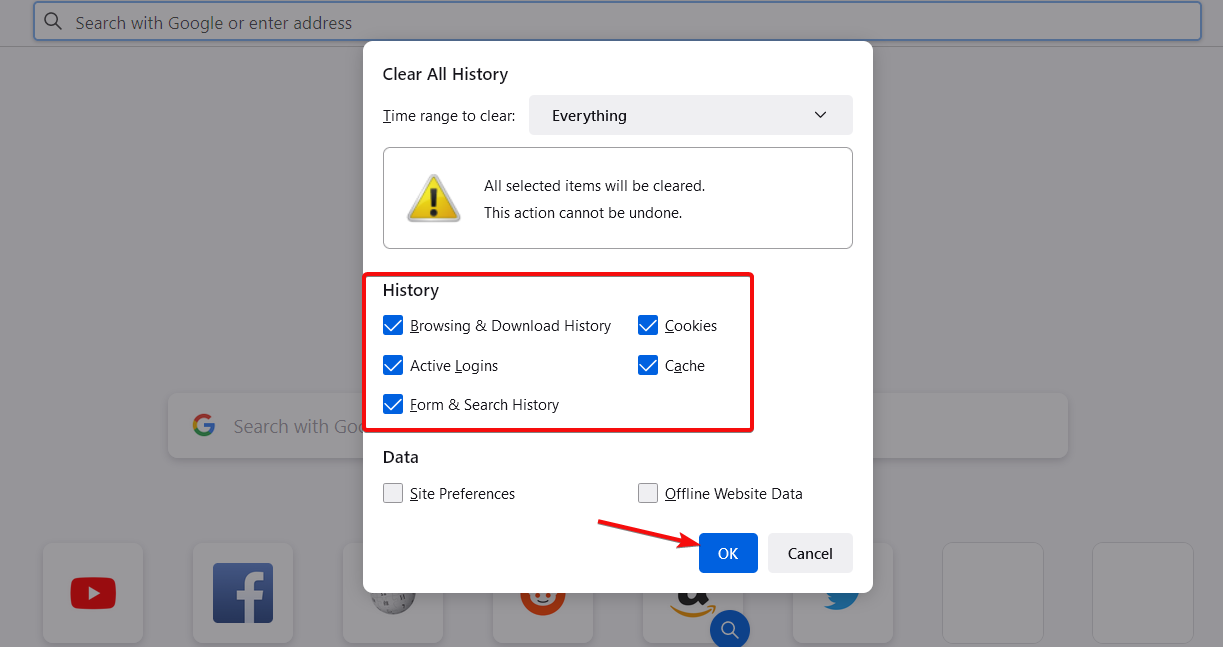
Then click all the history and data checkboxes to select them.
Press the OK button to erase the data.
Microsoft Edge
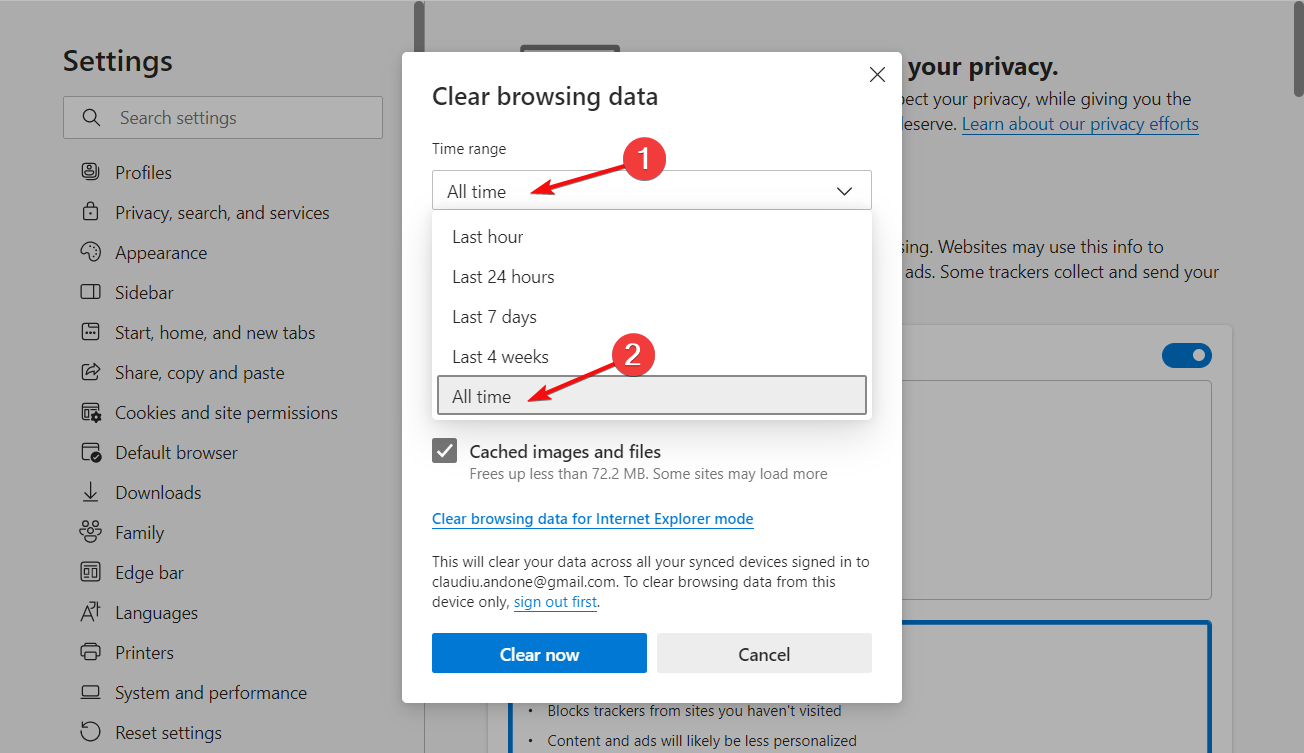
In Edge, press the Ctrl + Shift + Del keyboard shortcut.
Click the Time range drop-down menu to select All time.
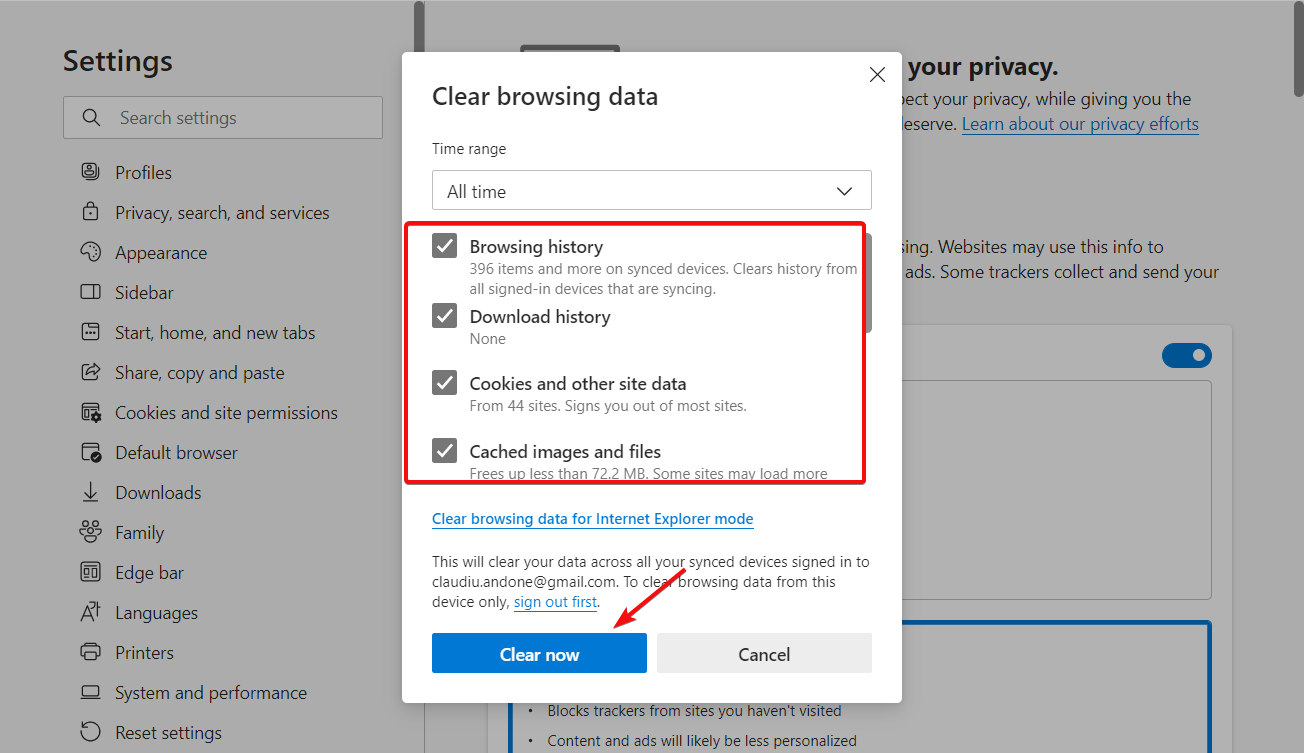
Then select all the data checkboxes on the Clear browsing data window.
Press the Clear now button.
Alternatively, you can also thoroughly erase temporary internet files with third-party disk cleanup utilities like CCleaner.
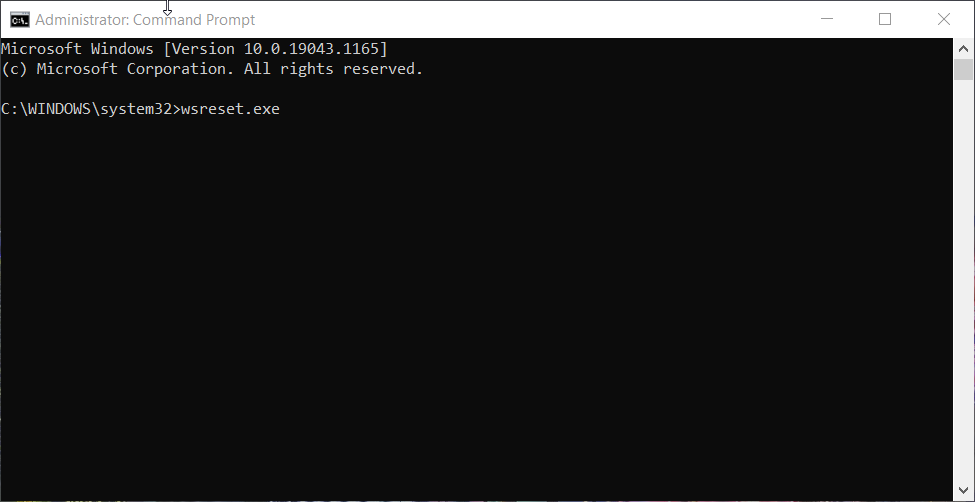
Click the Start button, type cmd, and select Run as administrator from the results.
Then type in this command and press Enter: wsreset.exe
The Microsoft Store’s cache will reset.
You can contact library support about the OverDrive error obtaining license issue via the Contact support page on OverDrive Help. Enter your library’s name in the search box there. Then click the Get support button for a library to fill out and submit a tech support form.
There’s also a general OverDrive support service you can contact. To do so, click the Submit a supportticket button on OverDrive’s support page. Then you can fill out the question boxes to send a ticket.
There aren’t many confirmed fixes for OverDrive’s error obtaining license issue. However, the potential resolutions above might fix it. Try applying all the above resolutions and then downloading the audiobook that triggered the error.
If you have any other questions or suggestions, you may leave them in the comments section below.
Acronis Cyber Backup offers full disk image backups, and it allows you to store your backups on local/external disks, network storage, and the cloud.
The software also brings clustered Exchange support, so you can easily back up Exchange DAG clusters from passive nodes, or you can choose specific or active nodes for the backup process.
There’s also support for Acronis Cloud storage, allowing you to upload your data to one of the 14+ Acronis Cloud Data Centers.
AES-256 encryption is available, making sure that your backups are safe from third parties and unauthorized access.
Acronis Cyber Backup offers an abundance of additional features, and if you want professional backup software with Exchange Server support, be sure to try Acronis Cyber Backup.
Another great backup software that deserves a mention is Handy Backup. The software offers support for Microsoft Exchange thanks to the MS Exchange plug-in.
The software can create Exchange backups without interfering with other applications. Support for automatization is also available, allowing users to completely automate the backup process.
Handy Backup can also run missed tasks, or call for other programs before or after the backup. Of course, all your backups will be encrypted and compressed so that they take up less space.
Regarding the backups, you can keep them on the local or external hard drive, send them via FTP, or store them on NAS or cloud storage.
Handy Backup offers great features when it comes to Exchange backup, and since it’s a pretty versatile tool, you should definitely try it out.
Handy Backup features:
Support for Exchange 2019, 2016, 2013, 2010, and older using a special plug-in
Ability to start other applications before or after a backup
Hot backup feature that will perform backups without interfering with your system
If you’re looking for backup software for Exchange Server, you should definitely consider Stellar Exchange Backup & Recovery.
The software is automated, and it allows you to back up storage groups and mailbox stores and save your precious data. After the backup is done, you can easily restore single or multiple mailbox stores.
Stellar Exchange Backup & Recovery lets you restore your backup files manually from the backup image which will surely come in handy. If needed, you can also automate and schedule your backups.
Regarding backups, there’s support for full and incremental backups and you can also view detailed log reports and email notifications.
Stellar Exchange Backup & Recovery is powerful backup software, and if you’re using Exchange Server, you should definitely try it out.
Stellar Exchange Backup & Recovery features:
Ability to back up storage groups and mailbox stores
If you’re looking to back up data from the Exchange server, you might want to try CodeTwo Backup for Exchange. The software can easily manage your Exchange mailbox, public folders, and SharePoint backups.
CodeTwo Backup for Exchange offers continuous incremental backups after a full backup is completed, so each new backup process will be faster than the previous one.
Support for filtering is available, and you can easily choose which mailboxes or folders you want to back up based on several filters.
Speaking of customization, you can customize your backup settings and easily create one-time or continuous backups with ease.
CodeTwo Backup for Exchange offers solid features, and with its easy to use interface and zero-configuration setup, it’s a great tool for less experienced users.
BackupAssist is another great backup software that also supports Exchange Server. The application lets you perform full server backups, Active Directory, Hyper-V, Exchange Server, and SQL Server backups.
Regarding backup destinations, you can back up your data to external storage, NAS, cloud storage, and RDX. As for recovery, granular recovery is available, so you can recover individual files or emails.
If you want better support for Exchange, there’s Exchange Granular add-on available that will help you restore individual emails or attachments with ease.
The application also offers full server recovery as well as built-in encryption so your sensitive data will remain completely protected.
BackupAssist is a professional server backup software, therefore it’s a perfect choice for professionals that are using the Exchange Server.
BackupAssist features:
Full server backup
Works with Active Directory, Hyper-V, Exchange Server, SQL Server
File-based backups with version history
Can store backups on external drives, NAS, cloud, and RDX
Backing up Exchange Server doesn’t have to a tedious or daunting task, as long as you’re using the proper tools for the job, and we hope that you found suitable software for your needs in this article.
OBS Studio is a software developer of free open-source software. Their product is for those with a passion for video recording and live streaming.
Some of them want to know what are the OBS settings for recording on a low-end PC. Here’s what one user says:
I have a PC with very low specs. I want to record and not to stream my game. I request anyone to tell me the settings that can give me a lag-free gaming and recording experience.
If you have in mind the same thing, don’t hesitate to follow our quick solutions to use the best OBS settings for recording on a low-end PC. Read carefully our next section to check them out.
Is OBS CPU heavy?
OBS can potentially hog up a lot of processing power and this is something to take into consideration especially when running on a low-end PC.
You can tweak the software’s settings to use less CPU, but the quality will be impacted both for streaming and recording tasks. For instance, FPS loss is a direct consequence of OBS’ CPU consumption rates.
And speaking about that, you must be also wondering what is the best FPS for OBS.
We know that 60 frames is the desirable preset for quality videos. However, we mustn’t forget that we are aiming to find the very best OBS settings for a low-end PC, hence system specs should prevail.
60 FPS will not only take up more storage but also demand a higher bitrate, which could potentially lead to buffering issues, lagging, and stuttering.
Instead, a 30 FPS preset will provide more stability, which will secure a more committed audience.
What are the best OBS settings for low-end PCs?
1. Configure computer and OBS settings
Turn all video settings from your game to their lowest.
Reduce Canvas resolution for OBS to 16:9 720p (1280×720) or 480p (854×480).
Use the Bicubic downscale filter.
Verify the OBS FPS and reduce them to 24 or 30. (Is 30 FSP good for OBS? In this case, yes, it will be more stable than 60 or higher).
Verify OBS Audio and set the sampling rate to the lowest at 44.1kHz.
If you’re wondering what is the best bitrate for OBS for low-end PC, know that you can set them as low as 64 KBpS.
When you have set the game video settings to the lowest, this will decrease the quality of game graphics. Even so, your computer will perform better because this step reduces the load from the CPU and GPU.
After setting the OBS Audio and ensuring its sampling rate is at the lowest, that will save you some bits. Also, resume strictly playing the game, and avoid running other applications or services.
2. Use Quick Sync Video for your encoder
2.1. Activate Quick Sync
Open OBS, navigate to Settings, and visit the Encoder section.
Select Quick Sync Video.
When trying to find the best OBS settings for recording on a low-end PC, note that your encoder is very important as it uses certain hardware and encodes your video file.
Quick Sync Video is designed to use the Intel IGPU for encoding. This leaves the processor, graphics card, and hard disk drive free for gaming or software.
Thus, the Intel graphics chip will handle the entire encoding process while you can use the AMD or NVIDIA GPU at its full capacity.
Navigate to BIOS and activate the integrated Graphics Chip.
Open your web browser and visit Intel Download Center.
Choose and download Intel Graphics Drivers for your processor.
Run the driver installation process.
Restart the computer after installation has finished.
Open the OBS application and navigate to Settings.
Visit Encoder and select Quick Sync.
The possibility to activate the Quick Sync encoder depends on the manufacturer of your computer’s motherboard. We recommend you verify the mainboard manual in this regard.
This applies even to those who are looking for the best OBS stream settings for a bad, old computer that’s far from its days of glory.
In BIOS, please search for one of the following options and enable it:
IGPU Multi-Monitor
Internal Graphics
IGD Multi-Monitor
If you are unable to find such an option, then your computer’s mainboard might not support Quick Sync. We also advise you to contact the mainboard manufacturer and ask them for more information.
If you have managed to activate the option in BIOS, download the latest drivers available from Intel’s Download Center. Regardless if you use OBS Classic or Studio version, both of them are useful.
The encoding options remain the same for each of the variants. If you want to stream, use constant bitrate. For local recording, use the variable bitrate and increase the bandwidth.
When navigating through the advanced settings in OBS, you can change the encoding preset from x264 to Quick Sync. Lowering the preset is useful if you encounter problems during encoding.
Can I use OBS with 2GB RAM?
There is no official prohibition to doing so. According to OBS system specifications, it is recommended – not be mistaken for mandatory – to use a PC with 4GB of memory space and have DirectX enabled (version 10 onwards).
The previous section has detailed the best OBS settings for low-end PCs. Use our first solution to configure your computer, and then your OBS software.
The second solution we recommend is to use the Quick Sync feature. Read carefully that specific section and check out both possible cases. First, use the steps presented to activate Quick Fix.
If you don’t have it, make sure it is installed, and if not, then follow the steps written above the current section. Try out our tested solutions and implement OBS settings for recording on a low-end PC.
Now that you learned the steps to get the ideal settings for your computer check out this guide to learn steps to enable hotkeys in OBS Studio to increase productivity while using the software.
Do not hesitate to write a comment and give us details about your experience with OBS.
The world smiled more when cartoons came into being. No one could resist (and nobody still does) the intense funny-looking characters displayed all over our screens and papers.
Probably because they appear like creations of a different world from ours. In reality, photo cartoonizer software tools for Windows 10 are responsible for the fascination.
This has inspired the springing up of certain tools. They enable one to turn their photos into their desired animations.
A variety of features available in the following cartoonizer software make it possible for fun manipulation of images. All from the comfort of a personal computer.
What are the best photo cartoonizer tools for Windows 10?
Turning your awesome pictures into cartoons and putting them into motion in just a few steps is easy with Adobe Cloud plan.
This solution contains all the Adobe’s most popular apps such as Photoshop, Illustrator, or Premiere Pro so you can create engaging high-quality animations.
You can use any app to craft your animated projects, and then use vector drawings to tell your own story by adding impressive effects, backgrounds, or movement.
That being said, its intuitive interface and all the above-mentioned features make this tool a great pick for getting started with 2D animation.
Best-in-class drawing tools here included:
Stock images and texts
Tutorial for learning the basics
Rich libraries with logos, layouts, and designs
Effective collaboration tools
Adobe Creative Cloud
Open up a new age of animation using this Adobe editing toolset.
If you are looking for a simple photo editing software that can help you turn basically any image into a cartoon, then chances are to appreciate Photo Cartoon.
This service requires no editing skills – in order to cartoon your photograph, just upload it, hit Cartoonize, and choose the desired effect. Yes, that’s how easy it is to achieve your goal.
The Cartoon Effect isn’t the only interesting one. You can go bold with the Pencil Draw Effect as well or trick your friends into considering you a new Picasso with the Painting Effect.
In mere seconds you’ll have the photo that you had in mind, ready to be shared on Facebook and other social networks.
After all, you must quickly abandon the idea of keeping it for yourself. Where’s the fun in that?
Here’s what great key features Photo Cartoon brings to the table:
Turning photos into cartoons is easy and intuitive, even for newbies
The software supports a wide range of image files
Countless effects to choose from
It’s compatible with Windows 10. 8, 7, and Android
Free trial if you’re undecided
Photo Cartoon
Applying cartoon effects to pictures turns into a fun process when using Photo Cartoon. Ready to try it out?
Cartoon.Pho.to. has recently set a new scale in the photo-to-cartoon transformation segment. Reinforced cartoon graphics enable the display of real emotions on a cartoonized face.
This happens through adjustable features. Users get an interesting variety of face changes to choose from, on uploading their photo/image to the service. Here, the fun begins.
One can create a happy expression from the saddest of faces. Filters and modifications are applicable to all types of photos except face morphing which only applies to portraits.
Main features you are about to enjoy:
Changing face expression – Cheeks, lips, eyelids, and eyebrows are altered to move in a matter of seconds to reveal a look. For instance, the motion of widening lips may signify a smile
Display of emotions – A choice of effects exists to give a cartoonish image a mourning or excited face
The caricature effect – Want to turn your photo into a troll? Perhaps an alien or a tough guy. Here’s the feature for it
An avenue for excellence – this is what first comes to mind when using the BeFunky Cartoonizer. Launched in 2007, the tool has been in service to its clients for 11 years.
Over the years, the software’s developers have worked with creativity to up its standards from the mere manual editor it was to the fast and popular cartoonizer it is today.
A manufacturer of beautiful and professional quality images. The software developers have not availed the full application for download. However, users can access it online.
Check out some of its great features below:
Five classic cartoonizer kits in the artsy section of the photo editor. Either of these will cartoon a photo/image of any category
The Deluxe Edition Digital Art part houses a widely reformed cartoonizer DLX for an even more enhanced appearance
It’s no surprise that users find themselves attached to their screens for hours – flairs like hats, jewelry, beards, etc. make good virtual toys; smart enhancements that fix digital noises, poor lighting, and fuzziness with just a click are even more engaging
Perhaps the most interesting thing about the BeFunky Cartoonizer is its ability to transform pictures into Warhol-esque art; this is an image that appears like it was taken off one of your top-of-the-shelf novels
The configuration options for this photo cartoonizer software for Windows 10 are top-notch. Convert your favorite artist’s picture with this tool and you might just have their next album’s cover photo.
The well-explained software allows users to engage the tool easily. The straightforward guidelines and controls are a plus too.
For all one knows, the cartoon generator may just be the most diverse cartoonizer. Users can convert photos with BMP, GIF, PNG, JPG, TIFF, and other formats.
Main features included in the package:
A range of settings that set in order the appearance of a photo. Some of them include Brush Width, Sketch Depth, Darkness, Dot Sensitivity, Color Sketch, Blur/ Sharpen, etc.
The interphase under the settings menu contains adjustable sliders. These apply cartoon effects to images
On the left panel, one can apply their desired range of effects including Pencil Sketch, Sketch, Sketch+Dot, Sepia+Dot, and Color, among others
The Cartoon Generator has a Batch option to perform mass photo-to-cartoon conversion
The sight of the new image cartoonizer software on a desktop screen is quite inviting. A mere click separates images, large or small, from their animated selves.
While the software works just fine in most cases, the error management system is like no other.
The photo cartoonizer software for Windows 10 sorts using meaningful information to solve issues. It either corrects the problems or alerts the interested parties.
Main features that it brings to the table:
Developers have equipped the software with over 100 effects. Some include; the color balance, brightness/ contrast, sticky template, hair switch, sketch, and grey just to name but a few
The above programs are uniquely dynamic online and offline tools with a simple and convenient interface.
Their proficiency in creating dazzling, high-quality cartoons within an instant is remarkable. They are indeed the best photo cartoonizer software for Windows 10.
The truth is that software that can automatically mix songs does not exist yet, and if it did we would probably already attend parties with Artificial Intelligence as a DJ, and this is not the case, at least not for the moment.
For instance, such software will be able to seamlessly sync a drum and bass tune with 160-180 BPM with a house song with a slower pace of 84 BPM, and so on.
We picked out five of the best software that can automatically mix songs and we’ve listed their sets of features so that you will be able to make an idea about what’s best for you.
Automatically mix music with these auto DJ software
Zulu is a professional DJ mixing program that probably knocked even Pete Tong’s socks off and blew his mind when it first came out on the market.
This DJ software is the complete DJ mixer solution, and it packs some compelling features that are united in the most effortless-to-use interface.
You’ll be able to mix your music while applying the effects on the fly.
Check out its awe-inspiring set of features:
It comes with automatic beat detection so that your music will always stay on tempo.
All you have to do is load a track onto a deck, and Zulu DJ Software will automatically scan for its beat, assign a BPM and it will change the tempo of the second track for flawless customization.
The software can perfectly cross-fade between tracks, and it comes with real-time pitch and tempo adjustment.
It also provides an auto-play mode for hands-free and seamless music mixing.
Zulu DJ Software supports all popular audio formats, and it allows you to apply effects in real-time including reverb and distortion.
You can loop sections with a track and sync to the BPM.
It comes with VST plugin support for additional effects.
The safe live mode will successfully prevent accidents for flawless shows. This is the best DJ Software that you can possibly find on the market.
Download Zulu DJ Software to check out more of its features and to see for yourself more amazing functionalities that it includes.
Zulu DJ Software
A super-easy layout that anybody can grasp, encouraging you to start playing music and mixing tunes right away, for free!
Traktor Pro 3 is one of the industry-leading software for Windows 10, a proficient tool designed to move dancefloors.
Mix in the automatic functions and presets of the tool with four virtual decks, over 40 studio-quality effects, and a plethora of Traktor gear suited for professional performance.
In its 20 years of development, Traktor has proven its worth in numerous aspects for creation, improvement, stability, and great sonic sculpting.
These are the main features of Traktor Pro 3:
Clear and well-organized interface
Experiment with your mix with the sync button to instantly blend your songs
Rate songs to create the perfect fluency for your mix
Take your set to the next level when performing live with the library organizer
Remix with loops, hot cues, and best jumps
Native recording for harmonic mixing
Full FX suite included
It includes Traktor Scratching so you can use any soundcard you like, like vinyl
Traktor Pro 3 is compatible with any third-party controller, such as Native Instruments or Traktor-ready controllers, allowing you to set it up and start mixing straight away.
The software comes with a library of free remixes and stems to help you along the way, and you can even build your own stems with the Stem Creator tool.
This is another advanced DJ software that is worth checking out especially since it’s also free. The program includes everything you need to start making DJ mixes.
Whether you are spinning at a club, Djing your house party, or broadcasting as a radio DJ, Mixxx has about everything required to make it right.
Take a look at the most impressive functionalities that are included in the program below:
The program comes with iTunes integration, and this means that all your songs and playlists will be ready to go for your next live DJ performance.
The software comes with 85 MIDI DJ controllers that are supported out-of-the-box and also with several HID controllers.
The program provides comprehensive hardware control for your mixes.
You will be able to instantly sync the tempo of four tunes for seamless beat mixing.
The mix comes with an Auto DJ that can take over from time to time.
The software also supports MP3, M4A/AAC, OGG, FLAC, and WAV audio, adjustable EQ shelves, timecode vinyl control, recording, and Shoutcast broadcasting.
This is another robust program that you can use to create professional mixes with minimum effort. Check out the best features that are included in this software:
It allows you to create professional mixes with beat-mixed song transitions on PC and Mac as well.
You will be able to make songs slower and faster without having to change their pitch.
You can trim down longer songs, and you can remix shorter ones in order to extend them.
MixMeister Express 7.7 allows you to add special effects for more ways to blend the songs together.
You can create a full-length mix and export it to various devices.
The program also offers a random and smart playlist creation for mix suggestions.
Using MixMeister Express 7.7, you will be able to hit the exact tempo that you are after. You can use this program to create a mix for a dance floor and even for a fitness class, and you’ll be able to adjust the tempo to heat up people and to cool them down as well.
These are five of the best programs that will automatically help you with your tune mixing.
If you discovered that DJ-ing is your passion, take a look at some of our purposeful articles on tips and tricks in the world of music, and see for yourself which one fits your needs and skills the best. Check them out and have some fun!
You can find out more interesting stuff about audio software in our dedicated section, to give yourself and your friends a boost while enhancing your knowledge with technical and useful guides!
You may need to connect Xbox Controller to your Chromebook to get a better gaming experience from this platform. Usually, Chromebook is not a good gaming platform, unlike Windows. However, because of the ability to run Android apps, it has changed.
Nevertheless, there are some native games as well. Moreover, some tricks to run .exe files on Chrome OS have made it possible to play some Windows games too. But the problem begins when you want to use a decent controller with Chromebook. Can you do it?
How do I connect an Xbox Controller to Chromebook?
Fortunately, you can connect Xbox Controller to your Chromebook. However, before following the actual steps, you will need to ensure the following things:
It doesn’t have any issues like physical damage or manufacturer faults.
Make sure that your controller model is compatible.
If everything seems OK, follow these steps to connect this Controller.
1. Use Bluetooth
Open the ChromeOS settings.
Go to Bluetooth and click on Pair new device.
Turn on the Xbox controller.
If necessary, press and hold the Pair button until it begins flashing.
On Chromebook, you should see the Xbox controller under Available devices.
Just click on it and connect.
This method will work with all compatible wireless Xbox controllers.
2. Use a USB cable
If it is a wired controller, connect it via a USB cable.
Your Chromebook should detect it without any problem.
These two methods explain how to connect Xbox one, 360, or any wired or wireless controller to Chromebook. It should work without any problem. If you are interested, learn how to solve the Xbox Controller USB device not recognized error.
If the controller doesn’t connect, see the next section of this article.
Why won’t my Xbox controller connect to my Chromebook?
If your Xbox controller doesn’t connect to the Chromebook, it can be because of the following things:
Compatibility issue: If the model you are using is not compatible, it will not connect to Chromebook.
You have not pressed the Pair button: As mentioned in method 1, you may need to press and hold the Pair button. If not, your Controller may not appear in the Bluetooth device list.
Internal faults: Internal problems with Xbox Controller can be another reason it is not connecting to
Issues with Chromebook: The root of the problem may also exist in your Chromebook. If the Bluetooth module is problematic or there are other bugs or problems, Xbox Controller will not connect.
Controller Firmware is outdated: Outdated firmware is another reason the Controller may not connect.
In this type of situation, we suggest you reset the Xbox Controller and update its firmware. In most cases, it will solve any connectivity issues. If you find there is a Bluetooth connectivity issue, see how to solve Xbox Controller keeps disconnecting.
This article has explained how you can connect Xbox Controller to Chromebook and why it may not connect, along with solutions. You can also try your luck with connecting your Xbox to your laptop.
Do you have any suggestions on this? Feel free to let us know in the comment box.
Some Windows users reported to us that their external HDD won’t format. If you also experience the same issue, we would gladly help you with this post.
The external HDD won’t format problem is normally accompanied by the ‘Windows was unable to complete format’ error prompt. As a result of this, the format process is either halted or incomplete.
There are several reasons why the external HDD won’t format problem may occur; this includes:
Incompatible or outdated hardware drivers or BIOS, etc.
How do I do if the external hard drive won’t format?
1. Scan the external HDD for malware
Malware and viruses can cause external HDD format issues. Therefore, you should scan the external hard drive for potential malware or viruses.
In order to scan the external hard drive, you can use Windows’ built-in antivirus i.e. Windows Defender, or third-party antivirus programs.
Here’s how to scan your external hard drive for viruses:
Plug the external hard drive into your system
Go to Start > type ‘defender’ > double click Windows Defender to launch the tool
In the left-hand pane, select the shield icon
In the new window, click the Custom scan tick box.
Now, click on the ‘Scan Now’ option.
Alternatively, you can use a third-party option, such as ESET HOME Security Essential. This is one of the best antivirus in 2023 for Windows PCs because it can scan your external hard drive and protect your whole PC against all threats without slowing down your device.
It can also remove threats while preserving your data. Once the scan and removal processes are done, you will be able to safely open your files.
Moreover, ESET HOME Security Essential acts as a web-filtering antivirus software when you share your PC with multiple people. It can help you set browsing permissions so no other users can access harmful websites.
Saving the best for the last, there are several third-party tools out there which you can use to format your external HDD without stress. Therefore, you can try out any of them in order to resolve the external HDD won’t format problem.
Dedicated partition format software are safe to use and do not require expert-level knowledge from users.
Besides allowing you to format your partitions, they come with additional features that let you merge/split, resize or create new partitions.
They include instructions along each step of the formatting process to ensure you know exactly what happens and you get the results you are looking for.
3. Run a SFC scan
Press Windows+Q and type cmd.
From the search results, right-click Command Prompt and choose “Run as Administrator”.
A new cmd window appears. Type sfc /scannow and hit the ‘Enter’ key.
Wait until scan and repair process is finished.
Corrupt system files can also cause external HDD format problems. Therefore, you can use SFC (System File Checker) utility tool, which scans the system files to check for integrity file violations for systematic resolution.
4. Run CHKDSK
Go to Start > Type command prompt >Right-click on it, and select Run as administrator.
Now, type CHKDSK C: /F.
Hence, type CHKDSK C: /R without quotes in the Command Prompt and hit Enter key.
After the CHKDSK process, restart your PC afterward.
CHKDSK can also be used to solve the external HDD won’t format problem. This is because CHKDSK cleans up disk-related errors from your drive.
Note: Ensure you type in the external drive letter in the second step above. Sometimes, the letter might be F, G, or any alphabet.
Go to Start>type update in the search box, then click on Windows Update to proceed.
Check for updates in the Windows Update window and install the available updates.
After the update is complete, restart your Windows PC.
Outdated BIOS and hardware drivers can cause external HDD won’t format problems. So, therefore, it is essential that you update your PC so as to resolve the issue.
Besides, Windows updates can fix many Windows OS issues, especially any external HDD-related issue.
6. Use Diskpart
Follow these steps to use Diskpart:
Plug in the external HDD into your system
Go to Start > Type Command Prompt without quotes.
Select Command Prompt (Admin) to open the Prompt’s window.
In the Command prompt window, type ‘diskpart’, and then press the Enter key. This will open the Diskpart window.
Now, type ‘list disk’ and hit the Enter key to open a list of drives.
Type ‘select disk n’ in the Diskpart window, and press the Enter key. (Note: replace the n with the number of the external hard drive you intend to select.
Type ‘clean’ without quotes, and hit the Enter key.
Proceed by typing ‘create partition primary’ command in Diskpart, and hit the Enter key
Finally, type format fs=ntfs quick and press Enter to format the external HDD with NTFS (New Technology File System).
Some Windows users reported that they fixed the external HDD won’t format problems simply by using Diskpart. On the other hand, Diskpart is a utility tool that can be used to format the external hard drive. However, before accessing Diskpart, you need to use the Command Prompt.
7. Run the Disk management tool
Plug in your external hard drive
Go to Start > type ‘disk management‘ > select the Disk Management utility
Right-click the drive that you want to format > select the Format option
Follow the prompts to proceed with the format process > click OK on the warning window.
After the format process is complete, you can use your drive.
Another workaround applicable in resolving the external HDD won’t format problem is by using disk management. This tool formats and restores the default drive settings, enabling you to format your external hard drive once and for all.
In conclusion, we do hope that any of the solutions we mentioned above helped you to fix the external drive without a format problem. However, if you still experience the problem, you can use an enclosure with a SATA cable for the external HDD before you proceed with the format process.
If you have any questions or comments regarding any of the solutions we mentioned above or you experience technical issues with your Windows PC, feel free to comment below.
Every time a Windows user runs more than two operating systems virtually on the same piece of hardware there is a potential chance for loss of data or services. Hence the need for backup software for Hyper-V.
Why do I need Hyper-V backup tools? Loss of data means a drop in a considerable amount of revenue and standing. Why should anyone, for that matter, want to suffer that risk when they can get a backup solution that allows for the restoration of info in a fitting manner?
Different Hyper-V backup tools have different features. Some are strong and unique; others are plain weak. In order to make an informed choice, take a look at our top picks below.
If you frequently work within a Windows Server Environment, then you know about the importance of backing up and keeping your data safe.
That being said, it goes without saying that you will be probably looking for the best software tool available that works in that direction.
Acronis Cyber Backup is one such tool, and the best part is that, with just a few simple steps, you can back up data to the storage location of your choice.
Additionally, this powerful tool is capable of recovering individual files, applications, or a complete system in mere seconds.
Of course, all types of servers are supported, including those that are virtual, physical, and cloud.
Here are some Acronis Cyber Backup key features that you are about to enjoy:
Easy to use
Offers a 30-day free trial period
Efficient server backup and protection features
Works with physical, virtual, or cloud-based servers
Can recover individual files, applications, or a complete system
Paragon is a free backup software for Hyper-V with an unquestionable two-decade experience in data safety and recovery practices.
Small and medium businesses together with freelancers are able to efficiently spread out and administer storage resources in three easy-to-use steps.
All you need to do is download and install the tool, restart your computer, create a new file or partition, and then back up your data.
While the ordinary version of Paragon Backup works just fine, its paid service is capable of a whole lot more. Discover what other features come in handy from purchasing the premium backup and recovery software.
Paragon Backup key features that you are about to enjoy:
WinPE flexible restore – The WinPE environment allows for flexibility to put back data based on what the user needs; restoring an entire disk is as acceptable as restoring only parts of it
Recovery media (WinPE-based)– Create a recovery environment, savable in bootable media such as a USB or CD drive; this way, data is safe and secure, even with a corrupted OS
Differential backup – A data preservation feature that dwells on saving up on storage space through smart selection
Intelligent automation lets users schedule their own backups based on chosen triggers
Executing backups can be a time-consuming task. If only there was a way to protect valuable data without having to deal with the tussle of doing so.
NovaStor, a provider of data security solutions created NovaBACKUP. Like any other backup software for Hyper-V on this list, NovaBACKUP is a scalable and reliable software that meets the needs and requirements of the user.
What sets it apart though, is its configurable solutions that can be adjusted to match the user’s budget and particular necessities.
NovaBACKUP key features:
NovaBACKUP works 4x faster than its closest competitor; this turns the software into a virtual bullet
The image-level or file-level backup options
Support for cloud saving services such as Google Drive and Dropbox
Microsoft’s Hyper-V is a revolutionary virtualization tool although not invincible. Some physical workstations and servers refuse to be virtualized.
These have demanding regulatory compliance requirements and complicated hardware structures. As such, incidents such as file corruption and hardware failures are inevitable. They leave data to exposure.
Veeam Backup and Replication mitigates such occurrences. The software bridges the gap between large different environments.
Incremental backups succeed as a primary backup in a fast process that works towards saving as much storage as possible.
Compare the free and paid versions to determine which best fits your virtual environment.
Veeam Backup key features:
User-friendly interface
No installation and management requirements whatsoever
NAKVIO Backup & Replication was built speciffically for virtual environments. It is a fast, affordable, VM backup solution for multiple virtualization environments.
That includes VMware vSphere, VMware Cloud Director, Microsoft Hyper-V, and Nutanix AHV among others.
The solution doesn’t cover only virtual machines, but also cloud, physical, SaaS and hybrid environments, all from a centralized web interface.
You can install it on NAS, Windows, Linux or as a pre-configured VMware vSphere or Nutanix AHV VA and you will be able to get your first VM backup in just a few minutes.
And the best part is that NAKVIO only requires 2 cores and 4 GB of RAM for full deployment and to start running backups.
Don’t worry, your data will be safe because you can encrypt it in transit and at rest using AES-256 encryption. As for the access to the solution itself, the two-factor authentication (2FA) method is golden.
Let’s review some of its most important features:
Over 9 recovery options
Image-based, incremental, app-aware backups of VMware vSphere, Microsoft Hyper-V and Nutanix AHV VMs
Iperius Backup is a complete and affordable backup software for Hyper-V that performs hot VM backups. It then copies them to NAS, tape devices, or across the network in an automatic rhythm.
Do note that users can back up with synchronization or compression, copy locked files, and perform an online backup to the cloud and FTP.
Iperius Backup key features:
Lightweight software tool with a rich choice of options
Save unlimited VMs in a network and execute a bunch of other backup types
The above backup software options for Hyper-V including Paragon, Veeam, Altaro, NovaBACKUP, and Iperius are highly innovative and flexible.
They have been made just right, for the most complex enterprise environments. With these, users can now worry less about the safety of their data and focus their attention on other endeavors.
The Taskbar has been present from the earliest versions of Windows and has remained a crucial part of the Windows experience. Nevertheless, the taskbar has changed over the years.
For instance, the earliest versions of Windows didn’t have Quick Launch icons. Instead, you could only see the list of currently opened apps.
How do I make taskbar icons bigger?
1. Change the display scaling
NOTE
This feature will also change the size of the text and other elements on your screen. So, if you choose to use the display scaling option, bear in mind that you’ll also increase the size of other elements.
Open the Settings app. You can do that instantly by using Windows Key + I shortcut.
2. Now go to the System section.
3. Locate Change the size of text, apps, and other items option and change it to 125%.
If your Taskbar icons look too small, perhaps you can fix this issue by changing the display scaling setting. Don’t worry, if the Windows Settings app won’t open, you can easily fix it with our help.
Sometimes your applications and icons can appear smaller, especially on a larger display, and this is why many users use the display scaling feature. After doing that, the size of your icons, text, and apps will change.
This change will also affect the size of your Taskbar icons. If the elements on your screen look too big after making this change, revert the settings to the default value and proceed to the next solution.
2. Make sure that you’re not using small icons
Open the Settings app and go to the Personalization section.
Now select Taskbar from the left pane.
In the right pane, be sure to disable Use small taskbar buttons option.
Sometimes, your Taskbar icons might look too small if you have a small Taskbar buttons option enabled.
Windows 10 has two sizes available for Taskbar icons, normal and small, and you can change the size of the Taskbar icons by performing the steps indicated above.
If this feature is already disabled, it means that you’re using the normal size for Taskbar icons. Unfortunately, there’s no way to further increase the size of Taskbar icons without using third-party solutions.
Go to the Appearance tab from the left pane. In the right pane, check the Use larger taskbar option.
Click Apply and OK and you’re good to go.
Finally, here’s a third-party solution that might help you increase the size of your Taskbar icons.
StartIsBack++ was initially designed for Windows 8 to restore the Start Menu, but it can also be used to customize the look of your Taskbar.
As you can see, changing the size of Taskbar icons is simple with this tool. However, bear in mind that it isn’t free, but it’s available for a free trial, so you might want to try it out.
Can I make my taskbar icons bigger on Windows 10?
As previously mentioned, there is no native feature that can allow you to increase the taskbar icon size. While there is a scaling option, it will also change the text size and other elements on your screen.
So, how can the taskbar icons be increased in size? As always, there are ways to deal with a taskbar that is too small or with small icons.
In short, users will want to know how to make taskbar icons more prominent in Windows 7, Windows 10, or Windows 11, as per their needs.
These are some of the ways that you can use to change the size of Taskbar icons especially if apps like Xbox keep pinning themselves and taking up space.
Windows 10 doesn’t have the option to increase the size of Taskbar icons manually, so if the first two solutions didn’t fix the problem, you’ll have to use third-party software to change the size of Taskbar icons.
It is safer to click on “Safely remove hardware,” when you want to remove your USB flash drive from a computer, than just pulling it out. But, what if this button disappears from the notification area? Don’t worry, we have a solution for that.
Missing Safely Remove Hardware icon can be a problem, but users reported the following issues as well:
Safely Remove Hardware icon not working, missing, not showing, not responding, not active
Many users reported that Safely Remove Hardware icon isn’t working on their PC.
According to users, the icon isn’t responding, and in some cases, the icon isn’t showing at all.
Safely Remove Hardware icon won’t go away, always present, stays on, stuck, always showing
Several users reported that they can’t remove Safely Remove Hardware icon.
According to them, the icon is always showing and it seems that it’s stuck.
Safely Remove Hardware icon flashing
Several users reported that their Safely Remove Hardware icon is flashing.
This can be caused by corrupted drivers, so be sure to reinstall them.
Safely Remove Hardware icon does not show devices
This is an unusual problem, and several users reported that they can’t see their devices using Safely Remove Hardware feature.
Safely Remove Hardware error message
Sometimes various errors can appear while using Safely Remove Hardware feature.
These errors are usually caused by your settings or by driver issues.
How can I open a Safely remove hardware window in Windows 10?
1. Create Safely Remove Hardware shortcut
As staff from Microsoft forums pointed out, Safely Remove Hardwareicon can sometimes disappear from the notification area in the taskbar, especially in Windows 10.
So, even if the device is found, and it functions well, this button just doesn’t show. Luckily, there’s a simple solution for this problem, and all you have to do to solve it is to follow these steps:
Press Windowskey and R at the same time. This will open the Run window.
Enter the following command into Run, and press Enter or click OK:
This will open Safely Remove Hardware dialog, from this dialog, you can select the device you want to remove and remove it, by clicking on Stop.
We hope that this problem won’t happen more than once, but if it does happen again, you can create a Desktop shortcut to Safely Remove Hardware dialog, so you don’t have to launch it from Run every time. To create this shortcut, just follow the instructions:
Click Next, and rename it to Safely Remove Hardware.
Click Finish.
After the recent updates, you can unplug your USB devices without hitting Safely Remove Hardware. If you’re interested in more info about that, check out this article.
2. Change your notification settings
Several users reported that Safely Remove Hardware icon is missing on their PC. This icon isn’t missing and it’s most likely hidden in your Taskbar.
To reveal this icon, you just need to click the arrow in the bottom right corner to show more sysbar icons. If the icon is available, you can permanently pin it to your Taskbar by doing the following:
Connect a USB flash drive or any other removable storage to your PC.
Click the arrow in the bottom right corner to expand the sysbar section.
Now locate Safely Remove Hardwareicon and drag it to your Taskbar.
After doing that, the icon should be pinned to your Taskbar and visible whenever you insert a removable media. You can also change this setting using the Settings app:
Press Windows Key + I to open the Settings app.
When Settings app opens, go to the Personalization section.
From the menu on the left select Taskbar. Now in the Notification area click on Select which icons appear on the taskbar.
Locate Safely Remove Hardware and make sure that it’s enabled.
After doing that, the icon should appear in your Taskbar and the problem will be resolved.
3. Reinstall your devices
According to users, you might be able to fix this problem simply by reinstalling your devices. If Safely Remove Hardware icon is missing, the problem might be your drivers.
To fix the issue, you just need to remove the problematic drivers and let Windows reinstall them. This is rather simple and you can do it by following these steps:
Press Windows Key + X to open the Win + X menu and choose Device Manager from the list. You can also open this menu by right-clicking the Start Button.
When Device Manager opens, go to View and check Show hidden devices.
Navigate to Universal Serial Bus controller section, and delete USB controllers.
To do that, simply right-click a device and choose Uninstall device from the menu.
The confirmation dialog will now appear. Click on Uninstall button to remove the device. Note: Keep in mind that you might have to uninstall all devices in this section before you can fix the problem.
After removing the problematic driver, you just have to connect your USB device to the PC and Windows 10 should automatically recognise it. Once your device is recognised, Safely Remove Hardware icon should appear again.
Now locate Windows Explorer on the list and right click it.
Select Restart from the menu.
This is just a workaround, but several users reported that it worked for them. If your Safely Remove Hardware icon is missing, you can restore it simply by restarting Windows Explorer process.
After doing that, Windows Explorer will restart and your Safely Remove Hardware icon should reappear. Keep in mind that this is just a workaround, so you’ll have to repeat this solution whenever the issue occurs.
5. Change your device policy
If Safely Remove Hardware icon is missing on your PC, you might be able to fix the problem simply by changing your device policy. To do that, connect your USB flash drive to the PC and follow these steps:
Go to Device Manager.
Expand Disk drives section and double click your removable storage.
When Properties window opens, go to the Policies tab. Select Better performance and click on OK to save changes.
Optional: Some users are recommending to repeat these steps and select Quick Removal option again. This isn’t mandatory, but sometimes switching between these two options fixes the issue.
After enabling this option, the Safely Remove Hardware icon should appear again on your Taskbar.
6. Check if Plug and Play service is running
To check if the necessary services are running, do the following:
Press Windows Key + R and enter services.msc. Press Enter or click OK.
When Services window opens, locate Plug and Play and double click it.
The Properties window will now appear. Check the Service status. If the service isn’t running click on Start button to start it. Now click Apply and OK to save changes. Note: Some users are suggesting to change the Startup type from Manual to Automatic, so you might want to try that as well.
Windows uses all sorts of services in order to run properly, and if Safely Remove Hardware icon is missing, the problem might be related to your services.
It unlikely that your Plug and Play service is stopped, but sometimes these issues can occur, so be sure to check if the service is running properly on your PC.
7. Use third-party tools
If Safely Remove Hardware icon is still missing, you might want to consider using a third-party solution as a temporary workaround. Many users reported that they used USB Disk Ejector software to safely disconnect their USB devices.
This is a free and portable application that allows you to safely disconnect any USB storage device from your PC. If you can’t fix the problem with missing Safely Remove Hardware icon, be sure to try USB Disk Ejector.
If you can’t eject you’re USB device in Windows 10, we’ve prepared a quick guide that will help you fix the issue in no time.
That would be all, I hope that problem with Safely Remove Hardware icon disappearance won’t bother you more than once.
Tell us in the comments, do you prefer to ‘use’ Safely Remove Hardware button when you’re removing your USB (or some other peripheral), or you just pull it out?
A macro recorder is one notable tool Windows lacks. If you’ve ever used the MS Office or LibreOffice suites, you might be familiar with the macro tools they have that enable users to record a sequence of selected options or actions to automate more repetitive tasks.
If Windows 10 included a similar macro recorder, you could automate a multitude of PC tasks that would otherwise require manual input. For example, you could set up macros that automatically launch four alternative programs at once or adjust a theme setting.
As Windows lacks a macro-recording tool, some publishers have developed automation software for creating macros and apps. These programs enable users to script macros and apps from scratch; the less code-savvy can record macros instead.
Alternatively, some Windows automation software might enable you to set up batch files within a GUI to automate tasks. The more advanced automation programs are generally scripting tools. Here are five programs that you can automate PC tasks in Windows with.
RoboTask users can automate a range of PC tasks with a multitude of custom variables and more advanced options.
You could use this software to automatically open multiple programs and documents, manage automatic backups, send emails, process folders, and files, shut down Windows with a specified trigger, and lots more besides.
Or you can add a freeware RoboTask Lite version to Windows, which has more limited actions and system variables, from this web page.
RoboTask enables you to automate PC tasks by selecting actions and then editing them to meet your requirements further. You can select 205 automated actions for software applications, FTP servers, emails, ZIP files, flow control, and file processing.
Aside from setting up automated tasks, you can add various trigger events that activate the macros. For example, you can set up system events to activate the automated tasks or schedule them for specific times.
RoboTask has its own macro recorder with which you can record mouse and keyboard actions to automate tasks. In addition, the software has a Service Manager utility that enables automated tasks to work with system privileges even when you’re not logged into Windows.
This program also supports plug-ins, and its BASIC plug-in enables users to create custom BASIC scripts.
RoboTask
With triggered events and a variety of automated chores, this macro recorder droid simplifies every operation.
AutoHotkey is open-source scripting software for Windows. The program has an intuitive scripting language with which you can automate many tasks, and the software also enables users to remap keyboards and create mouse hotkeys.
You can add AutoHotkey’s non-portable or portable version to all Windows platforms on the software’s website.
AutoHotkey enables you to set up scripts to schedule system scans, fill out form fields, open software or web pages with keystrokes, automatically close programs, and much more.
The software’s scripting language allows users to compile basic and more complex scripts with custom GUIs into portable EXE files.
Note that this software doesn’t have its own text editor, so users must compile their scripts in Notepad or other third-party programs.
You can select most of AutoHotkey’s options from its system tray icon. The software’s website includes scripting tutorials, but you can also download (or copy and paste) ready-made scripts.
Robotic Process Automation by MicroFocus provides durable robots for corporate businesses to combine screen and API automation, whether the process is simple or complicated.
It recognizes screen items using AI-based machine learning or attribute-based object recognition, even when the objects move or change color or size. They can recognize over 600 UI objects across the web, Windows, and SAP.
HR departments can use digital workflows to parse PDF files, send notifications, and enter data. RPA encrypts data, prepares financial reports, reads emails, and interacts with business support apps, even for finance and sales activities.
Robotic Process Automation makes all tasks look keen and fluid by encrypting them. All of the resilient robots’ actions may be easily tracked in detailed logs and on a central dashboard.
You may specify and control all phases in your automation with advanced orchestration for decision-making, parallel processing, and error handling.
This software enables users to build ‘software robots’ to automate tasks. WinAutomation is an advanced application for creating macro scripts to automate Windows, websites, web applications, and other third-party software.
Although there’s a cheaper Standard edition that still includes most of the options and tools in the Pro version.
WinAutomation has a much more extensive GUI than AutoHotkey. One of the best things about this program is its Visual Software Robot Designer, which has a drag-and-drop UI that enables you to drag and drop actions into a script.
That also includes visual debugger tooltips and help balloons that highlight errors.
The software has a Macro Recorder with which you can record mouse clicks and keystrokes. As such, no manual scripting is required to automate tasks with WinAutomation.
This program also has a Web Recorder for automating browser tasks like form filling. With the software’s Email Automation Actions tool, you can send automated emails and automate email processing and sorting.
This program has a handy Task Scheduler tool to schedule macros and programs to run at specific times, and users can also design their own dialog windows for software robots with the UI Designer.
Macro Express is a proprietary program that has an extensive set of macro commands with which to automate Windows. The software has a Pro version.
Macro Express Pro enables users to run macros simultaneously and includes an enhanced script editor. There’s also a portable version of the software that you can run from USB drives.
Macro Express has Script Editor and Direct Editor tools that enable users to create macros from scratch with script commands. The Direct Editor shows users more specific details for each macro command.
Alternatively, you can use the software’s Capture utility, which has a variety of capture settings, to record macros. Quick Wizards, which guide you through creating the macros, are another good addition to the program.
The software even enables you to create floating menus to select macros to playback.
Another good thing about ME is that it provides multiple methods for activating macros, which include keyboard shortcuts, floating menus, system events, scheduling, and mouse clicks.
You can even configure the macros to run in more specific windows or programs. In addition, the publisher includes extensive Macro Express Pro guides on its website; and you can also download shared macros from the site.
JitBit Macro Recorder includes a macro recorder and visual editor for inserting custom commands to automate PC tasks. Macro Recorder has Basic, Pro, and Premium versions retailing on the publisher’s site.
The publisher also offers free Macro Recorder copies for blog reviews of JitBit software. Furthermore, there’s a freeware Lite version of the software that retains the recording options from the full package.
JitBit Macro Recorder is a flexible package you can record and edit macros with.
With the macro editor, users can insert extra custom commands along the lines of ‘shutdown,’ ‘open file’ and ‘launch websites’ and include for-loops and if-then statements within the macro code.
You can even add C# code snippets to macros in the Premium version. Macro Recorder includes various recording options to configure the playback speed, loop the playback, select alternative recording modes, and set up macro-recording filters.
Then the software enables you to add keyboard shortcuts to activate the with. The Premium and Pro versions include a scheduling tool and EXE compiler to convert the macros to EXE files.
There’s a lot of software that enables you to automate PC tasks. Those six programs have fairly extensive tools and options to create macros and scripts to automate Windows and other third-party software.
Windows 10 users have reported that they are seeing software named Nahimic Companion getting installed on their PC after a Windows update. They are confused about what is Nahimic Companion and whether or not they can uninstall the program from their PC.
If you are also having similar doubts and are looking for a guide on what is Nahimic Companion then this guide is for you. Here, we will explain what is Nahimic Companion and how you completely and safely remove it from your Windows PC. Let us get right into the guide.
What is Nahimic Companion?
Nahimic Companion is an app that comes pre-loaded with the Nahimic drivers and gets installed with a Windows update. If you have a PC with a motherboard or laptop from brands MSI, Aorus, ASRock, Dell, Machenike, or ThundeRobot, you will receive this audio driver.
This program is designed to enhance audio quality and would be beneficial for gamers. The Nahimic Companion driver improves the MSI (Micro-Star International) PC’s audio and also voice performance. This will ultimately give you a better gaming sound and media experience.
It features advanced algorithms such as Sound Tracker and awesome Nahimic sound effects with any connection be it HDMI, audio jack, Bluetooth, etc. To improve voice quality, it comes with Voice Stabilizer and Static Noise Suppression feature.
Although the Nahimic Companion improves your PC’s audio performance, it can cause multiple issues because of incompatibility. In such a case, it becomes necessary to uninstall the program from your PC.
Can I uninstall Nahimic companion?
Well, if you are really experiencing some ground-breaking sound enhancements with the Nahimic Companion app on your Windows PC, then it is best to stick with the audio driver.
However, in case you do not find the program useful and are facing multiple issues with the Nahimic Companion app, then you should uninstall it from your PC.
What happens if I uninstall Nahimic?
The only thing that will happen if you uninstall the Nahimic Companion app from your Windows PC is that your PC will go back to using the default audio driver.
If you have tweaked the Nahimic Companion app and attained good-quality sound, then you will definitely miss it. But apart from that, there isn’t much that you are losing when you uninstall the program from your PC.
How can I uninstall Nahimic Companion?
1. Disable Nahimic service and uninstall
Press the Win + R keys to open the Run dialogue.
Type services.msc and press Enter.
Locate Nahimic service.
Press the Stop button at the top.
Close the Services window.
Press the Win button to open the Start menu.
Search for Device Manager and open it.
Expand the Sound, video and game controllers section.
Right-click on the Nahimic mirroring device and select Uninstall device.
Follow the on-screen prompts to completely remove it from your PC.
Use the search function or locate the Nahimic Companion app.
Select it and hit the Uninstall button.
Wait for the process to complete.
Restart your PC.
There are a bunch of uninstaller software tools that can help you get rid of sticky apps from your PC. By sticky apps, we mean apps that leave behind residual files. We advise you use IObit Uninstallerto remove unwanted programs from your PC.
That is it from us in this guide. If you are looking for some cool sound enhancers for your Windows PC, then you can check out our guide that lists 5 of the best audio enhancers you can try.
DDS (Direct Draw Surface) is an image file format that Microsoft established with DirectX 7.0. Microsoft conceived DDS as a container format for raster images with compressed and decompressed pixels.
This file format is primarily for saving graphics textures and game maps. However, DDS is not among the most widely supported image file formats, so you might wonder how to open DDS files in Windows 10.
We made sure to provide you with a set of tools that can open the DDS file extension.
What program can open DDS?
? Photoshop – obviously, the champion en titre will deliver and we’ll show you exactly how to open DDS files in photoshop. Nevertheless, there are other options to consider.
How do I open DDS files without Photoshop? If you’re among those who still ponder the different possibilities, you’re in big luck.
? DDS Viewer – What is DDS viewer? The name says it all, it’s the ultimate tool to handle DDS files: view DDs thumbnails, open and edit a DDS image as per your needs.
? Aconvert.com –Last, but not least, here’s a nifty DDS viewer online which will help you convert a DDS file to PNG and make it more maneuverable.
Today, we’ll be looking at some of the best music software for recording vocals. If you are a music artist or audio engineer, or just want to keep audio records of your call logs, this piece is specially designed for you.
Voice recording has been a conventional procedure for quite some time now, as virtually all digital gadgets are equipped (in varying degrees) to, one way or the other, record audio/sounds.
Typically, all computer systems, smartphones, tablets, and even old analog mobile brands come with a built-in audio system, designed to record vocals or sound.
However, most of these inbuilt audio recorders are too simple to handle the demand and quality standard of required vocal output today.
More often than not, system-recorded vocals are blighted by issues like background noise, unwanted breaks, distorted speakers, voice cracks, and so on.
The ultimate solution to this is to edit audio during and/or after recording, and the built-in audio recorders are not equipped to execute this function.
Therefore, to facilitate the production of quality, error-free, recordings, a myriad of audio recording tools/music software have been developed.
However, only a handful of these tools are of the standard, and we’ll be looking at five of the standard ones in this article.
Read on to get a good grip on some of the best music software for recording vocals, as we bring you a comprehensive review of each of them.
Adobe Audition is an excellent vocal recording and audio editing software for both Windows and Mac.
You can record audio from any device or microphone. Before starting to record, don’t forget to adjust the signal‑to‑noise levels to clear the input signal as much as possible.
The Multitrack Editor is a nifty Adobe Audition feature that automatically saves your audio recordings into WAV files. Moreover, you can also use this tool for overdubbing and recording audio on multiple tracks.
The Essential Sound panel offers you a wide array of features to achieve professional-quality audio. Enjoy clear and pristine vocal recordings without any noise interference.
Adobe Audition is perfect for creating podcasts. This all-in-one tool lets you record, edit and export audio recordings. Combine Audition with a top-notch microphone and your podcasts will mesmerize your audience.
Sometimes, your vocal recording may not be of the best quality. The good news is that Adobe Audition comes with a set of built-in audio repair tools that you can use to diagnose and repair audio issues.
Other key features include:
Seamless integration with other Adobe products
Support for overlapped clips
Manual keyframe entry support
Punch and roll recording for voiceover
Adobe Audition
You can now record, edit and export audio recordings with this great all-in-one tool, so try it out!
RecordPad from NCH Software is a popular music software for recording vocals, with a commendable user base across the globe.
The software hosts multiplatform support for PC (Windows XP/Vista/7/8/8.1/10) and macOS computers, as well as iOS and Android mobile devices.
RecordPad features broad sets of recording and audio-enhancing features, which can easily be employed to record, refine/edit, and rip and burn vocals.
With this, you are able to produce near-perfect audio notes, demo songs, announcements, voice messages, and so on.
One significant feature of this software is its voice-activated setting, which enables you to auto-erase a long period of silence during a voice recording.
This feature makes RecordPad very ideal for music artists, as they are afforded the opportunity of going over their lyrics (during recording), without altering the music flow.
Other notable features of RecordPad include:
Pitch shifting
Noise reduction
Multi-format support (MP3, WAV & FLAC)
FTP upload
MPEG layer-3 encoding
Wave encoding (6000 to 19600 MHz)
RecordPad
Start recording your music with no background noise using this fantastic tool!
Wavepad from NCH software is probably the most widely used music software for recording vocals, and it conveniently stands out as one of the most reliable recording software for Windows PC.
Specifically, it is compatible with all Windows versions between Windows XP and Windows 10. It is also supported on macOS and mobile platforms (Android & iOS).
WavePad is arguably the best recording tool out there, in terms of feature packages and ease of usage.
It hosts a clean and intuitive interface, which is simple enough for anyone to use, irrespective of technical proficiency or audio system familiarity.
This software offers you in excess of twenty audio filters and effects during recording. With this, you are easily able to manipulate just about any aspect of a recording, to produce desired voice outputs.
With Gilisoft Audio Recorder Pro you can record voice and sounds at the same time, producing high-quality audio compilations.
This streaming audio recorder does not entail a microphone, since it works directly with your sound card.
It is an ideal audio recorder for Windows OS, recording computer noises and microphone to AAC, AC3, AIFF, AMR, AU, FLAC, M4A, M4B, M4R, MKA, MP2, MP3, OGG, RA, VOC, WAV, or WMA files.
It really isn’t difficult to record the sound that streams through your audio card, but GiliSoft Audio Recorder Pro seeks to make everything much easier, even for individuals with basic computer science.
Award-winner and safe to use, Gilisoft Audio Recorder Pro specializes in seeking the smoothest resonance between all vibrations of sounds. It’s like having your portable mini-studio with you all the time. Cool, right?
The highlighted attributes of Gilisoft Audio Recorder Pro include:
Recording Internet Broadcasts from over 500 radio channels
Record all chat voices manually and automatically
Trigger auto functioning with a recording schedule
Recognizes audio recording formats and adapts for the best performance
Prior to actually initiating a recording, you can use a recording sample tool to preview the output
Gilisoft Audio Recorder Pro
It is available to download for free, but also available to unlock extra features as paid software.
i – Sound Recorder 7 is a simple, yet powerful, sound recorder designed to run on all Windows versions from Windows 10 all the way down to Windows XP.
This tool stands out as one of the best music software for recording vocals, with respect to its highly intuitive UI, as well as its unrivaled ease of usage.
Furthermore, it features some advanced functions like a recording scheduler and voice-only recording, which is an essential component of noise reduction.
Other key functions and features of i – Sound Recorder 7 include:
Timer
Multi-format support (MP3, WAV, FLAC, and more)
Live compression
Audio conversion
Voice-activated recording
Auto-gain control (AGC)
The voice-activated recording (VOX) function is similar to that of a portable digital recorder. With this method, you may automatically split the recording into several tracks, making it easier to record vocals without pauses in between.
i – Sound Recorder 7
Integrated VOX is a clever method that can skip audio gaps but ignores brief snaps and background noise.
Audacity is a special-purpose recording software, built exclusively for voice recording and multi-track sound editing. The software is compatible with all major computer OS, including Linux, Mac, and Windows.
Audacity’s platform, though simple, is packed with a broad set of powerful recording and audio manipulation features.
Basically, you are offered a set of advanced tools to record and manipulate sound elements like treble, frequency, bass, and the like.
Some key features of this software include:
sequential undo/redo
Live preview
Frequency analysis
Live recording
VST support
Vamp analysis (plug-in)
Import/export setup
Audacity is an open-source program, which is financed by donations from all over the world. In light of this, it is offered to prospective users at absolutely no cost.
Mixcraft 8 Pro Studio from Acoustica is a top-quality music software for recording vocals. It hosts a fairly intuitive UI, with an akin reflection of a digital audio workstation.
With this, it is probably the best software for recording music, as it offers you an imitated DAW platform to work on.
The software is currently supported on only Windows OS, with exclusive support for all versions between Windows XP and Windows 10.
Mixcraft 8 Pro Studio is one of the most versatile vocal recording tools out there, having 7500+ loops, 28+ audio effects, samples, filters and so on.
Essentially, you are provided with an all-inclusive package to record, edit, improve and burn audio works. The end result is error-free, top-quality sound output.
Other notable features of Mixcraft 8 include:
Pitch correction
Recording timer
Reverberation tools
Silence gauging
MIDI scoring
Broad format support (WAV, MP3, FLAC, OGG etc.)
One of the obvious downsides of this software is its pricing. Mixcraft 8 Pro Studio is one of the most expensive audio recording/editing software out there.
Today, recording vocals/audio has been made easy with the advent of audio recording software.
Voice notes, music demos, soundtracks, and the like can now be recorded and manipulated with ease (in quick time) to generate near-perfect audio files, in desired output format(s).
To better enlighten you on the suitability of these tools, we have reviewed five music software in this article, with succinct descriptions of their flexibility of usage, affordability, compatibility, and functionality.
Hence, if you need audio recording software for your PC, the above-listed tools are the recommended software for you.
If the Power BI Scheduled Refresh option is greyed out, users won’t be able to refresh their datasets, and that can be a problem, but this issue can be resolved, and this guide will show you how to do it.
Why is the scheduled refresh option greyed out in Power BI?
This problem can appear if there are issues with the Power BI account or installation. Sometimes dataset is not connected to the data source and this can cause an issue. In some cases, the DirectQuery connection or your datasets don’t support scheduled refresh.
How do I enable scheduled refresh in Power BI?
Before we start, make sure that you don’t have any network issues and that your dataset is structured correctly.
1. Make changes from Options and settings
Open your report on Power BI desktop.
Click the File menu and click Options and settings.
Click Data source settings, go to Data source credentials, and click the ellipsis (…) next to the data source you want to refresh.
Select the Credential kind in the Edit credentials dialog box, then click OK.
Click Publish in the left pane, select the workspace where you want to publish your report, and then click on Publish.
Click the ellipsis (…) next to the report you just published in the Publish dialog box.
In the Report settings, click the Schedule refresh tab, and select how often you want the report to be refreshed.
Navigate to the Authentication method tab, select the authentication method and click Apply to save the changes.
You must have permission to connect to the data source and permission to publish the report to the workspace where you are publishing it.
2. Create a new schedule refresh plan
Sign in to your Power BI portal.
Right-click on the Power BI Reports tab and select the Manage option.
Click on the Data Sources option, select the type of authentication in the Authentication type bar, type in the required Credentials and click on Save.
Navigate back to the Power BI report tab and select Manage.
Click on Schedule Refresh Plan, then click the +New Scheduled Refresh Plan button to create a new refresh plan.
On the New Scheduled Refresh Plan page, input the description and a schedule for the duration you want the data model to refresh.
Creating a new schedule refresh plan allows you to enable Power BI Schedule Refresh.
In case you encounter any further problems with refreshing, our Power BI won’t refresh guide is here to help you. We also have an article on how to auto-refresh Power BI, so don’t miss it.
If you have any questions or suggestions, kindly drop them in the comments section.
Windows Server backup software is different from Windows backup software. If you use Windows Server 2019, 2016, 2012 R2, 2012, 2008 R2, or 2008, you should find backup tools that are not only compatible but also powerful.
Everything a Windows user does is based on a straightforward concept: input of data. The single next important thing to do for you would be to ensure backing up data in case of any technology fails.
That being said, here is our selection of the best backup software for Windows Server.
ManageEngine OS Deployer is OS deployment and migration software, but it also offers online and offline imaging.
The software lets you create an image of the OS and disk partitions in your computer and can be deployed on single or multiple computers simultaneously, even on a machine with a corrupted OS.
The Online imaging method allows admins to capture the system’s disk image when it is live and functioning in a network.
Conversely, with Offline imaging, the disk image is acquired when the network is shut down.
The tool can create an image of single or multiple partitions or entire disks and shrink the volume to prevent disk size incompatibility errors.
ManageEngine OS Deployer can also migrate user profiles and data from one computer to another, ensuring that users can seamlessly continue their work on a new device.
It provides a pre-boot environment, allowing administrators to perform computer diagnostics and repairs without accessing the operating system.
Let’s go through some of ManageEngine OS Deployer’s best features:
Can deploy standardized configurations across multiple computers
Simplifies the process of migrating from an older OS to a new one
Automates the process of deploying operating systems across machines
Allows IT administrators to manage computers in remote locations
Installs the necessary drivers during OS deployment
ManageEngine OS Deployer
Manage your server backups and keep your system in top shape with this powerful tool.
Paragon Backup & Recovery Business is ideal Windows Server backup software for small and mid-sized companies. It’s the server edition of Paragon Backup & Recovery.
This tool meets all of your demands, whether it’s simply storing data, automating backup procedures, or developing sophisticated backup routines.
The strong software wizard helps users through the backup wilderness step by step, and the newly designed UI clears the course.
Backup strategies are meant to make it simple to set up and perform automatic backup operations. You may pick from dependable pre-defined methods or create your own.
Because of its CRC technology, Paragon backup archive PVHD (Paragon virtual hard drive) may be mounted and read within your Windows system and is ideal for hosting network sharing.
Here are the key features of the Paragon Backup & Recovery Business:
Comprehensive backup solution for physical and logical media
Flexible restore options
Create a bootable environment and fix boot errors
Secure your Windows Server environment and automate administrative tasks
Integrated end-to-end security, low impact on the system and network
Paragon Backup & Recovery Business
With this flexible and intuitive tool, you can back up your system data worry-free.
Zinstall FullBack (Server Edition) is a complete, always-on, easy-to-use backup solution for your entire server.
Unlike other backups, FullBack can restore server applications, not just files, even to completely different server hardware with a different Windows version.
For example, you can restore a backup of a Dell Server 2012, to an HP Server 2022 (or to an Azure-hosted Server 2022) – including server applications.
Note that this is not a clone restore, i.e., it doesn’t overwrite the new OS or hardware layer.
It doesn’t just restore data; it recovers your applications, their configurations and accounts, your profiles, shares, and security permissions.
You get back to work as if nothing happened. This unique capability alone makes FullBack severe worth consideration. Of course, you can recover a file or a folder with a click.
With all that powerful technology under the hood, FullBack is nevertheless super simple to use.
FullBack can store your backups pretty much anywhere: local drives, external drives, network shares, NAS / SAN, and 3rd party Cloud storage such as Amazon S3 or Backblaze B2 (or even OneDrive / Dropbox, although that is more applicable for smaller server deployments).
It also allows you to backup to multiple targets at the same time, so you can keep a local backup for quick access, and a Cloud backup in case your office burns down – a proper implementation of the 1-2-3 backup rule.
Oh, and it even allows you to go back in time to any point in the past: you can restore a file as it was an hour ago, yesterday, a week ago, a month ago, and so on.
It is truly a backup powerhouse that is still easy to use for anyone.
Here are some of its best features:
Automatic backup for your entire server
It recovers your applications, along with their configurations
Stores your backups anywhere, including on cloud storage
Backup to multiple targets at the same time
Full restoration of any file
Zinstall FullBack
Powerful, automatic, super easy to use, and restores everything to anywhere.
Acronis Cyber Backup is one of the best Windows Server backup software for your business. It’s like an edition of Acronis True Image but made for Windows Server.
Cyber Backup runs full backups on your Windows Server environment and recovers the complete entire system or just specific files and programs.
Customizable widgets, reports, notifications, and important event alerts are among the advanced reporting and status-monitoring features of Acronis Cyber Backup.
You can allow Acronis’ AI-based ransomware solution to protect your data from unauthorized change, decryption, and ransomware outbreaks such as Petya, WannaCry, and Osiris.
Furthermore, by adding an extra layer of protection, you can safeguard your data from unauthorized access.
Through a mathematical algorithm, Acronis Notary’s blockchain-based innovation provides a safe connection.
Acronis Cyber Backup is a subscription-based backup solution and includes a 30-days free trial.
Here are the Acronis Cyber Backup key features:
Works with any Windows Server whether it’s virtual, physical, or on the cloud
Save your backups anywhere, including NAS, SAN, tapes, disks, Acronis Cloud, Azure, AWS, Google
Recover the data you need: full system, drives, Microsoft application data, urgent files, and folders.
Scalable backup solution
Capture the current server state using Volume Shadow Copy (VSS).
Acronis Cyber Backup
Do you need more security for your business data? Try Acronis Cyber Backup and be confident about the Windows Server environment!
Paragon Backup & Recovery Business is ideal Windows Server backup software for small and mid-sized companies. It’s the server edition of Paragon Backup & Recovery.
This tool meets all of your demands, whether it’s simply storing data, automating backup procedures, or developing sophisticated backup routines.
The strong software wizard helps users through the backup wilderness step by step, and the newly designed UI clears the course.
Backup strategies are meant to make it simple to set up and perform automatic backup operations. You may pick from dependable pre-defined methods or create your own.
Because of its CRC technology, Paragon backup archive PVHD (Paragon virtual hard drive) may be mounted and read within your Windows system and is ideal for hosting network sharing.
Here are the key features of the Paragon Backup & Recovery Business:
Comprehensive backup solution for physical and logical media
Flexible restore options
Create a bootable environment and fix boot errors
Secure your Windows Server environment and automate administrative tasks
Integrated end-to-end security, low impact on the system and network
Paragon Backup & Recovery Business
With this flexible and intuitive tool, you can back up your system data worry-free.
Quorum onQ – Best business tool for one-click backup & recovery
Quorum onQ is a one-click solution to protect your critical infrastructure from disasters. When you lose a production server, you can move to Quorum’s appliance with a single click and continue to operate.
The technology inside was initially designed for the military to keep the missile tracking system in sync, so there is no margin for error.
OnQ is perfect for businesses because it creates a full server backup, including images, applications, and data, and performs incremental backups as often as every 15 minutes.
Additionally, after backing up a server, Quorum allows unlimited testing to ensure that it will run perfectly when needed.
The Quorum appliance fully supports the ease and flexibility of both physical and virtual servers. Quorum supports physical servers through its proprietary software and interface.
The product is fully integrated into VMware for virtual environments, utilizing vCenter to manage and vMotion to restore.
There are four ways you can configure the Quorum product:
Place a local appliance onsite to support the environment – High Availability only (HA)
Combines a local appliance with replication to a second appliance at a remote site – HA & Disaster Recovery (DR)
Combines a local appliance with replication to Quorum’s private cloud – HA & Disaster Recovery as a Service (DRaaS)
Backup directly to Quorum’s private cloud – Direct-to-Cloud
Key features of Quorum onQ:
One-click recovery to any point in time
Automated recovery testing
HA Anywhere architecture
Ultra-fast backup and recovery thanks to appliances with 25,000 IOPS
Disaster recovery and cloud failover
Quorum onQ
Back up and restore your business servers with a single click for complete data security.
Uranium Backup is a complete backup solution for both local and host servers, so it’s a tool that can help you greatly.
It was designed for businesses and individuals, and the friendly interface allows one to configure a backup set in just a few seconds.
Don’t worry. In case of any malfunction, the reporting system will alert you immediately, saving you precious time.
Regarding backup options, Uranium Backup will secure all data, disk images, databases, Exchange mailboxes, and even virtual machines.
And the backup destination options are staggering. This solution can store the backups on anything, including FTP, FTPS, SFTP, cloud, and even tape.
Why do you create the backup in the first place? This tool ensures complete restoration of your server in case of damage or Ransomware attacks.
Uranium Backup is highly versatile. It is available as a Free version for file and folder backup. Still, it comes with dedicated licenses for higher needs like a backup of Drive Image, databases, and Virtual Machines.
NovaBACKUP for Servers is an exemplary Windows Server backup software for offices and small businesses. It comes equipped with a lot of practical features for creating and managing backups.
The utility called File Copy Jobs, when run manually or on a schedule, can keep a current version of your files in a location you specify through a one-way copy.
File and image backups are compressed by default, saving anywhere from 10% to 25% more than a simple file copy.
Storage is compatible with any disks formatted in New Technology File System that are connected to the system, including hardware RAID configurations.
Backups may be saved to any NTFS formatted disk (including RDX), Network Shares (NAS), or Single Tape Drives.
The NovaBACKUP user interface is designed to be compatible with screen readers and other sensor technologies, making it accessible to those who have difficulty reading or hearing.
Here are the key features of NovaBACKUP for Servers:
Cloud storage backup
Schedule server backups to run automatically in full or incremental mode
Recover the entire server system from the backup to any Hyper-V environment
Follow the 3-2-1 backup rule to save your server in case of disaster
Windows Server Backup is the default Windows Server backup software solution that we simply can’t overlook. Introduced in 1997, the backup solution has been integrated with all Windows Server editions.
Unfortunately, the latest version of Windows Server Backup doesn’t support tape drives. As such, you must use third-party apps to save and tape on a recent OS.
When all’s said and done, customers need not look further than their OS to handle their backup concerns.
Windows Backup is designed to provide a one-stop solution for server protection. You may set up a scheduled job to backup files and the system state, as well as to perform an empty restoration.
Microsoft anticipates that you will have one scheduled job so that you may do a one-time save with Windows Backup.
You could want to copy files to a network share, for example. Remember that any previous backups to the same folder will be overwritten, so try as much as possible to save the previous backup in a different location.
Here are some of its best features:
Comes ready with your server environment
Works with all Windows Server editions
Automatically backs up and recovers your server system
Copies currently used files and applications without any issues
Performs differential, incremental, normal, and daily backups.
It does. It is called Windows Server Backup, and it comes preinstalled with your Windows Server OS.
We also included this solution in our selection below, but as you will see, the tool doesn’t offer all the features offered by more powerful third-party tools.
However, it does have the most important options necessary for Windows Server backup and recovery.
Many companies and organizations will get data loss prevention software and leave it at that. However, this does not address the issue of recovery say if server data were to disappear.
Despite Microsoft’s best efforts to ensure server data protection, some environments are simply too different and complicated for its inbuilt software.
In that case, you can resort to trustworthy Windows Server backup software solutions, like the ones on this list.
Client files and other valuable documents stored on servers are just too valuable to leave unguarded. You can go for cheap Windows servers just make sure your security is top-notch.
Try the above tools and ensure your business security with a fast and uncomplicated backup and recovery experience.
Music is a very important part of our daily lives, and this is why there are so many devices dedicated to bringing us the music we want close to us and always available.
But sometimes, we get bored by the same playlist, and in times like these, we turn our attention to an old friend that has been with us for generations. You might have guessed it: radio.
Although there are countless radio apps on the Microsoft Store, not many offer you the features that you might like, and most of them are targeted to a specific area.
Nevertheless, there are the old-time favorite radio services available for Windows 10 or 11, in the form of these awesome radio apps for PC.
Can I listen to FM radio on my computer?
Although the common radio is not that popular anymore, Internet radio is on the rise. With these digital services getting better and more numerous by the day, there is no shortage of apps that allow us to listen to them. So, is there a radio app for PC?
Windows 10 also has some great solutions for listening to online radio, and now we’ll be taking a look at some amazing options for the best radio app for Windows 10:
Boom 3D – Huge array of local & international Internet radio stations
Spotify – Create endless playlists and stream popular music
Tuba.FM – Create and share your personal radio channel
TuneIn Radio – Great filering options & 24/7 coverage
Pandora – Popular radio app for Windows 10 accessible from any browser
iHeartRadio – Free radio app for Windows 10 with an impressive selection of musical genres
Audials Radio – Boasts radio recorder features
Windows Media Player – Offline FM radio for PC & streaming at high quality
? How do I play FM radio on Windows?
? It couldn’t be easier! Get your hands on an internet radio app or radio player for Windows 10 and 11 from our list.
▶️ Make sure it broadcasts the format you need and hit the Listen or Play button.
? Your app will swiftly load the station you’re currently playing.
Obviously, there are also great options to consider if you’re after an offline FM radio for PC, in which case you will need to download a radio for PC Windows 10 or 11. Here we go!
What are the best radio apps for Windows 10 & 11?
Boom 3D – Huge array of local & international Internet radio stations
Boom 3D is a great tool for boosting up the sound on your PC but what you probably didn’t know is that it’s also an excellent Internet radio streaming app.
In fact, you can access more than 20,000 local and international Internet radio stations from 120 countries, a huge number, no less.
Of course, you also have an integrated player that you can use to create your own playlists according to your needs.
Plus, you will always have awesome sound because Boom 3D comes with a nice equalizer that features greatly built presets that you can use, or you can create your own.
The tool even features a special audio effects feature that you can use to give your music a touch of extra spatiality or even enhance the vocals in a podcast.
Apart from music and the Internet, Boom 3D is absolutely great to enhance your gaming sound experience with the 3D features.
That’s because you can check the sound from each speaker of the virtual surround system and adjust the subwoofer gain, and intensity of audio.
Here are some of the best Boom 3D features:
Access 20K Internet radio stations from 120 countries
Apply the special effects to your audio
Easy to control and operate
Boost the volume of your sounds
The integrated player with music management features
Boom 3D
Access a huge number of Internet radio stations and enhance the sound with Boom 3D!
Tuba.FM – Create and share your personal radio channel
Tuba.FM is described as the first application that matches music with the taste of every user.
It is intuitive, user-friendly, and allows you to customize your music searches and organize your own lists (even create and share your personal radio channel).
Due to its advanced algorithms, it finds music genres you like. You will easily find a good music friend in Tuba.FM.
The only problem is that the app is Polish, and you will see a lot of their stations in the default view and the recommended lists.
The language can also be a problem if you try to create an account. However, you can log in with your Facebook account.
Otherwise, you can search for a lot of free stations that have more than satisfactory results for any possible genre and you can share your playlist via mail, Facebook, or OneNote.
At the bottom of the page, you will see the player where you also have the option to add the song to your favorites.
TuneIn Radio – Great filering options & 24/7 coverage
TuneIn Radio needs no introductions, its services are very well known, and they are beyond reproach.
The app for Windows 10 is not different than what we’d expect from TuneIn, in the sense that it offers the very best features and lots of flexibility.
Users can browse through stations grouped by a number of filters, such as region, music genre, news, or podcasts, they can add favorite radio stations and they can also view the most listened-to stations.
If you want news, this is the best you can get 24/7 live coverage from all the important sources like BBC, CNN,
live 24/7 news from national and global sources like BBC, CNN, MSNBC, NPR, and many more to which you can add the local stations from your area.
Another great thing about TuneIn is that it’s not available only for your desktop but also for a lot of other devices like Google Home, Amazon Echo, Alexa, Sonos, Bose, Roku, Chromecast, and more.
That means that you can start listening to your PC and continue the show on any other device. Anyway, the app is rock solid and its performance is flawless so try it.
Audials Radio is one of the most popular Internet radio apps in the Microsoft Store. This tool brings more than 100,000 radio stations from around the world to your Windows 10 computer.
There are over 70 genres available, so you’ll definitely find something you’ll like. Moreover, the radio recorder feature allows you to record your music and save the respective songs as MP3 files.
If you prefer listening to podcasts, Audials Radio has got you covered. There is a list of more than 260,000 podcasts that you can choose from.
To play an Internet Radio station on Windows 10, you need to download the stream and open it with Windows Media Player.
Supported formats are – .m3u URL, WMP and it can’t play .pls URL as it did before with Windows 7.
How can I play FM radio on my computer without internet? Well, if you were wondering about this possibility, here’s the best way to enjoy offline FM radio for PC.
Since you can’t discover Internet radios with the Windows Media Player, you will need to download the streams by yourself. So go ahead and download radio for PC Windows 10, Windows 7, and so on, according to your version of Windows.
Of course, Windows Media Player is a video and audio player at its core so you will be able to do a lot of other things with it, including managing your collection of media files.
As for the radio stations, most of them have .m3u links that you can include in your player to stream the station at the highest possible quality.
Internet radio has become a more abstract concept that doesn’t only include FM radio that streams online or simply Internet radio stations, but also people’s playlists.
There are many choices, genres, topics, and podcasts and we covered all possibilities in our list of apps above. However, here are a few tips about selecting the right software.
➡️ Decide on what content you want to listen to
If you want to listen to traditional radio, you can simply visit their website and find the listen button in any browser.
If you want to change the station like on a regular radio, some of the apps above will do a great job.
However, if you want to avoid the commercials from the regular stations, you have plenty of choices from the music streaming services from above.
➡️ Free versus paid apps
All the above apps have a free version but some of them have premium options that can either get you extra features or get you free from commercials.
The only thing you need to do is to figure out how important are the extras and how much you’re willing to pay for them.
➡️ Sound quality may be important
Classic radio doesn’t offer top sound quality because let’s face it, it was not created for audiophiles but for those who want to listen to a song and some news while traveling.
If you want to listen to Hi-rez audio, you will find it on some apps above but definitely not on the FM stations. However, Hi-rez audio means higher bandwidth, keep that in mind.
We hope that you found plenty of options to listen to your favorite Internet radio stations and enjoy your music.
You can also look at our selection of the best radio apps for Windows 10 which will also bring you a couple of other solutions.
If you have any other suggestions or questions, don’t hesitate to leave them in the comments section below.
If you’re using an ASRock motherboard and need to enable TPM 2.0, follow the guidelines below. This will help if you want to upgrade your system, as per the Windows 11 hardware requirements.
This allows only the approved software to boot your PC, thus preventing bootloaders and other malware from infecting your PC.
The differences between TPM 1.2 and TPM 2.0 include TPM 2.0’s enhanced security features, which offer stronger cryptographic algorithms and better support for modern hardware compared to the more basic protection provided by TPM 1.2.
Here’s how you enable it:
How can I enable TPM in BIOS on ASRock?
1. ASRock motherboards with AMD CPU
While your PC boots keep pressing F2 to access BIOS. The key might be different depending on your model, so be sure to check the motherboard manual.
Once you enter BIOS, go to the Advanced tab.
Select CPU Configuration.
Select AMD fTPM switch and set it to AMD CPU fTPM.
Navigate to the Security tab.
Set Secure Boot to Enabled. If you can’t enable Secure Boot, set the Secure Boot Mode to Standard and try again.
Enter BIOS by pressing F2 during the boot process.
Go to Advanced mode.
Now head to the Security tab.
Locate Intel Platform Trust Technology and set it to Enable.
Go to Exit and select Save Changes and Exit.
Select Yes to confirm.
How do I check if TPM is enabled?
Press Windows Key + R to open the Run dialog.
Enter tpm.msc and press Enter.
Now you should see the status of the TPM.
How does fTPM work?
fTPM is a version of a crypto processor for AMD devices. Instead of having a separate chip on your motherboard, this feature is implemented in system firmware.
This doesn’t affect your performance in any way, and it works almost identically to a dedicated chip.
However, some experts believe that fTPM isn’t as safe as its hardware counterpart, but for the vast majority of users, it should provide enough protection.
Can I install Windows 11 without TPM?
To install Windows 11, your device needs to support this feature, but you don’t have to keep it enabled if you don’t want to.
Many users reported TPM 2.0 errors that have prevented them from installing the operating system. This is because the required security component isn’t detected.
There’s a way to install Windows 11 without TPM, but if Microsoft fixes this workaround, your only option would be to buy the hardware that meets the security standards.
Windows 11 does its best to improve user security, and we hope that you managed to enable TPM in BIOS on ASRock motherboards after reading this article.
As you can see, the process is pretty simple, and if your hardware supports it, you should be able to turn it on in a matter of minutes.
What are your thoughts on this feature? Are you using it on your PC? Let us know in the comments section below.
Using Avast antivirus on a PC protects users against viral and malware attacks. However, different users have reported The Avast online content is unavailable error message popping up when using the Avast browser.
The Avast online content not unavailable error can occur for many reasons. However, the primary cause of this is browser plug-ins. Some browser plug-ins can affect Avast web scan making the website unavailable.
Furthermore, some common factors responsible for the issue are:
Firewall or security software – Avast online content may be unavailable if the system firewall or other Firewall services are blocking it.
Unstable internet connection – When your internet connection is unstable or slow, it may cause difficulty with Avast accessing a website or content.
Internet service provider (ISP) issues – Avast online content may be unavailable if there are issues with your Internet Service Provider. It can be due to maintenance, technical issues, or other reasons.
Server issues – The error may appear if there are problems with the servers that host the content.
However, these causes can vary on different PCs. Hence, we’ll discuss some fixes as we go further into the article.
What can I do if Avast online content is unavailable?
We recommend trying out the following preliminary checks:
Uninstall and install Avast on your PC and restart your PC to check if the issue persists.
If the Avast online content is unavailable after trying the preliminary checks, go ahead with the following advanced steps.
1. Add Exceptions in Avast
Open Avast Antivirus and go to the Settings menu.
In the left sidebar, click on General.
Scroll down to the Exceptions section and click on the Add Exception button.
You can either input the name of the file or folder you want to exclude from scanning or click the Browse button to locate it on your computer.
Click on the Add Exception button to confirm your selection.
Adding an exception to Avast allows the specified file or website to bypass Avast’s protection and potentially be a security risk.
2. Clear the DNS record on your PC
Press Windows + R keys to open the Run dialog box, type cmd in the text space, and then press Enter to open the Command Prompt.
Type the following and press Enter: ipconfig/flushdns
Restart your PC and check if the error persists.
If you are using a third-party DNS service, you may need to clear the cache on the DNS server itself or use a different method to flush the cache. Learn what to do if the DNS server is not available on Windows 11.
Right-click on the Avast icon on your desktop, then click on the Avast shields control.
From the side menu, select Disable Avast and choose how long you want to disable it.
Choose the duration to disable the Avast, preferably 10 minutes, then click Yes to confirm your actions in the Avast prompt.
All antivirus shields are off, which would appear to indicate Avast is disabled. All messages will appear in red in the main window when Avast is disabled.
Some protection features cannot be completely disabled. Setting these features in Passive Mode might be a preferable option.
Furthermore, temporarily disabling antivirus protection, if necessary, is recommended, and re-enable it as soon as possible. Read on how to stop Avast if you can’t get around the above steps.
The Enterprise Office 365 version comes with the IRM (Information Rights Management) feature. It allows the users to control the security of their data and prevent unauthorized users from printing the documents. However, at times while setting up the IRM you may see the Configuring your computer for information rights management window stuck without any progress.
The Configuring your computer for information rights management stuck issue is not common but not a rarity either. If you are also troubled by this issue, here is how to fix IRM configuration stuck issue in Windows.
Fix configuring your computer for information rights management stuck
1. Log Out of Microsoft Office Apps
One of the workarounds that have helped the Office 365 users to resolve the Information Rights Management issue is by signing out of Office 365 apps.
So, log out of all the Microsoft Office 365 apps including Skype, Outlook, etc.
Launch Microsoft Word and make sure you sign out of the Word app as well.
Close and relaunch the Word app. Click the Sign in button and login to your Office 365 account.
Now try to configure IRM again and check if it gets stuck again.
Microsoft Office app comes with a built-in troubleshooter. The troubleshooter can scan fix any issues with the Office apps.
Press Windows Key + R to open Run.
Type control and press OK to open the Control Panel.
In the Control Panel, go to Programs > Programs and Features.
Select Microsoft Office version and click on Change.
The repair window will appear. Here you have two options. Quick Repair – First select the Quick Repair option. It will check for any common issues with the Microsoft Office system files and fix them without requiring internet. Online Repair – If the issue persists, try the Online Repair option. This is a more advanced repair option but requires internet to connect to the server and find fixes for the error.
Close the troubleshooter once it is finished fixing the Microsoft Office.
Relaunch the Word App and sign in and check if the configuring your computer for Information Right Management configuration is still stuck.
3. Check Authentication Issues
Open the Office App where the configuring your computer for Information Right Management configuration is stuck.
Click on File and select Signout.
Click on Sign in again.
Type the email of the user to whom you want to give IRM access.
A new dialog box will ask you if you want the organization to control this installation.
Click Yes.
Now try to configure IRM and check if the configuration process goes through.
To setup Information Right Management for Office 365, you need to have admin privileges. If not, ask the admin to make necessary changes and setup IRM for Office. This should help you to resolve configuring your computer for Information Right Management configuration stuck issue in Office 365.
The saga of Microsoft’s attempt to acquire Activision Blizzard will no doubt continue into 2023 as another response to the FTC lawsuit from Microsoft (this one 37 pages in length) has been uncovered.
The document, titled “Answers and Defenses of Responent Microsoft Corp.,” reiterates Microsoft’s various arguments that the deal should be allowed to complete without interference. Among these arguments Microsoft states on page 2:
Xbox also believes it is good business to make Activision’s limited portfolio of
popular games more accessible to consumers, by putting them on more platforms and making them more affordable. That includes making Call of Duty, one of Activision’s most popular games, more broadly available. Microsoft made this public pledge on the day the deal was announced. Since then, Xbox has agreed to provide the game to Nintendo (which does not currently have it) and has offered [REDACTED] to Sony [REDACTED].
The statement also goes on to point out that “The acquisition of a single game by the third-place console manufacturer cannot upend a highly competitive industry.”
At this point it is unclear whether the Activision Blizzard deal will ultimately go through, or whether Microsoft’s claims will have any impact on how the FTC proceeds with its lawsuit.
If League of Legends won’t go full screen, the game may launch in windowed or borderless mode despite selecting full screen in settings. This display issue is common after patches, driver changes, or DPI scaling conflicts. Follow these quick steps to restore proper LoL full screen mode on Windows 10 or 11.
What can I do if League of Legends won’t go full screen?
To rule out driver conflicts behind League of Legends full screen not working, try updating your GPU directly through Device Manager:
Right-click the Start button and choose Device Manager
Expand the Display adapters section
Right-click your GPU (e.g., NVIDIA, AMD, Intel) and select Update driver
Choose Search automatically for drivers and follow the prompts
Restart your PC after installation completes
This method is quick, built into Windows, and often resolves rendering issues that also cause FPS caps or game crashes.
If Device Manager can’t find a new version, visit your GPU manufacturer’s site and install the latest driver manually. That often leads to smoother performance and fewer display bugs, especially after major game or OS updates.
9. Launch League in Compatibility Mode
Right-click the game shortcut and choose Properties.
Under the Compatibility tab, enable Run this program in compatibility mode and select Windows 8 or 7.
Can I make League start in full screen by default?
Yes. Once you set the Window Mode to Full Screen and apply it, League will remember your preference for future sessions.
Why does League keep reverting to windowed mode?
This usually happens when the game crashes, or if the config file doesn’t save properly. You may need to adjust settings again or reset the config file.
Does LoL windowed mode reduce performance?
Yes. Full screen typically delivers better FPS and input response, especially during competitive play or ping spike issues.
For any other additional questions, feel free to leave a comment in the section below. We’ll make sure to quickly come up with the most useful feedback.
Spotify is an online music streaming platform that allows users to stream music from across the globe on various Operating Systems. Lately, users report the error message A firewall may be blocking Spotify on the platform.
What does it mean when Spotify says a Firewall is blocking it?
The error may occur on Spotify with various error codes:
A firewall may be blocking Spotify. Please update your firewall to allow Spotify. Additionally, you could try changing the currently used proxy settings (Error code: 17).
Others are Error codes: auth: 15, 16, 30, 34, etc.
However, the error doesn’t mean your login credentials are wrong. It means some underlying problems are impeding the activities of the Spotify client. Some factors are:
Antivirus program Firewall interference – Programs like Windows Defender Firewall can block other programs, causing the error to occur. It happens when the Firewall picks up a Spotify connection as a threat, causing it to crash or result in errors.
Using a Spotify account from different geographical locations – Users who registered their Spotify account with a country different from their current one can run into the Firewall error.
Proxy enabled on Spotify and Windows – If the Proxy is enabled, it can cause issues with the connections between Spotify and its servers. Also, a wrong configuration in the proxy settings in your PC or Spotify can result in the Firewall blocking Spotify.
Outdated Spotify app – When the Spotify app is outdated, it prevents it from accessing the needed updates for fixing bugs and improving performance. It can cause Spotify not to open and run into several issues that may result in errors.
Third-party app interference – Apps like Virtual Private Networks (VPN) can prompt internet connection issues in the Spotify app. It can conflict with its privacy policies or security protocols. Hence, running the VPN network alongside the Spotify app can cause the Firewall to block Spotify errors.
Nevertheless, we’ll take you through some basic steps for fixing the error.
What can I do if a Firewall is blocking Spotify on my PC?
Press Windows + R key to open the Run dialog box and type ncpa.cpl, then click OK to open the Network Connection page.
Right-click your network adapter and select Properties from the drop-down.
Select Internet Protocol Version 4 (TCP/IPv4) and click Properties.
Tick the box for the Use the following DNS server addresses option, type 1.1.1.1 in the Preferred DNS server and 1.0.0.1 for the Alternate DNS server, then click OK to save settings.
Restart your PC, then check if the Spotify error persists.
Changing your DNS server address can help fix network issues and help Spotify connect to its servers. Read more about checking and changing the DNS server if you’re having trouble with the steps.
7. Reinstall the Spotify application
Left-click the Start button, type the control panel, and press Open.
Click on Programs and Features.
Find Spotify and select Uninstall from the drop-down.
Follow the onscreen prompts to complete the uninstallation.
So, if you’ve encountered any issues upon connecting your PlayStation 3 controller to your PC, keep reading. We’ll explain a few different ways to fix it.
What can do if the PS3 controller is not working on my PC?
1. Reset your controller
To reset a PS3 controller, turn it over and press the small reset button on the back with a pin or paperclip for a few seconds.
A few users confirmed this helped them overcome various PS3 controller issues.
2. Update your drivers
2.1 Update the drivers manually
Right-click the Start button and select Device Manager from the list.
Click on the Sound, video and game controllers to expand the section.
Right-click the controller and select Update driver from the menu.
Click on Search automatically for drivers, or hit the second option if you already have the driver on your PC.
With the first option, the system will automatically search, find and install the correct driver.
You also might get the message that you already have the best driver installed in which case, you can click on the Search for updated drivers on Windows Update option.
That will bring up the update section, so click on View optional updates.
Now click on Driver updates to expand the section, check the drivers you want to install and finally, hit the Download and install button below.
2.2 Update the drivers automatically
Most of the time, you’re going to use Xbox 360 controller drivers, so make sure these are updated. In that regard, we can only recommend using specialized driver updating tools.
With this type of software, you can download and install new drives, manage them, troubleshoot and back them up on a set schedule.
Our top choice here is Fortect Driver Updater because it’s fast, easy to use, and very reliable.
3. Disable your current antivirus
Some people also said that their antivirus program interferes with the program they’re using for connecting the PS3 controller to the PC. And that might be the case with you, as well.
If that’s the case, just disable your antivirus program while using the PS3 controller. If it’s now working, consider adding PS3 as an exception to your antivirus or switch to a better one that won’t interfere.
4. Disable driver enforcement
Go toStart Menuand openSettings.
Go toUpdate & Security.
ChooseRecovery from the left pane and select Restart Now under Advanced Startup.
Your computer will restart, and you’ll get advanced startup options on the next boot. In these options, choose Troubleshoot.
Now head toAdvanced options.
Then, go toStartup Settings.
The computer will restart again and it will give you the list of startup settings you can change.
You should look forDisable driver signature enforcement, to turn off this option, pressF7.
Restart your computer and boot normally.
5. Make sure all redistributables are installed
Just like that’s the case with proper drivers, the PS3 controller also needs redistributables in order to function properly.
The most important ones are Visual C++ redistributables and the latest version of .NET Framework. So, make sure you have these installed on your computer.
6. Use another connection method
And finally, since there are more ways to connect your PS3 controller to your PC, maybe using a different method will solve the problem. The most common methods are via Motioninjoy and Bluetooth.
We explained how to use both methods in our detailed guide, so make sure to check it out.
That’s about it. We certainly hope at least one of these solutions helped you overcome the PS3 controller stopped working on the PC issue.
If you have any comments, questions, or suggestions, make sure to let us know in the comments area below.
Windows Activation verifies that the copy of Windows is genuine and still adheres to the Microsoft Software License Terms. However, users complain about encountering 0xc004f012 Windows activation error in the process.
What causes the 0xc004f012 Windows Activation error?
The 0xc004f012 Windows activation error can appear on your computer for many reasons. First, it indicates something wrong with your product key or any other issues with the Windows activation process.
Furthermore, some common factors that are likely to be responsible for the activation error include:
Missing or corrupt Licensing repository – When the licensing repository is corrupted or missing, it can impede the activation process. For example, it causes the Windows activation to crash because the repository hosting its license is compromised.
Corrupt system files – Corrupted system files can affect the Windows activation process. Corrupt files on the PC from third-party programs, update processes, etc., can alter the activation, resulting in activation error 0xc004f012 in Windows 11.
Hardware replacements – Replacing major hardware like the motherboard can be a problem with Windows activation, resulting in the error 0xc004f012. It indicates that the hardware is new to Windows, and it requires licensing to activate it. So, you’re likely to run into a Windows activation error due to a hardware change.
Issues with the Activation token – It’ll be impossible to pull through with an activation process without the time being intact. So, issues with the activation key or expired token can cause errors during Windows activation.
These factors may vary in different PCs. Nevertheless, we’ll take you through some general fixes to help get your Windows activated.
How can I fix the 0xc004f012 Windows activation error?
Before proceeding with any advanced troubleshooting, try the following:
Moreover, you have more reliable repair software that repairs your PC by scanning the system and replacing corrupted files that generate the 0xc004f012 Windows activation error.
2. Reset the Windows activation components
Right-click the Start button, then click on Terminal (admin).
Copy and paste the commands below and press Enter after each: net stop wuauservnet stop cryptSvc net stop bits ren C:\Windows\System32\SPP\Store\2.0\tokens.dat tokens.oldren C:\Windows\SoftwareDistribution SoftwareDistribution.oldren C:\Windows\System32\catroot2 Catroot2.old
Then, type the following and press Enter: net start wuauservnet start cryptSvc net start bitsnetsh winsock reset
Restart your PC and try the Windows activation process to see if the error persists.
Restarting the Windows activation components will fix any issues preventing them from functioning correctly.