Best Switch For Small Business [Top Picks]

No matter if you own a small, medium-sized, or large business, the efficiency of the way it works is highly dependent on the way the information can travel within the company.

If your network is not set up properly, the business can not grow efficiently, if it works at all. For this reason, it is very important that your company uses a series of good switches that allow a fast transfer of information.

Because we know it can be overwhelming to choose a good option, we’ve compiled an easy-to-understand list for you to choose the best switch for a small business.

Which are the best switches for a small business?

TP-Link 24 Port Gigabit Ethernet Switch

  • Greatly expands your network capacity with much less power consumption
  • Easy setup with no software installation or configuration needed
  • Latest innovative energy-efficient technology
  • 24× 10/100/1000Mbps RJ45 Ports
  • May be rather loud

If you have a house or a home office and like the reliability of a wired connection, then you know what it’s like to need a network switch with a lot of ports.

Well, the TP-Link 24 Port Gigabit Ethernet Switch has 24 of them for you, and they will all function at maximum speed, even when they have all plugged in.

Of course, you’d expect a lot of power to be wasted, but the switch’s build makes it so that it greatly reduces unwanted waste in that department.

NETGEAR GS105

  • Can be mounted either on a wall or simply sat on a desk
  • Simple to install without any configuration needed
  • Fanless design that ensures no added noise
  • Low power usage
  • The warranty claim can take up to an hour of waiting on the phone

The NETGEAR GS105 is a very affordable 5 port Gigabit Ethernet unmanaged switch that can help you set up the network for your small business without encountering any issues.

This product is ensured with a lifetime limited warranty and a next-business-day replacement so you never have to worry about using a faulty device.

NETGEAR GS305E-100PES

  • Data Transfer rate of 1000MBps
  • Easy web interface configuration
  • Case made of resistant metal
  • Fanless design for quiet operation
  • The speed limit is fixed and cannot be manually changed

NETGEAR GS305E-100PES is a 5 port switch that supports 1GBS per second and a voltage of 220.

The device has an easy configuration with a web-based interface. It’s designed for absolute beginners, taking you through every step of the configuration.

Special features include indicator lights, QoS support, and jumbo frame support.

NET GEAR GS116PP

  • Plug and play configuration, no software required
  • Multiple mounting options with all hardware necessary included
  • Fanless design for silent operation
  • Lifetime warranty
  • Connections may drop if you connect multiple demanding hardware

NET GEAR GS116PP is a 183 W gigabit managed switch with 16 ports that provides up to 30w per port. It has flexible power options with an interchangeable external power supply of 90W, 130 W, or 200W.

All the ports support PoE and PoE+ so you should be able to connect power-hungry devices like PTZ cameras or access points without worry.

The package includes the switch along with a quick install guide, a rack mounting kit, a wall mounting kit, and an external power adapter of 200W.

NETGEAR GS108

  • A good number of Ethernet ports for any small business
  • Compact design that doesn’t attract attention
  • Offers 1G, Multi-Gig, 10G speeds
  • L2 management layer
  • No advanced VLAN and QoS features

The NETGEAR GS108 is a good network switch that offers 8 Gigabit Ethernet ports, and in order to start using it, you don’t need to initiate any setup process.

It offers very good network connections without producing any noise because it’s designed to contain no fans. It is a fan favorite on the list of the best switches for a small business.

Linksys Business LGS108P

  • No fans are used to make the switch silent while working
  • Wired connections can obtain speeds up to 1,000 Mbps
  • Quality of Service (QoS) traffic prioritization
  • 4 PoE+ ports
  • Some users reported the loss of connectivity without any network issues

The Linksys Business LGS108P has 8 Gigabit Ethernet ports that offer your business the speed required to function optimally.

Besides, the speeds that you can reach can be of up to 1000 MBps, which greatly enhance your ability to stream high-bandwidth files to connected devices without lag and interference.

The best part is that all of this can be easily yours since there is no installation involved in using it. Just plug it and use it.

Ubiquiti UniFi

  • Auto-sensing PoE ports offer up to 15.4W of power each
  • 16 Gb switching capacity for smooth operations
  • 8 Gbps speeds for each Ethernet port
  • Some users have reported that they faced issues with PoE dropping

The Ubiquiti UniFi switch offers you access to 8 Gigabit Ethernet ports and another four 802.3af PoE ports that allows you to keep your small business running at very good speeds.

The switch is a compact, fully managed 802.3af PoE Gigabit model, delivering robust performance and intelligent switching for enterprise networks.

It supports up to 8 Gbps total, non-blocking line rate, and up to 15W output per PoE port.

It is very important that your business network setup is efficient in order to be able to run smoothly, and using good switches makes a big difference.

We provided you with a list that includes all price-ranges, in order for you to be able to choose the best switch for a small business for your circumstances.

Let us know in the comments section below if you found this guide helpful.

How to Fix MultiVersus Lag Easily [Tried and Tested]

MultiVersus online has grown to huge popularity since its release.

But, although it has a classic design and isn’t very intensive for your average gaming PC, high ping and lag are still common issues. 

The game stutters, attacks are delayed, and characters seemingly teleport around the screen. In the worst cases, MultiVersus boots you from the game in the middle of a match.

Let’s explore why gamers are having such poor performance, how to use a VPN to reduce ping, and check out some additional helpful tips.

Why is MultiVersus so laggy?

There are a number of factors that can cause in-game lag when playing MultiVersus online. 

First, the official servers hosting the game have been known to run poorly in the past. While things have improved in recent months, it’s not unlikely for such issues to reappear from time to time. 

You’ll know if there’s a server problem by checking the MultiVersus Twitter or searching if it’s down for other players.

If lag seems to only be affecting you, it could be due to:

  • ISP Throttling 
  • Poor internet connection 
  • Slow computer
  • Geographic location
  • Firewall settings

How do I fix bad lag in MultiVersus?

Luckily, you can fix most of these problems easily. However, the only way to bypass speed throttling by your ISP is to use a Virtual Private Network (VPN). 

A VPN can also help stabilize your connection to a game server if you’re located in a faraway region. Furthermore, it can unlock access to the game if it’s unavailable where you live or your school or workplace has blocked it

#1 Use a premium VPN

To get the best results, subscribe to a premium VPN provider. Our top 5 recommendations are listed below. Each of these encrypts your traffic and uses IP leak prevention. 

This means your ISP can’t detect that you’re playing MultiVersus and therefore won’t slow down your connection:

Here’s how to get started: 

  1. Subscribe to a premium VPN provider and download the relevant app for your computer.
  1. Log in and connect using the default location for the fastest speed.
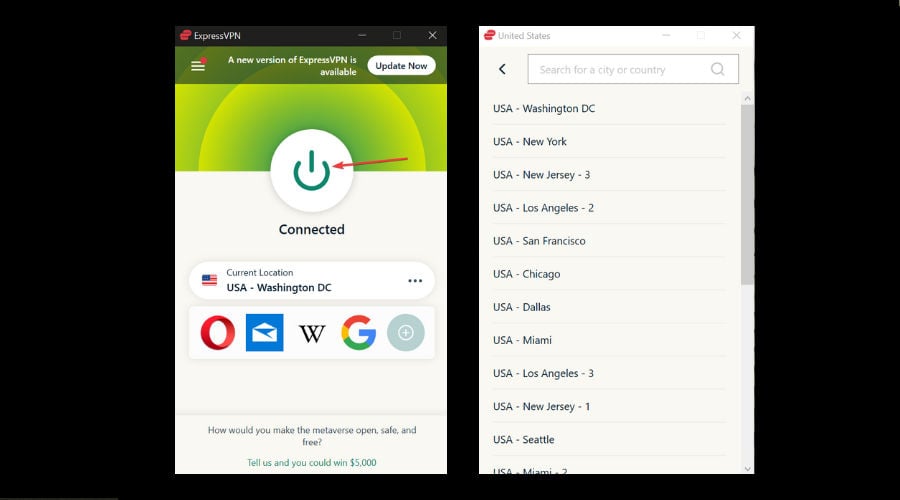
  1. If you want to access MultiVersus from a restricted region, manually select a location in the USA, where the game has a strong presence. 
expressvpn connected to usa washington server
  1. With the VPN connected, launch the game. If throttling was an issue, it should now be resolved.

Using a VPN with another relevant MultiVersus lag fix will ensure the best results. 

Turn off firewall

We suggest you turn off your firewall when playing or make the game an exception in the settings. 

  1. Go to Control Panel > System and Security > Windows Defender Firewall. 
windows firewall settings
  1. Click Allow an app or feature to through Windows Defender Firewall.
  1. Add the game’s .exe file to make an exception.

#2 Use a wired connection

Wi-Fi is never as stable as a wired internet connection because the signal must travel through the air, leaving it prone to obstructions and interference. 

The further the distance between the router and device, the weaker the connection.

google run speed test
  1. If you suspect your Wi-Fi is slow, run a speed test by googling “speed test” and clicking the blue button.
  1. If the results are poor, use an Ethernet cable to connect your computer directly to the router. 
  1. Alternatively, reposition your device and router closer together. Also, keep in mind that routers function better when mounted high up.
  1. Repeat the speed test. If it’s still slow, the problem may be your ISP providing a bad service.

#3 Lower graphics settings

To change your graphical options, go to Settings > Graphics while in-game.

multiversus graphics settings
  1. First, try dropping the resolution by one level. I.e., 4K to 2K, or 2K to regular 1920×1080 HD. 
  1. Other intensive settings are Texture Quality, Visual Effects Quality, and Shadow Quality. Lower each of these and test the results.

What are the best VPNs for a MultiVersus lag fix?

For a VPN to work well for gaming it needs to offer fast speeds and lots of servers. 

We tested the most popular VPNs with MultiVersus and came up with 5 that are guaranteed to work well.

ExpressVPN – fastest speeds

ExpressVPN offers the most consistent speeds in the industry. You can also connect up to 5 devices at once if you have other users on the network.

multiversus with expressvpn new york server

It has servers across 94 countries, with 9 in the US alone. This gives you the freedom to unblock access to the game, as well as giving you the pick of gaming regions. 

For example, you may choose to connect in Japan where the average player’s skill level is higher.

ExpressVPN regularly ranks number one in encryption and leak tests, so you know your ISP will never be able to deliberately slow down your connection for gaming. 

And what’s more, it has gaming-optimized servers to improve ping and overall performance.

  • The best for leak prevention
  • Fast servers for gaming
  • Simple Windows and macOS apps

ExpressVPN

Enjoy the smoothest gaming experience with this high-performing VPN.

PIA VPN – static IP for stability

Private Internet Access lets you connect up to 10 devices, which is ideal for larger home networks. 

Its static IP feature hides traffic from your ISP while offering superior stability when gaming.

pia vpn dedicated ip settings

You can connect in more than 45 countries, with over 30,000 individual servers. This means you can always find a fast server for MultiVersus. 

  • Your own exclusive IP
  • Maintain a large home network
  • Great monthly price

Private Internet Access

Have your pick from thousands of servers and enjoy uninterrupted gaming with PIA.

CyberGhost – dedicated gaming servers

cyberghost servers for gaming

CyberGhost offers up to 7 simultaneous connections and has preconfigured servers and settings specifically for online gaming.

It’s one of the best when it comes to leak prevention, which means your ISP, school, or workplace will never discover you’re playing MultiVersus and tampering with access.

  • Optimized gaming servers
  • Advanced leak protection
  • 7 simultaneous devices

CyberGhost

Enjoy a lag-free MultiVersus experience with CyberGhost’s gaming dedicated servers.

NordVPN – thousands of servers

multiversus low ping with nordvpn

NordVPN offers up to 6 simultaneous device connections. Its servers are optimized to handle heavy traffic from gaming and streaming and always rank high in VPN speed tests. 

Choose from more than 5,000 servers in 59 countries, each with military-grade encryption to hide your activity from your ISP.

  • Lots of servers to choose from
  • Good monthly price
  • Strong encryption

NordVPN

Play MultiVersus no matter where you are with this fast and secure VPN.

Surfshark – unlimited connections

multiversus lag fix surfshark vpn

Surfshark offers unlimited connections with speeds of around 70 Mbps. If your ISP is throttling, it fully encrypts traffic to hide that you’re gaming and fix MultiVersus lag.

It has over 3,200 servers in 100 countries, including the US, UK, and across Europe. You can automatically connect to the best server based on your location or manually select one to gain access to the game if you’re in a restricted region.

  • No connection limits
  • Highest number of countries
  • Virus protection and other security features

Surfshark

Connect to the optimal MultiVersus server locations and play on all of your devices.

Conclusion

Whether you have bad Wi-Fi, your graphics settings are too high, or your ISP has been throttling your internet, there’s a MultiVersus lag fix for every issue. 

Now that you know which VPN suits you best, there’s no need to worry about high ping and latency while playing MultiVersus online.

Hyperlinks Not Working In Outlook? Try These Solutions

There are times when Outlook hyperlinks stop functioning out of the blue, regardless of the version you are using. As confirmed, this issue appears when you click email hyperlinks within both older and latest Outlook versions.

This can give you a lot of trouble if not resolved at the earliest. Therefore, don’t hesitate to apply the below steps to correct this issue and insert hyperlinks in Outlook 365 without any problems.

How do I enable hyperlinks in Outlook?

If you don’t know how to hyperlink in Outlook, you can try the fastest way which is to type the address of an existing webpage and press Enter or the Spacebar to automatically convert the address into a link.

Besides the web pages, you can create links to existing or new files to email addresses, or to certain locations in a document on your device.

What can I do if hyperlinks are not working in Outlook?

1. Select an alternative default browser

  1. To select Internet Explorer as the new default browser in Windows 10, press the Windows key + Q hotkey.
  2. Enter the keyword default in the search box and click Default apps to open the windows shown below.click Default apps
  3. Click the Web browser box to open the Choose an application list.Choose an application list
  4. Select Internet Explorer as the default browser. However, if IE is already the default browser, select an alternative such as Opera One.
  5. In addition, click the Email box and select Outlook to be the default mail application if it’s not already.

Changing the default browser can also help you open the link or document in emails in a preferred browser

2. Reset browser settings

  1. Use the keyboard shortcut Windows Key + R and the Run window will open.
  2. Input inetcpl.cpl in Run’s text box, and press the OK button.internet properties window This operation has been canceled due to restrictions in effect on this computer
  3. Then click the Advanced tab shown directly below.Advanced internet options his operation has been canceled due to restrictions in effect on this computer
  4. Press the Reset button on that tab to open the window in the snapshot directly below.
  5. Select the Delete personal settings option.
  6. Select the Reset option.
  7. Restart Windows after resetting Internet Explorer.

3. Export and import the registry key from a different PC

  1. Open Registry Editor on the other PC.
  2. Find your way into ComputerHKEY_LOCAL_MACHINESOFTWAREClasseshtmlfileshellopencommand
  3. Right-click on the Command folder, then select Export.right-click on Command folder and select Export
  4. Save the file and name it accordingly.
  5. Transfer the Registry file to your current computer.
  6. Double-click on it, and it will merge the entry into your computer Registry.

4. Repair your Office programs

  1. Firstly, right-click the Start button.
  2. Select Apps and Features on the pop-up menu.
  3. Select the Microsoft Office product you want to repair and select Modify.
  4. This will open the Office Repair options.
  5. Choose one of the following: Quick Repair (no Internet connection is required) or Online Repair (Internet connection is required, but it fixes all issues).Office Repair option
  6. Finally, try opening a link and see if it works as expected.

Do the links open hyperlinks in Outlook email on another PC? It takes mere seconds to check this out. If that’s the case, then you may try importing particular registry settings from that computer to the one you’re currently using.

The above resolutions should fix the hyperlinks not working issue. These are the most probable resolutions but don’t hesitate to let us know if you’re aware of any other fixes. The comments area below is waiting for you.

Windows 11 Startup Folder: Where is it & How to Use it

The Startup folder on Windows 11 allows you to launch specific apps as soon as your operating system starts.

This isn’t a new feature, but if you’re not familiar with it, we’ll show you how to properly use it in the latest installment of Windows.

What type of files work with the Startup folder?

Although the Startup directory is commonly used to start applications, it also works with all other file types, be it a text document or a PDF.

How do I add items to the Startup folder in Windows 11?

1. Manually add a shortcut to the Startup folder for all users

  1. Press Windows + E or click the File Explorer icon in the Taskbar.
  2. Navigate to the following directory: C:\ProgramData\Microsoft\Windows\Start Menu\Programs\Startup
  3. Next, go to the desktop, right-click anywhere, choose New, and then select Shortcut from the menu.
  4. Click the Browse button.
  5. Browse and select the desired application.
  6. Click Next to proceed.
  7. Enter the name of the new shortcut and click Finish.
  8. Move the shortcut to the Startup directory.
  9. When the confirmation dialog appears, click on Continue.

After making these changes, the shortcuts in your Startup folder will start automatically when your system boots. Keep in mind that these changes affect all user profiles on your PC.

2. Add shortcut to Startup folder just for the current user

  1. Press the Windows key + R and enter shell:startup to open the Startup directory for your user account.
  2. Move the shortcuts or files to the Startup folder.
  3. Close the Startup folder.

Additional tips

  • Startup folder not working – If this happens, go to User Account Control and set it to Never Notify.
  • Startup folder missing – Check your folder path and make sure it’s 100% correct.

Where is Windows startup folder located?

You can find Startup folder for all users at: C:\ProgramData\Microsoft\Windows\Start Menu\Programs\Startup

For a single user, the path is the following: C:\Users\username\AppData\Roaming\Microsoft\Windows\Start Menu\Programs\Startup

To better understand the difference between Local, LocalLow, and Roaming directories mentioned in the Startup folder path, check out this detailed article: Local vs LocalLow vs Roaming Folders.

You can also explore a full guide on accessing the Accessories folder in Windows by checking this detailed article on finding the Accessories folder.

How do I manage startup items in Windows 11?

  • Open Task Manager and go to Startup. From there you can manage startup items.
  • In Settings app, go to Apps and choose Startup. Disable or enable the desired apps.
  • Use the Startup folder and add or remove items from it.

Adding too many applications to the Startup Folder will increase the boot time and affect the performance of Windows. So, it’s recommended that you only add the critical ones.

Also, if the computer is running slow, find out how to optimize Windows startup. You can also disable startup apps on Windows 11 to make it faster.

You can also learn how to launch specific applications automatically by reading a guide on how to make a program run on startup in Windows 11.

Are you currently using the Startup directory on your PC? Let us know in the comments section below.

More about the author

Milan has been enthusiastic about technology ever since his childhood days, and this led him to take an interest in all PC-related technologies.

He’s a PC enthusiast and he spends most of his time learning about computers and technology.

Before joining WindowsReport, he worked as a front-end web developer.

My Laptop Won’t Connect To Wifi But Other Devices Will [Fix]

Many users reported that their laptop won’t connect to WiFi but other devices will, and this can be a frustrating issue, but luckily, there are few solutions available that can help you.

Why is Wi-Fi not working on my laptop but working on other devices?

This can happen due to glitches with your Wi-Fi adapter or problems with DHCP. Sometimes outdated drivers can cause this issue.

What can I do if my laptop won’t connect to Wi-Fi but other devices will?

Before we try more advanced solutions, ensure that your Wi-Fi is enabled on your laptop, by pressing the Fn + F12 key. Some models use different F key, and you can find them with by Wi-Fi icon. If you have VPN enabled, disable it.

1. Change the IPv4 properties

  1. Press the Windows key + R, type ncpa.cpl, and click OK.
    ncpa run window
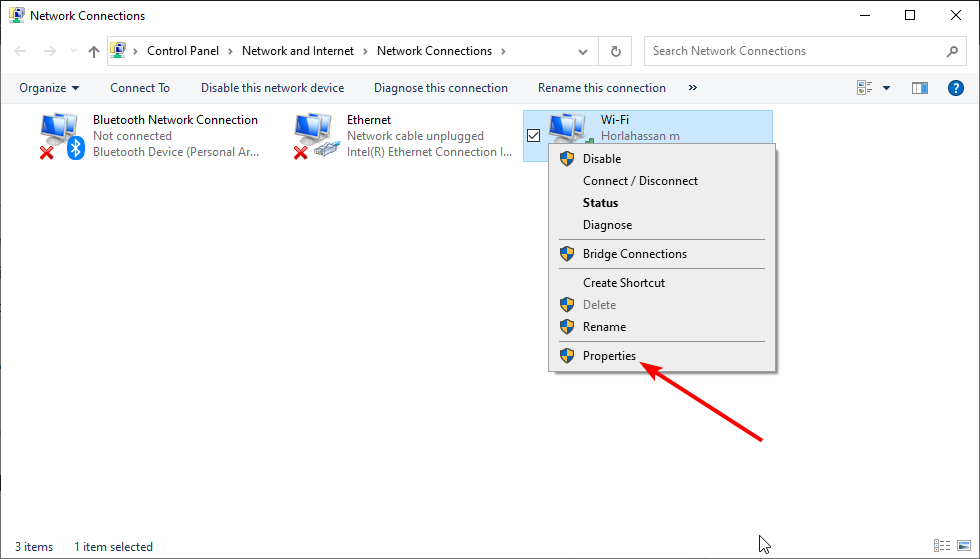
  2. Right-click your WiFi network or adapter and select the Properties option.
    wi-fi connection properties context menu
  3. Click Internet Protocol version 4 (TCP/IPv4) and select the Properties button.
    IPv4 properties
  4. Now, tick the radio button for the two Obtain IP address automatically options and click OK.
    obtain IP address automatically

2. Disable and enable your Wi-Fi apdater

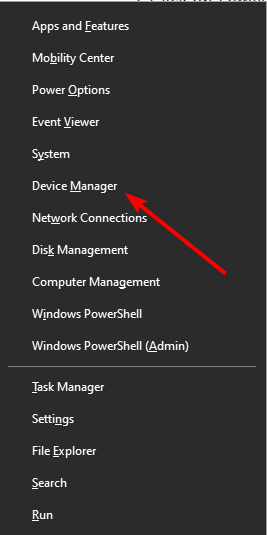
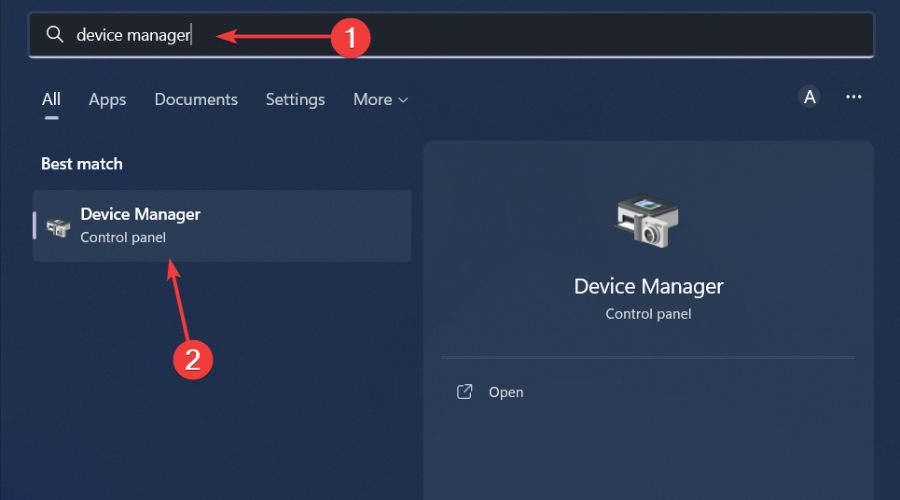
  1. Press the Windows key + X and choose Device Manager.
    open device manager
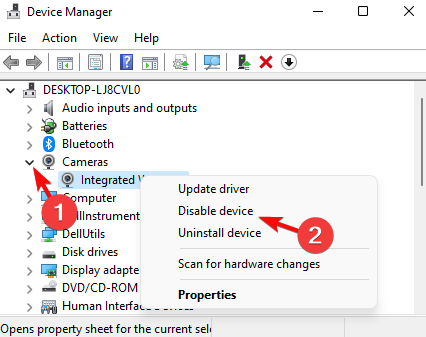
  2. Locate your Wi-Fi adapter, right-click it, and choose Disable device.
    disable device device manager
  3. Wait for a few moments, right-click it and again and choose Enable device.

If your laptop cannot detect WiFi but the phone can, try reinstalling the drivers and check if that helps.

3. Reinstall the network drivers

  1. Right-click on the Start icon and select Device Manager.
    device manager win + x menu
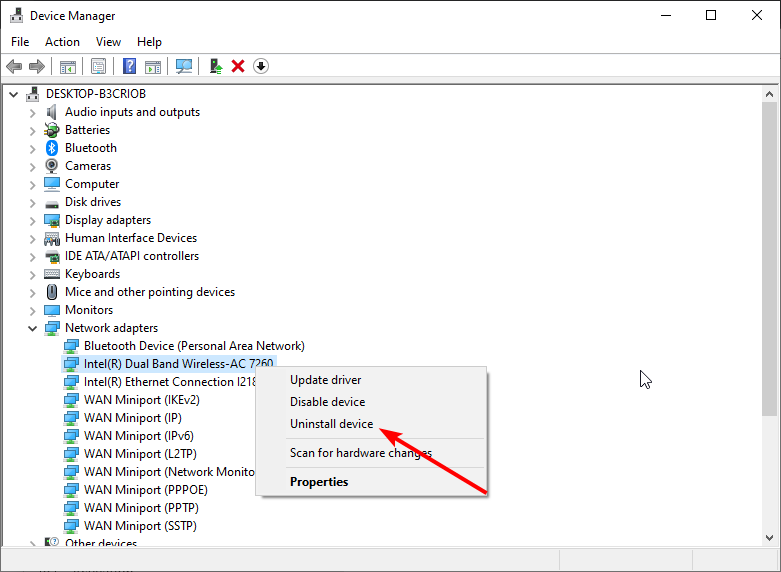
  2. Expand the Network adapters option and right-click on your Wi-Fi adapter.
  3. Now, select the Uninstall device option.
    uninstall device device manager window
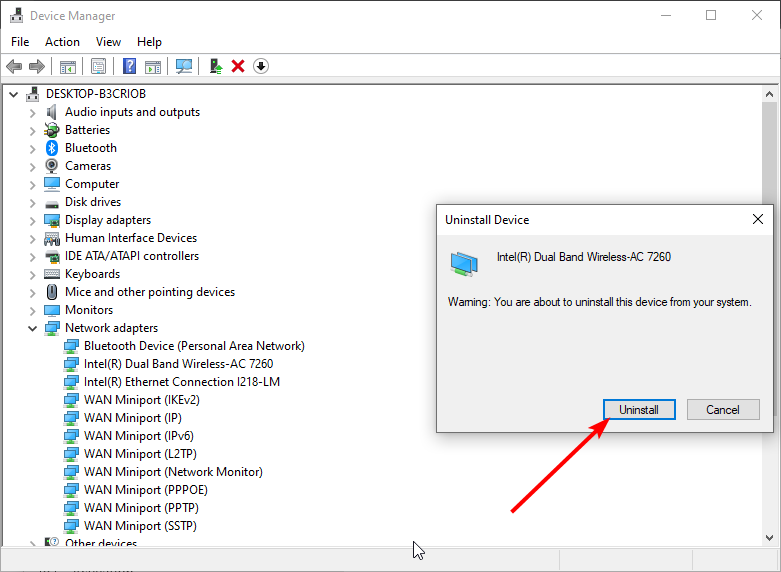
  4. Click the Uninstall button.
    uninstall button device manager
  5. Finally, restart your PC.

If your laptop still can’t detect your Wi-Fi but your phone can after trying all the fixes above, you need to uninstall and reinstall your network driver. This will clear the glitches causing the issue and reset the connection.

Alternatively, you can try updating your driver using a reliable tool in Out. This tool will scan for faulty and outdated drivers and update them before they can cause problems.

⇒ Get Outbyte Driver Updater

4. Change power settings

  1. Press the Windows key + R and type powercfg.cpl.
    Type powercfg.cpl and click OK to open the Power plans - overwatch 2 keeps crashing windows 11
  2. Locate your plan and click on Change plan settings.
    change plan settings windows 11
  3. Next, head to Change advanced power settings.
  4. Locate Wireless Adapter Settings. Set Power Saving Mode to Maximum Performance.
    maximum performance wireless adapter settings

5. Reset Winsock

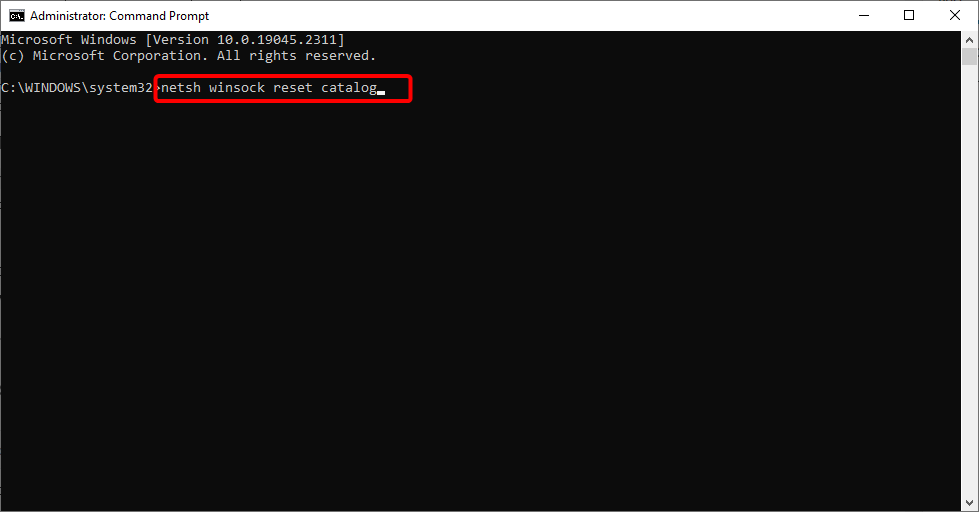
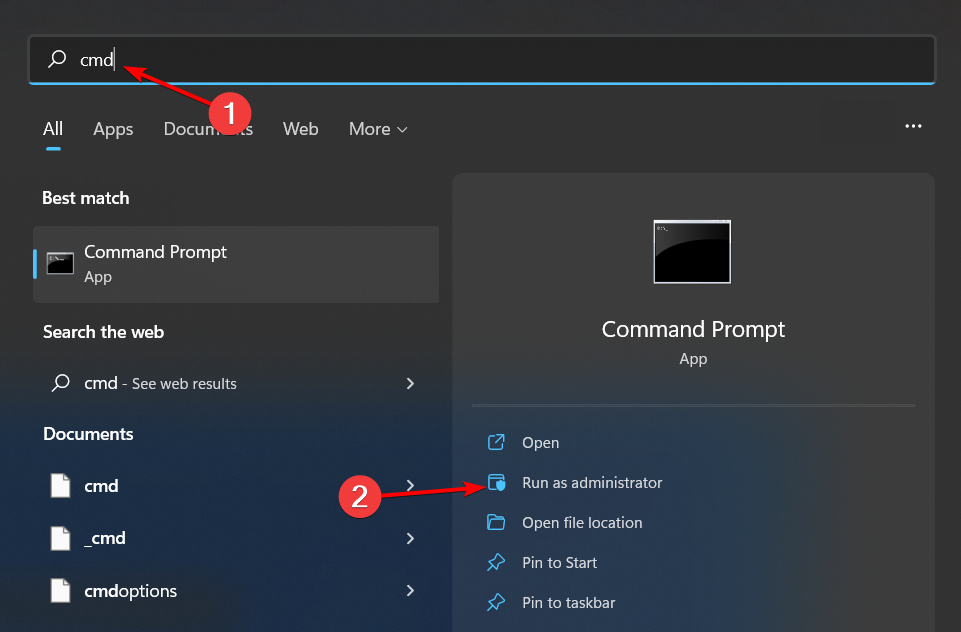
  1. Press the Windows key, type cmd, and select Run as administrator under Command Prompt.
    command prompt run as administrator
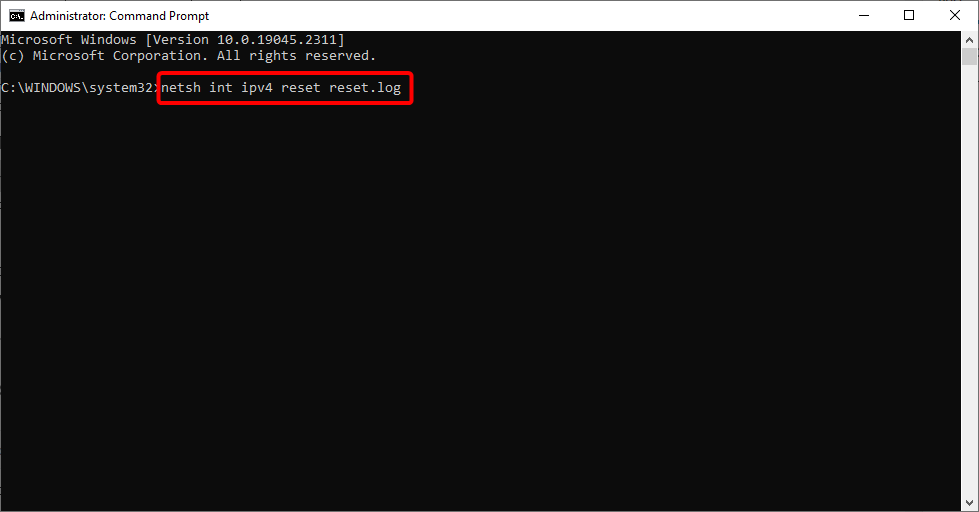
  2. Type the following commands and press Enter after each: netsh winsock reset catalognetsh catalog netsh int ipv4 reset reset.lognetsh winsock reset
  3. Finally, wait for the commands to finish running and restart your PC.

6. Switch to a different channel

  1. Log in to your router.
  2. Go to the Wireless section.
  3. Set the Channel to a specific channel and save changes.
    channel select

Similarly, if your laptop Wi-Fi only works close to the router, check our detailed guide to fix it quickly.

Many also reported that Windows can’t find Wi-Fi network, while others reported that laptop doesn’t detect their Wi-Fi, but detects others.

If your laptop is not connecting to Wi-Fi, it might be beucase no Wi-Fi networks are found.

We hope this guide helped you fix the issue with HP laptop that won’t connect to Wi-Fi while other devices will. If you have additional solutions, share them in the comments.

Windows 11 Media Creation Tool: Download, Install & Use

The Windows 11 Media Creation Tool can be used for multiple purposes.

Whatever the reason you have in mind in order to do a complete OS installation, this tool is one of the easiest ways to achieve your goal. It is also ideal for creating a USB flash drive to install Windows 11 on another device.

Windows Update can sometimes lag in rolling out newer versions, but this Media Creation Tool will always support you. You may create the Windows 11 installation media by downloading it from the Microsoft website.

The official Windows 11 Media Creation Tool is the most popular and widely used program to quickly perform these actions. Plus, you can use this Windows Update Assistant to get the newest updates on your device.

How do I install the Media Creation tool on Windows 11?

First of all, you can install the Media Creation tool directly from Microsoft Download Center as it’s the official source. Briefly, you can perform the installation with the next steps:

  1. Download the Windows 11 installation media.
  2. Open the installation assistant on your PC.
    windows-11-media-creation-tool
  3. Accept the Terms and Conditions to continue.
    media-creation-tool-not-enough-space
  4. Pick whichever option you need to install Windows 11.
    windows-11-media-creation-tool
  5. Tick Use the recommended options for this PC and click Next.
    windows-11-media-creation-tool
  6. Continue the process to finish the installation.

Prepare yourself for using Windows 11 Media Creation Tool

Before anything else, you should make sure to back up your data. Even if this tool is supposed to save all your personal files if you choose this way, it’s always a good idea to be cautious.

Verify if your device meets the minimum Windows 11 requirements. Also, check if you have a good Internet speed for downloading it.

Owning a USB or DVD drive with at least 8GB of storage is an essential condition as well. You can easily check it from File Explorer.

This article will show you how to use Windows 11 Media Creation Tool in 3 different ways. They are extremely simple to apply, so do not worry about not having enough experience.

How to use Windows 11 Media Creation Tool?

1. Try it as an upgrade tool

  1. After you downloaded the tool from the Microsoft Store, run it, then choose to Upgrade this PC now, and click on Next.
  2. Wait a few seconds until your OS is completing the process. Note that this also depends on your PC’s capabilities and internet speed.
  3. Your operating system will also check settings and configurations.
  4. After this, choose to keep your personal files and apps. For a clean install you should click on the Change what to keep option, then select the files you got to remove.
  5. Your PC will restart and will power on the latest Windows 11 OS.

2. Use it as a bootable USB tool

  1. To simply do it, you should open the downloaded tool, choose to Create installation media, instead of Upgrade this PC now, then click on Next.
  2. It will automatically populate the configuration of your computer. If you need to change it you can uncheck the Use the recommended options for this PC option and make the necessary changes and click Next.
  3. Select the USB flash drive option, then click on Next.
  4. Insert a USB flash drive, with a minimum of 8 GB, then the tool will automatically detect it.
  5. The creation of Windows 11 OS installation media will begin.
  6. Once it is finished you will get a Windows 11 bootable USB.

For more information, check out this guide on how to make a bootable USB drive for Windows 11.

In addition, because protection is mandatory, take a look at the best antivirus software for USB flash drives. Choosing one of these options will keep you away from infecting with malware or other harmful threats.

3. Try it using an ISO file

  1. Follow the same two steps as in the above solution.
  2. Instead of the USB flash drive option, choose ISO file, then click on Next.
  3. Follow the on-screen instructions.

If there are times when you need to run Windows 11 on VM, this option represents an important step in achieving your goal.

Note that if you choose the ISO file option, the Windows 11 ISO file will be downloaded. You can later burn it using certain burning tools.

Check out the best software to create and open ISO files, then decide which one suits you the most.

Also, you should take a look at how to burn ISO files in Windows 10. Considering the latest OS model works similarly to the previous one, this article will surely help you.

Why should I use the Windows 11 Media Creation Tool?

You’ve seen how Windows 11 Media Creation Tool can be used, but let’s see now what its real advantages are. The following aspects really matter when it comes to creating a unique digital experience:

  • Files protection – This tool won’t change any of your files while upgrading your PC or laptop to the latest version.
  • It is quite easy to use – If you correctly follow an efficient guide, your OS will be upgraded without consuming time.
  • No cost – It is a free utility developed by Microsoft, so you won’t have to pay for it.

Can I use Windows 10 Media Creation Tool on Windows 11?

Yes, you’re able to install Windows 10 Media Creation Tool on your Windows 11 OS in case you want to roll back to the previous version.

It’s possible to find the installation tool on the Microsoft website by simply searching it on your browser or from the Microsoft download center.

The above solutions will guarantee important help in your future Windows 11 activity. As you see, the Media Creation Tool is great and can reduce your effort considerably.

Because your opinion matters the most, you should share it with us by leaving a comment in the section below.

Use PC as Network Switch [Step-By-Step Guide]

Many PC users wonder if they could use their machines as an Ethernet switch. While this is a pretty common question, the answer is not that clear and straightforward.

Windows Report wants to shed some light on this mystery and offer you a clear answer to this question. So, can you use your computer as an Ethernet switch? If the answer is yes, then what are the steps to follow?

Can I use my PC as a network switch?

First things first, let’s begin with some basic networking notions. A switch is a control device that enables networked devices to communicate efficiently. Switches share information and manage resource allocation among the connected devices.

It is possible to use your PC as an Ethernet switch, but that’s not a good idea.

Using your computer as a switch creates a parallel connection. Remember that network communication is normally done using a serial architecture model up until the bus entry. Creating a parallel connection significantly slows down the network. This makes the switching process very slow and that’s not very efficient. Not to mention that electricity consumption also increases.

Purchase a Switch instead

If you need a switch, the best solution is to simply buy one. You can purchase a switch for only $30.00 from Amazon. Compared to using your PC as an Ethernet switch, you can buy a switch with multiple ports, depending on your needs.

All in all, yes you can use your computer as Ethernet switch, but that’s too complicated and involves a series of downsides such as slow connection, using different cards with different drivers and an increase in electricity consumption.

As a result, we recommend you to choose a simpler solution and buy a switch to get the job done.

Regardless, we hope you managed to use your PC as a network switch using our guide. Let us know how it went in the comments section below.

Cat5e Vs Cat6 Ethernet Cables | Which One Is Best For You?

In the article today, we will make a Cat5e vs Cat6 comparison, so that you are able to see which one fits your needs best.

A Cat5e Ethernet cable is the successor of Cat5, the latter being now rarely found on the market. While they’re physically similar, Cat5e Ethernet adheres to more stringent IEEE standards.

By comparison, Cat6 cables take things one steps further especially in terms of performance rates, which is oftentimes the main aspect that clients look for in any tech-related product.

Choosing between these two is, in the end, a matter of cost vs. performance, and we want to make things easier for you by focusing on some aspects such as speed, safety, and costs.


Cat 5e vs Cat 6 – What are the differences between them?

cat5e vs cat6 cables

As mentioned, with Cat5E cables certain capabilities were enhanced, namely reducing the potential for crosstalk (interference that transfers from adjacent wires). 

Cat5E is suitable for small space installations like households, though it is still used in commercial spaces.

  • trueCABLE Cat5e Riser (CMR), 1000ft
  • 24 AWG with 4 pairs (8 conductors)
  • Supports PoE and PoE+ (IEEE 802.3af/at) up to 30W and 300V DC
  • Too flexible

Cat6 cables reduce crosstalk, even more, using tighter wound wire pairs and usually also have a plastic core through the middle of the cable to better insulate the internal wires, which also makes it more resistant in time.

Otherwise, the two cables come with the same end port that plugs into any Ethernet jack on a computer, router, or another similar device. 


How much better is Cat6 than Cat 5e?

  • trueCABLE Cat6 Riser (CMR), 1000ft
  • Bandwidth up to 550 MHz
  • Suitable for 1 Gigabit up to 328ft or 10-Gigabit Ethernet up to 165ft
  • Low stock due to high demand

Naturally, the big difference between Cat5e and Cat6 cables lies in their performance or the amount of data that can be sent over through each one of them. As expected, Cat6 has a higher bandwidth compared to Cat5. 

Cat5e supports a maximum frequency of up to 100MHz and a speed of up to 1Gbps (which is why it was also known as the Gigabit Ethernet). Cat6 cables increased that bandwidth to 250 Mhz, which also boosted up the transfer speed to 10Gbps.

One drawback of Cat6 cables is that though standard Ethernet supports distances of up to 100 meters, they only support 37-55 meters (depending on crosstalk).


Should I run Cat 5e or Cat6?

There’s no correct answer to this question. Both cable types are being widely used.  Perhaps of all the current cabling options, Cat5e is the least expensive option. 

Cat5e is also the most common type of cabling for residencies, due to its profitability when balancing cost and performance. 

Just think that most on-demand video streaming services require somewhere around 14-16Mbps Internet speed (or even less) to stream 4k content, so you can imagine that with a Cat5e Ethernet cable you’d be just fine.

On the other hand, for better Internet speed and transfer speeds 10 times faster between several devices, Cat6 cables are definitely the better option.

For more comprehensive guides, check out our guide on Cat 7 vs Cat 8.

You can also find out which are the best Ethernet splitters available on Amazon right now from our dedicated article.

Lastly, if you’re interested in some USB C to Ethernet adapters, we have yet another list with expert-made reviews for you.

We hope you managed to choose between Cat5e vs Cat6 using our guide and that you are happy with your purchase. Let us know in the comments section below what you decided to go with.


Cat5 vs. Cat6 Differences | Which One To Choose?

When it comes to computers, accessories and peripherals are just as important items as the main device itself. Choosing the right accessories, to be compatible with your machine and to serve your needs is essential.

With Ethernet cables, you might have noticed that they come in various numbers and colors. The Cat represents the category, while the numbers represent specifications and standards.

It can be confusing to have to choose between a Cat5 and a Cat5e cable, Cat 5e vs Cat 6, or between a Cat5 and a Cat6 cable. So keep reading to find out the difference between them and which one might be your best choice.

Is Cat5 or Cat6 better?

What are Cat5 cables?

Cat5 cables provided a maximum data transmission speed of 10/100 Mbps over distances of up to 100 meters, at a maximum bandwidth of 100 Mhz. This used to be known as Fast Ethernet. 

Right now, the minimum Internet speed should actually be at least 1 Gbps, so using a Cat5 cable not only slows down the speed, but it’s also less reliable.

Are Cat5 obsolete in 2022?

So Cat5 cables are now obsolete and can’t be found anymore; some older deployments still use it, although they have been replaced by Cat5e cables.

Moreover, when referring to Cat5 Ethernet cables, most people actually mean the Cat5e.

What are Cat 6 cables?

In terms of performance, Cat6 cables can support up to 10 Gbps and frequencies of up to 250 MHz. They are equipped with thicker sheaths in comparison to Cat5e, which helps increase the Internet speed.

Though standard Cat6 cables support distances of up to 100 meters, in reality, they only reach 37-55 meters (for no interference at all) when transmitting 10 Gbps speeds. Anything beyond this bandwidth will rapidly decay to only 1 Gbps, the same as Cat5e.

Additionally, Cat6 cables use a plastic core through the middle of the cable to better insulate the internal wires, which also makes it more resistant in time.

Cat 5 vs Cat 6 – Which is better?

The general opinion is that there’s no good or right Ethernet cable and that the answer depends on what are you using it for.

Generally speaking, Cat5 Ethernet cables should be OK just for your home network. A Cat5 premium cable can be just as good as any successor cable type. But, as mentioned, it is very possible that you won’t find them on the market.

On the other hand, Cat6 cables are more suitable for small businesses where there’s a demand for not just fast Internet speeds but fast internal speeds. They reduce crosstalk (interference), but they are also more expensive.

We also have a dedicated article with a comparison on Cat 7 vs Cat 8 that you can check out for more info.

Now that you know more about the difference between the two, just go out and buy the best one for you.

FIXED: Microsoft Teams Won’t Mark Messages As Read

As we all know, chats in Microsoft Teams are a crucial feature because it allows users to communicate quickly and efficiently. However, many people encountered an annoying chat issue.

Microsoft Teams might not show messages as read or will show unread messages that aren’t really there. Therefore, the chat icon will appear as if you have an unread message, even if this is not the case.

One user reported the following on the official Microsoft forum:

The Chat group is showing a red circle with a 1 in it? I am assuming there’s an unread chat somewhere. I can’t find it and I don’t care. I want the circle to be gone. How do I do this?

So, the red circle remains, but there’s no unread chat anywhere. Today we will show you how you can fix this issue and mark all Teams messages as read.

Chats won’t mark as read in Microsoft Teams? Fix this in no time

1. Turn off all notifications

  1. Go to Settings.
  2. Turn off all notifications.
  3. Enable them after a few minutes.

Learn how to use Microsoft Teams in Windows 10 from our detailed guide!

2. Check if the chat session is hidden

Microsoft Teams hides chats over time if they are not used. Therefore, check out if you have hidden messages. Eventually, you can mute the conversation.

  1. Click on the three dots.
  2. Select Mute.microsoft teams mute chat

3. Log out and log back in

Log out of Microsoft Teams and log back in. This is a better solution than closing the program and/or restarting the computer.

4. Solve the issue with Alt+Tab

  1. While you’re in the program, press Alt+Tab.
  2. Close the badge by selecting the X in the corner of the window that pops up.

Conclusion

While this is not a serious issue, it is still annoying for many users to see that notification every time they open Microsoft Teams. Luckily, the problem can be solved in no time with our quick solutions.

All in all, the chat in Teams is great. However, Microsoft should improve the feature.

Moreover, you can’t delete conversations. So, if a notification like this still appears and you know the conversation that is causing it, you can’t delete it to solve the issue permanently.

Did you find our solutions helpful? How often do you use the chat feature in Microsoft Teams? Do let us know in the comments section below!

Cat 7 vs. Cat 8 | Which One Is Best For You?

As if three types of Ethernet cables were not enough, electric equipment producers moved on to launch two more options, much to the confusion of many regular clients.

So now, besides Cat5E and Cat6, Cat 5 vs Cat 6 (not to mention Cat6A), we also have Cat7 and Cat8 Ethernet cables. Besides the marketing reasons that led to this evolution, for sure there’re also some safety standards involved.

What makes these last two the so-called next-generation Ethernet cables and which is the best. In this article, we will do a Cat 7 vs Cat 8 comparison, to help you choose the one that is right for you.

What’s the difference between Cat7 and Cat8 Ethernet cables?

Basically, the biggest difference between the two lies in their performance for what they were made. They differ when it comes to Ethernet speed, endurance in time, flexibility, sturdiness, etc.

What is Cat 7 used for?

cat 7 cable

The Cat7 Ethernet cables support high-speed ethernet communication of up to 10 Gbps, with a larger bandwidth than its predecessors, of 600 MHz.

They are made of twisted pairs of wire, and each pair is cover in a shield, complying with the strictest specifications for reducing crosstalk.

Here’s our top pick for the best Cat7 Ethernet cable.

What is Cat 8 Ethernet?


Cat8 Ethernet cables are also fully shielded. They bring a huge difference from the previous versions, supporting a frequency of 2 GHz, with a speed of 25 Gbps or in some cases 40 Gbps, over up to 30 meters.

They can be terminated with RJ-45 or non-RJ-45 connections, which makes them compatible with previous cable versions.

Both cables are sturdier as compared with the previous versions, which are more flexible.

This is what makes them more time-resistant when it comes to a Cat 7 vs Cat 8 comparision, with a life span of up to 15 years, according to tests.

Here’s our top pick for the best Cat8 Ethernet cable.

Cat 7 vs Cat 8 – Which is better?

cat 7 vs cat 8 cables comparision

Cat7 cables are perfect to get more speed over wider distances. And so they are the preferred cables type for large enterprise spaces and datacenters.

For a regular home, a Cat7 cable will do the job but might be overrated, since most homes don’t have switches that require more than 1Gb.

On the other hand, Cat7 cables are not recognized by the TIA/EIA standards (applicable in the US, for instance).

Also, Cat7 does not use standard 8P8C RJ-45 connectors, but GG45 connectors for top performance.

Cat8 cables are the most expensive of all cables categories because they have a lot of features that increase costs.

Depending on where they are used, the distance limitation can be a blocker.


So now that you know more about Cat7 and Cat8 Ethernet cables, you can make an informed choice.

Don’t hesitate to get into contact with us by using the comment section found below this guide.


Why Does Firefox Use so Much Memory & How to Reduce High Usage

Firefox is one of the best web browsers for all devices. However, it is not without its issues, one of them being the report from users that it uses too much memory on their Windows PC.

This affects the performance of Firefox and the other programs and processes running on the computer. This makes it all the more important to identify and eliminate the underlying cause.

So, here is all you need to know about why Firefox is using too much memory and the best solutions for it.

Why does Firefox use so much memory?

There are a few factors that can make Firefox use so much memory. Below are some of the prevalent ones:

  • Faulty extensions and themes: If Firefox uses excessive memory, you must first check your extensions and themes. Add-ons like DeArrow are notorious for this. While these can improve your PC’s functionality and aesthetic, they can considerably increase memory usage. The solution is to disable or remove these extensions and themes.
  • Outdated browser: In some cases, Firefox might take up lots of memory because your browser is outdated. In this case, the solution is to update your browser.
  • Disabled hardware acceleration: The hardware acceleration feature helps to maximize resource usage, especially when you are playing media. If this feature is disabled, your memory and CPU usage can increase exponentially.

How can I fix Firefox if it’s using a lot of memory?

Before making changes to your browser to fix this issue, try the following troubleshooting steps:

  • Restart Firefox.
  • Close unnecessary tabs.
  • Close other apps.

1. Switch to a different browser

The quickest and most hassle-free way to get back online without errors is to use a different browser.

If Firefox keeps using tons of resources, we suggest you try a lightweight alternative like Opera GX. This browser aims to load pages fast, even on lower-end PCs.

That is why it implements dedicated features like RAM and CPU limiters. YOu can easily enable them, and the browser will not bypass the limits, hence offering peak performance.

Using other apps while browsing the web can become demanding, but if you enable the bandwidth limiter feature and set how much data you want to allocate to your browser, your other apps will run faster too.

Opera GX

Open as many tabs as you want and load pages fast with this performance-oriented browser.

2. Update Firefox to the latest version

  1. Click the hamburger icon on the top right corner and select Help from the menu.
    help firefox using a lot of memory
  2. Next, click on About Firefox.
    about  firefox using a lot of memory
  3. A new window will now appear. Check if Firefox is up to date.
    update
  4. If your version is outdated, Firefox will download the latest version automatically.

After updating Firefox to the latest version, check if the Firefox is still using too much memory

3. Start Firefox in Troubleshoot Mode

  1. Click the hamburger icon to open the Firefox menu, and select Help.
    help firefox using a lot of memory
  2. Now, click on Troubleshoot Mode here.
    troubleshoot firefox using a lot of memory
  3. Finally, click on Restart in the confirmation prompt that pops up.
    restart

Firefox will now launch with extensions and other custom settings disabled, and if it works fine, you know what’s using too much memory.

So, disable extensions one by one, or revert any changes made to the browser setting and see how it behaves. Hopefully, you’ll find the problematic plugin in no time.

4. Disable themes and extensions

  1. Launch Firefox, and press Ctrl + Shift + A to open the Add-ons and themes.
  2. Now, click the Extension option in the left pane.
  3. Toggle off the switch for each extension to disable it and restart your PC.
    disable
  4. If this resolves the issue, repeat Steps 1 and 2, and click the three vertical dots before the fault extension.
  5. Choose the Remove option.
    remove firefox using a lot of memory
  6. Now, select Themes from the tabs on the left.
  7. Click the Enable button for the System theme-auto.
    themes

After selecting the Default theme, restart Firefox, and check if it still uses a lot of memory. Many users like to customize Firefox with new themes and improve the browser’s functionality with extensions.

Although the experience can be impressive, it can later cause your browser to hog your system resources.

5. Use about:memory feature

  1. Launch Firefox, paste the following path in the address bar, and hit Enter:about:memoryabout memory firefox using a lot of memory
  2. On this page, you can view detailed reports regarding memory usage.
  3. You can also easily free your memory by clicking the Minimize memory usage button in the Free memory section.
    minimize

One of the excellent built-in features of Firefox is the memory and performance optimizer. Using the memory tool, you can reduce or stop Firefox from using a lot of memory.

6. Enable hardware acceleration

  1. Launch Firefox, click the Menu button (three horizontal lines), and select the Settings option.
    settings firefox using a lot of memory
  2. Scroll down and uncheck the box for Use recommended performance setting under the Performance section.
  3. Now, check the box for Use hardware acceleration when available and restart your browser.
    performance firefox using a lot of memory

Hardware acceleration is one of the superb features on modern browsers that help with load sharing. It is especially useful when playing a media file as it transfers some load from your CPU to the GPU.

If this feature is disabled, it can strain your PC resources, including the memory. So, you need to enable it to get the best performance from your browser.

7. Reset your browser

  1. Click the Menu button on Firefox and select the Help option.
    help firefox using a lot of memory
  2. Choose More troubleshooting information.
    more troubleshoot
  3. Now, click the Refresh Firefox… button.
    refresh button
  4. Click the Refresh Firefox button again to confirm the action.
    refresh firefox using a lot of memory
  5. Finally, Firefox will restart and bring the list of your imported info. Click the Finish button to reset them all.

If the fixes above do not stop Firefox from using many resources, you need to reset Firefox to default. This will clear up the settings you might have made to the browser that might be causing the problem.

Firefox using too much memory is a major concern, and you should now be able to fix it by using one of our solutions listed above.

If you are experiencing memory leaks on Firefox, check our detailed guide to fix it.

Feel free to let us know the solution that worked for you in the comments below.

Upgrade Windows 7 To Windows 10 Free 2026 [Accesibility Upgrade]

Microsoft announced that the Windows 10 free upgrade offer ended on December 31. As a quick reminder, the Redmond giant initially introduced this loophole to allow assistive technology users to upgrade Windows 7 to Windows 10 for free in 2023.

Read on to find out how to take advantage of a free upgrade right now on your PC.

Can I still upgrade to Windows 10 for free in 2023?

The short answer is Yes. Windows users can still upgrade to Windows 10 without shelling out $119. The assistive technologies upgrade page still exists and is fully functional.

Well, it’s 2023, and the assistive technologies loophole is still viable, so take advantage of the offer while it still lasts.


How can I upgrade Windows 7 to Windows 10 for free in 2023?

1. Activate Windows 10 using a Windows 7 key

You’re still able to upgrade to Windows 10, as long as you have Windows 7 or Windows 8.1 running on your PC. Bear in mind that you’ll need to run a genuine copy on your PC in order for this process to work.

In addition to the genuine copy of Windows, it’s also a good idea to have your product key available since you might need it to activate Windows 10.

Once you obtain your key, write it down and keep it safe because you might need it later. After that’s done, your next step would be to back up your files just in case anything goes wrong.

If you can, create a hard disk image and use it to restore your system in case things go south. If you want things to go smoothly, we’ve got you a list of backup software that will get the job done easily.

2. Use the Windows Media Creation Tool

After creating your backup and obtaining your product key, you can start upgrading Windows 7 to Windows 10 free of charge. This is fairly simple, and you can do that by following these steps:

  1. Download and run Media Creation Tool. You can get this software from Microsoft’s website.
  2. Accept the terms of service and select Upgrade this PC now option.
  3. You’ll be asked to download the important updates. Usually, it’s advised to download them, but if you’re in a hurry you can choose Not right now
  4. Windows will now configure your PC and get the necessary updates.
  5. Follow the instructions on the screen until you reach the Ready to install screen. Click Change what to keep
  6. Now you can choose between three options. We suggest using Keep personal files and apps option, but you can also select Nothing if you want to completely remove the previous Windows installation.
  7. Now follow the instructions on the screen to complete the upgrade process.

After doing that, you should have Windows 10 up and running. To make sure that everything is in order, check if your Windows installation is activated. If not, use your Windows 7 serial number to activate it.

If you’re having trouble accessing the Media Creation Tool, take a look at our dedicated article and solve the problem with a few easy steps.

3. Use an Installation Media

Alternatively, you can create an installation media and use it instead. To do that, follow these steps:

  1. Start the Windows Media Creation Tool
  2. Select Create installation media (USB flash drive, DVD, or ISO file) for another PC and click Next.media creation tool safe mode won't accept password
  3. Make sure that Use the recommended options for this PC option is selected.
    • If you want to manually configure language, edition, and architecture, you can uncheck it. Click Next to proceed.
  4. Make sure that your USB flash drive is connected to your PC. Select the drive from the list and click Next.
  5. The process will now start.

Once the process is finished, you can boot from the USB flash drive and try to install Windows again. Be sure to use your Windows 7 or 8.1 key during the installation process.

After the install, if you can’t change your product key be sure to check our guide to find some easy solutions for your problem.

Many users claim that this method works, so before you try to upgrade to Windows 10, be sure that you have a genuine copy of Windows 7 or 8.1 installed and your Windows 7 or 8.1 product key available.

Windows 10 Home

Windows 10 Home

Microsoft’s best OS is what every PC owner need, so upgrade your system today!
Check priceVisit website

If your Windows 7 won’t update to Windows 10, check out our dedicated guide for a quick fix.

For how long will the Windows 10 accessibility upgrade be available?

We’re pretty sure that Microsoft will support this free upgrade offer for years to come. The company made it clear that it wants as many users as possible to jump on the Windows 10 boat.

However, making them pay $119 to install the latest Windows 10 OS is not the best strategy to adopt.

Here’s a catch: Microsoft initially said that the offer would expire on January 16, 2018.

If you use assistive technologies, you can upgrade to Windows 10 at no cost as Microsoft continues our efforts to improve the Windows 10 experience for people who use these technologies. Please take advantage of this offer before it expires on January 16, 2018.

But somehow nobody believes that’s true. The free upgrade offer first expired on July 29, 2016 then at the end of December 2017, then on January 16, 2018.

Somehow that happened only in theory. In practice, the upgrade has always been free or charge.

Allowing this free upgrade loophole to exist increases the chances that more users will agree to upgrade — and Microsoft is aware of that.

It was proved that all Windows users could take advantage of this loophole to upgrade to Windows 10 at no cost.

Of course, some said that Microsoft had been aware of this fact from the very beginning and used it as an incentive to convince more users to install the latest Windows 10 version.

So, what’s your take on this matter? Do you think Microsoft will ever end this free upgrade loophole? Let us know in the comments below.

Windows 7 end of support

Microsoft ended mainstream Windows 7 support on January 14, 2020. Long story short, you’ve got all the reasons in the world to switch to Windows 10. However, OS upgrade processes are never easy.

We covered the upgrade topic extensively, in order to help you transition from Windows 7 to Windows 10 as smoothly as possible.

If you don’t want to update, don’t miss our guide guide on Windows 7 KB4474419 update and learn how to keep your PC safe.

We hope you managed to upgrade your Windows 7 PC to Windows 10 for free in 2023 using our guide. Let us know in the comments section below if you encountered any difficulties following it.

How to Fix the Windows Driver Foundation High CPU Usage

Usually, the Windows Driver Foundation (WDF) doesn’t use too many resources. However, Many Windows users often complain that the Windows Driver Frameworks uses too much CPU, slowing down Windows and draining the battery insanely fast. Here’s how to bring things back to normal!

How can I fix Windows Driver Foundation’s high CPU usage?

1. Perform a clean boot

  1. Press the Windows key + R, type msconfig, and click OK.
    Windows Driver Foundation high CPU Displaylink
  2. Choose the Services tab at the top, check the box for Hide all Microsoft services, and click Disable all.
    Wudfhost high CPU Windows 10
  3. Go to the Startup tab and click Open Task Manager.
    Windows Driver Foundation high memory usage
  4. Right-click each of the apps here and choose Disable.
    WDF high CPU usage
  5. Go back to the System Configuration window, click Apply, and OK to save changes.
    Windows Driver Foundation high CPU Displaylink
  6. Finally, restart your PC.

Sometimes third-party applications or services can cause the Windows Driver Foundation high CPU issue. To pinpoint the cause, it’s advised to perform a clean boot.

Your PC will now start without any third-party services or applications. Now you need to check if the problem is resolved.

If so, you’ll need to enable disabled applications and services one by one until you find the one causing this issue. Remember to restart your PC to apply changes after allowing an application.

2. Reinstall your Wi-Fi driver

  1. Before we start, download the latest Wi-Fi drivers from your device’s manufacturer.
  2. Press the Windows key + X to open and choose Device Manager from the list.
    Wudfhost high CPU Windows 10
  3. When Device Manager opens, locate your WiFi adapter, right-click it and choose Uninstall device from the menu.
    Windows Driver Foundation high memory usage
  4. A confirmation dialog will now appear. If available, check the Remove driver software checkbox. Now click Uninstall.
    WDF high CPU usage

According to users, sometimes problems with Windows Driver Framework and high CPU usage can occur due to your drivers. Several users reported fixing the issue simply by reinstalling their WiFi driver.

Also, if you are experiencing the Windows Driver Foundation high CPU issue with DisplayLink, you should know the driver uses the WDF process. So, choosing between the high CPU and the ability to extend your active displays would be best.

Since Windows Driver Framework is related to your drivers, we strongly suggest keeping your drivers up to date to fix this problem.

3. Run the System Maintenance troubleshooter

  1. Press the Windows key, type control, and select the Control Panel option.
    control panel windows driver foundation high cpu
  2. Click the dropdown before View by and select the Large icon option.
    large icon
  3. Choose the Troubleshooting option.
    troubleshooting
  4. Now, click View all in the left pane.
    view all windows driver foundation high cpu
  5. Select the System Maintenance option from here and wait for the diagnosis to complete.
    system maintenance

The System Maintenance troubleshooter helps to make your PC run optimally. For example, this can help fix the Windows Driver Foundation high CPU issue.

4. Change the Zoom video setting

  1. Launch the Zoom app and click the Gear icon in the top right corner.
    gear icon
  2. Choose Video in the left pane and click the Advanced button.
    video windows driver foundation high cpu
  3. Check all the boxes under Use hardware acceleration for section.
    hardware
  4. Now, click the dropdown before for Video Rendering Method and set it to GDI.
    gdi windows driver foundation high cpu
  5. Click the dropdown for Video Rendering Post Processing to Disable.
    disable
  6. Finally, set the option for Video Capturing Method to Direct Show and restart Zoom to effect the changes made.
    direct show windows driver foundation high cpu

Zoom uses a feature called Media Foundation for Video Capturing Method. Unfortunately, this can use the Windows Driver Foundation process leading to high CPU usage.

Following the steps above should help normalize the process.

5. Run the Memory Diagnostic tool

  1. Press the Windows key + R, type mdsched.exe, and click OK.
    mdsched
  2. Choose Restart now and check for problems (recommended) option.
    restart windows driver foundation high cpu
  3. Wait for the diagnosis to complete and apply any recommended fix.

How to fix Windows Driver Foundation high CPU usage on Windows 11?

Besides applying the solutions above, you can also do the following:

  • Run Windows Update
  • Repair your system files as they may be corrupt
  • Disable Windows Driver Foundation
  • Optimize startup applications

For more solutions, check out our guide on how to fix high CPU usage in Windows 11.

Memory issues are another known cause of this abnormal resource usage. Again, the Windows Memory Diagnostic tool should detect and recommend effective fixes.

Alternatively, you can use MemTest86 to detect and fix issues with your PC memory.

What causes Windows Driver Foundation’s high CPU usage?

There are a few reasons the Windows Driver Foundation registers high CPU usage when using a media player. Below are some of the potential causes to look out for:

  • Activities of third-party: The Windows Driver Foundation high CPU when using Teams or other apps can be caused by the third-party apps using the process. To fix this, you need to perform a clean boot. If you detect the app causing the issue, you might need to remove it with one of the best uninstaller software.
  • Driver issue: This high resource usage issue can also be caused by issues with your WiFi drivers. In this case, you need to reinstall or update the driver.
  • Zoom app features: At times, some Zoom app video features make use of the WDF processes. This can increase its resource usage. The solution here is to tweak some of these settings.
  • Faulty memory: Some users have found their PC memory to be the cause of this issue. You need to run the Memory Diagnostic tool to fix this.

The Windows Driver Foundation’s high CPU issue can make your PC run at unbearable temperatures. Unfortunately, this can lead to more severe problems in the future. Thankfully, this guide has everything you need to fix it effectively.

Are you facing a related issue, such as Explorer.exe high CPU usage? Then, check our detailed guide to fix it quickly.

Feel free to let us know the fix that helped you get past this issue in the comments below.

Netio.sys Blue Screen Error: 4 Simple Ways to Fix It

The Netio.sys blue screen of death occurs largely on Windows 10 PCs after installing new operating system upgrades. Netio.sys is a system file on your Windows computer. As a result, when it gets obsolete or corrupted due to malware attacks, it causes system crashes.

However, we have compiled practical solutions for fixing this BSOD problem. Follow along to see how you can implement them right after we see in more detail what this system file is.

What does Netio sys mean?

An essential component of a computer’s operating system is the Netio.sys file. It is connected to the software that controls a computer’s network adapters.

It is also utilized by applications not part of the network to interact with connected devices. However, it can cause the dreaded Blue Screen of Death issue when something goes wrong.

Listed below are some of the causes of the BSoD error:

  • Faulty or outdated drivers: The primary cause of the Netio.sys BSOD is an outdated network driver. You need to reinstall or update the driver to get past the issue.
  • Issues with antivirus software: Many users have found some third-party antivirus to be the cause of this issue. Removing this software with one of the best uninstaller software should do the trick here.
  • Broken system files: Sometimes, this problem can be caused by faulty system files. One quick way to fix this is to fix the files using one of the best repair tools.

When does the Netio.sys error occur?

On their Windows computers, many users have reported receiving a Netio.sys blue screen error. The majority of them experience this problem on a sporadic and frequent basis.

This error message can appear on the blue screen in a few different ways, including the following:

  • Netio.sys blue screen DRIVER_IRQL_NOT_LESS_OR_EQUAL: It is brought on by several factors, including corrupted system files, a damaged hard disk, incorrectly configured drivers, or obsolete drivers.
  • KMODE_EXCEPTION_NOT_HANDLED Netio.sys: An instance of the KMODE exception not handled issue appears in Windows 10 whenever two or more applications accidentally overwrite the memory of one another.
  • Netio.sys SYSTEM_SERVICE_EXCEPTION: Errors in the graphical user interface, corrupted system files and problems caused by either outdated or corrupt drivers result in this error message.
  • PAGE_FAULT_IN_NONPAGED_AREA Netio.sys: When you see this error message, also known as Error Code 0x00000050, it indicates that the system has referred to memory that is not valid.

This being said, let’s jump into the list of solutions you can implement.

How can I fix Netio.sys error?

1. Remove antivirus software

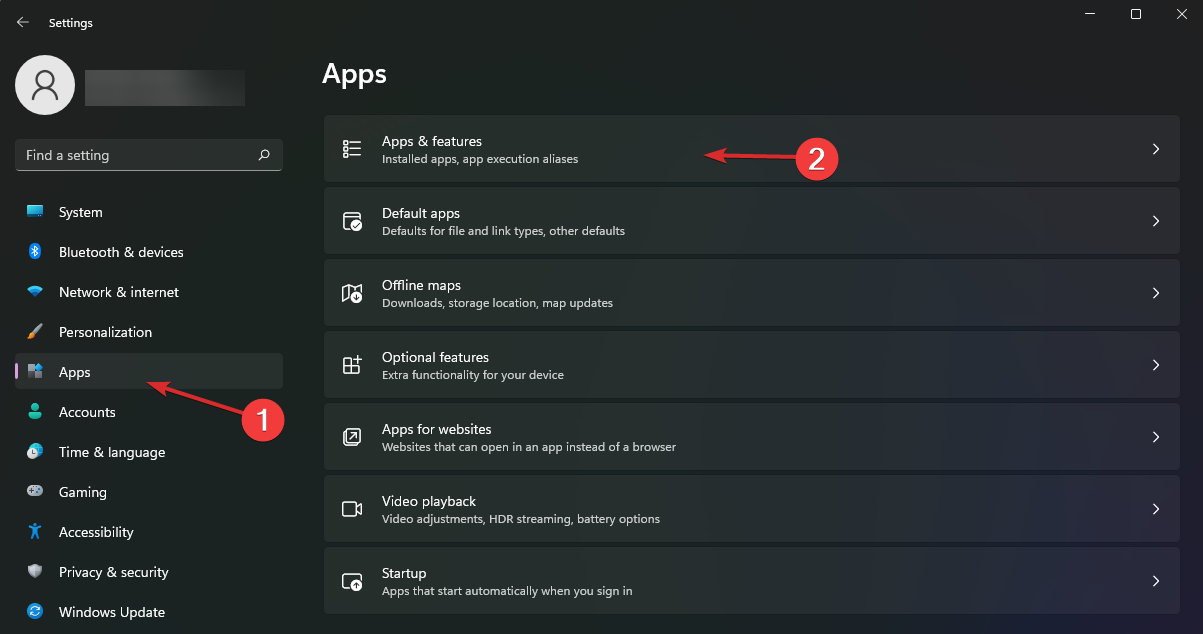
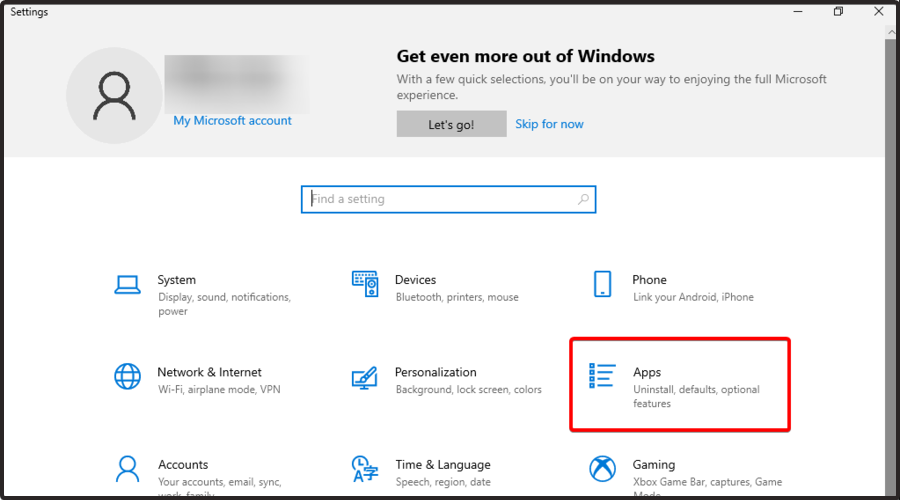
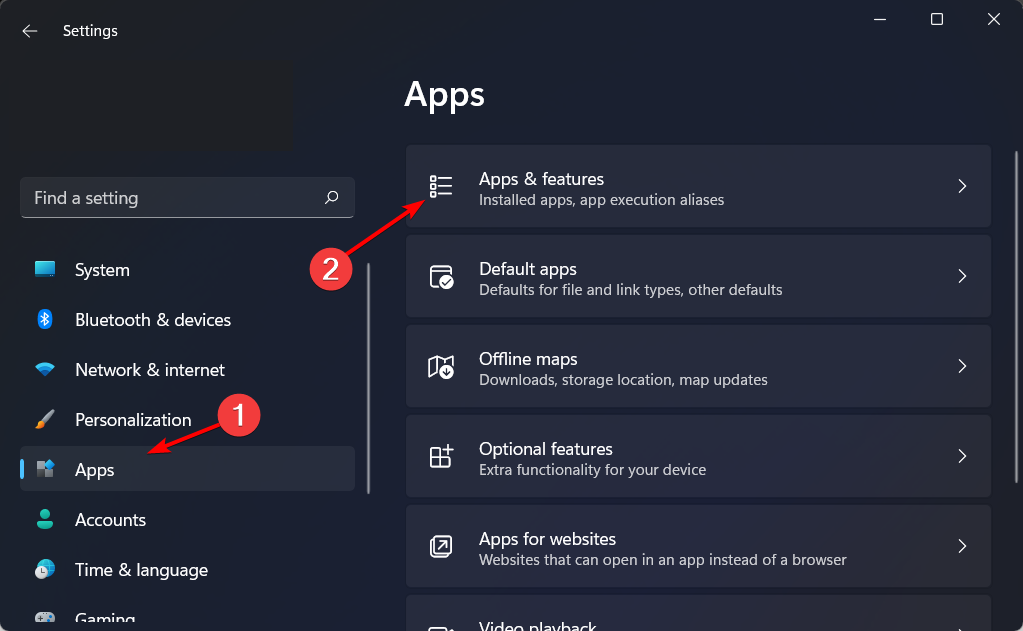
  1. Press the Windows key + I and select the Apps option.
    apps netio sys
  2. Select your antivirus software and click the Uninstall button.
    uninstall
  3. Finally, follow the onscreen instructions to complete the removal process.

One of the major causes of the Netio.sys BSOD is interference from third-party antivirus software. To fix this, you need to remove this software and stick to Windows Defender.

Note that some antiviruses have their uninstaller program. In this case, it is advised that you use the dedicated tool to remove them.

Finally, to be sure you remove all components of any software, we recommend a general uninstaller tool in CCleaner. This excellent tool removes even the most stubborn app and ensures there are no leftovers that can cause problems in the future.

2. Update your drivers

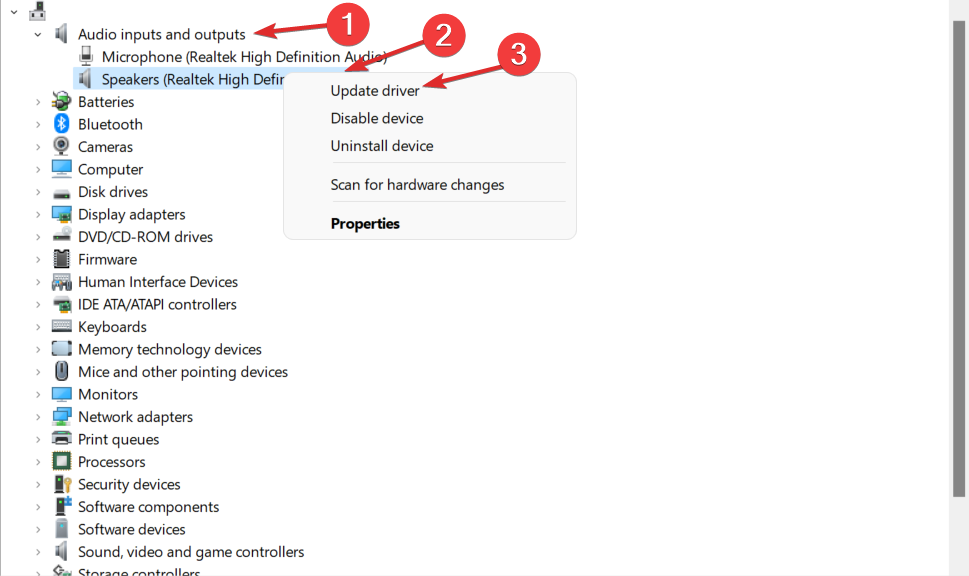
  1. Press the Windows key + X and select the Device Manager option.
    device manager
  2. Double-click the Network adapters option and right-click each of the drivers there.
  3. Select the Update driver option.
    update driver netio sys
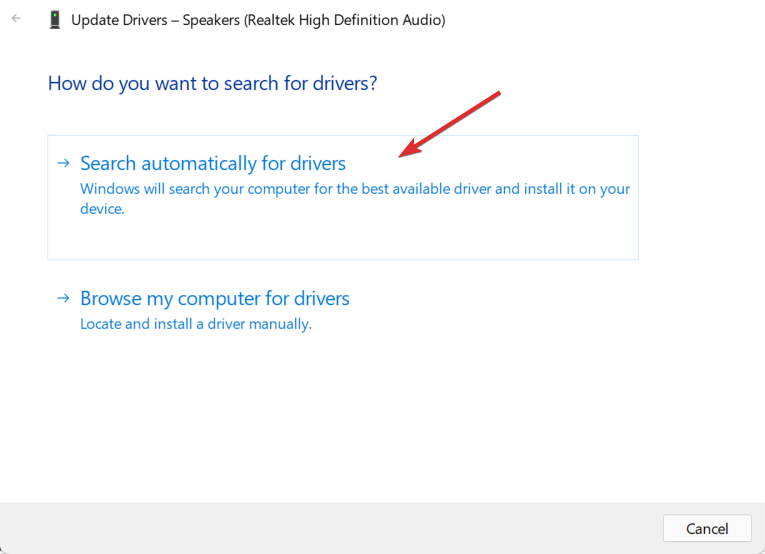
  4. Finally, select Search automatically for drivers and install any available updates.
    search auto

Outdated drivers can cause a series of issues, including this Netio.sys blue screen problem. Most users have found the network drivers to be the cause of the problem. So, you should update it first.

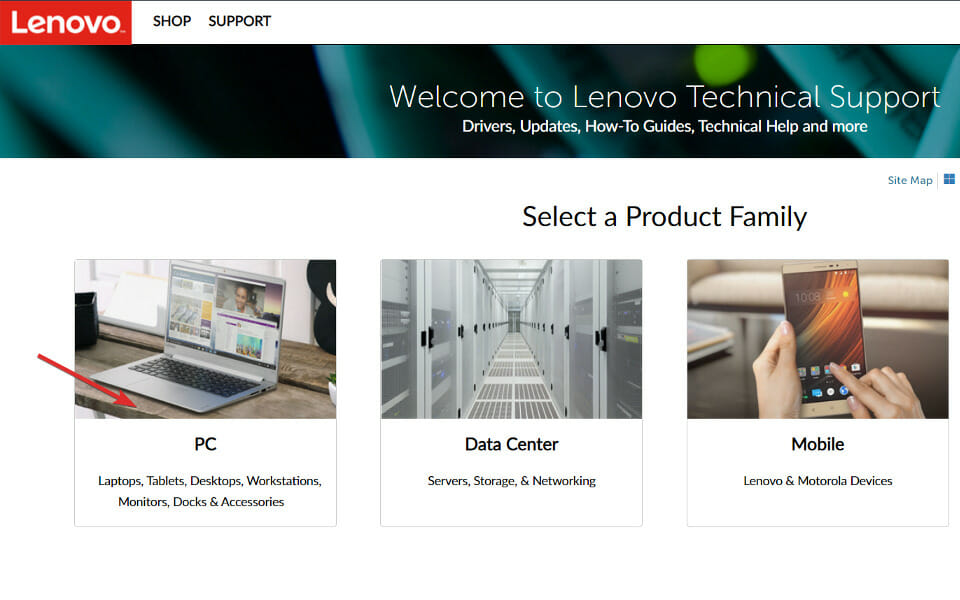
If the Windows driver updater cannot find the latest drivers, you can visit your PC manufacturer’s website to download and install them. Also, you can check for the latest versions of your chipset drivers and BIOS.

Alternatively, you can update all your drivers automatically using a specialized tool in Fortect Driver Updater. This takes out the guesswork and fixes any driver-related issue for good.

3. Repair system files

  1. Click on the Start icon, type cmd, and select Run as administrator under Command Prompt.
    cmd admin
  2. Now, type or paste the following command and press Enter: sfc /scannowsfc netio sys
  3. Finally, wait for the command to finish running.

Corrupt system files can also be the cause of the Netio.sys blue screen issue. This System File Checker utility program verifies the integrity of all system files and repairs files with problems when possible.

Alternatively, you can fix these corrupt system files using a dedicated tool to prevent more errors from occurring.

4. Perform a System restore

  1. Press the Windows key, type system restore, and select Create a restore point.
    system
  2. Click the System Restore… button.
    system restore
  3. Now, click the Next button.
    next
  4. From here, select a restore point and click the Next button.
    restore point netio sys
  5. Finally, click the Finish button to complete the process.
    finish

System Restore is a Windows feature that enables you to reinstate your system to a previous state and fix any recent problems. This should help you return your PC to a time before you started experiencing the Netio.sys blue screen issue.

These are the ways in which you can fix the Netio.sys error on your PC. If you need further help, check out our post on the 5 best BSoD fixers to repair Blue Screen errors effortlessly.

Alternatively, take a look at our guide on how to fix the DRIVER_IRQL_NOT_LESS_OR_EQUAL error in Windows 10.

Don’t hesitate to comment in the section below to tell us the solution that worked for you.

Twitch Error 4000: 5 Ways to Fix Video That’s Not Loading

In the beginning, Twitch used to be based around the gaming industry, allowing gamers to live stream their gameplay. Meanwhile, the platform developed the IRL streaming section and expanded to eSport competition broadcasts.

Unfortunately, from time to time, Twitch is affected by various errors. The Error 4000: Resource format not supported is known to disable audio while streaming.

What causes Twitch error 4000?

Users have identified a few common triggers for this error. On the top of the list are the following:

  • Browser extensions – Twitch error 4000 might be triggered by incompatible browser extensions. You should ensure you do not have conflicting extensions.
  • Cookies – Users have reported that third-party cookies may also factor in this error.
  • App settings – This issue may also appear due to incorrect app settings or temporary bugs.

Users have also encountered the following:

  • 1000 – The Twitch error 1000 is pretty standard, as many users reported. Before discovering what you can do to fix it, remember that it might appear while downloading specific videos.
  • 2000 – This one indicates network-related issues, and it seems like it can come in different forms. To discover more about it, verify our Twitch error 2000 article.
  • 3000 – If it ever happens to face this issue, your browser will encounter an error while decoding the video. We suggest checking our specialized guide to solve the Twitch error code 3000.
  • 5000 – The most common reasons this code can occur are the cached data and extensions. Fortunately, several methods would fix the Twitch error 5000 in less than a few minutes.

Fortunately, we’ve compiled some valuable solutions to all these problems. To get rid of the Twitch error 4000, follow the instructions listed below one by one to see which works for your case.

Quick Tip:

Opera GX automatically blocks cookies and other trackers, which translates into faster browsing speeds. This is great if you spend a lot of time streaming online content on Twitch.

More than that, Opera GX has a built-in Twitch on the sidebar to keep up with all the live streams you’re interested in.

Opera GX

Forget about video format errors on Twitch and navigate smoothly on this gaming browser.

How can I fix This video is it either unavailable or not supported in this browser (error #4000)?

Before you try any of these solutions, you should:

  • Refresh the stream. Sometimes, something as simple as a refresh can fix tiny bugs and streaming issues.
  • Restart your browser if you didn’t solve the Twitch error 4000 issue after a refresh. A
  • Also, If you can’t get the Twitch streams to open in a browser, you can try downloading the desktop app.

1. Play the stream in the pop-up player

  1. Click the Settings icon in the bottom right corner of the stream (it is marked as a gear).gear-twitch twitch error 4000
  2. Select the Popout Player option.
    popup-player twitch error 4000

2. Close other active media players

  1. Open Task Manager by holding Ctrl + Shift + Esc.task-manager twitch error 4000
  2. Select each media player process running, and click End process.end-task twitch error 4000
  3. Close the Task Manager and try reloading the stream to see if it works.

3. Remove audio hardware

Additional audio hardware connected to your PC could stop the stream from loading. Hardware such as headphones or external speakers could be interfering with Twitch.

Remove the hardware from your PC and try loading the stream again. You can plug your audio hardware back in if the error goes away.

5. Clear browsing data and history

5.1 Clear browsing data and history in Firefox

  1. Tap the Windows key, type Firefox, and open the first result to access the browser.firefox-search twitch extensions not working
  2. Tap the hamburger menu icon from the top right corner and navigate to History.firefox-history twitch error 4000
  3. Click on Clear Recent History.clear-recent-firefox twitch error 4000
  4. Under the Time range dropdown menu, select Everything.everything-firefox twitch error 4000
  5. Select all the data from the History and Data sections. We recommend that you leave Active logins out. Then click OK to start the deleting process.delete-data twitch error 4000

5.2 Clear browsing data and history in Opera GX

  1. Open Opera GX by pressing Windows and typing its name inside the search bar.opera-gx-search twitch error 4000
  2. Next, click on the menu icon from the top right corner and select Go to full browser settings.menu-opera-gx twitch error 4000
  3. Next, click Advanced followed by Privacy & security and Clear browsing data.cookies-opera-gx twitch error 4000
  4. Select All time under the time range.all-time-operagx twitch error 4000
  5. Select the Cookies and other site data and Cached images and file options, then click on Clear data.cookies-clear twitch error 4000

5.3 Clear browsing data and history in Chrome

  1. Press the Windows key and type Chrome to access it.chrome-search twitch extensions not working
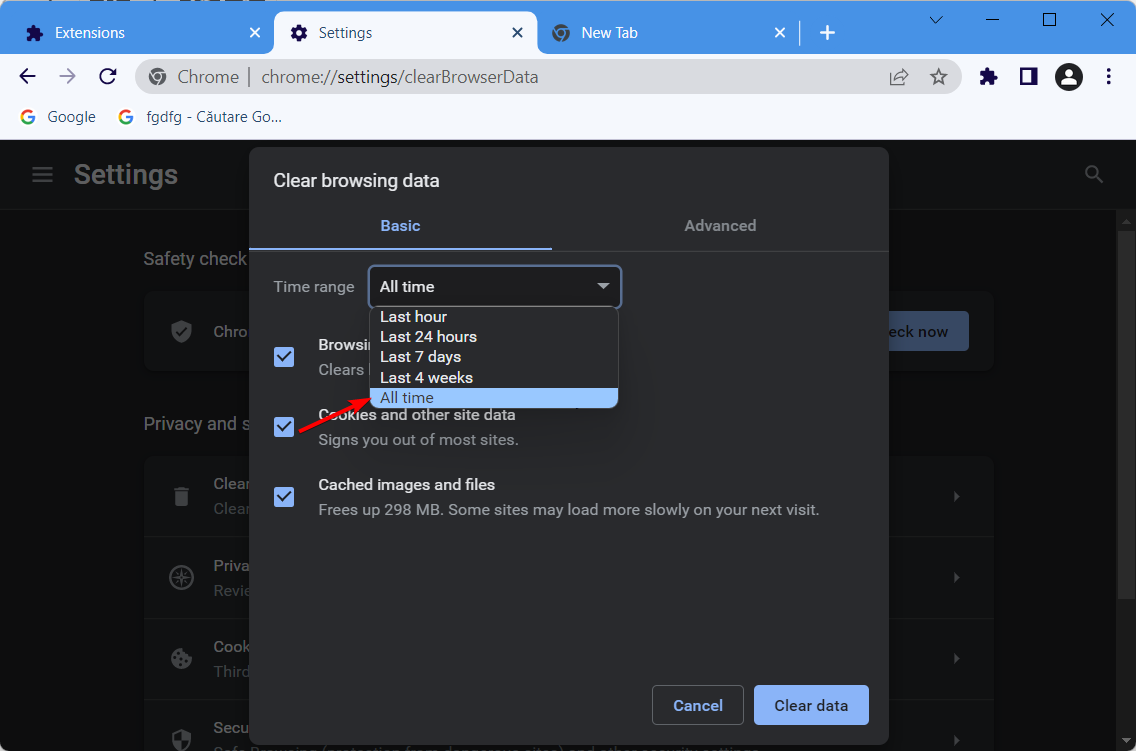
  2. Use the following keyboard shortcut to open the Clear browsing data menu: Shift + Ctrl + Delete, then choose All time under the time range.all-time-chrome images not loading in chrome
  3. Check the Cookies other site data, and Cached images and files options.
  4. Tap Clear Data. The Twitch error 4000 Chrome issue will be fixed.

5.4 Clear browsing data and history in Chromium

  1. Open Chromium by pressing Windows and typing its name inside the search bar.
  2. Next, click on the menu icon from the top right corner, followed by Settings.
  3. Here, click on Privacy and security from the left menu.
  4. Select Clear browsing data.
  5. Select All time under the time range, followed by the Cookies and other site data and Cached images and files options.
  6. And lastly, click on Clear data.

We hope you can find a fix for this Twitch error 4000 from our list of steps. As you can see, they are simple to follow, so you don’t have to be an expert to fix this annoying issue.

If you know any other methods of fixing the error code 4000, feel free to share them with us in the comments section below.

Best Ethernet Splitter [Reviews & Buying Guides]

Ethernet splitters can come in handy, especially when you are looking for ways to connect more than one device to the Internet.

There is a chance though that the internet speed slows down if you are having more machines hooked up to a single switch.

In order to prevent encountering this kind of situation, we’ve compiled a list of the best Ethernet splitters that will make sure that your internet connectivity remains strong no matter what you’re doing: whether you’re working, gaming, or simply browsing the internet.

Which is the best Ethernet Splitter in 2022?


NETGEAR 5-Port

  • 5 Gigabit ports
  • Easy to set up
  • No sound while working
  • The hub provides no indication what the device connection speed is

NETGEAR 5-Port is yet another great ethernet splitter that comes with nice addition that will make you feel great with this choice.

First, it’s extremely easy to use as there are is no need to install any software or make any configurations.

Thanks to the intelligent design and components, it makes no sound while working which means that it’s a perfect Ethernet splitter for noise-sensitive environments.


GizmoVine Ethernet Splitter

  • Compatible with cat5/cat5e/cat6/cat6e/cat7 network environment
  • Superior quality
  • Stable signal transmission
  • Some users report having their speed attenuated

GizmoVine Ethernet Splitter has enlarged usability since it is compatible with cat5/cat5e/cat6/cat6e/cat7 network environments.

This ethernet splitter does a great job at dividing the network cable into two outputs which will provide Internet simultaneously, in case you also have a pair of network cable splitter.

Thanks to the external EML/PFL, you can rest assured that any damage will be prevented as well as other electromagnetic interferences.


Aumox 5 Port Gigabit

  • Offers stable internet speed
  • 6KV lightning protection
  • Plug and play
  • The power supply is a bit noisy

Aumox 5 Port Gigabit features 5 auto-negotiating gigabit ports, which will expand your network capacity. Not to say that this will also allow for instant transfer of large data files.

Also, thanks to the steel housing, the Aumox switch will not make sounds while working and won’t generate extra heat.

It’s a durable ethernet splitter, with fantastic durability and the best choice for SOHO network as you’ll be able to economically increase the network connectivity.


TP-Link 8

  • Easy to use
  • Quiet and reliable
  • Saves energy
  • Seems that the fan is a bit loud

TP-Link 8 is the last product from our list and a good one nonetheless. It comes with some really nice features such as the option to prioritize your traffic while guarantying high-quality traffic.

It also comes with the latest innovative technology that will expand your network capacity while saving power.

The set up is fairly simple, there is no software installation needed or any other configurations for that matter.


With this, we conclude our list of best Ethernet cable splitters that you can use.

We hope that we have offered you all the needed informations and guidelines in order to make up your mind about which is the best Ethernet splitter for you.


Fix CBS Sports App not Working on Xbox in 5 Simple Steps

You’ve been waiting all day for your favorite NFL game or TV show, and when you try to get it going on your Xbox console, the CBS Sports app is not working. This is one of the most annoying user experiences ever.

But still, it’s a very common situation among CBS Sports users. Luckily enough, there are a few things that you can try to fix the situation quickly before contacting CBS’s Help Center.

How do I fix CBS Sports app not working on my Xbox?

1. Restart the consolecbs all access on xbox

1. Press the Xbox button to open the guide.
2. Select Settings.
3. Select Restart console > Yes.

If the console appears to be frozen, press and hold the Xbox button for about 10 seconds to turn off the console. Then, press the Xbox button again to restart.

2. Power cycle the consolefix cbs app on xbox one

  1. Press the Xbox button for approximately 10 seconds to turn off the console.
  2. Unplug the console from the power source and wait for a few minutes. 
  3. Plug the console back in and restart it.

3. Restart the app

  1. In the home screen, highlight the app with the controller.
  2. Press the Menu button > Quit (if unavailable, the app is not running).
  3. Restart the app from My games & apps.

4. Uninstall/reinstall the appreinstall cbs all access app

  1. In the Home screen > My games & apps.
  2. Highlight the CBS All Access app.
  3. Press the Menu button on your controller > Uninstall.
  4. Re-install the app from Store > Apps > Get it Free.

5. Update Xboxget cbs all acess to work on xbox

  1. Tap the Xbox button on your controller.
  2. Press RB three times.
  3. Select Settings.
  4. Open the System tab.
  5. Click Updates & downloads and see if any updates are available.

Aside from the app not working, you may also encounter another CBS 465 error where your app is restricted in some areas.

All of the above solutions proved successful in one situation or another, but if you have other tips, please level them in the comments section below.

Avira not Opening in Windows 10: 4 Simple Fixes to use

Some users have said Avira is not opening in Windows 10, and this can be a problem, especially since this is a perfect antivirus for low-end PCs.

However, there are ways to fix this problem, and in today’s guide, we’ll show you how to do it.

Why is Avira not opening?

There are several reasons for this, but the most common ones are the following:

  • Lack of privileges – In order to get Avira to work, you might need administrative privileges. Alternatively, you can run applications as administrator.
  • Required services aren’t running – Avira software requires its services to run before it can start. So open services.msc and start the necessary services to fix the problem.
  • Corrupted installation – Sometimes your software can be damaged. If that’s the case, you need to repair or reinstall it.

What can I do if Avira is not opening in Windows 10?

1. Reinstall Avira software

  1. Press Windows key + X. Next, select Apps and Features.
  2. Select Avira on the list and click on Uninstall.
  3. Follow the instructions on the screen to remove it.
  4. Once the software is removed, install it again.

2. Try running your Avira software as an administrator

  1. Right-click an Avira shortcut on your desktop and select Properties on the context menu.
  2. Click the Compatibility tab on the properties window that opens. Next, the Run this program as an administrator checkbox.
  3. Press the Apply button to save the new setting.
  4. Select OK to exit the window.
  5. Then try opening your Avira software with the shortcut you just configured to run as administrator.

3. Repair Avira software

Avira Security

  1. To repair an Avira Security installation, click Settings on Windows 10’s Start menu.
  2. Click Apps to open Apps & features.
  3. Select Avira Security in apps.
  4. After that, press the Modify button to open an Avira installer window.
  5. Then click the Repair option in that window.

Avira Antivirus

  1. Press the Windows key and R simultaneously to open the Run accessory for opening software.
  2. Next, type the following command within Run’s text box: appwiz.cpl
  3. Select your Avast Antivirus software and click the Change button.

  4. Select the Modify option, and click the Next button.
  5. Press the Next button again to install all listed components.
  6. Thereafter, restart Windows after you’ve repaired Avira Antivirus.

4. Start Avira Service Host

  1. Open Search and type services in the search text box. Next, click on Services.
  2. Then right-click Avira Service Host within the Services window to select Start.
  3. After the service starts, check if the problem is resolved.

These are simple steps, and they should help you if Avira is not opening on Windows 10. This isn’t the only issue, and if you having Avira Antivirus error 500, be sure to check our dedicated guide to see how to fix it.

What solution did you use to fix this issue? Let us know in the comments section.

How to Add a Network Adapter in Hyper V

If you are a system admin and work with Microsoft Hyper-V virtual machine, you may want to know how to add a network adapter to a Hyper-V virtual machine.

The latest version of Windows Hyper-2016 added the functionality that allows you to add or remove virtual network adapters to/from running virtual machines.

If you are new to the Windows Hyper-V virtual machine world, there are a lot of things to learn. However, knowing how to add a network adapter to the Virtual machine is an essential part of running the VMs successfully.

In this article, we show you how to add a network adapter to Windows 10 Hyper-V virtual machines. There are two ways to achieve this, and we have listed both the methods in this article.

How do I add a network adapter in Hyper-V?

1. Add a Virtual Network Adapter from Hyper-V Manager

  1. Launch Hyper-V Manager on your Windows machine.
  2. First, you need to make sure that you have a network adapter added to your Virtual Switch manager.
    add network adapter to Windows 10 Hyper-V
  3. To do this, click on the Virtual Switch Manager from the right pane in Hyper V-Manager.
    add network adapter to Windows 10 Hyper-V
  4. In the new window, from the left pane check if you have Virtual Network Card. You should see something like the New Virtual Switch.
  5. Click Cancel.
    add network adapter to Windows 10 Hyper-V
  6.  In the Hyper V-Manager, right-click on the Virtual Machine and select Settings.

  7. Under the “Add Hardware” section, select Network Adapter.
  8. Click the Add button.
  9. It will show you the Network Adapter window.
    add network adapter to Windows 10 Hyper-V
  10. Under “Virtual Switch“, click the drop-down menu and select “New Virtual Switch“.
  11. Click on Apply to save the changes. Click OK.
  12. If you have multiple Virtual Machine, you can add the same new virtual switch to other virtual machines as well.
  13. The Hyper-V is capable of sharing network resources with multiple VMs as long as you are running a Cat 5/6 cable on a Gigabit switch to reduce latency.

2. Add network adapter to Windows 10 Hyper-V using PowerShell

  1. If you don’t want to use the Hyper-V Manager or prefer your PowerShell do the talking, you can use PowerShell to add a network adapter to Windows 10 Hyper-V virtual machine.
  2. Right-click on Start and select Windows PowerShell (admin).

  3. In the PowerShell terminal, type the following command and hit enter.
    Add-VMNetworkAdapter -VMName svwdsg2-12r2 -SwitchName vSwitch -Name HotAdded -DeviceNaming On
  4. Wait for the command to execute and that’s it. You have successfully added a virtual network adapter in Hyper-V.
  5. The above command should work on configuration version 6.2 and above.

How can I remove my Hyper V adapter?

In case you want to remove the virtual network adapter, you can use the following PowerShell command:
Remove-VMNetworkAdapter -VMName svwdsg2-12r2 -Name HotAdded

The above command will remove all the network adapters that match the name unless you specify the name of the adapter to be removed.

To overcome this problem, you can either use filters or use the Hyper-V Manager to remove the adapter:

  1. In the Hyper-V Manager, right-click on your virtual machine and select Settings.add network adapter to Windows 10 Hyper-V
  2. From the left pane, click on Network Adapter and then click the Remove button.
  3. Click Apply to save the changes.

We hope you managed to add a network adapter in Hyper V using our guide. Also, once have it up and running, find out how to setup USB passthrough in Hyper-V, a critical functionality that’s not present by default.

Let us know how it went in the comments section below.

How to Fix Multiplayer blocked due to Xbox live settings

“We get the message that says: ‘You cannot play online multiplayer through Xbox live because of how your account is set up.” So what next?”

This is one of the many concerns that Xbox users have raised, and it can be both annoying and frustrating especially when everything was working before, and now it isn’t.

If you’re getting the same message, it is likely that your privacy and online safety settings on your Xbox One console are causing the issue.

In this case, you need to check the following first before you try any of the solutions listed below:

  • Check that you’re logged in to Xbox Live so you can make changes.
  • Check that you’re logged in to the console via an adult account, because children and teenagers are not allowed to make any changes to their own privacy and online safety settings.

SOLVED: Xbox won’t let you play online

1. Check for any alerts on Xbox Live status

Go to your Xbox Live service and check for any alerts in the status, then wait until it says ‘up and running’ before trying again. This could save you from other troubleshooting steps for errors like code 1017 on Battlefront 2.

2. Change your privacy and online safety settings

If you have any issues in managing your privacy and online safety settings on your Xbox One console, sign in to your Microsoft account, then click Xbox One Online Safety and review your settings online.

3. Add/Remove passkey

You can use a passkey to sign in, so if you have not set the Sign-In, security & passkey settings to require a passkey before changing settings, you can enter your passkey to do so. If you forgot your passkey, remove the current one. Usually, Microsoft prompts you for an account password after you fail to key in the correct one three times. Enter your password then remove the passkey you forgot.

Note: to create a new passkey, select create a new passkey and follow the instructions to get started. Without a passkey, you’ll have to enter your password in case your settings still require a passkey. Change the setting to stop getting the prompts.

4. Change Privacy Safety settings

  1. Sign in to your Xbox Live account
  2. Click Privacy Safety
  3. Change Everything to ‘Everyone’ and ‘Allow’ in the checkboxes on the Privacy Tab
  4. Go to the Xbox 360 Online Safety tab at the top
  5. Change every checkbox to ‘Allow’
  6. Click Save
  7. Reload your game or close then reopen it and try to play again

5. Turn off Power Saving mode

Some users have reported that there’s an issue where using a Power Saving mode on your phone or tablet prevents Xbox app from running in the background, and this is needed to sign you in the correct way. To fix this, try the following:

  1. Turn off any power saving mode on your device
  2. Ensure your Internet connection is working and is reliable/stable
  3. Force close the game app
  4. Open Xbox app and sign in to your Xbox Live account
  5. Start your game app and wait for it to sign in. You can also choose settings> sign in

6. Adjust Family settings

If you’re still experiencing problems, adjust the settings for your family. To do this:

  1. Go to Xbox Live settings page
  2. Check that you and your family members are there
  3. Choose the account you want to change
  4. Go through and check that the relevant boxes are selected. Check all three columns: Privacy, Xbox One Online Safety, and Xbox 360 Online Safety, with specific attention to ‘Join multiplayer games’ settings

7. Allow ‘Accept Friend Requests’ and ‘Online Gameplay’

  1. Go to account.xbox.com website. Log in under your account
  2. Go to “privacy & online safety” page
  3. On the page you should see your profile and your child(s)
  4. Click on the child profile pic, it should be green now
  5. Click the “Xbox One Online Safety” tab
  6. Allow everything but “buy and download”
  7. Click save at the bottom
  8. Click the “Xbox 360 Online Safety” tab.
  9. Allow the first 2 “Accept Friend Requests” and “Online Gameplay”
  10. Ensure that you save the settings

Did any of these solutions help? Let us know in the comments section below.

Best Network Adapter For Windows 7: Top Picks

Hardware devices and peripherals designed to help your Windows 7 PC connect to the web could not function properly without Ethernet controller driver devices.

In our article today, we will be presenting you our top picks for the best Network adapters for Windows 7 available to buy right now on Amazon.

There is a wide selection of Ethernet controllers, and each one of them uses different chipsets and manufacturers, henceforth why the drivers are different from one product to another.

Therefore, when you search for the latest drivers, you’ll need to know the product’s name, and look for the specific driver made for that said product.

What are the best Windows 7 Ethernet controller devices?

TP-Link TG-3468 Gigabit Ethernet PCI Express Network Card

  • Ultra-Fast 10/100/1000Mbps PCIe Adapter
  • Wake on LAN supporting Auto-Negotiation and Auto MDI/MDIX
  • IEEE802.3x Flow Control for Full-duplex Mode and backpressure for Half-duplex Mode support
  • The range is not great

As with any other TP-Link product, the TP-Link TG 3468 is one great device which provides a stable and smooth connection. It is easy to install and supports high internet speeds.

You can go about installing the drivers on this device in two ways. You either use the CD and let the product install the default firmware driver, or you download the latest one yourself.

Simply go to the Realtek official site, and search for the RTL8168 chipset driver in the downloads section. You will find the latest available version of this network adapter for Windows 7 right there.

EDUP Gigabit Ethernet PCI Express Network Card

  • Fits any PCI Express x1, x2, x4, x8, or x16 socket
  • Provides simple connection to a Gigabit Ethernet network, and is fully compatible with 802. 1Q virtual LAN (VLAN) tag
  • Suitable for any server or workstation, supporting high-Performance Dual-channel networking and maximum data transfer speeds of 1000Mbps in each direction
  • The prongs don’t align properly with the PCIE socket on some PC cases

Yet another powerful Ethernet network card that works with high internet speeds, the EDUP Gigabit Ethernet is perfect for those who are limited by their on-board card.

As with any other such product, it doesn’t require any installation. You simply plug it in the PCI slot and it should start working. Your OS will download the drivers after you turn the PC on.

However, if you really wish to install the latest drivers manually, you’ll find them on EDUP’s official website. Download the EP-9602GS Driver (that’s the name of the chipset) and install it.

Rosewill Ethernet network adapter card

  • Wake-on-LAN supporting auto-negotiation and auto MDI/MDIX supports IEEE802
  • Compatible with FreeDOS/Win98SE/Me/2000/XP/Vista/Linux/Novell Netware
  • Led indicators that indicate the status of data transmission
  • Some users stated that the Tx is faster than Rx

The Rosewill Ethernet network adapter card will greatly improve your internet download speed compared to the on-board adapter that comes with your motherboard.

Naturally, the card is ready to go after you plug it in, and the installation process is pretty easy. You PC will also install the driver by itself.

As it’s the case with the other network adapter cards, if you really wish to install the latest driver manually, you’ll have to go to the manufacturer’s website, in this case, Rosewill’s official site.

StarTech 32-bit Gigabit Ethernet Network Adapter Card

  • Compatible with IEEE 802.3, 802.3u, 802.3ab, and 802.3x standards
  • Supports Linux/Windows 98SE/ME/2000/XP/XP-64bit/Vista/Vista-64bit/7/7-64bit and Mac OSX
  • Speeds up to 10/100/1000 Mbps
  • No technical details on the product’s description

This card provides a simple connection to the Gigabit internet, which will ensure you won’t get random disconnects or other internet-related issues.

Oviously, it is more potent than a normal on-board network adapter cards, reaching higher speeds then the ones you’ll normally find incorcporated into motherboards.

As for the drivers, StarTech has got you covered. Go to their official website, navigate to Find Drivers, enter your product ID and you’re good to go. Download the latest driver and enjoy your brand new card.

What is an Ethernet controller?

A computer or laptop’s Ethernet controller allows it to connect to the internet via an ethernet cable. The internet speeds provided by these cables surpass those of normal wireless connections.

These controllers also have different speed capabilities, and most of them are incorporated into the motherboard by the manufacturer.

Specialized Ethernet adapter cards can be bought separately and inserted into the PCI slot, alongside the motherboard. They are usually faster than those in-built ones and provide a better connection

Why do I need a Windows 7 network adapter?

Ethernet controller drivers serve as the manual that the PC uses as a guide to instructing your Ethernet hardware on how to behave in various circumstances.

That means your PC depends on those instructions to the hardware devices through these drivers loaded in the hard disk.

Without these driver tools, your PC won’t recognize a hardware device you attach to the motherboard. Simply put, drivers are as equally important as the hardware itself.

How do I install an Ethernet controller?

Installing them is quite easy. You just have to open up your PC case, remove one PCI slot and just plug the adapter into the respective slot.

It is as simple as that. We do have to mention that some network adapters come with a CD that contains drivers for the product, and some rely on your Windows to automatically search and install them.

Either way, it is safe to say that you can manually install the latest drivers by going to the manufacturer’s website and searching for them.

Is your Wi-Fi network adapter giving you trouble? Easily fix this issue by checking out this helpful article about fixing Wi-Fi network adapter problems.

That’s about it for this article. There are many ethernet adapters out there, and each one of them has special drivers made them.

That being said, we do hope that our products and the information you’ll find here will help you. Feel free to tell us about your experience and which was the best Network adapter for Windows 7 PCs from the list for you.

0x80070483: How to Fix This Microsoft Store Error Code

The Microsoft Store comes in handy when you want to update an app and continue using it seamlessly. However, users are now reporting that the error code 0x80070483 is appearing on their screens.

As such, they can’t access the store and are locked out. This can be frustrating, especially because some apps won’t function until updated. If you’re in the same boat, this article may be of help.

Why am I getting the error code 0x80070483 in Microsoft Store?

The error code 0x80070483 is occasioned by some of the following reasons:

  • Virus infection – If you don’t have a comprehensive antivirus to secure your system, malware can easily find its way to your device.
  • Microsoft Store cache – If you have been downloading and installing a significant number of apps, there’s a probability that there’s too much Microsoft Store cached.
  • Conflicting apps – If you have another similar app installed on your PC, it may be causing conflicts with the Microsoft Store and present some errors.
  • Microsoft Store is blocked – In some peculiar situations, you may find out that the Microsoft Store is blocked on your Windows 11 so ensure that you check for such anomalies.
  • Missing system files – Editing the registry can help solve some issues, but if you don’t know what you are doing, you can end up with more problems.

How do I fix error 0x80070483?

A few preliminary checks to perform before moving to the slightly technical troubleshooting include:

1. Run a virus scan

  1. Press the Start Menu, search Windows Security, and click Open.
  2. Select Virus & threat protection.
  3. Next, press Quick scan under Current threats.
  4. If you don’t find any threats, proceed to perform a full scan by clicking on Scan options just below Quick scan.
  5. Click on Full scan to perform a deep scan of your PC.
  6. Wait for the process to finish and restart your system.

2. Run the Windows Store troubleshooter

  1. Hit the Start menu icon and click on Settings.settings windows 11
  2. Click on System on the left pane then Troubleshoot on the right pane.
  3. Select Other troubleshooters.going other troubleshooters win11
  4. Scroll down, locate Windows Store Apps and click the Run button.

3. Repair/reset Microsoft Store

  1. Hit the Windows key and click on Settings.settings windows 11
  2. Click on Apps on the left pane then Apps & features on the right pane.
  3. Locate the Microsoft Store app, click on the three vertical ellipses and select Advanced options.
  4. Click on Repair.
  5. Go back and click on Reset.
  6. Restart your PC and check whether the error code still appears.

4. Run DISM and SFC scan

  1. Hit the Windows key, type cmd, and hit Run as administrator.cmd-run-admin-w11 unexpected kernel mode trap windows 11
  2. Type the following commands and press Enter after each one: DISM /Online /Cleanup-Image /RestoreHealth sfc /scannow

The manual process can be very helpful, but sometimes you also rely on specialized repair software to scan your PC for corrupt or missing files and find the best replacements for them in no time.

5. Reinstall the Microsoft Store

  1. Press Windows + I keys simultaneously to open Settings.settings windows 11
  2. Type Powershell in the search bar and click Run as administrator.
  3. Type the following command: Get-AppxPackage -allusers Microsoft.WindowsStore | Foreach {Add-AppxPackage -DisableDevelopmentMode -Register "$($_.InstallLocation)\AppXManifest.xml"}powershell command reinstall microsoft store
  4. Press Enter to execute the command.
  5. Microsoft Store is now reinstalled on your computer.

If none of these bear fruit, your last option may be to perform a clean install of Windows. There is a chance your copy of Windows may be corrupted. If you choose this route, ensure you back up all your files.

The 0x80070483 error code is just one of the many Microsoft Store error codes that you may encounter so check out our comprehensive guide on the other errors for available fixes.

You may also get through the store, but then your apps are stuck on downloading. We not only have an answer for that but also how you can speed up your Microsoft Store downloads.

We’d love to know which solution was able to help you resolve this error. Leave us a comment down below.

How to Fix PC Won’t Boot When Hard Drive Is Plugged In (Second Drive Boot Issue)

Windows won’t boot on second hard drive? We’ll show you how to fix it. This might happen due to incorrect BIOS settings, a faulty SATA connection, or a corrupted boot sector on the second drive.

With tricks such as adjusting boot priority in BIOS, checking cable connections, or repairing the bootloader using Command Prompt, you can get your PC to recognize and boot properly from the second hard drive.

Here’s what you should do:

What can I do if a new hard drive won’t boot on Windows 10/11?

1. Set the boot disk at the top of the computer’s boot order in BIOS

  1. Power up your computer.
  2. Press the F1 key or any specified key to enter the BIOS (other keys such as F1, F12, or Delete may be used depending on your HP system).
  3. Locate your computer’s boot order under BIOS Boot.
  4. Select the HDD/SSD i.e. the boot disk and move it upward using the arrow key.
    second hard drive stops boot
  5. Save the changes by following the screen prompts and exit the BIOS.

One of the reasons for this problem is that the HDD/ boot disk is not at the top of the boot order. The system retrieves boot information and OS details by following a boot order.

The boot order consists of the sequence of sources that the computer searches in order to retrieve valid information.

Meanwhile, BIOS enables you to specify a drive by its position in the hard-drive list as below (eg HDD-1, HDD-2, etc.) make sure that your original drive is on the SATA0 data cable, and the new one is on the SATA1. Hence, the system will try to read off the SATA0 drive first.

However, if the HDD/boot disk is not at the top of the boot order, the computer tries to boot from another source which results in the error message.

If you intend to set the boot disk i.e. HDD at the top of the boot order in BIOS (Basic Input/Output System), follow the above steps.

If you want to keep your system running smoothly, you can get a dedicated Windows optimizer software. They typically include cleaner utilities, as well as disk management tools that are more user-friendly than the BIOS.

If you’re facing issues with a second hard drive not being detected, this step is crucial.

2. Check the PC-to-HDD’s connections

  1. Power off your computer and remove the battery. Open up your computer’s casing afterward.
  2. Detach the HDD from your computer.
  3. Clean all the ports and wirings linking the HDD to the computer and also check the SATA and power cables.
  4. Replace the faulty cables you detect and fix loose connections.
  5. Now, reconnect the HDD to the computer. (Ensure that all the connections are fastened tightly.
  6. Hence, attach the battery and power up your computer.

Power down your PC and inspect the SATA and power cables. Re-seat them or replace faulty ones. A loose or damaged connection could prevent the system from recognizing the drive, especially after a Windows 11 update that caused a missing hard drive.

In order to check the PC/HDD wire connections, you need to use a screwdriver. Follow the above steps to check the connections and fix the problem.

However, if you do not have the tools and required practical knowledge involved in using this method; it is advisable that you consult a computer technician or computer engineer to help you out.

3. Update the IDE drivers

  1. Press Windows key + X and select Device Manager from the list.
    windows 11 device manager search
  2. When Device Manager opens, locate the IDE controllers section, right-click on the drivers, and choose Update driver.
  3. Click on Search automatically for drivers.
  4. If a newer driver will be found, it will be installed. Repeat the process if you have more devices or drivers.
  5. Restart your PC and check if the machine is booting from the second drive.

Driver conflicts often lead to detection failures, like when Windows 10 doesn’t recognize a portable hard drive.

Sometimes the only way to fix this problem is simply to visit your laptop manufacturer’s website and download the latest drivers’ drivers for your laptop. After downloading the latest drivers, uninstall your current one by following these steps:

However, updating drivers manually could be very stressful and time-consuming. You can always opt to execute all processes through third-party software like Fortect Driver Updater.

This program not only will show you the right driver version for your device but will also prevent PC damage.

⇒ Get Fortect Driver Updater

4. Run Automatic Repair/Start Repair

  1. Insert Windows bootable installation DVD and restart your PC.
  2. Press any key to boot from CD or DVD when prompted to continue.
  3. Select your language preferences, and click Next.
  4. Click Repair your computer in the bottom-left.
  5. In the Choose an option screen, Click Troubleshoot > Click Advanced option > Automatic Repair or Startup Repair. Then, wait for the Windows Automatic/Startup Repairs to be complete.
  6. Restart your PC and boot to Windows. Attach the second hard drive afterward.

You can also fix the boot error problem by performing automatic repair/start repair on your system by using the Windows bootable installation DVD. This fixes boot-related issues such as corrupted boot sectors, especially when Windows 11 won’t recognize your external hard drive.

5. Replace your Hard Disk Drive (HDD)

Finally, you need to consider replacing your PC’s HDD because it may be faulty. You can remove your HDD, connect it to another PC to access the files and folders on the PC, and also confirm if it boots up from the HDD.

Meanwhile, if the new PC is unable to identify and access the HDD, then you definitely need to replace it with a new one.

However, if the PC can detect and access the HDD, then the probable cause for the error problem is the faulty SATA cable.

The SATA cable connects the HDD to its motherboard; we highly recommended that you replace it with a new one. You can carry out the replacement with a professional computer engineer.

We’ve also seen cases where faulty permissions or corrupted partitions were the root cause—check out this guide on external hard drive permissions in Windows for help.

No less important, keep in mind that the above solutions are recommended whenever experiencing these issues as well:

  • External hard drive prevents booting – Booting issues, while an external hard drive is present, are nothing out of the ordinary. You may reset your UEFI setting back to default or apply the above tips.
  • Computer won’t boot with the external hard drive plugged in – If that’s a problem you can’t get rid of, running Automatic Repair/Start Repair or reformatting the external drive may help.

Feel free to comment below if you have any questions concerning the solutions we mentioned above.

How to Fix Excel Break Links is Not Working? [Simple Guide]

Some Excel users link their spreadsheets with reference links. A value in one Excel file will then be linked to another. Users can usually remove those reference links with the Edit Links dialog, which includes a Break Link option.

However, sometimes users encounter an error where the excel function to break links is not working. If you can’t break all reference links in an Excel file, check out some of the resolutions below.

How to fix the Excel function break links is not working?

1. Unprotect the Excel worksheet

  1. Select Excel’s Review tab.
  2. Click the Unprotect Sheet button.The Unprotect Sheet button excel file will not break links
  3. If the sheet protection has a password, you’ll need to enter that password in the dialog window that opens.
  4. Click the OK button.
  5. Then the Break Link option might not be greyed out. Select the Data tab.
  6. Click the Edit Links option.Edit Links option excel file will not break links
  7. Select the links listed, and click the Break Link option.

2. Delete named cell ranges

  1. Click the Formulas tab.
  2. Press the Name Manager button.Name Manager window excel file will not break links
  3. Select a cell range name there.
  4. Press the Delete button to erase it.
  5. Click the OK option to confirm.
  6. Delete all the referenced cell range names listed within the Name Manager.
  7. Click the Close button.

3. Clear all data validation rules from the sheet

  1. Click the Select All button at the top left of a worksheet.
    Select All button excel file will not break links
  2. Select the Data tab.
  3. Then click the Data Validation button.
  4. Select the Data Validation option.
  5. A dialog box should then open that asks to clear all.
    • Press the OK button on that window.
  6. Repeat the above steps for other sheet tabs in the spreadsheet.

4. Check out the Break Link Excel add-in

The Break Link Tool is an Excel add-in with which you can quickly remove all reference links from an Excel worksheet. The add-in is not freely available, but you can still try out the add-in with a one-week free trial.

Click the Download button on the Break Link Tool page to install that add-in.

With that add-in installed, you’ll see a Break Links button on the Home tab. Click that button to open the tool’s window. Then you can click a Select all option to select all the tool’s break link settings. Pressing the Start button will remove all the links.

So, that’s how you can break links in your sheet when you can’t get rid of them with the Edit Links tool. Note that spreadsheet objects and pivot tables might also include referral links.

So, also check if any objects and pivot tables on sheets have any reference links.

Which one of these methods worked out for you? Let us know by leaving a message in the comments section below.

How to Convert a Live Photo to Still on PC

Live Photos contain two features you can use your camera for taking pictures and making videos. However, users have been asking how to convert Live Photo to still on Windows to save their space.

You can also check our guide on what to do if the photo gallery is not working on Windows before diving into the article.

Can I save Live Photos on a PC?

Live Photo is one of the best features of the iPhone camera, and it’s because of the composition of both photo and video in a single frame. However, many users have been curious whether they can save Live Photos from iPhones to PCs for various reasons.

Yes, you can save Live Photos from iPhone to PC via several procedures. Also, backing up Live Photos on your PC can be beneficial. It can help free up disk space on your iPhone because Live Photos are way bigger than still pictures.

Also, saving Live Photos on your PC allows you to convert them to still photos without screenshotting the picture. This helps retain the quality of Live Photos.

How do I convert a Live Photo to still on Windows PC?

Before proceeding with any steps for converting your Live Photo, apply the following:

  • Fix network congestion on your PC.
  • Ensure there’s enough disk space on your PC.
  • Enable the antivirus software on your PC to detect any malicious item that may enter your PC.
  • Make sure your USB port works properly.

The above checks will help your PC initiate the saving and conversion process faultlessly. Proceed with the steps below.

1. Transfer the Live Photo to your PC

1.1 Transfer Live Photo via USB cable

  1. Plug the USB cable into the PC and the iPhone.
  2. Press Windows + E to open File Explorer.
  3. Select the Apple iPhone folder, then click on the Internal Storage subfolder.
  4. Grant permission to trust this computer when prompted.
  5. Open the DCIM folder, check the Live Photos name on your iPhone, then search for it.
  6. In the result folder, the Live Photo will save as both photo and a video. So, copy and paste both items to another folder on your PC.

With the steps above, you can access the still photo for the Live Photo in question without going through the conversion process. Check what to do if iPhone photos are not showing up on your PC.

1.2 Transfer Live Photos via iCloud

  1. Go to the iCloud site on your browser and sign in with your iCloud account credentials.
  2. Go to Photos to open your iPhone gallery, click on Live and select the Live Photo you want to transfer for converting.
  3. Click the Download button in the top right corner to download the Live Photo on your PC.

Downloading via iCloud will save both JPEG and MOV files on your PC. Here, you can extract the JPEG format, which can serve as the still photo and the MOV file that is the video.

2. Use dedicated software

  1. Go to CopyTrans Photo’s official website to download the software for your Windows PC.
  2. Install the downloaded software, then open it.
  3. Connect your iPhone to your PC. and click on Start beside CopyTrans Photo.
  4. Navigate through your photos on the left pane of the screen, then drag the Live Photo to the iPhone tab.
  5. Click the Apply changes button in the top-left corner to convert the Live Photo to JPG.

CopyTrans Photo is a software that allows users to transfer photos and videos from iPhone to a Windows PC. Also, you can convert HEIC to JPEG and back up your iOS photos to your PC.

Afterward, the converted JPG picture will be saved in a folder on your PC. Hence, you can access it anytime you want.

Alternatively, you can read our article about how to open & convert HEIC to JPG on Windows for more software options you can use.

Conclusively, our readers may be interested in software to turn photos into paintings on Windows & Mac.

How to Fix CPU Fan Error on Boot (Step-by-Step)

Seeing a CPU fan error on boot can be alarming, especially when your PC won’t load past the BIOS screen. Common messages include CPU fan error detected, please check, or press F1 to continue, usually on ASUS motherboards. These alerts appear when your system doesn’t detect the CPU fan or its RPM is too low.

Here’s how to fix the issue safely without diving deep into BIOS tweaks or replacing hardware.

Why does my BIOS say CPU fan error?

An error that occurs at startup caused by the central processing unit (CPU) fan is frequently the result of physical damage to the fan itself, faulty settings, or external circumstances that cause the computer to overheat and force the fan to spin at speeds that are exceptionally high.

Alternatively, errors with the computer’s central processing unit (CPU) fan might be brought on by dirt or other debris that obstructs the device’s air vents.

How do I fix CPU fan speed error?

Before moving on to more complex solutions, make sure to do the following:

  • Remove the fan and clean the dust. You can use pressurized air to clean it.
  • If you installed an AIO liquid CPU cooler, check to see that the Pump was plugged into the AIO PUMP port and that the AIO Radiator Fans were plugged into the CPU FAN port.
  • Check to see that the CPU cooler is correctly attached to the motherboard and that the fan of the CPU cooler is specifically hooked into the CPU FAN header.
  • To reduce the CPU temperatures, re-apply the thermal paste.
  • Disable overclocking and custom fan curves
  • Move your PC to get adequate ventilation

1. Update BIOS

    It’s more likely to work out CPU fan error on boot by accessing your BIOS and update the firmware of your Windows PC.

  1. 1. Download the newest BIOS version from your motherboard manufacturer’s website and copy it onto an USB flash drive.

  2. 2. Open the Start Menu then click the Power button. Hold the Shift key and choose the Restart option.

    restart-pc cpu fan error
  3. 3. You should see several options available. Choose Troubleshoot followed by Advanced options.

    advanced options Windows 10
  4. 4. Select UEFI Firmware Settings.

    uefi-settings cpu fan error
  5. 5. Click the Restart button and your computer should now boot to BIOS.

  6. 6. Once you enter BIOS, look for the BIOS update option and select it.

  7. 7. Now you need to choose the BIOS update file from your USB flash drive and wait while your BIOS updates.

For more details about your computer’s BIOS, check out our dedicated guide on how to check the BIOS and update it.

2. Lower the default fan RPM in BIOS

  1. To fix the CPU fan speed error detected boot into BIOS on your PC.
  2. Navigate to CPU Fan settings. The sections might differ based on your motherboards. The important thing is to look for anything related to the CPU Fan control, usually found in the Advanced settings menu. Now, locate the setting that regulates RPM warnings. The default value should be around 600 RPM (rotations per minute).fan-cpu cpu fan error
  3. Lower the default value to 300 RPM and save changes.
  4. Exit BIOS and boot into the system. This is one of the best solutions for the Asus motherboard CPU fan error.

3. Disable CPU Fan speed monitoring in BIOS

  1. Boot into BIOS. Navigate to the aforementioned Advanced settings.
  2. Look for the Monitoring (Monitor) section.
  3. Change the CPU Fan Speed to Ignore and confirm changes.
  4. Boot into Windows and look for improvements.

After that, the CPU fan press F1 error should be gone. However, if the issue persists, take your PC for diagnostics and repair.

4. Try another CPU fan header

In some cases, your PC might have more than one CPU fan header. If you face the CPU fan error, it might be because the header you are using is faulty.

The best thing to do in this case is to try another header. Also, ensure the fan is connected to the correct location (i.e., the fan header).

5. Check other fans

Sometimes, you need to verify if your CPU fan is working well. To do this, you need to try other fans compatible with your PC.

Just make sure you connect it to the header and that the area is well-ventilated.

6. Replace the CPU fan

If the fixes above fail to solve the CPU fan error, you might need to go for broke and replace the fan. This is especially true if you tested your PC with other fans, and they worked without error.

The only thing you need to take care of is the compatibility of the fan with your PC and that you get the connection right.

7. Shut Down and Check the CPU Fan Connection

Make sure the fan is connected to the correct motherboard header. Many users mistakenly plug it into a chassis fan port instead of the CPU_FAN port.

Steps:

  • Power off your computer and unplug it.
  • Open the side panel of your case.
  • Locate the CPU fan cable and ensure it’s firmly plugged into the CPU_FAN header.
  • Plug everything back in and restart the PC.

This is the most common cause of the CPU fan error ASUS motherboard message.

8. Clean the CPU Fan and Heatsink

Dust buildup can prevent your fan from spinning correctly or reduce its RPM enough to trigger the CPU fan speed error detected warning.

Steps:

  • Power off and unplug your PC.
  • Use a can of compressed air to clean the CPU fan blades and heatsink.
  • Make sure no cables or wires are obstructing the fan’s path.
  • Reboot and check if the error persists.

9. Reset the BIOS via CMOS

If you see CPU fan error press F1, there might be a BIOS glitch or misconfiguration. Performing a CMOS reset will restore BIOS defaults.

Steps:

  • Turn off the PC and unplug all power sources.
  • Remove the CMOS battery from the motherboard for about 30–60 seconds.
  • Press and hold the power button for 15 seconds to discharge residual power.
  • Reinsert the battery, power the system back on, and check if the error is gone.

10. Use a Fan Monitoring Tool

To make sure the CPU fan is spinning properly, install a hardware monitoring tool in Windows. This can help verify RPM levels and fan detection.

Recommended tools:

  • HWiNFO – Offers detailed readings on CPU, motherboard, and fan RPMs.
  • AIDA64 Extreme – Useful for diagnosing fan detection issues or low RPM behavior.

If your fan shows “0 RPM,” it’s either disconnected, faulty, or not spinning fast enough for BIOS to detect.

11. Reseat the CPU Cooler

Improper mounting can cause the cooler to sit unevenly, which may stop the fan or reduce performance. If nothing else works, this step is worth trying.

Steps:

  • Shut down the PC and unplug everything.
  • Remove the CPU cooler carefully.
  • Clean off the old thermal paste with isopropyl alcohol.
  • Apply a small amount of new thermal paste to the CPU.
  • Reseat the cooler firmly and reconnect the fan to the CPU_FAN header.

What will happen if the CPU fan fails?

Central processing units that have dead fans will overheat. When a computer’s central processing unit (CPU) gets too hot, there are normally built-in safeguards that will either shut it down or slow it down to prevent it from exploding.

However, suppose the computer protections fail or don’t kick in quickly enough. In that case, the central processing unit (CPU) could reach temperatures above its maximum operating temperature and burn out.

To learn more about this issue, our CPU fan is not spinning guide is a great place to start.

Check out how to lower high CPU temperature in Windows 10 & 11 to extend its lifespan.

Alternatively, you can replace the cooler, which isn’t a complex task. Did our article help you with the Asus water-cooling CPU fan error? Let us know by leaving a comment in the section below.

Avpui.exe Error: Use These 6 Methods to Fix It

If you have been experiencing avpui.exe application error on your Windows 10 PC after installing Kaspersky Antivirus, we have come up with the right fix.

This app error has done the rounds, and many users have encountered it. However, before we dive into some practical solutions, let us explore some of the more common causes of the error.

What causes avpui.exe error?

The avpui.exe application error occurs most especially during Windows startup with error messages such as Avpui.exe not found or Avpui.exe is not running.

This error is associated with Kaspersky Antivirus program, one of the best antivirus software in the world. However, the reasons for this error include:

  • Virus or malware infection – The error could signify that you have been compromised and need a deep scan from a good antivirus tool.
  • Incompatible program with Kaspersky Antivirus – If some third-party applications are incompatible with Kaspersky, you may expect this error.
  • Missing Dynamic Link Libraries (DLL) – DLLs are essential software components, and a lack of the appropriate DLL will trigger this error.
  • Installation issues – Incomplete installation of Kaspersky Antivirus software has been noticed to nbbe one of the core causes of the error.
  • Corrupt Kaspersky Antivirus exe file – Corrupt files will generally trigger errors on your computer, which is the case for Kaspersky.

Meanwhile, Windows Report has come up with solutions to fix avpui.exe application error on your Windows 10 PC.

How can I fix avpui.exe error?

1. Use third-party software for Windows issues

We recommend using a dedicated repair tool with features that aim to repair corrupt registry keys and the damage left by malware.

Solving these things manually would be a time-consuming task, and you might harm your data during the process. That’s why this alternative is preferred.

2. Run a full system scan

  1. Firstly, type Windows Security in the Search bar, and click on the relevant search result.
  2. Now, click on Virus & threat protection here.avpui.exe error
  3. Click on Scan options.scan options / advanced scan
  4. Lastly, select Full scan and click on the Scan now button at the bottom.full scan windows defender

Note: If you are done scanning your PC, you should remove all detected viruses; the option may be clean or delete, depending on the antivirus you are using.

Viruses and malware can cause the avpui.exe application error. Run a full system scan on your PC to remove every possible virus corruption.

There are several third-parties antivirus software around that you may use; however, you can use Windows’ built-in antivirus, Windows Defender.

3. Use the SFC scan

  1. Click the Start menu, type cmd and select the Run as Administrator option.
    avpui.exe error
  2. Here, type the script below and hit Enter.
    sfc /scannow
    sfc scannow command prompt
  3. Finally, restart your Windows PC.

System File Check (SFC) scans; checks for system file integrity, and fix any corrupted files. This process can fix any corrupt system file associated with Kaspersky Antivirus program file and data.

4. Uninstall incompatible programs

  1. Click the Start menu, type control panel, and select the app.open control panel
  2. Select Uninstall a program.
  3. Lastly, click on any program from the program list and select the Uninstall button.

Another way of fixing avpui.exe application errors is by uninstalling incompatible programs. Some Windows users reported that some general-purpose applications might cause avpui.exe application errors.

So, if you can identify the specific program responsible for the problem, you can easily uninstall it from Programs and Features.

5. Disable Kaspersky Antivirus from startup

  1. Press Windows key and R key to launch the Run program, type msconfig, and hit Enter.
    avpui.exe error
  2. In the System Configuration window, click on the Startup tab, and select Open Task Manager.
  3. Click Kaspersky on the list of programs and select Disable.
    avpui.exe error
  4. Finally, restart the PC.

Another method of fixing avpui.exe application startup error on Windows 10 is by disabling Kaspersky Antivirus from the startup menu.

6. Uninstall Kaspersky Antivirus

  1. Click the Start menu, type control panel, and select the app.open control panel
  2. Select Uninstall a program.
  3. Lastly, click on Kaspersky Antivirus from the program list and select the Uninstall button.

One of the simplest ways of fixing avpui.exe application error problem is to uninstall Kaspersky Antivirus from your Windows PC.

In conclusion, the above methods can fix the avpui.exe application error problem on Windows 10 PCs.

Also note that some common problems you will solve with the solutions we discussed include: avpui.exe unknown hard errors, avpui.exe download errors, avpui.exe exception errors, as well as avpui.exe errors in Kaspersky.

Finally, share your experience after using any of the programs we mentioned. Feel free to comment below.

PC Keeps Freezing and Restarting: 6 Tested Fixes

If your PC keeps freezing and restarting for no clear reason, you’re not alone. This guide covers the most common causes, from driver issues to overheating, and walks you through quick fixes to stabilize your system.

What to do if the computer freezes while restarting?

1. Inspect RAM

  1. Download MemTest86, here.
  2. You can burn the MemTest86 to CD/DVD or create a bootable stick drive.
  3. Plug in the USB, insert the CD/DVD and restart your PC.
  4. Press F11 (F10 or F12) to open the Boot menu.
  5. Select the MemTest86 bootable drive or disk and press any key to run it.computer keeps rebooting and freezing
  6. The scanning process will begin on its own.
  7. After it’s done (and it can take some time), it should give you an insight into the state of your RAM.
  8. Now check if the computer rebooting freezes have stopped.

Critical system errors have existed for ages, and troubleshooting hasn’t changed much. So, for example, if there’s no Blue Screen of Death and your PC is freezing or constant reboots plague it, hardware inspection is the first thing you should do.

Every component might affect this, but our primary concerns are RAM and HDD.

First, let’s start with the easier one, which is RAM. You can shut down your PC, unplug the power cable, and open the casing. Once you’re there, remove the RAM card from its slot (if you have multiple units, do it for everyone).

You can switch RAM cards in sequence or plug them into different unoccupied empty slots.

Moreover, you can unplug one by one RAM card and try running the PC that way. Furthermore, you can scan for RAM issues with a third-party tool called MemTest86.

If your RAM is fully functional, but the problem persists, move to additional steps.

2. Check HDD

  1. Download Hiren BootCD.
  2. Burn the Hiren’s BootCD ISO file to DVD or stack it on USB.
  3. Insert the USB or DVD and reboot your PC.
  4. Press F12 to open the Boot menu and boot Hiren USB or DVD.
  5. Now, once the Hiren BootCD loads, choose Dos programs.
    computer rebooting freezes
  6. Enter number 6 and press Enter to open Hard Disk Tools.
  7. To select HDAT2 4.53, choose number 1 and press Enter.
    computer rebooting freezes
  8. Highlight your partition on the list and press Enter.
  9. Select Device Tests Menu.computer keeps rebooting and freezing
  10. Pick the Check and Repair bad sectors option.
  11. After the scanning procedure finishes, remove the USB/DVD and restart your PC.

This is an excellent solution if the computer freezes and restarts to a black screen.

Even if we neglect that HDD is quite an expensive component, your data is more critical. Unfortunately, the HDD malfunction is too often the sole reason for freezing and unforeseen reboots.

The same goes for RAM, which applies to the hard drive regarding physical or software troubleshooting.

You can remove it and try it on another PC or use a third-party tool to scan for errors. However, before that, ensure the SATA cable is connected correctly.

The physical troubleshooting should be simple: shut down your PC, cut the power, open the casing, unplug the cables, and remove the HDD.

Then, insert it into any other PC and try booting from it. If everything works fine, you can loosen up.

If all these steps seem too advanced, we suggest you utilize an efficient PC repairing software solution to replace all corrupt files with healthy versions.

3. Check for overheating

  1. Clean the PC case and use something like canned compressed air, don’t use a vacuum cleaner.
  2. Remove and clean the CPU cooling fan thoroughly.computer keeps rebooting and freezing
  3. Replace a thermal paste, and do it carefully.computer keeps rebooting and freezing
  4. Add extra cooling fans.
  5. In case you have a liquid cooling system, double-check the pump.
  6. If you’re using a laptop, get a cooling pad or use something to elevate the computer above the surface; that way, the air can circulate freely, and the overheating should be subdued.

In addition, we can’t overlook overheating as a possible cause of the issue at hand. Typically, the PC will shut down to prevent CPU damage after extensive exposure to heat.

However, sometimes overheating can cause the PC to slow down or, as in this case, to fall into a boot loop, inflict unexpected crashes, or cause computer rebooting freezes.

Besides the sudden PSU failure, overheating is the easiest way to ruin your PC completely, so tracking temperature changes closely is highly advised.

You should be able to understand the current state by touch; however, for better insight, we advise you to use a third-party program like SpeedFan or HWMonitor.

If CPU temperature is above 75-80 degrees Celcius or higher when idle or above 90 when under stress, you should address it immediately to avoid fatal damage to your motherboard or CPU.

4. Double-check drivers

  1. Power the system on and hit F8 (this function key may be different on your computer) while it is starting up.
  2. Select Last Known Good Configuration (advanced).
    computer rebooting freezes
  3. If that falls short, return to Advanced startup options and select Safe Mode with Networking.
  4. Launch the Device Manager.
  5. Starting from the first element, expand it, right-click on the driver, and select Update driver. Make sure you do this for all drivers.
    computer rebooting freezes
  6. Select the Search automatically for drivers option.
  7. Once you’re confident that all drivers are correctly installed, restart your PC and try booting Windows, and see if the computer rebooting freezes have stopped.

We have accounted for most of the physical hardware issues that might’ve been the reason for freezing and crashes. However, if you’ve moved past those, it’s a valid point that the software is why PCs are gradually underperforming.

Or, to make a precise point, some drivers are either not installed or incompatible with the current system version.

The first troubleshooting step regarding software is to access the Advanced startup options and start the system with the last known exemplary configuration.

You must press F8 upon booting to access the Advanced startup options menu. However, sometimes this won’t work due to the fast boot sequence.

In that case, physically restart your PC multiple times, and it should access the menu mentioned above on its own. Then, if you’re still stuck with the same freezing/boot loop routine, move on to the last two steps.

Downloading and updating drivers can be quite annoying. Employing the help of a professional driver updating software is always a great idea.

These tools are able to perform comprehensive scans and identify the right driver for your computer, and download them in just a few minutes.

5. Update BIOS

Besides drivers, there’s also BIOS or, rather, a motherboard firmware that can cause issues. This is somewhat of a cross-road between software and hardware.

Suppose issues emerged after you recently installed a new component supported by your motherboard or after you upgraded your OS. In that case, there’s a chance that you’ll need to update BIOS to make it compatible with the hardware and software changes.

Now, flashing BIOS is not a child’s game. But, on the other hand, you don’t have to be an extremely knowledgeable user to perform it. It’s mostly done from the Windows interface, but specific novel configurations offer BIOS updates through the BIOS utility.

Either way, make sure to check out this article for detailed insights. In addition, since the procedure can vary, the best advice is to google your motherboard and look for a detailed explanation.

6. Perform a clean system reinstallation

Finally, if you’re 100% positive that the hardware is fully functional and that software is the one that created the problem, reinstallation is an obvious choice. But, unfortunately, that can take time and effort if you’re a Windows XP user.

Yet, if Windows 7, 10, or 11 are your cup of tea, the procedure is manageable and not a nerve-wracking experience. Detailed instructions on how to do it in a few easy steps are found in this article, so make sure to check them out.

Can RAM cause the PC to freeze?

Your computer’s daily operations employ a kind of memory called random access memory (RAM). Over time, cache problems and hidden system files might clog up your RAM, causing your PC to freeze when it transfers memory to your hard drives.

So this is a YES. The RAM can cause your PC to freeze.

With that, we can finally conclude this exhaustive but hopefully helpful article. We hope your computer rebooting freezes are now a thing of the past.

If the problem seems specific, check out our fixes for Windows 11 freezing randomly, secondary hard drive causing freezes, or Remote Desktop freezing in Windows 11.

You might also draw helpful information from our guide on what to do if Windows 11 restarts after sleep. Many also reported that Windows 11 freezes but the mouse works, and we have a great guide to help you fix it.

If you have something to add to our list of solutions or an urgent question to ask, feel free to tell us in the comments section below.

How to Stop the Mouse From Clicking By Itself [6 Ways]

Sometimes, the mouse appears to have a will of its own and starts moving around erratically or clicks by itself. So, you might be asking yourself, why is my mouse clicking on its own?

Well, anything from dust and dirt to outdated drivers and faulty touchpads can cause it. In this piece, we’ll address all these and more to ensure you can use your mouse effectively.

How do I stop my mouse from clicking on its own?

1. Try a different port

  1. Open the Settings app using the hotkeys Windows + I.
  2. On the left pane, click Bluetooth & Devices, then on the right pane, select Mouse.
    mouse keeps clicking
  3. Now set Select your primary button to Right.

? If your mouse is connected to a USB 3.0 and doesn’t work correctly, maybe there’s a problem with the port. Check out this step-by-step guide to fix issues with the USB 3.0 port.

2. Update the mouse driver

  1. Press Windows Key + X and choose Device Manager.
    Mouse keeps clicking twice
  2. Click on Mice and other pointing devices to find your mouse driver.
  3. Right-click to select the driver, click Update Driver, and follow the instructions on the screen.
    Mouse keeps clicking when held down,

Downloading the drivers manually can turn into a daunting and time-consuming task. That’s why we advise using a third-party tool that automatically updates drivers.

These tools are quick and easy and will update and repair all your drivers in one go. In addition, they will automatically update the most recent driver available for your device in a matter of seconds.

Once your mouse driver is updated and working properly, you can explore simple automation to test mouse functionality or repetitive clicks. Learn the exact steps in this guide on how to use OP Auto Clicker.

3. Check for remote control software

  1. Disconnect your computer from the network and the Internet.
  2. Open the Start menu and type control panel, then click on Uninstall a program.
    mouse keeps clicking
  3. Check your installed programs to see if there are any unusual programs installed. For example, the presence of programs such as TeamViewer, Chrome Remote Desktop, or X2GO is suspicious.
  4. Click on any of these programs if they exist, then select Uninstall.
  5. Follow the wizard to complete the uninstallation.
  6. Start the computer in safe mode and scan it for viruses.

If your mouse stops clicking randomly on the desktop, this could mean that some remote control software has taken over your computer.

4. Disable the touchpad

  1. Press Windows Key + I to open the Settings app.
  2. Once the Settings app opens, go to Devices & Bluetooth section, then on the right pane, select Touchpad.
  3. Toggle off the Touchpad switch.

Check your laptop manual for detailed instructions if you can’t find the keyboard shortcut. Once you disable your touchpad, the issue with your mouse should be resolved.

If you need more info on disabling the touchpad when a mouse is connected to your laptop, read our dedicated article for further details.

5. Disable the ClickLock feature

  1. Open the Settings app and navigate to Devices section.
  2. Choose Mouse from the menu on the left and click on Additional mouse options.
    My mouse keeps double clicking
  3. Mouse Properties window will now appear. Make sure that the ClickLock feature isn’t enabled. If it is, uncheck Turn on ClickLock, and click Apply and OK to save the changes.
    Mouse moving and clicking on its own

6. Disable the touchscreen

  1. Press Windows Key + X and choose Device Manager.
    Mouse keeps clicking twice
  2. Expand Human Interface Devices and locate your touchscreen on the list.
  3. Right-click your touchscreen and choose Disable from the menu. If the confirmation dialog appears, click Yes.
    Mouse moving and clicking on its own

What can I do if the mouse keeps clicking on its own Windows 11?

All the solutions listed in this article are valid once you have a clicking problem on your mouse in Windows 11.

However, once you are confident that the mouse is bad, we recommend you change it instantly, as repairs may be hard to effect, and you may need a technician in such cases.

Other common problems include the mouse not moving to the second screen, the cursor disappearing completely, or lagging during use.

If you have any other suggestions or questions, don’t hesitate to leave them in the comments section below and we’ll be sure to take a look.

How to Uninstall Discord Completely [5 Easy Ways]

Discord is one of the best chat apps for the gaming community. However, many users reported that they couldn’t uninstall it on their PC.

This is a minor problem, and it can be easily fixed. In today’s guide, we’ll show you how to deal with this issue in a matter of moments.

To make it more clear to you, let’s take a look at some reasons why this error occurs.

Where is Discord installed?

You can find the installed application by going to the following location inside your File Explorer. Make sure to replace the username with your actual username: C:Users%username%AppDataLocalDiscord

Why can’t I uninstall Discord?

Like any other program, Discord might run into several problems. Our today’s issue usually appears due to some JavaScript errors.

One of the most common ones is related to Discord’s process. Do not hesitate to check some valuable solutions if you notice a JavaScript error in the primary process.

When you cannot uninstall Discord, your app might remain on the computer at an unknown file location.

If you’re in the same boat, today’s solutions will help you to bypass this problem. Use the steps below, and you’ll not have to worry about this irritating problem again.

What happens if I uninstall Discord?

The app along with its data will be deleted from your computer.

If you try to delete Discord again, you’ll probably get a message that says the file is no longer in that location. Therefore, it couldn’t be appropriately deleted.

Let’s see what you can do if you can’t remove Discord from your PC. Follow along!

How do I completely uninstall Discord?

1. Disable Discord auto-run

  1. If you cannot uninstall Discord from Windows 10, right-click on the taskbar and choose Task Manager.
  2. From Task Manager, go to the Startup tab.
  3. Right-click on Discord and select Disable.

2. Use the Windows Settings menu

  1. Use the following keyboard shortcut to open the Settings app: Windows + I, then navigate to Apps.
  2. Check if you can find Discord in this list.
  3. If yes, click on it and select Uninstall. This is how to completely remove Discord from PC.

3. Delete the Discord cache

  1. Use the following keyboard shortcut: Windows + R, then type %appdata% and click OK.
  2. In the AppData Roaming folder, right-click on the Discord folder, then select Delete.
  3. Open the Run dialog box again, using the Windows + R keys.
  4. Now, type %LocalAppData% and hit the Enter key.
  5. Locate the Discord folder, then right-click on it, and select Delete.
  6. Restart the computer and check again to see if the folders are created similarly.

Why can’t I delete Discord from Localappdata?

Most of the time, users will remove Discord, but the application will still be on the computer in an unidentified file location.

When users attempt to delete Discord once more, the PC responds by stating that the file is no longer at that place and that it cannot be erased.

With the above solutions, you can work around this situation and remove Discord from your computer altogether.

Note icon NOTE
In some cases, the error message u003cemu003eThe action can’t be completed because the folder or a file in it is open in another programu003c/emu003e might appear. To resolve this, open the u003cstrongu003eTask Manageru003c/strongu003e and close any related folders/files running concerning Discord.

4. Delete Discord from the registry

  1. Hit the Windows key, type regedit, then open Registry Editor.regedit bluetooth won't turn on windows 10
  2. Now, follow this path: HKEY_CURRENT_USERSOFTWAREDiscord
  3. Right-click on the Discord folder and select Delete.
  4. Restart the computer. The Discord uninstall not working issue will be gone. This is how to uninstall discord from Windows 10, 11, 7.

5. Try a dedicated software

You can use dedicated PC uninstalling tools if you still haven’t managed to remove Discord. There is plenty of software for this job.

We suggest using the IObit Uninstaller software to get rid of Discord or any other app. It is straightforward to use. Just select Discord from the app listing and click the Uninstall button.

Along with providing an easy way to remove apps by browsing around a listing of everything installed on your PC, IObit Uninstaller can ensure the app is gone for good.

Packed with cleaning features that can take care of your junk files, this tool will remove all unnecessary files that may have been left behind after you uninstall Discord.

You will not need the help of any other tool to complete a full uninstallation of Discord or any other stubborn application.

At the press of one button, all clutter will be deleted, and you’ll be able to enjoy your PC at its full potential.

IObit Uninstaller

Get rid of Discord and all associated files that can usually be left behind.

How to uninstall Discord on Windows 11?

  1. Press Windows + I, then go to Apps, followed by Apps and features.apps-features where is the chrome menu button
  2. Type discord inside the search bar, click the three-dot button next to the result and select Uninstall.discord-uninstall-w11 can't uninstall discord windows 10

If this method doesn’t work, make sure to go through the above solutions, as they are applicable in Windows 11 as well.

How do I uninstall and reinstall Discord?

If you change your mind and want to get the Discord app back into your system, you don’t have to worry! The installation process is straightforward and takes only a few minutes.

The first thing to do is download Discord from the official site, then follow the on-screen instructions. Also, do not forget that you can also use the app’s web version.

We strongly recommend checking our dedicated guide if you wonder how to uninstall Discord and reinstall it.

Why does Discord keeps reinstalling?

This occurs whenever Discord has a problem that is located inside its code, or whenever its installation media is incomplete. This can happen through file corruption.

In order to fix this issue, you should follow the solutions we have listed above and then try to reinstall Discord once again.

Also, you should remember that the installation process might get into trouble. One of the most common is the Discord setup error: Failed to extract the installer. To fix it quickly, make sure you verify some efficient solutions.

Additionally, if you’re having problems with Discord videos not playing, we can help you out. We also have a guide dedicated to Discord Error Parsing, so don’t miss it.

Following the steps presented in this guide, you will succeed in uninstalling the Discord app for good.

It is rare to still have issues after doing everything in this article. However, if this is the case, it could be a problem with your Windows profile or Windows.

Printer is Only Printing Half Page: Why & How To Fix This

Whenever your printer has issues with the printing job that results in wrong color printing or incorrect page printing it mostly has to do with the ink cartridges.

The same ink cartridge can also cause the printer to only print half the page or to leave the middle of the page blank, as reported by the HP printer users in the Microsoft Community Answers.

I’m having a problem printing. Whenever I print a document, my computer will print either a blank page, a small portion, of a page, most of a page, or (sometimes) a full page. Then it will repeat the print job, indefinitely, until I cancel it, printing at random items 1, 2, 3, or 4 above. Also, when I view the print queue, the printer status flickers into offline mode, and the print job continuously resets, it appears.

Or, another variant of the printing issue is the following, mentioned in another thread:

Printing from the context menu of a jpg file in file explorer produces a broad empty white stripe down the center. Only from the context menu, so far as I can tell.

Why is my printer only printing half the page?

This issue is because of your printer settings like the page size and orientation. Other causes for this printing error are:

  • Your paper is not entirely blank
  • The cartridge is running low
  • It might be due to printer malfunctions or errors

Follow the steps listed in this article to fix the HP printer prints half pages issue.

What can I do if my printer is printing only half a page?

1. Uninstall recent updates

  1. Open Settings and click on Update & Security.
  2. Go to Windows Update and click the View update history button.
  3. Click the Uninstall updates option.
  4. Look for the problematic update, select it and click on Uninstall.uninstall update kb500802
  5. Choose Yes when prompted then restart your computer.

Oftentimes, Windows updates create problems with various features or apps. It is also the case with the printing process.

Recently, Microsoft acknowledged that update KB5000802 causes some apps to stop printing altogether.

Within days, Microsoft also released update KB5001649 which was supposed to fix any kind of printing issues for all supported system versions.

It’s preferred to manually get the update from the Microsoft Catalog; look for the version corresponding to your system.

2. Check the printer configurations

    This short but effective guide can certainly solve printing errors like half-page printing by only changing your printer settings, which can be the reason for this problem.

    1. Type Printer&Scanners in the Start Menu.
    Printers and Scanners
  1. 2. Click on your printer device from the list.

    printer-prints-half-the-page
  2. 3. Choose the Manage option.

    printer-prints-half-the-page
  3. 4. Go to Printing preferences.

    printer-prints-half-the-page
  4. 5. In the new window, choose the correct print settings.

    printer-prints-half-the-page

3. Remove and reinstall Printer Driver

  1. Press Windows Key + R to open Run.
  2. Type Control and click OK.
  3. In the Control Panel, go to Hardware and Sound > Printers and Devices.
  4. Select the printer with a half-page printing problem and click on Printer server Properties option (at the top).
  5. In the Printer Server Properties window click the Drivers tab.
  6. Select your printer from the list of installed printers.
    my printer only prints half the page
  7. Click the Remove button and select Remove Driver Only.
    my printer only prints half the page
  8. Click OK to remove the Driver. Click Yes to confirm the action.
  9. Restart the computer.
  10. Now download the HP Printer setup software from the official website.
  11. Run the Setup software and select Connect a new printer option.
  12. Proceed with the on-screen instructions to install the printer.
  13. Now print a test page and check if the printer is printing full pages.

If you require an easier method to manage all your drivers at once without any hassle, Outbyte Driver Updater automatic software will do the job.

It’s the go-to program when it comes to driver matters such as reinstalling official printer device drivers or fixing corrupted drivers on your PC.

Outbyte Driver Updater

Escape driver incompatibility or outdated driver issues by using this all-around automated tool.
Free Trial Download now

4. Check ink cartridges

  1. Launch the HP Printer Assistant app on your computer.

2. Click the Estimated Cartridge Levels tab.

The app will display the estimated cartridge levels.

If the Cartridge is low on ink, you probably need to replace the cartridges with new ones.

Check ink cartridge for expiry

  1. If the Ink level is okay, then check if the Ink cartridge has expired.
  2. If the Ink Cartridge has expired, the printer may not be able to use it to print the documents properly.
  3. Replacing the Ink cartridges with the new ones should help.

Before you leave, don’t miss our guide on what to do if the printer is printing even pages first.

We hope you found this guide useful. Feel free to leave comments and suggestions in the dedicated section below.
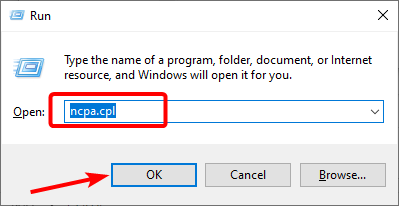
UA.exe: What Is It & How to Fix This System Error

Many files can be illegitimate on your computer, while some hide under the guise of executable files with the .exe file extension. The UA.exe application error results from these files running on your computer.

However, the dangerous .exe files can cause issues with valid .exe files not opening on Windows 10.

What is the UA.exe application error?

The UA.exe file is a legitimate component of the Verizon Wireless Software Utility Application for Android – Samsung program. It has the Windows .exe file extension. However, it can cause application errors, resulting in UA.exe.

Furthermore, you can run into the UA.exe System Error code: The code execution cannot proceed because C:\Windows.ol\Users\lapis\AppData\Roaming\VERIZON\UA_ar\mfc90.dll due to the interference of the UA.exe file.

Moreover, the UA.exe file is not an essential Windows file, so it doesn’t have any crucial Windows process it performs.

Why do I get the UA.exe application error?

The UA.exe application error may be due to numerous factors affecting the file or your system. Regardless of being an executable file, a UA.exe file can become malicious and cause issues with other .exe files not opening on your PC.

However, the factors liable for causing the error are:

  • Corrupt system file – When your system files are not intact, they can cause the UA.exe app error. They can interfere with legitimate files and programs, prompting errors.
  • Malware or virus attacks – When you have malware infection on your PC, it can impede its functionality, causing it to run into errors like the UA.exe application errors. It can also be a virus attack causing the error.

The causes of the problem may vary on different PCs. Nonetheless, you can fix the error by troubleshooting your PC.

How can I fix the UA.exe application error?

Do not hesitate to apply the following preliminary checks:

Go ahead with the solutions below if you still can’t fix the UA.exe application error.

1. Run the SFC and DISM to repair corrupt system files

  1. Left-click the Start button, type Command Prompt, then click Run as administrator.
  2. Choose Yes if the User Account Control prompt appears.
  3. Type the following and press Enter: sfc /scannow
  4. Type the following commands and press Enter: DISM /Online /Cleanup-Image /RestoreHealth
  5. Restart your PC and check if the UA.exe error still appears.

Running an SFC and DISM scan will detect and restore corrupt system files that may cause the error. Read how to fix the run as an administrator option not working on your PC.

If you want to perform the SFC and DISM scan more effectively and faster, then we recommend you use a specialized repair tool to scan your computer and automatically replace the corrupt files with healthy ones.

2. Update Windows Operating System

  1. Press Windows + I key to open the Windows Settings app.
  2. Select Updates & Security.
  3. Click on Windows Update and click on Check for updates. (If any updates are available, it will search for and install them)

Updating Windows OS will install the latest security features to protect your PC, fix bugs liable to cause the error, and update your drivers. Read about fixing Windows not connecting to update service if the error occurs on your PC.

3. Uninstall the Verizon Wireless Utility app

  1. Left-click the Start button, type Control Panel, then open it.
  2. Click on Programs, then select Programs and Features.
  3. Find the Verizon Wireless Software Utility Application for Android – Samsung, right-click on it, then select Uninstall from the drop-down.
  4. Follow the onscreen instructions and restart your PC to check if the error persists.

Uninstalling the program responsible for the UA.exe file on your computer can fix the application error it’s causing.

4. Run an antivirus scan on your PC

You should run an antivirus scan on your PC because a virus might trigger the UA.exe application error. It will help detect any malicious or threatening viruses infecting your PC.

Check the best antivirus software for Windows PCs. However, running antivirus software can block .exe files on your PC, so we recommend you read how to fix it.

Conclusively, .exe files can delete themselves on Windows 10, which can be an issue, so check our guide for solutions.

If you have further questions or suggestions concerning this guide, kindly use the comments section below.

What is WmiPrvSE.exe and How to fix Its Issues on Window

Windows 10 relies on processes and services in order to run properly, and even though processes are important, sometimes certain processes can cause problems. Users reported that wmiprvse.exe is causing problems for Windows 10 users, so let’s see how to fix those issues.

What is the WMI Provider Host (wmiprvse.exe process)?

Wmiprvse.exe is the process of the Windows Management Instrumentation Provider Service, which has the function of reporting important errors and monitoring other programs. 

This process might be used by some other third-party applications to connect to Windows management and monitoring services. In most cases, disabling or stoping WMI processes or services can cause problems. 

How do I fix problems with wmiprvse.exe on Windows 10?

1. Restart Windows Management Instrumentation service

  1. Press Windows Key + R and enter services.msc.
    wmiprvse-exe-services-1
  2. When Services window opens, locate Windows Management Instrumentation service, right click it and choose Restart from the menu. If restart option isn’t available, simply stop the service and start it again by choosing the appropriate options.
    wmiprvse-exe-services-2
  3. After you’re done, close Services window and check if the issue is resolved.

According to users, you can fix problem with high CPU usage simply by restarting Windows Management Instrumentation Service.

Some users are suggesting to permanently disable this service, so you might want to try that as well. To disable Windows Management Instrumentation service permanently, do the following:
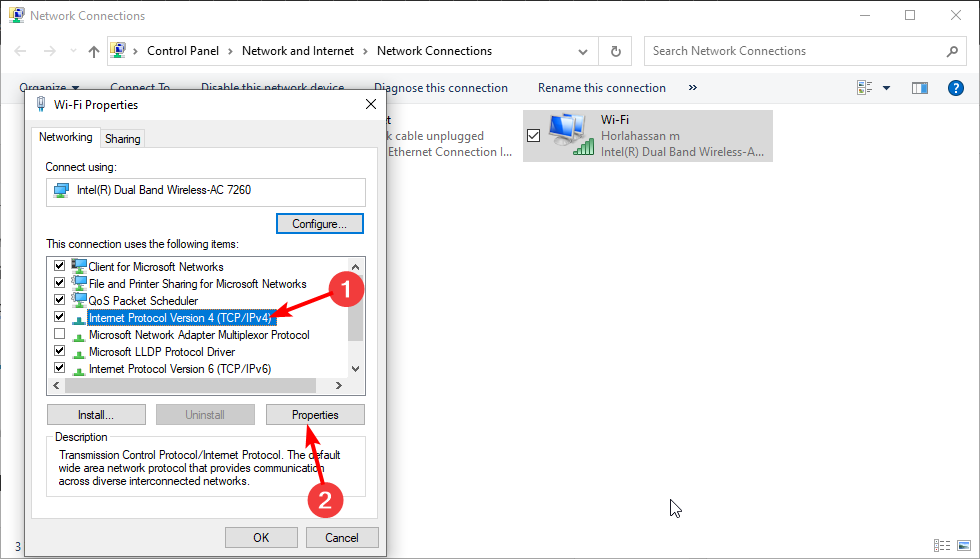
  1. Locate Windows Management Instrumentation service and double click it to open its properties.
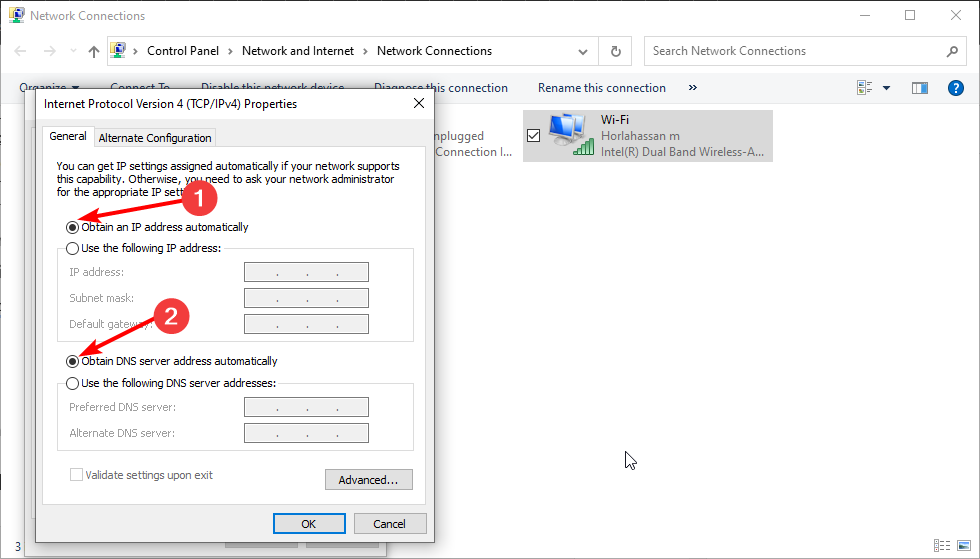
  2. Set Startup type to Disabled and click Apply and OK to save changes.
    wmiprvse-exe-services-3

2. Restart other services

As we already mentioned, you can fix this problem by restarting certain services, and in order to quickly restart the necessary services you can use command line tool. To restart these services, do the following:

  1. Press Windows Key + X to open Power User Menu. Choose Command Prompt (Admin) from the menu.
    wmiprvse-exe-cmd-1
  2. When Command Prompt starts, run the following commands:
    • net stop iphlpsvc
    • net stop wscsvc
    • net stop Winmgmt
    • net start Winmgmt
    • net start wscsvc
    • net start iphlpsvc

After the commands are executed, restart your PC and check if the issue is resolved.

3. Use Event Viewer to find the problematic process

  1. Press Windows Key + X and choose Event Viewer from the menu.
    wmiprvse-exe-event-1
  2. Go to the View tab and make sure that Show Analytic and Debug Logs option is enabled.
    wmiprvse-exe-event-2
  3. In the left pane navigate to Applications and Services Logs > Microsoft > Windows > WMI-Activity > Operational.
    wmiprvse-exe-event-3
  4. Select any error from the list and locate ClientProcessID. In our case the ClientProcessID was 6976.
  5. Write down this number because you’ll need it for the next step.
    wmiprvse-exe-event-4
  6. Press Ctrl + Shift + Esc to open Task Manager.
  7. Go to the Services tab and look for the process that has the same ClientProcessID.
    • In our example that was 6976 and the related service was WMPNetworkSvc.
      wmiprvse-exe-event-5
  8. Stop the service by right clicking it and choosing Stop from the menu.
    wmiprvse-exe-event-6
  9. If the service is related to a third-party application, you can try removing that application from your PC. In addition, you can also try stopping this service from running by setting the Startup type to Disabled in the Services window.

Event Viewer is a powerful tool that allows you to view computer logs. Using this tool you can find which process is causing this problem, and to do that you need to follow the steps listed above.

Keep in mind that you’ll probably get a different ClientProcessID number, so be sure to use that number and not the one that we used in our example.

4. Check your PC for malware

  1. Open Task Manager and go to the Details tab.
  2. Locate the process that is related to Search Conduit and choose End Task option.
  3. After that, go and uninstall the Search Conduit application.

Few users reported that malware can also cause this error to appear, so if you’re having this error we strongly suggest that you perform a scan and check your PC for malware. After removing the malware the issue with wmiprvse.exe should be fixed.

Users reported that malware called Search Conduit caused this issue, and to fix this problem you need to disable this application and remove it from your PC.

Many users reported that Search Conduit is the main culprit for this problem, and after removing the application, the issue was completely resolved.

5. Remove HP Wireless Assistant

According to users, HP Wireless Assistant can also cause this problem on Windows 10. Stopping the HP Wireless Assistant service fixes the issue, but we also recommend that you remove this software from your PC if you want to permanently fix this problem.

6. Stop certain services

  1. Open Services window and locate VMWare USB, VMWare USB Arbitration Service and Hyper-V Virtual Machine Management services.
  2. Be sure to disable all three services by right clicking each of them and choosing Disable from the menu.
  3. Once all aforementioned services are disabled, restart Windows Management Instrumentation service and the problem should be fixed.

Users reported that VMWare USB, VMWare USB Arbitration Service and Hyper-V Virtual Machine Management services are related to wmiprvse.exe and that they can lead to high CPU usage. To fix this problem it’s recommended that you disable those services and restart winmgmt service.

7. Remove any unwanted programs

Unwanted applications can sometimes be installed to your PC and cause high CPU usage. Users reported that applications such as SaveSense, WebSteroids, PremierOpinion, and Relevant Knowledge can cause this issue to appear, so be sure to remove these applications from your PC.

Sometimes those applications will install their own updater and sync programs, so be sure to completely remove them from your PC. Many regular applications will sometimes install certain unnecessary software, so be sure to check your PC and remove any applications that you don’t recognize or remember installing.

8. Remove certain third-party applications

Sometimes regular applications aren’t fully compatible with Windows 10, and that can cause problems with wmiprvse.exe. Users reported problems with GoPro Studio, Beats Updater and Scipe.

To fix this problem, you can remove the problematic applications or end them in Task Manager. You might be able to fix this problem by updating the problematic applications or by using some of the older versions.

9. Perform SFC and DISM scan

Problems with wmiprvse.exe can occur if your Windows 10 installation is corrupted, and you can fix this problem by performing sfc and DISM scan. To do that, follow these steps:

  1. Open Command Prompt as administrator.
  2. When Command Prompt opens enter sfc /scannow and press Enter.
  3. Wait for the process to finish.
  4. After the sfc /scannow process ends, check if the problem is resolved. If the issue persists, enter DISM /Online /Cleanup-Image /RestoreHealth in Command Prompt and press Enter to run it.

10. Disable the spmgr service

According to users, spmgr service can sometimes cause this problem on your PC, so in order to fix it you need to disable the problematic service.

This service is in control of Asus PC Probe application, and to fix this problem you can disable spmgr service or simply uninstall Asus PC Probe application.

Problems with wmiprvse.exe are usually caused by certain services or third-party applications, but you can easily fix them by using one of our solutions.

We covered a similar service in our What is WbemCons.exe and how to address its application issues guide, so don’t miss it.

What method did you use to fix this problem? Let us know in the comments below.

Microsoft bans crypto mining from its online services

Recently, we’ve seen even more people hop on the crypto mining craze with one end goal, earning some cash. To those unfamiliar with the phenomenon, it is the process of creating new bitcoins by solving complicated math problems verifying transactions in the currency.

And now, Microsoft has restricted crypto mining using Azure and all its online services, effective December 1. The company stated that the move was geared towards enhancing the security of its customers’ cloud accounts.
Microsoft quietly updated its Universal License Terms for Online Services citing the new ban on crypto currency mining. According to the new update, “Neither Customer, nor those that access an Online Service through Customer, may use an Online Service: to mine cryptocurrency without Microsoft’s prior written approval.”

The company further stated in one of its forums titled Important actions partners need to take to secure the partner ecosystem that:

The Acceptable Use Policy has been updated to explicitly prohibit mining for cryptocurrencies across all Microsoft Online Services unless written pre-approval is granted by Microsoft. We suggest seeking written pre-approval from Microsoft before using Microsoft Online Services for mining cryptocurrencies, regardless of the term of a subscription.

Talking to The Register, Microsoft highlighted that the move was geared towards enhancing security for its cloud services and that crypto currency mining can cause “disruption or even impairment to Online Services and its users and can often be linked to cyber fraud and abuse attacks such as unauthorized access to and use of customer resources”.

That said, you’ll now need Microsoft’s prior written approval to mine crypto currency using its online services, but there’s also a catch. The company will only give you approval for testing and research for security detections.

Via: The Register

Best Audio Driver for Windows 11 & Setup Guide

To get sound on your Windows 11 PC for music or meetings, you need an audio driver. Realtek HD Audio Driver is a popular option and comes with Realtek HD Audio Manager, which lets you adjust your sound with features like an equalizer and noise cancellation.

This guide will show you how to download an audio driver on Windows 11 and explain why Realtek HD Audio Manager is so common.

Best audio drivers for Windows 11

1. Realtek High Definition Audio Driver

This is the most common and reliable option for Windows 11 users. It supports high-definition audio, works with most built-in sound cards, and usually comes preinstalled. If not, you can download the latest version directly from the Realtek official website or from your motherboard or laptop manufacturer’s support page.

Pros:

  • Great compatibility
  • Good audio quality
  • Regular updates

Cons:

  • Realtek Audio Manager can go missing after updates

2. Microsoft Generic Audio Driver

When other drivers fail, this built-in Windows driver steps in. It’s not fancy, but it’s stable and works on almost any system. You don’t need to download it separately, as Windows installs it automatically when no other suitable driver is found. It can also be installed through Device Manager. We’ll explain how in the guidelines below.

Pros:

  • Universally compatible
  • No installation required

Cons:

  • Basic sound quality
  • No support for enhancements or advanced features

3. Manufacturer-Specific Drivers (ASUS, Dell, HP, etc.)

If your device came with a custom audio driver, it’s worth sticking to it. These drivers are tuned specifically for your hardware and may offer better stability or extra features compared to generic ones. You can find these drivers on your PC brand’s official support website, such as ASUS support, Dell support, or HP support.

Pros:

  • Optimized for your device
  • Can offer better performance or tools

Cons:

  • Updates may be infrequent
  • Harder to find on older devices

How can I download an audio driver on Windows 11?

1. Use Device Manager

  1. Begin by right-clicking on the Start icon then tap on Device Manager.device-man windows 11 bluetooth driver download
  2. Expand the Audio inputs and outputs section then right-click on the driver shown and click on Update driver.update-driver-audio windows 11 audio driver download
  3. Choose Search automatically for drivers.automatic-audio-driver windows 11 audio driver download
  4. Choose the Select for updated drivers on Windows Update option.updated-audio-driver windows 11 audio driver download
  5. Go to Advanced options followed by Optional updates where you will find the audio driver ready for download. Tick the box next to it and select the Download & install button.advanced windows 11 bluetooth driver download

2. Use your device manufacturer’s website

  1. Navigate to your motherboard manufacturer’s website. We will be using Lenovo as a showcase, thus if you also use Lenovo, head to Lenovo’s page and click on PC to find your computer model.pc-lenovo windows 11 error kmode exception not handled
  2. Click on the Drivers & software section after you enter your device’s model.lenovo-drivers windows 11 error kmode exception not handled
  3. Type audio in the search bar and click on the result. Here you will be shown the audio driver that you need to download.audio-driver windows 11 audio driver download

It is important that you only use the drivers offered by your manufacturer as the others won’t be compatible with your PC and will cause further problems.

3. Use a third-party software

Manually downloading a driver that your computer requires is not something that you have to get used to. There are third-party software tools intended to update, repair, and download any drivers from your PC.

The software will maintain your PC in top operational shape and make sure that you don’t encounter any driver-related errors along the way.

If you have manually downloaded the audio driver on Windows 11 and now you face issues with it, take a look at our guide on how to fix Realtek HD Audio Driver issues. However, if you have used Outbyte Driver Updater for this, you won’t be needing any further assistance as it will take care of everything.

We also have a guide on how to update the AMD High Definition Audio driver, so don’t miss it.

Keeping your drivers up to date can prevent sttray64.exe Application error and other errors, so be sure to do update drivers regularly.

Keeping your audio drivers updated helps avoid sound problems. For more info, check out the best audio drivers for Windows 10, how to fix USB audio driver issues, generic audio driver problems, and what to do if your Realtek HD Audio Manager is missing.

Was this guide helpful for you? Leave us a comment in the section below and tell us what you think as well as whether you have more methods in mind.