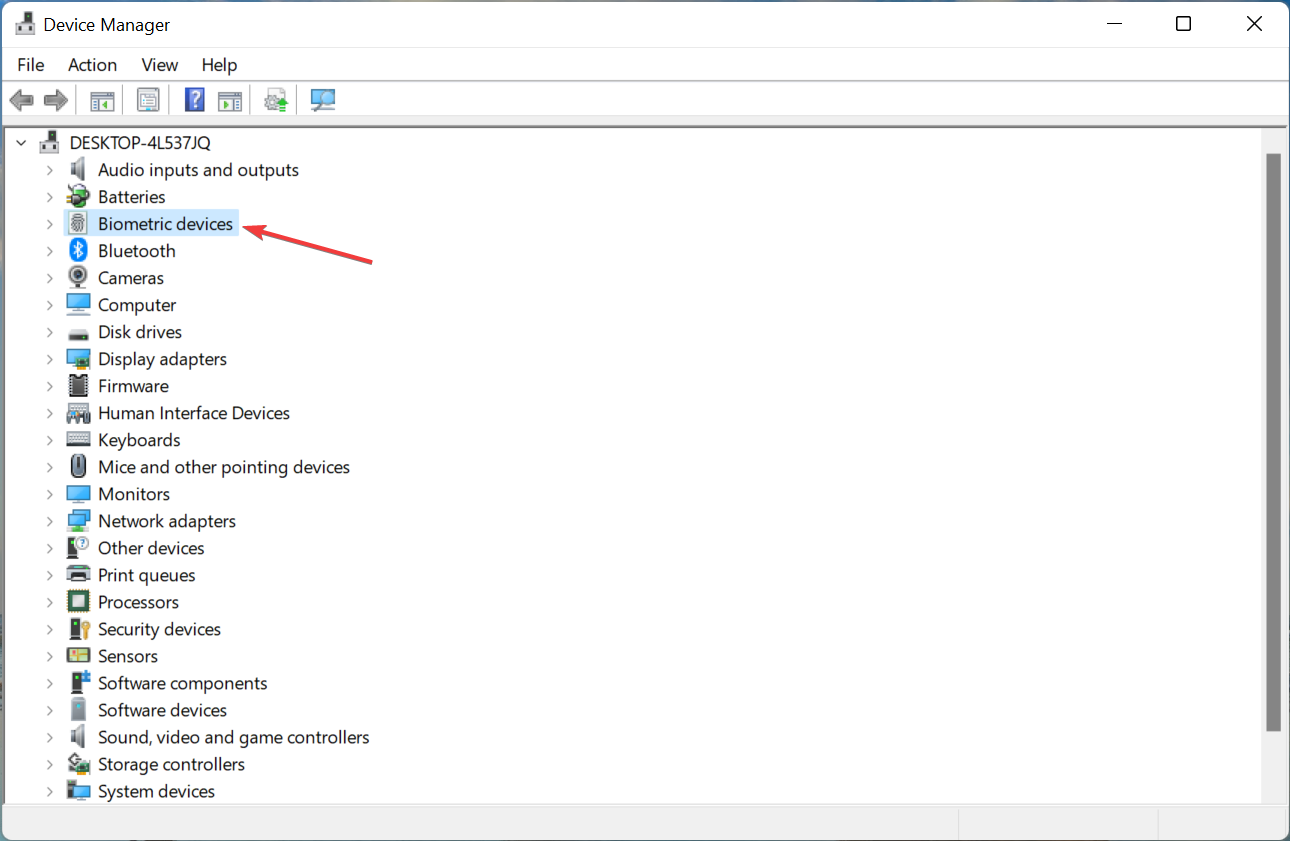
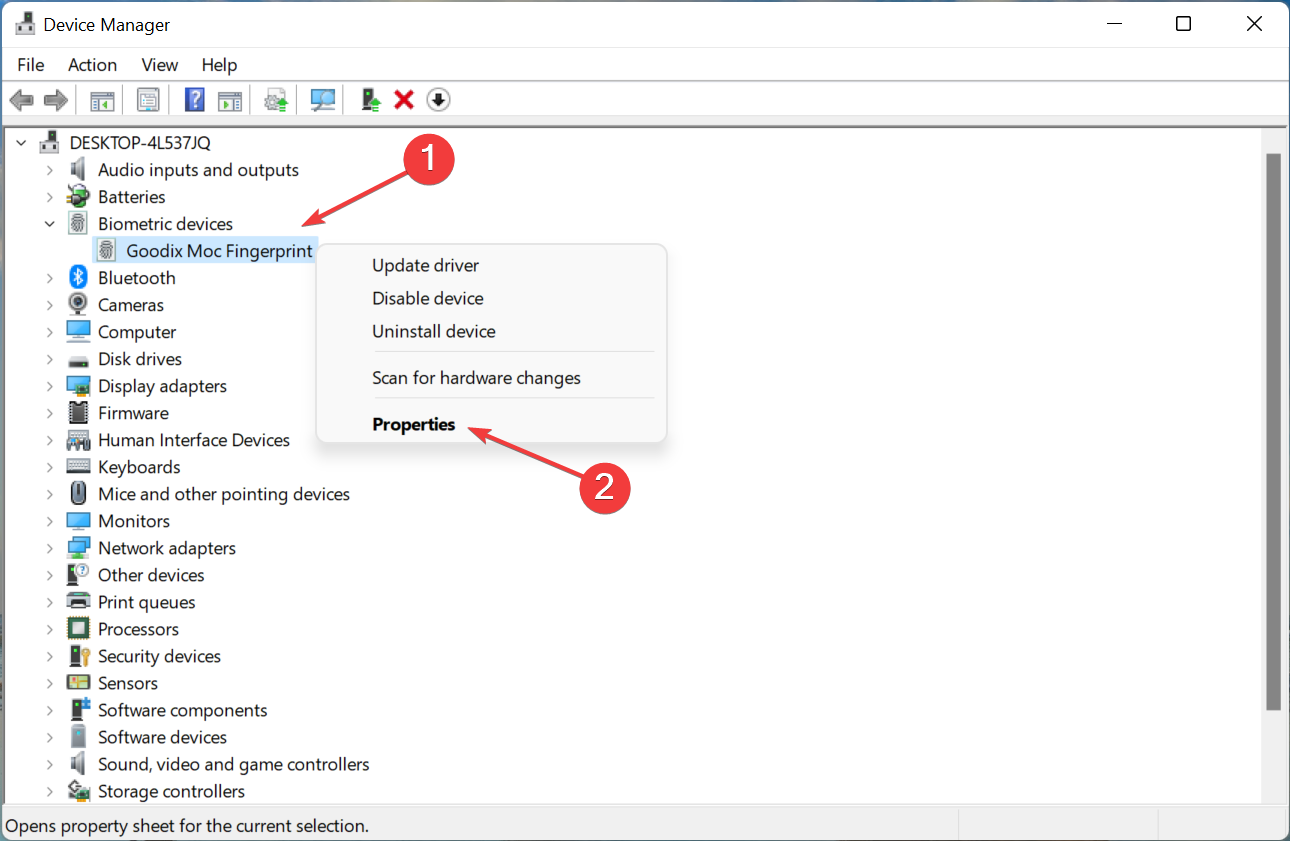
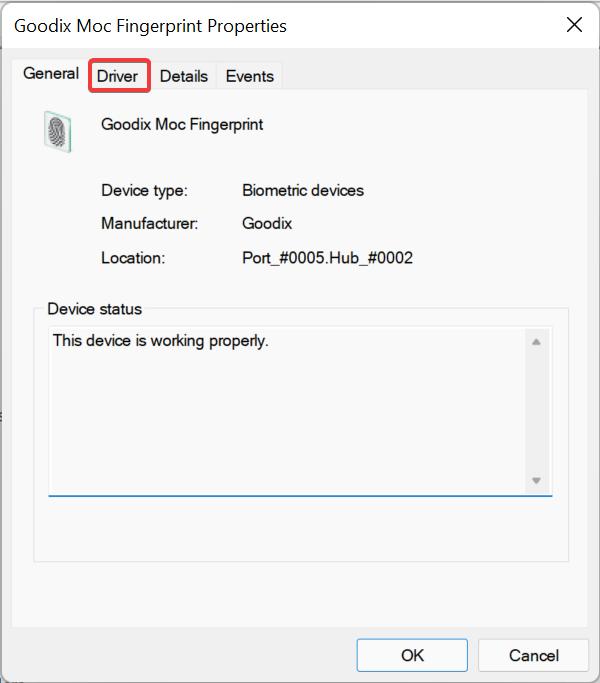
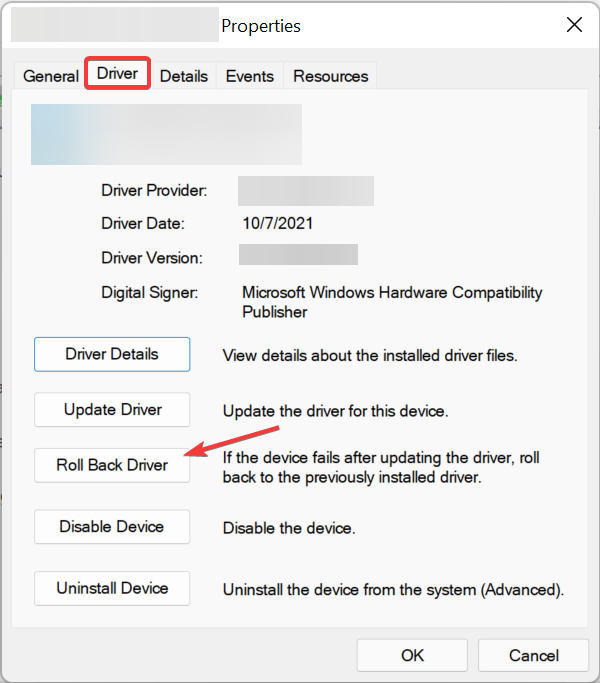
Are you experiencing Windows 10 docking station issues on your computer after connecting your docking station or upgrading to Windows 10?
If this is your situation, this article may help as we will look at some of the most common issues and the corresponding quick fixes to help you resolve the issue.
Common problems users encounter include audio, screen resolution, monitor display, connection, and charging. While some issues can be specific, these are just the common ones experienced by most users and their solutions.
How can I fix Windows 10 docking station not working?
1. External monitors not working
This problem manifests when you have external monitors connected to a docking station, a portable computer running Windows 10, or you’ve attached your computer to a docking station.
In this case, the computer won’t detect the external monitors, so they display a black screen instead.
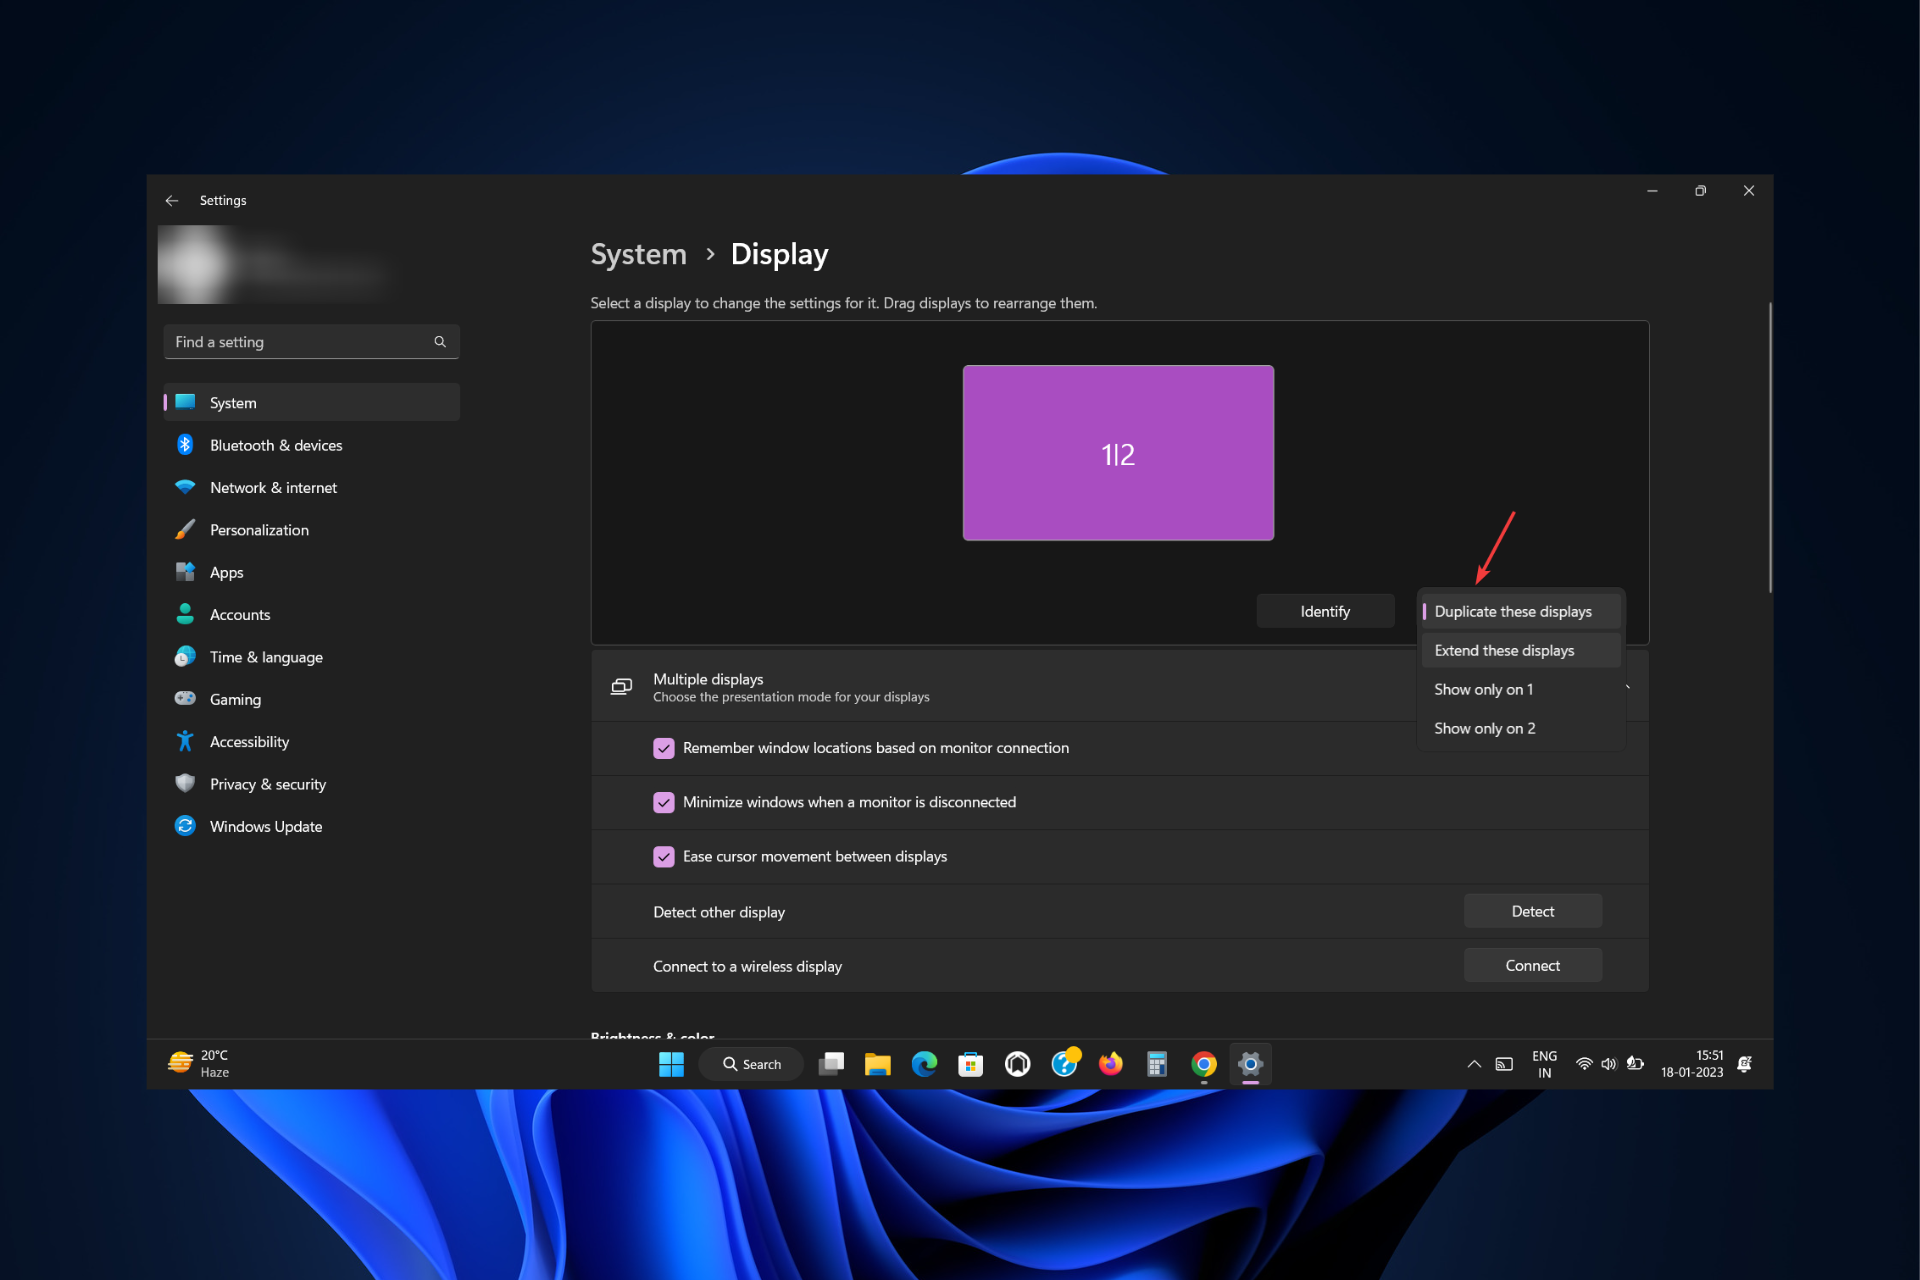
Make sure the monitors are detected by using the keyboard shortcutWindows+ Ctrl + Shift + B, and then in Display settings, click Detect button.
Solutions:
Change Lid close action to any setting other than ‘Do nothing’, but ensure the change doesn’t affect your docking experience
Upgrade to the latest Windows 10 version that doesn’t have the issue
Having trouble updating your Windows? Check out this guide that will help you solve them in no time.
Also, don’t forget to check the cables. Sometimes, faulty or broken cables may trigger these problems. Replacing them should fix the issue.
2. Audio and sound problems while docked
If you’re not able to hear audio while you’re docked, check first for the following:
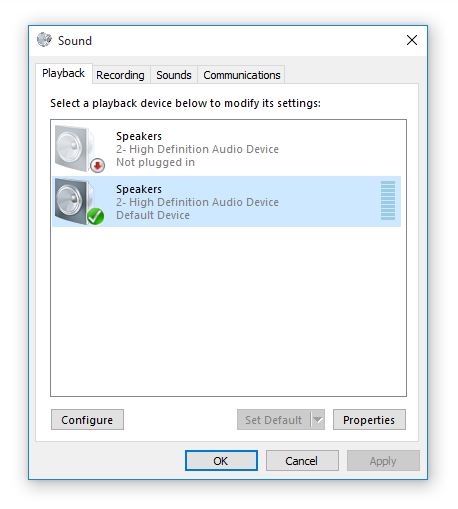
Type Manage Audio in search results and select Manage Audio devices
Do one of the following to choose which speakers play audio:
To play through the audio port on the docking station, select Speakers Microsoft Docking Station Audio Device
To play through your computer’s speakers, select Speakers 2 – High Definition Audio device or Speakers Realtek High Definition Audio
Select Set Default and then press OK
Most users don’t know what to do when the Windows search box goes missing. Readthis article to learn how you can get it back in just a few steps.
3. Charging issues while docked
If you’re experiencing charging problems, or your computer/device isn’t charging while docked, then you need to check for the following:
Check if your computer or device is securely seated in the docking station with both sides fully inserted into the sides of your computer/device
Check if the light on the docking station is on
Check if the power cable is securely inserted into the charging port on the docking station
Check if the power outlet works properly
If using a power strip, check if it is turned on
If you have other accessories that draw power from the docking station, unplug them and check if the charging starts. If it works, connect the accessories to a powered USB hub plugged into a power outlet, then plug the hub into the docking station or your device.
4. Trouble connecting to the docking station
If this is your situation, make sure that:
Your computer or device is seated properly in the docking station. If one side is tilted out, open the docking station, then reseat your device and push the sides in again
Both sides of the docking station are pulled out before you try to insert your device
You remove any attached accessories that keep the docking station sides from connecting with your device
You’re using the correct docking station for your device
5. Docking station not recognized
If your docking station is not recognized, you can connect to AC power while undocked and then try a two-button reset.
You can do this by pressing and holding the power button on your device for 30 seconds. After it turns off, press and hold the volume-up button and power button simultaneously for at least 15 seconds.
When the screen flashes the Windows logo, continue holding the buttons down for at least 15 seconds, release and wait for 10 seconds, then press and release the power button to turn your device back on.
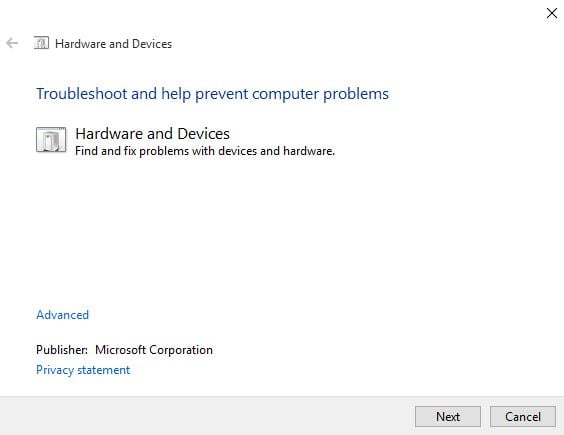
Follow the instructions to run the Hardware and Devices troubleshooter. The troubleshooter will begin detecting any issues causing the drag-and-drop problem.
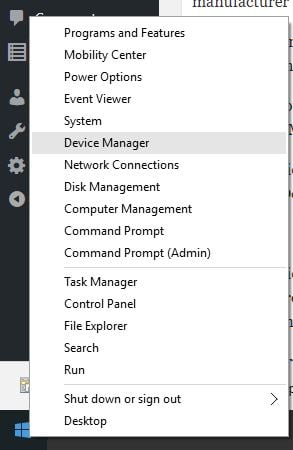
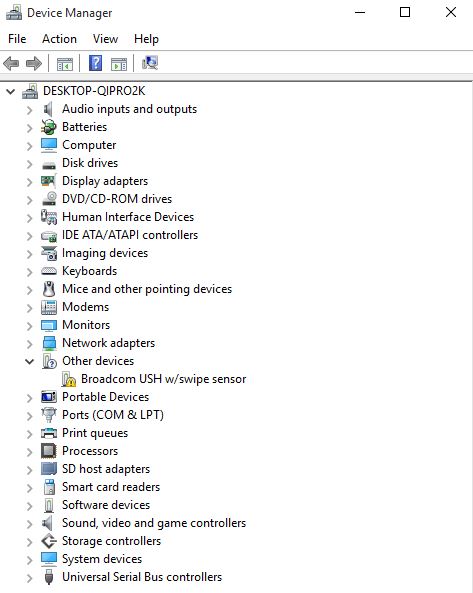
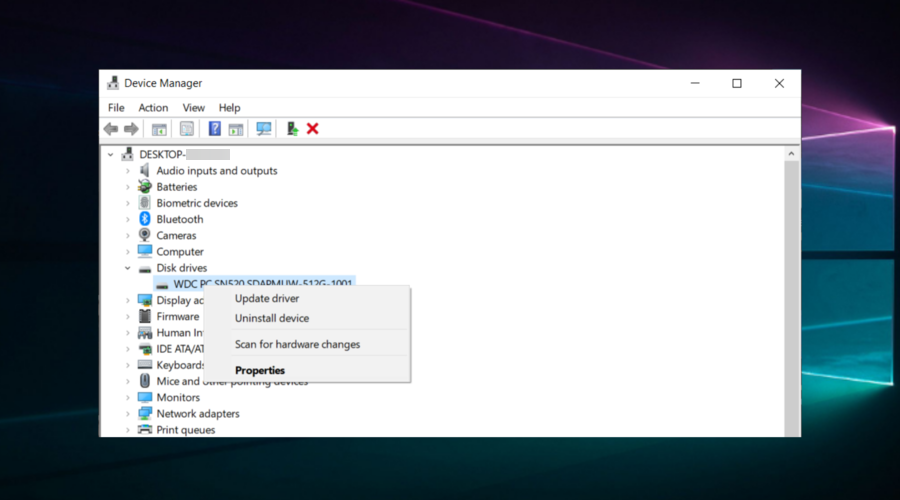
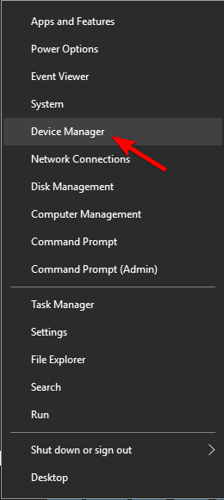
Follow these steps to uninstall and reinstall USB host controller from Device manager:
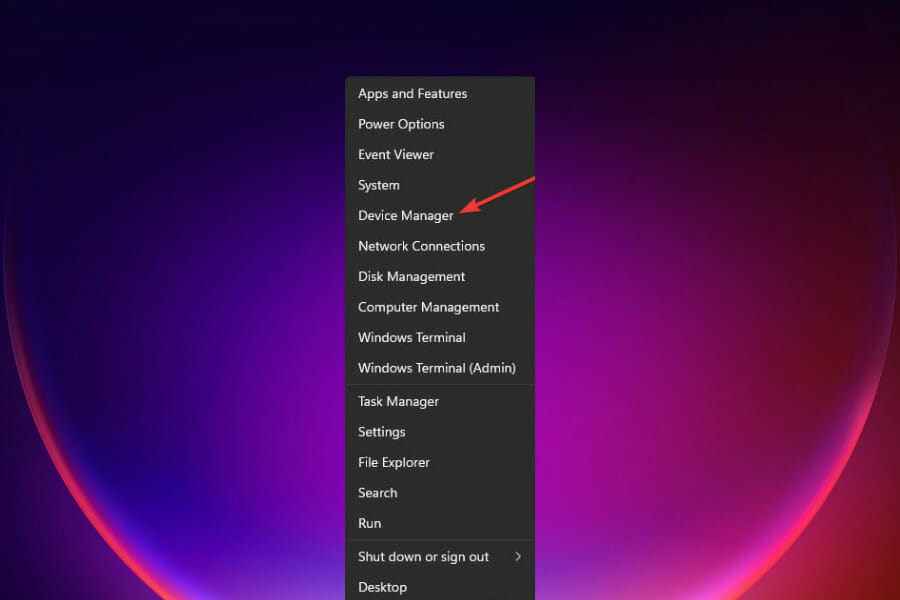
Right-click Start
Select Device Manager
Find Universal Serial Bus controllers
Right-click on every device under the USB controllers node
Click Uninstall to remove them one at a time
Restart the computer for Windows to re-install the generic drivers automatically
Plug in the removable USB device and docking station to ensure the issue is resolved
3. Update graphics card drivers
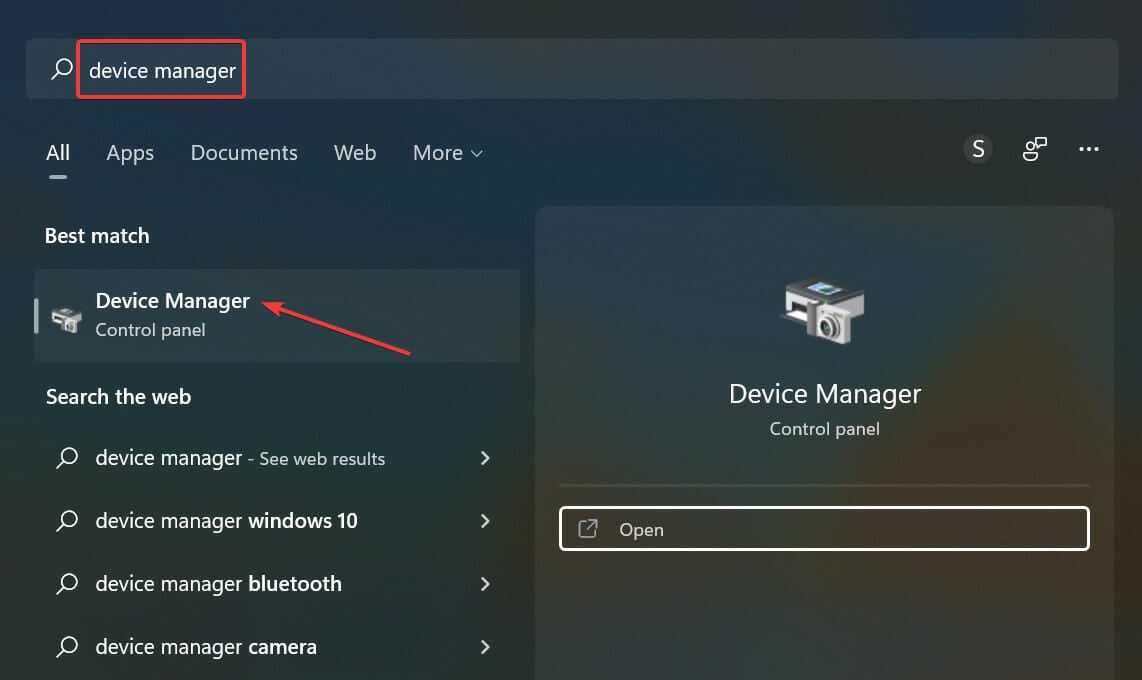
Right-click Start
Select Device Manager
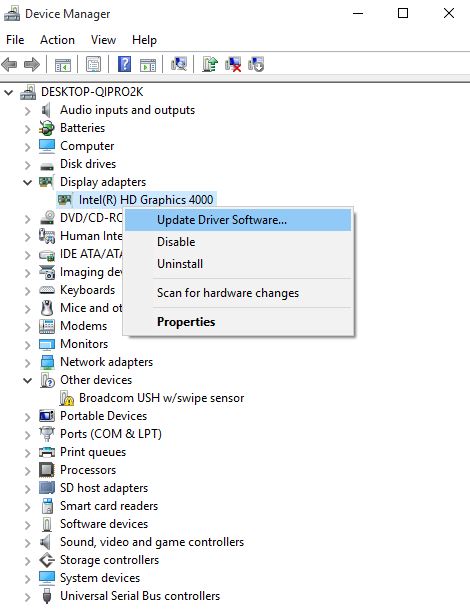
Click Display adapters to expand it
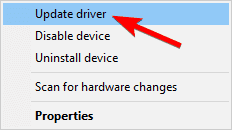
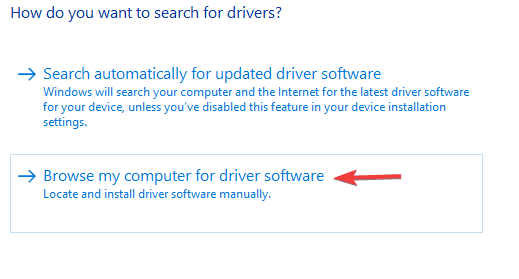
Right click on the graphics carddriver and choose Update driver software
If you don’t have any driver updates available, right-click on the graphics carddriver and click Uninstall, then restart your computer.
6. Fix Surface Dock issues
If this problem affects your Surface Dock device, you can first fix it by downloading the Surface Updater tool. You can often quickly solve Surface Dock issues by installing the latest updates.
If you are one of the many people who are interested in investing in cryptos but do not know where to start, then you may want to consider getting a mining computer.
In order to make serious income from cryptocurrencies mining, you will have to create a mining rig that is mostly composed of GPUs or dedicated mining hardware.
Probably the most efficient mining hardware are dedicated miners such as Bitmain S17 Pro and Antminer D3. However, dedicated miners only work for custom-built rigs, and cost a lot as well.
A crypto mining rig will only be good for this task, and you won’t be able to use it for any other operation whatsoever.
Therefore, you will want to seriously consider purchasing a PC or laptop that is powerful enough to do the job, while also allowing you to play games, browse the internet, and do other day-to-day tasks.
If you eventually become successful with your mining computer then you can always add more GPUs to increase your computer’s mining capabilities, even by using a powerful eGPU.
How we chose the best PC for mining cryptocurrency?
Our team of expert testers with a combined experience of more than 15 years has tested a wide range of devices to create this list.
They analyzed the products both in a head-to-head comparison with the contenders and also as a single unit.
This type of analysis allows the team to observe any advantages that can be found as the devices are exposed to real-life tests both concerning crypto mining but also GPU benchmarks across a variety of games with different requirements.
As the GPU is the component that’s doing the processing in the mining process, this element was the main focus in our expert’s tests, even though CPU and RAM were considered as well.
The CPU and RAM don’t influence the ability to mine cryptocurrency, but people investing in a system capable of this feat would like to tackle other tasks as well, so these components become important as well.
Tip
Editor’s tip:
To make the best choice when investing in a PC for mining crypto, here are the elements that you need to consider:
➡ GPU ➡ Cooling system power ➡ CPU power ➡ RAM capacity ➡ System security
The product list resulted after our team of testers have gone through the process of choosing ensures that no matter which one you choose, you will be ready to tackle crypto mining and other day-to-day tasks without any issues.
What to consider when choosing the best PC for crypto mining?
➡ GPU(Graphics Processing Unit)
As we mentioned previously, the GPU is the most important component from the perspective of cryptocurrency mining, as its capability equates to the mining efficiency level.
A powerful GPU not only allows you to mine more in less time but also ensures that the speed is optimized throughout the process.
Beyond the crypto-related capabilities, a good GPU will also ensure that your system will be able to run the latest games, image processing software, CAD applications, etc.
➡ Cooling system efficiency
The cooling system you have installed on your system is very important even in day to day use of normal PCs but becomes even more important when we’re talking about cryptocurrency mining.
Because the crypto mining process will require your GPU to work at full speed the entire time, a good cooling system will make a very big difference. It will allow the GPU to maintain normal temperatures while mining, and thus will improve productivity exponentially.
As a general guideline, your PC temperature shouldn’t rise above 60°C, as this can cause system instability, decreased performance, and even total hardware failure. You can also choose PC cooling software to aid in this endeavor, but don’t expect any miracles to happen.
Not all cooling systems are the same, and in the last decade, companies have released a variety of types, each with its own benefits in rapport to the cost.
As you can see from the image above, even though one system might look better than the other, there are plenty of disadvantages to choosing any of them.
For optimal cooling, it is best to consider using a combination of both types presented above, as this would cover all aspects and complement each other.
Even if the CPU is not used specifically when it comes to crypto mining, having a good CPU will ensure that every last bit of processing power from your GPU can be used efficiently.
Beyond this, as you might use the PC for other tasks such as gaming and image/video editing, a good CPU will ensure good frame rate levels and a smooth operation of any media processing software.
➡ RAM capacity
As in the case of the CPU, the rapid access memory of your PC doesn’t tie in directly to mining cryptocurrencies but can be incredibly important when it comes to running a few applications concomitantly.
For example, without enough RAM, you won’t be able to listen to music, browse the internet, and stream a live feed to your gaming network, and even if it works, the constant jittering will make the entire process annoying.
The same principle applies when playing games, as the latest releases require at least 4GB of RAM to be played, with some even going up to 16GB RAM for medium-range graphics.
➡ System security
Another important aspect especially if you’re interested in starting your crypto-mining adventures is your system’s security.
Software like this protects your hard-earned cryptocurrencies from being taken over, and at the same time protects your system from any other phishing or malware attacks.
Tip
Buyer’s tips:
➡ If you don’t mind spending some extra money, and want to be able to run a crypto-mining operation at home while also being capable of running any game, you can’t go wrong with the powerful OMEN – GT13 or MSI MEG Trident X SFF.
➡ Even though the ASUS ROG Strix G35CZ offers a more chiseled and futuristic design than the previously-mentioned options, the capabilities are similar. It has been placed in the 3rd position in our list because of the excessive price.
➡ If you’re more interested in the hardware capabilities and don’t mind some extra noise, the CUK Continuum provides very good performance.
➡ For an even greater reduction in cost with minimal effects on the system’s capabilities, choosing SkyTech Shadow 3.0 will satisfy all your needs without breaking the bank.
After considering all these elements, let’s have a look at all the details which made us classify these options as we did.
The GT13 from OMEN is one of the best options when it comes to investing in a powerful crypto-mining computer.
To start, the GT13 uses an Nvidia GeForce RTX 3090 GPU, which will ensure that your system has enough video processing power for the crypto-mining tasks.
It is constructed with the Ampere RTX architecture, the 2nd generation from Nvidia, and has a whopping 24GB GDDR6X dedicated memory.
These GPU specs will be enough for you to mine crypto efficiently, and it will also be able to run the latest games without any problem, with 4K gaming quality.
This system also offers you an Intel Core i9-10850K processor with liquid cooling which ensures that no amount of tasks would be overwhelming for it, and a PCIe NVMe M.2 SSD with 1 TB space.
To top it off, you also get an HYPERX DDR4 memory with 32GB RAM, which provides more than enough power to run a variety of system-intensive applications at the same time, without even a second of lag.
The design of this powerful system completes the setup, with a beautiful transparent tempered glass side panel that allows seeing it work its magic.
Besides this, the minimalistic design with the OMEN logo at the front makes this system one of the best-looking on this list.
As it is also VR-ready, your new system will be capable of exploring 3D worlds as soon as you set it up.
You also don’t need to worry about peripherals, as this package comes with a wired OMEN keyboard and optical mouse included, and with Windows 10 pre-installed.
The MEG Trident X from MSI is another great option for your crypto-mining activities, coming very close to the first choice in this guide, but at a more affordable price.
This system comes with a GeForce RTX 3070 GPU with 8GB memory, which is a true contender for the GPU of the previously-mentioned system.
This GPU is also powered by Ampere 2nd generation RTX architecture, but uses an enhanced version of Ray Tracing Cores and Tensor Cores, allowing your system to provide the power it needs to run optimally.
When it comes to the processor, the MEG Trident uses an i9-10850K CPU, with 10-core and 20-threads, offering a base frequency of 3.6 GHz.
As a bonus, the CPU is using the powerful Intel Turbo Max 3.0 technology, which optimizes the performance for seamless gaming and overclocking capabilities.
This system offers you 32GB DDR4 RAM and comes with a 1TB PCIe SSD, and an extra 2TB HDD. For this reason, if you consider that having more space is important, this device would be the right choice.
The MPG from MSI uses advanced RGB lighting synchronization, and also offers you full control over this feature. The front RGB LED gives this powerful machine a very slick and futuristic look, but it is also used to provide in-game and real-time notifications.
In our opinion, the combination between the effect and utilizability of the front LED makes this system stand out from the crowd without issues.
To ensure that you can start crypto-mining and playing games as soon as you get the delivery, this device comes with Windows 10 Pro pre-installed.
As a bonus, you also get a JTD Webcam in the package, that not only provides great image quality but comes in with a privacy cap, which can be closed at open at will.
The ROG Strix from ASUS offers a very powerful system configuration that can prove very useful when it comes to cryptocurrency mining at home.
Using the TUF gaming RTX 3080 GPU, you will be able to mine cryptocurrencies without issues. The GPU has 10GB GDDR6X memory, which provides more than enough computing power.
The processor powering this monster is an i9-10900KF model, and even though powerful enough for most operations, it is only 1% better than the CPU of the previously-mentioned system presented in this list.
The producer ensures that the CPU is overclocked from the factory, and thus makes the most out of every last bit of power. To back up this CPU and maintain its temperature across time, a liquid cooling system is installed.
When it comes to storage, the ASUS ROG Strix has a 1TB PCIe NVMe M.2 SSD, and a 1TB HDD running at 7200RPM.
At the same time, the 32 GB DDR4 RAM ensures that you can run a variety of software concomitantly without any problems.
The case in which these components are contained looks like a cyborg from the future, with a big cooling vent in the front, and Aura Sync RGB lighting.
The glass panel allows you to appreciate the RGB lights inside the device as well, while at the same time offering quick access to the components.
If you decide to order this system, you also get a gaming mouse and keyboard, so nothing will get into your way to start gaming or mining crypto.
The CUK Continuum Micro is another powerful system that enables you to mine cryptocurrency from the comfort of your own home, and without compromising on versatility.
This system comes with an Nvidia GeForce RTX 3070 with 8GB GDDR6 memory which provides all the power you need for mining and gaming at the highest levels.
The CPU installed on this system is an Intel Core i9-11900KF with 8 cores, running at speeds from 3.5 GHz to 5.3 GHz. The processor is cooled by a liquid system, thus providing silent operation.
The system has 32GB DDR4 RAM and includes a 512GB NVMe SSD, and an extra 2TB HDD running at 7200rpm.
Even though the total storage is similar to the other models we presented in this guide, it has a small SSD in comparison, but you can always invest in one later.
To ensure that you can start mining as soon as the delivery arrives, this system comes bundled with a wired LED backlit USB gaming keyboard and a mouse.
COK also offers a 3-year limited warranty, so you can rest assured that your system will run optimally.
The design of this system, even though simple when turned off, comes to life instantly when you start it.
The front panel of the case features an infinity mirror effect with RGB lighting, which can be customized to fit your desire, from solid to fading, to strobe, to breathing, etc.
On the side, it has a hinged glass panel that showcases the interior elements and provides quick access to its components.
Shadow 3.0 from SkyTech is another great computer option for crypto-mining at home and other gaming-related activities.
The GPU on this device ensures that your crypto-mining process will be effective, as it is a great contender for all the other system options we presented in this guide.
Using an Nvidia RTX 3060 GPU with 12GB RAM, the Shadow 3.0 will ensure smooth operations even in the latest games and will be productive while mining crypto for you as well.
This gaming PC uses an AMD Ryzen 7 3500X CPU with 8 cores, which clocks in at about 3.6GHz, with 4.4 GHz capability when using Turbo.
You also get a 1 TB SSD that allows you to store and access your data at lightning speeds, and even though this amount might not be enough for avid miners, it can always be extended considerably.
When it comes to RAM, this system offers a 16GB DDR4 which ensures that you will not encounter any issues while running multiple system-demanding applications at once.
To keep the temperature in check, the Shadow 3.0 from Skytech is equipped with a useful heatsink and 3 RGB fans which are powered by a 600 Watt power supply.
The design of this device is also created with efficiency in mind but doesn’t compromise on looks either.
The USB ports and console buttons are presented at the top of the case for easy access, which also includes the see-through heatsink. A tempered glass panel on the side allows you quick access to the components.
This design feature allows you to show off the interior RGB lighting, and at the same time see the components.
Bottom runners
Besides the crypto-mining PCs presented in the list above, our rigorous testing has resulted in some other options, which didn’t quite make the list, but can still be capable enough.
Depending on the amount of money that you’re willing to spend, these options can prove to be good. Don’t worry, as they have also gone through the same selection process mentioned before.
All these options were excluded from the list based on the most important hardware piece when it comes to crypto-mining, being the GPU power.
What cryptocurrencies can I mine from my PC at home?
Even though theoretically you could mine any cryptocurrencies from the comfort of your own home, not all of them would be practical.
The most common of them all, Bitcoin, requires an enormous amount of power to mine, and using a PC as a mining device will not get you any substantial coins by using the power of the GPU.
Fortunately, there are a variety of crypto coins options to choose from, and here are the most useful ones:
It is worth noting that these values will not be exact at the time you’re reading this guide, as the values fluctuate constantly, but it will give you a useful overview nonetheless.
These are some of the best PCs that are able of performing crypto-mining activities without taking away from the capability of being used as a normal computer.
For beginners in this domain, it is recommended that you invest in a powerful PC that can mine crypto and at the same time offer features as a gaming PC, running the latest games, and exploring the web.
In time, if you find that you want to expand your crypto-mining capabilities, you can either invest in a specialized crypto miner or manually build your own custom mining rig with a variety of GPUs working together.
Feel free to share your experience with us by using the comment section found below.
Despite being an excellent device, the Surface Pro 4 is not free from issues. After a massive battery drain issue that was connected to the irregular sleep mode, users are reporting that their Surface Pro 4 device won’t turn on.
While this issue might look scary, there might still be some way to salvage your PC. In this guide, we will show you the possible ways to fix this issue for good.
But before showing how to fix this issue, below are some of the variations of this issue reported by users:
Surface Pro 4 black screen of death: The most common problem with Surface Pro 4 is the black screen of death. You can recognize this problem by the black screen and the inability to turn on your tablet.
Surface Pro 4 not charging, holding a charge: According to users, sometimes your device won’t be able to charge at all. This isn’t a common problem, but several users reported that their device isn’t holding a charge. This issue is usually related to your battery, so you might want to replace it.
Unable to turn Surface Pro 4 on after update, charging, shutdown – Users reported this problem in several instances. Sometimes this problem can occur after a firmware update, but many users reported this issue after charging or shutting down their devices.
Surface Pro 4 not starting, not waking up, not turning on – Many users reported that their tablet isn’t starting at all. According to users, the tablet is unable to wake up or to turn on.
Surface Pro 4 not working, not booting: If you’re having this problem, you sometimes won’t be able to boot your Surface Pro 4. In the worst-case scenario, your tablet might not work at all.
What to do if I can’t turn Surface Pro 4 on?
1. Perform a two-button reset
Press and hold the power button for 30 seconds.
After the Surface turns off, press and hold the volume-up button and the power button simultaneously for at least 15 seconds (The screen may flash the Surface logo before 15 seconds, but don’t release the buttons).
After you release the buttons, wait for 10 seconds.
Press and release the power button again, and your Surface will be turned on again.
Although it’s not confirmed, the sleep mode error on Surface Pro 4 might cause it not to turn on. So, performing a hard reset should clear up the error quickly. Another option, if the issue continues, is to try a full factory reset of Surface Pro to restore the device to default settings.
Another thing you can do is to hold the power button for 20 seconds to one minute till the logo screen appears. This is known to fix many issues on Surface Pro 4
2. Disconnect the power cable and let the battery drain
If you can’t turn Surface Pro 4 on, you might be able to fix the problem simply by draining its battery. Several users reported that they fixed the problem by disconnecting it from the power adapter and letting the battery drain.
This process can take a couple of hours, so it might be best to leave your Surface Pro 4 for 24 hours or more in order to drain the battery completely.
Once the battery is completely drained, you can connect your tablet to the power adapter and check if the issue is resolved.
3. Use the keyboard shortcut
If you can’t turn Surface Pro 4 on, you might want to try using the Windows key + P shortcut. According to users, your device might be running but with a different Project mode.
Users reported that this issue occurs with the keyboard attached, and to fix it, the keyboard shortcut is the surest bet.
4. Disconnect all peripherals
Another quick way to fix this issue is to disconnect all peripherals connected to your tablet.
If you can’t turn Surface Pro 4 on, you need to disconnect your power adapter, keyboard, and other devices connected to it.
After that, press and hold the Power button for a minute or two. Release it for 30 seconds, and press and hold it again for 5-10 seconds. After doing that, your tablet will turn on, and everything will start working.
5. Connect your device to a different power outlet
If your Surface Pro 4 that won’t turn on is connected to a power outlet with other devices, it is advised that you try another outlet with no other device.
This is because the power supplied to it might be unstable, leading to problems. So, you need to move it to a different outlet.
Also, it is important to note that you should only plug your Surface Pro 4 with the power accessories that came with it. This is because using another power cord might not supply the needed amount of power.
Hence, if your power accessories are faulty, you should order an original replacement from Microsoft.
6. Wake up your Surface with hotkeys
Sometimes this problem can occur after putting your Surface Pro to sleep. If you can’t turn Surface Pro 4 on, you can try waking it up by pressing certain hotkeys.
To do that, press the Windows key + Ctrl + Shift + B button on your keyboard. If you’re using the device in tablet mode, simultaneously press both Volume up and Volume down buttons three times quickly.
This should wake up your tablet, and everything will start working again.
If you can’t turn Surface Pro 4 on, your battery may be drained. Charge your battery for 30 minutes or more, and then try to turn it on again.
If your battery fails to charge after about 15 minutes, then it might be faulty.
This isn’t a universal solution, but it might be helpful, so feel free to try it.
8. Put your laptop in a cold room
While this looks a weird way to fix this issue, some users actually found it useful. This solution is especially useful if your device is overheating.
To do this, simply put your tablet in a cold room for 30 minutes. After cooling off your tablet, put it back in your room and wait for another 30 minutes. Now try to turn your tablet back on again.
With this, we can conclude this detailed article on the Surface Pro 4 not turning on issue. Hopefully, you were able to solve the problem by following the steps in this guide.
With delivery services, certain tracking events statutes are self-explanatory. Others are a bit confusing, generating a lot of debate on forums or social media, and not only.
If UPS says delivered but no package, you might have a hard time getting to the bottom of things. Should you start investing or assume your parcel is yet to come?
In other words, does UPS ever mark delivered before delivering? On rare occasions, the status can indeed be updated to delivered prematurely. So it’s recommended to wait for a few days more.
Why does UPS say delivered when it’s not?
UPS clients, for instance, sometimes get the status that the package has been delivered, but they have not actually received the parcel.
Things are pretty easy if you see this status.
Namely, when the UPS driver completes the delivery, the package’s tracking status or a delivery notice (the UPS InfoNotice) should indicate where it is (UPS left at residential, at the office, etc.).
The big problem arises when UPS says delivered front door but no package is to be found.
What if UPS says delivered but no package?
According to UPS’ terms, shipments that don’t require a signature can be left in a safe place. This place is left at the driver’s discretion, but it can include various areas around the house (porch, garage, etc).
If the shipment requires a signature, in most cases the package is entrusted to a neighbor.
If you still cannot locate the package, you should contact the sender to initiate a trace process with UPS, and then follow up with you on the progress of your shipment.
Amazon clients, on the other hand, have complained of a similarly confusing tracking status: your package was left in the mail room.
If you’ve ever had to deal with FedEx, you might notice the similarities between this instance and the shipment information Sent to FedEx case.
In most cases, clients mentioned that they were either at their residence the whole day, or that they have no specific mail room.
Why does my package say delivered to mailroom Amazon?
It turns out that for Amazon, the mail room can mean, besides a physical mail room at the respective address, a leasing agent or office, or just the area around your mailbox.
Consequently, Amazon advises their customers to check around the house/delivery location (porch, mailbox, back garden, garage).
In most cases, clients mentioned that the parcel was left outside, with no other notice.
Additionally, if you don’t find the package, check with the neighbors. And, as mentioned above, wait for a few more days before taking further action.
We can only hope that your parcels arrive safe and sound at their destination. If you have any advice on this topic, your comments are more than welcome.
Did you encounter error 0x00000000 on Windows 11? Here are the elements you should be aware of.
Microsoft Store is an essential app on Windows 11 that allows users to download and install various apps, games, and media content. However, some users have been experiencing an error code 0x00000000 when trying to access the Microsoft Store.
This error can prevent users from downloading or updating apps and can be frustrating.
In this article, we will discuss some possible solutions to fix the Microsoft Store error 0x00000000 on Windows 11.
Why am I getting Microsoft Store Error 0x00000000 on Windows 11?
There are several reasons why you may be getting the Microsoft Store error 0x00000000 on Windows 11. Some possible causes include the following:
Corrupted or outdated system files – If your Windows 11 operating system has been damaged or has obsolete system files, it can cause errors with the Microsoft Store.
Incorrect system settings – If your Windows 11 settings are not configured correctly, it can cause problems with the Microsoft Store app.
Network connectivity issues – If your device is not connected to the internet or has a weak connection, it can prevent the Microsoft Store from functioning correctly.
Corrupted or outdated Microsoft Store app – If the Microsoft Store app on your device is corrupted or obsolete, it can cause errors.
Third-party software conflicts – If you have other software installed on your device that conflicts with the Microsoft Store app, it can cause errors.
It’s hard to say which is the root cause of your error without more information, but the above are the most common causes, and you should be able to solve them using any of the solutions we now discuss.
How do I fix 0x00000000 on the Microsoft Store?
1. Run file repair scans
1. 1 Run the SFC scan
Right-click the Windows icon and select Terminal (Admin) or Command Prompt (Admin).
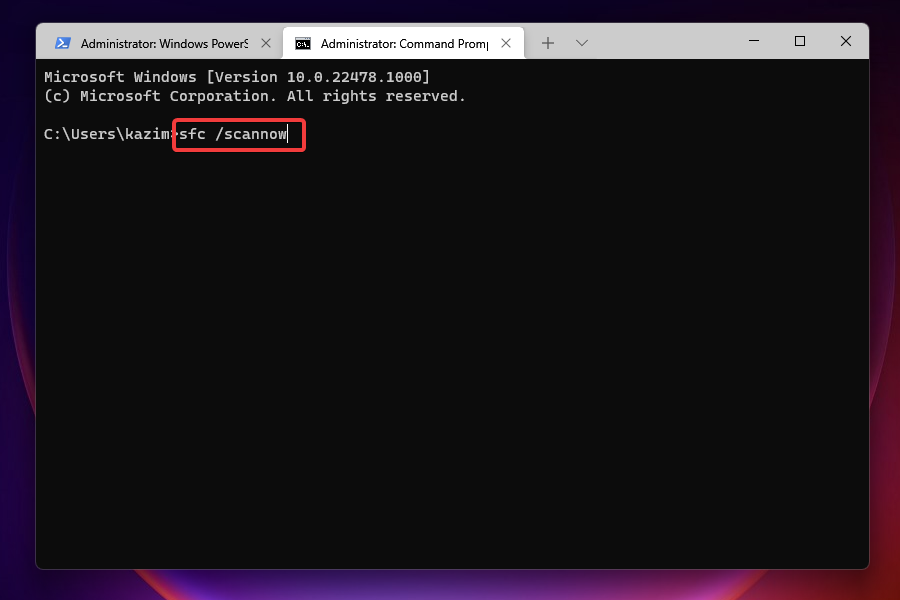
Once the Command Prompt opens, type the script below and hit Enter. SFC /scannow
Please wait for it to complete, then exit the Command Prompt.
1.2 Run the DISM scan
Right-click the Windows icon and select Terminal (Admin) or Command Prompt (Admin).
Once the Command Prompt opens, type the following scripts hitting Enter after each one. DISM /Online /Cleanup-Image /CheckHealth DISM /Online /Cleanup-Image /ScanHealth DISM /Online /Cleanup-Image /RestoreHealth
Please wait for it to complete, then exit the Command Prompt.
Now check if the 0x00000000 Windows 11 error is resolved.
2. Run the Windows Store troubleshooter
Press Windows + I to open the Settings app.
On the right pane, scroll down and click Troubleshoot.
Click on Other troubleshooter, scroll down, and under the Windows Store app option, click Run.
Follow the instructions from the troubleshooting process to complete the steps.
3. Reinstall your Microsoft Store application
Press the Windows key, type powershell, and select the Run as administrator option.
Type the script below and hit Enter. Get-AppXPackage WindowsStore -AllUsers | Foreach {Add-AppxPackage -DisableDevelopmentMode -Register "$($_.InstallLocation)\AppXManifest.xml"}
Restart your computer.
4. Reset the Windows Store cache
Press Windows + R to open the Run dialog.
Type the script below and hit Enter. wsreset.exe
After roughly ten seconds, a blank Command Prompt window will start and shut, and the Microsoft Store will launch on its own.
The Windows Store cache is a temporary storage area on your computer. It is where the Windows Store app stores data, such as app installation files, to make it faster to access that data in the future.
This cache is used to speed up the process of installing or updating apps from the Microsoft Store because the app can retrieve the necessary files from the cache instead of having to download them again from the internet.
If the Windows Store cache becomes corrupted or otherwise malfunctions, it can affect the functioning of the Microsoft Store app in a few ways. It can also cause error 0x00000000 on Windows 11.
5. Restart your Microsoft Store Install Service
Press Windows + R to open the Run dialog.
Type the script below and hit Enter. services.msc
Scroll down and double-click on the Microsoft Store Install Service.
Change the Startup type to Automatic and ensure the Service status is Running.
The Microsoft Store Install Service is a background service responsible for managing the installation and updating of apps from the Microsoft Store. The service runs in the background and is not directly visible to the user.
It is responsible for downloading and installing app updates and new apps and managing the installation process. It does not affect the functioning of the Microsoft Store app itself, but if the service is not running or is encountering errors, it may prevent apps from updating or being installed.
Your user account is a collection of options that customize how your PC looks and functions.
Your desktop backdrop, screen savers, sound settings, preferred pointer, and other features are all included.
A new profile may be necessary due to the range of personal settings that might ruin your user profile and create system use issues. Other apps can also bring about these changes.
So, you may have to log out and log in with a new profile to resolve 0x00000000 Windows 11.
The Microsoft Store error 0x00000000 on Windows 11 can be a frustrating problem for users, but several solutions can help to fix it.
If none of these solutions work, it may be necessary to reinstall the Windows operating system or seek further assistance from Microsoft support.
By following the steps detailed in this guide, you should be able to resolve the Microsoft Store error 0x00000000 and regain access to the apps and media content you need.
Select the Currency and the amount that needs to be sent
Keep note that a minimum amount needs to be present on the account already in order to make a payment
Enter their credentials carefully
Commence with the transfer
Funds will be transferred as early as within 2 hours and there is no cost when paying from Payoneer to Payoneer
You can also load your card either by either:
Working for one of the marketplaces
From a US/EU payment services
Even so, you must remember that most of the times you need to send a Payment Request beforehand
The lack of diversity in terms of how you can add money to your Payoneer account is pretty logical.
This is because the main purpose of services like Payoneer is that of facilitating the payments from large institutions and companies towards employees.
As such, any other method that would result in you getting money on your Payoneer account could be considered a workaround at best.
Many users have recently complained of Windows 11’s virus and threat protection not working. If Windows Defender isn’t working, your PC will be vulnerable to malware.
It’s not hard to realize, why is this such a problem, and in today’s guide, we’re going to show you how to fix it.
Why is Windows Security not opening in Windows 11?
Listed below are the reasons you encounter the Windows 11 virus and threat protection not working issue:
Bug in the current version of Windows 11 – If this is the case, the proper line of action will be an OS update.
Conflict with third-party antivirus installed on the PC – You should disable the antivirus or uninstall it. To remove it completely, you can use uninstaller software.
Corrupted Registry – Your Registry is a delicate part of the OS; if it is corrupted, many OS functions will no longer work correctly. If you’re not familiar with it, read our guide on how to use Registry Editor in Windows 11.
System infected with malware – In this case, you should employ a powerful antivirus and perform a full system scan.
Corrupted system files – You may try to repair or recover these files using some Windows utility.
With a basic understanding of the underlying issue, you must first identify if any of these is causing the problem and head to the relevant fix. Then, you will end up saving considerable time this way.
Nevertheless, if you have no clue what’s causing the error, execute the fixes mentioned in this article in the same sequence.
What error message is displayed when accessing virus and threat protection?
Users generally encounter the following error message when accessing or using the virus and threat protection on Windows 11: Your IT administrator has limited access to some areas of this app.
If you see this on the Windows Defender window, you have come to the right page. Go through the following sections to understand the causes and the most effective fixes for the error.
What can I do if virus and threat protection is not working?
Before we start fixing this issue, there are a couple of checks that you might want to perform:
Restart your PC – In some instances, this problem can be caused by a glitch, and a quick restart is all that’s needed to fix it.
Install the latest updates – Sometimes, certain components can encounter glitches, and that can cause problems such as these. Keeping Windows updated is a great way to fix this issue.
Check date and time – Issues like this can occur if the date or time isn’t correct on your PC. To fix it, you need to change time on Windows 11 and make sure it’s correct.
Perform a System Restore – It’s possible that installed applications or settings are causing this issue. To fix it be sure to create a restore point and restore your system.
1. Run an SFC (System File Checker) scan
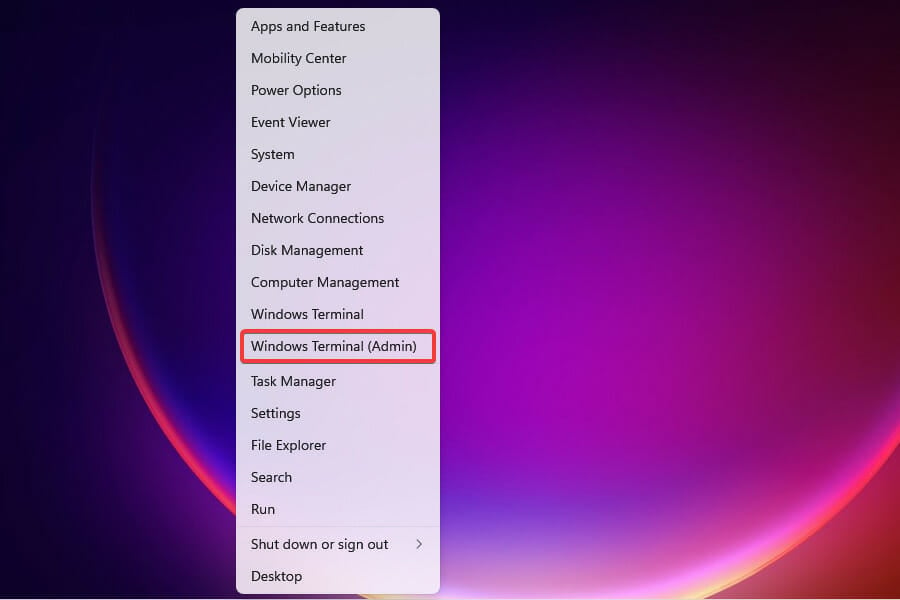
Press Windows + X to launch the Quick Access menu.
Select Windows Terminal (Admin) from the list of options that appear.
Click Yes on the UAC prompt that appears.
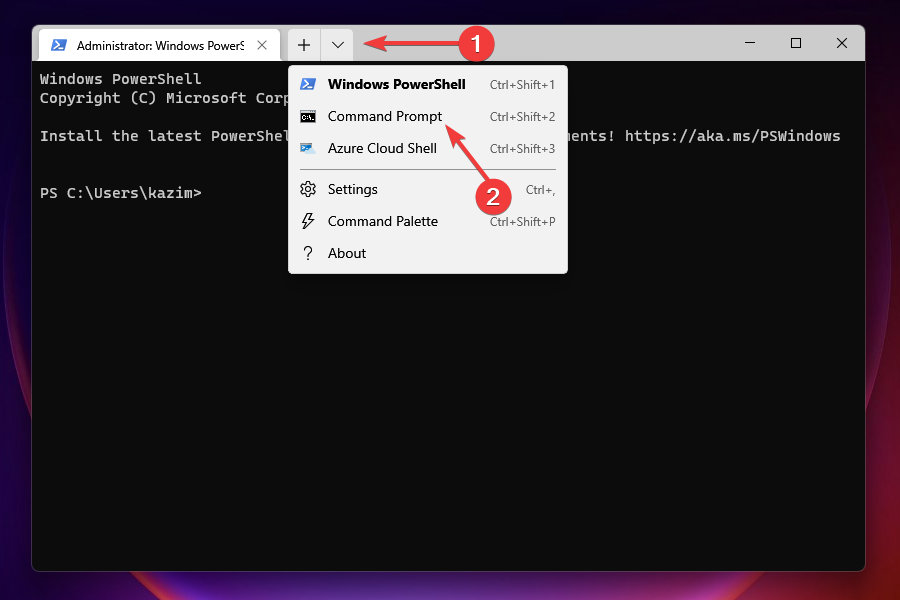
Next, click on the downward-facing arrow at the top and select Command Prompt from the menu in Windows Terminal.
Type or paste the following command and hit enter to run the SFC scan: sfc /scannow
Wait for the scan to complete, reboot the computer and check if the error is fixed.
The SFC (System File Checker) scan is used to identify corrupt system files and replace them with their cached copy stored on the system. Running the scan will likely solve the problem if Windows Defender is corrupted.
For a thorough scan of your system files, we recommend using a third-party tool that specializes in finding and repairing corrupted or damaged system files.
2. Uninstall any other third-party antivirus
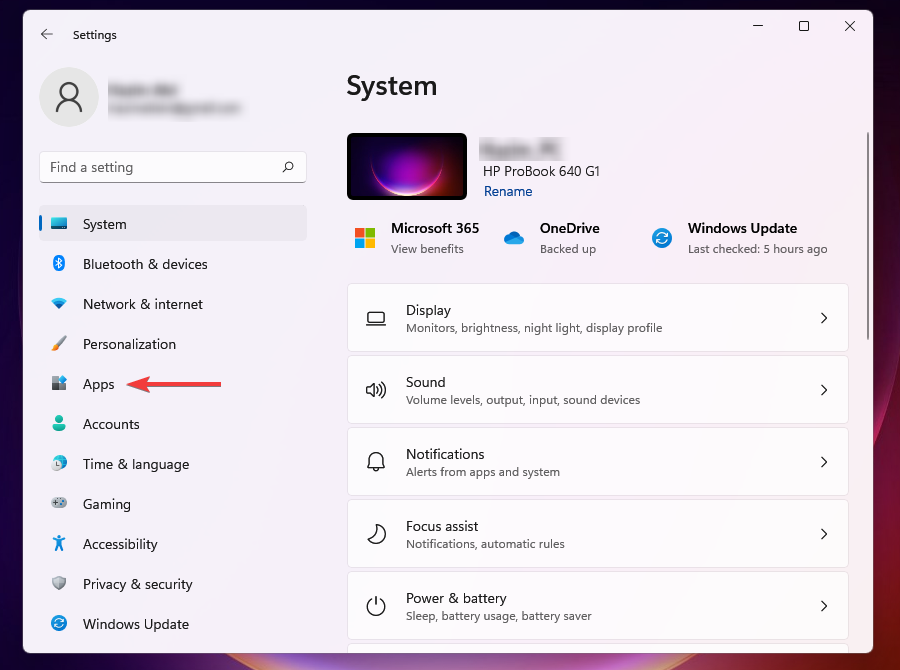
Press Windows + I to launch Settings.
Select the Apps tab from the left.
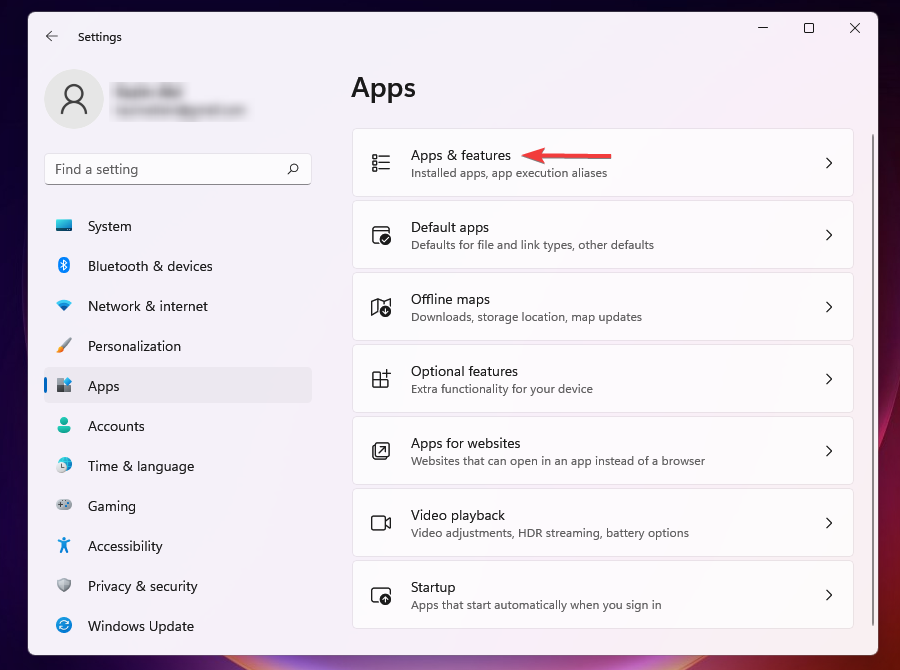
Select Apps and features.
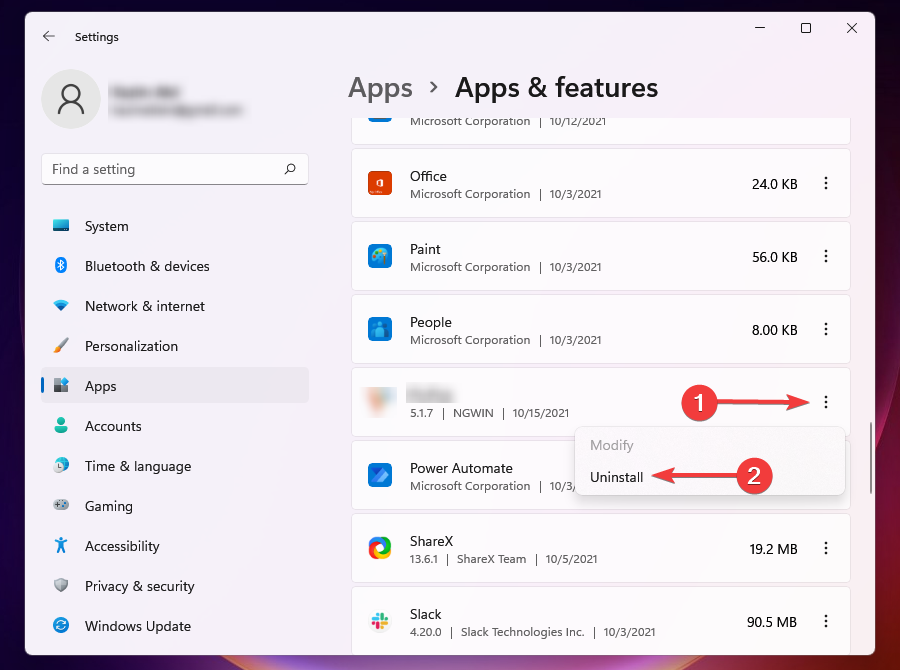
Click on the ellipsis next to the antivirus you want to remove and select Uninstall from the flyout menu.
Click Uninstall on the prompt.
If you have a third-party antivirus installed on the PC, it could conflict with the functioning of the virus and threat protection.
Also, sometimes, when Windows detects a similar tool installed on the system, it disables Windows Defender to prevent the two from running into conflict. Hence, uninstalling the antivirus should be a direct approach to solving the error.
3. Use PowerShell
Press Windows key + S and type powershell. Select Run as administrator.
When the PowerShell opens, enter the following command: Set-MpPreference -UILockdown 0
Press Enter.
4. Turn on Real-time protection
Press Windows + S to launch the Search menu.
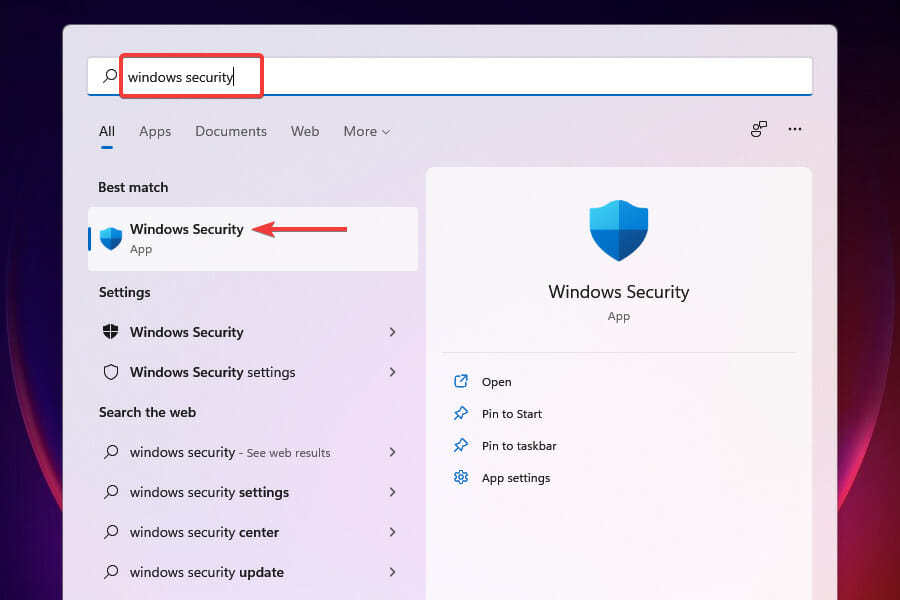
Enter Windows Security in the text field and click on the relevant search result.
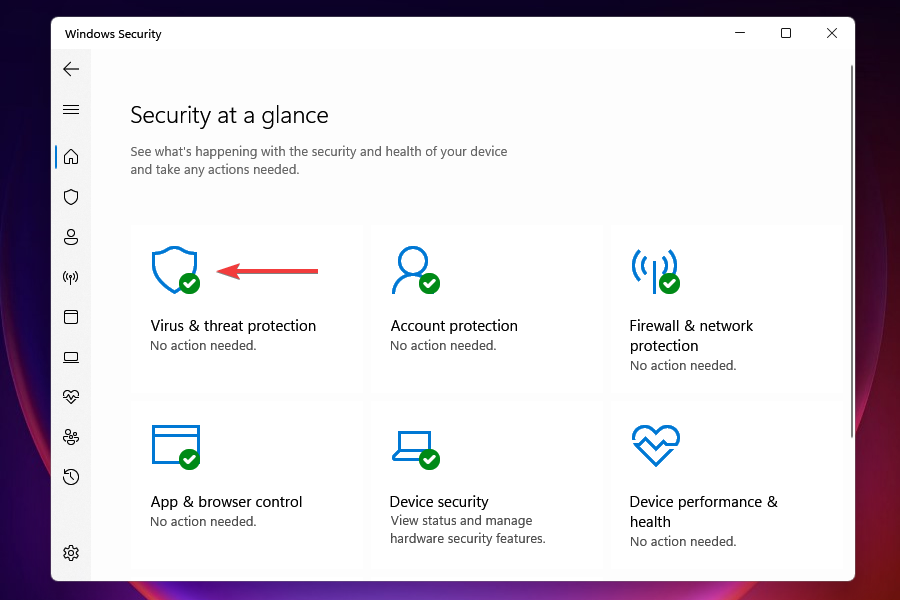
Select Virus & threat protection.
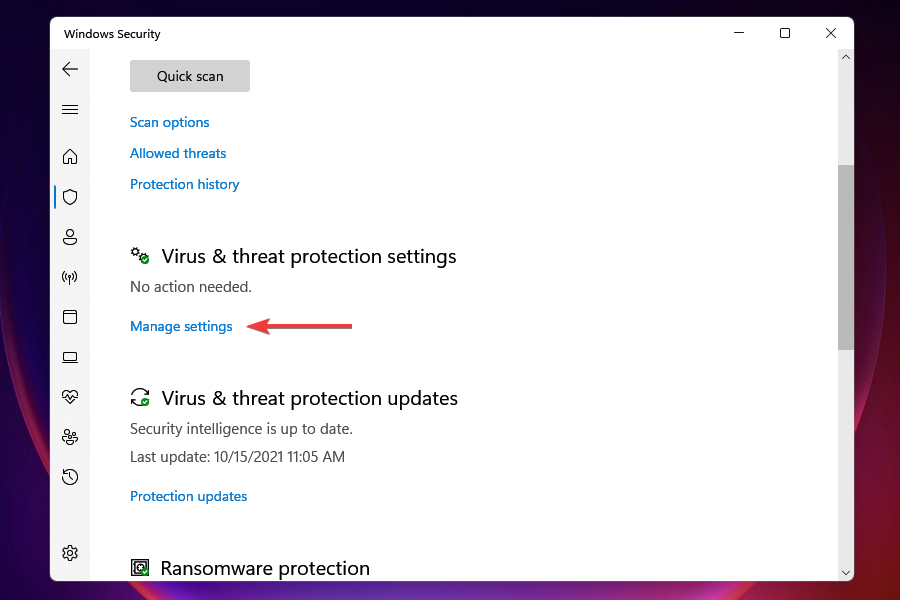
Click on Manage settings under Virus & threat protection settings.
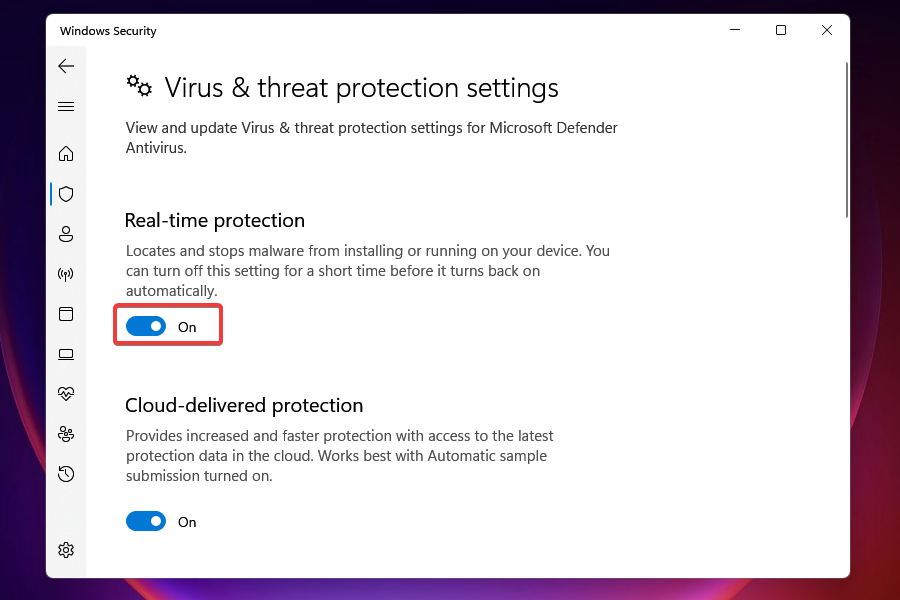
Enable the toggle for Real-time protection.
After enabling real-time protection, you should be able to access virus and threat protection. For example, the toggle might be turned off either manually by you or by Windows itself if it detects a third-party antivirus.
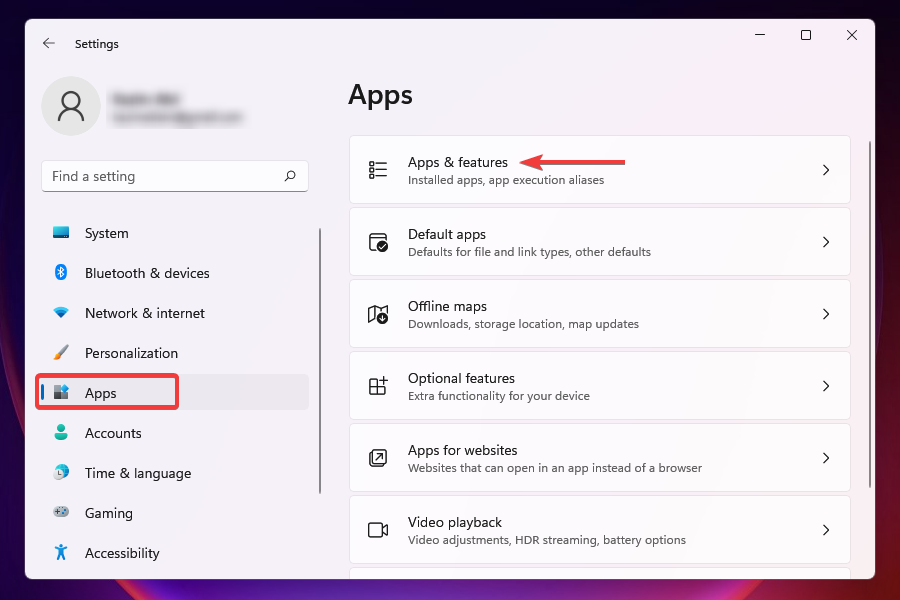
Select Apps from the tabs on the left and click on Apps and features on the right.
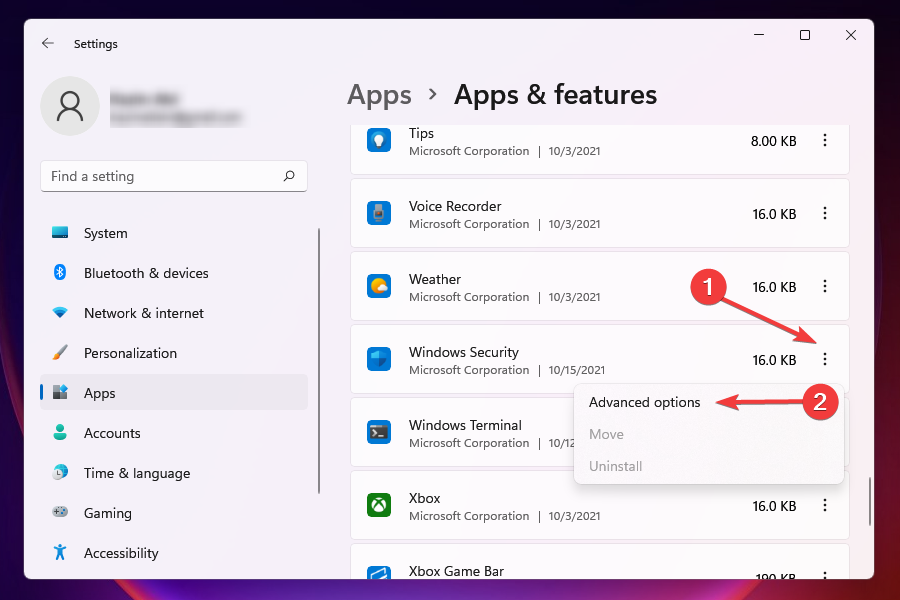
Locate the Windows Security app, click on the ellipsis next to it, and select Advanced options from the flyout menu.
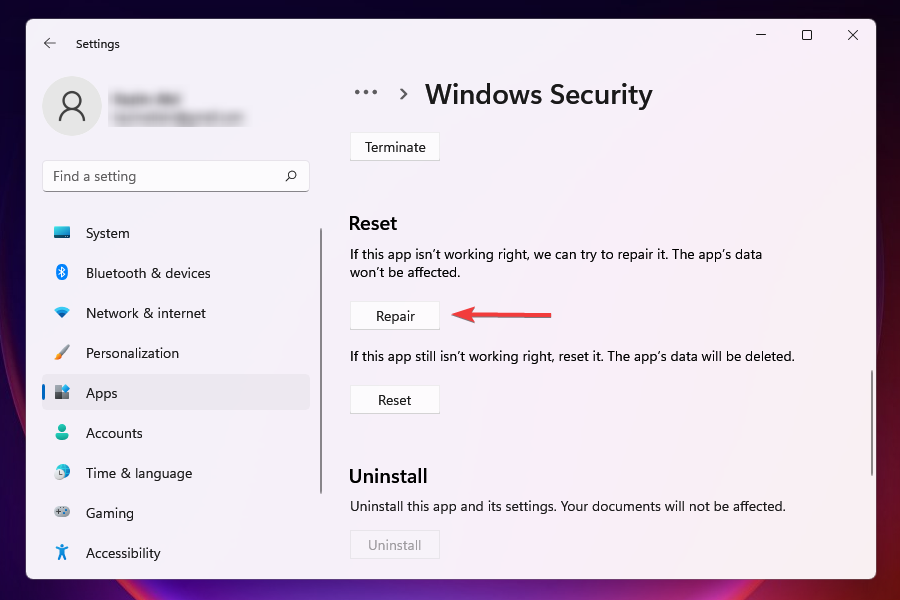
Click Repair under Reset.
Wait for the repair process to complete.
If a program throws errors on launch or during its functioning, repairing it could help. When you fix an app, Windows looks through its installation, identifies and replaces any problematic files, and checks its entries in the Registry.
This is a quick troubleshooting method; you don’t lose any data or configured settings.
6. Run a malware scan
In many cases, it was reported that malware or virus was causing issues in launching the virus and threat protection. However, since the Windows Defender app is not working, you must use another tool to run a scan.
Pick one of the best third-party antivirus software for Windows 11 and install it. After downloading the program, run a malware scan to find out and eliminate/quarantine any viruses present on the system.
To ensure that there is nothing trying to stop your Virus and Threat Protection from working, a malware scan is essential. For a fast and advanced malware scan, we recommend ESET NOD 32.
ESET is a complete antivirus with very advanced security features that will always protect you from threats. Plus, some amazing security features let you explore anything online safely.
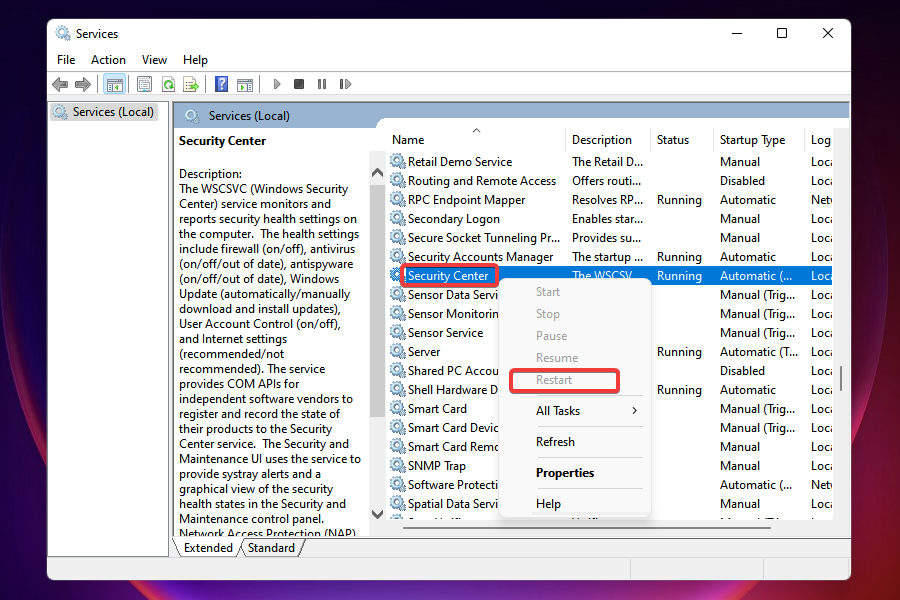
7. Restart Security Center service
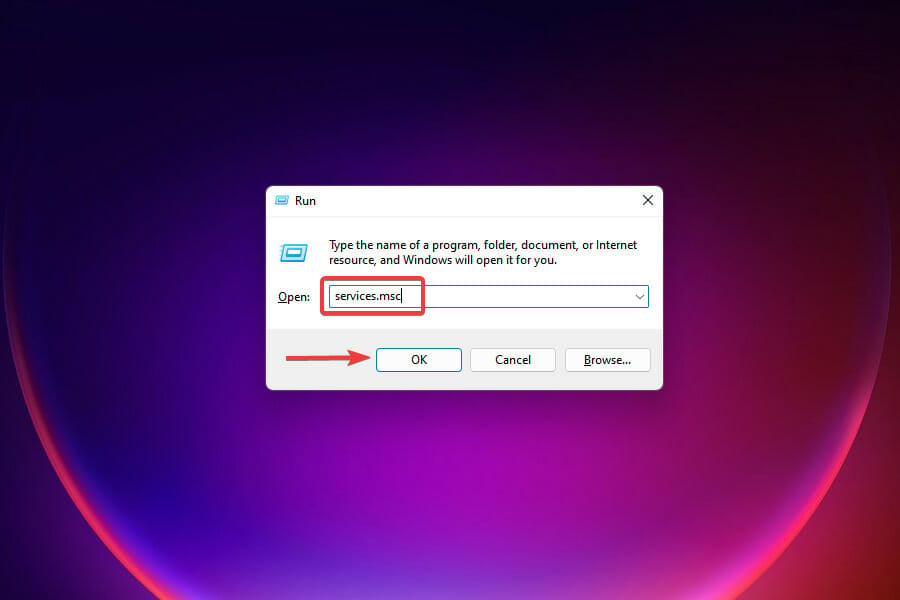
Press Windows + R to launch the Run command.
Enter services.msc in the text field and click on OK to launch the Services app.
Locate the Security Center service, right-click on it, and select Restart from the context menu.
Next, restart the computer and check if the issue is fixed.
NOTE
The services are listed in alphabetical (or reverse-alphabetical) order; thus, locating the Security Center service shouldn’t be challenging.
8. Make modifications to the Registry
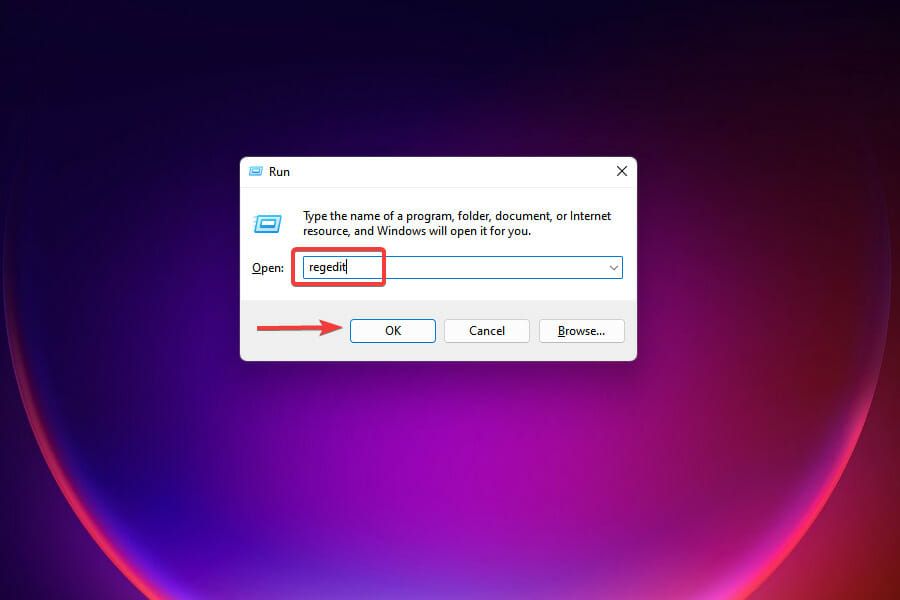
Press Windows + R to launch the Run command.
Enter regedit in the text field and click on OK to launch the Registry Editor.
Click Yes on the UAC prompt that appears.
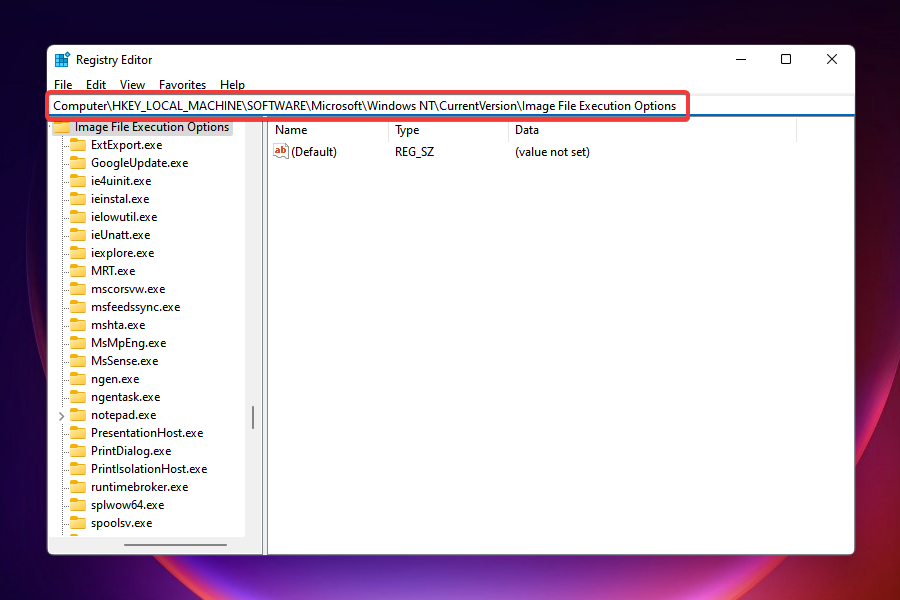
Paste the following path in the address bar at the top and hit Enter: HKEY_LOCAL_MACHINE\Software\Microsoft\Windows NT\CurrentVersion\Image File Execution Options
If you find any of the three entries, right-click on MSASCui.exe, MpCmdRun.exe, or MsMpEnd.exe, and select Delete.
In case the entries are not present, head to the next fix.
Certain viruses are known to create entries in the Registry that conflict with the functioning of Windows Defender. If that’s preventing you from accessing virus and threat protection, deleting the above entries will solve the problem.
It would help if you executed this fix only after trying the ones listed earlier. Also, we recommend being extra cautious when making changes to the Registry since a minor lapse on your end can damage the PC and render it unusable.
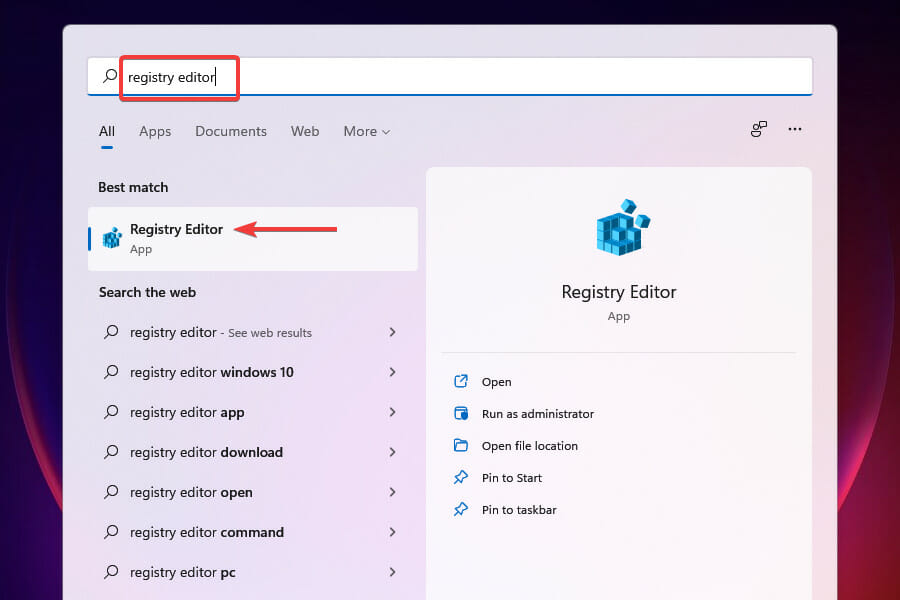
Press Windows + S to launch the Search menu.
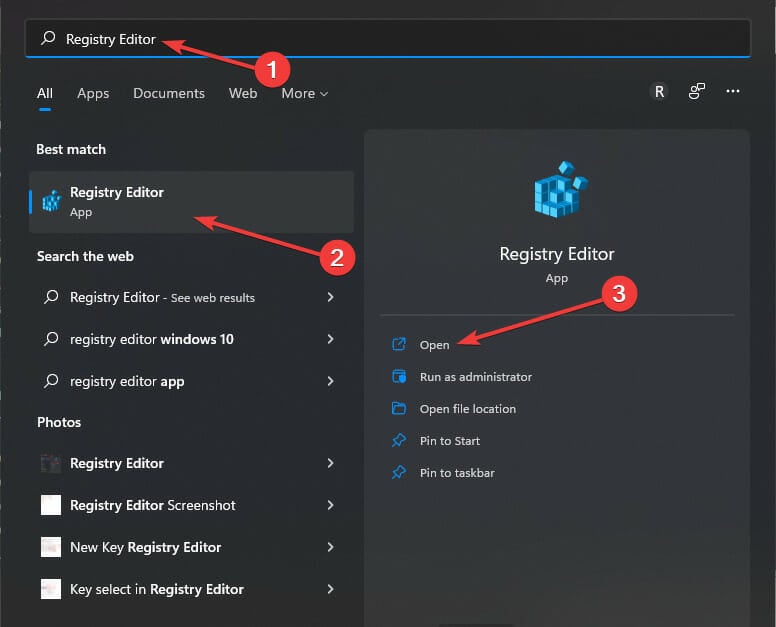
Enter Registry Editor in the text field at the top and click on the relevant search result.
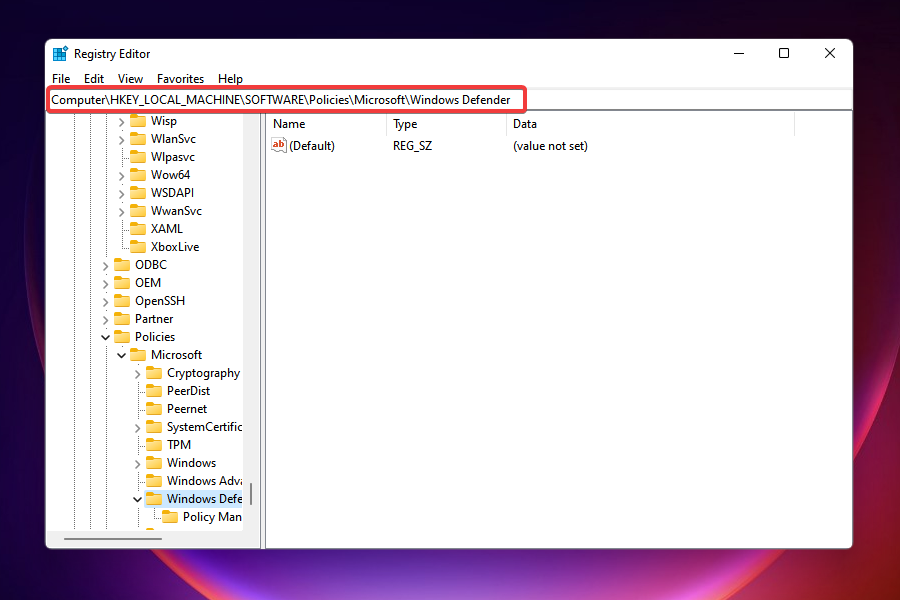
Paste the following path in the address bar at the top and hit Enter: HKEY_LOCAL_MACHINE\SOFTWARE\Policies\Microsoft\Windows Defender
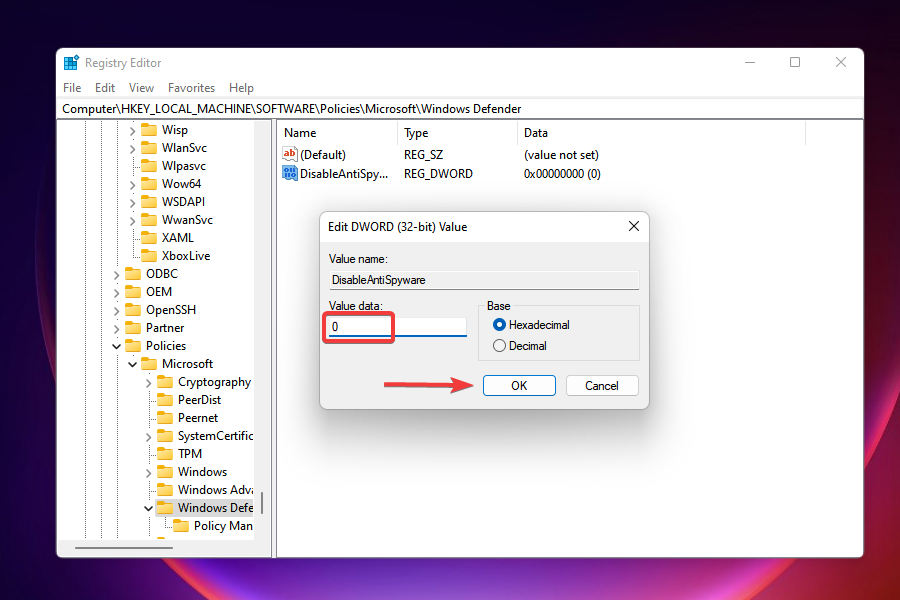
Locate the DisableAntiSpyware entry and set its value to 0.
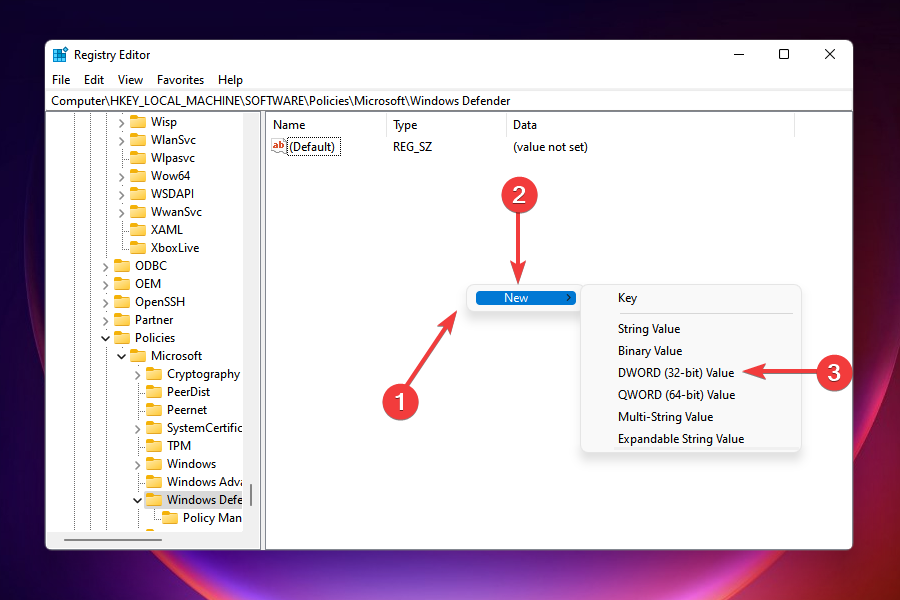
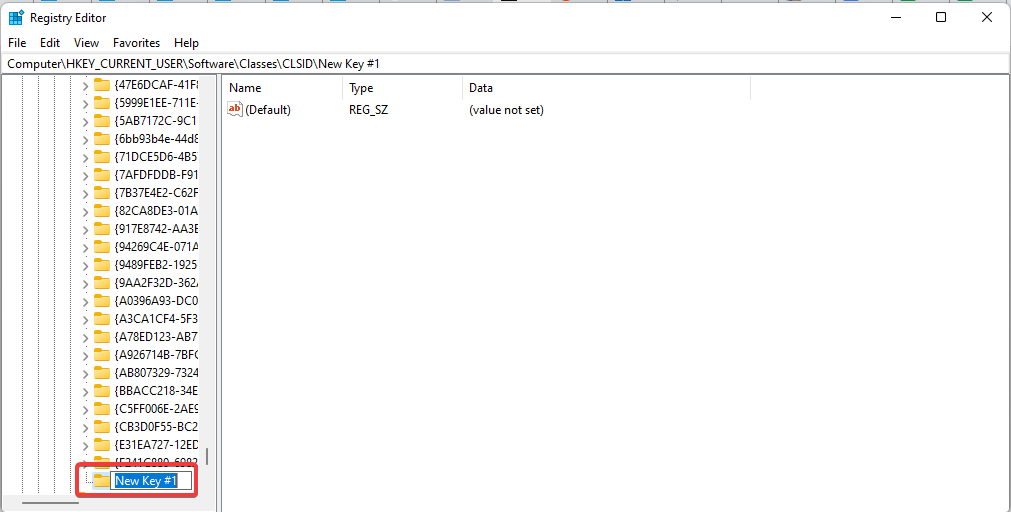
If the entry isn’t there, right-click on the space, hover the cursor over New, and select the DWORD (32-bit) value from the menu. Name the entry as DisableAntiSpyware.
Double-click on the entry and enter 0 under Value data.
After making changes to the Registry, check if the problem with Windows Defender is solved, and you can access and make changes to it.
What can I do if the fixes listed here don’t work?
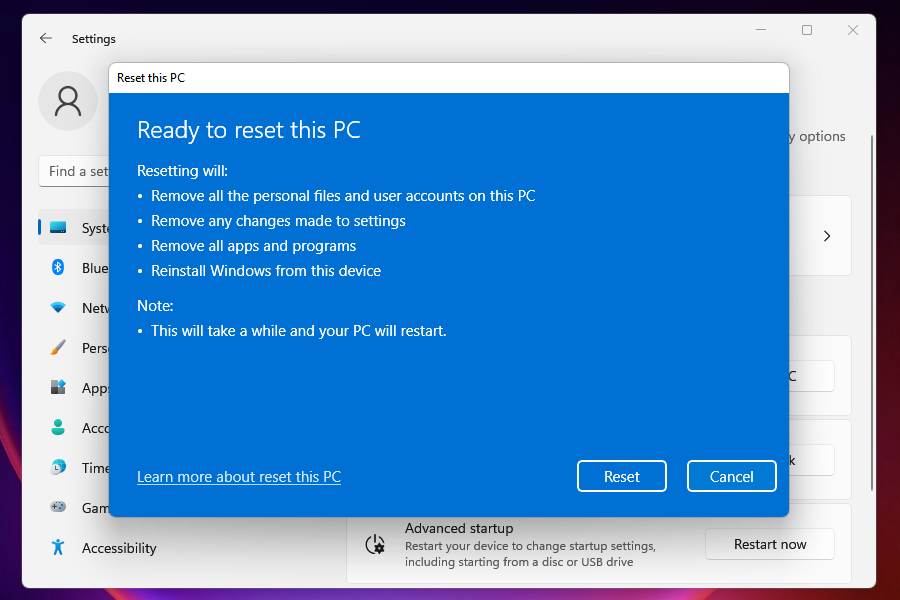
First of all, that’s an improbable scenario. However, if the solutions didn’t work, a restore point was unavailable, or system restore didn’t help, amongst other things, you can always reset Windows 11 to its factory settings.
When you do that, the PC returns to the initial stage. In simple words, in the same stage, you first used it in terms of settings and stored data.
Why has virus threat protection stopped?
In most cases, when you run into this error, it is because you have some corrupted system files. Therefore, we always recommend running an SFC and DISM scan to look for any system-wide corruption and repair it to resolve some difficulties, such as the Windows Security issue.
The above fixes should resolve the Windows 11 virus and threat protection not working issue and get things up and running.
Many are still wondering whether Windows 11 needs antivirus, and in most cases, Windows Defender will do its job perfectly. However, some users prefer using third-party software.
Let us know which fix worked for you in the comments section below.
Although instant messaging has become a native part of popular online services like Facebook and Google, its proliferation has not completely wiped out dedicated local chat apps for PC.
Thanks to dedicated offline messaging apps for PC and more, instant messaging is still a convenient task even across platforms.
Here’s a quick preview of our favorite picks:
Softros LAN Messenger – Local LAN messenger with remote desktop sharing & file exchange
Qualia LAN Messenger – Best free offline messaging app
Squiggle – Open-source PC to PC chat messenger (LAN chat-based)
LanTalk – Offline chat app without internet (+WAN & VPN)
Nonetheless, the built-in IM services offered by Internet giants remain limited in functionality and rely still on third-party platforms.
How can I communicate with someone without Internet?
As shown above there are still some great options when it comes to local network messaging apps. They do not require an Internet connection or servers but act more as Intranet messengers.
To this purpose, they rely on corporate networks which also have the benefit of serious encryption and airtight security.
Developed by Softros Systems, Softros LAN Messenger is a secure instant messaging application for user-to-user or user-to-group communications and file exchange.
The program requires no server and works through corporate networks. You can chat with multiple users with Softros’ LAN chat rooms or connect with a single user through its classic single-message window.
The app also supports offline messaging and uses the AES 256 encryption algorithm to secure your chat messages from eavesdroppers.
Meanwhile, the group broadcast feature lets users notify their contacts or groups about an event.
Softros LAN Messenger also provides users the option to log messages to the local drive or to a centralized file server.
Since the program requires no Internet connection, corporate users can avoid wasting their time on unimportant communications with friends outside their work.
You can also avoid hefty Internet charges and firewall breaches with the app. The program supports Microsoft/Citrix Terminal Services and Microsoft Active Directory.
With Softros LAN Messenger, you can also call for remote assistance through its desktop sharing feature.
LAN Messenger by Qualia is an open-source cross-platform messaging tool to communicate with friends over a local network. The application does not require a server.
The instant messaging program features event notifications, file transfers, and message logging.
The service currently supports Windows, Mac, and Linux platforms. You can download the program from Qualia for free.
3. Squiggle – Open-source PC to PC chat messenger (LAN chat-based)
Like most local messaging apps, Squiggle is a free LAN messenger for peer-to-peer communications that do not require servers.
After downloading the app, you can immediately run the program and connect to anyone on your local network.
Squiggle’s main features include group chat, broadcast chat, and private chat features with spell check, buzz, emoticons, audio alerts, tray popups, and multiple file transfers.
What’s more, you can easily replace the translation file to use Squiggle in your native language thanks to its localization support.
It’s versatile enough to allow you to contact groups, display messages, photos, chat commands, or message aliases, and you can also view chat history and status history.
This offline messaging app for PC allows you to create a bridge for connecting two LANs across subnets or WAN.
4. LanTalk – Offline chat app without internet (+WAN & VPN)
If you’re looking for the best messaging apps that work without Internet connection, you will definitely love this one.
LanTalk Messenger lets you send and receive messages over LAN, WAN, Intranet, or VPN anywhere. It also aims to protect your company network as the tool uses no external connection.
Key features include sending emails, sending files, and chatting with group members.
The software is free to download and use during a 30-day trial period, after which you will need to pay the licensing fee to continue using the product.
These offline messaging apps for PC support an array of operating systems and platforms. Most of these tools are free of charge, plus the installation process takes no more than 3 minutes to complete.
If we’ve missed other impressive local chat apps, give us a tip in the comments.
Filtering data in Power BI is the main feature for people who want to visualize various sets of information. It is an interactive tool which usually doesn’t bring many issues.
However, there are some instances in which you don’t need a filter. Quite a few users reported issues with disabling a filter in Power BI and today we will show you what it needs to be done to solve them.
One user described the following issue on the official forum:
I have a problem with filtering. What I want to do to have a chart like below showing a trend of Sales and expense and have a dynamic timeline to adjust the dates on the chart. BUT I want to show an expense percentage of sales for 2015/2016 on a card unaffected by timeline visuals.
So, the automatic filtering on visuals poses a problem for the OP.
This is not the only issue encountered by users. Another one reported the following:
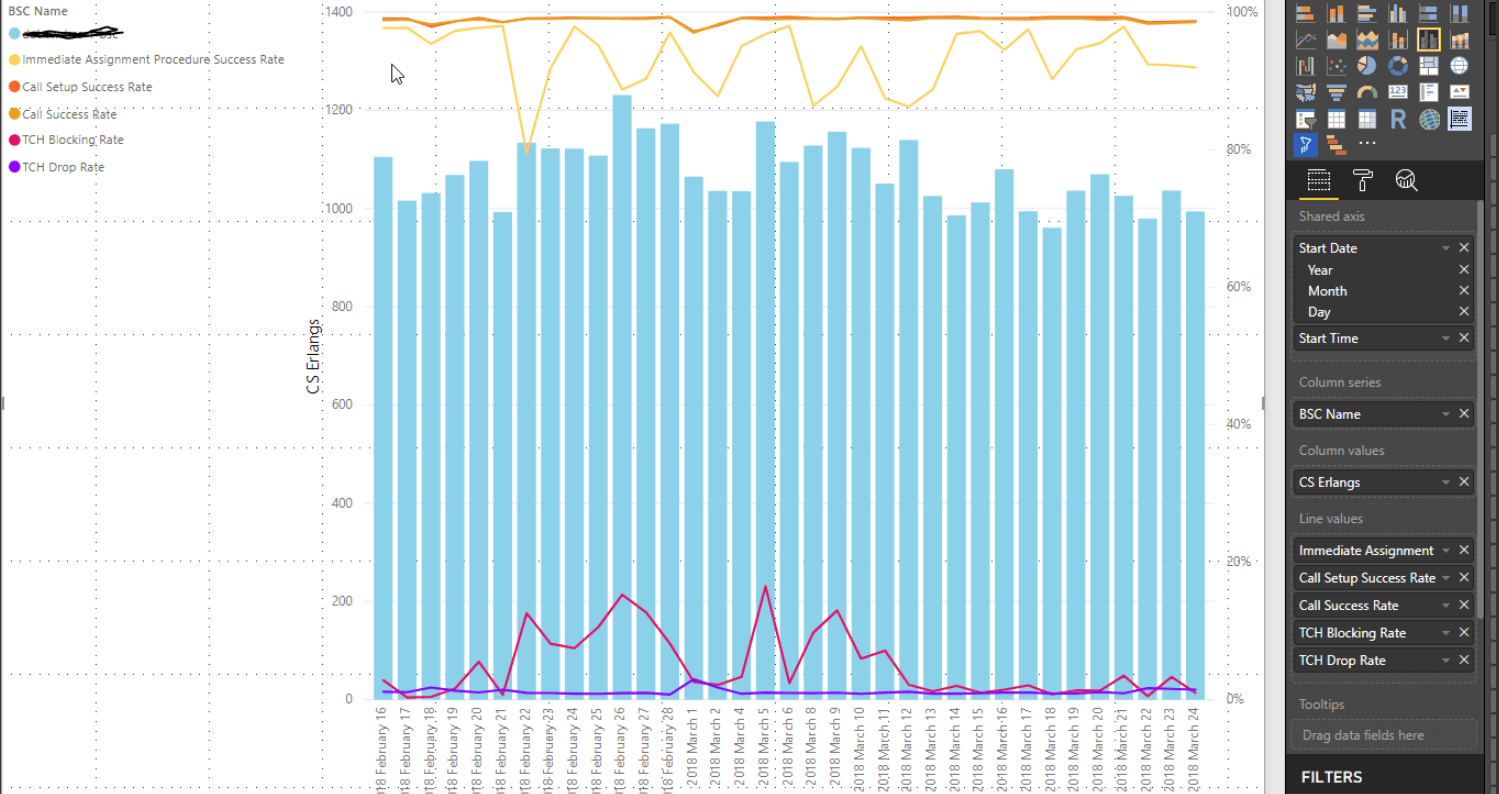
I have a multi-page report that I publish to the web each week for upper managment. I have received a request from them to have the ability to disable all of the lines values except one of them. Basically, they want the ability to toggle the line values in a graph on and off similar to the way you would toggle values in a slicer. Is this possible? For example, in the image below, they would like to toggle on/off any or all values in the legend. And, this must be done via the published WebUI. Is it possible?
The OP of this thread wants to disable all lines except one. It is worth mentioning that the operation must be done through the published WebUI.
How can I disable filter on visual on Power BI?
1. Use the Edit interactions feature
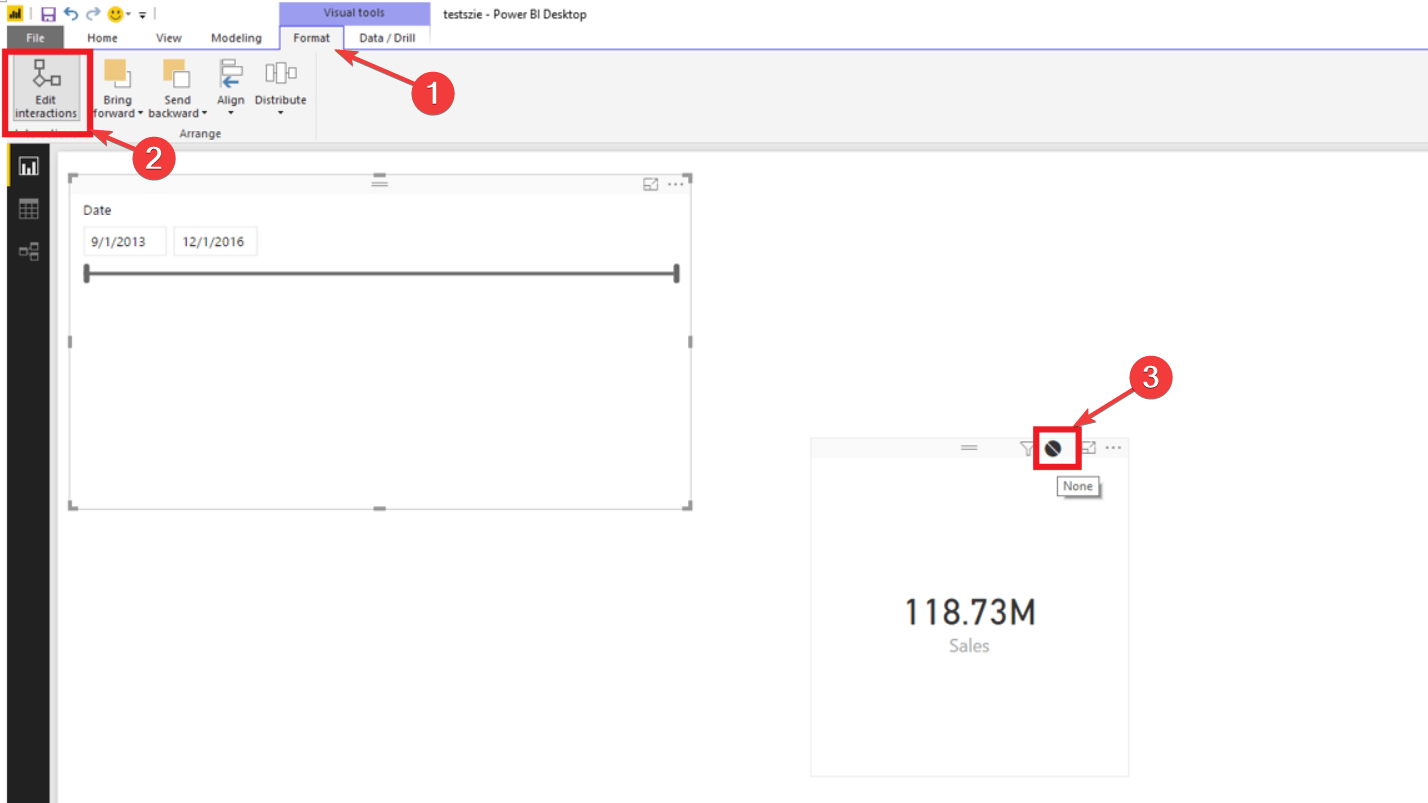
For the first issue, here are the steps you need to follow:
Click on the timeline visual in your scenario.
Turn on Edit interactions under the Format ribbon.
Choose None in the Card visual.
So, a little twitch in the settings solved this issue, but different cases may have different solutions. So, now we explore another issue described by a Power BI user.
2. Write a new measure
For the second example, you need to write a new measure in DAX that returns BLANK () based on the selection from a slicer.
So, here you have it. You can disable filters in more ways than one. Now, all depends on your project.
How do you disable filters in Power BI? Do let us know in the comments section below.
Do you like to keep your Windows 10 system secured? Of course, you do, as everyone tries to keep their data in safe hands all the time; but what should you do when getting the following message from Windows: Your pc is offline; please enter the last Well, first of all, don’t try to log in repeatedly as Microsoft might suspend your account and as you will notice each time you will try to enter your username and password you will be prompted with the following message That password is incorrect. Make sure you’re using the password for your Microsoft account.
Now, if you are experiencing these issues, then don’t hesitate and use the below guidelines below.
Usually, the Your PC is offline alert is displayed suddenly, after a new reboot or when you power on your computer; the error will be displayed even if your device has been worked properly only a few minutes back, so if that happens to try to fix it without rushing in applying operations like a clean install of Windows, or a Recovery procedure by using the installation disk (these should be the last solutions to apply as you will end up in losing your data).
Here are some more examples of this problem:
Your device is offline. Please sign in with the last passwordWindows 10
My Computer is offline
Windows 10 your PC is offline please sign in with the last password
Your PC is offline please enter the last password
How do I fix your device is offline try a different method error?
1. Re-connect to your network
Remove the network plug-in cable and wait a few seconds.
If you have a network adapter, reset it.
Reconnect your network wire on your Windowsdevice and try to log in.
If you have a WiFi connection, just check the WiFi transmitter – it should be turned on and it should provide a good signal to your laptop, tablet, or desktop.
Now, usually, this should do the trick; but if you can’t address the Your PC is offline error by applying this method, then try the following one.
2. Reset your Microsoft Account
If you have tried to connect to your Microsoft account several times within a short period, probably your account has been suspended and you will have to reset it.
In that matter just follow the Microsoft troubleshooting process which implies accessing the official Reset Your Microsoft Account Password web page.
From that point, you should only follow the on-screen prompts until Microsoft resets your account and provides you access to your Windows device.
3. Run PC in Safe Mode
Restart your computer while holding the SHIFT button.
The Advanced Startup menu will open on the boot. Go to Troubleshoot.
Now, go to Advanced Options > Startup Settings.
Click the Restart button.
A window with various startup options will show up. Press 5 or F5 on your keyboard to choose Enable Safe Mode with Networking.
Wait for your computer to boot.
Safe Mode allows you to run Windows without any additional processes, so you’ll be able to boot, even if you don’t have access to your account.
Now that you’re in the Safe Mode, you can perform some of the following workarounds.
4. Check your network connection
Restart your modem or WiFi adapter by pressing Windows Key + X to open Win + X menu and select Device Manager from the list.
Find your networking device, right-click on it and click Disable.
Restart your computer
Go to Device Manager again, and enable the networking device the same way you disabled it
This will restart your networking device, and hopefully, your network connection will be back to normal. If this doesn’t solve the issue and your network connection is still not working, then take a look at the following articles
If your network connection is now available, you should check the following two solutions.
5. Use your Local Account temporarily
Open theSettings app.
Go to theAccounts section. Now navigate to theYour info tab.
Click Sign in with a local account instead.
Enter your password and click Next.
Now enter a username for your local account and click Next.
After doing that, click the Sign-out and finish button.
Now log into Windows 10 with your local account.
Switching to a Local User Account should be a temporary solution until you resolve the Your pc is offline; please enter the last password you used on this computer problem.
Using a Local Account is more practical and accessible than using a Microsoft Account because it allows you to log in without a password and without being online.
6. Use Registry Editor
Go to Search, type Regedit, and go to Registry Editor
Expand the StoredIdentities key, and you’ll see your Microsoft account sub-key under it.
Now, just find the problematic sub-key, and delete it.
Restart your computer.
So, that’s how you can get pass through the Your PC is offlineWindows 10 issue. If you can’t manage to address this issue, then you will have to run a System Recover operation by using the Windows installer disk or why not you should perform a clean Windows install.
Anyway, don’t forget about us and share your experience and thoughts with our team and with our readers by using the comments field from below.
Thankfully, the fixes for this problem are not far-fetched, with a little tweak needed in most cases. Read on to find out what to do if Windows Defender is not installed on your Windows 11 device.
Why can’t I find Windows Defender?
There are various reasons why Windows Defender is not found in Windows 11, but we will highlight the most important ones:
Malware infection – Usually, the first thing a virus or malware does is disable or eliminate the antivirus. Good third-party antiviruses are harder to counter.
The service is not running – Though Windows Defender should show up even when the service is not running, this, coupled with other issues, can make the app inaccessible.
Registry problems – Changes to the registry, wherein Windows Defender is disabled, could be an underlying cause. The administrator could take action in case you are using an office computer.
So, let’s find out how to fix things if Windows Defender is not working in Windows 11.
Quick Tip: If you want to protect your PC on all fronts, use a security utility with multi-layered protection. TotalAV’s feature set aims to protect you from today’s cyber threats.
It includes advanced banking and payment protection, webcam and microphone security, parental controls, anti-malware, anti-ransomware, and more.
TotalAV
TotalAV technology protects every click, screen tap, and step in your digital life.
How can I fix the Windows 11 Windows Defender missing issue?
1. Install Windows Defender Using PowerShell
Using the commands below via Powershell should reinstall Windows Defender on your Windows 11 PC and solve the missing issue in no time.
1.Right-click on the Start icon in the Taskbar, and then select the Windows Terminal (Admin) option.
2.Click theYesbutton to allowWindows Terminalto make changes to your PC.
3. Paste the following commands individually and hitEnterafter each:Set-ExecutionPolicy UnrestrictedGet-AppXPackage -AllUsers | Foreach {Add-AppxPackage -DisableDevelopmentMode -Register "$($_.InstallLocation)\AppXManifest.xml"}
The command above helps to reinstall all default Windows apps. This is especially useful if Windows Defender is not installed in Windows 11 due to file corruption during an upgrade.
2. Repair and reinstall Windows Defender
Press Windows + S to open the Search menu, enter Terminal in the text field, right-click on the relevant search result, and select Run as administrator.
Click Yes in the UAC prompt.
Type/paste the following command and hit Enter:Get-AppxPackage Microsoft.SecHealthUI-AllUsers | Reset-AppxPackage
Sometimes, Windows Defender might be installed, but the installation is either incorrect or incomplete. The command above will remove all components from the PC and reinstall Windows Defender in Windows 11.
Press the Windowskey, and select the Settings app.
Select the Windows Update option on the left pane.
Click the Check for updates button in the right pane.
If an update is listed after the scan, download and installs it on the computer.
Windows update comes with fixes for bugs and other errors in the previous versions.
If Windows Security is missing in Windows 11, an update should have fixes for the bugs responsible for the error. Also, if it is due to an incomplete or incorrect update, this should solve the problem if done correctly.
4. Perform a System Restore
Press Windows + R to launch the Run command, enter rstrui.exe in the text field, and click OK.
Select Next in the System Restores window to proceed.
Choose a restore point from the options provided, and click Next.
Verify the restore details, and click on Finish to initiate the restore process.
If you noticed the Windows Defender link missing after installing an update in Windows 11 or making changes to the system, this fix could help you return to the previous state.
Select a restore point created before installing the new update, and things should return to normal.
Yes, Windows 11 comes with Windows Security as the built-in antivirus. In case you are confused between the two, Windows Defender and Windows Security are the same thing.
The program efficiently identifies and eliminates malware and performs other essential functions to ensure security. But, in case you were looking for advanced security, we recommend using an effective third-party antivirus.
The Windows 11 Defender not installed problem is not the first faced by users. There have been complaints that Windows Defender is not opening or not enabled, among other issues.
Unlike some of these issues, this problem is not hard to fix, as shown above. We hope you find the helpful guide and get Windows Defender back to protect your PC.
Also, if you are wondering, Windows Defender can be downloaded from the Microsoft Store. This will download the Windows Defender 64-bit version in Windows 11.
Feel free to discuss the solution that worked for you in the comments section. You can also state any solution you tried successfully that is not in this guide.
Today we’ll walk you through the best photo management software so you can ditch the hassle of Windows’s built-in app.
With thousands of photos scattered across devices, these tools help you easily organize, edit, and store your pics.
Features include automatic organization, robust editing tools, cloud integration, duplicate detection, and batch processing for streamlined photo management across all your devices.
Which is the best photo management software for Windows 10?
Adobe Lightroom is a powerful cloud-based photo management tool that integrates AI-driven features for organizing and editing photos.
It uses Adobe Sensei to sort images by metadata and keywords, making it easy to find and categorize photos.
With 1TB cloud storage, you can access and edit your photos across all devices.
The software supports importing presets, exporting raw photos as DNG files, and creating albums. It also includes advanced search options and panorama fill edges for enhanced editing.
Let’s quickly go through its key features:
Photo organization (find photos or create albums instantly with machine learning)
Easily export photos as DNG files (export raw photos to DNG)
Import presets and profiles from Google Drive and local storage
Support for new cameras and lensesPanorama fill edges (easily fill in the edges of stitched-together panoramic)
Adobe Lightroom
Streamline your photo workflow with Adobe Lightroom’s cloud-based organization.
ACDSee Photo Editor provides extensive photo management and editing capabilities. It supports RAW file editing with tools for noise removal, sharpening, and color adjustment.
The software features pixel-based editing, precision targeting, and a variety of filters. ACDSee also offers text layer support with full customization, alignment adjustments, and easy import/export actions.
It supports over 500 camera models and allows you to use Photoshop plug-ins, providing a cost-effective alternative to Adobe’s offerings.
Other key features include:
Text layer spport with full customization
Liquify feature
Alignment adjust feature
Easy import and export actions
ACDSee
Edit and manage photos like a pro with ACDSee’s powerful tools.
Adobe Bridge is designed for comprehensive asset management, especially when used alongside Adobe Creative Cloud products.
It offers batch renaming, metadata editing, and advanced filtering based on metadata, tags, and keywords.
You can create and manage libraries, portfolios, and collections across various Adobe applications. Features include customizable search filters, color labels, and star ratings.
Adobe Bridge also integrates seamlessly with Photoshop, Illustrator, and other Adobe tools, making it ideal for organizing large volumes of creative assets.
Other key features include:
Supports portfolio creation
Import and export batch files
Export directly to Adobe Stock
Adobe Bridge
Master your assets with Adobe Bridge’s comprehensive file management tools
Cyberlink PhotoDirector is a robust photo management and editing software with AI-powered features.
It organizes photos by creating folders and albums, adding tags and descriptions, and searching using metadata.
The tool includes precision layer editing, face retouching, and split layers for advanced photo manipulation.
You can access a vast library of stock photos and videos, and the software also offers photo animation features and audio effects integration. It supports both beginners and advanced users with its versatile toolkit.
Other key features include:
Precision layer editing
Face retouch features
Split layers
Add audio effects to image files
CyberLink Photo Director
Organize, edit, and animate your photos with Cyberlink’s advanced features.
Corel PaintShop Pro is a versatile photo management and editing tool. Its Manage workspace lets you organize photos using tags, ratings, and collections.
The software provides batch editing capabilities and detailed metadata handling.
With features like customizable workspaces, grid or single image previews, and an Info palette displaying EXIF and IPTC data, PaintShop Pro helps streamline your workflow.
It offers a range of photo editing tools and is available as a one-time purchase or subscription, with a 30-day free trial.
Luminar combines advanced AI-driven photo editing with efficient management features.
It includes a Library module for organizing and syncing folders, creating albums, and viewing images in grid or single view.
Batch processing and date-based search capabilities enhance productivity. The software supports integration with some Adobe products and offers intuitive tools for managing and editing photos.
The interface allows easy drag-and-drop for album creation, and it includes advanced AI features for photo enhancement.
Other key features include:
Search pictures by date
Can be used as a plugin for some Adobe products
Batch processing features
Luminar is a subscription-based software with a 7-day free trial included.
Magix Photo Manager offers efficient photo management with features like duplicate detection, face recognition, and basic editing tools.
It allows for rating photos, sorting galleries based on ratings or other criteria, and creating virtual albums. The software includes advanced tools for photo repair and secure sharing options.
Additionally, it provides options for slideshow creation, automatic backups, and a large stock photo gallery, making it a comprehensive tool for managing and enhancing your photo collection.
Other key features include:
Magic repair brushes
Large online stock photo and stock illustration gallery
Premade templates for different types of media
Multiple file format suppot
Magix is a subscription-based software compatible with Windows PCs.
The FastStone image viewer can import images from scanners, cameras, and other portable media devices. It is a free utility, perhaps the closest to ACDSee, and is tested to be malware-free.
The core strengths of this software are its strong support for RAW and DNG RAW image files and its compatibility with popular digital camera brands like Nikon, Canon, Olympus, Panasonic, and Minolta.
The features it includes are image viewing, image comparison, red-eye removal, emailing, color balancing, resizing, retouching, and cropping.
The full-screen mode provides access to EXIF information and thumbnail browsing.
It also supports components, such as a hidden toolbar appearing on hover, a musical slideshow, and over 150 transitional effects.
Other key features include:
image annotation
lossless JPEG transitions
artistic montage images
Image EXIF metadata support
Screen capture capability
Support for a touch interface
Fast Stone supports various digital camera formats and all major graphic formats.
XnView is a feature-rich photo management tool that supports over 500 file formats. It provides customizable and pre-set filters, batch processing, and image optimization.
Key features include metadata editing, image comparisons, and a range of view options such as thumbnail, fullscreen, and slideshow modes.
XnView allows for creating web pages, contact sheets, and video thumbnails. It also includes tools for duplicate file detection and sorting images by various criteria, enhancing your photo organization workflow.
Other key features include:
Metadata support & Editing
Print module
Duplicate file transfer
Moreover, XnView can locate duplicate files using techniques like similar filename, same file data, same image data, or by comparison of scenes or backgrounds in photos.
In regards to photo gallery organization, PicaJet allows you to sort your pictures into endless categories. On top of that, you can create as many subcategories as you like.
The software also sorts images on the basis of provided ratings, date or time, and keywords. Categorizing images is as easy as dragging and dropping.
PicaJet is an easy-to-use, highly customizable, and efficient photo management utility and image database that perfectly organizes and categorizes your fast-growing media files.
PicaJet also creates automated categories that can help you navigate easier across your gallery. It uses metadata information, as well as other filters to help you find whatever picture you like.
Other key features include:
Hide feature for private photos
Powerful search feature
Album management
Image timeline view
PicaJet is a licensed software. You can purchase a single license or a family pack for multiple users You can also download a free trial that expires in 15 days.
We’ll end our list here. We hope that this article helped you decided which photo management and editing software to download. Choose the tool that best suits your needs.
If you’ve already used the tools listed in this article, you can tell us more about your experience in the comment section below.
While trying to project media files from your Windows computer to the projector, users may face sound-related issues. A prominent one is the projector sound not working issue that is troubling many users.
This issue occurs with HDMI and wireless connections making the cause difficult to trace. While it can be very frustrating, it is actually easy to fix with the right information, such as the one provided in this guide.
How do I get sound to play through my projector?
1. Check your connection
Before making changes to your PC in a bid to fix the projector sound not working issue, you need to check that all the components are properly connected. Check the connection between your PC and projector and if possible, try different HDMI cables.
Also, note that you should only use the projector’s HDMI port, not the DVI/HDMI port. Also, check any connection setting that is peculiar to your projector.
2. Check the volume
Click the Volume icon on your taskbar.
Check the volume level and increase it accordingly.
Now, right-click the Volume icon again and select Open Volume Mixer.
Finally, check if your output device is not muted.
As easy as it may look, sometimes your projector sound is not working because of low volume. So, you must ensure that your speaker and projector volumes are not muted or too low.
To increase the projector volume, you only need to press the + button on the remote controller if it has one. You can also check if it has not been muted by pressing the A/V mute button.
3. Run Sound Troubleshooter
Press the Windows key + I to open the Settings app and select System.
Click the Sound option in the left pane.
Now, click on the Troubleshoot button under the Master Volume section.
Finally, wait for the scan to complete and apply any recommended fix.
The projector sound not working issue might be due to minor glitches with your PC sound. Running the troubleshooter should clear any problems and restore your sound.
4. Use your projector as audio output
Press the Windows key+ I and select the System option.
Choose Sound in the left pane.
Now, go to the Output section and set your projector as the audio output.
Next, press the Source button on your projector if it has to check the output sound source setting.
If your projector has an output speaker connected, you need to choose it as the output sound to make the sound work.
Launch the Settings app and select the System option.
From the left pane, click on the Sound tab.
Click on App volume and device preferences under the Advanced sound options section.
Now click the Reset button under the Reset to the Microsoft Recommended Defaults section.
Restart the system if prompted.
With this, we can conclude this detailed guide on the projector sound not working issue. All you have to do now is to follow the steps carefully, and things should be back to normal.
A smartwatch never goes out of style or uses its utility regardless of how much users have become to depend on their android phones.
Most people still find it extremely practical to use a smartwatch for intense workout sessions in nature or indoors.
Why choose a solar powered watch?
Lately, solar powered smartwatches are among the favorite accessories that many simply can’t do without. One of the most important reasons for choosing these products is the fact that they function on rechargeable batteries which are environmentally friendly.
Basically, solar smartwatches are based on a technology that converts light energy into electronic energy.
As opposed to a disposable battery, an eco-friendly battery can be recharged without the hassle of buying a new one, and of course without spending a dime.
In this article, we are going to give you a complex guide to the best solar-powered smartwatches.
A great choice is a device coming from Casio, which is part of an excellently developed sports line and it’s made to face a variety of extreme natural phenomena.
This device is a great solar-powered smartwatch for 2021. It has a sturdy design and comes with a 50 mm resin case that features Japanese quartz movement along with a digital display.
The Casio solar-powered smartwatch can resist high water pressure as well as centrifugal and impact forces. It seems ideal for practicing extreme sports in mountain areas or for regular morning hikes.
Another sign of its advanced technology is the fact that this smartwatch is used mainly in professional marine and military activities.
Our next choice from Casio is a smartwatch that comes with a duplex LC display that includes a Tide Graph feature for specific dates and times.
Besides, you also get to enjoy a digital compass, an altimeter, and a barometer, features that come in handy if you are a mountain aficionado.
The thermometer has a display range of -10 to 60 C (14 to 140 F). Another impressive feature is that this device is low-temperature resistant.
You’ll definitely love the full auto EL backlight with afterglow, which allows you to read the time even in dark spaces. The solar rechargeable battery has an extended life of approximately 5 months.
It seems that Garmin has every need covered with this solar-powered smartwatch that has incorporated tactical features, such as Jumpmaster mode and waypoint projection.
This smartwatch is developed to U.S. military standard 810 for thermal shock and is water-rated to 100 meters.
You can monitor various physical activities like running, biking, swimming, or strength training, and thanks to the Pulse Ox feature you can keep track of your daily health state.
It provides a built-in 3-axis compass and barometric altimeter and a multiple global navigation satellite system that connects to GPS, Glonass, and Galileo.
If you like taking hikes or cycling in nature, you might also need to check out this article on some useful handheld GPS devices.
This Garmin solar smartwatch comes with a body battery energy monitoring feature that tracks your heart rate, and stress and estimates your sleep needs. This way, you have all the info for maintaining a healthy and active lifestyle.
With the solar-powered smartwatch from Garmin, you will have a safe and efficient workout suitable for your physical needs, thanks to the Pulse Ox monitoring tool.
You can keep track of your pulse with the wrist heart rate feature that provides precious data even when you are underwater.
The Casio watch features a rechargeable battery with approximately 6 months of fully charged power.
There are various styles of solar-powered smartwatches on the market, and in this article, we provided you with a versatile selection of the best devices that can suit your every need.
A common OneDrive syncingerror is the You now have two copies of a file. We couldn’t merge the changeserror message. This usually happens when say you are trying to sync the same file from two different locations or if there is a connectivity issue during the syncing process.
One user was quite concerned about his data safety when the error appeared.
I use onedrive for all of my university work. I had just finished some work and saved all items to my OneDrive in the usual places.After i did so a notification popped up saying: “you now have two copies of (50-142 number changes with every notification) files we couldn’t merge the changes” and continues to do so every second or two and has not stopped since (which has been about an hour).
Check the steps below to fix the error at hand.
How can I fix the OneDrive You now have two copies of a file error?
1. Delete multiple Office versions
Go to Start -> Settings -> Apps -> Microsoft Office.
Click on the Uninstall
Follow on-screen instructions and restart your PC if prompted.
2. Update/Repair Microsoft Office on your PC
Click on Start -> Settings -> Apps -> Microsoft Office.
Click on the Modify button.
If there is a pop-up window asking for your permission to make changes to your PC, consent to it.
In the How would you like to repair your Office programwindow, select the Quick Repair option and click on the Repair
Or you can go for the Online Repair option as well if you have the time as this does take a while since it’s akin to re-installing the program all over again.
3. Delete the Microsoft Upload Center cache
Go to Start –> Microsoft Office –> Office Upload Center.
Click on Settings.
In the Microsoft Office Upload Center Settingswindow, click on the Delete cached file
Click on OK.
4. Stop syncing the particular library
Right click on the OneDrive icon located towards the right of the taskbar.
Select Settings.
In the Settingswindow and under the Account tab, click on Stop Sync for the particular library that is causing issues.
There is going to be a pop-up confirmatory box seeking your consent. Click Stop sync again followed by clicking on the OK
Also, while the above should be enough to deal with the You now have two copies of a file we couldn’t merge the changes, another general rule of thumb would be to dissuade from syncing very large files.
Microsoft Family Safety is a very useful app when it comes to protecting your loved ones in your digital life. This is a free tool available for Windows 10, Xbox One and Android devices.
The Family options in Windows 10 are very useful as they allow you to create another account or a child’s account that you can control and get reports about their activity on your PC.
The Family Safety option lets you set additional limits, as well. But a number of users have been complaining on the forums that the feature isn’t working as it should be.
Some Windows 10 users claimed that the app is not working and the following message being displayed: There’s a temporary problem with the service. Please try again.
I have three younger sisters, all three have the same make and model of Toshiba laptops. We have family safety set up on all three laptops but only two of them work correctly. The two that work block the internet and give feedback on activity. My youngest sister has family safety set up exactly the same but she has full access to the internet and it will not give feedback on activity. The administrator on her account has a local account, she does as well. I have a different laptop and I have a Microsoft account.
In the following, we’ll try to offer you a series of solutions for this problem, so read on to fix it with ease.
What can I do if Microsoft Family Safety is not working on Windows 10?
1. Restart your device
The first and most obvious step that the person who is having similar issues needs to do is to restart the device. If that solves your problems, then it’s great; if not, read further.
Other factors to consider before moving forward:
Make sure that the kids you choose to monitor each need a standard user account
Set up a new child account and setup the limitation in Family safety to check the result
Use the Clean boot mode to check whether a security block could be the culprit
2. Disable your antivirus/ firewall
If the issue persists, try disabling your antivirus temporarily and see whether that has any effects. Turn off the firewall as well.
Another cause for issues with the Family Safety app on Windows 10 can be your antivirus software. Sometimes your antivirus can block certain applications from running.
So, be sure that the Family Safety app is added to the list of exceptions in your antivirus. If this app is blocked by your antivirus, perhaps you can fix the problem by disabling your antivirus.
Certain antivirus tools just aren’t compatible with older software, and if you’re unable to run the Family Safety app, try removing or disabling your antivirus.
If removing the antivirus solves the problem, this might be a perfect moment for you to consider switching to different antivirus software.
There are many great antivirus tools on the market, but if you’re looking for a reliable antivirus that won’t interfere with applications such as Family Safety, feel free to try out the one mentioned below.
Take the problematic device and go to Microsoft’s support page to fix account issues that may be causing this error.
Your child’s Microsoft account may periodically expire on their device. When this happens, activity is not sent from the device and various errors and issues may occur.
The quickest way to fix that is to verify the account, so be sure to check it accordingly.
4. Update Windows
Go to Start, and type update.
Double-click the first result to open the update section.
Now, click on the Check for updates button, and install the available updates.
Restart your computer and check if the issue persists.
Microsoft periodically release new Windows 10 updates in order to improve system stability, add new features and fix the existing bugs.
As a matter of fact, the latest Windows 10OS version brings major improvements for time limits and activity reporting.
If it’s been a while since you last updated your Windows 10 computer, check for updates as soon as possible as this action may solve the Family Safety app issues that you’re experiencing.
5. Check the control level
Press the Windows key + I to open the Settingsapp.
Go to the Privacy section and select Feedback & diagnostics.
If you can’t see recent usage data from your child’s device, it most likely the Family Safety app is working properly, it’s just that the control level is not appropriate.
If you use a Lenovo computer, you might have met the Error 1962: No operating system found. This annoying issue occurs because of a corrupt boot sequence or when the boot order priority is misconfigured.
You’ll notice the error 1962 at random intervals, sometimes within 2-3 days or after a time slot of 2-3 hours. It might take hours before your device can boot up normally, making it a major inconvenience for you.
We prepared some accessible solutions to fix this problem for good, but let’s first see the most common reasons why the error displays on your screen.
Insert thebootable USB or DVD, then start up Windows from it.
In the Windows Setup window, select the Language to install, the Time and Currency format, and the keyboard or input method.
Hence, click Repair your computer and select Troubleshoot.
Select Advanced options.
Click Automatic Repair, then select the OS.
After the repair process, follow the prompts notification to boot up your Windows PC.
2. Use automated software to fix the issue
Even though this step is described in detail in the following method below, considering the complexity of it and the chance of getting it wrong and affecting your system makes it a risky step.
To avoid going through that process, you can also try using specialized software that automatically fixes issues.
3. Run System restore in Safe Mode
NOTE
Identify the restore point dated before the error message started, and rest assured that the system restore does not affect any of your files, documents, and personal data.
On your desktop, press the Power button until it shuts down, then press it again to switch the screen.
You’ll need to start your OS in Safe Mode for those who own a laptop. First, click the Power icon, then press the Shift key while you click Restart.
Select Troubleshoot.
Choose Advanced options.
Navigate to Startup Settings.
Click Restart.
Press the F4 key to run your OS in Safe Mode.
Once you see the Safe Mode desktop, press the Windows key, create a restore point, and click on the result.
Click the System Protection tab, then click System Restore.
Now, you only need to select the recommended restore point or choose a different one and click Next.
Confirm your selection, wait for the process to complete, and then reboot.
Safe Mode is a diagnostics mode in Windows that starts your PC with only essential files and drivers. Running system restore can also fix the presented issue.
You can also perform a system restore in Safe Mode to revert to a specific restore point on your system and eliminate the annoying error message displayed on startup.
4. Change Boot priority in BIOS
Press and hold the following keyboard shortcut, then boot your PC: Ctrl + Alt + Delete.
While booting, press the F12 key several times to launch the BIOS setup.
After you see the Setup box, hit Enter.
Click the Startup tab, select CSM, and press Enter again.
Select Enabled.
Locate Boot Priority, then hit Enter.
Change the current option of Legacy First to UEFI First.
Hence, press the F10 key and choose YES, then wait for your PC to reboot.
5. Replace your Hard Disk Drive (HDD)
Finally, it’s not the best choice, but if the other solutions don’t work, you need to consider replacing your PC’s HDD with a new one because it may be faulty.
You can remove your Hard Disk Drive, then connect it to another computer to access the files and folders.
If the new PC cannot identify and access the HDD, you need to replace it with a new one.
If the device can detect it, then a probable cause for the error problem is the faulty SATA cable. So, to simplify your work, look at these SATA power cables for SSD & HDD.
Repeatedly tap the F1 button on your keyboard when the Lenovo, ThinkPad, ThinkStation, or ThinkCentre logo appears.
You will enter the BIOS menu.
2. Enter BIOS from Windows
Press the Win + I keys to open the Settings menu.
From the left side, select System.
Scroll down and select Recovery.
Hit the Restart now button next to the Advanced Startup option.
What does error 1962 No operating system found mean?
Faulty hard disk drive – Some of the most common signs includesluggish performance, unusual noises (clicking or loud component sounds), and corrupted files. Do not hesitate to apply the below tips and check theselaptops with both SSD and HDD for increased performance.
Corrupt Windows startup – It refers to those times when your OS is damaged, and you can not properly perform the booting. Keep in mind that there are some simple ways to optimize Windows 10 startup and correct the issue.
Startup errors – An error message during startup indicates specific problems, so it’s important to troubleshoot the related issue. If this is your situation, then do not waste time testing unrelated pieces of hardware or replacing unassociated files.
BIOS related troubles – Windows BIOS Setup Utility contains both read-only information and settings that can be personalized. However, improper customization or poor updates can lead to the PC error 1962.
How to prevent the PC error 1962?
➡ Always check the hard disk drive condition
To prevent this annoying issue, the first thing to do is to update HDD-related drivers. You can manually update disk drives through Device Manager by simply choosing Update driver or using Outbyte Driver Updater, which will automatically scan your PC and replace missing or outdated HDD drivers.
In addition, you can also automatically verify the hard disk drive condition by giving a try to these HDD health check software tools. They won’t disappoint you.
➡Constantly update your OS and run the troubleshooter
The disk drives need to be updated, you’ve seen that already, but this also applies to your entire operating system.
Keep it up to date to prevent corrupted Windows setup and other setup errors. If you have no Internet connection or a wrong network, keep in mind that you can even update your OS offline.
To avoid system errors and unexpected data loss when updating Windows 10 offline, it’s best to use local data backup software. Unfortunately, even if Windows does have its backup tools, they have limited scheduling and optimization options.
➡Make sure you always keep BIOS updated and correctly set
You should always check for the latest updates and customize the related settings precisely. Therefore, learn how to easily update BIOS, which will keep you from getting into trouble.
These methods are highly recommended to prevent the error 1962: No Operating System Found, so do not hesitate to apply them. However, if none of them worked for you, also check these Windows 10 boot repair tools to rescue your PC and get things back to normal.
It’s not always that someone wants to type in English on the standard keyboard. If Marathi is your weapon of choice, you mustn’t miss out on the best Marathi typing software for PC.
If you’re wondering how to type in Marathi on laptop or PC, you’re in the right place. First things first, though.
You probably know that different fonts are required to complete your Marathi task, be it transcription, assignment submission, or learning new foreign languages.
We’ll show you how to install Marathi font on PC. All it takes is good Marathi font software to deal with this quickly and easily. Here’s a quick preview of our favorite picks:
Google Input Marathi – Marathi typing software online (Google-powered)
Marathi Typing – ISM Marathi typing software free download
EnglishtoMarathiTyping.com – Easy Marathi typing keyboard for PC
LipiKaar – Excellent English to Marathi typing software for Windows 10
Baraha – Nifty Marathi font software & editor (+ Punjabi languages)
But you needn’t necessarily add new fonts. Here’s what we’re talking about.
How can I type Marathi typing in computer?
Windows 10 is equipped with over 7000 languages from all over the world plus it allows you to create a custom keyboard layout, as per your needs.
However, users would still need separate programs for adding special characters or typing in Marathi.
An English to Marathi typing software for Windows 10 will help you write in Marathi without adding new fonts, and more. The same principle applies to unified India typing software, including Marathi.
From auto-completion for fast typing to auto-correction, there’s much more that makes these programs an essential addition to Windows.
Google Input Marathi is a free-to-use Marathi typing software developed by none other than the search giant. What’s more, it comes with a responsive and smooth-running interface.
It’s a perfect option for those looking for an efficient Marathi typing tool on the fly. In fact, it is a practical word processor that comes with a language menu and the facility to input special characters.
It may not offer any pro features or spell-checking functions for that matter, but it supports various languages (more than 50 international languages) including Marathi.
Once the users select the language, the letters conform with the respective keys on the computer keyboard.
One of its other major advantages is that it does not need to be downloaded and installed separately and so, there’s no concern with memory usage.
If you don’t feel like using the Google English to Marathi typing software for PC as such, you can also get the Chrome extension.
Marathi Typing – ISM Marathi typing software free download
How to download Marathi typing? ISM delivers a nifty Marathi typing software with a free download option. You can easily install it on your computer and use it as you see fit, even offline. That’s right!
The best part is that users don’t even need an active internet connection while using this English to Marathi typing software for PC.
Moreover, it comes equipped with various keyboard options that make it convenient for the users to select the layout based on their requirements. This makes it an excellent Marathi keyboard for PC Windows 10.
Users can then type on any of their chosen keyboards. In fact, it also provides on-the-spot support for correct word replacement. Another great feature is the auto-complete function that helps users work much faster.
EnglishtoMarathiTyping.com offers users all the assistance in Marathi typing on a word document or on social media platforms like Facebook.
However, users would first need to download the software to get access to the typing features. It’s free software that helps users type in Marathi efficiently.
After it’s downloaded and installed on the windows system, it’s no longer dependent on an active Internet connection.
With its simple concept, users do not need to remember the intricate Marathi keyboard layout. All they need to do is to write English alphabets on the document.
Then, it gets automatically translated into Marathi words as the space key is pressed.
When pressing the backspace key once, it suggests optional words which users can insert into the text. It can be used in any format such as Word, Excel, Gmail, and Facebook. Best of all, it’s absolutely free of cost.
LipiKaar – Excellent English to Marathi typing software for Windows 10
Lipikaar is a typing technique that allows users to write in different Indian languages, including Marathi using the standard English keyboard.
It’s a straightforward, responsive, and easy-to-use tool that helps users write Marathi on Word documents, Excel sheets, presentations, and emails.
The awesome part is that you do not need to be an expert in English. There are, of course, specialized dictionary browser extensions that you can use to improve your English vocabulary.
However, Lipikaar helps users to think in Marathi. What’s more, it does not require any keyboard stickers, and it gives users full control over typing.
This English to Marathi typing software for Windows 10 works on easy rules that enable users to type even the most challenging word easily and flawlessly.
Baraha – Nifty Marathi font software & editor (+ Punjabi languages)
Baraha provides support for a wide range of languages including Marathi. The software is used to type in the preferred language and create Word documents, blogs, websites, Excel sheets, emails, databases, and presentations.
It offers fundamental word-processing capabilities and comes with a Unicode-enabled text editor. It also comes equipped with a tool that can swiftly switch from one language to another.
It’s not only compatible with Windows 10 but also works well with previous versions. This makes it an excellent English to Marathi typing software for PC Windows 7.
Baraha also offers unique tools like FontConvert that helps converts documents between the software and third-party fonts.
Typing in a different language can be complicated, but these typing tools make it a breeze to do so. Simply make your choice from the above list and start typing in Marathi easily and proficiently.
Windows 11 has a new right-click menu, but many don’t like it and they are wondering if is there a way to get the old right-click menu on Windows 11 back.
In this guide, we’ll show you a couple of methods to achieve this, so keep on reading.
Why did Microsoft adjust the right-click context menu?
The simple answer is that Microsoft tries to achieve optimal aesthetics in Windows 11 while enhancing performance. The new context menu is designed to provide fewer options that are usually useful to users.
How do I show the old right-click menu in Windows 11?
1. Edit Windows Registry
NOTE
Modifying the registry comes with certain risks, therefore, it’s advised to back it up before making any changes.
Locate and open the Registry Editor using Windows Search.
Select the Registry Editor, then click Open.
Select Yes if the User Account Control requests permission.
The Registry Editor will be displayed.
To continue with the process of disabling Show more options in the new context menu, find the CLISID folder. You can copy the address below and paste it to search: HKEY_CURRENT_USER\SOFTWARE\CLASSES\CLSID
Right-click on the CLSID folder, expand New, and select Key. Or after right-clicking the folder (CLSID), next, right-click on an empty space in the pane.
A new Key folder will be created.
Rename the Key folder. Copy and paste from below to avoid an error: {86ca1aa0-34aa-4e8b-a509-50c905bae2a2}
Create a sub-key by right-clicking the renamed key folder, placing the cursor on New, then selectingKey.
Next, name the sub-key InprocServer32. With the newly named sub-key highlighted, double click the Default option. Examine the pop-up window and make sure the Value data is empty. Next, select OK.
Exit Registry Editor. Next, restart your computer or restart File Explorer.
2. Run Command Prompt
Select Windows key + R. Copy and paste the code below: reg.exe add "HKCU\Software\Classes\CLSID\{86ca1aa0-34aa-4e8b-a509-50c905bae2a2}\InprocServer32" /f /ve
Restart your computer or restart Windows Explorer.
This method will achieve the same results as modifying the registry, but it doesn’t require any user input.
Next, type the code below: reg.exe delete "HKCU\Software\Classes\CLSID\{86ca1aa0-34aa-4e8b-a509-50c905bae2a2}" /f
By now, you should be able to switch between the new context menu and show all options. If you need more tricks, do not hesitate to learn how to disable Windows 11’s Show More Options Menu.
For laptop users looking for touchpad-specific options, see how to right click on a laptop for easy steps before editing the registry.
Before you go, let us know if these methods helped you restore the old right-click menu on Windows 11. Did you solve it using another method? If so, we’d love to hear it. Please share in the comments section below.
Many are wondering how to remove the Office Click to Run since it can cause various problems. Removing it is simple and it will take just a few minutes.
Why do I need to uninstall Office Click-to-Run?
The problem arises when you are trying to install a 64-bit version of Office. If Click-to-Run is installed, you won’t be able to do that.
How can I uninstall Microsoft Office Click-to-Run?
1. Disable Click-to-Run from Services
Press the Windows + R keyboard hotkey to launch the Run application.
Type services.msc and press OK.
Right-click on Microsoft Office Click-to-Run service and select Properties.
In the General tab, go to Startup type, pull down the menu and select Disable.
Click OK and restart your computer.
2. Uninstall Click-to-Run from Control Panel
Type control in Windows search and click on Control Panel from the results.
Click on the Programs and features item.
Click on Uninstall or change a program.
In the list of installed programs, click on Microsoft Office Click-to-Run.
Click on Uninstall.
Click YES when you are prompted to remove all applications that were installed by Click-to-Run.
A third-party uninstaller will scan your PC for any leftovers and will provide a report so you will know exactly what files were still on your system after the regular uninstall.
You can give IObit Uninstaller a try as it is the exact kind of tool we mentioned above and can help you erase unwanted or stubborn programs with all their associated files.
It will scan and display logged applications, folders, registries, or any other leftovers to quickly perform a cleanup process by removing all these files and further improving your PC’s health.
4. Download the Office version that is not Click-to-Run
Visit the site where you purchased Office and sign in by using your Live ID.
Click My account at the top of the home page to access your Office downloads.
Click download for the suite you purchased and then click Advanced Options under Download now.
A version of Office is listed that is not an Office Click-to-Run product and does not require the Q: drive to be available.
Since Click-to-Run provides updates to the Office suite and is an important component of Microsoft Office, it is not advisable to uninstall it.
If you want to get it back, here is the complete guide on how to download Office Click to Run. However, if you still have your reasons to do that, we hope that you will find useful the solutions described above.
To learn more, we have a special guide on OfficeClickToRun.exe, so don’t miss it for more information.
If you encounter any issues while uninstalling Office Click-to-Run, consider using the Microsoft 365 Uninstall Troubleshooter to resolve common uninstallation problems and ensure all components are properly removed from your system.
Did you manage to uninstall OfficeClickToRun.exe? Do give these fixes a try and let us know which one worked for you in the comments section below.
Adobe Illustrator Crack is a powerful tool for creating vector images. It is widely used by graphics designers and artists worldwide. Despite its popularity, it is not free from errors. One such error is can’t finish previewing not enough memory. Thankfully it can be easily fixed.
Here, in this blog, we will discuss the expert-tested methods to fix the issue right after discussing the cause. Let’s get started!
What causes Illustrator can’t finish previewing not enough memory error?
There could be various reasons why Illustrator is unable to finish previewing on Windows 11. Some of the popular ones are:
Insufficient system resources – Illustrator needs certain memory and processing power to run smoothly. If your computer can’t provide that, you may get this error.
Software is outdated – You must have an updated version of the app and ensure it is compatible with Windows 11. If the software is obsolete or missing some files, you may get the error.
A lot of apps running – If your computer has a significant number of apps running, it could interfere with the smooth working of the app. Try to close unnecessary apps or settings.
System requirements not met – If your computer doesn’t meet the system requirements needed to run Illustrator, then you might face this issue.
Corrupt files – If the file you want to preview is corrupt, then you might see this issue. To ensure the file is corrupted, try opening another image to see if you get the error.
What can I do if Illustrator shows can’t finish previewing not enough memory error?
Before engaging in advanced troubleshooting steps, you should consider performing the following quick fixes:
Now under the Files to delete column, select all files and click OK.
Choose Delete Files and let the process complete.
4. Split the Complex artwork
Illustrator allows you to create even complex artwork with the available tools and effects such as 3D, effects, mesh, etc. However, it can burden software or the computer’s ability to preview it.
If you suspect that the artwork is causing the issue, you need to split the artwork into segments. Alternatively, you can save the artwork, close the app, and restart your PC.
5. Damaged or missing files
When the artwork is being imported or opened in the app but has links to the artwork that is corrupt, you may get this error. Alternatively, there could be corrupt, missing fonts, patterns, and swatches. To fix this, you need to find the exact font or a font that is close to substituting for the missing font.
6. Contact Adobe Support
If nothing has worked for you so far, it is advised to contact Adobe Customer Support. Explain the issue and solutions you have tried; this will help them to understand the situation better.
So, these are the things that you can try to fix Illustrator can’t finish previewing on Windows 11. Try them and let us know what worked for you in the comments section below.
Sometimes Instagram won’t save edits no matter what. You may try to change your profile picture, username, or something else only to see that there was a problem saving your profile on Instagram.
There was an error saving your changes Instagram caption, reel, hashtags
Instagram username there was a problem saving your profile
Instagram there was a problem with your request – In this case, Instagram won’t save edits.
If you are wondering how you can fix this, we’ve got you covered. There are a few confirmed solutions that you can try.
You might also be wondering – and legitimately so – why won’t Instagram save your edits. Let’s take a closer look.
Why are my edits not saved on Instagram?
This error usually comes up as a result of a poor Internet connection or from an outdated Instagram application version that may affect mobile users.
And speaking about mobile platforms, it’s likely that your phone’s OS also be in dire need of updating. As always, cache and clutter piling up can affect the way in which your apps act and Instagram makes no exception.
Finally, if you’re lucky, this is nothing but a temporary bug and it won’t be long before the glitch is corrected.
If there was an error saving your changes on Instagram, we prepared a few easy steps to help you regain control of your account in no time.
How can I fix the error saving changes on Instagram?
? Before we dig in, make sure you try restarting your phone or tablet if you’re having trouble with Instagram.
1. Update your Instagram app
Make sure your device is connected to WiFi.
Open the Google Play app on Android.
Type Instagram in the search bar.
Tap Update. The Instagram app will now begin to update.
If there is no Update button, this suggests that your app is already up to date.
Click on Clear data and select Yes when asked if you want to clear all data.
3. Reinstall your Instagram app
iPhone and iPad
Go to the Home screen, tap, and hold the Instagram app icon until it shakes.
Tapxon the app to delete it. Your photos and profile info will be saved by Instagram.
Go to the App Store.
Search the Instagram app and click Install.
Lastly, log in with your username and password.
Android
Open Settingsand tapApplications>Manage Applications>Instagram.
TapUninstall.
Now, go to the Google Play Store.
Search the Instagram app and click Install.
Reinstall Instagram, and then log in with your username and password.
4. Check your Internet connection
If restarting your device doesn’t help, try using Instagram both on WiFi and on your mobile data connection.
This will allow you to confirm if the Instagram edits not saving issues has to do with one or the other. According to the results, you can follow these easy steps to solve unknown network errors on Instagram.
Near the bottom, tap System – Advanced –System update.
You’ll see your Update status. Follow any steps on the screen.
iPhone
Make sure you are connected to your Internet with WiFi.
Go to Settings – General
Tap Software Update.
Tap Download and Install. If a message asks to temporarily remove apps because the software needs more space for the update, tap Continue or Cancel.
To update now, tap Install. Or you can tap Later and choose Install Tonight or Remind Me Later.
If asked, enter your passcode.
6. Report the technical issue
If these steps didn’t resolve your problem, you can report the bug so that the Instagram support team can investigate.
These are the confirmed solutions that should help you fix the error if there was a problem saving your profile on Instagram. Let us know which of these solutions worked for you.
No matter what role you cover in an enterprise, if it regards intellectual work, at some point, your boss could ask you to design an ER diagram for the company.
If you want to be ready for this task, it’s important to have this article saved somewhere on your laptop. In this guide, we’ll show what software solutions you can use to create ER diagrams.
Before listing the tools, it’s important to offer you some background information.
What is an ER Diagram? According to the definition within the LucidChart website, an ER Diagram is:
a type of flowchart that illustrates how “entities” such as people, objects or concepts relate to each other within a system.
Those specific flowcharts can have several sets of symbols. They are also useful to manage and show databases in many fields from research to software engineering.
Now that we have provided you with a definition, let’s dive right in and describe the different software solutions available on the market.
Where can I draw an ER diagram online?
You can draw ER diagrams in many programs that have online platforms, such as Adobe Illustrator, Lucidchart, Canva Diagram Maker, and many others that you will find mentioned below as solutions.
ER diagrams tools help you create and design your diagrams with ready-to-use templates, drag-and-drop symbols functionalities, shapes libraries, and other specialized features.
Adobe Illustrator is an excellent tool for creating ER diagrams although most users utilize it to create icons, logos, illustrators, and other graphic design elements.
Creating an ER diagram in Illustrator is as simple as a walk in the park. All you need to do is draw some squares or other shapes that will serve as blocks of information.
You can then use straight lines and arrows to connect these blocks of information and describe the relationship between them. To insert shapes, you can use the built-in Shape tools.
To highlight particular blocks of information, you can also color them. Even if you haven’t used Illustrator before, you’ll be able to sketch your ER diagram within minutes thanks to the intuitive UI.
The best part is that you can take your ER diagrams to the next level once you’ve become familiar with Illustrator. You can use the built-in editing tools to play with colors, and textures, insert icons, and much more.
With this tool, you can reconstruct complex data into basic graphics with illustrations tools which makes it easier to learn insights and make clever decisions.
The Illustrator app also provides you with faster feedback and sharing features because you can organize memos and comments, making your reviewing task more efficient.
Adobe Illustrator
Try Adobe Illustrator to create flowcharts and ER diagrams for both personal and professional use.
Lucidchart is a simple and well-designed online platform for ER Diagrams. It’s a complete tool to design captivating charts for your personal use or professionally for your business.
By using this program, you can envision your database design before you create it, such as the general structure and different kinds of data interaction.
Thus, you can design, patch, or debug relational databases by creating ER diagrams to conceptualize easily your projects while finding faulty information in time.
Lucidchart successfully simplifies designing databases with shape storage and drag-and-drop symbols functionality.
It includes tables, fields, and primary or foreign keys that connect each entity with individual crow’s foot notations to show the cardinality and ordinality of each one.
Therefore, Lucidchart helps you differentiate in a matter of seconds relationships, entities, and their attributes.
Moreover, you can save time creating your ER diagrams because this tool has an automatic generator of models and connections using its data import feature to build your database tables and plans right onto your canvas.
Lucidchart
Save time creating your ER diagrams and use Lucidchart’s automatic template generator.
If you want to make free charts online, you can also choose to use the famous Canva software. To use it, simply register, select one of the ready-to-use templates and modify it according to preference.
This free online service (also available as an app for Android and iOS devices), allows creating lots of graphic works in an extremely easy and fast way.
Once arrived there, select one of the options in the box First time on Canva? Subscribe! to specify the personal or professional reason to use the service.
The site will require you to register via an e-mail address, Facebook account, or Google account, by pressing the appropriate buttons.
When registered, start creating the ER Diagram or organization chart. At this point, you have to select one of the templates listed under the Canva Layout entry.
You should also modify the organization chart replacing the example text with the names and positions of the people that make up the team.
If other graphics elements need to be added (eg shapes, logos, illustrations, etc.), text, or upload new images, you can pick the options on the left sidebar.
When the work is finished, download the project by pressing the Download button at the top right, selecting the format in which to save the output file, and pressing again on the Download button to complete the procedure.
Canva Diagram Maker
Try the popular Canva app to create your ER diagrams with ready-to-use templates.
If you are looking for programs to create remarkable free charts and ER diagrams, you should consider trying LibreOffice. This is one of the best free and open-source alternatives to Microsoft Office.
This software also allows you to create organizational charts but not for free. It includes applications for Word processing, spreadsheet processing, database management, and drawing.
The application designed for drawing – LibreOfficeDraw – allows you to create diagrams, organization charts, and other graphs in an easy way.
The entire LibreOffice suite is available for all major operating systems: Windows, macOS, and Linux.
To download LibreOffice on Windows, you should connect to the program’s website, press the green button to download the tool, and wait for the installation to complete.
If you need to add lines and/or arrows, to connect the various elements of the organization chart, you can press the appropriate items always from the sidebar.
To add text, instead, you can select one of the shapes drawn and type the text desired, to insert it. Once the work is completed, click on the Save item in the File menu to save the changes made.
Xmind ZEN is one of the most complete solutions for creating ER diagrams, organization charts, concept maps, and other types of graphs. It is characterized by a very attractive and user-friendly user interface.
It also includes a wide range of pre-set templates from which you can start to create your own graphics. So, it is very intuitive even for less experienced users.
The program is available in various versions: the free version has no major limitations and allows the user to share projects online. It is important to highlight that the software provider applies a watermark to the work.
You can remove this watermark by subscribing to the Premium version. The software is available for Windows, macOS, and Linux and in the form of apps for Android and iOS.
To create free organization charts with Xmind, you must first download the program on a computer. Therefore, you should connect to the online software page and press the Free Download button.
When the download is complete, follow the steps and install the software, then you’re good to go. Thankfully, the software’s interface is easy to follow for anyone.
Note: It is important to remind that the trial version of the program applies a watermark to the works. This watermark is removable only by subscribing to the Premium version.
As its name suggests, Diagram Designer is a program that allows you to create ER diagrams, organization charts, and other graphs. It does that through a “spartan” user interface but is rather simple to use.
It includes a wide range of pre-set templates for shapes and arrows, allowing users to create various types of diagrams and graphs very quickly. The program is free and perfectly compatible with Windows.
To download Diagram Designer, go to the software homepage. Then, press the link Download installer and, on the page that opens, click on the Diagram Designer Windows Installer link. The latter is located under the heading “Download”.
When the download is complete, open the .msi file that appears, and press the Next button twice in a row. To end the procedure, press the Install button and, then, Yes and Finish.
At this point, you have only to shape the ER diagram, “fishing” the various elements you want to compose from the menu on the right.
Keep the left mouse button pressed on one of the objects in question (shapes, connectors, etc.), drag it to the work area, and change its position and size using the appropriate indicators.
To edit the text in one of the organization chart nodes, double-click on it, type the desired text in the Insert text field in the object, and press the OK button to apply the changes made.
When the work is finished, open the File menu and select the Save As entry from the menu that opens. This will allow you to save the document in the format and position you prefer.
Another excellent online option is Smartdraw. This program is easy to use and really comprehensive, not requiring any setup to use. You can simply choose from over 70 templates.
Besides that, the software also has integration with most Google products, so you can easily tie your work to your excel and other software that uses such file formats.
You can automatically create an ER diagram, by just putting the data available, without using a time drawing thanks to its True Automation feature.
It has Intelligent Formatting with which you can add or remove more than one shape, and the program will be able to realign and arrange all the ERD elements.
Furthermore, the platform provides professionally-designed ERD examples and other software design diagrams, such as Quick-Start templates.
Smartdraw has free Support, and many users have reported effective customer service online, carried out via live chat or email.
Not satisfied with the software solutions listed above? You did try them, but you want to test other software? You can try as well ERD Plus, ER Diagram Tool, Draw.io and Creately.
This article gave you a glance on the hottest software able to create the best ER diagrams. Let us know which software suits your needs best in the comment section below.
TikTok is a video-making and-sharing social media platform. However, there are endless videos to be found, covering a wide range of themes. There are funny sketches, DIY and craft films, and everything else you can imagine.
Right-click on any video you want to download and select the Save video as option.
Name the file and click on Save.
2. Use a dedicated browser extension
Open your browser’s extension store page. We used Opera‘s because the browser is lightweight and supports watching the demanding multimedia content on TikTok on pretty much any device.
Download the TikTok download extension. Just click on Add to Opera and wait a few seconds. Its button will appear in the top right corner of your browser, next to your other extensions.
Open TikTok in your browser and find the video you want to download. Click on it to open from the For You page. Now click on the TikTok download button in the right corner of your browser.
This will open a new tab in your browser. You will have to wait a few seconds, and then you’ll get a Save Video link. Click on it to start the download.
Select the location on your PC where you want to save the Tiktok and click on Save.
3. Use online services
Copy the video address of the TikTok video you wish to download by clicking on the share button and the Copy link icon.
Launch the app, paste a name of a Tiktok user, hashtag, or URL into the dedicated space and click Download.
If you access a user, it will download all the clips in his feed. However, the tool only lets you download 50 per day with the free version.
These methods listed in the article will be effective even if you are looking to batch-download TikTok videos without a watermark.
Now you should be able to download in batch. The only difference between the two tools is that 4K TokKit allows you to download from one account. At the same time, EaseUS Video Downloader enables you to download from multiple accounts in a batch.
You can connect your computer to a projector if you want to share your screen while giving a presentation at work or watching a movie on a big screen. Connecting Windows 11 computer to a projector is a simple process and can be done in a few steps.
This guide will walk you through the Windows 11 projector settings for a seamless setup. Let’s get started.
How can I connect Windows 11 to a projector?
Before moving to the actual steps, make sure you go through these preliminary checks:
It would be best if you had a compatible cable that could be used to connect the two devices. The standard wires used are USB-C, HDMI, and VGA.
Check that your computer operating system and projector are compatible to accept the input from the cable.
Read the projector manual and the computer’s technical specifications so that both devices support the resolution and refresh rate for a smooth display.
1. Connect with a cable
1.1 Choose a suitable cable
You need to check if you have HDMI, VGA, or USB-C port on your computer and check the projector for HDMI, VGA, or USB-C input. Once established, choose the compatible cable and connect your computer to the projector.
1.2 Customize your projector display
Press Windows + P to get options for the projection menu of Windows.
Select the projection settings from the following options:
PC screen only -this option is not for the projector.
Duplicate – It will show the same thing as your laptop screen.
Extend – The projector will be the second monitor.
Second screen only – Your computer screen will shut off, and the projector image will act as the main screen.
On the Settings window, go to System, then click Display.
Under Multiple displays, click Connect next to Connect to a wireless display option.
It will search for the Available displays and click on the option to connect to your projector.
If both devices support Miracast, you can connect your PC and projector by pressing Windows + K and choosing the projector. You can adjust the display settings as mentioned in method 1. To stop projecting your screen, press Windows + K again and click Disconnect.
So, these are the steps you need to follow to connect Windows 11 to the projector to establish a successful connection and display the content on a larger screen. If you have questions or concerns, please mention them in the comments section below.
We all know how handy it is to have a USB drive or stick to transfer our data between two devices.
They are so convenient and easy to use that it’s our first choice for the job but sometimes, the system doesn’t recognize your USB device and the story could end right there.
Many of our readers received the USB device not recognized message and when they checked Device Manager, they encountered a device listed as Unknown USB Device (Device Descriptor Request Failed).
Some of our readers also received the message A request for the USB Device Descriptor Failed accompanied by the error code 43.
Obviously, Windows didn’t identify the device. Don’t worry because we can fix this easily but first, let’s see why this is happening in Windows 11.
What causes device descriptor request failed?
This is a problem that may occur on all Windows OSs and doesn’t refer strictly to Windows 11.
Also, if you have a USB 1.0 old device, the system probably didn’t find a driver for it. The issue may be also produced by system corruption but it’s less likely.
How do I fix device descriptor request failed Windows 11?
1. Enable the Enhanced Power Management
This valuable solution can be the way to fix this request failed error for your removable devices in a few clicks. Thus, carefully apply the steps below to repair the USB issues.
1. Click the Search icon on the taskbar, type device manager, and click on the app from the results.
2. Go to the USB controllers section, right click the problematic driver and select Properties.
3. Navigate to the Details tab, select Device instance path and in the Value section, highlight the value, right-click it and select Copy.
4. Now, press the Windows key + R to start Run, type regedit and press Enter or click OK.
5. Navigate to the following path and replace <device instant path> by pasting the actual path you copied in step 3: HKEY_LOCAL_MACHINE\SYSTEM\CurrentControlSet\Enum\<device instant path>\Device Parameters
6. In the right pane, right-click and select New and select DWORD Value and name it EnhancedPowerManagementEnabled.
7. Double-click the new key and set the Value data to 0, then click OK.
8. Now, close Registry Editor, unplug the USB device and reboot the PC.
9. After restart, connect the USB device and the issue should be resolved.
2. Update USB device drivers
Update with Device Manager
Right click on the start button and open Device Manager.
Under Universal Serial Bus Controllers, find the Unknown USB Device.
Right-click on it and select Update.
Windows should now scan and install the latest driver version for your USB device. Sometimes, however, it may not be able to detect the best version, in which case we recommend you use a dedicated driver updater.
Update with dedicated software
To update your USB drivers automatically, without much hassle, we suggest you use a specialized driver updater as it is one of the simplest and most reliable options.
These tools can scan your PC and detect any driver problems. It gives you a quick report and updates and repairs all of your drivers in just a few minutes.
3. Use the Hardware and Devices troubleshooter
Click the Search icon from the taskbar, type cmd, and select Run as administrator from the results.
Type or paste the following command and press Enter to run it: msdt.exe -id DeviceDiagnostic
Now, click Next to start the Hardware and Devices troubleshooter.
If the system finds a solution, click on Apply this fix.
In the next window, click Enable to allow Windows to check for drivers when a new device is installed.
The Hardware and Devices app was removed from the troubleshooting settings a long time ago by Microsoft but you can still run it, even on Windows 11.
And as you can see, it can be pretty effective in this kind of situation when the USB device is not recognized by the system.
4. Uninstall the device
Select the Windows Search icon on the taskbar, type device manager, and click on the app from the results.
Look for the problematic driver in the USB controllers section, right click on it and select Uninstall device.
Remove the device from the USB port, reboot your PC and after the system loads, insert the device once again.
If the USB device is older but it came with its own dedicated driver, use that software to install your device properly.
You may also try visiting the manufacturer’s website and see if it provides the proper drivers for your system.
How can I avoid the Device Descriptor Request Failed error?
This is a common problem that may occur any time you plug in a new USB device to your PC, but there are a couple of things you can do to prevent it.
➡ Connect the device directly to the PC
We know that a PC or laptop never has enough USB ports to go with all your devices and sometimes it’s necessary to use USB extenders or hubs.
However, these can often malfunction or not be compatible so it’s important to connect your USB device directly to an empty port on your machine.
➡ Use the correct port
Although USB ports are backward compatible, your device, especially if it’s very new or very old, may not be so adaptive.
That’s why you should try connecting your gadget to the right socket so it can be recognized quickly and function properly.
➡ Change the port
Although it doesn’t happen that often, USB ports can malfunction sometimes, or maybe they just accumulated some dust and cannot ensure the proper contact.
So, the right thing to do, apart from trying to gently clean the port and connector with a soft brush, is to try plugging your device into another one and see what happens.
Compile error in hidden module is an error message that might pop up for some MS Word and Excel users.
The error message is generally triggered when Office users open Word or Excel. Consequently, neither application isn’t launching.
How to fix compile error in hidden module?
Does the Compile error in hidden module error message pop up when you open Excel or Word? If so, these are a few resolutions that might fix it.
1. Update Adobe Acrobat
The Compile error in hidden moduleerror can be due to two Adobe Acrobat template files in MS Office folders. As such, updating Adobe Acrobat is one potential resolution for the issue.
It’s also of utmost importance to run software that comes from a trusted source, which is why we strongly recommend you only install Acrobat from its official website.
As a powerful editing suite that is closely connected to Microsoft Office file formats, Acrobat delivers an all-digital document experience.
In fact, there is no need to start over if you happen to run into an error, you can quickly export PDFs into other Microsoft 365 such as Word, Excel, or Powerpoint.
1.1. What does Adobe Acrobat provide?
Let’s quickly look at its key features:
Simplified workflows across any platform from desktop, to mobile and web
Convert a PDF to Microsoft 365 formats
Enhanced collaboration tools to share, review, and sign documents across devices
Edit data in scanned tables and convert forms to fillable forms
Powerful editing toolkit (merge, convert, delete, rotate, crop and more)
To manually check for Adobe updates, click Help on Acrobat’s window.
Select Check for Updates to open the updater window. Then you can press a Download and Install button if there are updates for it.
2. Move Pdfmaker Files to Another Folder to fix the compile error
Pdfmaker.xla and Pdfmaker.dot are the two Adobe Acrobat files linked with the Compile error in hidden module issue. As such, moving those files out of their MS Office folders might also fix the error.
This is how you can move those files to an alternative folder in Windows 10.
Press the Type here tosearch button to open Cortana’s search box.
Enter Pdfmaker.xla in the search box to search for that file.
To search for Pdfmaker.dot, enter that file title in the search box.
Then right-click the files and select Open file location to open their folders in File Explorer.
If you can’t find those files with the search tool, open the MS Office Startup and Xlstart folders in File Explorer. The Startup folder includes Pdfmaker.dot, and the Xlstart directory includes Pdfmaker.xla.
To move the Pdfmaker files to the desktop, right-click them in File Explorer and select the Cut option.
Right-click another folder (or Windows desktop) to move them to and select Paste.
3. Update the Norton Antivirus Software to fix the Compile error in hidden module
Norton Antivirus is also linked with the Compile error in hidden moduleerror. If Norton AV is on your desktop or laptop, updating that software might fix the issue.
You can check for updates by pressing the Update Me Now button on this webpage. Alternatively, right-click the Norton Antivirus system tray icon and select Norton LiveUpdate.
4. Uninstall Norton Software to fix the hidden module error
If updating Norton Antivirus doesn’t fix the hidden module error, consider uninstalling your Norton software. To do that, press the Windows key + R keyboard shortcut.
Enter ‘appwiz.cpl’ in Run, and click the OK button.
Select the listed Norton Antivirus software, and press its Uninstall button.
No error is a match for this powerful tool and the compile error in hidden module makes no exception. Stellar Repair is the ultimate repair software for Excel protecting your workbook data from corruption and permanent loss.
Stellar Repair for Excel fixes severely corrupt .XLS/.XLSX files, with the highest degree of precision, and restores all data to its original state while preserving all properties and formatting.
Let’s quickly look at its key features:
Repair corrupt Excel files and restore original formatting, layout, and specifications
Uncluttered, intuitive UI with an integrated step-by-step wizard and repair recommendations
Easy Find and Search options to quickly track down your files and folders
Real-Time Pre-recovery Preview feature
Fully compatible with Windows 10, 8.1, 8, 7, Vista, and, XP
Supports Microsoft Excel 2019, 2016, 2013, 2010, 2007, 2003, and 2000 versions
Powerfully data recovery toolkit (including tables, charts, cell comments, formulas, and filters)
1. Press the Windows key + X hotkey to open the WinX menu.
2. SelectCommand Prompt (Admin) from the list.
3. For a 32-bit Windows platform, input the following commands in the Prompt and then hit Enter, one by one: regsvr32 -u c:windowssystem32mscomctl.ocx regsvr32 c:windowssystem32mscomctl.ocx
4. On 64-bit Windows platforms, input these commands one by one and press Enter after each one: regsvr32 -u c:windowssyswow64mscomctl.ocx regsvr32 c:windowssyswow64mscomctl.ocx
5. The compile error in hidden module is now solved.
The Compile error in hidden module error can also be the side effect of Windows updates. As such, registering a mscomctl.ocx file using cmd might also fix the issue.
One of these resolutions for the Compile error in hidden moduleerror might kick-start Word or Excel so that you can launch them again.
Some of the more general tips in our post for fixing MS Office applications that don’t open might also come in handy for fixing the hidden module issue.
Let us know which one worked for you in the comments section below.
So, your HP Envy x360 won’t wake up, or it’s stuck in sleep mode? Don’t fret. There are lots of users like you. Laptops with this kind of issue usually would only go to sleep when you force shutdown.
Although there are numerous solutions for problems related to this on the internet, there is a dearth of those that are specially compiled for the HP Envy x360.
My HP Envy x360 (m6-w103dx) will not turn on, why?
Here are a few reasons you might be encountering the problem:
Misconfigured power settings: If you have incorrectly modified the power settings, chances are that’s what is responsible for your HP Envy being stuck in sleep mode.
Corrupt graphics drivers: Graphics drivers are an integral part of the PC, and issues with them can trigger a range of problems.
Incompatible hardware connected: Incompatible hardware will affect the core functioning of the OS and, in some cases, lead to HP Envy being stuck in sleep mode.
What can I do if my HP Envy is stuck in sleep mode?
Before trying the slightly complex solutions, here are a few quick ones you can try:
Restart the computer. For laptops, remove the battery, hold the Power button to drain any excess charge, plug the battery back in, and then power it on. In most cases, the problem shouldn’t reappear from now on.
Disconnect any new peripheral connected to the computer around the same time the problem first appeared and verify whether things work now. For one user, it was a card reader plugged in via the USB port.
If these two don’t work, head to the solutions listed next.
1. Reinstall the graphics drivers
Press Windows + R to open Run, type devmgmt.msc in the text field, and hit Enter.
Expand the Display adapters entry, right-click on the graphics adapter, and choose Uninstall device.
Now, tick the checkbox for Attempt to remove the driver for this device, and then click on Uninstall.
Similarly, uninstall the drivers for the other graphics adapter as well.
Once done, restart the computer for the changes to come into effect.
In some cases, the graphics drivers were corrupted or outdated, which led to the HP Envy being stuck in sleep mode, as reported by users. And reinstalling it usually does the trick. If that doesn’t work, you can try updating the graphics driver.
2. Enable keyboard to wake up computer
Right-click on the Windows logo in the Taskbar or press Windows + X, and select Device Manager in the list of popped-up options.
Click the drop-down arrow beside Keyboards. Right-click on the connected keyboard. Next select Properties.
Select Power Management. Then check, Allow this device to wake the computer.
Click OK and after that, restart the system to effect changes and observe if the HP Envy remains stuck in sleep mode issue is resolved.
Launch Windows Search by pressing Windows + Q, type control panel, and select Control Panel in the displayed results.
Type troubleshoot in the Search Box. Click on Find and fix problems.
Select Other troubleshooters.
Scroll until you find Power. Next, select Run.
Follow the prompt to fix any problem discovered by the system. Next, restart the PC to see if it solves the HP Envy stuck in sleep mode problem.
4. Reset power plans to default
Open Command Prompt by looking for it in Windows Search. When located, Run as administrator.
Type the command below or copy and paste: powercfg –restoredefaultschemes
Close the Command Prompt. After this, restart your computer.
5. Set the PC to never go to sleep
Press Windows + R to open the Run command, type Control Panel, and click OK.
Click on System and Security.
Now, click on Power options.
Choose the Change plan settings option.
Click on Change advanced power settings.
Finally, set the Sleep settings to Never on Battery and Plugged in, and then click on Apply and OK to save the changes.
That’s it! One of these methods should help you get things up and running when HP Envy is stuck in sleep mode. And to execute most of the solutions here, you will have first to press and hold the power button to turn on the computer.
If you have tried all of these methods but still experiencing the issue, you may need to update your BIOS. Check our guide on how to do that.
For Windows 10 users, we have a guide tailored to suit your screen display. Learn what to do if the computer monitor won’t wake up from sleep and rest assured that some of these tips may be applied by Windows 11 users as well.
Share your experience after trying these methods or comment on the solution that works for you.
Excel is essentially one big calculator that can also display numerical data in the form of spreadsheet tables and graphs. Formulas (or functions) are the cornerstone of Excel that perform a multitude of calculations and display them within spreadsheet cells.
Excel’s formulas make it one of the most essential MS Office applications.
However, sometimes Excel might not always calculate formulas automatically. When that happens, the formulas don’t automatically update when users change the values they’re based on.
Alternatively, sometimes Excel might just display the formulas within cells instead of their results. If either of those scenarios sounds familiar, check out some of the resolutions for them below.
What can I do if an Excel spreadsheet is not auto calculating?
1. Select the Automatic Calculation option
If Excel functions don’t auto-calculate when you modify the values they’re based on, the default automatic calculation mode probably isn’t enabled. Click the File tab at the top left of Excel.
Click Options, which opens the Excel Options window.
Click the Formulas tab on the left of the window.
Is the Manual option there selected? If so, select the Automatic setting.
Click OK to close the Excel Options window.
2. Turn off Show Formulas
If an Excel spreadsheet displays all its formulas within cells, the Show Formulas option is probably enabled. To disable that option, click the Formulas tab in Excel. Then click the Show Formulas button on that tab.
You can also press the Ctrl + `hotkey to toggle the Show Formulas button off/on.
3. Check the cell format for formulas
Excel will also display formulas instead of calculated output in cells when the cells have a text format. To check if that’s the case, select a spreadsheet cell that’s displaying a formula.
You might see <strong>Text in the format drop-down menu shown in the snapshot directly below. Select General on the drop-down menu. Then the cell will display calculated output when you click within the formula bar (with the cell selected) and press the Return key.
4. Check you’ve entered the formulas correctly
Excel won’t automatically calculate formulas when they haven’t been entered correctly. One of the things hardest to spot is a space in the formula just ahead of the equals (=).
When there’s a space right at the beginning of the formula, its cell will display the function instead of a result for it. So, make sure there aren’t any spaces at the start of functions. If the formula contains spaces anywhere else, Excel will display #Name? in its cell.
So, that’s how you can fix an Excel spreadsheet that doesn’t automatically calculate its formulas. Thereafter, the spreadsheet’s cells will automatically display the results for formulas as expected.
For any other questions or suggestions, feel free to reach for the comments section below.
You found this article because you can’t edit the Registry in Windows 10. So, here is all you need to know.
The Registry is a database that stores Windows operating systems and application settings. Sometimes, you need to change those values manually.
Can’t edit Registry is an error you’ll face when you try to edit a key in Registry but cannot edit the registry.
This unpleasing issue can affect your operating system and stop necessary processes, including that you cannot create value error writing to the registry.
Why can I not edit the registry?
In some cases, users may be unable to make changes to the Registry. This could happen because of a host of reasons, including the following:
Lack of permissions – The user account may not have the necessary permissions to access and edit the registry.
Group Policy restrictions – An administrator may have implemented group policy restrictions that prevent certain users from editing the registry.
Third-party software – Third-party software may have been installed that blocks access to the registry for security reasons.
System protection – The system may have been set up with a feature such as System Protection that prevents changes to the registry.
Before you follow the step-by-step guide to gain permission, you should know that editing the Registry is a very dangerous thing to do.
You can break your computer if you edit it without knowing precisely what to do. You must create a restore point, backup your Registry, and edit with extreme caution to not cause corrupt registry errors.
So now, if you can’t edit the Registry on Windows 10, let us consider a valid solution.
What should I do if I can’t edit the Registry on Windows 10?
Search for Regedit in Start and right-click on it, and from the menu, you should click on Run as administrator.
Navigate to the folder you want to edit.
Right-click on the folder and then click on Permissions.
The Permissions window will open; click on the Advanced button near the bottom-right corner.
At the top of the window, you’ll see Owner: [name], where [name] is most likely the name of the program that created the folder. Click on the Change Link.
In the Select User or Group form, under Enter the object name to select, provide your username on that computer or your Microsoft email address if it is associated with your computer. You then have to click on Check Names.
Click OK on the Select User or Group window and the Advanced Security Settings window.
Before closing the Permissions Window, select Users from the Group or user names list and check the box under allow for Full Control. After that, close the window by clicking OK.
If you can’t edit the Registry on Windows 10, you should have full access to the folder after these steps. More specifically, the current user has full control.
If you use more than one user on your computer, you must repeat these steps every time you access a folder that a program or the other user owns.
Plus, you can change the Registry keys or folder owner to yourself. This will allow you to edit, delete, or insert keys in the folder.
The only downfall of this method is that you have to repeat the steps for each folder you want to edit.
In this article, we explained what Registry is and why you face a can’t edit Registry error. Note that you must be logged into the device as an administrator; if not, these steps will not work.
We looked at how you can fix it by gaining full access to the folder you want to edit and manipulating it as you wish.
Lastly, tell us in the comments section if this method worked for you.
While using the Gmail web app or desktop client to compose an email is easy, you can sometimes stumble upon the address not found error in Gmail.
Several users have reported a similar error in the Google community and Reddit forums.
Upon sending an Email Gmail says address not found This happens every email, to every adrress (they are all right, no typos etc) Also my storage isnt full either (4% occupied) Any ideas?
As the user describes, this error occurs with a specific account and not all. Google usually sends an automatic reply to messages that are not delivered due to the email being deleted.
And speaking about errors, let’s quickly review some of the most common ones:
Address not found Gmail domain – In this case, Gmail is not recognizing the email address.
Address not found your message wasn’t delivered to
Mail delivery subsystem address not found
What is the meaning of an address not found in Gmail?
When an address is not found in Gmail, your email cannot and it did not go through. There are various possible reasons for this and we’ll start listing them below, starting with the most common one:
Spelling errors or missing characters in the recipient’s email address, causing it to be invalid or illegitimate
The recipient’s email address was deleted and is no longer available
The Gmail account to which you are trying to deliver a message is protected or has blocked you as a sender
Instead of clicking on Send, click the small drop-down menu beside the Send button.
Select Schedule Send and click on the Select date and time option.
Specify the time and date and click on Schedule.
On the left pane, click on the Scheduled option to view the scheduled email. You have to click on More to see the option.
If you are trying to send the email to a custom email address, it is possible that the domain or the server is down for Maintainance.
Moreover, you should contact the recipient to check the email service. If the service is down, use the Schedule feature in Gmail to send the email at a specified time and date.
The address not found Gmail error usually occurs if the recipient’s email address is deleted or invalid. Follow the steps in this article to verify the account status and fix the error.
The Windows Recycle Bin can be considered the last bastion of your computer’s files. It’s the final opportunity where users can undo mistakes and restore files before they’re gone forever.
Emptying the Recycle Bin on Windows 11 is something that should be done regularly, but what if you have multiple users on your computer? Can you wipe out various Recycle Bins? Yes, you can.
Why would I want to empty out other Recycle Bins?
The main reason to empty out a Recycle Bin is to free up space on your hard drive which is particularly helpful if you have a computer with multiple users. Bins can get full pretty quickly.
But there are other reasons to do so. Below is not an extensive list, but it does cover the more critical reasons why you should empty the Recycle Bins of all users:
Emptying the Recycle Bin can improve computer performance: Deleting files can make your computer faster because you’re getting rid of that extra burden from the system.
It deletes files with important information: It’s important to protect your computer’s files from bad actors. Having documents in the Recycle Bin can be dangerous.
How do I empty the Recycle Bin of all users?
There are multiple ways you can delete the Recycle Bin for multiple users on your Windows 11 computer; both manually and automatically. This guide will show you how to do both.
You can certainly go into each individual user’s account and empty the Recycle Bin one by one, but that may take a while. Especially if you have a ton of people.
There are special cleaner apps that can do the job for you automatically. Be sure to check out Window Report’s guide on the best Recycle Bin cleaning apps for Windows 11.
You can also use the Disk Cleanup tool to empty out the Recycle Bin and other unnecessary, temporary files.
1. Use Command Prompt
Bring up the Command Prompt on the Windows 11 Search bar. Click Run as administrator when it appears.
If a User Account Control appears asking if you want to make changes, select Yes.
Type the following into the Command Prompt and hit Enter on your keyboard: rd /s c:\$Recycle.Bin
If the Command Prompt asks you to confirm the action, press the Y key and hit Enter on your keyboard again.
The “c” in the command corresponds to the drive that’s being cleaned out. If you have other external hard drives connected, switch the “c” for the letter of that particular drive.
For example, insert “d” to clear out the Recycle Bin on your D:\ hard drive, “E” for the E:\ drive, and so on.
2. Use PowerShell
Bring up Windows PowerShell on the search bar and select Run as Administrator.
If a User Account Control page asks if you want to make changes, select Yes.
Enter the following in PowerShell, then press Enter on your keyboard: Clear-RecycleBin
Press Aon your keyboard to erase all of the contents in your Recycle Bin.
If you want clear out a specific hard drive on your computer, type in the following command and then the corresponding letter for the drive: Clear-RecycleBin -DriveLetter C
Press Enter on your keyboard, and like before, press A on your keyboard to wipe out everything.
If you don’t want to prompt the confirmation, type in the following then press Enter on your keyboard: Clear-RecycleBin -Force
If you’re using Windows Server 2016, using the PowerShell method to clear out the Recycle Bin is the best way to do it.
Right-click the Recycle Bin desktop icon and select Properties.
Set the custom size to a smaller quantity in megabytes. For example, 5,000 MB which is 5 GB.
Click Apply then OK to close the window.
You should do this on all the different drives connected to your computer.
4. Configure Task Scheduler
Launch the Notepad app, and in it, type the following command: rd /s \q C:\$Recycle.bin
Do this for all the different drives you have on your computer.
Click File, then Save as, and name it EmptyRecycleBin.bat.
Now open the Task Scheduler app, right-click Task Schedule Library, and select Create Task.
Go to the Triggers tab and select the New button on the button.
Set a start date for when you want your computer to start automatically emptying the recycle bin and how often. Click OK when finished.
Now go to the Actions tab and click New.
Set the Action to Start a program.
Click the Browse button and locate the .bat file you created earlier. Then select OK.
Select OK on the final page to finish setting up Task Scheduler.
Can I restore deleted files on my Windows 11 computer?
We all make mistakes, and that extends to accidentally emptying out the Recycle Bin when there was something important in there. But don’t worry because it’s possible to restore those files.
Feel free to leave a comment below if you have any questions about the Recycle Bin. Also, leave comments about reviews that you’d like to see or information on other Windows 11 features.
Most Excel users probably set up data tables within that application. Users can filter data in their tables with Excel’s filtering tool. However, sometimes Excel spreadsheet tables might not filter the data correctly.
If you need to fix Excel’s table filtering, check out some of the potential resolutions below.
How can I fix Excel table filtering?
1. Select the whole column to apply the filter to
If Excel is not filtering the whole column in a spreadsheet, you can manually configure it to do this. What you need to do is select the column and tweak its filter settings.
1. Launch Microsoft Excel.
2. Open the file where the filter is not working.
3. Select the table’s whole spreadsheet column by clicking the column’s letter.
4. Navigate to the Data tab.
5. Then click theFilterbutton to apply the filter to the whole column.
6. Click the cell filter arrow button to open the filtering options shown directly below.
7. Uncheck theBlankscheckbox. This setting will ensure that blank cells will not be filtered.
8. Click on OK to apply the changes.
2. Delete blank cells from the table’s column
Alternatively, you can erase blank rows from a table’s column to include values below the empty cells within the filter.
Select all the empty cells’ rows by holding the Ctrl key. Then right-click and select the Delete option.
3. Ungroup sheets
The Filter option will be greyed out when your sheets are grouped together. Thus, you can’t filter spreadsheet tables in grouped sheets. To fix that, right-click the grouped sheets at the bottom of Excel and select Ungroup sheets.
4. Unprotect the worksheet
Select Excel’s Review tab.
Press the Unprotect sheet button.
If an Unprotect sheet window opens, enter the password for the worksheet in the text box.
Click the OK button.
5. Unmerge cells
Press the Ctrl + F hotkey.
Click the Format button on the Find and Replace window.
Click Merge cells on the Alignment tab shown directly below.
Press the OK button.
Press the Find All button.
Thereafter, the Find and Replace window will list all cell references with merged cells.
To unmerge merged cells, select a merged cell.
Click the Merge & Center option on the Home tab.
Select the Unmerge cells option.
6. Set up a new filter
If there are rows in your table that don’t get filtered, try setting up a new filter. To do so, select the Data tab.
Click the Clear button within the Sort & Filter group.
Then select the table’s full column range with the cursor.
Click the Filter button on Excel’s Data tab.
Those are some of the resolutions that might get your Excel table filters fixed. In most cases, reapplying filters or clearing them to set up new filters will often resolve Excel filtering issues.
Which of the solutions solved the pro-Excel filtering issue for you? Let us know by leaving a message in the comments section below.
BAD POOL CALLER is a Blue Screen of Death error, and just like many other BSoD errors, this one will crash Windows 10 and restart the PC.
The error is encountered on all iterations of the OS, including the two most extensively used ones, Windows 10 and 11.
These errors can be troublesome; therefore, today, we’ll show you how to fix the BAD POOL CALLER error in Windows.
What does BAD POOL CALLER mean?
It’s possible that it’s pointing to a scenario in which a piece of software is attempting to use a processor thread that isn’t available because another piece of software is currently utilizing it.
It’s also possible that the thread it was looking for doesn’t even exist anymore which results in a bad request.
What causes BAD POOL CALLER blue screen?
Similar to the Bad Pool Header error, this is a BSOD error, and it’s caused when your system encounters a fatal error and can’t operate normally.
Third-party applications can also cause this issue, so keep an eye out for all potentially problematic software.
BAD POOL CALLER can cause many problems on your Windows 10 PC, and in this article, we also covered the following issues:
BAD POOL CALLER crash – Many users reported that this error comes with a blue screen followed by a crash. This can be a big problem, but you should be able to fix it using one of our solutions.
BAD POOL CALLER overclock – To get maximum performance, many users overclock their hardware. However, overclocking can cause various issues, such as this one, to appear. To fix the problem, you need to remove all your overclock settings.
MSDN nugcheck bad_pool_caller – Sometimes, third-party applications can cause this error to appear. Many users reported that uTorrent was causing this problem, but the issue was resolved entirely after removing it.
BAD POOL CALLER uTorrent, ESET – Avast, AVG, Kaspersky, McAfee – Antivirus software can also cause this issue. Many users reported problems with ESET, Avast, AVG, and Kaspersky tools.
BAD POOL CALLER RAM – Hardware issues can also cause this problem to appear. The most common cause is your RAM; after replacing it, the issue should be resolved.
BAD POOL CALLER rdyboost.sys, rdbss.sys, tcpip.sys, tdica.sys, usbport.sys, usbstor.sys, usbhub.sys, iusb3xhc.sys, igdkmd64.sys, picadm.sys – Often, this error message will tell you which file caused the PC to crash. Once you know the file name, you just need to find the device or application that is associated with it and fix the problem.
BAD POOL CALLER when inserting USB drive – Several users reported this error only after inserting a USB drive. This can occur if your USB drive is faulty or you have a problem with your chipset drivers.
BAD POOL CALLER on startup – Many users reported this error occurring right on startup. This can be a big problem since your PC can become stuck in a loop. In some more severe cases, your PC won’t boot at all.
BAD POOL CALLER page fault in nonpaged area – This is a variation of this error, but you should be able to fix it by using solutions from this article.
BAD POOL CALLER Windows 11, 10, 7, 8, XP – The solutions below are applicable to all Windows iterations, so make sure to follow them.
BAD POOL CALLER Windows 11 HP, Dell, Lenovo – By using a specialized software option, you can fix this error in no time.
Without further ado, let’s just jump right in!
How do you fix a BAD POOL error?
1. Use specialized repair software
Errors such as BSOD BAD POOL CALLER can be tough to fix, especially if you’re not an advanced user.
However, there are specialized tools that can analyze your system and help you fix these types of errors with relative ease.
2. Update Windows 10
Press Windows + I to open the Settings app, and click on Update & Security.
Now click on the Check for updates button.
If an update is listed after the scan, click on Download and install to get it. The stop code bad_pool_caller will be fixed.
After installing the updates, check if the BAD POOL CALLER error in Windows persists and your PC won’t boot.
Blue Screen of Death errors such as BAD POOL CALLER can arise due to hardware or software incompatibility. To be sure that your hardware and software are fully compatible with Windows, we strongly advise you to download the latest Windows patches.
Microsoft is frequently releasing newer versions through Windows Update, and many of these address various hardware and software issues. So, download them if you want to keep your PC error-free.
3. Update the drivers
Press Windows + X and select Device Manager from the list.
Now, expand the category for the driver you intend to update. We will go with the graphics driver since it’s the most critical one.
Right-click on the device, and then select Update driver.
Next, select the Search automatically for drivers option.
The system will download and install the compatible drivers for the hardware component, assuming that you don’t already have them.
Similarly, perform the same operation for all problematic drivers.
Outdated or incompatible drivers can lead to the BAD POOL CALLER Blue Screen error in Windows 10. So, it’s best to keep them up-to-date.
We recommend you easily update your drivers using a dedicated tool that can automatically update drivers.
This solution is specialized in driver updates for your PC. With a quick scan, it will find all outdated drivers and update with one from its extensive driver files database. The installation is safe and fast, so you can stay worry-free.
Enter Troubleshoot settings in the Search bar, click on the relevant search result, and then go to Additional troubleshooters.
Select Blue Screen from the right pane and click on Run the troubleshooter.
Follow the instructions on the screen to complete the troubleshooting.
The built-in troubleshooter is one of the easiest ways to identify and eliminate computer issues. And in this case, the Blue Screen troubleshooter will come to your aid and fix the BAD POOL CALLER error in Windows 10.
5. Run the SFC scan
Press Windows + S to open the Search menu, enter Terminal in the text field, right-click on the relevant search result, and select Run as administrator.
Click Yes in the UAC prompt that appears.
Press Ctrl + Shift + 2 to open Command Prompt in a new tab.
Paste the following command and hit Enter:sfc/scannow
The System File Checker is a command-line tool that scans all the system files for potential issues. So, if a corrupt system file is behind the BAD POOL CALLER error in Windows 10 on HP, the SFC scan will likely resolve it.
6. Run DISM
Open Terminal with administrative privileges, click on the downward-facing arrow at the top, and select Command Prompt.
Paste the following command and press Enter:DISM /Online /Cleanup-Image /RestoreHealth
Restart your computer and try updating again.
The DISM tool re-deploys the system image and resolves potential issues along the way. So, it’s possible that running DISM will also resolve the BAD POOL CALLER error in Windows 10 on Dell.
7. Check the hard drive
Launch Terminal as an administrator, and open the Command Prompt tab.
Now, paste the following commands one at a time, and hit Enter after each:bootrec.exe /rebuildbcdbootrec.exe /fixmbrbootrec.exe /fixboot
Next, you need to run the Check Disk scan by executing the following command while replacing the drive letter with the one in your case:chkdsk /r c:
Issues with your hard drive can cause BSOD errors, and to fix this issue, it’s advised to run the Check Disk scan.
8. Remove your antivirus/firewall
Antivirus software can also cause Blue Screen of Death errors to appear, and to fix them, you have to remove the installed antivirus or firewall.
Bear in mind that your PC won’t be completely defenseless even if you remove your antivirus since Windows 10 already comes with Windows Defender, which serves as a default antivirus.
According to users, they had issues with McAfee, Malwarebytes, ESET, Trend, and Comodo Firewall, and if you’re using any of these tools, we urge you to remove them from your PC in order to fix this error.
Keep in mind that almost any antivirus program can cause these types of errors, so be sure to remove all third-party antivirus programs from your PC.
If you’re using any antivirus solution and you want to altogether remove it from your PC, a reliable uninstaller software will come to your aid. It will remove all the leftover files and the registry keys created by the app when you uninstall it.
Certain third-party applications can cause these types of errors to appear. Therefore, we strongly recommend you find and uninstall the problematic application.
If you installed or updated any applications recently, be sure to uninstall them or revert to the older version.
Users reported that tools such as Hotspot Shield tend to cause these types of errors, so be sure to remove Hotspot Shield to fix the BAD POOL CALLER error in Windows 11 on your Dell device.
10. Check your modem
A few users reported issues with Huawei modems, and according to them, the modem was set to work as a network adapter, and that was causing the BAD POOL CALLER BSoD error.
In order to fix this problem, you need to set your modem to work as a modem by using its software. Simply change the connection from NDIS to RAS, and you should be able to fix this problem easily.
11. Check your hardware
These types of errors are often caused by hardware issues. If you’re getting a BAD POOL CALLER Blue Screen on Windows 10, be sure to check your hardware.
Users reported that this issue was fixed after finding and replacing the faulty hardware, and in most cases, the problematic hardware was RAM or motherboard.
Checking your RAM is rather simple, and in order to do that, you just need to test RAM modules one by one until you find the faulty one. In addition, you can also use tools such as MemTest86+ to perform a thorough scan of your RAM.
Any hardware component can cause this error to appear. If you installed any new hardware recently, be sure to remove or replace it to eliminate compatibility issues.
How can I fix BAD POOL CALLER BSoD error on Windows 11?
Fixing the BAD POOL CALLER error in Windows 11 is very similar to that on the previous iteration. You just need to identify the underlying cause and look for ways to eliminate it.
And, it’s usually incompatible hardware or a third-party application creating conflicts. Keep an eye for these, and you will be able to fix the error in no time.
Does BSoD damage your computer?
BSOD doesn’t generally damage the hardware but can seriously mess things up with the OS.
If that underlying cause has to do with a faulty external device, it could damage the other components, though that’s a very unlikely scenario. But, BSOD can break the OS, if not fixed initially.
Even if we were to overlook the damage caused, if any, BSOD would affect the progress and leads to loss of data. This very aspect in itself highlights the importance of troubleshooting Blue Screen of Death errors.
By now, you would have fixed the BAD POOL CALLER error in Windows 10 and should have your PC up and running like before.
The fingerprint is probably one of the most convenient and secure sign-in options. Most laptops released in the last few years come with a scanner. But for some Dell users, the fingerprint reader is not working.
In this article, we will present how you can fix things when the Dell XPS fingerprint sensor is not working. Keep on reading!
Why my fingerprint sensor is not working Dell laptop?
Problems with the fingerprint reader generally arise due to issues with the driver, particularly after an update. Also, it could be a misconfigured BIOS or the current data set may have gone corrupt.
Moreover, our users reported other related issues, which can also be fixed by following the methods below. Some of the most common ones are the following:
Dell XPS fingerprint reader not working after sleep – By attempting to reinstall the drivers, you can fix this particular issue.
Windows 10 Dell XPS fingerprint reader not working – The solutions below can apply to Windows 10 and 11.
Windows 11 Dell XPS fingerprint reader not working – You can try to update your OS to bring it up-to-date.
Dell XPS 13 9380 fingerprint reader not working – Navigate to the BIOS Adjustments menu, ensure that Software Guard Extensions (SGX) is set to Software Controlled, then save the settings.
Dell XPS 13 9370 fingerprint reader not working – Just like before, you should check your BIOS settings.
Fear not, as all of these cases are solvable, and the solutions are straightforward to apply.
Where is Dell XPS 13 fingerprint sensor?
You’ll find the fingerprint reader on the button that controls the power. You can place your finger on it to detect your fingerprint.
However, if it doesn’t work, you can follow the steps below to fix this issue. At the end of the article, we will provide even more potential solutions in case the error is still not solved. Follow along!
What do I do if Dell fingerprint sensor is not working?
1. Reinstall the driver
Press Windows + S to launch the Search menu, enter Device Manager in the text field at the top, and click on the relevant search result.
Double-click on Biometric devices to expand and view the devices under it.
Right-click on the fingerprint reader, and select Uninstall device from the context menu.
Tick the checkbox for Attempt to remove the driver for this device, and click Uninstall at the bottom.
Once done, restart the computer, and Windows will automatically install a fresh driver for the reader.
If a fresh driver is not installed, open the Device Manager and click the Scan for hardware changes button.
A corrupt driver is a major issue and can cause the device to malfunction or stop working at all. Reinstalling the corrupt fingerprint reader driver did the trick for most users. To identify one, look for a warning sign near the corner of the device icon.
2. Roll back driver update
Press Windows + R to launch the Run command, enter devmgmt.msc in the text field, and either click OK or hit Enter to launch the Device Manager.
Next, double-click on Biometric devices.
Right-click on the fingerprint reader, and select Properties from the context menu.
Navigate to the Driver tab.
Click on the Roll Back Driver button.
Now, select a reason for rolling back the driver version, and click on Yes at the bottom.
After the uninstall is complete, restart the computer for the changes to come into effect fully.
If you started encountering the problem after updating the driver, either manually or via Windows Update, reverting to the previous version should fix the fingerprint reader not working problem in Dell XPS.
Also, you can use a reliable third-party app to reduce the chances of encountering such errors by installing only the right drivers. We recommend Outbyte Driver Updater, a dedicated tool that will automatically update all the drivers and only install the best available version.
Outbyte Driver Updater
Update and repair any corrupted drivers with this great tool.
3. Remove the current fingerprint and add a new one
Press Windows + I to launch Settings, and select Accounts from the tabs listed in the navigation pane on the left.
Next, click on Sign-in options on the right.
Click on Fingerprint recognition (Windows Hello).
Now, click the Remove button to delete the currently set fingerprint.
Once done, click on Set up to add a new fingerprint.
Click on Get started and follow the on-screen instructions to complete the process.
If there are issues with the currently set fingerprint, it would appear as if the fingerprint reader in Dell XPS 13 is not working. So, remove the current one and add a new fingerprint instead.
These are all the ways you can fix the Dell XPS fingerprint reader not working issue and use it to log in to Windows from now on.
Why did my laptop fingerprint scanner stop working?
Your fingerprint reader will malfunction if the associated drivers are corrupted, out of date, or incompatible. Moreover, it may be that some system files are corrupted, which will prevent you from using the fingerprint reader.
Make sure your fingerprint reader has no potential hardware problems, such as scratches, dust, or grease on any of its components.
Have you ever received an ADB command not found error message when you were trying to connect your smartphone to your personal computer? This error prevents you from running developer commands on your phone, but it can be easily fixed.
4. Run ADB command from the installation directory
Open Command Prompt.
Navigate to the directory where Android SDK is installed in Command Prompt. By default, it should be one of the paths below: C:\Program Files (x86)\Android\android-sdk\toolsC:\Program Files (x86)\Android\android-sdk\platform-tools
Try running the ADB command from these directories.
Alternatively, you can open Command Prompt in the Android SDK directory by doing the following:
Open the Android SDK installation directory.
Press and hold the Shift key, and right-click the space inside the directory. Choose the Open PowerShell window here option.
Once the PowerShell window opens, try running the ADB command.
5. Create a user or system variable path for ADB or fastboot
Press the Windows key, type advanced system, and choose View advanced system settings.
Click on the Environment variables button.
Now, select any item under the System or User variables sections, and click the New button.
Type Path as the Variable name.
Next, click the Browse Directory button, select platform-tools, and click OK.
Finally, click the OK button to confirm the changes, and remember to click the OK button on the Environment variables button.
We hope this article and our solutions helped you fix the ADB inaccessible or not found message.