HDMI Port is not Working on PC: 7 Ways to Fix it

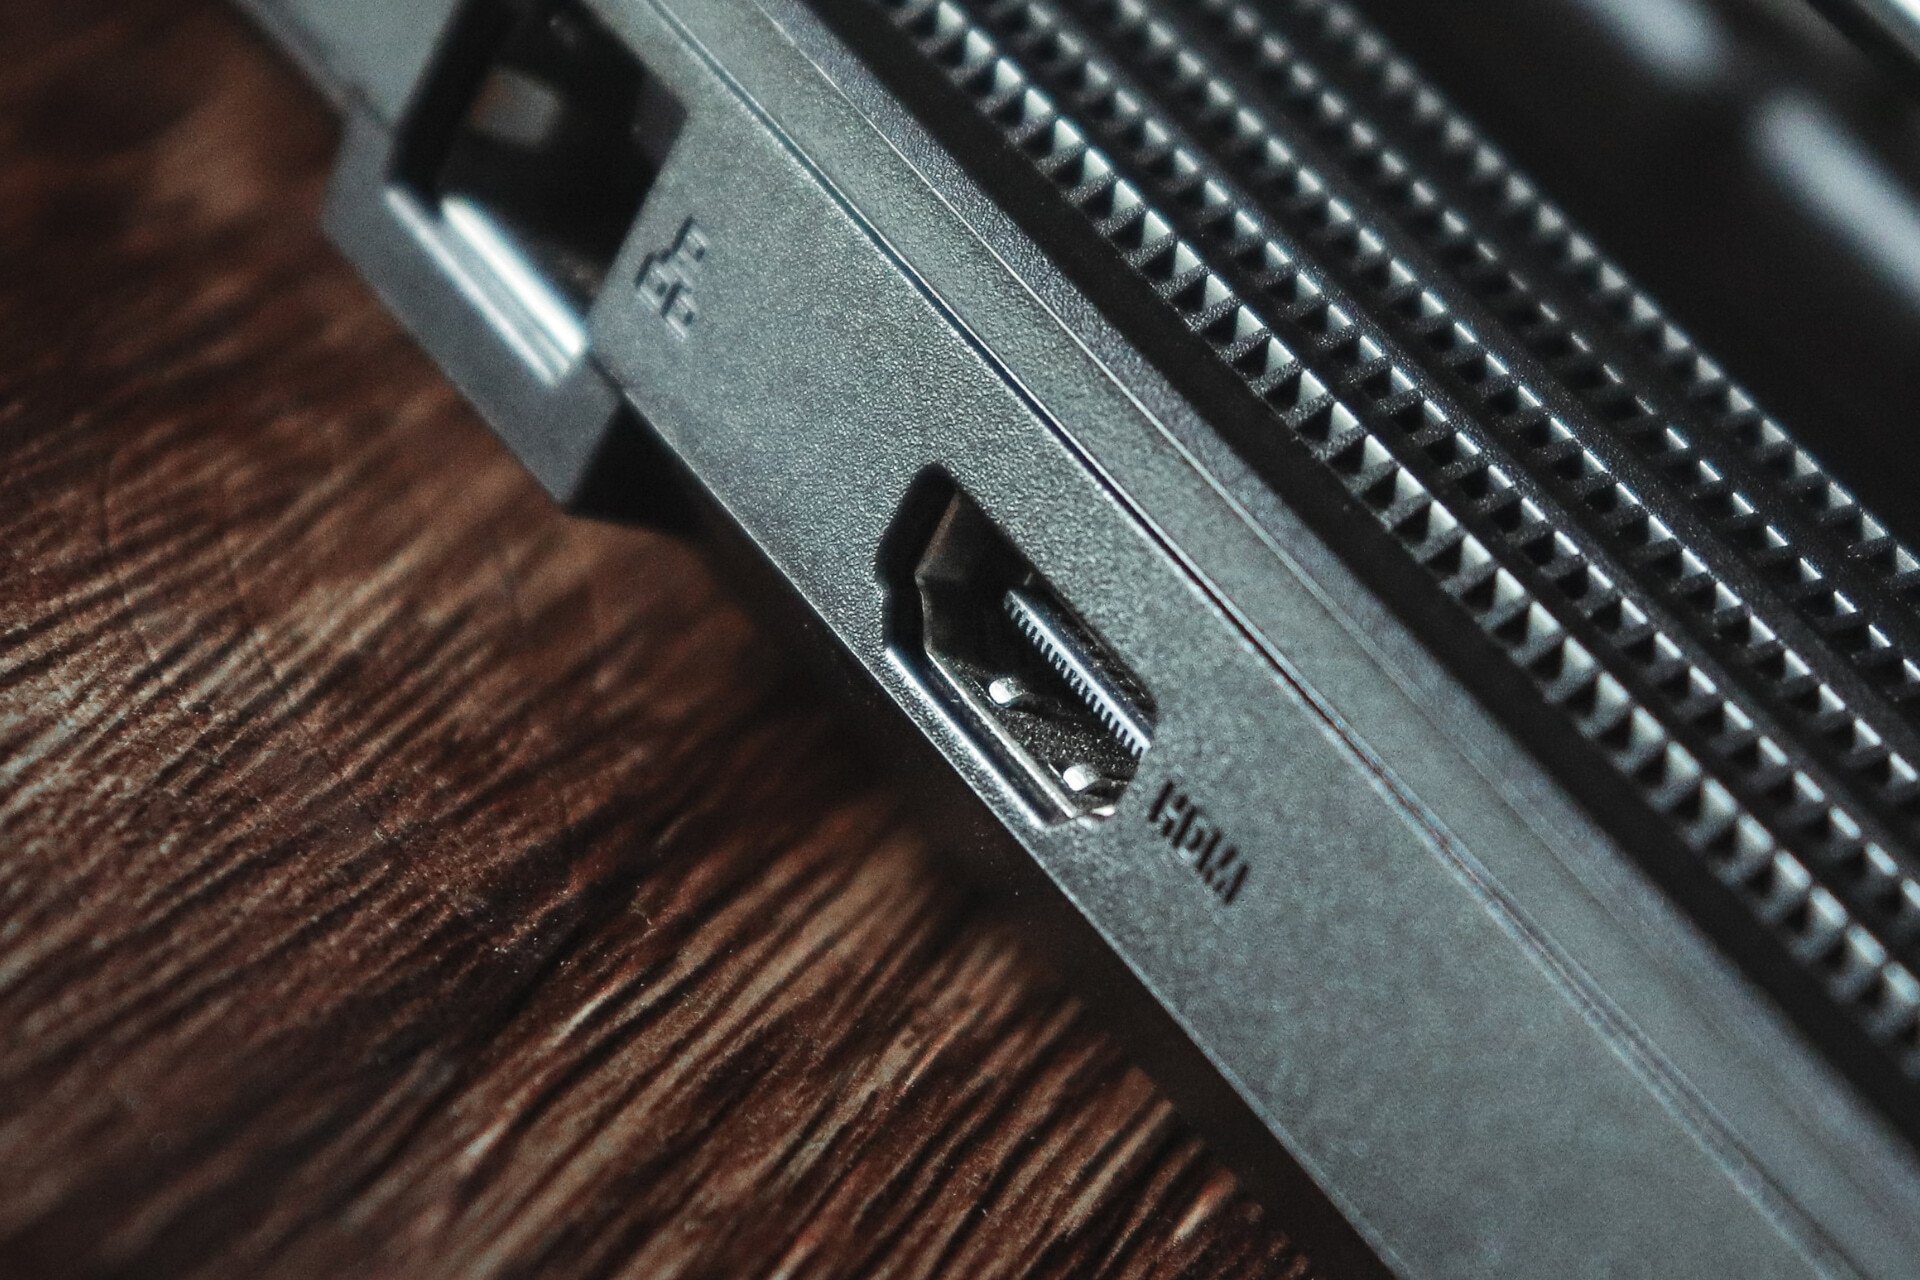
You must have encountered a problem that has led to your HDMI port not working on Windows 10. This is a problem other users have experienced.

This port is handy for connectivity, especially with modern equipment, so we will show you how to fix this problem.

Why is my HDMI port not working on my PC?

There are multiple reasons why the HDMI port isn’t working on Windows, and in most cases, this is just a glitch with your graphics card, so you might want to check your drivers.

This issue can affect any PC, and many reported that HDMI isn’t working on laptops. If drivers aren’t the issue, a solid workaround would be to use a specialized adapter.

However, that’s not always the best solution since sometimes the USB to HDMI adapter won’t work, so it’s essential to find the core cause of this issue.

Here are some quick examples of how these issues can manifest:

The most common problem with HDMI is that audio or video is missing, and in most cases, that’s caused by driver incompatibility, but there are a few things you can do to fix this problem.

How do I test my HDMI port?

  1. Check for damage along the length of the chord.
  2. Check for particles in the head of the chord and the port on the device. You can spray some compressed air to remove these particles.
  3. Insert one end of the chord in the source device and the other in the display device.
  4. Boot the display device and ensure it is set to HDMI mode.
  5. Boot your source device and ensure it is set to export images.
  6. If the image and sound quality are fine, nothing is wrong with your HDMI chord.

If there’s no sound, video is missing, or your HDMI port is not working on your PC, follow the below steps to refresh your audio and video drivers.

How can I fix the HDMI port if it’s not working on PC?

Before you go into any of the solutions provided, make sure you do the following:

  • Enable your HDMI port on Windows 10
  • Restart your computer
  • Make sure to select the correct HDMI port on the display device
  • Check the hardware and make sure the HDMI cable is not slipping out
  1. Set your HDMI device as the Default Device
  2. Update your drivers
  3. Rollback to the older driver
  4. Uninstall the graphics driver
  5. Remove recently installed software
  6. Run System Restore
  7. Replace your cable

1. Set your HDMI device as the Default Device

  1. Right-click on the volume icon on the taskbar and select Playback devices.
    hdmi port not working windows 10
  2. In the newly open Playback tab, select Digital Output Device or HDMI if they exist on the list of devices, then click Set default.
    hdmi port not working windows 10

First, the HDMI port will not work on your monitor if your HDMI device is not set as the default device.

2. Update your drivers

2.1 Update drivers manually

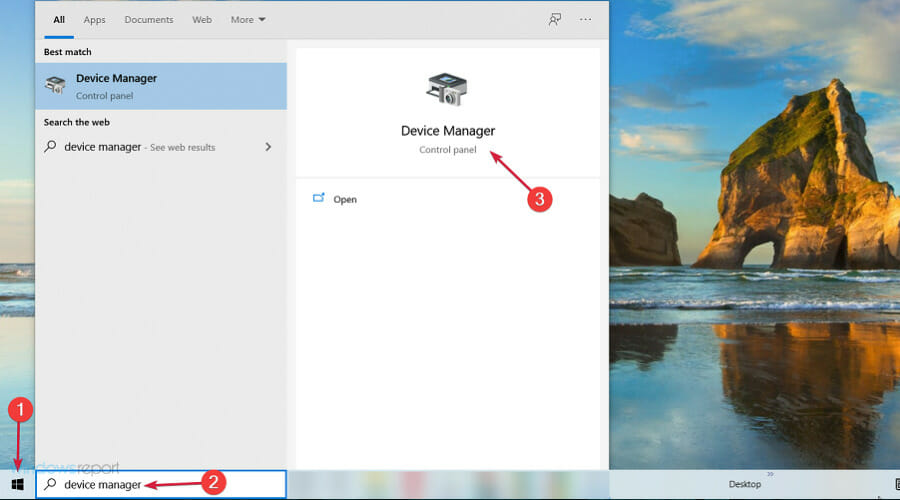
  1. 1. Click the search bar on your taskbar, type Device Manager, and select the Device Manager app.

    hdmi port not working windows 10
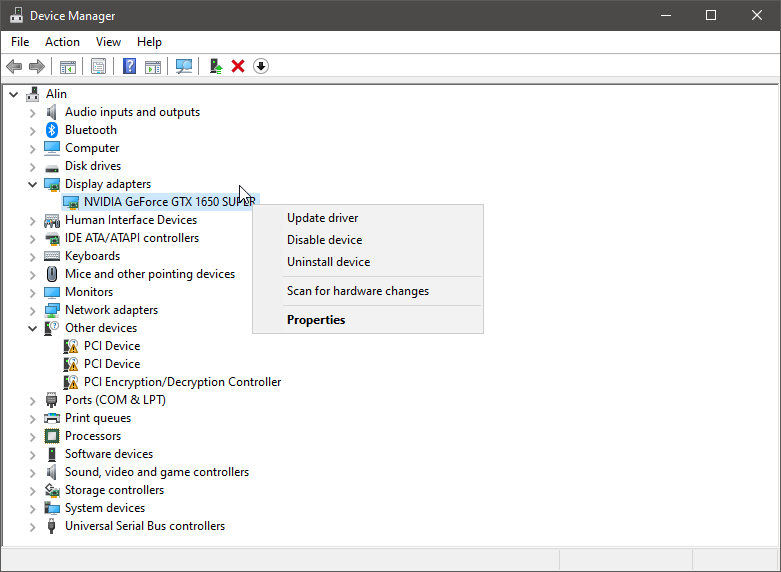
  2. 2. Expand any section with outdated devices (Start with the Display adapters).

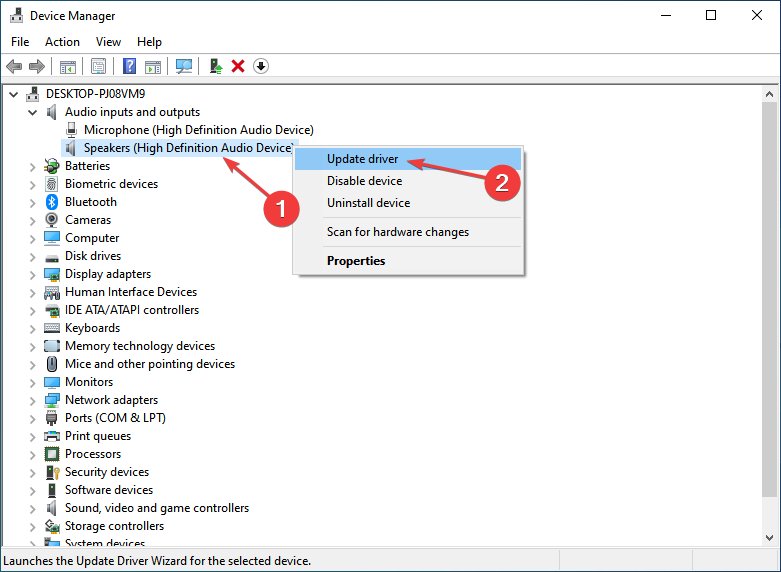
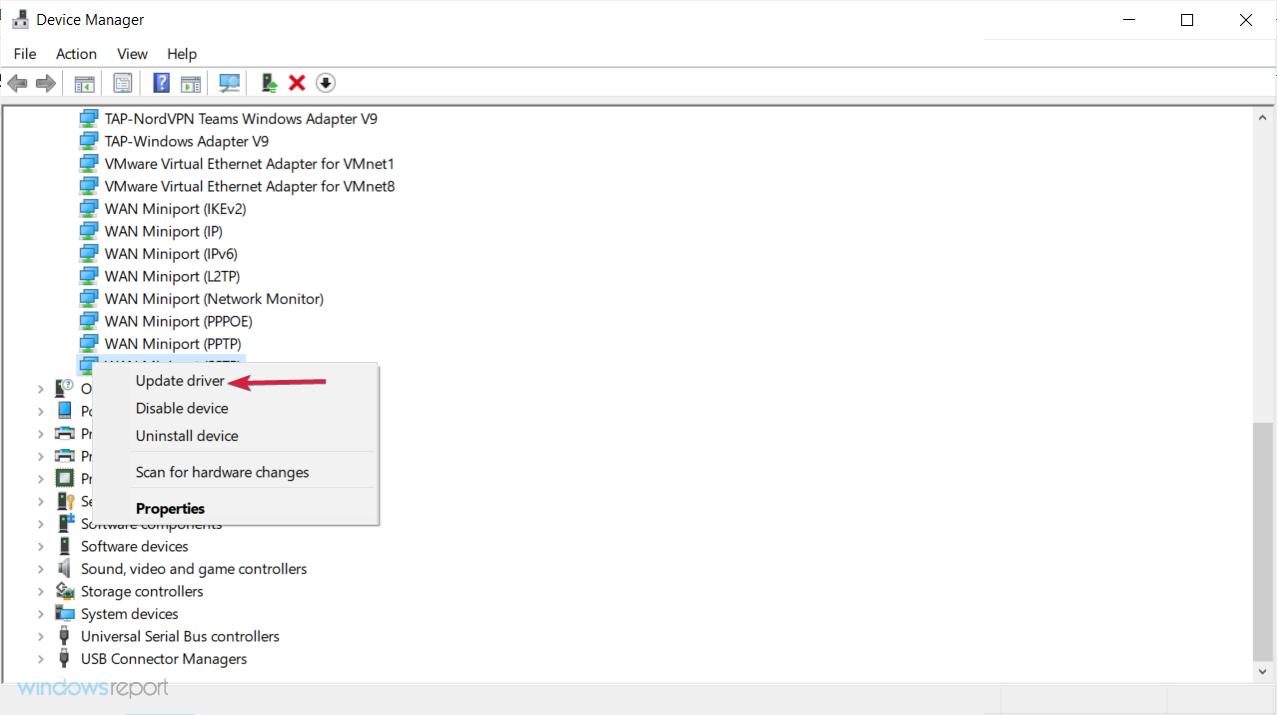
  3. 3. Right-click on the device and select Update driver.

    hdmi port not working windows 10
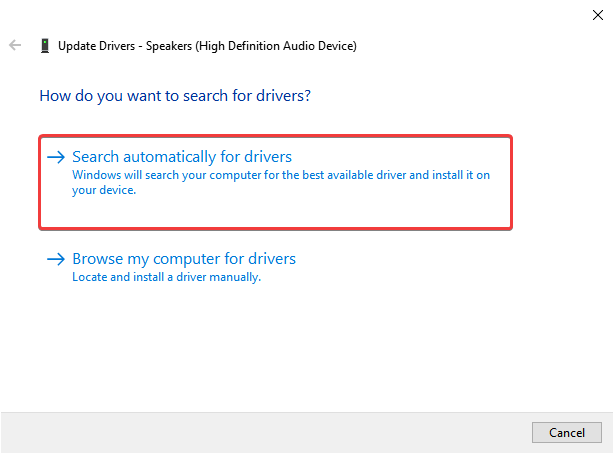
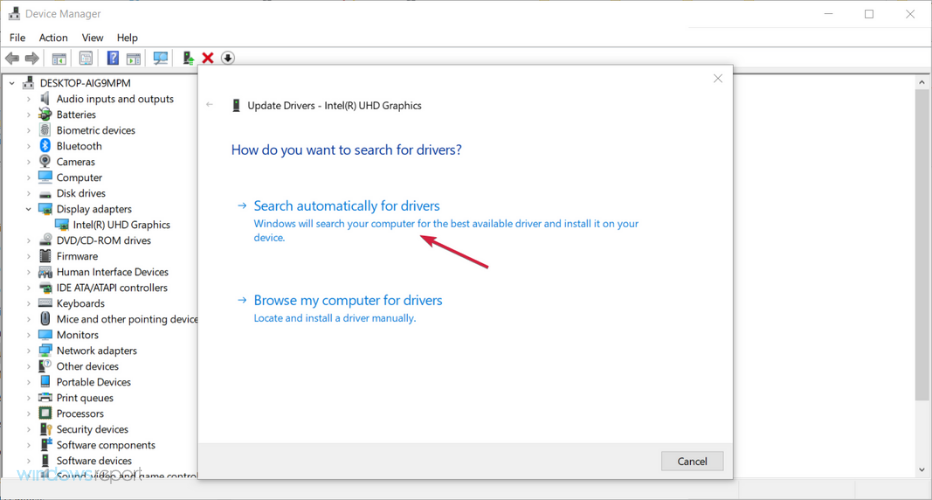
  4. 4. Click Search automatically for drivers.

    https://i.imgur.com/4wwrDqm.png
  5. 5. Install the drivers found by the wizard.

  6. Sometimes, all you need to do to fix the HDMI port not working issue is to install the latest drivers. Just visit your graphics card or motherboard manufacturer’s website and download the latest drivers.

    You can also update your video and audio drivers using the Device Manager, as shown above.

2.2 Update your drivers with an advanced tool

One common factor that can cause your HDMI port not to function correctly is out-of-date drivers. Therefore, updating your device is crucial, and we recommend you do this by using professional software.

Fortect Driver Updater is an excellent tool for the maintenance of your drivers. After a quick scan of your system, this software will allow you to replace or update any broken driver with fresh genuine ones, all within minutes.

⇒ Get Fortect Driver Updater

3. Rollback to the older driver

  1. Click the search bar, type Device Manager, and select the Device Manager app.
    hdmi port not working windows 10
  2. Expand any section with devices to be rolled back.
  3. Right-click it and choose Properties.
    hdmi port not working windows 10
  4. Navigate to the Driver tab and click on Roll Back Driver if it is not greyed out.
  5. Restart your computer.

Sometimes, it’s better to use the default driver to avoid compatibility issues. You’ll need to uninstall the current driver, and the default one will install itself.

However, using the Roll Back feature is also an effective method of getting back an old driver. Check if this resolves the issue of the HDMI port not working on Windows 10.

4. Uninstall the graphics driver

  1. Click the search bar, type Device Manager, and select the Device Manager app.
    hdmi port not working windows 10
  2. Expand the Display adapter menu, right-click on your graphics driver, and select Uninstall device.
    hdmi port not working windows 10
  3. Click on Uninstall.
    hdmi port not working windows 10

Check if this resolves the issue of the HDMI port not working on Windows 10.

5. Remove recently installed software

  1. Go to Start and type Control Panel and open up the app.
    hdmi port not working windows 10
  2. Click on Uninstall a program.
  3. Select the program recently added, and click Uninstall (Repeat this step for recently added programs).

If you recently installed new software on your computer, try uninstalling it. Then, check if this resolves the issue of the HDMI port not working on Windows 10.

This solution may work if the HDMI port is not showing in your Device Manager. Sometimes, newly installed software may trigger compatibility issues and various connection problems.

6. Run System Restore

  1. Press Windows Key + S and enter system restore, then choose Create a restore point from the menu.
  2. The System Properties window will now appear. Now click the System Restore button.
    hdmi port not working windows 10
  3. When the System Restore window opens, click Next.
  4. If available, check Show more restore points. Select the desired restore point from the menu and click Next.
  5. Now follow the instructions on the screen to complete the restoration process.

The System Restore option allows you to restore the previous well-performing system configuration without losing files, except for a few customizable features and settings.

7. Replace your cable

Also, there might be situations when your problem is hardware-related. In this case, we recommend you look at some highly-rated products you could buy.

This way, you can ensure the HDMI output works great on your Windows 10 devices.

That would be all; we hope these solutions helped you solve any problem you may encounter regarding your HDMI port not working on your Windows 10 device.

As always, if you come across other solutions to fix HDMI issues on your PC, you can help the Windows community by listing the troubleshooting steps in the comments below. And if you’re wondering what to do when the PC is connected to a TV with HDMI, but no picture appears, make sure digital vibrancy is not set to 0%.

Also, if you have any comments, questions, or suggestions, contact us in the same comment section. Don’t forget to tell us which solution worked for you.

Nvidia Control Panel is not Opening: How to Manually Force it

Many users reported that they can’t open the NVIDIA Control Panel on their PC. This can be a problem, especially if you want to fine-tune your graphics card settings.

The app is used to customize your graphics card settings and much more, depending on your graphics card.

We’re going to show you a lot of solutions to fix the NVIDIA Control Panel not opening issue, but let’s see why this problem occurs in the first place.

Why can’t I open the NVIDIA Control Panel?

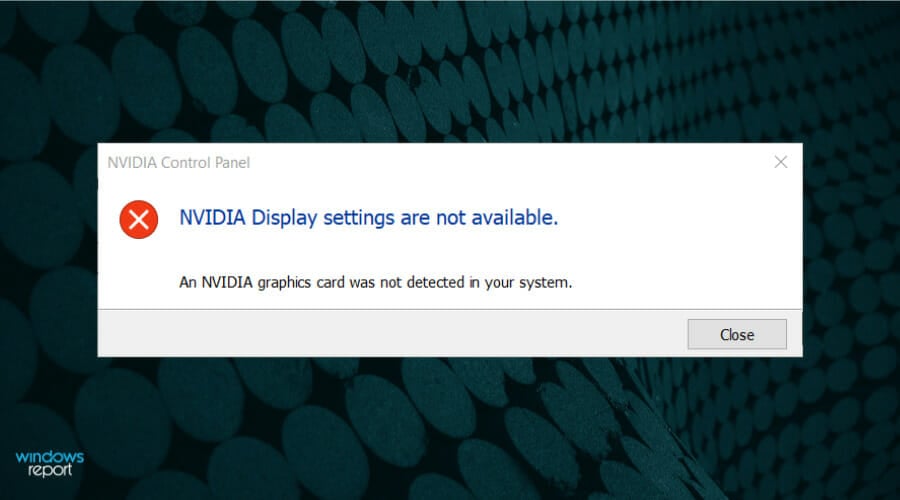
The NVIDIA Control Panel app only works on PCs with NVIDIA graphics cards so if you changed your hardware configuration, you won’t be able to run it any longer.

The app didn’t detect an NVIDIA graphics card in your system

You will get an error like the one above. However, that can also happen if your graphics card is malfunctioning or disconnected.

Or, if you made recent modifications, the NVIDIA driver might not be compatible with your Windows version.

Switching on the software side, the main reason why the NVIDIA Control Panel app isn’t working involves malfunctioning drivers, Windows updates, and services not working properly.

Of course, there are other reasons like the antivirus blocking the app and the Fast Boot option interference, but these are less frequent.

As with any problem in Windows, this one has its share of representations. Here are some similar problems that our readers reported:

  • NVIDIA Control Panel has stopped working on Windows 10 – Perhaps the problem is your antivirus. Read more about NVIDIA Control Panel stopped working issues and correct them now.
  • NVIDIA Control Panel not working on Windows 7 64 bit – This can appear on older versions of Windows, but you should be able to fix that problem with one of our solutions.
  • Can’t find NVIDIA Control Panel – If you can’t find the app, simply go to its installation directory, create a shortcut on your desktop, and the problem should be resolved.
  • NVIDIA Control Panel missing – Many users reported that the app is missing on their PC, but that’s not the case. Simply open Control Panel and you should be able to access it.
  • NVIDIA Control Panel not showing – This happens when it wasn’t installed with the drivers, or it simply stopped working.
  • NVIDIA Control Panel won’t launch – Users reported unsuccessfully trying to open NVIDIA Control Panel from the Windows Control Panel, and it’s probably caused by the malfunctioning driver.

Why does NVIDIA Control Panel closes after opening?

If you have issues opening this app, it’s possible that Nvidia driver keeps crashing in the background. To fix the issue, you might have to reinstall the driver.

A few users reported that Nvidia Control panel shows only 3D settings, and this can appear if the software is damaged, so reinstalling it might be the best option.

It’s not unusual for Nvidia Control Panel to not be opening, but luckily, we have a couple of solutions that will help you fix this problem.

How do I fix Nvidia Control Panel not opening?

1. Update your drivers

  1. Right-click Start and select Device Manager.
  2. Right-click on NVIDIA driver, and choose to Update driver.
  3. If a driver update is available, the wizard will automatically install it, if not, your driver is already up to date.
  4. Restart your PC.

If you can’t open NVIDIA Control Panel on your PC, the problem might be your drivers. They could be out of date, and that causes various errors to appear.

To fix the issue, it’s advised that you update your NVIDIA drivers. Visit the manufacturer’s website and download the latest drivers for your graphics card. Install them on your PC, and the problem should be resolved.

2. Update Windows

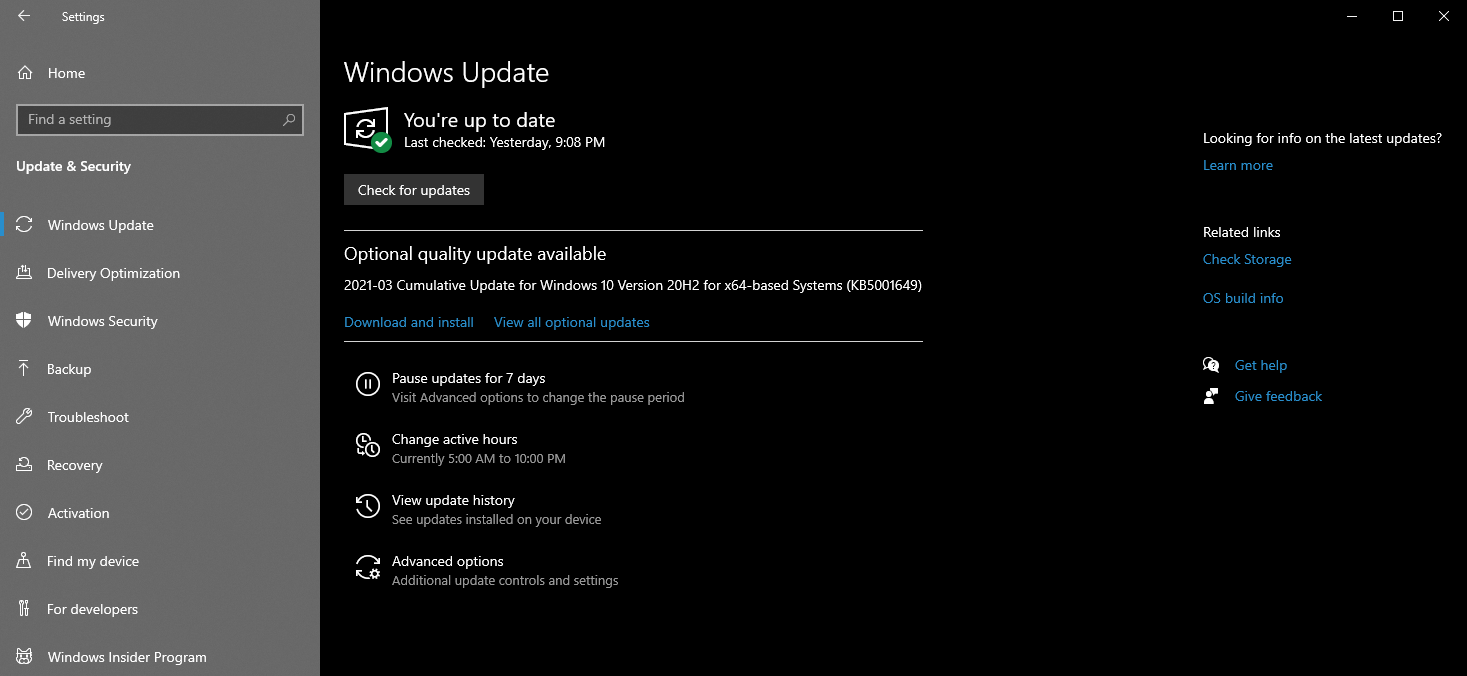
  1. Press the Windows key + I to open the Settings app.
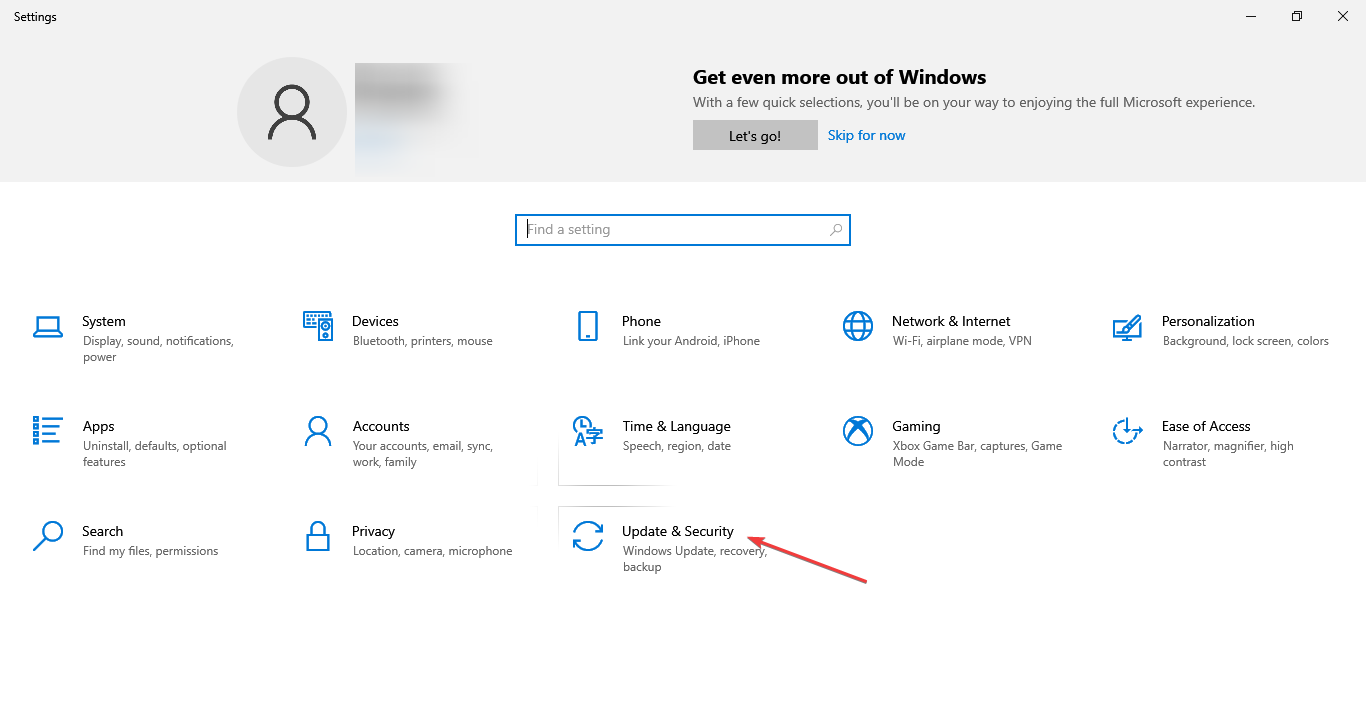
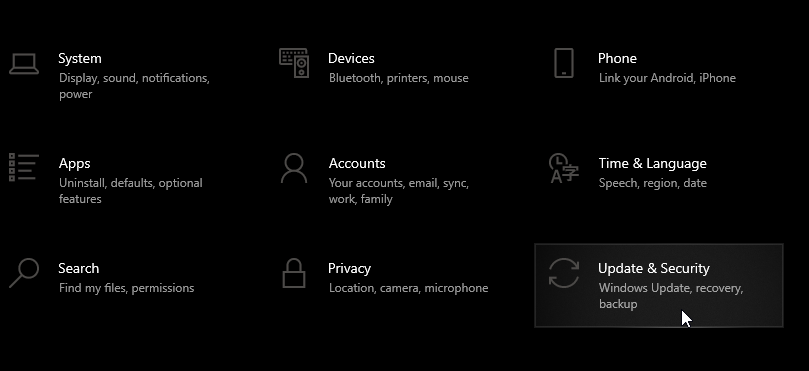
  2. Go to the Update & Security section.
  3. In the right pane, click the Check for updates button.

If any updates are available, they will be downloaded automatically in the background and installed as soon as you restart your PC.

Once your system and drivers are up to date, the problem should be resolved completely.

3. End NVIDIA Display Container process

  1. Press Ctrl + Shift + Esc to open Task Manager.
  2. Locate the NVIDIADisplay Container process, right-click it, and choose End Task from the menu.
Note icon NOTE
After doing that, the process will restart itself, and you should be able to open NVIDIA Control Panel. Bear in mind that this is just a workaround, so it’s rather likely that you’ll have to repeat it once you restart your PC.

4. Disable the antivirus temporarily

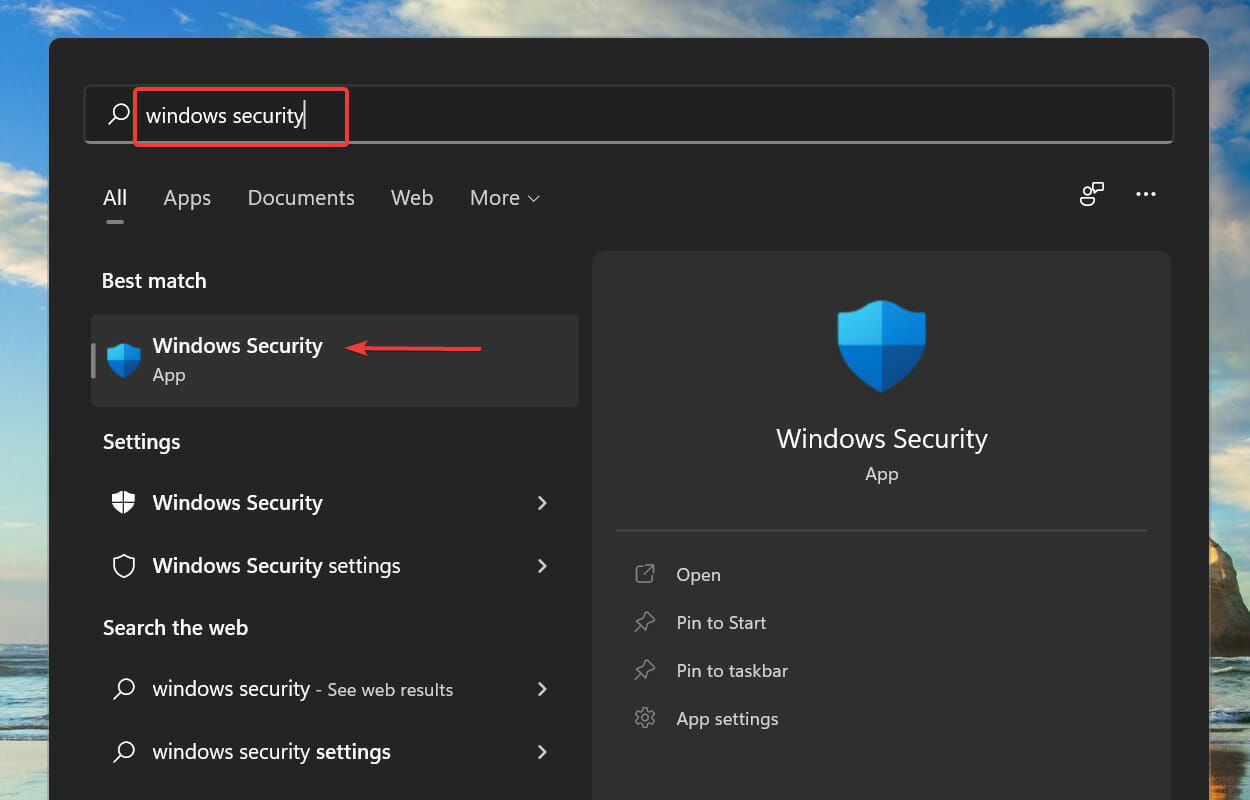
  1. Click the Start button, type security and click on Windows Security from the results.
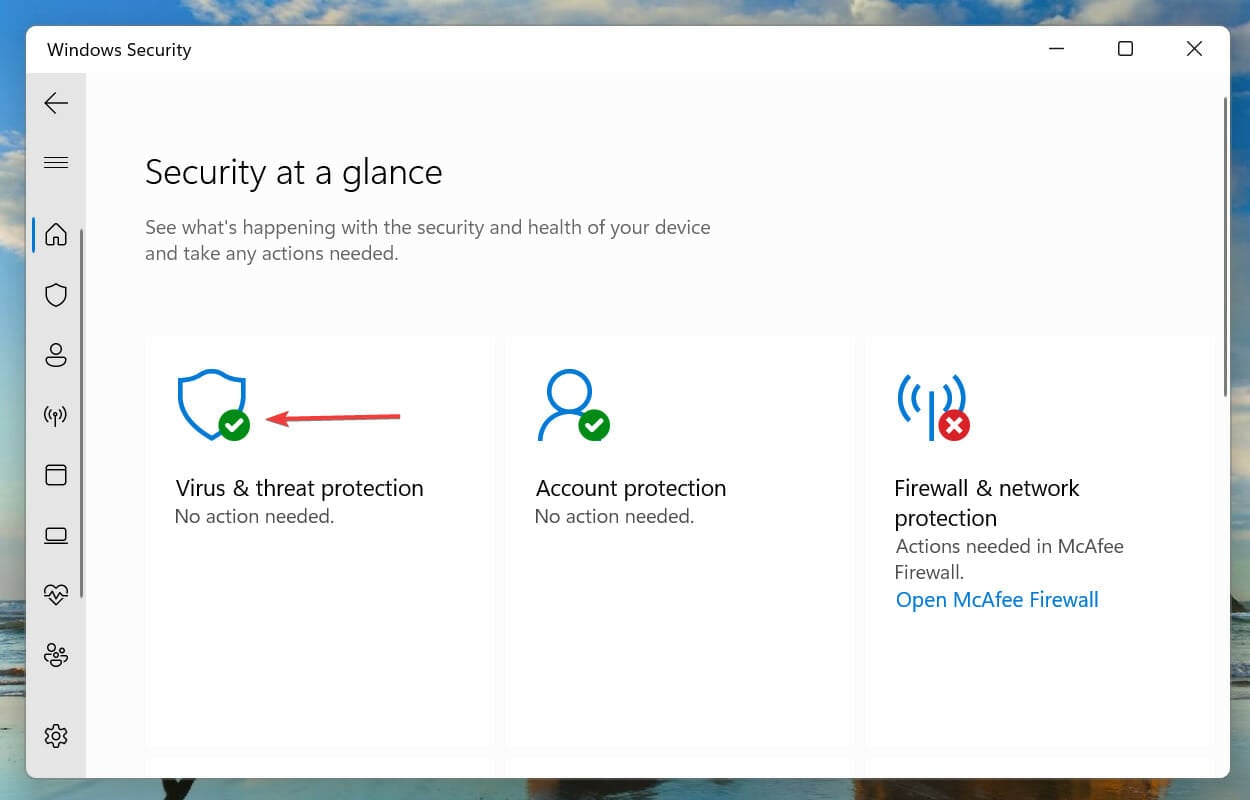
  2. Select Virus & threat protection.
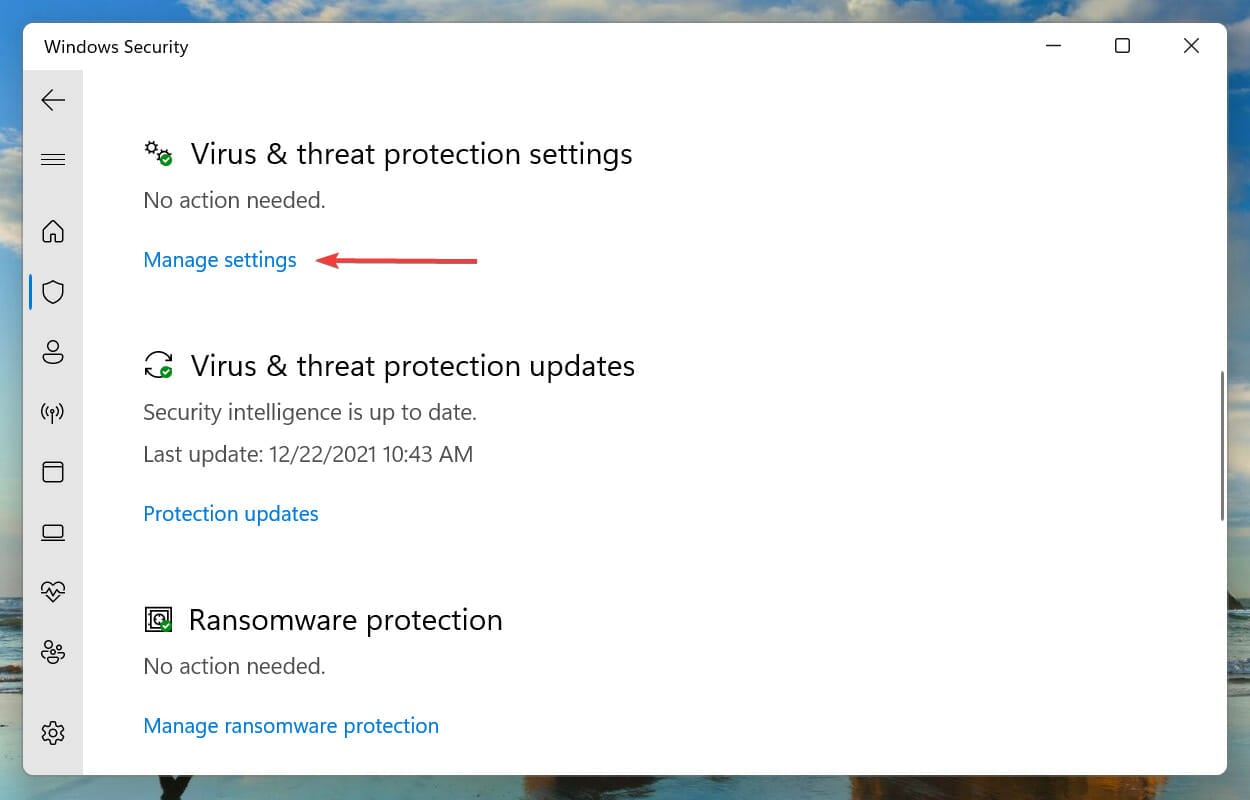
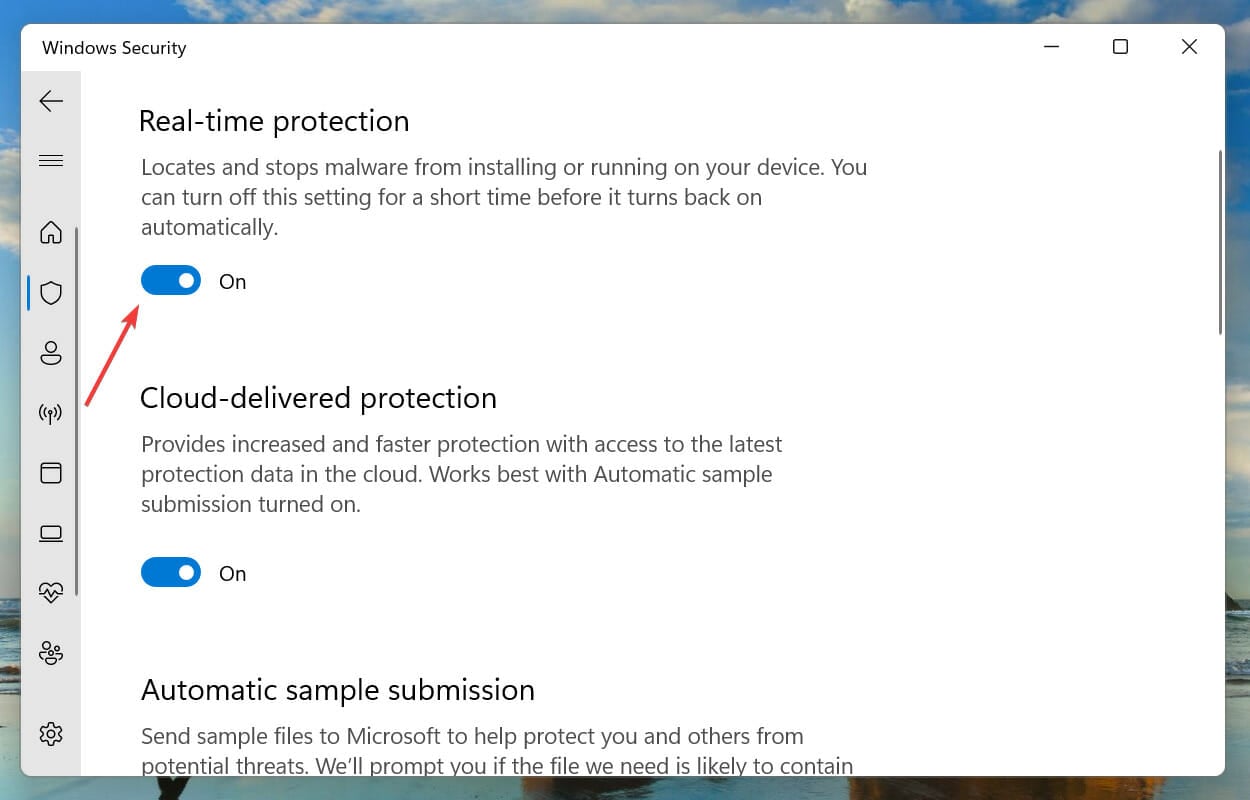
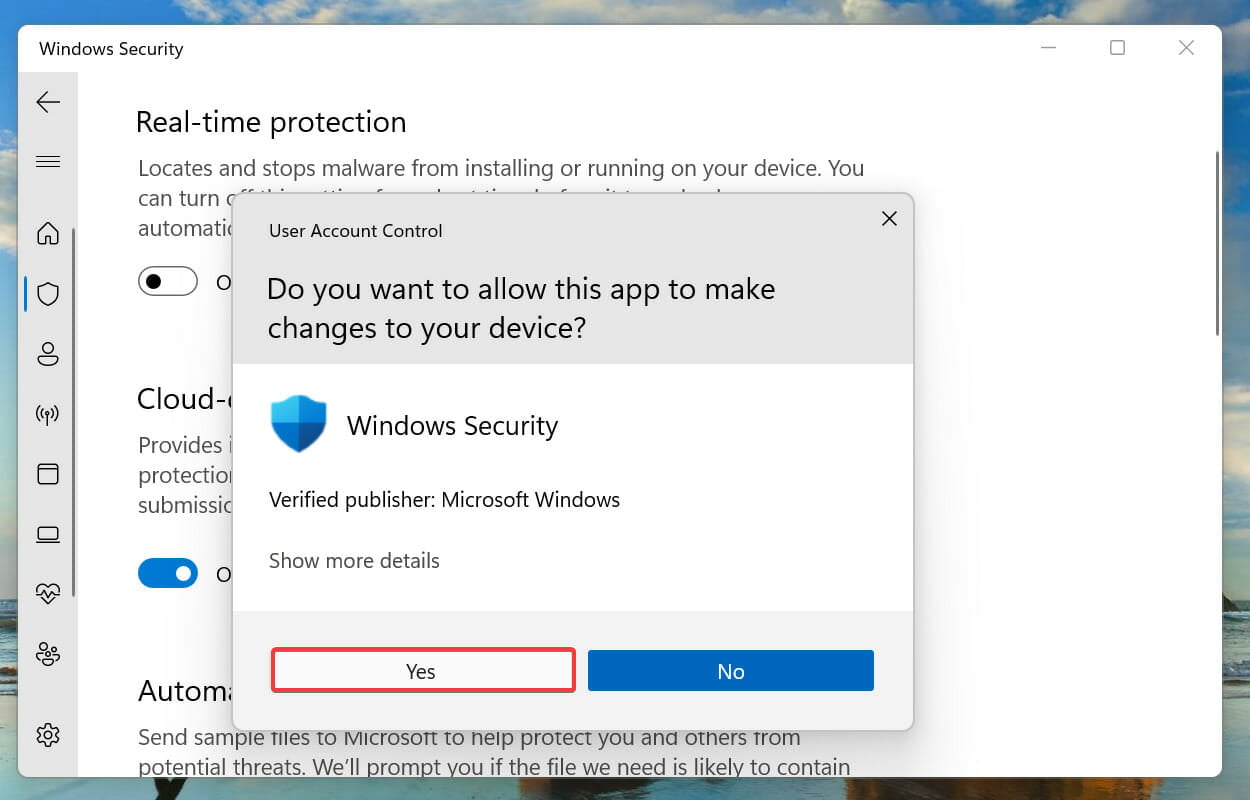
  3. Now, if you don’t have a third-party antivirus installed, you can deactivate the protection of Windows Defender. If you do, you can select Open app and disable your antivirus from its menu.
  4. For instance, for Avast, you can deactivate the defense from the Protection menu and then selecting Core Shields.

According to our readers, a common problem with applications can be your antivirus. Sometimes, you can’t open NVIDIA Control Panel because your antivirus interferes with it.

To fix the problem, it’s advised to check your antivirus settings and make sure that your antivirus isn’t blocking this app.

If that’s not the issue, try disabling certain antivirus features and check if that helps. In addition, you can also try disabling your antivirus altogether and check if that changes things.

The worst cases scenario is where you need to remove your antivirus completely. Some of our readers reported that AVG antivirus caused this issue to appear, but after removing it the problem was resolved.

Even if you don’t use AVG, you can try removing your antivirus and check if that solves the issue. In this case, you should consider switching to a different antivirus solution.

There are many great antivirus tools on the market, but if you want maximum protection and one that won’t interfere with your system, you should consider using an antivirus that is most compatible with the OS.

5. Make sure that the necessary services are running

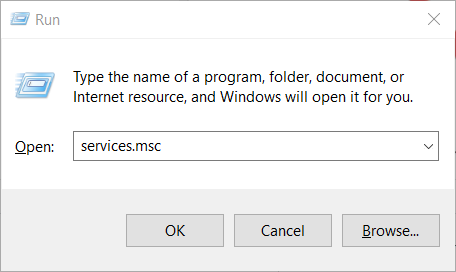
  1. Press the Windows key + R and enter services.msc. Now press Enter or click OK.
  2. When the Services window opens, locate NVIDIADisplay Container LS right-click it to open its properties.
  3. Now set the Startup type to Automatic and click the Start button to start the service. Click Apply and OK to save the changes.
  4. Locate NVIDIA Network Service Container, set its Startup type to Automatic, and make sure that the service is running.

6. Start the application directly from the installation directory

  1. 1. Press the Windows key + E to open File Explorer.

    opened file explorer
  2. 2. Go to the following folder: C:\Program Files\NVIDIA Corporation\Control Panel Client

    go to control panel client
  3. 3. Locate the nvcplui.exe file.

    launch the nvcplui exe
  4. 4. Double-click on it to launch it. After doing that, the NVIDIA Control Panel should start without any problems.

  5. 5. If you want, you can create a shortcut of this application on your desktop and use it to quickly start it from there.

    You may also force NVIDIA Control Panel to start automatically with your system. To do that, you just need to create a shortcut of the NVIDIA Control Panel and put it in the following directory: C:\Program\Data\Microsoft/Windows\Start Menu\Programs\StartUp

  6. If you cannot open Nvidia Control Panel with the traditional methods, then you should start the app directly from its application directory.

    For quicker access, you can create a desktop shortcut for the application, or add it to your Startup programs so that it opens as soon as you boot your PC.

7. Disable the Fast Boot option in Windows 10

  1. Press the Windows key + S and type power settings, then choose Power & sleep settings from the menu.
  2. Look for the Related settings section and click on Additional power settings.
  3. Power Options window will now open. From the menu on the left, select Choose what the power buttons do.
  4. Click on Change settings that are currently unavailable.
  5. Uncheck Turn on fast startup (recommended) option and click Save changes.

After doing that, the Fast Boot option should be disabled completely. Bear in mind that your system will start a bit slower than before, but the problem with NVIDIA Control Panel should be resolved.

8. Reinstall the driver from NVIDIA GeForce Experience

  1. Open NVIDIA GeForce Experience.
  2. Now head over to the Drivers section.
  3. Select Re-install the driver option, select the components and click on Install.
  4. Follow the instructions on the screen to complete the reinstall process. Once the driver is reinstalled, check if the problem is still there.

9. Make sure that NVIDIA Control Panel isn’t hidden

  1. Press the Windows key + S and enter nvidia control, then choose NVIDIA Control Panel from the list of results.
  2. Go to Desktop and select Add Desktop Context Menu and you can also select the Show Notification Tray Icon option if you want to receive notifications from the app.

After doing that, you should see NVIDIA Control Panel in your Taskbar and in your context menu.

Sometimes, you can’t open the NVIDIA Control Panel simply because it’s hidden. Specific software or Windows update can hide it.

10. NVIDIA Control Panel not opening in Windows 11

Believe it or not, this issue also has appeared on Windows 11. All the solutions we described for Windows 10 above can also be applied to the new OS.

However, we will still show you the solution to the most common problem our readers encounter, caused by the NVIDIA Control Panel service not working.

  1. Press the Windows key + R to start the Run app, type services.msc and hit Enter.
  2. Locate the NVIDIA Display Container LS.
  3. If the service is not running at all, right-click the service and select Start from the menu.
  4. Check if you can start NVIDIA Control Panel. If the issue persists, right-click the service again and select Restart this time.

If you still have problems opening the NVIDIA Control Panel, just go ahead and apply the solutions presented for Windows 10 above.

How to reinstall NVIDIA Control Panel?

  1. Click the Start button and select Settings.
  2. Select Apps.
  3. Scroll down until you locate NVIDIA Control Panel, click on it and select Uninstall.
  4. Head over to the Microsoft store and download NVIDIA Control Panel, then install the app.

Not being able to open NVIDIA Control Panel can be a big problem, especially if you want to fine-tune your graphics card.

If this issue occurred after you installed a new Windows update, just roll it back to restore things back to normal.

For more information, we also have an excellent guide on how to install graphics card drivers that might help you further.

The problem with the Nvidia Control Panel is often followed by You are not currently using a display attached to an Nvidia GPU message, but we covered that issue in a separate guide.

However, we hope you solved this issue by using one of our solutions, and now it works flawlessly.

Don’t hesitate to access the comments section below for more questions or suggestions. We’re eager to hear from you.

Misconfigured Windows Servers contributed to DDoS attacks

What can two businesses on two different continents have in common?  Incorrectly configured Microsoft servers that have been spewing gigabytes per second of junk packets causing distributed denial of service attacks (DDOS) on unsuspecting services and businesses.  These attacks can certainly disrupt a business or in some cases take it down without proper protection, which oftentimes isn’t affordable for a small business.

According to a recently published report by Black Lotus Labs, more than 12,000 servers running  Microsoft Domain Controllers with Active Directory were often used to magnify DDOS attacks.  For years it’s been a constant battle of attacker and defender, often times all the attacker had to do was gain control of an ever-growing list of connected devices in a botnet and use them to attack.  One of the more common methods of attacks is called reflection.  Reflection is when instead of flooding one device with data packets attackers send the attack to third-party servers.  Using third parties with misconfigured servers and spoofing the packets gives the appearance that the attack is coming from the target.  These third-party servers unknowingly end up reflecting the attack at the target often ten times larger than it started.

A growing source of attacks over the last year has been the  Connectionless Lightweight Directory Access Protocol (CLDAP) which is a version of the standard Lightweight Directory Access Protocol (LDAP). CLDAP uses User Datagram Protocol packets to authenticate users and discover services when signing into Active Directory.   Chad Davis, a researcher at Black Lotus had this to say in a recent email.

“When these domain controllers are not exposed to the open Internet (which is true for the vast majority of the deployments), this UDP service is harmless. But on the open Internet, all UDP services are vulnerable to reflection.”

Attackers have been using the protocol since 2007 to magnify attacks.  When researchers first discovered the misconfiguration in CLDAP servers the number was in the tens of thousands.  Once the issue was brought to the administrator’s attention the number dropped significantly, though it has risen sharply again since 2020 including a rise of nearly 60 percent in the past year according to Black Lotus Labs.

Black Lotus offered the following advice for organizations running CLDAP.

  • Network administrators: Consider not exposing CLDAP service (389/UDP) to the open Internet.
    • If exposure of the CLDAP service to the open Internet is absolutely necessary, take pains to secure and defend the system:
      • On versions of MS Server supporting LDAP ping on the TCP LDAP service, turn off the UDP service and access LDAP ping via TCP.
      • If MS Server version doesn’t support LDAP ping on TCP, rate limit the traffic generated by the 389/UDP service to prevent use in DDoS.
      • If MS Server version doesn’t support LDAP ping on TCP, firewall access to the port so that only your legitimate clients can reach the service.
  • Network defenders: Implement some measures to prevent spoofed IP traffic, such as Reverse Path Forwarding (RPF), either loose or, if feasible, strict. For more guidance, the MANRS initiative offers in-depth discussion of anti-spoofing guidelines and real-world applications.

Black Lotus has notified and assisted administrators they found vulnerable in an IP space provided by Lumen.  Microsoft hasn’t commented on the findings.

Via Arstechnica

5 Microsoft Cloud command line tips and tricks to find any Azure portal or blade

Are you tired of trying to find a Microsoft portal or blade in Azure? There is a open-source app available that Azure admins or devs might find useful. Microsoft’s Merill Fernando, Azure Active Directory Product Manager created [cmd.ms] to make it easier to get to Microsoft portals and blades without trying to memorize all of them.

The Microsoft Cloud command line, otherwise known as [cmd.ms], makes it easier to find your favorite blade in Azure, Microsoft 365, Azure AD, Intune, and more. It’s really easy to try out and you don’t need to download or install anything to get started.

Microsoft Cloud command line

The Microsoft Cloud command line aims to make it easier to find the right Microsoft product portal to get to individual blades within Microsoft 365 Admin, Azure, SharePoint, or wherever else you need to look for within Microsoft’s entire corporation.

You aren’t restricted to any one browser or operating system either, you can use Microsoft Cloud command line on almost any platform. Here’s what you need to do.

  1. Open a new tab in your preferred web browser.
  2. Type “cmd.ms” in the web address bar and use any of the commands or alias from the list available on the Microsoft Cloud command line homepage.

[Cmd.ms] is a short link tool that allows users to use the power of their keyboard to go to Microsoft portal or blade without endlessly clicking. [Aka.ms] is very similar to [cmd.ms] and shares the some of the same short links and commands.

#1 Address bar autocomplete extensions

microsoft cloud command line

For those that like autocomplete from the address bar, you can get the browser extension for Edge, Chrome and FireFox. Once you install the extension, you can find Microsoft portals and blades even faster:

  1. Open a new tab.
  2. Type c and press SPACE or TAB.
  3. Type in the cmd.ms shortcut you want to find (ex. Az).cloud command line

Get the browser extension to get autocomplete support for all the commands for your browser from the links below.

#2 Add a new command to [cmd.ms]

Interested in adding a new command? Head over to GitHub to request a new command. The preferred option is to create a pull request which updates the commands.csv.

Here is a list of tips to keep in mind when you are creating a new command in cmd.ms:

  • Verify that your new command/alias does not already exist.
  • If the app has a legacy or alternate name, include it in the Keyword column so it is searchable.
  • Only include links to Microsoft portals.

If you feel a command name is too long, be sure to include an alias to the CLI name so it is easily discoverable. If there is a new app, you can suggest a new two letter prefix for the app.

#3 Use cmd.ms/{command} instead

[Cmd.ms] also supports the cmd.ms/{command} format if you prefer to use it over the {command}.cmd.ms format. It is noted that {command}.cmd.ms is “better in the long run due to autocomplete filling in the cmd.ms suffix as soon as you type {command} in the browser tab.”

#4 MSPortals.io

CLOUD COMMAND LINE

If you like [cmd.ms], you’ll love MSPortals.io. Available on GitHub, MSPortals.io lists of all the Admin Microsoft Portal URLs in one place. MSPortals.io is a project set up and owned by Adam Fowler and is not affiliated with Microsoft in any way.

#5 Centro 365

cloud command line

Centro 365 is a browser extension created by Sean O’Sullivan that makes it easier for Admins to manage devices and apps in Azure and Microsoft 365. You can download Centro 365 on Edge, Chrome, FireFox, and Opera and the browser extension is free to try.

Did you know about or use [cmd.ms]? Let us know in the comments!

Failed to Play Test Tone: How to Fix the Error

The Windows OS, though getting refined over the years, still throws a few errors every now and then. One of these is Failed to play test tone error when troubleshooting issues with an audio device.

The error can be faced with a range of devices and could point to a wide array of underlying causes triggering the message, which makes it difficult to troubleshoot things.

But don’t worry! We have covered every aspect of the Failed to play test tone error and the most effective solutions for it in the following sections.

Why does it say Failed to play test tone?

There could be several reasons behind the error, and here are the common ones:

  • Outdated, incompatible, or corrupt audio drivers
  • Misconfigured sound settings
  • Critical services not running
  • Corrupt system files
  • A bug in the current version of the OS

In addition to this error, users reported the following problems as well:

  • USB audio Failed to play test tone – If you’re getting this error, it might be because you’re using a USB sound card or USB headphones; according to users, the problem occurs more often with USB audio devices.
  • Failed to play test tone Lenovo – Audio problems like this can occur on almost any PC, including Lenovo.
  • Laptop no sound, failed to play test tone – This issue affects both desktop and laptop PCs alike; in fact, the issue is more common on certain laptops than on desktop PCs.
  • Failed to play test tone Acer Nitro 5 – Many using the Acer Nitro 5 laptop reported the problem, and our solutions cover it as well.
  • Failed to play sound, sound disabled – In some cases, you won’t be able to play any sounds on your PC. According to users, the sound gets disabled on their PC due to this problem.

Let’s now head to the solutions.

How do I fix error Failed to play test tone?

Before you head to the solutions that require reconfiguring the settings or making other advanced changes, here are a few things you can try:

  1. If you’re using a 5.1 speaker system, go to your speaker settings and change them from Quadraphonic to 5.1.
  2. If you have the Xbox 360 controller connected to the PC, remove it. Many reported that the controller conflicted with the audio and triggered the error.
  3. If you are using a docking station or a USB hub to connect the audio device, remove it and directly connect the audio device to the PC.

In case these don’t work, head to the solutions listed below:

1. Update the drivers

1.1 Update drivers manually

  1. Type Device Manager in the Search bar, and click on the relevant search result.device manager
  2. Locate the problematic device, right-click on it, and select Update driver.update driver to fix failed to play test tone
  3. Now, select Search automatically drivers.search automatically for drivers

If Windows doesn’t find the updates, go to the manufacturer’s official site and manually download the latest driver version. However, the manual method isn’t always effective and may introduce instability if the incorrect drivers are installed.

1.2 Use professional software

Windows 10 usually installs all the necessary drivers, and it does a good job of finding and recognizing your devices. But, sometimes, it does not, and you have to manually install or update them.

The easiest solution is to have a tool that automatically installs all the drivers you need.

2. Install the High Definition Audio Device driver

  1. 1. Press Windows + R to open Run.

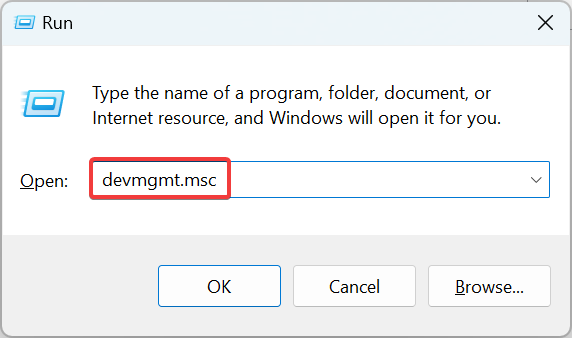
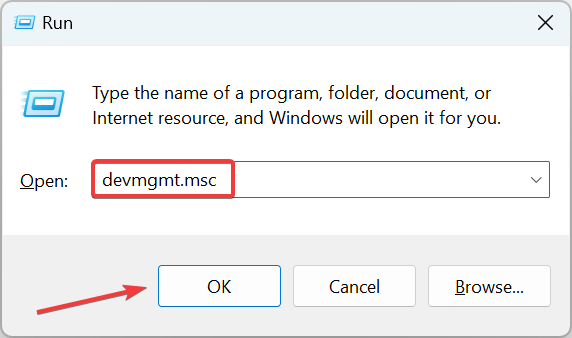
  2. 2. In the text box, type devmgmt.msc, and hit Enter.

    devmgmt.msc
  3. 3. Go to the Sound, video and game controllers section.

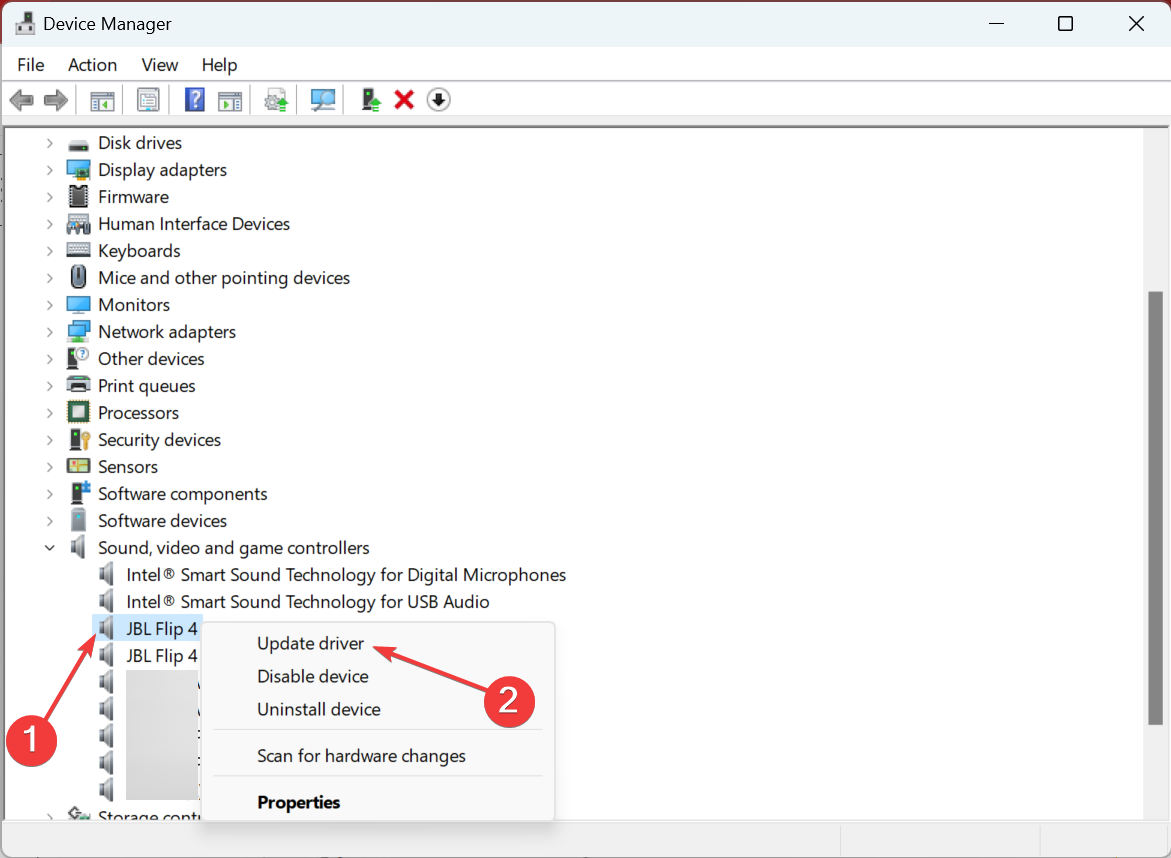
  4. 4. Right-click on the problematic device and select Update driver.

    update driver to fix failed to play test tone
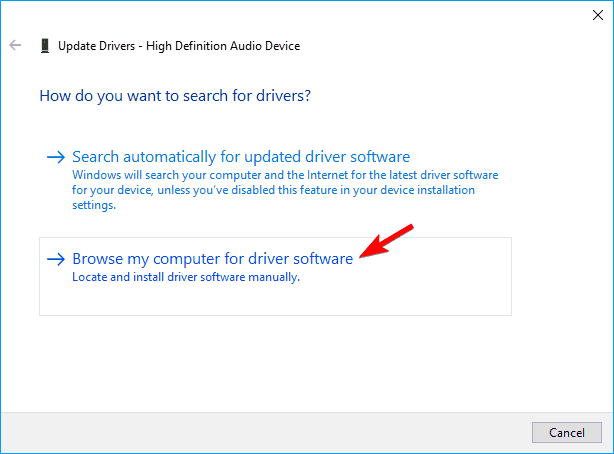
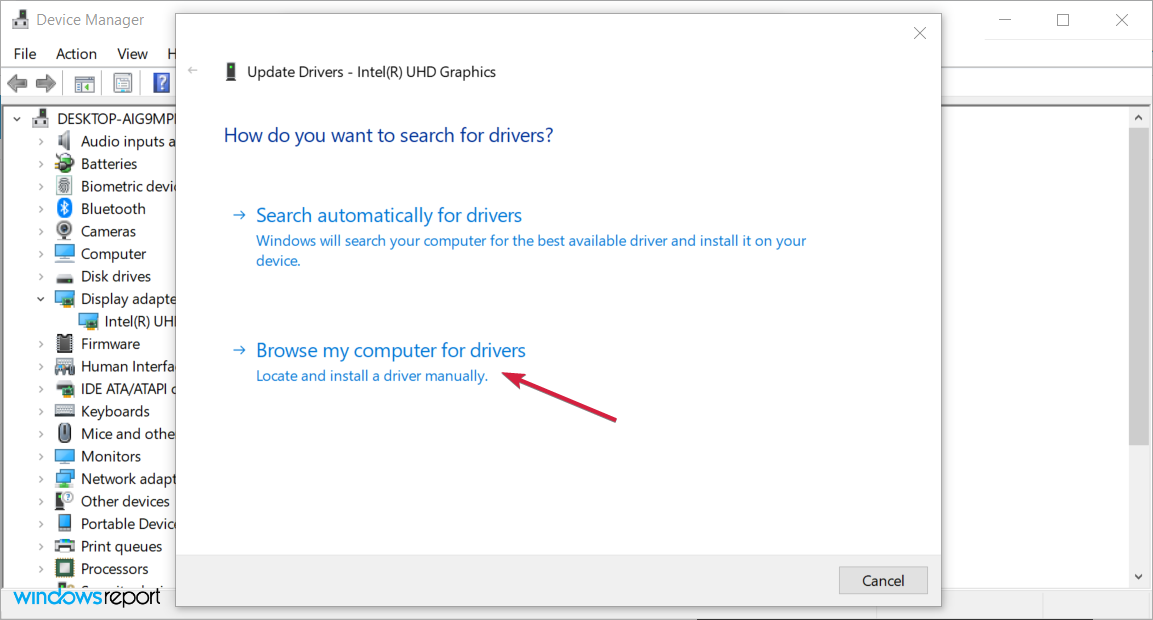
  5. 5. Choose the Browse my computer for driver software option.

    update driver
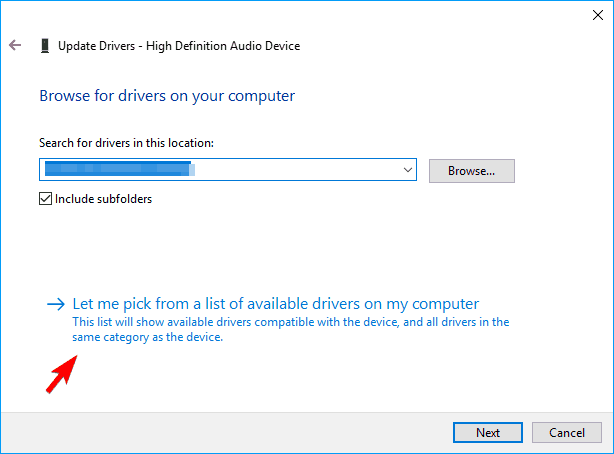
  6. 6. Now choose Let me pick from a list of device drivers on my computer.

    browse pc for driver
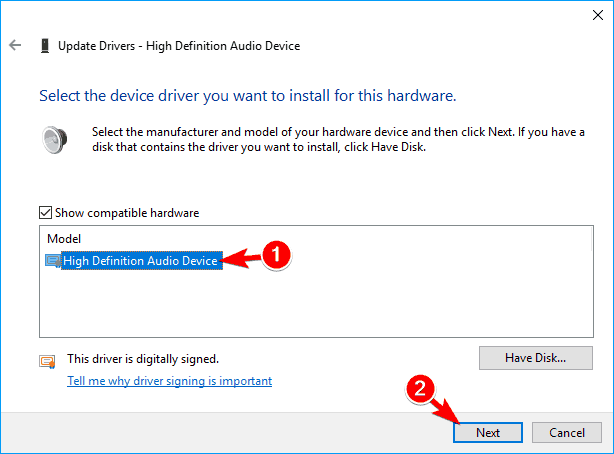
  7. 7. From the list of drivers, choose High Definition Audio Device, and click Next.

    install driver
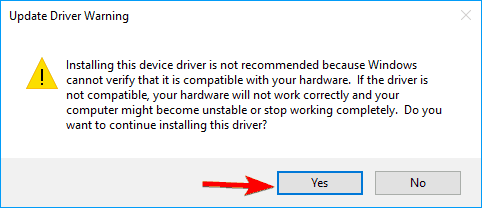
  8. 8. Click Yes on the warning box.

    press ok on the warning box
  9. If updating the driver didn’t work, you can install the High Definition Audio Device driver to fix things in case of the Failed to play test tone error.

    This can be done via Device Manager, and you need to browse your PC for the driver you want to install.

3. Restart the Windows Audio service

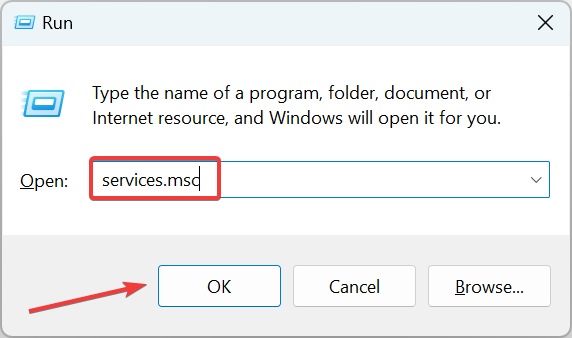
  1. Press Windows + R to open Run, enter services.msc in the text field, and click OK.services.msc
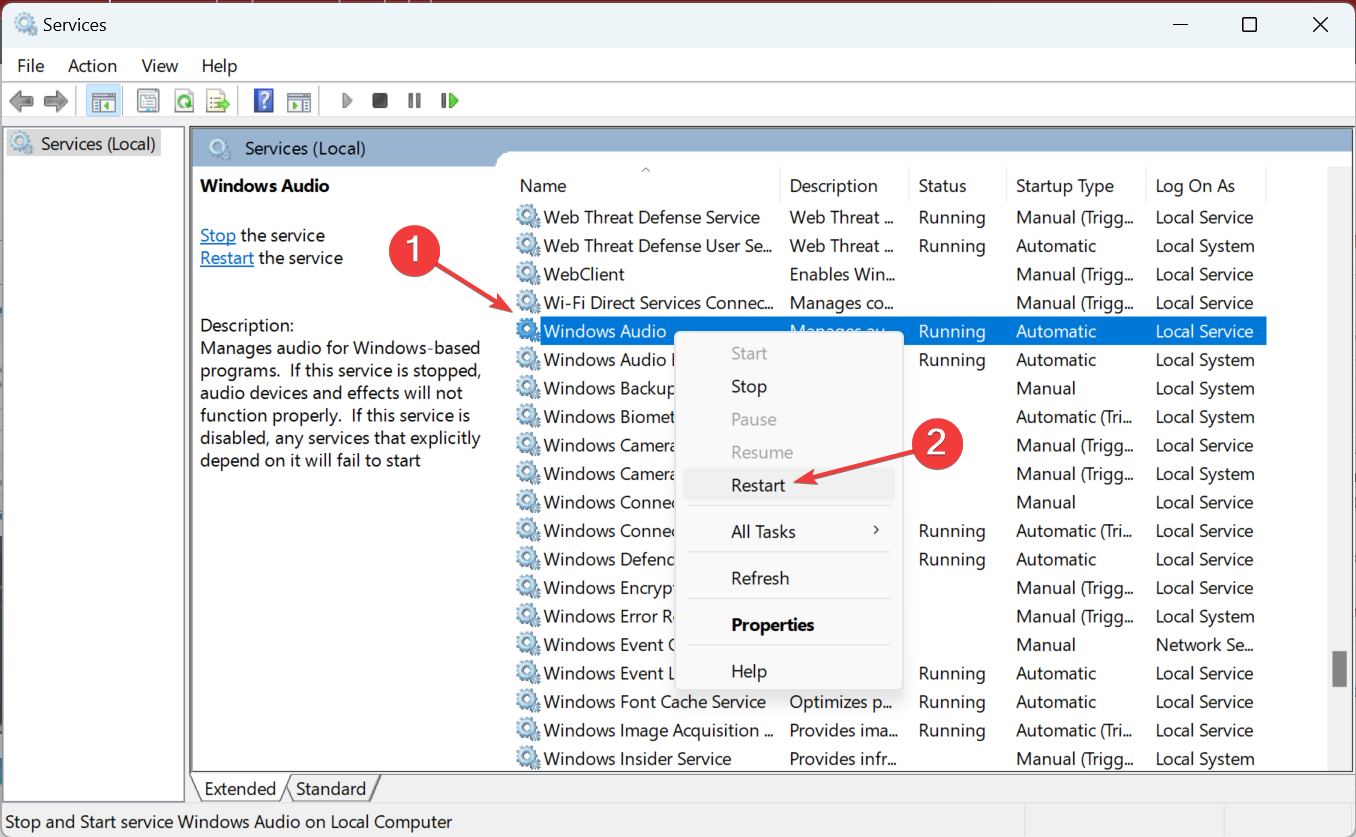
  2. Now, locate the Windows Audio service, right-click on it, and select Restart.restart service to fix failed to play test tone
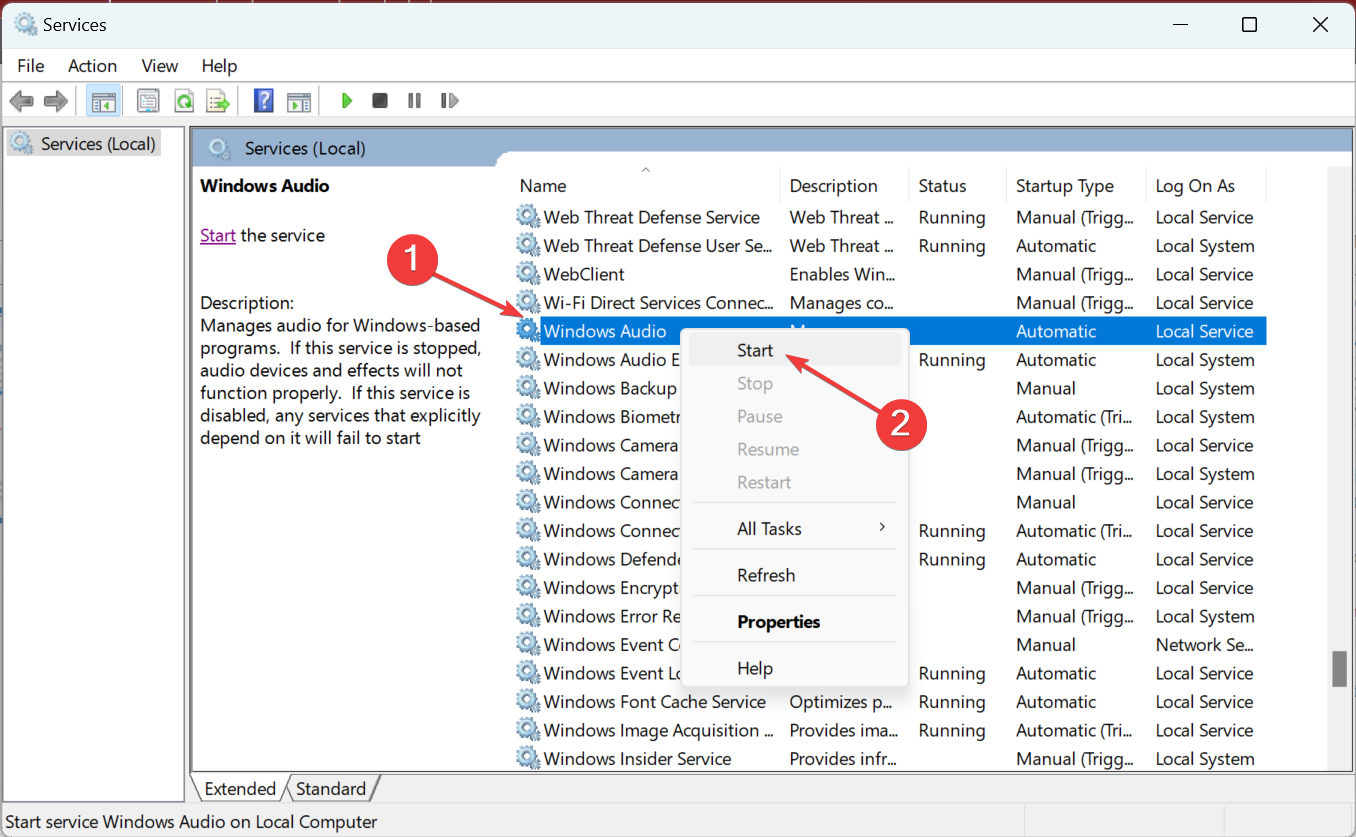
  3. If the service is not presently running, choose Start from the context menu.start

If your speaker failed to play the test tone in Windows 11, starting the Windows Audio service should help.

4. Disable all audio enhancements

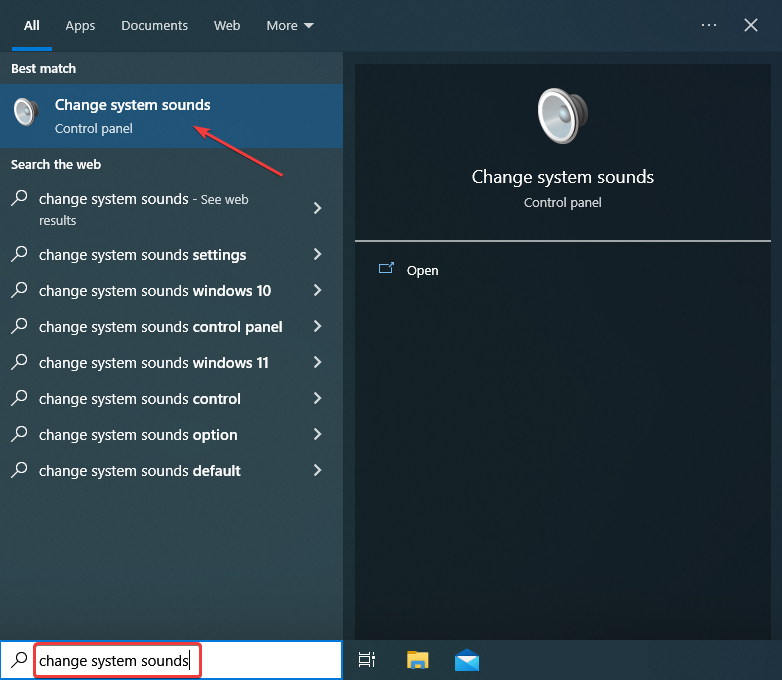
  1. Type Change system sounds in the Search bar, and then click on the relevant search result.change system sounds
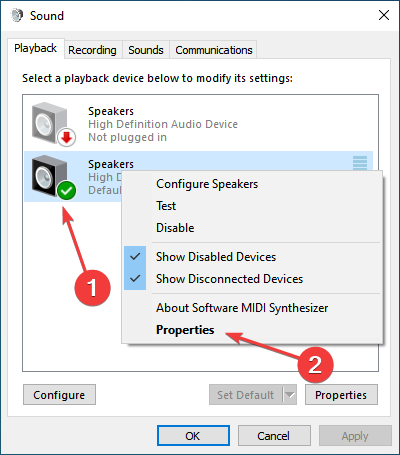
  2. Navigate to the Playback tab, right-click on the problematic device, and select Properties.properties
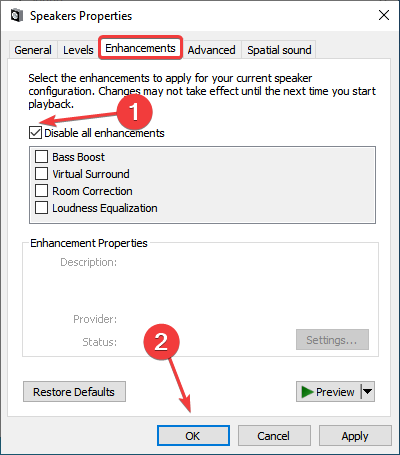
  3. Navigate to the Enhancements tab, check the Disable all enhancements option, and then click on OK to save the changes.disable all enhancements to fix failed to play test tone

Sometimes, the Failed to play test tone error can appear if you’re using certain audio enhancements, and disabling all of them should work.

5. Remove recently installed updates

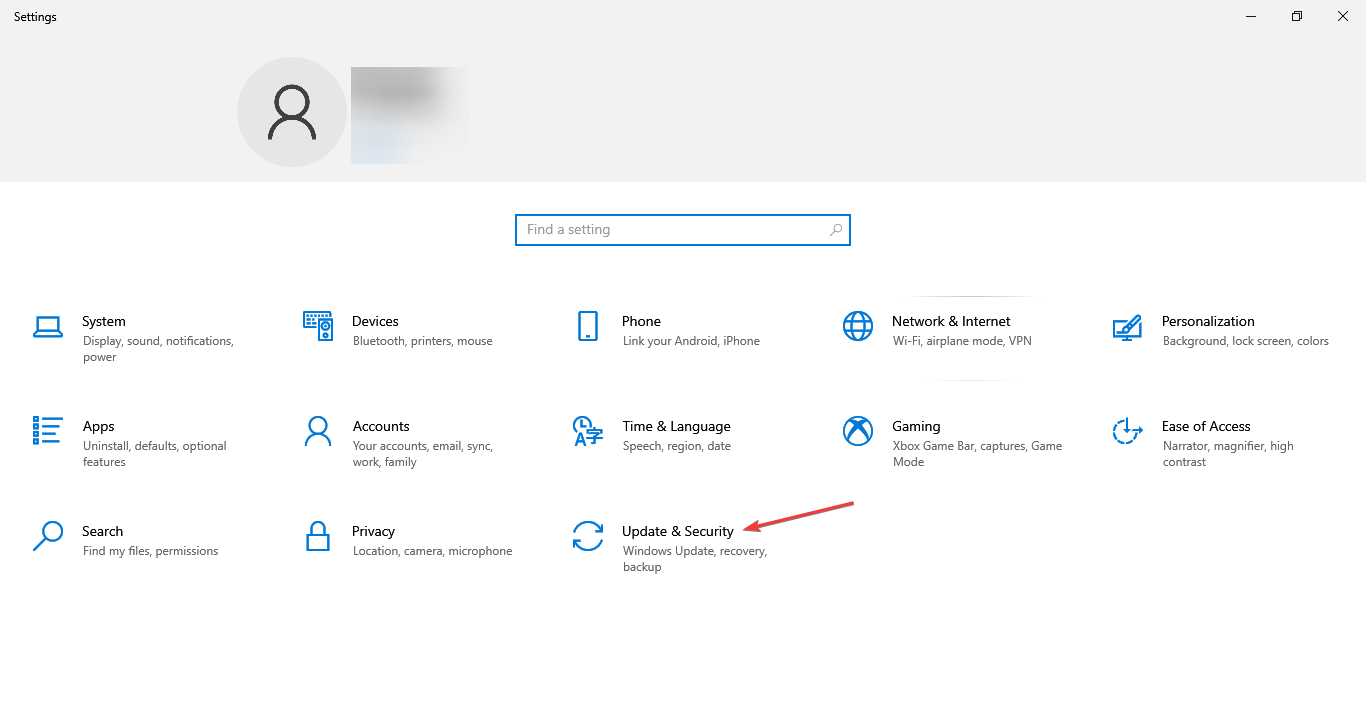
  1. Press Windows + I to open the Settings app and select Updates & Security.update & security
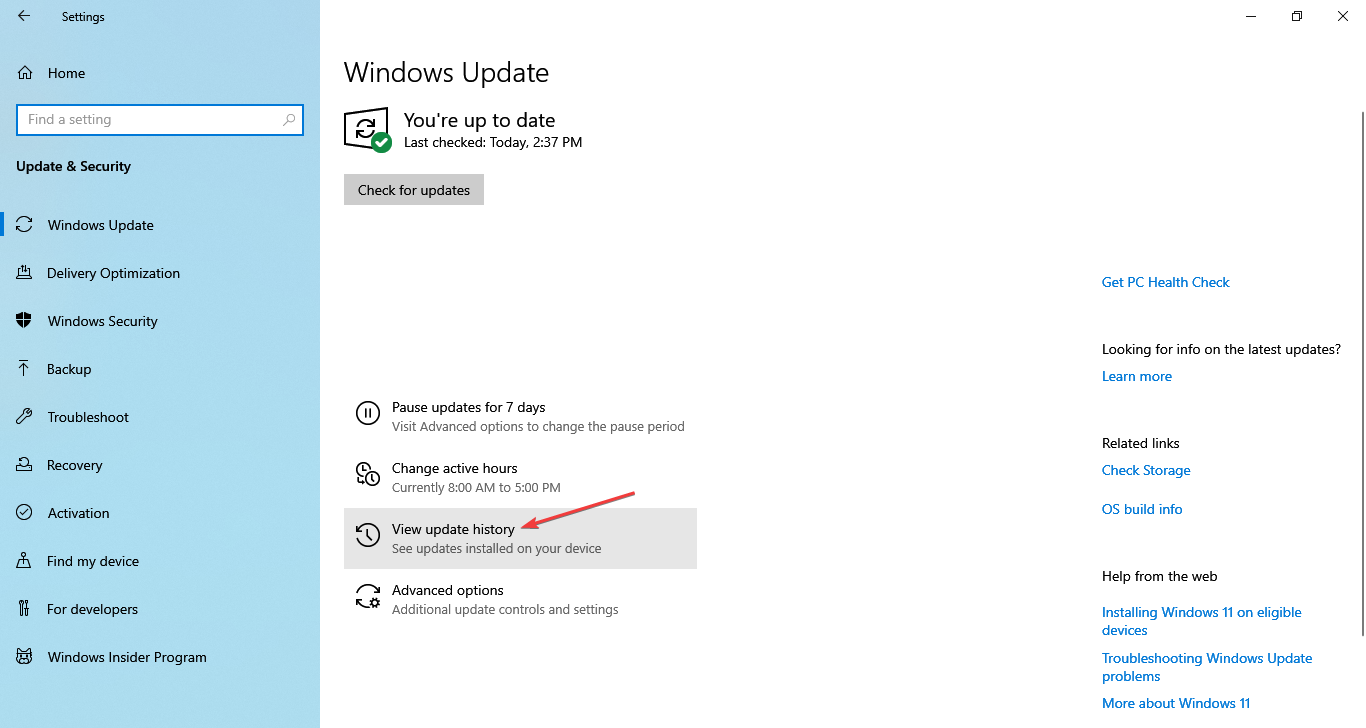
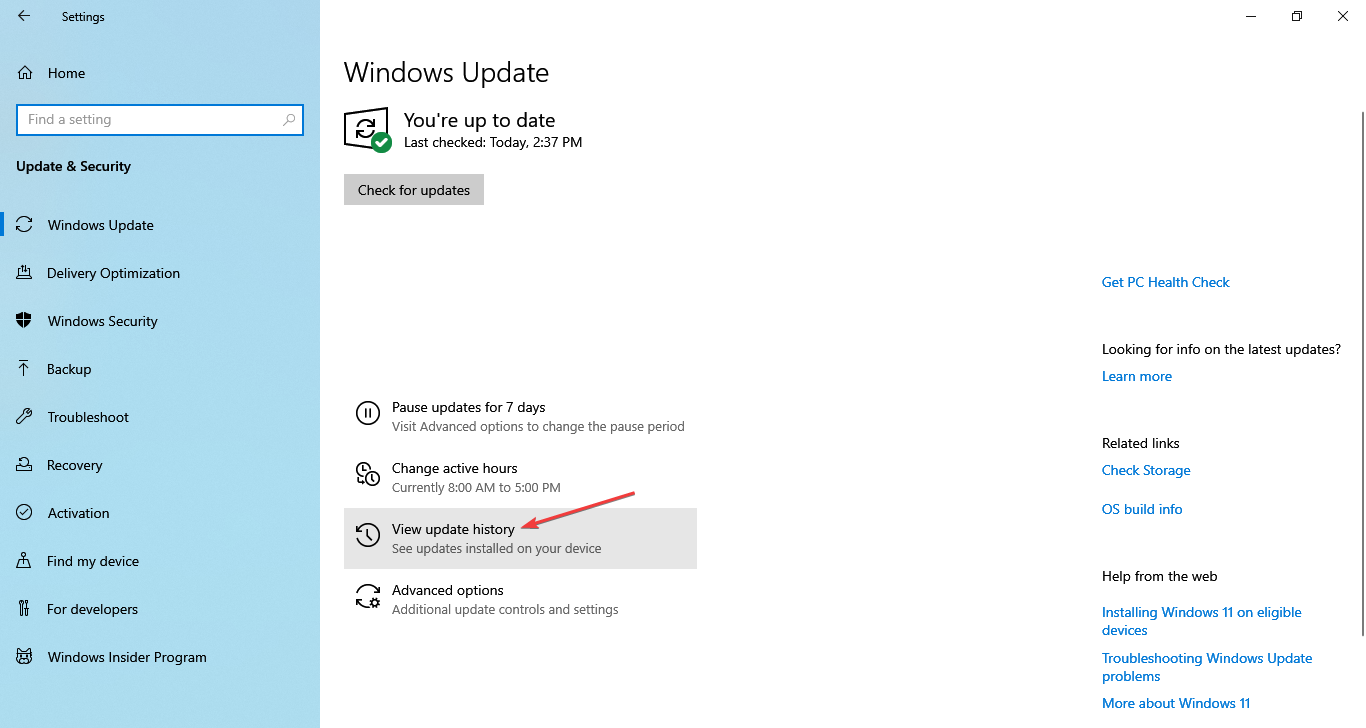
  2. Click on View update history.update history to fix failed to play test tone
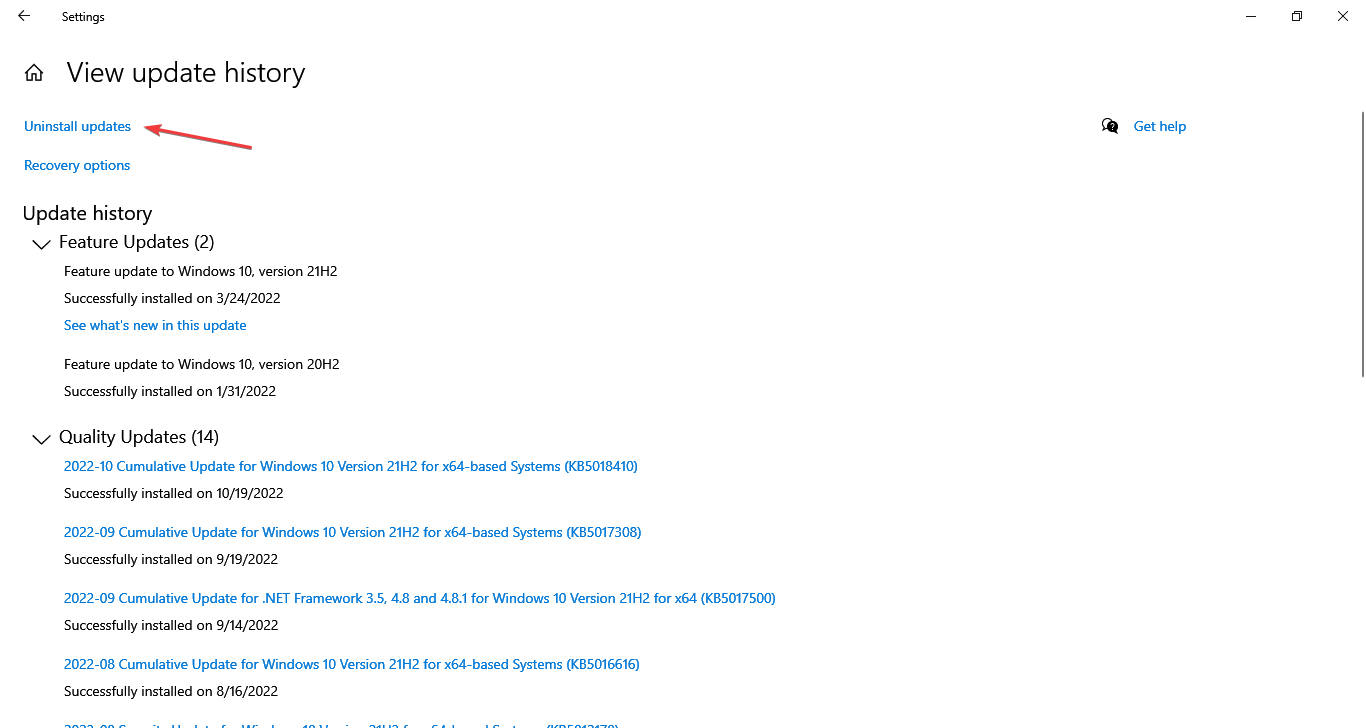
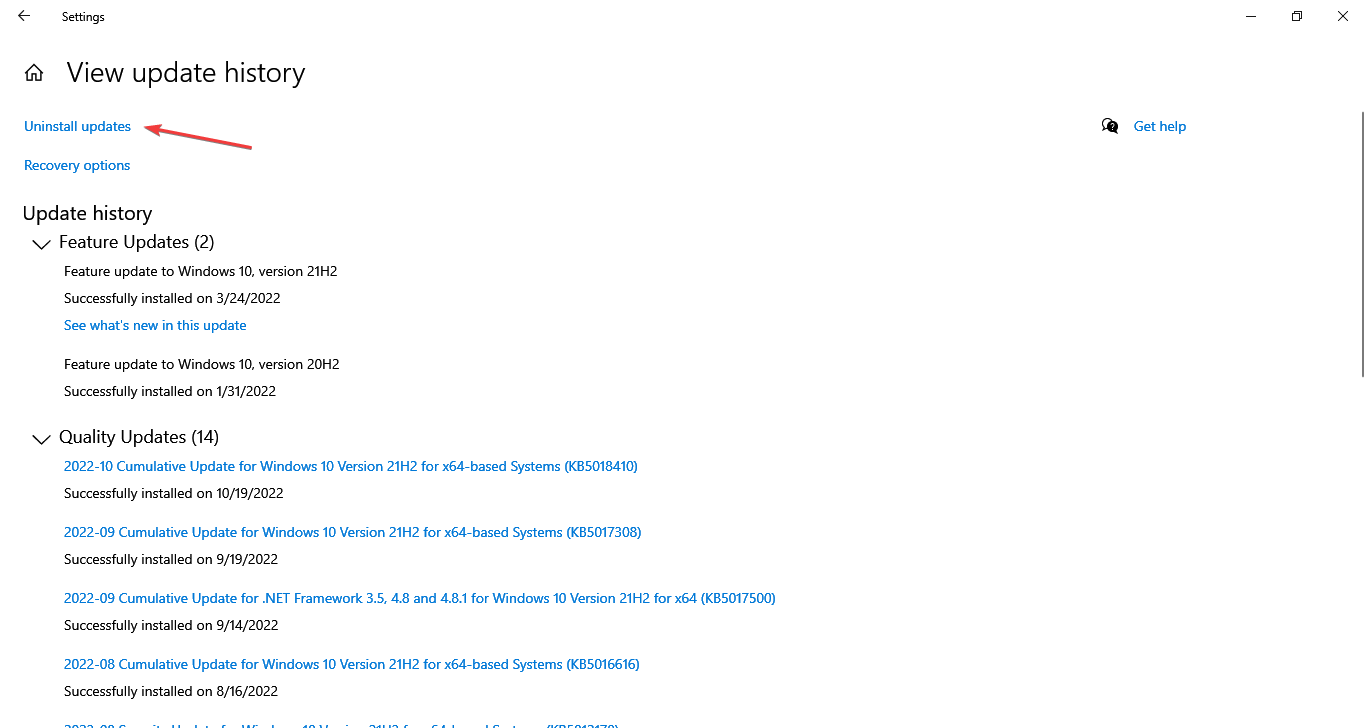
  3. Now, click on Uninstall updates.uninstall updates to fix failed to play test tone
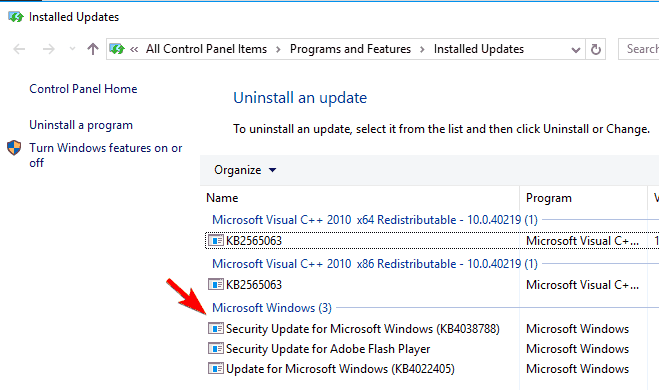
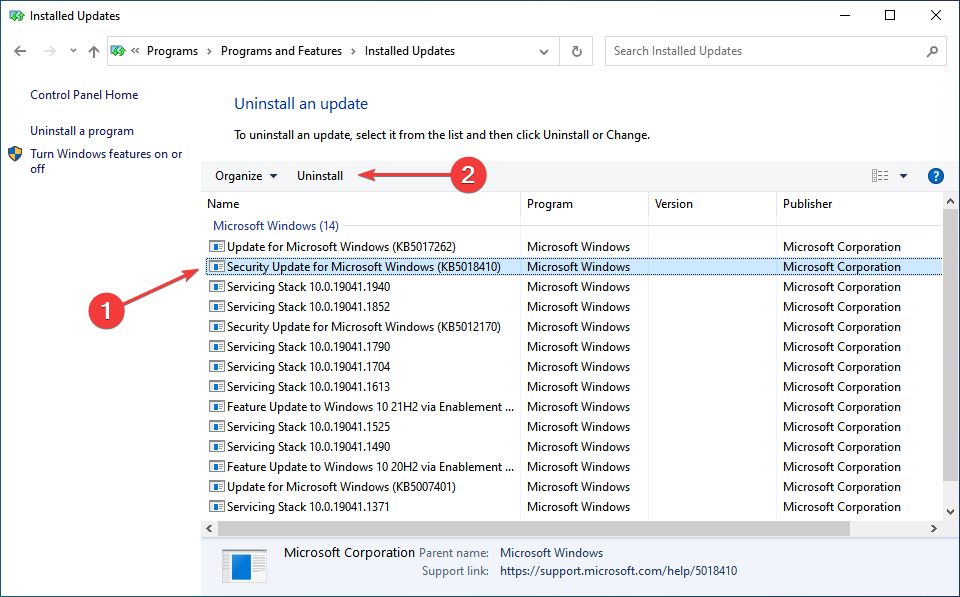
  4. Double-click the update that you want to remove.
    remove update Sound failed to access device
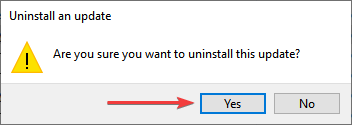
  5. Click Yes in the confirmation prompt.yes

Many users received the Failed to play test tone after Windows 10 update due to bugs in the recently installed version.

If the problem is fixed after uninstalling it, disable automatic updates in Windows, and wait for a newer version to release before you re-enable it.

6. Change the security permissions in the registry

Note icon NOTE
We recommend caution while modifying the Registry since a minor lapse could damage the OS. You may restore the Registry to a stable state in case things don’t go as planned.
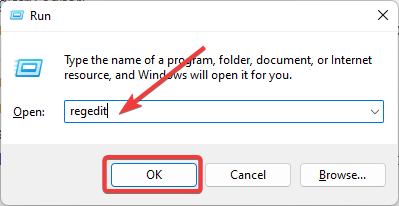
  1. Press Windows + R, type regedit in the text field, and click OK.
    regedit run window Failed to play sound, sound disabled
  2. Click Yes in the UAC prompt.
  3. In the left pane, navigate to: HKEY_LOCAL_MACHINE\SOFTWARE\Microsoft\Windows\CurrentVersion\MMDevices\Audio
  4. Right-click the Audio key and choose Permissions from the menu.
    permissions USB audio failed to play test tone
  5. Repeat the same steps on a working PC. Now compare the list of entries in Group or user names sections on a working PC and on your PC.
  6. Check permissions for each entry on the list. If certain entries or permissions are missing from your PC, you’ll need to readjust them.
  7. After all entries and permissions are the same on both PCs, click Advanced.
    advanced AMD HDMI audio failed to play test tone
  8. Check the Principal section on both PCs. If the owner section is different on the affected PC, be sure to change it accordingly.
    advanced security settings Dell audio failed to play test tone

If you’re getting this error frequently, you might be able to fix it by changing the security permissions. You’ll need to find another Windows 10 PC and compare the security permissions between the two.

7. Reset Windows

If nothing so far has worked, we suggest you factory reset Windows 10. Also, if possible, make sure to delete everything, including the files stored on the PC.

Once done, the computer will be as good as new and the Failed to play test tone error fixed.

In case this, too, doesn’t work, the problem likely lies with the hardware, and you will have to get it checked by a professional, or if it’s still under warranty, take it to the dedicated repair center.

Also, if the speaker Failed to play test tone in Windows 11, the same set of solutions would apply

Besides, check the best sound enhancement software for Windows 10.

If you have any suggestions, comments, or questions, just write them down in the comments below.

Kmode Exception Not Handled: How to Fix This BSOD Boot Loop

Kmode Exception Not Handled is a Blue Screen of Death error encountered on all recent iterations of the OS, including Windows 10.

Unlike other BSODs, this one may crash the PC on the login screen, making it challenging to troubleshoot things. Many users reported the error in Safe Mode, and some had KMODE EXCEPTION NOT HANDLED on startup.

Fret not! We have tested things and come up with a comprehensive list of solutions.

What causes KMODE_EXCEPTION_NOT_HANDLED?

Some of the reasons you may encounter the error are:

  • Hardware issues – If you can’t boot Windows and receive the error instead, it’s likely the hardware to blame. Also, the situation may lead to Kmode Exception Not Handled while installing Windows 10.
  • Outdated or corrupt driver – When encountering the error, it usually lists the problematic driver in brackets. Identify it and reinstall or update the driver.
  • A bug in the installed version of the OS – In many cases, users encountered the error after installing a particular version of the OS and managed to fix things simply by reverting to the previous version, which points to a bug.
  • Partial installation of Windows Updates – There’s also the possibility that an update was not installed properly, leading to the Kmode Exception Not Handled BSOD error.

The solutions we found may also work for other errors listed below:

  • Kmode Exception Not Handled ntfs.sys/netio.sys/ ndis.sys/ syntp.sys/ wdf01000.sys/ etd.sys/ tcpip.sys/ tppwr32v.sys/ usbport.sys/ igdkmd64.sys/ intelppm.sys/ iastora.sys – The system identifies the file’s name that caused the error. You can use that information to find the problematic device or application.
  • Kmode Exception Not Handled due to overclocking – This signals the voltage increase to the CPU behind the underlying cause.
  • Kmode Exception Not Handled due to RAM – Usually, it is a faulty RAM module that periodically gives the errors. Try reseating it or run a few tests on the installed RAM.
  • KMODE_EXCEPTION_NOT_HANDLED on USB – This message indicates a wrong driver or a faulty USB device.
  • KMODE EXCEPTION NOT HANDLED during install – Once again, this error can be caused by corrupted drivers or an incompatible one. In this case, install the driver compatible with the iteration/version you are trying to install.
  • Kmode Exception Not Handled loop – It indicates the computer’s incompatibility or old graphics card drivers.
  • Kmode Exception Not Handled in Windows 10 on Dell – Dell users with Windows 10 are more often affected by this error.

How do I fix the Kmode exception not handled?

Before we head to the other slightly more time-consuming solutions, here are a few quick tricks that worked for many:

  • If this is the first time you have encountered the error, force restart the computer. Users often encountered the error just once, and it didn’t reappear.
  • Ensure all the connections are proper, including the ones to the RAM and storage drive. For example, one user fixed things simply by reconnecting the SSD, so check that the storage drive is connected correctly.
  • Remove the RAM modules and re-insert them firmly into the slots.
  • Disable any third-party antivirus installed on the computer. In case that works, you know what’s causing the error. Here we would recommend switching to more reliable antivirus software.

1. Update the problematic drivers

Note icon NOTE
The first two steps are necessary only if you can’t usually access Windows. Otherwise, you can start from the third step.
  1. While your computer boots, keep pressing F8 or Shift + F8.
  2. If the shortcut works, you should see a list of options available. Choose Safe Mode with Networking and wait until Windows boots into Safe Mode.
  3. Click on the Start button, type device manager, and choose the app from the results.
  4. Find any unknown devices, right-click on them, and select Update driver.
  5. Choose Search automatically for drivers.
  6. If that doesn’t work, try the Browse my computer for drivers option instead, find the right driver, and install it.
  7. After you’ve installed all the missing drivers, exit Safe Mode and check if the issue is resolved.

Missing or corrupt drivers can sometimes cause a KMODE_EXCEPTION_NOT_HANDLED error in Windows 10. To fix this problem, updating the problematic one or installing the missing drivers is recommended.

This error is often related to your network adapter or the graphics driver, so start by updating those first. You can also visit your manufacturer’s website for the latest driver version.

If updating your drivers doesn’t work, or you do not have the necessary computer skills to update/fix the drivers manually, we strongly recommend you use a third-party repair tool.

The automatic driver updater Outbyte Driver Updater will quickly repair driver issues by scanning your PC for older, lost, or damaged drivers, then updating to the most recent compatible version.

Outbyte Driver Updater

Keep all your drivers up to date and fix most incompatibility issues with this simple tool.
Free Trial Download Now

2. Reinstall the corrupt driver

Note icon NOTE
If you can’t boot the PC normally, switch to Safe Mode by pressing the F8 or Shift + F8 key right after turning on the computer, choose Safe Mode, and then try the steps here. The same would apply throughout the guide.
  1. Press Windows + R to open Run, type devmgmt.msc in the text field, and hit Enter.device manager
  2. Look for drivers with a warning sign (these show up automatically), right-click on them, and select Uninstall device.uninstall device to fix kmode exception not handled windows 10
  3. If available, check the Delete the driver software for this device option, then click on Uninstall.uninstall driver to fix kmode exception not handled windows 10
  4. Once done, restart the computer, and Windows will automatically install a fresh copy of the driver as long as the concerned device is connected correctly.

Some users reported corrupt drivers as the underlying cause behind the Kmode Exception Not Handled error in Windows 10. So, make to check for these as well.

This method works when an updated version of the driver is not available. Otherwise, we recommend installing that instead of a fresh copy of the same performance.

3. Perform a System Restore

  1. 1. Press Windows + R to open Run.

  2. 2. In the Run dialog box, type rstrui.exe, and then click OK.

    rstrui
  3. 3. Choose the Create a different restore point option, and click Next.

    choose a different restore point
  4. 4. Select a restore point from the list and then click on Next.

    select restore point to fix kmode exception not handled windows 10
  5. 5. Now, review the restore details, and click Finish.

    system restore to fix kmode exception not handled windows 10
  6. 6. After the restore is complete and the system restarts, look for the latest version of Windows 10 and install it.

  7. A trick that can help users fix the Kmode Exception Not Handled error when the previous update wasn’t properly installed is to perform a system restore.

4. Rename the problematic file

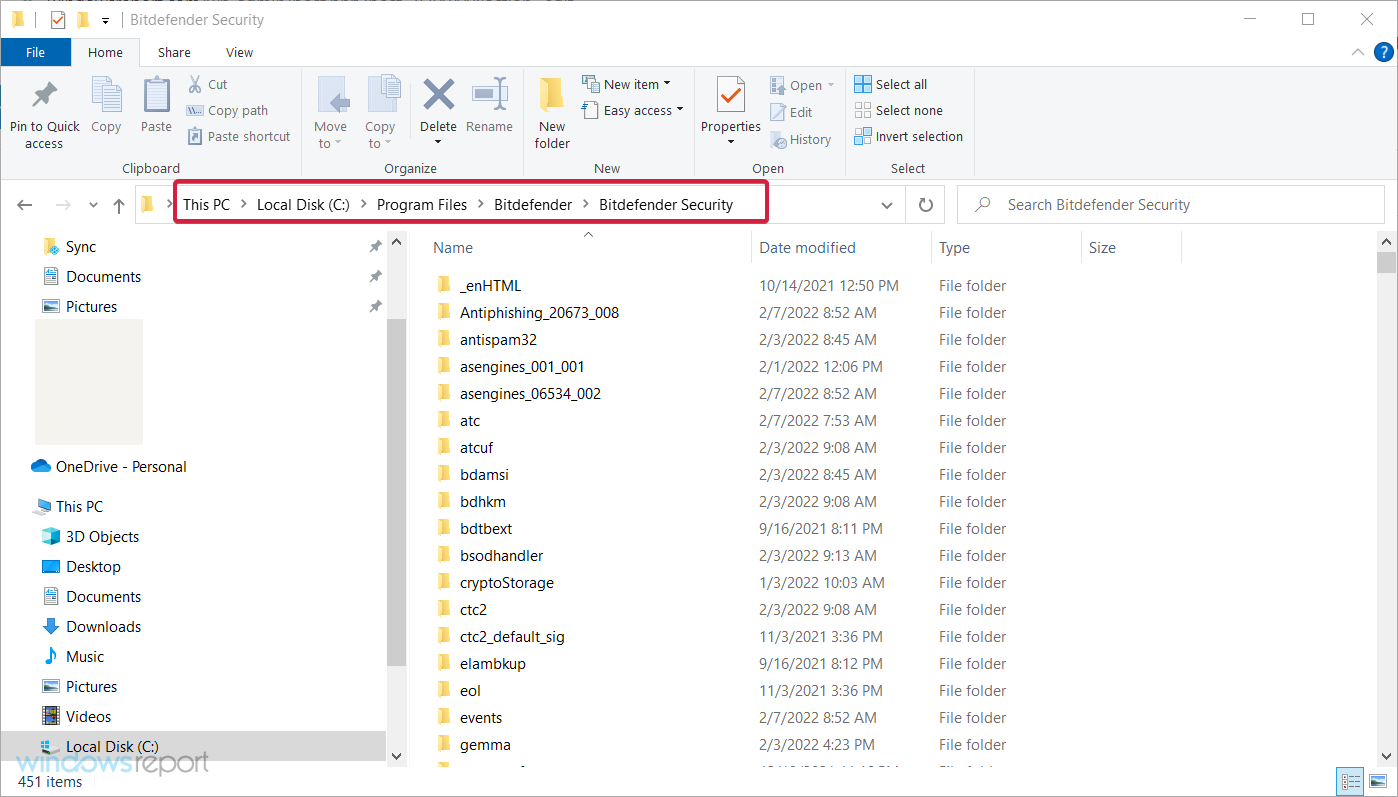
  1. Press Windows + E to start File Explorer, and navigate to the folder where the problematic file is installed.
  2. Locate the file that triggers the error, and rename it. For instance, for Bitdefender, locate bdselfpr.sys and rename it to bdselfpr.s__.

As previously mentioned, a specific software can cause the Kmode Exception Not Handled BSOD error on Windows 10.

Other programs that led to the error include:

  • Esportal (EspoDriver.sys)
  • Riot Games (vgk.sys)

Some users also fixed things by uninstalling these apps or related ones. For instance, if you have any games published by Riot Games, remove them or change the file’s name.

Remember that changing the name of these files isn’t always the best solution because it can lead to even more system instability.

Another way to quickly and efficiently solve the Kmode Exception Not Handled BSOD error is to use a repair tool.

5. Update the BIOS

Note icon NOTE
Bear in mind that BIOS update is an advanced procedure, and if not performed correctly, it can cause permanent damage to your PC.
  1. Go to your motherboard manufacturer’s website, download the latest BIOS version for your device, and load the files on a USB memory stick.
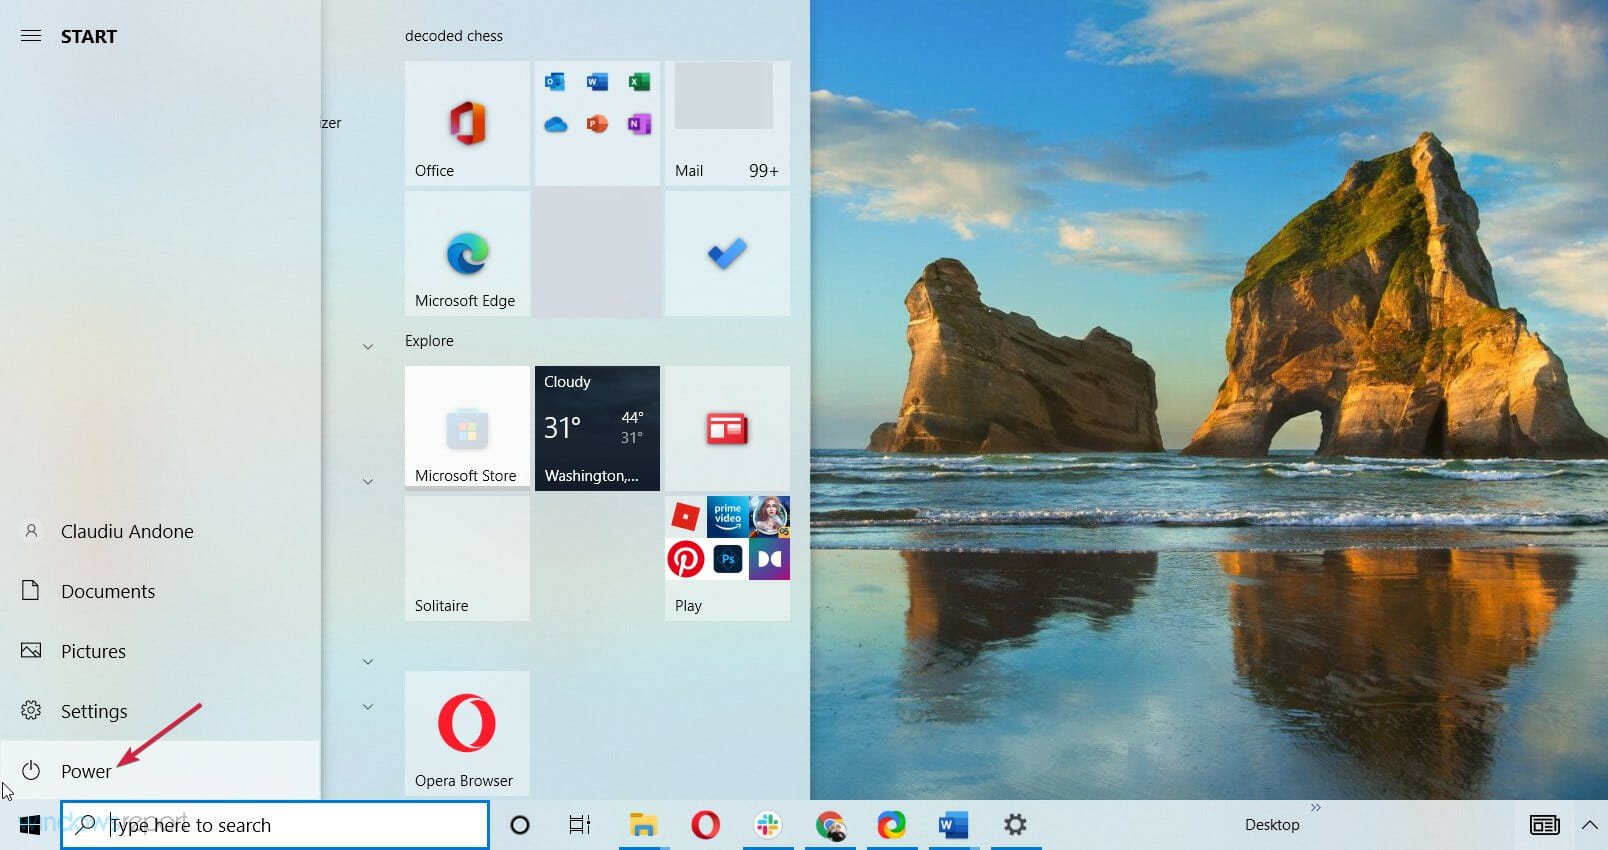
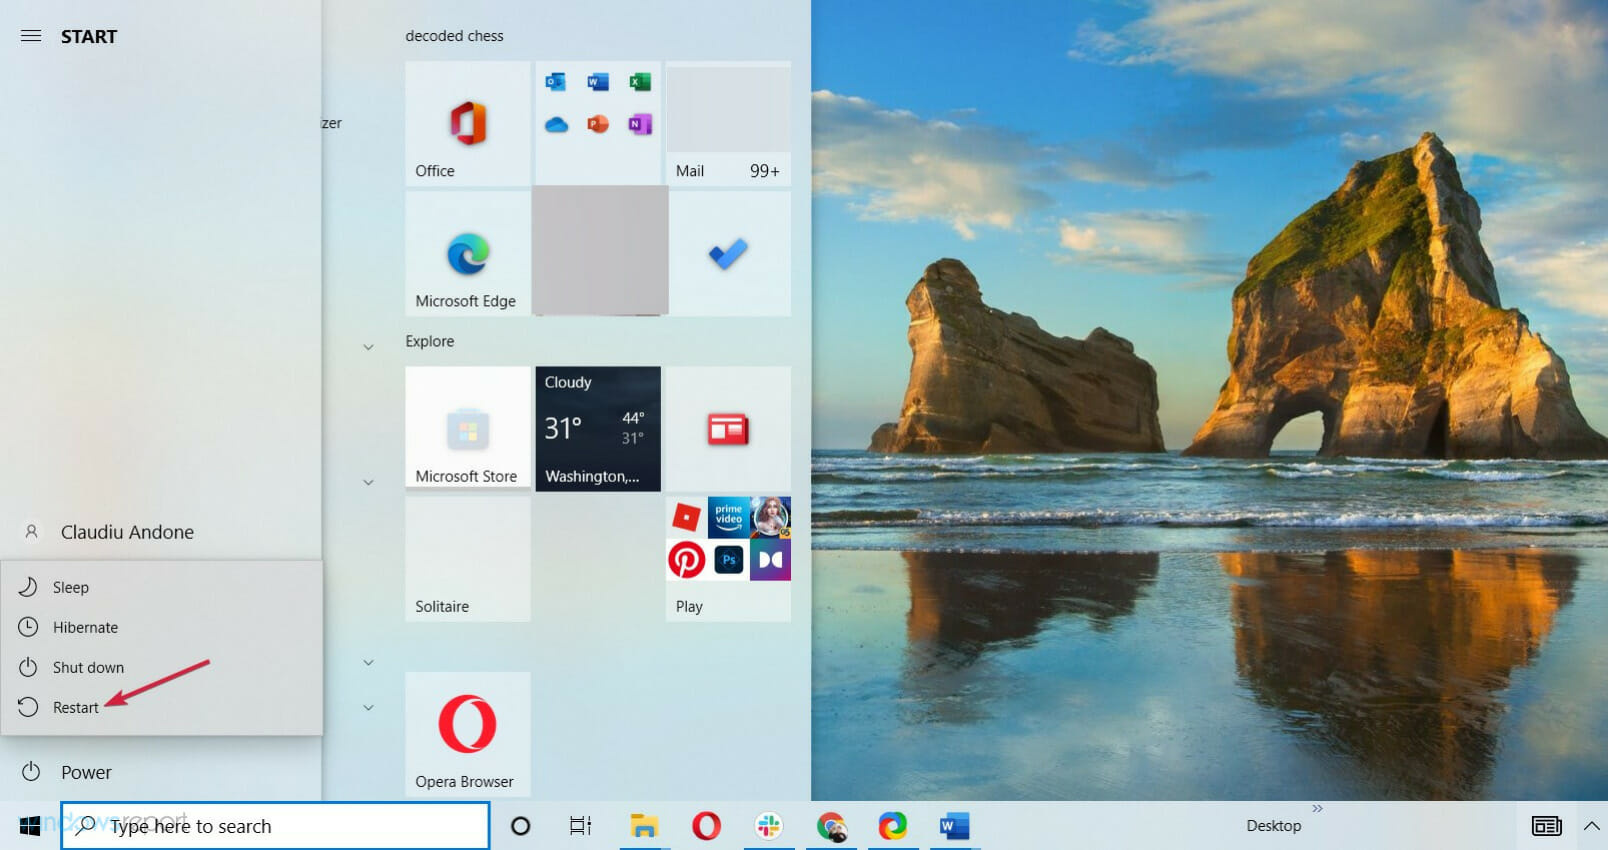
  2. Press Windows to open the Start Menu and click the Power button.
  3. Hold the Shift key and choose the Restart option.
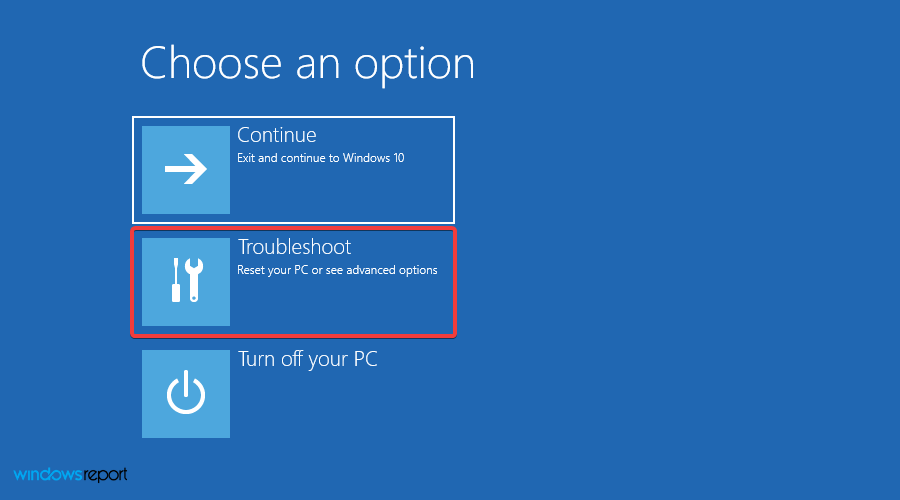
  4. You should see several options available. Choose Troubleshoot.
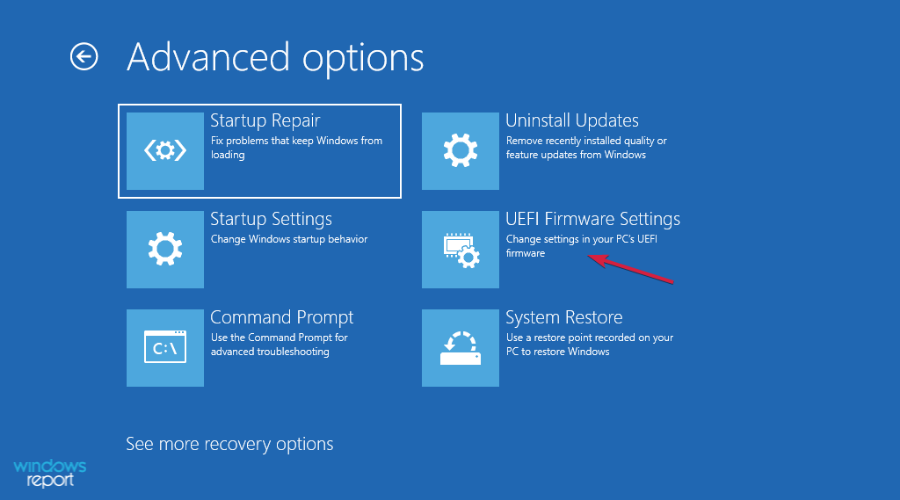
  5. Now select Advanced options and select UEFI Firmware Settings.
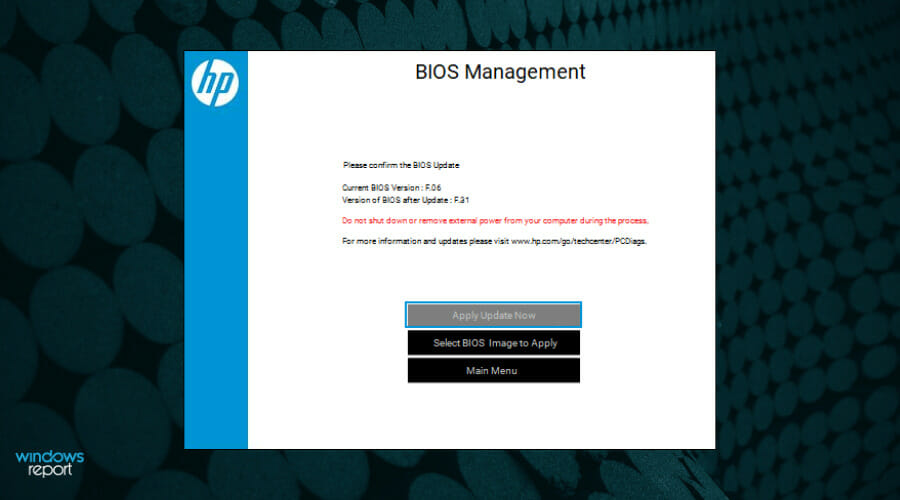
  6. Click the Restart button, and your computer should now boot to BIOS.
  7. Look for the update feature of your BIOS and load the new version from your USB stick.

In some cases, the Kmode Exception Not Handled error can be caused due to an outdated version of BIOS. We recommend checking the computer manual to find the exact process to update the BIOS.

Also, read all about how to update your BIOS; it may come in handy if you’re looking for more information on the process.

6. Uninstall recent Windows updates

  1. Press Windows + I to open Settings, and click on Update & Security.update & security
  2. Click on View update history.view update history to fix kmode exception not handled windows 10
  3. Now, click on Uninstall updates.uninstall updates to fix kmode exception not handled windows 10
  4. Select the update installed last, and click on Uninstall.remove recent updates to fix kmode exception not handled windows 10
  5. Finally, click Yes in the confirmation prompt.confirm change

7. Test the RAM for issues

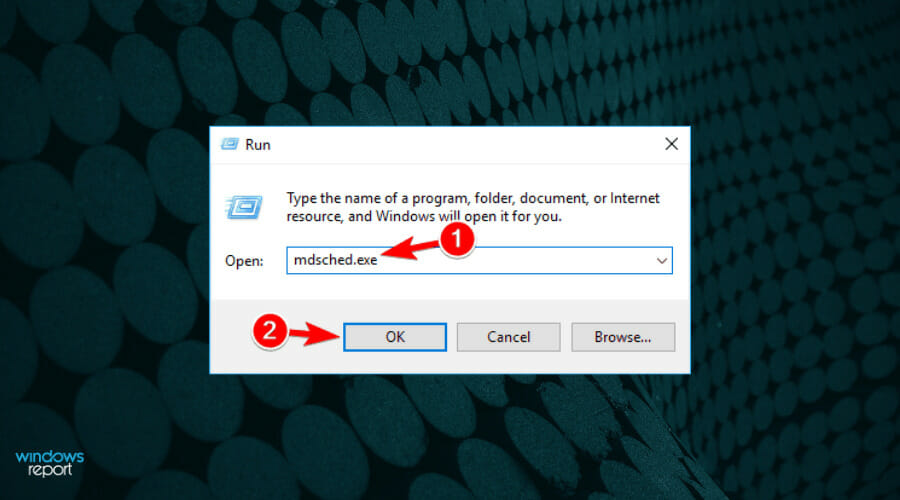
  1. Press Windows key + R, and type mdsched.exe, then press Enter or click OK.
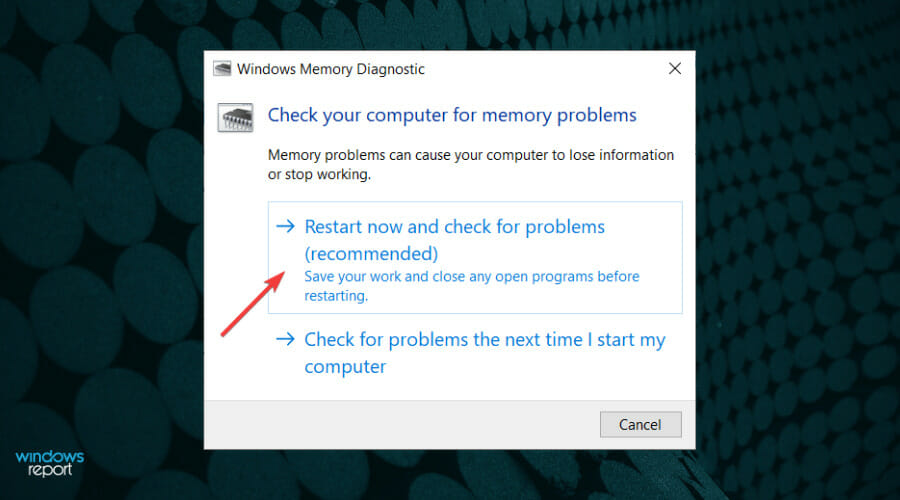
  2. In the Windows Memory Diagnostic window, choose one of the two options and follow the instructions.
  3. The tool will now detect and fix issues with the RAM.

In case the built-in utility doesn’t work, you can try MemTest86+, an open-source memory repair tool that runs extensive tests to find out the minutest of the issues with the RAM and eliminate them.

If issues are detected and can’t be repaired by the tool, we recommend you replace the RAM module. Or, if you have multiple sticks installed, remove the problematic one. This should, in all likelihood, fix the Kmode Exception Not Handled error.

These were the best fixes for Kmode Exception Not Handled BSOD error and have helped most users get things up and running.

Alternatively, you could prepare beforehand for such events and install a dedicated tool to repair BSoD errors and never have to worry about them again.

If you have any other suggestions or solutions that worked for you, leave us a note in the comments section below.

8 Ways to Fix Windows 10 if It Won’t Install on Your PC

If you’re having trouble trying to install Windows, you’ll be relieved to know there are working solutions to get you out of the rut. When Windows 10 installation has failed, first you’ll have to determine the cause.

To understand why you cannot perform a Windows 10 install, here is a list of the commonly experienced errors that hinder the installation:

  • Driver errors such as incompatibility with Windows 10 upgrade
  • A file needed by Windows Update is missing or is damaged
  • Interrupted upgrade process due to restarting your PC or you’re signed out
  • Your PC couldn’t connect to Windows Update servers
  • Not enough free space in the System Reserved partition
  • Your PC doesn’t have the required updates installed
  • Incompatible apps installed block the installation
  • Your PC doesn’t meet the minimum requirements to install Windows 10
  • Your PC doesn’t have enough space to install Windows 10

Why won’t windows 10 install?

This warning can indicate that your computer is missing certain essential updates that have not been installed.

Before attempting the upgrade, you should first double-check that your computer has all of the necessary updates loaded.

Lack of storage space, third-party VPN or antivirus software, or other incompatible applications are other typical contributing factors.

Why can’t I install Windows 10 on any partition?

Users have reported that if the SSD disk on your computer isn’t clean, installation issues with Windows 10 might arise.

It is recommended that before attempting to reinstall Windows 10, you first delete any partitions and files stored on your solid-state drive (SSD).

For more information and solutions to this particular case, check out our guide on how to fix Windows 10 cannot be installed to this disk.

Why can’t I install Windows 10 from USB?

If this happens, it’s possible that a media driver is missing on your PC. This isn’t the only problem, and many reported that Windows cannot be installed to this disk message.

If this happens, check your hard drive and its settings in BIOS and make sure that everything is in order. Hard drives aren’t the only problem, and few users reported that they can’t install Windows 10 to SSD.

Keep in mind that this issue affects all versions, and many reported that they can’t install Windows 11 due to these problems. However, there are a couple of solutions that can help you with this issue.

Each of these errors has a solution, so you need not worry about upgrading or getting to finally install Windows 10.

How do I fix Windows 10 not installing?

1. Fix Driver errors

Sometimes you can’t install Windows 10 because of driver errors such as incompatibility with Windows 10 upgrade.

This solution helps fix the driver errors so you can try the installation again.

How to fix driver errors before performing a Windows 10 install

  • Ensure your computer has enough space, at least 16 GB, to upgrade a 32-bit operating system, or 20 GB for a 64-bit OS
  • Run Windows Update to download and install available updates including software, hardware and third-party drivers.
  • Check for third-party drivers and download any updates available. You can find these on the manufacturer’s website.
  • Unplug excess hardware such as external storage device and drives, docks, and any other hardware not necessary for basic functioning of your computer.
  • Check Device Manager for drive errors by doing the following:
  1. Right click Start
  2. Select Device Manager
  3. Look for devices with a yellow exclamation mark next to itdevice manager windows 10
  4. Right click the device
  5. Click Update Driver Software or Uninstall to fix the error
  • Remove third-party security software, and use Windows Defender to protect your computer
  • Repair hard-drive errors by doing the following:
  1. Click Start
  2. Type CMD in the search field box
  3. Click Command Prompt app from the search resultsgame crash cmd
  4. Type chkdsk/f C: in the window that pops up
  5. Press Enter. Repairs will start automatically on your hard drive.
  6. Restart your computer once complete. The can’t install Windows 10 update error will be solved.

It is known that Windows 10 has drivers compatibility and this problem is not resolved yet. So, the reason why you can’t install Windows 10 might be your driver.

You need to update all your drivers, but doing it manually could be very annoying, so we recommend you to download a dedicated third-party tool to do it automatically.

2. Keep your PC on and try installing again

When you can’t install Windows 10, it could also either be due to an interrupted upgrade process from accidentally restarting your PC, or you could also be signed out.

To fix this, try performing the installation again but make sure your PC is plugged in and stays on through the process.

3. Turn off VPN software and increase the size of System Reserved partition

Performing a Windows 10 installation can also fail when the computer can’t connect to Windows Update servers.

Not having enough free space in the System Reserved partition also causes difficulty installing Windows 10.

If you’re using a VPN connection to connect to a work network, disconnect from the network then turn off the VPN software.

To fix the limited space issue, you can use a third-party software to increase the size of the System Reserved partition.

Try installing Windows 10 again.

4. Check for pending updates

    For a healthy computer, you need to keep updating Windows with the latest system updates, and drivers. This also helps resolve any issues or difficulties you may be experiencing.

    If you cannot install Windows 10 on your PC, you should check to ensure all your computer’s important updates are installed.

    Use this solution when your PC doesn’t have the required updates installed.

    Here’s how to check and install Windows Update (manually):

  1. 1. Go to Start.

  2. 2. In the search field, type Windows Updates.

  3. 3. Click on Windows Updates Settings from the search results.

  4. 4. Press on Check for updates.

    fix error 80070436
  5. 5. Install the latest Windows Updates.


5. Uninstall incompatible apps

This solution works when incompatible apps installed block the installation.

Check to ensure you’ve uninstalled incompatible apps before trying to install Windows 10 again.

In order to find incompatible apps, check Device Manager by using these steps:

  1. Right click Start
  2. Select Device Manager
  3. Look for devices with a yellow exclamation mark next to it

Once you identify any incompatible apps, uninstall them by doing the following:

  1. Right click Start
  2. Select Control Panel
  3. Select Programprograms and features
  4. Click Programs and Features
  5. Click Uninstall a program
  6. Select the app you want to uninstall
  7. Click Uninstall

Check if you’re able to install Windows 10 after uninstalling the incompatible apps.

6. Check if your computer meets the minimum requirements

Use this solution when your PC doesn’t meet the minimum requirements to install Windows 10.

Go to this link to get more information about the minimum requirements for installing Windows 10.

7. Free up space on your hard drive

This solution works when your PC doesn’t have enough space to install Windows 10.

Free up some space on the drive then try to install Windows 10 again.

Follow these steps to check the available disk space:

  1. Click Start
  2. Select Settings
  3. Go to System
  4. Click The used disk space for each drive will be displayed. What you need is enough space on your hard drive. This also works when you can’t install Windows 10 on SSD.

8. Run DISM tool

If you still cannot install the OS, run the DISM tool, or Deployment Image Servicing and Management tool.

The DISM tool helps fix Windows corruption errors when Windows Updates and service packs fail to install due to corruption errors, like if you have a damaged system file.

Here’s how to run the DISM command on your PC to check if it helps you when you can’t install Windows 10:

  1. Click Start
  2. In the search field box, type CMD
  3. Click Command Prompt in the search results list
  4. Type Dism /Online /Cleanup-Image /ScanHealth
  5. Type Dism /Online /Cleanup-Image /RestoreHealth

Once the repair is complete, reboot your computer and try to the installation again.

Also, don’t miss our guide on Windows cannot install required files for more troubleshooting tips during the setup.

We love feedback. Let us know in the comments section whether any of these steps did the trick for you.

Windows 11 Installation Has Failed [Upgrade Error Fix]

Windows 11 is here and many users are eager to test it. However, it seems that some of them are experiencing various issues while trying to install the OS.

The procedure should be straightforward, and all that you need is Windows 11 installation media and a PC that meets the hardware requirements.

However, various issues can sometimes occur, and in this guide, we’re going to show you how to solve them instead of thinking that it’s time to uninstall Windows 11.

But first, let’s see what to expect in order to determine what you’re up against. Just take a closer look below.

What are the most common Windows 11 installation problems?

Windows 11 can face multiple issues while installing, which leads to a plethora of different issues. Some of the most common ones are the following:

  • The installation has failed with no error code – Before trying the upgrade, make sure that your antivirus software is disabled or, better yet, uninstalled.
  • Windows 11 installation has failed ISO – Disconnect any external hard disks, USB drives, or SD cards that are currently attached to the computer.
  • Windows 11 installation has failed 0xc1900101 – Users with insufficient disk space on their devices are more likely to encounter the error 0xc1900101 in Windows 11.
  • Setup installation has failed – Check to see if your device has sufficient storage space.
  • Windows 11 installation has failed safe_os phase – The Safe OS installation error can be solved by adjusting your RAM capacity or by upgrading the BIOS.
  • Setup has failed to validate the product key – Eliminate any clutter from the Temporary Files.
  • Windows 11 keeps failing to install – This warning can indicate that your computer is missing certain essential updates that have not been installed.

But don’t sweat it! We will cover all of them in this article. Simply make sure to follow our steps one by one in order to find the right solution for you.

How do I fix Windows 11 installation failed?

1. Enable TPM in BIOS

  1. 1. Access BIOS/UEFI on your PC. This procedure is different for each manufacturer but usually implies pressing an F (function) key on your keyboard before booting the OS.

    access boot settings
  2. 2. Now go to the Security section.

  3. 3. Locate the TPM option and enable it.

    disable tpm
  4. 4. Finally, just save all recently made changes. Usually, you can press the F10 key to save and exit.

  5. 5. Check whether the Windows 11 installation problems are fixed.

  6. Since Windows 11 requires TPM 2.0 to be enabled, many reported that TPM 2.0 errors are preventing them from installing Windows 11.

    Therefore, in order to fix them, you should disable TPM support via BIOS/UEFI settings on your PC.

    Keep in mind that this process is different for each motherboard model and version of BIOS, so you should check your motherboard manual for detailed instructions.

Note icon NOTE
BIOS is a software tool installed in a ROM chip on your motherboard. If you need extra help, take a look at this dedicated guide on how to access BIOS.

2. Enable the Secure Boot option

  1. Click the Start button and select Settings then choose Update and Security.
  2. Click the Recovery option from the left pane, then select the Restart now button.
  3. When you see the boot options, select Troubleshoot.
  4. Click on Advanced options.
  5. Choose the UEFI Firmware settings option.
  6. After your PC gets into BIOS, click on Security, then select the Secure Boot option.
  7. Next, toggle the Secure Boot option to On to enable it, then accept the changes when you’re prompted.
  8. Save the changes and exit BIOS by pressing the F10 key on your keyboard.
  9. Wait for the PC to reboot, then try to install Windows 11.

If you have any problems performing this step, don’t hesitate to learn how to enable Secure Boot from BIOS.

3. Bypass TPM 2.0 and Secure Boot

  1. Press the Windows key + R to start Run, type regedit, and press Enter or click OK.
  2. Navigate to the following registry path: Computer\HKEY_LOCAL_MACHINE\SYSTEM\Setup
  3. Right-click on an empty space on the right, select New, and select Key, then name it LabConfig.
  4. Click on the new LabConfig key, right-click the blank space to create two DWORD (32-bit) Value options to, and name them BypassTPMCheck and BypassSecureBootCheck.
  5. Double-click the new items one by one, select the Decimal base, and set 1 in the Value data field, then click OK.
  6. Close the Registry Editor, then restart your PC. Try to install Windows 11 again.

If you need more details, also learn how to bypass TPM 2.0 check when installing Windows 11. However, after enabling these settings in BIOS, the installation errors should be gone.

Keep in mind that some motherboards don’t have the TPM chip, so you might have to purchase a TPM chip for your PC to fix that.

4. Remove the GPU driver

  1. Click the Start button, type device manager, and select the app from the results.
  2. Extend the Display adapters section, right-click the graphics driver, and select Uninstall device.
  3. The system will install a new driver after that.

Some of our readers reported that they managed to install Windows 11 after uninstalling their graphics driver, alternatively you can try updating your drivers with Outbyte Driver Updater which scans your PC for missing or outdated drivers and updates them automatically.

These are some of the most common installation problems that users have encountered, but hopefully, you should be able to fix them with the above tips.

What are the minimum hardware requirements for Windows 11?

Windows 11 comes with a different set of install requirements, and even if you were able to run Windows 10, you might not be able to run Windows 11.

To make sure that you don’t encounter any issues, we encourage you to check the official Windows 11 requirements before upgrading.

Can’t install Windows 11 even though I meet requirements?

The hardware requirements aren’t that different, and the biggest change is the need for a TPM 2.0 chip, which some older PCs don’t have. If your PC meets the requirements but you still can’t install Windows 11, that’s probably because the upgrade isn’t ready yet for your specific device.

Microsoft has lowered the requirements over time, so be sure to check the PC Health Check app constantly.

If your computer meets the Windows 11 install requirements, you’ll ensure that the upgrade process is smooth and without any issues, and you’ll avoid the dreaded This PC can’t run Windows 11 message.

Moreover, if you’re new to this, let us remind you how easy is to download Windows 11 in the first place. When available, you may simply install the update or use the Windows 11 Media Creation tool instead.

Some users see an “Install driver to show hardware” message during Windows 11 setup, so you can follow this step by step guide to fix the Install driver to show hardware error in Windows 11 and continue the installation.

Have you tried this OS already and did you encounter any installation issues? Do not hesitate to share your experience with us and other readers in the comments section below.

Microsoft Issues workaround for Outlook sign in issues

If you’ve had trouble signing into your Outlook.com account Microsoft has a workaround available while they work on a permanent fix.  The bug can occur in one of two ways.  Microsoft explained how the issue occurs below.

You are prompted to sign into Outlook for your Outlook.com account and receive the error dialog below.

Or, you already have your Outlook.com account added in the Outlook Profile, but “Need Password” is displayed on the Status Bar. When you attempt to sign in with your Outlook.com account you receive the error dialog below.

“You can’t sign in here with a personal account. Use your work or school account instead.”

To work around the issue Microsoft suggests turning off Support Diagnostics which turns off the ability to submit support tickets from inside the app using the Help Menu and Contact Support.  The bug impacts the way the app authenticates for support.  You can follow these instructions for editing the registry to disable support diagnostics in Outlook.

Below is how the registry key should appear in the Registry Editor once it’s been edited.

Via Neowin.net
Image Via Microsoft

Black Screen While Gaming: 7 Tested Fixes [Step-by-Step]

If the screen goes black while gaming, the issue often stems from graphics card driver errors. The good news is that you can quickly fix it if you follow the steps below. Whether you’re on NVIDIA, AMD, or Intel graphics, we’ve got you covered.

How can I fix black screen issues when playing games?

For easier troubleshooting, you can try following the video tutorial below:

1. Apply the latest updates

  1. On your computer, press the Win + I hotkeys to open Settings.
  2. From there, click on Update & Security.
  3. Under Windows Update, click Check for Updates.
  4. Apply the available updates and restart your computer.
  5. Try to play your games now and verify if the black screen problem persists or not.

If you get a black screen while playing games, it might be because of a pending update. The update itself can cause issues, or specific outdated software might be the reason for this behavior.

2. Update the graphics drivers

  1. Right-click on the Windows start icon and select Device Manager from the list.
  2. Now, find your graphic drivers under the Display adapters section, right-click on your drivers, and select Update driver.
  3. Restart your system in the end.

The black screen might be caused by an outdated graphic driver or by a corrupted graphic driver file. If that’s the case, then you can fix this problem by updating your drivers using efficient driver update tools.

Problems with graphics card drivers can also cause games to crash on Windows 10. A full driver scan may be required to ensure all issues are resolved.

3. Uninstall the graphics driver

  1. Right-click the Start button and select Device Manager.
  2. Access your graphic drivers, right-click on each entry, and this time select Uninstall.
  3. Next, click the Start button, type control panel, and click on Control Panel within the results.
  4. Click on Uninstall a program, under Programs.
  5. Find any associated entry with your graphic card and uninstall these programs.
  6. When done, restart your Windows 10 system.
  7. Now, access your manufacturer’s official web page, download the latest version of the graphic drivers that are compatible with your Windows 10 device, and follow on-screen prompts to complete the installation process.

Sometimes, using Device Manager to update your graphic drivers leaves the corrupted files unresolved. To resolve this particular problem, manually reinstall the drivers on your PC.

Additionally, you can use Display Driver Uninstaller to completely clear your graphics driver, and then you can do a clean install.

Keep in mind that if you try to install the drivers manually, you risk damaging your system by downloading and installing the wrong version; so you should consider specialized driver support.

4. Check the Advanced Power Options

  1. Click the Windows Start icon, type control panel, and click on Control Panel within the results.
  2. In the Search field enter Power Options and access the entry with the same name.
  3. From your current Power Plan click on Change plan settings.
  4. Next, click on Change advanced power settings.
  5. From the next window extend PCI Express.black screen playing games
  6. Also, make sure that State Power Management is turned off.

Your power plan options might prohibit your GPU from working properly due to battery/power saving options. Verify that your graphics card is properly powered by checking the settings.

If you get stuck on the step above, we have a great guide on how to fix the Windows Power Plan Settings.

For additional problems, verify your CPU / GPU temperature, and even consider increasing the fan speed.

5. Run a BSOD troubleshooter

Another way of fixing crashes of any type, including Blue Screens, Black Screens, and Green Screens, is using third-party software specialized in system restoration.

You only need to install the program, which will constantly run scans of your computer and automatically repair any damaged file or corrupted data.

6. Enable game mode

  1. Press Win + I to open the Settings app.
  2. Click on Gaming.gaming settings in windows
  3. Select Game Mode.game mode settings
  4. Toggle the switch to On to enable Game Mode.enable game mode in windows

7. Perform a clean boot

  1. Press Win + R to open the Run dialog box.
  2. Type msconfig and press Enter to open the System Configuration utility.run msconfig
  3. In the “System Configuration” window, go to the “Services” tab.
  4. Check the box that says “Hide all Microsoft services“.
  5. Click “Disable all” to disable the remaining services.hide all and disable all services
  6. Go to the “Startup” tab.
  7. Click “Open Task Manager”.Open task Manager Clean boot
  8. In the Task Manager, disable all startup items by right-clicking each one and selecting “Disable”.disable startup apps
  9. Click “OK” and then restart your computer.

Extra tips for fixing black screen while gaming for different GPU manufacturers

NVIDIA Graphics Concerns:

Black screens with NVIDIA graphics are often tied to driver or overclocking issues. Solutions include:

AMD Graphics Concerns:

Black screen issues aren’t exclusive to NVIDIA. AMD graphics users face similar challenges:

  • Black screen occurrences are frequently due to AMD graphic driver crashes, especially with outdated or incompatible versions.
  • Some users have identified AMD Catalyst as a potential cause. It’s essential to investigate this aspect to pinpoint the root cause.

Intel Graphics Concerns:

  • Driver Issues: Update drivers to prevent black screens. Intel’s support.
  • Game-Specific Issues: Ensure game files and settings are correct.
  • Resource Monitoring: Check CPU, GPU, and RAM usage during gameplay.
  • Temperature Concerns: Monitor component temperatures; ensure effective cooling to prevent colors changing while gaming.
  • App Readiness Service: Disabling might resolve the black screen.

The steps listed above should help you fix the black screen while playing games on Windows 10 and even Windows 11.

Of course, in the end, don’t forget to share your experience with us, and tell us how you eventually managed to address this issue to help others, too.

If you have any other questions, leave them in the comments section below, and we’ll be sure to take a look.

Windows 11 Bluetooth Keeps Turning Off? Stop it in 7 Steps

Several user reports highlight that the Windows 11 Bluetooth keeps turning off the issue, where theY cannot use their Bluetooth devices on their PCs.

If you are one of such users looking for ways to resolve the problem, then you are in the right place. Because this guide will give you 7 ways in which you will be able to fix Bluetooth keeps turning off in Windows 11 problem.

Why does Bluetooth keep turning off on my Windows 11 PC?

Here are a few reasons why the Bluetooth on your Windows 11 PC keeps turning off randomly:

  • The Bluetooth service is facing issues – Your PC makes use of different services to offer corresponding features to the user. If the Bluetooth service itself is facing some issues then you will come across such errors.
  • Your Bluetooth device is not in the range – If your Bluetooth device is out of the range of your PC, then for obvious reasons, it will get disconnected.
  • The battery of your wireless device is drained off – Wireless devices depend on their batteries for functioning and if it doesn’t have enough power then it will get disconnected from your PC.
  • There is some interference – If there are too many electronic products in between your wireless device and your PC, then it could also cause frequent disconnection problems.
  • Bluetooth drivers aren’t updated – Outdated drivers can cause multiple issues with their corresponding service.

How can I resolve Bluetooth keeps turning off in Windows 11 problem?

Before applying advanced troubleshooting solutions, let us first go through a list of quick fixes that might help you resolve the problem:

  • Restarting your PC loads all the files from scratch, which could possibly be the reason why the Bluetooth service was misbehaving on your PC.
  • Remove any interference between your wireless device and your PC and check if this resolves the issue or not.
  • Install the latest Windows update on your PC to fix any bugs or glitches.
  • Toggle on and off the Bluetooth on your PC.

Let us now check the advanced solutions to fix Bluetooth that keeps turning off in Windows 11.

1. Restart the Bluetooth service

  1. Press the Windows + R keys to open the Run dialogue.
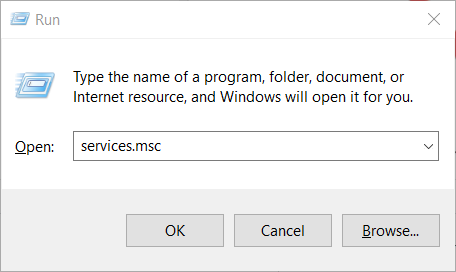
  2. Type services.msc and hit Enter.
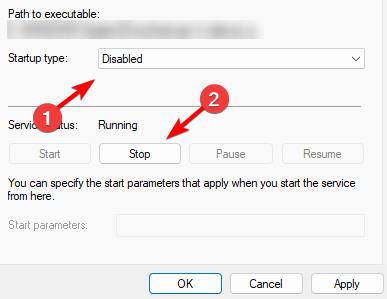
  3. Find the Bluetooth support service, right-click and select Restart.
  4. Right-click on Bluetooth support service again and select Properties.
  5. Under the General tab, select Automatic as the Startup type, then click OK.
  6. Click on Apply and OK.

If the Bluetooth service is not working or a third-party program is conflicting with it, then it could very well cause multiple issues with the service.

2. Run the Bluetooth troubleshooter

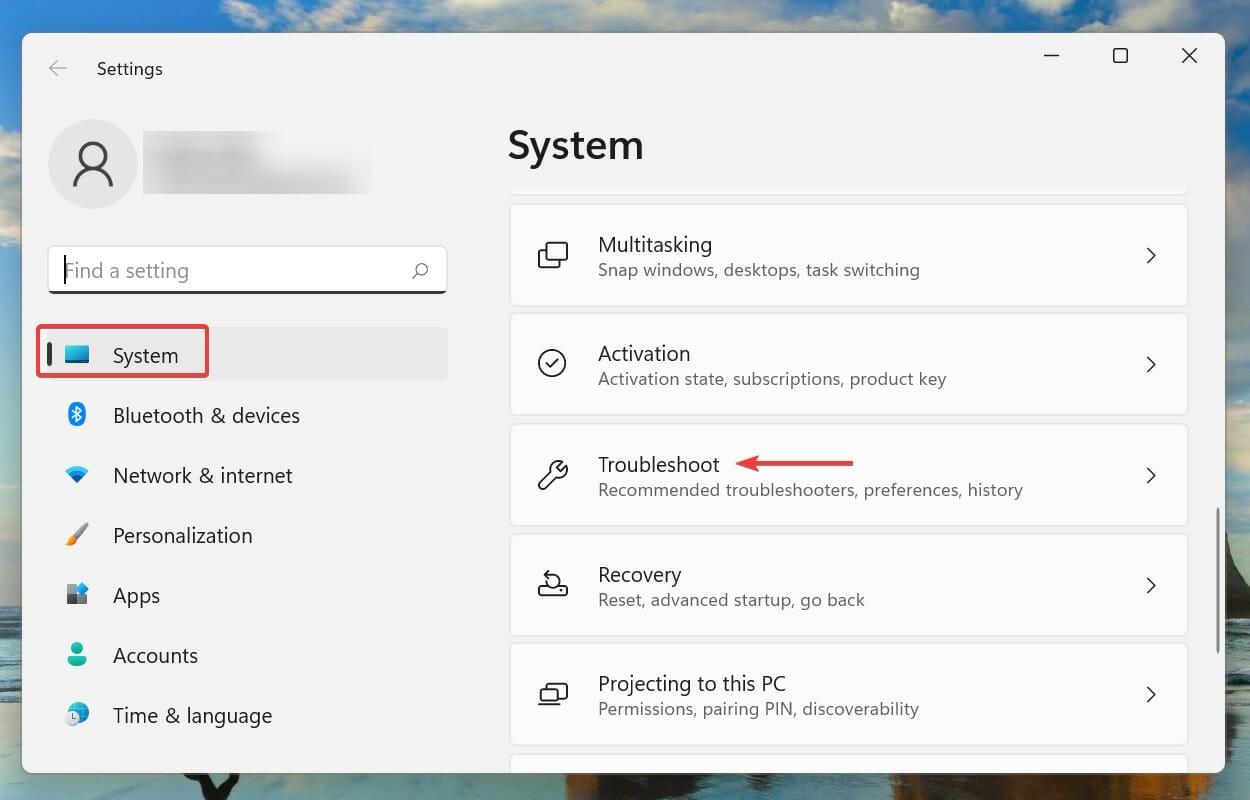
  1. Press the Windows + I keys to open the Settings menu.
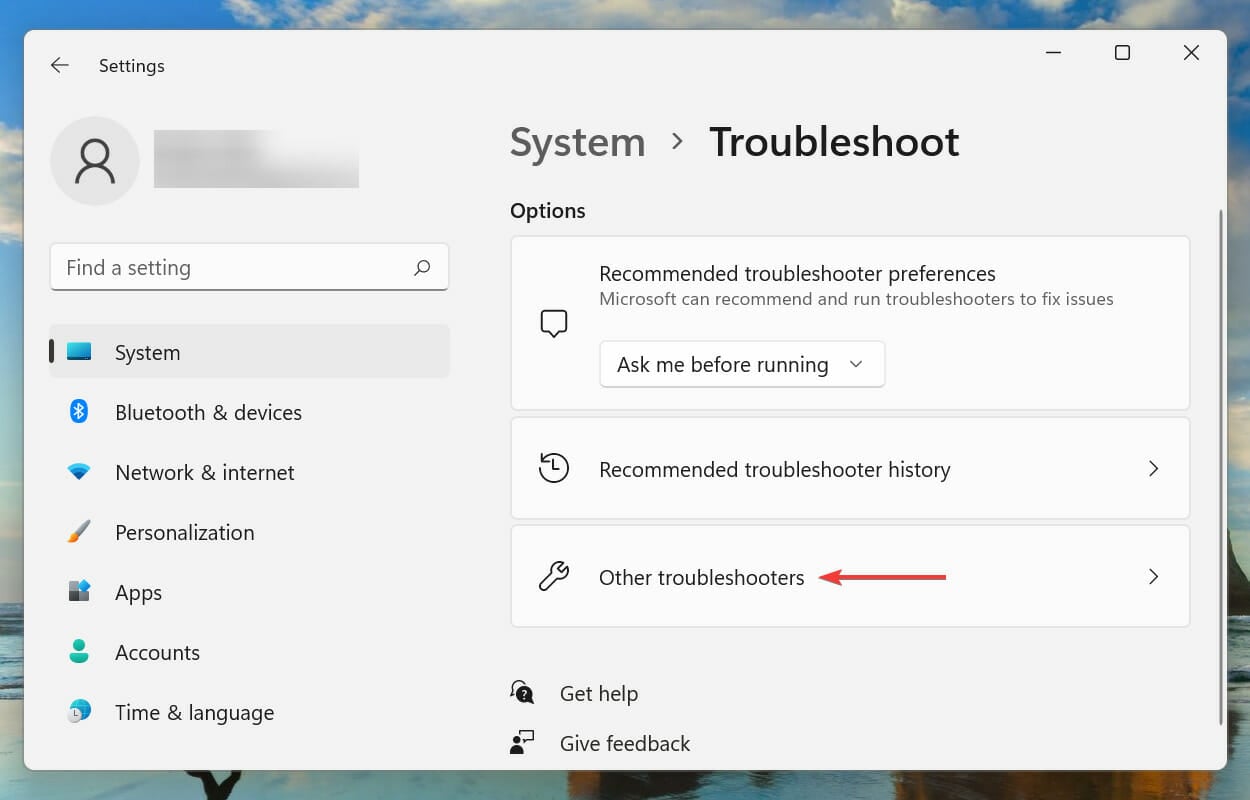
  2. Select Troubleshoot from the left.
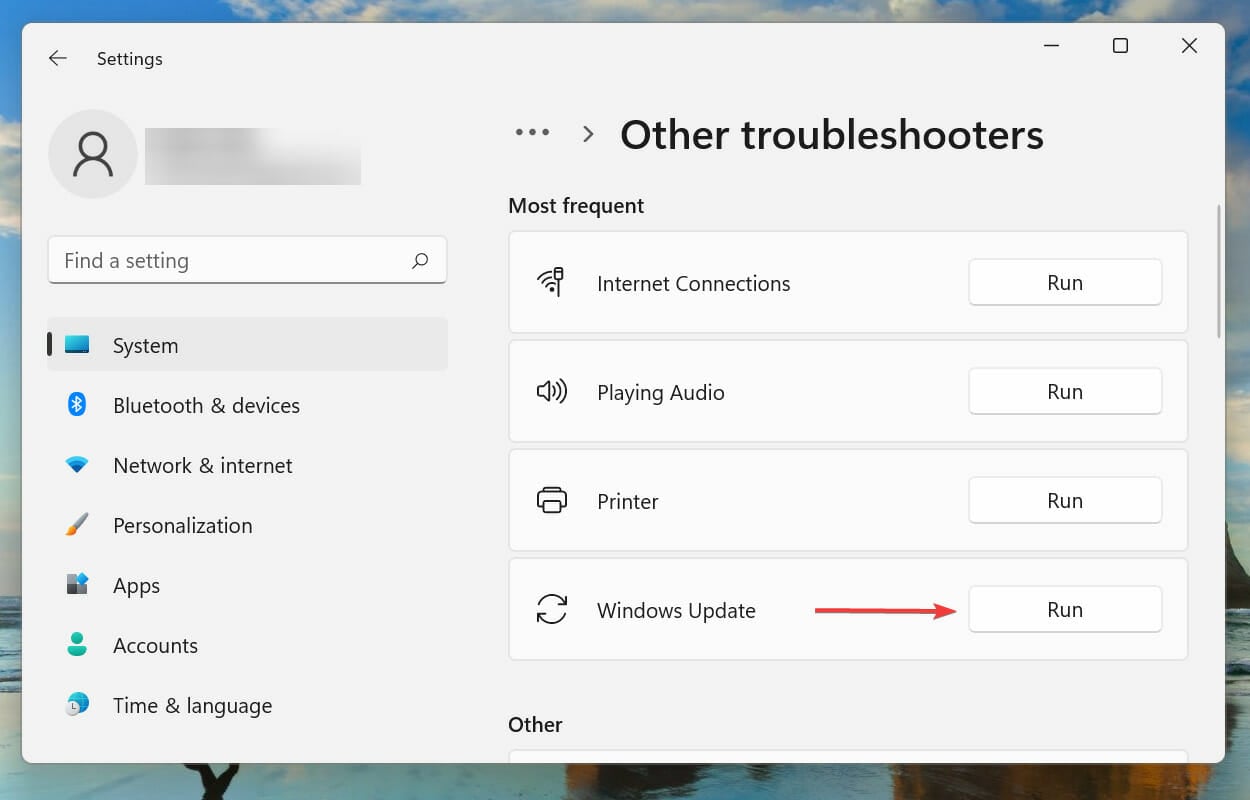
  3. Click on Other troubleshooters.
  4. Hit the Run button for Bluetooth.
  5. Wait for the troubleshooter to complete the process and do the needful if asked.

If you are facing any issues related to Bluetooth, then you can make use of the Bluetooth troubleshooter. It will look for any problem with the service and prompt you to take necessary actions to fix the problem.

Several problems including Bluetooth keep turning off in Windows 11 can be fixed by running the Bluetooth troubleshooter.

3. Update the Bluetooth driver

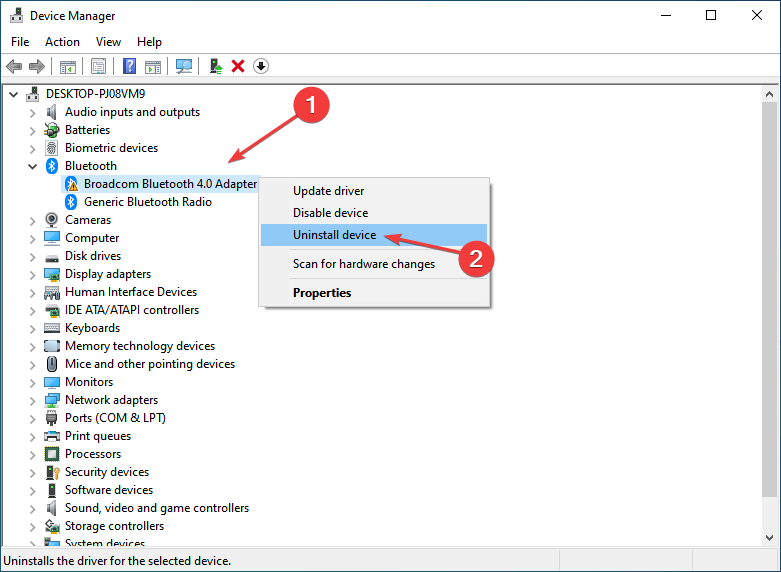
  1. Right-click on the Start menu and select Device Manager.device manager audio static windows 10
  2. Expand the Bluetooth section.
  3. Right-click on your device and select Update driver.
  4. Select Search automatically for drivers option.search for drivers automatically - rog gaming center not showing cpu and gpu
  5. Your system will start looking for new drivers and if found, will prompt you to install them.

There are chances that the current version of the Bluetooth driver has some bugs because of which it is having issues connecting to your PC.

You can try updating the device driver using the above method but will take some extra time. To make it easier, we would recommend you use an efficient tool called Outbyte Driver Updater.

Using Outbyte Driver Updater you can easily update all the drivers on your PC with just a few clicks. It is fast and saves a lot of time.

Outbyte Driver Updater

Prevent Bluetooth bugs and connection issues and let Outbyte Driver Updater find the latest updates for your drivers.
Free Trial Download now

4. Disable Bluetooth Power Management

  1. Right-click on the Start menu and select Device Manager.device manager audio static windows 10
  2. Expand the Bluetooth section.
  3. Right-click on your device and select Properties.
  4. Switch to the Power Management tab.
  5. Uncheck the Allow the computer to turn off this device to save power option.
  6. Click Apply.

5. Run SFC Scan and DISM

  1. Open the Start menu by pressing the Windows button.
  2. Search for Command Prompt and open it as an administrator.
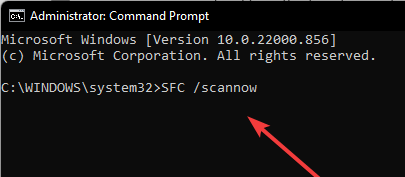
  3. Type the below command and press Enter. sfc /scannowsfc scan command in command prompt
  4. Let the process complete.
  5. Type the below commands and press Enter after each one. DISM /Online /Cleanup-Image /ScanHealth DISM /Online /Cleanup-Image /RestoreHealthrun dism command
  6. Restart the PC.

If there is a Bluetooth-related system file corrupt or missing, then your PC will trigger multiple issues like the one at hand. Try running the SFC Scan and DISM commands and check if this fixes the issue or not.

6. Unpair and repair the Bluetooth device

  1. Press Windows + I buttons to open Settings.
  2. Click on Bluetooth & devices from the left.
  3. Click on the 3-dot icon and select Remove device.
  4. Select Add device.
  5. Click on Bluetooth and follow the on-screen prompts to pair your Bluetooth device back again and check if this fixes the issue or not.

Sometimes repairing your Bluetooth device back again with your PC can fix some glitches or issues.

7. Reset your PC

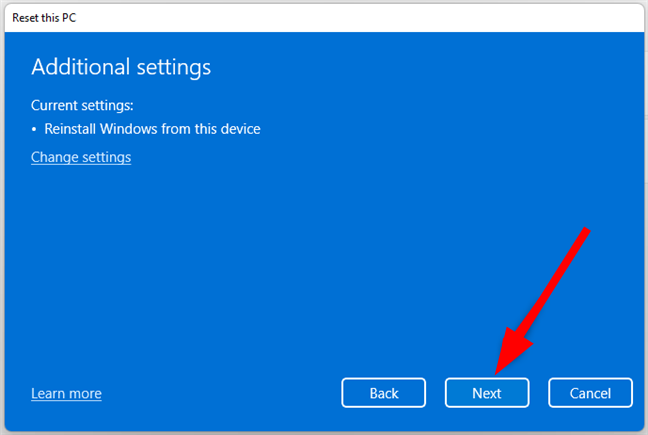
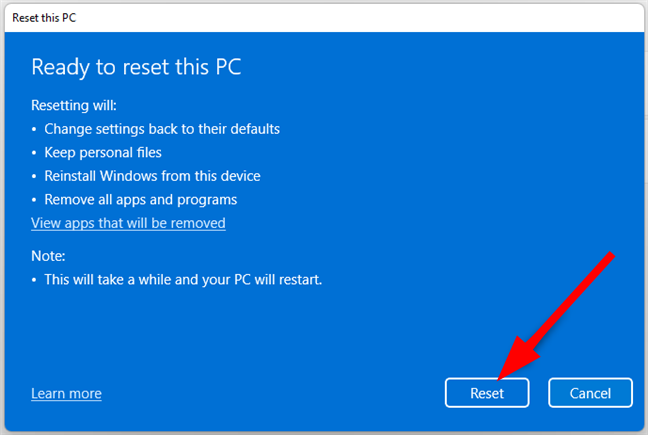
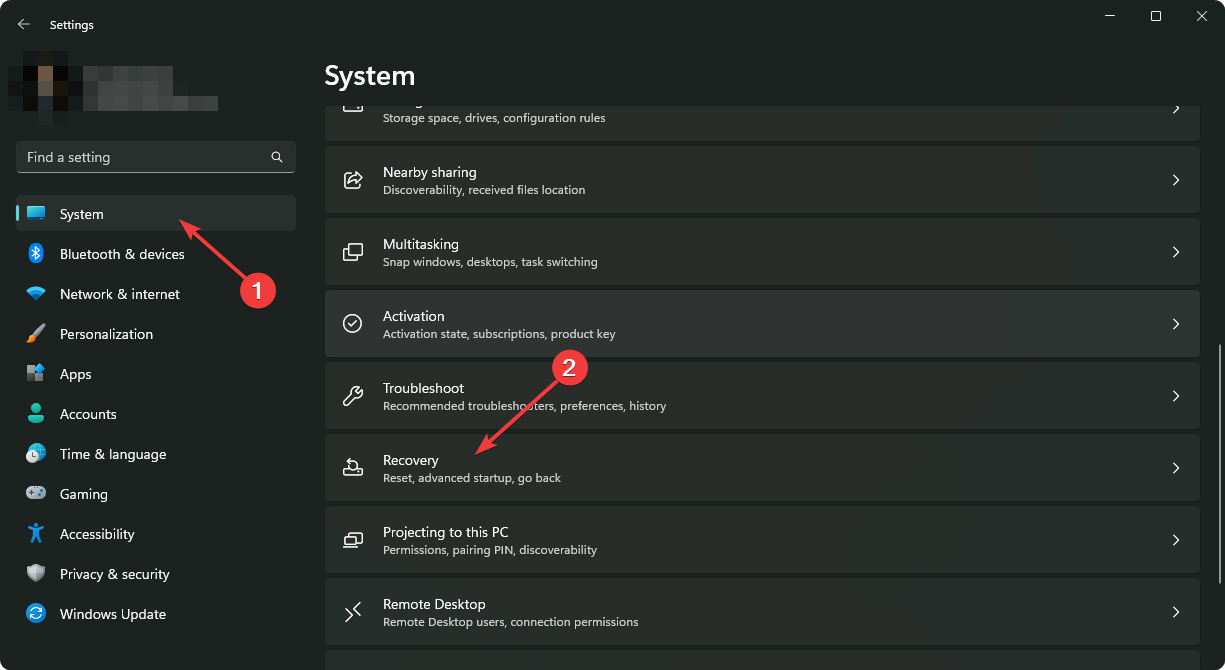
  1. Press Windows + I buttons to open Settings.
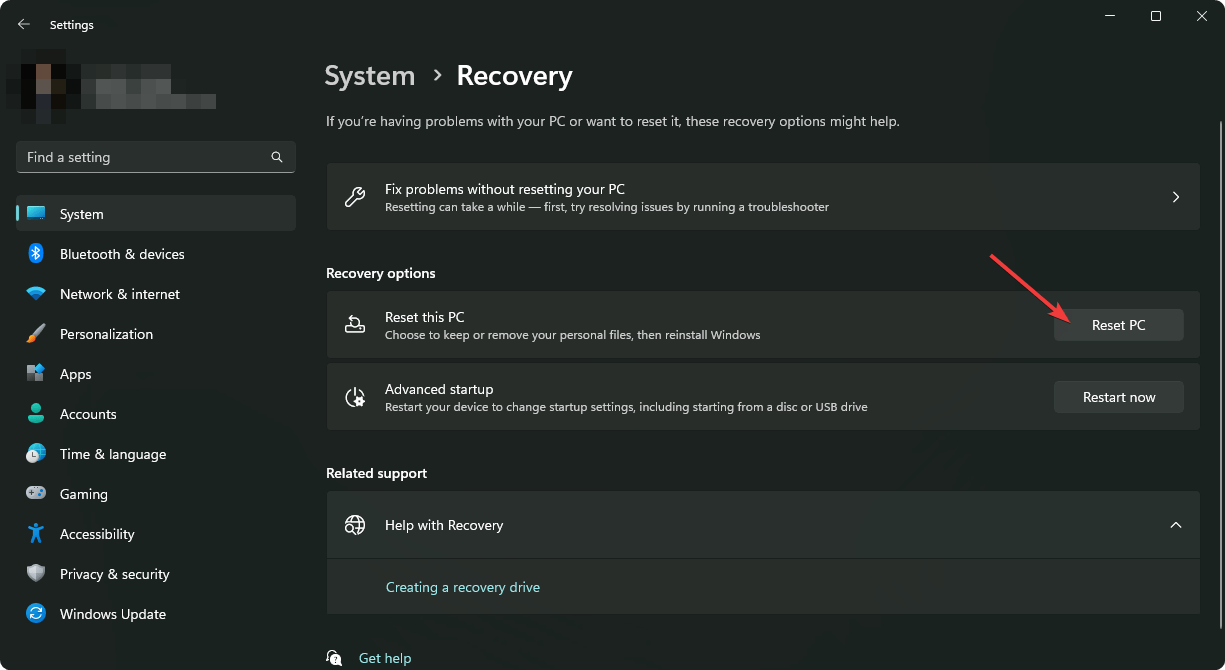
  2. Select Recovery from the right side.
  3. Hit the Reset button for Reset this PC option.netio.sys blue screen windows 11
  4. Select Keep my files option.
  5. Choose how you would like to reinstall Windows.
  6. Hit Next.
  7. Click on Reset.

As a last resort, if nothing works, then probably it is safe to say that your Windows PC is having some issues, which you can get rid of by resetting it.

That is it from us in this guide. Well, this isn’t the only issue that Windows 11 users face while using Bluetooth devices.

If you are having issues related to Bluetooth headphones that are constantly disconnecting, then you can refer to our guide which gives a bunch of solutions to fix the problem.

Also, we have a guide that gives you a list of solutions that will help you resolve the Bluetooth audio stuttering issue in Windows 11.

If you are getting no sound after a Bluetooth connection, then you can refer to our guide which will definitely help you resolve the problem.

Let us know in the comments below which one of the above solutions helped you resolve the problem.

Windows 11 Can’t Remove Bluetooth Device: 5 Ways to Fix it

Many readers have reported that they can’t remove the Bluetooth device from their Windows 11 PC. This issue is often caused by a temporary glitch that can be restored by simply restarting your PC. However, it can also be caused by a recent Windows update bug. Here’s how to fix this problem and remove your Bluetooth device!

How can I remove a Bluetooth device from my PC?

1. Run the Bluetooth troubleshooter

  1. Press the Win + I keys to open the Settings menu.
  2. Select Troubleshoot from the left.
  3. Click on Other troubleshooters.
  4. Hit the Run button for Bluetooth.
  5. Wait for the troubleshooter to complete the process and do the needful if asked.

First things first, you should make use of the built-in troubleshooting tool that Windows 11 offers to fix any problem related to Bluetooth.

2. Turn on the Device Association Service

  1. Open the Run command by pressing Win + R buttons.
  2. Type services.msc and hit Enter.
  3. Locate Device Association Service from the left side.device association service
  4. Double-click to open its Properties.
  5. Make sure to select Startup type as Automatic.
  6. If the service is stopped, hit the Start button.
  7. Restart your PC and check if you can remove the Bluetooth device or not.

The Device Association Service is responsible for pairing between your PC and the wired or wireless devices.

Because of some reasons, the service might have stopped working, and enabling it could allow you to fix the can’t remove a Bluetooth device in Windows 11 issue.

3. Use Control Panel

  1. Press the Windows button to open the Start Menu.
  2. Search for the Control Panel and open it.control-panel-search fallout new vegas runtime error
  3. Change the View by option to Large or Small icons.
  4. Right-click on Devices and Printers and select Open in a new window option from the context menu.
  5. Right-click on the device your wish to remove and select the Remove device option.

4. Use Device Manager

  1. Right-click on the Start menu and select Device Manager.device manager
  2. Click on View on the top menu bar and select Show hidden devices.
  3. Expand the Bluetooth section, right-click on the Bluetooth device that you wish to remove, and select Uninstall device.
  4. Hit Uninstall again when prompted.

5. Use the Registry Editor

  1. Press the Win + R keys to open the Run dialogue.
  2. Type regedit and hit Enter.open regedit
  3. Navigate to the below-mentioned path. HKEY_LOCAL_MACHINE > SYSTEM > CurrentControlSet > Services > BTHPORT > Parameters > Devices
  4. Select any of the keys under the Devices section on the left side.
  5. Double-click on the Name key on the right side to check the name of the corresponding key.
  6. When you find the correct key, right-click on it and select Delete.

Why can’t I remove a Bluetooth device in Windows 11?

Here are a bunch of reasons you cannot remove a Bluetooth device from your Windows 11 PC:

  • The Bluetooth service is experiencing some issues – Chances are that a Windows update has triggered some issues with the Bluetooth service.
  • Some important system file is missing – If a Bluetooth service-related file goes missing or corrupt, then also you will come across this issue.
  • A third-party program is blocking the removal – If you have a third-party app that makes use of Bluetooth, then chances are that the app itself is blocking the removal of the device from your PC.
  • The Bluetooth drivers are outdated – A buggy driver can also cause all sorts of problems, which could very well be the reason for this issue.

While the above solutions are sufficient and would definitely help you fix the can’t remove Bluetooth device on Windows 11 issue, there are a few more tips that you can apply.

Apparently, you can try installing the latest update available for the Bluetooth driver. We have a guide that lists different ways to update drivers on your Windows 11 PC.

You can try running the SFC scan and DISM commands. Running these commands will replace the corrupt or missing system files and might also help bring back the Bluetooth service to its original working condition.

There are some users that have suggested removing Bluetooth devices after turning on the Airplane Mode.

If nothing works, then as a last resort, we would suggest you reset your PC. We have a guide that lists all the steps that you need to follow to carefully reset your PC.

That is it from us in this guide. We hope that the above solutions helped you remove the Bluetooth device from your PC. Let us know in the comments below which solutions did the job for you.

Windows 10 Freezes Randomly: 4 Easy Solutions to Use

You have found this guide because your Windows 10 devices freezes randomly; here is all you need to know.

For some users, these freezes are random; for others, it happens almost always. The multiple freezes make it a hard computer problem to troubleshoot. However, we have documented the best solutions.

Why does my computer keep freezing on Windows 10?

There are a few known reasons for this problem, and here are the top culprits:

There are also a few known variations of this problem, and at the top, we have the following:

  • Windows 10 hangs – According to users, their Windows 10 PC frequently hangs. This occurs randomly and it can drastically impact your performance.
  • Windows 10 freezes after an update – In some cases, freezing can occur after installing an update. Certain updates can be buggy and cause this error to occur.
  • Windows 10 keeps freezing on startup – This is another common problem that can occur on Windows 10. According to users, the freezing starts as soon as their Windows starts.
  • Windows 10 freezes when idle, shutting down, playing video, restarting, updating, going to sleep, when connected to the internet – Users reported that freezing can occur on their PC on various occasions. According to users, freezing can occur when shutting down your PC or while your PC is idle.
  • Windows 10 freezes SSD randomly – In several instances, users reported this problem using an SSD. However, you can fix the problem with your SSD by changing your power settings.
  • Windows 10 freezes, then black screen, blue screen – Sometimes, this problem can cause a black or blue screen to occur. This is usually caused by a hardware problem or a bad driver.
  • Windows 10 stuttering – This is another variation of this problem, and many users reported that Windows starts stuttering at random intervals.

How can I fix random freezes on Windows 10?

  1. Update your drivers
  2. Install the missing updates
  3. Change your power settings
  4. Perform a Startup Repair

1. Update your drivers

  1. Press Windows Key + X to open the Power User Menu. Select Device Manager from the list.
    windows 10 freezes randomly
  2. Expand any driver that has a yellow badge. to do this, expand the category, double-click the driver, go to the Driver tab, and click the Update Driver.
    windows 10 freezes randomly
  3. Click Search automatically for drivers.
    windows 10 freezes randomly

2. Install the missing updates

  1. Enter Windows Update in the Search bar and select Check for updates from the menu.
    check for updates
  2. Now click on Check for updates button.
    check for updates
  3. Windows will now check for available updates. If any updates are available, Windows 10 will download them automatically in the background.

3. Change your power settings

  1. Press Windows Key + S and control panel, and select Control Panel from the list.
    open control panel
  2. Change the View by option to Large icons.
    windows 10 freezes randomly
  3. Choose Power Options from the list.
    open power options
  4. When the Power Options window opens, locate your currently selected plan and click on Change plan settings.
    power plan
  5. Now click on Change advanced power settings.
    advanced power settings
  6. Navigate to PCI Express, then Link State Power Management, and set all options to Off. Now click on Apply and OK to save changes.link state power management off

4. Perform a Startup Repair

  1. Open the Start Menu, click the Power icon, and hold the Shift key while clicking on Restart.
    repair startup
  2. When your PC restarts, you’ll be presented with a list of options. Select Troubleshoot.
    windows 10 freezes randomly
  3. Click Advanced options, then select Startup Repair.
    windows 10 freezes randomly
  4. The repair process will now start. Remember that repair can take about 15 minutes or more, so don’t interrupt it.

Once the repair process is completed, the issue should be completely resolved.

These fixes mentioned above should be efficient if your Windows 10 device freezes randomly while playing games, for just a few seconds or if Windows 10 freezes randomly but the mouse still works.

Freezing can be a big problem on any PC, but we hope you solve this issue using one of our solutions.

Start Menu Disappeared in Windows 10: Try These 9 Fixes

Has the Start menu disappeared from your Windows 10 devices, let us show you all possible fixes in this guide.

While this may be an annoying situation, the solutions are often straightforward. Hence, with a few clicks, you should have your devices fully operational again.

Why is my Start Menu missing on Windows 10?

From user experiences, we can conclude that there may be a few things that will trigger this Windows problem. On top of the list are the following:

  • Stopped processes – The Start Menu disappears mainly because of a process that has not started when your Windows 10 is powered up.
  • Damaged files – Corrupted or damaged registry files also will trigger many computer errors, including a missing Start menu.
  • Damaged user profile – If Start Menu isn’t working, it’s possible that your installation or user profile is damaged. Not that this may also be the case in Windows 11 devices.

Users have also reported some similar issues, including:

  • Windows 10: Start Menu and Cortana not working – According to users, sometimes both Cortana and Start Menu aren’t working on their PC. To fix this, you just need to run a single command from PowerShell.
  • Windows 10: Start button doesn’t work – If the Start button isn’t working on your PC, the problem might be caused by a corrupted user account. However, you can fix that simply by creating a new user account.
  • Start Menu lost in Windows 10 – Several users reported that Start Menu is lost on their PC. This can be a problem, but you might be able to fix it by scanning corrupted system files.
  • Windows 10: Start Menu disappeared after update – Sometimes an update can cause your Start Menu to disappear. However, you can easily fix that by finding and removing the problematic update.
  • Start Menu in Windows 10 won’t open, not showing up, unresponsive – Users reported various issues with Start Menu on their PC, but if you have any problems with Start Menu, be sure to try some of our solutions.

How can I fix Start Menu if it’s disappeared in Windows 10?

  1. Update the graphics card driver
  2. Try restarting all Windows 10 apps
  3. Install the latest updates
  4. Log out and log back into your account
  5. Restart File Explorer
  6. Perform SFC and DISM scans
  7. Create a new account
  8. Remove the problematic update
  9. Use third-party software

1. Update the graphics card driver

  1. Press Windows Key + X to open the Power User Menu. Select Device Manager from the list.
  2. Expand Display adapters, double-click your graphics card, go to the Driver tab and click the Update Driver.
  3. Click Search automatically for drivers.

We strongly recommend you use a dedicated driver updating tool to keep your system safe from permanent damage while installing the wrong driver versions.

The tool detects all of your outdated, broken, or missing drivers then downloads them from the Internet straight from the device developers and installs them on your PC.

2. Try Restarting all Windows 10 apps

  1. Right-click on the Start Menu button and open Command Prompt (Admin).
  2. Enter the script below and click Enter.
    Powershell
  3. Paste the following script and hit Enter:
    Get-AppXPackage -AllUsers | Foreach {Add-AppxPackage -DisableDevelopmentMode -Register “$($_.InstallLocation)AppXManifest.xml”}start menu not working windows 10 3
  4. Wait for the PowerShell to execute the command (ignore a few red error codes).

3. Install the latest updates

  1. Press Windows Key + I to open the Settings app.
  2. Now navigate to Update & security section.
    Windows 10 Start Menu disappeared after update
  3. Click the Check for updates button.
    Windows 10 Start button doesn't work

Restart the system and check if the disappeared Start menu on Windows 10 is now visible.

4. Log out and log back into your account

  1. Press Ctrl + Alt + Del.
  2. Now choose Sign Out from the menu.
  3. Wait for a few seconds and then sign back into your account.

5. Restart File Explorer

  1. Press Ctrl + Shift + Esc to open Task Manager.
  2. Locate Windows Explorer on the list. Right-click it and choose Restart from the menu.
    Windows 10 Start Menu disappeared after update
  3. Wait for a few moments for File Explorer to restart.

6. Perform SFC and DISM scans

6.1 SFC scan

  1. Press Ctrl + Shift + Esc to open Task Manager.
  2. Click on File, then Run new task.
  3. When Create new task window opens, enter cmd, and check Create this task with administrative privileges. Click on OK to start Command Prompt.
    Start Menu Windows 10 not showing up
  4. When Command Prompt starts, input the script below and hit Enter.
    sfc /scannow
  5. The SFC scan will now start. This scan can take up to 15 minutes, so don’t interrupt it.

Once the SFC scan is finished, check if the problem persists. If the problem persists or you could not run an SFC scan, you need to run a DISM scan instead.

6.2 DISM scan

  1. Right-click on the Start Menu button and open Command Prompt (Admin).
  2. Input the command below and hit Enter.
    DISM /Online /Cleanup-Image /RestoreHealthWindows 10 Start button doesn't work
  3. DISM scan will now start. It’s worth mentioning that this scan can take up to 20 minutes or more, so don’t interrupt it.

7. Create a new account

  1. Open the Settings app and navigate to the Accounts section.
    Start Menu lost Windows 10
  2. From the menu on the left select Family & other people, and in the left pane, choose Add someone else to this PC.
    Windows 10 Start Menu disappeared after update
  3. Select I don’t have this person’s sign-in information.
    Start Menu Windows 10 unresponsive
  4. Now, choose Add a user without a Microsoft account.
    Windows 10 Start Menu and Cortana not working
  5. Enter the desired user name and click Next.
    Windows 10 Start button doesn't work

After doing that, switch to the new account and check if the disappeared Start menu on Windows 10 is now visible.

8. Remove the problematic update

  1. Press Windows Key + I to open the Settings app.
  2. Now navigate to Update & security section.
  3. Now click on View installed update history in the left pane.
    Windows 10 Start Menu and Cortana not working
  4. A list of recent updates will appear. Click on Uninstall updates.
    Windows 10 Start button doesn't work
  5. You should now see the list of installed updates. Double-click the update to remove it.
    Start Menu lost Windows 10

Once the problematic update is removed, restart your PC and check if the problem persists. If you can’t find the problematic update, you can also use System Restore to restore your PC to an earlier state.

9. Use a third-party software

If none of the fixes work, we recommend you try installing Start Menu from IObit.

The tool is designed to be a designated replacement for Windows 10’s default start menu, and it can be a wonderful solution if, for any reason, the default Start Menu becomes broken and unresponsive.

As you can see, we don’t have an ultimate solution that fixes the problem for all users because the cause of the problem is different.

If you have another solution that helped you or someone you know to fix the missing Start Menu, please write it down in the comments, I’m sure you’re going to help a lot of people.

Start Menu 8 PRO

Start Menu 8 PRO

If your default Windows 10 Start Menu stops working, then IObit is here to present to you a great alternative!
Free trial Visit website

That’s it, several simple methods on how to fix your Start menu if it disappeared from your Windows 10 operating system.

If you have other questions related to this subject, you can write us below in the comments section of the page, and we will help you further as soon as possible.

0x8000ffff on Windows 11: How to Fix This Update Error

Windows 11 is still in the early stages, and users are likely to encounter errors more frequently. While most of the errors are trivial and can be fixed by a simple reboot, some just make things a lot more difficult. One example is the 0x8000ffff error code in Windows 11.

This doesn’t allow you to use Windows Update, and in turn, you are left with an outdated version of the OS which puts your system at risk. So, let’s find out how you can fix 0x8000ffff in Windows 11.

Note icon NOTE
If you are encountering the error only with Microsoft Store, open Run and execute the wsreset.exe command.

What does error code 0x8000ffff mean?

The 0x8000ffff error in Windows 11 usually points to an issue preventing the update process from going through. And it’s usually easily fixable.

Here are some of the reasons why you may be seeing the error:

  • Corrupt system files – If the system has corrupt system files, you will likely face a range of issues, including some while updating Windows.
  • Critical services not running – Many users found that Windows Update and other critical services were not running.
  • Malware or virus infection – The presence of malware or virus on the computer can also affect the update process and also lead to issues launching the Microsoft Store.
  • Conflicting apps or third-party antiviruses – Several users reported that a third-party antivirus caused the issue, and our solutions will help fix the Windows Update error code 0x8000ffff.

How can I fix the 0x8000ffff error code in Windows 11?

Before we head to the slightly complex solutions, here are a few quick ones to get things up and running:

  • If this is the first time you are encountering the update error, we recommend you try again in some time. In a few cases, the error appeared due to issues with the Microsoft servers.
  • Disable all third-party antiviruses and security software installed on the PC.

If none works, the solutions listed next certainly would.

1. Run the Windows Update troubleshooter

  1. Press Windows + I to launch the Settings app, and click on Troubleshoot on the right in the System tab.Run troubleshooter to fix windows 11 error code 0x8000ffff
  2. Next, click on Other troubleshooters.Other troubleshooters
  3. Locate the Windows Update troubleshooter and click on the Run button next to it.Run Windows Update troubleshooter to fix windows 11 error code 0x8000ffff
  4. Wait for the troubleshooter to diagnose the problem and follow the listed instructions to resolve it.

Your primary approach when eliminating errors should be to run a relevant troubleshooter if there’s one for the problem. The troubleshooter automatically diagnoses the problem and, in most cases, makes the necessary changes to the system to fix it.

Once the troubleshooter is done running, check if the 0x8000ffff error code in Windows 11 is fixed. If the issue still persists, we recommend specialized repair software, it will scan your PC for damaged and missing system files and automatically repair or replace them.

2. Uninstall BitDefender and Malwarebytes

If you have either BitDefender or MalwareBytes installed on the PC, uninstall them. While disabling works for other third-party antiviruses, these two, in particular, are known to affect the update process, even when disabled.

You can either use a reliable software uninstaller to remove these or go with the dedicated uninstaller tool released by the MalwareBytes and BitDefender. Once done, verify if the Windows Update error 0x8000ffff is still encountered.

3. Disable .NET Framework

  1. Press Windows + S to open the Search menu, enter Turn Windows features on or off in the text field, and click on the relevant search result.turn windows features on or off
  2. Uncheck all the .NET Framework entries here, and click on OK.disable .NET framework to fix 0x8000ffff windows 11
  3. Once done, restart the computer for the changes to come into effect.
  4. Now, press Windows + I to open Settings, select Windows Update from the navigation pane, and click on Check for updates.check for updates

It should now install all the pending updates without throwing the 0x8000ffff error in Windows 11. Also, many users reported that it was a combination of disabling/uninstalling the antivirus and the .NET Framework that fixed things. So try that as well.

This method will fix things for the following two updates:

  • KB5015814 error 0x8000ffff
  • KB5016629 Windows 11 update 0x8000ffff

Also, once done, re-enable the .NET Framework from Windows Features. This time, simply select the entries you unchecked earlier and click OK.

4. Disable Windows Security

  1. Press Windows + S to launch the Search menu. Enter Windows Security in the text field at the top, and click on the relevant search result that appears.Windows Security
  2. Click on Virus & threat protection from the options that appear here.Virus & threat protection to fix windows 11 error code 0x8000ffff
  3. Next, click on Manage settings under Virus & threat protection settings.Manage Settings
  4. Disable the toggle for Real-time protection.Disable Real-time protection to fix windows 11 error code 0x8000ffff
  5. Click Yes on the UAC (User Account Control) prompt that pops up.UAC

If disabling/uninstalling the third-party antivirus didn’t do the trick, it could be the built-in Windows security that kicked in and is now triggering the 0x8000ffff install error in Windows 11. So make sure to disable it as well.

5. Perform an in-place upgrade

  1. Head to Microsoft’s official website, choose the edition for the ISO and click on the Download now button. download ISO to fix 0x8000ffff windows 11
  2. Choose the installer language from the dropdown menu, and click Confirm.language
  3. Now, click on the 64-bit Download button.64-bit installer
  4. Once the ISO file is downloaded, double-click to open it.iso file
  5. Click Open in the prompt that appears.open to fix 0x8000ffff windows 11
  6. Run the setup.exe file here.setup.exe
  7. Click Yes in the UAC prompt.
  8. Click Next in the Windows 11 Setup window.next
  9. Now, click on Accept to agree to the license terms.accept
  10. Finally, verify that the Keep personal files and apps option is selected, and click on Install.install to fix 0x8000ffff windows 11
  11. The in-place upgrade would now start, and your computer would restart several times during the process.

Most users fixed the 0x8000ffff update error in Windows 11 with an in-place upgrade. Though the method is slightly time-consuming, it most certainly, will eliminate the underlying cause and get things up and running.

These are all the ways you can fix the 0x8000ffff error code in Windows 11. In case you are encountering it in the previous iteration as well, learn how to eliminate 0x8000ffff in Windows 10.

Several users have also reported coming across Windows 11 installation assistant error code 0x8000ffff, which, too, can be resolved with the methods listed above.

Whether you are on Windows 10 or Windows 11, the error 0x8000ffff catastrophic failure may suddenly appear. Check out this complete error 0x8000ffff catastrophic failure guide to troubleshoot and apply working solutions.

Also, find out how to make your Windows 11 PC faster than ever.

Tell us which fix worked for you in the comments section below.

4 Quick Ways to Fix AMD Error Code 43 on Windows 10

Graphics card issues are among the common problems on Windows 10, with the AMD error code 43 being the latest reported by users. There are various causes of this problem but it is not the most difficult issue to fix.

This guide will show you the surefire ways to fix the AMD error code 43 easily on your PC.

What does code 43 mean?

Error code 43 shows that Windows cannot establish communication with a drive or the needed driver has crashed. When it comes to AMD, this error can sometimes be accompanied by an error message that reads: Windows has stopped this device because it has reported problems. (code 43).

Below are some of the causes of this issue:

  • Faulty drivers – The AMD graphics device driver error code 43 can be caused by outdated or faulty driver installation. You can fix this by rolling back or updating your drivers.
  • Hardware problems – External devices or some of your PC hardware can also lead to the AMD error code 43 issue as reported on the forums of different sites like Promox, VFIO, and Unraid. To solve this, you need to run the Hardware and Devices troubleshooter.

How do I fix AMD Error code 43 on Windows 10?

1. Update your drivers

  1. Press the Windows key + X and select Device Manager.
    device amd code 43
  2. Double-click Display adapters section to expand, right-click the AMD driver, and select Update driver.
    update driver
  3. Choose Search automatically for drivers and install any available update.
    search auto
  4. If Windows says there is no update and the issue persists, choose the Browse my computer for drivers option.
    browse pc amd code 43
  5. Now, choose Let me pick from a list available drivers on my computer.
    let me
  6. Finally, choose the default driver and click Next.
    next

The AMD error code 43 appears graphic card drivers are outdated. Aside from using the default Windows driver updater, you can download and install the latest drivers from your PC manufacturer’s website.

However, it must be noted that the manual way is not the most reliable method to update your drivers since it will not always find the latest available versions, especially recent releases.

One simple way to update the drivers automatically without the need to manually find your GPU model and the compatible driver on their site is to use a third-party app, such as Fortect Driver Updater.

⇒ Get Fortect Driver Updater

2. Roll back drivers

  1. Open the Device Manager, expand the Display adapters option, and double-click your driver.
    display
  2. Choose the Driver tab at the top.
  3. Click the Roll Back Driver button.
    roll back amd code 43

If you started noticing the AMD error code 43 after installing a new driver, you might need to roll back your driver to the previous version. This should fix the issue and wait till another updated version of the driver is available before updating it.

3. Uninstall and reinstall your drivers

  1. Disconnect your PC from the internet and open the Device Manager.
  2. Expand the Display adapters, right-click your driver, and select the Uninstall device option.
    uninstall device
  3. Check the box for Delete the driver software for this device and click Uninstall.
    uninstall button
  4. Restart your computer and your graphics controller should now be listed as Microsoft Basic Display Adapter.
  5. Finally, go to the AMD official website to download and install the latest version of your driver.

If updating and rolling back your driver does not fix the AMD code 43 issue, you need to uninstall your drivers. You can uninstall and reinstall the integrated and dedicated drivers on your PC if you have the two of them.

Lastly, it is important to turn off your internet before you start this solution. This is to prevent the automatic installation of the driver after you remove it.

4. Run the Hardware and Devices troubleshooter

  1. Press the Windows key + S, type cmd, and click Run as administrator under Command Prompt.
    cmd amd code 43
  2. Type the command below and hit the command below: msdt.exe -id DeviceDiagnosticmsdt
  3. Now, wait for the command to finish running.

If you’re getting AMD error code 43, it might be down to hardware issues. In this case, running the Hardware and Devices Troubleshooter should solve the problem.

AMD Error Code 43 can be down to various factors and in most cases, updating your driver should do.

If you want to know how to fix the most common AMD driver installation problem, check our detailed guide on the topic to do it quickly.

Feel free to let us know the solution that helped you fix the problem in the comments below.

Windows 7 Repair Tool to Download in 2026 [Updated Guide]

Regardless of how tech-savvy or careful you are on Windows 7 or the operating systems, there will be a time you will need a repair tool to fix some issues on your PC.

This is because the OS is not perfect and issues are bound to show up at times. In this guide, we handpicked some of the best repair software you can always use to restore normalcy on your PC.

Does Windows 7 have a repair tool?

Windows 7 has a series of built-in repair tools just like its successors and some of its predecessors. There is the Startup repair tool that fixes all sorts of startup issues.

Also, you can run the SFC scan to fix broken or corrupt system files, among other repair tools on this operating system.

What is the best software to fix Windows 7 errors?

Tweaking Windows Repair – Lightweight Windows 7 repair tool

tweaking windows 7 repair tool

The last tool on our list of Windows 7 repair tools is an effective one you can use without a CD.

This is because of the dated UI, but make no mistake, this tool is perfectly capable of doing its job just right, even on the more modern Windows 10.

Tweaking Windows Repair allows you to perform all of the most basic repair and optimization tasks that you could expect from such a tool, from the registry and RAM repair to DLL fixing and replacing,

This, coupled with the fact that the tool itself is extremely lightweight, makes it a great addition to anyone’s digital library, especially those of you that have older PCs still running Windows 7.

Check out the best features that are included in this tool:

  • Windows Repair tool is able to reset Registry permissions and file permissions as well
  • With this tool, you will be able to register System Files and repair WMI, Windows Firewall, Internet Explorer, MDAC & MS Jet, Hosts File, and more
  • You can also remove policies set by infections
  • Windows Repair allows you to remove temp files and repair proxy settings as well
  • You will be able to unhide the non-system files and repair Windows Updates
  • You can also repair CD/DVD missing or not working

⇒ Get Tweaking Windows Repair

Microsoft Fix It Center – Easy-to-use tool

fix it

Microsoft Fix It Center is another excellent Windows 7 repair tool that scans your PC for all kinds of issues.

It will also download the latest updates and solutions from Microsoft.

One of the best things about this tool is that it covers all the aspects of your system from performance to crashes, hardware devices, and audio.

This tool is perfect for non-technical users because it’s really effortless to use. This app will look over your Windows 7 system and a vast range of potential issues that might pop up.

Take a look at the most important features that you will be able to enjoy if you do decide to use this tool:

  • The tool’s installation requires a fast and easy process, and after you install the tool, you’ll see that it comes with an effortless to use interface
  • The interface comes with a list of issues that you will be able to scroll through
  • After you click on the Run button, a scan of your whole system will begin
  • When the tool finds a problem, it will suggest a fix for it
  • You will get the chance to apply fixes automatically, and you can also choose them manually
  • You will be able to sign in via a Windows Live account, and this will allow for more online solutions and remote management of more computer
  • Microsoft Fix It Center also prevents various issues before they get worse

⇒ Get Microsoft Fix It Center

Iolo System Mechanic Ultimate Defense – Portable tool

Iolo System Mechanic Ultimate Defense is a useful tool that was designed to help users fix the issues that are encountered in 10, 8, 8.1, 7 (XP/Vista up to v16.0.0.10) when using the Windows Media Player and more.

This great application will attempt to solve the problems that are caused by the registration of particular DLL files that are used by the media player.

This tool is able to handle problems that are caused by more than 40 software components and recreate the registry keys that are required for playing media files.

Such issues might be caused by system crashes or by all kinds of cyberattacks that result in corrupting the registration of essential components.

If you receive error messages that have to do with DLL components, you will be able to use this tool.

This will turn out to be a useful tool especially if you want a quick fix, and you’re not very interested in finding out the exact nature of the problem. It is ideal when you don’t want to waste time online looking for system components’ issues.

Lastly, it is a Windows 7 repair tool that can be used on a USB flash drive.

Check out the essential features and advantages that it comes with:

  • This is a portable program that can be used without needing any installation
  • You can use this tool on any computer that runs into troubles and has a Windows system installed
  • Its interface is effortless to understand and use, and you don’t even need any troubleshooting experience
  • All you will have to do is click one button to re-register all the DLL components
Iolo System Mechanic Ultimate Defense

Iolo System Mechanic Ultimate Defense

Solve most Windows problems and enjoy a faster PC with fewer errors.
Check Price Visit Website

We hope that our software recommendations were helpful. For more suggestions, please access the comments section below.

The Easy Way to Perform Windows 10 Repair Upgrade

A lot of things can go wrong with your Windows 10 computer. Apart from the usual blue screen of death crashes, other errors can cause problems in your system.

Thankfully, Microsoft has provided several ways to restore your PC and part of them is the repair upgrade. In this guide, we will show you to perform the Windows 10 repair upgrade when something goes wrong.

What is a Windows 10 repair upgrade?

Windows 10 repair upgrade is the process of installation of Windows 10 on the existing one on your PC. This can be done with the use of an ISO file and bootable media like a USB or DVD.

The advantage of this repair is that it fixes issues on your PC, including a faulty operating system. It does this without affecting your personal files.

How do I perform Windows 10 repair upgrade?

  1. Visit the Windows 10 download website to download the media creation tool.
    download windows 10 repair upgrade
  2. Double-click the tool to run it and click the Accept button on the license page.
    accept
  3. Choose Create installation media for another PC on the What do you want to do page and click Next.
    create media
  4. Select your language, system version, and architecture and click Next.
    language windows 10 repair upgrade
  5. Choose the ISO file option click the Next button.
    iso file
  6. Choose where to save the ISO file, wait creation to complete and run the program.
    save windows 10 repair upgrade
  7. Accept the terms on the license page.
    accept terms
  8. Select Keep personal files and apps on the Choose what to keep page and click the Next button.
    keep files
  9. If all things are set and ready, click the Install button.
    install windows 10 repair upgrade
  10. Finally, sign and set up your PC accordingly.

This is how you can install Windows 10 using the repair upgrade without losing programs, apps, and files.

If you need to perform the Windows 10 repair upgrade from a USB flash drive to install Windows 10, you can select the flash drive option in step 5.

Also, if you can’t access your PC, you might need to perform a clean installation instead.

That is about it for using this option to repair your PC. With these steps, you have everything to rescue your PC when you are facing issues without losing your files.

If the Windows 10 media creation tool is not working, check our detailed guide to fix it quickly.

Feel free to let us know if you face any problems performing this upgrade in the comments below.

7 Ways to Fix Windows Hello if It’s Greyed Out

Encountering a greyed out Windows Hello will limit how you can use the biometric sign-in mechanism. Most of our readers reported that they encountered this after a Windows update.

Similarly, this issue will cause Windows Hello not to work. Hence, we will examine the likely causes and solutions for this problem.

Why did Windows Hello grey out?

While there are multiple reasons for this problem, the most prominent cause is an issue with the Windows update. Other likely reasons that could cause Windows Hello greyed out issue are:

  • Outdated or corrupt imaging and biometric drivers – If the drivers for the devices you need are outdated, the Windows Hello will appear greyed out.
  • Malfunctioning biometric devices – Windows Hello will not work when the biometric devices malfunction. Take a look at this guide to fix the fingerprint sensor if it’s not working.
  • Trusted Platform Module is not set up – Windows Hello can only be accessible when the PIN login is enabled. Check how to enable TPM without BIOS in Windows 11.
  • Corrupt System files – It isn’t uncommon for system files to be corrupted. Whenever this happens, it distorts the PC’s performance and renders some functions inaccessible.
  • Outdated Windows – The system can easily be vulnerable when it is outdated, leading to bugs affecting components of the PC. Look at this guide to fix Windows update errors on Windows 11.

Irrespective of the causes, let’s proceed to solve the Windows Hello greyed out problem with these solutions.

How do I fix Windows Hello when it’s greyed out?

Before anything, ensure you carry out these preliminary checks:

  • Ensure that the biometrics devices are functioning well.
  • Disable fast startup on your computer to avoid Windows Hello’s crash.
  • Restart your computer to see if the issue still persists. Should you encounter an issue restarting your PC, check this guide for fixes.

If the problem persists after these checks, proceed to apply the fixes below.

1. Update the Biometrics driver

  1. Right-click the Start button and select Device Manager.
  2. Locate and expand Biometrics or Imaging devices, right-click on the device you want to update, and click Update driver.
  3. Choose Search automatically for drivers and wait for the completion. Then Restart your PC to take effect.

Since Windows Hello greyed-out problems can occur if the Biometric drivers are corrupt or outdated, updating them will help fix it. If this does not work for you, check out other ways to fix outdated drivers error in Windows 11.

If your Windows doesn’t find the required driver, we recommend you use Outbyte Driver Updater, a tool that automatically scans your computer for outdated drivers and updates them with their latest version.

Outbyte Driver Updater

Safely update all your drivers to keep your system in top shape.
Free Trial Download Now

2. Uninstall and reinstall the Biometric driver

  1. Right-click the Start button and select Device Manager.
  2. Locate and expand Biometrics or Imaging devices, right-click on the device you want to remove, and click Uninstall device.
  3. Now, check the Attempt to remove the driver for this device checkbox, and click Uninstall.
  4. Finally, reboot your PC for Windows to search for and reinstall the best driver for the device.

Similar to the first solution, this will also attempt to fix the problem caused by corrupt or outdated drivers.

3. Set up the TPM

  1. Press the Windows + R keys to launch the Run window, input tpm.msc, and click OK to open the TPM management console.
  2. Click the Action tab and select Prepare the TPM… from the options.
  3. Click the Restart button and follow the onscreen prompts. Then check if Windows Hello is fixed.

By default, the TPM should be set up. However, Windows updates or personal mistakes can disable the TPM. Hence the reason Windows Hello greyed out. Also, you can check how to enable TPM 2.0 in different versions of BIOS if the steps do not work for you.

4. Reinstall Windows Hello

  1. Press the Windows + I keys to launch the Settings app.
  2. Select Apps and choose Optional features from the right pane.
  3. Search to see if Windows Hello is installed or not. If not, click View features at the top.
  4. Now search for Windows Hello and install it.
  5. Reboot your PC and check if the problem is fixed.

Most of our readers using Windows 11 claim they had to install the optional pack because Windows Hello isn’t preinstalled. Further, we have a guide on installing Windows Hello face driver on Windows 11; you can check it out.

5. Run the System file checker

  1. Left-click the Start button, input the command prompt and select Run as administrator.
  2. Input the following commands and click Enter: sfc/scannow
  3. Wait for the process to be successful, close the window and restart your PC.

The SFC scan will identify the error’s potential causes and troubleshoot it automatically. If the SFC scan fails to work, check out the various solutions in this guide.

6. Perform a hardware and devices troubleshooter

  1. Right-click the Start button, input the command prompt, and select Run as administrator.
  2. Input the following command and press Enter: msdt.exe -id DeviceDiagnostic
  3. Wait for the device to load the Hardware and Device troubleshooter and click on Next.
  4. The device will auto-detect the issues and prompt steps to troubleshoot them.
  5. If it doesn’t identify any issue, close the troubleshooter.

Troubleshooting the hardware and devices will identify all potential errors on the computer and provide steps to fix them. If the Hardware and Devices troubleshooter is missing on your device, try these fixes to restore it.

7. Update Windows

  1. Press the Windows + I keys to launch the Settings app.
  2. Select Windows Update and click Check for Updates.

Windows will automatically look for the latest updates and download and install them to your PC. Then you are required to restart for the changes to effect.

These are the best fixes to apply when you encounter Windows Hello greyed out problem.

However, if facial recognition isn’t working on your Windows 11, kindly check the fixes in this article.

Also, our guide on what to do if you can’t remove your PIN in Windows 11 could come in handy if you are ever faced with such a problem.

If you have further queries, drop them in the comments section. Also, we would appreciate your suggestions if you have one fix that has worked for you other than the outlined ones.

Discord Yellow Border: What Is It & How to Get Rid of It?

Many of our readers complain that the latest update on Discord isn’t working smoothly on their devices. It prompted a series of issues, and the Discord yellow border is one of them. Also, some of you may experience Discord frequently freezing during use.

What is the Discord yellow border?

The Discord yellow border appears on the edges of the screen mostly when you are streaming or using the screen-sharing feature. Many of our readers report that the error started not long after the recent Discord update.

Furthermore, the yellow border around the screen on Windows 10/11 can distract you when using Discord. Also, it can appear in different instances, like a yellow border around Chrome when streaming.

What causes the yellow border on my Discord app?

The yellow border on the Discord app can occur for a few reasons, and they are:

  • Discord update issues -The most common story behind the problem is a bug in the Discord update after they moved to a new graphic capture system.
  • Windows incompatibility – Older Windows versions are still incompatible due to the latest updates and changes in the graphic capture interface. Hence, the reason for the yellow border when screen sharing on Discord.

Nonetheless, the yellow border around the screen on Windows 11 affects lots of Discord users. However, you don’t have to panic because the issue can be fixed by troubleshooting some settings.

How do I fix Discord’s yellow border?

Before proceeding with any advanced troubleshooting, we recommend you go through the following preliminary checks:

  • Close other third-party streaming applications that you use for Discord on your PC.
  • Close and relaunch Discord on your device.
  • Temporarily disable third-party antivirus software on your computer, and verify whether the Discord screen share yellow border still appears.
  • Restart your PC to resolve startup bugs that can affect app performance. You can check this guide should you encounter an issue with restarting your PC.

The checks above should fix the Discord yellow border issue. However, if the problem persists, please proceed with the tweaks below.

1. Update the Discord app

  1. Locate the Update Ready! button at the top right corner and click on it (whenever there’s an update, the button will appear).
  2. Alternatively, you can launch the Discord app on your Windows PC and press the Ctrl + R keys to update Discord.
  3. For Mac users, press the Command + R keys while running the Discord app to update.

In addition, the Discord update that prompts the yellow border to appear on the screen will be resolved since they have rolled out a new update. However, we recommend checking what to do if the Discord app won’t update.

2. Switch to a full-screen mode

  1. For Windows users, press the Ctrl + Shift + F keys on your Keyboard to initiate the Discord Full-Screen Mode.
  2. For Mac users, press Command + Shift + F on your Keyboard to initiate the Discord Full-Screen Mode.

The yellow border often pops up during screen sharing, although not always. Switching to the full-screen mode will stretch the borders, and the yellow outline will disappear.

Some of our users claim their audio doesn’t work while screen sharing on Discord. If you experience this also, hop on our guide to fix it.

3. Update Windows OS

  1. Left-click the Start button on the taskbar and select Settings.
  2. Expand the Windows Update and click Check for updates. If new updates are available, Windows will download and auto-install them for you.

Updating Windows will fix bugs affecting your PC. Also, it will make your PC compatible with the current version of the Discord app.

Also, for those wondering why my name is yellow on Discord, it concerns the assigned role. Members can be assigned different colors based on their role in Discord, which is probably why yours appears in yellow.

Moreover, the yellow border issue on Discord is common on older versions like Windows 10 but if you spot a yellow border on Windows 11, we know just the trick for it.

So, updating can help fix the problem. You can look at what to do here if Windows Update is not working.

For further reading, you may check out the causes and possible fixes if you encounter a bad network request on Discord.

Likewise, we have a detailed guide to help you learn how to enable and disable push-to-talk in Discord.

Should you have further queries and suggestions, you can drop them in the comments section below.

Black Screen in Fable: 5 Quick Ways to Fix It on Your PC

Some users have recently reported a Fable 3 black screen, which has caused concern about what could be wrong and the best fix.

Although this is a common issue for games on PC, we will identify the possible causes and ways to fix it.

What causes the black screen on Fable 3?

For users who experience Fable 3 black screen or not working, the following may be responsible for the error:

  • Using two monitors – A black screen issue can occur if you use two monitors simultaneously. Simply detach one of your monitors, and the problem should disappear.
  • Black screen due to overclocking – Black screen can occur because of a driver or overclocking issue, so it is advised that you update your drivers and remove all overclocking settings.
  • Black screen after Windows 11 update – This problem can sometimes appear after a problematic update. To fix the issue, try to remove the latest update by rolling back to the older version and check if that helps.

In case you need to learn more about what may be the reason for this issue, you can read further our article about how to fix the black screen after BIOS.

How do I fix the black screen in Fable 3?

Before proceeding to explore advanced fixes on Fable 3 screen not working, you should consider performing the following preliminary checks:

  • Check if there’s any damage to the graphics processing unit.
  • Unplug one of your monitors if you’re using two.
  • Restart your PC to check if you are experiencing the issue due to startup errors.

Having performed the above checks, and the error is persistent, you can try the troubleshooting tweaks provided below:

1. Update Windows

  1. Press the Windows + I keys to open Settings.
  2. Choose Windows Update and click on Check for Updates (apply the available updates and restart your computer).

At times, when users get a black screen while playing games, it could be a result of pending updates or certain outdated software.

2. Update your graphics driver

  1. Right-click on the Windows Start icon and select Device Manager from the list.
  2. Now, find your graphic driver under the Display adapters section. Right-click on your driver and select Update driver.
  3. Select Search automatically for drivers and restart your system for the fix to take effect.

The above steps should fix your graphics driver issue. Alternatively, you can install a third-party driver software tool for Windows 11 to fix all your driver issues.

Also, to facilitate this process you can use a specialized tool called Outbyte Driver Updater that will automatically find and update all outdated drivers.

Outbyte Driver Updater

Avoid these kinds of issues by keeping all drivers updated.
Free Trial Download Now

3. Boot your PC from Safe Mode

  1. Open the Start Menu and click the Power button, press and hold the Shift key and choose Restart from the menu.
  2. Next, choose Troubleshoot, then Advanced options.
  3. Select Startup Settings and click on the Restart button.
  4. Press F4 or 4 to Enable Safe Mode.

The above steps should fix your Fable 3 screen not working because Safe Mode uses default drivers, which is a perfect troubleshooting tweak.

4. Play Fable 3 in Compatibility mode

  1. Right-click on the Fable 3 app and select Properties.
  2. Under the compatibility tab, check the box next to Run this program in compatibility mode for.
  3. Choose an operating system from the drop-down menu.
  4. Then, click Apply at the bottom to save your settings.

The above should fix your Fable 3 black screen issue. If it doesn’t, try the next fix.

5. Check the advanced power options

  1. Click the Windows Start icon, type control panel, and click on it within the results.
  2. In the Search field, type Power Options and access the entry with the same name.
  3. From your current Power Plan, click on Change plan settings.
  4. Next, click on Change advanced power settings.
  5. From the next window, extend PCI Express and make sure the State Power Management is turned off.

Your power plan options may prohibit your GPU from working perfectly due to your battery/power saving options, hence the above.

If you get stuck on the steps above, you can check a more detailed description of how to fix Windows power plan settings.

If you have any questions or suggestions, do not hesitate to use the comments area below.

Resident Evil 4 Black Screen: 5 Ways to Fix It in Windows 10

Resident Evil 4, just like every other game, is vulnerable to problems, one of which is the highly reported black screen issue on Windows 10. Users have reported that this error pops up during the gameplay or right at the startup.

While they can hear the audio, the screen goes pitch black. If you are also experiencing the same Resident Evil 4 black screen issue on Windows 10 and are looking for solutions to fix it, then this guide is for you.

Why am I getting a black screen when playing Resident Evil 4?

There could be several reasons why you are seeing a black screen when playing Resident Evil 4 on Windows 10. Here are a few of the most common ones:

  • There is an in-game bug – Chances are that the recent patch might have introduced a bug or glitch that is triggering the black screen issue.
  • The firewall is blocking Resident Evil 4 – Chances are your firewall or antivirus software is blocking Resident Evil 4 from launching and causing the black screen issue.
  • Some important game files are missing – If there was an interruption during the installation of the game, then this could be very well the reason why the game crashes and throws a black screen.
  • The game is not running with sufficient privileges – Some programs, such as games require sufficient privileges in order to run smoothly. Here’s how you can make yourself an admin in Windows 10.

Now that have some idea about what are some of the common reasons you could come across a black screen issue with Resident Evil 4 on Windows 10, let us go through the solutions to fix it.

How can I fix the Resident Evil 4 black screen issue on Windows 10?

Before going over to advanced troubleshooting methods, let us first check out the preliminary solutions and try resolving the problem or not.

  • Check and install the latest available Windows update. We have a guide that lists a bunch of solutions if you are having issues updating your Windows PC.
  • Verify if the game’s official server is down or going through maintenance.
  • Make sure that you have an active internet connection. If there is an issue with your Wi-Fi, check out our guide which will help you resolve the problem.
  • Restart your PC.

Let us check out the solutions that have helped users fix the problem at hand.

1. Verify the integrity of game files

  1. Launch the Steam client.
  2. Click on the Library tab.
  3. Right-click on the Resident Evil 4 game and select Properties.
  4. Switch to the LOCAL FILES tab.
  5. Click on Verify integrity of game files.
  6. Steam will begin verifying the game files and will repair missing or corrupt game files that might be triggering the black screen issue.

When you verify the integrity of your game files, it checks all the files you have on your computer along with the ones on the official Steam servers.

If it finds any missing or corrupt game files, then Steam automatically detects and replaces them with new ones and thereby, fixing the problem in the process.

2. Update the graphics driver

  1. Right-click on the Start menu and select Device Manager.
  2. Expand the Display adapters section.display adapters
  3. Right-click on your graphics card and select Update driver.
  4. Choose the option to Search automatically for drivers.search automatically for drivers
  5. Your PC will search for the update and if detected will prompt you to install the update.

While the above process will update the driver as it should, it requires a lot of steps to go through to update the driver.

To simplify this, you can use our recommended tool called Outbyte Driver Updater. Using this program, you can easily update all of your drivers with just a few clicks.

Outbyte Driver Updater

Try this great software to always keep your drivers updated with the most suitable versions.
Free Trial Download now

3. Run the game as an administrator

  1. Right-click on the Steam client.
  2. Select Properties.
  3. Click on the Compatibility tab.
  4. Check the Run this program as an administrator box.
  5. Hit Apply and OK.

One user has shared this solution as it has helped him fix the problem. Since some programs or games require admin privileges to run perfectly, you need to grant admin access by following the above steps and then check if this resolves the issue for you as well or not.

4. Disable HDR

On Steam

  1. Launch Steam.
  2. Click on the Library tab.
  3. Right-click on the Resident Evil 4 game and select Properties.
  4. Switch to the LOCAL FILES tab.
  5. Hit the Browse button.
  6. Open the Config file.
  7. Set HDRMode to False.

On Windows 11

  1. Press the Win + G buttons to open the Xbox Game Bar.
  2. Click on Settings.
  3. Go to Gaming Features.
  4. Uncheck the box for Use Auto HDR with supported games.

After you have disabled the HDR, check if the game is running without any issues or not. If not, then check out the below solution.

5. Disable Steam overlay

  1. Launch Steam.
  2. Click on the Library tab.
  3. Right-click on the Resident Evil 4 game and select Properties.
  4. Select GENERAL from the left panel.
  5. Uncheck the Enable Steam Overlay while in-game box.

That is it from us in this guide. Well, the black screen errors aren’t the only thing that has been troubling Steam users.

We have a guide that lists solutions to the most common Steam errors. Also, if you are having an error while updating a game on Steam, you can check out our dedicated guide on it to resolve the problem.

Let us know in the comments below, which one of the above solutions resolved the Resident Evil 4 black screen issue on Windows 10.

Windows 11 Display Settings Not Working: How to Fix it

Some users reported that Windows 11 display settings are not working for them, and this can be a problem, especially if you need to adjust certain settings.

While this isn’t a serious problem, it can get quite tedious, but a couple of solutions can help you fix it.

Why won’t my display settings work?

Problems with the Settings app most likely cause this issue. Corrupted system files or corrupted user profiles can also contribute to this issue.

What can I do if the display settings are not working on Windows 11?

First of all:

  • Make sure you have the latest updates installed. Certain applications, such as MacType, can interfere with the Settings app, so close them.
  • You can also disconnect the second monitor, open Settings, and then connect the monitor again as a workaround.
  • Alternatively, you can use your GPU control panel to configure your display.

1. Restart File Explorer

  1. Press Ctrl + Shift + Esc to open Task Manager.
  2. Next, locate Windows Explorer, right-click it, and choose Restart.
  3. The issue will be gone.

This is just a workaround, so you must repeat it if the issue reappears.

2. Disable the Print Spooler service

  1. Press Windows key + R and type services.msc.
    Services RUn command - destiny 2 stuck on initializing
  2. Locate the Print Spooler service and double-click it.
  3. Click the Stop button to stop the service and set Startup type to Disabled.
  4. Lastly, click on Apply and OK and check if that solves the problem.

3. Disable internal graphics

  1. Restart your PC.
  2. While it boots, keep pressing F2 or Del to enter BIOS.
  3. Next, navigate to Settings and set Internal graphics to Disabled.
  4. Save changes.

4. Reregister Windows apps

  1. Press Windows key + R to bring up Windows 11’s Run dialogue accessory, and input PowerShell.
  2. To open an elevated PowerShell app, press Ctrl + Shift + Enter.
  3. Then input the following commands and hit Enter:
    Get-AppXPackage -AllUsers -Name windows.immersivecontrolpanel | Foreach {Add-AppxPackage -DisableDevelopmentMode -Register “$($_.InstallLocation)\AppXManifest.xml” -Verbose}
    Get-AppXPackage|Foreach{Add-AppxPackage -DisableDevelopmentMode -Register "$($_.InstallLocation)\AppXManifest.xml"}
  4. Close PowerShell when the command finishes reregistering apps.
  5. Press the Alt key + F4, and select Restart on the drop-down menu.
    Restart option windows 11 display settings not working

By performing this solution, you will reinstall the whole Windows Apps package and the problem should be over.

5. Start a new user account

  1. Press the Windows key + R combination to bring up Run’s dialogue box and enter this command in it: control userpasswords2
  2. Click OK to open the User Accounts window.
    The OK option in Run windows 11 display settings not working
  3. Select the Add option.
    The Add button windows 11 display settings not working
  4. Input an email address in the text box.
  5. Click the Sign in without a Microsoft account option and press Next.
    The Microsoft account option windows 11 display settings not working
  6. Select the Local account option.
    The Local account button windows 11 display settings not working
  7. Fill out the required user account fields.
    The Add a user text boxes windows 11 display settings not working
  8. Then press the Finish button.
  9. Select the added account in the User Accounts window and click the Properties button.
  10. Click the Group Membership tab.
  11. Select the Administrator radio button.
    The Administrator option windows 11 display settings not working
  12. Click Apply and OK to save the account settings.
  13. Press Alt + F4 to select Sign out. Then log into the new account to see if the issue remains there.

If that resolution works, migrate your user profile to the new account. Our guide on how to copy a profile includes full instructions for migrating a profile to a different account.

6. Perform an in-place upgrade

  1. Open this Windows 11 download page.
  2. Click the Download button for the Windows 11 ISO.
    The Download option windows 11 display settings not working
  3. Press your keyboard’s Windows + E keys to open File Explorer.
  4. Navigate to the directory that contains the downloaded ISO file.
  5. Double-click the Windows 11 ISO file to open it, then click the setup.exe file to bring up a Windows 11 Setup window.
    setup.exe file windows 11 display settings not working
  6. Select the Next option to go through the setup wizard and install the latest Windows 11 build.
    The Next option windows 11 display settings not working

7. Perform a Windows reset

  1. Press the Windows key + I to open the Settings app.
  2. Next, navigate to System and select Recovery.
    recovery
  3. Click on the Reset PC button.
    reset-pc-rvlkl-exe
  4. Select Remove everything.
    select
  5. Select Local reinstall. If that doesn’t work, you might have to use Cloud download.
  6. Click on Next and then Reset.
  7. Wait for the process to finish.
Note icon NOTE
This process will remove all files from your system drive (C:), so be sure to back up important data beforehand.

Why I can’t adjust the display resolution in Windows 11?

This is most likely an issue caused by display drivers or file corruption. Luckily, we have a dedicated guide that explains what to do if Windows 11 can’t change the display resolution.

Those resolutions can help if Windows 11 display settings are not working, so be sure to try them.

As this problem is mainly caused by wrong app associations, you should also consult our guide on how to remove them in Windows 11.

You’re also welcome to chat about the ms-settings:display error in the comments area below. There you can add questions and even share other resolutions for the ms-settings:display error.

Recent Files Not Showing in Quick Access on Windows 11 [Fix]

The Quick Access feature on Windows 11 can run into issues, prompting We can’t get the list of your recent files right now. Please try again later. It means that you won’t be able to see recent files due to some issues.

Likewise, users complain that File Explorer frequently crashes whenever they use it on Windows 11. Hence, we will explore the issue’s possible causes and potential fixes.

Why is Quick Access not showing recent files in Windows 11?

The most prominent cause is that the Quick Access program is disabled on your computer. It results in Quick Access not working.

However, other factors can cause the recent files not to show in quick access Windows 11:

  • Outdated Windows – When Windows is not updated on your PC, it affects the programs and features. Moreso, not keeping your OS updated deprives it of the needed patches and updates for fixing bugs liable to cause problems.
  • Windows File Explorer issues – If your File Explorer is not working as expected, it impedes its functionality, like Quick Access. Also, full or corrupt file history can cause problems accessing recent files on Windows.
  • Outdated driver issues – It is possible that you will have a hard time accessing the recent files from Quick Access due to outdated drivers. Also, updating drivers like the graphics card can help avert display issues.

What can I do if Quick Access is not showing recent files in Windows 11?

Observe the preliminary checks below before proceeding with any advanced troubleshooting solutions:

  • Stop background apps running on your PC that may disrupt its activities.
  • Close the File Explorer and reopen it by pressing the Windows + E keys simultaneously,
  • Restart your PC to fix startup errors liable to cause problems.

If the Quick Access not showing recent files on Windows 11 persists, proceed with the fixes below.

1. Enable recent files in the folders option

  1. Press the Windows + E key to open File Explorer.
  2. By default, you should be on the Quick access page, right-click and select Properties.
  3. Click on the General window, locate the Privacy tab, then check the box for the Show recently used files in the Quick Access option.
  4. Click the Apply button and OK to save the changes.

Enabling the recent files will allow you to access them from the Quick Access menu.

2. Enable Jump List from File Explorer

  1. Press Windows + R key to open the Run window, type ms-settings: into the search bar, and click OK to prompt the Settings app.
  2. Go to the Personalization tab, then click on the Start option in the right pane of the page.
  3. Toggle on the switch to Show recently opened items in Start, Jump List, and File Explorer.

Open a new file and see if it appears on Quick Access.

These steps will allow the recently opened items on your PC to appear in the Start menu, Jump list, and File Explorer.

3. Clear File Explorer history

  1. Launch File Explorer by pressing the Windows + E keys.
  2. Select the three dots at the top and click on Options.
  3. Click the General tab and locate Privacy. Under it, click the Clear button.
  4. Click Apply and OK to save the changes.

4. Update Windows

  1. Click on the Start button and select Settings from the drop-down.
  2. Choose the Windows Update option and press Check for updates. If there are any updates available, Windows will search for and install them.

Updating your OS can fix bugs affecting your PC and causing the Quick Access recent files not to show.

If you encounter issues with the Windows update, check our guide on how to fix Windows updates & security issues on your PC.

5. Restore folder options to default

  1. Launch File Explorer on your PC.
  2. Right-click on Quick Access, select three dots options from the top, and click on Options.
  3. Select the View tab, click the Restore Defaults button, click OK to save the changes, and reset the Folder options to default.

This will restore the default configuration for folder options in Quick Access. It can fix the recent files not showing. Read this guide on how to fix File Explorer not opening on your PC.

We hope this article helps you fix the Quick Access not showing recent files. For Office apps like Word not showing recent documents, check out our quick guide on how to restore them. Alternatively, users can check how to fix Windows’s most common File Explorer issues.

Do not hesitate to use the comments section for further questions and suggestions.

How to Turn Off the Hard Disk in Power Options

Recently, some users have reportedly made inquiries as to know what it means to turn off the hard disk in Windows power.

Getting familiar with what the option brings to bear the fact that an opportunity in Windows 11 enables the user to turn off hard disk drives for a specified period.

What does turning off the hard disk mean?

Turning off the hard disk is a part of power management options that enable users to conserve their system’s energy.

Depending on the selected power plan, the user can decide to enable or disable it out of the box. For instance, it can be enabled in the Balanced and Power Saver power profiles and disabled in the Performance power plan.

Moreover, when enabled, your hard disk drive will be turned off after your PC is idle during the specified period. Turning off the hard disk is similar to enabling the Sleep Mode in a system.

Although, when next your software accesses the drive, it will take a few seconds before the drive starts spinning and give access to files.

How do I turn off the hard disk in Windows power options?

1. Use Control Panel

  1. Click the Start button and type Control Panel and launch it.
  2. Change the View by from Category to Small icons and open Windows 11 Power Options.
  3. Click on Change plan settings.
  4. Choose Change advanced power settings to access the disable hard drive feature.
  5. To access the Turn off hard disk after setting if it’s greyed out, click on Change settings that are currently unavailable.
  6. Edit the Turn off hard disk time for the On battery field and also for the Plugged in field.
  7. Once done, press Apply and OK to save the changes and exit.

This should be an easy way to turn off hard disk in Windows power options. However, you can also learn how to tweak other system settings in Control Panel.

2. Use Command Prompt

  1. Press the Windows key, input the cmd in the search space, and select Run as administrator.
  2. Type the following command in the space and press Enter: powercfg -change -disk-timeout-dc 0
  3. Replace 0 with the number of minutes you want your hard disk to turn off after idle for the On battery option.
  4. Next, run the below command in the space and press Enter: powercfg -change -disk-timeout-ac 0
  5. Now, replace 0 with the number of minutes you want your hard disk to turn off after idle on the Plugged in option.
  6. Restart your PC for all the changes to take effect.

Make sure not to set the idle period to a few minutes. It can wear out your HDD and trash its head.

For users who can’t access Command Prompt as administrator, you should check this guide for a quick fix.

Many of our readers asked: Does turning off the hard disk affect SSDs? No, it doesn’t, since it has no moving parts, unlike the HDD.

For users willing to know how safe it is to turn off a hard disk on HDD, it is recommended to keep the disk spinning than to make it stop and start all the time. This will help prevent HDD wear out.

Further, you can learn how to fix any Windows 11 disk error by following the solutions provided in this guide.

If you have further questions or suggestions, do not hesitate to use the comments below.

5 Ways to Fix Netflix when It’s Not Autoplaying Your Videos

Just like the browser not supported error, Netflix not autoplaying videos is also a far too common error.

Why is Netflix not autoplaying your next episode? What can you do to restore normalcy? This article has answers to all your questions.

Why is Netflix not autoplaying my videos?

Some of the things that can go wrong and cause Netflix not to autoplay your videos include:

  • Device incompatibility:– Netflix does not support some devices. You may be experiencing this problem because your device is not compatible with Netflix.
  • Poor internet connection – Bad internet connection or mobile data usage can cause the issue.
  • Out-of-date Netflix app – Not using the latest version of the app can be a reason for autoplay not to work.
  • Apps and browser cache – Heavy web browser caches and apps cache can cause Netflix to malfunction.
  • Autoplay disabled – If autoplay is not enabled on your Netflix account, your videos will not play automatically.
  • Bugs on Netflix – Occasionally, the streaming platform gets hit by bugs. So this and other Netflix streaming error might be due to bugs.

Now that you know some of the reasons why Netflix is not autoplaying let’s see what you can do to fix it.

What can I do if Netflix isn’t autoplaying my videos?

Before you proceed to the major fixes in this guide, try some of these simple solutions, as they could be all you need to solve Netflix autoplaying problem on your device:

  • By default, Netflix does not allow autoplay videos via mobile networks. The way out is either to use a VPN to stream on Netlfix or connect through Wi-Fi network.
  • Whether you are using a smartphone, PC, or Smart TV, switching your device off and back on can fix most of Netflix’s issues on Windows and other devices.
  • Some devices don’t support autoplay when connected to smart TV with cables. Unplug cables, turn off your devices for a minute, and see if it works. 
  • Go through the Netflix compatible devices list to check that your device isn’t on the list of unsupported devices. If it is, switching to a compatible device is your solution.

If these basic actions don’t solve it for you, you can move on to the following fixes to make Netflix autoplaying work again.

1. Enable autoplay on all devices

1.1. On Android, iPhone, and iPad

  1. Open the Netflix app on your device and tap the Profile icon at the top right.
    Netflix users profile
  2. Choose the profile you want to edit and click Manage Profiles.
    Manage netflix profile
  3. On the next screen, toggle on the switch next to Autoplay next episode.
    toggle on Netflix autoplay

1.2. On all other devices

  1. Log in to your Netflix account on a browser, click the Profile icon in the upper right corner of your screen, and select Account from the drop-down menu.Netflix account settings
  2. Go to PROFILES & PARENTAL CONTROLS and click to expand.
    open profile and parental control
  3. Locate Playback settings and click Change.
    Change playback settings
  4. Check the box next to Autoplay next episode in a series on all devices and click the Save button.
    Enable episode autoplay

2. Clear browsing cache

2.1. On Chrome Browser 

  1. Click the three-dotted icon at the top-right of your browser and choose Settings from the options.
    chrome browser settings
  2. Go to Privacy and security and select on Clear browsing data.
    Browser privacy and security
  3. Switch to the Advanced tab, check the boxes for Browsing history, Cookies and other site data, and Cached images and files, then click on Clear data.
    Clear browsing cache
  4. Sign in again to see if Netflix now autoplay.

The solution above is for the Chrome browser but the procedure is similar on all major browsers.

You may also clear the browsing cache directly from Windows. Here’s a comprehensive guide you can follow to clear the cache on Windows 11.

2.2. On Android devices

  1. Open Settings on your phone and scroll down to select Apps.
    Android app settings  
  2. Locate Neftlix app from the list, tap to open, and select Storage.
    Netflix storage
  3. Next, click on CLEAR CACHE.
    clear netflix app cache

3. Sign out of all devices

  1. Open Netflix and click on your Profile image.
    netflix phone profile
  2. Click on Account. 
    Open your netflix account
  3. Select Sign Out of all devices under the settings section.
    Sign out of all devices
  4. Confirm by clicking the Sign Out button.
    Confirm sign out

Once this is done, you may try logging in with the device of your choice and see if the problem has been solved.

4. Update the Netflix app

  1. Open the Google Play Store app and click on your Profile.
    Google profile
  2. Select Manage apps and device.
    manage app
  3. Switch to the Manage tab and select Update available.
    Uppdate NEtflix
  4. Locate Netflix on the list and tap Update. If you don’t see Netflix on the list, it means your app is up to date.

5. Reboot your router

  1. Switched off and unplug your router.
  2. Wait for at least 30 seconds to ensure it’s completely offline.
  3. Plug in the router back and wait for another 30 seconds to allow the full boot.
  4. Now connect your device and open Netflix to see if the autoplay feature is working.

Hopefully, the above solutions will put an end to Netflix not autoplaying your videos. However, there are other Netflix errors you may encounter.

One of them is when Netflix is unable to process your request. You can solve it by going through the guide.

Are you able to solve the problem with the solutions in this post? Drop us a comment about your experience.

5 Ways to Fix High Ping & Lag in New World [Latency Issues]

Games like New World needs can run into issues on your PC for several reasons. The New World’s high ping is one of the issues users complain about when playing the game on their computers. It causes latency and stuttering in the game.

Hence, it is essential to understand how to lower ping when playing games on your PC.

Why is there so much lag in New World?

A slow network connection will prolong the communication time between your device and New World’s online server.

However, other factors can cause lags and stuttering in the New World. Some are:

  • Low bandwidth available for the game: Having many programs running on your PC makes it difficult for your games to get enough bandwidth.
  • Outdated drivers on your PC: You can experience lags in the New World game due to outdated drivers. Drivers like the network driver need to be updated to handle the network properties on your PC.
  • Issues with the game requirements: Playing games like New World on a computer that doesn’t meet the system requirements will prompt problems.
  • Issues with the router: if your network router is not working as it should, it’ll result in slow network connection speed, resulting in a lag in your game.

How do I fix high ping in New World?

The high ping issue in New World can be resolved by troubleshooting your device. Nonetheless, we recommend you observe the preliminary check below before proceeding:

  • Ensure you connect to a stable and fast network connection.
  • Power cycle your network router.
  • Close other programs that are running on your computer.

The above check should reduce the ping on New World. If you’re not able to fix the issue, proceed with the fixes below:

1. End process for apps using more bandwidth on your PC

  1. Press Windows + R keys simultaneously to prompt the Run window, type resmon in the search space, and press Enter to open the Resource Monitor.
  2. Click the Network option in the Resource Monitor window.
  3. Navigate to the Total volume to check the programs using most of your network resources.
  4. Right-click on the program with much bandwidth usage, then select the End Process option from the function menu.
  5. Choose End Process to confirm the action and restart your PC to sync the changes.

Making available as much bandwidth as you can increase bandwidth on Windows 11 for New World on your PC.

2. Update your network drivers

  1. Right-click the Start button, and select Device Manager.
  2. Expand Network adapters and right-click the driver, and select Update driver.
  3. Choose Search automatically for drivers and wait for the driver to update.

Updating your network drivers improves your connection speed and helps your PC connect faster with network servers.

3. Check your network connection

The router can run into several errors, affecting its network connections. So, checking if your network connection is fast and working correctly can help fix high ping in New World.

Alternatively, switch to another network connection and see if the high ping issue persists in the game. It’ll fix the issues with New World being disconnected from the server.

4. Allow the New World game client through Windows Firewall

  1. Press the Windows key, search for Windows Security, and launch it.
  2. Click the Virus & threat protection option.
  3. Scroll down and click on Manage ransomware protection.
  4. Click the Allow an app through the Controlled folder access option.
  5. Then click the + Add an allowed app button and Browse all apps.
  6. Go to New World’s installation folder, select the executable file and click Open.
  7. Close the Settings app and restart your device.

The Windows Defender Firewall can take much time to process network traffic through the app, so allowing it to get past it will make it faster.

5. Reboot the computer in Safe Mode

  1. Left-click the Start button, select the power button, and hold the shift key + Restart to open the Advanced Recovery Options.
  2. Click on Troubleshoot and select the Advanced options.
  3. Click on Startup Settings.
  4. Press 4 to Enable Safe Mode.

Windows 11 will restart in Safe Mode and fix startup errors causing high ping and latency when playing your game.

Nevertheless, fixing network congestion on your PC will help with high ping, lag, and stuttering in games. Also, you can read about how to use NordVPN to reduce ping on your device.

Let us know which solution worked for you in the comments area below.

4 Best Portable Browsers with Built-in VPN

Portable apps come in handy when you don’t want to install them on your hard drive or want to use them momentarily. For example, there are a bunch of portable web browsers that you can use directly from your USB flash drive without the need to install them.

If you are looking for a mobile web browser with a built-in VPN feature, this guide is for you. Here, we will list some of the best portable VPN browsers you can install and add an extra layer of privacy to your browsing.

What are the benefits of using a portable VPN browser?

Before you check out the list, here are some benefits of using a portable VPN browser.

  • Carry it on your USB – Portable means you do not need to install them separately on your PC; they can be carried on a USB flash drive.
  • Protect your online activity – VPN hides your IP address and re-routes them to a different location, making you anonymous on the internet.
  • Access blocked content – With VPN enabled, you will be able to access geo-restricted content.
  • Safe for remote work – VPNs are also helpful to help you establish a safe connection for remote work.
  • Avoid bandwidth throttling – It Lets you escape data throttling.
  • Targeted ads are blocked – Using a browser with VPN makes sure that ads are not following your online activity, reducing targeted ads.

Let us now check out the list of some of the best portable VPN browsers you can get for your Windows PC.

What are the best portable VPN browsers?

Opera – Enjoy all features in the portable version

You are reading it right. One of the best web browsers, Opera, has an official portable version with a built-in VPN.

Are there any limitations in using a portable version of Opera than the full version? Absolutely no! You get to enjoy all the features, like the full version.

These features include a free VPN, access to social media apps such as Twitter, Instagram, WhatsApp, etc., on the sidebar, the option to search in tabs, an ad-blocker, a snapshot tool, a unit converter, battery saver mode, and much more.

Some valuable features of the Opera browser:

  • Built-in free unlimited VPN
  • Built-in adblocker
  • Social media apps on the sidebar
  • Battery saver mode

Opera

Excellent browser option with built-in VPN that doesn’t store any of your personal information or activity.

Tor – Offers great customization.

Tor has emerged as one of the most privacy-focused browsers available for multiple platforms. The best part is that you can install it on your removable media.

It comes with a built-in VPN (of course) but also offers many other privacy features that will make your browsing more secure and private than ever.

It blocks trackers, Tor prevents your online activity from monitoring, offers multi-layered encryption, encrypts all your traffic, etc.

To install Tor browser portable version, after you have downloaded the EXE file, during the installation process, select your removable media when asked where to install the Tor browser.

Some of the highlights of the Tor browser are:

  • Automatic data encryption
  • Built-in VPN
  • Ad-blocker
  • Dark mode
  • Cross-platform availability

⇒ Get Tor

Aloha Browser – Offers solid encryption with VPN

Aloha browser is a brilliant browser for mobile phones. However, a PC version is also available that offers solid encryption and comes with a built-in VPN.

It offers an unlimited VPN facility, ad-blocking features, inbuilt video player to play videos directly without the need to install a video player.

The best part about this is that it is pretty easy to set up. All you need to do is grab the EXE files from the official website, place it in your USB flash drive, double-click on them, and boom! It will get installed.

Some of the best features of the Aloha browser are:

  • Offers unlimited VPN
  • Fast internet browsing
  • Ad-blocker
  • In-built media player

⇒ Get Aloha

Maxthon – Full-fledged features with VPN

You may not find many people using the Maxthon browser, but it is a browser that packs in many features.

There is an official portable version of the Maxthon browser, which you can download, place in your USB flash drive and start using.

Apart from the bunch of features on offer, such as night mode for night browsing, a snapshot tool for better screenshots, mouse gesture shortcuts, etc., it also features an in-built VPN that is unlimited and available for free.

Here are some of the notable features of the Maxthon browser:

  • Built-in VPN
  • Advanced screenshot tool
  • Mouse gesture shortcuts
  • Support for Chrome extensions
  • A rich collection of themes
  • Available across multiple platforms

⇒ Get Maxthon

That is the complete list of some of the best portable VPN browsers you can use without needing to install them.

Does Firefox have a built-in VPN?

No, Firefox does not have a built-in VPN, as is the case with most popular browsers except Opera.

Firefox users must rely on third-party VPNs or an extension available on the Add-Ons store. If you plan on using one with Firefox, check our created list of the best VPN extensions for Firefox.

Is Opera VPN untraceable?

Opera is one of the few popular and user-friendly browsers offering a free built-in VPN tool. But, for a long, users have been wondering whether the Opera VPN is effective and untraceable.

Opera relies on 265-bit encryption, the industry standard, to encrypt the traffic and create a secure tunnel. So, the Opera VPN is relatively stable, reliable, and safe, but it is certainly no match to some paid options. You can read our detailed analyses of Opera VPN.

In case you don’t have an issue installing a web browser and are looking for the best ones you can use on your Windows PC, we have a list prepped up for you, including browsers tested for speed and security.

Also, if you are searching for a VPN, don’t worry; we have got you covered. You can check out our guide, which lists our recommended list of the best VPNs you can install and protect your online activity.

How to Run a Steam Game in Compatibility Mode [Quick Setup]

Steam has lots of features that help players get the utmost gaming experience. The compatibility mode is one of these features of Steam, but users don’t know how to run a steam game in compatibility mode. However, it is an effective solution for Steam games not launching on Windows 11.

Is it OK to run Steam games in compatibility mode?

Running Steam in compatibility mode is one of the most controversial arguments in the gaming world. Some say it is not recommended, while others argue it is an excellent feature. Regardless, we’ll show you what you need to know about it.

Steam compatibility mode in Windows 11 allows users to play old games created for the previous versions of Windows on the current one.

Furthermore, it runs the program on a recent Windows using the settings from an earlier version of Windows. Some notable benefits of running Steam in compatibility mode are:

  • It serves as a means of backdating your system settings to access games not made for the current version you have.
  • It helps users fix errors. The installed version of the OS can’t run your game error can be fixed by running it in compatibility mode. It initiates the settings from an earlier version of Windows OS.

However, there are some issues with running Steam in compatibility mode.

  •  It can affect the game’s performance by forcing it to use an emulation layer.
  • Some users complain about game crashes or malfunctions after running it in compatibility mode.

Factors such as outdated Windows OS, and issues with the Steam client, can be responsible for problems you encounter with running Steam in compatibility mode.

Nevertheless, you can run Steam in compatibility mode without experiencing problems with your apps. So, this article will guide you through how to successfully Steam games in compatibility mode on Windows 11.

How do I run Steam games in compatibility mode on Windows 11?

Tweaking your settings to run Steam games in compatibility mode on Windows 11 can be tricky. So, we recommend you go through the following preliminary check before attempting any changes:

  • Disconnect your PC from any remote connection.
  • Ensure the game client you want to run in compatibility mode doesn’t have any background activities.
  • Temporarily disable Windows Defender Firewall on your computer.

After observing the checks, go on with the steps below.

  1. Left-click the Start button, input Steam in the search box, and select the Steam client from the search results.
  2. Go to the Steam Library at the top of the screen and locate the game you want to run in compatibility mode.
  3. Right-click the game title and select Properties from the drop-down.
  4. Navigate to the Local Files tab, and click the Browse Local Files option.
  5. Find the game’s executable file, right-click it, then select Properties from the drop-down.
  6. Navigate to the Compatibility tab and check the box for Run this program in compatibility mode, then choose the operating system.
  7. Click OK to save the changes, then Apply.

When you run the Steam game in compatibility mode, it will bypass the version barriers and launch successfully.

In conclusion, you can read our guide on how to fix Steam games not launching on Windows.

Likewise, experiencing game lag or slow running on Steam seems to be a common problem for our readers. So, check our guide for easy fixes for it.

If you have more questions and suggestions, kindly leave them in the comments section.

LibreOffice Won’t Open in Windows 10: How to Get It to Work

Some users are reporting that LibreOffice won’t open on Windows 10, no matter how many times they try. This can be troublesome for individuals who depend on the application as a free Microsoft Office alternative.

If you’re experiencing the same problem, don’t worry, we have you covered. This article shares with you 4 effective solutions to troubleshoot the issue in no time.

Why LibreOffice won’t open in Windows 10?

LibreOffice won’t open in Windows 10 due to one of the following reasons:

  • The application software isn’t up to date – Ensure that you’re using the latest version of LibreOffice. Sometimes bugs and glitches are fixed in newer releases.
  • Duplicate processes running in the background – If you have multiple processes running in the background, it can cause your LibreOffice app to crash or freeze.
  • Hardware acceleration – The feature can help make the API run smoother; however, if not configured correctly, it may cause issues.

Let’s take a look at how to fix the issue after we’ve identified the causes.

What can I do if LibreOffice won’t open in Windows 10?

Before moving on to more complex solutions, try these basic fixes to solve the LibreOffice won’t open on Windows 10 problem:

  • Make sure you have a reliable internet connection to avoid any app malfunctions.
  • If you’re using an older version of the app, try updating to the latest version.
  • Check that your system meets the minimum requirements for LibreOffice.

If the basic steps listed above can’t fix your issue, try the following methods.

1. Open LibreOffice via Run Command

  1. Press the Windows key + R on your keyboard to open the Run Dialog window.
  2. In the Run box, type or copy-paste the following command and hit Enter: %ProgramFiles%\LibreOffice\program\soffice

If you follow the steps correctly, the LibreOffice software should open on your Windows 10 PC. However, if it doesn’t, there are other solutions you can try.

2. Reinstall LibreOffice

  1. Press the Windows + R key combination to open the Run Box.
  2. In the Run box, type or copy-paste the following and hit Enter: appwiz.cpl
  3. Double-click the LibreOffice software and select the Uninstall option. Once this is done, restart your computer.
  4. After restarting your PC, you need to visit the LibreOffice website to reinstall the software.

3. Launch LibreOffice in Safe Mode and Disable Hardware acceleration

  1. Press the Windows key + R on your keyboard to open the Run window.
  2. In the Run window, type or copy-paste the following and hit Enter: CMD
  3. Now, in the Command Prompt Window that opens, type or copy-paste the following and hit Enter: start soffice.exe --safe-mode
  4. Shift the button to Configure.
  5. Then, check the box associated with Disable hardware acceleration.
  6. After that, click on Apply Changes and Restart your PC.

4. Delete duplicate processes running in the background

  1. Press the Windows key + X on your keyboard and select the Task Manager option from the Power Task Menu.
  2. In the Task Manager window, locate any LibreOffice tasks running in the background and right-click them.
  3. From the pop-up menu that appears, select End Task.
  4. Restart your computer and you should now be able to fix the issue and open LibreOffice successfully.

If these fixes don’t solve your issue, you can look for another Microsoft Office Alternative for Windows 10. Alternatively, if you are wondering how to download LibreOffice for Windows 11, our guide will help you through the process.

Thank you for reading this post. If you have any feedback or would like to share which of the methods worked for you, please leave a comment in the section below.

Fix: Activation by Phone is Not Available on Your Windows PC

Some users encounter the Windows Activation by phone not available problem when verifying how genuine their copy of Windows is.

Also, error messages such as We can’t activate your copy of Windows are liable to appear when trying to activate Windows 11.

Why is my Windows Activation status not available?

Checking Windows Activation status can result in errors saying it is unavailable. The main reason for this is that the Software Protection service (sppsvc.exe) is disabled or not running as it should.

Furthermore, other factors that can cause the issue are:

  • Interference from third-party antivirus software or Windows Defender Firewall – It is common for users to encounter Windows Activation errors due to the activities of security software on their computers. They can impede the activation process and result in a series of problems.
  • Content of the Software Distribution folder – Windows Activation process can result in an error if the content of the Software Distribution folder is faulty or corrupt. Take a look at this guide for the best steps to delete the Software Distribution folder.
  • Motherboard or hardware replacement – When you replace your PC’s motherboard or hardware, it can make the activation status unavailable.
  • Network connection issues – You may encounter issues with the Windows Activation status if your network connection is slow or not stable. It gets you easily disconnected from the servers.

Now that we know what causes this problem, it’s time to find the best way to solve it.

What can I do if activation by phone is not available?

Resolving the activation by phone not available error on Windows 11 is not so hard to do. However, we recommend you go through the following preliminary checks:

Proceed with the troubleshooting steps below if the preliminary checks are not helpful:

1. Run the Windows Activation troubleshooter

  1. Press Windows + I keys to launch the Settings app on your PC.
  2. Click on System and choose Activation on the right pane of the screen.
  3. Check if Windows is already activated. If not, proceed to troubleshoot.
  4. Locate and click on the Troubleshoot option. You will find it right below the activation if your copy is not yet activated.
  5. Wait while the troubleshooter runs, then follow the on-screen prompt to complete the process.

Running the troubleshooter can fix the Windows Activation by phone not available and other issues affecting it.

2. Run the DISM command

  1. Right-click the Start button, type command prompt in the Search box, and select Run as administrator.
  2. Execute the following command and press Enter: DISM.exe/Online/Cleanup-image/Restorehealth
  3. After the command execution, restart your computer and check if the error persists.

When you run the DISM command in the Command Prompt, it’ll fix and restore the Window activation health on your PC.

You can also check other recommended ways to use the DISM command to repair Windows PC in this guide.

3. Reset Windows 11

  1. Press Windows + I keys to open Windows Settings on your PC.
  2. Locate and expand the Recovery option in the System tab.
  3. Press the Reset PC button on the right side of the screen and select the type of factory reset you want to perform.
  4. Click the Next button and click the Reset button.

Resetting Windows 11 can fix the issues affecting Windows Activation, prompting the activation by phone not to be available. Also, you can refer to our article to learn how to factory reset your PC.

Can I permanently activate my Windows for free?

Users can permanently activate Windows for free by following the steps below:

  1. Press Windows + I key to launch the Settings app on your PC.
  2. Click on Activation on the right pane of the screen.
  3. On the activation page, select I don’t have a product key option.
  4. Log in to your Microsoft account. (If your digital license was linked to your Microsoft account, then Windows will be automatically activated)

The steps above let you activate Windows 11 without a product key for free.

However, you can read how to fix We can’t activate your copy of Windows error during the activation process. Click the link above to see how to fix it.

If you have further queries, kindly drop them in the comments section. Also, we welcome suggestions on fixes that have worked for you but are not included in this guide.

10 Display Settings & Tweaks for Better Windows 11 Graphics

Do you have a high-end display and a powerful Windows 11 PC but don’t know how to optimize the display settings to get the best output?

If this is the scenario you are in and you are looking for a guide that would give you the best Windows 11 display settings, then you are in the right place. This guide will provide you with all tweaks and settings you need to make to get the best display output. So let’s get right into it.

How can I get the best display settings on Windows 11?

Before diving into the existing solutions, it is best to check for these elements which might resolve your problem:

  • Make sure you have the best display at your disposal. A great display already enhances the picture quality, and you can get the best output results by performing specific tweaks.
  • Ensure that the PC that you have has a lovely graphic card installed in it. Then, you can look at our guide, which lists some of the best graphics cards you can buy.
  • Finally, ensure you use a high-speed HDMI cable to get the best display performance, low latency, high picture quality, etc.
  1. Press the Win + I buttons to open Settings.
  2. Select Display.
  3. From the Display resolution drop-down, select the recommended option.

You must select the correct resolution as per your display’s resolution. This ensures that everything you see on your display is crisp, sharp, and accurate colors.

For example, a resolution of 800×600 enlarges everything on display, resulting in poor picture quality. On the other hand, a resolution of 1920×1080 gives a better outcome.

To know what maximum resolution your display supports, you can quickly check out the box it came with or go through the manual. You can also hop onto the internet and search for the resolution support over the internet for your display.

2. Tweak the scale and layout

  1. Press the Win + I buttons to open Settings.
  2. Select Display from the right side.
  3. From the Scale drop-down, select the recommended option.

You must select the correct scale to read the text and correctly see apps and other items on your display.

If you have a high-resolution display, you can opt for an increased scale size, i.e., above 100%. While the increased size may not look nice, it improves readability. Moreover, if you have a high-resolution display, everything will look nice; there shouldn’t be anything to worry about.

3. Calibrate the colors

  1. Press the Win + I buttons to open Settings.
  2. In the search field, type Calibrate Display Color and hit Enter.
  3. Click on the Calibrate Display Color option on the right side.
  4. Follow the onscreen steps as the wizard prompts you to set the ideal color settings for your monitor.

Using the Calibrate Display Color wizard, your PC will be set to the best color settings supported by your display.

4. Use Night Light to reduce eye strain

  1. Press the Win + I buttons to open Settings.
  2. Select Display from the right side.
  3. Click on the toggle for a Night light.
  4. Also, when you click on Night light, you can select the strength of the warmer tone that will color on your display.
  5. You can also schedule the Night light by using the Schedule night light toggle.

Do you feel fuzzy, or do your eyes strain when you work for a longer time on your PC? If yes, you can use the Night light settings to apply a warmer tone.

This reduces the blue light that goes directly into your eyes, and you can use the PC for an extended period without irritating your eyes.

5. Turn on HDR for enhanced picture

  1. Press the Win + I buttons to open Settings.
  2. Select Display from the right side.
  3. Click on HDR.
  4. Turn on the toggle for HDR video streaming.
  5. This will help you stream HDR videos whenever available.

Do note that not all displays would support this feature. So, make sure that your collection supports HDR before turning on this feature.

HDR will enable an enhanced video viewing experience, as it details the bright and dark parts of the video to provide you with a true-to-life picture.

6. Tune the text

  1. Open the Start menu by pressing the Windows key.
  2. Type Adjust ClearType text and open it.
  3. Click on Next.
  4. A window will show you the five best options for text. You need to select the best one as per your liking.
  5. Follow the onscreen prompts.
  6. Once done, hit the Finish button.

Tuning the text, as shown above, makes sure that you are being displayed the text on the screen in the best possible way or the way that you like.

If you use your PC or laptop for reading or writing content, then this setting or calibration is a good one to ensure that the texts are readable as per your needs.

7. Apply dark mode

  1. Press the Win + I buttons to open Settings.
  2. Select Personalization from the left side.
  3. Click on Colors on the right.
  4. For Choose your mode drop-down, select Dark.
  5. This will enable dark mode on your PC.

The dark mode is the best theme setting you can apply if you want to eliminate the white colors that appear on Windows or apps.

This makes it easy on the eyes and protects your eyes from the bright white light. The dark mode also goes well with the backgrounds and wallpapers.

8. Change screen refresh rate

  1. Press the Win + I buttons to open Settings.
  2. Select Display from the right side.
  3. Select Advanced display.
  4. Select the appropriate refresh rate supported by your display for the Choose a refresh rate drop-down.

Windows 11 supports high refresh rate displays. Also, the best part is that it can dynamically switch content between different refresh rates, i.e., from 60Hz to 120Hz.

If your monitor or display supports a high refresh rate, you can follow the above steps and bump up the screen refresh rate to enjoy buttery smooth content viewing.

9. Adjust the power mode

  1. Press the Win + I buttons to open Settings.
  2. Click on Power and Battery.
  3. Under Power mode, select the Best performance option.
  4. This will ensure that everything at the highest level runs on your PC, including the performance or the display settings.

10. Change the text size

  1. Press the Win + I buttons to open Settings.
  2. Select Accessibility.
  3. Click on Text size.
  4. Use the Text size slider to adjust the size of the font.
  5. Click the Apply button.

Adjusting the text size ensures that the text appearing on your display is appropriate and readable.

Apart from all these settings, you should also ensure that you keep the display driver up to date. You can do that from the Device Manager. But that requires some steps to follow.

An alternative is using an automated tool called Outbyte Driver Updater. Using Outbyte Driver Updater will ensure that the display driver and all other outdated drivers on your PC are up to date.

You must launch the app, scan for outdated drivers, and hit the update button. It is far more efficient and time-saving than the manual method.

Keep Windows up to date as well, ensuring that all the bugs present in the previous versions are resolved and that you are protected with the latest security.

If you are facing screen distortion issues, you can check out our dedicated guide that lists some of the best solutions to resolve the problem.

Also, if there are some other screen problems you are facing and want to resolve, you can check out our guide.

That is it from us in this guide. Let us know in the comments below if you tweaked the settings as mentioned above and if you were able to get the possible output from your display or not.

Windows 11 Reset vs. Clean Install: Which One’s Better for You?

People often get confused when they want to choose between Windows 11 reset vs. clean install. Even though these two things will give you a fresh Windows environment, there are still differences.

This article will help you to understand resetting Windows and clean installation better so that you can decide the best option for you.

Windows 11 reset vs. clean install – What are the key differences?

Windows 11 reset

Windows 11 reset option

From Windows 8, Microsoft has introduced the reset feature. On Windows 11, this feature has gotten more polished. It is like a factory reset of a smartphone. It re-installs Windows 11, but you can keep or erase your files and apps if you want.

You don’t need bootable media to reset Windows 11. There is also no need to configure the partition. In some cases, resetting can be faster than a clean installation. However, sometimes, it may be a long process, depending on various factors.

While resetting, you can choose to keep your personal files or wipe the system drive as well as the entire partition, which is a great benefit. Also, no version changes occur on Windows for a reset.

Users also don’t need to worry about drivers if they do reset. Everything will work well after doing a reset.

Why should I reset Windows 11?

Usually, users do a system reset on Windows 11 due to the following reasons:

  • To get the Windows in the default state
  • To fix common PC problems
  • And to get the PC performance back if it gets slower due to misconfiguration or other things

How can I reset Windows 11?

  1. Press Win + I on the keyboard.
  2. Go to System and click on Recovery.going recovery win11 settings
  3. Click on Reset PC.clicking reset PC win11 settings
  4. Click on Reset now.
  5. Choose how you want to do the reset.
  6. Follow the onscreen steps.

We also have a complete guide on how to factory reset Windows 11. You can check out that for more details.

Windows 11 clean installation

The clean installation gives a clean environment and a fresh Windows experience. However, unlike reset, it doesn’t let you keep your personal files. The clean installation also requires bootable media.

During the installation process, you will get the option to configure your partition. You can choose to keep your files on other drives or erase them if necessary. But, the drive where you will install Windows 11 will be erased, and no personal files will be kept.

You can pick a different version of Windows 11 while creating a bootable media. After doing a clean installation using that media, you will get the same version that you used there, not the old one installed on your PC.

Another thing is you will need to install missing drivers after Windows 11 clean installation. For this, you can use a specialized driver updater, as it can do this job quickly and automatically.

Why should I clean install Windows 11?

In general, users do a clean installation for the following reasons:

How to clean install Windows 11?

  1. Create a bootable USB drive for Windows 11.
  2. Insert the bootable media into your PC’s USB port.
  3. Restart your PC.
  4. When the first light appears on your monitor, keep pressing F8 or any other key, depending on the motherboard you are using.
  5. Choose the bootable media from the boot menu.
  6. Go forward and choose the disk where you want to install Windows 11.choosing-windows-11-installation-drive
  7. Follow the onscreen steps to complete the setup.

We have a complete guide on the above steps with more details. So, we suggest you read how to install Windows 11 properly.

Should I reset or clean install Windows 11?

After looking at these differences mentioned above, you can choose the one that fits you well. If your PC is not working well and you want to keep your personal files and want to fix something, reset is the best option. It will save you from the hassle of driver installations and any reconfiguration.

However, if you want to reconfigure the partition and wish to start from scratch, a clean installation is the ideal choice.

In some cases, you may not be sure of what you should do. In this case, we suggest you reset your Windows 11 first. If it doesn’t solve your difficulties, do a clean installation.

This article explains the differences between Windows 11 reset vs. a clean install. If you have any opinions, let us know in the comments box.

Group Policy Not Syncing Between Domain Controllers [Fix]

Group Policy not syncing between domain controllers is one of the problems users complain about. It indicates that the changes or effects initiated across the domain controllers are not replicating between them.

Also, users complain about not being able to install the Group Policy Management console on Windows.

Why is GPO not syncing between controllers?

Issues with one of the Domain Controllers can cause Group Policy replication issues. Some other notable causes of the Domain Controller not syncing are:

  • Latency or slow File Replication Service issues – Syncing between the Domain Controllers can be problematic if there’s an error with previous syncing processes on a Domain. Each Domain Controller needs to finish any syncing process on it before it can initiate other replication processes.
  • The Distributed File System (DFS) client is disabled – The Windows Group Policy not syncing between Domain Controllers can be due to settings issues. Features like the Distributed File System (DFS) need to be enabled to allow the files created to be synchronized across the Domain Controllers.
  • Network Connectivity to the Domain Controller – Syncing network connectivity issues can impede the files created on one Domain Controller to another.

The cause of Group Policy replication issues can differ on your part. However, the solutions below will help you fix the problem.

How do I force synchronize GPO between Domain Controllers?

Forcing GPO replication between Domain Controllers requires advanced troubleshooting. So, you should go through the following preliminary checks before diving into it:

  • Close and restart the Windows Group Policy.
  • Ensure that you connect to fast and stable network connectivity.
  • Reboot your computer and try syncing the GPO between DCs.

After following the preliminary checks above, and you’re unable to fix the sync problems, proceed with the steps below:

1. Enable the Distributed File System (DFS) in the Server Manager

  1. Press Windows + R keys to open the Run window, type ServerManager in the search box, and press Enter.
  2. Click on Manage and select the Add Roles and Features option to prompt the add roles and features wizard.
  3. Click Next to start the setup.
  4. Tick the Role-based or feature-based installation option, then navigate to the Server selection tab and select a server.
  5. Navigate to Server Roles and go to File and storage services.
  6. Check the box for DFS Namespaces and DFS Replication under File and iSCSI Services. Clicking the Namespaces will prompt another tab asking if you’d like to add features. Click the Add Features button in the prompt.
  7. Click Next twice to confirm features and install them.

Replicate the same steps (except step 6) on the second Domain Controller.

2. Perform a Non-Authoritative Sync of SYSVOL data using the File Replication Service (FRS)

  1. Press Windows + R key to open the Run window, type net stop ntfrs in the search box, and press Enter to stop the File Replication service.
  2. Left-click the Start button, type Regedit in the search box, then press Enter and select Registry Editor from the search results.
  3. Navigate through this path and click Enter: HKLM\CCS\Services\NtFrs\Parameters\Backup\Restore\Process
  4. Double-click the BurFlags directory and set it to a hexadecimal value of D2.
  5. Press Windows + R keys to open the Run window, type net start ntfrs in the search box, and press Enter to restart the File Replication service.
  6. Click Start, search for Windows tools, and launch it.
  7. Then select the Event Viewer.
  8. Go to the Applications and Services Logs to check the File Replication Service event log for informational event 13516. Wait for the event to appear.
  9. When the event 13516 has appeared, open the Run windows and input net share in the search box.
  10. Confirm that the SYSVOL and NETLOGON shares are in the output. The data in both DCs should correspond.

Restart your device to see if the issue is fixed.

3. Fix network connectivity affecting the syncing process of the Domain Controller

  1. Press Windows + R key to open the Run dialog box and input secpol.msc into the search bar and press Enter to launch the Local Security Policy.
  2. Navigate to Security Settings, select Local Policies, and select the User Rights Assignment entry.
  3. Double-click on Access this computer from the network option.
  4. Click the Add User or Group button.
  5. Enter the name and click OK.

Restart your computer and check if you can fix the Group Policy not syncing between Domain Controllers.

You can read about the best HP server for Domain Controllers. You may also be interested in reading how to fix the Group Policy blocking programs on your device.

No less important, you can read about how to fix corrupt Local Group Policy issues on Windows and let us know which solution worked for you.

How to Copy, Paste, and Edit Rich Text in Windows Clipboard

If you want to learn about the Windows Clipboard rich text copy, paste, and edit feature, this article will help you. Clipboard is not a new thing on this OS. On Windows 11, the Clipboard has got significant enhancements, and you can get several advantages because of this.

Rich Text is a type of text that maintains its formatting even when you paste it into another software, particularly word processors. Usually, it keeps formatting information, including paragraphs, blockquote, lists, hyperlinks, etc.

Can I access rich text items from the clipboard history on Windows 11?

Yes, you can easily access history on Windows 11 Clipboard. It will allow you to pick any copied rich text items and paste them anywhere you want.

However, before that, you should enable the history feature. For this, press Windows + V on the keyboard and click on Turn on.

From now, you will be able to access recently copied items by pressing Windows + V on the keyboard.

How can I utilize Windows Clipboard rich texts properly?

Before knowing about the usage of Windows Clipboard for rich texts, please ensure the following things:

If everything seems alright, go through the below procedures.

1. Copy rich texts

  1. Select the rich texts you want to copy.
  2. Press CTRL + C on the keyboard.
  3. Alternatively, you can right-click and choose Copy.copying text windows edge

2. Paste rich text

2.1 Paste in the same device

  1. Put your cursor on where you want to paste.
  2. Press CTRL + V on the keyboard.
  3. Alternatively, you can right-click and choose Paste.ms word paste options

By default, it will paste the last copied item. But you can choose which one should be pasted by access to the Windows Clipboard History. If you need, you also can increase the clipboard history size.

2.1 Paste on another device

  1. Press Win + I on the keyboard to open Settings.
  2. Go to System and then click on Clipboard.going clipboard settings windows 11
  3. Toggle on the button next to Sync across your devices.enabling clipboard sync windows 11
  4. Paste the texts on another device, as shown in method 2.1.

You only can paste on the devices with the same Microsoft account or the devices connected to your PC properly.

For example, you can connect your Android phone to Windows using the PhoneLink app provided by Microsoft. After connecting, you can copy and paste between Android and Windows.

3. Edit rich texts on Windows Clipboard

3.1 Modify text

  1. Paste the rich texts on software that supports it.
  2. Modify it according to your preference.
  3. Copy it again.

Now, you can paste modified items on any supported tools. However, you can consider using Comfort Clipboard Pro.

This tool allows you to edit and delete clipboard items conveniently. Else, it has a lot of helpful features to give you the best experience. You won’t get this awesome experience from the built-in Windows functions.

3.2 Delete copied rich text

  1. Press Win + V to access the clipboard history.
  2. Click on the three vertical dots and click on the Delete button.deleting item windows clipboard history

To copy-paste rich texts on Windows, you won’t need to do any more extra steps. By default, when you paste, Windows maintains the original formatting where possible. To enhance the experience, you also can consider using third-party clipboard managers for Windows.

If you need to paste formatted rich texts as plain texts, you can press CTRL + Shift + V. There may be different keyboard shortcuts for some different software.

Please note that software like Notepad doesn’t support rich texts. If you want to copy or paste such text formats, you must use any online or offline tools like MS Word, Google Docs, etc.

This article has featured the steps to copy, paste and edit the rich text in Windows Clipboard. You can let us know in the comment box if you have any suggestions or opinions.

Windows 11 Storage Doesn’t Add Up: 7 Ways to Fix It

Several users have recently complained about an issue regarding their storage not adding up in Windows 11. To some, it feels like the system’s storage on their hard drive suddenly vanished.

If your Windows storage usage settings is misreporting files by a huge amount, take your time to explore this article to troubleshoot the issue.

Why doesn’t storage space add up?

There is almost no straightforward cause for this. However, you may have hidden files and directories that contain system files unaccounted for in the calculation. Other probable causes are:

  • Too many tiny files stored on disk – Small files take up more space on the disk than the initial size. They occupy the initial size and take a chunk in the file system to save names and properties. Hence, these may be unaccounted for.
  • Unaccounted files in Recycle bin – If you have too many deleted files, they are stored in the Recycle bin. Hence, they are hidden and may cause a disparity in storage space.
  • Content indexing takes up space – Allowing files on the drive to have contents indexed in addition to file properties may create an unaccounted space on your device.
  • Enabled System Restore points – When enabled, it creates new files regularly whenever updates are installed, and this consumes a large chunk of storage space, which may be unaccounted for. This may also cause Windows to be slow after Windows Restore.

Although the causes are not only limited to these, let’s explore the possible ways to troubleshoot the problem.

What can I do if storage space doesn’t add up in Windows 11?

Before proceeding to explore advanced fixes on account used space on the hard drive, you should consider performing the following preliminary checks:

  • Ensure to clear long and overdue files in your Recycle bin.
  • Uninstall all unnecessary applications and remove programs that are not useful to you.
  • Consider clearing out the temporary files on the computer.
  • Delete files in your download folders if they have not been opened for a long period.

Having checked the above and you still have a whooping amount of storage space that doesn’t add up, you can then explore the solutions provided below:

1. Check your System’s Cleanup recommendations

  1. Press Windows + I to open the Settings app.
  2. Select Storage on the right in the System tab.
  3. Next, click on Cleanup recommendations under Storage management.
  4. Select the files you want to delete and click the Cleanup button.

Alternatively, there are other ways you can clear out more spaces by removing other recommended files on Windows.

2. Remove temporary files

  1. Open File Explorer by pressing the Windows + E keys simultaneously.
  2. On the left pane, click on This PC and check the following directory to locate the temporary files folder: C:\Windows\Temp or C:\%userprofile%\AppData\Local\Temp
  3. Select the files in these folders, then press the Shift + Delete keys to delete them permanently.

Alternatively, if you need a more simplified approach to accessing and deleting temporary files in Windows 11 you can check here.

3. Delete hibernation files

  1. Press Windows + R keys to open Run administrator.
  2. Enter the following command in the text field and press Enter: powercfg.exe /hibernate off

Running the above command easily frees up much space on the drive where the operating system is installed. Also, some hibernation files may be corrupt, so it is wise to clear them out.

4. Run System Maintenance Troubleshooter

  1. Press Windows + R keys to open Run, type control, and click OK to open the Control Panel.
  2. Search for troubleshooter and click on Troubleshooting from the search result.
  3. Next, click on System and Security.
  4. Click on System Maintenance to launch the troubleshooter.
  5. Click Next.
  6. The troubleshooter will start detecting the issue and recommend fixes if available.
  7. Apply any fixes, close the Control Panel, then restart your PC and check for any improvements.

The storage problem on Windows 11 should be fixed. Alternatively, you can check out our list of the best PC maintenance software.

5. Uninstall unnecessary software

  1. Press Windows and R keys to open Run, input appwiz.cpl, and click OK to open Program and Features.
  2. Choose the program you want to remove, then click on Uninstall.
  3. Choose the appropriate response to complete the process if prompted.

Alternatively, you can save up more storage space by using one of the best automated uninstaller software available for use by checking here.

A specialized program that we recommend you try using in this situation is CCleaner. It has a software uninstaller feature that allows you to easily uninstall programs or a group of programs with just a single click.

CCleaner

Let CCleaner help you uninstall applications in a more safe and easier way.
Check Price Download now

6. Reconfigure your System Restore settings

  1. Press Windows + R keys to open Run, input sysdm.cpl in the text field, and click OK to open System Properties.
  2. Next, open the System Protection tab and under Protection Settings, click on Configure.
  3. Select the Turn on system protection option.
  4. Next, under the Disk Space Usage section, drag the Max Usage slider to the extreme left.
  5. Then, click OK to save the changes.

This should reduce the gap in the storage on Windows 11 if it’s not adding up due to system restoration files. Also, consider checking here for what to do if the Restore points fail to work.

However, avoid dragging the value to 0 because that would prevent your system from saving previous updates. Hence, you will have no Windows backups to roll back to if you ever need to.

7. Perform a disk cleanup

  1. Press Windows + S keys to open the Start menu, type Disk Cleanup in the text field, and open Disk Cleanup from the list.
  2. Select drive C: or any drive in which your operating system is installed, and click OK.
  3. Check the boxes next to the type of files you want to delete. Click OK to confirm.

You can also select from our list of best tools to delete unnecessary files and free up your storage space.

All the troubleshooting steps provided in this article are a great solution to fixing your Windows 11 storage space issue.

If any fixes have solved your problem, kindly let us know by using the comments below. Alternatively, please do not hesitate to use this section if you have further questions or suggestions.