Laptop Making Clicking Noise: Fix it With These 8 Methods

If your laptop keeps making clicking, you know for sure that something is wrong with your device. This issue can be due to hardware or software problems.

Fortunately, it is pretty easy to fix, as shown in this guide. After that, you only need to follow the instructions, and things should return to normal.

Why is my laptop making a clicking noise?

It can be traced to numerous factors if your laptop is making a clicking noise through the speakers or when you are typing. Below are some of the causes:

  • Issues with the hard drive: If your HP laptop or other products keeps making a clicking noise and then shut down, it might be due to your SSD or HDD drive. In this case, you need to check the disk and ensure it is in perfect condition.
  • Virus infection: Another cause of this issue is the presence of viruses. The quick way around this is to perform a malware scan with one of the best antivirus software.
  • Problems with the audio driver: Some users have reported that the Realtek High Definition Audio driver causes the laptop keeps making noise when plugged in and on battery. To fix this, you need to disable the driver.

How can I fix the laptop’s clicking noises?

1. Disable the audio driver

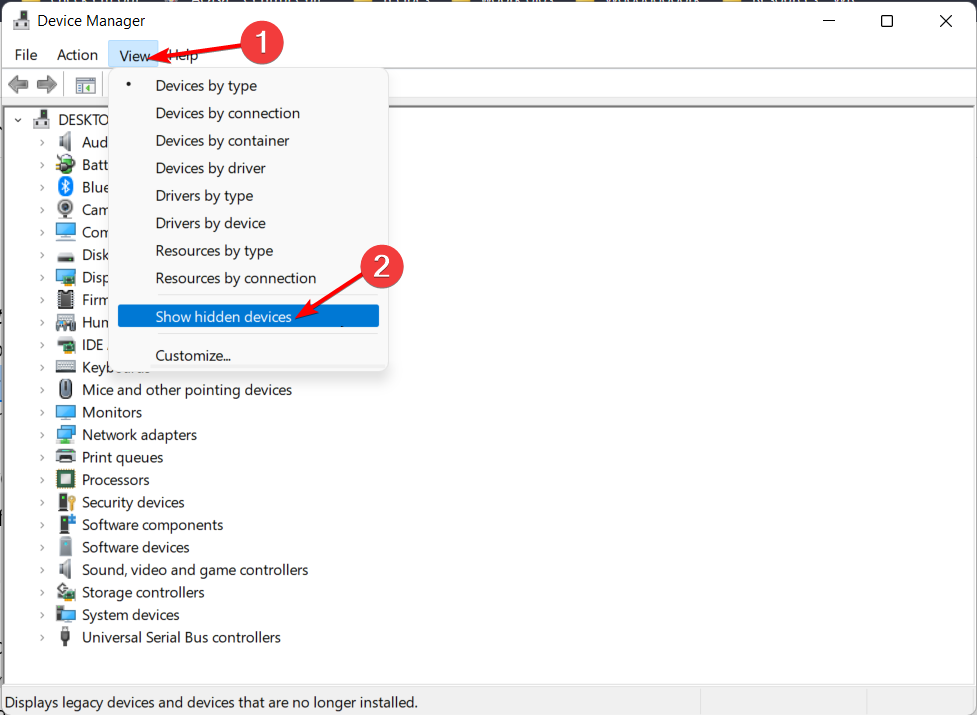
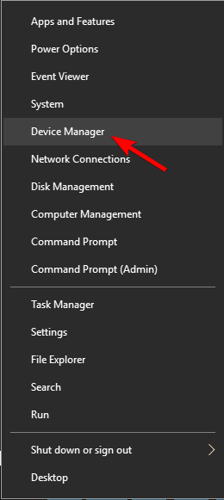
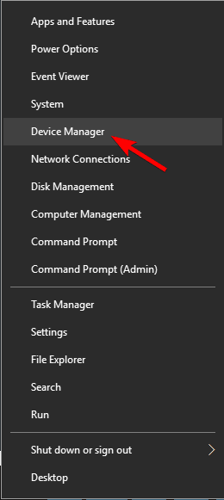
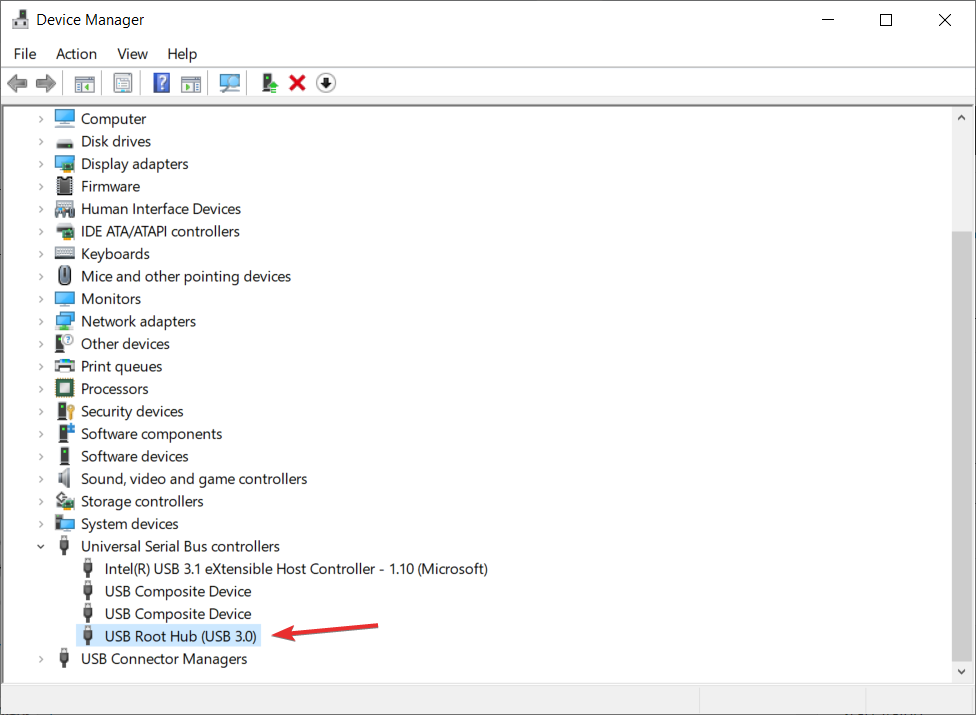
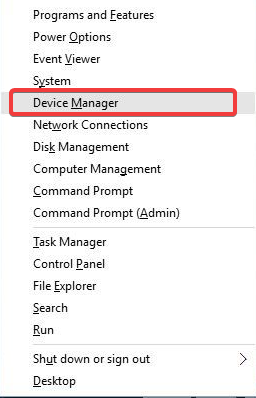
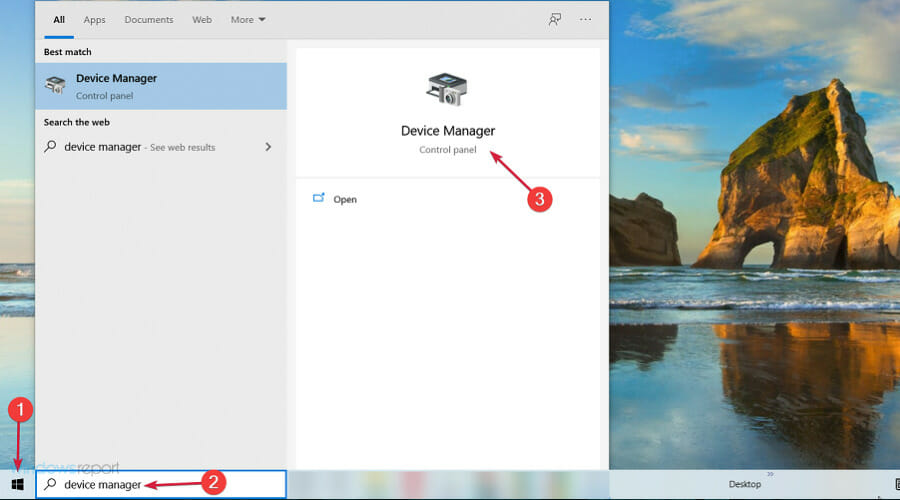
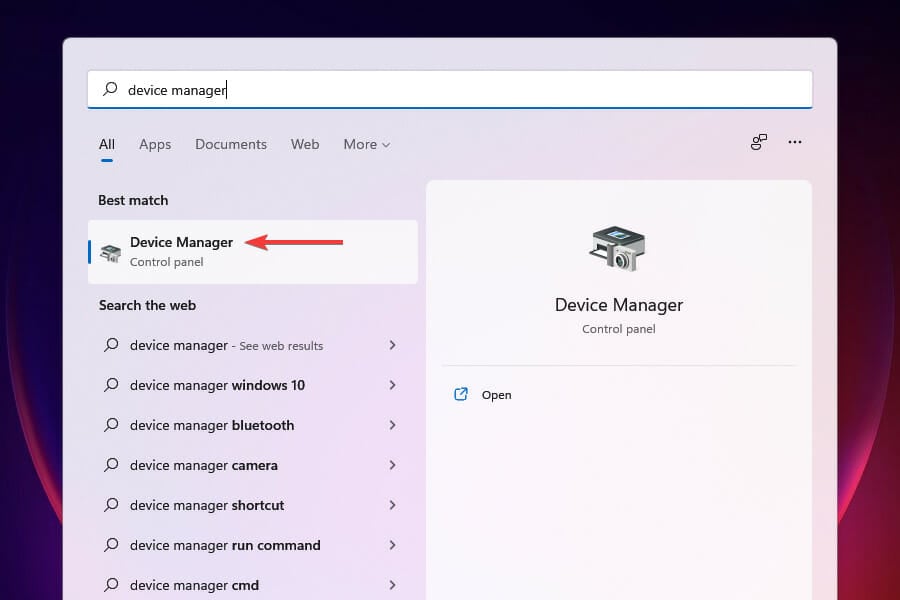
  1. Press the Windows key + X and select Device Manager.
    device manager laptop making clicking noise
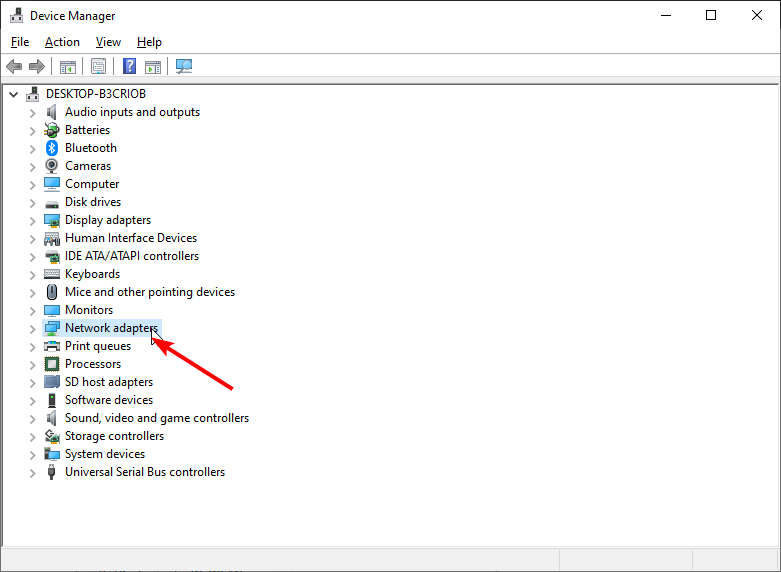
  2. Double-click the Sound, Video, and game controllers option to expand it, and right-click the Realtek High Definition Audio.
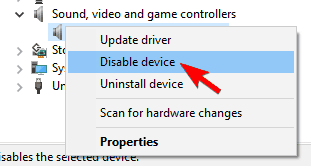
  3. Select the Disable device option.
    disable device laptop making clicking noise

If you don’t have the Realtek High Definition Audio driver, you can still disable your driver and check if it fixes the laptop’s clicking noise issue.

For a safe and fast driver update, we recommend using a tool that automatically finds and updates all outdated drivers on your computer.

2. Scan for malware

  1. Press the Windows key + S, type virus, and select Virus & threat protection.
    virus
  2. Choose Scan options.
    scan options
  3. Select your preferred scan option and click the Scan now button.
    scan now

Making sure your PC is protected from the effects of the malware presence is of utmost importance. If the laptop clicking noise persists, we recommend a Full Scan.

We strongly recommend using antivirus software in ESET NOD32 to optimize your computer by removing all traces of malware and ensuring your PC’s smooth running.

This tool is fast, stays out of the way, and keeps your digital life safe. Additionally, it offers complete protection against viruses, worms, spam, spyware, and other malware.

3. Update the audio driver

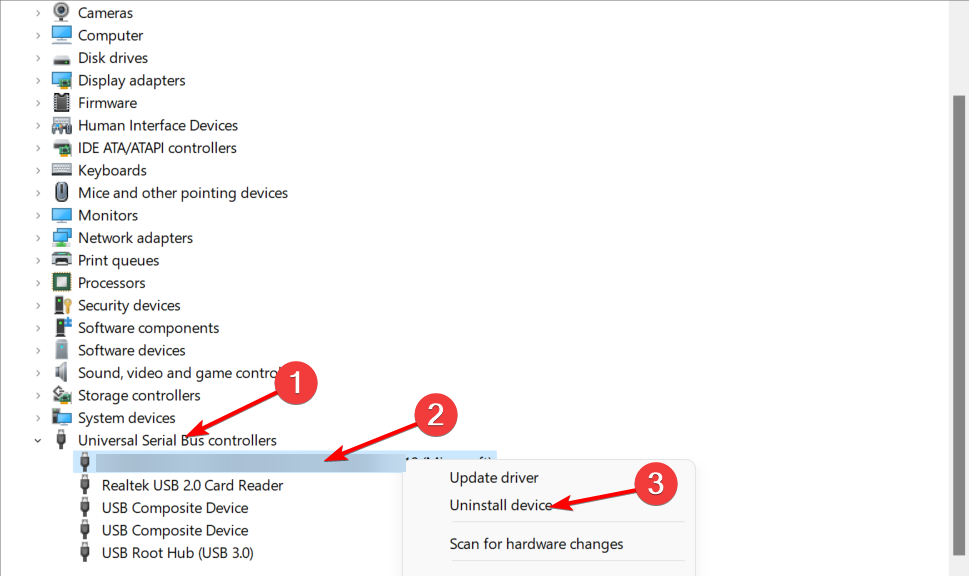
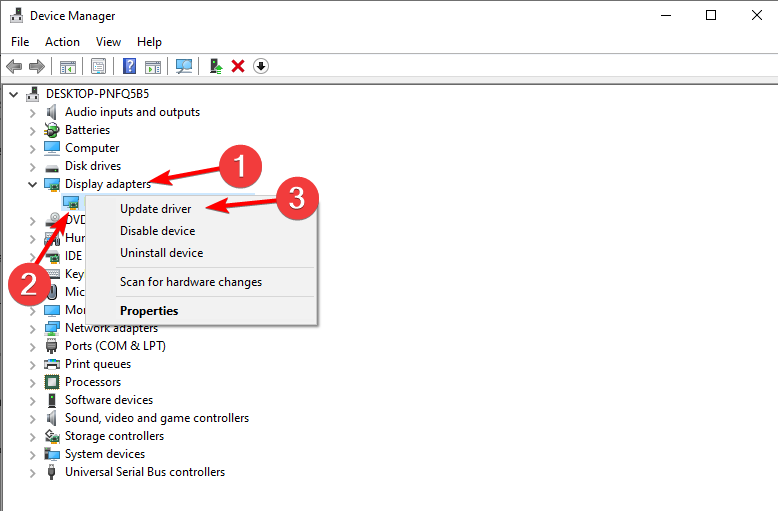
  1. Open the Device Manager, expand the Sound, Video, and game controllers option, and right-click the driver.
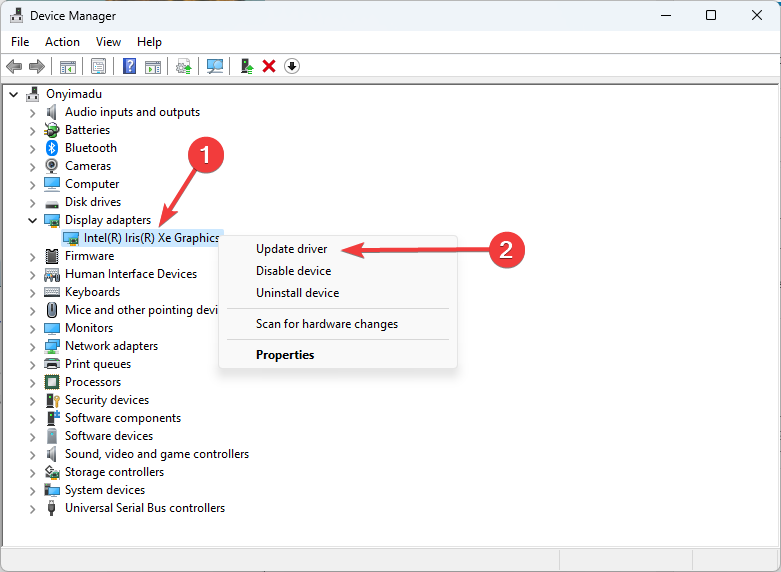
  2. Select the Update driver option.
    update driver
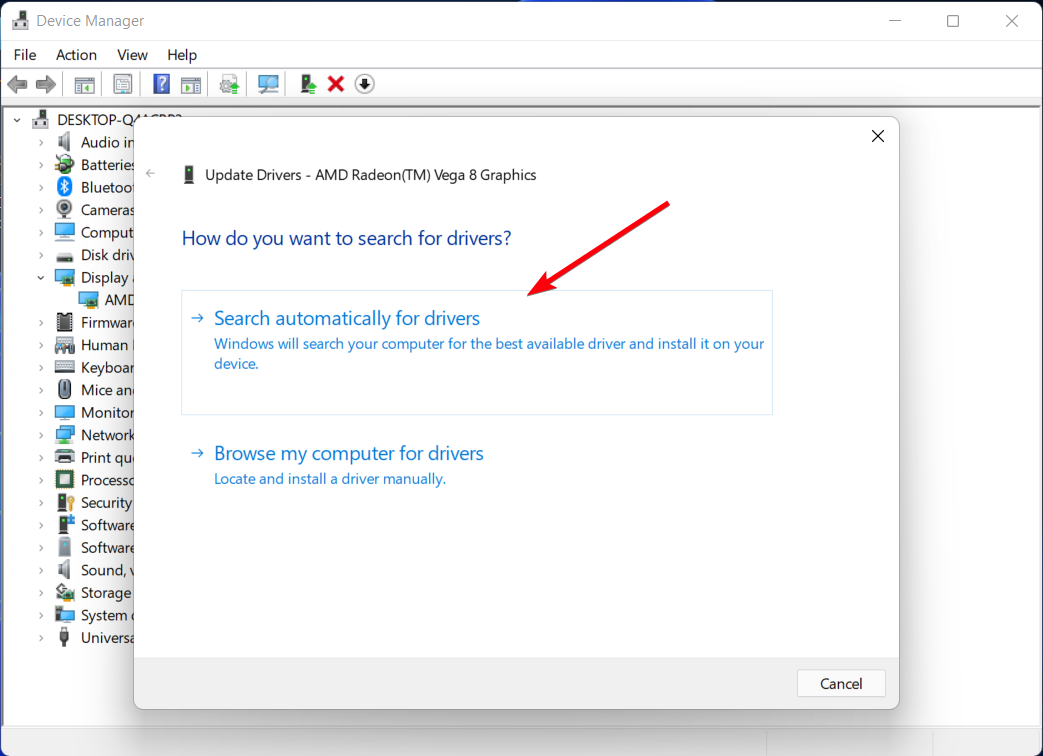
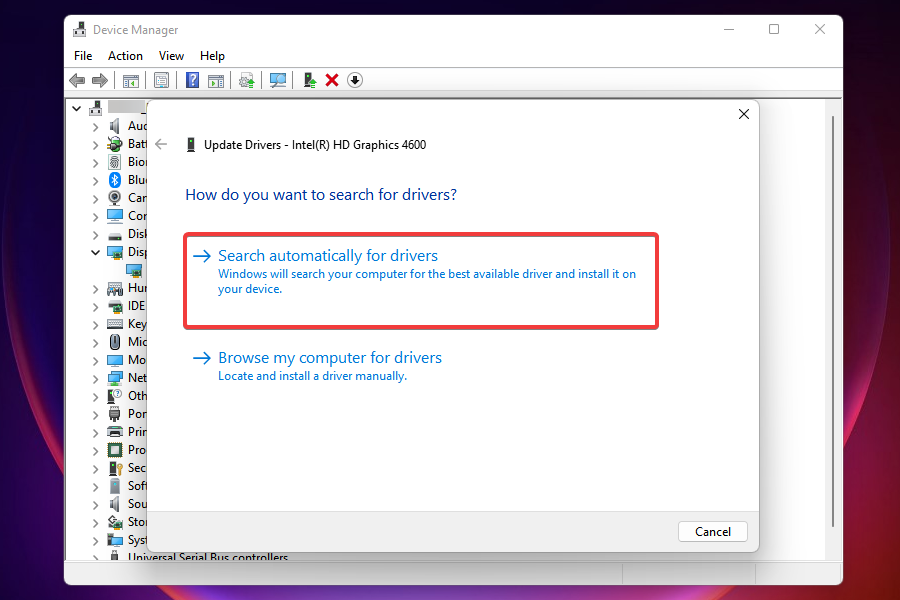
  3. Choose Search automatically for drivers and install any available update.
    search auto laptop making clicking noise

However, other outdated drivers can cause this problem as well. Downloading drivers manually is a process that carries the risk of getting the wrong driver installed, which may lead to severe malfunctions.

Automatic software is the safer and easier way to update drivers on a Windows computer. We strongly recommend using Outbyte Driver Updater to update your drivers to avoid damage to your PC by manually downloading the wrong driver versions.

It scans your system and lists all existing and possibly missing drivers. The tool also detects if there is already a new version for current records. If necessary, these can be updated directly via Outbyte Driver Updater.

It just might be everything you need for your PC to run smoothly.

⇒ Get Outbyte Driver Updater

4. Boot in the Safe mode

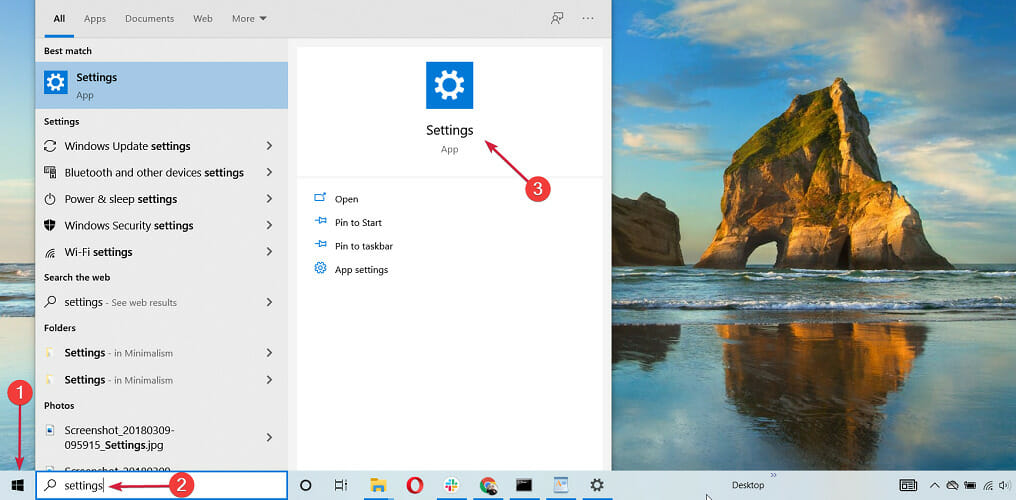
  1. Press the Windows key + I to open the Settings app and select the Update & Security option.
    update and security
  2. Select Recovery in the left pane and click Restart now under Advanced startup.
    restart now
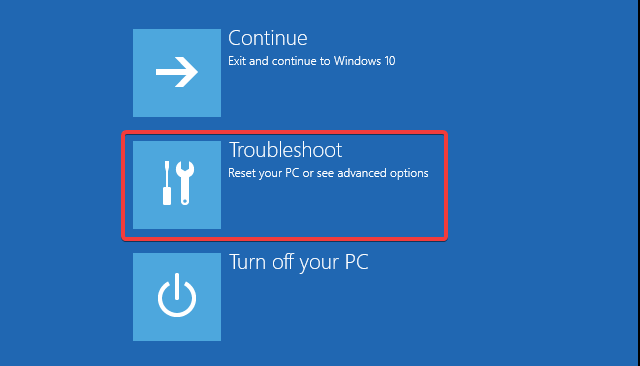
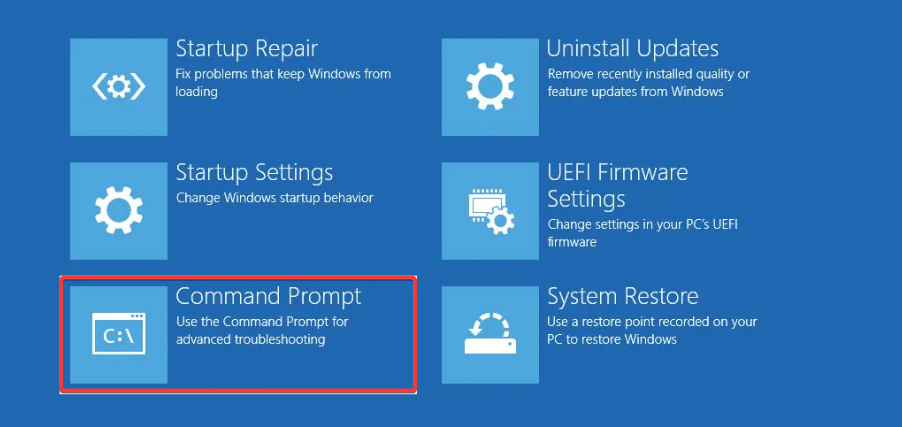
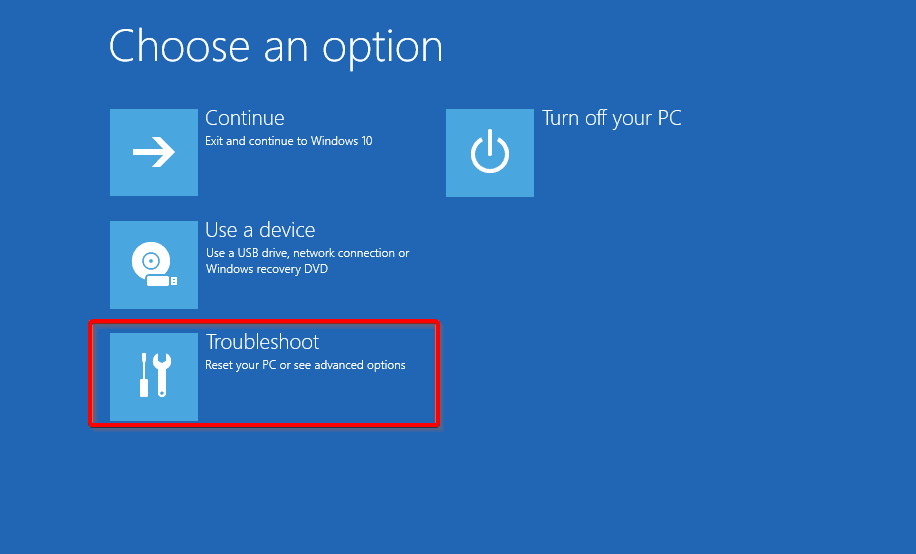
  3. Once your computer restarts, choose Troubleshoot > Advanced options.
    advanced option laptop making clicking noise
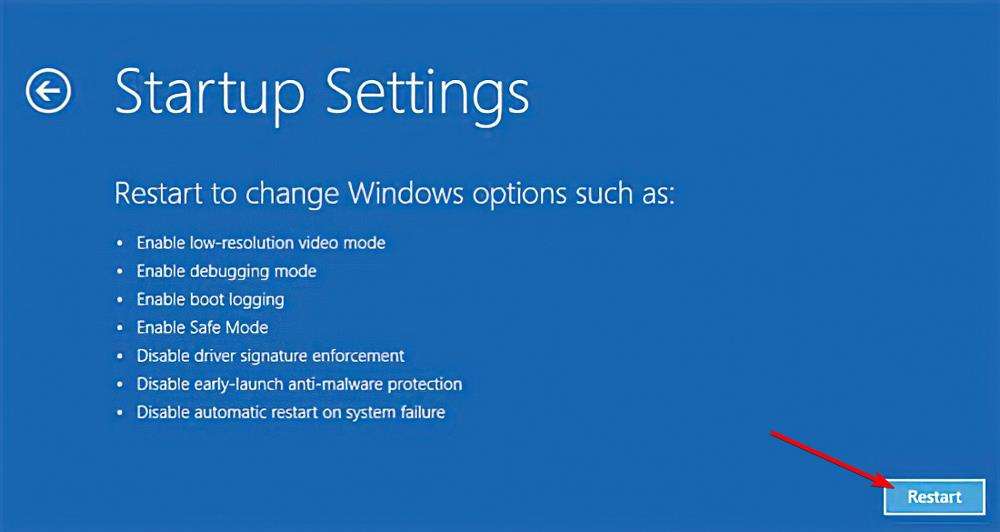
  4. Select the Startup Settings option.
    startup options
  5. From here, click the Restart button.
    restart button
  6. When the PC restarts, press the corresponding key to enable Safe Mode.
    enable safe mode laptop making clicking noise

If the laptop clicking noise persists, check whether it occurs while your computer is in Safe mode. This starts your computer with limited files and drivers, but Windows will still run.

If the laptop clicking noise problem isn’t there while in Safe mode, then your default settings and fundamental drivers are not contributing to the issue.

5. Perform a clean boot

  1. Press the Windows key + R, type msconfig, and click OK.
    msconfig
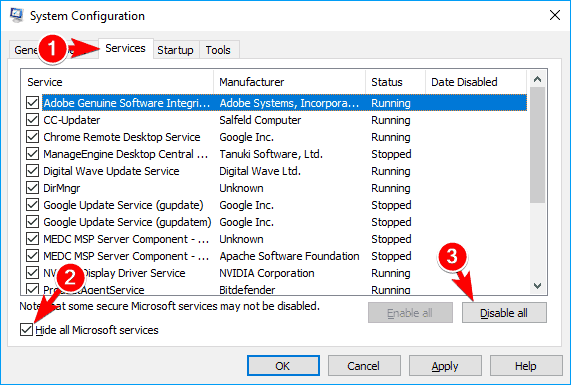
  2. Select the Services tab at the top, check the Hide all Microsoft services box, and click on Disable all.
  3. Select the Startup tab, and click on Open Task Manager.
    open task manager
  4. Right-click each item there and click Disable.
    disable task laptop making clicking noise
  5. Now, go back to the System configuration windows and click Apply, followed by OK.
    apply laptop making clicking noise
  6. Restart your PC.

Performing a clean boot for your computer reduces software-related conflicts that can bring up the root causes of the laptop clicking noise.

These conflicts can be caused by applications and services that typically start up and run in the background when you start Windows.

6. Check your hard drive for corruption

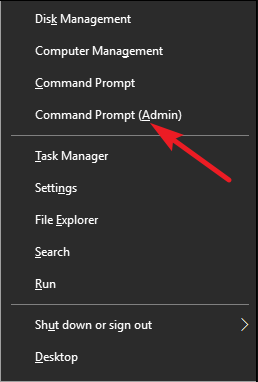
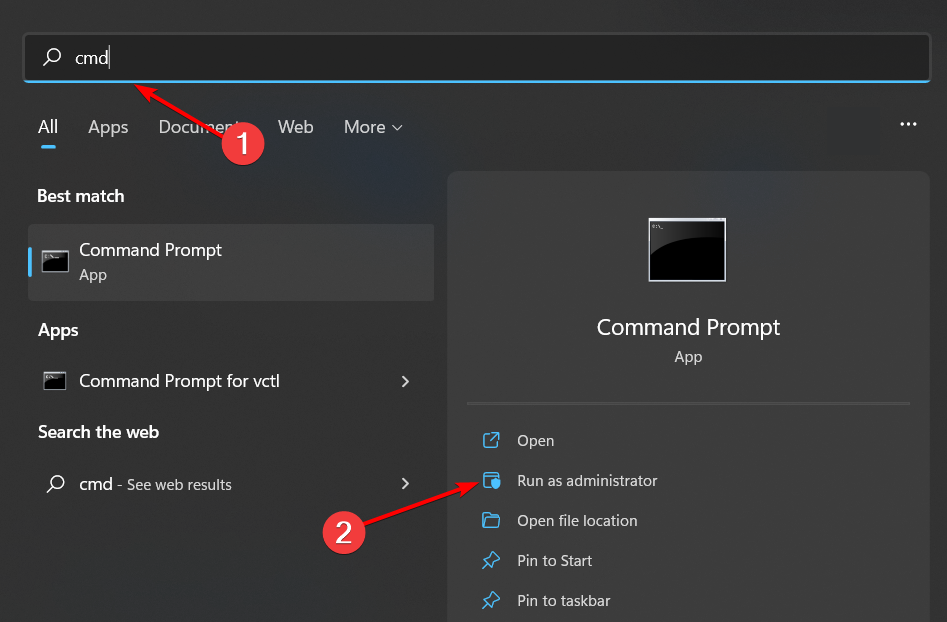
  1. Press the Windows key, type cmd, and select Run as administrator under Command Prompt.
    cmd
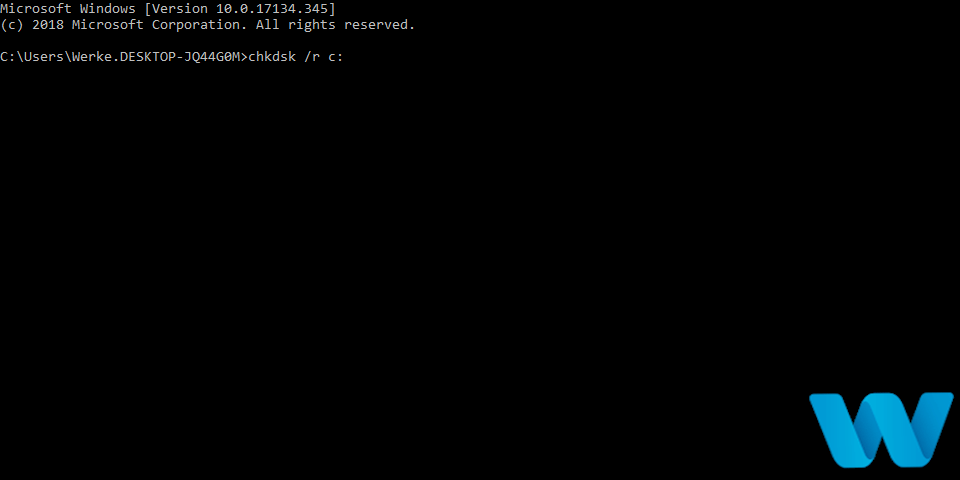
  2. Copy and paste the command below and press Enter: chkdsk /f /rchkdsk laptop making clicking noise
  3. It will want to schedule itself to run at the next restart. Answer Yes, then restart your PC.

A scan will begin to fix any corruption or bad sectors on your hard drive, then remove this corruption as a potential cause of the laptop clicking noise.

Can you not access Command Prompt with administrator privileges? Look at this article dedicated to running cmd as an admin to learn what to do.

7. Run the audio hardware troubleshooter

  1. Open the Settings app, and go to Update & Security.
    update and security
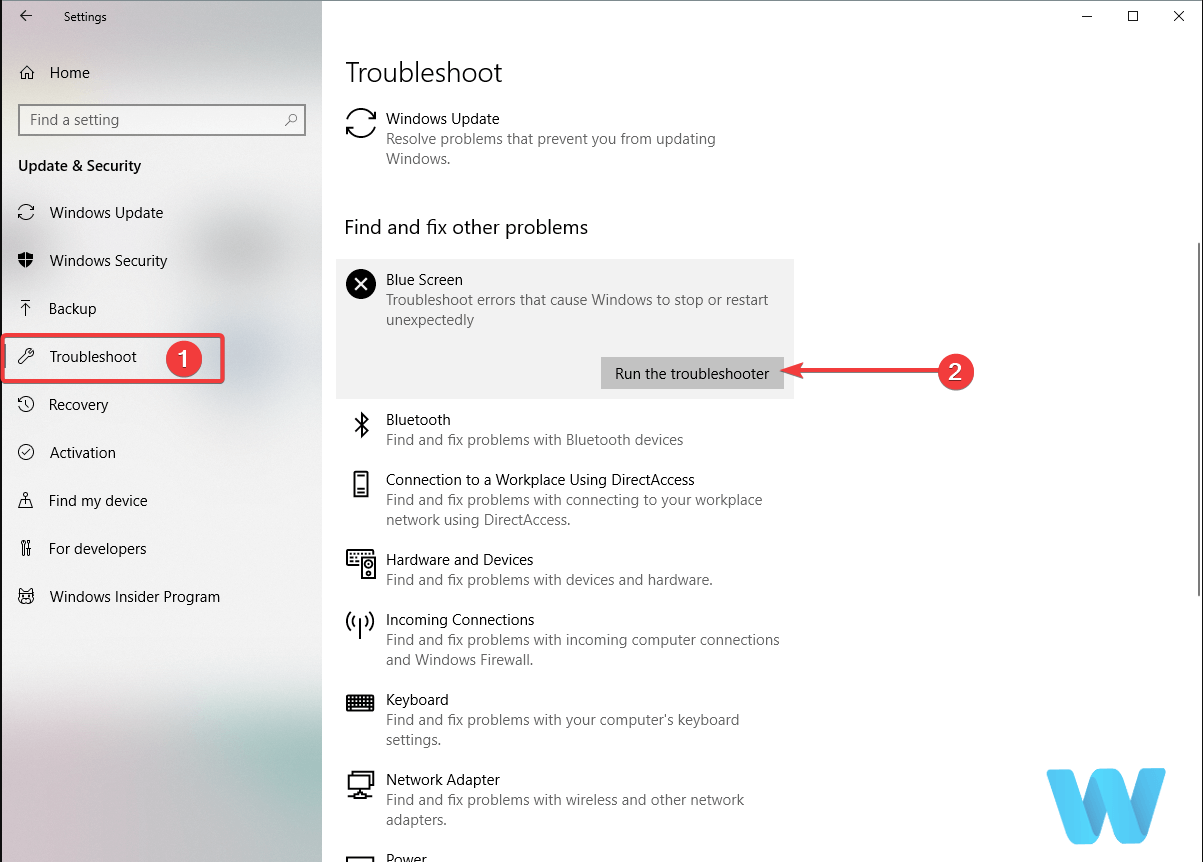
  2. Select Troubleshoot in the left pane and click Additional troubleshooters.
    troubleshoot
  3. Choose Playing Audio, and click Run the troubleshooter.
    run troubleshooter laptop making clicking noise
  4. Follow the on-screen instructions to complete the process.

8. Install the latest updates

  1. Open the Settings app and select the Update & Security option.
    update and security
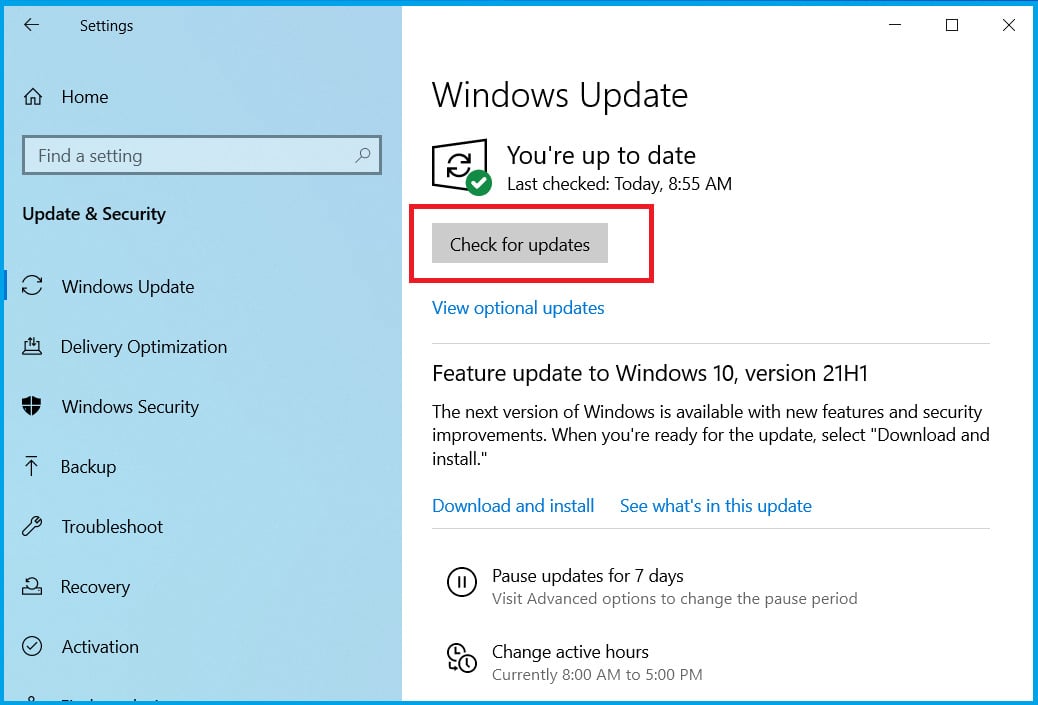
  2. Click on the Check for updates button.
    check for
  3. Download the available updates and restart your PC.

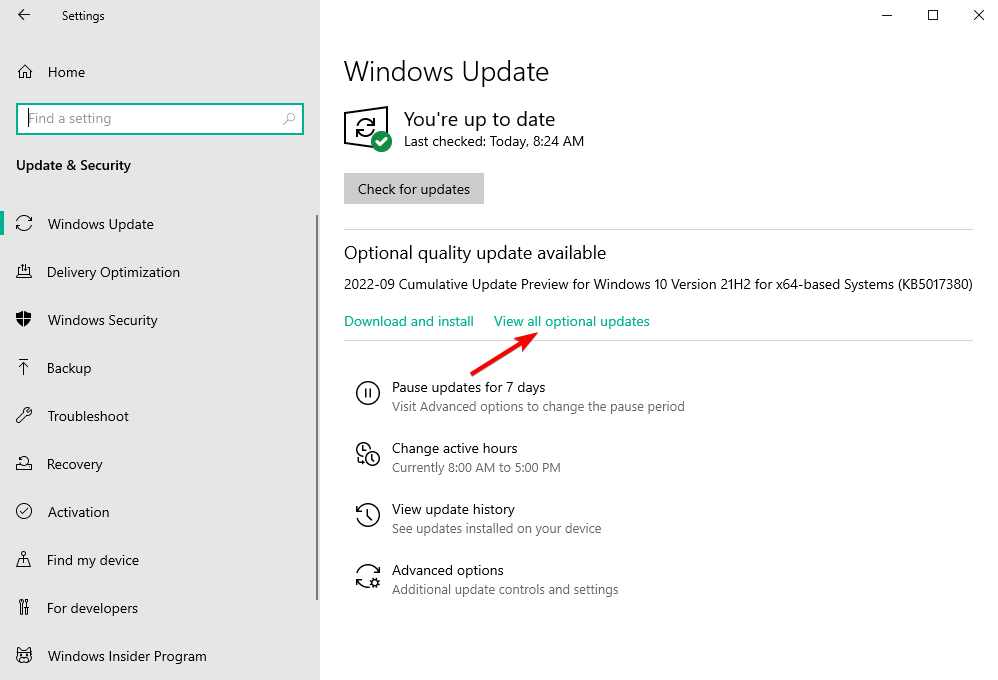
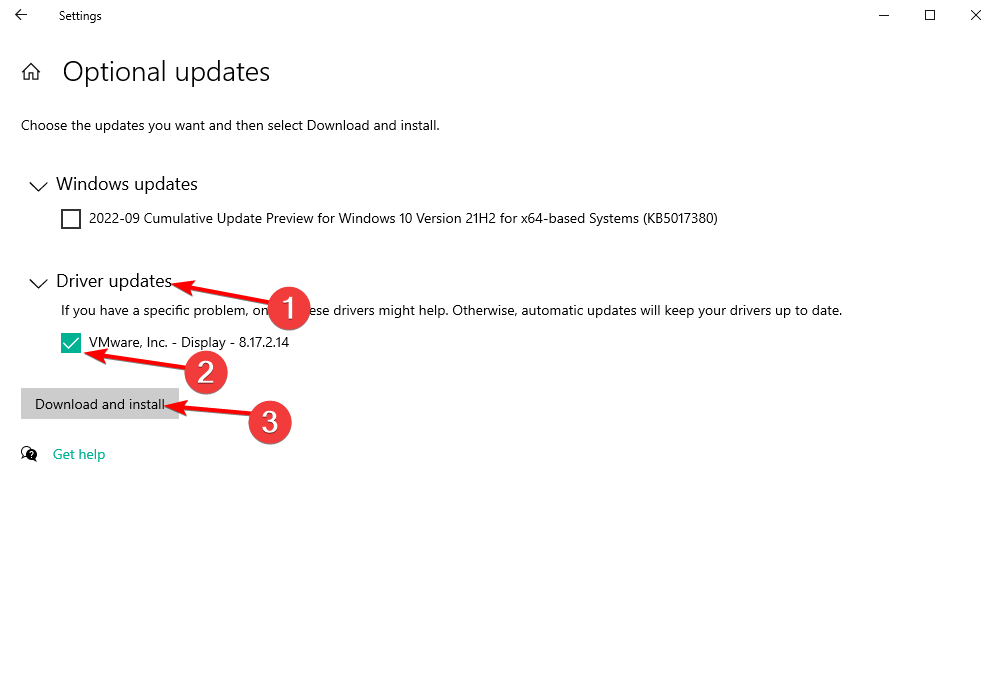
However, installing the latest updates can fix the laptop clicking noise. Windows 10 usually installs the updates automatically, but you can always check for updates on your own.

With the fixes in this guide, we believe you have everything to solve the laptop making clicking noise issue.

Is your operating system giving you a hard time on your laptop? This excellent guide dedicated to fixing Windows 10 not responding on the laptop will solve it quickly.

We hope these solutions helped you fix the annoying clicking noise on your PC. Use the comments below to tell us which solutions worked for you.

6 Ways to Fix Print Spooler High CPU Usage in Windows 10

The Print Spooler service’s high CPU usage issue is known to cause painfully slow processing times in Windows 10 PCs. 

The service, designed to store the print jobs for a while until the printer is ready, can often lead to issues. But these are easy to fix and shouldn’t take more than a few minutes of your time.

What causes Print Spooler’s high CPU usage?

The Spooler service is by no means a resource-hungry process that should overwhelm your computer, and if that’s the case, it’s usually due to one of these issues:

  • Minor system glitches – If the completed tasks are still stored, the queue may get overwhelmed and lead to high CPU usage due to Print Spooler. Also, inevitable glitches cause it to create logs in the spooler.xml, which, too, could be the underlying cause.
  • Outdated or incompatible drivers – Most users reported corrupt, inconsistent, or outdated drivers that led to spoolsv.exe high CPU usage.
  • Third-party app conflicts – In a few cases, third-party apps responsible for printing jobs or managing the printer can trigger conflicts and lead the problem. Here, it’s best to uninstall the app.

Our solutions would also work for the following related issues:

  • Print Filter Pipeline host high CPU – Several users reported Print Filter Pipeline to be the reason behind the high CPU usage on the PC.
  • Spooler SubSystem app high CPU – For many, Spooler SubSystem consumed the maximum CPU, close to 30% or even more, in the Task Manager.

How can I fix the Printer Spooler’s high CPU usage?

Before we head to the relatively complex solutions, here are a few quick ones to try:

  • Restart the computer.
  • Please install the latest version of Windows 10 since it could be a bug in the current one, and a patch may be bundled with the next update.
  • Scan your computer for malware using Windows Security. If it doesn’t find an issue, we recommend using an effective third-party antivirus to be sure.

If these didn’t work, head to the ones listed next.

1. Disable the Print Spooler service

  1. Press Windows + R to open Run, type services.msc in the text field, and hit Enter.
    services.msc
  2. Locate the Print Spooler service, right-click on it, and select Properties.
    properties
  3. Now, select Disable from the Startup type dropdown menu, click on the Stop button, and click on OK to save the changes.
    disable service to fix print spooler high cpu
  4. Once done, restart the computer.

First, if you don’t use a printer, the Print Spooler service need not be running. And disabling it will automatically fix the Print Spooler high CPU.

When you need to turn the service back on in Windows 11, follow our guide to enable Print Spooler for a quick restore.

2. Update the printer drivers

  1. Type Device Manager in the Search bar, and click on the relevant search result.
    device manager
  2. Expand the Printers entry, right-click on the one connected to the PC, and select Update driver.
    update driver to fix print spooler high cpu
  3. Now, select Search automatically for drivers.
    search automatically for drivers
  4. Wait for Windows to install the best available driver.
  5. Similar, update the other ones as well.

In most cases, an incompatible printer driver led to the Print Spooler high CPU problem, and updating it did the trick. When you update the driver, it fixes all three issues: incompatibility, file corruption, or running an outdated version.

Also, some users reported that installing just the driver package from the manufacturer’s website, without any supporting applications, for instance, HP Smart App, did the trick.

Another easy way to update your drivers is by using a dedicated tool, like Outbyte Driver Updater, to scan your device and instantly choose the right driver directly from its database.

Outbyte Driver Updater

Let Outbyte Driver Updater help you download the most suitable updates for your device drivers.
Free Trial Download now

3. Clear the printing queue

  1. Type Services in the Search bar, and click on the relevant search result.
    services
  2. Right-click on the Print Spooler service, and then select Stop.
    stop service to fix print spooler high cpu
  3. Press Windows + E to open File Explorer, paste the following path in the address bar, and hit Enter:C:\Windows\System32\spool\PRINTERS
    paste path
  4. Press Ctrl + A to select the files, and hit the Delete key.
  5. Once done, head back to Services, right-click on Print Spooler, and select Start.
    start service to fix print spooler high cpu

4. Pause printing for individual printers

  1. Press Windows + I to open Settings, and choose Devices.
    devices
  2. Now, select Printers & scanners from the navigation pane, click on the printer you don’t use anymore and select Open queue.
    open queue
  3. Now, click on the Printer menu, and choose Pause Printing.
    pause printing to fix print spooler high cpu
  4. Similarly, pause the printing for other printers not currently in use.

A simple way to fix high CPU usage by Print Spooler is to pause printing for all the old printers. Often, a printer you may have used in the past remains saved and consumes resources. However, increase the number of printers, and you will have a high CPU usage issue.

5. Uninstall third-party applications

  1. Press Windows + R to open Run, type appwiz.cpl in the text field, and click OK.
    appwiz.cpl
  2. Locate the last installed app, select it, and click on Uninstall.
    uninstall app to fix print spooler high cpu
  3. Follow the on-screen instructions to complete the process.

Often, third-party apps installed on the PC may lead to high CPU usage by Print Spooler. Some users found DYMO Connect to be the problem, so if you have the app, uninstall it right away.

Also, look for other programs installed around the same time the problem first appeared and remove them.

6. Uninstall the latest Windows update

  1. Press Windows + I to open Settings, and click on Update & Security.
    update & security
  2. Click on View update history.
    view update history
  3. Now, click on Uninstall updates at the top.
    uninstall updates to fix print spooler high cpu
  4. Select the update last installed, and then click on Uninstall.
    uninstall to fix print spooler high cpu
  5. Finally, click Yes in the confirmation prompt.
    confirm

A few late updates have been reported to cause the problem. So here, you have two options: installing the next available version or heading to the previous stable one.

If another update has not been released yet or doesn’t carry a patch, you can quickly revert to the version that worked.

By now, you should have fixed the high CPU by Print Spooler, and the PC’s performance should have improved considerably.

And while you are at it, learn how to make Windows 10 faster than ever.

If you have any other queries regarding the information listed here, drop a comment below.

Anycubic Kobra Neo 3D Printer Hands-on Review

3D printers are now a must tool for makers and the ones who are passionate about DIY.

There are more 3D printer types but the most affordable are the plastic extruding printers.

We’ve tested the Anycubic Kobra Neo, one of the most affordable of its kind but, as you will see below, it does a pretty good job.

The Anycubic Kobra ships in a semi-assembled state and doesn’t require any decent experience and knowledge to put it together. This provides a beginner-friendly assembly experience.

In this article, we’re going to talk about the 3D printer’s installation, features, software, and how you can actually use it.

What are Anycubic Kobra Neo’s technical specifications?

First, let’s overview Anycubic Kobra Neo’s characteristics:

Leveling25-point automatic leveling
Printing platform8.7 x 8.7 inches / 22 x 22 cm
Printing materialPLA / ABS / PETG & TPU
Nozzle sizeø 0.4 mm (replaceable)
Nozzle temperature≤ 500 °F / 260 °C
Hot bed temperature≤ 230 °F / 110 °C
Printing speed≤10cm/s (Max speed)
Control panel2.4″ LCD screen with a control knob
Z-axisSingle threaded rod
Printing dimensions25x22x 22 cm (HWD)
Machine dimensions49.0 x 44.5 x 44.3 cm

Although it’s easy to look at the technical specifications to know what you’re dealing with, we need to mention some features that you usually don’t get from such an affordable 3D printer.

What are the best features of Anycubic Kobra Neo?

1. Easy automatic leveling with inductive sensor

The most important aspect of a 3D printer is to keep everything smooth and precise and the LeviQ 25-point auto-leveling technology makes things a lot easier for beginner users.

Manual leveling is time-consuming and requires decent experience and judgment. With the automatic leveling, you just select the calibration from the menu and in just a few minutes, the printer is ready for the job.

2. Double-sided PEI Spring Steel sheet

The heated printing platform is covered with a double-sided magnetic sheet that is wear-resistant, less breakable, and bendable.

Textured PEI beds make part removal easier because prints will stick to less surface area than on a smooth sheet, and the dips and highs of the bed will force the parts to pop off once the bed cools down.

So you can easily remove the prints, even the larger or more sticky PETG prints.

3. Direct Drive Extruder

The extruder is included in the print head and the Direct Drive system feeds the filament to the extruder at the right pace for constant flow during the printing process.

This way, you don’t need to worry about any filament entanglement and the finished print will be a lot more accurate.

Moreover, the printer also comes with a filament unloading option that pulls out the thread after you’re done printing.

4. 2.4-inch knob control LCD screen

The Kobra Neo also comes with a 2.4’’ knob-control LCD screen. The display is an easy-to-read display and the knob helps you navigate the menu system.

Truth be told, we were a bit surprised that it wasn’t a touchscreen but the push-knob was extremely convenient to use and we could perform all the actions quickly.

➡ High printing speed – Kobra Neo prints at a typical speed of 6cm/s and reaches 10cm/s at its highest speed which is not bad at all within the industry standards

Now that we know about its most important features, let’s see how we can actually assemble and use Anycubic Kobra Neo.

How do I use the Anycubic Kobra Neo 3D printer?

1. Anycubic Kobra Neo package and assembly

Everything comes packed safely, all the parts are protected by plastic foam so we didn’t find any pieces affected by transport although the box was sent all the way from China.

First of all, you should know that all the tools you need for the assembly and set-up of the printer are provided in the box.

Anycubic even included the SD card and USB flash drive with the software and user manual for the device.

You will also find a replacement nozzle, a nozzle cleaning tool, and 10 m of PLA filament to start your printing adventure.

It took us only about 20 minutes to assemble and tune-up of the printer because it’s extremely easy to do that.

Mounting the frame on the base with 4 screws, another 4 screws to mount the printing head on the frame, and another screw to mount the X-axis limit switch.

The last part is to mount the 2.4-inch screen with another 2 screws on the right side of the base.

2. Anycubic Kobra Neo set-up and printing

  1. After you finish installing all the components, look at the back of the printer and make sure that the power supply is set up for the right voltage available in your country (110V or 220V).
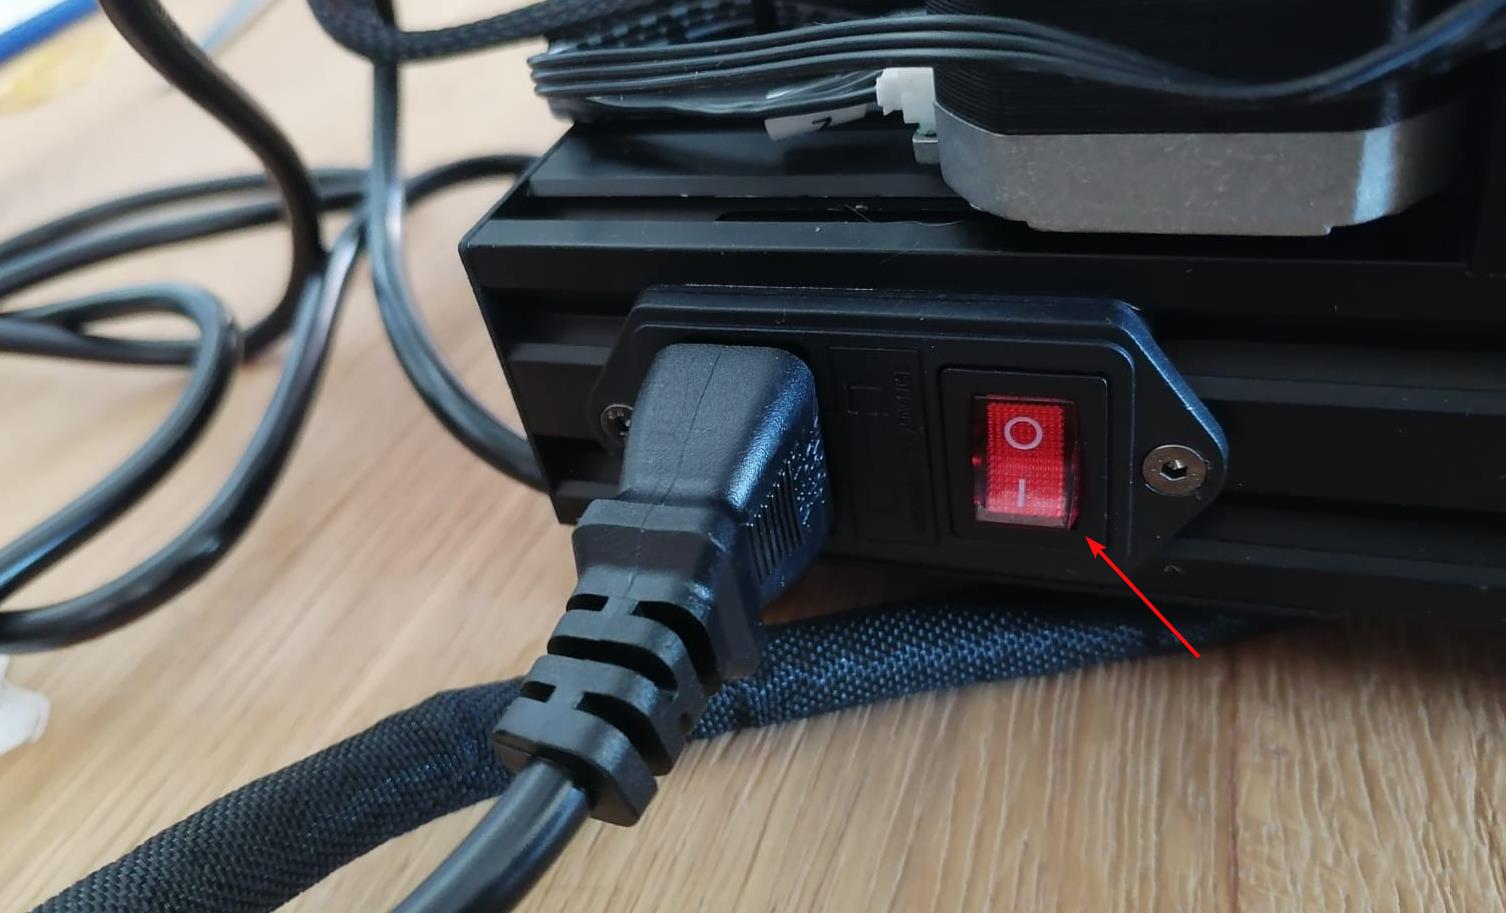
  2. Now, plug the power cord into the printer and outlet, then turn on the device.
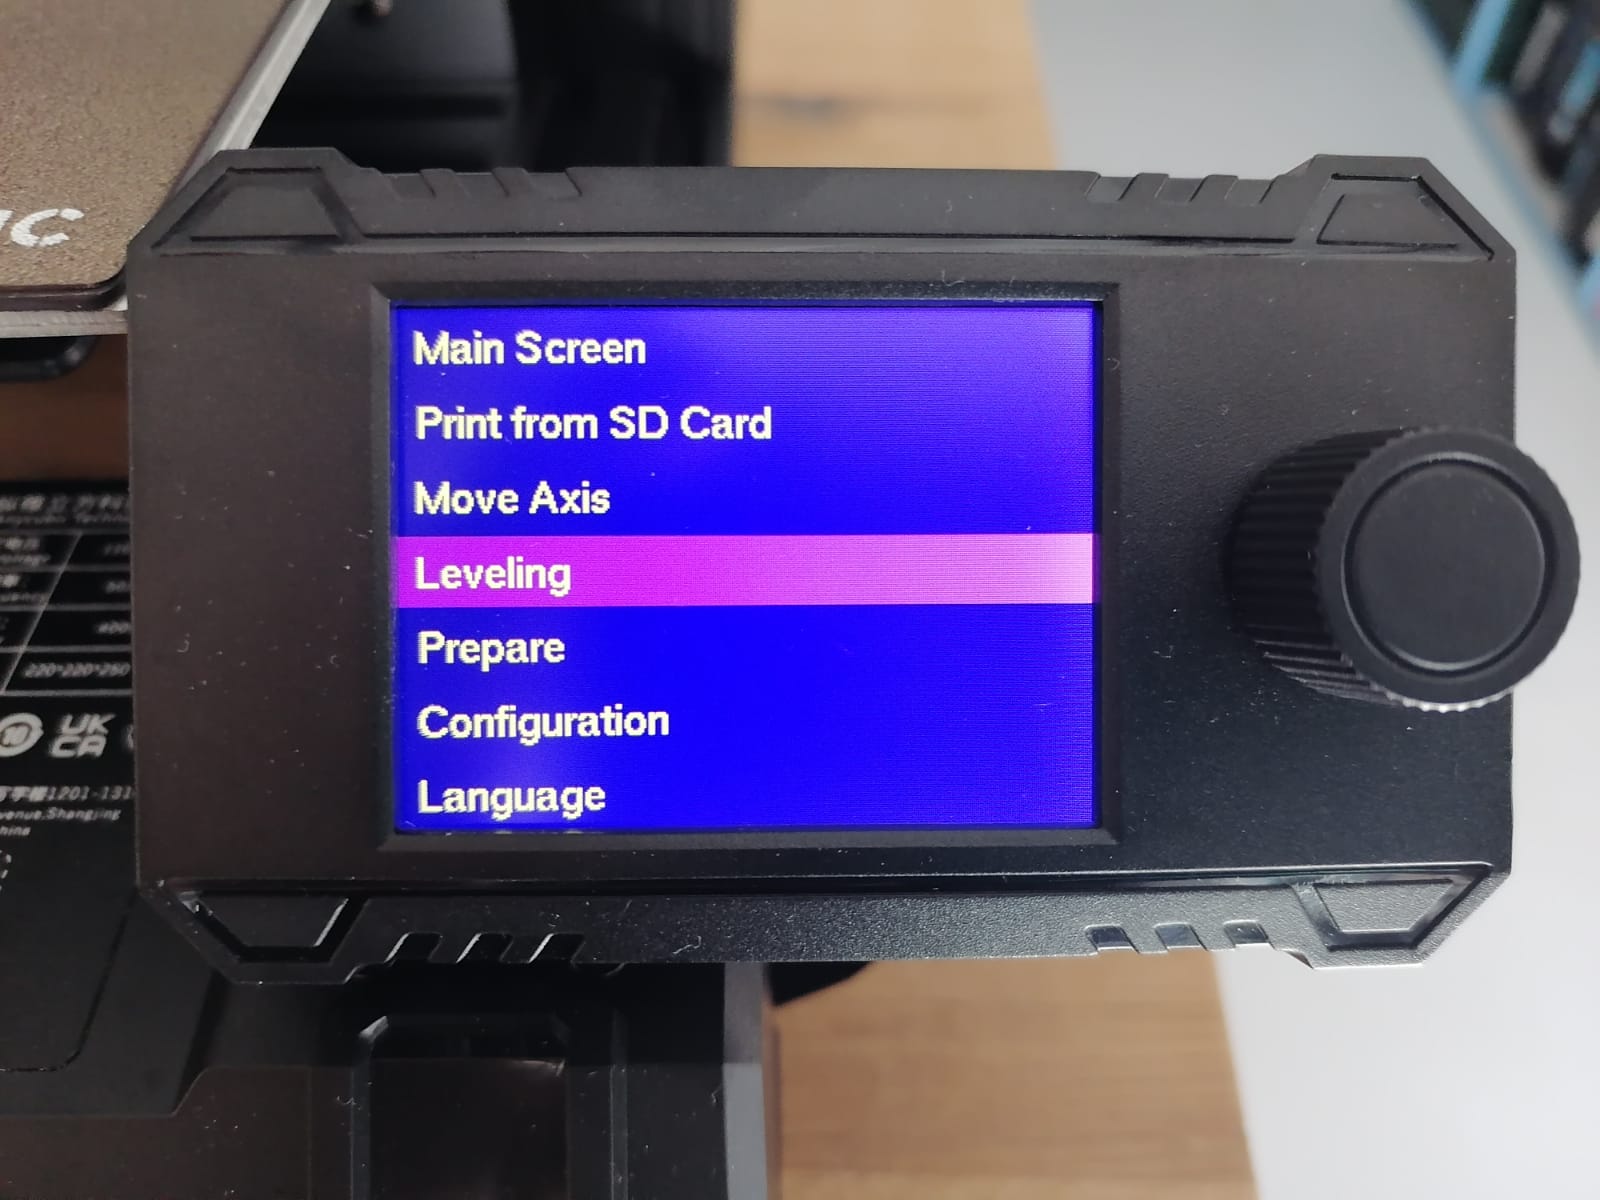
  3. The screen will turn on. Turn the knob until you highlight the Menu, then press the knob.
  4. Turn the knob to reach Leveling and press the knob, then select Automatic leveling.
  5. The printer has a 25 points automatic leveling technology and the process will take a few minutes.
  6. After the process is done, you will see that on the screen.
  7. Now, cut the PLA filament to a 45-degree angle with the cutter from the package.
  8. Pull the lever on the print head, then insert the filament all the way down in the orifice.
  9. Now, insert the SD card provided with the package in the slot from the lower right part of the printer base.
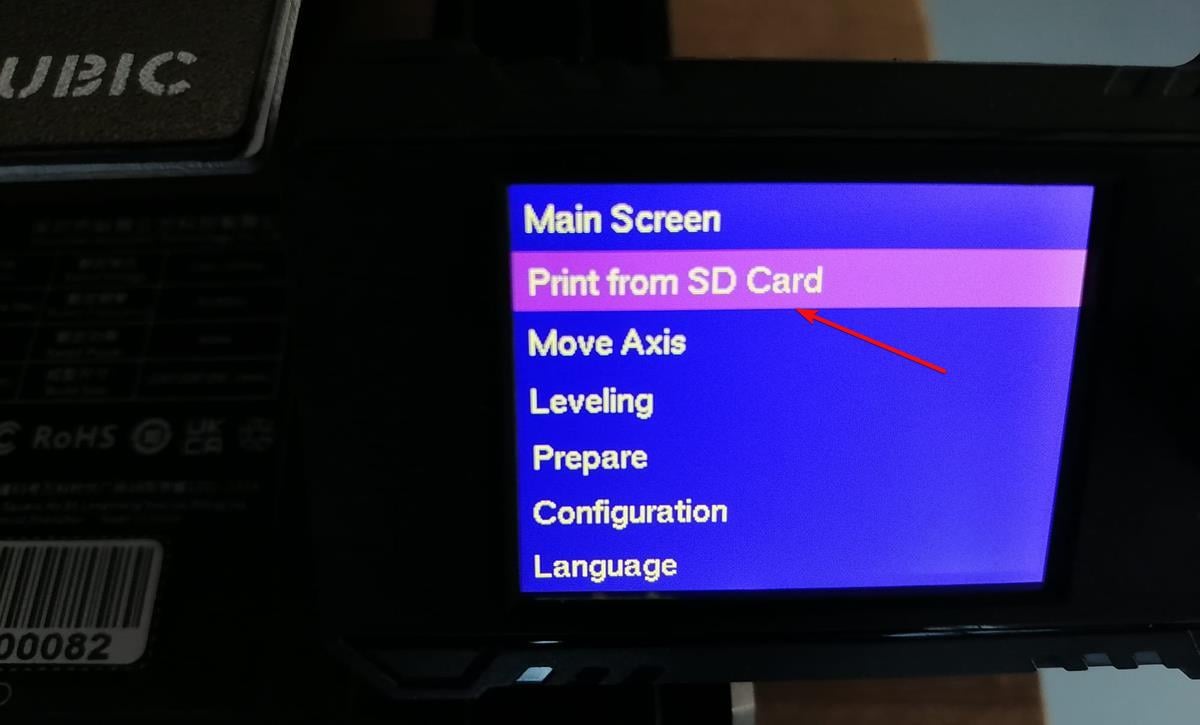
  10. Rotate the screen knob to get to Menu, then select Print from SD card and press the knob.
  11. You will see that you already have a small 3D model on the SD card which is perfect for testing your printer.
  12. After you select it, the nozzle will heat up and when it reaches the right temperature, the printing will start.

3. Printing 3D models from your PC

  1. Connect your PC/laptop to the printer with a USB-C cable. This one, unfortunately, is not supplied but you probably have one from your smartphone. That’s the one we used and it worked perfectly.
  2. Use the supplied USB flash on your laptop or PC and install the Cura software for 3D printing. If you have issues with the stick, you can find all the drivers and slicing app on the Kobra webpage.
  3. Once the software is installed, you will be prompted to add a printer. If not, click on the Settings menu, hover your mouse pointer over Printer and select Add a printer.
  4. Scroll down and click on Anycubic to expand the list of available printers. If you don’t find Kobra Neo within the results, go for Anycubic 4Max and click Add. It worked for us.
  5. Now, click on the Folder icon from the top-left corner and select the 3D model you want to print.
  6. After you load your 3D model, click the Slice button.
  7. Finally, hit the Print button.

After you start the printing, it will take a few minutes for the nozzle to reach the correct temperature. And within the software, you will be able to monitor the printing process, view the elapsed and estimated time for printing.

What were the Anycubic Kobra Neo printing results?

First, we chose a small 3D model to see how things work out. It took about 45 minutes to print. If you’re new to 3D printing, you should know that the machine doesn’t only print the 3D model itself.

It needs a base, a support structure that you need to remove after the printing is finished.

Finished print and after a little bit of sanding

In the image above, on the left, you can see how the model looked right after finishing printing. On the right, we removed the excess support material and sanded the model a little bit.

Also, you should know that the Cura software is only a slicer, a program that breaks the model into layers so that the printer knows how to build the structure.

If you want to create your own objects, you will need a 3D modelling software and save your work in SLT or 3MF format. The software and printer support a lot of other formats, but these are the most used.

Next, we switched to a full-blown skeleton hand that turned out amazing, but it took about 5 hours to complete.

The skeletal hand could be used as study material

The image above was taken after removing the support PLA and sanding, but the whole process was smooth and uneventful.

The maximum print sizes are 250 x 220 x 220 mm and a print volume of maximum 12.1 liters

We also got a large roll of silver color PLA, and we found a much larger model to try it out on.

The idea was to test the actual largest printing object that we could create with Anycubic Kobra Neo and we were not disappointed.

It took approximately 12 hours to print but after removing the scaffolding and sanding it looked amazing.

How do I get Anycubic Kobra Neo and what is its price?

It’s going to be a shocker but this 3D printer is priced at only $249 and it’s available for ordering straight from the manufacturer’s website.

Actually, if you hurry ups, there’s even an offer with extra $20 off sitewide $100+ order via PayPal Pay. Just use the code PAYPAL when you order to benefit from this deal.

⇒ Get Anycubic Kobra Neo

Pros
Simple and easy installation
Anycubic LeviQ auto-leveling
All the tools for installation are included
High volume printing dimmensions
High printing speed
Cons
It doesn't come with a protection cover
No wireless connectivity

Verdict

For this price, Anycubic Kobra Neo is really a remarkable tool. It’s very easy to assemble even for a beginner and it feels sturdy enough for any build.

The auto-levelling feature took all the pain away from any manual tweaking and the fact that absolutely all the required tools were inside the package helped a lot.

We only discovered a few downsides, the lack of wireless connectivity and the absence of a USB cable for connection.

However, for this small price, the provided SD card is more than enough to load up your 3D models.

Speaking of models, you might be interested in the best STL file software for 3D printing because you will need them to start creating.

We hope that our review raised your interest and knowledge of 3D printers. Tell us your opinion in the comments section below.

Screen Recorder with Webcam Overlay: We’ve Ranked 7 Best Apps

Sometimes you need to record your screen if you’re making a video tutorial or you just want to record your gameplay session.

But what if you want to add your webcam video to the screen recording as well? There are several ways to do it, but the simplest one is by using a screen recorder with a webcam overlay feature.

In today’s guide, we’re going to show you the best screen recording software that can record your webcam as well, so let’s get started, shall we?

How can I record my screen and webcam at the same time?

The answer to this problem is a walk in the park because you can perform this from your own browser using a screen recorder like Loom:

  1. Install the Loom software or browser extension.
  2. Launch the screen recorder on your PC.
    Loom best screen recorder for Windows 11
  3. In the screen recording settings, choose the Screen and Camera option and press Start Recording.
    screen-recorder-webcam-overlay
  4. Choose the screen area you want to share and press the Share button.
    screen-recorder-webcam-overlay
  5. Record your video with the webcam on.

That being said, it is intuitive to start your recording while displaying your webcam only performing a few simple steps. Plus, there are multiple software in the following list to help you with this task.

What is the best screen recorder that supports webcam overlay?

Loom Screen Recorder – Intuitive webcam overlay recordings

The Loom Screen Recorder software with camera overlay support is an excellent tool for your digital workplace and classrooms, allowing you to transmit high-quality recordings.

Loom’s Business, Enterprise, and Education services have limitless storage. However, the free subscription is restricted to 25 videos or screenshots.

The software free plan on desktop software has a 5-minute recording time per video restriction, whereas the student plan has a 45-minute recording time limit.

Loom Business and Enterprise allows you to record a single video for up to 6 hours and save recordings and find them later for follow-ups.

Whether you have a one-person or a thousand-person audience, sharing updates via a Loom video lets individuals watch them at their leisure so the flexibility goes a long way.

The Loom screen recorder app’s advanced options are accessible directly from the software. They will be hidden by default, but you may personalize your recording with a simple click.

If you are recording both a screen and a camera, you may select which camera source you want your camera to be captured from. 

Recording Countdown before starting your recording so it doesn’t throw you off guard and starts on time. Camera flip is useful if you have text behind you and don’t want to show a mirror image.

The nicest aspect about Loom is that the recordings are instantly available through a link and ready to share with people who missed a meeting.

Loom Screen Recorder

For business teams and clients who interact with one another and seek to use screen recording with webcam overlay support.

Movavi Screen Recorder – Effective screen recording tools

Movavi Screen Recorder software is a simple-to-use method to capture your screen and record a clear sound while having the webcam overlay aside.

This comprehensive screen recorder will help you record your desktop for multiple needs, including recording webinars, creating an instructional guide, or just capturing your gameplay.

With an intuitive interface, anyone can use this software and save the recording in a few clicks. You will only set up the video framework, record the video in 4K resolution, do the last touches and save.

You have countless useful tools which can provide valuable screen recordings such as scheduling with the time and date, showing keystrokes and mouse on your display, drawing, and editing, etc.

There are many screencasting options to help you record any actions on your device, using the screen recording with audio and the webcam or separately.

More so, you have keyboard shortcuts to help you start de video, pause or stop, and even take a screenshot of your desktop.

It’s worth knowing that you can utilize different video frames for better quality, webcam settings, and helpful effects to change the mouse cursor or the keystrokes.

Movavi Screen Recorder

Capture your screen with crystal clear sound and quality webcam overlay for any type of recording.
Check price Visit website

NCH Debut – Supports multiple video inputs

screen-recorder-webcam-overlay

NCH Debut is a powerful video recording software that can capture videos from all types of sources, including webcams, IP cameras, or video input devices.

Of course, the software can record your screen, a single window, or a specific portion of a screen. The software is perfect for recording tutorials because it has a mouse highlighting feature, and it can even highlight keystrokes.

As previously mentioned, the software supports webcam recording, but it also supports webcam overlay, so you can add your camera video on top of your screen recording with ease.

The software supports audio recording, but it can record audio that is being played on your PC, which is perfect if you want to record a conference or a stream.

The green screen tool is also available, so you can easily remove the background and replace it with a video, image, or solid color.

NCH Debut works with video streaming websites, and you can upload your recordings directly to YouTube, Vimeo, or Flickr, or you can burn them a DVD.

The software also supports captions and video adjustments, and it works with popular video formats such as AVI, WMV, FLV, MP4, MPG, MOV, and others.

Overall, NCH Debut is a great application, and if you need a screen recorder with a webcam overlay, this is the best tool for the job.

NCH Debut

This tool from NCH is the simplest screen recorder that can also record your webcam at the same time.
Free trial Visit website

Bandicam – Gaming recording in 4K

Another great screen recorder with a webcam overlay is Bandicam. This is a lightweight screen recording software, and it can record your screen in both MP4 and AVI formats.

The application allows you to draw while recording your screen, which is perfect for presentations, or video tutorials. As for video tutorials, we also have to mention that Bandicam supports webcam overlays.

This means that you can record your webcam while recording your screen with ease. This feature also works with a green screen, so you can easily remove your background if need be.

We also have to mention that Bandicam has several recording modes, and you can record your entire screen or just a certain section of the screen.

Another feature that might come in handy is the ability to record the selected area around your mouse, which means that you can record the selected area while following your mouse around.

Bandicam also supports audio recording, so you can record your microphone or you can record audio that is being played from your speakers.

Features such as image and text overlays are also supported, allowing you to easily add watermarks to your recordings.

Overall, Bandicam is a simple but incredibly powerful screen recorder with a face cam, so be sure to try it out.

Bandicam

Bandicam is a well-known and easy-to-use screen recorder that comes with a webcam recording feature.
Free trial Visit website

Aiseesoft Screen Recorder – No quality loss video editing

How to record your desktop using Aiseesoft Screen Recorder

If you’re looking for screen recorder software, you might want to consider Aiseesoft Screen Recorder. The software support full-screen recording, but you can also record a part of the screen if you choose to do so.

It’s worth mentioning that the application supports window recording, so it can only focus on a specific application window.

The mouse recording feature is also available, and by using this feature, you can record the selected area around your mouse while following it at all times.

Webcam overlay is available as well, so you can record your webcam and screen simultaneously. The same applies to audio, allowing you to easily record audio overlays, which is perfect for video tutorials.

Aiseesoft Screen Recorder is optimized for game recording, and with GPU acceleration technology, you can record intensive gaming sessions without any lag.

It’s important to mention that the software supports snapshots, and you can create screenshots in several popular formats. You can also annotate screenshots if needed, so you won’t need to use snipping software.

Video editing is present, and you can add arrows, and text, or trim the videos and only save the most important parts.

Aiseesoft Screen Recorder works with a wide array of file formats, and if you need a screen recorder with a face cam, be sure to give it a try.

Aiseesoft Screen Recorder

Looking for easy to use screen recorder that supports webcam overlay? If so, try Aiseesoft Screen Recorder.
Free trial Visit website

RecMaster – 7 screen recording modes

screen recorder with webcam overlay

Another great screen recorder with a webcam overlay is RecMaster. The application is simple to use, so it’s perfect for first-time users.

The software has five recording modes, and you can choose to record the entire screen, a part of a screen, your webcam, or only audio.

Of course, the software supports picture-in-picture mode, thus allowing you to record your screen and webcam simultaneously, which makes it perfect for tutorials.

Regarding video recording, RecMaster supports 1080p and 4K videos at 60 FPS, so it’s perfect if you want to record high-intensive gameplay sessions.

You can also use this software for tutorial making because you can choose movement and click effects for your mouse to better highlight mouse movement and clicks.

Annotations are available as well, so you can easily add captions, lines, arrows, and other elements and highlight certain parts with ease.

Moreover, the software supports adding watermarks, and you can add both text and image watermarks to your recordings.

RecMaster is available on both Windows and Mac platforms, and if you’re looking for a reliable and simple-to-use screen recorder, you might want to give RecMaster a try.

⇒ Get RecMaster

liteCam HD – Speed up recording on 1080p HD

screen recorder with webcam overlay

If you need a simple but powerful screen recorder with a face cam, you might want to try liteCam HD. The software supports full HD video recording and it comes with four different recording modes.

The available recording modes include a full-screen recording mode as well as an area recording mode. The software also has a window recording mode and a program recording mode, so you can record only a specific application or a window.

We also have to mention that the software supports picture-in-picture recording, allowing you to record both your screen and your webcam at the same time.

The software is incredibly simple to use, and you can start recording with just a single click of a button. liteCam HD fully supports hardware acceleration and H.264 format, so you shouldn’t experience any lag while recording.

Thanks to the RSCC codec, the recording takes less toll on your system resources, and it gives you improved encoding speed. In addition, this codec will make editing and converting/exporting files faster than before.

According to the developers, you can expect to see up to 30% faster speeds compared to other codecs. liteCam HD also has various mouse effects and you can also change the mouse appearance, which is perfect for making video tutorials.

Speaking of tutorials, the software supports drawing, allowing you to draw, and add highlights or text to your recordings, which will surely come in handy.

Overall, liteCam HD offers some interesting features, and if you need simple-to-use screen recording software, you might want to give it a try.

⇒ Get liteCam HD

Can I use any webcam with screen recording software?

As long as your software supports webcam recording, you can use any type of webcam with it. It doesn’t matter if you’re using a USB webcam or a built-in laptop webcam.

If you have the necessary drivers and your webcam is detected in other software, you can use it with your screen recording software.

How do we choose the best screen recorder with a webcam overlay?

Our team of experts, with a combined experience of more than 15 years, has created this list with a variety of elements in mind.

These elements are the staples for choosing a good screen recorder software to suit your needs.

Here are some of the most important elements considered when creating this list.

Ease of use

How hard it is to use the software will ultimately influence how much time you will be comfortable using it, thus if the UI is built properly, you can access the options efficiently.

Beyond the efficiency of access, having software that’s easy to understand and control ensures that you will be able to access all the customization options and get the best results possible.

Webcam overlay support

As this guide will cover only software options that have the webcam overlay support feature, you don’t need to worry about this topic.

The quality of the feature itself comes into play as well, but we made sure to choose only the best options, so you can easily scroll through the list and make an informed decision.

Number of useful features

The number of customization options and other features was also taken into consideration when deciding if software should be included in the list.

This element ensures that your needs will be met, but we want to ensure that the results are also high quality, and don’t cause any issues for the overall customization of the process.

System resource impact

Using software that doesn’t impact your system’s resources too much is also an extremely important element to consider.

If the software affects your system considerably, this not only will cause it not to work properly, but will most likely result in you searching for another viable option.

When it comes to screen recorder software, there is a wide array of applications to choose from, and we hope that we helped you find the best screen recorder with a face cam with this guide.

What is your favorite screen recorder software? Let us know in the comments section below.

Which one is better: an online screen recorder or a desktop application?

In our opinion, a desktop application offers more versatility and features. If you’re on a slow network, a desktop application is a better choice since it doesn’t require you to upload or download your videos.

Online screen recorders are usually free, and if you want to record a short video they might come in handy, but if you want to create professional-looking screen recordings, a desktop application is a better choice.

Are there any free screen recorder applications?

There are many great free screen recorders, and in fact, Windows 10 has its screen recorder called the Game Bar that you can use without any restrictions.

Third-party applications might offer more features to their users, so they are usually a better choice. However, most free screen recorders do have certain limitations, such as a watermark or time limit for recordings.

This is our list of the best screen recorder with webcam overlays available on the market this year.

As you already noticed, the options we chose tick all the boxes when it comes to compatibility, usability, performance, and ease of access.

Feel free to share your opinions with us by using the comment section below.

Best Screen Recorder for Windows 11 [Free Picks Included]

There are several reasons you might use screen recorder software. You can use it to record instructions for helping someone with troubleshooting their PC, or you can record a gameplay video and share it on the internet.

These are just a few use-case scenarios of screen recorder software. However, the question arises as to which screen recorder software you should install on your PC.

It is where this guide comes into the picture. Because, in this post, we will share with you a curated list of some of the best screen recorder software for Windows 11.

Since Windows 11 is the latest operating system and many people have already migrated over to it, it is the reason we will be sharing compatible screen recorders for Windows 11, but you can also check out the best recorder software for Windows 10.

Without any further ado, let us jump right in.

Does Windows 11 have a screen recorder?

Yes, it has indeed. Windows 11 includes a built-in screen recorder called Xbox Game Bar that can help you capture your screen either for gaming or other tasks you need to record on your PC.

You should also be aware that Microsoft just announced that the Snipping tool will be revamped soon to include the screen recording on Windows 11.

Furthermore, we present you a full comparison of our best picks for screen recording software available on Windows 11 devices.

Comparison Table

Screen RecorderOperating SystemFreeAudioFeatures
➡️Wondershare DemoCreatorWindows 7, 10, 11, MacFree trialYes– Connect with multiple live-streaming websites
– Visual effects
– Pre-rendered stickers
➡️LoomWindows 8.1, 10, 11;
Android, Mac, and iOS
YesYes– Browse video editing
– Record system audio
➡️ BandicamWindows 11, 10, 8, 7, Vista, XPYesYes– Real-time drawing
– Webcam overlay
➡️ Apowersoft Screen RecorderWindows 10, 11, Mac, AndroidYesYes– Picture-in-picture recording
– Cloud video saving
➡️ Camtasia Windows 10, 11, Mac 12 and aboveFree trialYes– Favorite tools and effects
– Royalty-free assets
➡️ ShareXWindows 11, 10, 8, 8.1, 7YesNo– Entirely free
– Productivity tools
➡️ Screencast-O-MaticWindows 10/11, Mac, iOS, Android, ChromebookYesYes– Stock music&captions
– Trimming tools

Some of the tools above can be used for free and offer helpful support for your screen recording needs on different Windows editions.

That being said, let us now take a look at the comprehensive list of the best screen recorder apps for Windows 11.

Wondershare DemoCreator – Best real-time screen drawing feature

Wondershare DemoCreator

Wondershare DemoCreator, previously known as Filmora Scrn, is a recording and video editing software for Windows 11.

Wondershare, as you might have known because of its popular Filmora video editing tool and other tools, has developed this screen recorder.

With this tool, you can capture anything on your PC’s home screen, including the webcam, audio from the system, and your mic.

It lets you draw or annotate anything on the screen in real-time and offers various mouse-highlighting effects.

In addition to this, Wondershare DemoCreator also allows you to zoom and pan on a particular section of your screen while recording, pretty quickly.

Some of the key features of Wondershare DemoCreator:

  • It allows for real-time screen drawing
  • Lets you record a custom area of your screen
  • Gives you the option of pan and zoom to highlight a particular area
  • A full-fledged video editing suite

Wondershare DemoCreator

DemoCreator from Wondershare is an amazing screen recording app that allows quick and easy access with great results.
Free Trial Visit Website

Loom – Integration with apps

Loom best screen recorder for Windows 11

Another best free screen recorder for Windows 11 is Loom. There are paid options available as well, which will unlock the advanced features of this tool.

It lets you record your screen or a specific app, lets you share the recorded video with anyone with the instant link that it generates, offers an in-built video editing tool, etc.

With the free plan, you can record in 720p resolution. However, the premium plans unlock this limitation, and you will be able to record at up to 4K UHD resolution with Loom.

Other features of Loom include not disturbing mode, annotation and drawing tools, a video thumbnail customizer, password protection for videos, and integrations with apps such as Slack, Notion, etc.

Some of the highlights of the Loom screen recorder app are:

  • Offers in-built video editing tool
  • Allows you to record in up to 4K UHD
  • Gives you integration with apps such as Slack, Notion, GitHub, etc.
  • When video recording, the do not disturb mode prevents any pop-ups from appearing.

Loom

Take your screen recording experience to the next level with this amazing software today.
Free Trial Visit Website

Bandicam – Good 4K record feature

Bandicam best screen recorder for Windows 11

Bandicam is an effective screen recorder for Windows 11 that earns its place on our list. It is a very popular screen recording app that is used by millions of users across the globe.

The most important thing that makes it so popular is the list of features the Bandicam comes with. You can draw or outline in real-time on your own videos, making it easier to create instructional recordings.

You can insert a webcam overlay of yourself over the screen recording, which is beneficial for instructional or gameplay videos.

Other features include the option of scheduled recording, the ability to record the system and your voice together, mouse click animation and effects while recording, support for Chrome Key for webcam overlay, and much more.

Bandicam lets you save your recordings in MP4 or AVI file formats. Using this software, you can record 4K UHD videos, with support for up to 480 FPS videos.

Here are some of the best features of Bandicam:

  • Gives you the option to draw in real-time over your recording
  • Support for Chrome Key for webcam overlay
  • Offers schedule recording feature
  • Can also capture only a certain area of your screen
  • Several mice click effects while recording

Bandicam

This software offers you access to a plethora of useful features that will make your screen recording experience easier than ever.
Free Trial Visit Website

Apowersoft Screen Recorder – Multiple output formats supporter

Apowersoft best screen recorder for Windows 11

If you are looking for a simple screen recording software, then you should consider Apowersoft Screen Recorder. You can even use it as a web-based screen recording tool, which negates the need to install the software.

On the other hand, there is the option to download the Apowersoft screen recorder as an app on your Windows 11 PC as well.

You can record anything happening on your screen, be it a video stream, instructional video, live chat, etc. Moreover, Apowersoft lets you export your recordings in popular formats such as MP4, WMV, AVI, FLV, MPEG, VOB, ASF, and GIF.

The user interface is simple, and all you need to do is hit the record button to start your recording session. Furthermore, you can also record a certain section of your screen using this tool.

It gives you the option to annotate in real-time, capture video on your screen and record audio from a mic simultaneously, insert webcam recording, and more.

Some of the key highlights of the Apowersoft screen recorder are:

  • Lets you annotate, highlight, or draw in real-time
  • The interface is really easy to understand
  • Gives you the option to record video and audio at the same time
  • Available as a web-based tool as well
  • Supports multiple output formats

Apowersoft Screen Recorder

Experience seamless screen recording with this user-friendly and efficient software today!

Camtasia – All-in-One software

Camtasia screen recorder

Camtasia is an all-in-one software. Notably, it lets you edit your videos as well as let you record anything on your screen.

There is a huge collection of templates that you can select and add to your videos. The favorites and presets options let you access your favorite tools easily.

The screen recording feature lets you record your video calls, PowerPoint presentations, websites, or gameplay.

You can select whether you want to record the entire screen, a specific area of the screen, a window, or an application.

Other features of Camtasia, which make it an all-rounder for screen recording and editing, include webcam capture, mic, and system audio recording, annotations, cursor effects, applying device frames, and more.

Here are the best features of Camtasia that you should look out for:

  • Provides powerful video editing tools
  • Multiple options for screen recording
  • Gives you the option to add different cursor effects
  • Add quizzes to your video, select from thousands of templates, and use visual effects

Camtasia

Camtasia enables you to quickly and efficiently record your computer screen and offers some great results.
Free Trial Visit Website

ShareX – Amazing free features

ShareX

A popular open-source screen recording application that you can use is called ShareX. Along with being a screen recording app, it is also an efficient screenshot tool.

There are various capture methods you can use on ShareX, including monitor menu recording, active window recording, custom region recording, etc.

The best thing about ShareX is that you can enjoy all these and more features free of charge. It is rare for an app to offer so many features for free.

You can capture GIFs as well as video files. Moreover, there aren’t any watermarks slapped on your recordings. However, the UI can be a bit overwhelming for some, which you will easily crack after a few minutes of usage.

It comes with a video converter, a video thumbnail, an image editor, and a bunch of other tools that would facilitate your recordings.

Here are the best features of ShareX:

  • Gives you a lot of screen recording options to choose from
  • You can use the hotkeys to start/stop video recording and GIF capturing
  • It is a lightweight screen recording app
  • Available free of cost

⇒ Get ShareX

Screencast-O-Matic – Built-in video editor

Screencast-o-matic best screen recorder for windows 11

Screencast-O-Matic is another popular alternative for screen recording. This software comes with a good set of features, and the premium version of the app is also affordable.

Just like other screen recording apps for Windows, this one also lets you capture a specific area of your screen. Additionally, you can also add narration using your mic to the screen recording.

There is a nice drawing tool available, which gives you the option to annotate, scribble, or draw anything on the ongoing recording.

You can even add stock music or automated captions using the in-built tool. Screencast-O-Matic offers a script editor from which you can import scripts and bring perfection to your video recordings.

Some of the best aspects of Screencast-O-Matic are:

  • Has an affordable premium version with advanced options
  • Offers you stock music and the option to add automated captions
  • Has an in-built video editor
  • Share videos with the generated link on popular websites such as YouTube, Microsoft Teams, Twitter, etc.

⇒ Get Screencast-O-Matic

What are the things to remember before selecting a screen recorder for Windows 11?

Screenshots are great and they can help you make someone understand some complicated thing, or instruct them on how to maneuver a tool or an app.

However, a complete screen-recorded video can often be more beneficial than a single image because the video gives you a complete guide on how to go about doing something on your PC.

You can also use a screen recorder on your Windows 11 machine to create an instructional video, video tutorial, learning course, or even create product-related videos for marketing.

There are a host of use-case scenarios for screen-recording apps, but there is no shortage of screen-recording apps on the internet for Windows 11.

This is where things might get a bit complicated. We get confused when we have a bunch of options.

To clarify that, we have listed some important points you should keep in mind before selecting a screen recorder for Windows 11.

✅ The screen recorder’s user interface should be easy to understand and use.

✅ If it comes with an in-built editing tool, then it would be a great package.

✅ The tool should feature some advanced screen recording options.

✅ Is the software available for free? If not, then does it justify its pricing?

✅ The screen recording software should be less resource intensive.

✅ Is it compatible with the Windows 11 operating system?

✅ Does the software receive regular updates?

✅ The reviews of actual users of the software.

Well, you can, of course, test and trial, but these points will help you avoid wasting time and may get you the correct software for screen recording.

How do I record my whole screen on Windows 11?

It’s pretty straightforward to capture your screen in Windows 11, and this is how you can do it in a few steps:

  1. Press the Windows key + G key to open the Xbox Game Box.
  2. Open the window or app your need to record.
  3. Select the Capture option in the middle and click on the recording button.
  4. Perform your actions while the screen is recorded. (The tab with the screen recording will appear)
  5. To save the video, press the Stop button from the Capture Status tab in the right corner.

You should know that built-in screen recording on Windows 11 or 10 is only possible for apps or programs, and not for the desktop or the File Explorer menu.

What are some key points to remember when screen recording?

Screen recording, for some, may look like a regular task they would do on their computers. But there are a few things that we would like to advise our readers on.

These tips will not only help you get the optimal video recording but also help you stay safe so that you don’t share too much of your personal information.

Here are some tips that will help you to capture the best screen recording:

  • Make sure your mic is turned on, and your camera is clean and clear.
  • Avoid opening too many programs. Let the resources be used by the recorder to avoid stutters during recording.
  • Prevent yourself from entering your personal information, such as usernames, passwords, social security numbers, healthcare numbers, etc., during a video recording, especially during live streaming.
  • If you think your background isn’t good enough for video recording, then you can make use of a green screen to change it as per your genre.
  • Use tools such as a mouse highlighter or annotate to point out key things in your videos.

Let us know your thoughts on this topic. You can also mention your favorite screen recorder for Windows 11 in the comments section.

Connection was Forcibly Closed on Minecraft: 4 Easist Fixes

When trying to log in or access your Minecraft server, you may encounter the An existing connection was forcibly closed by the remote host error.

In this article, we take a look at some of the common solutions to help you resolve the issue on your Minecraft server.

Why am I getting Connection closed message in Minecraft Bedrock?

  • Server issues – Sometimes your server can encounter certain issues that are preventing you from joining it, so be sure to check your server configuration. Users reported An existing connection was forcibly closed by the remote host Minecraft on Aternos and Hypixel, but others are affected as well.
  • Hardware resources – Minecraft can be demanding on your server, so make sure you have enough RAM.
  • Network issues – Network issues, such as high ping or lag can lead to problems, so make sure that your connection is fast and stable. Not addressing these problems can lead to No Internet connection error in Minecraft.
  • Firewall settings – Certain firewall features can prevent you from connecting to a server, so you’ll need to adjust them.

How do I fix An existing connection was forcibly closed by the remote host in Minecraft?

Before we start fixing the issue, here a couple of simple checks to perform:

  • Restart the server, client, and the network connection – Server glitches can cause problems such as these, so restarting your server occasionally can help. The same goes for your PC and network connection. To learn more about server issues, visit our Minecraft Server not working guide.
  • Switch to Badlion client – Few users reported that the error doesn’t appear while using this client, so feel free to give it a try.
  • Run server/client as administrator – Starting the server or the game as administrator can help sometimes. Also you can try using Java launched server instead of minecraft_server*.exe.
  • Contact the server admin – If you’re getting this error while trying to join a server, it’s possible that server is having issues. Sometimes morph data can cause problems, but after an administrator clears it, the problem should be gone.

1. Change server-side view distance

  1. Stop the server if running.
  2. Click on Files. Next go to Cong Files and select Server Settings.
  3. Locate the View Distance option and change it to 4.
    Existing connection was forcibly closed
  4. Scroll down and click Save to apply the changes.
  5. Start your server and check for any improvements.

If you’re getting this error as a client, adjust the view distance by doing the following:

  1. Start Minecraft and open Settings.
  2. Go to Video settings.
  3. Now set Render distance to 4 or 2 and save changes.

2. Use Forge and Optifine mod

  1. Download Forge. After downloading it, install it.
  2. Next, download Patcher mod.
  3. Download Optifine mod.
  4. Using Optifine, reduce your settings to improve the performance.
Note icon NOTE
Be sure to check installation instructions for each mod on its website.

3. Adjust your router settings

  1. Open your router’s configuration page and log in.
  2. Navigate to LAN and then select Switch Control.
  3. Locate NAT Acceleration and disable it.

This feature is available usually on ASUS routers. It’s sometimes known as Hardware acceleration in some cases by other branded routers. It can also be named as CTF (Cut-Through Forwarding) and FA (Flow Accelerator).

4. Adjust router firewall settings

  1. Go to your router’s login page and sign in.
  2. Next, go to Firewall settings.
  3. Lastly, disable blocking of IP fragments.

Follow all the steps in the article one by one to fix the An existing connection was forcibly closed by the remote host in Minecraft.

This isn’t the only issue that you can encounter, and we already covered Minecraft failed to authenticate your connection in a separate guide.

Do let us know which method helped you resolve the issue in the comments.

Error 0x80070570: What Does it Mean & How to Fix it

Windows errors aren’t uncommon, and many of them are present on Windows 10 as well. One particular error that we’re going to fix today is 0x80070570.

While some problems aren’t serious and can be ignored as a one-time occurrence, others can interfere with your daily activity and affect your performance.

What does error 0x80070570 mean?

This specific error appears when installing Windows, and it’s usually caused by bad installation media or a hard drive issue. Also, when installing the OS from an external drive, you may come across error 0x80070570 on USB.

Many also reported Unexpected error when copying a file, and this can happen due to your antivirus, so you might have to temporarily disable it. In this case, the error message reads, Error 0x80070570 The file or directory is corrupted and unreadable.

Another reason for this issue is the lack of administrative privileges, and if that happens, you’ll usually get Error 5: Access is denied error.

Error 0x80070570 can prevent you from copying certain files, and speaking of errors, users reported the following issues:

  • Windows installation error code 0x80070570 – In most cases, this error occurs while installing Windows 10. To fix the issue, you need to check your hardware.
  • 0x80070570 Windows 10 clean install – If you’re having this problem while installing Windows 10, you might have to change your BIOS configuration.
  • Windows cannot install required files error code 0x80070570 – If this error occurs, the problem might be your SoftwareDistribution directory. To fix the issue, delete all files from it and the issue will be resolved.
  • Error 0x80070570 on Windows 10,11,7 – Many OS iterations encounter this error, the trick is to try all the solutions below to find the one that works for you.
  • Error 0x80070570 on USB/external hard drive – By performing a Startup Repair you can check whether there is something wrong with your peripherals.
  • An unexpected error is keeping you from deleting the file 0x80070570 – This error can also occur while copying your files. If that happens, be sure to scan your hard drive for errors.

Why does error 0x80070570 appear?

In most cases, this error shows up due to file corruption. It can occur if your system is damaged or certain files are missing.

The error can appear due to hardware failure as well, and if your hard drive or memory is faulty, you might encounter this issue.

What does error 0x80070570 do?

This error usually prevents you from copying files on your PC. In some cases, it can affect only certain files, so it won’t cause too much inconvenience.

However, sometimes this problem can affect Windows installation, so it will make you unable to install your operating system at all.

How do I fix error code 0x80070570?

1. Use a dedicated tool

If you get the error 0x80070570 it means that the file or directory is corrupted and unreadable. In this particular situation, we recommend that you use a dedicated advanced app.

These amazing tools provide online databases that are constantly updated with files that you can download in order to replace corrupted ones.

2. Move your file to a different directory

  1. Locate the file that you can’t access due to this error.
  2. Right-click the file and choose Cut from the menu.
  3. Move to a different directory. Right-click it and choose Paste.
  4. Now repeat the steps from above and move the file to the original location.

3. Perform a Startup Repair

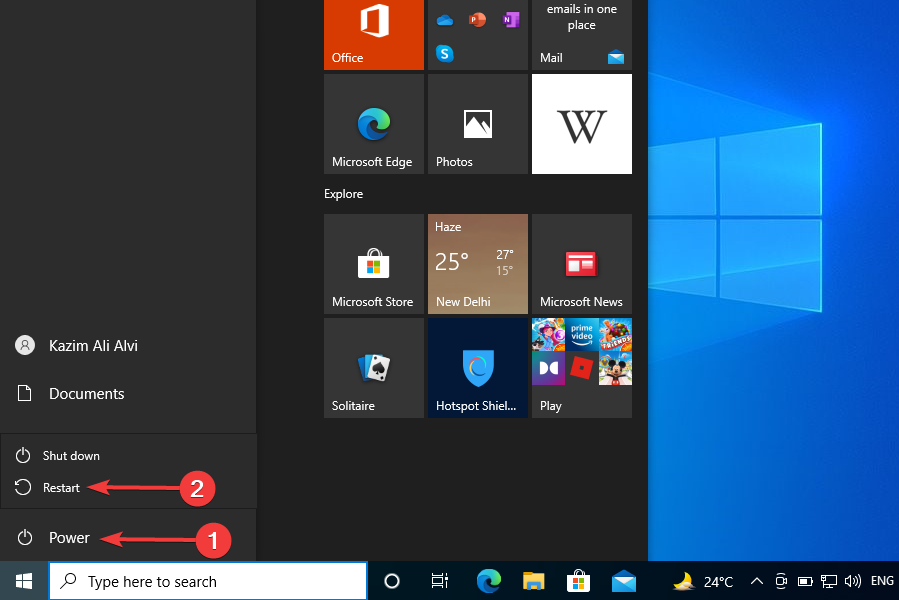
  1. 1. Open the Start Menu and click the Power button.

  2. 2. Press and hold Shift and select Restart.

    restart the computer
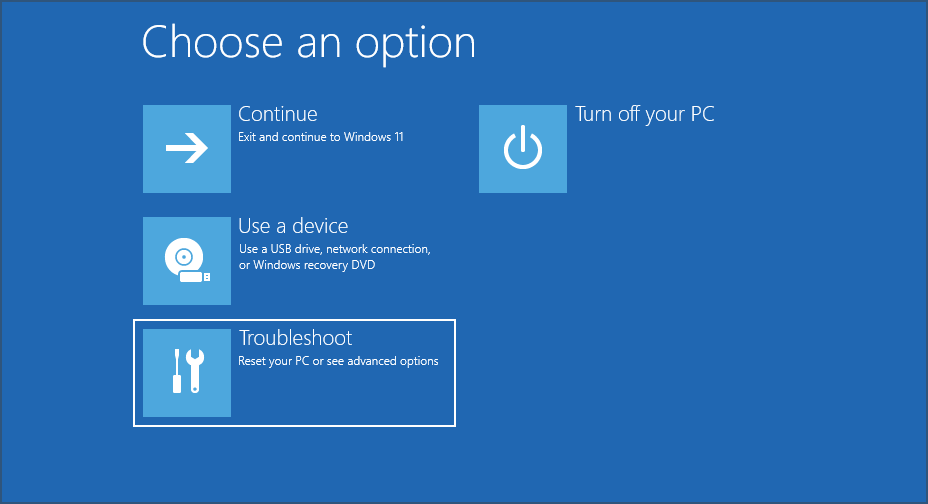
  3. 3. Click on Troubleshoot.

    Troubleshoot to fix device manager power management tab missing
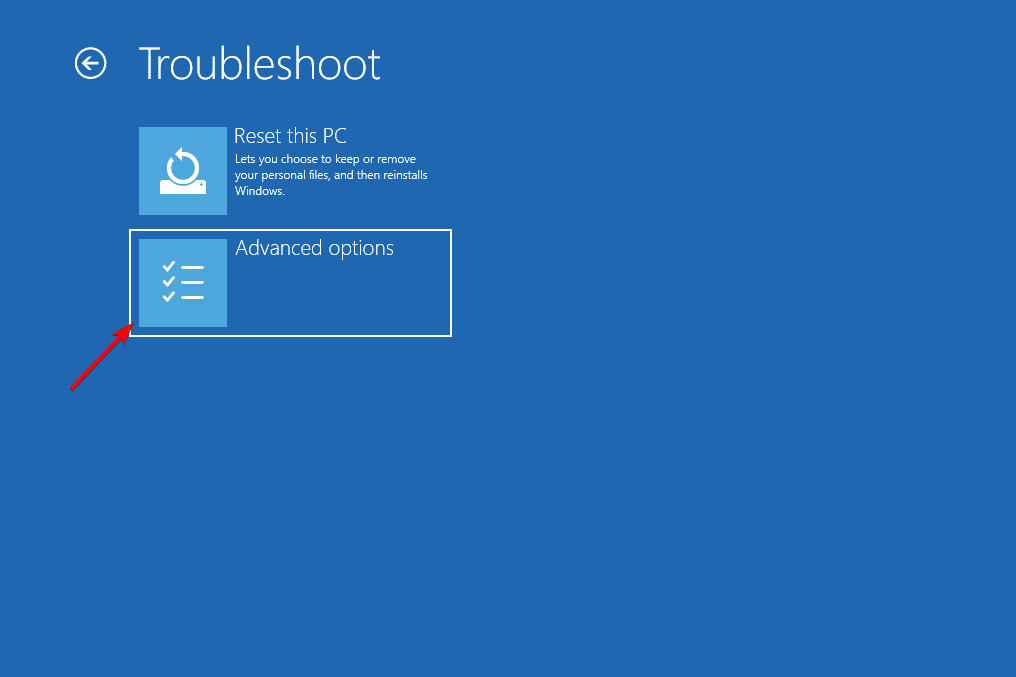
  4. 4. Now select Advanced options.

    advanced options exception on invalid file
  5. 5. Next click on Startup Repair. If asked for Administrator password make sure that you enter it.

    go to advanced options
  6. 6. Startup Repair will now try to fix your computer and after it’s done you should see a report saying whether the repair process was successful or not.

  7. If you encounter error 0x80070570, it is worth performing a Startup Repair to try and fix your system. The built-in Repair tool will scan and repair your PC and should get rid of any underlying issues it has.

Sometimes this method won’t be able to fix the issue, so it might be better to use specialized and fully automated repair software.

4. Disable your antivirus

  1. Press Windows key + S and enter defender. Select Windows Security from the list.
  2. In the left pane, navigate to Virus & threat protection. In the right pane, click on Manage settings.
  3. Now disable Real-time protection.
    turn-off-realtime-protection

This method works only for Windows Defender, but if you’re using a third-party Windows 10 antivirus, the process is different.

5. Check your hard drive for errors

  1. Open This PC, right-click the partition you want to scan, and choose Properties from the menu.
  2. Navigate to Tools tab and click the Check button.

  3. Check Automatically fix system errors and click Start.

If you’re encountering error 0x80070570 on Windows 10, the problem might be related to corrupted files on your hard drive. To fix it, you just need to check your hard drive for errors by doing the following:

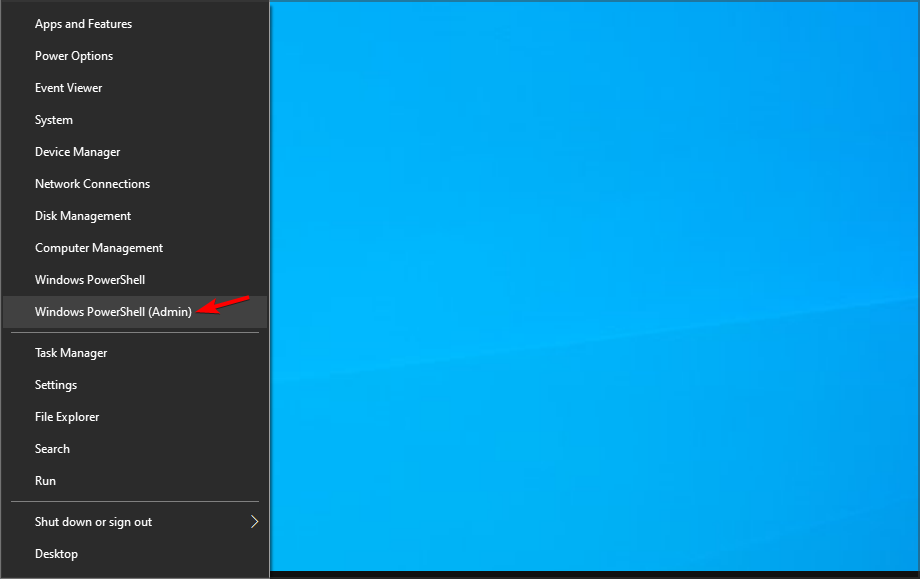
  1. Press Windows key + X to open the menu. Choose from Windows PowerShell (Admin) the list.
  2. When PowerShell opens, enter the line below and press Enter to run the command. Keep in mind that you need to replace X with the letter that represents your drive: chkdsk /f X:
  3. Chkdsk scan will now start and scan the selected partition. Keep in mind that chkdsk will perform a detailed scan, so it might take about 10 or more minutes.

6. Perform in-place upgrade

  1. Visit the official Windows 10 download page and click on Download tool now.
  2. One the software is downloaded, run it.
  3. Select Upgrade this PC now and click Next.
  4. Choose Download and install updates and wait for the process to finish.
  5. Follow the instruction on the screen.
  6. Once you reach Ready to intall screen, select Change what to keep.
  7. Select Keep personal files and apps and click Next.
  8. Follow the instructions on the screen to complete the process.

7. Delete $ directories

  1. Open File Explorer.
  2. Go to the C drive.
  3. Now click on View and check Hidden files.
  4. Several folders with $ in front of their name will appear.
  5. Delete those folders.

According to users, these files are located in the root directories on your partitions such as C, D, etc. so be sure to delete them. After deleting these files, try installing Windows 10 again.

If you can’t access Windows or delete these files from Windows, boot your PC from a Linux flash drive and remove them.

8. Delete all files from the SoftwareDistribution directory

  1. Press Windows key + X and select Windows PowerShell (Admin).
  2. When Command Prompt starts, run the following commands:
    net stop wuauserv
    net stop bits
  3. Minimize PowerShell. Now navigate to the directory path below and delete all files from it: C:\Windows\SoftwareDistribution
  4. After deleting all files, go back to Command Prompt and run the following commands:
    net start wuauserv
    net start bits

9. Use Ethernet connection and disconnect USB devices

  1. If possible, use Ethernet connection to perfrom the update.
  2. Disconnect all non-essential USB devices.
  3. After doing that, try to perform the update again.

10. Enable and disable RAID in BIOS

  1. Restart your PC.
  2. While the PC boots, keep presing F2 or Del.
  3. Now locate SATA Mode configuration and make sure it’s not set to RAID.
  4. Save changes.

Can a damaged hard drive or memory cause problems?

A damaged hard drive or SDD will cause a lot of issues. Firstly, you won’t be able to access certain files, and you’ll experience slowdowns and freezes.

Eventually, your storage device will completely fail, and you won’t be able to access your data at all. The same goes for your memory.

You’ll experience crashes and BSOD errors, your PC will become unstable, and eventually, you won’t be able to boot to Windows.

How do I fix error 0x80070570 on external hard drive?

The error may be caused due to bad sectors on the drive, and an effective solution would be to run the Check Disk scan. Also, you may scan the external hard drive for malware using a reliable antivirus.

Some users reported that it was a problematic third-party software installed on the PC that led to the error, in which case you will have to manually identify and remove it to fix the error 0x80070570.

What can I do if a Windows installation error appears?

The first thing that you should do is check your BIOS configuration since it’s possible that your PC isn’t properly configured.

Be sure to inspect your installation drive, and create it again, if needed. Sometimes the setup might fail because the bootable media isn’t properly configured or if the ISO file you downloaded is corrupted.

In case you didn’t manage to fix this issue, our Windows 10 installation failed guide has a couple of useful solutions that you might want to check out.

If you have any other suggestions or questions, don’t hesitate to leave them in the comments section below and we’ll be sure to take a look.

Best Registry Cleaner to Use in 2026 [We Tested 30]

The best Windows 10 registry cleaner can fix errors, boost performance, and keep your PC stable. We tested 30 free and paid registry cleaner tools for compatibility, safety, reliability, accuracy, extra optimization features, performance, and ease of use.

Note that Windows was designed to store all the important information and settings inside registry files, contained in the registry. The tools below will help you keep things in check and clutter at bay:

🏆 Fortect – Easy to use, focused on fixing registry errors and boosting stability.
🥈 Iolo System Mechanic – Safely cleans and speeds up your PC by optimizing registry and startup.
🥉 Fortect – Full scans with reliable registry backup for safe fixes.
🔹 CCleaner – Automatically backs up your registry before cleaning.
🔹 IObit Advanced SystemCare – User-friendly interface for quick registry cleanup.
🔹 Glarysoft Registry Repair – Simple, safe cleaning with easy undo options.

Let’s explore each of them further:

What are the best registry cleaners for Windows 10 & 11?

Fortect – User-friendly service

Next on our list is Fortect which is a great repair and optimization tool that has a lot of advanced features you can use to keep your PC at its peak performance.

It helps you run a scan of your whole system and establish your computer’s health state and show you all its deficiencies that need to be repaired or replaced.

Thanks to its advanced OS repair technology, Fortect will compare your device’s operating system to a new one so it can detect exactly which components need improvement.

This software checks for invalid or corrupt registry entries that are left behind by numerous programs on your Windows Registry.

Furthermore, you can select to repair your OS files by replacing all the damaged or missing files, including DLLs and registry keys, with healthy components from the repository which is regularly updated.

Fortect can protect and monitor your downloads, installs, and executables from malware and viruses every time you download something.

If there are junk files and registry issues, you can definitely perform a cleanup procedure and get rid of all these build-ups from your folders, disk, and hard drive which automatically improves your PC’s performance.

You can perform a browser cleanup as well by removing all web browser tracking cookies, which will clear any trace of your online activity.

Your device will run smoothly because your computer’s stability issues will be successfully found and ultimately corrected by Fortect’s repair engine.

Fortect

Fortect

Try using Fortect to clean and repair your PC’s various issues for a smoother performance.
Free trial Download now

Fortect PC Cleaner – Very powerful and easy to use

PC Cleaner from Fortect is an amazing tool that can be used for cleaning your computer registries but also for general optimization.

This tool comes with a straightforward interface, I was quite surprised by how intuitive it was compared with similar software.

After installation, you will notice that the program is very light on your system, and the resource requirements are quite low.

Scanning the computer is seamless and will be done in just a few minutes, after which a prompt will inform you of all the issues identified and you can choose to fix them all or you can go around and access each section individually and only repair what you see fit.

When it comes to registries, PC Cleaner offers you a dedicated section in the Clean Up tab. You can there select to run a full scan or if you already know where the issues are located you can just customize the scan.

Of course, when working with registries it is always recommended to create a backup, as they are very important system files and you don’t want to break anything in there. PC Cleaner allows you to safely back up your registry before running the scan so you can make sure your computer is safe.

The scan itself only takes a few minutes and it is very comprehensive. This software will identify Windows issues but also problems created by third-party software.

After the scan with just one click all these issues will be solved and you can already feel the improvements on your computer.

All in all this software is very powerful and easy to use. It deploys fixes easily and without any stress on your system, and the number of issues it repairs is simply amazing for such a light tool.

PC Cleaner from Fortect is a great choice when you want to quickly fix your registry but also for other system-related issues.

Fortect Cleaner

Fix any registry issues in just a few cliks with this user friendly tool!
Free trial Visit website

IObit Advanced SystemCare – Outstanding interface

Advanced SystemCare is probably the best-looking software on this list in terms of interface design.

The software packs a lot of useful features, and even though we will focus mainly on the Registry Clean tool, the other elements deserve a mention as well.

Note that the Clean & Optimize section of the software provides you with tickable boxes for various tasks and provides a good overview of the software’s capabilities.

Because the software is created to be as easy to use as possible, you also have the option to tick the box next to Select all, and not waste any time choosing what you want to be optimized exactly.

The toolbox section of this software enables you to extend its capabilities even further by choosing from options like Internet Booster, Driver Booster, Disk Doctor, and many others.

Choosing the Registry Cleaner from the System Clean section in the Toolbox presented above will initiate a scanning process that will not take long before identifying every aspect of your registry which is not correct.

Then, automatically, the tool will replace the corrupted data to improve your system’s stability.

If you are not too tech-savvy, this tool is great for you because the interface is very simple to understand, and it is quick no matter how many errors your registry has.

It also lets you shut down or restart your PC automatically after the cleaning is done, and it also performs automatic backups.

IObit Advanced SystemCare

Clean up your Registry and remove superfluous keys to enhance your PC performance by up to 200%!
Free Trial Visit Website

System Mechanic Ultimate Defense – Great boosting feature

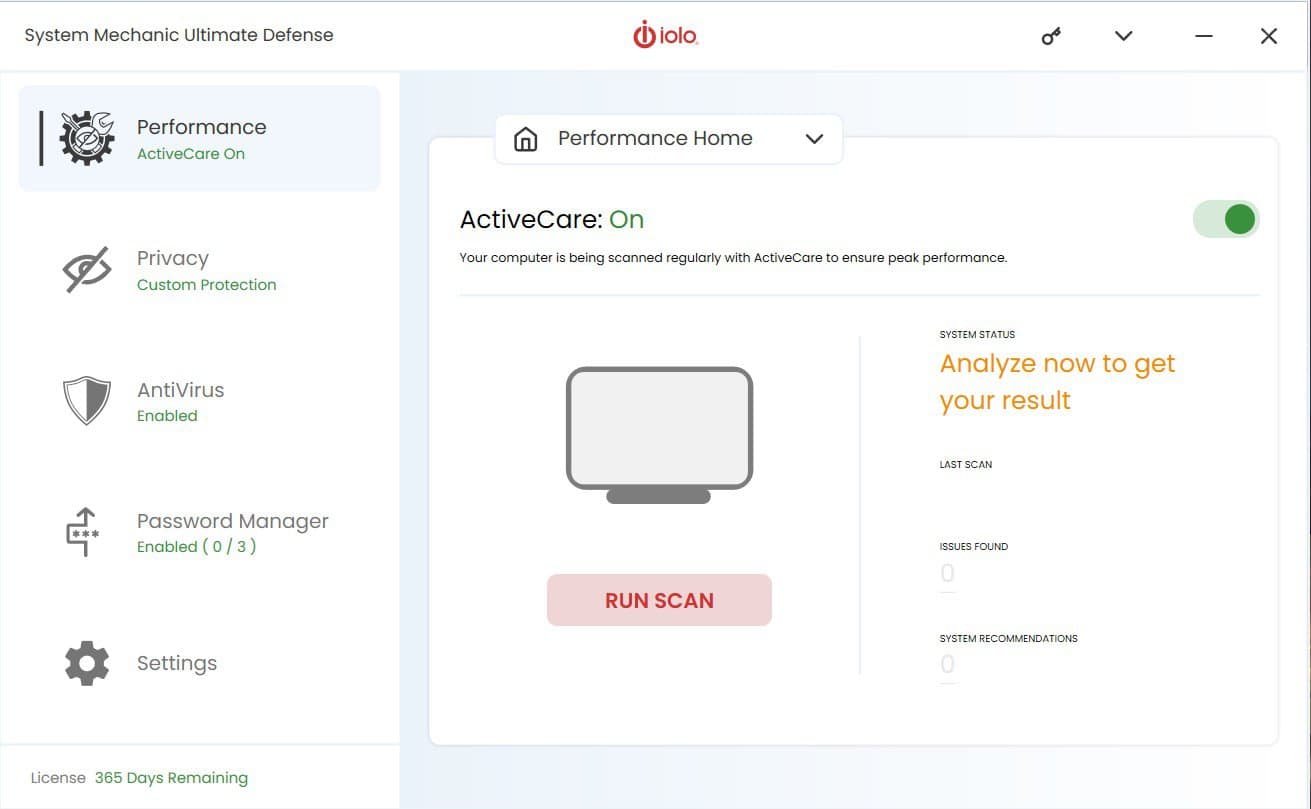
Iolo System Mechanic Ultimate Defense continues our list of the best PC registry cleaner tools, with a great track record of successfully boosting PCs, and doing so easily and without too much impact on your system resources.

If you’re struggling with too many background processes on your PC, this is the go-to tool for optimizing those processes to the core.

Besides the capabilities mentioned above, this handy tool also optimizes, cleans, and repairs broken registry values without the need for you to weigh in on all the minutiae.

Built to be easy to use and adaptable to the user, Iolo System Mechanic impresses with a simple yet slick user interface, which allows you to quickly access any option and deploy the troubleshooting steps required.

System Mechanic Ultimate Defense’s Privacy Guardian

As we now have an overview of what the software is capable of, let’s dive deeper into each of these capabilities and explore them further.

Initializing the scan is as simple as clicking one button and drinking a few sips of your coffee while the software does the heavy lifting for you.

Being capable of identifying almost any threat to your PC’s well-being, a scan will give you useful information about Deceptive and Unwanted Programs, the memory you have available, junk files from the Internet that take up space on your drive, security items that need to be removed, and even checks for connection problems.

System Mechanic Ultimate Defense repairing the problems

When it comes to PC maintenance, this tool does it automatically and provides you with a useful menu in which you toggle variables on and off.

The entire process has two big steps: automatic repair of registry problems (cleaning, optimizing, and issue detection) and automatic repair of registry fragmentation problems.

As you can see from the image above, you have the option to choose between a quick optimization process for your registry, or a complete session.

Even though the time it takes for these two processes to be completed differs, the accuracy of identification is very similar.

As the registry is an important component of Windows OS, keeping it working will ensure that you will not have any problems with your system. IOLO System Mechanic is the tool that can help you with that.

System Mechanic Ultimate Defense

System Mechanic Ultimate Defense

As its name suggests, this software is a real mechanic that will also optimize your PC after repairing your registry.
Check Price Visit Website

Glarysoft Registry Repair – Easy to use

Registry Repair from Glarysoft is a tool much like others on the list, it scans your registry and tells you if there are any errors present, and if there are, it will attempt to fix them.

Created with simplicity and efficiency in mind, Registry Repair automatically starts scanning your registry when you open it and identifies a specific number of problems, which are presented at the top of the window.

You then have the option to customize which of these areas you would like to exclude (if any), and then simply click the Repair your registry green button.

What makes this different from the other tools is the number of details it shows you about the errors.

It can tell you exactly what is wrong making it easier for you to decide if you want to do something about it. The scanning speed is impressive, and the results are thorough.

If you ticked or unticked any boxes from the previous window, it would be recommended that you perform another scan, and you can do so by choosing the Rescan option next to the green button.

This will ensure that no registries are missed and that your system will be able to operate smoothly.

Even though it doesn’t have any other features like the rest of the programs we presented in this list, Glarysoft Registry Repair does its job well.

Registry Repair

Safely scan, clean, and repair invalid registry entries with Registry Repair. You won’t regret this choice!
Free Trial Visit Website

Wise Registry Cleaner – Good registry cleaning quality

Wise Registry Cleaner has a simple and good-looking interface that works well and goes through your registry faster than most other programs on this list.

As opposed to some of the other options presented in this guide, the main focus of this software is registry cleaning but also includes other useful tools.

The Registry Cleaner section allows you to choose which of the areas of your PC and scanned and how you want the software to deal with possible issues.

Added to this, you can schedule registry cleaning at certain intervals, and also makes backups of your registry automatically in case you will ever need to revert the changes.

The System Tuneup tab offers other useful tools that can optimize your system including a variety of factors and preferences.

To start the optimization process, you will just need to choose the options you’re interested in and click on the Optimize button.

Moving on, there is also a very useful tab called Registry Defrag, which, as you might have already figured out, defragments your Registry thus affecting further optimization of your system speed and efficiency.

While there is a downside to this program in that you always need to perform a system reboot after using it, the results are so good that it is worth it.

Wise Registry Cleaner

Successfully repair Windows registry issues on your PC using this performant cleaner tool.
Check price Visit Website

CCleaner – Automatic registry back-up

CCleaner is one of the most popular tools that besides cleaning your registry, offers a variety of other useful features.

These include removing cookies and caches from your browsers and improving the speed of your PC.

Once you open this tool, you will be greeted by a friendly-looking dashboard that offers you efficient access to all the tools you need.

Starting from the top, you get the Health Check section, which enables you to perform a quick scan of your system and see if there are any issues across all departments.

Depending on the results you get, you can simply click the respective issues from the bottom of the screen and follow the instructions to start fixing them one by one.

The Custom Clean option, as the name suggests, allows you to customize the way the PC cleanup process will be done, including which applications to be scanned.

Depending on your goals, you can choose between two main categories, Windows, and Applications.

In the Windows tab, you will find everything that is built into your operating system, like caches, cookies, and data from Microsoft Edge and Internet Explorer, and the data collected within the System and Windows Explorer areas (see images above).

In the Applications tab, you will find the same correlating information, but dealing with third-party applications that you installed on your system, including browsers and other data-collecting programs (see image below).

Inside the Registry menu, you will find a comprehensive list of all the registries found on your system. Exclude or include any of them by ticking the box next to them, and then simply click Scan for issues.

The identification process will start and will present you with a list of all the registry files that need to be fixed.

After this, you can simply take each of these issues one by one and click the Fix Issue button or click Fix All Selected Issues for the program to automatically do it for you.

As an added bonus, CCleaner will automatically back up your registry before doing anything so you can restore it in case something bad happens.

However, this is optional and you can choose to restore the Windows 10 registry without backup.

CCleaner is also available as portable software, so you don’t even need to install it. It also comes with a paid version that can monitor your PC for changes in real time.

Tweaking Windows Repair – Straightforward program

When the idea of an old-school design sounds like music to your ears, rest assured that there is no better choice than Tweaking Windows Repair. This safe tool can help you fix a variety of Windows problems.

Even though is not as fully featured as other software options presented in this list, Tweaking Windows Repair still does a great job when it comes to repairing registry files across your system.

As soon as you open the program, you are welcomed by a screen that, even though seemingly rudimental, offers you quick access to all the important tools.

Starting the process involves the Pre-repair Steps, which ensure that your system is ready for a successful cleaning process.

Follow the on-screen instructions by clicking Go To Step 1, 2, etc., and make the required settings.

Before diving into cleaning the registry it is recommended that you make a Registry Backup, which will be available in step 3.

When it comes to registry cleaning, ticking the Repairs button from the top will open the following screen, in which you will need to select which of the options you want to apply to this fix, and then click the Start Repairs button.

This section will include the registry errors as well, and you can just relax until the software does its job.

Even though sporting an old-school design, this software performs cleanups for your PC in a very professional manner.

Tweaking Windows Repair

Acquire this reliable service for cleaning registry errors for free on your Windows PC.
Check price Visit Website

Outbyte PC Repair – Effortless characteristics

The Outbyte PC Repair tool has all the possible features and functionalities to identify and resolve performance issues but it can also repair the Registry in the process.

In fact, the solution is capable of solving more than 100 common PC issues and will even get rid of any PUP (Potentially Unwanted Programs) that may be lurking on your system.

Of course, it does a great job cleaning up the drive, improving security and privacy, identifying and removing the temporary and cached files, and many more.

Once you install and run the app, it starts performing a scan of all the potential problems of your system, including password weaknesses, vulnerabilities, and unuseful files that take up space on your drive.

Usually, after the detection step, you can easily click on the Repair button to clear all the problems in a single shot but in the Free trial version, you only have the Activate & Repair button which will lead you to the purchase options.

Outbyte PC Repair comes with real-time privacy protection features that help you disable Windows telemetry features.

You can also track the cookies from the browser and delete them and turn on the File Shredder tool to prevent any data leakage.

Lastly, PC Repair comes with a built-in uninstaller to get rid of any old or unwanted apps completely, along with any of their possible traces.

Other features of this tool include speed boosters for your system and browsers, battery management, and a lot more.

⇒ Get Outbyte PC Repair

Defencebyte Computer Optimizer – Exemplary system optimization tool

If you want a quick registry cleaner with an advanced detector for malfunctions, you can certainly consider Defencebyte’s Computer Optimizer.

Furthermore, the solution also offers a quick and deep scanning of all the temporary, cache, and search files to delete them with a single click.

Like any other such program, after the installation, Defencebyte Computer Optimize performs a full scan of the system and quickly provides a full report of the findings.

The best part is that this solution also has a free trial version so the Run to Optimize button really works and you will see all the detected problems get fixed at your own glance.

Of course, at the end of the process which lasts for only a couple of seconds, you will get a similar report with the status of the repairs.

After this quick fix, you can access Computer Optimize’s dedicated Registry Cleaner from its main dashboard and hit the Start button after you check the list with the procedures you want to perform.

There are ten possible operations that can be undergone during the tool’s scan but once you fix them, you will notice that your PC will visibly start working better.

The Registry scanning will take a little bit longer but still be measurable in seconds so your patience will not be tested.

Defencebyte Computer Optimize also comes with a complete uninstaller, startup program removal, browser cleaner, and a lot more.

⇒ Get Defencebyte Computer Optimize

JetClean – Simple application

Although it’s not as complex as the counterparts listed above, BlueSprig’s JetClean is straightforward and very effective in cleaning the Registry.

But just like a lot of other optimizer software from our list, this solution features a one-click junk file and unneeded registry entries removal function that will improve the performance of your PC.

Takes up very little space on your drive (only 3.54 MB) but offers great computer clean and fine-tune functionality in a reliable way.

At its first run, it will proceed with a system scan that includes the detection of Registry issues, OS, apps, shortcuts, and RAM problems.

Of course, you can go through them one by one, or just click the Repair button to make all the mess go away in seconds.

JetClean identifies and deletes any junk files that it finds in Recycle Bin, Recent Documents, Temporary files, Log files, Clipboard, DNS Cache, Error Reporting, Memory Dumps, and Jump Lists.

Helps speed up PC startup by rearranging applications that launch together with Windows. Shuts down programs that may slow down your system and even removes software from the registry.

Once you’ve cleared out the clutter, you can go to the Tools section to find a great uninstaller that will help you get rid of the most stubborn programs completely.

And this uninstaller can also take care of the Windows Updates that got stuck and prevent you from using the system optimally.

In the Tools section, you will discover a lot of useful features, like the Startup optimizer, allowing you to disable any software that starts when the system boots.

Although small and portable, this optimizer software comes with Internet Booster and Performance Booster, two features that promise to ramp up the performance of your device.

⇒ Get JetClean

Find all about broken registry items

In simple terms, broken registry items are corrupted or deleted registries that affect the way your PC works.

This situation usually occurs when the values are not set properly or have been changed because of some third-party or manual incurrence.

One of the first steps in troubleshooting a registry problem is to find the affected key manually or to use a dedicated Registry key finder to locate it.

Their existence can lead to a variety of problems, including frequent errors, the inability to open apps, driver issues and hardware unresponsiveness, BSoD errors, and more.

Broken registry items can be caused by frequent installs and uninstall of software on your PC, or even tampering with those while not knowing exactly what you’re doing.

Fortunately enough, there are ways of tracking any changes that occur with your registries, and this can be done with the help of dedicated registry monitoring tools.

Alternatively, there are even ways through which you can undo registry changes altogether, and while these usually involve a certain degree of skill and experience, following the steps described in the guide linked above will surely be of help.

But when you have so many things to keep track of, the registry can get pretty messy after a while, and you’ll end up having to clean up your registry.

What are registry keys used for?

As mentioned above, keys are ways through which your registries are organized based on their functions, and there are five in total:

  • HKEY_CLASSES_ROOT
  • HKEY_CURRENT_USER
  • HKEY_LOCAL_MACHINE
  • HKEY_USERS
  • HKEY_CURRENT_CONFIG

Each of these keys holds specific information, so those that have a certain experience with such things can easily modify their PC’s settings en-masse just by changing a few digits in the right registry.

It’s also not very wise to delete a Registry key from Windows 10 or 11 without knowing exactly its purpose or function because there might be damaging consequences.

However, keys aren’t the only thing that makes up the Windows registry, as it is also composed of different value types:

  • REG_SZ – String value
  • REG_MULTI_SZ – A multi-line string value
  • REG_EXPAND_SZ – Unlike the previous value type, this is an expanded string value
  • REG_BINARY – As the name says, this is a binary value
  • REG_DWORD – This is similar to a binary value, but also supports 32-bit decimal and hex values
  • REG_QWORD – It’s similar to DWORD but it’s stored as a 64-bit value

Registry keys are extremely important to the system’s correct functioning but if you run into trouble, there’s a way to restore the Registry in Windows 10.

While we’re at it, take a look at our top picks for the best registry cleaner to get a clearer overview of what’s to come.

Registry cleanerTop capabilitiesPlatform Compatibility
System Mechanic➡ Registry repair
➡ Clean junk files from your drive
➡ Security improvement tips
Windows 7 – 11
Fortect
➡ Replenish the operating system
➡ Substantial comparison summary
➡ Advanced repair technology
All versions of Windows
Fortect➡ Registry Backup
➡ Registry scan and fix
➡ Windows security and optimization
Windows XP – Windows 11
Advanced SystemCare➡ Registry Clean tool
➡ Driver updater tool
Windows XP/Vista/7/8/8.1/10/11
Glarysoft➡ Automatic Registry repairAll versions of Windows
Wise➡ Registry cleaning + backup + defrag
➡ System Tuneup utility
Windows XP, Vista, 7-11, 32 & 64 bit
CCleaner➡ Removing cookies and caches
➡ PC cleanup
 ➡ Back up your registry
Windows 10, 8.1, 7, Android, Mac
Tweaking Windows Repair➡ Registry cleaning + backupAll versions of Windows
Defencebyte➡ Quick registry & browser cleaner
➡ Complete uninstaller suite
Windows XP, Vista, 7, 8, 10, 11
JetClean➡ Detect RAM problems
➡ Startup optimizer
Windows 8, 7, Vista, XP, 32 & 64bit

Issues and tasks that this guide will help you with

By reading this complete guide, and the solutions, and with the help of the tools we included, you will also be able to perform the following tasks:

  • Remove printer from registry – When you remove a printer, it should be cleared from the Registry; if not, a registry cleaner from our list will help you with that
  • Repair broken registry items in Windows 10 and 11 – All of the tools listed below will help you accomplish this task
  • Remove software from the Registry – If a stubborn software is stuck in the Registry, the software presented below will certainly remove them
  • Remove software leftovers – Another useful feature of a registry cleaner is to clear out any unfinished uninstallation
  • Clean the Registry from uninstalled programs – The Registry can get clogged with the remains of uninstalled apps but the tools below will clear them out
  • Clean the Registry from Office – Microsoft Office is a big package but rest assured that you will delete any of its traces from the Registry using the recommended registry cleaners from our list

How can a registry editor improve your PC’s performance?

Besides solving any sort of issues that might be caused by a faulty registry value, there are many other benefits to using a good registry cleaner tool on your PC.

Here are some of the most common related improvements:

➡ Boost your PC performance

Even though in this case the exact registry cleaner tool you would use has great significance, the optimization of all the values in the registry of your PC could improve the processing speeds of your system considerably.

In the same way that a cluttered hard drive (even without errors) affects the speed at which the data from the HDD is being read, the clutter of registry items causes the same slow-down effect.

Having any registry items that are not of use removed will enable your system to process the remaining ones even faster than before, as your system will not waste any more time processing useless data.

Beyond this, the optimization of the remaining registry files will involve setting the correct values and even modifying their location inside the hives and keys.

Talking about improved performance, if you have made the big step to the new OS, we have a selection of the best registry cleaners for Windows 11 that will help you with that.

➡ Enable a faster booting process

Not all software presented in this list is equal when it comes to the improvement in your system’s booting times either.

While not having your PC’s booting time optimized takes a lot longer, using a registry editor with this capability can greatly improve the scores.

Fortect comes at the top with the best results and is closely followed by Iolo System Mechanic and IObit SystemCare.

Even though the others improve the booting times as well, the chart shows the difference between them.

It’s important to note that all the software from this list or recommendations work on Windows 11 too so if you upgraded, you will still be able to use them.

If you didn’t do that yet, check our guide on how to download Windows 11 ISO or update from Windows 10 and keep up with the trends.

Choosing the right software to optimize will depend very much on first identifying if you need a simple program that does only one job, or if you wouldn’t mind having some extra useful features.

Our recommendation is to go for software that offers a variety of capabilities.

If you’re still using the old Windows 7, we also have a list including the best registry cleaners for Windows 7 that still work fine for that OS.

What’s your favorite tool for keeping your PC fresh and fast? Do share your experience with us via the comments section below.

Fix Code 45 error on Windows like This

Are you getting the error message Currently, this hardware device is not connected to the computer (Code 45)? Don’t be alarmed, this post is meant just for you.

Several peripheral devices may be connected to the PC such as USB, mouse, keyboard, and other USB-connected devices. Error code 45 pops up especially on Windows 10 PC when the OS is unable to communicate with those devices.

The error implies that the connected hardware device is not being recognized by Windows, hence the error message.

However, this error can also be caused by corrupt Windows registry keys, outdated device drivers, or faulty hardware.

If Bluetooth is not detecting devices on Windows, it’s possible that Bluetooth is not working because of hardware issues.

To fix that, we advise you to check your drivers and install the latest updates. If you still can’t add Bluetooth devices to your PC, you might be able to fix this issue with the built-in troubleshooter.

Using a USB adapter can also be a great workaround for this problem, so make sure that you consider that as well.

10 Solutions to fix Code 45 error

1. Perform a DISM scan

  1. 1. Type cmd in the Windows search bar and click on Run as administrator to start Command Prompt with full rights.

    cmd-run-admin 0x80070002 windows update
  2. 2. Once the Command Prompt opens, input the following command: DISM /Online /Cleanup-Image /RestoreHealth

    DISM-RESTORE faulting application path
  3. 3. Press Enter to run the command.

  4. 4. The DISM scan will now start. This scan can take about 20 minutes or more, so don’t interfere with it or interrupt it.

  5. 5. When the scan completes, check if the issue persists.

  6. If the previous method didn’t fix the problem for you, perhaps you might want to try running a DISM scan to fix the This Hardware Device is Not Connected to The Computer error. This is fairly simple to do, and you can do it by following the steps above.

    Once the scan is finished, your installation should be repaired and the issue will be gone.

    If the DISM scan fails, there are several things you can do to fix it. You can check your antivirus, clean your system image components, and more. If you experience this issue, take care of it first, and then move on to the other steps of the solution.

2. Update the drivers

  1. Right-click the Start button and select Device Manager from the list.device-manager-w10 amd driver install problems
  2. Click on the Universal Serial Bus controllers category to expand it. Right-click on the affected driver and click on Update driver.update-usb hardware device error code 45
  3. Choose the Search automatically for drivers option then reboot your PC once the process is done.automatically-search bluetooth not working windows 10

This is all good but manually updating all the drivers can be a tedious task. This job is a lot quicker and easier if you use a third-party solution that updates and fixes your drivers automatically.

These tools are especially easy to use and effective so you will get maximum results with little to no effort on your part.

3. Run Windows Update

  1. Press Windows + I then click on Update & security.update-security nmi hardware failure windows 10
  2. Click the Check for updates button.check-updates searchui windows 10
  3. After the update is complete, restart your Windows PC.

In addition, you can fix the code 45 error problem by updating your Windows 10 OS to the latest version.

Microsoft constantly releases Windows updates so as to improve the system’s stability and fix various issues and errors associated with the startup error. Follow the steps above to update Windows 10 OS.

4. Repair PC Registry

  1. Go to Start, type cmd, and click on Run as administrator to start Command Prompt.cmd-run-admin 0x80070002 windows update
  2. Type the following command and press Enter:sfc /scannowscannow 0x80070002 windows update
  3. Wait for the scanning process to complete and then restart your computer. All corrupted files will be replaced on reboot.

The simplest way to repair your Windows registry is to use a dedicated repair tool. Alternatively, you can also use Microsoft’s System File Checker to check for system file corruption.

System File Checker verifies the integrity of all system files and repairs files with problems when possible.

5. Uninstall and reinstall the driver

  1. Right-click the Start button and select Device Manager.device-manager-w10 amd driver install problems
  2. Click on the Universal Serial Bus controllers section to expand it. Right-click on the affected driver and click on Update driver.unisntall-device hardware device code 45
  3. Restart your PC afterward. Windows automatically detects the change in your hardware and reinstalls the driver.
  4. Alternatively, download and install the hardware’s driver from the official manufacturer’s website or Microsoft’s driver download center.

Windows users reported that they were able to solve the code 45 error problem using this fix so make sure you try it out.

6. Replace the USB Device

If you are still experiencing the code 45 error problem after trying all the fixes above, it is most likely that the device may be faulty.

Some hardware devices are not genuine, hence, they do not last long. You fix the faulty device if you have good technical knowledge or consider consulting a computer engineer to help you fix it.

However, we do recommend that you purchase a new USB device and install it on your Windows PC normally.

This will prevent the Currently this hardware device is not connected to the computer. (code 45) error on your PC.

Here are some additional solutions you could try:

  1. Reconnect the Problematic Device: Ensure the connection is secure and test on another computer.
  2. Run Windows Troubleshooters: Use the Hardware and Devices troubleshooter.
  3. Disable and Then Re-enable the Device: Use the Device Manager to disable and re-enable the device.
  4. Run System File Checker (SFC): Use the SFC tool to scan and repair corrupted system files.
  5. Run CHKDSK: Use the CHKDSK command to check the file system and status of the system’s hard drives.

We’d love to hear from you if these solutions helped. Let us know your experience by leaving your comment in the section below.

Windows 11 Settings Won’t Open: How to Restore it [Fix]

Many reported that the Settings won’t open on Windows 11, and this can be a big problem since you won’t be able to configure your system.

However, there’s no need to panic, since there are ways to fix this problem, and it’s simpler than you think.

Why can’t I open my settings in Windows 11?

This appears usually due to file corruption, and if the Settings app or user profile is corrupted, you’ll encounter this issue. Outdated drivers can also cause this problem.

What can I do if the Settings app won’t open in Windows 11?

If you have Intel Graphics, so be sure to download the latest Intel Graphics drivers before trying any other solutions. Certain hardware, such as Wi-Fi adapters can also cause problems.

1. Create a new user account

  1. Press Windows key + R and enter netplwiz. Press Enter.
  2. Click the Add button.
  3. Select Sign in without a Microsoft account.
  4. Now click on Local account.
  5. Enter the account name and click on Next.

If you can’t complete these steps, you can create a new user account with net user command.

After creating a new account, switch to it and check if the problem is still there. If it’s gone, you’ll have to move your personal files to the new account and start using it instead of your old one.

2. Re-register the app

Note icon NOTE
Running certain commands in PowerShell can cause system issues, so be sure to back up your files and have a restore point ready in case any problems appear.
  1. Press Windows key + S and type powershell. Select Run as Administrator.
    Powershell 2 - Xvdd SCSI Miniport
  2. Run the following command: Get-AppxPackage windows.immersivecontrolpanel | Reset-AppxPackage
  3. After running the command, check if the problem is gone.

If your system applications are damaged, you can repair them with specialized tools. These types of software are able to scan and replace any broken files they may find in just a few moments.

Can I install updates if the Settings app isn’t working?

  1. Press Windows key + X. Select Windows Terminal (Admin) from the list.
  2. Now run the following command: Install-Module PSWindowsUpdate
  3. After it’s finished, enter: Get-WindowsUpdate
  4. Once the update is downloaded, run this command: Install-WindowsUpdate

Alternatively, you can use Microsoft Update Catalog to get the latest updates.

Can I use the Control Panel instead of the Settings app?

For the most part, yes. The two are quite similar, and you use the Control Panel to change several options.

Do keep in mind that you won’t be able to reset your PC, or change the appearance, but other operations should be accessible.

Is Microsoft removing Control Panel?

Slowly but surely Microsoft has been moving options from Control Panel to the Settings app, and some settings can only be found in the latter.

Although this feature is still available, one day it may be completely removed from Windows.

If the Windows 11 Settings app is not opening, these solutions should be able to help you fix this problem.

Sometimes the problem can be with your installation, and if that’s the case, you’ll have to reinstall Windows 11 from scratch. This might be sometimes necessary, especially if Windows 11 apps are not opening.

This isn’t the only issue you can encounter, and many reported that the Settings app is missing on Windows 11.

Did you find a solution to this problem on your own? Do not hesitate to share it with us in the comments section below.

How to fix Firefox freezing caused by Suggested Actions

Windows 11 22H2 has brought new features, performance improvements, and bug fixes. But it has also brought new problems and incompatibility issues. One of the most common issues is Firefox freezing due to the latest Windows 11 feature called Suggested Actions.

The problem was first spotted five months ago, and later, it was officially confirmed. When users try to copy something by right-clicking such as copying links or texts, etc., Firefox becomes unresponsive. Mozilla reportedly has fixed the problem with version 106.0.3.

However, still, the freezing issue is bugging a lot of users for the new clipboard feature. To overcome this issue, Mozilla suggested following some technical steps.

How can I fix Firefox freezing issues due to Windows 11’s Suggested Actions feature?

  1. Press Win + I on the keyboard to open Windows 11 Settings.
  2. Go to System and click on Clipboard.going clipboard settings windows 11
  3. Turn off the Suggested Actions by toggling the switch next to it.

With the release of Windows 11 Insider Preview Build 25163, Microsoft wanted to solve this issue. However, unfortunately, that only happened for a small number of users.

Firefox version 106.0.3 has solved the issue for a lot of users, but it is not the case for everyone. Moreover, on Monday, Mozilla addressed a new problem that is causing startup crashes on the latest Firefox version on Windows.

So, the steps mentioned above are the only true way to fix the Firefox freezing issue caused by Suggested Actions on Windows 11 until Mozilla or Microsoft fixes this.

How to Download Opera Mini for Your Windows 10 PC

There are many reasons why you might want to use Opera Mini on your Windows computer. It’s a lightweight browser that’s designed for people who have slow Internet connections, or those who don’t have an unlimited data plan.

You can download it from the Opera website, but unfortunately, it doesn’t work on PCs. This is because Opera Mini is designed for mobile devices and does not have any desktop version. However, there are other browsers that you can use instead of Opera Mini on your Windows computer.

How do I install Opera on Windows 10?

Opera is a web browser that offers a fast and user-friendly way to access the Internet. It’s available for Windows, macOS, and Linux systems.

If you’re using Windows, you can download Opera through the Microsoft Store or from the official Opera website.

Is Opera Mini free on PC?

Opera Mini is a free web browser that’s designed to use less data and be faster on slow connections. It is one of the best browsers for Android. It is available on the Android app store and is free to download.

Whereas there are many options on the internet that claim you can download Opera mini on your PC, it won’t work. Most websites offer the Opera Mini download apk version which will download but once you try to run it, you’ll experience installation issues.

The Opera Mini browser does not support any version of Windows 10, so you cannot install it using the Microsoft Store app or by downloading it from the official website. However, there are other versions of Opera that do work with Windows 10.

How can I download Opera Mini on Windows 10?

You can’t. However, this shouldn’t stop you from enjoying all the features that Opera has to offer. Although Opera Mini doesn’t work on PC, there are other Opera variations that you can use to get the same experience.

If you’re looking for an alternative that still offers the same speed and security, Opera or Opera GX are worthy contenders.

The most popular one is the desktop version of Opera. It has a built-in ad blocker, customizable themes, and thousands of extensions. While most modern browsers today claim to be focused on speed, Opera walks the talk.

It is one of the fastest browsers today and coupled with all the features, there’s no doubt that it should be your top browser. With a built-in VPN and ad-blocker, you can easily mask your internet activity without having to worry about today’s cybercriminals.

Opera’s super features are an endless list you should check out if you are still not convinced that it is the best PC browser.

When it comes to Opera GX, this is more for the users who spend most of their time with gaming consoles. You guessed that right, Opera GX is a browser made with the gaming community in mind.

Opera GX is a new generation of gaming browsers. It’s designed to be lightweight, fast, and secure. The main idea of the project is to create a browser for gamers that will allow them to enjoy their favorite games without any distractions.

It is a Chromium-based web browser for Windows, Mac, and Linux with a built-in ad blocker and VPN. It offers a clean, minimalistic interface with tabs on top.

Opera or Opera Mini

It depends. Each browser is suited for a different audience and different devices. Opera Mini offers many of the same features as its desktop counterpart but with some limitations that make it more suitable for use on mobile devices.

If you have an Android device and don’t have Opera Mini installed, you are missing out. For PC users, the Opera browser is your best bet. For a more detailed review, check out our Opera Mini vs Opera comparison.

We also have an Opera vs Chrome showdown in case you are wondering how it compares with other browsers.

Don’t forget to check out the differences between Opera and Firefox to get a clearer picture of the browser world.

If you prefer smaller apps, we also have a great guide on how to download the Opera News app on PC, so you might want to visit it.

Let us know what Opera variation you use and your experience thus far in the comments section below.

PlayStation Plus has lost nearly 2 million subscribers since June relaunch

Sony’s efforts to restructure its PlayStation Plus game subscription service into something that can rival Xbox Game Pass is not getting off to the best start. Since the service’s June relaunch it has lost 1.9 million subscribers, according to Sony’s Second Quarter financial report. The total subscription numbers fell from 47.3 million to 45.4 million during that three month span.

While that still eclipses the roughly 25 million Game Pass subscribers, it is not the kind of momentum Sony was hoping for with the relaunch of PlayStation Plus. What’s more, it seems as though the relaunch has failed to reverse a trend that has been ongoing since fall of last year, when PlayStation Subscriber numbers started to decrease. Over the year since, a total 2.6 million subscribers have been lost.

However, it should be pointed out that Sony’s revenue from PlayStation Plus through this period has actually increased by 10%, thanks to the more costly tiers being offered. This means Sony is earning more money per subscriber, though those subscriber numbers are dropping.

Sony execs have placed some of the blame on the fact that Sony has failed to flex its marketing muscle. During Tuesday’s earnings call Sony CFO Hiroki Totoki said “we didn’t make aggressive promotions during the second quarter.” He also added that “More people are now going outdoors.”

What’s the Best Browser for Firestick & Fire TV in 2026? Find Out

Amazon Fire TV is a great device for video streaming, but did you know that you can also browse the web with it?

You can install different options, and today we’re going to show you the best browsers for Fire Stick. But first…

Can I uninstall the Silk browser on FireStick?

Unfortunately, uninstalling the Sink browser from your FireStick is not possible, as it is a built-in element for the entire experience. But that does not mean that you’ll be stuck with it.

In fact, you can easily install a browser on Firestick and we will show you exactly how to do that.

As in the case of some other devices, certain elements, apps, and settings come pre-loaded, allowing the producer to tweak and customize the user’s experience based on the feedback they gather.

The browsers below that are not marked with this note will be installed normally onto your device, by using the Amazon Appstore download service.

Which browser is best for streaming video?

BrowserImpact on resourcesVideo-rendering capabilities
? Opera One✔️ Browser with very low RAM consumption rates (around 600 MB)✔️ Can compress videos and load them faster
Amazon SilkModerate RAM usageCan play videos from any website
UC BrowserMemory usage optimizationsSupport for casting across devices
Chrome❌ Chrome has high memory usageGreat sync capabilities for videos and more
PuffinSuper lightweight browser❌ Rather slow when streaming high-quality videos
GlanceOffers great, ad-free performanceWebView engine for fast video rendering
RM WebSimple and fast interfaceCompatible with Firestick streaming
FirefoxRather RAM-intensive, but speedy❌ Amazon support discontinued

As we all know by now, not all browsers are made the same, and this applies at all levels, no matter what tasks you want to cover with this type of software.

That being said, choosing the best browser for streaming video can be a cumbersome task for some users, with too much conflicting information being found online.

During our expert testing process, Opera One and Opera GX have proven that they can maintain a high-quality online video experience over time, and they do not affect your CPU and RAM at the same level as other options.

Which browser is best for FireStick?

Opera One – Great privacy & security

The first browser on our list is Opera One. The browser is available on multiple platforms, so it’s no wonder to see it available on Amazon Fire TV as well.

That being said, choosing the best internet app for FireStick will need to take into account a variety of factors, including the browser’s capability, but also compatibility.

Using the Opera One browser for FireStick has the ability to block ads out of the box so you can enjoy the ad-free browsing experience. Opera One can also compress videos and save your bandwidth and even make videos load faster.

Furthermore, Opera One allows you to add pages to the home screen easily, and it even has support for push notifications. Private browsing mode is also available, so your browsing history and cache won’t be stored.

The browser comes with a sleek user interface, and since it’s lightweight it should handle any website without any slowdowns. Sometimes, Amazon Fire TV can struggle to open browser links.

That won’t be the case with Opera One. Besides, it has plenty to offer, so if you’re looking for the best browser for Firestick or streaming in general you should definitely give it a go.

Other useful features:

  • Redesigned user interface
  • Ability to block ads out of the box
  • Video compression feature
  • Modular design
  • AI-integrated browser

Opera One

Experience the full Fire Stick capabilities by taking advantage of the superior speeds and stability of Opera One.

Amazon Silk – Basic browser with built-in parental control

Amazon Silk is developed by Amazon, and it allows you to watch videos and browse the web from your Amazon Fire TV device. Silk works with Fire TV remote, but it also fully supports Alexa.

The browser is simple for navigation, and it has the ability to add bookmarks and memorize your passwords. It can also render both desktop and mobile sites.

If needed, you can block websites thanks to the parental control feature.

Other useful features:

  • Works with Alexa
  • Ability to play videos from any website
  • Can save your passwords for quick login
  • Bookmark feature
  • Parental control

⇒ Get Amazon Silk

UC Browser for FireStick – Good speed and customization options

UC Browser offers some great features that can not be ignored if you’re interested in finding the best browser for FireStick, like very easy navigation, good speeds, and customization options.

This browser not only allows you to play videos on your TV service but will be able to sync between devices and thus make the entire endeavor a lot easier, especially if you’re planning on casting your devices to each other.

The latest version of the software 9.1.0 has a set of very good features added to it, like the capability to preload pages based on intelligent analysis, background downloads that don’t bother you while browsing, and a new and improved auto-fill feature to save some time every time you want to log in or order something online.

Amongst the changes, UC Browser has also gotten improvements when it comes to its security, and memory usage optimization, making it more versatile than ever.

Other useful features:

  • Instant share capability to Facebook, Twitter, etc.
  • Built-in voice control
  • Multi-touch capable
  • Built-in download manager
  • Night mode

⇒ Get UC Browser for FireStick

Chrome browser for FireStick – Very good customization tools

Tip icon Editor’s tip
Installing this browser on your FireStick will require you to sideload it by using the Downloader app from the Amazon Store.

Once you have the Downloader app installed, you can simply paste the following link and hit Enter to reach the downloading page for Chrome: https://pttv.xyz/ and search the Index for Chrome.apk.

Even though the Chrome browser is designed for Android and PCs, it still is compatible with FireStick. The only issue with choosing this browser is that it needs to be installed as an APK file (the Android installation file), as it is not available on the Amazon Appstore.

This browser makes using your FireStick a lot easier than when using the built-in apps and adds a good layer of privacy and protection on top.

Even though this browser can not be compared with Opera One, Chrome still is a very good alternative to browsers like Silk Browser, which is optimized for FireStick but lacks in features and stability department.

Other useful features:

  • Easy-to-use UI
  • Great account sync capabilities
  • Can download community-created apps
  • Uses the Blink search engine
  • Multiple tabs

⇒ Get Chrome for FireStick

Puffin Browser for FireStick – Very lightweight with slow browsing speeds

Tip icon Editor’s tip
Installing this browser on your FireStick will require you to sideload it by using the Downloader app from the Amazon Store. The details of this process can be found at the start of this guide.

Once you have the Downloader app installed, you can simply paste the following link and hit Enter to reach the downloading page for Chrome: bit.ly/browpuff or search for Puffin TV.

Even though this browser looks good on the FireStick TV, Puffin has some serious speed issues when it comes to streaming any sort of content, especially high-quality videos and music.

For what this software lacks in speed, it makes up for privacy and security, allowing you to use the built-in security protections to render websites on the cloud servers of the company itself. Even though this browser doesn’t have a built-in VPN, this service works similarly.

Puffin Browser for FireStick is also very simple, with just a few of the basic features being present for your use.

Another very important aspect of choosing this browser for your FireStick TV, is that free users have a limited data allowance until they decide to upgrade the app. Some features are also restricted for free users.

Other useful features:

  • Can download to PC or onto cloud storage services
  • Accepted search engines: Google, Yahoo, Yandex, Bing, and Naver
  • Easy to use with a simple interface
  • No extensions
  • Very slow browsing speeds

⇒ Get Puffin Browser for FireStick

Glance Browser – Simple alternative to Chrome

Glance Browser is built on the WebView engine, the same web engine that is behind Google Chrome. Regarding speed, the browser offers great performance and a simple-to-use interface.

It’s worth mentioning that the browser is ad-free, and it has a search widget available in the notification drawer thus allowing you to make searches quickly.

Glance Browser is a solid alternative to Amazon Silk, and if you haven’t tried it, this might be the perfect moment for it.

Other useful features:

  • Built on the WebView engine, just like Chrome
  • Ad-free
  • Fast
  • Simple user interface
  • Search widget in the notification drawer

⇒ Get Glance Browser

RM Web Browser – Simple browser for basic web exploration

RM Web Browser is built for Kindle Fire and Android devices, and according to the developer, it offers certain features that other browsers don’t.

Using this browser, you can get local news, weather, and other information right from the start screen. The bookmark feature is available and it allows you to easily add or remove favorites from the start screen.

Notable RM Web Browser features:

  • Allows you to see useful information on the start screen
  • Bookmark manager

⇒ Get RM Web Browser

Firefox for Fire TV – Great UI with good privacy, but discontinued

Note icon NOTE
Mozilla ended its support for all Amazon products in April 2021. You can no longer download or update your browser. If you have it installed already, you will be able to use it, but it is not as secure as up-to-date browser apps.

Firefox has been available on the browser market for years, and even though it’s a good browser with a great number of fans, the company has decided to remove its product from the Amazon product list.

Even though that is the case, applying the same steps described at the start of this guide in order to sideload the APK file will work wonders.

Tip icon Tip
Installing this browser on your FireStick will require you to sideload it by using the Downloader app from the Amazon Store.

Once you have the Downloader app installed, you can simply type 16725 or the following link https://go.aftvnews.com/16725 in its search box, and open the page. The download will start and will take some time, but your Firefox for Fire TV will work once again.

This version will bring you the best videos from the web neatly categorized on your home screen.

The browser fully works with YouTube, Pocket, Rotten Tomatoes, and Flickr, and it allows you to save your favorite websites for quick access.

Other useful features:

  • Ability to search the web from your Fire TV
  • Neatly organized videos on your home screen
  • Works with services such as YouTube, Pocket, Flickr, and Rotten Tomatoes
  • Ability to save favorite websites to the home screen for quick access

⇒ Get Firefox for Fire TV

How can I install apps on FireStick that are not on the Amazon Appstore?

Installing a browser, or any other app that is not presented on the Amazon Appstore on your FireStick will require you to use an APK file (an Android default app installer format), and also make sure that your FireStick is configured to accept downloads from unknown sources.

Here are the steps you need to take in order to ensure that you will be able to try out some other browsers on your FireStick:

➡ Enable FireStick to install third-party content

  1. Turn on your FireStick.
  2. Choose Settings.
  3. Click My Fire TV (or Device & Software for newer models).
  4. Select Developer options from the list.
  5. Enable the Apps from Unknown Sources option.

➡ Install the Downloader App from the Amazon AppStore

As the official FireStick browsers are configured not to allow you to download files from third-party sources, in order to install some of the browsers mentioned below, you will need to have the Downloader App installed on your device:

  1. Click the Search option and type Downloader in the search field.
  2. Choose the Downloader app with the orange icon found in the Apps & Games category.
  3. Download the app to your FireStick and install it.
  4. Open the Downloader app, and search for the specific browser.
  5. Click Open to install and run that browser/app.

➡ Sideload the APK file to your FireStick

  1. Open the Downloader app on your FireStick.
  2. Allow permission for storage access.
  3. Search for the respective browser APK file from the main menu of the Downloader app.
  4. Download and install the APK file.
  5. Select Done.

Now you’re ready to sideload any app not found on the Amazon Appstore, so read through the guide and check for which browsers you need to perform these steps for.

Having a good web browser on your Firestick is important, and we hope this article helped you find the proper web browser for your needs.

If you have other suggestions, feel free to leave them in the comments section below.

Which Browser Uses the Least RAM and Resources in 2026

If you were wondering which browser uses the least RAM and CPU, it is Opera One. This powerful browser uses only 0.7 to 2.0% of your CPU, and around 600MB of RAM, making it perfect for both 1GB RAM, 2GB RAM, and beyond.

Check out our test results to see how it performed and find other worthy browsers with similar performance.

What browser uses the least RAM? (and CPU)

Take your time and explore the variety of benchmark results when it comes to almost all browsers on the market by researching our content table.

To better understand the circumstances of these tests, it is worth mentioning that all browsers were tested on the same PC and under the same conditions.

BrowserCPU UsageMemory Usage
Opera One0.7 - 1.0 %400- 620 MB
UR Browser0.8 - 2.0 %657 - 651 MB
Falkon2.3 - 3.1 %387 MB
Slim Browser1.9 - 2.8 %410 - 420 MB
SeaMonkey2.2 - 3.1 %336 - 353 MB
Maxthon2.2 - 3.1 %290 - 336 MB
Firefox1.4 - 2.3 %415 - 478 MB
K-Meleon1.4 - 2.5 %160 - 170 MB
Lunascape Orion2.2 %259 MB
Midori2.4 - 3 %355 MB
Pale Moon1.5 - 2.9 %539 MB
Mypal2.6 - 3.1 %569 MB

When it comes to how much RAM a browser should use, you should know that there is no specific amount of RAM that a browser should use, as the answer depends on how you use the PC.

This splits situations like this into three separate groups:

Type of userUsageRAM requirement
Casual usersimple internet browsing, email exchange, watching videos, listening to music, etc.you can perform these browser tasks without any problems if your system has at least 1-2 GB of RAM
Intermediate userbrowsing, word processing, spreadsheets, multitasking, running simple graphic programs, etc.you will be able to seamlessly complete your actions if your system has between 2 and 4 GB of RAM.
Professional userhigh-performance online gaming, graphic design/3D modeling, intensive multitasking, ultra-high-definition videos, multimedia editing, etc. anything less than 8GB will severely impact the way you can achieve your online goals, and the processes will also lag considerably. In order to be fully ready for this type of task, 16GB or 32GB RAM is recommended

First, analyzing the above information will ensure that you estimate the amount of RAM you should aim for depending on your device usage.

Let’s move on and find out what browser offers the perfect balance between system requirements and speed, agility, stability, and security.

Which browser uses the least RAM?

Opera One – Low impact on resources & AI tools

Opera One is an excellent Internet browser that works well on low-spec systems. It can be customized with add-ons and different types of plugins, allowing you to tailor your experience to your needs.

Regarding web page loading speeds, Opera One comes in 1st place in our top 3. This browser puts the least strain on your computer and uses the least resources.

The security features are better than other browsers like Chrome or Firefox, offering excellent protection against malware, phishing attempts, and other cyber threats.

If you’re looking for a less RAM-consuming PC browser, Opera One will be the perfect pick.

Here are some of the best features found in Opera One:

  • Can customize the toolbars by pinning icons
  • One-click bookmarking
  • Mouse gestures
  • Tab-stacks features – tab islands
  • Security settings for malware and phishing that need configuration to work
  • Compatible with Windows, macOS, and mobile devices
Opera One CTA

Opera

When it comes to having limited computer resources, Opera is the best choice for faster browsing!
Check price Visit website

UR Browser – 3 different levels of privacy/security

UR Browser is our second pick on the list of browser options that allow you to have the full online experience without needing a high-end PC.

Thanks to its sophisticated programming, UR Browser goes easy on your system resources. The memory consumption is much lower than on Chrome, right at the top with Firefox.

This browser was designed to require as few resources as possible to run and still offers access to a wide range of unprecedented features in the market.

Here are some of the best features found in UR Browser:

  • Very fast web-page loading speeds
  • Very low impact on system resources
  • Built-in VPN service
  • Ad-blocker
  • Malware blocker
  • 3 levels of privacy to choose from (Low, Medium, and High)

UR Browser

With fast web page loading speeds and a decent ad-blocker, UR Browser promises low memory usage.

K-Meleon – Simple yet very low resource requirement

The open-source K-Meleon is a fast and flexible web browser created with Microsoft Windows in mind. It also can use the Mozilla Gecko layout-based secure Goanna engine.

K-Meleon supports macros and configuration files, allowing users to adjust most of the browser’s features on outdated operating systems and hardware that more contemporary internet browsers do not support.

This function comes in handy when the browser has to be altered for public use, such as at an Internet café or library.

Additional features:

  • Popup blocker
  • Quick search support
  • Mouse gestures

⇒ Get K-Meleon

Lunascape Orion – Simple interface with acceptable loading speeds

Here is a  typical web browser that is straightforward to use. The Gecko engine-powered browser’s technology provides quicker startup and javascript execution than other browsers.

Additionally, it may launch more quickly, even when several add-ons are loaded.

With Lunascape’s Tabs menu, accessible by right-clicking on a tab, you may open many websites in a single tab. You may, for instance, close the right half of an open tab or all active tabs simultaneously.

It has many capabilities, including the ability to delete personal information when shut down, customize mouse motions and gestures, display open websites in several lines of text, automatically backup settings, import favorites from other browsers, and change user agents.

⇒ Get Lunascape Orion

Pale Moon – Old-style but fast browser

Pale Moon is an open-source, Goanna-based web browser that looks outdated compared to more popular ones.

However, it is updated to work on all modern processors, and it works seamlessly on Windows, macOS, and Linux.It has been drawing resources and add-ons from Firefox for years, but lately, Pale Moon has gone its own way.

It has its own add-on page, and themes, and you can customize it pretty much the way you want, so it’s up to you if you keep it slim and light or bling it.

Another exciting feature of Pale Moon is that it supports NPAPI plugins like Silverlight, Adobe Flash, and Java.

⇒ Get Pale Moon

Which low-resource browsers are the fastest?

Our team of testers with a combined experience of more than 15 years has tested all the browsers found in this list to offer you some useful information about this topic.

For the testing sequence, our testing team has used the Base Mark Web 3.0 benchmark, which tests the browsers for various possible issues.

This image has an empty alt attribute; its file name is chrome_8UP7rapG4M.png

Before we jump into the actual results of these browsers when dealing with RAM usage, it is worth noting that a larger number is indicative of better results in the benchmark.

Let’s have a look at how the browsers compare among themselves:

BrowserBenchmark Score
1. UR Browser1413.48
2. Opera One835.6
3. Falkon800.6
4. Slim Browser 675.43
5. SeaMonkey 658.35
6. MyPal609.81
7. Maxthon581.35
8. Firefox567.65
9. Pale Moon533.02
10. K-Meleon332.91 - Browser wasn't able to run WebGL 2.0 Test
11. Lunascape OrionNo benchmark tests chould be run
12. Midori No benchmark tests chould be run

UR Browser has taken the lead in this test, scoring 1413.48 points, making this browser option the fastest on the market, while Opera One has scored 835.6 points, making it the second-best browser for systems with low resources.

Even though UR Browser has had better scores, our testers have decided to place Opera One in the first place, as the level of built-in tools, stability, security, speed, and customization features makes it far more capable than UR Browser.

Not all browsers from the table above were included in this guide, but if you want more information on the topic, feel free to explore the best 12 browsers for use on old or slow PCs.

Conclusion

In this article, we explored some of the best browser software options on the market that work perfectly fine without having a high impact on your system’s resources.

Opera One is the best option, giving you access to top-of-the-range online privacy and security features, great customization power, built-in VPN service, breakneck speeds, and low system requirements.

Please let us know what software option you chose from this list and your experience using it in the comments section below.

PC Health Check Is Not Installed: What to Do When It’s Missing

PC Health Check app not installed on Windows 11 is one of the many problems users encounter after upgrading their computers to the latest version of Windows.

In the past, users have complained that the PC Health Check app crashes. But now, many could not even find the app on their device at all.

Why is the PC Health Check not installed on Windows 11?

There can be several reasons why PC Health Check is missing on Windows 11. The most culpable ones include:

  • Update error – With some Windows update errors that need your immediate attention, your PC can churn out problems like this.
  • Incomplete or incorrect installation – Sometimes, the app might have been installed on your computer. But if it’s not properly done, it will not be installed.
  • Malware infection – Virus attacks can be responsible for multiple issues on Windows 11. Making the PC Health Check disappear on your PC is one of them.
  • Corrupt or missing system files – System file errors on your computer can be the underlying cause.

Let’s find out how can make the PC Health Check app appear on your PC again.

What can I do if PC Health Check is not installed?

You can fix this PC Health Check problem with the methods explained below. But before you start using them, ensure you take these initial steps:

In case, you still can’t find the PC Health Check app after doing all these, then you can proceed to the following solutions.

1. Download and Install the PC Health Check app manually

  1. Click on this link to download the PC Health Check app to your Windows 11 PC then click on Show in folder once the download is complete.
    Download PC Health Check app
  2. Once the folder opens, double-click on the setup file, WindowsPCHealthCheckSetup.exe.
    PC health check setup
  3. Check the box next to I accept the terms in the License Agreement and click the Install button.
    Install PC health check app
  4. Wait for the installation to be complete then click the Finish button.
    Complete PC health check installation
  5. Now you can start using PC Health Check on your Windows 11 PC.
    Use PC health check

2. Uninstall updates

  1. Press Windows + I keys on your keyboard to open Settings.
  2. On the left tile, scroll down to click on Windows update and select Updates history.
    Windows update history
  3. Click on Uninstall updates under Related settings
    uninstall updates
  4. Next, locate the latest update under Microsoft Windows and click on Uninstall.
    uninstall latest update
  5. Click the Yes button on the dialogue that pops up and wait until the removal process is complete.
  6. Restart your computer and check if the PC Health Check app has been installed.

3. Perform a system restore

Tip icon Tip
To use a system restore point to solve any problem on your PC, you must have created a restore point before the problem arises. Follow this comprehensive to learn how to create a restore point in Windows 11.
  1. Click on the Search icon on your taskbar, enter Create a restore point into the Search box, and select the Best match result.
    create a restore point
  2. Next, click on the System Restore… button on the System Properties window that pops up.
    system restore
  3. Click the Next button to proceed with the system restore.
    Proceed to restore
  4. Select the system restore point you want to use and click the Next button.
    Select restore point
  5. Click the Finish button to confirm the system restore.
    Complete system restore
  6. Your PC will automatically restart to effect the changes. Wait until the process is complete then check if the PC Health Check app is now on your PC.

If you follow the solutions in this guide, you should be able to get the PC Health Check app back on your computer to benefit from its useful insights.

The PC Health Check app provides you with up-to-date information on the condition of your computer, enabling you to take proactive measures to improve Windows performance.

On top of system compatibility checks, this tool also helps with regular Windows updates. It will notify you if your device requires maintenance or an update.

Are you able to install the app with these solutions? Let us know in the comments section below.

Best PC Repair Tool for Windows 7 [Ranked From 4 Tested]

Though Windows 7 is a very old operating system for which Microsoft ended support in January 2020, there are still some using it on their PCs for lightweight tasks.

Since the update support has ended, you will come across multiple issues using Windows 7. Thankfully, this guide gives you a list of tested PC repair tools for Windows 7 that you can use and fix a multitude of issues. Let us get right into it.

Is there an in-built repair tool for Windows 7?

Yes. There is a repair tool for Windows 7 available in-built. You can also repair your copy of Windows 7 by using the CD/DVD of your Windows 7 OS.

It is called the Startup repair tool and can help you fix all sorts of startup issues. Also, you can run the good-ol’ SFC Scan to fix broken or corrupt system files on your PC.

What are the best PC repair tools for Windows 7?

Tweaking Windows Repair – Lightweight and effective repair tool

tweaking windows 7 repair tool

Tweaking.com – Windows Repair is a tool is a versatile PC repair tool for Windows 7. It helps you fix multiple issues including registry errors, file permission problems, internet explorer problems, Windows update issues, etc.

While you may use this on your Windows 7 machine, it is also perfectly capable of resolving issues on modern PCs running Windows 10 as well.

Since the fact that it is lightweight and does the job pretty effectively, it is one of the best PC repair tools available for Windows 7.

When you purchase the Pro version, you also get access to features and optimizations for automatic updates, memory cleaner, Windows drive cleaner, and much more.

Here are some of the highlights of the Tweaking.com – Windows Repair tool:

  • Helps fix multiple issues on your Windows PC
  • Resolves temporary files and proxy settings issues
  • Repair Windows updates and registry errors
  • Lightweight and easy to use

Microsoft Fix It Center – Easy-to-use and official tool

While Microsoft has officially ended support for the Microsoft Fix It Center, you can still download it from a third-party source, and is actually a nice repair tool if you still have Windows 7 running on your PC.

It will help you scan your PC and fix problems including system crashes, audio issues, hardware issues, etc.

Microsoft Fix It Center has a clean and simple UI, and you need to hit the Run button to use the tool. Once the scan is complete, the tool will suggest solutions doing which the issue will get fixed.

The tool also offers options such as remote management of multiple computers, and online solutions, best for non-technical users.

Here are some of the best features of Microsoft Fix It Center:

  • Provides solutions for a wide range of issues
  • User-friendly and easy to use
  • Allows for remote-management of multiple PCs

⇒  Get Microsoft Fix It Center

Note icon NOTE
The download link for Microsoft Fix It Center is from a third-party website. We, at WindowsReport, advise you to scan the downloaded file before installing it.

OutByte PC Repair – Ideal for quick repair

Outbyte PC Repair is another stellar tool that will help you resolve issues related to performance or startup, very quickly and easily.

It comes with support till Windows 7, all the way up to Windows 11. So, it is a one-stop shop for any Windows machine.

You can use the Outbyte PC Repair tool to fix system issues, clean up your drive, performance optimizations, and even touch upon privacy and security.

Here are some of the key highlights of the Outbyte PC Repair:

  • Cleans up disk space
  • Optimizes performance
  • Improves privacy and security
  • Bans malicious websites
  • Fixes system issues

⇒ Get Outbyte PC Repair

iolo System Mechanic Ultimate Defense – Portable tool

When you talk about system repair, especially for Windows 7, you cannot miss out on the iolo System Mechanic repair tool.

It is one of the best PC repair tools for Windows 7 that you can have as it will help you tackle multiple issues with your PC.

You can use it to delete junk files, remove system-hogging bloatware, boost gaming, system, and download performance, free up memory, and repair system-related issues.

Check out some of the highlights of the iolo System Mechanic tool:

  • Helps boost the PC speed
  • Repair over 30,000 different issues
  • Remove bloatware
  • Cleans out junk files
iolo System Mechanic Ultimate Defense

iolo System Mechanic Ultimate Defense

Great repair program for effortlessly removing system-hogging bloatware and other issues.
Free Trial Download now

Many users across the globe have already shifted over to the latest operating systems. If you have a Windows 10 or Windows 11 machine, then you can check out our best Windows PC troubleshooting tools guide which will give you a list of the best repair tools available.

Also, if you do not want to spend money right away and want to test the waters before jumping ship, then you can refer to our best free PC repair tools guide.

Let us know in the comments below, which one of the above tools you got for yourself and if it was effective or not.

Fix: Drop Your Files Here Won’t Go Away in Microsoft Teams

Users encounter issues with Microsoft Teams that can make it annoying to use. In Microsoft Teams, an error message users complain about is to drop your files here, and the error doesn’t go away. Also, we get complaints about the operation failing with unexpected errors.

Why won’t the drop your files here box go away?

When the drop your files here box appears and won’t go away, it can be due to several factors affecting Microsoft Teams and your PC. The main culprit for this problem is the Microsoft Team cache. It can become old or corrupt, causing many issues with your app.

However, various other factors may cause Microsoft Teams to drop your files here prompt not to disappear. Some are:

  • Outdated Microsoft Teams app – Users can run into many issues with the Microsoft Teams functionality if the app is outdated. It won’t be able to fix Teams bugs like 911 that may cause issues.
  • Corrupt or faulty data file – When Microsoft Teams’ data file becomes compromised, it can interfere with how it works and cause Microsoft Teams not to log in.
  • Issues with the PC – Many issues may interfere with how it relates to other apps like Microsoft Teams. Factors such as outdated Windows, third-party app interference, and others may impact Microsoft Teams’ performance on your PC.

The causes of the error may differ on different PCs. However, the solutions discussed in this article will fix any cause of the issue.

What can I do if Microsoft Teams drop your files here won’t go away?

We recommend you apply the following preliminary checks:

Check if you’re able to fix the problem. If not, proceed with the steps below:

1. Use the drag-and-drop option

  1. Left-click the Start button, search for Microsoft Teams and open the app from the results.
  2. Use your mouse to drag the file you want to upload from its location and drop it on the drop your files prompt.
  3. A new prompt will appear, then press the X button to close the drop your files here prompt not disappearing on Microsoft Teams.

The drag-and-drop option allows you to proceed to the next screen, where you can access the X button for quitting tabs.

2. Restart the Microsoft Teams app

  1. Left-click the Start button and select Task Manager.
  2. Select the Microsoft Team app from the list of apps on your PC, click on the End task option from the drop-down, and click OK.
  3. Restart your PC to help it sync the changes.

Ending tasks will restart and refresh Microsoft Teams, stopping every background activity affecting its functionality. You can also equip yourself with shortcuts for accessing the Task Manager on your PC.

3. Clear Microsoft Teams cache

  1. Press the Windows + R keys to open the Run box, type the following in the text space, and press Enter: %appdata%
  2. Expand the Microsoft folder on the left side and double-click the Teams folder to open it.
  3. Select all the folders in the Teams folder and press Delete to clear them.
  4. Close and relaunch Microsoft Teams.

4. Sign out and sign into your Microsoft Teams account

  1. Left-click the Start button, search for Microsoft Teams and open the app from the results.
  2. Click on your profile picture in the top-right corner of the page, select the Sign-Out option from the drop-down menu and click OK.

You can read about Teams sign-in error code 503 if you can’t sign into your account.

5. Update the Microsoft Teams app

  1. Launch the Microsoft Teams app on your PC, then click on the three dots in the top-right corner to prompt the Menu.
  2. Click on the Check for updates option from the drop-down.

If nothing previously worked, this should, in all likelihood, fix the Drop your files here issue in Micorosft Teams.

How do you clear drop your files here in Teams?

Here are a few ways you can clear Drop your files here in Teams:

  • Restart the app: A quick way is to terminate it via Task Manager and then relaunch it. Or you could reboot the computer and launch Teams.
  • Clear app data: Clearing the app data has also been found the get rid of the option, both on Windows and Android devices. You could reset the app for the former, while there’s a Clear cache option for the latter.
  • Drop the image completely into the chat box: Users reported that dropping the image partially into the chat box triggers the Drop your files here option, and dropping it cleanly should clear it.

Nevertheless, you can read about how to install and use two Microsoft Teams in Windows 11. Also, we have a detailed guide on what to do if you can’t download files on Microsoft Teams.

You can leave your suggestions and questions in the comments section below.

The Action Cannot Be Completed Because the File is Open: Fix

Computer errors occur sooner or later on any PC. While some are relatively harmless, others, like your PC ran into a problem and needs to restart error will prevent you from performing specific tasks.

One error preventing users from accessing files on their PCs is that the action cannot be completed because the file is open in another program. This problem can be frustrating, as it causes delays when you need to open a file.

The error occurs on various applications and processes, including Excel, OneDrive, Microsoft SharePoint, or Network Share. Dealing with it isn’t very clear because it leads you to believe the app is running, but nothing is open.

This guide will show you how to fix the issue quickly and regain access to your file.

Can’t delete because the file is open? Here’s why:

There are some reasons for the the action can’t be completed because the folder or a file in it is open in another program error:

➡️ One of them is the accumulation of file thumbnails.

➡️ Problems with the File Explorer or the Recycle Bin.

➡️ A wrong group policy setting can prevent you from opening files.

How do you find which program is using a file?

  1. Open the Process Explorer on your PC. Download it from the official site if you don’t have it.
  2. Press the Ctrl + F keys to open the search box.
  3. Type the file’s name, and it will show you the program using it.

This error will prevent you from opening or changing files. Read on to see how to delete a file when you get the action cannot be completed because the file is open in another program error message.

How do I fix the this action cannot be completed because the file is open error?

1. Use Disk Cleanup and repair HDD

  1. Press Windows key + S and enter disk cleanup.
  2. Select Disk Cleanup from the menu.
  3. Select your system drive. By default, it should be C: and click on OK.
  4. Your PC will now scan the drive. Depending on your partition size, this process can take a while, so be patient.
  5. Once the scan is complete, you’ll see a list of options. Select Thumbnails and click OK.
  6. Wait while Disk Cleanup removes the selected files.

In some cases, this problem can be caused by thumbnails, but you might be able to fix it by removing them. If the file is open in another program error appears again after applying this fix, you might need to repeat this process.

Alternatively, you can use one of the best Windows 10 optimizer software to clean up and optimize your PC.

These tools can enhance your PC by conducting in-depth cleaning and diagnosis. Also, they help in removing junk data and broken shortcuts, fixing Registry entries, and disabling unnecessary services.

2. Empty the Recycle Bin

  1. Locate the Recycle Bin on your desktop.
  2. Right-click it and select Empty Recycle Bin.

If you’re getting the file open in another program error, but know it isn’t, you might be able to fix it by emptying the Recycle Bin. This sounds like an unusual solution, but many users claim that emptying the Recycle Bin fixes the issue, so feel free to try it out.

Also, to avoid adding files to the Recycle Bin, you can use the Shift + Delete shortcut or press and hold the Shift key while clicking the Delete option.

3. End the Windows Explorer process and restart it

  1. Press Ctrl + Shift + Esc to open Task Manager.
  2. Click Windows Explorer.
  3. Click on the Restart button.

Another temporary solution that can help you with the file is open in another program problem is to end the File Explorer process. Sometimes files can become locked, but after ending the File Explorer process, you should be able to unlock them.

If you can’t end a task in Windows 10, look at this step-by-step guide that will help you do it in just a few steps.

4. Edit your group policy

  1. Press the Windows key + R to open the Run utility.
  2. Enter gpedit.msc and click OK.
  3. When Local Group Policy Editor opens, navigate to the path below:User Configuration > Administrative Templates > Windows Components > File Explorer
  4. In the right pane, double click the Turn off caching of thumbnails in hidden thumbs.db files option.
  5. Now, select Enabled to enable the policy.
  6. Finally, click Apply and OK to save changes.

You can solve The action cannot be completed because the file is open in another program error simply by modifying your group policy.

All thumbnails will be disabled in File Explorer with the steps above, but the problem should be resolved entirely.

If you don’t have the Group Policy editor on your Windows 10, get it on your PC by following our guide on how to install Group Policy editor.

5. Disable the Preview panel

  1. Open File Explorer by pressing the Windows key + E shortcut.
  2. Now, go to the View tab.
  3. Make sure that the Preview panel isn’t selected.

According to users, The action cannot be completed because the file is open in another program can appear if you’re using the Preview panel.

After disabling the preview panel, you should be able to modify your file without any problems. If you want to disable the Preview pane quickly, you can use the Alt + P shortcut.

6. Disable thumbnails

  1. Press Windows key + S and enter file options.
  2. Select File Explorer Options from the menu.
  3. Go to the View tab and check the Always show icons, never thumbnails option.
  4. Now, click on Apply and OK to save changes.

Another way to solve the file open in another program problem is to disable thumbnails entirely. This might not be the best solution, especially if you like thumbnails, but it might be a solid workaround you can use quickly.

If you want at any point to restore thumbnails in Windows 10, check out this guide to learn how you can do it.

7. Modify your registry

  1. Press Windows key + R, enter regedit, and click OK.
  2. When the Registry Editor opens, navigate to the path below in the left pane: HKEY_CURRENT_USER\Software\Microsoft\Windows\Current\Version\Explorer\Advanced
  3. In the right pane, locate IconsOnly DWORD and double-click it.
  4. Once the properties window opens, enter 1 to show icons or 0 to show thumbnails in the Value data field.
  5. After you’re done, click OK to save the changes.

You can also disable thumbnails by changing other values in your registry. To do that, follow these steps:

  1. Open Registry Editor and navigate in the left pane to the path below: HKEY_CURRENT_USER\SOFTWARE\Microsoft\Windows\CurrentVersion\Policies\Explorer
  2. Look for DisableThumbnails DWORD in the right pane.
  3. If the DWORD isn’t available, you’ll need to create it by right-clicking the space in the right pane and choosing New > DWORD (32-bit) Value from the menu.
  4. Now enter DisableThumbnails as the name of the new DWORD.
  5. Double-click DisableThumbnails DWORD to open its properties. Set the Value data to 0 and then click OK to save changes.

There’s also another way to fix this problem using Registry Editor. To do that, follow these steps:

  1. Open Registry Editor, and in the left pane, navigate the path below: HKEY_CURRENT_USER\Software\Policies\Microsoft\Windows
  2. Right-click the Windows key and choose New > Key.
  3. Enter Explorer as the name of the new key.
  4. Go to the newly created Explorer key, right-click the space in the right pane, and choose New > DWORD (32-bit) Value.
  5. Enter DisableThumbsDBOnNetworkFolders as the name of the new DWORD.
  6. Double-click DisableThumbsDBOnNetworkFolders DWORD to open its properties.
  7. Set Value data to 1 and click OK to save changes.

If you’re frequently getting the file open in another program error, you might be able to fix it by making a few changes to the registry. After making the changes restart your PC.

Remember that modifying the registry can be potentially dangerous, so use extra caution.

8. Delete the TEMP folders

  1. Press Windows key + R, type %temp%, and click OK.
  2. When the temp folder opens, delete all files from it.
  3. Press Windows key + R, type temp and click OK.
  4. The temp folder will now open. Delete all files from it.

If you keep getting The action cannot be completed because the file is open in another program error message, you might be able to solve the problem by deleting the temp folders.

Windows stores temporary files in two temp folders, and sometimes temporary files can cause this problem to appear.

9. Set folder windows to open as separate processes

  1. Open File Explorer Options. as shown in Solution 6.
  2. Navigate to the View tab and check Launch folder windows in a separate process option.
  3. Click Apply and OK to save changes.

After making these changes, all folders will open as separate processes, and you won’t have any more problems with this error message.

Few users claim that this option is causing the problem, so if Launch folder windows in a separate process option is enabled, be sure to disable it and check if that solves the error.

10. Disable the Homegroup

  1. Press Windows key + S and enter homegroup.
  2. Choose Homegroup from the menu.
         
  3. Choose Leave the homegroup from the menu.
  4. A list of options will appear. Choose Leave the homegroup from the menu.
  5. If everything is in order, you’ll see a confirmation message. Click the Finish button.

After leaving the Homegroup, you have to disable its services. To do that, follow these steps:

  1. Press Windows key + R, type services.msc, and click OK.
  2. The Services window will now open. Locate HomeGroup Provider and double-click it.
  3. Locate the Startup type field and set it to Disabled.
  4. Now, click on Apply and OK to save changes.
  5. Locate HomeGroup Listener service, double-click, and set its Startup type to Disabled.

Lastly, you have to make a few changes to the registry, and you’re good to go. To do that, follow these steps:

  1. Open Registry Editor.
  2. In the left pane, navigate to the path below: Computer/HKEY_LOCAL_MACHINE/SOFTWARE/Classes/CLSID{B4FB3F98-C1EA-428d-A78A-D1F5659CBA93}
  3. Create a new DWORD in the right pane and enter System.IsPinnedToNameSpaceTree as its name. Now open the newly created DWORD and set its Value data to 0. After saving the changes, close Registry Editor.

Homegroup is a valuable feature, but sometimes it can cause this problem due to specific bugs. Disabling this feature isn’t the best way to solve this problem, but it might be helpful in some cases.

Few users claim they fixed the problem simply by leaving their current Homegroup, so you might not have to disable the Homegroup service or make changes to the registry to fix this problem.

11. Use Unlocker

If you can’t access or delete specific files due to The action cannot be completed because the file is open in another program error, you might be able to fix it by using Unlocker.

This is a simple tool that will allow you to unlock any files that are locked by your system and allow you to remove them. The tool is simple to use and free, so if you have any issues with this error, try Unlocker.

Another third-party solution that can help you fix this problem is Lockhunter. A few users reported they solved the problem using this tool, so try it out.

12. Change your folder view

  1. Open File Explorer.
  2. Go to the View tab.
  3. Choose Small icons, List, or Details from the menu.

After changing the folder view, you should be able to modify the files from this directory without any problems. Since this is a workaround, you’ll have to repeat these steps for every directory giving you this error.

13. Disable Windows Search

  1. Press Windows key + S and enter indexing options.
  2. Select Indexing Options from the menu.
  3. Indexing Options window will now appear. Click on Modify button.
  4. Now you can disable indexing locations simply by unchecking them. After you’re done, click OK to save the changes.

Now you need to disable the Windows Search service. To do that, follow these steps:

  1. Press the Windows key + R, type services.msc, and click OK.
  2. Once the Services window opens, locate Windows Search on the list and double-click it.
  3. Set the Startup type to Disabled and then click the Stop button to stop the service.
  4. Now click on Apply and OK to save changes.

According to a few users, this problem can also be caused by Windows Search, and to fix it. You need to disable this feature entirely.

Windows Search is a core component of Windows, and if you use it frequently, you might want to skip this solution and try a different one.

Also, keep in mind that changing Indexing Options or disabling the Windows Search service can cause problems with specific features. So, if any issues occur, restore everything to the previous state.

14. Open and close your file

If you cannot move a particular file because the action cannot be completed because the file is open in another program message, you might want to try opening and closing that file.

This is a simple workaround; by opening and closing the file, you’ll ensure that it’s not open in any application. This isn’t a permanent solution; you’ll have to repeat it with every file whenever this problem appears.

15. Use Safe Mode and Command Prompt

  1. Open the Start Menu, and click the Power button.
  2. Press and hold the Shift key and click on Restart from the menu.
  3. Navigate to the path below: Troubleshoot > Advanced options > Startup Settings
  4. Now, click the Restart button.
  5. Once your PC restarts, a list of options will appear. Select Enable Safe Mode with Command Prompt from the menu by pressing the appropriate key.
  6. Once you enter Safe Mode, Command Prompt will automatically start. Now you just have to use Command Prompt to navigate the problematic file and modify it.

Remember that Command Prompt is an advanced tool, and if you’re unfamiliar with it, you’ll have to learn basic syntax before using this solution.

Few users claim that you don’t even have to use Command Prompt. Simply start Safe Mode and find the problematic file, and you should be able to modify it without any problems.

You can not only access your files, but alsocan use Command Prompt to copy your files or folder to the destination path, to learn more about it, read this guide.

16. Perform the Clean boot

  1. Press Windows key + R, type msconfig and click OK.
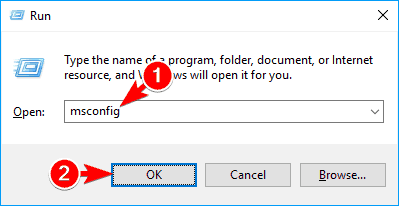
  2. Click the Services tab.
  3. Check the box for Hide all Microsoft services.
  4. Now, click on the Disable all button.
  5. Go to the Startup tab and click on Open Task Manager.
  6. Select the first entry on the list and click on Disable button. Now repeat the same steps for all entries on the list.
  7. After disabling all startup applications, go back to the System Configuration window.
  8. Click Apply and OK to save changes.
  9. Restart your PC or log out and log back into your user account to apply the changes.

Sometimes third-party applications can interfere with your PC and cause this and other errors. In fact, some applications tend to start automatically with Windows causing the problem to appear as soon as Windows starts.

To fix the issue, you need to find the problematic application. This is relatively simple, and performing a Clean boot is the best way to do that.

To find the problematic application, you need to repeat the same steps and enable startup services and applications one by one until you find the one causing this problem.

17. Use a different PDF application

According to users, Adobe Reader can sometimes cause this error message to appear. You need to download a different PDF reader and set it as a default application for PDF files to fix the problem. After doing that, the issue should be resolved entirely.

A few users also claim that you can fix this problem simply by uninstalling Adobe Reader from your PC, so you might want to try that as well.

18. Use Optimize for option

  1. Open the directory that holds the problematic files/folders.
  2. Right-click on the space inside the folder and choose Properties from the menu.
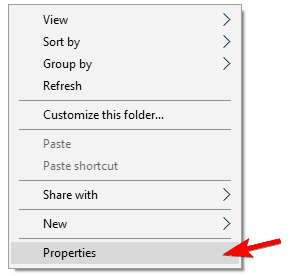
  3. Click the Customize tab and select the desired option from the Optimize this folder for the menu.
  4. Now, click on Also apply this template to all subfolders.
  5. Lastly, click on Apply and OK to save changes.
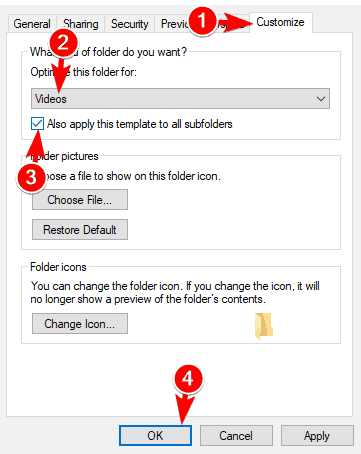
After using Optimize for option, you should be able to delete files without any issues. You might get a warning while trying to do so, but you should be able to circumvent it.

You might have to try optimizing your folder for different file types since it might take a few tries to find the setting that works for you.

19. Use Command Prompt to remove Thumbs.db file

  1. Press Windows key + X and select Command Prompt (Admin). If Command Prompt isn’t available, feel free to use PowerShell.
  2. Type X: in the command prompt Window and press Enter. Be sure to replace X with an actual letter representing your partition where the file to open is.
  3. Type the command below and press Enter to delete all thumbs.db files from your partition. del /ash /s thumbs.db
  4. Now you have to repeat these steps for all other partitions on your PC.

In many cases, the leading cause of this problem can be Thumbs.db file. The file is in charge of storing your thumbnail cache, but sometimes, these files can cause this and many other errors to appear.

You need to remove those files from your partitions to fix the issue. This is relatively simple, and you can do it by following the above steps.

Remember that this solution doesn’t require performing it on every partition. Instead, you can achieve it only on the one giving you this problem.

However, you might have to delete thumbs.db from all partitions on your PC to stop this error from appearing.

20. Stop sharing for the problematic folder

  1. Locate the folder or file that is giving you this error message.
  2. Right-click the problematic file or directory and choose Share with > Stop sharing from the menu.

After stopping sharing for the problematic folder, the issue should be resolved entirely, and you’ll be able to move, rename and delete your files without any problems.

21. Install the latest .NET Framework

Many Windows applications use .NET Framework; sometimes, this problem can occur if you don’t have the necessary .NET Framework installed.

However, you can fix this problem simply by downloading .NET Framework from Microsoft’s website. This framework is completely free, and to fix the problem, you might have to install all versions of the framework and check if that solves the issue.

22. Try to rename file or directory using the Command Prompt

  1. Open Command Prompt as administrator.
  2. Enter the desired directory, followed by the command below, and press Enter to rename the file. Note that you need to type the name and extension of the file to make it work. rename problematic_file.txt new_name.txt
  3. Alternatively, you can use the command below: rename c:path_to_problematic_file problematic_file.txt new_name.txt

According to users, they sometimes cannot rename specific files because the action cannot be completed because the file is open in another program.

However, you might be able to fix the problem simply by using Command Prompt to rename the problematic file or directory. Keep in mind that this is an advanced solution. So, if you want to use it, learn Command Prompt syntax beforehand.

If for some reason, you’re getting Access denied message in Command Prompt, you might want to try running it from Safe Mode, as we showed you in Solution 15.

23. Change your security settings

  1. Locate a working folder that doesn’t have this problem. Be sure to use a non-system folder.
  2. Right-click the folder and choose Properties from the menu.
  3. Go to the Security tab, check the list of available groups and users and write it down.
  4. Repeat the same steps for the problematic folder or file once you open the Security tab, and check if any entries from Step 2 are missing.
  5. If so, you need to add them manually by clicking the Edit button.
  6. Now click the Add button.
  7. Enter the desired user name or group in the Enter the object names to select the field and click on Check Names.
  8. Click the OK button.
  9. Select the newly added user or group and check Full control in Allow column.
  10. Click Apply and OK to save changes.
  11. Remember that you might have to repeat these steps and add all missing users and groups from Step 2.

If you’re getting this error frequently, it might be due to your security settings. Sometimes the problematic folder might lack specific security permissions causing the problem to appear.

Some users suggest just adding your user account and granting it Full control over the affected directory. After doing that, the problem should be resolved entirely.

This solution is a bit advanced, so you might be unable to perform it correctly if you’re a basic user.

It’s also worth mentioning that you shouldn’t use this solution on system files and directories. So, if you’re having problems with those, you might want to try a different solution.

24. Change dllhost.exe security permissions

  1. Press Ctrl + Shift + Esc to open Task Manager.
  2. Once Task Manager opens, navigate to the Details tab.
  3. Locate dllhost.exe on the list, right-click it and choose Properties from the menu.
  4. Navigate to the Security tab and click on the Edit button.
  5. Select Administrators from the list and check Full control in Allow column.
  6. Click OK and Apply to save changes.

If you can’t change the security permissions for some reason, you might want to try ending COM Surrogate process. Few users claim this solution worked for them, so feel free to try it out. To end the COM Surrogate process, do the following:

  1. Open Task Manager.
  2. Locate COM Surrogate in the list of processes, select it and click the End Task button.

This error can sometimes occur due to problems with COM Surrogate process. This process is related to dllhost.exe, and you can fix the problem by changing the security settings for dllhost.exe.

After ending the COM Surrogate process, the problem should be resolved. If the issue appears again, you might have to repeat this process.

25. End Windows Explorer process and use Command Prompt to delete the file

  1. Open Task Manager and end File Explorer process, as shown in Solution 3.
  2. After ending the File Explorer process, Click the File option at the top and select Run new task.
  3. Enter cmd, check the Create this task with administrative privileges box, and click OK.
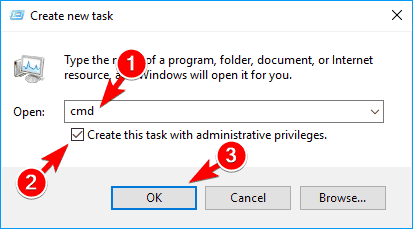
  4. When Command Prompt opens, locate the problematic file or directory and remove or edit it using the Command Prompt.
  5. After deleting the file, enter explorer.exe in Command Prompt to start Windows Explorer again.

As you can see, sometimes Windows Explorer can interfere with Command Prompt and cause the the action can’t be completed because the folder or a file in it is open in another program error and other issues to appear. However, you should be able to avoid it by using this solution.

Remember that this solution requires you to be familiar with basic Command Prompt syntax, so you might want to learn a few basic commands before you try it.

Several users claim that you don’t even have to end Windows Explorer to delete the problematic file.

According to them, you just have to start Command Prompt with administrative privileges and use the command below: DEL /F /S /Q /A C:UsersUserNameDesktopFile.txt

Of course, use the correct path to the problematic file before running the command.

26. Use Process Explorer or Handle

If you’re an advanced user, you can try fixing this problem using Process Explorer or Handle. Process Explorer is similar to Task Manager, allowing you to see currently active processes along with the list of files they’re using.

Using this tool, you can easily find the process holding your file and close it. Simply choose Find > Find Handle or DLL option from the menu and enter the file or directory name that gives you this error.

Now you’ll see the process’s name and ID so you can quickly close it.

Another application that can help you fix this problem is Handle. This is a third-party command-line tool, and it’s more complex than Process Explorer. Below are the steps to follow to use Handle:

  1. Download the tool and start Command Prompt as admin.
  2. Type the command below and press Enter. Handle64.exe > output.txt
  3. After doing that, the output.txt file will be created. Minimize Command Prompt and open output.txt file.
  4. Search for the problematic file on the list and write the HEX number next to it. This is the ID of your file that you’ll need to use for future steps.
  5. Locate the parent row for your file and write down its ID.
  6. Go to the Command Prompt, type the command below, and press Enter. handle.exe -c your_file_id -p your_process_id
  7. Be sure to replace your_file_id and your_process_id with the correct HEX values.

If you perform this process correctly, you’ll successfully release the file without ending its process. This is an advanced solution, so if you’re a basic user, you might experience some difficulties performing it.

27. Disable inheritance for the problematic file/directory

  1. Right-click the problematic file or directory and choose Properties.
  2. Navigate to the Security tab and click on Advanced.
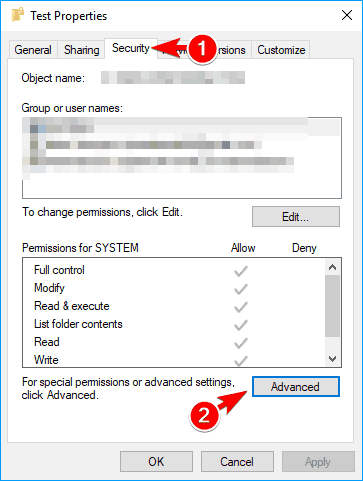
  3. Click on the Disable inheritance button.
  4. Choose Remove all inherited permissions from this object.
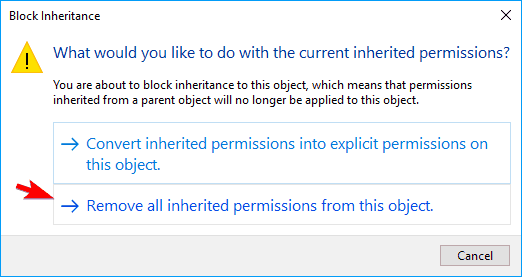
  5. Now click Enable inheritance button and then click on Add.
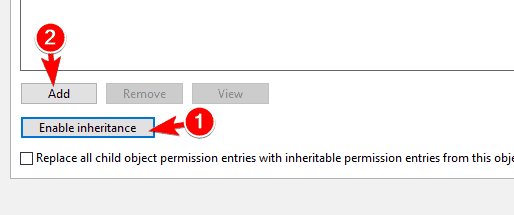
  6. Click on Select a principal.
  7. Enter your user name in the Enter the object name to select and click Check Names.
  8. If everything is in order, click OK.
  9. Check the Full control option and click OK.
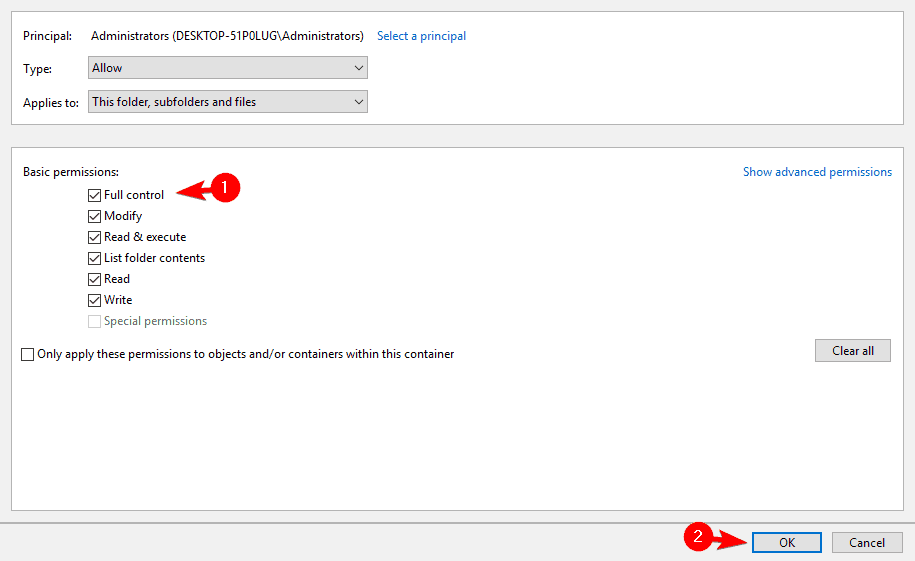
  10. Save changes.

After making the changes above, you should be able to delete files and folders without any issues. Remember that this is an advanced solution, so you should use it only for non-system files and directories.

This is because disabling inheritance for system files and directories can cause problems. So, you might want to use a different solution if you have this problem with system files.

28. Unmount all drives

  1. Open Magic ISO and go to Tools.
  2. Now navigate to Virtual CD/DVD ROM > Unmount All Drives.

Alternatively, you can unmount an ISO image right from the This PC. ISO images work as standard optical drives, and you can quickly eject them.

  1. Open File Explorer and go to This PC.
  2. Locate the ISO drive and right-click on it.
  3. Select the Eject option.

Few users claim that you can fix the file that is open in another program problem simply by mounting the ISO file and unmounting it from the application. MagicDisk can sometimes show your ISO file as mounted when it isn’t.

After unmounting it, all your mounted ISO files will be released, and you’ll be able to delete them without any problems.

29. Use Task Manager to close the problematic process

Sometimes this error message will tell you which program is holding your file. For example, many users reported this error while trying to remove Word documents.

If you’re having a similar problem, you need to start Task Manager and check if the problematic application is running in the background. If so, end its process, and the issue should be resolved entirely.

30. Rename the file

According to users, if you can’t delete a specific file, you can circumvent the problem simply by renaming that file. You have to locate and rename the problematic file to fix it.

After doing that, restart your PC. Once your PC restarts, try to delete the file again. If, for some reason, you can’t rename the file, restart your PC and try to delete or remove the problematic file.

31. Use Ubuntu Live CD

If you’re frequently getting this error message, you might be able to solve it simply by using Ubuntu Live CD. You can use any other version of Linux if you want, but we recommend using an Ubuntu distribution due to its simplicity.

Simply download the Ubuntu ISO file and create a bootable USB flash drive or Live disc. You need to boot from the USB flash drive or optical disc to start Ubuntu.

After doing that, you should be able to find the problematic file with ease and delete it.

32. Remove the metadata using the EXIFtool

According to users, sometimes metadata of your files can cause this problem to appear. You need to remove all metadata from the problematic file to fix the issue.

Users reported that they fixed the problem by using EXIFtool. This is a command-line tool, so you might have to learn its syntax before you can successfully remove the metadata.

After you remove the metadata, you’ll be able to delete the file without any problems.

33. Change the owner

  1. Right-click the problematic file or folder and choose Properties.
  2. Navigate to the Security tab and click on the Advanced button.
  3. You should now see the owner of the file.
  4. Click the Change option next to the owner’s name.
  5. Select User, or Group window will appear.
  6. Enter your user name in the Enter the object name to select field and click Check names.
  7. Now, click the OK button.
  8. Now, check the Replace owner on subcontainers and objects option.
  9. Click Apply and OK to save changes.

Sometimes you can fix this problem simply by changing the file owner or directory. Keep in mind that changing the owner of system files can cause specific issues, so use this solution only for non-system files.

If you’re interested in how to take ownership of a file or a folder in Windows 10, check out this fantastic guide.

34. Try to copy another file

One workaround that might help you with this problem is copying another file. To do that, locate any other file, right-click it, and choose Copy from the menu.

After that, locate the folder or file you couldn’t delete previously and try to delete it again.

By copying another file, you’ll release other files from File Explorer, allowing you to delete them. Remember that this is a workaround; you’ll have to repeat it for all affected files.

It’s also worth mentioning that this isn’t a universal solution, meaning that this workaround might not be able to fix the problem in all cases.

35. Make sure that the file isn’t set to read-only

  1. Right-click on the faulty file and choose Properties.
  2. Click the General tab from the top menu.
  3. Uncheck the box for Read-only in the Attributes section.
  4. Click on Apply and OK to save changes.
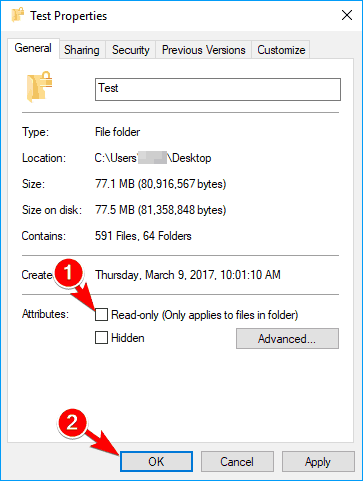
Sometimes this error message can appear if you’re trying to modify a file or directory to read-only mode. To fix the issue, you need to disable the read-only mode.

After making these changes, you should be able to modify the file or folder without any issues.

36. Be sure that your Windows is up to date

  1. Press the Windows key + I to open the Settings app.
  2. Click the Update & security option.
  3. Now, click on Check for updates button.

Sometimes, this error message can be caused by a bug in Windows 10. Most bugs are addressed via Windows updates. By default, Windows 10 automatically downloads the updates, but sometimes you might miss an important update.

After you update Windows to the latest version, the problem should be completely resolved. If your system is already up to date, you’ll have to use a different solution to fix this problem.

How do you force delete a file that is open in another program?

  1. Open File Explorer and go to the file location.
  2. Press Shift and right-click on any space in the location.
  3. Select the Open PowerShell window here, or Open Command Prompt window here as the case may be.
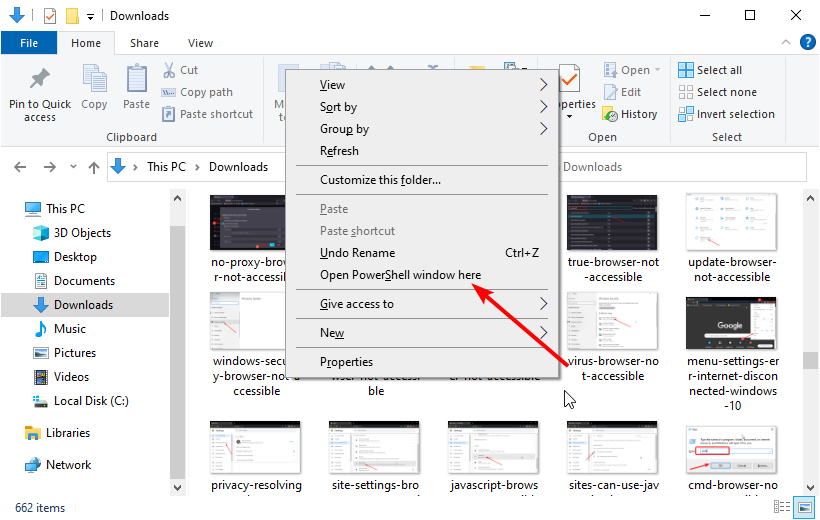
    open file is open in another program
  4. Type del followed by the file’s name in the Command Prompt or PowerShell window.
    del  file is open in another program
  5. Hit the Enter key.

Note that using the del command like this completely deletes the file. With this, there will be no way to get the file back as it won’t be available in the Recycle Bin. But it is good if you cannot delete files because it says the file is open in another program.

The action cannot be completed because the file is open in another program error message can cause many problems on your PC. This error will prevent you from accessing or removing specific files. But you should be able to fix it using one solution.

Are you facing other problems, like an unexpected error stopping you from opening this file? Then, check our guide to fix it quickly.

If you have any other questions, don’t hesitate to leave them in the comments section below, and we’ll check them out.

10 Best Corporate & Small Business VPN Solutions

One of the biggest challenges with VPN servers and client setup and configuration is getting the same consistent experience all through.

This is why IT professionals prefer to deploy the best corporate VPN solutions to a pre-configured client with installation files that automatically configure the software and install the keys.

There are different corporate options in the market that offer VPN functionality plus a comprehensive suite of solutions, though some come as standalone products.

Their purpose is similar to that of a personal user – to keep communications private and offer access to services abroad.

How do corporate VPNs work?

Corporate VPNs work a bit differently as there are major dissimilarities regarding the number of supported users, dedicated servers, and server quality.

VPNs are useful particularly if your company relies on employees who telecommute or who are out of sight permanently.

But if you need more details about this subject, we have a dedicated piece on how corporate VPNs work that will hopefully clear out any questions.

It’s also possible that you encounter issues with your VPN connection, so you should learn how to resolve slow corporate VPNs.

Therefore, this article lists the best corporate VPN solutions you can use for your business or enterprise.

What are the best corporate & small business VPNs?

NordLayer – Smart remote access

NordLayer is a top-notch VPN service specifically designed for businesses and offers multi-layered security features for ultimate protection.

It sets a multi-step authentication to log into it for a supplementary layer of protection on your device. It also has a single sign-on characteristic that authorizes you to use one assortment of security credentials to access multiple cloud apps.

NordLayer lets you pick your preferred DNS server which leads to not only faster request processing, and strengthened server dependability, with phishing protection as well.

You can set user permissions through network access control to restrain access to specific resources which means your network security is significantly improved.

This VPN implemented a Smart Remote Access feature with which you can share files endpoint-to-endpoint because it uses the internet to create the same secure connection between multiple devices without physical limitations.

Benefit from other key features of NordLayer, such as:

  • Dedicated IP/Fixed IP
  • Virtual private gateways
  • Site-to-site
  • AES 256-bit encryption
  • Biometric authentication
  • Threat block
  • Custom DNS

NordLayer

Make sure your business is extremely protected and choose this software for the best VPN service.
Check Price Visit Website

ExpressVPN – Rich server network

ExpressVPN is without a doubt one of the best VPNs on the market. It provides exceptional performance for each and every device.

While the software doesn’t have a dedicated plan for professional use, it can be implemented as a corporate or small business VPN. One subscription allows simultaneous access on up to 5 devices.

The solution comes with VPN split tunneling technology which allows you to connect to the Internet both directly and with a VPN, simultaneously.

Express VPN is known for its outstanding encryption and user data protection. It runs its own private DNS servers using the expert-recommended AES-256 encryption algorithm.

Browsing activity is completely private, the software doesn’t log any user data, keeping identities 100% concealed.

ExpressVPN is a subscription-based service that can be tried for free for 30 days.

Some notable features of ExpressVPN include:

  • 160 server locations in 94 countries
  • IP address masking
  • 24/7 live chat support & tons of tutorials and guides
  • Network Lock Killswitch which protects your data in case the connection drops
  • Surpasses VPN detection of streaming platforms
  • Speed Test to ensure you are connected to the best possible server location
  • Unlimited Bandwidth

ExpressVPN

Protect your business data and privacy with the highest level of encryption.
Check Price Visit Website

Perimeter 81 – WireGuard private connection

Perimeter 81 is a solidly performing VPN alternative for small businesses and corporate users worldwide who are looking for top-grade security and flexibility.

Firstly, you’ll find it particularly useful in meeting network challenges. Its SDP configurations can ensure zero-trust access to all kinds of web applications, VNC, RDP, or Telnet.

A unique consolidated security platform based on these principles will increase security, offer transparency, and minimize mitigating data loss.

Even more, this will literally prevent draining huge resources on ownership (TCO) for IT security.

Since it is an intuitive VPN alternative solution, it provides secure application-level access by fully auditing, recording, and monitoring every single session.

On top of that, Perimeter 81 is a cloud-based VPN alternative solution. This means that you have the chance to scale your network as you go without even worrying about external hardware.

Check out these Perimeter 81 key features:

  • Secure Cloud & Network Access
  • Software-Defined Perimeter
  • Site-to-Site Interconnectivity
  • Unified Network Security
  • Supports IKEv2, OpenVPN, L2TP, and PPTP security protocols
  • It works on all major platforms, including Windows, Mac OS, iOS, and Android
  • Also compatible with Linux, Linux X64, and Chromebook
  • You may manage team settings and view employee network access all in one place
  • 30-day money-back guarantee

Perimeter 81

Improve your corporate security with this profitable small business VPN.
Check Price Visit Website

Surfshark – Multi-purpose VPN tools

When it comes to corporate VPN clients, Surfshark is one of the best in the niche.

This award-winning privacy protection software is perfectly suited to meet the highest standards that come with handling sensitive data and businesses tend to deal with such confidential information a lot.

Surfshark makes sure your business data is kept 100% secure from unauthorized access or prying competitors’ eyes.

It gives you impressive security features such as industry-leading AES-256-GCM encryption and secure IKEv2/IPsec protocols,

However, there is more to this VPN client since Surfshark is as versatile as it is powerful.

Seamlessly blending with all major operating systems and platforms from Windows, Mac, Android, and iOS, to Linux, you can rest assured that all your employees’ workstations (even mobile ones) are well-protected by an impenetrable private connection.

And we do mean all since the solution easily protects all devices with just one single subscription plan.

Let’s quickly look at its key features:

  • Extended network of 1700+ servers with global coverage
  • IP cloaking function and supreme privacy
  • The ultimate encryption for your traffic data
  • Strict no-logs policy
  • Kill Switch function to protect sensitive data and identity in case the connection suddenly drops
  • Private DNS & leak protection
  • Integrated adblocker and whitelisted
  • Supports unlimited devices simultaneously

SurfShark

Secure all your business assets with the best corporate VPN using just one subscription.
Check Price Visit Website

CyberGhost – Customize protection

If your company is in need of more privacy CyberGhost is the right choice. With this VPN solution, you’ll get the best privacy and anonymity that a VPN can get you.

This VPN solution is really easy to use even if it may seem complicated at first. The software encrypts your online traffic and hides your real IP.

Cyberghost prides itself on a no-logs policy meaning that it never tracks, shares, or sells your data. This is pretty great, especially from a business point of view, meaning your competition can never get to you.

This VPN also has a large server fleet at its disposal all across America, Europe, Asia, and Africa. You will never run out of location to switch to and you’ll never be out of service.

CyberGhost is also well known for its powerful encryption, 256-bit AES, and it’s great speed. Your work is not only protected but it’s also as fast as possible when using a VPN.

This software is also available on all the main operating systems: Windows, macOS, Linux, Android, iOS. So if you and your employees are using different devices and systems, you can protect them all with a single VPN.

If all that was not enough, CyberGhost also allows you to customize the type of protection you get based on your personal preferences or business needs.

Here are some of the key features of CyberGhost:

  • Customize Your Windows VPN
  • Get your own dedicated IP
  • strict No Logs VPN
  • Killswitch if your VPN stops working
  • 45 days money back guarantee

CyberGhost

Personalize your VPN protection and easily encrypt your data with this powerful tool.
Check Price Visit Website

VyprVPN for Business – Strong business encryption

If you’re looking for a VPN for your company, you might want to consider VyprVPN for Business.

That’s your chance to ensure that your communications remain private between all employers in your company, even if they are working remotely.

Developed by Golden Frog GmbH, this tool offers Wi-Fi protection, so your employers will be able to use Wi-Fi safely in any location and without any fear of data theft.

It’s worth mentioning that VyprVPN lets you access geo-restricted services in any country without issues.

This software comes without any bandwidth restrictions, and it offers high-speed connections, which will be perfect for all your business needs.

Moreover, VyprVPN manages its own servers and DNS, therefore your privacy should be completely protected from third parties.

Regarding compatibility, this software is available on all major platforms including Windows, Mac, iOS, and Android.

To manage all your employees, this tool has a built-in admin interface. Therefore, you can easily manage all accounts that are using VyprVPN.

In order to provide you with maximum security, VyperVPN for Business has a NAT Firewall that blocks unrequested inbound traffic and keeps your data secured.

Regarding the supported technologies, it uses PPTP, L2TP/IPsec, and OpenVPN. There’s also a Chameleon technology that will prevent deep package inspection and VPN throttling.

Overall, VyperVPN for Business offers amazing features, and if you’re looking for a VPN for your business, you might want to consider this software.

Let’s see its best features:

  • Simple user management
  • Cross-platform support
  • Unlimited bandwidth and fast VPN speeds
  • NAT firewall
  • PPTP, L2TP/IPsec, and OpenVPN protocols

VyprVPN

If you still didn’t found a corporate VPN, choose this VPN to secure your company.
Check Price Visit Website

GoodAccess – Global cloud network

If you want to manage your entire team’s network and control their remote access from the same place, GoodAccess is the tool you need for your business.

The user console is extremely straightforward. They just need to log into their account with a username and password and start the VPN.

In the administrator’s view, there are a lot of features and options to consider but it all comes to the same excellent service and seamless network traffic encryption.

The system is perfectly protected with GDPR, SOC2, and HIPAA compliance, and allows the connection to sites without HW or MPLS.

Basically, this Cloud VPN will secure and encrypt connections between remote users and business systems wherever they are physically or in the network.

And because you can manage each user’s access, you can also limit their access to the business apps.

The app’s security level is tailored to businesses, and it can detect any insider or external threats like scanning or data breach. Even more, via DNS filtering, it blocks undesired and risky domains by default.

GoodAccess comes with multiple gateways in over 33 locations throughout the world and it provides a dedicated static IP just for your team.

Take a look at its best features:

  • GDPR, SOC2, and HIPAA compliance
  • Network traffic encryption
  • Dedicated static IP
  • Over 33 network locations worldwide with multiple gateways
  • Control network access individually for all the members of your team

GoodAccess

With this premium tool, your business and team will have ultimate privacy protection and security.
Check Price Visit Website

OpenVPN – Easy network management

Fix Open VPN not working in Windows 11

This comes in two different corporate VPN solutions: the Connect Client and Community Client. The former can be downloaded from the OpenVPN access server once installed.

Download the latter from the site as an installer file that provides the option to install a VPN server, a Community Client, or both.

The two VPN clients are quite different even though they fall under the same VPN. Connect Client is meant to connect the OpenVPN access server.

However, it doesn’t support other connections, so you need to go to the site and download the VPN for your OS.

On the other hand, Community Client is all-purpose and attaches to various VPN servers including the OpenVPN server.

OpenVPN comes in a software package for older and newer Windows versions, where it runs as a service by default. Therefore, you don’t have to start it, plus after a crash, it restarts automatically.

This VPN has benefits over other VPN servers; it corrects bugs or exploits fast being an open-source solution.

Cloud versions of the server are also available, and you can set up either a primary or backup data center therein, allowing remote systems to connect securely from any location.

OpenVPN is simple, manageable, and can be used by anyone without tech expertise. It also has more capabilities, in addition to connecting to other VPN servers.

Let’s go over its most important features:

  • Very easy to use without prior training
  • Direct access to the Access Server’s administration portal without SSH and start the Access Server
  • Cloud images are also available directly on Azure, Digital Ocean, Oracle, and Google Cloud
  • Cyber Shield protects you from cyber threats
  • Allows remote systems to connect from any location

⇒ Get OpenVPN

The GreenBow IPSec VPN Client – Complete endpoint security

Corporations can rest assured that this is one of the best VPN solutions with its consistency, manageability, and dedicated support, across multiple operating systems.

It also comes with more options and features compared to built-in clients like the Microsoft VPN Client for Windows.

The GreenBow IPSec VPN is easy to install through silent installation files, which can also be sent via email to users.

Its keys can be stored on USB flash drives and smart cards or integrated into the remote device.

You basically get a multi-factor, all-in-one security process. Its user interface is the same across all platforms, except Apple.

Even so, it enables VPNs for remote users and large data centers with multiple tenants.

It comes in either VPN Client or VPN Client Premium versions – the latter of which is meant for easy integration with third-party software management platforms for ease of large deployments.

VPN Client lacks such features as it is solely meant for at-home telecommuters and those who travel much.

IT professionals will love the GreenBow solution as it comes with the advanced Public Key Infrastructure management options which they’re used to and support for all standard VPN functions including IPSec, IPv4/6, and SSL.

Overall, it is easy for admins to pre-configure it, plus it can connect to many VPN servers from different providers – with no setup issues – though it’s pricey.

Let’s review some of its best features:

  • Standard VPN functions include IPSec, IPv4/6, and SSL
  • VPN Client or VPN Client Premium versions are available
  • Advanced Public Key Infrastructure management options
  • Easy integration with third-party software management platforms
  • Simple integration and usage

⇒ Get GreenBow IPSec VPN Client

Cisco VPN – Full monitoring for data breaches

best-corporate-vpn tool

This corporate VPN solution can run on all desktop and mobile operating systems, with support for VPNs and other security services, protecting different WAN designs.

It also helps businesses protect their most important asset – data – whether in transit or at rest.

Cisco VPN provides cryptography which helps enable origin authentication, strong encryption, and topology hiding, and offers it on its routing platforms as a VPN solution.

The VPN portfolio of solutions includes Dynamic Multipoint VPN for authentication and key exchange, as well as Group Encrypted Transport VPN for highly secure communication between grouped systems in a network.

You also get FlexVPN for origin authentication and key exchange, as well as the Secure Socket Layer VPN.

This protects data communication between a software client like AnyConnect and the corporate network.

The best features that you will benefit from:

  • Dynamic Multipoint VPN for authentication and key exchange
  • Strong encryption, and topology hiding
  • FlexVPN and Secure Socket Layer VPN included
  • 1.5 million malware samples processed per day
  • Empower employees to work from anywhere

⇒ Get Cisco VPN

Is VPN good for small businesses?

To answer this you have to consider what type of business are you running. VPN is good if you handle sensitive data or have remote employees.

We hope that you found the best VPN for your corporate or small business needs in our list and you’re now protected from any online threats.

A VPN will definitely help your employees work from any location but you should also consider increasing the network protection with the best antivirus for corporate use.

Let us know which of these corporate VPN solutions works best for your organization or business by leaving a comment below.

Fix: Bluetooth Audio Stuttering in Windows 10 [Choppy Sound]

Many users connect Bluetooth peripherals with their desktops or laptops. However, some users have posted on support forums about audio stuttering issues when using Bluetooth audio devices with their PCs. For example, one user said this in a forum post:

As of recent, when connecting any pair of Bluetooth headphones or devices, I would get stuttering problems when using Bluetooth headphones. The audio would frequently cut in and out randomly, and it would frequently disconnect, even when it was fully charged.

This guide will list down multiple solutions to help you resolve the Windows 10 Bluetooth audio stutter issue. But, first, let us check out the solutions.

Why is my Bluetooth audio glitching?

If this happens, you may have issues with your adapter, and if Bluetooth won’t turn on, it’s somewhat likely that there’s a driver problem.

Pairing issues can also cause sound problems, and if there’s no sound after a Bluetooth connection, your device might not be appropriately connected to your PC.

A few users reported that they can’t connect Bluetooth headphones at all, and this is most likely a driver issue, so updating or reinstalling your drivers should help.

 How do I fix Bluetooth audio stutter in Windows 10?

1. Update Bluetooth and audio drivers

  1. Right-click the Start icon then select Device Manager.device-manager-w10 amd driver install problems
  2. Click the View button then select Show hidden devices.view-hidden-devices nvidia graphics card not detected windows 10
  3. Here, expand the Bluetooth section, right-click the driver, and select Update driver.update-bluetooth-w11 bluetooth won't turn on windows 10
  4. Select Search automatically for drivers.automatically-search bluetooth not working windows 10
  5. Next, expand the Sound, video, and game controllers section, right-click the audio driver, which might be Realtek, then select Update driver. Like before, select the Search automatically for drivers option.update-realtek-driver windows 10 bluetooth audio stutter
  6. Reboot your computer in order to apply the changes made and fix the Bluetooth headphones stuttering in Windows 10.

You can manually update your PC’s audio and Bluetooth drivers, but using driver updater software is quicker. A driver updater utility will scan your PC and immediately list devices with outdated drivers.

Then you can download and install new drivers with the driver updater utility’s options.

2. Reinstall the Wi-Fi driver

  1. Right-click on the Start menu. Select Device Manager from this list.device-manager-w10 amd driver install problems
  2. Expand Network adapters to expand that category.
    Device Manager window bluetooth audio stuttering windows 10
  3. Right-click your PC’s wireless network adapter and select the Uninstall device option.
  4. Select the Delete the driver software for this device option on the Uninstall Device dialog box window.
  5. Click the Uninstall button.
  6. Select the Network Adapters category, and click the Action menu.
    Action menu bluetooth audio stuttering windows 10
  7. Select the menu Scan for hardware changes option to reinstall the driver.

Once you reinstall the driver, check if Bluetooth audio stuttering still appears on Windows 10.

3. Run the Bluetooth troubleshooter

  1. 1. Open the Start menu.

  2. 2. Type troubleshoot in the search box and click on the first result to open Troubleshoot settings.

  3. 3. Click on Additional troubleshooters.

    additional troubleshooters menu
  4. 4. Select Bluetooth and click on Run the troubleshooter.

    bluetooth troubleshooter detecting problems screen
  5. 5. Follow the troubleshooter’s instructions.

  6. Whenever you have any Bluetooth related issues on your Windows 10 device, you can run your built-in troubleshooter.

    The Bluetooth troubleshooter can be accessed on your device via Settings in just a few steps. After you configure the troubleshooter to run, you need only wait for it to finish to ensure your problem is fixed.

4. Select the Disable all enhancements option

  1. Right-click the speaker (sound) icon on your system tray to open its context menu. Select Sounds.
     
  2. Right-click on your default audio device under the Playback tab, and click the Properties button.
  3. Switch to the Enhancements tab.
  4. Click the Disable all audio enhancements checkbox.
  5. Press the Apply and OK buttons to save the new settings.

After disabling audio enhancements, the Bluetooth audio stuttering on Windows 10 should be gone.

5. Select a different audio format setting

  1. Right-click the speaker (sound) icon on your system tray to open its context menu.
  2. Select Sounds. 
  3. Right-click the default sound device on the Playback tab and select Properties.
  4. Click the Advanced tab.
  5. Then select the 16-bit 48000 Hz (DVD Quality) option on the Default Format drop-down menu.
    advanced sound
  6. Select the Apply option.
  7. Click the OK button to close the window.

6. Reset Bluetooth headphones

If you need to fix Airpods stuttering in Windows 10, try resetting the headphones. Then, press and hold the headphone power button for several seconds.

When you see a blue light flash, release the power button. After that, you’ll need to pair your Bluetooth headphones again.

7. Disable Remote Control and Hands-free telephony

  1. Open the Run dialogue by pressing Win + R keys. Type control panel and press Enter.
  2. Click OK to open the Control Panel. Select Devices and Printers.
    Devices and Printers applet bluetooth audio stuttering windows 10
  3. Right-click your Bluetooth device and select Properties then click the Services tab.
  4. Deselect the Remote Control and Hands-free telephony checkboxes to disable them.
  5. Click Apply and OK to save the new options.

8. Disable Bluetooth Collaboration

  1. Right-click the Start menu button and select Device Manager.device-manager-w10 amd driver install problems
  2. Double-click the Network adapters section of Device Manager.network best ethernet settings for gaming
  3. Click on your network adapter then select the Advanced tab.
    The Bluetooth Collaboration setting bluetooth audio stuttering windows 10
  4. Next, select Bluetooth Collaboration on the Property list.
  5. Select Disable on the Value drop-down menu.
  6. Click OK to confirm the new setting.

A few users reported that this method fixed Bluetooth audio stuttering on Windows 10, so try it out.

9. Connect your Bluetooth audio device with a USB extension cable

If you have a USB extension cable handy, try connecting your Bluetooth device to your PC with a USB extension cable. Some users have said doing so can fix Bluetooth audio stuttering.

10. Reduce signal interference

Bluetooth audio stuttering can arise because of Wi-Fi interference from other devices. First, try moving your Bluetooth device closer to your PC.

Doing so will reduce potential obstructions generating the stuttering issue and ensure your device is within range.

Remove other Wi-Fi devices from the room your Bluetooth audio device is in. For example, things like tablets and phones might be interfering with your Bluetooth signal.

So, try moving all other Wi-Fi devices away from the speakers or headphones.

11. Adjust the Roaming aggressiveness settings

  1. Open Control Panel then click Network and Sharing Center.
    The Network and Sharing Center bluetooth audio stuttering windows 10
  2. Select Wi-Fi in the Connections section.
    Wi-Fi Status window bluetooth audio stuttering windows 10
  3. Click the Properties button then press the Configure button.
  4. Select the Advanced tab.
    The Roaming Aggressiveness option bluetooth audio stuttering windows 10
  5. Click on the Roaming Aggressiveness option.
  6. Select the Lowest option on the Value drop-down menu.

There are various potential fixes for Bluetooth audio stuttering in Windows 10. Many users have confirmed they’ve fixed audio stuttering with the resolutions above. So, those resolutions are worth a shot.

How can I fix Bluetooth audio stuttering on Windows 11?

Here are a few solutions you can apply to resolve the Bluetooth headphones’ sound-muffled problem in Windows 11. Note that they also work for the airpods choppy audio issue in Windows 11.

  • Check if your Bluetooth driver is updated or not.
  • Turn on and off the Airplane mode.
  • Disconnect other Bluetooth devices.
  • Repair your Bluetooth device.
  • Run the Bluetooth troubleshooter on your PC.
  • Restart the Bluetooth service on your Windows 11 PC.
  • Reinstall the Bluetooth driver.

Why is my Bluetooth speaker crackling?

The wire of the Bluetooth speaker might be damaged, or there could be some issue with your wireless connection.

This could also arise due to a faulty connection, but nonetheless, you need to check your volume and impedance levels.

That is it from us in this guide. Let us know in the comments below which one of the above solutions helped you resolve the Windows 10 audio stutter issue.

Fix: League of Legends Could Not Connect to The HTTP Server

League of Legends could not connect to the HTTP server is one of the errors users encounter when playing the game. It indicates an irregularity when relating to the League of Legends servers. Also, users report League of Legends ping spike on Windows.

Why is League of Legends not connecting to the server?

Many factors may be responsible for the League of Legends not connecting to the server. However, the most common cause of the problem is DNS server issues. The DNS server is responsible for establishing a connection with a server on the internet.

Furthermore, a couple of factors can also cause the League of Legends not to connect to the server issues:

  • Interference with other apps on your PC – The League of Legends game app may encounter issues due to the activities of other apps running on the PC. They can block its connection and prevent it from connecting to the server.
  • Network congestion issues – Many things may go wrong with your game if the network connection is congested. Games like the League of Legends require a fast and stable network to work smoothly.
  • Outdated League of Legends app – When the game app is obsolete, it can make it function abnormally. Likewise, bugs affecting the outdated app may cause issues with connecting to the servers.

The cause of the issue may vary. Nonetheless, it is fortunate that regardless of the reasons, the fixes below will help you get through the process.

What can I do if League of Legends fails to connect to the HTTP server?

Before troubleshooting the League of Legends when it fails to connect servers, observe the following preliminary checks:

  • Connect to a stable and fast network.
  • Close and relaunch the app.
  • Restart your League of Legends app and check if the issue persists.

In case the preliminary checks are not helpful, proceed with the solutions below

1. Run League of Legends as Admin

  1. Press the Windows + S keys and type league of legends in the search space.
  2. Select Run as administrator from the drop-down, then click on the OK button.

Running the game as an administrator will fix permissions issues affecting its performance.

2. Flush DNS records on your PC

  1. Press the Windows + R keys to prompt the Run dialog window, type cmd in the search box, and press ENTER to open the Command Prompt window.
  2. Type the following command and click on ENTER: ipconfig/flushdns
  3. Restart your PC and check if the issue has been resolved.

Flushing the DNS record on Windows can help fix issues with the DNS server that may cause the game not to connect to the HTTP server.

Peradventure, if you encounter an error saying your DNS server might be unavailable on Windows 10/11, read this article.

3. Allow League of Legends through Windows Defender Firewall

  1. Press the Windows + R keys, and type firewall.cpl, and click OK.
  2. Click the Allow an app or feature through the Windows Firewall option, then click Change settings below it.
  3. Click Allow another app, then Browse.
  4. Go to the League of Legends installation directory: C:\Riot Games\League of Legends
  5. Select the LeagueClient.exe file and click Open, then click the Add button at the bottom of the screen.
  6. Check the boxes for Private and Public columns next to League of Legends, and click OK.

4. Change your DNS server address

  1. Press Windows + R key and type ncpa.cpl.
  2. Right-click your network adapter and select Properties from the drop-down.
  3. Select Internet Protocol Version 4 (TCP/IPv4) and click Properties.
  4. Tick the box for the Use the following DNS server addresses option; type 1.1.1.1 in the Preferred DNS server, and the Alternate DNS server, type in 1.0.0.1.
  5. Click OK to save settings.
  6. Restart your PC for the changes to sync correctly.

Changing your DNS server address can help fix issues and allow you to connect League of Legends to the HTTP server.

Alternatively, you can read how to fix critical errors in League of Legends on your PC if you experience other problems.

Likewise, you may be interested in how to fix League of Legends startup issues on your computer and get the app working again.

Kindly leave your questions and suggestions in the comments section below.

Sims 4 Won’t Load Household: 5 Quick Ways to Fix It

Launching the Sims app on your PC may not encounter problems until you attempt to load your household. Some of our readers complain that Sims 4 won’t load the household and its items when they want to. Also, they encounter issues with the mods not working on Sims 4.

Why is my household not loading on Sims 4?

Households not loading on Sims 4 is caused by corrupted game saves. The saved data collected by the app could impede the game. Other likely causes are:

  • Outdated Sims 4 client on Windows – Running an outdated client on your PC can impede the game, such as the household not responding issue.
  • Issues with your graphics card – Sims 4 may not load the household if your graphics cards are not updated. Check your computer’s graphics card by following the options outlined in our guide.
  • Outdated Windows – This can make your PC incompatible with the game. Hence, it affects in-game functionalities that could cause the household not to load on Sims 4.

These are other causes of the problem, which can be fixed by troubleshooting some components on your PC.

What can I do if Sims 4 won’t load the household?

Before proceeding with any advanced troubleshooting, go through the following checks:

  • Connect to a stable network connection to activate your game.
  • Restart your PC to see if the issue persists.
  • Ensure to update your Windows to avoid incompatibility issues for the game.

If you can’t fix the issue after the checks, proceed with the steps below.

1. Remove the corrupted game files

  1. Press the Windows + E to open File Explorer, and copy the Saves folder to the desktop from this path: C:\Documents\ElectronicArts\TheSims4\Saves
  2. Launch a new game, and if it works, exit the game.
  3. Locate the game named slot00000002.save located in the folder you moved to the desktop and take it back into the new Saves folder.
  4. If the game loads, repeat the third step for all the game files, except for slot00000001.save, till you identify the corrupt one.
  5. If after moving a file, the game stop loading the household, delete the file.
  6. Also, check if there are any files tagged slot0000000X.save.ver0 – slot0000000X.save.ver0 where X is the number of your problematic save.
  7. Move the slot0000000X.save file back to the folder on your desktop.
  8. Move the ver0 file to the active folder.
  9. Change the name of the slot0000000X.save.ver0 to slot0000000X.save.

Since corrupted game files are often responsible for the error, identifying and removing them should solve the Sims 4 if it won’t load the household.

2. Repair the game

  1. Left-click the Start button, search, and open the Origin software.
  2. Click My Games in Origin and right-click The Sims 4 to select a Repair Game option.

Some players have confirmed that repairing the game can fix the household not loading issue. You can also apply this fix for the Sims 4 error code 3.

3. Remove the mods

  1. Press the Windows + E to open the File Explorer and go to the Sims 4 installation directory: C:\Documents\Electronic Arts\The Sims 4\Mods
  2. Then copy the mods folder available there, paste it on the desktop, and launch the game.
  3. Launch the game. If it works, copy one of the mod files from the desktop folder and paste it into the new mod folder.
  4. If the game works fine after this, paste the mods files one by one from the desktop folder into the new mod in the game installation folder to identify the faulty mod file.
  5. Delete any problematic mod preventing the game from working fine.

By removing the corrupted mod files, you should gain access to the household on the Sims 4.

4. Update the game

  1. Click the Start button, search for Origin and launch it on your PC and navigate to the My Game Library tab.
  2. Right-click on the Sims 4 icon, then click on the Check for Update option from the drop-down.

Follow the above steps to ensure you’re playing the most updated Sims 4 version. If the Sims 4 fails to update, check out the various fixes to solve the problem.

5. Update your graphics drivers

  1. Press the Windows + R keys to open the Run window, type devmgmt.msc into the search space, and click OK.
  2. Click on the Display adapters from the search results, select the display driver to update, then right-click on it, and click the Update driver option.
  3. Then select Search automatically for drivers and restart your PC after the update process is complete.

Updating graphics drivers will help it process graphics performance on your game smoothly. Check our guide on how to update drivers on Windows 11 and other methods to use.

How do I clear my Sims cache?

  1. Press Windows + E to open File Explorer, paste the following path in the address bar, and hit Enter:Documents/Electronic Arts/The Sims 4/
    path
  2. Delete the localthumbcache file here.
  3. Next, open the Cache folder, and delete all the files except, FileCache.cfg.
    cache folder

Does wiping cache delete data?

No, a cache comprises temporary files and does not represent any critical data in an application or game. So, even when you wipe the cache, your data is not deleted. Though you may have to re-login or see some other minor changes, the data per se remains safe.

Besides, it’s recommended that you regularly clear the cache for improved performance and to get rid of trivial.

Also, you can read this guide if you want to learn how to install Sims 4 mods on Windows and Mac. 

Other information you may want to use includes how to fix Sims 4 not starting, change the game language, or reduce lag in Sims 4.

Do not hesitate to use the comments section if you have any suggestions.

Posted in PC

How to Find Missing Drivers on Windows PC [Auto Detect & Install]

Driver detector and updater software are meant to take the hassle of having to use Device Manager constantly so as to update your drivers in Windows 10/11.

The swift, yet clever nature of software that automatically detects drivers also frees you from having to visit your device or hardware manufacturer’s website every other time to find the right driver as and when you need it.

In short, they make it easy to keep your computer or device drivers updated. Let’s see how these tools can simplify your digital life.

How can a driver detector help you?

Here are the general benefits of using a driver detector:

  • Driver detectors are compatible with Windows 7, 8 and 8.1, 10, 11
  • Offers a download and booster option
  • Finds missing drivers
  • Offers an offline & online detector
  • Offers support for all major CPU/GPU/laptop manufacturers (Driver detector Dell/HP/Intel/AMD/NVidia)
  • Automatic detection and installation
  • Detects hardware and installs drivers (They are also called hardware driver detectors for this reason).
  • Offers a motherboard driver detector

How do I find and install missing drivers for free?

Some of the tools listed below offer a free version that will find and install your missing drivers.

How to install missing drivers via Windows Update?

  1. 1. Press the Windows + I keys, then go to Update & Security.

    update-security nmi hardware failure windows 10
  2. 2. Select the View all optional updates option.

    opt-updates faulting application path
  3. 3. Click on the Driver updates section.

  4. 4. Select the available drivers, then click on Download and install.

    drive-install-updates faulting application path
  5. 5. Wait for the installation process to complete.

  6. The traditional method of installing missing drivers on your PC involves using the built-in Windows Update feature.

    Under Optional updates, you can manually select which driver updates you want to install.

This is how you can update or install drivers via Windows Update. Alternatively, you can try to use Device Manager, as it is another manual way to do this.

How do I automatically detect drivers?

We’ve listed some of the top software that automatically detects drivers so you can pick the one that matches your needs. Yes, it can be that simple!

What are the best tools to auto detect your Windows drivers?

Here’s what we found to be the best:

  • Driver Fusion – user-friendly choice
  • TweakBit Driver Updater – eliminates compatibility issues
  • DriverMax – offers scheduled scans
  • Device Doctor – best for offline scans
  • DriverIdentifier – best for minimalistic usage
  • Free Driver Scout – offers one-click maintenance

Driver Fusion – User friendly choice

get Driver Fusion

If you are looking for a user-friendly software tool that automatically detects drivers, you can’t go wrong with Driver Fusion.

You need to know from the very start the fact that it has a collection of over ten million drivers at the moment.

Even more, you get access to all driver versions that it can find for your drivers, so it’s easier than ever to choose a different version to install.

On top of all these, it enables you to clean driver entries that were at any time installed for a device, so that no errors could ever occur while using it.

Driver Fusion key features that you’re about to enjoy:

  • Automatic update of drivers for all your devices
  • Using your own driver backups is also possible
  • Easy identification of the type, name, and manufacturer of your devices
  • Detailed reports for all installed drivers
  • All major device manufacturers and drivers are supported

Driver Fusion

Driver Fusion is an ideal solution when looking for a tool that can automatically detect drivers. Ready to try it out?

TweakBit Driver Updater – Eliminates compatibility issues

get TweakBit Driver Updater

TweakBit Driver Updater helps you solve and prevent issues related to drivers on your computer. It is officially approved by Norton and Microsoft so you can use it without any risks.

This software automatically scans your computer to detect any corrupt, missing, or outdated drivers and looks for the latest versions in its online database with more than 300,000 official versions of drivers.

Based on your device or computer type and model, TweakBit Driver Updater picks out the perfect drivers that match it.

Plus, you can click a button to have it automatically apply any or all suggested driver updates, though you can do it manually.

The manual process is tedious and carries with it risks such as getting the wrong driver version or downloading unofficial versions that may bring along spyware or viruses into your system.

This is why TweakBit Driver Updater is the number one complete solution and recommended software that automatically detects drivers so you don’t have to make complex decisions.

Features include a free scanner, and better stability as it eliminates compatibility issues and driver-related system errors.

It also boosts improved functionality as you get the latest manufacturer driver updates, faster performance, saving time, and absolute safety.

It also has drivers for different Windows devices including laptops, tablets, printers, scanners, hard drives, Bluetooth, and video and audio cards, among others.

⇒ Get TweakBit’s Driver Updater

DriverMax – Offers scheduled scans

get DriverMax

The DriverMax driver detector and updater software works for Windows operating systems and all Windows Server editions to update, backup, and restore outdated, missing, or faulty drivers for more than 2.3 million devices.

DriverMax has an easily automated update for drivers with automated installs, scheduled scans, and full device driver backups.

It also delivers increased computer productivity as it reduces system freezes and malfunctions, making for a great performance of your computer as you get the best and latest updates.

It also analyzes your existing drivers with the latest versions for more than 2.3 million devices, with an intelligent and unique online self-learning technology.

That ensures that only the most appropriate and recent versions of drivers are installed.

You also get maximum security as DriverMax tests each new driver before installing it on your computer, with backups for the current drivers and system restore points that allow for quick installation rollback.

⇒ Get DriverMax

Device Doctor – Best for offline scans

get Device Doctor

Device Doctor is a free Windows app that scans your computer hardware and checks for any new driver updates available for your computer or device. It also locates drivers for unidentified devices in the Windows Device Manager.

Once you click Begin Scan, Device Doctor queries its manufacturer driver database and immediately fetches the correct driver files for your computer or device.

It updates drivers for over 13 million individual devices and computers, with more added every week.

Other features include consistent updates, future proof with Windows versions and 64-bit support, offline scans, and it provides device names for unknown devices before updating drivers.

To use Device Doctor, you’ll need Windows 10/8/8.1/7/Vista/XP and 10 MB of available hard drive space.

⇒ Get Device Doctor

DriverIdentifier – Best for minimalistic usage

DriverIdentifier is designed as a software tool that automatically detects drivers so you can get the right driver each time you need an update on your computer.

Its features include an incredible database with the most updated drivers, and no need for an Internet connection as it’s enough to download the app to a USB flash drive and use it offline.

You’re also about to enjoy simplified driver downloads, driver updates, ease of use with a simple and foolproof interface, and support for all modern operating systems on both 32-bit and 64-bit versions.

⇒ Get DriverIdentifier

Free Driver Scout – Offers one-click maintenance

get Free Driver Scout

Free Driver Scout is a simple, all-in-one software that automatically detects drivers that offer free driver updates, with a database for more than 1 million different devices.

Free Driver Scout helps get your computer up and running while eliminating whatever slows down the system.

It is created to update all drivers installed on your computer, and remove outdated, broken, and defective drivers from your computer while offering the latest driver versions as free downloads.

It is 100 percent compatible with Windows versions and features one-click maintenance for quick and easy updates of drivers, driver scans, download manager, backup and recovery.

Other features include secure driver updates, no sluggish gaming as drivers are updated, plus you can determine the storage location for your backups and updates.

You can also auto-download, install, and update your drivers with the tool’s Driver Booster 5 for better performance and updated drivers.

⇒ Get Free Driver Scout

How do I know if I have missing drivers in Windows 11?

Believe us, you will know when you have missing drivers. Errors or PC slowdowns will immediately ensue.

One such error is the drivers not found error while installing Windows 11 issue which occurs exactly when users failed to install and update their drivers.

How do I find old drivers on my computer?

Open Device Manager by pressing Windows + I then go through the list of device drivers in order to find them.

By double-clicking the drivers, you will access their properties which includes information about their version and when they were updated/installed.

Where are Windows 10 drivers stored?

When Windows 10 drivers are stored in the following locations:

C:\Windows\System32\Drivers folder

C:\Windows\System32\DriverStore folder

Did any of these software tools that automatically detect drivers catch your attention?

Let us know your favorite pick, or if you’ve used any of these, share your experience in the comments section below.

How to Fix a Lagging Mouse on Windows: 8 Tested Ways

When your mouse lags, the cursor moves slowly or jumps around, making it hard to click, drag, or control tasks like browsing, editing, or gaming smoothly.

Mouse lag is usually caused by low battery, signal issues, dirty sensors, outdated drivers, or high system load.

Follow the steps below to fix this issue withing minutes.

How to fix mouse lag

1. Update the mouse driver

  1. 1. Right-click the Start button and select Device Manager from the list.

    open device manager
  2. 2. Select Mice and other pointing devices and double-click your mouse.

    mouse driver update return cursor
  3. 3. Open the Driver menu, then click Update driver.

    click to update mouse driver
  4. 4. In the next window, select the Search automatically for drivers option.

    click to search automatically for drivers
  5. 5. If there are any new drivers, the system will install them, and you will need to restart your PC for the changes to take effect.

  6. 6. If you get the message that you already have the best drivers for your device, you can click the Search for updated drivers on Windows Update.

    click to search for updated drivers
  7. 7. You will be redirected to the Windows Update section. Select View optional updates.

    view optional updated
  8. 8. Click on Driver updates to expand the section and look for any mouse driver.

    driver updates
  9. 9. If you find one, check its box from the left and hit the Download and install button.

    download and install
  10. If your mouse is lagging, installing the correct mouse driver is likely to solve the problem.

    In most cases, Windows 10 will automatically install the default mouse driver, and while that driver usually works, sometimes specific issues can occur.

    You can install drivers via Device Manager, with the help of Windows Update. This consists of a manual update.

    If you’re using a branded mouse, check the manufacturer’s website and download the latest drivers for your mouse model.

If you want to avoid going through all these steps and ensure that the correct drivers are installed, you could try using powerful driver updater software.

This tool will help any user who needs to update or find missing drivers on a Windows OS computer.

⇒ Get Outbyte Driver Updater

2. Enable hardware-accelerated GPU scheduling

  1. Click the Start menu and select the Settings icon.
  2. Select System.
  3. Select Display from the left pane, and click on Graphic Settings from the left.
    mouse lagging
  4. Toggle on the switch for Hardware-accelerated GPU scheduling.

3. Edit USB selective suspend settings

  1. Right-click on the battery icon and select Power Options.
  2. On the left pane, select Change when the computer sleeps.
    mouse lagging
  3. Click on Change advanced power settings.
  4. Click USB settings, expand the USB selective suspend setting, and change both options to Deactivated.
    mouse lagging

This solution will be helpful if you use a Bluetooth mouse.

4. Enable / Disable the Scroll Inactive Windows option

  1. Click the Start button and select Settings.
  2. Select the Devices option.
  3. Next, click on Mouse from the left pane.
  4. Now locate the Scroll Inactive Windows option and disable/enable it.
  5. Try disabling and enabling this option a few times and check if the issue is resolved.

The tricky part of this solution is that some users may have difficulty accessing the Setting app. But this can be resolved in a few clicks.

5. Change the PalmCheck threshold in Windows

  1. Press the Win + X keys and choose Settings from the list.
  2. Choose the Devices option from the list.
  3. Next, click on Touchpad from the left pane and select Settings under Synaptics Touchpad.
  4. Now get the PalmCheck slider to the left.

6. Set the touchpad sensitivity

  1. Click on the Start button and select the Settings app.
  2. Now select Devices from the list.
  3. Select Touchpad from the left pane.
  4. Click on the Touchpad sensitivity menu and change it to High sensitivity or Most sensitive.
  5. If you’re not using the touchpad, you can disable it from the same window by toggling off the Touchpad option from the top.

7. Disable the NVIDIA High Definition Audio device

  1. Click on Start and select Settings.
  2. Now choose the Apps option.
  3. Look for the GeForce Experience app, click on it and select Uninstall.
  4. Right-click the Start button and select Device Manager.
  5. Locate NVIDIA High Definition Audio under Sound, video and game controllers; right-click it and choose Disable.
    disable device nvidia sound
Note icon NOTE
Disabling devices to make a peripheral work properly is not recommended, but some users have resorted to this step after no other solution was possible.

Try this step only if there is no other solution to your mouse lagging issue.

To ensure that no lasting damage is possible, ensure that you have quick access to the Device Manager to activate the devices quickly.

8. Change the USB Hub power management options

  1. Right-click the Windows Start button and select Device Manager from the list.
  2. Double-click the USB Hub device to open its properties.
  3. Go to the Power Management tab and uncheck Allow the computer to turn off this device to save power. Click OK to save the changes.
    allow the computer to turn off this device to save power usb root hub

Remember to check your USB port. If it doesn’t work as expected, you can fix your USB ports in a few clicks.

What causes a mouse to lag?

Connection problems

Mouse lag often happens when the connection is weak. This can happen with wireless or wired mice if the Bluetooth signal is far away, the cable is tangled, the USB port is faulty, or other devices interfere.

Low battery

If your mouse is wireless, low batteries can cause lag. Even if there’s no warning light, try changing the batteries.

Outdated drivers

Sometimes your mouse needs updated drivers to work smoothly. If you don’t update them, your mouse might lag or not perform well.

Wrapping up

If you have erratic mouse movements, it’s possible that the mouse is damaged or you’re having problems with your USB port. Connecting the device to a different port or PC is recommended in such a case.

For other related issues, check out guides on mouse not moving to a second screen, cursor disappearing, mouse jumps, and mouse keeps clicking.

Updating the mouse software can help, especially if you have mouse lag in CS:GO or other games or disable Palmcheck altogether.

This issue is reported in other games, and Call of Duty: Cold War also has mouse problems. Hopefully, the solutions from this guide will help you fix that.

Before you leave, don’t miss our guide on the mouse cursor stuck in the corner to see how to fix it.

If you have any questions or, on the contrary, some valuable solutions, drop them in the comments section below.

Fix: Bluetooth Volume Control is Not Working in Windows 11

Windows 11’s Bluetooth volume control not working is one of the rampant complaints from users. It indicates that the Bluetooth device connected to the device can’t use its volume control on the PC. Users also report no sound after Bluetooth connection in Windows 11.

Why is Windows 11 Bluetooth volume control not working?

Bluetooth volume control not working on Windows occur by some factors. The most common cause of the issue is an outdated Bluetooth driver on the computer. It can affect how the Bluetooth devices connected to your PC work.

Also, you can experience difficulty with Windows 11 Bluetooth volume control not working due to other factors such as:

  • Startup errors – It is common for Windows PCs to encounter issues when they fail to boot up. So, it can affect several components on the system, including Bluetooth, causing its volume control not to work.
  • Outdated sound drivers – Sound drivers are responsible for sound features on Windows PC. If they are outdated, they tend to lose control and impede the performance of sound features. So, outdated drivers caused Bluetooth not to work on Windows 11 or not function as it should.
  • Issues with Bluetooth pairing – Windows 11 Bluetooth volume control not working can erupt from connection issues during the pairing.

Let’s review how to fix the issue and get the Bluetooth volume control to work again.

What can I do if the Bluetooth volume control is not working on Windows 11?

Before trying any advanced troubleshooting on your PC or the Bluetooth device, we recommend you apply the following:

  • Unpair the Bluetooth device from your PC and pair it back after seconds.
  • Disconnect other Bluetooth devices from your computer.
  • Turn off background apps running on your PC.
  • Restart your PC to check if the issue is resolved.

If you’re not able to fix the issue by trying these preliminary checks, proceed with the solutions below:

1. Run the Bluetooth Troubleshooter

  1. Press the Start button, type troubleshoot in the search bar, and press Enter.
  2. Click on Troubleshoot Settings from the search result, then click on the Other Troubleshooters option.
  3. Navigate to Bluetooth and click the Run button. (Wait for the error to be diagnosed and fixed)
  4. Close the troubleshooter after the process is complete.

Wait for the troubleshooting process to complete, then restart your PC. Then, pair the Bluetooth device to your PC and check if the volume control works.

Running the troubleshooter will scan and repair any issues with Windows that can cause Windows Bluetooth not to turn on or the volume control not to work.

2. Restart the Bluetooth Support Service

  1. Press Windows + R key to prompt the Run dialog box, type services.msc in the text space, and press Enter to open the Services window.
  2. Right-click on Bluetooth Support Service and click on Restart from the drop-down.
  3. Then right-click on the Bluetooth service and select Properties from the drop-down.
  4. Choose Automatic from the Startup type options, then click OK to save the changes you’ve made.
  5. Restart your PC to allow the changes to sync and check if the problem persists.

Restarting the Bluetooth Support Service will allow it to refresh and fix any errors plaguing its Bluetooth features.

However, we have a detailed guide on how to fix Bluetooth support service error 1079 on Windows 10/11.

3. Update the Bluetooth driver

  1. Press Windows + X key to launch the Quick Link Menu and click on Device Manager.
  2. Double-click on Bluetooth, right-click on the Bluetooth adapter, and select Update driver from the drop-down.
  3. Click on the Search automatically for drivers option, restart your PC, and check if the issue persists.

The Bluetooth driver update will download patches and updates to fix bugs and improve your PC’s Bluetooth functionality. Read more on how to update drivers in Windows 11.

You can also go for an automatic solution if you don’t necessarily want to do this manually. Outbyte Driver Updater is a great software that can help you update not only your Bluetooth driver but all your outdated or missing drivers with just one click.

Outbyte Driver Updater

An amazing solution that keeps your drivers updated to fix or prevent various bugs or issues.
Free Trial Download now

4. Delete and re-pair the Bluetooth device

  1. Press Windows + I key to open Settings.
  2. Click Bluetooth & devices, toggle on the Bluetooth switch, and click Devices.
  3. Click the three dots to open the menu and select the Remove option from the menu.
  4. Navigate to Add device and select your Bluetooth device from the list.
  5. Click the Connect button to pair, then click on Done.

Deleting and pairing the Bluetooth device will remove it from your PC, allowing you to establish a connection.

Take a look at this guide for what to do if you can’t remove Bluetooth devices on Windows 11. You can also check our guide on how to make your Bluetooth devices auto-connect.

For more questions and suggestions, kindly drop them in the comments section below.

EASY FIX: PFN_LIST_CORRUPT BSoD in Windows 10 [9 Ways]

If your computer encounters a hardware failure or a major software problem, it will give you the infamous Blue Screen of Death error and restart itself.

These errors can sometimes appear on Windows 10 and are somewhat severe. Therefore, fixing them as soon as possible is crucial, either manually, or using a dedicated BSoD fixer.

What does PFN List Corrupt error mean?

The PFN List Corrupt error typically indicates a problem with the Page Frame Number (PFN) list in a computer’s memory management. This list keeps track of the pages in physical memory, and when it becomes corrupted, it can lead to system crashes or blue screen errors in Windows. Addressing this error often involves troubleshooting memory or driver-related issues.

Other instances of PFN_List_Corrupt BSoD are often encountered during games like Valorant, and it is commonly attributed to outdated drivers, so updating them is recommended. This error bears similarities to the Memory Management error, leading many to believe that faulty RAM might be the cause.

Another related problem is the Critical structure corruption BSOD experienced by gamers, but fortunately, solutions are available for these issues. Overclocking your PC can also trigger the error, so reverting to default settings is advised.

How can I fix PFN LIST CORRUPT BSoD error on Windows 10?

Before we move on to more advanced troubleshooting solutions, make sure to do the following:

1. Check your memory

  1. 1. Press Windows then type Windows memory diagnostic and click to open the first result.

    memory-diag-w10 mdsched.exe
  2. 2. Choose either the Restart now and check for problems option, or Check for problems the next time I start my computer. We advise to choose the first in order to start the process right away.

    rest-check mdsched.exe
  3. 3. The Memory Diagnostics Tool will automatically start running tests on your PC’s memory. The system will also display the progress bar and the status notification during the process.

    Once finished, your computer will reboot and return to the Windows desktop.

    memory-diag-tool mdsched.exe
  4. 4. The system might not always display the results found, thus, right-click the Start icon and select Event Viewer.

    event-viewer pfn class list error windows 10
  5. 5. Click Windows Logs on the left side then select Filter if you have the option on the right side.

  6. 6. Input MemoryDiagnostic and select Find Next to see the results from the Memory Diagnostic Tool.

    windows-logs pfn class list error windows 10
  7. Through the use of the Windows Event Viewer, one is able to view a log of application and system messages. These messages may include failures, information messages, and warnings.

    It is a useful tool for diagnosing and repairing a variety of problems that may arise with Microsoft Windows.

    Therefore, if you encounter the stop code PFN LIST CORRUPT, you should check your memory info via Event Viewer before trying out other solutions.

Memory issues are a common cause of the PFN LIST CORRUPT BSoD, thus we recommend that you check your RAM’s health with additional third-party software as well.

2. Uninstall the problematic driver

  1. Press Windows Key + X to open the Power User Menu and select Device Manager from the list.
  2. Once the Device Manager starts, expand the Universal Serial Bus controllers section, right-click the Etron driver, and select Uninstall device. unisntall-usb pfn critical list error windows 10
  3. If available, check the Delete driver software for this device option and click OK.
    confirm-uninstall-driver
  4. Restart your computer.

Bear in mind that almost any driver can cause this error, you might need to do a bit of research before you find a driver that is causing you this problem.

3. Update Windows 10

  1. Type Settings in the Search bar and select the top result.
  2. Select Update & Security from the Settings list.update-security nmi hardware failure windows 10
  3. Click on Check for updates to find new updates that you need to install.

Windows 10 isn’t a perfect operating system, and there are a few bugs and issues, so to fix any hardware or software issue, it’s crucial to run Windows Update regularly.

By downloading the latest updates, you’ll fix most of the hardware and software issues, which are both major causes of the blue screen PFN LIST CORRUPT error.

In addition to bug fixes, updates bring improved stability, security, and new features, so be sure to download them frequently.

4. Update drivers

  1. Type Device Manager in the Windows Search bar.
  2. Select the drivers you want to update from the list, right-click on them and click Update driver.
    pfn list corrupt
  3. Click on Search automatically for drivers to install the driver.
  4. Wait for the available drivers to be installed.

Searching for drivers on your own can be time-consuming. So, we advise you to use a tool automatically to do this for you.

Using an automatic driver updater will save you from the hassle of searching for drivers manually, and it will keep your system updated with the latest drivers.

Thus if you can’t follow these steps or it doesn’t work in your case, third-party software can instantly help you find your faulty drivers and fix them efficiently. Outbyte Driver Updater can easily perform this job.

This approved tool will find outdated and bad drivers and let you choose which ones you need to be updated.

Outbyte Driver Updater

Automatically update all drivers and keep your PC running without any errors.
Free Trial Download now

5. Run the BSOD Troubleshooter 

  1. Open the Settings app by pressing Windows + I, and go to the Update & Security section.update-security nmi hardware failure windows 10
  2. Select Troubleshoot from the menu on the left, then select BSOD from the right pane and click Run the troubleshooter.
  3. Follow the instructions on the screen to complete the troubleshooting.

This is a part of Windows 10’s built-in troubleshooting tool that can be found in the settings. Hopefully, this tool can also resolve the stop code PFN LIST CORRUPT error.

6. Run the SFC scan

  1. Tap Windows then enter cmd and select Run as administrator.cmd-run-admin 0x80070002 windows update
  2. Enter the following line and press Enter: sfc/scannowPFN LIST CORRUPT Windows 10 error
  3. Wait until the process is done (it may take a while) then close the Command Prompt and restart your computer.

7. Run DISM

  1. Right-click Start and open Command Prompt (Admin).
    pfn list corrupt
  2. Paste the following command and press Enter: DISM /Online /Cleanup-Image /RestoreHealthPFN LIST CORRUPT Windows 10 error
  3. Wait until the scan is finished. Restart your computer and try updating again.

And the third troubleshooting tool we’re going to use is DISM. Deployment Image Servicing and Management (DISM) re-deploys the system image, resolving potential issues on the way.

8. Check the hard drive

  1. Enter the Advanced Startup (Restart your computer while holding the Shift key).
  2. Choose Troubleshoot, then Advanced Options.
  3. Select Command Prompt from the list of options.
    pfn list corrupt
  4. When Command Prompt appears, enter the following lines and press Enter after each line to run it:bootrec.exe /rebuildbcd bootrec.exe /fixmbr bootrec.exe /fixbootPFN LIST CORRUPT Windows 10 error
  5. Some users are also suggesting that you need to run additional chkdsk commands as well. To perform this, you must know the drive letter for all your hard drive partitions. Enter the following command and enter the letter corresponding to your hard drive partition: chkdsk /r c: chkdsk /r d:PFN LIST CORRUPT Windows 10 error
  6. Restart your computer and check if the issue is resolved.

9. Disable Microsoft OneDrive

9.1. Use the Local Computer Policy panel

  1. Press Windows + S and enter group policy. Select the Edit group policy.
    edit-group-policy
  2. When Local Group Policy Editor opens, navigate to Local Computer Policy, then access Computer Configuration.
  3. Choose Administrative Templates then click Windows Components and OneDrive.
  4. In the right pane, locate Prevent the usage of OneDrive for file storage and double-click it.
    pfn list corrupt
  5. Select Enabled and click Apply and OK to disable OneDrive.

9.2. Use the Registry Editor

  1. Press Windows Key + R and type regedit. Press Enter or click OK to start Registry Editor.
    regedit
  2. Once Registry Editor starts, you need to navigate to the following key in the left pane:HKEY_LOCAL_MACHINE\Software\Policies\Microsoft\Windows
  3. Expand the Windows key and search for OneDrive. If the key doesn’t exist, go to the next step to create it.
  4. Right-click the Windows key and choose New then Key. Enter OneDrive as the name of the key.
    pfn list corrupt
  5. Select the OneDrive key. In the right pane, right-click and choose New then DWORD (32-bit) Value. Enter the code below as the name of the new DWORD: DisableFileSyncNGSC
  6. Double click the DisableFileSyncNGSC and change its Value data to 1. Click OK to save changes.

9.3. Use Safe Mode

  1. Restart your computer a few times while it boots. This should start Automatic Repair process.
  2. Choose Troubleshoot, then Advanced options.troubleshoot Driver Power State Failure
  3. Go to Startup Settings, and click the Restart button.restart-startup-screen Driver Power State Failure
  4. Once your computer restarts again, you’ll see a list of options. Press F4 or 4 to select Safe Mode. Once the Safe Mode starts, disable OneDrive.

OneDrive was a part of the Windows Essentials suite for many years, but with the rising popularity of cloud storage, it became a default application on Windows 10.

OneDrive is a great tool that allows you to collaborate and share files with others, but unfortunately, several users reported that OneDrive can also cause PFN LIST CORRUPT error.

Why does PFN List Corrupt appear after GPU upgrade?

This error usually implies that you have upgraded to faulty hardware. And this is in fact the major cause of the issue on your computer.

Upgrading to a different GPU would fix the error. Alternatively, downgrading the device will also be a handy step in rectifying this error.

You should note that while this error may occur post-GPU update, users have also experienced the PFN list corrupt error when installing Windows 10. In this case, you will have to reset your OS.

In case nothing helps, you can always get help from a dedicated BSoD fixer.

We’d like to hear more from you on this matter so drop us a comment in the section below.

Fix: Microsoft Office Cannot Open [Word, Excel, PowerPoint]

Microsoft Office cannot open? You’re not alone. Windows 10 users have reported an issue regarding Microsoft Office versions 2010 and 2013, where products like Word, Excel, or PowerPoint will not open and return no error or prompt.

Here’s how to fix it:

How do I fix Microsoft Office not opening?

1. Use Task Manager

fix-office-not-opening-windows-8 (2)
  1. Press Ctrl + Shift + Esc or right-click on the Taskbar, select Task Manager.
  2. Take a look either through the opened apps or under the Details tab, where you will find it as WINWORD.EXE.
  3. If you see the process there, this means that Windows 10 thinks the program is open and will not do anything about it. In this case, try to create a new document, right-click it, and select Edit.

In some cases, this method has proven useful and might help you in a tight spot.

2. Go to the source

If your Microsoft Office shortcuts don’t do anything when you try to launch them, then there might be an issue of communication between the shortcut itself and the actual executable it should open.

Depending on what Office version you’ve installed, you should find them in one of these locations:

  • C:Program FilesMicrosoft OfficeOffice14
  • C:Program Files (x86)Microsoft OfficeOffice14

Try launching the tool you need from here, if it works, then your shortcut was to blame. Create a new shortcut for the Office components you use and replace the faulty ones.

3. Use Safe Mode

Starting an Office product in Safe Mode is pretty simple, as it was in previous Windows versions.

Just open the Run utility (Windows key + R) and type in the name of the product you want to follow by /safe.

For example, if you wish to open Microsoft Excel in Safe Mode, type in excel /safe.

4. Use a Microsoft Office alternative

In case you need to sidestep this Office issue, it might be useful for you to consider another document management suite.

WPS Office Suite is a legitimate alternative to Microsoft Office due to the effective management of documents across multiple devices. You can thus edit and manage your files on Windows, macOS, Linux, Android, or iOS.

There are enough Office apps on the market capable of providing extra value. Hence, this alternative provides Writer, Spreadsheet, or Presentation document tools.

Plus, it supports 47 file formats and it’s available in many languages out there.

⇒ Get WPS Office

5. Repair or Reinstall

  1. 1. Press the Windows key and type apps in the search box, then click the Apps & features result.

    apps-features microsoft office not opening
  2. 2. Here, type office inside the search bar, then click the Microsoft Office result.

    advanced-office microsoft office not opening
  3. 3. Click on Advanced options.

  4. 4. Scroll down, then click the Repair button. By using this option, your app’s data won’t be deleted, but the app’s files will be checked for any damage or corruption.

    repair-app-office microsoft office not opening
  5. 5. Alternatively, you can use the Reset button in case repairing the app didn’t work. In this case, your app data will be lost as well.

    reset-office microsoft office not opening
  6. The built-in Reset option for Microsoft Office will uninstall and reinstall the application, thus fixing the Microsoft Office not opening issue.

    You can choose to fully reset the app or merely repair it, thus preserving your app data for later use. Choose the appropriate option according to your needs.

6. Install Windows updates

Microsoft regularly releases updates for Microsoft Office (and other in-house features and programs) through Windows Update.

So, if your current version of Office is disrupted in some way, there’s a chance a new update will fix it. And it doesn’t necessarily need to be an Office update.

Maybe some other features installed on your computer are interfering with Office, preventing you from accessing it. In both cases, installing fresh updates can resolve the problem.

To install the latest updates on your computer, simply go to Settings > Update & Security, and check for updates.

If you’re having issues opening the Setting app, take a look at this article to solve the issue.

7. Uninstall Windows updates

  1. Go to Settings. Now, go to Updates & Security, followed by Windows Update.
  2. Go to Update history > Uninstall updates.
  3. Now, find the latest Office update installed on your computer (you can sort updates by date), right-click it, and go to Uninstall.
  4. Restart your computer.

Now, let’s do the total opposite of the previous solution. If the problem started to manifest after you’ve updated your Office suite, then you can easily uninstall the latest updates and see if this fixes your problem.

8. Disable Add-Ins

disable Add-Ins
  1. Open the troublesome app.
  2. Go to File > Options.
  3. Click Add-Ins, and then disable all add-ins.
  4. Restart the program, and run it without any add-ins enabled.

Sometimes, damaged add-ins may block your Word/Excel/PowerPoint from opening any document.

Since you can’t know for sure which add-in causes the problem, we recommend uninstalling all of them and then installing them one by one again.

That way, you’ll be able to find out which one causes problems. The task is time-consuming, but you don’t have too many choices.

9. Make sure Office is activated

make sure Office is activated

If your copy of Microsoft Office Suite is not genuine, you won’t be able to open any Office app. Technically, you’ll be able to open any program normally, but you can’t do anything with it.

You can’t create new documents, or open and edit existing documents. It’s just an empty shell. So, make sure your Office is properly activated, and try to run in once again.

10. Remove Word Registry Keys

Registry Editor
  1. Go to Search, type regedit, and open Registry Editor.
  2. Navigate to one of the following paths:
    • Word 2002: HKEY_CURRENT_USERSoftwareMicrosoftOffice10.0WordData
    • Microsoft Word 2003: HKEY_CURRENT_USERSoftwareMicrosoftOffice11.0WordData
    • Word 2007: HKEY_CURRENT_USERSoftwareMicrosoftOffice12.0WordData
    • Word 2010: HKEY_CURRENT_USERSoftwareMicrosoftOffice14.0WordData
    • Microsoft Word 2013: HKEY_CURRENT_USERSoftwareMicrosoftOffice15.0Word
    • Word 2016: HKEY_CURRENT_USERSoftwareMicrosoftOffice16.0Word
  3. Now, just click on the Data key, and delete it.
  4. Restart your computer.

If you specifically have problems with opening Word, we’ll try to delete some registry keys. Hopefully, the program will work after that.

11. Remove old printer drivers

And finally, some users have also reported that having old printer drivers installed on your Windows 10 PC prevents Microsoft Office from working.

Alternatively, you can use dedicated uninstaller software to automatically remove old printer drivers from your PC.

After you finish removing your old drivers, check to see if the problem persists.

Wrapping up

That’s about it. We certainly hope at least one of these solutions helped you resolve the problem with Microsoft Office.

Keep in mind that this problem mainly occurs with Microsoft Word. However, we’ve detailed solutions that apply to all Office programs, nevertheless:

If you want to try the new Office 2024, you can download the preview version of the software; read this guide to learn the detailed steps.

If you have any comments, questions, or suggestions, just let us know in the comments down below.

Steam Keeps Changing The Language: 5 Ways to Quickly Fix It

Many readers report that Steam keeps changing language even when they set a preferred default language.

Because Steam supports multiple languages, knowing how to change the language on Steam allows you to select your choice.

Why does Steam change language every time?

The common cause of the constant language change is opening multiple Steam community pages and refreshing them in the Steam browser. Some of our readers say it’s what caused the issue.

However, other factors may cause Steam to keep changing language frequently. Some are:

  • Outdated app – If your Steam app is outdated, it will lack the needed updates and patches for optimal performance. It isn’t uncommon for the Steam app to be stuck when downloading an update.
  • Your account has been hacked or infiltrated – Steam accounts can change the language settings based on the region the account is logged in. Hence, frequently changing Steam language can mean your account has been hacked.
  • Pirated games on Steam – Many users complain that they encounter problems with Steam changing their language after installing a pirated game. They can come in different languages and affect the language of other certified games on Steam.

However, the issues of Steam frequently changing your language can’t be pinned on a specific cause as it is random but annoying. Nonetheless, there are some fixes we’ve put together to help you with it.

How do I fix Steam if it keeps changing the language?

Before you try any troubleshooting steps, go through the steps listed here:

  • Make sure you connect to a stable network connection.
  • Log out of your Steam account and log in to see if the language changes.
  • Close and relaunch the Steam client.

If you are unable to fix the issue, use the following solutions to fix it.

1. Update the Steam client

  1. Left-click the Start button, search for Steam, and launch the app.
  2. Click the Steam Menu and select the Check for Steam client update option.
  3. Click on Update. If there are updates available for your app, Steam will automatically install the updates.

Updating the Steam client will fix bugs-related issues that can cause it to malfunction. If your Steam upload is stuck, read our guide to fix it.

2. Change your Steam account password

  1. Click the Start button, search for Steam, and open it.
  2. Click the Steam menu button and select Settings.
  3. Go to Account and click the Change Password button on the right pane of the screen.
  4. Enter your current password and click Next.
  5. Check your mail for the Steam Support email, copy the 5-character code from the email, then input it in the confirmation box alongside your desired new password.
  6. Click Next to complete the process, then FINISH on the next page.
  7. Restart the Steam client.

Changing your Steam account’s password will deactivate your account from other devices, preventing others from changing your language. Read how to fix Steam if you can’t run it on Windows.

Besides, resetting the password also helps fix Steam Error Code E87.

3. Disable the Steam cloud sync feature

  1. Click Start, search for Steam, and launch the app.
  2. Click Steam at the top of the screen and select Settings.
  3. Then go to the Cloud tab and toggle Off the switch next to Enable Steam Cloud Sync for applications that support it.
  4. Restart the Steam client.

Disabling the Steam Cloud Sync option will prevent changes from other devices from affecting yours. It can fix the frequent language changes.

You can hop on this guide for quick fixes if you encounter other Steam Cloud errors. Also, you can read how to delete Steam Cloud saves from your PC.

4. Change the Steam client’s language

  1. Press the Windows key, search for Steam, and launch the Steam client from the search results.
  2. Click Steam at the top of the screen, then select Settings.
  3. Go to the Interface tab, click the drop-down arrow on the language menu, then select your desired language from the drop-down.
  4. Restart the Steam client.

Since this issue keeps reoccurring, it might be worth changing your language again. We also have an in-depth guide on how to change the Steam client’s language.

5. Uninstall pirated Steam-based game

  1. Press the Windows key, search for Steam, and launch the Steam client from the search results.
  2. Select Library and go to Games.
  3. Right-click the game to uninstall and click Uninstall.
  4. Restart the Steam client.

Pirated games are developed in different countries, so they select the language they are built on by default and can impact Steam. However, uninstalling the game can fix the language change in Steam.

We have a detailed article to guide you on how to fix errors when connecting with the Steam servers on your PC.

For more questions and suggestions, kindly leave them in the comments below.

Ntoskrnl.exe BSoD: What is & How to fix it?

The ntoskrnl.exe BSoD is usually related to memory, or caused by a faulty driver. Before starting the solutions below, disconnect all unnecessary peripherals such as external drives, printers etc. Also, if you installed new RAM modules, reverse the procedure and return to the original setup to see if that’s what causing the problem.

How do I fix ntoskrnl.exe BSoD missing or corrupt?

1. Fix bad memory issues

  1. Go to Start and type Memory. Double-click on Windows Memory Diagnostic.memory-diag ntoskrnl.exe bsod
  2. Select the first option to restart your computer and check your memory.
fix bad memory windows pc

A common cause of ntoskrnl.exe BSoD errors is related to bad memory. Use Windows 10‘s built-in memory diagnostic tool to identify potential memory issues affecting your system.

2. Update your Realtek audio driver

  1. 1. Right-click the Start icon then select Device Manager.

    open device manager
  2. 2. Expand the Sound, video and game controllers section.

  3. 3. Right-click the Realtek driver and select Update driver.

    update-realtek ntoskrnl.exe bsod
  4. 4. Select the Search automatically for drivers option in order to update the driver.

    automatically-search bluetooth not working windows 10
  5. 5. Reboot your PC.

  6. If you have been experiencing a similar ntoskrnl.exe BSoD DRIVER_POWER_STATE_FAILURE in Windows 10, you need to download the latest Realtek drivers.

    It is possible that the Realtek HiDefinition Audio driver, labeled as Creative Audio Driver, is out of date and causing you issues.

Save yourself some time and do it automatically with a third-party program. Never think about updating your drivers again thanks to this awesome software. Just download it, click a few things, and the rest of the process is automated. Say goodbye to BSoD errors related to driver issues.

⇒ Get Outbyte Driver Updater

3. Update your computer

  1. Press Windows + I then when the Settings app opens, click on Update & security.update-security nmi hardware failure windows 10
  2. Now click the Check for updates button. The ntoskrnl.exe BSoD PAGE_FAULT_IN_NONPAGED_AREA error will be fixed.check-updates searchui windows 10

Note: If your Windows search box is missing, get it back in a couple of easy steps from this useful guide.

4. Use a third-party BSoD fixer

Fix any BSoD errors, including the ntoskrnl.exe BSoD IRQL_NOT_LESS_OR_EQUAL in Windows 10, automatically with the help of a nifty third-party program. The software will restore your damaged, corrupted, or missing system files.

You won’t have to worry about fatal errors and crashes anymore. The process is, once again, automated. You only need to click a few times and the program will start scanning and repairing your computer.

5. Disable the overclocking settings

If you installed overclocking software on your computer, this may explain why you’re getting the ntoskrnl.exe BSOD errors.

These game-boosting tools put a strain on your hardware, forcing them to run beyond the recommended frequency.

As a result, this may cause various issues, including Blue Screen of Death crashes. The quickest solution to fix them is to disable the overclocking software.

6. Turn off BlueStacks/ another Android emulator

  1. Open Notepad.
  2. Enter the following lines: C:Program Files (x86)BlueStacksHD-Quit.exe net stop BstHdUpdaterSvc net stop BstHdLogRotatorSvc net stop BstHdAndroidSvc
  3. Click on File and then on Save as.file-save-notepad ntoskrnl.exe bsod
  4. Set Save as type to All Files. Enter script.bat as the file name and click on Save.save-bat ntoskrnl.exe bsod
  5. Locate the script.bat file and double-click it to run it.

Note: Some Windows 10 users reported that the ntoskrnl.exe BSOD errors occur mainly when they enabled BlueStacks and other Android emulators.

So, if you installed emulators on your computer, disable or completely uninstall them.

7. Clean your registry

  1. Go to Start, then type CMD and open the top result as an admin.cmd-run-admin 0x80070002 windows update
  2. Type in the following command and press Enter: sfc/scannowscannow 0x80070002 windows update
  3. Wait for the scanning process to complete, then, restart your computer.

You can also use Microsoft’s System File Checker to check for system file corruption. The utility verifies the integrity of all protected system files and repairs files with problems when possible.

Note: Corrupted or missing registry keys may also cause BSOD errors. Don’t forget to first back up your registry in case anything goes wrong.

The simplest way to repair your registry is to use a dedicated tool for Windows.

8. Check your disk for errors

  1. Press Windows then type cmd and select the Run as administrator option.cmd-run-admin 0x80070002 windows update
  2. Type the following command, replace the C letter with your drive’s letter, and press Enter: chkdsk C: /fchkdsk-c-f ntoskrnl.exe bsod
  3. To repair physical issues, type the following command: chkdsk /r D:chkdsk nmi hardware failure windows 10

On Windows 10, you can run a disk check using Command Prompt. As a quick reminder, if you do not use the /f parameter, chkdsk displays a message that the file needs to be fixed, but it does not fix any errors.

9. Remove faulty sticks of RAM

Some Windows 10 users reported that the system_thread_exception_not_handled ntoskrnl.exe errors that they encountered were caused by a faulty stick of RAM.

So, if you recently changed the RAM configuration of your computer, check your RAM sticks to make sure that they’re properly inserted and are working as they should be.

What is ntoskrnl.exe BSoD?

This is a system file, and if the file is damaged or it has crashed, you’ll encounter a BSoD error. Do keep in mind that Ntoskrnl.exe can also cause high CPU usage so it might be a good idea to check your hardware as well.

It has been reported that this file can also lead to Driver power state failure, so we encourage you to check your drivers and update them to avoid this issue.

In some instances, this file can also cause Critical_process_died csrss.exe BSoD, but luckily there are multiple solutions that you can use to fix this problem.

We hope the solutions listed in this article helped you fix Windows 10 BSOD errors caused by ntoskrnl.exe. If you come across other solutions to fix this issue, let us know in the comments below.

Also, leave there any other suggestions or questions you may have and we’ll be sure to check them out.

Windows 10 Randomly Shuts Down: 9 Ways to Permanently Stop It

All of us have experienced one or two Windows 10 random shutdowns from time to time. Sometimes the culprit is hardware, sometimes software.

Either way, it’s an isolated event. However, what happens if your computer keeps shutting down? On a daily or even hourly basis?

Why is my Windows 10 computer shutting down randomly?

If Windows restarts randomly or shuts down, it’s possible that you have an issue with the power supply, so make sure that everything is properly connected.

In some instances, the computer shuts down while gaming, and the issue can be overheating, overclocking, or even incompatible drivers.

A few users reported that the Shutdown box appears randomly on Windows 11, and this is usually due to system glitches.

Here are a few other instances you may encounter the error:

  • Windows 10 immediately shuts down after login
  • Computer suddenly turns off and won’t turn back on
  • Computer randomly shuts off no error message

No matter the cause of the problem, this guide will help you fix the problem once and for all.

How do I fix random shutdowns in Windows 10?

1. Update your drivers

  1. Click Start and type device manager then click the top result. Launch Device Manager to fix random restart in Windows 11
  2. Expand Display adapters. Right-click on your GPU driver and select Update driver.update-driver-w10 amd driver install problems
  3. Select Search automatically for drivers then reboot your PC once the process is done.Search automatically for drivers

Note: If you are using dual-GPU with Intel (integrated) and AMD/nVidia (dedicated) graphic cards, make sure to update drivers for both.

The majority of generic drivers that you received through the Windows Update can be used, but that’s not the case with GPU drivers. You’ll need the latest drivers provided by the official manufacturer.

Update your drivers automatically

If you’re tired of manually searching up drivers for all of your components, you’ll be happy to know that there is a third-party app that can do that for you.

This awesome software will not only scan your computer for compatible drivers, but it will also automatically install them for you as well, saving you a lot of time and effort.

2. Turn off the Sleep mode

  1. Press Windows + I to open the Settings app then choose System.system-10 windows 10 random shutdown
  2. Go to Power & sleep.
  3. Set both Screen and Sleep to Never.

Sleep mode is great in scenarios when your PC/Laptop is idle for a long period of time.

It preserves energy while enabling you to continue with the use in a few seconds. Until it became a problem in Windows 10. Namely, some users, instead of standard sleep, experienced complete shutdowns.

To be precise, it seems that Safe Mode equals Hibernation in some cases. Because of that, your next step would be to disable sleep mode. We’ll continue from there.

You can also try and set it on 5 hours timeout. That way some other possible interference should be prevented. If the shutdowns repeat, move on to the next steps.

3. Turn off Fast Startup

  1. Right-click Start and run Power Options.
  2. In Power Options click Choose what the power buttons do.
  3. Click Change settings that are currently unavailable.
  4. Uncheck the Turn on fast startup (recommended) within the Shutdown settings.
  5. Click OK to confirm and you are done.

With the newly added Fast Startup, Microsoft tried to speed things up while maintaining stability. But, since it affects the way your PC is shutting down, it may summon a lot of errors.

Luckily, you can disable it, check the PC behavior, and move on to the next steps if the workaround failed.

4. Tweak the advanced power settings

  1. 1. Press the Windows key, then type choose a power plan and select the top result.

    choose-power plan windows 10 randomly shutdown
  2. 2. Choose your default power plan and click on Change plan settings.

    change-plan windows 10 random shutdown
  3. 3. Click on Change advanced power settings.

    change-advanced windows 10 random shutdown
  4. 4. Navigate to Processor power management, then System Cooling policy, and set it to Passive.

  5. 5. Now, navigate to Hard Disk, then Turn off hard disk after and reduce the value until it shows Never.

    never-hard-disk windows 10 random shutdown
  6. 6. Save changes and exit.

  7. It seems that a lot of issues are related to power settings in Windows 10. Random shutdowns may be on the list. We have a few tweaks for advanced power settings that are worth trying.

    Have in mind that you’ll need administrative permissions in order to perform them.

5. Use this dedicated tool we recommend

Fix computer random shutdowns with Windows Shutdown Assistant

The Windows Shutdown Assistant is a dedicated tool that will stop your computer from randomly shutting down. With an easy-to-use interface and automated tasks.

It enables you to shut down the computer at a desired set time automatically.

Additionally, you can set it to shut down the computer in other situations such as system idle, excessive CPU usage, or low battery. The software also allows you to log off, restart, and lock the computer automatically.

This tool supports all Windows Operating Systems and comes with the following features:

  • Turn off the computer automatically in various situations
  • Schedule to Run a Program or Open a File
  • Multiple Functions to Manage Windows Tasks
  • Secure Computer Files and Data
  • A Visual Break Reminder
  • Create a reminder and set it to auto-display on the desktop at a set time.

Feel free to download the trial version now and give it a shot. Besides fixing the random shutdowns, it’s also a great tool to organize your tasks effortlessly.

⇒ Download the Windows Shutdown Assistant

6. Check the CPU temperature

In some cases, your CPU or GPU may overheat and that will lead to random shutdown on Windows 10. Namely, your motherboard is programmed to shut down everything in order to prevent serious damage to your CPU.

This especially goes for laptops that are most of the time lacking an adequate cooling system for intensive gaming.

You can check system temperatures with 3rd-party tools or just casually touch the backside of the laptop.

If the temperatures are alarmingly high, you’ll need to take some action.

  • Clean fan bay on laptops or CPU cooler on a desktop.
  • Change the thermal paste.
  • Use a cooling pad of some kind to reduce heating.
  • Change overclock settings to default.

In case your notebook/PC is in warranty, we advise you to take it to your supplier and let the professionals do the cleanup.

7. Update BIOS

Even though BIOS updating is not advisable, especially for beginners, sometimes it’s required. If misused, Bios updates can cause a lot of problems and most of them are fatal to your PC.

Some motherboards offer special update tool featured in BIOS settings. If you have a new motherboard, you’ll have an easy time updating.

However, those of you with the older configurations have a much harder task.

Make sure you gather all the information before performing the process. Moreover, if your motherboard is up to date, don’t upgrade it.

8. Check HDD state

  1. Right-click on Start and run Command Prompt (Admin).
  2. In the command line type, the following command and press Enter to confirm: wmic diskdrive get status
  3. You’ll know your hard disk is healthy when prompted with OK for every partition.

Another thing worth checking is your HDD. If your HDD is corrupted or it has damaged sectors, you’ll probably encounter a large variety of problems.

Most of the time the system won’t boot, but it may as well be related to sudden shutdowns. For that purpose, you can use 3rd-party tools and scan the disk (like HDDScan), or use the built-in tool and do it internally.

For starters, the built-in tool will serve you right, and here is how to use it. On the other hand, if you are seeing Unknown, Caution, or Bad, your hard disk has some issues.

Of course, you can always scan your HDD with one of the best dedicated tools.

9. Perform a clean reinstall

At the end of the day, the clean reinstallation of Windows is the most viable solution. Of course, if the hardware isn’t the instigator of the uncalled Windows 10 random shutdown.

You can use Media Creation Tool to easily obtain installation setup for either ISO DVD or bootable USB.

Have in mind to back up your data from the system partition before the process commences. Moreover, take good care of your license key.

The process is not as hard as it was on some of the previous systems so you’ll be able to finish in two hours.

That should wrap it up. We hope you’ll find these workarounds appropriate for the Windows 10 random shutdown issue.

Finally, all you can do is try since Microsoft is the one that should address this issue with more enthusiasm. In case you have any suggestions, alternative solutions, or questions, don’t forget to tell us in the comments.

How to Find IP Address on Windows 11 [6 Different Ways]

Every device connected to the Internet or a local network has a unique IP (Internet Protocol) address assigned to it. And, there are times when you may need need to find this IP address in Windows 11.

There are two standards for IP addresses, IPv4 (Internet Protocol Version 4) and IPv6 (Internet Protocol Version 6). The former has been there for quite some time while the latter is new and advanced. Also, IPv6 can accommodate a lot more addresses.

Now, that you know the two standards, let’s find out how an IP address works, and the various ways you can it in Windows 11.

How does an IP address work?

An IP address looks something like this, 192.181.1.1, a combination of four sets of numbers. Each of these sets can range between 0 to 255. These sets are actually read as binary numbers by the computer.

Amongst the various types, there are four that require thorough understanding, it’s Static and Dynamic IP addresses and Internal and External IP addresses.

A Static IP address, as the name suggests, is one that does not change and is set manually. On the other hand, a Dynamic IP address is automatically assigned to each device on the network and can change over time.

The internal IP address refers to the one for a particular device on the network and is unique for each. It is assigned by the modem or router and is generally dynamic. The external IP address is common for all the devices on the network and is what people on other networks see.

Now that you have a basic understanding of the concept, let’s walk you through all the ways to find an IP address in Windows 11.

Quick tip:

A well-established and trusted VPN provider is Private Internet Access (PIA). It offers advanced network settings and has an outstanding app interface with strong speed scores. In case you want to hide your IP address, PIA helps by rerouting your internet traffic through one of its servers.

Furthermore, PIA provides an unbreakable security against IP trackers with a strict no-logs policy where it doesn’t record traffic or store any browsing data from its users at all. It also blocks ads and malicious websites for a safer and faster online experience. You can control your online privacy and fully encrypt your connection with a static IP address where only you can have your way in.

⇒ Get Private Internet Access (PIA)

How can I check the IP address in Windows 11?

1. Use Settings

  1. Press Windows + I to launch the Settings app, and select Network & internet from the tabs listed in the navigation pane on the left.
    Network & internet to find windows 11 ip adress
  2. Click on the Properties option on the right to view these for the currently connected network.
    Properties
  3. Now, scroll down to the bottom and locate the IP address.
    Find IP address in Settings in Windows 11

This is probably one of the simplest methods and several users find it the most suitable to find the IP address in Windows 11.

2. Use Control Panel

  1. Press Windows + S to launch the Search menu, enter Control Panel in the text field at the top, and click on the relevant search result that appears.
    Control Panel to find windows 11 ip adress
  2. Next, click on Network and Internet from the options listed here.
    Network and Internet
  3. Click on Network and Sharing Center.
    Network and Sharing center to find windows 11 ip adress
  4. Now, click on the network you are connected to get its status.
    Connection
  5. Click on the Details button.
    Details to find find windows 11 ip adress
  6. You will find the IP address listed here.
    IP address

3. In Task Manager

  1. Press Ctrl + Shift + Esc to launch the Task Manager and navigate to the Performance tab from the top.
    Task Manager to find find windows 11 ip adress
  2. Next, click on the Wi-Fi entry from the options on the left.
    Wi-Fi
  3. The IP address will now be listed on the right.
    IP address

This method is probably the quickest of all to find the IP address in Windows 11.

4. Via the System Information app

  1. Press Windows + S to launch the Search menu, enter System Information in the text field at the top, and click on the relevant search result.
    Systen information to find find windows 11 ip adress
  2. Double-click on Components in the navigation pane on the left to expand and view the categories under it.
    Components
  3. Now, double-click on Network and then select Adapter under it.
    Adapter to find windows 11 ip adress
  4. You should now find the IP address under the active network adapter on the right.
    Copy

5. Use an online tool to find the IP address

Another method to check the IP address is by using a reliable online tool on a secure browser in Windows 11. A simple Google search should list various such tools, and you can use any of these. In most cases, Google itself should list the IP address at the top.

Do remember that this method will list the external IP address which may be different from the ones you found in the previous methods, which was the internal IP address or that of the individual device.

You can also use other tools like What is my IP or IPConfig.in to find your IP address in Windows 11. Also, several third-party apps might help you find the IP address as well.

6. Via Command Prompt

  1. 1. Press Windows + X or right-click on the Start icon to launch the Power User menu. Depending on your default command tool, you will see Command Prompt, Powershell or Windows Terminal here.

  2. 2. Click on the result to open it. In our example, we have Windows Terminal on our PC. It is a tool that merges command line shells.

    Windows Terminal to find find windows 11 ip adress
  3. 3. If you are already in Command Prompt, skip this step and jump to step 4.

    If you use Windows Terminal, click on the downward-facing arrow and select Command Prompt from the menu. Alternatively, you can hit Ctrl + Shift + 2 to launch cmd in a new tab.

    Command Prompt windows terminal
  4. 4. Now, paste the following command and hit Enter: ipconfig

    ipconfig to find windows 11 ip adress
  5. 5. You will now find the IP address listed under the network adapter currently being used.

    IP address cmd
  6. Several advanced users prefer Command Prompt over the conventional methods to find the IP address in Windows 11.  Also, the same command would work in PowerShell as well, or any other command-line tool.

By now, you realize that finding the IP address is not intricate as it sounds. From the six methods listed here, choose the one that you are the most comfortable with and that takes minimum time.

Also, learn how to set a static IP and add a secondary IP address in Windows 11 from our guides.

You can learn how to switch to the newer protocol by following this guide for enabling IPv6 on Windows 11.

If you have any further queries, drop them in the comments section below.

5 Best PDF Compression Software [Windows 10 & Mac]

PDFs can be extremely efficient when you need to present a large document that contains images and graphs, and because of this, there’s no surprise that this format is so popular.

But if the file is too big to be included in the email or other software, PDF compression software comes to the rescue.

How can PDF compression software help me?

In some situations the PDF file you’re working with is way too big, thus not allowing your PC to process all the information in a timely manner.

In other cases, you can’t share the PDF file you just finished with your co-workers because of the same size issue.

It is very important that the compression is done without damaging any of the content or reducing the quality of the images.

Read on to find out what the best PDF compression software is, for both Windows 10 and Mac users.

What is the best software to compress PDF?

WinZip – Best compression

WinZip is a powerful software that enables you to compress PDFs with just a few clicks of your mouse, and without losing the quality of any of the data.

Beyond this, the speed at which this software compresses even the largest PDFs is absolutely astonishing, leaving the competition in the dust.

One of the most unusual but very useful features is the fact that you can use WinZip to add links to files via email, IM, and social media, which in this day and age can give you a clear advantage.

On top of amazing compression speeds, and unequaled compressions quality, WinZip also offers you a wide range of other useful features:

  • Can merge and split archives as easily as saying zip
  • Great compatibility with all well-known operating systems
  • Offers great portability and an easy-to-navigate interface
  • Can convert files to PDF
  • Add watermarks
  • 128/256-bit encryption
  • Fully compatible with DropBox, GoogleDrive, SkyDrive, etc.

WinZip

Compress PDFs of any size quickly and efficiently with this powerful and easy to use software.
Free trial Visit website

Adobe Acrobat – Best native compression

Being the actual inventor of the PDF format, Adobe Acrobat enables you to compress PDF files almost as easily as WinZip.

This powerful tool not only allows you to compress PDF files no matter of their size, but also offers viewing, editing, managing, creating, and converting of PDF files.

To top everything off, Adobe Acrobat DC is easily controlled by using its user-friendly interface,  giving you quick access to the plethora of features.

Even the way you use the software can be customized by being able to easily set the way your toolbars are shown, and what elements they include.

The conversion process is done efficiently, and the results suffer no loss of quality whatsoever.

Here are some other useful features:

  • Touch-enabled functionality
  • Can be adapted to any sort of document or user-preference
  • User-friendly interface
  • Fully compatible with most OSs

Adobe Acrobat Reader

Compress PDF files fast with this extraordinary software. Try it out today!
Free trial Visit website

ShortPixel Online PDF Compressor – Best online tool

If you want to archive some PDF files quickly, ShortPixel’s Online PDF Compressor is the best online tool for that.

Not only will it get the job done in record time, but you may work with batches of up to 50 files at a time, which is impressive for an online app!

Just drag and drop your files into the designated area on the website and set up the compression rate. Lossy will provide the best compression, but you will lose some image quality inside the PDF.

The Glossy settings seems like the best choice because you will have the best of both worlds: good compression and decent image quality. However, if you want to keep the graphics inside the PDF at their best quality, pick the Lossless setup.

Although the tool is free, you may only work with files that don’t exceed 10 Mb. You can remove this limitation by creating an account in a few seconds.

⇒ Get ShortPixel Online PDF Compressor

PDFOptim – Great compression

PDFOptim is a good compression software that offers decent results, even though the output settings are not as complex as in the case of other software options presented in this guide.

This software works by offering you a choice from a large number of pre-defined presets, which can simplify things at the cost of more exact customization.

One of the best features of this software is that it allows you to perform a side-by-side comparison between the file pre and post-compression.

Some other useful features:

  • Fast processing of files
  • Professional-level results at no cost to image/text quality
  • Simple interface that’s easy to understand and use
  • Useful pre-sets that prove easy to use even for beginners
  • Supports batch-processing of PDF files

⇒ Get PDFOptim

WorkinTool – Best dedicated PDF compression

WorkinTool is actually a swiss knife for file conversion and compression and it has a dedicated PDF compression feature.

This software offers three levels of compression: Smaller Size, Normal Compression, and Clearer Output.

Of course, the first one is the most effective and it can shrink a several MB file in a few hundred KB.

However, that setting might affect the quality of the images inside the PDF so we would recommend using the second option, Normal Compression.

The third setting can be used if you need to keep your images to a good quality but it’s a tradeoff for the amount of shrinkage.

Other than that, it’s really easy to use it. Just click on the PDF Compression option, drag-and-drop your file, select the compression setting and hit the Compress button.

The same simple process can be applied to images, videos, Word or Powerpoint files.

WorkinTool works on all versions of Windows, and also on macOS. It can be downloaded and used for free so you can at least try it.

Take a look at its best features:

  • Three compression settings available
  • Simple and easy usage
  • Up to 85% compression ratio for the smallest size compression
  • Image, video, PDF, Word and Powerpoint file compression
  • Free to download and use

⇒ Get WorkinTool

We hope that the software options presented in this guide have been useful in your search for a good PDF compression software.

You may also be interested in our selection of the best PDF to Word compression tools.

If you have any other software suggestions in mind or would like to share your experience with us, don’t hesitate to make use of the comment section below.

How to Fix Bluetooth Not Working in Windows 10 (Step-by-Step Guide)

If you’re dealing with Bluetooth not working in Windows 10,we ll help you fix it fast. Many users report issues like missing toggle buttons, failed connections, or devices not pairing. This guide covers the most effective solutions to restore Bluetooth functionality quickly.

What can I do if Bluetooth stops working in Windows 10?

1. Check if Bluetooth Is Enabled

Before anything else, confirm Bluetooth is turned on.

Steps:

  • Press Windows + I to open Settings.
  • Go to Devices > Bluetooth & other devices.
  • Make sure the Bluetooth switch is toggled On
bluetooth device is on

If the option is missing, your driver may be corrupted or your device doesn’t support Bluetooth.


2. Restart Bluetooth Support Services

Sometimes Bluetooth services crash or fail to start properly.

Steps:

  • Press Windows + R, type services.msc, press Enter.services msc
  • Locate Bluetooth Support Service.
  • Right-click it > Restart.
  • Set Startup type to Automatic.

This method helps with Bluetooth connection problems and missing settings.


3. Run the Bluetooth Troubleshooter

Windows includes a built-in tool for fixing Bluetooth problems in Windows 10.

Steps:

  • Open Settings > Update & Security > Troubleshoot.
  • Select Additional troubleshooters.
  • Click Bluetooth > Run the troubleshooter.

It detects and resolves common issues automatically, including pairing failures.


4. Reinstall the Bluetooth Driver on This Computer

Corrupted or outdated drivers are a top reason why Bluetooth won’t work.

Steps to reinstall Bluetooth driver for Windows 10:

  • Press Windows + X > choose Device Manager.
  • Expand Bluetooth, right-click your adapter > Uninstall device.
  • Confirm and restart your PC.
  • Windows will reinstall the driver automatically.

If Windows doesn’t reinstall it or you still have issues, consider using a reliable tool like Fortect Driver Updater. It scans your system and helps you reinstall or update your Bluetooth driver with a single click, perfect for avoiding manual errors.


5. Update Bluetooth Drivers

Outdated drivers can break Bluetooth pairing and connection.

Steps:

  • In Device Manager, right-click the Bluetooth adapter.update msi bluetooth driver
  • Choose Update driver > Search automatically for drivers.

If no updates are found, visit the OEM support site to get the latest version.


6. Re-Pair Your Bluetooth Device

This step is key when learning how to fix Bluetooth headphones pairing.

Steps:

  • Go to Settings > Devices > Bluetooth.
  • Select your device > Remove device.
  • Reboot your PC.
  • Pair the device again by clicking Add Bluetooth or other device.

This resolves corrupted pairings or failed connections.


7. Use the Airplane Mode Toggle Trick

Toggling airplane mode can refresh your wireless settings.

Steps:

  • Go to Settings > Network & Internet > Airplane Mode.
  • Turn it on, wait 10 seconds, then off again.

This is a quick fix for Bluetooth connection issues without deeper troubleshooting.


8. Use Windows 10 Optional Features Repair

Some Windows components may be missing or damaged.

Steps:

  • Open Settings > Apps > Optional features.
  • Look for Wireless Display or Bluetooth-related entries.
  • Remove and reinstall if needed.
  • You can also use sfc /scannow in CMD to scan for corrupt system files.

Why is my Bluetooth not in Device Manager?

If you can’t find your Bluetooth device in the Device Manager, it might be because of an outdated or faulty driver. You can fix this quickly by updating or reinstalling your driver, as shown in this guide.

Another known cause of the issue is an outdated PC. Updating your operating system should help restore normalcy here.

That’s about it. We hope at least one of these solutions helped you resolve the Bluetooth problem in Windows 10.

If you updated to the latest version of the OS, we prepared a separate guide on how to fix your Bluetooth in Windows 11.

While troubleshooting this problem, you might also be interested in our guide on what to do if your Bluetooth headphones are not working in Windows 11.

If you have any questions or suggestions, just let us know in the comments below.

The Specified Procedure Could Not be Found: 4 Ways to Fix It

The specified procedure could not be found error on Windows 10 and Windows 11 is an issue that often arises when users try to launch certain applications during startup. When that issue occurs, this error message pops up:

RunDLL: There was a problem starting [file reference]. The specified procedure could not be found.

Why the specified procedure could not be found?

The specified procedure error is a RunDLL issue that pertains to DLL (Dynamic Link Library) files. That means the Rundll32.exe can’t access the specified file within the error message. Consequently, software that needs the referenced DLL file can’t start.

Thus, the specified procedure could not be found issue is in some respects similar to the more common missing DLL errors that blight Windows. It can arise because of corrupted or missing system or third-party software DLL files much the same.

How do you fix The specified procedure cannot be found?

1. Run the SFC command-line utility

  1. 1. Press the Windows key, then input the keyword cmd within the search text box and select Run as administrator for the Command Prompt’s search result.

    cmd-admin hp printer won't scan
  2. 2. Before initiating an SFC scan, input this command and press Enter: DISM.exe /Online /Cleanup-image /Restorehealth

    restore health command
  3. 3. Then type in the SFC command and press Enter: sfc /scannow

    sfc scan command
  4. 4. Wait until the SFC scan has reached the 100 percent mark and displayed an outcome message within the Command Prompt.

  5. 5. Reboot your computer.

  6. If you’re experiencing the specified procedure could not be found error, you should check your system for any corruption.

    To do that, you need to perform the SFC (System File Checker) scan in Command Prompt.

2. Run a malware (antivirus) scan

  1. Double-click Windows Security on your system tray.
    The Windows Security icon the specified procedure could not be found
  2. Select Virus & threat protection on the Home tab.
    The Home tab the specified procedure could not be found
  3. Click Scan options to open more scanning settings.
    The Scan options option the specified procedure could not be found
  4. Then select the Full scan radio button shown directly below.
    The Full scan option the specified procedure could not be found
  5. Click Scan now to start. 
    The Scan now option the specified procedure could not be found

You can also scan for malware with third-party utilities like Malwarebytes and not only delete digital threats but also prevent them from affecting your computer. This will help fix the ippipyramidgetsize_l The specified procedure could not be found error.

3. Roll Windows back to a previous time

  1. Right-click the Start menu’s taskbar button and select Run.
    The Run option the specified procedure could not be found
  2. Open System Restore by entering this command in Run and clicking OK: rstrui
    The rstrui command the specified procedure could not be found
  3. If there’s an option to Choose a different restore point, select that radio button. Then click Next to continue.
  4. Choose a restore point that might restore Windows to a time that predates the specified procedure error on your desktop or laptop. Or select the oldest restore point available if you’re not sure.
  5. Then click the Next and Finish button to restore Windows to your chosen date.

This method will remove software installed after your selected restore point. Click Scan for affected programs in System Restore to check what software you’ll need to reinstall.

4. Reinstall the software the specified procedure error occurs for

  1. Launch Run via the Win + X menu (or press a Windows + R hotkey for it).
  2. Then input this Programs and Features command and click OK: appwiz.cpl
    The appwiz.cpl command the specified procedure could not be found
  3. Select the software the specified procedure error occurs for, and click its Uninstall option.
    Uninstall button the specified procedure could not be found
  4. When you’ve uninstalled the software, click Power and Restart on your Start menu.
    Restart option the specified procedure could not be found
  5. Then reinstall the latest version of the software you just uninstalled.

To ensure there aren’t any leftovers from uninstalled software, it’s better to utilize a third-party uninstaller app, such as IObit Uninstaller. This tool includes options for erasing residual files and registry entries left behind after uninstalling programs.

If you come across The specified procedure could not be found with Windows Photos, you’ll need to reinstall the app with PowerShell. You can enter this PowerShell command to reinstall a specific built-in app:

Add-AppxPackage -register “C:\Program Files\WindowsApps\<PackageFullName>” –DisableDevelopmentMode

Will resetting Windows 10 fix the specified procedure issue?

Yes, resetting Windows might work because that will at least restore missing DLL system files. However, resetting Windows will also remove all third-party apps on your PC that weren’t pre-installed with it. So, that potential fix is a recommended last resort only.

Our guide on how to reset Windows 10 to its factory settings post provides full instructions for resetting that platform.

Will any third-party system repair software resolve this error?

Some might, but you’ve got to select the better system repair software available. Moreover, you can use these tools as a registry cleaner, as this issue can arise because of corrupted Windows registry entries.

Our best registry cleaner tools article provides further details about the best registry utilities. You can also check out the software in our best DLL fixer repair software guide.

Is the specified module could not be found error the same as the procedure one?

The specified module could not be found error is a very similar issue that we have addressed separately. The only difference is that its message references a module instead of a procedure. In programming terms, a procedure is a specific task whereas a module is a small program section.

However, the specified module is a RunDLL error much the same. It arises when users try to start certain software and includes a DLL file reference. Some of the same resolutions for the specified procedure issue might also fix the module error.

If you need more fixes, consider contacting the Microsoft support service for Windows. You can do so via the Contact Microsoft Support webpage.

You’re most welcome to discuss this error in the comments section below. There you can add any questions and even share alternative fixes (if you’ve discovered any) for the specified procedure error.