Ghost of Tsushima might be coming to Steam in 2023

This is beyond doubt one of the most anticipated and critically acclaimed games of 2020, and it’s about to extend its reach.

We know that a lot of people were sad when finding out that Ghost of Tsushima was going to be a PlayStation exclusive, but that’s about to change pretty soon.

Allegedly, this highly desired RPG is about to be enjoyed by PC players around the world, as it would be coming to Steam in 2023.

Is Ghost of Tsushima coming to Steam in 2023?

There is no confirmed official information yet but, as we all know, spoilers can come from where you least expect it.

Redditor Repulsive_Lettuce was simply browsing one of his go-to sites for game keys when he stumbled upon something that raised more than just an eyebrow.

We also did a deep dive on the Instant-Gaming website and searched for this awesome PlayStation title, only to find out that this is not actually a joke.

Searching for Ghost of Tsushima yielded two results. The first one was the console version, and the second one was, just as found on Reddit, dedicated to Steam.

Furthermore, the site also reveals when the beloved game will join the Steam lineup. According to the first Instant-Gaming post, Ghost of Tsushima was supposed to come to the PC platform starting on the 8th of February, 2022.

Things have changed a bit since we last reported it, and the 2022 release date is no longer present on the website. Now, it just says that it will be available in 2023 without any month being specified.

For the time being, you can’t pre-order the game key, only subscribe to the site’s newsletter and get informed about when this option will become available.

This is a really big deal for PC players, who actually saw a lot of PlayStation exclusives added to Steam recently, among which are Horizon Zero Dawn, Days Gone, and also God of War.

However, as we said, this is not official information and it is rather strange for an unannounced game to appear on a third-party key retailer.

So before we get all excited and start making plans for next February, let’s see if developers or even the people at Steam will confirm this.

Since we’ve initially written this article, a lot of streamers have become increasingly hyped and impatient, sharing their enthusiasm with their viewer community.

We’re not sure how this will translate into a faster availability of the PlayStation exclusive for PC players, but the hope is that we will have it soon.

We’ll keep an eye out and report back if there are any changes in this story. Will you buy Ghost of Tsushima once it becomes available on Steam?

Share your opinion with us in the comments section below.

Best PDF Reader for Windows 10 to Use in 2026

Nowadays, there are many PDF viewer tools you can choose to edit and view PDF files. As always, when too many options are available, it becomes challenging for users to choose one.

To make this task easier for you, we’ve created a list of the best Windows 10 PDF viewer tools available on the market. In case you’ve made the transition to the latest OS, do not hesitate to check out the best PDF reader software for Windows 11.

Here are the top products that we’re gonna talk about:

  1. Wondershare PDFelement – Best PDF reader and editor
  2. Soda PDF – Feels like a book
  3. Adobe Acrobat Reader – Nice interface
  4. Icecream Ebook Reader – Perfect for Ebooks
  5. Nitro Free PDF Reader – Offers a free trial
  6. Xodo PDF Reader – Simple and quick
  7. PDF Annotate&Fill – Best for editing
  8. PDF Viewer – Easy navigation
  9. Perfect PDF Reader – Compatible with most formats
  10. Foxit Mobile PDF – Perfect for slow PCs
  11. Reader – Microsoft’s very own PDF viewer
  12. Swifdoo – Seamless in every sense
  13. PDF Reader – As refined as it can be

What are the best PDF reader tools for Windows & Mac?

Wondershare PDFelement – Best PDF reader and editor

If you’re looking for a great PDF reader, but also want a bit more than reading a PDF document, look no further than Wondershare PDFelement.

Actually, a lot more because AI also powers this PDF editor, so it’s the next level when handling documents.

With Wondershare PDFelement, you can translate or even wholly rewrite your PDF documents and then export them in one click.

Another cool AI feature is document summarization. Yes, you may create text summaries of a complex PDF and export them as Markdown files.

As mentioned above, this app also has complete PDF editing features. For instance, you can eSign PDFs, annotate your documents, move, copy, delete, split the pages, combine more documents, and more.

Another pleasant surprise is that PDFelement works on Windows but also on Android and iOS, so that you can work on your documents on any such device.

In case you’re wondering, you will also be able to access your own 20 GB cloud storage space to store your documents safely.

Let’s review some of its best features:

  • Sign your documents securely
  • AI features for summarizing, translating, and exporting your documents
  • 20 GB of cloud storage space
  • Collaborate with your colleagues by using the annotate tool
  • Move, copy, delete, and split the pages or combine PDF documents

Wondershare PDFelement

Read your PDF documents or edit them easily by using a modern AI-infused software!
Free trial Visit website

Soda PDF – Feels like a book

Soda PDF viewer

As its name suggests, this tool allows you to view your PDF files in 3D. You can flip through the pages of a PDF document just like you would with a real paper book.

Moreover, there’s no need to transform the files into another format. The software is versatile, compatible with tablets, laptops, and phones.

This app lets you view your PDF files in regular modes: single, continuous, facing, and facing continuous.

You can also convert your PDF documents into Microsoft Word format, allowing you to edit all aspects of the document.

Let’s quickly look at its key features:

  • Mark your document by highlighting, underlining, and strikethrough
  • Add Shapes, use the Pen tool, and add Text to your document
  • Sign and secure files

Soda PDF

Enjoy your eBooks, and read and annotate your important work or school files and projects with Soda PDF.
Free Trial Visit Website

Adobe Acrobat Reader – Nice interface

adobe acrobat reader

The Acrobat Reader is one of the best PDF readers for PC, and it allows you to view, print, sign, comment on, share, and annotate PDFs absolutely free of charge. It’s undoubtedly the best PDF viewer in Windows 10.

Thanks to its cross-platform functionality, the Reader is versatile enough to accompany you anywhere. View your PDFs and more from any device and any location absolutely free.

Speaking about versatility, the Reader is also highly flexible, and you can customize it to fit your needs.

When reading a PDF document, you can hide all the toolbars and task panes to maximize the viewing area on your screen.

To open Read mode, simply choose View > Read Mode from the menu. Further, use the basic reading controls available on the floating toolbar, such as page navigation and zoom.

Let’s quickly look at its key features:

  • View and annotate PDF files (complete commenting toolset integrated)
  • Acrobat Reader mobile app (view PDFs across any device and any location)
  • Cloud storage (Acrobat Reader DC is connected to Adobe Document Cloud)
  • Seamless integration with popular third-party apps (Dropbox, Google Drive, or Microsoft OneDrive)
  • Fully customizable tool (activate additional capabilities and only pay for what you want and need: Adobe Acrobat Export PDF to convert PDFs to Word or Excel files or Adobe Acrobat PDF Pack to convert, combine, and send files for a low monthly fee)

Adobe Acrobat Reader

View, annotate, and edit PDF files easily, on multiple platforms using Adobe Acrobat Reader
Free trial Visit Website

Icecream Ebook Reader – Perfect for Ebooks

ice cream ebook reader

Icecream Ebook Reader is a top-notch PDF viewer, designed mostly for eBooks, but for sure, you can also use it for any large PDF document.

What makes Icecream Ebook Reader unique is the one-click feature that allows you to resume reading where you left it, the bookmarks feature, to mark your favorite parts of a book or the full-screen mode for PC.

Moreover, you may alter the text to better suit your needs, allowing you to read the text in blocks of any preferred size.

Some other notable features of Icecream Ebook Reader:

  • Opens PDF, MOBI, DJVU, and other similar formats
  • Copy, Translate, and Search functions
  • Intuitive scrollbar for quick navigation
  • Text annotation feature
  • Night mode
  • Export Library features to easily transfer your ebook collection

Icecream Ebook Reader

Read, annotate, and mark your PDF documents with ease with this intuitive and handy reader.
Free Trial Visit Website

Nitro Free PDF Reader – Offers a free trial

nitro pdf viewer

Nitro PDF reader is an excellent free PDF software for Windows and over 600,000 companies use it, it truly deserves the first position in this list.

Starting with a 2-week trial period and finishing with all the features that are opened once you get the paid version, this software is worth all your attention.

This app makes the team work on the same document easier by adding multiple user layers including comments, bookmarks, and signatures.

Let’s quickly look at its key features:

  • You’ll be able to create PDF files from over 300 file formats
  • You can customize your PDF documents: colors, orientation, page size, quality
  • Automatic display of digital signatures, comments, or bookmarks and their prioritization
  • Creation of your own signature by taking a photo or scanning the signature
  • Full output compatibility with other PDF readers

The tool can be downloaded for free from Nitro’s official website. However, to unlock all the features for a full user experience you can buy the Pro version.

Nitro Free PDF Reader

Nitro Free PDF Reader lets you customize, display digital signatures, and add bookmarks to your PDF files
Free Trial Visit Website

Xodo PDF Reader – Simple and quick

The Xodo PDF Reader is a very powerful tool, offering a wide range of features, from viewing and editing PDF files to converting your photos into PDF documents.

Another interesting feature is the presence of the Night Mode for comfortable PDF reading in dark environments.

Let’s quickly look at its key features:

  • Bookmark pages for future reference
  • Use the table of contents to jump to chapters and sections
  • Draw and type text directly on the PDF
  • Insert, rearrange, and delete pages in PDF documents
  • Fill out, save, and send PDF forms
  • Optimized for styluses.

You can download the Xodo PDF Reader & Editor from the Microsoft Store.

Xodo PDF Reader

With Xodo PDF Reader you can bookmark, insert, rearrange, and delete your document pages with ease
Check price Visit Website

PDF Annotate & Fill – Best for editing

This tool focuses mainly on editing PDF files, but you can also use it simply for viewing PDF documents.

PDF Annotate & Fill allows you to draw on PDF docs, add different shapes or text, and edit elements by changing their color, size, transparency, and location. We dare say it’s the Photoshop of PDF readers.

Let’s have a look at its key features:

  • You can draw text, straight lines, and any other shapes directly into the PDF
  • Highlight, underline, and even strikeout your text
  • Add comments and shapes to your PDF
  • Add annotations and navigate between them easily

PDF Annotate & Fill

Annotate, fill, view, and edit your important PDF documents with this awesome little software

PDF Viewer – Easy navigation

PDF Viewer Windows 10 app


This powerful PDF tool allows users to open documents from local storage and from the Internet. Also, you can zoom in and out and search for specific words in the text.

Navigation is very easy and smooth, you can use the scroll mode or use the navigation keys. The interface is simplistic and plain, to keep you focused on your reading.

Besides, you can add bookmarks to make it easier to locate important information.

Let’s take a quick glance at its main features:

  • You can navigate through the document by using pages
  • You can bookmark your favorite books
  • Small app size barely takes any storage space
  • Works with Wi-fi at 2.5 or 3G
  • You can select multiple documents

PDF Viewer

PDF Viewer is a simple and small app that will allow you to view and edit your PDF files with no problem

Perfect PDF Reader – Compatible with most formats

Perfect PDF Reader windows 10 app

Perfect PDF Reader is a free, fast, and user-friendly app for viewing and printing PDF and XPS files. It’s one of the best PDF viewers in Windows 10.

This tool can quickly open PDF, XPS, and OXPS files in multiple windows.

Also, you can use various viewer layouts, fit modes, and zoom tools, and navigate using links, bookmarks, outlines, and/or semantic zoom. The app allows users to fill in PDF forms as well.

Let’s quickly check its core features:

  • You can open any type of PDF file and eBooks
  • You can text search in any document
  • View multiple files in individual windows
  • Comes with a bookshelf that will arrange itself based on categories
  • You can share PDF files with your other apps

⇒ Get Perfect PDF Reader

Foxit Mobile PDF – Perfect for slow PCs

foxit

Foxit Mobile PDF is a small PDF viewer which allows you to open, view, and annotate any PDF files. This tool has been specially designed for those who use PDF documents on the go.

It’s a simple yet highly effective PDF viewer that works well on Windows and should meet all the requirements. Besides, it offers the option to search.

Let’s quickly look at its key features:

  • Search text in a file
  • Directly jump to a certain page using bookmarks
  • Easily zoom the page using your fingers
  • Easily adjust comment colors and opacity
  • Show or hide comments
  • Record recently opened files.

⇒ Get Foxit Mobile PDF

Reader – Microsoft’s very own PDF viewer

Reader is Microsoft’s own PDF viewer and one of the best for Windows 10. The tool supports XPS and TIFF files. Also, Reader allows users to view documents, search for words or phrases, take notes, fill in forms, and print or share files.

This app has a clean and easy-to-use interface but lacks essential features such as multi-window support and bookmark navigation needs to be improved.

Overall, the app does what it promises and doesn’t require much space on your disk, it only needs 15MB.

Let’s see some of its main features:

  • Highlight your content
  • Fill in forms and signatures digitally
  • Easily save, share, and print your documents

⇒ Get Reader

SwifDoo – Seamless in every sense

SwifDoo is one of the most user-friendly and user-centric PDF viewers you would come across. It offers a range of features, be it creating PDFs, editing them, changing their format, merging or compressing one, and even adding a signature.

Also, the PDF viewer is compatible with all recent iterations of Windows, including Windows 11, Windows 10, Windows 8, Windows 7.1, and Windows XP. So, no matter which one the PC runs, you can always count on SwifDoo.

Besides, SwifDoo has a simple and interactive User Interface (UI) with various options suitably placed, allowing quick access and thereby improving work efficiency.

And with SwifDoo, you don’t have to wait for the PDF documents to load or the changes to reflect since it does that in a jiffy!

The PDF viewer also allows adding a digital signature to documents and has three ways for it, either to upload one, type it in a text field, or use a cursor to draw the signature.

It also offers the option to add links to the document to redirect the reader to another page on the same document or one on the web.

Here are some of SwifDoo’s key features:

  • Runs on almost every computer and needs only 150 MB of free space and 1 GB of RAM
  • One of the safest PDF viewers with two-level password protection
  • Offers a range of features and is extremely quick
  • SwifDoo has a free trial, so you don’t have to purchase a subscription right away
  • Signatures on SwifDoo are legally binding

⇒ Get SwifDoo

PDF Reader – As refined as it can be

The tool allows you to read, manage, share, and back up your PDF documents.

This is an excellent collaboration tool as it allows users to import PDF files from any device, share PDF files via the sharing feature, send out PDFs as email attachments, and also print out the documents.

The current version of PDF Reader brings a brand new user experience specially designed for Windows 10, as well as many bug fixes.

Let’s take a look at some of its key features:

  • Annotate your documents with highlights
  • You can scroll horizontally and vertically
  • Zoom the document in and out
  • Precise and fist file rendering

⇒  Get PDF Reader

Have you already used some of the apps listed in this article? Share your experience in the comment section below.

Email Signature Software: 6 Best to Use With Office 365

If you’re using Office 365, you’re probably using a compatible email client for Microsoft Office 365. However, email signature software can take your emails to a new level.

Using them will ensure that your emails look professional, and in today’s guide, we’ll show you the best tools for the job.

What’s the best email signature software to use?

WiseStamp – Best email signature software

WiseStamp is one of the most used email signature software that works with almost every client, including Gmail, Google WorkSpace, Outlook, Mac Mail, iPhone, and Yahoo Mail.

It offers a range of customizations and pre-set templates to create signatures for individuals and organizations seamlessly.

You can also choose the layout, colors, and font style and add buttons, personal photos or brand logos, banners, videos, disclaimers, links to social accounts, and more.

WiseStamp offers dynamic banners, which have recently become highly popular. The platform has a collection of these for every occasion, all very attractive, and there’s also the option to add a link to the banner.

In addition to the plethora of pre-set templates available, WiseStamp allows users to create a template from scratch and integrate the various components into it.

Besides, it’s the best signature software for organizations, creating unified signatures for all employees, regardless of their number, at a low cost.

WiseStamp hasn’t become the leading email signature software overnight but has worked through the years, adding more customizations and simplifying the process.

Features to look out for in WiseStamp:

  • Seamless creation of email signature
  • You can add a dynamic (animated) signature
  • Auto-installation of the signature into emails
  • Offers a wide range of templates, so you will always find the perfect one
  • Allows adding gender pronouns to the email signature

⇒ Get WiseStamp

Xink – Quick deployment

Xink is an email signature platform that is compatible with Windows and helps companies all over the world manage their email signatures.

With its help, you can create professional, branded email signatures and manage them across devices and email systems.

Setting up and customizing the email signature according to your company’s needs will be effortless.

This might be the perfect choice if you need reliable email signature software for Exchange or any other service.

Take a look at some important features included in Xink:

  • Compatible with Office 365, Google Workspace, and Outlook
  • Various integrations, including Azure AD, Active Directory, SQL Azure, Apple, Salesforce, Zendesk, etc.
  • Compatible with Mac Mail
  • Ability to create mobile-friendly signatures
  • Quick deployment

⇒ Get Xink

Exclaimer – Great customer experience

Over 50 million users worldwide are currently using Exclaimer signatures software to obtain total control over their corporate email signatures.

With Exclaimer, you can ensure that every message comes with the appropriate email disclaimer for legal compliance.

Another important thing worth noting is that no unauthorized user can redesign their signature.

With its features, Exclaimer is one of Outlook’s best email signature software, so it’s worth checking out.

Check out the most important features that make this tool so trusted by its users:

  • Ability to create attractive email signature software templates with HTML images and text
  • You will be able to get signatures with merged field data that is pulled from Active Directory/Office 365 Directory
  • Manage everyone’s signature from a central console to ensure high professionalism around your brand
  • Design different signatures for different departments
  • Signatures can include dynamic content, including award logos, promotional banners, media icons, and more

⇒ Get Exclaimer

Email Signature Rescue – Incredibly simple to use

Email Signature Rescue is a professional email signature software for small teams, companies, and designers as well.

Using Email Signature Rescue, you can create and customize signatures with the software, download and email all signatures from the dashboard, and install in more than 45 email clients following the easy guides.

The software also allows you to crop, resize, and upload your images. Email Signature Rescue supports retina images and animated gifs.

After customizing your signature, download it and get an API key from the Dashboard.

You can try out the program for a week to see how it works, and if you don’t like it, you will get your money back.

Check out the best features that are implemented in Email Signature Rescue:

  • Ability to create, edit, and manage all your HTML signatures online.
  • Various customizable email signature templates
  • Over 200,000 social media icons are available
  • Ability to add custom graphics to your signatures
  • Requires no technical knowledge to use

⇒ Get Email Signature Rescue

CodeTwo Email Signatures for Office 365 – Best HTML template editor

CodeTwo Email Signatures for Office 365 is an administrative program that enhances your ability to manage company-wide email signatures and disclaimers.

Using this tool, you can gain control over every email traveling through your Office 365 tenant.

CodeTwo Email Signatures for Office 365 allows you to compose signature templates using a built-in HTML editor. Your signature will be visible when you write your email.

Check out the best features that come with CodeTwo Email Signatures for Office 365:

  • Ability to personalize your signatures by using Azure AD data.
  • Easy to add images and banners to your signatures
  • You can use Office 365 users’ photos in signature templates.
  • Support for personalized social media links in your email signatures
  • Has Email marketing, analytics, and one-click-surveys

⇒ Get CodeTwo Email Signatures for Office 365

ZippySig from Gimmio – Great for first-time users

With ZippySig, you can create stunning and reliable email signatures in just a few seconds.

The service is web-based and works in any web browser. In the left panel, simply select the elements you want to change and adjust their settings.

This incredibly simple email signature generator will be perfect for first-time users.

Check out the most impressive features that are packed in ZippySig:

  • Ability to create stunning email signatures that will give your company a professional vibe.
  • Endless customization options to ensure a consistent and professional brand image.
  • Email signatures are stored online and ready for easy installation.
  • Your email signatures can be edited, duplicated, or deleted from your dashboard.
  • Multiple plans are available: economy (perfect for sole traders and micro businesses), business (preferred plan for most companies), and ultimate (perfect for IT or design companies).

⇒ Get ZippySig

How do I create a professional-looking email signature?

There are several guidelines to follow when creating an email signature:

  • Length – Make your signature short and straight to the point. Don’t use more than 3-4 lines of text or else your recipient might not read it.
  • Use fewer links – Including links in your signature is acceptable, but don’t overdo it. Keep the number of links less than 3 for best performance.
  • Use images – A good image will make your signature stand out. Adding a corporate logo or your professional photo will make your signature stand out.
  • Don’t use colors – You want your email to look professional and have the same style. Adding colors to your signature might make it look out of place, so don’t do it.
  • Use fewer fonts – Having less font variety works better for signatures. Use one or two fonts maximum for best results.
  • Choose the information carefully – Keep only the essential business information in your signature. Make sure not to include any contact information that’s not essential.

This is where our roundup of five of the best email signature tools comes to an end.

Go to their official websites to check out more details on their features, and pick the best tool for email signatures that fits your needs.

If you got the e-mail signature software, maybe you’re also interested in our selection, including the best e-mail clients for Windows 10.

We also have a guide on how to perform DKIM Office 365 setup, so don’t miss it.

What product did you choose? Let us know about any other software that you use in the comments below.

Irql Not Less or Equal in Windows 11: How to Fix it

Many users encountered driver irql_less_or_not_equal on Windows 11, and this issue will force your PC to crash, so it’s important to know what causes it and how to fix it.

What causes the IRQL_NOT_LESS_OR_EQUAL error in Windows 11?

In most cases, this issue is caused by driver issues, but sometimes corrupted system files can lead to this issue. Faulty RAM can also cause this problem and in some rare cases, third-party software can be responsible.

How do I fix the IRQL_NOT_LESS_OR_EQUAL BSoD error?

1. Use the Startup Repair

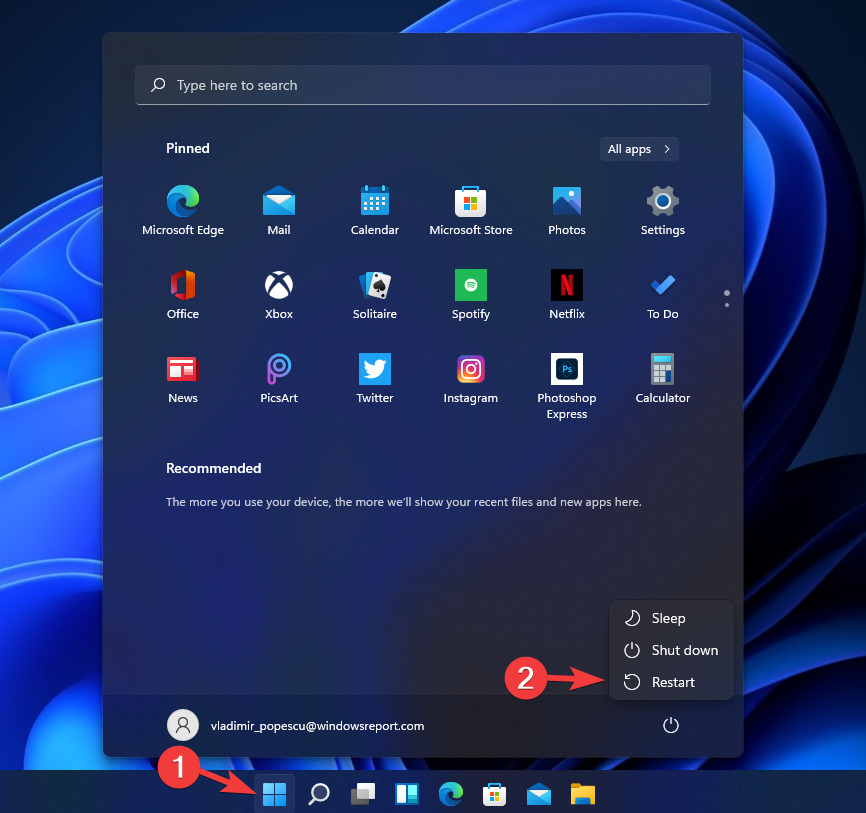
  1. 1. Click the Start icon from your Taskbar, click the power button, hold down the Shift key, and select Restart.

    Alternatively, you can create a bootable media for Windows 11 and start your PC with it.

    power-restart-shift irql not less or equal error windows 11
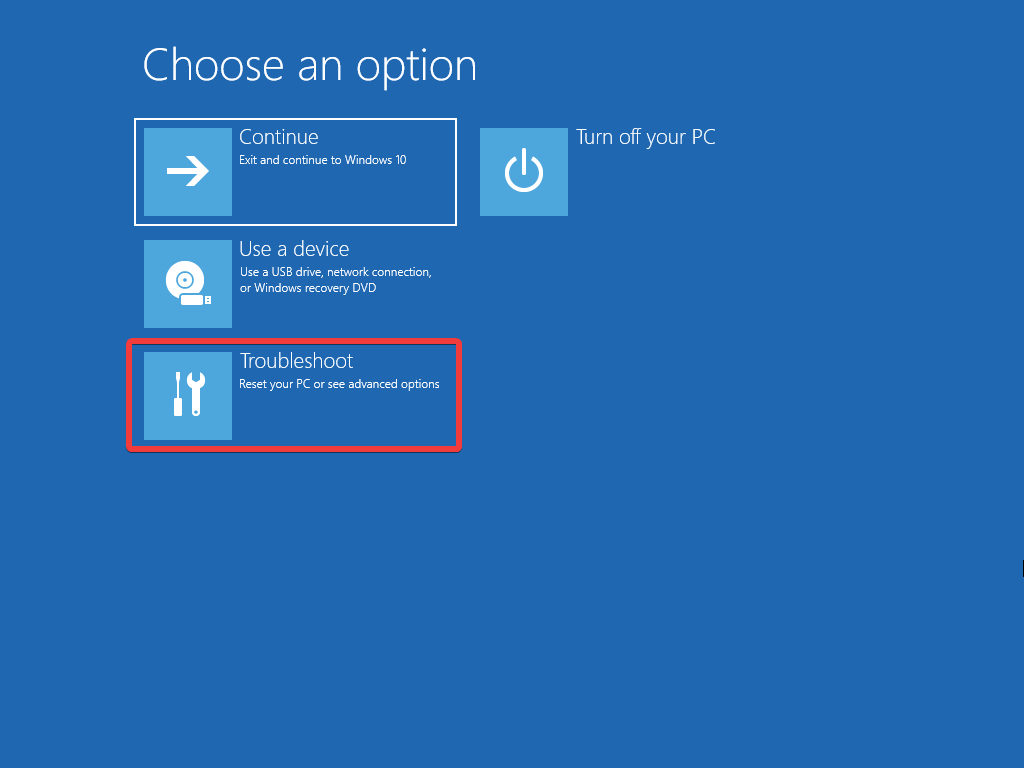
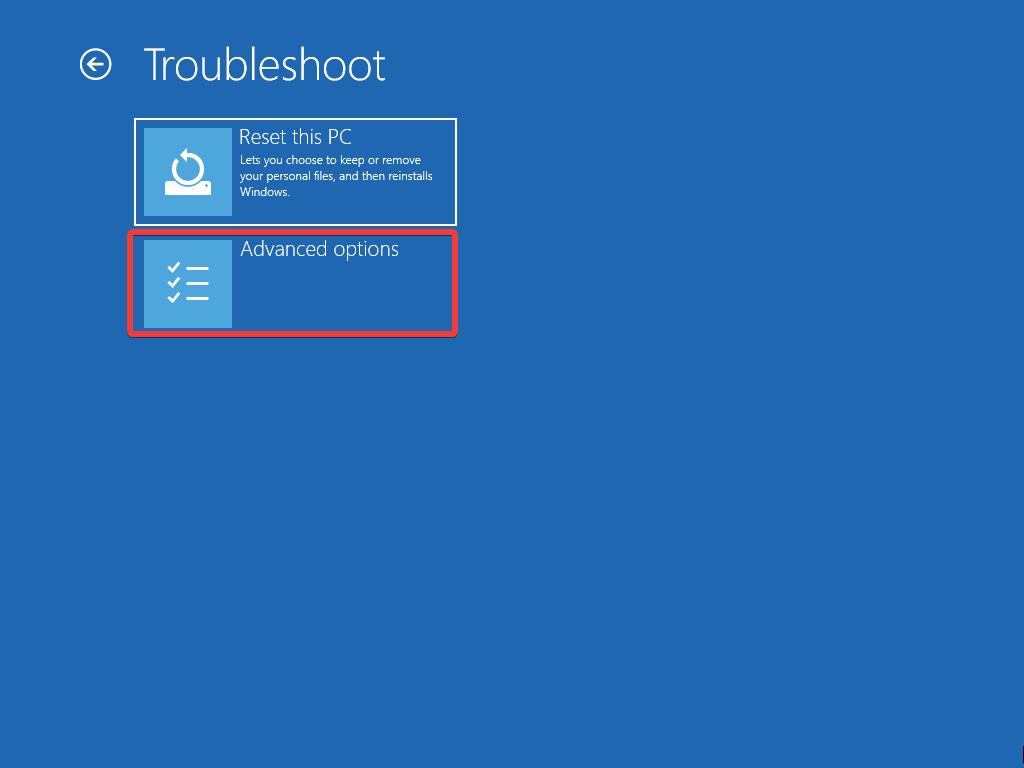
  2. 2. Select Troubleshoot.

    choose troubleshoot
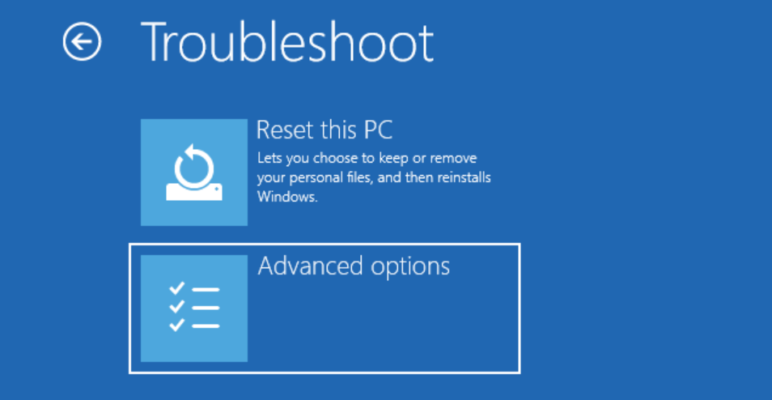
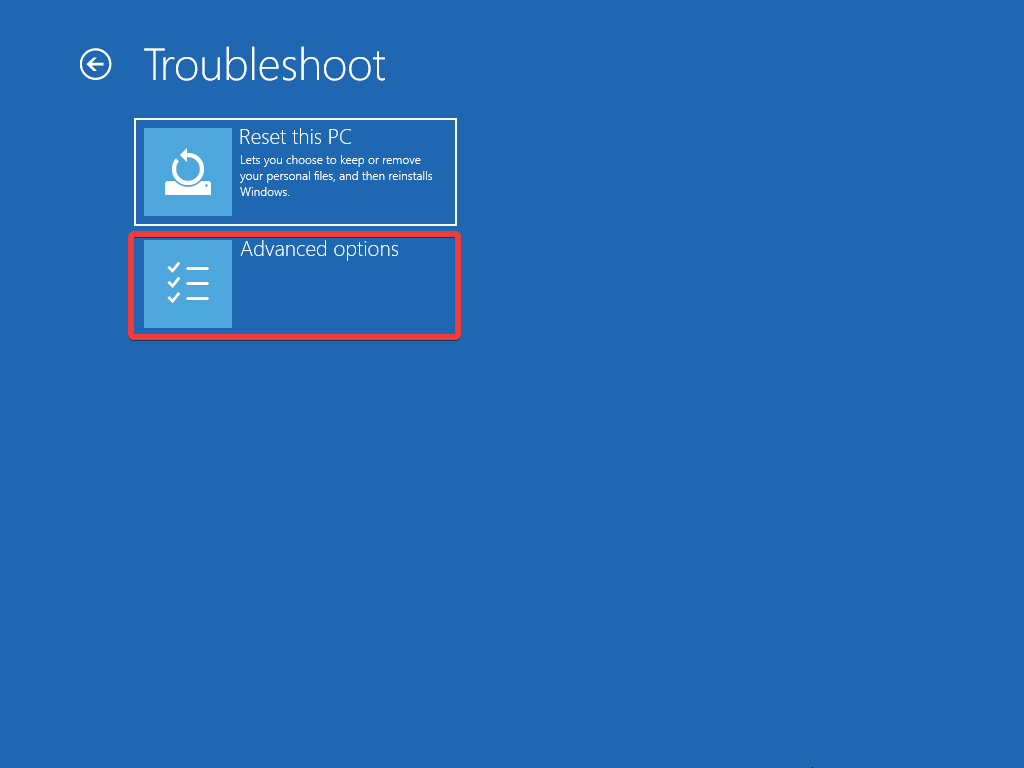
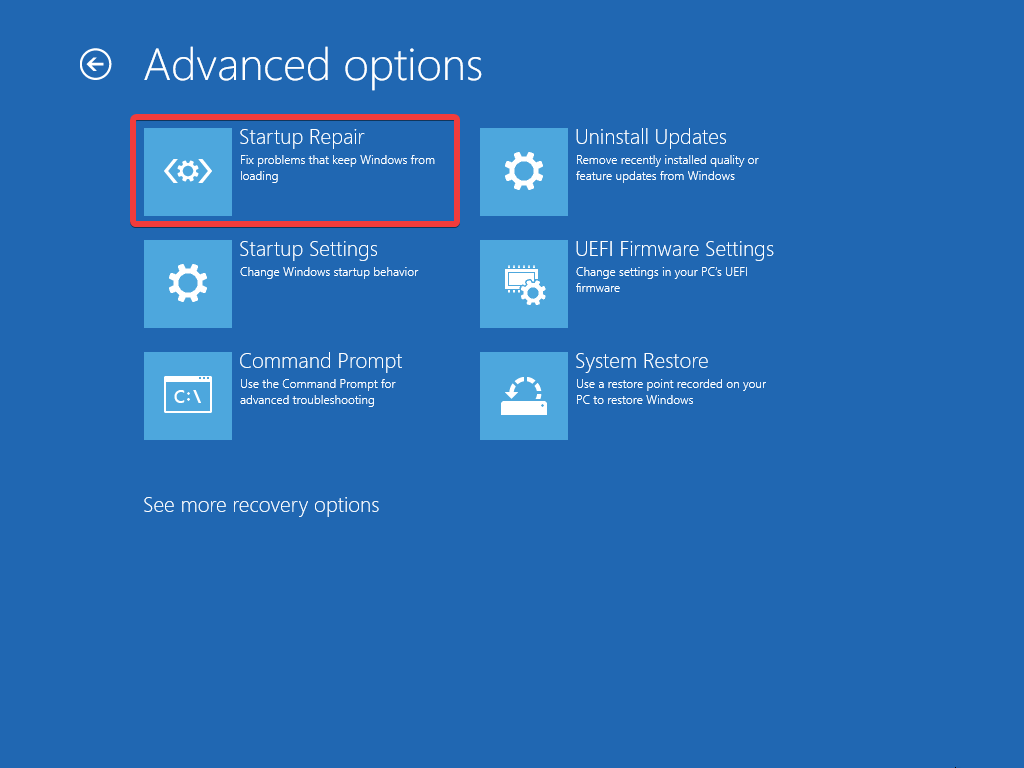
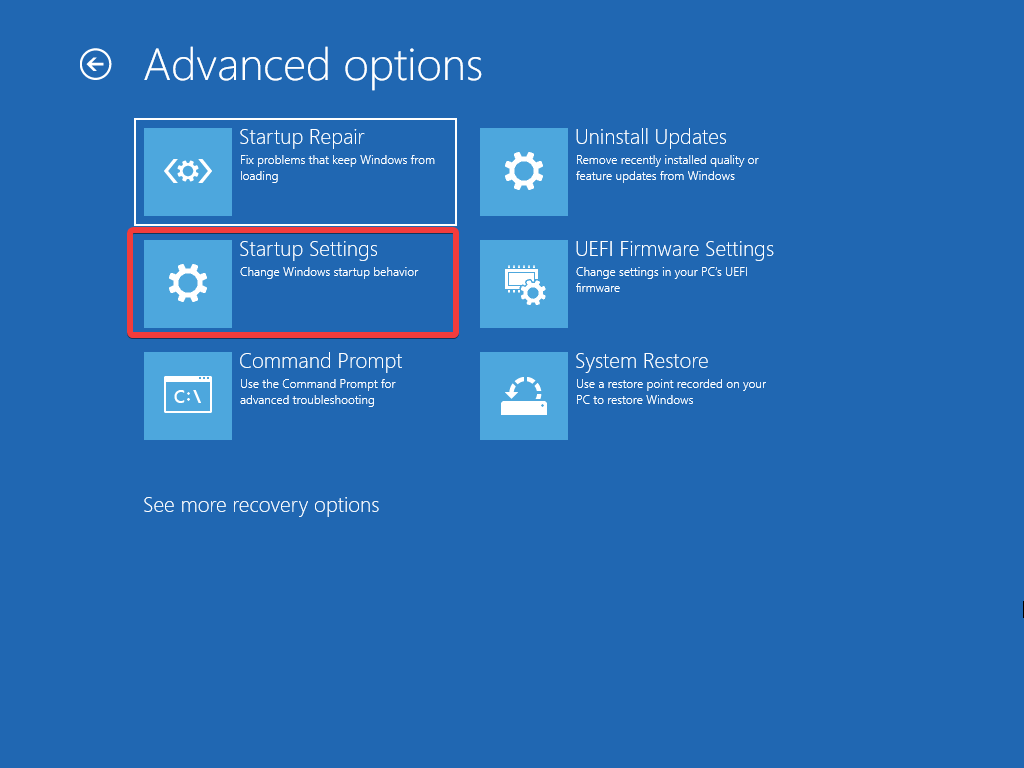
  3. 3. Click on Advanced options, then choose Startup Repair.

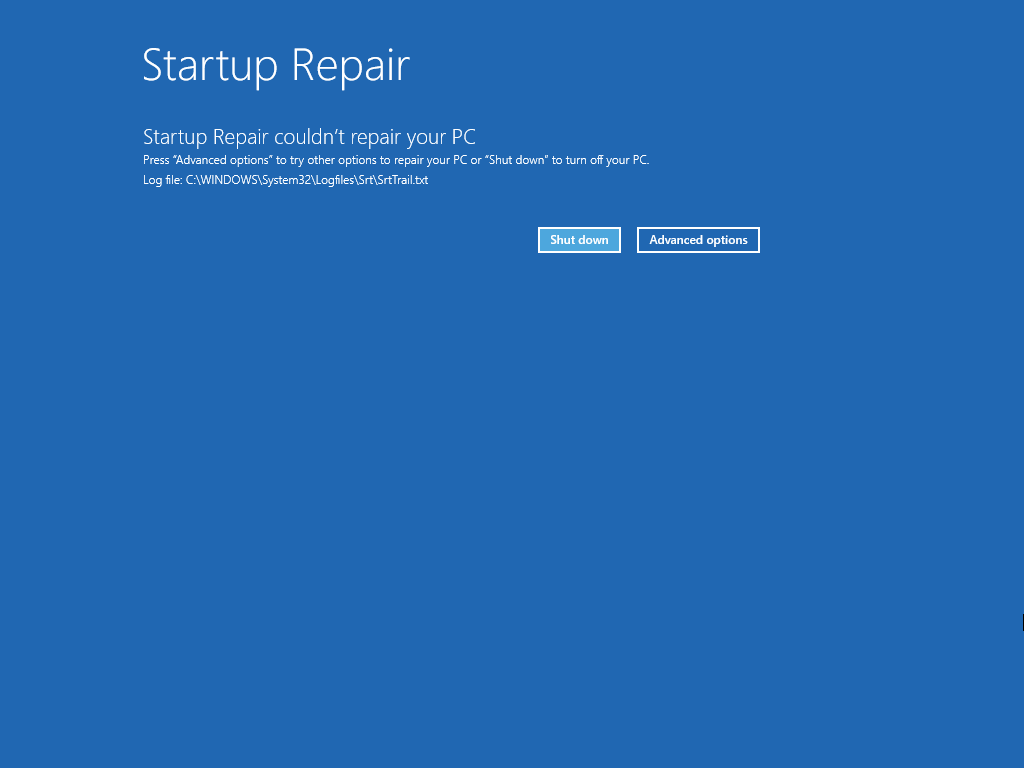
  4. 4. If the system detects any problems, it will attempt to solve them. If it doesn’t find any, you will receive the message that Startup Repair couldn’t repair your PC.

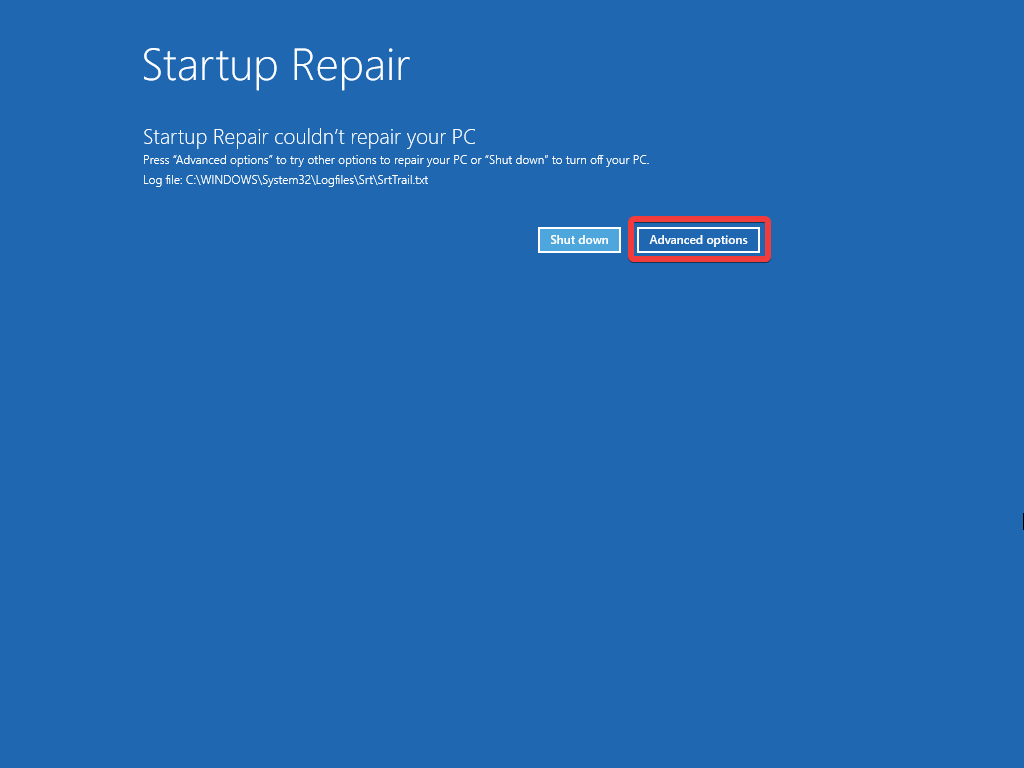
  5. 5. Click on the Advanced options button. This will bring you back to the main screen.

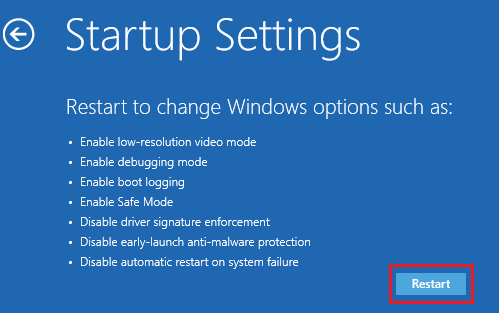
  6. 6. Select again Troubleshoot, then Advanced options, and in the new window click on Startup Settings.

    startup-sett Driver Power State Failure
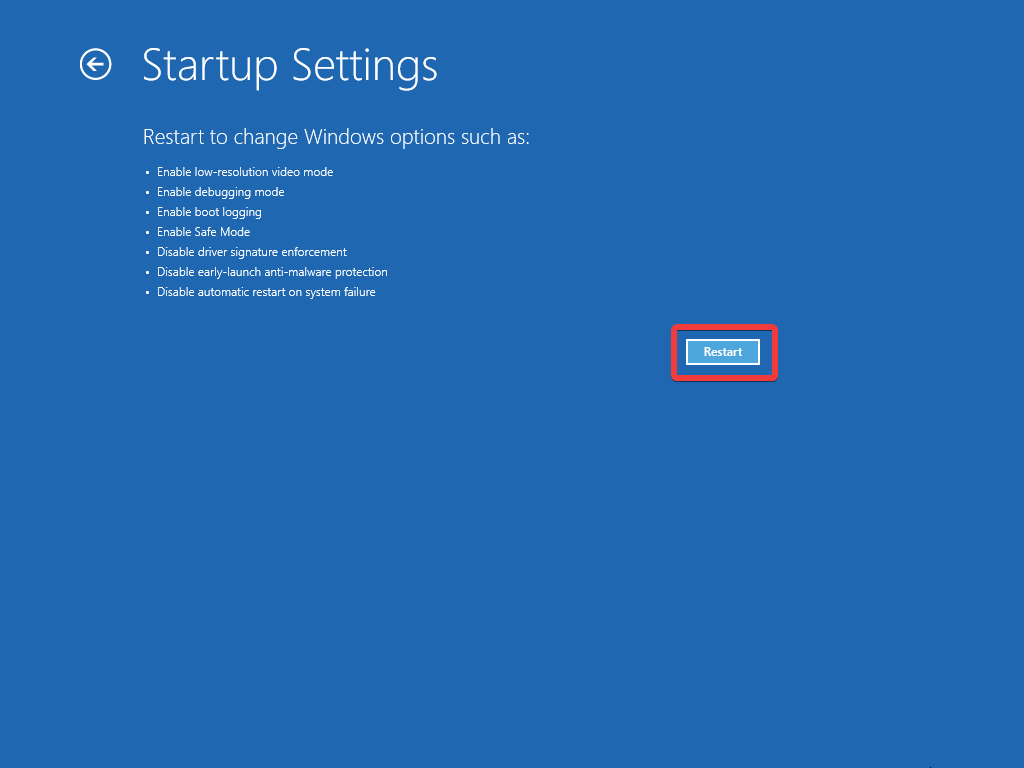
  7. 7. Now click on Restart to start the PC in Safe Mode.

    restart-startup-screen Driver Power State Failure
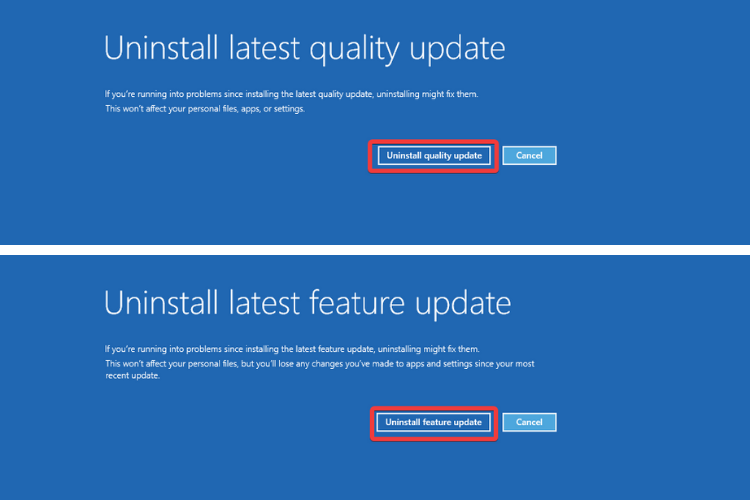
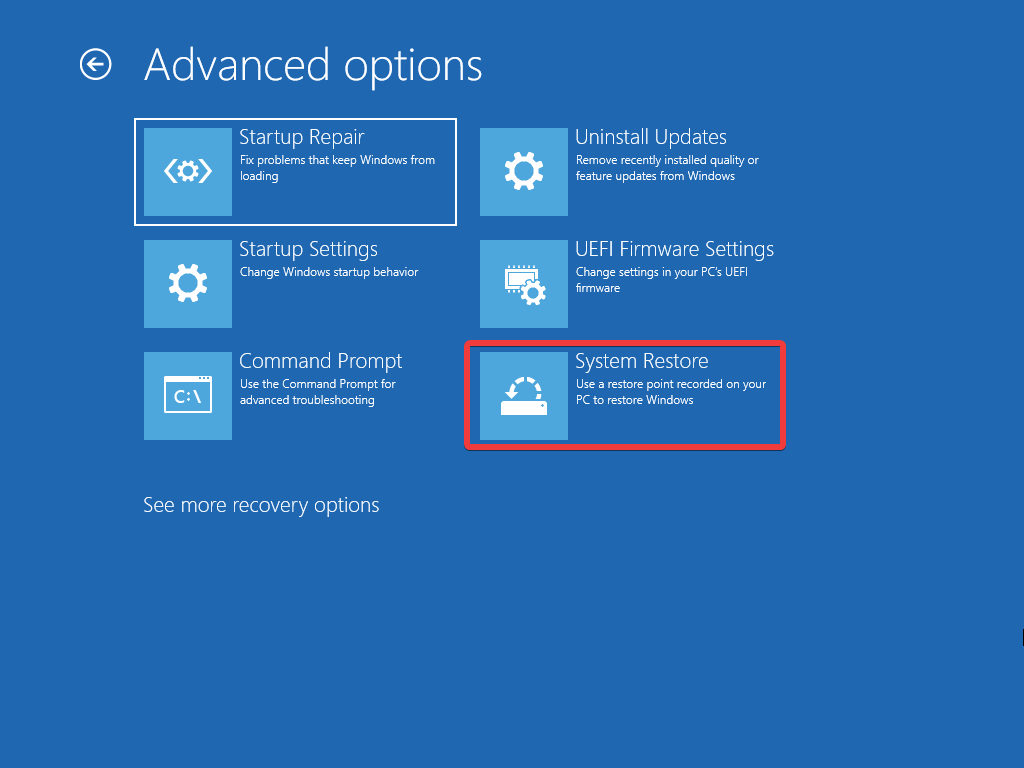
  8. 8. From the previous menu, you also have the option to select Uninstall Updates and roll back any recent updates if you suspect that they caused this issue.

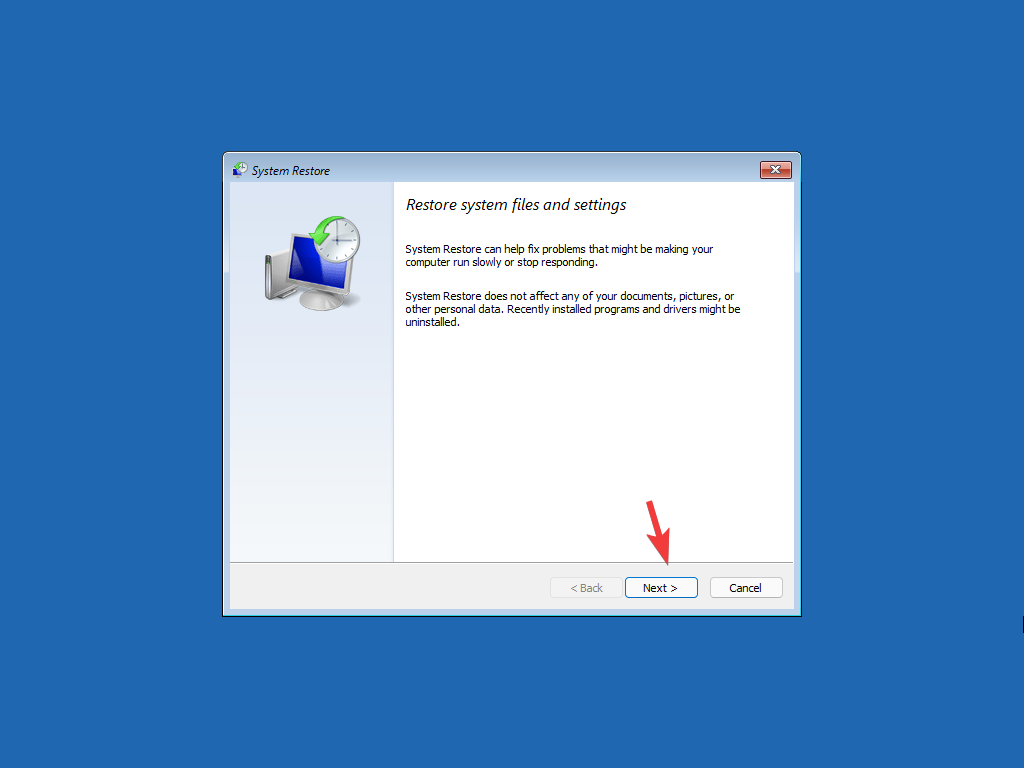
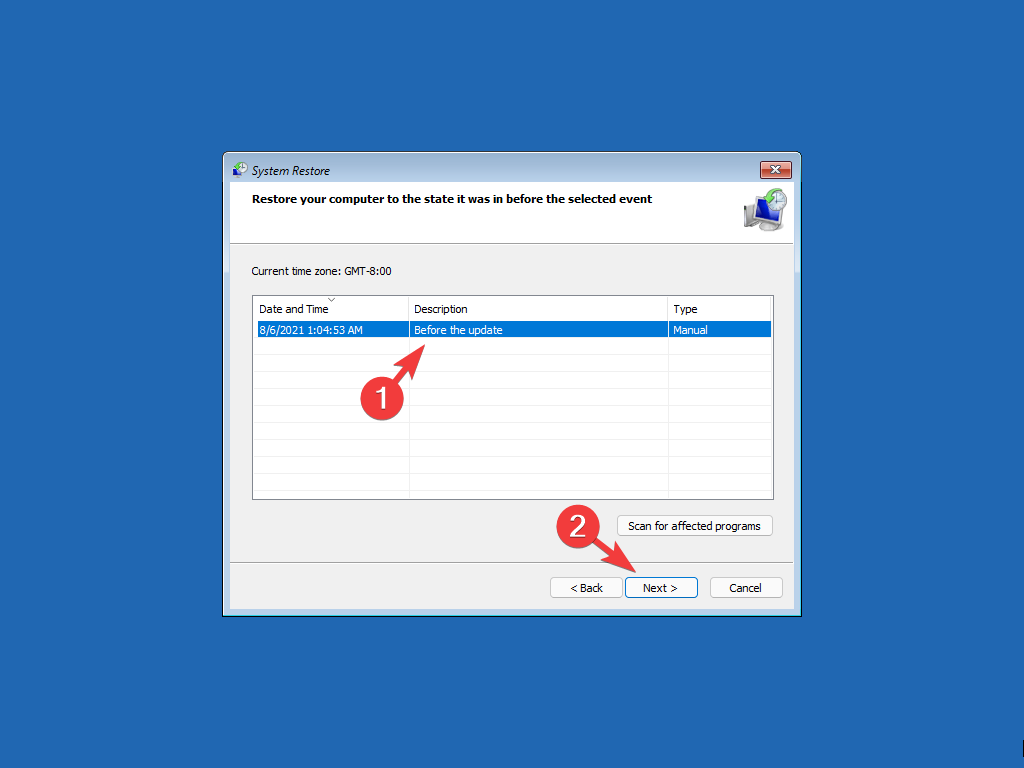
    Or you can choose System Restore and roll back your system to a previous point in time before this error occurred.

    uninstall-update-system-restore irql not less or equal error windows 11
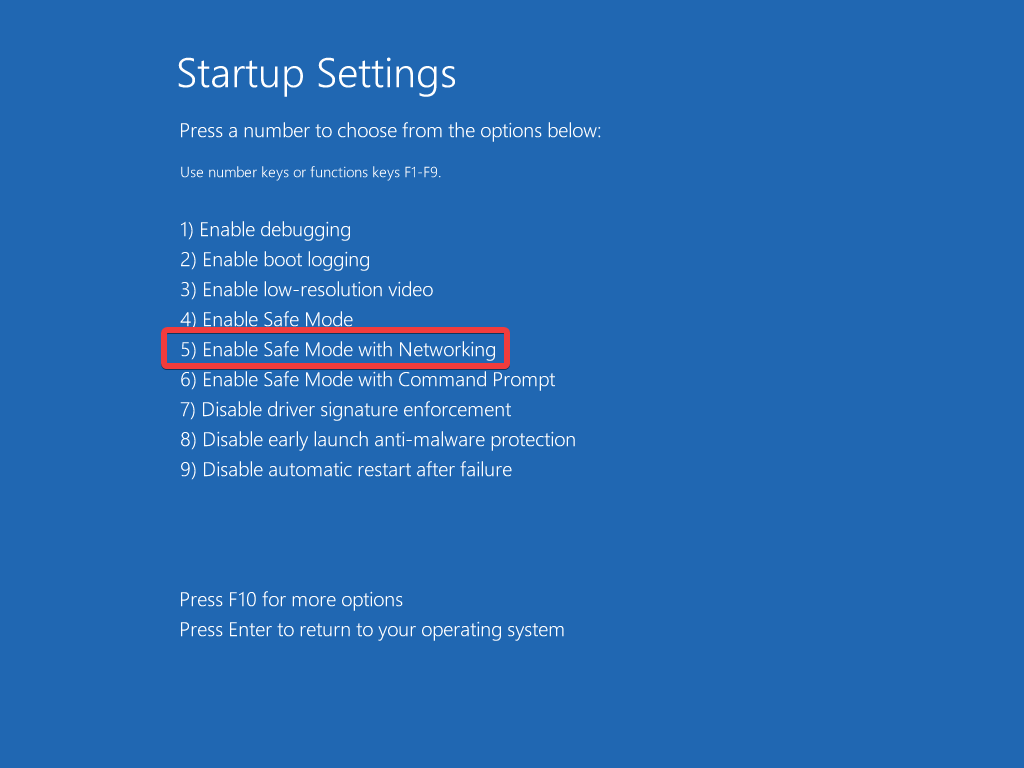
  9. 9. Once the PC restarts, press the 4 or F4 key on your keyboard to enter Safe Mode. If the issue is gone, that basically means that a third-party app is causing this issue and you need to uninstall it.

  10. The built-in Startup Repair tool on your PC is likely to solve the IRQL_NOT_LESS_OR_EQUAL error without you having to try out other more complicated solutions.

2. Check the memory on your PC

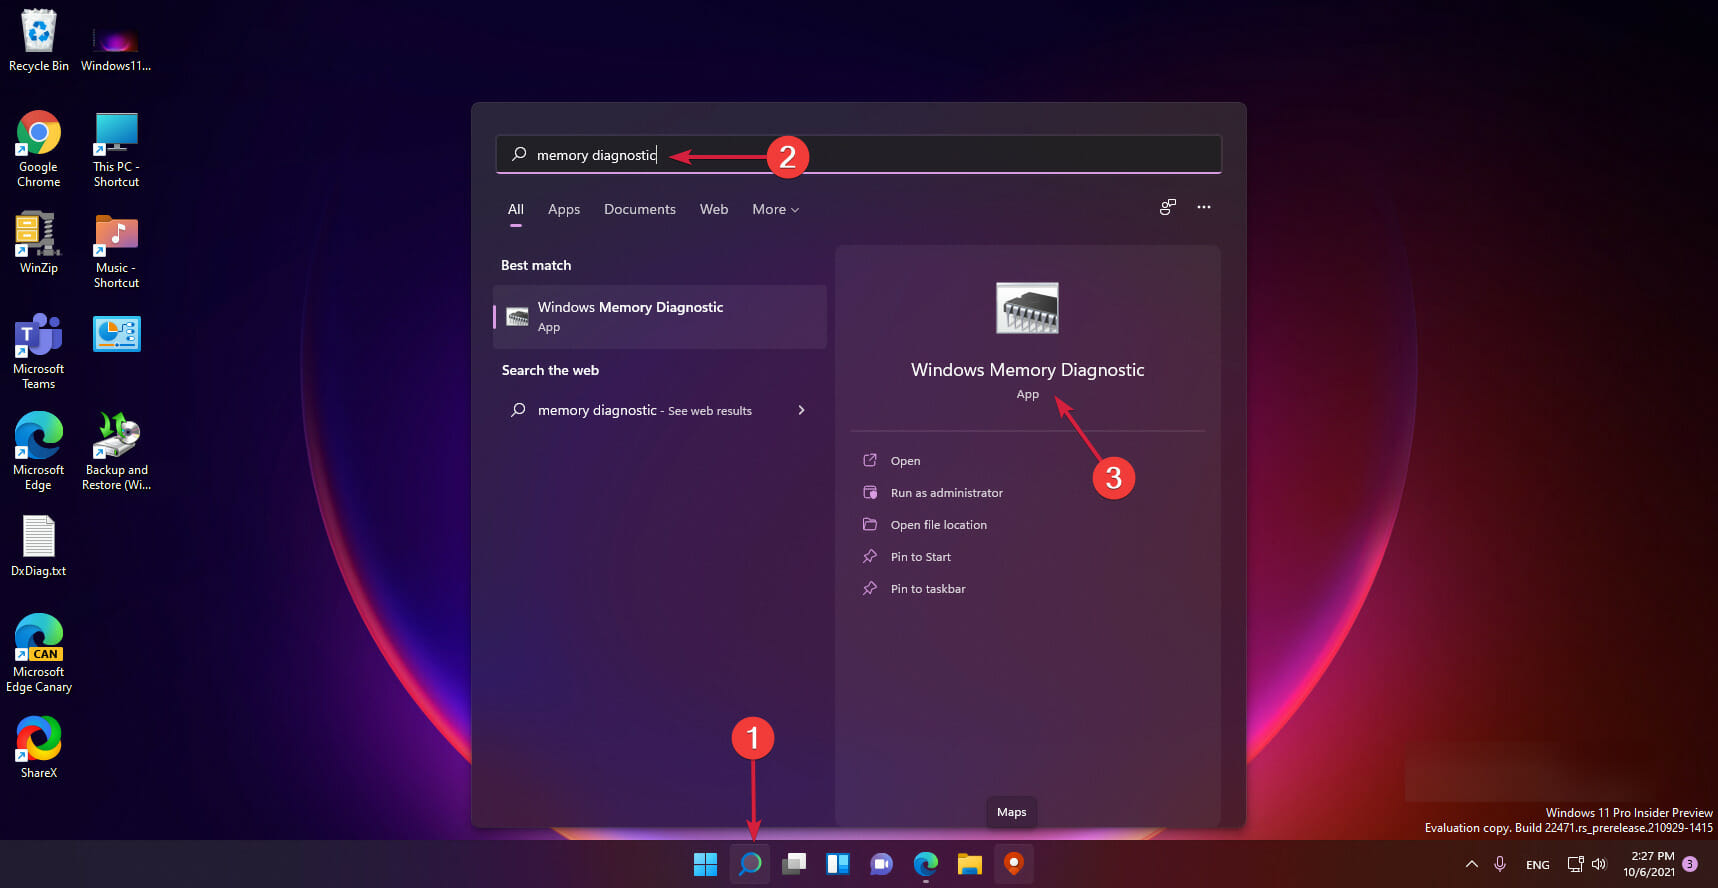
  1. Click the Search icon from the Taskbar, type memory diagnostic, and select the app from the results.
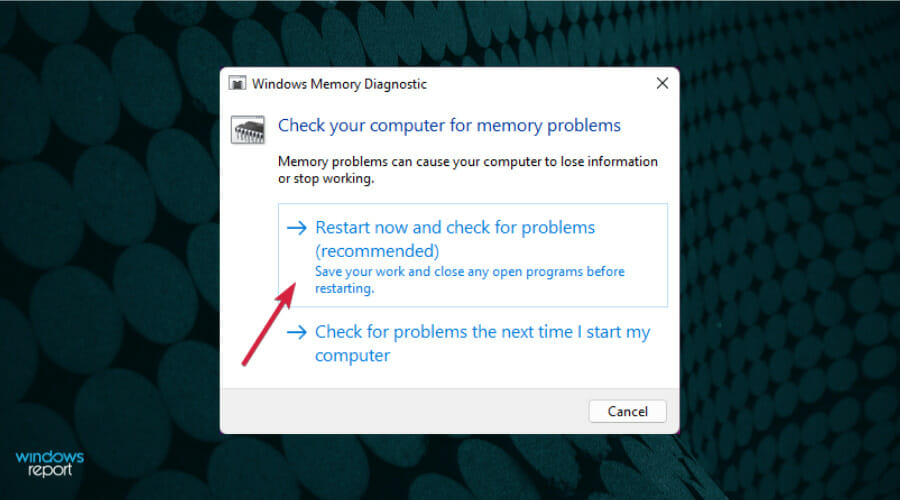
  2. Choose the first option, Restart now and check for problems.
  3. The PC will restart and make the necessary check for your RAM and if it finds any problems, you will receive a report so you can deal with the problem.

Since the IRQL_NOT_LESS_OR_EQUAL startup error in Windows 11 can be caused by some problems with the memory, it’s important to use the dedicated Windows Memory Diagnostic Tool to get a reading on your modules.

3. Update, uninstall or rollback your drivers

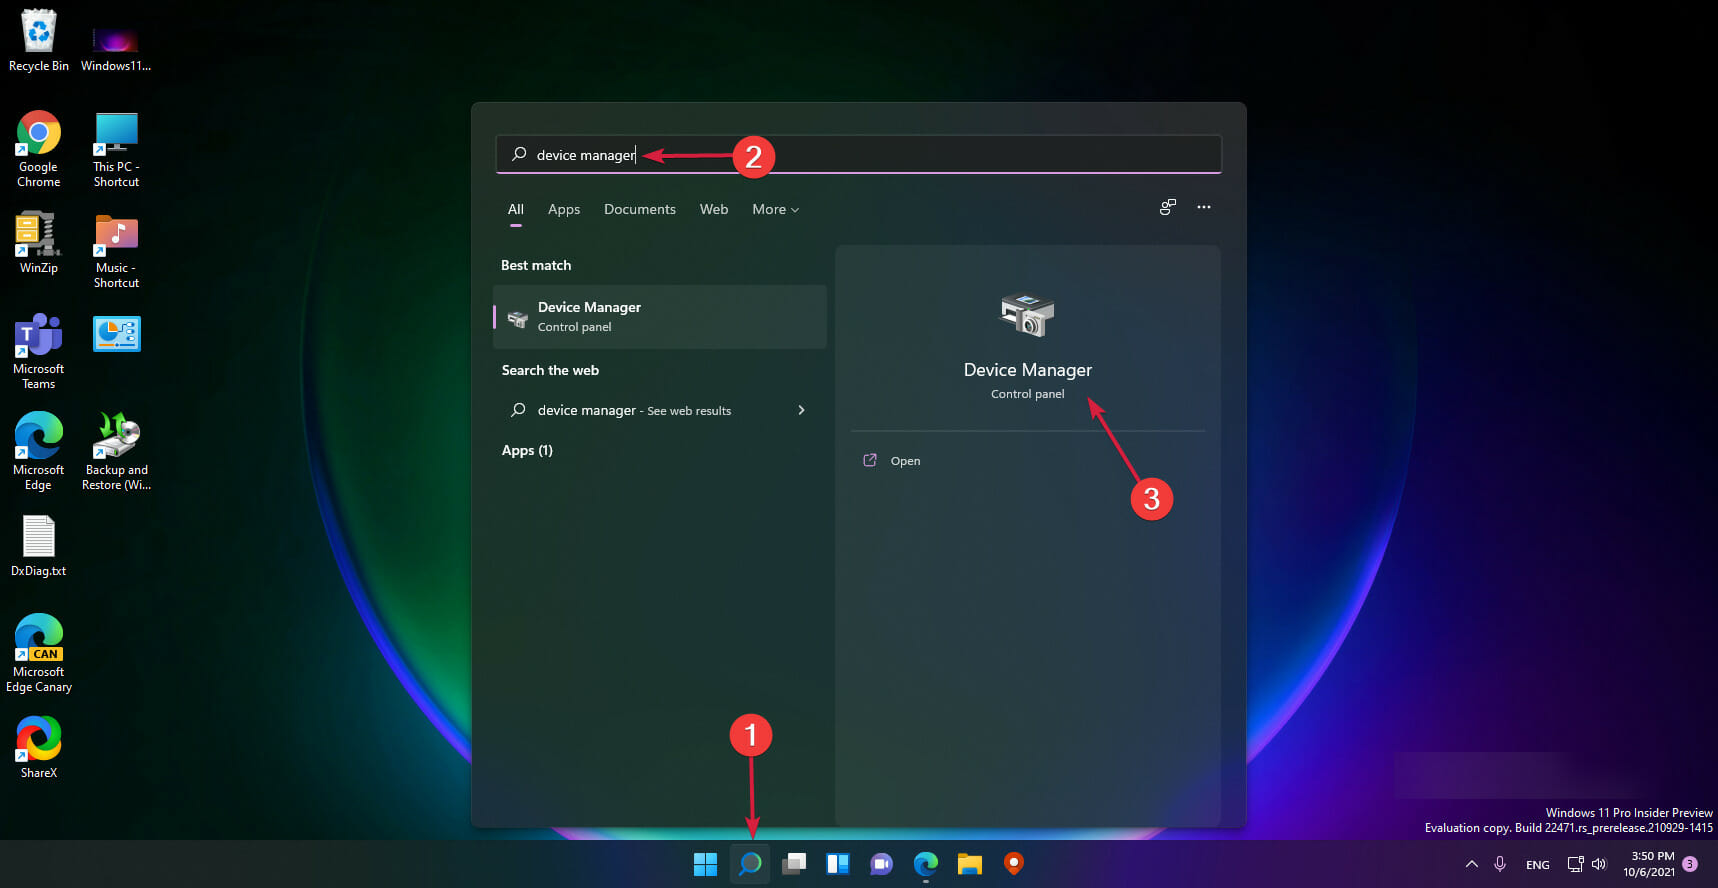
  1. Click the Search icon from the Taskbar, type device manager, and select the app from the results.
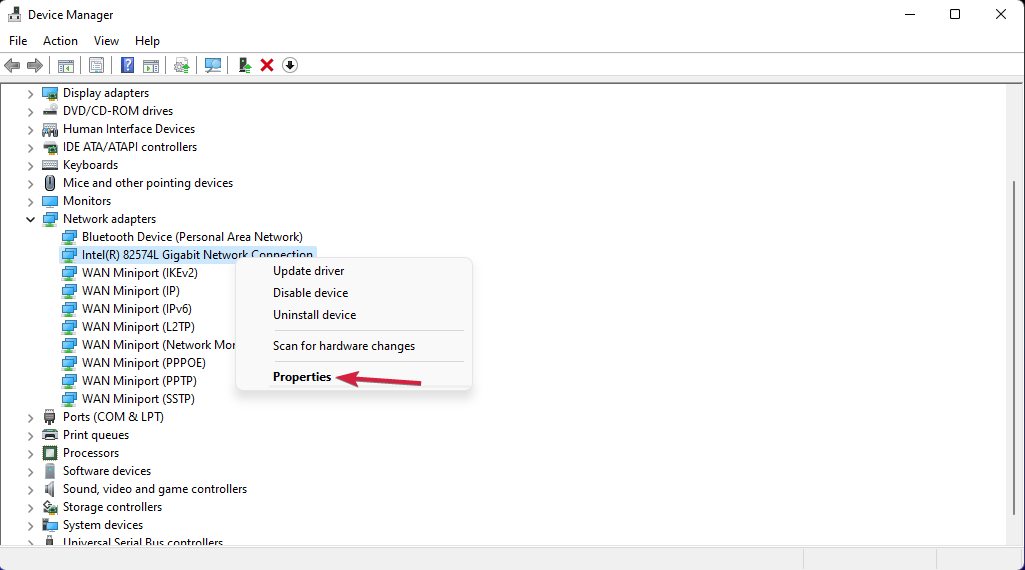
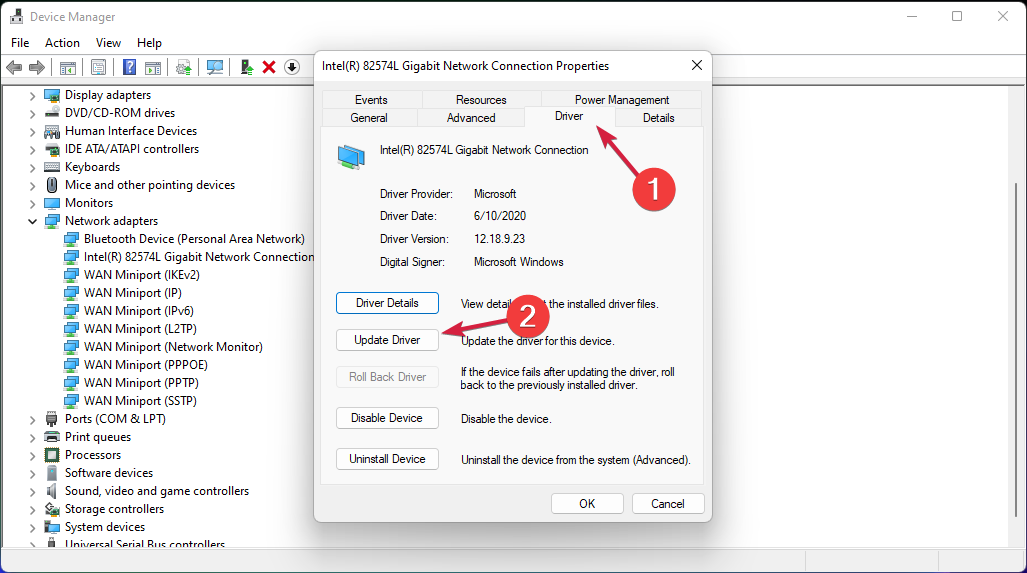
  2. Select any section to expand it (we recommend starting with the Network adapters), right-click the driver, and select Properties.
  3. Now click on the Driver tab and then start by selecting Update driver. If the system will find a better driver, it will install it. If not, you can also try the Roll Back Driver or the Uninstall Device options, one by one, and see if that changes the situation.

We demonstrated this procedure on the Network Adapter driver because it’s more likely to cause this error but you should update all drivers.

Driver management can be tiresome and time-consuming, but it is always a good idea to employ the help of a third-party driver updating software to help you out. A professional driver updater can scan your system and identify any missing, corrupted, or out-of-date drivers, then you will be prompted to download new versions for them.

⇒ Get Fortect Driver Updater

4. Run the SFC scan

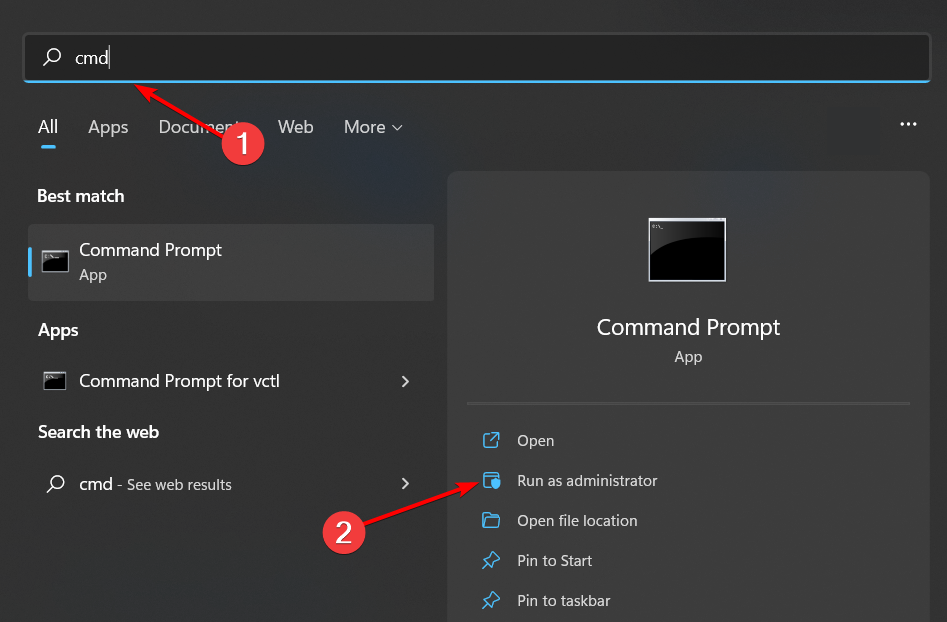
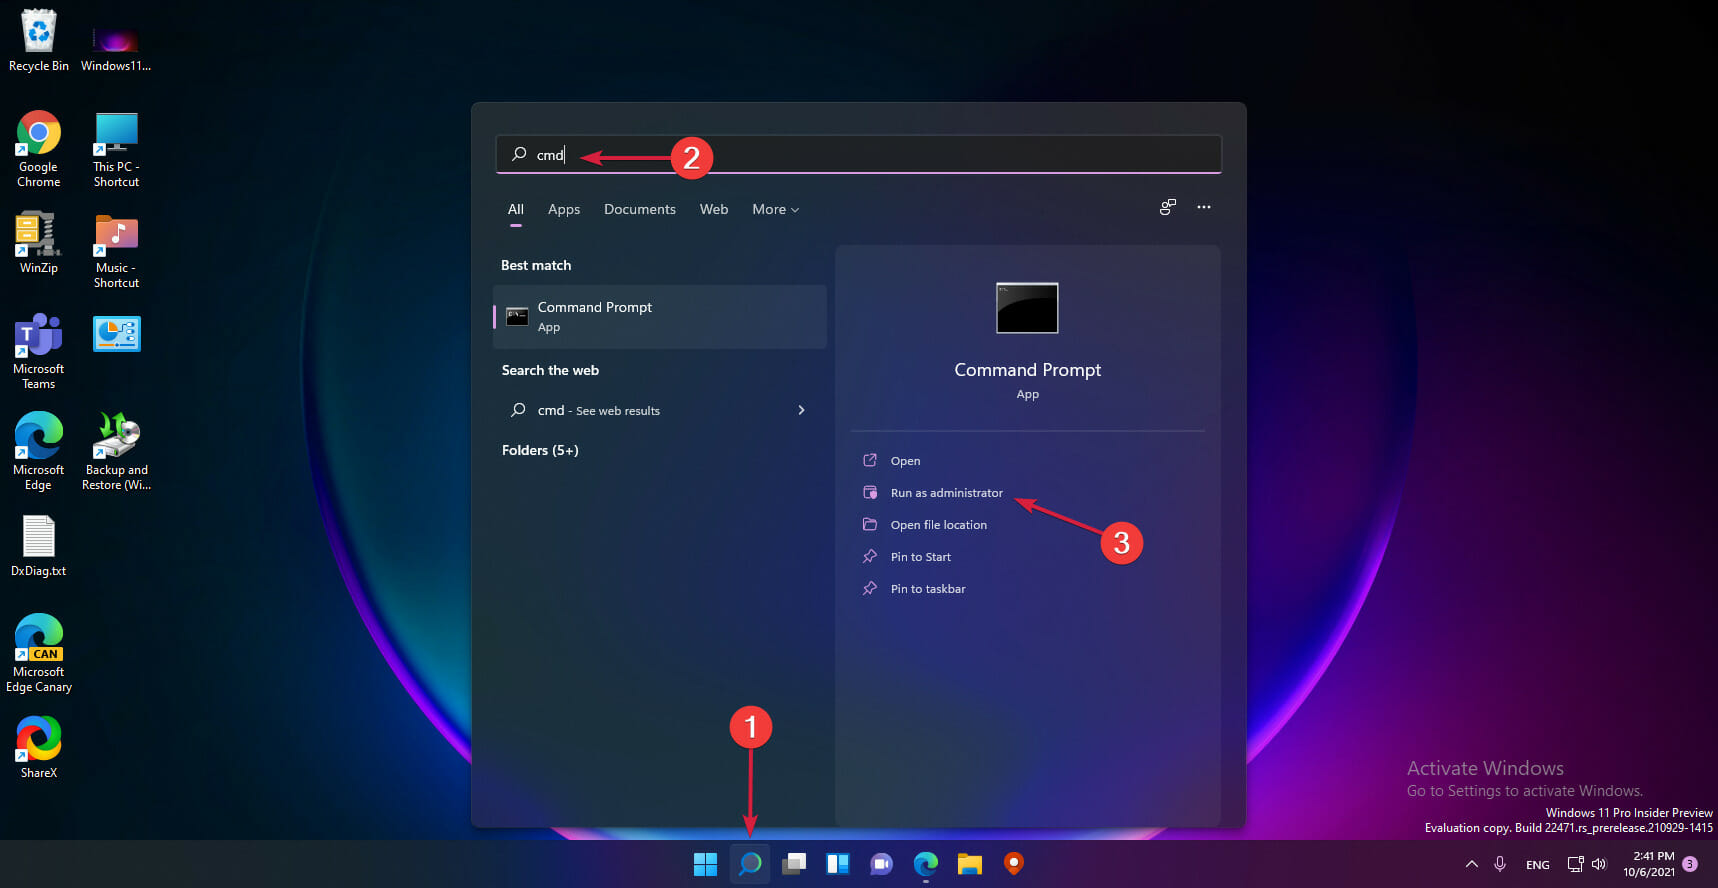
  1. Click the Search button from the Taskbar, type cmd, and select Run as administrator to start Command Prompt with full privileges.cmd-admin hp printer won't scan
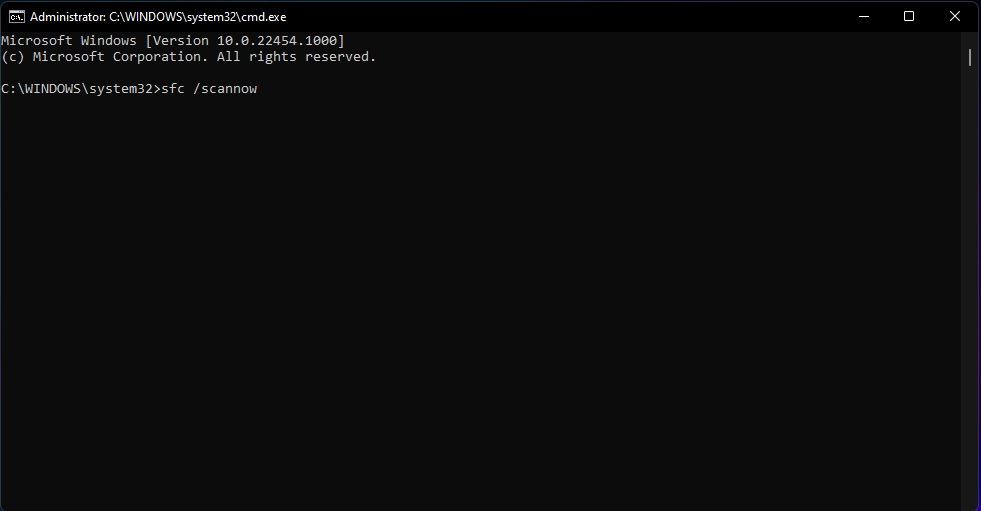
  2. Type or paste the following command and press Enter to run it: sfc /scannow
  3. Wait patiently for the scan to finish as it will take a few minutes. If there are any corrupted system files, the tool will detect and repair them.

5. Check the drive for errors

  1. Select the Search button from the Taskbar, enter cmd, and select Run as administrator to start Command Prompt with administrative rights.cmd-admin hp printer won't scan
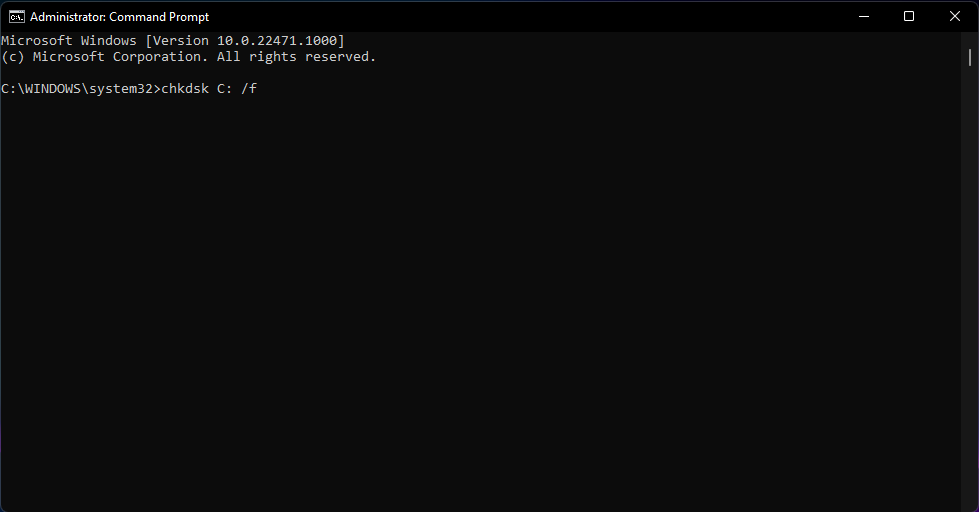
  2. Type the following command in the window and hit Enter to run it: chkdsk C: /f

6. Scan your PC for viruses

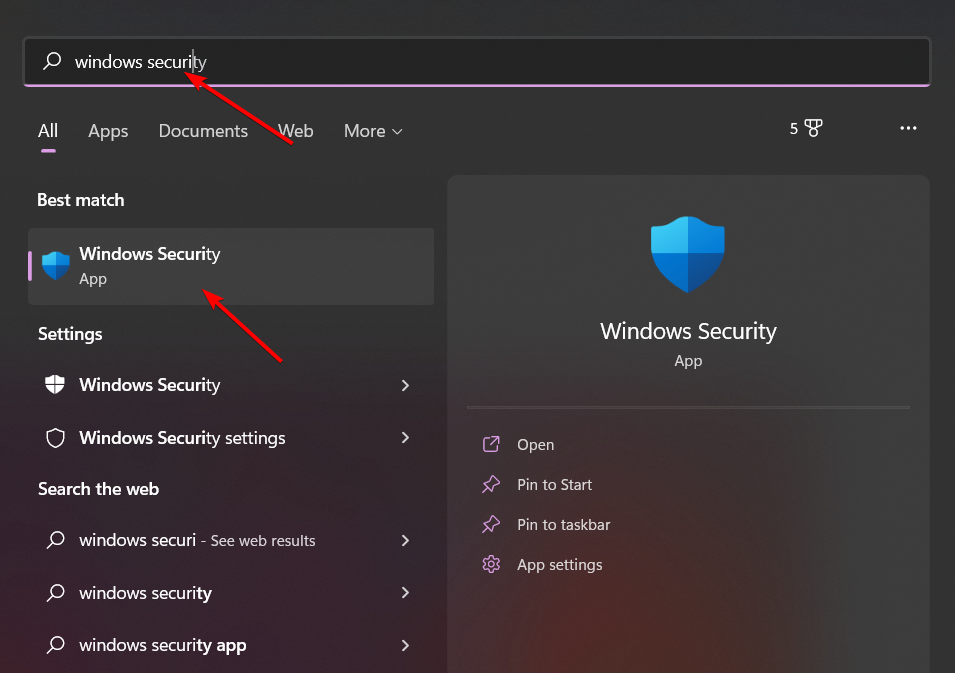
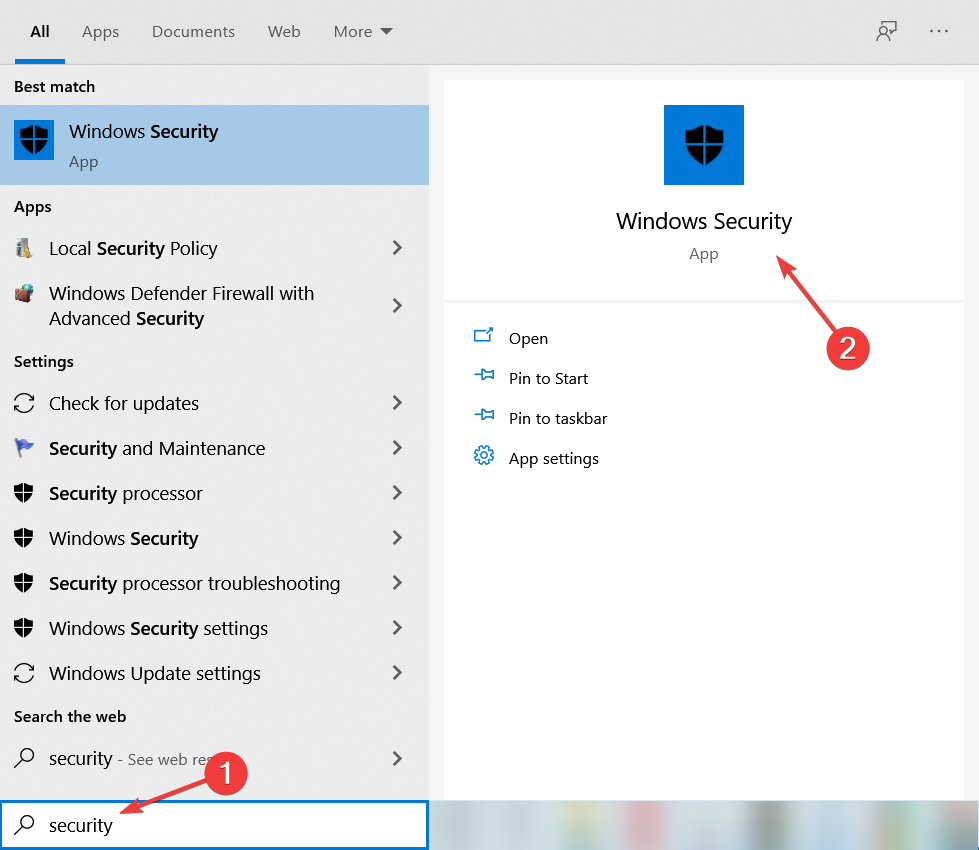
  1. Click the Search button on the Taskbar, type windows security, and select the app from the results.windows-security-search irql not less or equal error windows 11
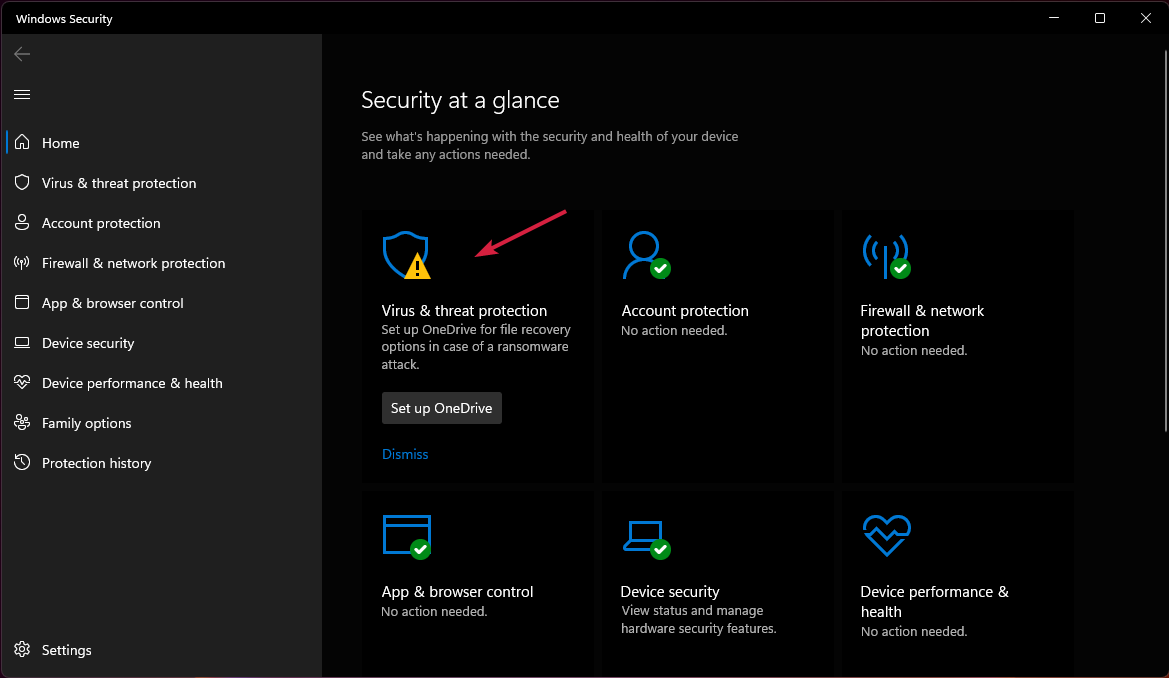
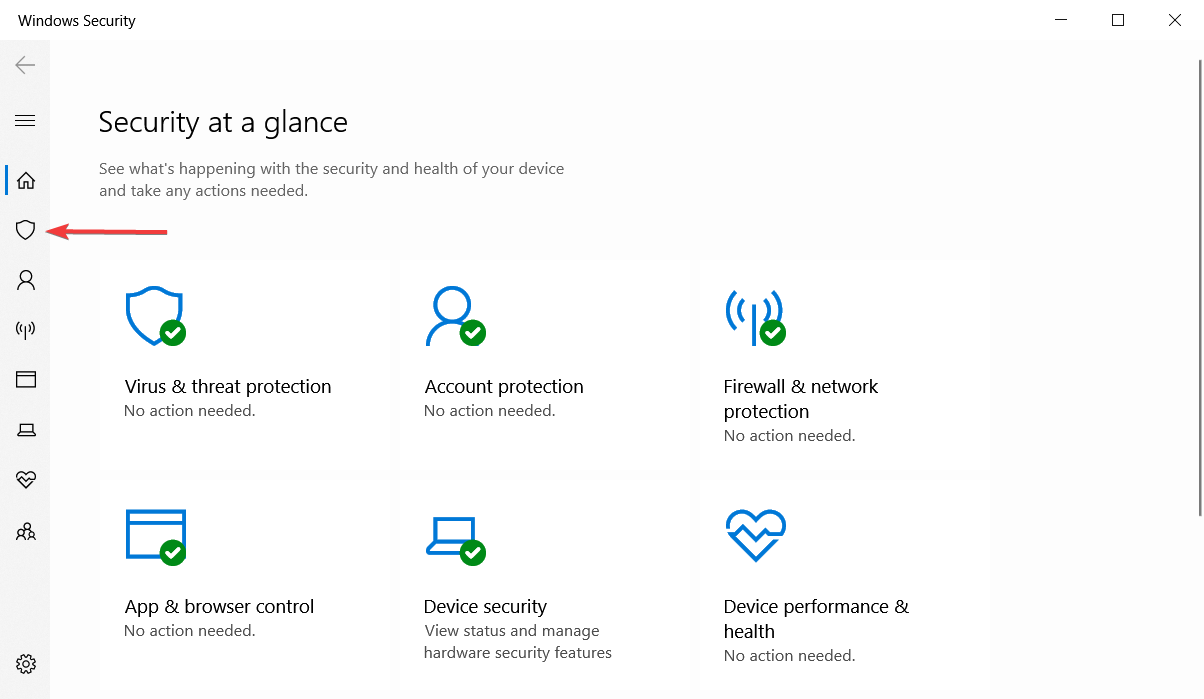
  2. Now select Virus & threat protection.
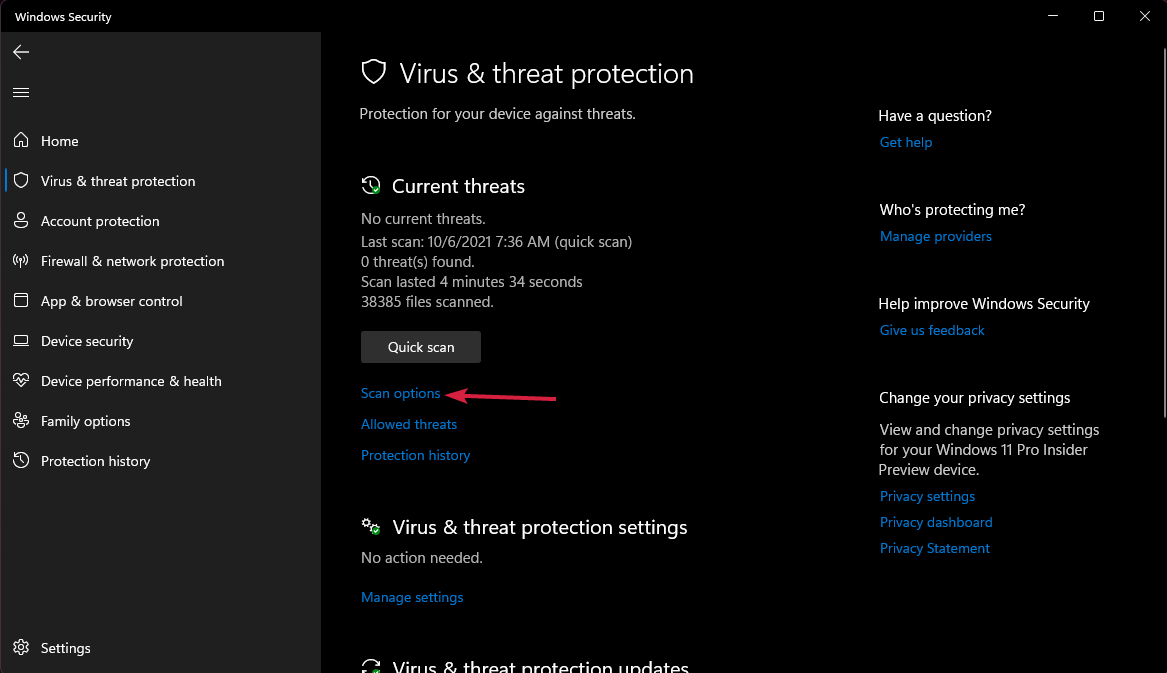
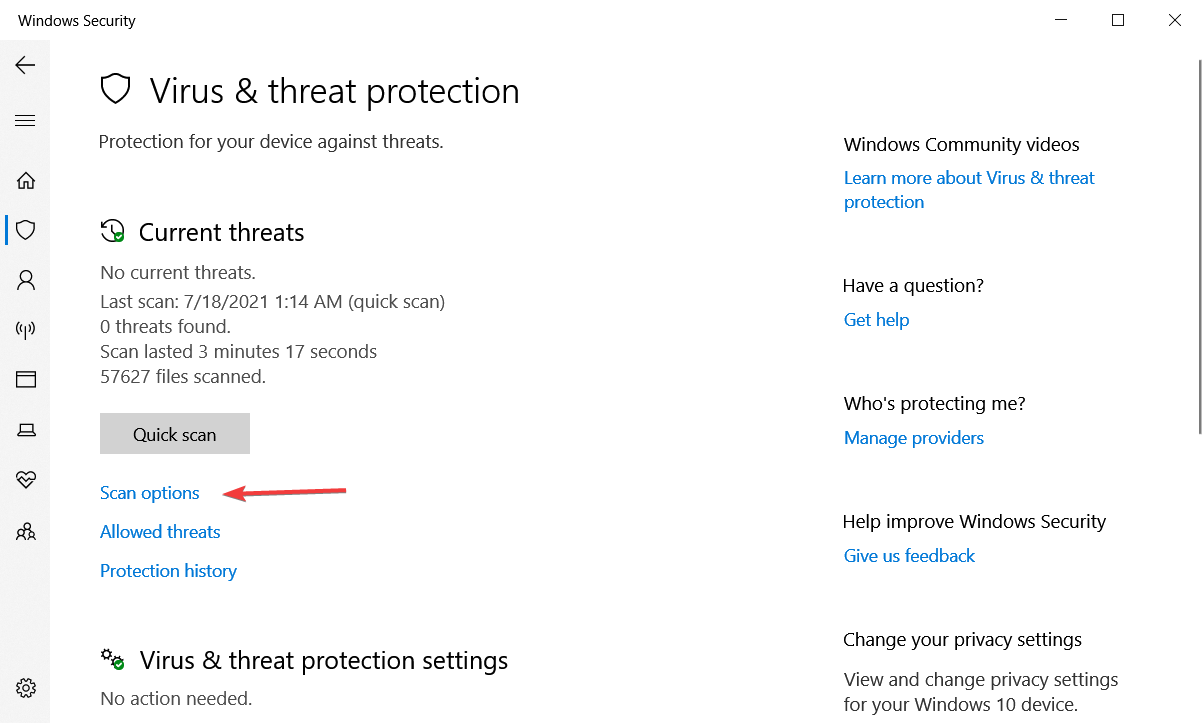
  3. Click on Scan options.
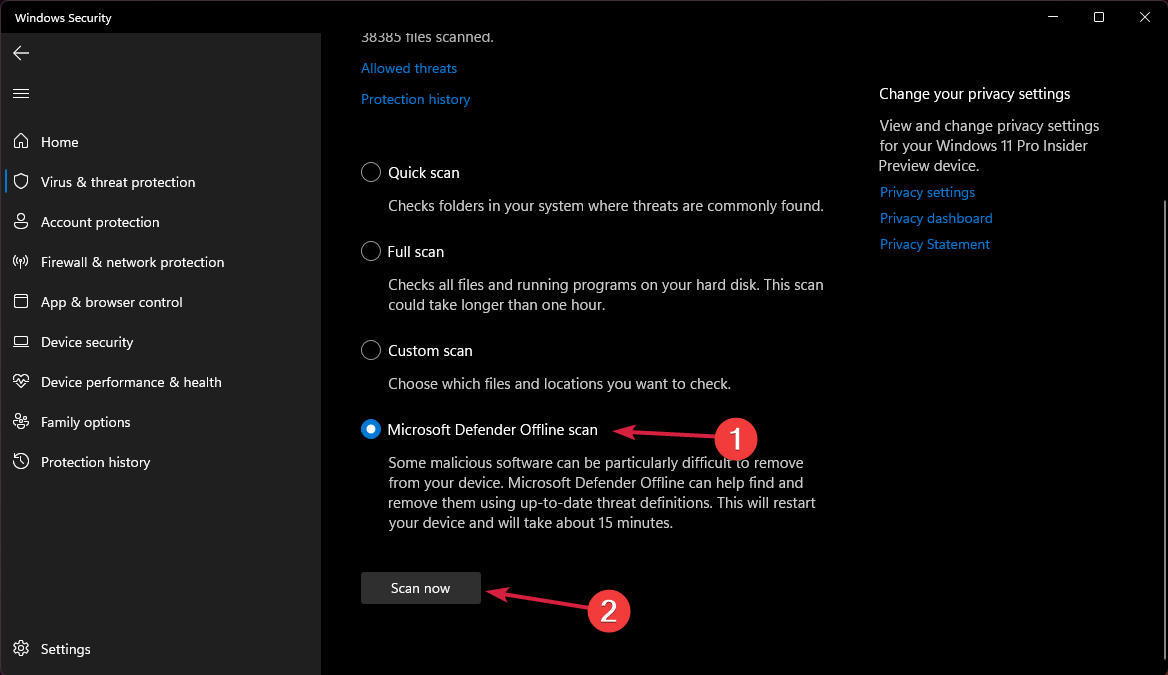
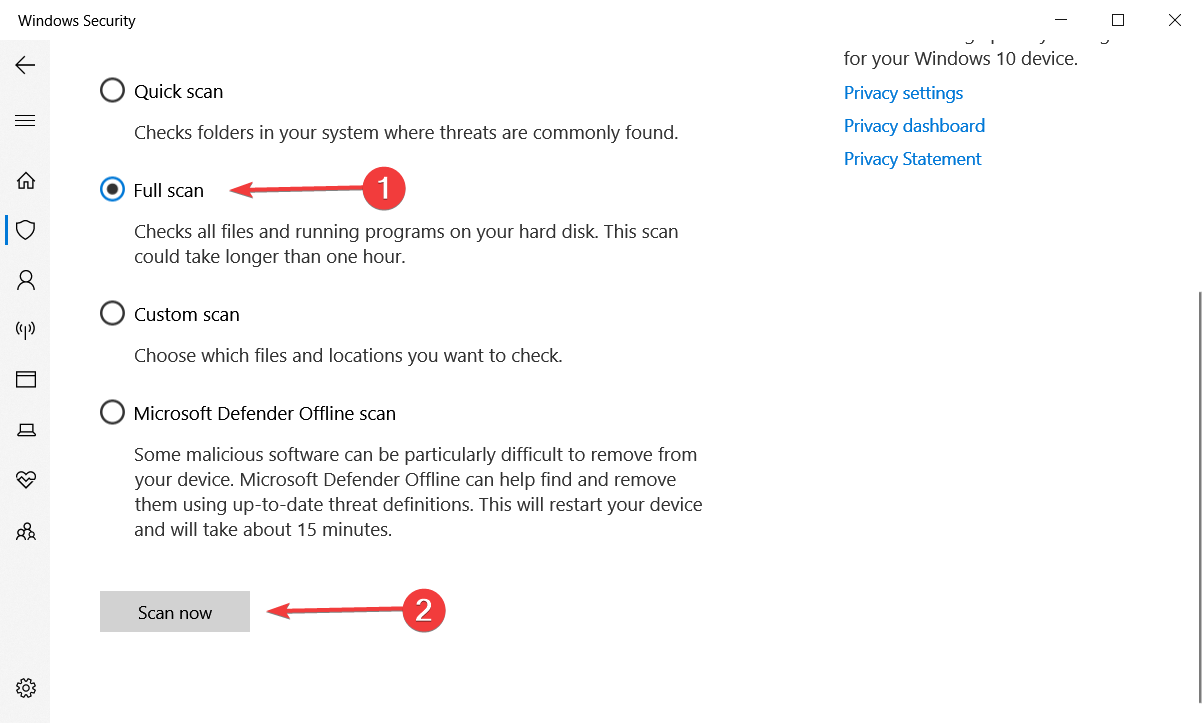
  4. Choose the Microsoft Defender Offline scan option and hit the Scan now button. That will prompt you to restart the PC.

In this solution, we showed you how to perform an offline scan using Microsoft Defender but if you have a third-party antivirus, you can use it instead.

7. Reset your PC

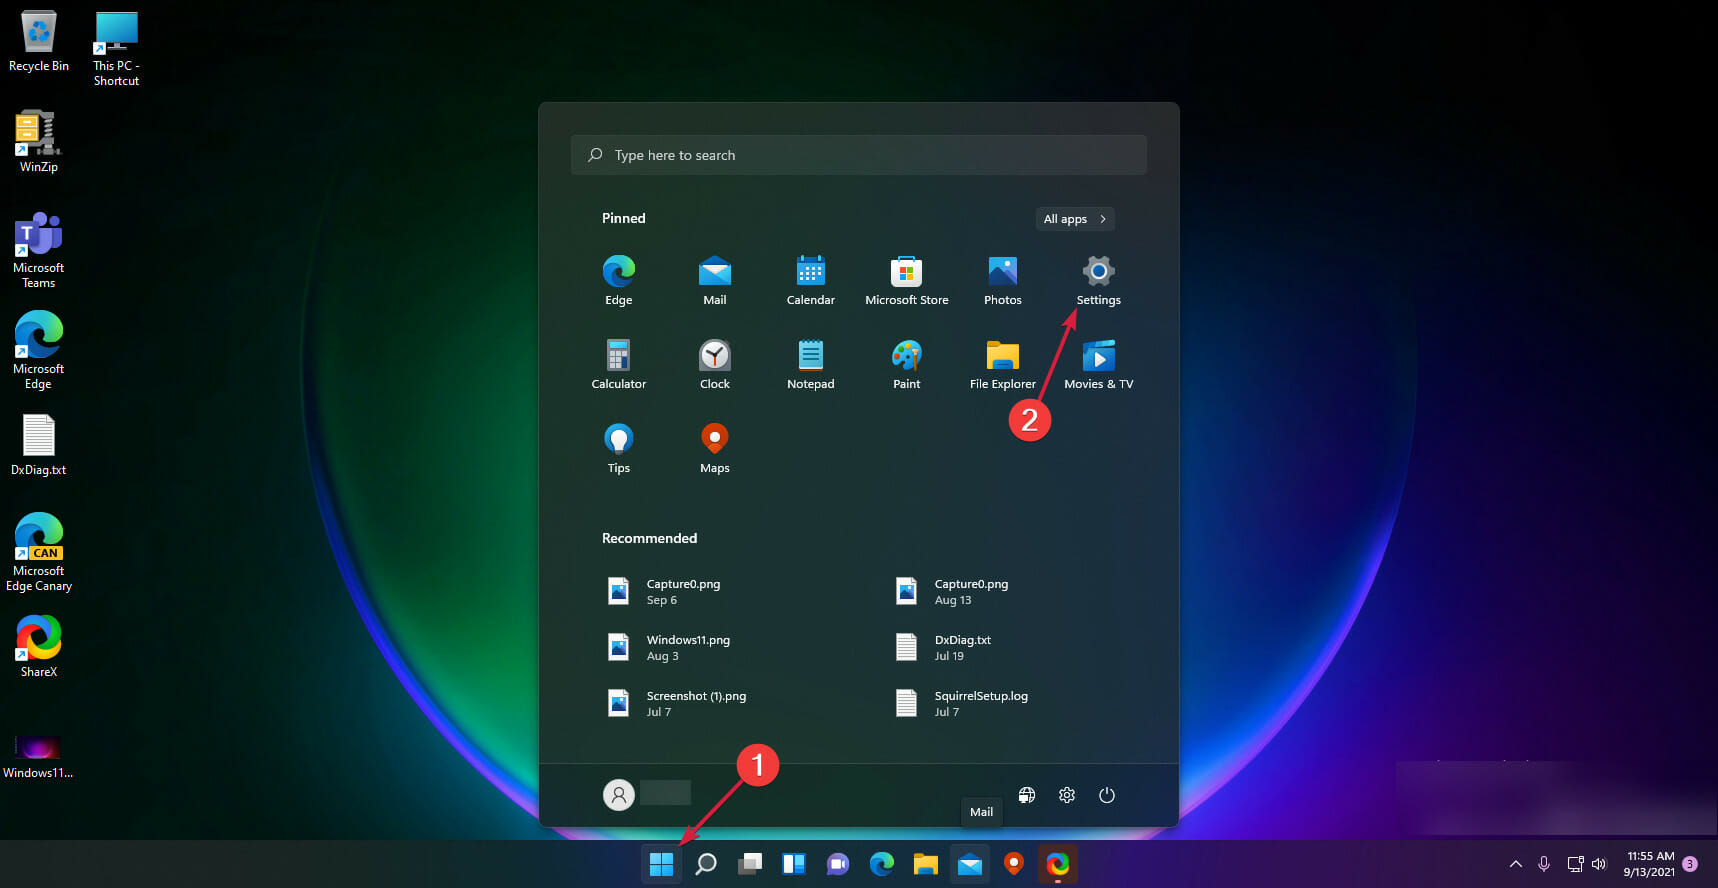
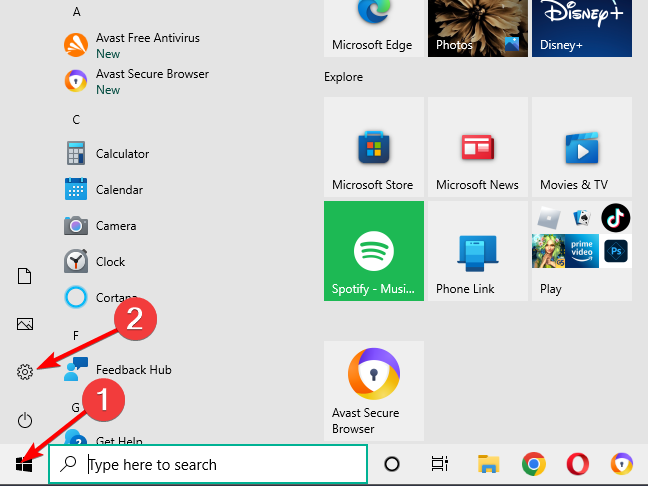
  1. Hit the Start button on the Taskbar and select Settings.
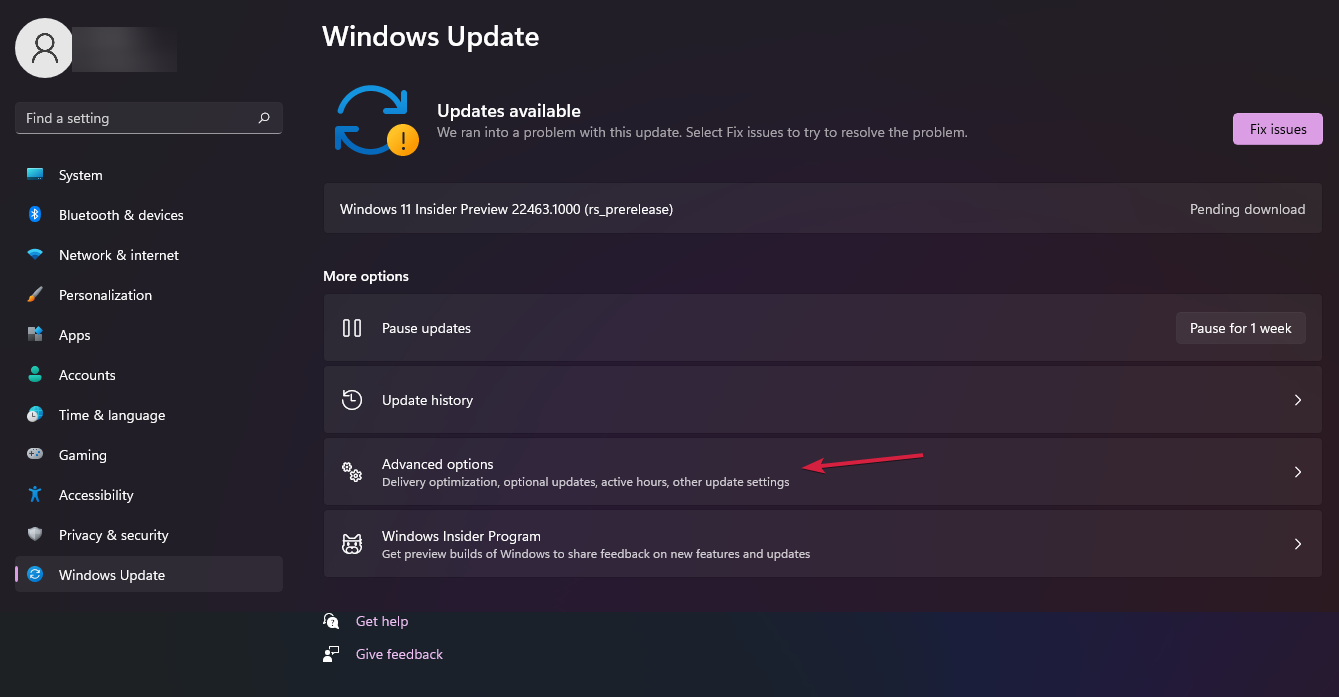
  2. Click on Windows Update from the left pane, then click on Advanced options.
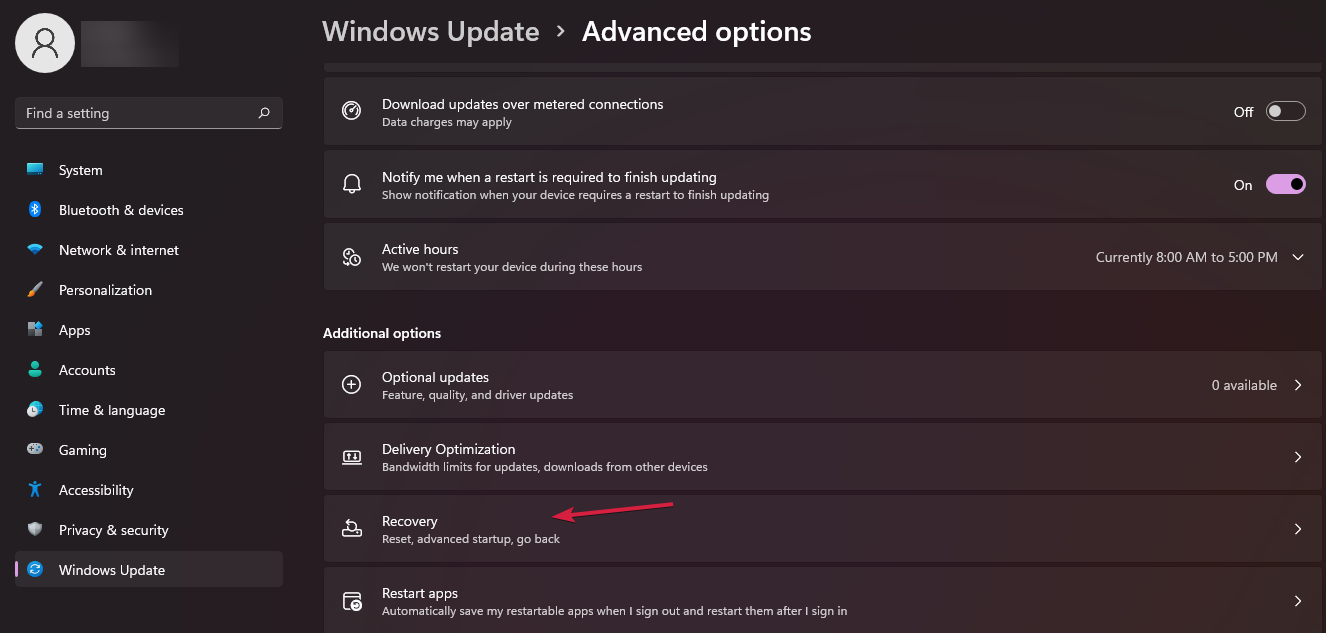
  3. Now select Recovery from the list of options.
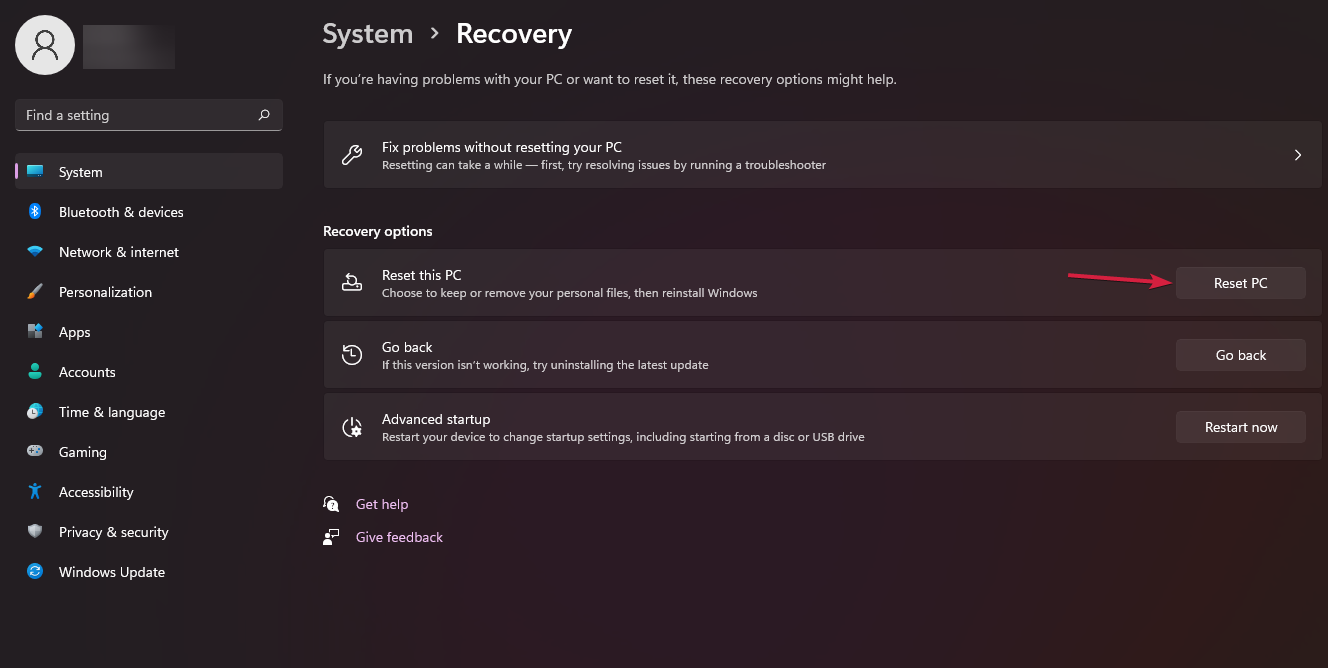
  4. Click on the Reset PC button.
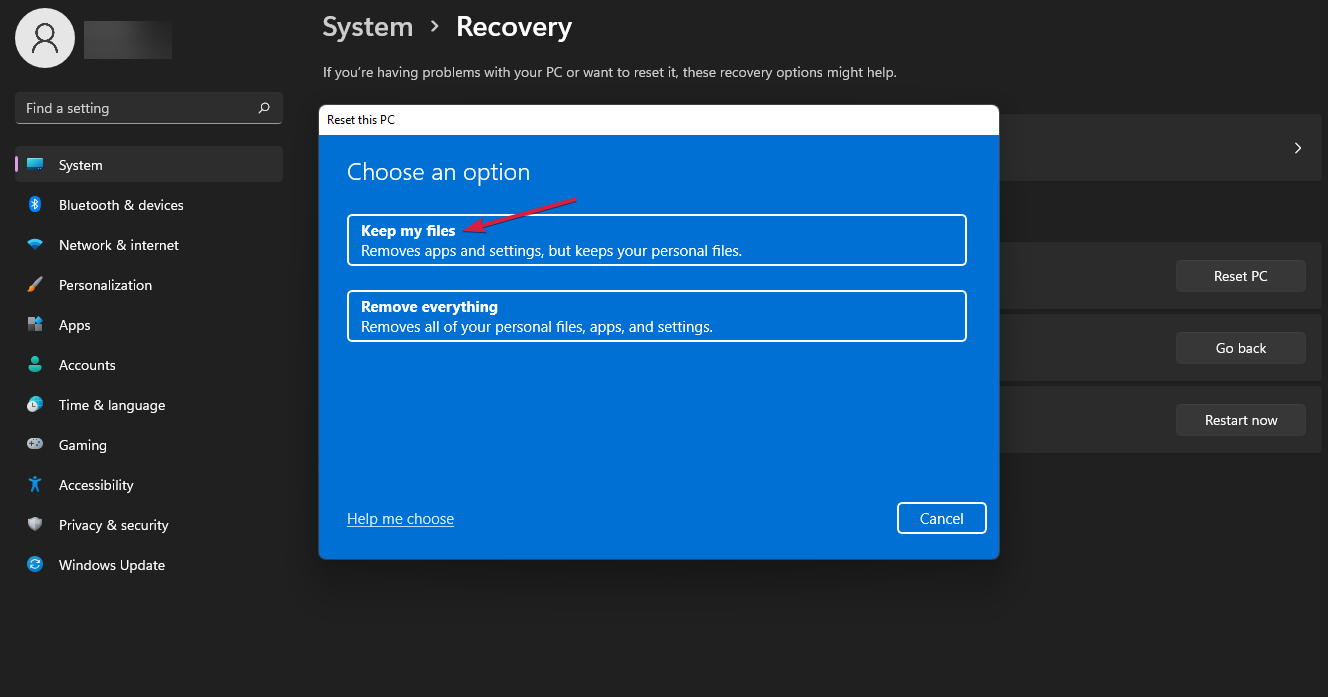
  5. Now we have two options. We recommend going with the first, Keep my files because the other will wipe all data from the system partition. If you still want to remove everything, cancel this procedure and back up your files first.
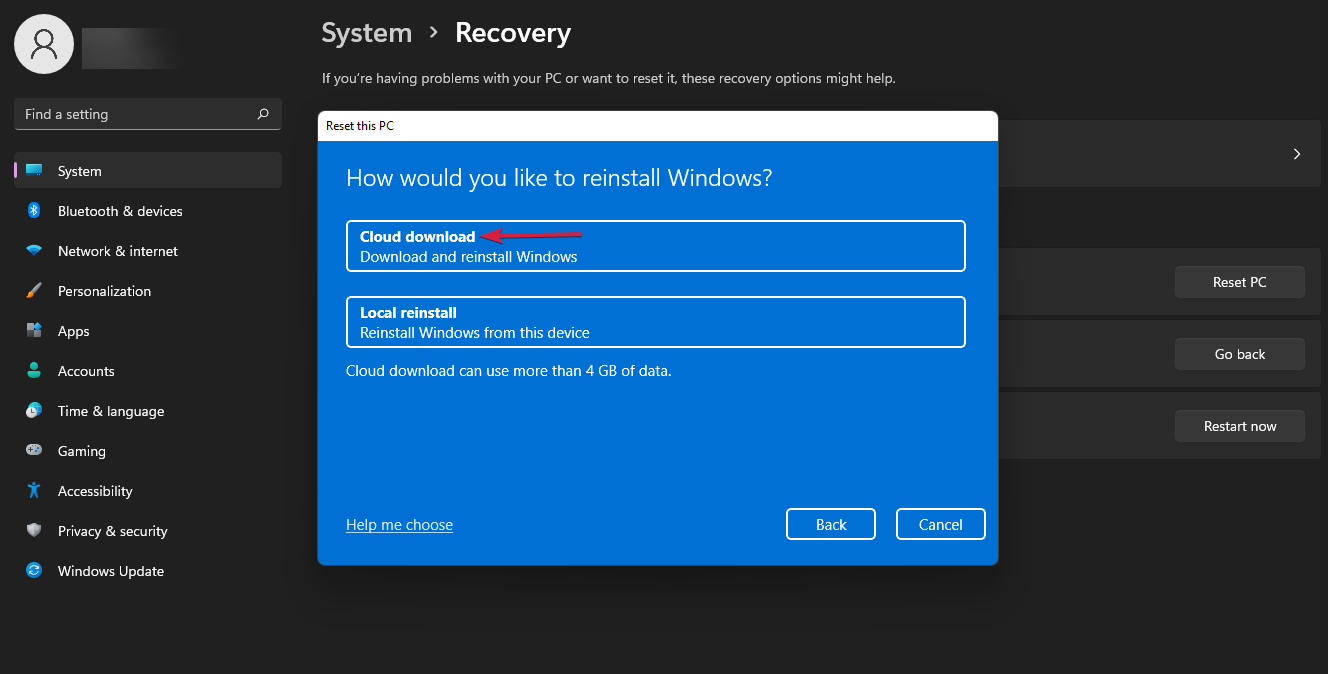
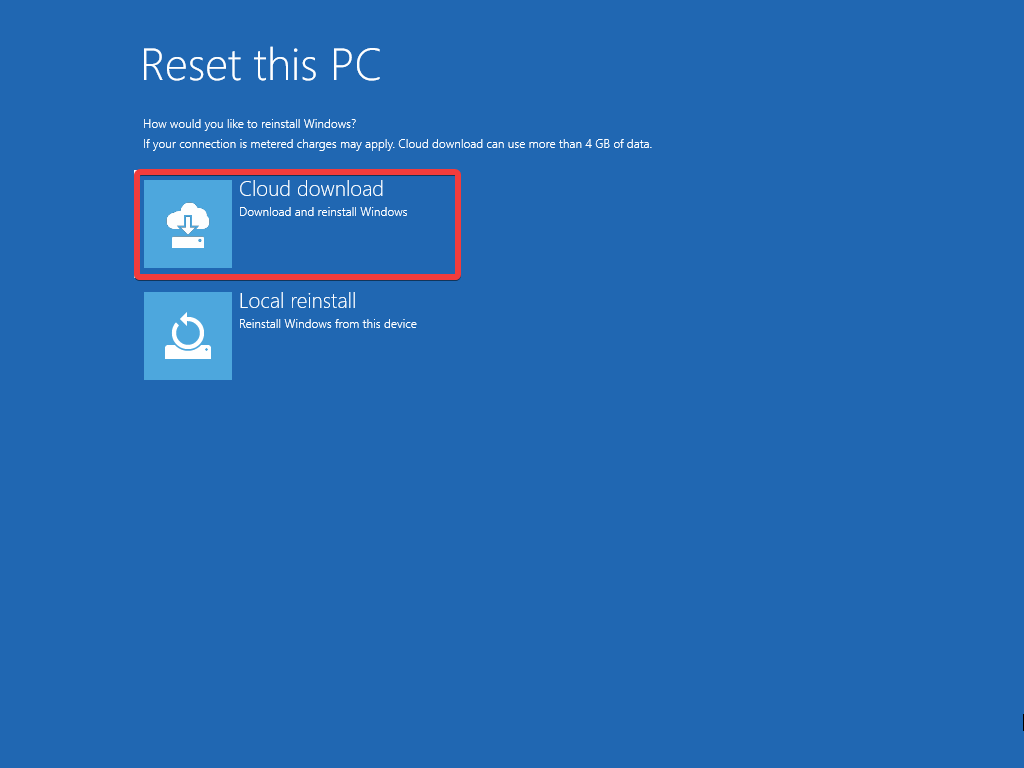
  6. Next, we recommend selecting the Cloud download option but if you have a Windows 11 kit, you can also go with the second option.
  7. Windows 11 will be downloaded and reinstalled on your PC if all the necessary requirements are met.

How to check the system stability in Windows 11?

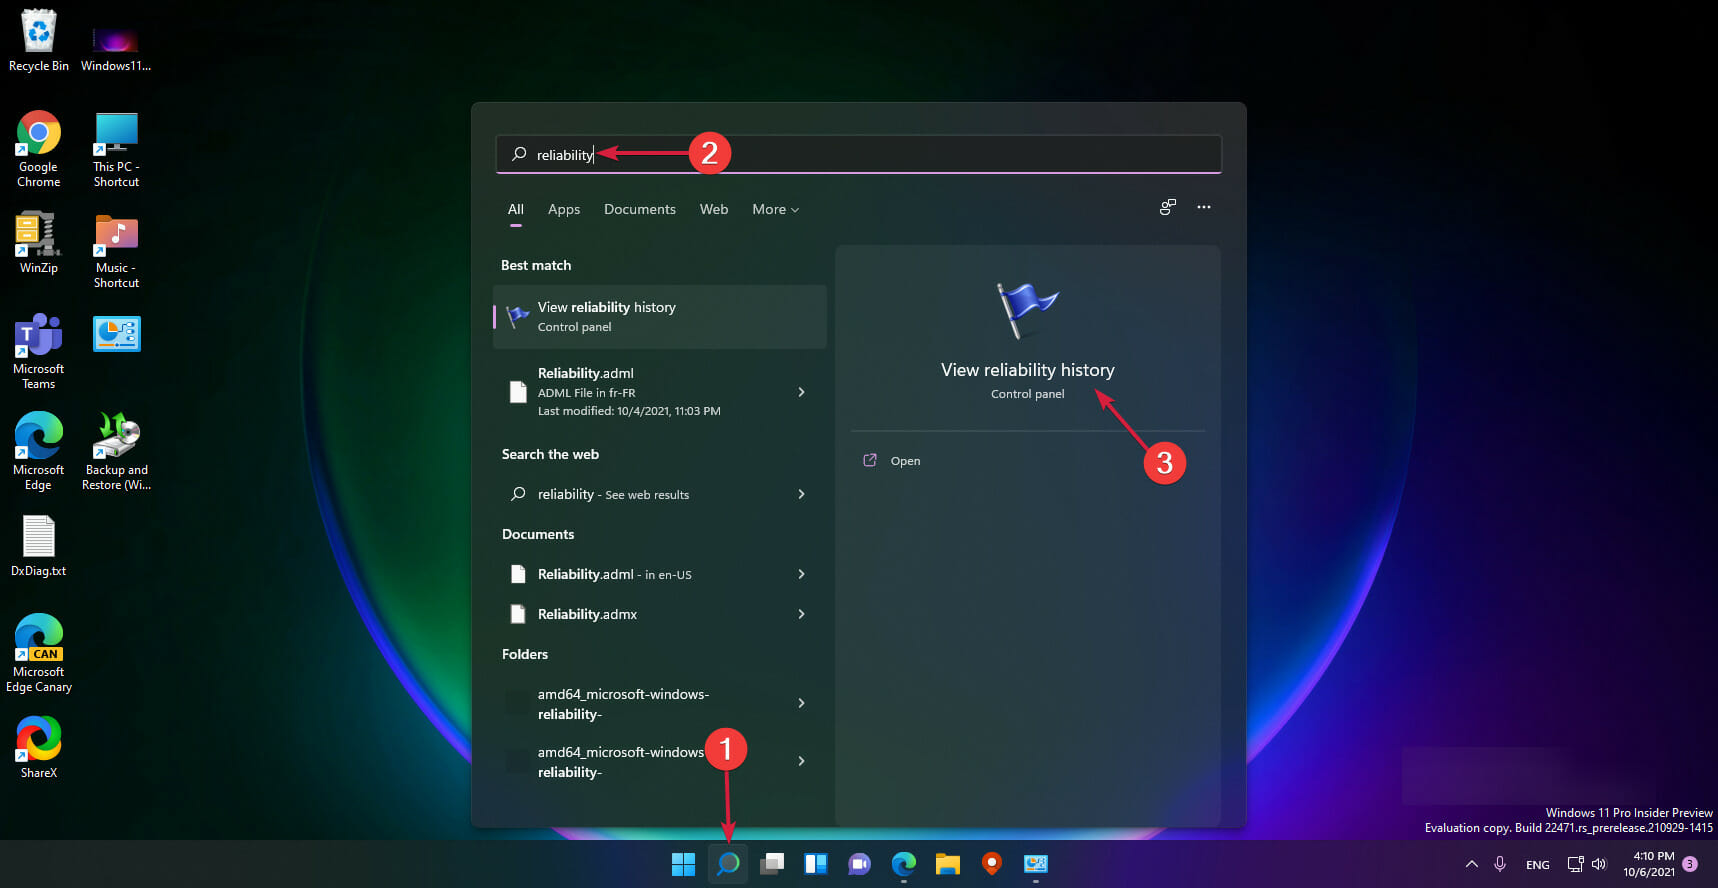
  1. Click the Search icon from the Taskbar, type reliability, and select View reliability history from the results.
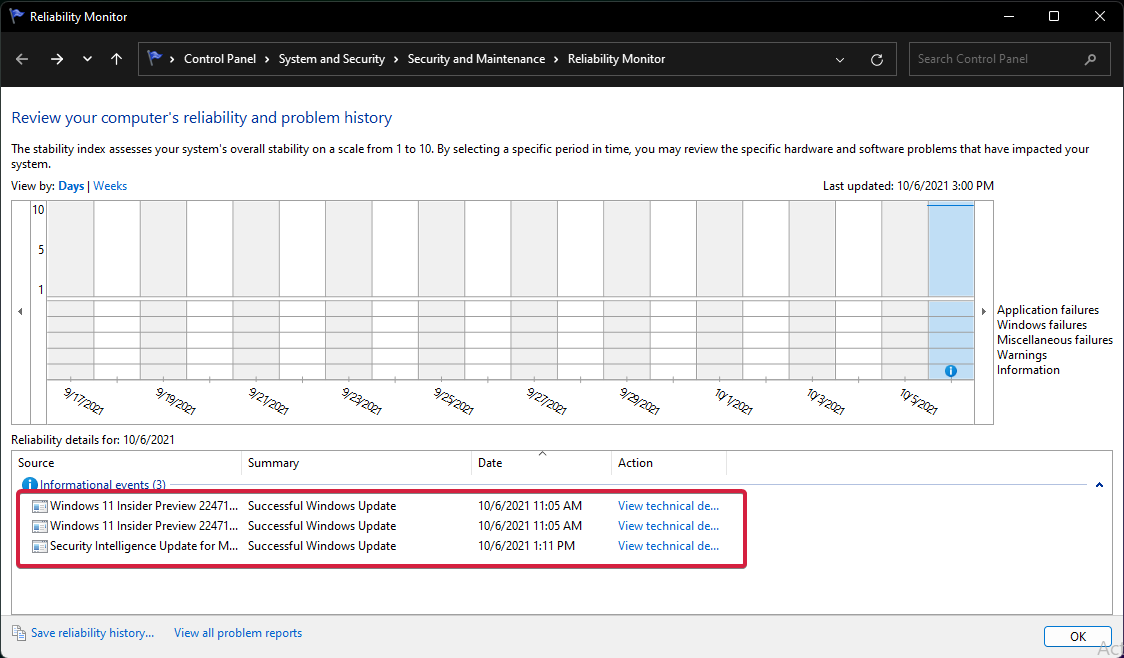
  2. At the bottom, you can see all the recent events and you can click on them to find out what were the implications and data for each one.

In case you get IRQL_NOT_LESS_OR_EQUAL error in Windows 10 or a variation in the form of l1c63x64.sys BSoD error, we covered some compressive solutions to solve it safely and fast.

We also have a guide on IRQL_NOT_LESS_OR_EQUAL error, so don’t miss it for more general solutions. Sometimes certain files can cause this issue, such as the case with Driver irql not less or equal (mfewfpk.sys) error.

For any suggestions or questions we wait for your input in the comments section below and we will get back to you as soon as possible.

The Callisto Protocol’s Japanese release derailed by ratings board

The Callisto Protocol is one of the most anticipated survival horror games in recent memory. A product of the same mind that gave us Dead Space—that of horror maestro Glen Schofield—The Callisto Protocol is set to release on December 2nd this year courtesy of publisher Krafton and Schofield’s own Striking Distance Studios.

The game is set in a far-future prison colony on Jupiter’s moon Callisto, called Black Iron, which is besieged by an alien invasion. The game was shown off at this year’s Summer Games Fest back in June with its world premiere gameplay trailer, which you can see below. The game has made quite stir among survival horror fans (you’ll see why).

Unfortunately for Japanese gamers, the game won’t see a release in their country thanks to a dispute with Japan’s Computer Entertainment Rating Organisation (CERO). The game, which admittedly is an especially violent and gory one (which you know for yourself if you watched the trailer) was unable to meet CERO’s standards in its current form.

While it should be noted that Japanese games often get alternate releases, one being a “cut” version that censors the goriest bits, Striking Distance Studios decided it could not alter the game and retain its vision. The studio made the announcement on the game’s official Twitter account.

We have decided to discontinue the Japanese version of The Callisto Protocol. We have determined that the game cannot pass the CERO rating in its current state and that changing the content will not provide the experience that players expect. We would appreciate your understanding in Japan

Japanese games analyst and CEO of Kantan Games Dr. Serkan Toto explained that since its 2002 inception, CERO has become increasingly strict in regards to video game censorship. He notes that among other high-profile games to be censored in Japan are Uncharted, The Last of Us, The Witcher 3 and Cyberpunk 2077.

Via PureXbox.

Featured image via wccftech.com. 

Bluetooth Unknown Device in Windows 11: 5 Ways to Fix It

So you’ve got your Windows 11 PC, and it’s fantastic but, there is one ghost in the machine; an unknown Bluetooth device. This can be really annoying as you might not be able to install your Bluetooth device unless you address this. 

In most PCs, you can make your Bluetooth devices auto-connect but sometimes, it just appears as an unknown device and it won’t connect either. If you have been struggling with this, let’s find a way to fix it.

Why is my Bluetooth showing unknown devices?

If you’re seeing unknown devices in your Bluetooth menu, it could be for one of these reasons:

  • Nearby devices are sending signals – If you are trying to establish a Bluetooth connection on your Windows 11, devices nearby may be sending out signals but aren’t connected to anything.
  • The other device has no power – If either device doesn’t have enough battery power to communicate with the other, Windows 11 may not be able to detect Bluetooth in the list of available devices.
  • Bluetooth signal strength is low – If there aren’t enough radio waves for two devices to communicate with each other at once, they won’t appear as available connections.
  • Faulty driver – If the device’s driver is not installed properly or is corrupted, it can cause problems with the software.
  • Wrongly paired device – If the device was not switched off or paired properly with the computer, it may show up as an unknown device.
  • Hardware fault – There may be hardware fault in your Windows 11 which leads to unknown devices showing up.

How can I fix the unknown Bluetooth device in Windows 11?

A few basic checks to perform before the slightly technical solutions include:

  • Turn off Bluetooth on both devices that you are trying to pair then turn them back on. You may find there’s a hiccup and Bluetooth won’t turn on.
  • Move closer to the Windows 11 PC to boost the signal strength.
  • Check for any possible interference from other wireless devices that may be causing issues with the Bluetooth device you are trying to connect with and turn them off.
  • Try connecting the Bluetooth device to another computer and check if it is working fine (if available).
  • Ensure the device you are trying to pair has enough power.
  • Unpair the devices, forget on both devices then repair.

Did you know that you could also pair multiple Bluetooth devices on Windows? The highlighted guide will provide information on how to do that.

1. Uninstall and reinstall the Bluetooth drivers 

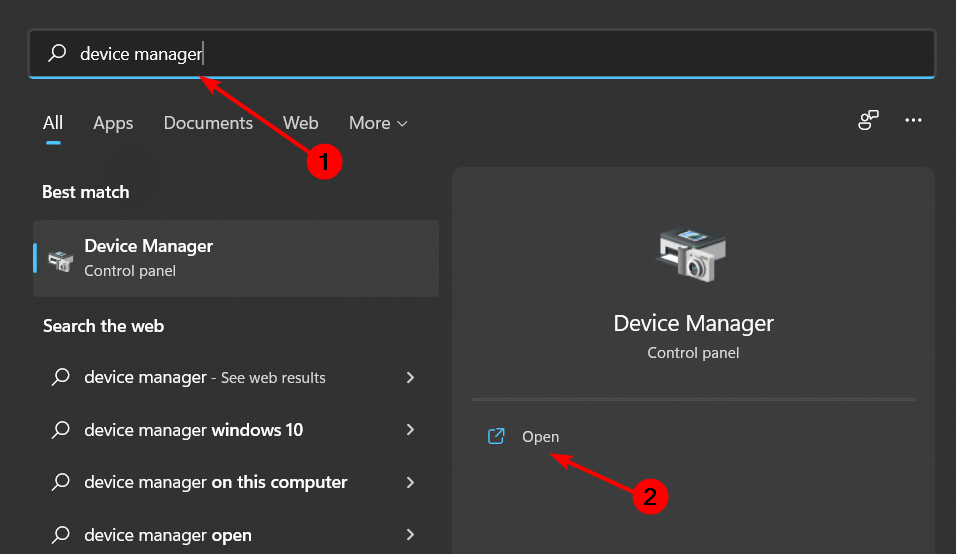
  1. Press the Windows key, type Device Manager in the search bar, and click Open.
  2. Navigate to your Bluetooth device, right-click and select Uninstall device.
  3. Confirm by clicking Uninstall.
  4. Restart your PC and the driver will automatically reinstall.

If the Bluetooth option is not showing, you can easily show hidden devices in the Device Manager.

2. Update your Bluetooth drivers

  1. Hit the Windows key, type Device Manager in the search bar, and click Open.
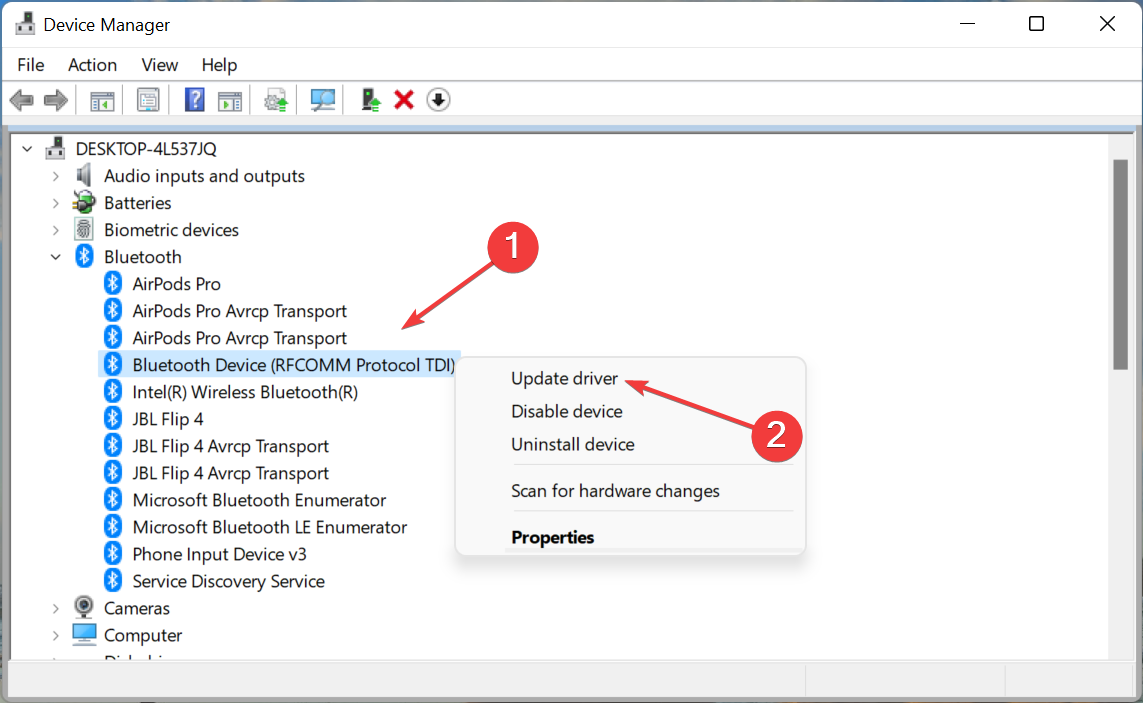
  2. Find your Bluetooth device, right-click and select Update driver.
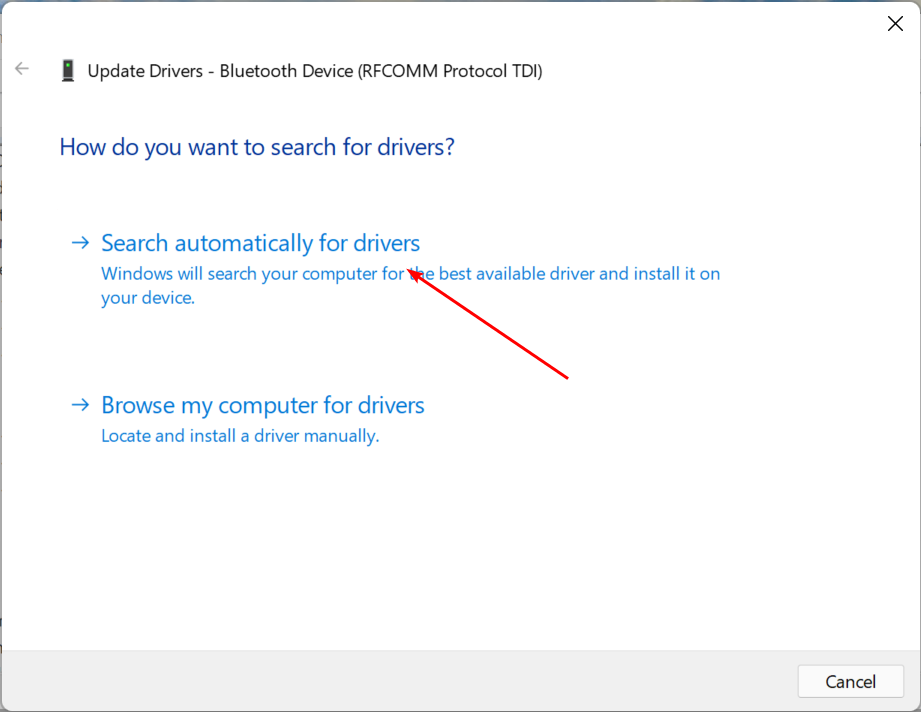
  3. Select Search automatically for drivers.
  4. Restart your PC and try reconnecting.

While this method works most of the time, the most effective way to update drivers is by using a third-party tool that does the job automatically and is very thorough.

Outbyte Driver Updater is a professional driver updater tool that will scan for outdated or missing drivers on your PC. You can use it to download and update all the outdated or faulty drivers on your computer.

Outbyte Driver Updater

Let Outbyte Driver Updater install the right and newest updates for your device drivers.
Free Trial Download now

3. Run the Bluetooth troubleshooter 

  1. Press Windows key and select Settings.settings windows 11
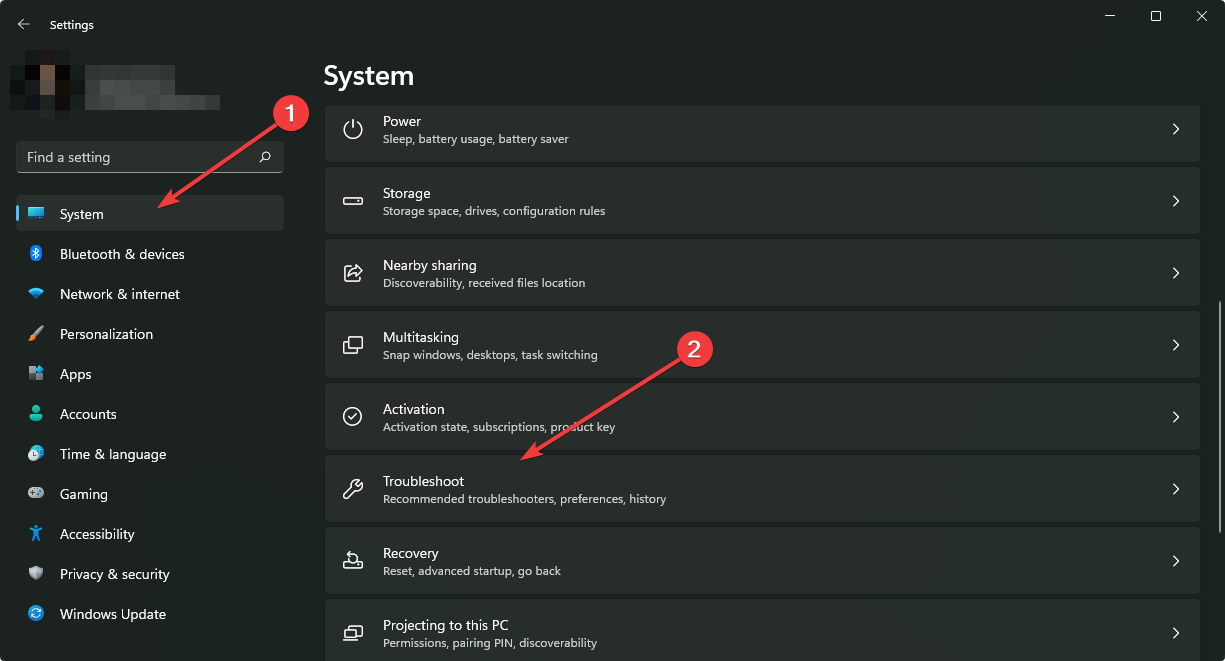
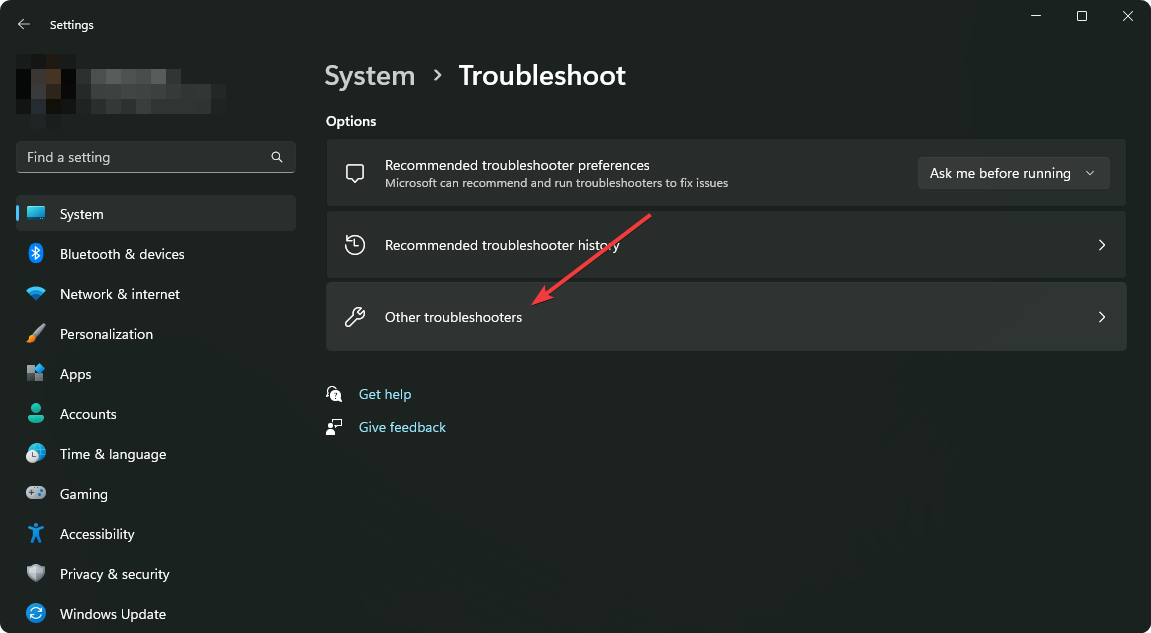
  2. Click on System on the left pane then Troubleshoot on the right pane.going system and troubleshoot windows 11 settings
  3. Select Other troubleshooters.going other troubleshooters win11
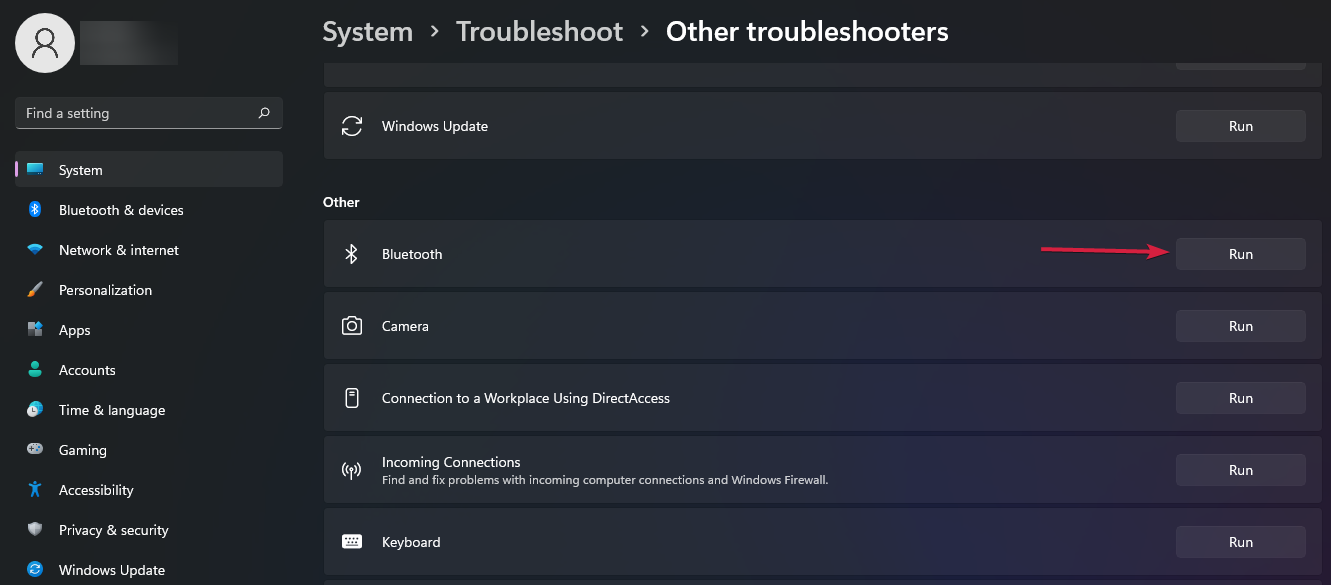
  4. Locate the Bluetooth troubleshooter, and click on the Run button next to it.

4. Restart the Bluetooth service 

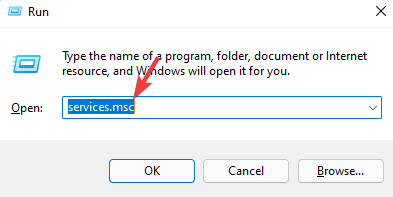
  1. Press the Windows + R keys simultaneously to open the Run window.
  2. Type services.msc in the Run dialog box.Open service manager
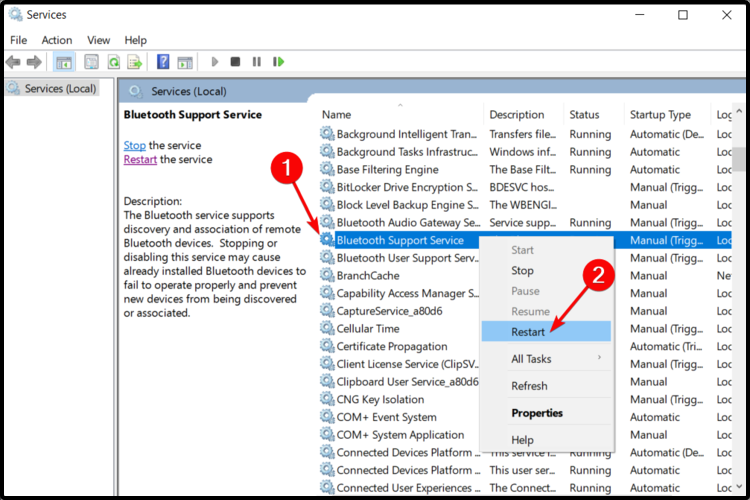
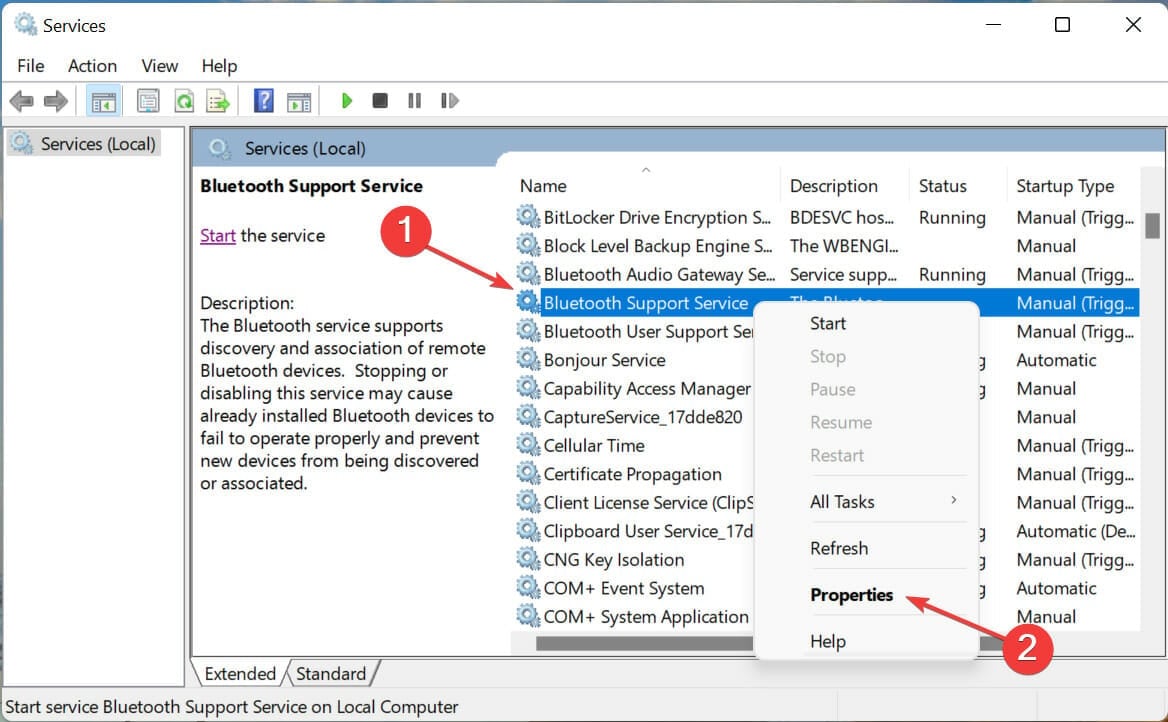
  3. Find the Bluetooth Support Service, right-click and select Restart.
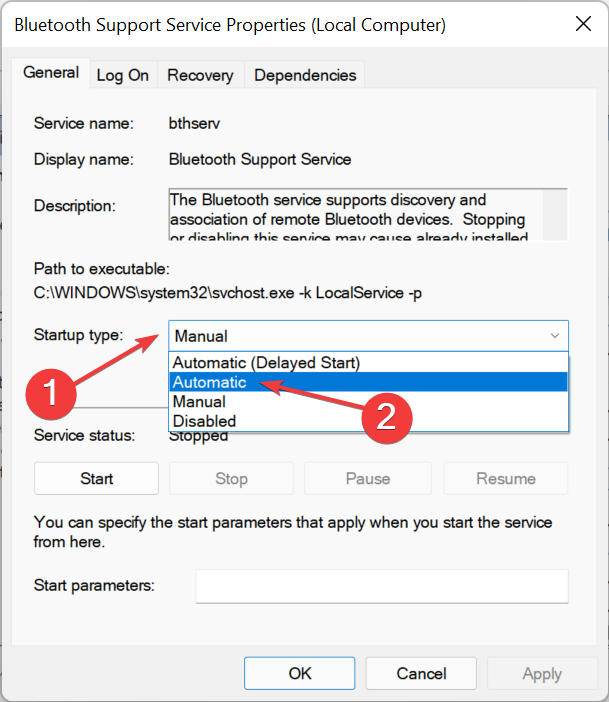
  4. Right-click again and select Properties.
  5. Under the General tab, select Automatic as the Startup type then click OK.
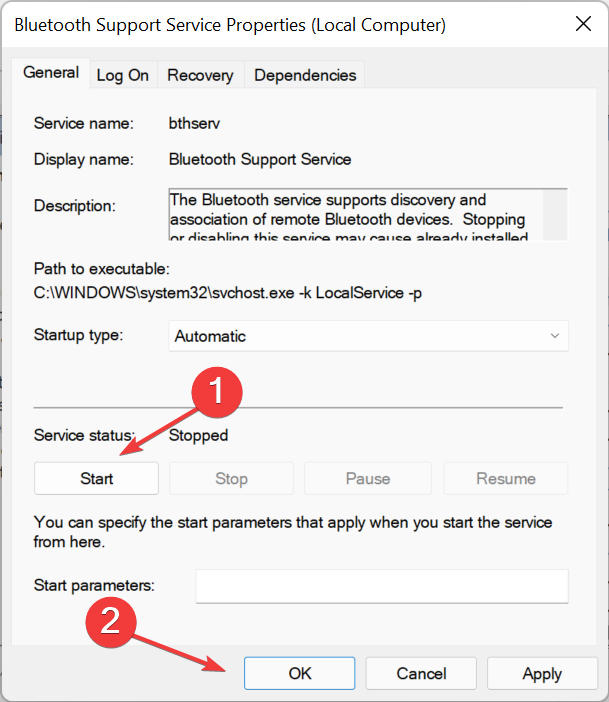
  6. Under Service status, click the Start button then hit OK to save.

If interested, know how to share files over Bluetooth on Windows 11.

5. Run the SFC command

  1. Hit the Windows key, type cmd in the search bar and select Run as administrator.cmd-admin hp printer won't scan
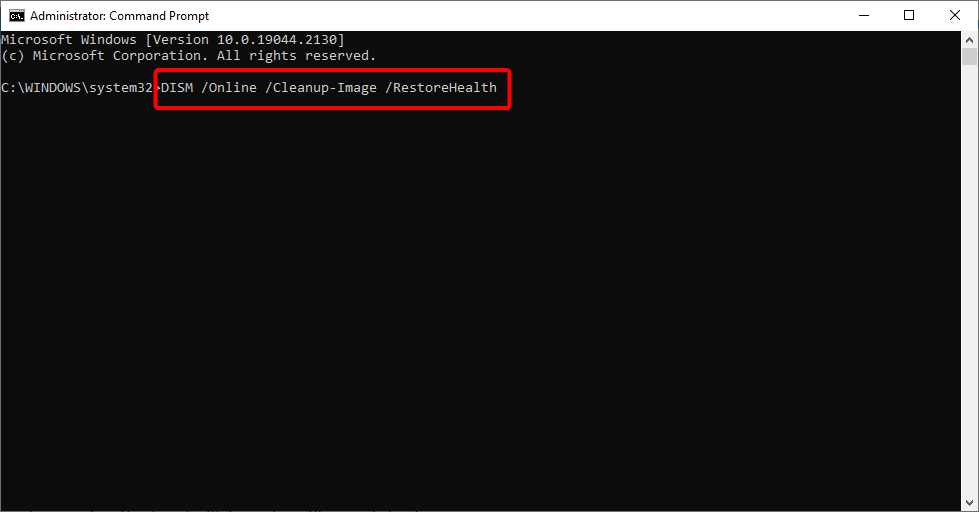
  2. Type and Enter the following command: DISM.exe /Online /Restorehealth dism
  3. Allow for the command to be executed then type in the next one: sfc /scannow

If nothing works out, your PC may be missing a few important updates. Usually, drivers are known to work well with the latest OS so ensure you check for any available updates and download them.

Should you encounter any other issues such as Bluetooth has failed to remove a device, feel free to check out our comprehensive article for available fixes.

Sometimes Bluetooth may disappear from the Device Manager but we have also uncovered various ways to get it to reappear.

While you are still here, check out why your audio stutters when connected to a Bluetooth device and how you can easily fix it.

We also have a guide on the Microsoft Bluetooth Enumerator driver on Windows 11, so don’t miss it.

Please let us know what workaround fixed this issue for you in the comments section below.

Fix a Memory Leak on Windows 10 with These 7 Methods

The biggest foe of every PC’s memory is a memory leak. There are many reasons for leaking memory, but the most common one is a programming oversight.

We’ve prepared a high variety of solutions that will help you to prevent memory leaks from occurring again. There could be various factors involved, and we’re going to address most of them.

What causes memory leaks in Windows 10?

Memory leaks simply mean more memory is being used up than is necessary. Unlike many computer programs that have many triggers, these leaks are primarily caused by one of the following:

  • Specific apps or programs – In almost all cases, memory leaks can be traced to an app or a program. that have taken more RAM than they should.
  • Malware – Malware is a source of many computer issues, including memory loss, and using proper antivirus apps will help.

We will address how these can be resolved below. You should know that programs store data in RAM temporarily, only while running. So, when you restart your PC, RAM is emptied. Each program stores its information about running in RAM.

As programs are different, the more-demanding ones and the programs that actually do more complex action store more data in RAM, requiring more memory, while the simpler programs use less memory.

How can I fix a memory leak in Windows 10?

Before you go into any of these solutions:

  • Simply restart your computer. Rebooting resets many computer processes, and the memory leak problem may be solved after it starts up.

1. End specific processes

  1. Press CTRL + SHIFT + ESC keys to open Task Manager.
  2. Head over to the Processes tab, and see which program is using the most memory.
  3. Just click on it, then click the End process button to close that program.
    memory leak windows 10

2. Use the Windows 10 built-in tools

  1. Press the Windows key + R key to open the Run dialog box, then key in the following code and click on OK:
    mdsched.exe
  2. Select Restart now and check for problems (recommended).
    memory leak windows 10

Windows 10 has built-in diagnostic tools that are often enough for providing accurate analysis that will help you determine the cause of your problem.

This type of tool scans your PC for potential memory issues, including memory leaks, and gives you precise diagnostics about all detected problems.

3. Check for driver updates

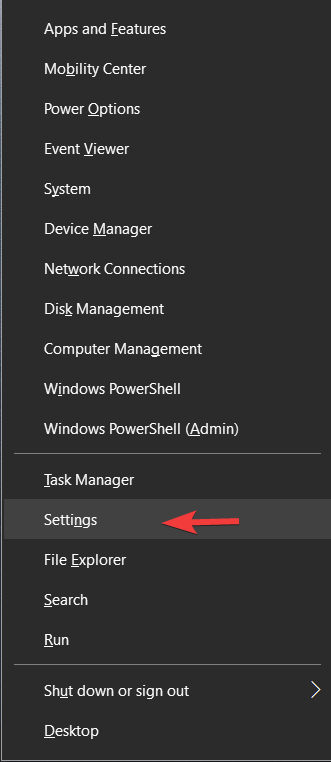
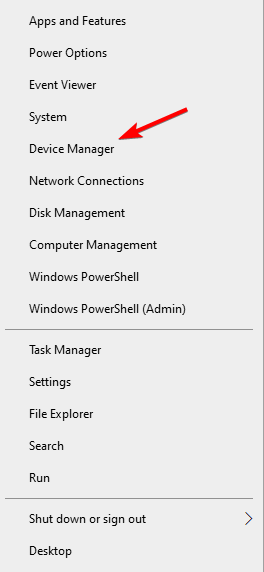
  1. Press Windows Key + X to open the Power User Menu. Select Device Manager from the list.
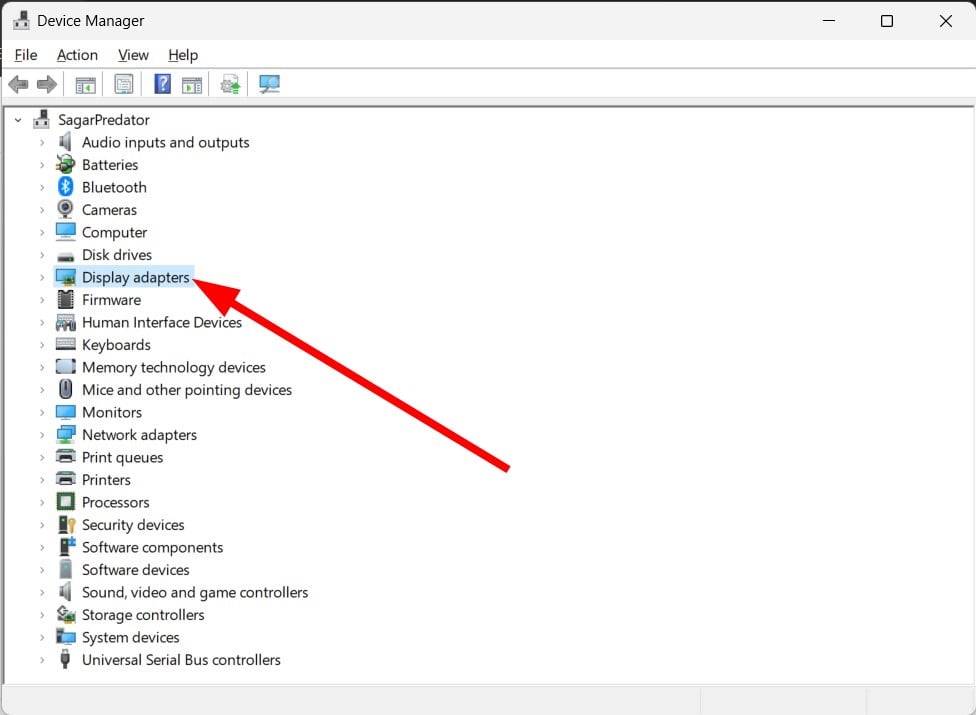
  2. Check any driver with the yellow exclamation mark sign next to it, double-click it, go to the Driver tab and click the Update Driver button.
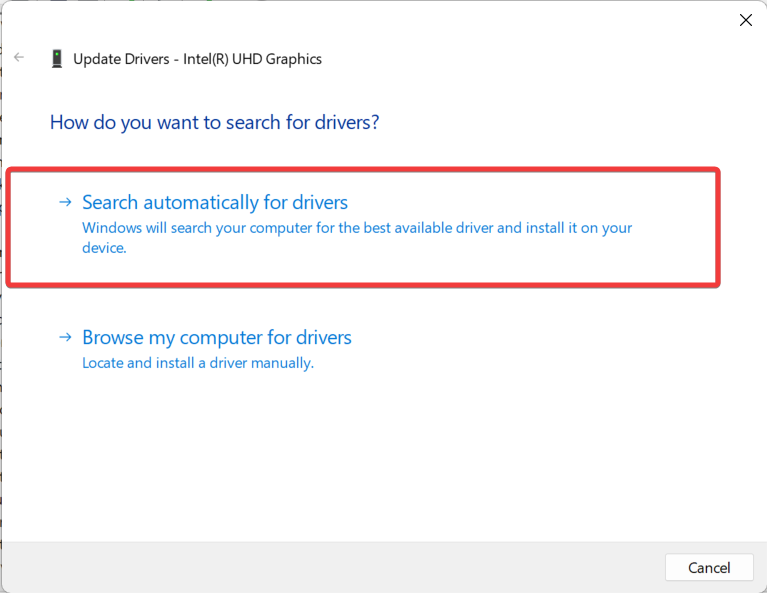
  3. Click Search automatically for drivers.

Keep in mind that updating your drivers is an advanced procedure. If you’re not careful, you can cause permanent damage to your system by downloading the wrong driver versions.

However, we recommend you download this driver updater tool (100% safe and tested by us) to do it automatically. Thus, you will prevent memory leaks and even permanent damage to your PC.

Outbyte Driver Updater

Outbyte Driver Updater automatically installs the latest drivers for you to keep your PC up to date in the future.
Free Trial Download now

4. Remove malware

  1. Type windows security in the Search tab and click on the app from the results.
  2. Select Virus & threat protection.
    memory leak windows 10
  3. Now, if you have a third-party antivirus installed, it will override the default Microsoft Defender protection, and you can click on the Open app option. That will take you to the main menu of the antivirus, and you will be able to perform the scan.
  4. Lastly, opt for the Microsoft Defender Full or Offline scan options if you don’t have one, and verify that the ethernet not working issue is fixed.

We recommend you use third-party antivirus software. Dedicated tools can typically detect a lot more threats and remove them before they get a chance to impact your system in any way.

Thankfully, many Windows 10 compatible antivirus software can fully protect your system without using too many system resources or placing unnecessary restrictions.

Most antivirus software has a quick scan feature, so after you install your tool, just run the quick scan and let the software remove any threat it detects.

5. Disable programs running at Startup

  1. Press CTRL + SHIFT + ESC keys to open Task Manager.
  2. Go to the Startup tab, then click on the program you want to disable and choose Disable.
  3. Restart your PC.

6. Defrag hard drives

Note icon NOTE
If you use an SSD, we suggest you skip this solution because it may break your hard drive.
  1. Open File Explorer, then go to This PC.
    memory leak windows 10
  2. Right-click your current system hard drive (most likely C:), and select Properties.
    memory leak windows 10
  3. Go to the Tools tab, and click Optimize.
  4. Select the drive you want to defrag, and choose Analyze.
  5. Wait for the process to finish.
  6. Restart your PC.

It is recommended to defrag your hard drive now and then. Besides optimizing your hard disk, it could also benefit your PC, including better memory management.

7. Disable Superfetch

  1. Use the following keyboard shortcut: Windows + R.
  2. Type in services.msc, then hit the Enter key.
  3. Find the process called Superfetch, right-click it, and choose Properties.
  4. Select Stop, and choose Disable from the Startup Type drop-down menu.
  5. Restart your PC.

Superfetch is another Windows service whose goal is to optimize the performance of the system. This process allows Windows to manage the amount of RAM, decrease boot time, and make application loading more efficient.

Disabling Superfetch is not recommended, but you can experiment with it to determine if it makes your PC slower.

That’s about it for our article about memory leaks in Windows 10. We hope that this info was helpful to you and that we managed to solve the problem.

In case you have some comments, questions, or suggestions, feel free to let us know in the comments section below.

Here is a sneak peek at next week’s new Xbox releases

Things have definitely been picking up as of late when it comes to new Xbox releases. Next week (October 31st to November 4th) there are 18 new games slated for launch on Xbox consoles. Let’s check them out below.

Monday, October 31st

Tuesday, November 1st

Wednesday, November 2nd

Thursday, November 3rd

Friday, November 4th

As you can see, it looks like another solid lineup of new Xbox games coming next week. There should be something in the list to please everyone. Stay tuned for more in Xbox gaming news as it happens.

Featured image via Xbox Wire. 

Motorsport Manager Is Not Launching: 5 Easy Fixes

The Motorsport Manager not launching is an issue many users complain about. It makes the game inaccessible for players due to numerous problems.

Some of our readers also encounter other issues because of bugs affecting the Motorsport Manager on their PC.

Why is the Motorsport Manager not launching?

Motorsport Manager not launching or a black screen on launch can occur because of many factors. The primary cause of the problem is an outdated game client on your PC. If the Motorsport Manager is outdated, it will not be able to fix bugs affecting it.

Nevertheless, Motorsport Manager not launching can occur due to other factors such as:

  • Outdated Windows – When the Windows operating system is not updated, it can make your system not compatible with the current version of the game on your PC. So, you may run into problems with the Motorsport Manager if your OS doesn’t have the latest build.
  • Third-party app interference – Other apps running on your computer can prompt issues with Motorsport Manager. Apps like Steam with overlay features can run in the background, which may interfere with the game.
  • Windows Defender Firewall – Because it monitors and protects Windows from malicious attacks, it may block Motorsport Manager from launch if it senses unusual behaviors. If you cannot change settings in Windows Defender, check this guide for fixes.

Hence, this article will take you through how to fix the problem.

What can I do if the Motorsport Manager is not launching?

There are some fixes for the Motorsport Manager if it’s not launching. Nonetheless, we recommend you observe the following preliminary checks before making any adjustments to your PC.

  • Make sure you have enough memory space on your PC.
  • Close unnecessary programs and services running in the background.
  • Disable any antivirus software services on your computer.
  • Restart your PC. Try these fixes if your PC is stuck on restarting.

The checks above should help you launch the Motorsport Manager. Peradventure you’re not able to, go ahead with the solutions below.

1. Update Windows

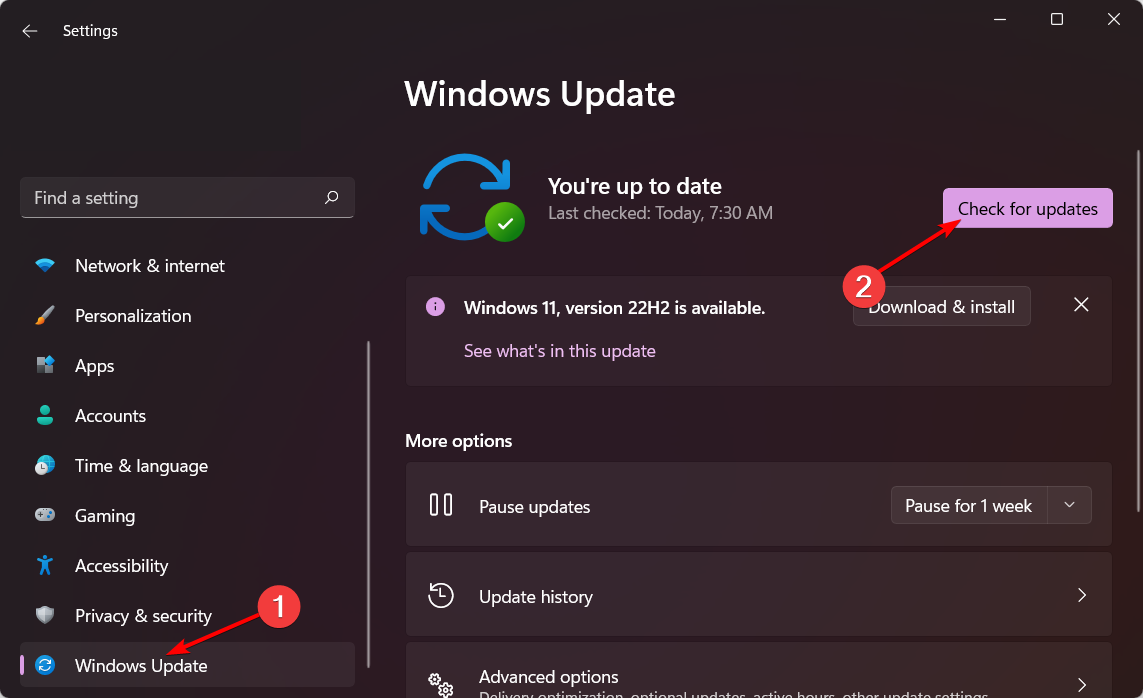
  1. Press the Windows + I keys to launch the Settings app on your PC.
  2. Click on Windows Update and select Check for updates (Windows will automatically search for the updates, download and install them).

It isn’t uncommon to encounter an error in Windows Update. Hence, this guide will help troubleshoot any problems encountered.

2. Temporarily disable the Windows Defender

  1. Click the Start button on your desktop, type Windows Security in the search box, and press Enter.
  2. Select the Virus & threat protection option, and click on Manage settings.
  3. Toggle off the Real-time protection option to temporarily disable the Windows Defender Antivirus on your PC.

Disabling the Windows Defender Firewall will fix any issues blocking Motorsport Manager from launching on your PC.

You can check our guide on how to fix the Windows Defender not working on Windows 11.

3. Check  Motorsport Manager’s system requirements

Users should check if their computers are compatible with Motorsport Manager. Hence, check the Motorsport Manager system requirements and compare them with your PC’s specifications.

However, switching to a PC that fits the requirement status is the best solution.

4. End unnecessary programs

  1. Right-click on the Start button, search Task Manager, and launch it.
  2. Right-click on the apps using lots of CPU and memory space on your PC and click on the End task from the drop-down that pops up.
  3. Restart your computer and launch the game to see if the Motorsport Manager is still not launching.

We recommend you check the best Task Manager software installed on your PC for improved performance.

5. Run the app as an administrator

  1. Press Windows + S keys to open the Windows Search box, type Motorsport Manager in the search space, and select Run as administrator from the drop-down.
  2. Click the OK button to confirm permission to run the Motorsport Manager as an administrator.

Running the Motorsport Manager as an administrator will fix permission issues preventing it from launching.

In conclusion, we have an extensive guide on fixing the Forza Motorsport 7 crash on Windows 11. Also, read more about how to fix Motorsport Manager bugs on your PC.

If you have more questions and suggestions, kindly leave them in the comments section below.

Posted in PC

The Most Common Windows Activation Errors & How to Fix Them

Are you getting Windows activation errors when trying to activate it? Notably, there are different kinds of Windows activation error codes that are caused because of various reasons.

In this guide, we have listed most of the Windows activation errors and also the effective solutions that will help you to resolve them quickly. Let us check them out.

What are the most common Windows Activation errors?

Here is a list of some of the most common Windows activation errors that you can come across:

  • Error 0xC004F211, 0xC004F213 – These errors mean that Windows could not find a license associated with your device’s hardware. To fix the error code 0xc004f213 or 0xC004F211, you must buy a valid activation code.
  • Error 0xC004F212 – This error indicates that the product key you entered on the device did not work. To fix it, contact Microsoft Store or try using the Windows Activation troubleshooter.
  • Error 0x803f7001, 0x800704cF – The cause for these errors is a major hardware change or because you have entered an invalid product key. These are common Windows 10/11 activation errors, and they can be easily fixed.
  • Error 0xC004C003, 0xC004C060, 0xC004C4A2, 0x803FA067L, 0xC004C001, 0xC004C004, 0xC004F004, 0xC004C007, 0xC004F005, 0xC004C00F, 0xC004C010, 0xC004C00E, 0xC004C4A4, 0xC004C4A5, 0xC004B001, 0xC004F010, 0xC004F050 – All these error codes are caused because of the same issues. These could pop up because of the wrong product key, or because the activation servers were busy.
  • Error 0xC004F034 – You will face this error if you have entered the wrong product key or entered the product key for a different version of Windows. Apply the solutions mentioned in our dedicated guide to resolve Windows 11 activation error 0xC004F034.
  • Error 0xC004F210, 0xC004E016, 0xC004F00F – This error pops up when you have entered the wrong product key, or the current version of Windows installed on your PC does not match the edition of the digital license. We covered 0xc004e016 in Windows 10 in depth in a separate guide.
  • Error 0xC004FC03, 0x8007267C, 0x80072ee7 – Internet issues or firewall/antivirus settings can cause this problem. You can try connecting your PC to the internet, or disable the Firewall or antivirus software temporarily to complete the online activation. Here is a dedicated guide to fix the error code 0x80072ee7.
  • Error 0xC004E028 – This error appears when you have already sent the request for activation, and the process is underway. You should wait for the process to get completed, and your device will get activated once the process finishes.
  • Error 0xD0000272, 0xC0000272, 0xc004C012, 0xC004C013, 0xC004C014 – You will come across this error if the activation server is busy during the time of activation. Try after some time to complete the process.
  • Error 0xC004C008, 0xC004C770, 0x803FA071, 0xC004C020 – These error codes mean that the product key you have entered has already been used on another PC or is being used on multiple PCs than allowed by the Microsoft Software License Terms. Try entering a different product key, valid for your copy of Windows.
  • Error 0x8007232B, 0xC004F074, 0xC004F038, 0x8007007B – You will see these error codes if you have used a product key of the Enterprise edition of Windows to activate Windows 11 Home or Windows 11 Pro. Also, these errors pop up when you are not connected to the internet to complete the online activation process.
  • Error 0x80072F8F – Error 0x80072F8F will appear when your clock isn’t correct. It can also occur if Windows can’t connect to the online activation service. Adjust the time, and check your connection to fix it.
  • Error 0xC004E003 – This error occurs when third-party software changes your system files. You can restore system files back to an earlier point in time using System Restore. Also, apply the solutions mentioned in our guide on how to fix Windows 10/11 error 0xc004c003.
  • Error 0x80004005 – This error code can be solved by running the Windows activation troubleshooter. For other solutions, you can check out our Windows 0x80004005 error article.
  • Error 0x87e10bc6 – This is another one of those errors, where your PC is taking a bit of time to confirm the activation process because of an error in the activation server or licensing service. You can check out our guide that gives you complete solutions to fix error 0x87e10bc6 on Windows 11 as well as 0x87e10bc6 activation error on Windows 10.
  • Error 0x80070652 – If the update components or the update-related system files are missing from your PC, then you would come across this error 0x80070652. For a complete list of solutions, you can refer to our guide on how to fix Windows 10/11 update error 0x80070652.
  • Error 0xc004f063 – When your PC fails to authenticate the license you will see error code 0xc004f063 on Windows 10. You can try fixing this issue by running the SFC Scan on your PC.

How do I fix Windows activation errors?

Before applying the solutions, here are a few things you can apply and resolve the error:

  • Restart your PC. Sometimes a quick restart can help with all sorts of Windows problems.
  • Disable your antivirus and firewall temporarily since it’s possible that they are interfering with your connection.

If these short steps didn’t fix the situation, follow the solutions below to resolve the Windows activation error.

1. Run Windows Activation troubleshooter

  1. Press the Win + I buttons to open Settings. Click on Activation.
  2. You will see the Troubleshoot button if your copy of Windows is not activated.
  3. Hit the button and follow the on-screen prompts to fix the activation problems.

2. Use Command Prompt to activate Windows

  1. Press the Windows key to open the Start menu.
  2. Type Command Prompt and run it as an administrator.
  3. Execute the below command: slmgr.vbs –rearm
  4. The process will begin, and once the success prompt is displayed, click OK.
  5. Restart your PC.

3. Activate Windows 11 by phone

  1. Click the Start button and select Settings.
  2. Now, choose System from the right and Activation from the right pane.
  3. Under Activate Windows Now section, select Activate by Phone.

We have listed some of the most common and searched Windows activation error codes and their solutions. These errors can prevent you from personalizing your PC or experiencing Windows to its full capacity.

Following the above solutions, you can fix any error codes effectively and easily.

If none of the troubleshooting methods work, a better option would be reinstalling the Windows OS. This should be done only when nothing works.

We have a guide that will guide you on how you can reinstall Windows 11. The article explains how to do it using the ISO file and installation media.

A failed network connection is the root cause of multiple Windows activation error codes. In such a case, you can check our Intenet connection lost guide for more information.

We have a guide on the 0x803fa067 activation error on Windows 11, so don’t miss it for more solutions.

Did you manage to fix activation errors? Let us know in the comments below.

7 Best Screen Recorders for Windows 10 in 2026 [Free & Paid]

Screen recorder software solutions are great for capturing your desktop to create videos. For example, you can make a video about some problem you are facing on your computer or make a tutorial if you have a solution to another issue.

But finding a good program to record your screen can be challenging since most don’t really do a good job at it.

Does Windows 10 have a screen capture tool?

Yes, the Windows Snipping Tool is a utility app included in modern operating systems such as Windows 10. You can access it by typing in the search bar Snipping Tool.

The tool has a modern appearance and a clear difference from the old tool in that it includes instructions on how to take screenshots using the shortcut key Windows + Shift + S.

This is very useful for taking screenshots, especially when trying to capture dropdowns or tooltips.

Windows 10 has a built-in screen recorder called Xbox Game Bar, and with the Windows + Alt + R keyboard shortcut, you can record your screen in Windows 10.

It was created primarily to record PC and Xbox gaming sessions, but it can also record other apps and activities on your PC.

That’s why we created this top list of screen recording programs that can capture not only games but also anything else happening on your desktop.

➡️Even though we tested more than 10 screen recorders, we decided to make a shorter comparison list for you to make it easier to pick.

Comparison Table

Screen
Recorder
Operating System Free / PaidWatermarkOpen-source
LoomWindows 8.1, 10, 11;
Android, Mac, and iOS
Free trialNoYes
Movavi
Screen Recorder
Windows 10, 8, 7, Vista, and XP; MacFree trialYes, in the free versionYes
CamtasiaWindows 10, 11, Mac 12 and aboveFree trialYes, in the free versionNo
Icecream
Screen Recorder
Windows 10, 11, 8.1, 8, 7, 2003, 2000, Vista;
Android and macOS
Free trialYes, in the free versionNo
BandicamWindows 11, 10, 8, 7, Vista, XPFreeYesNo
SnagitWindows 11, 10, Windows Server 2016, 2019;
macOS 11 and 12
Free trialYesNo
TechSmith
Capture
Windows 11, 10, Windows Server 2016, 2019;
macOS 11 and 12
FreeYesNo
ActivePresenterWindows 11, 10, 8.1,
macOS 10.15 and above
FreeYes, in the free versionNo
Wondershare
DemoCreator
Windows 11, 10, 8, 7;
macOS 10.13 and 11
Free trialYes, in the free versionNo
ShareXWindows 11, 10, 8, 8.1, 7FreeNoYes

Which is the best screen capture app for Windows 10?

1. Loom – Great for sharing videos

It should come as no surprise that Loom makes our list of best screen recording software. It offers a seamless user experience embodying next-gen screen recording features into a simple and intuitive app.

This easy-to-use screen recording app is suitable for pretty much anyone. Whether you want to film instructional materials or record gameplay, this tool is definitely worth a shot because it can record your screen, camera, or both at the same time.

Not only can you record videos in HD, but you also have an array of handy editing tools to make your videos easier to follow and more engaging.

With Loom you can suppress background noise, create and correct transcripts, remove filler words from your video, add chapters, and more.

This screen recording software makes it easy for you to share your videos. It generates a shareable link that you can give your friends or embed into your website.

Of course, you can also export your video and upload it to a third-party platform as well. If you choose to share it with Loom, your viewers will be able to give their feedback using comments and emoji reactions.

Loom has a free version that you can download and start recording your screen right away. If you want additional benefits and features for more professional results, you have to get a subscription.

In its applications, Loom makes use of open-source software and third-party libraries.

Other key features of Loom Screen Recorder include:

  • Record internal audio and/or microphone
  • Custom recording dimensions
  • Browser extension and dedicated apps
  • Drawing tool and mouse emphasis
  • Closed captions
  • Up to 4k high-definition recording

Loom

Record your screen and webcam, edit, and share your final product with this all-in-one solution.
Free trial Visit website

2. Movavi Screen Recorder – Ideal for call recording

When making a top list of screen recorders, we look at important criteria such as video recording capabilities, system requirements, how user-friendly it is, how much it costs, and more.

Well, Movavi Screen Recorder seems to have everything in check, since it can record your screen to great effect, even in 4K.

It is very lightweight for your system requirements, it is easy to use, and it is an open-source tool.

Using it is merely a matter of pressing a few buttons, and you can even trim and edit your recordings once you’re done, so any irrelevant parts of a video can be easily eliminated.

The program is especially geared towards recording video calls, being capable of capturing webinars and online calls, recording video instructions and tutorials, and grabbing streaming videos and online events.

You don’t need to look for the needle in the haystack if you want to use in-game recording software, Movavi Screen Recorder has been proven to work great with streaming platforms.

More so, if you want to test out the program before you buy it, you can go ahead, since there’s a free version of it available for download.

It has all the capabilities of the base program, except the inclusion of watermarks, at the end, video, and the inability to tag videos for uploading on YouTube.

However, these drawbacks still allow you to test out the program to full effect, allowing you to make a more informed decision on whether to buy it or not.

Other key features of Movavi Screen Recorder include:

  • Set up recording parameters
  • Draw on videos
  • Set a time limit for recording
  • Create screencasts

Movavi Screen Recorder

We couldn’t create a list of best screen recorders without mentioning Movavi Screen Recorder for its versatility alone!

3. Camtasia – Advanced video editor

Video editor Camtasia

Camtasia is a powerful screen recording software tool for Windows 10. It is one of the most comprehensive tools on this list, providing both recording and post-production tools.

Camtasia comes packed with a full-blown video editor and video rendering module. If you are making tutorials, then this is quite possibly the best software you could use.

If you could think of a feature, Camtasia probably has it – so it will take too long to talk about all the things it can do.

The tool has tons of pre-made video templates so you can easily create the type of video you need.

Although comprehensive, the editing tool is simple to use, with drag and drop controls. You can easily insert, remove, trim, make selections, sync audio, and other similar tasks in just a few clicks.

There is a free trial available you can use to figure out if it’s worth it for you, but that’s the price you have to pay for a complete set of tools.

Other key features of Camtasia include:

  • Audio recording for mic and system
  • Library of royalty-free music
  • Integrated with PowerPoint
  • Cursor path editing
  • Animations
Camtasia

Camtasia

Capture anything on your Windows 10 desktop with the best all-in-one screen recorder and video editor!
Free trial Visit website

4. Icecream Screen Recorder – Best tool for beginners

best freeware apps Icecream-Screen-Recorder

Icecream Screen Recorder is a dependable screen recording software tool for Windows 10, with enough features to satisfy but not confuse you.

It lets you add hotkeys to make recording a breeze, and supports your own watermarks so you don’t have to add your logo during the editing stage.

It can also focus on your mouse pointer and you can select a certain area on the screen to record instead of recording all of it. It even lets you zoom in and out while recording the video.

Videos recorded with Icecream Screen Recorder are easy to share, with support for popular platforms such as YouTube, Dropbox, and Google Drive.

In the post-production phase, you get a few easy editing tools that let you, for example, trim your videos so you can remove unnecessary pauses or beginning/end footage.

You can also slow down or speed up the pace of your video and save it to various formats. You can also come back and convert already saved footage to a different format.

Let’s quickly look at its key features:

  • Screen area selection:  select the area you want to be recorded
  • Drawing panel: add arrows, lines, and marks to your capture
  • Project history: you can easily find your past projects
  • Personal Watermark: personalize your video by adding your signature/logo on it
  • Zoom in while recording: zoom to an object
  • Record around the mouse: select what area round your cursor you want to record

Icecream Screen Recorder is free to try and you can download it from the link below.

Icecream Screen Recorder

Capture your Win 10 screen effortlessly and share it with the entire world!

5. Bandicam – Ideal for gamers

Bandicam is one of the most popular screen recording and editing software out there. It is designed for the general public, you don’t have to be familiar with screen recording software in order to be able to use it right away. 

The software can record everything on your computer screen and you even have the option to only record certain areas of the screen. The files can be saved as .mp4, .avi, or image files.

Moreover, it allows the recording of external video devices such as a Webcam, Xbox, Playstation, smartphone, tablet, IPTV, etc.

The tool has simple editing tools, and you can draw and add annotations in real-time to make your content more engaging.

You can add mouse effects so your video recordings will be easier to follow. You can also include animations and play around with other effects.

In terms of cost, the software comes at a good price that aligns with the industry standards. The payment is made once, you just have to get a license for your PC and you can use it as you please. 

A free version of this software exists and it incorporates some of its licensed features, the biggest downside being that it places a watermark on all your videos. It’s a good way to test it out and see how it works for you.

Other key features include:

  • Quality game recording of 2D/3D games with 4K UHD Video and captures up to 480 FPS Video
  • Preserves top-level video quality
  • One-time purchase
  • Recording certain screen areas
  • Real-time drawing function
  • You can upload recordings on YouTube without converting
  • Uses less CPU/GPU/RAM resources than similar software which means a smoother experience with less lag
  • You can continuously record for over 7 days non-stop

Bandicam

Record ready-to-upload videos of your screen and integrate external video sources with a lightweight and easy-to-use tool. 
Free trial Visit website

6. Snagit – Easy-to-use tool

Snagit is a premium screen recording software for Windows 10. It is full of useful features that help you record professional-level videos by just using your computer.

It is not only a screen-capturing tool, but it also packs a powerful video editor. It integrates several third-party services such as Google Drive, Microsoft Office, TechSmith Screencast, and Dropbox.

This software gives you a lot of freedom, allowing you to record exactly what and how you want. You can capture your whole screen, a specific region, a window, or a scrolling screen.

You can record your screen and camera both separately and at the same time. The tool lets you include audio from your microphone along with system sounds.

The editor also is very promising, with trimming options, annotations, pre-made templates, and more.

Snagit is the smart, convenient way to get your point across, eliminate confusion, and future-proof your content.

If you are looking for something professional with an insane amount of features and a team of support staff that can help you go through those features, Snagit is your option.

Let’s quickly look at its key features:

  • Customize and edit every screenshot with professional-quality markup tools
  • Trim any part of your screen recordings
  • Convert videos to animated GIFs
  • Premium screen recording tools

It comes with free tech support, so you can always ask a specialist if you need help.

Snagit

Transform your desktop into a visual how-to guide with the best screen capture and recording software!
Free trial Visit website

7. TechSmith Capture – Great for full-screen captioning

Formerly known as Jing, TechSmith Capture is a good free option when it comes to screen recording software for Windows 10. It’s one of the most used high-definition video recorder software for multiple platforms whatsoever.

It is made by the same team that’s behind Snagit and Camtasia Studio, so it provides a promising set of tools to help you record and edit computer screen and webcam footage.

With this tool, you can record your computer screen as well as your webcam and integrate both microphone-sourced and system audio.

This application is a good solution to easily make your footage more engaging. You can add annotations such as arrows, highlighters, and text.

This free application is easy to use, with a minimalistic user interface. You can start recording in just a few clicks. It’s a reliable solution, especially when getting started, as it is not overwhelming.

Other key features of TechSmith Capture include:

  • MP4 output format
  • Access to the TechSmith cloud services
  • Capture fullscreen and regional screenshots

TechSmith Capture

Save screenshots to your local drive, or copy and paste them into a document using cloud services like Screencast.

Kernel Security Check Failure: Definitive Guide to Fix

If you are reading this article, it means that you were unfortunate enough to get the Kernel Security Check Failure error.

Because this problem occurs while trying to install Windows 10, users end up panicking that their entire system is stuck.

Even more believe that it’s a virus trying to take over and while that is a potential cause, it’s not as simple as that. That being said, is Kernel Security Check failure a virus? The short answer is no, it is not.

Many other users who upgraded their operating system to Windows 10 have experienced the same issue. Indeed, the Windows 10 Kernel Security Check Failure occurs more frequently than you might think.

It’s one of the most common Windows install issues out there. So let’s see what triggers it in the first place.

What causes Kernel Security Check failure?

The Kernel Security Check Failure error can be caused by a variety of issues, including memory problems and virus infections.

But the most common reason is that the drivers you were using on the previous version of the OS are not compatible with Windows 10.

As a result, the OS gives you the Kernel Security Check Failure error message followed by the 0x000000139 error code.

Here are some specific situations in which the annoying Kernel Security Check Failure error often occurs:

  • Kernel Security Check Failure after sleep – This error may occur after waking your PC from sleep
  • Kernel Security Check Failure after RAM upgrade – Users report that this error message sometimes occurs after they insert a new RAM card
  • Kernel Security Check Failure when playing games – If you’re a gamer, you probably already encountered this error quite a few times.
  • Kernel Security Check Failure when using particular apps and programs – It seems that particular apps and programs are more prone to trigger this issue than others. For instance, Kernel Security Check failure is common in Photoshop.

How do I fix Kernel Security Check Failure?

1. Use a dedicated third-party repair tool

The Kernel Security Check Failure BSOD error is not to be reckoned with as it may be caused by a lot of possible issues, all covered in this guide.

However, before starting to tweak your system with a more complicated solution, you should try a dedicated solution that can help you solve this issue automatically.

2. Enable legacy advanced boot menu

  1. Restart your computer and insert a Windows 10 bootable media into the optical media drive. Find out how to create a bootable media)
  2. On the displayed Windows Setup box, click Next.
  3. On the next page, click on Repair your computer.
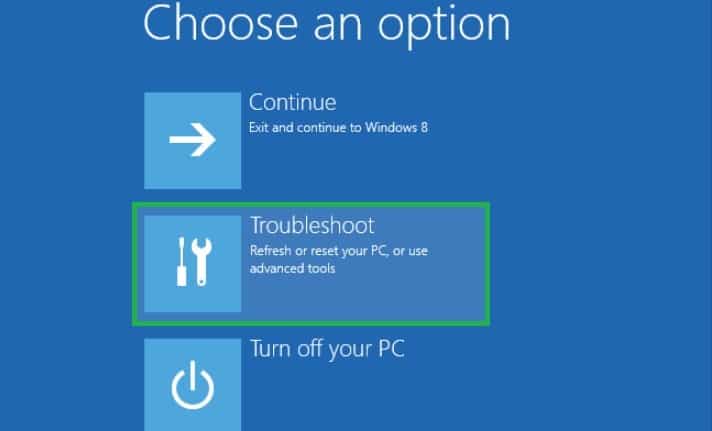
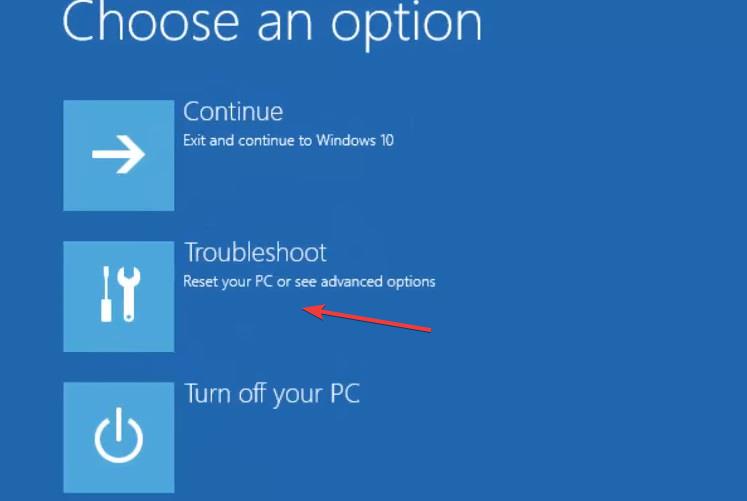
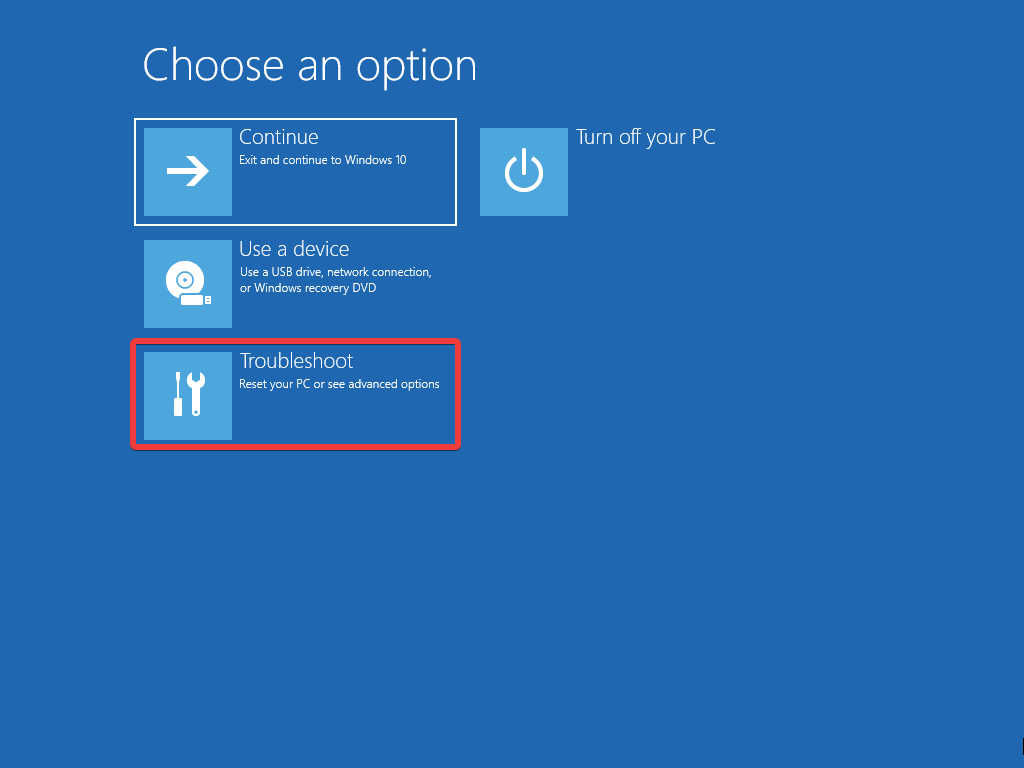
  4. On the Choose an option screen, click Troubleshoot.Kernel Security Check Failure
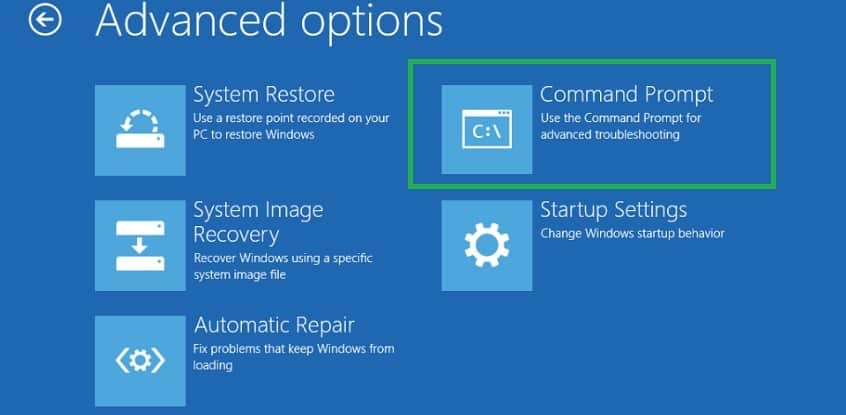
  5. Click on Advanced options.
  6. Now select Command Prompt.Kernel Security Check Failure fix error
  7. On the newly opened Command Prompt window, type C: and hit Enter.
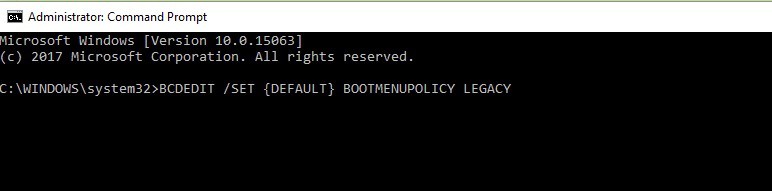
  8. Type the following command and press Enter to enable the legacy advanced boot menu: BCDEDIT /SET {DEFAULT} BOOTMENUPOLICY LEGACYKernel Security Check Failure fix
  9. Once the command executes successfully, type EXIT to close the Command Prompt window.
  10. Go back to the Choose an option screen, click Continue and start your computer normally.

3. Update and fix your drivers

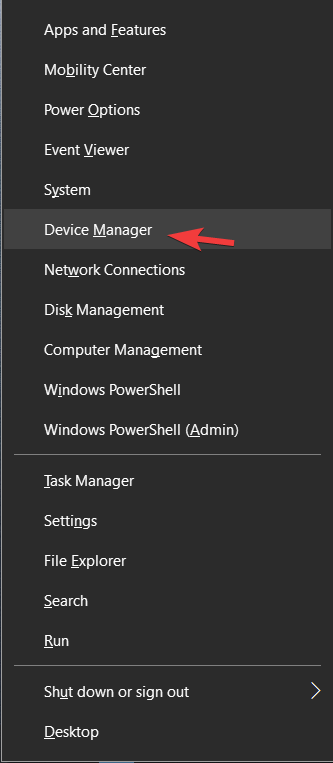
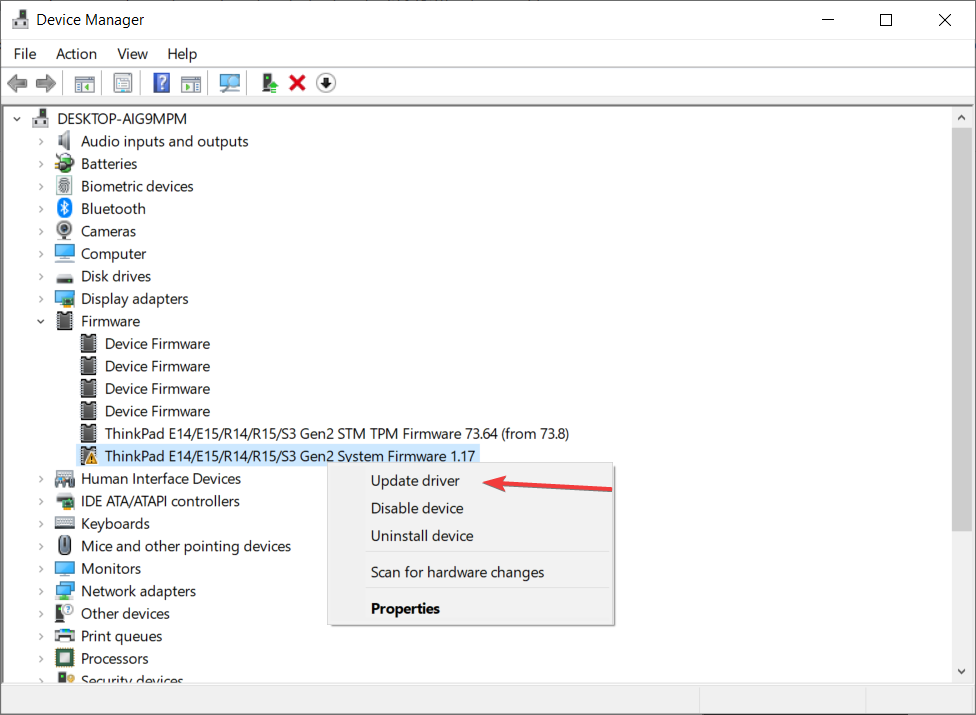
  1. Right-click the Start button and select Device Manager from the list.
  2. Click on a category of components to expand it.
  3. Right-click on the driver you want to update and select Update driver from the list.
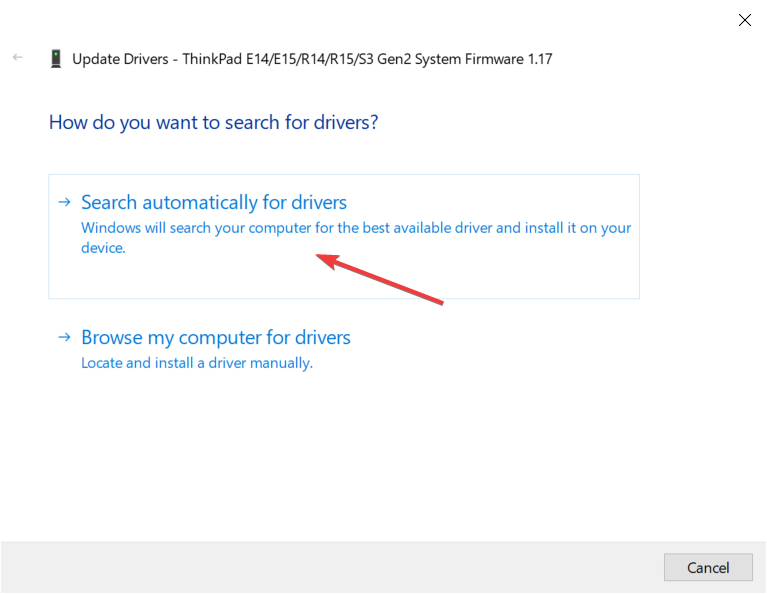
  4. In our case, we found a firmware with a yellow question mark on it so we addressed it with priority but you should try to update all drivers.
  5. In the next window, click on Search automatically for drivers.
  6. If the system will find an updated driver, it will install it and you will have to restart the system.

All the BSoD errors can be caused by missing or corrupted drivers so updating or replacing them might be the key to fixing the Kernel Security Check Failure error.

4. Use System File Checker and Memory Diagnostic

  1. 1. Go to Advanced Startup Options.

  2. 2. Tap on Troubleshoot.

    go to troubleshoot
  3. 3. Go to Advanced Options.

    click on advanced options
  4. 4. Click on Startup Settings.

    click on startup settings
  5. 5. Press the Restart button located on the lower right side of the screen. Your operating system should boot with the minimum system requirements.

  6. 6. Left-click the Search feature located on the taskbar and type cmd in it.

    search for cmd in the taskbar
  7. 7. Click on Run as administrator to open Command Prompt with full privileges.

    run command prompt as admin
  8. 8. Type the following command and hit Enter to run it: sfc /scannow

    use the sfc command
  9. 9. Wait until the scanning process completes, then type Exit and hit Enter.

  10. 10. Now it’s time to run the Windows Memory Diagnostic tool. To start off, click on the Search button in your taskbar.

  11. 11. Type memory, and select Run as administrator under the Windows Memory Diagnostic option.

    open windows memory diagnostic
  12. 12. Select Restart now and check for problems.

    restart now
  13. 13. After the reboot, the OS will automatically check your RAM and display the possible reasons why you got the Blue Screen of Death error.

  14. 14. Reboot your PC normally.

  15. 15. Check to see if the Kernel Security Check Failure BSOD error persists.

  16. Another fix for the Kernel Security Check Failure error is to perform an SFC scan and then run the Memory Diagnostic tool. These will scan your PC for errors and are likely to fix the problem.

5. Update your PC

  1. Click the Start button and then select the Settings option.
  2. Next, click on Update & Security.
  3. Click on the Check for updates button from the top-right.
  4. If there are any new updates you can install them, and you will have to restart your PC for the changes to take effect.

Make sure that you’re running the latest Windows OS updates on your machine. As a quick reminder, Microsoft constantly rolls out Windows updates to improve the system’s stability and fix various issues.

6. Scan your PC for viruses

  1. Go to Start, type security, and double click Windows Security to launch the tool.
  2. In the left-hand pane, select the shield icon.
  3. Click on Scan options.
  4. Check the Full scan option and click the Scan now button.

If the Windows Defender cannot remove the malware detected, the best option is to try out a third-party antivirus with a better detection rate.

Run a full system scan to detect and remove any virus or malware that potentially sneaks into your PC. Malware may cause various issues on your computer, including the Kernel Security Check Failure error.

7. Check your disk for errors

  1. Press the Windows key + X and select PowerShell (Admin) from the list of options.
  2. Type the following command and hit Enter to run it (Replace C with the letter of your hard drive partition): chkdsk C: /f
  3. As a quick reminder, if you do not use the /f parameter, chkdsk displays a message that the file needs to be fixed, but it does not fix any errors.
  4. To repair physical issues, run the /r parameter as well.

If the system is in use, you will be asked if you want to act as a restart. Press Y and then Enter, then restart your computer.

This process can be time-consuming. Depending on the hard drive’s memory, it can go between half an hour and two hours before it is done.

We also have a complete guide on how to repair hard drive errors so you can refer to it for more in-depth information.

8. Run your PC in Safe Mode

  1. Click the Start button on Windows and select the Settings app.
  2. Select Update & Security from the menu.
  3. Click on Recovery from the left pane, then select Restart now from the right.
  4. A list of options will appear. Select Troubleshoot.
  5. Next, select Advanced options.
  6. In the following window click Restart.
  7. After you enter Safe Mode, check if the problem persists.
Note icon NOTE
If the problem doesn’t occur in Safe Mode, an app or software is most likely behind it.

Enable your programs one by one to identify the culprit. Once you’ve done that, you can uninstall the problematic software.

If you don’t want to reset your computer, you can try to boot your computer in Safe Mode to identify if any apps or software are causing this problem.

The steps above showed you how to fix the Kernel Security Check Failure error message on your Windows 10 PC.

If there is a hardware failure of the HDD or the RAM in your device, you will most likely have to replace it with a new one.

9. Perform a System Restore

  1. Press Win Key + X and choose Settings from the menu.
  2. Select the Update & Security option.
  3. Now click on Recovery under the left pane and select the Get started button from the right.
  4. In the next window, choose Keep my files.
  5. Now you can either use the Cloud download or the Local reinstall options.
    • The first option, which we recommend, will reinstall Windows using a cloud download but it will use more than 4 GB of data so you need to have enough Internet data available.
    • The second will require you to have bootable media ready. Don’t worry, we have a helpful guide on how to create a Windows 10 bootable USB drive.
  6. Follow the on-screen instructions to complete the reset.

If the System Restore fails to extract the original copy, read our guide on what to do if the System Restore fails.

If the problem started recently after you installed new software on your computer, run System Restore. This tool helps you to remove recently added apps and programs.

Windows 10 offers a series of advanced recovery option that allows users to clean and install the OS. You can also use the Reset this PC recovery option.

10. Fix the Kernel Security Check Failure stop code on Windows 11

Now, you probably figured out by now that the error is by no means exclusive to Windows 10. So, what is kernel security check failure 11?

It’s the very same issue that has found a way to sneak into Microsoft’s newest OS as well. Don’t worry, we also have a solid guide on how to fix Kernel Security Check Failure on Windows 11.

10.1. Automatically diagnose your PC using the built-in recovery tool

  1. To open the System recovery page, click on Start, and while holding the Shift button pressed, choose Restart.
  2. Click on Troubleshoot.
  3. Choose Advanced Options.
  4. Select Startup Repair.
  5. Wait for Windows 11 to go through the process of diagnosing your PC.
  6. Depending on the results of the process, you will have Windows 11 boot normally, or you will see the following image.
  7. If you see the image presented above, move on to the next step.

10.2. Enable safe mode by using Startup Settings to recover files

  1. Press the Advanced options button from the screen.
  2. Choose Troubleshoot again.
  3. Choose Advanced Options again.
  4. Click on Startup Settings.
  5. Select Restart.
  6. Choose Safe Mode with Networking option by pressing the number 5 keypad.
  7. Your Windows desktop should look like this when booted into Safe Mode with Networking.
  8. Recover any files that you need and move on to the next step.

10.3. Uninstall any updates

  1. Click the Start button, hold the Shift key pressed, and click Restart.
  2. Click Troubleshoot.
  3. Select Advanced options.
  4. Choose Uninstall Updates.
  5. Choose if you want to uninstall the latest quality update (smaller update), or the latest feature update (bigger update).
  6. Press the Uninstall quality update button or the Uninstall feature update button, depending on your previous choice.
  7. Follow the on-screen instructions to complete the uninstallation process.

10.4. Restore your system

  1. Inside the Advanced Options menu, choose System Restore.
  2. Click Next.
  3. Select the most recently created restore point, and press Next.
  4. Click Finish.
  5. Confirm the action inside the pop-up.
  6. Wait for the system restore process to proceed.
  7. Click Restart when the process is completed.
  8. Windows 11 should boot normally now. Click the Close button and start using your PC.

If the System Restore didn’t manage to resolve the problem, then follow the next extra methods to ensure that this issue is resolved once and for all.

10.5. Run Command Prompt from the Advanced options menu

  1. Re-open the Recovery menu by choosing Start, holding down the Shift key, and choosing the Restart option.
  2. Choose Troubleshoot from the list.
  3. Click Advanced options.
  4. Select Command Prompt.
  5. Inside the Command Prompt window type the following command and press Enter: C:
  6. Type in the following command and press Enter to run it: dir
  7. You will see a result similar to the one in this image.
  8. Type the following command and press Enter to run it: cd \windows\system32\config
  9. Write the command and press Enter: md backup
  10. Type the following command and press Enter to activate it: copy *.* backup
  11. Write this command and run it by pressing Enter: cd regback
  12. Type the next command and press Enter: dir
  13. Write the following command and run it by pressing the Enter key: copy *.* ..
  14. Type A and press Enter to accept the changes.
  15. Close the Command prompt by clicking the X in the upper-right corner.
Note icon NOTE
The last command didn’t work in our case as we were using a Virtual Machine to perform these steps.

If this solution hasn’t resolved your problem, then the only method that remains is to try to reset your PC entirely.

10.6. Reset your PC

  1. Navigate back to the Recovery boot menu by clicking Start, holding Shift pressed, and clicking on Restart.
  2. Click Troubleshoot.
  3. Choose Reset this PC.
  4. Choose between the Keep my files and Remove everything options. We recommend going with the first one, as it would also keep the settings you couldn’t manually recover in the previous step.
  5. Choose Cloud download for an easier method, or choose Local reinstall if you have the Windows 11 installation disc downloaded.
  6. Follow the on-screen instructions and complete the reinstallation of your OS.

? How to prevent Kernel Security Check Failure in the future

BSOD or stop errors can cause a lot of stress and worry and even more so when it occurs after you update your system like the Kernel Security Check Failure.

The triggers are usually similar, so we can give you a few tips on how to avoid Kernel Security Check Failure and BSOD errors in general in the future.

➡ Keep your system and drivers updated

  • Windows Updates

An updated system will always work better, and it also enables you to use the latest security features, and patches released by Microsoft.

This ensures prolonged system stability and safety in the online environment. It is recommended that you check for updates as often as possible, and you can do so by following these simple steps:

  1. Press Win Key + X and choose Settings.
  2. Choose the Windows Update tab, and then click on Check for updates.
  3. Wait for the updates to be downloaded, and follow the on-screen instructions to restart your system so the updates can be applied.
  • Optional driver updates

Not all the drivers are updated automatically, most of them you will find within the View optional updates link from the Windows Updates settings menu.

To reach this menu, simply follow these steps:

  1. Press Win Key + X and choose Settings.
  2. Open the Windows Update section.
  3. Click the View optional updates link.
  4. Toggle the Driver updates section by clicking on it.
  5. Choose the optional drivers you want to install by ticking the respective boxes.
  6. Click Download and install.
  7. Wait for Windows Update to install the selected drivers.

➡ Clear your computer from junk programs and files

Uninstall unnecessary programs from your PC and run the Disk Cleanup tool from time to time because a clean system is less prone to errors and BSoDs.

Just type disk cleanup in Windows search and click on Disk Cleanup from the results to start it. Then select the category of files you want to delete and hit the OK button.

This is just a quick way of doing some internal cleaning but you can also delete the unused and old files manually by using File Explorer or you can use a dedicated cleaning software.

We encountered this issue in the office while we were trying to set up a network, so the steps described in this guide are the ones that helped us fix the issue.

If you have any additional questions regarding this subject, please don’t hesitate to write us in the comments section below and we will be happy to answer.

Explorer.exe Application Error: How to Fix it in 8 Steps

Explorer.exe error can occur at any time with some users stating that it shows up while shutting down their PCs. It is a system error, so it affects all Windows iterations, but it’s most often present on Windows 10 and Windows 11.

What is explorer.exe system warning?

Explorer.exe is a system error that pops up when your OS or critical files are corrupted. It can also be a sign of malware on you PC or related do memory issues.

There are various known causes for the explorer.exe application error. Below are some of the popular ones:

  • Outdated OS – Windows updates are crucial to the smooth running of your PC. If you are getting the explorer.exe error on shutdown or startup on Windows 10, the first thing to do is update your PC.
  • Presence of malware – At times, it might be a virus that is triggering the explorer.exe error. A deep virus scan will fix the error in this case.
  • Faulty system files – Another popular cause of this error is faulty system files. If the files need for the smooth running of Windows Explorer are broken, it is likely you get this error. You need to repair and restore the corrupted system files to solve this problem.
  • Problematic memory – Your RAM or hard disk can also the explorer.exe error Windows cannot access the specified device issue. To solve this, you need to use the Memory Diagnostic tool and run the CHKDSK command.

How do I fix explorer.exe error?

1. Update PC

  1. Press the Windows key + I to open the Settings app and select Update & Security.
    update and security explorer.exe error
  2. Click the Check for updates button.
    check for explorer.exe error
  3. Now, install the available updates and restart your PC.

If you are facing the explorer.exe error this file does not have an app associated with it or any other version of the error, it might be due to an outdated operating system.

Thus, it is recommended to always keep Windows 10 up-to-date.

2. Change the size of the virtual memory

  1. Open File Explorer, right-click on This PC, then select Properties.
    properties this pc
  2. Click Advanced System Settings.
    advanced system
  3. Choose the Advanced tab and click the Settings… button under the Performance section.
    advanced settings explorer.exe error
  4. Now, choose the Advanced tab and click the Change… button in the Virtual memory section.
    advanced change
  5. Uncheck the Automatically manage paging file size for all drives box and tick the radio button for Custom size.
    custom size
  6. Now, enter the Maximum size in MB. It is a good practice to keep the virtual memory x1.5 larger than your RAM memory.
  7. Click Set and then OK to apply the changes.
    set and ok explorer.exe error

Having your system manage the virtual paging file size automatically can lead to the explorer.exe error. Thus, the need to disable it and set the maximum size manually. Note that, you shouldn’t set the value to more than what your PC can manage.

Other processes can experience issues too, and we already covered nvwmi64.exe errors in a separate guide.

Other Windows processes can throw similar errors. If you encounter a filecoauth.exe application error, follow our dedicated fixes to restore stability.

3. Check the hard drive

  1. Press the Windows key + E to open File Explorer and right-click your system drive (most likely C:).
  2. Choose the Properties option.
    properties c drive
  3. Select the Tools tab at the top and click the Check button under the Error checking section.
    check tools
  4. Finally, click the Scan drive option.
    scan drive explorer.exe error

There’s a good chance your hard drive actually causes the explorer.exe system error. Most likely if it’s corrupted or not defragmented well. Running the Error Checking feature should tell you more about the issue and the possible fixes.

4. Run SFC and DISM scans

  1. Press the Windows key + S, type cmd, and select Run as administrator under Command Prompt.
    cmd admin
  2. Copy and paste the following command and press Enter: sfc/scannowsfc scan
  3. Wait for the process to finish. Whether the command is successful or not, type the command below and hit Enter: DISM.exe /Online /Cleanup-image /Restorehealthdism
  4. Wait for the process to finish.
  5. In case the DISM can’t obtain files online, insert a media installation and type the following command: DISM.exe /Online /Cleanup-Image /RestoreHealth /Source:C:RepairSourceWindows /LimitAccessdism limit
  6. Make sure to replace C:RepairSourceWindows path of your DVD or USB.
  7. Wait for the scan to complete and restart your computer.

If your hard disk is in a good condition, and you are still getting the explorer.exe application error, the problem might be down to corrupt system files.

Running the SFC scan should help you fix this easily. However, if the SFC scan fails, you can use DISM to run a deeper scan and fix the issue. It is also a good idea to run another SFC scan after DISM finishes.

Alternatively, to avoid the back and forth and uncertainty, you can use a specialized tool to handle the situation.

5. Disable the taskbar auto-hide

  1. Open the Settings app and select Personalization.
    personalization  explorer.exe error
  2. Click Taskbar in the left pane.
  3. Disable both Automatically hide the taskbar in desktop mode and Automatically hide the taskbar in tablet mode.
    taskbar
  4. Restart your computer.

Some users reported that having the taskbar auto-hide option enabled can cause the explorer.exe application error. So, the obvious solution, in this case, is to turn off the auto-hide option.

6. Run Memory Diagnostic Tool

  1. Press the Windows key + R, type mdsched.exe, and click OK.
    mdsched explorer.exe error
  2. Choose Restart now and check for problems (recommended) option.
    restart now
  3. Wait for the diagnosis to be complete and follow the recommendations.

The Memory Diagnostic Tool scans your system memory for any potential problems that can cause the explorer.exe error. It also gives recommendations, which allows you to take further action.

7. Perform a virus scan

  1. Press the Windows key, type virus, and select Virus & threat.
    virus
  2. Select Scan options.
    scan options
  3. Choose the Full Scan option and click the Scan now button.
    scan now

The explorer.exe error the group or resource is not issue can sometimes be triggered by a virus that is causing your PC to misbehave. While the Full Scan option might take hours to complete, it should help detect and eliminate hidden malware.

Better still, you can use a top-notch antivirus in ESET NOD32. This lightweight software runs a deep scan and removes even the most stubborn of viruses.

Whether online or offline, ESET NOD32 takes a no-nonsense stand against malware of any kind.

8. Restore the system to a healthier point

  1. Press the Windows key, type system restore, and select Create a restore point.
    type system
  2. Click the System Restore… button.
    system restore explorer.exe error
  3. Now, click the Next button when prompted.
    next button
  4. From here, choose your preferred restore point and click the Next button.
    restore point
  5. Finally, click the Finish button to confirm the action.
    finish explorer.exe error

If all fixes prove abortive in solving the explorer.exe application error, you might need to restore your PC to a point when the process was working well. Note that this will remove all the changes made to your PC since that time.

That would be all, we hope at least one of these solutions helped you solve the Explorer.exe Application Error.

In the same vein, if you are experiencing the explorer.exe high CPU usage issue, check our detailed guide for everything needed to fix it.

If you have any questions, comments, or suggestions, just reach out for the comments below.

How to Download and Install Bluetooth Drivers for Windows 11

Need to download and install Bluetooth drivers for Windows 11? Whether you’re setting up a new Bluetooth adapter or fixing a missing driver, getting the correct software is crucial for wireless connectivity. This guide will show you the easiest ways to download, install, or update your Windows 11 Bluetooth driver, for free and safely.

How can I download and install a Bluetooth driver for Windows 11?

1. Use Device Manager to download Windows 11 Bluetooth drivers

  1. 1. Right-click on the Start icon and choose Device Manager from the options

  2. 2. Now expand the Bluetooth section and right-click on the driver shown in order to choose Update driver.

    bluetooth-driver-update windows 11 bluetooth driver download
  3. 3. Next, select Search automatically for drivers.

    automatic-driver-search windows 11 bluetooth driver download
  4. 4. Click on the Select for updated drivers on Windows Update option.

    updates drivers-windows windows 11 bluetooth driver download
  5. 5. Navigate to Advanced options, followed by Optional updates. where you will find the Bluetooth driver ready for download

    advanced windows 11 bluetooth driver download
  6. 6. Check the box next to it then click on the Download & install button.

  7. The easiest way to install a Bluetooth driver on your Windows 11 device is via Device Manager and Windows Update. This way, you don’t need to browse the web for the driver, and the entire process is much faster.

Now the device should be ready and you can connect, share files, and more.

2. Download a Windows 11 Bluetooth driver from the manufacturer’s website

  1. First, you need to visit your motherboard manufacturer’s website. As an example, we will head to Lenovo’s page and click on PC to find our specific model.pc-lenovo windows 11 error kmode exception not handled
  2. Next, go to the Drivers & software section after entering your device model into the search bar.lenovo-drivers windows 11 error kmode exception not handled
  3. Search for the latest Bluetooth driver for your computer and click on it in order to download it.bluetooth-driver windows 11 bluetooth driver download

Once the file is downloaded to your computer, all you have to do is double-click on it and follow the on-screen steps in order to install the Windows 11 Bluetooth driver.

3. Use Windows Update (Beginner-Friendly)

Windows Update often includes the correct Bluetooth driver pack for Windows 11.

  • Press Windows + I to open Settings
  • Go to Windows Update > Check for updates
  • Install any optional updates related to Bluetooth or wireless adapters

4. Use Bluetooth installer software

An alternative to manually downloading the necessary Bluetooth driver on Windows 11, is to use a third-party tool that manages drivers.

Fortect Driver Updater, which is a lightweight software solution designed particularly for individuals who don’t want to waste time completing procedures such as the above, you can say goodbye to driver errors or downloads.

The software will take care of all your computer drivers automatically and ensure that you don’t encounter any issues regarding them.

⇒ Get Fortect Driver Updater

Troubleshooting Tips

If Bluetooth still doesn’t work:

  • Enable Bluetooth in Settings > Devices > Bluetooth & devices
  • Make sure Airplane mode is off
  • Reboot your system after installation
  • Try the Bluetooth troubleshooter (Settings > System > Troubleshoot)

FAQs

Where can I find a free Bluetooth download for Windows 11?

You can get Bluetooth drivers from Windows Update, your device manufacturer’s website, or third-party tools like Intel Driver Assistant, all free.

Can I install a Bluetooth driver without internet?

Yes, but you’ll need to first download the Bluetooth driver pack on another PC and transfer it via USB.

Is there a universal Bluetooth driver for Windows 11?

No, you need to match your driver to the Bluetooth chipset (e.g., Intel, Realtek, Broadcom). Some generic installers like “Bluetooth Driver Installer” may help in unknown cases.

What are the differences between Bluetooth and Bluetooth Low Energy?

Bluetooth Low Energy sends small packets of data over short periods thus saving energy, unlike the classic version that uses two-way continuous communication. As a result, Low Energy uses up to 100 times less energy.If interested, check out this guide to know how to increase Bluetooth range on Windows devices.

Summary

Was this guide useful? Did you manage to download and install a Bluetooth driver for Windows 11 using our solutions? Don’t hesitate to tell us in the comments section below as well as whether you have more methods in mind.

HEVC Video Extensions for Windows 11 [Install Guide]

HEVC or High-Efficiency Video Coding extension helps play videos on native Windows apps. But, these don’t come bundled with the OS, and you will have to separately install the HEVC extension in Windows 11.

A codec is basically anything that encodes or decodes signals. The HECV, also known as H.265, is the latest in the series. So if you tried playing a video on one of the built-in players in Windows 11 and were unable to do so, it’s likely that the HEVC extension is missing.

In the following sections, we will understand the need for these and the process to install the HEVC extension in Windows 11. We have included both, paid and the free method.

Do I need the HEVC Video Extension?

Most video streaming services and even iPhones use HEVC codecs. And if you don’t have it installed, playing videos shot on an iPhone won’t be possible. You will likely receive an error and it would seem as if the HEVC extension not working on Windows 11.

to play this video you need a new codec hevc
Unable to play videos in the absence of HEVC extensions

But here’s the catch! As discussed earlier, you will need these HEVC codecs only when playing videos on the apps that come bundled with Windows. However, there are a bunch of third-party media players that have the HEVC extension built in.

While installing the HEVC extension in Windows 11 is not absolutely necessary, you will need it for the native apps. You now know both options, and we leave it up to you to choose whether you want to purchase the extension or use a third-party video player.

In the next section, we have listed the methods you have available to install HEVC codecs for free or for a small fee.

How can I install HEVC codecs in Windows 11?

1. Purchase and install the HEVC Video Extension from Microsoft Store

  1. Press Windows + S to launch the Search menu, enter Microsoft Store in the text field at the top, and click on the relevant search result that appears.Launch Microsoft Store to fix hevc extension not working on windows 11
  2. Now, type HEVC Extension in the Microsoft Store search box, and hit Enter.Search for HEVC extensions
  3. Click on the HEVC Video Extensions search result.HEVC Video Extensions to fix hevc extension not working on windows 11
  4. Next, click on the option where the price is mentioned to get the codec. Do verify that the extension you are installing has been released by Microsoft Corporation since there is a bunch of other software with the same name and a similar thumbnail. Download to fix hevc extension not working on windows 11
  5. Complete the payment to download the HEVC extension in Windows 11.Complete payment

Once the payment process is complete, the HEVC extension will be installed on your Windows 11 system. And, from now on, you wouldn’t face any trouble when playing videos encoded with this particular extension.

2. Install the HEVC Video Extensions tool for free from MS Store

  1. 1. Open your preferred web browser.

  2. 2. Copy this into the browser’s address bar:ms-windows-store://pdp/?ProductId=9n4wgh0z6vhq

  3. 3. Press Enter. The Microsoft Store app will open, to an application called HEVC Video Extensions from Device Manufacturer.

  4. 4. Press on the Install button to add the codecs to your PC.

  5. 5. Click on Open and browse your PC for the file you want to open.

    open the free tool for hevc video extensions windows 11
  6. At the moment, there is a way to install HEVC Video Extensions for free on your Windows 11 device. You need to access the app’s page on Microsoft Store by url, or else it won’t open.

    In doing so, you will be able to install the manufacturer version of the app, which does not come with a price tag. Do keep in mind that this workaround is only for US users.

3. Download a video player with a built-in HEVC extension

Users earlier had to visit the VLC Media Player’s official website to get it. However, now you can easily download the VLC media player from the Microsoft Store. This makes the whole download and installation process a lot quicker and more seamless.

vlc app in microsoft store
Download VLC Media Player from Microsoft Store

Once you have gotten the VLC media player, there’s no need to separately install the HEVC extension in Windows 11, since these come along with the player. So start playing the videos you have always wanted without shelling out a single penny.

Apart from VLC, check out the other media players that let you play HEVC videos.

How can I install other codecs in Windows 11?

You now know how to install the HEVC extension in Windows 11, but what about the other codecs; what if you still encounter an error when playing audio or video? These won’t be necessary to most users, but you should at least know how to get them.

To find out, check our dedicated guide that lists out the various sources for downloading codecs in Windows 11. You don’t need to necessarily download them right away, but do bookmark the guide, in case you ever require them in the future.

These are all the ways you can install the HEVC extension in Windows 11, along with the other codecs. Once you have these, playing any type of video on your computer shouldn’t be a problem anymore. Also, check out the best video codec pack for all formats in Windows 11.

Tell us whether you purchased the HEVC extension or downloaded a third-party media player, in the comments section below.

Joe Belfiore, for many the face of Windows Phone, to retire

What do you say about Joe Belfiore? For many, he was the “face of Windows Phone,” so much so that’s exactly what Tom Warren at the Verge called him even as I was writing the very same thing. Belfiore wore a number of hats over his 32 year tenure at Microsoft, leading efforts in Windows Phone, Office, Edge, Windows 10 and Windows 10 apps, OneNote, and even Sets.

Belfiore announced today that he’s leaving the company, set to retire next summer to focus on his kids:

Belfiore’s ride with Windows Phone wasn’t always smooth, and in 2011, he infamously took to Channel 9 to “laugh off” issues with a belated update to the phone OS and took a lot of heat for it, so much so that he felt the need to publicly apologize.

Still, Belfiore was a beloved front man for Windows Phone (a tough job, to be sure), and we wish him all the best with whatever comes next.

7 Ways to Fix Projecting to This PC if It Keeps Disconnecting

If Projecting to This PC keeps disconnecting, don’t worry. This article will give you a clear insight into why it is happening and will also show you the ways to resolve this problem.

Basically, this feature allows another Windows or supported device to cast a screen to a Windows PC via a wireless network. If there is any problem, it can create a very annoying situation.

Why the Miracast on Windows 11 keeps disconnecting?

Miracast or Projecting to This PC may go through frequent disconnect issues due to the following reasons:

  • Poor Wi-Fi signal – If the Wi-Fi signal in your home is very weak, the host and remote PC will have difficulties in proper data exchange.
  • Outdated network components – If the network components you are using are extremely old or outdated, they may not work with many modern features like Miracast properly.
  • Outdated drivers – Outdated network and display drivers also can cause Projecting to This PC disconnecting issue.
  • PC’s internal problem – Frequent disconnecting issues also may indicate that your computer has some internal problems which need to be sorted out.

What can I do if Projecting to This PC keeps disconnecting on Windows 11?

Before trying the actual troubleshooting methods to solve frequent disconnect issues with the Projecting to This PC feature, do the following things:

  • Update Windows to the latest version.
  • Use a 5GHz Wi-Fi band if your router and PC support it.
  • Make sure you are not using a metered connection. Disable it if necessary.
  • If it is a laptop, make sure you are using high-performance mode.

After ensuring the above things, you can proceed to the methods featured below.

1. Update the network and display driver

  1. Open the Start Menu.
  2. Type Device Manager and press Enter.opening device manager windows 11
  3. Right-click on the Network driver and click on Update driver.updating network driver windows 11 device manager
  4. Choose the preferred method to update.
  5. Do the same for Display Adapter and other chipset drivers.

The Device Manager often fails to detect the latest update. Else, it is also a bit tricky and lengthy process to update using this built-in tool, especially when you want to update multiple drivers.

So, we suggest you use Outbyte Driver Updater. It can scan outdated and missing drivers and update or install them with just a single click. If configured, it also can do it automatically according to your own schedule.

Updating these drivers should solve the disconnecting problem with the Projecting to This PC feature. If not, follow the next methods.

Outbyte Driver Updater

Solve multiple occurring errors by letting Outbyte Driver Updater automatically update your device drivers.
Free Trial Download now

2. Change power management

  1. Open the Device Manager like before.
  2. Right-click on the Network adapter and go to its Properties.going network adapter properties device manager windows 11
  3. Go to the Power Management tab and uncheck Allow the computer to turn off this device to save power.
    disabling power management for network adapter windows 11
  4. Click on OK.

Now, your network device will work properly, and Windows won’t interfere to save power. As a result, some problems related to it may get fixed.

3. Run the network troubleshooter

  1. Press Win + I on the keyboard to open Settings.
  2. Go to System and click on Troubleshoot.going system and troubleshoot windows 11 settings
  3. Go to Other troubleshooters.going other troubleshooters win11
  4. Click on Run next to the Network adapter.running network troubleshooter win11
  5. Go forward and finish the steps.

If necessary, restart your PC. Then, see if it has fixed the Projecting to This PC disconnecting problem or not.

4. Reset the network

  1. Open Windows Settings like before.
  2. Go to Network & Internet and click on Advanced network settings.going advanced network settings win11
  3. Go to Network Reset.
  4. Click on Reset now.clicking reset now for network reset win11 settings
  5. Follow the on-screen steps to complete the process.

5. Tweak Unicast response

  1. Open the Start Menu, type local security policy, and hit Enter.
  2. Expand Windows Defender Firewall with Advanced Security and find Windows Defender Firewall with Advanced Security – Local Group Policy Object.
  3. Right-click on it and go to Properties.going windows defender firewall with advanced security local group policy properties
  4. Go to the Public Domain tab.
  5. Click on Customize next to Settings.
    clicking customize settings defender firewall advanced security properties
  6. Set Display Notification and Allow unicast response option to Yes.enabling unicast response windows 11
  7. Click on OK.
  8. Restart your PC.

6. Change network profile to private

  1. Go to Network & Internet from Windows Settings, as shown before.
  2. Go to WiFi or Ethernet, depending on the connection type you are using.
  3. Click on the connection you are using.
  4. Change it to Private if it is set to Public.setting a network to private windows 11
  5. Restart your PC.

7. Run the hardware troubleshooter

  1. Open the Start Menu, type cmd, and hit Enter.
  2. Type the following command and press Enter to open the Hardware troubleshooter: msdt.exe -id DeviceDiagnosticopening hardware troubleshooter using cmd
  3. Go forward and run it to solve your problem.

Hardware troubleshooter is not available in settings on modern Windows. So, that command prompt method is the only way right now. It is very helpful to fix problems with Miracast.

Ensuring a better Wi-Fi connection is also necessary in order to solve our problem. So, we suggest you check out these Wi-Fi routers if your current one is not that powerful.

These above methods will help you to get rid of Projecting to This PC keeps disconnecting issue on Windows. You will need to apply these methods on both the host and remote PC.

This isn’t the only issue you can encounter, and many reported that projecting to this PC is greyed out, but we tackled this issue in another guide.

If you have any other suggestions to solve this problem, you can let us know in the comment box.

6 Most Secure Video Conferencing Software [2026 List]

Many companies and users use video conferencing software in order to communicate. But if you want another level of privacy, you might be interested in the most secure video conferencing solutions.

These types of services usually have strong encryption, and in today’s guide, we’re going to show the best options for personal and business users.

How safe is video conferencing?

Video conferencing is usually safe, but there are several points to consider if you want to make it more secure:

  • End-to-end encryption – This is a must-have option for secure video calls. By using encryption, your calls can be viewed only by authorized participants.
  • Password protection – Make sure that all your conference calls are protected by a password. In the event that somebody randomly tries to access your call, he won’t be able to due to the lack of a password.
  • Meeting rooms – This feature allows you have participants in a separate room. By doing so, you can manually approve them and ensure that only trusted users can join the call.
  • Open-source – If an app is open-source, its code can be reviewed by an independent third-party. By doing so, you can know what type of encryption and type of data the software is collecting.
  • Vigilance – The most important aspect of security is user vigilance. To security issues, don’t share video call URLs online or access video calls on public unencrypted networks.

Now that we know what conditions must be met, let’s discover the most secure web conferencing tools below.

What is the most secure video conferencing software?

Zoho Meeting – Best encryption features

When it comes to secure communication, Zoho Meeting delivers the best standards while ensuring all the communication features you need.

This tool encrypts audio, video, and screen sharing to keep your information secure at all times.

Apart from that, you may lock the meetings to keep them completely private. You will be able to control who gets in, and as a host, you get a notification every time someone requests to enter.

Also, only the host can record a meeting and gets to decide whom to share it with afterward. And if you forget to lock the meeting and someone gets in, you can remove it right away.

Zoho Meeting has remote access capability during screen sharing but it asks for your permission before enabling this feature for another participant to your computer.

The solution has amazing interactive features. For instance, you can run audience polls, set up Q&A sessions, engage the attendees through the Raise Hand option, and many more.

Last but not least, this software offers integrations with a lot of other Zoho tools but also other major communication platforms such as Teams, Outlook, Gmail, and more.

Let’s review some of its key features:

  • Industry-standard voice, video, and data encryption
  • Record meetings safely and securely
  • Lock the meetings so you can strictly control who is allowed to attend
  • Screen and file-sharing capabilities
  • Advanced interactive features

Zoho Meeting

Lead your meetings in a safe environment, with encrypted communication and file transfer.
Free trial Visit website

ClickMeeting – Supports large-scale conferences

ClickMeeting is a secure video teleconference (svtc) service that aims to be very easy to set up and offers a wide range of advanced features for small businesses and midsize ones alike.

You don’t need to put in any extra effort to change the way you work with this communication software. ClickMeeting provides exceptional customization for however your organization functions.

In fact, it is one of the most inspiring choices for inter-team communication, remote work, distance learning, online video/audio meeting, and chatting with co-workers or teachers/students.

That’s why ClickMeeting is a competent video conferencing solution for businesses looking for a reliable tool to host video calls and not only.

Here are some significant features that ClickMeeting brings to the table:

  • Greater interaction with attendees via efficient live conferences
  • Four different Audio Modes to manage your webinar interactions even remotely
  • Extreme ease in sharing your desktop or interacting on the same document
  • Option to stream your events live on Facebook or YouTube
  • Can support up to 40 attendees in a single meeting

ClickMeeting

ClickMeeting is the most secure video conferencing software and you’ll love its services and tools.
Free trial Visit website

Microsoft Teams – Secure and reliable

Microsoft Teams also ticks all top feature boxes, especially if you’re looking for the most secure video conferencing service.

As always, it all starts with a team. You’ll notice the ease of use when working with this product right from the very start while creating a team and inviting people with whom you want to collaborate.

Convenience is Microsoft Teams’ very essence, so the fact that you can instantly go from group chat to video conference with the touch of a simple button might just be music to your ears.

Moreover, it provides incredible collaboration features for 1:1 online meetings, teams, or even live events with up to 10.000 people.

To find out more, we listed some of the included benefits below:

  • Teams calling, Phone System, Calling Plan, or Direct Routing for conference calls
  • Chats, shared Word docs, PowerPoint, and Excel files are all available in one single interface
  • Everything gets backed up to the cloud, for immediate access for all members
  • The option to blur backgrounds can help you with embarrassing situations during video calls
  • Fun options like live subtitles, gifs, emoticons, and stickers are all included

Microsoft Teams

You know the story: it all starts with a team, so make sure that video conferencing is safe and efficient.
Check price Get it now

Signal – Privacy-oriented

Open Whisper Systems is the developer that created this application called Signal. This app is one of the few in the world that is supported and trusted by the famous Edward Snowden.

Thanks to its incredible features and functionalities, Signal managed to become one of the most popular messaging apps with voice and video calling features among mobile device and desktop users.

This is an open-source program that allows anyone to check the implemented security features by simply auditing the code.

Signal does not put users through the hassle of dealing with ads, and the software is free, so it’s a secure video conferencing for therapists or other types of users.

Take a look at some of the leading features that are packed in Signal:

  • Send high-quality text, messages, video, voice, picture, and document messages throughout the world
  • End-to-end encrypted video conferencing that offers maximum privacy
  • Crystal clear video calls
  • The platform cannot see your calls so you can put your worries aside
  • Group chat feature that lets you communicate with multiple contacts

⇒ Get Signal now

Wire – Highly customizable conference settings

Wire is another excellent application for video and voice calls that was developed by Wire Swiss GmbH.

Using Wire, you will be able to enjoy end-to-end encrypted video conferences that will focus on your intimacy and security.

This is a free open-source application, and it enables all of its users to check out the security’s quality by auditing the app’s code.

Wire combines strong encryption processes with a massive set of useful features.

Here are some of the most exciting features that are packed into this app:

  • The ability for team admins to access and remove the chat history
  • You can use group chats with up to 128 people
  • Crystal clear video and audio calls with up to 50 people
  • Screen sharing
  • Self-destructing messages for maximum privacy

⇒ Get Wire now

Linphone – Free and open source

Linphone is an open-source SPI Phone service that also allows free voice-over IP. It’s available on desktop and mobile environments and web browsers.

Linphone supports ZRTP for end-to-end encrypted voice and video communication, and more great features are included in it.

Here are some of its key features:

  • Available on all desktop and mobile platforms
  • You can enjoy high-definition audio and video conferences with advanced calling features
  • Instant messaging, group chatting, and file sharing
  • End-to-end encryption for maximum privacy
  • Uses open standards such as SIP and RTP

⇒ Get Linphone now

These are the five tools for encrypted video conferencing that we picked because of their incredible and unique sets of features and thanks to their popularity and appreciation among users.

If you prefer texting over video calls, then visit our best encrypted messaging software article for more information.

What is your secure video conferencing software of choice? Let us know in the comments below.

PC Video Conferencing Software: Top 10 of 2026

Gone are the days when meetings used to be postponed, just because two or more members couldn’t make it due to geographical constraints.

Thanks to technology, we now use robust video conferencing software that allows people to interact and collaborate both in audio and video.

How does a video conferencing app help me?

Video conferencing software allows for a face-to-face chat even if the participants are located miles and miles away.

Real-time business meetings can be set up at any time by the use of video conferencing software and you can add as many people as you want.

The best video conferencing tools even allow you to share documents and files in real time with your participants.

This comes in handy especially when the essence of the meeting is to discuss the financial performance of the company or something that requires members’ approval.

Here at Windows Report, our goal is to keep you updated, so today we bring you the very best video conferencing tools that will give you and your team members an uninterrupted chat session.

Which are the best video conferencing tools?

Zoho Meeting – Best video conferencing

If you’re looking for the next level in video conferencing, Zoho Meeting is the solution you were looking for.

With this tool, you have all the possible communication features onto one cloud platform that is safely encrypted and secure.

For instance, you can present or allow anybody to present, share their own screen and even send files to the party seamlessly.

And if someone can’t attend the meeting for some reason, you can record and then share the whole thing to keep everyone up to speed.

Zoho Meeting also has other interactive features like polls, answering questions through Q&A, getting a Raise Hand response, and text chat anytime during the call.

And if the meeting happens to be a webinar after the presentation, you can extract reports on attendees, engagement, polls, and Q&As in XLS and CSV formats.

You may use Zoho Meeting as a stand-alone communication tool or integrate it with many other Zoho tools but also with Outlook, Teams, Gmail, and more.

Let’s review some of its best features below:

  • Screen and file sharing, voice, and video communication
  • Easy to use and access
  • Record and share meetings
  • Advanced interactive options like polls and Q&A
  • Get extensive meeting reports in XLS and CVS formats

Zoho Meeting

Take your video conferencing to the next level with file sharing and meeting reports!
Free trial Visit website

ClickMeeting – Good for webinars

ClickMeeting offers a lot of control geared toward improving your audio and visual experience in video conferencing. The program is very flexible and can host over 1000 attendees.

The interface is clean with a corporate feel, and it can be customized with a choice of background skins. You can also activate automatic features such as auto-recording, reminders, and thank-you emails for all participants.

It has amazing presentation features, and you can upload files either from your computer or Dropbox. There is a YouTube button for access to YouTube on the meeting dashboard.

It is populated with ClickMeeting how-to videos although you can also search for other videos right from the dashboard.

Let’s see some of its key features:

  • Can host up to 1000 attendees
  • Customizable background skins
  • Interactive presentation features
  • YouTube Integration

ClickMeeting

Host the most professional meeting using these great features.
Free trial Visit Website

Microsoft Teams – Ideal for team collaboration

With a name like Office 365 behind it, Microsoft Teams is the ultimate video conferencing solution that aims to create a unique collaboration and communication hub for teams.

Everything is easy to access, with no formal training required. You just need to be ready to manage your time and prioritize tasks better, while working as part of a team.

People may easily join meetings on the go with a global dial-in number or contact each other directly. All they need is a mobile device and Teams. One-on-one calls or group calls with audio-only or video are both supported.

More precisely, anyone in your Teams account can click your name, click the video icon, and call you. If you aren’t available at the time of the call, then the caller can leave a voicemail-like message.

Another key advantage is that using Teams doesn’t mean you need to forget all about the other tools you normally use. Teams can integrate with a long list of other Microsoft Office apps.

For scheduling calls, Microsoft Teams has some tools and integrations with Outlook not found in other team chat apps. You can schedule a video call in advance, for example, and get an alert before it starts. You may even schedule recurring calls if you’d like.

Some other handy features include scheduling assistance, meeting recording, meeting note-taking, or presentations with up to 10.000 attendees inside or outside the organization.

Support for likes, gifs, emoticons, live subtitles, and live link previews is also ready to lighten up your long, working day.

Take a look at its best features:

  • Seamless integration with Office 365
  • Great compatibility with other Microsoft products
  • Can host up to 10.000 attendees
  • Scheduling assistance, meeting recording, meeting note-taking, or presentations
  • One-on-one calls or group calls with audio-only or video

⇒ Get Microsoft Teams (for Business)

ooVoo – Great for friends meetings

video_conferencing_software_oovoo

Great interface and simplicity of use are what sets this video conferencing software apart from its competitors. But it’s not just about the looks; ooVoo has some amazing features to offer.

For instance, it can record video conferences and store up to 1000 minutes. This ensures that even those who missed the meeting have first-hand information about the meeting proceedings.

It can also come in handy when team members want to jog their memory on the matters that arose in the previous meetings.

ooVoo allows up to 12 participants to video conference which is generous by market standards. The program is available for Windows, Mac, iOS, and Android devices, so you can even chat with friends on the go.

Here are some of its most important perks:

  • Record up to 1000 minutes of meeting
  • Simple and efficient interface
  • Works on Windows, Mac, iOS, and Android devices
  • Up to 12 participants

⇒ Get ooVoo

WebEx Meetings – Great for professional video calls

WebEx video conferencing software

Developed by Cisco, WebEx Meetings delivers some of the best video conferencing services. The product allows you to add up to 100 participants in video calls.

It has garnered some very positive user reviews due to the ease of use and the top-notch features it brings on board.

For instance, it has some of the best collaborative document management tools, screen sharing, messaging, and efficient remote control.

WebEx has garnered a huge market share and it now powers over 20 million meetings per month.

Pricing starts at $24 per month for up to 8 people per meeting, and various plans are available so you can choose the plan that suits your business needs.

⇒ Get WebEx Meetings

GoToMeeting – Good for recording the meetings

video_conferencing_software_gotomeeting

Available for Windows, Mac, Android, and iOS, GoToMeeting is a robust video conferencing software that allows for up to 100 participants.

However, only 6 can video conference at a time. It has some amazing features that put it ahead of the competition.

For instance, you can video record the meeting proceedings to further upload them to a website or YouTube.

It also has amazing screen-sharing features and powerful commenting options. GoToMeeting boasts of 3 million users per month and top-rated customer support.

There is a free version that allows up to 3 participants but if you want more participants, the paid plan starts at $19 per month.

⇒ Get GoToMeeting

MegaMeeting – Good for large organizations

Being a web-based video conferencing software, MegaMeeting is limited only to your imagination.

More and more companies are now using it to host internet meetings, demonstrate products and services, conduct staff training, and build relationships with remote clients.

It provides unlimited video conferencing services and up to 16 people can participate in the video conference at a time.

It gives you the freedom to control what you see. You can adjust the video quality and customize how many frames per second are seen.

Sharing features are also available and you can share your presentations with all the attendees in a convenient way. The Web and videoconference plans start at $39 per month.

⇒ Get MegaMeeting

Skype – Seamless integration in Windows

Skype is not only the most popular video chat tool; it is trusted by millions of people from all across the world.

While most people use it for socializing and catching up with friends and families, Skype does have a business offering that is affordable and reliable.

There is a group call feature that provides excellent video conferencing services, but you’ll need to have Skype for Business installed.

The good thing about it is that only the host needs to sign up for the Skype for Business version. You can add up to 250 participants for video meetings, even if they are not on the Skype for Business version.

Skype for Business works well with Microsoft Office. It allows users to schedule meetings in Outlook and start conversations from apps like PowerPoint and Word.

All conversations are secured by strong encryption. Skype also allows for file sharing which makes it an effective collaboration tool.

⇒ Get Skype for Business

Paltalk – Ideal for social interaction

Paltalk is a multi-purpose platform anyone can use for different needs, like making group video calls to discuss any subject or even meeting new people online. 

With 100 million downloads, this free app guarantees productive video conferencing if you need it for business purposes. Also, public chat is a specific feature of this tool that allows anyone to join the conversation virtually. 

However, you can use it to meet online with your friends or colleagues separately from public online chat rooms. So by the press of a button, you can catch up with family or friends with a very intuitive platform. 

In terms of features, you should enjoy 5000+ video cams, stickers and clip arts, media integration, and cross-platform accessibility. (Windows, Mac, Kindle, iOS, or Android)  

In addition to that, you can conveniently download this software for free and use it like your video calling app.

⇒ Get Paltalk

When buying video conferencing software, it is important to consider the price as well as ease of use and meeting features.

The best video conferencing software should strike a good balance between price and features.

Again, if the interface is difficult to use for you and the attendees, then it will bog down progress in the meeting which will eventually be more of a frustration.

In each of the above reviews, we highlight the best tools that will make your online meetings a success. We hope that you’ll find this information useful. Feel free to comment and share.

Fix: Windows Audio Drivers Are Not Working on Steam Deck

When you are playing a game on Steam Deck, you need to make sure that your Windows audio drivers are working properly. If they are not working, then you will not be able to hear any sound from the game.

Windows audio drivers play a very important role when it comes to playing games on Steam Deck. One of the biggest problems facing gamers today is poor performance. The audio drivers may be damaged but let’s have a look at how to solve it.

Why are Windows audio drivers not working on Steam Deck?

There are times when you see that your Windows audio drivers are not working on your Steam Deck. This can be due to many reasons:

  • Incorrect driver update – If you are having trouble with Steam Deck, it is likely because your audio drivers are not installed correctly.
  • Outdated BIOS – If you are using an older version of Windows, there is a good chance that your BIOS is outdated and needs to be updated. 
  • Conflicting software – There are a lot of programs that can conflict with Steam Deck, including antivirus software, system utilities, and other audio-related applications.
  • Incompatible drivers – If your Windows audio drivers are not working on Steam Deck, it could be because the drivers do not work with your operating system.
  • Driver conflicts – Sometimes, multiple drivers can be loaded into memory at the same time. 
  • Corrupted files – Corrupted files can cause problems with your audio drivers as well as other software applications on your PC.

How can I fix Windows audio drivers if they are not working on Steam Deck?

Before you go through the technical solutions, there are a few things that you need to check and verify:

  • Make sure that your hardware is compatible with Steam.
  • Close all other applications that may be running on your system at the moment.
  • Check whether all your hardware devices are properly plugged into the correct port on your PC. Sometimes, the audio jack may be damaged.
  • Disconnect all external devices from your computer, including external speakers and headphones/headsets. 

1. Update drivers from the manufacturer’s site 

If you have updated your audio drivers in the past but they still don’t work properly, then try updating them again but this time from the manufacturer’s website rather than the Device Manager in Windows. You’ll find the Steam deck APU drivers with the latest update date.

The reason for this is that sometimes the driver that comes pre-installed on your system might not be up-to-date or compatible with newer versions of Windows. Updating from the manufacturer’s site ensures it is the correct and updated driver.

If you don’t want to do this manually, then you should give a try to a professional tool that can do the work for you.

Outbyte Driver Updater has your back in this kind of situation, it scans your PC in a thorough manner for outdated or missing drivers and then searches its database to locate the newest and correct version for each one.

Outbyte Driver Updater

Choose this great program for automatic driver updates and boost your PC’s health state.
Free Trial Download now

2. Uninstall and reinstall audio drivers

  1. Click on the Windows button type Device Manager in the search bar and click Open.
  2. Navigate to Sound, video, and game controllers to expand, right-click on your sound card and select Uninstall device.uninstall audio driver
  3. Restart Windows after uninstalling the driver.

If you’ve recently updated your computer’s graphics card or motherboard, it’s possible that Windows is still using old drivers. You can also check out our guide on the best way to reinstall your audio driver.

3. Run the audio troubleshooter

  1. Click on the Windows button and select Settings.settings windows 11
  2. Select System then click on Troubleshoot.going system and troubleshoot windows 11 settings
  3. Click on Other troubleshooters.going other troubleshooters win11
  4. Hit the Run button next to Playing Audio.playing-audio game audio stops working

An audio troubleshooter is a built-in tool for Windows that helps users to troubleshoot various issues related to audio devices like speakers and sound card. Once the troubleshooter is up, it will analyze your system and fix any issues related to audio devices.

4. Update your OS

  1. Hit the Windows key and select Settings.settings windows 11
  2. Click on Windows update, then select Check for updates.check-updates-w11 windows 11 blue screen
  3. Download and install if any are available.

The reason for updating Windows is that older versions do not support some of the newer features found in Steam Deck.

5. Uninstall and reinstall Steam Deck

Uninstalling and reinstalling Steam Deck will remove any corrupted files or registry entries that may be causing problems with your audio drivers.

Once you reinstall, all traces of previous installations will have disappeared and will hopefully allow the program to run smoothly again. 

Now that you have managed to fix your audio issues, perhaps you need more recommendations for unlimited enjoyment. We have a list of some of the best Steam Deck games to play so don’t get left out.

Users have also complained about issues where Steam Deck is unable to reach the Steam servers but we have discussed the fixes in our detailed guide.

Let us know of any other issues you may be facing in the comments section below.

5 Best Antivirus for Oculus Quest 2 to Enjoy VR Risk-Free

For passionate gamers always looking for the next big thing, Oculus Quest 2 is quite the promised land. This Facebook-owned VR headset redefines the depths of immersion through an innovative combination of lightweight design and larger-than-life internal specs that can propel you straight into another universe.

The prospect of such an exhilarating adventure is enticing enough for most of us, not to mention the flexible architecture that allows you to use it as a standalone headset (au revoir, cables!) or pair it with Oculus-compatible VR software and rock Virtual Reality on your PC.

It is one of the best VR headsets for gaming, after all, so versatility is a must to make potential buyers fall head over in heels in love with it.

From wireless streaming to desktop pairing through Oculus Link, augmented reality-ready APIs, and phone/Chromecast-ready device VR casting, anything is possible as long as you have the Oculus app and a Wifi connection.

But Oculus Quest 2 is not unanimously praised and criticism or at least skepticism has risen occasionally not just in connection with its controversial requirement for users to sign in via a valid Facebook account.

Security is also a reason for concern and using antivirus for Oculus Quest 2 is more and more of an appealing perspective for security-aware users. So are these worries justified? Let’s find out together.

Does Oculus Quest 2 have virus protection?

Similar to Xbox (another powerful gadget with which gamers have an ongoing love affair), Oculus Quest 2 relies on a closed environment with downloads strictly controlled by proprietary security technologies.

In other words, you can only install programs and apps from the Oculus Store and they only get there once vetted reliable, and trustworthy by the Oculus quality department.

But as it’s often the case, practice and theory don’t always meet eye to eye and there are ways to elude security checks and install unverified software. This applies to Oculus Quest 2 just as much as it concerns Microsoft-owned consoles, hence the need to deploy a robust antivirus for Xbox One.

Then, there is also the built-in Oculus browser that you can use to surf the Web. Needless to say, browsing online without protection is a bit (or should we say a lot) like opening Pandora’s box.

You unknowingly open a portal and invite nastiness to come in and prowl on whatever gaming vulnerabilities can be exploited. And there is no shortage of those.

Now, Oculus developers are constantly trying to downplay the importance of deploying antivirus software for their VR headset, claiming that there is simply no need to burden the system for no reason at all.

Don’t worry, we will dig deeper into it later on, but for now, here’s what you need to remember. Does Oculus Quest 2 have antivirus? No. Can the Oculus Quest get viruses? Yes.

Can Quest 2 give you viruses?

1. Unofficial APKs and sideloading

We know that Oculus Store is the sole official source to download verified and authorized software on your VR device. However, you can still sideload APKs. And it’s a treacherous capability.

While the Developer Mode can be beneficial for particular cases such as allowing you to install a VPN even if Oculus does not have native support for this tool, you can just as easily land on pirated, counterfeit, and malware-infected apps.

Furthermore, installing software that is not originally intended for Oculus implies removing default security. Since apps no longer have to undergo Oculus’s scrutiny, you have no means to control the installed files or the app’s access.

Unknown, unofficial, or otherwise sketchy download sources remain the biggest causes of infection even if there is not yet evidence of widespread virus replications on Oculus devices.

2. Browser-targeted attacks

From Pandora to Achilles, you’re in for quite a Greek ride! Another prolific source of infection, the Oculus-built browser is the perfect embodiment of a digital Achilles’ heel.

And we’re not talking about downloading pirated games or mods on purpose. Sometimes, all it takes is an uninspired or hasty click to redirect you to malevolent or otherwise dangerous websites.

From email attachments to pop-ups and in-browser messaging, there are countless methods to lure unsuspecting users with advanced phishing or social engineering-based fraudulent techniques.

For what is worth, you don’t even have to download anything to open the door to havoc. Fileless attacks are on the rise, not no mention malware exploiting vulnerabilities in browsers that can infiltrate a legitimate file or program without you installing or running it.

3. Increasing popularity

While they don’t exactly play by the book, hackers are and always have been ROI-conscious. If until recently, VR equipment was simply not a big enough prey to chase, you should know that the digital landscape is shifting.

Virtual Reality decentralization is no longer a distant dream, but a tangible objective. An increasing audience means that Oculus Quest 2 devices steadily grow into more attractive targets for profitability-driven hackers.

This unprecedented popularity boost is a strong enough incentive that stimulates hackers to design Android-specific vermin and exploit whatever vulnerabilities they can find in your VR headset.

4. VR-specific vulnerabilities

Speaking about vulnerabilities, VR opens an entirely new world of possibilities for hacking prowess to stand out. We did a bit of digging and found out that a research team from the University of New Haven conducted an intriguing experiment.

The young scientists deliberately infected a PC with email-attached malware in order to observe the security mechanisms that Oculus deploys when dealing with a compromised device.

It turns out there are numerous vulnerabilities that need urgent addressing and that the popular Oculus Quest 2 is as prone to exploits as a computerized product can be.

Can Oculus sensors be hacked? That’s a strong YES since researchers were able to manipulate the digital boundaries and physically expand them.

Here’s another interesting question: Can VR cameras be hacked? Once again, it’s a YES with the same group of researchers being able to hack Oculus cameras and alter visual parameters with ease.

To conclude, sensors, cameras, displays, and even system boundaries are hackable, which is one more reason for you to deploy an antivirus for Oculus Quest 2 without delay.

How do I protect my Oculus Quest 2?

Oculus Quest 2 runs on an Android-based OS and just like smartphones, it can contract malware. It seems that security-aware users have a problem with the lack of specific virus protection on their VR headset and this is what drove us to come up with a suitable antivirus selection.

Since many users rely on their Virtual Reality-ready helmet to browse the Web, installing a good antivirus for Oculus Quest 2 not only makes sense, but it’s a must.

We know that reluctance to this idea is still widespread and we would like to address some of the most common concerns for your peace of mind.

Tip icon Tip
Here’s how we chose the best antivirus for your Oculus VR headset:

➡ Cross-platform compatibility (You need an antivirus that can crush malware across multiple platforms including Android and iOS.)
➡ Modular infrastructure that can easily adapt to your specifications without triggering software conflicts, incompatibility, and interferences with other security or system components (Antiviruses that block Oculus content downloading or updating are users’ worst nightmare. If you’re already struggling, here’s how to get rid of problems with Oculus software updates.)
➡ Low impact on resources and computing power (A significant percentage of users are reluctant to deploy adequate security because they dread their gameplay will be impacted by prejudiced performance. It’s time to demystify this legend, so find out once and for all if antiviruses really slow down gaming.)
➡ Automatic updates to keep emergent threats in check
➡ Beware of security software that hides bloatware, adware and is susceptible to selling your data to third parties (This usually happens with free tools, but it’s not an exclusive condition.)
➡ High detection rates and close-to-perfect accuracy (Check out the false positive rates as well.)

TotalAV

  • Protects the PC and phone you pair with your Quest 2
  • Real-time malware and ransomware protection
  • WebShield blocks phishing and malicious sites
  • Android app covers your phone
  • One licence for Windows, Mac, Android and iOS
  • There is no app for the headset itself.

TotalAV is a simple, lightweight antivirus with real-time protection, WebShield browsing protection and built-in clean-up tools. One licence covers Windows, Mac, Android and iOS.


Bitdefender Total Security

  • Anti-Theft and App Lock capabilities
  • Comprehensive performance optimization suite
  • Advanced on-access and on-demand scans
  • Dedicated Work, Game and Movie profiles
  • Advanced web protection system
  • Bitdefender VPN traffic is capped at 200 MB per device.

Everybody’s darling, la crème de la crème of cybersecurity or simply, Bitdefender could not have missed from our selection for obvious reasons.

With unmatched prowess when it comes to fighting malware and a delicate approach implying minimal resource consumption, Bitdefender is the expert security solution that stays light on your system.

And this goes for all the platforms, from Windows and macOS, to iOS and of course, Android.

Bitdefender is the proud owner of the best detection rates in the industry, closely followed by its instant neutralization capabilities.
But it also shines when it comes to post-virus-removal remediation as well as proactive defense thanks to its state-of-the-art AI-based technology.

With staggering precision, Bitdefender can repel both new and emergent threats and sniff fraudulent behavior from miles away while still managing to improve your device’s overall performance through dedicated profiles, adaptive technologies that perfectly match your specs, security settings optimization, vulnerabilities assessment, and more.

While the Autopilot mode scrutinizes your smartphone for signs of weakness, the Battery & Performance Saver will take care of your battery life so that you can continue to enjoy uncompromised speed and performance on your Android device.

Yes, device is the key term since you can protect your smartphone as well as your smartwatch with this amazing security program.

Similar to ESET, Bitdefender Total Security also boasts App Lock (activated via PIN code or fingerprint) and Anti-Theft to help you locate, lock, remotely contact the finder, or delete the contents on your Android device in case of alienation.

Meanwhile, its powerful scans and comprehensive Web protection module will instantly notify you in case you approach harmful websites or install apps that pose any danger.


AVG Internet Security

  • Webcam monitor and data shredder
  • Smart firewall and Wi-Fi Guard
  • Malicious link and PUA scanner + toolbar remover
  • Password and ransomware protection
  • Web defense (including fake website shield)
  • There is no traffic encryption module included.

AVG Internet Security simplifies cybersecurity for you and it does it with an amazing suite that can safeguard all your assets with just one single subscription.

Flexible and user-focused, this best antivirus for Oculus Quest 2 caters to Android, Windows, Mac, and iOS and we simply cannot get enough of its simplified defense strategy that will make your life easy (and secure, of course).

AVG’s dashboard lays everything neatly and transparently before you, letting you know right from the start that its defense relies on 5 major pillars to cover every single aspect of your digital life: Device Protection, Web & Email Protection, Hacker Attacks Protection, Privacy Protection, and Payments Protection.
Its world-class real-world vetted protection combines advanced antivirus engines with heuristics and AI detection to swiftly identify and block out viruses, malware, ransomware, spyware, fake websites, malicious links, dangerous email attachments, and even PUA.

Your network is not forsaken either. AVG’s comprehensive defense toolset also includes an enhanced and fully customizable firewall, Wifi Guard, and sophisticated anti-hacking tools to stop fraud attempts right on their track.
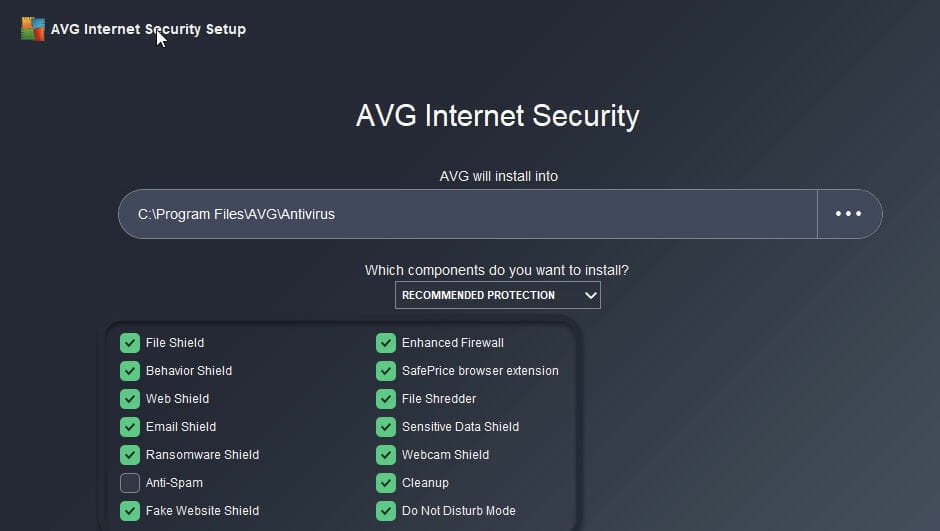
An additional layer of protection then steps in to secure your webcam against intrusion while the built-in data shredder removes sensitive files to prevent unauthorized retrieval.


Norton 360 for Gamers

  • Advanced protection against gaming-targeted exploits
  • Intrusion detection system
  • Built-in VPN and firewall for complete privacy
  • Dark Web Monitoring
  • Norton Optimizer, Cloud Backup, and SafeCam are only available on Windows.

The good old Norton has done it again! It managed to surprise us with a fresh antivirus catering exclusively to gamers and we could not be more impressed.

We’re talking about Norton 360 for Gamers, of course, the very best antivirus for Oculus Quest 2, and pretty much any gaming device you fancy.
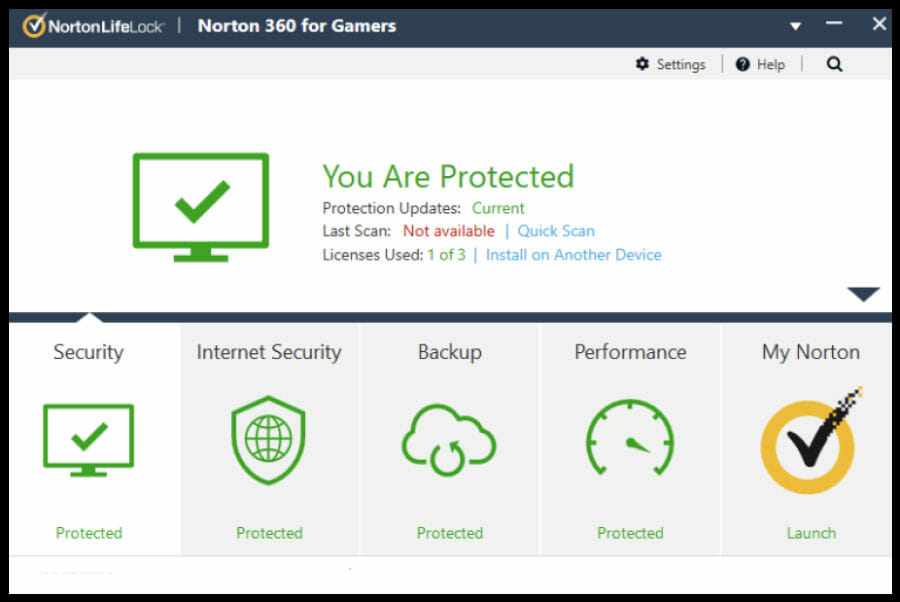
Norton understands that gamers are an entirely different breed of users with special protection needs and high expectations when it comes to performance and speed. And it’s up for the challenge.

360 for Gamers is one antivirus designed by gamers for gamers and it manages to deliver iron-cast defense against DDoS attacks, network-targeted exploits, gaming assets theft, snooping, and more while making sure you keep your leverage in the competition and never miss a framerate.

With this awesome security program on your team, you can be sure your road to victory is paved and we’re not talking about just good intentions. We’re talking serious, battle-grade defensive mechanisms for your gaming information, accounts, devices, tags, and assets.
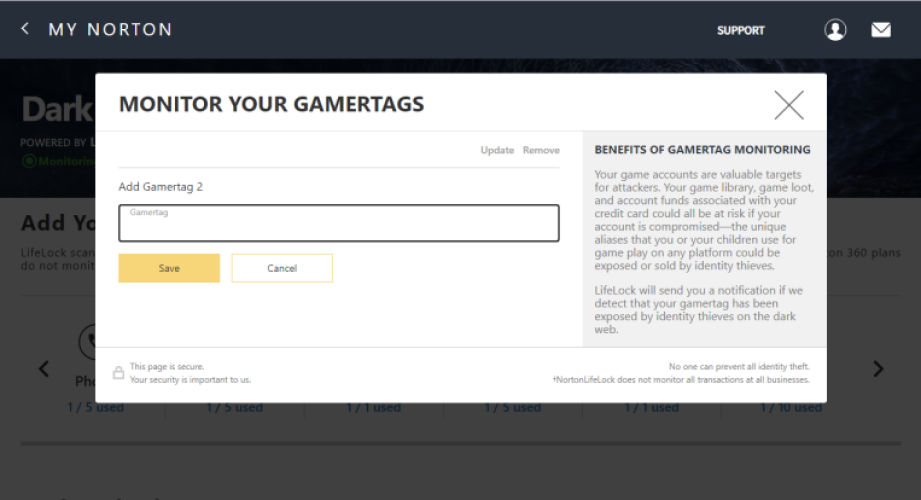
The Dark Web Monitoring feature will keep an eye on your personal information as well as gamer tags, usernames, and email addresses associated with your gaming accounts.

More privacy-focused tools come to the rescue including a secure no-log VPN to repel DDoS attacks, webcam protection for safe streaming, anti-phishing, and proactive exploit protection to block fraudulent websites and zero-day attacks.

The Game Optimizer feature will quickly identify resource-intensive processes and put them on hold in order to pump power where it matters the most, your gameplay.

The same goes for non-essential system functions. By optimizing your CPU, Norton makes sure you encounter no lag, drag, or drowsiness, just smooth graphics and a snappy FPS to propel you straight into the first position.


Malwarebytes Premium

  • Intelligent defense against any types of ransomware attacks
  • Security Advisor to see you protection in real time
  • Intuitive user interface with complete control over cutomization
  • Brains over brute force to block hackers
  • Free option but with significantly less security features

If smooth, secure, and ultra-fast gameplay is on your mind, you will certainly appreciate a specialized antivirus with a dedicated Gaming Mode and Booster.

Malwarebytes Premium is the pinnacle and we’re pretty sure its amazing capacities will knock you off your feet.

Here’s why! First of all, its signature-based detection gets a well-deserved boost.

In come the top guards including intelligent defense, real-time malware and spyware detection, and expert guidance from the Security Advisor to keep you safe against the most complex threats, online as well as offline.

Multi-layered protection is important, but it does not mean much by itself for performance-focused gamers that often refuse to deploy any kind of defense for fear of hindering their FPS.

This best antivirus for Oculus Quest 2 relates to your concerns and it retaliates accordingly. To begin with, virus signature updates are taken from your device to reduce the pressure on your system’s resources.
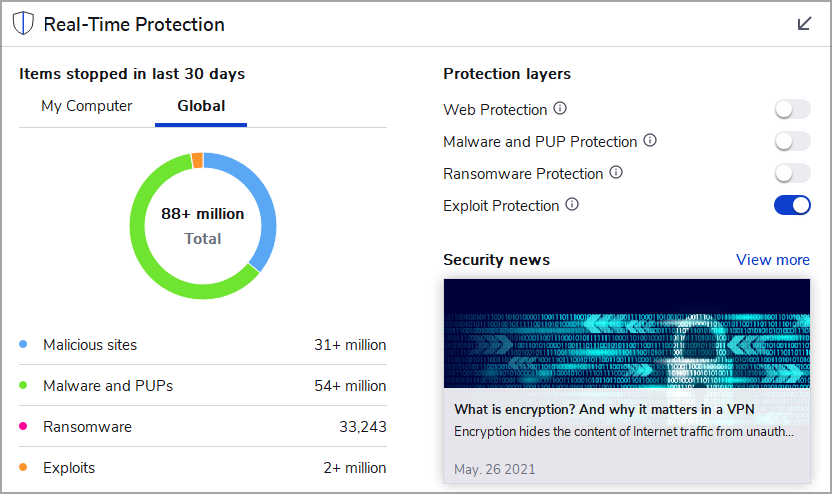
Meanwhile, the built-in vulnerability scanner supervises security settings across all your devices to make sure you are up to date, up to speed, and up for the challenges in your gameplay.

Finally, the enhanced firewall further optimizes performance and is fine-tuned to use less computing power.

Whatever your preferred weapon of choice and by weapon we mean OS, Malwarebytes has your back across Windows, macOS, and Android.

If you choose to deploy it on the latter, you can expect even more advanced tools designed to keep your smartphone safe.


Any antivirus for Oculus Quest 2 from this list should provide the right amount of security for you to fully indulge in immersion, free of any risk. Why not take a chance and not leave anything at all to chance?

Antivirus Blocking Camera: 8 Ways to Fix

Is your antivirus blocking your computer camera? It’s probably an attempt to protect your privacy. However, some security software also block legitimate apps.

Today we’ll show you how to tweak strict security settings, update camera drivers, and other tricks that will stop your antivirus from blocking camera.

How can I fix the antivirus blocking camera issues?

1. Check Windows Privacy settings

  1. Open the Settings app.
  2. Click on Privacy & security.
  3. On the right pane, select Camera.
  4. Lastly, toggle on the switch to grant camera access.
    antivirus blocking camera

2. Update camera drivers

  1. Type device manager in the Start bar and open it.device manager start bar
  2. Locate the Cameras section and expand it (click on the little arrow > on the left).cameras in device manager
  3. Right-click on your camera and select Update driver.update camera driver
  4. Select Search automatically for camera drivers.search automatically for camera drivers
  5. If a new driver is available, follow thee on-screen prompts to complete the installation. If you already have the latest drivers, Windows will let you know.

Alternatively, if you need to manage your drivers or Windows can’t find new camera drivers, consider using an automated driver updater like Fortect’s.

This tool scans your PC for missing or outdated drivers and installs them automatically. It’s often faster than Device Manager, which can have delays between driver release and availability.

→ Get Fortect Driver Updater

3. ESET HOME Security Essential

  1. Launch ESET to open the main program window.
  2. Click Setup, and select Select Network protection.
    antivirus blocking camera
  3. Click the slider bar next to Firewall.
  4. Select Pause until reboot and click Apply. This will pause the ESET firewall till you restart your PC.

ESET is a PC protection company operating for about two decades. It helps to keep threats at bay and offers excellent protection against malicious websites.

ESET HOME Security Essential

Enjoy a wide variety of tools and features that protect you from malware with ESET HOME Security Essential.
Free Trial Visit Website

4. Bitdefender Internet Security

  1. Open the main Bitdefender user interface.
  2. Click on the Privacy icon on the left side of the main window.
    antivirus blocking camera
  3. Under the Video & Audio Protection option, click on Settings.
  4. Select the Settings menu.
    antivirus blocking camera
  5. Lastly, toggle off Webcam protection.

Bitdefender is pre-installed with a built-in feature designed to secure your camera app. And this feature can be configured so that you can decide which apps can use it and which cannot.

⇒ Get Bitdefender Internet Security

5. Kaspersky Internet Security

  1. Open the Kaspersky user interface.
  2. Go to Settings.
  3. Click on the Additional section, then select Threats and exclusions.
    antivirus blocking camera
  4. Now click on Specify trusted applications.
    antivirus blocking camera
  5. Finally, add your camera to this list.

Like Bitdefender, Kaspersky will automatically block certain apps and software from accessing your camera.

While this is a good thing as it can protect your identity, in some situations, you might have to add an exclusion for a specific tool or for the webcam app itself.

⇒ Get Kaspersky Internet Security

6. Avast Free Antivirus

  1. Open the Avast program.
  2. Click the menu at the top right.
  3. Click on Settings.
    antivirus blocking camera
  4. Select Exceptions, then the ADD EXCEPTIONS button.
  5. Finally, it would help to input the computer’s IP with the camera.

In most situations, this antivirus program will successfully secure your computer against malware attacks or similar other malicious and infected files.

Sometimes you have to manually introduce the IP address of your camera in the ignored addresses field to be sure that you can enjoy its functionality.

⇒ Get Avast Free Antivirus

7. Norton 360

  1. Open the AV interface and navigate to the Settings tab, then click SafeCam.
  1. In the SafeCam settings window, move the SafeCam feature switch to Off/On.
  1. Lastly, click Apply, and then click Close.

With Norton’s SafeCam feature enabled, untrusted sources cannot access and capture images or videos and send them outside of your PC to compromise your privacy.

⇒ Get Norton 360

8. Windows Defender

  1. Open Windows Defender.
  2. Select Virus & threat protection.
  3. Go to Virus & threat protection settings and click Add or remove exclusions.
  4. Finally, complete the required forms, add your camera path, and save your changes.

This will stop Windows Defender from blocking the camera.

Summary

The guidelines above should help you add exclusions for the webcam or camera app. Of course, similar steps can be applied to other antivirus programs too.

Don’t forget that the first thing to do when noticing that the camera/webcam isn’t running or cannot be accessed is to reinstall the associated drivers.

Sometimes your antivirus can be responsible for the Camera reserved by another app error, so ensure that it doesn’t interfere with your webcam in any way.

If specific errors are received, don’t hesitate and share all these details with us by accessing the comments section below.

Games Crashing After Installing New RAM: Fix it in 5 Steps

Users reported that games keep crashing after adding new RAM. This usually occurs when trying to run high-speed DDR RAM.

Installing the memory component on an unseated module or CPU overclocking can also be responsible for games crashing.

Solving this issue is not complicated, and this guide will show some of the best options to try. Take a closer look right away and forget all about Fortnite crashes/game crashes after installing new RAM.

Can new RAM cause games to crash?

It can and it does. The reasons your games keep crashing after the RAM upgrade is diverse and numerous. Below, we will explore the common causes:

  • Outdated BIOS – If your BIOS is not up-to-date, it can cause your games to crash the RAM. To get back the optimal performance, you need to go to the BIOS manufacturer’s website to install the latest version.
  • Wrong RAM installation slots – Sometimes, the PC keeps freezing after installing new RAM issue can be because you have inserted the RAMs in the wrong slots. This is common on PCs with 4 slots. You need to check the motherboard documentation to know the pair slots to use.
  • Bad RAM – At times, the issue might not be all that technical. It might just be bad RAM from the two causing game crashes. You can download Memtest86 to check for issues with the memory.
  • Outdated chipset driver – When your chipset drivers are outdated, it can also lead to this issue. Updating the drivers should help solve the problem here.

How can I fix games crashing after installing new RAM?

Before applying the fixes in this section, there are some basic checks that might save you stress and time. Below are some of the preliminary checks you should perform:

  • Check the motherboard documentation for the correct allocation of slots and swap the DIMMs around.
  • Verify that the RAM is not faulty.
  • Ensure they are properly seated.

1. Adjust your XMP profile

  1. Access BIOS.
  2. Look for an option named Extreme Memory Profile (X.M.P) or something related.
  3. Activate the XMP option and choose a profile. 
Note icon NOTE
The link from step 1 can help to adjust your XMP profile for any version of your operating system.

2. Improve your PC’s power plan

  1. Open Control Panel.
  2. Switch to View by Category, then select Hardware & Sound.
  3. Go to Power Options.
  4. Choose to Create a power plan, from the left side.
  5. Checkmark the High-performance option and add a name to your plan.
  6. Click on the Next button, adjust your settings, then select Create.

3. Downclock the RAM

  1. 1. Open BIOS.

  2. 2. Locate the Overclocking settings, then look for the Memory settings.

    go to overclocking settings
  3. 3. From there, look for the DRAM Timing Mode.

  4. 4. Go to Advanced DRAM Configuration.

    advanced dram configuration
  5. 5. This will take you to another screen where you’ll be able to manually input the values for the Memory Timings.

  6. 6. Go back to the previous menu and look for DRAM Voltage.

  7. 7. The Auto setting will be displayed, and you’ll need to change this to your specific value.

  8. 8. Finally, look for the DRAM Frequency, click on the drop-down list, then choose the correct speed for your RAM.

    dram frequency
  9. 9. Save your settings and restart your PC.

  10. Games crashing after installing a new RAM memory is an issue that’s likely to be solved by downclocking your RAM. This can be done via BIOS on any PC.

4. Update your BIOS

Your system’s BIOS is responsible for recognizing and initiating all of your system’s hardware. BIOS updates will enable your motherboard to correctly identify new hardware, such as RAM.

To simply update the BIOS, you can also visit your motherboard manufacturer’s website.

There, you’ll be able to find some useful instructions on how to verify your activated version and some tools you can use to keep your BIOS up to date in proper conditions.

5. Update your chipset drivers

  1. Press the Windows key + X and select Device Manager.
    device manager
  2. Click the arrow next to System devices and right-click each of the drivers there.
  3. Select Update driver.
    update driver
  4. Choose Search automatically for drivers and install any available updates.
    search auto games crashing after installing new ram

Chipset drivers are responsible for controlling the communication between various components of your PC, such as the video card or the system memory.

Thus, it is important to make sure that they are up to date – especially if you are experiencing game crashes after adding new RAM but also if your games simply keep crashing on Windows for no apparent reason.

The support of a specialized tool is one of the most popular methods that will help to update your drivers. This kind of software will automatically scan and download all the right drivers for your system.

Plus, with specialized software, you won’t have to worry about drivers going out of date anymore since you can set up automatic scans that will notify you if that happens

⇒ Get Fortect Driver Updater

So there it is! A full guide that will surely help you prevent games from crashing after adding RAM.

If you still notice any game-related trouble, don’t hesitate to check a complete article about how to fix your PC if it keeps crashing while gaming.

Feel free to share your thoughts, so comment in the section below and let us know the method that worked in your case too.

How to Fix Error 0x80072f8f 0x20000 in Windows 7

Error 0x80072f8f 0x20000 in Windows 7 is a common error that occurs when you try to upgrade your OS. This error can appear in any version of Windows 7 and other Microsoft operating systems.

Although the error also occurs in other later operating systems, Windows 7 is more at risk because Microsoft stopped issuing security updates. This means the operating system is at risk and as such, you will need software to fix most of the errors.

Why I’m I getting the error 0x80072f8f 0x20000 in Windows 7

If you are seeing this error message, then it means that the installation of a program has failed. This could be due to one of the following reasons:

  • Compatibility issues – The program is not compatible with your Windows version.
  • Permission settings – Note that the permissions settings on the file/folder or registry entry might be incorrect.
  • The antivirus or firewall is blocking the installation process – In this case, you may have to disable the antivirus temporarily.
  • The file/folder or registry key is missing or damaged – If that’s the cause in your case, you may need a registry cleaner to get rid of such issues.
  • Modified files – Keep in mind that this has nothing to do with you, but the program might have modified its own files by mistake during installation.

How can I fix error 0x80072F8F in Windows 7?

Before jumping into the more technical solutions, check the following things first:

  • Ensure that the date and time of your computer are set correctly. You may have to sync your time with the Microsoft server.
  • Run the Media Creation Tool with administrative privileges.
  • Disconnect your internet connection while updating.
  • Ensure your drivers are up-to-date.

1. Uninstall conflicting apps

  1. Click on the Start icon or press the Windows key to launch the Start menu, and then select Control Panel from the options on the right.
  2. Locate Programs and click on Uninstall a program. 
  3. Now, select the program you want to remove, and then click Uninstall at the top.

Usually, if this problem started after installing an app, it would be best to uninstall it. The main issue is usually a conflict in software or downloading from unverified sources. To prevent such instances in the future, we recommend you equip your system with an antivirus program.

Antivirus programs can easily detect any corrupt files and stop them before they have the potential to cause any further damage.

TotalAV is one of the best antivirus programs because it can run smart scans and effectively protect your device against all types of threats so your PC can never be at risk.

⇒ Get TotalAV

2. Scan for viruses

  1. Click on the Start icon, search for Microsoft Security Essentials, and click on the relevant search result.
  2. Now, select Full scan from Scan options.
  3. Finally, click on Scan now and wait for the scan to complete.

Given that Windows 7 doesn’t get critical security updates from Microsoft anymore, it is more susceptible to malware attacks. This necessitates a virus removal program for your device to work extra at detecting threats.

3. Start the critical services

  1. Press Windows + R to launch the Run command dialog box, type services.msc in the text field, and either click OK or Enter to launch the Services app.
  2. Locate and double-click on the Background Intelligence Transfer Service (BITS) to launch its Properties.
  3. Now, click on the Startup type dropdown menu, and select Automatic from the list of options.
  4. Next, click on the Start button under Service status, if it’s not running, and then click on OK to save the changes.
  5. Make similar changes to Application Identity, Cryptographic, and Windows Update service.

Critical services are important to the operation of your PC. If you stop or disable these critical services, it can cause your Windows to stop working properly. Nevertheless, there are some critical services you can disable that won’t affect your PC’s performance.

4. Perform a clean boot

  1. Hit the Start icon, type msconfig and press Enter.
  2. Navigate to the Services tab, check the box for Hide all Microsoft services then click Disable all.
  3. Go back and click on the Startup tab, select Disable all then click OK.

The clean boot allows you to restart your PC with only the essential services so that if a third-party program is causing the error, you will be able to single it out.

5. Force the update

  1. Hit the Start icon, type cmd, and select Run as administrator.
  2. Type this command and press Enter: wuauclt.exe /updatenow

The wuauclt.exe command is a tool used to check for Windows Update and install any pending updates that are available. You can also use it to repair Windows Update components.

You may also run into an error where the Media creation tool does not have enough space so be sure to check out our article on how to fix it.

Should you face any other issues such as Windows 7 won’t upgrade to Windows 10, we also address various fixes in our detailed guide.

That’s all for this article and hopefully, you have found a fix for this error. Let us know which solution worked for you in the comments section below.

10 Best WBS Software for PC [2023 Guide]

WBS aka work breakdown structure is a detailed tree structure of various tasks and deliverables that need to be performed in order to complete a project.

WBS is the foundation of project planning alongside Gantt charts. These two tools are probably the most common project management instruments.

How can WBS and Gantt chart software help me?
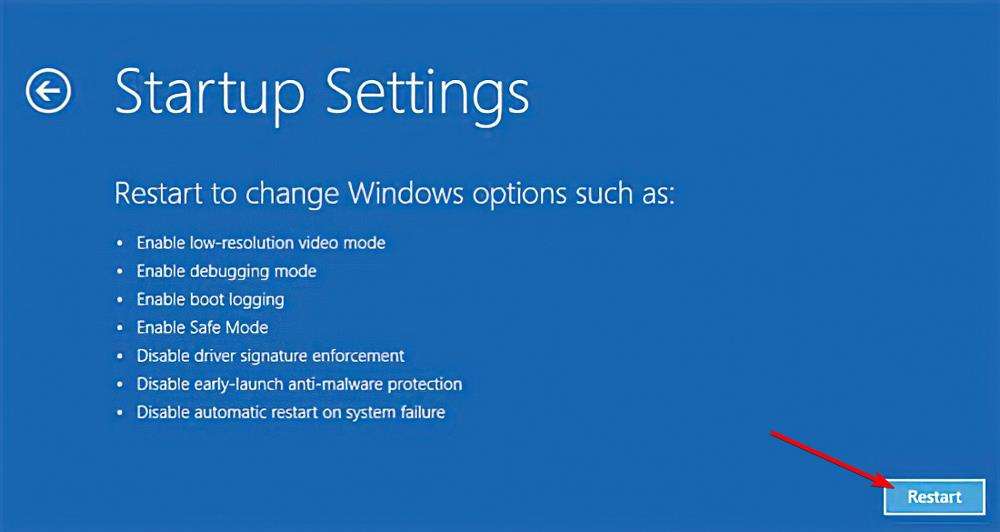
Nowadays, you have every tool possible for project planning and management, from timekeeping and clock-punching to communication platforms Gantt charts, and expense tracking.

All lead to a better understanding and handling of any project in order to manage your budget and resources to finish the job within your scheduled deadline.

Here are five of the best tools for creating WBS and Gantt charts together with their sets of features.

What are the best tools to create WBS and Gantt charts?

Monday.com – Best overall

To ensure reaching the goals and targets, Monday.com provides smart Gantt charts to enable visual tracking in real-time of all important data. Team communication and coordination will be improved and everyone will be kept focused and informed about what matters.

Future goals and targets are better planned on a roadmap like a Gantt chart. Simple to follow, it’s critical to secure the success of your company. Monday.com provides all the tools needed to make planning ahead look like a piece of cake.

Gantt charts are a new way of viewing the road ahead, simple to understand by anyone. With this feature, you can skip some of those long and boring PowerPoint presentations. By having all your data in one single place, you’ll have a better overview of your business.

All this is made possible by Monday.com, along with plenty of features that we want you to discover by yourself, only to help your company increase its value. Also, it has a mobile app to let you do all this from anywhere.

Here are some other good features:

  • Dashboards for an easy way to run reports from a high-level overview to the very last detail
  • Integrations with apps like Slack, Microsoft Teams, Outlook, Dropbox, etc.
  • Automations that save time on repetitive tasks
  • Gantt charts are prepared to help you plan, execute and track all types of projects by using a visual and flexible platform.
  • Handle any workflow and smooth it out with an easy setup
  • Collaboration available in real-time, documents that contain real-time updated data, and connections between data and documents across platforms
  • One collaborative space to manage and share all files

Monday.com

Your companion when it comes to efficient planning and smart Gantt charts.

Zoho Projects – Seamless project management

If you want to use WBS and Gantt charts to their maximum potential, Zoho Projects is one of the top project management tools on the market.

Don’t worry, you don’t need to download anything because this is a cloud-based app that can be accessed from anywhere with any browser-able device.

Although project management is a complicated job, with the intuitive UI from Zoho Projects, everything falls into place a lot easier.

Thanks to its drag-and-drop function, rescheduling tasks and setting up dependencies only takes a few clicks in the Gantt charts.

Talking about the Gantt charts, they are easy to edit, color code everything, delete, adjust time lags between tasks, and a lot more.

That’s why the built-in Gantt chart maker makes it simple for you to track all the processes and any possible problem just pops out.

With Zoho Projects, you can monitor many projects simultaneously and save the templates you create to use them on future projects.

The solution has time-tracking and project management features but you may also integrate it with other products from Zoho but also Microsoft and Google apps that you may already use.

Let’s review some of its best features:

  • Cloud-based dashboard available from anywhere in the world on any device
  • Built-in Gantt chart maker
  • End-to-end project and task automation
  • Color coding for tasks, teams, projects, and more
  • Notifications and collaboration features
  • Time tracking for everything there is to track, from work to time spent on projects and billable hours, all centralized in one place.

Zoho Projects

Get your projects done in time with a built-in Gantt chart maker and lots of other WBS features!
Check Price Visit Website

ClickUp – Most business-wise capabilities

ClickUp is an all-project management solution. It contains features that allow you to manage practically every area of a business. It does not have, for example, native accounting management but you can integrate accounting software.

Gantt charts are an essential tool within ClickUp making goals easier to view and reach. Also by using this feature, you will have a better view of how tasks are finalized, track the progress of projects and keep everyone on the right track.

With a friendly interface, affordable, and lots of templates to choose from, ClickUp is a great solution for business monitoring and goal tracking. Rather than getting entangled in a few large projects, ClickUp’s hierarchical structure, or WBS, allows you to access your complete workflow in one spot. 

ClickUp also provides excellent customer support to assist you in determining how to work on your tasks more efficiently and successfully.

To get things done, check out its features to discover if it suits your needs:

  • 1000+ app integrations for time tracking, cloud storage, calendar, and more
  • Organize your action items into projects, spaces, lists, and tasks
  • Gantt charts, Calendars, and other tools can be added with documents, discussions, reminders, spreadsheets, and embeds
  • Automatically accomplish tasks, conditions, and processes
  • Build for any type of company in any domain, no matter the size

ClickUp

Gantt charts are one of the many ways to improve productivity and efficiency when using ClickUp.

Smartsheets – Best for creating spreadsheet roadmaps

Smartsheets is a cloud-based software that provides award-winning work management features to your business. This will make roadmap planning, task completion, and project management seem like a walk in the park.

Smartsheets provide Gantt charts, one of the best ways to visualize progress inside the company, whether it’s a project, tasks or just an overview for reaching goals.

And since detailed reports are a powerful way to communicate insights, now you can get reports from multiple sheets at the same time.

Understand better how your assets are performing, distribute them, and do smart research across a variety of other assets metadata and taxonomy.

All the company’s data will be updated in real-time on every doc and sheet, for everyone to see. Informed employees will perform better under stress or deadlines, and by building amazing Gantt charts to view the progress better they will know what needs to be done next.

Smartsheets also has some other key features such as:

  • Smart reminders, fast task assignments, specialized platforms for communication, and much more
  • Simple and powerful workflow automation in a matter of minutes
  • Plan, manage and review content
  • Control center for all automation, goals, progress tracking, and much more
  • Integration support

Smartsheet

Modern work management with smart Gantt charts for having the best overview of the business.
Free Trial Visit Website

GanttPro – Best for Gantt charts

GanntPro is an online program that will allow you to draw Gantt charts for different types of projects. This tool is created for real performances and its users got 45% time-saving while planning the project and 70% fewer missed deadlines. Impressive, huh?

This is not its only strong point – you will also be able to manage the team more efficiently so they could have more productive results and it is managed to cut off project management expenses where this can be done.

If you want to see if somebody is underperforming or has too many tasks, you can monitor that from your management dashboard.

Gantt Pro has many other useful features to discover but you need to try it for yourself. Check it out after getting a free version from its website.

All you have to do is to try it and learn the basics as GanttPro is user-friendly and you can do a lot of stuff while knowing the most simple manipulations.

Here are some key features:

  • Drag-and-drop simplicity
  • Delegate different projects and tasks
  • Prioritize tasks functions
  • Set durations and dependencies
  • Create separate and distinct workplaces for teams
  • Easy resource and cost management

GanttPro

Plan your project to fruition with seamless Gantt charts and task prioritization features.
Check price Visit website

Edraw Project – Great for project tracking and management

Edraw Project is an ideal project management tool recommended if you want to quickly create your very own customized Gantt charts with simply mouse clicking or data file generation. 

You can master the present progress with Edraw Project by using the timeline and multi-angle reports, allowing you to provide appropriate answers to various difficulties more rapidly.

After you start a task, you may follow its progress with a progress bar that displays the task’s completion percentage on the taskbar. Normally, you may manually record the completion percentage by using the mouse. If the Auto Progress option is enabled, the progress meter will be automatically updated each day.

The software can help you deliver high-quality work on time by scheduling all of your projects in one place, assigning resources to tasks, tracking the progress to optimize the team’s time usage, and managing the budget.

Furthermore, you can make the most of your team’s time by enjoying an incredibly easy interface and various managing and tracking functionalities. 

Here are some other key features of this software:

  • Convenient drag-and-drop functionality
  • It generates reports to capture specific project information in summary views
  • Easily set, change, or measure progress for all tasks and subtasks on your projects
  • It links tasks to create dependencies so that all tasks can update at the same time
  • It provides quick export to MS Office files and other files
  • Successfully tracks costs involving a system of standard or overtime rates

⇒ Get Edraw Project

Edraw Max Breakdown Structure Software – Most types of uses

Edraw Max provides a really innovative approach to creating, editing and modifying WBS diagrams graphically. It comes with lots of cutting-edge tools for advanced drawings.

Work Breakdown Structures (WBS) are quite useful when it comes to understanding the budget and resources required for your project, and when you are unsure where your project stands, you may refer to the WBS to obtain a clear picture.

WBS may serve as a roadmap for your industry’s technical side, allowing teams to see the development phases and get a sense of how the project is progressing.

Edraw Max is ideal not only for professional-looking flowcharts, mind maps, and organizational charts but also for network diagrams, floor plans, fashion designs, electrical diagrams, ULM diagrams, and more.

Check out the most important functionalities that are included in this tool:

  • Create WBS effortlessly
  • High-level and detailed display of all your projects
  • Present an unlimited number of fields
  • Automatically increase the size of the WBS chart
  • Save the WBS chart to various formats, and they can be any size and contain any number of tasks

 ⇒ Get Edraw Max

WBS Schedule Pro – Best for block schemes

This is a Project Management software with WBS charts for planning, and network charts for scheduling. You will be able to find all the necessary tools to manage and plan your projects.

Use a Network Chart to plan and manage projects by linking activities to establish dependencies and define the Critical Path. The click-and-drag method makes it simple to arrange the activities in your project.

WBS Schedule Pro is fully integrated with Microsoft Project. WBS Schedule Pro may be used as a front-end planning tool for Microsoft Project or to generate charts from existing Microsoft Project plans.

Discover how simple it is to plan your most complicated projects utilizing a Top-Down strategy. Only then will you be able to identify the activities that are critical to completing your project on time.

Take a look at the most important functionalities that come packed in this tool:

  • Use the UBS chart to brainstorm projects by breaking them down into manageable pieces
  • Top Down approach to create projects
  • Define the dependencies in your project easily
  • Click and drag to create links
  • The Gantt Charts are really easy to use, and they’re loaded with features

⇒ Get Web Schedule Pro

MindView WBS Software – Best for work breakdown

This is a full-features WBS Software with robust Project Management functionalities included.

MindView produces mind maps that can be used in presentations, reports, websites, and other applications. It is ideal for usage by individuals, small teams, and big organizations.

Mind Maps can be tiny and basic, like the one above depicting a work breakdown structure, or huge and complicated. MindView is an excellent and adaptable concept development tool, with a wide range of export choices to Microsoft Office programs such as Microsoft Project, HTML, and other formats.

To develop a Work Breakdown Structure, begin with the end product in its whole and work your way down to increasing degrees of detail.

MindView is perfect for this since it allows you to rapidly enter items and then organize them into a structure that is appropriate for your project. When you change your mind, it is simple to reorganize your valuables.

Check out the best features that come with this tool:

  • Efficient brainstorming, developing, and structuring ideas visually
  • Add calculation fields to track cost or budget
  • Quickly create a task list
  • You can find out how the necessary work is distributed between the elements of your project
  • Available guides on how to create a WBS using this tool
  • Learn how this software will help your organization and the execution of a project

⇒ Get MindView WBS Software

WBS Tool – Most WBS features

WBS Tool is a free web program that allows you to build WBS, WBS charts, organograms, and more types of hierarchies.

Take a look at the most important features that you will be able to find in this tool:

  • The WBS Tool will work with any web browser if you have the Adobe Flash plug-in installed.
  • Using this tool, you can build WBS charts effortlessly.
  • You can use the links displayed on the official website, and you can also register to have your own account.

⇒ Get the WBS Tool

These are the best tools for creating WBS and Gannt functionalities that you can currently find on the market.

Head over to their websites and check out their complete sets of features before you decide which one is the best choice for your needs.

While we’re talking about project management, you might be interested in our selection of the best time-tracking tools.

Which product did you choose? Let us know about your experience in the comments section below.

Windows 10 KB5018482: Here’s what you might have missed

Remember that not only Windows 11 receives constant updates from Microsoft since there are also other operating systems to take care of.

That being said, if you are on one of the obsolete versions, such as Windows 7 or Windows 8.1, just know that these versions will reach end of service and no longer receive anything starting with January 2023.

Big companies such as Google have also retired Chrome browser support for these old OS versions, so it makes more and more sense to upgrade.

And, if you don’t want Windows 11 just yet, the obvious choice is good old Windows 10. And, speaking of this version, it just received a brand new cumulative update.

What should I know about KB5018482 for Windows 10?

The Redmond tech giant, aka Microsoft, has just released the optional KB5018482 Preview cumulative update for Windows 10 20H2, Windows 10 21H1, and Windows 10 21H2.

This above-mentioned update includes nineteen bug fixes and enhancements, including a fix for graphics issues in Direct3D 9 games and a bug that caused OS upgrades to fail.

Note that KB5018482 is part of Microsoft’s October 2022 monthly C update, allowing admins to test fixes coming in the November 2022 Patch Tuesday.

Unlike the Patch Tuesday cumulative updates, the C preview-type patches are optional and do not include any security updates whatsoever.

Remember that Windows 10 users can also manually download and install the KB5018482 preview update from the Microsoft Update Catalog.

Let’s take a look at the changelog and see for ourselves what we should expect after downloading and installing it.

  • Addresses an issue that affects Distributed Component Object Model (DCOM) authentication hardening. It automatically raises the authentication level for all non-anonymous activation requests from DCOM clients to RPC_C_AUTHN_LEVEL_PKT_INTEGRITY. This occurs if the authentication level is below Packet Integrity.
  • Addresses a DCOM issue that affects the Remote Procedure Call Service (rpcss.exe). It raises the authentication level to RPC_C_AUTHN_LEVEL_PKT_INTEGRITY instead of RPC_C_AUTHN_LEVEL_CONNECT if RPC_C_AUTHN_LEVEL_NONE is specified.
  • Addresses an issue that causes an OS upgrade to stop responding, and then it fails.
  • Addresses an issue that affects the Microsoft Azure Active Directory (AAD) Application Proxy connector. It cannot retrieve a Kerberos ticket on behalf of the user. The error message is, “The handle specified is invalid (0x80090301).”
  • Addresses an issue that affects the font of three Chinese characters. When you format these characters as bold, the width size is wrong.
  • Addresses an issue that affects Microsoft Direct3D 9 games. The graphics hardware stops working if the hardware does not have a native Direct3D 9 driver.
  • Addresses graphical issues in games that use Microsoft D3D9 on some platforms.
  • Addresses an issue that affects Microsoft Edge when it is in IE Mode. The titles of pop-up windows and tabs are wrong.
  • Addresses an issue that affects Microsoft Edge IE mode. It stops you from opening webpages. This occurs when you enable Windows Defender Application Guard (WDAG) and you do not configure Network Isolation policies.
  • Addresses an issue that might cause an application to stop responding. This might occur when the input queue overflows.
  • Addresses an issue that affects input method editors (IME) from Microsoft and third parties. They stop working when you close the IME window. This occurs if the IME uses Windows Text Services Framework (TSF) 1.0.
  • Addresses an issue that affects the lasso tool in a graphics editing program.
  • Addresses an issue that affects Miracast advertisements. This issue occurs on Surface Hub devices under certain conditions.
  • Addresses an issue that affects some drivers. They use more power when you play hardware-protected digital rights management (DRM) content.
  • Addresses an issue that affects .msi files. Windows Defender Application Control (WDAC) will ignore them when you disable script enforcement.
  • Addresses an issue that affects a remote desktop virtual desktop infrastructure (VDI) scenario. The session might use the wrong time zone.
  • Updates the Windows kernel vulnerable driver blocklist that is in the DriverSiPolicy.p7b file. This update also ensures that the blocklist is the same across Windows 10 and Windows 11. For more information, see KB5020779.
  • Makes Microsoft compliant with US Government (USG) version 6 revision 1 (USGv6-r1).
  • Stops the start of daylight saving time in Jordan at the end of October 2022. The Jordan time zone will permanently shift to the UTC + 3 time zone.

KB5018482 also properly synchronizes the Microsoft Vulnerable Driver Blocklist, which prevents drivers that have known vulnerabilities from being installed in Windows.

Before this cumulative update, Microsoft had not synchronized the blocklist to Windows 10 since 2019, effectively breaking this security feature.

And, after installing this update, Windows 10 20H2 will be updated to build 19042.2193, Windows 10 21H1 will be updated to build 19043.2193, and Windows 10 21H2 will be updated to build 19044.2193.

Lastly, don’t miss our urgent update alert: KB5034122 for Windows 10 and learn why it’s a must-install for users.

Have you discovered any other issues after installing KB5018482 on your Windows 10 PC? Share your experience with us in the comments section below.

Error Status 0xc000012f (Bad Image): Causes & 6 Steps to Fix

The error status 0xc000012f may appear on some Windows 10 computers with the message Bad Image. The error message reappears multiple times even after you click on OK and its usually due to corrupted or missing Visual C++ Redistributable files.

You can also find it under these names: error 0xc000012f file not found or 0xc000012f download. The error message coming with the error code may vary, but you’re dealing with the same issue.

How do I fix error status 0xc000012f on Windows 10?

1. Install the Visual C++ Redistributable for Visual Studio

  1. Download the latest version from Microsoft’s website.
  2. Select the appropriate version of the program.
    • 32-bit if you’re a 32-bit Windows user, or 64-bit if you’re a 64-bit user.
  3. After downloading, Open the installation file.
  4. Follow the on-screen instructions (keep pushing Next). use MultiPack Visual C++
  5. Once the installation is complete, check to see if the error status 0xc000012f persists.

Installing the latest version of Microsoft’s Visual Studio Redistributable resolved the error code 0xc000012f for most of our readers.

If you need a more hands-on approach, here’s how to easily download Microsoft Visual C++ on 64 bits platforms.

2. Run the sfc/scannow scan

  1. 1. Press the Windows key to open Start, and in the search bar, type Command Prompt.

  2. 2. In the search results, right-click on Command Prompt, and select Run as administrator.

  3. 3. Click Allow when prompted by an UAC message.

  4. 4. In Command Prompt, type in the following command and hit Enter:sfc/scannow

    sfc scan command
  5. 5. Wait for the verification to reach 100%. Once the process is complete, restart the computer.

  6. The simplest solution you could try to resolve error code 0xc000012f is to run the sfc/scannow command to conduct an automatic system repair.

    The SFC tool will help to repair and replace corrupted system files, if any, and remove 0xc000012f instances from your PC.

If this didn’t resolve the issue, move on to the next solution. If you’re having trouble accessing Command Prompt as an admin, then you better take a closer look at our guide.

3. Use a third-party system repair tool

One other easy way to repair your system files and get rid of these pesky error messages is by downloading a specialized repair tool that will keep your system in healthy and working condition.

This software scans your computer for broken files and restores or completely replaces them. You won’t ever need to worry about errors or BSoD crashes anymore after installing it on your computer.

4. Uninstall updates

  1. Press the Windows key to open Start and in the search bar type Update.
  2. Select & open Update & Security.
  3. In the Update & security window, select Windows Update.

  4. Click on Advanced Options, then Update history.
    • You will get a list of all the updates that were installed successfully and those that failed to install successfully.
    • Usually, these are the roots of the error.
  5. Click on Uninstall an update.
  6. You will be taken to the Uninstall an update window.
  7. Right-click on the first installed update on the list and click Uninstall.
  8. Confirm your decision & follow the on-screen instructions.

  9. Restart the computer and see if this fixed your issue.
    • If not, repeat the steps for every installed update on the list, until the issue is resolved.

You should try reverting all recent updates, to see if the issue arose from one of them.

5. Check for new updates

  1. Click the Windows key and in the search bar type Update settings.
  2. Select it from the search settings.
  3. In the Windows Update dialogue, click on Check for updates.
  4. This will send an update request to the Microsoft servers, and if any new updates are available, you will be notified.

Microsoft frequently releases small and big updates for Windows 10 and with patches that fix issues such as the error status 0xc000012f.

Once the new updates are installed, error code 0xc000012f will most likely be resolved. If this didn’t work for you, move on to the next solution.

6. Perform a clean boot

  1. Click on Start, and in the search bar, type msconfig.
  2. From the search results, select System Configuration.
  3. Open the Services tab.
  4. Check the Hide all Microsoft services check box.
  5. Next, click the Disable all button.
  6. Next, open the Startup tab, then Task Manager.
    • Alternatively press Ctrl + Shift + Esc keys.
  7. Open the Startup tab in Task Manager.
  8. Right-click on all start-up items and click on Disable to disable them.

  9. Close Task Manager.
  10. Click the OK button on the Startup tab of the System Configuration window to save the changes.

Performing a clean boot can be useful in identifying the cause behind error status 0xc000012f. Usually, the problem stems from some third-party application or startup processes.

Disabling all start-up processes and then re-enabling them one at a time can help pinpoint the source of the error.

If you want to know how to add or remove startup apps on Windows 10, we got your back.

Conclusion

To summarize our guide, you should know that this error usually appears when the image file that is being used is not of the right format and this is especially common in programs that rely on Microsoft Visual C++.

File corruption is another major culprit together with DLL incompatibility or missing executables altogether. You can obviously try to re-register all your DLL files.

However, if running long strings of commands via the elevated Command Prompt is not really your area of expertise, you can simply use a DLL repair tool to handle this task for you.

As you can imagine, the error status 0xc00012f impacts all kinds of programs, starting with Office tools, Outlook, OneDrive, Teams (msteams.exe with bad image), and so on, all the way to games and gaming apps on Windows 10 as well as 11.

Some are prone to be more impacted than others, but regular names on the list include Halo Infinite, Fornite, Valorant, and other Steam games or Origin games plagued by the bad image error xc000012f.

A few of the error variations you may come across are:

  • Error status 0xc00007b Windows 10
  • Error status 0xc0000020
  • Status 0xc00000f Windows 7
  • Error status 0xc00035a Windows 10

We hope these solutions solve your problem. However, if none of these solutions worked for you, try contacting Microsoft Support.

Do not hesitate to leave any other suggestions or questions in the comments section below and we’ll surely take a look.

Error code 0x800706be: Diagnose & Fix in 5 Simple Steps

Most Windows users realize the importance of regular updates and why it’s imperative that you download the latest ones at the earliest. However, several users reported getting the 0x800706be Windows Update error.

The error prevents the installation of updates, and can lead to other instabilities as well. One user reported receiving the error followed by an increased boot time. So, let’s find out all about the 0x800706BE error and the solutions that worked for users.

What does error 0x800706be mean?

It’s usually a Windows Update error that points to corrupt system files or other issues with the system.

The error can appear on several apps as well, for instance, Excel, or even the installed drivers and devices, and the fixes in all these cases are different depending on the underlying cause.

Where else can I find error code 0x800706be?

  • Media capture failed event 0x800706be – Also known as the 0x800706BE Camera error code. A related stop code is 0xa00f4271, and it can be fixed by using the dedicated Windows Troubleshooter. You may also come across the 0x800706be Microphone error.
  • Minecraft error 0x800706be – But it’s safe to state that error 0x800706BE can plague more Xbox games as well as the app itself.
  • 0x800706be in Remote Desktop – You might experience the RDP authentication error 0x800706be and similar ones if the Remote Desktop app is poorly configured.
  • Install error 0x800706be on Windows 11, 10, 7 – As you can see, all of the Microsoft-based OSs from Windows 7 to the fresh Windows 11 and everything in between – including specific Windows 10 versions such as 1803 or 1809 – can be impacted by this Windows Update error.
  • Excel 0x800706BE error – Many users also reported the error with Excel, and updating or reinstalling the app should fix things.
  • An authentication error has occurred code 0x800706be – Scan the registry as we have shown in our first solution below to fix this.

How do I fix error code 0x800706BE?

Before trying the slightly complex solutions, here are a few quick tricks and workarounds to fix things:

  • Restart the computer and then try installing the update.
  • Terminate all non-critical programs and processes. In some cases, a background process or app was conflicting with the update process, and terminating it did the trick.

If these didn’t work, try the following methods to get things up and running.

1. Scan the Registry

  1. Click Download on CCleaner’s official website to get the setup wizard.
  2. Open the CCleaner setup wizard and follow the on-screen instructions to install it.
  3. Launch CCleaner and navigate to Registry from the navigation pane on the left.registry
  4. Check all the entries for the most rigorous scan, and then click on Scan for Issues.scan for issues to fix 0x800706be
  5. After the scan is run, click on Review selected Issues.review selected issues
  6. When asked to back up the Registry, we recommend clicking on Yes.yes
  7. Choose a location to store the backup and then click on Save.back up registry
  8. Once done, click on the Fix All Selected Issues button.fix all selected issues to fix 0x800706be

The 0x800706be error might be due to corrupted registry entries. As such, scanning the registry with registry cleaner (or repair) utilities could fix the issue.

Windows don’t include a built-in registry cleaner, but there are plenty of third-party system optimizers that incorporate registry repair tools.

CCleaner is one registry cleaner with a massive user base. You can seamlessly scan the registry with the freeware CCleaner and fix most issues with it.

CCleaner

Give your computer the cleaning it deserves and let this tool fix most of your problems.
Free Trial Visit Website

2. Clear the Software Distribution folder

  1. Type Windows + E to open the File Explorer, paste the following path in the address bar, and hit Enter:C:\Windows\SoftwareDistribution\Downloadsoftware distribution folder
  2. Now, press Ctrl + A to select all the files here and hit Del.delete files to fix 0x800706be
  3. Choose the appropriate response in case a confirmation prompt pops up.

Once done, restart the computer and try installing the update that earlier gave the 0x800706be error.

3. Run the built-in troubleshooter

    The built-in troubleshooter may sometimes be the solution to the problems.

    1. Press Windows + I to open Settings, and click on Update & Security.
    update & security
  1. 2. Choose Troubleshoot from the left, and click on Additional troubleshooters.

    troubleshoot to fix 0x800706be
  2. 3. Click on the Windows Update entry here, and then on the Run the troubleshooter button.

    windows update troubleshooter to fix 0x800706be
  3. 4. Now, choose the appropriate response or follow the on-screen instructions to complete the process.

4. Reset Windows Update Components

Another effective way to fix the 0x800706be Windows Update error is to reset Windows Update Components.

The process is usually quick and can fix a wide range of errors encountered while updating the OS. In case this too doesn’t work, it’s likely that the problem lies with the available version, but you can always download it manually.

5. Manually install the update

  1. Go to the Microsoft Update Catalog, enter the KB (Knowledge Base) number for the problematic update in the search box, and hit Enter.download update to fix 0x800706be
  2. Now, click on the Download button next to the update that best matches your system.download update
  3. Click on the link that appears in the new window.update
  4. Once downloaded, double-click on the file to launch the Windows Update Standalone Installer.Update windows
  5. Now, follow the on-screen instructions to complete the process.

That’s it! It should take a while, but after you have manually installed the problematic update, the ones that follow should install seamlessly without throwing any errors.

Also, find out the best Windows Update repair tools to automatically fix such problems.

If you know any other methods to fix the 0x800706be error, let us know in the comments section below.

Error Code 16 on Sims 3: Fastest 5 Ways to Fix It

The Sims 3 is a simulation game. You design the characters, create their personalities and interact with them in a virtual environment. As you create all these instances, you need to keep saving the game and that’s where the error code 16 may appear.

The error code 16 in Sims 3 is a save error that users seem to be experiencing after updating to the 22H2 build. It can be frustrating to have made progress to an advanced stage then unable to save to pick up when you want to play the next time. 

Why I’m I getting the error code 16 in Sims 3?

Error code 16 is a common problem in the Sims 3 game where you are unable to save your game. There are many reasons why this happens. Below, we discuss some of the possible causes of this problem:

  • Limited internet connection – For your game to be able to save, you need either an active internet connection or an active cloud save. If you have neither of these things, then you won’t be able to save your game.
  • Outdated drivers – Make sure that all of your drivers are up-to-date and that everything is working correctly on your system.
  • Low memory – You need to make sure that there is enough free space on your hard drive so that the game can continue to run smoothly without errors.
  • Corrupt game files – A hardware failure can cause your Sims 3 game files to become corrupted and hence unable to save.

Now that we know the causes of this issue, let’s fix it with the solutions below.

How can I fix the error code 16 on Sims 3?

Before going ahead with the methods mentioned below,  check the following things first:

  • Make sure that your device meets the minimum system requirements for running The Sims 3 game.
  • If you have an older version of the game, try updating it first. 
  • Close any background apps that may be using the RAM.
  • Turn off your computer and router/modem for 10 seconds and then turn them back on again.

1. Pause Windows updates

  1. Hit the Windows key and select Settings.settings windows 11
  2. Navigate to Windows Update.
  3. Click on Pause updates and select pause for 1 week.

2. Uninstall OneDrive

  1. Hit the Windows key and select Settings.settings windows 11
  2. Select Apps then click on Apps & features.
  3. Locate Microsoft OneDrive, click on the three ellipses and select Uninstall.

For some peculiar reason, when you try to save Sims 3, it won’t save but once you uninstall OneDrive, you can successfully save it. A handful of users seemed to fix the issue after uninstalling or disabling it.

3. Clear storage space

One of the most common causes of this error is a lack of RAM or not having enough memory on your machine to run the game smoothly. There are many ways of clearing storage space; from deleting unnecessary files and programs to running a Disk Cleanup. 

This will free up some space for your operating system and should help resolve the issue with Error Code 16 in Sims 3.

4. Reduce graphics settings

Sims 3 allows you to customize your neighborhood, characters’ appearances, and many other traits. As such, these tend to bulk up the game file whenever you save it.

You can opt for more basic features or no enhanced features at all. It may be a basic game but it’s better than having to start from scratch. Better yet, check out some of the best game settings for Windows 11 for optimized performance.

5. Update your drivers

  1. Hit the Windows key and select Settings.settings windows 11
  2. Click on Windows Update on the left pane then select Additional options on the right pane.
  3. Now click on Optional updates.optional-updates windows 11 blue screen
  4. Select Driver updates then check the updates you wish to install.driver-updates-showcase kernel security check failure windows 11

If you worry about choosing the wrong updates for your drivers, then you should try a specialized program, like Outbyte Driver Updater, to help you.

It is a great software that scans your PC for outdated drivers and then immediately locates the latest updates from its complete database.

Outbyte Driver Updater

Maintain your device in a good state by updating your drivers properly with Outbyte Driver Updater.
Free Trial Download now

And that’s how to fix the error code 16 in Sims 3. Should you encounter any other related issues such as error code 12, feel free to check out our comprehensive article on the same.

You may also encounter a Sims 3 error on startup but we have also addressed the fixes in our expert article.

Some users have also complained that Sims 3 keeps crashing but worry not as you can easily solve the issue by visiting our detailed guide.

Let us know of any solution not mentioned here but worked for you in the comment section below.

Headphones not Working in Windows 10: Diagnose & Fix

Have you ever connected your headphones ready to tune to your favorite jam, or privately watch a movie, just to see that nothing happens? Sometimes, headphones are not detected in Windows 10, so they simply won’t work.

It’s easy to get frustrated if Windows 10 won’t recognize the headphones. However, there are various solutions to resolving the issue and getting you back on track.

But first, let’s make sure you’re up to date with what you’re up against.

Here are some frequent issues that our readers reported in connection with headphones not being detected in Windows 10 and more.

Why don’t my headphones work when I plug in my computer?

  • All Windows versions are likely to be impacted – Headphones not detected in Windows 11, 7, and 8 (Fortunately, you can fix Windows 11 headphones not working with some of these solutions.)
  • Specific editions are most likely to be affected by this issue – Headphones not detected in Windows 10 Enterprise, Pro, and more
  • Realtek not detecting headphones (Headphones not detected in Windows 10 with Realtek, this usually happens as a result of previous Realtek HD Audio Driver issues).
  • All laptop brands can be affected (Dell, Asus, Lenovo, or HP laptops not recognizing headphones in Windows 10 are common. Even Alienware laptops struggle to recognize headphones on occasion.)
  • Bluetooth headphones not detected Windows 10 (If this is also your case, you won’t be able to connect the Bluetooth headphones to your PC or laptop).
  • Windows not detecting headphones plugged in (Sometimes your system might show that no speakers or headphones are plugged in, even if that is not true).
  • Headphone jack not working Windows 10 (This issue is likely to emerge if your audio jack is not working at all).
  • Earphones not detected in Windows 10

There can be many possible culprits behind this. From outdated or broken drivers to an improper configuration for your speakers or faulty USB ports, everything can be responsible for Windows not detecting headphones.

? Why are my headphones connected but no sound Windows 10?

Here’s another interesting scenario. Sometimes, headphones are detected, but there is no sound on Windows.

While connectivity errors (impacting Bluetooth, for instance) are common, the problem is most likely software-related.

How do I fix headphones if not recognized in Windows 10?

1. Update audio/sound driver

1.1. Update your audio/sound drivers manually

  1. 1. Type control in Windows search and click on Control Panel from the results.

    search for control panel
  2. 2. Click on Sound.

    click on sound in control panel
  3. 3. Go to the Playback tab.

    go to the playback sound tab
  4. 4. Select your headphones and click on Properties.

  5. 5. Go to Controller Information, then click on the Properties button.

  6. 6. Click on Change Settings (this may require administrator permission).

    change settings driver
  7. 7. Go to Driver tab.

  8. 8. Select Update Driver.

    cluick on update driver
  9. 9. Choose to automatically download the update and wait for the process to finish.

    search automatically for drivers
  10. 10. Once the process is complete, plug in your headphones to check whether they work.

  11. Given the fact that the most likely culprit for your headphones not working on your Windows 10 device is a faulty driver, you should first update your audio driver.

1.2. Update audio/sound driver using a utility tool

Downloading drivers manually is a process that carries the risk of getting the wrong driver installed, which may lead to serious malfunctions.

The safer and easier way to update drivers on a Windows computer is by using an automatic driver updating tool.

These tools can get the job done in just a few seconds and clicks because they will repair and update your drivers automatically.

2. Disable front panel jack detection

  1. Press the Windows key + R to start the Run application.
  2. Type Control Panel then press enter to open it
  3. Select Sound.
  4. Find Realtek HD Audio Manager then click on it
  5. Go to Connector settings.
  6. Click Disable front panel jack detection to check the box.

This is one of the simplest ways to resolve the Windows 10 won’t recognize headphones issue.

If you have the Realtek software installed on your computer or laptop, follow the steps above to disable the headphone jack detection.

Try on your headphones again to see whether this solution works for you. Don’t worry, we have more nifty hacks for you to try if the audio jack is not working at all.

If disabling the front panel jack detection doesn’t fix the Windows 10 won’t recognize headphones issue, try the next solution.

3. Change the default sound format

  1. Open Control Panel and click on Sound.
  2. Under Playback, double click on Default Playback device
  3. Switch to the Advanced tab.
  4. Change the default sound format from the drop-down menu.

Another reason why your headphones may not be recognized by Windows 10 is the sound format. If this is not set correctly, then you may have the same problem over and over.

Try plugging in your headphones again to check if this solution fixes the Windows 10 won’t recognize headphones issue.

4. Set the headphone as a default playback device to fix

  1. Open Control Panel and click on Sound.
  2. Under Playback, right-click and select Show Disabled devices.
  3. From the list of headphones, right-click on your headphone device name.
  4. Select Enable.
  5. Click Set as Default.
  6. Click Apply and OK.

If changing the default sound format doesn’t work for you, try setting your headphone as the default playback device using the steps above.

? How do I get Windows 10 to recognize my headphones?

If Windows 10 headphones are not detected, here’s a concentrated check-up list for you to hang on to:

Once you follow all these steps, plug in your headphones again and check if they’re working. If the problem persists, here’s what to do if the PC says that no headphones are plugged in.

We hope that these solutions helped you to fix the headphones not detected in Windows 10 error.

If you’ve come across other solutions to fix this problem, you can list the troubleshooting steps in the comments below.

4 Ways to Fix Twitch if It’s Not Loading on Chrome

Most people follow their favorite streamers on the Twitch web client. However, some users noticed that Twitch streams are sometimes not loading on browsers like Chrome and Firefox.

Twitch tv started as a small gameplay streaming platform, and now it has millions of daily followers. So, it isn’t a surprise that it might run into trouble. We’ve provided you with some solutions and workarounds for the problem at hand.

Why is Twitch not loading?

Different factors may be responsible for this problem. On the top of the list are the following:

  • Server problems – Sometimes, server issues can cause this problem to appear. When such errors appear, your Twitch chat might not be loading, or the Twitch extensions will stop working, so make sure that the service is working properly before proceeding to fix this issue.
  • Account problems – It’s also possible that you have issues with your account, so check that you can access it without issues. A few users reported that they cannot reset their password on Twitch.
  • Temporary errors – Twitch might get into random and temporary troubles like any other app. Fortunately, you can always check its status. Also, you should check your Internet connection to ensure it’s stable.
  • Browsing data or add-ons blocking the app – Because it can cause serious problems with your browser, it is always recommended to clear your browsing data. In addition, we suggest disabling the extensions and add-ons.
  • Viruses and malware – Cyber attacks are becoming more frequent, so it is extremely easy to get your system infected. To prevent it, you should constantly run an efficient antimalware program.
  • Problems with your main browser – Sometimes, your browser might have more serious problems. In these terms, we strongly recommend using a dedicated option to offer a unique and safe experience.

Why does Twitch take so long to load?

This can be due to the browser cache or add-ons that slow down the browser and as a result the Twitch client.

Follow our steps below in order to fix all those problems, and boost your browser’s performance.

Quick Tip:

If you want to avoid any other Twitch issues, you should consider using it on a specialized gaming browser like Opera GX.

This optimized browser Opera GX has Twitch embedded and a dedicated button on its left-side menu to start it in a second. You will also be able to get notifications when your favorite streamers come online.

Opera GX

This specifically optimized browser makes Twitch errors and loading problems a thing of the past.

How can I fix Twitch if it’s not loading?

Before you try any of these solutions:

  • Double-check that the Twitch servers are not down. If they are down, there will be nothing you can do other than wait for them to come back up. The Twitch status page is your best bet for this.
  • You may also decide to skip all these solutions by using the desktop version of Twitch.

1. Clear the browser’s cache and cookies

    It’s most likely to repair your Twitch not loading error by clearing browsing data such as cookies or cache. To do so, use our simple guide presented down below.

  1. 1. Hit the Windows key, type Chrome, then click on the first result.

    twitch-wont-load-chrome
  2. 2. Use the following keyboard shortcut to open the Clear browsing data menu: Shift + Ctrl + Delete.

    twitch-wont-load-chrome
  3. 3. Select All time as the time range.

  4. 4. Checkmark the Cookies other site data and Cached images and files sections.

    twitch-wont-load-chrome
  5. 5. Click on the Clear Data button.

2. Disable Add-ons

  1. Hit the Windows key, type Chrome, then open the first result.
  2. Click on the Customize and Control Google Chrome menu button (the 3 vertical dots placed in the right-top corner of the window).
  3. Hover the mouse over More tools, then click on Extensions.
  4. On to the extension you want to remove, click Remove.
  5. Confirm by clicking Remove.

3. Disable Experimental features

  1. Press on the Windows key, type Chrome, then open the first result.
  2. In the Address bar, type the following line, and press on the Enter key: chrome://flags
  3. Click on Reset all.

You can safely skip this step if you never meddled with the Experimental options in Chrome. There are many available options, some of which are part of the Beta program.

They’re mostly safe to use on the standard Chrome release but can occasionally slow down the browser or negatively affect some of the standard features.

4. Reset your browser

  1. Click the menu icon and then select Settings.
  2. Go to Restore and clean up.
  3. Select Restore settings to their original defaults.
  4. Now click on Reset settings in order to fix the Twitch player not loading issue.

If now Twitch is not working on Chrome, it’s possible that your settings are interfering with it, so resetting the browser might help.

And on that note, we can wrap it up. These solutions should come in handy if Twitch is not loading your video, or not loading streams on your PC. Furthermore, if you keep encountering similar issues on Opera, we can help you out.

If you have additional related questions, do not hesitate to leave a comment in the section below.

Miracast for Windows 10: 3 Steps to Download & Install

Let’s set up Miracast so you can connect your Windows 10 to a TV or projector wirelessly.

We’ll walk you through all the necessary steps: from checking compatibility to installing drivers and setting it up with your devices.

How do I turn on Miracast on my Windows 10 PC?

Here’s a quick video summary of the steps you have to take to install Miracast on Windows (62-bit & 32-bit). If you need more details, keep reading.

1. Check if your Windows PC supports Miracast

  1. Press the Windows + R keys on your keyboard to open the Run dialog, then type dxdiag and hit Enter.
  2. After the tool collects all the information about your computer, click the Save all Information button.Setup & use Miracast directx
  3. Now you have to choose where you want to save the DxDiag.txt file on your computer. You can save it on a quick-to-access location such as your desktop.miracast save as
  4. Open the DxDiag.txt file, which is usually in notepad format.
  5. Then, scroll toward the bottom of the report, where you will find the status of the Miracast on your PC.
  6. It will either read Miracast is available, in which case your PC will be ready to cast its display to a compatible device, or read Miracast not supported, which you might want to explore other options. If you see Miracast: available with HDCP, everything works correctly.
    miracast windows 10

If your PC isn’t compatible with Miracast, consider using another screen mirroring software.

2. Get the current Miracast drivers for your PC

  1. Right-click on the Start icon and select Device Manager.
    device manager windows 10
  2. Locate Display Adapters and expand the list.display adapters in device manager
  3. Right-click on the WDDM driver and click Update.
  4. Select Search automatically for drivers and follow the on-screen instructions to finish up the process.search automatically for display drivers

Even if your PC supports Miracast, you will need to have updated Miracast drivers for it to work.

Wireless (Miracast) displays can only be supported by Windows Display Driver Model (WDDM) 1.3 and later models.

If Windows cannot detect new drivers or you want to save the time and hassle of installing them manually, you can also use a specialized tool such as Fortect Driver Updater.

It allows you to download and update all your drivers and it also helps in the maintenance so you won’t run into this issue in the future.

⇒ Get Fortect Driver Updater

3. Project your Windows 10 PC to an HDTV with Miracast

  1. Plug the Miracast adapter into one of the HDMI ports on your TV.
  2. Select the correct HDMI channel.
  3. Now open the Start Menu on your Windows 10 computer. You will find it at the bottom left corner of your screen.
  4. Click on the Settings icon. It looks like a cogwheel.
start-settings miracast for windows 10
  1. Expand the Multiple display option and then click the Connect button.
connect multiple displays
  1. If you have devices ready for Miracast, they will be displayed on the cast menu. You need to click on them to start the projection.
miracast windows 10

Miracast system requirements

  • Windows 8.1 or newer.
  • Wi-Fi chip that supports Miracast.
  • The latest graphics card and network drivers installed.
  • A display that has Miracast support (or Micracast adapter).
  • In case your PC doesn’t meet the requirements, you’ll need to purchase a Wi-Fi adapter that supports Miracast.

Wrapping up

Unlike general screen mirroring, Miracast provides a standardized and secure connection with WPA2 encryption. So, Miracast is a particular type of screen mirroring with its own protocols and extra security.

Setting up Miracast on a PC is easy, whether you use Windows 10, Windows 11 or an older version. And if Miracast isn’t working, troubleshooting it shouldn’t take too long, as it’s a pretty stable tool.

Brands like Samsung and LG TV will work great with Miracast on Windows 10. Bur besides mirroring your content to the large screen, Miracast secures your connection with WPA2 encryption so protected content can freely flow through it.

However, if you still can’t use Miracast, we recommend that you take a look at other top software for screen mirroring compatible with Windows 10 & 11.

Tell us how you use Miracast on Windows 10 and if you have any other questions regarding the setup process, feel free to post them in the comments section below.

FAQ

Why is Miracast not working on Windows 10?

Impaired drivers are usually behind Miracost not working on Windows 10 issues. Thus, it’s possible that your graphics drivers do not support Miracast.

To fix common Miracast issues, make sure your drivers are up to date. Also make sure your device supports.

For common issues, restart devices, adjust screen resolution, or set the Miracast display as the default audio device.

What can I do if my PC does not support Miracast?

Windows PCs support Miracast by default, thus if you get the Miracast not supported error message, note that this is an internal issue and you can fix.

Is Miracast free for Windows?

Yes, Miracast is completely free and available to all Windows users without limitations. The only requirement is that you have Windows 8.1 or newer and a compatible wireless card.

What’s the difference between screen mirroring and Miracast?

Screen mirroring lets you show your device’s screen on another display. Miracast is a specific technology that uses Wi-Fi Direct to wirelessly connect devices directly.

Cache Manager Blue Screen: How to Fix The Stop Code

Since BSoD errors can be problematic, today we’ll show you how to fix the stop code cache manager BSoD error.

Blue Screen of Death errors can cause your PC to restart frequently. These errors can affect any operating system, and Windows 11 is no exception. Let us take you through all you should know about this error in Windows 11.

What is Cache Manager?

The memory manager and the cache manager work together, providing data caching for the Windows file system drivers. It is a collection of kernel-mode operations and system threads (network and local).

Cache managers act as a container for organizing a collection of caches into a single management unit that may be started and stopped simultaneously.

What causes the Cache Manager blue screen?

  • Hardware devices – If there are defects or faults with hardware components like your hard drive, you may experience this error. You should only use the best hard drives for your Windows PC.
  • Bad or outdated drivers – Windows users can expect varying errors, including the cache management blue screen error when drivers have not been updated.
  • Corrupt system and OS files – Maintaining proper system and app files will reduce the chances of experiencing this error on a Windows device.
  • Software or anti-virus compatibility issues – When an app has compatibility flaws, it triggers errors in the OS. We always recommend only the most compatible software and antivirus programs on your Windows devices.

How do I fix the Cache Manager blue screen error?

Before jumping into these solutions, apply the following:

  • Make sure that you keep a regularly updated OS, this way, you can avoid little bugs or defects that may trigger this error.
  • You should also ensure your hardware works fine and change faulty drives if there are any. To check your RAM, you’ll need to use tools such as MemTest86+. Simply put the tool onto a USB flash drive and boot your computer from it. Let MemTest86+ run for a couple of hours.

1. Use a third-party BSoD fixer

The fastest way to fix this issue is to use specialized repair software. These powerful tools allow you to scan your computer and replace any broken system file in just a few moments. Plus, they act as great maintenance tools in the long run, so you can always be sure your computer is protected.

2. Run the BSOD Troubleshooter

  1. Open the Settings app and go to Update & Security section.
  2. Select Troubleshoot from the menu on the left, then select BSOD from the right pane and click Run the troubleshooter.
  3. Follow the instructions on the screen to complete the troubleshooter.

3. Update your drivers

Many BSoD errors are caused by outdated drivers that aren’t fully compatible with Windows. Searching for drivers on your own can be time-consuming.

An automatic driver updater will save you the effort of manually looking for drivers and will ensure that your system has the most recent drivers available.

Driver updaters such as Outbyte Driver Updater can also repair damaged or missing drivers. You can schedule regular updates and driver scans to ensure your device is always fully optimized.

The software is very lightweight, so it can silently run on your machine without interfering with other apps or using too many resources.

⇒ Get Outbyte Driver Updater

4. Run the SFC scan

  1. Right-click on the Windows search and type cmd, then click Run as administrator.
  2. Enter the following line and press Enter: sfc/scannow
    stop code cache manager
  3. Wait until the process is done (it may take a while); if the solution is found, it will automatically be applied.
  4. Now, close the Command Prompt and restart your computer.

5. Run DISM

  1. Right-click on the Windows search and type cmd, then click Run as administrator.
  2. Enter the following line and press Enter:
    DISM /Online /Cleanup-Image /RestoreHealth
    stop code cache manager
  3. Wait until the scan is finished, then restart your computer and try updating again.

6. Run chkdsk

  1. Right-click on the Windows search and type cmd, then click Run as administrator.
  2. When Command Prompt starts, enter the script below and press Enter to run it.
    chkdsk /f /r C:
  3. You’ll have to perform this scan for every hard drive partition, so be sure to replace C with a matching hard drive letter.
    chkdsk-cmd

Blue Screen of Death errors, such as the stop code cache manager error, can be troublesome, but you can easily fix them using some of our solutions.

In the worst-case scenario, you might have to replace your hard drive or try if your hard drive works on a different computer. Let us know what solutions worked best for you.

How To Use A VPN To Book Cheap Flights & Get Discounts

If you’ve considered using VPN to get cheaper flights and lower travel prices, we’re here to set things straight. Indeed, a VPN service can be a tremendous help.

Although a lot of people know the goal of a virtual private network solution is to hide your IP address and encrypt your traffic, few are aware that they can also use VPNs to get better deals online.

Moreover, you can utilize VPN for traveling in other countries to get the most convenient price deals, plus bypassing website restrictions. Rest assured we’ve got you covered if you need a trustworthy VPN service that provides you with Pennsylvania servers.

Do VPNs get you cheaper flights?

Yes, you can use a VPN to get cheaper flights. But it’s not a solution that always lives up to your expectations.

In fact, if you’re not doing it properly, you might even be disappointed and never attempt to use a VPN for traveling again.

The most important aspect is the country of the VPN server. It’s essential to take your time and perform multiple types of searches when looking for cheaper flights using a VPN.

What is the best VPN location to get cheap flights?

The US and Western Europe have by far the highest price range. Eastern and Southern European countries, on the other hand, have lower price ranges.

You can also find lower flight prices using the USA location with regions such as New York. Besides this, there are different countries where you can find cheap flights using a VPN:

EuropeAsia
PortugalIndia
RomaniaMalaysia
MoldovaThailand
PolandJapan

The absolute best depends on what locations you are interested in. Travelers around the web say there are higher chances of finding your flight on the local pages of bigger countries like Malaysia or Japan.

How to use a VPN to get cheaper flights

  1. Download and install ExpressVPN on your device.
  2. Launch your VPN to connect to a server.
  3. Connect to a VPN server and access the flight booking website to compare prices.
  4. Check for browser leaks to make sure your real location will not be exposed.

This is how you can utilize the VPN software and find cheap flights to your desired destinations anywhere you require.

You may compare multiple flight booking websites connected to different servers offered by the following VPNs described below.

What are the best VPNs for cheap flights?

ExpressVPN – best VPN for cheap flights

ExpressVPN comes to help anyone who needs the cheapest flights for their destinations with a high-speed server network in 94 locations around the world.

You can be relaxed about your IP location or online privacy because you have the smartest data encryption and private DNS for each server.

Plus, it’s likely to find advantageous flight prices due to numerous servers with tested speed and quick connectivity between other locations.

There are advanced functionalities as well to help you mask your real location, such as TrustedServer, which hides all data from your hard drive.

More about ExpressVPN:

  • Lightway protocol for safer browsing
  • Threat Manager
  • Network kill switch
  • Smart protocols to unblock any website

ExpressVPN

Book your flight for memorable trips using speedy navigation servers with extra security mechanisms.
Free trial Visit website

Surfshark VPN – speedy server network

Surfshark is the right choice VPN for getting more suitable flight prices due to its double protection servers all over the globe.

The first aspect you should be aware of is the comprehensive privacy for any server you connect to. That is because you have private DNS and leak protection and the latest VPN protocols.

You also have extra benefits that will help you find cheap flight offers such as Camouflage Mode which hides your traffic entirely from any party, even your ISP.

More so, there is the CleanWeb feature that gives you safe browsing without annoying ads or phishing attempts.

More about Surfshark:

  • IKEv2/IPsec default protocols
  • Fully advanced encryption
  • Kill switch tool
  • No data log policy

Surfshark

Gain access to the most convenient flight prices in your country with this affordable VPN.
Free trial Visit website

CyberGhost VPN – best option with a free trial

Another great VPN for cheaper flights is CyberGhost VPN. Also a product of Kape Technologies, this VPN solution can get you better online deals for traveling, thanks to its impressive range of servers and top-notch security features.

CyberGhost VPN supports the OpenVPN protocol and provides anti-hacker protection. It also offers the possibility to connect with other protocols like  L2TP/ IPSec, IKEv2/ IPSec, and PPTP.

Each protocol has its respective benefits, OpenVPN is known for its versatility, security, and fast speed. IKEv2 is another popular option nowadays, scoring high when it comes to security as well.

You can use exclusive DNS servers to secure your DNS queries, split tunneling, and a kill switch. It’s the only free VPN option on this list.

While the app itself is premium, it has a free trial that lets you try out all the VPN features that are included. It also has a dedicated free browser extension.

More about CyberGhost VPN:

  • +6,500 VPN servers in 89 locations
  • 7 simultaneous connections
  • Completely safe, no leaks
  • 45-day money-back guarantee (1-day free trial)

CyberGhost VPN

If you’re looking for an excellent VPN to get cheaper flights, check out this tool.
Free trial Visit website

Private Internet Access – largest server network

If you’re interested in using a VPN for cheaper flights, you can’t go wrong with Private Internet Access (PIA).

Made by Kape Technologies, PIA comes with a wide network of VPN servers so that you can connect to various countries for traveling purposes. It’s also great for bypassing geo-blocks.

PIA uses the OpenVPN and WireGuard protocols to encrypt your traffic. These protocols are well-known in the industry for being both fast and secure.

It’s relevant to mention that you have the highest server speed and an exhaustive network with multiple locations to find the greatest flight prices.

It comes with exclusive port forwarding, a kill switch, split tunneling, and an integrated malware blocker for your browsers. It also has 24/7 live chat support.

You can also install it on game consoles, smart TVs, or even your router.

More about PIA:

  • +3,500 VPN servers in 48 locations
  • 10 simultaneous device connections
  • No IP, DNS, or WebRTC leaks
  • 30-day money-back guarantee (no free trial)

Private Internet Access

Check plane prices all around the world with this fast and reliable VPN service.
Check price Visit website

NordVPN – great server security

Created by Tefincom & Co., NordVPN offers a quick and easy solution to get cheaper flights with a VPN.

It gives you the possibility to connect to numerous VPN servers all around the world. Plus, it’s the only VPN on this list that can bypass VPN blocks by connecting to obfuscated servers.

Server obfuscation in VPNs means that your traffic is encrypted twice. So trackers and advanced geo-blocking technologies are not able to tell that you use a VPN in the first place.

NordVPN encrypts your data traffic using OpenVPN to make sure it won’t increase your network connection speed. The tool also supports custom DNS servers.

NordVPN has many servers across the whole globe so you can really do your homework and research airplane ticket prices in various countries.

More about NordVPN:

  • +5,100 VPN servers in 59 countries
  • 6 simultaneous connections
  • No browser leaks
  • 30-day money-back guarantee (no free trial)

NordVPN

Use Nord VPN to connect around the world and get cheap flights without getting detected!
Check price Visit website

How to search for cheap flights using a VPN?

Once you know your destination, search the web for all available options. We suggest you look both at airline companies and booking agencies.

Use a VPN to connect to a country with a low price range and see if the flight is listed there. It’s best to clear your cookie data or access the pages in Incognito mode.

Airline websites generally use cookies, so it’s best to clear them to not get tracked down. This is especially important when you use a VPN because you may want to try out a few different locations when hunting for the best price.

Does a private browser make flights cheaper?

Some people around the web suggest that it’s best to look for web prices from a private browser or Incognito mode as prices may be higher for logged-in users or those who have previously accessed the pages and have their IP stored.

There is no evidence that this is actually happening. We tried it ourselves, and just switching to Incognito doesn’t change anything.

We do recommend it, though, when using a VPN because many of these websites may install cookies on your browser and have some info about your identity or location. So to make sure your VPN usage 100% effective, a private connection is recommended.

What day are flights the cheapest

Back in the day, you could say for sure that airplane tickets are the cheapest on Tuesdays and Wednesdays. 

For years, Tuesday has been considered the best day to buy cheap plane tickets. But the rule is not as applicable now as it used to be.

The reason why the middle-of-the-week prices used to be cheaper is that plane tickets were released for sale at the beginning of the week, and the strategy was to offer deals after some tickets were already sold.

As for now, these days seem to vary from one company to another. A more applicable rule to follow is to book your flight early because prices now tend to increase as your flight date approaches.

In conclusion, if you’re interested in various hacks to get cheaper flights online, you can’t go wrong with a VPN.

By spoofing your IP address and using encryption to connect to a different location, you make it look like you’re trying to buy tickets from somewhere else, like a low-income country.

Since travel agencies are pretty flexible, you can never know what awesome deals lurk around the corner. Besides, it’s perfectly legal to use a VPN to get cheaper flights, so there’s nothing to worry about.

7 Best Time Tracking Tools with Screenshots for Best Results

Herein, we’ll be looking at some of the most reliable time tracking software with screenshot support for Windows, which are affordable and readily available in the market.

Time management is an essential element in the effective conduct of every business. In fact, it is usually the fine line between successful businesses and not-so-successful ones.

Why do I need a time tracking tool?

Today, with the advent of time tracking tools, business owners, freelancers, and even employees are able to optimize the use of their time, towards achieving optimum productivity and sustained business growth.

Hence, in the next section of this piece, we’ll be reviewing five of the most reliable time tracking software for Windows. That is time tracking software that is compatible with the Windows operating system.

What are the best time tracking tools with screenshot support?

Insightful – Best time-tracking app

When you’re looking for the best time tracking tool, you can’t ignore Insightful, because it has all the features you need.

And we’ll start with the screenshotting capabilities because it does that automatically, at a regular interval, or based on the rules you set up.

That’s only one aspect because Insightful tracks all the computer activity, including the used apps and visited websites.

Insightful is an ideal solution for big enterprises with over 1000 employees because it’s easy to install and use.

This solution works perfectly as a time-clocking tool and at the end of the day, it provides detailed reporting on the user’s proficiency.

Of course, with that precise data, you will also be able to build up a perfectly accurate budget forecasting for any of your projects.

And that’s because Insighful’s automatic time mapper assigns the work of your employees to projects automatically.

Don’t look for your card yet because this tool can be tried for free before making any budget commitments.

Check out Insightful’s best features:

  • Down-to-the-decimal project budgeting
  • Automatically captured screenshots
  • Automatic clock-ins and outs
  • Full computer activity tracking
  • Detailed reporting with time calculations

Insightful

Track your employees’ activity with this smart tool that provides screenshots and detailed reporting.
Free trial Visit website

Zoho Projects – Great workflow visualization

Whatever the project type, business size, or industry, Zoho Projects will help you get things to completion with all the tools necessary.

The first advantage is the intuitive UI with clean and modern-looking menus that easily allow you to identify any possible issue with the workflow.

And thanks to its drag-and-drop function, you can set up dependencies and reschedule tasks right into the built-in Gantt charts.

Moreover, you may create four types of dependencies for the tasks in the Gantt chart maker. Then, it’s easy to edit, delete, or adjust the time lag between dependent tasks.

Everything is customizable through color coding so any critical issues or stuck processes just pop up in the scheduled timeline for you to address.

Of course, you can run several projects at the same time and use the existing templates or create new ones according to your needs.

But in the meantime, for each and one of them, you also keep track of all the time-based teams’ work, expenses, and milestones right there, in your cloud-based dashboard.

More importantly, you can integrate Zoho Projects with more than 12 other Zoho-related products, Google and Microsoft apps, and more.

Let’s review some of its best features:

  • Cloud-based dashboard available from anywhere in the world on any device
  • Great collection of customizable Gantt chart templates
  • Drag-and-drop functionality
  • Seamless color coding
  • Notifications and collaboration features

ZOHO Projects

This cloud-based project management solution meets the deadline with strong time-tracking tools.
Check Price Visit Website

DeskTime – Great reporting

DeskTime is widely regarded as the best alternative to Hubstaff. In fact, most of its users believe it is the best time tracking software out there.

The software hosts extended support for both mobile and desktop/laptop platforms, which include Windows, Linux, Mac, Android, iOS, and so on.

In addition, DeskTime is designed to provide employers unfettered access to their employees’ activities during work hours.

The software’s design provides a dynamic, customizable dashboard, where team leaders can easily monitor the progress of their team members, as well as time spent on individual projects.

This would encourage every team to sit up and work strictly against assigned deadlines.

Some of the core features of DeskTime time tracking software include Windows title tracking, productivity analysis, absentee & vacation calendar, custom reports, screenshots, open API, secure database, free trial, and more.

Check out its key features:

  • Customizable dashboard
  • Support for desktop and mobile platforms
  • Productivity analysis reports
  • Absentee and vacation calendar
  • Screenshot captioning

Desktime

Monitor your work or analyze your team’s productivity using this leading automatic tracker.
Check price Visit website

Hubstaff – Good for project tracking

Hubstaff is a versatile time tracking software for Windows. It is optimized to facilitate your firm’s time management and ensure you attain optimum productivity in due time.

The software is a web-based platform, which is compatible with virtually all operating systems. There is also dedicated support for Windows and a host of other OS.

Hubstaff’s functionality is not limited to time tracking; it is also designed to track employees’ progress and prepare payment invoices, based on logged time.

In light of this, Hubstaff is an essential tool for freelancers and business owners whose staff work remotely.

In a nutshell, the software is able to identify productive team members and projects, as well as the less productive ones.

Hubstaff is available in three pricing flavors: Premium, Basic, and Solo Lite(free) al the paid plans are subject to an initial 14-day free trial.

Take a look at its most important features:

  • Advanced time tracking
  • Location tracking by GPS
  • API screenshots
  • Cross-platform compatibility
  • Advanced reporting

Hubstaff

Turn your time into an asset and grow your business using this workforce time tracking tool.
Check price Visit website

Time Doctor – Customizable dashboard

Time Doctor is an optimized time tracking tool, designed to provide near-perfect time management functions.

The software is flexibly built to support all types of devices, including Windows/Mac/Linux computer systems and Android/iOS mobile platforms.

Time Doctor is a cloud-based software that offers you a highly customizable platform, which can easily be tailored to suit your dynamic operational pattern, as a small/medium/large scale business owner or freelancer.

To facilitate transparency, especially for off-site or remote employees, Time Doctor provides you an avenue (as an employer) to get screen grabs of all employees’ activities.

This way, you are able to track the project’s progress, and time spent in real-time.

You will benefit from the following key features:

  • Simplified time tracking
  • GPS location tracking
  • URL activity monitoring
  • Productivity analysis
  • Data encryption

Time Doctor

Meet the most ambitious goals or projects using a valuable tracker for employees and managers.
Check price Visit website

TimeCamp – Great attendance monitoring

TimeCamp is another popular time tracking software for Windows, with a huge global client base. It is cross-platform compatible and designed for all classes of operating systems.

Also, it is flexibly built to adapt to any business, irrespective of size; be it a small, medium, or large enterprise.

TimeCamp is an all-rounder, providing you with dynamic sets of time tracking and management, invoicing & client billing, and report-generating features.

These sets of features work in sync to expedite your operational efficiency and improve productivity.

TimeCamp offers a free trial version to all new users, albeit for a limited period of one month. There is also a Solo version, which is offered for free. 

Let’s look at some of its most important features:

  • Online timesheets and off-time detection
  • Staff billing rates and online payment
  • Project syncing and management
  • Multiple currency support
  • Reminders and time entry notes

TimeCamp

Manage any project successfully with this unlimited and integrated time tracker software.
Check price Visit Website

Toggl – Great multi-platform support

Toggl is a simple, yet powerful, time tracking software for Windows. It is a cloud-hosted platform, with support for all web-enabled devices. Also, the software has dedicated apps for Windows, Android, and iOS.

It provides you a comprehensive overview of time spent by each employee, as well as the total time spent on each project.

This enables you to have a clear, unbiased, view of productive employees and tasks, as well as the less productive ones.

And you can easily use this to bill clients, promote staff, set remuneration, assign queries (where and when necessary), set up training, and so on.

Basically, Toggl assists you in optimizing your time usage, with the ultimate aim of increasing productivity to facilitate business growth.

The tool is available in three license variants: Starter, Premium, and Enterprise. All plans are subject to a first-time free trial.

Check out its key features below:

  • Time charts and time management
  • Data backup up to twice a day
  • In-depth reporting
  • Online and offline time tracking
  • Friendly interface

⇒ Get Toggl

Time management is obviously one of the key drivers of growth in every business, especially businesses associated with service delivery.

However, more often than not, quality man-hour is wasted on mundane tasks, which contribute little or nothing to a company’s growth.

To bypass this inadequacy, and improve the efficiency and productivity of businesses, time tracking tools were invented.

In this article, we have reviewed, briefly, five of the most widely used time tracking software for Windows. Hence, if you are in need, the above-reviewed tools are the recommended software for you.

You should also check our extensive list of the best time tracking software and you might get other insights on this matter.

Have you tried any of the solutions highlighted above? If so, tell us about your personal experience in the comments section below.

Windows 11 Freezing Randomly: Diagnose & Fix in 8 Ways

Since Microsoft released Windows 11, quite a few users have posted on support forums about Windows 11 randomly freezing.

Such Windows 11 freezes occur randomly and regularly for those users. Windows 11 freeze errors can happen mostly because of GPU driver incompatibility or system file corruption.

So, there’s more than one way you might be able to fix this issue. Follow along to find out how you can fix random freezing in Windows 11.

How can I fix Windows 11 freezing randomly?

1. Reduce your monitor’s resolution setting

  1. 1. Click the Windows taskbar icon to bring up the Start menu, and select the pinned Settings app there.

  2. 2. Select the Display navigation option on the System tab.

    go to display
  3. 3. Click the Display resolution option to open a drop-down menu with multiple resolutions to choose from.

    go to display resolution options
  4. 4. Select a resolution lower than the one you currently have.

  5. 5. Click on the Keep changes option on the dialog box prompt to confirm the modification.

  6. If you encounter issues with your Windows 11 device freezing, it is likely that your GPU is causing it. Your screen resolution could be too high for your graphics adapter, thus resulting in issues.

    The screen resolution can be easily changed using your device’s built-in Settings, on the Display tab.

2. Run a system file scan

  1. First, click the magnifying glass icon beside the Start menu on the taskbar.
    magnifying glass button windows 11 keeps freezing
  2. You’ll need to enter cmd in the to search box to find the Command Prompt.
  3. Make sure you open an elevated Prompt by right-clicking the Command Prompt search result and selecting Run as administrator.
    Run as administrator option windows 11 keeps freezing
  4. Enter this command and press Return: DISM.exe /Online /Cleanup-image /Restorehealth
    Deployment image scan command windows 11 keeps freezing
  5. Next, type in the following SFC command and hit Enter: sfc /scannowThe SFC command  windows 11 keeps freezing
  6. Now wait for the System File Checker scan to finish and display an outcome within the Command Prompt’s window. The Windows 11 freezing randomly issue will be fixed.

3. Run a disk scan

  1. Open the Command Prompt as an administrator as covered within the first three steps of the previous resolution.
  2. Tap in this disk scan command and hit Enter: chkdsk c: /f /r
    The chkdsk command windows 11 keeps freezing
  3. Now the check disk scan will be scheduled to run on reboot. Click the Start menu, press the Power button, and select Restart. This is another great fix for Windows 11 freezing.
    Restart option windows 11 keeps freezing

4. Check for RAM issues

  1. Press the Windows and S keys both at the same time.
  2. Input Windows Memory Diagnostic within the search box that opens.
    A Windows Memory Diagnostic search windows 11 keeps freezing
  3. Click Windows Memory Diagnostic to open it.
  4. Select the Restart now and check for problems option.
    Restart now and check for problems option windows 11 keeps freezing

Thereafter, Windows will restart, Windows Memory Diagnostic will scan, and it should then display an outcome. If it doesn’t, however, you’ll need to check the scan result in Event Viewer as outlined within our Memory Diagnostic Tool mdsched.exe guide.

Note icon NOTE
You might need to replace faulty RAM modules if Windows Memory Diagnostic detects errors.

5. Expand virtual memory allocation

  1. Bring up the search utility with its taskbar button or Windows key + S hotkey. Enter the keyword performance of Windows within the search box.
    A performance of windows search windows 11 keeps freezing
  2. Then select the Adjust the appearance and performance of Windows search result to open the Visual Effects tab shown directly below.
    Visual Effects tab windows 11 keeps freezing
  3. Click the Advanced tab. Then select the Change option there.
    Change button windows 11 keeps freezing
  4. Uncheck the Automatically manage paging file size for all drives checkbox, and select the primary C: drive partition.
    The Automatically mange paging file size for all drives checkbox windows 11 keeps freezing
  5. Then click the Custom size radio button.
    The Custom size option windows 11 keeps freezing
  6. Type the recommended value specified within the Virtual Memory window in the Initial size (MB) text box.
    Initial size box windows 11 keeps freezing
  7. Input a bigger value than the recommended one within the Maximum size box.
    Maximum size box windows 11 keeps freezing
  8. Click OK on the Virtual Memory window.
    OK button windows 11 keeps freezing

6. Update your GPU’s driver

  1. Open the manufacturer’s website (NVIDIA, Intel, AMD) for your graphics card. Then go to the driver download section of that website.
    The NVIDIA download page windows 11 keeps freezing
  2. Select your graphics card model and Windows platform on the driver download section’s menus. Click the Download option for the latest driver that’s compatible with your PC.
    Download button windows 11 keeps freezing
  3. Thereafter, bring up File Explorer by clicking the taskbar button shown directly below.
    The File Explorer button windows 11 keeps freezing
  4. Open the folder that includes the driver package you downloaded. Double-click the driver package to open its setup window. Then go through the setup wizard to install the driver.
    A NVIDIA package windows 11 keeps freezing

You can also upgrade graphics card drivers with third-party driver updater software.

7. Uninstall Sonic Studio 3

  1. Press the Windows + X key combination, and select the Run shortcut.
    Run shortcut windows 11 keeps freezing
  2. Type this command in the Open box and click OK: appwiz.cpl
    The appwiz.cpl command windows 11 keeps freezing
  3. Select Sonic Studio 3 in Programs and Features, and click an Uninstall option for that software.
    Uninstall button
  4. Click Yes on any uninstall confirmation prompts that might pop up.

Some users might prefer to uninstall Sonic 3 with third-party uninstaller utilities like IObit Uninstaller. With IObit Uninstaller, you can also delete residual files and registry entries left behind from installed software.

8. Reset Windows 11 to factory defaults

  1. Press the Windows + I key combination.
  2. Select Recovery on the System tab in Settings.
    Recovery navigation option windows 11 keeps freezing
  3. Click the Reset PC button shown directly below.
    The Reset PC option windows 11 keeps freezing
  4. Choose the Keep my files option.
    Keep my files button windows 11 keeps freezing
  5. Then select either Cloud download or Local reinstall.
    Reinstall options windows 11 keeps freezing
  6. Click Next > Reset to restore Windows 11 to its factory default.
    The Next option windows 11 keeps freezing
Note icon NOTE
This method will uninstall all third-party software packages that weren’t pre-installed on your PC. So, you will need to reinstall the software after resetting Windows 11. Try applying this potential resolution as a last resort for fixing Windows 11 freezing.

Why is my PC freezing constantly?

There are a few potential causes that can trigger random Windows 11 freezing:

  • Graphics issues – It can be a graphical issue for users utilizing PCs with limited GPUs. The freezing might occur because the screen resolution is set overly high for your PC’s graphics adapter.
  • GPU driver incompatibility – If you’ve recently upgraded to Microsoft’s latest desktop platform, your graphics card might have an incompatible Windows 11 driver. In this case, you would need to update the GPU’s driver to a more compatible one.
  • Limited RAM – Limited system RAM can be another factor behind random Windows 11 freezing. Insufficient system memory can result in such crashing on Windows 11 PCs with four GB RAM. Extending virtual memory allocation can resolve such issues.
  • System file corruption – Running a system file scan will likely fix the issue for such a scenario. Resetting Windows 11 is a more drastic alternative resolution for repairing system files.
  • Conflicting programs – Sonic Studio 3 is a conflicting program that’s known to clash with Windows 11. Some users have confirmed uninstalling that software can fix Windows 11 freezing. Maybe you should check if you have Sonic Studio 3 installed.

Besides this, there are different scenarios in which Windows 11 can freeze. The most common ones are the following:

  • Windows 11 freezing after update – In this case, uninstalling the latest OS update is the best course of action.
  • Windows 11 freezing when idle – Your computer files might be damaged due to various reasons. However, the most effective solution is to run system scans as we have shown below.
  • Windows 11 freezing on login screen – Updating your GPU driver proved to be another effective solution when it comes to immediate Windows 11 freezing.
  • Windows 11 freezing while gaming/during games – By reducing your monitor’s resolution as we have shown in the third solution below, will ensure that your games won’t be interrupted anymore.
  • Windows 11 freezing when alt-tabbing – This has definitely something to do with your system files. Find out how to run DISM like a pro in order to fix all kinds of OS errors.
  • Windows 11 freezing after sleep – Uninstalling Sonic Studio 3 will remove any miscommunications across your system, thus eliminating OS freezes.
  • Windows 11 freezing on shutdown – RAM issues can affect your PC in many ways, including causing it to stop responding. Besides fixing any RAM problems, you might also want to clean and optimize it.

Can the same issue occur on other Windows platforms?

Yes, users have also reported similar Windows 10 freezing in support forums. Interestingly, some users have said that freezing/crashing started after OS updates. Such issues can also occur on Windows XP, Vista, 7, and 8.

Some of the resolutions above might help fix similar freezing issues on different Windows platforms. However, our Windows 10 freezes randomly guide includes potential resolutions and instructions specifically for that platform.

We can’t guarantee the potential resolutions in this guide will fix random freezing in Windows 11 for all users. However, there’s a good chance that they’ll fix random and regular freezing on many Windows PCs. Try applying all those fixes in the order they’re specified.

The only other potential resolutions that might be worth a try are to reset or update the BIOS. Our how-to easily update your BIOS guide provides the full low-down on how to update BIOS.

Before you go, you might be interested in our guide on what to do if Windows 11 freezes but the mouse moves for more solutions.

You may also want to read this guide on how to fix a secondary hard drive freezing your computer or check out what to do if Remote Desktop keeps freezing on Windows 11, both cover specific freezing issues you might be facing.

You can also enter any questions you might have about fixing persistent Windows 11 freezing in the comments section below. Feel free to discuss this issue there.