Fix Laptop Camera Black Screen Issues with 9 Easy Tips

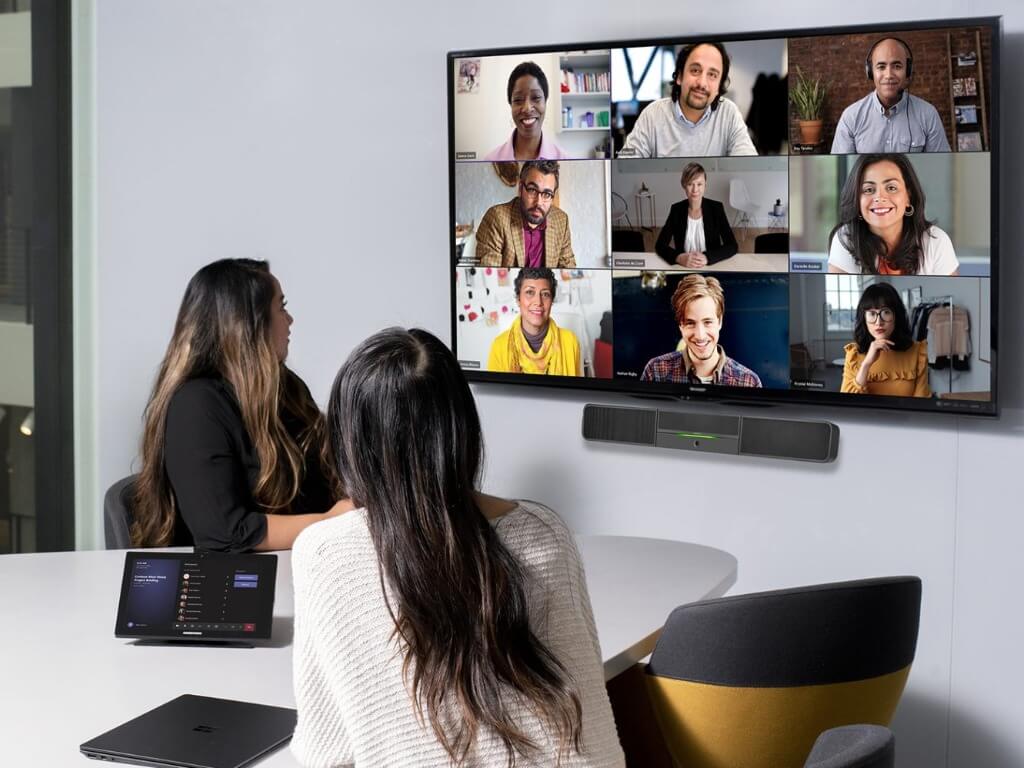
Windows 10 and 11 work with some of the best high-quality webcams to devastating effect. However, some users are starting to complain that their webcam is showing a black screen when using it.

This issue mostly occurs after an operating system upgrade. Thankfully, you can fix the issue quickly by following the steps in this guide carefully.

However, it must be noted that if you have any hardware malfunctions to the webcam this will not be an appropriate approach to the issue. If you are sure it is not a hardware issue, you can confidently use our solutions to solve the webcam black screen issue on Windows 10 and 11.

Why is my laptop camera black?

There are many things that can cause the black screen issues with your webcam on Windows 10. Below are some of the variations of this issue and the causes:

  • A4Tech, Logitech webcam shows black screen – Camera showing a black screen on Zoom: Almost every webcam can have this problem, and many users reported this issue with A4Tech and Logitech webcams.
  • Webcam shows a black screen no audio: This is usually caused by a bad driver, and it can be easily fixed.
  • Webcam shows a white screen, green screen, gray screen: This is a variation of this problem, but you should be able to fix it by using solutions from this article.
  • HP, Dell, Lenovo, Asus, Acer, Toshiba laptop camera showing black screen on Windows: This can be a driver or a hardware-related issue.
  • Webcam shows mirror image, inverted image, picture upside down: This is usually caused by a bad driver or your webcam settings.
  • Webcam not working, not detected: If your webcam isn’t detected, be sure to connect it to a different port and update your drivers.
  • Laptop camera showing black screen Windows 10, Windows 11, Windows 7: The solutions below are applicable to all Windows iterations, so make sure to check them out.
  • Camera black screen Android: Try to restart your phone or apply any software updates available.

Without further ado, let’s just jump right in!

How do I fix my camera black screen?

1. Download the latest webcam driver

  1. Go to your manufacturer’s website to download the latest of your webcam driver.
    intel camera windows 10 webcam black screen
  2. If a new version of drivers for Windows 10 is available you will need to uninstall the current drivers you use and install the new drivers from the website

If the webcam camera of a laptop like HP, Dell, or Lenovo is showing a black screen, you can proceed to your webcam manufacturer’s website to download the latest driver. This should help fix the driver issue. try it.

Use a third-party driver downloader

We also strongly recommend using dedicated software, in order to make sure that your PC won’t have any problems caused by installing the wrong drivers.

Rid yourself of manually searching for the correct drivers with specialized driver updating software. Any driver that is found broken will be compared to its built-in database and updated accordingly.

2. Update your webcam driver

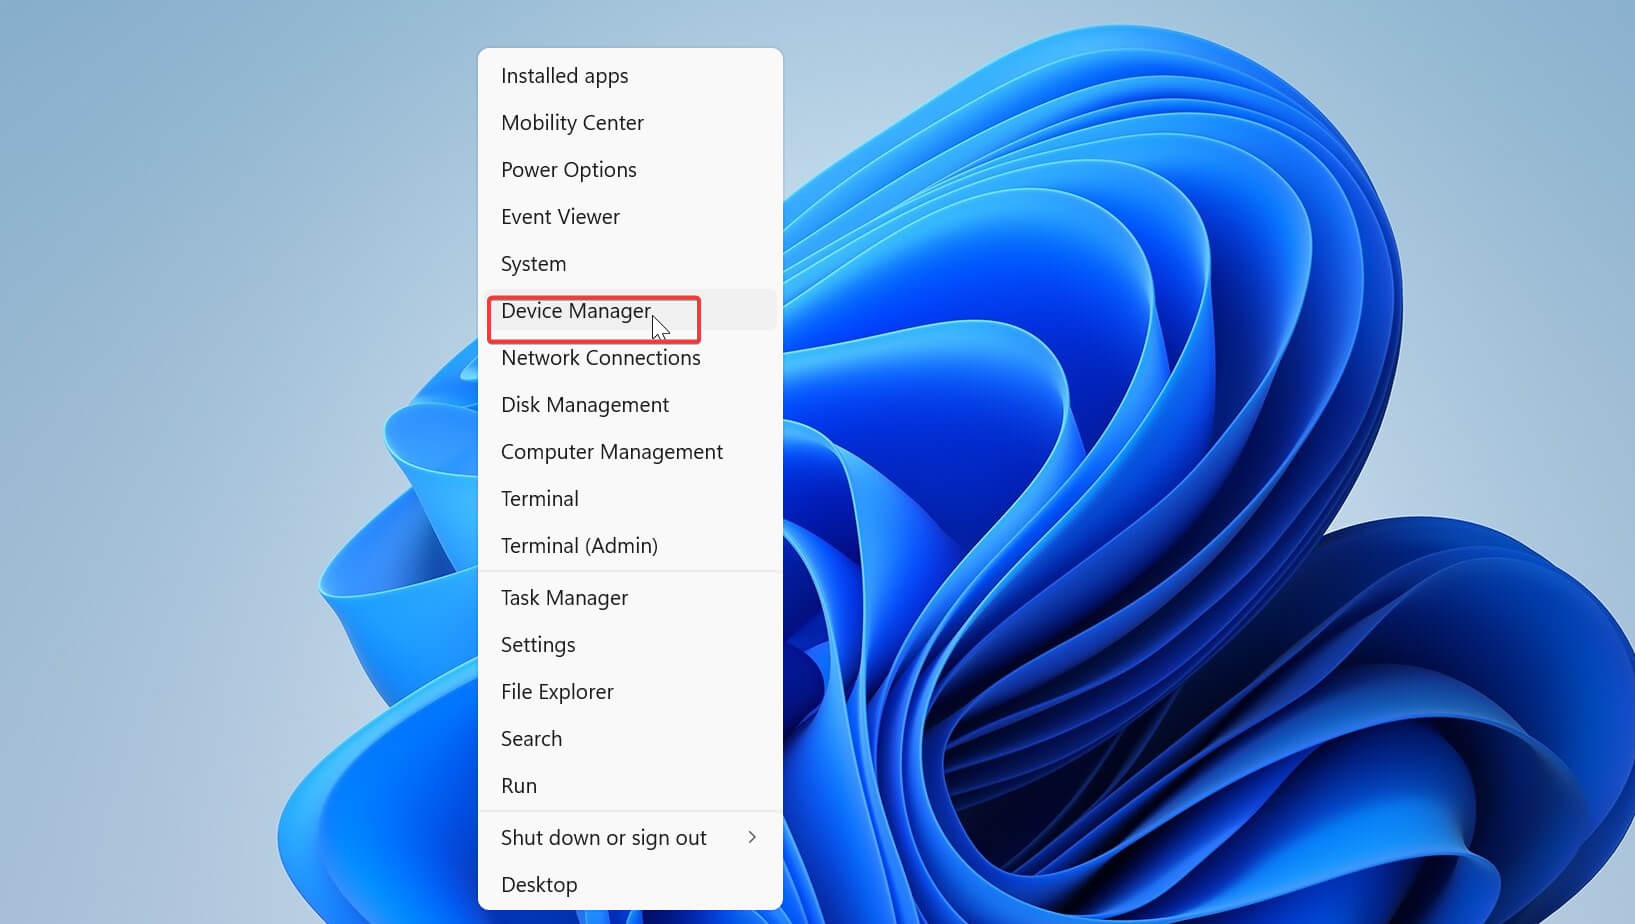
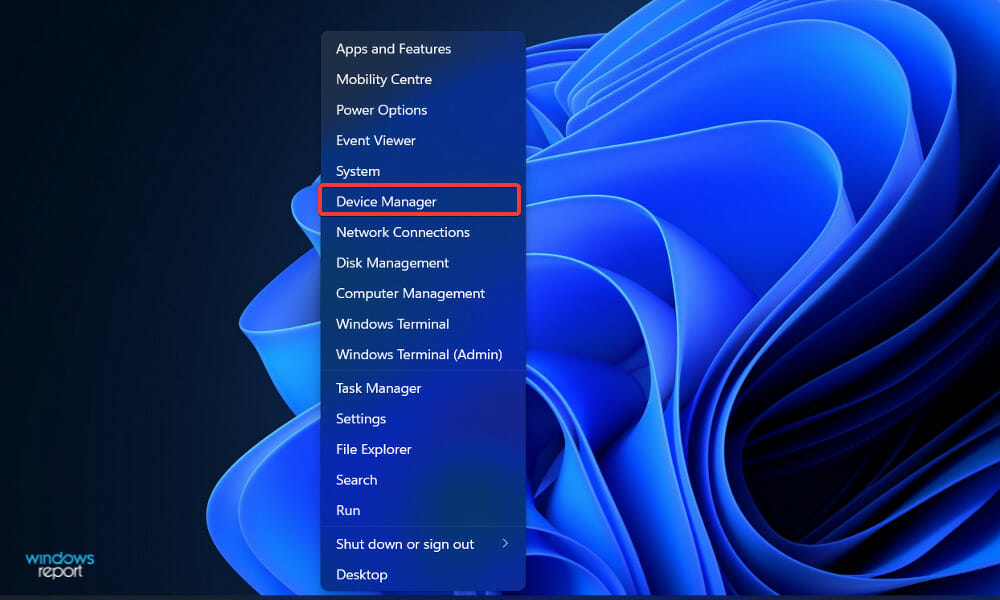
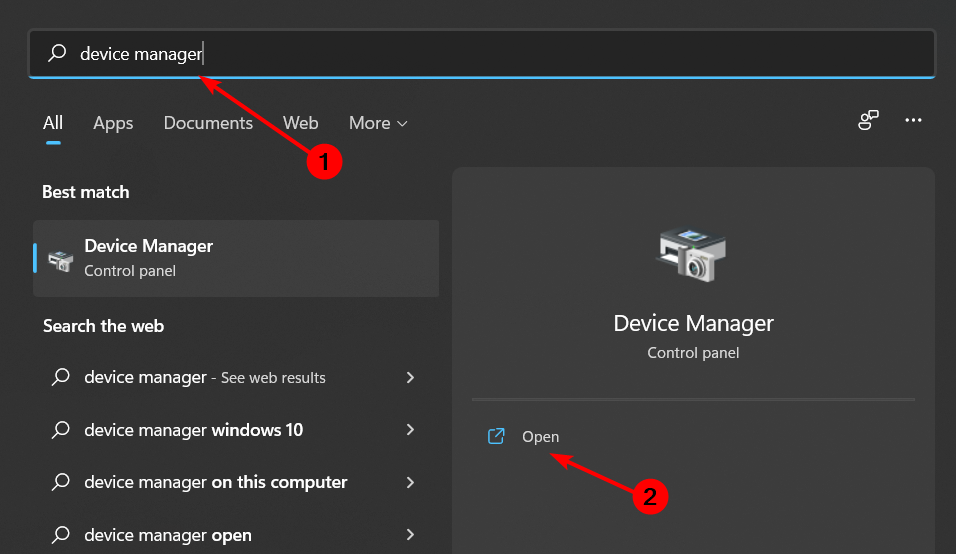
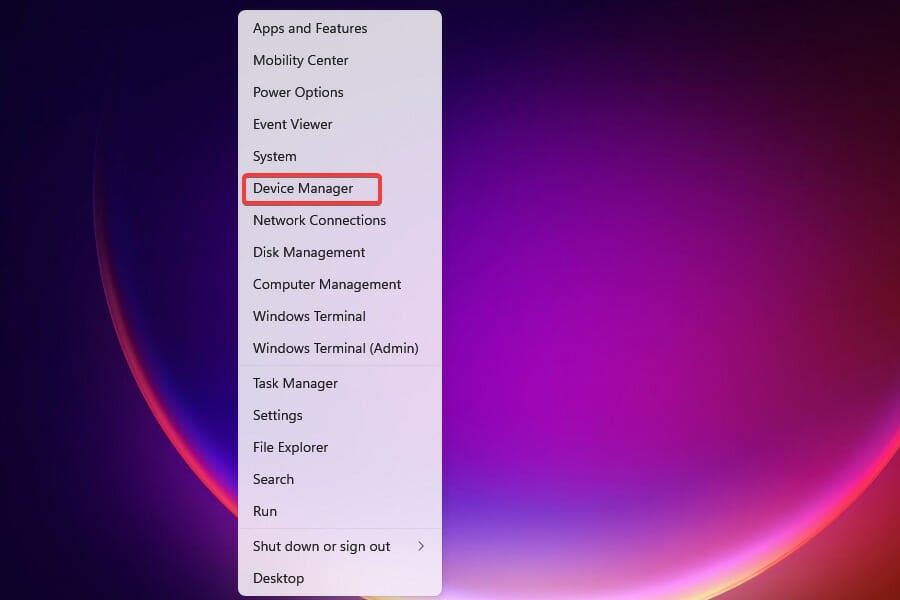
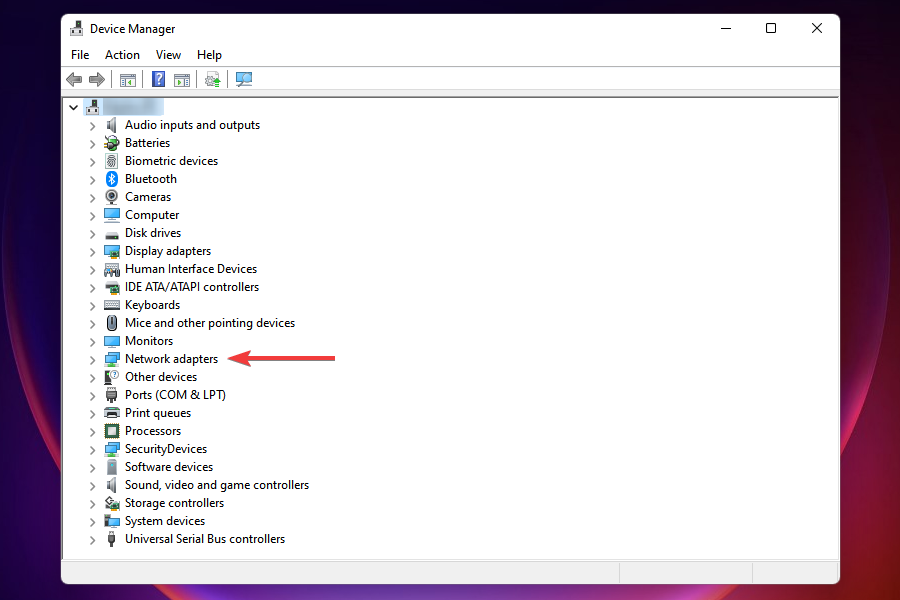
  1. Press the Windows key + X and select Device Manager.
    device manager
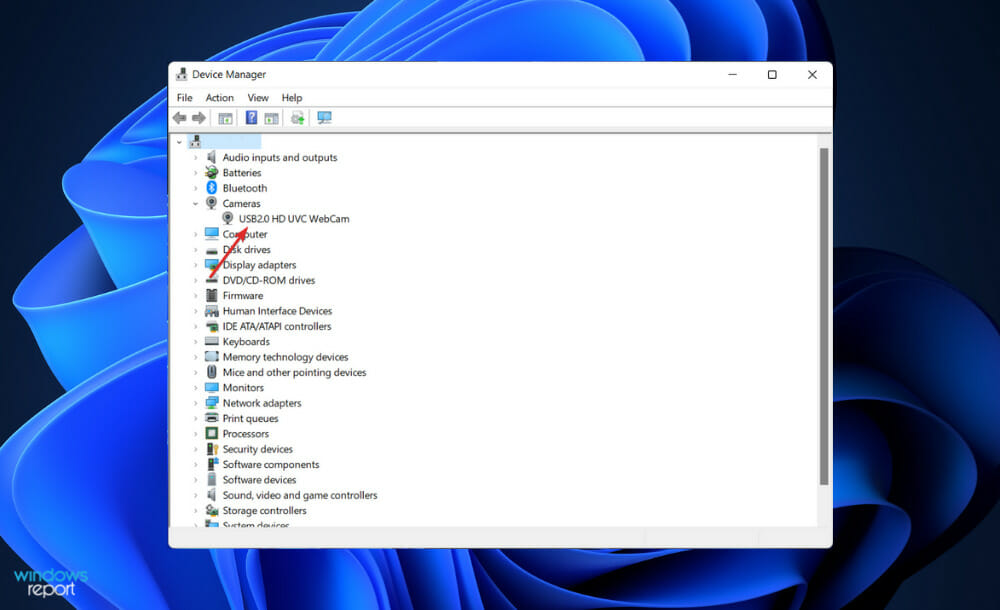
  2. Double-click on the Cameras option to expand it.
    cameras
  3. Right-click on the drivers there and select Update driver.
    update driver
  4. Select the Browse my computer for drivers.
    browse my computer  camera windows 10 webcam black screen
  5. Select the Let me pick from a list of available drivers on my computer option.
    let me
  6. Now, choose the USB Video device option.
  7. Finally, click the Next button and wait for the process to finish.
    usb video

The webcam black screen issue on Windows 10 is usually down to driver issues. Updating your drivers should help fix the issue in this case. Remember to restart your PC after the update.

3. Update your recording application

  1. Press the Windows key + I to open the Settings app.
  2. Select the Apps option.
    apps camera windows 10 webcam black screen
  3. Look for the app that is experiencing the issue and click on it.
  4. Click the Uninstall button.
    uninstall zoom
  5. Now, go to the Microsoft Store to download the latest version of the app.

If you are facing the camera black screen issue on apps like Zoom or Skype on Windows 10, you can uninstall and reinstall the app. This is because the issue might be with the version of the app you are using.

So, reinstalling the latest version should solve the problem.

4. Uninstall your webcam driver

  1. Open Device Manager.
  2. Expand the Cameras option by clicking the arrow next to it.
    cameras
  3. Right-click your webcam driver and choose Uninstall device.
    uninstall device camera windows 10 webcam black screen
  4. Click the Uninstall button to proceed.
    uninstall button
  5. Finally, click on Scan for hardware changes icon and wait while Windows installs the necessary drivers.
    scan for

After reinstalling your drivers, check if the laptop camera is still showing a black screen on Windows 10.

Keep in mind that Windows 10 can sometimes update your drivers automatically in the background causing this issue to reappear.

If this happens, you’ll have to repeat this process and uninstall your driver once again.

To prevent your webcam driver from automatically updating be sure to check our guide on how to prevent certain drivers from updating.

5. Add an additional light source

According to users, sometimes you might fix this problem simply by adding an additional light source.

If your webcam shows a black screen, simply use a flashlight or any other light source, and point it at your camera. After doing that your webcam should start working again.

Keep in mind that this is a crude workaround, but if this solution works for you, you need to repeat it whenever you want to use your webcam.

6. Remove your laptop battery

Sometimes, the camera black screen issue on Windows 10 might be down to some glitches with your laptop.

To fix this, some users suggest that you disconnect your laptop from the power outlet and remove its battery.

Now, press and hold the power button for 30 seconds or more. You might have to repeat this process a couple of times in order for this solution to work.

After doing that, the laptop battery back into your laptop and start it normally. Now your webcam should start working again.

If the issue still persists, you might have to remove your battery and repeat the entire process again.

7. Change your Exposure settings

  1. Open Skype and go to Tools and select Options.
    Webcam show black screen no audio
  2. Now navigate to Video settings and click on Webcam settings.
    Webcam shows green screen
  3. Go to the Camera Control tab and check the Auto checkbox next to Exposure.

Keep in mind that every recording application is different, so you might not have the Exposure option available.

This isn’t a universal solution, and you’ll have to repeat it for every video recording app that you want to use.

8. Make sure that your camera is compatible with your PC

If your camera shows black screen on Windows 10 or 11, the problem might be a compatibility issue. Some older webcams might not be fully compatible with your PC, and that can cause this issue to appear.

To check if the compatibility is the issue, we advise you to try your webcam on a different device and see if the issue reappears.

If the issue manifests on another PC, the camera might not be fully compatible with Windows 10, and your only solution is to replace it.

9. Disconnect other USB devices and connect the camera to a different port

If you’re using a USB camera, you should know that sometimes other USB devices can cause interference. This can occur if you’re using a USB hub.

You can check out our useful article about the best USB hubs if you are thinking about changing your current one.

To fix the issue, it’s advised to disconnect unnecessary USB devices and check if your webcam works.

If the issue still persists and your webcam shows a black screen, you might want to try connecting it to a different port. Try connecting your camera to every available port and check if that solves the issue.

The solutions above are all you need to find and fix your webcam if it only shows a black screen since the update to Windows 10.

How can I fix camera showing black screen on Windows 11?

  1. Press the Windows key + X and select Windows Terminal (Admin).
  2. Type the command below and hit Enter: get-appxpackage *Microsoft.WindowsCamera* | remove-appxpackage
  3. Finally, go to the Microsoft Store to download the camera app again.

After reinstalling the app, you camera should start working normally again on Windows 11.

Like Windows 10, the camera black screen issue on Windows 11 can also be due to outdated or faulty drivers.

The driver update process is pretty much the same in the new OS so you will find it very easy to perform by following the steps on our Windows 10 guide.

Also, other solutions in this guide should work seamlessly on Windows 11. So you can try them if updating your drivers does not work.

How do I restart my laptop camera?

The easiest way to restart your built-in webcam on a Windows 10 or 11 laptop is to restart your PC. Also, you might need to uninstall and reinstall the camera drivers as shown in this guide.

However, if you want to restart the camera for a particular app or program, you can turn off the access from settings and turn it on again.

The camera black screen issue on Windows 10 and 11 can be exasperating, as it restricts some apps like Zoom and Skype. But with the fixes in this guide, you should be able to restore normalcy easily.

While still on camera issues, you might be interested in our guide on what to do if the webcam is not working in Windows 11.

Please post below in the comments section of the page if you encountered any other issues to your webcam and the fixes posted above don’t work for you.

Windows Cannot Connect to the Printer? 6 Best Solutions

Many reported that Windows could not connect to the printer, getting error messages such as windows Could not connect to the printer check the printer name and try again. This can prevent you from performing any future printing tasks.

It can be a major problem, but luckily, there are few solutions that can help you with that.

How to fix Windows cannot connect to the printer?

Before we try anything, ensure that your system is up to date to prevent any issues.

1. Check if your printer is an Unspecified Device and update the drivers

1.1 Find out if your printer is listed as an Unspecified Device

  1. Click the Start button, type control, and select Control Panel from the results.
  2. Choose Devices and Printers.
  3. Scroll down and see if your printer is under the Unspecified section.

1.2 Update drivers

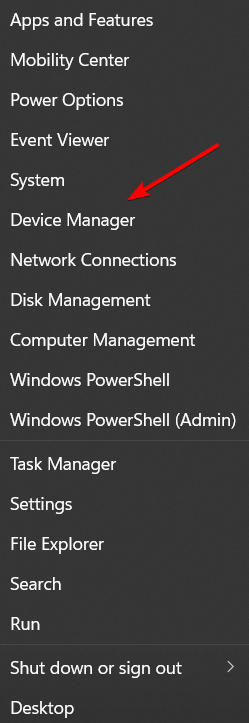
  1. Right-click the Start button and select Device Manager from the list.device-manager bluetooth won't turn on windows 10
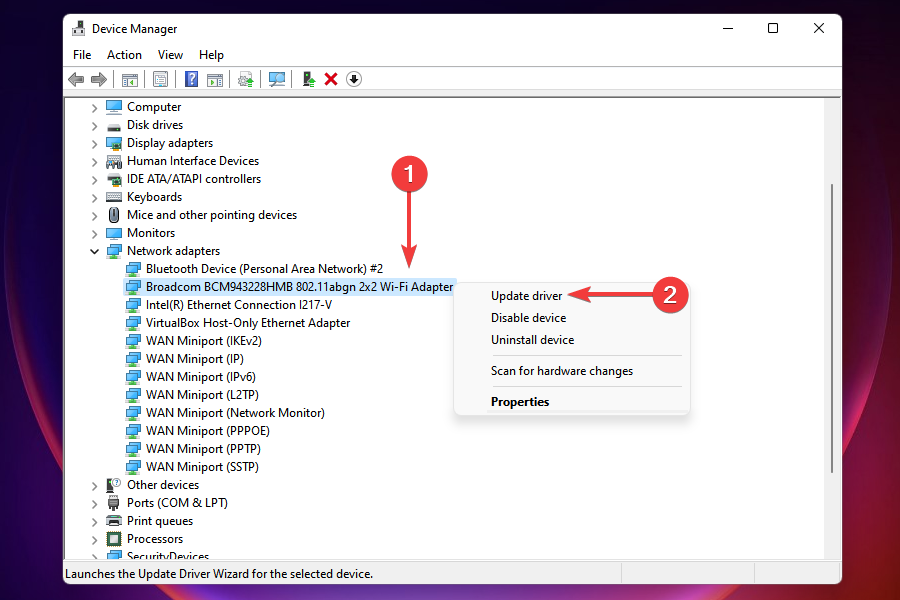
  2. Expand the Printers or Printer queues, find your printer in the list, right-click it, and select Update driver. If you don’t find it in the mentioned sections, you can also look under USB controllers or LPT on your PC.
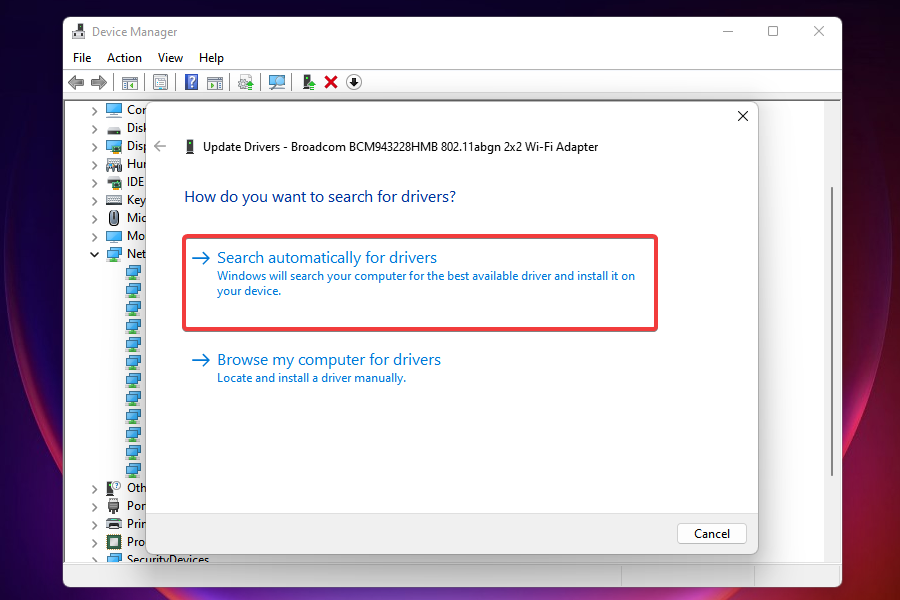
  3. Now select Search automatically for drivers.
  4. If the system finds a new driver, it will install it, and you will have to restart your PC for the changes to take effect.

Another method you can use to update your drivers is a tool such as Outbyte Driver Updater. Install it, and you’ll automatically update all outdated drivers with just a few clicks.

This method is perfect if you don’t want to search and download drivers manually, so be sure to try it out.

⇒ Get Outbyte Driver Updater

2. Uninstall and reinstall your printer

2.1 Uninstall the printer

  1. Select Start and click on Settings.
  2. Choose Devices.
  3. Click Printers & Scanners on the left pane.
  4. Find your printer and click on it, then select Remove device.

If you have problems with this step, we also have an article on what to do if you can’t remove the printer in Windows 10.

2.2 Reinstall the printer

  1. Click the Start button and select Settings.
  2. Choose Devices.
  3. Click Printers & Scanners on the left pane.
  4. Select Add a printer or scanner.
  5. If the system detects your printer, select it and go on with the installation. If not, you can click on The printer I want isn’t listed.
  6. Now you have plenty of options for every situation, including a network or a Bluetooth printer. In our example, we chose to Add a local printer because it’s the most common. Select the appropriate option for you and click Next.
  7. Next, select the port with your printer from the drop-down menu and click Next. Nowadays, printers use USB ports, which may be different in your situation. If you don’t know which one is, consult the printer documentation or contact the manufacturer for the information.
  8. Try to find the manufacturer and the model in the list. If there aren’t many to choose from, clicking the Windows Update button will add a lot more, but the process takes a few minutes.
  9. You can also click on the Have Disk button if you have the software disk that came with the printer. After you select the printer, click Next.
  10. Select the printer name (it’s already there, but you may change it) and click Next.
  11. The system will install the printer in a few seconds. You will be able to decide if you want to share the printer or not but in the end, click Next.
  12. You can click the Print a test page button in the last window and select Finish. Printing the page will tell you if the printer works, so we recommend using it.
Note icon NOTE
You can print a test page to ensure the printer works correctly. Check the device’s manufacturer’s website for troubleshooting or driver updates if it is installed but doesn’t work.

3. Temporarily disable your antivirus security software

  1. Click the Start button, type security, and click on Windows Security from the results.
  2. Now select Virus and threat protection.
  3. Scroll down and click on Manage settings under Virus & threat protection settings.
  4. Turn off Real-time protection.

Another option is to uninstall third-party software on your PC, such as computer cleaners or antivirus tools.

When protecting your PC – use an antivirus- temporarily disable it because you need it to prevent your computer from security threats.

Immediately after fixing the connection error, you can enable it back. However, if the antivirus is indeed causing this issue, perhaps this is a good moment to consider switching to a different one.

Tip icon Editor’s tip
If you’re looking for a reliable antivirus that won’t interfere with your system, give it a try to ESET HOME Security Essential.

4. Check Default printer settings

  1. Click Start and select Settings.
  2. Choose Devices.
  3. Click Printers & Scanners on the left pane.
  4. Scroll to Let Windows manage my default printer and uncheck the box.

5. Clear spooler files and restart spooler service

5.1 Stop the Print Spooler service

  1. Click Start, type services, and click on the app from the results.
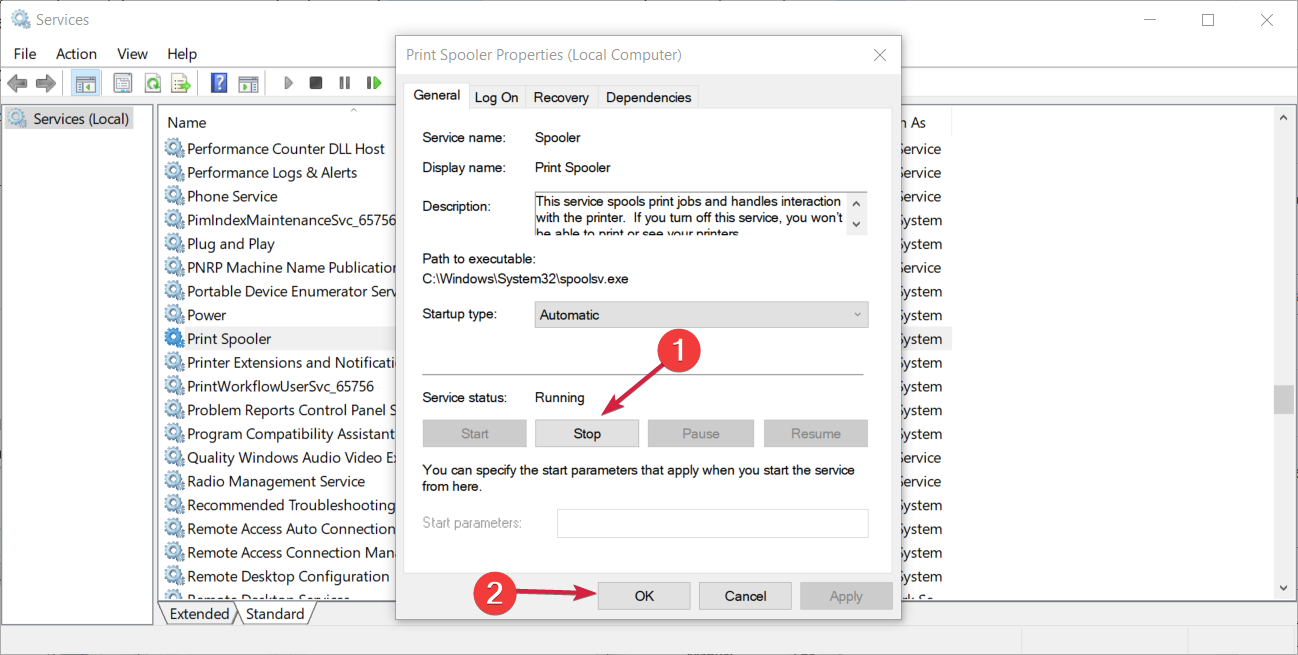
  2. Under Services, double-click Print Spooler.
  3. Select Stop, then OK.

5.2 Delete the contents of the Spool folder and restart the Print Spooler service

  1. Press the Windows key + E to start File Manager, then go to the following path (you will need administrative privileges to access the folder): C:\Windows\System32\spool\PRINTERS
  2. Delete all the folders in the folder if you find any. In our example, you can see that the folder is empty, but it might be different in your case.
  3. Click the Start button, type services, and select the Services app from the results.
  4. Under Services, double-click Print Spooler again.
  5. Click Start.
  6. Go to the Startup Type list and select the Automatic box.
  7. Click Apply, then click OK.

We also have a helpful article that will guide you on what to do if the Print Spooler keeps stopping on Windows 10.

6. Use the built-in Printer troubleshooter

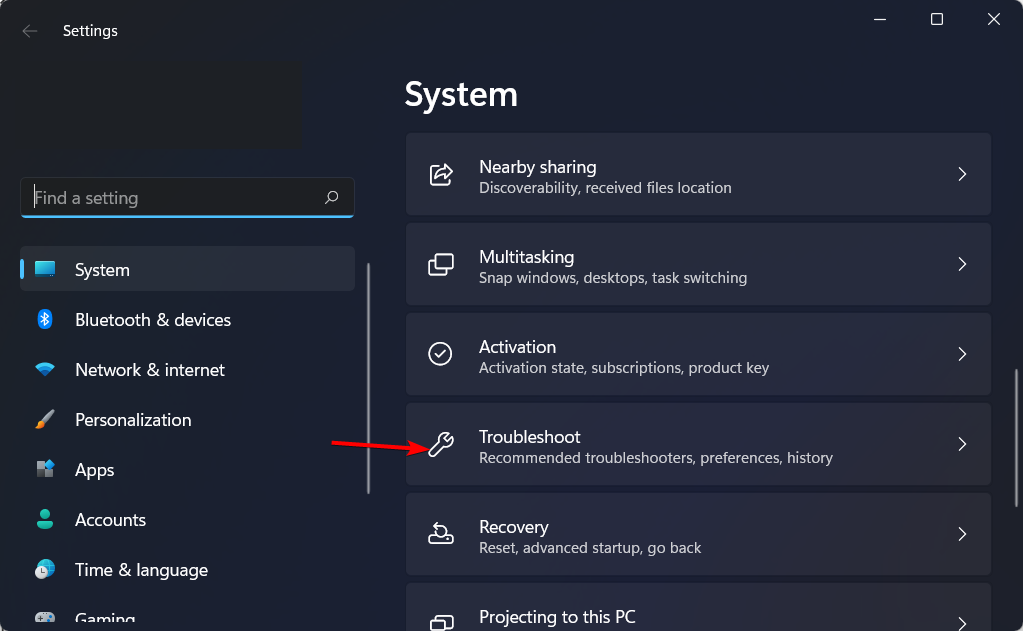
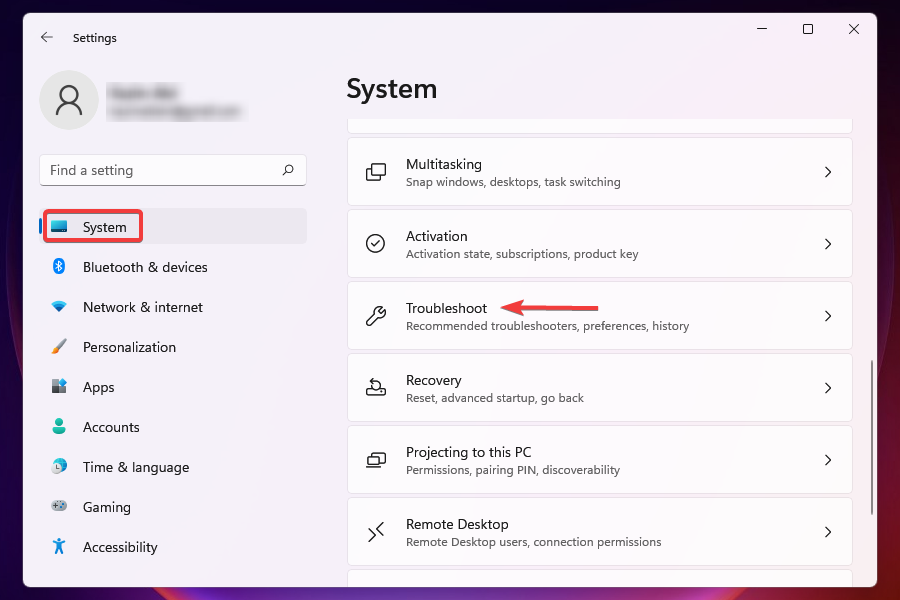
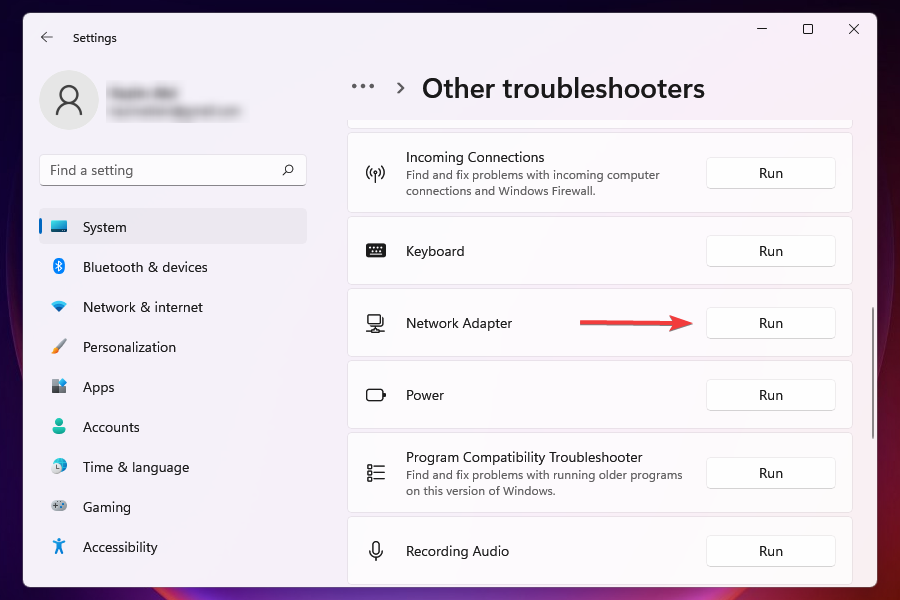
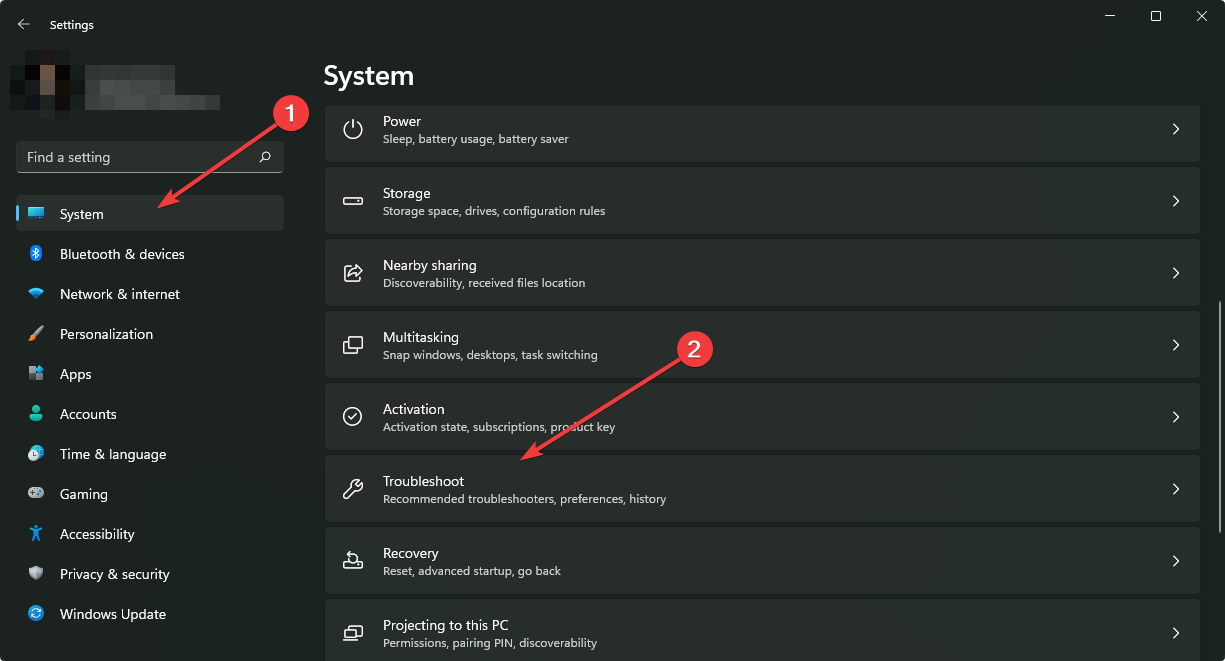
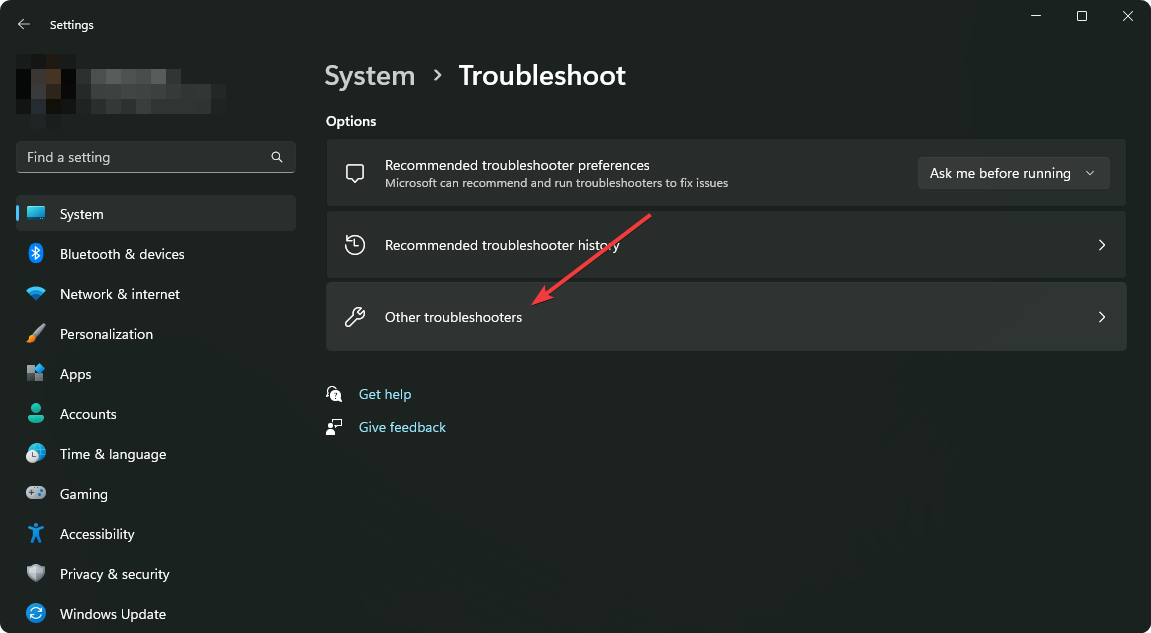
  1. Press Windows + I, then go down to the Troubleshoot section and click it.troubleshoot-opt-w11 0xa00f4244 nocamerasareattached
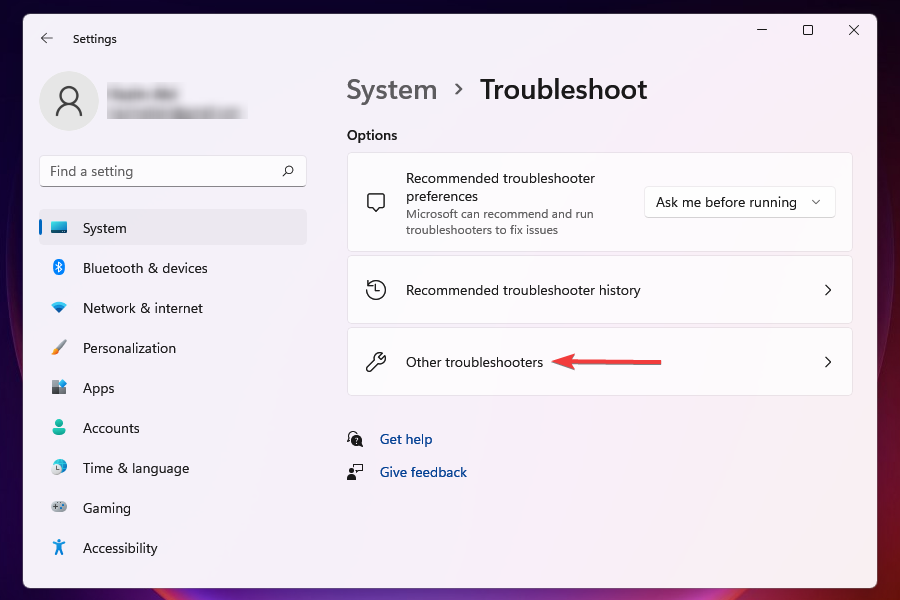
  2. Choose Other troubleshooters from the right side.
  3. Find the Printer troubleshooter and click Run next to it.printer-run windows cannot connect to the printer

Thus, it is one of the most efficient and fast solutions you can try if you come across Windows cannot connect to the printer in Windows.

How do I know what IP address my printer is on?

  1. Press Windows, then type control and open the top result.
  2. Here, navigate to Hardware and Sound.hardwa-resound windows cannot connect to the printer
  3. Next, go to Devices and Printers.devices-printers windows cannot connect to the printer
  4. Right-click your printer and select Properties.prop-print windows cannot connect to the printer
  5. Then look in the Web Services or Ports tab for your IP address.

How to access the printing preferences in Windows 10?

  1. Click the Start button and select Settings.
  2. Select Printers and scanners from the left pane.
  3. Click on your printer and select Manage.
  4. Now choose the Printing preferences option.
  5. In the next window, you can tweak the settings as you like, but remember that it may look different for your printer model and manufacturer.

If none of our solutions worked, contact your printer’s manufacturer for more troubleshooting and support based on your specific issue.

Because the main problem when it comes to such an issue is a malfunctioning driver, we also recommend consulting our guide on how to remove a corrupted printer driver.

We also have a guide on what to do if Windows can’t find the printer, so be sure to check it out for more solutions.

We also have a guide on Printer sharing not working, and a useful guide on what to do if you’re unable to install printer on Windows.

Share with us your experiences in the comments section below, and write us any questions or suggestions you might have.

Error 500 on Dropbox: How to Fix This Connection Issue

Dropbox is a cloud-based platform that allows you to store and share files. However, users have complained about the Dropbox error 500 preventing them from using it. Also, users report that the Dropbox bug revives deleted files removed for up to five years.

What causes Dropbox error 500?

The Dropbox Error 500 message can pop up when using the Dropbox app on your PC. It can occur in several instances, such as Dropbox error 500, something went wrong…, Dropbox couldn’t upload file error 500, etc.

Various factors can cause the error 500 to appear in Dropbox. Some are:

  • Network connection issues – Issues like network congestion and low bandwidth can cause the error 500 on the Dropbox app. Since it is a cloud-based platform, it needs a stable and fast internet connection to run smoothly.
  • Corrupt installation file – Many things can go wrong with the Dropbox program on your PC if the installation file is compromised. It affects its activities and can cause the app components to malfunction, resulting in Dropbox error 500.
  • Corrupt system files – When your system files are corrupt, they can impede the process of Dropbox on your PC. Likewise, the Dropbox app can get corrupted due to the corrupt system files, causing it to crash or run into the error 500 when initiated.
  • Browser cache – If your browser cache is corrupt, you may run into the Dropbox error 500. It can occur if the cache files are too old.

Nonetheless, there are some troubleshooting steps you use to fix Dropbox error 500 and get Dropbox to work again,

How do I fix the Dropbox error 500?

Go through the following preliminary checks:

If you can’t fix the error, try the solutions below.

1. Run a System File Checker (SFC) scan

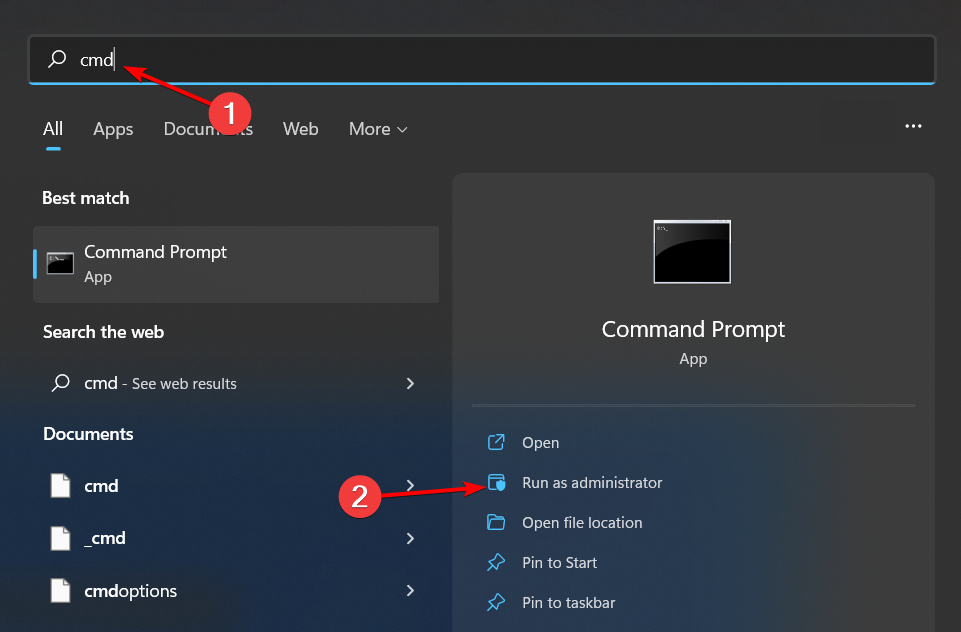
  1. Left-click the Start button, type command prompt, and select Run as administrator.
  2. Click Yes on the User Account Control prompt.
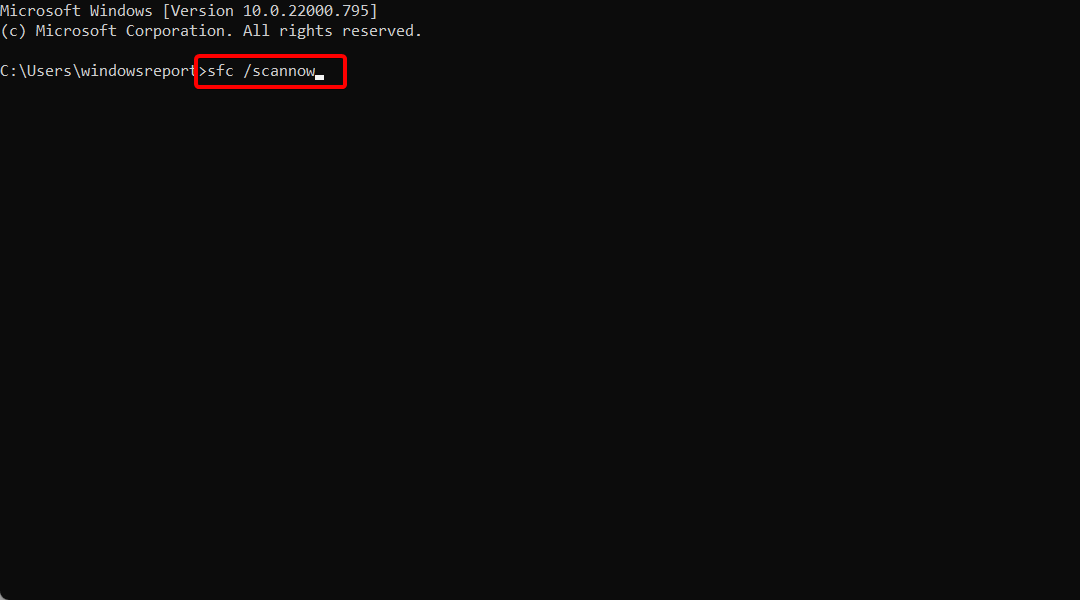
  3. Type the following and press Enter: sfc /scannow
  4. Restart your PC and check if the Dropbox error 500 appears again.

The System File Checker scan will repair corrupt system files causing the Dropbox client to run into Error 500. Read our guide on what to do if nothing happens when you select run as administrator on Windows 11.

2. Power cycle your router or modem

  1. Hold the power button on your router for about 10 seconds.
  2. Unplug your router’s Ethernet and power cable for seconds to allow it to power off.
  3. Plug in the needed cables to your router and connect it to a power outlet.
  4. Press the Power button to turn it on.
  5. Reconnect to the network and check if the error persists.

Power cycling the router or modem will refresh its network and allow it to connect faster. It will fix Dropbox’s no internet connection error on Windows 11.

3. Check for Router Firmware updates

The Router’s firmware can become outdated and get plagued by bugs causing its network to be unstable. Hence, you need to update its firmware to provide the patches and updates.

Hence, go through the router manual and check for router Firmware update procedures. Additionally, we recommend you contact your router’s manufacturer for instructions on updating the device.

4. Clear your browser’s cache and cookies

  1. Launch the Chrome browser. Click the Menu button, select More Tools, then click Clear browsing data.
  2. Choose a time range for the data to be cleared, then select All time to delete everything.
  3. Check the boxes for Cookies and other site data and Cached images and files, then click Clear data.
  4. Close and relaunch your browser.

Clearing the browser’s cache and cookies will delete the corrupt files that may prevent you from using Dropbox web.

5. Uninstall the Dropbox app

  1. Left-click the Start button, type Control Panel, then press OK to open it.
  2. Click on Programs and Features.
  3. Find Dropbox, right-click on it, then select Uninstall from the drop-down.
  4. Follow the onscreen instructions to complete the installation.
  5. Restart your PC and check if the error 500 still shows on your computer.

Uninstalling Dropbox will help stop its processes on your computer and fix installation fl issues.

You can check our guide on uninstalling programs that cannot be uninstalled on Windows 11.

In conclusion, you can read about the Dropbox error: Your computer is not supported, and some simple solutions. Our readers may also be interested in fixing the Dropbox failed to uninstall on their PCs.

If you have more questions or suggestions, kindly drop them in the comments section.

A Driver Cannot Load On This Device [Solved]

Drivers are a critical piece of software that facilitates the relay of commands between the OS and the respective device. But what do you do if you encounter the A driver cannot load on this device error in Windows?

You will see this error message when booting the OS, and its effect may or may not be distinctly visible initially, depending on the driver affected. But, over time, the driver may stop functioning with the respective device.

So, you must troubleshoot the error. Also, in most cases, the malfunctioning driver is listed in the error box, which makes it easy for you to proceed.

How can I fix A driver cannot load on this device?

1. Update the affected driver

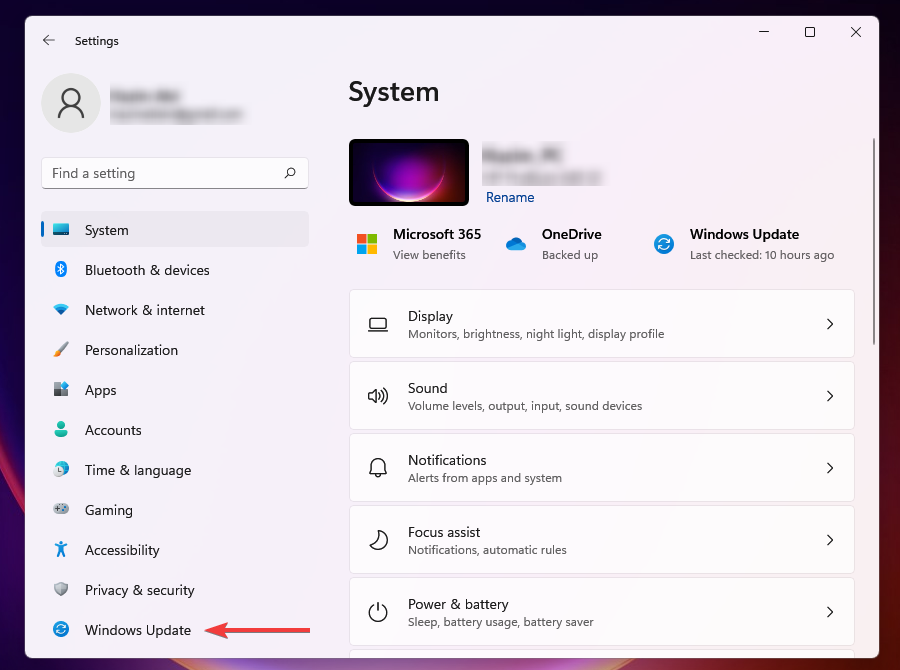
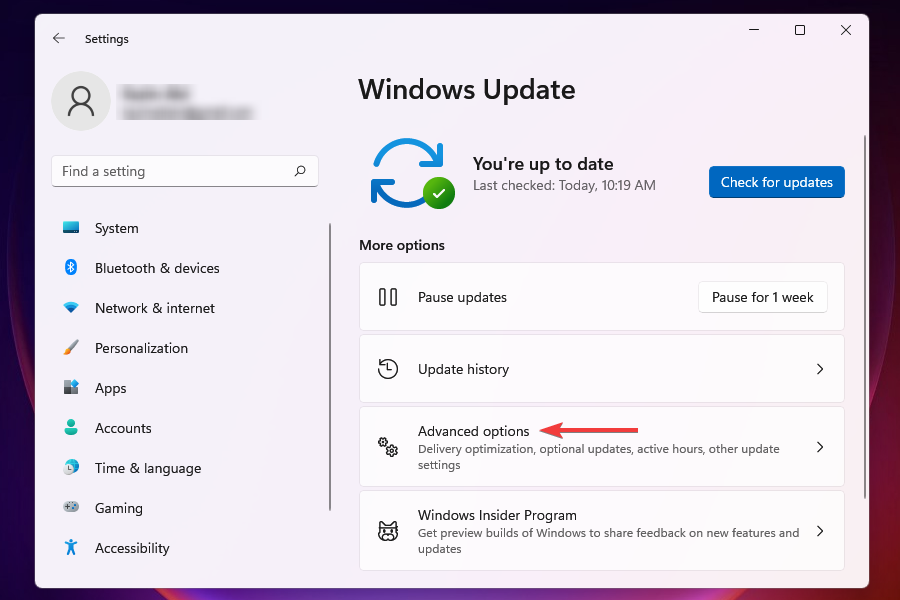
  1. Press Windows + I to launch the Settings app, and select Windows Update from the tabs listed in the navigation pane on the left.Windows Update to fix windows 11 a driver cannot load on this device
  2. Now, click on Advanced options on the right.Advanced options
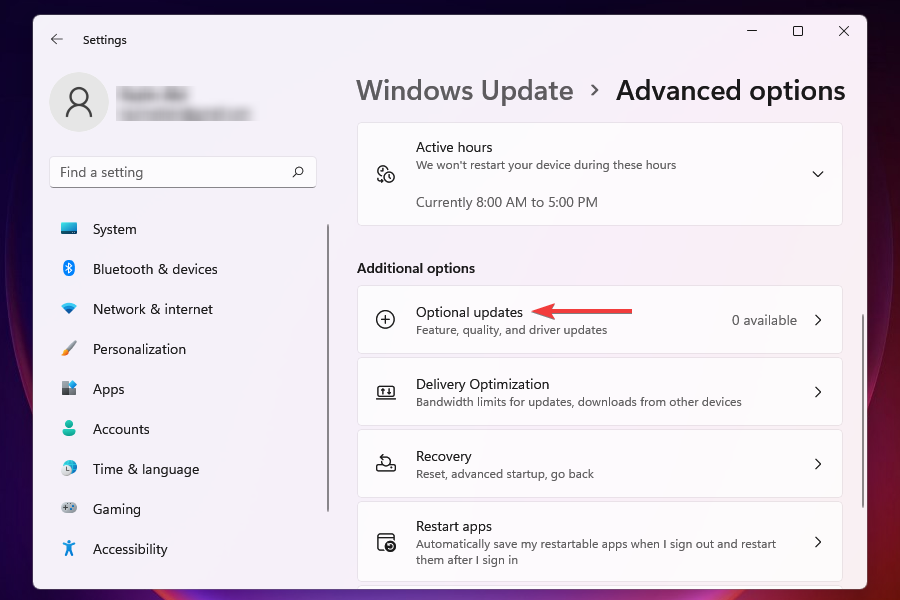
  3. Scroll down and click on Optional updates under Additional options.Optional updates to fix windows 11 a driver cannot load on this device
  4. Click on Driver updates here.Driver updates
  5. If you see an update for the problematic driver, tick the checkbox for it, and click on the Download & install button at the bottom.Update driver to fix windows 11 a driver cannot load on this device
  6. Once done with the installation process, restart the computer for the changes to come into effect.

Most of the time, simply updating the driver is likely to fix the A driver cannot load on this device error in Windows 11. So, check if there’s an update listed for the driver from Windows itself and install it.

In case you don’t find a newer version listed in the Windows Update section, try the other ways to update the driver. Here, you just need to check if the device manufacturer has uploaded the latest driver version on their website.

2. Disable the memory integrity feature

  1. Press Windows + S to launch the Search menu, enter Windows Security in the text field at the top, and click on the relevant search result.Windows security to fix windows 11 a driver cannot load on this device
  2. Next, click on Device security from the various options listed here.Device Security
  3. Click on the Core isolation details option at the top.Core isolation details
  4. Now, turn off the toggle for Memory integrity.Disable memory integrity
  5. Finally, restart the computer for the changes to fully come into effect.

Memory integrity is a security feature in Windows that prevents the installation of incompatible or potentially harmful drivers.

So, if a bad driver is trying to gain access, the feature will block that thereby leading to the A driver cannot load on this device error in Windows 11 or Windows 10.

Here are some variations of this error:

  • ene.sys driver cannot load
  • vmdrv.sys cannot load
  • ssgdio64.sys cannot load
  • iqvw64e.sys cannot load
  • mslo64.sys cannot load
  • amsdk.sys cannot load
  • driver cannot be loaded reinstall the program may fix the issue

Also, for more details on driver-related issues, especially if you encounter an error stating An exception occurred in the driver: Could not find driver (driver cannot load on this device), refer to our comprehensive guide.

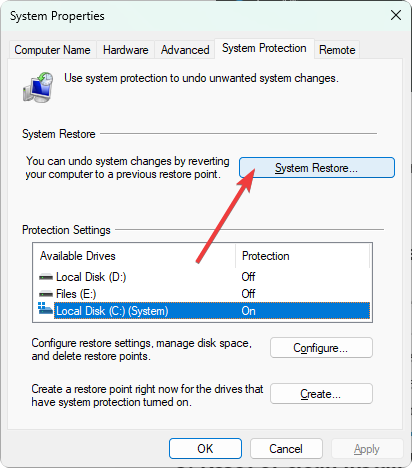
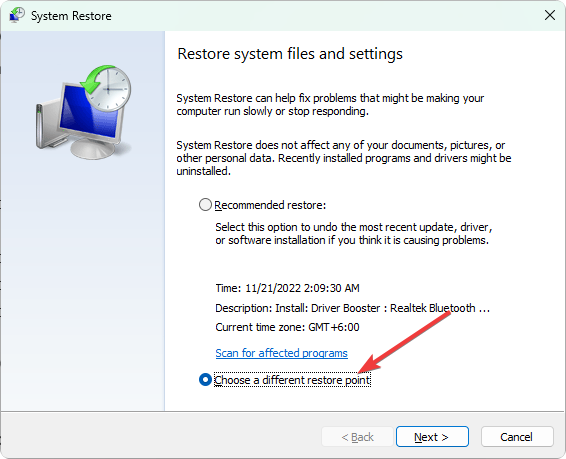
The two methods here have fixed the error for most users. However, if it persists, you can perform a system restore or reset Windows 11 to its factory settings.

Find out what to do if a driver is missing when installing Windows, since this would prevent you from installing the latest iteration and upgrading the OS.

Tell us which fix worked and which driver you had trouble with in the comments section below.

DISM Error 87 On Windows: Causes & Quick Fixes

Windows users have a problem dealing with many error codes caused by different issues. For example, DISM Error 87 is a command-line error that appears on Windows 11 and Windows 10.

This article will look at what causes and several ways of fixing the DISM Error 87.

Why am I getting Error 87 when trying to run DISM?

There are several causes of this error when you input any DISM command in the Command Prompt. These are some of the common ones:

  • Mistype when entering the DISM command line, especially spellings and spacing. Most users perform simple mistakes like incorrect spacing between the commands, which raises the error.
  • Improper installation of Windows causes this error due to problems with the Command Prompt.
  • Users tend to block some essential updates when performing Windows updates, which raises bugs that throw that error.
  • When using the wrong versions of DISM, it raises an error since the DISM version is old.
  • You get an error if you use the standard Command Prompt (without administrative privileges). This is because it limits the user from accessing the administrative parts of the prompt.

Here are some of the related issues you might come across:

  • Error 87 The parameter is incorrect
  • DISM Error 87 The restorehealth option is not recognized in this context
  • Error 87 the cleanup-image option is unknown

Now that you have a basic understanding of the DISM Error 87 problem in Windows 11 & Windows 10, let’s head to the solutions.

 How can I fix the DISM Error 87?

1. Type the DISM command correctly

The first thing you have to verify is whether to commands are correct. For example, if you input the wrong command, make a spelling mistake, or add a space at the wrong point, DISM Error 87 might appear in Windows.

Here are the correct commands for the DISM tool:

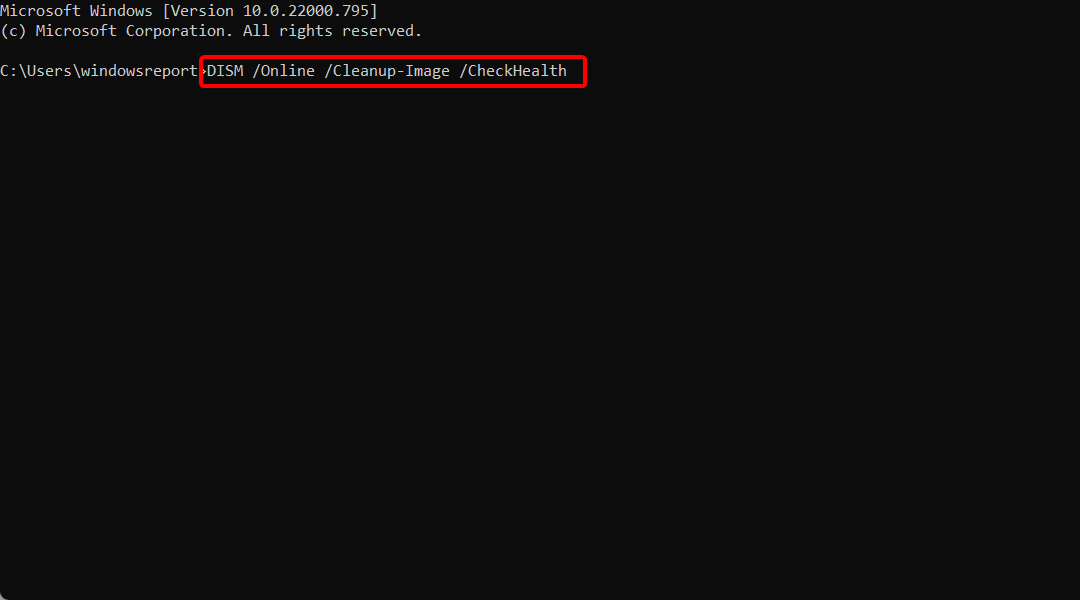
DISM /Online /Cleanup-Image /CheckHealth DISM /Online /Cleanup-Image /ScanHealth DISM /Online /Cleanup-Image /RestoreHealth

There are other DISM commands as well, but these should provide you with a basic understanding of how to use them.

2. Update your Windows

  1. Press Windows + I to open Settings and select Windows Update from the tabs on the left. Windows Update
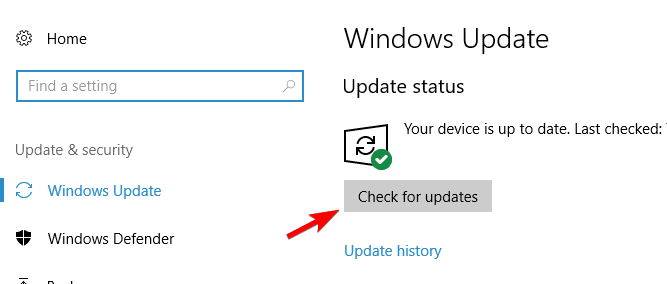
  2. Now, click on Check for updates.check for updates to fix dism error 87 windows 11
  3. If an update is listed after the scan, click on Download & install to get it.download & install to fix dism error 87 windows 11

After updating the OS, verify if the DISM Error 87 is fixed in Windows 11. If it still appears while running the tool, head to the following method.

3. Use a third-party tool

Some system problems, such as TLS, can be highly frustrating, and the reason for these errors is often unknown.

The ideal solution is to use reliable third-party repair software so the process would run efficiently and error-free.

4. Run the command line as an administrator

  1. Press Windows + S to open the Search menu, enter Command Prompt in the text field, and click on Run as administrator on the right.Run as administrator to fix dism error 87 windows 11
  2. Click Yes in the UAC prompt that appears.Yes
  3. Now, try running the DISM tool.

Launching Command Prompt as an administrator will provide all the administrative rights to run the DISM tool and should fix Error 87 in Windows 11.

5. Use the correct DISM version

  1. Head to the official Windows Assessment and Deployment Kit(WADK) website and click Download the Windows ADK.
  2. Click Run to install the downloaded executable file. It has deployment tools that create the Deployment and Imaging Tools environment to make the running of DSIM commands successful.
  3. Click Next and follow the prompts to finish the installation.

6. Check for corrupt system files

  1. Press Windows + R to open the Run command, enter cmd in the text field, press the Ctrl + Shift keys, and then click OK.cmd to fix dism error 87 windows 11
  2. Click Yes in the UAC prompt.
  3. Type this command and hit Enter: sfc /scannow
  4. Wait for the verification process, and check if any violations were found and resolved.

While it’s recommended that you first run the DISM tool and then SFC (System File Checker) scan, in this case, using just the latter might help. After completing the SFC scan, check if DISM Error 87 is fixed in Windows 11.

7. Perform a disk check

  1. Press Windows + S, enter Command Prompt in the text field, right-click on the relevant search result, and select Run as administrator.run as administrator to fix dism error 87 windows 11
  2. Click Yes in the UAC prompt.
  3. Type/paste the following command and press Enter:chkdsk C:/rcheck disk
  4. If you are asked to schedule the scan the next time the computer restarts, press Y, and then hit Enter.schedule scan to fix dism error 87 windows 11

Let the Check Disk process run uninterrupted until it’s completed, and then verify if the DISM Error 87 is fixed in Windows 11.

8. Clear component store and revert the Windows update

  1. Launch Command Prompt as an administrator.
  2. Type the following command and hit Enter:dism.exe /image:C: /cleanup-image /revertpendingactions
  3. Once done, restart the computer.
  4. Again, launch Command Prompt with administrative privileges, paste the following command, and hit Enter:dism.exe /online /cleanup-image /startcomponentcleanup
  5. After the two commands are run, restart the computer for the changes to effect.

9. Reinstall Windows

If none of the solutions listed previously fixed DISM Error 87, you are left with no option but to reinstall Windows.

There are two options: reset Windows 11 to factory settings or perform a clean install. Both are equally effective, though the latter requires much more effort, and you would need to create a bootable USB drive.

How do I use DISM to repair an image in Windows 11?

  1. Press Windows + S to open the Search menu, type Command Prompt, and click on Run as administrator.command prompt
  2. Click Yes in the UAC prompt.yes
  3. Now, paste the first of the following three commands, hit Enter, and after one is done running, execute the next until done with all three:DISM /Online /Cleanup-Image /CheckHealth DISM /Online /Cleanup-Image /ScanHealth DISM /Online /Cleanup-Image /RestoreHealthdism
  4. Once done, restart the computer for the changes to effect, and the Windows 11 image will be repaired.

What is DISM?

DISM stands for Deployment Image Servicing and Management, and its main work is to help organize virtual disks. It manages split Windows Imaging Format (WIM) files, Full Flash Utility Files, Virtual Hard Disks(VHD), and other vital information.

You can access the tool from the Command Prompt or Windows PowerShell, which is used to fix problems with the Windows image.

Fixing the DISM error 87 in Windows 11 will correct all the system file errors and problems. It also helps in making the modification to the OS more seamless. If you have issues with Windows 11, fixing it addresses all the problems the user faces.

Also, please find out how to make Windows 11 faster and more responsive and boost its performance. To learn more about DISM, we have a guide that explains what is dismhost.exe, so you might want to check it out.

Most DSIM errors are temporary and quick to fix. Try all the methods, and let us know which one worked for you in the comments section.

To Sync This Notebook Sign In To OneNote [Error Fixed]

OneNote users often describe getting this popup OneNote needs a password to sync this notebook. They click the sign-in option and enter their Microsoft email in vain. None of the notes they are entering are being synced.

If you are also confronting with this situation, let us tell you that there are a few possible causes to take into consideration. The most common ones include generic glitches, synchronization conflicts, server errors, corrupted data in Windows Credentials stores or corrupted Office installation.

Moreover, this tends to happen if you leave your OneNote open and the PC enters Sleep Mode. In this case, OneNote will create a record in its cache to stop you from losing your data. This sounds like a useful function, yet it can block OneNote from launching correctly when exiting Sleep Mode.

Long story short, OneNote keeps looking to the Cached user for credentials and there are none when it tries to authenticate. Therefore, you keep trying to enter the password but never end up signing in. In the following guide, we’ll help you fix this error.

How can I fix OneNote needs a password to sync this notebook error?

1. Delete Generic Credentials

how to delete Generic Credentials

  1. Close OneNote.
  2. Open up a Run dialogue box by pressing Windows key + R keyboard shortcut.
  3. Inside the newly opened Run window, type Credential Manager and press Enter.
  4. Click the Windows Credentials tab.
  5. Identify all the Cached users on the list. They are labeled MicrosoftOffice15_Data: or MicrosoftOffice16_Data:
  6. Press the arrow on the side of each of them and choose Remove or click on Delete.
  7. Up next, open OneNote and try to enter the password for your account. It should connect this time, letting you sync your notebooks again.

Credential Manager is not working? Don’t panic, this guide will help you get past this issue in no time.


2. Re-sign with your OneNote account

Remove Account - Yes

  1. Open the OneNote application.
  2. Then, click on your name in the top-right corner.
  3. Choose Sign Out.
  4. At the Remove Account prompt, click on Yes to remove your account and sign out of this Office application.
  5. Return to the top-right corner of the OneNote window and click on Sign In.
  6. Add your Microsoft email, phone number or Skype, and the password to sign back into the OneNote application.
  7. Once the process is complete, see if you’re still getting the same error.

The OneNote needs a password to sync this notebook error can also be caused by a generic glitch after a major Windows 10 update. In this fortunate case, simply logging out and back into the OneNote application proves to be useful.


3. Repair the Office Installation

Online Repair

  1. At first, press the Windows key and the R key at the same time. This will immediatelly open the Run command box.
  2. Inside the Run window, type appwiz.cpl and press Enter to open up the Programs and Features window.
  3. Scroll down through the list of installed applications and find your Office installation.
  4. Right-click on it and choose Change from the newly appeared context menu.
  5. Have patience until the initial investigation is complete. Up next, select Quick Repair from the list of available options.
  6. Confirm and start the process by clicking on Repair.
  7. When prompted, restart your computer and verify if the problem you were having is resolved.

It all the above solutions failed, consider an Office installation error as the root of the error message you are seeing. To fix this, repair your Office installation. Note that the repair experience is similar to a fresh installation.

The amount of time it takes usually depends on your connection speed and what the issue is. If you’d like more details, take a look at the best tools to test the Internet speed on Windows 10.

If that doesn’t resolve the problem, then you could also try the Online Repair option. The repair procedure is far from complicated, so just follow the wizard. However, prior to clicking Repair, you’ll need to save your work and close all Office programs.

Another scenario to take into consideration is that Windows Credentials holds corrupted data that affects your Microsoft account. Removing the account via Credential Manager is the best solution to apply.

Are things any better now? Don’t hesitate to let us know your opinion in the comments area below, along with any other suggestions to fix this error.

[wl_navigator]

Steam VR Keeps Opening Itself: 3 Ways to Get Rid of it

Many reported that Steam VR keeps opening by itself, and this can be a problem if it happens randomly or when you try to start a game.

This is a minor but rather annoying issue, and in today’s guide, we will look into why this issue occurs and how to fix it on your PC correctly.

Why does Steam VR keep opening?

  • Specific Developer settings might be starting the application.
  • Your controller has a button stuck that keeps waking up the device.
  • Hidden settings in Firefox can sometimes cause this issue.

How do I stop SteamVR from opening automatically?

Before you try out any advanced troubleshooting, check if the buttons on your device aren’t stuck. In addition, disconnect controllers from the charging station and the SteamVR software off as well as your controllers.

1. Change the Status Check setting

  1. Click the Steam VR icon in the system tray.
  2. Navigate to Developer Settings.
     
  3. Set Status Check to Never.
  4. Optional: Disable Start SteamVR when an application starts and Check for Steam options.

2. Change Firefox settings

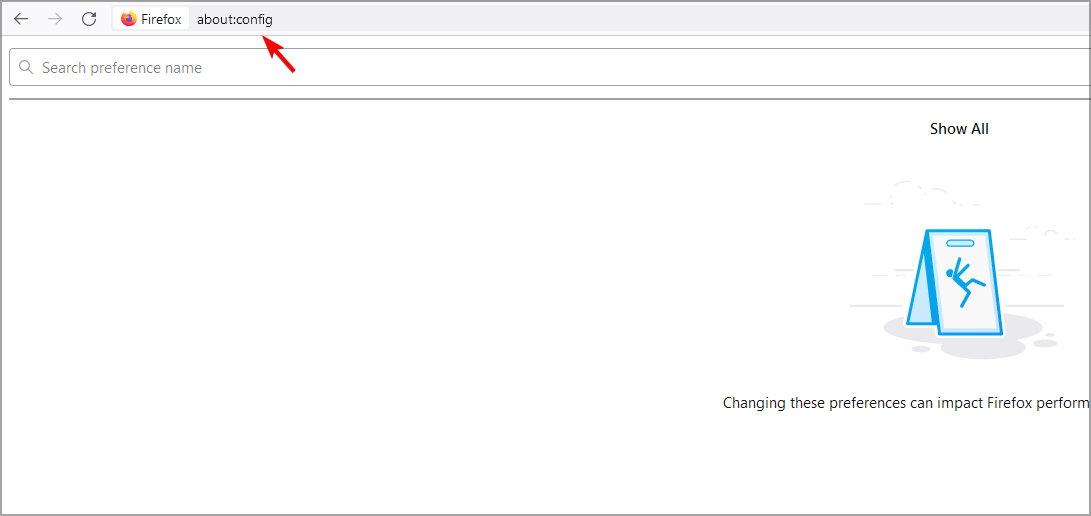
  1. Open Firefox and in the address bar go to about:config
  2. Search for dom.vr.openvr.enabled.
  3. Double-click it to set it to false.

3. Rename the OpenVR file

  1. Hit the Windows + E keys to open File Explorer.
  2. Type %localappdata% in the address bar and hit Enter.
  3. Locate the OpenVR file and delete it. The best option would be to copy the original file to a different location and then rename the file in the folder in case you need it in the future.

How do I stop SteamVR from launching on Roblox?

  1. Press Windows + R and enter %localappdata%\Roblox\
  2. Locate Globalbasicsettings_13 file and open it with Notepad.
  3. Make sure to find the following line: <bool name="VREnabled">true</bool> and change it to <bool name="VREnabled">false</bool> 
  4. Optional: Locate <bool name="HasEverUsedVR">true</bool> and change it to
    <bool name="HasEverUsedVR">false</bool>
  5. Save changes.

There you have it. That’s how to successfully stop SteamVR from opening itself whenever you log in to your PC and any other information you need.

Sadly, this isn’t the only issue you may encounter, and many reported that SteamVR settings aren’t working. If that happens, you might need to update Steam VR.

In case you’re not having any issues, we have a guide on how to make Steam VR games run better, so don’t miss it.

We’d love to hear about any other tips that helped you solve this problem in the comment section below.

Diagnostic Policy Service High CPU: 3 Methods to Reduce it

There are some background services in Windows to enhance your experience and minimize errors. But, several users have reported that the Diagnostic Policy Service shows high CPU usage.

This will, in turn, affect the system’s performance and slow it down, which is not desirable. If you have been facing this issue, read ahead to learn more about it and its relevant fixes.

Why is Diagnostic Policy Service causing high CPU usage?

Here are the possible reasons for the Diagnostic Policy Service’s high CPU usage:

  • Corrupt system files: One of the significant reasons the Diagnostic Policy Service registers 100 percent CPU usage is a broken system file. The solution is to repair these files using built-in tools or dedicated repair software.
  • Outdated PC: Windows updates play a vital role in the smooth running of all components of your PC. You can experience this high CPU usage issue if your PC is outdated. You need to update Windows 11 to restore regular service.
  • The service itself has run into an issue: In some cases, it might run into a problem causing it to create large log files. This leads to abnormal resource usage. Killing the process and deleting its files should do the trick here.

Let’s now head to the methods to solve the high CPU usage by Diagnostic Policy Service.

How can I fix Diagnostic Policy Service’s high CPU usage?

1. End the Diagnostic Policy Service

  1. Press Ctrl + Shift + Esc to launch Task Manager.
  2. Locate the Diagnostic Policy Service under Windows processes, right-click, and select End task from the context menu.Terminate Diagnostic Policy Service to reduce high CPU
  3. Tick the checkbox for Abandon unsaved data and shut down, and click on the Shut down button.Confirm change
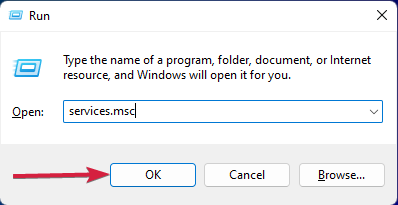
  4. Press the Windows key + R, type services.msc, and click OK.Launch Services
  5. Locate and double-click on the Diagnostic Policy Service to view its properties.View properties to fix Diagnostic Policy Service high CPU
  6. Click on the Stop button to terminate the service, and click on OK at the bottom.Stop service
  7. Again, press Windows + R to launch the Run command.
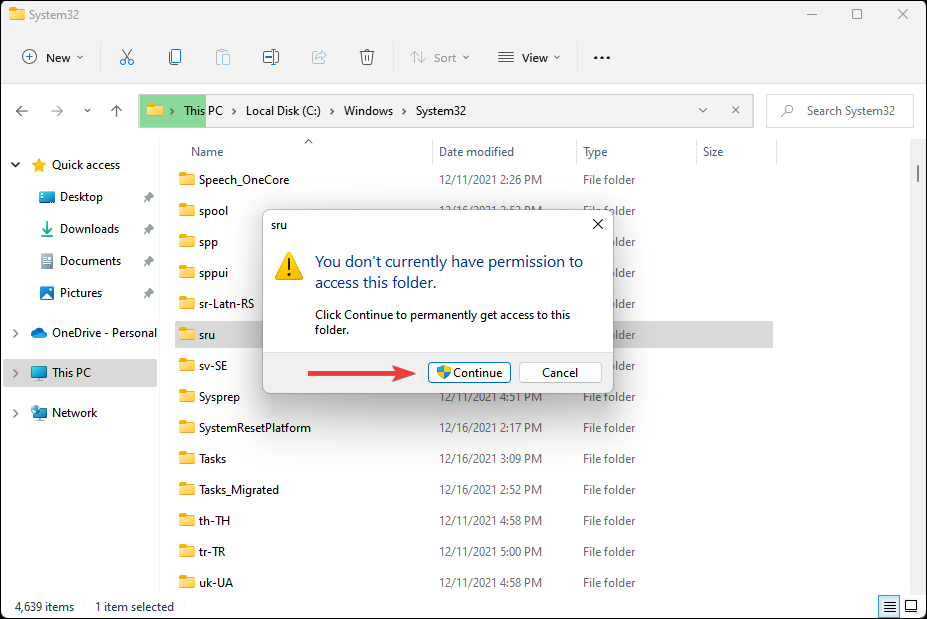
  8. Type/paste the following address in the text field, and hit Enter.C:\WINDOWS\System32\sruGo to sru folder
  9. Click Continue in case a confirmation box pops up.Continue
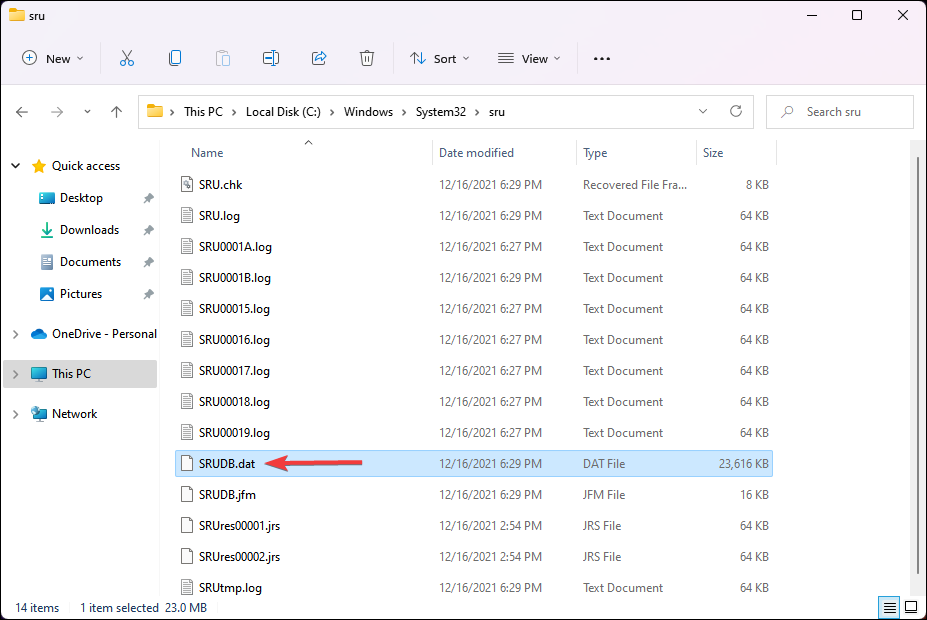
  10. Locate and select the SRUDB.dat file, and hit the Del key to delete it.Delete SRUDB.dat file to fix Diagnostic Policy Service high CPU

After terminating the Diagnostic Policy Service, do not hesitate to check if the high CPU usage problem is resolved.

2. Update Windows 11

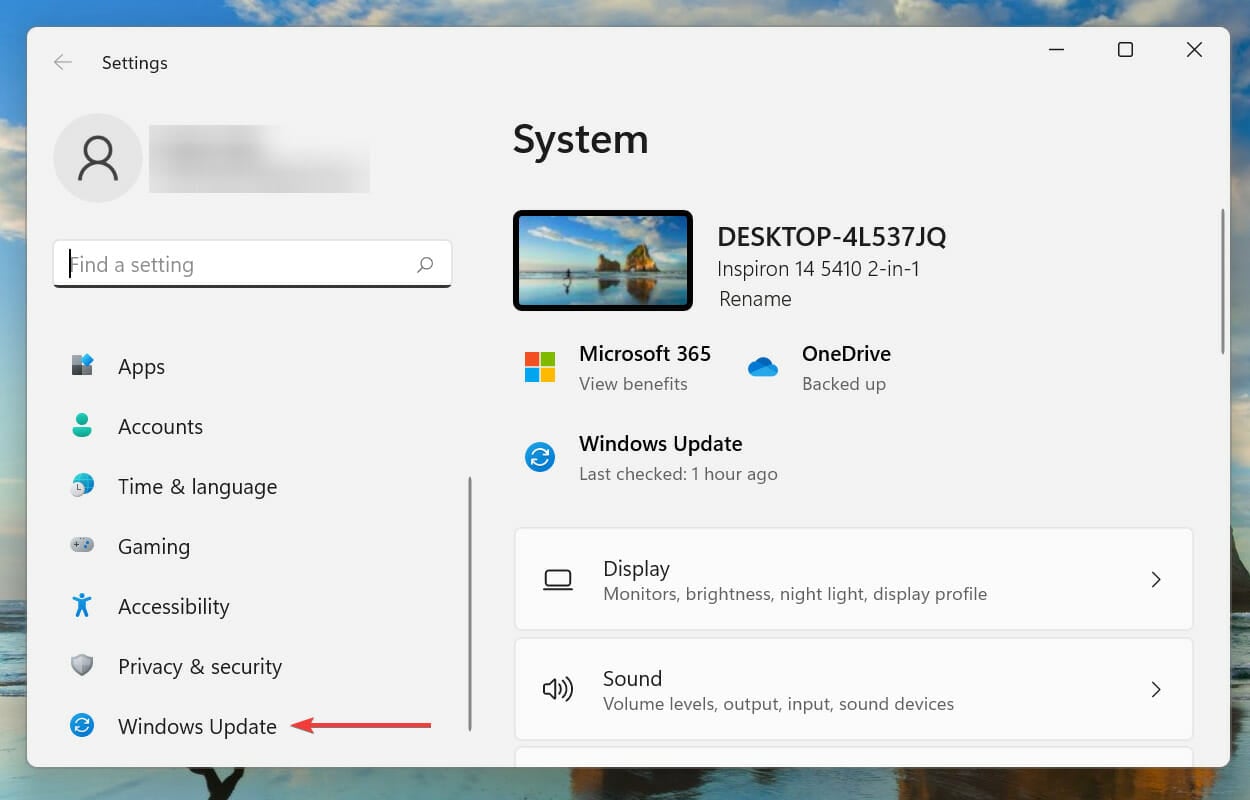
  1. Press the Windows key + I to launch the Settings app and select Windows Update in the left pane.Windows Update
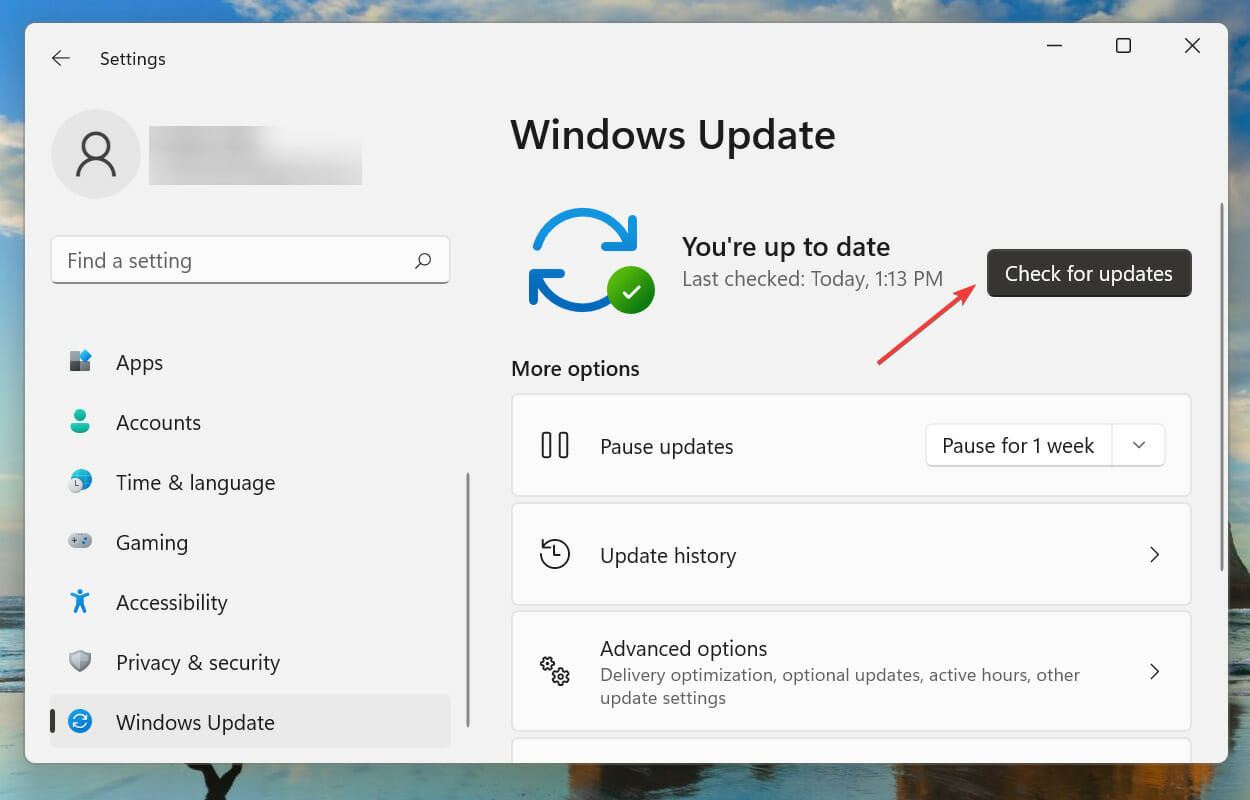
  2. Click on Check for updates to scan for any available newer versions of the OS.Check for updates to fix Diagnostic Policy Service high CPU usage
  3. If any are available, download and install them on your computer.

If that does not help, we recommend trying a specialized repair app, which will scan your PC and fix any errors related to corrupted system files.

3. Run SFC and DISM scans in Command Prompt

  1. 1. Press Windows + S to launch the Search menu.

  2. 2. Enter Windows Terminal in the text field at the top, right-click on the relevant search result, and select Run as administrator from the context menu.

    Launch Windows Terminal to fix Diagnostic Policy Service high CPU
  3. 3. Click Yes on the UAC (User Account Control) prompt that pops up.

  4. 4. Next, click on the downward arrow at the top, and select Command Prompt from the list of options. Alternatively, you can press Ctrl + Shift + 2 to launch the Command Prompt tab.

    Open command prompt
  5. 5. Type/paste the following command and hit Enter to execute it: sfc /scannow

    Run SFC scan to fix Diagnostic Policy service high CPU
  6. 6. Once the SFC scan is complete, type/paste the following command and hit Enter to run the DISM tool: DISM /Online /Cleanup-Image /RestoreHealth

    Run DISM tool
  7. 7. Wait for the DISM tool to run and then restart the computer.

  8. You can solve the Diagnostic Policy Service high CPU problem by running the SFC and DISM commands in Command Prompt. The SFC (System File Checker) scan identifies the corrupt system files, and if any are found, replaces them with their cached copy stored on the system.

    On the other hand, the DISM (Deployment Image Servicing and Management) tool is used to fix issues with Windows Image or modify the installation media, if required.

These are all ways to reduce the high CPU usage due to Diagnostic Policy Services. Execute the fixes in the sequence listed, and your computer should be running smoothly in no time.

Several users have also reported high CPU usage due to Explorer.exe, so learn how to fix the problem. Again, the guide is for the previous OS, but remember that it is equally effective on Windows 11.

Please tell us which fix worked for you and what problems you faced due to high CPU usage in the comments section below.

How to Download Origin on Windows 11

You can purchase some of the most incredible games available on Origin, such as Battlefield, The Sims, Star Wars, Fifa, and the list goes on and on. Thus, we will show you today how to download Origin on Windows 11.

The platform also offers numerous entertaining free-to-play games, so there is no need to spend money on games.

Aside from that, you may add friends, play with friends, use the in-game overlay to browse the web while playing, and gain achievements, among many other things.

If you find that you can’t install Origin on your computer, scroll down to our last section which discussed this topic and provides a solution for you to follow. Keep up with us!

What does Origin do?

Origin is a platform that is required in order to be able to play the majority of Electronic Arts games on your Windows 11 PC. The platform has been in existence for quite some time, and it offers a diverse selection of other games that you can purchase and play.

origin install how to download origin on windows 11

But it also has other useful features, such as the ability to talk with friends and earn achievements for the games you play. It is definitely worth checking out.

In addition to Steam and Epic Games, it is one of the many game launchers that are accessible for your Windows computer.

For those who would prefer to have a large number of various games to pick from and enjoy playing without the necessity of purchasing each one, EA Play is the solution.

In essence, it is a subscription service that grants you access to special in-game awards, trials of specific games, exclusive in-game incentives, as well as a library of games that you can choose from.

How can I download Origin on Windows 11?

    Use their official website

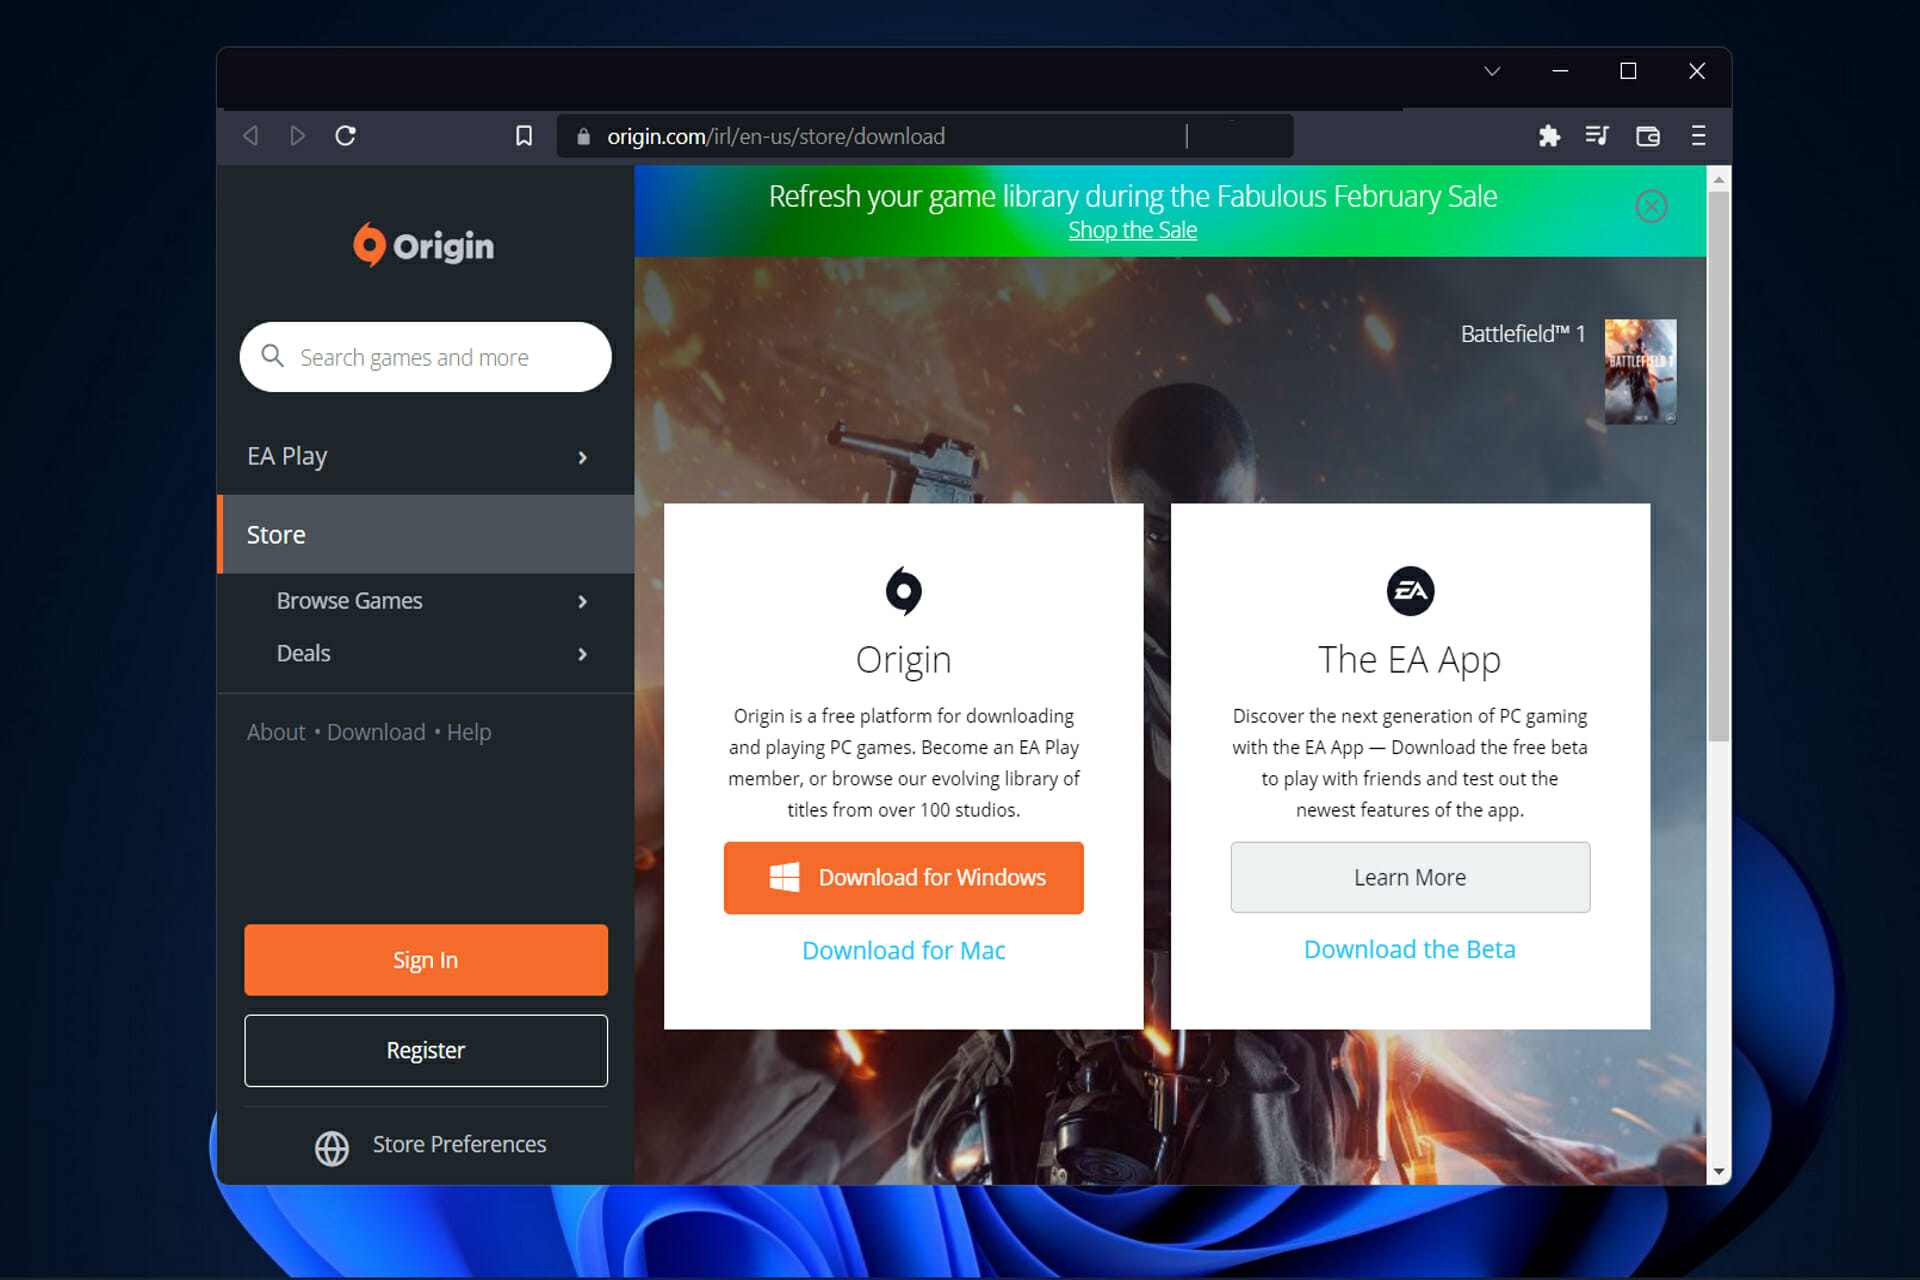
  1. 1. Head to Origin’s official website

    On their website you will find the option to download Origin on your Windows PC or Mac.

    origin-home how to download origin on windows 11
  2. 2. Click on Download

    After you clock on download, then save the executable file they will show.

    download-origin how to download origin on windows 11
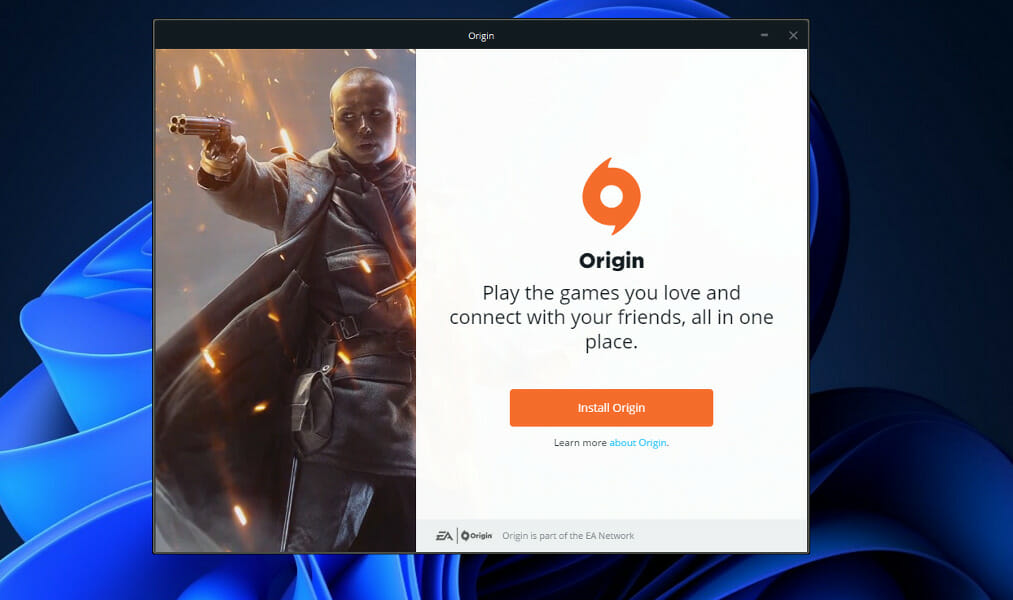
  3. 3. Double-click on the downloaded file

    Lastly, you only need to install it and follow the on-screen steps. That’s it! Pretty simple, isn’t it?

    run-origin how to download origin on windows 11

Why can’t I install Origin on Windows 11?

Due to potentially unwanted files and invalid Windows Registry entries left on your computer by a computer, Origin may fail to install on your computer.

Too much clutter on your hard drive not only takes up valuable storage space but also makes your computer work harder to locate the things you do need.

It is possible to archive files that are no longer in use to an external device, while downloads, duplicates, and temporary files can be erased entirely.

The usage of a specialized tool that cleans your files and the Windows Registry, such as CCleaner, is recommended in this situation because other software installations and Windows functioning may be impaired as well.

An alternative to the aforementioned software, CCleaner, we recommend that you check out our article on 5 best registry cleaner applications for Windows 11.

For more information on how to clean your files, take a look at our post on how to run Disk Cleanup in Windows 11 and make your PC swifter to use.

And if you are interested in how to make Windows 11 faster and more responsive, don’t miss out on the guide linked, and make sure to share it with your friends!

Was this guide helpful for you? Don’t hesitate to tell us in the comments section below. Thanks for reading!

How to Install APKs on Windows 11

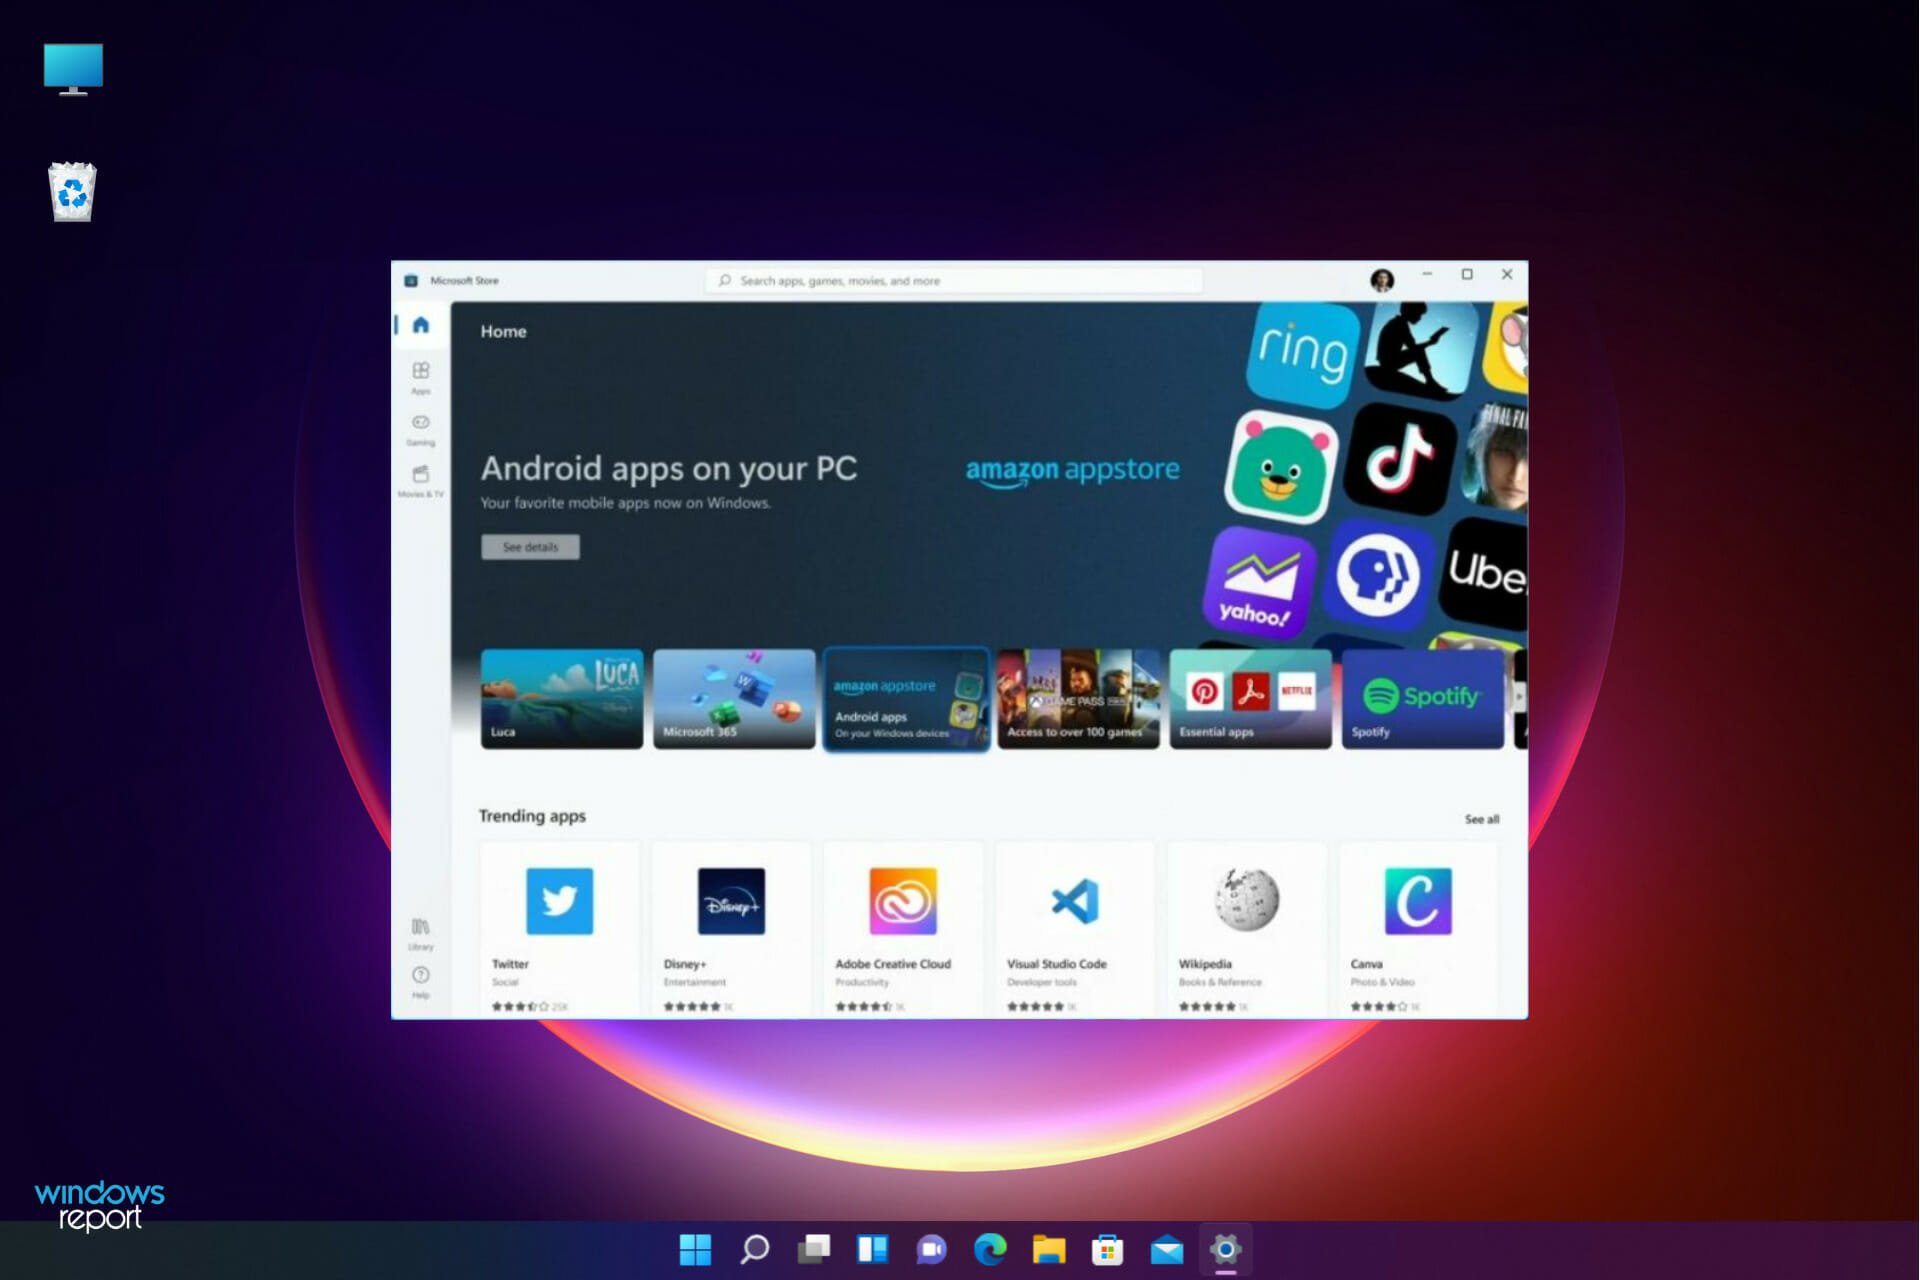
If you’re wondering how to install APKs on Windows 11, the good news is that Microsoft now allows Android app support natively. You can install APK files directly or through third-party APK installers, opening the door to thousands of apps beyond the Microsoft Store.

Below are all the reliable methods to perform APK installation in Windows 11.

How can I install APK files on Windows 11?

1. Enable the Windows Subsystem & download the Amazon Appstore

1. 1. Download and install Windows Subsystem for Android

  1. Press the Windows + I keys to open the Start Menu.
  2. Select Microsoft Store to launch.
  3. Type Windows Subsystem for Android on the Microsoft Store search window and press Enter.
  4. Click Open Microsoft Store to be redirected to the Microsoft Store.
  5. Hit the Get button to start installation.
  6. Once installed, you can now download and open APKs.

1. 2. Download and install the Amazon Appstore

  1. Press the Windows + I key to open the Start Menu and click on All apps.
  2. Locate the Amazon Appstore and click on it to launch.
  3. Find the application of your choice and click on the Get button.

The Windows Subsystem for Android (WSA) lets you run Android apps natively on your PC. With it, you can install the Amazon Appstore and use it to get APK files.

In terms of compatibility, it’s the best option. However, the app selection is quite limited.

2. Sideload APKs using an APK file

  1. Open your browser and click to Download SDK Platform-Tools for Windows.
  2. Click the checkbox I have read and agree with the above terms and conditions to start downloading.SDK download
  3. Open the zip folder to extract all files.
  4. Open the Start Menu and select All apps.
  5. Locate Windows Subsystem for Android and launch it.
  6. Select Developer mode and toggle it on.
  7. Go back to the extract folder and type cmd on the address bar.
  8. Type in the following commands and press Enter after each one: adb.exe connect <IP address>

    adb.exe install <file name>.apk
  9. Once your app is installed successfully, the following message will be displayed:
  10. Go back to the Start Menu and launch your APK to open.

By sideloading, you will be able to install more apps because you’re not limited to a specific app store. However, this implies some security risks and potential incompatibilities.

Even though you’ll be able to install the app, there’s no guarantee it will work error-free.

3. Get an Android emulator app

  1. Download and install an Android emulator on your PC. We highly recommend Bluestacks because it gives you direct access to the Google Play Store and is highly optimized for all sorts of mobile apps.
  2. Open Bluestacks and log into your Google Play account.sign into google play on bluestacks
  3. Once logged in, you can browse for and download apps as you would on your phone. You can then locate and access them directly from Bluestack’s interface.bluestacks

With an Android emulator like Bluestacks, you’ll have the easiest of times.

They offer full access to the Google Play Store and practically work as a virtual Android device. The drawback is that they can be resource-intensive.

How do I open an APK file on my PC?

In order to install APKs on Windows 11, you need to have Hyper-V and Virtual Machine Platform enabled.

To enable the two features:

  1. Hit the Windows + I keys simultaneously to open the Start Menu then select the Settings app.
  1. Navigate to Apps and select Optional features.
  1. Select More Windows Features.
  1. Locate Hyper-V and click on the checkbox then press OK.
  1. Also, find Virtual Machine Platform, click on the checkbox and press OK.
Enable virtual machine platform
  1. Wait for the installation to complete.

Are there implications of running APKs from third-party sites?

The safety of this approach is often questioned. Are you really installing what you think you are? Probably not from a random site you found on the Web. 

But when you have a choice between an app installed from a site you know and one that is not, there are other considerations. It’s worth reviewing those to make sure your risk profile is as low as it can be.

When installing APKs from third-party sites, Windows users need to be aware of the risks. Malware attacks are a growing threat. You need to make sure that your device is completely safe and secure. We have outlined some of the top antiviruses for your PC to keep you safe while browsing.

Are APK files safe?

Not all APKs are safe. Only download APKs from trusted sources. Avoid unverified websites, as APKs can hide malware, spyware, or programs that steal data and control your device. Stick to official app stores or the developer’s official site.

Watch for phishing scams that mimic legitimate sites to steal login or payment details. Always check the URL before entering sensitive information

Also, if you choose to use other Android emulators to run APKs and encounter installation problems, refer to our guide on how to resolve the issue.

Wrapping up

Now that you know how to install APK files on Windows, you should be able to install apps like Pikashow for Windows 11 without any problems.

We hope you found a way to open and install APKs from one or more of the methods we listed above. If you encounter any problems while running APKs, leave us a comment down below.

GPUpdate /Force Not Working? 5 Ways to Quickly Fix it

Gpupdate force is a command designed to forcefully apply updates on Windows machines. This means that if you have updates waiting to be installed but you haven’t applied them yet, this utility will force them to be installed immediately. 

The main reason why people use this tool is that it helps to update their machines as quickly as possible. It can also be used when you want to make sure that a policy setting is not applied or you want to troubleshoot why a particular setting is not working as expected.

Why is my GPO not being applied?

GPOs are applied on a computer-by-computer basis and can be applied in one of two ways:

  • Group Policy refresh – This occurs every 90 minutes by default and is the most common method for applying policies. You can easily change the time interval through the policy settings. 
  • Group Policy update – This occurs when someone logs into a computer or starts it up for the first time after a policy change has been made.

However, sometimes, your gpupdate/force command may not be working on your Windows 10 or 11 device. This is because:

  • No GPOs to be applied – Gpupdate will not work if there are no GPOs currently in effect for the user or computer in question.
  • Incorrect/missing registry entry – An incorrect or missing registry setting can prevent the GPUpdate command from applying changes made to your computer’s group policy settings. 
  • Virus/malware – If your system has been infected by malware or a virus, it can prevent this command from working properly. With a comprehensive antivirus, you can avoid such errors.
  • Corrupt user profile – A corrupted user profile can prevent certain operations like gpupdate force from completing successfully. 
  • Computer not connected to the domain – If your PC is not connected to the domain, then this could be causing the problem. GPUpdate only runs on computers that are joined to a domain. 
  • Insufficient privileges – It is also possible that the user account you’re using to execute the command does not have sufficient privileges to run the command.

How do I force the Gpupdate command to apply?

Before anything else, check off the following:

1. Delete the registry.pol file

  1. Hit the Windows + E keys to open File Explorer.
  2. Navigate to the following location by pasting it on the address bar: C:\Windows\System32\GroupPolicy\Machine\
  3. Now, locate Registry.pol file and move or delete it. A safer option would be to move it to your desktop because you might want to restore this file if any new issues occur.corrupt local group policy
  4. Restart your PC and try running the command again.

2. Perform DISM and SFC scans

  1. Hit the Windows key, type cmd and select Run as administrator.cmd-run-admin-w11 unexpected kernel mode trap windows 11
  2. Type the commands and hit Enter after each one: DISM /Online /Cleanup-Image /RestoreHealth sfc /scannow

3. Restart Group Policy

  1. Press the Windows + R keys to open the Run command.
  2. Type services.msc in the dialog box and click OK.
  3. Locate the Group Policy Client and right-click on it to open its Properties.Group Policy Client Properties
  4. Select the General tab and change the Startup type to Automatic.
  5. Click the Apply button and OK to save changes.

4. Create a new user profile

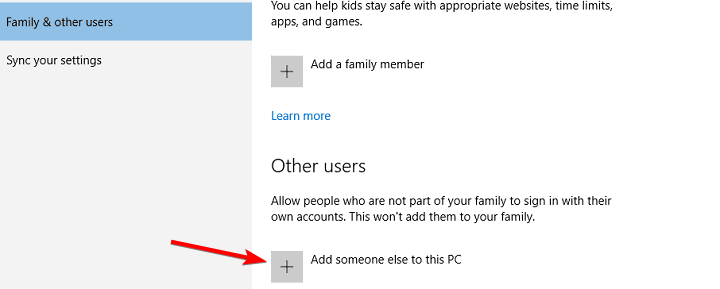
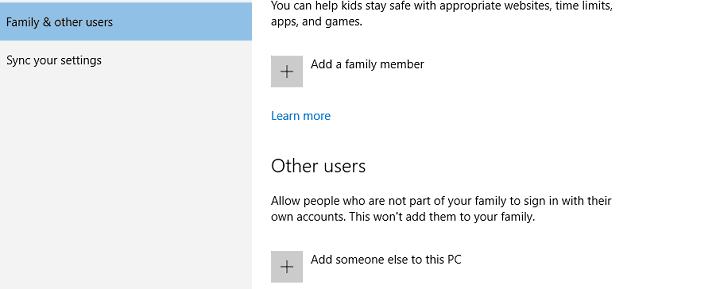
There are times when you may have to create a new user profile and then use it to log on to your computer. This can be done for many reasons, but the most common is that there is an issue with your current user profile.

When creating the new user profile, don’t forget to assign administrative privileges that will enable you to make changes to the Group Policy Editor.

5. Reset Group Policy

  1. Hit the Windows key, type cmd and select Run as administrator.cmd-run-admin-w11 unexpected kernel mode trap windows 11
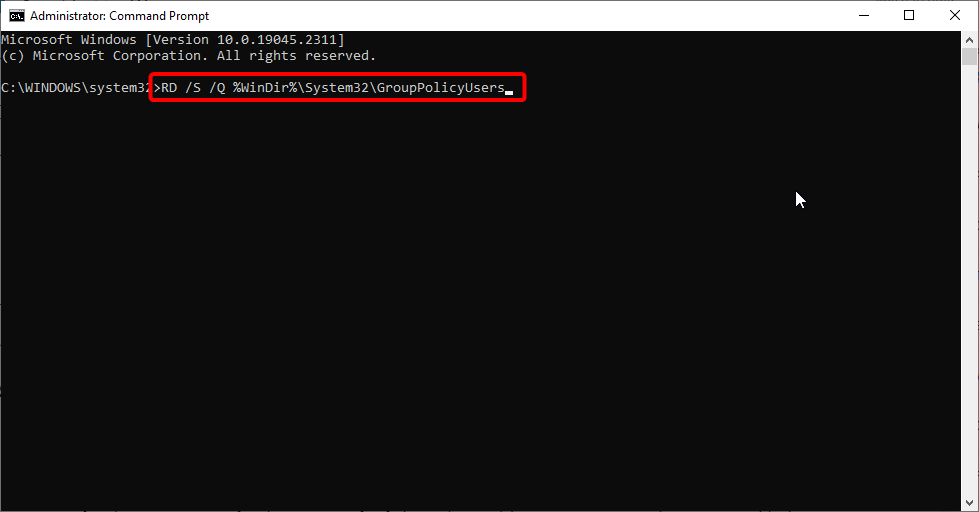
  2. Type in the following commands and press Enter after each one: RD /S /Q "%WinDir%\System32\GroupPolicyUsers" && RD /S /Q "%WinDir%\System32\GroupPolicy" gpupdate /forcerd user how to fix group policy error in windows 10
  3. Restart your PC.

If all these fail, consider using GPMC to troubleshoot your Group Policy issues. It is a powerful and intuitive tool that can help you resolve most of these issues including gpupdate/force command not working.

As a last resort, a clean install or in-place upgrade may be on the horizon if the command line is still not working.

We also have answers on what to do if your group policy keeps reverting so feel free to check out our detailed guide on the same.

Let us know if you have been able to resolve this issue in the comment section below.

Hidparse.sys BSOD Error: 5 Easy Ways to Fix It on Your PC

Hidparse.sys is a Windows driver, and sometimes you might get a blue screen after installing drivers. This is exactly the case with this file, and many reported this problem on their PC.

Sometimes these issues can occur after installing the driver manually or, in some cases, after a Windows update.

In today’s guide, we will take a closer look at this error and show you the best ways you can use to fix this problem once and for all.

What causes hidparse.sys blue screen error?

Several causes will result in this, but the most common are the following:

  • Bad Windows update – It’s not unheard of to experience BSOD error after the upgrade. In fact, even Microsoft confirmed that this issue can be caused by the KB5021233 update.
  • Corrupted files – Sometimes, the driver in question is damaged and needs to be repaired to work.
  • Driver version mismatch – A bad update can cause your driver version to be mismatched. To fix it, you’ll need to replace the bad driver manually.

What can I do to fix the HIDPARSE issue on Windows 10 22H2?

1. Disable driver signature enforcement and update Windows

  1. Restart your PC three times during the boot to enter the recovery environment.
  2. Go to Troubleshoot. Now select Advanced options and finally choose Startup Settings.
  3. Now click on Restart.
  4. When your PC restarts, press 7 or F7 to disable driver signature enforcement.
  5. Now you should boot to Windows.
  6. Press Windows key + S and type updates. Select Check for updates.
  7. Let Windows download the missing updates.

Microsoft has addressed this issue and the update that fixes hidparse.sys blue screen is already available, so updating your operating system is the best way to fix this issue.

2. Use SFC and DISM

  1. Disable Driver Signature Enforcement to boot to Windows. You can find instructions in Solution 1.
  2. Next, press the Windows key + X and choose PowerShell (Admin).
  3. Run the following command: sfc /scannow
  4. Once the command is finished, run these three commands:
    DISM /Online /Cleanup-Image /CheckHealth
    DISM /Online /Cleanup-Image /ScanHealth


    DISM /Online /Cleanup-Image /RestoreHealth
  5. After these commands are executed, the problem should be resolved.
  6. Go ahead and check for updates to fix the issue permanently.

Following the steps above may seem too complicated for some, and this is why we recommend using a dedicated system repair software. These tools allow you to automatically scan for and fix system files.

3. Copy the file from the recovery environment

  1. Restart your system while booting to Windows three times.
  2. Select the Troubleshoot button.
  3. Next, choose the Advanced Options button.
  4. Select the Command Prompt button and wait for your device to restart, if needed.
  5. Your device should restart to a Command Prompt window. You might need to sign into your device with your password before getting to the Command Prompt window.
  6. Run the following command, then press Enter: xcopy C:\windows\system32\drivers\hidparse.sys C:\windows\system32\hidparse.sys
  7. Once the previous command completes, type: exit
  8. Select the Continue button.
  9. Windows should now start up as expected.

Many reported that they weren’t able to complete step 6, and this is because they used the incorrect letter. To fix that, follow these steps:

  1. Repeat the steps from above until step 6.
  2. Once you reach it, run the following command: diskpart
  3. Now enter list volume
  4. Notice the name of your drive, it can be C or something else.
  5. Type exit
  6. Now use the following command but be sure to replace C with the letter that matches your system drive: xcopy C:\windows\system32\drivers\hidparse.sys C:\windows\system32\hidparse.sys
  7. Close Command Prompt and try to boot.
Note icon NOTE
You can have one of the two versions of hidparse.sys file on your PC. One that dates 2021/04/28 and the other that dates to 2019/12/07. For this solution to work, you need to copy the 2021 version and not the 2019 one.

4. Disable Driver Signature Enforcement and rename the hidparse.sys file

  1. Disable Driver Signature Enforcement as described in Solution 1.
  2. Navigate to the following location: C:\Windows\System32\
  3. Locate hidparse.sys and rename it to hidparse.sys.old 
  4. Go to drivers folder inside the System32 folder.
  5. Locate hidparse.sys and copy it to System32 directory.
  6. If that doesn’t work, repeat the steps from Solution 1.

Many reported that Hidparse sys says access denied while using other solutions, so renaming the file might help.

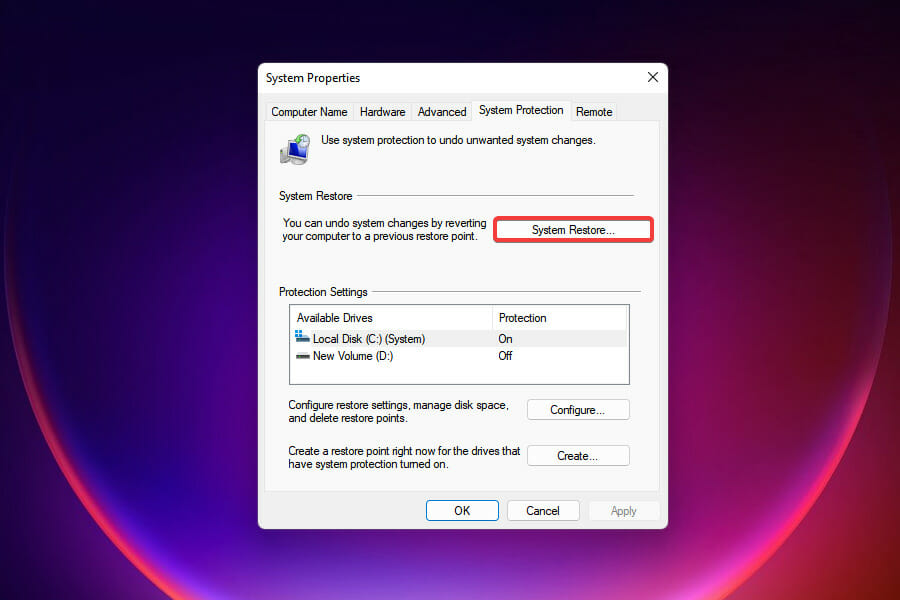
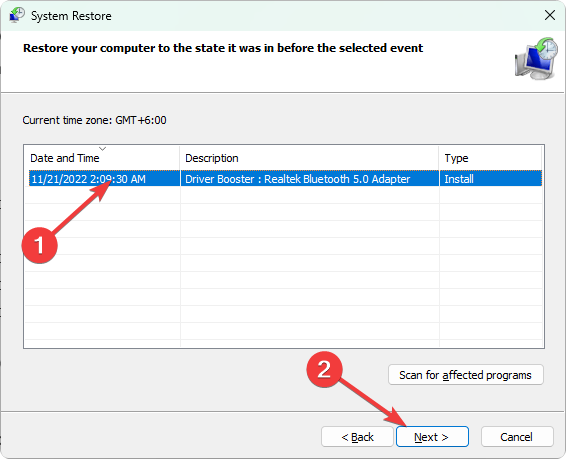
5. Uninstall update or use System Restore

  1. Restart your PC three times to enter recovery mode.
  2. Choose Troubleshoot. After that, pick Advanced options.
  3. Select System Restore.
  4. Follow the instructions on the screen to restore your PC.

If the System Restore doesn’t work, it’s suggested to uninstall the update by doing the following:

  1. Restart your computer three times during the boot.
  2. Navigate to Troubleshoot. Next, select Advanced options.
  3. Choose Uninstall Updates.
     
  4. Choose the type of update you want to uninstall. We suggest going for Uninstall the latest quality update.
  5. Follow the steps to complete the process.
  6. If that doesn’t work, repeat the steps and choose Uninstall the latest feature update.

After doing that, install the latest updates to fix the issue permanently.

If you’re still having this issue, be sure to visit our guide on how to fix blue screen loop on Windows 10 for additional solutions.

We also have a guide on wdfilter.sys blue screen error, so don’t miss it for more information.

Leave a comment below if you also had to deal with these problems.

How to Download the Camera Driver in Windows 11 [Step-by-Step]

You need to download and install your camera driver in Windows 11 if you want it to work properly.

In general, Windows automates this process, but if you want to update the driver or you can’t find the camera in Device Manager, this guide is for you. We’ll show you all you need to know.

How do I download webcam drivers for Windows 11?

1. Use Device Manager

  1. Right-click on the Start icon and select Device Manager.device manager windows 11
  2. Expand the Cameras section.
  3. Right-click on your Camera and hit Update driver.device manager update camera driver
  4. Select Search Automatically for drivers and follow the on-screen instructions to finish up the process.search automatically for camera drivers windows 11

If you can’t find the Camera driver in Device Manager, click on View and select Show hidden devices.

hidden devices

2. Use the manufacturer’s website

  1. To check your camera’s model, right-click on the Start icon, then click on Device Manager to open it.device-manager google meet getting ready loop
  2. Now expand the Cameras section. There you will see the name of your camera’s model. Copy it as you will need it later.camera-model windows update troubleshooter windows 11
  3. Go to your manufacturer’s website and locate the corresponding drivers for your cameras model. .msi-support windows update troubleshooter windows 11
  4. Once you have found the matching driver, or the desired one such as HD user-facing driver for Windows 11, simply download and install it by following the on-screen instructions.

Downloads pages on most manufacturer websites are usually located under the Support area. For instance:

3. Use dedicated driver software

If you don’t have time to manually search for your camera model, you can speed up the process with a third-party driver updater.

When it comes to these tools, Fortect Driver Updater is a top choice. Itcan install and repair all the drivers on your system with very little effort on your part.

Moreover, ituses a very small amount of system resources so you can let it run in the background. It will regularly check and update your drivers whenever a new version becomes available.

⇒ Get Fortect Driver Updater

How do I get Windows 11 to recognize my camera?

  1. Press Windows Key + I to open Settings.
  2. Select Bluetooth & Devices, then Cameras.cameras settings in bluetooth and devices
  3. Select Camera Privacy Settings.camera privacy settings
  4. Toggle on the button to allowcamera access.camera access settings

Bottom line

Having up-to-date drivers is key to maintaining good performance and preventing common camera problems like camera freezing.

Let us know in the comments section below whether you were able to download the Windows 11 camra driver.

We want to know which method worked best for you and whether you will switch to an external web camera.


Edge Out of Memory Error Code: 3 Ways to Free it up

If you encounter Error code out of memory in Edge, you won’t be able to browse the web, and certain pages might crash, but luckily, this issue can be easily resolved.

Why does my browser keep saying “out of memory”?

This issue appears if your browser is out of date or due to certain security settings.

How do I fix Out of memory error in Microsoft Edge?

Before we try anything, ensure you have the latest version of Edge installed.

1. Adjust Edge’s security settings

  1. Click the Menu button in the top right corner and choose Settings.
    edge menu settings
  2. Next, navigate to Privacy, search, and services in the sidebar. Locate and disable Enhance your security on the web.
    enhance your security on the web disable in edge
  3. Restart your browser.

2. Create a new user profile in your browser

  1. Open the Edge browser and click on the Personal icon at the top left of the browser window.profile icon microsoft edge
  2. Click the Setup New personal profile buttonset up a new personal profile edge
  3. You will be redirected to a new page where you can click Start without your datastart without your data
  4. On the next page click Confirm and start browsingconfirm and start browsing microsoft edge
  5. You will be prompted with color customization options, where you can choose whatever you like
  6. After choosing your color scheme a new window will open and you’ll already be on the newly created profilenew profile created microsoft edge

Alternatively, you can sign out and sign back in with a new account to fix this issue.

3. Modify the registry

  1. Press the Windows key + S and type cmd. Select Run as administrator.
    run command prompt as administrator
  2. Next, run the following command: reg add "HKLM\SOFTWARE\Policies\Microsoft\Edge" /v EnhanceSecurityMode /t REG_DWORD /d 0 /f
    reg add enhancesecuritymode command prompt
  3. Check if the problem is resolved.

Most browsers also have this issue, and we have a guide on what to do if Opera is out of memory. This isn’t the only issue, and Not enough memory to open this page in Chrome is a similar error, but we already covered that one.

Which method helped you fix the error? Do not hesitate to let us know in the comments section below.

Fix Logitech G Hub Stuck on Loading Screen & Not Loading

The Logitech G Hub stuck on loading screen error is a common issue that occurs when you attempt to open an application and it will not execute, even when you run it in administrator mode.

There are a variety of reasons why the software could get stuck, but fortunately, we found four solutions that will certainly fix the error.

Logitech G Hub is a new version of their gaming software, which was produced in the early 2010s. The most significant difference is that G Hub is put out in a more intuitive manner, and since 2019, all products have been using it as their default interface.

Follow along as we have prepared a comprehensive list of solutions for you to implement right after we see the causes of this error. Note that the methods below will also work with the Logitech G Hub stuck on loading screen in Windows 10.

Why is my Logitech G Hub stuck on loading screen?

The causes range from outdated drivers, and faulty app installations to auto-updates that cause more trouble than good.

Due to the fact that G Hub is a driver software, it operates in the background automatically. Because LGHUB automatically installs new updates when they are released, when you run this program, it may become unresponsive owing to the updates that have been installed at that time.

You can permanently turn off auto-updates and resolve loading issues such as the Logitech G Hub stuck on loading animation. Now let’s see how to address these errors.

Moreover, here are some error variations that you may encounter, but nonetheless, fix with the solutions below:

  • Logitech G Hub loading forever or constantly, keeps loading, not opening
  • G Hub infinite loading
  • Logitech G Hub stuck on logo
  • Logitech G Hub loading resources
  • G Hub stuck on loading animation
  • Logitech G Hub stuck on installing screen

Without further ado, let’s just jump right in!

How can I fix Logitech G Hub stuck on loading screen?

1. Reinstall Logitech G Hub

The linked processes are frequently not terminated when the Logitech G HUB client is uninstalled. You must therefore manually close them.

  1. Right-click the Windows Start button and choose Task Manager to close the Task Manager processes related to the Logitech G HUB.task-manager-right  Fix Logitech G Hub Stuck on Loading Screen
  2. Look for any Logitech G HUB client processes in the Task Manager. Find the processes, do a right-click, and then choose End task.end-task-logitech  Fix Logitech G Hub Stuck on Loading Screen
  3. There are three processes that you’ll probably find there: LGHUB, LGHUB Agent, and LGHUB Updater. Close them, then restart the client in administrator mode. The recently closed processes will be automatically restarted, which can assist you in fixing the problem.
  4. After terminating all G HUB-related processes in Task Manager, go to the following location: C:/Program Files/LGHUB directory
  5. Now execute each of these programs individually as an administrator by right-clicking each one with and selecting Run as administrator.
  6. Next, access your Settings app and go to Apps followed by the Apps and features section.apps-apps&features logitech g hub stuck on loading screen
  7. Here, search for the Logitech G Hub app, click on the three-dot menu and choose Uninstall.logi-uni logitech g hub stuck on loading screen
  8. Next, head to Logitech’s website and click on the Download for Windows 10 button in order to reinstall the app. Note that even though it says Windows 10, it will work on 11 as well. This solution should fix the Logitech G Hub not detecting mouse and keyboard as well.download-10 logitech g hub stuck on loading screen

More lighting effects such as Fixed, Screen Sampler, and Audio Visualizer effects, are among the additional features available in the Logitech G Hub.

In addition, G Hub is significantly more lightweight than Logitech Gaming Software. The former app always included firmware and software updates for all of the Logitech devices that were compatible with it, which added a significant amount of needless burden to the PC.

CCleaner is a great way to clean up any junk left on your computer after you’ve uninstalling programs. In fact, it will free up disk space and delate any useless files present on your device.

2. Update your drivers

  1. In order to solve the Logitech G Hub stuck on loading screen in Windows 11, access your Settings app and go to Windows Update followed by the Advanced options section.advanced-options logi
  2. Next, tap on the Optional Updates section to select all the driver updates shown to you. Lastly, click on Download and Install.optional-updates-button llogi

Device drivers are a critical piece of software that allows different hardware components to communicate with your computer in an efficient manner.

When device drivers are out of date, computers can become sluggish and suffer from apparent performance issues, which can be a major source of frustration and dissatisfaction.

3. Restart the LGHUB Services

  1. Press the Windows and R keys at the same time to launch Run then type services.msc and hit Enter.services can't remove bluetooth device windows 10
  2. Find the LGHUB Updater Service and stop the service by right-clicking it and selecting Stop. Right-click it once again and select Start to restart the service.stop-start-lghub Fix Logitech G Hub Stuck on Loading Screen & Not Loading

Restarting pertinent services can also help customers resolve app-related problems. Restart the LGHUB Updater service if restarting the processes doesn’t resolve the problem.

4. Disable Logitech G Hub automatic updates

  1. Open Logitech G Hub and go to Settings.settings-g logitech g hub stuck on loading screen
  2. Uncheck the box next to the Enable automatic updates option from the top-right corner. disable logitech g hub stuck on loading screen

Device drivers are a critical piece of software that allows different hardware components to communicate with your computer in an efficient manner.

When they are out of date, computers can become sluggish and suffer from apparent performance issues, which can be a major source of frustration and dissatisfaction.

5. Update your OS

  1. Hold Windows + I simultaneously in order to open the Settings app and go to Windows Update.windows-update logitech g hub not detecting mouse
  2. Tap on the button that either says Install now, Restart now, or Check for new updates in order to solve the Logitech G Hub stuck on loading screen error.restart-now logitech g hub not detecting mouse

For users who reported their Logitech G Hub got stuck on loading screen on Mac computers, we recommend that you disable automatic updates as we have shown in the third solution.

We have shown you how to fix the stuck on loading screen error, but if you need further assistance, check out our post on what to do if Logitech G Hub is not working.

Alternatively, take a look at how to fix the Logitech G Pro Wireless not working issue and get back to gaming.

Don’t hesitate to share your thoughts with us in the comments section below. Thanks for reading!

Posted in Fix

Microsoft Edge’s February 2023 update will disable Internet Explorer 11

For some time now, Microsoft has been intending to retire Internet Explorer in favor of Microsoft Edge. And earlier this year on June 15, the company started phasing out Internet Explorer urging users to transition to its browser Edge which also received an IE Mode update to cater to the users’ needs as it replicates IE11 in so many ways.

Still, on the same premise, Microsoft released new information detailing its plans as far as completely phasing out IE11 from Windows 10 is concerned. The company detailed that it intends to kill it off completely next year on February 14 via a Microsoft Edge update.

The initial plan was to disable it via a Windows Update on Windows 10, but the company has shifted gears and will be disabling it through a Microsoft Edge update instead. This is in a bid to enhance the user experience and ultimately make the transition process for the users simpler.

After Microsoft started phasing out IE11, its users started being redirected to Microsoft Edge. And now, once Microsoft rolls out the Edge update in February users will no longer be able to access IE11. Both Windows 8.1 and Windows 7 users won’t be able to access it either.

According to Microsoft:

Users will see a dialogue box when they are transitioned to Microsoft Edge. When they try to click any IE11 icons or other entry points, they will be redirected to Microsoft Edge. Users’ browsing data will be automatically brought over to Microsoft Edge from IE11 so they can seamlessly continue browsing.

What’s more, Microsoft has disclosed that June’s Patch Tuesday update will erase any remnants of Internet Explorer from Windows 10, that is, its logo that appears in the Start menu or on the taskbar. We invite you to make the transition as soon as possible before IE11 reaches its end of support to avoid any setbacks.

Share your thoughts with us in the comment section.

How to Use 2 Audio Outputs at the Same Time on Windows 10 [Tested]

You can configure Windows 10 to play sound from two connected playback devices simultaneously.

For instance, you can use two USB headphones at once on Windows as long as you properly configure both devices. Here’s how:

How do I use 2 audio outputs at once on Windows 10?

1. Enable Stereo Mix

  1. Right-click the Speakers icon on the system tray and select Sounds.
  2. Select the Playback tab shown in the snapshot directly below.
  3. Then select your primary speakers audio playback device and click Set as default. That will be one of the two playback devices that play the audio.
  4. Select the Recording tab shown directly below.
  5. Right-click a blank space on the Recording tab and select the Show Disabled Devices option. Then you will usually see Stereo Mix on the Recording tab.
  6. Right-click Stereo Mix and select the Enable option.
  7. Then right-click Stereo Mix to select the Set as Default Device option on its context menu.
  8. Click Properties on Stereo Mix’s context menu to open the Stereo Mix Properties window.
  9. Select the Listen tab on the Stereo Mix window.
  10. Then click the Listen to this device checkbox.
  11. Select the second playback device listed on the Playback this device drop-down menu.
  12. Click the Apply and OK buttons on both the Stereo Mix Properties and Sound window.
  13. Restart your desktop or laptop. Thereafter, Windows will play audio at the same time from your primary audio device and the one you selected on the Playback this device drop-down menu.

Setting the default device on your computer can help easily switch between headphones and speakers, read this guide to learn more about it.

2. Select Output Devices to play audio from specific apps

  1. To select audio output for specific software, right-click the Speakers icon and select Open Sound settings.
  2. Then click App volume and devices preferences to open the options shown in the image directly below.
  3. The Settings lists all your open apps. Click the Output drop-down menu adjacent to the software you need to select a playback device for.
  4. Then, you can select a connected playback device from the drop-down menu. Note that Windows will save the chosen output audio device to play audio when you open the software you selected it for.

There are various ways to use 2 audio outputs at the same time on Windows 10. You can rely on the built-in settings or use third-party tools.

Check out the recommendation above and pick the option that best suits your needs. If you have any questions, don’t hesitate to ask below.

High CPU Usage in Roblox: 5 Ways to Fix It

High CPU usage in Roblox is a common issue that causes FPS drops and stuttering in games. It can even cause the game to crash. The game can be quite resource-intensive when playing with lots of people or using a lot of graphics. 

This article will take you through some of the most common causes of high CPU usage in Roblox and how to fix them.

Why is the game using 100% of my CPU?

If you’ve ever run a game and seen the CPU usage shoot up to 100%, you might have wondered how this is possible. It’s not that the CPU is being used so hard by the game that it can’t handle any other tasks, but rather that it uses all available cores to run itself.

This can happen for a variety of reasons:

  • Old game – You’re probably playing an older game that hasn’t been optimized for modern hardware. You can upgrade your CPU or play games optimized for old processors.
  • Outdated OS – Older OSes don’t include support for multi-core processors. This will help reduce CPU usage when running these old games so the best option is to upgrade your OS.
  • Resource-hungry game – Some games just require more processing power than others and will demand more resources than your computer can provide.

That being said, games that use 100% of your CPU are not necessarily bad. The reason they’re using so much CPU is to achieve the highest possible frame rate. 

So just how much CPU should Roblox use? If you have a high-end gaming PC or laptop, then there’s nothing to worry about when running Roblox. 

However, if your PC or laptop is below average and you want to play the game without issues, then it’s better that you know what kind of hardware and system requirements Roblox requires before playing it for the first time.

How do I limit Roblox’s high CPU usage?

Some basic things you can do to reduce CPU usage in Roblox include:

  • Ensure your PC meets the minimum system requirements to run Roblox.
  • Close all other programs running on your computer while playing Roblox as they might be using up some of your computer’s resources.
  • Uninstall any unnecessary programs.

1. Adjust your graphic settings 

If you have an old PC or laptop, then it’s possible that your computer may not be able to handle high graphic settings in Roblox. This will make your programs compete for the available CPU.

In such cases, lowering the graphic settings will help you get rid of this problem as well as increase your frame rate and improve overall performance.

2. Disable Hardware Acceleration 

  1. Launch your browser (in this case Opera) and click on the icon at the top left corner to open the menu.
  2. Select Settings from the drop-down menu.opera settings
  3. Click on Advanced then hit Browser from the drop-down menu.
  4. Scroll down and under System, toggle off Use hardware acceleration when available. 

Hardware acceleration basically improves the performance of graphics and sound but takes up more resources at the same time causing high CPU usage in Roblox. The steps to disable it will be different for each browser, but with this example, you get the main idea.

3. Update your drivers

  1. Click on the Search icon, type Device Manager in the search bar, and click Open.
  2. Navigate to Display adapters to expand, right-click on your graphics card, and select Update driver.Graphic Driver Update
  3. Select Search automatically for drivers.

If you don’t know which drivers are causing problems on your PC because they’re not working properly anymore, manual updates can be time-consuming and still end up in a disaster. Luckily, there are other ways to approach this issue – a third-party tool.

Outbyte Driver Updater is a powerful yet simple Windows driver updater tool. It can help you easily update your outdated display card drivers, network card drivers, and other hardware drivers to their latest versions.

Outbyte Driver Updater

Boost your gaming experience and use Outbyte Driver Updater to keep your drivers updated at all times.
Free Trial Download now

4. Check for malware

  1. Press the Start Menu, search Windows Security, and click Open.
  2. Select Virus & threat protection.
  3. Next, press Quick scan under Current threats.
  4. If you don’t find any threats, proceed to perform a full scan by clicking on Scan options just below Quick scan.
  5. Click on Full scan to perform a deep scan of your PC.
  6. Wait for the process to finish and restart your system.

5. Update your PC’s software

  1. Hit the Windows key and click on Settings.settings windows 11
  2. Select Windows Update and click on Check for updates.check-updates-w11 windows 11 blue screen
  3. Download and install if available.

Is Roblox using CPU or GPU?

Roblox is not a game that uses graphics cards to render graphics although, in some instances, you may experience Roblox with high GPU usage. Normally, it uses your computer’s CPU to process the graphics, which means it’s less dependent on your graphics card.

That being said, if your computer doesn’t have a good processor, you’ll notice lower framerates in Roblox games. If you want to improve your framerate in Roblox, one option is upgrading your CPU. 

Another option would be to make Roblox use GPU instead of your CPU especially if you have a multi-core processor. You can turn on hardware-accelerated GPU scheduling to take off the load on your CPU if Roblox CPU usage is high.

And as we wind up, you can also reset your browser or switch to gaming browsers if you’re still facing high CPU usage issues with Roblox.

We also have a solution for when you experience high ping and lag in Roblox so feel free to check our comprehensive article on the same.

Let us know if you’ve noticed an improvement in Roblox’s CPU usage after trying our solutions in the comments section below.

Fix Error Code 0x887a0005 [Video Editor / Photos, MW2, CoD]

Photos is the default image viewer app in Windows 10 that some users create and export videos with. However, Microsoft Photos displays an error 0x887A0005 when some users try to export videos with that app.

When some users click the Finish video button, Photos displays this error message:

Update your drivers to export video… We encountered an issue with your video drivers and are unable to export video… Here’s the error code, in case you need it: 0x887A000.

If that’s your issue as well, take a closer look at the tips and tricks described below. One of them will probably help you get things back to normal.

This guide focuses on photos/video editor error 0x887A0005 , but some of the solutions below will also help if you’re experiencing this issue while gaming (CoD, MW2).

What is error code 0x887a0005?

According to the notification that appears when you click on the error, the application has suddenly ceased working. Error Code: 0x887a0005 is typically caused by damaged game files or problems with the graphics driver.

Drivers are essentially software programs that assist your system in properly communicating with its hardware. As a result, if your system’s drivers are out of date or if any critical drivers are missing, it will not function as you want it to.


This is exactly why you got the error code 887a0001 on your computer. Drivers are critical components of your system.

Moreover, here are some error variations that you may encounter, but nonetheless, fix with the solutions below:

  • 0x887a0005 (0x887a0006)
  • Error code 0x887a0005 Modern Warfare 2/MW2, Vanguard, Warzone 2, Call of Duty/CoD
  • 0x887a0005 dxgi_error_device_removed
  • Error code 0x887a0005 (0x887a002b) (6456) d
  • Video editor error code 0x887a0005 – movie maker error 0x887a0005, Microsoft video editor error code 0x887a0005
  • Dx12 error code 0x887a0005
  • Update your drivers to export video 0x887a0005

Without further ado, let’s jump right in!

How do I fix error code 0x887a0005?

1. Update your PC’s graphics card drivers

The 0x887A0005 error message says the app encountered an issue with video drivers. Thus, updating your PC’s drivers to export video is a likely remedy.

Scanning the computer with professional driver updater software will tell you if its GPU drivers are outdated (or faulty) and enable you to quickly update them.

2. Run the troubleshooter

  1. First, open the Start menu.
  2. Click Settings in your Start menu to open that app.
  3. Next, click Update & Security > Troubleshoot to open the options shown directly below.
    Troubleshoot tab error code 0x887a0005
  4. Then click Additional troubleshooters to open the list of Windows 10 troubleshooters.
  5. Select Windows Store Apps in the list, and click the Run the troubleshooter button.
  6. When you’ve gone through the troubleshooter, restart your PC.

3. Reset Photos

  1. Bring up the search tool in Windows 10 by clicking the magnifying glass taskbar button.
  2. Type the keyword apps in the search utility.
  3. Click Apps & features in the search tool’s results to open the window shown below.
    Apps & features tab error code 0x887a0005
  4. Select the Microsoft Photos app.
  5. Then click Advanced options to open the Reset button.
    The Repair button error code 0x887a0005
  6. Press the Reset button there.
  7. Click Reset again on the confirmation prompt that appears.
  8. Note that you can also press a Repair button there. If resetting Microsoft Photos doesn’t do the trick, try clicking the Repair option as well.

4. Reinstall Photos

  1. Open the search box by clicking its taskbar button.
  2. To find the Command Prompt, input cmd in the search utility.
  3. Open an elevated Command Prompt by clicking its Run as administrator option on the right side of Windows 10’s search tool.
  4. Next, type this text into the Command Prompt: get-appxpackage *Microsoft.Windows.Photos* | remove-appxpackage
    The uninstall Photos command error code 0x887a0005
  5. Press the Return key to uninstall Photos with the entered command.
  6. Restart your laptop or desktop after uninstalling Photos.
  7. Open the Microsoft Photos app page in your browser.
  8. Click the Get button on the Photos app page.
  9. Then select the Open Microsoft Store option.
    The Get button error code 0x887a0005
  10. Press the Get button in MS Store to install Photos.

5. Update Windows 10

  1. Launch Settings by holding the Windows key and pressing I.
  2. Select Update & Security to open the update options below.
    Windows Update tab error code 0x887a0005
  3. Press the Check for updates button to download and install available patch updates.
  4. If you can update Windows 10 to a new build, click the Download and Install option to get the latest version.

6. Turn off hardware-accelerated video encoding in Photos

  1. Open the Photos app window.
  2. Click the See more menu button at the top right corner of Photos.
  3. Select the Settings option on the menu that opens.
  4. Then scroll down the window to the Use hardware-accelerated video encoding when available option shown directly below.
  5. Toggle off the Use hardware-accelerated video encoding setting.

7. Clear the MS Store cache

  1. Open the search box with the Windows + S key combo.
  2. Type WSReset.exe in the search box.
  3. Right-click the WSReset.exe search result to select a Run as administrator option for it.
  4. Wait for the blank WSReset.exe window to close and the MS Store to open. Thereafter, try exporting your videos in Photos again.

Those are the most probable resolutions for fixing the error code 0x887A0005 Photos issue. As users have confirmed some of these tricks, they’re certainly worth a try.

Moreover, if the Microsoft Photos app has disappeared, we’ve got a few quick fixes for that as well. After all, no issue is there to remain unsolved.

For further information on Microsoft Photos, take a look at how to fix Microsoft.Photos.exe high memory usage and optimize your computer.

Let us know in the comments section if you found our solutions helpful. We’d love to hear your opinion.

Fix Another Installation is in Progress Error on Windows

Is there a worse thing than being unable to install a third-party application as, seemingly, something else is currently installed in the background?

That’s the whole deal with the Another installation is already in progress error on Windows 10. Any solutions? More than a few, actually.

How do I know if the installation is stuck?

The best way of knowing if another installation is in progress is to check the Windows Installer service.

What is Install in progress?

As the message clearly suggests, although you might not even see that, probably another program or update is being installed at the same time.

This issue usually occurs in Microsoft Office but it can happen with any other software. Here are some other examples of the error:

  • Installation failed, another installation is already in progress
  • Another installation is already in progress in Veeam
  • Another installation is already in progress in Microsoft Office, Adobe, Google
  • Another installation is already in progress in AutoCAD
  • Another installation is in progress Epic Games
  • Another installation is already in progress in Python , Java, Node JS, SCCM
  • Autodesk: Another installation is in progress
  • Error 1500/1618: Another installation is in progress. You must complete – another installation is already in progress. Complete that installation before proceeding (0x80070652)
  • Sophos another installation is already in progress
  • SCCM another installation is in progress
  • Windows setup cannot be launched while another instance of setup is already running
  • Another installation is in progress Windows 11, Windows 10, Windows 7
  • Cannot start another instance of the installer while this instance is running
  • Your machine is busy installing a program other than Visual Studio

For all these errors, you will find a suitable solution below and things are going to return to normal.

Right below, in our first solution, you will learn how to do that and even restart the service to fix this issue.

But don’t worry because here, we’re going to show you how to fix that error on Windows 10.

How do I fix Another installation is in progress?

1. Restart the Windows Installer service

  1. Press the Windows key + R to start Run, type services.msc, and press Enter or click OK.
  2. Scroll down, find Windows Installer, and double-click on it.
  3. Look at the Service status and if it reads Running, just click the Stop button below.
  4. Then, wait for a few seconds and press the Start button again.
  5. Close the Services window and check if the problem is resolved.

Windows relies on its services in order to run properly, and there’s a service called Windows Installer that’s in charge of installing new software.

Whenever you try to install a new application, this service will start and help you install it.

Sometimes, certain repair or uninstall processes can start automatically in the background, and it can require Windows Installer service in order to run.

If you try to install another software while Windows Installer is running, you’ll encounter this error.

One of the simplest ways to fix this problem is to open the Services window and restart the Windows Installer service just like we described in the solution above.

2. End the Windows Installer process

  1. Press Ctrl + Shift + Esc on your keyboard to open Task Manager.
  2. Navigate to the Processes tab and locate Windows Installer.
  3. Right-click it and choose End task from the menu. Often you’ll see a 32-bit and 64-bit version of Windows Installer running. If you have multiple Windows Installer processes running be sure to stop them both.
    kill Windows Installer process in Task Manager Another installation is already in progress
  4. Close Task Manager and try to install the application again.

As we previously mentioned, the Windows Installer service is in charge of installing new applications on your PC.

Windows Installer process is related to this service, and according to some users, you can fix this problem simply by ending the Msiexec process using Task Manager.

3. Disable Windows Installer service and restart your PC

  1. Press the Windows key + R to open the Run console, input services.msc, and press Enter or click OK.
  2. Scroll down and double-click on Windows Installer.
  3. Set the Startup Type to Disabled and click Apply and OK to save the changes.
  4. After doing that, restart your PC.
  5. After your PC restarts, open the Services window again.
  6. Locate Windows Installer service and open its properties.
  7. Set the Startup Type to Manual and click OK and Apply to save the changes.
  8. Close Services window and try to perform the installation again.

Windows Installer service is a common culprit for Another installation is already in progress error, and if restarting the service doesn’t help, you might want to temporarily disable it.

A few of our readers also reported that they fixed the problem simply by changing the Startup Type of Windows Installer service to Automatic just as described in our solution above.

4. Perform Disk Cleanup

  1. Click Start, enter disk cleanup in the search window, and select Disk Cleanup from the menu.
  2. Select the system drive, by default it should be C:, and click OK. Wait while Disk Cleanup scans your PC.
    system drive disk cleanup installation is already in progress
  3. Select all options and click the OK button to clean your disk.
    clean your system disk cleanup Another installation is already in progress
  4. Wait for the process to finish and try to install the software again.

Few of our readers reported that performing Disk Cleanup fixed the issue for them. It seems that Another installation is already in progress error is caused by temporary files left by previous installations.

By running Disk Cleanup you’ll easily remove any temporary files left by older installations.

For more advanced clean-up we advise you to check some of the best tools to delete junk files that we selected.

Sometimes errors like this show up because of corrupt files, like installers in our case. This can only be resolved by finding a good version of it with no issues.

For this kind of situation, we use third-party software that searches your system for corrupted files and replaces them with original Windows files from its database.

5. Perform a Clean Boot

  1. Press Windows key + R and enter msconfig. Press Enter or click OK.
    run window msconfig Another installation is already in progress
  2. Go to Services tab and check Hide all Microsoft services option and then click on Disable all.
    hide all microsoft services system configuration window installation already in progress
  3. Now go to Startup tab and click on Open Task Manager.
    disable programs from starting with the system task manager
  4. A list of all available startup items will appear. Right-click each item on the list and choose Disable from the menu.
    disable startup programs task manager different installation is already in progress
  5. After disabling all startup items, close Task Manager.
  6. Go back to System Configuration window and click Apply and OK to save the changes.
  7. Restart your PC.

When your PC restarts, check if the problem still persists. If the issue is resolved, it means that a third-party application or service was causing the problem.

To identify the problem, open System Configuration window and turn on disabled services one by one.

Keep in mind that you’ll need to restart your PC after enabling a service in order to apply changes. Be sure to repeat the same process in Task Manager for Startup applications.

6. Check your Registry

  1. Press Windows key + R and enter regedit, then click OK or press Enter.
    run windows regedit installation in progress
  2. In the left pane navigate to the following key: HKEY_LOCAL_MACHINE\SOFTWARE\Microsoft\WindowsInstaller\InProgress
  3. If you can’t find this key, navigate to HKEY_LOCAL_MACHINE\SOFTWARE\Microsoft\Windows\CurrentVersion\Installer
  4. In the right pane locate the Default value and double-click it. Delete the values from Data value field and click OK to save changes.
  5. Close Registry Editor.
  6. Set the Startup type of the Windows Installer service to Disabled just like in Solution 3.
  7. Restart your PC and set the Startup type for Windows Installer to Manual.

Sometimes this problem can be caused by certain values in your registry, so you’ll have to manually edit those values.

Editing your registry can be a dangerous process, so we recommend that you export your registry and use it as a backup in case anything goes wrong.

7. Uninstall and reinstall Office

  1. Download the Microsoft Support and Recovery Assistant.
  2. After the download is finished, run the tool and follow the instructions to remove Office from your PC.
  3. Once the uninstall process is finished, restart your computer.
  4. After that, try to install Office again and check if the problem is resolved.

Users reported Another installation is already in progress error message while installing Microsoft Office. This can occur because another Office installation or update was running in the background when you started the setup.

To fix this problem, check for the Office icon in the system tray to see if the installation is running. If Office is installing or updating, you’ll need to wait for the process to finish.

If there’s no Office icon in the system tray, you need to uninstall and reinstall Office.

If the problem persists, consider using a professional-level tool. Unfortunately, some apps are really difficult to uninstall completely.

They leave behind residual files that will interfere with the functionality of your system, in one way or another.

We recommend trying one of the best uninstaller software available because they are equipped with up-to-date technologies that detect and safely remove the smallest traces of any app.

8. Uninstall Java and download offline installer

  1. Press Windows key + I to open the Settings app.
  2. Choose Apps.
  3. Locate Java on the list and click the Uninstall button to remove it.

Users reported this error message while installing Java on their PC. To fix this problem you need to uninstall your current version of Java.

After Java is uninstalled from your PC, you need to download offline installation of Java. After you download it, start it and follow the instructions on the screen.

9. Re-register Windows Installer

  1. Press the Start button, type cmd, and select Run as administrator from the list.
  2. When Command Prompt starts, you need to enter the following lines:
    • msiexec.exe /unregister
      msiexec /regserver
  3. After both commands are executed, close Command Prompt and check if the problem is resolved.

In most cases, this error is caused by Windows Installer, and one potential solution is to re-register Windows Installer.

10. Create a new Windows user

  1. Press Windows key + I to open the Settings app.
  2. Select Accounts, then click on Family & other users.
  3. In Other people section select Add someone else to this PC.
    family & other people settings windows 10 installation in progress
  4. Select I don’t have this person’s sign-in information.
    enter sign-in information Another installation is already in progress
  5. Select Add a user without a Microsoft account.
  6. Set the username for the new user account and click Next. If you want, you can also protect the new account with a password.
    create an account for this PC installation already in progress

If none of the previous solutions work, your Windows user profile might be corrupted. If that’s the case, you’ll need to create a new user profile and use it instead.

After creating a new user account, log out of our current account and switch to the new one. Check if the error message appears on a new user account.

If everything is in order, you might want to move your personal files to a new account and start using it as your main account.

11. Fix the Another installation is in progress error for Visual Studio 2015

  1. Press the Windows key + R, type regedit, and press Enter or click OK.
  2. When Registry Editor starts, navigate to the following key: HKEY_LOCAL_MACHINE\SYSTEM\CurrentControlSet\Control\Session Manager
  3. In the right pane locate PendingFileRenameOperations value. Right-click it and choose Delete from the menu. We have to mention that deleting values from the registry can lead to certain problems, so we advise you to create a backup of your registry just in case.modify PendingFileRenameOperations dword in regedit installation in progress
  4. After deleting this value, close Registry Editor.
  5. Try to install Visual Studio 2015 again.

Another installation is already in progress error can appear while installing any application, and users reported that it appears while installing Visual Studio 2015.

To fix this problem, you need to delete a single value from your registry. This is relatively simple, but before you make any changes to your registry, we strongly advise that you create a backup.

By doing so, you can remedy any potential issues that can occur after modifying the registry.

How do I stop background installation?

The quickest and easiest way to stop a background installation is to stop the Windows Installer service.

You have the full indications on how to do that right in Solution 1 of this guide.

Another installation is already in progress error will prevent you from installing new software. This can be a tedious problem, but we hope that you solved it by using one of our solutions.

You should also consult our guide on what to do if the Windows 11 Installation Assistant disappeared.

If you have any suggestions on how to fix this problem, we’re waiting for your input in the comments section below.

Darktide Error 4008: How to Fix The Failed Handshake Timeout

The Warhammer 40000: Darktide is a first-person action video game newly released on Windows. Despite being recently released, users have reported Darktide error 4008: failed handshake timeout error.

You can also check out Darktide error 4001 reported by users for a quick fix.

What causes error 4008 in Darktide?

The Darktide error code 4008 occurs when a client PC fails to connect to the server for a specified time. The error occurs to prevent the device from a continuous standby response from the server.

Some of the factors that can cause Darktide errors 4008 are:

  • Network connection issues – Darktide error 4008 failed handshake occurs when the client cannot secure a server connection to join the game within a specific time frame. Issues with network congestion and a slow internet connection can cause the error.
  • System requirement compatibility – Devices not compatible with the minimum requirements can interfere with its activities. It can result in frequent crashes and errors that prevent users from being Abbie to play their games.
  • Third-party app interference – Background running of other third-party apps like antivirus can hinder the client PC from securing a connection with the game server. So, the activities of Darktide can be impeded by other apps.

How do I fix error 4008 in Darktide?

Here are a few preliminary steps to apply:

If the error keeps appearing, proceed with the following steps.

1. Disable Windows Defender’s Real-Time Protection

  1. Left-click the Start button, type Windows Security in the search box, and then press Enter.
  2. Select the Virus & threat protection option, and click Manage settings.
  3. Toggle off the Real-time protection option to turn off Windows Defender Antivirus.

Disabling the Windows Defender Real-time protection will resolve any effect of the Windows defender affecting the game.

2. Check the integrity of the game file

  1. Left-click the Start button and type Steam, then double-click to open it.
  2. Select the Library tab and search for Warhammer 40,000: Darktide.
  3. Right-click the game and select Properties from the drop-down.
  4. Click the Local Files tab and select the Verify Integrity of Game Files button.

Checking the game’s integrity will verify and fix all the games’ corrupt or missing files. Read more on the ways to verify the integrity of game files not working for more advanced steps.

3. Update the Warhammer 40000: Darktide

  1. Left-click the Start button and type Steam, then double-click to open it.
  2. Click the Library tab and click on Warhammer 40,000: Darktide.
  3. Right-click the game and select Properties from the drop-down.
  4. Go to the Updates tab and select the Always keep this game up-to-date option from the automatic updates menu.

Updating the Warhammer 40,000: Darktide will fix all bugs and errors in the current version allowing the app to run smoothly.

4. Run the Warhammer 40,000: Darktide game as an administrator

  1. Press Windows + E to open File Explorer.
  2. Locate the Warhammer: Darktide app. Right-click on the .exe file and select Properties.
  3. Navigate to Compatibility, check the box for Run as administrator, and click Apply, then OK.

Running Warhammer 40,000: Darktide as administrator will give the app permission to perform more tasks effectively and allow user access control.

You can check our guide on ways to fix run as administrator not working in Windows.

In conclusion, our readers can check Warhammer 40,000: Sanctus Reach issues and some helpful fixes you can use. We also have a guide on Darktide backend error and Darktide error 9999 so don’t miss it.

If you have further queries or questions and suggestions about this guide, kindly drop them in the comments section.

Posted in PC

Teams Premium preview is now available for trial, says Microsoft

As reported in October during the annual developer conference, Ignite, Microsoft announced that it will be unveiling the new Microsoft Teams Premium add-on in preview this month. The offering comes with a host of new features that are designed to enhance the meeting experience by personalizing it and making it more secure with end-to-end encryption.

Last week, the company announced that the add-on is now available in public preview for commercial customers as a 30-day free trial. You can access it via the Microsoft 365 Admin Centre. This means that users will now have access to features like live translations, intelligent meeting recaps, advanced meeting protections, and more.

IT admins can also leverage this add-on to extend their organization’s brand and company culture with branding, and organization backgrounds. Since Teams Premium is powered by AI, you can use it to make the meetings you attend or miss more productive and impactful. Through the combined efforts of the live translations feature and intelligent recap, you’ll now be able to achieve this.

It is worth noting that you’ll not be able to access all the features we highlighted during the Ignite event just yet. Features like intelligent recap and custom branding for meetings will be rolled out sporadically between now and January 2023.

Once the trial period runs out, you’ll lose access to the add-on, however, it is expected to hit general availability in February 2023. You’ll need to make a monthly payment of $10 for this offering.


Easy Fix: Accidentally Deleted Audio Driver from Windows 10

For the proper functioning of the audio and speakers of your computer, Windows requires Sound Drivers. While the Sound Drivers are generally unaffected by anything, some users have reported that after the latest update, Windows 10 wiped out their sound driver.

Several users took to the Microsoft Community Forums complaining about Windows 10 updated deleted sound driver.

The latest Windows update installed on my computer, after which my sound was disabled.  I right-clicked on the speaker in the toolbar and it indicated that now headphones were the default sound device.  I have tried everything to turn that off without success…

If you are also troubled by the deleted sound driver issue, below are a couple of ways to troubleshoot this problem in Windows 10.

What happens if I uninstall my sound driver?

If you do not have audio drivers installed on your computer, or if you uninstall them, the only thing that will occur is that you will lose the ability to play any audio.

Moreover, here are some error variations that you may encounter, but nonetheless, fix with the solutions below:

  • I accidentally deleted my audio driver Windows 10, Windows 11
  • Accidentally uninstalled audio driver Windows 10
  • Accidentally deleted Realtek audio driver Windows 10
  • Accidentally deleted sound device Windows 10 (removed audio device)
  • Restart sound driver Windows 10
  • Audio driver gone Windows 10
  • Windows 10 no sound after update

Without further ado, let’s just jump right in!

What do I do if I deleted my audio driver?

1. Use a professional driver installer tool

how do I reinstall my audio drivers Windows 10? You can manually reinstall the sound drivers from Device Manager, but we also suggest you try a dedicated tool that can do all the hard work for you. Besides this, you can avoid some serious malfunctions and save time.

⇒ Get Fortect Driver Updater

2. Run Audio Troubleshooter

  1. Click on Start and select Settings.
  2. Click on Update and Security.
    Windows 10 update deleted sound driver
  3. From the left pane click on Troubleshoot tab.
  4. Next click on “Playing Audio” and select “Run the Troubleshooter” button.
    Windows 10 update deleted sound driver
  5. The Troubleshooter will now scan the system for any issues and show a few recommendations to fix the problem. Follow the on-screen instructions to fix the audio problem.
  6. After that, reboot the system and check for any improvements.

Windows 10 update deleted your files and you don’t know how to get them back? Learn how from our guide.

3. Roll Back or Uninstall Sound Driver

  1. Press Windows Key + R to open Run.
  2. Type devmgmt.msc and press OK to open the Device Manager.
  3. In the Device Manager expand, “Audio Inputs and outputs” section.
  4. Right-click on your Speaker Driver or Microphone Array (whichever device is having sound issues) and select Properties.
  5. Go to the Driver tab.
    Windows 10 update deleted sound driver
  6. Click on the Roll Back Driver button if it is visible. Click Yes if asked to confirm.
  7. If the Roll Back driver button is grey, click on Uninstall Device.
    Windows 10 update deleted sound driver
  8. Restart the PC. Windows will automatically re-install the device after the restart.

4. Use System Restore Point

  1. If the issue occurred after installing a Windows 10 update, use a Restore Point to roll back the update and fix your audio issues.
  2. Type Restore in the Window search bar and click on “Create a Restore Point” option.
  3. Click the “System Restore” button in the “System Properties” window.
    Windows 10 update deleted sound driver
  4. Choose “Next”.
  5. Click on “Shore more restore points” box.
  6. Now select the Restore Point that was created before the Windows update was installed.
  7. Click on Next to proceed.
    Windows 10 update deleted sound driver
  8. Read the description and click on Finish.
  9. The System Restore process may take a few minutes to an hour. So wait for it to complete.
  10. After the restore is complete, you should get a success message. Check if the audio drivers are working fine like before.

How do I update my audio drivers in Windows 10?

With the sound driver reinstalled, as you know, updating your drivers is one of the most important steps you need to perform routinely in order to ensure your computer’s sound functionality.

Thus, follow the steps below to update your audio drivers in Windows 10:

  1. Press the Windows + I buttons to open the Settings app and go to Update & Security.update security adio drivers deleted
  2. Click on View optional updates and expand the Driver updates section.optional updates audio driver deleted
  3. Select all the drivers and hit Download and install.download and install drivers deleted audio driver

For more information and ways to retrieve a deleted driver, take a look at how to reinstall audio drivers in Windows 10 [Realtek].

Alternatively, check out what to do if audio device is disabled on Windows 10/11 PC in order to reenable and make use of them.

Was this guide helpful for you? Don’t hesitate to let us know in the comments section below.

Most Common Darktide Error Codes & How to Fix Them

Even though Warhammer 40,000: Darktide is a newly released game, it suffers from many error codes. Users frequently complain about several Darktide error codes that affect their game performance.

Also, we receive reports of Darktide 2 running into problems on Windows 11.

What are the most common Darktide error codes and how to fix them?

1. Error code 2001

The Error Code 2001 in Warhammer 40K: Darktide mostly appears when playing the game. It interrupts and prevents players from completing matches in the game.

However, the error occurs due to system requirements issues with your PC. It indicates that your PC doesn’t meet up with the requirements for running the game. Also, corrupted game files can cause it.

Fix: Check the system requirements

Check if your computer meets Warhammer 40,000: Darktide system requirements to know if it is strong enough to play the game. If it doesn’t, upgrade your PC or switch to a stronger one.

2. Error code 3001

The cause of the error code 3001 on Darktide is unknown, meaning the factors may vary on different PCs. Moreso, it occurs due to the game’s failure to connect with its servers.

Also, the error blocks players from either accessing the game or completing the matches they’re actively playing.

Fix: Restart Windows in Safe Mode

  1. On the sign-in screen, press the Shift key while holding the Power button.
  2. Hold the shift key to open the Advanced Recovery Options page.
  3. Click on Troubleshoot, then select the Advanced options.
  4. Click on Startup Settings and select Restart.
  5. Press 4 to Enable Safe Mode.

Restarting Windows in Safe Mode will disable startup apps that may interfere with the game from startup. Check other methods to Restart Windows in Safe Mode on your PC.

3. Darktide error code 2006

The error code 2006 occurs when joining a match or mission. It prevents players from getting past the Morningstar screen and selecting missions.

Furthermore, many factors can cause the error code to disrupt your game, and there’s no definite reason.

Fix: Reduce Worker Threads number

  1. Launch Warhammer 40K: Darktide on your PC.
  2. Click on Settings.
  3. Navigate to Worker Threads, reduce the number by at least 2, and click Accept.
  4. Restart the game.

Reducing the Worker Threads can resolve the error code.

4. Darktide error code 9999

The error code 9999 in Darktide appears when there’s difficulty connecting to the game server. It can show at any point in the game.

However, the error occurs due to corrupt game files impeding the connections between the game and its servers. Also, network issues can prompt the error.

Fix: Run a System File Checker (SFC) scan

  1. Left-click the Start button, type the command prompt, and select Run as administrator.
  2. Click Yes on the User Account Control prompt.
  3. Type the following command and press Enter: sfc /scannow
  4. Restart your PC, then check if the error appears again.

The System File Checker scan will repair corrupt system files causing the error. Check what to do if the SFC Scannow stops working on Windows 11.

5. Darktide error code 2003

Error code 2003 in Warhammer 40K: Darktide indicates that the game has disconnected from its servers. Hence, it prevents players from playing a game or joining a match.

Network congestion and other network issues can cause the game to disconnect from its servers. Also, the error may occur if the game files are not intact.

Fix: Verify the integrity of game files

  1. Left-click the Start button, search for Steam, then double-click to open it.
  2. Click the Library tab and search for Warhammer 40,000: Darktide.
  3. Right-click the game and select Properties from the drop-down.
  4. Tap the Local Files tab, then click the Verify Integrity of Game Files button.

Verifying the integrity of the game file will repair any missing or corrupt files. If Verify the integrity of game files is not working on Steam, check how to fix it.

6. Darktide error code 2004

Error 2004 is a similar error code to 2001. When Darktide crashes or runs into the error code 2004, it means there’s been a system requirement issue causing the game to act up.

A common cause of the error is an outdated graphics driver and an outdated Windows OS. They can result in your PC not meeting the system requirements for the game.

Fix: Update your graphics driver

  1. Press Windows + R keys to prompt the Run window, type devmgmt.msc, and click OK.
  2. Click on Display Adapters, select the driver from the drop-down menu, and click the Update driver option.
  3. Select Search automatically for drivers.
  4. Restart your PC.

Check other steps for updating graphics drivers on Windows 11 if you have any issues.

Other than updating your graphics driver manually, you can try an automatic alternative that helps you scan your computer for outdated drivers and find the best updates as their replacements.

Outbyte Driver Updater

Solve various PC issues and make sure you update your drivers with Outbyte Driver Updater.
Free Trial Download now

7. Darktide error code 2007

Error code 2007 indicates an internal error in the game, causing it to crash when joining a mission. However, issues with game servers and corrupt installation files can be responsible for the error.

Fix: Update Warhammer 40,000: Darktide

  1. Left-click the Start button and type Steam, then double-click to open it.
  2. Click the Library tab and click on Warhammer 40,000: Darktide.
  3. Right-click the game and select Properties from the drop-down.
  4. Go to the Updates tab and select the Always keep this game up-to-date option from the automatic updates menu.

The update will fix bugs affecting the game.

8. Darktide error code 1003

When the Darktide error code 1003 appears, it means there’s a connection issue affecting the game. Hence, the game can’t connect to its servers.

Moreso, outdated router firmware can cause connection issues when playing the game, resulting in the error.

Fix: Check for Router Firmware updates

Bugs can infect the router if its firmware is not updated, causing its network to be unstable. Check the router manual for the router Firmware update procedures.

Note that the steps for a firmware update can vary in different routers due to different manufacturers.

The causes of the error codes highlighted above may vary for different users. Nonetheless, you can try other fixes mentioned in the above guide.

In conclusion, our readers may be interested in the Warhammer 40,000: Dawn of War III system requirements for PC. Also, you can read about Warhammer 40,000: Sanctus Reach issues and some effective fixes you can use.

We also have a whole guide dedicated to Darktide backend error and the Darktide error 9999 so don’t miss it.

If you have more questions or suggestions on this guide, kindly drop them in the comments below.

Posted in PC

Windows 11 Not Showing WiFi Option (Quick Fix Guide)

If Windows 11 is not showing the WiFi option, you’re likely missing key drivers or dealing with disabled services. This guide walks you through step-by-step solutions to restore wireless connectivity and access the WiFi toggle from the settings menu.

Why Is There No WiFi Available on Windows 11?

When the WiFi toggle is missing in Windows 11, it often points to:

  • A disabled WiFi adapter in Device Manager
  • Missing or outdated network drivers
  • Airplane Mode being active
  • Corrupt system or network configurations

You might also encounter this if you’re setting up a new device with no WiFi available during Windows 11 setup.

How do I get my Wi-Fi back on Windows 11?

Before trying complex fixes, start with these: boot Windows 11 in Safe Mode if Wi-Fi is missing, switch to Ethernet for a stable connection, and enable auto-login to skip entering your password.

1. Check for a physical switch to turn on Wi-Fi

Many new computers, and laptops, in particular, have a built-in switch to enable/disable the Wi-Fi. You will find it either on the side or around the keyboard.

After locating the switch, make sure it’s turned on and check if the Wi-Fi icon and settings reappear.

Note icon NOTE
If you are unable to locate the switch, check the manufacturer’s website or the manual that came along with the system for its position.

2. Update the Wi-Fi driver

2.1 Via Device Manager

  1. Press Windows + X to launch the Power User/Quick Access menu.
  2. Select Device Manager from the list of options that appear.Launch device manager
  3. Locate and double-click on the Network adapters entry to expand and view the devices under it.expand Network adapters
  4. Right-click on the Wi-Fi adapter and select Update driver from the context menu.Update Wi-Fi driver
  5. Select Search automatically for driver to let Windows scan for the best available driver on the system and install it. Check if the Windows 11 no WiFi option issue is solved.Search automatically for drivers
Note icon NOTE
The Device Manager method only allows you to install the drivers already downloaded to the system. In case you haven’t downloaded an update earlier, go for the methods listed next.

2.2 Via Windows Update

  1. Press Windows + I to launch the Settings.
  2. Select Windows Update from the navigation pane on the left.select Windows Update
  3. Click on Advanced options.Advanced options
  4. Select Optional updates under Additional options.Optional updates
  5. Check if there is an update available for the Wi-Fi driver. In case there’s one present, tick the checkbox for it and click on the Download & install button.

2.3 Via manufacturer’s website

  1. Launch the Device Manager.
  2. Double-click on Network adapters, locate and right-click on the Wi-Fi adapter, and select Properties from the context menu.Wi-Fi adapter properties
  3. Navigate to the Driver tab and jot down the driver version.Note the driver version
  4. Once you have the current driver version, go to Google or any other search engine of your preference, and search for the update using the Driver Name and Operating System (Windows 11) as the keywords followed by Update driver.
  5. Locate and open the manufacturer’s website from the search results.
  6. On the OEM’s website, identify if there is an update available based on the current driver version you noted earlier.
  7. In case a newer version is available, download it.
  8. Navigate to the folder the driver update is downloaded to, double-click on it to launch the installer, and follow the on-screen instructions to complete the installation process.
  9. After updating the driver, restart the computer for the changes to come into effect and check if the Wi-Fi icon can be accessed now.

In case you are looking for simpler ways to keep your drivers up-to-date, we recommend using a dedicated third-party tool. It automatically scans for driver updates and installs them to your PC, thus making the whole process simpler and more convenient.

⇒ Get Fortect Driver Updater

3. Verify that Airplane mode is disabled

  1. Press Windows + I to launch the Settings app.
  2. Select Network & Internet from the tabs listed to the left.select Network & internet
  3. Locate the Airplane mode toggle and ensure that it’s disabled. The Windows 11 no WiFi option issue, will be solved.disable Airplane mode

4. Turn on the Airplane mode and then disable it

  1. Click on the Action Center icon at the right of the Taskbar or press Windows + A, to view the Quick Settings.Action Center
  2. Click on the Airplane mode tile to enable it. Once enabled, the tile color will change to blue.airplane wifi disappeared windows 11
  3. Wait for a couple of minutes, and then again click on the Airplane mode tile to disable the setting. Check it the Windows 11 no WiFi option problem is gone.

Quick Settings allow you to make modifications to the system and enable or disable features without having to navigate to their actual location. You can also customize the Action Center and only keep the tiles you often use, for a finer experience.

5. Restart the PC

  1. Go to your Desktop and press Alt + F4 to launch the Shut Down Windows box.
  2. Click on the dropdown menu and select Restart from the list of options.Restart windows 11
  3. Click OK at the bottom.click OK

We hope this helped you solve the Windows 11 no WiFi option situation. If you have trouble with the account after the restart, learn how to change your password and username in Windows 11.

6. Check if Wi-Fi adapter is enabled

  1. Press Windows + R to launch the Run command and enter ncpa.cpl in the text field, then either click on OK or press Enter, to launch Network Connections.Launch Network connections
  2. Locate and check if the Wi-Fi entry is greyed out. In case it is, you have to enable it.
  3. Right-click on the Wi-Fi adapter, and select Enable from the context menu.Enable Wi-Fi adapter

7. Use the Roll Back Driver option

  1. Launch Device Manager.
  2. Locate and double-click on Network adapters, right-click on the Wi-Fi adapter, and select Properties from the context menu.Wi-Fi adapter properties
  3. Go to the Driver tab and select Roll Back Driver.Roll Back Driver
  4. You will now be asked to select a reason for rolling back the update. Choose the necessary response and click Yes.
Note icon NOTE
If the Roll Back Driver option is greyed out, either the driver wasn’t updated recently or Windows didn’t store the files for the previous version. In this case, you will have to reinstall it from the manufacturer’s website, as discussed in the previous fix.

In case the Wi-Fi disappeared after you updated the Wi-Fi driver, rolling back the update could work. Windows keeps the files for the previous version if you want to revert to it.

8. Reinstall the Wi-Fi driver

  1. Launch Device Manager.
  2. Double-click on the Network adapters to expand and view the devices under it, right-click on Wi-Fi adapter, and select Uninstall device from the context menu.Uninstall driver
  3. Tick the checkbox for Attempt to remove the driver for this device and click on Uninstall at the bottom.Uninstall driver
  4. After the driver is uninstalled, restart the computer.
  5. When the computer turns on, Windows will automatically look for the best available driver and install it. Check if you are now able to connect to the Wi-Fi.

9. Update Windows 11

  1. Press Windows + I to launch the Settings app.
  2. Select Windows Update from the tabs listed on the left.Update windows
  3. Click on Check for updates and let Windows scan for any pending updates. If there are any available, they will be downloaded and installed on the computer.Check for updates

Sometimes, running an older version of Windows is also likely to cause a bunch of issues. In the updates released by Microsoft, there are patches for various problems along with other new features for your computer. It’s the former part that you should be concerned with here.

After installing the latest updates, the problem with no WiFi option in Settings on Windows 11 should be resolved.

10. Uninstall Windows 11 updates

  1. Press Windows + I to launch the Settings.
  2. Select Windows Update from the tabs listed on the left.Windows Update
  3. Click on Update history on the right.View update history
  4. Click Uninstall updates under Related settings.Uninstall updates
  5. Select the update you want to remove and click on Uninstall.Uninstall the problematic Windows Update

11. Run the Network Adapter troubleshooter

  1. Press Windows + I to launch the Settings.
  2. Scroll down and select Troubleshoot in the System tab.select Troubleshoot
  3. Click on Other troubleshooters.Other troubleshooters
  4. Click on the Run button next to Network Adapter troubleshooter.Network adapter troubleshooter
  5. Wait for the troubleshooter to run a scan and then select Wi-Fi from the list of network adapters.Wi-Fi adapter
  6. Wait for the troubleshooter to identify and fix the issues.

12. Run File Explorer

  1. Press Ctrl + Shift + Esc to launch the Task Manager.
  2. Click on the File menu at the top-right corner and select Run new task.Run new task in Task Manager
  3. Type explorer.exe in the text field, and either click on OK or hit Enter to launch File Explorer.Launch File Explorer
  4. After the File Explorer process starts, check if the Wi-Fi icon reappears.

13. Modify the Group Policy

  1. Press Windows + R to launch the Run command.
  2. Enter gpedit.msc in the text field, and either click on OK or hit Enter to launch the Group Policy Editor.run group policy editor
  3. Navigate to User Configuration, then to Administrative Templates and Start Menu and Taskbar from the navigation pane on the left.
  4. Locate and double-click on Remove the networking icon.remove the network icon
  5. Select the checkbox for Disabled and click on OK to save the changes.Disable remove the networking icon

14. Perform a clean boot

  1. Press Windows + R to launch the Run command.
  2. Type msconfig in the text field, and either click on OK or hit Enter to launch the System Configuration window.System configuration
  3. Go to the Services tab.Services tab in System configuration
  4. Tick the checkbox for Hide all Microsoft services and click Disable all.Disable non-Microsoft services
  5. Navigate to the Startup tab and select Open Task Manager.Launch Task Manager
  6. Select all the startup items listed here one at a time and click on Disable each time.Disable startup programs
  7. Close the Task Manager once you are done disabling the startup programs
  8. Click on OK in the System Configuration window.click OK
  9. Click Restart to launch Windows with just the critical services and startup programs.Click Restart

For any problems logging in after the clean boot, learn how to remove your login password in Windows 11.

15. Perform a system restore

  1. Press Windows + S to launch the Search menu.
  2. Type create a restore point in the text field at the top and click on the relevant search result.create a restore point
  3. Click on System Restore.System restore
  4. Select the preferred setting and click on Next. The first option here is the recommended restore point by Windows while with the other setting, you can select one manually. We will choose the second option.Click Next
  5. Choose a restore point and click on Next.Select a restore point
  6. Review the details and click on Finish to start the restore process.Click Finish
  7. The computer will restart during the restore process, hence, we recommended that you save any open files to avoid loss of data.

System restore has been present on the previous versions of Windows as well and is an effective troubleshooting method.

It takes the computer back in time to a point where the error did not exist by modifying the settings and uninstalling apps. The restore process, however, does not affect the files stored on the system.

However, if you noticed a gradual reduction in the Wi-Fi strength over time or have run into trivial issues, it could be the failure of the hardware as well.

If you are facing trouble with the connection, check our guide on how to increase the Internet speed on Wi-Fi. Also, find out the best browsers for Windows 11 to seamlessly surf the web while ensuring privacy and security.

Lastly, if your WiFi symbol is not showing on laptop, check out our dedicated guide for help.

If you want to learn more about other issues like no Wi-Fi networks found, a “Wi-Fi action needed” message, or a Wi-Fi adapter not working, check out these helpful guides.

Let us know which fix worked for you in the comments section below.

FAQs

Why is WiFi toggle missing in Windows 11 setup?

If you don’t see WiFi during initial setup, you’re likely missing wireless drivers. Use an Ethernet connection temporarily or create a USB with drivers.

Can I install WiFi drivers without internet?

Yes. Download the drivers from another PC and transfer them via USB.

Windows 11 cannot find WiFi—what now?

Ensure the WiFi adapter is enabled, the drivers are installed, and Airplane Mode is off.

Repair Your Corrupted Windows 10 User Profile in Minutes

Windows 10 ties your user profile closely to your Microsoft account, so when that profile gets corrupted, things can quickly go sideways.

From login issues to lost settings, a corrupted profile can seriously disrupt your workflow.

Luckily, there are several ways to fix it, whether by repairing the registry, creating a new profile, or running system scans. Let’s walk through all the options you have to get back on track.

How do I fix a corrupted user profile in Windows 10?

1. Repair corrupted Windows 10 user profile with Windows Registry

Note icon NOTE
We highly advise you to create a backup of your hard disk or just files you don’t want to lose before trying anything which involves messing with the Windows Registry.

How do I fix user profile problems? If your Windows 10 user profile registry is corrupt, try restarting your computer first, as it probably doesn’t work. Then restart it again and enter Safe Mode.

Note that the steps are similar for both Windows 10 and 11 and you can use this to fix a corrupted user profile in Windows 11.

Once you enter the Safe Mode, do the following:

  1. Go to Search, type regedit, and open Registry Editor.
    Corrupt user profile registry key
  2. When Registry Editor launches, navigate to the following key:
    Computer\HKEY_LOCAL_MACHINE\SOFTWARE\Microsoft\Windows NT\CurrentVersion\ProfileList
    profileImagepath registry Corrupted user profile unable to load
  3. Click each S-1-5 folder and double-click the ProfileImagePath entry to find out which user account it relates to. (If your folder name ends with .bak or .ba follow Microsoft’s instructions to rename them).
  4. Once you have determined where is the corrupt user profile(and it doesn’t have a .bak ending), double-click RefCount and change the Value data to 0 and click OK. If this value isn’t available, you might have to create it manually.percount value data User profile service failed
  5. Now double-click on State, make sure the Value data is again 0, and click OK.
    state value data Corrupted user account active directory
  6. Close Registry Editor and restart your PC. This is how to fix a corrupted profile registry in Windows 10.

This is a simple and easy method to fix a corrupt user profile on Windows 10 with Regedit, so be sure to give it a try.

If you believe doing it manually is confusing, we suggest you try automated repair software and restore broken and corrupted system files in a safe manner.

2. Create a new user profile in Windows 10

If you cannot log in to your user account on startup, you can only create a new account and then transfer files from your corrupt account to repair your user profile in Windows 10.

If you already have another account registered on your computer, log in with that account and follow the steps for copying files from one account to another, as shown below.

Moreover, if you don’t have another account, you’ll have to enable a special hidden admin account and then log in to that account to create a new user account and transfer files from your old user profile.

2.1 Enable a hidden admin account

  1. Restart your computer and boot into Safe Mode. Note that the steps are similar for Windows 11 and 10.
  2. Press Windows then type cmd and open the Command Prompt result as an administrator.cmd-run-admin 0x80070002 windows update
  3. Type in the following command and press Enter: net user administrator /active:yesnet-user how to fix corrupted user profile windows 10
  4. You should get The command completed successfully message. Reboot your computer

You have activated the admin account, and it will be available to log in on the next boot. So, when your computer starts, just login into the admin account and follow the steps below.

2.2 Create a new user profile

  1. Go to Settings by pressing Windows + I and select Accounts.
    accounts settings app User profile won't load
  2. Go to Family and other users. Click on Add someone else to this computer.add-new how to fix corrupted user profile windows 10
  3. Follow the instructions and finish the creation of the new user profile.

Now, you have a fully-function new user account, and all you have to do is to transfer your data from the old user account to it.

2.3 Transfer your data

  1. Restart your computer, and log in to the admin account again (it’s better to use this account than the account you just created).
  2. Navigate to the corrupt user account (it’s on the disk you have Windows installed on, under Users).
  3. Open your corrupted user profile and copy content from it to your new user profile (if you have any problems with permissions, check out our post on what to do if you cannot delete files).move files Corrupt user profile registry key
  4. Once everything is done, log out from your admin account, and log back into the new account, and your settings should be transferred.

3. Repair user profile Windows 10 with CMD

3.1 SFC scan

  1. In order to repair a user profile in Windows 10 with CMD, press Windows then type cmd and choose the Run as administrator option from the right panel.cmd-run-admin 0x80070002 windows update
  2. Paste the following command and press Enter: sfc /scannowscannow 0x80070002 windows update

Your files can become corrupted for various reasons, and in order to fix the problem, you need to perform an SFC scan.

If the SFC scan can’t fix the problem, or if you can’t run the SFC scan at all, you might want to try using the DISM scan instead.

This solution should also fix the Settings app if it resets on reboot, but the highlighted guide has even more methods to solve this issue.

3.2 DISM scan

  1. Tap Windows then enter cmd and select Run as administrator.cmd-run-admin 0x80070002 windows update
  2. Next, paste the following command and press Enter: DISM /Online /Cleanup-Image /CheckHealthdism how to fix corrupted user profile windows 10

Keep in mind that a DISM scan can take up to 20 minutes or more to complete, so be sure not to interrupt it.

3.3 Use PowerShell

Before we start, we have to mention that PowerShell is a powerful tool for repairing a Windows 10 profile, and running certain commands can cause problems with your Windows installation.

To run this command, you need to do the following:

  1. Start PowerShell as an administrator by right-clicking the Start icon and selecting the Windows PowerShell (Admin) option.
  2. When PowerShell starts, paste the following command and press Enter: Get-AppXPackage -AllUsers |Where-Object {$_.InstallLocation -like "*SystemApps*"} | Foreach {Add-AppxPackage -DisableDevelopmentMode -Register "$($_.InstallLocation)/AppXManifest.xml"}
    Corrupted user file

After doing that, the problem with the corrupted user profile should be resolved. As you can see, it’s possible to repair the user profile on Windows 10 with cmd, and this solution will help you do just that.

4. Install the latest updates

  1. Press Windows + I then when the Settings app opens, click on Update & security.update & security settings app User profile won't load
  2. Now click the Check for updates button.
    check for updates windows update User profile keeps disappearing

Windows will now download the available updates in the background. After installing the missing updates, check if the issue still appears.

5. Reset Windows 10

  1. Open the Start Menu, click the Power button, then press and hold the Shift key and choose Restart from the menu.
    restart PC Corrupt user profile registry key
  2. A list of options will appear. Select Troubleshoot followed by Reset this PC and Keep my files.reset-pc how to fix corrupted user profile windows 10
  3. Select your account and enter your password if prompted. If asked to insert the installation media, be sure to do so.
  4. Select your version of Windows and click on the Reset button to proceed.
  5. Follow the instructions on the screen to complete the reset.
  6. If this method doesn’t work, you might want to repeat the reset process and choose to Remove everything followed by Only the drive where Windows is installed.remove-everything how to fix corrupted user profile windows 10

According to users, sometimes the only way to fix a corrupt user profile is to perform a reset for your user profile in Windows 10.

This process will remove installed applications but should keep your personal files intact. Just in case, it might be a good idea to back up your important files in case anything goes wrong.

It’s worth mentioning that this process might require a Windows 10 installation media, so create one using Media Creation Tool.

If the resetting process sounds a bit confusing to you, be sure to check our guide on how to reset Windows 10 for more information.

6. Run an in-depth antivirus scan

In rare cases, certain malicious codes may trigger user profile issues and even corrupt your user profile.

You need reliable antivirus software to detect and remove the threats that caused this problem.

It’s important to run a full system scan and wait until the antivirus has scanned all your system files.

Moreover, here are some error variations that you may encounter, but fix with the solutions below:

  • Corrupt user profile registry key
  • Corrupted user profile unable to load
  • User profile service failed
  • Corrupted user account active directory
  • Corrupted user file
  • User profile won’t load
  • User profile keeps getting locked out, keeps disappearing
  • Corrupt user profile on Windows 10/7 domain
  • Corrupt default user profile (Windows 10)

How do I check if the user profile is corrupted in Windows 10?

One of the symptoms of corrupted user profile in Windows 10 is if your Windows 10 profile is not loading properly, or when your account profile picture won’t update. This is usually followed by a message that appears when trying to log in. In addition, certain features might not work properly.

Many users reported that Windows apps can crash due to a corrupted user account, which will negatively impact your user experience.

In some instances, you might even be signed in with a temporary profile on Windows 10 until you manage to find the issue.

What causes a corrupted user profile you may ask? It’s possible that your system is damaged or that it has encountered a bug. It’s also possible that your profile is not deleted completely, thus causing the issue.

User profile errors can appear after a Windows Update, or if the user profile is not in the registry, but luckily you can fix those issues by doing the following:

  • If you choose to repair the user profile on Windows 10, you’ll have to use the command line and Registry Editor to achieve that.
  • You can also delete corrupt user profiles, but to preserve them, you must back up your files.
  • It’s also possible to reset user your profile, which involves creating a new one and moving all the files and settings to it.

Wrapping up

That’s how to fix a corrupted Windows 10 user profile. For other sign-in problems, see Black Screen After Sign-In and Windows 11 Sign-In Issues. Comments are welcome!

Microsoft Excel: How to Insert an Image Into a Cell

Microsoft Excel is an excellent tool for storing and calculating data. It allows you to insert text, numbers, dates, and error values into the cells. However, a recently added feature now lets you insert images into cells in Excel.

Nonetheless, users report that they can’t insert new cells in Excel when working on the program.

Can I drag and drop images into an Excel cell?

The straightforward answer is Yes. You can drag and drop images into an Excel cell. It allows you to select images directly from a file, and drag and drop it into the desired cell.

However, Microsoft Excel doesn’t support using the drag-and-drop option to copy items from Windows Explorer and insert them in the cells. There’s no definite reason for the restriction, but there is a way around it.

Furthermore, the drag-and-drop option is not a registered feature in Microsoft Excel, so it doesn’t support inserting images directly from open files. Hence, the image must be embedded in a file to be viewed in Excel.

How do I insert a picture into a selection cell?

Go through the following before proceeding with the guide below:

  • Move the necessary images to an identifiable file.
  • Ensure Word is running on your PC.
  • Back up your current work on Excel before trying to insert any image.

The above checks will help prepare the necessary items to insert images in the Excel cell. Follow the steps below to start inserting.

1. Via the Insert tab

1.1 Allow the Insert options in Excel

  1. Launch Microsoft Excel and click on Files in the top-right corner.
  2. Click on Options.
  3. Then select the Advanced tab on the left pane. Go to the Cut, Copy and Paste tab, then check the box for the Show Insert Options button.
  4. Scroll down to the Display options for this workbook tab, check the box for All, then click the OK button.

The steps above allow you to access and use the Insert Options to cut, copy, and paste images, charts, etc., into the Excel cells.

1.2 Use the Insert feature to add an Image into a cell in Excel

  1. Go to the cell where you want to insert the image, click the Insert tab on the toolbar, tap the Illustration button, and select Picture.
  2. Select an option from the Insert Picture From section, choose the image you want, then click the Insert button.
  3. The picture will appear on the spreadsheet. Drag the small circles at the edges to modify the picture size until it is small enough to fit into the cell.
  4. Save your Excel file and continue your work.

The Insert Option allows you to access pictures and other items to add to the Excel cells you’re currently working on. Check our article on what to do if the toolbar is missing in Microsoft Excel.

2. Insert an image into an Excel cell by dragging and dropping

  1. Launch Microsoft Word, and create a new document.
  2. Navigate to the directory of the image, and copy and paste it into the Word document.
  3. Launch Microsoft Excel and enter the cell you want to insert the image.
  4. Go to Word, click and hold on to the image, drag it across to the Excel spreadsheet, then drop it into the cell.
  5. If needed, drag the small circles at the edges to modify the picture size until it is small enough to fit into the cell.

Since Microsoft Excel doesn’t support dragging and dropping from Windows Explorer, using Microsoft Word is the best alternative. It allows you to drag images and drop them into your desired cells easily.

Read how to fix Microsoft Word not working on Windows 11.

Our readers can also check our guide on fixing corrupt Excel cells that may cause problems with their activities on Excel. Even more, you can read about what to do if you run into too many different cell formats error in Excel.

If you have further questions or suggestions on this guide, kindly drop them in the comments section.

How to Enable Directx 12 Ultimate on Windows PC [Step-by-Step]

Many users are wondering how to enable DirectX 12 Ultimate on their computer, and in this guide, we’ll tell you everything we know about it.

We’ll show you how to enable it using DXDiag so you can unlock better graphics, faster performance, and support for advanced features like ray tracing and variable rate shading.

How do I enable DirectX 12 Ultimate on my PC?

Does my PC support DirectX 12 Ultimate?

  1. Press Windows key + R and type dxdiag.
    run window dxdiag
  2. Navigate to the Display tab. In the DirectX Features section look for DirectX 12 Ultimate.
    display tab dxdiag
  3. If it’s not available or it says Disabled, it means your graphic card doesn’t support it.

We also have a guide on how to check if your graphics card is DirectX 12 compatible, which may come in handy.

How do I get DirectX 12 Ultimate?

The only way to get DirectX 12 Ultimate is by using a GPU that supports it. The following graphics cards support it:

  • GeForce RTX 20 series
  • GeForce RTX 30 series
  • Radeon RX 6800 series
  • Radeon RX 6900 XT series

If you don’t have it already, we have a great guide on how to download DirectX 12 for Windows 11, so don’t miss it.

Does Windows 11 support DirectX 12 Ultimate?

Both Windows 11 and 10 support Direct 12 Ultimate, however, to use it, you need to have a compatible graphics card.

Is DirectX 12 Ultimate worth it?

Yes, the Ultimate version of DirectX 12 brings built-in support for built-in support for ray tracing, variable rate shading, mesh shaders, and more.

If you’re wondering how to enable DirectX 12 Ultimate, it should be available by default, if you have the compatible hardware. If not, your only option is to upgrade your GPU if you want to use DirectX 12 Ultimate.

In our latest article we covered what to do if DirectX 12 is not supported on your system, so check it for more information. If you’re using an older system, don’t miss our guide on DirectX 12 on Windows 7.

Before you go, don’t miss our guide on how to fix DirectX errors if you encounter any issues.

PCI Device Driver Missing in Windows 10 [Complete Guide]

If the PCI device driver is missing in Windows, that is probably because the OS is not recognizing the device you connected, or you installed a problematic driver by mistake. When you can’t get the right drivers either, try uninstalling it and restarting your PC to see if Windows finds a correct one. Another good thing to do is to install the latest OS updates, because they also come with updated drivers.

What can I do if the PCI device driver is missing in Windows 10?

1. Automatically update the driver

  1. Press Windows + R to open Run, type devmgmt.msc in the text field, and hit Enter.device manager
  2. Locate the PCI device with the missing driver, right-click on it, and choose Update driver.update driver to fix pci device driver missing
  3. Now, select Search automatically for drivers and wait for Windows to install the best one.search automatically for drivers

A quick way to fix things when the PCI device driver is missing is to update the driver. Here, Windows does it all automatically, and the solution also works when you have the PCI device driver missing in Windows 7.

2. Install the driver manually

Note icon NOTE
The first few steps below revolve around identifying the device using the Hardware ID. If you already know which PCI device is missing a driver, directly head to Step 5.
  1. Press Windows + X to open the Power User menu, and select Device Manager from the list of options.device manager
  2. Expand Other devices, right-click on the PCI device that’s missing a driver, and then select Properties.properties
  3. Now, navigate to the Details tab, choose Hardware Ids from the dropdown menu, right-click on the first entry, and select Copy.copy hardware ID to fix pci device driver missing
  4. Now, search for the Hardware ID using Google or any other search engine, and identify the device it belongs to.search
  5. Once you have all the information, simply head to the OEM’s website, locate the relevant driver, and download it.
  6. Finally, run the driver setup, wait for the installation to complete, and then restart the computer for the changes to effect.

That’s it! Manually installing the driver can be tricky, but it works in all cases, especially when the PCI device driver is missing in Windows 10 on HP. Also, this allows you to get a newer version before it makes its way to Windows Update.

It’s important to ensure that your system drivers are constantly updated, which is why using a dedicated third-party tool could simplify the process. To install the right driver version on your PC in just a few clicks, we strongly recommend Outbyte Driver Updater. 

Outbyte Driver Updater

Make sure you update your drivers straightforwardly by using Outbyte Driver Updater.
Free Trial Download now

Why is the PCI device driver missing?

Here are a few reasons why the PCI device driver is missing in Windows:

  • Incompatible or outdated drivers – Usually, when you have incompatible or outdated drivers installed, it leads to such issues.
  • Corrupt system files – When the system files are corrupt, it leads to issues with the OS, the installed applications, and the drivers.
  • Issues with Windows Update – Windows Update handles installation of the latest driver version for most devices. If the PCI device driver is missing, it indicates a problem with the Windows Update itself.

That’s all there’s to fixing things when the PCI device driver is missing in Windows. Once you manage to get the right driver, it’s also imperative that you update it regularly to avoid such errors in the future. And a third-party tool does this job perfectly.

Also, find the most effective ways to make Windows 11 faster and get the best-ever performance.

We also have a guide on how to deal with Device PCI requires further installation message, so don’t miss it.

Tell us which fix worked and share any other solutions you may know in the comments section below.

3 Tips on How to Download & Install DisplayLink on Your PC

Don’t know how to update the DisplayLink driver for Windows 10? DisplayLink makes it easy and efficient to connect any display to any computer via USB or Wi-Fi.

Today, we will let you know how to download and install DisplayLink driver for your Windows 10 computer.

How do I connect to DisplayLink?

Connecting the Displaylink with your computer is very simple. Download the DisplayLink software on your PC, and then plug in the DisplayLink dock with a USB cable to your computer.

And since the newest DisplayLink docks come with USB-C ports, that makes it easy to connect to your external monitors. 

The DisplayLink will install the driver needed for Windows 10 and then determine the best settings for the connection and automatically configure the external monitors for the best picture quality, also saving them for future use.

How do I download & install DisplayLink driver for Windows 10?

  1. Go to DisplayLink’s support website and click on Download Drivers in the top left corner.
  2. Now, select Windows from the Individual Installers if you are using DisplayLink on a personal computer or for home use, or select Windows from the Corporate Installers if it is for office use.
  3. Now download the latest drivers from the Latest Official Drivers box and hit the Download button. Or if you are downgrading, you can find the previous versions of the DisplayLink drivers from Legacy Drivers.
  4. Once the file is downloaded, open the file and complete the installation process.
  5. Reboot your computer for the changes to take effect.

2. Check for Windows updates

  1. Click the Start button and select Settings.
  2. Choose Update & Security from the menu.
  3. Now, select View optional updates from the right pane.
  4. Click on Driver updates to expand the section and check if there is a DisplayLink related driver. If so, check its box and install it.
  5. Also, ensure you install the latest Windows 10 updates because Microsoft includes driver updates within the OS updates.

3. Install the DisplayLink driver manually

  1. Right-click the Start button and select Device Manager.
  2. Click the Universal Serial Bus controllers to expand the section, right-click on the DisplayLink driver, and select Update driver.
  3. Now, click on Browse my computer for drivers.
  4. In the next step, you may either hit the Browse button and locate the driver you have downloaded in solution 1 from this guide or click on Let me pick from a list…
  5. If you have the right driver, pick the first option, and you’re all set. If you don’t have it yet, choose the latter and pick the correct driver from the list.

Why is DisplayLink not working?

If you find that your DisplayLink has stopped working or not starting at all, it could be due to reasons such as a loose connection, outdated USB or DisplayLink drivers, or it can also be due to running outdated BIOS settings on your computer.

The first step to solving the issue is by recognizing what is causing the problem. However, we have a guide on what to do if DisplayLink is not working that will help you fix this problem in no time.

Also, try connecting a different USB product to the same port and see if it successfully connects or not. If it is, then go ahead and replace the cable.

If you have tried everything, but still your DisplayLink doesn’t seem to work, you should contact customer support as they can help you better, and if the dock is under warranty, you can also get a replacement.

That’s it! We hope that our guide helped you download and install the latest DisplayLink driver and now your device is working properly.

You may also be interested in our guide on what to do if the second monitor was not detected on Windows 10.

If you have more solutions or tips on this issue, we would appreciate your input in the comments section.

How to Fix Outlook’s There Is No Default Mail Client Error

Some Outlook users have posted on Microsoft’s forum about a curious Either there is no default mail client error that arises on their PCs. That’s an Outlook error message that can pop up in slightly different circumstances.

The full error message says this: Either there is no default mail client or the current mail client cannot fulfill the messaging request. Please run Microsoft Outlook and set it as the default mail client.

What causes Outlook’s no default mail client error?

The above error message can simply pop up randomly in Windows for some users. Sometimes that error arises when users try to open email MSG files from File Explorer or when they try to share files via emails from Microsoft Office applications.

As the no default mail client error occurs in different circumstances, there are a few different causes behind it:

  • Outlook isn’t your default email client – The error message even instructs users to set Outlook as the default client, so this might be the most viable cause.
  • Wrong Registry paths – The registry might reference old paths that generate the issue when you try to open email files. Fixing the Registry will solve the issue.
  • Incorrect GUID (Globally Unique Identifier) for Outlook – When the error occurs for email file sharing, Outlook’s MSIComponentID registry value might have the wrong GUID. If so, repairing the MS Office suite can be the solution.
  • Cortana interference – Some of our readers have also cited that disabling Cortana has resolved this issue. As there are other causes, however, that potential resolution won’t work for everybody.

Therefore, there are a few ways you might be able to fix the no default mail client Outlook error. This is how you can fix that error in Windows 10.

How can fix the no default mail client error in Outlook?

1. Set Outlook to be the default email client software

  1. Click the Start button and select Settings on the Start menu.
  2. Then click the Apps category in Settings.
  3. Next, select Default apps to open the window in the screenshot directly below.
    Default apps tab either there is no default mail client
  4. Click the Email box there to open a choice of mail apps and select the Outlook email app listed there.

2. Repair your Microsoft Office suite

  1. Hold the Windows key and press X at the same and select the Run shortcut.
  2. Type this command in the Open text box and click OK: appwiz.cpl
  3. Select your Microsoft Office suite in the Programs and Features window.
    Programs and Features applet either there is no default mail client
  4. Click the Change option to bring up the repair tool shown directly below.
    Quick Repair radio button either there is no default mail client
  5. Now select the Quick Repair radio button and press the Repair button.

3. Edit the MSMapiApps registry key

  1. Click the Start button, type registry, and select Registry Editor to open its window.
  2. Then open this registry path: HKEY_LOCAL_MACHINE\SOFTWARE\Wow6432Node\Microsoft\Windows Messaging Subsystem\MSMapiApps
  3. Select the MSMapiApps subkey.
    MSMapiApps key either there is no default mail client
  4. Next, right-click the Version REG_SZ value there and select Rename.
  5. Enter Version_Renamed to rename the string, and press the Return key.

The registry key path cited above is for 32-bit Microsoft Office versions installed on 64-bit Windows 10.

If you have a 64-bit Microsoft Office version installed on a 64-bit Windows 10 platform, you’ll need to apply this resolution at this registry path: HKEY_LOCAL_MACHINE\SOFTWARE\Microsoft\Windows Messaging Subsystem\MSMapiApps

If you’re not sure about this here’s our guide on how to check if your Windows OS is 32-bit or 64-bit.

4. Delete the Microsoft Outlook subkey

Note icon NOTE
It’s recommended to back up the registry before deleting any subkeys in it. You can do so by clicking File > Export within the registry. Then enter a title for the registry’s backup file, and click the Save button.
  1. Click the Start button, type registry, and select Registry Editor to open it.
  2. Then open this registry path: HKEY_LOCAL_MACHINE\Software\Clients\Mail\Microsoft Outlook
  3. Select the Microsoft Outlook subkey, and press the Delete key.
    Microsoft Outlook key either there is no default mail client
  4. Click the Yes option to confirm.
  5. Close the Registry Editor, and restart your Outlook software.

If you encounter any problems with editing the Registry, our guide on how to gain full access to edit the Registry in Windows 10 will help you.

5. Disable Cortana

  1. Click the Start button, type registry, and choose Registry Editor to open the app.
  2. Enter this key in the Registry Editor’s location bar and press Return: HKEY_LOCAL_MACHINE\SOFTWARE\Policies\Microsoft\Windows
  3. Next, right-click the Windows subkey, select New, then pick the Key option.
  4. Input Windows Search to be the key’s name.
    The Windows Search key either there is no default mail client
  5. Select the Windows Search key on the left of the Registry Editor.
  6. Right-click a space within the window’s right pane to select New, and choose the DWORD (32-bit) Value.
  7. Then enter the name AllowCortana for the string, and press the Return keyboard key.
    AllowCortana string either there is no default mail client
  8. Double-click the AllowCortana string to open the window shown directly below.
    Edit DWORD window either there is no default mail client
  9. Type 0 in the Value data box, and click the OK option.

Windows 10 Pro and Enterprise users can disable Cortana with Group Policy Editor.

You can do so by disabling the Allow Cortana setting at this Group Policy Editor location: Computer Configuration\Administrative Templates\Windows Components\Search

Also, you can contact Microsoft’s support service for Windows and Office about this issue. To get in touch with that help service, fill out the description box on the Contact Microsoft Support page and click Get help. Then you can press a Contact Support button.

Alternatively, try posting a question on Microsoft’s Windows or Outlook forums. Simply click the Ask a question buttons on those forums to ask the community for potential resolutions. The Microsoft agents and independent advisors there will usually reply to technical queries.

Outlook users have widely confirmed the resolutions above can fix the no default mail client error. So, there’s a pretty good chance one of those resolutions will also resolve the same Outlook issue for you.

If you have any questions or suggestions, refer to our comments section below, and we will get back to you as soon as possible.

5 Asus Gaming Mouse to Improve Your Performance in Game

If you’re a gamer, you need a proper mouse, and to help you with that, today we’re going to show you the best Asus gaming mouse.

Before we start, you also might want to check our list of best Razer keyboards to equip yourself with the right gaming peripherals.

How to pick an Asus gaming mouse?

When buying a mouse, you need to pay attention to the following factors:

  • Gaming style – If you play MMO or RTS games, you’ll need a mouse with side buttons. RTS players will need more buttons while FPS players can use models with 2 or more.
  • Type of sensor – Laser mice tend to be more sensitive, so depending on the type of game you play you might need a laser or optical mouse.
  • Connection type – Depending on your mobility, you need to choose between a wired or a Bluetooth mouse. Both offer the same features, but if you’re on the go, the wireless one might be better.
  • Sensitivity – Depending on the type of games you play, you might need a mouse with higher sensitivity. If so, check DPI on your PC to ensure that your mouse meets your needs.
  • Customization – If personalization is important to you, look for a mouse that has reliable and advanced configuration software.

What is the best Asus gaming mouse?

ASUS ROG Gladius II Origin – Best overall

  • Ergonomic design for a better fit
  • Detachable cord with different textures 
  • Excellent performance with Optical Sensor 
  • Good RGB lighting 
  • Glitch configuration software 
  • Only three configuration profile 

ASUS ROG Gladius II Origin is a popular gaming mouse by the company. The mouse was relaunched with new internals that wasn’t received positively; however, the improvement has made it an excellent gaming mouse for hardcore and casual gamers alike.

The mouse features the typical Asus hardware design elements such as the RGB Asus logo, lights on the scroll wheel, and the base of the mouse. Apart from this, the design is minimalistic. 

ASUS ROG Gladius II Origin uses 12,000 DPI optical, 50G acceleration, and 250 IPS sensors for precision movement. The accidental clicks issue from the previous general is fixed with the new Omron switches rated for 50 million clicks. The push-fit switch socket design allows you to swap the switches to customize click resistance.

It comes with two detachable cables with different textures. Helpful if you carry around your mouse and use it with two different setups. ROG Armoury software lets you customize the settings to suit your style. You can customize lighting effects, and performance, create profiles and even map buttons.

On the flip side, you may find the mouse to be a little slippery, and the limit on three profile configurations can be a deal-breaker for some users.

ASUS ROG Chakram X – High polling rate

  • 36,000 DPI ROG AimPoint sensor
  • 8000Hz polling rate
  • Built-in programmable joystick
  • Can connect up to 3 devices
  • The joystick is only 4-directional
  • Pooling rate is not supported by most titles

This is a Bluetooth mouse, and it uses 2.4GHz frequency. It supports tri-mode connectivity, meaning that you can connect it to up to three devices.

You can also find a joystick on its left side and you can assign 4 buttons to it.  The device comes with changeable tips, allowing you to find the best for your needs.

Speaking of buttons, we have to mention that there are additional seven buttons that you can easily program as you please.

It’s also worth mentioning that this model has Push-Fit Switch Socket II that allows you to hot-swap switches easily.

As for the sensitivity, this model has a 36,000 DPI ROG AimPoint sensor, and an 8000Hz polling rate for maximum accuracy. Regarding the DPI, you can adjust it easily simply by scrolling your mouse.

Overall, ASUS ROG Chakram X offers amazing performance, and if you’re looking for a gaming mouse, this model is worth checking out.

ROG Strix Impact II – Swappable switches

  • Lightweight build
  • Push-fit swappable switches
  • RGB light lights and compatible with Aura Sync
  • Limited profile support 
  • Not the best design ergonomically 

If you want an Asus wireless gaming mouse that is a little light on your pocket while offering more battery life, the ROG Strix Impact II is an excellent choice. It is a well-built wireless gaming mouse that can also be used in wired mode using the included USB cable.

The design of the mouse is minimal, with only the Asus ROG logo and the scroll wheel lighting up. It features five programmable buttons that you can customize through Aura Sync. You can further customize the mouse by swapping the push-fit switches for better clickiness.

With the dedicated DPI button, you can reach a maximum of 16,000 DPI for unerring precision. In addition, ROG Strix Impact II weighs just 93 grams and offers maximum acceleration of up to 40 G. The PTFE mouse feet and rubberized grip on the side offer good grip and works well on even smooth surfaces.

ASUS ROG Pugio II – Simple ambidextrous design

  • Ambidextrous design 
  • Three connectivity modes
  • Swappable buttons
  • RGB lighting 
  • DPI button not usable during use
  • Small side buttons

ASUS ROG Pugio II is another sleek, RGB-lit wireless high-performance optical mouse from the company. Equipped with a high-end optical gaming sensor of 16,000 DPI, you can choose your performance using the dedicated DPI button.

ASUS ROG Pugio II comes with three-mode connectivity. You can connect it using the traditional USB wired mode, use a wireless 2.4GHz dongle or Bluetooth for LE for uninterrupted connectivity. An inbuilt battery offers over 100 hours of playtime over Bluetooth LE and 69 hours of 2.4GHz RF.

It features an ambidextrous design offering an ergonomic hold complimented by the magnetic swappable buttons to reduce fatigue. You can adjust the buttons through the Push-bit mechanism as per your requirement. 

Additionally, it features a radio switch at the bottom to instantly switch between the cleanest mode available. Finally, with Aura Sync, you can customize the RGB to match your gaming RIG’s theme.

ASUS ROG Keris – Supports wired and wireless connectivity

  • Swappable push-fit switches 
  • Ergonomic and lightweight 
  • Wired and wireless connectivity 
  • Excellent value for money 
  • Surface calibration option not available 

ASUS ROG Keris is the company’s attempt at cracking the elite gaming mouse market, and for the price, it is among the best in the segment. It is a wireless mouse, and similar to other high-end Asus gaming mouse it comes with a USB-C cable for wired connectivity.

It features a 16,000 DPI, 400 IPS optical sensor, and 1000Hz polling rate offering exceptional performance in FPS games. In addition, Rog Keris’s ergonomic design of the mouse makes it ideal for long hours of gaming sessions and prevents fatigue.

The exclusive ROG push-fit switches socket allows you to customize the flick force and extend the mouse’s lifespan. Asus claims a battery life of 78 hours with the RGB off and 58 hours with RGB on. It also supports fast wired charging and can give up to 12 hours of playtime on a 15-minute charge.

So these are the best Asus gaming mice that you can buy on every budget. If you need a regular, non-gaming mouse, then our best mouse for multitasking guide might come in handy.

What is your mouse of choice? Let us know in the comments below.

Choose Where to Get Apps is Missing? 5 Ways to Get it Back

Like Google on Android, Microsoft allows users to choose from which source they can install on their Windows PC. They can choose the safest option to install apps officially from the Microsoft Store or install apps from third-party sources, which often acts as a pathway for viruses or malware into your system.

Several reported that the Choose where to get apps from button is missing, or the option is greyed out for them. This appears to be troubling Windows 10 users, specifically. The good thing is that we have a bunch of solutions that you can apply right away.

Why is the Choose where to get apps from option missing on my Windows PC?

Here are a few common reasons why the Choose where to get apps from option is missing for you in Windows Settings:

  • Antivirus has blocked it: Antivirus in your PC is essential but often using aggressive settings on your antivirus can block certain settings.
  • Your administrator has blocked it: If you are using a company’s laptop or school PC, chances are that your admin has blocked the option to prevent you from installing virus-infected apps.
  • The service isn’t enabled: Chances are that the option to install apps outside of the Microsoft Store isn’t enabled via Group Policy Editor.
  • Corrupt Microsoft Store cache: The presence of corrupt cache files can often conflict with the app’s smooth functioning.

How can I get back the Choose where to get apps from option?

We suggest you first go through the preliminary solutions:

  • Whenever you come across any issues with the software on your PC, the best thing to do is perform a simple restart as it will load all system files from scratch.
  • Make sure that you are running the latest version of the Windows update available as it ensures all bugs and glitches in the previous version are resolved.
  • Check if you are using the administrator account or not. Because an admin can block certain settings.

Now let us check out the advanced solutions and try getting back the Choose where to get apps from option.

1. Reset the Microsoft Store

  1. Press the Win + I buttons to open Settings.
  2. Click on Apps.
  3. Click on Apps & features on the left pane.
  4. Search for Microsoft Store by typing it in the search box.
  5. Select Advanced options.
  6. Click on Reset.

2. Use Group Policy Editor

  1. Press the Win + R keys to open the Run dialogue.
  2. Type gpedit.msc and press Enter.
  3. Expand Computer Configuration.
  4. Select Administrative Templates.
  5. Double-click on Windows Components.
  6. Select Windows Defender SmartScreen.
  7. Click on Explorer.
  8. Select Configure app install control from the right side.
  9. Click on Not Configured.
  10. Click Apply and OK.

Using the Group Policy Editor, you can easily modify the policies enforced by your domain administrator. As mentioned, your administrator might have blocked the setting, which you can easily enable by following the above steps.

If you want to know how you can enable Group Policy Editor on your PC, then you can check out our guide that gives you detailed steps on it.

3. Use Registry Editor

  1. Press Win + R to open the Run dialogue.
  2. Type regedit and press Enter.
  3. Navigate to the below path and press Enter. HKEY_LOCAL_MACHINE\SOFTWARE\Policies\Microsoft\Windows Defender\SmartScreen
  4. Delete both entries from the right side:
    • ConfigureAppInstallControl
    • ConfigureAppInstallControlEnabled
  5. Close Registry Editor.
  6. Restart your PC and now check if the Choose where to get apps from option is still missing or not.

You can also make use of the registry editor and delete the entries as mentioned above to bring back the Windows 11 Choose where to get apps from option.

4. Switch to Windows 11 Home

  1. Press the Win + I buttons to open Settings.
  2. Click on System.
  3. Select Activation from the left side.
  4. Click on Go to Store option from the right side.
  5. Now select the option to upgrade to Windows 11 Home for free.

If Choose where to get apps in Windows 10 is not showing, you can switch to the Home edition of the OS.

5. Run SFC Scan and DISM commands

  1. Open the Start menu.
  2. Type command prompt and open it as an administrator.
  3. Type the below command and press Enter. sfc /scannow
  4. Once the process completes, type the below command and press Enter. DISM /Online /Cleanup-Image /RestoreHealth

There are chances some important files are missing which is why your Windows Settings is missing the Choose where to get apps missing option.

In such a case, you can use the built-in tools SFC Scan and DISM to scan for corrupt or missing system files and replace them with new ones.

While this is a nice way to do it, you can always rely on specialized repair software, which can help you not only fix corrupt system files but also help you fix a lot of other errors such as DLL errors, BSOD errors, system crashes, and much more.

These are some of the ways via which you can easily get the Choose where to get apps missing option. Let us know in the comments section which solution helped you resolve the problem.

How to Fix Error Code 25509 in Modern Warfare 2

If you are a fan of Modern Warfare 2, you may encounter the error code 25509 while matchmaking. MW2 has been known for glitches and errors due to bug patch updates. However, 25509 is a relatively new error reported by many gamers off-late.

What causes error code 25509 in MW2?

How do I fix error code 25509 in Modern Warfare 2?

Try some preliminary checks to see if one of them helps fix the error:

  • Restart the Xbox console.
  • Check for Warzone game updates. One of the most common errors does not allow users to update the game and throws up not enough free space errors, yet you can fix them in no time.

If none of the above help, we have some proven workarounds to help you fix the error code 25509.

1. Reset your network hardware

  1. Remove the power cord from the back of the router, modem, or gateway, and wait for 5 minutes. unplug and plug router
  2. If using both a router and a modem, disconnect the power cord from both devices.
  3. Long hold the Xbox button on your console till it shuts down, and then wait for 2 minutes before you start the device again.Xbox console button
  4. Once 5 minutes are up, connect the modem or gateway, and now wait for all the lights to switch on and be normal again. Repeat for your router too.router lights

Now that you successfully power cycled and reset the network hardware, you should not encounter the error anymore.

2. Reset the console keeping games and apps

  1. Press the button on the Xbox device to open the guide.press xbox button
  2. Next, click to expand Profile & system, and select Settings. open xbox settings
  3. Now, under Settings, click on System.xbox system settings
  4. Under system settings, on the right, click on Console info & updates. Console info & updates
  5. On the next screen, click on Reset console on the left. xbox Reset console
  6. You will now see a prompt asking Reset your console? Click on Reset and keep my games & apps.Reset and keep my games & apps

Once done, you can now continue with your game without coming across the error code 25509 in MW2 anymore.

3. Turn off VPN and proxy

  1. Press the Win + I shortcut keys to launch Windows Settings, click on Network & Internet on the left, and then click on VPN on the right. vpn settings
  2. On the next screen, click to expand the VPN connection on the right you want to disable and click Disconnect. disconnect vpn
  3. Now, return to Network & internet, and click on Proxy. proxy settings
  4. Here, under Automatic proxy setup, turn on the Automatically detect settings option. disable Automatically detect settings
  5. Next, under Manual proxy setup, disable the Use a proxy server option.

In case you encounter a proxy error, follow the troubleshooting methods in our detailed post to fix the proxy error in Windows 11.

But, if you are using a third-party service like the Express VPN you can follow the method in our post (also applicable for Windows 11) to disable VPN temporarily or for good.

If all of the above methods fail to fix the error code 25509 in MW2, you can try contacting Call of Duty support via chat, contact form, or over the phone.

While it’s a new error code that has been bugging game lovers recently, these are some of the working solutions we found from different forums.

If you found any other solution for the error code 25509, do let us know in the comments box below.

Error Code 0x801901f4 on Xbox: 4 Quick Ways to Fix It

Some of our readers have recently reported that they encounter the Xbox error code 0x801901f4 when trying to update their Xbox consoles.

To fix this error, we have gathered some possible fixes that worked for other users and believe should work for you too. Also, these solutions are also applicable to the Xbox error 0x97e107df.

What causes the Xbox error code 0x801901f4?

If you do not know the reason behind the Xbox error code 0x801901f4, the following are some of the major factors responsible:

  • Connection problems – Whenever you come across the Xbox error code 0x801901f4, this might mean your console is experiencing connection issues to the Live servers.
  • Corrupt system update – If the Xbox error code 0x801901f4 is new on your system, there is a possibility that you have installed a corrupt update. Hence, it may fail to read profiles.

Now that you know some of the causes, we can go ahead and talk about how you can fix the problem.

How can I fix the error code 0x801901f4 in Xbox?

Before engaging in advanced troubleshooting steps, you should consider performing the following:

  • If the servers are down, the core services supporting the Xbox console won’t work. Go to the Xbox live status page and check for details on the status of Xbox features and functionality. Read our guide on Xbox Live networking service missing and ways to fix the problem.
  • Remove your Xbox profile.
  • Create a new Microsoft account.

Having confirmed the above checks, if the problem persists, you can explore the solutions provided below

1. Restart your Xbox Console

  1. Press the Xbox button on your controller to access the guide.
  2. Now, navigate to Profile & System and select Settings.
  3. Under General, click on Power mode & startup.
  4. Select Restart now.

On many occasions, restarting the console can temporarily solve issues. In that case, when you run into Xbox error code 0x801901f4, you can follow the above steps to perform a restart.

2. Update your console

  1. Press the Xbox button on your controller to access the guide.
  2. Now, navigate to Profile & System and select Settings.
  3. Click on System from the left pane menu, then tap on the Updates button from the right.

If there is any update available, you will be prompted to install it, then follow the onscreen instructions to complete the installation.

You can read about fixing the Xbox update error if you encounter such during the process.

3. Power Cycle your Xbox

  1. Press and hold the Xbox button on your console for about 10 seconds to turn off your console completely.
  2. Next, disconnect the power cable from your console for at least one minute.
  3. Plug the power cable back in and press the Xbox button to turn on your console.

If restarting your device doesn’t fix the problem, power cycling your Xbox console is another possible solution to apply as it sometimes helps solve systems update issues.

4. Reset your Xbox console

  1. Press the Xbox button on your controller to access the guide.
  2. Now, navigate to Profile & System and select Settings.
  3. Click on System to expand and choose Console info.
  4. Click on Reset Console.
  5. Then choose between Remove everything or Reset and keep my games & apps.

Removing everything will clear all data and games on the console, resetting it to the way it came. You can check how to fix the Xbox controller detected but not working if you can’t navigate with it.

Make sure you work your way through the provided fixes to know which will work for you.

If you have any questions or suggestions, do not hesitate to use the comments section below.
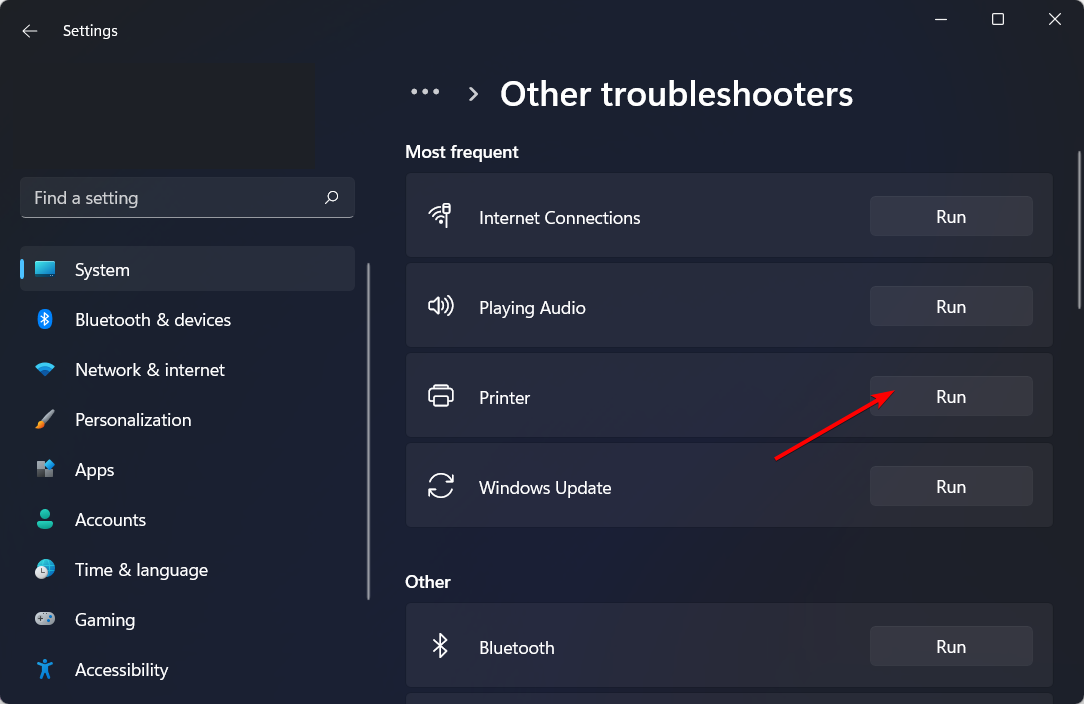
80070308: How to Fix This Windows Update Error

Is the Windows update process stuck due to an error code 80070308? This article is the place where you will get the most precise solutions.

Usually, Windows updates downloading and installation process should work smoothly. But, sometimes, it doesn’t happen due to some errors. This type of problem may occur in modern Windows 11, 10, and even in old Windows 7 systems. One of the most common issues is the error code 80070308.

Why does the update error 80070308 occur?

Usually, this type of problem occurs due to the following reasons:

  • Corrupted Update component: Windows maintains some components which are responsible for handling the update process. If some of these things get corrupted, you will encounter update errors.
  • Bad internet connection: Sometimes, a bad internet connection also can cause the update error 80070308.
  • Third-party Antivirus: Third-party AV programs are often responsible for creating unexpected Windows update-related problems.
  • Internal Windows problems: Some internal problems with Windows can also be why you are getting the update error.

How can I fix the Windows update error code 80070308?

Before trying out solutions, we recommend a few things. These are:

If, after doing these things, you are still getting the same Windows update error 80070308, go through these methods to fix your problem.

1. Run the Update troubleshooter

  1. Press Win + I on the keyboard to open Windows Settings.
  2. Go to System and click on Troubleshoot.going system and troubleshoot windows 11 settings
  3. Click on Other troubleshooters.going other troubleshooters win11
  4. Now, click on Run next to the Windows Update.running windows update troubleshooter windows 11
  5. Go ahead and complete any on-screen suggested steps.
  6. Restart your PC.

Troubleshooting is a ubiquitous way to solve update error code 80070308 on Windows. If you are using an old Windows OS, you will need to find the troubleshooting option on Control Panel.

2. Reset update component

  1. Open the Start Menu and type CMD.
  2. Right-click on Command Prompt and choose Run as Administrator.
  3. Run the following commands one by one: net stop wuauserv
    net stop cryptSvc
    net stop bits
    net stop msiserverrunning net stop cryptSvc cmd
  4. Now, navigate to the following location using File Explorer: C:\Windows\
  5. Find the SoftwareDistribution folder.software distribution folder windows
  6. Rename the Software Distribution folder to something like SoftwareDistribution.bak.
  7. Similarly, go to the following location: C:\Windows\System32
  8. Rename the Catroot2 folder.
  9. Now, run these commands: net start wuauserv
    start stop cryptSvc
    net start bits
    net start msiserver
  10. Restart your PC.

3. Repair .Net component

  1. Press Win + R to open Run.
  2. Type the following command and hit Enter: optionalfeaturesoptionalfeature windows run command
  3. Uncheck the .Net Framework-related services and click on OK.disabling dot net optional feature windows
  4. Restart your PC.
  5. Again, open the optional features Window and re-enable these services.
  6. Restart Windows again.

Often, resetting the .Net components solves update-related problems like update error 80070308. So, you can try it.

4. Try fixing using the registry

  1. Open the Start Menu, type Regedit, and hit Enter.
  2. Go to HKEY_LOCAL_MACHINE and expand Components.components hklm regedit windows
  3. Now, find the DWORD value called pendingrequired and delete it or rename it to something else like pendingrequired.bak.
  4. Restart your PC.

If you don’t find that DWORD value, skip this method and follow the next ones.

5. Update manually

  1. Go to the Windows Update Catalog page.
  2. Find and download the relevant update.downloading windows update manually from update catalog
  3. Install it on your PC.

In this way, you will be able to bypass the annoying Windows update error code 80070308. If you are facing this issue on Windows 7, learn how to download Windows 7 updates manually.

6. System Restore

  1. Open the Start Menu, search for Create a restore point, and click on System Properties.
  2. Click on the System Restore.clicking system restore
  3. Check the Choose a different restore point and click on Next.clicking-choose-a-different-restore-point
  4. Select the restore point and click on Next.choosing system restore point clicking next
  5. Click on Finish.
  6. Go ahead and follow the onscreen steps to complete the process.

If necessary, learn how to solve if the restore point is not working on Windows. Additionally, you also can take steps to repair corrupted Windows system files using SFC and DISM commands. It will help if any internal system file problems cause this update error.

Is the problem still bugging you? You can consider installing the latest Windows build manually using the media creation tool. If you are using Windows 7 or other old operating systems, We suggest you upgrade to the latest ones if your PC hardware can support it.

Microsoft has stopped supporting these operating systems. So, consider upgrading to Windows 11 or at least 10.

Is your Antivirus program the main culprit? You can switch to a different one, as you should not leave the system unprotected. We suggest you try any of these best Antivirus and Security programs.

This article has shown you how you can fix Windows update error code 80070308. Do you know any other method that can help others? You can let us know in the comment box.