Unable to Type in Excel: Common Reasons & How to Fix It

If you’re unable to type in your Excel cells, you should check your editing options and rule out hardware graphic acceleration problems. In this article, we’ll show you how to do all that + other simple tricks to fix the inability to type in Excel.

What can I do if I can’t type in Excel?

Go through the following before trying any advanced troubleshooting steps:

  • Ensure you change your cell font color to black.
  • Turn off background apps running on your computer.
  • Close and reopen Excel.
  • Restart your PC and check if you can type in Excel.

If you can’t fix the problem, proceed with the following solutions.

1. Start Excel in Safe Mode and disable the Excel Add-Ins

  1. Press Windows + R key to open the Run dialog box, type excel.exe /safe, then click OK to start Microsoft Excel in Safe Mode.
  2. Go to File in the top menu bar, then select Options from the menu on the left.
  3. Select Add-ins on the right, select Excel Add-ins, then click on the Go button.
  4. Uncheck the boxes next to the active Add-Ins and click OK to save the changes.
  5. Restart Excel and check if the error persists.

Starting Excel in Safe Mode fixes third-party app interference while disabling the Add-ins will fix any issues for corrupt add-ins.

2. Verify the editing options settings

  1. Open Excel, click on Files in the top menu bar, then select Options from the menu on the left.
  2. Select the Advanced option and check the box for Allow editing directly in cells.
  3. Close Excel and reopen it, then check if you can now type.

The Allow editing directly in cells checkbox is most likely unchecked. Checking the box will fix the problem.

3. Repair Microsoft Office

  1. Press Windows + R key to open the Run dialog box, type appwiz.cpl, and click on OK to open Programs and Features.
  2. Right-click on Microsoft Office and click on Change from the drop-down.
  3. Click the Quick Repair option on the new windows, and tap the Repair button.
  4. Try the Online Repair option if Quick repair can’t fix it.

Repairing Microsoft Office will resolve missing or corrupt app files that may cause you unable to type in Excel.

You may be interested in adding the Run command to the Start menu in Windows 11.

4. Disable the hardware graphics acceleration

  1. Launch Excel, click on Files in the top menu bar, then select Options from the menu on the left.
  2. Select the Advanced option.
  3. Go to Display, check the box for Disable hardware graphics acceleration, and click on OK to save the changes.
  4. Close and restart Excel, then try typing and see if you can.

Disabling the hardware graphics acceleration will fix graphics issues that may cause you to be unable to type in Excel.

5. Download the latest updates for Excel

  1. Launch Excel and click on Files in the top-right corner.
  2. Click on Account from the menu on the left, click Update Options, then tap on the Update Now option.
  3. Restart your PC and check if the save function in Excel works.

The most common reason why you can’t type in Excel is cell formatting. Make sure the font color isn’t set to white, making the text invisible. Other factors include hardware graphic acceleration, which can prevent text from displaying properly, interference from other apps and corrupt system files.

Following the above-mentioned steps should help you get rid of all these issues.

Also, users complain about not being able to access Excel toolbar for some reason.

If any update is available, it will automatically install it. Updating Excel will fix bugs that may be causing issues with it and install the latest features for Excel.

In conclusion, you may be interested in the ways to fix the Excel file that could not be found error on your computer. Also, our readers can check our article about Excel file format and extension not matching and how to fix the problem.

For more questions or suggestions on this topic, kindly drop them in the comments section below.

Shut Down Windows 10 Without Start Menu: 6 Ways to Do It + Video

The Windows Shut down option has always been on the Start menu. However, sometimes the shutdown can be missing. This isn’t a problem because you can shut down Windows 10 without a Start Menu.

First try these manual shutdown options that don’t imply the Start menu:

  • Using the shutdown button – This is the most common method that the majority use. However, sometimes the shutdown button is not working, so you need to look for alternative methods.
  • Using the power button – Many users prefer using the Power button to turn off their PC. Be sure to check your power settings and make sure that everything is properly configured before using it.
  • Keyboard shortcuts – You can turn off your PC with keyboard shortcuts. You can even create a shutdown shortcut if needed.

How do I shut down Windows 10 without Start Menu?

1. Use the Windows 10 shutdown dialog box

  1. Minimize or close all windows.
  2. Press the Alt + F4 combination on your keyboard.
  3. Select Shut down from the drop-down menu and click OK.
Note icon NOTE
Few users reported that this method didn’t work for them. If you experience any issues, make sure that all active windows are minimized before trying it.

2. Use Windows Win + X menu

  1. Right-click the Taskbar or press Windows key + X.
  2. Expand the Shut down or sign out section and select Shut down.
  3. Optional: Instead of Step 2, press U then U again on the keyboard to turn the PC quickly off.

3. Use Windows PowerShell

  1. Press the Windows key + X keyboard combination.
  2. Next, select Windows PowerShell (Admin).
  3. Type the following command and press Enter to run it: shutdown /s/f/t 0

Using the command above in Windows PowerShell will immediately turn off your laptop or desktop.

4. Add a Shut down shortcut to the Desktop

  1. First, right-click the desktop and select New, then choose Shortcut.
  2. Type the following line in the location box and click the Next button: shutdown.exe -s -t 00
  3. Enter Shutdown in the Type a name text box, and click Finish.
  4. Right-click the Shutdown shortcut and select Properties, then hit the Change Icon button.
  5. Select a shortcut icon from the Change icon window and click OK.
  6. Click the Apply and OK buttons to add the new icon to the shortcut.

You can also add a keyboard hotkey to the shortcut that will shut Windows down when you press it. From the shortcut’s Properties, click on the Shortcut key box and press S to add a Ctrl + Alt + S hotkey.

Now, whenever you click the Shutdown shortcut, the system will start the Shut down process and close your machine.

5. Schedule an Automatic Shut Down

  1. Open Run with the Windows key + R keyboard shortcut, then type taskschd.msc and click OK to open Task Scheduler.
  2. Click the Action tab and select Create Basic Task.
  3. Enter a title in the Name text box (we suggest Shutdown), and click the Next button.
  4. Select the Daily option, and press the Next button.
  5. Select a start date for the scheduled task and enter a time for Windows 10 to shut down at. We recommend setting it closer to the present time if you want to shut down your PC faster.
  6. Select the Start a program option, and click the Next button.
  7. Input the following line in the Program/script text box and enter /s in the Add arguments box, then click Next: C:\Windows\System32\shutdown.exe
  8. Click Finish. Now Windows 10 will shut down at the time you selected for the scheduled task.

If you can’t follow the solution, we have a complete guide on how to schedule an automatic shut down that you might find a lot more descriptive.

6. Set up a Shutdown Batch File

  1. Click the Windows Search tab, enter notepad, and open the app from the results.
  2. Copy the following batch code with the Ctrl + C hotkey and paste it using Ctrl + V in the notepad window: @echo off
    shutdown /s /f /t 0
  3. Click File and then Save as.
  4. Select All Files from the Save as type drop-down menu, then type Shutdown.bat in the text box and hit Save. We selected to save it on the desktop but you can use other locations.
  5. You can click the batch file to shut down Windows 10 when required.
  6. You can set up a batch file to restart Windows instead of shutting it down. To do that, enter shutdown -r -t 00 in the batch file instead. Then the batch file would look like the one shown directly below.

Is it safe to shut down my PC by pressing the Power button?

No, it is not safe, and you can use this method only if you run out of every other alternative because turning off the PC by pressing the Power button can cause serious file system damage.

The file system and its processes are running even if you are not doing anything. The normal shut down procedure closes them in a certain order, leaving everything in working order.

Turning off the power switch it’s almost equivalent to an electrical power loss that will interrupt important threads and leave your computer in an inoperable state.

So, now you have plenty of alternative ways to shut Windows 10 down without clicking the Start button. You can also explore ways to start your PC with a keyboard if your mouse isn’t working or encounter a power button lockout message.

But these are only workarounds. For more solutions, read our guide on how to fix laptop that won’t shut down.

If you have any additional questions or suggestions, please let us know by using the comments section below.

Fix: There was a Problem Authenticating Ownership of This Product

Ubisoft game owners reported experiencing an annoying issue when trying to launch their favorite games. Although they purchased their games via their Steam accounts, the error message There was a problem authenticating the ownership of this product prompts when you try to launch the respective games.

This issue is usually known to be triggered by Uplay errors, but we know how to fix it.

How do I fix the There was a problem authenticating ownership of this product in Uplay

1. Restart both clients

  1. Close both Steam and Uplay apps
  2. Launch them again and see if this fixed the issue.

2. Re-log into Uplay

  1. Click the account username in the top right corner of Uplay > select Log out
  2. Enter your email and password associated with the Uplay account and log back in.Uplay Login

3. Change the Uplay password

  1. Log out of the Uplay client
  2. Sign in to your account using your browser
  3. Go to the account management section > change your passwordubisoft account information settings
  4. Log back in using Uplay and try to see if this fixed the issue.

4. Open the game in Uplay

If the game does not open through Steam, make sure to open it using Uplay. If this fixes the issue, you should then be able to open the game through Steam as well.

5. Contact Ubisoft Support

If you’re using Steam Share and receive the error message, you should contact Ubisoft Support.

Verify your account information and the account you’re sharing the game with.

We hope you were able to fix the Uplay authentication issue using one of our solutions. If you found this article helpful, leave a comment in the comment section below.

Excel Not Responding When Saving: 5 Ways to Get It to Work

Being able to document your work or do other things after using Excel on your PC can become an impossible task. A common problem users report is Microsoft Excel not responding when saving.

Also, users complain about running into the Microsoft Excel out-of-memory error that appears when using the app.

Why is Excel not responding when saving?

Many factors can cause issues with Excel when saving files as pdf, saving files to a network drive, saving to OneDrive, etc. One of the factors is corrupt program files. Corrupt program files can cause Excel not to respond to its functions.

Other factors that are liable to cause Excel not responding when saving are:

  • Outdated Excel program – An outdated program indicates that it can’t access updates and patches for fixing bugs and improving performance. So, it can sometimes contribute to Excel not responding when saving.
  • Other activities running on Excel – Other processes or tasks running in the background on Excel. These processes can prevent it from being able to use the save function when invoked.
  • Issues with Excel Add-ins – Add-ins on Excel can become malicious or run into problems, causing issues with Excel. So, Excel may not respond when saving due to a faulty Add-in on the app.

Nevertheless, you can fix the problem by troubleshooting the Excel app and your device.

What can I do if Excel fails to respond when saving?

Before proceeding with any advanced steps to fix the problem, try the following:

If you still run into problems with saving on Excel, proceed with the solutions below.

1. End task for Excel on your computer

  1. Right-click the Start button and select Task Manager from the menu.
  2. Navigate to the Processes tab, select the Excel app from the list, right-click on it, then click End Task from the drop-down menu.
  3. Click on OK to confirm and restart your computer to help it sync the changes effectively.

Ending tasks for Excel on your PC will kill any background activities on the app interfering with the save function. You can check for shortcuts to open Task Manager on your PC.

2. Repair Microsoft Office

  1. Press Windows + R key to open the Run dialog box, type appwiz.cpl and click on OK to open Programs and Features.
  2. Right-click on Microsoft Office and click on Change from the drop-down.
  3. Select the Quick Repair option on the new windows, then click the Repair button.
  4. If Quick repair can’t fix it, select Online Repair.

Repairing Microsoft Office will fix any missing or corrupt app file issues that may cause Excel not to respond when saving to OneDrive or Network drive.

You may be interested in adding the Run command to the Start menu in Windows 11.

3. Download the latest updates for Excel

  1. Open Excel and click on Files in the top-right corner.
  2. Click on Account from the menu on the left, select the Update Options, then click on the Update Now option.
  3. Restart your PC and check if the save function in Excel works.

If any update is available, it will automatically install it, fixing bugs and installing the latest features for Excel.

4. Use the Save as option to change the file location

  1. While on the file you want to save on Excel, on File in the top menu bar.
  2. Click on Save as from the menu on the left to prompt the available locations.
  3. Try saving the file in a different location and check if it works.

The issue may occur if there is a problem with the location the file is trying to store. So, using Save as to change location will fix Excel not responding when saving to a network drive or saving to OneDrive.

5. Start Excel in Safe Mode and disable the Excel Add-Ins

  1. Press Windows + R key to open the Run dialog box, type excel.exe /safe, then click OK to start Microsoft Excel in Safe Mode.
  2. Click on File in the top menu bar, then select Options from the menu on the left.
  3. Click on Add-ins on the right, select Excel Add-ins, then click on the Go button.
  4. Uncheck the boxes next to the active Add-Ins and click OK to save the changes.
  5. Restart Excel and check if the error persists.

Starting Excel in Safe Mode fixes third-party app interference, while disabling the Add-ins will fix any issues for corrupt add-ins.

Alternatively, you can read about fixing too many different cell format errors using Excel. Also, we have a guide on how to fix Microsoft Excel if it can access files.

Microsoft to open source Soundscapes, the audio navigation research project

Starting January 3, 2023, the Soundscape source code is going to be available as open-source software so that anyone can continue to build on it.  For the last six years, Microsoft has developed Soundscape as a research project. Soundscape was designed to use augmented reality and three-dimensional audio to deliver information about a person’s location and points of interest.  Augmented reality has been used to guide people to unfamiliar locations.

Also on January 3, 2023, the IOS app will no longer be available for download while the existing installs will function until the end of June 2023. Microsoft learned that Soundscape helped power mobility instructors, and adaptive sports, and has been a great asset to low-vision individuals.

Documentation on how to build and use the system will be available from the Soundscape GitHub page that will be shared on January 3, 2023.

How to disable a microphone on Windows PC

Your microphone settings on Windows PC can be easily tweaked per your needs. In fact, if you consider ever-shifting cybersecurity crises, it makes even more sense to keep your microphone disabled unless needed.

In this article, we go into precisely that. So, let’s explore how you can easily disable the microphone settings on your Windows.

How to disable the microphone on Windows 10 or Windows 11

Whether you want to stay safe from the possibility of hackers snooping on your conversations unbeknownst to you or for some other personal reason, the easiest way to go about this is through the Settings app.

1. Settings

Here’s how you can disable the microphone on your Windows PC:

  • Press the Windows key + I to launch the Settings menu.
  • From there, select System > Sound.
  • Scroll down and select Microphone.
  • Click on Device Properties and select Disable.

sound settings

Do this, and your microphone will be successfully disabled.

2. Use Device Manager

We’ve previously covered many tips and tricks for using Device Manager on your Windows. For instance, you can use Device Manager to update your device drivers and disable your in-built Windows camera.

A free applet from Microsoft, the Device Manager aims to give you a firm view and control of your computer’s hardware. You can also use it to disable microphone settings on your Windows PC.

Here’s how you can disable your Windows microphone with it:

  • Head to the Start menu search bar, type in ‘device manager,’ and select the best match.
  • Click on Audio inputs and outputs.
  • Right-click on Microphone and select Disable.
  • Click on OK.

device manager

That’s it; your microphone will get disabled. Of course, when you want to enable it again, all you’ve to do is enable it again from the Device Manager, and you’ll be good to go.

Disabling the microphone on your Windows PC

Follow the steps above, and you can easily tweak your microphone settings. While you might not have needed to stay on your toes back in the early days of the internet, things couldn’t be more different in the 21st century. Whether it’s AI-enabled deepfake photos or the ever-growing ransomware scams, make sure you’re using all the measures to keep your security defenses up.

0x87e105dc Xbox Error Code: 5 Ways to Fix It

Launching games or apps on the Xbox console can be impossible sometimes because of some issues with the console. These issues result in the 0x87e105dc Xbox error code users report nowadays. However, users can report problems via the Insider and Report a problem app on Xbox to get help.

What causes the 0x87e105dc Xbox error code?

Difficulties accessing games and apps on the Xbox console can be many factors, resulting in the error code 0x87e105dc. The most common cause of the error issues with the Xbox Live server. When the server is down, it can prevent the apps and games on the console from launching.

Furthermore, you encounter the error due to other factors such as:

  • Xbox Live verification issues – You may run into the error code 0x87e105dc in Xbox if there’s an issue with Xbox Live verifying the downloaded games and their licenses. So, it can impede the game’s permission to play.
  • Old or corrupt cache – Cache files can become corrupt if they’ve been on the console for a long time. They may cause games and apps not to open on the Xbox console, resulting in error code 0x87e105dc.
  • Incorrect Alternate MAC address – When there is a problem with the Alternate MAC address in Xbox network settings, it can sometimes cause difficulties with running your games.

The listed causes are a few of the likely reasons for error code 0x87e105dc in Xbox. Nevertheless, there are a couple of fixes you can try.

How do I fix the error code 0x87e105dc in Xbox?

Before proceeding with any advanced troubleshooting on your Xbox console, try these:

  • The first thing to do before any troubleshooting is to check if Xbox Live servers are up and running. If the servers are down, the core services supporting the Xbox console won’t work. Go to the Xbox Live status page and check for details on the status of Xbox features and functionality. Read our guide on Xbox Live networking service missing and ways to fix the problem.
  • Restart the Xbox console.
  • Ensure that the Xbox console connects to a stable network connection.

Proceed with the solutions below if you can’t fix the problem.

1. Test network connection

  1. Press the Xbox button to open the Menu window.
  2. Click on the Settings icon on the right pane, then click on General and select Network settings.
  3. Navigate to the Troubleshooting tab and click on the Test network connection option.

Wait for the troubleshooting process to complete, then check the result to know if it’s a network connection issue. If there’s any concern, refresh your network router or modem, then restart the Xbox console.

2. Install pending updates

  1. Press the Xbox button to open the Menu window.
  2. Click on the Settings icon on the right pane, then click on All Settings.
  3. Click on System from the left pane menu, then tap on the Updates button from the right.

The system will automatically check for available updates for your console. If there is any update available, you will be prompted to install it, then follow the onscreen instructions to complete the installation.

Read about fixing the Xbox update error you may encounter during the process.

3. Clear the Alternate Mac Address

  1. Press the Xbox button to open the Menu window.
  2. Click on the Settings icon on the right pane, then click on General and select Network settings.
  3. On Network settings and click on Advanced Settings.
  4. Select Alternate MAC Address.
  5. Click on Clear, then click on the Restart option to apply the changes.

4. Reset the Xbox console

  1. Power on your Xbox console and press the Xbox button on the controller to open the guide overlay.
  2. Select the System menu and click on Settings.
  3. Click on System to expand and choose Console info.
  4. Click on Reset Console.
  5. Then choose between Remove everything or Reset and keep my games & apps.

Removing everything will clear all data and games on the console, resetting it to the way it came.

You can check how to fix the Xbox controller detected but not working if you can’t navigate with it.

In conclusion, you can read about fixing the Xbox error code 80153048 on your console. Also, you can check our guide about not being able to download games from the Xbox game pass and how to fix it.

If you have further questions or suggestions, kindly drop them in the comments section below.

What causes Xbox 360 error code 8015190e and How to Fix it

Several Xbox One and Xbox 360 users report struggling with the Xbox 360 error code 8015190E. They usually get the Your console can’t connect to Xbox Live message accompanied by the error code 8015190E and they are suddenly unable to connect to the Xbox Live servers.

If that’s happening to you as well, we’re sure you’re wondering if there’s anything to do about this situation. This should only take a couple of seconds of your time, so access the official Xbox Live Status page. If you see any alerts, you just need to wait until the service is up and running and then try again.

However, if none of the services on the Xbox Live status page look suspicious, this means that you’re ready to try some more drastic options to fix the 8015190E error code.

How to fix Xbox 360 error code 8015190e?

1. Reboot your Xbox console

  1. Press the Guide button on your controller.
  2. Find your way to the system menu by pressing the right bumper three times.
  3. Select Restart console.
  4. Then, select the Restart option from the next window.

As you can see, turning your Xbox off and on again is a fairly easy process. Rebooting it quickly often clears out messages like yours, but you may also choose to go through a full shutdown. You could start by pressing the Xbox button on the console for approximately 10 seconds. The console will immediately turn off.

Unplug the console’s power cable and wait at least 10 seconds to reset the power supply. Plug the console power cable back in. Finally, turn the console on by pressing the Xbox button.

2. Enable UPnP on your router

Status UPnP
  1. To begin the procedure, verify that your console is connected to the router that you’re about to access.
  2. Type 192.168.1.1 or 192.168.0.1 in your default browser and press Enter to open up the router settings page.
  3. These are the most commonly used default IP addresses. If they don’t work for you, find the IP address of your router. Launch the Command Prompt first, then, type: ipconfig /all and hit Enter.
  4. Once you arrive at the initial login page, insert the credentials of your router. They are, by default, admin and 1234.
  5. Go to the Connectivity page.
  6. Select the Administration tab.
  7. Make sure you tick the corresponding checkbox.
  8. Restart the router first, then your console to make sure all the necessary ports are opened.
  9. Once the next startup is complete, launch the game again and see if the issue is now resolved.

Another great troubleshooting procedure for the Xbox 360 error code 8015190E message is to enable the Universal Plug and Play option on your router/modem. This should help your networking device to forward the ports required by your Xbox console and get rid of the error, so apply the above steps.

3. Perform a hard reset

reset option
  1. Press the Xbox button to open the guide.
  2. Select System > Settings > System > Console info.
  3. Select Reset console.
  4. Choose the desired option to reset the console: Reset and keep my games and keep my games and apps or Reset and remove everything.
  5. You may also choose to cancel if you do not wish to restore your console to the factory state.
  6. Now, wait for a while as the console restores itself back to its factory settings.

In the event the above steps don’t fix the problem you’re facing, it might be worth performing a hard reset. Restarting your console isn’t always enough for purging the excess data. You might need to go a little further to make sure this happens.

Plenty of Xbox users have already confirmed this method for being effective in allowing them to sign in to their account once again without encountering the 8015190E error any longer. If you’re ready to reset your console to the factory default settings, follow the above steps.

Just keep in mind that resetting your console to its factory settings erases all accounts, saved games, and settings, so you should better sign in and connect to Xbox Live if you want your data synced up. And if you happen to have trouble opening the Xbox One guide, check out this quick procedure to fix the issue is no time.

If you found this article helpful, let us know in the comments section below.

Files Copied to USB Drive Disappear: 3 Ways to Get Them Back

It is not an entirely unusual scenario for files copied to a USB drive to mysteriously disappear. Users have stated on forums that they can’t find files on USB drives that they’re sure they copied to them.

In this guide, we will show you the easy ways to recover your files and do with them whatever you wish.

Why do copied files disappear from the USB?

There are several reasons your copied file might disappear from your USB drive. Listed below are some of the causes of the issue:

  • Presence of malware: Your copied files can mysteriously disappear because malware has corrupted them. The solution here is to scan the drive with an excellent antivirus app.
  • Hidden files: Sometimes, your file might just be hidden and not missing on your USB drive. You need to show the hidden files in File Explorer.
  • Broken drive: Some users have found this problem due to problems with the USB drive. You can fix this by checking the drive using the CHKDSK command.

What can I do if files copied to a USB drive disappear?

Before proceeding to the fixes in this section, we recommend performing the following preliminary checks:

  • Restart your PC. If the computer is stuck on restarting, do not hesitate to correct the issue right away.
  • Try another USB port.
  • Try the drive on another PC.

If you can’t make the drive work, you can now explore the fixes below.

1. Use a file recovery software

A virus might have erased it even if you’re sure you haven’t deleted files on the USB drive. Nevertheless, you can still restore deleted files with file recovery software.

Our recommended solution is so powerful that it can recover files from a formatted or corrupted drive. It’s very useful for data recovery from all storage types: classic hard drives, SSDs, SD cards, and USB drives.

It can search and recover different file types, including music, videos, photos, PDFs, documents, etc. You’ll like the ability to preview any recoverable files found to be sure it’s the right one you’ve been looking for.

In 3 easy steps, you can solve the issue of the files that disappeared from the USB drive:

  1. Open the software and select the file types you are looking for (you can select all if you like).
  2. Make sure the USB drive is plugged-in, and select it from the Connected Drives section.
  3. Click the Scan button and wait. Select any or all files found and click on the Recover button to save the data.
Stellar Data Recovery

Stellar Data Recovery

Use this powerful tool to recover all the files that disappeared from your USB drive.
Free trialVisit website

2. Show hidden files

  1. Open File Explorer by clicking the folder icon on the Windows 10 taskbar.
  2. Click the View tab and select Options.
    view option copied files disappear usb drive

  3. Now, click the View tab at the top and tick the radio button for Show hidden files, folders, and drive.
  4. Finally, click the Apply button, followed by OK.
    view ok

File Explorer doesn’t display all files when the show hidden files option isn’t selected. This might be why the files copied to your USB drive disappear from your view.

3. Run CHKDSK

  1. Press the Windows key, type cmd, and select Run as administrator under Command Prompt.
    cmd admin
  2. Type the command below (replace C with the letter of the drive) and hit Enter: chkdsk c: /r
    chkdsk
  3. If you get any prompt, press Y to continue.

Sometimes, if your files are copied to a USB drive disappear, it might be because some partitions are faulty. The CHKDSK command will help detect the problems and fix them if possible.

If you can’t view your files on a USB because they suddenly disappeared, the fixes above should help you get them back. If everything proves futile, you might have to format the drive or replace it.

Should Windows fail to format the drive, check the linked guide to push it through.

Feel free to let us know the solution that helped you solve the problem in the comments below.

Desktop Icons Blank: 5 Fixes to Use if They Aren’t Showing

Some users have posted on Microsoft’s support forum about blank desktop icons. For those users, the Windows 10 desktop displays blank, white icons instead of software icons. Today’s guide will explore this issue and discuss how to fix blank icons in Windows 10.

Why do my desktop icons have no picture?

Regarding this problem, we have gathered users’ more common causes. These include:

  • Corrupted files – This is a cause of many Windows problems. You may need to redownload or repair the files.
  • Windows Explorer glitch – This error could result from a simple glitch in Windows Explorer. A restart might fix it.
  • System bugs – These may happen more often than you imagine but are usually fixed with new update releases.

In some instances, Windows icons are not showing, but this issue can be quickly resolved by following the instructions from this guide.

Note that these solutions will work if the desktop icons show a blank page, blank squares, and for cases of Steam desktop icons blank, OneDrive desktop icons blank, and more.

How can I fix blank desktop icons?

1. Manually change icons

  1. First, try manually changing the blank icons on the desktop by right-clicking their software shortcuts and selecting Properties.
    desktop icons blank
  2. Click the Change Icon button on the Shortcut tab.
    desktop icons blank
  3. Then you can select an alternative icon on the Change Icon window.Change Icon window windows 10 blank icons
  4. Alternatively, click Browse to choose a downloaded icon.
  5. Click the OK button.
  6. Select the Apply option. and press the OK button to exit the window.

2. Run DISM and System File Checker scans

  1. Click the Windows Start menu, input cmd, and select Run as administrator.
  2. Type the following command and press Enter:
    DISM.exe /Online /Cleanup-image /Restorehealth
  3. Then also, input the following command followed by Enter.
    sfc /scannow
    sfc /scannow command windows 10 blank icons
  4. Wait for the system scan to finish. Restart Windows if it repairs system files.

Also, you can use a tool to run this scan more thoroughly. Using a specialized tool is faster and will repair damaged or corrupted files.

3. Rebuild the icon cache

  1. Open File Explorer by pressing the Windows key + E keyboard shortcut.
  2. Click the View tab, and select the Hidden items checkbox.
  3. Open the following path:
    C:\Users\(your user folder)\AppData\Local folder
  4. Click the IconCache.db file and press Shift + Del.
  5. Restart Windows 10 after deleting the IconCache.db file.

This process will automatically rebuild the icon cache and restore your icons, so the problem should be solved.

4. Disable the tablet mode

  1. Press Windows + I and select System.
  2. Click Tablet mode on the left of the Settings window, and if tablet mode is selected, select Use desktop mode on the When I sign in menu.
  3. Restart Windows after selecting Use desktop mode.

5. Restart Windows Explorer

  1. Press Ctrl + Shift + Esc to open the Task Manager.
  2. Look for the Windows Explorer process and click on it.
  3. Click on the Restart button from the bottom right corner.

This procedure will reload the icon cache from File Explorer and its components. Consequently, your desktop icons should return to their original colors.

The above resolutions are among the most likely fixes for blank desktop icons. Many users have been able to fix desktop icons with the System File Checker or by rebuilding the icon cache.

If any of your icons are corrupted, check out our detailed guide on the topic. And do not forget to go through some easy ways to save the desktop layout in Windows.

If these fixes aren’t enough to resolve the problem, we recommend that you try restoring or resetting Windows 10.

Let us know which solution worked for you in the comments area below.

E100 Error on Xbox: 4 Ways to Fix This Update Problem

Many Xbox One users complain about encountering the e100 error on Xbox when updating the console. It indicates that there’s an error with the update process. Also, you can run into the Xbox error code 80153048 on your console for many reasons.

What causes the e100 error on Xbox?

One of the factors that can cause the error is startup issues. When there’s a startup issue, it affects the Xbox installation process and software updates. Other factors liable for causing the e100 error code on Xbox are:

  • Corrupt console files – Xbox can have corrupt files via game installation. It can cause issues with the update process, prompting it to run into the e100 error on Xbox.
  • Network connection issues – You need a stable and fast network connection to download updates on the Xbox console. So, issues with the network connection on Xbox can cause errors during the update process.
  • Xbox server issues – Users may experience difficulties with the Xbox update if Xbox live server is down. It can result in an update error, preventing you from updating the console.

These causes can vary in several Xbox consoles. Nevertheless, you can fix the e100 error code on Xbox by tweaking the console and your devices.

How do I fix the e100 error code on Xbox?

Before proceeding with any troubleshooting steps for the Xbox console, try the following:

  • Reconnect the console to the network router.
  • Ensure the console is plugged into a stable power source.
  • Restart the Xbox console and check if the error code e100 persists.

If you can’t fix the error, proceed with the advanced fixes provided below.

1. Power cycle the Xbox console

  1. Hold the power button on the Xbox console for about ten seconds to drain all power residue.
  2. Unplug the power cable from the console, then wait for 2 minutes.
  3. Connect the power cable back into the console, then press the power button to turn it on.
  4. After the Xbox is fully booted, try the system update and check if the error code e100 appears.

Power cycling the Xbox console will resolve startup issues that can cause problems with its activities.

2. Reset the Xbox console

  1. Power on your Xbox console and press the Xbox button on the controller to open the guide overlay.
  2. Select the System menu and click on Settings.
  3. Click on System to expand and choose Console info.
  4. Click on Reset Console.
  5. Then choose between Remove everything or Reset and keep my games & apps.

The Remove everything option will delete all data and games, resetting the console to the way it came. Check how to fix the Xbox controller detected but not working if you experience it.

3. Power cycle your router or modem

  1. Hold the power button on your router for about 10 seconds.
  2. Unplug the Ethernet and power cable from the router for a few seconds to allow it to power off.
  3. Plug in the necessary cables to your router and plug it into a power source.
  4. Press the Power button to turn it on.
  5. Connect to Xbox and check if you can update your console.

Power cycling the router or modem will refresh its network and make its connection faster. Read our guide on fixing Xbox One not connecting to Xbox Live issues for more details.

4. Check for Router Firmware updates

Routers can get outdated and suffer from bugs causing their network to be unstable. So, updating its firmware will provide the needed patches to fix these bugs.

Hence, go through the router manual and check for router Firmware update procedures. Also, you can contact the manufacturer for guidance on how to update your router.

If none of the above steps work for the e100 error code on your Xbox, you’ll need to submit a request to repair your console. Go to the Device service and repair page to submit a repair request.

Conclusively, read about fixing issues with downloading games from the Xbox game pass on your PC. Also, check what to do if you can’t play games on Xbox One.

If you have further questions or suggestions, kindly drop them in the comments section below.

Fix: Last USB Device you Connected to Computer Malfunctioned

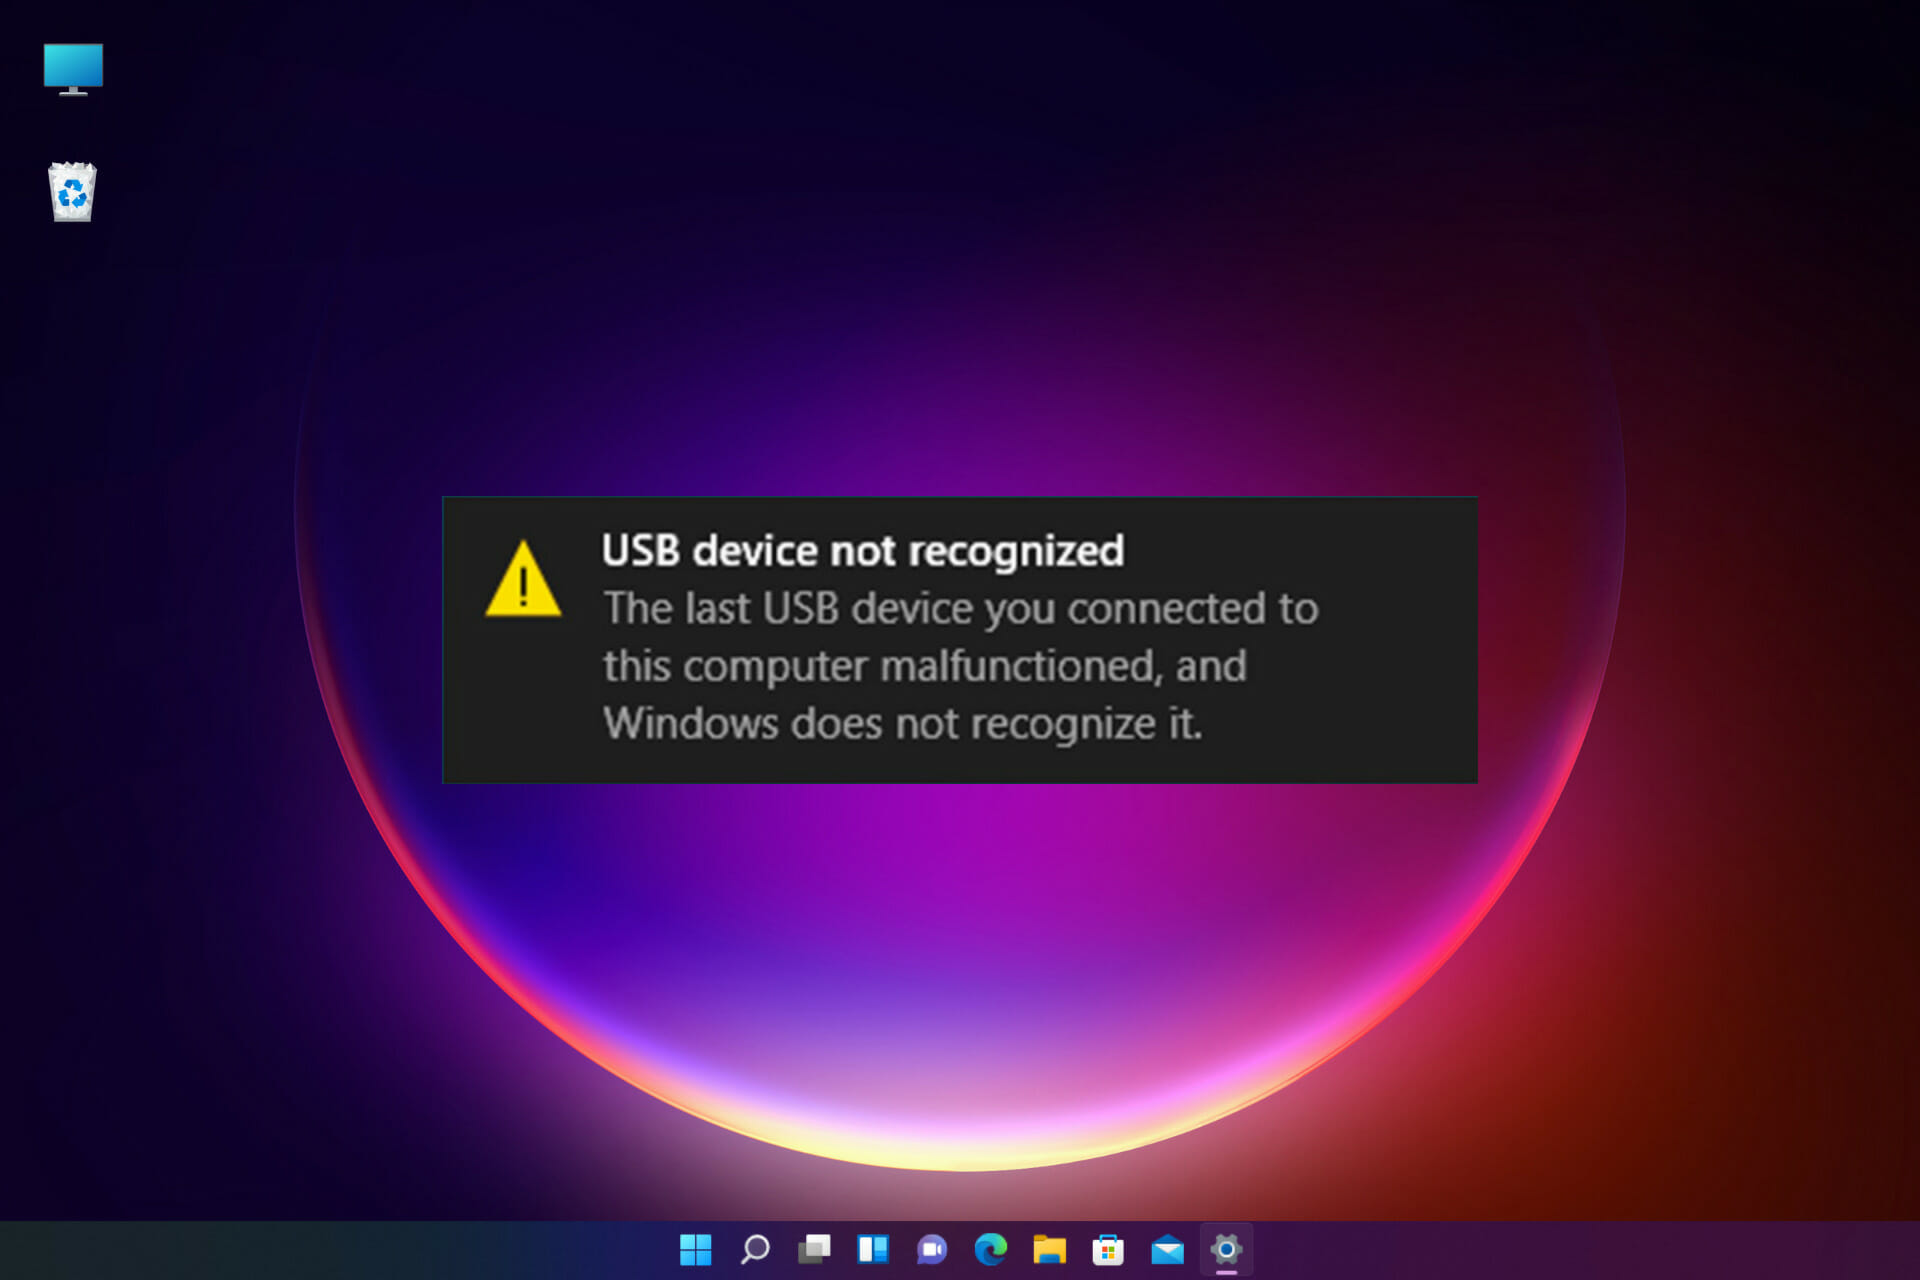
Many of our readers received the message USB device not recognized with the description The last USB device you connected to this computer malfunctioned. In other variants of this error, you may receive a recommendation: Try reconnecting the device. If Windows still does not recognize it, your device may not be working properly.

The error is pretty vague because this could mean many things, and it doesn’t pinpoint the cause of the problem. Before going into any of these fixes, reconnect your USB device, as a bad connection could trigger the problem. You may also want to restart your computer, as a reboot will force many conflicting processes to end.

What can I do when getting The last USB device you connected to this computer malfunctioned?

1. Update the USB driver

  1. Click the Search icon from the taskbar, type device manager, and click on the app from the results.
  2. Select the Universal Serial Bus controllers section to expand it, right-click the first controller, and select Update driver.
  3. Now choose the first option, Search automatically for drivers.
  4. If the system finds a new driver, it will install it. If you already have the latest one, you can click on the Search for updated drivers on Windows Update.
  5. That will bring you to the Windows Update menu. Click on Advanced options.
  6. Now select Optional updates. If you find any updates related to drivers, select and install them.

Unfortunately, you will have to perform this procedure for all the USB drivers you can find in the Universal Serial Bus controllers section.

Of course, the last part with the Windows Update will be required only once. After you install the latest drivers, the USB device should start working again.

If the above procedure seems too complicated for you, do not hesitate to use a dedicated driver updating tool.

2. Change the USB power settings

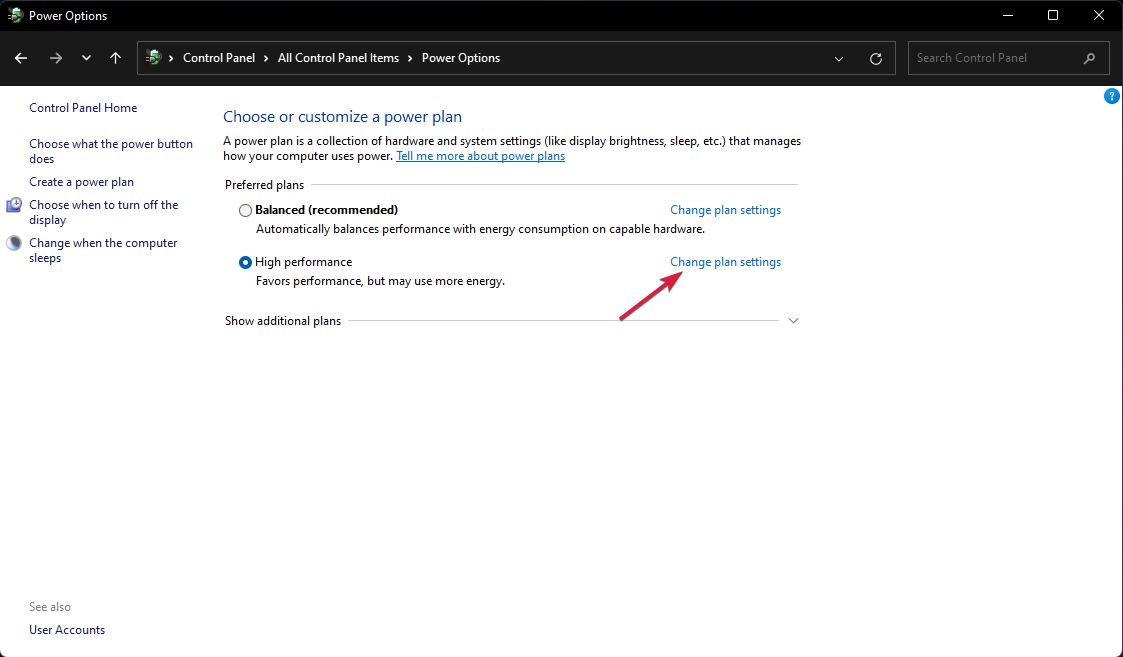
  1. Click the Seach icon on the taskbar, type control panel, and select the app from the results.
  2. Choose Power Options.
  3. Click on Change plan settings for your power plan.
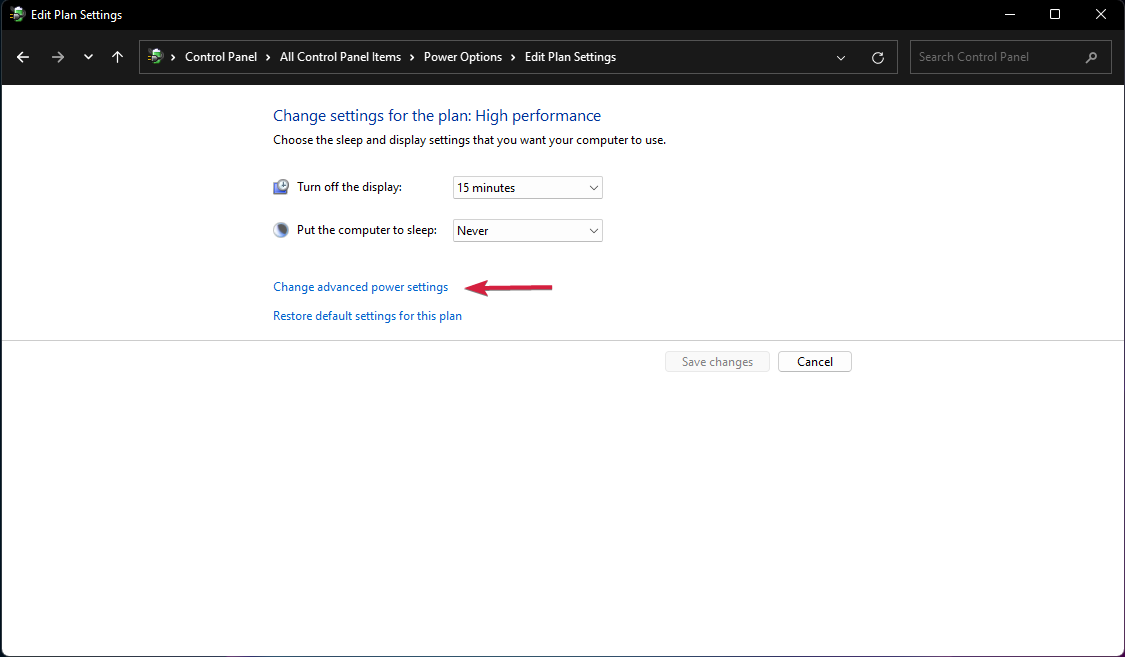
  4. Now select Change advanced power settings.
  5. Next, click on the USB settings, extend the USB selective suspend settings, and change its value to Disabled.

3. Uninstall the USB drivers

  1. Click on the Search icon on the taskbar, type device manager, and click on the app from the results.
  2. Expand the Universal Serial Bus controllers section, then look if any of the drivers have a yellow question mark symbol, right-click on it, and select Uninstall device.
  3. Restart your PC, and the system will automatically install the driver.

4. Use the USB troubleshooter

  1. Right-click the Start button and select Terminal (Admin).the last usb device you connected to this computer malfunctioned
  2. Type or paste the following command and press Enter to run it: msdt.exe -id devicediagnostic
  3. This will start the Hardware and Devices troubleshooter, so hit Next.the last usb device you connected to this computer malfunctioned
  4. The system will find any possible problems with your hardware and if it does, click on Apply this fix.the last usb device you connected to this computer malfunctioned
  5. You will be prompted to restart your device.

This should solve the problem of the last USB device you connected to this computer malfunctioned.

6. Add the printer manually

  1. Select the Search icon from the taskbar, type control panel, and open the app from the results.
  2. Now choose Devices and Printers.
  3. Click on Add a printer.
  4. Now select The printer I want isn’t listed.
  5. Check the Add a local printer box, then click Next.
  6. Select the right USB port for your printer and hit Next but make sure that the printer is connected to the PC first.
  7. Now choose the brand and model of the printer. If you can’t find it, click on the Windows Update button. The system will update the list.
  8. After the list gets populated, select your printer and mode, then click on Next.
  9. Enter a name for the printer, or leave the default one, and hit Next.
  10. The printer will be installed, and you will need to restart your PC.

If the problematic USB device is a printer, you can try installing it manually. That will set the correct driver for the product and solve the problem of the last USB device you connected to this computer malfunctioned.

7. Provide a drive letter to the USB device

  1. Right-click Start and select Disk Management from the list.the last usb device you connected to this computer malfunctioned
  2. If the drive has unallocated space, right-click on it and select New Simple Volume.
  3. Click Next in the new window to start the wizard.
  4. Set the volume capacity or leave it to maximum and choose Next again.
  5. Now assign a drive letter and hit Next.
  6. If the drive is empty, choose to format it and select Next. If you have data on that drive, select the first option, Do not format this volume.
  7. Lastly, click Finish when the process is over.
  8. If the drive has already allocated space, right-click on it and select Change Drive Letter and Paths.
  9. Click the Add button.
  10. Press the OK button.

Now that the drive has an allocated space and a drive letter, you can see it in Windows without problems.

What does The last USB device you connected to this computer malfunctioned mean?

Speaking of possible causes, let’s outline some of the most common issues that produce this error message.

  • Malfunctioning or wrong drivers – As you might know, driver issues are the most common culprits for many errors in Windows. If the system identifies your USB device incorrectly, it will also install the wrong driver, which will not help.
  • The USB drive is not partitioned – Regarding an external hard drive, if it’s not partitioned and doesn’t have a drive letter, you won’t be able to see it in Windows. You can also have issues with the USB not working in Windows 10.
  • Malfunctioning USB ports – Like any other component, USB ports can fail. That is a common occurrence, but you can fix that by switching to another one.

However, unfortunately, many other possible software problems may prevent the system from recognizing a USB device, but our solutions should come in handy.

They will help you if you encounter the issue of the last USB device you connected to this computer malfunctioned, for a mouse, keyboard, Xbox controller, Quest 2, Samsung devices, and other manufacturers.

This concludes our guide on what to do if the USB device was not recognized or malfunctioned in Windows 11, and we hope now it’s all working fine.

If you still have problems with your device, check out our piece on what to do if Windows 11 is not recognizing your USB device.

Use the comments area below to let us know which solution worked for you too.

Fix: Windows Hello PIN This Option is Currently Unavailable

If you get the message, This option is currently unavailable for Windows Hello PIN, you are in the right place.

One of Windows 10’s enhanced security features is an option to sign in with a PIN code, but some users report that this option isn’t available on Windows 10. The PIN code is always helpful for logging in because it’s faster to enter than a regular password and more accessible to remember.

But it seems that some Windows 10 users cannot add it, or it does not work. Also, the PIN sign-in option can be greyed out or not appear. Here are common causes and solutions.

Why does Windows say my PIN is unavailable?

There are a few factors known to trigger this problem. The most common of these include:

  • Corrupted data – If the NCG folder’s data is damaged, you may not be able to enter your PIN.
  • Conflicting applications – The Dell Data Protection security tools are one example of a program that may conflict with your PIN.
  • Permission errors – From user experience, we have gathered that some permission errors may disrupt the Windows PIN log in option. This also sometimes trigger, Your organization requires you to change your PIN.
  • Malware infection – We recommend using the best antivirus because a sign that you have an infected computer is an inability to gain access.

Note that this problem may come in different forms, including Windows hello PIN This option is currently unavailable, This setting is managed by your organization, This option is currently unavailable Something went wrong try again later, This option is only available when connected to your organization’s network.

Now, let us look at some of the best solutions.

How can I fix Windows Hello PIN This option is currently unavailable?

Before we try to fix it:

  • Make sure that your Windows 10 is up to date. Microsoft is aware of this issue, which might be resolved with a Windows 10 update, so before we start, ensure that your Windows 10 is updated with the latest patches.

1. Remove Dell Data Protection security tools

If you’re using a Dell PC, you might experience problems with PIN sign-in due to applications such as Dell Data Protection security tools.

There are three different Dell Data Protection security tools, and to fix this problem, you need to remove them in the correct order. Once you remove those tools, you have to add your PIN again, and the problem should be resolved.

A software installation will frequently contain additional data not located in the application’s installation folder.

Remember that these applications can leave specific files behind even after you remove them. To remove all files and registry entries associated with it, it’s recommended to use a proper uninstaller.

2. Delete the NGC folder and add a new PIN code

  1. Press Windows + E and navigate to the path below:
    C:\Windows\ServiceProfiles\LocalService\AppData\Local\Microsoft\NGC
    windows hello pin this option is currently unavailable
  2. In THE NGC folder, delete all the files. To do so you must be logged as an Administrator.
  3. Open the Settings app by pressing Windows Key + I.
  4. When the Settings app opens, navigate to Accounts section.
    windows hello pin this option is currently unavailable
  5. From the menu on the left select Sign-in options.
    windows hello pin this option is currently unavailable
  6. Click the Windows Hello PIN button in the PIN section.
  7. Enter the desired PIN twice. Once you’re done, click OK to save changes.
    Windows 10 add PIN not working

Deleting the Ngc folder also helps with the Your PIN is no longer available error.

3. Use the I forgot my PIN option

  1. Open the Settings app by pressing Windows Key + I.
  2. When the app opens, navigate to the Accounts section.
    windows hello pin this option is currently unavailable
  3. Next, go to Sign-in options and choose I forgot my PIN.windows hello pin this option is currently unavailable
  4. Follow the instructions and enter your Microsoft account password, and you’ll be able to set a new PIN code or use the old one instead.

Some users also suggest combining both Solutions 1 and 2. To do so, follow the steps from Solution 2, but when asked to set up a new PIN code, click Cancel.

Then follow the steps from Solution 1, delete the NGC folder and add a new PIN code.

4. Switch to a local account and add a PIN code

  1. Open the Settings app by pressing Windows Key + I.
  2. When Settings opens, navigate to Accounts.
    windows hello pin this option is currently unavailable
  3. Locate your account and click Sign in with a Local Account instead.
  4. Follow the instructions to set up a local account.
  5. Sign out and sign in to your local account, and now add a PIN code.
  6. After you’ve added your PIN code you need to locate your account under the Accounts section in Settings and choose Sign in with a Microsoft Account instead.

5. Press Tab on the login screen

  1. On the login screen, you have to press the Tab key on your keyboard.
  2. After doing that, you should see a password input field. Here, click on Sign in Options and enter your PIN.
    windows hello pin this option is currently unavailable

This is a simple workaround, and several users reported that it works, so feel free to try it out. We must mention that this isn’t a permanent solution, so you’ll have to use it whenever you want to log in to your PC.

It is a solid workaround for the Windows hello PIN this option is currently unavailable error.

6. Create a new Administrator account

  1. Open Settings by pressing Windows Key + I.
  2. When the Settings app opens, navigate to the Accounts section.windows hello pin this option is currently unavailable
  3. Select Family & other people from the menu on the left. In the right pane, then click on Add someone else to this PC.
  4. Select I don’t have this person’s sign-in information.
    Windows 10 won't let me add a PIN
  5. Now click on Add a user without a Microsoft account.
    Windows 10 sign in options not showing
  6. Enter the desired account name and click Next.

If PIN sign-in isn’t available for your account, you might be able to fix the problem by creating a new administrator account. 

After creating a new administrator account, switch to it and set a PIN for it. We showed you how to set up a PIN code in one of our previous solutions, so be sure to check it out for detailed instructions.

Once you set the PIN code for the new account, try accessing your old account to see if the PIN code works. According to users, after setting up a new administrator account the issue was completely resolved, so feel free to try this solution.

7. Check if CNG Key Isolation service (KeyIso) is running

  1. Press Windows Key + R and enter services.msc, then press Enter or click OK.
    Windows 10 won't let me add a PIN
  2. When Services window opens, locate CNG Key Isolation service and double click it.
    windows hello pin this option is currently unavailable
  3. When the Properties window opens, change the Startup type to Manual. 
  4. Check if the service is running. If not, click the Start button to start it.windows hello pin this option is currently unavailable 
  5. Now click Apply and OK to save changes.

According to users, sometimes PIN sign-in can become unavailable if the CNG Key Isolation Service (KeyIso) service is disabled. Windows relies on this service for PIN sign-in; if this service isn’t running, you’ll experience problems with PIN login.

All of the above solutions should help you solve all of the common PIN login issues you might face, including the error message Windows hello PIN this option is currently unavailable.

You should now be able to log in with a PIN. But if Windows 10 PIN is still not working, this full guide will help you.

If you have any other questions or suggestions, don’t hesitate to leave them in the comments section below, and we’ll be sure to check them out.

Microsoft promises more gaming news soon after disappointing Games Awards presence

The Games Awards 2022 took place last week, where the best players in the gaming industry received awards for their accomplishments. Big players in the industry also used this opportunity to announce what they had in store for their fans next year.

If you happened to catch the 3-hour-long ceremony, then you might have noticed that Microsoft wasn’t at the forefront as you’d expect it to be.

As we had earlier reported in our recap of the Games Award 2022, Microsoft’s presence was merely felt at the event. The company only made a handful of announcements highlighting the entries that avid gamers should expect next year.

A lot of people were not pleased and took to social media to express their disappointment, as they had greater expectations.

But Microsoft has now come to address the issue and has stated that there’s a lot in store for gamers in 2023 and that its appearance and the few announcements made during the Games Award 2022 should not be misconstrued as the only thing it has to offer come next year.

Recently promoted, Microsoft’s Vice President of Xbox Games Marketing, Aaron Greenberg took to Twitter to clear the air and stated the company indeed has lots of goodies in store for gamers.

Though this is very little to go by as the company didn’t disclose more details, at least we now know that there are a couple of projects in the works. We will just have to wait and see what Microsoft has in store for its fans moving forward.

In November, it was rumored that the tech giant was set to skip the event over the Activision Blizzard controversies because the FTC was set to file its own antitrust lawsuit against the $68 deal. Perhaps, this is the reason why Microsoft’s presence in the award ceremony was almost negligible, in a bid to prevent even more people that might get in the way thus prolonging the process of finalizing the impending Activision deal.

via: Eurogamer.net

Windows 11 File Explorer Search Not Working: How to Fix it

The Windows 11 File Explorer search feature not working is one of the different problems with Windows Explorer. Like the File Explorer search bar not working issue, this problem can come in different forms.

Some users cannot type anything into the search box, while the search button does not respond for some. Irrespective of the severity of the issue, this guide will walk you through the steps to fix it.

Why is the search not working in File Explorer?

Different factors can cause the Windows File Explorer search not working issue. Below are the well-known ones:

  • Broken search index: A broken or disabled search index can cause the search feature on your PC not to work. The easiest way to solve this is to rebuild the search index from the Control Panel.
  • Disabled service: If the Windows Search service is disabled, it can also lead to problems in File Explorer. You must enable this service and restart your PC to get past this problem.
  • Issues with Windows Explorer: Sometimes, Windows Explorer might not be working well because it ran into minor problems that can lead to this issue. Restarting it in the Task Manager should help fix the issue.

How can I fix Windows 11 File Explorer search if it’s not working?

1. Restart File Explorer

  1. Press the Ctrl + Alt + Esc keys to open the Task Manager.
  2. Right-click the Windows Explorer process and select the End Task.
    end task windows 11 file explorer search not working
  3. Finally, launch Windows Explorer again.

If the Windows 11 File Explorer search feature is not working, a quick solution is to restart it. This will clear up any glitch that can be causing it to malfunction.

2. Use PowerShell

  1. Press the Windows key + S, type powershell, and click Run as administrator under Windows PowerShell.
    windows powershell
  2. Type the command below and hit Enter to run it: Get-AppxPackage Microsoft.Windows.Search | Foreach {Add-AppxPackage -DisableDevelopmentMode -Register “$($_.InstallLocation)\AppXManifest.xml”}get
  3. Now, wait for the command to finish running.

Sometimes, you need to re-register Windows search to fix the Windows 11 File Explorer search feature. The quickest and most effective way to do this is to run the command above.

3. Rebuild the search index

  1. Press the Windows key, type control, and select Control Panel from the options.
    control
  2. Click the View by dropdown and select Large icons.
    large icons windows 11 file explorer search not working
  3. Now, select Indexing Options from the list.
    indexing
  4. Click the Advanced button.
    advanced
  5. From here, click the File Types tab at the top and tick the radio for Index Properties and File Contents.
    file types windows 11 file explorer search not working
  6. Finally, click the Index Settings at the top, followed by the Rebuild button.
    rebuilt

If the search index is broken, there is a high chance the Windows 11 File Explorer search will not work. To be sure this is not the case, you need to rebuild the index, as shown above.

4. Run the Search and Indexing troubleshooter

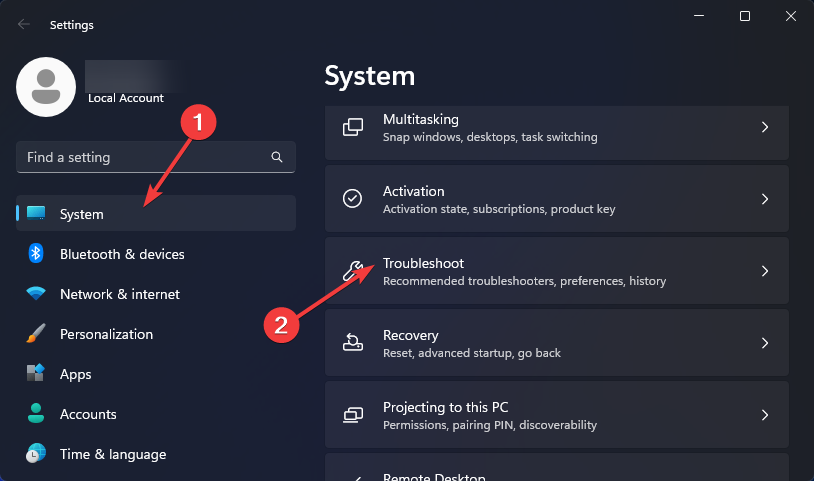
  1. Press the Windows key + I to open the Settings app and select Troubleshoot.
    troubleshoot
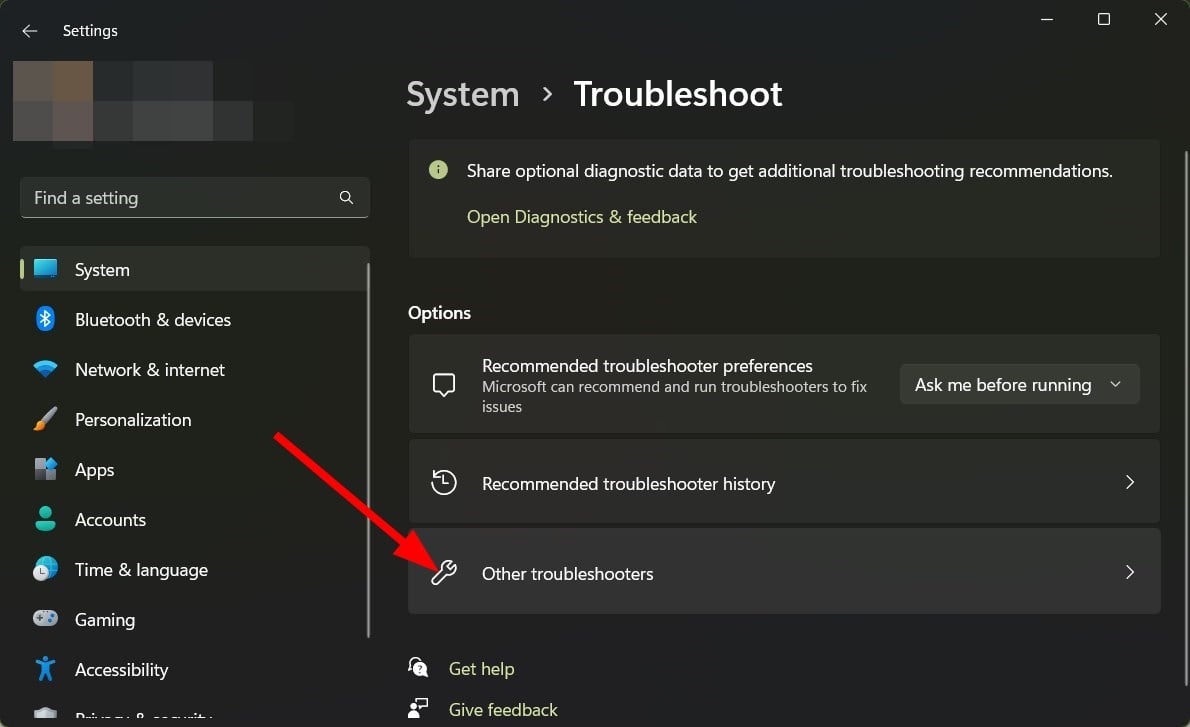
  2. Select the Other troubleshooters option.
    other trouble windows 11 file explorer search not working
  3. Finally, click the Run button before the Search and Indexing option.
    search indexing

You need to wait for the troubleshooter to complete its diagnosis and apply any recommended fix. This should help you fix the Windows 11 File Explorer search not working issue if a system component causes it.

5. Restart the Windows Search service

  1. Press the Windows key + R, type services, and click OK.
    services
  2. Right-click the Windows Search service and select Restart.
    restart windows 11 file explorer search not working
  3. Now, restart the File Explorer and check if the issue is fixed.

The Windows Search service might not run or have encountered issues in some cases. This will cause problems with anything that has to do with search and could be why the Windows 11 File Explorer is not working.

Restarting the service should eliminate any glitches with it.

The Windows 11 File Explorer not working issue can be frustrating. However, it is not the most difficult issue to fix, as shown in this guide. And similarly, you can fix things when File Explorer steals focus.

If File Explorer frequently crashes on Windows 11, check our detailed guide for surefire ways to fix it.

Lastly, if you find results loading slowly, learn how to effectively search on Windows 11 and how to search for special characters in Windows Explorer.

Feel free to let us know the solution that helped you fix this issue in the comments below.

Sys_Error DEV ERROR 6041: How to Fix This COD Warzone Bug

COD Warzone is one of the most popular games in the world, with many players around the globe. However, the game suffers from bugs like Sys_Error DEV ERROR 6041, preventing players from using the game.

Another COD Warzone error is the error code torch, indicating that the game can’t start.

What causes the Sys_Error DEV ERROR 6041 in COD?

Many factors can cause the Sys_Error DEV ERROR 6041 in COD Warzone, ranging from issues with the game client to problems with the PC. The most common cause is a corrupt game installation file. It impedes the game from functioning as it should, resulting in errors.

Other factors that may be responsible for the Sys_Error DEV ERROR 6041 in COD Warzone are:

  • Game requirement issues – You may encounter various DEV errors while playing your COD game if your device doesn’t meet the requirements. It can cause the game client to crash or malfunction.
  • Overlay features on other programs – Other programs like Steam, Nvidia GeForce, and Overwatch have the overlay feature. Likewise, COD Warzone has an overlay feature that doesn’t work well with other programs. It can interfere with the feature in the game, causing it to crash or run into the Sys_Error DEV ERROR 6041.
  • Outdated game client and PC drivers – An outdated game client is prone to several bugs that affect its performance. Also, the outdated graphics card driver on the PC can cause an error.

The cause of the Sys_Error DEV ERROR 6041 in COD Warzone may vary in different devices. Nonetheless, you can fix it by tweaking your game and device.

How do I fix Sys_Error DEV ERROR 6041 in COD Warzone?

Before proceeding with any advanced steps, try the following:

If you still can’t fix the Sys_Error DEV ERROR 6041 in COD Warzone, go ahead with the fixes below.

1. Run a System File Checker (SFC) scan

  1. Left-click the Start button, type command prompt, and select Run as administrator.
  2. Click Yes on the User Account Control prompt.
  3. Type the following and press Enter: sfc /scannow 
  4. Restart your PC, then launch COD Warzone to check if the error appears again.

The System File Checker scan will repair corrupt system files causing the game to run into the DEV ERROR 6041.

If you want to perform this scan faster and more efficiently, we recommend you try an automated repair tool.

This software helps you run a comprehensive scan of your computer to find corrupted files and locate healthy replacements for the malfunctioning files.

Check our article about what to do if nothing happens when you select run as administrator on Windows 11.

2. Scan and repair game files

  1. Left-click the Start button, type Battle.net, then click Open.
  2. Select COD Warzone in your library. Click the Options button and select Scan and Repair.
  3. Click Begin Repair to start the scanning process.
  4. Wait until the scan is complete, restart your PC, and check if the error persists.

Repairing the game files will fix corrupt files that may impede the game’s activities.

3. Uninstall and reinstall Call of Duty Warzone

  1. Left-click the Start button, type Battle.net, and click Open.
  2. Select COD Warzone in your library. Click the Options button and select Uninstall.
  3. Once the process is completed, click the Install button to reinstall COD Warzone.
  4. Launch Warzone and check if you encounter any errors.

Uninstalling Warzone will clear the corrupt files prompting the Sys_Error DEV ERROR 6041 in COD Warzone.

Alternatively, updating COD Warzone can generally fix game errors you can encounter. So, it may be beneficial to read about fixing the COD Warzone Update requires a restart error on your device.

You can also check our article about how to fix Dev Error 5476 in Warzone as well as our latest Dev error 6144 guide.

If you have questions or suggestions about this guide, kindly use the comments section below.

Microsoft acquires fiber cable company Lumenisity

Microsoft is still in a buying mood with their latest purchase being Lumenisity,  an innovator in hollow core fiber (HCF) This acquisition serves to bolster Microsoft’s Cloud Platform and Services to allow for tighter latency and security requirements.

HCF could provide faster transmissions with better instruction protection for federal and local governments.  Since HCF fiber is better equipped to handle large data sets the public sector could see enhanced speeds when transmitting medical data for example.  Faster and more secure financial transactions across the cloud are also possible.

Lumenisity’s next-generation fiber has a proprietary design where light penetrates an air core which has great advantages over traditional fiber which uses a glass core. Other key advantages of HCF fiber are low signal loss without the need for repeaters, enhanced intrusion protection, and increased overall speed versus standard fiber.  You can learn more about Lumenisity fiber visit their website.

How to Enable and Use Compatibility View Settings in Chrome

Some websites are designed for older browsers that don’t work on the latest browsers. So, the Compatibility view settings in Chrome will allow users to use features in the previous version, suiting the site’s preferences.

Also, users report Chrome not syncing with Windows 11, making it difficult to track data.

Does Google Chrome have Compatibility view settings?

Chrome browser is one of the most advanced browsers. It has several features that give it a unique edge over other browsers. The compatibility view settings in Chrome is one of those features.

Furthermore, users can initiate the compatibility mode to access incompatible websites in Google Chrome without crashing. These websites are designed to work on older versions of browsers. Hence, they may not run smoothly on the newer versions.

However, the compatibility mode will break the standard of sites that can work with the browser. It does this by getting the page to appear like it did on the old Chrome version. Hence, it helps support pages that may not have all the latest browser features.

How do I enable and use the compatibility view settings in Chrome?

Using the compatibility view settings in the Chrome browser can be done in a few ways. Before proceeding, go through the following:

  • Ensure there are no network congestion issues that can affect your browser.
  • Close other browsers that may be running on your device.

The above checks will prepare the Chrome browser for the view switch. Go ahead with the steps below to enable the compatibility view settings in Chrome:

1. Run Chrome in Compatibility Mode on your PC

  1. Right-click the Start button, find and right-click on the Chrome browser app, and select Properties.
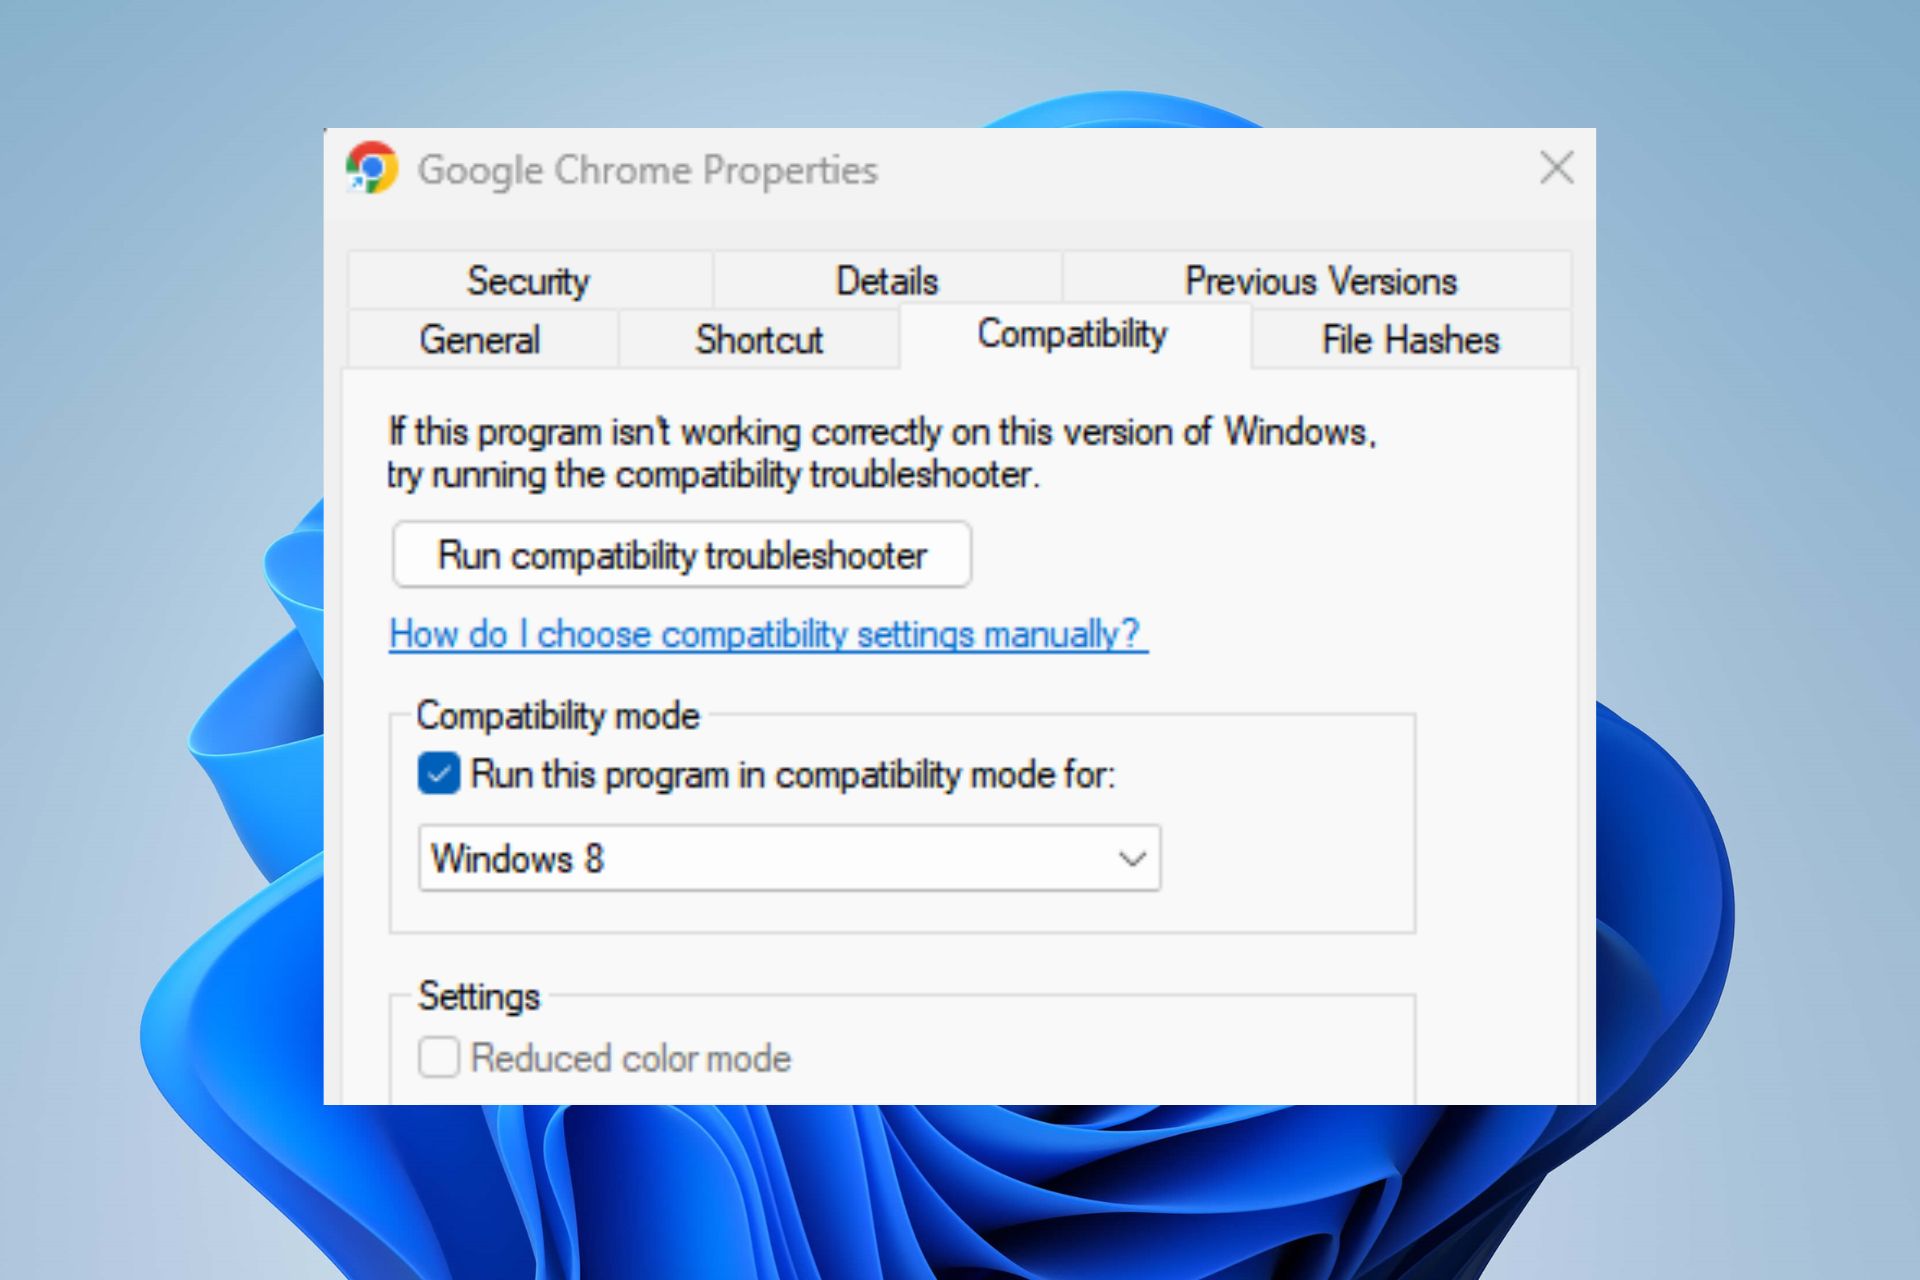
  2. Click on the Compatibility tab, check the box for Run this program in compatibility mode for, then choose your operating system.
  3. Go down and check the box for Run this program as an administrator.
  4. Click Apply, then OK to save the changes, and restart your PC to allow the changes to sync with the browser.

Running the Google Chrome browser in compatibility mode allows it to get around app version requirements that may prevent it from working in the Compatibility view.

2. Add the IE tab extension to Chrome

  1. Go to the Chrome store and Add the IE Tab extension to Chrome.
  2. Click the Add to Chrome button, then click the Add extension button on the prompt.
  3. The IEtab.net host page will automatically open, go to Step 1 and sign in with a preferred account.
  4. Go to Step 2 and select the Internet Explorer version you want IE Compatibility Mode to use, depending on your preference.
  5. Click the GO button to Launch IE tab and enter your URL.
  6. Input the URL for the website you want to use in the compatibility mode and press Enter to load it.
  7. Go to the top-left corner, and click the drop-down button beside the URL bar to switch between IE versions to use in compatibility mode.

Adding the IE tab to the Chrome extension will help you use the Compatibility View feature in Internet Explorer.

In conclusion, our readers can read about enabling compatibility view settings on Windows 11.

You can also read about what to do if Internet Explorer is not keeping the compatibility view settings you enabled on the browser.

If you have any questions or suggestions, kindly drop them in the comments section below.

Do I Really Need Realtek HD Audio Manager on My PC

Realtek HD Audio Manager is one of the most user-friendly audio drivers available. It provides DTS, Dolby, and Surround Sound support for the user’s Audio Card.

Many users ask themselves if the Realtek audio driver is really needed on their computer. We developed a list of features that Realtek HD Audio Manager provides to help you decide if it’s worth installing the software.

What is Realtek HD Audio Manager and do I need it?

Realtek High Definition Audio Manager is the complete name of the Realtek HD Audio Manager.

It is a widely used audio driver/sound driver for the user’s audio card that supports Dolby, DTS, and surround sound. It might also be referred to as Realtek HD Audio Driver.

Connecting a headset to your PC or a new pair of speakers or headphones helps you decide on the audio configuration for the system.

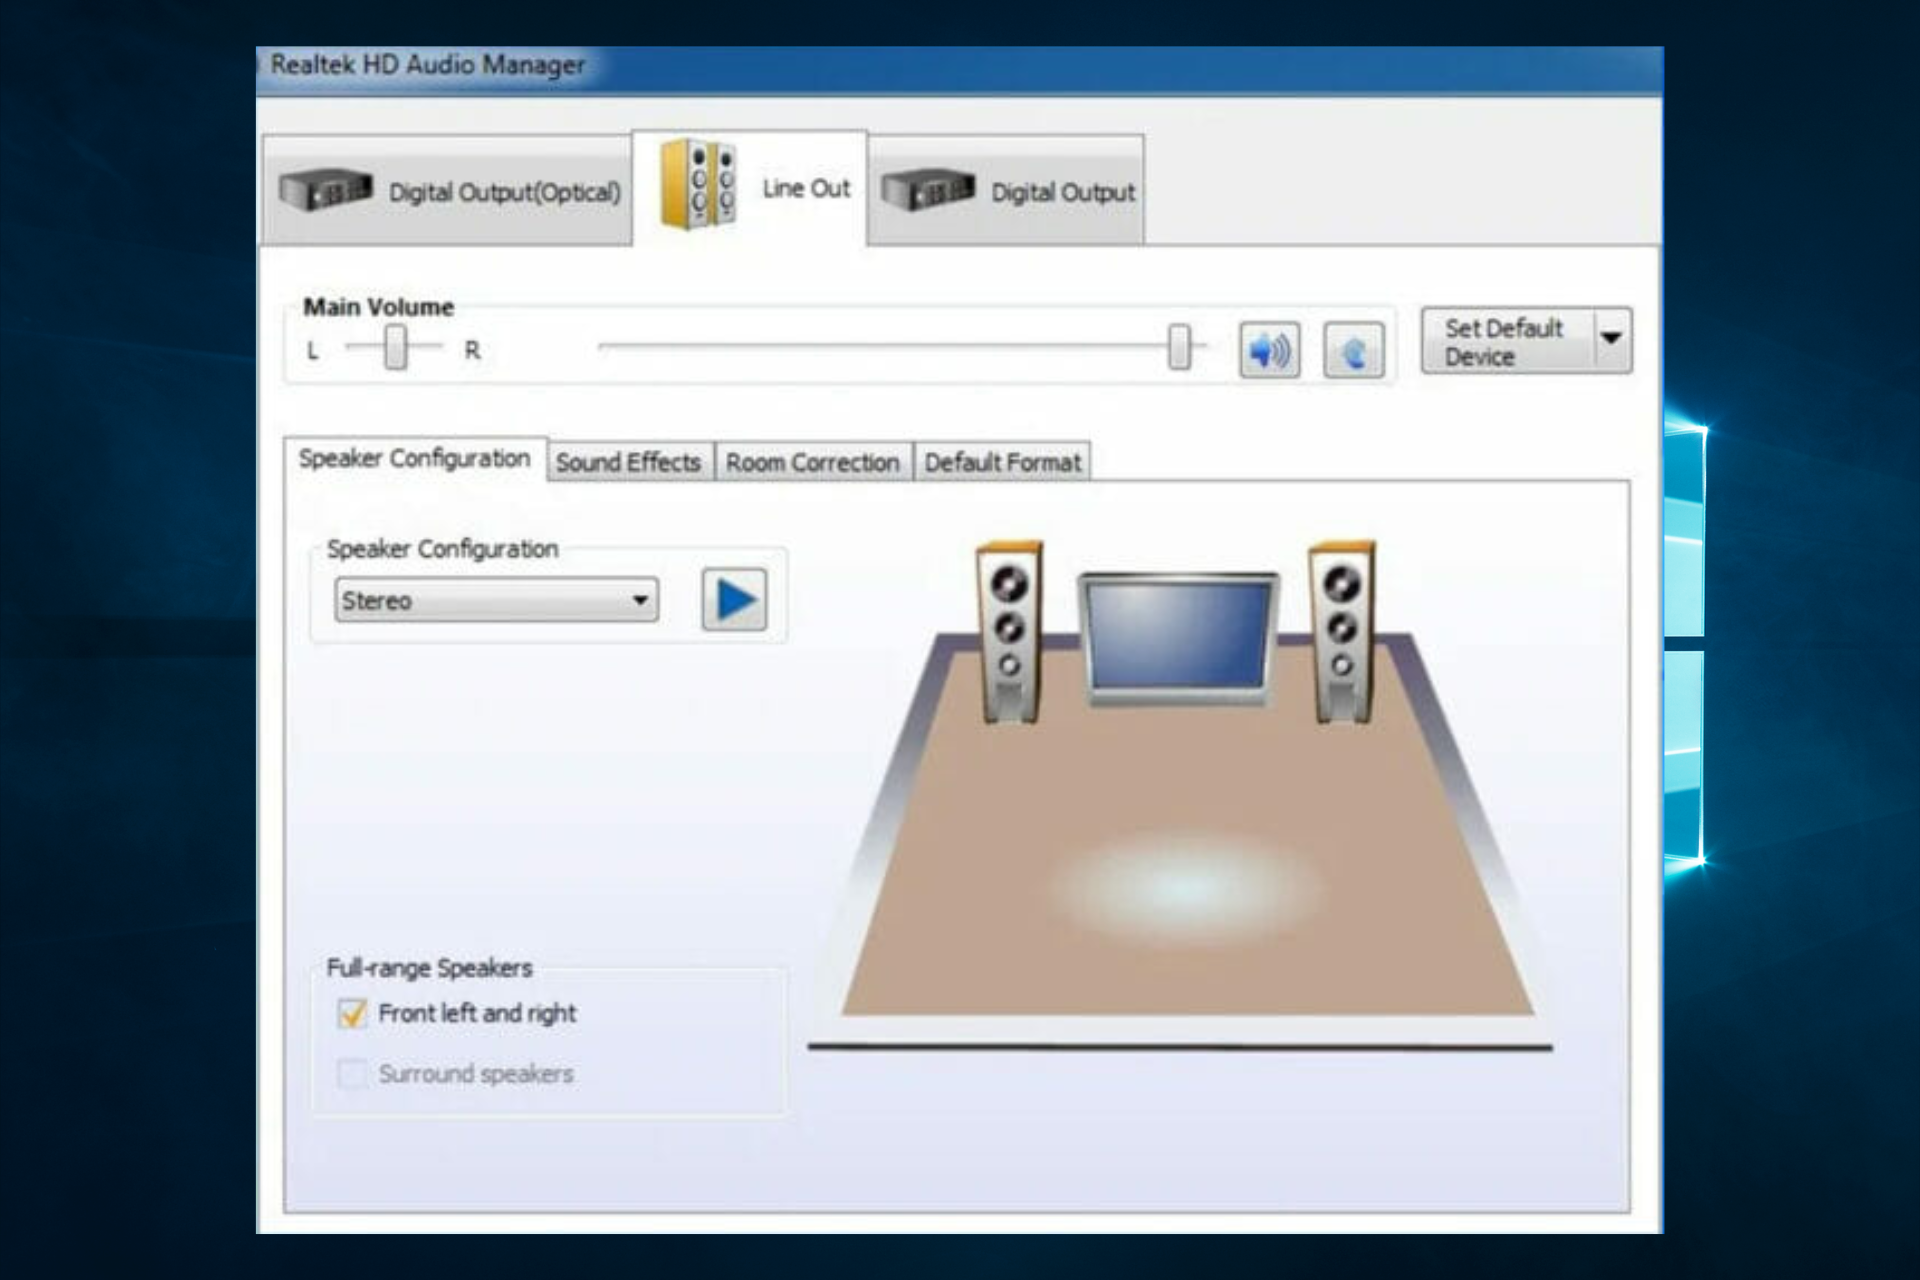
It also contains a Room Correction tab that allows you to adjust the volume for each speaker manually.

Although it’s not required to be installed on your device, we do advise utilizing it because of its widespread use and wealth of features.

Below is a list describing the Realtek High Definition Audio Manager’s main features.

What are Realtek’s High Definition Audio Manager features?

Below is a list of some of the things you can expect from this HD audio manager:

  • Ease of access – You can access the manager from the bottom right corner of your desktop, next to the time and date display.
  • Multiple sound tools – Right-clicking on the orange sound icon offers you access to all the sound tools you’ll need: Sound Manager, Audio Devices, System Sound Events, Windows Media Player, Volume Control, and Sound Recorder.
open realtek sound manager Do I need Realtek High Definition Audio
  • Configuration options – The Sound Manager allows you to choose your speaker configuration. Choose between 5.1 Speaker, Quadraphonic, and Stereo, if you have the available setup.
  • On/Off option – Disabling/enabling specific speakers can be done from the Speaker Configuration tab.
  • Non-essential features – Additional instruments such as Speaker Fill, Swap Center/ Subwoofer Output, and Enable Bass Management are available.
  • Customizable speaker tab – A sound test button and a volume control section are also available in the Speakers tab.
  • Separate volume levels – A Room Correction tab allows you to manually adjust each speaker’s volume manually.
  • Sound quality controls – The Default Format tab provides the ability to change the sound quality.
  • Mic test and volume suppression – In the Microphone tab, you can adjust the microphone volume and perform an actual test for your device. You also get additional instruments, such as Noise Suppression and Acoustic Echo Cancellation.

How do I access Realtek HD Audio Manager?

  1. Press hotkeys Windows + R, type control panel, and hit Enter.
    realtek hd audio manager not opening
  2. Change the View by option to small icons.
    realtek hd audio manager
  3. Finally, to launch Realtek HD Audio Manager, look for it and click it.

Is it OK to disable Realtek HD Audio Manager from startup?

You can turn it off, as it is unnecessary during startup, but you should know that some important features may not work properly if this process is disabled.

Hence it should come down to your personal choice and what features you hope to use at startup. And whether your use the Realtek HD Audio Manager for Dell, Asus, or other manufacturers, this remains the same.

In conclusion, Realtek HD Audio Manager is not crucial for your audio device, but we do strongly recommend using it. We hope that this quick review helped you decide whether to try out the Realtek driver or not.

To learn more, we have a guide explaining what is RtkAudUService64, so don’t miss it. We also have a guide on how to get ASUS Realtek HD Audio Manager so don’t miss it.

Lastly, if you liked this article, leave a comment in the comments section below.

Error 4001 on Darktide: 4 Ways to Fix This Warhammer Issue

Warhammer 40,000: Darktide is a newly released first-person action-adventure multiplayer video game. Though it’s not been long since its release, players report Darktide error 4001 alongside other errors they encounter with the game.

However, you can check Warhammer 40,000: Dawn of War III system requirements for PCs to avoid getting into errors.

What causes the Darktide error 4001?

Darktide error 4001 mostly appears when players get disconnected from the game server or are blocked from joining a party. An outdated game client on your PC is a common factor that causes the error. It means bugs are affecting the game because of the lack of updates.

Other factors that can cause the Darktide error 4001 to appear are:

  • Corrupt or missing game files – The Warhammer 40K: Darktide game client on your PC may run into the error 4001 if the game files are corrupted or missing. It means the files are not intact and can’t be accessible whenever the game needs them to play.
  • Third-party app interference – Apps like antivirus on your PC can block the game client from running correctly. Also, Windows Defender Firewall can block the game’s activities, causing it to run into errors.
  • Network connection issues – Players can encounter the Darktide error 4001 when joining a party due to server problems or internet issues from the party’s leader. So, it affects your game when you join.

Nevertheless, you can fix these problems by troubleshooting your PC and the game.

How do I fix the error 4001 on Darktide?

Apply the following preliminary checks:

If the error does appear, proceed with the solutions below.

1. Run the game as an Administrator

  1. Press the Windows + E key to open File Explorer.
  2. Navigate to the Warhammer 40k Darktide installation directory. Right-click the .exe file and select Properties from the drop-down.
  3. Navigate to the Compatibility tab and check the box for the Run this program as an administrator option.
  4. Click OK to save the changes.

Running Warhammer 40000 Darktide as an administrator will fix permission issues and allow the User Account Control (UAC) access to the PC.

Read our guide on what to do if running as administrator is not working on Windows 11.

2. Verify the integrity of game files

  1. Left-click the Start button and type Steam, then double-click to open it.
  2. Click the Library tab and search for Warhammer 40,000: Darktide.
  3. Right-click the game and select Properties from the drop-down.
  4. Click the Local Files tab and the Verify Integrity of Game Files button.

Verifying the game file integrity will check and repair any missing or corrupted files. If Verify the integrity of game files is not working on Steam, check our guide on how to fix it.

3. Update Warhammer 40,000: Darktide

  1. Left-click the Start button and type Steam, then double-click to open it.
  2. Click the Library tab and click on Warhammer 40,000: Darktide.
  3. Right-click the game and select Properties from the drop-down.
  4. Go to the Updates tab and select the Always keep this game up-to-date option from the automatic updates menu.

If there is any update available, it will automatically download and install on the game. The updates will fix bugs causing the error.

4. Disable Windows Defender’s Real-Time Protection

  1. Left-click the Start button, type Windows security, and open it.
  2. Select the Virus & threat protection option, and click Manage settings.
  3. Toggle off the Real-time protection option to turn off Windows Defender Antivirus.

Disabling the Real-time protection will fix any issues with the Windows Defender antivirus and the game client on your PC.

The last resort for the error code 4001 in Warhammer 40K: Darktide is to wait while the servers are fully online. If by trying the earlier mentioned fixes, you can’t fix the problem, it indicates that it’s a server issue.

Likewise, you can check the Warhammer 40k: Darktide Twitter page if there’s any concern with the servers.

Alternatively, you can read about Warhammer 40,000: Sanctus Reach issues and some effective fixes you can use.

Sadly, there are other problems you can encounter, and we wrote about the Darktide backend error and Darktide error 9999 in our previous guides, so don’t miss it.

Kindly leave your comments in the section below if you have any questions or suggestions.

Turn Off UAC For a Specific Program on Windows 11 [How to]

The UAC feature can be useful, but many users wonder if it can turn off UAC for a specific program on Windows 11.

While this is possible, it’s not as straightforward as many users think. However, this guide will show you how to do that, so keep reading.

Can I disable the UAC for one program?

Windows doesn’t allow you to disable UAC just for a single application. However, a workaround allows you to run an app and bypass UAC.

How do I disable UAC for specific applications in Windows 11?

Use Task Scheduler

  1. Go to Start, search for task scheduler in the Windows search bar, and click on the first result to open Task Scheduler.search for task scheduler
  2. Right-click on Task Scheduler Library on the left, and select New Folder. Task Scheduler Library - new folder
  3. You can then rename it as, for example, Disable UAC and press OK.rename Disable UAC
  4. Next, expand Task Scheduler Library, right-click on the new folder, and select Create Task.create task for Task Scheduler Library
  5. In the Create Task window, name the task something like turn off UAC for quick access, go to Security Options below, and select Run with highest privileges. name task, Run with highest privileges
  6. Now, next to Configure for, select Windows 11 (or the OS you are currently running) from the drop-down. Click OK.
  7. Press OK again in the next prompt to proceed. Next, under Actions, click on New. actions, new
  8. Now, in the New Action dialog, select Start a program in the Action field, and click on Browse. You must select the target app’s .exe file.Start a program
  9. If using a laptop, you must also go to the Conditions tab and deselect Start the task only if the computer is on AC power. Press OK. uncheck Start the task only if the computer is on AC power
  10. Now, show the desktop on your PC and then create a shortcut for the target app.

To undo the action, and re-enable UAC, delete the created task and the folder.

How do I permanently disable UAC?

1. Deactivate UAC with msconfig in Windows 11

  1. Press the Win + R keys to launch the Run console. Then type msconfig in the search bar and hit Enter to open the System Configuration window. run command msconfig
  2. Next, go to the Tools tab in the System Configuration window, select Change UAC Settings, and press Launch. Change UAC Settings
  3. This will open the User Account Control Settings window. Here, move the slider on the left to Never notify, and press OK to save the changes. set UAC to never notify

2. Disable UAC in the Windows 11 registry

  1. Press the Win + R shortcut keys to open the Run console, type regedit, and hit Enter to open the Registry Editor window. Registry Editor
  2. Next, navigate to the path below, and double-click on the EnableLUA DWORD. open EnableLUA dword
  3. In the Edit DWORD (32-bit) Value dialogue, change the Value data from 1 to 0. Press OK.change value data from 1 to 0

Now, close the registry editor and restart your PC. The UAC settings should be disabled successfully now.

To enable the User Account Control Settings back again, follow the above instructions and change the value data from 0 to 1.

Note icon NOTE
Remember that only administrators can disable UAC, so if you’re not an administrator, these solutions won’t work.

What are the risks of disabling UAC?

By disabling UAC, all users on the computer will be able to make system changes and run any software.

In the worst-case scenario, if a user installs malicious software, it will have almost all privileges and it will be able to adjust PC settings without any restrictions.

You can also get This app can’t be activated when UAC is disabled message if you choose to disable this feature.

As you can see, while it’s impossible to turn off UAC for a specific program on Windows 11, there are other workarounds you can use.

Before you leave, don’t forget to check our guide on Do you want to allow this app to make changes message.

Let us know in the comments box below for any other User Account Control settings queries.

5 Ways to Fix HBO Max when It’s Not Allowing Downloads

HBO Max is available on select devices and platforms and can be purchased as a standalone or bundled with a traditional HBO subscription. However, HBO Max not allowing downloads is a problem faced by several of its users.

If you are having problems with the HBO Max app not allowing downloads, there are a few things you can try, as discussed in this article. Try and use them to resolve your issue. 

Why does HBO Max disallow downloads? There are a few reasons why HBO Max does not allow users to download shows or movies:

  • One reason is that it would take up a lot of storage space on users’ devices.
  • Another reason is that it would be easy for users to share downloaded content with others, which would violate copyright laws. 
  • Finally, HBO Max wants users to watch shows and movies on their platform so that they can continue to generate revenue from advertising.

What can I do if HBO Max is not allowing downloads?

1. Check your internet connection

  1. Visit fast.com to check the speed of your internet.fast speed test
  2. If slow, change your connection or contact your ISP.

2. Update the HBO Max app

  1. Open Microsoft Store on your device.windows store - hbo max not allowing downloads
  2. Click the Library icon at the bottom left side of the screen.
  3. Scroll down to HBO Max and select Update.Update
  4. Once the update is downloaded, click the Open button to launch HBO Max.

3. Restart your device

  1. Click the Windows Start button and select the Power button.
  2. Select Restart, wait for your computer to start, and then open the HBO Max app.restart device - hbo max not allowing downloads

4. Clear the HBO Max or your browser cache

  1. On Google Chrome, click the three dots menu on the top right.
  2. Select More tools and then Clear browsing data.Chrome settings - hbo max not allowing downloads
  3. Select All time on the time range option at the top.
  4. Tick the checkbox on Cookies and other site data and Cached images and files, and then select the Clear data button at the bottom.Clear cache

5. Uninstall and reinstall the app

  1. Press the Windows + I key combination to launch Settings and then select Apps.Apps on settings - hbo max not allowing downloads
  2. Search for HBO Max or scroll down to the app and then click on it.Search HBO
  3. Click on the Uninstall button and follow the on-screen instructions to uninstall the app.Uninstall HBO - hbo max not allowing downloads
  4. Visit the Microsoft Store and then reinstall the app.

How do I download shows or movies on HBO Max?

To compete with streaming giants Netflix, Amazon Prime Video, and Disney Plus, Warner Bros. established the standalone streaming service HBO Max. A wider selection of programming is available on HBO Max, including HBO originals, Max originals, and more. 

Additionally, because you might wish to watch HBO Max while traveling or in an area with spotty internet, this service lets you download HBO Max movies and series to your device and view them offline.

The HBO Max app, available for download on smartphones and tablets, is the quickest and most straightforward way to download content from HBO Max for offline viewing. You can download shows or movies on HBO Max by going to the My Stuff section and selecting the download icon next to the title.

If none of the solutions work, you may need to contact customer support. Have you seen any HBO Max login notifications that you don’t recognize? Investigate this issue as soon as possible.

In the comments section below, let us know which way worked for you. Feel free to comment about any other solutions as well.

How to Install Star Wars Forces of Corruption Mods on Steam

Mods are a great way to enhance the experience of playing your favorite games. They allow you to do things that normally aren’t possible in the game, like adding new characters and items, changing the way it looks and sounds, or even adding new gameplay features. 

If you’re a gamer, it’s likely that you’ve heard of Steam and Star Wars. Being a fan-favorite game, we explore how to install Star Wars Empire at War Forces of Corruption mods on Steam. 

Why should I install mods on my Steam games?

Mods are a great way to add more fun and replayability to your favorite games. But why should you install mods on Steam? What do they do, and how can they help? Here are some of the best reasons:

  • Save time – Installing mods on Steam will not only save you a lot of time, but they can also help you get more things done than before.
  • New experience – When you install mods on Steam games, it means that you will be able to have a different kind of experience from what you would have had without them. 
  • Fun factor – Mods allow you to make your game more immersive or challenging to keep things interesting.
  • Enhance graphics – Mods can also improve the graphics or performance of some games. This is especially useful if you’re playing older titles that are no longer supported.
  • Bug fixes – Some mods may even fix bugs in the base game itself, making it more stable or giving you a better quality of life when playing it.
  • Free of charge – Most mods are developed by fans and are totally free. This is a win for gamers as you get a top-notch experience without a dip in your pockets.

How do I Install Star Wars Forces of Corruption Mods on Steam?

1. Use the Steam library

  1. Launch Steam and navigate to the Steam Workshop for the Star Wars: Empire at War Gold Pack. 
  2. A list of mods will appear, so browse through available ones. (Note that some mods are tied to specific games and won’t work on every Star Wars version). 
  3. Once you have identified the mod you’d like, click on Subscribe to download.
  4. Go back and load Star Wars and click on the main menu, select Options, then hit the Mods button.
  5. A list of mods you have subscribed to will appear. Select the one you’d like to use and the game will download the mod to your system.
  6. Restart Steam and the mod will now be enabled.

2. Use Command Prompt

  1. Navigate to your browser and Download SteamCMD.
  2. Find the AppID for the program. This can be found on Steam’s official page. 
  3. Also, find the ModID. This can be in the mod description box or at the top of the address bar where the link is while browsing the Mod.
  4. Run SteamCMD and launch the command line version of Steam. 
  5. Type the following commands and remember to replace AppID and ModID with the values you found in 2 and 3 above then press Enter: login anonymous workshop_download_item <AppID > <ModID>

The Command Prompt method may be long and tedious for the not-so-tech-savvy users so we recommend you install it from the Steam library.

Aside from the Star Wars mods, there are also a bunch of other games that you may be interested in downloading mods to. If you would like to install Sims 4 mods, we have an excellent article guide for PC and Mac users.

We also have a list of the best mods for the top games if you’re unsure what mods you’d like to try to take your game to the next level.

Let us know which method you found easier to install the Star Wars mods in the comments section below.

How to Fix Windows Update Error Code 8024402

Windows updates are essential for fixing bugs affecting your PC and adding new features to your PC. However, error code 8024402C is an error users encounter when updating Windows.

Also, users report that Windows 10 couldn’t install on their PCs for some reason.

What does an error code 8024402C mean in Windows Update?

Windows Update error code 8024402C appears when Windows Update can’t connect to Microsoft’s update servers, making it impossible to complete updates. It is rampant on Windows 7 and 10.

Likewise, it can indicate issues with Windows Update services running correctly on your device.

What causes the Windows Update error 8024402C?

Windows Update errors can be due to many factors impeding the update process. They occur due to network connection issues that are causing the Windows Update services not to connect to Windows Server.

The process requires a stable and fast network connection. Other factors that can cause the error to occur are:

  • Third-party app interference – The Windows update on your PC may be affected by installing third-party apps like antivirus software. They can block the connection between your computer and the Windows update service, resulting in error 8024402C.
  • Issues with Windows Update components – The Windows update process on your computer needs some services to run smoothly. So, you can run into the error code 8024402C if the Windows update components are not intact.

Hence, we’ll take you through some fixes for the issue.

How do I fix the error code 8024402c?

We recommend you go through the following preliminary checks:

  • Turn off apps running in the background on your PC.
  • Disable third-party antivirus software on your computer.
  • Resolve network congestion issues.
  • Power cycle your network router or modem.
  • Restart Windows in Safe Mode, retry the update, and check if the error appears.

If you still can’t get through with the Windows update, proceed with the solutions below.

1. Run Windows Update Troubleshooter

  1. Press Windows + I key to open the Settings app.
  2. Click Update and Security.
  3. Select Troubleshoot and select Additional troubleshooters.
  4. Then click on Windows Update and click Run the troubleshooter.
  5. Follow the on-screen prompts and restart your PC afterward.

The troubleshooter will repair issues causing the Windows Update not working on your PC.

If you can’t use the steps above, check other ways to run the Windows Update troubleshooter in Windows 10/11.

2. Reset the Windows Update process

  1. Left-click the Start button, type cmd, and choose Run as Administrator.
  2. Type the following commands and press Enter after each one to stop Window update services:net stop wuauserv net stop cryptSvc net stop bits net stop msiserver
  3. Type the following command one after the other: ren C:\Windows\SoftwareDistribution SoftwareDistribution.old   ren C:\Windows\System32\catroot2 Catroot2.old
  4. Input the following commands and press Enter after each one to start Windows update services:net start wuauserv net start cryptSvc net start bits net start msiserver
  5. Exit the Command Prompt and restart your PC.

Resetting the Windows Update process will fix the problems with Windows update services and clear the update caches on your PC.

3. Disable Windows Firewall

  1. Click the Start button, type the control panel, then press Enter.
  2. Then click on the Windows Defender Firewall option and click the Turn Windows Defender Firewall on or off option from the left side.
  3. Go to the Private network settings and Public network settings, then click the radio buttons for the Turn off Windows Defender Firewall (not recommended) option.
  4. Close the Control Panel and restart your computer.

Disabling the Windows Defender Firewall will fix any interference it’s causing in the Windows update process.

4. Change your DNS server address

  1. Press Windows + R key to open the Run dialog box, type ncpa.cpl, then click OK to open the Network Connection page.
  2. Right-click your Network adapter and select Properties from the drop-down.
  3. Select Internet Protocol Version 4 (TCP/IPv4) and click Properties.
  4. Tick the box for the Use the following DNS server addresses option, type 8.8.8.8 in the Preferred DNS server, and 8.8.4.4 for the Alternate DNS server, then click OK to save settings.
  5. Restart your PC, then try updating Windows to check if the error persists.

Changing your DNS server address can help fix network issues and help the Windows Update services connect to Windows Update servers.

Read more about checking and changing the DNS server on Windows 10 if you’re having trouble with the steps.

Alternatively, our readers can check our article to fix slow Windows updates on their PCs. Likewise, we have a guide on Windows Update error 0x8007045b and some fixes for it.

Do not hesitate to leave your comments if you have any suggestions or questions.

Microsoft news recap: FTC sues Microsoft over Activision Blizzard acquisition, Xbox Series X|S could be UK’s 2022 best seller, and more

Microsoft news recap is a weekly feature highlighting the top Microsoft news stories of the past week. Sit back, grab some coffee, and enjoy the read!

The FTC officially sues Microsoft to halt its Activision Blizzard take over

A legal challenge by the US Federal Trade Commission has been filed against Microsoft over its Activision Blizzard acquisition, with the FTC explaining its decision to sue Microsoft over the deal:

Today we seek to stop Microsoft from gaining control over a leading independent game studio and using it to harm competition in multiple dynamic and fast-growing gaming markets.

FTC building with sign out front

Xbox Series X|S could be 2022’s best-selling console in the U.K.

According to information from GamesIndustry.biz, Xbox Series X|S could be a best-seller in the UK for 2022, as there’s reportedly just 20,000 unit sales between the top spot, amongst PlayStation 5, Xbox Series X|S, and Nintendo Switch.

Xbox Series X|S could be 2022's best-selling console in the U.K. - OnMSFT.com - December 8, 2022

Microsoft’s stats detail how the Sleeping tabs feature is helping Edge users save resources

Sleeping Tabs is a Microsoft Edge feature that freezes open tabs that aren’t in use, helping to save resources and energy. The latest data shows that over 1.38 billion tabs have been put to sleep.

Microsoft's stats detail how the Sleeping tabs feature is helping Edge users save resources - OnMSFT.com - December 7, 2022

Microsoft promises to support Call of Duty games on Nintendo consoles and Steam

As Microsoft continues to fight to get its Activision Blizzard deal over the line, the company has reached an agreement with Nintendo and Steam to bring Call of Duty to the respective platforms for 10 years.

Call of Duty Modern Warfare 2 video game on Xbox Series X

That’s it for this week. We will be back next week with more Microsoft news.

How to Fix Snapchat Code C14a [3 Methods]

Getting hit with Snapchat Code C14a? This error usually pops up when Snapchat can’t connect to its servers during login.

It’s often caused by poor internet, corrupted app data, device restrictions, or using outdated software. Sometimes, it’s triggered after switching devices, reinstalling the app, or logging in too many times in a short span. Whatever the cause, here’s how to fix it quickly.

How can I fix Snapchat support code C14a?

1. Install the latest version of the app

  1. Open the Google Play Store (or App Store on your iPhone).
  2. Click on your profile picture.
  3. Select Manage apps & device.
  4. Under the Updates available section, click on See details.
  5. Check if there is a new update available for the Snapchat app. If yes, then hit the Update button.
  6. After the app is updated, launch it and see if it fixes the Snapchat error code C14a.

As mentioned, this issue has been resolved for several users after installing the latest version of the Snapchat app. If you haven’t done that yet, you can follow the above steps and update the app to resolve the issue.

After doing that, check if Snapchat support code C14a login error is still there.

2. Clear the Snapchat app cache

  1. Long-press on the Snapchat app icon.
  2. Tap on the I button at the top to see App details.
  3. Under the Usage section, tap on Storage.
  4. Hit the Clear cache button.
  5. Relaunch the app and check if this resolves the issue or not.

Chances are that the app cache stored on your phone is of an older version of the app which is causing conflict with the app. Clear the app cache and check if this resolves the issue.

If your issue also includes a camera black screen or failed captures, follow this guide on fixing the back camera not working on Snapchat.

3. Reinstall Snapchat

  1. Long-press on the Snapchat app.
  2. Select Uninstall.
  3. Open Google Play Store.
  4. Search for Snapchat.
  5. Install the app.
  6. Launch the app, log in with your credentials, and check whether this resolves the issue.

Snapchat error code C14a is an app glitch caused by difficulties in contacting the servers. Limited Internet connection and a corrupt cache.

Did you know that you can download Snapchat without Play Store? We have a dedicated guide that will show you how to do that.

Let us know in the comments below which one of the above solutions resolved the Snapchat error code C14a for you.

8 Best Software For Turning Photos Into 3D Models

How software can turn a face photo into a 3D model?

If you are a graphic designer or a regular user who would like to know the best software available on the internet for turning photos into 3D models, then you have come to the right place.

Previously, it required a lot of time and a lot of images of the face from different angles to create a face into a 3D model. Thanks to artificial intelligence and powerful software, you can easily turn your face photo into a 3D model.

In this guide, we will present 7 of the best free and paid software for turning pictures into 3D models. Some software is pretty easy to use, while others require a bit of graphic designing knowledge to convert photos into 3D models. Let us take a look at the software one by one.

What is the best software for turning photos into 3D models?

Adobe Substance 3D Sampler – Digitize and enrich assets

We all know that Adobe is the go-to company when it comes to digital art and anything visual actually. Of course, they are also great at transforming your picture into a 3D asset.

Adobe Substance 3D Sampler it’s the product that can do that for you. This Adobe software is packed with powerful tools that are not as hard to master as one would think.

The scan system of this product is powered by AI allowing you from the very start to set up the way your 3D will look like. You can remove shadows, generate albedo, roughness, and mapping. Post-scanning you can focus on the 3D transformation.

Adobe Substance 3D Sampler also comes with parametric effects, allowing you to combine weathering and natural effects any way you want.

It is worth mentioning that this Adobe product is not part of the Creative Cloud All Apps.

Some key features:

  • AI-powered Scan Processing
  • Create HDR environment lights
  • Built-in Photogrammetry
  • Send any image directly to Adobe Photoshop
  • Combine weathering and natural effects

Adobe Substance 3D Sampler

Transform your photos into 3D assets with this professional tool from Adobe.
Free Trial Visit Website

Clip Studio Paint – Great for drawing 3D comics

If you are looking for great value software to help turn your face into a 3D model, then you should consider using Clip Studio Paint.

Clip Studio Paint consists of over 10,000 free assets, and many more are available if you are ready to pay. It comes with access to 3D models, which you can use to create illustrations and comics.

You can use it to create full 3D color comics and convert tone and outline into separate layers by using the LT conversion of layers. The best part is that you can import 3D data made with other software and configure them as materials in this tool.

Here are some of the key highlights of Clip Studio Paint:

  • You can import 3D data from other software
  • Use built-in AI to pose your figure
  • Lets you fine-tune various attributes of your 3D drawing figure
  • Regsiter 3D primitives as materials

Clip Studio Paint

Create 3D models by using this great app which has a multitude of editing options, including tones, layers, and colors.
Free Trial Visit Website

Autodesk Tinkercad – Good overall 3D modeling software

Tinkercad is the next one on our list of the best free software for turning photos into 3D models. It is available for free and can be accessed via the web. All you need to do is create an account on the website, and you can create your 3D masterpiece.

You can use Tinkercad to turn your 2D images into 3D images. The 3D model will have clearly separated colors and will show off gradually.

Tinkercad also lets you enhance the details of your 3D model, place objects, combine objects, and use various features.

Check out some of the best features of Tinkercad:

  • It has a user-friendly interface
  • Available for free
  • It is compatible with 3D printing
  • You can use it on your browser

⇒ Get Tinkercad

ItsLitho – Create high-quality 3D printed lithophanes

ItsLitho is a free online tool that will help you turn your 2D image into a 3D lithophane. The user interface is also easily understandable, and there isn’t much learning curve.

The tool also has multiple in-built tools, such as a gray-scale converter and pixel editor to edit the brightness and contrast of the images.

You can also use this tool to design your shape, add a frame or border, enhance the quality, and other aspects of the image.

Apart from converting your image to a lithophane, you can also turn a 2D image into a 3D model as well.

Here are a few key features of the ItsLitho tool:

  • Create a 3D printable image from a 2D image in a few clicks
  • Easy to use
  • Free of cost
  • Does not require installation and can be used on a browser

⇒ Get ItsLitho

Vectary – Decently price 2D to 3D converter

Vectary is another popular name that makes it to our list of the best software for turning photos into 3D models. While you can use it on your browser for free, it will have limitations, which you can easily get rid of by purchasing the paid plan.

The conversion process is pretty simple and comes with an extensive library of tools to create 3D visuals on your 2D image.

You can drag-and-drop elements, use ready-made assets from the massive 3D library, and tweak the size or rotate your 3D model as per your liking.

Here are the best features of Vectary:

  • It is web-based
  • The user interface is pretty simple to use
  • Lets you control various elements of the 3D model
  • Comes with a huge 3D asset library
  • Allows viewing in Augmented Reality

⇒ Get Vectary

Blender – Free and open-source tool

Blender is an open-source and free tool that lets you easily and quickly create 2D to 3D images. It is an advanced tool that is used by professionals and is best for commercial projects.

You can use this tool on any device, and apart from converting your images from 2D to 3D, you can also create a 3D image from scratch.

Blender can be used to for rendering, modeling, sculpting, animation, motion tracking, 3D printing, and much more.

Some of the best features of Blender are:

  • It is a free and open-source tool
  • Can be used on any device as it is web-based
  • Comes with multiple features
  • Apt from 3D printing and various other aspects of filmmaking

⇒ Get Blender

3DF ZEPHYR – An advanced tool for creating 3D models

3DF ZEPHYR lets you create 3D models from images you have captured from any device. Be it a camera, phone, laser scanner device, drone, etc., you can use the images from these devices to convert them into 3D models.

While the tool offers a free version to try out the features, you need to purchase the product to access advanced features such as full exporting capabilities, control points, full NVIDIA GPU support, etc.

Check out some of the special features of 3DF ZEPHYR:

  • Can take images from different devices to process them together in a single project
  • Fast processing speeds
  • Control minute data points to enhance the image
  • Offers plenty of editing tools
  • Good for advanced users

⇒ Get 3DF ZEPHYR

Photomodeler – Powerful photogrammetry software

Last but not least, we have the Photomodeler tool that will help you extract measurements out of 2D and 3D images.

You can try out the Photomodeler software to measure your photos for free but get the paid version for advanced measurement, diagramming 3D modeling, or 3D scanning tasks.

The customer support is also pretty great, as several users have reported getting their queries resolved in no time. The product is highly accurate, captures moving objects, and can be used with photos from many devices.

Check out the best features of Photomodeler:

  • Highly accurate measurement
  • Good for professionals
  • Multiple editing tools to enhance your photos

⇒ Get Photomodeler

That is in our list of the best free and paid software for turning photos into 3D models. Do note that this list contains both free and paid options allowing you to decide on the software as per your need.

If you are someone that is looking for the best CGI software, then we would suggest you check out our guide on the 5+ best CGI software for professional 3D modeling list.

We also have a guide on the 5 best 3D printing software for PC that lists some of the best tools that you can have for 3D printing.

Let us know in the comments below which one of the above tools you opted for turning 2D images into 3D.

Fix: CPU Usage Stays High until I Open the Task Manager

Having your CPU work full blast for an extended period of time can actually harm your computer. The high temperatures can cause irreparable damage which is why CPUs are outfitted with cooling fans.

Fixing is as easy as going into the Task Manager and closing some apps, but something peculiar has been reported. Whenever Task Manager is open, CPU usage suddenly drops only to then increase when closed.

What causes this strange CPU fluctuation?

CPU usage dropping can be a sign of something benign or you have a very serious problem with your Windows computer. If it’s the latter, you’ll need to get it fixed as soon as possible.

The following list is by no means extensive but does mention the most likely culprits of this phenomenon.

  • The Task Manager is simply readjusting itself: If you ever see the CPU indicator on Task Manager drop after opening, that’s normal. It’s just the software outputting a more stable reading.
  • Your computer has been infected with a virus: Malware can infect your computer and wreak havoc. It’s very important that you protect yourself with the best antivirus software.
  • Your computer is using cryptocurrency mining software: Some bad actors have been caught accessing other people’s computers and taking advantage of their hardware to earn cryptocurrency.
  • A bad actor has hijacked your machine: Similar to cryptocurrency takeovers, people on the internet will hijack the computers of others. Fortunately, there exist special antivirus tools to protect you.

What can I do to stabilize my CPU?

From our own research, the more effective ones are the complex solutions, but you can always the easier ones first and see if they work:

  • Run your antivirus software to get rid of malware infesting your computer. This will solve the problem a majority of the time.
  • Download and install any new updates you have pending. If updating doesn’t work, we recommend performing a clean boot first, then updating.

1. Run an SFC scan and more

  1. In the Windows search bar, bring up the Command Prompt and select Run as administrator.
  2. If a User Account Control window appears, select Yes.
  3. In Command Prompt, type in the following and hit Enter on your keyboard: dism /online /cleanup-image /restorehealth
  4. Give your computer ample time to complete the process.
  5. Once done, type in this command, hit Enter, and wait until it’s done: sfc /scannow
  6. Now type in this to access a new set of tools: powershell
  7. Copy and paste the following command and hit Enter: Get-AppXPackage -AllUsers |Where-Object {$_.InstallLocation -like "*SystemApps*"} | Foreach {Add-AppxPackage -DisableDevelopmentMode -Register "$($_.InstallLocation)\AppXManifest.xml"}
  8. Give your computer time to finish.
  9. Once done, restart the computer and see if the CPU usage problem has been fixed.

2. Use Process Explorer to find hidden software

  1. Go to Microsoft’s Learn page and download the Process Explorer app.
  2. Extract the file you just downloaded and open it.
  3. Take the time to look through Process Explorer and identify what other processes are utilizing the CPU. If you have a computer with a lot of software running, this may some time.
  4. Right-click it and select Kill Process If you locate an app running that you don’t remember installing. The image below is just an example.
  5. Open File Explorer and go to the following address: C:\Users\USERNAME\AppData\Roaming
  6. Replace USERNAME with the name of your computer.
  7. Locate any folders or applications with archiver or unarchiver in the name and delete them.

Process Explorer is a first-party app from Microsoft that gives you a first-hand look into every single file and directory running at any given moment. It’ll show software normally undetectable by Task Manager.

If you download files from an unverified source, you may have installed hidden malware. Offending processes to look out for are archiver or unarchiver as some have reported online.

3. Clean up system files

  1. Open Windows Search and type in Clean.
  2. Select Disk Cleanup.
  3. Click the Clean up system files button.
  4. Check off all the boxes in the Disk Cleanup window and select OK to finish.

Needless to say, the CPU is a crucial part of any computer and because of that, it’s very important that you keep a close on it at all times. To help you do this, we recommend installing a monitoring app. This type of software gives an up-to-date reading on your CPU’s load, clock speed, and even RAM usage.

You should also look into AIO (All-in-One) coolers if you build your own computers or are thinking of doing it. They can be pricey but offer some of the best cooling possible for processors.

Feel free to comment below if you have questions about other CPU problems.

Libusb0.dll: What Is It & How to Fix It if It’s Missing

When you encounter an error message saying the Libusb0.dll file is missing on your computer, it means the programs in need of the file can access it. It’s due to issues affecting the Libusb0.dll file.

Aside from the Libusb0.dll file error, there are other DLL file missing errors you can run into on Windows 11.

What is Libusb0.dll?

Libusb0.dll is a vital file in the Windows system files library. It ensures that the programs on your PC operate as they should. Without the file, some programs depend on it won’t work, resulting in errors.

Why is Libusb0.dll missing in Windows 11?

Many factors can prompt the Libusb0.dll missing file error on Windows 11. The most prominent cause of the error is that the Libusb0.dll file is corrupt or deleted from the system. So, programs and services that require it won’t have access to it.

Furthermore, you can come across the Libusb0.dll missing file error due to other factors such as:

  • Issues with the program – Sometimes, the error may be from the program you’re using. If it is not updated or its installation file is corrupt, it can impede it from accessing the Libusb0.dll file. Hence, it prompts the missing file error.
  • Malware infection – Malware blocks the functionality of the programs running on your computer. It can prevent system files, including the Libusb0.dll file, from being visible when invoked by programs.

There are other likely reasons for the error, but you can fix them by trying some troubleshooting steps.

What can I do if Libusb0.dll is missing on Windows 11?

Go through the following preliminary checks:

Proceed with the solutions below if you can’t fix the Libusb0.dll missing error:

1. Download and replace your Libusb0.dll file

Note icon NOTE
We don’t encourage downloading from unofficial sites. However, our experts have tested these steps to confirm their safety.
  1. Launch your browser and download the appropriate version of the Libusb0.dll file for your Windows.
  2. Double-click the downloaded zip file to open it, click Extract all, and select Desktop for a location to extract the DLL file.
  3. Restart your PC and check if the error persists.

Downloading a new copy of the Libusb0.dll file will replace the missing copy, which should fix the error.

2. Register the LibusbO0.dll file

  1. Left-click the Start button, type Command Prompt, and click Run as administrator.
  2. Click Yes on the User Account Control prompt.
  3. Type this command and press Enter:regsvr32 LIBUSB0.dll
  4. Restart your PC.

The Libusb0.dll missing error should not persist on your computer after registering it. It helps the system rewrite the file, making it visible to the services needing it.

3. Run a System File Checker scan

  1. Left-click the Start button, type Command Prompt, and select Run as administrator.
  2. Click Yes on the User Account Control window.
  3. Type the following and press Enter: sfc /scannow
  4. Restart your PC and check if the error persists.

The System File Checker scan will find and repair corrupt system files causing the Libusb0.dll file not to be visible. Check our article about what to do if nothing happens when you select run as administrator on Windows 11.

And if you want to complete this process automatically, you can easily opt for a specialized repair tool as it can do the job for you by running an in-depth scan to find corrupted or compromised files and locate healthy replacements for them.

4. Run System Restore

  1. Left-click the Start button and type Restore, then click on Create a Restore Point.
  2. Go to the System Protection tab and select System Restore.
  3. Choose a different system restore and click Next to select a specific Restore Point.
  4. Select the last time your PC worked perfectly, and click Next.
  5. Click the Finish button.

The System Restore will backdate your PC to an earlier point in time. It will remove any apps, drivers, and updates installed on your PC after selecting the restore point. Read how to fix Restore Point if it’s not working on your PC.

Alternatively, you can go through our guide on the best DLL repair tools you can download to solve the error on your PC. Finally, our readers may be interested in the Autorun.dll error on Windows 11 and its fixes.

For further questions or suggestions, kindly drop the in the comments section below.

How to Stop Webex From Using Your Mic Outside of Meetings

If you are using Cisco Webex, you’ve probably run into the Microphone is not working issue at least once. Now, users are also reporting that the program is still using the mic long after the meeting is done.

When using Cisco Webex meetings, there’s a chance that your microphone will be turned on even when you’re not using it. This is because it uses the microphone to detect nearby devices and automatically add them to meetings.

Why is Cisco Webex always using my microphone?

If you’re wondering why Webex is constantly using your mic even when you’re not in a meeting, below are some possible reasons:

  • Browser settings – If you’re having this issue, it’s likely that you have a setting in your browser that’s causing Webex to use your microphone.
  • Automatic detection setting – If the microphone is always on outside of meetings, it is likely that you have enabled the detect nearby devices option on Webex.
  • Virus infection – A malware attack on your system can cause strange behavior with some programs’ functions. You should always protect your system with a reliable antivirus program.
  • Default input device – If you’re using Cisco Webex as the default input device, it will use your microphone even after the meeting is over.
  • Webex is running in the background – Sometimes, even after the meeting, you’ll find that Webex is still running in the background and hence still using your mic.

How do I stop Cisco Webex from using the mic outside of meetings?

1. Disable all Webex processes from Task Manager

  1. Hit the Windows key, type Task Manager in the search bar, and click Open.
  2. Navigate to the Startup tab. 
  3. Locate any Webex processes and click on Disable.

Also, if you want to stop Cisco Webex from running in the background, you can follow the same process, only this time, you’ll navigate to the processes tab and End all Webex instances. 

2. Run a virus scan 

  1. Press the Windows key, search Windows Security and click Open.
  2. Select Virus & threat protection.
  3. Next, press Quick scan under Current threats.quick scan
  4. If you don’t find any threats, proceed to perform a full scan by clicking on Scan options just below Quick scan.
  5. Click on Full scan to perform a deep scan of your PC.Full scan
  6. Wait for the process to finish and restart your system.

Running a virus scan on your computer is crucial as you are able to see viruses and other digital threats that may affect its health.

Apart from your Windows Security, there are also advanced antivirus programs like TotalAV that can offer multilayered security features to remove all kinds of cyber threats and prevent them from entering your PC.

3. Turn off automatically discover nearby devices 

  1. Launch your Webex desktop app and select Preferences.
  2. Click on Video system and uncheck Automatically discover nearby devices.

You may be wondering why Cisco proximity is using your microphone. This is because of the automatic nearby device option that you have enabled on Webex. 

The application automatically discovers nearby devices, including microphones and video cameras, so that users can join a meeting and start talking to each other. If your microphone is turned on, it’ll be automatically detected and used by the meeting.

4. Run the sound troubleshooter

  1. Click on the Windows button and select Settings.settings windows 11
  2. Select System then click on Troubleshoot.Open system troubleshooter
  3. Click on Other troubleshooters.
  4. Hit the Run button next to Playing audio.playing-audio game audio stops working

5. Uninstall and reinstall Cisco Webex

  1. Hit the Windows key and click on Settings.settings windows 11
  2. Select Apps on the left pane then click on Apps & features on the right pane.
  3. Locate Webex, click on the three vertical ellipses and select Uninstall.
  4. Go to the Webex site and download Cisco for Windows.

Uninstalling the application will help clear any glitches or bugs that were present and causing the anomaly. To ensure you get rid of all problematic files, also remove any software leftovers before installing the application again.

Hopefully, one of these steps has helped you solve the issue of Cisco using your microphone outside meetings. If you’re out of luck, you should try changing your input device and see if the error persists.

Cisco Webex is not the only software you can install for your meetings. If you’re looking for variety, we have a rich list of the best video conferencing software to choose from.

Let us know what solution worked for you in the comment section below.

How to Fix a Windows Update That is Stuck at 35%

Is the Windows update on your Windows 7 PC stuck at 35%? Multiple users confirm that they are waiting for hours, but nothing happens as the Windows 7 update is stuck at 35%. Some were able to access their PCs, while some could not.

Fortunately, in this guide, we will give you a bunch of solutions that will help you resolve the Windows 7 update stuck at 35%. The best part about this guide is that you can apply the solutions for other versions of Windows as well. Let us get right into it.

Why is the Windows 7 update stuck at 35%?

Before we apply the solutions, it is very important to understand what exactly is causing the problem, which in our case is Windows 7 update stuck at 35%.

  • Outdated drivers: Outdated drivers might conflict with the system update. It is very important to keep all drivers up to date to avoid errors.
  • Incompatible peripherals connected to PC: Chances are some peripherals or device connected to your PC is causing the issue.
  • Third-party program conflict: On many occasions, the third-party applications that we install on your PC interfere with the system processes and cause multiple issues.
  • Corrupt temporary files: Temporary files are created for your system to remember some in-app settings. In case they get corrupt, you will face multiple issues.

How can I fix Windows 7 update stuck at 35% problem?

Here are a few things that we would advise you to do before applying the advanced troubleshooting methods.

  • Try restarting your PC. Chances are your system wasn’t able to load a crucial Windows update-related file.
  • Check the internet connection. If the internet connection is faulty, the system won’t be able to contact the server.
  • Delete the temporary files. If you are having issues deleting temporary files on your PC, you can follow this guide.
  • Disconnect the peripherals attached to your PC and check if this resolves the update error or not.
  • Uninstall unwanted programs from your PC.

Now let us advance toward the troubleshooting method that has helped users to fix this problem.

1. Turn on Data Execution Prevention

  1. Press the Win + R keys to open the Run dialogue.
  2. Type sysdm.cpl and hit Enter.
  3. Click on the Advanced tab.
  4. Under the Performance section, select Settings.
  5. Select Data Execution Prevention.
  6. Choose Turn on DEP for Essential Windows Programs and Services only option.
  7. Click Apply.
  8. Restart your PC and check if this resolves the issue or not.

According to several users, turning on the Data Execution Prevention feature resolves the Windows 7 update stuck at 35% error because this feature prevents other processes from interrupting the Windows update process.

2. Run the Windows update troubleshooter

  1. Open the Start menu.
  2. Type troubleshoot and open it.
  3. Under System and Security, click on Fix problems with Windows Update.
  4. Click Next.
  5. The troubleshooter will detect the errors and prompt you to apply solutions to fix them.

3. Restart Windows Update Service

  1. Press the Win + R keys to open the Run dialogue.
  2. Type services.msc and hit Enter.
  3. Right-click on the Windows Update service and select Stop from the context menu.
  4. Wait for sometime and then right-click on the Windows Update service and select Start.
  5. Close Services.
  6. Restart your PC and check if this resolves the issue or not

Chances are that the Windows update service is facing some internal issues, or it failed to load some important file that has stuck the Windows 7 update at 35%. You can restart the Windows update service and check if this fixes the problem or not.

4. Run the DISM command

  1. Reboot your PC with your Windows 7 CD or DVD.
  2. Press any key when you get Press any key to boot from CD or DVD message to enter Windows Recovery Environment.
  3. Select Windows 7 language and other settings.
  4. Select Next.
  5. Click on Repair your computer.
  6. Click on Command Prompt.
  7. Type the below commands and press Enter. dism /image:C:\ /cleanup-image /revertpendingactions
  8. Let the DISM complete the process.
  9. Restart your PC and check if this fixes the issue or not.

5. Perform System Restore

  1. Reboot your PC with your Windows 7 CD or DVD.
  2. Press any key when you get Press any key to boot from CD or DVD message to enter Windows Recovery Environment.
  3. Select Windows 7 language and other settings.
  4. Select Next.
  5. Click on Repair your computer.
  6. Select System Restore.
  7. Click on the system restore point and select Next.
  8. Your PC will now be restored to back when everything was working normally.

This solution is helpful when you have waited for long, and nothing happens. The only option now left is to forget about the update and restore your PC back to the state when everything was working normally or when you were able to access your PC.

That is it from us in this guide. However, Windows 7 update stuck at 35% isn’t the only error troubling its users. Users have reported facing issues updating their Windows 7 PC, which can be resolved by following the guide.

We also have a guide that provides multiple solutions to the most common Windows 7 update errors. In the comments below, let us know which of the above solutions resolved the Windows update stuck at 35%.

Posted in Fix

Fix: Windows is Stuck on Cleaning Up – 0 Percent Complete

Despite Windows 11 being around for about a year now, Microsoft frequently supports and updates Windows 10 and will probably do so for a while. Updates often bring fixes and new features to an OS.

To facilitate this, Windows 10 updates have a Cleanup feature that gets rid of the old files to make way for the new ones. But some users have reported the Cleanup feature not starting beyond launching.

What causes Windows Update to get stuck on cleaning up?

The main driving force behind Window Update’s Cleanup feature is the Disk Cleanup tool itself. Any time the cleanup is stuck at zero percent, there’s something wrong with the app.

  • Your Windows computer has too many files: It’s entirely possible that because you have so many files that need to be parsed, it will take Disk Cleanup a long time to finish.
  • Your computer is experiencing slow performance: As a consequence of too many files, Windows may experience a performance drop because it’s all too much to process.
  • Corrupt files may be getting in the way: We recommend repairing and restoring corrupted files to get past this obstacle and ensure things run smoothly.

What can I do if Windows 11 is stuck on Cleaning up – 0 percent complete?

Before trying out any of the solutions, we recommend the following:

  • Wait it out. Perhaps you have so many files on your hardware that it takes your computer extra time to finish.
  • Create a restore point in case things go south and you have a way to bring your computer back to its previous state.
  • Turn off or uninstall your antivirus. It’s been reported that sometimes antivirus software will get in the way of important Windows functions.
  • Run the Windows Update Troubleshooter to identify the problem and resolve it. The software has been known to have its issues, so we recommend running a debug tool to fix it.
  • Install any new Windows updates currently available, specifically in Safe Mode. Microsoft frequently rolls out fixes in its updates.

1. Run a series of commands

  1. Bring up the Command Prompt in the Windows search bar and select Run as administrator.
  2. Click Yes if a User Access Control window pops up.
  3. Type the following in Command Prompt and press Enter on your keyboard to stop Windows Update: net stop wuauserv
  4. Next, type in the following commands and hit Enter after each one: net stop bits net stop cryptsvc net stop trustedinstaller
  5. After that’s done, type in the following command and press Enter after each one: ren %systemroot%\softwaredistribution softwaredistribution.bak ren%systemroot%\system32\catroot2 catroot2.bak
  6. Now it’s time to restart earlier services. Start by typing in the following and hit Enter after each one: net start wuauserv net start bits net start cryptvc
  7. Type in the following commands and press Enter like before: net start trustedinstaller net start appidvc

Stopping and restarting the services in the solution clear out the Windows Update cache so the system can redownload the files instead of using the ones already on the drive. Those files may be damaged.

2. Perform a clean boot

  1. Now it’s time to perform a clean boot. Open System Configuration on your computer.
  2. Go to the Services tab, click Hide all Microsoft services then Disable all. Select Apply to finish in this tab.
  3. Go to the Startup tab and click Open Task Manager.
  4. Select each item you see in Task Manager and disable everything.
  5. Close Task Manager, click Apply, then OK.
  6. Select Restart in the new window that appears. After the clean reboot, update your drivers and see if the problem has been fixed.

3. Run an SFC scan

  1. Bring up the Command Prompt again with the same administrator permissions as before.
  2. Type in the following and hit Enter on your keyboard: SFC /scannow
  3. Wait for the process to finish.
  4. Next enter the DISM command: DISM /Online /Cleanup-Image /CheckHealth
  5. Type in and press Enter: DISM /Online /Cleanup-Image /ScanHealth
  6. Now, type the following and press Enter: DISM /Online /Cleanup-Image /RestoreHealth
  7. Restart your computer to complete the process.

This solution is recommended to be performed after the clean boot, but you can do this at any time and see similar results.

How can I fix the 0 percent clean-up issue in Windows 11?

In case of facing this issue on this OS, do not hesitate to run the troubleshooter and SFC scan on Windows 11, as described below.

  1. First, open the Settings menu and click System on the left-hand side.
  2. Scroll down to Troubleshoot and click it. Select Other troubleshooters on the following page.
  3. Click Run next to Windows Update activate the troubleshooter. Give it time to finish.
  4. Select Next if a window appears telling you to restart your computer.
  5. A window will appear telling you what the problems were and if it fixed them.
  6. Now, bring up Command Prompt on Windows Search and select Run as administrator.
  7. Type the following command and hit Enter on your keyboard: SFC /scannow
  8. Wait for your computer to finish the process.

Note that this straightforward solution is the best for Windows 11, but you can also try it out on Windows 10.

Also, whenever Windows Update’s cleanup feature gets rid of old files, it puts them in a folder called Windows.old.

Older versions of Windows tend to be more stable, so this folder is handy to have in case you want to revert. But you can get rid of it, if you choose, to free up space on your hardware.

We also recommend checking out our best memory cleaner list. These apps clear out all the extra fluff software manufacturers may add. In return, you’ll experience much faster performance.

Feel free to comment below if you have questions about other Windows 10 problems. And please tell us if there’s a specific guide for any error or app you’d like to see.

How to Fix fltmgr.sys BSoD on Windows 10 & 11

The fltmgr.sys (Filesystem Filter Manager) ensures all files stored in the user’s hard drive are in their locations. Likewise, it ensures the data is readable and accurate. However, users report issues with the fltmgr.sys BSoD (Blue Screen of Death).

Moreso, many factors can cause a Blue Screen of Death on your PC.

What causes the fltmgr.sys error?

The fitmgr.sys failed bluescreen error can appear on your computer due to various factors. A common problem that may be responsible for the error is outdated or corrupt drivers. When the relevant driver for the fltmgr.sys process is outdated, it can result in BSoD.

Other factors that can cause the fltmgr.sys BSoD errors are:

  • Corrupt system files – You can run into the Blue Screen of Death if you have corrupt system files on your PC. These files will affect the fltmgr.sys activities and can result in the fltmgr.sys system service exception error.
  • Hardware issues – Users can encounter problems with the fltmgr.sys if there is a hardware issue. Also, external devices plugged into the PC can impede the functionality of the Filesystem Filter Manager, resulting in fltmgr.sys kmode _exception_not handled error.
  • Outdated Windows OS – Many things can go wrong with your PC if your operating system is not updated. It means your PC can’t access needed patches and updates for fixing bugs and can cause errors.
  • Problematic drivers – Faulty or corrupt drivers may also cause the fltmgr.sys page_fault_in_nonpaged_area error. Updating the faulty driver will solve this issue.

Fltmgr_file_system blue screen error is causing your PC to crash and restart. Fortunately, there are some effective fixes for the fltmgr.sys BSoD error.

How do I fix the fltmgr.sys BSoD error?

Go through the following preliminary checks:

  • Turn off background apps running on your computer.
  • Temporarily disable antivirus software services on your PC.
  • Restart the computer and check if the error persists.

If the error occurs again, proceed with the solutions below to fix the problem.

1. Restart Windows in Safe Mode

  1. Click the Start button, select the Power icon, hold the Shift key, and hit Restart.
  2. Click on Troubleshoot, then select the Advanced options.
  3. Click on Startup Settings and select Restart.
  4. Press 4 to Enable Safe Mode.  

Restarting Windows in Safe Mode can fix startup issues that can cause fitmgr.sys memory leak and other issues.

2. Run an SFC scan

  1. Left-click the Start button, type Command Prompt, and click Run as administrator.
  2. Click Yes on the User Account Control prompt.
  3. Type the following command and press Enter: sfc /scannow
  4. Restart your PC and check if the error persists.

Running an SFC scan will find corrupt system files causing the fitmgr.sys failed bluescreen and repair them. Read about fixing the run as administrator option if it’s not working on your PC.

Also, you can use a third-party tool to run a system file check which will automatically repair any problems that are found.

3. Update the graphics driver

  1. Press Windows + R key to prompt the Run dialog box, type devmgmt.msc, and open the Device Manager.
  2. Expand the Display adapters, right-click the driver you want to update, and click the Update driver.
  3. Then select Search automatically for drivers.
  4. Restart your PC and check if the issue persists.

Check our guide on how to update drivers on Windows 11 for other methods to use.

4. Update Windows OS

  1. Left-click the Start button and select the Settings app.
  2. Click on the Windows Update option and click on Check for updates.

If there are any updates available for your PC, Windows will search for and install them.

Windows updates will fix bugs affecting your PC that can cause fitmgr.sys BSoD error and add new features.

If you encounter issues during the update, check how to fix Windows not connecting to update services on your PC.

We need to mention that this guide will work seamlessly on Windows 10 as well as for Windows 11.

We hope you can fix the problem and get the Blue Screen of Death off your screen. However, you can read our article about fixing Fltmgr_file_system Error on Windows for more details on the problem.

Windows Activation Error Code 0x8007007b: 4 Quick Fixes

Users encounter numerous activation errors when attempting Windows Activation. These errors prevent users from verifying their Windows OS. Moreso, Windows activation error code 0x8007007b is a problem users complain about.

Also, Windows 7 & 10 Activation Error 0xc004f063 is an error that users frequently report.  

What causes the Windows activation error 0x8007007b?

Many reasons can be responsible for the Windows activation error 0x8007007b on Windows 7, 10 & 11 PCs. It indicates that the filename, directory name, or volume label syntax is incorrect and can also refer to other issues that may prompt Windows activation to fail.

However, a prominent cause of the error is the activation wizard not connecting to the Key Management Service (KMS).

When the connection between the two components can’t be established, the activation process will fail and result in an error.

Furthermore, you can encounter the error due to other factors, such as:

  • Corrupt system files – Having corrupt system files on your computer can prevent the activation wizard from connecting to the KMS server. Also, it can affect other Windows activation protocols on your PC, resulting in errors.
  • Illegal Windows activation – Many PCs were activated with pirated Windows versions that are not supported or licensed. It can cause the errors to prompt when you upgrade to Windows 10 from Windows 7 or 8.1. So, installing a new Windows OS on a used PC with an illegal pre-install Windows version will fail.

Users should note that the causes of the error may vary in different computers because the error comes in many instances. Nonetheless, you can generally fix the error by troubleshooting your PC.

How do I fix the Windows activation error 0x8007007b?

Before trying any fixes for the error, take care of the following:

  • Resolve network congestion on your computer.
  • Temporarily disable antivirus software on your PC.
  • Restart Windows in Safe Mode and check if the error persists.

Proceed with the solutions below if you can’t fix the error.

1. Run the Windows Activation Troubleshooter on Windows 10

  1. Press Window + I to open the Windows Settings app.
  2. Click the Update & Security option.
  3. Click on the Activation button, then tap on the Troubleshoot link.
  4. After troubleshooting completes, click on the I changed hardware on this device recently link.
  5. Input your credentials and sign in to your Microsoft account.
  6. Select your device and click Activate.

2. Manually assign a KMS server on Windows 7

  1. Left-click the Start button, type cmd.exe to prompt the Command Prompt, then Run as an administrator.
  2. Provide the necessary information for the prompt.
  3. Run a command from the following according to your network setup: cscript slmgr.vbs -skms yourkmshost.domain.com  cscript\windows\system32\slmgr.vbs –skms <KMS_FQDN> :<port> cscript\windows\system32\slmgr.vbs –skms <Ipv6Address> :<port>  cscript\windows\system32\slmgr.vbs –skms <Ipv6Address> :<port>
  4. Close the Command Prompt and restart your computer.

3. Replace and generate a new product key on Windows 11

  1. Left-click the Start button, type command prompt, and click Run as administrator.
  2. Type the following and press Enter to change the product key: slmgr -ipk <your current product key>
  3. After changing the product key, press Enter to submit and activate the product key change.
  4. Wait till you see a Windows Host Script prompt informing you that the product key has been successfully activated, then close the Command Prompt.
  5. Restart your PC.

After some hours, try the Activation process again with the new generic code. Read our guide if the Windows server change product key does not work on your PC.

4. Run an SFC/ DISM scan and clean up your PC

  1. Left-click the Start button, type Command Prompt, and click Run as administrator.
  2. Click Yes on the User Account Control prompt.
  3. Copy and paste the commands below and press Enter after each: sfc /scannow
  4. Then input the following and click Enter also: dism.exe /online /cleanup-image /restorehealth
  5. Restart your PC and check if the error persists.

An SFC scan will find and repair corrupt system files and clean up faulty system data that can cause the activation error 0x8007007b. Check our guide about finding Windows product keys on your PC.

Alternatively, you can make use of a specialized PC cleaning tool that simply scans your device and repairs defective system files that may generate this Windows activation error.

Conclusively, we have a detailed article on the most common Windows Activation errors & how to fix them. Also, you can read about resolving Windows 11 activation error 0xC004F034 on your PC.

If you have further questions or suggestions, kindly drop them in the comments section below.

How to Fix Shstat.exe Application & System Errors

Several of our readers have reported that they encounter the shstat.exe system error message. While some request to know how to fix this error, others are interested in knowing what it is.

What is shstat.exe?

This shstat.exe file is an application of the McAfee VirusScan Enterprise product. The VirusShield Statistics process, which manages program communication between various McAfee AntiVirus components, is run by the executable file shstat.exe.

It is well known that Shstat.exe, which is not a Windows system file, usually leads to computer issues. Shstat.exe can be found in a C:Program Files subdirectory.

The Windows operating system excludes the shstat file from its components. Shstat.exe can alter other Windows tasks, and cause system file errors, in addition to tracking other programs.

Because of this, most users believe that this file might pose a threat. It has a high likelihood of becoming harmful.

What causes the shstat.exe application and system errors?

You may consider the following causes:

  • Damaged or corrupted entries – If Windows notifies you of a shstat.exe system error, the problem may be due to corrupted or damaged entries. You should run a scan on the Windows Registry to determine the error.
  • Unnecessary startup programs – In some cases, programs and files can have a strong impact on the performance of a Windows operating system. This can also include shstat.exe. You should turn off the automatic startup of shstat.exe and other programs, causing the PC to lag.
  • Shstat.exe file in a wrong path – It is possible that during installation, the shstat.exe file was installed on the wrong path, this can be an indication of a virus.

Now that you know some of the potential reasons behind the shstat.exe system error message, let’s proceed to how you can fix this issue.

How do I fix the shstat.exe application & system errors?

Before attempting the fixes we have identified, try these few tweaks:

  • End task for the McAfee app in the Task Manager. If the Task Manager is not working, check this guide for fixes.
  • Restart your PC to check if the issue persists.

If it does, then try the following solutions.

1. Run the SFC/ DISM Scan

  1. Press the Windows + X keys to bring up the Command Prompt menu (Admin).
  2. Type the following command line and press Enter: sfc/scannow
  3. Do not interrupt the scanning process, as it may take up to 15 to 20 minutes.
  4. Also, you can run this DISM command and click Enter: DISM /Online /Cleanup-Image /RestoreHealth
  5. Close the Command Prompt and restart your PC.

The SFC and DISM scans are the most straightforward fixes for application and system errors through the command-line tool that thoroughly checks your system for potentially damaged files.

2. Uninstall/Remove the app

  1. Left-click the Start button and click on Settings.
  2. Click on Apps.
  3. Locate the McAfee product or app in the list, then click on Uninstall.
  4. Select Yes in the UAC prompt requiring the administrator’s permission.
  5. Follow the screen prompts on McAfee’s uninstaller and close Settings.

By removing McAfee, you should uninstall the shstat.exe also. In case the shstat.exe file has an uninstall program, you can run the Uninstaller located in such a directory also.

Alternatively, you can remove shstat.exe from your PC’s Control Panel in the Add/Remove Programs section.

Additionally, if your application or system is lagging, make sure to remove some of the unnecessary programs in your Task Manager.

And if you’re unable to open your Task Manager, try to follow the right solution provided in our dedicated guide.

If you have any questions or suggestions, do not hesitate to use the comments section below.

How to Enable Minidumps on Windows & Where to Find Them

Blue Screen of Death or BSOD errors are some of the most frustrating errors to come across on a Windows PC as they prevent you from your PC normally.

While there are multiple BSOD fixing software that can help you fix the error, knowing what is causing the issue could help you troubleshoot it the next time something happens.

You can fix the BSOD error by using the crash dump file or minidump files. We have a similar guide that gives you information regarding the BSOD dump file location in Windows 7. In this guide, we will give you details on how to enable minidumps on Windows. Let us get right into it.

What could trigger BSOD errors?

Here are some of the most common causes that could trigger the BSOD or Blue Screen of Death error on your Windows PC:

  • Outdated operating system: Whenever there is a new update available, you need to install it right away as it brings fixes for several underlying issues. If your OS isn’t up to date, you will face multiple issues.
  • Hardware malfunction: You need to make sure that when you install a new RAM or a new SSD into your PC, there isn’t any loose connection. Because of this, there could be a loss of power, and it can malfunction. Hardware, when pushed beyond its capabilities, can also cause a BSOD error.
  • Corrupt system files: Because of corrupt system files can also trigger BSOD errors. It can happen if a third-party program has tweaked system settings or replaced the DLL files.
  • Virus attacks: The presence of viruses or malware can give rise to multiple issues, among which is the BSOD error. You can check out some of the best antivirus tools for Windows 11.
  • Outdated device drivers: Outdated drivers on your PC can create a hurdle for your hardware to communicate with your PC, ultimately causing the BSOD error. Here are the different ways to update drivers on your Windows PC.
  • Power issues: PCs, when connected to a power source with a fluctuating voltage, can also cause certain hardware to misbehave, leading to BSOD errors.

How can I enable the minidump file in Windows?

  1. Press the Win key to open the Start menu.
  2. Open Control Panel.
  3. Click on View by and select Large icons.
  4. Open System.
  5. Click on Advanced system settings.
  6. Hit the Settings button for Startup and Recovery.
  7. Under the System Failure section Small memory dump.
  8. The highlighted box below shows you the location of the dumpfile.

Where can I view the minidump file in Windows?

  1. Open File Explorer.
  2. Navigate to the below path and press Enter: C:\Windows\Minidump
  3. If your system has created a minidump file in case you have encountered the BSOD error, then you will see the dump file available there.

How can I view the minidump file in Windows?

  1. Download the WinDbg Preview app.
  2. Launch the tool.
  3. Click on the File button.
  4. Select the Start debugging option.
  5. Click on the Open dump file option.
  6. Select the dump file: %SystemRoot%\Minidump
  7. Click the Open button.
  8. Let the program load the dump file.
  9. Type the below command and press Enter: !analyze -v

Once the analysis is complete, you can view the information regarding the dump file analysis. The WinDbg is a brilliant tool that explains the analysis in a language anyone can understand.

You can check the FAILURE_BUCKET_ID and MODULE_NAME lines to know more about the dump file that you are reviewing.

We have a guide that explains some quick fixes for Windows 11 users to resolve the BSOD errors. Also, for fixing the critical process died BSOD error in Windows 11, you can refer to our guide.

If Chrome is causing the BSOD error, then you can check out our guide to resolve the BSOD error in Windows 11. Also, we have a guide that will help you fix the BSOD error 0x00000109.