The No output devices found in Windows 11 error arises when there’s an issue with your sound card. It’s quickly signaled by a red x over your taskbar’s sound icon.
The most common reasons why you get the No output device found error are outdated or unsigned drivers. Missing updates and audio settings may also be at fault.
Hre’s how you fix it:
How do I fix No output devices found in Windows 11?
1. Reinstall the audio driver
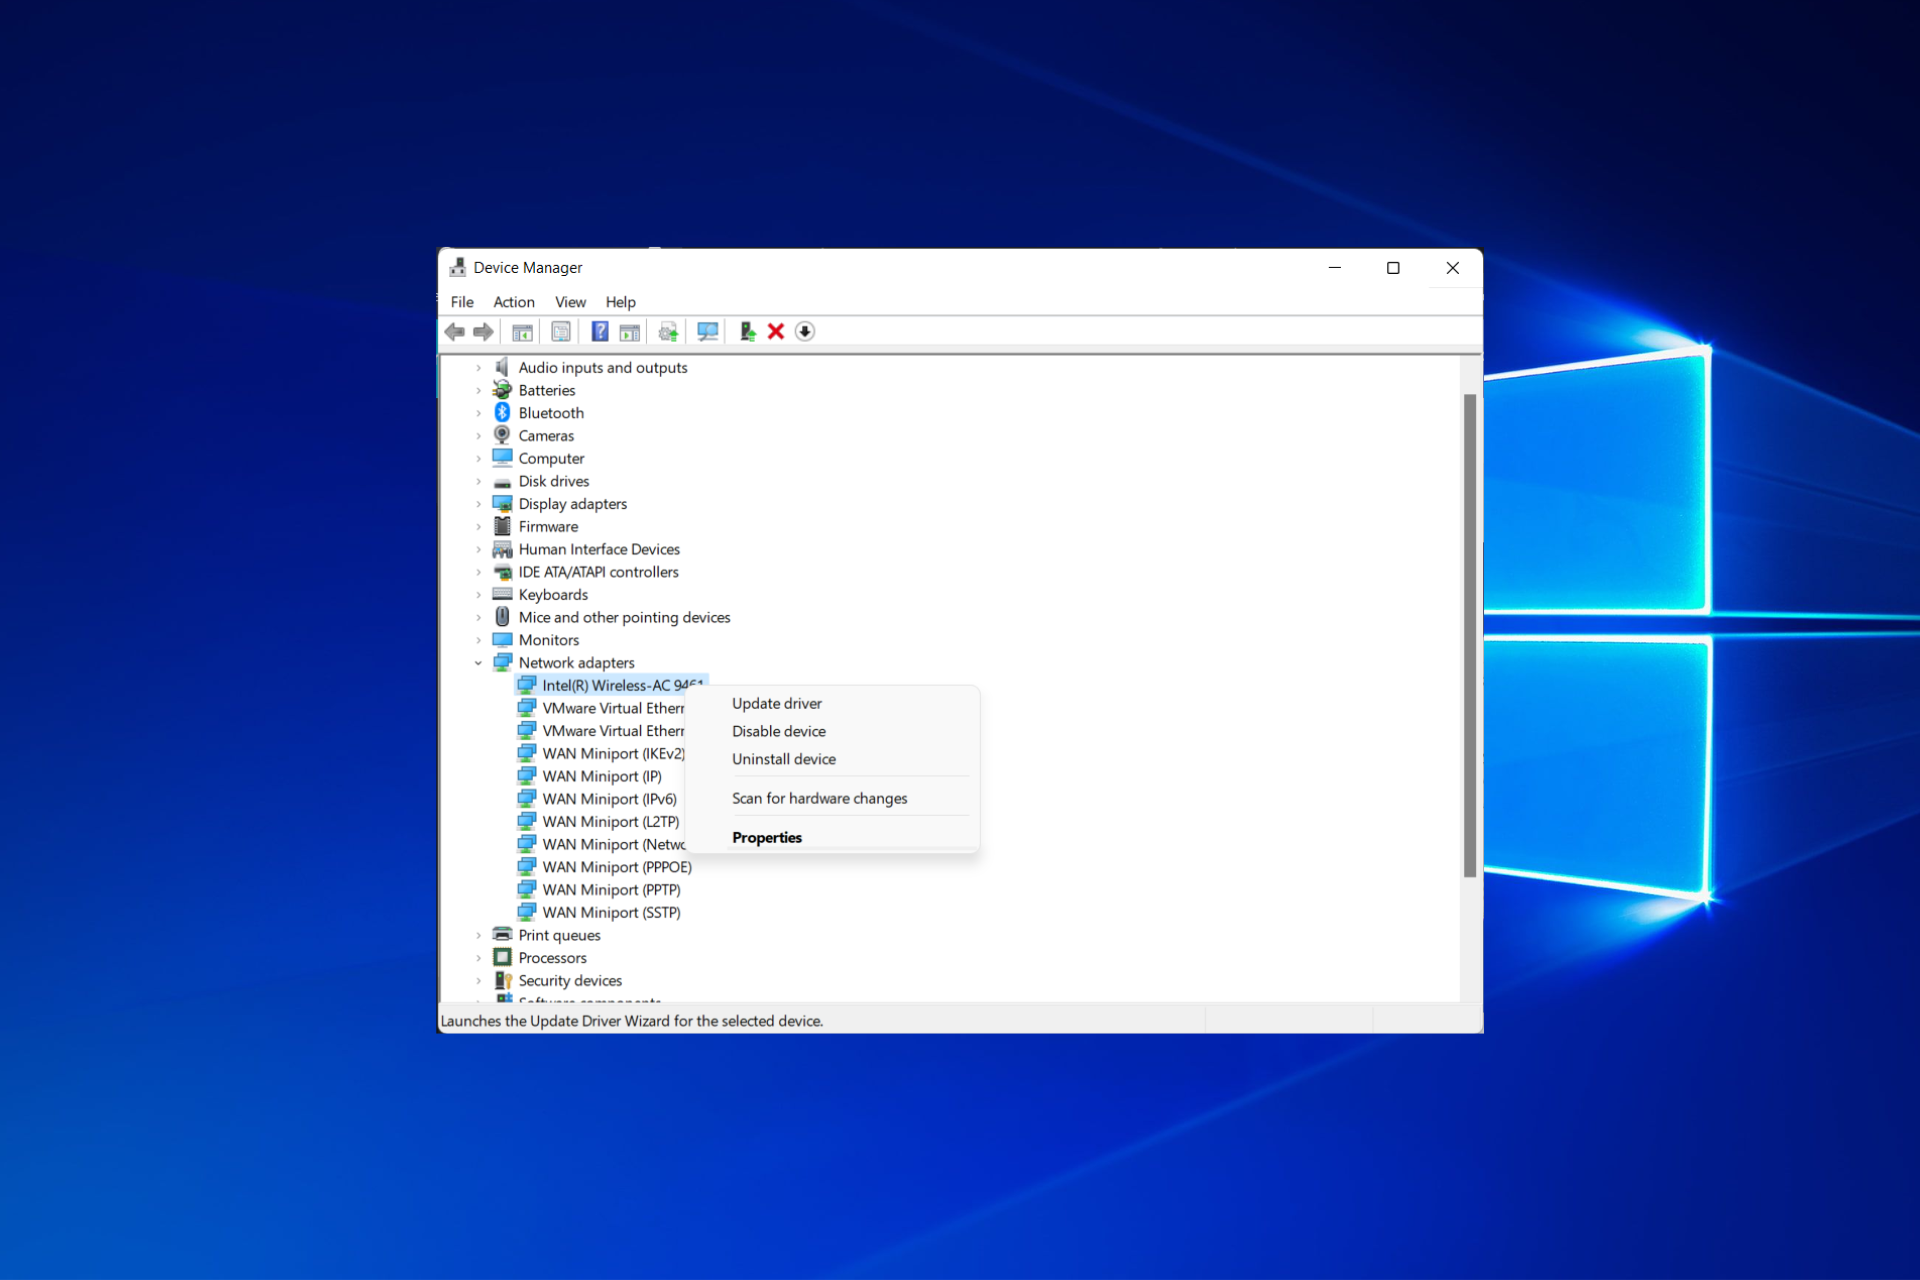
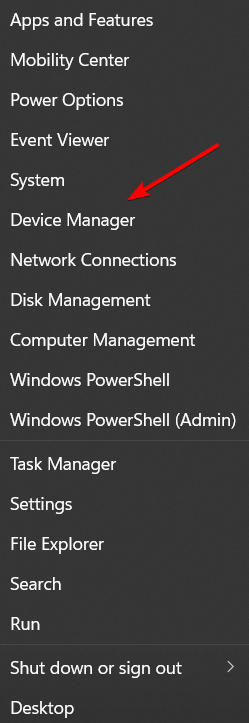
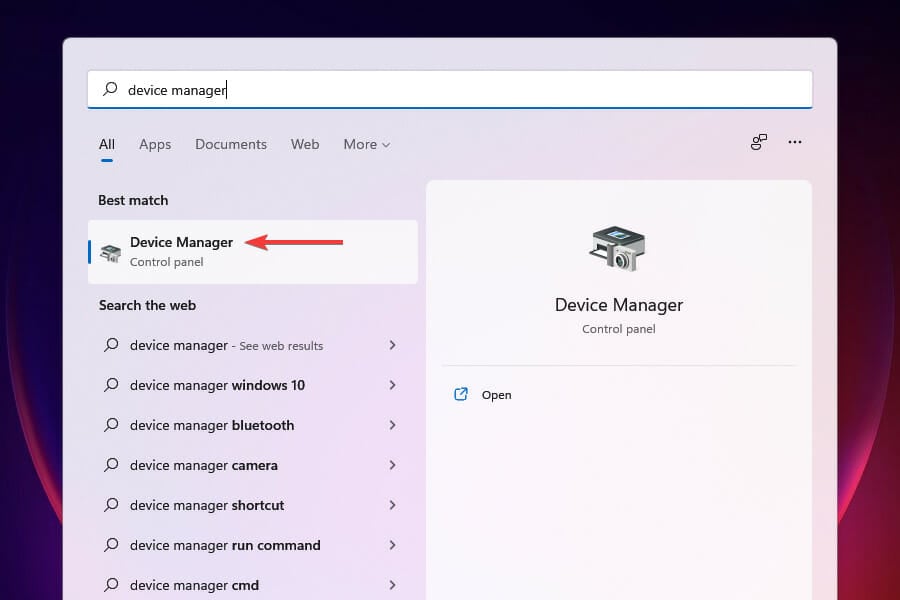
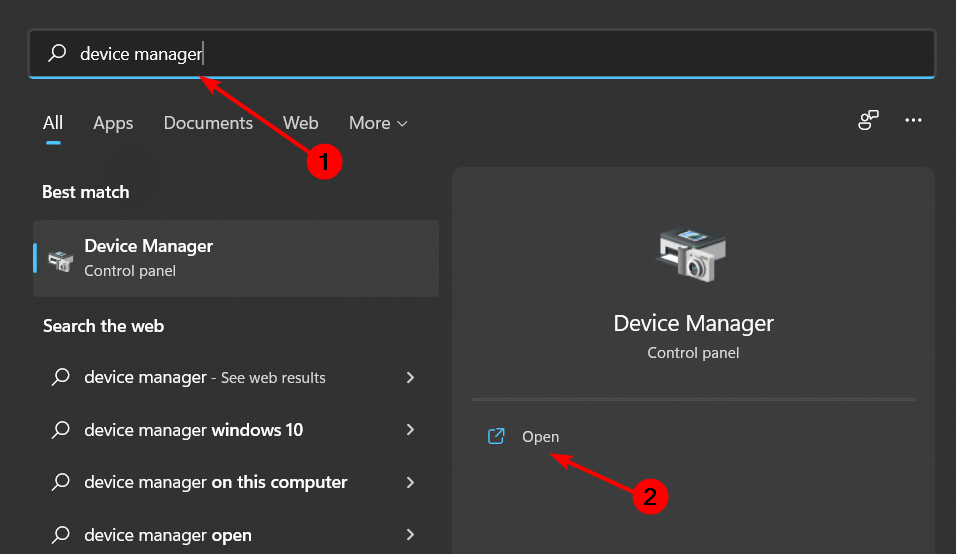
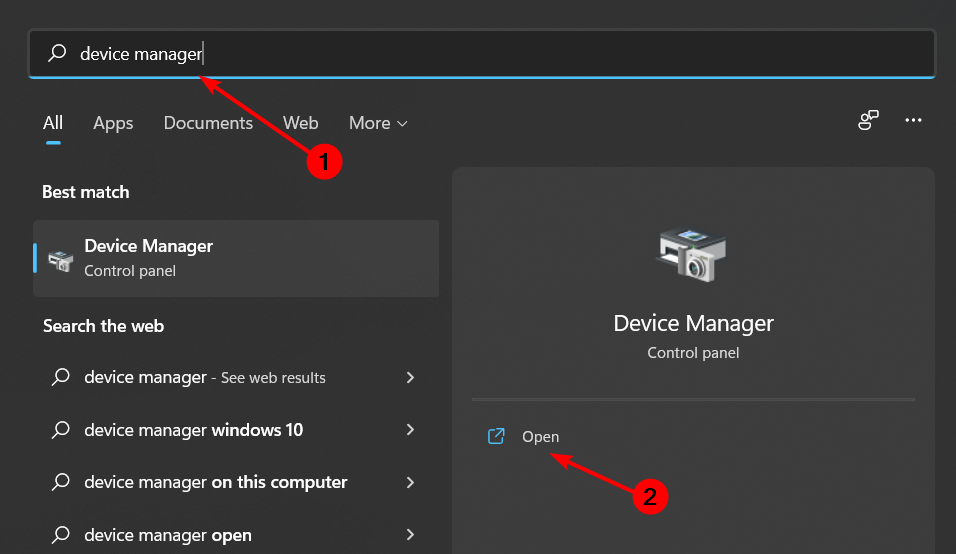
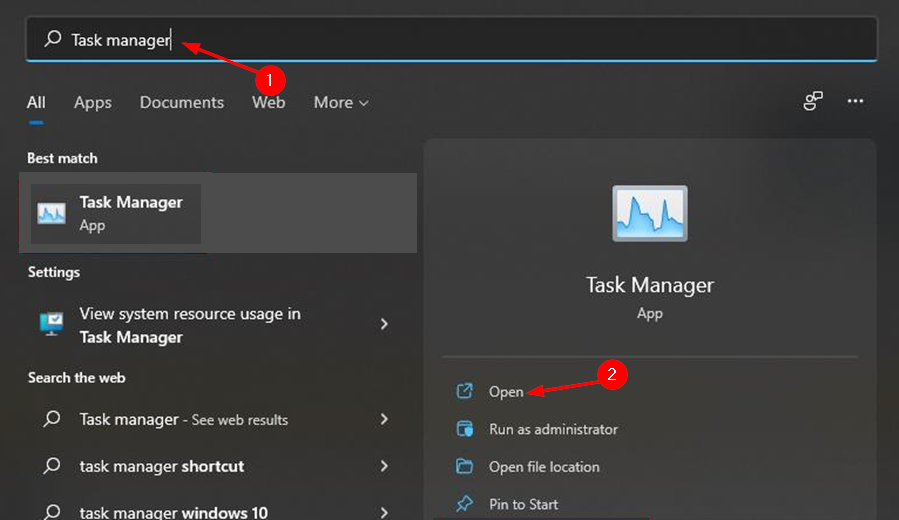
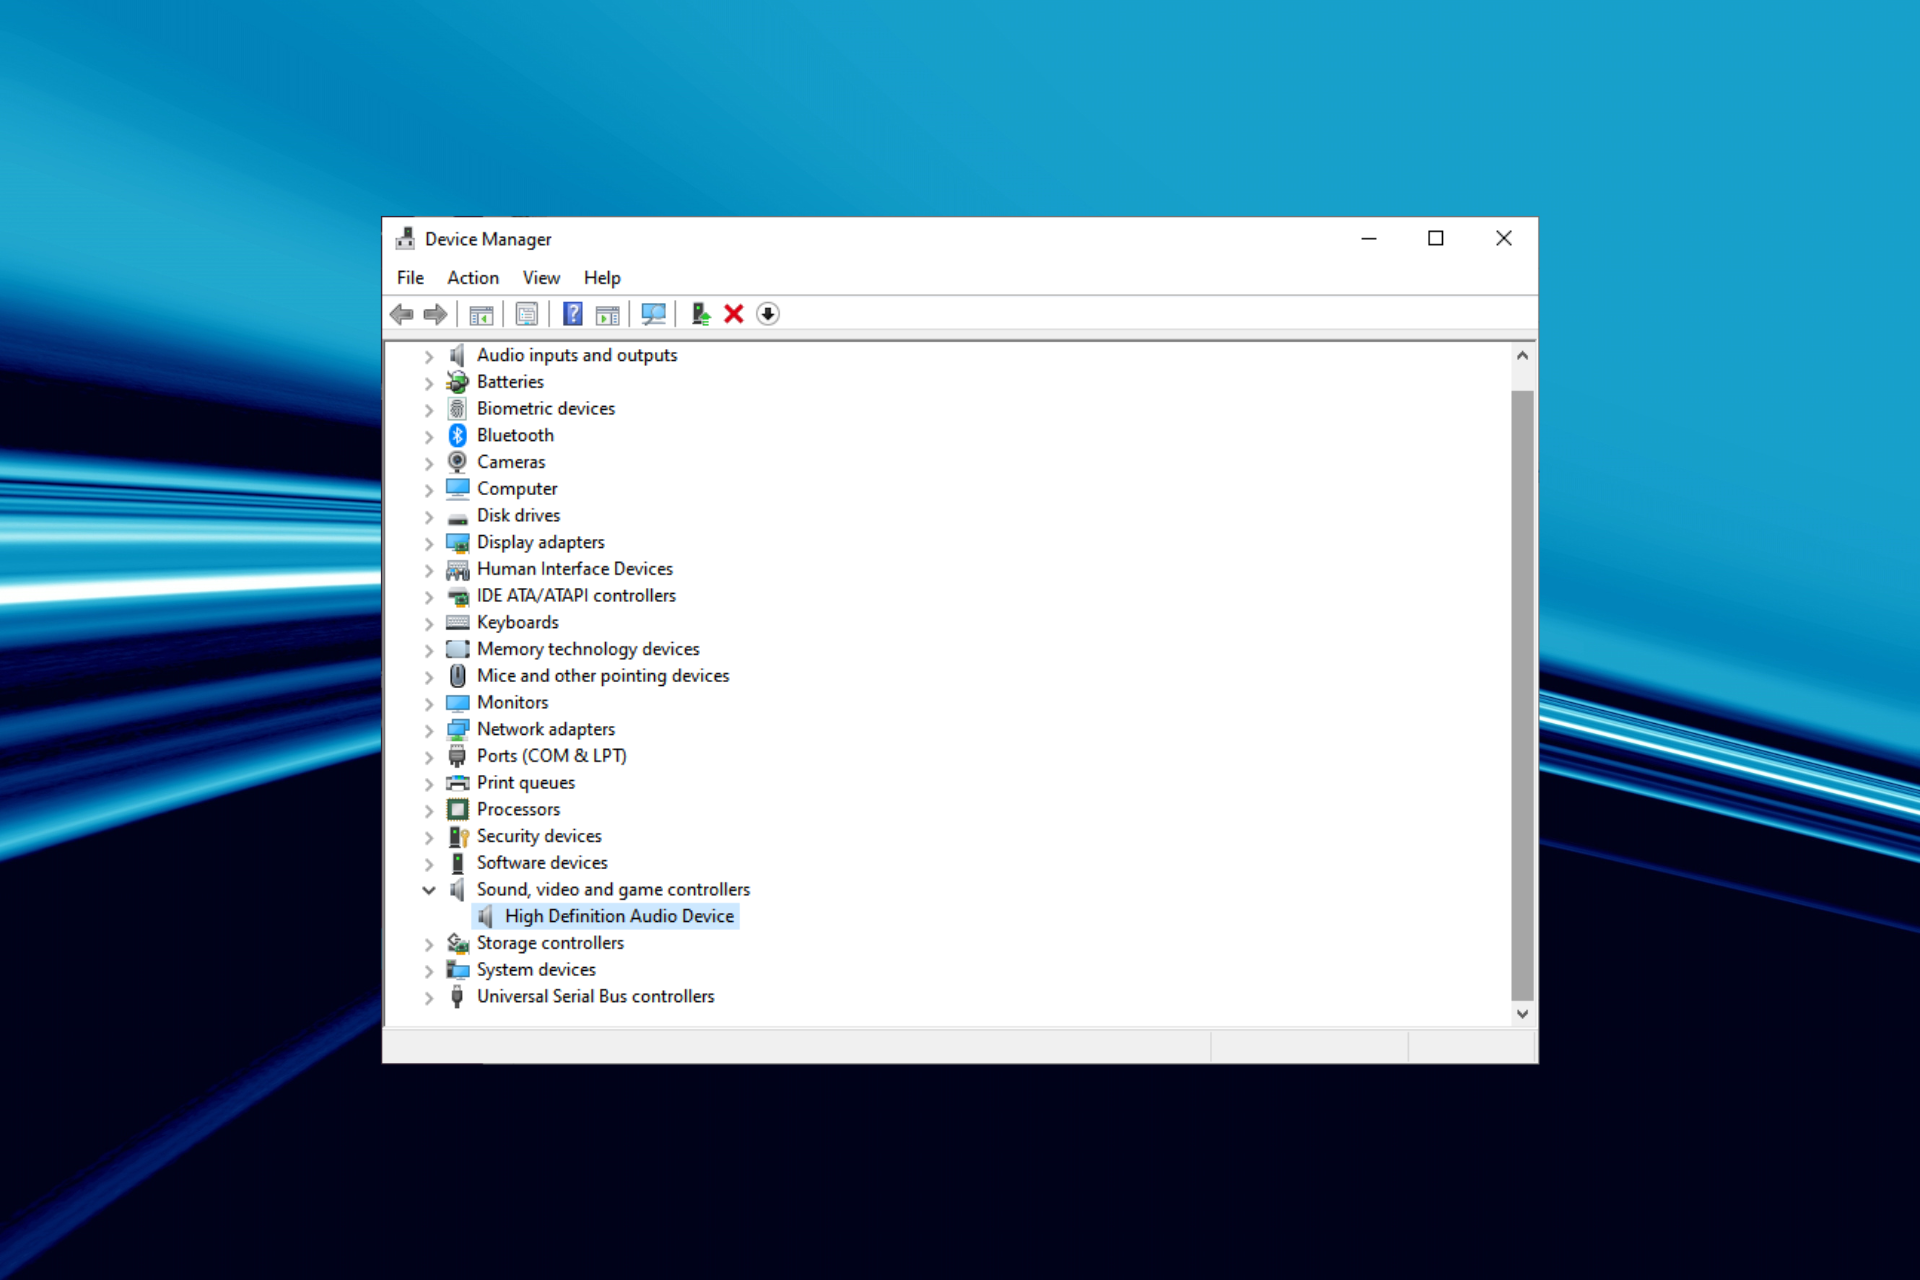
Press Windows + S to open the Search menu, enter Device Manager in the text field, and click on the relevant search result.
Double-click Sound, video, and game controllers to view the devices for that category.
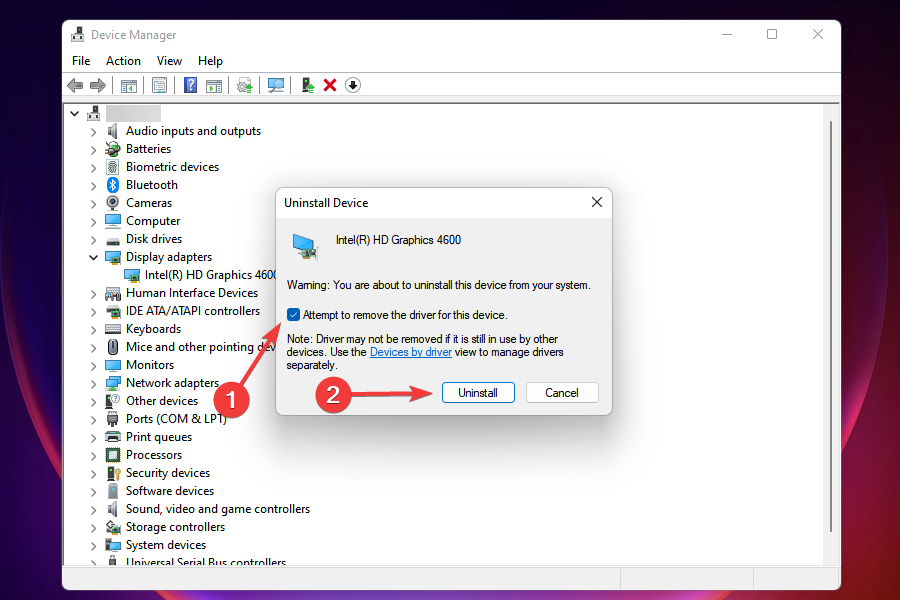
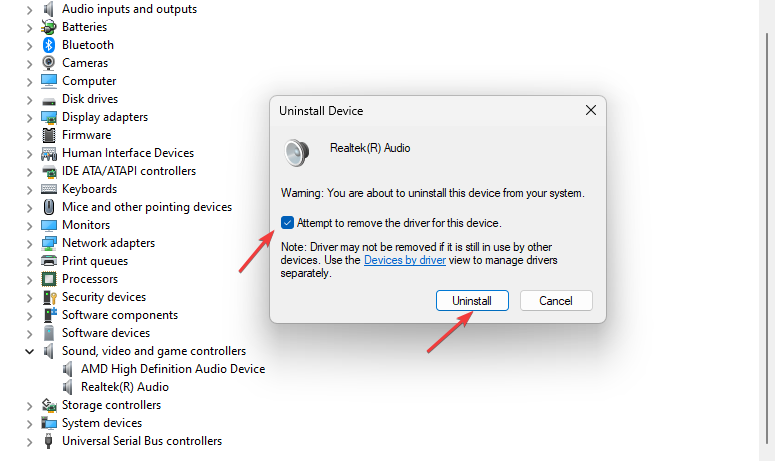
Next, right-click your PC’s sound device, and select Uninstall device.
Click Uninstall in the confirmation prompt that appears.
Also, look for a device with SST in its name under System devices, and reinstall it too.
Once done, restart the computer, and Windows will automatically install the best driver for the device.
If Windows doesn’t identify the device after the restart, go to the Action menu, and select Scan for hardware changes.
2. Reset the audio controller
If simply reinstalling the audio controller doesn’t work, you will have to reset the audio controller. To do that, first, uninstall the High Definition Audio Device from the Device Manager.
Once done, shut down the PC, remove the power cable, and then hold the power button for at least 60 seconds. After that, wait another 10 minutes or so, and restart the computer after plugging in the power cable.
3. Double-click the category for Sound, video, and game controllers.
4. Then right-click your PC’s sound device, such as High Definition Audio Device, and select Update driver.
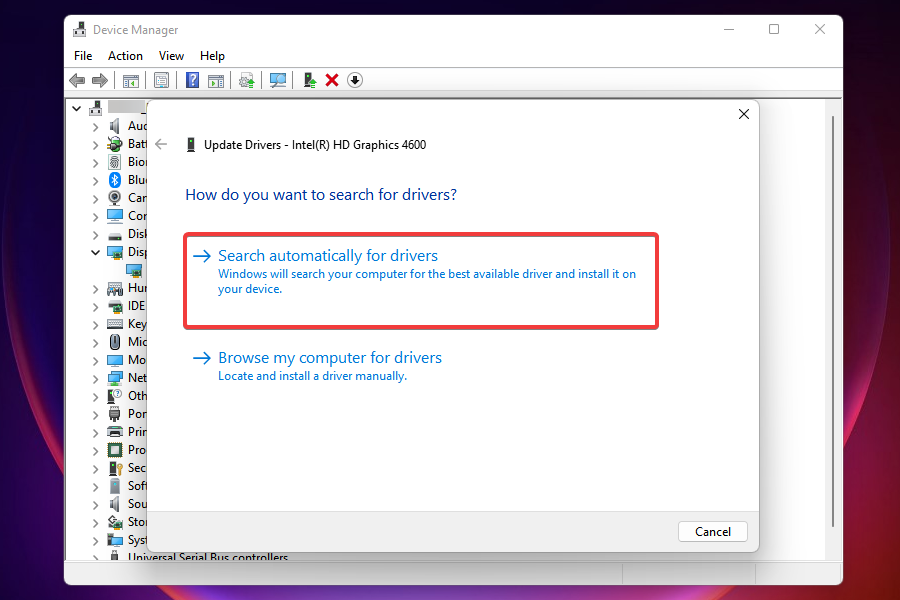
5. Click the Search automatically for drivers option.
6. If selecting that option doesn’t install a new driver, select the Search for updated drivers on Windows Update option.
7. Next, press the Check for updates button on the Windows Update tab that opens.
8. Select to download and install available updates.
9. In addition, click on Advanced options, then Optional updates.
10. Select the checkboxes for optional driver updates, and then on Download & install.
Some users prefer to update drivers with third-party driver updater software, as it is a much faster solution. This third-party driver updater will scan your PC and display what devices on it need new drivers.
If your sound device is among them, you can select to download and install the latest driver for it within the software.
Press Windows + R to open Run, type gpedit.msc in the text field, and hit Enter.
Now, double-click Administrative Templates under User Configuration, and then on System.
Select Driver Installation from the left, and then double-click on Code signing for driver packages.
Check the Enabled option, then from the When Windows detects a driver file without a digital signature dropdown menu, select Ignore, and finally click on OK to save the changes.
Press Windows + I to open Settings, select Windows Update from the left, and then click on Update history.
Now, scroll down to the bottom and click on Uninstall updates.
Click on Uninstall next to the last installed update.
Again, click Uninstall in the confirmation prompt.
If no output devices were found after Windows 11 update, it could be a bug in the last installed version of the OS. And the simplest solution here would be to uninstall that version. Once done, make sure to disable the automatic installation of Windows updates.
Now, all you have to do is wait for a newer version to be released, install it, and again enable automatic updates.
There might also be more ways to fix the No audio output deviceinstalled issue. Some solutions are common here and when Windows can’t find an audio device. So, you may try those as well.
MP4 and WMV are two prevalent video file formats established by Moving Pictures and Microsoft. Many users prefer to save videos with those formats, which are widely supported by media players.
MP4 is a more widely supported video format than WMV as it can handle h.264. As WMV is a format more specifically designed for Windows, it’s not so widely supported by Apple-based media players.
The WMV format has a higher compression format than MP4, which means WMV file sizes are typically smaller. WMV’s smaller file sizes make it better for YouTube video streaming and email video attachments.
So, many users might prefer to convert their MP4 videos to the WMV format for YouTube and to save hard drive space. You can convert MP4 videos to the WMV format with web apps and software.
How can I convert MP4 to WMV on Windows 10?
1. Use WinX HD Video Converter Deluxe
WinX HD Video Converter Deluxe is the ideal software for converting MP4 to WMV.
This is a powerful video conversion tool that can convert a multitude of 4K/HD and regular video formats to a wide variety of output alternatives.
Furthermore, WinX is more than just a file converter as it includes some video-editing options. Users can crop, trim, expand, and apply subtitles to the converted video output.
Using this software you can also easily download YouTube videos, compress videos, and also supports level-3 hardware acceleration for faster video transcoding.
Open the WinX HD Video Converter and click the Video button.
Next, select an MP4 video to convert, and click Open.
Click PC General Video on the Output Profile window.
Select the WMV Video option.
Press the Browse button to select a destination folder for the WMV video.
Select Intel or Nvidia to enhance video conversion speed.
To enhance the video picture quality, select the Use High-Quality Engine option.
You can merge multiple MP4 videos together by selecting the Merge checkbox.
Click Run to initiate the conversion.
WinX HD Video Converter Deluxe
Get started on converting Mini DV files to DVD with the powerful WinX HD Video Converter Deluxe.
2. Choose the MP4 video to convert to WMV. You can add a file from your PC, using an URL, or from your cloud storage.
3. Click on Advanced options to open additional settings.
4. Select a resolution for the output file.
5. Click the Video Aspect Ratioand choose the desired setting.
6. Press theConvert To WMVbutton.
7. Click theDownload WMVbutton to save the file to your hard drive.
If you’re looking for an mp4 to WMV converter to use on your Windows 10 device for free, then you need to look no further than FreeConvert.
This converter can be used directly on the web, and doesn’t require any installation. All you need to do is add the mp4 file you want to convert into it, tweak the settings to your preferences, and then wait for the video to be converted.
Note: To select an MP4 video saved in cloud storage, hover the cursor over the small arrow on the Choose Files button. Then you can select the options displayed.
If you’re looking for the best software to open WMV files, read our dedicated article.
As you can see, converting MP4 to WMV files is straightforward with WinX HD Video Converter Deluxe and FreeConvert’s MP4 to WMV converter.
Websites like Online-Convert, Cloudconvert, and Convertio also include similar video conversion tools, but FreeConvert’s utility includes good options.
It’s possible for you to face the Halo Infinite could not find compatible graphics issues during installation and startup.
Although the error seems somewhat complicated, the primary reason behind it for several users is that they do not have enough video GPU RAM in their system.
Why is Halo Infinite not compatible with my GPU?
Apart from the primary reason, insufficient Video GPU RAM, other factors that could be responsible for this error are:
Corrupt game files – If the game is not downloaded from the official site, it could have some corrupt files included during compression.
Outdated Windows – When Windows is outdated, several compatibility issues will pop up with different apps due to bugs or corrupt files.
Outdated Steam Client – If the Steam client on your device is outdated, games directly tied to it will encounter issues such as the one addressed in Halo Infinite not working guide.
What can I do if Halo Infinite couldn’t find compatible graphics?
Before anything, consider conducting these notable checks:
Check if your graphics card has enough memory space in the System Information. Press Windows + R to open the Run box, type msinfo32, and then hit Enter to access it.
Check to know if the GPU fan, if available, is working correctly
Ensure the version of the Halo Infinite game is up to date.
Restart your PC to check if the issue still persists.
Proceed to the outlined fixes below after the above checks.
1. Update DirectX
Press the Win + R keys on your keyboard to open the Run dialog box, type dxdiag and launch it.
Verify that the DirectX Version is DirectX 12 under the System tab.
In case it is not the latest version of DirectX, then press Win + I on your keyboard to open Windows Settings.
Select Windows Update from the left pane, click the Check for updates option, and Windows will automatically update DirectX (if a new version is available).
Alternatively, go to the official download site to download the latest DirectX Installer.
Run the Installer and follow the onscreen prompts to install DirectX 12.
You can also follow steps 4 and 5 to update Windows, and if you encounter any issues, you can check out our expert guides on how to fix Windows Update errors. Since Windows update is another solution for this error.
2. Update the graphics driver
Right-click the Start button, search Device Manager, and launch it.
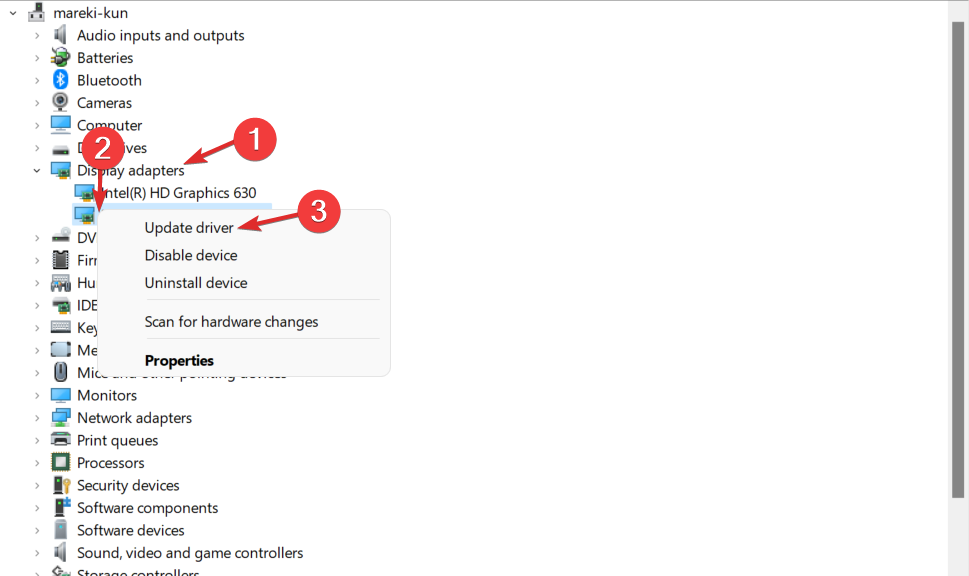
Locate the Display adapter, expand it, and right-click the driver you want to update.
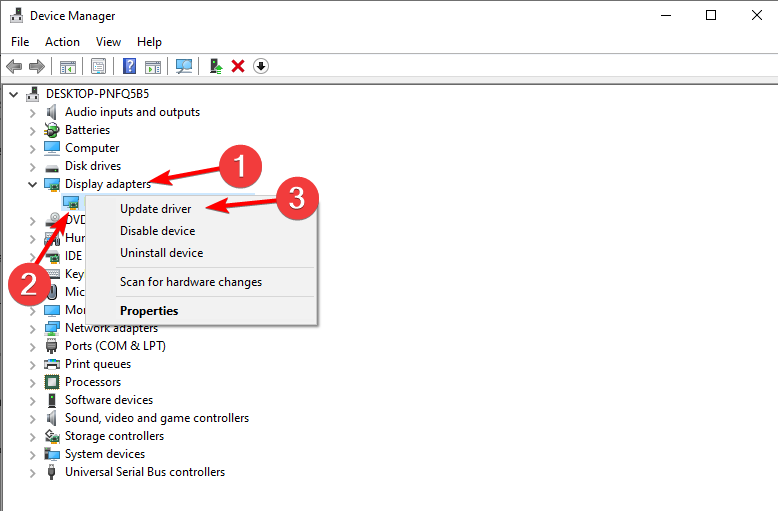
Select Update driver and click Search automatically for drivers.
Right-click the Start button, search Steam on your PC, and launch it.
Click on the Steam tab located on the top menu bar.
In the drop-down menu, click on the Check for Steam Client Updates option.
Steam will automatically search for a new update and download it if available.
Once Steam is updated, the error should be fixed. However, it isn’t uncommon for Steam updates to revert or fail to apply. Hence, follow the solutions provided in our guide to solve the problem.
That is it from us in this guide. We hope that the above solutions helped you correct the Halo Infinite compatible graphics device issue. You can also explore the solutions provided in the article including tips to fix Halo Infinite crashing on PC.
Do let us know in the comments below which one of the methods helped you fix the problem.
If you want to get rid of or remove the Skype ads that are being displayed in the home menu and also in the chat window, follow the steps below and learn how to use a “clean” Skype app and environment.
Are there ads on Skype?
The latest versions of Skype have brought annoying ads displayed not only in the home menu but also on the chat windows which can be stressful for all of us.
Anyway, if you are tired of these ads, then you should learn how to disable them as there is an easy method that can be applied to that matter.
This procedure can be performed on any Windows system, so the steps below are also compatible with Windows 11, Windows 10, 8, and Windows 8.1 devices.
How can I disable ads on Skype?
1. Launch Control Panel on your Windows PC.
You can access Control Panel by pressing Win + R and by searching for “control”. After, click on “ok” and then run Control Panel.
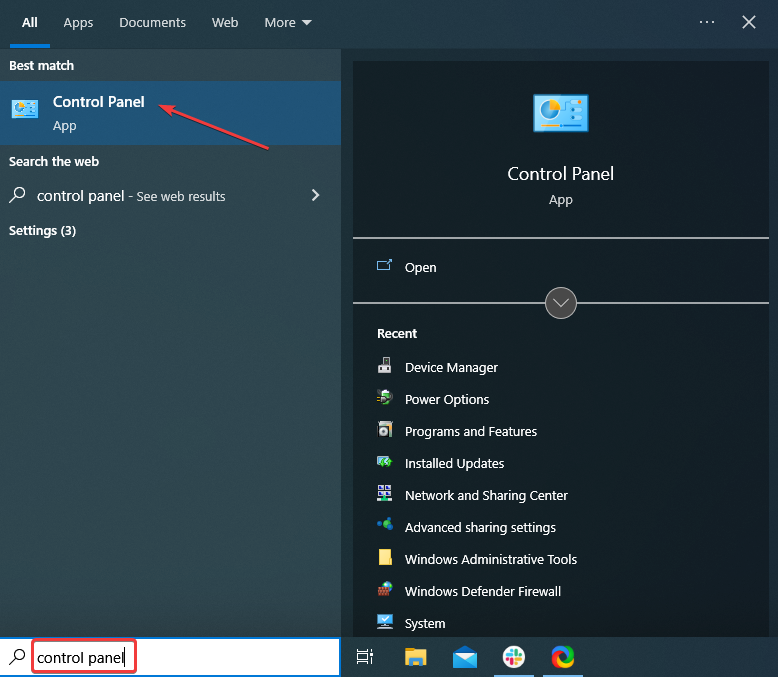
Also you can just search for Control Panel by using the Windows Search feature – just type the word “control” on the search box and choose Control Panel from the list that will be displayed.
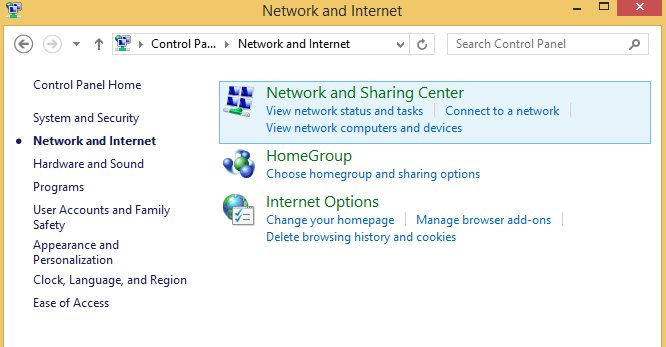
2. Navigate to Network and Internet (Network and Sharing Center).
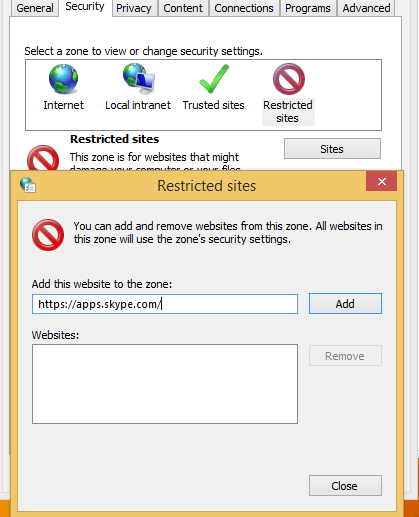
3. From the window that will be displayed, tap on the Security tab.
4. Then, from the first box, click on Restricted sites.
5. Up next, tap on the Sites button. A dialog box dubbed as Restricted sites should be now displayed.
6. In the same dialog box, type https://apps.skype.com/.
7. Save your changes and close Control Panel.
8. Now just restart Skype and enjoy the ads-free program. Instead of the annoying ads, you should now see an empty placeholder.
No matter what Windows OS you are using, whether it is Windows 11, Windows 10 or even Windows 8, it is just as easy to disable Skype ads.
All you need to do is add Skype to the list of restricted sites via Internet Properties. In doing so, you will ensure that the app’s ads will no longer show up, and will display a placeholder in their stead.
Speaking of blocking ads, you can also block them on your browser as well. There are many browser extensions that allow you to disable ads and enjoy a smooth browsing experience. Here are some examples of such extensions:
Perfect; you now know how to remove Skype ads from the home menu and chat window. Remember that this method can be applied on any Window system, so you can anytime try it on your own Windows 11, Windows 10, 8, and Windows 8.1 device.
We hope you successfully removed ads from your Skype app on your computer. Write down in the comments section below whether you encountered any difficulties following our guide.
Overwatch 2 errors that involve starting the game are some of the issues plaguing it nowadays. Many users complain about this error popping up, preventing them from being able to play the game. Also, you may experience Overwatch black screen on launch on your PC.
Why does the error starting Overwatch 2 show up?
The main culprit for this error is an outdated game version. It makes the game incompatible with the server you want to connect to. Some other factors are:
Outdated graphics driver – When your graphics cards are outdated, they will affect games like Overwatch that use many graphics components. Likewise, running other outdated drivers on your PC can result in crashes when playing games.
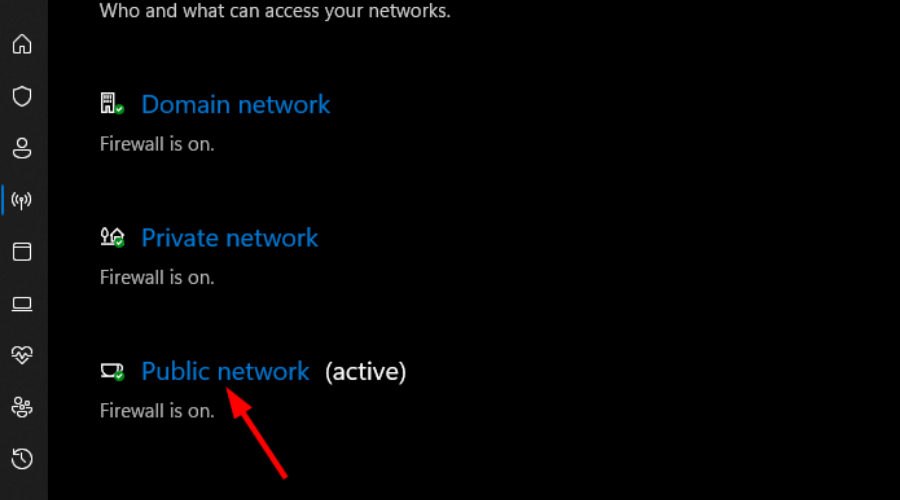
Windows Defender Firewall interference – It is common for Windows Firewall to interfere with gaming activities. The Firewall can stop the game from running if it senses any threat.
Background programs running on your PC – Many apps can cause interference with your game, resulting in the Overwatch error starting a game.
Corrupt game files – The game files are responsible for communication between the game client and other components. So, when there is an issue with your game file, it’ll become inaccessible.
Not that we know why this happens, let’s start fixing the game and resume playing.
What can I do if getting an error that starts the game in Overwatch 2?
Before proceeding with any solutions for the error starting the game in Overwatch 2, apply the following preliminary checks:
If you have many apps running simultaneously, close the unnecessary ones.
Disable the antivirus software on your PC that can blacklist some game files and prevent them from starting.
Restart your PC in Safe Mode to resolve boot errors liable to cause the issue.
In case you’re unable to fix the issue, carry on with the troubleshooting steps below.
1. Repair Overwatch 2
Left-click the Start button, search for Battle.net and launch the app.
Select the Overwatch 2 game from the library, click the cog-wheel icon, and click the Scan & Repair option.
Then select Begin Scan to initiate the diagnostic process.
Follow the prompt that appears after the scan to fix the problem.
2. Uninstall and reinstall Overwatch 2
Left-click the Start button, search for Battle.net and launch the app.
Select the icon for Overwatch 2, select the drop-down arrow next to the play button, then selectUninstall.
To reinstall, select Start Install from the Overwatch 2 tab.
Although this is an extreme step, it is the most effective way to fix this error. You should note that your data and progress will be lost after this process.
A third-party software can also be useful here because it performs the updating process automatically. Outbyte Driver Updater is a straightforward program that runs a comprehensive scan of your PC and instantly updates any outdated drivers.
Outbyte Driver Updater
Great app with an easy-to-use interface that helps you update your PC drivers.
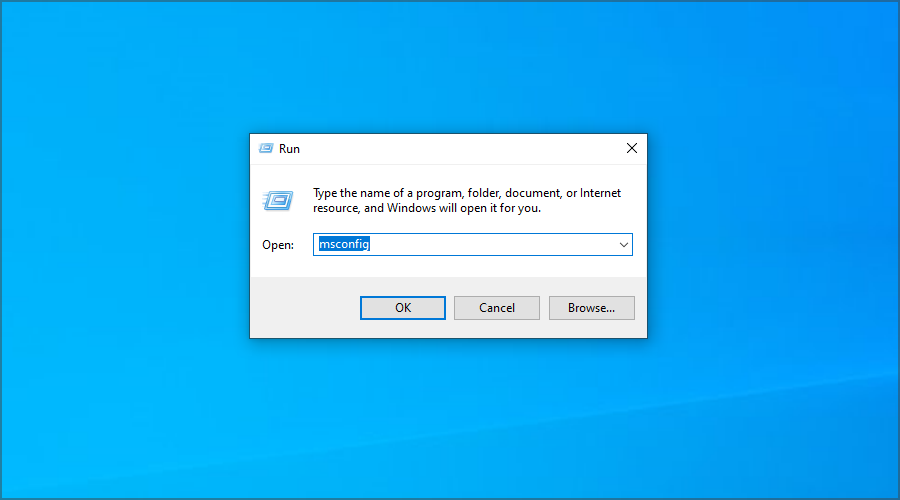
Press Windows + R to open the Run Window, type the following, and click OK: msconfig
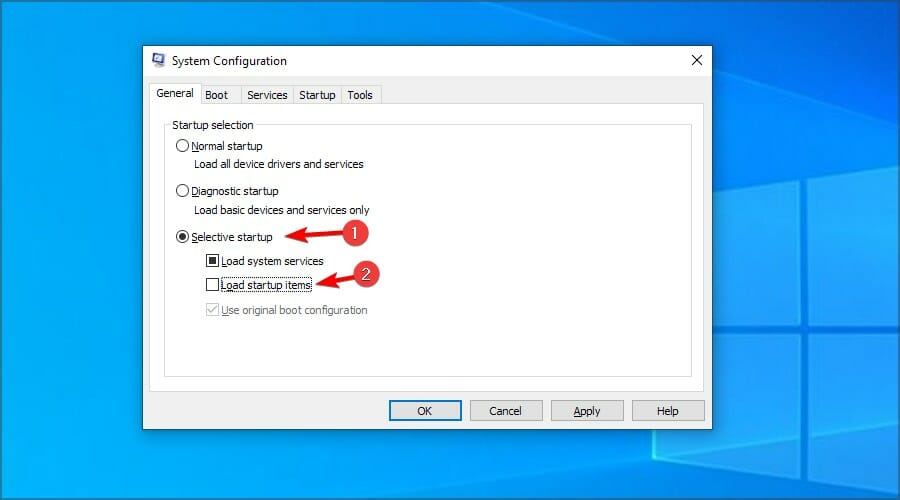
Select the Selective startup and uncheck the Load startup items box.
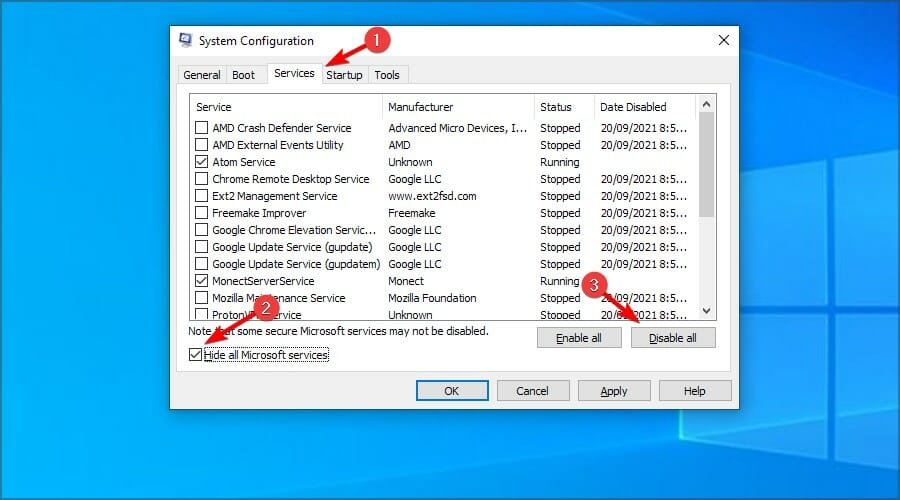
Now, navigate to the Services tab. Check the Hide all Microsoft services box. Now, click on Disable alland then OK to confirm changes.
Finally, restart your PC and check if the problem is resolved.
Ending activities for background programs consuming lots of system resources can fix the issue with Overwatch. This is a great step if the Task Manager is not working on your PC.
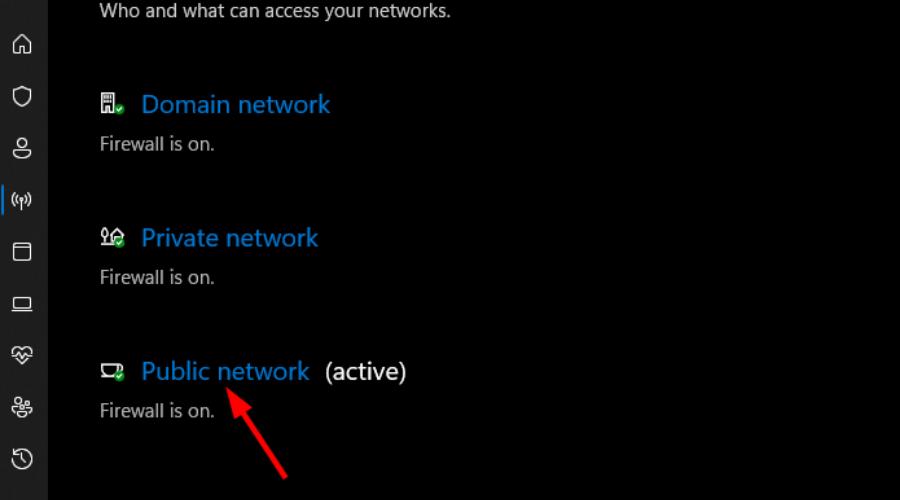
5. Disable Windows Firewall
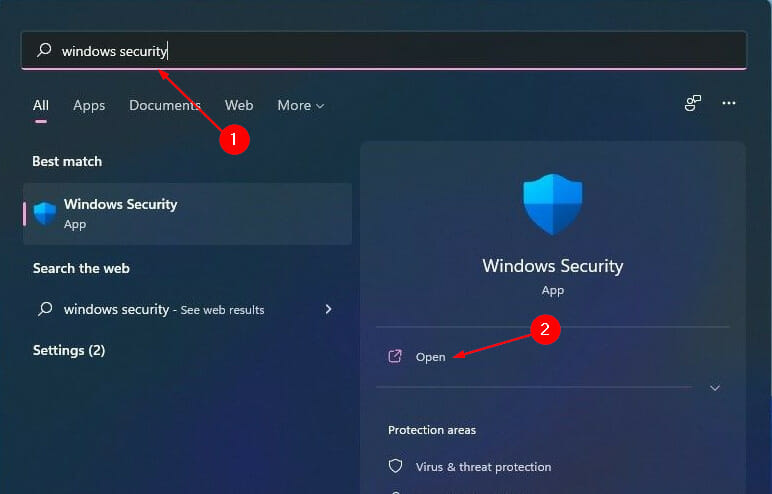
Left click the Start button, type windows security in the Search bar, and launch it.
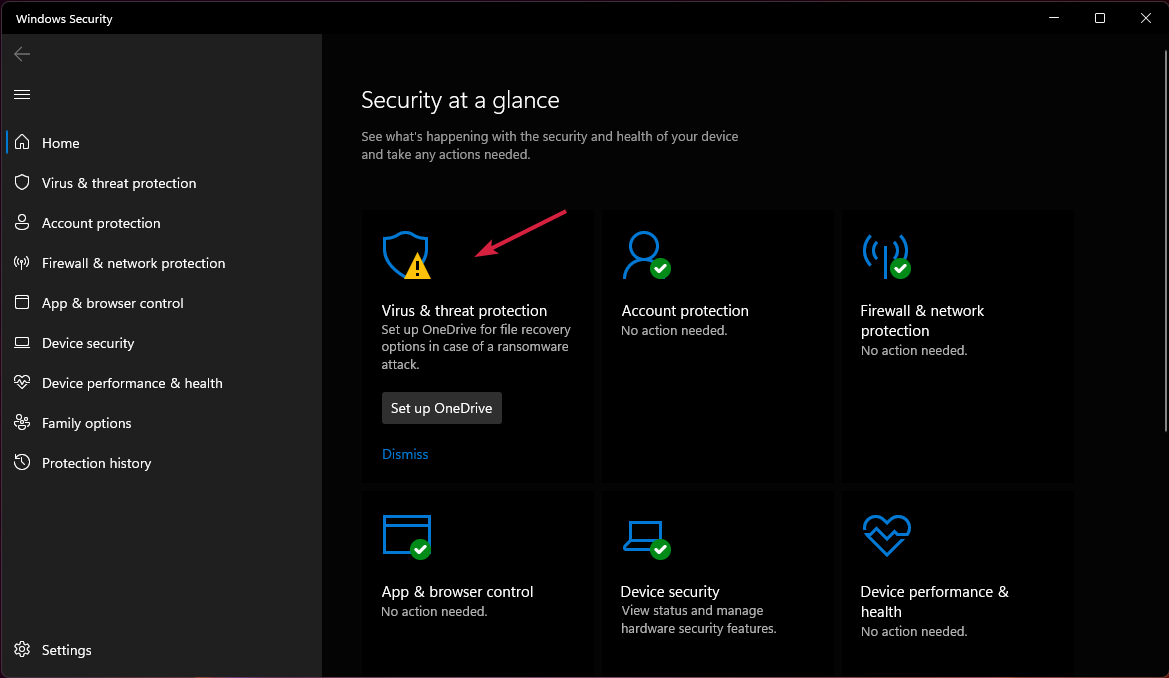
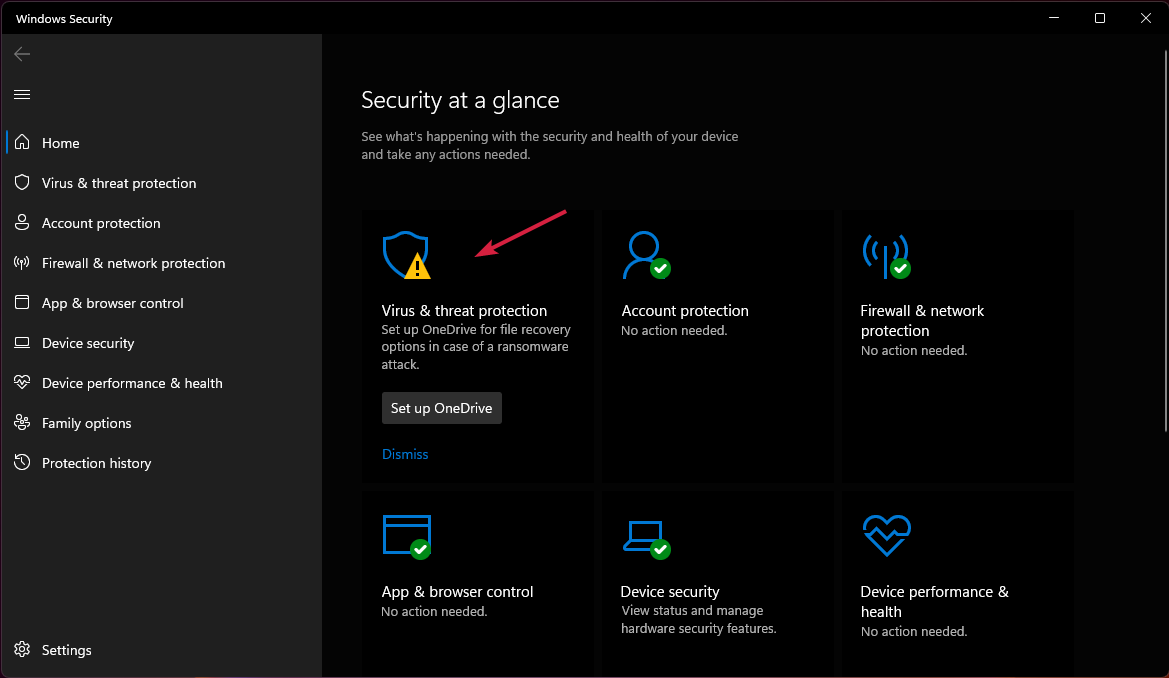
Click Virus & threat protection on the Windows Security tab, then select Manage settings.
Toggle Off the Real-time protection option.
Restart your PC to sync the changes.
Disabling the Windows Firewall will help prevent Overwatch 2 files from being flagged as malicious.
If you have suggestions on other proven fixes that have worked for you, kindly drop them in the comments section. Also, we welcome your queries and questions.
To prevent errors like BSoD and system crashes, you need to monitor your PC with a reliable hardware diagnostic tool.
Today, we’ll walk you through the best tools that can detect whether your RAM is failing, your hard drive is about to die, your GPU is overheating, or if there’s a hidden fault in your motherboard.
So let’s check them out.
What are the best hardware tester tools for Windows?
NOTE
Important! Some of the special data such as the CPU fan speed and temperature of various components, can only be shown if certain hardware comes with a sensor for it.
AIDA64 is a hardware monitoring software for Windows 10 and that caters to home users, corporate engineers, and businesses. It offers detailed information for over 185,000 hardware devices.
The System Stability Test uses a 64-bit multi-threaded stress testing module to drive your PC to its limits.
Even more, SSD, hard disk, and OpenCL GPGPU video adapter stress testing are all part of the package. Even more, it can easily provide detailed information on the PC’s internals in no time. This is possible thanks to a generous hardware database holding more than 200,000 entries.
Check out the main features that this tool brings to the table:
Over 50 pages of information on software licenses, installed programs, and Windows settings
Implements a set of 64-bit benchmarks
Supports over 250 various sensor devices to measure temperatures, fan speeds, and not only
Custom panel that perfectly fits the design of your rig
CPU PhotoWorxx Benchmark for accurate color space conversion
AIDA64 Extreme
This is a great system information tool that allows you to monitor the performance of your computer.
If you want to know if your SSD or hard drive is in good condition, the tool to use is no other than CrystalDiskInfo. It performs a complete analysis of the state of your data drives, including USB drives, SSDs, and HDDs.
It will give you details about error rates, uptime, spin-up time, and temperature.
What we found extremely useful is that you can configure CrystalDiskInfo to send you alerts if there is any issue identified in one of the systems being monitored.
Check out the main features that this tool brings to the table:
Straightforward interface, with Temperature, Health Status, and Smart information displayed
Auto-detection feature that can be easily turned On or Off
Ideal for reading and monitoring disk drive status
Provides a health rating based on your drive’s Smart status
Intel Processor DiagnosticTool performs various stress tests on the processor, verifies the processor’s operating efficiency, and checks for brand identification.
Even more, feel free to configure it by accessing Tools > Config > Edit. You will immediately receive a note about the effect of changing Intel PDT parameters from the default configuration.
We also want to share a useful tip with you. You can get more details on how to use the utility by clicking on About > Help to view the Help Documentation file.
Check out the main features that this tool brings to the table:
Verifies the functionality of allthe cores of Intel processors
Tests specific processor features
Brand identification is included
Verifies the processor’s operating frequency
Lets you save the test results files after the test
If the stuck pixels are not a result of defects in the screen, then JScreenFix can fix the problem. The program uses HTML5 and JavaScript directly in your web browser, so there’s nothing that you are supposed to install.
Quite the opposite, just launch it by using the link below and note that it works by flushing the affected area with hundreds of different colors every minute. This way, it takes only a few minutes to unstick the pixels.
Besides the fact that it has an intuitive interface and it’s very easy to use, this web app is suitable for both LCD and OLED screens.
Check out the main features that this tool brings to the table:
Easy to use, clean, and crisp interface
Repairs stuck pixels in less than 10 minutes
Pixel fixing algorithm that has been applied to over four million screens
Next, click on Privacy & security from the left pane and select Diagnostics & feedback from the right.
Now, turn On the Diagnostic Data Viewer and click on the Open Diagnostic Data Viewer button.
By default, you don’t have the Diagnostic Data Viewer installed so you will be redirected to the Microsoft Store app where you need to click the Get button to download and install the app.
After the app is installed, open the app and if you click the Problem Reports tab, you will see all the recent hardware issue reports with detailed information.
If you didn’t upgrade your machine with the latest OS, below you can see how you can do that on Windows.
Now, select Diagnostic & feedback from the left, turn On the View diagnostic data option and click on the Open Diagnostic Data Viewer button.
By default, this app is not installed so you will be redirected to Microsoft Store where you need to click the Get button to download and install it.
After the process is finished, open the app and click on the Program Reports tab from the left to see a detailed situation of all the latest hardware and software issues.
Do Windows 10 and 11 have a hardware diagnostic tool?
Although they offer a Memory Diagnostic Tool, it doesn’t offer too much information.
In comparison with Windows 10, the updated version of troubleshooting software has been improved on Windows 11. But it still doesn’t offer the entire range of features or the amount of information a good third-party software can.
How do I use the Memory Diagnostic Tool?
Press the Win + R keys to open the Run dialogue box.
Type mdsched.exeand press Enter to run it.
Choose either to restart the computer and check for problems or to check for problems the next time you restart the computer.
Also known as mdsched.exe, the Windows Memory Diagnostic Tool runs comprehensive tests on your computer’s memory checking for any error that may stifle proper functioning.
To be more precise, it tests memory for defects and displays the results so that you can take action.
Keep in mind that no intervention is required on your part at this point since the verification is completely automatic. As for the actual memory test sets, they will continue to repeat until the PC is powered off.
The Memory Diagnostic Tool will run tests on your machine and will notify you of any memory module issues.
Yes, legit hardware diagnostic tools are safe. However, hackers and other third parties have used the disguise of such tools to pack malware and bloatware. So always make sure to use reputable tools and only download them from their official sites.
There are many diagnostic tools that you can use to fix hardware problems and since we could not cover all of them in one lot, we hope that you will find the above tools useful.
You can bookmark this page as you might need to visit it again if you come across the same problem or a different one in the future.
And if you suspect your motherboard might be the culprit, try one of the free options covered in our roundup of motherboard diagnostic software to pinpoint any faults before they lead to bigger problems.
If you have any other questions or suggestions, feel free to drop them in the comments section below.
We have all got a bunch of useful programs on the computer, surviving without which seems impossible. And every few days, more are added to the list. However, many users reported that they can’t install anything on a Windows 10 computer.
The problem is rather tricky because it, more or less, eliminates the use of third-party tools, though there are some that manage to bypass it and fix things. We have a recommendation shared later in the article.
Why can’t I install anything on my PC?
Here are the reasons why you can’t install anything on the computer in Windows 10:
Misconfigured power settings – Certain features, when enabled in Windows, may affect the core functioning of the OS and prevent the installation of new programs.
Background processes conflicting with the installation – The Windows Installer (msiexec.exe) process is usually found to be the culprit here.
Incorrect system setting – In many cases, users had set the settings such that only the apps from Microsoft Store could be installed, which turned out the problem.
Running an outdated version of the OS – Many were unable to install apps when running an extremely old iteration of the OS, for instance, Windows 96 or XP, due to compatibility issues. Here, it’s recommended that you upgrade the OS.
File system error – Some users also reported receiving the File system error when installing apps, which must be fixed first.
Also, here are a few issues shared by users, and we have found the solutions that work in these cases as well:
Windows won’t let me install anything – Some users shared the inability to install any app on the computer, and this is usually the case for most who come across the error.
I can’t install anything on my computer in Windows 10 – A few users reported that none of the apps, not even those from Microsoft Store, were installed, which may indicate a problem with corrupt files or Windows installation.
Windows installer won’t let me install anything – A very similar issue, but in this case, users received a Windows Installer error.
How do I fix Windows 10 if it can’t install anything?
Let’s first try a few quick tricks and workarounds that worked for some users before heading to advanced troubleshooting.
Restart the computer if you can’t install anything on your Windows 10 computer.
If these don’t work, try the solutions listed next.
1. Terminate the Windows Installer process
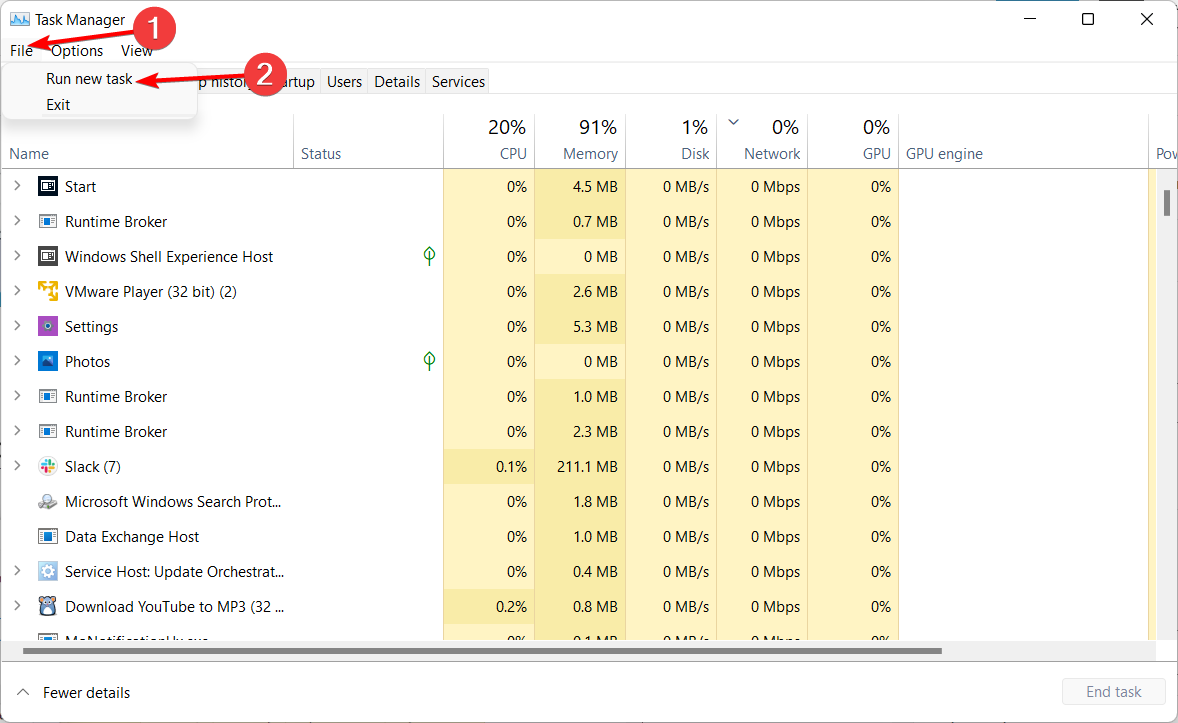
Press Ctrl + Shift + Esc to launch the Task Manager, and locate the Windows Installer (msiexec.exe) process.
Now, select the process and click on End task.
There could be two processes by the same name. Make sure to terminate the other one as well.
Once done, check if you still can’t install anything on the Windows 10 computer or if the problem is fixed for good.
2. Disable Fast Startup
If you are logged in as administrator but can’t install software in Windows 10, it’s likely theFast Startupfeature to blame. Though meant to reduce the boot time in Windows,Fast Startuphas often been found to affect the functioning of the OS.
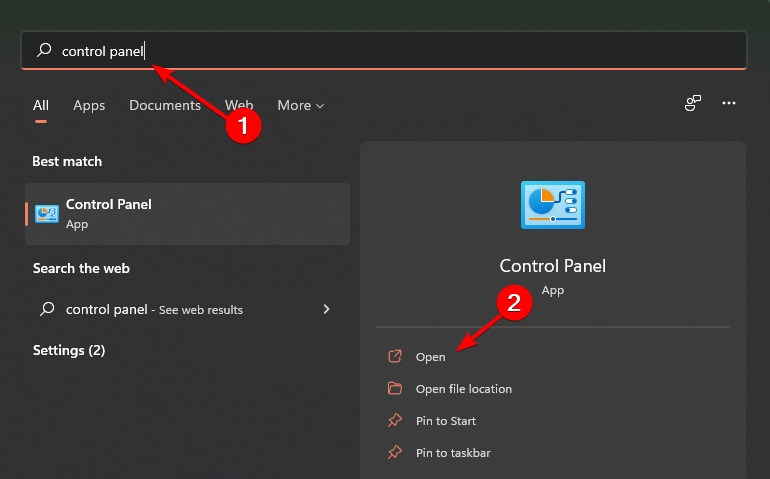
Type Control Panel in the Search bar, and click on the relevant search result.
2. Click on System and Security.
3. Now, choose Change what the power buttons do under Power Options.
4. Click on Change settings that are currently unavailable.
5. Uncheck the Turn on fast startup (recommended) option, and click on Save changes at the bottom.
6. Once done, restart the computer to fixI can’t install anything on myWindows 10computer
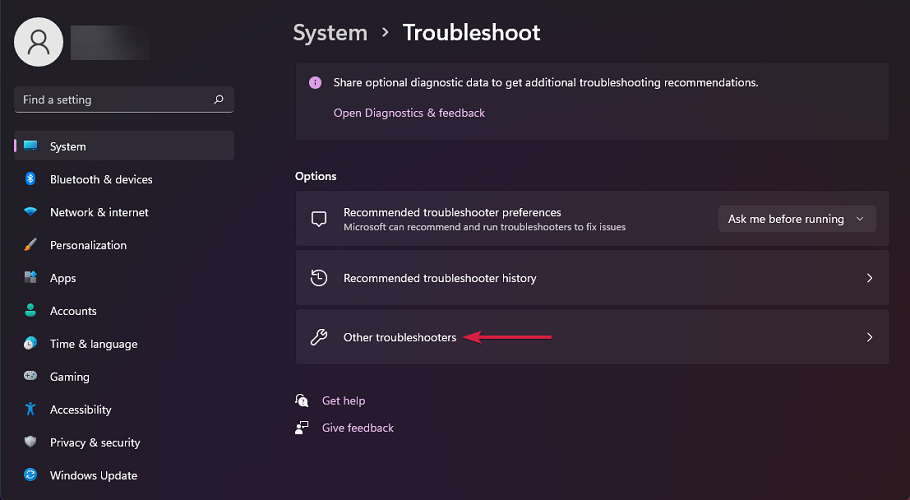
3. Use Windows troubleshooter
This helps automatically repair issues like corrupted registry keys that may be responsible for the issue.
A better alternative is to use a comprehensive repair tool that scans and offers a thorough report of your PC. These tools also allow you to fix or replace the broken system file.
4. Run critical services
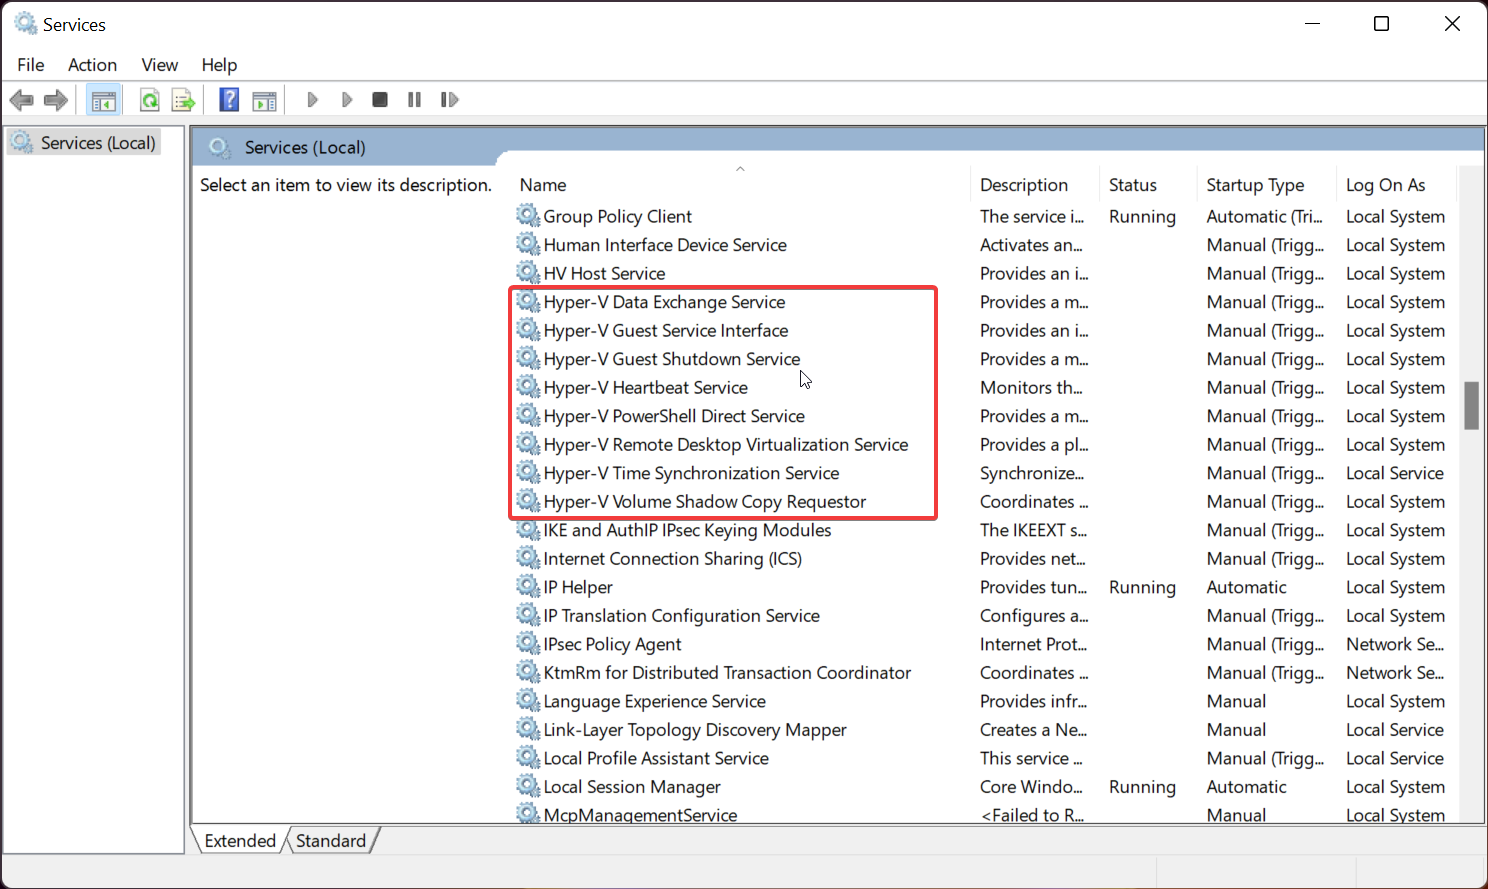
Press Windows + R to open Run, type services.msc in the text field, and click OK.
Locate the Windows Audio service, right-click on it, and select Properties.
Select Automatic from the Startup type dropdown menu.
Click on the Start button if the service is not running, and then click on OK to save the changes.
Similarly, make sure the Windows Update service is running and has been configured to run automatically.
Many who can’t install anything on a Windows 10 computer were saved with this method. For some, it was the Windows Audio service, while for many, it was Windows Update that needed to be run. The latter was usually when users couldn’t install apps from Microsoft Store.
5. Change UAC settings
Type Change User Account Control settings in the Search bar, and click on the relevant search result.
Drag the slider to the bottom, and then click on OK to save the changes.
Click Yes in the UAC prompt that pops up. The I can’t install anything on my Windows 10 computer issue will be fixed.
6. Disable/uninstall conflicting apps
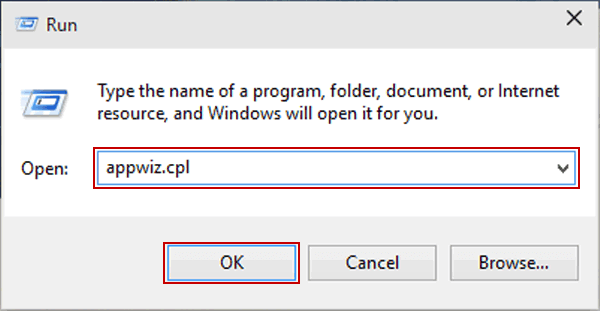
Press Windows + R to open Run, enter appwiz.cpl in the text field, and click OK.
Now, select the conflicting app, and then click on Uninstall.
Follow the on-screen instructions to complete the process.
In some cases, it was third-party apps responsible for the issue. So, if you can’t install anything on a Windows 10 computer, locate the problematic app, and uninstall it. The option to disable it can usually be found inside the app settings.
One user reported Pi-hole to be the culprit here. Look for other similar apps as well.
7. Check security settings
Log into Windows as administrator, press Windows + I to open Settings, and then select Update & Security.
Choose For developers from the left, and then enable the toggle under Developer Mode.
Click Yes in the confirmation prompt that appears.
These solutions have been confirmed by users and should get things up and running if, earlier, you couldn’t install anything on the Windows 10 computer.
The Video TDR Failure nvlddmkm.sys BSOD error has been an issue for quite a while. From outdated drivers to an overloaded GPU and faulty overclocking, many things could trigger this error.
That said, it’s not unfixable, and below we’ll show you ally ou need to do to get rid of it.
How do I stop the TDR crash?
1. Change the PhysX settings
Launch the NVIDIA Control Panel, and select Configure Surround, PhysX from the left.
Now, click on the Processor dropdown menu under PhysX settings, and select your GPU from the list.
Once done, save the changes.
This is one of the quick methods that helped many get things running in case of the Video TDR Failure nvlddmkm.sys blue screen error. So, make sure to try it.
2. Check for updates for the drivers of your graphics card
Press Windows + S for Run, type in dxdiag in the text field, and click OK.
Navigate to the Display tab and verify details about your operating system.
Visit the NVIDIA website and download the newest drivers for your graphics card.
Select the latest drivers from the list from the NVIDIA website and download them.
Choose the updates necessary for your graphics card, agree, and download them.
Install them and restart your computer.
Verify if the problem has disappeared.
Naturally, you will want to see whether or not your graphics card is up to date also. In fact, most of the time, the error is caused by an outdated driver.
After you entered the NVIDIA website, we advise you to download only certified or recommended updates. You must avoid the ones that are still in the beta development stage. Fortunately, it is very easy to update the graphics drivers, but the manual approach is not always fruitful.
This method involves making changes to the Registry which is a complex process. We recommend you first create a restore point and then follow the instructions as it is to avoid any issues.
A quick workaround to fix the stop code Video TDR Failure nvlddmkm.sys is to change the TDR values. Setting it as 60 worked for users, and we recommend you try the same.
1. Press Windows + R to open Run, type regedit in the text field, and click OK.
2. ClickYesin theUACprompt.
3. Now, paste the following path in the address bar and hit Enter:Computer\HKEY_LOCAL_MACHINE\SYSTEM\CurrentControlSet\Control\GraphicsDrivers
4. Locate the TdrDelay and TdrDdiDelay DWORDs on the right.
5. If you can’t find both, right-click on the blank portion, hover the cursor over New, select DWORD (32-bit) Value, and name it as TdrDelay.
6. Double-click on the newly created DWORD, choose Decimal under Base, enter 60 under Value data, and click on OK.
7. Once done, create another DWORD, name it TdrDdiDelay, and similarly, choose Decimal under Base, change the Value data to 60, and then click OK.
8. Restart the computer for the changes to come into effect.
In you still receive the VIDEO_TDR_FAILURE nvlddmkm.sys BSOD, delete the two DWORDs created earlier, and contact the GPU manufacturer for more help. At this point, it’s likely that the problem lies with the hardware itself.
There you go! We hope that one of these solutions helped fix the annoying VIDEO_TDR_FAILURE nvlddmkm.sys error on Windows. Also, find out how to make Windows faster than before.
As always, if you come across other workarounds to fix this problem, you can help the Windows community by listing the troubleshooting steps in the comments below.
Encountering a payment validation issue on Netflix can be annoying. Some users report that Netflix is not accepting their payments, which is a similar issue on Hulu as well.
Such problems will restrict your access to your favorite premium content. Hence, we will provide plausible fixes.
Why is Netflix not accepting my payment?
Although Netflix offers exceptional service, you can sometimes experience payment rejection issues.
The primary cause of this is due to invalid card details. Since most users opt for the card as a means of payment, a mistake in the details can render the card ineligible for payment. Other likely causes are:
Expired card – If your payment card is expired, then your financial institution cannot process it. Hence, your payment will not be successful.
Unsupported payment method – Netflix supports multiple payment methods. However, it has a limit, and if you opt for an unsupported one, Netflix cannot accept the payment.
Issues with the Netflix payment system – There are times Netflix is unable to process your request. It could be due to the server, or you are encountering an error that freezes or makes the app get stuck.
Insufficient funds – If the amount in your account is not up to the subscription plan you opt for, you will likely encounter the Netflix not accepting payment error.
Let’s proceed to the possible ways to fix this error.
What can I do if Netflix is not accepting my payment?
Before anything else, ensure you perform these checks:
Ensure you have a stable Internet connection to avoid disruption during payment processing. If there is a problem connecting to Netflix, take a look at this guide.
Ensure your card has not been attached to different accounts for recurring subscription charges.
Ensure that your bank account is configured for international payments.
Restart Netflix and retry the payment.
If all these have been checked and the issue persists, consider trying the fixes below.
1. Update your payment method
Go to the Netflix website or start the app and log in to your account.
Choose your Settings icon and select Account from the drop-down.
Select Account details.
Click Manage payment info under the Membership and Billing section.
Click Add Payment Method, select one of the multiple options available, and provide the information.
Then choose this as your preferred billing method by clicking on Make preferred.
Updating your billing method should fix the Netflix not accepting payment issue. However, accessing Netflix via a browser can lead to Netflix error code M7111-1331-4027. Hence, check our guide to fix it if you ever encounter it.
2. Contact Netflix support
If you encounter an issue with your payment, it is recommended to contact Netflix support. Sometimes, the problem might be from Netflix when a payment method is temporarily down due to updates or not being supported in your country.
Also, they can further pinpoint why your payment is not accepted. You can reach their support via social media, app, call or live chat.
Sometimes, your financial institution might be responsible for this issue if they fail to process the payment. There might be restrictions on your card, insufficient funds, an embargo on international payments, and more.
So, reach out to them to better understand the reason and remove the restrictions causing the Netflix payment not to be processed, if possible.
4. Create a new Netflix account
Go to the Netflix signup page and choose your subscription plan of preference.
Input your details and click Next.
Proceed with the payment method and follow the prompts to activate your subscription.
Try the previously denied payment method on the new account. Sometimes, the payment issues might be tied to just one account. Hence, the need to try it on a different account.
5. Use another browser
Users may encounter payment issues on Netflix due to browser issues. Hence, we recommend you switch to another browser to check if the payment issue persists.
One of the top browsers we had no issue using is Opera browser, coming with a simple interface yet a complete set of features.
Trying Opera is gonna take you only a few moments since you can import all data such as passwords and browser history with just a few clicks.
Opera
Comes with a built-in ad blocker, free VPN and many more integrated features.
These are the best fixes to try out when faced with a Netflix payment rejection issue. Whatever the case, any of these fixes should fix the issue for you.
However, Windows users who want to download the Netflix app might encounter the error 0x80240014. So, check out our guide on the causes and fixes for the error.
If you remember, back in May, we told you that Microsoft was gearing up to release a brand-new mini PC designed to improve Windows on Arm called Project Volterra.
And, while everyone was focusing on native Arm support for Visual Studio 2022 and VS Code, the Redmond tech company was creating an Arm-native toolchain.
Support for this includes full Visual Studio 2022 & VS Code, Visual C++, Modern .NET 6 and Java, Classic .NET Framework, Windows Terminal, and WSL and WSA for running Linux and Android apps.
It looks like the time has finally come and Microsoft is launching its own version of the Mac Mini today with a price that many will find a bit spicy.
The new mini Windows PC is great for building ARM apps for Windows 11
The truth is that you will have to dig deep in your pockets and pull out a whopping $599 for this mini PC that’s designed for developers to build native ARM apps for Windows 11.
Previously known as Project Volterra, the Windows Dev Kit 2023 is already available today in Australia, Canada, China, France, Germany, Japan, the United Kingdom, and the US.
So, developers will now be able to purchase this highly-coveted device, but really anyone wanting a miniature Windows on Arm machine can buy one as well.
You surely want to know more about this device so let’s take a closer look at it and see what actually makes this new miniature PC tick.
What are the Windows Dev Kit 2023 specs?
Well, if you are interested in buying one, know that the Windows Dev Kit 2023 is powered by Qualcomm’s Snapdragon 8cx Gen 3 platform with 32GB of RAM and 512GB of NVMe storage.
Furthermore, there are also two USB-C 3.2 Gen 2 ports at the side and three USB-A 3.2 Gen 2 ports at the rear, alongside an Ethernet port and Mini DisplayPort.
We’re also looking at a neural processing unit (NPU) on this device, much like the 5G Surface Pro 9, which will enable developers to run hardware-accelerated AI tasks and machine learning workloads.
The tech giant started to leverage NPUs in Windows 11 to power features like Voice Focus, a state-of-the-art background noise removal algorithm that doesn’t hit your CPU or GPU.
Speaking software-wise, this is where the Windows Dev Kit 2023 will absolutely shine. As we’ve said, Microsoft is working to launch a full toolchain of ARM native apps for developers to use.
Thus, Visual Studio 2022 17.4 now runs natively on Arm with far better performance, and .NET 7 will include improved performance for ARM.
Please keep in mind that previews for Arm versions of Visual C++ and the Windows App SDK are also available now.
With this device, we are getting more apps, tools, frameworks, and packages that are being ported to natively target Windows on ARM and will be arriving over the coming months.
In the meantime, thanks to Windows 11’s powerful emulation technology, developers will be able to run many unmodified x64 and x86 apps and tools on their Windows Dev Kit.
And if that wasn’t already enough, the Windows Dev Kit will also have access to native ARM versions of Microsoft Teams, Office, Edge, and OneDrive sync.
As a result, Microsoft really hopes this device will encourage Windows on Arm app development, so we can finally see more apps run natively on Arm-powered laptops.
The Windows 10 error wdf01000.sys BSoD is one of those blue screen errors that can have various error messages, including STOP 0×00000050: PAGE_FAULT_IN_NONPAGED_AREA – Wdf01000.sys and SYSTEM_THREAD_EXCEPTION_NOT_HANDLED.
However, all the wdf01000.sys error messages will include wdf01000.sys in them.
What does Wdf01000 sys mean?
If you have wondered what exactly is wdf01000.sys, it is a Windows driver that helps your computer to communicate with hardware and other connected devices. This is an important Windows 10 element.
What failed wdf01000.sys?
A few users have complained of this BSoD error. It is triggered by a few factors, including:
Issues with Windows Driver Frameworks – If the WDF fails to work, you may run into this error message.
Hard drive issues – Hard drives, especially bad and defective ones, have triggered this error for many users.
Compatibility issues – If some programs have compatibility issues with the OS, it can lead to an error. This, in many cases, could actually be your antivirus software.
Defective drivers – Users have encountered this issue when drivers are outdated or defective.
Follow along to find out detailed solutions to this!
How can I fix wdf01000.sys?
1. Use a specialized BSOD repair software
System files are very delicate to handle and any mistake can severely hurt your computer. Using a dedicated system repair software is always a good idea, as they will automatically scan and replace any corrupted file they encounter.
2. Run a System File Checker scan
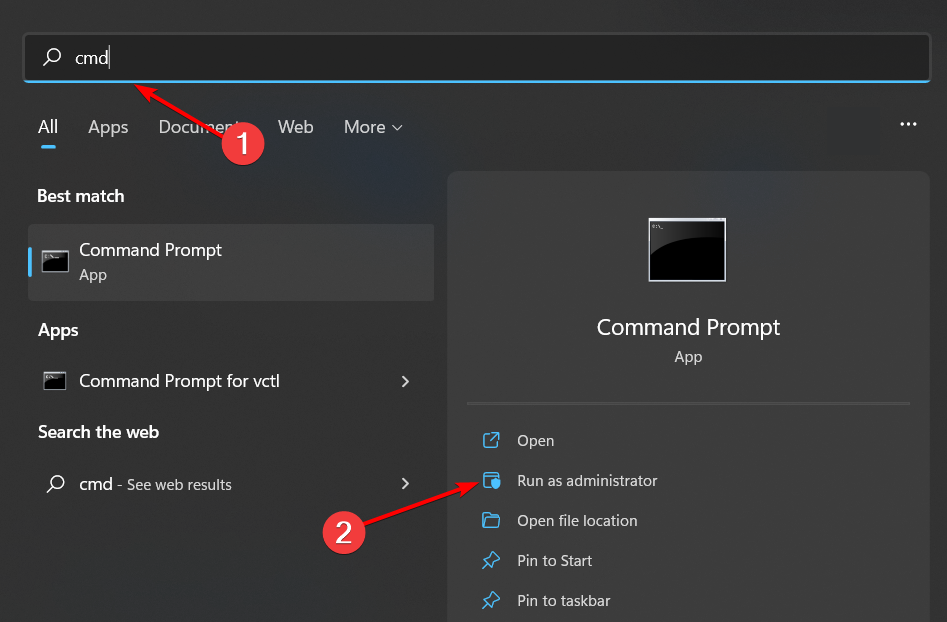
Open the Windows search bar, type cmd, and click Run as administrator.
First, enter the following command and press Enter: DISM.exe/Online/Cleanup-image/Restorehealth
Theninput the script below in the Command Prompt, and press the Enter button. sfc /scannow
When the SFC scan is complete, the Command Prompt might state Windows Resource Protection found corrupt files and successfully repaired them. If that’s the case, restart Windows.
The System File Checker is a Windows tool that restores corrupted system files.
If this Blue Screen error occurs on your Windows PC, it’s because of corrupted drivers or incompatible driver version that generate such error codes. Hence, make sure you update all the drivers as illustrated below.
1. Press Windows key + X and select Device Manager from the drop-down list.
2. Expand the proper category for the driver you want to update, right-click on the driver you want to update, and select Update driver.
3. Select Search automatically for drivers.
4. The system will download and install the compatible drivers for the hardware component.
SYS file errorscan bedue to corrupted driver files. Thus, updating, or at least reinstalling, corrupted device drivers might resolve the wdf01000.sys error.
You can update the drivers manually, which is time-consuming, or by using software that does this automatically.
Open the Windows search bar, type cmd, and click Run as administrator.
Enter the script below in the prompt, and press the Enter key. chkdsk /f
The wdf01000.sys error can also bethe consequence ofhard drive corruption. As such, Check Disk is another utility that might potentially fix the BSOD error.
5. Reinstall problematic software
Open Run with the Windows key + R keyboard shortcut.
Next, enter appwiz.cpl in Run and click OK to open the window shown directly below.
Select the software you need to reinstall, press the Uninstall button, and click Yes toprovidefurther confirmation.
Then restart your desktop or laptop.
Download an updated copy of the uninstalled software from the publisher’s website, then open the program’s setup wizard to reinstall the software.
Don’t hesitate to observe how your PC behaves over the next few days. If there’s no sign of the error, the previous app installation was clearly corrupt.
6. Open the Blue Screen Troubleshooter
To open that troubleshooter, press theCortana button.
Input the keyword troubleshoot in the search box.
Click Troubleshoot to open the window in the snapshot directly below, select the Blue Screen troubleshooter, and then click itsRun the troubleshooter button.
The troubleshooter window will then open and might detect some issues.
7. Re-register the wdf01000.sys file
Open the Windows search bar, type cmd, and click Run as administrator.
Enter the following command in the Command Prompt, and press the Return button: regsvr32 C:Windowssystem32driverswdf01000.sys
Those are a few resolutions that can fix the wdf01000.sys BSoD error in Windows 10. In addition, fixing the registry with system optimization software might also help resolve the issue.
Note that the solutions above will also be relevant if you have the wdf01000.sys error on startup or if the wdf01000.sys experiences a crash or failed.
If you have any other questions, feel free to leave them in the comments section below.
You must have encountered the page fault in nonpaged area error on your Windows 11 device. At times, it may cause the system to crash. Page Faults often occur when an application attempts to use memory that is part of its work set but does not find it. They are either soft or hard.
A hard Page Fault will occur when the page is found in the page file on the hard disk, whereas a soft Page Fault will happen when the page is located somewhere else in the memory. This issue may be triggered by RAM change, a Windows faulty update, outdated or corrupted drivers or a faulty disk drive.
How do I fix Page Fault in Nonpaged Area BSoD in Windows 11?
NOTE
The Page Fault in the Nonpaged area in Windows 11 causes a BSOD loop on your device. This makes it impossible for you to log into your device. Therefore, you must access Safe Mode to perform the methods and fix the issue.
1. Update drivers
Launch the File Explorer. Then, right-click on This PC.
Select Manage to continue.
Select the Device Manager under System Tools option.
Then, right-click the disk device under the Disk Drives. Select Update driver or Uninstall device.
Don’t hesitate to give a try to a dedicated tool such as Fortect Driver Updater. Rest assured that this lightweight software solution will automatically look for outdated drivers and update them periodically.
Select whether to Keep my files or Remove everything when resetting your device.
Follow the Wizard to continue till you can reset your device completely.
3. Disable Automatic Paging File Size Management
The useful guide presented here will help you resolve this BSOD error with a few clicks on your Windows 11 settings.
Press Windows key + E key to open File Explorer.
2. Right-click on This PC and select Properties.
3. Choose Advanced System Settings under device specification.
4. Go to the Performance section, then click on Settings.
5. Select the Advanced tab, then click on the Change button.
6. Uncheck the Automatically manage paging file size for all drives and clickOK to save settings.
7. Check whether the page fault in nonpaged area error in Windows 11 is still there.
4. Run the troubleshooter
Press the Windows key + I key.
Click Troubleshoot on the Settings page.
Then, select Run automatically, then notify me.
Then, wait on your device to detect any problems with the hardware. The error will be identified once the scan is complete. You can then fix the problem.
However, if the scan does not detect any problem, the hardware on your device does not have any issues. Then you probably need to use another method to fix the error.
5. Check your disk
NOTE
At times, the error may occur because of a faulty disk. Don’t hesitate to use the Window Snap-in tool to check and fix the problem on the disk.
Press the Windows key + S key.
Type cmd in the search box, then select the Command Prompt Application to Run as Administrator.
Then, press Enter after you key in the following code (C represents the letter of the drive where you store your operating system): chkdsk/f/r
Press the Y key on your keyboard.
Press the Windows key + R key to open the Run dialog box, then key in the following code and click on OK: mdsched.exe
Select Restart now and check for problems (recommended).
Wait for the scan to end, then check whether the page fault in nonpaged area error in Windows 11 is still there.
Type memory diagnostic on the search box, then select Windows Memory Diagnostic.
Click Restart now and check for problems (recommended).
Wait on your device to identify the problems. Once the search is complete, your device will display the problems detected on the screen.
It is quite evident that the Page Fault in the Nonpaged Area with Valorant in Windows 11 will affect the gaming experience and even when with other apps.
Therefore, it is important to ensure that your device’s drivers, hardware, and software are safe and will not affect its performance.
These solutions would work even in case of encountering Page Fault in Nonpaged Area errors in Windows 11 devices or while running Apex Legends and VMware.
Feel free to let us know if you have any questions on how to fix this issue for good. Also, leave comments about guides that you would like to see or information on other Windows 11 features.
Hyper-V is Microsoft’s virtualization platform and one of the most popular ones in the world. It allows users to create virtual machines and run different Operating Systems on them.
One of the main advantages of Hyper-V is that it can be used to manage multiple operating systems on the same machine. However, there may be times when you find yourself unable to ping your host from a guest machine.
Why can I not ping my virtual machine?
If you try to ping your virtual machine from your host computer and it does not work, there are several things that could be causing this issue:
Incorrect IP address – If you do not have an IP address set up properly for your network adapter, then it will not be able to communicate with other systems on the network.
The VM is not running or has been stopped – If it’s not running, make sure you’ve configured your VM to start automatically when the server boots.
You are using a standard account – If you are running your VM as a non-admin user, then it might not be able to access all needed resources. You may run into a Hyper-V is not authorized to connect error.
Lost connectivity – You may not have network connectivity on the host machine. This can be due to a hardware fault or because the host is down.
Unspecified gateway – If this is not set correctly, then you will not be able to access the Internet from within the virtual machine as the destination host is unreachable.
Yes, you can run Hyper-V without SLAT (Second Level Address Translation), but we don’t recommend it because there are some limitations. If you have server hardware that supports SLAT, then you can run Hyper-V on that hardware.
SLAT makes it very easy to manage virtual machines. It provides you with an interface for creating and deleting virtual machines, adding files to the virtual machines, configuring network settings, etc.
If your computer doesn’t have this feature, it will limit how much memory can be allocated to each virtual machine. Without it, Hyper-V may not be able to run and thus can’t ping the host.
While Hyper-V is a useful tool for VMs, you also need to ensure that your system meets all the minimum system requirements to run it to avoid performance issues.
Consequently, if you feel the requirements are too stringent, you can always switch to an alternative VM that is equally good and offers similar features.
While it’s expected that Microsoft will continue to post growth in its burgeoning cloud business, analysts are preparing for more modest improvements quarter over quarter while also keeping an eye on predicted ‘lower-than-expected’ Windows licensing revenue due to fewer PC shipments for this earnings report.
Gartner tracked a 12.6% drop in PC sales back in July and with AMD loweing its preliminary estimates, it’s unlike the situation has gotten much better since then.
A consortium of 14 analysts from prominent firms polled by CNBC peg Microsoft’s Azure cloud growth in the 35-36% range for this quarter which is a relative departure from its 40% growth recorded last quarter.
In the midst of an organizational tightening where the company released up to 1,000 employees recently, representing less than 1 percent of its total workforce, Microsoft is also restructuring its reporting and prepped investors with a new FY23 Investors Metrics report earlier this month.
The new report lists the five areas that have been updated and where product categories have shuffled to include “HoloLens revenue, previously in the Intelligent Cloud segment, moved to the More Personal Computing segment” and will be measured in the PC accessories revenue alongside Surface revenue growth.
A bit of an obfuscating move by Microsoft for investors interested in augmented hardware as a standalone business for the company, but with the recent Meta partnership news, it’s clear Microsoft is looking to turn the HoloLens into a tech licensing endeavor while pivoting its Windows augmented reality software into yet another platform akin to its Azure efforts.
Microsoft just announced its Windows 11 2022 Update, a new features pack began rolling out and just a couple of weeks ago it hosted a new hardware event, all items not expected to impact its quarterly earnings report this time around.
While the market was raised by the prospect of tech earnings on Monday, Microsoft shares have seen a 26% deflation over the year and we’ll have to see how the company’s call is received later today before there is potentially more shaved off the stock in afterhours trading.
Internet problems can cause a lot of trouble, and one problem that Windows users reported is The default gateway is not available error.
The gateway is the element that connects your computer to the Internet so you won’t be able to access any external links.
What happens if default gateway is not available?
When no next-hop IP address is defined within a routing table for forwarding data packets to a host, a default gateway acts as a forwarding hop to the other networking system.
As a result, when two networks desire to communicate or send data packets to one another, the default gateway serves as the access point to the other networks. This also includes changing the system and network topologies’ IP addressing and subnet masks.
When it is not available, it implies that there can be no communication. Hence in more general terms, you will suffer connection or network issues and will not be able to access other networks as normal.
If the default gateway not available keeps happening, here are some possible causes:
Interfering antiviruses – Antivirus software is known to cause issues in areas with no potential dangers. In this case, you will have to remove it altogether, then perhaps head for a better one that won’t interfere in the future.
Outdated drivers – Drivers make sure your OS successfully communicates with your PC components. When they are outdated, miscommunications will happen which lead to errors such as The default gateway is not available.
Driver settings – The network driver will have by default an option that will turn it off in order to save power. We will show you below how to turn this off in order to fix the error.
Faulty router – We recommend that you try to connect to another network connection to figure out if your router is the cause of this error.
Incorrect IP settings – Before moving on to serious troubleshooting solutions, you should check the IP address, and that the ISP configuration settings are correct.
Router settings and outdated drivers could also cause this problem. Some users reported that antiviruses may sometimes block your connection.
With this in mind, go through our solutions one by one because one of them will help you fix this issue.
How do I fix default gateway is not available?
Before jumping into the list of advanced troubleshooting solutions, make sure to do the following:
1. Change the Power Management settings for your network adapter
Click the Windows Start button, type device manager and select the app from the results.
Locate your network adapter and double-click it. Once the Properties window opens, go to the Power Management tab and uncheck Allow the computer to turn off this device to save power. Click OK to save the changes.
2. Update your network driver
2.1 Use Device Manager
Right-click the Start icon then select Device Manager.
Expand the Network adapters section, right-click your network driver and select Update driver.
Select the Search automatically for drivers option and wait for the process to end then reboot your PC.
Head to your computer manufacturer’s website and go to the support page and search for the model that you have in order to see all the drivers available. We will use Lenovo as an example.
Select the network driver and download it. Double-click the file downloaded to install it then reboot your PC. The default gateway is not available keeps happening will be solved.
2.3 Automatically update your drivers
It’s important to mention that downloading drivers manually is a risky decision. You can damage permanently your system by manually downloading the wrong driver versions.
Thus, we recommend using a third-party driver updater tool that is 100% safe to automatically download all the outdated drivers on your PC.
3. Run the Network troubleshooter
Press Windows + I then go to Network & Internet.
Click the Network troubleshooter option in order to run it.
4. Reset the network
Press Windows + I then go to Network & Internet.
Next, click the Network reset option.
Click Reset now and follow the on-screen steps. The default gateway is not available through Ethernet issue will be solved.
5. Reset the network connections via CMD
Given the fact that connection gateway errors are caused by network malfunctions, it may be useful to reset the network connection on your PC. Use the example down below to do it.
1. Click on the Windows Start button, type cmd, and choose Run as administrator from the results.
2. When Command Prompt starts, enter the following commands and press Enter after each: netsh winsock resetnetsh int ip resetnetsh advfirewall resetipconfig / flushdnsipconfig / releaseipconfig / renew
3. After the process is completed, close Command Prompt.
4. Restart your PC. (You can fix The default gateway not available error by resetting TCP/IP).
How do I fix the default gateway error in Windows 11?
Apart from some very useful extra features and a more attractive design, the new OS is very similar to the old one.
That is why all the solutions we outlined for Windows 10 will work seamlessly to solve the gateway error on Windows 11 as well.
To fix any network adapter problems, follow the instructions above and also check out our guide on how to fix network adapter issues which will surely help out.
If you have any more questions, or you wish to add anything about the subject, don’t hesitate to do so in the comments section below.
Your Windows 11 PC might be restarting randomly due to issues like overheating, fast startup issues, or hardware faults. This leads to loss of progress, unexpected shutdowns during important tasks, and a lot of frustration if left unresolved.
Below, we’ll walk you through tested solutions that address all major causes. Follow along to stop Windows 11 automatic restarts.
Quick Video Summary of the Solutions for Stopping Windows 11 Automatic Restart
1. Disable automatic restart
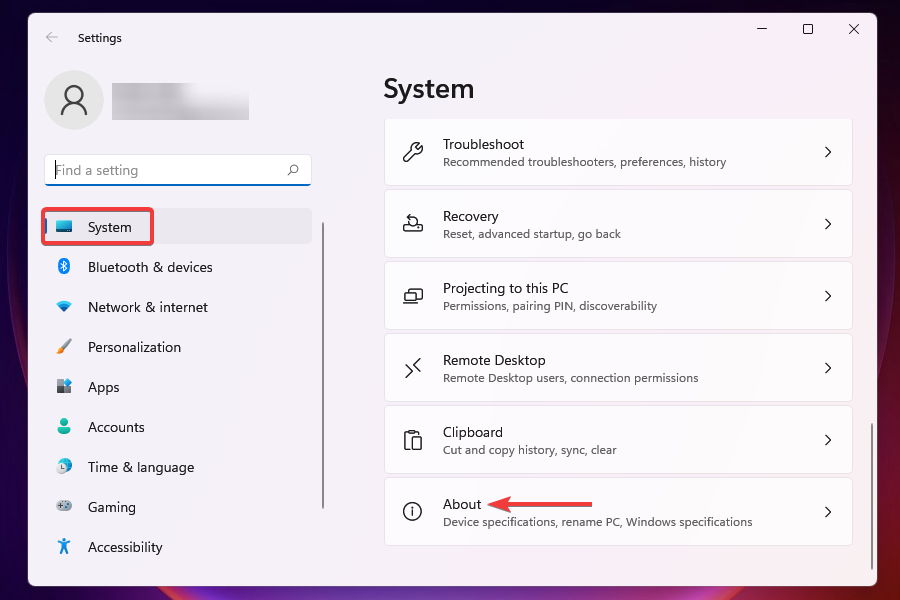
Press Windows + I to launch the Settings app then scroll down and click on About in the System tab.
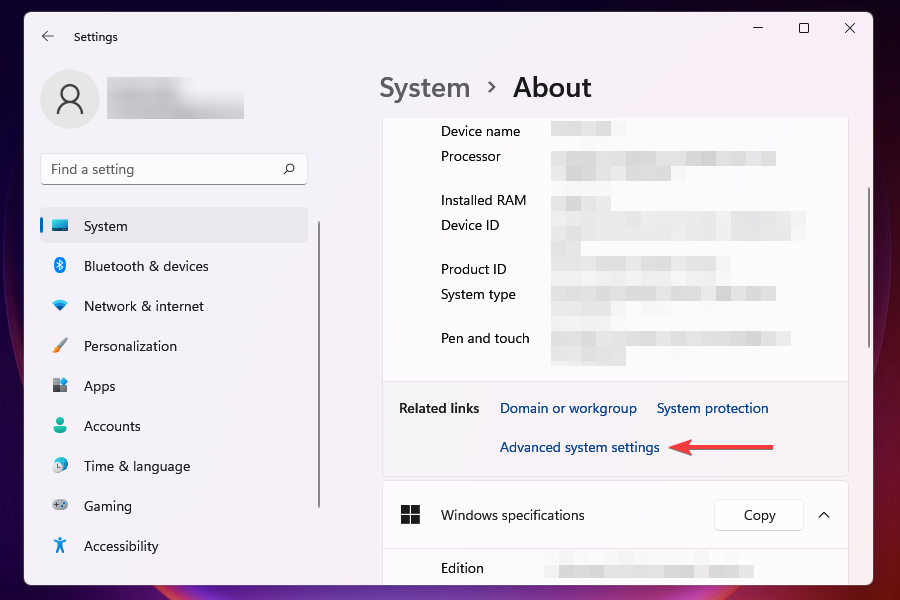
Next, click on Advanced system settings under Related links.
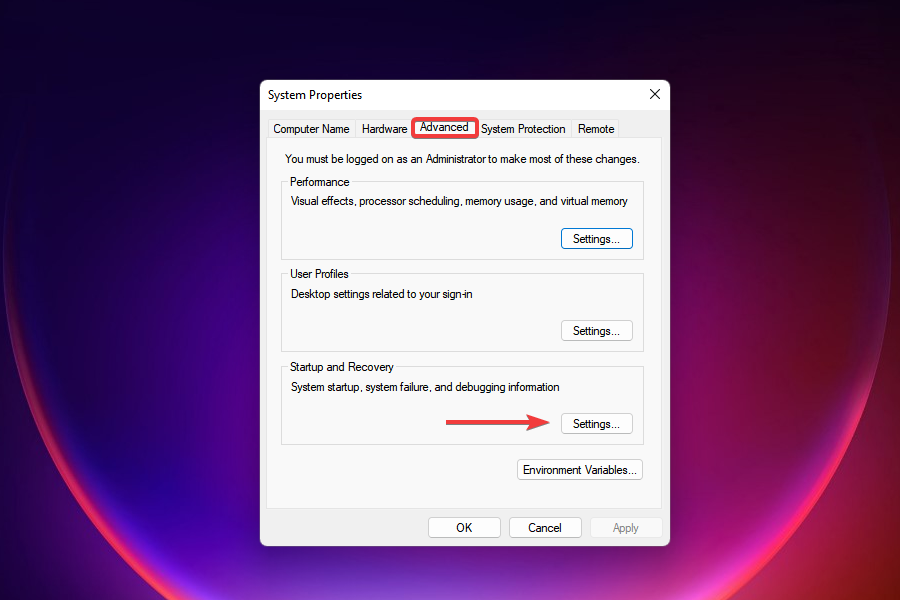
Click the Settings option under Startup and Recovery.
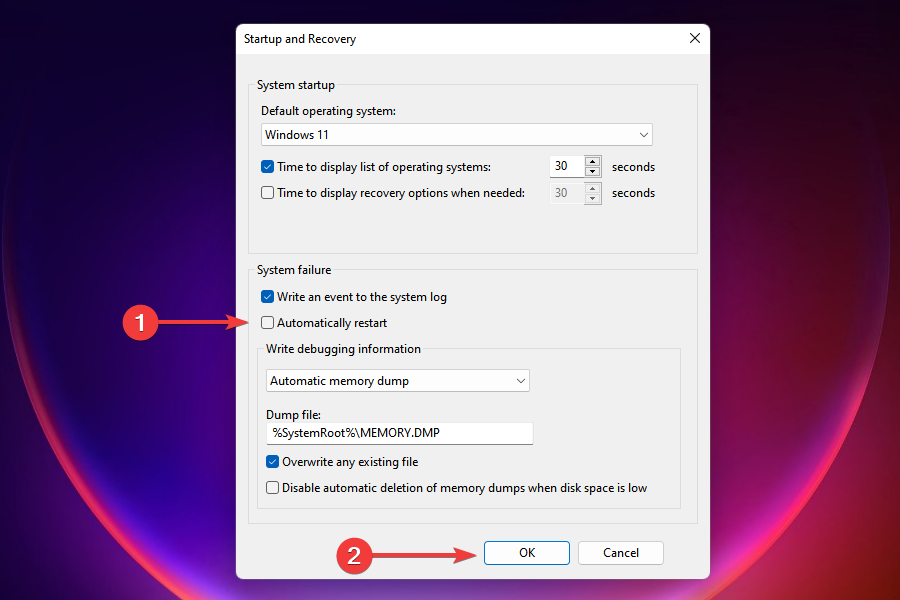
Untick the checkbox for Automatic restart under System failure, and click on OK to save the changes.
Now restart the computer and check if the Windows 11 keeps restarting randomly issue persists.
Fast startup is a feature that considerably reduces the boot time when you turn on Windows after shut down. With the feature enabled, certain critical files are saved and immediately loaded on startup.
1. Press Windows + S to launch the Search menu then enter Control Panel in the text field at the top, and click on the top search result that appears.
2. Select System & Security from the list of options that appear.
3. Click on Power options.
4. Now, select Choose what the power buttons do from the list of options on the left.
5. Navigate to the Change settings that are currently unavailable tab.
6. Untick the checkbox for Turn on fast startup (recommended), and then click on Save changes at the bottom.
This option it’s known to cause compatibility issues and may also result in random restart problems in Windows 11. Therefore, disabling it should fix the restart problem on your Windows 11 device.
3. Update group policies
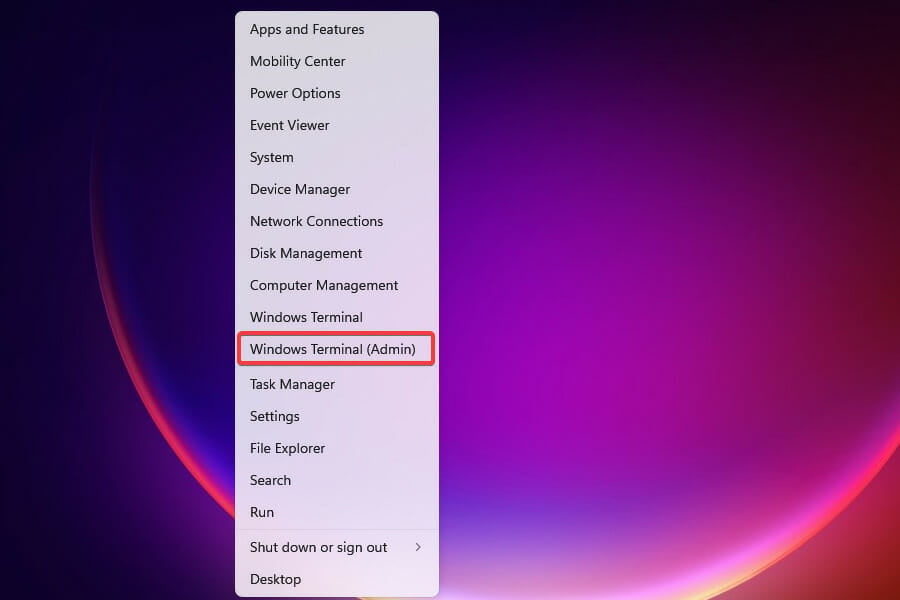
Right-click on the Start button to launch the Power User/Quick Access menu then select Windows Terminal (Admin) from the list of options that appear.
Click Yes on the UAC prompt that appears.
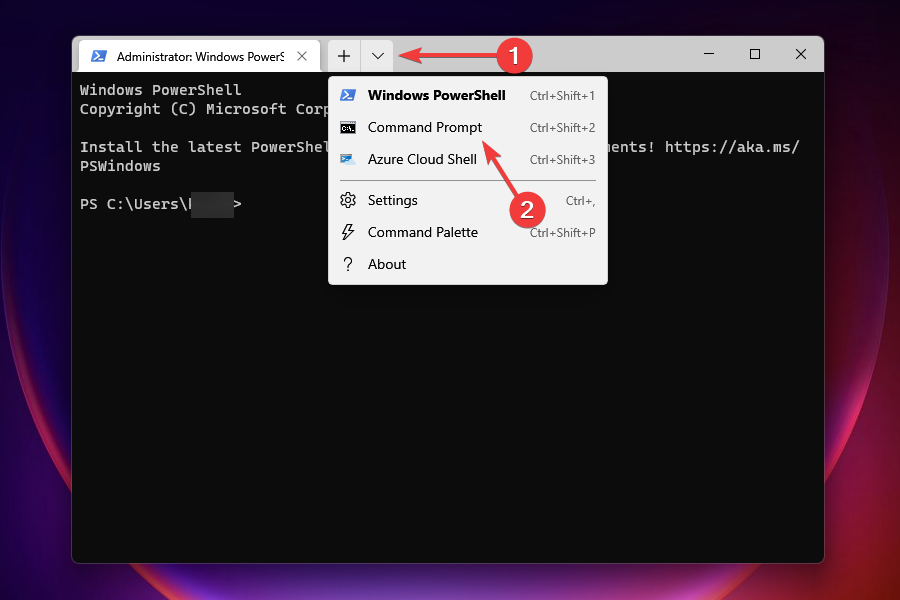
Then, click on the downward-facing arrow at the top and select Command Prompt from the list of options. Alternatively, you can press Ctrl + Shift + 2 to launch the Command Prompt tab.
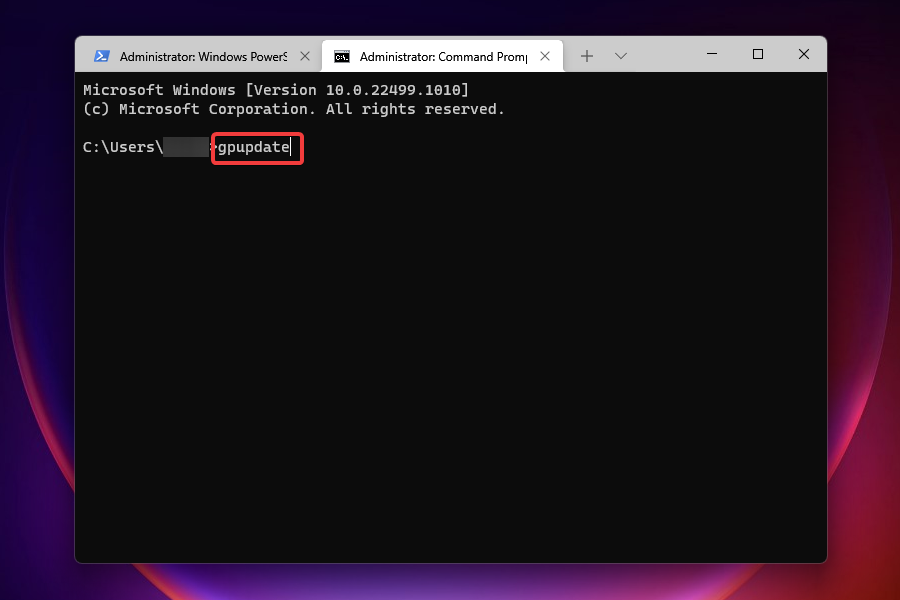
Now, enter the following command and hit Enter to execute it:gpupdate
Misconfigured group policies are also known to cause trouble from time to time, hence it’s recommended that you keep them updated.
Though they would be updated automatically, manually doing it eliminates the Windows 11 keeps restarting loop issue right away.
4. Change Windows Update settings causing random restarts
NOTE
The Registry is a critical aspect of Windows and you should not go around making changes without a proper understanding, since it could damage the system and even render it unusable. Follow the steps listed below as it is without changing any other keys or values.
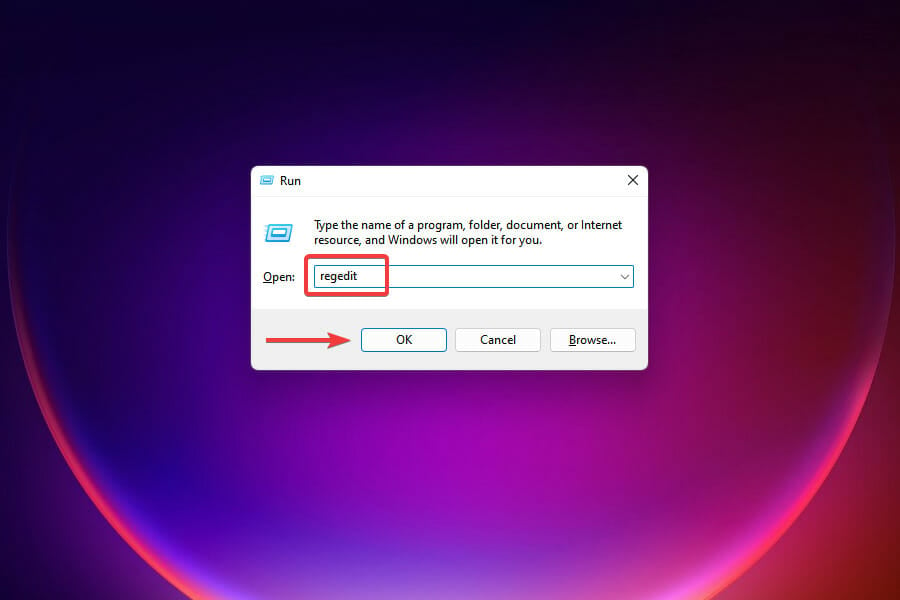
Press Windows + R to launch the Run command. Enter regedit in the text field, and either click on OK at the bottom or hit Enter to launch the Registry Editor.
Click Yes on the UAC prompt that appears.
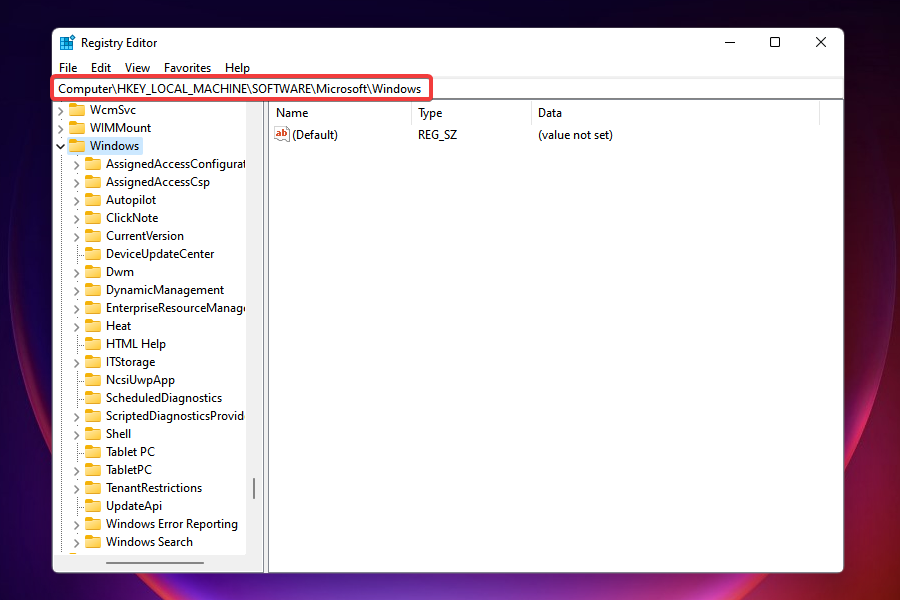
Now, navigate to the following path or type/paste it in the address bar at the top and hit Enter:Computer\HKEY_LOCAL_MACHINE\SOFTWARE\Microsoft\Windows
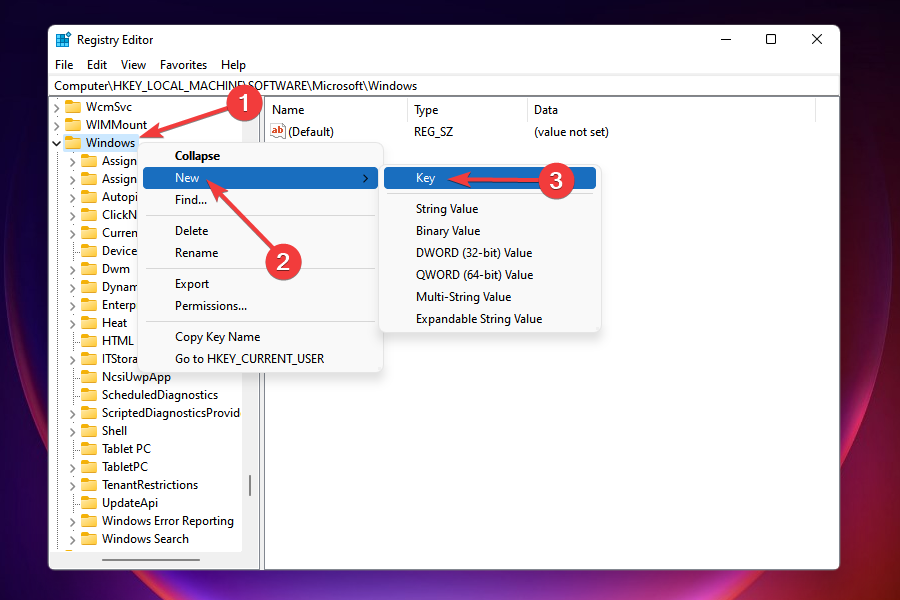
Now, right-click on the Windows key in the navigation pane on the left, hover the cursor over New, and select Key from the list of options that appear.
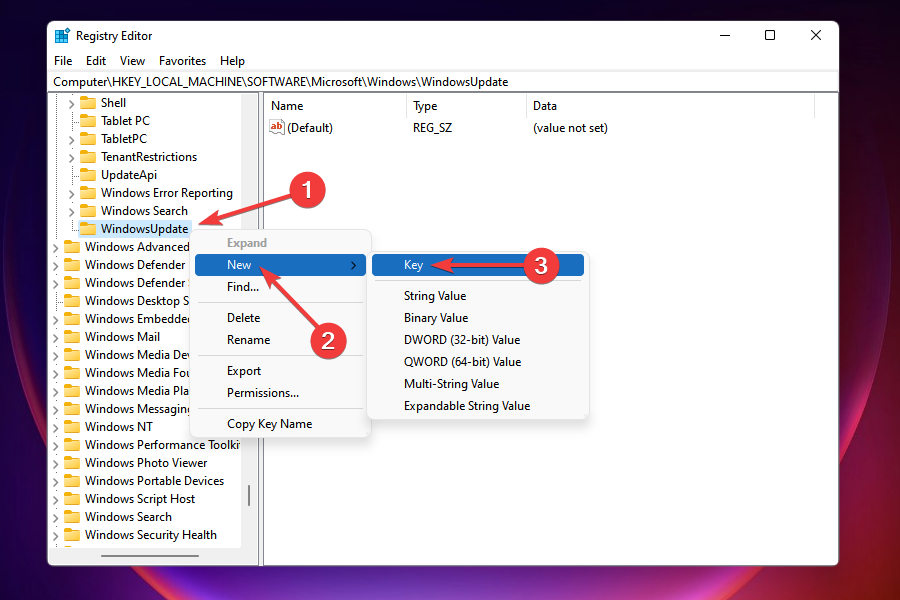
Name this key as Windows Update. Then right-click on the newly created key, hover the cursor over New, and select Key.
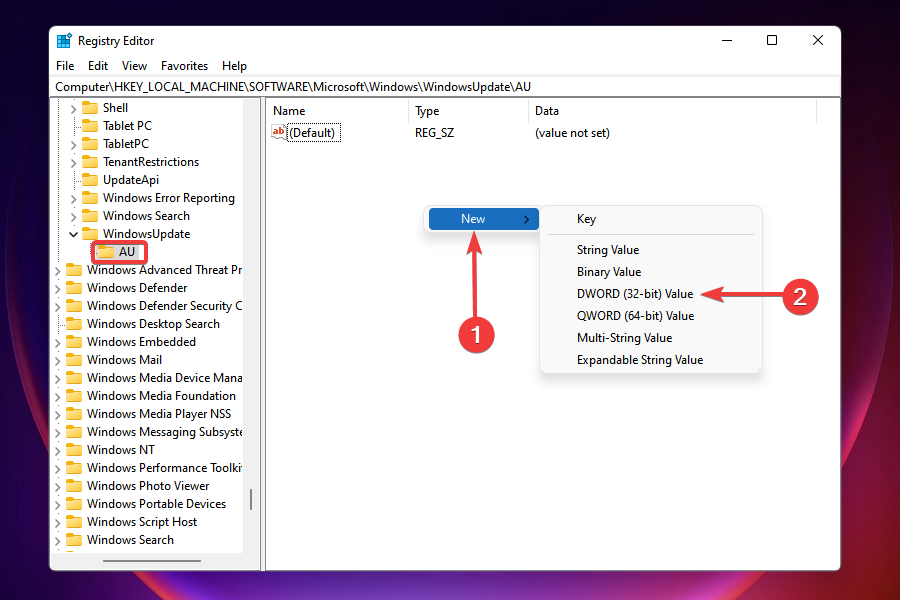
Name this key as AU. Click on the newly created key to open it, right-click on the empty space on the right, hover the cursor over New and select DWORD (32-bit Value) from the context menu.
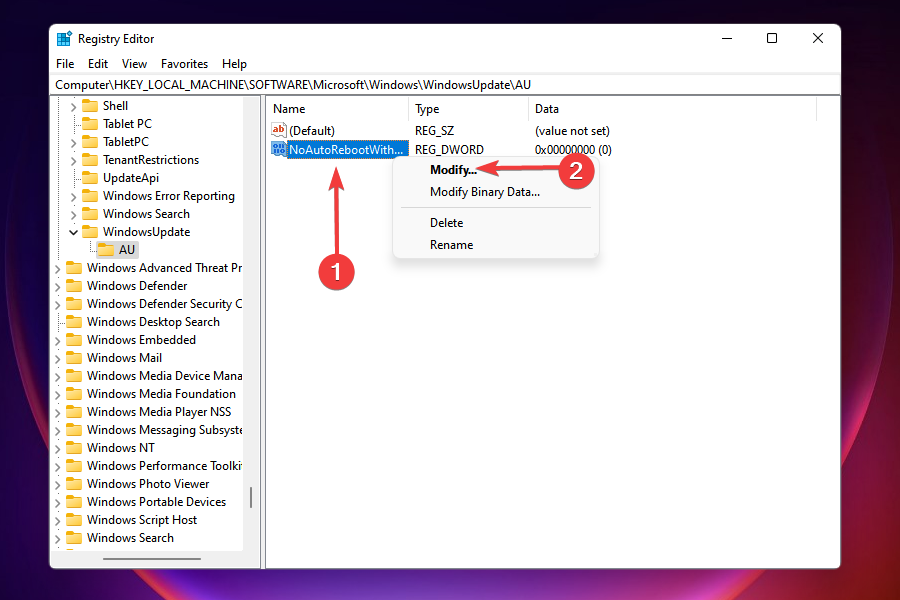
Name it as NoAutoRebootWithLoggedOnUser. Now, right-click on it and select Modify from the list of options.
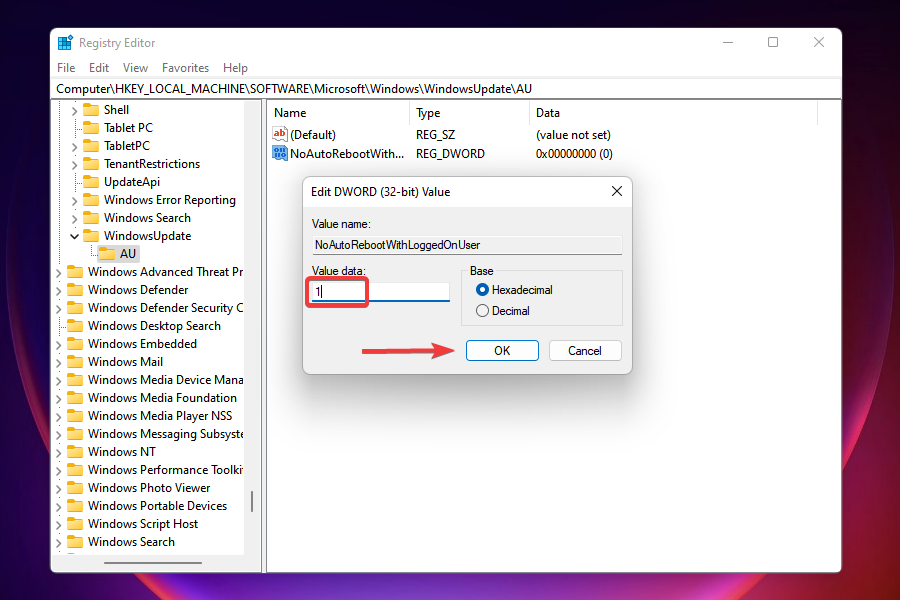
Enter 1 in the field under Value Data and click on OK at the bottom to save the changes.
When you download an update, you need to restart your Windows. You can either manually restart the computer or set it to restart automatically after the download is complete. In case the latter settings are in place, you may encounter the random restart issue in Windows 11.
In the above steps, we modified the registry such that Windows will no more reboot automatically, thereby eliminating the error.
Another option, if these methods don’t work or simply seem too much trouble, you can use a third-party driver updater. A dedicated tool will automatically scan the web for driver updates and keep all the installed ones up-to-date. Our top choice in this case is Fortect Driver Updater.
6. Reinstall the graphics driver
Press Windows + S to launch the Search menu. Enter Device Manager in the text field at the top, and click on the relevant search result that appears.
Double-click on Display adapters, then right-click the graphics adapter and select Uninstall device.
Tick the checkbox for Attempt to remove the driver for this device and click on Uninstall at the bottom.
After uninstalling the driver, restart the computer and Windows will automatically install a fresh driver for the graphics adapter.
If the graphics driver installed on the PC is corrupted, you are bound to encounter errors every once in a while, including Windows 11 restarting when playing games. A corrupt driver can be easily identified by a yellow exclamation mark (warning) sign next to the driver icon.
The best part about the process, you don’t have to manually install a fresh set of drivers rather Windows does it automatically.
7. Scan for malware
NOTE
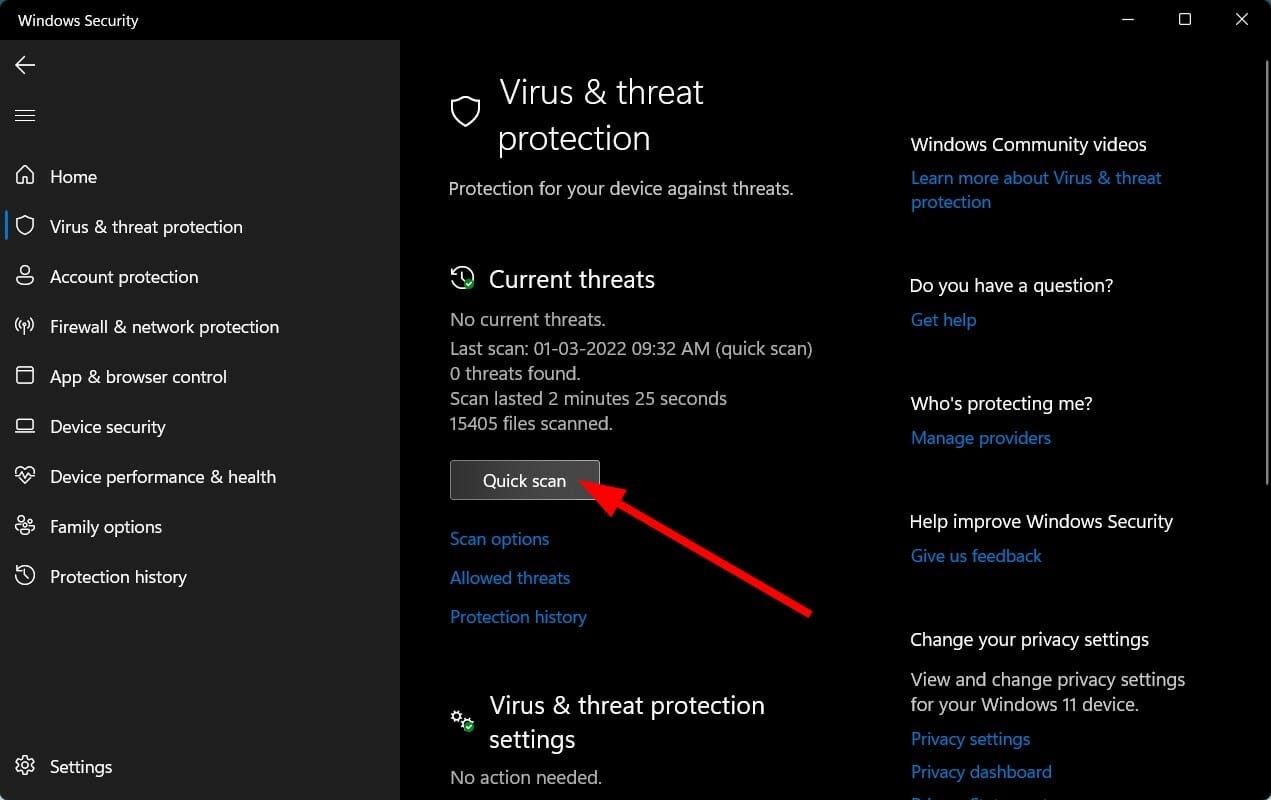
You can scan for malware and virus using the built-in Windows Security app or any effective third-party antivirus. We choose the former, however, it’s perfectly alright to scan using any reliable antivirus.
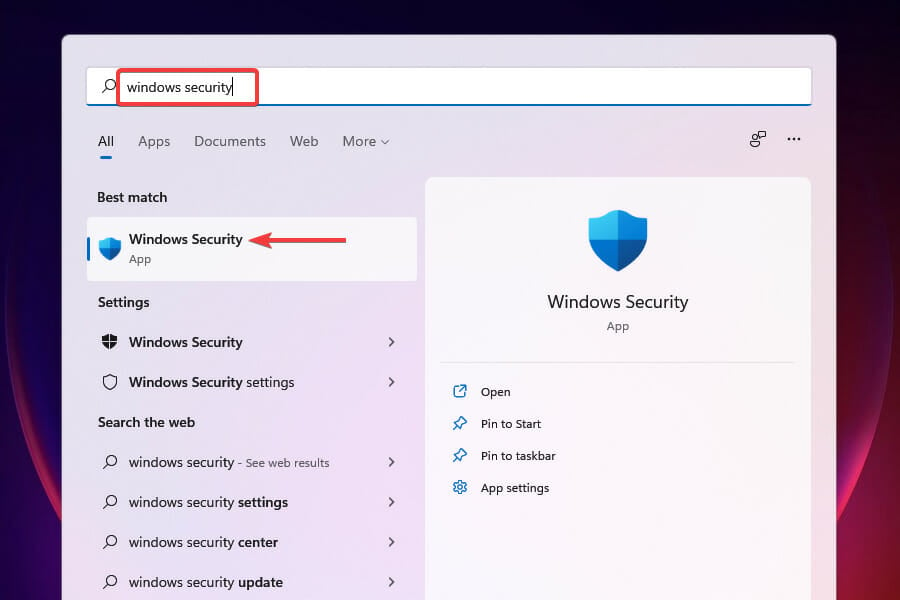
Press Windows + S to launch the Search menu. Enter Windows Security in the text field at the top and click on the relevant search result that appears.
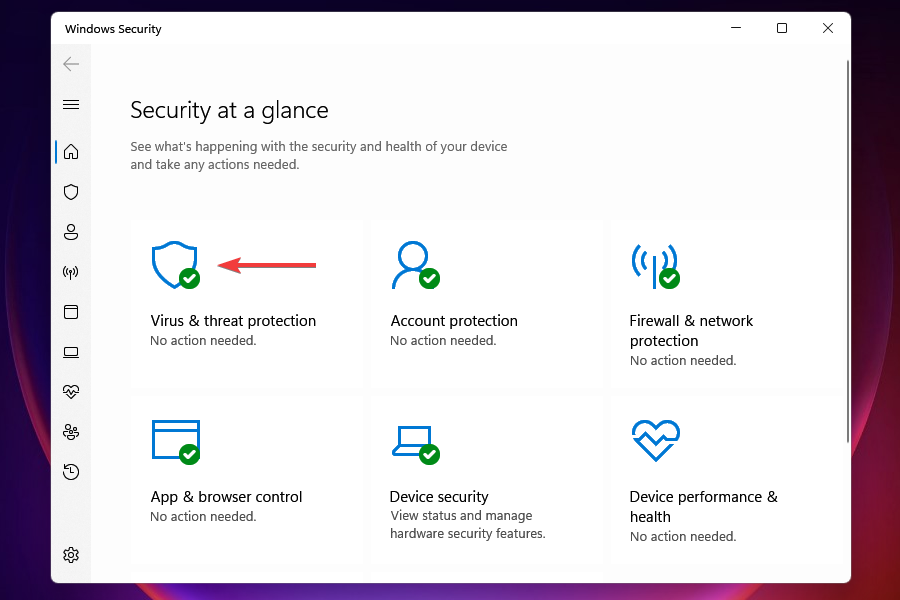
Select Virus & threat protection from the options listed here.
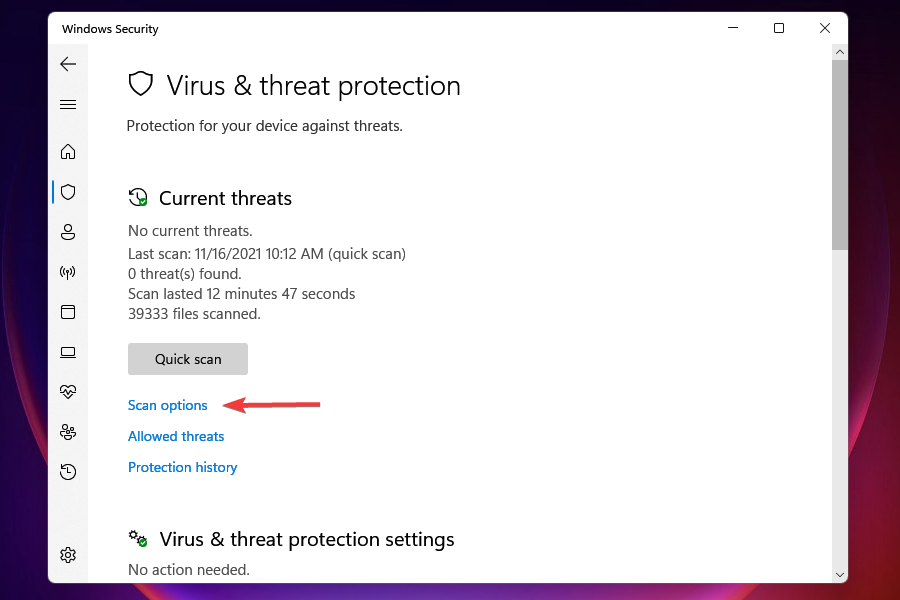
Click on Scan options.
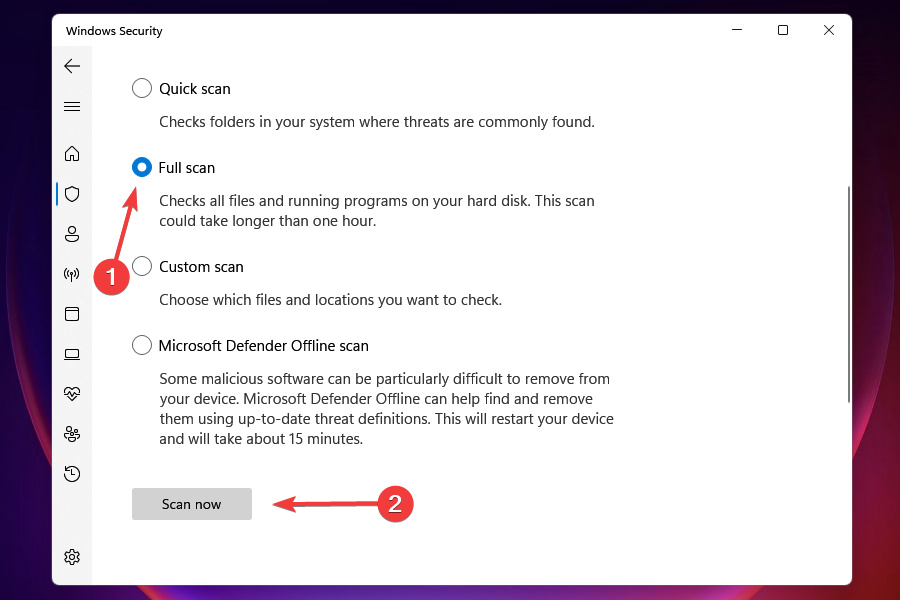
Select Full scan and click on Scan now at the bottom.
In many instances, users realized it was actually malware or a virus that caused the Windows 11 keeps crashing and restarting issue. To remove these, all you have to do is to run a scan.
The full scan will take a lot longer to complete compared to a quick one, but it will scan more files, thereby increasing the chances of detection and removal of malware.
8. Run SFC and CHKDSK scans
Press Windows enter cmd and click Run as administrator under Command Prompt on the right.
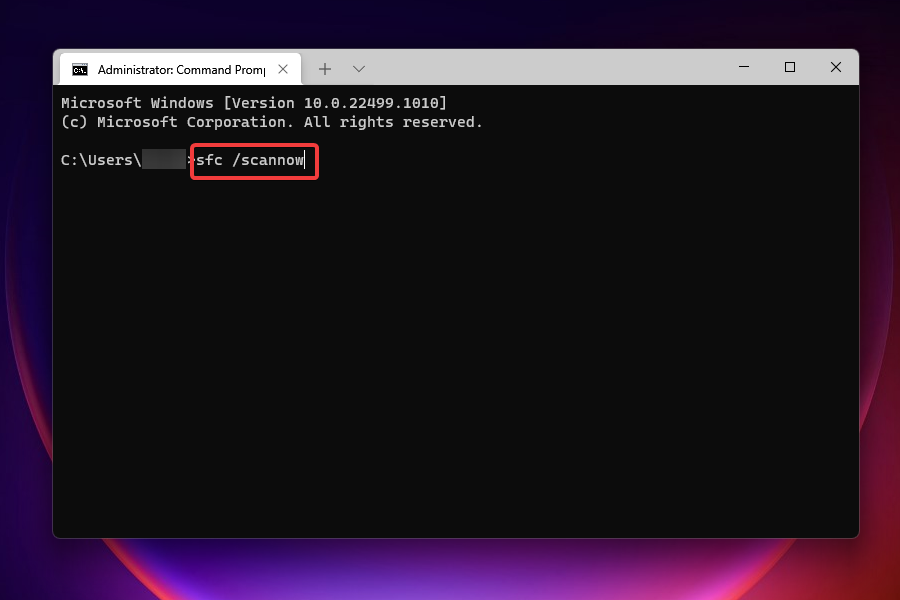
Type or paste the following command to run the SFC scan:sfc /scannow
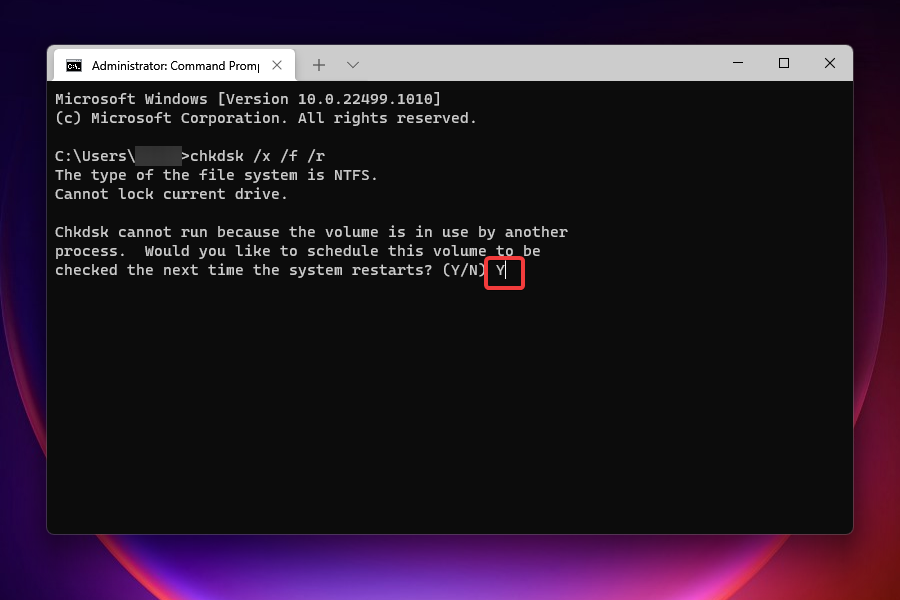
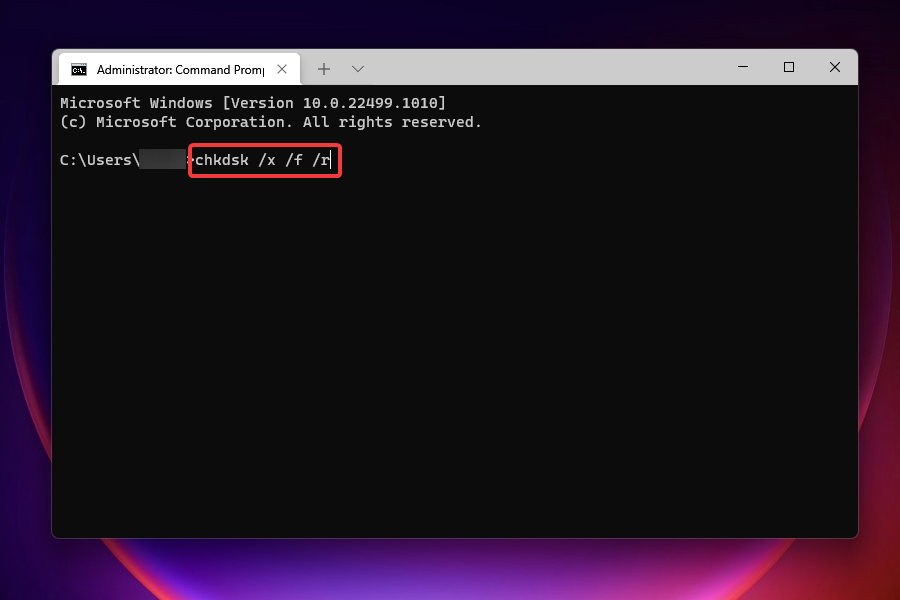
Wait for the scan to complete. Now, enter the following command to perform a Check Disk:chkdsk /x /f /r
You will be asked to schedule the scan to run the next time you restart the computer. Press Y and hit Enter to confirm. Then restart your computer.
The scan may take some time to complete depending on the data stored on the computer but it’s known to fix the random restart issue in Windows 11 for a lot of users.
9. Uninstall the latest OS update
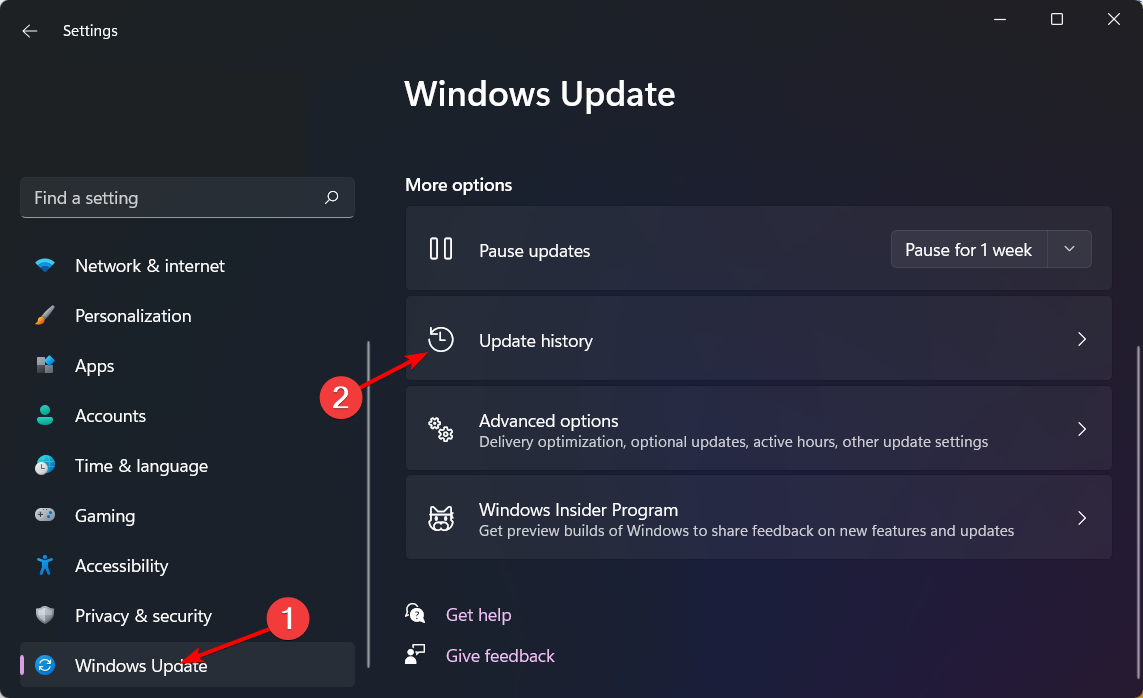
Press Windows + I then go to Windows Update followed by Update history.
Click Uninstall updates from down the page.
Click the top Windows update then select Uninstall.
Windows updates are generally positive, but sometimes they can cause issues such as random restarts. By uninstalling the last update you have installed, you can stop Windows 11 keeps restarting after update issue.
10. Update your BIOS
It makes no difference whether you buy one of the most recent laptops on the market or have an old one. At some point in time, you may need to do a BIOS update or make some modifications to the software since it can cause Windows 11 to keep restarting after the shutdown.
Carefully follow our dedicated guide to updating your BIOS, as this is no easy task for anyone.
Does my Windows 11 PC keep restarting because of overheating?
Overheating is one of the reasons for the system to restart. Whenever the temperature reaches a certain value, one that can damage the components, the system will automatically restart to cool down.
It’s easy to identify an overheated system, be it a laptop or PC. So if you believe that high temperature is the real culprit here, you can easily fix the overheating problem in Windows 11.
Wrapping up
Fixing a Windows 11 PC that keeps restarting randomly, without any obvious reason might seem intimidating at first, but if you follow the steps outlined above, you’ll put an end to this issue in no time.
So you’re trying to run OBS in Windows 11 but after clicking several times, it is not opening. OBS is a great program to record your gaming performance.
Most gamers prefer to download OBS because it is lightweight and does a pretty good job when recording or streaming on multiple platforms. When it won’t open, it can be frustrating but let’s look at how to address this issue, shall we?
Why is OBS not opening in Windows 11?
If you are having trouble opening OBS in Windows 11, below are some possible causes:
Outdated version – OBS Studio is a very popular program and it’s constantly being updated. That means that some people have the latest version, while others don’t.
Hardware requirements – If your PC does not meet the minimum system requirements to run OBS, you may have trouble opening it.
Outdated drivers – OBS is a pretty resource-intensive application and it needs a good graphics card to run well.
Corrupted system files – If your system files are corrupted, you may be unable to open programs on your PC.
Software conflict – Another possible cause for problems is that another program may be interfering with OBS when trying to open up on your computer.
Malware infection – If you’re using a pirated version of OBS, then there’s a good chance that malware has infected your computer as well as the app itself.
Not enough permissions – You may not have permission to access the necessary folders or files. You can try running OBS in administrator mode.
How can I fix OBS when it is not opening in Windows 11?
Before jumping into fixing OBS not opening in Windows, we suggest performing some preliminary checks first:
Check and close any other applications running in the background that might be blocking the program.
Make sure that you have enough free space on your computer’s hard drive. You may need to clean up your RAM.
Restart your PC.
If you are lucky enough, one of these will open OBS but if not, here are more troubleshooting options.
1. Update OBS
The first thing you need to do is check if there is any update available for OBS Studio. This will ensure that all the latest features are available in your version of the software, which could help fix the problem.
Click on Windows update, then select Check for updates.
Download and install if any are available.
5. Uninstall and reinstall OBS
Hit the Windows key, type Control Panel and click Open.
Locate OBS studio, right-click and select Uninstall.
Now navigate to your browser and download OBS to reinstall.
While you are uninstalling OBS, you may also consider any recently installed program that may have brought along the problem. Software conflicts can prevent certain programs from opening so be sure to check out the culprit if the issue persists.
Is OBS truly ready for Windows 11?
OBS Studio is a free tool that allows you to create videos with ease. It has many features, such as recording your screen, and capturing video from webcams, microphones, and more.
If you’re wondering whether OBS Studio will continue working with Windows 11, the answer is yes. OBS and many other applications have been tested and are ready for Windows 11.
The only thing you need to know is that some of the new features will not be available. So, you might be wondering: How do I get OBS to work on Windows 11?
The most probable reason why OBS may not work with Windows 11 is if you are running an outdated version of OBS or your graphic drivers are outdated. You may need to update your drivers manually.
While you are still here, feel free to check out our guide on what to do if OBS keeps crashing. For users with low-end hardware, we also have a little something for them to enjoy OBS. We explore some of the best OBS settings that guarantee you great performance.
Sometimes, you may be trying to delete a file that you are looking at on your screen. However, you will get an error message that says File Explorer could not find this item.
When you are deleting files, you are trying to free up space on your hard drive for other pressing tasks. More often than not, this message means there’s a problem with your storage drives. The file may not be visible because Windows thinks it’s in another location.
Why I’m I getting the Windows File ExplorerCould not find this item error?
If you are wondering why you are experiencing the Windows Explorer can’t find this item error, below are some possible reasons:
You moved the files to another location – When organizing your files, it is common to place related files together for easier management hence why the item is not found in Windows 11.
It may be a shortcut or a link – The file you may be trying to delete may actually be a shortcut to the original file that is located in another folder or previously deleted.
Virus infection – If you downloaded the file without scanning for viruses, it could be infected with malware, so always use a powerful antivirus. Also, if you transfer files to your computer from an infected USB drive, there is a possibility they could be corrupted.
Problem with your hard drive – Your hard drive may have been damaged from a computer crash or unexpected shutdown. Luckily, there is recovery software for damaged hard drives to help you repair them.
Windows File Explorer has an error – Some programs or services running in the background may cause issues with File Explorer. You can shut these down from the task manager and try deleting the file again.
Corrupt Windows system files – Sometimes when you are saving a large file, it may take a few moments during the save process. If your PC shuts down unexpectedly, you may get this error when you try to open it the next time.
Now that you know why you could not find this item when deleting files, below are some solutions to help you resolve the issue.
How do I solve the Windows File Explorer could not find this item error?
Before applying the actual solutions, there are some preliminary checks you can apply:
Sometimes, Windows File Explorer may become unresponsive. In such cases, you may be unable to view, manage or do anything on the UI. Restarting it is a good place to start. It helps close any unnecessary background services that may be interfering with the process.
Restart your PC as well. This will clear any temporary files that may prevent File Explorer from opening.
Now, let’s check out the detailed procedures below.
1. Convert the file to a zipped file
Zipped files are compressed files that require a third-party tool to open, such as WinZip . The compressed files take up less space and you can easily unzip them with Windows’ built-in utility.
Once you have converted the file to a zipped folder, you can go back and locate the folder to delete it from your system.
2. Use a specialized troubleshooting tool
Sometimes Windows will retain some files in a temporary form because it is either corrupted, used by another program, or damaged.
A great solution is to use a specialized tool to run a Windows File Integrity Scan to see if the files causing this kind of problem are corrupted.
3. Rename and delete the file with Powershell
Right-click on the problematic file and select Copy as path.
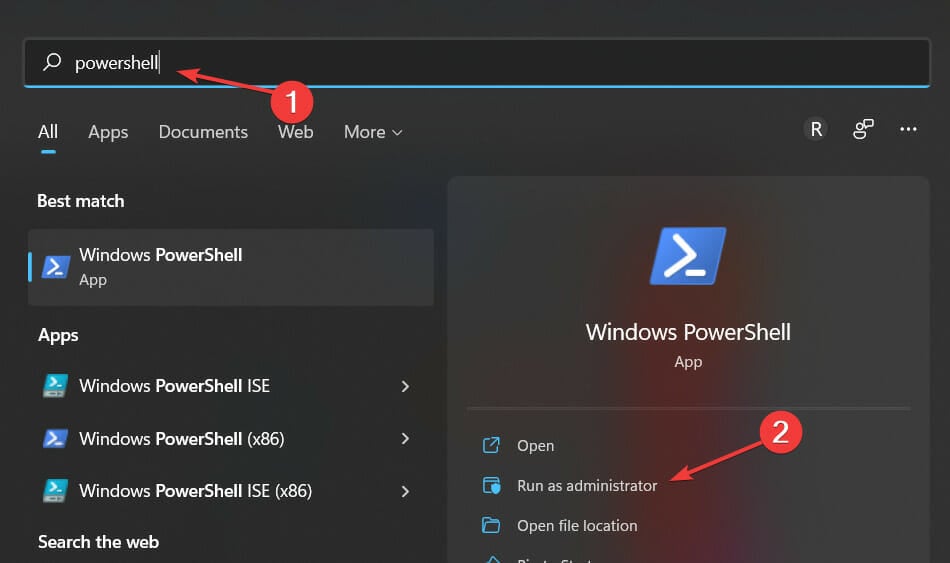
Press the Windows key, type Powershell in the search bar and click Run as administrator.
Type in the following command and press Enter (Replace OldName with the file’s original name and NewName with your chosen new name for the file): REN drive:\path\OldName NewName
If none of these solutions works for you, as a last resort you can start your PC in Safe Mode. Safe Mode allows your PC to start without some software and drivers. This way, you can proceed to delete the file if there was a glitch.
You may also encounter an issue where Windows File Explorer is slow but worry not as our detailed article takes you through a step-by-step process on how to solve this problem.
Feel free to let us know of any other solutions not mentioned here that may have worked for you in the comment section below.
Horizon Zero Dawn is a fantastic game, and it’s one of the best titles released in 2017. However, it’s not without its issues. In fact, some gamers have reported that Horizon Zero Dawn keeps crashing on their PS4 and Xbox One.
It takes up a lot of memory, especially if you’re playing on the PS4 Pro with the 4K mode enabled. You may experience issues with Horizon Zero Dawn not loading or it won’t launch at all.
Why is my game suddenly crashing?
There are several reasons why Horizon Zero Dawn crash may happen in your game. Below are some common causes of crashes:
Outdated graphics card drivers – If you’ve installed the latest graphics card drivers and still experience crashes, try updating them again or using an older version of the driver that works well with Horizon Zero Dawn.
Insufficient storage space – The game requires around 100GB of free space on your hard drive to install. If you don’t have enough room, or if you have an external hard drive that isn’t listed as a location for the game to save, Horizon Zero Dawn will crash when trying to load it up.
Corrupted files – The problem with corrupted files is that they may be corrupted on your hard drive or on Steam’s servers. You can try downloading a fresh copy of Horizon Zero Dawn from Steam, but if this doesn’t work, then you’ll want to try repairing or reinstalling your OS to fix this issue.
Virus/malware infection – Viruses and malware can cause all sorts of weird behavior in Windows including crashing games and applications, freezing up computers, and more. That’s why we recommend using a reliable antivirus program.
How can I fix Horizon Zero Dawn if it keeps crashing?
Don’t hesitate to pay attention to the preliminary checks below:
If your hard drive is running low on space, try deleting some old files or installing games onto an external hard drive. You can also delete temporary files from your computer to free up space.
You should also clear up some storage space on your console. Horizon Zero Dawn takes up a huge chunk of space, but if you have other games or apps that are taking up more than that, it could be causing problems.
Also, as a rule of thumb, it is always recommended that you ensure your device meets the minimum system requirements for the said game. This will prevent frequent crashes and game lags.
1. Update your console firmware
If you’re running an outdated firmware version on your PS4 then this could be causing your Horizon Zero Dawn crashes. As with any software program, updating your firmware can help resolve issues with stability.
Try updating your firmware to the latest version. This should fix many common issues such as crashes and freezing during gameplay as well as other performance problems.
2. Update your graphic drivers
Hit the Windows key, type Device Manager in the search bar and click Open.
Locate the Display adapters to expand, right-click on your driver and select Update driver.
Click on Search automatically for drivers.
If you find updating drivers manually to be tiresome, the good news is that you can use an automatic tool. This amazing tool will automatically detect outdated drivers on your system and download and install updated versions of them in just a few clicks.
3. Disable antivirus temporarily
Hit the Windows button, type Windows Security in the search bar and click Open.
Click on Firewall & network protection then select Public network.
Locate Microsoft Defender Firewall and toggle the off button.
4. Scan for viruses
Press the Windows key, search Windows Security and click Open.
Select Virus & threat protection.
Next, press Quick scan under Current threats.
Wait for the process to finish and restart your system.
If none of the above works for you, you can uninstall and reinstall the game. You can also try updating your OS and see if this fixes the Horizon Zero Dawn crashing issue.
On the flip side, this is not the only game you can enjoy. Guerilla Games have an amazing portfolio so it is worth considering other masterpieces.
File Explorer is the program you should open whenever you’re trying to locate your different files on Windows. This program makes it easy for you to go through your computer files. However, sometimes, the program can be slow or won’t budge and fails to open at all.
Most of the time when File Explorer won’t open, it’s a problem with known easy fixes. If you’re having trouble opening File Explorer, then this post might just be able to help.
Why won’t File Explorer open in Windows 11?
If you’re trying to open File Explorer, but it won’t open, there could be several reasons for it. Here are the most common reasons:
Corrupt/missing registry keys – If one of the registry keys has been missing or deleted accidentally, then your File Explorer won’t be able to work properly anymore.
Virus infection – Your system is infected with malware that is blocking the program from opening. That’s why we recommend you stay up-to-date with a reliable antivirus program.
Program is already running – If you have multiple instances of File Explorer running at once, then this would cause an error in opening up another instance of it.
Now that we are aware of why File Explorer won’t open, let’s attempt to resolve it.
What can I do if File Explorer is not opening on Windows 11?
Before troubleshooting File Explorer, there are some preliminary checks you can make to determine if the problem lies within your computer or outside of it. Here are some things to check:
Restart your PC. This could help clear any temporary files that may prevent File Explorer from opening.
Now, let’s check out more solutions below.
1. Restart File Explorer
Hit the Windows key, type Task Manager and click Open.
Locate Windows File Explorer, right-click then select End task.
Click on File on the top left corner and select Run new task.
In the dialog box that appears, enter explorer.exe to restart File Explorer.
2. Clear File Explorer history
Hit the Windows key, type Control Panel and select Open.
Search and click open on File Explorer Options.
Navigate to the General tab and select Clear next to the Clear File Explorer history option.
The history of files that you have opened in File Explorer can sometimes cause the app to crash or freeze. Clearing the history works best if Windows Explorer won’t restart or is taking forever to load.
3. Run a System File Checker (SFC) scan
Hit the Windows key, type cmd in the search bar, and click Run as administrator.
Type the following command and press Enter: sfc /scannow
This scans all protected Windows files and replaces incorrect or corrupted ones with good copies.
You can also use a third-party program to perform a more thorough scan of your system files and detect other errors to make sure everything is fine.
4. Run a virus scan
Press the Windows key, search Windows Security and click Open.
Select Virus & threat protection.
Next, press Quick scan under Current threats.
Wait for the process to finish and restart your system.
Click on Windows update, then select Check for updates.
Download and install if any are available.
6. Disable antivirus temporarily
Press the Windows key, search Windows Security and click Open.
Click on Firewall & network protection then select Public network.
Locate Microsoft Defender Firewall and toggle the off button.
7. Restore File Explorer to default settings
Hit the Windows key, type Control Panel and select Open.
Search and click open on File Explorer Options.
Navigate to the General tab, select Restore Defaults at the bottom and click OK.
Sometimes when you install a new program or uninstall another program, it can change the settings in File Explorer and cause it to stop working properly. If this happens, you can restore the default settings.
How do I make File Explorer open to this PC on Windows 11?
If you’re using Windows, File Explorer opens to your Quick access location by default. However, you can change the default location to any other drive or folder on your computer.
If you want File Explorer to open to This PC in Windows instead of Quick access, here’s how to do it.
Open File Explorer and click on the View tab.
Select Options.
Click on Open File Explorer to and in the drop-down select This PC then hit OK to save changes.
If you have tried all the above but are somewhat unlucky, there may be a more serious underlying issue with your PC.
The easiest way to get around such a problem is to restart your computer in Safe Mode. Restarting in safe mode disables all third-party apps and services that can cause problems on your computer.
It boots your PC with only the basic functions running. This means you won’t be able to use a lot of features so it can be very useful for troubleshooting problems like this.
Alternatively, you can opt for another file manager that comes along with far more features than File Explorer and give you better organization.
Apart from File Explorer not opening in Windows 11, users have also complained that File Explorer keeps crashing. If you are experiencing this issue, refer to our detailed guide on how to fix it.
We also have an exciting article on how to enable the dark theme on File Explorer to reduce eye strain or just get a break from the old usual light theme.
For any additional thoughts on this topic, let us know in the comments section below.
The File Explorer, sometimes also known as Windows Explorer, is the Windows GUI that helps you access, edit, and manage your data, files, or other folders—all from a single place.
Interestingly, most users who have probably never looked it up formally, nevertheless have some vague idea of what it is and how it works. However, what most people are unaware of is how to make the most of the Explorer app. In this article, we’ve tried to tackle that. So, let’s get started.
1. Change the default home screen
When you launch File Explorer, you’ll quickly see that it’s set to Quick Access View by default. Although it’s just the perfect setting for some, everyone’s not a fan.
Luckily, you change this default look on your Windows 10 or 11 computer with only a few clicks, and set the default view to the Home Screen instead. Here’s how:
If you’re on Windows 11, click on the ellipses option from the top taskbar of your PC and select Options from there. From there, select the toggle option for Open File Explorer, and pick This PC. Finally, click on OK to save the settings.
Restart the File Explorer and you’ll find that the default view has been changed.
2. Manage the View
By default, the File Explorer arranges your files and folders in the Details format. However, you can change this setting without much hassle.
Just head to the View option from the top, and select the settings you’d like to use. You have a host of arrangements to pick from: Large icons, Small icons, List, Tiles, and so on. Moreover, if you click on the Show, you’ll also get to pick from different pane settings to select from.
You have three primary options: Navigation pane, Details pane, and Preview pane. You can try them all out and select the setting that suits you best.
3. Checkboxes, extensions, and hidden items…
Let’s stick with the View option from above. Interestingly, apart from helping you fiddle with icons and the display in general, you’ll see that the app also gives you the feature to manage your extensions on your PC.
On the View tab, click on Show and select File name extensions. This way, you can choose if you’d like File Explorer to disable file extensions along with the files. Also, you can enable check boxes for every individual file, making it easier to copy, cut or delete your files and folders. And last but not least, you also have the option to make all hidden files available that you might have on your PC.
4. The Filter feature
Wouldn’t it be better to remove specific files and deal only with the ones you currently want to? Luckily, with the Filter feature, you can.
To use this feature, click on the Filter icon at the top, and select the file you’d like to remove from your File Explorer. As you can see below, you have a wide variety of options to pick from: Word, Excel, PowerPoint, Images, Videos, and so on.
Pick one file format from above. As soon as you do, all the files of the specific format will be filtered out of Explorer.
Managing your files or folders on Windows
The Windows File Explorer makes ordering and managing your files and folders a cakewalk.
If you’re a Windows user who has been using Windows for a few years now, then most of these features won’t surprise you. However, for those still new to navigating the world of Windows, we’ve covered many guides before that can help you tweak your Windows settings with relative ease.
Windows 11 comes with two different power plan options: one is a balanced performance power plan, while the other is a high-performance power plan; both are interchangeable.
The question is, which power plan is worth switching to? In order to figure out the answer to this query, browse through this article built upon a balanced vs high-performance power plan.
What are the key differences between a balanced and high-performance power plan in Windows 11?
Windows 11 comes with two different power plans: a balanced-performance power plan and a high-performance power plan, and both options are interchangeable.
You should also have some best PC software monitoring software to monitor the performance of your system. Here we will explore the differences between the two power plans and help you decide which one is right for you.
Power consumption difference – The main difference between the two power plans is the amount of power each uses. The balanced-performance power plan is designed to save energy, while the high-performance power plan uses more energy to provide better performance.
Performance difference – The high-performance power plan is designed to provide the best possible performance, while the balanced-performance power plan sacrifices some performance in order to save energy.
Increased FPS – The high-performance power plan also offers increased FPS for gaming and other graphics-intensive applications. The high-performance power plan is the better option if you’re a gamer or use applications requiring a lot of graphical processing.
Which power plan should I use?
The answer to this question depends on your needs. You should use the high-performance power plan if you need the best possible performance. However, the balanced-performance power plant is better if you’re more concerned about saving energy.
In general, the high-performance power plan is best for gamers and other users who require the best possible performance. The balanced-performance power plant is best for most other users.
How do I switch between a balanced and a high-performance power plan?
1. Use the Settings app
Click on the Start button from the bottom of the screen and click on the Settings option.
Click on the System tab from the sidebar and select the Power & battery option.
Then click on the Power mode dropdown and select your desired mode from the dropdown menu.
Click on the Search icon from the bottom of your screen, type cmd, and click on Run as Administrator.
Type the following command in your terminal and press Enter: powercfg /list
Once the command is executed, you will list available power plans.
Then, to enable the Balanced mode, enter the following command and press Enter: powercfg /setactive 381b4222-f694-41f0-9685-ff5bb260df2e
Then, to enable the Power saver mode, enter the following command and press Enter: powercfg /setactive a1841308-3541-4fab-bc81-f71556f20b4a
To enable Ultimate performance mode (this mode is not available on all systems), enter the following command and press Enter: powercfg /setactive 8c5e7fda-e8bf-4a96-9a85-a6e23a8c635c
If you are looking to have the best performance system for you and are confused about what hardware you should choose. Then stop worrying, as we have a guide for you on the best hardware for Windows 11 performance.
We hope that this article has helped you a lot in clarifying the differences and methods of switching modes. If you have any further queries in your mind, do let us know in the comments section below.
Accessing items or web pages on Microsoft OneDrive may run into issues, resulting in this item not existing or is no longer available on OneDrive. Likewise, you can encounter a not valid file name error on OneDrive when accessing it.
Why does OneDrive say that this item might not exist?
This item does not exist or is no longer available on OneDrive is mainly due to the change of name of the default document library on the OneDrive site. When a user changes the name from one document to another, accessing it with the previous name will be impossible.
However, a couple of other things can cause the error these files are no longer available on OneDrive. Some are:
Not having permission to view the item – Users may encounter issues with viewing some items or folders if they don’t have permission to use it. So, it can indicate that the item is not available for you.
In the Run diagnostics window, input the necessary data in the User Principal Name (UPN) text bar, then click the Run Tests button.
After the diagnostics are complete, check if the test results indicate that the default document libraryname was changed.
If it was, check the box for I acknowledge by clicking Update settings will make the change(s) described above to the tenant configuration.
Then, click the Update Settings button. It will repair the default Document library and set it to its original name.
2. Clear your browser’s cache and cookies
Launch the Chrome browser on your PC.
Click the Menu button, select More Tools from the drop-down, then click the Clear browsing data option.
Choose a time range for the data to be cleared, check the boxes for the Cookies and other site dataand Cached images and files options, then click Clear data.
After completing the process, restart your browser and check if the error persists.
Clearing your browser cache and cookies will fix issues with the browser data causing problems with OneDrive Documents.
Click the circular arrow at the top of the URL bar while on the OneDrive page. The page will refresh.
Navigate to the item prompting the error and click the three dots next to it.
Some users report that they were able to access the document prompting that This item might not exist or is no longer available on OneDrive. So, we recommend using another browser and checking if you can fix the issue.
An excellent option you should give a try is Opera One browser. You can immediately send files, links, and notes between your devices and easily browse with increased privacy and security for free.
By using specialized survey software for academic research, you can create surveys that are either anonymous or personalized and then use the results to get answers to your scientific queries.
There are dozens of reliable tools for academic research, but finding the specific one to collect data, experiences, or feedback, may be an uphill task as you’d have to test-run each to discover a suitable one. Luckily, we’ve already done this for you!
What should I look for in a survey app?
Among the important things to consider are data management, distribution, and formatting, ease of use, pricing, versatile appearance, and branding.
Of course, we also considered the capabilities for sophisticated analysis, the accuracy of results, simple uploading, and a responsive experience.
We did the hard work for you to help with that dilemma by sharing the best survey software for academic research while highlighting their key features.
What is the best survey software for academic research?
With Easyfeedback, it is very easy to create great surveys for academic research, as the tool provides all the necessary functions to create, conduct and analyze surveys.
Build your questionnaire or quiz simply by dragging & dropping, 14 different question types, set one or more questions per page, include media like images, audio, and video, and use simple or complex branching logic depending on response behavior.
Then, change the background image, logo, and colors of your survey exactly as you want them.
After that, it’s all a question of how you disseminate the results but Easyfeedback has plenty of answers in that department too.
For instance, you will be able to use different result views to filter answers and discover the right data.
You can create reports with individual or overall results, segment them or create comparisons. And then, send reports easily to anyone.
The most important aspect is that this solution gives you all the tools to send the survey to your target, including by email, link, social media, QR code, and even website integration.
And if you’re not the most creative person or you’re simply in a rush, get inspired with over 60 free templates available.
Take a look at its most important features:
Easy to create surveys, forms, and quizzes for any purpose, especially for academic research
More than 60 free and fully customizable survey templates
Change the background image, logo, and colors of your survey exactly as you want them
Export results in SPSS, CSV, XLS, and PDF
Invite participants via email, social media, QR code, and more
Extensive evaluation possibilities
Great support team available
Easyfeedback
This great solution comes with all the tools necessary to create and send your survey to your target audience.
The Connecteam software and app is an excellent all-in-one survey creator for academic and workplace team management purposes.
Project and task management, communication features, scheduling, time tracking, checklists, digital forms, and staff training are all included in the Connecteam app and software.
With this tool, you can effectively inform, teach, supervise, and manage staff while also increasing productivity and doing your research for academic purposes.
When you opt to build your own Survey, you may include rating, multiple-choice, open-ended, yes or no, and free text questions.
Connecteam may be accessed via a web browser, a Mac or Windows computer, or a mobile app for Android and Apple devices. Although the company does not share information on integrations, it does provide virtually all services needed by companies directly within its desktop and mobile apps, including job training capabilities.
Let’s review some of its key features:
User-friendly interface
Customizable templates
Push notifications for survey status
Anonymous polls
Digital polls in real time
Staff insights
First mobile-experience surveys
Nonetheless, we want to highlight Connecteam’s utilization of the engagement survey. The way they incorporate it into their curriculum is extremely unique and unlike most of what is currently on the market.
Essentially, they prioritize employee communication by assisting businesses in using honest feedback to make the best possible business decisions.
Connecteam
Get real-time survey data and relevant insights to help you make informed decisions and act on challenges.
SurveySparrow is a complete customer experience that provides effective support for enterprise surveys, quick offline surveys, website chatbots, and many more.
You can employ this intuitive survey tool and conduct the research in a logical manner. It includes a logical survey builder, assorted question types, and smart surveys with variables or piping technology.
For academic purposes and requirements, you have insightful tools that can add value to your projects and bring qualitative findings.
Hence, there are helpful features such as an executive dashboard to access data from all surveys in one view, and customer journey maps to track and analyze respondents or see essential metrics.
Plus, you can benefit from improved insights about your research with reporting tools, cross-tabulation, or advanced filters to sort out questions and answers.
You can even schedule survey reports to your inbox and get notified via email about dashboard news, staying updated about any actions.
In addition, you can have recurring surveys and choose the exact date and time to share your surveys and conduct resourceful analysis.
Take a look at its best features:
White label surveys
Embedded and conversational forms
Data-rich dashboards
Case management tools
Smart survey sharing options
Dedicated mobile survey types
Eye-catching surveys themes and builder
Video surveys
SurveySparrow
This all-rounded survey software offers you smart user tools and thousand of functionalities for eminent studies.
This cloud survey solution is created for custom mobile devices to conduct effective analysis and gather your data with ease.
Using this mobile survey provider, you can create offline surveys with built-in functionalities for multiple platforms.
The software delivers productivity tools for creating descriptive surveys and reports with useful apps like Microsoft Word or Excel.
You can as well utilize this mobile survey platform and design it with photos and annotations, audio or videos, sketches, file attachments, or GPS and mapping support.
Plus, the Forms on Fire application comes with other app integrations that help you transfer and manage survey data between different platforms, such as Google Sheets, Drive, Dropbox, Sharepoint, or Microsoft Azure.
Another significant capability lets you automate repetitive tasks and use dispatch office to mobile, recurrent tasks, structured workflows, the first available option, and so on.
Take a look at its best features:
Analytics tool with summary data
Offline printing
Barcode and NFC Scan
Task management
Hidden fields option
No coding skills required
Available with Windows, Mac, and mobile devices
Forms on Fire
Benefit from all mobile survey functionalities and investigate public opinion with future-proof automation.
QuestionPro – Great tool for questionnaire creation
This web-based survey software comes with multiple pre-built templates and over 30 types of questions which you can use to create personalized surveys and questionnaires for your academic research.
Among its features includes email, integrated pop-ups, and posting of your survey on social media channels like Facebook and Twitter.
Each of the surveys you create in QuestionPro has a survey progress bar that lets your respondents know how much of the survey is left to complete (in percentage), plus you can ensure primary questions are answered by keeping some fields mandatory.
It also computes scores on how many questions got answered and presents the overall scores once it is completed.
You can then export results into CSV, Excel, and other formats or share them through the mobile app.
Other great features include the multimedia integration for customized surveys that contain videos, pictures, and emoticons that make the survey more interactive for your respondents, plus you have full control over the survey.
It is also multilingual, with a full set of reporting features like text and trend analytics, segmentation, and real-time summary.
For academic research, you get unlimited access to the highest-paid license if you’re a student in an academic institution.
The most important features include:
Over 30 types of questions are available
Post your survey on social media channels like Facebook and Twitter
Text and trend analytics, segmentation, and real-time summary
Export results into CSV, Excel, and other popular formats
The app is available in multiple languages
QuestionPro
Manage all your surveys efficiently and conduct powerful analyses with academic tools.
SurveyMonkey – Great tool for academic research studies
This survey software for academic research lets you launch any survey on its easy-to-use platform, in which you can tailor surveys based on your audience and variables.
It reaches out to millions of respondents and delivers real-time results, even with a huge amount of data that is collected, analyzed, and reported using its tools.
Additionally, the data and report analysis are easily exported in different formats and shared for collaborative purposes.
The great thing about SurveyMonkey is its features, which include built-in configurable attributes that make the creation, collection, and analysis of data from many respondents so easy.
Some of the powerful features include a wide question bank with customizable questions, a reporting and analyzing tool, survey templates, security encrypted surveys, answer validation, custom branding, SPSS integration, real-time results, and you can export results to Excel/PDF.
Design academic research surveys with confidence, reach the people that matter most via email/chat/mobile/web or social media and maximize your data’s potential.
Trusted by over 100 schools worldwide, this award-winning survey software for academic research is built to help researchers and scholars generate better results for better analysis and conclusions in their research projects.
It is the first software solution to use artificial intelligence in analyzing survey data, with intelligent and advanced features called Qualtrics IQ, and machine learning to make your sophisticated academic research simpler.
With a plethora of tools to create, test, and modify your survey instantly, you can get your insights easily and as fast as possible, and in case of issues, their professional experts are available 24/7 via phone, email, or chat to assist.
It is an intuitive survey software with bespoke solutions for multiple uses including research and development, segmentation, and strategy among others.
Whether you’re a beginner or expert, Qualtrics makes research simplified, using the Stats IQ that helps you decipher data, identify trends, and derive predictive models, while guiding you towards the strongest statistical relationships and translating these into simple and actionable terms.
Its Text IQ capability gives actionable insights by using AI and natural language processing to analyze open texts and then suggest relevant topics with sentiment scores to each comment.
Qualtrics also has an information repository or IQ directory that stores all the data including emotions, sentiments, beliefs, and preferences, for use in your academic research.
Additionally, it supports multi-channel distribution whether that is email, SMS, mobile, social media, or others, so you can embed your survey wherever you like or use QR codes to get people to take them.
Take a look at its best features:
AI and machine learning capabilities
Multi-channel distribution including SMS, mobile, and social media
Helps you decipher data, identify trends, and derive predictive models
This is yet another online survey software for creating and conducting surveys for academic research.
It has a customizable interface that makes for an easy and interactive experience for your audience, convenience when conducting the actual surveys, and integration into social media and other digital platforms.
At the end of the survey, this software offers options to analyze the data via advanced reporting and data export features, in formats including PDF, PowerPoint, Excel, and Word, after which you can share or distribute them for thorough analysis.
Among its best features are email distribution, mobile and embeddable surveys, question library, skip logic, templates, kiosk survey, support for audio/image/video, custom survey URLs, and data analysis among many others.
Technology has made everything easier in terms of making forms and surveys exciting and fun for people to fill and submit.
TypeForm is a survey software solution that has changed the conventional forms and surveys, using interactive mediums that make your respondents want to be part of the process.
Making a form in this tool is so easy, and its features include a drag-and-drop feature, flexible form creation, multiple question types and pictures, rating and opinion scales, and many more.
It has a user-friendly and interactive interface, a free API to integrate surveys and forms with other apps, and data export options.
A unique feature that makes this survey software powerful is the Logic Jumps, with which you can integrate your survey logic using Typeform tools.
Your return rates will also increase and you’ll get more credible and reliable data for further processing and accuracy of results.
You can also make an unlimited number of forms and/or surveys with its free account, and rest assured of security what with its 128-bit SSL encryption of forms and surveys.
Any student or teacher that is highly organized will tell you that they rely on a class schedule maker app to keep everything together and tidy.
Time management is the key to solving many of life’s problems, and even though you can achieve that with information organizer software, the focus of the following apps are on students and teachers.
What should I look for in a class schedule maker?
The best class schedule maker for students is all dependent on what you want and what you’re looking for. There’s no one singular best app that can do everything well at once. Some specialize.
For example, maybe you want an app that’s well structured or one that’s highly customizable. There are also apps with a very clean user interface, but there are super dense with tons of information on them.
Some schedule makers feature integration with others. That said, this will guide WILL help you by listing out the best class schedule maker apps on the internet.
You may better know this by its older name: Adobe Spark. Since it dropped its old name, Adobe Express has gone through quite a facelift. It’s worth pointing out that it shares similarities with Visme.
It has thousands of templates, free images, backgrounds, and other types of design assets available to you. The free version is pretty basic in what it can do.
You get some editing tools and image effects to brighten up your schedule, but what you have from the get-go is more than enough for any student or teacher.
On Express’ free version, you can change the layout and fonts with ease. Creating a schedule is as simple as dragging and dropping an asset on the page.
Key features:
Works on any platform
Browser-based
Wide array of available templates
Simple user interface
The premium adds even more design assets, new tools like refined cutouts, and the ability to export to and from PDFs.
And like Visme, Express has an easy-to-follow user interface. It’s available as a desktop app and a web browser service so it’s one great online class schedule maker.
Adobe Express
Completely focused on improving curriculum and school calendar tactics via the use of user-friendly instruments.
Bookeo is an all-in-one scheduling and management software that enables you to customize your school schedule easily.
You can access your Bokeo online class calendar and effortlessly set what each teacher or colleague can see.
It has an automatic email and TXT notifications feature, meaning your teachers and colleagues will be up-to-date with new, rescheduled, or canceled courses.
It also offers a printing feature that allows you to print class rosters with participant specifics, payment details, and supplementary options selected during your registration.
Other key features of Bookeo include:
Automatic notifications and reminders
24/7 access for students and teachers
Mobile version app
Registration steps tracking
Bookeo
Easily track your progress or other useful information with the Bookeo software.
If you’re looking for a powerful web app that can be used to create school schedules, you might want to consider using Canva.
You can choose between many available presents, and create perfect graphics for any purpose, including your classroom.
With the wide array of available templates to choose from, you can easily create anything you want. Or if you’re feeling creative, you can create your own templates from scratch.
Regarding the supported elements, Canva allows you to all sorts of lines, tables, and other graphics, but you can also add photos, text, and backgrounds.
This is just the tip of the iceberg, and if you want an online timetable maker, then we encourage you to try this tool
Key features:
Available on any platform
Works in any browser
Many templates to choose from
Easy to use
Canva
Using Canva, you can personalize your school schedule by modifying the style of your template or adding your own art.
Kicking things off is Visme, a schedule creator with a good reputation among some big-name corporations and institutions like IBM and Penske.
The service has an easy-to-understand user interface and an even easier method to create schedules. No graphic design college degree is necessary.
All you need to do is select a template, add your class details, and choose a color palette. The palette allows you to assign a color to certain time blocks in order to create a schedule that’s quick to read.
You can also add photos and icons to the time blocks for a better visual overview. And if you don’t know how to do something, there are plenty of How-To guides on Visme.
Key features:
Works with all sorts of objects
Can be used to create any type of graphics
Supports videos and animations
Perfect for branding
There is a standalone PC app and a version for web browsers, which is great if you’re low on space. And there is multiple premium version available for business or those who want more out of a personal account.
The higher tier includes the ability to add video, integration with third-party apps, and 24/7 email/chat support, thus making it a perfect class schedule maker for teachers.
Visme
The schedule may be shared online as a public or private link or saved as a JPG, PNG, PDF, or HTML5.
Express and Visme have a lot of bells and whistles on them that help beautify the look of a schedule. But if you don’t want any of those extra flourishes, then you should out check out Free College Schedule Maker.
It’s a straightforward web browser application that lets you create a schedule for free. Nothing is behind a paywall or a premium tier. What you see is what you get.
On Free College Schedule Maker, you can customize the layout by changing the start day of a week as well as the time increment from 30 minutes to an hour.
You can also choose to have weekends on the schedule if you have classes on those days. Schedule Maker has an export/import feature where you can download everything as a CSMO file or upload one from your computer.
That way, you can upload a pre-made schedule without having to create a new one from scratch. And if you don’t want a CSMO file, the schedule can be downloaded as an image instead if that works better.
All in all, it’s a decent class schedule maker that can make printable documents.
Next up is Doodle, which is similar in form and function to Free College Schedule Maker but it’s better used for online classes. It’s a web-based app that’s also available on mobile as an app.
Doodle is ideal for people who want a straightforward app like Schedule Maker but has the neat advanced features other services have. There is a free version on the website, but it’s really only good for scheduling meetings.
You can’t do anything substantial with the free version, although there is a 14-day trial where you try out the premium features. The subscription service adds notifications for deadlines, tracks email invitations, and has a special bot for Slack rooms.
The higher tier throws in third-party integration with services like Zapier, which allows people to integrate other apps to automate workflows. With Zapier enabled, Doodle connects to Facebook, Paypal, Mailchimp, and a lot of internet services.
Logos for a school or class can be added too. May be out of reach for college students, but teachers and professors can get a lot of usage out of it.
If you prefer a desktop app and are tired of using an internet browser, then you should check out iStudiez Pro. Right off the bat, you can tell that it’s a brightly colored and coordinated calendar app.
In fact, iStudiez is actually a pretty good general calendar app to use. So if you ever get tired of the native app on Windows 11, you should keep this one on hand.
On the left-hand side, you’ll see a variety of tabs. These tabs open sections that allow you to enter Assignments and class semesters into your schedule.
iStudiez allows you to look at your classes from a weekly view or a daily view. The Week View lets you see what you got planned for the week and the Day View shows what tasks you have for that day.
There’s also a premium version that keeps track of your GPA. As you receive grades throughout the year, you can enter the grade and point value you got then iStudiez calculates everything for you.
Another great premium feature is the multi-platform sync for unifying your schedule across the desktop and mobile apps.
And the final entry of this is myHomework, another online class timetable. Like many of the entries on this list, it has a simple and clean user interface with features that help out both students and teachers.
myHomework has been formatted to allow different types of class schedules. It has categories for block, period, and time-centered scheduling. The app also has options for inputting assignments and tasks.
You can then prioritize those tasks so you can focus on the most important ones. Notifications can be set as reminders for upcoming deadlines so you don’t miss a single thing.
A neat aspect of myHomework is it doesn’t require an internet connection to save your information, the one thing that the other browser-based apps don’t have.
And in case you were wondering, there is indeed a paid version of myHomework. The premium version allows teachers and students to share assignments, add file attachments, and change the theme.
But if you’re on a budget, then this is a great free timetable app for students that you mustn’t miss.
There are no shortages of organization apps available for Windows 11. If you’re a busy professional, there are tons of weekly planner software out there like Monday.comwhich is a cloud-based app to help people keep track of projects.
It all comes down to what you’re looking for in a class timetable maker, and we’re positive that you’ll find something that meets your needs on our list.
We hope that you enjoyed our guide and that you found a suitable timetable PC app for students. Even if you’re a teacher, don’t be shy to try one of these tools, you might find them useful.
In case you’re looking to enhance your productivity, you might want to consider these great productivity apps.
What is your app of choice? Let us know in the comments below.
While some are focused on how to develop online content, others are eager to find the best quiz-maker software that will give them as many features as possible while maintaining functionality and an intuitive interface.
Read on as we round up some promising offerings in the quiz-making field, and pick your favorite software to make quizzes for better knowledge assessment.
Can I create quizzes for free?
The answer is a resounding Yes! With the help of tools such as Fyrebox, which are discussed further down in this article, it is now possible to generate intricate quizzes without spending a dime.
Some applications are available at no cost whatsoever, while others may provide a free trial version or charge a fee for a portion of the service.
Which are the best tools to create quizzes on my PC?
If you want beautiful and complex quizzes but know nothing about such tools, Outgrow will help you get outstanding results with minimum effort.
Its quiz maker comes with many professionally-looking layouts that are fully customizable with just a few clicks.
Moreover, you will get access to over 1 million free stock images provided by Unsplash. Of course, you may also add GIFs and videos to your questions and results.
The WYSIWYG quiz builder has drag-and-drop functionality, so you can add elements to your work with a flick of the mouse.
For more advanced users, CSS can also be used for advanced design features.
After the quiz, Outgrow allows you to add social media widgets or share your quiz in your newsletter, emails, landing pages, and even ads.
But this is not all because the app features graphical dissemination of your quizzes so you can integrate the results.
Outgrow
Create fast and eye-catching quizzes with a tool that offers drag-and-drop functionality and great integrations!
Jotform Quiz Maker is a feature-packed online tool that allows users to create dynamic quizzes and surveys easily.
It has a user-friendly drag-and-drop design interface and offers a rich template library, allowing you to build well-designed custom quizzes without spending hours on them.
You can also use their more advanced features such as conditional logic and calculations, which means unique, dynamic quizzes that get graded automatically for everyone.
The powerful data management features allow you to create auto-generated reports, graphs, and dashboards and analyze your statistics effectively.
You can set up autoresponders and reminder emails, build approval flows, and set time or submission limits for your quizzes.
Jotform also allows you to embed your quiz into your website, share it with a link or QR code as well as build apps with multiple quizzes and documents in one place.
Jotform Quiz Maker
With this tool, you can make the most unique and interactive quizzes for any purpose!
Interact is a platform that helps you create quizzes with ease. These quizzes have various uses, such as entertainment, contests, or just content for generating leads for your brand.
It allows you to generate different types of quizzes depending on their purpose. You can use assessment-type quizzes to test the knowledge of your students or your friends and a personality-type quiz where the takes will see the personality types that apply to them.
Also, you can create a scored quiz to compete with your friends or create a professional contest with real winners. Each participant will get a score based on the number of correct answers, and in the end, each one will see his score.
With Interact, you can create quizzes using hundreds of customizable templates or start from scratch. These quizzes can help you increase your online visibility.
Use quizzes to your advantage by adding your brand to the test, embed it into your website then just nerd out all the data that you can use subsequently to optimize your website, brand, or just the content you produce.
Find out more about the people who follow you or your content, and create personalized offers or products for them. The sky is the limit.
Interact
Simple and fast way to create professional quizzes for any purpose.
Adobe Captivate is the best choice when it comes to creating quizzes and projects that can be edited on desktop display and mobile.
To design authoring eLearning, it is needed only to choose from created templates and quiz slides that specialists already created.
It is interactive and easy to use this quiz maker software as you have to swap out the desired elements like texts, images, characters, and videos in order to publish the quiz.
You can also set quizzes that are integrated into multi-module eLearning courses, so be sure that your audience is completing the course to get to the quiz.
You don’t have to complicate yourself in knowing how to program for creating an outstanding quiz, so you may use drag-and-drop features as well as customizable images and interactive elements.
This intelligent tool allows users to modify mistaken or answered questions in order to submit all questions at the same time. One of the most useful features is that you can calculate the score only for the branch audience.
With this software, the entire process has gotten easier, because it facilitates completing the quiz by showing the user the progress in getting to the final response.
Allowing users to preview the answered questions after they saw the score.
Moreover, you may convert PowerPoint presentations in order to create eLearning course videos in Adobe Captivate where you can add quiz sections.
Adobe Captivate
Get your hands on the best tool for creating excellent eLearning courses and educational materials online!
This quiz creator app is free to download and may be used in one of two ways: conventional display or dialogue display. It is excellent for individual use, academics, entrepreneurs, and marketing strategies.
It’s as effortless as filling out forms and shifting a few modes to customize the quiz’s contents. Fill in the directions, questions and answers, and a result at the closing of your survey.
With all of the web and app technologies available today, the major goal of a quiz builder should be user experience. You are not making a quiz for yourself, but for the players. As a result, it should be visually appealing so that participants want to participate in your quiz.
Of course, your quiz should be mobile-friendly, and the quizzing software should provide numerous options for sharing your quiz, depending on how and where you intend to utilize it.
Depending on why you want to develop a quiz, the quizzing app can register data such as player answers, contact information, and statistics.
Fyrebox
Are you seeking blogging tools that can assist you in creating quizzes for your followers? Fyrebox allows you to make quizzes in minutes, without coding.
This is the best quiz-making software to make printable quizzes with easy and clear formatting.
It creates tests and answer sheets with multiple choices, short answers, true/false, match columns, and fill-in-the-blank questions.
It has an easy interface with an all-inclusive sidebar, and the tests come with consistent formatting; plus, you may save them for future access online.
The great thing about Easy Test Maker is the variety of question styles, saving tests online for remote access from anywhere, and automatic numbering that adjusts according to questions when you delete or reorder them.
However, you cannot create online tests with this tool. Plus, there’s a limit of 25 tests with every teacher account, and the free version’s formatting is not as good too.
Other features include export to Word or PDF, spellchecker, bold/italicize/highlight for words, and automatic generation of alternative test versions to reduce cheating.
With the paid-for version, you can insert graphics, set time limits, print individual graded tests, and automatic grading for online tests.
This quiz maker offers a secure and professional online-based testing service that’s easy to use, customizable, and saves you hours of paperwork.
Some of the benefits you can gain from using ClassMarker include a secure and private platform, easy-to-define test settings, custom certificates and branding of exams, and public and private options for exams.
It also provides assistants to help manage your account, automatic grading that is viewable in real-time, no software installations required, plus multiplatform use.
Feel free to create tests, view results, analyze statistics, and deliver tests just the way you want them by using your own branding and customization, or themes each time.
ClassMarker integrates with your website, and you can optionally set a charge for your exams to sell quizzes online and get instant payments.
Other features include unlimited quizzes and questions, white labeling of exams, importation of questions and tests, online certifications, multilingual student interface, quiz maker Webhooks, or API access.
The downside is the free version has ads, plus creating questions can be tedious. You also need internet access to create the tests and for students to take the tests.
The free version also can’t save more than 100 results for group tests, plus it is limited to multiple-choice, true/false, free tests, and grammar questions.
The premium version, however, provides certificates, and email results, and you can upload/embed images or files.
This quiz maker software for PC is perfect for education exams if you want to create secure exams that prevent cheating, add instructions, and schedule tests.
It is also perfect for employee assessments, online tests, personality quizzes, surveys, and polls. ProProfs Quiz Maker lets you create and deliver online exams and tests easily for students or even employees.
Advanced options include free templates, data security, and automated grading, and you can add surveys or polls and get feedback from your learners.
It delivers detailed reports and statistics for your quizzes so you may analyze your students’ performance.
Simply create a quiz (with over 6 types of questions), brand it with your logo/colors, and add videos or images and other media.
Once done, you can share your quiz via social media and blogs, embed it on your website, and share the link to the quiz, then analyze the results by instant grading or getting statistics and reports.
It is free and simple, plus the quizzes can work across multiple devices and operating systems. It also comes with security and confidentiality with passwords, privacy controls, and more.
Some of its flaws include lots of ads on the site. However, the basic version has unlimited quizzes and attempts, adds various media, and delivers reports and tracking.
With the paid or Pro version, you can get 500MB of storage and a question bank.
With this best software to make quizzes, you can create, discover, and even share online quizzes for free.
GoConqr has millions of learning resources that have been created by teachers across the world, so you can search for any subject you like and find quizzes at any level you want.
These tests also help students learn how to take the exam, whether it’s science, language, or arts, there are quizzes on every topic you need.
One great perk is that knowledge assessments can be included in the learning or study routine to monitor progress and improve teachers’ planning.
The quizzes may be embedded online and shared, which makes this solution perfect for teachers and their students.
You can include one or more quizzes as part of a whole online course, and share quizzes privately and securely with Smart Links to get results on a class progression.
The full suite of content creation tools includes mind maps, flashcards, quizzes, notes, slides, a study planner, a library of resources, flowcharts, groups to exchange content and engage in discussion, and a course builder to curate resources in a course.
However, with GoConqr, users are limited to three subjects, uploaded resources are public, resources are crowdsourced, and it comes with many ads. The premium version has no ads and lets you create private resources.
Imagine messed student fee records, missing exams, inaccurate lesson attendance, or even confusing timetables. Now, these are some of the reasons why school managers insist on the best student management software.
What is student management software?
Also known as student information systems (SIS) or student records system (SRS), these are software created to manage daily school operations.
To do this, they come with capabilities such as attendance trackers, timetable creation, grade books, parent portals, library management, e-learning integration, and more.
There are both free and commercial options. Some are desktop programs while others are features-rich cloud-based student information systems.
What’s the role of student management software?
The software is very important in bringing order and accuracy to schools running. The automation also helps save time, cut fee losses and other wastages, and increase efficiency.
This attracts more goodwill (and student numbers) while smooth operations can be the first step toward future academic success.
After checking far and wide, we finally settled on the best student management software. Here is a brief preview.
This is a premium student management application and passes off as a powerful self-contained program.
Headaches like monitoring class attendance are well-taken care of with attendance reports available to your office instantly.
Coming to classes and scheduling, gives you full control of the class/subject setup. You can first adjust units and customize the grade scales to suit your school’s values.
Additionally, Gradelink lets you configure assessments and report cards/transcripts as you deem fit.
Also perfect is the highly customizable counseling section which offers administrators a flexible way to track discipline by recording incidents.
There’s a complete lesson planning, a feature to collect prospects’ information from the school’s website, and another for tracking students’ medical records.
Others include a flexible bookkeeping module to help you make sense of the dollars.
With almost everything you may ever need, this easy-to-use software should help your school fulfill its mission.
Gradelink
Monitor all your student’s class attendance, grades, medical records, and more with a top app.
This pushes school administration a notch higher by introducing intelligent statistics to help you make smart decisions.
Like GradeLink, it seemingly has all the essentials: From attendance records, discipline, fee follow-up, and an adaptable grade book tool, all the way to immunizations.
Academic assignments management and curriculum design are the other hallmarks.
The program’s registration feature is seamless thanks to its straightforward enrollment and re-enrollment steps.
The intuitive interface (including the mobile one) is quite impressive while printing is similarly made easy by print-friendly stylings.
Teachers, parents, and students are also kept up to date by prompt notifications and alerts.
You can additionally build customized reports for every staff member depending on their role.
Its other attraction is the outstanding customer support team which works with you all the way until you wrap your head around its workings.
In summary, this platform brings limitless possibilities.
If you’re looking for solid free school management software, then Fedena deserves your ears.
Its performance and abilities rival the very best and leave one wondering how they could afford to give all this greatness out for free!
Again it’s quite flexible: For instance, you configure and manage all your courses and batches to match your existing school’s systems.
Then, you’re able to create error-free timetables within a couple of minutes to ensure you’re maximizing your teachers’ and other employees’ availability.
Coming to admissions, you can customize the forms to help pull in only students who are the best fit for your school.
At the same time, the color-coded Fedena calendar keeps users informed of all the happenings around the institution.
Reports are as detailed as in any other be they for students, employees, fees schedules, and courses.
Parents, on the other hand, use their secured logins to easily monitor the various students’ reports including attendance and results.
In reality, Fedena is more than a mere student information system and a handy time savior.
An award-winning SIS, Infinite Campus remains one of the most scalable and dependable options on the whole market.
The idea behind the application is to help K12 schools better serve their students and interact instantly with the various stakeholders.
Not only do the built-in features allow easier data entry but they also ensure it is immediately available across districts or charters.
Just to mention, the program is built on a multi-tier architecture and will support districts and charters whether with less than twenty students or in excess of 300,000 students (scaling is forthright).
We also love the slick design which allows a successful integration of all administrative functions into the platform meaning that you can do everything from one window.
Still, navigation is easy and you should have your classes up and running without much hassle.
Interestingly, while many have voted it one of the very best, the company doesn’t rest on its laurels and keeps issuing free updates to make it even better.
Overall, Infinite campus is an accomplished choice for those looking for the peace of mind and professionalism needed to take their institution to the threshold of success.
Instead, schools are turning to the best student management software in droves to smoothen matters. As a result, there’s more effectiveness, efficiency, and harmony.
In an age where you own vending machines all over the world and they can be in the tens of thousands, having to micro-manage each one of them doesn’t cut it anymore.
That is why software designed specifically for that was developed. It can come in the form of downloadable software for your PC, mobile apps, or even online services.
These will streamline the vending process of your products, allowing you more freedom to focus on the more important matter at hand. In the long run, it can even help generate additional profit for you.
Vending machine management software can take your business to the next level. Remote access to all machine data simplifies all manual processes from delivery to maintenance.
Because there are plenty of such services out there, choosing one that is truly good can be daunting. That is why we’ve decided to compile a list of the best vending machine management software that you can get.
What is a vending management system?
Vending management software (VMS) is a tool that helps vending companies better manage their sales and inventory. Get a remote overview of all vending machines and know exactly what to do next so you can run your business more efficiently.
If you own lots of vending machines, you know that their maintenance is troublesome. A VMS helps you track real-time data which can increase service efficiency and sales. Also, you can create reports and see insights into specific data.
Furthermore, some software can create custom routes so you reduce supply and service time and increase productivity.
VMS is a great choice when you want to save time and increase efficiency for your business.
What is the best vending management software that I can get?
If you’re looking to manage vending machines in a way that is fast and efficient, then you will need a program like VendSoft.
This online service will automate every aspect of your vending machine business, allowing you to focus more on other things, increasing profits and reducing the time that is wasted.
Whether you have a few vending machines or an entire fleet of them, VendSoft is a great choice for optimizing supply routes, creating detailed reports, and micro-managing each of them.
Benefits:
In-depth reports for all or for individual vending machines
Smart supply route management and optimizing for the minimum time
Analyze every product mix for each route to maximize sales turnover
Parlevel – Best software for big vending machine businesses
Parlevel comes as an all-in-one business solution for vending machine management. This software will take care of everything there is and you just have to supervise and make the right decisions.
Its aim is to increase control and accountability over all your machines. Real-time monitoring of sales, micro markets, and OCS routes.
With Parlevel you can boost your sales by giving customers the option to pay with a reliable, 4G cashless reader. Get faster payments via NFC, credit cards, and Apple Pay.
Benefits:
Inventory tracking, product ordering and warehouse management
Detailed insights on hard data and boost productivity
Machine breakdown and stock-out alerts
More ways to pay so more cash on hand
Can provide multiple types of vending machines
7 days a week support for implementation, training, and troubleshooting
OTI Global – Best provider of contactless payment devices
OTI Global is a provider of some of the best technologies for contactless payments for vending machines, and it comes with its own vending management software.
They have a complete package for any business that wants to expand their payment methods and increase their cash on hand and provide faster payments.
With multiple certified EMV solutions, they shorten the integration time to market and provide great customer support for troubleshooting.
Benefits:
Real-time status of your vending machines
Automatically generated routes for product stocking
Detailed reports of vending data
Can be placed on any type of vending machine
Increase on hand cash and facilitate payments
Multiple solutions for different types of business
Nayax is a new way to manage your vending machine or other unattended automated machines to achieve more efficiency in your operations.
This management software for unattended machines will help you manage your business from afar, using advanced vending telemetry solutions.
With Nayax you will have the ability to monitor your machines with real-time information about stocks, payments, and any aspects regarding their working conditions.
Benefits:
Fast cashless payments for more cash on hands
Reduce spoilage with real-time alerts
Faster restock by knowing exactly the levels of inventory
Cantaloupe can be viewed as more of a conglomerate of software tools that work together in order to maximize the efficiency and profits of your vending machine operations.
This service comes with a host of tools, each of which is capable of taking care of every single aspect of business, from the payments it receives to the delivery it makes.
Boost profitability by bringing dynamic route optimization to your business. You will know exactly how many products to bring, their exact location and you can even schedule future routes for increasing efficiency.
Benefits:
Seed Cloud is the only web-based, end-to-end vending operations solution:
In an age of technology, it was only a matter of time before software that can take care of business for us was invented. Every simple process can be automated and can create a window for improvement.
While it cannot make your business run itself, it can be an amazing help to aid in boosting productivity, be more efficient in supplying and increasing your overall revenue.
In the long run, this translates into less time wasted, and more profits earned because of streamlined management and faster response times.
Windows 10 has brought us many exciting features, and there are still many others to look forward to. One of them is the ability to move apps from one monitor to another one quickly.
So, if you want to move apps to another screen in Windows 10, here are some straightforward ways to do it.
DisplayFusion makes dual monitor handling as simple as it gets. This feature-rich Windows desktop utility boasts a unique combination of powerful, yet intuitive options that will allow you to manage multiple monitors effortlessly.
Plus, your DisplayFusion experience is entirely customizable starting with the Hotkeys to the Power User Menu, TitleBar Buttons, and even appearance thanks to stunning wallpapers and screen savers.
Let’s quickly look at its key features:
Multi-Monitor Taskbars (to keep your windows organized on each monitor)
Impressive library of desktop wallpapers and screen savers from multiple online sources
Monitor Set up Panel (enable easy configuration with precise settings)
Monitor Splitting and Fading (to divide your monitor into multiple sections and dim unused ones while focusing on particular tasks)
Preset Commands and Remote Control from your smartphone or tablet
The best part is that you get to experience all these amazing features risk-free thanks to a free trial period, courtesy of DisplayFusion.
DisplayFusion
Make your multi-monitor life easier by using DisplayFusion’s full set of features.
1. Before you can swap between your monitors, you need to enable Extend mode on them. To start off, press the Windows + P keys on your keyboard to open the Project window.
2. Choose the Extend option from the list.
3. Launch the application that you want to move to another monitor, then minimize it in the taskbar.
4. Left-click and hold the cursor on the app’s icon.
5. Continue holding the left-click and drag the app to the left or the right edge of your first monitor (depending on where your second monitor is positioned).
6. Drag it until it enters the desktop of the second monitor and then release the left-click.
If you want to move an application to your other monitor, you must first enable Extend mode via your PC’s settings.
Afterward, you only need to drag and drop your app’s window into the monitor of your choice.
3. Use Shortcut keys to move an application to another monitor
Here are some other new keyboard shortcuts for navigating and managing your multiple desktops:
Snapping window: WIN + LEFT or RIGHT (can be used with UP or DOWN to get into quadrants)
Switch to recent window: ALT + TAB (unchanged) – Hold shows new Task view window view, let go, and switches to the app.
Task view: WIN + TAB – New Task view opens up and stays open.
Create new virtual desktop: WIN + CTRL + D
Close current virtual desktop: WIN + CTRL + F4
Switch virtual desktop: WIN + CTRL + LEFT or RIGHT
The message stating Sorry, this video is not available in your country is pretty common on the web. You can stumble upon this annoying notification when you’re trying to watch any clip, be it a movie, TV series, or YouTube content. It’s not limited to one platform in particular.
Fortunately, you can fix this issue and skip this video is unavailable in your country error by turning to a VPN.
A virtual private network service encrypts and anonymizes your data to protect your online privacy and data security. It does this by changing your IP address and geographical position and distributing other identifiable information on the web, even to video-sharing platforms.
How do I watch a video that is unavailable in my country?
Click on the three dots next to the Selected location to open the VPN server list.
Pick a location outside your country.
Go to your video-sharing/streaming platform and try relaunching that blocked video.
With this tested VPN solution, you can unlock restricted content on video-sharing sites, be it live streams on YouTube, your favorite Netflix series, or local content from different regions.
When can This video is not available in your country/region occur?
Having a video unavailable on platforms like YouTube or even Twitter happens due to copyright laws or content-related restrictions in your area.
Some content is not licensed for distribution in all countries of the world. Along with that, certain countries restrict access to highly violent content, and video-sharing platforms have to comply with that. However, errors such as Sorry, according to the request of the copyright owner, this film is not available in your area or Unsupported location. The video you are trying to watch cannot be viewed from your current country or location can be easily solved.
Why this video is not available in your country?
This video is unavailable in your country error appears when the media service has no distribution rights in your area, or when the video violates your government’s regulations or the platform’s terms of use.
The types of videos that get blocked most commonly contain explicit material, violence, hate speech, political criticism, promotion of harmful behaviors or products, or misinformation.
To sum up, you can resort to a dependable virtual private network service like Private Internet Access to get around geographical restrictions, fix the Sorry, this video is not available in your country error, and watch any video content on the web.
It’s common for users to complain about experiencing the Surface Pen not pairing. Consequently, it makes it impossible for users to use the pen with Surface. The Surface Pen not working with Surface Pro 4 is another issue users report.
In this guide, we will explore the causes and possible solutions for this problem.
Why did my Surface Pen fail to pair?
Surface Pen not pairing or not showing up in Bluetooth settings can be due to various problems with the pen or your device. Some of the reasons are:
Outdated Windows: Windows is fond of developing issues when not updated. It indicates that it lacks the needed patches and updates. So, it can cause the Surface Pen not to work correctly.
Issues with Bluetooth connectivity: it’ll be impossible for the Surface Pen to pair if the Bluetooth is not working correctly. It can make it not visible for pairing.
Interference with other devices using Bluetooth: the Surface Pen not pairing issue can occur due to the activities of the other apps using Bluetooth.
Issues with the pen: problems with the Surface Pen not showing up in Bluetooth can occur if you do not go about the pairing process correctly. For instance, not pressing the pen button for as long as you should allow it to pair can make it not visible.
How do I fix the Surface Pen when it’s not pairing?
The Surface Pen not pairing can be fixed by troubleshooting some device settings. Nonetheless, we recommend you do the following preliminary checks before proceeding:
Toggle off and on the Bluetooth option on your PC.
Unplug external devices connected to your computer.
Restart the pen and your device to fix the startup error.
Check and see if you’re able to pair the Surface Pen afterward. If not, proceed with the solutions below if you’re not able to:
1. Repair the Surface Pen correctly
Press the top button on the pen until the LED light blinks, indicating the Bluetooth pairing mode is on.
Left-click the Start button and select Settings.
Select Bluetooth & devices in Settings, toggle on the Bluetooth switch, and click Add device button beside Devices.
Click Bluetooth from the options.
Select Surface Pen in the list of devices and follow the screen prompts to pair your pen.
Restart Windows and see if the issue persists. If you encounter an issue while restarting your PC, check out the fixes suggested in our guide.
2. Reset your Surface device
Press and hold the Surface power button for 30 seconds and then release it to force off the device.
Then, press and hold the volume-up and the power button simultaneously for at least 15 seconds despite the Surface logo appearing.
After resetting the Surface device, press and release the power button to turn your Surface back on.
Try to pair the Surface Pen and see if it works smoothly.
3. Check the Surface Pen’s battery
You should consider checking and maybe, changing the Surface Pen’s battery. It uses an AAAA battery as its main power supply.
To do this, press the eraser for a few seconds and take note of the light color that blinks. If the light turns green, then the battery is active and charged.
If the light turns red, it indicates a drained or depleted battery and requires changing or charging. Meanwhile, if there’s no light, you should change the battery.
After changing the battery, the pen should start working and pairing immediately.
Click the Starts button, and click the Settings app or press the Windows + I keys.
Click System and selectTroubleshoot.
Choose Other troubleshooters.
Then select the Run button in front of Bluetooth.
Follow the instructions on the screen to complete the troubleshooting.
The Troubleshooter will fix errors affecting the device that causes pairing issues for the Surface Pen.
5. Update Windows
Click the Start button and select Settings or press the Windows + I keys.
Click on Windows Update and select Check for updates (if there are any updates available, Windows will automatically search for them and install them).
The Windows update is usually a fix that works for most basic errors, especially connection-related issues.
Although uncommon, sound issues are one of the worst you can encounter on a PC, and solving this is often time-consuming. And several users reported no sound on the Nvidia High Definition Audio, which is what we will be fixing today.
In this case, one common issue is users completely lose system sound after installing NVIDIA GPU drivers. For others, the audio device, for instance, headphones, was not recognized.
So, let’s find out why Nvidia audio is not working and its most effective solutions.
Why is my high definition audio not working?
Here are some of the reasons why Nvidia Sound is not working on your PC:
Outdated, corrupt, or incompatible drivers installed: Issues with the driver are usually the most common reason behind the problem.
A bug in the installed version of the driver: Oftentimes, users encounter the problem after updating the driver when there’s a bug in the current version.
Two sound cards running into conflicts: If you have multiple sound cards, there are chances that these might conflict with each other.
Misconfigured BIOS settings: Many users found the BIOS settings responsible for the issue.
Speaking of the issue, the solutions below should also help in the following cases:
Nvidia HDMI audio not working – This is a relatively common problem encountered by many users eager to enjoy Nvidia with their home theater receiver. If you’re one of them, you should be able to fix it by using one of our solutions.
No sound Nvidia High Definition audio – This also happens when using HDMI to stream audio and video to other displays. Faulty drivers and a potentially disabled onboard sound device in BIOS are often the culprits.
No sound after Geforce update – Many users reported that their sound was gone after updating their Geforce drivers or after installing a Geforce graphics card.
No sound after installing graphics card Windows 10 – According to users, this error can sometimes appear after installing a new graphics card. This is most likely caused by incompatible drivers.
Nvidia video card no sound – Users reported that their sound is completely missing while using Nvidia graphics. To fix the issue, you might have to reinstall both your Nvidia and audio drivers.
How do I fix Nvidia high-definition audio?
Before we head to the slightly complex solutions, let’s try a few quick checks and see if it helps.
Reconnect the audio device you are facing issues with.
Restart the computer.
Update to the latest version of the OS.
If these don’t work, the following methods would:
1. Update or reinstall audio drivers
The first thing you must do is check if there’s an updated version available and install it. If you can’t find one on the computer, head to the manufacturer’s official website and download it to update the audio driver manually.
1. Press Windows + R to open Run, type devmgmt.msc, and click OK.
2. Double-click on the Sound, video and game controllers entry.
3. Right-click on High Definition Audio Device, and select Update driver.
4. Click on Browse my computer for drivers.
5. Choose Let me pick from a list of available drivers on my computer.
6. If a High Definition Audio Device driver is listed, select it and click Next.
7. Click Yes in the confirmation prompt.
8. After the update is complete, restart the computer for the changes to come into effect.
Now, you can verify if the NVIDIA High Definition Audio Driver starts working.
Update drivers automatically
Try a third-party driver updating tool if the previous method doesn’t fix the issue. Downloading drivers manually is a process that carries the risk of getting the wrong driver installed, which may lead to severe malfunctions.
2. Roll back to a previous Windows build
Press Windows + I to open Settings, and click on Update & Security.
Select the Recovery tab from the navigation pane, and click on Get started.
Now, follow the on-screen instructions to complete the process.
If the no sound problem on Nvidia High Definition Audio Device started after an update, you might revert to the previous build within ten days of updating.
If the previous methods didn’t work, you can reconfigure the BIOS settings and disable the other sound cards in case there’s more than one.
Also, remember that you don’t necessarily have to disable the others. For example, if another sound card does the job, disable Nvidia High Definition Audio Device to fix the no sound problem.
4. Run the built-in troubleshooter
Press Windows + I to open Settings, and click on Update & Security.
Select Troubleshoot from the left, and then click on Additional troubleshooters.
Click on the Playing Audio entry here, and then click on Run the troubleshooter button.
Follow the on-screen instructions and make the recommended changes to fix things.
Users sometimes manage to fix things by simply running the built-in troubleshooter. If you still have no sound from Nvidia High Definition Audio, head to the following method.
Once you get to the Installation options menu, select Custom (Advanced) and click on Next.
Now, tick the Perform a clean installation option and click on Next.
Follow the on-screen instructions to complete the installation process.
Many users reported that sound was missing after installing Nvidia drivers. However, you can fix that problem simply by performing a clean installation of your drivers. Several users said this solution worked for them, so feel free to try it out.
7. Scan for hardware changes
Type Device Manager in the Search bar, and click on the relevant search result.
Double-click on the Sound, video and game controllers entry.
Right-click on High Definition Audio Device, and select Scan for hardware changes.
If Nvidia High Definition Audio delivers no sound after sleep, scanning for hardware changes should do the trick. First, though, this is a workaround suggested by users with this problem. The above solutions should help eliminate the underlying cause.
We expect the issue to be resolved and the audio device to work seamlessly.
Windows users complain that the Realtek audio driver keeps crashing on their PCs. It impedes the functionality of the audio features dependent on it. The audio driver’s frequent crashes can cause the Realtek HD Audio Manager not to work on Windows 11.
Why does Realtek audio keep crashing my PC?
Realtek High Definition Audio driver crashes on your PC can occur for a few reasons, which can vary in different instances.:
Outdated Realtek audio driver: The most common cause of the problem is your computer’s outdated or broken Realtek audio drivers. This will likely cause an incompatibility issue and crash your PC.
Outdated Windows operating system: Windows updates are available to help you fix bugs affecting your PC. So, not keeping your Windows PC up-to-date can make it incompatible with the driver version, causing it to crash.
What can I do if Realtek audio driver keeps crashing?
Fixing the Realtek audio driver that keeps crashing on your PC can be tricky. Hence, we recommend you go through these preliminary checks before troubleshooting your PC:
Disconnect external audio devices connected to your PC, and peripherals plugged into the USB ports.
Restart your PC to fix startup problems that may interfere with the Realtek audio driver crash.
If you’re unable to fix the issue with the preliminary checks above, then proceed with the solutions below:
1. Uninstall and reinstall the Realtek audio device
Right-click the Start button in the bottom-left corner of the taskbar, then select the Device Manager from the drop-down.
Expand the Sound, video, and game controllers, right-click on Realtek Audio,and select the Uninstall device option from the drop-down.
Check the box for the Attempt to remove the driver for this device option, then click Uninstall.
Restart your computer after the installation is complete, and your PC will automatically install the driver.
Click on Start in the bottom-left corner of the taskbar and select Settings from the Start menu.
Click on Windows Update, then select Check for updates (Windows will automatically search for updates and download them if any are available for your PC).
Despite making changes to the display of Windows 11, Microsoft still allows users to change their Windows color settings. This is without ignoring that Windows 11 is the most aesthetically designed.
However, the OS is meant to be used on your personal laptop or computer and should be allowed to look how you like.
Read on as we highlight how you can easily tweak your Windows display color settings if you have been unable to do so.
We would also direct you on some quick fixes if you encounter issues changing your Windows default color settings.
How do I change the color profile on Windows 11?
1. Via Color Management
1. Hit the Windows key to open the search box and then type Color Management in it.
2. Press the Enter key to open the app.
3. Go to the Advanced tab.
4. Click on the drop-down menu next to Device profile and select one of the options.
5. In order to install a custom color profile, go to the Advanced tab and click on the Add… button. You will need to browse your PC for a profile to install.
6. After you select the desired color profile, click on Close.
You can change your Windows 11 color profile from the Color Management app, that is built-in on your device.
The Color Management app allows you to change your color profile to a a different one within a few clicks. You can choose a pre-existing default profile or install a new custom one.
2. Change the Windows colors mode
Open Settings by pressing Windows key + I. Choose Personalization.
Select Colors.
In Choose your mode, select the drop-down box to select the color you like. Either Light or Dark.
Set the Accent color to Automatic to allow Windows to choose a color itself. Or pick one from the Windows 11 color palette.
If you prefer a custom setting, choose your default Windows mode and default app mode. Changes will be effective automatically.
This is how you can easily change the color profile in Windows 11 and customize the appearance of your OS.
Right-click on an empty space on your desktop home screen. Next, select Personalize.
Select a theme of your choice from the options.
The color of your desktop should be changed by now. If you don’t like the default options offered by Windows, you can download more themes instead of changing your Windows 11 color settings.
3.2 Pick a Contrast theme
Open Settings by pressing Windows key + I. Select Accessibility.
Scroll and choose Contrast themes.
Pick your preferred Contrast theme from the list of drop-down options. Then select Apply or Edit as you want.
This option is very useful if you have problems distinguishing different colors or the text within the boxes and messages.
Users who want to improve text visibility on their desktops can also check this guide on how to change the desktop font color, which helps enhance readability alongside the other Windows color options.
Turn on your system and make sure it has been powered for about 30 minutes. This will also work for changing your Windows 11 color settings if you are sharing your screen with a monitor or other display.
Right-click on a free space on your desktop and select Display settings.
Scroll to Display resolution and select and select the recommended solution by your system. If already in place, no need to change it. Move to the next step.
Scroll up to select HDR.
Then, pick Optimize for image quality when viewing HDR content on battery power.
Keep in mind that not all monitors have HDR capability. Only apply this tweak if you see that the feature is supported under the Display capabilities section.
Otherwise, changing these settings will have no effect on your system whatsoever.
5. Calibrate your Windows 11 display
Open Settings by pressing the Windows key + I. Type Calibrate in the Search Box and click on Calibrate display color.
Click on Next and follow the displayed instructions on the screen.
After reading the instructions and consecutively clicking Next. You will see notes on how to adjust Gamma.
Adjust the Gamma the way you like. Then, select Next.
Click on Next to complete the set-up.
You can decide to Skip brightness and contrast adjustment. If you don’t want to skip it, just select Next.
The screen information is well detailed to enlighten the steps to take. Proceed from each step by selecting Next. Adjust the brightness and contrast to a level you are satisfied with.
You will also be prompted to adjust the color balance. The information on how to do this will be displayed on your screen.
At the end of this setting, You’ve successfully created a new calibration will be displayed. Select Finish to complete the set-up.
Check if you are satisfied with the new color settings. If not, check other methods to change it below.
The Windows 11 color calibration for your monitor is not an easy task for regular users and if you want to use your monitor for graphics applications, it’s better to consult a specialist.
6. Change the Windows wallpaper
Right-click on an empty space on Desktop Home Screen. Next, select Personalize.
Click on Background.
Choose how you will like to adjust the display color setting by choosing from the list of options in Personalize your background. You can select the photos you prefer using the Browse photos option to create a slideshow.
There you have it all. With any of the methods explained so far, you should by now be able to customize your Windows default color settings to your taste.
It’s also helpful to note that if your copy of Windows is not activated, you will not be able to access the personalization options, and therefore, you will not be able to change the theme or access the color settings from that menu.
Undoubtedly, Windows 11 runs smoother and much faster than the previous operating system. However, this only happens on performant PCs and not on old devices.
Even if it comes up with plenty of improvements compared to Windows 10, some users seem interested in making Windows 11 faster. And we are here to help you do just that!
Why is Windows 11 so laggy?
Take a look at the following list and find out some of the most common explanations for your slow PC:
Having too many startup apps – These are the programs configured to load at startup, thus increasing the boot time and negatively affecting the performance of Windows.
Running out of RAM – If your OS runs out of RAM memory, it may use a part of the storage drive as virtual memory, and this will result in low performance. You can take advantage of RAM cleaner software to solve this problem.
Old or fragmented devices – These can corrupt computer performance to nonviable levels. As mentioned before, consider that Windows 11 does not support old devices as we thought.
Running out of disk drive space (like HDDs or SDDs) – This one is similar to running out of RAM, being based on the same explanation. And if you need more space, you can always upgrade to a new SSD.
Malware and viruses – They can be caught from untrusted sources when you download different apps or programs. So, make sure you check them twice before and use one of the best antivirus options for Windows 11.
Poor Windows or driver updates – Not constantly updating your software and hardware pieces can cause severe crashes on your PC. You can also use a specialized driver updater, which automatically updates missing or outdated graphic drivers, which has significant benefits on the overall performance of Windows 11.
If you’re looking to speed up Windows 11, we’ve got some performance tweaks and optimizations to improve performance and make your computer or laptop run smoothly.
How can I make Windows 11 run faster?
Before trying the slightly elaborate solutions, let’s see a few quick Windows 11 performance tweaks:
Restart the computer. It’s the simplest way to boost your PC quickly and should provide temporary relief.
Allow optimal space around the CPU for the hot air to be effectively released.
Scan your PC for malware using an effective antivirus since these have been found to affect the performance.
Delete unwanted files. These could be files you don’t need anymore, app installer setups, or zipped files, the contents of which have already been extracted.
Once done, we recommend you go ahead with the methods listed next, and by the time you are done with these, Windows 11 will be much faster.
1. Check for updates
Select the Windows button and choose Settings.
Click on Windows Update from the left pane and hit the Check for updates button.
If the system finds new updates, it will install them, and you will be prompted for a restart.
Although it may sound unusual, the issue may be caused by a bug in Windows 11, and if Microsoft fixed it, you could hope to find a patch to install. So, updating should be the primary approach if you are wondering how to make Windows 11 faster and smoother.
2. Use a resource-friendly browser
When your PC meets the minimum requirements for installing Windows 11, you will also need a resource-friendly browser for a faster connection. Opera GX is one such browser that is smart in terms of memory use and also has built-in resource management capabilities.
One of the most intriguing features is the GX Control, which includes RAM and CPU restrictions. Give Opera GX a try if you want to be able to decide how much RAM the browser may use. In addition, if you want your browser to be very colorful and configurable, this browser is the game changer.
The Network limiter allows you to set maximum limits for uploads and downloads on how much of your network’s bandwidth you would like to dedicate to your browser.
Opera GX will stick to that limit, meaning any apps or services outside of the browser will run more smoothly with a larger network bandwidth.
Opera GX
Set up bandwidth limiters and control how much RAM and CPU your browser can use.
3. Disable visual effects to make Windows 11 faster
1. u003cspanu003ePress the u003c/spanu003eu003ckbdu003eWindowsu003c/kbdu003eu003cspanu003e key, type u003c/spanu003eu003cemu003eview advancedu003c/emu003eu003cspanu003e, then select u003c/spanu003eu003cstrongu003eView Advanced System Settingsu003c/strongu003eu003cspanu003e.u003c/spanu003e
2. u003cspanu003eClick on the u003c/spanu003eu003cstrongu003eAdvancedu003c/strongu003eu003cspanu003e tab and select u003c/spanu003eu003cemu003eSettings.u003c/emu003e
3. u003cspanu003eAdd a checkmark to the u003c/spanu003eu003cstrongu003eAdjust for best performanceu003c/strongu003eu003cspanu003e option.u003c/spanu003e
4. u003cspanu003eFrom the u003c/spanu003eu003cemu003eCustomu003c/emu003eu003cspanu003e list, checkmark the following options: u003c/spanu003eu003cstrongu003eShow thumbnails instead of iconsu003c/strongu003eu003cspanu003e and u003c/spanu003eu003cemu003eSmooth edgesu003c/emu003eu003cspanu003e u003c/spanu003eu003cemu003eofu003c/emu003eu003cspanu003e u003c/spanu003eu003cemu003escreen fontsu003c/emu003eu003cspanu003e.u003c/spanu003e
5. Click onu003cspanu003e u003c/spanu003eu003cstrongu003eApplyu003c/strongu003e, then onu003cspanu003e u003c/spanu003eu003cemu003eOKu003c/emu003eu003cspanu003e u003c/spanu003eto save the changes.
Although visual effects can create a more unique visual experience, they require plenty of system resources. In the end, this will slow down PCs with older hardware.rnrnDisabling visual effects reduces approximately 20% of the load on the GPU. Therefore, you can easily speed up your Windows 11 PC by turning visual effects off.
4. Turn off Startup apps and programs to speed up Windows 11
4.1 Turn off apps
Click the Start button and select Settings.
Go to Apps.
Choose Startup.
Disable the toggle for the apps you don’t need to start in an automatic way.
4.2 Turn off programs
Right click the Start button and select Task Manager.
Click on the Startup tab.
Right-click any program that you don’t want to load in startup and select Disable.
If you were wondering how to speed up Windows 11 boot time, disabling the startup apps should do it. After disabling them all, you will notice a considerably faster boot time.
5. Enable Storage Sense
Press the Windows button on your keyboard or select the Start button, and choose Settings from the list.
Go to System, then select Storage.
Select the Storage Sense option, then turn it on by adjusting the toggle button.
Enabling Storage Sense will automatically help you free up space, delete temporary files, and manage locally available cloud content.
6. Adjust the Performance Power Plan settings
Click on the Start button, type power plan, then select Choose power plan.
Checkmark the High Performance section, then select Change Plan Settings.
If you can’t see it on the list of plans, click on Show additional plans.
Click on Change Advanced Power Settings.
Go to Processor Power Management and make sure the minimum and maximum processor state is 100%.
NOTE
If you can’t find the u003cemu003eProcessor Power Managementu003c/emu003e option, this issue can be easily corrected by running SFC, Powercfg, and DISM,u003cstrongu003e u003c/strongu003ethen adding the registry key.
7. Get rid of Temporary Files
Open Settings by clicking the Start button and selecting it from the list.
Go to System, then select Storage.
Click on Temporary files.
Select all files that you don’t want, then select Remove files.
If you want to make your Windows 11 faster, removing temporary files is effective. It includes Internet history, cookies, and cache. They take up a ton of space on your device, so deleting them frees up plenty of storage, thus speeding up your PC.
8. Uninstall unnecessary software
Click the Start button in Windows 11 and select Settings.
Select the Apps option from the left pane, then click on Apps and features.
Click on the three vertical dots from the right of the app you want to get rid of and select Uninstall.
Your OS and computer come preloaded with some apps, referred to as Bloatware, that many people won’t use, and these eat up system resources. You should uninstall them, and we can help you remove all the bloatware in Windows 11.
9. Remove bloatware with a dedicated tool
Right-click the Start button and select Windows Terminal (Admin) from the list.
Type the following command and press Enter to run it: iwr -useb https://git.io/debloat|iex
The command will download the Windows 10 Debloater app that will help you eliminate a couple of unwanted bloatware on your PC. Don’t worry, we tested it on Windows 11, and it works fine.
We now recommend disabling Cortana (if you don’t use it, of course), uninstalling OneDrive (same here), and disabling the telemetry and tasks. The last one turns off data collection, location tracking, and more such services that use a lot of your memory.
This little tool will not just debloat Windows 11 but can do a lot more. If you are unsure about the outcome, it’s better not to play with other settings.
10. Add more memory to your PC to speed it up
Increasing the RAM or SSD memory can speed up your devices for good. An SSD will load everything faster, and RAM can keep more stuff running simultaneously. If you were wondering how to make Windows 11 faster for gaming, this should do it.
Make sure that when you insert the RAM module, the knobs from the socket fit into the RAM module’s hinges. They have to click into place.
Align the plastic knob with the hinge
Nevertheless, if your computer only starts acting weird once you open tons of tabs, you’ll surely have to try a RAM boost. There are also times when the computer is not using all the available RAM, so you should consider this option too.
11. Turn off the notifications to make Windows 11 faster
Click the Start button, then select Settings from the list.
Next, click on Notifications.
Now, you can either disable all the notifications with the general switch above or go through the apps one by one and disable their notifications individually.
Disabling the notifications in Windows 11 won’t make your PC faster directly, but it would influence your productivity because you won’t be bothered during your work.
How can I maintain the speed of my PC?
Now that you know the reasons your system slows down and how to make Windows 11 run faster, take a look at some of our tips to keep it that way in the future:
Don’t install bloatware – Some software prompts you to install other programs that can even run in the background; don’t allow their installation.
Delete temporary files and cache as often as possible – Those files can slow your system down, so don’t wait for them to clog your system; be proactive.
Close unnecessary programs – Your PC’s memory is limited, and if there are too many processes, your system will run slow, no matter how clean. You can also limit the RAM usage for some programs.
Verify the settings of your antivirus – Some antiviruses will use a lot of resources when running a full scan. That’s understandable, but set it to do that when you’re not using the PC, and, therefore, you will be unaffected.
Check the running processes – Sometimes, the software can start consuming too many resources all of a sudden, even causing high CPU temperature. Keep an eye on them in Task Manager.
As you can see, we sorted out those options that will make Windows 11 faster than before and improve its performance to the maximum.
There is always the choice of using dedicated optimization programs. We have a great list of Windows 10 optimization software that also works for Windows 11.
In case you still have a hard drive, you can also use ReadyBoost on Windows 11 to gain a small performance gain, and we have a guide explaining how to do that.
Do you have any other thoughts or questions about how you can improve the OS capabilities? Make sure to describe them in the comments section below.
Are you one of those people who keeps your PC running around the clock? If so, then you probably know the importance of sleep mode. Sleep mode allows your computer to save power and avoid overheating.
Does your PC shut down instead of going to sleep mode? This seems to be a common occurrence. However, most recently, users seem to have problems with their Realtek audio driver preventing their PCs from going to sleep mode.
What is preventing your PC from sleeping?
There are a number of reasons why your computer may not be sleeping. Below are some:
Power settings – Your PC’s power settings may be set to never sleep, hibernate or turn off. It’s also possible that the computer is simply not in a sleep state. To get the best power efficiency from Windows, you may need to tweak some settings.
Software conflicts – Some programs might be preventing Windows from sleeping properly. Examine any behavior and check whether it coincides with the recent installation of a new app.
Background apps – If you have a lot of applications open, or even just one that’s not responding, your computer may not be able to sleep until those apps have finished running. At times, a lot of non-essential services are running on your PC.
Antivirus programs – Antivirus software often monitors your system for malicious activity. Some virus scanners can prevent your PC from going to sleep by keeping certain processes running at all times.
Driver issues – If you have recently updated drivers for any of your hardware components such as graphics card, these might be interrupting with Windows’s ability to sleep properly.
Power management tools – If you have installed third-party power management tools, your PC may not enter sleep mode. Third-party power management tools often have similar settings that prevent your PC from entering sleep mode.
USB devices – USB audio devices such headphones or other devices such as printers and external hard drives can prevent a computer from going into sleep mode.
What can I do to fix my Realtek audio driver from preventing sleep on my PC?
Perform the below basic checks before moving onto the more advanced steps:
Disable all other sounds and notifications on your computer. You are likely to get a message that says an audio stream is currently in use when you force Sleep mode.
If you have any USB devices attached to your computer, disconnect them from the ports. If possible, turn off any hardware that’s connected directly to your computer or its power supply such as a printer.
Check if you have installed any new software or hardware recently and uninstall the programs.
Check with your antivirus software and temporarily disable it.
1. Disable Cortana
Hit the Windows + R keys to open the Run command.
Type regedit and press Enter.
Navigate to the following location: HKEY_LOCAL_MACHINE\SOFTWARE\Policies\Microsoft\Windows\Windows Search
Right-click on Windows Search and select New DWORD (32-bit) Value.
Rename it to AllowCortana, double-click on it and set the Value data to 0.
You may have to restart your PC.
2. Uninstall and reinstall the audio drivers
Hit the Windows key, type Device Manager in the search bar, and click Open.
Navigate to Sound, video, and game controllers to expand, right-click Realtek High Definition Audio and select Uninstall device.
Restart your device and the drivers will automatically reinstall themselves.
You can also use a third-party tool if you are not a fan of manual updates. Outbyte Driver Updater is a smart driver updater that can help you get rid of all the bad drivers.
It will scan your system and find all the outdated, corrupt, broken, and incompatible drivers. Then it will download and install official updates for these drivers to fix them instantly.
Outbyte Driver Updater
Automatically keep all your drivers up to date to get the best performance from your PC.
Hit the Windows key, type cmd in the search bar, and click Run as administrator.
Type and Enter the following command: powercfg -restoredefaultschemes
5. Run a Power Efficiency Diagnostics Report
Hit the Windows key, type cmd in the search bar, and click Run as administrator.
Type and Enter the following command: powercfg /energy
Users have also complained that they have been having issues where the Realtek audio driver keeps reinstalling itself. If you experience a similar occurrence, do not hesitate to check out our detailed guide for a quick fix.
You may also find out that your Realtek mic is not working but we have adequately addressed the issue in our article.