As we are sure you know by now, back in November 2022, Microsoft started enabling its upcoming Windows 11 Moment 3 update for the first time.
Back then, users found traces of the upcoming feature update in Dev Channel builds. Yes, it was also around this same time that Microsoft moved into the Zinc development semester.
We have some information for you today that we’re pretty sure you are going to like, especially if you are a Windows 11 aficionado.
Windows 11 Moment 3 update coming later in 2023
We know that you want to know more, so know that internal test IDs revealed that the Redmond giant had begun enabling Moment 3, and even Moment 4, features in the Dev channel.
Until now, anything and everything around Moment 3 revolved around the Dev Channel. That being said, things are now starting to spill over to the Beta Channel as well, indicating that future Moment 3 features are now moving in slightly closer to the general availability.
Users started posting about this on Twitter after noticing mentions of future Beta channel builds 23141 and 23145 in the recent Beta channel releases.
Tech-savvy users now speculate that the new build numbers are indicative of Windows 11 Moment 3 and that the mentions were found in the Microsoft Symbol Server.
The talk now is that this might actually be hinting at the ongoing debugging and development efforts by the company.
This makes a lot more sense as earlier reports had suggested that Windows 11 22H2 Moment 3 could be out in May this year.
Now, further reports suggest it will be followed by Moment 4 later in the year when Windows 11 version 23H2 will be released.
Be sure to check out all the available information on Windows 11 version 22H2. We can show you how to install it, and also the bugs it still has.
Please keep in mind that it is important to understand that this is only speculation for now until we get official confirmation from Microsoft.
With no exact release date, all that’s left to do now is wait for Microsoft to reveal more information. Leave a comment below informing us about your feelings on the topic.
Most modern wireless printers allow users to print directly from their mobile phones. It makes things all the easier and more seamless. But for many, the printer and phone won’t connect.
This presents a major problem, especially when their idea of getting a wireless printer was to access it directly from the mobile phone. So, let’s find out why it happens and how you can fix things in no time.
Why won’t my phone connect to my printer?
Here are a few reasons your phone and printer won’t connect:
Incorrect network configuration: In several cases, it was an incorrect or invalid network configuration that prevented the connection between the two devices.
Devices on different networks: For users to print from their phones, the devices must be on the same Wi-Fi network. If that’s not the case, it won’t work.
Relevant features are not enabled: Many printers support the Wi-Fi Direct feature, but it’s not turned on by default. So that could be the reason your printer and phone won’t connect.
What can I do if my printer and phone won’t connect?
Before we start making major changes, here are a few quick tricks:
Check whether the printer supports printing via a mobile phone. Though most new models do offer the features, it’s missing in several of the old ones.
Make sure the printer and the phone are on the same Wi-Fi network. If your router supports dual-band, i.e., 2.4 GHz and 5 GHz, it’s all the more important that you verify this.
Restart all three devices, the printer, the phone, and the router, and then try establishing a connection.
If you can’t connect to other devices on the network but just not to your phone, check whether a VPN is enabled. And if that’s the case, ensure that Allow LAN traffic (or a similar feature) is enabled within the VPN app.
Look for a reset button on the printer and hold it for a few seconds to perform a reset. Or you could look through the printer’s manual for the exact steps to reset it.
If these don’t work, head to the solutions listed next.
1. Connect the printer via the IP address
Open your phone, head to the Default Print Service, and choose a printer from the list.
If yours doesn’t appear, click on the ellipsis, and then choose Add printer by IP address.
Enter the IP address for the printer to get things running.
A quick way to fix things when your printer won’t connect to the phone is to establish a connection using the IP address. Though, for older models, connecting a printer via Bluetooth should do fine.
2. Change the network settings
NOTE
You would require a computer to change the network settings for the printer. So make sure you have one on the same network. Also, the steps here are for an HP printer, though the idea remains the same.
Enter the printer’s IP address in a browser to open its settings.
Now, head to the Network tab, choose IPv4 Configuration, and click on Suggest a New Manual IP Address.
Wait for it to apply, then under DNS Address Configuration, choose Manual DNS Server and enter the following:
Manual Preferred DNS Server: 8.8.8.8
Manual Alternate DNS Server: 8.8.4.4
Once done, click on Apply to save the changes, and then try connecting the printer to your phone.
3. Clear print spooler on the phone
Open the Settings on your Android phone, and tap on Apps.
Select the ellipsis at the top right.
Choose Show system apps from the menu.
Locate and tap on Print Spooler.
Now, select Storage.
Finally, tap on both Clear data and Clear cache.
That’s it. In some cases, users could fix things when their printer won’t connect to the phone by clearing the data and cache for Print Spooler. So, make sure you try that.
Apple iPhone users can easily connect to the printer and take prints using the AirPrint functionality. All you have to do is verify that the printer supports it. Check the manual or the official website for the same.
With AirPrint, you can directly print a document in a few seconds. Just tap on the share icon, choose Print, select a compatible printer, and you are good to go.
That’s it! One of the solutions listed here should have helped you get things running when the printer won’t connect to a phone. Also, check the best printers with feeder scanners in the market.
Do tell us which fix worked for you in the comments section below.
Using an email marketing service is paramount for business growth in a lot of sectors. You need fast, easy, and accurate reach to your target audience.
In that respect, Moosend is a popular email marketing tool among eCommerce stores, bloggers, publishers, and small businesses.
What is Moosend and how can it help you?
Moosend is an email marketing tool that offers automation, segmentation and reporting features to help you engage with your clients.
Not only that it tracks your website to supervise the visitors’ behavior, but it comes with wide integration for more than 38 third-party services.
Moreover, you may use Zapier to sync to all eCommerce, CRM, or other software you need in the process.
The UI is extremely friendly, with drag-and-drop functionality and you’ve got more than 75 pre-made email templates to get you started.
But is Moosend the right tool for you or your business? We reviewed this email marketing solution so you can find out!
What are Moosend’s best features?
1. Great selection of templates
Moosend comes with a huge assortment of email templates with a modern design premade for a lot of usage scenarios.
From the left menu, you may choose the domain and type of newsletter and in the main window, you may preview and select the one that better serves your purpose.
There are over 75 there and you will definitely find something to start from and edit it to your needs.
However, you may also use your own. You can import it from an online source by entering the link or HTML code, or directly from your PC.
Nevertheless, after you customize and edit your template, you can save and use it every time you need to.
2. Simple and efficient email campaign editor
It’s essential to have an easy-to-use newsletter editor and the one from Moosend is extremely straightforward.
On the left pane, you’ve got the layouts, items, and settings, in the center you have the actual result and, on the right, there are, of course, all the contextual settings for all the objects you select.
We’ve worked with other such tools, and Moosend doesn’t offer anything out of the ordinary in this aspect.
However, we found it very easy and intuitive to use. All the menus and settings are right where you expect to find them.
You can add lots of free images from Unsplash & Giphy
Whether you’re writing news, products, or events, with Moosend, you will find just the right image to illustrate it.
That’s because it’s connected to Unsplash and Giphy, but you may also get all your images stored in your cloud drives or even point out one with the direct link.
Another interesting feature of the editor is the Personalization Tags you can include in any type of merge field.
If you select the merge tag from the drop-down menu, Moosend will replace it with personalized information for each subscriber to your newsletter.
Another smart block to include is the Countdown Timer. If you have a special time-limited offer, the timer will signal the remaining duration for the offer.
3. Efficient automation feature
The automation features in Moosend are basically limitless. You can personalize virtually any action of your subscribers and perform additional steps to engage them.
This feature is extremely simple to use because it’s designed as a flowchart, but it comes with complex choices and conditions.
Not only that the Automation editor is modern looking and very straightforward, but it is also very efficient.
It’s based on a three steps process, like any logical diagram. You set a trigger such as when someone opens a campaign, then set a condition or filter, and finally, define an action.
A set of actions based on a Yes or No condition
For instance, if someone opens a certain link, wait for a defined period of time, and send a message to the subscriber with an offer to a product connected to that article.
However, the possibilities and combinations of triggers, filters, and actions are only limited to your understanding of the marketing process.
Everything is color coded, easy to comprehend, and structuring the chart can be a really enjoyable task.
Ready-made workflows can be customized quickly
But if you don’t want to take things from scratch, Moosend offers plenty of pre-made such recipes.
There are 18 charts available and ready to be customized based on your needs but at least you have a starting point.
The results of your email campaign are the most important when it comes to discussing its efficiency.
That’s why it’s important to receive accurate reports based on which to shape your future marketing strategy.
With Moosend, you get all the data you need, from clicks on each button, product, and offer but also the numbers of unsubscribers, the region from where they clicked, and lots more information.
Add widgets to customize your reports
Furthermore, you can personalize your reports with a lot of widgets that will filter the exact information you need.
Of course, all the reports can be saved in CVS format to use them further and integrate them into other statistical data.
With Moosend the reports are not limited to performance. For instance, The Track Recipient Activity report displays how each recipient interacted with and reacted to your email marketing campaign.
It alsotracks link clicks with a map that displays your newsletter with bubbles indicating how many times each link has been clicked.
The Track email clients and devices report shows you the different devices, email clients, browsers, and operating systems your recipients use to view your campaigns.
Long story short, every single reporting option is covered and you can personalize it to pinpoint your precise interests.
5. Create landing pages in minutes
You would think that creating a landing page is difficult, but with Moosend, this task is as easy as building a newsletter.
Of course, you get to choose from 38 templates that match the email campaign ones. And the page editor works and looks almost exactly like the one for newsletters.
That can be extremely useful because if you already know how to work with the first one, creating a landing page will be a piece of cake.
All the layouts are flexible to customize from the text font to images, spaces, backgrounds, and every other element.
A neat trick from Moosend is that you can resize the image right there, in the editor, you don’t need to do that before uploading it, a detail that will save you a lot of time.
You can share the landing page and publish it in one go
And once you have done with the layout and content, it’s very easy to share it on social media (Facebook & Twitter) and publish it on Moosend’s platform or on your WordPress website.
For the second option, it’s only a matter of installing the WordPress plugin and managing the inclusion.
6. Huge array of integrations
As we’ve mentioned at the beginning of this review, Moosend offers 38 third-party integrations that cover all possible areas of interest.
The list includes CRM tools, list validation services, platforms for lead generation but also e-commerce, and more.
Integrating an e-commerce platform like Magento, will allow you to get product listings on your newsletters and automate upsells.
Note that when you set up your website in the beginning, if you choose e-commerce, that will also trigger the sales reports features. Otherwise, you won’t get them as you don’t need them in other domains.
How much do I pay for Moosend?
First, you can try Moosend for 30 days as a free trial version and you don’t need to provide any credit card information.
For this option, you get unlimited emails, and automation workflows and you can make one landing page and one form.
If you decide that Moosend is the right thing for you or your business, you can go for a Pro plan and customize it for your number of subscribers.
The lowest Pro plan goes for only $9 per month for a maximum of 500 subscribers but if you choose the annual payment, the rate lowers to $7.
It’s important to note that the Pro plan also comes with an SMTP server.
There is also an Enterprise plan available that you may customize to your exact needs and by completing a preliminary form, you will get a personalized quotation.
Moosend
Create the most engaging newsletters, landing pages, and forms to grow your business!
Some users have been complaining that they see a notification in their Windows Security app that says, Standard hardware security not supported.
At the same time, this error seems to appear even if the device meets the standards for hardware security, and has the latest drivers, Windows updates, and BIOS firmware installed.
What does it mean by standard hardware security not supported?
Having said that, this message occurs when your device does not meet at least one of the requirements of standard hardware security:
The device has TPM 2.0 (security processor), and it’s enabled
Secure boot is enabled
DEP is turned on (Data Execution Prevention)
UEFI MAT ((Unified Extensible Firmware Interface Memory Memory Attributes Table)
CPU Virtualization is enabled
What causes standard hardware security not supported?
So, if you see the Standard hardware security not supported error notification in Windows 11, it could be because:
The minimum requirements for hardware security are not met – It could be possible that the TPM 2.0, secure boot, or virtualization is not enabled in the BIOS settings.
Outdated system drivers – If the drivers are not updated to the latest version, this may trigger the standard hardware security not supported error.
BIOS firmware not updated – Chances are that you see the error notification due to outdated BIOS firmware.
Corrupted Windows update – Sometimes, it could be a corrupted Windows update causing the error.
Recurrent Windows 11 bug – In many cases, it has been reported that the standard hardware security not supported error shows up due to a bug in the OS.
What can I do if standard hardware security is not supported on Windows 11?
Before you move over to the main section to try the primary methods, here are a few quick checks:
However, if none of the above steps help you eliminate the standard hardware security not supported error, we have some expert tips to fix the issue.
1. Enable Data Execution Prevention (DEP)
Press the Win + R keys to open the Run dialogue. Type sysdm.cpl and hit Enter to open System Properties.
Now, select the Advanced tab, and under Performance, click on Settings.
Next, go to the Data Execution Prevention tab, and select Turn on DEP for essential Windows programsand services only option. Press Apply and OK.
Now, restart your PC and check if you could successfully fix the standard hardware security not supported error in Windows 11 or if you still see the notification.
Here, go to CPU settings or System Configuration, look for either Intel Virtualization Technology, Virtualization Technology, VT-x, AMD-V, or SVM, and set it to Enable.
This enables Core isolation in Windows Security.
Next, under the Advance tab, navigate to System Agent Configuration or North Bridge Configuration, and enable VT-d or IOMMU to enable Memory integrity in Windows Security.
Now, enable Intel Platform Trust Technology (PTT) or the AMD equivalent, and the motherboard chipset acts as a TPM. This enables the Security processor in Windows Security.
4. Reregister Windows Security App using PowerShell
Press the Win + R shortcut keys to open the Run console. Type in Powershell, and press the Ctrl + Shift + Enter keys together to launch the elevated Powershell window.
Now, run the below command in the Powershell (Admin) window and hit Enter: PowerShell -ExecutionPolicy Unrestricted -Command "& {$manifest = (Get-AppxPackage *Microsoft.Windows.SecHealthUI*).InstallLocation + '\AppxManifest.xml' ; Add-AppxPackage -DisableDevelopmentMode -Register $manifest}"
Once the command executes successfully, close PowerShell and restart the PC. This should help you fix the standard hardware security error in Windows 11.
Download the latest version of the Windows Security app. Now, create a restore point, and then unzip the downloaded ZIP file on the desktop.
Next, press the Win + E keys to open File Explorer, navigate to C:\Windows\System32\SecurityHealth, right-click on the setup file, and select Properties.
Now, follow the below path to change to Administrators, and take ownership of that folder: Properties > Security tab, > Advanced > Owner > Change > Select User or Group > Advanced
In the next window, click on Find Now, go to the Search results, select Administrators, and press OK.
In the Select User or Group dialog, click on Check Names and press OK.
Now, in the Advanced Security Settings window, select Replace owner on sub containers and objects, press Apply and OK to save the changes, and return to the Properties dialog.
Here, under Group or user names, select Administrators, and click on Edit.
Next, in the Permissions window, select Administrators, and check theAllowbox next to Full Control. Press Apply and then OK.
Back in the SecurityHealth folder in the File Explorer window, copy the 1.0.2207.20002-0 folder, and paste it on the Desktop to the SecurityHealth folder.
Now, you can open the folder and run the application Microsoft.SecHealthUI_8wekyb3d8bbwe.appx as an administrator.
Once done, restart your PC, and check if this helps eliminate the standard hardware security error.
Also, you must check if the BIOS is updated. If not, then update the BIOS firmware to the latest version to fix the standard hardware security not supported issue.
Besides, if your device already meets the hardware security standards, you can simply access the BIOS settings, disable the virtualization and enable it again.
If none of the above methods work, you may do a clean install of Windows 11 using a USB, and this should help you get rid of the issue.
For any other queries related to Windows 11 or the Windows Security app, do let us know in the comments section below.
Many users reported Windows can’t connect to a hidden network. While you should be able to connect by entering the correct SSID and password, that won’t always work.
But don’t worry, in this guide, we’ll explain all you need to know to successfully connect to a hidden network on your Windows PC.
How do I fix the hidden WiFi network?
1. Manually connect to the hidden SSID network
Go to Network and Sharing Center.
Select the name of your hidden Wi-Fi connection.
On the Wi-Fi Status box > click on Wireless Properties.
Check the box Connect even if the network is not broadcasting its name.
Sometimes in order to connect to the hidden wireless network, you need to make a few changes to your network connection. To do that, follow the steps described above.
This quick workaround should fix your Wifi hidden network problem, and your computer should automatically connect to your default network.
2. Turn off your Bluetooth
Press Windows Key + I to open the Settings app.
When the Settings app opens, navigate to the Devices section.
Now, select Bluetooth from the menu on the left and disable Bluetooth from the right pane.
After doing that, the Bluetooth will be disabled and you should be able to connect to a hidden WiFi network without any issues.
If you want to quickly disable Bluetooth, you can do it right from the Action Center. To do that, simply follow these steps:
Network and Sharing Center window will now appear. Click on Set up a new connection or network.
Now select Manually connect to a wireless network and click Next.
Enter the required information such as Network name, Security type, and Security Key. Keep in mind that you need to enter the correct information or else you won’t be able to find and access your network.
Also, be sure to enable Connect even if the network is not broadcasting and Start this connection automatically options. Once you’re done, click Next to proceed.
After you enter the necessary information, check if the problem still persists. If the problem is still present, you need to log in to your router and temporarily turn on the SSID broadcasting feature.
Then, connect to your wireless network and turn off SSID broadcasting once again.
Locate your network adapter on the list and double-click it to open its properties.
Navigate to the Power Management tab and uncheck Allow the computer to turn off this device to save power option.
Now click OK to save changes.
After making these changes, your PC should be able to connect to a hidden network without too many issues.
According to users, in order to connect to a hidden network, your network adapter should be prevented from going to sleep. This isn’t hard, and you can change this setting by following the steps described above.
5. Forget the wireless network
Open the list of available networks.
There you should see Hidden network on the list.
Select it and click on Forget.
If you’re having problems connecting to a hidden wireless network, you might be able to fix the problem simply by forgetting the network.
After doing that, manually connect to the hidden network and check if that solves the problem. This is just a workaround, but it works according to users, so we encourage you to try it out.
6. Select the hidden network from the list of networks
Click the WiFi icon on your Taskbar.
A list of available networks will now appear. Select Hidden Network and check the Connect automatically option.
Now click the Connect button.
Enter the name (SSID) of the hidden network. Be sure to enter the correct name or else you won’t be able to connect to the hidden network.
Now enter the password for that network and click Next.
When asked whether you want to make your PC discoverable on the network, click Yes.
Keep in mind to select Yes only if you’re using a home network that you trust.
According to users, you can connect to a hidden WiFi network simply by selecting it from the list of networks. After doing that, you should be able to connect to a hidden network without any issues.
Hidden networks can be useful since they can hide from the public, but any user that has the required information can easily access them.
As you can see, certain issues can occur while trying to connect to a hidden network, but we hope that you managed to solve them using one of our solutions.
The GeForce Experience client by Nvidia is an all-in-one suite covering everything from in-game screenshots to live streams and graphics optimization.
However, GFE won’t do you good if you can’t access it. And Something went wrong, try rebooting your PC error on Nvidia GeForce Experience is a widespread issue bothering many of the community.
We listed some solutions which should help you address this. Check them out below.
How do I fix Something went wrong error in Nvidia GeForce Experience?
1. Run Nvidia GeForce Experience as an administrator
Right-click on the Nvidia GeForce Experience client and open Properties.
Select the Compatibility tab.
Check the Run this program as an administrator box.
Finally, click OK to confirm the changes.
Some features of the app might get limited if you’re not running the application as an administrator. This might be the reason you are experiencing the Nvidia GeForce Experience something went wrong issue with error code 0x0003 or 0x0001.
Therefore, we’ll need you to grant Nvidia GFE administrative permissions. This helped some users on Windows 7, so it might be worth a try on Windows 10.
2. Install the latest GPU drivers
In the Windows Search bar, type Advanced and open View advanced system settings.
Whether you double-checked Device Manager and drivers are seemingly spot on, the generic GPU driver is not what anyone should settle with. They can cause the something went wrong error Nvidia GeForce Experience.
You need to download the latest driver from the official support site and install them. You might also want to block Windows from automatically updating drivers, as this feature is proven to be flawed.
3 Check associated services
Press the Windows key + R, type services.msc, and click OK.
Right-click Nvidia Telemetry Container and choose Properties.
Now, click the Log On tab at the top.
Choose the Local system account.
Next, click the General tab.
Change the Startup type to choose Automatic.
Finally, click the Start button, followed by OK, and restart your PC.
Some users have been able to fix this issue simply by making changes to the properties of the Nvidia Telemetry Container. The major problem with the service is that it won’t start unless you allow it to log in with the local account.
This can cause the something went wrong error Nvidia GeForce Experience. Hence, you need to change its startup type and other properties to fix this issue.
Use the Safe mode from the launch options and recommended settings to remove the current Nvidia driver and GeForce Experience.
Now, click the Clean and restart button and wait for the process to complete.
Finally, download and install the latest driver and stable version of GeForce Experience.
Another effective solution is reinstalling everything remotely associated with Nvidia on your PC. To remove the driver cleanly, you’ll need to run the DDU (Display Driver Uninstaller).
After you’ve cleaned all traces of Nvidia GeForce Experience from your PC, you can safely install the correct version. Also, we suggest preventing Windows 10 from automatically installing drivers by turning off your internet.
This should fix something went wrong on the Nvidia GeForce Experience issue.
5. Try an older version
If none of the previous solutions resolved the issue, you should try rolling back to an older version of GFE. On the other hand, finding an older iteration of the GeForce Experience client isn’t a walk in the park.
Some third-party repositories have them in abundance, but there’s a security question. So, you must ensure you download the app from a safe website.
That is about it for the Nvidia GeForce Experience something went wrong issue. You only need to follow the instructions carefully, and things should be back to normal.
Trying to start The Sims 4, but it won’t launch? Maybe the EA App opens and… nothing. Or worse, you get hit with the “already running” message even though it clearly isn’t.
Don’t stress. This is one of the most common issues in 2025, especially with the new launcher updates and Epic Games compatibility quirks.
Whether it’s a broken mod, stuck background process, or something else entirely, we’ll walk through the most effective ways to fix it, step by step.
How do I Fix Sims 4 if it won’t launch on PC?
1. Force the game to create a new Mods folder
Open File Explorer and go to Documents > Electronic Arts > Sims 4.
Select the Mods folder and press the Ctrl key + C to copy it.
Now, go to the Desktop folder in the left pane and press Ctrl + P to paste the folder.
From here, delete the Mods folder in the Sims 4 folder and start the game. This should force Sim 4 to create a new Mods folder.
Now, open the new and empty Mods folder in the Sim4 folder and the original one on your Desktop on two separate File Explorer windows.
Open one of the folders in the original Mods folder and copy its content.
Then, go to the new and empty Mods folder window and click the New folder icon. Give the folder any name you like.
Paste the files you copied into this new folder.
Now, repeat Steps 6 to 8 for the other folders in the original Mods folder. Note that you don’t need to worry if you don’t have any folder to copy in the original Mods folder.
After copying these folders, you can now copy the other contents of the original Mods folder to the new one at once.
If Sims 4 won’t launch with mods, try disabling a few mods and check if that helps.
2. Delete the Origin cache files
Open File Explorer and follow the path below: C:\Users\<username>\AppData\LocalC:\Users\<username>\AppData\Roaming
If you can’t find the AppData folder there, click the View tab at the top and check the box for Hidden items.
Now, delete the Origin folder there.
If Sims 4 won’t launch on Origin, you may be able to fix the issue by cleaning up the cache files.
3. Repair the game
Open Origin.
Now, go to My GameLibrary
Right-click The Sims 4 and choose the Repair option.
If Sims 4 is not launching, your installation might be damaged, and repairing it can help.
Press Windows key + R and enter msconfig. Now press Enter or click OK.
On the Servicestab, click to select theHide all Microsoft services check box and select Disable all.
On the Startuptab, click Open Task Manager.
Select each startup item and click Disable.
Close Task Manager, then click OKand restart the computer.
Sometimes third-party applications and services can interfere with your game and cause this and other similar issues. Enable startup services and apps one by one until you find the culprit.
Now go to Application Settings and selectOrigin In Game.
Uncheck Origin In Game.
Several users reported that disabling Origin In Game can help if Sims 4 won’t open. This isn’t the only issue, and sometimes Sims 4 won’t download on Origin.
6. Reset your user files
Launch the This PC app on your device.
Go to My Documents.
Locate and open the Electronic Arts folder.
Find The Sims 4 folder, right-click on it and select Copy.
Go to your desktop, right-click on a free space, and select Paste.
Right-click on the copied folder and select Rename.
Change the name of the folder and launch a new game.
Wrapping up
We hope these quick workarounds helped you and that you started the game without any issues. If the game starts but online features like the Gallery do not load, follow our Sims 4 Gallery not working guide for step by step fixes.
This isn’t the only issue, and many reported that The Sims 4 won’t update, but we covered this issue in a separate guide.
OneDrive features a sharing feature that allows you to access any file in your OneDrive from anywhere. This makes it easier for users to access their files or even during a presentation.
Whereas this feature is helpful most of the time, users have since come up to complain about not getting access to the files. To be precise, an error comes up that says Error 0x80070185: The cloud operation was unsuccessful. Find out why this happens and how to fix it here.
Why does the 0x80070185 error occur in OneDrive?
The error 0x80070185 in OneDrive occurs when users try to access shared files. In this scenario, once one user clicks or downloads a shared file, it becomes inaccessible to other users.
Some of the reasons why this happens include:
File size increase – Whenever you open and close a file in One Drive, it increases in size. Although negligible, the file is no longer considered the same as the original, especially if you deleted it from your hard drive.
Cached files – The more you open and close files, the more cache build up. If not deleted, some of the caches can become corrupt and result in the error.
Unstable internet connection – If you’re trying to access files on the cloud with a limited internet connection, you may also get this error.
Change in permissions – If you’re having trouble opening a file shared on OneDrive, it could be because you don’t have permission to access the file or it’s locked.
Corrupt Windows Registry files – If your Registry is corrupted somehow, files in OneDrive may be rendered inaccessible.
Antivirus settings – Sometimes, your firewall or antivirus settings can prevent you from accessing certain files if it is considered a risk to your system.
Insufficient storage – Given that opening the file increases its size, if OneDrive is getting full and you don’t have enough RAM to accommodate it, you may have issues opening it again.
How can I resolve error code 0x80070185 in OneDrive?
Before attempting the slightly complex solutions, try the following:
Ensure that you’re using an updated version of OneDrive. Some older versions that have been superseded by newer ones tend to be a bit buggy.
Check if you have permission to open the shared file. Sometimes, access may be denied, so try contacting the person who created it and ask them for permission.
1. Pause and resume syncing
Launch the OneDrive icon by clicking on the system tray.
Click on Help & Settings in the pop-up menu.
Select Pause syncing and choose a suitable time option for you.
Pausing syncing and resyncing in OneDrive does not delete any files on your computer. It just pauses the process until you decide to resume it again.
When you pause syncing, all changes made to documents or images on your computer since the last time you synchronized with OneDrive are copied to the cloud. It’s useful when you wait for an update to arrive on your computer.
2. Run the Windows Store apps troubleshooter
Hit the Start Menu icon and click on Settings.
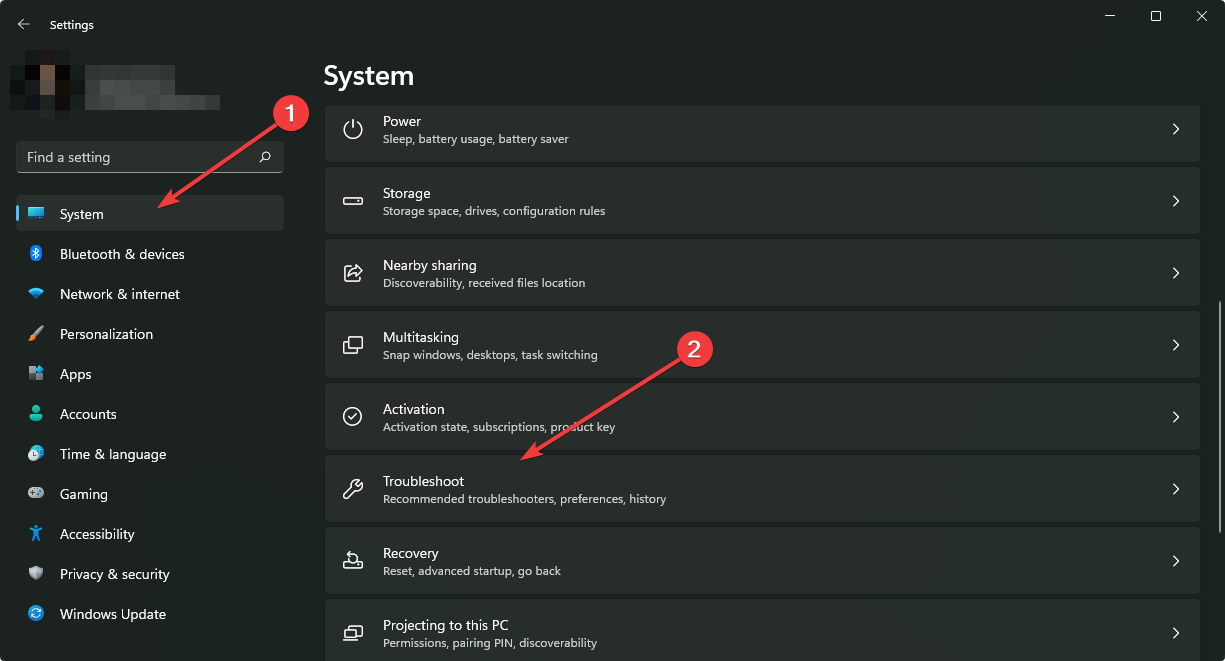
Click on System on the left pane, then Troubleshoot on the right pane.
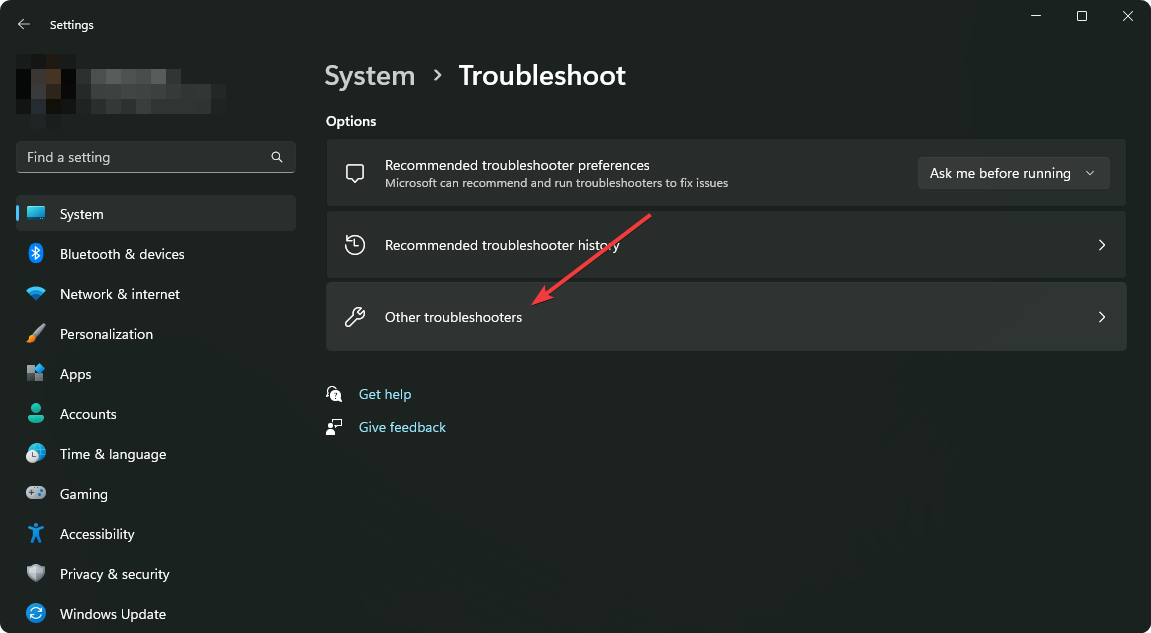
Select Other troubleshooters.
Scroll down, locate Windows Store Apps, and click the Run button.
3. Get more storage
Right-click the OneDrive icon on the Taskbar and click the Gear icon.
Choose the Settings option.
Click the Account tab at the top and check your available storage.
Finally, click the Get more storage option and select your preferred plan.
Once you have acquired more storage, restart OneDrive again and try opening the problematic file again.
BSOD errors are a common occurrence in Windows and prevent the PC from booting the OS. There are several of these, each indicating a major issue with the hardware or software. One such is the Inaccessible Boot Device BSOD error.
The error appears when Windows cannot access the boot device or the system partition. It has, of late, been in the spotlight. The primary reason, the Inaccessible Boot Device stop code has troubled a lot of Windows 11 users. So, let’s find out all about it.
What causes Inaccessible Boot Device?
Here are a few reasons you might be getting the error:
A faulty hard drive: If the hard drive is faulty, you will likely get this error due to the computer’s inability to read the critical files. Often, SSD users are found to be affected by this error.
Problems with the last installed update: For many users, the problem appeared after they updated Windows, pointing to either a bug in the installed version or a change made to the BIOS.
Incompatible hardware: When an incompatible hardware or peripheral is connected to the PC, it could trigger the Inaccessible Boot Device error in Windows.
Overclocking: If not done correctly, overclocking can lead to several errors and even BSODs, including this one.
How do I fix the Inaccessible Boot Device error?
Before we head to the slightly complex solutions, here are a few quick ones to try:
Make sure all the connections are in order, especially the ones to the hard drive. You can try reconnecting it just to be sure.
Remove any recently connected hardware, and check if the Inaccessible Boot Device error stops appearing.
If these don’t work, move to the fixes listed next.
1. Disable VMD in BIOS
Turn off the computer, power it on, and press the F1, F10, F12, or Esc key, depending on the manufacturer, to access the BIOS.
Now, check the VMD feature and make sure it’s disabled.
A user reported that a recent update enabled VMD in the BIOS, and, as a result, the Inaccessible Boot Device BSOD error showed up in Windows. So, make sure to revert the change.
2. Uninstall recent Windows updates
Turn on the computer, and as soon as the display lights up, hold the power button to turn it off. Repeat it twice, and Automatic Repair should kick in on the last attempt.
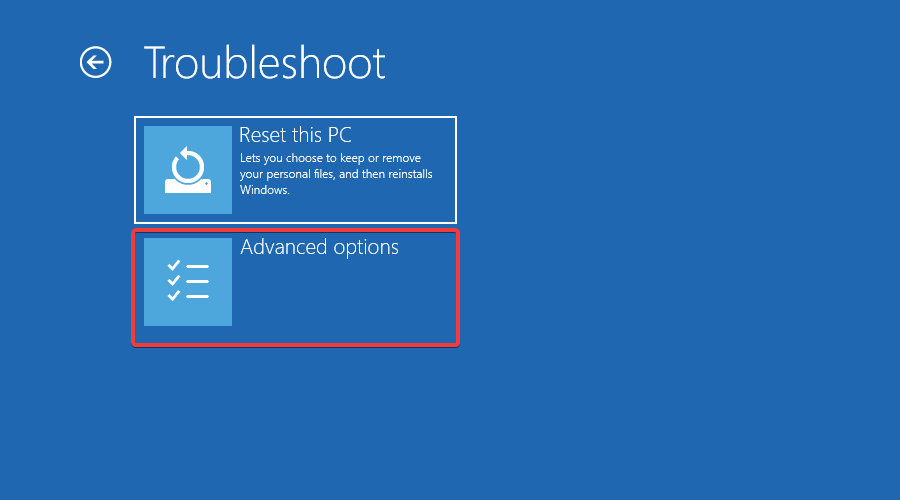
Once it’s done running, click on Advanced Options.
Now, choose Troubleshoot.
Again, click Advanced options.
Choose the Uninstall Updates entry here.
Select the Uninstall latest quality updates option.
Choose an account and then enter the password for it to continue.
Click the Uninstall quality update button.
Wait for the update to uninstall, and then restart the computer.
While the previous solution looked at a particular change made after the update, there could also be others. And the easiest solution is to uninstall the update and disable Windows Update for a while to prevent the Inaccessible Boot Device error from reappearing.
Paste the following commands individually and press Enter after each to repair the MBR:bootrec /FixMbrbootrec /FixBootbootrec /ScanOsbootrec /RebuildBcd
Once done, restart the computer, and check if you can now boot Windows.
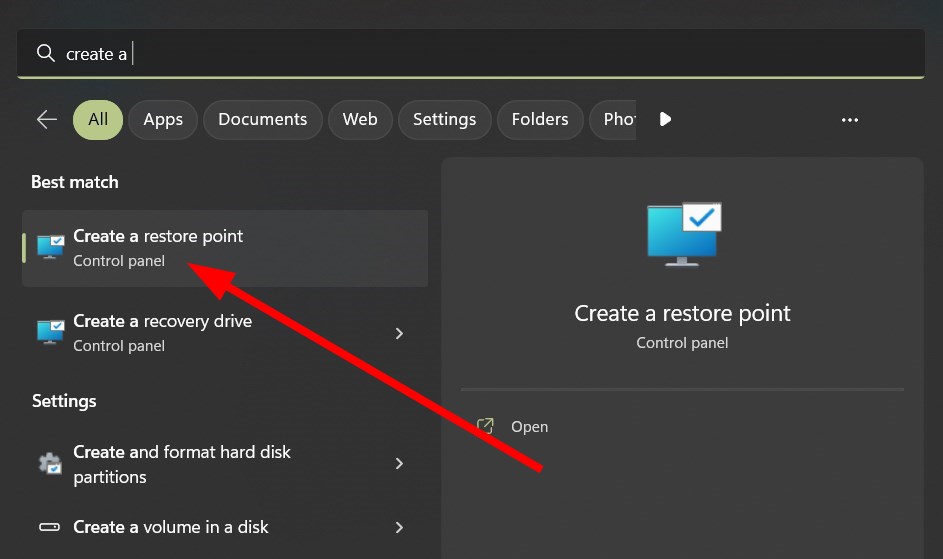
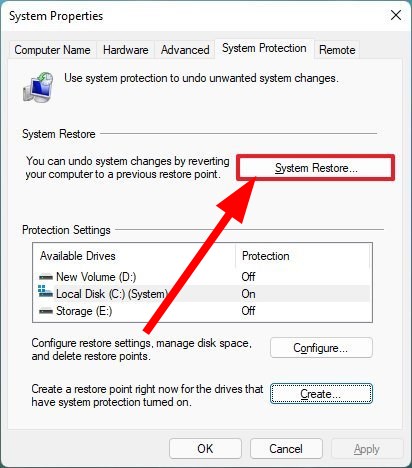
4. Perform a system restore
In the Advanced Options menu that you accessed previously, choose System Restore.
Choose an account from the list and enter the password for it to proceed.
Click on Next.
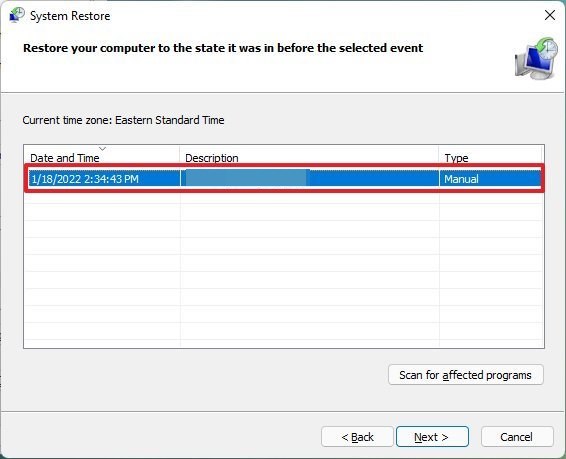
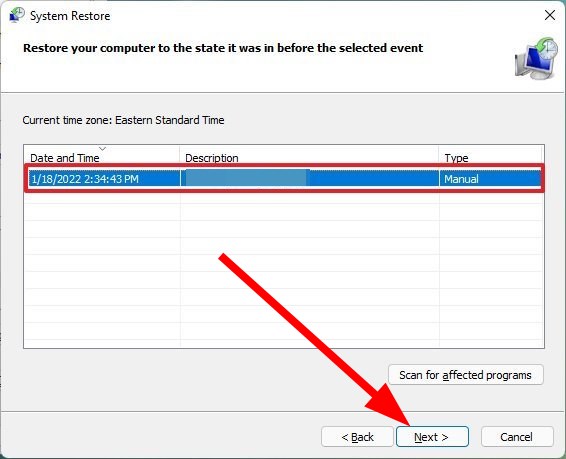
Select a restore point from the list, and again click Next.
Verify the details, and click Finish to restart the restore process.
Click Yes to confirm.
Once the restore is complete, restart the computer.
A system restore is often very effective against a range of BSOD errors. It primarily helps when you can’t identify what caused the error, which in this case may hold true. If the Inaccessible Boot Device error persists, head to the next solution.
5. Update the drivers
NOTE
To update the drivers, you first have to boot Windows in Safe Mode with Networking and proceed with the steps here.
Press Windows + R to open Run, type devmgmt.msc in the text field, and hit Enter.
Expand the IDE ADA/ATAPI controllers category, right-click on the SATA controller under it, and choose Update driver.
Select Search automatically for drivers and wait for Windows to install the best one.
Similarly, update the other device drivers in Windows.
Drivers play a critical role in the effective functioning of the PC, and if these are outdated or corrupt, you are likely to encounter the Inaccessible Boot Device error. So you must regularly update the drivers.
Remember, sometimes, a driver update, too, can trigger BSODs, so you would have to avoid downloading them. A few users reported every time the Raid driver got installed through Windows Update, the OS would crash with a BSOD.
Update drivers automatically
Searching for drivers on your own can be time-consuming. So, we advise you to use a tool that will do this for you automatically.
This software will allow you to fix the Inaccessible Boot Device error on Windows 10, optimize your computer and enjoy an awesome gaming performance. After several tests, our team concluded that this is the best-automatized solution.
Furthermore, if you want to be constantly aware of your drivers’ actuality or functionality, take action and optimize your computer using powerful software like Fortect Driver Updater.
Fortect Driver Updater
Boost your PC’s health and keep your drivers up to date with Fortect Driver Updater.
Proceed with this solution only if none of the other fixes worked for you since it will clear the data on the drive and require reinstalling Windows. This method will also help if you cannot install Windows on the drive.
Choose Command Prompt from the Advanced Options in the recovery environment.
Paste each of the commands one at a time, and hit Enter after each to convert the disk from MBR to GPT:diskpartlist diskselect disk 1cleanconvert gpt
Once you have completed that part, turn off the computer.
Alternatively, you can automate the whole process by using specialized repair software, such as Fortect. This tool allows you to scan the whole system and repairs any broken files it finds, including essential Windows files that are often the cause of BSOD.
That’s all for the Inaccessible Boot Device BSOD error in Windows, and one of our solutions should have helped fix things. In case the error persists, we recommend you contact Microsoft Support or a professional in your locality.
Chrome has a reputation for fast performance, and it’s optimized to be lightweight and resource-efficient while still providing modern features like tabbed browsing and hardware acceleration.
But, there are times when you may experience a flickering screen in Google Chrome that appears to be happening randomly or when using certain websites. If this sounds familiar, keep reading to find out how you can end the flickering screen.
Why is my Google Chrome screen flickering in Windows 11?
There are various reasons why your Google Chrome screen is flickering in Windows 11. Some of the common causes include:
Outdated driver – The display driver on your computer might be causing the flickering because it’s out of date.
Hardware issues – Another reason why Chrome flickering occurs is due to hardware issues such as low RAM or an underpowered CPU that causes lags or freezes.
Outdated browser – This can cause a problem with the way that Chrome renders elements, such as your web pages and graphics
Improperly configured drivers -If you are using graphics drivers in your system which are not compatible with Google Chrome, then they may cause excessive screen flickering.
Chrome extensions – Some Chrome extensions can find their way to your PC without your permission and may be causing problems with your browser.
Unnecessary programs – If you have many programs installed, some of them might be causing your Google Chrome to flicker in Windows 11 or slow down your PC.
How do I fix Chrome flickering screen on Windows 11?
If you are experiencing a flickering screen in Chrome on Windows, there are a few things that you can try before any advanced troubleshooting:
First, make sure that your monitor is compatible with the resolution of your laptop or desktop.
Ensure you update Google Chrome to make it compatible with Windows 11, which will solve most of your problems regarding Google Chrome flickering in Windows 11.
Try to restart your computer and check if the issue persists.
1. Adjust graphic settings
Hit the Start menu icon and select Settings.
Click on System then select Display.
Navigate to the Scale & layout section, then under Display resolution, click on the drop-down menu and pick a lower resolution setting than your current one.
2. Update graphic drivers
Click on the Windows button, type Device Manager in the search bar, and click Open.
Navigate to Display adapters to expand, right-click on your graphics card and select Update driver.
Select Search automatically for drivers.
The best way to fix Chrome’s flickering screen on Windows 11 is to update your graphic drivers using an automatic tool instead of doing it manually.
Outbyte Driver Updater can help you detect, install, and update your PC’s drivers. It scans for all the drivers that are missing or outdated and then replaces them with the correct versions.
Outbyte Driver Updater
Make the updating process of your drivers easier and more efficient with Outbyte Driver Updater.
Open your Chrome browser and click on the three vertical ellipses at the top right corner.
Select Settings.
Next, click Reset and cleanup,then select Clean up computer on the right.
Hit the Find button next to Find harmful software.
Wait for the scan to finish and remove any recommended software.
To ensure you’re thorough, you must perform a virus scan on your Windows 11. Although Chrome may not find harmful software, there may be malicious code hidden in your system, making your screen flicker. You can also run an antivirus scan using a third-party antivirus solution.
5. Disable hardware acceleration
Open your Chrome browser and click on the three vertical ellipses at the top right corner.
Select Settings.
Navigate to System and on the right pane, toggle off Use hardware acceleration when available.
Open your Chrome browser and click on the three vertical ellipses at the top right corner.
Select Settings.
Next, click on Reset and cleanup then select Restore settings to their original defaults.
Confirm Reset settings in the next dialog box.
If you’ve been experiencing the issue with Chrome flickering in Windows 11, this should help. However, if none works, consider using another browser, such as Opera, and give Chrome a break. Should you face a similar issue in Windows 10, the same steps should apply.
Users also complained of getting a white screen in Chrome. If you encounter a similar issue, we have an expert article with quick fixes. We also have answers for when Chrome fails to load pages, so be sure to check our guide to that effect.
That’s all we had for this article, but continue the conversation in the comment section below with any additional thoughts.
If your phone is not showing up on PC, it usually means the computer isn’t establishing a proper data connection. This can happen with Android phones not connecting to PC via USB due to faulty cables, outdated system software, or connection settings on the computer.
What to do if your phone is connected to the PC but not showing up
After you connect the phone, a notification will appear confirming whether you want to allow the connected device to access data on it. Simply tap Allow.
If you don’t receive it, check the notifications bar, and tap on USB for file transfer, or any similar entry there.
Now, make sure This phone option is selected under USB controlled by, and Transferring files under Use USB for.
2. Enable USB debugging
Open Settings on your Android device, and tap on About phone.
Now, tap on Software information.
Now, tap seven times on Build number.
If required, enter the phone’s PIN to enable developer mode.
Again, go back to Settings, and then tap on Developer options.
Enable the toggle for USB debugging.
Tap OK in the confirmation prompt.
3. Install the MTP USB device driver
3.1 Update the driver manually
Press Windows + X to open the Power User menu, and select Device Manager.
Locate your Android phone under Portable Devices, right-click it, and choose Update driver.
Click Browse my computer for drivers.
Now click on Let me pick from a list of available drivers on my computer.
From the list, choose MTP USB Device and click Next.
After the driver has been installed, your Android device should be recognized.
3.2 Update drivers automatically
Downloading drivers manually is a process that carries the risk of getting the wrong driver installed. This can lead to severe malfunctions in your PC. Thus, we recommend an alternative tool that will do it for you.
The safer and easier way to update drivers on a Windows computer is by using a tool like Fortect Driver Updater that will do the heavy lifting for you.
4. Install the Media Feature Pack
MTP (Media Feature Pack) protocol is related to Windows Media Player, and some versions of Windows 10 don’t have Windows Media Player and support for related technologies such as MTP protocol.
Press Windows + R to open Run, type devmgmt.msc in the text field, and hit Enter.
Locate the phone under Portable Devices, right-click on the device, and then choose Uninstall device.
Click Uninstall in the confirmation prompt that appears.
Once done, remove the phone and then reconnect it to the PC.
Windows will now automatically identify and install the best drivers for it.
6. Delete cache and data for the External Storage and Media Storage app
Open Settings and go to Apps.
Tap the ellipsis near the top-right corner.
Choose Show system apps.
Tap on External Storage.
Now, tap on Storage.
Next, tap on Clear data.
Choose OK to confirm.
Similarly, clear the data for Media Storage.
Once done, restart the phone and then reconnect it to the PC.
7. Check your phone’s sync apps
Some phones have their own PC sync applications. For instance, Samsung hasLink to Windows, and Motorola has Ready For.
Sometimes, these apps might interfere and lead to your phone not showing up in Files. However, it might be recognized in the app itself.
Just open the app and check the file transfer section/ connected devices or something similar.
If you prefer using Windows’ built-in File transfer options, you can uninstall these apps. Once you do this, the phone should show up under Removable devices.
8. Try a Different USB Cable or Port
Some USB cables only support charging, not data transfer. Switch to a certified cable and connect to another USB port on your PC. Avoid using USB hubs as they can cause detection issues.
9. Restart Both Devices
Restarting both your phone and PC can reset the USB connection process. After rebooting, reconnect the cable to check if your phone appears in File Explorer.
10. Update Your PC’s Operating System
Outdated Windows versions can cause phone not recognized by PC problems. Go to Settings → Windows Update and install all pending updates, then reconnect your device.
11. Disable USB Selective Suspend
The USB selective suspend feature can sometimes stop your Samsung phone from showing up on PC.
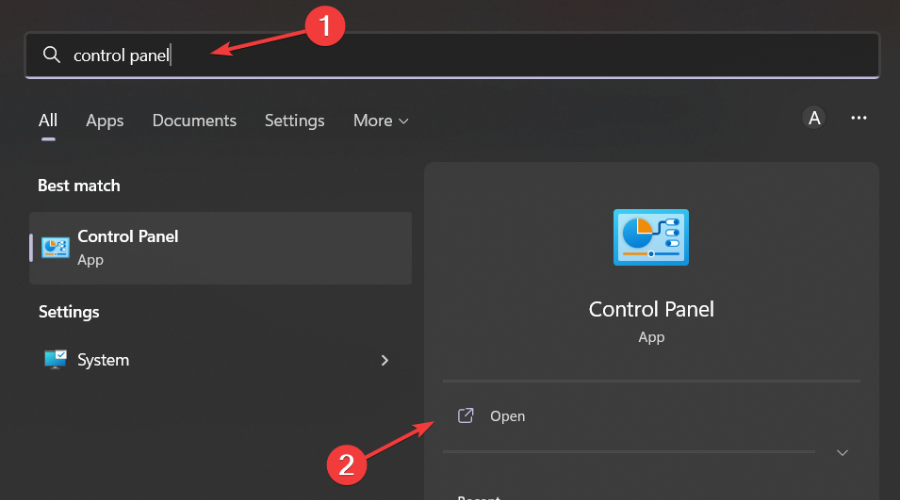
Press Windows + R, type control panel, and press Enter.
Go to Hardware and Sound → Power Options.
Select Change plan settings → Change advanced power settings.
Expand USB settings → USB selective suspend setting and set it to Disabled.
12. Try Connecting to a Different Computer
If your phone is not connecting to a PC at all, test it on another computer. If it works there, the issue likely lies in your original PC’s configuration.
13. Use a third-party app
On the flip side, if your phone doesn’t have its own app and you tried everything else and still can’t access your files, consider a third-party sync app.
This might make your PC recognize your phone due to its functionalities.
We would recommend the following tool to make sure your PC will always recognize your Android device:
If you’re using a Lumia or similar device and still having connection issues, check out our guide on what to do when Windows 10 laptop doesn’t recognize Lumia for more help.
Tell us which fix worked for you in the comments section below. Also, if you have any other queries, drop them here, and we will get back to you soon.
You may receive the following error message from your PC when you attempt to connect to a wireless network: Windows Wireless Service is not running on this computer.
There are several reasons why your computer might not be showing wireless networks. Some of these include:
The PC is not set up to show wireless networks – If you have a wireless router, you need to ensure that it’s turned on and that the computer is connected to the right network.
Signal interference – Some devices, such as cordless phones, emit radio frequencies and could interfere with your device’s ability to detect nearby wireless networks. You may need a Wi-Fi booster.
Corrupt/disabled network adapter – If your computer does not show wireless networks, then your network adapter may be disabled or is just not working properly.
Locked network – If your wireless network is set up to require a password before connecting, you’ll need to type that in manually before accessing it.
Now that we know the reasons for this issue, let’s fix the problem.
How can I fix Windows wireless service not running on this computer?
Before any technical troubleshooting, ensure you tick off the following basics first:
Restart your computer and check if the issue persists.
If these simple measures didn’t solve the problem, let’s go through the actual solutions below.
1. Start the wireless service manually
Hit the Windows + R keys to open the Run command.
Type services.msc and hit Enter.
Locate WLAN AutoConfig service, double-click on it, and select Properties.
Navigate to the General tab, under Startup type select Automatic from the drop-down options and click on the Start button.
Next, click Apply and then OK.
2. Update network drivers
Hit the Windows + I keys to open Settings.
Type Device Manager in the search bar and click Open.
Navigate to Network adapters, right-click, and select Update driver.
Select Search automatically for drivers.
One of the most important things that you need to do is to update your network driver, because it will help you to connect to the Internet.
A simple and fast solution to update all your drivers is to employ the help of specialized driver updating tools. They can easily detect missing, damaged, or outdated drivers on your PC and update the network drivers in just a few minutes.
3. Scan for viruses
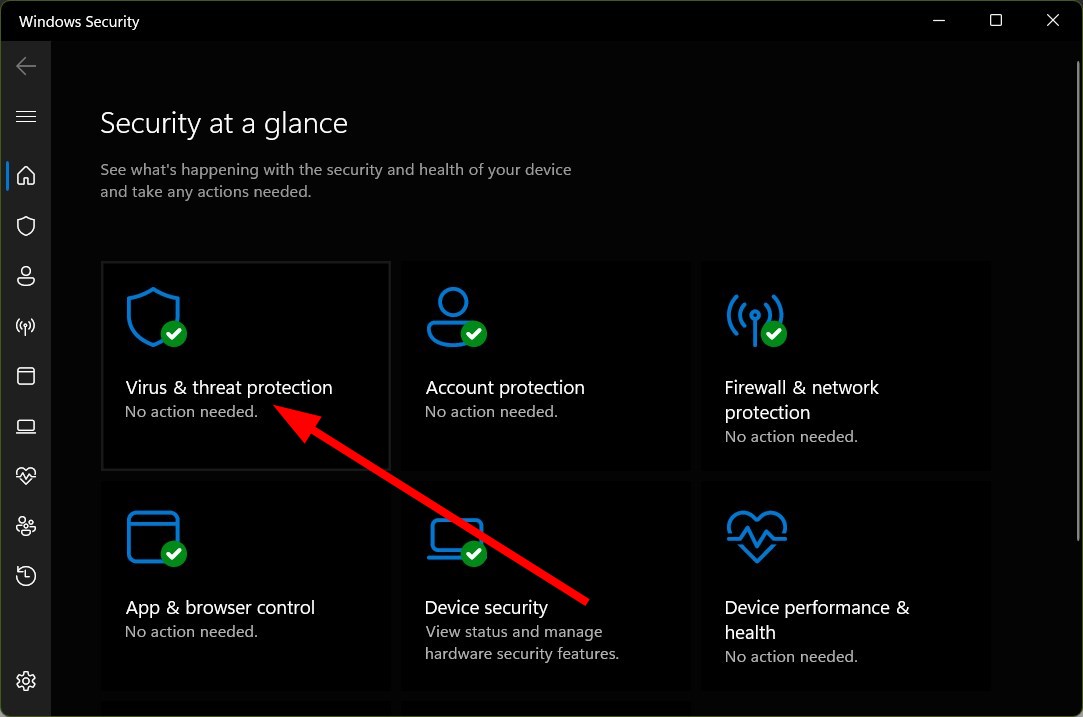
Press the Windows key, search Windows Security, and click Open.
Select Virus & threat protection.
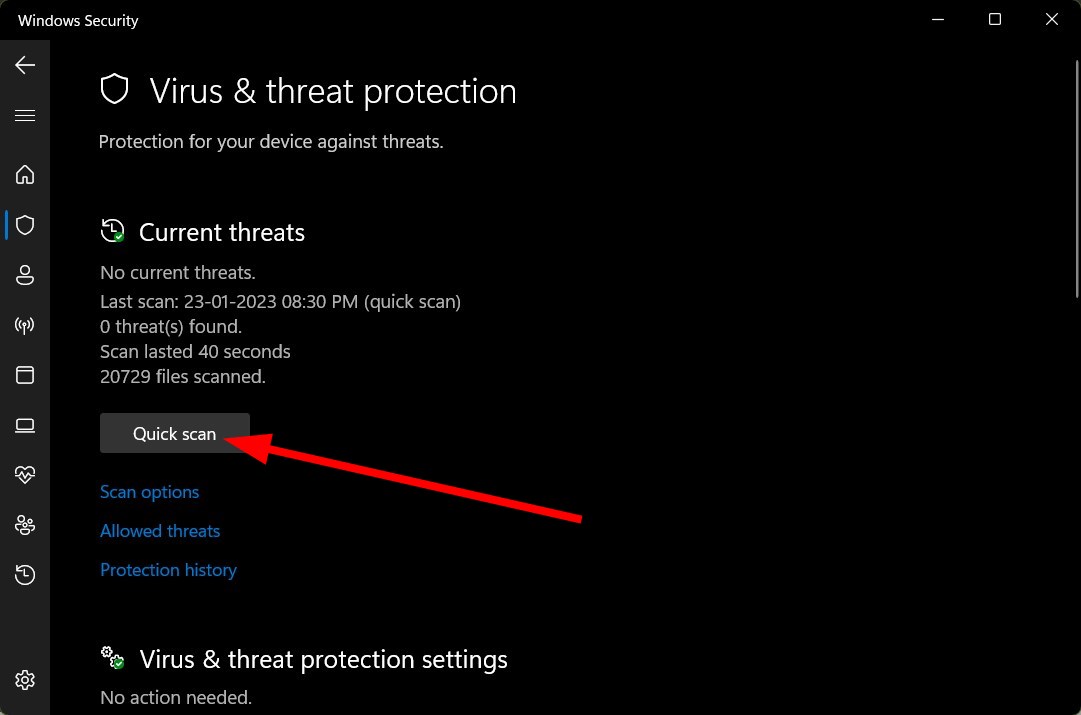
Next, press Quick scan under Current threats.
Wait for the process to finish and restart your system.
Hit the Windows key, type cmd in the search bar, and click Run as administrator.
Type the following command and press Enter: sfc /scannow
How do I reset Windows wireless service?
Resetting the wireless service is a useful troubleshooting technique for Windows users. As you might have guessed, this process restores the built-in wireless network adapter in your laptop or desktop computer to its factory settings.
This will refresh the connection and force Windows to re-establish it. All saved Wi-Fi networks and passwords will be removed from the device’s memory. So why would you want to reset Windows wireless service? Well, there are several reasons.
It can help you fix issues like:
Poor performance, low speeds, and frequent disconnections
Connections that are slow to connect or that drop frequently
Ethernet adapters not working at all
To reset, follow the steps below:
Hit the Windows + R keys to open the Run command.
Type services.msc and hit Enter.
Locate WLAN AutoConfig service, double click on it and select Restart.
How to fix Windows wireless service not running on Windows 7?
First, we must recommend upgrading to a newer Windows OS since Windows 7 is obsolete.
In case you are asking How do I reinstall Wi-Fi on Windows 7? the answer is that you need to reinstall the drivers. Our guide on what to do if the Wi-fi drivers are missing will help you with that issue.
Elsewhere, users also complained of an issue where the WLAN autoconfig service keeps stopping. If you have encountered this problem, we have a detailed guide on how to fix it.
This app offers an extensive collection of vector and raster brushes, which makes it the perfect choice for digital artists and art students.
Live brushes are also available, and they simulate the look and effects of real brushes, thus allowing you to achieve impressive results.
Speaking of which, the software is compatible with Adobe Photoshop brushes, thus making the number of available brushes almost unlimited.
The service works with the cloud, so you can continue working on your artwork on any compatible device. Of course, integration with other Adobe services is also available.
Adobe Fresco offers amazing features, and it’s perfect for all digital artists that need drawing software with pressure sensitivity.
Other great features:
Liquify effects
Magic wand tool for colors
Multicolor swatches
Motion path effects
Adobe Fresco
Create amazing digital art with realistic brushes using Adobe Fresco software.
What better app to use if not one designed specifically for artists that took into account all the natural touch features and sensitivity levels of the tools?
Clip Studio Paint is an app designed by artists, that is constantly being optimized and improved with different features.
This app is fairly easy to use once you have it on your device, and the workflow is not complicated.
You will have at your disposal over 8000 levels of pen pressure, which gives you the possibility to choose the exact sensitivity and pressure you want for your work.
And, as mentioned before, Clip Studio Paint is constantly being improved with 1000 new materials monthly.
Other great features:
Up to 6 months free trial
Available on all desktop and mobile platforms
Realistic color blending
Fully customizable brushes
Clip Studio Paint
One of the most advanced software that puts in the center the tool’s sensitivity and natural touch feeling.
Photoshop is the right place to be for pressure-sensitive drawing and unparalleled editing benefits.
It’s no need for much introduction to this solution, as everybody knows it’s worth it. You benefit from clever tools like generative fill for enhanced drawings.
In addition, there are useful functionalities such as sky replacement or background remover tools that make everything easier.
Not only that, you can get a neural coloring filter to transform your drawings into creative artwork ready to meet the world.
Other great features:
Object removing functionality
Professional layer colonizing
Nondestructive layer masking
Adjustment presets
Adobe Photoshop
Take full advantage of this artist drawing software with built-in pressure sensitivity.
Corel Painter could not miss from our list of recommended software that puts a great emphasis on pressure sensitivity. The app offers a natural feeling touch, world-class natural-media emulation, and digital art brushes.
Moreover, you can also customize the brushes in unlimited ways, including their textures and sensitivity pressure. You can create the brushes exactly as you want them, your patterns, palettes, and many more.
This app comes with a brush accelerator that is intuitive, and it evaluates your system CPU, GPU, and memory to optimize the settings for the best performance.
Other great features:
Extensive brush customization
Advanced color mixing
Built-in composition tools
Works with drawing tablets and Apple devices
Corel Painter
Bring your drawings and paintings to the next level with this fantastic software. Get the best deal now!
Our last recommendation but certainly not the least important will go to the Krita app. This app is created by artists, which can give assurance regarding the most sensitive details.
Krita has incorporated many features, most of which are innovative and will make drawing fun and productive.
The brushes for sketches and drawing come in different shapes and features; you can choose the one that best fits your art and the stabilizers for inking and clone layers.
GIMP is a well-known photo editing software and is one of the best alternatives to Adobe Photoshop. The software supports all standard photo editing features, but you can also use it with digital pens.
Thanks to the customizable interface, you can adjust it for any purpose. All photo editing features are there, allowing you to adjust your photos with ease.
Drawing tablets and MIDI controllers are fully supported, which makes GIMP one of the best free drawing software with pressure sensitivity on the market.
The software also supports various plugins created by the community, so even if a certain feature is missing, you can add it easily on your own.
Overall, GIMP is a great multi-platform tool, so it’s a perfect open-source choice for photo editors and digital artists alike.
Drivers are the software required to allow your computer to communicate with other devices. Some drivers are built-in and automatically installed when you connect a device to your computer. Others may come pre-installed on your system.
If a driver is incompatible with the version of Windows installed on your PC, it may interfere with how it works. That’s exactly the problem facing users who have come across the Brusbsib.sys incompatible driver error. Let’s dig deeper and find out possible solutions below.
Should I turn on core isolation in Windows 11?
Core isolation is a feature of the Windows 11 operating system that allows you to protect your computer from security threats by limiting what applications can do. It is good practice to turn it on as soon as possible to protect your computer from malware and other threats.
For users who deal with virtual machines, turning on core isolation may be necessary. Enabling memory integrity in Windows 11 is a great idea to keep your PC safe from malware and other viruses.
Memory integrity is another feature that prevents applications from accessing parts of the memory that they shouldn’t be able to access. However, you may find you can’t turn on memory integrity because of incompatible drivers.
For users who experienced the Brusbsib.sys incompatible driver with the Brother printer error, they were unable to enable memory integrity on their PCs. The message said Brusbsib.sys incompatible driver preventing memory integrity from functioning.
You may end up with an incompatible driver under the below circumstances:
Installing the wrong driver – A good example is if you have an Intel graphics driver and you install the AMD graphics driver instead. Your computer will probably not work correctly.
Installing a driver for a different OS – If you try to install a driver that has not been optimized for your version of Windows, you’ll have trouble getting your PC to work.
Installing drivers from unauthorized sources – Some websites offer illegitimate drivers that may have been tampered with or altered, so they won’t work properly on your computer.
How do I fix an incompatible driver?
Before jumping into the slightly technical solutions, try the following basic steps:
Ensure you’re running an updated version of Windows.
4. Remove the Brusbsib.sys driver using a third-party tool
If a driver incompatible with your system has been installed and is causing problems, you will need to remove it. The process for doing so varies depending on the type of driver you have installed and how it was installed.
If you cannot uninstall the driver using the Device Manager, try using driver remover software. These tools have been around for years, and they are very effective at removing drivers that are not working properly or are incompatible with your system.
Some also provide you with a free scan so that you can determine if there are any other drivers that need to be removed from your system before you can use them again.
PC not detecting GPU? This can hinder your experience, especially when playing games. The good news is that you can fix it.
Find below tested methods explained step by step to get rid of this error.
What can I do if my PC is not detecting GPU?
Before trying other methods, check if your GPU slot is clean, and that your graphics card is properly connected. Ensure that your power supply can handle it and set the CPU startup voltage to Maximum in BIOS.
NOTE
The following solutions can only be applied if you have an integrated GPU in addition to a dedicated one or if you have an old graphics card that you can use.
1. Enable the hidden devices and graphics card driver
Right-click the Start icon, then select the Device Manager option.
Select the View button at the top, then click Show hidden devices.
Expand the Display adapters section, right-click on the GPU, and then choose Enable device if it’s currently disabled.
2. Install or update the graphics card driver
2.1 Via Device Manager
If the PC is not detecting your GPU, right-click the Start icon from your Taskbar, then select Device Manager.
Expand Display adapters, right-click your graphics card driver, and click Update driver.
Click Search automatically for drivers, then reboot your computer after the process is finished. The PC not detecting AMD graphics card issue will be solved.
2.2 Via the manufacturer’s website
Navigate to Nvidia’s official website or AMD, depending on your GPU, then choose your Product type, series, your OS, download type, and language that fit your GPU description, then click the Search button.
Click Download under the resulted driver, then double-click the exe file to install it on your PC. Restart your PC afterward to apply the changes made. The PC not detecting GPU error will be fixed.
2.3 Via Windows Update
Press Windows + I together, then go to Update & Security.
Click the View all optional updates option on the right.
Expand the Driver updates section, tick all the updates in there then select Download and install.
2.4 Automatically install the latest drivers
Alternatively, you can use an automated tool such as Fortect Driver Updater that will handle this task for you.
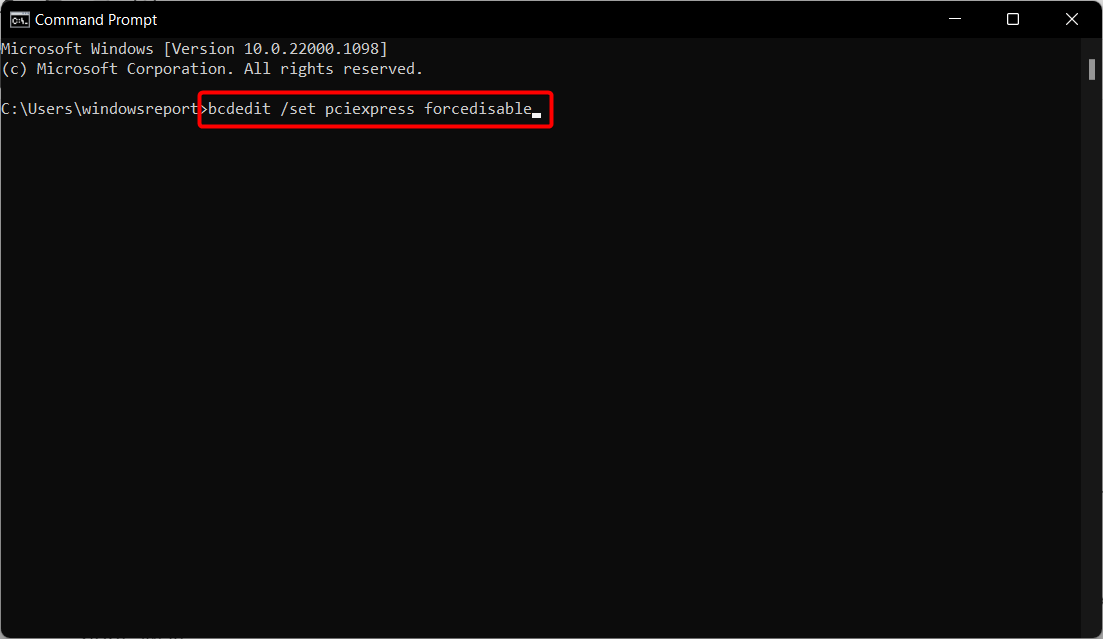
Press Windows, then type cmd and select Run as administrator.
Type or paste the following command, then press Enter and reboot your PC once it’s done: bcdedit /set pciexpress forcedisable
4. Reset your BIOS and update it
Boot into BIOS by pressing F2 or Del after you press the power button.
Navigate to the Reset to Default section, then choose Load setup default and press Enter. Note that this might differ depending on your PC, nonetheless, the steps should be similar.
Proceed to update your BIOS, which will enable your motherboard to work with any new hardware you install. The PC cannot detect Nvidia graphic card issue will be solved afterward.
We must point out that changing the BIOS can occasionally be a potentially risky activity; as a result, you should exercise extra caution to prevent causing any irreparable harm.
Press the Windows + I keys together to access the Settings app, then select Update & Security.
Select View installed update history from the right side.
Select Uninstall updates.
Click the top Windows update installed, then select Uninstall in order to remove it from your PC. Reboot your computer and check whether the GPU issue is fixed.
There you go; you should be able to fix your PC not detecting graphics card issues with one of these solutions. Do let us know if you used other workarounds.
Whether it’s HBO Max or other SVOD services, watching 4K HDR movies is a thrilling experience. However, some users report that occasionally, HBO Max HDR is not working.
The problem may be caused by the HBO app or a streaming device like Roku that, in rare situations, cannot stream movies in HDR. Additionally, the TV you are using must support HDR.
Now, without further ado, let’s get into the article and look at the solutions to the HBO Max HDR not working problem.
What are the requirements for streaming HDR content on HBO Max? Before watching HBO Max in HDR, you must fulfill a few requirements:
HBO Max subscription
A streaming HDR device
A fast Internet connection
Built-in displays – Minimum resolution of 1080p, the brightness of 300 nits or more
External display – HDR support, DisplayPort 1.4, HDMI 2.0 or higher, USB-C, or Thunderbolt
You should also know that there are many HDR formats, like HDR 10 & 10+. Hybrid-Log Gamma (HLG), Dolby Vision.
And although all the formats are about more vivid colors and enhanced brightness, they are not the same.
So, if the question is: Does HBO Max support HDR? The answer is yes, but you will also need a compatible device and display to see the content in HDR.
Why is HBO Max not displaying HDR? The most probable cause for this issue is an unstable or poor Internet connection. HBO Max adjusts the video quality based on your connection.
For instance, for 4K HDR content, you will need a connection of at least 25 Mbps, but that is the minimum limit, so a faster connection is recommended.
If you meet all the requirements, let’s see how we can fix the problem with HBO Max streaming.
What can I do if HBO Max HDR is not working?
1. Check if the content is HDR
Launch the HBO Max app.
Search Dolby Vision to get the list of all content supporting HDR.
Select a movie or a series to watch.
Check if your device has enabled HDR.
You should know that not all the HBO Max content is HDR. The movies and shows that support it will be highlighted in the movie list.
The problem starts if you can watch some shows in HDR but not others. Read on to find other solutions.
2. TV not capable of HDR
Go to your TV settings.
Navigate to Display and Sound.
Select Picture and then Picture Mode.
If you see Dolby Vision on the list, your TV supports HDR.
As previously stated, it is possible that your TV or streaming device does not support HDR. Most modern devices support this feature.
However, if one of the three factors (the content, TV, or streaming device) does not support HDR, you cannot watch movies with this feature.
Select Applications, then go to Manage Installed Applications.
Select HBO Max from the list.
First, select Force Stop, then select the options Clear cache and Clear data.
Start HBO Max and see if the problem was corrected.
3.3 On a browser
Open Chrome.
Click on the three vertical dots, hover on History, then select History from the secondary context menu.
Click on the Clear browsing data option, then select a Time range for which you want to clear the cache.
Checkmark the Cached images and files box, then click on Clear data.
Now that you’ve confirmed that your TV and streaming device supports Dolby Vision, you’re probably dealing with corrupted cache files that interfere with how the software operates.
Get rid of those files so you can watch the Dolby Vision video or movie immediately.
4. Update the HBO Max app
Go to the App Store on your Device or TV.
Look for HBO Max and select it.
Select the Download or Update option.
After updating the app, restart your device.
If Dolby Vision or HDR still does not activate, the next step is to update the HBO Max app.
The app has recently had issues because most of its marked material does not support Dolby Vision. The developers have already provided a fix, so updating the app is the quickest way to resolve this.
5. Reset the TV to factory settings
Go to the Settings menu on your television.
Choose either Preferences or General.
Select Reset.
Select Factory Reset.
Enter a PIN code if required, or click OK to confirm.
Now that we’ve established that it’s not a hardware or app issue, there’s just one place to look. Device firmware, like the ones for your streaming devices and TV, might cause this Dolby Vision issue.
You wish to restore your device to factory settings to install the HBO Max app from scratch.
What devices can I watch HBO Max HDR on?
The following are some of the top devices that are compatible with 4K HDR on HBO Max:
Smartphones: Apple iPhone, iPad, iPod Touch, and Amazon Fire tablets
Media streaming devices: Fire TV, Roku, Xbox, Spectrum WorldBox, and more
TVs: All smart TVs that support Dolby Vision
Consoles: Xbox, PlayStation
You may fix HBO Max Dolby Vision now that you know how to do so to enjoy your preferred content in the best possible quality.
Some of our readers also asked: How do I force HBO Max to 4K? The short answer is that you can’t!
HBO Max adjusts the quality and resolution automatically to the best possible settings. However, if your bandwidth or connection speed is low, the resolution and quality will downgrade automatically.
Ads on Smart TVs can be intrusive, especially when watching YouTube or navigating through menus. Whether you’re using a Samsung, LG, or Android TV, it’s possible to reduce or eliminate most ads using DNS filters, third-party apps, and network-based solutions. Here’s how to set up a reliable adblocker for Smart TV devices, step by step.
On your smart TV, head to Advanced network settings. There is an option for it on all TV, be it any manufacturer.
Now, choose DNS server and set it to manual.
Enter the following values as the DNS server, and save the changes:
Preferred DNS server: 94.140.14.14
Alternate DNS server (if asked): 94.140.15.15
The DNS server we used earlier belongs to AdGuard, a dedicated tool specializing in blocking ads and ensuring security over the web. You can also install the AdGuard app for your Android TV from the official website and set it up.
However, keep in mind that not all smart TVs have the option of changing the DNS. At the same time, your ISP or cable service supplier might block this feature. If you encounter any issues, undo the changes.
2. Block ad links via the router settings
NOTE
This method will work only if your smart TV is connected to the Internet via a router. And make sure you are making changes to the same router the TV is connected to.
Access the router settings on a PC since it is usually more convenient. For most routers, you will have to head to the following address: 192.168.1.1
Enter the username and password to sign in.
Locate the Filter settings, enter the URLs for the ad you usually see on the TV, and enter them here. Just make sure that you are blacklisting and not whitelisting them.
This is another trick that works, and since the blocking is via the router, the effects will reflect across devices. Here are some of the links you need to block for specific manufacturers, as shared by a user on Reddit:
Samsung
ads.samsung.com
LG
ngfts.lge.com
us.ad.lgsmartad.com
lgad.cjpowercast.com
edgesuite.net
us.info.lgsmartad.com
For Roku TV and a few others, you will have to disable the Use Information From TV Inputs feature in the settings to block ads on a smart TV.
3. Modify the smart TV settings
Open your Android TV.
Access the home screen.
Go to Settings.
Select Device Preferences, then About.
Navigate to Legal information, and then click on Ads.
Turn off Ad personalization.
Changing this setting will not actually block ads on many TVs. However, the ads will not be personalized based on your previous options.
4. Install AdGuard on Android TV
AdGuard is a third-party ad blocker that runs directly on Android TV devices. It works across apps and browsers to remove banners, pop-ups, and some video ads.
Open the Play Store and install the “Downloader” app
Once activated, AdGuard will filter ads system-wide—including in browsers and many ad-supported apps.
Do smart TVs collect data? This may come as a shocker to many, but the answer is Yes. Some smart TVs have a built-in feature called Automatic Content Recognition (ACR), which gathers information about the channels viewed and when.
But why exactly would a TV store or share information? To sell it to advertisers for placing targeted ads. So smart TVs not only collect data but are also sharing it with potential advertisers. The next time you set up a smart TV, read the terms and conditions properly.
These were some of the best ad blocker tips for TV. Of course, all the methods can block ads on a Panasonic Smart TV or any other manufacturer. If you’d like to download a cross-platform adblocker, try Total Adblock.
And for those wondering, you could always cast Windows 11 to a smart TV and watch your favorite shows on a bigger screen.
Microsoft Teams meetings are about to get a higher production value and are easier to manage thanks to Microsoft and Elgato working together. Elgato’s Stream Deck now works with Microsoft Teams. If you’re a gamer or Twitch streamer odds are you know what the Stream Deck is. If not the Stream Deck is an interactive keypad that allows you to execute actions and macros on the fly with a push of a button. In terms of Microsoft Teams, being able to mute your audio, and turn on and off recording at the touch of a button makes your workflow more efficient.
If you have a Stream Deck, getting started is easy, you can go to the Stream Deck store inside the software or go directly to this link to download the plugin. If you don’t have a Stream Deck they start at $79.99 for the Stream Deck Mini.
If you want to know about the best Windows settings for Blue Yeti microphones, this article is for you. Here, you will get the best step-by-step instructions along with some crucial information.
What makes a microphone performs better on a Windows PC? Of course, quality plays a significant role. But, the configuration is the key. There are several high-quality mics available on the market. But, among them, the Blue Yeti is the most popular due to its excellent performance.
Blue Yeti features:
There is no magic behind the success of this USB microphone. The Blue Yeti mic has both pros and cons. It has the features that most users, streamers, and podcasters need. These are:
Multiple patterns: Unlike many other typical professional mics, Blue Yeti supports multiple pattern modes, including cardioid, stereo, omnidirectional and bidirectional modes. It gives a lot of flexibility to any type of user.
Control: Volume, pattern selection, instant mute, sensitivity, etc., are easily controllable on this microphone.
Unique design: Yeti has a very positionable design that makes it easier to record comfortably. By using better mic stands, the BY can fit in an even better way.
Plug and play: This USB mic doesn’t need a special tool. You can plug on a PC or Mac and start using it.
If you get unexpected or stunning performance, from this mic, in most cases, it is because of the settings or configuration.
What are the factors that can impact microphone performance?
The following things have a direct impact on Blue Yeti’s performance:
Driver: Though you won’t need a separate driver for plug-and-play mics, sometimes, the problematic driver can affect the microphone performance.
System resources: The capability of PC hardware and other system resources also impact mic performance.
Software: You don’t need software to use a mic. But, there are various tools to enhance microphone performance. If the software has a problem, the opposite may happen.
Settings: This is the biggest factor that no one can deny. Faulty settings can bring down a decent microphone performance to the ground. A better setting can boost a typical mic’s performance.
How to apply the best Windows settings for Blue Yeti?
We have found the best settings that work great with the Blue Yeti microphone. Before applying it, we suggest you do the following things first:
Make sure Windows is up to date.
If you use audio software that runs in the background and can tweak your microphone and sound quality, disable it.
Adjust your gain and pattern mode using the selector knobs on your microphone.
Now, follow these steps to gain optimal Blue Yeti performance:
Press Win + I on the keyboard to open Windows Settings.
Go to System and then click on Sound.
Click on Microphone from the Input section.
You can control the Input volume from here.
Usually, you will find 50% volume is ideal. However, it may differ depending on your surroundings and requirements. Rather than using the built-in Windows settings, you also can use Blue Yeti’s software to adjust the volume.
2. Change input quality
From the Microphone settings, find Format in the Input settings section.
Change it to the highest quality.
You will find various studio quality options. Choose the one 16 Bit with 48000 Hz or anything better.
On Logitech G Hub for Blue Yeti, go to the NVIDIA tab.
Enable NVIDIA Broadcast.
You can set Noise Removal to around 60.
These settings will work for most of you. Keep in mind that Blue Yeti has discontinued its software. So, the Logitech G Hub is the officially recommended one. So, we have featured it in our article.
These are the best settings for a Blue Yeti mic for a Windows PC for most situations. If you have found your own preferred configuration that works better for you, feel free to let us know in the comments box.
NVIDIA Reflex, also known as NVIDIA Reflex Low Latency, allows GeForce GPUs to optimize PC games, such as lowering latency for smoother gameplay.
The Reflex app is available through NVIDIA’s developer website, and it can a little complicated to use. It’s meant more for developers and not the everyday gamer. But with some instructions, anybody can use it.
What are the benefits of having low latency in video games?
Before going into how the Reflex app works, it’s important to explain why low latency is a good thing. This term is thrown around a lot among PC gamers, but you may not know what it means:
It increases the polling rate on your mouse and keyboard – The polling rate is how fast a mouse and keyboard communicate with the computer. The higher the rate, the faster the accessories are.
Low latency reduces the chance of a connection loss or delay – A connection loss or delay can ruin a game and result in a loss. That’s why it’s important to maintain a consistent connection.
High performance means there’s a chance to experience lag – Like connection losses, lag can ruin a game. You may also have to adjust your PC to get rid of annoying lag.
For the purposes of this guide, we’re going to use the game Naraka: Bladepoint, as it’s one of the few titles that work with NVIDIA Reflex. The full list of compatible games is available on NVIDIA’s website.
How can I use NVIDIA Reflex Low Latency?
The first thing you should do is go to NVIDIA’s developer website and download Reflex. Then you install it. Be aware that the app isn’t perfect. Some players have experienced issues:
Some games may feel choppy, meaning they’re not running as smoothly as they should. If you experience this, you’ll have to disable the Reflex app.
The app and game may be incompatible with the hardware. If your CPU and GPU can’t keep up, there will be a bottlenecking issue which also results in bad performance.
You also need to ensure the app is properly configured to the GPU. Otherwise, low latency mode will increase the latency.
1. Update graphics drivers
Open the Device Manager, then expand Display Adapters in the window.
Right-click the GPU you want to update and select Update driver.
Select Search automatically for drivers to instantly download and install the graphic drivers.
To use GeForce Experience mid-game, go to the app’s settings and enable In-Game Overlay.
Also, click the box next to Enable experimental features at the top. You may have to update GeForce Experience.
Press Alt + Z in-game to open up GeForce Experience.
Under GeForce Experience, click Performance.
In this section, you can tweak the game’s performance however you like. Each game will have its own settings. Naraka: Bladepoint, for example, allows you to enable automatic tuning.
4. Turn on Low Latency Mode
Launch the NVIDIA Control Panel and click the Manage 3D settings tab on the left-hand menu.
Under Global Settings, scroll down until you locate Low Latency Mode.
Click the Off entry to the right of Low Latency Mode and select Ultra.
Click Apply, then close the window.
How can I improve my computer’s gaming performance?
If you want to take your computer’s performance to the next level, there are two main ways to go about it. You can turn on Windows Game Mode to get more out of your Windows 11 machine.
That said, the feature has been known to be a resource hog, so you should learn how to turn it off. It’s not too hard, but navigating a Windows 10 Settings menu can be tricky.
You can also use overclocking software to push your computer past its limits. However, overclocking for too long can cause long-term computer damage.
Feel free to comment below if you have questions about other gaming tips and tricks. And please tell us if there’s a specific guide for any gaming error or how to use a specific tool you’d like to see.
We spend most of our time on the internet, and there are multiple user queries on how they can speed up their internet. Well, Internet Explorer cannot be set to clear the cache automatically, but you can change the size of the cache.
Changing the cache size or making it smaller will make the browser speedier. However, some users have reported that they cannot change the temporary internet file cache size. If you are among such users, then in this guide, we will share some solutions with you that will help you resolve the problem.
How to change the temporary internet files cache size?
Before you get ahead with the solutions that will help you with cannot to change the temporary internet file cache size issue, let us first take a look at the conventional way of changing the temporary internet file size.
Press the Win key to open the Start menu.
Open Control Panel.
Select Internet Options.
Click on the General tab.
Under the Browsing History section, select Settings.
Enter the value in the Disk Space setting.
Click the OK button.
Restart your PC for the changes to take effect.
This is the usual way of increasing the temporary internet cache file size. However, if you are not able to set the cache file size or the slider is missing, which has been reported by multiple users. You can go ahead with the advanced troubleshooting solutions mentioned below.
What to do if I cannot change the temporary internet files’ cache size?
1. Tweak the Registry
Press the Win + R keys to open the Run dialogue.
Type regedit and press Enter.
Navigate to the below-mentioned path. HKEY_CURRENT_USER\Software\Microsoft\Windows\CurrentVersion\Internet Settings\5.0\Cache\Content
Double-click on the CacheLimit value.
Change Base to Decimal.
In the Value field, enter the size you want to have for the temporary internet files cache.
Press OK.
Navigate to the below path. HKEY_CURRENT_USER\Software\Microsoft\Windows\CurrentVersion\Internet Settings\Cache\Content
Double-click on the CacheLimit value.
Change the Base to Decimal.
Change the value to your preferred size.
Note that tweaking the registry files wrongly could take things south and even brick your PC. So, it is recommended that you create a backup of the registry before fiddling with it.
Sign in as an admin to your Windows PC. (Make sure to log in as an admin as you won’t be able to delete the Temporary Internet Files folder if you log in as yourself.)
Open the File Explorer.
Navigate to the below path. %SystemDrive%\Users\%Username%\AppData\Local\Microsoft\Windows\Temporary Internet Files\
Open the Temporary Internet Files.
Delete all the files inside the folder.
Restart your PC and check if you can change the temporary internet files’ cache size or not.
The reason why you cannot change the temporary internet files cache size might be that the Temporary Internet Files folder is corrupt.
In such a case, to fix this issue, you need to delete all the temporary internet files inside the folder and then check if this lets you change the cache size.
Type create a restore point and open the appropriate option.
Select the drive where you have installed Windows OS.
Hit the System Restore button.
Click Next.
Select the restore point.
Hit the Next button.
Click Finish.
Your PC will begin performing the system restore and bring it back your PC to a state where everything was working normally.
Do note that system restore process will work only if you have created a system restore point on your PC. If you do not know how to create a restore point, then you should refer to our guide, which will help you with that.
4. Reset your PC
Press the Win + I keys to open the Settings menu.
Click on Recovery on the right side.
Under Recover options, select Reset this PC.
Click on Keep my files option. Choosing this option makes sure that none of your personal files are replaced.
The reset process will begin.
Chances are some of the system files are missing from your PC, or the installation was problematic. In this case, we would suggest you reset your PC, as this would bring your PC back to a fresh state.
Do note that reset your PC only when none of the above solutions helped you resolve the cannot change temporary internet files cache size problem.
Feel free to let us know in the comments below which one of the above solutions helped you fix the cannot change temporary internet files cache size problem.
Sometimes, when trying to lower the volume on your Windows 11 PC to a plausible level like 50%, it gets stuck at 100.
Not to mention how frustrating this can be, especially if you are not used to higher sound levels and want to adjust the volume.
Why is my Windows volume stuck at 100?
Some of the potential reasons why the volume bar on your Windows computer gets stuck at 100% are as below:
Corrupted audio driver – It could be possible that the audio driver has gone corrupt, causing the volume bar to stuck on the screen.
Fault in the voice settings – Sometimes, the volume bar may get stuck at 100 due to corrupted voice settings.
Volume is set to max in the OS or apps – Chances are that the volume is set to maximum in the operating system or some apps, which may trigger the issue.
Windows audio service not running – If the Windows audio service is not running, as a result, the volume bar may get stuck at 100.
Outdated/corrupted audio drivers – If you have not updated the audio drivers off-late or if they are faulty, that can cause the volume bar to get stuck at 100%.
How do I fix when Windows volume is stuck at 100?
Before you proceed with the primary methods below, here are a few preliminary checks that you may want to try:
However, if the above methods do not work, we have a list of proven solutions that may help you fix the volume bar stuck at 100 issue.
1. Adjust the volume via speaker properties
Press the Win + R keys together to open the Run console. Type mmsys.cpl and hit Enter to open the Sound dialog.
Here, under the Playback tab, right-click on the sound device and select Properties.
In the Properties dialogue, go to Levels and adjust the volume. Press Apply and OK to save the changes.
You have successfully moved the volume bar stuck at 100% and adjusted the levels. But, if your laptop volume is low, we recommend a few solutions in this post to help you fix the issue.
2. Restart Windows Explorer if volume is stuck at 100
Right-click on the Start button and select Task Manager from the context menu.
In the Task Manager window, under the Processes tab, go to the Windows Processes section.
Here, look for Windows Explorer, right-click on it, and select Restart.
Once the service has been restarted, try moving the volume bar which was stuck at 100% and the issue should be fixed.
Moreover, you can ease this process by using a third-party driver updating tool to detect any outdated drivers and automatically locate the best updates from its repository.
3.2 Roll back the audio driver
Press the Win + R keys simultaneously to launch the Run console. Type devmgmt.msc and hit Enter to open the Device Manager.
Next, click to expand the Audio inputs and outputs section, right-click on the audio device, and select Properties.
In the Properties dialog, select the Driver tab and click on Roll Back Driver.
Once the driver has rolled back to the previous version successfully, restart your PC and check if the volume bar is stuck at 100 or if the issue is resolved.
3.3 Reinstall the audio driver
Open the Run dialog by pressing the Win + R shortcut keys. Type in devmgmt.msc and hit Enter to open the Device Manager window.
Here, expand Audio inputs and outputs, right-click on the device, and select Uninstall device.
In the Uninstall Device prompt, click on Uninstall again to confirm the action.
Now, restart your PC and Windows will install the latest driver automatically.
Press the Win + R keys to open the Run console. Type msconfig and hit Enter to open the System Configuration window.
Next, go to the Services tab, check the box next to Hide all Microsoft services, and click on Disable all.
Now, select the Startup tab and click on Open Task Manager.
Next, in the Task Manager window, under the Startup tab, right-click on a third-party program and click on Disable. Repeat this for all third-party apps and programs.
Now, restart your PC in the Clean Boot state, and this will help you to understand if the third-party programs you disabled were the reason behind the issue.
But, if the problem is resolved in the clean boot state, it means that it was caused by a third-party app or program.
Now, remove all the third-party apps or programs that may be causing the issue.
This should successfully help you to fix the issue, and the volume bar should not be stuck at 100 anymore.
In addition, you can also run the Windows audio troubleshooter, which will scan the device for any potential issues and apply the fix automatically.
Alternatively, you can use the system file checker utility to detect any corrupted system files, and repair them automatically if the volume bar is stuck at 100.
For any other queries related to volume issues on your system, do let us know in the comments box below.
File Explorer’s preview pane usually displays expanded thumbnail previews of selected files in a sidebar. However, many users reported that the Preview Pane in File Explorer is not working on Windows 11.
If the File Explorer preview pane is not working, it shows a No preview available or File not found message. So, let’s find out how you can fix things in no time.
How can I enable the File Explorer preview pane?
Open File Explorer from the taskbar.
Click View on the command bar, and select the Show submenu.
Make sure that Previewpane is enabled here.
It might not be enabled if you don’t see the preview pane when a file is selected. So, first, check that before you proceed with the troubleshooting.
If these didn’t work, the solutions listed next would.
1. Make sure preview handlers are enabled
Press Windows + E to open File Explorer, and click the See more button.
Select Options to view a File Explorer Options window.
Click View to access Advanced settings, and check the Show preview handlers option.
Next, uncheck the Always show icons, never thumbnails setting there.
Once done, click Apply and then OK to save the new settings.
Check if the preview pane in File Explorer on Windows 11 now starts working. In case the problem persists, head to the next solution.
2. Restart the Windows Explorer process
Press Ctrl + Shift + Esc to open the Task Manager.
Scroll down, locate the Windows Explorer process, and select it.
Finally, click the Restart option near the bottom-right.
3. Restore default File Explorer settings
Press Windows + E to open File Explorer, click on the ellipsis, and choose Options from the flyout menu.
Click Restore Defaults on the General tab.
Then switch to the View tab, and click the Restore Defaults option there.
Select Apply to save changed settings, and click OK to exit.
Once done, verify whether the Preview Pane in File Explorer is still not working in Windows 11. Though that should not be the case for most, move to the last solution if it is.
This resolution is more specifically confirmed to fix the preview pane not showing PDF file previews. In that case, the preview pane shows a File not found message for selected PDFs.
Open the folder that contains any files with the hash (#) symbol in their names.
Right-click on such files and select Rename.
Delete all # symbols from the file’s names.
Similarly, remove # from every file’s name here.
File Explorer’s preview pane probably isn’t its most essential feature. However, it’s still a convenient feature showing you what files look like when it works correctly. Still, it may be a resource hog, so you can disable your thumbnail previews to speed up your PC.
The Snipping tool is a feature that comes with most Windows computers. The program allows you to create images of the desktop screen and snapshots and copy words or images from all or part of your PC screen.
However, users can’t add text to the Snipping tool. Hence, this article will discuss inserting text in the Snipping tool. Also, you may read our guide about what to do if Snip and Sketch is not working on Windows 11.
Can you edit in the Snipping Tool?
The Snipping tool allows users to capture or take a screenshot of all or an area of their PC screens to copy words or images. It uses drag and drop and many other features that are not common to other tools.
However, the Snipping tool lets users edit the content on their PC screen and make changes or notes they can save and share with other users. It allows you to make marks around images, inscriptions, and others.
Moreover, the only downside is that users can’t insert text in the Snipping tool because the add text editing option is not officially available in the program. Fortunately, there are some ways to insert texts in the Snipping tool.
There aren’t any features for adding texts in the Snipping tool, but we’ve devised some easy ways to get around that. Follow the steps below.
How do I add text in the Snipping tool?
1. Insert text in the Snipping tool using the Windows Paint app
Press the Windows + Shift + S shortcut keys to open the Snipping Tool on your PC.
Click and drag the mouse to select a snipping area on your screen, and a prompt saying Snip saved to clipboard will appear.
Left-click the Start button, type Paint in the search box, and open the app.
Press the Ctrl + V keys to paste the saved Snip screenshot.
Click on the Home tab in the top bar of the Paint app.
Tap on the A icon in the Tools section of the top bar, and you’ll see the Text icon.
Select the area you want to insert text into on the screenshot and start typing.
Click and drag the text box to move it around on the image.
Edit and change text font, color, and other attributes of texts by clicking the Text icon.
Click any space when you’re done inserting the text.
Press Ctrl + S to save the image, or use the Snipping Tool to take a screenshot of the image, depending on your choice.
The Windows Paint app allows you to insert text in the Snipping tool and edit other text features like font, color, and size. So, the Paint app is the best option for adding text to the Snipping tool.
Sticky Notes are useful, but many Windows users want to know how to keep Sticky Notes always on top. This is rather simple, and today we’re going to show you how to do it.
How can I make Sticky notes stay on top in Windows 11?
1. Use Microsoft PowerToys
Open the Microsoft store app on your PC, search for Microsoft PowerToys and download it.
Follow the on-screen command to finish the installation and open the app.
Navigate to the Always on Top tab. Toggle on the button next to Enable Always on Top to enable it.
Click on the search icon, type in Sticky Note, and click on it to open it.
To keep Sticky Notes on top, open the Sticky Note app window and press Windows + Ctrl + T.
Microsoft PowerToys is one of the ways to customize your device for Windows users. You can read about how to download and install PowerToys on your devices.
2. Use DeskPin to keep Sticky Note on Windows
Open your browser, and visit the DeskPin page to download the latest .exe version.
Follow the on-screen command to complete the installation process.
Press the Windows button, select all apps, navigate to DeskPin and open it.
Click the Arrow at the bottom left side of the desktop to open the system tray, and click on the DeskPin icon to activate a pin.
Click on the Sticky Note app window to pin it.
DeskPin is a third-party app that permits users to pin a window on top of another. If you don’t like this app, you can also use Stickies or Notezilla instead.
Microsoft Teams is a workspace-centered communication tool. This tool has been installed on some versions of Windows 10, while you need to download and install Microsoft Teams on some versions.
If you need to download the tool, this guide will take you through the steps to follow to do it.
How do I download and install Microsoft Teams on Windows 10?
Finally, follow the simple onscreen instructions to complete the process.
The official website is the first place to download and install Microsoft Teams on your PC. You only need to download the installer and follow the onscreen instructions to get the app installed on your PC.
Now, click the Install button and wait for the process to complete.
Another easy way to install the Microsoft Teams app on Windows 10 is to use the Store app. So, if you don’t want to use the official download website, you can install the app from the Store.
Press the Windows key, type cmd, and select Run as administrator under Command Prompt.
Type the command below and hit Enter: winget install Microsoft.Teams
Finally, wait for the app to be installed on your PC.
The last method on this list on how to install Microsoft Teams on Windows 10 is to use the Command Prompt. The command above will help you download and install the app without stress.
With this, we can end this guide. You can easily download and install the app on your PC using any of the methods above.
The Reserved storage ensures that Windows 11 can be updated and performed optimally without running out of disk space for essential tasks. You can enable or disable reserved storage by using the command line utility.
Reserved storage is a feature in Windows 11 that sets aside a portion of the storage capacity on a device for system and app updates, system caches, and temporary files.
The amount of reserved storage varies based on the device configuration and can range from several gigabytes to over 7GB, depending on the size of the Hard Disk.
Furthermore, the Reserved Storage is automatically managed by Windows 11, so users don’t need to worry about freeing up space or managing the storage manually. The reserved storage ensures that the system and apps have enough space to operate correctly, even when the device is low on storage.
How do I enable or disable reserved storage on Windows 11?
1. How to view reserved storage on your device
Tip
Before proceeding with any steps to enable or disable the reserved storage on your PC, you need to check whether the storage is enabled. Hence, follow the steps to view the reserved storage on your computer.
Press the Windows + I key to open Windows Settings app.
Select the System tab from the settings and click on Storage from the right sidebar.
Scroll through and select the Advanced storage settings. Click on the Storage used on other drives to view the storage drives on your PC.
Select the C drive from the list.
Select the System & reserved to see your reserved storage capacity.
The reserved storage capacity varies on each device based on the size of the Hard Disk. If the reserved storage is intact, proceed with the steps below to enable or disable it.
2. How to disable and enable reserved storage
Left-click the Start button, type Command Prompt, and click the Run as administrator option.
Click Yes on the User Account Control (UAC) prompt.
Type the following lines of commands and press Enter to run them: DISM /Online /Set-ReservedStorageState /State:Disabled
Follow the steps listed above to check if reserved storage is disabled.
To enable reserve storage, type the following lines of commands and press Enter to run them: DISM /Online /Set-ReservedStorageState /State:Enabled
The Windows Command Prompt can enable and disable reserved storage effectively without affecting other storage capacities on your PC.
Multiple user reports regarding the Dell Data Manager high CPU usage issue exist. High CPU usage issue affects the overall smooth functioning of the PC. In this guide, we will give you a bunch of solutions that will help you resolve the Dell Data Manager high CPU usage issue.
What is triggering Dell Data Manager high CPU usage?
After going through multiple forum reports, we have deduced a list of the most common reasons why Dell Data Manager is eating up the CPU on your PC:
Presence of malware or virus: Chances are that the Dell Data Manager high CPU usage issue is triggered because of malware or virus. It could only be detected using a good antivirus.
Dell Data Manager is added to the system’s startup items: If you have added Dell Data Manager to the system startup, then it would load automatically every time you boot your PC, hence causing high CPU usage issues.
It could be because of the Dell Support Assist app: Some users have reported that the Dell Data Manager’s high CPU usage was triggered because of some issues in the Support Assist app.
What can I do to fix Dell Data Manage high CPU usage issue?
Before any advanced solutions, note that:
Dell has resolved the issue by disabling the System Repair option in the Dell Support Assist app.
This, in turn, resulted in the Dell Data Manager usage to less than 5%, and the CPU usage went back to normal. So, you can try updating the Dell Support Assist app.
Uninstalling it from your PC might also do the trick.
1. Scan your PC for virus
1.1 Using Windows Defender Firewall
Press the Win key to open the Start menu.
Type Windows Security and open it.
Select Virus & threat protection.
Hit the Quick Scan button.
You can tap on the Scan options and select Full Scan for a deep scan of your PC.
Here, we have used the Windows Security in-built tool to scan for viruses or malware, but it isn’t as effective as any third-party antivirus software.
1.2 Use a third-party antivirus software
If there is no trace of high CPU usage in Task Manager, is it a virus infection or malicious software that runs in the background, then there could be a hidden program or a virus that might be causing the problem.
To keep yourself safe from any malware or virus that could potentially be the reason why you are getting the Dell Data Manager high CPU usage issues, we would recommend using TotalAV.
TotalAV is easy to use and install. The program is lightweight and will not interfere with your system or cause interruptions. Using TotalAV, you will stay secure from such viruses.
TotalAV
Lightweight antivirus solution that will unquestionably eliminate any digital threat from your device.
Locate any Dell related services and disable them.
Close Task Manager.
Restart your PC.
4. Update all drivers
Press the Win key to open the Start menu.
Type Device Manager and open it.
Expand the Display adapters section.
Right-click on your GPU and select Update driver.
Select Search automatically for drivers option.
Follow the same steps for each driver on your PC.
You can update all drivers on your PC by following the above-mentioned steps. However, these are time-consuming as you have to repeat the same steps for each driver.
To fix this, we would suggest you make use of a dedicated tool called Outbyte Driver Updater. It will not only help you update all drivers in just a few clicks, but it also acts as a download manager, creates driver backups, help you schedule scans to keep your PC up to date, and much more.
Outbyte Driver Updater
You need to keep your drivers updated at all times and Outbyte Driver Updater will make your PC faster as well!
Choose a different power plan other than battery saver.
If you have a battery saver power plan enabled, then your PC will have to do a lot more to run all the processes in a smooth way.
In this case, we would suggest you select a different power plan that will take off the pressure from your CPU and would result in less CPU usage by programs.
6. Reset your PC
Open the Start menu by pressing the Win key.
Type recovery options and open it.
Select the Reset this PC option.
Choose the Keep my files option.
Follow the on-screen prompts to reset your PC without losing your files.
As a last resort, we would suggest you reset your PC. Resetting will help you fix all the problems associated with any programs.
That is it from us in this guide. For users facing the Dell laptop plugged in but not charging issue, we would suggest you check out our guide that lists 6 effective solutions to resolve the problem.
If you can’t connect to 5GHz WiFi on Windows 11, you are not alone. To avoid network overlapping and to gain a more stable and speedy wireless connection, 5 GHz has been a new standard for WiFi.
However, due to some limitations, many users can’t connect or find the 5GHz WiFi SSID on Windows. Keep in mind that this problem is not like the WiFi option disappearing problem.
Why can’t I connect to the 5GHz WiFi from Windows 11?
Incompatible adapter: If the latest Windows do not support the WiFi adapter or it is incompatible, your 5G WiFi will keep dropping, fail to connect altogether, or it may be why you can’t connect or find a specific SSID.
Incompatible router: If there is a problem with your router, the problem may happen, so you might have to power cycle it.
Incorrect settings: Note that improper settings on both the PC and router may trigger this problem.
Driver problem: Keep in mind that a proper driver is a must to make your 5GHz wireless adapter work properly.
Windows 11 bug: If there is a bug on Windows, you can encounter various connectivity issues. Some of the below procedures will help you in this regard.
The adapter has an internal problem: The root of the problem can also be the wireless adapter you are using.
How can I check if my computer supports the 5 GHz wireless band?
Press Win + X on the keyboard and click on Terminal.
Type the following command and hit Enter:netsh wlan show drivers
If you see that it is 5 GHz mentioned in the supported band section, it means your PC has the capability. However, for some adapters, you may see different information. In this case, you should look at the Radio type section.
If you see 802.11a and 802.11g, 802.11n, and 802.11ac, the network adapter supports both 2.4 and 5 GHz bands.
How to switch to 5GHz WiFi in Windows 11?
You can forcibly switch to 5Ghz WiFi on Windows 11 to solve this problem. However, before that, we recommend you check out these things:
Make sure Windows is up to date.
Ensure that your wireless adapter driver is up to date. If necessary, use Outbyte Driver Updater to update the drivers.
Restart your PC and also power cycle your router.
Make sure your WiFi router supports the 5Ghz band, and doesn’t have any other issues. If needed, check out these 5GHz WiFi routers.
Ensure that the adapter supports the specific 5Ghz band your router is using.
At last, you must make sure that all wireless and networking settings are correct on your PC and router.
After that, you can go through the following methods to fix can’t connect to 5Ghz WiFi in Windows 11.
1. Run the Network Adapter troubleshooter
Press Win + I on the keyboard to open Windows 11 Settings.
Go to System and then click on Troubleshoot.
Navigate to the Other troubleshooters.
Find the Network Adapter and click on Run next to it.
Select your WiFi adapter and click on Next.
Follow the on-screen steps to complete the troubleshooting process.
2. Set 5Ghz preference
Press Win + X on the keyboard and click on Device Manager.
Expand Network adapters.
Right-click on your wireless adapter and go to its Properties.
Go to the Advanced tab.
Find an option like Wireless Mode and select the 5Ghz band.
Click on OK.
You may directly see the 5 GHz option. However, for some adapters, there may be different IEEE standard names, like IEEE 802.11ac. Select these options and see which one works. It should solve can’t connect to the 5GHz WiFi on Windows 11 issue.
Right-click on your wireless adapter and click on Disable.
Next, right-click on the adapter again and choose Enable.
4. Reset TCP/IP
Open the Terminal like before.
Type the following command and press Enter: netsh winsock reset
Then, run the following commands one by one: netsh int ip reset ipconfig /release ipconfig /flushdns ipconfig /renew
After that, try to connect to the 5Ghz wireless network and see if it works.
5. Re-install the wireless adapter
5.1 Uninstall the WiFi adapter
Like methods 2 and 3, open the Device Manager and expand Network Adapters.
Right-click on the wireless adapter and choose Uninstall.
Tick Attempt to remove the driver for this device and click on Uninstall.
5.2 Install the adapter
Go to your wireless adapter or computer manufacturer’s website.
Download the appropriate driver.
Install it on your PC.
Alternatively, you can use an automated driver updater to install any missing drivers on your PC.
After re-installation, it should solve the problems with 5GHz WiFi connectivity on your PC. However, in some cases, you may need to consider resetting Windows 11. If necessary, you also can do a clean installation.
This article has explained how you can fix can’t connect to a 5GHz wireless network on Windows 11. If you have any suggestions, feel free to let us know in the comment box.
Windows users can open File Explorer and customize it, but they don’t need to sign in to access it. However, it now appears that a recent Windows update has brought about a Please sign in button at the top right corner.
Although it seems like a problem at first glance, it’s a good sign. It means that you’re yet to authorize your Office files to connect to File Explorer. Nevertheless, the sign can be somewhat annoying, so if you’re looking for ways to remove it, you’re in the right place.
Why is File Explorer asking me to sign in?
When Windows users try to open File Explorer, they’re met with a pop-up asking them to sign in. Once they attempt to log in, they are prompted to use either a business or education account. It also says that Microsoft does not accept personal accounts.
The reasons behind this anomaly include:
New Windows update – According to users, the File Explorer please sign in prompt appeared after updating their operating systems. It could be a Windows update error or just a new feature.
Virus infection – It is also possible that a virus has taken over your system and infected malicious code that is making the changes in your PC. You can install an antivirus solution for your woes.
How do I remove the Windows 11 File Explorer Please sign in pop-up?
Before you try the slightly technical solutions, check the following:
You can create a local account if you don’t already have one or just switch. A local user account does not need you to sign in with your Microsoft account, so try switching and see if the File Explorer Please sign in pop-up still appears.
1. Restart File Explorer
Right-click on your Taskbar and select Task Manager to open.
Locate Windows File Explorer, right-click, then select End task.
Click on File in the top left corner and select Run new task.
In the dialog box that appears, type explorer.exe in the dialog box and press Enter to restart File Explorer.
2. Hide files from Office.com
Hit the Windows + E keys to open File Explorer.
Click on the three ellipses at the top and select Options.
Under the Privacy section, uncheck the Show files from Office.com option, then click on Apply and OK to save changes.
The pop-up is a way to ask you to integrate your Office files with File Explorer, so if you disable this option, the pop-up will disappear.
3. Run a virus scan
Press the Start Menu, search Windows Security, and click Open.
Select Virus & threat protection.
Next, press Quick scan under Current threats.
If you don’t find any threats, perform a full scan by clicking on Scan options just below Quick scan.
Click on Full scan to perform a deep scan of your PC.
Wait for the process to finish and restart your system.
Click on Windows Update and select Update history on the right pane.
Scroll down and under Related settings, click on Uninstall updates.
This will take you to the most recent installed updates.
Select the topmost update and click on Uninstall.
Restart your PC and check if the problem persists.
Many users started seeing the File Explorer Please sign in message after updating their Windows. If this is the case, it means the update came with the pop-up, and reverting to previous settings could get rid of it.
While this may solve your issue temporarily, it is not advisable to run your system without critical updates as it could expose your PC to risks.
Another troubleshooting solution worth trying if the ones listed above don’t work is to perform a clean boot, especially if you don’t know the root cause of the problem.
If you need data visualization and analytics software, you may become confused as there are multiple good options. This article will give you an overview of Looker vs. Power Bi vs. Tableau. This will make it easier to choose the right software for you.
Besides finance software, data analysis and visualization tools are also very important for businesses for efficient workflows and key decision-making. For this, there are plenty of options available. Most of the time, everyone prefers already established platforms like Tableau, Power Bi, Looker, etc.
But, the problem begins when you cannot choose between these options. If you look at the feature details and know about some key points, you will easily understand which one is ideal for you.
If you are looking for business intelligence software that helps to explore and analyze business data easily. Looker is an excellent option. Looker Data Sciences, Inc is the company behind this platform. It is a browser-based platform. That means you can access it from anywhere from a supported browser.
Power BI is an excellent data visualization and business intelligence software from Microsoft. This platform has a straightforward and feature-rich UI. You can access Power BI from a browser or a desktop or mobile app.
This is another excellent data visualization software from an American company Tableau Software. You can use it on the web, desktop, cloud, and your own server. This platform can help with its excellent visualization capability.
In terms of general features, both Power BI and Looker hold similar characteristics. Both offer excellent pre-built templates and tools to create stunning graphs and charts. These two software tools are accessible from anywhere on any device.
Even though both have many similarities, they also have some differences. Power BI offers a very easy-to-use interface with various customizability, such as creating custom themes.
But, Looker is more on in-depth analysis. If you know SQL, you can do even more with Looker. Both use different data modeling languages.
Is Power BI better than Looker?
It’s difficult to conclude which one is better if we compare Power BI and Looker. It depends on your needs. Power BI has a lower learning curve, and it is more flexible.
Looker has a bit more learning curve and is a bit less flexible. If you can learn LookerML and you know SQL, you will get better from Looker. But, if you want simplicity and don’t bother with slightly better flexibility, Power BI is a superior option.
Is Looker better than Tableau?
It also depends on your needs. Both Looker and Tableau serve similar purposes. However, Tableau is better for data visualization and management. But Looker can give you better analytics and data querying functions.
At the end of the day, it is your choice based on your need. If you need better visualization and data management, Tableau is slightly better. For more detailed analysis and flexibility, Looker is excellent. Microsoft Power BI has an edge for user-friendliness, simplicity, and flexibility.
If you’re interested in a great data analytics and automation tool, check out Coupler.io. It helps you manage and analyze your data, then has all the tools to automate your flows.
Using the Task Manager, you can keep a check on all the programs and processes on how many resources each one of them is using. You can easily disable the task that you might feel is the culprit of high CPU usage on your PC.
But did you know that you can change the real time update speed in Task Manager to speed up the process of its update and automatic refresh? In this guide, we will show you some ways to change the Task Manager update speed. Let us get right into it.
What are the different Task Manager real time update speed options?
There are a bunch of different options, four to be specified under the Task Manager real time update speed drop-down.
High: When you set the real time update speed to high, you will be able to monitor resource extensive programs such as games, and photo and video editing tools. The Task Manager will update the usage percentages every half second.
Normal: This is the default setting in the Task Manager’s real time update speed drop-down. The usage percentage is changed every second. A good setting if you don’t know whether you should tweak the setting or not.
Low: Choosing this option will slow down the usage update speed to 4 seconds. This could come in handy if you want to focus on the resource usage of a particular program or process.
Paused: This will pause everything on the Processes tab and the Performance tab. In order to resume things, you need to change the option. This is best when you want to take a screenshot of the problematic program.
Let us check out the steps that would help you change the Task Manager update speed.
How can I change the real time update speed in the Task Manager?
Press the Win key to open the Start menu.
Type Task Manager and open it.
Click the Settings icon.
Under the Real-time update speed drop-down, select the appropriate option:
High
Normal
Low
Paused
Select the option based on your needs, and that is it. This is the simple way to change the Task Manager update speed.
We also have a guide for users who are looking for creating a shortcut for Task Manager on their Windows 11 PC. This would allow accessing the Task Manager pretty quickly.
Also, there are multiple users that have reported that the Task Manager is not closing the program. You can check out our guide and force close the program.
Please let us know in the comments below if you could change the Task Manager update speed following the above steps.
Anyone can create a System Restore point to restore their computer to a previous state. This makes it possible to roll back changes made to your computer during usage. It’s useful if you accidentally delete or format files or if something goes wrong with your computer or software.
Whereas they are vital to the health of your system, they can be a little tricky to set up if you are not familiar with the process. For instance, users have complained of the HP Support Assistant getting stuck on creating a restore point, so let’s dive deeper and attempt a fix.
Why can’t I create a System Restore point?
The system drive is running out of space – If your system drive is running low on free space, you’ll need to free up some space. You can delete some files or move them to another drive.
Windows is damaged – System Restore might not work if Windows is damaged. Viruses and malware may have damaged windows.
The System Restore folder iscorrupted – It’s possible that your folder is corrupted. This can happen if you made some registry edits.
Damaged hard drive – If you can’t restore your system using the System Restore feature, it’s possible that the system hard drive has been damaged.
The disk is partitioned improperly – If you have a system that has been partitioned using an unsupported partition style, the System Restore may fail. Consider partition manager software for this task.
How long should System Restore take on an HP laptop?
System Restore is a utility that lets you take a laptop back to the state it was in when you first turned it on. This includes the applications and files you installed.
Given all the work it does, it can take some time to complete. Some of the factors to consider include:
Amount of data that’s being restored – The amount of data being restored depends on the size of the hard drive. If it takes a significant amount of time to read it, it will take longer to restore.
The numberof files that are being backed up – If you have a lot of files, it could take longer to complete the backup process.
Amount of free space – The more RAM, the more data and programs you have to work with. This means it will take longer.
Speed of your PC – A faster computer will likely finish restoring files quicker than a slow one.
Still, a System Restore takes a considerable amount of time to complete. This is because it restores the system to an earlier point in time. The process requires it to load the operating system from a backup file.
As such, the restoration process can take anywhere from 15 minutes to several hours, depending on the factors above. For users who have done the process a couple of times before, a rough estimate is possible.
If the System Restore process is taking longer than usual, you can consider the possibility that it is stuck at creating a restore point and proceed to the solutions below.
What can I do if HP Support Assistant Support is stuck at creating a Restore point?
1. Check for Windows updates
Hit the Windows key and select Settings.
Click on Windows Update on the left pane then select Check for updates.
If available, click on Download & install.
2. Run the Windows Startup repair
Hit the Windows key and click on Settings.
Select System and click on Recovery.
Navigate to Advanced startup and click on Restart now.
Click on Troubleshoot.
Select Advanced options.
Choose the Startup Repair option.
Wait for some time until the diagnosing process is complete.
Click the downloaded file to run the installer and click Yes when asked to confirm.
Follow the on-screen instructions and restart your PC when prompted.
Reinstallation should only apply if you get a message saying This version of HP support assistant appears to be incompatible. It could mean the latest updates have not been registered on the application.
Elsewhere, you may find that although the process has been successful, Windows becomes extremely slow after a System Restore. If this is the case, don’t hesitate to check out our helpful guide to resolve this issue.
You may also be interested in undoing a System Restore in case you change your mind or just aren’t interested anymore. If so, you’ll find our article quite insightful and easy to follow.
Share any additional thoughts you may have on this topic down below.
Windows Experience Index (WEI) is a tool that measures your Windows computer’s capabilities based on the CPU, RAM, graphics, and hard disk performance.
This guide will cover all the available methods to check Windows Experience Index on your Windows 11 computer. Let’s start!
Does Windows 11 have Windows Experience Index?
The graphic version of the Windows Experience Index tool was discontinued after the launch of Windows 8.1. However, you can still check Windows Experience Index using Command Prompt, PowerShell, and Performance Monitor on Windows 11.
How do I find my Windows Experience Index in Win 11?
1. Use the Command Prompt
Press the Windows key, type CMD, and click Run as administrator.
Copy and paste the following command to start the benchmarking operation and press Enter: Winsat formal
Now press Windows + R to open the Run console.
Type the following path and press Enter: %WINDIR%\Performance\WinSAT\DataStore
In the DataStore folder, look for Formal Assessment. If there is more than one file, open the latest one using the preferred You
You will see all the details related to your RAM, hard disk, GPU, and more.
Press the Windows key, type PowerShell, and click Run as administrator.
Copy and paste the following command to start the benchmarking operation and press Enter:get-wmiobject -class win32_winsat
You will get the scores. D3DScore is for Gaming Graphics, DiskScore is for Primary Hard Disk, GraphicsScore is for Graphics, and MemoryScore is for Memory.
3. Use the Performance Monitor
Press the Windows key, type Performance Monitor, and click Open.
Follow this path: Data Collector Sets\ System\System Diagnostics
Right-click System Diagnostics and select Start. This will initiate the diagnosis.
Now on Performance Monitor, to get System Diagnostic Report, follow this path: Report\System\System Diagnostics\[computer name]
Locate Hardware Configuration, expand it, and click Desktop Rating. Now expand Query, then Returned Objects.
What is a good WEI score in Windows 11?
A 4.0-5.0 is good, meaning your PC can handle high-end work and multi-tasking easily. With a 6.0 or higher score, your computer can handle anything you want.
Games for Windows Live was a service and software developed by Microsoft. It allowed players to use their Xbox Live account on the PC. The service had run for a few years before Microsoft opted for the Xbox GamePass.
Microsoft is constantly updating its services and products to meet today’s gamers’ needs. With Windows 11 being rated as the best gaming OS yet, Games for Windows Live on Windows 11 doesn’t seem to be worth the trouble.
Can you still use Games for Windows Live?
The Games for Windows Live service was officially retired in July 2014, but as with all online services, the platform continued to work and you could access the owned games for a few years after.
In 2020 they took things a step further, by removing the download page from their server, hence making it unable to install the Games for Windows Live client anymore.
You can still access Games for Windows Live in Windows 11 if you are willing to download the last version of the client from a third-party source. You will also need to have the activated games already installed and access them directly because the client won’t open as it doesn’t have any server to connect to.
Some of the Windows Live games are still online, but playing them through the Games for Windows Live on Windows 11 would be just like playing them offline but having the old GFWL overlay.
Though it’s not officially supported, some users have figured out how to still use Games for Windows Live. If you’re feeling sentimental and want to play a section of these games, you can. But you won’t have any support from Microsoft and you have to download the app from a third-party unverified source.
In 2024 Microsoft has become bigger than ever in the gaming industry and they offer a great deal of games through their Microsoft Store. The store is connected to the Xbox Network and so it allows you to play any games you could find on the platform.
Xbox Game Pass is a very affordable service that you can easily access from your Windows 11. You can certainly find all the games that were once part of the Games for Windows Live Marketplace on this new platform. There’s also no mention of Games for Windows Live in Windows 11 support for the future.
With today’s modern game requirements, it’s much better to play on regularly updated platforms such as Steam to avoid crashes and glitches.
Can I use Windows 11 for gaming?
Yes, Windows 11 is a great operating system for games. Microsoft has improved a lot based on the lessons learned from Windows 10. This operating system is properly optimized and will allow you to play even older games without hiccups.
Windows 11 can run games you would have found on the old Games for Windows Live flawlessly. Not only that but the degree of connectivity is amazing when it comes to games. You can easily add Xbox games to Steam, or use any other gaming platform you might think of.
Windows Game Mode which was launched with Windows 10 is also present. Although seemingly unchanged since that iteration, it comes with better integration with other gaming services.
That’s about it, but we’d love to continue the conversation in the comments section below. Share your thoughts on Games for Windows Live and how it compares to Steam or any other service you use.
When trying to install a Windows update, some users receive the error message, Failed to determine source edition type.
This error is especially seen when trying to upgrade Windows 10 to 21H2. It indicates that the upgrade process fails to identify the edition type of the current version of Windows.
Why do I see failed to determine the source edition type error?
Some of the reasons why you may encounter the Failed to determine source edition type error as you try to install Windows update are:
Corrupted Windows installation files – It could be possible that there’s a virus or malware infection, a hardware failure, or a power outage; hence, you see the error.
Incompatible software – Incompatible software programs may interfere with the upgrade process and trigger the Failed to determine source edition type error.
Check if the Windows version is compatible with your PC.
If the above methods fail to fix the Windows update error, we have a quick rundown of some of the best solutions.
1. Reset Windows update components
Press the Win + R shortcut keys to launch the Run console. Type cmd and press the Ctrl + Shift + Enter keys together to open the elevated Command Prompt.
Now, run the below commands one after another in the Command Prompt (Admin) window and hit Enter:
net stop bits
net stop wuauserv
net stop cryptsvc
Del “%ALLUSERSPROFILE%\Application Data\Microsoft\Network\Downloader\qmgr*.dat”
Once the commands have been executed successfully, the Windows updated files are fixed. Now, exit Command Prompt, restart your PC, and check if the Windows update error is gone.
2. Pause Windows updates
Press the Win + I keys simultaneously to launch the Windows Settings app.
Now, click on Windows Update on the left, and then, on the right, click on Resume updates (if you have already paused the updates).
Reboot your PC, and again open the Settings window (press Win + I ).
Next, click on Windows Update on the left and go to Pause updates under More options.
Here, select the pause duration from the drop-down, for example, Pause for 1 week, Pause for 2 weeks, etc.
Now, look for the SoftwareDistribution folder, select it, and hit Delete.
Now, close File Explorer, restart your PC, try installing the Windows update, and check if you still encounter the error.
5. Modify the registry settings
NOTE
Make sure to create a backup of the registry data before you make any changes to the settings. This will help you to recover any data lost accidentally during the modification.
Press the Win + R keys together to open the Run dialog, Here, type regedit and hit Enter to open the Registry Editor.
In the Registry Editor window, navigate to the below path: HKEY_LOCAL_MACHINE\SOFTWARE\Microsoft\Windows NT\CurrentVersion
Double-click on the Installation type string and set the Value data field to Client. Press OK.
Now, double-click on the EditionID, and set the Value data field to the supported value based on the edition (for example, CoreSingleLanguage in my case). Press OK.
List of supported values for EditionID based on the current Windows edition
Supported Values
Operating System SKU
BusinessN
Windows 10/11 Professional N (49)
CloudEdition
CloudEdition (Windows 11 SE (203)
CloudEditionN
CloudEditionN (Windows 11 SE N (202)
Core
Windows 10/11 Home (10/111)
CoreCountrySpecific
Windows 10/11 Home China (99)
CoreN
Windows 10/11 Home N (98)
CoreSingleLanguage
Windows 10/11 Home single language (100)
Education
Windows 10/11 Education (121)
EducationN
Windows 10/11 Education (122)
Enterprise
Windows 10/11 Enterprise (4)
EnterpriseEval
Windows 10/11 Enterprise Evaluation (72)
EnterpriseG
Windows 10/11 Enterprise G (171)
EnterpriseGN
Windows 10/11 Enterprise G N (172)
EnterpriseN
Windows 10/11 Enterprise N (27)
EnterpriseNEval
Windows 10/11 Enterprise N Evaluation (84)
EnterpriseS
Windows 10 Enterprise LTSC (125)
EnterpriseSEval
Windows 10 Enterprise LTSC Evaluation (129)
EnterpriseSN
Windows 10 Enterprise LTSC N (162)
Holographic
Windows 10 Holographic (136)
IoTUAP
Windows 10 IoT Core (123)
IoTUAPCommercial
Windows 10 IoT Core Commercial (131)
IoTEnterprise
Windows 10/11 IoT Enterprise (188)
PPIPro
Windows 10 TeamOS (119)
Professional
Windows 10/11 Professional (48)
ProfessionalEducation
Windows 10/11 Professional Education (164)
ProfessionalEducationN
Windows 10/11 Professional Education N (165)
ProfessionalWorkstation
Windows 10/11 Professional for workstation (161)
ProfessionalN
Windows 10/11 Professional for workstation N (162)
ProfessionalSingleLanguage
Windows 10/11 Professional Single Language (138)
ServerRdsh
Windows 10/11 Enterprise multi-session (175)
Besides you must also check if your internet connection is stable. Because if the network is poor, it can cause issues while downloading and installing Windows updates.



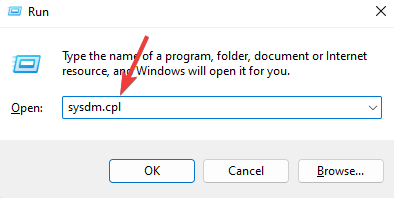

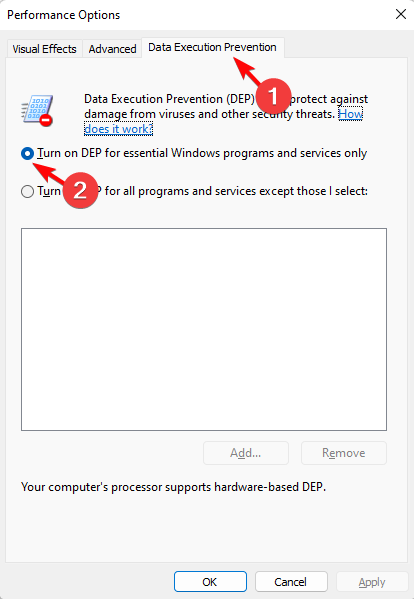


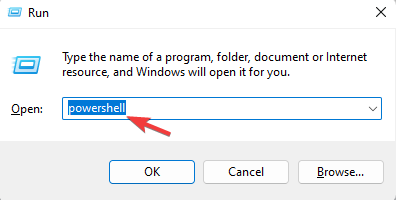
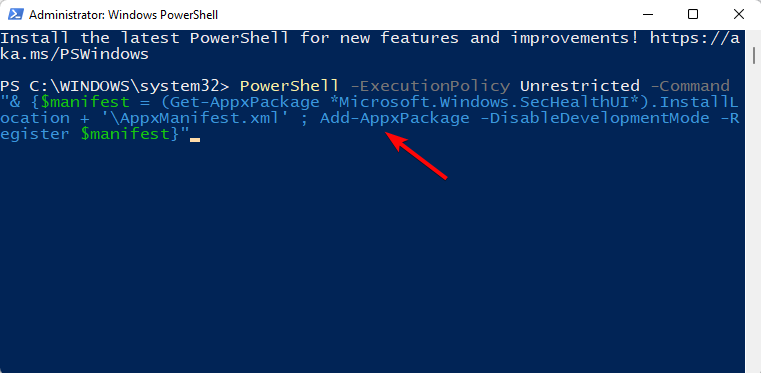


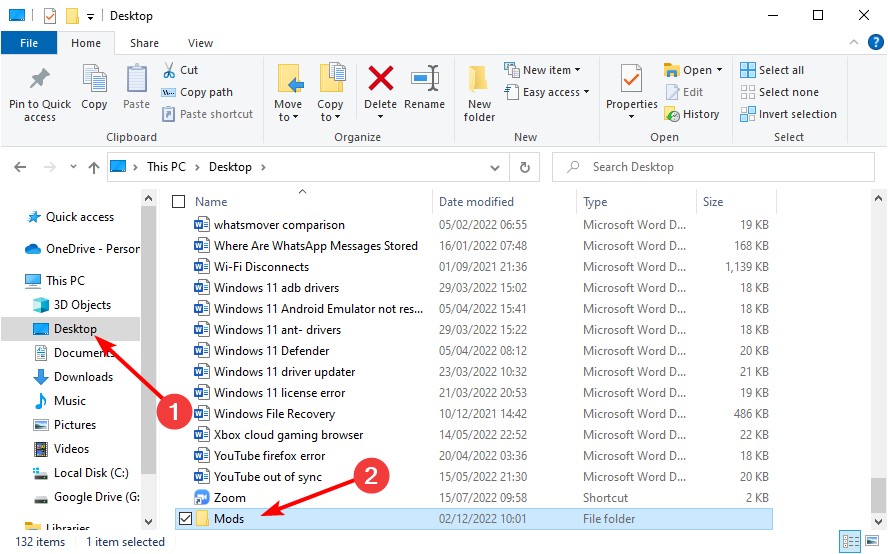


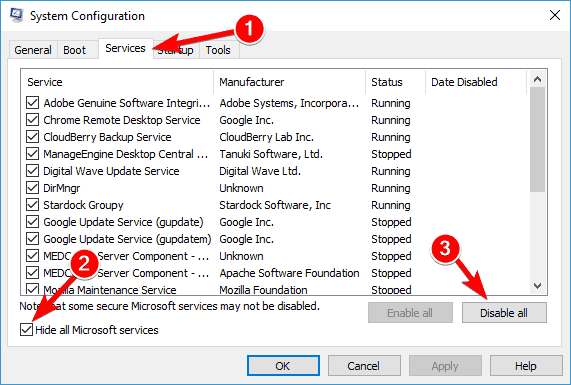
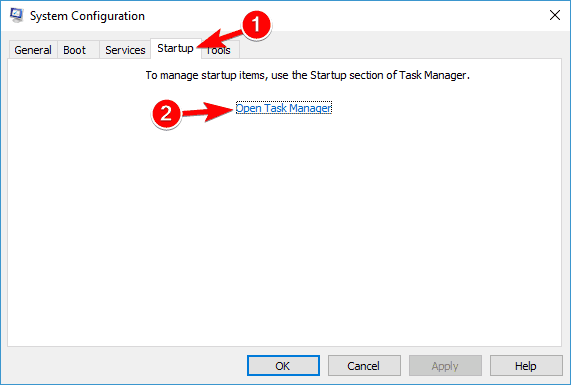
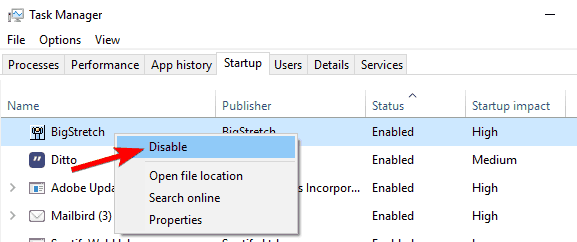


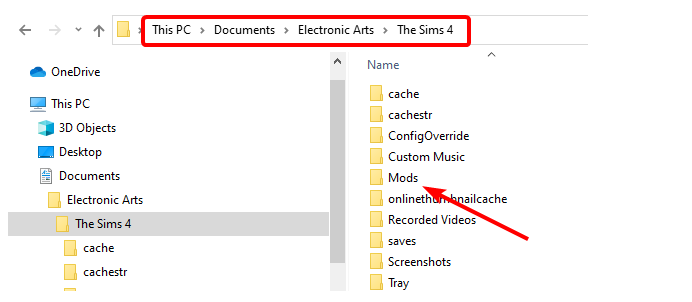
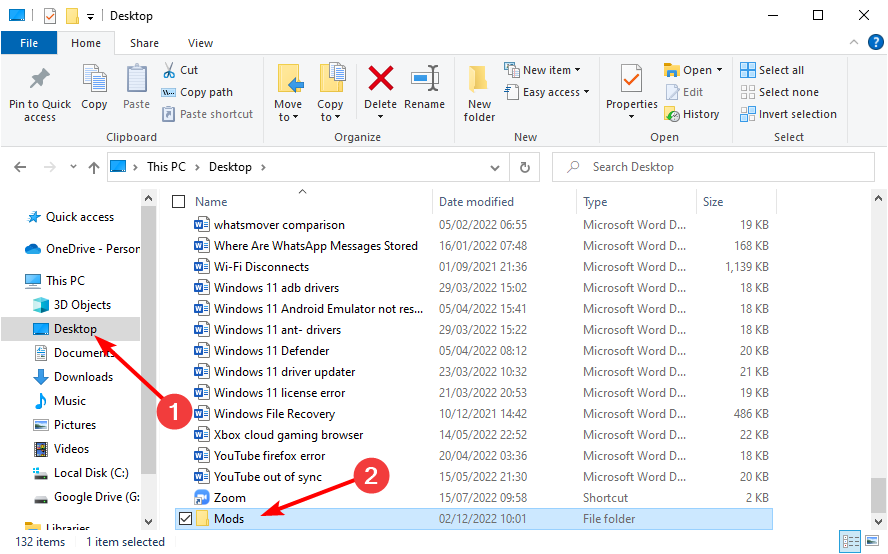




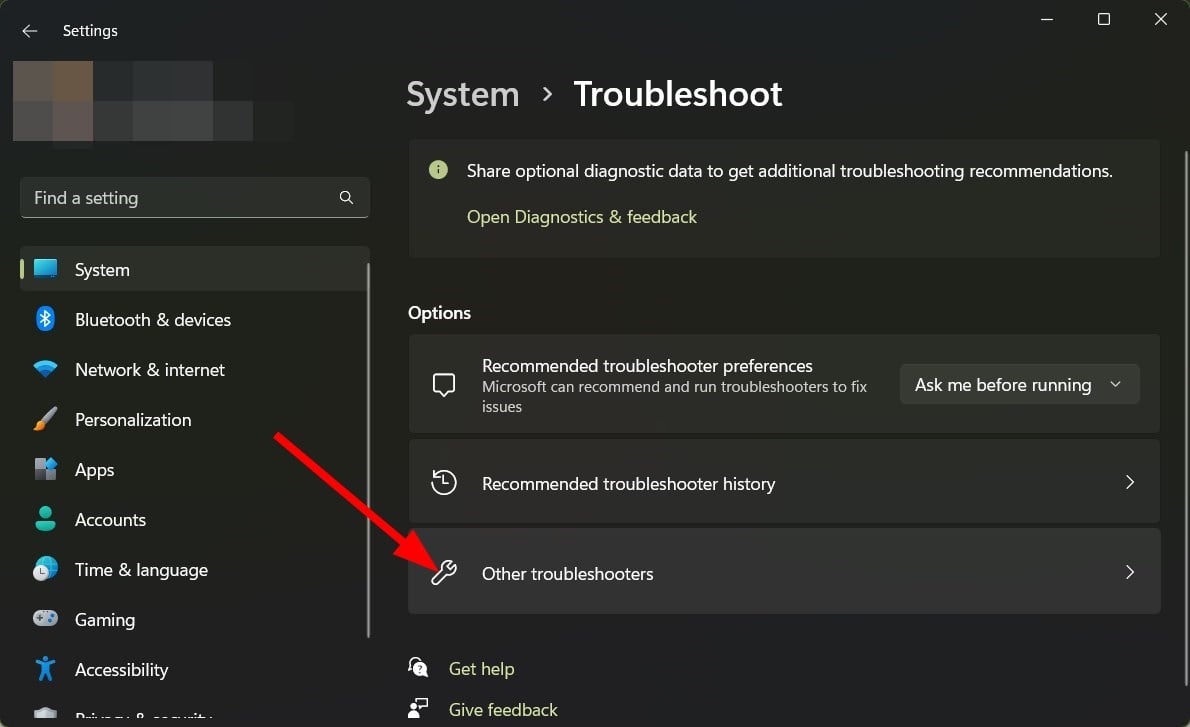
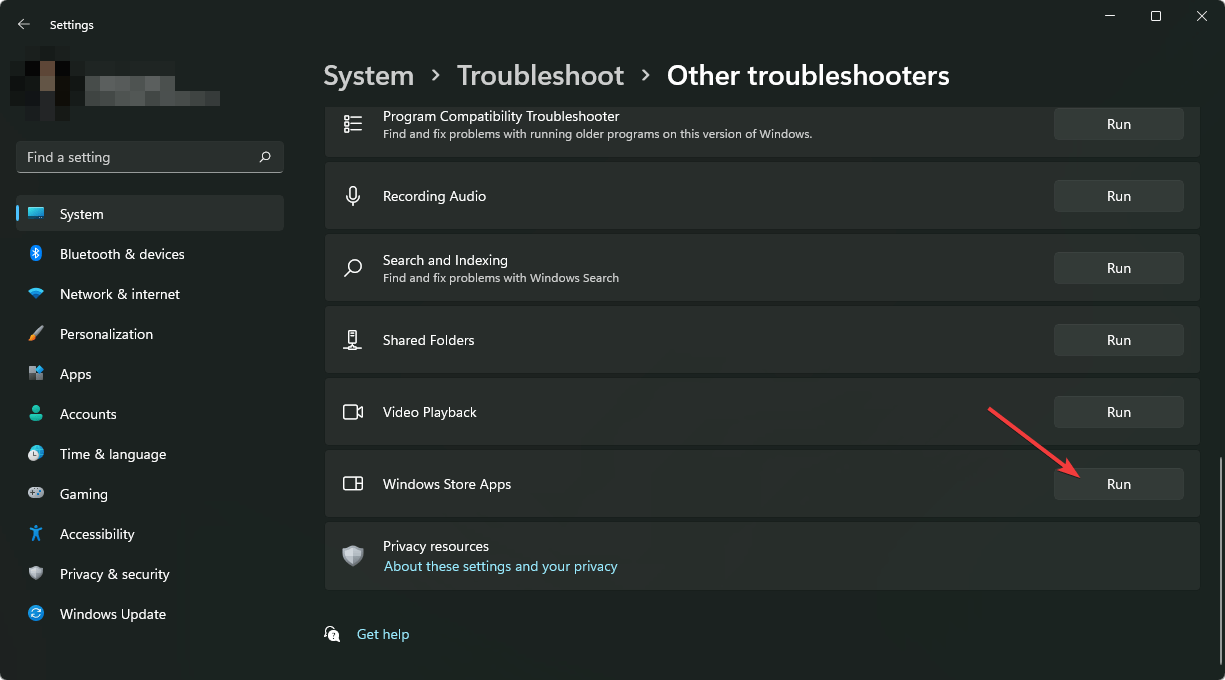


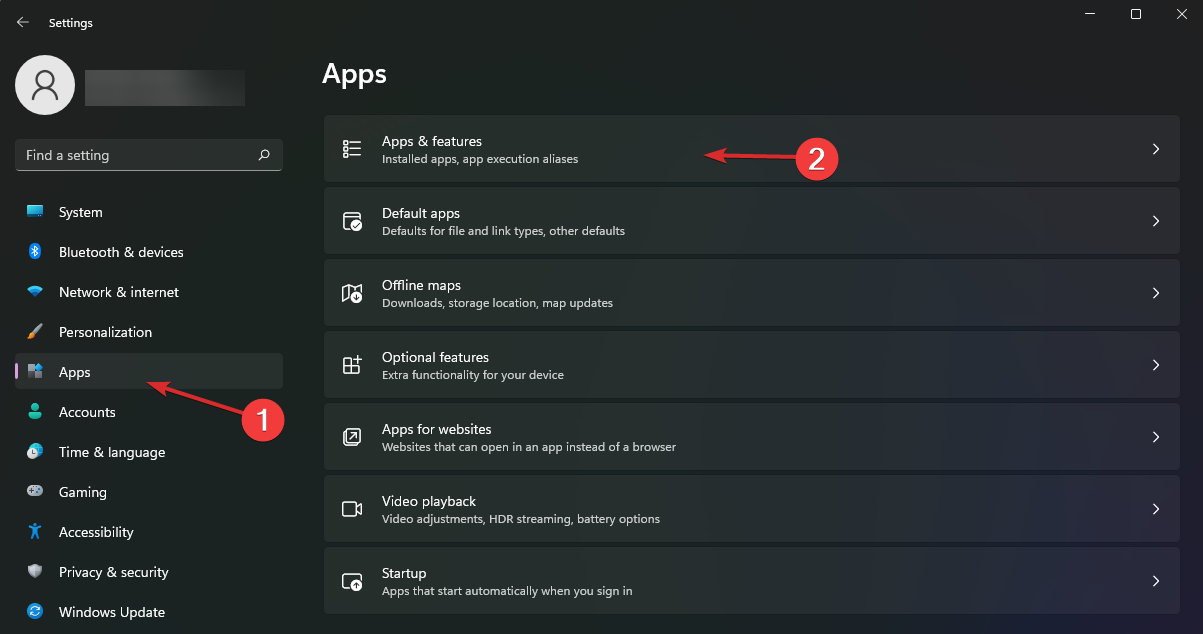


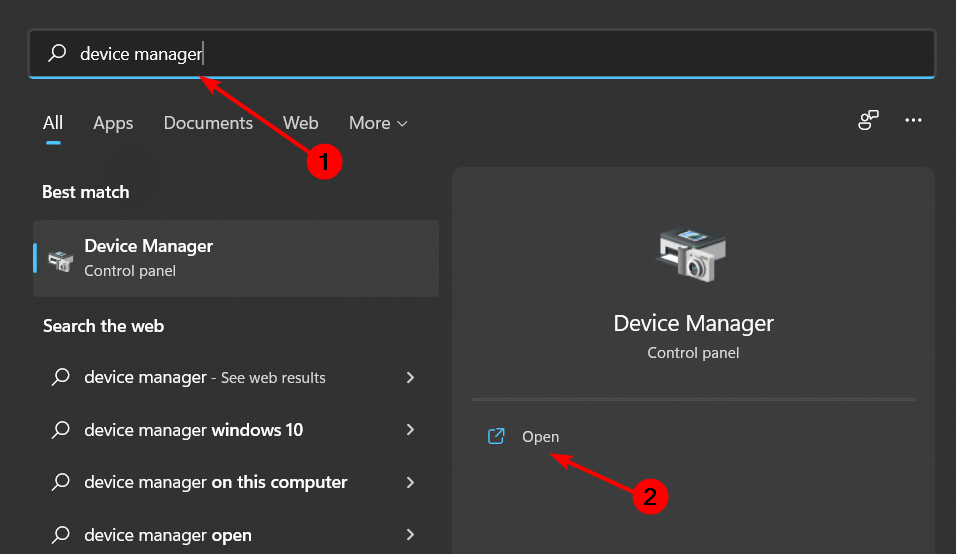

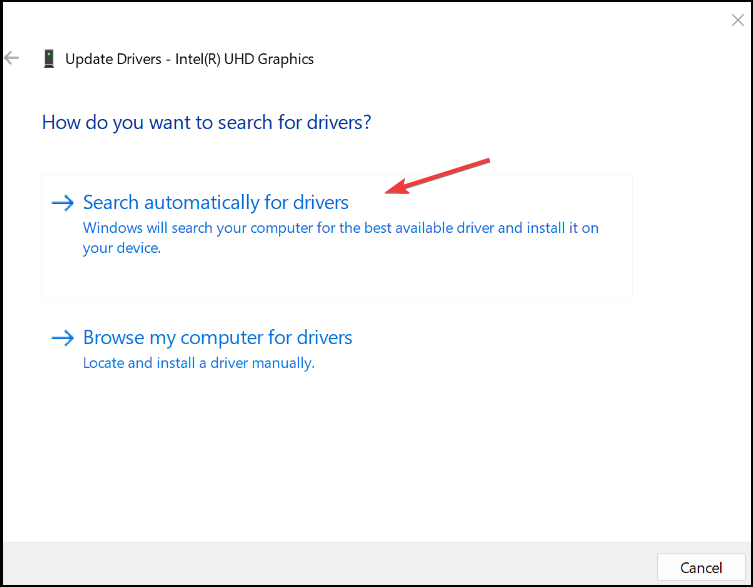




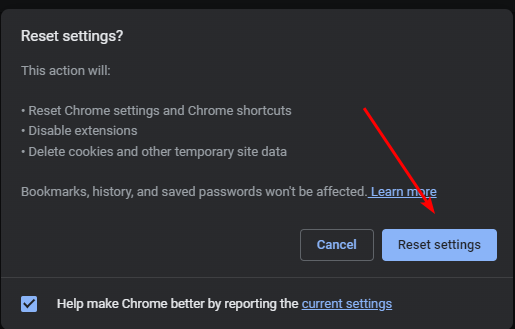


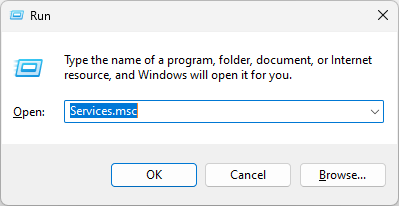
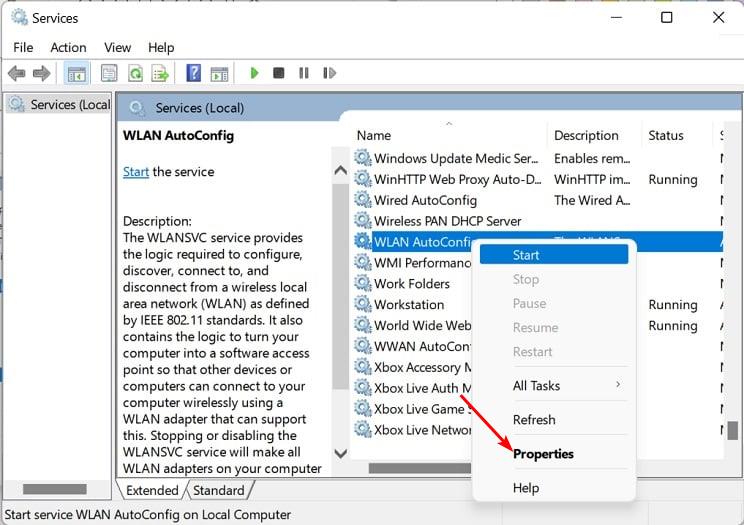
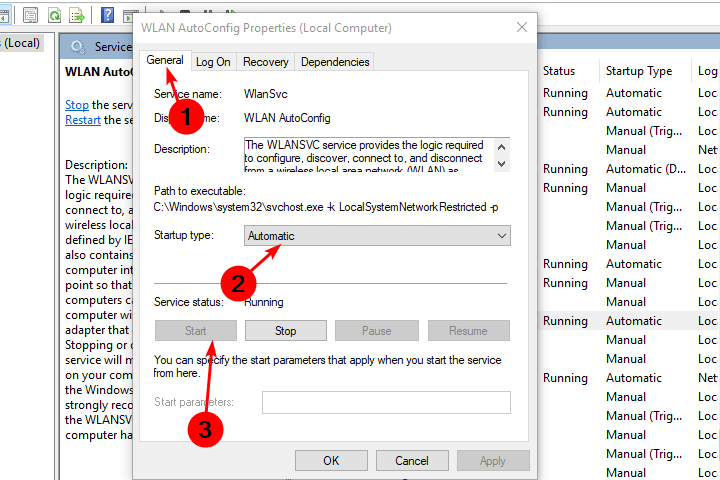
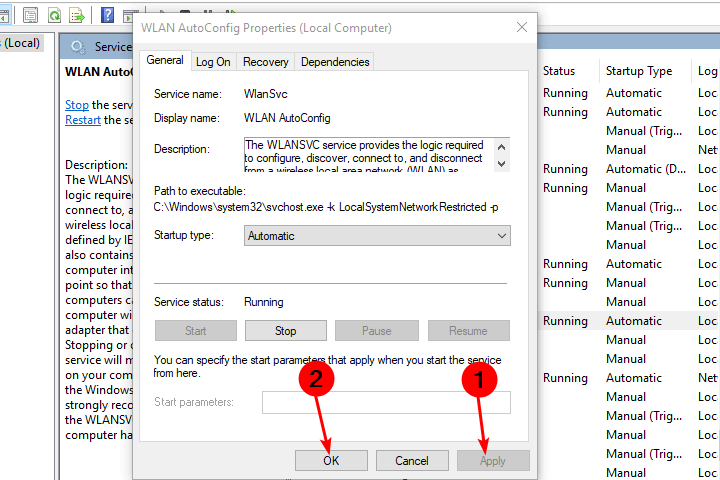



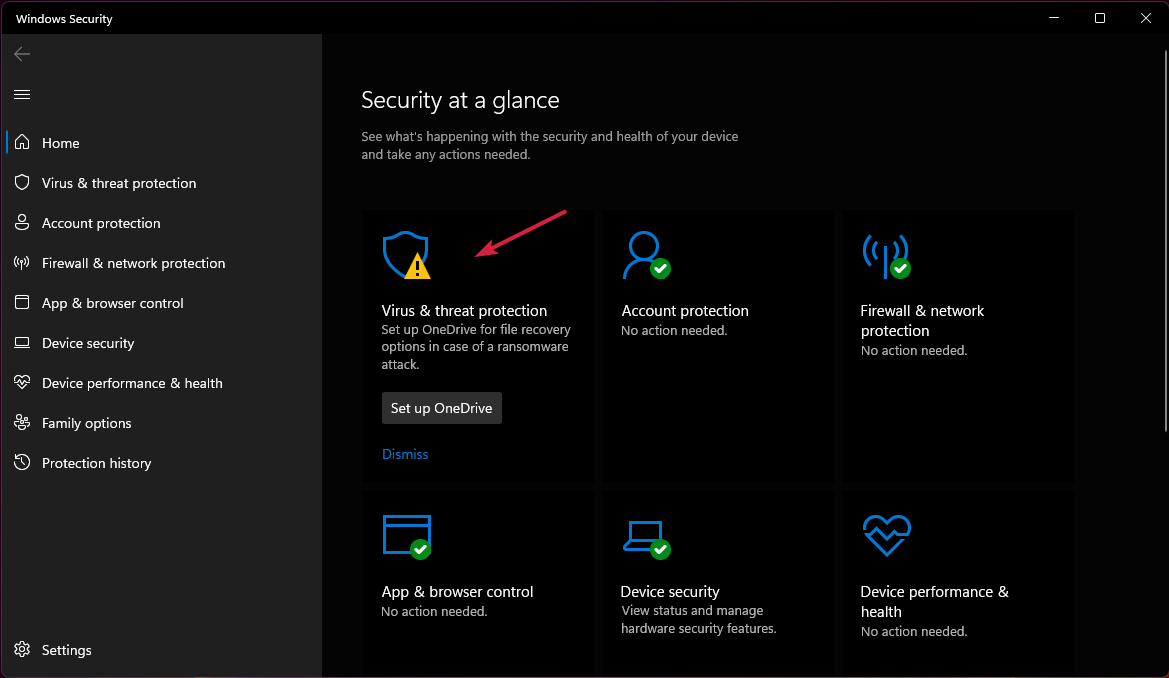
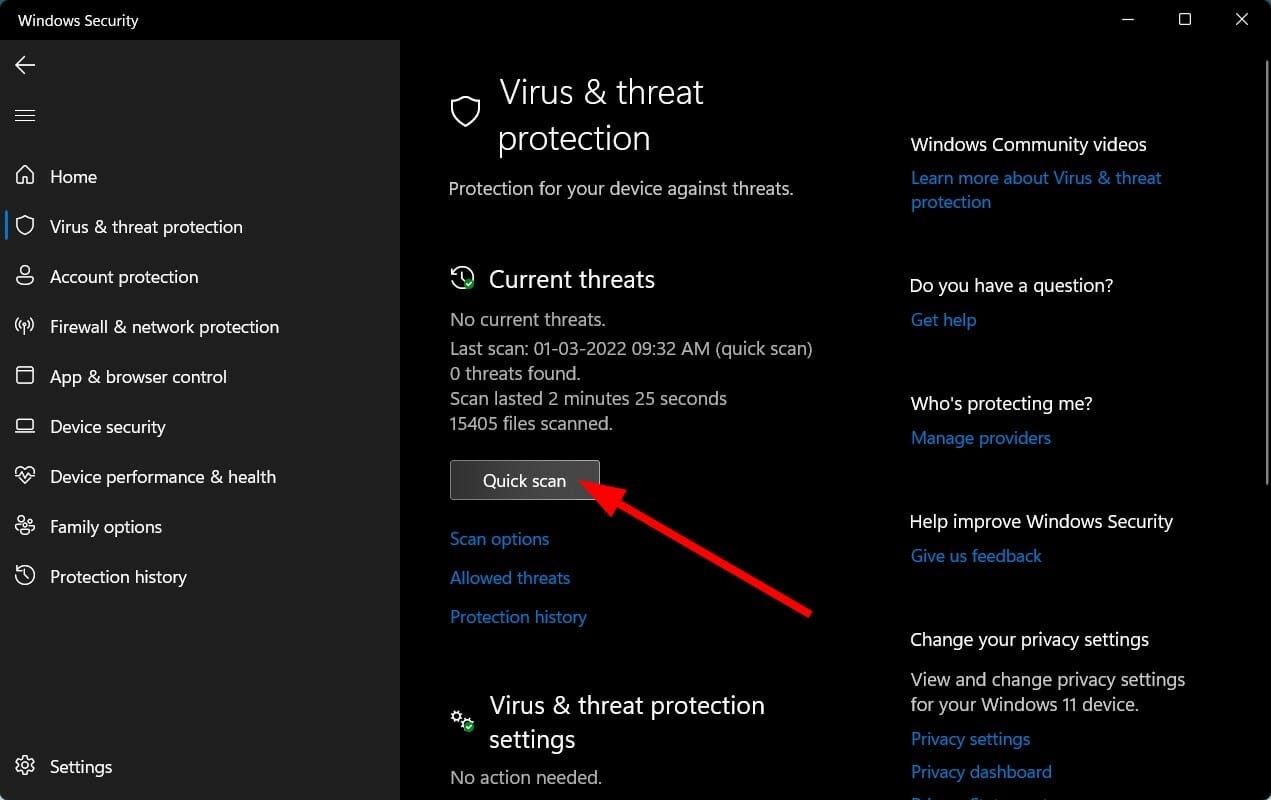
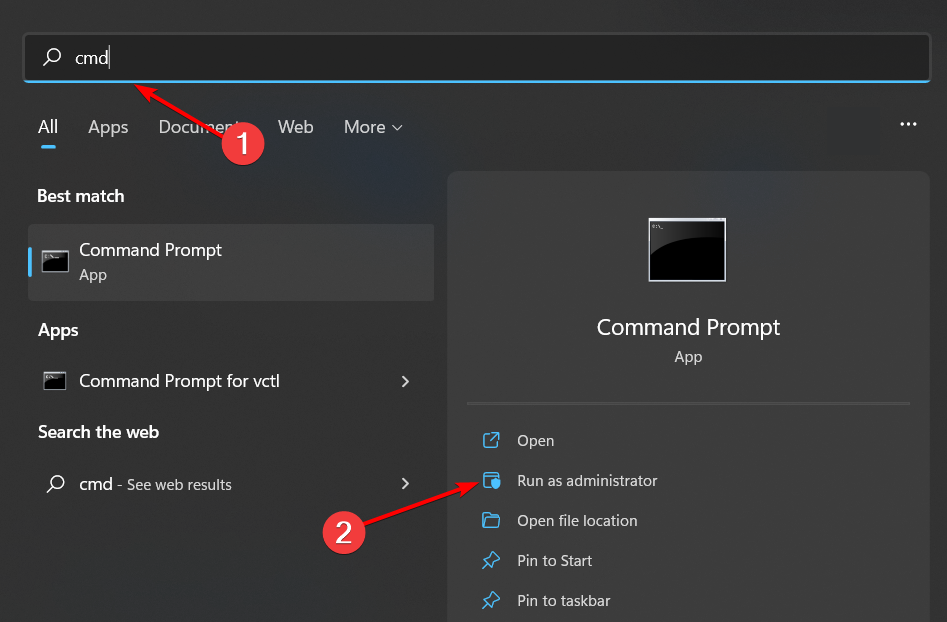















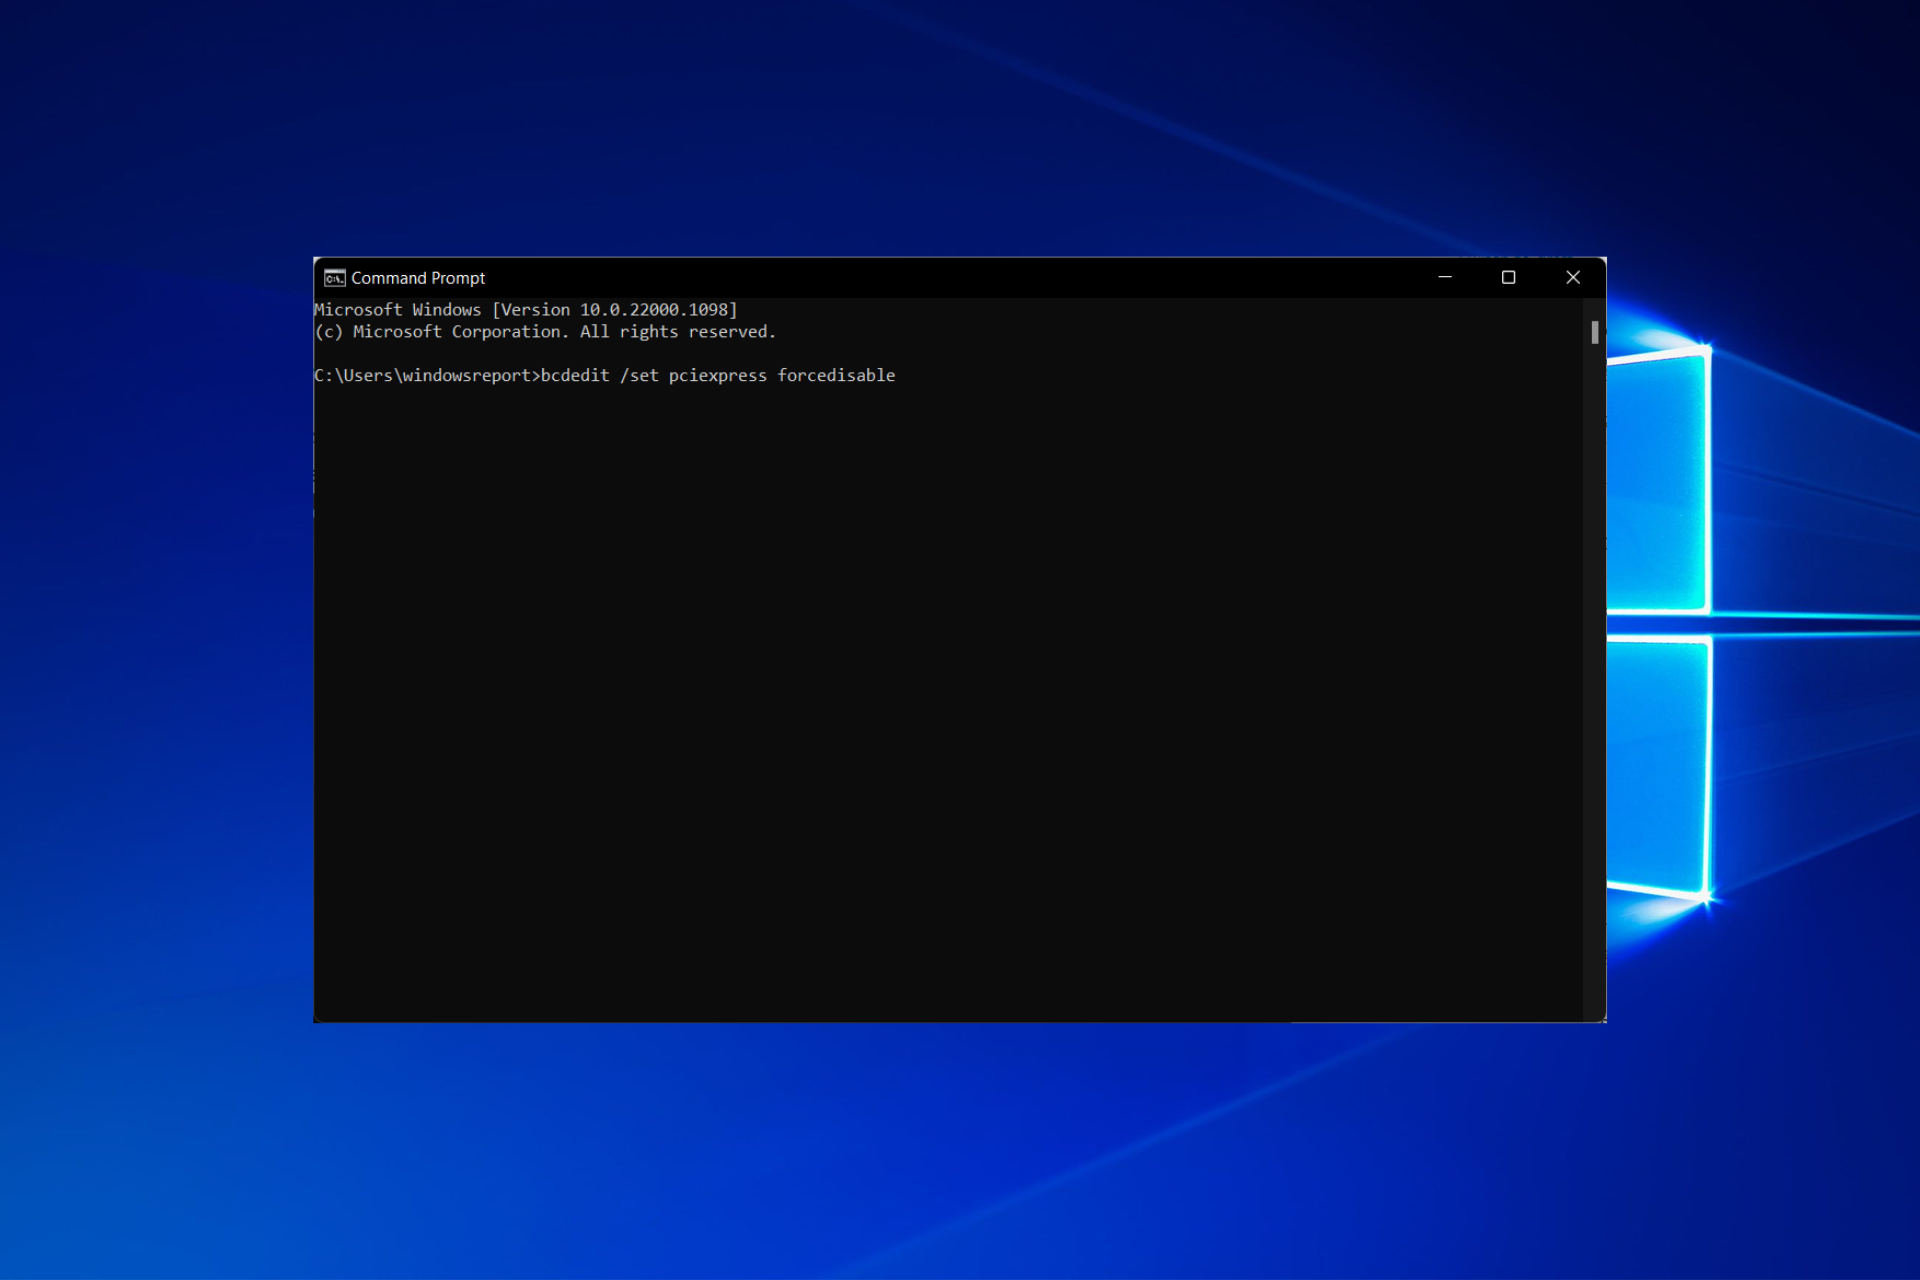


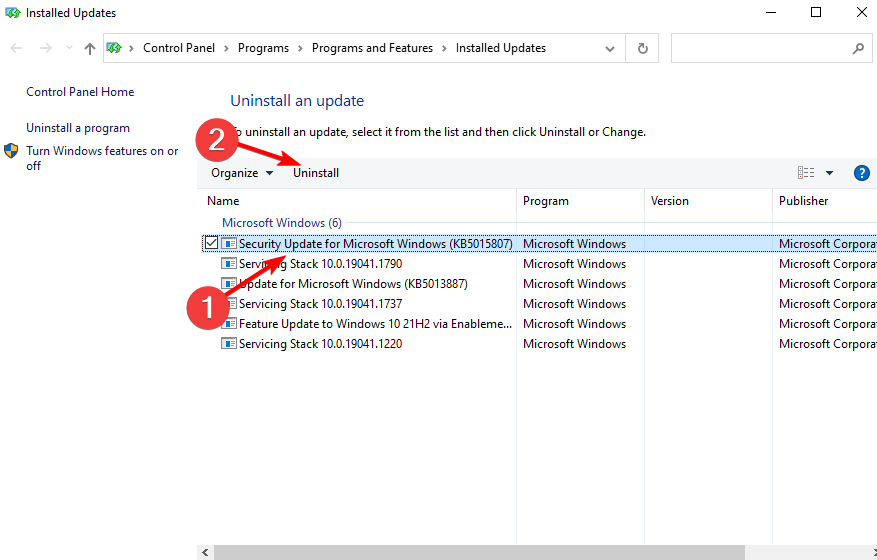

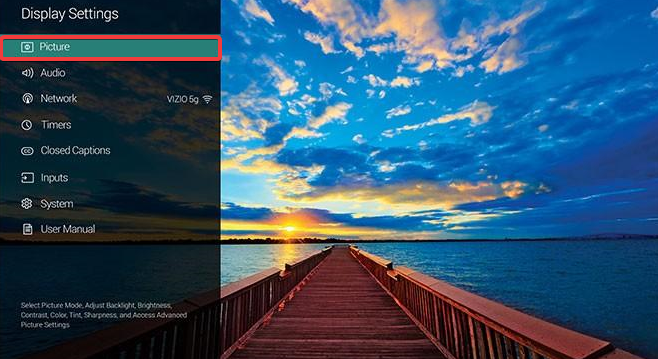
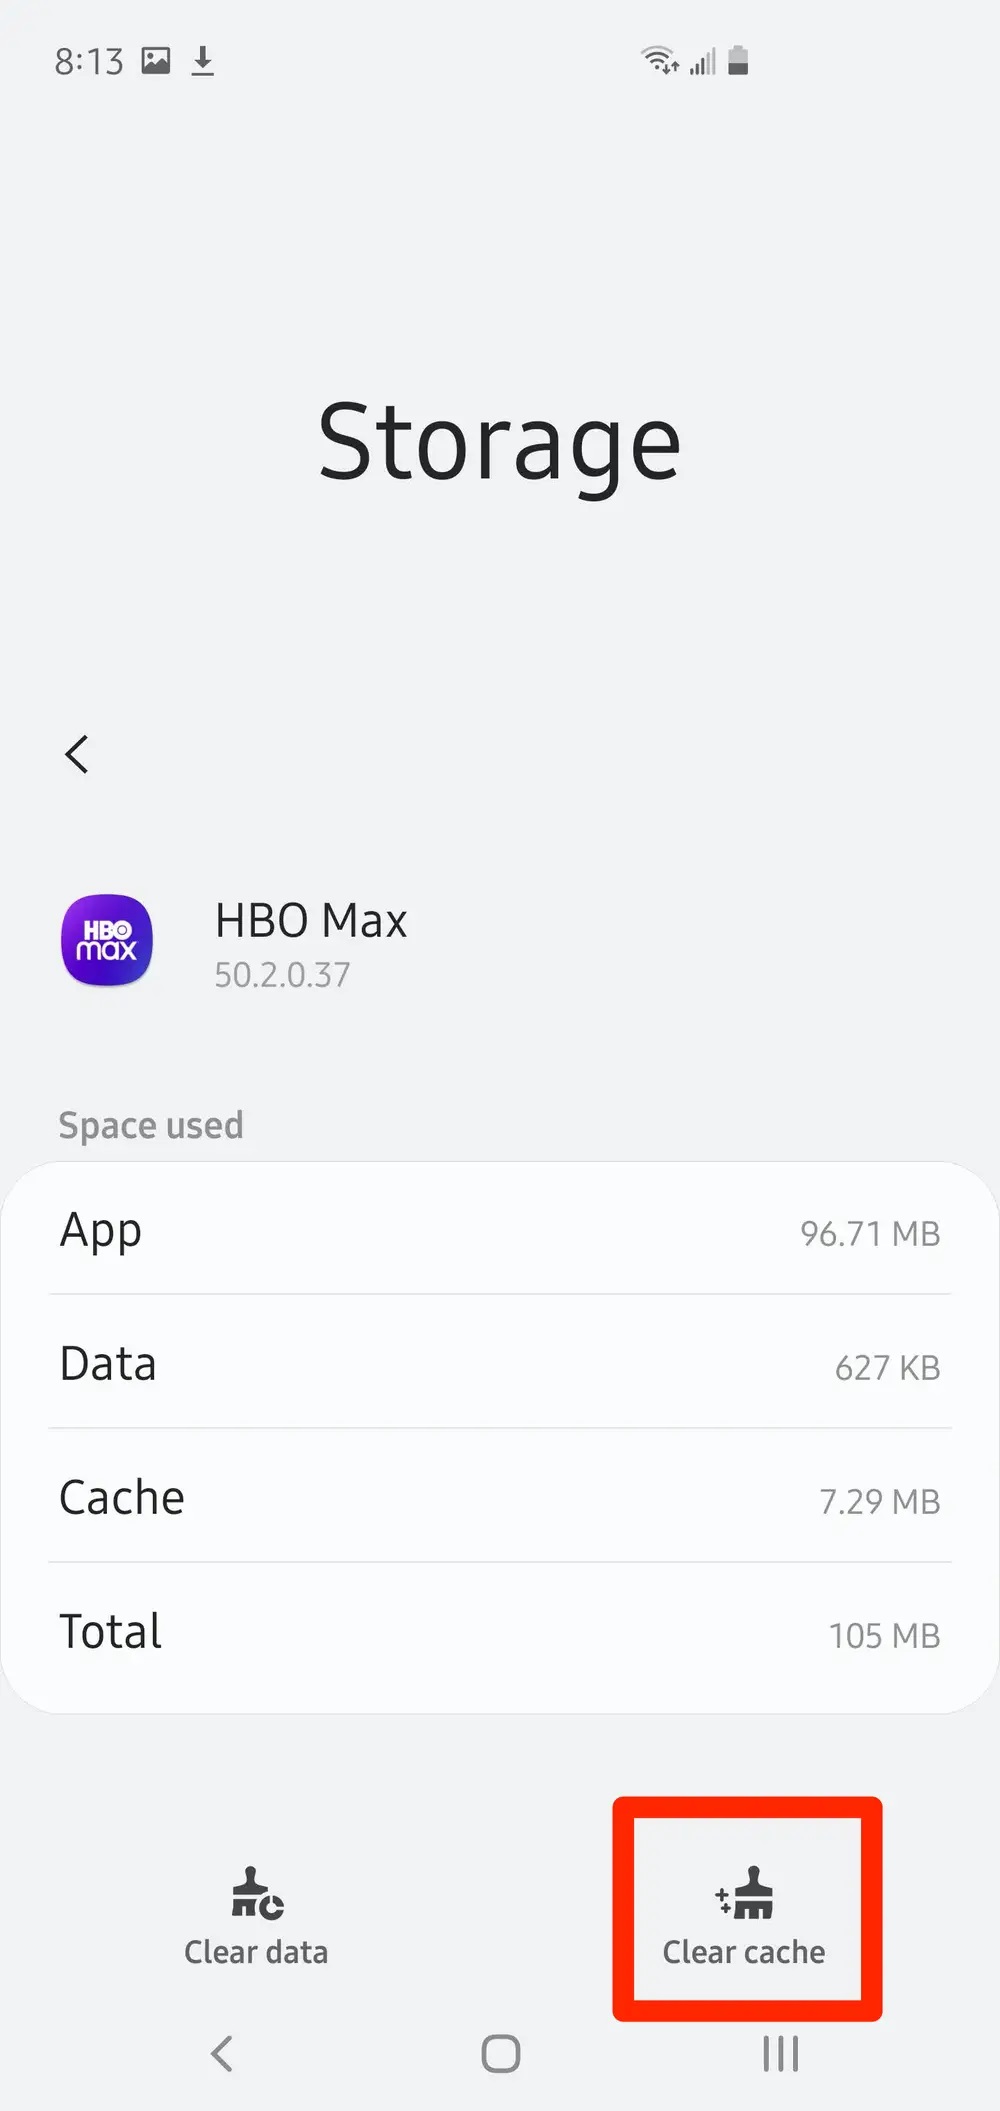
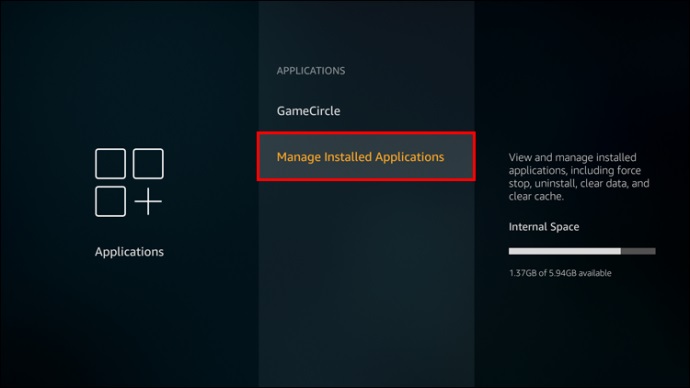
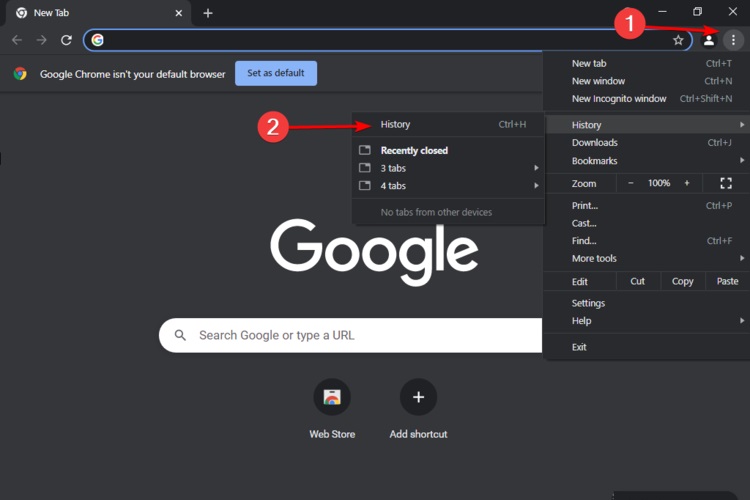
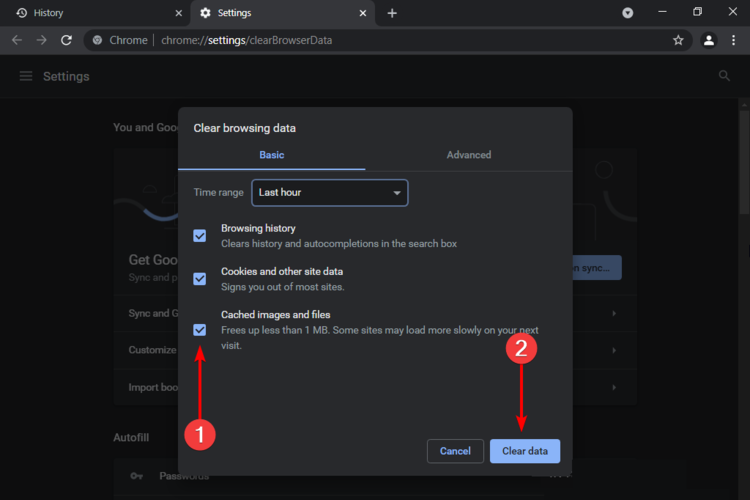
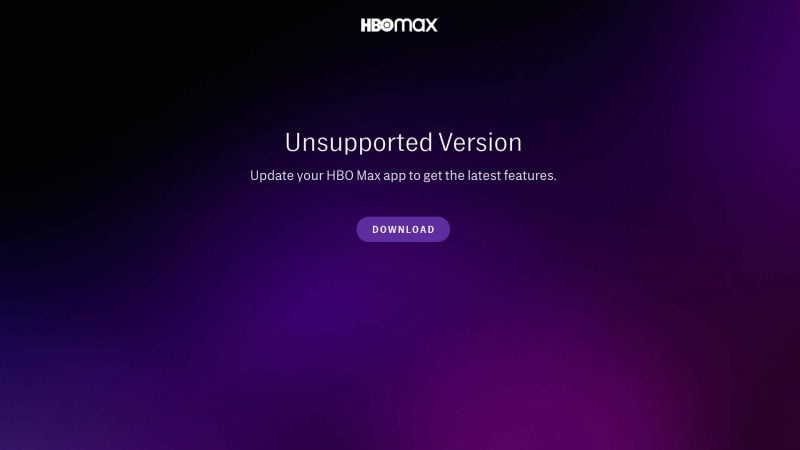
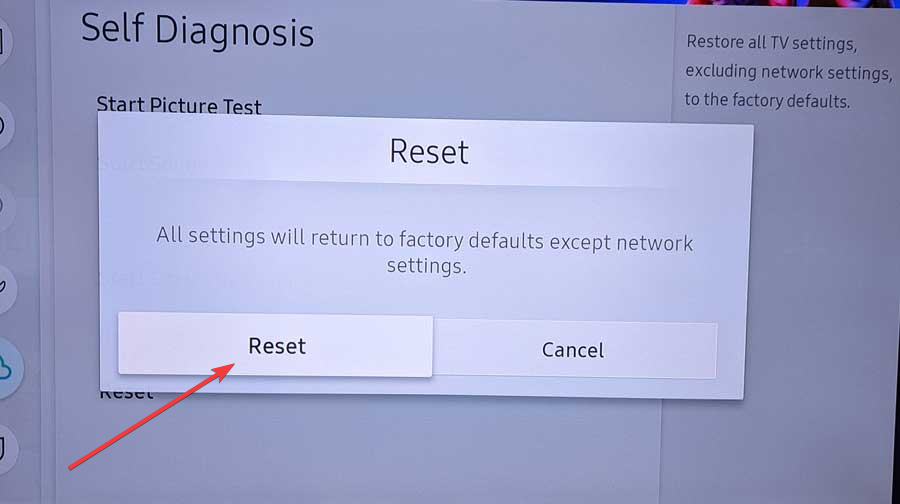

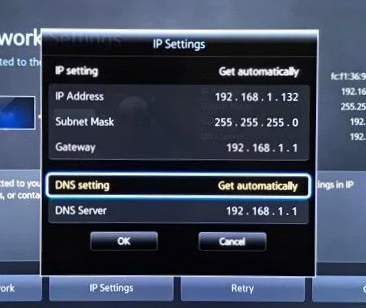


 If you have a Stream Deck, getting started is easy, you can go to the Stream Deck store inside the software or go directly to