Fix: Skyrim Black Screen on Startup / After Loading

Skyrim is still one of the most popular games today, besides the fact that it was released four years ago, and of course, a lot of people who play Skyrim switched to Windows 10.

However, some of them reported that Skyrim displays a screen issue and this problem usually occurs while they’re playing the game on their Windows 10.

So in this article, we’re going to analyze what are the best solutions to fixing this situation that most gamers have encountered.


How can I fix Skyrim black screen issues?

1. Close the game

  1. Press Alt + Tab to access the taskbar.
  2. Now click on the task button and create a Desktop.
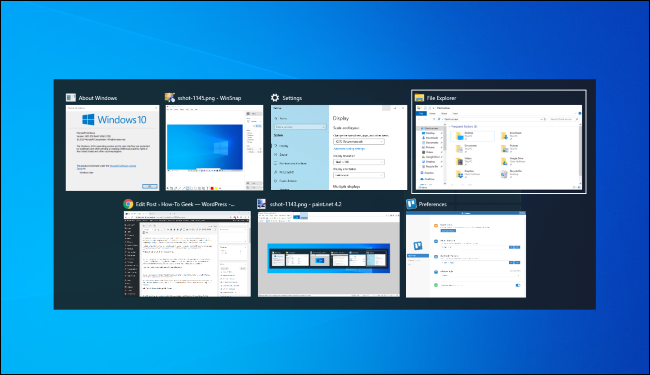
  3. Open Task Manager on the second desktop and force-close Skyrim.
  4. Get back to the first desktop and it should be closed.

The first thing you should do if Skyrim SE displays a black screen on Windows 10 is to safely leave the game. Since you don’t see anything on the screen, follow the above instructions to get to your desktop.


2. Reboot your computer

After that just restart your computer and run the game again and it should work normally.

I tell you that because I played Skyrim on Windows 10 (on not such a powerful computer) for hours and I didn’t notice a single issue.

So Skyrim is completely compatible with Windows 10, and if Skyrim still generates a black screen after loading then the problem is not Windows 10-related and it’s a gaming error.


3. Update your video drivers

3.1. Use Windows Update

  1. Click Start.
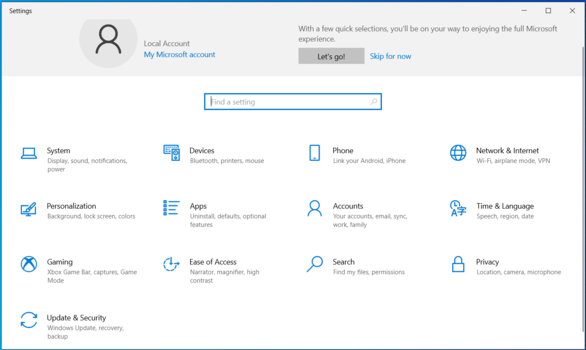
  2. Type in Settings.
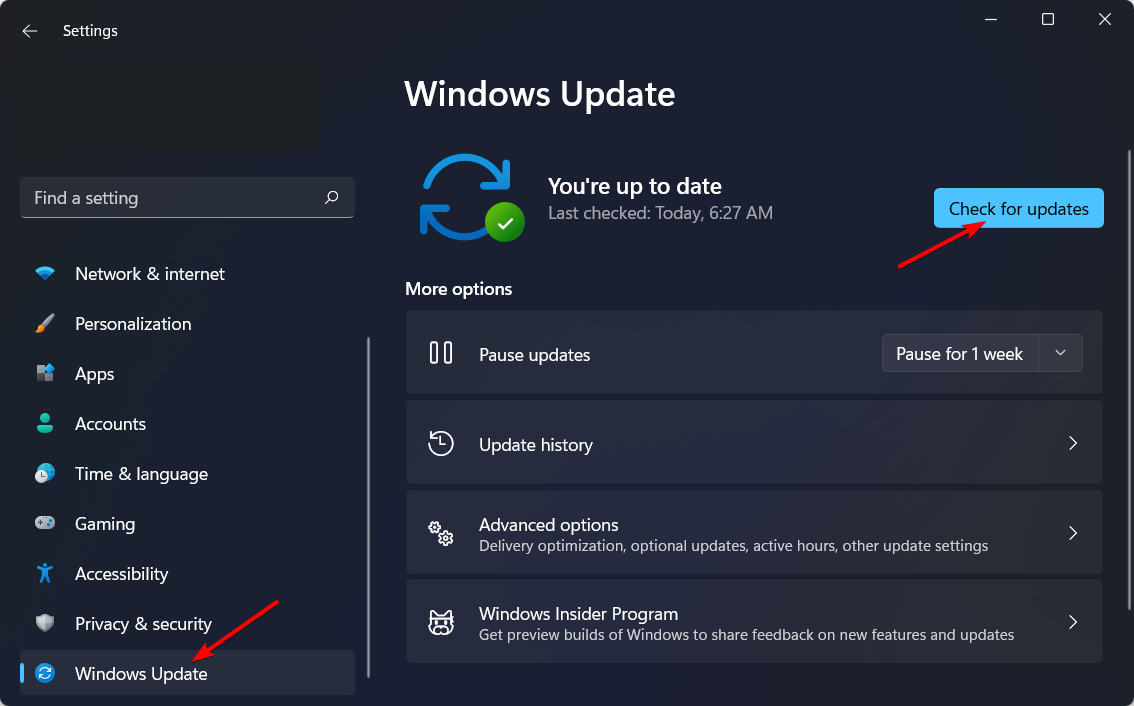
  3. Access the Update & Security option from the left panel, menu.
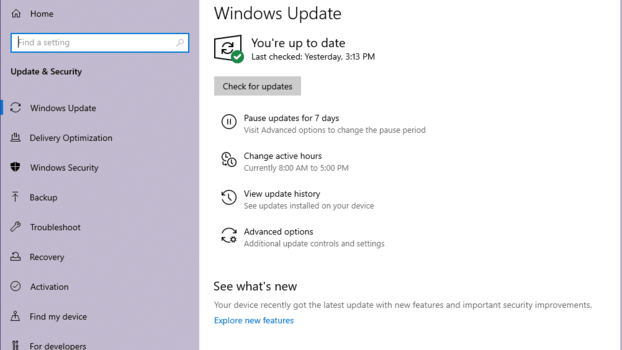
  4. In the Windows Update menu click Check for Updates.

You can also try other solutions like updating your graphics driver. GPU manufacturers roll out new driver versions as soon as a new game is out.

You can install the latest graphics driver updates by running Windows Update or you can get them directly from your GPU manufacturer’s website.

3.2. Give a try to a great tool

You can opt for updating your drivers automatically in order to fix the Skyrim black screen issue on startup.

This tool is able to scan your device right from installation and provide you with an accurate report of all the elements that need to be updated.

4. Reinstall DirectX

  1. Go to the official Microsoft download center.
  2. Go to the DirectX End-User Runtime Web Installer and click Download.
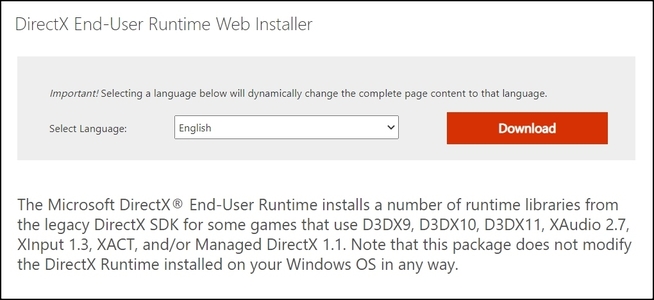
  3. Follow the setup wizard.
  4. Restart Windows 10.

Many gamers confirmed that re-installing DirectX fixed their in-game black screen problem. Simply access the official site and follow our instructions.


5. Set your GPU to high performance

  1.  Right-click on the desktop and select NVIDIA Control Panel.
  2.  From the NVIDIA Control Panel, select the Manage 3D settings.
  3. Click on the Power management mode drop down box and choose Prefer Maximum Performance.
  4.  Click Apply to apply the changes.

If you own an NVIDIA-powered computer, go ahead and change the preferred graphics processor settings from Auto-select to High performance.

Many players confirmed this quick workaround solved the issue they had with Skyrim displaying a black screen on startup.


6. Clean boot your computer

  1. Go to Start, type msconfig and hit Enter.
  2. Go to System Configuration then click Services,  check the Hide all Microsoft services check box and click Disable all.hide all microsoft services
  3. Go to the Startup tab and access Open Task Manager.
  4. Select each startup item click Disable, close Task Manager, restart the computer
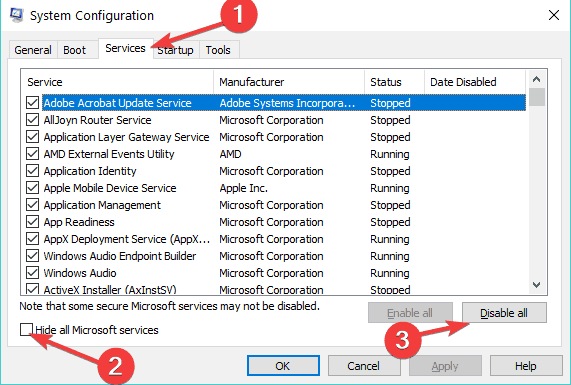
disable startup programs

In-game black screen issues may occur if other programs are using too much computer power, leaving too little for your game.

You can quickly fix this by clean booting your machine so that it uses only a minimum set of drivers and programs.


Microsoft pays attention a lot to gaming in Windows 10, therefore the majority of newer games are compatible with the system, including Skyrim, as one of the most popular games of the past decade.

In this article we presented you with all the solutions that you can use for fixing the Skyrim black screen problem.

If you have any other Windows 10-related issues you can check for the solution in our Windows 10 Fix section.

6 Ways to Set up Automatic Backup on Windows 11

When files get lost, it can be quite a hassle to recover deleted files. If you have a Windows computer, then you’re probably aware of how important it is to have a sound backup system in place.

Thankfully, Windows has a built-in backup utility that makes creating backups manually or on a schedule easy.

Does Windows backup save all files?

Backup is an essential feature of any operating system. For Windows, it is a built-in tool. You can use it to back up your files and folders to another location. As Windows versions evolve, the feature may keep changing positions.

And to answer the question, yes, Windows backup can save all files, unlike File History. You can check a detailed File History vs Windows Backup review to learn about the differences.

Windows Backup is a great tool for protecting your computer from data loss. The tool allows you to back up your data on an external drive or network location so that if your computer crashes or gets damaged, you’ll be able to restore everything just as it was before.

However, you should never rely on your Windows backup tool to back up all of your data. It’s always a good idea to have additional backup software for any eventuality.

How do I automatically Backup files in Windows 11?

Before establishing an automatic backup, we also remind you that you can perform a manual backup of your data.

All you have to do is copy your important documents and pictures onto another storage device such as a CD DVD, or drive so that if anything happens to your computer, they won’t be lost forever.

You can use a flash drive or hard drive for this purpose and any external storage device that supports USB 2 or higher speeds for faster transfers. Then, if something happens, such as a virus or hard drive failure, you can use this copy to restore the original files.

1. Turn on automatic backup

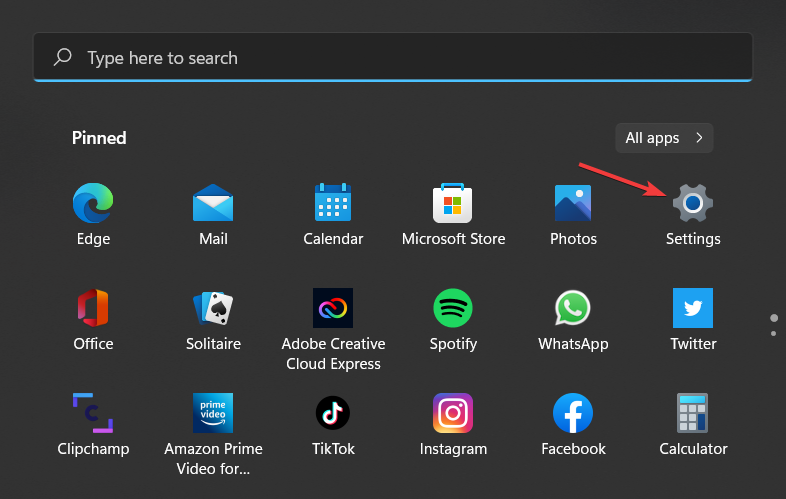
  1. Hit the Windows key and select Settings.settings-option oops thre was an error
  2. Select Accounts on the left pane then click on Windows backup on the right pane.
  3. Now, select the preferred cloud storage (by default, it’s OneDrive) and turn on app and preferences backups.

2. Use File History

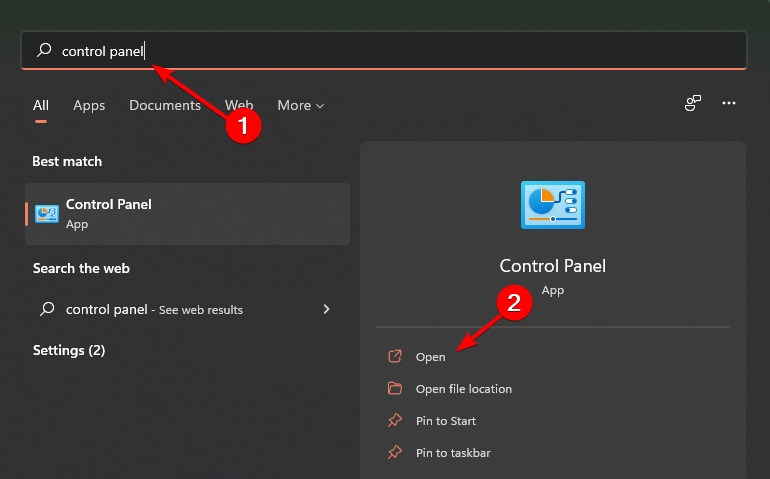
  1. Hit the Windows key, type Control Panel in the search bar and click Open.
  2. Select System and Security.system and security setting in control panel
  3. Navigate to File History.
  4. Click on Select drive on the left pane.
  5. Choose your preferred drive from the list and click OK.
  6. Hit the Turn on button to activate the tool.
  7. Now click on Run now to backup any files you have.

3. Use Windows backup

  1. Hit the Windows key, type Control Panel in the search bar and click Open.
  2. Select Backup and Restore (Windows 7) under System and Security.
  3. Click the Set up backup button.
  4. Select the Backup destination then click Next.
  5. Select one of the two backup options then click Next.
  6. Click on Change schedule and set up your preferred time then select Save settings and run backup.

4. Use a third-party tool

As you can see, it’s not that easy to set up and use the built-in Windows tools to back up your data.

It’s a lot easier to use a professional tool and we recommend AOMEI Backupper because we have tested it with excellent results. It can be used by anyone and you can make individual files and full system backups with ease.

If you’re not convinced, you may also find the best choice in our list of the best backup tools for Windows 11.

5. Use OneDrive

  1. Hit the Windows key and select Settings.settings-option oops thre was an error
  2. Select Accounts on the left pane then click on Windows backup on the right pane.
  3. Click on Set up syncing/Manage sync settings.
  4. Enter your credentials to login or Create account if you don’t have one.
  5. Select a folder to backup then click on Start backup.

6. Use System Image

  1. Hit the Windows key, type Control Panel in the search bar and click Open.
  2. Select Backup and Restore (Windows 7) under System and Security.
  3. Click on Create a system image on the left pane.
  4. Select your hard disk and click Next.
  5. Click Start backup.

How do I set up automatic backup on my external hard drive in Windows 11? 

File History is a feature that lets you automatically back up your files so that if anything goes wrong with them, you can restore them quickly and easily. 

It works by creating copies of your documents and saving them in a separate location — typically your OneDrive folder or an external drive. You can choose how often File History should run (daily, weekly, or monthly), and how many versions of each file it should keep.

To set up, follow the steps below:

  1. Plug in your external hard drive to your PC.
  2. Hit the Windows key and select Settings.settings-option oops thre was an error
  3. Select System then click on Storage.
  4. Click on Advanced storage settings under Storage management.
  5. Select Backup options.
  6. Now click on the Add a drive option under Back up using File History.
  7. Select your external drive and start the backup process.

And that’s how to automatically back up your files in Windows 11 using various methods. If you feel that you are running out of storage space, you can always delete app backup files which are usually just cache files.

Should you encounter a Windows 11 backup error, we also have a detailed guide on bypassing the issue. These tips might come in handy, especially if the Seagate Dashboard isn’t working.

If you want a solution that works on multiple platforms, don’t miss our latest guide on how to download IDrive for Windows.

Let us know in the comment section your preferred backup method and why.

Failure When Attempting To Copy Boot Files: Fix

Some users utilize the Bcdboot command-line utility within WinPE (Preinstallation Environment) to deploy Windows on PCs.

However, a “Failure when attempting to copy boot files” error aries for some users when they try to copy boot files. Consequently, users can’t deploy the Windows OS image when WinPE returns that error message.

How can Users Fix the Failure When Attempting to Copy Boot Files Error?

1. Copy Both UEFI and BIOS Files to the Disk

Some users have confirmed they’ve fixed the “Failure when attempting to copy boot files” error by copying both UEFI and BIOS files to disk. To do that, enter the ‘bcdboot c:\windows /s s: /f ALL’ command. The ALL at the end of that command ensures that both UEFI and BIOS files get copied.

bcdboot command failure when attempting to copy boot files

2. Set the System Partition As Active

  1. The “Failure when attempting to copy boot files” error can also be due to an inactive system partition. To fix that, users will need to insert a bootable USB flash drive into the laptop or desktop.
  2. Turn on the laptop or desktop.
  3. Click Repair your computer on the Windows Setup window.The Troubleshoot button failure when attempting to copy boot files
  4. Then select Troubleshoot and Advanced Options to open further options.
  5. Select Command Prompt to open the Prompt.
  6. Input ‘diskpart’ in the Command Prompt, and press the Return key.
  7. Enter ‘list disk’ and press Return to display a list of hard drives, which will probably include just one HDD.List disk failure when attempting to copy boot files
  8. Then enter ‘select disk 0’ and press Return if that’s the only hard drive listed. Users with more than one hard drive to select the one that includes the Windows install.
  9. Next, input ‘list partition’ and press Enter to display a list of drive partitions.list partition failure when attempting to copy boot files
  10. Thereafter, select the partition that includes the Windows installation. For example, enter ‘select partition 2’ if partition 2 includes Windows.
  11. Enter ‘active’ and press Return to set the selected partition as active.
  12. Then input ‘exit’ and press Enter to close the DiskPart utility.

Those are two resolutions that can fix the “Failure when attempting to copy boot files” error for users. Users who have fixed the same issue with other resolutions are welcome to share them below.

Fix: Age of Mythology Won’t Launch on Windows 10 & 11

Age of Mythology is certainly a hall of fame RTS classic, still very popular till this day. The only problem with this game is its outdated engine and lack of discontinued supporting software on Windows 10.

A lot of AoM aficionados have had a hard time running the game on the latest Windows platform, and there are various reasons for that.If you’re stuck with this error for some time, make sure to check our steps below.

How do I launch Age of Mythology on Windows 10?

1. Disable anti-malware protection

Antiviruses are programs designed to protect its users from viruses, spam, Trojans, zero-day attacks, adware, and more, without compromising system performance in the process. These software add a layer of protection, keeping your system safe and running at full capacity.

Most of them are easy to use, having an interactive and simple interface, making it really neat to have on any computer, never failing to deliver on its promises, protecting the data of pro and home users alike.

⇒ Get TotalAV

2. Run the game in the compatibility mode

  1. Right-click on the Age of Mythology shortcut and open Properties.
  2. Choose the Compatibility tab.
  3. Check the Run this program in compatibility mode for box and select Windows XP SP2 from the drop-down menu.
  4. Now, check the Run this program as an administrator box and confirm changes.
    age of mythology won't start windows 10
  5. Try starting the game and look for improvements.

Let’s start by running the game in compatibility mode. It’s not a novelty for Microsoft’s own games to have issues on newer iterations of the Windows platform.

This classic title is as old as 16 years, and it was developed for Windows XP. Thus, the issues occur on Windows 10, because it is missing certain, long ago discontinued, drivers that were used for piracy protection back in the days.

Some of you might’ve got the error informing you about that.

There’s only so much you can do if that’s the case, but we still gladly suggest running the game in the compatibility mode. It might help and it won’t cost, so give it a go.

3. Check GPU drivers with third-party software

We can say that these are rarely the problem, but need to be thorough with the troubleshooting. The majority of users who experienced issues with Age of Mythology on Windows 10, had no issues with other games.

Nonetheless, we still encourage you to double-check your GPU drivers. The generic driver, provided by Windows Update, won’t work occasionally with some games.

That’s why the best way to eliminate drivers from the list of possible culprits is acquiring them from the OEM’s support website.

In addition, you’ll get the latest version of the Control Panel, so you’ll be able to optimize your GPU better for individual games. And, with all we saw, Age of Mythology on Windows 10 starts successfully in the lowest-graphics settings.

Check one of these to get the latest GPU drivers:

Sometimes your drivers are not up-to-date, causing your system not to run properly, and that is why you should try a program that automatically scans your PC drivers for newer versions and updates them.

With this software, you will no longer need to worry about outdated software. The software will update all of your drivers, not only the GPU ones.

4. Enable DirectPlay

  1. In the Windows Search bar, type Turn Windows and open Turn Windows features on or off from the list of results.age of mythology won't start windows 10
  2. Navigate down and expand Legacy Components.
  3. Check the “DirectPlay” box and confirm changes.age of mythology won't start windows 10

Outdated games require certain Windows features a new game doesn’t need. That’s why a feature like DirectPlay is disabled by default, as Microsoft switched to Games for Windows Live.

This feature was part of the DirectX API and it was used to update games. However, for more than a decade it’s out of the picture.

Age of Mythology requires this feature enabled in order to work, so make sure to turn it on, by following the aforementioned steps.

5. Enforce the low resolution

  1. Right-click on the Age of Mythology desktop shortcut and open Properties.
  2. Under the Shortcut tab, look for the Target line.
  3. What you’ll need to do is copy-paste the following line at the end of the current entry: xres=640 yres=480age of mythology won't start windows 10
  4. Save changes and start the game.

The problem with the resolution is the most probable reason why Age of Mythology won’t start on Windows 10. Users who managed to start the game did that with the minimum resolution.

Later on, you can, of course, change the resolution in the in-game settings menu, but the important thing is to get past that initial screen.

There are variations on how to do it, but it seems that the most successful one requires a multi-step approach. We made sure to find out the explanation for the whole procedure and are bringing it here for you.

6. Start the system without background programs

  1. In the Windows Search bar, type msconfig and open System Configuration.
  2. Under the Services tab, check the Hide all Microsoft services box.
  3. Click Disable all to disable all active third-party services.
  4. Now, select the Startup tab and go to Task Manager.
  5. Prevent all programs from starting with the system and confirm changes.
  6. Restart your PC.

Some tech-savvy users suggested disabling all background programs and installing the legacy versions of DirectX and redistributables.

These two usually won’t pose a problem, but since we’re already deep in the precaution troubleshooting steps, we encourage you to follow them through.

First, we suggest downloading and installing older versions of DirectX and Visual Studio C++ redistributable. The game installation should include the setup files for all you need. After that, we recommend giving the clean boot a try.

7. Start the game in a windowed mode

  1. Right-click on the Age of Mythology desktop shortcut and open Properties.
  2. Under the Shortcut tab, look for the Target line.
  3. What you’ll need to do is copy-paste the following line at the end of the current entry: -windowedage of mythology won't start windows 10
  4. Save changes. 

Besides the enforced 640×480 resolution, some users managed to start the game only in the windowed mode. Now, the procedure is similar to the one with the resolution downgrade.

You’ll need to navigate to the shortcut and change the target section entries by adding an additional command. Likewise, you’re able to restore to a Fullscreen mode later on in the in-game settings menu.

8. Reinstall the game and use a non-CD version

  1. Backup saved games.
  2. Open Start, right-click on the Age of Mythology, and choose Uninstall.
  3. This will take you to Uninstall a program section in Control Panel. Remove the Age of Mythology and delete saved files.
  4. Restart your PC.
  5. Right-click on the installer and run it in compatibility mode for Windows XP (if available).
  6. Wait until the game installs and give it another shot.

That’s how you reinstall Age of Mythology on Windows 10.

Note: Reinstalling the game might help as well. Also, since the game requires the installation CD in order to run, we suggest using a virtual drive emulator of some kind.

Or relying on some other ways we can’t mention here due to its connection with pirated software.

Give the Extended Edition a try

Finally, if you’re still unable to start the game, in spite of all troubleshooting steps, we recommend trying the revamped edition of the beloved classic.

This game is optimized to work on Windows 10, and it seems that Microsoft doesn’t pay a lot of attention to the 16-years-old original game.

You can find and buy this game for cheap on Kinguin and it should bring the same experience as the classic game, with some improved graphics and a few new features.

⇒ Buy Age of Mythology Extended Edition

These solutions should help you get your game working, so u can finaly start praising the ancient gods and conquering new lands with your awesome civilization.

If you have additional questions or suggestions regarding the subject, feel free to tell us in the comments section below.

Fix: Synaptics Touchpad Not Working / Automatically Disabled

One of the most common issues with Windows 10 laptops is definitely the not working touchpad. You’re probably using Synaptics’ touchpad because Synaptics is the world’s most famous manufacturer of human interface solutions, but even Synaptics’ touchpads have their issue.

These issues could be caused by various factors, such as outdated drivers and conflicts with other software. In this article, we offer solutions for most of them.

What can I do if Synaptics touchpad is not working?

1. Disable the mouse from the Device Manager

  1. Press the Windows Logo and X keys on your keyboard.
  2. Click on Device Manager.
    Touchpad disabled automatically
  3. Search for the mouse device from the device list, right-click on it and select Disable.
    Synaptics touchpad disables itself
  4. Check if your touchpad device now works.

Sometimes your mouse is the one preventing the touchpad from working. Disable the mouse, and see if the touchpad works now. If the mouse isn’t the issue, try to clean the boot and check if there is any software on your computer that conflicts with the touchpad device.

2. Perform a Clean Boot

  1. Type msconfig in the search box, and then tap or click System Configuration.
    Synaptics touchpad keeps crashing
  2. On the Services tab of the System Configuration dialog box, tap or click to select the Hide all Microsoft services check box, and then tap or click Disable all.
    Touchpad disabled automatically
  3. On the Startup tab of the System Configuration dialog box, tap or click Open Task Manager.
    Touchpad disabled automatically
  4. List of startup applications will appear. Right-click each item on the list and choose Disable. Repeat this step until you disable all startup applications.
    Synaptics touchpad disables itself
  5. Close Task Manager and go back to the System Configuration window. Click Apply and OK and restart your PC. A clean boot helps to eliminate software conflicts and to determine what is causing the problem.
    Synaptics touchpad disable when mouse is plugged in

A Clean Boot helps you to determine if there are any software conflicting with the work of some of your devices. After performing a Clean Boot, check if your touchpad device is working properly.

If it works fine and without any distractions, the problem was probably caused by the conflict between the mouse drivers and the touchpad drivers, or due to the conflict with some other software.

To solve these conflicts, you need to update the drivers for both devices and check if that helps. To do that, follow next steps.

If you want to know how to add or remove startup apps on Windows 10, check out this simple guide.

3. Update the Drivers for the Touchpad device

3.1 Check the Windows updates for any latest driver updates

  1. Open the Settings app and go to Update & security section
    Synaptics touchpad disables itself
  2. From the Windows Update window, click on Check for Updates.
    Synaptics touchpad disable when mouse is plugged in
  3. You’ll receive a list of all recent updates, check and install all of them.

If you’re having trouble opening the Setting app, take a look at this article to solve the issue.

3.2 Try updating the drivers from the Device Manager.

  1. Open Device Manager.
  2. Search for the touchpad device from the device list, right-click on it and select Update driver.
    Synaptics touchpad not working
  3. Follow the on-screen instructions and complete the installation of the latest driver.
    •  If no driver updates are available, you may also search for the updated touchpad device drivers in the Drivers and DriverStore folders in the location C:WindowsSystem32 by selecting the option Browse my computer for Driver Software.

In case you’re unable to find any latest drivers on your computer, then go to Synaptics’ website and check for the latest touchpad drivers there. If they’re available, download and install them on your computer.

3.3 Update drivers automatically

If this method doesn’t work or you lack the computer skills to update/fix the drivers manually, we suggest you use dedicated driver updater software to do it automatically.

This type of tool will automate the whole process and assist you in downloading and updating the right version of drivers that best fits your needs.

⇒ Get Fortect Driver Updater

4. Make sure that you’re not disabling your touchpad

Most laptops come with a dedicated button that can disable your touchpad. To disable your touchpad, you have to press a certain keyboard key such as F5, for example.

If your touchpad is frequently disabled, be sure not to disable it by using this key. Alternatively, you can try to enable it by pressing this key. Many users reported that this solution fixed their problem, so be sure to try it out.

If your touchpad is disabled on the login screen in Windows 10, fix the issue quickly by following the simple steps in this guide.

5. Check your touchpad settings

  1. Press Windows Key + S and enter control panel. Select Control Panel from the list.
    Synaptics touchpad not working
  2. When the Control Panel opens, go to the Mouse section.
    Synaptics touchpad keeps crashing
  3. Now navigate to Device Settings tab.
  4. Select your touchpad from the list and click on the Settings button.
  5. Now locate the Tapping section and make sure that you disable Double tap to enable or disable touchpad option.

According to users, sometimes your touchpad settings can cause your Synaptics touchpad to become disabled. According to them, this touchpad supports a tapping gesture that can enable or disable your touchpad.

After doing that, save changes and check if that solves your issue. Many users claim that this solution works for them, so feel free to try it out.

6. Roll back to the older driver

  1. Open the Device Manager.
  2. Now locate your touchpad driver and double click it to open its properties.
  3. Navigate to the Driver tab and click the Roll Back Driver button.
    Synaptics touchpad has stopped working

Keep in mind that this option might not be available. If not, you’ll need to uninstall the driver and try using the default driver instead.

  1. In Device Manager locate your touchpad driver, right-click it and choose Uninstall device.
  2. Check Delete the driver software for this device option and click on Uninstall button.
    Synaptics touchpad keeps resetting
  3. Once the driver is uninstalled, click on Scan for hardware changes icon.
    Touchpad disabled automatically

Windows will now install the default driver.

If you’re having issues with your Synaptics touchpad on Windows 10, the problem might be related to your drivers. Although installing the latest drivers is advised, sometimes this issue can occur even if you’re using the latest drivers.

However, users are suggesting you try rolling back your drivers and see if that helps.

If the default driver works, you have to prevent Windows from updating it automatically. We already wrote a guide on how to prevent Windows from updating certain drivers, so be sure to try that.

If the default driver doesn’t work, go to your touchpad manufacturer’s website and download an older driver. Once you install the older driver, check if the problem persists.

7. Modify your registry

According to users, if your settings keep resetting, the problem might be related to your registry. However, you can easily fix that by doing the following:

  1. Press Windows Key + R to open the Run dialog.
  2. Enter regedit and press Enter or click OK.
    Synaptics touchpad disable when mouse is plugged in
  3. In the left pane, navigate to HKEY_LOCAL_MACHINESOFTWARESynapticsSynTPInstall key.
  4. In the right pane, double click the DeleteUserSettingOnUpgrade DWORD and change its value to 0.

If you’re having problems editing the registry, you may want to take a look at this amazing guide that will show you how to get past them.

After you save the changes, restart your PC and check if the issue reappears.

Problems with Synaptics touchpad driver can prevent you from using your laptop, and speaking of touchpad issues, users reported the following problems as well:

  • Touchpad disabled automatically
    • Many users reported that their touchpad becomes disabled automatically.
    • In most cases, the problem is caused by your settings or drivers.
    • This issue can affect almost any touchpad and not just Synaptics touchpads.
  • Synaptics touchpad disables itself
    • In some cases, Synaptics touchpad can disable itself for an unknown reason.
    • This might be because your touchpad software is disabled in system startup.
  • Synaptics touchpad disable when mouse is plugged in
    • Many users tend to disable their touchpad if they’re using a mouse.
    • In fact, your touchpad might be disabled automatically if you connect a mouse.
  • Synaptics touchpad not working, has stopped working
    • According to users, it seems that Synaptics touchpad suddenly stopped working.
    • If your touchpad isn’t working at all, try rolling back your drivers and see if that helps.
  • Synaptics touchpad keeps crashing, resetting
    • A few users reported that Synaptics touchpad keeps crashing or resetting on their PC.
    • Your touchpad settings or a problematic driver most likely causes this.

Following the steps in this guide should help you solve your issues with Synaptics touchpad device or any other touchpad device. Before you go, we suggest you visit our guide on SynReflash configuration for more information.

Unfortunately, this isn’t the only issue you can encounter, and many experienced Synaptics touchpad driver code 24, but we covered it in another guide.

This isn’t the only problem, and for many users, touchpad settings are missing on Windows 11, but we covered this issue in another guide.

If something didn’t work out or you have some alternate solutions, we would love to hear about them, so write them down in the comments section below.

Windows Cannot Format this Drive: How to Fix & Main Causes

No operating system is not free of quirks, and sometimes when your machine is slow, you may try to resolve the problem by formatting your hard disk. However, users sometimes get a Windows cannot format this drive prompt when trying to format their device.

This error can make you clueless about the next line of action. Thankfully, this issue can be fixed with a few tweaks, as shown in this guide.

How can I fix the Windows cannot format this drive, quit any disk utilities error?

1. Use the Diskpart command

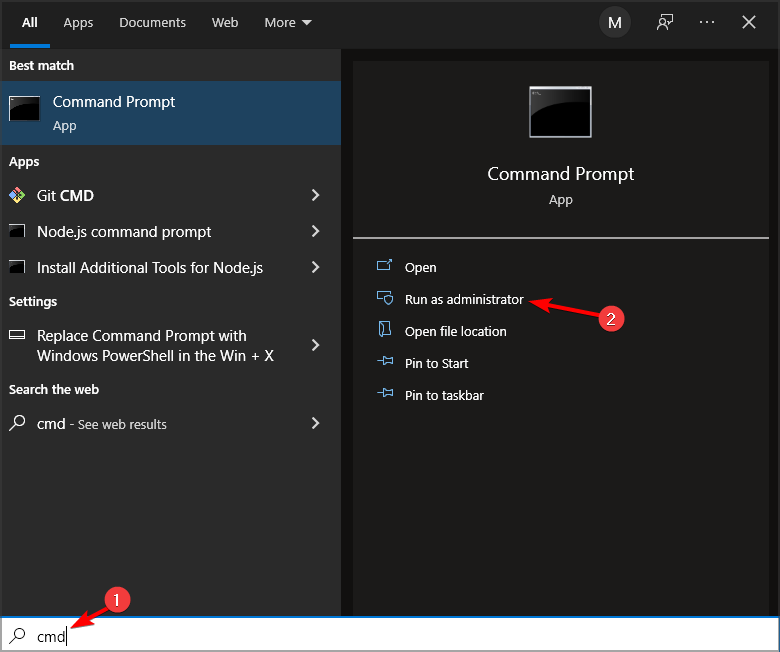
  1. Press the Windows key, type cmd, and click Run as administrator under Command Prompt.
    cmd windows cannot format this drive
  2. Type the command below and hit Enter: diskpartdiskpart
  3. Now, type the following commands and press Enter after each: list disklist disk list volumelist volume windows cannot format this drive select volume<number>select volume windows cannot format this drive format
  4. Note that you need to replace the <number> in the third command with the correct one you need to format (we used 2 in our command).

One of the quickest methods to fix the Windows cannot format this drive error is to force the process through using the DiskPart command.

If you have a preferred file system you want to format your drive to, you can use the fs switch with the format command. An example is format fs=ntfs quick.

2. Hard Format using Disk Management

  1. Press the Windows key + R, type diskmgmt.msc, and press Enter.
    diskmgmt  windows cannot format this drive
  2. Right-click the drive you want to format and select the Format option.
    format
  3. If you get a prompt that The volume (Disk>#) is currently in use, click the Yes option to force the format of the volume.
  4. After clicking Yes, the storage disk will be formatted without further error messages.

Another effective solution to try if you are getting Windows cannot format this drive error is to use the Disk Management feature to complete the process.

With this second fix, we can conclude this guide. We believe you now have everything to fix. Windows cannot format this drive error.

If the solutions above fail to fix this issue, you must check your drive for physical damage. You can also check and fix bad sectors on your PC.

It might also help to read our guide on how to format an NVMe SSD on Windows 11 or convert exFAT to FAT32.

Feel free to let us know in the comments below the solution that helped you fix this issue.

This WiFi Uses An Older Security Standard: Quick Fixes

Some users who have updated Windows 10 with the May 2019 Update might have spotted a curious Wi-Fi notification at the bottom right of the desktop.

That notification states: “This Wi-Fi network uses an older security standard that’s being phased out. We recommend connecting to a different network.”

That notification tells some users that their Wi-Fi connections are utilizing antiquated encryption methods. The message pops up for users with Wi-Fi networks that are still utilizing the WEP and TKIP authentication protocols. Consequently, the notification informs some users that their net connections aren’t entirely secure.

How can I fix the WiFi uses an older security standard pop up?

1. Select a Newer Security Mode via the Router’s Admin Page

Users who spot an “isn’t secure” notification should select a newer encryption method, such as AES or WPA2, on their routers’ admin pages.

  1. To open a router’s admin page, users will need to get the IP address for it by pressing the Windows key + R keyboard shortcut.
  2. Enter ‘cmd’ in Run’s Open box, and click the OK option.
  3. Then input ‘ipconfig’ in the Command Prompt window that opens, and press the Enter key.
    ipconfig command this wifi network uses an older security standard
  4. Then note down the Default Gateway number. Alternatively, users can copy it to the clipboard by selecting the number and pressing the Ctrl + C hotkey.
  5. Paste the Default Gateway number in a browser’s URL bar by pressing the Ctrl + V hotkey, and press the Enter key. That should open a router admin page like the one shown directly below.A router admin page this wifi network uses an older security standard
  6. Next, enter the required login details to log in to the router admin page. The router’s instruction manual should include the login details for that page, and the router’s rating plate might also include those details.
  7. As router admin pages don’t have the same UI, specific instructions for selecting a new security mode can’t be provided. Look for a tab that includes Wi-Fi security settings on it.
  8. Then select a WPA2 or AES option, which a Security Mode drop-down menu might include.
  9. Select a Save or Apply option.

2. Get a New Router

Users who can’t select WPA2 or AES, or other more update security mode options, within their routers’ admin pages will need to get new routers to fix their unsecure Wi-Fi. There’s little point sticking with outdated routers that don’t support reasonably update encryption methods. So, get a replacement router that does support the latest encryption methods.

Wi-Fi Router this wifi network uses an older security standard

Microsoft has confirmed that it intends to stop supporting the WEP and TKIP protocols, which is why Windows 10 now displays an “isn’t secure” notification to some users.

Thus, users need to either change their current routers’ encryption settings or change their routers to ensure they can still browse the web when the big M terminates support for WEP and TKIP.

We hope you managed to get rid of the this WiFi network uses an older security standard pop up on your Windows device and fixed everything. Let us know how it went in the comments section below.

OneDrive Download Is Slow: 10 Quick Fixes

OneDrive is a solid cloud storage service but many users experienced slow OneDrive download speed on their PC. This can be a big problem, so in today’s article we’ll show you how to address this issue.

How can I fix a slow OneDrive download speed?


1. Check your antivirus

Using a good antivirus is important if you want to protect yourself from online threats, but despite the usefulness of antivirus tools, sometimes they can cause certain issues to occur. Your antivirus can interfere with other applications and in some cases it can cause slow OneDrive download.

To fix this issue, you need to make sure that OneDrive is allowed to go through your antivirus and firewall. In addition, you might want to try disabling certain antivirus features or disabling your antivirus altogether.

If that doesn’t work, your next step would be to remove your third-party antivirus. Several users reported that removing their antivirus fixed the problem for them, so you might want to try that.

If removing the antivirus solves the problem, your next step would be to switch to a different antivirus solution.

There are plenty of great alternatives and some of the best antivirus software available are actually really budget-friendly and don’t use too many system resources.

While Windows Defender is a well-performing protection tool, an extra layer of protection is always a good idea.

2. Remove other synchronization and backup software

Sometimes slow OneDrive download can occur because of other backup software on your PC. Other applications might try to back up the files that you’re currently trying to sync, and that can cause issues with OneDrive.

You can manually uninstall your backup software from Windows settings. You just have to open the panel by typing remove in the search bar, find your backup software and click uninstall.

However, many users report problems with this method because Windows settings can’t always fully remove stubborn software. This can prevent you from reinstalling your app or interfering with the functionality of your PC.

We recommend you try a dedicated third-party uninstaller software. These are specially created to delete any type of lingering app or file.

Uninstallers are completely safe, they use up-to-date technologies that can forcefully remove problematic apps, but don’t have any negative impact on your PC.

3. Reset OneDrive

  1. Press Windows Key + R to open the Run dialog.
  2. Now enter the following line, and press Enter or click OK.
    • %localappdata%MicrosoftOneDriveonedrive.exe /reset
      slow onedrive download

It might take a minute or two for OneDrive to reset on your PC, but once the application resets, check if the issue is still there.

If you’re having issues with slow OneDrive download, the problem might be the OneDrive application. Certain glitches can occur once in a while, and in order to fix them, it’s advised that you reset OneDrive.

This process won’t delete any of your files, but it will resync them, so it might take a while before all files are completely resynced.


4. Remove all files that are 0KB in size

According to users, sometimes certain files can cause slow OneDrive download issues. Supposedly this issue is caused by files that are 0KB in size, and in order to fix the issue, you’ll need to remove those files.

slow onedrive download

Finding all files that are 0KB in size isn’t that hard, and you just need to open your OneDrive directory and enter size: 0 in the search field in the top-right corner.

Now you should see all files that are 0KB in size. Delete those files and check if the problem is resolved. Before you remove those files, be sure to check if you actually need them.

If these files aren’t a part of your project or if they look unfamiliar to you, you can just delete them. Sometimes even small files can be a part of a work project, so be sure to double check all files before you remove them.


5. Unlink and sign back into OneDrive

  1. Right-click the OneDrive icon on your Taskbar and choose Settings from the menu.
    slow onedrive download
  2. Now go to the Account tab and click Unlink this PC.
    slow onedrive download
  3. A warning message will appear. Click the Unlink account button.
    slow onedrive download

Slow OneDrive download can be caused by certain glitches in OneDrive, and the simplest way to fix those glitches is to unlink your OneDrive account.

After doing that, you need to sign in back to OneDrive and resync all your files. This method might not be the most effective one, since you’ll remove online files and have to resync them again, so use this solution only if other solutions can’t fix the problem.


6. Restart File Explorer

  1. Press Ctrl + Shift + Esc to open Task Manager.
  2. Locate Windows Explorer on the list, right-click it and choose Restart from the menu.
    slow onedrive download

In some instances, slow OneDrive download speed can occur due to bugs on your system. However, these bugs are usually temporary, and you can fix the problem simply by restarting File Explorer.

After a couple of moments File Explorer will restart and your issue should be resolved. Keep in mind that this is just a workaround, so you might have to repeat it if the issue reappears.


7. Download files in batches

If you’re having issues with slow OneDrive download speed, the issue might be the number of files that you’re trying to sync. According to users, issues occurred after they tried to sync all of their files at once.

Although that should work, sometimes issues can occur, and you might experience reduced download speed.

To avoid this problem, users are suggesting to download your files in batches. Download 10-20+ files at once and check if the issue still appears.

If not, keep downloading files in batches until you download all your files. This isn’t the most straightforward solution, but it’s a decent workaround that might work for you, so be sure to try it out.


8. Disable Files On-Demand feature

  1. Open OneDrive settings. Uncheck Save space and download files as you use them.
    slow onedrive download
  2. A warning message will now appear. Click OK to save changes.
    slow onedrive download

OneDrive has Files On-Demand feature, and sometimes this feature can cause slow OneDrive download speeds. This is a quite useful feature since it allows you to download only files that you want to edit.

Thanks to this feature, you don’t have to store files on both your PC and the cloud. This is great if you want to save space on your PC, but sometimes there might be issues with this feature.

This feature can lead to slow download speed, and many users are suggesting to disable this feature. After disabling this feature, the problem with OneDrive should be completely resolved.


9. Disable Office integration

  1. Open OneDrive settings window.
  2. Go to the Office tab and disable all options.
    slow onedrive download

OneDrive has a useful feature that allows you to work on Microsoft Office files with other users. This is an incredibly useful feature, but it can sometimes cause slow OneDrive download speeds.

To fix the problem, some users are recommending to disable this feature altogether. After doing that, save changes and the issue should be completely resolved.


10. Make changes to Group Policy

  1. Press Windows Key + R and enter gpedit.msc. Press Enter or click OK.
    slow onedrive download
  2. In the left pane, navigate to User Configuration > Windows Settings. Right-click Policy-based QoS and choose Create new policy option.
    slow onedrive download
  3. Enter the name of your policy. Make sure that only Specify Outbound Throttle Rate option is checked. Set the value lower than your upload speed. Users are suggesting to use a value that is three times less than your current upload speed. Click Next.
    slow onedrive download
  4. Don’t change any settings in new windows, just keep clicking Next.

If you’re having issues with slow OneDrive download speed, you might be able to solve this problem by making changes to the Group Policy settings.

After creating the policy, restart your PC and check if the issue with OneDrive download slow speed is gone by now.


Fix Corrupt PST File with Outlook PST Repair Tool

The Microsoft Outlook Personal Storage Table (.pst) is the database where Outlook indexes all your emails and if this file is corrupted, you won’t be able to reach your personal content. However, Stellar Repair for Outlook repairs your PST files in just a few clicks.

What is Stellar Repair for Outlook and how does it help you?

Stellar Repair for Outlook is a simple and complete solution to repair corrupt Outlook Data Files (.pst).

If you accidentally deleted something from your mailbox, Stellar Repair for Outlook will retrieve it in no time even if you have emptied your deleted folder.

This tool can recover permanently deleted mailbox data such as e-mails, attachments, contacts, calendars, tasks, and even journals.

PST file corruption can occur due to various reasons such as large PST files, system crashes, abrupt shutdown, virus intrusion, etc.

However, this tool can repair your Outlook Data File efficiently irrelevant of PST file size as the latest update of the software supports large PST file repair and recovery processes.

Moreover, Stellar Repair for Outlook can recover the Outlook Data File(.pst) for all Microsoft Outlook versions including 2021, 2019, 2016, 2013, 2010, and 2007.

What are the best features of Stellar Repair for Outlook?

1. Great output support

Stellar Repair for Outlook scans and extracts data from a damaged PST/OST file, repairs it, and then saves it as a new usable PST file. Then you just need to import the file back into Outlook.

However, you may also save the file as MSG, EML, RTF, HTML, and even PDF. That provides you with great flexibility to view or embed the files in other software.

In the technician version of the software, you can directly import your repaired PST file to Live Exchange or Office 365(Microsoft 365).

2. Deleted files recovery

It doesn’t matter if you deleted some items by mistake. After it scans the PST file, Stellar Repair for Outlook will show you the deleted items marked with red color in the preview window, yes even the permanently deleted emails too.

3. Find and select only the content you need to recover

The database of your e-mail can be huge so retrieving the whole PST file may take some time.

However, if you don’t want to retrieve all the mail, you can select only a folder you want to recover.

You can also check a dedicated troubleshooting guide for situations where Outlook inbox repair tool keeps popping up.

More than that, you can use the search fields for sender, destination, subject, or date to get the exact email you are looking for.

That will save you a lot of time and space and we found the search even quicker and more accurate than the one from Outlook or Gmail.

How can I recover a PST file with Stellar Repair for Outlook?

  1. Go to the Stellar Repair for Outlook website and click the Free Download button.
  2. Install the tool and run it.
  3. Click on Select Outlook Data File, choose the profile (PST file), and hit the Repair button.
  4. The software will scan the PST file and retrieve all the files, folders, attachments, contacts, calendars, tasks, and journals.
  5. Now, select the folders or emails you want to recover. You will the list of emails on the center screen and previews of the emails on the right pane.
  6. Lastly, click on the Save Repaired File, select a format, and hit the Next button.
  7. Select the destination folder (by default, it’s the Outlook AppData folder) and click OK.
  8. You may also click the Apply Advanced Filter to select the time range of the emails, exclude some IDs, or exclude the Junk and Deleted folders if you want to.
  9. Open Microsoft Outlook and click the File menu.
  10. Select Open & Export from the left pane, then click on the Open Outlook Data File.
  11. Select the PST file you have just retrieved from Stellar Repair for Outlook and click the Open button.

That’s it! You have recovered all the elements you needed from your mailbox and opened them back on your Outlook app.

They will be shown as if they were never lost, with all the attachments, contacts, and details in them.

Other important features of Stellar Repair for Outlook

Stellar Repair for Outlook has a lot of other interesting features that we would like to outline here:

  • Save individual emails – You actually don’t need to go through all the processes described above to retrieve a single email. You can right-click on any emails from the list and save them in MSG, EML, RTF, HTML, and PDF.
  • Resume your scan any time – At any point during the scanning process, you may stop it and click the Save Scan button from the top menu so that later on to resume the process.
  • Great compatibility range – Stellar Repair for Outlook is compatible with Windows 11, Windows 10, Windows 8.1, Windows 8, and Windows 7.

You must know that in the free version of Stellar Repair for Outlook, you can scan your PST as big as it is, but you can’t save it. For that, you will need the paid version of the software.

Stellar Repair for Outlook

Repair your Outlook PST quickly and all the contents in your mailbox with just a few clicks.

We hope that our article helped you understand all about Stellar Repair for Outlook and how to use it to recover all your email contents and repair your Outlook PST.

While we are on this matter, you might also be interested in our guide on how to rebuild your Outlook profile.

Did you use it yet? Let us know about your experience with Stellar Repair for Outlook in the comments section below.

8 Tested Ways to Fix Sims 4 Lagging on PC

Is your Sims 4 freezing, stuttering, or loading at a snail’s pace? You’re not alone.

The cause is usually simple: too much custom content, outdated mods, corrupted save files, weak hardware, or background programs hogging memory.

In this guide, we’ll walk you through what’s causing the lag and show you exactly how to fix Sims 4 when it is laggy.

How to stop Sims 4 lag

First, try pausing and resuming the game, switching to Windowed mode, playing offline, freeing up drive space, and checking that your PC meets Sims 4’s system requirements. If the game is still laggy, try the more advanced fixes below.

Image Source: Steam

1. Update the graphics drivers

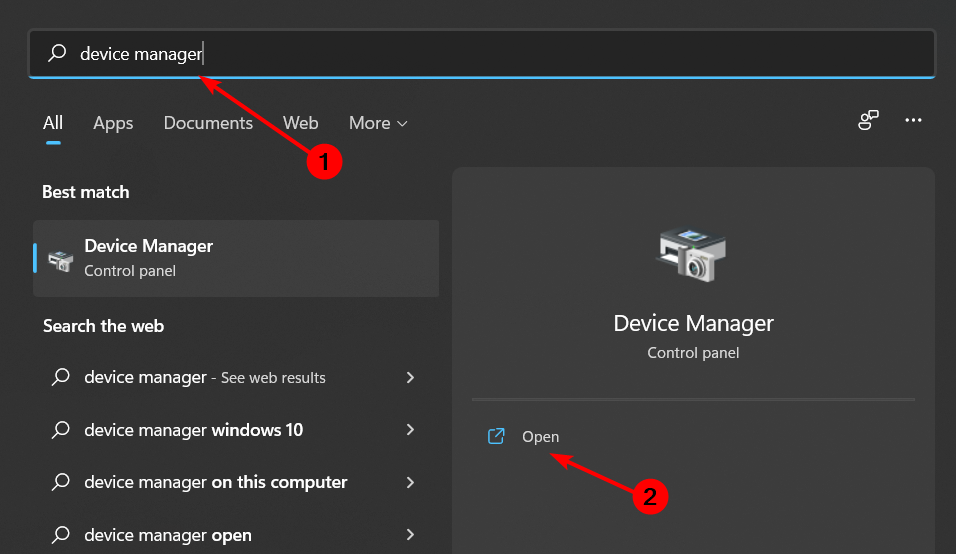
  1. Press Windows + X to open the Power User menu, and choose Device Manager from the list of options.
    device manager
  2. Now, expand Display adapters, right-click on the graphics adapter, and choose Update driver from the context menu.
    update drivers to fix sims 4 lagging
  3. Next, select Search automatically for drivers and wait for Windows to install the best one.
    search automatically for drivers

An outdated, corrupt, or incorrect graphics driver is likely to wreak havoc and lead to lagging when playing games. We recommend you update the graphics driver regularly.

To speed up the process, you can also try an automated tool that does the heavy lifting for you. You don’t have to do check ups or manual installs.

A good option we tested extensively on Windows is Fortect Driver Updater. It automatically scans your PC for outdated or problematic drivers and fixes them within minutes.

2. Repair the game

2.1 In the EA App

  1. Launch the EA App, head to Library from the navigation pane.ea app library
  2. Click the 3 dots next to The Sims 4 and choose Repair.sims 4 repair
  3. Now, wait for the repair process to complete. Though it shouldn’t usually take long, the process may take some time in rare cases where there are several issues.

2.2 On Steam

  1. Launch Steam, navigate the Library tab, right-click on The Sims 4, and choose Properties.
    the sims 4
  2. Now, head to Local Files from the navigation pane, and click on Verify integrity of game files.
    verify integrity of game files to fix sims 4 lagging
  3. Wait for the process to complete.
    wait

If there were issues with the game files or a few were missing, which led to lagging in The Sims 4, things should now be up and running like before.

3. Set the game priority to high

  1. Press Ctrl + Shift + Esc to open the Task Manager, and head to the Details tab.
    details tab
  2. Now, locate The Sims 4 process, right-click on it, hover the cursor over Set priority, and choose High.
    set priority to high to fix sims 4 lagging

4. Lower Graphics Settings

  1. Go to Game Options > Graphics.
  2. Set quality to Low or Medium.
  3. Lower Sims/Lighting/Object details.
  4. Turn off Uncompressed Sim Textures.lower sims 4 graphics settings
  5. Apply changes and restart the game.

5. Close Background Programs

  1. Press Ctrl + Shift + Esc.
  2. End non-critical tasks (browsers, updates, etc.).Microsoft Upload - Taks Manager - MSOUC-EXE - End task

6. Move Sims 4 to an SSD

  1. Backup your saves.
  2. Uninstall Sims 4.
  3. Reinstall on your SSD via the EA app.
  4. Restore saves to:
    Documents > Electronic Arts > The Sims 4 > Saves

7. Clean Up Mods & Custom Content

  1. Move the Mods folder to desktop.
  2. Launch Sims 4 — if lag stops, mods are the issue.
  3. Delete outdated CC and update essential ones.
  4. Use Sims 4 Tray Importer to check for broken or duplicate files.

8. Clear Cache & Keep Files Clean

  1. Delete localthumbcache.package in your Sims 4 folder regularly.
  2. Avoid huge households or oversized lots that strain performance.
  3. Keep Windows/macOS and GPU drivers up to date.

If Sims 4 is still laggy after these fixes, check for related issues like when Sims 4 won’t start, households won’t load, or mods stop working.

You can also follow guides on update problems or changing the game language for better performance.

The System Detected an Overrun of a Stack-based Buffer [Fix]

The System detected an overrun of a stack-based buffer in this application, is a rare error but can go as far as preventing your PC from booting after a BSOD.

The error is often caused by malware, faulty system files, or conflicting third-party apps. Here’s a quick look at how to address each cause and fix it.

How to fix the system detected an overrun of a stack-based buffer

1. Scan for malware

  1. Restart your PC and press the power button to forcibly shut it down when the manufacturer’s logo shows up. Repeat this 3 times to enter the Advanced recovery menu.
  2. Choose Troubleshoot > Advanced Options.
    advanced option system detected an overrun of a stack-based buffer
  3. Now, click Startup Settings.
    startup settings
  4. Click the Restart button.
    restart
  5. When your PC restarts, press the corresponding key to Enable Safe Mode or Safe Mode with Networking.
    enable safe system detected an overrun of a stack-based buffer
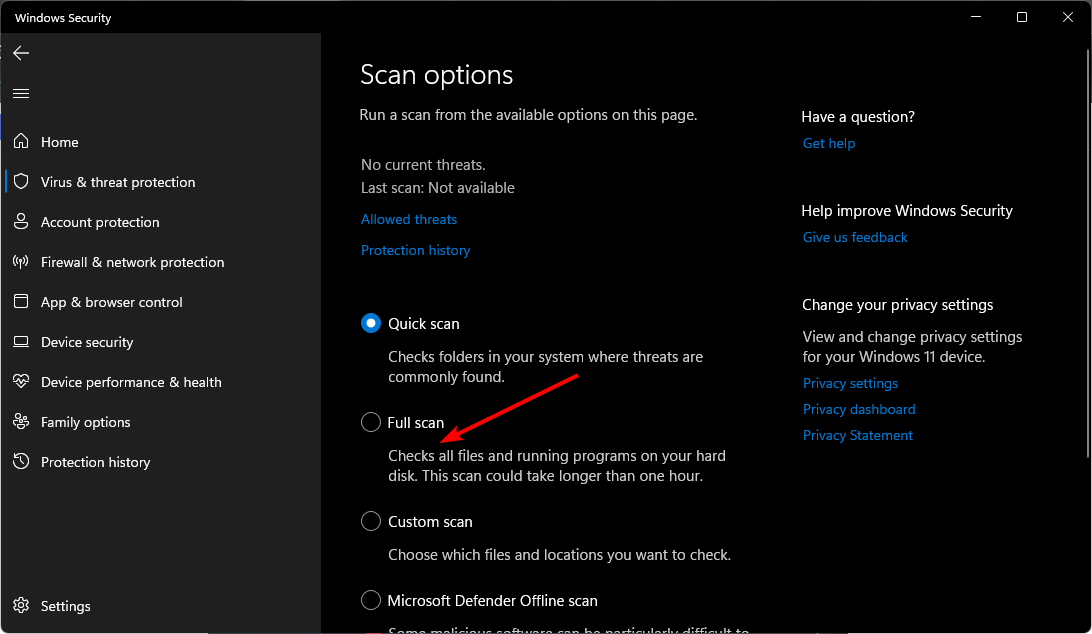
  6. Once the PC boots, press the Windows key, type virus, and select Virus & threat protection.
    virus
  7. Now, select Scan options.
    scan options
  8. Finally, select the Full Scan option and click the Scan now button.
    scan now system detected an overrun of a stack-based buffer

2. Run SFC/DISM

  1. Repeat Steps 1 to 5 in Solution 1 to Enable Safe Mode with Networking.
  2. Press the Windows key, type cmd, and select Run as administrator under Command Prompt.
    cmd admin
  3. Now, type the commands below and press Enter after each: DISM /online /Cleanup-Image / ScanHealthdism scan DISM /Online /Cleanup-Image /RestoreHealthdism restore system detected an overrun of a stack-based buffer
  4. After the commands finish running, type the command below and hit Enter: sfc /scannowsfc
  5. Finally, restart your PC when it’s done.

System files are important for the smooth running of your PC. If any files are problematic, you might encounter the system detected an overrun of a stack-based buffer error.

3. Perform a clean boot

  1. Press the Windows key + S, type msconfig, and click OK.
    msconfig
  2. Select the Services tab at the top, check the Hide all Microsoft services box, and click Disable all.
    services system detected an overrun of a stack-based buffer
  3. Now, select the Startup tab and click Open Task Manager.
    startup
  4. Next, right-click each of the apps there and select Disable.
    disable
  5. Go back to the System Configuration windows and click Apply, followed by OK.
    apply ok system detected an overrun of a stack-based buffer
  6. Finally, restart your PC.

4. Repair with system resources

  1. Access the Advanced Recovery menu and choose Troubleshoot.
    troubleshoot
  2. Choose Advanced options.
    advanced option system detected an overrun of a stack-based buffer
  3. Now, select System Restore or Startup Repair.
    system restore system detected an overrun of a stack-based buffer
  4. Try one and then the other; hopefully, you’ll be able to boot.

5. Repair with a bootable drive

  1. Unplug everything from your PC apart from the mouse and keyboard.
  2. Create and insert a bootable media drive (USB or DVD) and boot with it. If your PC does not boot automatically from the bootable drive, you need to enter BIOS to change your boot drive.
  3. Once the drive boots, enter your language and other important information and click Next.
    language
  4. Now, choose the Repair your computer option in the bottom left corner.
    repair computer
  5. Choose Troubleshoot.
    troubleshoot
  6. Select Advanced options.
    advanced option system detected an overrun of a stack-based buffer
  7. Finally, choose Startup Repair.
    startup repair system detected an overrun of a stack-based buffer

6. Reinstall Windows 10

Finally, if none of the previous steps helped you address the problem, we encourage you to back up your data and reinstall Windows 10.

We’re probably looking into a large-scale problem, and although reinstallation can be a drag, it’s a definitive solution.

That is all you need to fix the system detected an overrun of a stack-based buffer error on your PC. You only need to follow the steps carefully, and you should be able to restore normalcy on your PC.

If you are facing other issues, like the driver overran stack buffer BSOD, check our detailed guide to fix it quickly.

Lastly, don’t forget to tell us whether you find these steps helpful in the comments below.

How to Delete Files With Long Names [Easy Steps & Tips]

Have you ever run into a file name that was too long to delete or a file extension that was superfluous? This can happen when you’re removing an old file or editing a new file with a long title. Some files in Windows are strange. You may find that the file name is too long to delete or rename.

If this sounds familiar, we’re here to lift that burden. You don’t have to be stuck with a file you want to get rid of. In this article, we shed more light on how to delete files with long names.

What are long file names?

Long file names are file names that exceed the maximum length of 255 characters. You can use long file names as long as you want, but you must be careful to avoid problems when naming your files.

If you try to save a file with a long filename, Windows will automatically truncate the name to 255 characters or less and then save it to disk. A long filename that is too big for Windows to store on disk will result in an error when the user tries to use that file.

Long file names can be used for several reasons:

  • The file is large and needs to be saved in a different directory from the one it was created in.
  • To allow multiple versions of a document or project to co-exist.
  • The file has special characters or symbols that need to be written out in full, such as copyright information.
  • To provide additional information about the file, such as its size and modification time.
  • The file has long comments or data blocks that need to be displayed using special characters.
  • To indicate that a file is compressed or encrypted.

Why can’t I delete files with long names?

There are many reasons that can prevent you from deleting files with long names. These include:

  • The file is open in another app – If the file is open in any program or application, the file will not be deleted immediately. 
  • Not enough permission – Some files require an administrator account to be deleted. If you’re using a standard account, you may need to switch to one with administrator privileges.
  • You’re deleting a copy – If you try to delete a file that’s been renamed and its original name still exists in your current directory, then Windows will not be able to delete the new name until the original name is deleted first. 
  • OS can’t process it – The operating system has a limit for the length of the name and if the file has a name that exceeds that limit, it will not be able to delete it.

How do I delete files that are too long?

Before you proceed with any of these steps, we recommend you check the following:

1. Use a third-party file manager

Deleting long file names is a tedious task. It can be done using an automated tool or manually, but the latter is more time-consuming and cumbersome.

A third-party file manager is a great way to delete long file names from your computer. It will allow you to search for and select the files you want to keep, as well as delete them all at once.

Aomei Partition Assistant Professional is a third-party file manager that can be used to manage files and folders in your system. It is also one of the best partitioning software available on the market, so you can easily see what you are doing.

AOMEI Partition Assisstant Professional

Powerful file manager that lets you easily manage your partitions, delete unnecessary partitions, and move and resize partitions.
Free trial Visit website

2. Rename the file

  1. Navigate to the folder with the long file name.
  2. Right-click on the file and click on the Rename icon.
  3. Choose a shorter name for the file and press Enter.

While this method works most of the time, some file names are stubborn and won’t delete. For instance, when you try to delete a PDF with a long file name, you may be unsuccessful since most PDFs don’t allow any edits.

You can choose to install PDF editor software to help you edit the file but most of them are paid for. The free ones may be able to help but a majority of them come with basic features. If this works, you should be able to delete the file but if it doesn’t, proceed to the next step.

3. Delete via Command Prompt

  1. Locate the folder location where the long file name is stored, right-click on an empty space and select Open in Terminal.
  2. Type and Enter the following command: DIR /X
  3. Next, type and Enter the following command replacing FILENAME.TXT with the name of the file you wish to delete: DEL FILENAME.TXT
  4. Run the DIR /X command again and check if the deletion was successful. If not, proceed to type in the next command: del "\\?\c:\<very_long_path_and_file_name.ext>

Hopefully, one of these methods has been able to help you get rid of the long file name that wouldn’t delete. Aside from file names, you may also have trouble deleting a folder. If you encounter such an issue, don’t hesitate to check out our expert article on the same.

For any additional thoughts, leave us a comment down below.

Outlook Crashes When Opening Calendar: 7 Easy Fixes to Use

Outlook is a fantastic email client, but many reported that Outlook hangs when users switch to the calendar. This is also followed by Outlook running slow on your PC.

This can be a big problem, mainly if you use the calendar frequently, so in today’s guide, we will show you the best methods you can use to fix it.

What to do if Outlook hangs when you switch to calendar?

1. Turn off Outlook Add-ins

  1. Open the Outlook application.
  2. Click File and Options to open the Outlook Options window.
  3. Click Add-Ins on the left of the window.outlook add ins
  4. Select COM Add-ins from the Manage drop-down menu.
  5. Press the Go button to open the COM Add-ins window.
  6. Then deselect all the selected add-ins.
  7. Press the OK button.

Outlook users have confirmed that turning off the application’s add-ins fixes the calendar hanging. To be more specific, turning the iCloud Outlook add-in off has fixed the Outlook (Not Responding) error for some users.

2. Open Outlook in safe mode

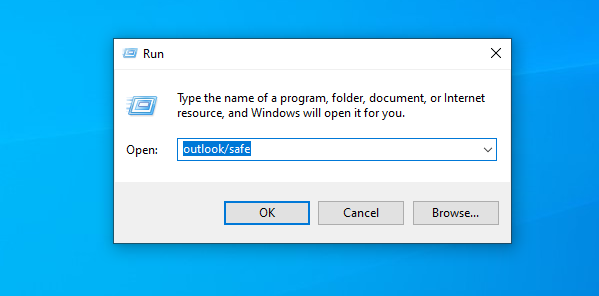
  1. Press the Windows key + R to open the Run dialog.
  2. Enter outlook /safe and press Enter.
    run outlook in safe mode
  3. Now check if the problem is still there.

If the issue doesn’t appear, it means that one of your settings or add-ins is causing the issue.

3. Set up a new User Profile

  1. Open the Run accessory with the Windows key + R keyboard shortcut. Enter control and press Enter.

  2. Click Mail in the Control Panel.
  3. Press the Show Profiles button on the Mail Setup window.
  4. Select your current profile, and click the Remove button. After that, confirm that you want to remove the profile.
  5. Open the Outlook application.
  6. Click File and choose Add Account..
    Then enter the required details in the text boxes.
    outlook add new account
  7. Press the Next button.
  8. Press the OK and Finish buttons to set up the new profile.

4. Repair the Microsoft Office Suite

  1. Press Windows key + R and enter appwiz.cpl. After that, press Enter.
  2. Select the MS Office suite on the program list.
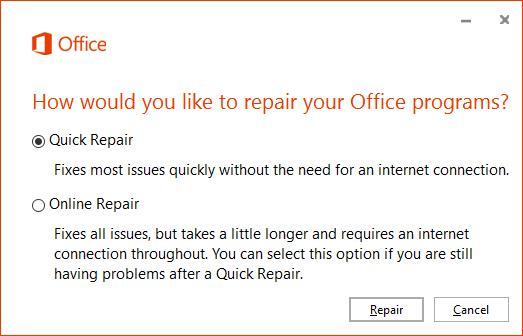
  3. Press the Change button to open the repair Office dialog.
  4. Select Online Repair for the most rigorous repair.
  5. Press the Repair button.

5. Fix Outlook data

  1. Press Windows key + S and type scanpst.exe and then select to open SCANPST. Alternatively, you can open the Inbox Repair Tool by opening your Office folder in File Explorer and double-clicking scanpst.exe.
  2. Click the Browse button to select your Outlook PST file.
    repair outlook
  3. If you’re not sure what folder includes your PST file, open Outlook click File, and then Account. After that, choose Account Settings. Then, you can select the Data Files tab that lists your PST file paths.
  4. Press the Repair button on the Outlook Inbox Repair Tool window.

6. Use Microsoft Support and Recovery Assistant

  1. Visit Microsoft Support and Recovery Assistant download page.
  2. Now click on Download.
  3. Once the application is downloaded, run it and check if it helps you fix the problem.

7. Change your email client

Almost everyone has used Outlook as their email provider, and they are one of the most known on the market. Unfortunately, many errors keep appearing when using it, and it may be time to start thinking about choosing another email app.

You can find many alternative email clients with similar task management tools.

You can find plenty of modern Windows 10 email clients that are much more stable and have great security and encryption to ensure your emails are entirely private.

On top of that, the best email clients you can find today come with excellent contact management tools, powerful search functions that can help you find any email in seconds, and other features like e-signatures, spellchecker, email templates, or a translator.

Those are resolutions that users have confirmed to fix the Outlook (Not Responding) calendar error. If you care about your privacy, read our guide on how to make Outlook calendar private.

For increased efficiency, learn how to keep Outlook’s calendars selected and view multiple calendars in one view.

After you have fixed this problem, you might be interested in how to add a holiday to your Outlook calendar.

If you want to be fully time efficient, there’s a way to show tasks in the Outlook calendar, so be sure to try that.

Did you find a different solution for this problem? Let us know in the comments section below.

GeForce Now Error Code 0xc192000e: 5 Ways to Fix It

Users are getting kicked out of their GeForce Now accounts and the error code 0xc192000e is displayed on their screens. This is a big problem because it means that you will not be able to play any games or watch any videos from your account.

Gamers who have been experiencing the issue say that they’ve been unable to play the game. It’s not uncommon for gaming software to have glitches as sometimes even the popular Xbox app fails to launch. If you are in the same boat, below we discuss some potential fixes.

Why does GeForce Now say error 0xc192000e? 

If you’re getting the GeForce Now error 0xc192000e, it could be due to one or more of the following reasons:

  • Server maintenance – The top reason why most users are getting kicked out of their GeForce Now accounts is that Nvidia had earlier announced plans for a server upgrade.
  • Expired subscription – If you have not yet updated your subscription, you may encounter the GeForce Now error code 0xc192000e.
  • Not using VPNs – Although not all games require a VPN to play,  they are recommended as they significantly improve gameplay and improve ping.
  • Outdated app– In some cases, if you’ve not updated your GeForce Now app, it may not be optimized to meet the requirements of the games you’re playing hence the frequent errors.

It is important to note that the GeForce Now error 0xc192000e can manifest itself in various ways such as:

  • GeForce Now not listing all the games in your library.
  • Automatic login is disabled and you have to keep logging in every time you want to play.
  • Getting asked to subscribe even though you have an active subscription.
  • Your GeForce Now member status is unavailable.
  • Games are no longer loading in 4K resolution and 1080p is the maximum quality.

How can I fix GeForce Now error code 0xc192000e?

Before you attempt any of the below solutions, perform these preliminary checks first:

  • Ensure you have an active subscription.
  • Check the GeForce Now official status page to see if there’s a server downtime or scheduled maintenance.
  • Try a different server and check if the issue persists.
  • Check that you’re running the latest version of the GeForce Now app.

1. Use a VPN

A VPN is basically a secure tunnel that encrypts your internet connection and sends it through another server. Using a VPN is not only beneficial in enhancing your gaming experience but also allows you to change your location. 

Some users who updated their locations when they switched to a different server in a different location were able to regain access to their accounts.

2. Switch to the browser version

Sometimes, the issue may be the GeForce Now app, and switching to a browser could fix the problem. A few users were able to bypass the error while using a browser but report that the response time was extremely slow.

That’s why we recommend you go for the Opera browser because it is fast and has the best features for gaming. As an added advantage, it also comes with a built-in VPN, so you can browse the web privately and securely.

3. Update your GeForce drivers

It’s good practice to keep your drivers always updated to avoid any compatibility issues or other errors that may crop up from time to time.

You can check out our comprehensive article on various ways to download the GeForce drivers and once they have been updated, check to see if the error code still appears.

4. Reinstall the GeForce Now app 

If the problem is your GeForce Now app that has failed to register updates, try uninstalling it to get rid of any corrupt files that may have accumulated over time. Also, don’t forget to remove any software leftovers as reinstalling it again could still bring up similar problems. 

Once you have successfully removed every trace of the program, proceed to download GeForce Now and check if the problem persists.

5. Contact support

If the above methods fail to yield desired results and you’re still getting error code 0xc192000e, it may be time to contact NVIDIA support. 

It’s possible they’re not yet aware of the issue or it’s an isolated problem that’s facing a section of users. Nevertheless, reporting the issue is one step closer to getting the problem resolved.

If GeForce Now is doing a server upgrade, there’s nothing you can do but wait. While you wait, we recommend checking out offline PC games that you can play to keep you entertained.

We also have an answer for when your GeForce Experience is not detecting games so feel free to check out our guide on the same.

We’d love to hear any additional solutions not mentioned here but have worked for you in this situation. Leave us a comment down below.

Teams and other Microsoft services were all down at the same time

What is even more annoying and frustrating than the software you need to use being bugged? That’s an easy answer: the software you need to use actually not working at all.

Of course, even some of the most utilized and popular services can have downtime, due to maintenance or unforeseen problems, but the bright side is that it rarely happens.

However, people that were trying to make use of some of Microsoft’s services yesterday were surprised to notice that many of them were down at the same time.

Teams and Outlook were both down together

Even though Microsoft provides some of the most reliable software solutions, there are also times when bugs or glitches just won’t let us do our jobs.

That being said, just know that the problem isn’t always on our end. In fact, from time to time, servers that sustain all these apps and programs can have problems of their own.

Microsoft is now said to investigate what happened with Outlook and Teams since users could not use them at all.

Thus, if you’ve been experiencing issues accessing Microsoft Teams or Outlook, just know that you’re not the only one.

Many users in India, the UK, as well as other areas around the world, are reporting that they currently cannot access the two services.

The Downdetector website, which monitors outages of online services in real time, showed that there were more than 3,700 incidents of people reporting issues with Microsoft Teams.

Users in the Philippines, United Kingdom, Australia, Britain, and the United Arab Emirates are also reportedly having problems.

Note that during the outage, people reported being unable to send or receive messages, join calls or use any Teams feature.

And, as you expected, many of them took to Twitter to share their experience during the service disruption.

The Redmond tech giant has been made aware of the situation and is now investigating what might have caused the outage.

If you are still experiencing problems, just know that Microsoft is working on solving them and we will keep you updated as soon as new information becomes available.

How to Fix We Couldn’t Find a Fingerprint Scanner Compatible Windows Hello Error

Running into the “We couldn’t find a fingerprint scanner compatible with Windows Hello” error in Windows 11?

This one’s frustrating because it usually pops up when you’re trying to set up biometric sign-in, but Windows just won’t recognize your hardware. Let’s walk through what causes it and how to fix it.

How to fix We couldn’t find a fingerprint scanner compatible with Windows Hello fingerprint error?

Before anything else, check the Windows 11 system requirements, update your device, restart it, and re-enable the fingerprint scanner. Also, note that sleep mode can cause the sensor to stop working.

If all that checks out but the fingerprint scanner error persists, try the fixes below:

1. Restart the Windows Biometric Service 

  1. Hit the Windows + R keys to open the Run command.
  2. Type in services.msc and hit Enter.
    run services.msc command
  3. Locate Windows Biometric Service, right-click on it, and select Properties.
  4. Under the Startup type, click on the drop-down menu and select Automatic.
  5. Click on Apply and OK to save the changes.

2. Allow Windows Biometric Service permissions 

  1. Hit the Windows + R keys to open the Run command.
  2. Type in services.msc and hit Enter.
    run services.msc command
  3. Locate Windows Biometric Service, right-click on it, and select Properties.
  4. Navigate to the Log On tab and under Local System account, check the box next to Allow service to interact with desktop.
  5. Click on Apply and OK to save the changes. 

3. Update your Biometric drivers

  1. Hit the Windows key, type Device Manager in the search bar, and click Open.
  2. Navigate to Biometric devices and double-click to expand.
  3. Right-click on your biometric device and select Update driver.
  4. Click on Search automatically for updated drivers.
  5. Wait for the scan to complete and install the recommended driver.

Updated drivers are a great thing, but if you’re using Windows Update or manually updating them yourself, you may have noticed that sometimes it doesn’t work. If you’re tired of having to manually check for updates each time you turn on your computer, Outbyte Driver Updater can do that for you.

Outbyte Driver Updater will automatically detect if a new version of your biometric driver is available on the Internet, so it will download this file. The software will then install them for you so that you are always up-to-date with the most recent version of your driver.

⇒ Get Outbyte Driver Updater

4. Uninstall your Biometric drivers 

  1. Hit the Windows key, type Device Manager in the search bar, and click Open.
  2. Navigate to Biometric devices and double-click to expand.
  3. Right-click on your biometric device and select Uninstall device.
  4. Click on the confirmation dialog box to Uninstall.
  5. Restart your PC and new drivers will automatically be reinstalled.

5. Roll back to previous Biometric drivers

  1. Hit the Windows key, type Device Manager in the search bar, and click Open.
  2. Navigate to Biometric devices and double-click to expand.
  3. Right-click on your biometric device and select Properties.
  4. Navigate to the Driver tab, select Roll Back Driver then click OK.
    Windows 10 fingerprint and PIN not working
  5. Select a reason for rolling back then click Yes.

Why won’t my fingerprint scanner work on Windows 11?

If you’re wondering why your fingerprint scanner is suddenly incompatible with Windows 11, it could be due to one or more of the following reasons:

  • Out-of-date OS – If you’re running a very old operating system or behind on Windows updates, it’s possible that your biometric devices won’t show or cannot be detected.
  • Outdated drivers – Most users who got the We could not find a fingerprint scanner compatible with Windows Hello fingerprint message on their Dell PCs because the manufacturer had not updated the drivers.
  • Recent Windows update – Sometimes Windows updates can cause glitches with certain features. You can roll back driver updates and restore a previous working version.
  • Virus infection – Some malware may have found its way into your system so always ensure you have a comprehensive antivirus solution.

Final Note

If your fingerprint scanner isn’t showing up or working with Windows Hello, chances are it’s a driver issue, a missing setting, or hardware that doesn’t meet Microsoft’s biometric standards. The steps above should cover most cases, but if you’re still stuck, try this troubleshooting guide for fingerprint recognition not working.

You might also want to check if your Hello Face driver is missing or outdated or if you’re seeing the face option currently unavailable.

For broader sign-in issues, here’s what to do when Windows Hello stops working in Windows 11. And if you’re on a work or school device, Windows Hello might be blocked on domain-joined PCs.

Fix: Windows 10 Could Not Connect to the ProfSvc Service

The User profile service (ProfSvc) is a Microsoft service in charge of loading and unloading the user profile. However, sometimes, the ProfSvc may be disabled or blocked.

The consequence is that users won’t be able to log into their user profiles, apps could have issues accessing users’ data, and some components installed to receive profile event notifications won’t receive them. Some users have associated the problem with the installation of Windows 10.

In this article, we will explain how to get rid of this problem in a few simple steps to bring your user profile to a normal state of use.

Why won’t Windows 10 connect to the ProfSvc service?

There could be several reasons why Windows 10 cannot connect to the ProfSvc (Profile Service) service. Some possible causes include the following:

  • Network connectivity issues – If there is a problem with your network connection, Windows may not be able to connect to the ProfSvc service.
  • Firewall settings: If your firewall is blocking access to the ProfSvc service, Windows may not be able to connect to it.
  • ProfSvc service not running: The ProfSvc service may not be running, preventing Windows from connecting.
  • Corrupted or missing system files – If specific system files are missing or corrupted, it could prevent the ProfSvc service from running correctly.
  • Malware or other security threats: Malware or other security threats may have affected the ProfSvc service, preventing it from running correctly.

Let us now explore some common fixes.

How can I fix ProfSvc connection issues?

1. Reset the account password

  1. Restart your computer and press the key to enter the boot menu (usually F8, F11, or F12).
  2. Select the option to boot from a Windows installation media (such as a USB drive or DVD).
  3. Select your language preferences and click Next.
  4. Now click Repair your computer.
  5. Select Troubleshoot, then Advanced options, and then click Command Prompt.
  6. In the Command Prompt, type the script below and hit Enter, replacing [username] with the username of the account you want to reset the password.
    net user [username] *
  7. You will be prompted to create a new password for the account. Enter the new password and press Enter.
  8. Exit the Command Prompt and select Continue to restart your computer.
  9. Log in to Windows with the new password.

The first and most natural action is to solve the problem by resetting your account password. If this approach cannot solve the issue, the computer will display the following error alert: “Windows couldn’t connect to the ProfSvc service.”

Before diving into more fixes, check if the apps, the user manager, shared PC Account Manager (shpamsvc), and the natural authentication are well configured, and make sure they are working correctly.

2. Restore the original ProfSvc service from Windows 10

  1. Restart your computer and press the key to enter the boot menu (usually F8, F11, or F12).
  2. Select the option to boot from a Windows installation media (such as a USB drive or DVD).
  3. Select your language preferences and click Next.
  4. Now click Repair your computer.
  5. Select Troubleshoot, then Advanced options, and then click Command Prompt.
  6. Type the following commands in the command window, hitting Enter after each one:
    • sc config ProfSvc start= auto
    • sc start ProfSvc
  7. Close the command window.
  8. Restart your computer and check if the problem persists.

The ProfSvc service uses the profsvc.dll file in the %WinDir%\system32 folder. You can restore the original version from Windows 10 installation media if the file is changed, damaged, or deleted.

3. Create a new user account

3.1 Log in to the administrator

  1. Click the power button on the sign-in screen and press Shift + Restart to go to safe mode.
  2. You are now in the recovery boot menu. Go to Troubleshoot, then click on Advanced options and select Startup settings.
  3. Now it can be seen as a list where you can choose Safe Mode with Command prompt by pressing F6.
    Safe Mode command prompt
  4. In the Command Prompt, type the script below and hit Enter.
    net user administrator /active:yes
  5. Login into the built-in administrator user profile and create a new user profile with administrator privileges.
  6. Lock your screen by pressing the Windows key + L, and sign in at the Administrator account.
  7. You can disable the built-in administrator account by typing the script below in the Command Prompt: 
    net user administrator /active:no

The first seven steps should allow you to be ready to create a new user account. Now you can follow these final steps to solve the problem.

3.2 Create a new user account

  1. Right-click the Windows key and select Command prompt (Admin).
  2. Type the script below and hit Enter.
    net user NewAccount password /add
  3. Run the next script below as well.
    net localgroup Administrators NewAccount /add
  4. Log off from the system and log in to the new user account.

Following these steps, you have enabled the built-in administrator and created a new user profile. Transfer all the data from the corrupted user to the newly created user profile and verify if the issue has been resolved.

Following one of the three above solutions should help you fix your issue. Let us know in the comments section below if you have any suggestions.

Viber Not Installing on PC: 5 Ways to Fix It

Viber is a chat messaging app that allows users to communicate with their friends and family members through text messages.  While it does its job well most of the time, sometimes Viber is not opening and other times you can’t even install it.

If you have tried installing Viber on your PC and have faced any issues, this article will help you. We have covered all the possible methods that can be used to install Viber on a PC.

Why can’t I install Viber on my PC?

There are a few reasons why you might not be able to install Viber on your PC. Some of them include:

  • Geo-restriction – Some applications are only available for certain countries. If Viber is not available in your country, it won’t install. You need to find a way to circumvent geoblocking.
  • Firewall/antivirus interference – Your antivirus software may be blocking the installation file from being downloaded from the Internet. 
  • Hardware requirements – It is possible that your PC does not meet the minimum requirements for running Viber.
  • Corrupted download – If you’re downloading Viber from an unofficial site, the installation file may be corrupted hence why you cannot complete the process. Also, check out if Windows 11 can detect pirated software.
  • Insufficient space – If you’re running low on memory, you may have trouble completing and installing downloads.
  • Outdated OS – If you’re running an older version of Windows, it may not be optimized for the updated version of Viber.
  • Unofficial/discontinued version – Some features of Viber are only available on older versions of the app or have been discontinued. This means that even after downloading it, Viber might keep crashing on your PC.

It’s also important to note that if the problem is Viber not installing on your PC, the solutions below may help. However, if it is not an isolated issue and you’re wondering why apps won’t install on your PC, you may need a different approach.

What can I do if Viber is not installing on my PC?

Before you proceed to the slightly technical solutions, try the following:

  • Check out the list of supported countries for Viber and ensure your region is listed.
  • Ensure your PC meets the minimum system requirements to run Viber.
  • Verify that you’re downloading from the official Viber website or Microsoft Store.
  • Delete the download file and redownload.

1. Clear hard disk space

  1. Press the Search icon, type this pc in the search box, then click Open.
  2. Right-click on the drive you want to clean up and select Properties from the list of available options.
  3. Click on Disk Cleanup under the Properties window and wait for it to calculate how much space you’ll be able to free.
  4. Select the types of files you want to delete and click OK (you can delete temporary files, log files, files in your recycle bin, etc.).
  5. Click on Clean Up System Files and wait until the cleaner calculates everything. It will give you even more free space by cleaning some unnecessary system files.
  6. Press OK after you make your selection to confirm the deletion.

Performing a Disk Cleanup is just one of the many ways available to free some hard disk space. Don’t forget to check out our comprehensive article on more ways to get rid of junk files and unwanted apps.

2. Use a VPN

One of the most reliable solutions to this problem is to use a VPN to get around your region’s restrictions and bypass Viber’s server block. In this case, you can use a VPN that masks your IP address, making it impossible for an ISP to recognize your device.

Here’s how you can easily get one of the best VPN services:

  1. Download and install ExpressVPN from their official website.
  1. Open the app and select Choose location to view all the available IP locations.
  2. Click on the Recommended button and pick your region.
  1. Enjoy using the ExpressVPN service.

A VPN will allow you to access content on Viber from anywhere in the world.

ExpressVPN

Never worry about geo-blocking and solve connectivity issues with this powerful VPN solution.
Check Price Visit Website

3. Scan for viruses

  1. Press the Windows key, search Windows Security and click Open.
  2. Select Virus & threat protection.
  3. Next, press Quick scan under Current threats.
  4. If you don’t find any threats, proceed to perform a full scan by clicking on Scan options just below Quick scan.Scan options
  5. Click on Full scan to perform a deep scan of your PC.
  6. Wait for the process to finish and restart your system.

4. Disable antivirus/firewall temporarily

  1. Hit the Windows button, type Windows Security in the search bar, and click Open.
  2. Click on Firewall & network protection then select Public network.
  3. Locate Microsoft Defender Firewall and toggle the off button.

5. Update your OS

  1. Hit the Windows key and click on Settings.settings windows 11
  2. Select Windows Update on the left pane then click on Check for updates.check-updates lenovo-ideapad-keyboard-not-working
  3. If available, click Download & install.

We have a lot more in store so if you have problems with Viber not delivering your messages, or system temporary failure, check out our article for quick fixes.

Don’t forget to acquaint yourself with offline messaging apps so that you can stay connected to your friends and family even without an internet connection.

In the comment section below, Share which method worked for you if Viber was not installed on your PC.

Outlook Deleted Emails Keep Coming Back: 5 Fixes to Apply

Emails are wonderful as they enable us to discuss things in detail, but many reported that deleted emails keep coming back in Outlook.

While many users want to recover deleted emails in Outlook, some want to remove them permanently.

Not being able to remove emails can be a problem, but in today’s guide, we’re going to show you the best ways you can use to fix this problem.

Why are deleted Outlook emails keep coming back?

There are several causes for this issue, but here are the most common ones:

  • Add-ins issues – Sometimes add-ins can cause a problem such as this one. Sometimes add-ins aren’t working properly, and that can issues like this. Speaking of add-ins and issues, visit our guide on Asana add-in not working in Outlook for more information.
  • Corrupted OST file – If this happens, you need to delete the OST file and recreate it.

What can I do if deleted Outlook emails keep coming back?

1. Try out a different email client for enhanced reliability

Some clients are meant to make your work experience better. Outlook often gives you the tools that you need to manage your workflow and work with an entire team.

However, you can find alternative productivity email clients that have a similar task and team management tools.

Luckily, most email clients are similar when it comes to user experience, so you won’t need to adjust too much if you decide to switch. 

2. Disable problematic add-ins

  1. Press the Windows key + R keyboard shortcut, type Outlook /safe, and press Enter.safe mode outlook mail
  2. This will run Outlook in safe mode.
  3. If the issue doesn’t appear, it means that one of the Add-ins is causing the issue.

Next, you need to find and disable problematic add-ins.

  1. To do that, click on File and then Options.

  2. Lastly, choose Add-ins.
  3. There you will find Manage Com-in Add. Click on the Go button beside it.
  4. If there are any add-ins listed, clear the checkbox for one add-in and restart Outlook and check if the issue is still persisting.
  5. In case the issue is still there, repeat the above step with another add-in until you have zeroed in on the target.

3. Delete the OST file and rebuild a new one

  1. Close Outlook if it is open.
  2. Press the Windows key + R and enter %LOCALAPPDATA%/Microsoft/Outlook
  3. Right-click the .ost file and select Delete.
    delete ost data outlook

Sometimes, there might be corruption in the OST files which can be another reason for a host of issues with Outlook, including deleted emails getting back. Use the above steps to correct that in no time.

4. Recreate OST file

  1. Click on File and then select Info.
  2. Click on Account Setting. Thereafter, double-click on Microsoft Exchange..

  3. There is the Setting pop-up that appears. Click on More Settings.
  4. Click on Advanced. Next, select Offline Folder File Setting.

  5. Select a location where .ost file will be saved and click on OK.
  6. There might be an error message shown. Click on OK. This will create a new ost file.
  7. Click on OK and then Finish.

Once you have successfully deleted the OST file, the next step would be to recreate it. Use the above steps in that regard.

5. Empty the Recoverable Items folder

Note icon NOTE
This method will delete all accidentally deleted emails, so use it as a last resort.
  1. Press Windows key + X and choose Windows PowerShell (Admin).
  2. Now run the following commands: Search-Mailbox -Identity "xxxx yyyy" -SearchDumpsterOnly -TargetMailbox "Discovery Search Mailbox" -TargetFolder "xxxxyyyy-RecoverableItems" -DeleteContent

  3. This method will delete the mailbox but copy its data to a different one. If you don’t want to recover data, use this command instead: Search-Mailbox -Identity "xxxx yyyy" -SearchDumpsterOnly -DeleteContent

Do keep in mind that you need to change the parameters so that they match the ones on your PC.

This isn’t the only problem that users can encounter, and many reported that emails are disappearing from Outlook, but we covered that issue in a separate guide.

Are things any better now? Don’t hesitate to let us know via the comments area below.

Switch Out of S Mode on Windows 10 With These 2 Easy Methods

Windows S Mode is an extra secure mode of Windows, but many are wondering how to switch out of S Mode since it enforces severe limitations.

Despite increased security, many reported This app can’t run on your PC error while using S Mode.

That is precisely why we’ve created this step-by-step guide, to show you exactly how you can disable this feature.

What is S Mode and how does it work?

S Mode is a version of Windows that is optimized for performance and security. This is achieved by allowing users only to install apps from the Microsoft Store.

In addition, this mode forces you to use Microsoft Edge for maximum security against online threats. With a focus on CPU and RAM optimization, it’s perfect for low-end devices.

Is it possible to turn off Windows S Mode?

Many budget PCs come with S Mode enabled by default in order to protect users from online threats and optimize resource usage.

If you’re an advanced user and you can stay safe from online threats on your own, you can easily turn off the S Mode, and this guide will show you how to do it.

Is it OK to switch out of S mode?

In most cases, yes. Microsoft Store has a limited choice of applications, and if you want to use your PC to the maximum potential, you should disable the S Mode.

The performance boost is negligible, and while your PC can potentially get infected, you shouldn’t have any issues as long as you use reliable antivirus software.

Pros and Cons of switching out of S Mode

Even though S Mode will limit you in a lot of ways, it will also offer improved security and machine performance, and also create important OneDrive backups.

In our opinion, switching out of it brings more options since it allows you to install any app without restrictions like on any other operating system, so there’s no reason to keep S Mode enabled.

Pros
Enhanced security
S Mode is streamlined to eliminate RAM and CPU use
Everything you do gets automatically saved to OneDrive
Cons
Can only download new software from the Microsoft Store
Antivirus options limited to Windows Defender
Only Microsoft-designed apps are allowed

How long does it take to turn off S Mode?

It doesn’t require much time to deactivate S Mode and you can perform it manually on your Windows device.

You can thus perform the task easily from the settings and activate the standard OS. On the Microsoft Store page, you should have a button that will get you out of S Mode almost instantly.

How do I switch out of S mode Windows 10?

1. Use the dedicated option in the Settings menu

Note icon NOTE
This method will require you to sign in to your Microsoft account before you can leave the S Mode.
  1. 1. Press the Windows key + I to open the Settings app.

  2. 2. Go to Update & Security.

    go to update and security
  3. 3. Look at the left pane and select Activation.

    go to windows activation settings
  4. 4. Select the Go to Microsoft Store link.

    go to the store option
  5. 5. Press the Get button.

    press get
  6. 6. Click the Install button.

    install the switch out of s mode
  7. 7. Select Yes, let’s go when prompted.

  8. By following these steps, you should be able to safely and securely switch back from Windows 10 S mode to the regular Windows 10

    The good thing about these steps is that they work silently in the background and that you don’t have to even reboot your PC for the changes to take place.

2. Reset Windows

Note icon NOTE
Resetting Windows will delete your installed apps and files, so it’s advised to back them up before proceeding.
  1. Press Windows key + S and enter recovery. Select Recovery options from the list.
  2. Click on Get started button in Reset this PC section.
  3. Choose the desired option and follow the instructions on the screen.

For a detailed explanation, we suggest reading our guide on how to factory reset your PC for more information.

How can I switch out of S Mode without using the Microsoft account?

Unfortunately, it’s not possible to switch out of S Mode without using Microsoft Store and Microsoft account.

There were workarounds available in the past, but Microsoft patched them. Currently, the only way to leave S Mode on your PC without Microsoft account is by performing a factory reset or a clean install.

How can I get out of S Mode on Windows 11?

Windows 11 also has S Mode, and yes, you can leave it anytime you want. The process is almost identical to the one on Windows 10, so we won’t go into it in this guide.

To learn more about it, visit our how to turn off S Mode in Windows 11 guide for detailed information.

Can I switch back to S Mode?

No, once you exit the S Mode, there’s no way to enable it again from the Settings app, so you’ll be forced to use your PC without it.

It’s possible to reinstall Windows and enable S Mode, but for that, you’ll need to modify your system image.

Windows 10’s S Mode has garnered mixed feelings from users, with some loving the new feature while others don’t. It was barely released and already with a handful of issues that made it unavailable for some.

Does getting out of S Mode slow down the laptop?

If you want to turn off Windows S Mode, you shouldn’t worry about slowing down your laptop. There are no performance differences between the two modes, so you can switch out anytime you need.

You should know that Windows S Mode includes all the features of the standard Windows 10, only without downloading applications from other sources.

Hence, it will not impact your speed or performance if you decide to switch it off.

One problem with it is that it can prevent you from accessing certain files. If you’re having such issues, you should visit our These files can’t be opened error guide for more information.

What are your opinions about Windows 10’s S Mode? Let us know what you think of this security mode in the comments section below.

How to Enable Winodws 10 Auto Login: 2 Easy Ways

What if you don’t want any security layers in between and want to auto-login in Windows 10? It can come in handy when your computer won’t let you type your password or if you simply don’t want to type it by hand.

This is fairly simple to set up and in this article, we walk you through the steps to enable auto login in Windows 10.

How can I enable auto login in Windows 10?

1. Configure User Accounts settings

  1. 1. Press Windows Key + R to open the Run dialog.

  2. 2. In the Run dialog box, type netplwiz and click OK. This will open the User Accounts window.

  3. 3. Uncheck the Users must enter a user name and password to use this computer box.

    Enable auto login Windows 10
  4. 4. Click Apply.

  5. 5. When prompted to user credentials, enter the username and password to disable password-based login. You may have to enter the username and password twice.

  6. 6. Click OK to save and exit the window.

  7. 7. On the next restart, you will be able to log in without entering a password for you account.

  8. You can remove the necessity to input a password every time you open your PC by disabling the login credentials. This can be done from the User Accounts menu in Control Panel.

A few users reported that the checkbox from Step 3 is missing on their PC. If that’s the case, you can get it back by doing the following:

  1. Press Windows key + X and select Windows PowerShell (Admin).
  2. Now run the following command: reg ADD “HKLM\SOFTWARE\Microsoft\Windows NT\CurrentVersion\PasswordLess\Device” /v DevicePasswordLessBuildVersion /t REG_DWORD /d 0 /f
  3. Once the command is completed, repeat this solution again, and the checkbox should be available.

2. Edit the Registry Editor

  1. If the first method did not work and Windows 10 still asks for a password during login, try this registry hack.
  2. Before making any changes to the registry, create a system restore point. It will allow you to restore the PC to normal if something goes wrong.
  3. After creating a restore point, proceed to next steps.

Edit registry files

  1. Press Windows key + R to open Run.
  2. Type regedit and click OK to open the Registry Editor.
  3. In the Registry Editor navigate to the following location:
    HKEY_LOCAL_MACHINE\SOFTWARE\Microsoft\Windows NT\CurrentVersion\Winlogon
  4. Next, locate the following values in the right pane:
    • DefaultUserName
    • DefaultPassword
    • AutoAdminLogon
  5. In case you can’t find one or more of these values, you need to manually create them. You can do that by right-clicking the right pane and expanding the New menu. Now choose String Value.
    select new and string value
  6. Name the newly created String Values accordingly.
  7. Next, double-click each to edit them. You need to set the Value data as follows:
    • DefaultUserName: WindowsReport
       
    • DefaultPassword: YourPassword
    • AutoAdminLogon: 1
  8. Close Registry Editor and restart your PC.
Note icon NOTE
We need to mention that this second solution only works for Windows Server 2019, Windows Server 2016, Windows Server 2012 R2.

Setting up auto login in Windows 10 is fairly simple. However, some users reported that they can’t log into Windows 10 at all, and we covered that issue in a separate guide.

We hope that our solutions helped you enable auto login on your PC. Let us know in the comments section below if you have any questions about this topic.

Fix: Microsoft Family Safety is Not Working on Windows 11

Microsoft Family, as the name suggests, is meant to keep users in touch with their loved ones. Parents can decide how long their kids will play games on their Xbox consoles or PC, and also keep track of how much time they spend online. Several users have reported that for them Microsoft Family Safety is not working in Windows 11.

This issue triggers right after upgrading to Windows 11. Fortunately, in this guide, we will give you a bunch of solutions that will help you fix that Microsoft Safety is not working on Windows 11.

Why is Microsoft Family Safety not working on Windows 11?

After some internet research, we have created some of the most common reasons which you will come across Microsoft Family Safety not working on Windows 11:

  • Disable Windows Firewall: Often aggressive Firewall settings can block certain features of the Microsoft Family Safety not working on Windows 11.
  • Verify your Microsoft Family account: If your Microsoft account has some issues, then this could cause multiple issues with the program associated with it.
  • Update Windows: You should make sure that the Windows version you have installed on your PC is up to date for all programs to work efficiently.
  • Check the control level: If the recent usage data isn’t visible on your child’s device, then there are some issues with the control level settings.

What can I do if Microsoft Family Safety is not working on Windows 11?

1. Disable Windows Firewall or antivirus

  1. Press the Win key to open the Start menu.
  2. Type Firewall and open Windows Defender Firewall.
  3. Click on Turn off Windows Defender Firewall from the left section.
  4. Click the Turn off Windows Defender Firewall (not recommended) radio option for both Public and Private networks.

Windows Firewall or any other antivirus is often the main reason why some programs misbehave or create issues within the app. In such a case, we would suggest you disable the Windows Defender Firewall.

We have shown the above steps for the Windows Defender Firewall, but you get the idea and do the same for any antivirus software that you are using.

2. Verify your Microsoft Family account

  1. Go to Microsoft’s support page. 
  2. Hit the Sign in button.
  3. Verify your account and fix the account issues.

Often after a certain time period, your Microsoft account may expire on your kid’s device. When this happens then the data isn’t sent from the device, causing multiple issues.

In this case, we would suggest you verify your Microsoft Family account and see if this resolves the Microsoft Family Safety not working in Windows 11.

3. Update Windows

  1. Press the Win + I keys to open the Settings menu.
  2. Click on Windows Update on the left pane.
  3. Hit the Check for updates button.
  4. Your system will start looking for a new update.
  5. If it detects a new one, then will prompt you to install the update.
  6. Click the Download and Install button.

As important as it is for the programs to be up to date, you should make sure that you are running the latest Windows update on your PC. This would prevent conflict with programs and also resolve several petty glitches.

4. Check the Family Safety control level

  1. Press the Win + I keys to open the Settings menu.
  2. Select Privacy and Security from the left pane.
  3. Click on the Diagnostic and Feedback option.
  4. See you can view the recent usage data from your child’s device.

If there is no data, then the Family Safety app is working properly, but the control level is not appropriate. You can check out our list of the best parental control software for Windows.

5. Re-add family member

  1. Press the Win key to open the Start menu.
  2. Type Family Options and open it.
  3. Click on View family settings.
  4. Sign in to the Microsoft Family Safety portal.
  5. On the family member you want to remove, click on the 3-dot icon.
  6. Select the Remove from family group option.
  7. Click on Remove.
  8. Click on Add a family member option.

Sometimes, issues with the added account could cause Microsoft Family not to work on Windows 11. You can easily remove and re-add the family member using the above-mentioned methods and check if this resolves the issue or not.

That is it from us in this guide. If you are looking for ways to change the Microsoft Family Safety settings, then you can check out our guide and do it easily.

We have a dedicated that gives you all the insights that you need to know about the Microsoft Family Safety feature. If you are using Windows 10 and you are facing Microsoft Family Safety not working on Windows 10, then check out our guide and fix the problem in no time.

If this feature isn’t working, you can also go ahead and disable Family Safety features, and we have a great guide that shows you how to do it.

Feel free to let us know in the comments below, which one of the above solutions helped you solve the issue.

Bose Headphones Not Connecting to Windows 10: 4 Expert Fixes

To fully enjoy the multimedia on your Windows 10, you need some quality headphones, such as those manufactured by Bose.

Although Bose headphones are fabulous, a few users reported problems with them. While some didn’t get a proper audio output, there was no sound at all in other cases.

So, today we’ll show you how to fix Bose headphones problems on Windows 10. But first, let’s find out why you are facing the issue in the first place.

Why are my Bose headphones not connecting to Windows 10?

In the case of wired headphones, you should check for problems with the cable or the jack at the end. Issues with both will lead to Bose headphone issues in Windows 10.

Also, if the Bose headphone is paired but not connected, it could be a problem with the device itself. In this case, you can update the driver or reset the headphone altogether.

This is a widespread issue; many users reported that Bluetooth headsets are not showing in Windows. This can occur because there’s an issue with the pairing process.

In some instances, Bluetooth audio stuttering can appear if there are issues with the Bluetooth adapter, thus causing the connection to drop.

It’s also possible that you’re having issues with your cables, and if that happens, you’ll encounter the No speaker or headphones are plugged in message. However, all these issues can be easily fixed by following the instructions from this guide.

Can Bose headphones connect to computer?

Yes, you can easily connect Bose headphones to a computer, depending on the means of connectivity offered by the particular model.

For instance, if it’s a wired headphone, simply plug it into the computer, while in the case of wireless ones, you will have to establish a Bluetooth connection between the two.

Why won’t my Bose headphones connect to my laptop?

There are several reasons for this, but the most common ones are Bluetooth glitches. These can happen from time to time, so you should restart your headphones and Bluetooth.

Another reason is that you have other Bose devices connected by Bluetooth so try to turn those off before starting to pair your headphones.

How can I fix problems with Bose headphones on Windows 10?

1. Uninstall your audio driver and install the latest version

    If Bose headphones are not recognized as an audio device on Windows 10, you can try removing their driver and installing them again. You can perform this task following our steps below. 

  1. 1. Search, type device manager, and click on the relevant search result.

    bose-headphones-windows-10
  2. 2. Expand the Audio inputs and outputs entry.

    double-click to fix bose headphones windows 10
  3. 3. Locate your audio device, right-click on it, and select Uninstall device.

    uninstall device to fix bose headphones windows 10
  4. 4. Click on Uninstall in the confirmation prompt. The Bose headphones paired but not connected issue in Windows 10 will be fixed.

    uninstall to fix bose headphones windows 10

After uninstalling the audio driver, you should go to your motherboard or sound card manufacturer’s website and download the latest driver.

However, installing an automatic driver update software could make things much more accessible. That’s a tool with a highly generous database of drivers; all it takes is one click for the task.

You’ll have your latest audio driver in no time. And besides helping you this time, it will keep your device updated with the newest device drivers which are added daily.

You can also try downloading the Bose Bluetooth driver for Windows 10 and check if that helps.

2. Remove headphones from Device Manager

  1. To fix the Bose headphones connected but no sound issue in Windows 10, press Windows + X, and choose Device Manager from the list.
  2. Expand the Sound, video and game controllers entry.double-click to fix bose headphones windows 10
  3. Locate your headphones, right-click on them, and choose Uninstall device.uninstall device
  4. Click on Uninstall to confirm.

Sometimes there might be issues with Bose Bluetooth headphones on Windows 10, but users reported that this issue could be fixed simply by removing your headphones from Device Manager.

After you’ve deleted Bose headphones from Device Manager, they should appear as headphones in the Bluetooth devices list.

Try pairing your PC with Bose headphones, but if the pairing doesn’t work, you’ll need to delete the headphones’ memory. To do that, follow these steps:

  1. On your Bose headphones, slide the Power button to the Bluetooth symbol and hold it there for 10 seconds.
  2. Now headphones should appear in the Bluetooth devices list, and you’ll be able to connect them to your PC.

Some users suggest that you don’t need to remove the device from Device Manager but must clear the headphones’ memory. So, try that as well. In addition, this method can help if your Bose QuietComfort 35 is paired but not connected to Windows 10.

3. Use a Bluetooth adapter/update your Bluetooth drivers

Bluetooth drivers can cause problems with Bose headphones, such as Bose headphones not recognized as audio device in Windows 10. To avoid this, ensure they are up-to-date before connecting Bose Bluetooth headphones.

If you have the latest drivers but the problem persists, you might want to use a suitable Bluetooth adapter. Users reported that the issue was resolved after buying a Bluetooth adapter and installing the necessary drivers.

While buying a Bluetooth adapter, verify that it comes with a driver CD to avoid any further Bluetooth issues. Again, though, with some of the newer models, Windows will automatically identify and install the best drivers.

4. Use a WiFi antenna

Using WiFi antennas may improve the strength and stability of the WiFi connection, which could solve issues with connecting Bose headphones to a Windows 10 device.

However, many other factors could be causing the connection issues, such as outdated device drivers or interference from other WiFi networks. Therefore, it would be best to troubleshoot the specific connection issues and identify the root cause before attempting to use WiFi antennas as a solution.

What can I do if Bose headphones won’t connect to Windows 11?

Though rarely the case, if Bose headphones won’t connect to Windows 11, you first should run the built-in Bluetooth troubleshooter. It will automatically identify and resolve issues preventing the connection.

Bluetooth troubleshooter

Also, you may update the drivers or roll back to the previous version if the problem starts after installing a new one. Besides, check for conflicting programs that may affect the functioning of Bluetooth, and uninstall the app.

How to connect Bose headphones to my PC?

  1. Press the Windows key + S and type Bluetooth. Select Bluetooth and other devices settings.
  2. Now click on Add Bluetooth or other device.
  3. Select Bluetooth.
  4. Turn on your headphones and activate the pairing mode.
  5. Now select your Bose headphones from the list to connect them.

How to connect Bose headphones to my PC without Bluetooth?

You can connect your Bose headphones to your PC using an audio cable, but to do that, you need to confirm that there’s an audio socket on the headphones.

If there is one, connect an audio cable to it and then click the other end of your PC, and it should start working without any problems.

Problems with Bose headphones on Windows 10 and 11 can be solved quickly, and if you notice any, feel free to try some of our solutions.

They can be applied even when you can’t connect your Bose headphones to the laptop.

Besides, find out what to do if Windows won’t recognize headphones.

If you’re aware of another solution to solve the problem, leave it in the comments section below so that other users can try it.

Also, leave there any other questions you may have, and we’ll certainly take a look.

How to Fix Laptop Not Connecting to Mobile Hotspot [2026]

If your laptop is unable to connect to a mobile hotspot, we’ve outlined tested solutions in the following lines. The problem most likely stems from faulty sharing or DNS settings on your PC.

At the same time, you may want to take a look at the hotspot settings and service availability on your phone.

We’ll show you how to do that and a couple of more tricks for flawless hotspot connections right down below.

How do I fix a hotspot not working on Windows?

First of all, check hotspot connection settings, ensure devices are allowed to connect, and set a channel for the network. Also, try disabling the Microsoft Wi-Fi Direct Virtual Adapter.

1. Change sharing settings

  1. Press the Windows key + S and type network connections. Select View network connections.
    view network connections windows 11 search results
  2. Locate your hotspot connection, right-click it and choose Properties.
    Network Connection properties context menu
  3. Navigate to the Sharing tab and enable all settings in Internet Connection Sharing (ICS).
  4. Save changes.
  5. Repeat the steps again, but this time disable all Internet Connection Sharing settings.

2. Reconnect to the network

Note icon NOTE
Try this solution only if you were able to connect to the mobile hotspot earlier. In case you are encountering the problem on the very first attempt, move to the next solution.
  1. Press Windows + I to open Settings, head to the Network & Internet tab, and click on Wi-Fi.wi-fi settings
  2. Choose the Manage known networks option.manage known networks settings app
  3. Locate the mobile hotspot, and click the Forget button next to it.forget wi-fi network settings
  4. Once done, head back to Wi-Fi settings, and choose Show available networks.show available networks settings app
  5. Now, click on the mobile hotspot here, and enter the password for it to establish a connection.connect to wireless hotspot

3. Check if the critical services are running

  1. Press Windows + R to open Run, type services.msc in the text field, and hit Enter.services.msc run window
  2. Locate and double-click on the WLAN AutoConfig service to launch its Properties.WLAN AutoConfig service
  3. Now, choose Automatic as the Startup type, click on the Start button if the service is not running, and then click OK to save the changes.automatic startup type WLAN AutoConfig service
  4. After you are done, check if the laptop is now connecting to the hotspot.

4. Restore DNS settings to default

  1. Press the Windows key + S and type network connections. Choose View network connections.
    view network connections w11 search results
  2. Locate your hotspot connection and choose Properties.
    Network Connection properties context menu
  3. Select Internet Protocol Version 4 (TCP/IPv4) and click Properties.
    internet protocol version 4 properties button
  4. Enable Obtain an IP address automatically and Obtain DNS server address automatically.
    Obtain an IP address automatically & Obtain DNS server selected
  5. Save changes, disable your hotspot connection, and enable it again.

5. Change hotspot security settings

  1. Open the Settings app on your mobile phone and select the Connections option.
    connections phone settings
  2. Now, choose Mobile Hotspot and Tethering.
    Mobile Hotspot and Tethering settings
  3. Tap the Mobile Hotspot option.
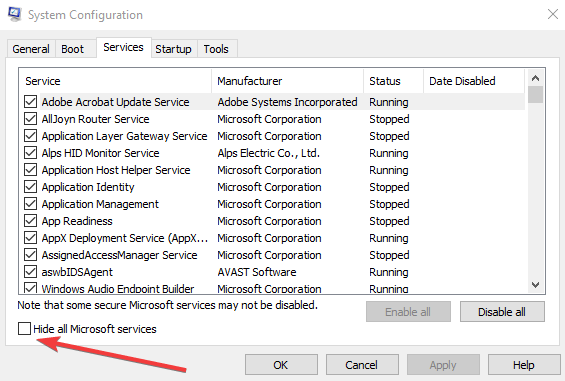
  4. Tap the three vertical dots in the top right corner and select Configure Mobile Hotspot.
    Configure Mobile Hotspot
  5. Next, tap the Security dropdown and select WPA2.
  6. Finally, tap the Save option and try connecting again.
    Security settings mobile hotspot

Users reported issues with WPA3, so using a different type of security can help.

6. Change the Wi-Fi frequency

  1. Open the Settings app on your mobile phone and Choose Connections.
  2. Now, select Mobile Hotspot and Tethering.
    Mobile Hotspot and Tethering connections settings
  3. Tap the Mobile Hotspot option.
  4. Next, click the three vertical dots in the top right corner and choose Configure Mobile Hotspot.
    Configure Mobile Hotspot
  5. Tick the radio button for Show advanced options.
  6. Finally, select the dropdown under Broadcast channel, select 2.4GHz, and tap the Save button.
    change frequency 2.4GHz mobile hotspot

On newer models, you might have to enable the Maximize Compatibility setting to enable 2.4GHz network.

Finally, if your hotspot is not showing up on your laptop, you might want to consider getting another wireless adapter.

Summary

For more information on this feature, check our guide on how to set up a mobile hotspot on Windows 11. In case you can’t set up a hotspot, check our guide on We can’t set up mobile hotspot or the hotspot keeps turning off.

Many complained that Windows 11 mobile hotspot is not working, as well as Macbook hotspot problems and iPhone WiFi hotspot issues. With a few tweaks like the ones above, you’ll figure those out too, and quickly.

With that said, we can conclude this article. Feel free to tell us in the comments section below if you have anything to add or take.

How to Keep Computer From Sleeping on Windows 10

By default, your Windows 10 PC will lock itself or go to sleep mode after a pre-set time, if you are not using your tablet, laptop, or desktop. This is done in order to preserve power and battery life.

In this way, Microsoft is helping you protect your data and optimizing the power consumption whether you are running your device on its battery or if you are using a physical connection to the electrical network.

Why keep my computer from sleeping?

As you can see, the sleep mode feature is quite useful, though in some situations it might get really annoying and frustrating – for example when your device goes to sleep mode too quickly and really often.

Moreover, automatic locking can be useful because it will prevent other users from accessing your computer if you’re away.

Even though these features are useful, they can sometimes be tedious. Today we’re going to show you the best tools to use to prevent the computer from sleeping or locking.

How can I keep my computer awake on Windows 10?

  1. 1. Open the Start menu and go to Settings.

  2. 2. Choose System.

  3. 3. Select Power and Sleep in the left-hand column and look for the Sleep section on the right.

  4. 4. Set the drop-down menu under When plugged in, PC goes to sleep after to Never.

  5. If you’re a computer administrator you can easily change power settings and stop your computer from sleeping or from locking.

    Of course, there are plenty of third-party apps that can keep your Windows 10 computer awake. However, there’s no need to install them since Windows comes with a dedicated option that allows you to block Sleep Mode.

However, if you’re just a regular user and you don’t have administrator privileges, you might have to look for some third-party solutions.

What are the best apps to keep the computer awake?

Preventing a computer from sleeping or locking is possible even if you don’t have administrator privileges on your PC. For that, you need to use a dedicated program to keep your laptop from sleeping.

Most apps to keep the computer awake that are on our list are portable, so they can work on any PC even if you don’t have administrator privileges. Moreover, you can run them on any PC without installation.

If you’re looking for the best tool to keep your PC awake, we recommend Coffee FF or Don’t Sleep, but you’re more than welcome to try other tools as well.

Caffeine – Simple and efficient

This is another portable app that doesn’t require you to install it in order to use it. Caffeine will stimulate the pressing of the F15 key on your keyboard every minute thus keeping your PC awake and running.

Since the F15 key isn’t available on your keyboard, this application won’t interfere with your work or open applications in any way.

Once you start Caffeine it will be located in the bottom right of your screen.

The application allows you to configure it, and you can set for how long you wish to keep the application enabled or disabled.

This is great if you want your PC to go automatically to sleep after some time but you don’t want to disable the application completely.

Caffeine also supports various command-line options and you can change the time interval of the pressed key, disable the Taskbar icon and so much more.

Caffeine is a simple app that will prevent your PC from going to sleep or automatically locking, and it will be perfect for basic users.

⇒ Get Caffeine

Coffee – Great when transferring files

Another tool that will keep your PC awake is Coffee. This tool checks your network connection and as long as you’re downloading or uploading something your PC will stay awake.

You can customize the download or upload threshold so your PC can go to sleep even if your PC is downloading files in the background. You can also set thresholds for different network adapters on your PC.

This tool is great if you’re downloading files, but unlike other tools on our list, it will not keep your PC awake by simulating a keyboard input. I

If you want to keep your PC awake using this tool, we suggest that you try experimenting with different threshold values. If you want, you can set this tool to start automatically with Windows or check for available sleep blockers.

Coffee is a simple application that will keep your computer from sleeping, and its only flaw is its reliance on a network connection in order to work.

Just like all other tools on our list, this is also a portable application and it doesn’t require an installation in order to run.

⇒ Get Coffee

Coffee FF – No installation required

Coffee FF is basically an improved version of the previous tool. The tools share the same user interface and features.

However, Coffee FF enhances the previous application by adding some missing features.

Using this app, you can prevent your PC from sleeping by setting a specific network threshold. You can also set the delay to remove the sleep block or simulate a key press in order to keep your PC awake.

If you want, you can even block sleep for a predefined number of minutes. Another option that we didn’t expect to see is the ability to prevent display standby which can be rather useful.

Lastly, you can even keep your PC awake as long as certain applications are running.

Coffee FF is a great tool, and it brings features that its predecessor lacks. A portable version of the tool is available, but you can install it on your PC if you want.

⇒ Get Coffee FF

Insomnia – Ideal for keeping a computer awake

This is another portable application that will keep your laptop from sleeping. The application doesn’t require installation, so you can run it on any PC without problems.

To prevent your PC from locking or going to sleep, just start the Insomnia application.

When the application starts, you’ll see its main window. The application doesn’t offer any advanced features, and you can’t configure the application in any way.

As long as Insomnia is running your PC won’t go to sleep or lock itself. Of course, you can lock your PC manually if you want.

Unlike other applications, Insomnia doesn’t simulate keyboard input instead, it uses the SetThreadExecutionState API in order to prevent sleep.

Insomnia is a rather simple application, but despite its simplicity and lack of advanced options, it will be perfect for most basic users to keep their computers awake.

⇒ Get Insomnia 

Caffeinated – Good for setting an awake duration

Caffeinated is a portable application and just like all other portable applications, it doesn’t need to be installed in order to run. Once you start Caffeinated it will show you its welcome screen.

From there you can set this application to start along with Windows or to automatically be active as soon as you turn it on. If you want, you can also set the default duration for the Caffeinated app.

The application will be located in the bottom right corner, and you can quickly disable it or enable it by clicking its icon. In addition, you can set how long will the application keep your PC awake.

Caffeinated is a simple but powerful application. It doesn’t have any advanced features, but it offers a straightforward and simple user interface.

Regarding requirements, Caffeinated requires .NET Framework 3.5 in order to work. This application is simple and portable, and it can start with Windows, so it will be perfect for all users.

⇒ Get Caffeinated

Noise – The most simple option

Another lightweight tool that can prevent your PC from going to sleep is Noise. This tool is portable just like all other tools on our list.

Once you start this tool it will send a random keystroke to its input field every 10 seconds thus keeping your PC awake.

We have to say that this is a somewhat primitive solution, but it should prevent your PC from going to sleep.

Noise doesn’t have any major flaws, but it doesn’t offer any advanced features, and it doesn’t have a modern user interface.

If you want a more modern solution to keep your PC awake, we suggest that you try a different application.

⇒ Get Noise

Don’t Sleep – Good selection of actions

Don’t Sleep is probably one of the most advanced tools on our list. This is a portable application, so there’s no need to install it in order to run it.

The application allows you to choose what type of actions you want to block. You can block Standby / Hybrid Sleep / Hibernation, Shutdown, Log-Off, and Screensaver / Monitor standby.

You can block all options, or you can select them individually from the list.

The application also comes with a timer, and you can schedule a specific time or date for a certain action. For example, you can set the application to turn itself off, stop blocking, or turn off your PC.

There are a total of 7 actions that you can schedule, which is enough for most users.

The application allows you to quickly access many system tools such as Task Manager, Power Options, Screensaver settings, etc. You can even turn off your PC or monitor right from this application.

Don’t Sleep also supports the Mini-HTTP feature that allows you to control the application using your web browser. By doing so, you can configure this application from any device on your network.

Mini-HTTP offers the most basic options, but the feature can be useful to some users.

You can also set this application to start along with Windows or you can change how the application behaves once your computer wakes up from Sleep Mode.

Don’t Sleep is a powerful but relatively simple application that offers advanced features. If you want to prevent your PC from going to sleep, this application is just what you need.

⇒ Get Don’t Sleep

Auto Mouse Mover – Great for mouse automation

Auto Mouse Mover is a simple application designed to move your mouse at specified intervals. By moving your mouse, your PC won’t go to Sleep Mode and it won’t lock itself.

When you start this tool you can choose when you want the tool to run. For example, you can set the tool to run only if you press a specific shortcut.

If you want, you can set the mouse to move as soon as the application starts or after a certain time of inactivity.

If needed, you can configure the inactivity timer and mouse movement as well. This tool also allows you to change the look of its Taskbar icon, so you can change it if you want to.

Lastly, you can set this tool to start automatically with Windows so you won’t have to start it manually every time.

⇒ Get Auto Mouse Mover

If you need to keep your computer from sleeping in Windows 10, tweaking Power settings is the first thing you need to try out. This is an easy solution, and you may find it very useful if you don’t want your PC to go to sleep.

Otherwise, if you don’t have access to changing the Power settings, one of the software options above will surely stop your laptop from going to sleep.

You might also get important information from our guide on what to do if your computer goes to sleep after 2 minutes.

Don’t forget to tell us in the comments section below what your favorite tool is that prevents the PC from sleeping and feel free to share other ways to keep the PC awake.

Mouse Lag in Call of Duty: Black Ops Cold War: 7 Quick Fixes

COD: Black Ops Cold War, released back in 2020, is one of the popular gaming titles. Though refined to a great extent, many users reported mouse lag in Black Ops Cold War.

When the mouse lags while gaming, it affects the whole experience and makes things extremely difficult in the case of multiplayer games. But the underlying cause is usually trivial and can be fixed in no time. Let’s find out how.

Why is my mouse lagging in Black Ops Cold War?

Here are a few reasons you might be encountering the problem:

  • Misconfigured mouse or game settings: In most cases, it was an incorrect setting, either for the mouse or the game itself, that led to the problem.
  • Corrupt or outdated drivers: If the installed drivers are outdated or corrupt, your mouse won’t perform as intended, and you might experience a lag in Black Ops Cold War.
  • Running out of system resources: Oftentimes, you experience mouse lag when enough system resources are not allotted to Black Ops Cold War.

How can I fix mouse lag for Call of Duty: Black Ops Cold War?

Here are a few quick tricks and workarounds we recommend you try first:

  • Restart the computer.
  • When experiencing mouse lag, press the Windows key and then again resume the game.
  • Make sure your PC at least meets the minimum system requirements for Call of Duty: Black Ops Cold War. Remember, it only guarantees that you would be able to run the game, not an optimal performance.
  • For a wired mouse, plug it into a different USB port on the computer.
  • If you haven’t changed the mouse batteries in a while, it’s time you replace them.
  • If you are using a TV for streaming, use a monitor instead since the latter delivers superior performance. In case you can’t, check if there’s a dedicated Gaming Mode on the TV and enable it.

If these two don’t offer any help, the solutions listed below surely would.

1. Update mouse and graphics card drivers

First, try updating the mouse and GPU drivers with driver updater software. Driver updater software will show you if there are more up-to-date drivers for your mouse and graphics card available.

Then you can quickly download and install the latest drivers with the driver updater utility.

2. Adjust Black Ops’ mouse settings

  1. Launch the Call of Duty: Black Ops Cold War game, and open its Settings.
  2. Select the Keyboard and Mouse tab shown directly below.
    keyboard and mouse tab mouse lag black ops cold war
  3. Set the Mouse Filtering and Mouse Acceleration values to 0.
  4. Now, enter 1.78 as the Monitor Distance Coefficient (revert to the default value if this doesn’t work).
  5. Disable the Mouse Smoothing setting if it’s not already.
  6. Experiment with different Sensitivity bar values to see if you can reduce mouse lag with that option.

After making these adjustments, check if the mouse lag is fixed in Black Ops Cold War.

3. Set the game’s priority to high

  1. Press Ctrl + Shift + Esc to open the Task Manager, and head to the Details tab.details
  2. Locate the BlackOpsColdWar.exe process, right-click on it, hover the cursor over Set priority, and choose High from the flyout menu.high priority to fix mouse lag black ops cold war
  3. Once done, run the game and check if mouse lag is still present.

And while you are in the Task Manager, make sure to terminate the non-critical programs and processes while also disabling startup apps to free up system resources.

4. Disable VSync

  1. Launch the Nvidia Control Panel, and choose the Manage 3D settings option from the navigation pane.manage 3d settings
  2. Now, head to the Program Settings tab, choose Black Ops Cold War from the Select a program to customize dropdown menu, and then Off from the Vertical sync menu.disable vsync to fix mouse lag black ops cold war
  3. If you can’t find the game, click on Add, and then disable VSync.

That’s it! Many users reported that disabling Vertical Sync (VSync) helped fix mouse lag in Black Ops Cold War. If this, too, doesn’t work, head to the next solution.

5. Disable the USB power-saving mode

  1. Press Windows + X to open the Power User menu, and choose Device Manager.device manager
  2. Expand the Universal Serial Bus controllers category, and then double-click USB Root Hub to open its properties.USB root hub
  3. Select the Power Management tab, uncheck the checkbox for Allow the computer to turn off this device to save power, and click on OK to save the changes.disable to fix mouse lag black ops cold war

Start the game again and check whether the mouse lag still persists in Black Ops Cold War. If yes, head to the next fix.

6. Disable mouse pointer options

  1. Press Windows + R to open Run, type Control Panel in the text field, and hit Enter.control panel
  2. Click on Hardware and Sound.hardware and sound
  3. Now, click on Mouse under Devices and Printers.mouse
  4. Navigate to the Pointer Options tab, uncheck the Enhance pointer precision and Display pointer trails checkbox, and click on OK to save the changes.disable to fix mouse lag black ops cold war
Note icon NOTE
If you’re utilizing a Logitech mouse, also disable its Smart Move feature. You can disable it in the Mouse Movement tab within the Logitech SetPoint settings software.

7. Change the mouse’s report rate

  1. First, open your mouse settings software, and look for report (or polling) rate sensitivity options.
    Report rate options mouse lag black ops cold war
  2. Select a report rate value of 250 or lower.
  3. Save your selected settings, and close your mouse configuration software.

That’s it! If nothing so far worked, adjusting the report rate should get things up and running when experiencing mouse lag in Call of Duty: Black Ops Cold War.

For those looking to upgrade, check the best gaming mouse for Windows and enjoy gaming like never before. Moreover, if you’d like to access bot lobbies with ease, we’ve got you covered.

Do not forget to tell us which fix worked for you in the comments section below. Also, you can drop any additional solutions that we might have missed.

Drag and Drop Not Working on Windows 10: How to Enable It

Moving files or folders, or even paragraphs and sentences around while working on your computer, is impossible when you can’t drag and drop in Windows 10.

If you’re experiencing issues and the drag and drop not working on Windows 10 issue happens on your computer, here are 12 quick fixes you can use to resolve it.

Why is drag and drop not working on Windows 10?

There are several potential reasons why drag and drop may need to be fixed on Windows 10. Some common causes include:

  • Touchpad or mouse driver issues – If the touchpad or mouse driver is outdated or incompatible with Windows 10, drag and drop may not function properly. Updating or reinstalling the driver may resolve the issue.
  • Corrupted system files – Drag and drop may not work if certain system files are missing or corrupted. Running the System File Checker (SFC) tool can help detect and fix any corrupted system files.
  • Third-party software conflicts – Some third-party programs, such as antivirus or security software, can interfere with drag and drop. Temporarily disabling or uninstalling these programs may resolve the issue.
  • Touchscreen issues – If you use a touchscreen device, drag and drop may only work properly if the touch screen is calibrated or the touch screen driver is updated.
  • Incorrect settings – Drag and drop may be disabled or not configured correctly in the settings. Check the settings of the specific program or the operating system settings to ensure that drag and drop is enabled.
  • Hardware problems – Hardware problems such as a malfunctioning touchpad or mouse can also cause drag and drop not to work. Replacing hardware such as a touchpad or mouse is the solution.

Now, let us examine some reliable solutions.

How can I fix drag and drop not working?

1. Run the DISM tool

  1. Click Start and type command, right-click the Command Prompt, and select Run as administrator.
  2. Type the script below and hit Enter.
    Dism /Online /Cleanup-Image /ScanHealth
  3. Lastly, type the repair script and hit Enter.
    Dism /Online /Cleanup-Image /RestoreHealth

Once the repair is complete, reboot your computer and check if the problem persists, after which you can run an SFC scan as described in the next solution.

2. Run a System File Checker scan

  1. Click Start and type command, right-click the Command Prompt, and select Run as administrator.
  2. Type the script below and hit Enter.
    sfc/scannow
  3. Restart your computer

3. Perform a Clean Boot

  1. Go to the search box, type msconfig, then select the System Configuration app.
  2. Click the Services tab, tick Hide all Microsoft services, and click the Disable all button.
  3. Go to the Startup tab and click the Open Task Manager option.
  4. Close Task Manager, then click Ok
  5. Reboot your computer.

4. Install Windows Updates

  1. Click Start.
  2. Go to the search field box and type Updates.
  3. Lastly, click Check for Updates, and install all updates listed.

Windows will immediately detect your system’s configuration and download appropriate ones.

5. Reset your PC

  1. Press Windows + I to open the Settings app.
  2. Click Update & Security.
  3. Click Recovery on the left pane, and under Reset this PC, click Get started.
  4. In the Choose an option screen, select the Keep my files option.
  5. Follow the Wizard to complete the reset.

6. Edit the registry

  1. Right-click Start and select Run.
    can’t drag and drop in Windows 10
  2. Type regedit, then hit Enter.
  3. Go to the path below:
    Computer\HKEY_LOCAL_MACHINE\SOFTWARE\Microsoft\Windows\CurrentVersion\Policies\System
  4. Right-click EnableLUA and select Modify.
  5. Change the value from 1 to 0.
    drag and drop not working windows 10
  6. Press OK. then restart your computer.

Check if, after the restart, the drag and drop not working on Windows 10 problem is gone. Try the next solution if you still can’t drag and drop in Windows 10.

7. Run Hardware and Devices troubleshooter

  1. Right-click Start and select Control Panel.
  2. Go to the View by option on the top right corner, click the drop-down arrow, and select Large icons.
    drag and drop not working on Windows 10
  3. Click Troubleshooting.
    https://i.imgur.com/BuFbHAn.png
  4. Select Hardware and Sound.
    drag and drop not working windows 10
  5. Select Configure a Device.
    can’t drag and drop in Windows 10
  6. Click Next to run the troubleshooter

8. Uninstall and reinstall mouse drivers

  1. Right-click Start and select Device Manager.
    drag and drop not working windows 10
  2. Expand Mice and other pointing devices to open the list, right-click the mouse device you want to remove, and click Uninstall driver.
    drag and drop not working windows 10
  3. Click Yes when you get a confirmation message, then restart your computer.

9. Enable drag and drop using ESC key

  1. Open File Explorer or Windows Explorer by pressing Windows + E.
  2. Click any file, and long-press the left-click mouse button.
  3. Press the Esc key.

10. Restart Windows Explorer

  1. Press Crtl + Shift + Esc to open the Task Manager.
  2. Search for Windows Explorer from the list of processes.
  3. Right-click on it and select Restart.

The explorer will be restarted, and in about 2 seconds, your problem should be fixed.

These simple tweaks have managed to fix the drag-and-drop feature for some of your readers, so you should try it also.

Other users reported that the program freezing caused this issue, and when they closed it, things went back to normal, so make sure you don’t have any stuck software.

If the Windows 11 drag and drop not working issue arises too, we have yet another guide to help you out. You can read a complete walkthrough of drag and drop behavior in Windows 11 by checking this guide on how File Explorer handles drag and drop.

Did any of these tips help you fix the drag and drop not working on Windows 10 problem? Let us know in the comments section below.

10 Ways to Fix Edge Browser Lagging in Windows 10/11

Today we’ll explain what to do if Microsoft Edge is lagging. Whether it’s on YouTube, a streaming service, or simply when scrolling or typing, this issue is actually pretty easy to address.

Here’s what you should try:

How do I fix Microsoft Edge if it’s running slow?

1. Clear cache and browsing history

  1. Open Microsoft Edge and click on the dotted menu. Choose Settings.
  2. Under Privacy, search, and services, select Choose what to clear.
  3. Select All time and check the boxes for all the available data.
  4. Click the Clear now button.

2. Set a new location for Temporary Files

  1. Press Windows key + R, type inetcpl.cpl, and hit Enter.
  2. On the General tab, under Browsing History, go to Settings.
  3. On the Temporary Internet Files tab, click Move folder…
  4. Choose the new location for the Temporary Internet Files folder.
  5. Then set the Disk Space to use 1024MB and click OK.
  6. Open Microsoft Edge, and see if the browsing is now faster.

3. Reset the host’s file

  1. Open File Explorer, and paste the following into the search bar: %systemroot%\system32\drivers\etc
  2. Now, right-click on hosts file, choose Open with..,
  3. Now choose Notepad.
  4. Replace the text from the file with the following text:
    # Copyright (c) 1993-2009 Microsoft Corp.
    #
    # This is a sample HOSTS file used by Microsoft TCP/IP for Windows.
    #
    # This file contains the mappings of IP addresses to host names. Each
    # entry should be kept on an individual line. The IP address should
    # be placed in the first column followed by the corresponding host name.
    # The IP address and the host name should be separated by at least one
    # space.
    #
    # Additionally, comments (such as these) may be inserted on individual
    # lines or following the machine name denoted by a '#' symbol.
    #
    # For example:
    #
    # 102.54.94.97 rhino.acme.com # source server
    # 38.25.63.10 x.acme.com # x client host
    # localhost name resolution is handle within DNS itself.
    # 127.0.0.1 localhost
    # ::1 localhost
  5. Close Notepad, and save the changes.

5. Delete Edge extensions

  1. Click the Menu icon and choose Extensions.
    edge error code status_access_violation
  2. Now click on Manage extensions.
  3. Disable all extensions by clicking the switch icon.

6. Reset Microsoft Edge

  1. Press Windows key + X and select PowerShell (Admin).
  2. Paste the following command and press Enter:
    Get-AppXPackage -AllUsers -Name Microsoft.MicrosoftEdge | Foreach {Add-AppxPackage -DisableDevelopmentMode -Register “$($_.InstallLocation)\AppXManifest.xml” -Verbose}
  3. Restart your computeredge slow to respond
  4. This command will reinstall Microsoft Edge, and hopefully, your problems will be solved. If not, move on to another solution.

It may be corrupted if Microsoft Edge is slow at scrolling or typing. Also, if Edge is considerably slower than the rather resource-hogging Chrome, resetting the browser to default should help.

7. Run the SFC scan

  1. Go to Search, and type cmd in the Search box.
  2. Click on Run as administrator.
  3. At the Command Prompt, type the following command, and then press Enter: sfc /scannowedge not loading pages
  4. Wait for the process to finish.
  5. Restart your computer.

This is a universal solution, and it should work if Microsoft Edge is slow and unresponsive on Windows 11 or 10.

8. Disable hardware acceleration

  1. Press Windows + R to open Run, enter inetcpl.cpl and press Enter.inetcpl
  2. Go to the Advanced tab.internet properties advanced tab
  3. Select the Use software rendering instead of GPU rendering Under Accelerated Graphics and then click OK to save changes.disable hardware acceleration

9. Repair Edge app

  1. Press Windows + I to open Settings.
  2. Navigate to Apps, and select Apps and features.apps-features where is the chrome menu button
  3. Search for Microsoft Edge from the apps list.
  4. Click the three vertical dots next to it, and select Modify.edge-modify windows 11 edge not working
  5. Click the Repair button and wait for the task to finish. repair-edge windows 11 edge not working

10. Use a faster browser

Ultimately, if you keep having issues with Edge being laggy/slow, consider switching to another browser.

If the Chromium engine is why you chose Edge, we recommend you try Opera One. It is lightweight, and among the fastest browsers in the world.

The looks can be further enhanced thanks to the vast array of visual customization tools, and the toolset can also be enriched with the vast library of extensions.

Besides speed, Opera One also prides itself on its users’ privacy, providing them with a built-in ad-blocker and even a VPN with unlimited data & traffic.

Opera One

Navigate to your favorite web pages instantly with zero lag with this lightning-fast browser!

Wrapping up

We hope this article helped you to solve the problem of Microsoft Edge being slow and unresponsive on your PC.

Also, if you have any other problems with Microsoft Edge, check out our article about fixing Edge problems in Windows 10, and you’ll find the solution.

Did you find a different solution? Please share it with us in the comments section below.

FAQ

Why is Microsoft Edge so slow?

Edge can become slow due to the number of open tabs, so be sure to close all the tabs that aren’t necessary.
Your cache can also cause the browser to be running slow on Windows 10 and 11, so it’s advised that you clean it from time to time. Specific extensions can also cause issues, so disable all unnecessary extensions

How do I reduce Microsoft Edge CPU usage?

To reduce Microsoft Edge’s high CPU usage on your PC, it’s advised to disable specific settings, such as Startup boost, for example.
Browser extensions can also cause slowdowns, especially if you have many of them running simultaneously. Lastly, clearing your cache can help with performance issues in any browser.

Why is YouTube lagging on Edge browser?

YouTube lagging on Edge can be due to slow internet, too many open tabs, interfering extensions, hardware acceleration issues, outdated graphics drivers, conflicting software, or system performance problems. Solutions include checking connections, updating drivers, disabling extensions, and adjusting settings.

How to Change OneDrive Sync Settings on Windows 10

Some time ago, Microsoft was forced to rename its cloud storage service SkyDrive into OneDrive. Besides the branding change, some new options were added, and today we’re going to talk about synchronizing settings.

Since OneDrive is the default cloud storage, Microsoft has decided to embed it deeply inside Windows 10.

How do I change OneDrive sync settings?

1. On Windows 10

  1. 1. Select the OneDrive icon in the taskbar.

  2. 2. Choose More and go to Settings (In some cases, you may be able to open Ondrive folder from the Settings app).

    onedrive settings taskbar
  3. 3. Click on the Account tab and choose folders. The Sync your OneDrive files to this PC dialog box should now be available on the screen.

  4. 4. Uncheck the folders you don’t want to sync to your PC. If you want to sync absolutely all your folders, then check the Make all files available option.

    Also, besides all this, you can choose to back up your files to your OneDrive account, as well.

    onedrive sync settings all files
  5. 5. After you make your selection, hit OK.

  6. You can change OneDrive sync settings in Windows 10 via the app’s built-in options. You can manually choose which folders to sync and which not to.

Speaking of cloud storage, you might also want to check out our guide on the Best Cloud Storage Apps or Top Decentralized Cloud Storage Solutions.

2. On older versions

  1. Open the Search charms bar, go to the right top corner or press the Windows + W keys.
  2. Type PC Settings.
  3. Then choose OneDrive.
  4. From there, choose Sync settings.
windows 8.1 one drive settings

Now, you will have access to a lot of features that you can choose to turn off, or leave them on, as they are, by default. So, from here, you can synchronize to your OneDrive account a bunch of things, and here they are enlisted:

  • PC settings – you can synchronize your desktop or tablet settings across your devices.
  • Start screen – your tiles and layouts
  • Appearance – colors, background, lock screen, and pictures
  • Desktop personalization – themes, taskbar, high contrast
  • Apps – a list of apps you have installed, as well as your settings and purchase within apps
  • Web browser – favorites, open tabs, home pages, history, and page settings
  • Passwords – sign-in information for apps, websites, networks, and HomeGroup
  • Language preferences – keyboard input, display language, personal dictionary
  • Ease of access – narrator, magnifier
  • Other Windows settings – File Explorer, mouse, printers

How to sync files using third-party software?

Since we are talking about synchronization, we simply cannot omit this incredible tool that will keep your files synced across all of your devices with no risk of data loss or leakage.

Keeping all of your assets synchronized has never been easier thanks to Sync, the tool that allows you to store, share, and access your files from any location.

But Sync delivers more than storage, it also protects your data with end-to-end encryption, acts as a real-time backup solution, and delivers strong data recovery features.

Let’s quickly look at its key features:

  • Storage space  of up 4TB in premium plans
  • Realtime backup and sync options
  • End-to-end encryption and data protection
  • File history and recovery features included
  • Two-factor authentification (2FA)
  • Mobile apps, desktop apps, and integration

The best part is that you get up to 5 GB to store all those essential files in the cloud free of charge.

⇒ Get Sync.com

We hope this has been of great help to you, so stay subscribed for more useful tips. As always, feel free to share your personal experience via the comments section below.

Desktop Icons Not Showing in Windows: How to get Them Back

The Windows 11 desktop is where many users stick shortcuts. However, some users can’t access their shortcuts when the desktop doesn’t show icons.

Have the icons on your desktop disappeared in Windows 11? If so, you don’t need to be a magician to get them back. You can fix desktop icons not showing in Windows 11 with the resolutions below.

Why are my icons not showing on my desktop Windows 11?

Before fixing desktop icons not showing, it’s worth considering some of the causes for them disappearing in the first place. These are the causes for desktop icons not showing in Windows 11:

  • A Show desktop icons option is disabled: Windows 11 has a Show desktop icons option that needs to be selected for icons to be visible. Updates can sometimes change that setting without user input.
  • Icon cache corruption: The Windows 11 icon cache might have corrupted data.
  • System file corruption: Icon display issues can feasibly arise from corrupted system files.
  • A Group Policy setting is hiding them: Group Policy editor has a setting that can hide all desktop icons. If you’re sharing your PC with other users, maybe one of them enabled that option.
  • Registry database issues: The icon registry database could be corrupted. A NoDesktop DWORD value can also cause the problem.

Now let’s get your Windows 11 desktop icons back. First, go through the following resolutions in the order specified to restore desktop icons in Windows 11.

How can I get desktop icons back in Windows 11?

1. Select the Show desktop icons context menu option

  1. Right-click any part of your Windows 11 desktop wallpaper to select View.
  2. Click Show desktop icons if that option isn’t selected.
  3. Open the Run command box, which you can view by pressing a Windows + R key combo.
    Show desktop icons option windows 11 desktop icons not showing
  4. To open Desktop Icon Settings, input this command and click OK: desk.cpl ,,5
    desk.cpl command windows 11 desktop icons not showing
  5. Select all the checkboxes for desktop icons.
  6. Click Apply > OK to show the selected desktop icons.
    Desktop Icon Settings window windows 11 desktop icons not showing

2. Change a Hide and disable all items on the desktop policy setting

  1. Select the file search tool on the taskbar by clicking its box or button.
  2. To find Group Policy Editor, enter a gpedit.MSC search phrase for that utility.
    A gpedit.msc search windows 11 desktop icons not showing
  3. Select gpedit.msc to view a Local Group Policy Editor window.
  4. Click User Configuration in Group Policy Editor’s sidebar.
    User Configuration category  windows 11 desktop icons not showing
  5. Select Administrative Template and Desktop to access policy settings for the desktop area.
  6. Double-click the Hide and disable all items on the desktop policy.
    Hide and disable all items on desktop policy windows 11 desktop icons not showing
  7. If that policy is set to Enabled, select Not configured.
    Not Configured radio button windows 11 desktop icons not showing
  8. Click the policy’s Apply option.
  9. Press OK to exit and close Group Policy Editor.
  10. Then press the Windows logo key. Next, click the Power and Restart buttons on the menu that opens.
Note icon NOTE
Windows 11 Home doesn’t have Group Policy Editor. Therefore, this resolution applies to the Windows 11 Pro and Enterprise editions in which you can access that tool.

3. Rebuild the icon cache

  1. Press the taskbar button to access File Explorer.
    File Explorer button windows 11 desktop icons not showing
  2. Click View on Explorer’s command bar.
  3. Select the Show submenu.
    Show option windows 11 desktop icons not showing
  4. Click the Hidden items option.
    Hidden Items option windows 11 desktop icons not showing
  5. Then navigate to this directory path (replace <user folder> with your actual folder): C:\Users\<user folder>\AppData\Local
  6. Right-click the IconCache.db file and select Delete (the bin icon).
    Delete option windows 11 desktop icons not showing
  7. Select to restart the PC from Windows 11’s Start menu.

4. Restart File Explorer

  1. Open Task Manager by clicking Start with the mouse’s right button and select that tool’s Power User menu shortcut.
    Task Manager windows 11 desktop icons not showing
  2. Select Processes within the Task Manager window.
  3. Scroll down to Explorer within the Windows processes section.
  4. Right-click Windows Explorer and select its Restart context menu option.
    Restart option windows 11 desktop icons not showing

5. Scan system files in Windows 11

  1. Bring up Windows 11’s search box.
  2. Search for the Command Prompt by inputting a cmd keyword.
  3. Right-click Command Prompt within the search tool to select a Run as an administrator launch option.
    Run as administrator option windows 11 desktop icons not showing
  4. Execute an SFC scan by inputting this CMD command and pressing Return: sfc /scannow
    sfc scannow command windows 11 desktop icons not showing
  5. Wait for the scan to reach 100 percent and show an outcome message inside Command Prompt.

6. Delete NoDesktop in the registry

  1. Open the Registry Editor app.
    Registry Editor search result windows 11 desktop icons not showing
  2. Bring up this key: HKEY_CURRENT_USER\Software\Microsoft\Windows\CurrentVersion\Policies\Explorer
  3. If you see a NoDesktop DWORD in the Explorer key, right-click it and select Delete > Yes.
    Delete DWORD option windows 11 desktop icons not showing
  4. Restart File Explorer as instructed in the fourth resolution.

7. Reset Windows 11

If desktop icons are still not showing after applying all the aforementioned potential solutions, a more drastic fix might be needed. First, consider resetting Windows 11 to resolve the issue.

Reset this PC option windows 11 desktop icons not showing

Resetting Windows 11 will likely resolve registry or system file issues for missing icons. However, apps that weren’t pre-installed on your PC will not be preserved after a reset.

WR’s guide to factory resetting Windows 11 includes instructions for how to do that with the built-in tool and other methods. Make sure you select the Keep my files option.

It’s essential to have icons on the desktop for quicker software access. The fixes above are most likely to work for restoring missing desktop icons.

Yet, there could still be other ways to fix desktop icons not showing in Windows 11. Users who’ve restored missing Windows 11 desktop icons with other methods are most welcome to share alternative fixes in the comments below.

Fix: Motherboard Audio is Not Working in Windows 11

Sometimes, you may encounter an issue where the motherboard audio may not work on your Windows 11 PC.

A Windows 11 PC producing no sound during an online presentation while listening to music or watching a video can be frustrating and is undoubtedly a matter of worry.

Why is my motherboard audio not working in Windows 11?

There could be different reasons why the motherboard audio of your Windows 11 PC may not be working, such as:

  • The audio cable is not correctly inserted – The motherboard audio may not work if the audio wire is not in the right slot on your motherboard.
  • Speaker wires are not in the correct slot – Sometimes, the laptop speaker plugs are not in the correct audio slot on the back of the motherboard.
  • Outdated audio drivers – If your system is not running the latest versions of the audio drivers, it can cause the audio components in the motherboard to malfunction.
  • Incorrect audio settings in BIOS – Chances are that the audio settings in the BIOS are incorrect.
  • Sound is set to mute – It could be possible that you accidentally set the PC volume to mute; hence, the motherboard audio is not working.

How do I fix it when the motherboard audio is not working?

Before you proceed with the primary methods, make sure to run the preliminary checks below to see if it helps fix the issue:

  • Reboot your PC.
  • Check if you have selected the correct speaker output.
  • Ensure the audio and speaker cables sit in the correct slots on your motherboard.
  • Check if the volume is set to a minimum or is not set to mute.
  • You must confirm if you have installed all the recent Windows updates.

If the above steps do not help you fix the motherboard audio problem, and if it’s still not working, you can continue to try the workarounds below.

1. Update audio drivers

  1. Press the Win + R keys simultaneously to open the Run dialog. Type devmgmt.msc and hit Enter to launch the Device Manager. run dev mgmt.msc command
  2. Next, expand the Sound, video and game controllers section. Here, right-click on the motherboard audio device and select Update driver. update audio device
  3. In the Update Drivers window, click on Search automatically for drivers. Search automatically for drivers
  4. Windows will start looking for the latest versions, and if any are found, it will finish the update automatically.

Once done, close Device Manager and restart your PC. Now, check if the motherboard sound problem is resolved.

If the Windows Update service is not running, we recommend a few practical methods to fix the issue.

Note icon NOTE
Alternatively, you can visit the manufacturer’s website for the motherboard and manually download and install the latest driver version.
Moreover, you can also try a specialized tool like Outbyte Driver Updater to automatically find the latest updates for your outdated or missing drivers.

2. Run the Windows audio troubleshooter

  1. To open the Windows Settings app, press the Win + I keys together.
  2. Here, on the left, click on System and then click on Troubleshoot. system troubleshooter
  3. On the next screen, go to the right and click on Other trouble-shooters. Other trouble-shooters
  4. Now, on the right, click on Playing audio. run audio troubleshooter
  5. The troubleshooter will start running, and as it detects any issues, it will automatically apply the repairs.

Now, close the Settings app, restart your PC, and check whether the motherboard audio is working. However, if there is still a problem with the audio device, here’s what you can do.

3. Set the audio device as the default

  1. Press the Win + R shortcut keys to open the Run console.
  2. Type in mmsys.cpl and hit Enter to open the Sound dialog. run mmsys.cpl command
  3. In the Sound window, select the Playback tab. Now, right-click on the desired audio device and select Set as Default Device. Set as Default Device

You can now restart your PC and check if the motherboard audio is working fine or not. You can also follow the instructions in our detailed guide to set the default speakers on Windows 11.

4. Disable audio enhancements

  1. Press the Win + R keys to open the Run dialog. For example, type mmsys.cpl and hit Enter to open the Sound dialog. run mmsys.cpl command
  2. In the Sound window, go to the Playback tab, right-click on the audio device, and select Properties. sound properties
  3. Next, in the Properties dialog, go to the Enhancements tab, and check the box next to Disable all enhancements. Press Apply and OK. disable all enhancements

Once done, close the dialog box, reboot your device and check if the motherboard sound problem is fixed or persists.

5. Restart audio services

  1. Open the Run console by pressing the Win + R keys together. Then type services.msc and hit Enter to open the Services window. run services.msc command
  2. In the Service manager, go to the right and under the Name column, look for Windows Audio. Then, right-click on it and select and Restart. restart windows audio services
  3. Repeat Step 2 for two more services, such as Windows Audio Endpoint Builder and Remote Procedure Call (RPC).

Now, exit the Services window, and restart your PC. The motherboard audio is not working issue should be fixed now.

If the audio services are not responding in Windows 11, here’s an expert guide on what you can do to fix the issue.

How do I know if my motherboard sound is working?

To check if your motherboard sound is working or if it has a problem, follow the below instructions:

  1. Press the Win + R keys together to launch the Run dialog. Type devmgmt.msc and hit Enter to open the Device Manager window. run dev mgmt.msc command
  2. Next, expand the Sound, video, and game controllers section, right-click on the sound card, and select Properties. sound properties
  3. Under the Properties dialog, check the Device status under the General tab. It should say, This device is working correctly.device status - This device is working properly

This indicates that your computer successfully detects the audio card, and the motherboard sound is working fine.

You must also check the sound settings, for example, if your Lenovo laptop (or any other device) is set to mute or if it has been disabled.

Alternatively, you can try different audio formats to check if that helps fix the mother sound problem.

Do leave a message in the comments section below for any other queries related to audio issues on your Windows 11 device.

How to Stop Mouse From Going off Screen: 5 Quick Ways

Whether using a USB mouse device or your laptop’s touchpad, it isn’t very pleasant when it suddenly goes off the screen.

Most computer users do one of two things: either unplug, then plug back the mouse, or change the Synaptics settings for the touchpad. But these quick, basic, yet knee-jerk responses may not always work.

In this case, you’ll want to search for other possible solutions, which we have outlined and described in this article.

What can I do if the mouse pointer goes off screen?

Here are a few things to check before you use any of the solutions below:

  • The make and model of your mouse
  • The operating system you’re using (32 or 64-bit)
  • Whether the issue is in all apps or a specific app
  • If changing mouse settings like speed helps resolve the issue
  • Whether connecting the mouse to a different computer helps
  • Check if you installed the latest drivers for the mouse
  • Look for any yellow exclamation mark on your mouse in the Device Manager
  • Check if other USB devices work properly

1. Check your monitor’s projector mode to fix the mouse going off screen

If your projector mode is set to Extend, this may cause the mouse to go off the screen. Go to the projector settings and set it to Computer only. This limits the mouse to the end where the screen does.

Go to display settings, press multiple displays, and set it to ‘Show only on 1’.

2. Boot in Safe Mode and check for the device

  1. Press the Windows key + I to open the Settings app and select Update & Security.
    update and mouse goes off screen
  2. Select Recovery from the left pane and click the Restart now button under Advanced startup.
    restart now
  3. Now, select Troubleshoot when your PC restarts.
    troubleshoot
  4. Next, click Advanced options.
    advanced option mouse goes off screen
  5. Choose Startup Settings.
  6. From here, click the Restart button.
    restart mouse goes off screen
  7. Once your computer restarts, press 4 or F4 to Enable Safe Mode.
    enable safe mode

If the mouse goes off the screen in Safe mode, then your default settings and basic drivers are not contributing to the issue.

Restart your PC to exit Safe Mode and boot normally. If that does not work, follow the steps below:

  1. Press the Windows key + R, type msconfig, and click OK.
    msconfig
  2. Click the Boot tab at the top.
  3. Now, uncheck the Safe Boot box, click Apply, followed by OK, and restart your computer.
    safe boot mouse goes off screen

Safe mode starts your computer with limited files and drivers, but Windows will still run. If the mouse issue persists, check whether it occurs while your computer is in Safe mode.

3. Run troubleshooter

  1. Press the Windows key, type cmd, and click Run as administrator under Command Prompt.
    cmd admin
  2. Type the command below and hit Enter: msdt.exe -id DeviceDiagnosticmsdt
  3. Finally, wait for the command to finish running.

If your mouse still goes off the screen after applying the fixes above, you might need to run the Hard and Devices troubleshooter to diagnose and fix the issue.

This checks for commonly occurring issues and ensures any new device or hardware is correctly installed on your computer.

4. Uninstall and reinstall mouse drivers

  1. Press the Windows key + X and select the Device Manager option.
    device manager mouse goes off screen
  2. Click the arrows next to the Mice and other pointing devices option to expand it and right-click the device there.
  3. Now, select the Uninstall device option.
    uninstall device
  4. Click the Uninstall button to confirm the action.
    uninstall button
  5. Finally, restart your PC and the driver will be reinstalled automatically.

Sometimes, your mouse might go off the screen because of faulty drivers. The quickest way to fix this is to reinstall the drivers.

5. Check Mouse Properties

  1. Press the Windows key, type control, and select the Control Panel option.
    control panel mouse goes off screen
  2. Choose the Hardware and Sound option.
    hardware and sound
  3. Select Mouse.
    option
  4. Select Click to change Touchpad settings.
  5. Click Sensitivity.
  6. Check the Turn On box next to Touch Guard.
  7. Move the white circle under Touch Guard to your extreme right (towards the + sign).
  8. Click Save and close touchpad utility.
  9. Click Ok.

In some cases, your mouse might be going off the screen because of its settings. You can follow the steps above to adjust its properties accordingly.

With this solution, we can conclude this guide on fixing the mouse goes off the screen issue. You only need to follow the instructions, and things should return to normal.

If your mouse cursor moves erratically, check our detailed guide to fix it quickly. When working with a secondary monitor, you can adjust the cursor movement to precision for easier transition between displays.

Feel free to let us know the solution that helped you solve this problem in the comments below.

Best File Shredder Software for Windows 11 [2026 Tested]

Shredding a file means removing the file from the operating system by overwriting selected data using a specialized data sanitization method.

This process ensures that the deleted file can never be recovered, even with a recovery tool. There are many file shredder tools available for Windows 11, we hope to help you find the right one for your task.

Which are the best file shredder tools on Windows 11?

EaseUS BitWiper – Best for beginners

EaseUS BitWiper - best file shredder windows 11

Removing sensitive data securely from Windows hard disk becomes easy with EaseUS BitWiper. It permanently erases files, partitions, or an entire disk. In addition, this high-speed shredder tool can erase multiple partitions or disks at the same time. 

You can also wipe data off memory sticks, USB flash drives, and SD cards. You can remove confidential data from the hard disk while keeping your system intact.

Many wiping methods destroy all on-disk data, like US Department of Defense Standard 5220.22-M, British HMG IS5, Peter Gutmann, and more.

The shredder tool can erase specific data volume or non-system volume. Also, you can wipe the system partition without a bootable. Finally, it allows you to remove your private information and confidential files, making them irretrievable. 

More about EaseUS BitWiper

  • It allows you to shred files that can’t be deleted forcibly.
  • Delete data permanently even if the recovery software can’t retrieve it.
  • Erase data with high speed from all disks and drives.
  • It comes with flexible data-erasing modes.
EaseUS BitWiper

EaseUS BitWiper

Shred sensitive files effortlessly and try the EaseUS BitWiper application.

BitRaser File Eraser – Great at wiping data from multiple storage devices

BitRaser File Eraser - best file shredder windows 11

BitRaser File can efficiently remove sensitive data permanently from any storage device or place, including hidden areas, files, and folders, drive partitions, application traces, chat & browser history, and log files. It wipes data and makes it irrecoverable, and generates tamper-free audit trails.

You can wipe out confidential files and folders, internet browsing history, saved login passwords, and more from your desktop, laptop, or server. In addition, it enables you to schedule when you can erase files and saves detailed log reports related to it.

This file shredding tool for Windows can automate the wiping process and allows you to customize the erasure process as per international erasing standards. It can also diagnose the mobile or hard drive health status to determine the functioning status.

More about BitRaser File 

  •  Supports international erasure standards, including NIST 800-88 standard, DoD 3, HMG, and Passes.
  • Uses cloud to wipe drives online and select Offline variant to erase data without internet.
  • It saves erasure reports in formats including CSV, PDF, and XML.
  • Identifies and wipes HPA, DCO & remapped sectors.
BitRaser File Eraser

BitRaser File Eraser

Try BitRaser to efficiently remove sensitive information from any of your storage devices.
Check price Visit Website

DriveScrubber – Great batch-file features

DriveScrubber - file shredder Windows 11

DriveScrubber can erase data, including private files, documents, and pictures, so it can never be recovered. It can restore your drives to like new even after a malware infection. It can erase hard drives, memory sticks, flash drives, cameras, etc.

This software is developed as per strict government and military security protocols. It allows you to scrub personal information permanently, which is an excellent way to eliminate your data and recycle your computer. In addition, this shredder has customizable tools to edit the security levels for wiping your data.

The tool also has scalable options, including erasing data in a batch, pause, cancel or resume features. In addition, this file shredder is the fastest in removing data and has optimized wipe methods.

More about DriveScrubber

  • It gives total control with customizable tools, including electron microscopy and magnetic field residue detection shields.
  • Allows you to scrub hidden files, temporary files, previous app files, and even deleted files.
  • Compatible with Windows 11, 10, 8.1, 8, 7, Vista, and XP.
  • It can be used on all home PCs.
DriveScrubber

DriveScrubber

Eliminate your data permanently by using this fast and advanced tool.
Check price Visit Website

Kernel File Shredder – Best shredding methods

Kernel File Shredder - best file shredder windows 11

Kernel File Shredder is one of the most effective shredding tools that enable users to shred important files and make them irrecoverable. This Windows shredder has robust algorithms which ensure that deleted data can’t be restored.

This is a customizable tool that has a lot of options to keep your confidential data secure. However, to make them irretrievable, first, the tool makes the files useless, renames them, and then shreds them completely. 

This tool allows you to create and run the file shredding task at a scheduled time. The file shredder enables you to set a password on your tool to protect your data. In addition, it has 11 shredding algorithms to choose from to ensure your data is completely wiped from the hard drive.

The ease of use and simple interface can make it one of the best software to use to shred files. It also can create log files in which the information related to the shredding task is saved. 

More about Kernel File Shredder

  • Protects confidential data from unauthorized access by shredding it.
  • Enables you to choose from shredding algorithms ranging from Zeros to DoD 5220 + Peter Gutman
  •  File shredding options include Shred File and Folder, Shred System Files, Shred Useless Files, Shred Recycle Bin, and Free Disk Space.
  • It has Automatic Shredding & Scheduler Feature to take care of the routine erasure tasks
Kernel File Shredder

Kernel File Shredder

Make your important files irrecoverable and shred them with this excellent tool.

Eraser – Useful scheduling feature

Eraser - best file shredder windows 11

This file shredding tool lets you wipe sensitive data from your hard drive by overwriting it several times to ensure it isn’t recovered. This tool can be used on Windows XP, Vista, 7, 8, 10, Windows Server 2003, 2008, and 2012-2022.

Eraser is free software, and its source code is released under GNU General Public License. The file shredder tool supports many data destruction standards, including American DoD 5220.22-M, British HMG IS5, and Gutmann.

You can schedule recurring tasks daily, weekly, and monthly. It allows you also to choose and customize the erasure method. All the functions performed by the tool are logged and can be viewed when needed.

More about Eraser

  • Supports both files and volume wiping.
  • Removes residue from deleted files.
  • Has a robust and flexible scheduler to fulfill the shredding needs.
  • Erases MFT and MFT-resident files and Directory Indices.

⇒ Get Eraser

So, these are some of the best file shredder software for Windows 11. You can choose any of them to erase your data permanently.

If you have any questions or concerns, please let us know in the comments section below. We are happy to help! 

Power Bi Data Source Credentials Greyed Out: 4 Simple Fixes

Power BI is a powerful data visualization tool that allows users to connect to various data sources and create dynamic, interactive reports and dashboards. However, users may encounter issues from time to time.

One of the most common ones is data source credentials greyed out on Power BI. It occurs if you don’t have permission to edit them or if there is an issue with the connection to the data source. Here, in this guide, we will discuss steps to enable data source credentials.

Why are the data source credentials disabled in Power BI?

There could be various reasons why data source credentials are greyed out; some of the popular ones are 

  • Wrong data source selected – When the data source is set to use Windows or Organizational authentication, you might face this problem.
  • Incorrect permissions – If a user accessing the data source doesn’t have enough permissions, then you might see the credentials greyed out.
  • Misconfigured settings – If the data source is set to Import mode instead of Live mode, as in Import mode, the data is imported and saved in the Power BI report, and credentials are not needed.
  • Accessing the published dataset – If the data source you are accessing is a published dataset in Power BI and can only be edited by the dataset owner or an administrator. Hence the issue.
  • Outdated version of Power BI – If you have an older version of Power BI, then you might face all kinds of errors, including data source credentials greyed out.

How do I enable data source credentials in Power BI?

To enable data source credentials, you need to follow these steps:

  1. Go to the Home tab.
  2. In the Queries pane, click Transform Data, and from the drop-down select Data source settings.click Transform Data
  3. Select the data source for which you want to enable credentials.
  4. Select Edit permissions.
  5. Under Credentials, select Edit.
  6. Choose the appropriate credentials type, and enter the necessary information. Select OK.

How can I fix data source credentials greyed out issues in Power BI?

1. Switch to Database authentication 

  1. Launch Power BI. Now go to the File tab.
  2. Click Options and Settings, then click Data source settings.Data source settings -power bi data source credentials greyed out
  3. In the Data source settings window, select the file and click Edit Permissions.Edit permissions
  4. From here, change the Privacy Level to None.Privacy Level
  5. Click OK and close the Options window. Now check if the issue is resolved.

2. Check your Power BI settings

  1. Launch Power BI, and go to the File menu.
  2. Click Options and Settings, and now click Options.Options and settings
  3. From the Options window, check all the settings in Power BI match the settings in the data source.DatA LOAD
  4. If not, then make the necessary changes and check if the issue is resolved.

3. Ensure Power BI is up to date

  1. Go to the File menu.File menu -power bi data source credentials greyed out
  2. Click Options and Settings, then click Options.Options and settings
  3. Now click Updates.updates -power bi data source credentials greyed out
  4. Place a checkmark next to Display update notifications for Power BI Desktop.
  5. Install updates if available.

4. Use a service account 

If nothing has worked for you from the above steps, you need to create a service account with the necessary permissions to access the data source. Use this account to connect to the data source. 

So, these are the fixes that you need to try to fix Power BI data credentials being grayed out and gain access to the data source. If you have any questions or concerns about Power BI, you can reach out to us in the comments below. We will be happy to help.

Canon Printer Drivers on Windows 11: How to Download & Install

Got yourself an upgraded PC that runs on the latest Windows 11 OS and wondering how to get the drivers for the Canon printer that you have? If yes, then you aren’t alone, as there are multiple users that are looking for ways to download and install the latest Canon printer drivers on their Windows 11 PC.

In this guide, we will show you a bunch of different methods that will help you download Canon printer drivers on your Windows 11 PC and also how you can install them safely. Let us get right into it.

Will Windows 10 Canon printer driver work on my Windows 11 PC?

Several people have this confusion about whether they can run the Windows 10 Canon printer driver on their Windows 11 PC or not.

If you have this confusion, then we would like to tell you that yes, you can absolutely, without any issues run and install the Windows 10 Canon printer driver on your Windows 11 PC.

This is because, Windows 11 is built on the solid foundations of Windows 10, and most Windows 10 drivers run perfectly fine on Windows 11.

How to download Canon printer drivers on Windows 11?

1. Use the official website

  1. Visit the official Canon website.
  2. From the Compatible Operating System drop-down, select Windows 11.
  3. Under the Type drop-down, select Driver.
  4. In the Driver Language drop-down, select English.
  5. The page will reload.
  6. Select your printer model and click on it.
  7. Click on the compatible driver link.
  8. Hit the Download button to download the EXE file of the Canon printer.

If you specifically own a Canon G3110 model, you can follow this Canon G3110 driver download guide to quickly get the right driver for Windows 11 without searching manually.

2. Use Windows updates

  1. Press the Win + I keys to open the Settings menu.
  2. Click on the Windows Update on the left pane.
  3. Click on Advanced options.
  4. Select Optional updates under Additional options.
  5. Click on Driver updates.
  6. Tick the box next to the Canon printer driver and hit the Download and Install button.

3. Using a specialized tool

  1. Download and install Fortect Driver Updater.
  2. Launch the program.
  3. Wait for the program to finish the scan.
  4. Select the drivers that you wish to download.
  5. Wait for Fortect Driver Updater to download the selected Canon driver it detected.
  6. Follow the on-screen steps to install the program.
  7. Restart your PC.

Using a specialized and recommended tool like this one will help you ease the task of updating or fixing corrupt driver files.

With Fortect Driver Updater, not only you can update the drivers on your PC, but it also helps to fix corrupt drivers, schedule driver scans to keep your PC performance optimal, create driver backups, act as an efficient download manager, and much more.

Fortect Driver Updater

You need to keep your drivers updated at all times, so this tool will optimize and refresh your PC.
Free Trial Visit Website

How can I install the Canon printer drivers on Windows 11?

  1. Launch the EXE file.
  2. The file will start unzipping itself.
  3. Open the unzipped folder.
  4. Open the UFRII folder.
  5. Double-click the x64 folder.
  6. Double-click the Setup file.
  7. Click Yes on the terms and agreements page.
  8. Select among the three options mentioned;
    • Standard: It will search the internet and install the latest driver.
    • Custom: Specify the port or IP address manually to install the drivers of the printer.
    • USB Connection: Install the driver of the connected printer.
  9. Click Next.
  10. Depending on the option you selected in Step 8, follow the onscreen prompts to install the printer on your PC.

Most printers are plug-and-play. So, you don’t need to install any printer driver for it. However, it is best to install the printer as it can also fix the problem of the printer not responding, etc.

We have a complete guide to help you fix the printer not responding in Windows for Canon, HP, and EPSON printers.

If you are getting an issue where Windows cannot connect to the printer, then you can check out our guide and fix the problem.

For users whose printer is printing double-sided by default, then you can refer to our guide and resolve the issue in no time.

We also have a complete guide that will give you an explanation of why the printer isn’t printing the actual size and how you can fix it.

For users looking to download the printer driver for Canon LBP2900B Driver for Windows 11, they can check out our dedicated guide.

If you are looking for the best photo printing software, then you can check out our curated list of apps.

Let us know in the comments below, which method you used to download the Canon printer drivers for Windows 11.