Your Device Is Missing Important Security And Quality Fixes

Windows gets updated pretty often, and most of these are security-related. Usually, updating your PC is seamless and is performed automatically. But in some cases, users receive errors, such as Your device is missing important security and quality fixes.

The full error message reads: Your device is missing important security and quality fixes. Some update files are missing or have problems. We’ll try to download the update again later. But Windows update errors are usually easy to fix.

How can I fix the Your device is missing important security and quality fixes issue?

1. Use the Windows Update troubleshooter

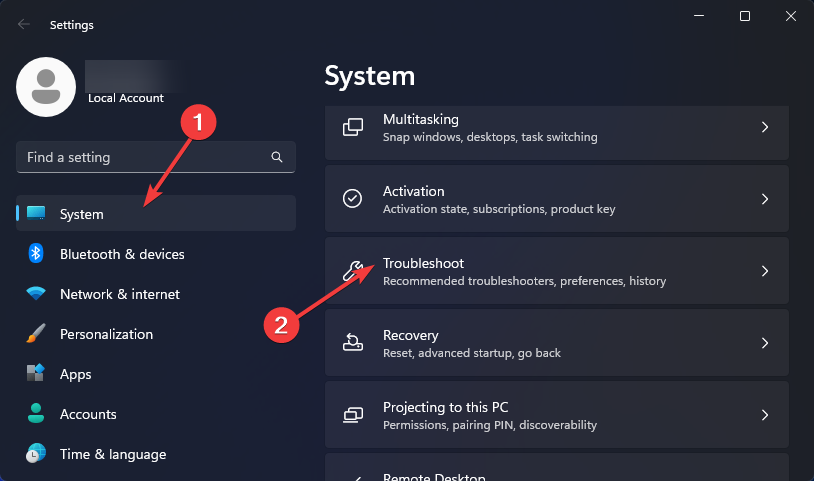
  1. Click the Start button and select Settings.
  2. Choose Update & Security.
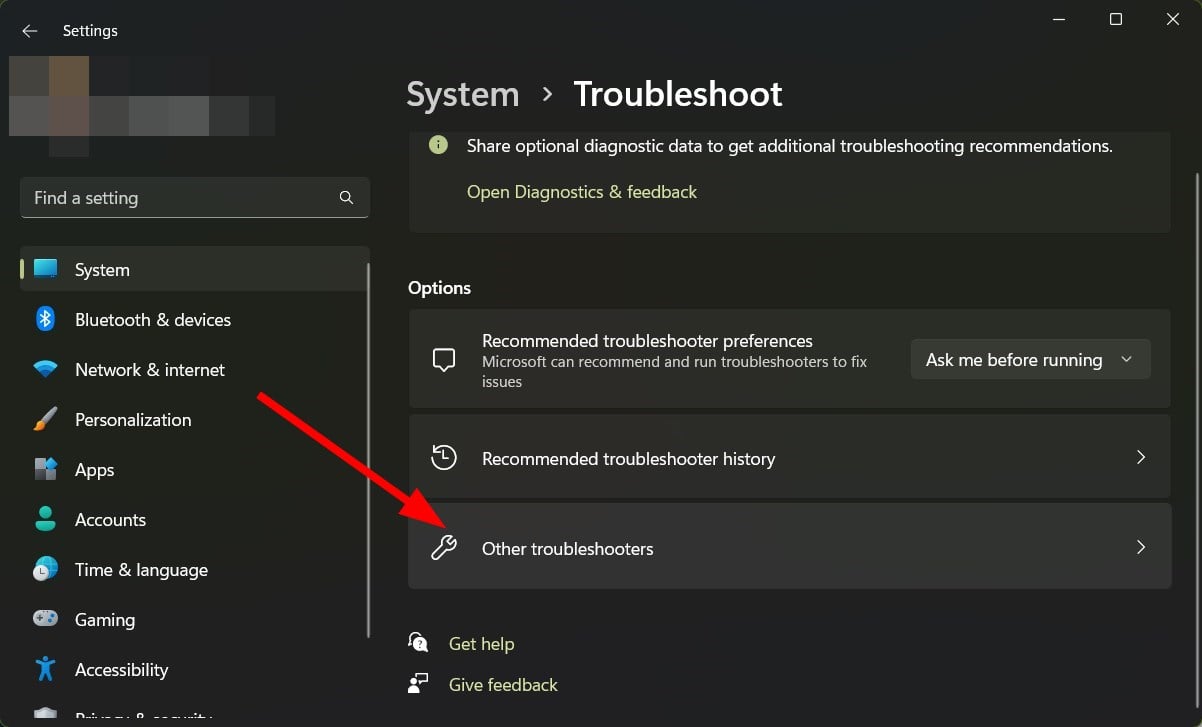
  3. Select Troubleshoot from the left pane and choose Additional troubleshooters from the right.
  4. Expand the Windows Update troubleshooter and click Run the troubleshooter.

If the troubleshooter identifies any problems, it will attempt to fix them. If not, you will get the message that the Troubleshooter couldn’t identify the problem.

However, this should disable the Your device is missing important security and quality fixes prompt, and your PC will be able to install them.

2. Download the most recent Servicing Stack Update (SSU)

  1. Click on Start, then choose Settings.
  2. Now go to System.
  3. In the left side panel, scroll all the way down and click on About.
  4. Under Device specifications, you’ll see System type.
  5. Now go to the official Microsoft Update Catalog webpage and download the latest SSU that matches your version.
  6. After that, restart your computer and check if Windows Update works.

3. Repair corrupted Windows files

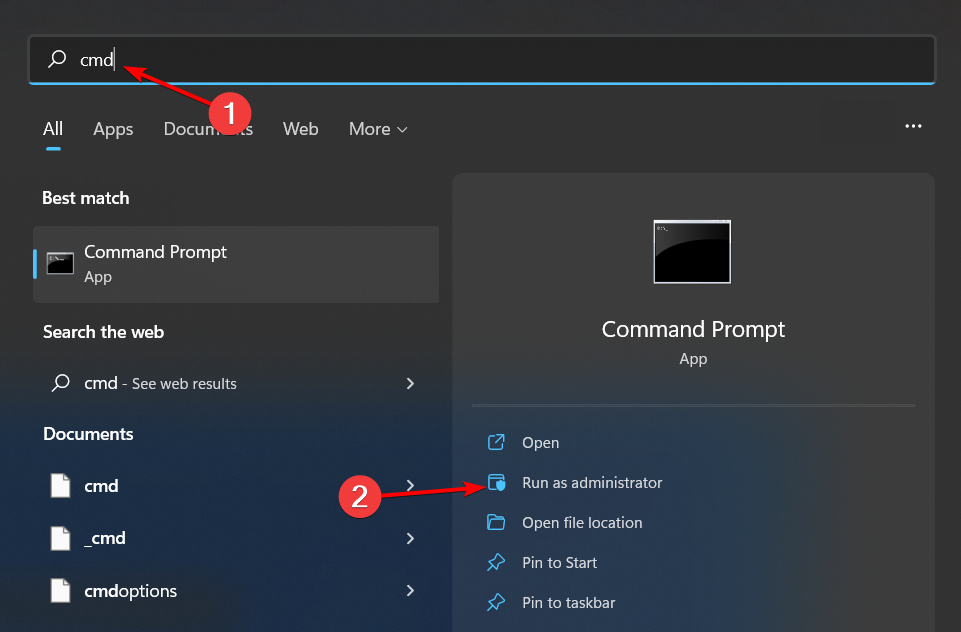
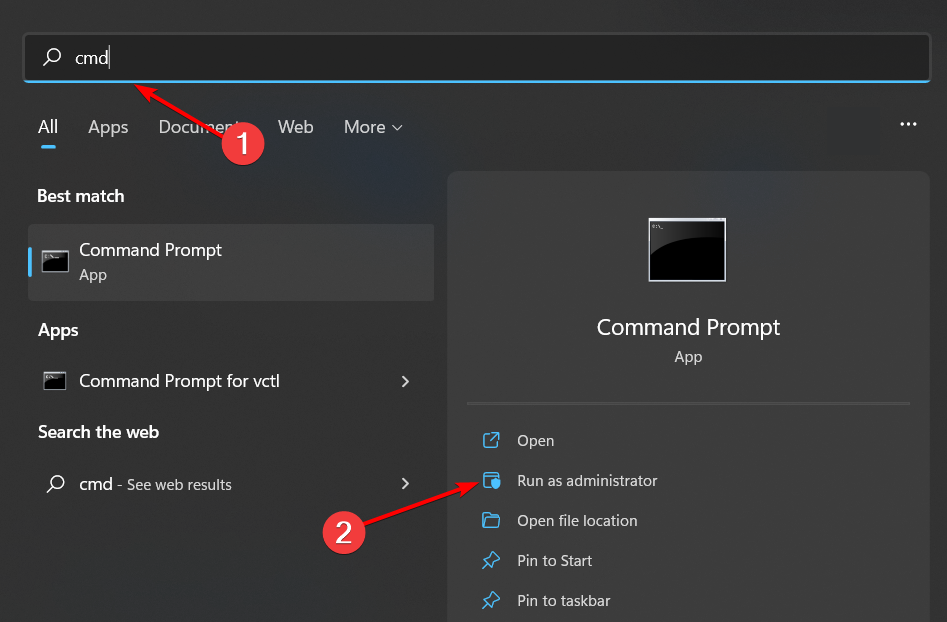
  1. In the Windows search bar, type cmd, and then click on Run as administrator on the right.
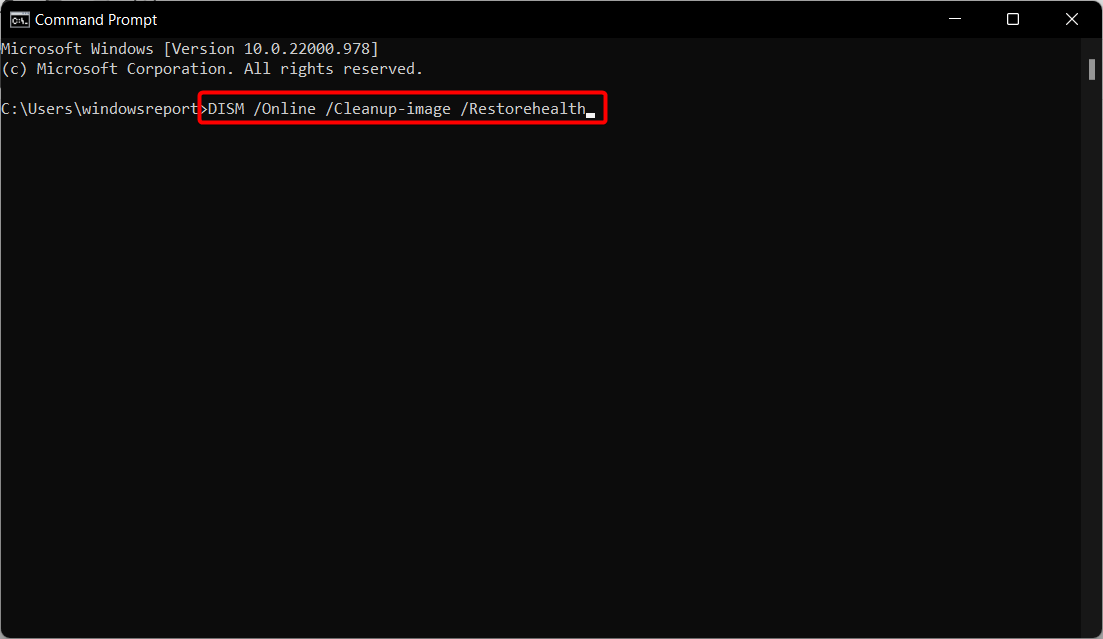
  2. When the Command Prompt window appears, type the following, then hit Enter: DISM.exe /Online /Cleanup-image /Restorehealth
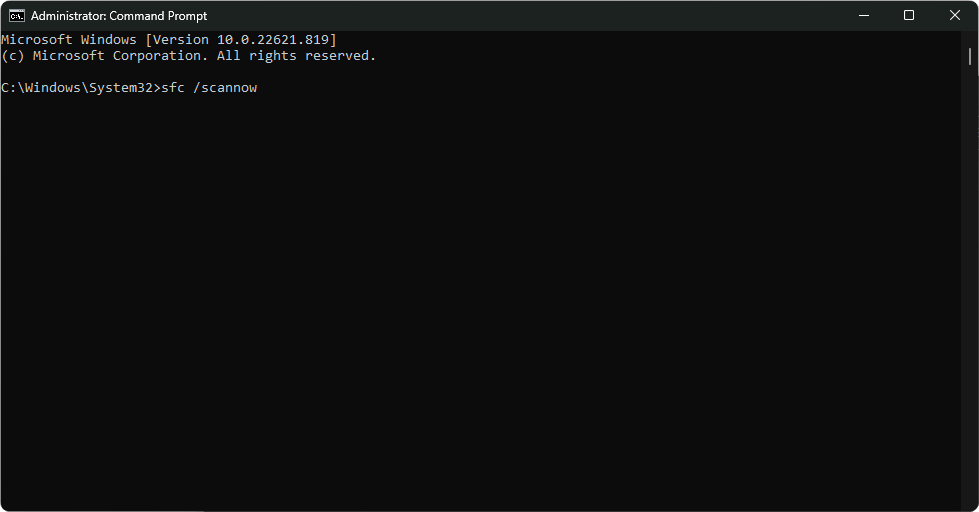
  3. Wait for the process to finish, then type the following command and hit Enter: sfc /scannow

The process can be executed automatically. If you haven’t yet repaired your PC, we recommend a professional repair utility that will help you solve your corrupted directory situation with ease.

4. Manually reset Windows Update Service

  1. In the Windows search box, type cmd, and click on Run as administrator.
  2. When the Command Prompt window appears, paste these commands one by one and hit Enter after each: net stop wuauserv net stop cryptSvc net stop bits net stop msiserver Ren C:\Windows\SoftwareDistribution SoftwareDistribution.old Ren C:\Windows\System32\catroot2 Catroot2.old net start wuauserv net start cryptSvc net start bits net start msiserver
  3. Now check to see if Windows Update is working properly.

5. Reinstall Windows updates

  1. Press the Windows key and select Settings.
  2. Choose Update & Security.
  3. In the right section, click on View update history.
  4. In the new window, choose Uninstall updates.
  5. From the list that appears, click on the last Update for Microsoft Windows (KBxxxxxxx) and uninstall it.
  6. After the process has finished, go to Windows Update and check for updates.
  7. Also, you can install the faulty update manually. In the update history, locate the one that’s of interest to you and go to the official Microsoft Update Catalog webpage and search for it.
  8. Now, download and install it manually.

Some readers reported that cumulative update KB4562830 is causing the Your device is missing important security and quality fixes error message, so you should look for that one and remove it.

6. Check the services

  1. Press Windows key + R to start Run, type services.msc, and press Enter or click OK.
  2. Look for a service called Stopupdates 10 guard.
  3. If you find it, double-click to open and select Disabled from the Startup type dropdown menu.
  4. Then, click on Apply and OK to save the changes.

For some users, this Stopupdates 10 guard service blocked the updates, so simply disable it.

7. Reset your PC

  1. Click on the Start button and open Settings.
  2. Go to Update & Security.
  3. In the left pane, select Recovery then, under Reset this PC, click Get Started.
  4. Select Keep my files.
  5. Choose Cloud download to get a fresh copy of Windows.
  6. Continue the process and reinstall the OS.

This process should reinstall the latest Windows version without affecting your apps and programs.

Other errors connected to the missing security and quality fixes

As you already know, security updates are very important for Windows, and that’s why you need to keep an eye on the Patch Tuesday event that happens every 2nd Tuesday of the month.

That’s when Microsoft launches the important security updates that cover some of the possible vulnerabilities of the system.

Now, this particular error can appear with more than one error code and other variations, so here are some of the codes you may encounter:

How can I get security updates on Windows 11?

As the new OS inherited many of the problems from Windows 10, Your device is missing important security and quality fixes message that also appears on Windows 11.

Fortunately, all the solutions we provided above for the older system also work on Windows 11, although the design of the menus is a bit different.

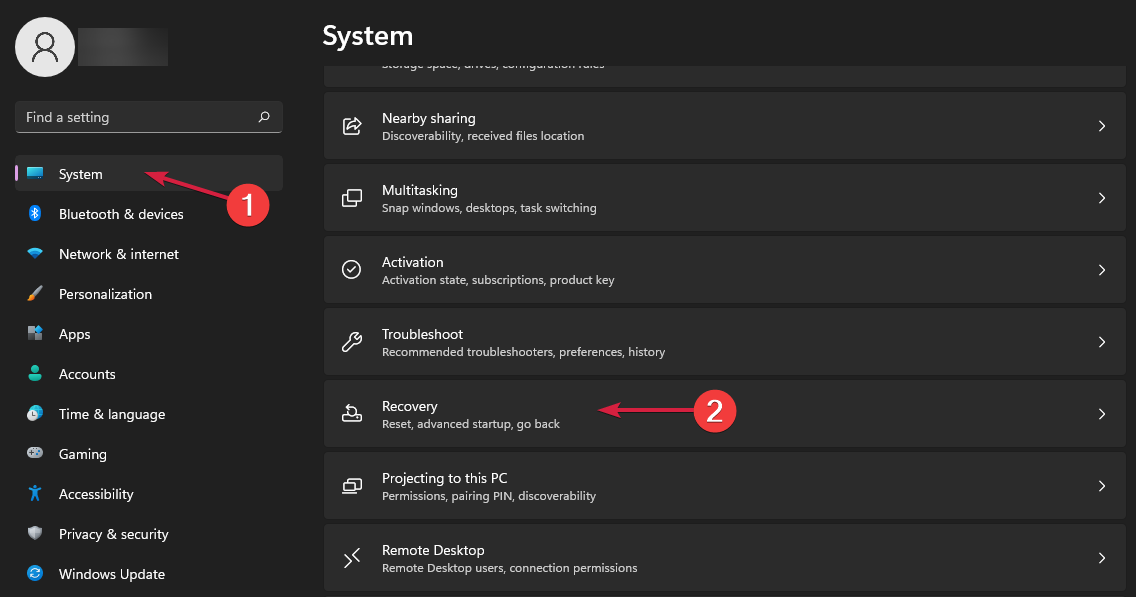
The only slight difference is in step 6 because the Reset this PC feature in Windows 11 is a bit different, and you will find it in the Recovery menu of the System settings.

Additionally, you can read about what you can do when Windows update cannot currently check for updates because it might also help you.

If you have more questions or maybe another workaround for the error that wasn’t covered here, feel free to post them in the comments section below.

Microsoft Excel is Waiting for Another Application to Complete OLE Action

Getting a Microsoft Excel is waiting for another application to complete OLE action error?

When it shows up, Excel becomes unusable, and you are forced to terminate the program. It presents a major issue, but there are some quick fixes and workarounds. Let’s take a look at them.

How do I fix Microsoft Excel is waiting for another application to complete an OLE action?

Before trying a complex solution, try restarting your computer with Excel running and cancel when prompted to close it. Moving files from cloud into the computer and disabling VPN could also help.

If you’re still getting the error, try the following fixes:

1. Enable the DDE feature

    Enabling the Dynamic Data Exchange (DDE) feature is likely to solve the error. You can easily turn on this feature through Excel’s built-in settings.

  1. 1. Launch Microsoft Excel and open a new sheet.

  2. 2. Click on the File menu near the top-left.

    file menu
  3. 3. Click on More and then choose Options.

    options
  4. 4. Head to the Advanced tab, tick the Ignore other applications that use Dynamic Data Exchange (DDE) option, and then click on OK to save the changes.

    enable feature to fix Microsoft Excel is waiting for another application to complete an OLE action
  5. 5. Once done, restart Excel.

2. Disable all add-ins

  1. Open Excel, and click on the File menu.file
  2. Click on More, and then select Options from the flyout menu.options to fix Microsoft Excel is waiting for another application to complete an OLE action
  3. Go to the Add-ins tab, and with Excel Add-ins selected in the Manage dropdown menu, click on Go.Excel add-ins
  4. Now, uncheck all the add-ins listed here, and click on OK to save the changes.disable add-ins to fix Microsoft Excel is waiting for another application to complete an OLE action
  5. Again, go to the Add-ins tab, choose COM Add-ins from the dropdown menu, and click Go.COM add-ins
  6. Similarly, remove these add-ins as well.disable COM add-ins to fix Microsoft Excel is waiting for another application to complete an OLE action

Once done, restart Excel for the changes to come into effect, and you shouldn’t encounter the Microsoft Excel is waiting for another application to complete an OLE action message anymore.

Users primarily reported the Cisco Webex and Adobe Acrobat PDFMaker add-ins, amongst others, to be conflicting. So, make sure to check and remove the two.

3. Repair Microsoft Office

Note icon NOTE
Before proceeding, make sure you have a stable Internet connection since several files will be downloaded during the repair process.
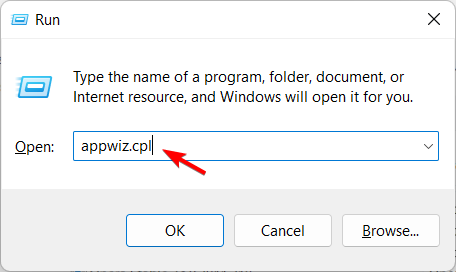
  1. Press Windows + R to open Run, type appwiz.cpl in the text field, and hit Enter.appwiz.cpl
  2. Locate the Microsoft Office entry, select it, and click on Change.change
  3. Click Yes in case a UAC prompt appears.
  4. Now, choose the Online repair option and then click on Repair.online repair to fix Microsoft Excel is waiting for another application to complete an OLE action
  5. Again, click Repair in the confirmation box to start the process.repair

Microsoft Office provides a built-in repair option to eliminate a range of issues with it, including Microsoft Excel is waiting for another application to complete an OLE action. So, run it and verify whether the error is resolved.

Tip icon Tip
If you are using the 32-bit version of Microsoft Office, the error appears quite frequently, but users who switched to the 64-bit version reported that it almost ceased appearing. So, download the 64-bit version of Microsoft Office from the official website.

4. Run Excel in Safe Mode

  1. Press Windows key + R to open the Run dialog box.
  2. Type the following command and press enter:
    • excel /safe
      running excel in safe mode
  3. Try editing the same spreadsheet you first got the error on and see if persists.excel spreadsheet

What is an OLE action in Excel?

Object Linking and Embedding (OLE) action is a technology allowing Office apps to interact with other programs.

It allows an editing app to send part of a document to other apps and then import the data, i.e., take it back with more content. The process, though usually quick, can take some time depending on the other application and the other vital parameters.

Why does the OLE error appear?

Here are a few reasons you might be getting the Microsoft Excel is waiting for another application to complete an OLE action error:

  • The concerned file is stored on cloud: If the Excel file that’s throwing the message is stored on a cloud service like OneDrive or Google Drive, the data transmission takes longer and, as a result, you get the error.
  • Misconfigured Excel settings: Certain Excel settings, when disabled, have been found to trigger the Microsoft Excel is waiting for another application to complete an OLE action message.
  • Conflicting add-ins and applications: A few users found that it was an Add-in in Excel or a third-party application responsible for the issue. And simply removing the add-in or uninstalling the application fixed things.

In case you are still facing the same problem, switch to a reliable Microsoft Office alternative. There are several of these, each offering a plethora of features and being just as effortless as the former.

If you have any queries or want to share another solution we missed, drop them in the comments section below.

How to access Ubuntu through your Windows PC remotely

We all know how easy it is to access Windows remotely from another PC. Of course, we’ve covered that before ourselves. But did you know that you can now access your Ubuntu right from Windows this way?

In this article, we’ll explain the best ways to access your Ubuntu from Windows PC remotely. So let’s jump right in.

How to remotely access Ubuntu on Windows

Accessing your Ubuntu from Windows is straightforward. All you need is a Remote Desktop Protocol (RDP), and some critical information beforehand, such as the IP address of your computer, enable the port forwarding, and install SSH.

We’ll discuss all the steps individually, so everything is clear. So let’s get started with finding the IP address.

1. Finding the IP address

To set up remote access to your Ubuntu on Windows, you first need to get your Ubuntu computer’s IP address. You’ll need it later when you make use of RDP.

Head to your Ubuntu machine, press the Ctrl + Alt + T shortcut and open the Terminal, type in the following command, and hit Enter:

ifconfig

From here, look for “net addr” against your current connection. If you’re using Ethernet, for instance, look up eth0. Similarly, if you’re on WiFi, look up wlan0.

If this method doesn’t work, you can find the network connection icon, right-click on it, and select Connection Information.

2. Turn on Port Forwarding

To enable a computer on another network, you also need to enable port forwarding on the router. Start by typing in the following command in your Terminal and hit Enter:

ip r | grep default

Note down the IP address from here, and open it in your browser to display the router’s admin. When you’re done with that, here’s what you should do:

  • Look for the Port Forwarding settings.
  • Create a New Rule labeled Remote Desktop.
  • Set the Internal Port number to 3389.
  • Enter the External Port number to be 3390.
  • Enter the IP address of your Ubuntu.
  • Click Save.

3. Set up access using SSH

To enable remote access to the Ubuntu command line, it’s also essential that you install SSH on your Ubuntu. Launch your terminal on Ubuntu, type in the following command, and hit Enter:

sudo apt install openssh-server

That’s it. SSH will be installed. We can move to set up the RDP on your PC.


Remotely access your Ubuntu on Windows by Remote Desktop Protocol

RDP, or Remote Desktop Protocol in full, is a unique Windows protocol designed by Microsoft to help you connect with other computers remotely. On top of this, it also provides a simple GUI, which makes the whole experience much easier than it would’ve been otherwise.

To start with RDP, head to your Ubuntu and install the xrdp tool on Ubuntu. Open the terminal by pressing Ctrl + Alt + T and hit Enter:

sudo apt install xrdp

From there, type in the following code and hit Enter again:

sudo systemctl enable xrdp

The tool will be installed in a few minutes. As soon as the installation is finished, launch the application. Now, head to the Start menu search bar, type in ‘rdp,’ and click on Remote Desktop Connection.

After the app is launched, follow the steps below:

  1. Head to the Computer field and type in your IP address.
  2. Click on Show Options and add the Username for Ubuntu PC.
  3. Finally, click on Save.
  4. Select Connect to establish your connection.

As soon you click on Connect, you’ll most probably get asked for a password; enter it, and you’ll be inside in no time.

Access Ubuntu through your Windows remotely

With the RDP on your PC, you can connect and access your Ubuntu straight from your Windows. And the method of accessing it isn’t incomplete in any way. Be it playing, copying, or deleting your files, you can manage to do anything you’d otherwise want to do on your Ubuntu physically.

Time.windows.com Not Working: 4 Ways to Fix

Windows has been using automatic clock syncing for years, but time.windows.com not working is a common issue. You’ll often get a message that reads An error occurred while Windows was synchronizing with time.windows.com.

Here’s how to make it go away:

How to fix time.windows.com not syncing

1. Reconfigure the Windows Time service (Worked best for users)

  1. Press Windows + R to open Run, type services.msc, and hit Enter.services
  2. Locate Windows Time service, right-click on it, and select Properties.properties
  3. Choose Automatic from the Startup type dropdown menu.automatic
  4. Click on Start under Service status.start services to error occurred windows synchronizing time
  5. Head to the Log On tab, select the Local System account option, tick the checkbox for Allow this service to interact with desktop, and then click on OK to save the changes.allow to interact with desktop to fix error occurred windows synchronizing time

2. Use a different server

  1. Press Windows + R to open Run, type control in the text field, and click OK.control panel
  2. Click on Clock and Region.clock and region
  3. Now, click on Date and Time.date and time
  4. Navigate to the Internet Time tab, and click on Change settings.change settings to fix error occurred windows synchronizing time
  5. Choose a different server from the dropdown menu, click on Update now, and then on OK.change server to fix error occurred windows synchronizing time
  6. Again, click OK in the Date and Time box.
  7. Now, check if you can synchronize time without any trouble.

Users reported fixing Windows time not syncing simply by using a different server If the ones available by default don’t work, try these:

  • pool.ntp.org
  • time-a.nist.gov
  • time-b.nist.gov
  • time-a.timefreq.bldrdoc.gov
  • time-b.timefreq.bldrdoc.gov

3. Run a few commands

  1. Type Command Prompt in the Search bar, and click Run as administrator.Command Prompt
  2. Click Yes in the UAC prompt.
  3. Now, paste the following commands individually and hit Enter after each:net stop w32time w32tm /unregister w32tm /register net start w32time w32tm /resync

If everything goes well, you should see, The windows Time Service is starting. The windows time service was started successfully.

4. Reset the BIOS

Note icon NOTE
This is an intricate process and differs for every manufacturer. So, we recommend you head to the support section on the manufacturer’s website and find the exact steps. In case you are unsure, consult a professional.
  1. Turn off the computer, then turn it on, and repeatedly hit the F1, F10, or Del key (as the case may be on your PC) as soon as the display lights up to enter the BIOS.
  2. Now, look through the various tabs for the Load Default Options, Load Optimized Defaults, or Load Setup Defaults option and select it.reset bios
  3. Finally, confirm the change and restart the computer.confirm
  4. After resetting the BIOS, power off the computer and remove the CMOS battery for around 5-10 minutes, plug it back in, and then turn it on.

The last option in case an error occurs when you synchronize Windows time is resetting the BIOS. Often, the problem lies in the BIOS settings; resetting it is the only way to go.

How to enable automatic sync from settings

  1. Press Windows + I to open Settings, select Time & language from the navigation pane, and click Date & time on the right.date and time
  2. Click on the Sync now button under Additional settings.sync now
  3. Now, wait for the sync process to complete.

Some of the main reasons why Windows time won’t sync include the fact that the service isn’t running, corrupt system files, interfering apps, or network problems.

With the steps above, the time.windows.com not working should be a thing of the past. If you want to learn more, check out the time.windows.com vs time.nist.gov comparison to see which server will give you the most accurate time.

Unable to Connect to Nvidia Try Again Later: 3 Error Fixes

When you install new hardware, such as a graphics card, many times the driver software that comes with the hardware can be incompatible with your OS. If you have tried to install the Nvidia graphics card driver you might get the unable to connect to Nvidia try again later message.

The most common reason for this incompatibility is that your operating system has not been updated to support the latest version of the graphics card’s driver. In this article, we look into why you’re unable to connect to Nvidia and how to restore the connection.

Why won’t my Nvidia graphics driver install? 

Nvidia graphics drivers are a crucial part of your computer’s performance. Downloading the latest Nvidia drivers is a good idea because it will improve the overall performance of your computer. When you can’t install an Nvidia graphics driver, there may be several reasons:

  • Firewall interference – If you have an older Nvidia graphics card, you may need to disable any anti-virus or firewall software that is interfering with the installation of the driver.
  • Outdated OS – The Nvidia driver may not be compatible with your operating system and won’t install properly.
  • Hardware failure -The latest Nvidia graphics driver may not be compatible with your system’s hardware. 
  • Missing components – It is possible that you haven’t installed all of the required components correctly. The latest Nvidia graphics driver requires a few other programs to run properly.
  • PC doesn’t recognize the graphics card– Your PC may have a problem detecting the Nvidia graphics card hence not recognized by Windows.
  • Old drivers – You probably already installed an older version of the Nvidia graphics driver on your PC and want to upgrade it to a newer one without removing the old one first.

How can I fix the unable to connect to Nvidia try again later error?

Before jumping onto the slightly technical steps listed below, ensure to check the following:

  • Make sure the latest Nvidia graphics driver supports your motherboard.
  • Remove all other devices connected to your computer, including keyboards and mice, printers, scanners, and speakers.
  • Ensure you’re running the latest version of the GeForce Experience app.

1. Update the Nvidia drivers

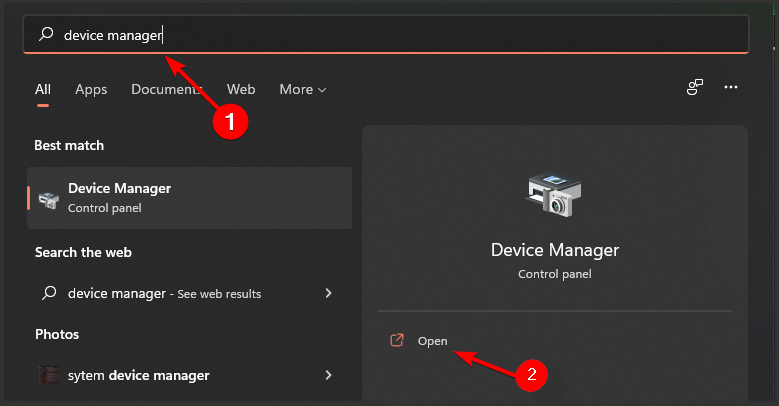
  1. Press the Windows key, type Device Manager in the search bar, and click Open.
  2. Navigate to Display adapters and click to expand.
  3. Select the Nvidia driver from the drop-down menu, right-click on it and click the Update driver option.choose update driver for NVIDIA graphics card device manager
  4. Next, click on select Search automatically for updated driver software.
  5. Restart your PC.

Since most of the users who encountered the unable to connect to Nvidia try again later message had problems updating drivers from the GeForce Experience app, it is recommended that you try other ways of updating the driver. 

The above steps are for manual driver updates, but if you want a more straightforward way, you can opt for a driver updater utility. 

Outbyte Driver Updater is a tool that automates the process of downloading and installing new drivers for your PC. It will automatically detect the system and finds the best compatible driver for you, and install it.

Outbyte Driver Updater

An excellent automatic program that gets you the latest updates for your drivers.
Free Trial Download now

2. Disable Nvidia services

  1. Hit the Windows + E keys to open File Explorer.
  2. Navigate to the following location and delete the NSManagedTask.xml file. If the folder is missing, follow the steps to show hidden files, then proceed: C:\ProgramData\NVIDIA Corporation\NetService\
  3. Next, right-click on the Start Menu and select Task Manager.task manager onedrive high cpu usage
  4. Navigate to the Details tab, find NVNetworkService.exe, right-click on it and select End task.
  5. Now, hit the Windows + R keys to open the Run command.
  6. Type services.msc in the dialog box and hit Enter.
  7. Locate the NVIDIA Network Service, right-click on it and select Start.
  8. Restart your PC and check if the issue persists.

3. Reinstall the GeForce Experience app

  1. Hit the Windows key and select Settings.settings windows 11
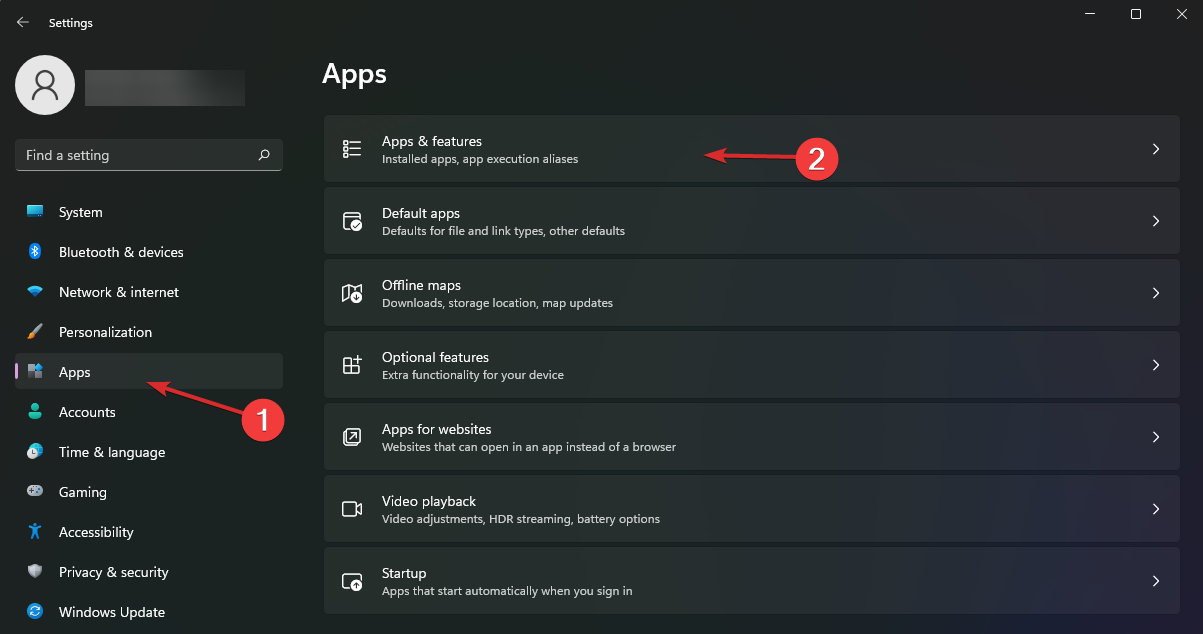
  2. Select Apps on the left pane then click on Apps & features on the right pane.
  3. Locate the GeForce Experience app, click on the three ellipses and select Uninstall.
  4. Confirm uninstallation in the next dialog box.
  5. Restart your PC and proceed to download the GeForce Experience app.
  6. Follow the on-screen instructions to install, then try downloading the drivers again and see if you’re still getting the error message.

And that’s how to solve the unable to connect to Nvidia try again later issue. If none of the above solutions work, it is possible that the issue is a GeForce server error. You can check the GeForce status page to see if there is scheduled maintenance. 

You may also encounter an annoying error where your Nvidia drivers keep crashing on your PC. If this is the case, refer to our helpful guide on the steps to follow.

Let us know which of the above methods worked out for you in the comment section below.

How to Fix White Screen & Blank Pages on Google Chrome

If you’re facing the Chrome white screen problem, you’re not alone. Many users report the Google Chrome white screen error when opening the browser, causing it to display nothing but a blank page. This issue, sometimes called the Chrome white screen of death, can happen on startup, when visiting certain sites, or even mid-session. Here’s how to fix it.

Why does Chrome show a white screen?

The Google Chrome completely white screen error usually appears due to GPU hardware acceleration conflicts, corrupted browser data, problematic extensions, or outdated settings. In some cases, Chrome’s internal rendering process fails to load web content, leaving you with a Google Chrome blank white screen instead of the expected page.

How can I fix Google Chrome’s white screen problems?

1. Uninstall and reinstall Google Chrome

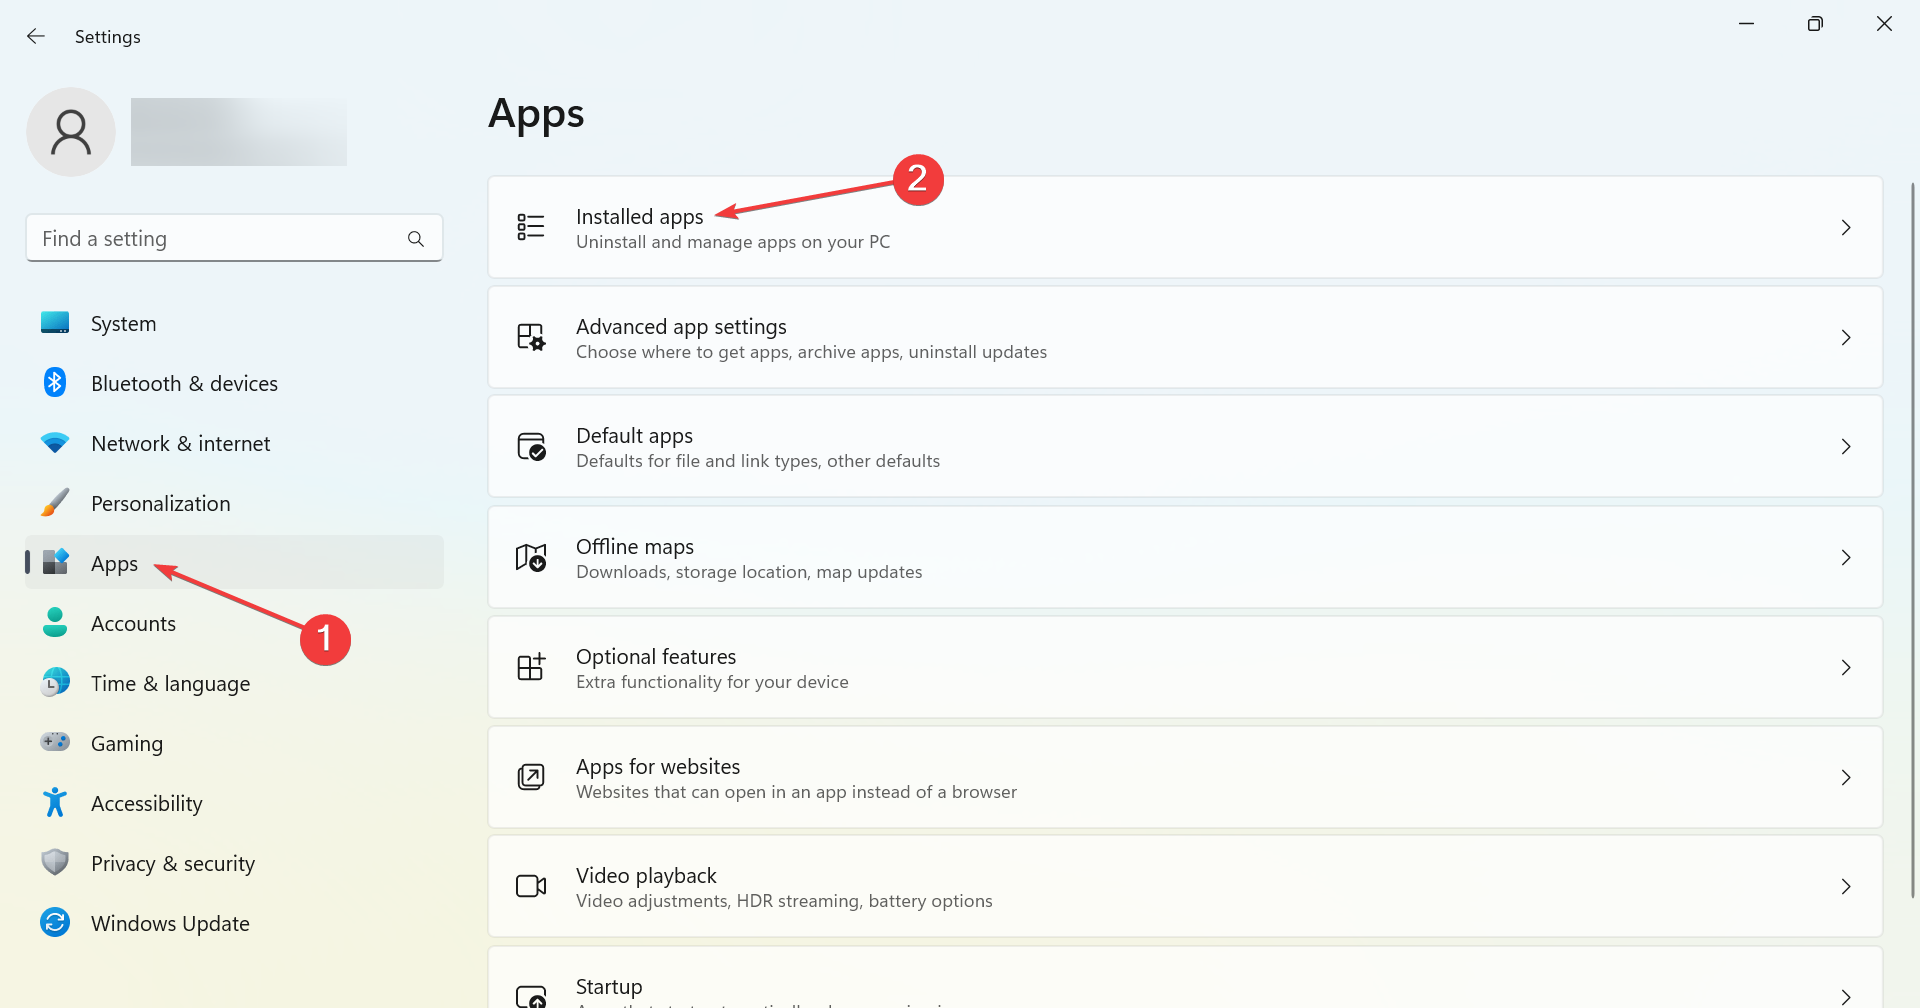
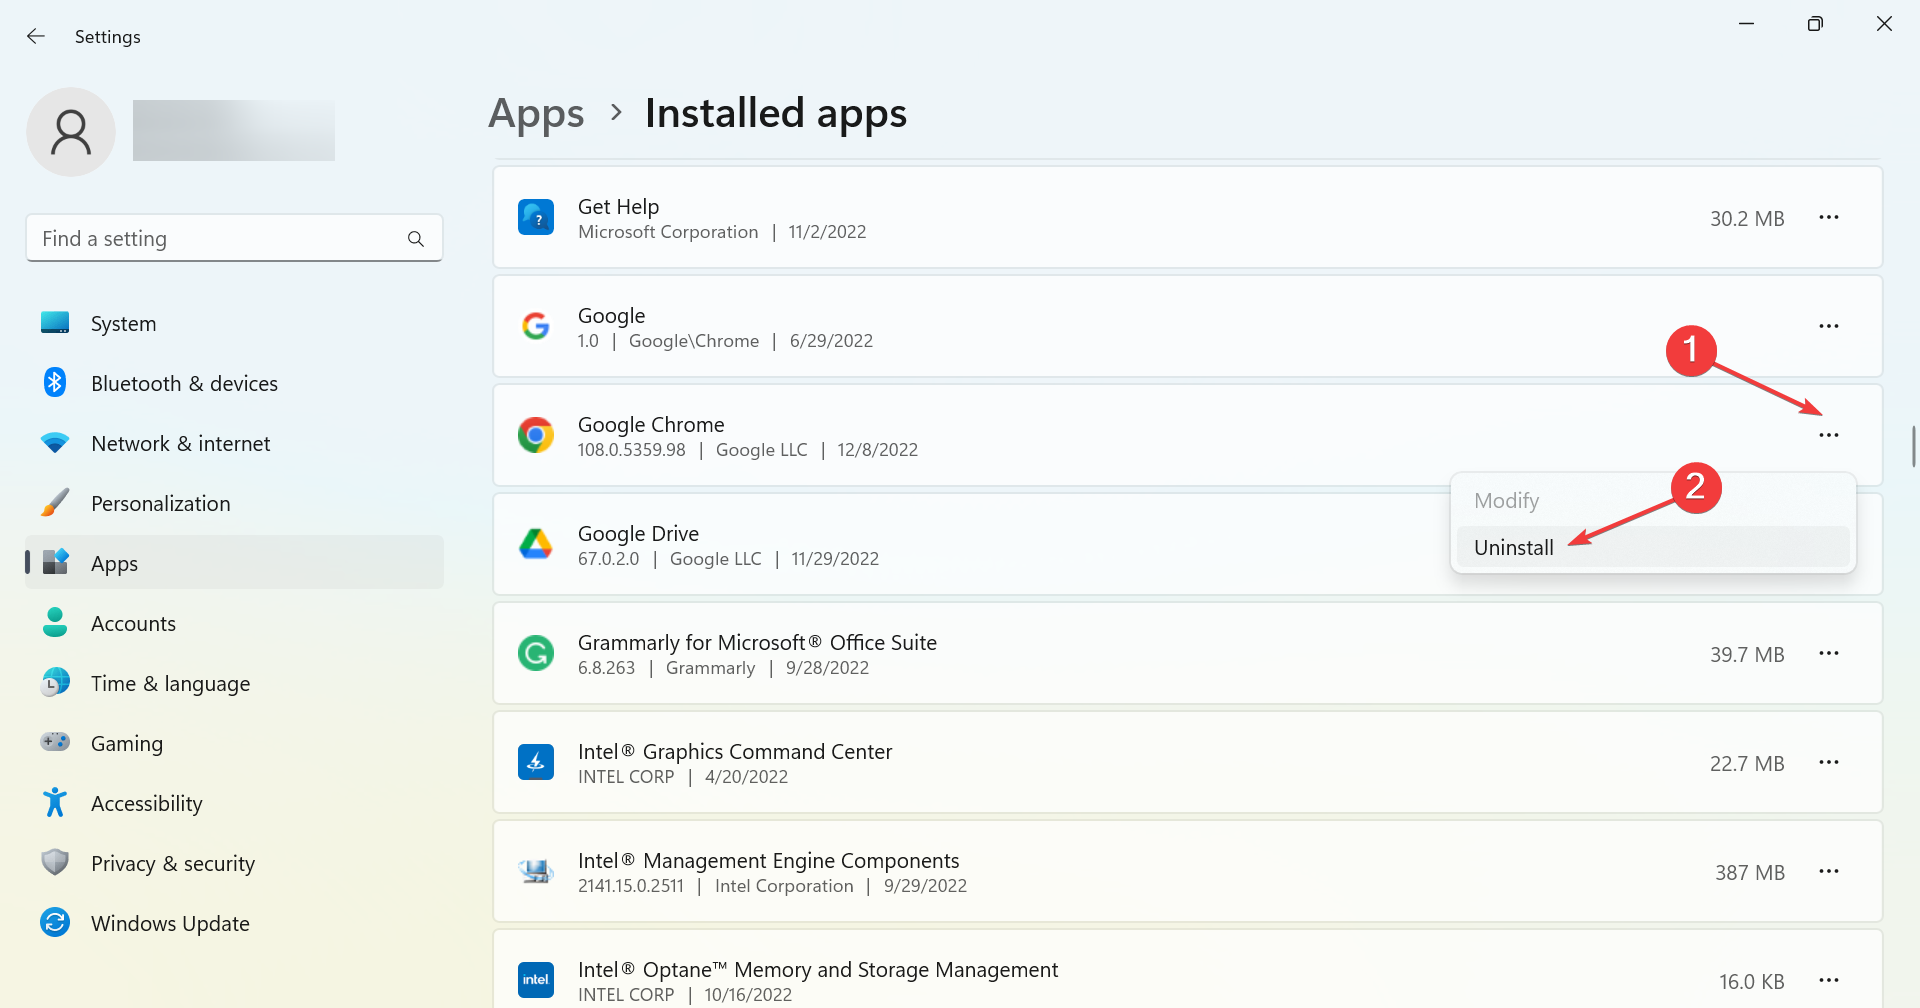
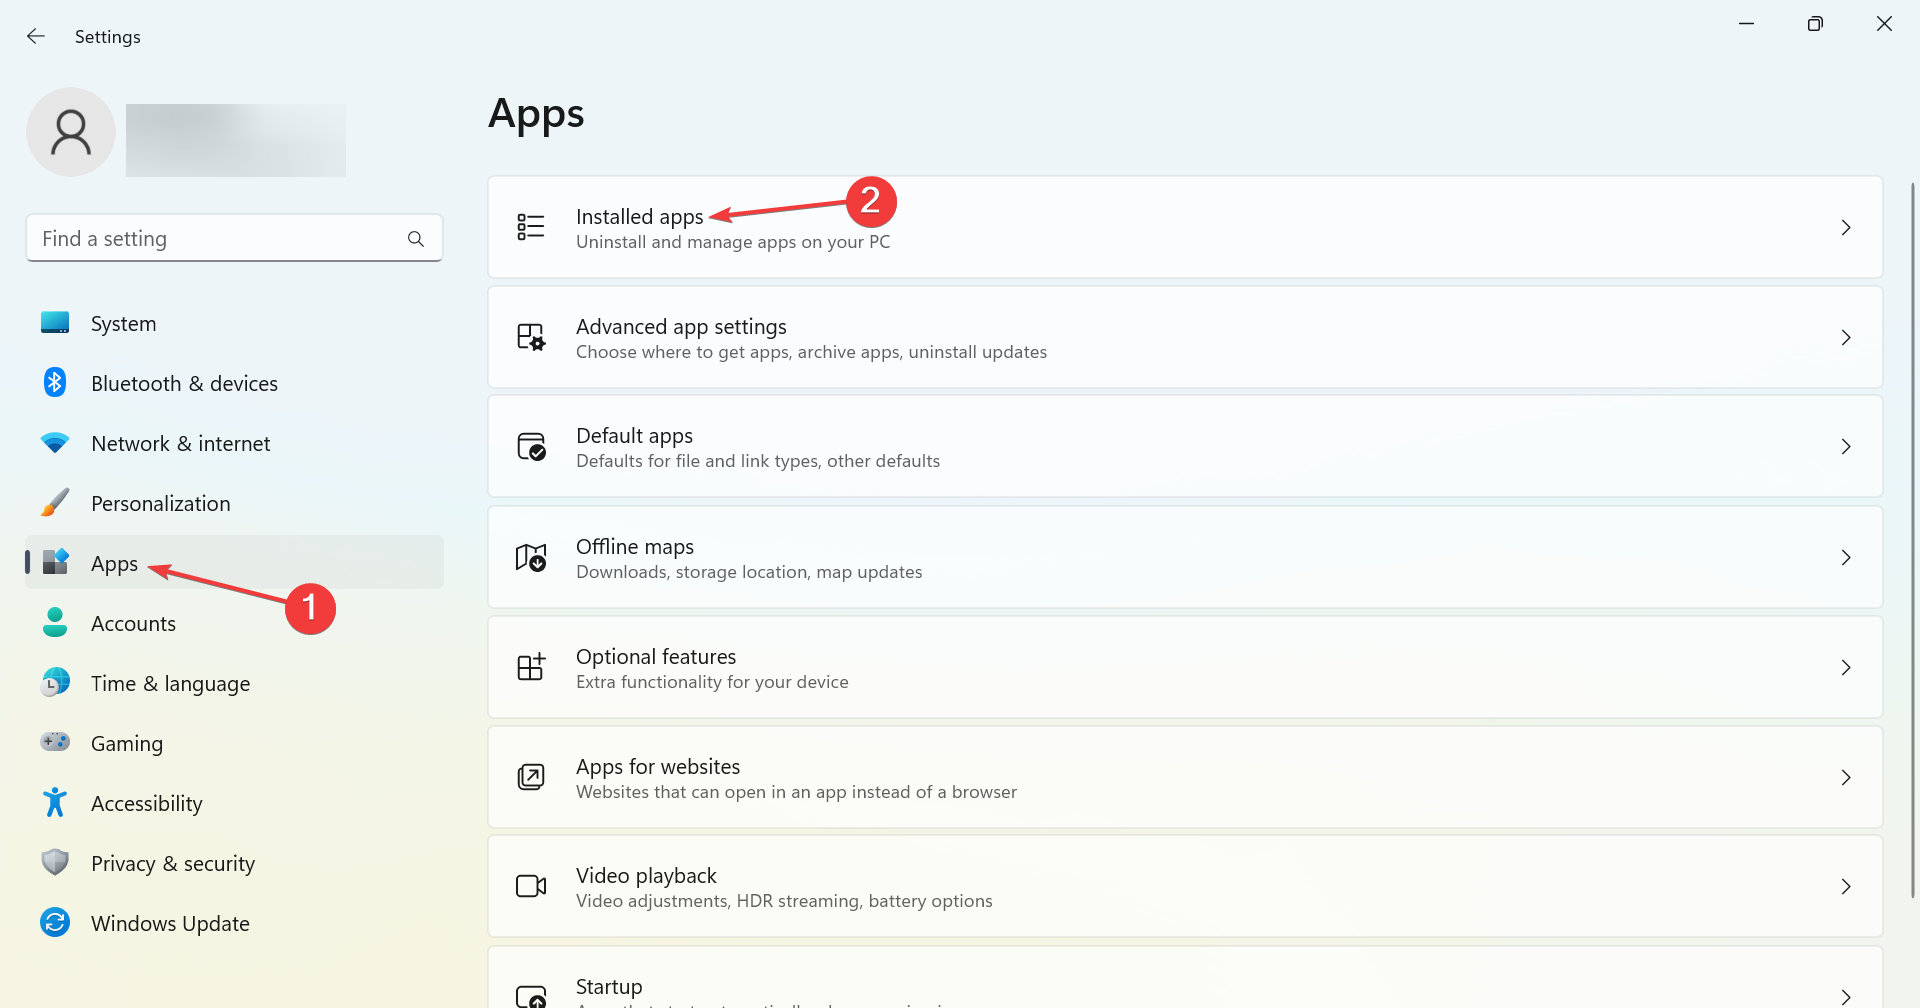
  1. Press Windows + I to open Settings, select Apps from the navigation pane, and then click on Installed apps.installed apps
  2. Locate Google Chrome, click on the ellipsis next to it, and select Uninstall from the flyout menu.uninstall chrome to fix chrome white screen
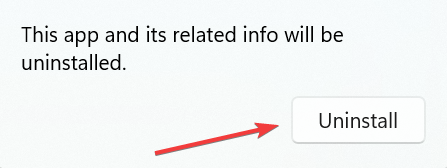
  3. Again, click on Uninstall in the confirmation prompt.uninstall
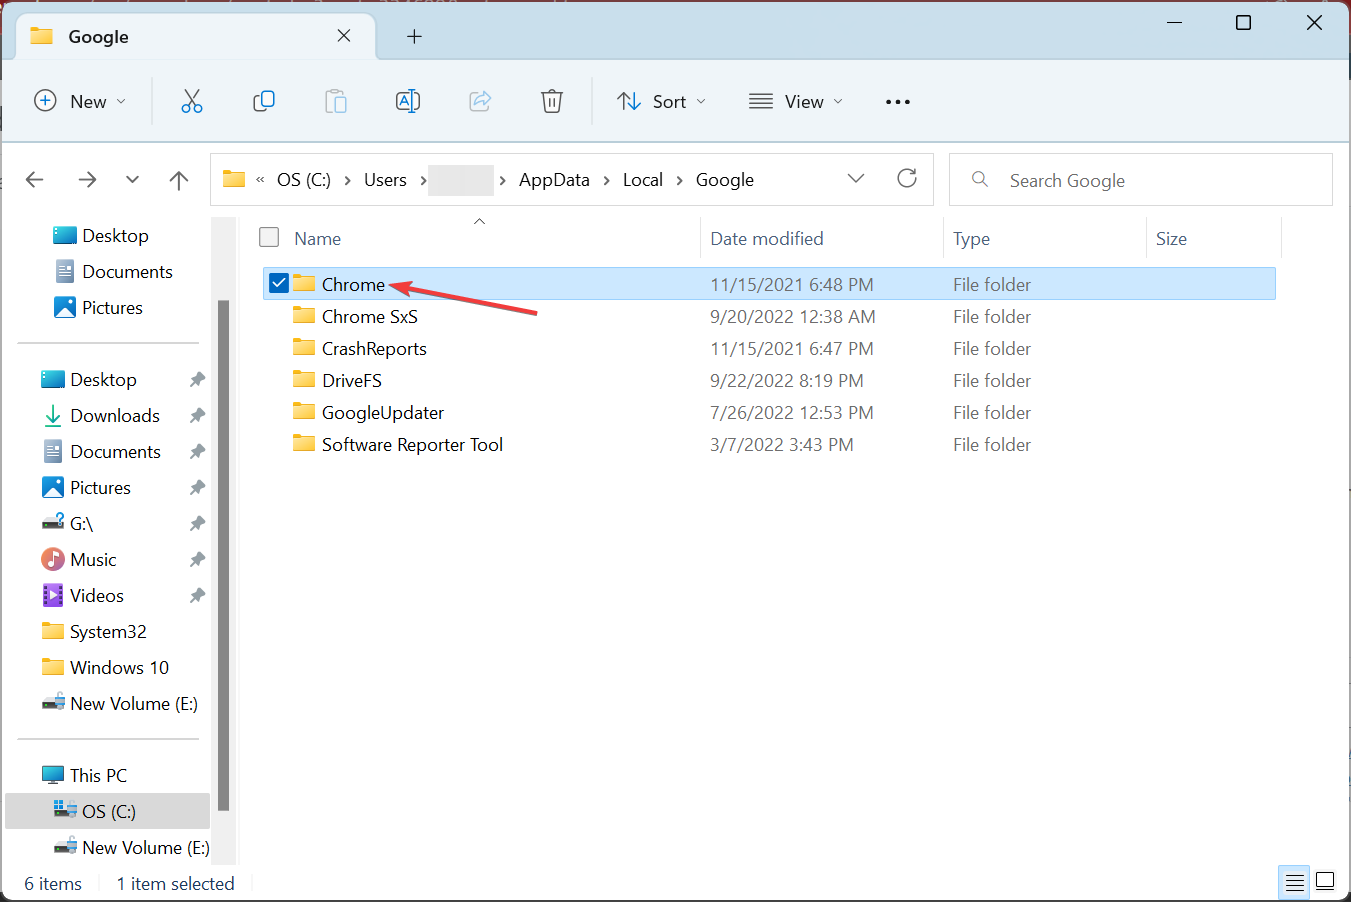
  4. Once done, navigate the following path, where the Username is the current account name, and then delete the Chrome folder here: C:\Users\Username\AppData\Local\Googledelete Chrome folder to fix white screen
  5. Finally, download Chrome and install it all over again.

We know that reinstalling Chrome may feel drastic, but it only takes 2-3 minutes and after logging back into your account, all the settings and bookmarks will be back as if nothing happen.

Completely uninstalling and reinstalling Google Chrome will fix this problem. Right after reinstalling it, make sure you also install its latest update.

2. Turn off hardware acceleration and background apps in Safe mode

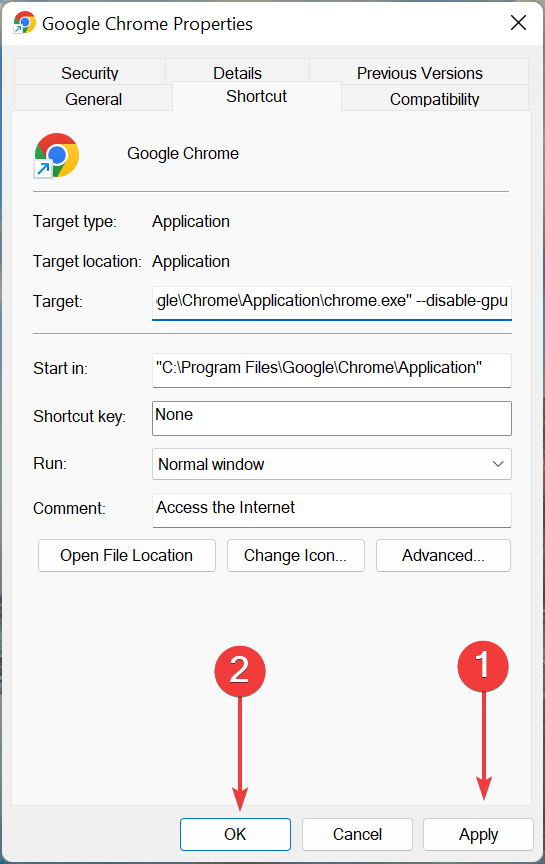
  1. Close Chrome completely, then right-click on the Chrome shortcut icon and select Properties.
  2. In the Properties window, add the flag –safe-mode to the end of the Target field.
  3. Click Apply and then OK.
  4. When you start Chrome again, it should open in Safe Mode.
  5. Now, enter chrome://settings/system in the address bar and hit Enter.
  6. Look for Use hardware acceleration when available and Continue running background apps when Google Chrome is closed and turn these features to OFF.
  7. Now, close Chrome and start it normally, without the –safe-mode flag.

3. Clear cache to fix Chrome opens to a white screen

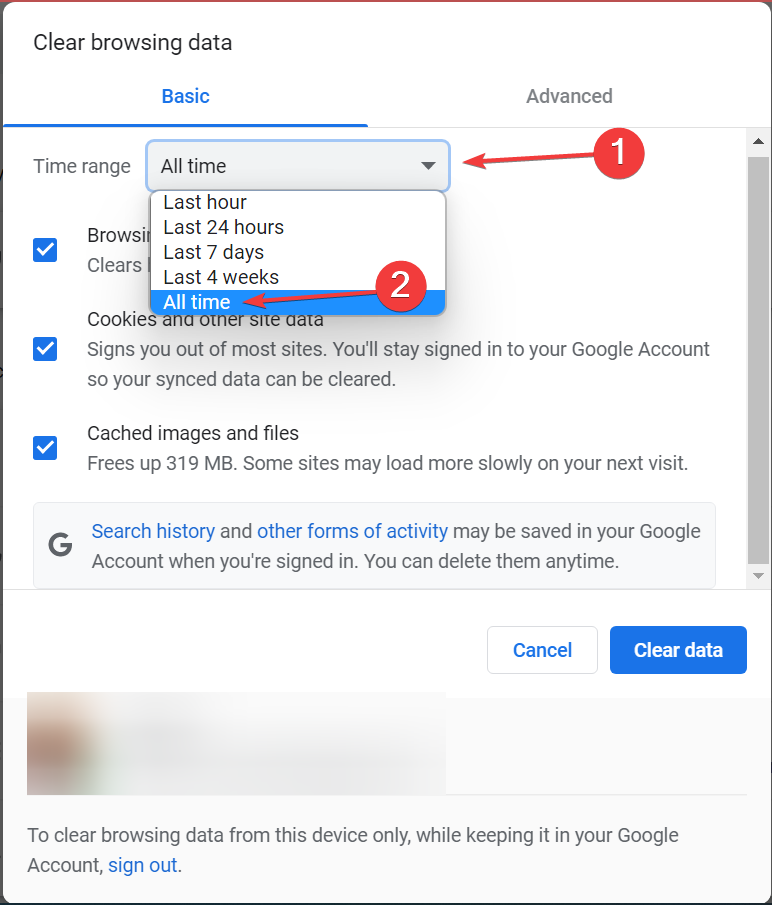
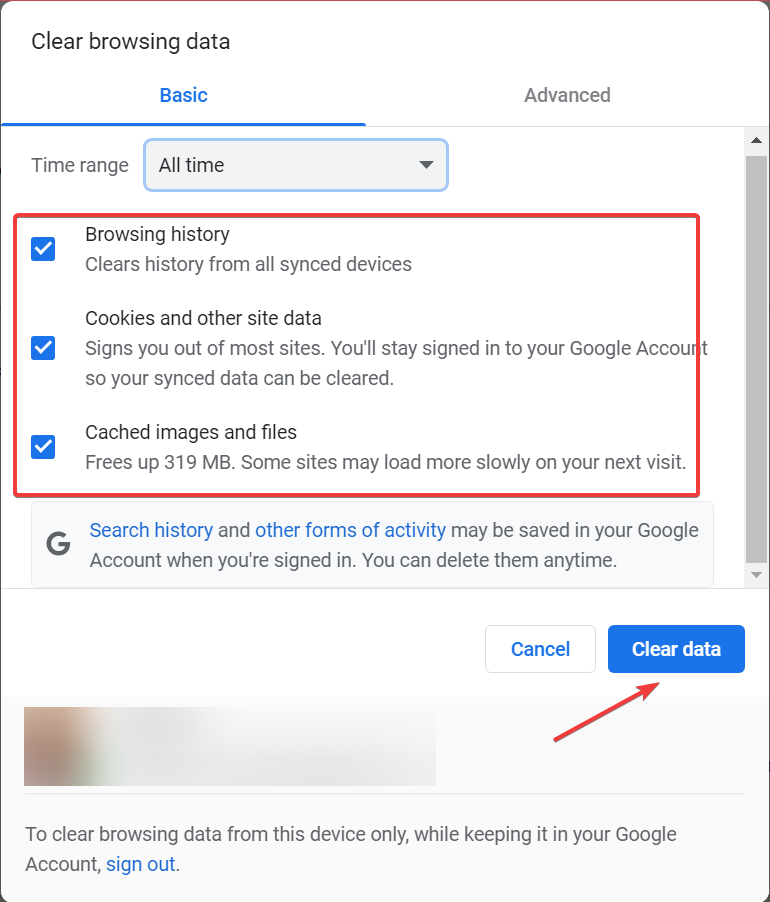
  1. Press Chrome’s Ctrl + Shift + Delete hotkey to open its Clearing browsing data window.
  2. Select All time from the Time range drop-down menu.All time to fix chrome white screen
  3. Tick the checkboxes for Browsing history, Cookies and other site data, and Cached images and files, and then click on the Clear data button.Clear data to fix chrome white screen

If clearing the cache doesn’t work in normal mode, use the first steps in the previous solution to start Chrome in Safe mode first.

4. Rename the User Data folder

  1. Close Google Chrome.
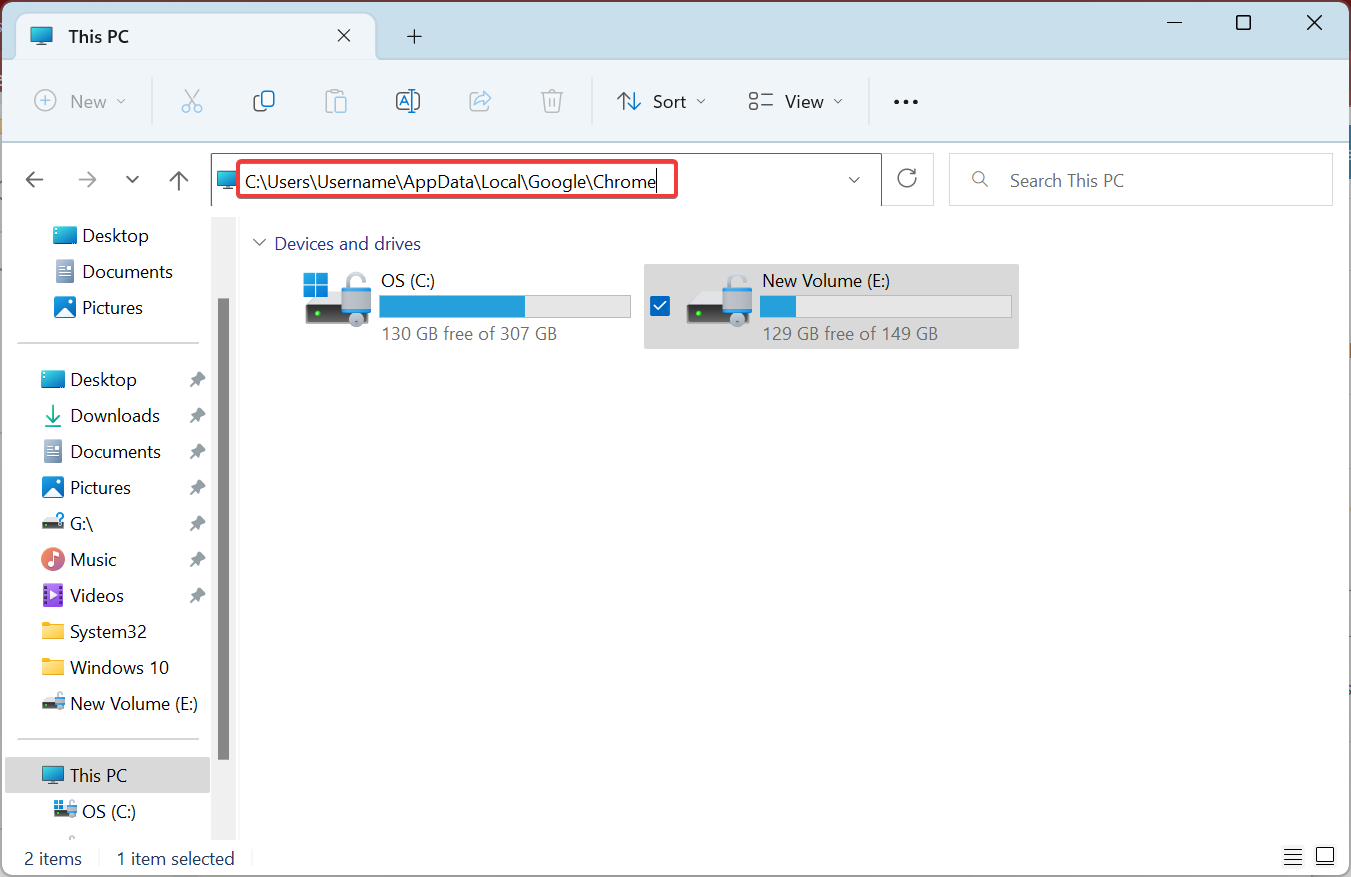
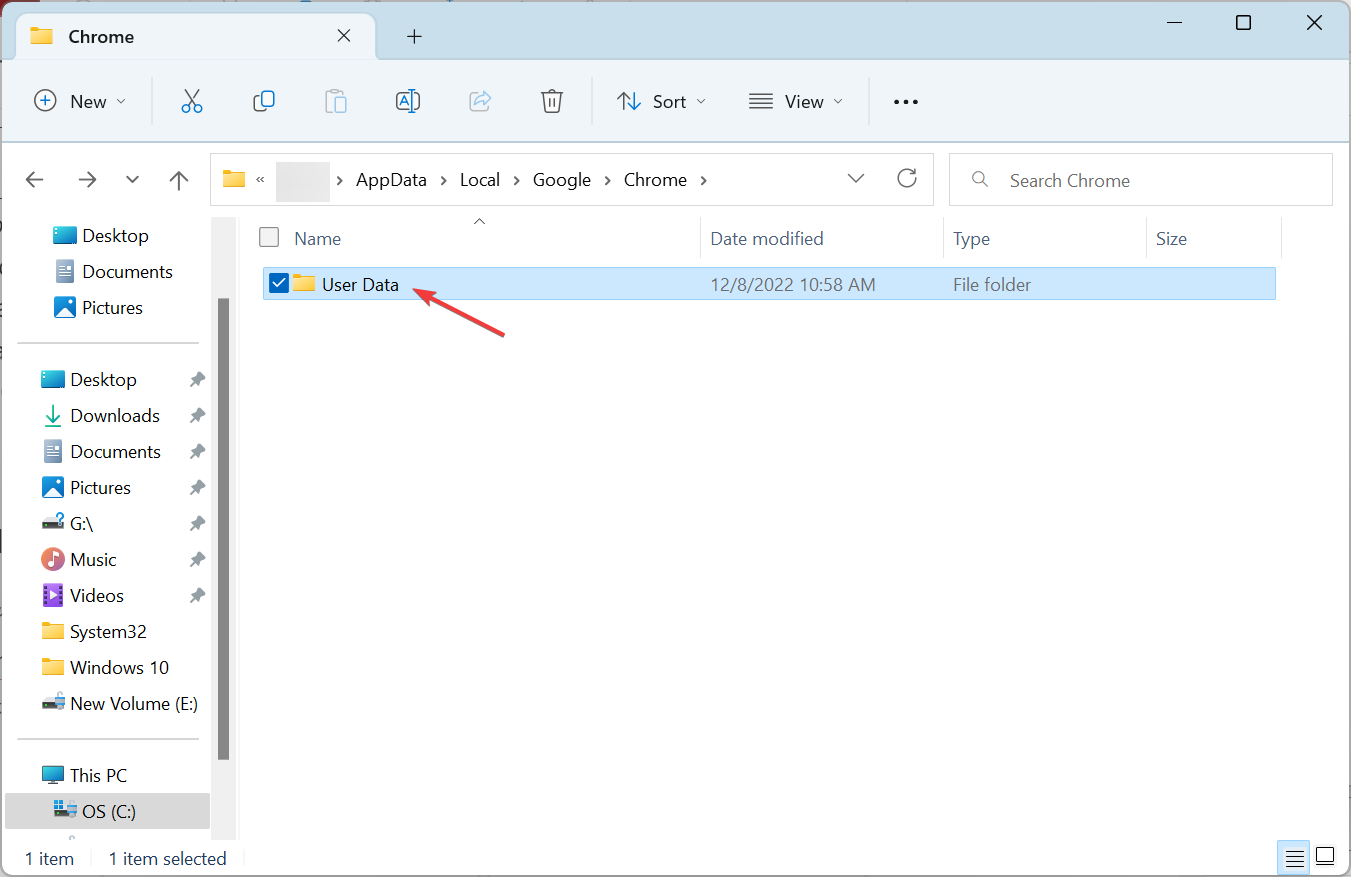
  2. Press Windows + E to open File Explorer, and navigate the following path, where the Username is the currently active account on the PC: C:\Users\Username\AppData\Local\Google\Chromeuser data
  3. Now, rename the User Data folder to User Data Old.rename folder
  4. Then, relaunch Chrome, and it will create the User Data folder again.

5. Disable all extensions

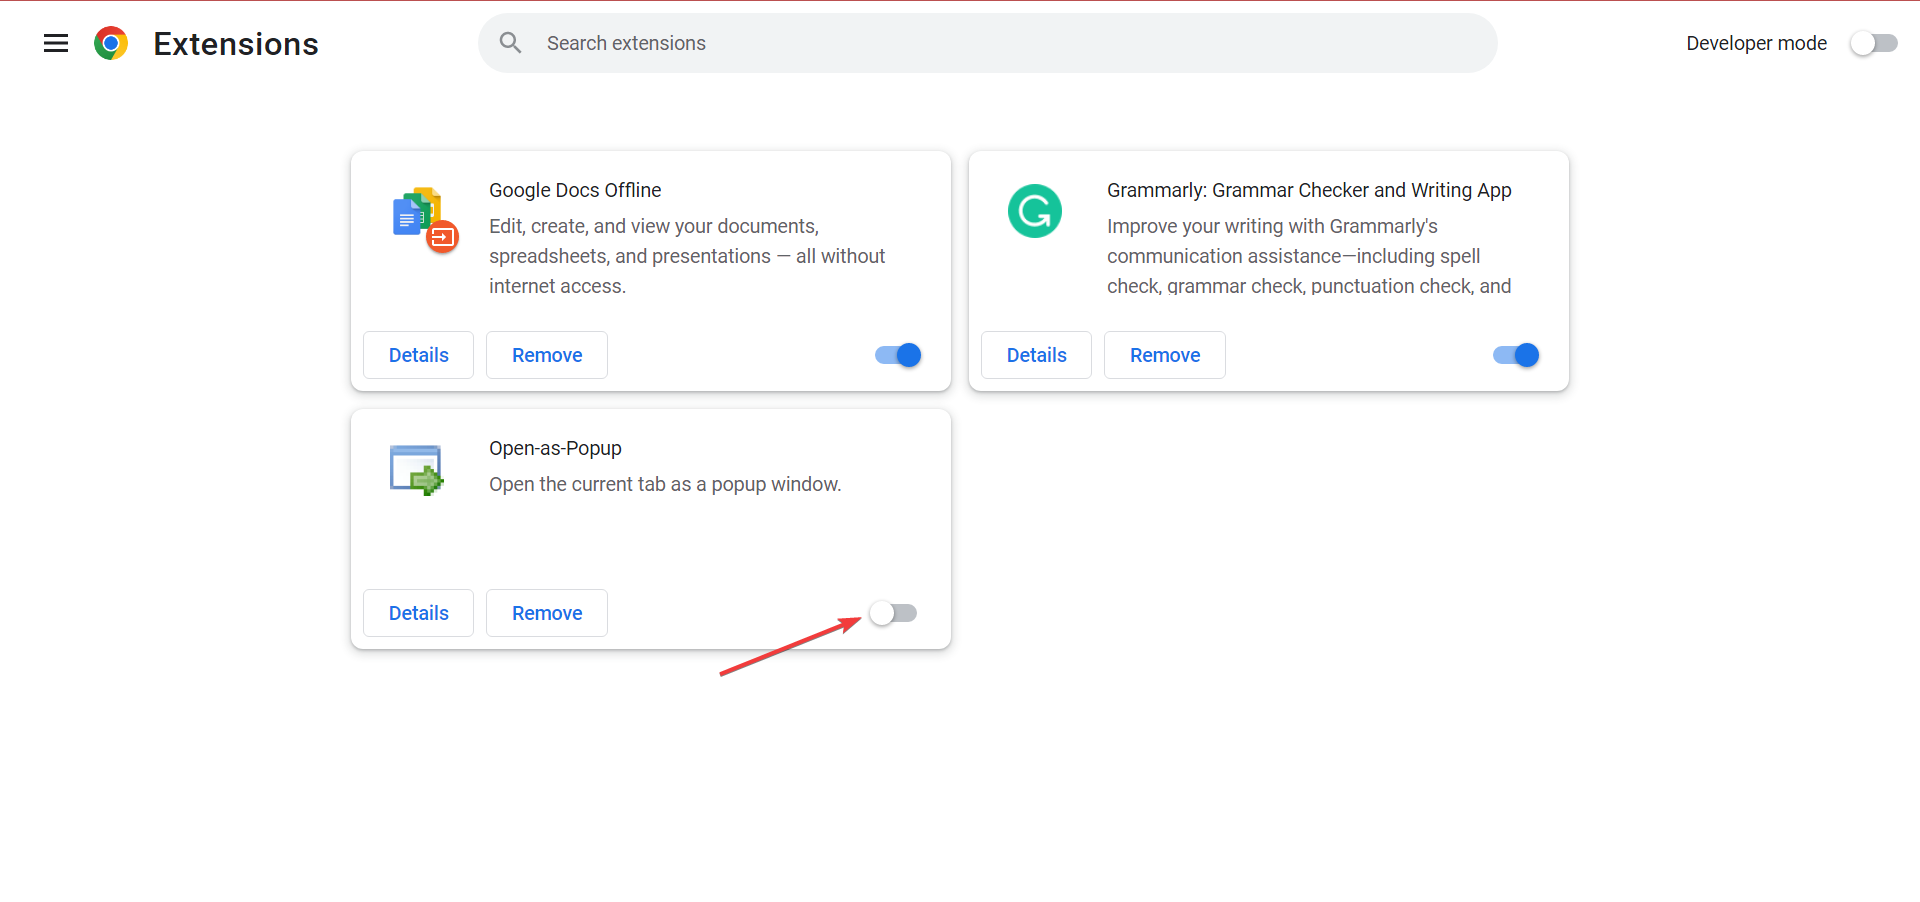
  1. Launch Chrome, paste the following path in the address bar, and hit Enter:chrome://extensions/
  2. Turn off the toggle for the extension that you want to disable.Disable extension to fix chrome white screen
  3. Then, repeat that for all the installed extensions.
  4. Finally, check if the problem is resolved.

If the white screen in Chrome doesn’t appear anymore, enable the extensions one by one until you recreate the problem and identify the one responsible for it.

Now, you can remove that extension and safely allow the rest.

5. Reset the browser

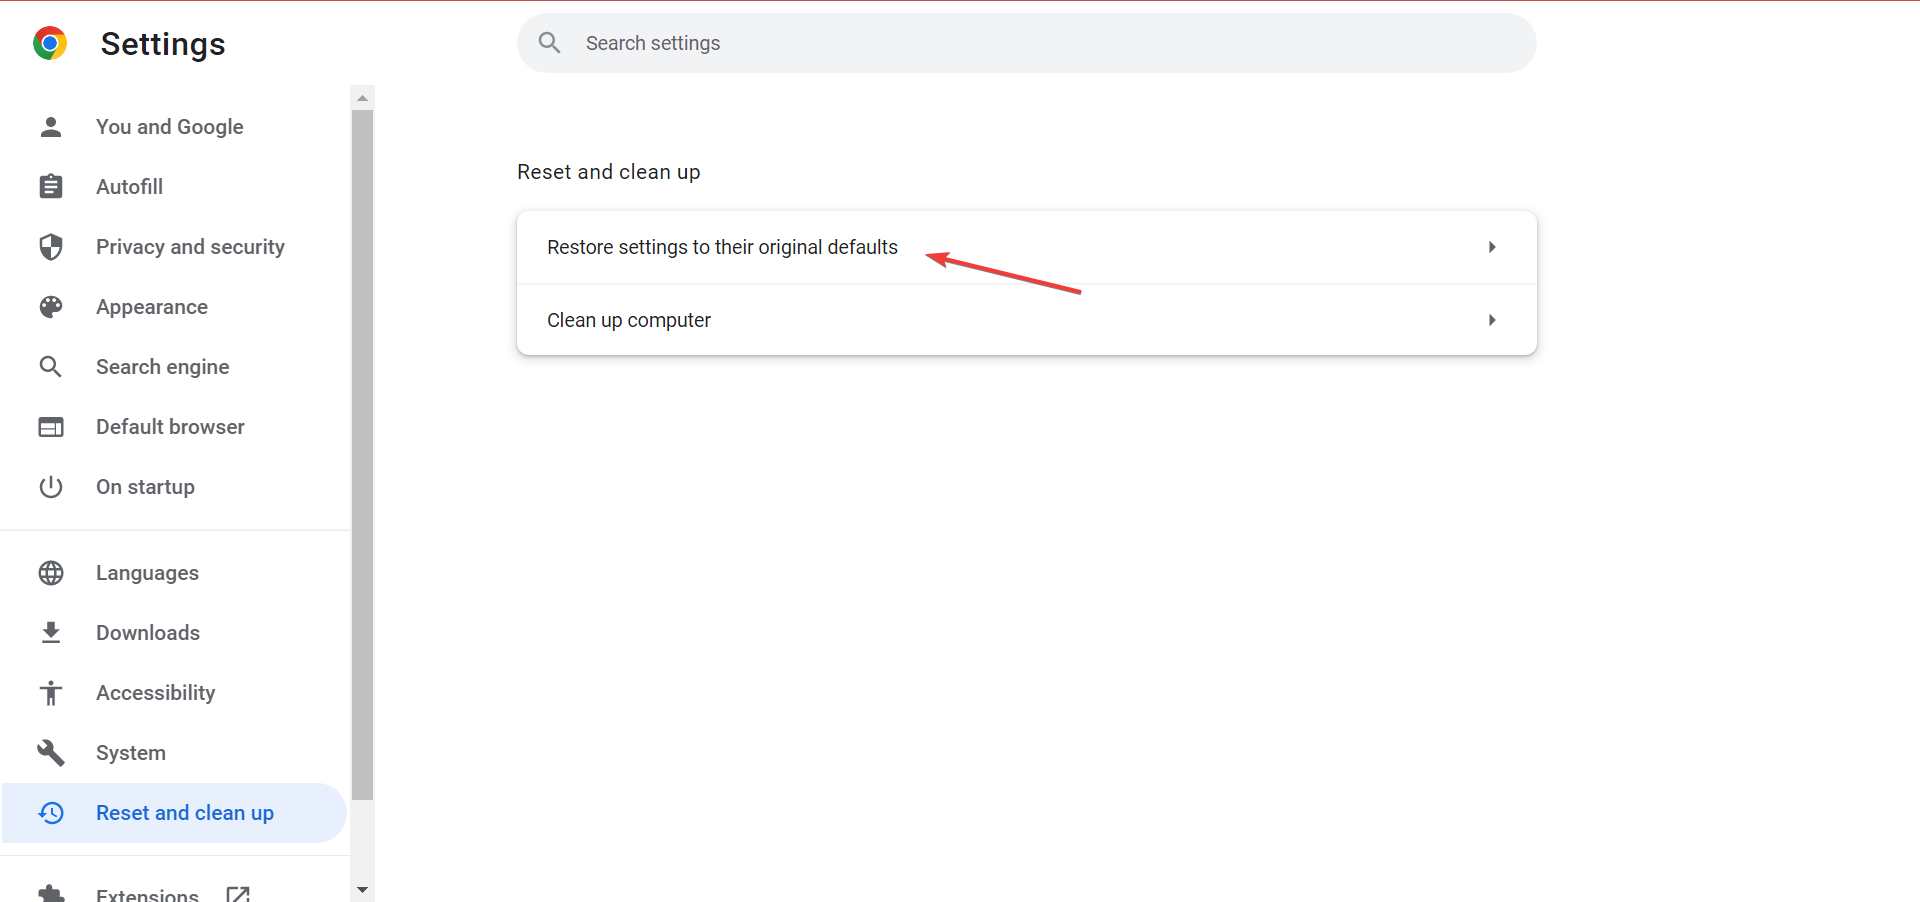
  1. Launch Chrome, paste the following path, and hit Enter to open the Reset and clean up settings:chrome://settings/reset
  2. Next, click the Restore settings to their original defaults option.Restore settings
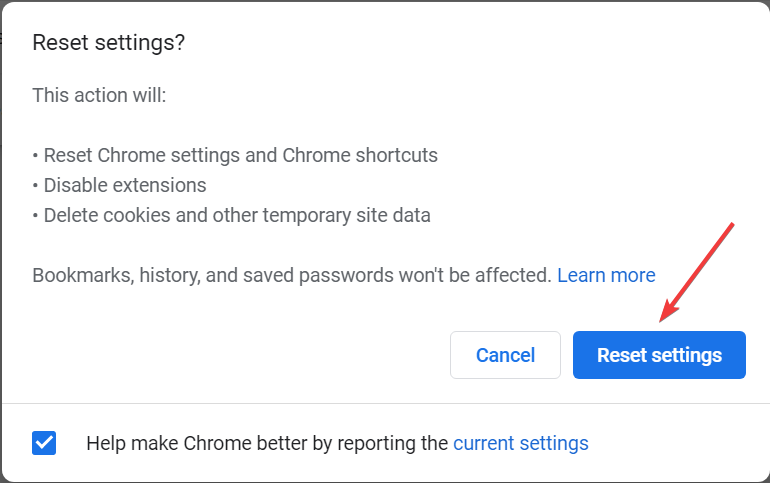
  3. Then select the Reset settings option.Reset settings to fix chrome white screen

6. Edit the shortcut target to fix page loads and then goes blank on Chrome

  1. First, make sure that Google Chrome is fully closed.
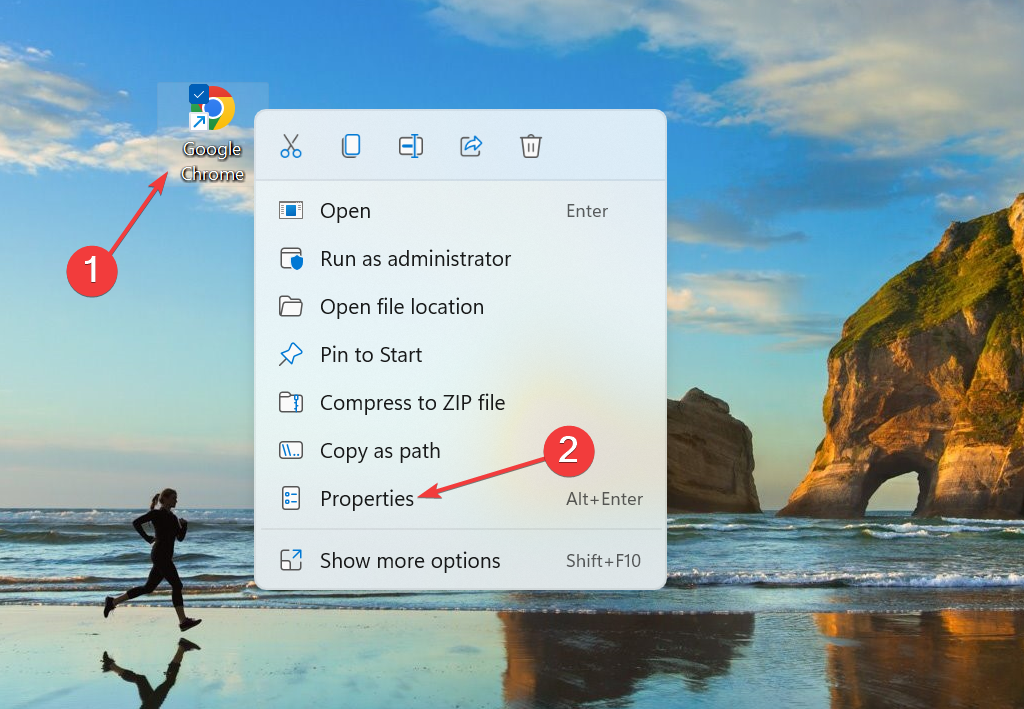
  2. Right-click Chrome’s shortcut icon and select Properties.Properties
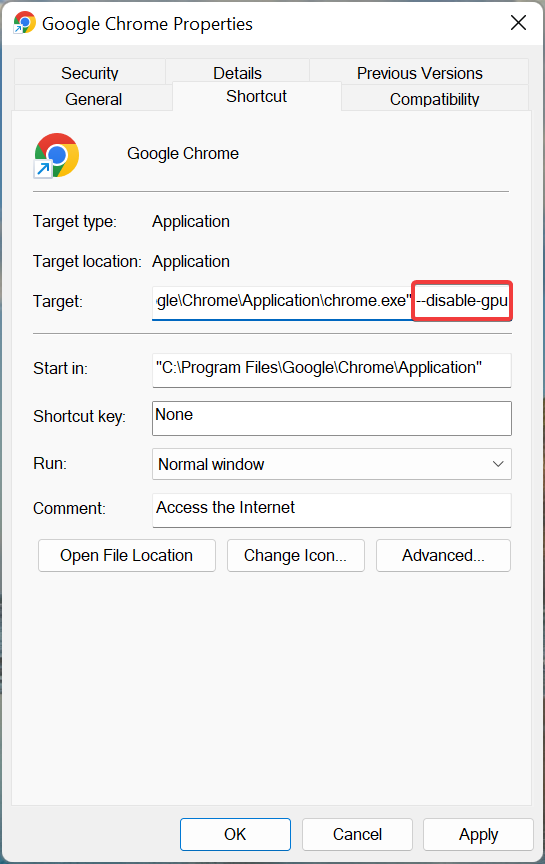
  3. Enter –disable-gpu at the end of the Target text box.disable GPU to fix chrome white screen
  4. Click on Apply and then OK to save changes.click Apply

7. Update Your Graphics Drivers

The Chrome white screen on startup can be caused by outdated or faulty GPU drivers. Updating them often resolves rendering errors.

  1. Press Windows + R, type devmgmt.msc, and press Enter.
  2. Expand Display adapters.display adapters
  3. Right-click your graphics device and choose Update driver.
  4. Select Search automatically for drivers.

To avoid installing the wrong driver, you can use a dedicated driver updater tool like Fortect Driver Updater, which scans your system and installs the correct GPU drivers automatically.

These are all the ways you can quickly resolve Google Chrome’s white screen in Windows. Sometimes this issue affects just a single website, and we wrote about that in our Twitch white screen in Chrome guide.

Also, find out what to do if Chrome is not responding or working or if you encounter a Chrome untitled error on your PC.

Did you manage to fix this problem with a different solution? Let us know in the comments section below.

Steam Update Stuck: How to Fix & Download Faster

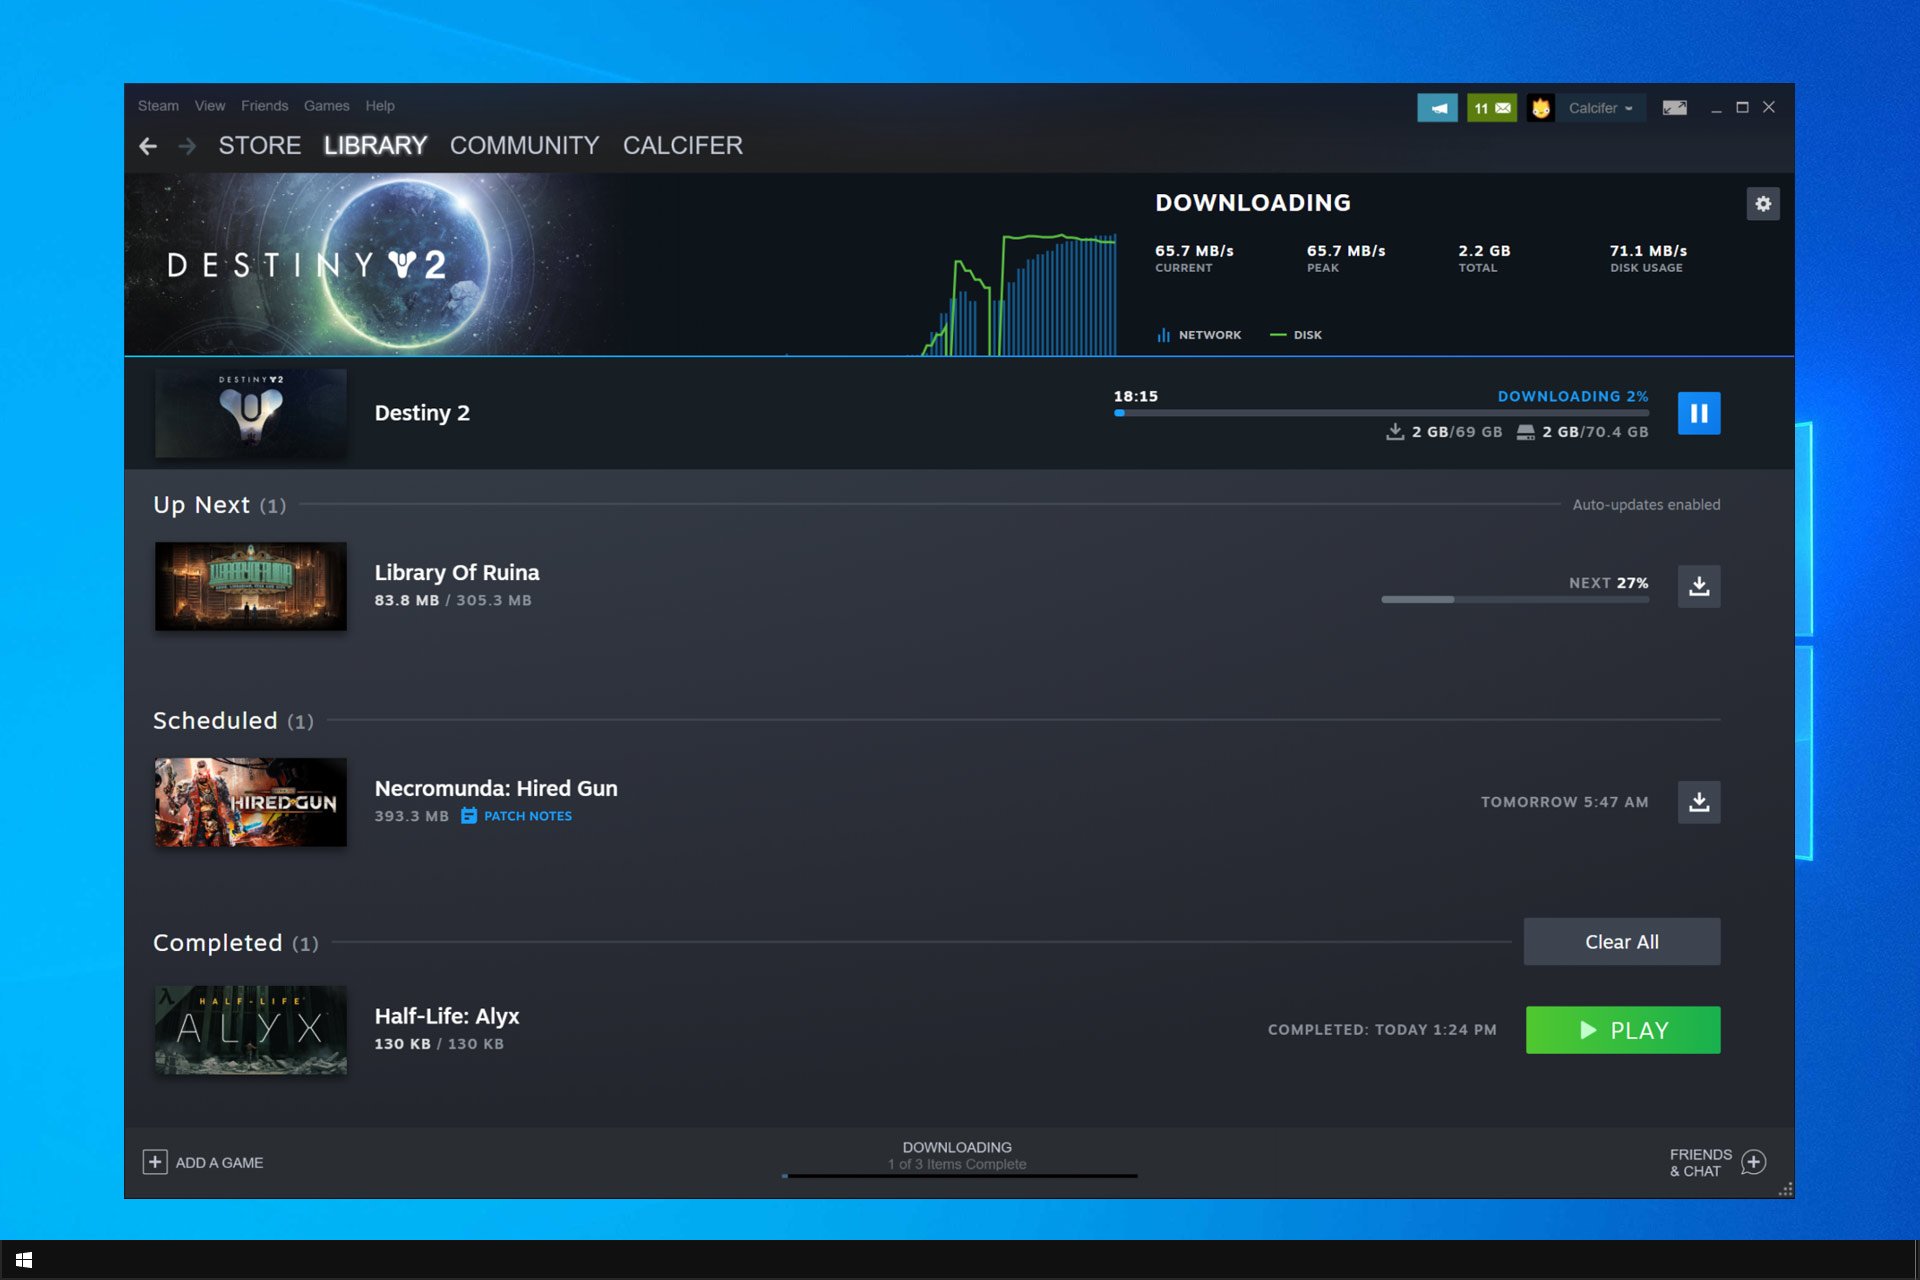
It’s important to update your games, but what if a Steam update is stuck? Speaking of issues Steam downloads can drop to 0 sometimes or completely hang.

These are all major problems, and in today’s guide, we’ll show you how to fix them.

Why is my Steam update stuck?

There are multiple reasons for this problems, but here are the most common ones:

What are other Steam update issues?

Related issues such as the ones below can also be fixed with at least one of the solutions from this article:

  • Steam update stuck at 100 – This can happen from time to time, but you shouldn’t worry. Restarting or clearing the download cache usually does the trick.
  • Steam update stuck on preallocating – Preallocating means that Steam tries to make sure there’s enough space to download and install. Increase the available free space if necessary.
  • Steam stuck on updating steam information – A common moment when the process gets stuck that can be fixed by applying the solutions from this article.
  • Steam stuck in update loop – Break the loop by removing Steam and performing a clean install with the latest version.
  • Steam download stuck – Check your Internet connection. Then turn off the firewall.
  • Updating steam extracting package – Once the update is downloaded, the next step in the process is to extract the files from the package and apply them. If it’s stuck, try loading with administrator rights.
  • Steam update problem – This is one of the common Steam errors that users face.

How do I fix Steam stuck on checking for available updates?

1. Open Steam as an Administrator

  1. Press the Windows key + E hotkey.
  2. Open the Steam installation folder.
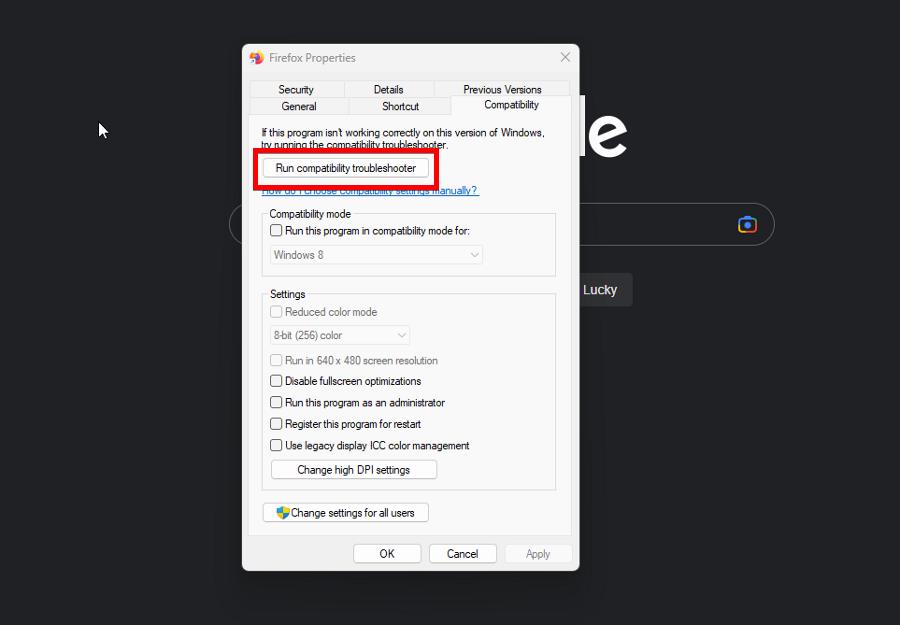
  3. Right-click Steam.exe within the software’s folder and select Properties.
  4. Click the Compatibility shown directly below.
  5. Select the Run as an administrator setting. Click Apply and OK to save changes.

First, make sure that Steam has admin privileges. Without admin rights, Steam might get stuck updating at some point.

Users can configure to run that game client software as an administrator using the steps from above.

2. Clear the download cache

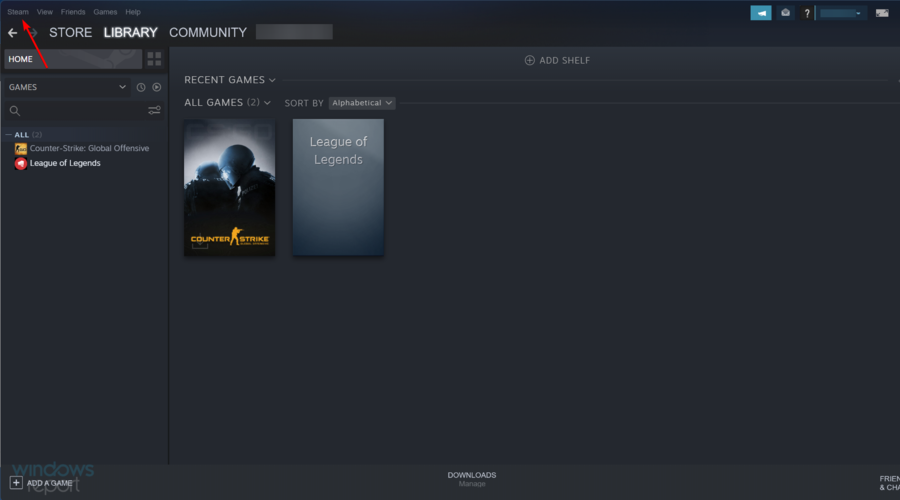
  1. Press on the Windows key, type Steam, then open the app.
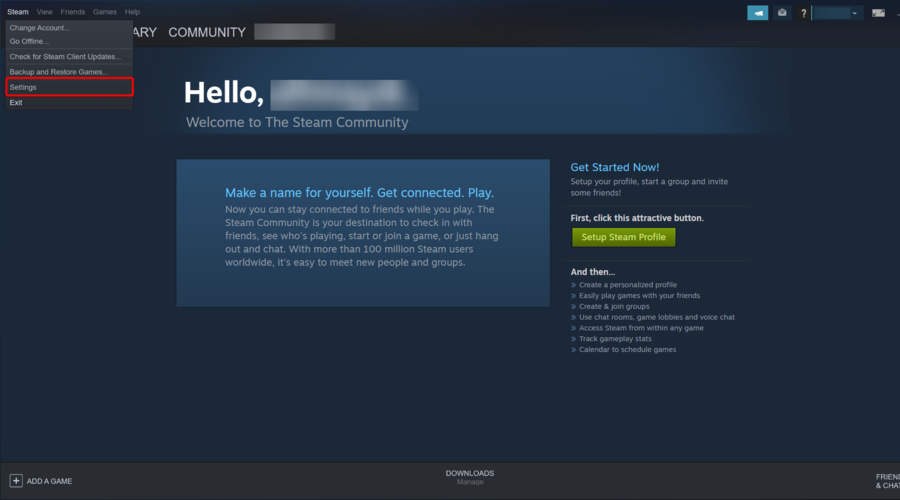
  2. From the top-left corner of the window, click on Steam.
  3. Navigate to Settings.
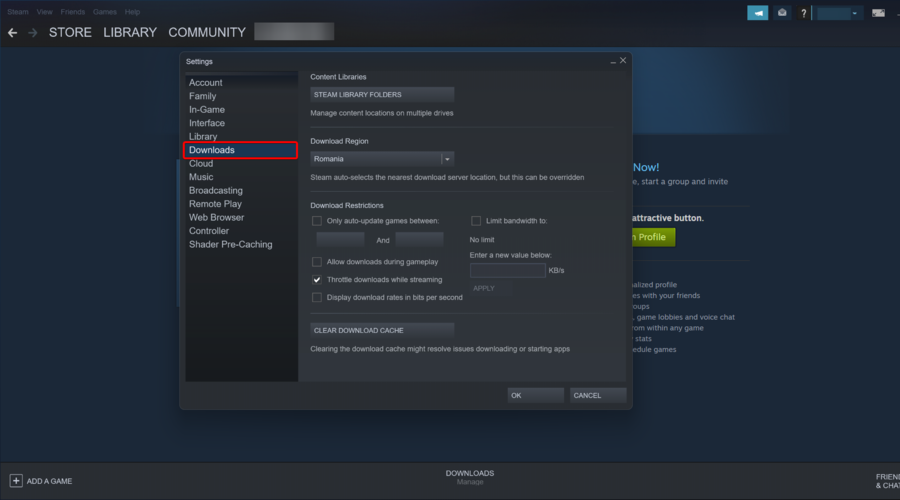
  4. On the left of the window, click on Downloads.
  5. Press the Clear Download Cache button.
  6. Click OK on the Clear Download Cache dialog box that opens.
  7. Thereafter, log back into Steam.

Clearing the download cache can resolve some Steam update issues. Clearing that cache will clear out cached data. Follow the guidelines above to clear the download cache.

3. Edit the host File

  1. Press the Windows key + S hotkey.
  2. Enter notepad in the search box. Right-click Notepad and select the Run as administrator option.
  3. Then click File and select Open.
  4. Go to the following path: C:\Windows\System32\drivers\etc
  5. Select All files and then double-click hosts file.
  6. Next, enter the following three lines at the bottom of the hosts’ file: 68.142.122.70 cdn.steampowered.com 208.111.128.6 cdn.store.steampowered.com 208.111.128.7 media.steampowered.com
  7. Click File and then Save to save the changes.
  8. Thereafter, open the Run window by right-clicking the Start button and selecting Run.
  9. Type ipconfig /flushdns and click OK.

Changing Steam’s content server might fix stuck Steam updates for some users. Users can do that by editing the hosts file just like we’ve shown.

4. Delete the package folder

  1. First, make sure that Steam isn’t running.
  2. Next, press the Windows key + E to open File Explorer.
  3. Open the Steam directory in File Explorer.
  4. First, back up the Package folder by selecting it and pressing the Copy to button.
  5. Select another folder to copy the subfolder to.
  6. Then right-click the Package subfolder in the Steam folder and select Delete.
  7. Launch Steam after erasing the Package folder.
    • Steam will then download a few files and open them.

The steam update might hang when the update package files get corrupted.

Erasing the Package folder will enable Steam to download again and might resolve the issue. Users can delete Steam’s Package folder as instructed above.

5. Turn off Windows Defender Firewall

  1. Open Cortana’s search box.
  2. Input firewall in the search box and select Windows Defender Firewall to open the window in the snapshot directly below.
  3. Click Turn Windows Defender Firewall on or off on the left of the WDF Control Panel applet.
  4. Select both the Turn off Windows Defender Firewall radio buttons, and press OK.
  5. If turning WDF off fixes the issue, users will need to add Steam to Windows Defender Firewall’s allowed applications. To do that, click Allow an app or feature through Windows Defender Firewall on the left of WDF’s Control Panel applet.
  6. Click the Change settings button.
  7. Then press the Allow another app button.
  8. Click Browse and open the Bin subfolder in the Steam folder within the Browse window that opens.
  9. Then select SteamService, and click the OK button.
  10. Thereafter, select Steam Client Service on the Add a Program window.
  11. Press the Add button.
  12. Select both the checkboxes for the Steam Client Service, and click the OK button.

It might be the case that Windows Defender Firewall is blocking Steam updating. In this case, turning WDF off might fix stuck updates.

6. Clean boot the Windows

  1. To clean boot Windows, open the System Configuration window by entering msconfig in Run.
  2. Navigate to the Services tab and check Hide all Microsoft services option first. After that, click on Disable all.
  3. Select the Apply option. Click OK to close the System Configuration window.
  4. Thereafter, a dialog box window opens from which users can select to restart.
  5. Select the Restart option on that window.

Some third-party antivirus software, firewalls, recording software, and other system utilities can also conflict with Steam and generate update errors.

If the issue is gone after disabling these services, start them one by one until you find the culprit.

7. Remove additional Steam library folders

Note icon NOTE
This method only works if you have two or more download folders set for Steam downloads.
  1. Open Steam Settings. Next, go to Downloads and choose Steam Library Folders.
     
  2. Select the drive that you want to make the default for downloads. Click the Gear icon and choose Make default.
  3. Select the drive you want to remove. Next, click the Gear icon and choose Browse Folder.
  4. A new window will now appear. Before proceeding, close Steam.
  5. Go one folder up, and you’ll see SteamMain directory. Rename it to SteamMainBackup.
  6. Open Steam again, and go to Steam Library Folders section.
  7. Select the drive you want to remove, click the Gear icon, and choose Remove drive.

Some of the above resolutions might fix Steam updates. Then users can launch Steam and enjoy the very best Windows games once again.

Users also reported that the Steam download goes on and off, but we covered that in a separate guide, so be sure to check it if you have more problems.

The Steam manifest unavailable error can cause issues with download, so it’s advised to fix it as soon as possible. For more information on Steam errors, don’t miss our error code 20 on Steam article.

Did you find a different solution? Share it with us in the comments below.

How to Keep Skype Always Active in Skype for Business

Skype for Business includes status indicators for its users. The app displays Available, Busy, Away, and Do not disturb status indicators, among others, for each contact shown within the app’s window.

However, the Skype for Business status indicator changes to Inactive after just five minutes of inactivity by default. That status changes to Away five minutes later.

Thus, the Skype for Business status indicator might change a little too quickly for some users. For example, a quick tea break will probably be enough to ensure the user status changes.

How can I appear Always Available on Skype?

  1. First, open the Skype for Business app window.
  2. Click the gear button on the right, select Tools, and click Options.
  3. Click the Status tab on the left of the Options window.skype how to always appear available
  4. First, click on the Show me as Inactive when my computer has been idle for this many minutes box. Enter 360 in that box, which is the maximum value.
  5. Then click on the Change my status from Inactive to Away after this many minutes box. Increase the value for that setting to 360.
  6. Press the OK button to exit the window.

Adjusting the value for the aforementioned status settings to 360 will ensure that the user status doesn’t change for 360 minutes.

Thus, the user status will not change to Inactive unless the desktop or laptop is idle for six hours. That should be enough time to ensure that the user status doesn’t change to Away while utilizing Skype for Business.

Note, however, that company system administrators can also adjust Skype for Business status settings changed by other users.

4 Best Bengali Typing Software for Windows 10 [Free Download]

The usual keyboard of a computer is in English. However, there are thousands of languages people speak around the world. Not everyone prefers writing in English or may choose to write in any other language for professional reasons.

That’s why Windows offers 202 keyboard layouts allowing you to write in over 7000 languages.

Recently, people also need to write in different languages due to the rise of the transcription industry. Bengali is one of those languages that people use in the transcription industry.

With over 230 million Bengali speakers in the Bengal region belonging to South Asia, this language is highly in demand. All they need to do is to download and add your preferred language to your system.

However, you would need separate software for added functionalities like special symbols and key mappings. Those who want to write in the Bangla language would need to download the PC software for Bangla typing.

We have listed some of the best free Bangla typing software for Windows that can help transcribe in Bengali effortlessly.

Type in Bangla seamlessly with these free typing tools

  1. LipiKaar – Highly reponsive
  2. Avro Keyboard – Built-in English-to-Bangla keyboard
  3. BanglaWord – Full word processing software
  4. Easy Learn Bangla – Easy to use

LipiKaar

LipiKaar bangla typing software for windows

LipiKaar is one of the leading PC software for Bangla typing that’s a typing system. This responsive and easy-to-use software helps users type in Bengali using the usual English keyboard.

It’s a simple application that enables users to create presentations, emails, word documents, or spreadsheets in Bengali.

The best part is that even if you are not proficient in English, you can use it easily since it helps you think in Bengali.

It works on a straightforward concept that helps users memorize words meticulously. In fact, it helps users to type even the most intricate words easily. This is why it is regarded as one of the best Bangla typing software.

It’s very different from transcription, as it allows the users to have complete typing commands. Developed for professional use, this program requires no keyboard stickers.

Price: the free version is available, and the pro version starts from Rs. 299

⇒ Get LipiKaar

Avro Keyboard

Avro Keyboard bangla typing software for windows

Avro Keyboard is the ultimate Bangla software package that’s completely Unicode based. This resourceful and customizable software implements all the popular Bangla typing techniques from India and Bangladesh in one interface.

The integrated Bengali spell checker makes it easier for the users to generate a flawless copy.

It also supports English to Bangla phonetic typing for home users. While beginners can use the Mouse-Based Bangla typing function, experts can use the traditional keyboard map for Bangla typing.

The best part is that the program features its effortless transcription scheme, which all the English inspires Bengali transcription software.

It’s especially beneficial for learning and is known for its user-friendly typing speed.

The floating preview Window, on the other hand, allows users to see how their English text is converted to Bangla on the spot.

What’s more? It even features an English-to-Bangla dictionary that contains around 150000 Bangla words and an auto-correct function for added support.

Best of all, the auto-correct dictionary can be edited by the users where they can add new words, modify them, or rectify any mistakes identified automatically.

Price: Freeware

⇒ Get Avro Keyboard

BanglaWord

BanglaWord bangla typing software for windows

BanglaWord is a clever word processing or typing software specially designed for those who want to write Bengali documents. The program lets you key in the Bangla text using only vowels and consonants.

The program automatically inserts the conjunct characters wherever possible or per the user’s requirement.

The Bengali alphabet is phonetically diagrammed on the usual keyboard in QWERTY format and is distinct from the Bangla font.

This lessens any learning curve required in the beginning and eliminates the need for material template design.

Moreover, the BanglaWord software enables users to send emails straight from the program with attached BanglaWord documents and RTF format text.

Additionally, it supports 200 plus Bengali fonts, offers a full word processing package, implements SmartBangla Typing Technology, and more.

Price: the free version is available on request, and the pro version available for $52.90

⇒ Get BanglaWord

Easy Learn Bangla

Easy Learn Bangla bangla typing software for windows

As the name suggests, Easy Learn Bangla intends to help users learn to read, speak, and write in Bengali proficiently.

It’s easy-to-learn software that’s perfect for tourists, school kids, and vacation planners as it helps them learn Bengali quickly. It’s also useful for business travelers and Bengali-speaking children from different countries.

From the introduction to the language or learning to read, write, and create the alphabet to making complete sentences in Bengali, it helps users learn Bangla pretty efficiently.

The program also offers guidance with basic conversations such as Time, Days, Months, Greeting, Farewell, etc., and also for advanced conversations like doctors, dentists, hotel booking, shopping, and more.

As a bonus, users can also take advantage of the talking dictionary.

Price: 1day free trial available, a pro version priced at $15

⇒ Get Easy Learn Bangla

These are some well-known, highly used, and reliable Bangla typing software for Windows that both beginners and advanced users can use.

So, make your choice and start writing proficiently with these easy-to-use programs.

Projector Not Turning On: Why & How to Fix [Epson, Dr.J]

If your Projector won’t turn on when you press the Power button or it shuts off abruptly, the issue can be with the projector’s power cable or other hardware failures.

This is not a new issue, as several other users are complaining about it. Fortunately, it is a problem that can be easily fixed, as shown in this guide.

How to fix the projector won’t turn on

1. Check your Projector Power

My projector own't turn on
  1. It is an obvious step, but check the power cord if you haven’t tried it. Check if it is correctly plugged in and if the main power switch to the projector is turned on.
  2. Check if the projector fan is spinning. This should give you a brief idea of whether the projector is receiving power.

2. Check Your Batteries

If you are using the Projector remote control to turn on the projector, you may want to check if the batteries have completely depleted.

Remove the batteries and rub them against your jeans for a few seconds until you see the surface is mildly hot. Insert the batteries and try to turn on the projector. If it works, you may need to replace the batteries.

3. Check your Projector Temperature

  1. All modern projectors come with a built-in safety feature that prevents the projector from being turned on if it has overheated or if the projector lamp is too hot.
  2. In the meantime, ensure that the filters are clean to make it possible for optimum air circulation. Without proper air circulation, the projector will overheat and refuse to turn on.
  3. Also, check the projector’s LED indicators that will flash if the projector is overheating. Check the projector manual to identify the correct indicator for overheating.

4. Check your Projector Lamp

  1. The projector still uses Lamps to project the image, and the lamp’s life can vary depending on the projector’s quality.
  2. Check your projector manual to check for the project bulb life. If the lamp has exceeded its life expectancy, you may need to replace the bulb to make the projector work again.
  3. Your projector may also have an LED indicator to detect lamp failure.

Most of the time, the projector won’t turn on the issue is due to a loose connection or faulty power cord. However, it can also occur if the projector board or bulb is defective.

Irrespective of the cause of the issue, you should be able to fix it with the solutions in this guide. In any case, check your projector manual for service to identify the problem.

If your projector fan won’t turn on for some reason, check our detailed guide to fix it quickly.

Feel free to let us know the solution that helped you fix this issue in the comments below.

LogonUI.exe System Application Error: How to Fix & Main Cause

Many users reported LogonUI.exe System Error on their PCs, and the problem is usually caused by issues with your graphics card. To know this for sure, you need to disable the graphics card in Safe Mode. This may also cause Exception_Illegal_Instruction.

How do I fix the LogonUI.exe application error?

1. Disable your graphics card in Safe Mode

  1. Press the Windows key and click the Power icon.
  2. Now, press and hold the Shift key and choose the Restart option from the menu.
  3. When your PC restarts, select Troubleshoot > Advanced options.
    advanced options logonui exe system error
  4. Choose the Startup Settings option.
    startup settings
  5. Next, click the Restart button.
    restart
  6. When your PC restarts, press the corresponding key to Enable Safe Mode or Safe Mode with Networking.
    enable safe logonui exe system error
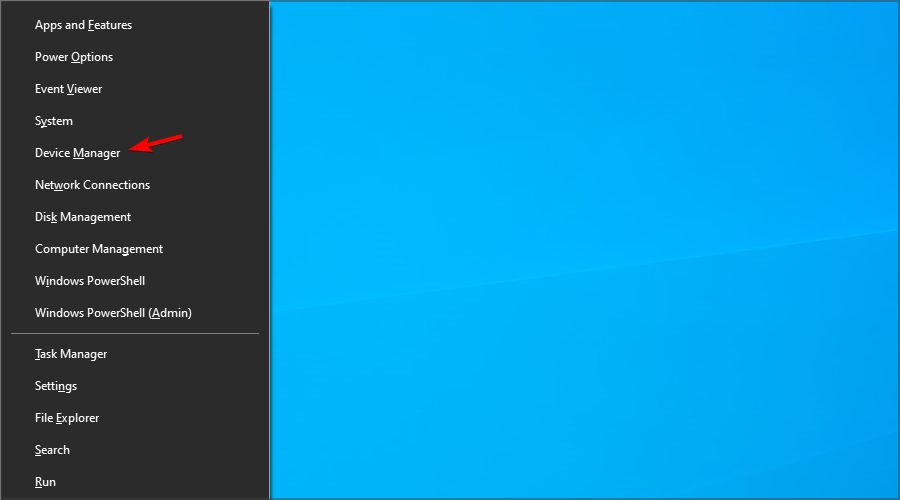
  7. Now, press the Windows key + X and choose Device Manager once your PC boots up.
    device manager
  8. Double-click the Display adapters option to expand it, and right-click your graphics card.
  9. Select the Disable device option.
    disable device
  10. Finally, click the Yes button to confirm the action.
    yes logonui exe system error

The LogonUI.exe system Error can appear due to your graphics card. Your drivers can be the problem and cause this error message to appear.

If you cannot boot your PC normally, you should enable Safe Mode, as shown above.

2. Disable the fingerprint scanner

Several users have reported that the fingerprint scanner can cause LogonUI.exe System Error to appear. You need to enter Safe Mode and disable your fingerprint reader to fix this problem.

After doing that, the problem should disappear, and you can access Windows without any issues.

We have to mention that you can also fix this problem simply by updating your fingerprint software and driver. To do that, visit your fingerprint manufacturer’s website and download the latest fingerprint software or driver.

3. Disable Micro Focus Password Self-Service

Users reported that LogonUI.exe System Error could appear due to the Micro Focus Password Self Service login extension. If you have this extension installed, remove it and check if that solves the problem.

It’s rather likely that Micro Focus has a new version of their software available, so if you want to continue using it, update it and check if that solves the problem.

4. Disable PIN login

  1. Press the Windows key + I to open the Settings app and select the Accounts option.
  2. Now, click the Sign-in options in the menu on the left, and scroll down to the PIN section.
  3. Click on the Remove button.
  4. Windows will ask you to confirm that you want to remove your PIN. Click on Remove.
  5. Now you have to enter your password and click on OK to remove your PIN.

PIN login is a simple way to protect your PC from unauthorized access, but sometimes problems can occur. Users reported that LogonUI.exe System Error is related to PIN login, and if you want to fix it, you need to disable it.

5. Perform SFC and DISM scan

  1. Press the Windows key + S, type cmd, and choose Run as administrator under Command Prompt.
    cmd admin
  2. Type the command below and hit Enter: sfc /scannowsfc logonui exe system error
  3. Now, wait for the process to complete. If the SFC scan fails, type the command below and press Enter to run it: Dism /Online /Cleanup-Image /Restorehealthdism restore

LogonUI.exe System Error can sometimes appear due to corrupted system files. However, you can easily fix this problem simply by performing an SFC scan.

If the SFC scan can’t run or if it can’t fix the problem, you need to use the DISM scan instead. After the DISM run successfully, you can now repeat the SFC scan.

6. Remove the Sensible Vision FastAccess application

  1. Press the Windows key + I and select the Apps option.
    apps
  2. Click the Sensible Vision FastAccess app and select the Uninstall button.
    uninstall
  3. Finally, follow the onscreen instructions to complete the process.

According to users, the issue was caused by the Sensible Vision FastAccess application. You need to find and remove this application from your PC to fix the problem.

If you cannot boot into your PC normally, you should enable Safe Mode, as shown in Solution 1.

7. Use Ctrl + Alt + Del shortcut

If you can’t log in to Windows due to LogonUI.exe System Error, you might be able to solve it simply by using a single keyboard shortcut.

A few users reported that they fixed the problem simply by pressing Ctrl + Alt + Del shortcut for 10 seconds. We have to mention that this might not be a permanent solution, so you’ll have to repeat it every time this error appears.

8. Use integrated graphics

According to users, LogonUI.exe System Error can appear due to your dedicated graphics card. One way to fix this problem is to disconnect your laptop from the power source. By doing that, you’ll force it to use integrated graphics.

If you want a more reliable solution, change your settings and set your integrated graphics as the default display adapter. Keep in mind that by using integrated graphics, you might experience lower performance in video games.

9. Perform a clean boot

  1. Press the Windows key + R, type msconfig, and click OK.
    LogonUI.exe Application Error msconfig
  2. Click the Services tab at the top, check the Hide all Microsoft services box, and click Disable all.
  3. Navigate to the Startup tab and click on Open Task Manager.
  4. Now, select each of the apps there and click the Disable button.
    LogonUI.exe Application Error task manager
  5. Finally, go back to the System Configuration window, click the Apply button, followed by OK, and restart your PC.
  6. A dialog will appear asking you to restart your PC. Choose the option to restart your PC now.

As we previously mentioned, LogonUI.exe System Error can be caused by third-party applications. To fix the issue, you need to disable all startup applications until you find the problematic one.

Once your PC restarts, start Windows normally and check if the problem still appears. If not, it means that one of the disabled applications or services is causing this problem.

To find out which application is the problem, you need to enable the apps in batches till you fix the faulty one.

10. Reinstall your graphics card driver

  1. If your Windows can’t start normally, start it in Safe Mode, as shown in Solution 1.
  2. Now, right-click the Start icon and select Device Manager.
    device manager
  3. Expand the Display adapters options and right-click your graphics card.
  4. Next, choose Uninstall device.
    uninstall device logonui exe system error
  5. Check Delete the driver software for this device and click on Uninstall button.
    uninstall button
  6. Finally, restart your PC.

Sometimes, the LogonUI.exe System Error can be related to your graphics card driver. This is especially true for AMD beta drivers. To fix this, you need to uninstall and reinstall the driver. You can also find the latest driver versions with a dedicated app like Fortect Driver Updater, saving both time and effort.

If you want to remove your graphics card driver completely, you can do that with Display Driver Uninstaller. This is a freeware tool that will remove your driver and all files and registry entries associated with it.

After you remove the driver, you have to install it again. To do that, visit your graphics card manufacturer’s website and download the latest driver for your graphics card.

11. Perform a System Restore

  1. Press the Windows key + S, type system restore, and choose the Create a restore point option.
    LogonUI.exe Application Error system restore search
  2. Click the System Restore button.
    LogonUI.exe Application Error system restore button
  3. Now, click the Next button.
  4. Now you should see the list of all available restore points. If available, check the Show more restore points option.
  5. Select the desired restore point and click on Next to proceed.
    LogonUI.exe Application Error system restore points
  6. Finally, click the Finish button and follow the onscreen instructions to complete the restoration process.

You might be able to fix LogonUI.exe System Error simply by performing a System Restore. This useful feature can restore your system and remove any recent problems.

If you can’t start Windows normally due to this error, you might have to perform System Restore from Safe Mode. Alternatively, you can access Advanced Startup Options and perform System Restore. To do that, follow these steps:

  1. Press the Power button to shut down your PC forcibly and power it on again. Force your PC to shut down again when the manufacturer logo shows. Repeat this thrice to start the Advanced recovery menu.
  2. Now, choose Troubleshoot > Advanced options.
    advanced options logonui exe system error
  3. Select System Restore.
    system restore
  4. Now, select your username and enter your password.
  5. Next, choose a restore point and click the Next button.
    restore point
  6. Finally, follow the onscreen instructions to complete the process.

After restoring your system, the problem should be resolved entirely.

12. Disable Anti-Aliasing for your graphics card

  1. Open Nvidia Control Panel.
  2. Choose Manage 3D settings from the menu on the left.
    LogonUI.exe Application Error manage 3d settings
  3. In the right pane, go to Global Settings, locate Antialiasing – Mode, and set it to Off.
  4. Some users also suggest turning off Multi-Frame Sampled AA (MFAA), so you might also want to do that.
  5. Now click on Apply to save changes.

Many users use Anti-Aliasing while playing their favorite video games, but sometimes this feature can cause certain problems.

Several users reported that this feature caused LogonUI.exe System Error to appear. To fix the problem, you need to disable Anti-Aliasing, the FXAA feature.

After doing that, the problem should be resolved completely. We showed you how to disable Anti-Aliasing for Nvidia graphics cards, but if you have AMD graphics, you should be able to disable it from Catalyst Control Center.

13. Uninstall CSR Wireless Stack software

Another third-party application that can cause the LogonUI.exe System Error is CSR Wireless Stack. If you have this application on your PC, remove it or update it to the latest version and check if that solves your issue.

14. Disable or uninstall your security software

According to users, your antivirus software can also cause LogonUI.exe System Error to appear. You might have to temporarily disable your antivirus to fix the issue and check if that solves the problem.

If the issue persists, you might try temporarily removing your antivirus software.

It’s worth mentioning that antivirus tools tend to leave certain files and registry entries behind, even after you uninstall them. You’ll have to use a dedicated removal tool to remove an antivirus tool from your PC completely.

15. Replace the problematic files

Sometimes LogonUI.exe System Error will tell you which file is causing this problem. Copy that file from a working Windows PC to your C:\Windows\System32 directory to fix the issue.

Sometimes you might not be able to access your Windows, and if that’s the case, you’ll need to boot to Command Prompt and copy the problematic file to the System32 directory using the command line.

This is an advanced solution, and if you’re not careful, you can cause even more problems with your operating system, so be extra cautious.

16. Reset Windows 10

  1. Restart your computer a few times during the boot sequence.
  2. Choose Troubleshoot.
    troubleshoot
  3. Now, select Reset this PC.
    reset logonui exe system error
  4. Finally, choose the Remove files option and follow the onscreen instructions to complete the process.

If other solutions can’t fix this problem, you might consider Windows 10 reset. This solution will remove all files from your system drive, so back them up beforehand.

In addition, you might also need a Windows 10 installation media, so be sure to create it using the Media Creation Tool.

LogonUI.exe System Error can cause many problems since it can prevent you from accessing Windows. However, you should be able to fix this problem simply by using one of our solutions.

There are other login errors you can encounter, and we wrote about resolving the Logon Balancing Error 88 in SAP GUI with our expert solutions.

If you are facing other issues, like the exception breakpoint has been reached, check our detailed guide to fix it quickly.

Feel free to let us know the solution that helped you fix this issue in the comments below.

Error 30016-22: How to Fix This Office Installation Bug

Are you getting error 30016-22 when installing Microsoft Office on Windows 10 Pro or Windows 11? If yes, and if you are looking for solutions, then, you have landed in the right place. There are multiple user reports that confirm facing error 30016-22 when installing MS Office.

The issue could pop up because of multiple reasons, such as insufficient disk space, Office license issues, internet connectivity, and much more. In this guide, we will give you multiple solutions that will help you fix the error 30016-22 when installing MS Office problem.

Why am I getting error code 30016-22 when installing MS Office?

Here are a few of the most common reasons you would encounter the error code 30016-22 when installing MS Office:

  • System files are damaged: One of the solutions that helped users was to fix missing or corrupt system files to resolve the error 30016-22 when installing the MS Office problem.
  • There are some issues with MS Office files: If the installation process was interrupted, then it might have caused the installer to skip some files, which is ultimately causing the error.
  • Network or firewall restriction: If you have set aggressive Firewall or antivirus settings on your PC, then this could block certain programs to access the network or important files.
  • Multiple copies installed: If you have multiple MS Office installations on your PC, then this could cause issues and trigger the error code 30016-22.
  • Disk space error: Disk space error or insufficient storage are some of the genuine reasons that could trigger the issue.

How can I fix error code 30016-22 when installing MS Office?

1. Disable Firewall

  1. Press the Win key to open the Start menu.
  2. Type Windows Defender Firewall and open it.
  3. Select Turn off Windows Defender Firewall on or off option from the left.
  4. Check the boxes of Turn off Windows Defender Firewall (not recommended) for both Public and Private networks.
  5. Click OK.

Windows Defender Firewall or any other third-party antivirus is often known to block certain programs from installing as they ask for elevated permissions.

In such a case, we would suggest you disable the firewall and then try installing the MS Office program. However, once you are done installing the program, it is recommended that you turn on Windows Defender Firewall or antivirus as it keeps your PC secure and protected.

If you are confused about which antivirus tool to get for your Windows 11 PC, then you can check out our dedicated list that mentions some of the best antivirus tools.

2. Uninstall all instances of MS Office

  1. Download the Office removal tool.
  2. Hit the Install button.
  3. Agree to the terms and conditions.
  4. Select the version you wish to install. If you see multiple instances of MS Office, check the boxes for each one.
  5. Click on the Next button.
  6. Uninstall the program.
  7. Restart your PC.
  8. Launch the MS Office installer.
  9. Follow the on-screen prompts and install it on your PC.

If there are multiple MS Offices installed on your PC, then it could conflict with the new installation. In such a case, you should uninstall all the instances of MS Office from your PC and give a clean slate for the MS Office installation.

3. Run the MS Office installer as admin

  1. Visit this website.
  2. Sign in with your Microsoft account associated with Microsoft 365.
  3. Select Install Office. (This will work only if your Microsoft 365 subscription)
  4. Select Other options in the Download and install Office window.
  5. Select the language you want to install the Microsoft 365 apps in.
  6. Check the box for Download an offline installer.
  7. Click Install.
  8. Locate the folder where you downloaded the offline installer.
  9. Right-click on the offline installer and select Run as administrator.
  10. Do note that you need to be connected to the internet for the offline installer to work.
  11. Follow the on-screen prompts to install MS Office and see if this fixes the issue or not.

Using the MS Office offline installer gives you the freedom to install Office at your convenience. You can keep the Offline installer handy with you on a USB drive and take it with you anywhere.

Also, one user suggested that running the offline installer as an administrator fixed the problem of error 30016-22 Installing Office. So, follow the above steps carefully and see if this fixes your problem.

4. Check Disk error

  1. Open File Explorer.
  2. Right-click on the target folder where you are installing the MS Office and getting error 30016-22.
  3. Select Properties.
  4. Switch to the Tools tab.
  5. Click on Check under Error checking section.
  6. Select the Scan drive option.
  7. The system will run a scan on the drive and will prompt you to apply the fixes if it finds any disk errors.

5. Fix corrupt system files

  1. Open the Start menu by pressing the Win key.
  2. Type command prompt and run it as an admin.
  3. Type the below command and press Enter. sfc /scannowsfc scan 0xc00000e
  4. Wait for the process to complete.

You can use the in-built SFC Scan tool to fix the corrupt or missing system files. It is an easy process, however, it isn’t as effective as a dedicated system repair and optimizing tool.

That is it from us in this guide. For users that are facing the cannot open MS Word, Excel, or PowerPoint. problem, we have a guide that will help them fix the problem.

Some users have reported that they are not able to zoom in MS Word. Such users can refer to our guide and easily resolve the problem. We also have a guide that will eliminate confusion on which version of MS Office will work on their Windows 11 PC.

If MS Office disappeared from your PC, then you can check out our guide and resolve the issue. We also have a guide to help you fix the burning issue of Olicenseheartbeat.exe stopped working.

For users facing MS Office product activation failed error, we have created a list of solutions that will help you resolve the error in no time.

Feel free to let us know in the comments below, which one of the above solutions helped resolve the error 30016-22 Installing Office.

Unable to Rename a Folder in Windows 11: How to Force it

There are some users that have reported that they are unable to rename a folder in Windows 11. The users confirm that the context menu disappears not allowing them to rename the folder. Else, they are treated with an error message.

Why am I unable to rename a folder in Windows 11?

After some research, we have found some of the most common reasons that would restrict you from renaming folders in Windows 11.

  • There is a glitch in the current Windows update: Chances are that there is a bug in the Windows update installed on your PC that is causing the problem.
  • Issues with the Windows Explorer: If the Windows Explorer or File Explorer itself is experiencing some issues then it will misbehave and trigger errors such as not allowing you to rename folders.
  • The folder is already in use: If you are using the folder or it is open in another window, then you won’t be able to rename it.
  • Your PC is infected with a virus: Often malware and viruses tend to restrict user input on a PC, which could be the reason you aren’t able to rename the folder in Windows 11.
  • You don’t own the folder: If you are not the admin of the folder, then you won’t be able to rename the folder.
  • Controlled Folder Access feature is enabled: Controlled Folder Access feature lets you protect an important folder from anyone making changes to it. Chances are this feature is turned on and preventing you from making the changes.

How can I fix unable to rename a folder in Windows 11 issue?

Here’s what you should do first:

  • Make sure that the folder that you wish to rename or modify isn’t open in the background or another window. Simply close all the Windows Explorer processes and go to the folder, right-click on it and select Rename.
  • You should also check and make sure that any file inside the folder isn’t opened.

1. Disable Controlled Folder Access

  1. Press the Win button to open the Start menu.
  2. Type Windows Security and open it.
  3. Select Virus and threat protection.
  4. Click on Manage ransomware protection.
  5. Toggle off Controlled folder access.
  6. Restart your PC for the changes to take effect.
  7. Locate the folder and see if you can rename it or not.

2. Take ownership of the folder

  1. Locate the folder that you aren’t able to rename.
  2. Right-click on it and select Properties.
  3. Switch to the Security tab.
  4. Click on Advanced.
  5. Click on Change for the Owner section.
  6. Select Yes in the prompt that appears.
  7. Type the username in the Enter the object name to select box.
  8. Click Check Names.
  9. Select OK.
  10. Check the box for Replace owner on subcontainers and objects.
  11. Click Apply and OK.
  12. Restart your PC.

Having the necessary privileges ensures that you can move, delete or rename the folder in question. You can easily get admin access to the folder by following the above steps.

3. Scan your PC for virus

  1. Press the Win button to open the Start menu.
  2. Type Windows Security and open it.
  3. Select Virus and threat protection.
  4. Hit the Quick Scan button.
  5. You can select Scan options and click on Full Scan for a deep scan of your PC.
  6. If the system detects any viruses, then follow the prompts to remove them from your PC.

Do note that the Windows Security antivirus tool is limited in features and often it is found that it isn’t as effective as dedicated antivirus software.

So, we would suggest you check out our list of the best antivirus software that you can use on your Windows 11 PC and see if this fixes the issue or not.

4. Check for Windows updates

  1. Press the Win + I keys to open the Windows Settings.
  2. Select Windows Update from the left pane.
  3. Click on the Check for updates option.
  4. Install the update, if there is a new one available.
  5. Restart your PC and see if you can rename the folder or not.

You should make sure that you are running the latest available version of the Windows OS to make sure everything runs perfectly fine without any issues.

5. Restart the Windows Explorer process

  1. Press Ctrl + Shift + Esc to open the Task Manager.
  2. Click on the Processes tab.
  3. Locate Windows Explorer.
  4. Right-click on it and select Restart.

Often due to multiple opened instances, Windows Explorer can misbehave. In such a case, it is better to restart the process and start from scratch.

6. Run SFC Scan

  1. Open the Start menu by pressing the Win key.
  2. Type the command prompt and open it as an admin.
  3. Type the below command and press Enter. sfc /scannow
  4. Wait for the process to fix the missing or corrupt system files.
  5. Restart your PC and see if this resolves the problem of unable to rename a folder in Windows 11 issue or not.

You can use the SFC Scan tool to fix missing or corrupt system files. While this is effective, it isn’t as effective as a dedicated third-party repair tool.

How to force rename a folder in Windows 11?

  1. Open the Start menu by pressing the Win key.
  2. Type the command prompt and open it as an admin.
  3. Type the below command and press Enter. REN "Full Path of Folder" "New Folder Name"
    • For example, to rename a folder with the current name XX in the C Drive to YY, the above command will look like REN “C:XX” “YY”.

That is it from us in this guide. If File Explorer is crashing or freezing in Windows 11, then you should check out our guide and fix the problem.

We also have a guide that will help you to delete files with a long name without any issues. You can also check out our guide that will help you disable the auto arrange in folders on Windows PC.

Feel free to let us know in the comments below, which one of the above-listed solutions helped you resolve the unable to rename a folder on Windows 11 PC.

How to Add a Period for Double-Tapping the Spacebar

There are some user reports that bring to light that they are not able to apply a period when they double-tap the space bar on their Windows 11 PCs. Some have even reported that for them the option to add a period when they double-tap the space bar isn’t visible on their Windows 11 PCs.

Well, if you are also experiencing the same issues, then either you are not looking at the correct place for the setting or you have recently discovered that you can add a period when you double-tap the space bar in Windows 11.

For both cases, we have mentioned some solutions in this guide that will help you get rid of the query in your head.

How do I add or stop the period after double spacing on Windows 11?

1. Use the Settings menu

  1. Press the Win + I keys to open the Settings menu.
  2. Click on Time & language option on the left pane.
  3. Select Typing.
  4. Expand the Touch keyboard drop-down.
  5. Check the box for Add a period after I double-tap the Spacebar option.

Once you have enabled the above-mentioned option, you can now apply a period when you double-tap the space bar on your keyboard. This solution works for those who are facing the double tap space bar period not working on Windows 11 issue.

2. Use Registry Editor

  1. Press the Win + R keys to open the Run dialogue.
  2. Type regedit and press Enter.
  3. Navigate to the below path. HKEY_CURRENT_USER\Software\Microsoft\TabletTip\1.7
  4. Right-click in the empty space on the right side.
  5. Select New and DWORD (32-bit) Value.
  6. Name the new DWORD as EnableDoubleTapSpace.
  7. Double-click on EnableDoubleTapSpace DWORD.
  8. In the Value data field, type 1.
  9. Set Base as Hexadecimal.
  10. Click OK.
  11. Close Registry Editor.
  12. Restart your PC.

In order to remove this feature of adding a period when you double-tap the space bar on Windows 11, you can simply change the DWORD value to 0.

3. Use a third-party tool

  1. Download and install AutoHotkey.
  2. Right-click on your desktop.
  3. Click on New.
  4. Select Text document.
  5. Give any name to the file and save it with the AHK extension. For example, Myscript.ahk.
  6. Open the newly created file.
  7. Paste the below script into the document. :*: ::{NumpadDot}{space}
  8. Click on File.
  9. Select Save.
  10. Close the document.
  11. Open the AutoHotkey.
  12. Click on New script.
  13. Click the Windows Search logo.
  14. Locate the script file that you created and select it.
  15. Hit the Create button.
  16. A new script file will be created.
  17. Right-click on it and select Run script.
  18. Open any app and start typing. You will see when you double-tap the spacebar, it inputs period.

This is another way to run other different scripts and get the option that isn’t available under the Windows Settings menu.

AutoHotkey is a pretty small-sized app and runs like a charm. There isn’t a learning curve apart from the steps mentioned above to run scripts and in our case, double-tap the space bar in Windows 11 to enter period.

If you are expending an issue where the keyboard isn’t working on your laptop or PC, then we would suggest you check out our guide that mentions some of the best solutions to fix the problem.

For some users, the keyboard switches language on its own, which could be a frustrating issue. Such users should check out the guide on how to fix keyboard switches language on its own guide.

The mouse and keyboard are two of the most important input devices on a PC. In case, you are having issues with it or your PC isn’t detecting the connected devices, then you can check out our guide to resolve the problem.

Feel free to let us know in the comments below, which one of the above solutions you used to accomplish the task of entering a period when you double-tap the space bar on your Windows 11 PC.

Fix: You Have Been Denied Permission to Access This Folder

In order to protect your files from unauthorized access, Windows 10 can lock certain folders. This means that some folders are inaccessible for certain non-administrator users.

Users reported You have been denied permission to access this folder message, and here we’re going to show you how to fix it.

What can I do if I don’t have permission to access this folder?

1. Change the ownership of the folder

  1. Locate the folder that you can’t access and right-click it. Choose Properties from the menu.
  2. Go to the Security tab and click the Advanced button.
  3. Look for the Owner section at the top of the window. Click the Change button.
  4. In the Enter the object name to select field, enter your account username.
  5. Now, click Check Names. If your input is correct, the input field will change.
  6. Click the OK button to save the changes.
    check names
  7. Next, go back to the Advanced Security Settings page and check the Replace owner on subcontainers and objects box.
  8. Click the Apply button, followed by OK.

As we already mentioned, many folders are protected by Windows, and you can’t access them without certain privileges.

However, by changing the folder ownership, you can fix You have been denied permission to access this folder message.

After taking ownership of the folder, you should be able to access it without any problems.

2. Modify your registry

  1. Download the Take Ownership.zip file.
  2. Open the zip file and extract the available files to any folder.
  3. Now, run the Install Take Ownership.reg file.
  4. When the confirmation message appears, click Yes to confirm.
  5. After doing that, right-click the problematic folder and choose the Take Ownership option from the menu.

Modifying the registry can be risky, so before you make any changes, we advise you to back up your registry just in case.

If you’re getting You have been denied permission to access this folder message, you can fix it by changing the ownership of that folder using your registry.

3. Use TakeOwnershipEx

  1. Start the TakeOwnershipEx tool.
  2. Click the Take Ownership button.
  3. Now select the problematic folder.
  4. After doing that, you’ll see a success message on the screen.
  5. Optional: If you want, you can always restore ownership settings to default by using the Restore Ownership option.

Unlike the previous solution, this one offers a way to restore ownership, which can be useful if trying to access any system file.

If you’re not comfortable modifying your registry and want to use a third-party tool to fix You have been denied permission to access this folder message. Feel free to use this simple tool.

4. Close Shared Folder Sessions

  1. Press Windows key + X and select Computer Management from the menu.
  2. When Computer Management opens, navigate to System Tools > Shared Folders > Sessions.
  3. You should now see all available sessions. Right-click them and choose Close Session from the menu.
  4. You can also right-click Sessions in the left pane and choose Disconnect All Sessions.
  5. After that, close Computer Management and check if the problem is resolved.

Several users reported that you have been denied permission to access this folder issue occurs even after changing ownership settings. If that’s the case, you might have to close Shared Folder Sessions.

5. Try using a different explorer application

If you’re getting You have been denied permission to access this folder message, you might want to try using a different explorer application.

File Explorer is the default application for file access in Windows 10. However, it is not free from issues like frequent crashes and the inability to open some folders.

Hence, we suggest that you download Q-Dir. Simply download and run this portable application and try accessing the folder using this tool.

6. Copy the folder to a different location

You can try a simple workaround if you can’t access a folder because you have been denied permission to access this folder message.

According to users, you can copy the folder to a different location and try it access it from there. This might not be the best solution, but it works according to users, so try it out.

7. Use Command Prompt to access files

You have been denied permission to access this folder message can prevent you from accessing certain folders, but there’s a way to circumvent this issue.

According to users, you can access any folder on your PC simply by using Command Prompt as administrator. You only need to press the Windows key, type cmd and select the Run as administrator option under Command Prompt.

After Command Prompt starts, you can access and copy files from the problematic folder.

8. Create a new group and add your user account to it

  1. Press Windows key + R, type lusrmgr.msc, and press Enter.
  2. When the Local Users and Groups window opens, select Groups in the left pane.
  3. Right-click Groups and choose New Group.
  4. A New Group window will appear. Enter the desired Group name. Now, click the Add button.
  5. In Enter the object names to select field, enter your username or Microsoft account email. Click Check Names.
  6. If your input is valid, click OK.
  7. Click the Create button to create a new group.
  8. Now, close that window.

According to some users, they fixed you have been denied permission to access this folder issue simply by creating a new group and giving ownership of the folder to the new group.

After creating a new group, you need to change the ownership of the problematic folder. You can do that simply by following the steps from Solution 1. Remember that you need to enter the group’s name while changing the ownership instead of your username.

In addition, if you see Replace all existing inheritable permissions on all descendants with inheritable permissions from this object option while changing the ownership, be sure to select it.

Fix – You have been denied permission to access this folder USB

1. Connect your USB flash drive to a different PC

Many users reported that they are getting You have been denied permission to access this folder message while trying to access certain folders on removable storage.

If you have the same problem, we advise you to connect the problematic USB flash drive to a different PC. After that, create a copy of the problematic folder and delete the original.

Rename the copy, and connect the flash drive back to your PC. After doing that, the issue will be resolved, and you should be able to access that folder.

2. Use xcopy command

If you can’t access a folder on your USB flash drive due to this error, we suggest that you try using the xcopy command.

This is a bit advanced process, so before you can perform it, we advise you to research and learn how to use xcopy command.

In addition, you’ll need to use this command from Command Prompt. We already explained how to start Command Prompt as an administrator in one of our previous solutions, so be sure to check it out.

3. Uninstall the USB driver

  1. Press Windows key + X and choose Device Manager from the menu.
    device manager
  2. Go to the View menu and check Show hidden devices option.
    show hidden
  3. Now, Double-click the Universal Serial Bus controllers option and right-click your USB flash drive.
  4. Select the Uninstall device option.
    uninstall device You have been denied permission to access this folder
  5. Finally, click the Uninstall button to confirm the action.
    uninstall button

According to users, they fixed You have been denied permission to access this folder message simply by uninstalling their USB device driver.

Now you need to connect your USB flash drive to a different port on your PC. After doing that, Windows 10 will automatically install the necessary drivers, and the issue will be fixed.

4. Make sure that you’re authenticated

Users reported You have been denied permission to access this folder message on certain HP computers. According to them, they cannot access their USB flash drive until they are properly authenticated.

To do that, you need to click the HP icon in the lower right corner and follow the authentication process. This is a security measure on some HP computers, and if you own an HP PC, we advise you to try this solution.

5. Change the security settings

  1. Open HP Client Security.
  2. Navigate to the Device Permissions.
  3. Click on Change.
  4. Now change the removable storage settings and allow full access for administrators and users. A few users reported that this option is grayed out but can still be changed.
  5. After doing that, save the changes and try to access your USB flash drive again.

If you’re having this issue on your HP computer, you might be able to solve it by changing the security settings.

This fixed You have been denied permission to access this folder message for some users on their HP computers. So, you might want to try this solution out.

6. Uninstall HP software

  1. Press the Windows key + I to open the Settings app and select the Apps option.
    apps You have been denied permission to access this folder
  2. Now, select any HP software there and click the Uninstall button.
    uninstall
  3. Finally, follow the onscreen instructions to complete the process.

The HP software can often interfere with your USB flash drive and prevent you from accessing it. If you’re getting You have been denied permission to access this folder message on your HP computer, you can solve it by removing HP software.

7. Change the ownership of the drive

You have been denied permission to access this folder is an ownership issue, and in most cases, you can fix it by changing the ownership. If you have this problem with your USB flash drive, we advise you to change the drive owner.

To do that, right-click your USB flash drive and choose Properties. Now go to the Security tab and follow the steps from the first solution in this article.

After taking ownership of the desired drive, the issue should be resolved.

8. Use Partition Wizard software

According to users, you can fix You have been denied permission to access this folder message simply by running Partition Wizard software. You need to run this software and let it scan your USB flash drive.

After doing that, close the application, and you should be able to access the USB drive without any problems.

Fix – You have been denied permission to access this folder no Security tab

1. Connect your drive to a different PC

You might need to change your security permissions if you have a problem accessing certain folders due to the You have been denied permission to access this folder message.

We already explained how to do that in our previous solutions. However, some users reported missing the Security tab on their PC.

This is an unusual problem, and if you have this issue, you might have to remove your hard drive or removable storage and connect it to a different PC. After doing that, you should be able to access the files and make the necessary changes.

This is a workaround, but if you need to access your files urgently, try it out.

2. Use Command Prompt

  1. Press the Windows key, type cmd, and click Run as administrator under Command Prompt.
    cmd admin You have been denied permission to access this folder
  2. Type the commands below and press Enter after each: takeown /F <folder path> /R /D Ytakeown C:>icacls <folder path> /grant administrators:F /Tc icals
  3. Be sure to replace <folder path> with the correct path to the folder that you can’t access.
  4. After running those commands, close Command Prompt and check if the problem is resolved.

Since You have been denied permission to access this folder message requires you to change your security permissions, you need to use the Settings tab.

Unfortunately, several users reported that this tab is missing on their PC. However, this doesn’t have to be a major problem since you can take ownership of the folder from Command Prompt.

3. Change Group Policy settings

  1. Press Windows key + R, type gpedit.msc, and press Enter.
  2. Navigate to the path below in the left pane: User Configuration > Administrative Templates > Windows Components > File Explorer
  3. In the right pane, double-click the Remove Security tab.
  4. Now, select the Disabled option from the menu and click the Apply button, followed by OK to save changes.
  5. Close Group Policy Editor.

If you can’t find Settings tab in Properties window, you might have to change Group Policy settings. This is a simple procedure.

After making the changes, the Security tab will become available and you should be able to access it and change the folder ownership.

You have been denied permission to access this folder message usually appears if you don’t have the necessary privileges to access a specific folder.

In most cases, you can fix this problem simply by changing the ownership of the folder or by removing the problematic apps.

If you are facing a similar issue in you don’t have permission to open this file on Windows 10, check our detailed guide to fix it. Additionally, we can help you out if you encounter a pop-up saying “Unable to execute file in the temporary directory.“

Feel free to let us know the solution that helped you fix this issue in the comments below.

Windows Cannot Find PowerShell.exe: 5 Ways to Fix It

When you’re using Windows, it’s usually a good idea to keep a few basic utilities in your toolkit. One of the most important ones is PowerShell – Microsoft’s command-line interface for Windows. It’s fast, powerful, and easy to use but sometimes you’ll have a hard time locating it.

If you can’t find the executable file, nothing will happen when you click Run as administrator when you try to open PowerShell. Luckily, this is no cause for alarm as you shall see below with easy troubleshooting solutions.

Why can’t I open Windows PowerShell? 

If you’re trying to launch the PowerShell executable file but for some reason, you get the Windows cannot find PowerShell.exe message, below are some possible reasons:

  • PowerShell is open in the background – The most common reason why you may be unable to open Windows PowerShell is that the program has already been opened.
  • Incorrect path – You may have installed it in a different location from the default location, or you may have deleted it from your system after uninstalling an older version of Windows. If you’re wondering where to find PowerShell exe, its default location is: C:/Windows/System32/WindowsPowerShell/v1.0/powershell.exe
  • Corrupt user profile – If the user account you’re using is corrupt, you may have trouble launching programs.
  • Outdated version of PowerShell – If you try to open an older version of the utility, it won’t work properly because the latest version contains important bug fixes that were removed from older versions.
  • Corrupt System Files – If Windows is having a hard time locating some files, it’s probably because some system files have been corrupted.
  • Incorrect permissions – You might not have permission to access the utility. Learn more about the differences between a standard and an administrator account.

What can I do if I can’t find Windows PowerShell?

As always, we recommend starting with the basic steps before any advanced troubleshooting:

  • Verify that your computer meets the minimum system requirements to run PowerShell.
  • Double-check the spelling and ensure there are no typing errors.
  • Ensure that there are no other programs running in between when starting up Windows PowerShell so that there is enough memory available for it to run properly.
  • Open PowerShell using the Run command and here’s how to add the Run command to your Start Menu.
  • Run the Windows Update feature to ensure all utilities are up-to-date. You can also use the command line to run Windows Update.
  • Try restarting your PC to close any instances of PowerShell.

1. Create a PowerShell shortcut

  1. Right-click on an empty space on your Desktop and select the New Shortcut option.
  2. Click the Browse button and click on This PC.
  3. Navigate to Drive C or where your Windows files are located, click on the Windows folder then expand SysWOW64.
  4. Double-click on the WindowsPowerShell folder and click on the powershell.exe file.
  5. Next, click OK and then the Finish button to create the shortcut.
  6. Now, click on the PowerShell shortcut you just created on the Desktop to open.

2. Re-enable Windows PowerShell

  1. Press the Windows + R keys to open the Run command.
  2. Type appwiz.cpl in the text field, and click OK.appwiz the operating system is not presently configured to run this application
  3. On the left panel of the main window, click on Turn Windows features on or off.
  4. Scroll down, locate the Windows PowerShell entry, uncheck the option and then click OK.
  5. Restart the computer for the changes to come into effect.
  6. Once the PC turns on, repeat steps 1 through 4 but this time, tick the checkbox for Windows PowerShell, and click OK to re-enable it.
  7. Wait for it to install.

3. Run an SFC scan

  1. Hit the Windows key, type cmd in the search bar, and click Run as administrator.cmd-run-admin-w11 unexpected kernel mode trap windows 11
  2. Type the following command and press Enter: sfc /scannowsfc scannow command

4. Update PowerShell 

  1. Right-click on the Start Menu and select Windows Terminal (Admin).
  2. Type the following command and hit Enter: Winget install --id Microsoft.Powershell --source Winget

5. Switch to another user account

If you’re having trouble finding PowerShell.exe, you can switch to another user account or create a new one and then try it again.  This is usually done to test whether the current user account has a problem or it’s an issue with Windows.

If it works, then you’ll know that it’s a problem with your profile and take the necessary steps to repair it.

Should the proposed solutions above fail, as a last resort, consider resetting your PC. Resetting the PC will remove any user accounts and any data that was stored on the computer. This can be a good way of making sure that Windows PowerShell is installed correctly.

You may also run into a problem where PowerShell is not working so don’t hesitate to check out our comprehensive article for available fixes.

Sometimes Windows may fail to recognize PowerShell as an internal or external command but we’re here to help you bypass such errors.

We appreciate your feedback so share with us in the comment section below what solution worked for you.

Fix: Snip and Sketch is Not Working on Windows 11

Snip and Sketch and Snipping Tool, two handy built-in options to capture screenshots, were integrated and released with the latter’s name in Windows 11. Yet, the tool remains prone to errors. One of the most common is Snip and Sketch not working in Windows 11.

While many reported that Snipping Tools was missing, others had quite a peculiar problem where Snip and Sketch wouldn’t cover the whole screen when capturing screenshots on a multi-monitor display setup. So, let’s find out all about it.

Why is my Snip and Sketch not working?

The particular problem where the Snip and Sketch tool does not cover the whole screen is due to a different scaling set for the various monitors. And as a result, users can’t capture screenshots in Windows 11.

For instance, if your primary display is set to 125% while the second one is at 100%, Snip and Sketch will have trouble functioning optimally. It is, undoubtedly, a software problem, but until this get’s resolved, there are a few workarounds that will do the job.

What can I do if Snip and Sketch is not working in Windows 11?

Before we head to the slightly complex solutions, try these quick tricks first:

  • When capturing a screenshot on the secondary display with a different scaling, try covering the monitor’s width first and then move along the length.
  • The bug has been reported to Microsoft, and in all likelihood, they are working on a fix which should soon be available. So, make sure you install all the updates for Windows 11.
  • A few users reported that the Snip and Sketch tool, when opened manually from the Search menu, usually works fine on the first attempt. Though a slight hassle, you can manually launch it when capturing a screenshot.

If these don’t work, the solutions listed below surely would.

1. Set scaling on all monitors to 100%

  1. Press Windows + I to open Settings, and choose Display on the right in the System tab.display
  2. Now, select the primary display from the two.primary display
  3. Scroll down and select 100% from the Scale dropdown menu.change scaling to fix snip and sketch not working windows 11
  4. Again, head back to the top and select the other display.secondary display
  5. Similarly, choose 100% as the scaling for it as well.100% scaling to fix snip and sketch not working windows 11
  6. If you have any other monitors as a part of the setup, choose the same scaling for them.
  7. Now, reboot the computer for the changes to come into effect.

That’s it! One of the easiest ways to fix things when Snip and Sketch or Snipping Tools is not working in Windows 11 is to set the Scale as 100% for all the monitors. Though it will affect the display, this seems to be the most viable workaround until a patch is released.

2. Configure the laptop as your main display

  1. Press Windows + I to open Settings, and click on Display on the right.display
  2. Now, click on the Identify button to check how the various displays are positioned and identify the laptop.identify
  3. Next, select your laptop, and then click on Multiple displays to expand the options under it.multiple displays
  4. Finally, tick the checkbox for Make this my main display.set laptop as main display to fix snip and sketch not working windows 11

3. Position the primary display to the right

Another workaround that fixed things when Snip and Sketch was not working in Windows 11 was to position the primary (main) display to the right. All you have to do is head to the Display settings and drag the main display to the right.

primary display to the right

Position all the other monitors to the left of the main display, which could be your laptop, and it should do the trick.

4. Repair and reset Snip and Sketch

  1. Press Windows + I to open Settings, head to the Apps tab from the navigation pane, and then click on Installed apps.installed apps
  2. Locate or search for Snipping Tool, click on the ellipsis next to it, and choose Advanced options.snipping tool
  3. Scroll down and click on Repair.repair to fix snip and sketch not working windows 11
  4. Wait for the process to complete and verify if Snip and Sketch starts working. In case it doesn’t, click on Reset.reset to fix snip and sketch not working windows 11
  5. Again, click Reset in the confirmation prompt.reset

In a few cases, it was a problem with the Snip and Sketch tool itself that led to it not working in Windows 11. And a simple fix is to Repair or Reset the app.

5. Use a third-party tool

When nothing else works, you can always use a reliable third-party snipping tool to capture screenshots in Windows.

These usually offer more options than the built-in Snipping Tool (Snip and Sketch) and serve as a great alternative. So, try one until Microsoft releases a patch for the bug leading to Snip and Sketch not working in Windows 11.

Also, find out all the ways you can capture a screenshot in Windows 11.

Do not forget to tell us which fix worked for you in the comments section below.

How to Show Drive Letters Before Drive Name on Windows 11

File Explorer shows drive letters after their names by default. Windows 11 doesn’t include any built-in setting to change the letters to appear before drive names.

However, that doesn’t mean you can’t configure Explorer to show drive letters preceding their labels. You can set drive letters to appear before names by manually tweaking the registry and using a third-party tool.

How can I set drive letters to appear before their names in Windows 11?

1. Edit the registry and restart File Explorer

  1. Click the Search icon from the taskbar, type regedit, and select the Registry Editor result.
    Registry Editor change drive letter windows 11
  2. Next, click on the Registry Editor’s address bar and clear the text within it. Open the Explorer key by inputting this address: Computer\HKEY_CURRENT_USER\Software\Microsoft\Windows\CurrentVersion\Explorer
  3. Right-click Explorer in the Registry Editor’s left sidebar, select New, and click DWORD (32-bit) Value to add a DWORD.
    The DWORD option change drive letter windows 11
  4. Input a ShowDriveLettersFirst title for the DWORD.
  5. Double-click ShowDriveLettersFirst to view its Edit DWORD window.
    ShowDriveLettersFirst DWORD change drive letter windows 11
  6. Input 4 inside the Value data box and click OK to save.
    Edit DWORD window change drive letter windows 11
  7. Press the Ctrl + Shift + Esc keys together at the same time to open Task Manager.
  8. Right-click Windows Explorer on the Processes tab and select Restart.
    Restart option change drive letter windows 11
  9. Then, press the Windows key + E to open File Explorer and click This PC to see the result. Drive letters will now precede their labels.
    The Local Disk drive icon change drive letter windows 11

This could help you distinguish between external hard drives, making it easier to change the drive labels; read this guide to know the steps.

2. Use the Drive Letters Tool

  1. Download the Drive Letters Tool app.
  2. Press the Windows key + E to start File Explorer, go to the Downloads folder, and extract the zip file of the tool.
    Extract All option change drive letter windows 11
  3. Click on the DriveLettersTool executable file.
  4. Now, click on Apply for the second option, to show the drive letter before the name.
  5. Now, relog or restart your PC for the changes to take effect.
  6. Press the Windows key + E to start File Explorer, click on This PC and you will see that now, the drive letter will appear before the name.

On the Drive Letters Tool’s software description, it doesn’t appear that it works on Windows 11, but we have tested the app, and as you see, it works just fine.

How useful this customization is for rearranging drive letters in Explorer may be debatable. Whether you prefer to have drive letters before or after their labels is a matter of preference.

Users who prefer to have drive letters before labels can easily rearrange them with both methods above. However, a third-party app offers users many more options for customizing Windows 11.

Microsoft news recap: Windows 10 download sales to end soon, GitHub has over 100 million active users, and more

Microsoft news recap is a weekly feature highlighting the top Microsoft news stories of the past week. Sit back, grab some coffee, and enjoy the read!

Microsoft’s GitHub now has over 100 million active users

In a few short years since Microsoft’s acquisition of GitHub, the company has now crossed over 100 million active users, 2 years ahead of its target of hitting that figure by 2025. At the time of acquisition, GitHub had reached 31 million active users.

Microsoft is working on a new version of Edge, code named “Phoenix”

A new version of Microsoft Edge is reportedly in the works, codenamed “Phoenix”, and designed to refresh the Edge experience, potentially with a Fluent design refresh, new productivity features, and more.

Microsoft’s Q2 2023 held together by continued cloud growth, as declining PC shipments hammer revenue

Microsoft’s fiscal Q2 2023 showed a 2% year over year growth in revenue, but behind the headline stat lies some interesting detail. Mirosoft’s cloud business propped up the majority of that growth, as other areas of its business, including Windows licensing and hardware sales (including Xbox), took a significant hit. At the same time services also saw a decline. This tallies with a bleak outlook of the PC market, with shipments falling, according to both Gartner and Canalys.

Microsoft set to stop selling Windows 10 downloads on January 31

From January 31, Microsoft will no longer sell Windows 10 downloads, as it places its focus firmly on Windows 11.Whilst the OS will continue to be supported until at least October 2025, ceasing sales of new licenses could be a way of Microsoft trying to push adoption of Windows 11 and reduce the burden further down the line of users having to transition at a later stage.

That’s it for this week. We will be back next week with more Microsoft news.

Microsoft Teams Chat Monitoring: What Is It & How It Works

While the Microsoft Teams app allows you to initiate a private chat with other users, the recently launched monitoring policy can control these chats.

The purpose of this feature is to ensure compliance and security for corporates and also help educators to prevent users from initiating private chats when a monitor is unavailable.

Can Microsoft Teams chat be monitored?

Yes. Microsoft Teams now has this new feature where employers or educators can monitor employees or students.

So, if you are the IT administrator, you can monitor employees’ messages in Microsoft Teams. But the company needs a proper license, as well as plans and policies in place.

Therefore, monitoring the Microsoft Team chats great idea if you are concerned about the safety of your company’s confidential data, preventing unknown users from joining or inappropriate chats between the learners.

Employers have access to a lot of information related to employees (if not all) that they create using Microsoft Teams. Here’s a quick rundown of some of the activities employers can monitor.

What can my employer see on Microsoft Teams?

1. Compliance

  1. Open Microsoft 365 admin center, expand the menu on the left side, and click on Show all.
  2. Next, under the Admin centers section, click on Compliance. admin center, compliance
  3. Here, the administrator can check all Microsoft offerings, such as emails, Skype, and even Teams.

2. Content search

  1. Expand the menu on the left side of the admin center, go to the Solutions section, and select Content search. content search
  2. Now, on the right, click on the New search tab. Here, you can run a search based on sender, author, date, location, subject, and more. search for content
  3. You can also check Teams chat messages, chat histories, private chats, and even deleted messages.

In fact, your employer can also see the deleted contents of your chat, hence, it’s suggested to be careful about what you share.

If Microsoft can’t load images in Teams chat, you can follow the instructions in our detailed guide to fix the issue.

3. Teams Admin center

  1. Launch the Microsoft 365 admin center, and go to the Teams admin center.
  2. Next, click on Teams on the left side, expand the Analytics & reports section, and select Usage reports. check teams usage reports
  3. The employer can view all types of reports on the right-hand section, filter them by date range, and even export the reports to Excel.
  4. You can also check other data like call details, Apps usage, Teams device usage, Teams usage, and Teams user activity. check usage reports

If Admin has disabled your Microsoft Teams for some reason, here’s how they can enable it for you.

4. Users

  1. Click on the Microsoft Teams admins center menu on the left, and select Users.
  2. Next, click on Manage users, and on the right, you can check the names of all the employees including their personal information (phone number, location, online status, username, etc.).check user details
  3. You can also check the number of meetings, calls, and the quality of the calls for the last 7 days for each employee.

For echo problems during meeting calls on Microsoft Teams, we have some quick workarounds to help you fix the same.

5. Reports

  1. Open the Microsoft Teams admin center, expand the menu on the left, and select Reports.
  2. Under this section, you can check the Productivity score that tells you about the overall productivity of the company based on the usage of Microsoft tools. check user reports
  3. You can also select Usage to check how different users are responding to the Microsoft apps and services.

In addition to chats and activities, your employer can also see any content created and shared in a Microsoft Teams channel.

They can also view other activities like creating a team, deleting a team, logging in, and logging out.

Moreover, your boss can also see the Microsoft Teams files and documents you are working on or comments or feedback on these files.

Whether you are using a webcam on Microsoft Teams or using just audio to make a call, your employer knows it. However, they cannot listen to your calls.

While your employer has access to a lot of data within Teams, they can’t see the contents of chats, emails, direct messages with other team members, or messages outside of Teams.

Your employer can also see if you’re idle, but, you can easily prevent idle status in Microsoft Teams with these tips.

Also, while you are here, discover Microsoft Teams’ Walkie Talkie!

If you have any other queries related to Microsoft Teams chat monitoring you can let us know in the comments section below.

How to Change the Network Band in Windows 11 [2.4 & 5 GHz]

Windows 11 is no doubt the best OS yet with all its promising features. One more thing you can benefit from is by changing the network band. Not only can you make your PC faster, but also enhance your browsing experience.

5G is the next generation of wireless connectivity, providing speeds up to 10 times faster than 4G. It’s designed to provide a seamless user experience with high capacity and low latency. If your PC is set to 2.4 GHz, you can upgrade to 5 GHz, and below is how to do it.

Does Windows 11 support 5 GHz Wi-Fi?

5G network is a new generation of wireless broadband technology. The primary advantages of 5G are much faster speeds and lower latency than those offered by earlier generations of cellular networks.

When it comes to Wi-Fi, Windows 11 does support 5 GHz Wi-Fi. If you have more than one network device and want your computer to connect to them all, you need a router that supports band steering and has enough bandwidth for all of them.

You can set up your computer to use the 5 GHz band if you’re using a wireless router that supports it and is connected to the internet. 

Although Windows 11 supports it, if you don’t have the requisite hardware to accompany it, you will not be able to change your network band. You need to make sure that your router and devices are compatible with this new feature.

In order to use this technology, you need:

  • A router with an integrated antenna or one with an external one. Most routers sold today will support 5 GHz. If you’re looking for a new router, check out our recommendations for the best routers.
  • PC or laptop that supports 5 GHz Wi-Fi.

Why should I upgrade to the 5 GHz network band?

Now that you know Windows 11 supports 5 GHz, you’re probably wondering what all the fuss is about when it comes to upgrading your network bands. Here are some convincing reasons:

  • Improved speed – The 5G network will be able to deliver speeds up to 10 times faster than the current 4G LTE networks. If you’ve been experiencing slow Wi-Fi, this is your sign to upgrade.
  • Stable connection – A 5 GHz network is much more stable than 2.4 GHz or older Wi-Fi networks, so you’ll see fewer dropped connections as you move around your home or office.
  • Better range – With 5 GHz, you will be able to connect your devices more easily and have better coverage in areas where there are more devices connected at once.
  • Fewer router crashes – If your internet randomly disconnects, the 5 GHz band can provide a more reliable connection than the previous generation of wireless networks.
  • More bandwidth – It allows you to use more devices at the same time with less interference from other networks or devices on your local area network (LAN). This means you can do away with bandwidth limiters.

How do I change the Network band in Windows 11?

Before you change your network band, ensure you check off the following:

If the above check out, proceed to change your network band in Windows 11 by following the steps below.

  1. Hit the Windows key, type Device Manager in the search bar, and click Open.
  2. Navigate to Network adapters and double-click to expand.
  3. Right-click on your network adapter and select Properties.
  4. Click on the Advanced tab and locate the Preferred Band.
  5. In the Value drop-down menu, select Prefer 5GHz band then click OK.
  6. Restart your PC.

How do I check if my PC is 5 GHz-compatible?

As mentioned above, one of the prerequisites to changing your network band in Windows is to ensure your PC supports 5 GHz. If you’re not sure whether your PC is compatible with 5 GHz Wi-Fi, here’s how to find out:

  1. Hit the Windows key, type cmd in the search bar, and click Run as administrator.cmd-admin hp printer won't scan
  2. Type and Enter the following command: netsh wlan show drivers
  3. Locate Number of supported bands section or Radio types supported.
  4. The Number of supported bands should list 5 GHz as a supported mode and in the Radio types,  802.11a, 802.11g, and 802.11n to show compatibility.

If your PC hasn’t listed any of the above modes, it means that it is only compatible with the 2.4 GHz. In this case, there’s not much you can do. You can always upgrade your PC or switch to a tri-band router.

We also have an answer for when your 5 GHz hotspot is unavailable in Windows 11 so don’t hesitate to check out our detailed article to address this issue.

And that’s how to easily change to a 5 GHz network band in Windows 11. Once you make the change, be sure to check your network connection details and ensure that the change has been applied.

Leave us a comment down below on your experience so far.

How to Fix Chassis Intruded Fatal Error System Halted

The Chassis intruded Fatal Error… System Halted error message is usually a hardware issue. The message shows when the chassis or the cabinet in which the motherboard is fitted gets open somehow.

In essence, the error message can be seen as a security mechanism provided by some OEMs. Knowing this, we will show you how to get rid of the error message in the ensuing sections of this guide.

How to fix the Chassis intruder fatal error?

1. Put the cabinet back in place

This often is the easiest and the most logical solution to the issue. However, before physically putting it in the cabinet, you must put the jumper back on the pin-marked chassis signal on the motherboard.

In some cases, there might be a switch mechanism that gets engaged once the cabinet is properly locked in its slot.

2. Clear CMOS

  1. Turn off the PC and remove all peripheral devices connected to it. Also, disconnect the AC power cord as well for additional safety.
  2. Open the PC cabinet cover.
  3. Locate the battery fitted on the motherboard. Refer to the company manual if needed.
  4. Remove the battery. Remember the + and – side to prevent nasty surprises later on.
  5. Wait for at least 5 minutes.
  6. Insert the battery again, but make sure that it’s inserted properly.
  7. Place the cabinet cover securely.
  8. Connect to the AC outlet and start your PC.

The above represents the battery method to clear CMOS, and the same can also be achieved using the jumper method.

However, it can be a bit more tricky and is best done under the supervision of a hardware specialist if you aren’t too comfortable with the motherboard and its components.

3. Disable Chassis intrusion

  1. Restart your PC.
  2. Press Del or F2 repeatedly under the BIOS screen when the PC has just started to boot. Refer to the company manual for the exact key applicable for your PC to enter into BIOS.
  3. Locate the Chassis intrusion feature and set it to Disabled.

The above steps should be all needed to take care of the Chassis intruded! Fatal Error… System Halted error message. Some of the steps mentioned above require hardware skills, so you might want to contact a professional.

If you are facing a fatal system error on Windows 10, check our detailed guide to fix it quickly.

Feel free to let us know the solution that helped you fix this issue in the comments below.

Chassis intrusion means that the chassis or the cabinet in which your motherboard is fitted is opened. This error seeks to warn the user if the cabinet is breached.

The mechanism uses a connector on the motherboard to detect if the chassis is removed/ replaced.

That said, the error message can also appear if there are issues with the BIOS or CMOS. However, notwithstanding how intricate the error might seem, it can be resolved easily and quickly with minimum effort.

PC Beeping But Does Not Start: Full 2026 Fix

Are you experiencing a situation where your computer beeps continuously when turned on? Many PC users run into this. In most cases, this is usually due to a faulty RAM or a poorly connected one.

The good news is that we’ve got the right fixes for you in this detailed guide.

What can I do when my PC doesn’t boot and beeps?

1. Check the video card

Firstly, to fix the computer that is continuously beeping when turned on, you need to check the video card whether is dusty or defective. The dusty video card can also prevent the computer from turning on.

Therefore, you need to clean up the video card/graphics adapter.

If you are not sure of what you are doing, it is advisable to take your PC to a technician to help you check it out.

2. Check the RAM

ram

In addition, faulty RAM can cause your computer to beep continuously when turned on. The first thing you need to check here is whether the RAM is firmly inserted or loosened.

If the RAM is properly seated and you have two of them, you can swap their positions and check if the beeping continues. If you notice that the RAM is defective, you have no choice but to replace it.

3. Check the PC-to-HDD connections

Sometimes, while carrying your PC up and down, the wires may be unfastened and wobbling, causing your computer to beep continuously when turned on. Therefore you need to check the PC-to-HDD connections and tighten them.

Also, you can clean up the PC of dust, re-seat RAM, CPU/HSF, GPU, and PCI cards, and then apply thermal compound to balance them.

However, we highly recommend you consult a computer technician to help you with this solution.

4. Replace your Hard Disk Drive (HDD)

If all the solutions above fail to stop your the continuous beeping on your computer when it is turned on, you might need to replace your hard drive.

However, before doing this, we recommend that you test the hard drive first. You can use and hard drive tester.

Also, you try to repair bad sectors on the drive and check if that fixes the issue. Another thing you can try is to remove your HDD, connect it to another PC to access the files and folders, and check if it boots up from the hard drive.

If the PC is unable to identify and access the HDD, then you need to replace it with a new one.

5. Reseat All Cables and Expansion Cards

  • Unplug and reconnect all SATA/Power cables, GPU, and other expansion cards.
  • Loose seating can interrupt hardware detection.

6. Test With Minimal Hardware

  • Disconnect non-essential components (extra HDDs, DVD drives, external devices).
  • Leave only the CPU, one RAM stick, and the boot drive.
  • If the PC boots, reconnect components one by one to find the faulty one.

7. Check the Power Supply Unit (PSU)

  • A failing PSU may not deliver stable voltage, causing POST errors.
  • If you have another PSU available, try swapping it to test.

To make an informed decision, check our list of the best hard drives for Windows 10.

That should do for this guide on how to fix the continuous beeping when the computer is turned on issue. Feel free to let us know the solution that helped you fix this issue in the comments below.

How to Fix Werfault.exe Error on your PC [4 Ways]

The werfault.exe application error is more common than you might think and if you encounter it, you’ll have issues with the error reporting feature.

What causes the Werfault.exe error?

This issue is caused by corrupt system files or problems with your drivers. Issues with Windows Error Reporting service can also lead to this issue.

How do I fix WerFault.exe error?

1. Run the SFC command inside PowerShell (Admin)

  1. Press the Windows key+ X and select Windows PowerShell (Admin).
  2. Inside the command prompt, type the command below and hit Enter: sfc /scannow PowerShell command - WerFault.exe windows 10
  3. Scanning your protected system files and replacing the corrupt files with a cached version will start.
  4. Wait for the process to complete and reboot your PC.
  5. Try to see if the issue is resolved.

2. Use the Windows Memory Diagnostic tool

  1. Press the Windows key + R, type mdsched.exe, and press Enter.
  2. Choose the Restart now and check for problems option inside the windows memory diagnostic tool.
    Windows memory diagnostic tool - WerFault.exe windows 10
  3. Wait for the scan to finish and fix memory-related problems inside your Windows 10 OS.

3. Disable the Error Reporting Service

  1. Press Windows key + R, type services.msc, and press Enter.
  2. Double-click the Windows Error Reporting Service to open its properties.
    Windows error reporting service - WerFault.exe windows 10
  3. Double-click on it.
  4. Set the Startup type to Disabled.
  5. Finally, click the Apply button, followed by OK.

For detailed instructions, visit our guide on how to disable Windows Error Reporting service on Windows 11.

4. Reinstall your display drivers

  1. Press the Windows key + X and choose Device Manager.
    Device Manager - Werfault.exe windows 10
  2. Inside the Device Manager window, click on Display adapters to expand the section.
  3. Right-click the display adapter and select Uninstall device.
  4. Now, click the Uninstall button to confirm the action.
  5. Finally, click the Scan for hardware changes icon at the top.

Is WerFault exe a virus?

WerFault.exe is an important system process that reports issues on Windows 10 and 11. These reports help Microsoft detect and fix bugs and issues troubling your PC and your most-used apps. Hence, it is not a virus and poses no threat to your PC.

In today’s fix article, we explored the best methods to try and troubleshoot your WerFault.exe error, but keep in mind that this issue can manifest as werfault.exe application error with a black screen.

If there’s a problem with this exe file, your Error Reporting service can keep restarting. We also have a guide on how to disable the Windows Problem Reporting service, so you might want to check it out.

Feel free to let us know the solution that helped you fix this issue in the comments below.

Fix: Character Map is Not Working in Windows 11

The Character Map is a Windows utility that allows you to add special characters to your writing, like shapes and Greek letters for mathematical equations.

Some users have experienced the Character Map software not opening on their Windows 11 machines. While annoying, a lot of common Windows fixes work in addressing this issue.

What causes the Character Map to not work on Windows 11?

Before going into the solutions, we need to take some time to understand why this error happens. Doing so will hopefully teach you what went wrong and what steps you can take to prevent future problems.

  • Your computer is out of date – Having out of software can cause compatibility issues with various apps, including, but not limited to, the Character Map. Be sure to stay up to date.
  • The update may be buggy – Conversely, the update you just installed may be the source of your problem. If you notice issues appearing after an update, you will need to roll back Windows 11.
  • Malware is causing a malfunction – Be more mindful of what files you download and pages you visit on the internet. If you get infected with a virus, download some antivirus software to get of it.
  • There are corrupt files on your hard drive – Like malware, corrupt files can interfere with software. This can be cleared up with an SFC scan.

How can I fix the Character Map?

Fixing the Character Map problem is very easy to do. We recommend trying the simpler solutions before moving on to the more complicated ones:

  • Download the latest Windows 11 update. Microsoft rolls out them once a month on Patch Tuesday, so be sure to keep an eye out for that.
  • You can always try restarting your computer. For the majority of the time, a straightforward reboot will fix whatever computer problem you have.
  • Use a third-party registry cleaner like CCleaner to eliminate corruption on your computer.

1. SFC Scan and repair windows image

  1. Bring up the Command Prompt in the Windows Search bar and select Run as administrator.
  2. In the Command Prompt, type in the following and hit Enter on your keyboard afterward: sfc /scannow
  3. Give your computer enough time to complete the process.
  4. Next, enter the following three commands one after the other: DISM /Online /Cleanup-Image /CheckHealth DISM /Online /Cleanup-Image /ScanHealth DISM /Online /Cleanup-Image /RestoreHealth
  5. Wait for each process to finish up and close the Command Prompt.

You can also scan for underlying PC issues using a third-party utility like a PC repair tool. Upon scanning your PC, it will fix the detected problems and offer you a user-friendly overview of all the changes made.

2. Perform a clean boot

  1. Press the Windows + R keys simultaneously to open the Run command.
  2. In the new window, type msconfig then click OK to open the System Configuration.
  3. Click the bubble next to Selective Startup. Make sure the boxes next to both Load System Services and Load Startup Items are blue.
  4. Now go to the Services tab. Click the box next to Hide all Microsoft services.
  5. Now select the Disable all button underneath the Services window.
  6. Now go to the Startup tab and click Open Task Manager.
  7. Disable all the apps you see that you are not currently using. You can do this by clicking one and selecting Disable in the upper-right corner.
  8. Close the Task Manager when done.
  9. Go back to System Configuration. Click Apply, then OK.
  10. Restart your computer to perform a clean boot. See if the problem has been resolved.

3. Create a new user profile

  1. Locate the Command Prompt on the Windows search bar and select Run as administrator.
  2. In the Command Prompt, type in net user "account name" /add
  3. Where it states account name, replace it with a new username, then hit the Enter key.
  4. Now type the following in and hit Enter when done: net localgroup administrators "account name" /add
  5. Like before, replace account name with the name of the new account you created.
  6. Close the Command Prompt and sign into the new user account. Check if the problem persists.

4. Run keyboard troubleshooter

  1. Launch the Windows 11 Settings app, and in the System tab, click Troubleshoot.
  2. On the following page, select Other troubleshooters.
  3. Locate the Keyboard entry and click the Run button on the right side.
  4. Allow the keyboard troubleshooter to complete the process and follow any directions it may give you. Once done, click Close the troubleshooter.

What can I do if a registry file no longer works?

The Registry Editor is another Windows utility software used to manage registry files which contains all the different settings, data, and values for apps and hardware on your computer.

If a registry file stops working or responding, it may be corrupted. You can try one of the mentioned solutions or refresh the system via the Settings menu.

While we’re on the topic of utilities, one that people use frequently is a file manager like File Explorer. The problem with File Explorer is that it isn’t that intuitive.

You should download a third-party file manager like WinZip or Total Commander instead of using the limited File Explorer.

Feel free to comment below if you have questions about other Windows utilities. And please tell us if there’s a specific guide for any Windows 11 error you’d like to see.

USB Device Descriptor Failure on Windows: How to Fix & Cause

We use USB devices all the time, so it’s quite frustrating when your USB ports aren’t working. This will affect your devices as well, and you won’t be able to use them at all.

Windows 10 users reported a USB Device Descriptor Failure error that prevented them from using their devices. However, there are ways to fix this problem, and in today’s guide, we’ll show you how to do that, so let’s get started.

What causes the USB device Descriptor Failed code 43 error?

Below are some of the factors that can cause the USB Device Descriptor Failure error:

  • Outdated or faulty drivers: Sometimes, you might be getting the USB device_descriptor_failure on Windows 10 64 bit because your USB drivers are faulty or outdated. The quickest way to rectify this reinstall or update your drivers and restart your PC.
  • Issues with power settings: In some cases, this issue might be due to the Fast Startup feature in your power settings. You need to disable the feature and restart your computer to solve the problem.
  • Outdated BIOS: The BIOS is integral to the smooth functioning of your hardware. Hence, if it is outdated, you can face issues like this.

Now that we know the causes of this issue, below are some of the variations that users have encountered:

  • Unknown USB device (Device Descriptor Request Failed) code 43: This is a relatively common error; we wrote in-depth about it in our Error code 43 for USB devices guide.
  • USB device_descriptor_failure Bluetooth: You can encounter this issue using a Bluetooth adapter on your PC. For more information, we suggest visiting our Bluetooth not working guide.
  • Unknown USB Device (Device Failed Enumeration) Windows 10: If you get a message saying there’s an unknown USB device on your PC, there might be a problem with the device itself. Alternatively, there might be an issue with your drivers.

How do I fix the request for USB device descriptor failed?

1. Use Hardware and Devices troubleshooter

  1. Press Windows key + R to open the Run dialog.
  2. Now enter the following and press enter: msdt.exe -id DeviceDiagnostic
  3. Once the troubleshooter window opens, click Next and follow the instructions on the screen.

Although this isn’t the best solution, some users report that it has helped them fix this error, so it’s worth trying out.

2. Turn off Fast Startup

  1. Press Windows key + S and enter power plan. Select Choose a power plan.
  2. On the left side click the Choose what the power buttons do.
  3. Next click on Change settings that are currently unavailable.
  4. Go to the Shutdown settings section and uncheck the Turn on fast startup.
  5. Next, click Save changes and restart your computer to apply the changes.

Some users report that Windows 10 boots too quickly and that external devices aren’t getting detected before the boot is completed, and this causes a USB Device Descriptor Failure error.

3. Update your BIOS

  1. Visit your motherboard manufacturer’s website.
  2. Search for the model of your motherboard and go to the Driver & Utility section.
  3. Head to BIOS & Firmware section and download the latest version of BIOS.
  4. Once the file is downloaded, extract it to a flash drive.
  5. Restart your PC and access BIOS.
  6. Now go to Firmware update section and select the files from your flash drive.
  7. Wait for the process to finish.

For more information, we suggest reading our how to update BIOS guide.

Note icon NOTE
Updating your BIOS can cause issues, even permanent damage, if you don’t do it correctly, so if you don’t know how to do it, maybe it’s best to hire a professional to do it for you.

4. Update USB Hub drivers

  1. Press Windows key + X and select Device Manager.
  2. Expand Universal Serial Bus controllers.
  3. Right-click the USB Root Hub, and go to Update driver.
  4. Select Search automatically for drivers and wait for the process to finish.
  5. Restart your computer.

Update drivers automatically

While a quick way to fix the USB device_descriptor_failure error if it’s related to the driver is to download the latest versions, doing it manually is a real hassle.

Hence, we suggest doing it automatically using a dedicated driver updater tool. Once installed, the program will automatically scan your PC for outdated drivers.

The third-party software will check your installed driver versions and recommend proper updates. Choose the drivers you want to update and click to update them automatically.

⇒ Get Outbyte Driver Updater

5. Disable USB Selective Suspend Settings

  1. Press Windows key + S and type power plan. Select Choose a power plan.
  2. Find your currently selected plan and click Change plan settings.
    Change Plan Settings
  3. Click Change advanced power settings.
  4. Find USB Settings and then select USB selective suspend setting. Change it to Disabled, and click on Apply and OK to save changes.

Some users also reported that disabling the USB Selective Suspend Setting from the Power Options also resolves the USB Device Descriptor Failure error, so feel free to try that.

6. Reinstall USB Hub

  1. Go to Search, type devicemngr, and open Device Manager.
  2. Expand Universal Serial Bus controllers.
  3. Right-click the USB Root Hub, and go to Uninstall device.
  4. Click on Uninstall to confirm. Wait for the process to finish.
  5. Restart your computer.

Once you boot your computer again, it should automatically install the USB Root Hub driver.

How can I fix an Unknown USB Device (Device Descriptor Request Failed) on Windows 11?

Windows 11 is similar to its predecessor, and all solutions from this guide can be applied.

There might be some minor differences in steps that you need to take, but in most cases, you should be able to use these solutions on the latest version as well.

For more information, visit our how to fix Device Descriptor Request Failed Error in Windows 11 guide.

That’s about it; we hope this article helped you solve the USB Device Descriptor Failure error on your PC.

If you’re having additional problems with your USB devices, read our guide on what to do if USB isn’t recognized in Windows.

For any comments or questions, write them down below.

PC did not Start Correctly on Windows 10: Why & How to Fix

You may have encountered an issue where your Windows PC doesn’t start as it should. It denotes this with an error right out of the blue that reads: Your PC did not start correctly.

This could happen for a variety of reasons and can sometimes be fixed by simply restarting your PC. However, the problem might be much deeper than that, in which case, it will require the technical fixes detailed in this guide.

Why is my computer not starting up properly?

Below are some of the reasons you are getting your PC did not start correctly error message on your device:

  • Outdated OS: In some cases, this problem might be caused by an outdated operating system. The quickest way around this is to update your PC to the latest version.
  • Faulty system files: Another known cause of this issue is missing or faulty system files. You need to repair and restore these corrupt files to fix this issue.
  • Antivirus interference: Sometimes, your security software might interfere with your boot sequence, leading to the discussed error message. You need to disable your antivirus temporarily and restart your PC to restore normalcy.

Your PC won’t start properly? Fix it with these solutions

1. Safe Mode/Startup Repair

  1. Go to the Start Menu and type Update and recovery.
  2. Click on Update and Recovery and go to Recovery.
  3. Now, under Advanced startup, click Restart now.restart now your PC didn't start correctly
  4. When your PC restarts, click Troubleshoot on the Choose an option screen.
  5. Now, select the Advanced options option.
  6. Click on Startup Settings 
  7. Next, click the Restart button.
  8. After your PC restarts, press 4 or F4 to Enable Safe Mode.
  9. Finally, Sign in with an account that has administrator rights.

Your PC should be in Safe Mode now. You must run Startup Repair from the Advanced boot option:

  1. Press and hold Shift and click on Restart.
  2. Click on Troubleshoot > Advanced Options.
  3. Now, click on Startup Repair and follow the onscreen instructions to complete the process.

2. Disable antivirus

Some reports suggest your antivirus is causing the problem. That’s a common thing in Windows 10, as the system is known for interfering with third-party antivirus software.

Although Windows 10 antivirus mainly affects updates and how they’re installed. It can sometimes cause a system error including, your PC did not start correctly.

So, try pausing your antivirus protection for some time. If the problem doesn’t occur while your antivirus is disabled, consider changing it or switching to Windows Defender.

You can also try to use a different security tool. The best antivirus software for Windows 10 is specifically configured to protect you without causing any issues in your system.

3. Use sfc/scannow

  1. Press the Windows key, type cmd, and select Run as administrator under Command Prompt.
  2. Enter the following command, and press Enter: sfc/scannowsfc scannow your PC can't start correctly
  3. Wait for the process to finish.

The next thing we will try is running the sfc/scannow command in the Command Prompt. This command acts as a troubleshooter for various system-related issues and might fix your PC did not start correctly prompt.

4. Update Windows

  1. Press the Windows key + I and select the Update & Security option.
  2. Click the Check for updates button.
  3. Finally, install any available updates.
check for updates your PC did not start correctly

In some cases, your PC might not start correctly because the OS is outdated. You can put an end to the error message by updating the latest version and restarting your PC.

5. Restore the system

  1. Right-click the Start menu and open the Control Panel.
  2. In the Category view, open System and Security.
  3. Now, click File History.
  4. Open Recovery from the bottom left.
  5. Next, click on Open System Restore.system restore your PC did not start correctly
  6. Click Next until you can see the list of the available Restore Points.
  7. Now, choose a restore point and click the Next button.
  8. Finally, click the Finish button to complete the process.

There’s a chance some unwanted changes have been made on your computer. This can be the cause of your PC did not start correctly error message.

The best thing to do, in this case is to perform a system restore to a time when your PC was working well.

6. Rebuild Boot Configuration Data

  1. Repeat Steps 1 to 5 in Solution 1.
  2. Now, choose the Command Prompt option.
  3. In the command line, type the following command and press Enter: bootrec /rebuildbcd
  4. Now, there are two scenarios you can encounter:
    • Total identified Windows installations: 0. Continue to Step 5.
    • Total identified Windows installations: 1. Type Y, press enter, and restart your PC.
  5. In the command line, type the following commands and press Enter after each: bcdedit /export c:bcdbackup attrib c:bootbcd -h -r -s ren c:bootbcd bcd.old bootrec /rebuildbcd
  6. Press Y or Yes and press Enter.
  7. Finally, reset the PC, and you should be good to go.

If you’re unable to boot normally even though you’ve performed all the previous steps, there’s a chance that the Boot Configuration Data is corrupted.

This can be the reason you are getting a prompt that your computer did not start correctly.

Also, some essential files may get deleted, or the system update can cause issues. Either way, you’ll need to rebuild the Boot Configuration Data to resolve this problem.

7. Fix the corrupted Master Boot Record

  1. Repeat Steps 1 to 5 in Solution 1.
  2. Select the Command Prompt option.
  3. Now, type the command below and hit Enter: chkdsk /r
  4. Wait for the repairs to finish. If the problem is still there, type the commands below and press Enter after each: bootrec /RebuildBcd bootrec /fixMbr bootrec /fixboot
  5. Reset your PC and look for changes.

Master Boot Record (MBR) is a special boot sector that saves the boot configuration and information on your HDD.

If it’s corrupted or incomplete, you won’t be able to boot your computer normally, leading to errors like your PC did not start correctly.

A large variety of errors can occur because of this issue, and it’s not exactly easy to resolve it, especially without the installation or recovery media. However, there’s always a way, and you should be able to perform this action by following the steps above.

8. Delete updates

  1. Press the Windows key + I to open the Settings app and select Updates & Security.
  2. Click View update history.
  3. Now, select Uninstall updates.
  4. Finally, right-click the faulty update and select Uninstall.
    uninstall update your PC did not start correctly
  5. Now, find the latest update installed on your computer (you can sort updates by date), right-click it, and go to Uninstall.
  6. Restart your computer.

If this error occurred after the latest update, there’s a good chance you’ll need to uninstall it and revert to the previous working version of the system.

That is all you need to fix the prompt that says your PC did not start correctly. If you still can’t fix the issue after following the steps in this guide, you will need to contact Microsoft support for further assistance.

If your computer won’t restart for some reason, check our detailed guide to fix the issue quickly.

Feel free to let us know the solution that helped you fix the issue in the comments below.

In case the issue persists, Microsoft advises you to contact support for further troubleshooting.

Spacebar Is Not Working in Windows 11: How to Fix It

The normal functioning of all of your PC components makes for a great user experience. In case some of the connected components, such as the keyboard do not work, then it could be pretty frustrating, especially, when the issue pops up out of nowhere.

Some users have reported that the spacebar is not working in Windows 11. For some, the issue triggers after the Windows 11 update. In this guide, we will give you a bunch of solutions that will help you resolve the spacebar not working in Windows 11 problem. Let us get right into it.

Why is the spacebar not working in Windows 11?

We did some digging and found a bunch of solutions that trigger the spacebar not working in the Windows 11 problem.

  • The issue is related to Windows update: Some users have reported that the problem started right after they installed the latest Windows update.
  • Sticky key feature is enabled: The sticky key feature is useful if you are a shortcut person. However, the spacebar won’t work if that is enabled.
  • There are some issues with the Keyboard driver: A problem with the keyboard software could be the reason the spacebar is not working in Windows 11.
  • You haven’t updated the driver: You need to make sure that you have the latest keyboard driver installed on your PC in order for the smooth functioning of the associated hardware.
  • There is some issue with the system files: If the system files are corrupt or missing then this could trigger multiple issues with your PC.

What can I do if the spacebar is not working in Windows 11?

Here are a few things that we would like you to apply before you go ahead with the advanced troubleshooting solutions:

  • Close all the programs and restart your PC and see if this fixes the issue or not.
  • Close all the background apps because there could be some programs that are blocking the spacebar.
  • Make sure that the keyboard connection, wired or wireless is perfectly fine.
  • You might have to replace the keyboard as the problem could be the hardware. For that, we have a guide as well, that lists some of the best keyboards that you can buy.

Now let us check out the advanced solutions to fix the problem.

1. Disable Sticky Key

  1. Press the Win + I keys to open the Windows Settings menu.
  2. Click on Accessibility on the left pane.
  3. Select Keyboard.
  4. Turn off the Sticky keys toggle.
  5. Restart your PC.

Sticky keys is an amazing feature, but several users have reported that the spacebar not working in Windows 11 problem was easily fixed by turning off the feature. You can also try disabling the feature and see if this resolves the problem or not.

If you are not able to turn off the Sticky keys on your PC, then you can refer to our guide and fix the problem. But before that, you should check how to turn off Sticky keys and see if the normal ways help you fix the problem or not.

2. Uninstall Windows 11 update

  1. Press the Win + I keys to open the Windows Settings menu.
  2. Select Windows Update from the left pane.
  3. Under Related settings, select Uninstall updates.
  4. Hit the Uninstall button for the recently installed update.
  5. Restart your PC.

Often the latest update may include some bugs along with several new features. As important as it is to keep your PC up to date, it is sometimes better to uninstall the update as it could very well be the reason for the problem that you are facing.

3. Run the Keyboard troubleshooter

  1. Press the Win + I keys to open the Windows Settings menu.
  2. Select Troubleshoot from the right side.
  3. Click on Other troubleshooters.
  4. Hit the Run button for Keyboard.
  5. The troubleshooter will detect any issues with your keyboard and will prompt you to apply the fixes to resolve the problem.
  6. Restart your PC.

You can use the keyboard troubleshooter to fix any keyboard-related problems such as the spacebar not working in Windows 11. It will automatically detect any issues and will ask you to apply the fixes.

This isn’t the only key that has issues, and many reported that the backspace key is not working for them, but we have dedicated guide to fix that.

4. Download the latest driver

  1. Open the Start menu by pressing the Win key.
  2. Search for Device Manager and open it.
  3. Expand the Keyboards option.
  4. Right-click on your keyboard driver.
  5. Select the Update driver option.
  6. Click on Search automatically for drivers.

You can follow the above steps to update the driver of your keyboard and see if this resolves the issue or not.

However, there is another way that makes use of a third-party tool called Outbyte Driver Updater. This will help you update all the drivers at once.

Apart from updating the drivers, you can use it as a download manager, schedule scans to keep all of your drivers up to date, create driver backups, and much more.

Outbyte Driver Updater

You need to keep your drivers updated at all times and Outbyte Driver Updater will make your PC faster as well!
Free trial Visit website

5. Rollback drivers

  1. Open the Start menu by pressing the Win key.
  2. Search for Device Manager and open it.
  3. Expand the Keyboards option.
  4. Double-click on your keyboard driver.
  5. Switch to the Driver tab.
  6. Hit the Rollback driver button.

Sometimes that new version of the program can bring in bugs that could cause multiple issues. In such a case, we would suggest you roll back the drivers and see if this helps.

That is it from us in this guide. We have a guide that will help you fix the Caps lock stuck on or Num lock issue. You might also want to take a look at our Ctrl key not working guide for more solutions.

Some users have reported that their keyboard is not typing the double letters. This can be easily fixed by following our dedicated guide. If the keyboard is not working at all on your Windows 11 PC, then you should check out our guide which will help you fix the issue.

Feel free to let us know in the comments below, which one of the above solutions will help you resolve the problem.

There’s No Compatibility Tab in Windows 11: How to Fix This

Compatibility problems on Windows apps are rare, but they do happen like software not properly launching. Errors like these are caused by an app having some kind of compatibility issue.

Usually, you can go to an app’s compatibility tab and tweak some settings, but what if the tab is missing? Don’t fret because getting the tab back is possible using the right set of tools.

What causes the compatibility tab to go missing?

Before going into what you can do to bring the compatibility tab on Windows 11 apps, it’s recommended you learn what causes the problem in the place.

Because it’s worth noting the missing tab is not always the result of malware or anything malicious.

  • The system administrator may have disabled the tab: This is to prevent other people on a network from messing with software. If this is happening to you, ask the admin for help.
  • You have disabled the tab either purposely or accidentally: To fix this, you can either go back in the system files to reenable the tab or use the Compatibility Troubleshooter – assuming it works.
  • A file may have gotten corrupted after a recent update: It’s recommended that you uninstall the update to revert your computer back to an earlier state.
  • It may not be compatible with Windows 11: Installing older apps can cause a weird compatibility program with newer versions of Windows. Games like Fallout 3 are notorious for this.

There are only a handful of ways to restore the compatibility tab on your computer. It’s also worth mentioning that there aren’t any quick and easy ways to fix this problem either.

How can I bring back the compatibility tab on Windows 11?

There are a few pieces of advice that we would like to give you prior to fixing this problem. They will go a long way to help you and save you future headaches:

  • Be careful of what you download. A fix for this problem has been circulating the internet, which involves downloading a file for Registry Editor. Those types of files tend to have malware.
  • Prior to making any changes, you should create a System Restore point in case you make a mistake and things go wrong. This will restore your computer to an earlier form.
  • Make sure you have admin permissions, or you contact the admin of your network so you can actually make changes. Without that level of control, you won’t be able to do these solutions.

1. Make older programs run properly

  1. In the Windows 11 Search bar, type in Run program made for previous versions of Windows. Select the entry that appears.
  2. Click Next in the window that appears.
  3. After it finishes searching, select the problematic software, then click Next.
  4. Select Try recommended settings to test the app.
  5. On the following window, click Test the program. The app will appear under a configuration.
  6. See if it works properly under these settings, then click Next.
  7. If the app works correctly, select Yes, save these settings for this program. Otherwise, click one of the other two to go back to either try another configuration or report to Microsoft.
  8. Close the troubleshooter when it finishes.

2. Use Group Policy Editor

  1. Right-click the Windows logo in the bottom left corner and click Run.
  2. In the Run window, type in gpedit.msc and click OK.
  3. Under User Configuration, expand Administrative Templates, then click Windows Components.
  4. Now search for Application Compatibility. Open that as well.
  5. Double-click Remove Program Compatibility Property Page to edit the policy (another policy will be used as an example, but the steps are still the same).
  6. Click the bubble next to Not Configured if the policy is enabled.
  7. Select Apply at the bottom of the window then OK.

This solution may be tricky to accomplish because the Local Group Policy Editor is not available on Windows 11 Home as it is exclusive to Windows 11 Pro.

However, it is undoubtedly possible to enable the tool on Windows 11 Home. Be aware it will require you to run a specific batch file to turn it on, which is a little complicated to do.

3. Run compatibility troubleshooter

  1. Right-click the problematic app and select Properties.
  2. Go to the Compatibility tab, then click Run compatibility troubleshooter.
  3. Similarly to the previous solution, select Try recommended settings to have Windows 11 reconfigure the problematic app.
  4. Once you have settled on a configuration, go back to the Properties window.
  5. Under Compatibility mode, click the box next to Run this program in compatibility mode for and select the original operating system for the app.
  6. Click Apply, then OK.

The purpose of this solution is to future-proof the compatibility error so that it doesn’t happen again; hopefully, anyway.

Alternatively, you can select the Troubleshooter Program option but there’s no real difference between the two. You’re ultimately doing the same thing with either choice.

For a complete walkthrough on adjusting these settings in Windows 11, see this compatibility mode guide.

Can I use the Local Group Policy Editor for other things?

Once you get the Local Group Policy Editor working on your Windows 11 computer, you can fix all kinds of issues. And it would behoove you to read up on them if they happen to you.

The software can be used to fix Windows 11 installing the same old Intel graphics drivers over and over. You can use the Policy Editor to disable automatic updates, for instance.

Additionally, you can also disable driver signature enforcement which is a security measure that only allows drivers signed by Microsoft to be installed.

This is useful when installing custom drivers for apps, but be aware that doing so can put your PC at risk of malware.

And lastly, if you find the Details tab missing in Windows 11, we have a dedicated set of solutions that will help.

Feel free to comment below if you have questions about other native Windows software. And please tell us if there’s a specific guide for any Windows 11 error you’d like to see.

Fix: Windows Could not Find a Driver for your Network Adapter

Some users have stated in forums that they can’t connect to the web when Windows can’t find a network adapter driver.

The Network Adapter troubleshooter they try to fix the issue displays this error message: Windows could not find a driver for your network adapter.

Consequently, that troubleshooter doesn’t fix the issue, and the users can’t connect to the Internet. These are some resolutions that might fix this network adapter error, so be sure to check them out below.

Why is my PC not detecting my network adapter?

The Windows cannot find a network adapter driver issue can be caused by various factors. Below are some of them:

  • Issues with the router: Sometimes, this issue can be caused by glitches with your router. Hence, you should first reset your router before doing any other thing.
  • Faulty network driver: You are likely to get this error code if your network driver is faulty. The solution to this is to uninstall and reinstall your drivers.
  • Outdated driver: Another cause of this issue is a badly outdated driver. Updating your driver should help fix this effortlessly.

What to do if Windows can’t find a network adapter driver?

1. Reset the router

  1. Turn off the router, unplug it for a few minutes and then plug it in again.
  2. Then turn the router back on. Thereafter, press the Reset button on the router with a paperclip for about 15-30 seconds.

You’ll be surprised how often resetting the router fixes internet connectivity in Windows. That will establish a new connection with the ISP and reset it to its default factory settings.

2. Enable the adapter

  1. Press the Windows key + R, type ncpa.cpl, and click the OK button.
    ncpa windows could not find a driver for network adapter
  2. Right-click your network adapter.
  3. Finally, select the Enable option.
    enable

In some cases, Windows could not find a driver for your network adapter issue can be because the adapter is disabled. The quickest way to fix this is to enable the adapter and restart your PC.

If the adapter is enabled, you can disable and re-enable it again.

3. Open alternative Windows Troubleshooters

  1. Press the Windows key + I to open the Settings app and select Update & Security.
    update and
  2. Select Troubleshoot in the left pane and click Additional troubleshooters.
    troubleshoot windows could not find a driver for network adapter
  3. Now, select Internet Connections, and click Run the troubleshooter.
    run the
  4. Wait for the diagnosis to complete and apply the recommended fixes.
  5. Next, press the Windows key, type cmd, and select Run as administrator under Command Prompt.
    cmd admin
  6. Type the command below and hit Enter to run the Hardware and Device troubleshooter: msdt.exe -id DeviceDiagnosticmsdt windows could not find a driver for network adapter
  7. Finally, wait for the command to finish running and apply the recommended fixes.

Ok, the Network Adapter troubleshooter doesn’t provide a resolution for fixing the connection.

However, there are a couple of other Windows troubleshooters that might still fix the connection.

For example, the Internet Connections troubleshooter is closely linked with the network adapter. The Hardware and Devices troubleshooter might also come in handy for fixing connected device errors.

4. Update network driver

  1. Right-click the Start icon and select the Device Manager option.
    device manager
  2. Click the arrow next to the Network adapter option to expand it and right-click your network device.
  3. Now, select the Update driver option.
    update driver
  4. Finally, choose the Search automatically for drivers option and install any available update.
    search auto windows could not find a driver for network adapter

An outdated network driver could be the reason you are getting the Windows could not find a driver for your network adapter option. Hence, you need to check if updates are available for your PC by following the steps above.

If the Windows driver updater cannot find the latest drivers, you can check the manufacturer’s website for them.

Updating your drivers manually can be a tedious task. For a rapid, safe, and well-done driver installation, we recommend you use specialized software to do all the hard work for you in seconds.

However, a program like Outbyte Driver Updater not only downloads and installs drivers but also helps you manage them by troubleshooting, backing up, and restoring them. As an outcome, it is worthwhile to install it!

⇒ Get Outbyte Driver Updater

5. Reinstall the driver for the network adapter

  1. Press the Windows key + R, type devmgmt.msc, and click OK.
    devmgmt
  2. Double-click the Network adapters category to expand it and right-click your network adapter.
  3. Now, select the Uninstall device option.
    uninstall device
  4. Select the Uninstall button.
    uninstall button windows could not find a driver for network adapter
  5. Finally, click the Scan for hardware changes icon and restart your PC.
    scan for

The Windows could not find a driver error message highlights that the issue might be due to the corrupted network adapter driver.

Alas, users can’t attempt to fix this issue by updating the driver without a connection.

However, reinstalling the network driver might be a potential remedy. Follow the guidelines above to reinstall the network adapter driver.

6. Roll Windows back to a restore point

  1. Press the Windows key + R, type rstrui, and click the OK button.
    rstrui
  2. Click Next to open the list of system restore points.
    next
  3. To expand the list, select the Show more restore points option.
  4. Now, select a restore point and click the Next button.
    restore point windows could not find a driver for network adapter
  5. You can also click the Scan for affected programs option to check what software gets removed.
  6. Finally, click the Finish button to complete the process.
    finish windows could not find a driver for network adapter

The System Restore utility might provide a resolution for the Windows could not find a driver error for users who can select a restore point that predates the time the issue arose.

Users can usually roll back Win 10 by a month. System Restore will undo system changes after the selected restore date.

7. Check the Power Management setting for the network adapter

  1. Press the Windows key + X and select the Device Manager option.
    device manager
  2. Expand the Network adapters option and double-click your network device.
    option windows could not find a driver for network adapter
  3. Then select the Power Management tab at the top.
  4. Deselect the Allow the computer to turn off this device to save power option if it’s selected.
  5. Select the OK option to close the window.
    allow

The Windows could not find a driver error can also be due to a Power Management setting that turns devices off when selected.

We have come to the end of this detailed guide. All you need to do now is to follow the steps above carefully, and the Windows could not find a driver for your network adapter issue will be fixed for good.

Similarly, you can check out our detailed guide if Windows 10 can’t find your WiFi adapter instead.

Feel free to let us know the solution that helped you fix this issue in the comments below.

Currently Not Connected to Any Networks [Windows 11 Fix]

When your computer is unable to connect to the network, you may see a message on the screen that says Currently not connected to a network. Such a message indicates that your PC has no connection to the internet through a router or modem. 

You will also notice that you cannot access the internet using your Wi-Fi. Sometimes there are available connections and other times you’re not connected and there are no connections available.

Why does my laptop say I’m not connected to any networks? 

When your laptop says it’s not connected to any networks, it basically means that no Internet access is available. This can be due to a number of reasons:

  • Your computer’s network adapter is not working correctly – This can be caused by any number of things, including missing drivers or problems with the network cable itself.
  • Downtime from your ISP – The wireless network you’re connected to might be down or undergoing maintenance.
  • Improper router configuration – This can happen if you are using a wireless router that is not configured properly. Router configuration software may be of help.
  • Firewall settings – The network may be protected with a firewall that prevents unauthorized access. 

How do you fix You are currently not connected to any networks error?

Before any advanced troubleshooting, try the following:

  • Try plugging in an Ethernet cable if available.
  • Make sure that there are no obstacles between the router and your computer
  • Ensure that your computer is connected to the same network as your wireless router.
  • Restart your router. Sometimes, your router won’t connect to the internet because of cache build-up.
  • Try restarting your PC and you can even schedule a restart.

1. Run Network adapter troubleshooter 

  1. Press Windows + I to launch Settings.settings windows 11
  2. Click on Troubleshoot on the right in the System tab.Open system troubleshooter
  3. Select Other troubleshooters.
  4. Locate the Network Adapter troubleshooter and click on the Run button next to it.

2. Troubleshoot Internet connection issues

  1. Press Windows + I to launch Settings.settings windows 11
  2. Select System then click on Troubleshoot.Open system troubleshooter
  3. Navigate to Other troubleshooters.
  4. Click the Run button next to Internet Connections.
  5. Select Troubleshoot my connection to the Internet in the pop-up window and wait for Windows to identify the problem and recommend a fix.

3. Remove the Network from saved networks

  1. Hit the Windows key and click on Settings.settings windows 11
  2. Navigate to Network & internet and click on Wi-Fi.
  3. Scroll down and click on Manage known networks.
  4. Locate the problematic network and click on Forget.
  5. Restart your PC and check if the issue persists.

4. Update your Network drivers

  1. Hit the Windows + I keys to open Settings.settings windows 11
  2. Type Device Manager in the search bar and click Open.
  3. Navigate to your Network adapter, right-click and select Update driver.
  4. Select Search automatically for updated drivers.Search automatically for drivers

Another way that would be much easier and more accurate would be to use a third-party driver updater. Such tools are instrumental in ensuring you get the right drivers without much hassle.

Outbyte Driver Updater updates network drivers that are missing or out of date. It scans your PC for any devices with missing or outdated driver updates, then downloads and installs them for you. With Outbyte Driver Updater installed on your computer, you can get the latest version of your drivers.

Outbyte Driver Updater

Use the Outbyte Driver Updater program to get the latest updates for your drivers with a single click.
Free Trial Download now

5. Reinstall your Network drivers

  1. Hit the Windows + I keys to open Settings.settings windows 11
  2. Type Device Manager in the search bar and click Open.
  3. Navigate to your  Network adapter, right-click and select Uninstall device.
  4. Confirm Uninstall in the next confirmation dialog.
  5. Restart your PC and your drivers will be automatically reinstalled.

6. Check for Windows updates

  1. Hit the Windows + I keys to open Settings.settings windows 11
  2. Click on Windows Update then select Check for Updates.check-updates lenovo-ideapad-keyboard-not-working
  3. Hit Download & install if available.

You need to install an updated version of Windows on your computer. This will ensure that all of the necessary drivers are working correctly and that everything works properly when you try to connect to the internet.

7. Enable IPv6 in the network adapter

  1. Hit the Start Menu icon and click on Settings.settings windows 11
  2. Navigate to Network & internet and click on Advanced network settings.going advanced network settings win11
  3. Scroll down and under Related settings, click on More network adapter options.
  4. Right-click on the problematic network and select Properties.
  5. Locate the Internet Protocol Version 6 (TCP/IPv6) box and tick the checkbox then click OK.

IPV6 is an internet protocol that allows computers to communicate with each other over the internet. The main difference with IPV4 is that it supports more addresses, which means it can support a much larger number of devices.

It also offers improved security because it can be used over public networks like the Internet and Wi-Fi hotspots that are not managed by your network administrator. You will also notice improved overall performance.

8. Perform a Network reset

  1. Hit the Windows key and click on Settings.settings windows 11
  2. Navigate to Network & internet and select Advanced network settings.going advanced network settings win11
  3. Click on Network reset.clicking network reset win11 settings
  4. Next, hit the Reset now button. clicking reset now for network reset win11 settings

Why won’t my computer connect to the internet but others will?

There can be a number of reasons why your computer might not be able to connect to the internet while other devices have no issues. Here are some common reasons:

  • Wi-Fi signal strength – If there is not enough signal strength or a poor Wi-Fi signal, then it will be hard for your computer to connect. Try moving closer to your router or another device that has a strong Wi-Fi signal or consider installing Wi-Fi repeater software.
  • Damaged network cable – Sometimes Ethernet cables become damaged especially if you’ve used them for a long time. Try another cable just to make sure yours is in great condition.
  • Conflicting programs – If you have recently installed any new hardware or software, it may be interfering with your current connection. Try uninstalling any new programs and re-install them if necessary.

That’s all we had for the You are currently not connected to any networks issue. Hopefully, you’ve been able to resolve it with one of our recommended solutions.

Users also complained of a related issue where they were getting an error message that says none of the networks previously connected are in range. If you’ve come across a similar issue, don’t forget to check out our article for quick fixes.

Also, if your internet keeps disconnecting randomly, we have an answer to finally resolve this problem.

Let us know if you have been able to fix this issue in the comment section below.

The Request is Not Supported Error: 5 Ways to Fix It

The request is not supported is a dreaded message that can appear on anyone’s PC. According to most users, they have encountered the message when they tried running some of their programs or even Windows services.

The details of the error are still fuzzy but what’s common for every user who has encountered the error is that the apps won’t open when they try to launch them. For now, we have compiled a few solutions that have proved helpful to many users.

What does the request not supported mean?

The error can occur for several different reasons, but it typically indicates an issue with the device driver or the program that’s being used. It usually occurs when users try to run a program or application that has been installed on their PC. 

When this happens it is an indication that the program(s) have been modified and are no longer compatible with the operating systems. Other reasons why this may happen include:

  • Virus infection – When a virus finds its way to your PC, all your programs are at risk. This is because they contain malicious code that can alter how an app works. A reliable antivirus can help you avert such risks.
  • Missing/corrupt system files – A corrupted system file could prevent your PC from working properly. The cause of the problem might be a software update that causes incompatibility.
  • Incomplete/missing updates – Windows updates are essential for the smooth running of your PC. If the update was downloaded from an unreliable source, or if it was unable to install because of a problem with the file structure, you may get the request is not supported error.
  • Missing DLL files – If you have missing DLL files and an application requires one or more of these DLL files, you may be unable to launch the program. The files may have been removed from your computer by virus protection software or another program.
  • Incompatible programs – If you try to install a program that is not supported by your version of Windows or from an unofficial site, you may be unable to launch it.

The request not supported error can also manifest itself in various ways such as:

  • The request is not supported disk management
  • Error 50: the request is not supported windows process activation service
  • The request is not supported cmd

How do I fix the request not supported error?

Before you attempt any of the fixes below, try the following basic checks:

  • Ensure your PC is up-to-date with the latest Windows updates. Also, check out what to do if Windows Update is not showing.
  • Uninstall any apps that you have recently downloaded.
  • Try alternative methods of opening the programs.
  • Attempt to launch the programs in compatibility mode.
  • Finally, try restarting your PC, and here’s what to do if your PC restarts automatically.

1. Run a DISM scan 

  1. Hit the Windows key, type cmd in the search bar, and click Run as administrator.cmd-run-admin-w11 unexpected kernel mode trap windows 11
  2. Type and Enter the following command: DISM.exe /Online /Cleanup-Image /RestorehealthDISM-RESTORE faulting application path
  3. Restart your PC.

2. Run the System File Checker scan 

  1. Hit the Windows key, type cmd in the search bar, and click Run as administrator.cmd-run-admin-w11 unexpected kernel mode trap windows 11
  2. Type and Enter the following command: sfc /scannow
  3. Restart your PC.

3. Run the chkdsk command 

  1. Hit the Windows key, type cmd in the search bar, and click Run as administrator.cmd-run-admin-w11 unexpected kernel mode trap windows 11
  2. Type and Enter the following command and remember to replace f with the letter of the drive in question: chkdsk /f X:chkdsk-f repair corrupted directory

4. Run the Windows Store Apps troubleshooter 

  1. Hit the Windows key and click on Settings.settings windows 11
  2. Click on System on the left pane then Troubleshoot on the right pane.Open system troubleshooter
  3. Select Other troubleshooters.
  4. Scroll down, locate Windows Store Apps and click the Run button.troublshoot windows store apps

The Windows Store Apps troubleshooter should be able to shed more light on the issue of whether the problem affects all apps downloaded from the Microsoft Store.

5. Start Windows in Safe Mode

If you have performed all four methods above but you’re still getting the error, it may be time to start your PC in Safe Mode. Safe mode will open only the essential drivers and services, making it easier to test whether your problem is a driver or a Windows issue.

If the problem still persists, try performing a custom install of Windows. Custom installs are also much faster than using the default installation options on Windows 11 machines.

When you use a custom install, you also get to save all of your personal files. This means that you won’t have to worry about losing anything important on accident or by accidentally deleting it.

If something goes wrong with your computer, then you will be able to access all of your data without having to worry about losing anything important. You can learn more about the difference between a Windows upgrade and a clean install in our detailed article.

Let us know of any additional methods not mentioned here that may have worked for you in the comment section below.

How to Reinstall Bluetooth Driver on Windows 11

If Bluetooth is acting up on your Windows 11 PC, reinstalling the driver might help. Whether you are fixing connection issues, updating to the latest version, or trying to roll back, a fresh install can make a difference.

Most of the time, Windows handles drivers automatically, but sometimes it is better to install one manually for smoother performance. Find below a few different methods to reinstall BT drivers:

How to reinstall the Bluetooth Driver in Windows 11

Before you start, make sure your Bluetooth adapter is plugged in if you use an external one, Windows is updated, and your internet connection is stable. Also, it is a good idea to disconnect any Bluetooth devices to avoid problems. Once that is done, you can go ahead and reinstall the driver.

1. Uninstall the Bluetooth driver

  1. Press Win + R on the keyboard to open Run.
  2. Type the following command and click on OK: devmgmt.msc
  3. Expand Bluetooth on the Windows Device Manager.
  4. Right-click on the Bluetooth driver, for example, Realtek Bluetooth 5.0 Adapter, and choose Uninstall device.uninstalling bluetooth driver windows 11
  5. Tick Attempt to remove the driver for this device and click on Uninstall.remove bluetooth driver windows

Now, you will lose Bluetooth ability on your PC or laptop. To get it back, you will need to install the necessary things again. See the next section for details.

2. Install it again

Note icon NOTE
After uninstalling, a simple restart can automatically install the BT driver again. If not, you can update Windows. It should automatically install the driver. However, it only happens in some cases. So, you should follow the methods mentioned below.

2.1 Use Device Manager

  1. Open the Device Manager like before.
  2. Select Bluetooth.
  3. Click on Action from the menu and choose Scan for hardware changes.scan for hardware changes device manager
  4. If it doesn’t automatically install the driver, you may see a driver with a yellow explanatory sign.
  5. Right-click on it and choose Update driver.
  6. Then, choose your preferred way to install the driver.

If you want the latest driver, you should choose the automatic method. If the latest driver has some issues, download or collect the older version of the driver manually and choose that file from the device manager to install.

2.2 From the manufacturer’s website

  1. Go to your motherboard or Bluetooth manufacturer’s website.
  2. Find and go to its download center.
  3. Look for the Bluetooth driver and download it.downloading bluetooth driver realtek
  4. Install it on your PC.

2.3 Use a third-party driver updater

We recommend you use a specialized driver updating tool to update or install any drivers on Windows 11 and 10. It is because this tool can download the latest drivers when the Device Manager often fails to detect the latest one.

Otherwise, these driver updaters can scan and update any outdated drivers automatically according to your own schedule.

Why has my Bluetooth disappeared from Windows?

If you notice that the Bluetooth icon or option has simply disappeared, it means there is something wrong. It can be with your Bluetooth adapter or the driver. In most cases, updating or re-installation of the driver should fix the issue. Otherwise, changing the BT adapter is the only option.

If you are interested, learn how to solve Bluetooth not detecting devices on Windows. If you’re using Windows 10 instead, here’s how to install a Bluetooth driver on Windows 10. And if you run into problems like error code 28, or you’re dealing with Intel hardware, check out the latest Intel Bluetooth driver update or read more about Intel’s recent driver improvements for better compatibility.

This article has shown you how to reinstall the Bluetooth driver on Windows 11 computers. If you have any suggestions or questions, write them down in the comment box.

Can’t Delete Calendar Events in Outlook: How to Fix It

The Calendar feature is a very useful option in Outlook; to help you keep reminders of important events. However, you’d often need to delete such events from your calendar. If you can’t delete calendar events in Outlook, this article will help you resolve such errors.

Why can’t I delete calendar events in Outlook?

Here are a couple of reasons why you can’t delete calendar events in Outlook:

  • Outdated Microsoft Office: If Microsoft Office is running on an outdated version, you might find it hard to delete calendar events on Outlook.
  • Poor network connection: If you’ve got an unstable connection, Outlook won’t be able to function properly.
  • Corrupt app data: If the Outlook application’s data is corrupted, it can result in a long list of errors, one of which includes being unable to delete calendar events.

If a deleted calendar event keeps returning to Outlook we invite you to apply the solutions below to fix the problem.

What can I do if I can’t delete calendar events in Outlook?

Before we move on to more advanced solutions, here are a couple of quick fixes you can attempt:

  • Exit all clients, such as Outlook web, on which the mailbox is set up.
  • Restart your PC.
  • Fix network congestion.
  • Close and relaunch the Outlook app.

If those quick fixes couldn’t resolve the error, here are a couple of advanced troubleshooting techniques you can attempt.

1. Use the Outlook web version

  1. Start your preferred browser.
  2. Visit outlook.com and click on the Calendar option.
  3. Right-click the specified calendar on the Navigation Pane, and then select Delete (or Remove) in the drop-down menu.
  4. A delete Calendar dialog box will open. Click the Yes button to remove the event.

Using the Outlook web version is one of the easiest ways to fix the inability to delete calendar events in Outlook.

Now, when you open Outlook on another device, the information should have been synced and you shouldn’t see that event anymore.

If interested, know the ways to add the creation date column to your calendar list view in Outlook.

2. Reset the Calendar App

  1. Press Windows key + I to open Settings.
  2. Click on Apps and select Installed apps.
  3. Search and select the Mail and Calendar app, click the three-dot option, and select Advanced options.
  4. Under the Reset section, click the Reset button.

Once you complete the steps, the Mail and Calendar applications will revert to their default state, deleting all data stored locally on the computer.

You’ll have to reconfigure Outlook when you next launch the application.

3. Run Outlook commands

  1. Exit Outlook on any of your devices.
  2. Press the Windows + R keys to launch the Run window, type this in the search box, and then press Enter: outlook /cleanreminders
  3. Press the Windows + R keys to launch the Run window, type this in the search box, and then press Enter: outlook /cleandmrecords

After running either of these switches, relaunch Outlook, and then try to delete the calendar event again. For more information about these types of switches, see Microsoft’s documentation of Outlook command line switches for Windows.

If an Outlook delegate cannot delete calendar items, it has insufficient permissions. The admin must assign the delegate with at least Author permissions on the Deleted Items folder from Outlook.

We believe our guide should help you resolve the error, but if you’ve got other solutions to resolve this error, do let us know in the comments.

Boost WhatsApp Web Typing with the 10 Best Tips & Tricks

WhatsApp is the world’s most popular messaging app used by billion of people around the world and has become the primary way people communicate online for certain regions.

Among the different forms of WhatsApp, the browser version is arguably the most overlooked. Although it’s the least robust, WhatsApp Web is still a handy tool to have for browsers.

What are the benefits of WhatsApp Web?

Like on desktop and mobile, WhatsApp Web as a service still offers a great messaging experience even if it’s not as robust. Below is a short list of why you should use WhatsApp Web.

  • You don’t have to download anything: To log in to WhatsApp Web, all you need is the mobile version to scan a QR code. Once that’s done, you’re logged in for as long as you want.
  • You have a much bigger keyboard to use: A bigger keyboard allows for faster typing than what can be done on a mobile device. It’s similar in function to WhatsApp on a desktop.
  • Compatibility issues won’t be a problem: Ever so often, WhatsApp will drop support for older phones. On browsers, that isn’t a problem unless you have an older operating system.
  • You’re able to house multiple WhatsApp accounts: WhatsApp Web can be signed into one account while the desktop app can be another.
  • You can save the battery on your smartphone: That way, you can use your mobile device for other things while still being able to communicate.

There are tons of tips and tricks for WhatsApp Web so we’re going to only list the top 10 so you can get the most out of the service.

The list will cover keyboard shortcuts to speed up typing and browser extensions that enhance the user experience.

What are the 10 best tips and tricks for WhatsApp Web?

1. Use keyboard shortcuts to quickly access features

  1. Pressing the CTRL + ALT +, keys at the same time opens the Settings menu.
  2. Press the CTRL + Alt + Shift + F keys to open a Search bar helping you locate messages in a chat.
  3. Pressing Ctrl + Alt + Shift + E at the same time archives a chat to store it. To view archived chats, click Archived at the top of the chats.
  4. Ctrl + Alt + Backspace deletes the chat. If you plan on one day restoring that chat, it’s strongly recommended you back it up first.
  5. Press the Ctrl + Alt + Shift + P keys at the same time pins the chat. You can tell if you did it correctly if you see a thumbtack icon next to the pinned chat.
  6. To create a new chat, press Ctrl + Alt + N. Then you can choose if you want a new group or community.
  7. If you want to open the Emoji Panel to send a reaction, press Ctrl + Alt + E.
  8. Pressing Ctrl + Alt + G opens the Gif Panel.
  9. And finally, pressing Esc closes the chat.

WhatsApp has a variety of keyboard shortcuts to help browser users utilize certain features in a much faster way than dragging the mouse over and clicking through a bunch of menus.

The added benefit of WhatsApp on mobile is you literally have everything at your fingertips so it’s much faster to pull off the app’s functions. The list is by no means extensive.

The full list can be found on WhatsApp’s website. The commands shown earlier are a collection of the better ones.

2. Enter Emoji shortcuts for quick reactions

  1. Enter a colon into the WhatsApp chat box. Afterward, type the name of the emoji you want.

It can be tricky to find the right emoji. Instead of trying and failing over and over, you can find the entire list of Emoji shortcuts for WhatsApp web on Github.

There you will find every single keyword for all 1,514 Emojis.

3. Change font on WhatsApp

  1. Launch the Settings app and click Accessibility.
  2. Select Text size.
  3. Drag the Text Size slider to the right to increase the font size. Click Apply.
  4. Additionally, you can press Ctrl + Alt + = to increase WhatsApp Web’s font.

If you’re looking for a way to completely change the font style on WhatsApp Web, you’re out of luck, unfortunately.

On WhatsApp for mobile and desktop, you can download font apps that change the look. Apps or browser extensions made specifically to change WhatsApp’s font aren’t available.

There are some, like Font Changer, for Google Chrome, but we had a tricky time setting it up. It also doesn’t work on Opera. And Firefox’s extensions library doesn’t have anything either.

Other changes to the WhatsApp Web font revolve around changing the format of the messages themselves.

4. Format messages

  1. Placing two underscore marks, one before and one after a word, to italicize it.
  2. Surround text with asterisks on either side to bold the text.
  3. To add a strikethrough line, place tildes (better known as the squiggly line next to the number one key) on both sides of a text.
  4. Placing three backticks around text will monospace it.

Common keyboard shortcuts like CTRL + B to bold text or CTRL+ I to italicize don’t work on WhatsApp Web. You will have to use the special formatting commands.

5. Add superscript on WhatsApp

WhatsApp Web supports both superscript and subscript characters which are smaller-size text to the top right or bottom right of a word. They’re most often seen in mathematical expressions or formulas.

Most people add an arrow pointing up or down to signify superscript or subscript but it is possible to add these characters to WhatsApp using some special websites.

You have websites like Tiny Text Generator and LingoJam to create either script. From there, you can copy and paste the special characters to WhatsApp.

6. Create an extra line with Enter

In the WhatsApp text box, press the Shift and Enter keys at the same time to add another line without sending the message to the other person.

7. Enable or disable disappearing messages

  1. In a WhatsApp chat, click the username at the top. A new menu will appear from the right.
  2. Click Disappearing messages.
  3. Select a period of time.

WhatApp’s Disappearing Messages will go after forever after a set period of time. You can choose from 24 hours to a week to a month and a half.

8. Schedule messages on desktop

  1. Head over to the Chrome Web Store and install the Blueticks browser extension to Google Chrome.
  2. Next to WhatsApp Web and click the clock icon next to the text box.
  3. In the Schedule a Message window, write whatever message you want to send and the time.
  4. Click Schedule Send.

There are different extensions and apps that can schedule messages for WhatsApp Web. But for the most part, Blueticks is the most widely used and recommended.

Also, be aware Blueticks is only available through the Chrome Web Store so it’ll work on the aforementioned Chrome browser and Opera, but nowhere else.

9. Manage audio messages with Zapp

  1. Go to the Chrome Web Store, then click Add to Chrome to install Zapp.
  2. Using the Zapp extension, you can speed up the playback up to twice as fast and increase or decrease the volume with your mouse’s wheel.

Like Blueticks from the previous solution, Zapp is only available through the Chrome Web Store.

10. Get background notifications with WAToolkit

  1. Like the previous apps, go to the Chrome Web Store and install WAToolkit.
  2. From here on, notifications from WhatsApp Web will appear on your browser even if it’s not currently open.

The notifications will appear in the WAToolkit extension icon in the upper right-hand corner of the browser. From our experience, WAToolkit appears to work best with Google Chrome.

On Opera, the extension is pretty spotty. The notifications don’t always come through.

Is there a specific browser that works best with WhatsApp Web?

Despite having some problems with WAToolkit, Opera is arguably still the best browser to use with WhatsApp Web. Most of the Chrome extensions work and WhatsApp comes integrated with Opera.

On the side, there is a WhatsApp tab that’s basically the web version. Besides Opera, Chrome is also really good thanks to its tab management features and Firefox is a decent choice too.

We also recommend checking out our guide on the best WhatsApp extensions for sending bulk messages throughout the day. You have the likes of WAPSender to send curated messages.

There’s also WA Self Sender on Microsoft Edge that can delay WhatsApp messages so they send out at a certain time.

Feel free to leave a comment below if you have any questions about other WhatsApp tricks or if you know of one that we left out.

Leave a suggestion about guides that you’d like to see or information on other Windows services.

Edge Shortcut Keeps Appearing on Desktop: 5 Easy Fixes

While Microsoft Edge has its fair share of innovative and user-friendly features, a lot of users prefer other reliable browsers over it. But, of late, users reported a problem wherein the Edge shortcut keeps appearing on the desktop.

The issue was reported on all iterations, even for users who never used the browser, and there was no word from Microsoft on it. This left users perplexed, many wondering if was malware. So, if you, too, are concerned, here’s all you need to know.

Why does the Edge shortcut keep appearing on the desktop?

The primary reason the Edge shortcut appeared on the desktop is that the browser underwent an update in the background. The Release Notes for Microsoft Edge list quite a few updates in the second and third week of January 2023.
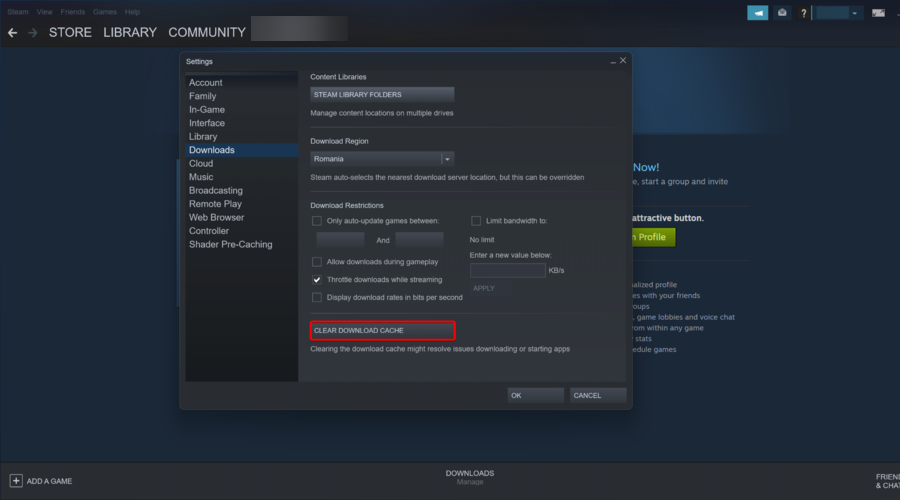
So, if the shortcut appeared around the same time and Edge was updated, you know the culprit. Let’s now walk you through the solutions that did the trick for other users.

What can I do if the Edge shortcut keeps appearing?

1. Delete the Edge shortcut

When faced with the problem, your primary approach should be to delete the Edge shortcut. Just right-click on the shortcut, and choose Delete from the context menu./

Delete the Microsoft Edge shortcut from the desktop

Though, there’s a chance that the Edge shortcut will keep appearing on the desktop. If you want to fix things once and for all, the solutions below will help.

2. Disable Edge from launching at the startup

  1. Press Ctrl + Shift + Esc to launch the Task Manager, and head to the Startup apps tab.startup app
  2. Now, select Microsoft Edge from the list of apps, and click Disable.disable startup app to fix edge shortcut keeps appearing

While you are at it, also make sure to remove Microsoft Edge from the startup folder in Windows. This will stop Microsoft Edge from running in the background and prevent it from creating a shortcut on the desktop.

Also, find out the other ways to stop Edge from loading at startup.

3. Disable automatic updates for Edge

  1. Press Windows + E to open File Explorer, paste the following path in the address bar, and hit Enter:C:\Program Files (x86)\Microsoftpaste path
  2. Now, double-click on the EdgeUpdate folder to view its contents.edgeupdate
  3. Right-click on the MicrosoftEdgeUpdate.exe file, and then select Rename from the context menu.rename to fix edge shortcut keeps appearing
  4. Change the file’s name to anything else, we choose MicrosoftEdgeUpdate111.exe.change to fix edge shortcut keeps appearing
  5. If prompted with a confirmation box, click on Continue to proceed.
  6. From now on, Edge won’t be able to update automatically. Even if you try to do it manually, the browser would instead throw an error.edge automatic update

This is a quick way to disable automatic updates in Edge to prevent it from creating desktop shortcuts. It’s worked for many. Though, if you use the browser, even occasionally, we wouldn’t recommend disabling updates.

4. Modify the Registry

Note icon NOTE
Making changes to the Registry Editor is a critical task, and we recommend you follow the steps here as it is. Do not make any other changes.
  1. Press Windows + R to open Run, type regedit in the text field, and hit Enter.registry editor
  2. Click Yes in the UAC prompt.
  3. Now, paste the following path in the address bar at the top, and hit Enter:HKEY_LOCAL_MACHINE\SOFTWARE\Policies\Microsoft\EdgeUpdateedgeupdate key
  4. In the EdgeUpdate key, right-click on the right side, hover the cursor over New, choose DWORD (32-bit) Value from the context menu, and then name it as CreateDesktopShortcutDefault.DWORD to fix edge shortcut keeps appearing
  5. Double-click on the new DWORD to modify its value.dword
  6. Make sure the field under Value data reads 0, and then click on OK to save the changes.modify value data to fix edge shortcut keeps appearing
  7. Once done, restart the computer for the changes to come into effect.

This is a concrete fix that will prevent Edge from creating a shortcut on the desktop. To revert the changes, all you have to do is delete the new DWORD.

5. Check the Task Scheduler

If the problem persists, it could be that Edge is configured to run in the Task Scheduler, an issue reported by many. Here, you will have to check this manually and delete the configured task, if any.

Once done with the solutions here, the Edge shortcut will not keep appearing anymore on the desktop in Windows, be it any iteration.

While we are discussing the browser, find out how to fix issues with Edge’s window position and size, another common problem reported by several users.

For any queries or to share another possible fix for the problem, drop a comment in the section below.