7 Best Browsers for El Capitan That Work in 2026

Today’s article will focus on the best browser for El Capitan. A true game changer back in the day, far fewer Apple customers now use the operating system.

If you’re part of this select group, we’ll show you the best browser that are compatible with El Capitan (Mac 10.11.6) and that can work hitch-free even on older computers.

What is the best browser for Mac El Capitan?

Tip icon Tip
The latest version of some of these browsers won’t work on Mac OS X El Capitan, and you will need to download an earlier one. Also, some browsers, even though they run seamlessly on the OS, don’t receive security updates anymore, which puts your PC at high risk.

1. Opera One – Most advanced AI browser
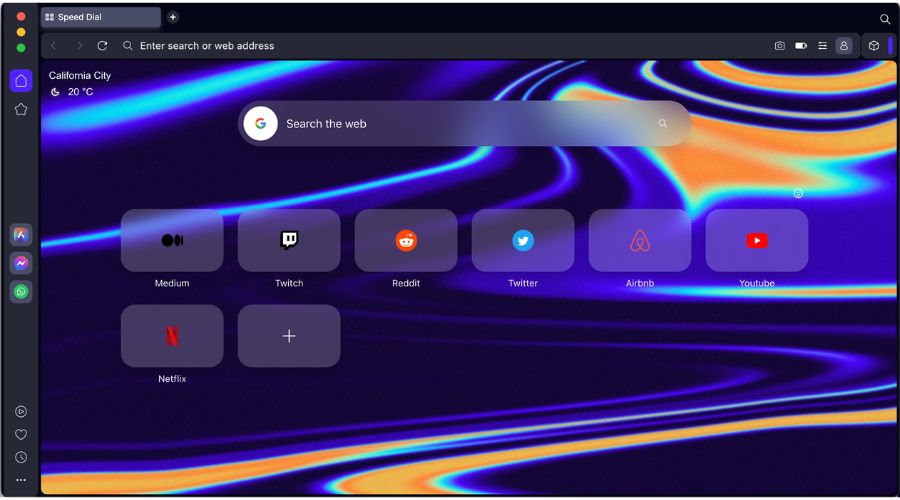
opera browser interface on macos

Edgy, speed-focused, privacy-conscious, and highly customizable Opera One is both lightweight and modern. For El Capitan, this browser brings a new, better side to surfing the Internet.

Pages load very fast thanks to its built-in adblocker. It’s also got a free, built-in VPN and tons of customization features that’ll allow you to create the best workspace for your needs.

Other useful features:

  • AI prompts
  • Tab island improvements
  • Integrated AI in the sidebar
  • Different Workspaces

Opera One

Get your hands on the most clever browser for the Cap and let nothing stand in your way!

2. Safari – Default browser for Macs

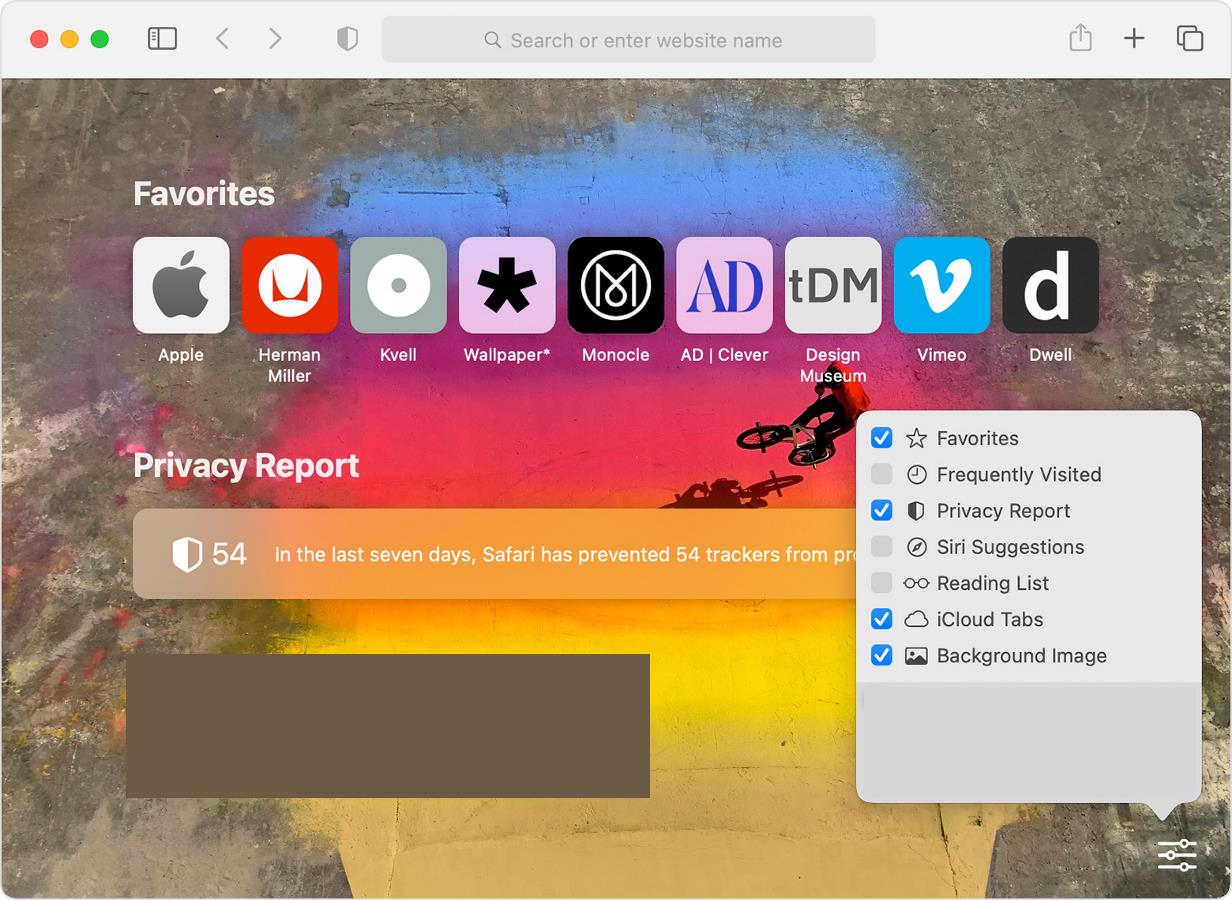
safari browser interface

For most people, Safari is the best choice for El Capitan (Mac 10.11.6). It’s available out of the box and optimized for the Apple ecosystem. It’s got excellent performance and integration.

However, for El Capitan, Safari isn’t supported on all versions.

Safari is capped at version 11 for El Capitan. Apple interrupted the official support for the Cap in 2018, and consequently, the latest version of Safari that you could run on this OS is 11.1.2.

Other useful features:

  • Fastest JavaScript engine
  • Battery saver
  • Sync across Mac, iPad, iPhone, and Apple Watch

⇒ Get Safari

3. AVG Secure Browser – Secure Mac OS compatibility
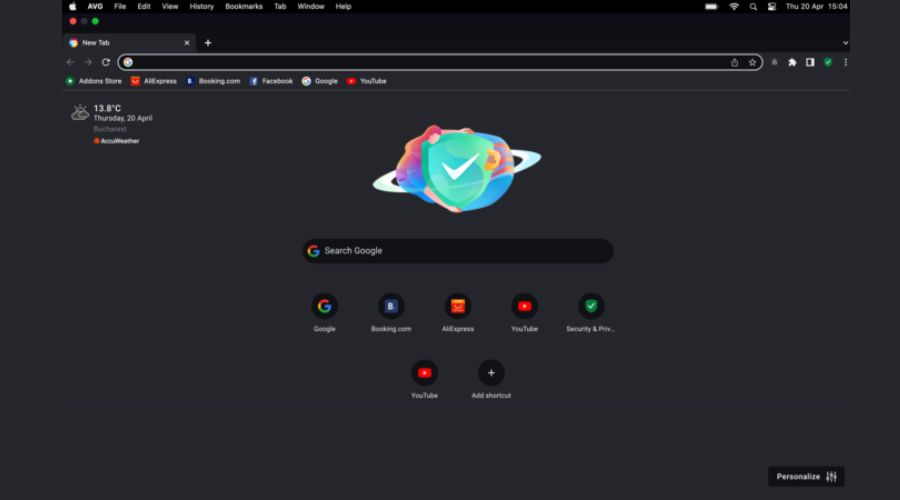
AVG Secure Browser Mac OS

AVG comes with an effective browser compatible with Mac El Capitan OS, offering high-end privacy and flawless navigation. It has anti-tracking tools, blocks ads and integrates AVG virus prevention features.

Essential features of this solution include a password manager, which stores web passwords, webcam protection, and a privacy cleaner service to erase browsing history or cookies.

Other key features include:

  • Simple UI
  • Blocks tracking scripts
  • Fast and easy to use

AVG Secure Browser

Navigate the web using the AVG browser with cross-platform usage for Mac OS.

4. Vivaldi – Customization stands out

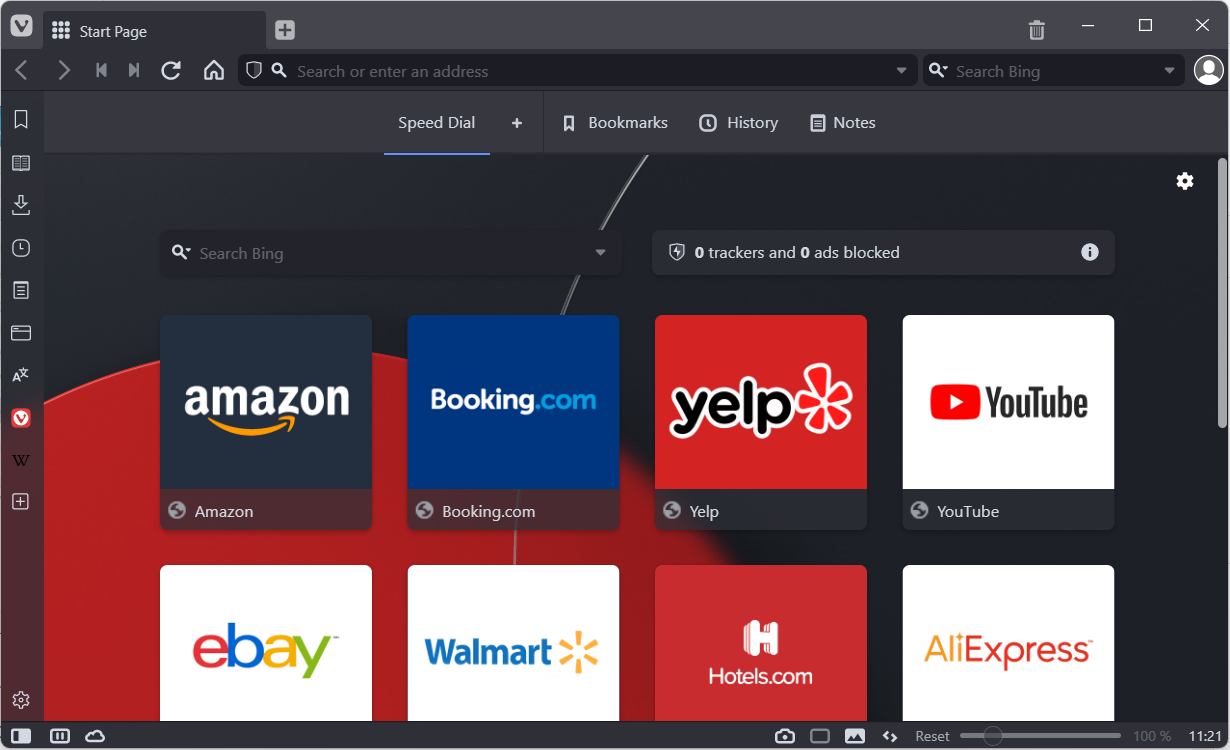
vivaldi browser

Another great option is Vivaldi for El Capitan. It is flexible enough to adapt to all major infrastructures from Windows to Linux, Android, and of course, Mac.

This excellent cross-platform browser comes packed with useful features to keep you safe on the web without restricting your choices.

Other useful features:

  • Web Panels
  • Quick Commands
  • Fast Forward and Rewind

⇒ Get Vivaldi

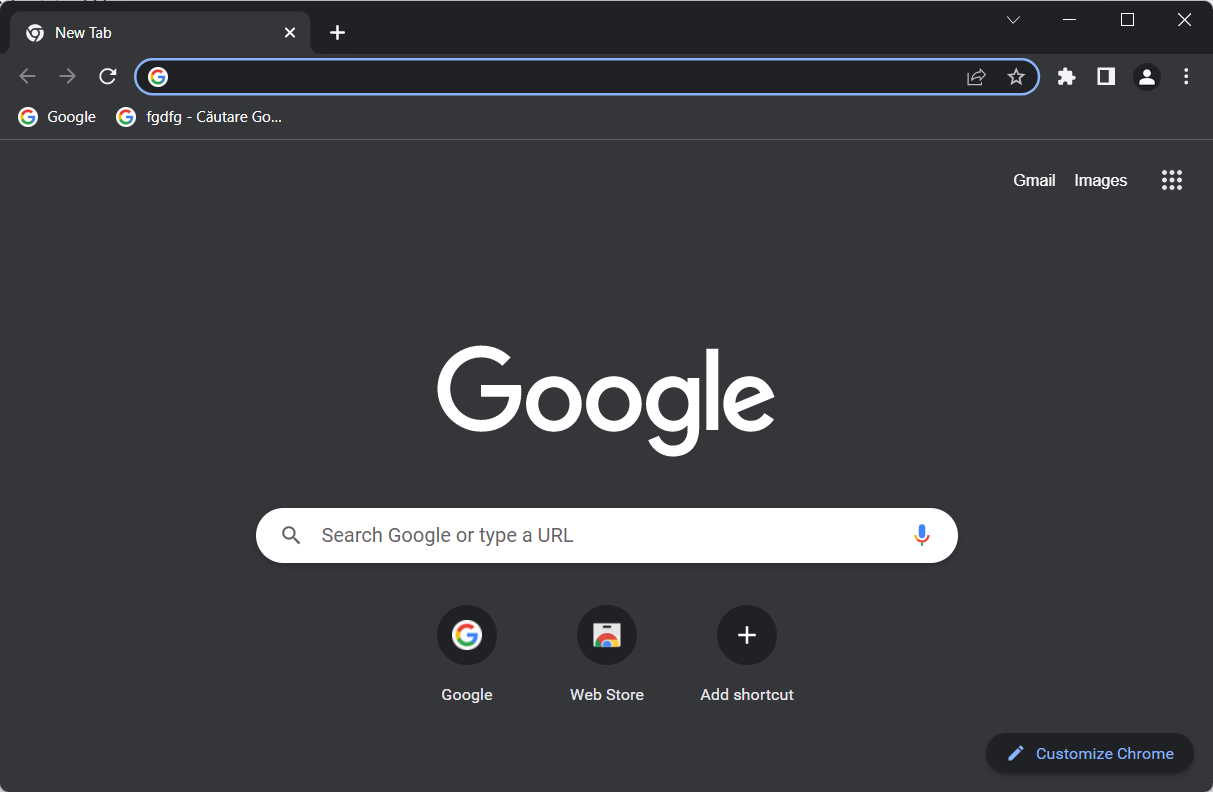
google chrome  user interface

We know that many of you would like to know for sure if this worldwide cherished browser makes a good match for the Cap and for Mac machines, in general.

So, does Chrome still support El Capitan? We’re pleased to announce it does indeed. It’s still considered a top choice, fully supporting the operating system. The only requirement is to run a 10.11 version of the OS.

Other useful features:

  • Wide range of extensions
  • Automatic translation and spell check of web pages
  • High-speed browsing

⇒ Get Google Chrome

6. Firefox – Privacy-focused browser

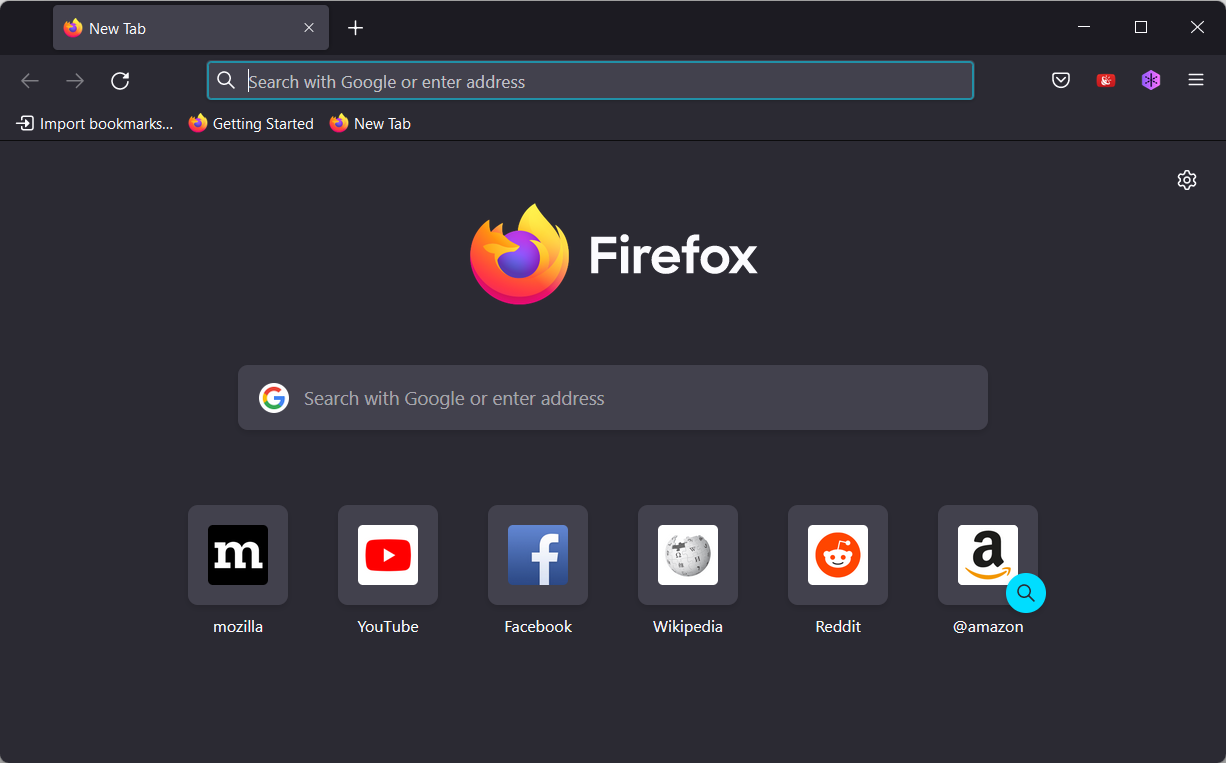
firefox browser interface

Last, but certainly not least, Firefox for El Capitan enters the scene, and we dare say, it’s still one of the greatest picks for macOS.

Just in case you were wondering, version 78 of Mozilla Firefox is the last one to support 10.11 El Capitan, so make sure you keep this in mind. Firefox is a strong contestant for the tile of the best browser for El Capitan, so you should try it out.

Other useful features:

  • Balanced memory usage
  • Enhanced Tracking Protection
  • A plethora of add-ons and themes

⇒ Get Firefox

7. Chromium legacy – modern option for older Macs

Chromium Legacy brings modern web compatibility to macOS El Capitan and similar older systems.

It runs smoothly on older hardware, offering a fast, lightweight browsing experience.

We’ve found it handles most tasks well, like loading modern web pages and running Chrome extensions. However, it struggles with DRM content like Netflix.

For everyday use, it’s a straightforward and reliable option without unnecessary frills.

Key Features:

  • Supports macOS 10.9 to 10.11
  • Compatible with Chrome extensions
  • Designed for low-resource systems
  • Actively maintained and open-source
  • Simple, no-clutter interface

⇒ Get Chromium Legacy

What browser should I use on an old Mac?

Speaking of versions, the latest one is 10.11.6, and browsers such as Opera One, Vivaldi, Chrome, Firefox, Brave, and Safari still support it beautifully.

So, which browser is best for an old Mac? Running an old machine has its challenges, and you definitely need a lightweight browser for Mac that can work for you rather than against you.

Among the top criteria to consider are stability and security, along with customization options. These need to be generous and versatile enough to allow you to personalize your experience to your taste and needs. Finally, you might also consider the impact on battery.

These top browsers won’t drain your Mac’s battery, so you might want to look closer. On this note, we wish you happy browsing!

There you go; these are our top picks for the best browsers that still work with El Capitan OS X on Macintosh computers. We hope you got what you came for, so don’t be shy to share your choice with us.

How to Install MSIXBundles on Windows 10 & 11

MSIXBundle is Microsoft’s own package format that allows for safer and more reliable deployment of multiple MSIX packages, each of which can support different architecture.

This means that the MSIXBundle can contain packages for both the x86 installer version and the x64 version of the installer.

It would mean better and easier distribution of MSIX Bundle for applications for each architecture. Also, by using the MSIXBundle you have to simply upload that MSIX Bundle to your distribution location, and the app installer will take care of the rest.

How to Install MSIXBundle on Windows 10 and 11?

1. On Windows 10

1.1. Use the App Installer

  1. Open the Microsoft Store on your PC.
  2. In the search bar, type App Installer.
  3. Install the App Installer.
  4. You will find the App Installer as Microsoft.DesktopAppInstaller, when you run the Appx-Package in PowerShell.
  5. To verify this, open the Start menu by pressing the Win key.
  6. Open Windows PowerShell as an admin.
  7. Type the below command and press Enter. get-appxpackage *installer*
  8. Open the MSIXBundle file, you will see the App Installer prompt.
  9. Click Install.

Using the Microsoft App Installer to install the MSIXBundle file will not only save you the hassle of running commands. It is pretty straightforward and easy to use.

1.2. Use PowerShell

  1. Open the Start menu by pressing the Win key.
  2. Open Windows PowerShell as an admin.
  3. Type the below command and press Enter. Appx-Package -Path "X:PathtoFile.Appx" (For example Add-AppxPackage -Path “D:AppxMicrosoft.VCLibs.140.00_14.0.30704.0_x86__8wekyb3d8bbwe.Appx”)

2. On Windows 11

2.1. Using App Installer

  1. Open the Microsoft Store on your PC.
  2. In the search bar, type App Installer.
  3. Install the App Installer.
  4. You will find the App Installer as Microsoft.DesktopAppInstaller, when you run the Appx-Package in PowerShell.
  5. Type the below command and press Enter. get-appxpackage *installer*
  6. Open the MSIXBundle file, you will see the App Installer prompt.
  7. Click Install.

2.2. Use PowerShell

  1. Open the Start menu by pressing the Win key.
  2. Open Windows PowerShell as an admin.
  3. Type the below command and press Enter. Appx-Package -Path "X:PathtoFile.Appx" (For example Add-AppxPackage -Path “D:AppxMicrosoft.VCLibs.140.00_14.0.30704.0_x86__8wekyb3d8bbwe.Appx”)

That is it from us in this guide. Here, we have properly explained all the steps you can follow on your Windows 10 or 11 PC to install MSIXBundle files.

Using Msixbundle, Appx, or AppxPackage, you can easily install or sideload third-party apps on your Windows 10 or 11 PC. This could come in handy for apps that aren’t available on the Microsoft Store.

Also, you can use Msixbundle, Appx, or AppxPackage to install apps from outside in case the Microsoft Store throws up errors or the server is not responding. In this guide, we will show you how to install Msixbundle on Windows 10 and 11.

Several users have reported that they are getting an error message The app package is not supported for installation error. If you are also experiencing this problem, you should refer to our guide and fix the problem.

Moreover, if you are getting the This Installation Package Could not be Opened error then you can check out the solutions mentioned in our guide to fixing the problem.

In case you have any questions, feel free to comment below.

This Application Made Too Many Requests: 5 Ways to Fix

Some of our readers have reported running into error 0x80860010 when launching downloaded apps from the Microsoft Store. The code is usually accompanied by this application made too many requests error message. Hence, we will explore its causes and proffer possible solutions here.

Also, we have a detailed guide for fixing a similar log in error 0x80860010 on Windows 11.

What causes this application made too many requests error?

There can be numerous factors causing this error with the Microsoft Store and downloaded apps. Some of them are:

  • Corrupt Microsoft Store cache – Microsoft Store cache files help it run faster and better, but they can become infected by malware or viruses if stacked for a long. As a result, it affects apps installed from the Store and may corrupt their installation files.
  • Log in errors with your Microsoft account – The error code 0x80860010 can occur if there’s an issue with your user account. It prevents Microsoft from accessing the necessary permissions to run the app. Also, a corrupt user profile on the computer can cause this issue.
  • Outdated Windows OS – If you’re running an outdated Windows operating system on your PC, it won’t be able to fix bugs affecting the current version. Hence, it can impede the app processing on the computer, resulting in an error.

Irrespective of the causes, let’s explore the troubleshooting steps below to fix it.

How can I fix This application that made too many requests error?

Before proceeding with any advanced steps, go through the following:

If the error appears again, proceed with the solutions below:

1. Run the Windows Store Apps troubleshooter

  1. Press Windows + I keys to open the Settings app.
  2. Click on the System tab and select Troubleshoot.
  3. Then, click on Other troubleshooters.
  4. Click the Run button beside the Windows Store Apps to execute the troubleshooter. Then, follow the prompts afterward.

Running the Troubleshooter will resolve issues with Windows Store apps that may interfere when opening the app.

2. Sign in and out of Microsoft Store

  1. Left-click the Start button, type Microsoft Store, then press Enter to open it.
  2. Click on the user icon in the top-right corner. Select your username, and click on the Sign-out button.
  3. Restart the Microsoft Store app and check if it’s logged out.
  4. Click on the user icon in the top-right corner of the screen and click on Sign in. Then, input the logging service credentials, then tap Next.
  5. Type your password, select the Keep me signed in option, and click Sign in.
  6. Exit Microsoft Store and restart your PC.

Re-signing into Microsoft Store can help fix account issues affecting the downloaded app. Read our guide on fixing the specified user who does not have a valid profile error on Windows 11.

3. Repair the Microsoft store app

  1. Press Windows + R keys to open the Run dialogue box, type ms-settings:appsfeatures, then press Enter.
  2. Locate and select the Microsoft Store, then click on the Advanced options.
  3. Go to the Reset tab and click the Repair button.
  4. Restart your PC after the repair process and check if the error is fixed.

Repairing the Microsoft Store app will fix any configuration issues and corrupt app files affecting its performance.

4. Re-register All Store apps

  1. Left-click the Start button, type PowerShell, and click Run as administrator.
  2. Click Yes on the User Account Control prompt.
  3. Copy and paste the following lines and press Enter:  Get-AppXPackage -AllUsers | Foreach {Add-AppxPackage -DisableDevelopmentMode -Register "$($_.InstallLocation)\AppXManifest.xml"}
  4. Restart your PC and check if the Error 0x80860010 appears while trying to log in to a Microsoft App appears.

Check our article about what to do if Windows PowerShell stops working when executing the steps above.

5. Delete the temporary folder files

  1. Press Windows + R keys to open the Run dialog box, type %temp%, and press Enter.
  2. Press Ctrl + A and right-click, then click on Delete from the drop-down.
  3. Navigate to: This PC\Local Disk (C):\Windows\Temp
  4. Press Ctrl + A, and delete all the temp files.
  5. Restart the PC and check if the error persists.

Deleting temp files will clear the corrupt files causing the Microsoft Store app error. You can check our article about how to delete Temporary files on Windows 11 for more steps.

Further, you may be interested in ways to fix the Microsoft Store 0x80070005 error on Windows 11, as it is also a rampant issue.

Likewise, it’s possible you encounter not enough space error on Microsoft Store. Hence, follow the fixes outlined in our guide to fix it.

For more questions or suggestions concerning this guide, kindly drop them in the comments section.

Microsoft news recap: Bing passes 100 million daily active users, ChatGPT-4 to launch next week, and more

Microsoft news recap is a weekly feature highlighting the top Microsoft news stories of the past week. Sit back, grab some coffee, and enjoy the read!

Microsoft to launch ChatGPT-4 next week

ChatGPT-4 is set to launch next week, igniting further waves in the AI space. With this version, multimodal models will be introduced, which can bring the possibility of video generation from textual prompts, among other possibilities.

Microsoft 365 set to get an accessibility assistant

An Accessibility Assistant has been introduced to Microsoft 365 that aims to highlight areas that may cause accessibility issues and provide suggestions on improvements.

Microsoft’s Bing crosses 100 million daily active users

With plenty of awareness over the past weeks and months with its ‘new Bing’, an AI-powered search engine, Microsoft’s Bing has surpassed 100 million daily active users, with users of its new Bing Chat helping drive usage up.

Local search ads come to Microsoft Bing

Microsoft Bing has gained Local Search Ads, helping advertisers to reach a local audience, making it easier for local businesses to reach customers in the right location.

That’s it for this week. We will be back next week with more Microsoft news.

How to Reset File Explorer: 4 Simple Ways

Microsoft allows many File Explorer customization options to change how files and folders are organized in the application.

Over time, File Explorer appears to be visually different, but you can do a File Explorer reset to restore the default settings. Go through our guide to know how to reset File Explorer on your Windows PC.

How can I reset File Explorer in Windows?

1. Reset the folder View settings

  1. Click the Search icon on your taskbar, type file explorer in the search field, and choose File Explorer from the search results.Reset file explorer
  2. In the File Explorer window, click the Menu icon (three-dots) located on the extreme right of the menu bar and choose Options from the drop-down menu that is revealed.Reset file explorer
  3. This will take you to the Folder Options window. Switch to the View tab to access the related settings and press the Reset Folders button located in the Folder views section to reset File Explorer to its default view.Reset file explorer
  4. A reset confirmation popup will open on the screen. Click Yes to confirm that you want to reset Windows 11 File Explorer to the default view.Reset file explorer
  5. Next, press the Restore Defaults button under the Advanced Settings section to revert these settings to their default value.Reset file explorer
  6. After the File Explorer is reset, press the OK button to save the changes you’ve made and exit the File Explorer Folder Options popup.

If you customized the file explorer folder view previously, you can reset File Explorer to the default view by implementing these simple steps discussed here.

2. Reset the general settings of File Explorer

  1. Use the Windows + E key shortcut to quickly launch File Explorer.
  2. Click the Menu icon (three-dots) on the File Explorer Menu bar and choose Options from the drop-down menu.Reset file explorer
  3. In the General tab of the Folder Options window and press the Restore Defaults button located at the bottom.Reset File Explorer
  4. Press the Clear button if you want to reset the File Explorer search history and press the OK button after performing the required actions.Reset file explorer

This method will roll back any changes made to the privacy and folder accessibility settings of the file explorer to restore the default values.

3. Reset the search settings

  1. Launch the Start menu by pressing the Windows key, type file explorer in the Search bar, and choose the relevant search result.Reset File Explorer
  2. Click the Menu icon (three dots) on the menu bar to view the hidden settings and select Options from the drop-down menu to access the Folder Options.
  3. Move to the Search tab in the Folder Options popup, and press the Restore Defaults button followed by OK to save the changes.Reset file explorer

This will reset any changes made to how File Explorer performs searches for indexed and non-indexed locations. We also recommend that you go through our guide on how to fix the File Explorer search if you run into trouble.

4. Reset File Explorer cache

  1. Use the Windows + S shortcut to launch the Search menu, type powershell in the search bar, and select the Run as Administrator option.Reset file explorer
  2. When the Windows PowerShell opens in front of you, type or copy-paste one of the following commands and press the Enter key to execute it. kill -n explorer Reset file explorer

These PowerShell commands will force File Explorer to wipe off the cache and restart itself if there are performance issues.

That’s all! Follow the step-by-step procedure in this article to reset the File Explorer settings to the default version on a Windows machine.

While you are here, you might be interested in our detailed guide to bring back the File Explorer icon if you use it often.

If you need further help regarding this issue, feel free to reach out in the comments section.

What is CPU Virtualization & How to Enable it in BIOS?

Virtualization is a technique that creates multiple versions of various system resources, including your CPU, server, storage, etc. For example, CPU Virtualization lets you use a single CPU like two different CPUs. This is like running two other computers on a single machine.

In this guide, we will help you understand what CPU virtualization is and how you can enable it in the BIOS settings of your PC. Virtualization can help several organizations efficiently manage their resources and other benefits, which we will discuss in this guide.

What is CPU virtualization?

The basic meaning of virtualization is to create another version of an operating system or any other resource. This could be anything from a network source, server, storage, or CPU.

When you virtualize your CPU, you give the same powers of one CPU to be used in another system virtually.

Every virtual machine runs an independent OS and acts like a separate computer. But that is not true, as it runs on just a portion of the main CPU.

Virtualization software communicates directly with the CPU, and the software handles everything else in the computer.

The software then splits the communication into different sections, as if they were being transmitted via two separate CPUs. One of the main advantages of CPU virtualization is that it allows you to run two different operating systems in one CPU.

There are two primary types of CPU virtualization:

  • Hardware-assisted virtualization: This type of virtualization relies on hardware features built into the CPU to provide isolation and performance benefits. Examples include Intel’s VT-x and AMD’s AMD-V technologies.
  • Software-based virtualization: In this approach, virtualization is achieved through software emulation. This method can have higher overhead and lower performance compared to hardware-assisted virtualization but can be used on systems without dedicated virtualization support in the CPU.

Is CPU virtualization the same as multi-tasking?

Do note that one should not confuse CPU virtualization with multitasking. Also, it would be best not to read CPU virtualization with hyperthreading along the same lines.

Multitasking lets you run two or more two applications at one time. However, the focus of operation would always be on a single application. Every modern CPU enables you to multitask.

On the other hand, hyperthreading is where compatible CPUs run a program specifically meant to carry out two actions at the same time.

Different from both multitasking and hyperthreading is CPU virtualization. In CPU virtualization, a single CPU can act as multiple separate systems.

So, you can run two operating systems in one CPU—for example, MacOS on one and Windows OS on the other. With CPU virtualization, running Windows OS on a Mac or Linus PC is also possible.

CPU Virtualization benefits

  • Saves cost: When you enable CPU virtualization, it allows you to set up multiple systems using a single CPU, thereby reducing the idle wait time.
  • Optimal utilization of resources: One powerful CPU can be used to virtualize into different systems reducing the idle compute time and enhancing the optimal utilization of resources.
  • Better in disaster recovery: When you have a virtualized environment, the recovery process would take a few minutes instead of hours on a single CPU because now you do not need to go through the hassle of setting up a new server, etc.
  • Increase efficiency: IT managers can easily install, update and maintain all the virtualized computers easily, as all they have to do is do the needful in the main CPU.
  • Eco-friendly: Setting up a virtualized environment helps reduce the number of physical servers, ultimately reducing the amount of power consumed. This will help reduce the carbon footprint.

For instance, a software development company can use virtual machines to simulate different operating environments for testing purposes. This can save costs and time, as developers can quickly switch between various operating systems and configurations without the need for multiple physical devices.

How can I enable CPU virtualization in BIOS?

  1. Press the Win + I keys to open the Settings menu.
  2. Click on Recovery.
  3. Under Advanced startup, select Restart now.
  4. Choose the Troubleshoot option.Choose an option - Troubleshoot diagnosing your pc
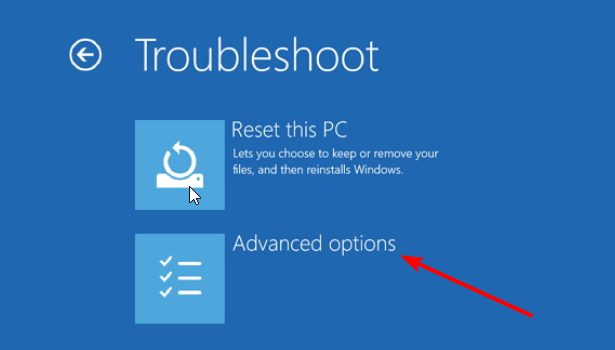
  5. Select Advanced options.0x80070422 firewall
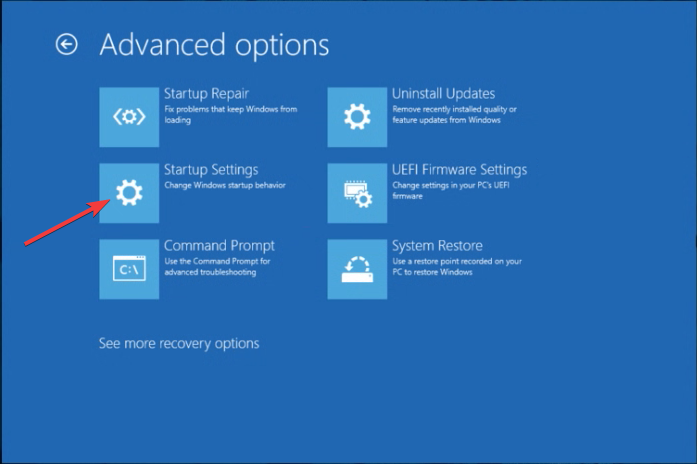
  6. Select UEFI Firmware Settings.Then, navigate to Troubleshoot followed by Advanced Options: UEFI Firmware Settings | Hyper V not booting from ISO
  7. Choose Restart.
  8. Click on the button that flashes on your screen to enter BIOS. The keys could be different. It is most usually F2, F8, F10, or Del.
  9. Use the arrow keys to select Configuration.
  10. Select Virtualization Technology.
  11. Select Enable.
  12. Press F10 to save the changes and exit.

That is it from us in this guide. The above steps let you turn on CPU virtualization on your PC. If you get an error where VT-X is disabled in the BIOS for all CPU modes, you should check out our guide to fix the problem.

Also, if Hypervisor is not running on your PC, you can refer to the solutions in our guide to resolve the problem.

We also have a guide that explains the 3 efficient ways to disable Hyper-V in Windows 11. So you should check out our guide if you want that.

Feel free to know your thoughts on this guide and whether you successfully enabled CPU virtualization on your PC or not.

How to Turn Off The Keyboard Sound in 6 Easy Steps

If you are annoyed by the constant clicking sound of your keyboard, this guide can help!

We will discuss some easy ways to turn off the keyboard sound so you can enjoy a quieter typing experience on your Windows. Let’s start!

What can I do to turn off the keyboard sound?

1. Use the Settings app

  1. Press Windows + I to open the Settings app.
  2. Click Time & language, and select Typing. Typing turn off keyboard sound
  3. Go to the Touch keyboard section, locate the Play key sounds as I type, and remove the checkmark beside it to disable the sound. Play sound

2. Use the Control Panel

  1. Press the Windows key, type Control Panel, and click Open. Control Panel
  2. Select View as Category, & click Hardware and Sound. Hardware and Sound turn off keyboard sound
  3. Select Sound.Sound
  4. On the Sounds tab, click Default Beep. 
  5. Choose Default Beep, click Sounds dropdown, and choose None. Sounds
  6. Click Apply and OK. 

3. Use the Registry Editor

  1. Press Windows + R to open the Run dialog box.REGEDIT RUN COMMAND 
  2. Type regedit and click OK to open Registry Editor. 
  3. Navigate to this path: Computer\HKey_CURRENT_User\Control Panel\Sound
  4. Locate and double-click the Beep key to modify. No turn off keyboard sound
  5. Change the Value data to no and click OK to confirm the changes. 

4. Use the PowerShell

  1. Press the Windows key, type PowerShell, and click Run as administrator. Powershell 2
  2. Type the following command to disable keyboard sound and press Enter: Set-ItemProperty -Path "HKCU:\Control Panel\Sound" -Name "Beep" -Value 0
  3. Copy and paste the following command to enable keyboard sound and press Enter: Set-ItemProperty -Path "HKCU:\Control Panel\Sound" -Name "Beep" -Value 1
  4. Close PowerShell.

5. Disable the Touch keyboard and handwriting panel

  1. Press Windows + R to open the Run dialog box. Services Run Command
  2. Type services. msc and press Enter to open Services. 
  3. Locate & right-click Touch Keyboard and Handwriting Panel Service and select Properties. Services turn off keyboard sound
  4. Change the Startup type as Disabled from the dropdown and click Apply and OK.

6. Use the Device Manager

  1. Press Windows + R to open the Run console.Device Manager RUN COMMAND
  2. Type devmgmt.msc and click OK to open Device Manager. 
  3. Go to System devices, locate Beep driver, right-click, and select Disable device.Disable driver turn off keyboard sound
  4. Click Yes to confirm your action.

So, these are the easiest ways to turn off the keyboard sound on Windows. Try them and let us know what worked for you in the comment section below.

Outlook PST Cannot be Found: 4 Ways to Fix This Error

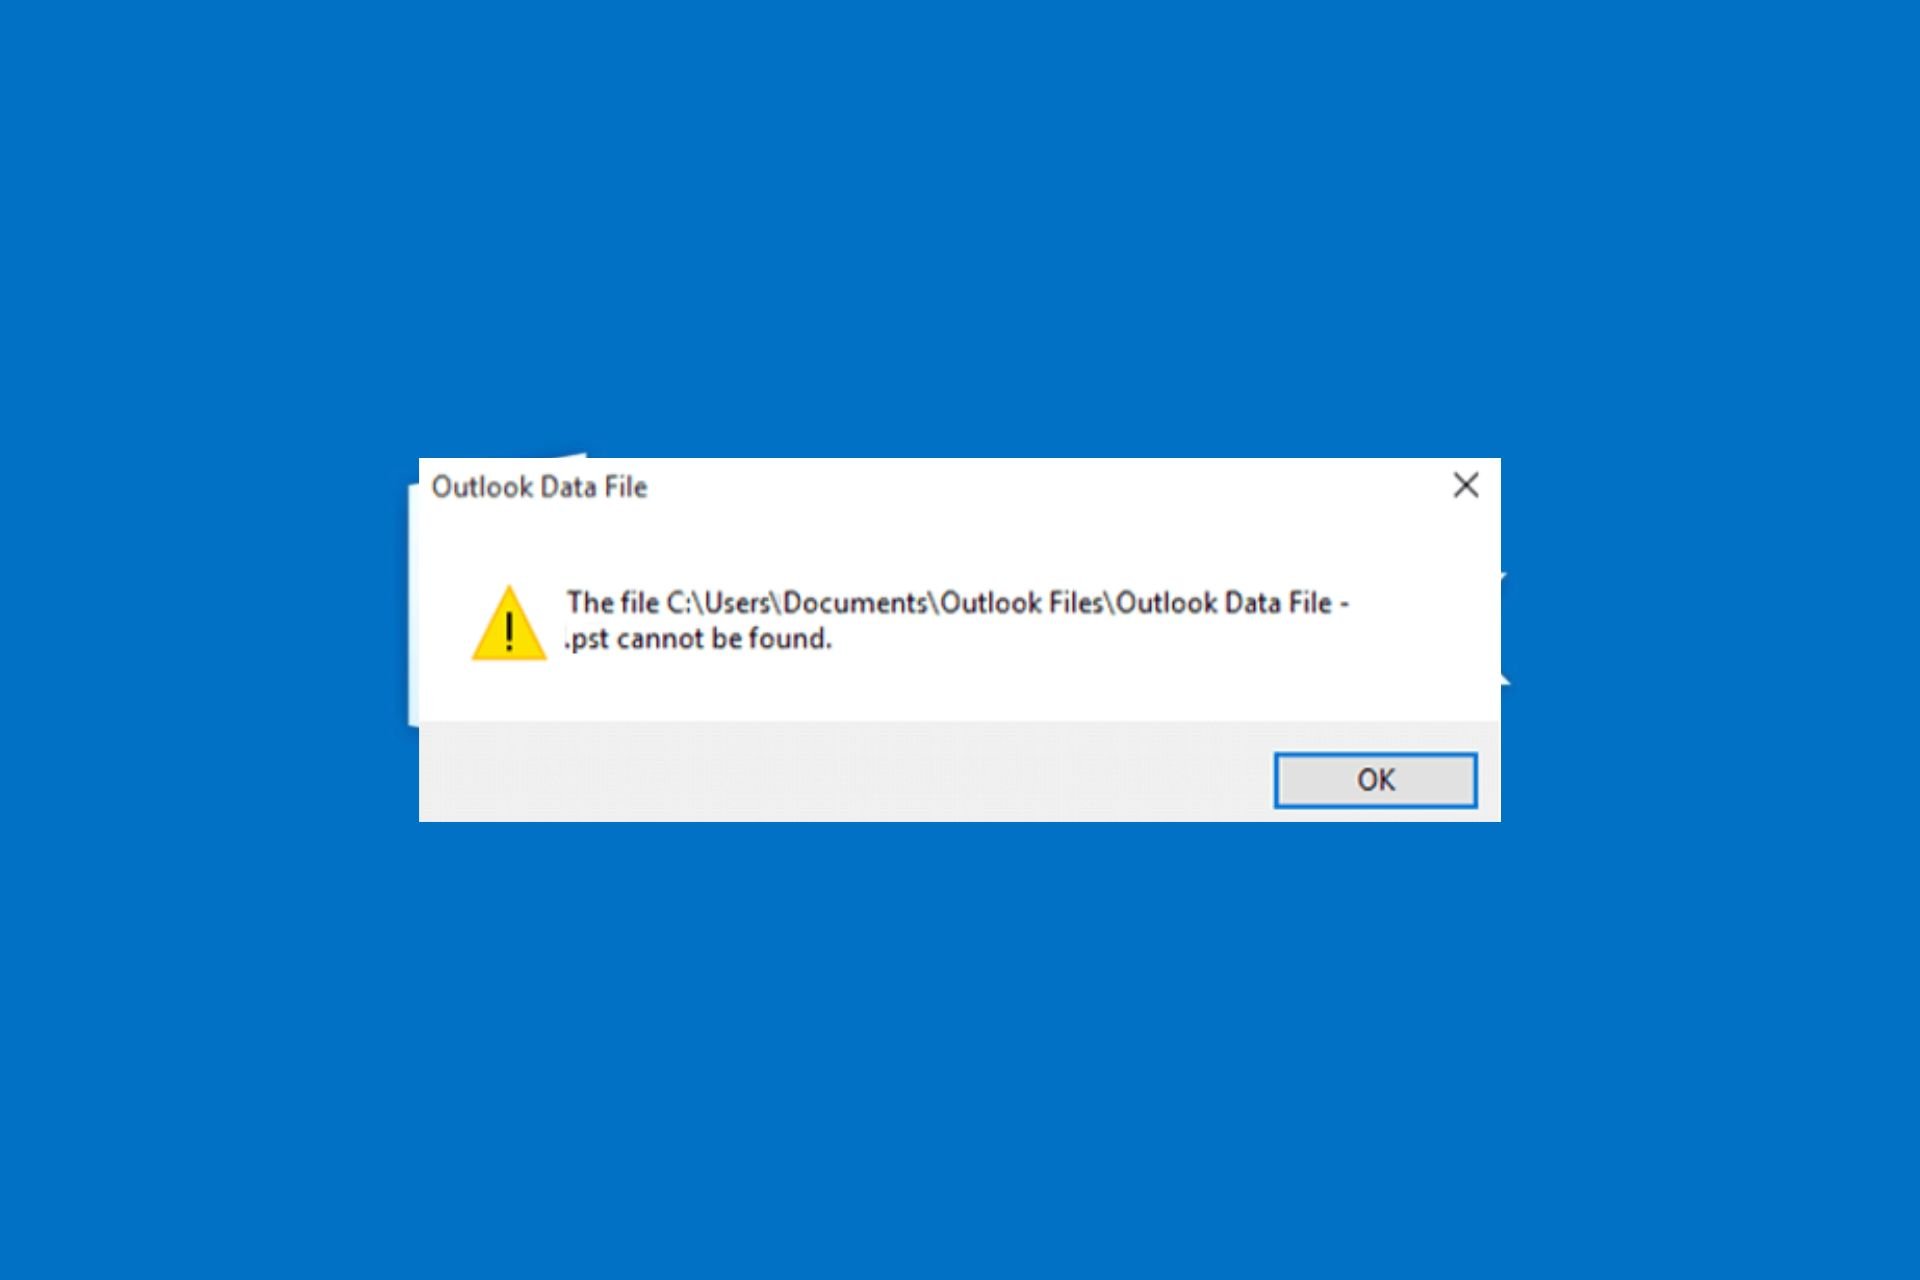
Lately, many users report receiving the error Outlook.pst cannot be found when starting the Microsoft Outlook app on their PCs. It indicates the software cannot locate the Personal Storage Table (PST) file.

Hence, this article will discuss ways to resolve the error and get Outlook working again. Also, you can read our article about how to save your Outlook emails using OST to PST Converter on your PC.

Why can’t I find my Outlook’s PST file?

Outlook PST file cannot be found error message can occur for numerous reasons such as:

  • The PST file is corrupt – You may see the error message when opening Outlook if the PST file is corrupt. It can cause it to be missing or unresponsive when invoked. Also, it can result in the Can’t open PST file error in Outlook.
  • Oversized PST file – The PST file is an Outlook data file that stores your messages, events, contacts, emails, etc. If the PST file has exceeded its limit and is oversized, it can cause issues with its functionality.
  • Problems with the work file – This issue can also arise from the fact that Outlook could not create the work file needed.
  • Corrupt Outlook installation file – MS Outlook can malfunction if its installation files are corrupted or compromised. It prevents the app from accessing the necessary files for communicating with its services.
  • Interference from other apps – The error can be because of interference from other apps, causing Outlook not to access its files. Also, third-party security software can prevent Outlook from opening on startup.

Nevertheless, we’ll take you through some solutions to fix Outlook data file issues and get it to work.

What can I do if the Outlook PST file cannot be found?

Go through the following before trying any advanced troubleshooting:

If you can’t resolve the error, proceed with the steps below:

1. Repair PST file via Inbox Repair Utility

  1. Close the Microsoft Outlook app.
  2. Press the Windows + E key to open File Explorer.
  3. Navigate to the following path: C:\Program Files\Microsoft Office\ OfficeXX or C:\Program Files (x86)\Microsoft Office\Office...
  4. Double-click on the SCANPST key to launch the SCANPST.EXE utility.
  5. On the Microsoft Outlook Inbox Repair utility page, click Browse, and choose the PST file.
  6. Click the Start button to scan the PST file and check for errors.
  7. Once the scan is complete, the Repair tool will show the errors. Select the Make backup of scanned files before repairing option to create a bak file, and click the Repair button.

Repairing the PST file can fix it if it’s corrupted or damaged and resolve the Outlook PST file not found error.

2. Recreate the PST file manually

  1. Press Windows + R key to open the run dialog box, type control, then press Enter to open the Control Panel.
  2. Click on Mail.
  3. Click on Show Profiles in the Mail Setup.
  4. Tap on the Add button to add a new file. Input the name and click OK.
  5. Click on Mail in the control panel and select the Data Files tab.
  6. Select the new Outlook profile from the list, then click the Set as Default option.
  7. Exit the Control Panel and restart tor PC, then check if the error persists.

Creating a new profile allows Outlook to create a new PST file for its operations. Check the methods for fixing corrupt Outlook profile on Windows 11.

Before trying this solution, you also might want to check your Outlook PST file location and make sure it’s properly configured.

3. Repair Microsoft Office

  1. Press Windows + I keys to prompt Windows settings.
  2. Click the Apps menu and select Installed apps.
  3. Locate Microsoft Office in the apps list, click the menu against it, and select the Modify option.
  4. Select Quick Repair from the new menu and click the Repair button.

Repairing Microsoft Office will fix issues that can cause PST file errors on Outlook and other Office apps that may interfere.

4. Reduce Memory Cache size for the PST file

  1. Press Windows + R key to open the Run dialog box, type regedit, and press Enter to open the Registry Editor.
  2. Navigate to the following path: HKEY_CURRENT_USER\Software\Microsoft\Office\XX.X\Outlook\PST
  3. Then right-click on the blank area, select New, then click on DWORD (32-Bit).
  4. Type UseLegacyCacheSize in the Value name and change the value to 1.
  5. Save the changes and exit the Registry Editor.
  6. Restart your PC and check if the Outlook PST file cannot be found message appears.

Reducing the memory cache size for the PST file will fix large Outlook data files causing the error. Check how to fix the Outlook folder if it’s disappearing on your PC.

In addition, do not hesitate to explore our article on fixing Outlook crashing after Windows updates on your PC. Likewise, you may be interested in reading how to fix Outlook if you can’t delete a folder with a few steps.

Even more, EML files can open natively in Outlook. However, in the case of using an older version, it is not as easy as you think, yet you may check our guide on how to open EML files in Outlook.

In some cases, you might even have to remove and download Outlook for Windows 11 again to fix this problem.

Kindly leave your suggestions and questions in the comments section.

Chrome Opens on Startup: 5 Easy Ways to Stop It

Several apps could slow down the booting process for your PC because they open on startup. Naturally, Chrome shouldn’t open on startup, but if the settings have been altered, this issue might occur to prolong the booting time.

Hence, we will tell you what to do when such a situation happens. Alternatively, you can check our article on fixing slow boot on Windows 11.

Why does Chrome open on startup?

Many factors may be responsible for prompting Google Chrome to open on startup. Some notable ones are:

  • Chrome being allowed to run at every startup – It is only normal for Chrome to run immediately when the system starts booting if it is set to run at startup in the Windows Startup Manager.
  • Issues with Chrome background settings – The Chrome background settings permission may allow it to run in the background even when you close the app. So, Chrome opening on startup, even though disabled, might be due to this.
  • Chrome is configured to retrieve tabs – Google Chrome is set to recover and reopen all the closed tabs from the last browsing session every time you start the browser. Hence, the feature may trigger the app to run from startup.

Fortunately, you can fix the issue by trying some troubleshooting steps we’ll discuss later in the article.

How can I stop Chrome from opening on startup?

Before proceeding with any advanced steps, go through the following:

If the issue persists, proceed with the solutions below:

1. Disable background operation in Chrome Settings

  1. Launch Google Chrome on your PC. Click the three dots button in the top-right corner to open the Menu, then select Settings.
  2. Under System, toggle off the switch for Continue running background apps when Google Chrome is closed.
  3. Close Chrome and restart your PC.

Disabling the feature above will stop any background operations in Chrome and prevent it from running after being closed. Read about how to fix Chrome not opening on Windows 11 if it crashes.

2. Disable via Task Manager

  1. Press Ctrl + Shift + Esc keys to open Task Manager.
  2. Click on the Startup tab.
  3. Find Chrome from the list of programs, right-click on it, and select Disable from the drop-down menu.
  4. Exit the Task Manager window and restart your PC to check if Chrome runs on startup.

Disabling Chrome in the Startup tab will stop the autostart feature. Should the Task Manager fail to work correctly, do not hesitate to check this guide for solutions.

3. Remove Chrome from the Startup list via Registry Editor

  1. Press Windows + R key to open the Run dialog box, type Regedit, and press OK to launch the Registry Editor.
  2. Navigate to the following path: Computer\HKEY_CURRENT_USER\Software\Microsoft\Windows\CurrentVersion\Run
  3. Delete any file referring to Google Chrome in this folder.
  4. Navigate to the following path: Computer\HKEY_CURRENT_USER\SOFTWARE\Microsoft\Windows\CurrentVersion\Explorer\StartupApproved\Run
  5. Delete any file referring to Google Chrome in this folder.
  6. Restart your computer to initiate the changes in the Registry Editor and check if the issue persists.

Deleting Chrome StartupApproved keys will remove the app from the startup list, preventing it from running when the system boots. Further, check how to fix a corrupt Registry Editor on Windows 11 if you encounter a problem.

4. Change your Account Privacy settings

  1. Left-click the Start button, type sign-in options, and click on it to open System Settings.
  2. Toggle Off the switches for Use my sign-in info to automatically finish setting up after an update and Automatically save my restartable apps options.
  3. Restart the PC to see if Chrome launches on startup.

Disabling these privacy settings prevents apps from using your account sign-in info to set up apps and automatically launch them.

5. Reinstall Chrome

  1. Press Windows + I key to open the Windows Settings app.
  2. Select Apps and click on Installed apps.
  3. Navigate to Chrome and click on it, then select Uninstall.
  4. Then download Chrome and reinstall it on your PC.

Reinstalling Chrome will fix any app file errors causing issues with its functionality. However, this has to be your last option because it will lead to app data loss.

In summary, this guide has outlined the various ways to fix Chrome opening on startup. Also, you may be interested in fixes for the Chrome browser crashing after a Windows update on your PC.

If you have further questions or suggestions, drop them in the comments section.

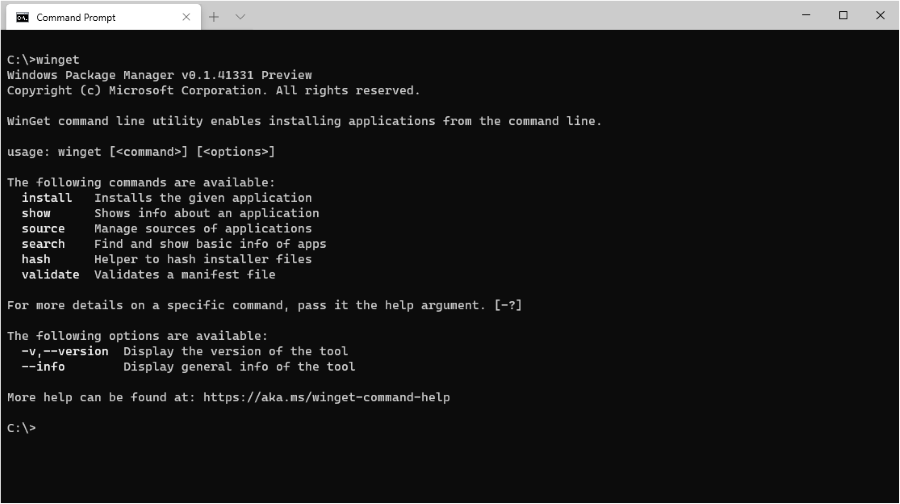
Windows Package Manager on Windows 11: How to Enable & Use

Windows Package Manager or Winget, is a tool that allows you to manage software packages on your Windows 11. Although there is a similar functionality on Linux, with the release of Windows 11, Microsoft has made it even easier to use this tool.

Thus, we will discuss how to enable and use Windows Package Manager on Windows 11. Also, you can read about how to fix the Winget if it’s not recognized on your Windows device.

What is a Windows Package Manager?

Windows Package Manager is a tool designed for installing, updating, and managing software packages on Windows PCs. Microsoft Introduced it in May 2020, making it available for Windows 10 version 1809 and later.

It allows you to use a command-line interface to perform software management functions instead of a graphical user interface.

Furthermore, Windows Package Managers help streamline the download of apps by providing a central location for users to manage all of their software installations. The Package Manager uses a YAML-based manifest file format that defines the software packages to be installed or updated with any dependencies or configurations required.

How can I enable Windows Package Manager and use it on Windows 11?

1. Install Windows Package manager (Winget)

  1. Open the Microsoft Store and search for the App Installer.
  2. Click the Get button to download and install the app.
  3. Click the Update button to update it if the App Installer is pre-installed on your PC.

The Winget feature is part of the App Installer. Therefore, downloading and updating the Microsoft App Installer will make the Winget feature available. You can read about how to resolve Microsoft Store if it’s not working in Windows.

2. Use Windows Package Manager

2.1 Download apps using Winget

  1. Press the Windows button, type cmd, and click the Run as administrator to open it.
  2. Type the following command line to search for a tool: winget search <appname>
  3. Type the next command line and press Enter to download and install the app on your computer: winget install (App name)

The above command line lets your computer download and install apps directly without navigating different web pages. Do not hesitate to check our guide on the best Installer Software Package for Windows.

2.2 Search for apps to download

  1. Launch the Command Prompt as an administrator.
  2. Type the following and press Enter: winget search (app name)

2.3 Use Windows Package Manager to see installed software

  1. Left-click the Start menu, type cmd, and click Run as administrator.
  2. In the UAC prompt, click on Yes to confirm.
  3. Type the following command line and press Enter to show the list: winget list

These are the steps to download, install and use the Windows Package Manager on Windows 11.

However, you can also read how to remove software using Winget to increase your knowledge of Windows Package Manager.

Also, do not hesitate to explore our guide on fixing the Windows Package Manager operation failing on your device.

If you have further questions or suggestions, kindly drop them in the comments section.

This File Cannot Be Previewed: How to Fix This Outlook Error

Among the many issues plaguing Outlook users, This file cannot be previewed because an error message has become prominent. This prevents you from accessing your emails and shared files. Hence, we will proffer possible solutions to fix it.

Also, you can encounter issues with Outlook not connecting to the server and Gmail, preventing you from accessing your emails.

Why can’t I preview files on Outlook?

This file cannot be previewed error can appear in various forms, and the variation may be based on the cause. Some notable causes of the error are:

  • The Previewer is not installed or inaccessible – Previewing files on Outlook can be challenging if the app responsible for the task isn’t running. So, when you click on a file or email to access its contents, it will pop up an error with the following Previewer, or there is no previewer installed.
  • Corrupt concerned file or Outlook app file – The error message may also occur if the file you’re trying to preview is corrupt. Also, problems with Microsoft Office or unknown Outlook errors and program files can cause this problem.
  • Issues with Antivirus settings – Sometimes, you can run into the file cannot be previewed error message if the antivirus software running on your device is impeding the action. It may be a setting blocking external files or the Previewer from interacting.

Nonetheless, we’ll take you through some basic steps to resolve the error and get Outlook to work as expected.

What can I do if I get this file cannot be previewed prompt on Outlook?

Apply the following preliminary checks:

  • Turn off background apps on your computer.
  • Fix network congestion on the device.
  • Close and reopen the Outlook app, then check if the problem persists.

If the error persists, follow the steps below:

1. Ensure the right Previewer is enabled in Trust Center

  1. Launch the Outlook app on your PC.
  2. Click on file in the top-left corner and select Options from the left sidebar.
  3. Scroll down and click on Trust Center from the left pane. Then, on the right side of the screen, click the Trust Center Settings button.
  4. Click on Attachment Handling on the left pane, then click the Attachment and Document previewers button on the right.
  5. Check the boxes for all the Previewers on the File Previewer options page, then click OK to save the changes.
  6. Relaunch the Outlook app and check if you can preview the file.

Enabling the Previewers in Outlook allows it to use them when needed.

2. Check Optimize for compatibility settings

  1. Launch the Outlook app on your PC.
  2. Click on the file in the top-left corner and select Options from the left menu.
  3. Click on General, then go to the User Interface options and tick the radio button for the Optimize for compatibility option.
  4. Then, click OK to save the changes.
  5. Relaunch the Outlook app and check if the file preview error persists.

Allowing the Optimize for compatibility option will fix display compatibility issues that can cause the problem. Read our guide on fixing the action cannot be completed error if you run into it on Outlook.

3. Reset Content.Outlook Folder

  1. Press Windows + R key to open the Run dialog box, type %LocalAppData%/Microsoft/Windows, and press Enter.
  2. Locate the Temporary Internet Files folder. If it isn’t visible, click View at the top bar and then Options.
  3. Click the View tab and uncheck the Hide protected operating system files (Recommended) option. Click Apply, then OK.
  4. Go to the Temporary Internet Files, and select the Content.Outlook folder, and then delete all files in it.
  5. Restart Outlook and try to open the file to see if the error occurs.

The Content.Outlook folder stores the files you want to preview in Outlook, so resetting it will remove corrupt files preventing the files from opening.

4. Repair Microsoft Office

  1. Press Windows + I keys to prompt Windows Settings.
  2. Click the Apps menu and select Installed apps.
  3. Locate Microsoft Office in the apps list, click on the menu button against it, and select the Modify option. 
  4. Select Quick Repair from the new menu and click the Repair button.

Repairing Microsoft Office will fix issues that can cause the file cannot be previewed error.

In conclusion, you may be interested in fixing Outlook crashing after Windows updates on your PC. Also, check how to fix Outlook folder disappearing issue on your computer.

Should you have further questions or suggestions, please leave them in the comments section.

Fix: Wireless Capability is Turned Off on Windows 11

Connecting a computer with other devices has been seamless through a wireless network connection, enabling data transmission over radio waves. However, users have encountered issues with the wireless capability feature being turned off on Windows 11.

Therefore, this guide will attempt to provide possible solutions. Alternatively, you can check out our article on fixing wireless adapters or access point issues on a PC.

Why is the wireless capability turned off?

You can experience this issue for several reasons. Some of the major factors are:

  • Outdated network drivers – A wireless driver is essential for providing a standard interface that allows the system to communicate with the wireless device. Thus, an obsolete driver can prompt wireless capability to be off in Dell computers.
  • Virus and malware attacks – A virus attack on a computer may affect the functionality of the wireless network. Do not hesitate to look at our recommended list of the best virus removal tools if this is the cause of the problem.
  • Windows power settings – The Windows power setting feature allows you to control your computer power usage, including when to sleep and the power used by various components. So, changing the power settings on Windows 11 can disable the wireless capability to save battery power.

Although these factors can differ on various devices, we’ll discuss ways to troubleshoot Windows 11 wireless capability turned-off error.

What can I do if the wireless capability is turned off in Windows 11?

Try the following preliminary checks before proceeding with anything else:

  • Check the hardware switch or button and see if Wi-Fi is turned off manually.
  • Check if the wireless network is in range.
  • Restart your PC in Safe Mode to check if it fixes the error.

If the problem is not fixed, proceed with the following steps:

1. Turn on the Wireless option

  1. Press the Windows + I to open the Windows Settings.
  2. Select the Network and Internet category and navigate to Advanced network settings.
  3. Under Network adapters, locate Wi-Fi, and select the box beside it to Enable it.

Turning on the wireless option will enable a wireless network on your device. If the Wi-Fi icon is missing or it disappeared on your PC, then hop on this guide to find the best fixes.

2. Update the Network Adapter driver

  1. Right-click the Windows icon and select Device Manager from the list.
  2. Click the drop-down button on the Network Adapter category to expand it, and right-click on the wireless network adapter. Then select the Update driver from the context menu.
  3. On the next window, select Search automatically for driver.

Updating the diver will allow the wireless network to communicate effectively with Windows OS. Meanwhile, we have a comprehensive guide to updatng system driver packs on Windows if you want to update all drivers.

3. Check Wireless network Power Management settings

  1. Right-click the Windows icon, type Device Manager, and press Enter to open it.
  2. Click on the Network adapter category to expand it, right-click on the wireless network adapter, and select Properties.
  3. Then, select the Power Management tab and uncheck the  Allow the computer to turn off this device to save power box. Click OK to apply changes.
  4. Restart your PC and check if the wireless capability is turned off issue is resolved.

The above method will disable the power manager from turning off wireless networks. However, you should check out how to fix a missing power management tab in Windows Device Manager if you can’t find the tab.

In addition, our guide on fixing Windows that can’t find Wi-Fi network may also be helpful to check out. Lastly, Windows 10 laptop crashing whenever you turn on Wi-Fi is another similar problem. Hence, do not hesitate to take a look at our guide.

If you have further questions or suggestions, kindly drop them below.

You’ll Need Internet For This: How to Bypass This Error

Also known as Error Code 0x800704cf, You’ll need internet for this is an error message that appears whenever you try to do certain Microsoft-related tasks like launching the Microsoft Store.

And it can appear even if you’re computer is already connected to the internet. You can try reconfiguring your Wi-Fi adapter, but if that doesn’t work, there are numerous solutions you can try.

What causes this error to appear in the first place?

Before getting into the solution, let’s go through what causes the Error Code 0x800704cf to occur in the first place. So if it ever happens again, you’ll know exactly how to address it.

  • Files on your computer are corrupt – Corruption can cause all sorts of hardware problems, so you must clear it all out with an SFC scan or run the DISM tool.
  • There’s a problem with the network adapter – Your network adapter could interrupt service. That’s why you should disable it momentarily to troubleshoot connectivity issues properly.
  • Your computer lacks the latest Windows 11 update – Microsoft typically rolls out numerous fixes in Windows Updates, so it’s important to stay up to date with them.

How can I bypass the You’ll need internet for this error?

Luckily, there are many different ways to get around Error Code 0x800704cf. If one solution doesn’t work, you can always try something.

  • The first thing that you should do when encountering this problem is to reboot your computer. Doing this simple action will address the problem most of the time.
  • Since this error typically revolves around the Microsoft Store, try signing out of your account and then signing right back in. It’ll refresh the app.
  • Run the Windows Store Troubleshooter. You can find the tool by launching the Settings menu, then going to the bottom of the Other Troubleshooters section in the Troubleshooter tab.
  • Double-check network problems on your network. Microsoft has a set of instructions on how to do this on their website. The company recommends briefly disconnecting your Wi-Fi.
  • Use a PC repair tool to fix missing or corrupt files. Windows 11 does have a native repair tool, but it’s not very good. You’re better off using a third-party tool.

1. Reset the Windows Store via Command Prompt

  1. Bring up the Command Prompt in the Windows Search bar and select Run as administrator.
  2. Type in the following command and hit Enter on your keyboard: WSreset.exe
  3. After running the command, the Microsoft Store should immediately open. If it doesn’t, reboot your computer.

2. Flush DNS

  1. Just like in the previous solution, bring up the Command Prompt and run it with administrator permissions.
  2. Type in the following commands and press Enter after each one: ipconfig /release ipconfig /renew
  3. Next enter the following: ipconfig /flushdns ipconfig /registerdns

There are other ways to flush out the DNS cache on Windows 11 that don’t involve the Command Prompt. It’s useful to know this in case you don’t have admin-level permissions on your computer.

Be sure to check out our guide on the alternate ways to reset DNS on Windows 11.

3. Obtain an IP address from DHCP

  1. Launch the Windows Settings menu and go to the Network & Internet tab.
  2. Select Advanced network settings.
  3. Scroll down and click More network adapter options.
  4. Right-click Wi-Fi. Select Properties.
  5. Highlight Internet Protocol Version 4 (TCP/IPv4), then click the Properties button.
  6. Toggle Obtain an IP address automatically. Select OK.

4. Re-register Microstore Store apps

  1. Bring up PowerShell in the Windows Search bar and select Run as administrator.
  2. Copy and paste the following command into PowerShell: Get-AppXPackage -AllUsers | Foreach {Add-AppxPackage -DisableDevelopmentMode -Register "$($_.InstallLocation)\AppXManifest.xml"}
  3. The command should begin running automatically. If not, hit Enter on your keyboard.
  4. Once done. restart your computer.

5. Reinstall Microsoft Store

  1. Like in the previous solution, launch PowerShell with the same administrator permissions.
  2. Enter the following command into PowerShell to first uninstall the Microsoft Store: Get-AppxPackage -allusers *WindowsStore* | Remove-AppxPackage
  3. Next, copy and paste the following command into PowerShell: Get-AppxPackage -allusers *WindowsStore* | Foreach {Add-AppxPackage -DisableDevelopmentMode -Register “$($_.InstallLocation)\AppXManifest.xml”}
  4. The command should run automatically. If it doesn’t, press Enter on your keyboard.

6. Enable built-in admin account

  1. Press and hold the Shift key, then restart your computer. This will reboot your machine in Advanced Startup Mode.
  2. On the first page you see, select Troubleshoot and then Advanced options.
  3. Under Advanced Options, select Command Prompt.
  4. Enter the following command: net user administrator /active:yes
  5. Exit the Command Prompt to restart your computer.
  6. A new profile with your name with administrator-level permissions is now available. Log in as normal.

This solution is meant for people who don’t have administrator-level permission on their user account and want to do one of the previous solutions.

Once created, it’s recommended that you copy files from your old account to the new one. Microsoft has a series of instructions on how to do this on their website.

What can I do if I run into Error Code 0x80073cfc?

Error Code 0x80083cfc relates to a problem where you cannot download Xbox games onto your PC. It relates to Error Code 0x800704cf, as it can also affect the Microsoft Store.

To fix this problem, you must download two specific software: Xbox Identity Provide and Microsoft Gaming Services.

Speaking of video games, you should also learn how to address the Xbox app not detecting Gaming Services. Without this software, the Xbox app will get stuck on the loading screen.

It is a little tricky to fix, however. You’ll have to delete key Gaming Services files on the Registry Editor, which can be confusing to navigate. If that doesn’t work, try resetting the Xbox app.

Feel free to comment below if you have questions about other system errors. Also, leave comments about reviews you’d like to see or information on other Windows 11 functions.

Xbox Error Code 0x8007013d: What Is It & How to Fix

0x8007013d is an error code that occurs when you try to install an Xbox app or game on your Xbox console. This issue can be caused by having a corrupt Xbox app or game installation file. Downloads can be slow at times but still successful. However, when they fail completely, it can be frustrating.

The problem will halt any attempt to download or install a game. Usually, the first line of defense is to reinstall the app. If that doesn’t work, check out our troubleshooting guide below for more help.

What is error code 0x80070013d on Xbox? 

If you receive a system error code 0x80070013d while installing the latest update for your Xbox, several things that could cause this problem. Some of the most common reasons include:

  • Server issues – It is possible that the server is overcrowded or experiencing downtime whenever you try to update or install a game.
  • Network inconsistencies – If you have an intermittent connection, whenever you try to update a game, it will be interrupted. This is because the connection is unstable.
  • Corrupt installation – If the game you’re trying to download or update has a problem or the installation files are corrupt, the error 0x80070013d will appear on your Xbox.

How do I fix error 0x8007013d on Xbox?

A few basic steps that could save the day include: 

  • Make sure your console is connected to Wi-Fi or Ethernet and that it’s charged.
  • Ensure that your Xbox One console is fully updated by downloading any updates available from the store.
  • Close any background programs and processes.
  • Disconnect other devices from the network that may be using up the bandwidth.
  • Try restarting your Xbox by pressing the power button on your Xbox console for 10 seconds. If this doesn’t solve the problem, try unplugging and plugging in your Xbox again.
  • Verify the Xbox server status and ensure there is no scheduled maintenance or downtime.
  • Restart your router.

1. Reset your MAC address 

  1. Go to Home on your Xbox.
  2. Navigate to Profile & system.
  3. Select Settings.
  4. Go to Network settings.
  5. Click on Advanced settings.
  6. Select Alternate MAC address.
  7. Hit Clear on the next page.
  8. Click on Restart console.

Clearing the MAC address of your computer will delete all connected devices, including Wi-Fi connections. This is a good way to get rid of any connected devices that may be slowing down your computer and using too much power, such as printers or USB devices.

2. Change your DNS

  1. Launch your Xbox, click on Settings then select Network Settings.
  2. Click on Advanced Settings.
  3. Next, go to Select DNS settings, then click on Manual.manual dns settings xbox
  4. Change the Primary DNS from 8.8.8 to 8.8.8.4.
  5. Restart your console and then check if the error persists.

Changing your DNS server is a quick and easy way to improve a website’s performance. Your DNS server is the bridge between your computer and the internet.

3. Reinstall the Xbox app

  1. Press the Start Menu icon and click on Settings.settings windows 11
  2. Select Apps from the left side and click on Apps & features from the right.
  3. Type Xbox in the search box and hit Enter.
  4. Click on the three-dot icon and select Advanced options.
  5. Scroll down and select Uninstall.
  6. Now download Xbox from the Microsoft Store.

Reinstalling the Xbox app will help you eliminate any corrupt installation files that probably never finished installing or build-up cache that could interfere with new installations.

Still, on Xbox errors, you may also come across the 0x87e10bef error code so don’t hesitate to check out our guide for some quick solutions. In case your Xbox game takes too long to start, we have answers as to why this is happening and subsequent fixes to bypass this issue easily.

Your feedback is important to us, so drop us a comment below if you have been able to resolve the Xbox error code 0x8007013d.

How to Disable Media Volume Control Popup [Permanently]

A media volume control popup appears on the screen when you fine-tune the volume levels using the corresponding shortcut key. This may be annoying, so keep reading to find out the different ways to disable the media volume control popup permanently.

How can I disable the media volume control popup?

1. In Google Chrome

  1. Click the Windows icon on the taskbar, type chrome in the search bar on the top, and select the relevant search result to launch Google Chrome.Disable Media Volume Control Popup
  2. Type or copy-paste the following in the address bar and press the Enter key. chrome://flagsDisable media control popup
  3. Type media key in the search box on the top and choose Disabled for the Hardware Media Key Handling drop-down.Disable media volume control popup
  4. Now exit the Google Chrome app and relaunch it.

Google Chrome offers several experimental features known as flags to customize the settings of the browser. Disabling the Hardware Media Key Handing flag in Chrome also disables the media volume control overlay for any media being played in the browser.

2. In Microsoft Edge

  1. Press the Windows key to launch the Start menu and click the Edge icon under the Pinned apps section.Disable media volume control popup
  2. Type or copy-paste the following in the address bar and hit the Enter key. edge://flagsDisable media volume control popup
  3. Type the media key in the search box on the resulting page and choose Disabled in the Hardware Media Key Handling drop-down.Disable media volume control popup

After this, relaunch the Edge browser and adjust the volume using the shortcut key. You will no longer see the media volume control overlay anymore.

We have shown the step-by-step procedure to disable the media control overlay on popular browsers, but you may perform this task on any Chromium-type browser.

3. Disable desktop overlay in Spotify

  1. Press the Windows key, type spotify in the search bar, and click the Spotify icon in the search result.Disable media volume control popup
  2. Click the Menu icon (three-dots) located in the top left corner and choose the Edit option from the menu followed by Preferences from the sub-menu.Disable media volume control popup
  3. Scroll down the settings window and disable the switch for Show desktop overlay when using media keys option.Disable media control popup

Some media apps, such as Spotify permit users to choose whether to see or hide the media volume control overlay when pressing the media keys.

4. Use a third-party tool

  1. Download HideVolumeOSD 1.4 tool from its official website.Disable Media Volume Control popup
  2. Use the Windows + E shortcut to launch File Explorer and navigate where the .exe file is located.
  3. Double-click the .exe file and install the Tray icon version.Disable media control volume popup
  4. After the successful installation, the HideVolumeOSD icon will appear in the system tray.
  5. Click the HideVolumeOSD tray icon once to disable the volume display.Disable media volume control popup

Windows PC does not have built-in settings to disable the media volume pop-up on the screen. However, installing a third-party tool known as HideVolumeOSD 1.4 will let you choose whether to enable or disable the media volume overlay as required.

Easy, right? Use the methods explained in this how-to guide to disable the media volume control pop-up if it bothers you.

You can check out our awesome guide explaining how to customize Windows using the registry editor.

If you have any queries or suggestions, reach out to us in the comments section below.

How to Undervolt Your CPU in Easy Steps

Whether you have AMD or Intel CPU on your PC, although there are several power-efficient versions, sometimes you have to manually undervolt your CPU for optimal performance.

When you undervolt your CPU, you make sure that that CPU is drawing less power but delivering the same processing power.

In this guide, we will show you how you can undervolt your CPU in some easy steps. We will also be discussing the benefits of undervolting your CPU, its purpose, and more in this guide. Let us get right into it.

What is CPU undervolting?

Before you go ahead and check out the steps to undervolt your CPU, you must understand the basics and advantages of why you should undervolt your PC.

CPUs use different amounts of power to perform different tasks. When you play a game, the CPU uses a good amount of resources to let the user play the game smoothly. However, when doing normal tasks such as viewing your media files or playing songs, the resources aren’t used to the extreme.

When the CPU draws a high amount of power, there are a few downsides attached to it:

  • It reduces the lifespan of the CPU.
  • Generates a huge amount of heat.
  • Draws more energy, thus increasing your electricity bill.

To avoid all such issues, you can opt to undervolt your CPU. This can be achieved by lowering the core clock frequency resulting in lower power consumption. The best part is that the performance of your PC isn’t affected in a major way.

Here are some pros of undervolting the CPU:

  • Consumes less power
  • Outputs less heat
  • The lifespan of your CPU increases
  • Noise is reduced
  • Batteries on your laptops can run a bit longer
  • Thermal throttling is avoided
  • No major decrease in performance

Is CPU Undevolting Safe?

As mentioned, undervolting your CPU is safe. However, it can be done wrong. Meaning, if you undervolt your PC too much then it will result in your PC crashing, underperforming, poor performance, and whatnot.

You will also come across BSOD errors as well. You should make sure that when you are undervolting your CPU, you are following the steps carefully.

The good thing about undervolting your CPU process is that it can be reverted in case things go wrong. All you need to do is perform as asked in the steps to undervolt your CPU backward.

How to undervolt the CPU?

  1. Download Throttlestop software.
  2. Install the program on your PC.
  3. Launch Throttlestop.
  4. Under the Settings menu, click Speed Shift – EPP to enable Intels’s Speed Shift technology.
  5. Hit the TS Bench button to get the base value of temperatures.
  6. Click FIVR.
  7. Select OK – Save voltages immediately.
  8. Click on Unlock Adjustable Voltage.
  9. Tweak the CPU core, CPU Cache, and Intel GPU values one by one by -100mV.
    • In case your PC or laptop crashes at -100mV, try reducing the level. Continue to increase the level till your PC is stable.
    • On the other hand, if the laptop is stable at -100mV, try upping the levels by -10mV till your system starts to crash.
  10. Select Apply and OK.

How to keep Throttlestop to be always on and run it when your PC boots up?

Keep Throttlestop always on

  1. In the main Throttlestop window, click on the Task Bar.
  2. Click Options.
  3. Select Start Minimized.
  4. Choose the Minimize on Close option.
  5. Click OK to save the changes.

Run Throttlestop always when your PC boots up

  1. Open the Start menu by pressing the Win key.
  2. Type Task Scheduler and open it as an admin.
  3. Click on Create Basic Task.
  4. Name it Throttlestop and click Next.
  5. Click Trigger on the left.
  6. Choose the option When I Log On.
  7. Click Next.
  8. Switch to Action, and select Start A Program.
  9. Locate the Throttlestop.exe file and click Open.
  10. Click Finish.
  11. Enter Properties and select Run with highest privileges.
  12. Click OK to save changes.

Throttlestop software is a tool to undervolt Intel CPUs. It does not support undervolting AMD CPUs. So, to undervolt an AMD CPU, you need to use another software, which we have explained below.

How to undervolt an AMD CPU?

  1. Download Ryzen Master for your AMD PC.
  2. Click on Curve Optimizer in the profiles section on the left.
  3. Under Control Mode, select Default.
  4. For Curve Optimizer Control, make sure Included with Auto Offset is turned on.
  5. Select either All Cores or Per Cores next to Curve Optimizer Mode. In our case, we will be selecting All Cores.
  6. Click Start Optimizing.
  7. Click OK on the prompt that pops up.
  8. The optimization process will take around 30 to 60 minutes, and your PC will restart a few times.
  9. Click Apply.

So this is how you can undervolt your Intel or AMD CPUs. We have a guide that explains all the steps that you need to know on how to underclock your NVIDIA or AMD GPU safely.

On the other side, if your system crashes when you overclock your CPU, you can check out our guide that does the needful to fix the issue.

Feel free to let us know in the comments below if you encounter any issues while following the above steps.

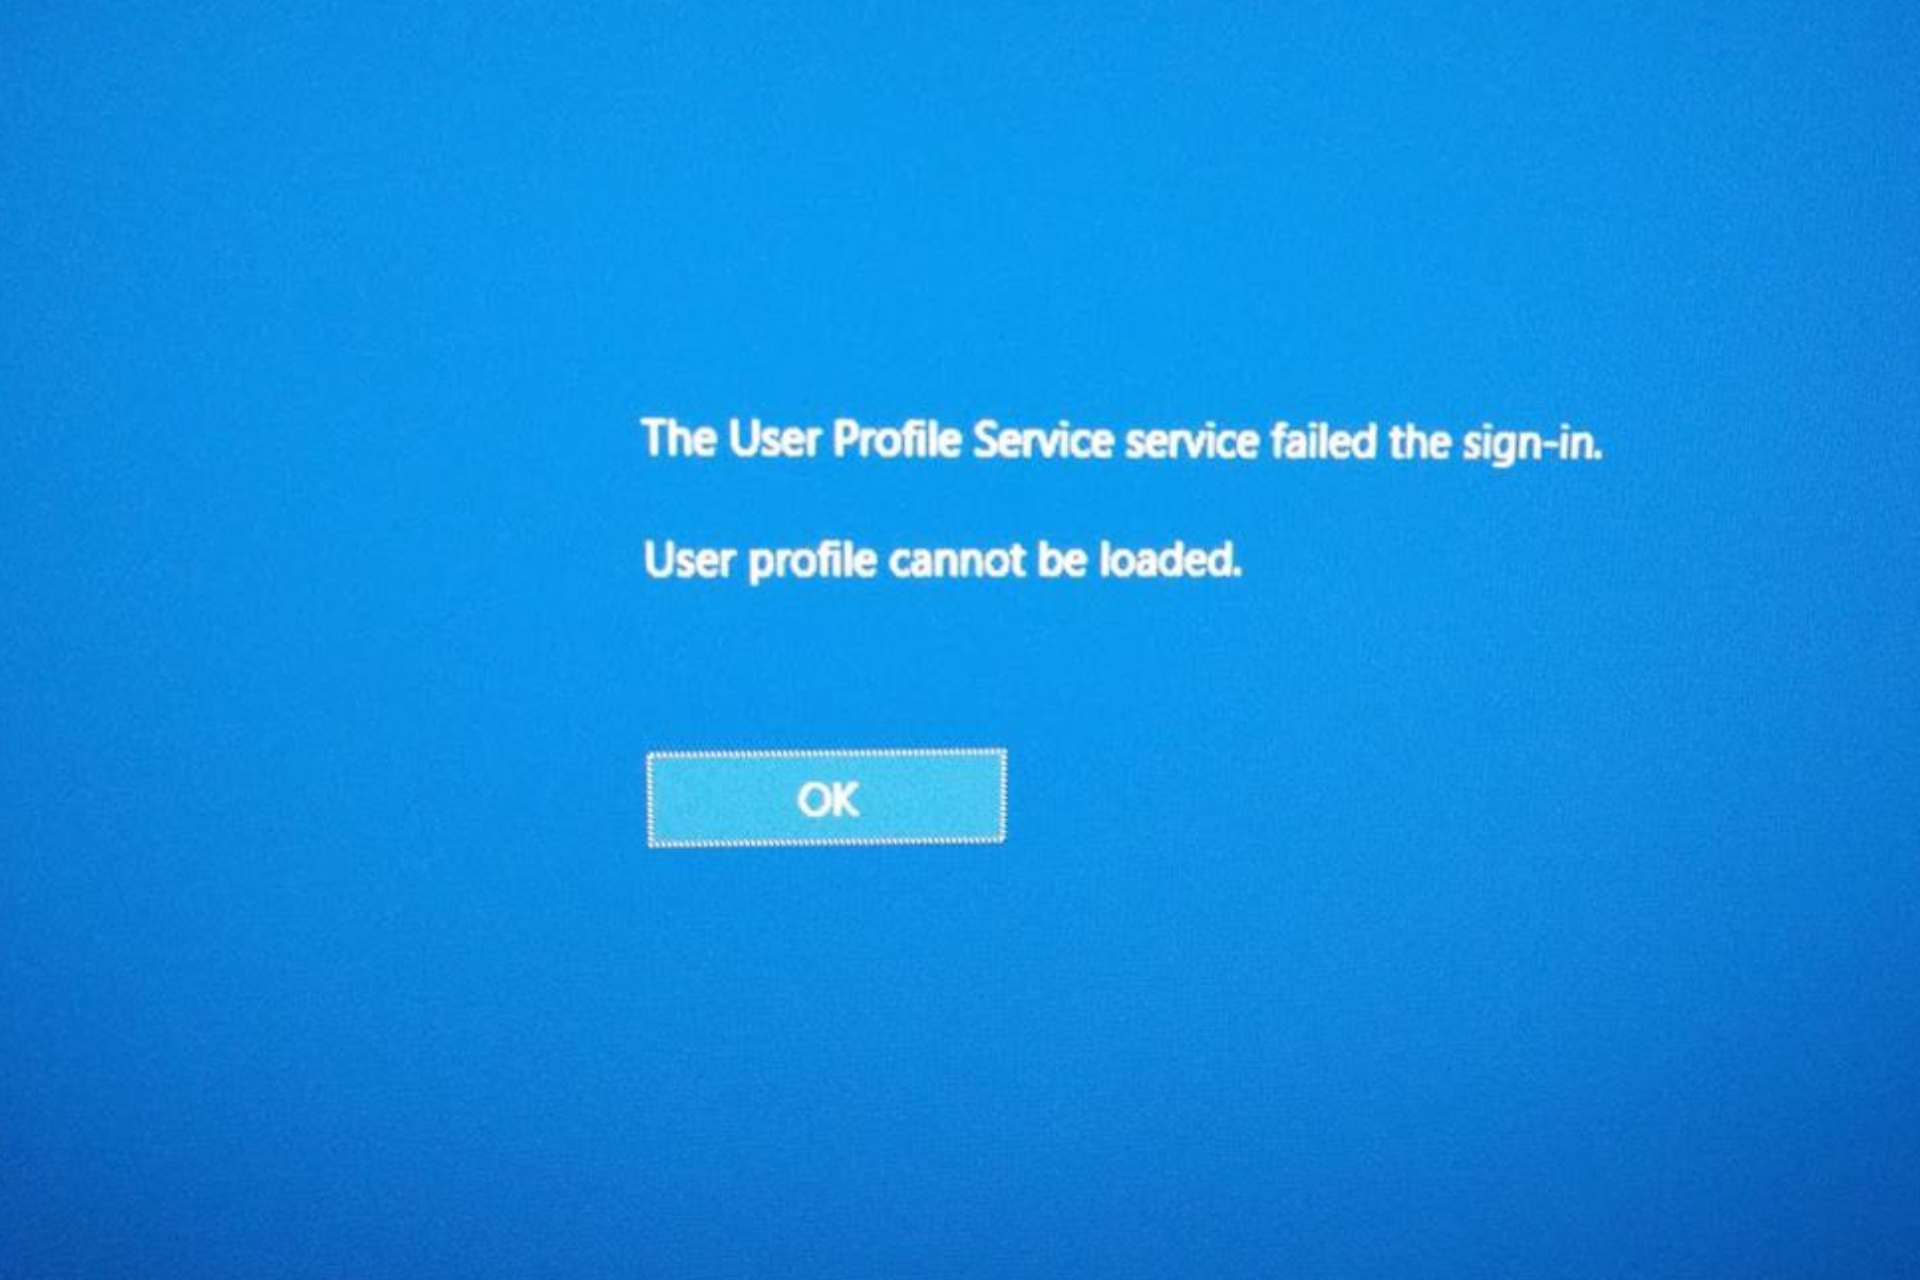
User Profile Service Failed the Sign-in on Windows 11 [Fix]

If you have encountered a User Profile Service that failed the sign-in on Windows 11 startup screen, it mostly means the user profile files are corrupt or failed to start. 

In this guide, we will discuss all the available troubleshooting methods to fix the problem right after talking about the causes. Let’s start! 

What causes the user profile service failed the sign in on Windows 11?

  • Improper Windows Update – An interrupted or unfinished update or crash could corrupt host files required for UAC to work correctly, and it could cause an error. You need to install all the pending Windows updates to fix it.
  • Resizing partitions –  While resizing the partition, often, those parts could get corrupted, leading to a corrupted user profile.
  • Corrupt Windows registry – If there are incorrect values in the registry or a corrupt registry, then it could cause the issue. To fix it, you need to make some tweaks in Registry Editor.
  • Antivirus interference – If an antivirus program is scanning your computer when you log in, it can stop you from using a user profile.
  • Improper shutdowns and restarts – If you don’t log out or shut down your computer properly, you may encounter this error. Always shut down your computer using the standard way once your work is complete.

How can I fix the user profile service failing the sign-in on Windows 11?

Before moving to the actual troubleshooting methods, you can try to restart your computer. 

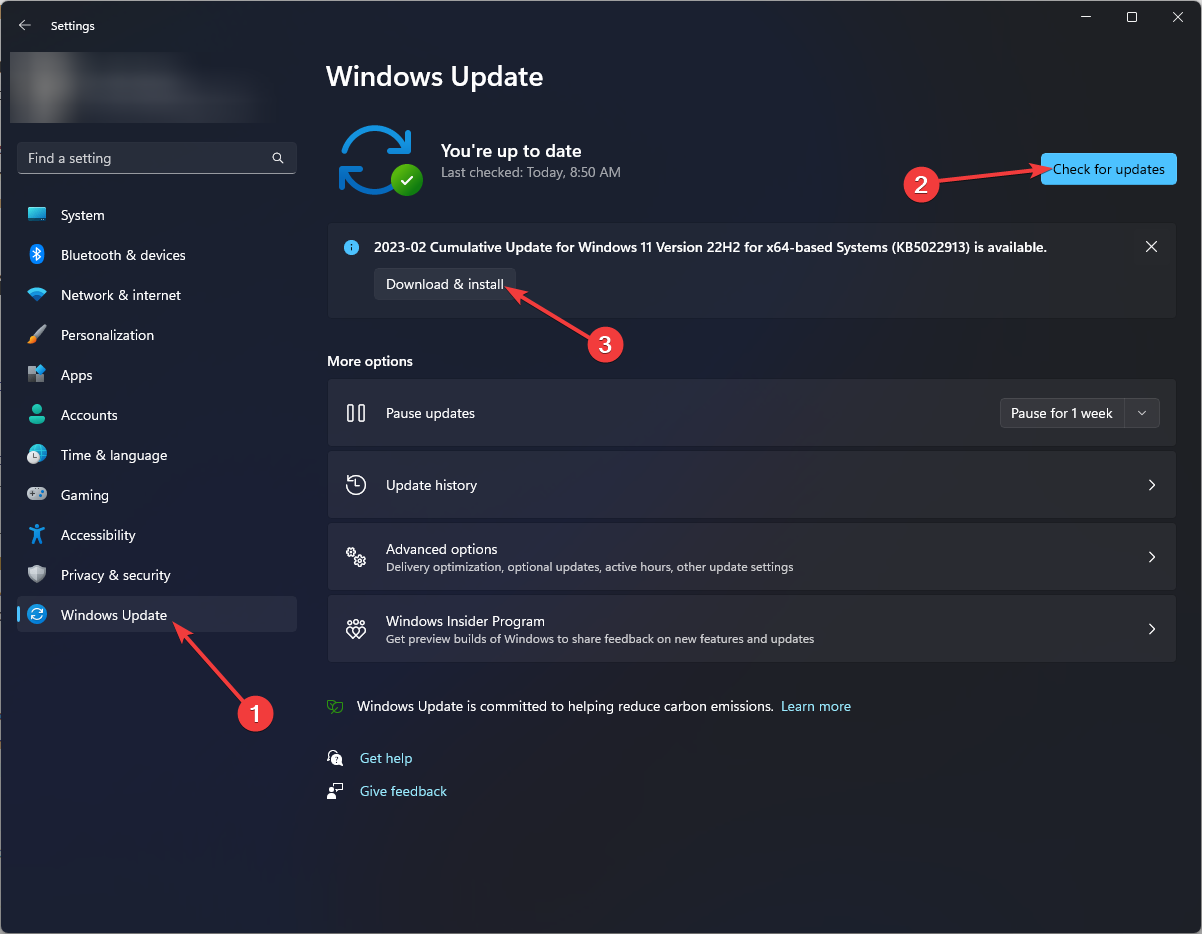
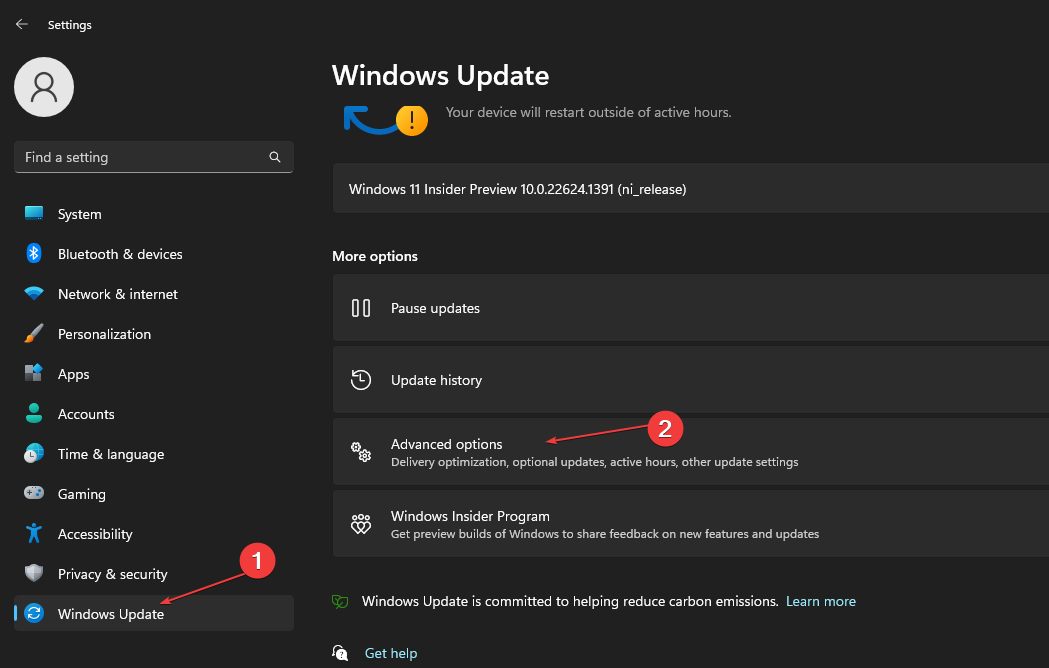
1. Check for Windows updates 

  1. Press Windows + I to open the Settings app.
  2. Go to Windows Update,  and click Check for updates.Windows Update Check for updates -user profile service failed sign-in windows 11
  3. If available, click Download and Install. While installing the updates, your computer will restart. 

2. Replace the NTUSER.DAT file from a working profile 

  1. Press Windows + E to open Windows Explorer.
  2. Follow this path: C:\Windows\Users
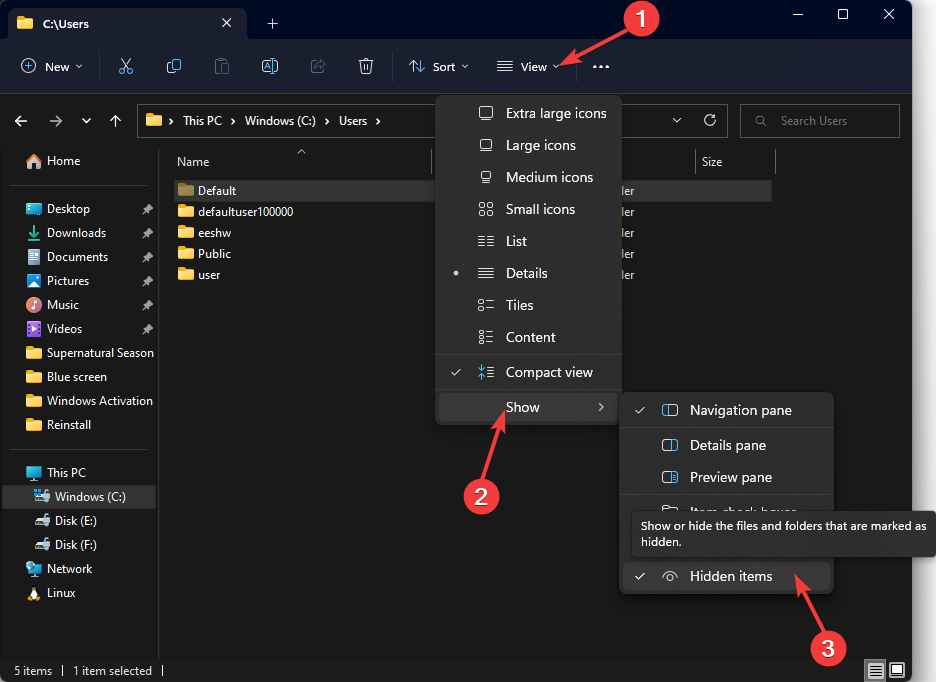
  3. Now click View, then select Show. Now choose Hidden items. Checkmark hidden items
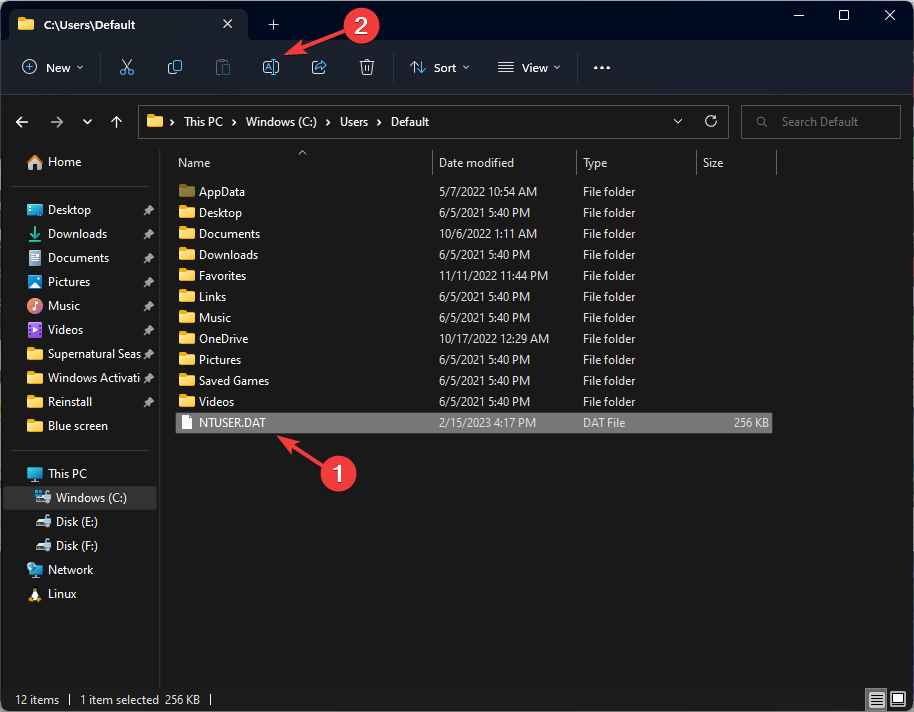
  4. Locate and double-click the Default folder.
  5. Rename the NTUSER.DAT file into anything you like. NTUser rename
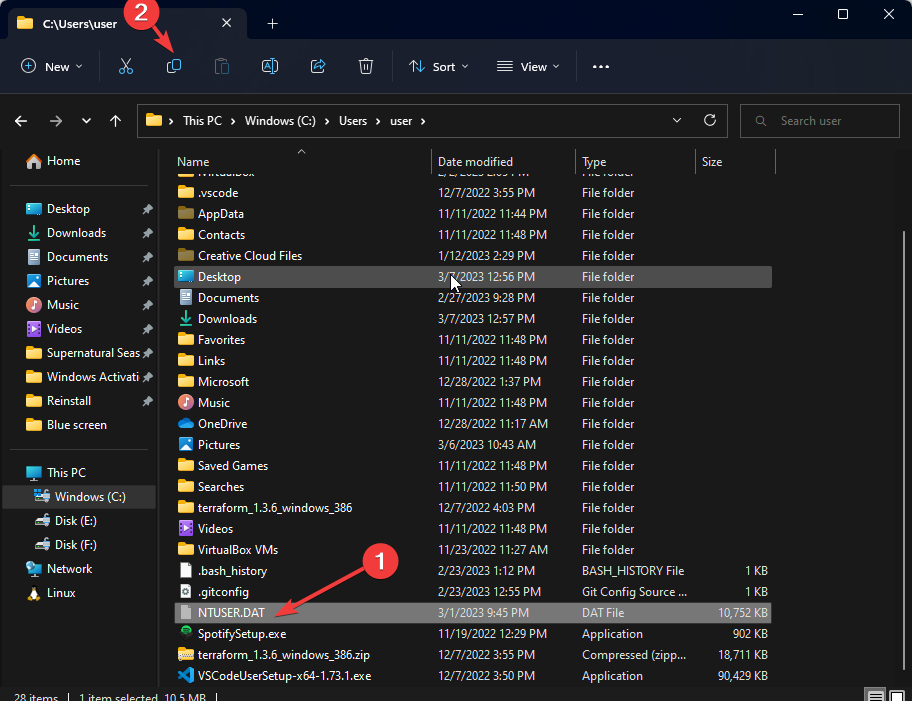
  6. Next, go to the working user profile folder, and copy the NTUSER.DAT file.Copy the file
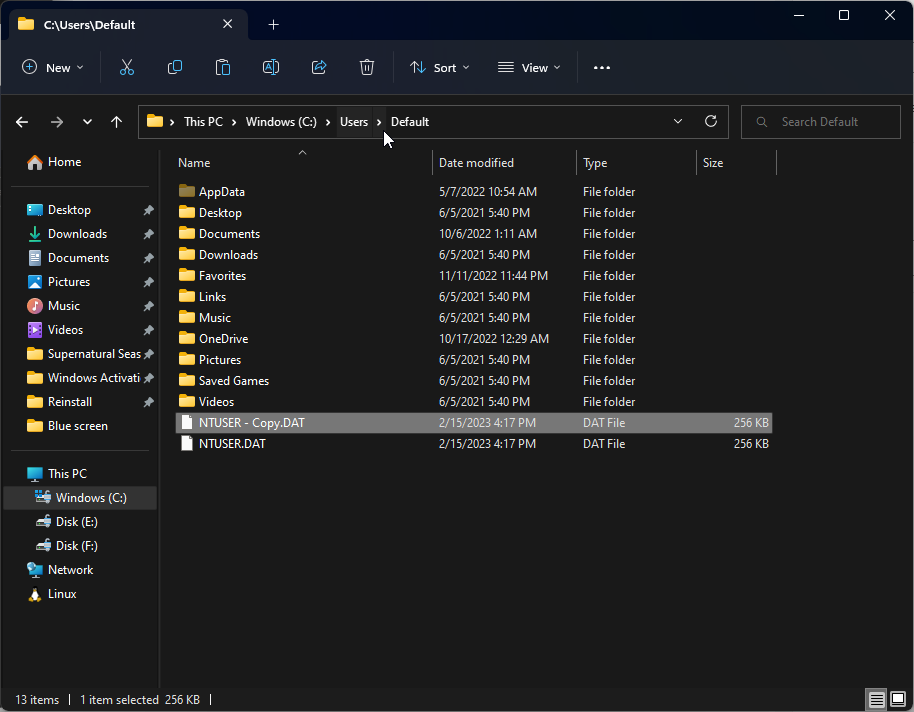
  7. Now paste it into the Default folder.Default folder paste

3. Delete the local user account causing the issue

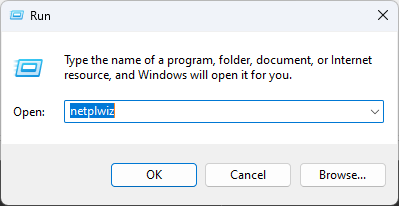
  1. Press Windows + R to open the Run window. netplwiz
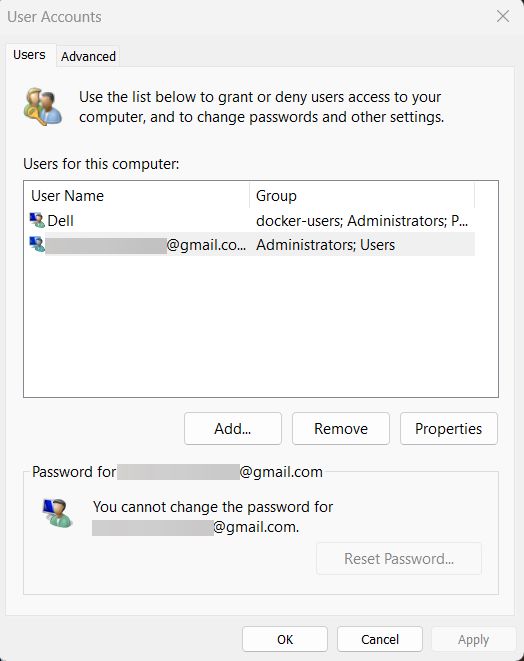
  2. Type netplwiz and click OK to open the User Accounts window.
  3. You will get the User Account Control; enter your username and password if prompted.
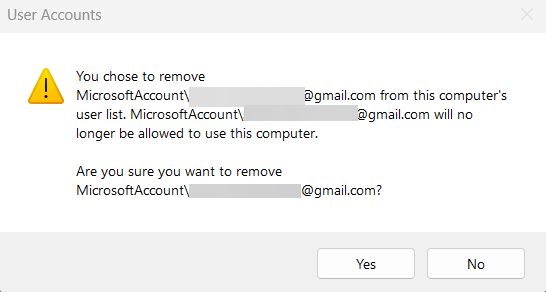
  4. Click the Remove option to delete the user account.
  5. Click OK to confirm your choice.
  6. Press Windows + L to exit the local account logon window. Restart your PC to save the changes. 

4. Use the Command Prompt

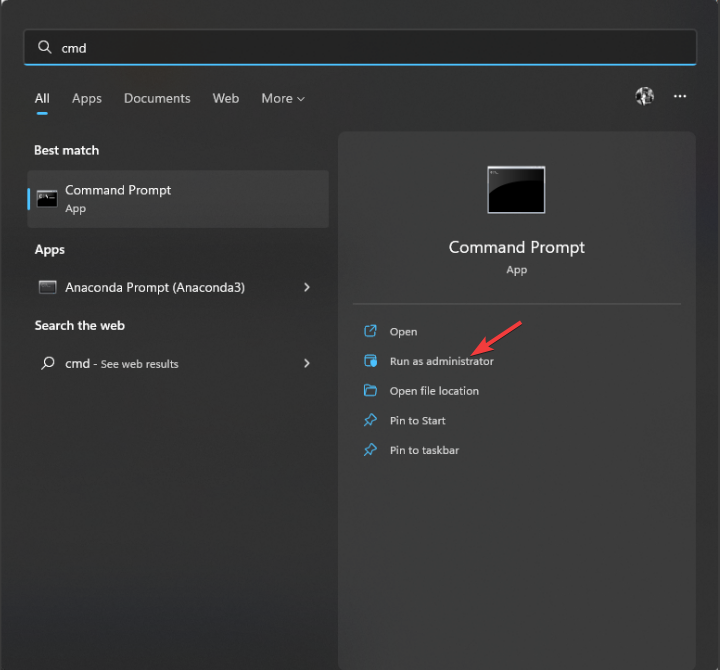
  1. Press the Windows key, type CMD, and click Run as administrator.DOS COmmand Prompt
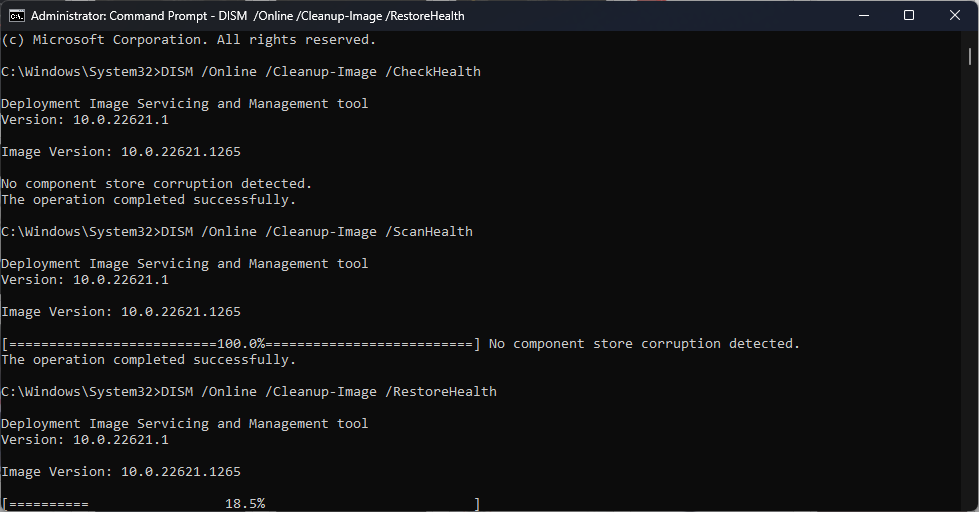
  2. Copy and paste the following commands one by one and press Enter after every command: DISM /Online /Cleanup-Image /CheckHealth DISM /Online /Cleanup-Image /ScanHealth DISM /Online /Cleanup-Image /RestoreHealthDISM user profile service failed sign-in windows 11
  3. Type the following command to repair system files and press Enter: sfc\scannowSFCSCANNOW CMD
  4. Restart your computer to let the changes take place. 

5. Use the Registry Editor in Safe mode

5.1 Enter Safe Mode

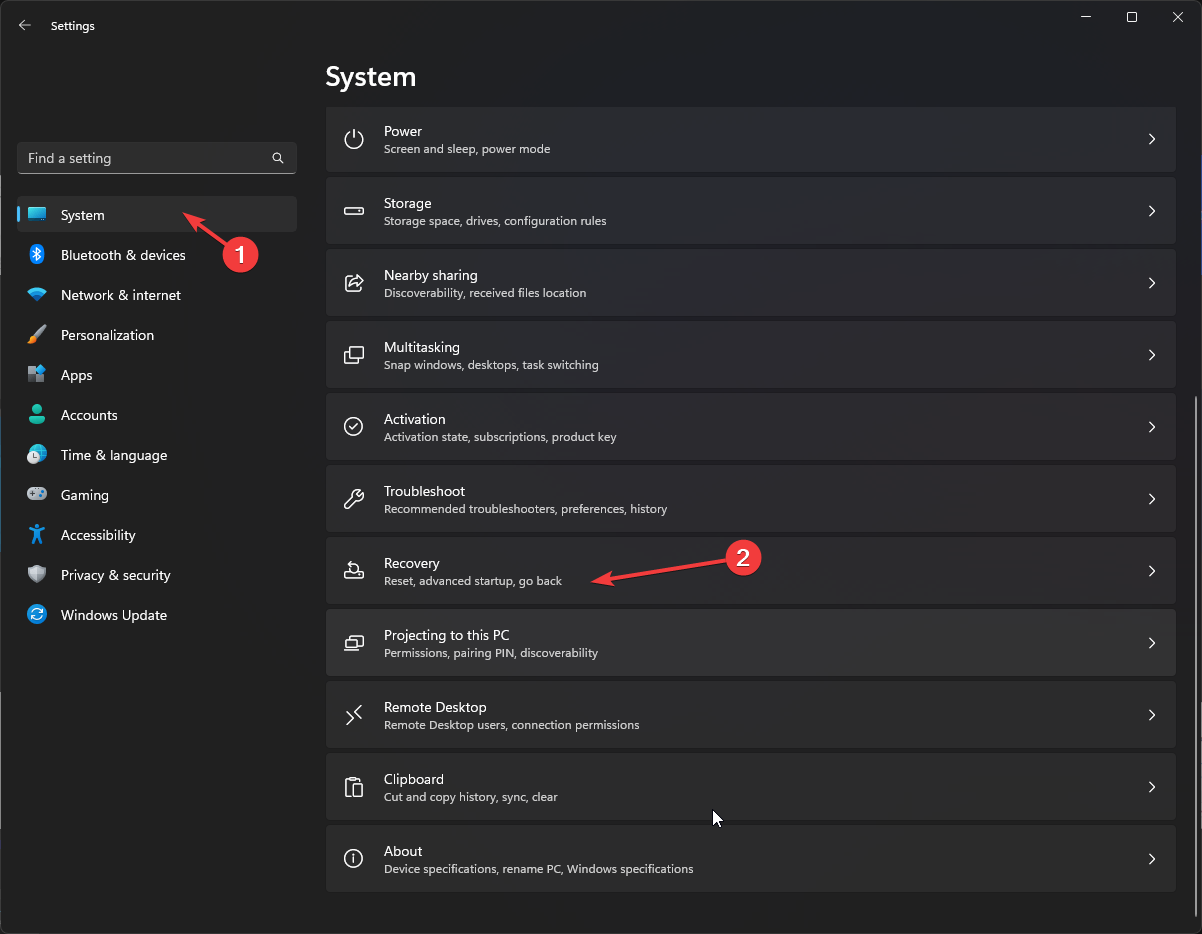
  1. Press Windows + I to open the Settings app. 
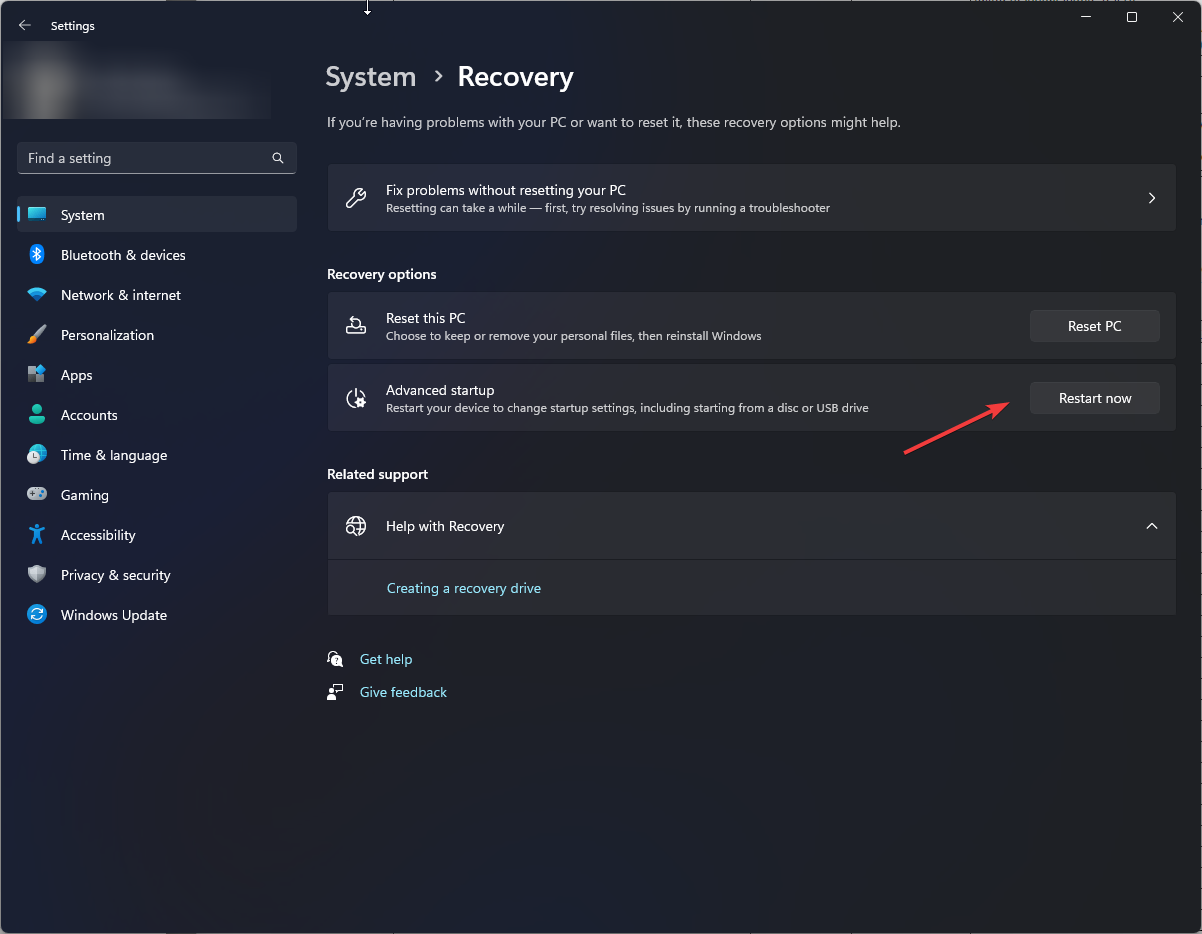
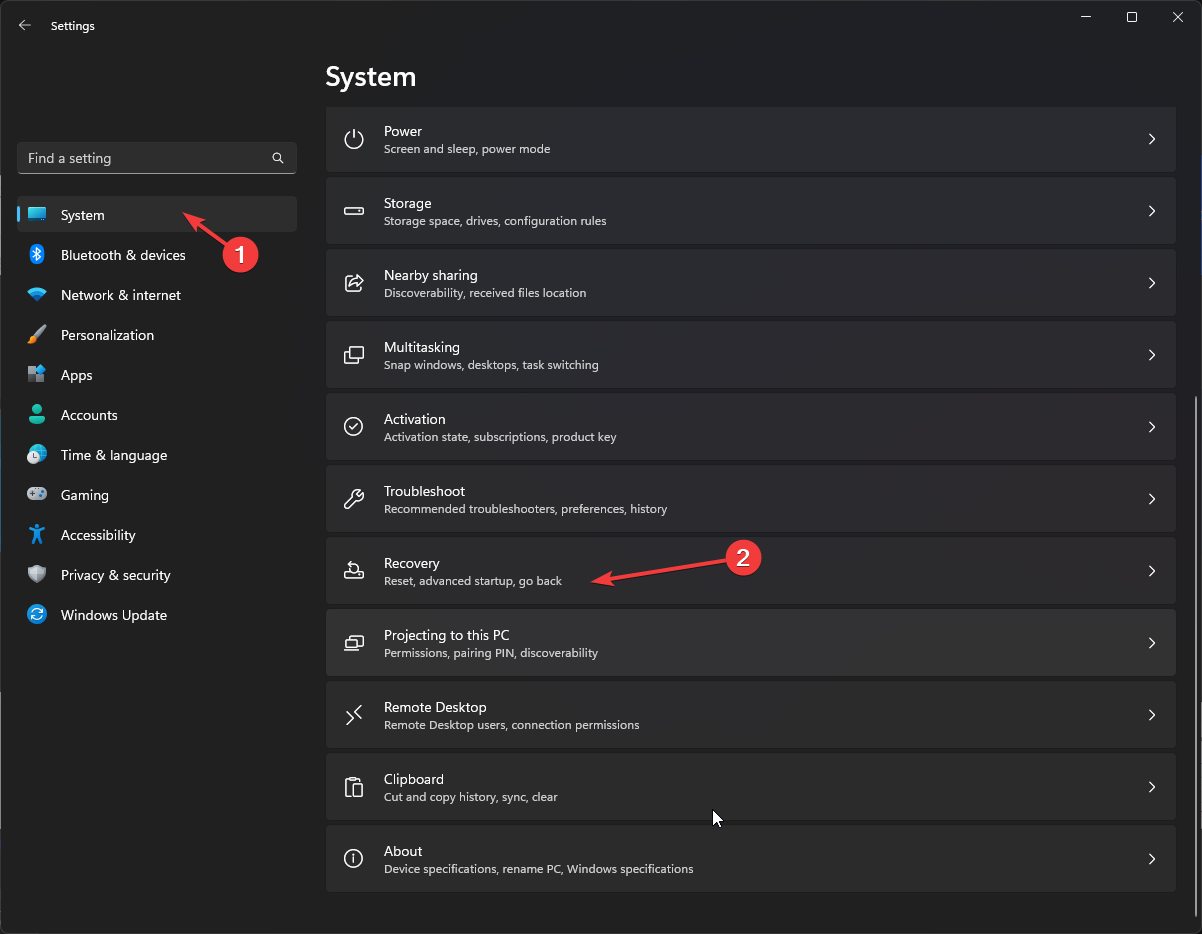
  2. Go to System, and click Recovery.System - recovery
  3. Locate Advanced startup, and click Restart now.Advanced Startup
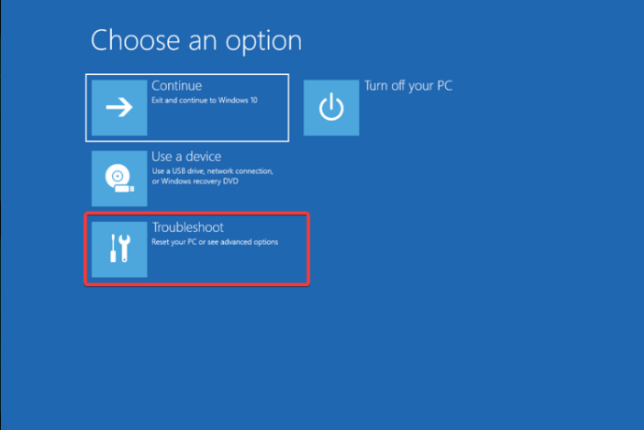
  4. On the Choose an option screen, click Troubleshoot. Choose an option - Troubleshoot
  5. From the Troubleshoot page, click Advanced options. Advanced options
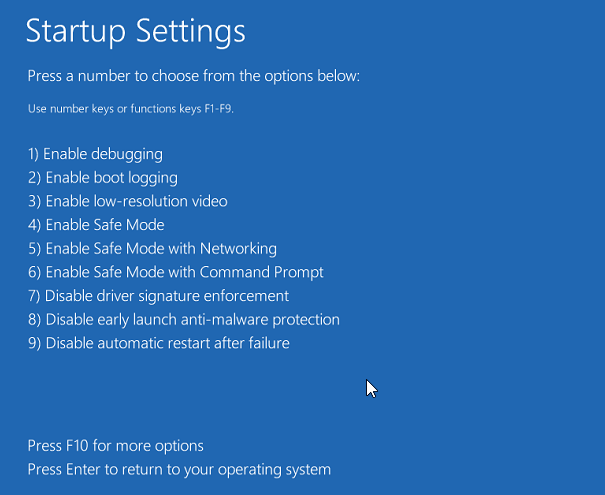
  6. On the Advanced options screen, choose Startup settings.Startup Settings
  7. Now select F4 to start your computer in safe mode.Safe mode

5.2 Tweak Registry settings

  1. Press Windows + R to open the Run dialog box. REGEDIT RUN COMMAND
  2. Type Regedit and click OK to open Registry Editor. 
  3. Navigate to this path: Computer\HKEY_LOCAL_MACHINE\Software\Microsoft\Windows NT\CurrentVersion\ProfileList
  4. Check the entries under ProfileList for duplicates. The entries will have similar names, and one will have a .bak file. Rename the .bak extension to .ba
  5. For the next duplicate entry, rename it but add the .bak extension. Remove all the other extensions if duplicate entries are present. Profile list user profile service failed sign-in windows 11
  6. Now delete the .Ba extension from the entry that you renamed
  7. Select the entry and double-click the State key from the left pane. Change the Value data from 1 to 0 and click OK. Change the value
  8. Now double-click RefCount and modify the Value data from 0 to 1. Click OK. 
  9. Close the Registry and restart your computer in normal mode. 

6. Perform a system restore 

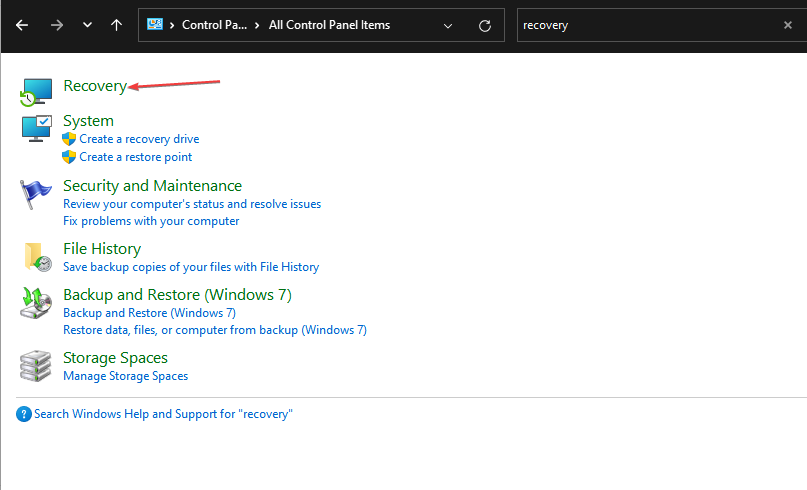
  1. Press the Windows key, type Control Panel, and click Open.CP
  2. Select Large icons for View as and click Recovery. Recovery Control Panel user profile service failed sign-in windows 11
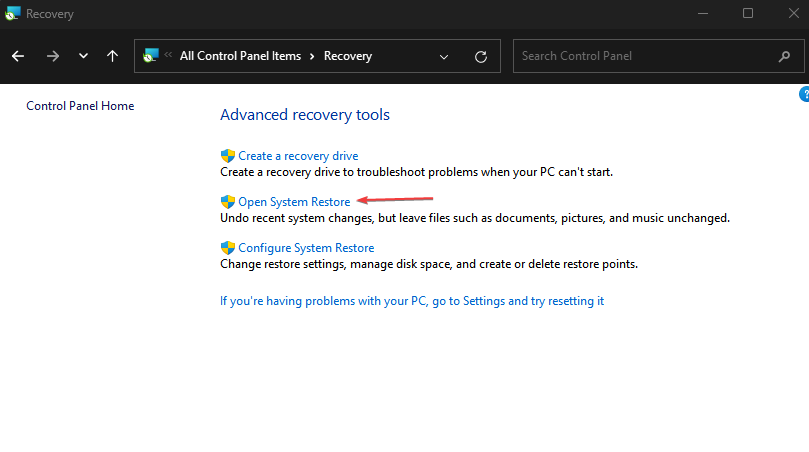
  3. Click Open System Restore. Choose a point
  4. Select Choose a different restore point in the System Restore window and click Next. Next Choose a different restore point
  5. Choose the restore point and click Next. Choose a point
  6. Click Finish, and the computer will restart. It will revert all system settings and changes in Registry values. Finish Restore point

7. Reset the Windows

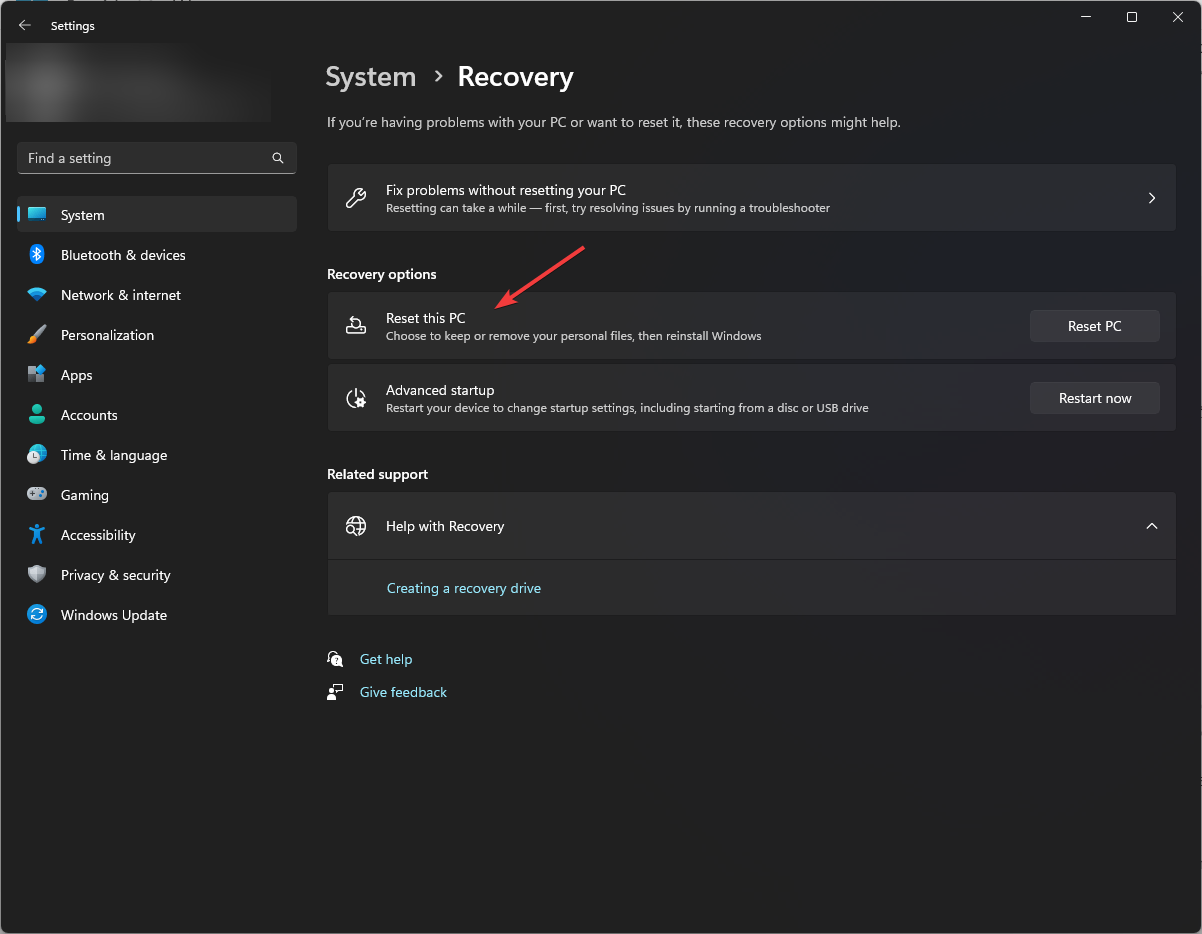
  1. Press Windows + I to open the Settings app.
  2. Go to System, then click Recovery.System - recovery user profile service failed sign-in windows 11
  3. Now select Reset this PC, and click Reset PC. RESET
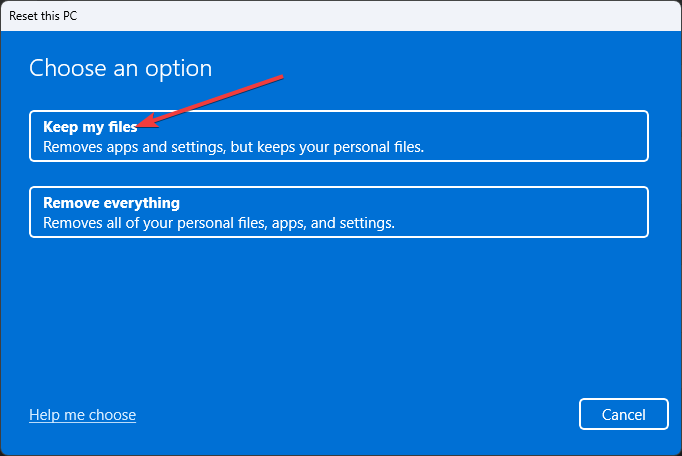
  4. Select Keep my files or Remove everything.Choose an option
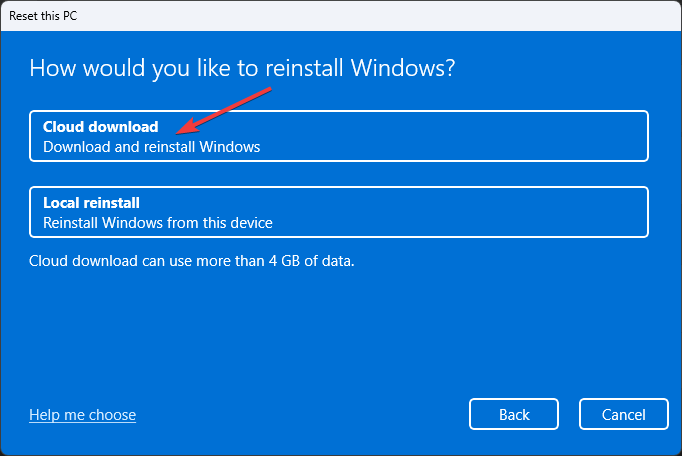
  5. On the How would you like to reinstall Windows page, select Cloud download. Cloud Download
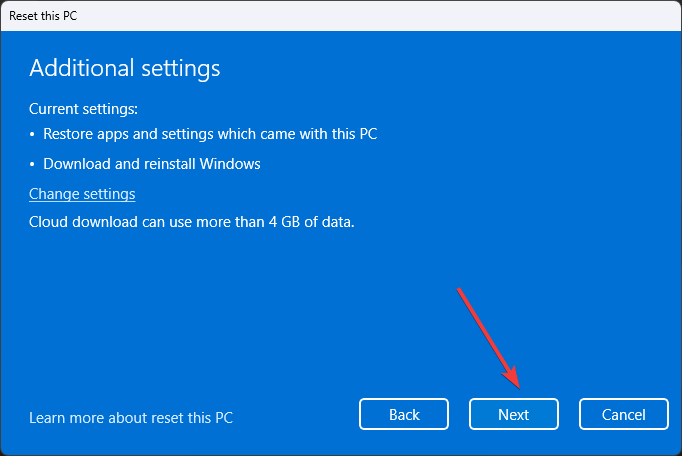
  6. On the Additional settings page, click Next. Additonal settings
  7. Wait for the process to complete.

Some of these solutions may also help you out when your user account profile picture fails to update.

These are some of the methods to fix the user profile service’s failed sign-in on Windows 11. Try them and let us know what worked in the comments section below.

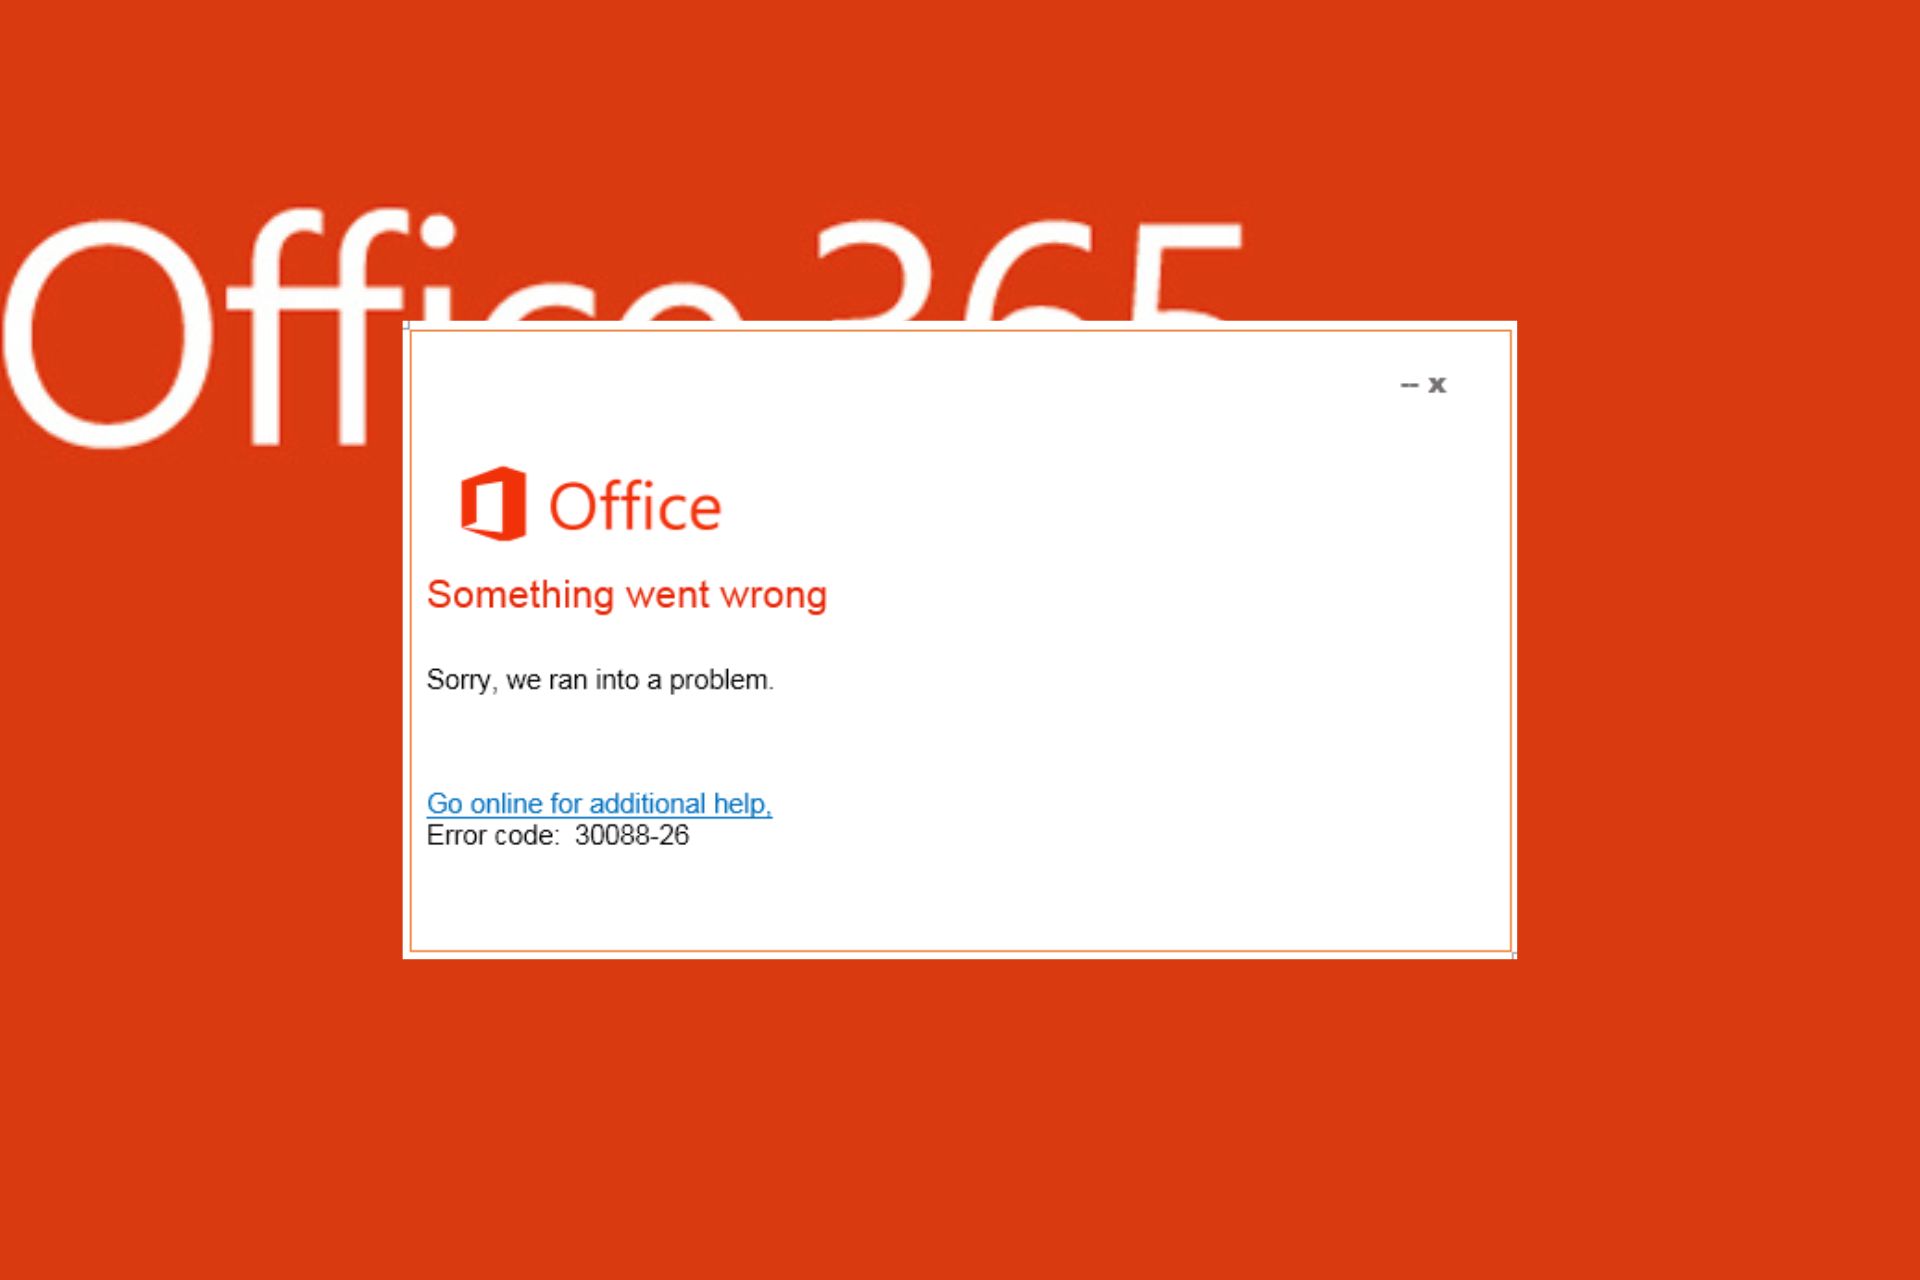
Office Update Error 30088-26: How to Fix It in 5 Steps

Microsoft Office is the most used productivity applications software package on the Windows OS. Sadly, there have been reports about Office update error 30088-26. Therefore, we will discuss solutions to resolve the error.

Also, you may be interested in our guide on fixing Office installation error 30016-22 on your PC.

What causes Office Update Error 30088-26?

You can experience issues with Office updates for several reasons. Some of them are:

  • Corrupt installation – Missing or corrupt system files on the previous Office due to viruses, downloading, or installation process can affect the app’s functionality, causing update errors.
  • Outdated Windows OS – Not installing the latest updates and patches for your Windows operating system can cause it to malfunction, and it can affect the Office app and other programs on it. Also, it can cause compatibility issues with new software and hardware.
  • Other software conflicts –  Security software like third-party antivirus and Windows Firewall can affect the Microsoft Office update, causing an update failure.

Nonetheless, we will guide you through quick steps to fix the error.

How can I fix the Office Update Error 30088-26?

Apply the following before proceeding with advanced troubleshooting steps:

Proceed with the following advanced troubleshooting if the error persists:

1. Repair Office suit

  1. Press the Windows + R key, type appwiz.cpl, and press Enter to open the Programs and Features.
  2. Scroll to Microsoft Office, right-click on it, and select Change.
  3. Then, select Online Repair and click on the Repair button.
  4. Select Repair from the Ready to Start an Online Repair dialog box.
  5. Wait to complete the process and restart your PC.

Repairing the Office app will fix issues with corrupt installation files in the Microsoft Office app. Check our guide about repairing Office app on Windows 11.

2. Turn off Windows Defender’s real-time protection

  1. Press the Windows button, type Settings, and open it.
  2. Select Privacy & Security and click Windows security.
  3. Select Virus and threat protection and click Manage settings.
  4. Toggle off the switch under the Real-time protection option.

3. Update Windows

  1. Press the Windows + I to open the Windows Settings.
  2. Click on the Windows Update category and click on Check for Updates. Wait for the Windows update result and click on Install Update if a Windows update is available.
  3. Close the Windows Update Window after the update and restart your PC.

Updating the Windows operating system will help download the infrastructural requirements needed by the Office update. Read about ways to fix Windows updates not working as it is a reported error.

4. Perform an SFC scan

  1. Press the Windows button, type Command Prompt, and click on Run as administrator to open it.
  2. Click Yes if the Windows User Account Control prompt appears.
  3. Type the following and press Enter: sfc /scannow
  4. Restart your PC and check if the error persists.

The SFC scan command will scan and repair corrupted or missing system files on your device that can cause Office update failure. Check our article about ways to fix SFC scannow not working on your Windows device.

Another reliable method of repairing OS files is using dedicated repair software to help you detect damaged or missing files and automatically replace them with clean parts.

5. Reinstall Office

  1. Press the Windows key, type Installed apps, and launch it.
  2. Navigate to Microsoft Office, click on the More button, and click on Uninstall.
  3. Select Uninstall to confirm your selection.
  4. Go to the Office webpage, log in to your Microsoft account if not logged in, and click the Install app button.
  5. Double-click the downloaded file in your browser and follow the on-screen command to install it.

Reinstalling the office file will fix bugs and corrupt files in the previously installed file.

In addition, you can check out our guide on fixing Microsoft Office not opening on Windows devices.

Further, we have a guide on how to install free Microsoft Office for students. So, check that out if you need it. And you can also learn how to fix Microsoft Office updating Office, please wait a moment error in no time.

Should you have further questions or suggestions on this guide, kindly drop them in the comments section.

Windows Script Host Error: 6 Ways to Fix It for Good

Windows Script Host error is one of the recent errors users have been complaining about when booting. The error occurs when the Windows Script Host fails to read a particular script file or encounters any other issue.

Likewise, users report having issues with random Command Prompt opening and closing on their PCs.

What causes Windows Script Host errors?

Windows Script Host error occurs in varieties, making it different in some computers. It can appear as Windows Script Host the system cannot find the file specified, and Windows Script Host permission denied. Some of the causes are:

  • Virus and malware attacks – The activities of the Windows Script Host tool may be affected by viruses and malware attacks on your computer. They can infect the crucial system files responsible for the tasks you’re trying to perform with malicious code, resulting in errors.
  • Issues with the VBS script file – The VBS script file stores VBScript or Visual Basic Scripting codes in Windows PCs that the Windows Script Host tool interprets and runs. So, any damage or interference with the VBS script file can impede the process, preventing Windows Script Host from functioning correctly.
  • Windows Registry errors – The error may pop up when the concerned file isn’t accessible in the Registry directory. Also, installing new programs by overwriting the old programs can cause problems with the files in the registry, impeding the hosting tool from running.
  • Corrupt system files – When essential system files are corrupted, it affects how several components of the system work, including the Windows Script Host tool.

These causes are likely to vary depending on the Windows Script Host error message you get. Nevertheless, follow the basic steps we’ll discuss as we go further to fix them.

How can I fix Windows Script Host errors?

Before proceeding with any advanced troubleshooting steps, try the following:

If the error persists, try the solutions below:

1. Run the SFC and DISM to repair damaged system files

  1. Left-click the Start button, type Command Prompt, then click Run as administrator.
  2. Click Yes on the User Account Control (UAC) prompt.
  3. Type the following and press Enter:  sfc /scannow
  4. Type the following commands and press Enter after each: DISM /Online /Cleanup-Image /RestoreHealth
  5. Restart your PC and check if the error still appears.

Running SFC and DISM scan on your PC can diagnose and repair corrupted Windows system files causing the Windows Script Host 80070002 error.

Read how to fix the run as administrator option if it’s not working on Windows 11.

2. Change the Default Value of the VBS file

  1. Press Windows + R key to open the Run dialog box, type Regedit, and press OK to open the Registry Editor.
  2. Navigate to: Computer\HKEY_CLASSES_ROOT\.vbs
  3. Double-click the Default key on the right-hand pane to open it. Change the Value data to VBSfile, then press OK to save these settings.
  4. Exit the Registry Editor and restart your PC to check if the error appears.

Tweaking the value for the VBS file in the Registry Editor will fix configurations causing the Windows Script Host error.

3. Run Windows Defender scan to remove viruses and malware

  1. Left-click the Start button, type Windows Security, then click Enter to open it.
  2. Click on Virus & Threat Protection and select the Scan option link.
  3. Then select Full scan to initiate an extensive scan and click the Scan now button and wait while the scan completes.

Running Windows Defender scan will detect and remove any malware and viruses affecting your system performance. Read how to fix the Windows virus and threat protection not working on Windows 11.

4. Enable Windows Script Host via the Registry Editor

  1. Press Windows + R key to open the Run dialog box, type Regedit, and press OK to launch the Registry Editor.
  2. Navigate to the following path: HKEY_CURRENT_USER\Software\Microsoft\Windows Script Host\Settings
  3. Double-click the Enabled key on the right pane to open it. Set the Value data to 1.
  4. If the Enabled key is missing, create it by right-clicking on an empty space on the right side of the screen, select New, then DWORD (32-bit) Value.
  5. Name the new value as Enabled and then click OK.
  6. Double-click on the value and set its Value data to 1.

Since the error can occur if the Windows Script Host tool is disabled on your PC, enabling it will fix the issue.

5. Remove Registry Values after Userinit.exe

  1. Press Windows + R key to open the Run dialog box, type Regedit, and press OK to launch the Registry Editor.
  2. Copy and paste the following in the search bar to go to the directory: Computer\HKEY_LOCAL_MACHINE\SOFTWARE\Microsoft\Windows NT\CurrentVersion\Winlogon
  3. On the right pane, scroll down to Userinit and delete any keys lined below it.

Deleting the following keys that appear after Userinit will resolve any interference they cause. Read about how to fix a corrupt Registry Editor on Windows 11 if you run into a problem.

6. Run System Restore

  1. Press Windows + R key to open the Run dialog box, type control, then press Enter to open the Control Panel.
  2. Type recovery in the Control Panel search bar and select Recovery.
  3. Then click Open System Restore.
  4. Click Next in the Restore system files and settings window.
  5. Choose the restore point you want to restore from, then click Scan for affected programs.

Running a System Restore will restore the system to an earlier point, removing recent activities that may be associated with the error.

Do not hesitate to read our guide on how to fix Restore Point if it’s not working on your PC. In addition, we have an extensive guide on fixing the Run.vbs error on Windows 11.

If you have further questions or suggestions, kindly drop them in the comments section.

Fix: Device Driver Software Was Not Successfully Installed

The latest versions of the Windows OS have a plug-and-play feature allowing your computer to download drivers for newly plugged-in devices. However, the device driver is not successfully installed error occurs when there are issues while downloading the generic driver on your PC.

Thus, we will explore some common reasons device driver software fails to install and provide solutions to resolve the issue. Alternatively, you can read about how to update driver packs on Windows 11 PC.

Why is device driver software not successfully installed?

Several factors are responsible for device driver software not being successfully installed. Some common reasons are:

  • Device not recognized – Windows operating system automatically downloads generic driver software for devices when plugged in. Thus, unrecognized by the system, it impedes the driver’s download.
  • Conflict with other software – Interference from other software installed on the system, like the Windows Defender, may affect the installation of the device driver software, preventing it from being installed or causing system instability.
  • Compatibility issues – the newly plugged-in device may meet your system minimum requirements, affecting your system download of the Device drivers.

These reasons differ on different PCs. Hence, we will discuss general fixes to resolve the error as we go further.

What can I do if the device driver software is not successfully installed?

Apply the following before proceeding with any advanced fixes:

  • Disconnect and reconnect the device to your system.
  • Remove unnecessary devices.
  • Scan a virus scan on your computer and check if the error persists.

If these preliminary checks do not resolve the issue, you can proceed with the following advanced troubleshooting.

1. Checks the manufacturer’s websites

  1. Open your browser and navigate to the device Hardware support website.
  2. Type the device model name and number in the search bar, then press Enter.
  3. Select your device model from the search result and click on the driver from the other resources.
  4. Download and install the device driver from the page.
  5. Restart your device and check if the issue persists.

Checking the manufacturer’s webpage will help to find and download the appropriate device drivers.

2. Update the driver via Device Manager

  1. Right the Windows logo and select Device Manager from the list.
  2. Expand the device category and right-click on the specific device name.
  3. Select update driver from the context menu.
  4. Select the Search automatically for driver from the new Windows.

The device manager helps to view and control the hardware attached to the computer and update the driver. Check our guide about how to reinstall devices in Devices Managers Windows.

3. Update driver using Windows update

  1. Press the Windows + I key to open the Windows Settings.
  2. Navigate to the Windows Update tab and select the Advanced options.
  3. Click on the select Optional Update.
  4. Click the drop-down button on the Driver Update and checkmark the list of updates available.
  5. Select the Update and Install button and wait for the drivers to install.

Windows update allows users to fix errors or bugs and update drivers to improve the performance of the Windows components.

You can read about ways to diagnose and fix Windows Update not loading on your computer.

4. Update the driver with third-party software

Using third-party apps could be the last resort if the above steps fail to resolve the issue. In this regard, different apps allow you to install device drivers on your computer. You can search and download the best third-party apps for your PC.

Check our guide about the best driver update software for your device.

In addition, you can read about how to fix Windows encountered errors installing the driver. Also, you can check our guide about fixing issues with users unable to install drivers.

If you have further issues, kindly drop them in the comments section.

Adobe Media Encoder Not Working: How to Reset It

Some readers have complained that Adobe Media Encoder is not working or opening. This, in turn, limits their access to the tool’s audio/video processing capacity and other features. Hence, we will address this issue in this guide and proffer possible solutions.

Likewise, you can check out our detailed guide on fixing Adobe Premiere Pro if it’s not exporting full video.

Why is Adobe Media Encoder not working?

Adobe Media Encoder may not work under different circumstances and for several reasons. Sometimes, it may appear as AME not working with After Effects. Hence, check other likely causes below:

  • Issues with other compositions added to Adobe Media Encoder – The system may run into problems when trying to launch or perform some tasks on Adobe Media Encoder on your PC if it doesn’t support the composition added to it.
  • Issues with the AME update – AME may not work because of faulty or unstable updates. If you recently installed an update on any Adobe 2023 product line, it can impede its performance and affect other products.
  • Corrupted or missing Adobe CC Media files – Having issues with the Adobe Media Encoder executable files can cause irregularities in the app. The Adobe CC may be corrupt or not accessible, making it difficult for the app to use the needed resources.
  • Malware or virus infections – Can corrupt the app or prevent communication between it and the necessary files. Do not hesitate to check out our recommended list for the best anti-malware software to troubleshoot this.

Now, let’s explore the possible ways to troubleshoot the Adobe Media Encoder app if it’s not opening on your PC.

What can I do if Adobe Media Encoder stops working?

Before trying any advanced troubleshooting steps, apply the following:

If the issues persist, try the solutions below:

1. Reset the CC Media files

  1. Press the Windows + E key to open File Explorer.
  2. Go to the following path to access the Adobe Media Encoder executable files: C:\Program Files\Adobe\Adobe Media Encoder CC 20xx
  3. Press and hold Ctrl+Shift+Alt and run the program.

Running the executable file will remove and reset the corrupted CC Media preferences files. Also, it’ll reset all the settings and fix issues preventing AME from working.

2. Remove Adobe Media Encoder temp settings

  1. Navigate to each of the following directories: C:\Users\[username]\AppData\Roaming\Adobe\Common\AME\[version no.] C:\Users\[username]\AppData\Roaming\Adobe\Adobe Media Encoder\[version no.] C:\Users\[username]\AppData\Roaming\Adobe\Common\Media Cache C:\Users\[username]\AppData\Roaming\Adobe\Common\Media Cache Files
  2. Highlight all the content of the directories and move them to another directory.
  3. Restart your PC and check if the Adobe Media Encoder works.

Removing the temp files allows the app to collect usable files and delete the corrupt or faulty ones. Check ways to run File Explorer as an administrator in Windows 11 if it is required in the process.

3. Turn off Adobe Media Encoder Parallel Encoding feature

  1. Left-click the Start button, type Adobe Media Encoder, and launch it.
  2. Go to Media Encoder CC.
  3. Click on Preferences, go to General, and then uncheck the Enable Parallel Encoding option.

Disabling the Parallel Encoding feature will fix any interference the alternative encoder is causing the program.

4. Update your graphics drivers

  1. Press Windows + R keys to prompt the Run window, type devmgmt.msc, and click OK to launch the Device Manager.
  2. Expand the Display adapter entry, right-click on the device, then select Update driver from the drop-down options.
  3. Click on Search automatically for the updated driver software option.
  4. Restart your PC and check if Adobe Media Encoder works.

AME uses many graphics features, so updating the graphics drivers will fix bugs causing issues with Adobe Media Encoder. Do not hesitate to check out our detailed article on updating graphics drivers on Windows 11 if you have any problems with the above steps.

You can also try a faster alternative to update your graphics drivers, and it is an automatic program like Outbyte Driver Updater that helps you locate the latest driver updates for your device from a vast database.

⇒ Get Outbyte Driver Updater

5. Reset Adobe Media Encoder Preferences

  1. Press Windows + R key to open the Run dialog box, type %appdata%, then Click OK.
  2. Click on Adobe, find the Adobe Media Encoder subfolder, and rename it Old_Adobe Media Encoder.
  3. Close the window, go to Documents, then select Adobe in File Explorer.
  4. Find the Adobe Media Encoder subfolder and rename it as Old_Adobe Media Encoder.
  5. Launch Adobe Media Encoder and check if it works.

Resetting the preferences can fix the problem and return the settings to default.

Alternatively, you can read about the Adobe Acrobat Readers DC not responding on the PC. Also, our guide on how to fix Adobe Reader if it’s not installing applies to other Adobe products.

We also have a guide on how to fix the Adobe Media Encoder not installed error that may provide further solutions.

Should you have further questions or suggestions, kindly drop them in the comments section.

How to Fix Outlook Memory Leak and Reduce Usage

If the Outlook app is responding slowly and causing app crashes on your Windows system, there is a possibility of an Outlook memory leak issue.

When the memory leak happens, Outlook is unable to free up the system resources automatically even though you after quitting the app window long ago. Consequently, there is a shortage of system resources to allocate other programs running simultaneously, resulting in performance issues.

Why am I experiencing the Outlook memory leak issue?

Outlook continuously runs in the background to promptly fetch incoming mail or services. Sometimes, the memory usage of the related background processes increases tremendously and to such an extent that Outlook and other apps begin to crash. Some other reasons are:

  • Resource-hogging background processes – Certain Outlook-related background processes consume indefinite system resources and cause performance drags.
  • Outdated Outlook app – Using outdated Outlook can cause incompatibility issues between the system drivers and the program.
  • Incorrect memory allocation – When Windows fails to allocate memory correctly, some applications consume more resources than they need.
  • Opening emails in a new window – If you open a new window every time for a new email without closing the previous ones, memory usage might grow enormously.

Memory leaks in Windows apps, including Outlook, are a very common problem, and in most occurrences, you will be able to resolve them singlehandedly. Implement these proven fixes to resolve the Outlook memory leak issue.

How do I fix a memory leak in Outlook?

1. Select preferred graphic settings for Outlook

  1. Use the Windows + I shortcut key to launch the Settings app.
  2. While staying in the System category, click Display on the right.Outlook Memory Leak
  3. Next, scroll down and select Graphics from the related settings section.Outlook Memory Leak
  4. Choose the Microsoft Store app from the Add an app dropdown and press the Browse button.Outlook Memory Leak
  5. Choose Outlook from the popup.
  6. Now scroll down to access the app list, click on Outlook and press the Options button.Outlook Memory Leak
  7. In the graphics preference popup that appears, choose Let Windows decide instead of High performance and press the Save button to apply the changes. Outlook Memory Leak

Relaunch the Outlook app, and you will no longer experience memory leak issues.

2. End Desktop App Web Viewer process

  1. Right-click the Windows icon present on the taskbar and choose Task Manager from the Quick Links menu.Outlook Memory Leak
  2. Locate the Desktop App Web Viewer task in the Processes tab.
  3. Right-click the Desktop App Web Viewer process and select the End Task option from the context menu.Outlook Memory Leak
  4. Now close the Outlook app window, and you will witness the instant release of system resources.

Desktop App Web Viewer is known to consume massive Windows resources while running in the background. So, force quitting the Desktop App Web Viewer process releases the acquired system resources resolving the Outlook memory leak issue.

How do I reduce memory usage in Outlook?

There are several best practices that you can adopt to reduce high memory usage and speed up Microsoft Outlook if it shows sluggish behavior.

  • Ensure that the Auto Archive feature in Microsoft Outlook is enabled and configured to run periodically.
  • Uninstall and disable non-essential add-ons like Skype and OneNote to prevent them from loading whenever you launch Outlook.
  • Massive Outlook slowdown is caused if searching indexing is enabled. So, disabling the search indexing can create major improvements.
  • Disable Advanced features like Speech recognition if you do not require them.
  • Remove and unsubscribe RSS feeds from Outlook to avoid carrying extra baggage.
  • Empty the Spam and Bin folders regularly, especially if you receive numerous daily emails.

This is everything you can do to resolve the Microsoft Outlook memory leak issue and reduce memory usage in Windows.

While you are here, you may want to go through the comprehensive guide explaining how to resolve the Something went wrong error in Outlook if it is bothering you lately.

If you need any further help in this regard, contact us in the comments section below.

How to Completely Uninstall BetterDiscord [Quick Steps]

Discord is a popular chatting platform that allows you to connect with your friends and family members. It started as a dedicated chatting and streaming platform for gamers. Well, since then, it has evolved and now has a bunch of modifications, such as BetterDiscord, to enhance its features list.

However, it is a third-party extension not approved by Discord as it does not follow Discord’s terms and agreements. So, if you use BetterDiscord, you will get banned from Discord. This guide will show you how to uninstall BetterDiscord from Discord. So, let us get right into it.

What is BetterDiscord and why it shouldn’t be used?

BetterDiscord has plenty of features that could lure any Discord user into using it. However, one must not use it to avoid getting banned from Discord since it is against Discord’s policy.

It won’t hurt if you get a peek at the features of the BetterDiscord extension:

  • It lets you customize the Discord client based on personal preferences.
  • It enables you to focus on specific channels.
  • It helps you download and customize plugins and themes.
  • It gives access to emojis and emoticons that aren’t available in Discord.
  • You can play music in the background using the rhythm bot.

But when you check the official website of BetterDiscord, it clearly explains that;

Yes. BetterDiscord violates Discord’s terms of service by modifying the client, although there is no evidence that discord either cares or takes actions against users who modify their client. Your account is not at risk for simply using BetterDiscord alone. Abusing the service or using plugins which further violate the Terms of Service can get your account terminated, however. All plugins from our official website are safe.

If you are a serious gamer or use Discord for essential purposes, you should avoid using unofficial extensions for the platform since that takes you one step closer or right at the door of getting banned from Discord.

How to completely uninstall BetterDiscord from my PC?

1. Use the installer

  1. Run the installer that you used to download BetterDiscord. You can get it from here.
  2. Agree to the license.
  3. Click Next.
  4. Click on Uninstall BetterDiscord from the list of options.
  5. Hit the Next button.
  6. Select the current version of Discord.
  7. Hit the Uninstall button.
  8. Discord will restart, and BetterDiscord will be removed.
  9. Delete the BetterDiscord installer file from your PC.

Using the BetterDiscord installer to uninstall is an excellent move, as it removes all files associated with the extension and leaves a clean slate.

2. Delete from the Discord folder

  1. Press the Win + E keys to open the File Explorer.
  2. Type the address below in the top search bar and press Enter. %localappdata%\Discord\app-0.0.305\resources
  3. Open the app folder.
  4. Check if BetterDiscord is available inside the app folder.
  5. Exit the app folder and delete it from your PC.

When you delete BetterDiscord from the Discord app folder, it also removes the application from the Discord platform.

3. Reinstall Discord

  1. Press the Win key to open the Start menu.
  2. Open Control Panel.
  3. Click on Programs and Features.
  4. Locate Discord and hit the Uninstall button. (The image shows uninstalling Microsoft Office, but you get the idea)Microsoft Office Uninstall
  5. Visit the official Discord website.
  6. Download the Discord EXE file on your PC.
  7. Install the program by following the on-screen instructions.
  8. This fresh installation will be free of the BetterDiscord extension.

Reinstalling the Discord app gets rid of the BetterDiscord application from your PC. This eliminates the hassle of removing all traces of BetterDiscord from your PC.

That is it from us in this guide. These are the three ways to answer your query on uninstalling BetterDiscord from your PC.

We have a guide that lists solutions to resolve Discord microphone issues. You can also check out our guide to fix the Discord robot voice issues.

Several users have reported that when they stream Netflix on Discord, it shows them a black screen. Thankfully, you can apply the solutions to fix the problem.

Are the Discord members list not loading? If so, apply the solutions to fix the problem at your end.

Also, check out the solutions in our guide to help resolve the crashing game issue when streaming on Discord.

Feel free to let us know in the comments below which one of the above solutions you applied to uninstall BetterDiscord from your PC.

Errors Were Detected While Saving [Excel Fix Guide]

Are you also among such users who are coming across the Errors were detected while saving error message in MS Excel? If so, then this error message prevents you from saving new information added to the Excel workbook.

In this guide, we will explain all the possible reasons that could cause the Errors were detected while saving error message in Microsoft Excel and how you can resolve it by applying some effective solutions.

What causes Errors were detected while saving problem in MS Excel?

After digging up the internet and reading multiple user reports, we have deduced a list of the most common reasons why you will come across Errors were detected while saving error message in MS Excel.

  • Version incompatibility: Chances are that the workbook that you are trying to save was created on a different version of Excel than the one on which you are trying to save.
  • The Excel file is large: Often, large Excel files are known to throw this error message.
  • Virus-infected storage device: In case the storage where you are trying to save the Excel file is infected with a virus, then you will face this error.
  • System errors: If some important system files go missing, then you will not only face system-related issues but issues with the programs installed on it.
  • Installation files are missing: Problematic installation of MS Office can also trigger multiple issues with its suite of apps.

How can I fix Errors were detected while saving MS Excel error message?

1. Copy data into a new Excel sheet

  1. Open the problematic workbook.
  2. Copy all the data from the workbook.
  3. Press Ctrl + N to open a new workbook.
  4. Paste the data in this new workbook.
  5. Hit the Save button at the top-left corner.
  6. In the Save this file window, type the name of the file and hit Save.

Several users have reported that saving the data from the problematic workbook to a new workbook has resolved the Errors were detected while saving error message in MS Excel. You can also try this solution and hopefully fix the problem.

2. Save the file in different format

  1. Open the problematic workbook.
  2. Click on the Save button at the top-left of the Quick Access Toolbar.
  3. In the Save this file window, click Save as type button.
  4. Select XLSX or XLSM as the file type instead of XLS.

Another easy way of fixing this error message is to tweak the format of the Excel workbook and check if this fixes the issue or not. Saving in a different format can also help out with the personal.xlsb is locked for editing error.

3. Use the Open and Repair option

  1. Launch MS Excel.
  2. Open a blank workbook.
  3. Click on File.
  4. Select Open.
  5. Click Browse.
  6. Locate the problematic file and select it.
  7. Click on the drop-down icon next to Open.
  8. Select Open and Repair.
  9. Click the Repair button.
  10. MS Excel will automatically check for and fix the issue with the file.

The Open and Repair function is very helpful when experiencing such petty issues out of the blue. You can easily fix and open problematic files after fixing them by using the above steps.

4. Install the Hotfix Pacakge

  1. Press the Win + R keys to open the Run dialogue.
  2. Type regedit and press Enter.
  3. Navigate to the below path. HKEY-CURRENT-USER\Software\Microsoft\Office\14.0\Excel\Options
  4. On the right side, right-click, select New, and DWORD (32-bit).
  5. Name the new DWORD as FullLoadImagesOnFileLoad.
  6. Double-click on this new DWORD.
  7. In the Value data box, type 1.
  8. Click OK.
  9. Exit Registry Editor and check if this fixes the issue or not.

While editing the registry editor you should be extremely careful, as a wrong move can cause your PC to crash or malfunction.

But in case you tweaked the registry wrongly, then we have a guide that explains how you can restore the Windows registry without any backup.

5. Check for file system error

  1. Press the Win + E to open the File Explorer.
  2. Identify the location of the problematic file.
  3. Right-click on the drive and select Properties.
  4. Switch to the Tools tab.
  5. Click on the Check button.
  6. Wait for the checking process to complete.
  7. Launch the Excel workbook.
  8. Try saving it and see if this resolves the issue or not.

6. Scan your PC for virus

  1. Open the Start menu by pressing the Win key.
  2. Open Windows Security.
  3. Click on Virus & threat protection.
  4. Select Quick Scan.
  5. Apply the fixes prompted by Windows Security to clear any virus.
  6. Alternatively, you can click on Scan options and select Full scan for an in-depth scan.

Sometimes, a virus or malware can affect your system files and cause all its programs to misbehave. While Windows Security is a capable tool, it isn’t as effective as a dedicated antivirus tool.

In such a case, you can refer to our guide, which lists some of the best antivirus tools you can opt for to use and remove viruses or malware from your PC.

That is it from us in this guide. If MS Excel isn’t opening on your PC, you should check out the solutions in our guide to resolve the problem.

For some users, the Excel isn’t scrolling smoothly, which could be pretty frustrating. In such a case, you can apply the solutions to fix the problem.

We also have a guide that explains how you can insert images in Excel. Opening Excel in Safe Mode is also pretty easy if you follow the steps in our guide.

Feel free to let us know in the comments below which one of the above solutions resolved the Errors were detected while saving Excel problem.

Something Went Wrong on Bing: How to Bypass This Error

Many Bing users have recently started seeing Something went wrong error message when using Bing. Notably, this issue triggers when users try to access Bing Chat. Unfortunately, even after refreshing the page, the error doesn’t go away.

This prevents users from using the Bing Chat service. Thankfully, in this guide, we will show you multiple ways that can be fruitful for you to resolve the Something went wrong with Bing error message. So let us get right into it.

What is causing the Something went wrong Bing error message?

After digging up the internet, we have compiled a list of reasons that would trigger Something went wrong. Please try again. error message.

  • The internet connection isn’t reliable: This issue with the Bing browser could trigger because of a poor internet connection.
  • Corrupt cache files: The presence of corrupt cache files can also cause the Bing browser or any other program to misbehave as it stores data for different websites you visit.
  • The browser isn’t updated: Latest versions of apps not only bring new features but also bring bug fixes for issues such as Something went wrong. Please try again. Bing error.
  • Rejoin Bing rewards program: Several users have reported that this error is because of the Bing rewards program. It may sound weird, but that is one reason that causes the error.

How can I fix the Something went wrong Bing error message?

Check out some of the quick fixes that you can try and possibly fix the issue at your end.

  • Restart the browser.
  • Check if your internet connection is working correctly or not.
  • Go a step ahead and restart your PC and check if this fixes the issue or not.

Let us now go through the advanced solutions that could help you resolve the problem.

1. Clear the Microsoft Edge browser cache

  1. Launch Microsoft Edge.
  2. Click on the 3-dot icon at the top-right.
  3. Select Settings.
  4. Click on Privacy, search, and services from the left pane.
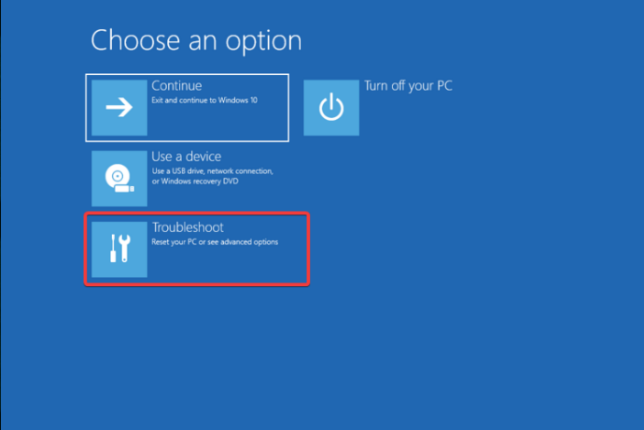
  5. Scroll down on the right side and select Choose what to clear button.
  6. Select All time from the Time range drop-down.
  7. Check all the appropriate boxes.
  8. Hit the Clear now button.

Chances are that the cache files for Bing stored for the browser are corrupt and causing the Something went wrong Bing error message.

Several users have successfully fixed the issue by clearing the cache files. You can also check if this fixes the problem or not.

If Bing loads but filters block results instead of showing an error, see our guide on how to turn off SafeSearch on Bing to adjust content settings.

2. Check for updates

  1. Launch the Microsoft Edge browser.
  2. Click on the 3-dot menu icon.
  3. Select Settings.
  4. From the left pane, click on About Microsoft Edge.
  5. Edge will automatically check for the newer version and prompt you to install the latest one if available.

A newer version of the app brings bug fixes for specific underlying issues. You can try updating the Microsoft Edge browser and see if this resolves the problem.

3. Disable extensions

  1. Open Edge browser.
  2. Click on the Extensions icon at the top toolbar.
  3. Select Manage extensions.
  4. Toggle off the extensions one by one.
  5. Restart the browser and see if this fixes the issue or not.

There is a good possibility that the third-party extension that you installed on your Edge browser conflicts with the browser’s functioning. Disabling them could help you fix the Something went wrong Bing error.

Alternatively, you can try to use the Incognito mode. Turning on the incognito mode disables all the third-party extensions and other apps you installed on it.

4. Disable VPN

A Virtual Proxy Network or VPN can help you with many things. First of all, it masks your IP address so that you are protected from hackers stealing your data.

Another important thing is that using a VPN gives you access to geo-restricted content that is otherwise not accessible in your region. However, it can often create issues with specific programs like browsers and trigger errors such as the one at hand.

In such a case, disable the VPN and check if this resolves the Something went wrong Bing error or not.

5. Create a new Microsoft account

Some users on Reddit have said that they are getting the Something went wrong Bing error because their Microsoft account was banned from using Bing Chat.

This could be because you might have asked the AI some malicious questions, which has led to your account getting banned. It is not always your fault; by the way, there might also be some error at Microsoft’s end.

In such a case, you should create a new Microsoft account and try using that account with the Microsoft Edge browser to check whether this fixes the issue.

That is it from us in this guide. If Microsoft Edge isn’t connecting to the internet and you are looking for solutions, you should check out our guide to resolve the problem.

We also have a guide that will help you to force close Microsoft Edge or how to fix it if you are having difficulties opening the Edge browser on your PC.

Several users have reported facing a blue screen on Microsoft Edge. This can be quickly resolved by applying the solutions in our guide.

You can refer to our guide that explains the methods to remove the warning alert on the browser. Also, check out our guide to fix the freezing or hanging issue with the browser.

Feel free to let us know in the comments below which one of the above solutions resolved the Something went wrong Bing error.

Best Package Manager For Windows: 5 Top Picks to Choose From

Windows OS has gained a bunch of Linux functionalities over the years. For example, Windows 10 and 11 support the Linux subsystem through WSL 2 and now also feature a package manager called Windows Package Manager.

A package manager allows you to upgrade, install, or remove software you have previously installed easily and from a single place. Package managers deal with packages, meaning a collection of files. This guide will show you a list of some of the best package managers for Windows.

What is a Windows Package Manager?

A package manager is a tool that allows you to package your project and publish it for others. As explained by Microsoft, a package manager is a system or set of tools used to automate installing, upgrading, configuring, and using the software.

A package can be understood simply. For example, when you bake a cake, it is called a compilation, and when you buy a readymade cake, you have a package. Developers can also use the package manager to specify the prerequisites if they need to develop solutions for a given project.

It allows you to manage the dependencies of your project. Managing all dependencies can be a challenging task, which using a package manager can ease.

Package managers are available as intuitive software or as a command line tool. Here are some of the benefits of using a package manager:

  • Install/uninstall packages
  • Safeguard source files from malware
  • Add drivers to the driver store
  • Install language packs
  • Seamlessly install, update, or remove multiple packages using one command string

What are some of the best package managers for Windows?

Chocolatey – Simple to use with powerful features

In the way RPM is the package manager for Linux, Chocolatey is a package manager for Windows. So the compatibility ranges from the most modern Windows OS version back to Windows 7.

Chocolatey supports cloud environments such as Microsoft Azure, Amazon AWS, and others. Additionally, you can use this Windows package manager to manage all software, such as installers, scripts, zip files, etc.

You do not need an active internet connection to use Chocolatey. It offers over 7,000 community packages, the largest online registry of Windows packages, that you can integrate with your package and reuse existing logic.

Chocolatey uses Windows PowerShell, so there is no need to learn a new language to use this package manager.

You may find some issues with it as not all software packages are up to date with their latest versions.

Here are some of the best features of Chocolatey:

  • Intuitive UI that makes package management easy
  • Once deployed, it allows you to manage anything from anywhere
  • It can be efficiently run using Windows PowerShell
  • Supports packaging of anything, including script, zip, etc.
  • Instructions to create your very own package
  • Offers features such as Package Auditor, Package Reducer, Malware Protection

⇒ Get Chocolatey

Scoop – Feature-rich open-source package manager

Scoop is another popular Windows package manager that is open source and can install Windows software with just a single command line.

It is a developer’s tool that lets you install system utilities, which rely on Linux and aren’t found by default on Windows.

You would need an extra repository to install Windows desktop programs, but it can generally install apps such as VLC and Chrome.

The Scoop package manager does not use NuGet or install programs globally. Instead, apps are limited to a user account and are installed in a unique path to avoid path pollution.

Below are some of the key highlights of the Scoop package manager:

  • Scope provides package manager facilities dedicated to a user account
  • It is more lightweight as compared to Chocolatey
  • You can use the Windows repository to install desktop apps
  • You do not need admin rights to use Scoop

⇒ Get Scoop

Ninite – Install software group without much effort

Ninite is a freeware tool that is crapware free and allows you to manage, update or install a group of software without putting in much effort.

The interface is pretty modern, and all you need to do is select the applications you wish to install on a system and get the installer for it.

Software installation in bulk saves a significant amount of time, and installing the software in your PC’s language so that you do not have to worry about different app versions.

When you open Ninite, it will show you some of the popular apps your PC should have. Hitting the Get Installer button gets you all those apps.

There is Ninite Pro as well, which lets you manage apps on all your machines via the web. It has now received a new interface as well.

Here are some of the best features of Ninite:

  • Works in background
  • Simple and easy-to-use interface
  • No junkware is required to run Ninite
  • Install appropriate apps on appropriate systems
  • No reboot is required after installing the apps

⇒ Get Ninite

Windows Package Manager (WINGET) – Microsoft’s native package manager

WINGET, or Windows Package Manager, is a Microsoft native command line tool that lets you discover, install, upgrade, remove, and even configure apps on Windows 10 and 11.

The process of downloading the latest version of the program to updating those running the old versions remains automatic and can be executed by running a simple command.

WINGET makes use of the YAML package manifest format. This makes it much easier to understand and configure. Devs also use YAML to bundle their applications to make them compatible with WINGET.

Previously, Windows had to use third-party package managers such as Chocolatey, which makes it more popular than the Windows Package Manager.

Below are some of the key features of Windows Package Manager:

  • The interface is easy to use
  • You can quickly discover new and popular apps with a single command
  • Easily upgrade or downgrade to a specific version of the app
  • It is open source
  • WINGET uses secure channels to download apps

⇒ Get Windows Package Manager

Yarn – A reliable and secure package manager

Yarn is another popular open-source command line tool that is fast and reliable. It is built by the community for the community, which means it allows community members to enhance its feature.

The Yarn Windows Package Manager is hosted on GitHub even though Facebook backs it. It is fast as it parallelizes the operation to use the resources better, making the installation faster.

Users can choose between silent, passive, and interactive modes to install complex things. To ensure high security, all the data is thoroughly checked for its integrity.

Yarn is designed to guarantee that the apps working on one system will work exactly in the same way on the other.

Check out the best features of Yarn:

  • Offers an offline mode
  • The same dependencies get installed on every system
  • Flat mode ensures that the exact versions are installed across the board
  • The open-source nature allows it to get more features from the community

⇒ Get Yarn

That is it from us in this guide. These are some of the best package managers for Windows that users commonly use.

Besides, users facing the Windows Package Manager operation failed error can check out our guide and resolve the problem.

Feel free to let us know in the comments below which one of the Windows package managers you opted for. Or if you have used or are using a different one that you would like to use to feature in this guide.

How good is the Accessibility Assistant on 365 apps?

Remember Clippy from Windows XP days? Well, Microsoft is back with another innovation of Accessibility Assistant on its 365 office apps—like Clippy, but better.

During Microsoft’s Annual Ability Summit, Redmond official Jenny Lay-Flurrie revealed that the tool can correct your grammar, flag low contrast issues between text and background, check your spelling, and give you smart suggestions to prevent accessibility issues.

accessibility assistant microsoft 365

Unlike Clippy Office Assistant which features a humanoid paperclip logo complete with eyebrows and a pair of eyes, the new Accessibility Assistant will feature a person-shaped icon to mark the location where issues are located.

Moreover, when the new feature takes place, it will replace the current Accessibility Checker on Microsoft 365 apps.

“The same issues pervade the emails, slide decks, documents, and spreadsheets we all create every day. This creates barriers that keep our colleagues and coworkers from doing their jobs effectively, prevent students from getting the most out of their education, and hinder authors from reaching their broadest possible audience. We all share the responsibility of breaking down these barriers by making our own content accessible—but often that is easier said than done.”

The million-dollar question is, how good will it be? We all know the ill-fated Clippy that was killed altogether from Office 2007 onwards. And, despite Microsoft’s attempt to resurrect the polarizing-annoying Groucho eyebrows by re-introducing it as a pack of stickers on Teams, Clippy was just never as good.

How good is the Accessibility Assistant on Microsoft 365 apps?

accessibility assistant microsoft 365

Well, Microsoft said that devs have been working closely with insiders to roll out this feature on select users before its general availability in the coming weeks. But if they stay true to what they promised, it’s safe to say that this feature will be a massive game-changer.

“In keeping with our mission to make Microsoft 365 support creators of all abilities and preferences, it’s important to acknowledge that some authors prefer to hold off on making revisions until they’re finished writing. In an internal study of content creators, we found a nearly even split among those who preferred to check spelling and grammar while they work (28%), at the end (19%), and both throughout and at the end (31%).”

Not only does the Accessibility Assistant work as a grammar companion, but it also helps you pick better colors for your text. When opening the text’s color option, the new color picker will automatically guide you to pick those that aren’t so hard to read.

What do you think about the accessibility assistant feature on Microsoft 365 apps? Let us know in the comments!

How to rename web apps on Edge

Microsoft Edge may not be the number-one most popular browser around, but it sure helps a lot of people browse the internet. Not only does it bear the title of the only browser to have an AI-powered search engine, but it also lets you create a simple web app on any website you want, courtesy of Edge.

It may not seem like a big deal for many, but it can help you multitask better. You can convert any website you want into an app, then put it as a shortcut on the desktop. With this, you can always come back to that site with just one simple click.

These websites, however, will be automatically enlisted as what they’re called by the system, but it’s not that hard if you want to rename them.

Read along to find out how you can rename those web apps on Edge.

H2 How to rename web apps on Edge.

1, With your Edge browser open, type edge://apps/all into the search bar then hit Enter.

2. Find the app you would like to ‘rename’. In this case, we’ve saved Bing AI – Search for our demonstration. Click on the 3 dot menu on the top right ➜ Create Desktop shortcut.

3. Go to your desktop, then rename the app to whatever you want by right-clicking on it. In this case, we’d call this Smart AI Chat.

5. Open your File Explorer, then type this into the taskbar ➜ %appdata%\Microsoft\Windows\Start Menu\Programs.

6. Cut the shortcut from the desktop by dragging it to this folder.

7. Open your Task Manager by accessing Ctrl + Alt + Del. On the Processes tab, right-click on File Explorer ➜ Restart.

9. Now, you should be able to see the app in Start ➜ All apps, in its new name (Smart AI Chat, in this case).

From here onwards, you can also pin the app to your taskbar by right-clicking on it.

If you find these tips helpful, let us know in the comments!

Immersive Control Panel: What Is It and How to Fix It

Many Windows users complained about the Immersive Control Panel code that appears instead of the Settings feature.

However, there are some easy fixes for the system error @(windows.immersivecontrolpanel_6.2.c. So, follow the instructions listed below, and you should be able to fix this problem quickly.

The system error you are facing concerns some Windows 10 OS updates that were not completed. The error may also indicate that a simple system error occurred even if you did not do anything special on the operating system.

What is the Immersive Control Panel?

The Windows Immersive Control Panel was introduced in Windows 8 and replaced the traditional Control Panel in Windows 10.

It is a touch-friendly interface optimized for use on tablets and other touch-enabled devices. It is designed to provide a more modern and streamlined way to access and manage system settings and features.

The Immersive Control Panel includes a variety of categories, such as Network & Internet, System, Devices, Personalization, and Privacy. Each category contains a set of related settings that can be easily accessed and adjusted.

While the Immersive Control Panel provides a more touch-friendly and visually appealing interface compared to the traditional Control Panel, many users still prefer the latter for its more comprehensive range of settings and options.

How can I fix Immersive Control Panel issues on Windows 10?

Before starting any of the fixes we recommend in this guide:

  • We suggest a PC reboot. While this may not always work, a restart will force some troublesome processes to end, making your computer return to proper functionality at startup.

1. Run PowerShell Scripts

  1. Press Windows + X and select Command Prompt (Admin).
    immersive control panel
  2. In the command prompt window, write the following script and hit Enter:
    powershell -ExecutionPolicy Unrestricted Add-AppxPackage -DisableDevelopmentMode -Register $Env:SystemRootcameraAppxManifest.xml
  3. Next, type the following execution policy script and hit Enter again:
    powershell -ExecutionPolicy Unrestricted Add-AppxPackage -DisableDevelopmentMode -Register $Env:SystemRootFileManagerAppxManifest.xml
  4. Finally, type the following execution policy script and hit Enter again:
    powershell -ExecutionPolicy Unrestricted Add-AppxPackage -DisableDevelopmentMode -Register $Env:SystemRootImmersiveControlPanelAppxManifest.xml
    https://i.imgur.com/PEwErrp.png
  5. Exit the terminal.
  6. Now that the command prompt window has closed, reboot the Windows 10 device.
  7. Lastly, please recheck the Settings feature to see if it works as intended.

2. Update your OS version

  1. Press Windows + I to open the Settings app.
  2. Click Update & Security.
    immersive control panel
  3. Select Windows Update and click Check for updates.
  4. Let it complete the process and restart your computer if it finds any updates.
  5. Lastly, please recheck the Settings feature to see if it works as intended.

If you’re enrolled in the Windows Insider program, update to the latest Windows 10 Preview build if you haven’t already. Using an old Windows 10 build is one of the leading causes of this error.

The same is valid for non-Insiders. Ensure you’re running the latest OS version and install any pending updates.

3. Run an SFC scan

  1. Press Windows + X and select Command Prompt (Admin).
    immersive control panel
  2. Type the script below and hit Enter.
    sfc /scannow
  3. Lastly, run the DISM scan using the script below:
    DISM /Online /Cleanup-Image /RestoreHealth
  4. Finally, exit the command prompt and try reaccessing the utility.

This brings us to the end of this guide. If you carefully followed the steps listed above in the correct order, you should have solved your Immersive Control Panel issues on Windows 10.

However, if you have any questions, please drop us a line in the comments below. We will help you further as soon as possible.

How to Download or Update ELM327 Drivers

ELM327 is a popular OBD-II interface that allows vehicle owners and mechanics to diagnose car issues. However, you need drivers installed on your computer to use this device. Therefore, we will discuss the steps to download and install the ELM327 driver on your PC.

Also, you can check our guide about the best car design software for Windows 11.

What is ELM327?

ELM327 is a small computer chip used as a Car Diagnostic Tool that allows vehicle technicians to read and clear Diagnostic Trouble Codes (DTCs) from a car’s onboard computer (ECU). It is also software that reports vehicle malfunctions.

Furthermore, the ELM327 chip communicates with the vehicle’s ECU through a standard OBD-II port and converts the data into a format that can be read and understood by a computer.

The chip can be in the OBD-II diagnostic tools, including Bluetooth adapters, USB devices, and standalone scan tools.

How can I download or update ELM327 drivers?

1. Download the ELM327 driver

  1. Insert the CD provided with the ELM327 cable into your computer CD-Rom and open your CD folder (don’t connect the ELM327 cable to your computer yet).
  2. Double-click on the driver’s folder to open the list of driver packs on the disk.
  3. Select the Driver Pack1 folder and double-click the CP210x_VCP_Win_xp_52c3_Vista_7.exe.
  4. Click the Yes button if the User Account Control prompts and follow the on-screen instructions to complete the installation.
  5. Navigate to the Drivers pack folder to install Driver Pack2 and Driver Pack5.
  6. Open the Driver Pack3, and right-click on the ser2pl.inf file and click on install from the context menu if you are using Windows 8 operating system.
  7. Plugging the ELM327 cable into your computer might pop up a Window for installing USB-SERIAL CH340 (COM3).
  8.  Right-click on the Windows icon and select Device Manager.
  9. Click the Port (COM & LPT) to see if the USB-SERIAL CH340 (COM3) is without a yellow marking then your device driver installation is successful.

The above step will aid in installing the ELM327 driver for Windows 10 and 11 using the computer CD-ROM.

You can proceed with the step below if you see a yellow marking next to Prolific USB-to-Serial Command Port. Alternatively, follow this guide to learn how to fix CD-ROM not working on Windows.

2. Installing Prolific USB-to-Serial Command Port driver

  1. Plug in the ELM327 cable to your computer USB port, press the Windows + X key, and select Device Manager.
  2. Expand the Port (COM & LPT), right-click on the Prolific USB-to-Serial Command Port, and select the Update Driver option.
  3. Select Browse my computer for driver software and click Let me pick from a list of device drivers on my computer hardware.
  4. Uncheck the Show compatible hardware box and select the Prolific USB-to-Serial Command Port Version 3.3.2. 102.
  5. Wait for the driver to install the yellow marking will be gone.

Manually updating the USB-to-Serial Command Port will help fix the yellow marking error. Thus, check our guide on how to install drivers manually on Windows.

In addition, you can read about the software you can use to check car history on your computer. Also, we have a detailed article on the best driver update software to download for your PC.

If you have further questions or suggestions, do not hesitate to drop them in the comments section.

How to Get Resident Evil 4 Chainsaw Demo on Xbox

Capcom just rolled out a lot of updates during their Capcom Spotlight 2023 press event. One of the most exciting news to arrive is about the hotly-anticipated remake of Resident Evil 4, which, starting from now, you can play its Chainsaw Demo on Xbox One & X/S, PlayStation 4 & 5, and PC via Steam.

Another good news is that the demo has no limit date, meaning you can play it as many times as you like for free before the full game is out on March 24, 2023. You can still pre-order the game on Xbox Store and PlayStation Store, priced at $60. 

Set six years after the fateful night in Racoon City, former rookie cop Leon S. Kennedy is tasked to rescue the US president’s kidnapped daughter in a secluded European village, squirmed by revengeful creatures. In this demo, you will enter the village as Leon and get through the first chapter of the original game. 

In the past few years, Capcom has been remaking some of its classic, best-selling horror games from the Resident Evil franchise. Following a return to its horror roots with Resident Evil 7 in 2017 plus RE Engine’s debut, the game publisher returned two years later with a remake of Resident Evil 2 (originally released in 1998) and Resident Evil 3 (1999). 

Now, it seems like we’re getting closer to seeing Leon’s game getting the same treatment. We all know how gruelingly awesome the graphics on Resident Evil Village were back in 2021, and with the next-gen technology from Xbox Series X/S, fans are in for a treat.

How to get Resident Evil Chainsaw Demo on Xbox?

1. Press the Xbox button on your controller ➜ Store.

2. Go to Search, then type Resident Evil 4.

3. Click on Resident Evil 4 Chainsaw Demo ➜ Get (Free).

Speaking of the franchise, an upcoming CG movie called Resident Evil Death Island is also in the works. Coming out this summer, the video game publisher teases Jill Valentine’s return, sporting her Resident Evil 3 Remake look.

Another hotly-anticipated game, Hogwarts Legacy, has also just experienced a release date push back on Xbox One. 

Are you excited about the return of Resident Evil 4 on Xbox? Let us know in the comments!

Remote Desktop App for Windows 11: 11 Best Picks Ranked

Remote desktop software has to be one of, if not the most useful apps to have ever been invented. It allows you to remotely control another computer and specific aspects of it from anywhere at any time, as if you were there in person.

Now, don’t confuse them with screen-sharing software, which is an app that allows users to share their screen for web conferencing or presentations. Naturally, these don’t offer full control.

How does remote access software work?

All remote access apps work pretty much the same. To be used, you must install the control apps on the computer or server you want to control, known as the host. Then you install it on your own computer, which is used to gain access to the other machine.

In the past, remote access software only allowed you to control one other desktop computer via a master/client association. Still, nowadays, that’s changed to allow access through a smartphone or tablet.

This guide will break down the best remote access software you can get for your Windows 11 computer in 2023. Although they have similar functionality, each app has its own set of features that make it stand out above the rest.

What are the best remote access apps for Windows 11?

Remote Access Plus – Best remote access and assistance

ManageEngine’s Remote Access Plus is unquestionably the best software you can get in terms of remote desktop control and assistance.

This HIPPA-compliant software will even help you run an IT remote assistance business because it also comes with workforce management and session recording of the job tasks.

Actually, Remote Access Plus has all the tools needed to carry out any assistance or remote control task on a Windows, Linux, or Mac computer.

The remote-control function is just one of the multiple features available. You can perform file transfers, control power options, and restrict users.

Remote Access Plus implies the usage of HTML5 RDP clients to access the remote machine no matter where it’s located.

If you want to provide assistance instead of remote troubleshooting, there’s always the option of instant voice and video chat to communicate with the receiving end and offer guidance.

When the IT technician finishes the job, a comprehensive report is generated. That and the session recording will help you assess the quality of the work.

Here are some of its key features:

  • Complete remote control and assistance tools
  • HIPPA compliance and HTML5 RDP clients
  • You may offer assistance to any Windows, Linux, and Mac computer
  • Single, cloud-based dashboard, accessible from anywhere in the world
  • Multi-monitor support, voice, and video chat

Remote Access Plus

With this smart software, you get all the tools for remote Windows 11 troubleshooting and assistance!
Free trial Visit Website

Password Manager Pro – Great password management

ManageEngine Password Manager Pro comes with the Secure remote access module allowing access to IT services and maintenance.

This software enables users to launch direct system connections without a plug-in or agent. It directly connects to a desktop and website from native browser extensions.

It allows you to set up connections to remote database servers and secure access to remote systems without showing passwords in plain text.

This password management tool provides granular access controls, strong encryption, and other security features to help organizations protect their critical assets.

With in-built features, you can analyze the strength of passwords and ensure that they meet the organization’s policies.

It enables you to reset your credentials of remote resources from and when required or automatically through scheduled tasks.

This tool has comprehensive audit trials and reporting capabilities, providing visibility into who accessed what credentials and when.

Some key features of this remote desktop app:

  • Allows you to define different roles and permissions for users to access and manage passwords
  • Offers both scheduled and live backups of the entire database to facilitate disaster recovery
  • Automatically log on to the target systems, sites, and apps from the PMP web interface
  • Initiates personalized connections to a system using Auto Logon Helper scripts
  • Detects and resets the passwords for service accounts linked to domain accounts

Password Manager Pro

Protects sensitive passwords and credentials of your organization with a tool that offers remote access.
Free trial Visit Website

Zoho Assist – Great for screen sharing

Zoho Assist is a cloud-based remote access software that provides specialized distant support and unattended access, all in an effort to streamline the workflow process. There are multiple versions available, including support plans.

With Zoho, you can share screens and files, plus talk with another user via chat that uses a unique session ID and password. Other features include multi-monitor navigation and the ability to have up to six different connections.

The company behind the app separates its software into two tiers. The Remote Support plans include features like remote printing and customer branding, which are highly useful for support technicians and IT professionals.

More advanced features are available in high-end plans. The top-tier plans include similar features like remote printing, plus access to the service’s mobile apps and the ability to record sessions. And if you ever need any help, Zoho Assist offers on-demand remote support.

Zoho Assist

Try one of the best remote access software to streamline your workflow process.
Free Trial Visit Website

Radmin Remote – Ideal for low-bandwidth connections

As a remote access app, Radmin Remote gives lightning-fast connections between the host computer and multiple clients. It houses a feature called DirectScreenTransfer which uses a special kernel-mode driver to increase the capture rate of screen updates. This means almost no lag in the connection.

Radmin Remote has also been specially optimized for low-bandwidth connections that allow remote control even on dial-up modems. Security is also pretty high as all the data, even mouse movement and keyboard inputs, are encrypted with 256-bit AES.

The latest version of Radmin supports Intel Active Management Technology to control remote computers even if they’re turned off, or the operating system can’t start. That way, the client can view and change the BIOS settings of the host to boot it.

Other features include compatibility with older versions of Windows operating systems, multiple monitor support, and a multi-language interface. Radmin users are given free technical support to all registered customers.

Here are some of its best features:

  • 256-bit AES encrypted connection
  • DirectScreenTransfer technology for fast connection
  • Intel Active Management Technology support
  • Compatible with older Windows OS versions as well

Radmin Remote

Try this software today and take advantage of the user-friendly interface and plethora of features for Windows 11.
Check price Visit Website

Mikogo – Simple and practical tool

Starting off the list is Mikogo, a very practical remote desktop app that sports a user-friendly interface that easily establishes a remote connection. Mikogo has a specific usage on presentations, team meetings, and web conferencing.

Mikogo can be installed on macOS and Linux computers, plus there are apps on iOS and Android, which is something that much remote access software has. With this particular app, you can organize meetings in advance and send out invitations.

Mikogo is unlike many other remote access apps in that it’s less focused on IT professionals and more focused on casual users. It takes more from conferencing apps like Zoom than anything else. The program isn’t free, unfortunately, but it does have a two-week free trial that you can try.

Setting up is easy as well. All you have to do is download and install the app. The software is immediately launched where you can enter your Mikogo account information so you can get started with scheduling sessions.

Let’s review some of its best features below:

  • Compatible with Windows, macOS, and Linux
  • Dedicated apps for Android and iOS
  • Simple and easy to use with a friendly UI
  • Dedicated tools for presentations, team meetings, and web conferencing

⇒ Get Mikogo

TeamViewer – Most popular tool

TeamViewer is up there as one of the most popular remote access apps for personal and business use. You can use it to remotely control computers and devices on all the major operating systems like Windows, Linux, Mac, and Chrome OS.

There are also app versions that allow you to control the Android, iOS, and Blackberry systems from your smartphone as the client. TeamViewer also supports multiple remote sessions with the host computer being able to accept multiple requests from different clients.

And that client can also send out multiple requests. Users will be able to conduct virtual meetings over TeamViewer to support up to 25 participants. To facilitate this large group of people, Team Viewer has a chat function where you can communicate directly with clients.

The free version is only meant to be used for personal reasons and not in a business setting. In fact, the software has advanced algorithms that can tell how you’re using the app.  Paid versions include new features like the aforementioned multiple requests.

Take a look at some of its key features:

  • Can control Windows, Linux, Mac, and Chrome OS remote computers
  • Seamless compatibility with Windows 11
  • Virtual eating with voice and video communication
  • Simple setup for remote access and control

⇒ Get TeamViewer

AeroAdmin – Simple to use

AeroAdmin is like a stripped-down version of Team Viewer. If all you want is a basic remote desktop app without all of the bells and whistles that Team Viewer has, then AeroAdmin is the way to go. It has a cleaner user interface that isn’t jammed packed full of features.

The interface includes only a field box where you enter the host ID to start a connection. Other features include file transfer and unattended control, where you can access the other computer without intervention on that end. Plus, remote sessions are encrypted to ensure data security during file transfers.

The free version of AeroAdmin has some solid utility for both a personal and commercial setting. Admittedly, however, this app is best suited for personal use or a medium-sized business. AeroAdmin limits the usage of the free version to 17 hours of connection time every month, but the premium version gets rid of this.

⇒ Get AeroAdmin

Splashtop Business Access – Ideal for business professionals

Splashtop Business Access was made with business professionals and teams in mind. It can manage multiple users’ remote access as a central hub of sorts. With Splashtop, professionals and teams can access the host and shared systems with any supported device.

Splashtop can be installed on a Windows 11 computer to control other systems, including Windows, Mac, iOS, Android, and Chromebook. It’s a versatile remote access program with a wide range of features, high security, and a user-friendly interface.

The app has a multi-monitor feature allowing you to view multiple screens from one or many displays. It also allows two separate users to access the same machine remotely and control who has access to which computer and assign tasks to them.

Set up is also easy to do for a problem-free deployment. There are multiple different plans that increase the number of computers that can be accessed, up to 25 separate machines. The paid versions also have on-demand customer service support.

⇒ Get Splashtop Business Access

Remote Utilities – Multiple platform support

Remote Utilities is a free remote access app that takes a different approach to its implementation. It’s actually two different tools used as one. There’s the host software that you install on the computer you want to control remotely, and then there’s the viewer which goes on the client.

With the two installed, you can have unattended access to eh remote computer while allowed to execute certain tasks like rebooting the host. Remote Utilities also have a portable version for when you need to access a computer quickly but have no time to install the apps.

Even Android and iOS versions allow you to gain a computer from a mobile device. Other features in Remote Utilities include remote printing, file transfer, webcam viewing, live chat, and multiple monitor viewing.

Remote Utilities can control up to ten separate devices and much older systems, going as far back as Windows XP, plus Windows Server 2019, 2012, and 2003.

⇒ Get Remote Utilities

Chrome Remote Desktop – Great for Google Chrome

Believe it or not, Google has created its own remote access software. It’s called Chrome Remote Desktop and it’s a free tool that allows users to access a computer via the Chrome web browser. It was originally conceived as a browser extension, but over time, it became a standalone tool.

Chrome Remote also allows any user with a Google account to access a computer via iOS or Android device. It does lack a lot of the features that standalone apps have, but its simplicity and cross-platform access make it one of the best free apps out there.

Now, because access happens through the browser, security is limited to HTTPS and includes full support for AES, which is the same protocol businesses use to protect credit card information during online transactions, so it’s not bad, but not amazing either. A PIN is required every time you want to access a remote computer.

Chrome Remote is easy to use and is quite responsive, allowing you to configure key mappings to customize access on a device. It’s a great offset to being light on features and the inability to share files.

⇒ Get Chrome Remote Desktop

LogMeIn – Great for large businesses

LogMeIn can be considered the go-to remote access software for large businesses. The apps come with remote monitoring, remote deployment, endpoint management, and other useful, advanced features.

Like many of the remote access apps on this list, LogMeIn has the standard file transfer capabilities and mobile apps for an immersive experience. The service has unlimited remote access from any and all devices, plus system admin tools so you implement business policies and controls.

The app also gives you access to a whopping 1 TB of cloud storage and LastPass subscribers get the opportunity to save their password in a secure vault of sorts. LogMeIn can also boast lightning-fast access to the host computer, whether it’s a Windows or Mac machine. You can access all the stored files on a computer for easy collaboration.

LogMeIn even has a whiteboard feature, which allows the client user to draw on the host computer if they need to illustrate an action. At first, the whiteboard may be tricky and confusing to use, but fortunately, the service has a helpful guide that teaches how to use the tool.

⇒ Get LogMeIn

Are there other useful Windows 11 apps to make browsing more enjoyable?

As a matter of fact, there are many useful Windows 11 apps that make the overall experience much better. If you ever find yourself needing to transfer vast amounts of data from one computer to another, it’s recommended that you download a useful migration tool.

A data migration tool transfers data by preparing, extracting, and transforming data to make sure it’s compatible with its destination. Some of these apps even have the ability to recover files from a damaged computer.

There’s also QT TabBar which adds tabs to the Windows File Explorer. It’s a relatively small, almost inconsequential addition to the File Explorer, but it’s actually an extremely useful app. It makes exploring your computer’s file less annoying when you can just have one window open.

We also recommend reading our selection of the best VPNs for remote desktop computers.

Feel free to leave a comment below if you have any questions on other Windows 11 apps. Also, leave comments about guides that you’d like to see or information on other Windows 11 features or list guides like this.

Fix: You Don’t Have Privileges for Configuring Connection

Many Windows 10 users reported an issue when trying to bridge network connections. The error message you do not have sufficient privileges for configuring connection properties pops up, leaving users hopeless. So, to help you fix this issue, we came up with a few solutions.

What does You do not have sufficient privileges for configuring connection properties mean?

Typically it indicates that the user attempting to configure a network connection does not have the necessary permissions. This can occur for several reasons:

  • User account – Firstly, the user account may not have sufficient privileges to configure network connections. Also, the user account may not be a member of the appropriate group or have the necessary permissions to modify network settings.
  • Group policy – The network administrator may have implemented group policies, so users are restricted from modifying network settings. This can prevent users from configuring network connections, even if they have administrative privileges on their local machine.
  • Third-party software – Some third-party security software, such as antivirus or firewall programs, may restrict users from modifying network settings to protect the system from unauthorized changes.
  • System corruption – In some cases, system corruption can cause issues with network connections and prevent users from configuring them.

Since we have covered some possible causes, let us explore our top recommended solutions with you.

How can I fix You do not have sufficient privileges for configuring connection properties?

1. Make sure you’re running as an administrator

  1. Press Windows + I to open the Settings app.
  2. Go to Accounts.
    you do not have sufficient privileges for configuring connection properties
  3. Click Family & other users and select Change account type.
    you do not have sufficient privileges for configuring connection properties
  4. Under Account type, choose Administrator and hit OK.
  5. Lastly, check to see if this changed anything.

2. Create a new user with administrator privilege

  1. Press Windows + I to open the Settings app.
  2. Go to Accounts.
    you do not have sufficient privileges for configuring connection properties
  3. Click Family & other users.family and other people you do not have sufficient privileges for configuring connection properties
  4. Select Add someone else on this PC.
    you do not have sufficient privileges for configuring connection properties
  5. Choose I don’t have this person’s sign-in information.
  6. Click Add a user without a Microsoft account.
  7. Enter the required information: user name, password, security questions, and click Next.
  8. Then you need to set it to have administrator privilege, so press Windows + I to open Settings.
  9. Go to Accounts and click Family & other users.
    family and other people you do not have sufficient privileges for configuring connection properties
  10. Select Change account type.
  11. Under Account type, choose Administrator and click OK.
  12. Finally, reboot the PC and log in with the newly created account to see if it fixed the issue.

3. Add the user to the administrator group

  1. Press Windows + R, type compmgmt.msc and hit Enter.
  2. Expand Local Users and Groups in the left pane and click Groups.
  3. Select Administrators in the middle pane, click More Actions in the right pane, and under Administrators, select Add to Group…Computer management groups admin you do not have sufficient privileges for configuring connection properties
  4. In the Administrators Proprieties window, select Add…
  5. Choose a name for the new user and click Check Names.add administrative account you do not have sufficient privileges for configuring connection properties
  6. Lastly, set up a password for the user > restart your PC and log in as the new user.

4. Update Windows

  1. Press Windows + I to open the Settings app.
  2. Click Update & Security.
    you do not have sufficient privileges for configuring connection properties
  3. Select Windows Update and click Check for updates.update windows 10 you do not have sufficient privileges for configuring connection properties
  4. Let it complete the process and restart your computer if it finds any updates.
  5. Finally, after rebooting your PC, check if updating Windows has fixed the issue.

Hopefully, any of the above fixes should help resolve the problem. But note that they have not been written in any particular order, and we hope you choose what feels the most appropriate for your situation.

We hope that our guide on how to fix the Windows privilege issues was able to provide the piece of information you needed. Lastly, if you found this article helpful, comment below.

How to Run the Java Applet Program in 2026 & Compatible Browsers

Running and installing Java on a web browser isn’t a piece of cake nowadays, but it ain’t that hard either. Today, we’ll help you find a shortcut because we found browsers that still support Java and we’ll show you how to use them.

Some support it natively, i.e. you just have to install it, while others will require workarounds like installing certain add-ons. Let’s check out how to run Java applets in 2024.

How can I run Java Applets in a browser?

1. Enable Java content for browsers

    Before you can run the applet program in Java on your favorite browser, you need to enable Java content. This can be done via Settings, after you install Java on your PC.

    The Java applet will then be displayed on the web page by making use of the deprecated applet HTML element, or the recommended object element.

  1. 1. Download and install Java for Windows.

  2. 2. In the Windows Search bar, type Java and open Configure Java from the list of results.

  3. 3. In the Java Control Panel, check the Enable Java content for browser and Web Start applications box.

    your browser is not setup to run java applets enable
  4. 4. Click on Apply and OK to save the changes.

  5. 5. You can now run Java applets on your browser.

2. Run Java Applets in Google Chrome

  1. Launch your browser.
  2. Navigate to the IE Tab extension page. It stimulates the Internet Explorer engine to run Java Applets for Google Chrome.
  3. Click on Add to Chrome.
    how to run java applet program in web browser
  4. After that, install the IE Tab Helper application on your PC. It’s a necessary tool if you want to run Java on Chrome.
  5. Lastly, you should be able to simulate the Internet Explorer engine in Chrome and use Java Applets without any issues.

3. Run Java applet in Microsoft Edge

  1. Launch the Edge browser.
  2. Click on the 3-dot menu and expand More tools.
  3. There, just click on the Open with Internet Explorer option.your browser is not setup to run java applets
  4. If you do not see that option, click the 3-dot menu, and select Settings.
    how to run java applet program in web browser
  5. On the left pane, click Default browser, and on the right pane, select Add under the Internet Explorer Mode pages option.
    how to run java applet program in web browser
  6. Enter the URL of the applet and hit Add.

If you get to a webpage with the Java content or Applets you need to run, the simple workaround is opening the page in Internet Explorer.

4. Enable Java Applet on Internet Explorer

  1. Now, the easiest way is to use Internet Explorer from the get-go. If you cannot run Java on Internet Explorer, then open Internet Explorer.
  2. Click on the cog Tools menu and open Internet Options.your browser is not setup to run java applets
  3. Under the Security tab, click on the Internet icon.
  4. Click on the Custom level.your browser is not setup to run java applets
  5. Make sure that the Scripting for Java applets is enabled.your browser is not setup to run java applets
  6. Restart Internet Explorer and try again.

Can Java applets run from a web browser?

Java applets used to be able to run from a web browser, but support for Java applets in modern web browsers has been largely phased out due to security concerns.

They were a popular way to provide interactive web page content, but they have fallen out of favor recently. Java applets run in a sandboxed environment within the web browser, which can help to prevent them from causing harm to the user’s computer or the web page they are visiting.

However, Java applets also have access to system resources, making them a potential security risk if they need to be correctly designed and implemented.

Most modern web browsers, including Google Chrome, Mozilla Firefox, and Microsoft Edge, no longer support Java applets by default.

Some browsers may still offer the option to enable Java support, but this is generally not recommended due to the security risks involved. Instead, web developers are encouraged to use other technologies like HTML5 and JavaScript to provide interactive content on their web pages.

Wrapping up

If your preferred browser does not support Java, check out our dedicated article to find solutions. You may also use a Java applet viewer.

We hope you enabled and ran Java applets on your web browser. In the comments section below, let us know if you encounter any difficulties or have any questions regarding the process.

Fix: DRIVER_IRQL_NOT_LESS_OR_EQUAL (kbdclass.sys) BSoD

Kbdclass.sys or DRIVER_IRQL_NOT_LESS_OR_EQUAL is a recent error that affects Windows PCs. It is related to Wireless Keyboards and other USB-connected accessories accompanied by BSoD. Though the error can be annoying, we will outline a few fixes.

Also, you can check how to fix USB device not recognized in Windows 11.

What causes DRIVER_IRQL_NOT_LESS_OR_EQUAL kbdclass.sys?

The following are some of the factors that may be responsible for the DRIVER_IRQL_NOT_LESS_OR_EQUAL kbdclass.sys error:

  • Corrupt system files – Windows systems files are responsible for hosting the activities of devices and components on the PC. If the system files are corrupted, they can affect device drivers, resulting in the BSoD error.
  • Conflict with Antivirus programs – Antivirus software running on your PC may interfere with the activities of the keyboard connected. A common one is Webroot antivirus, and recent updates on the software can be faulty, causing the error.
  • Conflicting drivers – Installing an incompatible or invalidated driver with the operating system running on your PC can cause the error.
  • Issues with the USB Controllers – The Universal Serial BUS Controllers ensure the devices connected to the computer function properly and interact with the necessary system components. So, if they are not intact or working correctly, it may result in the kbdclass.sys crash.

Though these factors vary on different computers, you can fix them by following the steps below.

How can I fix the BSoD DRIVER IRQL NOT LESS OR EQUAL kbdclass.sys error?

Before proceeding with any advanced troubleshooting steps, go through the following:

If you can’t resolve the error, try the steps below:

1. Reset the Driver’s changes

  1. Press Windows + R key to open the Run dialog box, type hdwwiz.cpl, and click OK to open the executable file on your computer’s hard drive.
  2. Right-click the Keyboard Device, then select Properties from the drop-down.
  3. Navigate to the Driver tab, then click the Roll back driver option.
  4. Restart your PC and check if the kbdclass.sys error persists.

Rolling back driver changes will reset it to the version where it works correctly, removing faulty settings or updates.

2. Run an SFC scan

  1. Left-click the Start button, type Command Prompt, and click the Run as administrator option.
  2. Click Yes on the User Account Control prompt.
  3. Type the following and press Enter: sfc /scannow
  4. Restart your PC and check if the error persists.

An SFC scan will find and repair corrupt system files causing the kbdclass.sys error. You can check how to fix the run as administrator option if it’s not working on your PC.

Otherwise, you can opt for another effective method to repair OS files, so we advise you to try an automatic repair tool.

The tool will check your Windows system for corrupted files and replace them with clean versions from its extensive repository.

3. Uninstall USB Controllers

  1. Press Windows + R key to open the Run dialog box, type hdwwiz.cpl, and click OK.
  2. Find the Universal Serial BUS Controllers tab, right-click on the Generic and USB Root Hubs, and select Uninstall device from the drop-down to remove the Controllers.
  3. Restart your PC to reinstall the Controllers, and check if the DRIVER IRQL NOT LESS OR EQUAL (kbdclass.sys) BSoD error persists.

Uninstalling the USB Controllers will allow your system to run and use new ones.

4. Update driver using Windows update

  1. Press the Windows + I key to open Settings.
  2. Select the Windows Update tab and select the Advanced options.
  3. Click on Optional Update.
  4. Click the drop-down button on the Driver Update and checkmark the list of updates available.
  5. Select the Update and Install button and wait for the drivers to install.

Updating drivers will improve the device’s performance and fix the kbdclass.sys. You can read about ways to diagnose and fix Windows Update not loading on your computer.

5. Run System Restore

  1. Press Windows + R key to open the Run dialog box, type control, then press Enter to open the Control Panel.
  2. Type recovery in the Control Panel search bar and select Recovery.
  3. Then click Open System Restore.
  4. Click Next in the Restore system files and settings window.
  5. Choose the restore point you want to restore from, then click Scan for affected programs.

Running System Restore will backdate the system and undo some recent system modifications on the PC. Read our guide on how to fix Restore Point if it’s not working on your PC.

Alternatively, you can learn about fixing the Keyboard if it’s not working after Windows 10/11 rollback on your PC.

If you have further questions or suggestions on this guide, kindly drop them in the comments section.

11 Best Tools to Run Windows Speed Test for your Internet

Internet speed is among the most important factors when choosing an Internet Service Provider. You however will not be sure of how reliable your ISP is without running a Windows internet speed test. 

There are many ways to check Internet speed, and today we will show you some of the best tools that let you test Internet speed on Windows.

What are the best tools to test my Internet speed?

SpeedConnect Connection Tester – Basic internet speed tester

SpeedConnect Connection Tester is a simple Windows application that will test your Internet speed with a single click.

After you install this tool, you just need to click the Run New Test button, and you’ll see latency and Internet speed in real-time.

This tool seems to try to download a specific file in the background and uses that file to test your Internet speed.

If you want, you can change the Test Server URL field and set a different file that will be used for testing purposes.

In addition to speed and latency, you’ll see other information, such as the duration of the test and file size. SpeedConnect Connection Tester is a simple tool with an outdated design and limited functionality.

This tool will be perfect for basic users who want a quick Internet speed test. However, you must use a different tool if you want more detailed information.

Some important features of SpeedConnect include:

  • Accurate speed measurements
  • Real-time graphs
  • Detailed reports
  • User-friendly interface

⇒ Download SpeedConnect Connection Tester

Network Speed Test – Universal Internet speed testing

Network Speed Test will be great if you prefer Universal apps. We already reviewed Network Speed Test a while ago, so if you want more details, check that article.

Network Speed Test is a simple Universal app that lets you test your Internet speed. Click the Start button to see your network latency and download and upload speed.

There’s also a history table on the right to see the results of your previous tests.

We have to mention that this application has labels next to certain speed values. Labels such as video calls, high-quality video, etc., will show you what kind of content your Internet connection can handle.

Network Speed Test is a simple app; its only flaw is the inability to change the testing server. However, this app will be perfect for basic users with its simple interface.

Some important features of Network Speed Test include the following:

  • Real-time speed testing
  • Accurate result presentation
  • Multiplatform and OS functionality
  • HTML and URL result sharing

⇒ Download Network Speed Test

Network Speed Test Pro – Interactive network readings

Network Speed Test Pro is another Universal app that will test your Internet speed. Before using this app, turn on the location discovery option from the Settings app. After that, you can choose one of the 4000 available servers and test your download speed and ping.

Network Speed Test Pro has an interactive map so that you can select and test one of many available servers. The test process looks rather interesting, and you’ll see a marker moving from your location to the server while testing the speed.

Choose the desired server or country from the menu if you don’t want to use the map. Regarding the available information, you’ll see download speed, upload speed, and ping, which is more than enough for most users.

Network Speed Test Pro has a lot to offer, but it’s not without flaws. One problem we encountered is that location discovery doesn’t always work reliably. Due to this problem, you can sometimes get inaccurate latency results.

Another minor flaw is the user interface. The user interface is simple, but once you start a network test, there’s no way to stop it, and since testing can take a minute, you’ll have to wait until it’s finished to choose a different server.

Some important features of Network Speed Test Pro include the following:

  • Network latency measure
  • Network performance history
  • Interactive map
  • Updated testing server list

⇒ Get Network Speed Test Pro

Fast Internet Speed Test – Easy online tool

This is another Universal app that will let you test your Internet speed. Fast Internet Speed Test is a simple application that will test your Internet connection as soon as you start it. After starting the app, you’ll see your download speed in real-time.

Information such as upload speed or latency isn’t available. In addition, there’s no option to choose the server.

Fast Internet Speed Test is a simple application with limited functionality. If you want the most basic app to test your Internet speed, Fast Internet Speed Test might be just what you need.

Some important features of Fast Internet Speed Test include the following:

  • Simple and easy to use
  • Integration with Netflix’s servers
  • Cross-platform operability

⇒ Get Fast Internet Speed Test

Speedtest – Comprehensive online speed tester

Speedtest is undoubtedly one of the most popular online services that let you test your Internet speed. You can perform a quick speed test simply by clicking Begin test button, and your test server will be selected automatically.

If you want, you can choose the testing server manually. You can choose any server in almost any country regarding the available servers.

All required information is available, including download speed, upload speed, and latency. In addition, you can also rate your ISP right from the Speedtest website.

If you want to share your test results with others, you can do that right from Speedtest. You can also create your Speedtest account and use it to keep track of your testing history and results.

Speedtest online service is amazing and probably the best for testing Internet speed. There’s also a Universal app available from Windows Store. The application is simple to use and has an attractive user interface.

Speedtest app will automatically select the best service once you tap the Go button. One advantage over the web version is the availability of testing history so that you can keep track of your results at all times.

You can also share your results using other apps, but we have to mention that there’s no ability to get a direct link to the results, which can be a flaw for some users.

Another flaw of Speedtest app is the inability to choose any testing server worldwide. You are limited to servers in neighboring countries. Compared to the web version that gives you access to any testing server worldwide, a limited choice of servers feels a bit underwhelming.

Some important features of Speed Test include the following:

  • Free internet speed testing tool
  • Easy-to-read graphs
  • Multiple server locations
  • Saving feature for test results

⇒ Download the Speedtest app

DownTester – Good manual tester

test-internet-speed-downtester-1

DownTester is another simple tool for testing Internet speed. Unlike other tools on our list, this one doesn’t show upload speed or latency. In fact, this tool doesn’t let you choose the server you want to use for testing.

To use this tool, you must add links to certain files you want to download in the background. By doing so, you’ll test the download speed of your connection.

One feature that makes this app special is the ability to test your download speed using multiple files or servers. DownTester is a simple app that requires some preparation before using it.

If you want something more user-friendly, we suggest you try another app from our list.

Some features of DownTester include the following:

  • Portable and lightweight utility
  • Accurate and real-time testing results
  • Easy-to-use interface
  • Test results saving in a CSV file

⇒ Download DownTester

SpeedOf.Me – Live chart speed tester

test-internet-speed-speedofme-1

SpeedOf.Me is a web service that lets you test your Internet speed. This service doesn’t require Flash or Java to be installed on your computer, which is great.

This also makes this service available on any mobile platform. The testing process will give you a live chart representing your download and upload speed.

In addition to download and upload speed, you’ll also see your latency. If you want, you can also export your testing results or your history as an image, PDF, or CSV file.

This simple service should work on any PC, even if you don’t have Java or Flash installed. The only flaw we found is the lack of ability to choose a testing server, so you’ll always use the same server.

Some features of SpeedOf.Me include the following:

  • Free online internet speed testing
  • Accurate and real-time testing results
  • Cross-platform operability
  • Internet speed comparison

⇒ Try SpeedOf.Me

TestMy.Net – Free internet speed testing tool

test-internet-speed-testmynet-1

Another web service that you can use to test Internet speed is TestMy.net. This service doesn’t use Java or Flash, so it will work on any browser and platform, including mobile.

This service lets you check your download or upload speed, or both simultaneously. Unfortunately, there’s no option available to check your ping.

This service offers several different servers to choose from. If you want, you can easily compare your Internet speed with the speed of other users from your ISP. You can also compare your speed to other users in your city or country.

We must mention that TestMy.net will automatically perform the speed test every hour if you keep it open in your browser. This allows you to get the most accurate information regarding your Internet speed.

TestMy.net is a decent service that lets you check your Internet speed, but some users might not like the lack of latency tests.

Some features of TestMy.Net include the following:

  • Download and upload speed testing
  • Multiple server locations
  • User-friendly interface
  • Test result-saving features

⇒ Try TestMy.net

Bandwidth Palace – Efficient HTML internet speed tester

test-internet-speed-bandwidth-palace-1

Bandwidth Palace is another web service that allows you to test your Internet speed. With this tool, you can choose several different servers.

All necessary information, such as download speed, upload speed, and latency, is available during the test. After you’re done with testing, you can easily share a link with your results.

Bandwidth Palace uses HTML5 for testing, so it will work on any platform and browser. Regarding the flaws, the only flaw might be the small number of available testing servers.

Some features of Bandwidth Palace include the following:

  • Results for download and upload speeds
  • Multiple server locations in different regions
  • Operational on all devices and operating systems
  • Insights and speed test comparison

⇒ Try Bandwidth Palace

Speed Test Loggger – Automatic speed testing

Speed Test Loggger is another desktop application that lets you test your Internet speed. To use this application, select Custom URL in the Settings menu. After doing that, you can start testing the download speed.

This tool will test your download speed every minute, which is useful if you want detailed information. The tool doesn’t measure upload speed or latency, which is its only flaw.

Speed Test Loggger is a simple tool for testing your Internet speed, but you’ll need to configure it a bit before you can use it.

Some features of the Speed Test Loggger include the following:

  • Automated speed tests
  • Open-source Windows app
  • CSV logged test results

⇒ Try Speed Test Loggger

SpeedSmart – HTML5 Internet speed tool

speed smart test internet speed

SpeedSmart is a useful HTML5 Internet speed tool that offers you all the information you need about your download and upload speed and ping information.

If you need to optimize your bandwidth for gaming, SpeedSmart supports a series of advanced settings that allow you to get the best of your Internet connection.

You can also keep track of your Internet connection speed values thanks to the detailed history list, chart, and stats this tool supports.

Testing Internet speed on Windows 10 is rather simple, and you can do it by using any of these tools or services. If we had to recommend one, our choice would be Speedtest.

This is the most popular service; it has all the necessary features, and millions of users use it. If you’re not a fan of web services, you can also download Speedtest Windows 10 app.

Some features of SpeedSmart include the following:

  • URL or HTML code result sharing
  • Mobile app version
  • latency and jitter internet information

⇒ Try SpeedSmart

How do I run a speed check on Windows 10?

There are several ways to check your internet connection speed on Windows 10. Here are a few methods:

  • Use the built-in Windows 10 network speed test – You will find this tool in the Settings app under Network troubleshooter.
  • Use a web-based speed test tool – You only need an internet connection and your web browser. A Google search will give you many handy options.
  • Use a specialized tool – Various third-party software tools are available specifically designed for testing internet speed on Windows 10. Examples include NetSpeedMonitor, Ookla Speedtest, and LAN Speed Test.

It’s worth noting that specialized tools tend to provide more detailed information and more accurate results than the built-in Windows 10 network speed test or web-based speed test tools.

So, a specialized tool is recommended if you’re looking for more in-depth information.

FAQs

What is a good internet speed for a Windows PC?

25 Mbps handles HD streaming and video calls. 50 to 100 Mbps is smoother for households with several devices. Gamers and 4K streaming typically need 100 Mbps or higher.

Why do different speed tests show different results?

Results vary due to Wi-Fi quality, server distance, network congestion, and background apps. VPNs, proxies, and antivirus web shields can also affect latency and throughput.

How do I get accurate speed test results on Windows?

Connect with Ethernet, close bandwidth-heavy apps, and pause cloud backups. Pick a nearby test server, run three tests at different times of day, then average the results.

What is the difference between Mbps and MB/s?

Mbps measures megabits per second, while MB/s measures megabytes per second. Convert by dividing Mbps by 8, so 80 Mbps equals about 10 MB/s.

That’s about it for Internet Speed testing tools. All of them are extremely efficient at measuring both your upload and download speeds, so in the end, it is up to your personal preferences which one you choose.

Want real time visibility after testing? You can show your live internet speed in the Windows taskbar with this step by step guide: How to display internet speed on the taskbar.

In case you want to keep track of your network usage in real time, then using a Net Speed Monitor for Windows 11 can be helpful.

[wl_navigator]