Razer Synapse is a hardware configuration software that helps you take your Razer devices to the next level. Therefore, by using it, you can maximize your unfair advantage.
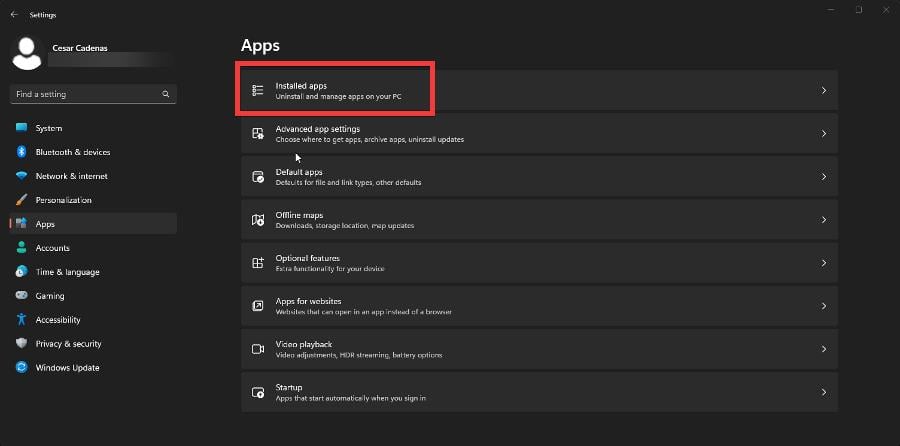
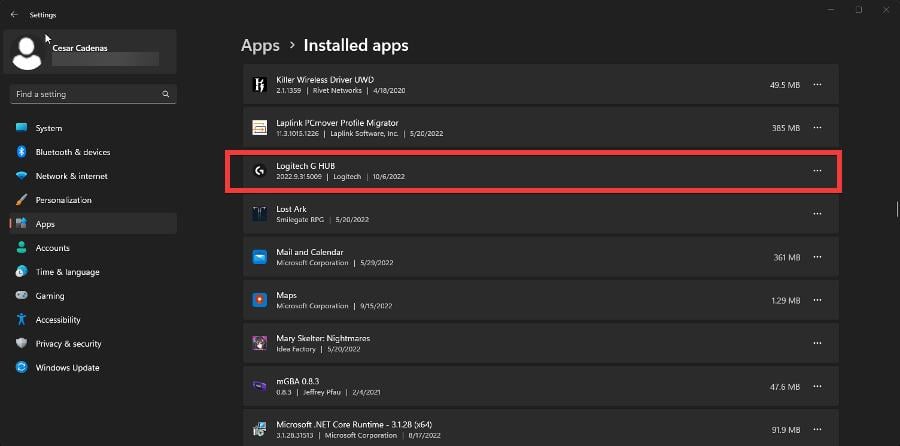
However, some users reported that Razer Synapse won’t uninstall, an irritating issue that deserves immediate attention.
The most common reasons for this issue include not having sufficient access to uninstall the app or stopping it from being uninstalled by another process using the file.
In this guide, we will show you some helpful troubleshooting tips. Just make sure to try them out one by one.
Why won’t Razer Synapse uninstall?
Here are some common reasons: several users have reported that the Razer Synapse won’t uninstall from your PC.
The Control Panel is having some issues.
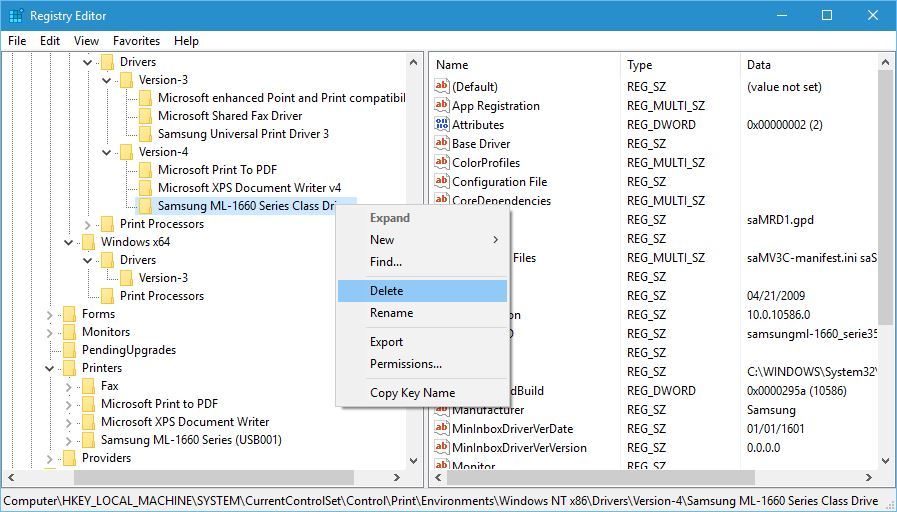
Registry settings might be blocking the uninstall.
Your Firewall might be blocking the Razer Synapse uninstallation process.
A third-party app is blocking the uninstall.
What is the purpose of Razer Synapse?
Razer Synapse is a tool that comes preinstalled on Razer laptops and brings you the latest updates for your PC.
Also, getting a Razer mouse or keyboard is recommended to get the latest updates and support using the Razer Synapse tool.
You can configure and customize the functionalities of your Razer mouse or keyboard using this Synapse tool. It even works with Razer headsets, mousepads, etc.
Navigate to the folder where Razer Synapse is installed.
Locate its uninstaller named unins000.exe or uninstall.exe.
Double click on its uninstaller.
Follow it to uninstall the program.
4. Use a third-party uninstaller
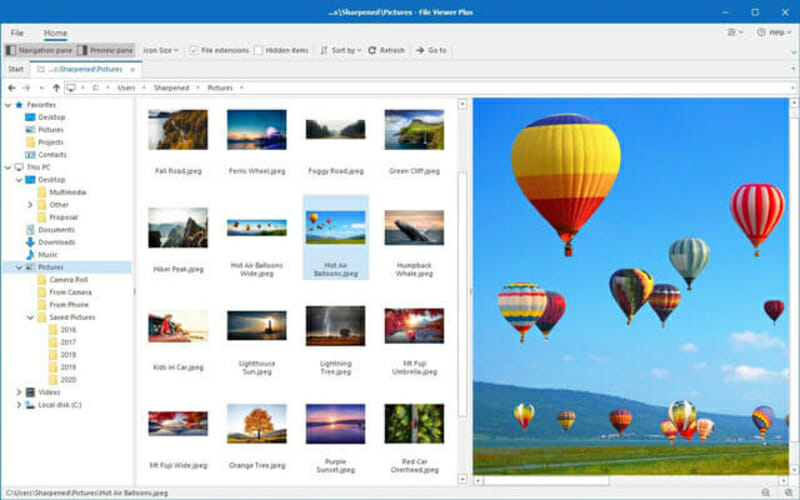
Using a dedicated third-party uninstaller is one more efficient option that will help you get rid of Razer Synapse from your PC. In addition, we are thinking of an app designed to remove unwanted software.
In addition, some of CCleaners‘ best attributes are the enlarged database and the capability to remove 5x stubborn software and 30% more residuals.
Using it will help you uninstall programs completely, clean leftovers automatically, and remove plug-ins easily.
It can also work when you have trouble uninstalling browser extensions or other complex programs, letting you perform uninstallation in bulk mode.
Users rated the app as an enjoyable and friendly program, which is constantly improving and is even capable of saving you from spending extra money.
CCleaner
Clean your system of any junk and old files to get rid of errors and lag.
Find and delete all registry entries of the program in: HKEY_CURRENT_USERSoftwareHKEY_LOCAL_MACHINE⧵Software⧵MicrosoftWindows⧵CurrentVersion⧵Runeg ui
Find and delete all files of the program in system folders: Settings⧵All Users⧵Application Data⧵ and C:⧵Documents and Settings⧵%USER%⧵Application Data⧵
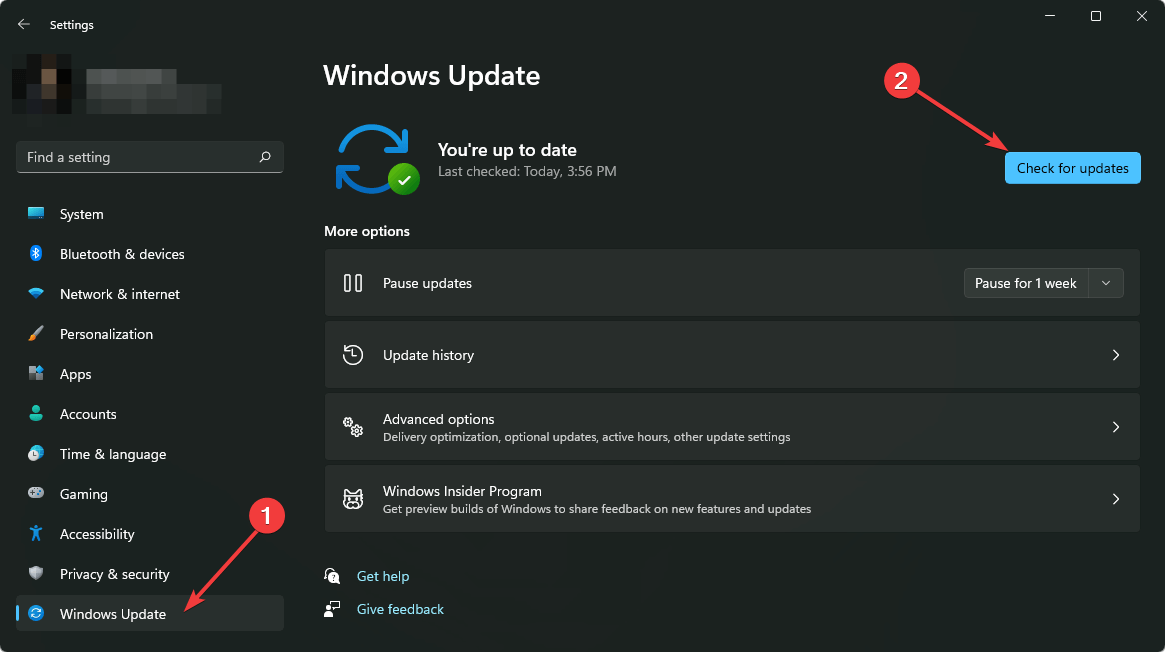
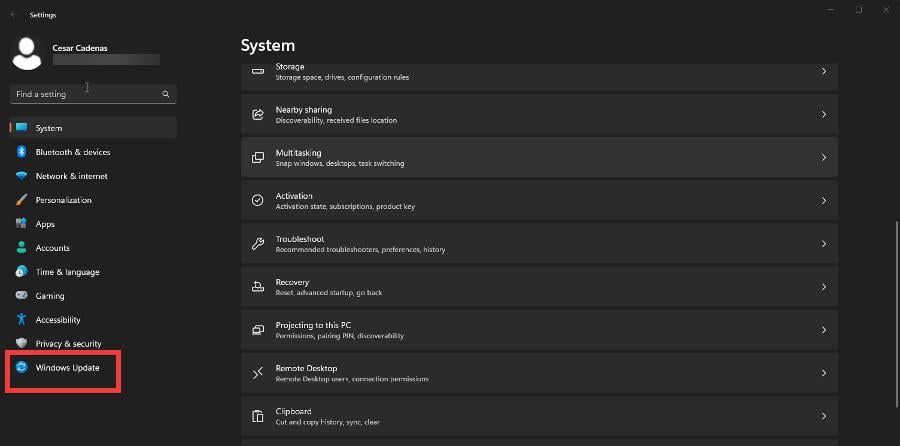
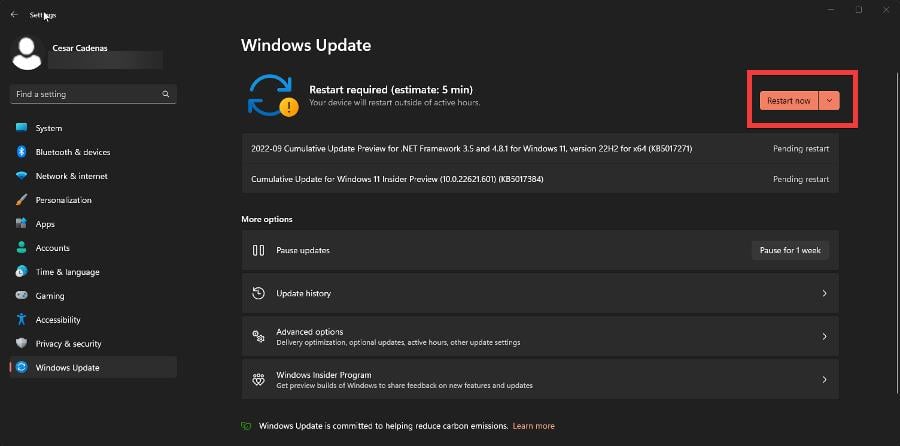
This was our list of fixing solutions for the Razer Synapse won’t uninstall issue. Also, as an extra option, we have to mention that you may check your Windows updates.
What can I do if Razer Synapse won’t uninstall on Windows 11?
You can try using a third-party tool.
Reboot your PC in safe mode and check if you can uninstall the tool.
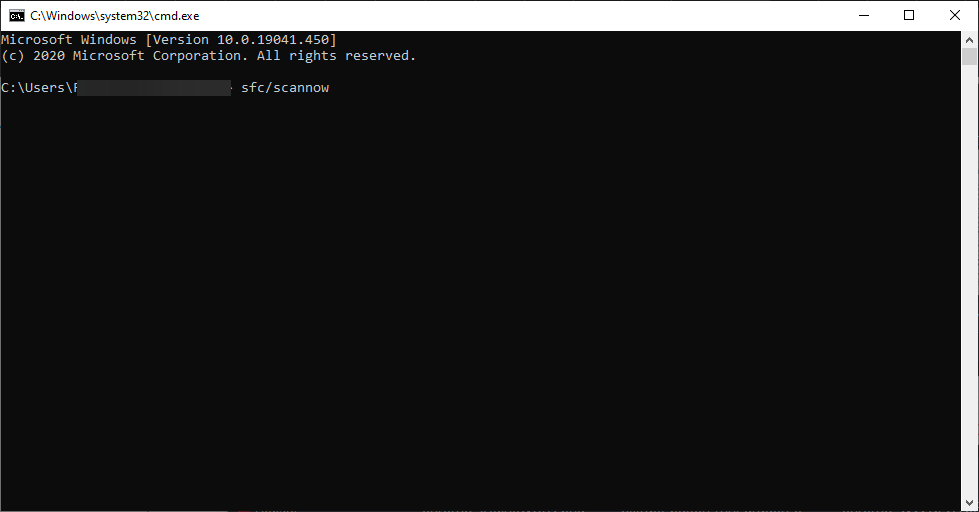
Run SFC Scan or DISM tool to fix corrupt or missing uninstallation-related files.
Reset your PC.
Perform a clean install of Windows 11.
Should you Uninstall Razer Synapse?
The simple answer is that if you use any Razer products, such as the laptop, mouse, keyboard, or headset, then you shouldn’t think about uninstalling the Razer Synapse tool from your PC.
You can use it to keep your products up to date and customize them as per your needs. Uninstalling will probably remove the control and customization option you could use with your Razer products.
Is there a Razer uninstall tool that I can use?
Yes, there are various tools that can be used to uninstall Razer Synapse on your PC. You can the built-in Windows installer to remove it completely.
Also, you can use a professional uninstaller like CCleaner to remove the software from your PC.
Also, we’d love to hear your opinion, so please don’t hesitate to contact us in the comments below and let us know which solution worked for you.
Many users reported that Minecraft is not using GPU, and this can cause various performance issues.
This is why many are eager to fix this issue, and in today’s guide, we’re going to show you the best ways to do that.
Why is my GPU not being used in Minecraft?
Incorrectly configured dual graphics cards usually cause this problem. If your dedicated graphics isn’t selected, you’ll encounter this issue. In addition, outdated drivers can also cause this issue.
Right-click the desktop and select NVIDIA Control Panel.
Select Manage 3D Settings on the left of the window.
Select the High-performance NVIDIA processor option on the Global Settings tab.
Click the Program Settings tab to select the NVIDIA GPU, more specifically for Minecraft.
Click the Add button.
Click Browse on the Add window.
Then open the Minecraft folder in the Add window.
Open Minecraft’s bin subfolder.
Select Javaw.exe in the bin folder.
Then click the Open option.
With the Javaw.exe path selected, click the Select the preferred graphics card for this program drop-down menu.
Select the High-performance NVIDIA processor option.
Press the Apply button.
Note: Users with NVIDIA laptops can also select a High-performance NVIDIA processor context menu option. Right-click Minecraft’s icon to open its context menu.
Then select the High-performance NVIDIA processor option on the Run with Graphics processor context menu submenu.
2. Select the AMD GPU
Right-click the desktop and select AMD Radeon Settings.
Then click the System tab.
Click the Switchable Graphics tab.
Select the Installed Profile Applications option to overview your installed software.
Click the Browse option to select Javaw.exe for Minecraft.
Click Javaw.exe to select the High-Performance option for the discrete GPU.
Quick Tip
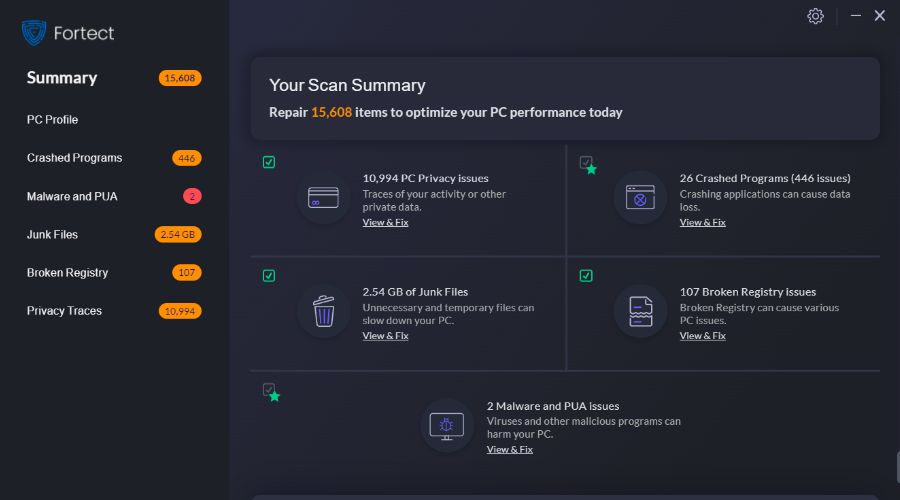
Before following the subsequent solutions, you should try updating your drivers first. Fortunately, Fortect Driver Updater is a dedicated software that provides you with a thorough scan of your PC and finds outdated drivers that can cause serious errors.
Your results appear in a pop-up summary and you can see your full list of drivers. From that, it searches its massive database for the latest versions of your old drivers and updates them promptly to boost your device’s health.
Fortect Driver Updater
Fast and easy tool with a simple UI that helps you update your device drivers right away.
How do I fix Minecraft not using GPU on Windows 11?
The above solutions also apply to Windows 11 PCs. Here are a few advanced solutions you can opt for if none of the above resolutions fix the problem.
Reinstall Minecraft.
Reinstall the graphics driver on your PC.
Reset your PC.
Check for Windows updates.
Why is Minecraft barely using CPU?
If Minecraft is not using enough CPU, verify that there’s no limit placed. Also, it could be a one-time problem, and restarting Minecraft might fix things.
If the problem continues, check that you have enough RAM installed since, in the absence of that, Minecraft wouldn’t run well and, in turn, not use the CPU.
Is Minecraft CPU or GPU intensive?
Well, the popular Minecraft game isn’t GPU intensive. However, having a better GPU won’t hurt much. Notably, Minecraft is more CPU intensive.
So, any PC with an integrated GPU will also run Minecraft perfectly fine. You may come across a few glitches here and there, but they are easily fixable.
How much RAM should I allocate to Minecraft?
Open the Minecraft launcher.
Click on the Installations tab.
Hover your mouse to the Minecraft version and click on the 3-dot icon.
Select Edit.
Click on More Options at the bottom of the screen.
Under the JVM Arguments field, you will see a command starting with -Xmx2G.
Replace the 2G in the text with 4G, which will allocate 4GB RAM to Minecraft.
So, that’s how you can configure Minecraft to utilize a discrete GPU instead of the integrated alternative. Then you’ll get better graphics performance for Minecraft when you play it.
Many users reported a different problem, and their main concern was high GPU usage in Minecraft, but we managed to fix that issue in another guide.
If Minecraft is still not using your GPU properly after trying all the steps, there may be other issues at play. For instance, multiplayer problems like Hamachi not working in Minecraft or Minecraft LAN not showing up can sometimes affect performance.
Suppose you get the Audio renderer error. Please restart your computer message while playing a YouTube video in your browser; then we might have the solution for you.
It seems like more and more Windows 10 users are reporting this error, and the odd thing is that it’s not specific to a particular web browser or a certain Windows version.
Many said this issue occurred because of an update, a BIOS bug, or after changing the audio device. If you’re in the same boat, let’s try to solve the problem with these handy suggestions.
The issue is usually triggered by a faulty connection or a corrupted driver. In this guide, we will give you solutions to resolve this problem.
Why do I keep getting the Audio Renderer error?
You will come across the audio renderer error because of the following reasons.
The audio driver is outdated.
The audio hardware is faulty.
There is a connection issue.
The installed version of the audio driver is buggy.
The sound settings aren’t compatible with your audio hardware.
Some important system-related files are missing or corrupt.
What is audio renderer?
The audio renderer occurs if there is a problem calibrating your software with the required drivers to render your audio.
This happens mostly when playing an audio or video from streaming sites on your browser.
Why is VoiceMeeter not working?
Voicemeeter is an Audio Mixer Application equipped with a Virtual Audio Device that can be used as Virtual I/O to mix and manage any audio sources from or to any audio devices or applications.
It is a freeware application that can be downloaded from the Internet and works flawlessly almost all the time. However, recently users reported getting an audio rendered error in VoiceMeeter as well due to some unknown reasons.
Audio issues usually occur due to faulty cables or peripherals, out-of-date drivers, or outdated operating systems. Thus we recommend you update your drivers and OS after following the solutions below that deal with connectivity issues.
How do I fix the Audio Renderer please restart the computer error?
1. Fix your audio driver with dedicated software
A faulty or outdated driver might cause the error. The simplest way to update your drivers is to use a tool instead of manually.
Outbyte Driver Updater is a very useful software that acts as a PC scanner. It tests your PC for drivers and finds if they are outdated, broken, or missing altogether.
Furthermore, the tool will provide you with the latest compatible driver for your particular hardware component straight from the manufacturer.
After you launch Outbyte Driver Updater, it will trigger a system-wide scan, and then you only have to choose which drivers to update or fix.
Outbyte Driver Updater also lets you create backups of all your drivers’ files, so in case anything happens, you will have a compressed zip file of all your drivers.
The software also has a download manager panel where you can see real-time progress reports on each driver file that is being downloaded.
Another worth-mentioning feature is the scheduled scans. You can set up the software to scan and fix your drivers regularly. This will almost eliminate the possibility of ever having a faulty driver again.
Outbyte Driver Updater
Enhance your device performance by keeping your drivers up-to-date with Outbyte Driver Updater.
As simple as it sounds, disconnecting and reconnecting your device, whatever it may be, can solve the short-term problem.
If you are using a pair of wired headphones, jack, or USB, then unplug them and plug them back in when you see the Audio renderer error. Then, please restart your computer message.
Many users confirm this solution, but remember that it’s only a temporary one. This also applies to restarting your PC. For a more long-lasting fix, check the other solutions below.
Two or more audio playback devices connected to your Windows 10 PC can also trigger the error.
In that case, disconnect the second device and keep only the main one connected, as this should solve the problem.
3. Run the Audio troubleshooter
Right-click on the Start icon and select Settings from the left side.
Go to Update & Security.
In the left side panel, choose Troubleshoot.
Click on Playing Audio and then on Run the troubleshooter.
Wait for the process to finish, and then restartyourPC.
4. Remove the Radeon software from your PC
Right-click on the Start button and select the Settings app.
Select the Apps option.
Scroll down, select your Radeon software, and then click on the Uninstall button.
For some users, this simple uninstall process made the problem go away. However, after fixing the problem, you can still go to the manufacturer’s website and download the app again.
5. Reset/Rollback/Update your audio device
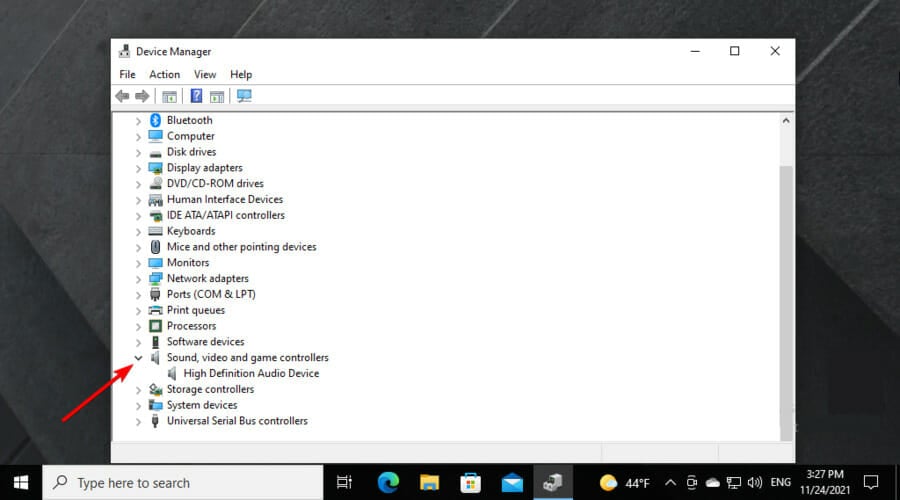
Open the Start menu, type Device Manager, and hit Enter.
In Device Manager, expand Audio inputs and outputs.
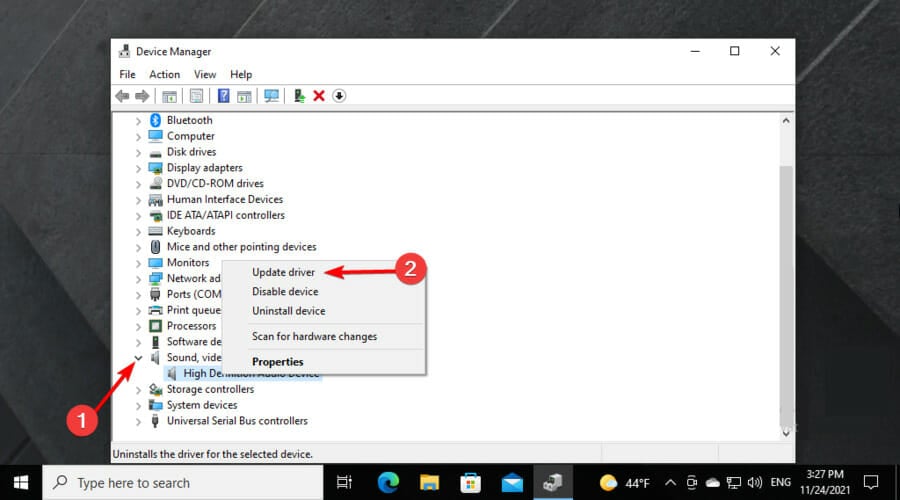
Right-click your audio device.
For resetting/restarting the driver:
Click on Disable device.
Wait a few seconds and then right-click it again, selecting Enable device.
To rollback your driver:
Click on Proprieties.
Go to the Driver tab.
You should see a Roll Back Driver button.
Click it and follow the on-screen instructions.
For updating the driver:
Click on Update driver.
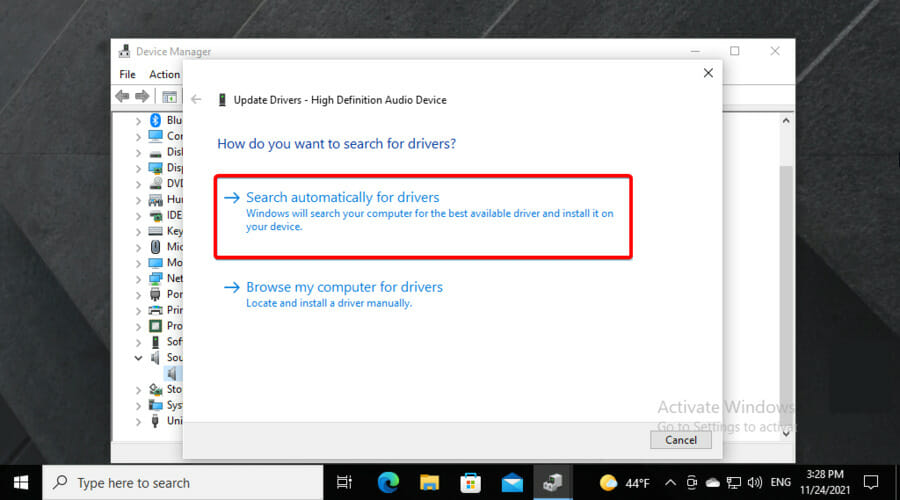
Click on Search automatically for updated driver software.
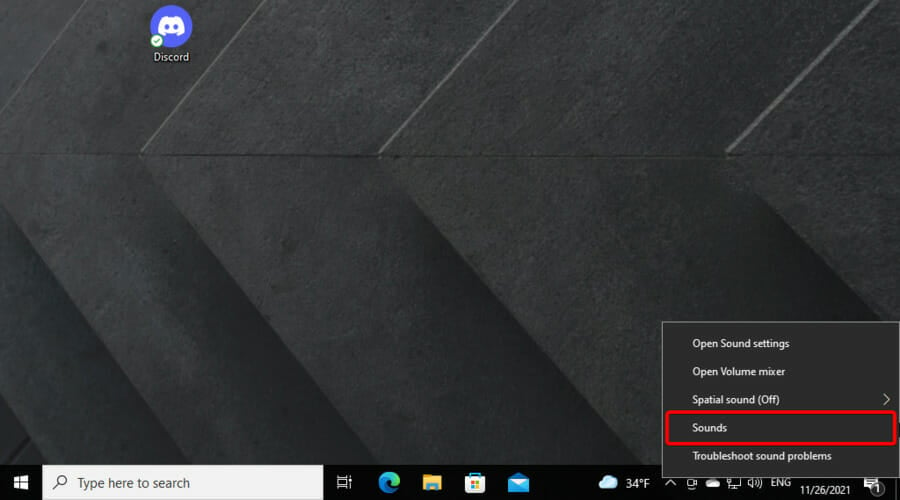
Right-click on the Speakers icon in the bottom-right of your screen, and then click on Sounds.
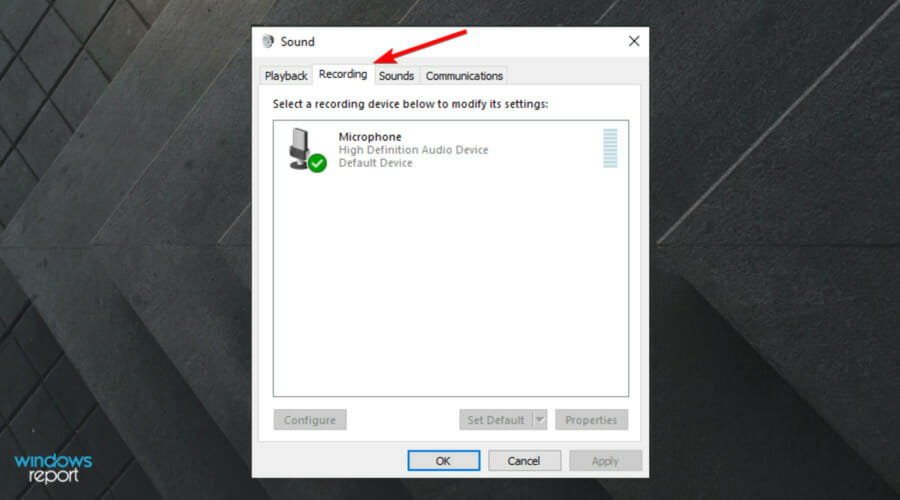
Go to the Playback tab, click on the desired audio device, and then on Properties.
Go to the Advanced tab, and under Default Format, choose your preferred sample rate.
Now, open your ASIO driver settings and go to the Audio tab.
Under Sample rate, set preferred sample rate.
Restart your PC.
7. Specific fix for Dell computers
The majority of Dell users confirmed that this solution works like a charm. Unfortunately, it seems like there’s a bug in the BIOS, and the only fix is to update the BIOS. You’ll have to thoroughly read the Dell support page and follow the steps.
Disclaimer: be aware that the process of updating BIOS is very precise and should be done exactly as described on Dell’s support page. Otherwise, you may render your system unusable.
How do I fix the audio renderer error on Windows 11?
Reconnect your device.
Reinstall the audio driver.
Run the troubleshooter.
Update the driver.
Reset the PC.
How do I restart my audio driver?
Open the Start menu.
Type Device Manager and open it.
Expand the Audio input and output devices section.
Right-click on your audio driver.
Select Disable device.
Click Yes in the follow-up prompts.
Right-click on the audio driver again.
Select Enable device.
That’s it. We hope that one of our solutions helped you get past the Audio Renderer Error. Please Restart Your Computer issue. If you have more questions, feel free to post them in the comments below.
Sheets is one of the foremost web apps for spreadsheets with which users can set up data tables.
Google Sheets users will sometimes need to swap multiple cells in rows and columns on their tables.
For example, a Sheets user might need to swamp all the cell values within column B with the numbers in column C.
That user could fall back on copying and pasting column cell ranges with the Ctrl + C and Ctrl + V hotkeys, but there are two better methods, and we will present them to you.
How do I swap cells in Google Sheets?
1. Drag and drop two columns/rows to switch them
1. Open the Google Sheets spreadsheet which contains the columns you want to swap in your browser. In our example, we will be using columns B and C.
2. Left-click the letter of column B. The cursor should turn into a hand.
3. Press and hold the left mouse button to drag column B over column C.
4. Then release the left mouse button. When you do that, you’ll have swamped the two columns’ cell values around as in the snapshot directly below.
5. You can swamp the cell contents of two adjacent rows in exactly the same way. Just double left-click a row number, hold the left mouse button, and drag it over another row to swamp it with.
You can quickly swap two cells in Google Sheets in a few clicks. All you need to do is drag and drop one column or row onto the other, and they will switch places.
2. Use Power Tools to switch two cells in Google Sheets
To add the Power Tools add-on to Sheets, open the download page for it in a browser.
Press the Install button on that page.
Select the Continue option to confirm.
Select your Google account.
Click the Allow option, and press the Done button.
Open an empty spreadsheet in Sheets.
Enter the dummy data 443 and 1233 in cells B2 and B3.
Next, input the numbers 533 and 643 in cells D3 and D4 as in the shot directly below.
Now click Add-ons > Power Tools to open the menu shown directly below.
Click Start to open the Power Tools sidebar.
Then left-click the very top of column B to select it.
Press and hold the Shift key and left-click column D. Then you’ll have selected both columns as in the image directly below.
Click the More (…) button at the top right of Power Tools.
Select the Flip adjacent cells, rows, and columns option.
Then select the Flip entire columns option to swap the cells in the non-adjacent columns around.
Alternatively, select the Flip cells horizontally option to obtain the same result. That option is more flexible as you can swap a smaller range of selected cells in one column with those in another.
To swap non-adjacent rows in a Sheets spreadsheet, select the rows to swamp around and click the Flip entire rows option in Power Tools. Or you could select the Flip entire rows option instead.
That’s how you can swap cells in rows and columns around in Sheets without copying and pasting. You can swap cells in columns and rows more quickly with the drag-and-drop method and Power Tools.
Write down in the comments section below any questions you have about the process of swapping two or more cells in Google Sheets.
The em dash (—) is a long dash punctuation mark that can be added to set off non-essential sentence clauses. However, the long hyphen symbol is not widely utilized.
Consequently, em dash keys are widely omitted from standard QWERTY keyboards.
So, some users might wonder how to add long hyphens to Google Docs documents. Read on to find out what are your options.
There are numerous ways you can add long hyphens to documents. Here are six alternative methods for entering the em dash in Google Docs.
How can I use an em dash in Google Docs?
1. Manually insert the long dash in Google Docs
1. Open a Google Docs document.
2. Select the place in the document in which you need to add the em dash to.
3. Click Insert > Special Characters to open the window in the shot directly below.
4. Inputem dash in the Search by keyword box.
5. Then click on the result to add it the symbol to the document.
Whenever you’re editing a Google Doc file, you can add an em dash with just a few clicks. All you need to do is open your file, and then insert the symbol via Special Characters.
2. Add the em dash to Docs’ automatic substitutions
First, copy a long hyphen mark in a Google Docs document with the Ctrl + C hotkey.
Click Insert > Preferences.
Click the Substitutions tab.
Enter a couple of hyphens (–) in an empty Replace box.
Then select the adjacent With box, and press the Ctrl + V hotkey to paste in the long hyphen.
Click the OK option. Now entering two hyphen marks and pressing Space in a Docs document will add a long hyphen to it.
3. Copy the long hyphen with Windows 10’s Character Map
To copy an em dash from the Character Map in Windows 10, press the Windows key + S keyboard shortcut.
Type Character Map into the search box.
Click Character Map to open its window.
Select the Advanced view checkbox.
Enter em dash in the search for box, and click the Search button.
Click the Select option.
Press the Copy button.
Now press the Ctrl + V hotkey to paste the long dash into Google Docs documents.
4. Desktop Chrome: Insert / Find & Replace
To replace text in a Docs document with the long dash, press the Ctrl + H hotkey in Google Docs.
Next, type in some text within the document in the Find box.
Copy an em dash with the Ctrl + C hotkey.
Then click in the Replace box, and press the Ctrl + V keyboard key.
Thereafter, you can click the Replace or Replace All buttons to replace the text entered within the Find box with long dashes.
MacOS users don’t need to select em dash in Google Docs. Instead, press the Shift + Option + Minus hotkey for the symbol on the macOS keyboard.
Pressing the hyphen key twice and Space bar will also add a long dash to documents in macOS.
7. Android or iOS: Long-hold hyphen
You can add long dashes to documents with the on-screen keyboards on some Android and iOS mobiles.
To do that, tap and hold the hyphen key until your mobile’s on-screen keyboard displays alternative character options. Select the longest dash, which is the em dash.
These are the most efficient ways to add the long hyphen to documents in Google Docs and other word processors.
Users can utilize Google Docs’ Special Characters utility, but that tool isn’t essential for entering em dashes within the Docsword processor.
Let us know in the comments section below if you managed to make long dashes in your Google Doc files.
5GHz is a higher frequency network band some users prefer to set up mobile hotspots with. However, not all users can create 5GHz hotspots in Windows 11. However, some of our readers who tried to create 5GHz hotspots see an error that says, Network band isn’t available.
Why isn’t 5GHz hotspot available in Windows 11?
There are a number of reasons why your PC or laptop can’t see any 5GHz hotspots when accessing the Wi-Fi connection. Let’s go through some of them:
The Wi-Fi adapter doesn’t support 5GHz bands – There’s a chance that you have an old Wi-Fi adapter that is simply not compatible with the 802.11ac standard.
Your router doesn’t support 802.11ac – If your router doesn’t have the ability to open a 5GHz hotspot or is malfunctioning, your PC or any other device won’t see it.
The adapter settings are incorrect – If the adapter is set to connect preferentially to the 2.4GHz band, it will ignore the 5GHz band or your 5G WiFi will keep dropping.
Now that we know where the problems may come from, let’s see how you can make sure that your PC or laptop supports the 5GHz band.
How can I check if my PC supports the 5GHz band?
Your PC’s network card (and router) must support the 5GHz band for you to create a 5GHz hotspot. So, check that your PC supports 5GHz like this before applying the resolutions below.
Press the Windows key + S, type cmd in the search text box, and click on Command Prompt.
Type the following command and press Enter: netsh wlan show drivers
Scroll down to the Radio types supported details in the Command Prompt and look for 802.11ac or 802.11ax.
If the supported radio type info includes 802.11ac (or 802.11ax), then your PC supports both 5GHz and 2.4GHz. Your PC’s network adapter doesn’t support 5GHz if you can only see 802.11b and 802.11g for supported radio types.
You should now be clear on whether or your PC supports 5GHz. If it doesn’t, you’ll need to upgrade your PC’s network adapter to one that does.
How can I fix the 5GHz hotspot not available error in Windows 11?
Before going forward with the troubleshooting, let’s go through some preliminary measures you can take to fix these problems:
Turn off your Wi-Fi, wait for a few seconds, then turn it back on.
Restart your device and check the Wi-Fi again.
Restart your router.
Verify if your router has 5GHz capability by consulting the device’s manual.
If the problem manifests on a laptop, make sure that it’s charged.
After you have checked all these prerequisites, let’s fix the problem by using the solutions below.
1. Run Windows 11’s network troubleshooter
First, open up Settings from Windows 11’s Start menu.
Then click Troubleshoot and Other trouble-shooters from the System tab in Settings.
Click the Network Adapter troubleshooter’s Run option.
Select the Wi-Fi network adapter in the troubleshooter. Or you can select the All network adapters option.
Right-click Start and select to open Device Manager.
Double-click the Network adapters section, right-click your Wi-Fi adapter to select Properties.
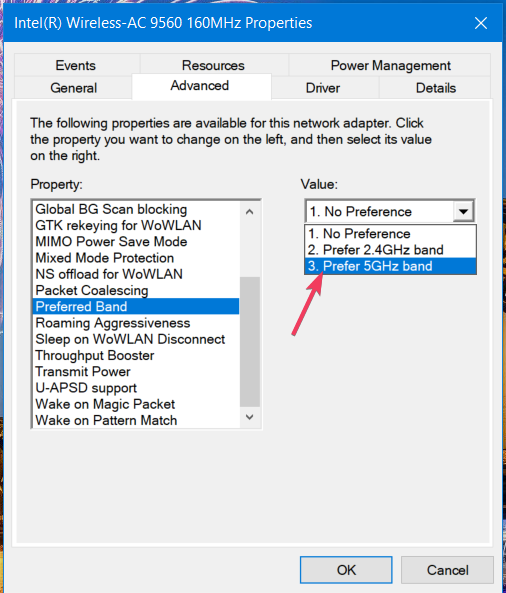
Select the Advanced tab, and click Preferred Band in the Property list.
Select the Prefer 5GHz band on the Value drop-down menu.
Also, select Enabled for the 802.11n option in the Property list. If you can’t see that setting, make sure 802.11n/ac Wireless Mode is set to 802.11 or 802.11ac.
3. Disable the Bluetooth, VPN, and virtual machine network adapters
Right-click the Start button and select Device Manager.
Expand the Network adapters section, right-click the Bluetooth Device to select Disabledevice.
Select Yes when prompted for confirmation to disable the device.
Repeat the previous two steps for any VPN or virtual machine (virtualization emulators) adapters listed.
Some of our readers said that after disabling other wireless adapters, they have been able to see the 5GHz connections in Wi-Fi.
That means some of the drivers were conflicting which lead to this problem. After disabling the devices, try to re-enable them until you see which one was causing this, and update the drivers for that component.
You can use an automatic tool, such as Outbyte Driver Updater, to scan your device for outdated drivers and immediately update them with the most recent version.
Outbyte Driver Updater
Try Outbyte Driver Updater for comprehensive scans and automatic updates to keep your PC healthy.
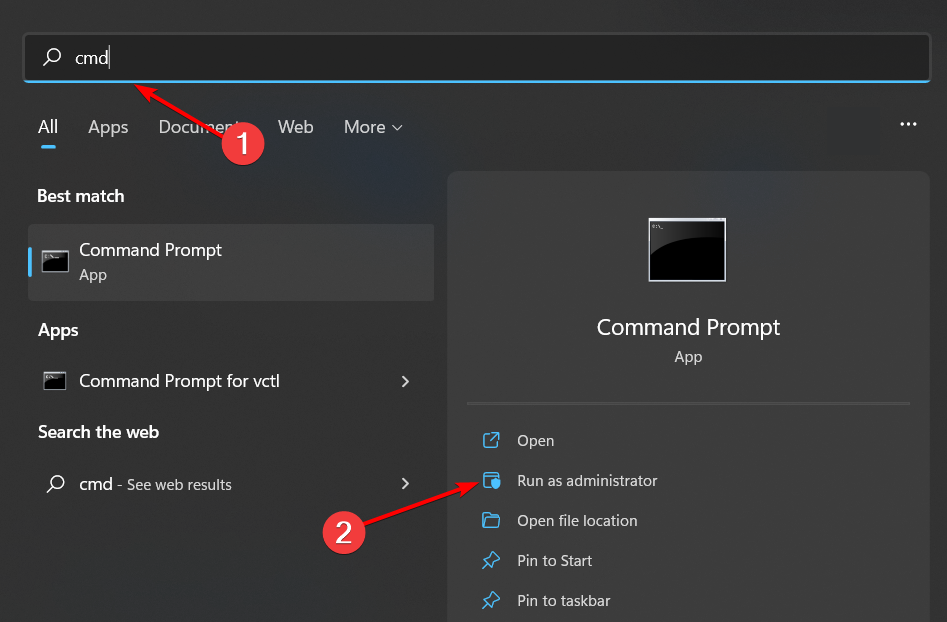
Click the Start button, type cmd, and select Run as administrator from the results.
Execute this ipconfig command: ipconfig /all
Note down the Default Gateway (IP address) number.
Open a web browser, input your router’s IP address into your browser’s URL bar, and pressReturn.
Log in to your router’s firmware. The firmware login details should be included in your router’s manual or other documents that came with it.
Look for and select an Enable 5GHz setting (or something similar) in the Wireless section of your router’s firmware. If you see a Band drop-down menu, select 5GHz on it.
Select Yes for and Enable Radio option if your router’s firmware includes it.
Click the Apply button to save your router’s new setting.
In most cases, users need to readjust some Wi-Fi adapter settings to get the 5GHz band working for mobile hotspots as outlined above. Failing that, try resetting your network adapter and updating its driver.
Also, note that there are numerous third-party Wi-Fi Hotspot apps you can set up mobile hotspots with beyond Settings. One of those apps might enable you to set up a 5GHz hotspot without issues.
Many reported that their Windows 11 hotspot is slow, and we tackled this issue in our latest guide, so don’t miss it.
There could be more ways to fix the network band isn’t available error for the 5GHz hotspot in Windows 11. Users who have resolved that issue with other fixes are welcome to share their solutions below.
HP is among the biggest printer brands for Windows 10&11. HP models are typically all-in-one printers with which users can print and scan. Printers such as the HP Deskjet 2130 and Envy 5540 are highly rated models.
Yet, HP printers can still have their occasional scanning hiccups. That’s especially the case for users who have just upgraded to Windows 10/11 from Win 7 or 8.1. Some users have stated on forums that their HP printers don’t scan after a platform upgrade.
Why can I print but not scan on my HP printer?
The issue with the HP printer not printing arises from malfunctioning drivers most of the time. To solve your HP printer, you might have to reinstall or upgrade the driver for the printer.
Alternatively, the problem might be caused by compatibility difficulties, or it could even be that your Windows Defender is blocking specific crucial files and programs.
Users reported the following related issues that will also be covered in the solutions below:
HP scanner not working but the printer is – By updating the printer drivers you will also update the scanner.
The HP printer won’t scan or copy – Follow our solutions below in order to check for compatibility issues and more.
HP smart scanning is currently unavailable please select home – Windows Defender Firewall sometimes blocks necessary processes as it renders them a potential risk.
The HP printer won’t scan to email – Running an SFC scan will also address the issue by fixing any broken system files.
HP printer won’t scan multiple pages – Resetting your printer is another workaround that proved to be helpful for other users.
HP smart scanning is currently unavailable windows 11
The HP printer will print but not scan windows 10
Without beating around the bush too much, let’s see what you can do in order to fix your HP printer and get back to work.
How do I fix the HP printer if it won’t scan?
1. Check Platform Compatibility
If your HP printer doesn’t scan after upgrading to Windows 10/11, check that it’s compatible with that platform.
To do that, open the HP Printers – Windows 10 Compatible Printers page in a browser. Then, expand an HP model series on that page to check if it includes your printer model. If the printer isn’t compatible with Win 10, you’ll need a new printer or a compatible platform.
Turning the printer off and back on can occasionally fix scanning and printing issues. That is known as power cycling, which can reinitialize a scanner’s configuration parameters.
Please turn off the printer and unplug its cable. Then plug the printer back in and turn it on about 10 to 20 minutes later.
Press Windows, then type control and open the top result.
Select Uninstall a program under Programs.
Select the HP Printer Software listed and choose Uninstall.
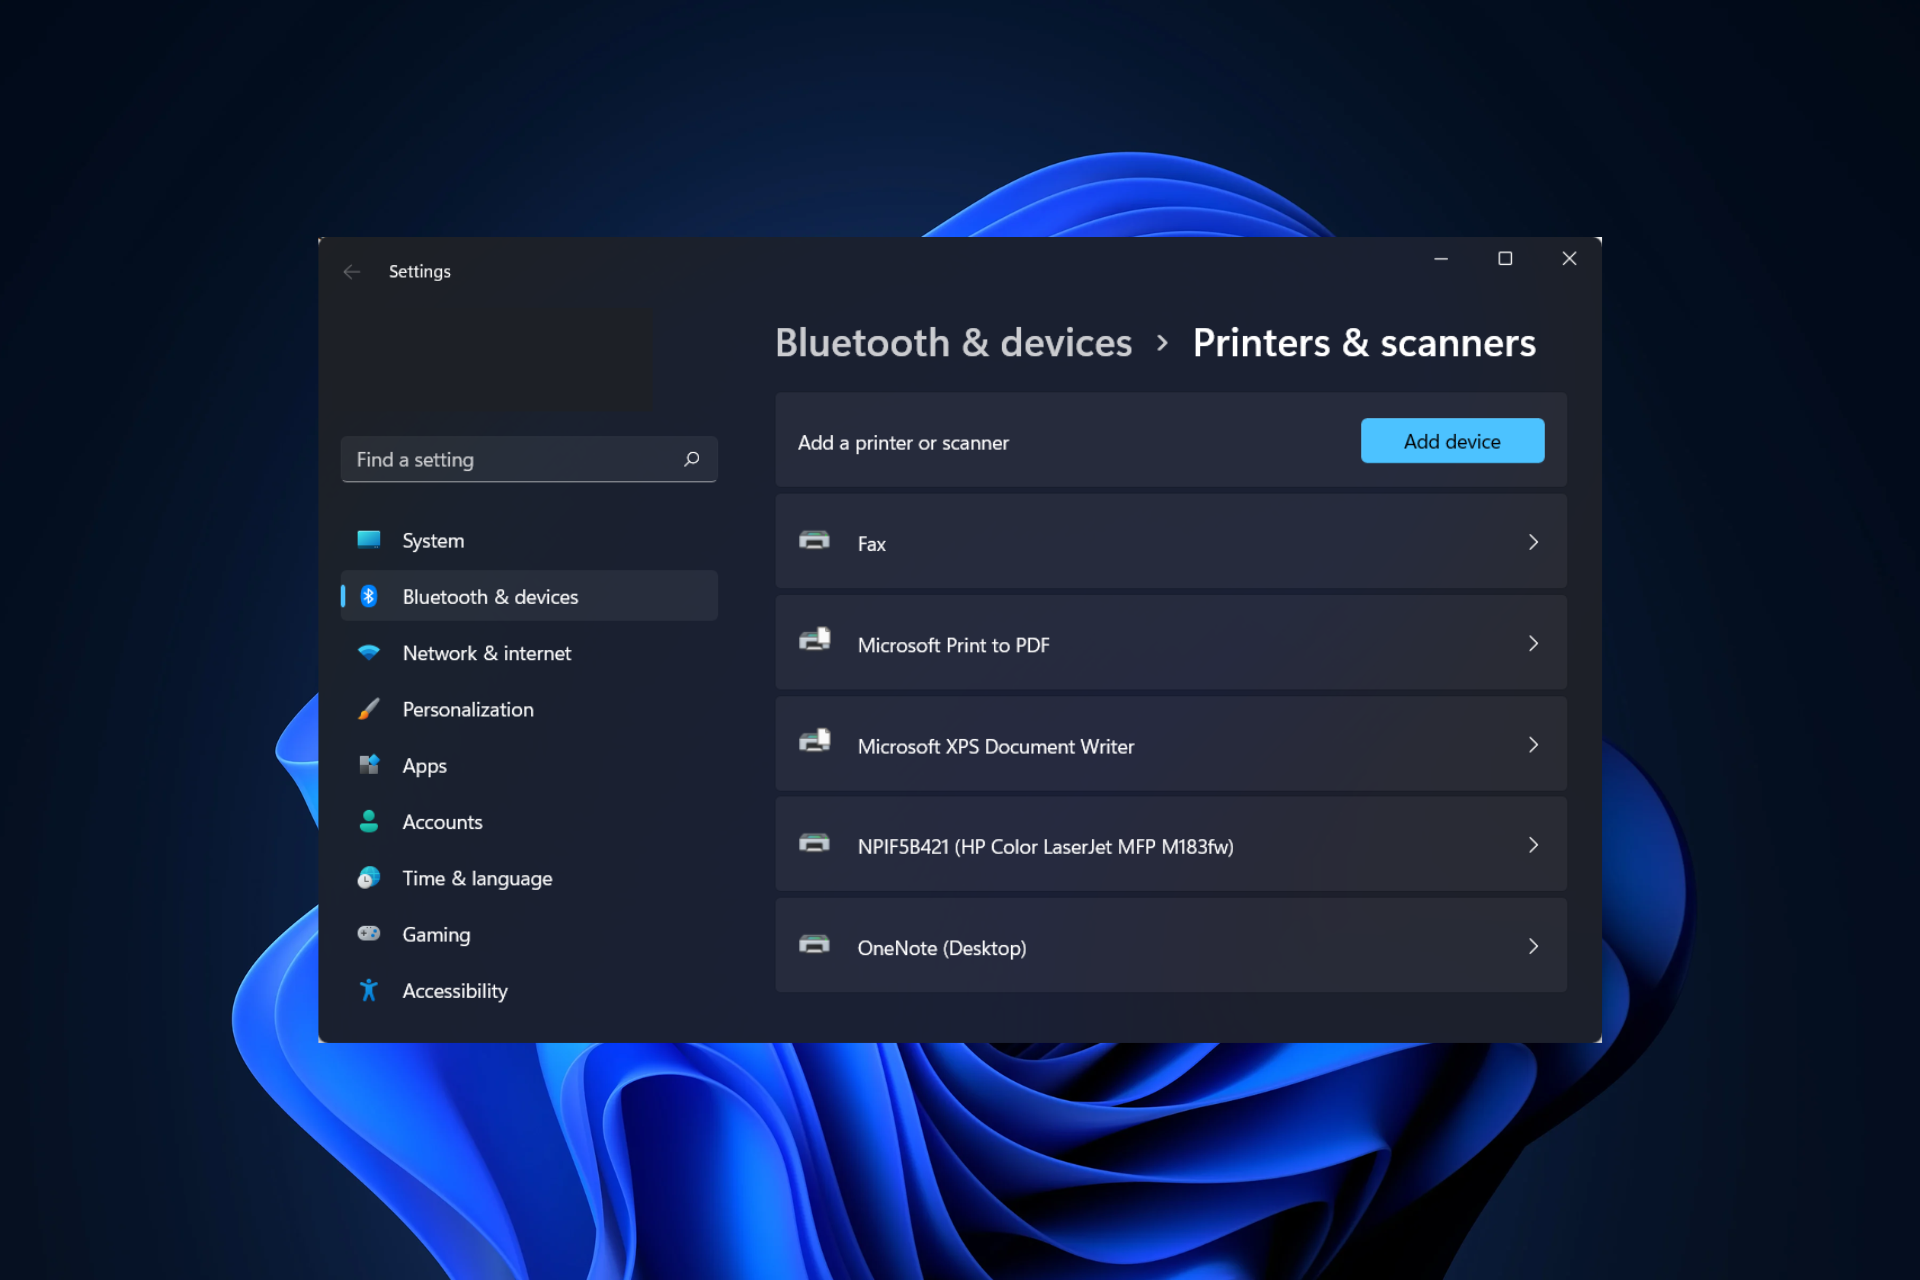
Next, press Windows, type printers & scanners, and open the top result.
Find your printer, then select the Remove button.
Open the HP printer support page and enter your model in the search box to find the appropriate drivers.
Select the latest driver in the list and download it for your Windows 10/11 PC.
Double-click the downloaded file to run it. That’s it! The HP printer won’t scan issue will be solved.
Reinstalling HP printer software is among the best resolutions for fixing HP printer scanning after upgrading to Windows 10/11. In addition, that will ensure users have the latest HP drivers for their models.
To be able to safely reinstall your HP printer software, no old files must remain on your PC. To do this, we recommend using CCleaner, a tool specialized in removing junk or leftovers from old uninstalled programs.
CCleaner finds and removes all associated files and roots of selected old programs, especially so that you can safely reinstall your HP printer software.
4. Open the HP Print and Scan Troubleshooter
Make sure the printer is on and connected to your laptop.
Click Start and select the printer that doesn’t scan.
After that, the troubleshooter will tell you if it detected and fixed any errors. For example, if it displays X icons, users might need to follow further guidelines the troubleshooter provides.
HP has Print and Scan Doctor software to fix printing and scanning for its printer models. So, that troubleshooter can fix numerous HP printer scanning errors.
5. Check that the Windows Image Acquisition Service is Enabled
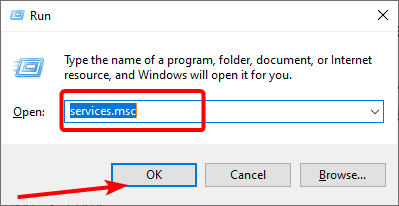
Press the Windows and R keys to launch Run, then type services.msc and press Enter.
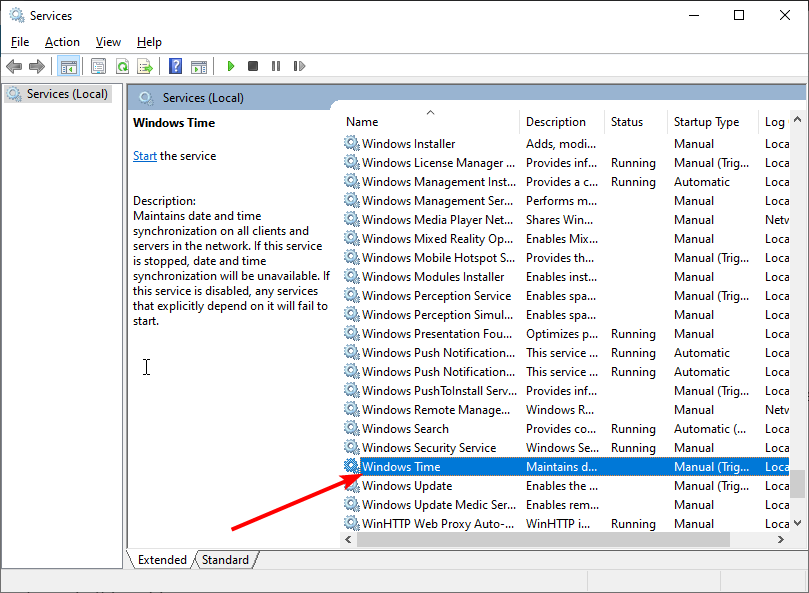
Double-click the Windows Image Acquisition service to open its properties.
Select Automatic on the Startup type drop-down menu if the WIA is disabled. Then make sure the Start button is clicked and tap OK to save the changes made.
Remote Procedure Call, DCOM, RPC Endpoint Mapper, and Shell Hardware Detection are some of the other more essential Windows services for scanning. Check that those services are also enabled, as outlined above.
The Windows Image Acquisition Service is among the more essential scanning services. Thus, some users might need to enable that service to fix their HP printers’ scanning.
6. Turn Off Windows Defender Firewall
Press the Windows key, input Windows Defender Firewall, and select the first result.
Click the Turn WindowsDefender Firewall on or off option from the left panel.
Select the radio button next to Turn off Windows Defender Firewall (not recommended) under the Private network settings section or the Public networks settings section if you use public Wi-Fi.
This resolution might fix HP printer scanning for users trying to utilize a network printer. However, the Windows Defender Firewall can block network printer ports and communications. Therefore, turning WDF off, and perhaps other third-party firewalls, might fix scanning for some users.
Third-party antivirus software can also include firewalls. So, it might also be worth temporarily disabling third-party antivirus software before scanning.
Most antivirus utilities include a disable or turn off button of some description on their system tray context menus—Right-click the utility’s system tray icon to select its turn-off or disable the setting.
7. Reset the HP Printer & Scanner to Factory Default Settings
Some HP printers include an option that resets them to their default factory settings, which might fix scanning issues.
How users can select that option varies from printer to printer. However, users can usually choose a Reset Factory Defaults option within the Setup or Tools menus on the printers’ control panels. Check the printer’s manual for details on resetting it to its factory default.
8. Run a System File Checker Scan
Press Windows, enter cmd, and open the top result as an administrator account.
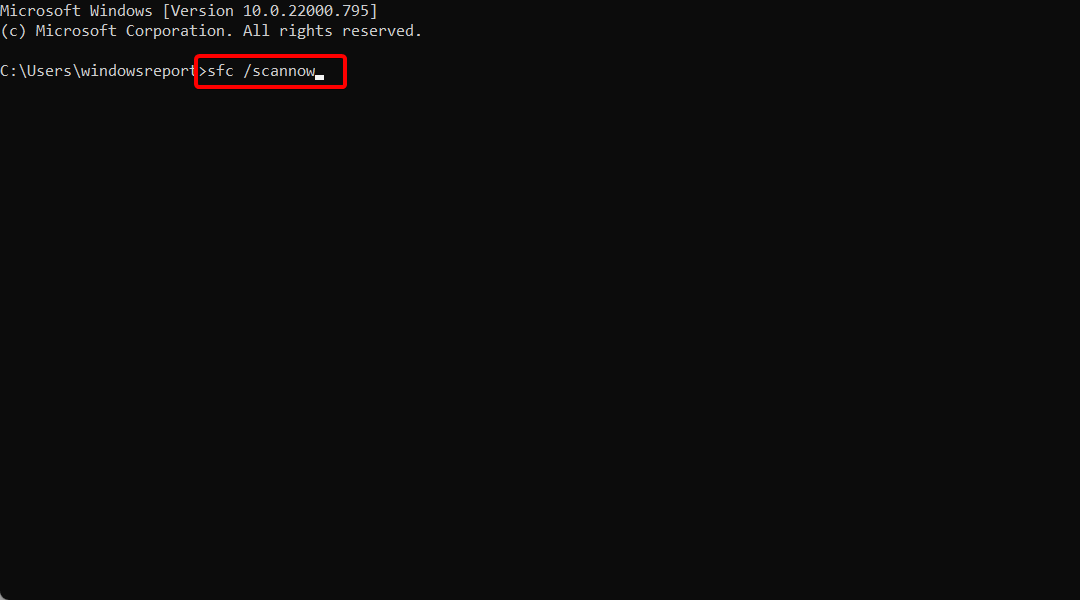
Paste or type the following command and press Enter: sfc /scannow
Corrupted system files can also be another factor behind scanning errors. Users can run a System File Checker scan to check for, and repair corrupted files and integrity violations.
For a more thorough file integrity scan, you should use a specialized repair tool. This kind of software finds any corrupted system files, missing DLL, and broken registries and repairs them automatically for you.
How can I fix the HP printer if it won’t scan on Windows 11?
The solutions above are all compatible with Windows 10 and Windows 11. Therefore, to resolve the HP printer won’t scan issue in Windows 11, carry out the actions outlined above.
However, users can also submit a support case at the HP Customer Support website if more fixes are required.
How do I enable my HP printer to scan?
Open the HP Printer Assistant that comes with your printer.
Navigate to the Scan section, select Manage Scan to Computer, and click Enable.
If you work from home or in a tiny office and need to print many documents or are getting ready to give an important presentation to your superiors, investing in a high-quality printer will help you speed up your tasks.
Adobe InDesign is a complex software solution that many users rely on to create posters, brochures, newspapers, ebooks, and other such materials.
The software generates its own file format – INDD. If you want to open such files with other apps, make sure that they are compatible or easily convertible.
Whether you alternatively work with InDesign and additional software or you don’t use the software at all, but need to open INDD files, you need to pick a good tool that is compatible with this format.
Even though publishing software follows similar patterns and provides similar tools, some won’t open certain formats, or convert them in such ways that you lose a lot of quality and need to work two times as hard to recover them.
Well, we got you covered. In this article, we’re going to list some of the best tools that you can use to open and edit InDesign files on your Windows 10 computer. Here’s what we’ve found:
Adobe InDesign – Layout adjustment
Canva – Photo straightener
Adobe InCopy – Swift hyperlink creation
Affinity Publisher – In-depth video tutorials
QuarkXpress – QR code generator
Stellar Data Recovery – RAID recovery
Quick tip
Adobe InDesign is basically the official tool, designed to create, format, and open INDD files. It is cross-compatible with both Windows and macOS computers.
Moreover, it is widely regarded as the ultimate tool if you need to open an InDesign file without using InDesign. And it has the largest user base, compared to others, so make sure to check it out, if you can.
Adobe InDesign
Get your hands on an excellent software that can help you create professional promotional materials!
Canva is an online graphic design platform that is very popular among social media and online marketing professionals. With its drag-and-drop feature, it is easy and intuitive to use.
You can create designs from scratch or use a big variety of templates for different types of designs such as infographics, calendars, book covers, banners, and social media posts.
While Canva doesn’t support .indd files yet, you can still find a way around it. If you convert your .indd files into pdf files you’ll be able to upload and edit them with Canva’s drag-and-drop tools.
This tool lets you edit all elements in PDF documents. You can change the font, add annotations, change placements, and insert other objects, all in a very intuitive manner.
Canva has both a premium and free option. The free version has a decent amount of features and you can use it to get familiarized with the designing experience. The pro version can be paid either yearly or monthly.
Key features of Canva include:
Text animations
Can create a team to work together on a design
Wide range of photo effects and filters
Thousands of icons and other elements to enhance your design
Pre-made templates
Photo straightener
Canva is a powerful and inspiring image manipulation tool suited both for advanced and novice users.
Canva
Convert and edit InDesign files with easy drag-and-drop tools and implement them within appealing templates.
Adobe InCopy is another reliable software that opens InDesign files. Just like InDesign, InCopy is also developed by Adobe Systems, as one of the tools under Adobe Creative Cloud.
And it runs in sync with Adobe InDesign to create and open an INDD file without InDesign. The software is supported on both Windows and macOS.
Adobe InCopy, though a traditional word processor, is flexibly designed to work in sync with InDesign to create interactive and beautiful print works and digital documents like ebooks, posters, flyers, and so on.
It is a perfect collaboration tool, which provides an avenue for designers and writers to work together on InDesign projects.
Basically, in the execution of such projects, graphic designers or creative artists handle the layout design, while content creators or writers work on the write-ups (written content).
InCopy stands out as one of the best software that opens InDesign files. However, it cannot create INDD as a standalone tool, unless it integrates with InDesign.
Besides INDD, it also offers extended support for PDF files. Not only can you open them, but you can also see the comments within them and add your own. This makes it a great collaboration tool.
Nevertheless, it remains one of the most reliable software that opens InDesign files. Adobe InCopy is offered a subscription plan that charges monthly.
Notable features of Adobe InCopy include:
Color swatches and templates
Spell check
Extensions/plugins (Adobe Exchange),
Multi-format support (INDD, ICST, PSET, etc.)
Swift hyperlink creation
Adobe InCopy
Trust Adobe InCopy if you want to benefit from various tools to help you make outstanding prints!
Affinity Publisher is a multi-purpose publishing tool with specific features for different physical and digital publications such as books, scientific projects, social media templates, and website mock-ups.
The software can import InDesign files if you save them in IDML (InDesign Markup Language) format. Affinity Publisher allows you to work on your IDML files without much restriction. You can edit text styles, work with bleed settings, add page numbering, and more.
Affinity provides multiple text editing features that let you place your text pretty much however you want, with many modern styles available. You can add lines and borders, add drop capitals to paragraphs, make your titles and headings stand out with artistic effects, and place text on a path.
In terms of graphics, the software allows you to import pretty much any image file type. Placing them is easy and not restrictive as it is the case with other publishing tools.
Affinity also offers some photo editing tools that let you adjust your picture to perfectly flow with the rest of the template. It also has advanced pen and node tools, bitmap fills, boolean operations, and layer effects.
Other key features of Affinity Publisher include:
Pan and zoom at 60 fps
Works with multiple publications simultaneously
Provides presets and lets you save your own
Offers in-depth video tutorials
Affinity is a licensed base product that provides constant free updates. It is available in multiple languages and works both on Windows and macOS.
QuarkXpress is one of the most popular computer software that opens InDesign files.
The software is an advanced publishing program for creating and opening digital documents like flyers, ebooks, newspapers, and so on.
It is widely seen as a reliable alternative to Adobe InDesign, and it hosts cross-platform support for both Windows and macOS.
QuarkXpress runs on the WYSIWYG – What You See Is What You Get – (lossless output) user interface, which presents you with accurate representations of your outputs.
Aptly put, QuarkXpress displays results in prints, with an akin reflection of what appears on the screen (no quality loss).
This feature makes QuarkXpress an excellent digital-print conversion tool, which is one of the most demanding aspects of graphics designing.
In addition, the tool also offers text alignment, custom color management, multilingual support (up to 35 languages), print scaling (10x reduction and enlargement), and many more.
Other keyfeatures of QuarkXpress include:
QR code generator
Font search
Filter and highlighting
MS Word import
PDF native support
Lossless zooming (up to 80x)
One of the most significant downsides of QuarkXpress is its pricing. The software is a little expensive, compared to other top software that opens InDesign files. However, you can try it for free for 7 days and see if you are happy with what it offers.
Stellar Data Recovery is more of a recovery and repair tool than an InDesign software. While it cannot create INDD file extensions, it can be used to open an InDesign file.
This is especially important if there is any form of corruption or file damage. Stellar Data Recovery is compatible with Windows, macOS, and iOS (mobile).
This tool is an all-inclusive solution, with support for several file formats, including INDD. It is especially useful in the event of damage or corruption to InDesign files.
In such cases, Stellar facilitates the repair and subsequent recovery. Stellar can repair various aspects of an InDesign file, notably INDD layers, cross-references, hyperlinks, images, and many more.
Essentially, you can employ Stellar to open InDesign files, whether corrupted or otherwise.
However, it should be noted that Stellar Phoenix is not a conventional InDesign tool, and so cannot be used to create or edit INDD file extensions, under whatever circumstance.
Other key features and functions of Stellar include:
In this article, we have outlined four of the most reliable software that you can use in order to open an InDesign file.
So, if you are a digital publisher, creative artist, or graphic design expert, the above tools are the recommended software for opening/reading InDesign (INDD) files on your PC.
Checks are used to make various types of transactions. The check payor has to carefully fill in the correct information regarding the identity of the check bearer, the sum of money paid, and many more.
Writing and filling checks can get overwhelming if you are a person who deals with lots of such financial instruments. A check design software can help you save time and also ensure that you don’t make any mistakes in the process.
Usually, you can use a word processor to create checks, but the truth is that check-writing software shortens the whole process a great deal and it can also help keep track of your checks.
Some of the tools that are available on the market also include useful business accounting features, so they’re really worth checking out.
We gathered some of the best check-writing software that you can currently find on the market, and we’re listing their main features and functionalities in order to help you with your final decision.
The easiest way of keeping track of your written checks is by using specialized tools. This kind of program can help you with graphic design that can create logos, checks, flyers, and many others.
It can accept business payments, manage and pay bills, and payroll functions. It can also offer print options and can allow you to see real-time transactions.
Furthermore, you can customize your checks with various fonts, logos, and fonts to create professionally-looking checks.
When it comes to managing your bookings, be it your home finances or that of a company, few services manage to offer the sheer amount of tools that QuickBooks delivers.
This accounting software is one of the best in the world of its kind for small-to-medium businesses, offering on-premises accounting applications along with cloud-based versions.
These are all capable of accepting business payments, managing and paying bills, and payroll functions.
That being said, something as simple as creating and writing checks is second nature to this program, allowing you to create designs however you want.
This tool is also accessible, as you can install it on your mobile device. The data is safely stored in the cloud, so you have real-time sync across all your devices.
Here are some of the perks of using QuickBooks:
Use it to separate business and personal expenses
It comes with automatic mileage tracking
On-the-go invoice creation
Automatic quarterly tax calculations.
Quickbooks is a paid service, but it provides a 30-day free trial.
QuickBooks
Manage your earnings and create invoices, checks, and other financial statements with the help of this versatile software service.
If you can’t find the ideal finance and investment solution, you’re in luck. Quicken is created for anybody who needs to better manage their money.
Before we start, you should know that 20+ millions of people chose this financial manager to track and save their money in an intuitive way.
So, you can use this solution to make more informed decisions and monitor your net worth over time, so you can efficiently organize your spending and bills.
With its smart money management dashboard, you can see every expense you need to pay and classify it into categories to improve your financial freedom.
Besides this, you have built-in calculators that you can use for future investments or taxes. In this way, you will manage your income responsibly without spending on useless things.
Last but not least, it’s likely to improve your personal finance situation and project favorable scenarios regarding your net worth, future spending, or even retirement.
Here are some more of the main features of Quicken:
Budgeting tools
Bill tracker and statistics
Bank-grade protection
Small business check writing
Customer chat support
Investment tracking
Quicken
Stop guessing your budget with Excel reports and better manage your money now.
Checkeeper is a straightforward app that can help you print checks on your own check-stock or on blank paper thanks to its online check printing software.
Besides this, it can automate the mailing of payments to vendors including refunds and rebates with its check mailing services.
You can pick from a professional check template and print directly to a totally blank paper with no check stock required.
Checkeeper has a drag-and-drop template editor that allows you to add logos, edit fonts and sizes, embed images, and also print signatures.
It has strong search tools and registry reports to successfully keep your books looking as current and professional as possible.
Other key features include:
Bank-lever security
Integrations with QuickBooks, FreshBooks, Xero, and Harvest
VersaCheck X1 Gold is software that has been designed for basic check writing and minor bookkeeping.
You will be able to use this software in order to create personalized checks with various fonts, logos, and shapes as well.
VersaCheck allows you to print checks on any type of paper and into the format of your choice.
The software can add the Magnetic Ink Character Recognition line at the checks’ bottom.
Banks usually use MICR to verify check data electronically, and if there’s no such a line on your checks, they will have to confirm that particular data manually.
You can also send or receive checks online or via phone, email, and fax.
Some new handy features include INKcrypt Counterfeit-Proof Safeguards and UV invisible Ink Tag Security.
Using this tool, you will be able to protect your accounts and receive activity alerts. You can see real-time transactions and other types of activities.
VersaCheck supports multiple accounts and covers a large number of banks. You can manage all your finances and all of your accounts from one place, using just one tool.
Let’s quickly go through its key features:
Copy and scan features
Compact and lightweight
Check paper included in the package
The software is compatible with Laser and Inkjet printers.
GnuCash is a competent tool for personal and small business accounting and most users with a few financial management basics will definitely get the most out of this freeware.
After you download the software, there will be a setup assistant program that will guide you through setting up online banking.
The program’s interface is effortless to understand and use and it presents itself in a familiar way, especially for users who are accustomed to performing online banking.
The software’s functions are listed in a tree along the left side, and you will see their checking accounts, stocks, and more investment forms.
At the top of the screen, you will see commands for reports, actions, and tools.
It’s quite simple to view the spending reports, reconcile checking accounts, and others.
You will be able to print checks on standard check stock, and the graphical interface will help you develop your check layout.
The program is quite simple, but it may not seem the ideal choice for beginners due to the vast amount of terms and actions that may require a dictionary.
On the other hand, GnuCash comes with a great tutorial that outlines the program but also the financial terminology.
Novice users will totally appreciate this wizard that walks you through the whole setup process.
Other key features of GNU Cash include:
Double entry accounting
Scheduled transactions
Invoicing support
QIF and OFX import
If you are overwhelmed by the massive number of personal accounts that you are trying to manage or if you are struggling to keep your small business on track financially speaking, this may just be the perfect solution for you.
Checksoft Home is a tool designed to offer users assistance in financial management. The software can support more accounts at the same time while sorting all data.
The software comes with a hundred check specimens built into its database, so you will have a lot to choose from. All you have to do is to select one of them and then enter the account data to start using it.
You can also create brand-specific checks with fully customizable background images, logos and graphics included. Checksoft provides over 1 thousand options to choose from.
There is also a quick print option available if you need one. You can either print check forms to fill out by hand or digitally filled checks.
The software comes with a few settings that allow administration or control for all your accounts.
Checksoft Home also includes more options such as financial transaction checks and client and supplier organization.
The dashboard displays all the transactions that have been operated by the user, and they are linked to detailed reports which are saved in the program’s archives
You will also get the chance to sort the data and organize it however you want to make the follow-up much more manageable.
Other key features of Checksoft include:
Real-time balance updates
Reconciliation wizard
Payment scheduler
Integrates with Quicken, QuickBooks, and Bookkeeper
The software generates printable financial reports which can also be modified if needed. Its intuitive interface makes it effortless to use even for people who are not extremely advanced.
Goldenseal Check Writing Software is another handy tool that prints checks, balances checkbooks, and reconciles checking accounts.
Goldenseal Check Writing Software lets you enter an unlimited number of checking accounts. Moreover, for each account, you can add as many separate checkbooks as you need. On the same note, there are multiple checkbook software for more financial security.
If you work with many checks, this software may save you a lot of time because it can automate the check-filling process. The Pay Bills and Write Payroll commands, as well as the Deposit Funds command, will fill out most of the information for you.
However, if you prefer to write and fill your checks manually, you can absolutely do that as well.
Goldenseal has an Instant payment feature that will create an item when you pay by check, cash, or credit card, so you won’t be required to enter two transactions.
This software also prints checks on any pre-printed check forms and the blanks support the most common layouts.
You will get the chance to use the Custom layouts command in order to change the forms however you like.
Other key features include:
Transactions for credit cards, savings, escrow, cash, and loan accounts included
Goldenseal prints paychecks and it allows the process on various check blanks
Register view reports
If you print a large number of checks, it’s recommended that you use the software to print your own MICR checks with info on the bottom of the checks.
On the other hand, for smaller quantities of checks, you can use the economical pre-printed ones.
Yes, you can actually print a check using your PC by using normal paper to get your check done. Even so, you should consider other aspects to make your check eligible.
It’s nothing complicated, as you only need to add the current date, bank information, and the beneficiary as well on your check.
Here’s where our list of the best check-writing software comes to an end. No matter which tool you decide to get, you will find it packed with lots of handy features besides the check printing ones.
All of the entries listed above are also useful if you’re interested in the following:
Free check writing software
All entries on this list have some form of free subscription model attributed to them
Online check writing software
Many of the entries on this list have an online component or are web apps.
Let us know which one convinced you to seal the deal in the comments section below. Tell us what functionalities and your overall experience with these products.
Microsoft CEO, Satya Nadella, already confirmed that “Microsoft loves Linux“. The company introduced some benefits for Linux developers using Windows 10.
Developers are now able to install the Linux Bash shell on their computers and work on their Linux projects in Microsoft’s environment.
What is Linux Bash?
In case you’re not familiar with the Bash shell, it’s a simple command line tool, that has been used by Linux developers for a long time.
Bash runs on Windows 10 natively, as a part of the Windows Subsystem for Linux. That means you don’t need any emulators or third-party applications to run it.
However, even though the Linux Bash is fully compatible with Windows 10, it is not ‘visible’ by default, as users need to enable it first.
So, if you’re interested in running Linux commands on your Windows 10 machine, we’ve prepared this guide to show you how to install the Linux Bash on your Windows 10 computer.
How can I install Linux Bash on Windows 10?
The easiest way to install Linux Bash on Windows 10 is with Command Prompt. You’ll need to run the latest version of x64 Windows 10.
Before anything else, prepare your PC for Linux Bash install, and then download and install it through cmd.
As we already mentioned above, you need to run at least Windows 10 version 1607 to be able to run Bash on your computer, because previous versions of Windows 10 are not compatible with this tool.
Secondly, you need to run a x64 system, as the Linux Bash doesn’t work on x32 versions of Windows 10.
If you can meet all these prerequisites, you can now freely install the Linux Bash on your Windows 10 computer. But before you actually install Bash on your computer, you need to prepare it. And here’s how to do that:
1. Press the Windows + I keys on your keyboard to open the Windows 10 Settings app.
4. On the message box, click Yes to turn on developer mode.
5. Restart your computer.
6. Once your computer reboots, open Control Panel.
7. Click onPrograms > Turn Windows features on or off.
8. Check the Windows Subsystem for Linux (Beta) option, and click OK.
9. Once the components are installed on your computer, restart it once again, to complete the process.
10. Once you’ve prepared your computer for the Linux Bash, you can finally enable this feature.
To start off, click on the Start button, do a search forbash.exe, and then pressEnter.
11. In the command prompt, type y and press Enter. This command will automatically download and install Bash from the Windows Store.
12. After that, you need to create a new defaultUNIX user account. This account doesn’t have to be the same as your Windows account.
Enter the username in the required field and press Enter. You can’t use the username “admin”.
13. Close thebash.exe command prompt.
14. Once you’ve done all this, Bash will be installed on your computer, and you’ll be able to run it from the Start Menu, or Desktop, just like any other app.
We must tell you that you won’t be able to perform all actions and access all features of Bash for Windows 10. Unlike the original Bash for Linux, the Windows Subsystem for Linux can’t run graphical apps. Developers can only use it as a text-based tool.
This is not the final version of Bash on Windows 10, as Microsoft is still working on future improvements. We should see even more features, and options in Bash on Windows 10 with the upcoming system updates or Windows 10 builds.
If you’re a fan of Bash, then this is great news and you can now enjoy its features on Windows 10with more on the way.
What’s your favorite thing about Linux Bash? Leave the answer along with any other questions you may have in the comments section below.
Anyone who deals with audio files regularly knows that noise on audio files is a constant, recurring problem. In this post, we are going to look at some of the best audio repair software for noise reduction.
In today’s fast-paced world, you must be prepared for problematic audio quality due to the recording flaws you may encounter. However, effective tools can help you in the recording or mixing stages to reach the maximum value of your tracks.
But first, let’s quickly look at how to reduce noise while recording audio files so that there is less work to do after the audio has been recorded.
How do I fix my recording sound issue?
Turn Off Appliances – Fans, air conditioners, TVs, fridges all generate noise that can be picked up during recording. Turning any of these off will considerably affect the quality of your audio files.
Use a Suitable Room – If you are recording in a big, empty room, there will be much more reverberation than in a small, cozy space. You should also consider moving to a different room if you cannot reduce the noise from other equipment because ambient noise will also interfere.
Clean your computer Fans – Your PC or laptop fans will create additional noise. Maintaining your computers to be dust-free will reduce the amount of work the fans will have to do.
Buy a Decent Mic – A cheap mic will not be able to record in good quality. Make sure you have a good mic and that you can adjust the settings on the software that comes with it. Reducing the gain while moving closer to the mic may fix many of your problems.
Of course, getting rid of all noise from audio recordings is pretty near impossible, so the next step is to look for audio repair software to help you repair what’s left. Some of the tools we highlight are excellent Forensic audio cleanup software.
Why my PC audio is not working?
This could be due to several reasons, ranging from problems with the connection in case of an external device to software conflicts. Also, outdated or corrupt drivers are often found to be an underlying cause in this case.
Besides, if Windows has no sound, the problem may just as well lie with configured audio settings or choosing an incorrect device as the default one. Check for all these aspects, and if none seem to be responsible, an audio repair software would come to your aid.
What is the best PC audio repair software for Windows?
Adobe Audition CC is the first choice on our list, thanks to the company’s excellent work on its Adobe cloud products.
Adobe is not cheap, but if you are looking to go beyond the basics or you are looking to turn audio repair into a career, then this may be for you.
Adobe has been the top of the line in graphics design for a long time. Their products are rich in features, very polished, comprehensive, and easy to use.
While Adobe Audition CC might seem challenging to understand for a newbie at first, the program has many video tutorials that will teach you everything you need to know.
Therefore, you can learn to record, edit or create stunning tracks using this professional software that will raise your music production skills rapidly.
Note: If you already have Adobe Creative Cloud, you already have Audition CC. Check before you buy it.
Important features:
Multitrack, waveform
Repair and restore
Workflows and audio finishing
Adobe Audition CC
Record yourself and modify your tone, and improve the quality of your audio with Adobe Audition CC
Sound Forge from Magix is a one-of-a-kind software that allows you to visualize audio files as layers in a frequency spectrum.
The program allows you to edit and create audio and gives you unrivaled tools to restore and repair damaged audio files.
To give just one example of how Sound Forge works as an audio repair software is its Heal Action feature. Heal Action can be used when there is a dropout in the recording.
It looks at the data before and after the dropout and builds the sound it feels will best fill in the missing data, thus fixing any glitch in the audio recording.
It also allows you to select recurring noises in your audio files and save them. These noise prints can then quickly reduce noise in future recordings.
Important features:
Disc description protocol export
Voice activity detection
Multitrack recording
Sound Forge
Consider this industry-standard software in audio editing to get clean sounds, using Sound Forge.
ERA Bundle from Accusonus is an excellent piece of software for those just starting with audio repair software. That’s not to say it isn’t for more advanced users because it is certainly not.
It has many features, such as noise remover, reverb remover, and plosive remover. And what is so great about this software is it is all done with just a push of a few buttons.
Far from being an expert and having seen ERA Bundle in action, if you are a newbie and are unsure what you are doing, this is for you.
Furthermore, you can eliminate all the sound clutter from your audio, like air conditioner, electric hiss, or background noise. The noise remover function can clear your sound perfectly in minutes.
Plus, you can use this noise remover to clear up disrupting noises and a voice deepener to change your voice pitch, de-breath, or voice de-clicker to decorate your content without recording flaws.
Additionally, the program offers benefits like Audio Clean-up Assistant, which automatically detects audio noises and optimizes your tracks.
Hence you have zero reasons not to give it a try and improve your audio tracks through crystal sound recordings.
iZotope RX is one of the best pieces of audio repair software for a few reasons. Firstly, it is a perfect bit of kit. It does a great deal more than just audio repair, so whatever you are looking to do, we are pretty sure this software will do it.
Another remarkable fact is that you can download the full version of the iZotope product and play with it for ten days before deciding to buy.
Additionally, you can enjoy clearer sound with the upgraded version of RX8. You can restore your recordings above 4 kHz and modify poor sound into crystal-clear meeting recordings or mobile sounds.
Thus make the best of this user-friendly interface that helps you to adjust settings like amount, vowel/ sibilant, balance, cutoff, or smoothing level. You can also use it for post-production or music production to master your crisp sound and remove grainy noise.
Finally, the website is chock-a-block full of training. Most websites have pieces of training, but iZotope seems to have gone above and beyond.
Of course, all this comes at a price, while RX7 Standard is reasonably priced, the better the software, the costlier it gets.
Antares SoundSoap is another fine piece of audio repair software. Plus, it comes in three different versions, SoundSoap Solo 5, SoundSoap 5, and SoundSoap+ 5. One of them is bound to be priced right for your pocket.
SoundSoap Solo 5 is the simplest of the three and is meant for interviews, podcasts, iPhone/iPad videos, and so on.
SoundSoap 5 is probably what most people would be looking for as it can reduce all background noises, such as air conditioners and fans. And SoundSoap+ 5 is the one with all the bells and whistles.
This software dramatically supports improving damaged recordings and turning them into clear soundtracks for everyone to enjoy.
Regarding features, it can perform intelligent background noise removal, plus automatic restoration of affected recordings, electric hum adjustment, and many more.
With that being said, this comprehensive noise removal solution will take care of noisy interviews or other such recordings you may use.
There are a few ways to remove noise, but one of the easiest ways is using an audio repair tool. And any of the software we have listed will do a great job.
Alternatively, you could use specialized noise-canceling software. These tools are essential for various activities, including Skype conversations, recording recorded voice tracks, and talking to pals while playing video games.
And there you have it. We’ve considered five of the best audio repair software on the market today; some are paid, but a few you may get free or on trial.
Do you have a suggestion that you think we should have included in this article? If so, put it in the comments below, and we will look at it.
Arrows enable you to scroll through images when using the Photo Viewer. While these arrows are not always necessary, they might come in handy from time to time.
A more worrying problem would be if Windows Photo Viewer is not working but we have already covered that in our detailed guide. For today, let’s solve the arrows missing from this program issue.
Why can’t I scroll through pictures on Windows 11?
If you’re a Windows user, then there is no doubt that you have used the Windows Photo Viewer at least once. It’s the default image viewer after all.
But if you’re trying to scroll through pictures, you may be wondering why the photos arrow keys are not working. Here are a few reasons:
Faulty mouse – If you can’t scroll through pictures on Windows 11 on your Photo Viewer, it’s possible that your mouse is faulty or broken. In this case, you’ll need to replace your mouse as soon as possible.
Outdated/corrupted keyboard drivers – If you’re using a keyboard that came with your computer, it’s possible that you have outdated or corrupted drivers. You will need to update your keyboard drivers first and see if the problem persists.
Incompatible application – If you’ve recently installed any new software or tried to download something from the Internet, it’s possible that there was a problem with that installation process, which could prevent Windows from recognizing your arrow keys. You will have to uninstall the application and see if it is the cause of the problem.
Firewall settings – Sometimes, your firewall settings can affect how other applications behave on your PC. You need to check whether your firewall is blocking a program, then disable it temporarily and see if that fixes the problem.
Sticky Keys – The Sticky Keys feature is a handy way for you to use your keyboard without having to press all of the keys at the same time. However, they can sometimes cause conflicts with other programs. You may have to disable the Sticky Keys feature and see if the arrows work.
Multiple keyboards – If you have multiple keyboards connected to your PC at once, you may have to disconnect all other keyboards from their USB ports and try again. Sometimes it may be the case that they have already been assigned to these keys and hence, won’t work on the keyboard you are using.
What can I do if the Windows Photo Viewer is not showing arrows?
To attempt the fix, let’s first start by checking off the basics:
Securely plug in the keyboard in the USB ports and check whether you still have no next/previous arrows in Windows 11 Photo.
Make sure that the Windows Photo Viewer application window is active by clicking inside with your mouse cursor.
Unplug all other peripherals and only connect your keyboard and mouse.
If none of these solutions works, then proceed to the more advanced troubleshooting steps.
1. Update your device drivers
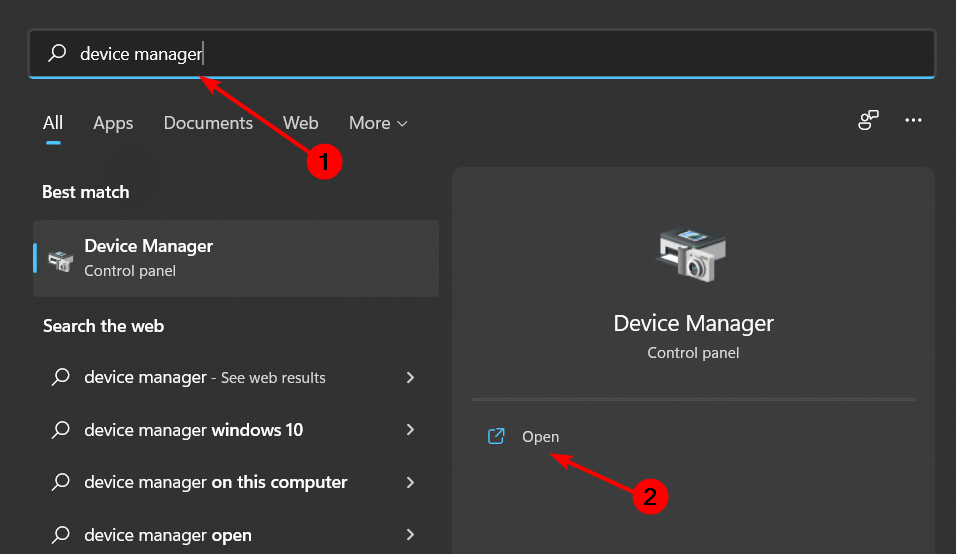
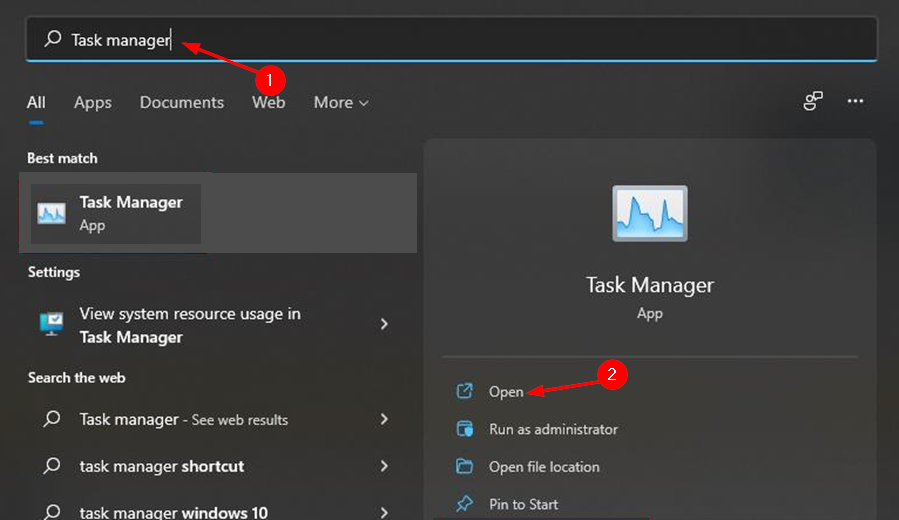
Hit the Windows key, type Device Manager in the search bar, and click Open.
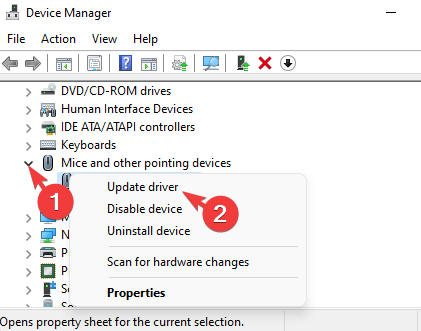
Navigate to Keyboard, select your keyboard, right-click, and select Update driver.
Select Search automatically for drivers.
Repeat the same process for Mice and other pointing devices and click Update driver.
2. Disable Firewall temporarily
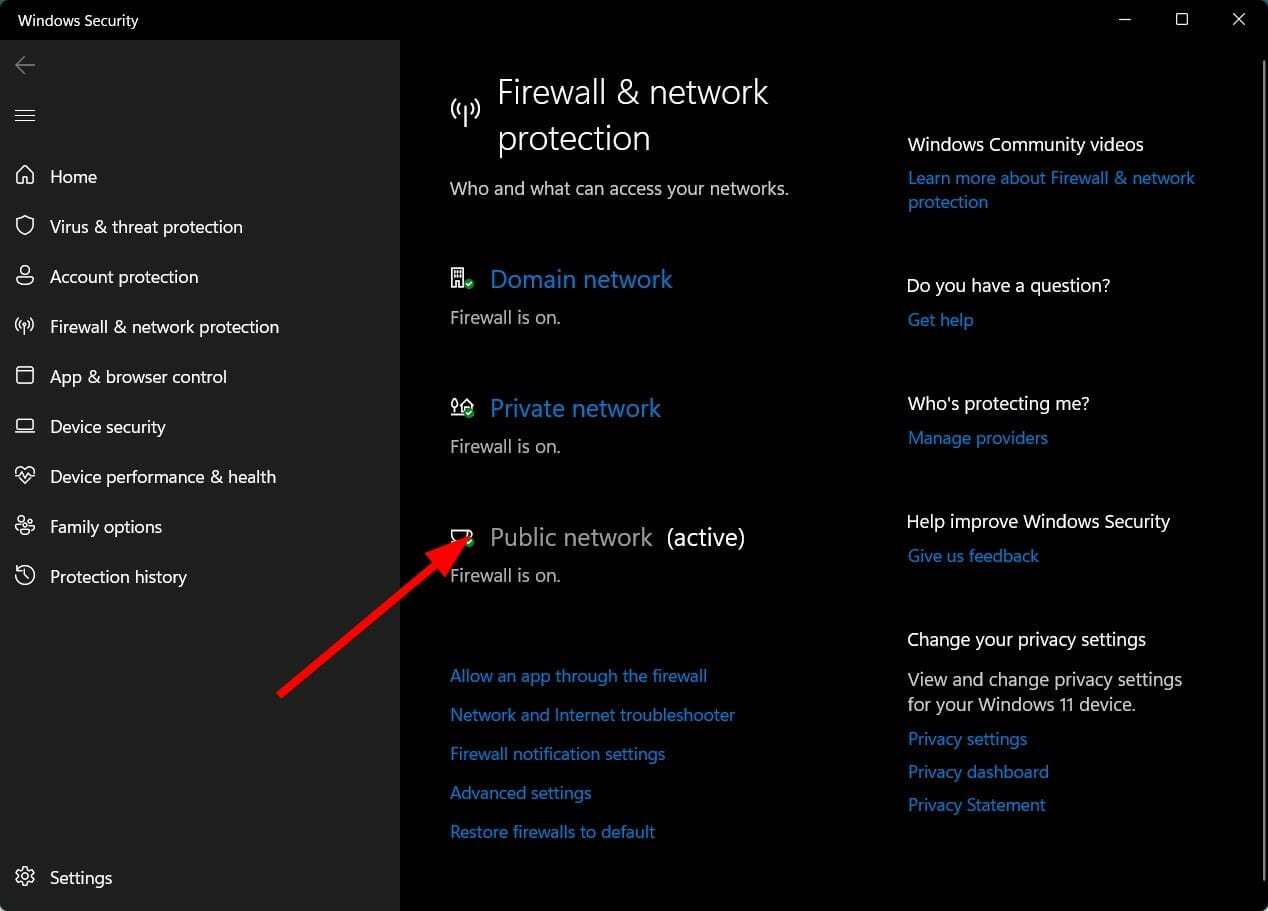
Hit the Windows button, type Windows Security in the search bar, and click Open.
Click on Firewall & network protection then select Public network.
Locate Microsoft Defender Firewall and toggle the off button.
3. Reset Windows Photo Viewer
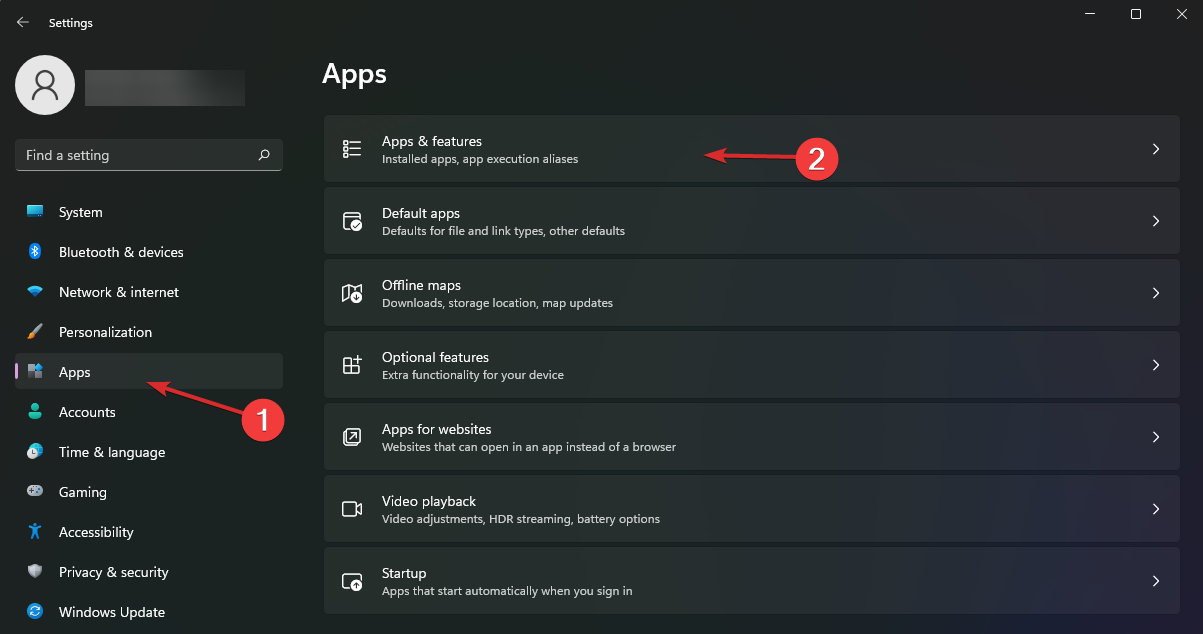
Hit the Windows key and select Settings.
Click on Apps on the left pane then select Apps & features on the right pane.
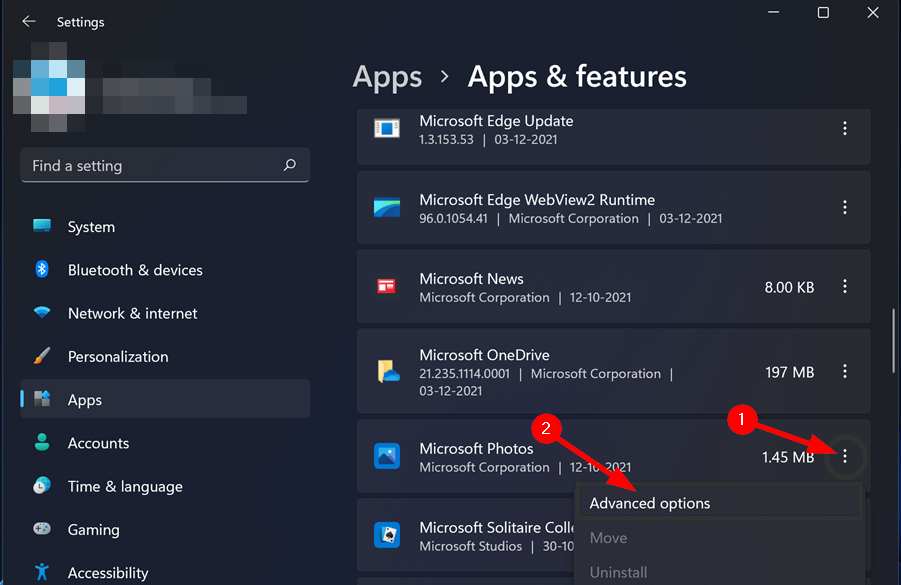
Locate Windows Photo Viewer, click on the three vertical ellipses and select Advanced options.
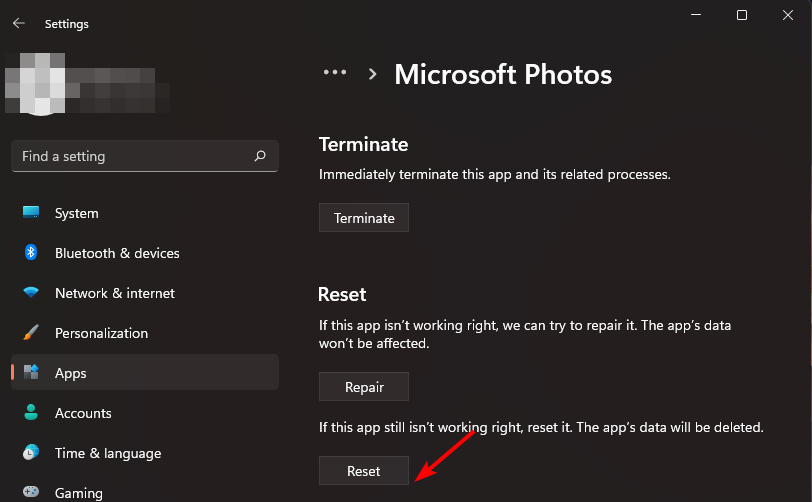
Click the Reset button.
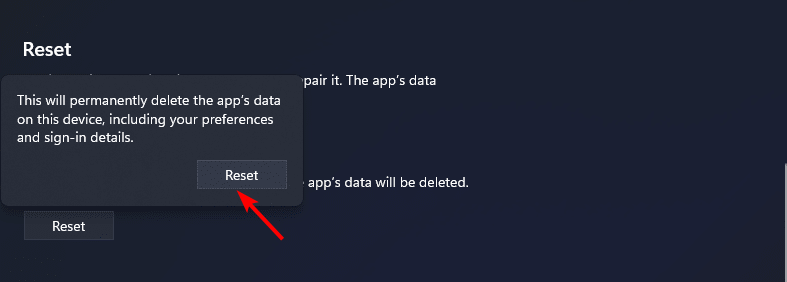
Again, click Reset on the pop up that appears.
Resetting the app should also help when there are no next/previous arrows in Windows 10 Photo. Though the process is slightly different from the previous iteration, it shouldn’t be much trouble to reset an app in Windows 10.
Click on Windows update, then select Check for updates.
Download and install if any are available.
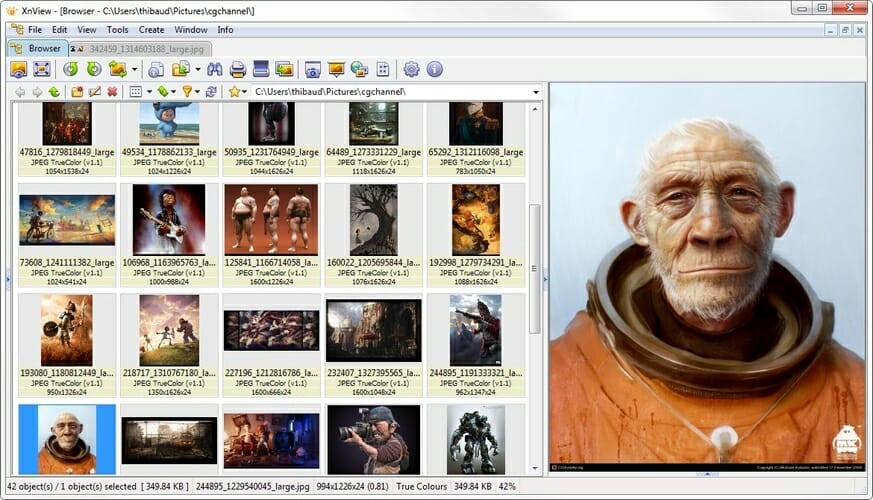
5. Use another image-viewer program
There are many options available for viewing images on Windows computers – including Windows Photo Viewer itself. However, sometimes, your operating system doesn’t support the necessary features the program needs.
That’s why you may find Windows Photo Viewer keeps skipping pictures. Most modern photo viewer software tools have many features that make it worth using over Windows Photo Viewer, including support for major formats and batch conversions.
And that’s how to resolve Windows Photo Viewer not showing arrows. You may also encounter an issue where Windows Photo Viewer cannot open this picture, so don’t hesitate to refer to our guide.
Perhaps you are tired of clicking the arrow to view the next picture and are wondering how to view photos continuously in Windows 11. You’ll be excited to know that there are a handful of slide show maker apps that take away any need for arrows.
Let us know what method worked for you in the comments section below.
Unfortunately, the Disney Plus app isn’t available to all Xfinity customers. However, this does not mean you can’t watch Disney Plus on Xfinity.
Read on to find out if and how to watch Disney Plus directly from Xfinity.
Can I watch Disney Plus on Xfinity?
If you own an Xfinity X1 or a Flex, you will be able to use the app just fine. However, even there they have some exclusions.
According to Xfinity’s support page, the following X1 boxes are not compatible with Disney Plus:
RNG150 with the following models:
PCRNG150BNMD – Pace RNG150N-M
PCRNG150BNCD – Pace RNG150N-C
SMRNG150BNMD – Samsung RNG150N-M
SRRNG150N/CCO – Samsung RNG150N-C
Pace Xi3 model PX031ANI
Samsung XG2v2 models SX022ANC and SX022ANM
Arris XG1v1 models MX011ANC and MX011ANM
Pace XG1v1models PX001ANC and PX001ANM
If you have one of these boxes, you’ve probably struggled to try and figure out if there is a way that could make Disney Plus available on the Xfinity platform.
The good news is there are some really good solutions you can try. We’re presenting in this article a few confirmed methods that will give you access to the app.
They all require some additional investments and for all cases, you will need a device that is compatible with Disney Plus. Here is how to get Disney Plus on Xfinity.
How can I watch Disney Plus on Xfinity X1 and Flex?
1. Press the Xfinity button on your remote.
2. Go to Apps.
3. Choose the DisneyPlus app tile or just say out loudDisney Plus app to your Voice Remote to open the app.
4. Select the Sign Up Now or the Login button.
5. Login with your account or create a new one. If you create a new account, follow the indications on the screen and after you finish the process, come back and login to your account.
It’s really easy to use the Disney Plus app on Xfinity X1 or Flex because you only need to perform the steps above to get in and enjoy your content.
In order to watch Disney Plus on Xfinity, what you need to do is press the Xfinity button on your remote, navigate to Apps, and then sign in with your Disney Plus account.
If your laptop keeps changing time zones, keep reading.
The issue usually stems from automatic settings, syncing errors, or even hardware problems. We’ll walk you through how to get your time zone set correctly and keep it that way.
How to fix your Windows time zone when it keeps changing
1. Disable automatic time zone
Right-click on the system clock on your taskbar.
Select Adjust date/time.
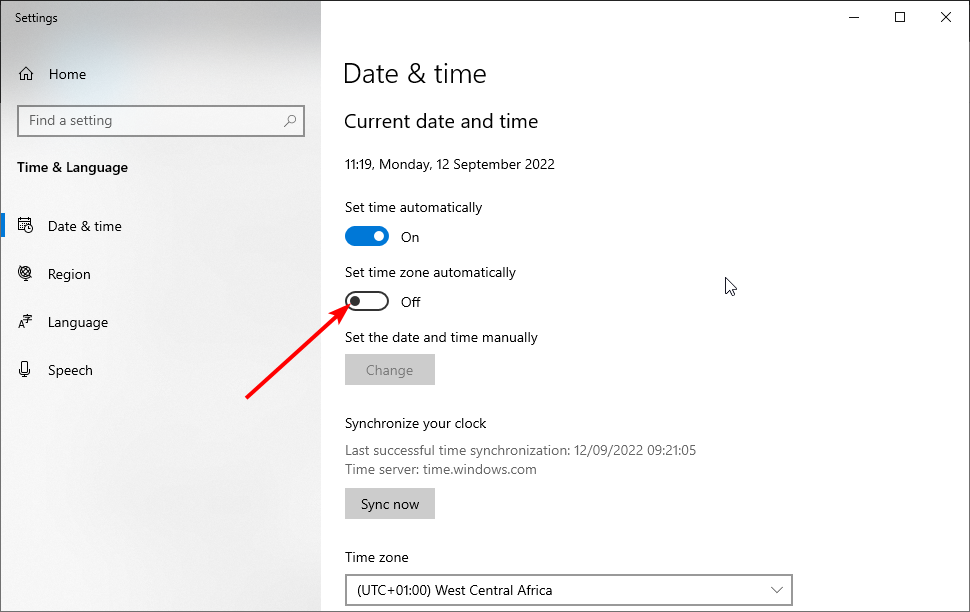
Toggle the switch for Set time zone automatically backward to deactivate it.
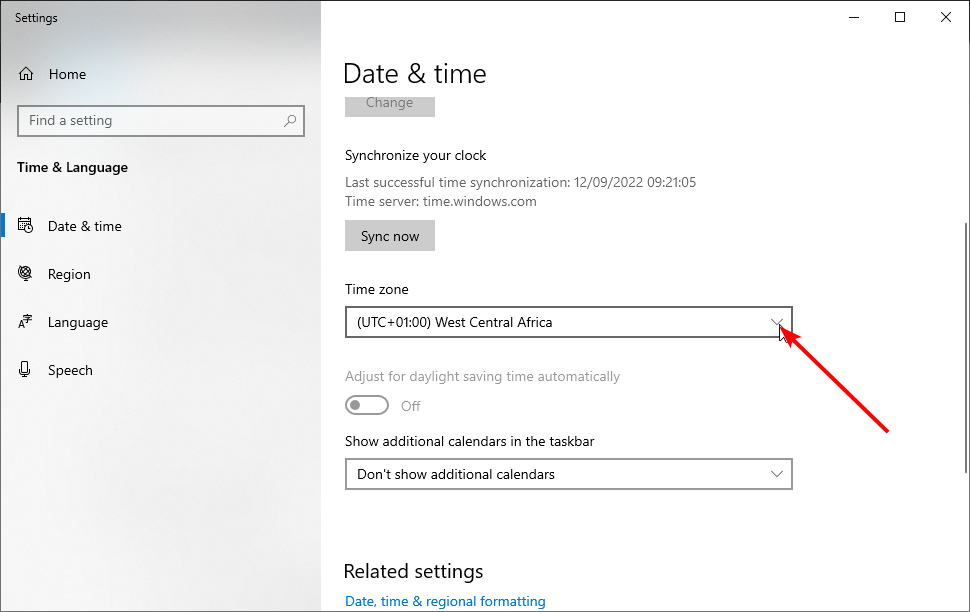
Now, click the dropdown under Time zone and choose your time zone.
To deactivate automatic time update, toggle the switch for Set time automatically off.
Now, set your time and date accordingly.
By disabling automatic time zone settings, you gain more control over your time and date. Changing time in Windows 11 and 10 is pretty straightforward, and setting it manually can prevent unexpected changes.
2. Set Internet Time
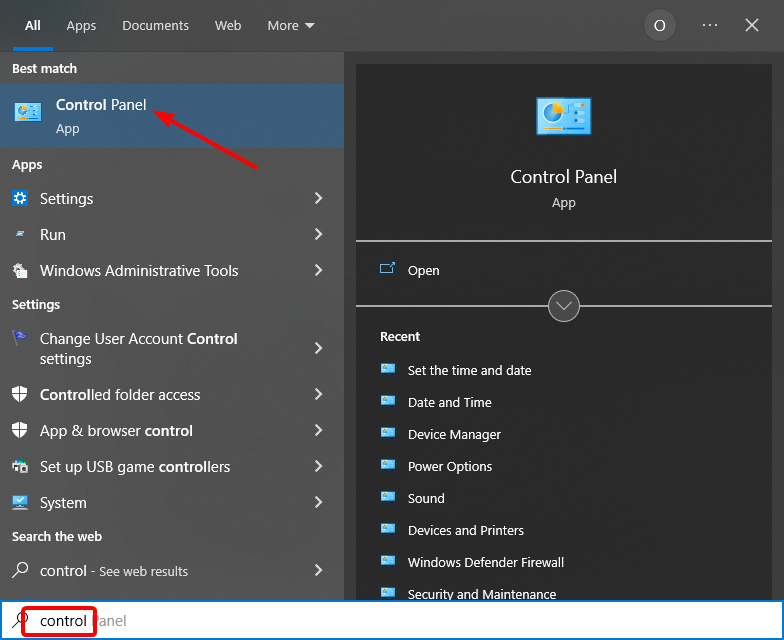
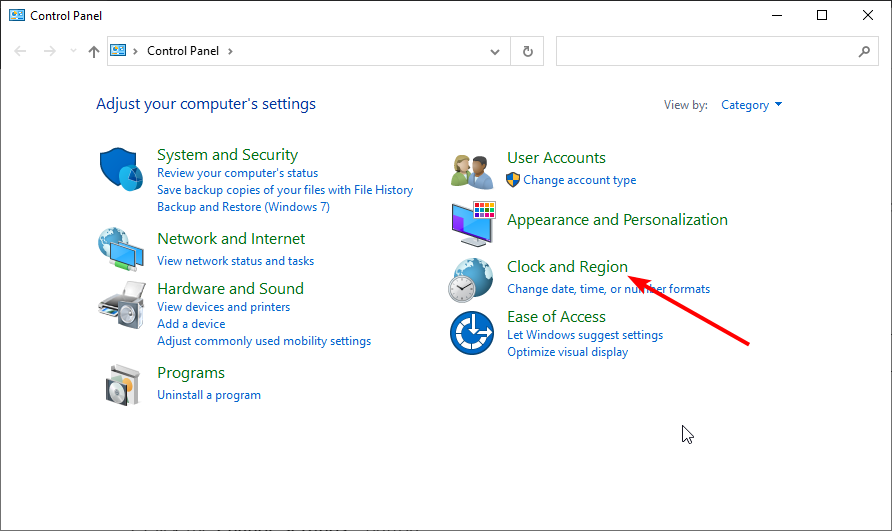
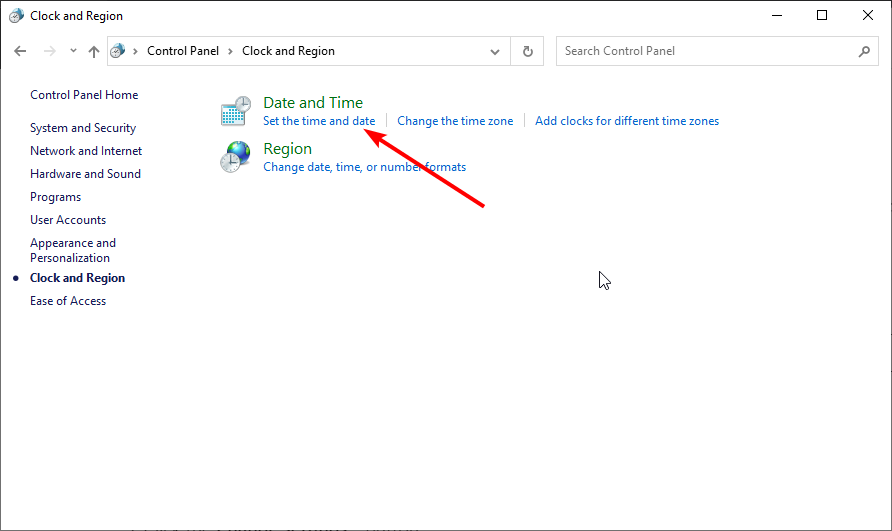
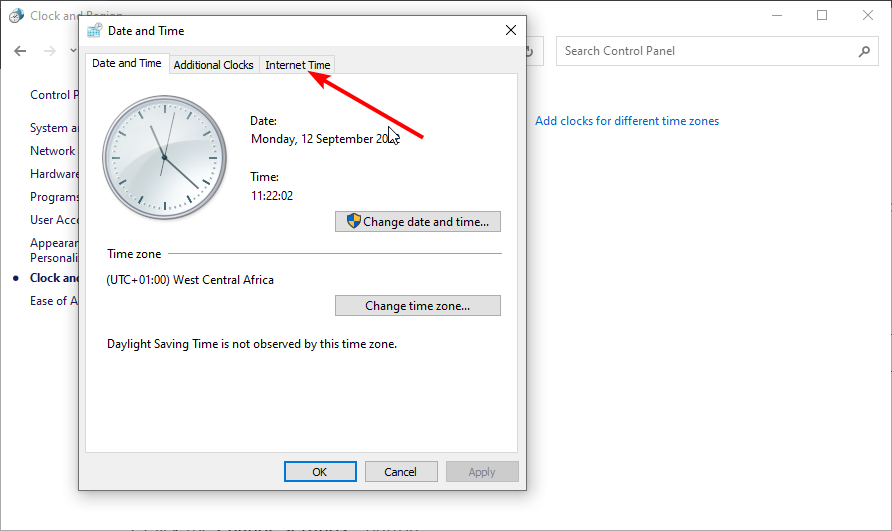
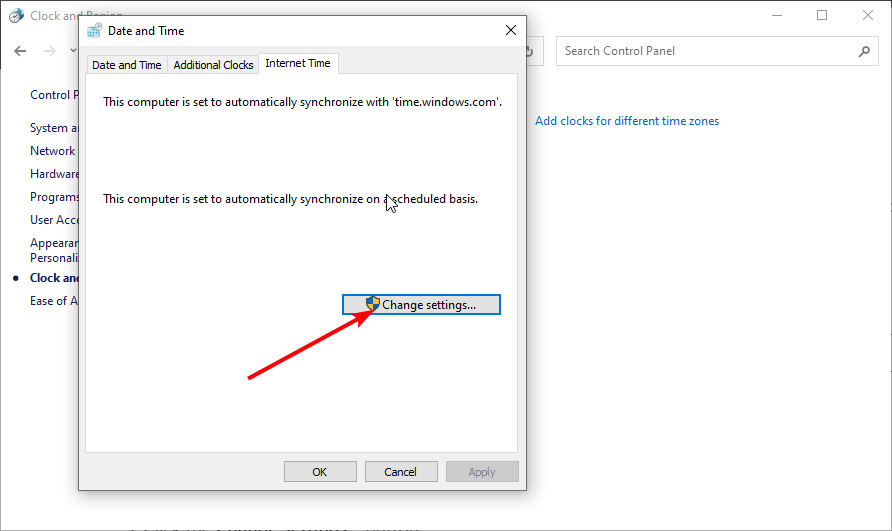
Press the Windows + S button, type control, and select Control Panel.
Select the Clock and Region option.
Now, choose Set time and date under the Date and Time option.
Click the Internet time tab at the top.
Click the Change settings… button.
Now, click the dropdown before Server and select time.windows.com.
Finally, click the Update now button followed by OK.
If your time or zone keeps changing on Windows 10, it might sync with the wrong server.
Setting it to sync with the Windows server will help recognize the time and location you set accordingly.
3. Scan for viruses
Press the Windows key and type Windows security.
Select Virus & threat protection in the left pane.
Choose the Scan options.
Select your preferred scan option and click the Scan now button.
Malware can cause all sorts of problems on your PC. It could be why your time zone keeps changing. Choose the Full Scan or Windows Defender Offline Scan to perform a deep scan and eliminate all threats.
Alternatively, you can use dedicated antivirus software to eliminate the most stubborn viruses on your PC. And you can’t go wrong with ESET NOD32.
This modern tool uses cutting-edge technology to protect you offline and online. It detects viruses before they can attack your PC and eliminates them accordingly.
The CMOS battery provides power to the motherboard to retain BIOS settings, including time and date, when the computer is turned off.
Fixing a corrupt CMOS battery will help ensure that your system retains the correct time and date settings even when powered off. To fix this issue, you’ll have to replace your battery.
Press Windows key + R, type services.msc, and click OK.
Scroll down to Windows Time and right-click it.
Select the Properties option.
Click the dropdown before Startup type and select Automatic.
Now, click the Start button under the Service status section.
Finally, click on the Apply button followed by OK.
Forcing Windows Time to start up automatically each time your PC starts can also effectively deal with time issues on Windows 10. here is how you do it.
6. Disable location services
Press the Windows key + I to openSettings.
Go to Privacy.
Select Location.
Click the Change button and toggle Off the button for Location access for this device.
7. Check Windows Time service
Press Windows key + R, type services.msc, and press Enter.
Find Windows Time in the list and double-click it.
Ensure the Startup type is set to Automatic.
If the service isn’t running, click Start.
Click Apply and OK.
Why does my laptop keep changing time zones?
One of the primary reasons your time keeps changing on Windows can be because your time is synced with an internet time server.
This feature will automatically update your time and date even if you set them differently. Also, it might be because the CMO battery is getting weak. However, irrespective of the cause, we have detailed the steps to fix it in this guide.
Does BIOS time affect Windows time?
Yes, it does! However, the converse is not true. While Windows relies on BIOS time, the BIOS functions independently of the time set in the OS.
Also, you should not modify the date and time set in the BIOS unless it’s highly inaccurate or is causing trouble with Windows or the installed applications.
How do I find my BIOS time and date for Windows 10?
To find out or change the BIOS time and date in Windows 10 or even a later iteration, you must first enter the BIOS. Depending on the system manufacturer, this can be done when you turn on the computer by pressing the F10, F12, Del, or other keys.
Once in the BIOS, locate the Time and Date settings, and change it from there. This is a fairly simple process and shouldn’t take much time.
This is it. If your Windows 10 laptop time keeps changing or resetting, the above methods should correct things.
Some users have reported an AutoIt error on Microsoft’s support forum. When that issue arises, users see an AutoIt Error message pop up every time Windows starts up.
The specified file path within that error message can vary, but despite the file path, there are a couple of solutions that you can use to fix this problem.
This is not a necessary operation for Windows and may be stopped if it is known to cause difficulties.
File corruption is a common cause of problems with Windows, including this one. This can happen anytime for unknown reasons, but the issues are minor and can be easily fixed by running scans with DISM and SFC.
If your computer has one or more autorun keys left behind by an application that is no longer available, you are likely to run into one of the most typical instances in which you would get this sort of error.
There are other causes, but these are the most common ones. Here are also the most common errors reported by our users regarding AutoIt:
AutoIt Error Line 0 file C:/Users – Conceivably, the cause is a conflict between a program or service and one or more of Windows’s processes to boot up.
AutoIt Error Line 0 – You may test whether or not this is the case by forcing Windows to boot with only the essential drivers and applications for the starting process.
Allocating memory AutoIt error – Using File Explorer, delete all entries that include AutoIt.
AutoIt Error opening the file – This can occur due to the residual autoruns.
AutoIt Error ServiceGet – Delete any string values associated with AutoIt from the Registry Editor.
Logonui.exe AutoIt error – Try using Startup Repair.
AutoIt error line 865 – Delete any AutoIt scripts running when Windows starts.
AutoIt error in Windows 7/10/11 – This issue is not specific to one OS iteration, but rather to all of them, or the latest ones. However, the solutions below are applicable to each iteration.
Without any further ado, let’s jump into the list of solutions to AutoIt errors in both Windows 10 and 11. Follow along!
How do I fix AutoIt error line 0 in Windows 10?
1. Run a malware scan
For those wondering how do I get rid of AutoIt virus, the error is often caused by malware known as Veronica, so you should start with a malware scan.
We suggest you use Eset HOME Security Essential because it has a very high detection rate and multiple security features to ensure you are protected on all fronts.
Eset is an award-winning antivirus with a powerful anti-malware engine. It protects your PC in real-time, at all times, without impacting its functionality.
Other notable features of Eset HOME Security Essential include:
Banking and payment protection
Parental controls
Webcam protection
Anti-phishing technology
Multilayered protection
Malware and ransomware protection
Eset lets you run a one-time full scan of your PC that will detect and remove any threats. It is online and completely free. It will help remove any threats and allow you to try the software.
ESET HOME Security Essential
Remove malware and secure your whole digital experience with award-winning antivirus technology.
The detailed solution below describes how to edit your Registry in order to resolve the AutoIt error on Windows PCs.
1. Open the Run tool
First, open the Runtool by right-clicking the Startbutton and selecting that option from the menu.
2. Enter this command in the Open box: regedit > Click Ok to open Registry Editor.
Enter the following command in the Open box: regedit. Then click OK to open the Registry Editor.
3. Click File on the Registry Editor window and select Export option.
Click File on the Registry Editor window. Select the Export option.
4. Enter a file name for the registry backup and save it.
Enter a file name for the registry backup. Choose a location for the registry backup file. Press the Save button.
5. Open this registry key path using a special coomand.
Open registry key path with: Computer\HKEY_CURRENT_USER\Software\Microsoft\Windows\CurrentVersion\Run
6. Search for REG_SZ strings in the Run registry key.
Look for these REG_SZ strings in the Run registry key: AdobeFlash, Windows Update, Adobe Update, and Google Chrome. Right-click all those REG_SZ strings and select Delete to erase them.
Repeat the 6th step for the LOCAL_MACHINE Run key you’ve just opened.
9. Close Registry Editor
Close the Registry Editor, and restart your PC to see if the issue persists.
After making these changes, the AutoIt error in Windows 11 should be gone.
Note: The REG_SZ strings specified above will include autoit3.exe, windowsupdate.lnk, googleupdate.a3x, or googleupdate.lnk within their data paths. Entering those data path keywords within Registry Editor’s Find tool should also locate the REG_SZ strings you need to erase.
3. Uninstall AutoIt
Open the Run window. Type this Programs and Features command into Run: appwiz.cpl
Next, select the AutoIt program listed.
Click the Uninstall option for AutoIt.
Restart your desktop or laptop after uninstalling AutoIt.
You can uninstall AutoIt and more thoroughly erase its leftover files and registry entries with third-party uninstaller software.
Download Autoruns by pressing the Download Autoruns and Autorunsc option from Microsoft’s page.
Extract it, locate its executable file and run it as administrator.
Now input autoit3 in the Filter box.
Locate AutoIt, right-click it, and choose Delete.
You can remove AutoIt scripts from the Windows startup with Autoruns. That’s one of the most detailed startup monitor tools for Windows. Using this tool, you should be able to fix the AutoIt error line 0 error opening the file message.
5. Reset your Windows 10
Open the Settings app by pressing Windows + I and navigate to the Update & Security section.
Select Recovery from the left pane. In the right pane, click on Get started button in the Reset this PC section.
Choose the option to keep your files and follow the instructions on the screen.
Once the process is finished, you’ll have a fresh installation of Windows ready.
Remember that factory reset removes installed applications, so you’ll have to install them again.
Is AutoIt V3 script a virus?
If you have used AutoIt for any significant amount of time, you are probably aware that it is an excellent and highly effective scripting language.
As is the case with all vital languages, one of the potential drawbacks is the generation of viruses by individuals with nefarious intentions.
Your installation of AutoIt does not include any viruses, and if a script you have written is flagged as a virus even though you do not intend to cause harm, it is an example of a false positive.
Is AutoIt malicious?
No, unless you haven’t downloaded the software from the official source, AutoIt is completely safe.
A PNG file is one of the most popular bitmap image formats used today as it is a lossless data compression format created to replace the GIF image formats, though PNG files don’t support animations.
PNG, which is an abbreviation for Portable Graphics Format, has no copyright limitations and comes with great features like the ability to display transparent backgrounds.
It also contains 24-bit RGB color palettes (plus grayscale images), and it contains high-quality graphics.
Besides sharing graphics content online, PNG images are also used a lot with image editors like CorelDraw and PaintShop Pro, among many others.
How can I open PNG files in Windows 10?
There are multiple ways you can use to view and/or open PNG files. Some involve using built-in apps on your PC, opening the files on the browser, or installing third-party PNG file opener software.
We will start by describing the built-in options you have at your disposal. Read on to find out all about the best PNG viewers.
1. Use Windows Photos
The Windows 10 Photos program can be easily used to open PNG files. It comes pre-installed with Windows, therefore is perfectly safe to use and will get the job done in no time.
Basically, all you need to do is choose to open the file with the Photos app when you select from the list of file openers.
1. Navigate to the file location of your PNG file.
2. Right-click on the file to open a menu with multiple options.
3. Hover your mouse over the Open with option.
4. Select Photos from the list of available file openers.
5. Your PNG file is now open in the Windows Photos app.
2. Open the PNG files in a browser
Web browsers, including Internet Explorer and/or Microsoft Edge, among others, automatically view PNG files from the internet, but can also be used to open them.
You can open a PNG file in the browser in two different ways, as shown below.
2.1 Drag the PNG file into the browser
Open your preferred web browser on your PC.
Navigate to the file location of your PNG file.
Select the file, then drag and drop it onto your browser.
The world’s best imaging and graphic design software is the natural choice when it comes to photo editing and graphic design solutions.
Since graphics file formats differ in the way they render image data as pixels or vectors, Photoshop supports different compression formats:
Formats for 16-bit images (Large Document Format (PSB), Cineon, DICOM, IFF, JPEG, JPEG 2000, Photoshop PDF, Photoshop Raw, PNG, Portable Bit Map, and TIFF)
Formats for 32-bit images (Photoshop, Large Document Format (PSB), OpenEXR, Portable Bitmap, Radiance, and TIFF)
You can crop the image, remove objects, retouch the image (color and effects), and even combine photos.
With this advanced software, you get unlimited layers, masks, or paint brushes. One of the best perks is that it provides cross-platform functionality(iPad to desktop).
With this tool, you can remove lens blur and make the best of the Improved Content-Aware Fill feature.
Make the best of your photos and images with the Enhanced Transform Warp function that adds a touch of originality to your visuals.
Adobe Photoshop
Create professional visuals with an excellent editor that allows you to make the best of your photos!
XnView is another great PNG reader. You can also use it to convert images as it supports over 500 image formats.
If you need an image editor, XnView is up to the task. You can also edit images, resize, rotate, and crop pictures or adjust brightness and contrast, among other things.
The tool lets you export 70 image formats, and create slideshows, webpages, and so much more.
Any time you’re wondering how to open PNG files in Windows 10 then this tool is built to do just that in addition to many other awesome functions, like creating interesting features for your graphics.
Besides viewing PNG photos, it also supports filters from Adobe Photoshop.
You can use it to open PNG files, do file searches, email and print options, batch conversions for advanced image processing, or fast view through directories.
You’ll definitely enjoy the Paint option or the blurring feature. It also allows you to capture screenshots, change cut/crop, and add watermarks plus much more.
As mentioned, there are many other ways to open PNG files, especially using software and standalone file openers. Some of the most common ones include Google Drive and gThumb.
The best for editing, though, is the XnView software mentioned above, plus Paint (included with Windows), GIMP, and Adobe Photoshop.
You can set either of these programs to be your default one to open PNG files in Windows 10.
If you want to convert a PNG file, you can use different image file converters that can change it to JPG, PDF, GIF, BMP, or TIF, among other formats, and open the files.
Some of these image converter software include FileZigZag and Zamzar, which are online PNG converters.
You can also use any of the image viewers mentioned above, to convert your PNG file on your Windows 10/11 PC and open it for viewing or editing.
PNG files are not necessarily used in every type of scenario as some can be too large and take up much space on your disk or are too large to attach to email, while others can slow down web pages from opening.
Before you open or convert one, think about the image quality, and space or web page loading, but the beauty is that the quality of the image in PNG format doesn’t diminish because the file format doesn’t compress the image itself, unlike JPG format.
Do you have other ways not listed here how to open PNG files in Windows 10? Share with us in the comments section below.
The printer plays a critical role for users who require taking a physical copy of their documents, pictures, or other forms of data. But, some Windows users encountered the Printer in an error state notification when trying to use it.
This prevents you from executing the print job or accessing the printer in general. And this is quite infuriating for many, having a printer right beside you and being unable to use it.
As is the case with any issue, the Printer in an error state problem too can be easily fixed. But before we head to that, let’s find out why you are encountering it in the first place.
What causes the printer to be in an error state?
There are various reasons why you may be encountering the error, and here are the most common ones:
System permission settings: If the required permissions have not been provided, the printer is bound to throw errors from time to time.
Incorrect or corrupted drivers: Many reported that it was the wrong or corrupt driver that caused the error. One user had the message show up after installing the HP drivers for a Canon printer.
System conflicts: Arises due to misconfigured settings or conflicting hardware and software.
Issues with the printer itself: This includes problems like printer low on/out of paper, paper jams, or low on ink, amongst others.
Hardware-related issues: Check the cables, and look for damaged printer ports and internal debris.
Connectivity issues: Reconnect the printer, verify compatibility, and check for installed drivers.
Also, here are some of the printers you are likely to encounter the issue with:
Xerox Printer in error state
Brother Printer in error state
Canon Printer in error state
Epson Printer in error state
Epos Now printer in error state
Rollo Printer in error state
HP Printer in error state
In order to help you to fix the Printer in an error state issue, we compiled a list of solutions that worked for most users.
These solutions will fix printer in error state in Windows 10 and 11 as well as devices like HP, Canon, and Epson.
How can I fix Printer in error state message?
1. Make ports settings changes
Press Windows + R, type devmgmt.msc, and click OK or hit Enter to open the Device Manager.
Click the View menu on the top, and select Show hidden devices.
Double-click on Ports (COM & LPT) to expand and view the devices under it.
Right-click on the printer port and select Properties from the context menu.
Navigate to the Port settings tab.
Check the Use any interrupt assigned to the port option, disable the Enable legacy Plug and Play detection setting, and click OK to save the changes.
Once done, reboot the computer for the changes to come into effect, and verify if the Printer in an error state message disappears.
2. Make sure that your printer is Online
Press Windows + S to open the Search menu, enter Control Panel in the text field, and click on the relevant search result.
Click on View devices and printers under Hardware and Sound.
Select the problematic Printer.
If you see that your printer has the Offline status, right-click on it and select Use Printer Online
If it is able to go online, you will see the Ready message instead of Offline.
After changing the status, verify if the Printer in an error state problem is fixed. In case you still see the notification, head to the next solution.
3. Reinstall the printer driver
Press Windows + R to open Run, type Control in the text field, and click OK.
Click on View devices and printers.
Right-click on your printer, and then select Remove device
Click Yes to confirm the device removal and restart your computer.
After the PC reboots, it should automatically detect and install your printer. If not, unplug it and plug it back again.
You may update the outdated driver manually, but we trust that using the automatic technique will save you time and provide reliable results.
Choose a decent driver updater program, such as Outbyte Driver Updater, to automatically update your drivers on Windows 10. With this powerful and feature-rich software, you can update missing and outdated drivers like a pro. It has a thorough scanning mechanism that searches your device for faulty drivers, looks for compatible and up-to-date drivers, and updates them quickly.
Outbyte Driver Updater
Great program for keeping your drivers in check with its various helpful features.
4. Set the Print Spooler service run automatically
Press Windows + R to open Run, type services.msc in the text field, and press Enter.
Search for the Print Spooler service, right-click on it and select Properties.
Now, select Automatic from the Startup type dropdown menu, click the Start button if the service is not running, and then on OK to save the changes.
Once done, restart the computer for the changes to apply and verify if Printer in an error state problem is resolved. If not, head to the last solution.
Press Windows + I to open Settings, and click on Update & Security.
In the Windows Update tab, click on Check for updates on the right.
If any are available, click Download and install.
Once done, restart the computer.
If the previous methods didn’t work, you should install the latest Windows Update since it is, most likely, incompatibility to be blamed here. After you are done installing the latest version of the OS, the Printer in an error state problem will be fixed for good.
Because most of today’s modern cross printers have wireless capabilities, they become an attack gateway and are vulnerable to viruses and malware.
In this regard, we strongly recommend that you choose a reliable antivirus program that you can use to secure your printer and, ultimately, your activities.
How can I fix Printer in error state on Windows 11?
The solutions for Printer in an error state in Windows 10 and 11 remain pretty much the same. So we recommend you first try the ones listed in the previous section.
Printer troubleshooter
Also, run the built-in Printer troubleshooter as it automatically identifies the underlying cause and suggests a solution for it.
In addition to these, you may update the printer driver and make sure to verify that the right one is installed. Also, look for programs that may create conflicts with the functioning of the printer and remove all such apps.
And if none of these work, there’s always the option to perform a system restore, in case the printer worked fine until a few days ago. Just make sure to choose a restore point created before the problem first occurred.
By now, you would have gotten a hang of the Printer in an error state problem and the solutions for both Windows 10 and 11.
How many times have you clicked the X close button in Windows Photo Viewer only to have it flash by and not close? Today we’ll show you how to fix it.
Compatibility issues, too many background apps, and corrupt system files could cause this. Let’s address each issue one by one.
What can I do if Windows Photo Viewer is not closing?
First, close other background apps and try reducing RAM usage, and try restarting your PC.
If after trying these Windows Photo Viewer is still not closing, proceed to the solutions below.
1. Close the program from Task Manager
Hit the Windows key, type Task Manager in the search bar, and click Open.
Locate Windows Photo Viewer (Photos), right-click and select End task.
2. Run the SFC command
Hit the Windows key, type cmd in the search bar, and click Run as administrator.
Type the following command and press Enter: sfc /scannow
The SFC command will check the integrity of all protected system files on your PC. If any file is found corrupted or missing, it will be automatically repaired or replaced.
Also, if you want a more thorough scan, we recommend using a specialized tool in system repair and optimization. A scan is enough to find and repair all issues.
3. Repair the app
Hit the Windows key and select Settings.
Click on Apps on the left pane then select Apps & features on the right pane.
Locate Windows Photo Viewer (Microsoft Photos), click on the three vertical ellipses and select Advanced options.
Press the Windows key, search Windows Security and click Open.
Select Virus & threat protection.
Next, press Quick scan under Current threats.
Wait for the process to finish and restart your system.
5. Uninstall and reinstall the app
Hit the Windows key and select Settings.
Click on Apps on the left pane then select Apps & features on the right pane.
Locate Windows Photo Viewer, click on the three vertical ellipses and select Uninstall.
Confirm Uninstall in the pop-up dialog box.
Should you run into any other problems such as Windows Photo Viewer not working, do not hesitate to check out our detailed guide for some quick fixes.
Also, if the Photos app keeps crashing, we have curated a comprehensive article on steps to take to bypass the issue. Feel free to check out some of the best photo editing software if you want quality and bespoke images.
As always, your feedback is appreciated so let us know what solution came through for you in the comment section below.
Compared to a few years ago, the structure of networks has become very complex. As a result, specific protocols have become necessary to increase security, speed, and efficiency.
However, one thing hasn’t changed: the annoying phenomenon of losing data packets.
Due to various factors, your network might be subject to various disturbances, often leading to high ping situations and packet loss.
Various software solutions are available to identify packet loss in a network. They work by detecting packets somehow, such as calculating their travel time or analyzing the packets.
Pinging devices on your network is the simplest way of implementing a packet loss fix, which we will go through later in this article.
Many users reported 100% packet loss on their PCs; this issue can occur on any version of Windows, and your network hardware usually causes it.
This can be a problem, and it will cause high latency and ping in games while browsing the web. However, it’s important to mention that any hub between you and the server can cause this issue.
The issue was reported on all types of connections, and many reported Wi-Fi packet loss on their PCs. Other variations of the issues as reported by users are listed below:
how to fix packet loss wired connection
However, you can fix these issues, and this guide will show you how to do it.
What is packet loss?
Whenever you access the Internet, your device transmits (sends and receives) data units called packets. If some packets fail to reach their destination, we call it packet loss.
This phenomenon can be observed through network slowdowns, disruptions, and total network connectivity loss.
Although any network service can be targeted by packet loss, games, VoIP services, and multimedia streaming services are more affected.
These apps are more likely to suffer packet loss because they process packets in real-time.
What causes packet loss?
An overloaded network: high traffic volume over several devices such as routers, servers, and terminals.
Unstable devices: if some of the devices on your network have weak or overloaded CPUs, said devices become unable to process data entirely. This can affect your whole network and be a cause of packet loss.
Software/firmware issues: glitches in a network device’s software can lead to packet loss, affecting the whole network.
Hardware-related issues: low-quality cables, faulty RAM modules, and outdated network adapters can all contribute to causing packet loss.
Many factors can play a role in packet loss occurring on your connection; however, the ones above are among the most common ones.
How to test for packet loss?
1. Use specialized software such as PRTG Network Monitor
Wait for the installation to complete (it takes a while).
Launch PRTG and log into it.
Let it perform the initial assessment and create sensors for your network devices.
Observe any faults or malfunctions with your network devices (high ping/packet loss).
PRTG Network Monitor is a complex tool for Windows 10 and also 11 that can perform an extensive analysis of your network and its devices.
Some PC users might still consider it intimidating from a feature standpoint, but it offers an interactive tutorial as soon as you log into it, so you will be just fine.
Its (web) interface comes with a broad range of tools you can work with and even define your own sensors.
For instance, you can stay protected using the built-in Packet Sniffing Sensor that detects suspicious network packets.
You’ll be glad to know that it has a general trial. During the trial, you can use the app with unlimited sensors (30 days).
After the trial expires, you’ll be limited to 100 sensors.
PRTG Network Monitor
Forget about packet loss and other network problems! Use the best network monitoring tool on the market for your PC!
Use a packet sniffer such as Wireshark to see what servers you’re connected to.
Hit the Windows key on your keyboard, type cmd, and select Run as administrator.
Type the following line in Command Prompt and hit Enter. ipconfig /all > c:packetloss.txt
Now type the following line and replace x.x.x.x with the IP of the server you suspect of packet loss. tracert x.x.x.x >> c:packetloss.txt
Once more, type the following line and replace x.x.x.x with the IP of the server you suspect of packet loss. pathping x.x.x.x >> c:packetloss.txt
Wait for the pathping operation to complete (can take up to 10 minutes).
Check the created file for high ping values, which can signal packet loss.
Using CMD to test for packet loss is also effective. As the hop count increases, your connection gets further away from your PC.
Therefore, the first hop (i.e. hop 0) is your PC, the next hop (hop 1) is your PC-router connection, hop 2 is the connection from your router to your ISP’s line.
After the third hop (hop 2), the connections belong to your ISP’s network.
You should be able to single out the server owner judging by the server’s name displayed next to the IP address (check the screenshot).
The last hop is the server you connected to and ran the test against.
Note: If you don’t want to create any log file on your PC (i.e., the packetloss.txt document), you can run the commands listed above without the > C:packetloss.txt and >> c:packetloss.txt bits.
Doing so will only display results in the command prompt.
How much packet loss is normal?
We often classify losses of less than 1 percent as excellent for streaming music or video and 1 – 2.5 percent as acceptable. However, losses between 5 and 10 percent of your total packet stream would considerably impact the quality.
How do I get rid of packet loss in Windows 10?
1. Use a VPN
Using a VPN might significantly reduce packet loss since you are playing on another server. The best VPN to use is ExpressVPN since it has some of the fastest servers.
Here is how to get ExpressVPN:
Download and install ExpressVPN from the official website.
Open ExpressVPN after the installation was completed.
Select Choose Location to open all the available IP locations.
Select the Recommended region or one that you need.
Enjoy using ExpressVPN.
When using ExpressVPN, it also creates a layer of protection for your data. When surfing the web you can’t be tracked, you are completely anonymous and no logs are left behind.
Not only can this service improve your ping, but it can also protect your privacy, keep your connection secure, away from prying eyes, and lift geo-restrictions for you by spoofing your location.
ExpressVPN
No more lagging and experiencing packet loss while gaming.
There’s no magic fix to packet loss since the pathway between you, and your server of choice is long and full of hops.
Therefore, you must isolate the issue and understand what part of your connection is at fault.
Therefore, the first step would be checking the log file you created earlier or the results in the command prompt window.
There are five different scenarios.
2.1. High ping on hop 0 and/or hop 1
If there’s high ping on either or both of these hops, the problem’s on your side.
You need to check that you’re using high-quality Ethernet cables, or if you’re using Wi-Fi, try using a wired connection and rerun the test to see if there’s any improvement.
Hard reset your router, and maybe check the configuration of your PC’s network adapter. Then, you need to carefully check every component between your PC and router, including the two ends of that connection (i.e., your PC and your router).
2.2. High ping on hop 2
As we’ve stated, hop 2 stands for your router-ISP line connection.
Therefore, if there’s nothing wrong with your router, then it might be the cable that belongs to your ISP and goes into the WAN port of your router.
In this case, you might want to call your ISP and ask them if there seems to be a problem on their side.
2.3. High ping on your ISP hops (e.g., 3, 4, 5)
Again, the only way to fix this is through your ISP. Give them a call, tell them about your findings, and maybe even provide them with some information on your log file.
Remember that neither tracert nor pathping is illegal to use, so don’t be shy and offer your ISP as many details as you can. Your information might be of great value to the support team.
If the high ping is outside your ISP network, you must call your ISP and tell them about your findings. Maybe they’ll know how to tackle this situation onward.
2.4. High ping at the last hop
The last hop stands for the server you’ve connected to and running your tests against.
Therefore, if you notice high ping exclusively on this hop, there’s nothing wrong on your side, and the server is experiencing some problems.
If you want to, you can contact the service you’re having trouble with and make them aware of the situation.
For instance, try contacting the game’s support crew and tell them about your findings if it’s a game server.
3. Update device drivers
Right-click on the Start menu and select Device Manager.
Expand the Network adapters section, right-click on your network card, and select Update driver.
Select the option to Search automatically for drivers, and follow the prompts.
You should update the network card drivers. However, the same is true for other devices, such as wireless access points. Additionally, you should ensure that the firmware is current.
Windows 10 and the new OS are incredibly similar. In fact, except for minor differences, you may not tell them apart. Hence, you should be able to apply all the solutions we have given above to fix the packet loss on Windows 10 and 11.
There may be the occasional UI difference, but the same solutions apply.
Does packet loss make you lag?
It is known as packet loss when information sent between your home network and a gaming server does not reach the final destination. Like excessive ping, packet loss may lead to an increase in lags and in-game problems like rubberbanding. Even with a fast internet connection, packet loss may still happen.
To wrap up, if you’re experiencing packet loss, it’s not the end of the world.
Sure, it’s annoying and renders your connection unusable at times, but if you have a bit of patience, you can figure out where the problem is and maybe even fix it.
Note that you may face upload packet loss, Windows 10 packet loss on Wi-Fi or ethernet, or packet loss while gaming. Regardless of the case, our solutions contain how to fix packet loss on both the wired and wireless connection.
FAQs
What is packet loss in Windows 10?
Packet loss happens when data packets fail to reach their destination. This leads to network slowdowns, high ping, and issues with gaming, streaming, or VoIP calls.
What causes packet loss on Windows?
Common causes include overloaded networks, faulty hardware (like low-quality cables), outdated drivers, unstable devices, or software/firmware glitches in network equipment.
How can I test for packet loss?
You can use tools like PRTG Network Monitor or free options like Wireshark. Windows also includes commands such as tracert and pathping in Command Prompt to identify where the loss occurs.
How do I fix packet loss in Windows 10/11?
Solutions include using a VPN, updating device drivers, switching to a wired Ethernet connection, or contacting your ISP if the issue is outside your local network.
Does packet loss cause lag?
Yes. Even with fast internet, packet loss can result in lag, rubberbanding, and stuttering in online games, as well as call drops or video buffering.
That will be it for this guide; let us know if this has been helpful in the comments section.
Discord is a free VoIP platform for the video gaming community. It offers text, image, video, and audio communication between users in a chat channel. Discord uses the selected microphone to send user audio to other users on the channel.
However, some users have reported the Discord picking up game audio issues in the community forum. This issue can occur for several reasons, including incorrect sound settings and corrupted sound drivers.
If you are also troubled by this error, here are a couple of troubleshooting tips to help you resolve this annoying problem in Windows.
Why can Discord hear my game audio?
We consider properly delivering some of the important reasons why Discord is picking up game audio while playing, so make sure you check the following information:
Wrong audio settings – In this case, we consider the entire sound and audio system. If the Stereo mix function is enabled, the sound from the speakers could blend with the input (microphone) sounds. Moreover, remember that this issue might also be caused if your mic is not set as the default input device.
Outdated drivers – Drivers are the backbone of each operating system, so having the sound and audio ones ancient can also lead to this problem.
You should know that this audio problem comes in different variations; a few are:
Discord picking up youtube audio – Like you must have guessed, this problem is specific to YouTube audios.
Game audio playing through mic Discord – This variation works on sounds from your attached mic hardware.
Discord picking up computer audio – In this case, the app pics sound played on your computer.
Discord picking up Chrome audio is the same error but specific to when you use the app on Chrome.
Fortunately, we’ve prepared some helpful solutions that will help you to get rid of this problem once and for all.
How do I change input sensitivity on Discord?
Click on the Settings icon.
Select Voice & Video from the Apps Settings.
Use the Input Sensitivity slider to adjust the settings.
What can I do if Discord is picking up game audio?
1. Check the Stereo Mix setting
Right-click on the speaker icon in the Windows taskbar, then select Sounds.
If the Sounds option is not visible, click on Open sound settings.
Scroll down to Related Settings and then click on Sound Control Panel.
In the Sound window, open the Recording tab.
Right-click on the Stereo Mix device and select Disable.
Close the Sound Control Panel.
Launch Discord and click on the User Settings icon (Grear icon).
Select the Voice & Video from the left pane.
Click the drop-down menu under the Output Device section and select your headphones as the OutputDevice.
Now, select your microphone as the Input Device.
Save the change and relaunch the app. Next, check if Discord picking up the game audio issue is resolved.
2. Update sound drivers
Use the following keyboard shortcut to open the Run dialog box: Windows + R.
Type devmgmt.msc and click on OK to open Device Manager.
In Device Manager, expand the Sound, video and game controllers category.
Right-click on your audio device and select Update Driver.
Select the Search automatically for drivers option.
Windows will download and install any pending updates for the sound drivers.
Next, expand the Audio inputs and outputs section from the Device Manager.
Right-click on your microphone device and select Update Driver.
Select Search automatically for updated driver software option and let Windows install any pending updates for the driver.
Close Device Manager and check for any improvements.
If you’re not used to performing such operations and don’t want to risk doing more damage than good, you could always use a dedicated third-party tool to update or fix your drivers.
This kind of tool will not only do everything mentioned above, but it will also do it with minimal input on you, allowing you to update all drivers within minutes.
That’s why we suggest you try a specialized driver updating software that can detect outdated driver files or find missing ones within a few clicks.
Outbyte Updater will efficiently repair or update any drivers in the operating system without any safety issues for your PC’s health.
Right-click on the speaker icon in the Windows taskbar, then select Sounds.
If the Sounds option is not visible, click on Open sound settings.
Scroll down to Related Settings and then click on Sound Control Panel.
In the Sound window, open the Recording tab.
Right-click on your microphone device and select Properties.
In the Microphone Properties window, open the Listen tab.
Uncheck the Listen to this device box.
Open the Advanced tab.
Ensure the following options are checked: Allow applications to take exclusive control of this deviceand Give exclusive mode applications priority.
Click on Apply and OK to save the changes.
Once the microphone settings are changed, open Discord and check if the Discord audio issue is resolved.
4. Disable sound drivers
Right-click on the speaker icon in the Windows taskbar, then select Sounds.
If the Sounds option is not visible, click on Open Sound settings.
Scroll down to Related Settings and then click on Sound Control Panel.
In the Sound window, open the Playback tab.
Right-click on Realtek speaker and select Disable.
Next, right-click on NVIDIAHigh Definition and select Disable.
Click Apply and OK to save the changes.
Close the Sound Control Panel and check for any improvements.
How can I fix Discord picking up game audio on Windows 11?
The good news is that if you have followed this article from the beginning, then you can resolve Discord picking up game audio issues on Windows 11.
The two operating systems are very similar; hence the steps that apply in one are applicable in the other. And there are very occasional UI differences. But generally, the above solutions work on both operating systems.
What else should I know about the Discord audio problems?
Besides our presented issue, you should remember more about the Discord audio problems.
Cutting the stream randomly – In this case, you won’t be able to communicate with your teammates. However, if Discord audio keeps cutting out, make sure you verify some efficient solutions.
Screen sharing audio errors – Even if Discord has its screen sharing feature, many users claim that Discord screen share has no audio. Fortunately, you can always check how to fix it quickly.
That is as much as we will be sharing in this Discord article.
If Discord is picking up Chrome audio, YouTube audio, or If Discord picking up computer audio on MAC or when muted, you should be able to apply some of these solutions discussed.
The Discord picking up game audio is triggered due to incorrectly configured recording or playback devices.
Follow all the steps in this article to fix the issue and continue your chat session on Discord.
Zelle is a mobile finance app for making electronic fund transfers that’s usually reliable. However, some users see this error on Zelle when they try to log in or transfer with it: An error has occurred. (A101).
If you see the same A101 Zelle error on your mobile device, try applying the potential resolutions for that issue in this guide.
Why is my Zelle saying an error has occurred?
Moving your phone’s SIM card into a different slot – This action may lead to an error on Zelle.
If you’re relying on Wi-Fi, connect to a trusted hotspot instead of a public one. This also helps with Zelle Reason Code 2900.
Verify your email address with Zelle.
Close all the apps, including Zelle, and open Zelle again.
Log out of the app and log back in.
If you checked all these prerequisite methods, let’s see how we can fix this problem quickly.
1. Use the mobile data connection
Make sure the Zelle app is closed on your mobile.
Swipe down from the top of your mobile device.
Disable Wi-Fi by tapping it.
Go to Settings, on your mobile, tap Connections, go to Data usage, and toggle on the Mobile data option.
We recommend using mobile data instead of Wi-Fi, especially if you want to connect with Zelle in public spaces.
However, you may also protect your privacy by using a VPN for mobile data on your device.
2. Reinstall the Zelle app
Tap the Settings icon, then press the Apps button.
Select the Zelle app in the list, then tap the Force Stop button if the app is running.
Select Storage to bring up the data options below, then tap both the Clear data and Clear cache options.
Check if the Zelle app works fine. If not, go back to the menu, select the Uninstall option for Zelle, and tap OK to confirm.
Restart your mobile device, then open Zelle’s Google Play page, and reinstall the app from there.
The above steps are for reinstalling Zelle on Android devices. You can apply the same resolution on iOS devices, but the specific steps will differ slightly. This also helps with Zelle error A106.
3. Insert your mobile’s SIM card into an alternative slot
NOTE
This solution is recommended if you’ve moved the SIM card into a different slot after registering it with Zelle.
Turn off your mobile device.
Then remove the SIM card from the slot it’s currently in.
Clean the SIM card, then insert the SIM card registered with Zelle into an alternative slot on your mobile.
Power on your mobile and see if the problem persists.
Different banks that offer Zelle have variable sending limits. You’ll need to contact a bank to check Zelle’s transfer limits.
If your bank doesn’t offer Zelle, the sending limit for each week will be $500. That’s a fixed limit users can’t request to increase or decrease.
Those quick fixes for Zelle’s error A101 are worth a try. It’s also recommended to check that your linked bank card hasn’t expired and that its billing address matches the one input for the Zelle app.
If those solutions aren’t sufficient, try reinstalling the app and creating a new Zelle account. You can also contact Zelle’s customer support by filling out the email form on this Contact Us page.
This error is frustrating, and you don’t need to bother because we have compiled this guide and built some quick ways to fix error code 901 on Roblox.
Error code 901 in Roblox mainly occurs when sometimes the game keeps on reconnecting due to internet connectivity issues or because of the pending updates. If you are also facing ping issues in Roblox, then check our guide to fix high ping issues in Roblox.
What causes the error code 901 in Roblox?
Some common causes of this Roblox error are:
Glitch at the backend – This error occurs because of a problem from Roblox’s side. So, if you are facing this issue again and again, you should wait until they fix the problem.
Pending updates – One of the most common causes of this error. If an update is available for your game, update it immediately.
Game needs reconnecting – Error 901 can also occur when the game you are playing needs reconnected. This happens because Roblox servers might be down due to maintenance.
Unstable Internet connection – A very unstable or poor Internet connection can also be one of the reasons for this error. Do not hesitate to learn what to do if the Internet connection is limited in Windows 11.
The error code 901 usually springs up on the screen when a user tries to sign in to the game. However, you can easily fix it by simply following the guide below.
How do I fix the error code 901 in Roblox?
Before you proceed to detailed solutions for error code 901:
Check impending Roblox updates because pending updates cause this problem.
Check for corrupted game files, if you have some corrupted game files, you can’t enjoy your smooth gaming experience.
Verify whether you have been banned; sometimes, your account gets banned. The best method to check this is to create a new account and try playing from it.
1. Unlink and sign back into your Roblox account
On the Roblox main page, click on the Settings option present at the bottom left corner of the screen.
In the SETTINGS window, click on the Account tab.
Simply click on the UNLINK option.
A confirmation prompt will open up; press CONFIRM to unlink your Roblox account.
Roblox Error Code E01 is similar to this error so the guide might also offer additional solutions.
2. Update your Roblox
Go to the Settings section on your Xbox One.
Click on Updates & downloads.
Under Updates, select your game and click on Migrate to Latest Update.
After installing, log in to Roblox and see if the Roblox error code 901 still appears.
If you’re playing the game in Steam, check if the game has any updates there too. Although they usually are automatic, Steam game updates may fail.
In Settings, click on General settings and then click on Network settings.
In the Networks tab, click on Test network speed & statistics.
Now the screen will display details regarding your internet connection. In case the connection is unstable, try connecting your console to the internet again.
An unstable internet connection is another fundamental reason behind your screen displaying the error code 901 in Roblox.
Fixing your Wi-Fi connection is likely also to fix the error mentioned above.
There is another known issue with Roblox of the white screen. If you are experiencing that too, check out the complete guide to fixing the white screen issue in Roblox.
4. Delete and reinstall Roblox
Within the Home panel, click on My games & apps.
Next up, click on the See all option present at the top of the screen.
Simply click on the game you wish to delete, and click on the Uninstall option in the pop-up menu that opened up.
Then, click on the Store present on the home page, search for Roblox, and install it again.
Ensuring a stable internet connection and reinstalling the game afresh can also help you fix similar issues on the Roblox app, like error code 267and 279. To know more, read this guide.
If none of the above solutions have worked, reinstalling the game is your best bet. Reinstalling Roblox might seem like a complicated task; however, it will resolve the error code 901 quickly!
5. Hard reset your Xbox gaming console
Hard press the Power button on your Xbox to switch it off.
Next up, press the Eject and Power buttons together, and release the buttons when you hear a beep.
The screen will open up a troubleshooting menu. In this menu, click on Reset this Xbox.
In the next screen that opens up, click on RESET AND KEEP MY GAMES & APPS so that you don’t lose any of your data.
Once you have hard reset your Xbox, log in to your Roblox account. The error code 901 must have been cleared by now!
If all methods fail, then on the now.gg website, you can play Roblox on your computer, laptop, tablet, or mobile device without getting blocked.
Whether you’re looking for mainstream games or classics, you can play them all without restrictions or compatibility issues. Similarly, the graphics are very close to those on the PC version.
We hope that this article helped you in resolving your problem. If you have any other questions or queries in your mind, then do let us know in the comments section below.
Sometimes, while taking a backup of data from a PC to OneDrive, using the KFM (Known Folder Move) feature causes some problems and stops working. If you face a data synchronization issue, you are already in the right place.
Why is OneDrive KFM not working?
OneDrive Known Folder Mode not working is typically seen when Windows 10 build 17763 or later versions are installed on the machine.
More specifically, the Known Folder Mode will not work when Windows 10 build 1809 and later versions are installed on the server hosting the Client Access License (CAL).
The main causes that are disrupting the working of OneDrive KFM include.
Exceeded file limit – If you try to sync more than the allowed limit of 10,000 files with OneDrive KFM, the process will fail, and an error message will be displayed.
Incorrect file types – Only specific types of files are supported by OneDrive KFM. These include .doc, .docx, .ppt, .pptx, .xls, and so on. OneDrive KFM will not back up any other type of file.
Not enough space – If your system doesn’t have enough free space, then OneDrive KFM will not be able to sync your files.
How do I fix OneDrive KFM not working?
Before moving to detailed solutions, make sure to apply these quick checks:
Restart the OneDrive desktop sync app because sometimes it just needs a fresh start to work, and your problem could be resolved with a simple restart
Disable any third-party security software because some of them can interfere with the OneDrive app
Make sure not to upload unsupported file types. Files or folder name that contains the given characters ~ ” # % & * : < > ? / \ { | }. as well as trailing and leading spaces in file or folder names.
Make sure that you’re not syncing too many files. You must upload the files under the maximum limit. When the number of files increases, the performance of the local system decreases.
Now let’s jump to the solutions on how to fix OneDrive KFM in no time.
1. Enable folder redirection
Press Windows + R key to open the run box and then type the following command in the box and click on OK: %localappdata%\Microsoft\OneDrive.
Now click on the folder named as 22.186.0904.0001 and then click on adm.
Copy OneDrive.adml and OneDrive.admx.
Enter the following command in the run box, hit enter, and type the following command: %windir\PolicyDefinitions
Click on the folder en-US and paste the content into this folder.
If prompted, click Continue to allow the administrator access.
2. Silently move Windows known folders to OneDrive
Press Windows + R key to open the run box, write the following command and hit Enter: gpedit.msc
Now under Computer Configuration, go to Administrative Templates, then click OneDrive.
Click Silently move Windows known folders to OneDrive.
Now enable the setting by clicking the radio button named Enabled.
Finally, click OK.
If you enable this option, Windows-known folders will move without user intervention. You can also enable a notification after their folders have been redirected.
Microsoft recommends using this setting alongside Prompt users to move Windows-known folders to OneDrive.
This is because if the automatic known folder move does not work, users are prompted to fix the errors and back up these folders.
Click the OneDrive icon at the bottom left corner.
Click the Settings icon.
Locate Settings and click it.
Click Auto Save.
Now click Update folders.
Click on the Start protection, and you are done.
If you are curious about what KFM is and how it works, check this article about OneDrive know folder move, then enabling OneDrive Known Folder move might overcome the OneDrive KFM issues.
4. Make sure you have the Site Collection Owner’s permission
Go to your OneDrive and click on the Settings icon.
Then click on the OneDrive settings option to open up the Settings page.
Click on More Settingsfromthe sidebar and select the Site collection administrators option.
Ensure that your email is added to the textbox and click on the OK button.
5. Close Windows file transfer before using KFM for backup
When you are moving and copying data within your local file system, and simultaneously you try to start a backup on Google Drive, then KFM not working due to local file transfer.
To use the OneDrive folder backup or KFM feature, you have to wait for the complete file transfer, or you can cancel the file transfer within your computer and then start using KFM, which will work properly.
If ever OneDrive had missed from your PC, then follow the simple methods found in this guide dedicated to OneDrive missing from File Explorer.
We are sure our provided solutions will greatly help you using KFM. If you are facing any issues, try these solutions and let us know which tip worked for you in the comments area.
Whether it’s due to camera shake or movement, you can restore clarity and fix blur in your photos with the right software.
We know how disappointing it can be to see your cherished moments come out blurry. In this article, we’ll share some fantastic tools that can help you turn those fuzzy images into sharp, vibrant memories.
inPixio Photo Studio Pro 12 is one of the best tools for photo editing lovers out there, professionals and amateurs alike. The software is multi-functional, including lots of features.
You can transform a simple image into a piece of art with inPixio’s plethora of image customization options. Resize, or completely remove backgrounds and objects from your photos with a few clicks.
How to fix blurry photos using inPixio Photo StudioPro 12:
Photoshop is a very complex image editing tool that you can also use to fix blurry images. However, if you haven’t used this tool before, we recommend using another from this list.
Photoshop is suitable for intermediate and advanced users. But if you still want to use Photoshop to fix blurry pictures, you can check out the guide below to learn what are the steps to follow.
How to fix blurry photos using Photoshop:
Go to the Filter menu.
Click on the Sharpen option.
Select the Shake Reduction filter.
The filter will automatically start analyzing the image.
You’ll see a progress bar on the screen that will remain there until the scanning process is complete.
Once the blurring problem has been automatically corrected, Photoshop will display the enhanced photo.
Here’s an example of an image where the blurring issues have been fixed.
You can take it even further from there and modify the blur traces, reposition the image in focus, and so on.
You can use this filter to reduce blurring issues caused by low-light environments, and all kinds of unwanted camera motion including arc-shaped and rotational motion.
Photoshop is without a doubt the best tool for photo editing, so it’s perfect if you need to fix blurry photos or make any other edits.
Adobe Photoshop
Transform your fuzzy photos into sharp masterpieces with industry-leading software!
Adobe Lightroom – Simple, intuitive sharpening for beginners
Yet another product makes it onto our list, but this one could be considered Photoshop’s smaller brother, since it has far fewer tools than it, but it is well suited for small-scale photo editing, making it great for beginners.
If you’re looking for an app that makes pictures clear, then Adobe Lightroom might be just what you need.
Here’s how to use Adobe Lightroom to sharpen blurry photos:
Movavi Photo Editor is a great tool to make blurry pictures clear. This tool has an intuitive user interface, allowing you to quickly understand what each option does.
The Movavi Photo Editor also allows you to add effects and filters, crop, flip pictures or change image backgrounds, and remove objects.
Add the blurred photo to the working area of the tool.
Start editing the picture:
Open the Adjust tab and move the Sharpness slider until it smooths out the fuzziness.
You can also use other types of photo correction options: for example, you can move the Contrast and Brightness slider to further improve your pictures.
Once you’re satisfied with the result, save the photo.
Movavi Photo Editor
Increase sharpness using the Adjust tab to eliminate fuzziness!
ACDSee Photo Editoris a professional-level solution for editing photographs on your PC professionally, without too much effort.
Thanks to it, you will gain total photography control so that you can adjust every little visual parameter.
It also features RAW processing support, so you can import RAW files straight from your camera, cutting out the time between the camera transfer and the editing.
ACDSee Photo Editor is a simple-to-use app that makes your pictures clear, so it’s definitely worth checking out.
Here’s how to unblur photos using ACDSee Photo Editor 11:
Topaz SharpenAI – AI-driven tools for detailed, sophisticated blur correction
Topaz SharpenAI is a tool that can reverse blur and sharpen image detail. You can use this tool to make an unusable image clear, a good image better, or give a great image that extra edge.
Here are the main features of this tool:
Ability to restore color and detail to an image
Micro-contrast tools for fine detail enhancement
Estimate blur tool for unknown/complex blur types
Targets four types of blur: generic, out-of-focus, straight motion, and unknown
Easily integrates into any part of your post-processing workflow
If you’re looking for a fast and easy way to fix blurry pictures, the free AI image upscaler from Depositphotos is a great choice.
You can increase resolution by 2x the original, instantly correcting blur and other imperfections. Moreover, the AI ensures natural and distortion free results by reconstructing and introducing pixels during the process.
The web-based upscaler is accompanied by a huge selection of other tools, including a logo maker, background remover, and AI image generator.
Here’s how to use the Depositphotos image upscaler:
Go to Depositphotos.com and find the Free Image Upscalerin the tools section.
Click the Upload Image button or drag-and-drop your image up to 15mb.
Wait a few seconds for the image to process, then instantly preview the results.
Click the Download Image button to save the enhanced image to your computer or device.
I tested the tool, and it quickly fixed this photo’s blurriness and upscaled it from 1050×593 to 2100×1186.
We hope this list helped you find the best choice that suits you. If you’ve used other tools to fix blurry images, you can tell us more about your experience in the comment section below.
In case you’re having issues with blurry images on the web, our guide can help you unblur image on a website with ease.
Users who experienced them have reported that the issue emerges immediately after starting a game or similar application.
One standard error is followed by the prompt that informs users about the d3dx9_43.dll file that’s missing. This error can be frustrating, as it affects your games.
In this guide, we have shown nine different ways to solve the issue effectively.
Why is d3dx9_43.dll not found?
There are different variations of this issue with varying causes. Below are some of the common ones:
D3dx9 43.dll missing Windows 7, 8.1, 10: This issue can appear on almost any version of Windows, and even if you don’t use Windows 10, you should be able to apply most of our solutions.
D3dx9_43.dll not found PES 2017, League of Legends, Stepmania, World of Tanks, Street Fighter X Tekken, Oblivion, Skyrim, Far Cry 4, GTA 5: Apparently, this issue can affect many games, and if you encounter this problem, make sure that you install the necessary version of DirectX.
D3dx9_43.dll is missing: This is just a variation of the error, and in most cases, you can fix it by updating your drivers.
Additionally, some users have faced issues with d3dx9_43.dll download on Windows 11 devices, d3dx9_43.dll missing on Windows 10, d3dx9_43.dll download on 64 or 32 bit, and d3dx9_43.dll League of Legends.
Let us go straight to the solutions.
How do I fix the d3dx9_43.dll is missing error in Windows 10?
1. Use a third-party DLL fixer app
Microsoft recommends that users do not tamper with their DLLs unless they truly know what they are doing, and even then, they should create backups just in case.
In that case, third-party solutions are the next best thing because you can use them to perform this task automatically.
Finally, click the downloaded file and follow the simple onscreen instructions to complete the installation.
The d3dx9_43.dll not found error message usually appears if you don’t have the necessary version of DirectX installed.
If you’re having this issue while trying to run a particular game, you can fix the problem simply by running the DirectX setup file that came with the game. Almost all games come with the necessary DirectX setup file, which you can find on installation media or in the installation directory.
Look for the redist/directx directory and run the setup file from that directory to install the necessary version of DirectX. Once you install DirectX, the problem should be resolved entirely. If it did not solve your problem, move to the next solution.
3. Reinstall the problematic program
According to users, d3dx9_43.dll is missing error that can sometimes appear due to third-party applications.
Sometimes the application you’re trying to run might not be properly installed, which can cause this and many other problems.
To fix this issue, it’s advised that you reinstall the problematic application. There are a few ways to do that, but the most effective one is to use uninstaller software.
These special applications can remove any software from your PC, including all its files and registry entries.
If an application is causing this problem to appear, use the uninstaller software to remove it altogether. A good uninstaller can force remove stubborn and malicious apps without causing any damage to your PC.
Making sure your app is completely removed from your PC usually makes for an error-free reinstallation. Once you reinstall the application, the issue should be resolved.
4. Scan for malware and check your antivirus
Press the Windows key and type virus.
Select Virus & threat protection.
Choose Scan options.
Select your preferred scan option and click the Scan now button.
According to users, sometimes malware infection can cause d3dx9_43.dll not found error to appear. This is unlikely, but to be sure, we advise you to perform a full system scan and check for malware infections.
If your system isn’t infected, the next cause for this problem could be your antivirus. Sometimes your antivirus can interfere with your system, and to fix that, it’s advised to disable it.
If disabling the antivirus doesn’t work, you may remove it and switch to a different antivirus solution.
And there is no better antivirus software with trial versions you can try than TotalAV. This software guarantees your online and offline safety without affecting other processes on your PC.
Also, it detects viruses before they can affect your PC. It might be all you need to fix the d3dx9_43.dll is missing errors on Windows 10 and 11.
Press the Windows key + X and select Device Manager.
Choose the Display adapters option.
Right-click your graphics driver and choose Update driver.
Choose the Search automatically for drivers option.
Wait for the search to complete and install the updates available.
The d3dx9_43.dll not found error can be caused by an outdated graphics driver. As you know, DirectX corresponds to GPU, and with their mutual effort, you can enjoy visual effects.
However, if you don’t have appropriate drivers that respond to the current DirectX version, you’ll certainly bump into this or a similar error. Updating the driver should solve the issue in this case.
If you don’t want to use the built-in Windows updater, you can visit the official websites of manufacturers like NVidia, AMD/ATI, and Intel to download the latest version of the driver.
While there is nothing wrong with updating your drivers manually, there is always the risk of installing the wrong drivers. This can cause a bigger problem than the d3dx9_43.dll not found error.
To prevent this, we recommend using a dedicated driver updater in Outbyte Driver Updater. This top-notch software automatically scans, updates, and fixes broken, outdated, and missing drivers.
It recommends original drivers from trusted manufacturers from its extensive database. And with a whopping 18+ million drivers in its database, you bet it has everything needed to take care of your driver needs.
Press Windows key + X and select Command Prompt (Admin) or PowerShell (Admin).
Type the command below and press Enter to run it: sfc /scannow
The scan will now start. Remember that this process can take about 15 minutes, so don’t interfere with it.
Once the scan is finished, the d3dx9_43.dll not found issue should be resolved. You might have to use a DISM scan if the problem is still there. To do that, follow these steps:
RunCommand Prompt with administrative privileges.
Now run the following command: DISM /Online /Cleanup-Image /RestoreHealth
DISM scan will now start. DISM scan can take about 20 minutes, so don’t interrupt it.
File corruption can sometimes cause d3dx9_43.dll is missing error to appear and to fix it, the best way would be to perform an SFC scan.
After the DISM scan is finished, check if the problem is still there.
If you could not run an SFC scan before, or if the SFC scan didn’t fix your problem, you might want to rerun it and check if that helps.
7. Copy the missing file from another PC
If you keep getting d3dx9_43.dll is missing error message, you might be able to fix the problem by copying the missing file from another PC.
Many websites allow you to download this file for free, but some of these websites can be malicious, so we strongly recommend that you don’t download this file from them.
To fix the problem, it’s always a better idea to copy this file from a friend’s PC.
Remember that your friend might not have this file on their PC, so this method isn’t always successful.
8. Install the latest updates
Press the Windows key + I to open the Settings app.
Select the Update & Security option.
Click the Check for updates button.
D3dx9_43.dll not founderror can appear if your PC is outdated. To fix the problem, ensure that you update your PC is updated. The application you’re trying to run is up to date.
In addition, if you are getting the d3dx9_43.dll missing error on a single application like League of Legends, make sure you update the app.
How can I fix the d3dx9_43.dll not found on Windows 11?
If you are facing the d3dx9_43.dll not found error on Windows 11, the causes are similar on other versions of Windows.
To fix the issue, you can update your driver and PC and reinstall the faulty apps. Basically, you can try all the fixes in this guide to solve the problem on Windows 11.
Can I download d3dx9_43.dll?
D3dx9_43..dll is available for download on various websites. You can download and install it from the DLL installer on the official Microsoft website, as shown in this guide.
Also, you can get it from various third-party sites. So, you are not short of quality options.
That should conclude it. We certainly hope that you managed to resolve the d3dx9_43.dll and not found errors with the presented solutions.
In addition, if you have questions or suggestions, post them in the comments below. We recently covered a similar error in our d3dx9_25.dll is not found guide, so don’t hesitate to check it out.
Over the years, a PC might become slower and less reliable than it once was. This can be due to invalid registry entries, many background apps, malware, a fragmented and complete hard disk, and more.
Although Windows already includes numerous top repair and maintenance tools to keep things ticking smoothly, with many PC optimization programs that can boost system performance.
PC optimization software relies on hard disk and registry cleaners, disk defrag, RAM optimizers, and startup tools.
This guide contains the list of the best free PC optimization software with which you can supercharge Windows. We will also answer your questions on what these tools can or cannot do.
Windows 10 and 11 have free built-in optimization tools that help to keep your PC in top shape. Also, you can try essential maintenance like PC updates, deletion of big files, and reduction of startup programs to optimize your PC.
To improve things, you can use some of the best free optimization software to improve the performance of your PC. These tools include start-up boosters, PC cleaners, RAM optimizers, and repair tools.
We will discuss them in detail in the subsequent sections of this article.
Fortect is an all-in-one automated solution that can help you optimize your PC with ease, thanks to its multitude of advanced features.
You can use this software to scan your device thoroughly and find its performance state and which components need to be ameliorated to reach an optimal setting.
The scanning process is fast and efficient because it covers your whole system and doesn’t take more than five minutes. Plus, it will also help you identify faulty or incompatible hardware.
Regarding the pricing category, you don’t have to worry because Fortect offers a free trial besides its excellent and affordable plans.
This program will help you get rid of lags as it can repair all the damaged files, including DLLs and registry keys, and resolve any stability issues.
Moreover, you can use Fortect to execute cleanup actions by erasing junk files, build-ups, and registry issues, and ultimately free up space, which will help with your PC condition.
Here are other key features that Fortect offers:
Blue screen of death prevention
Browser Cleanup
Operating system recovery
Fortect
Even if you don’t have the latest PC, Fortect will make sure that its condition will be visibly improved.
PC Cleaner is an amazing optimizing and repair software that has very low resource consumption and features and an incredibly easy-to-use interface.
Separated in their own tab the clean-up and optimization functions are easily accessible. You can clean and boost memory performance making sure your apps don’t take too much of your system resources.
The most important optimization from Windows can be accessed and tweaked from this software with just a few clicks.
Any system file can be repaired after an in-depth scan. This allows you to properly identify files that may cause DLL errors of BSOD.
PC Cleaner is able to create an in-depth report on your system condition and export it in CSV format so you can easily show or send it to specialized personnel in case of persisting problems.
These optimization options combined with the powerful cleaning function make Fortect PC Cleaner one of the most reliable tools for long-term maintenance of your computer.
Other key features:
Security booster
Residual files clean-up
Uninstall unwanted programs
Clean up browser extensions
Fortect PC Cleaner
Employ the help of this powerful cleaner and optimizer for the long-term maintenance of your computer.
PC performance issues are usually linked to either system mishandling or viruses. Logic dictates that the best free PC optimization software would have speed-up tools and certain antivirus features.
IObit Advanced System Care is a program based on the popular IObit anti-malware engine.
This tool incorporates full antivirus capabilities and the already proven comprehensive PC tune-up ability. It thus protects against all kinds of security threats, system slowdown, freeze, and crash without slowing down your system.
The program runs silently in the background without slowing down your system as other PC optimization tools do.
More so, it comes with a free version, and those who do not wish to continue with the subscription can always revert to it without uninstalling the program.
As for usage, the program is highly intuitive, with the menu being arranged in a way that caters to both experienced users and beginners alike.
The benefits of using IObit Advanced System Care are:
AI PC cleaning of all junk files, unwanted programs
Boosting of startup by disabling useless apps
Privacy data protection for 100% safe online browsing
Internet speed optimizer and booster
All in all, the program is an excellent addition to anyone’s digital library, especially those that value performance above all else.
System Mechanic Ultimate Defense is one of Windows’s most highly-rated free PC optimization software.
This software has a freeware and Pro version that includes more advanced modules with antivirus, internet connection tweaker, Windows customization, and search and recovery tools.
Nevertheless, the freeware version still has the essential maintenance tools to boost Windows.
System Mechanic Ultimate Defense has an intuitive and appealing UI design that includes most software tools and options within a left sidebar.
It gives you a system status overview (shown in the snapshot above) highlighting things that need fixings, such as registry issues, junk files, or fragmented hard drives.
System Mechanic Free retains several of the essential tools from the full package. It has a junk file cleanup tool that does a system-wide scan to erase obsolete files.
It includes a registry tuner with which you can fix invalid registry entries and comes with backup and restore options.
With the software’s startup manager, users can remove startup bottlenecks to speed up boot times. In addition, you can also speed up Windows with System Mechanic’s RAM optimizer that defrags RAM.
On top of that, this utility has tools to fix invalid shortcuts, repair internet connections and defrag hard disks; and users can run multiple tools at once with its wizards.
Let’s see the key features of using System Mechanic Ultimate Defense:
Speeds up the processor, memory, and hard drives
With PC cleaner it removes clutter and junk files
Password manager and credit card security
Antivirus capabilities
Browsing shield for increased online privacy
Iolo System Mechanic is one of the seven software products in the comprehensive security, privacy, and optimization package Phoenix 360.
Iolo System Mechanic Ultimate Defense
System Mechanic contains excellent optimizing features that stand beside its trustworthy name.
Yet another PC optimization tool that is based on a top-rated antivirus tool, AVG PC Tuneup.
This software incorporates all the protective tools of the AVG antivirus for free with basic PC optimization tools that everyone needs on their PC.
It doesn’t matter if your PC is slowing down due to old age or if there are tons of junk files on it. AVG PC Tuneup will take care of it and make it run almost as if it were new.
It allows you to:
Speed up your Windows PC
Remove junk files to free up space
Rid your browser of hidden files
Uninstall software you don’t need
Get all-around 1-click maintenance
As for the programs running in the background may be annoying, but at the same time, you may not want them removed.
If that is the case, you can use AVG PC Tuneup to put them to sleep and stop them from hogging any more resources.
However, there is also software with no business on your PC, which you may know as bloatware.
AVG PC Tuneup knows how to deal with these issues by cleverly detecting and removing them, even when other programs can’t.
Overall, AVG PC Tuneup can be considered a more elaborate refresh button for your PC and a much more affordable alternative to buying new hardware.
NOTE
The program is also available in a free version, but if you want to enjoy its full functionality, then getting the premium version is your best choice.
The latest Ashampoo WinOptimizer software might have more extensive file management and PC maintenance tools, but there are still many optimization options and settings to explore in the freeware version.
WinOptimizer Free has Drive Cleaner, Registry Optimizer, and Internet Cleaner tools for system maintenance. Its One-Click-Optimizer provides a handy shortcut to run those tools simultaneously.
The Drive Cleaner is flexible as users can create exclusion lists, add file filters and configure it to delete items to the Recycle Bin.
WinOptimizer’s Startup-Tuner is another essential system maintenance tool with which you can disable Windows services and edit startup items.
The program comes with a Task Scheduler for you to schedule optimization runs, and it also saves the most frequently used modules in Favorites for quicker access.
However, WinOptimizer isn’t just system maintenance software. It also includes handy Windows customization and file management tools.
For example, the software has a Context Manager with which you can customize Windows context menus. The Icon Saver enables users to save Windows desktop icon arrangements.
Also, using Ashampoo WinOptimizer provides the following perks:
Thorough in-depth cleaning of system critical areas
Find and remove older versions of Windows, updates, and system caches
Convenient cookie manager for “safe” cookies
Improved overview and easier handling in link checker and context menu manager
Up to 75% faster cleaners
In addition, you can split up, encrypt, and recover files with WinOptimizer’s File Splitter, File Encrypter, and Undeleter tools. So WinOptimizer offers more tools than most optimization suites.
Glary Utilities PC optimization software is a cut-down version of the Pro package.
However, there isn’t much difference between the freeware and Pro versions besides Glary Utilities Pro’s automatic updates, free technical support, and extra scheduling options.
There’s also a free portable version of the software you can run from external drives.
Glary Utilities is packed with more than 20 system tools to optimize Windows.
It includes standard tools such as disk cleaner, registry cleaner, startup manager, uninstalls manager, and disk defrag.
On top of that, this program also has fewer standard tools for removing malware, fixing invalid shortcuts, deleting empty folders, erasing duplicate files, splitting and joining files, and even file recovery.
Glary Utilities enables users to run a custom 1-click Maintenance scan that incorporates a number of its tools, which can come in handy.
The program’s RAM optimizer enables you to select a more specific amount of RAM to free up a slider bar.
Glary Utilities also integrates with File Explorer so that you can select some of Glary’s file management options directly from context menus.
Let’s see the main key features of Glary Utilities:
Simple, easy-to-use interface
Privacy-protecting features
Built-in secure-deletion tool
Integrated driver updater
Lets you manage which programs launch when a PC boots
Overall, Glary Utilities has almost all the tools you’ll need for PC optimization.
CCleaner is award-winning free PC cleaner optimization software for Windows 10 with an extensive user base eclipsing two billion downloads.
It has thorough cleanup tools that don’t erase any more essential system files. You can use this software to free up hundreds of megabytes of disk space, remove software, manage startup items, and repair possible errors.
The freeware version of CCleaner might lack some of the scheduling, file recovery, and disk defragmentation tools included in the Professional Plus package. However, it still has a few handy options for system optimization.
You can add the freeware CCleaner to Windows, which is quite limited in actions and in customizing CCleaner’s work.
But there is also a full version of CCleaner Pro if you are interested.
CCleaner primary tools
CCleaner’s primary tools are its hard disk and registry cleaners. It has a flexible hard disk and registry cleaners to configure to delete various, more specific files and registry items.
Another advantage of CCleaner’s hard disk cleaner is that it enables you to clean up third-party software file items.
Beyond the HDD and registry cleaners, CCleaner’s tools might seem limited compared to some alternative optimization software.
Some of the main key features of CCleaner are:
Can find and update old drivers
1-Click update for all your software
Disables unneeded programs for quicker startup
Fewer crashes and errors by fixing registries
Safer browsing with its browser features
CCleaner’s handy Browser Plugins tool lets users quickly activate or deactivate browser extensions, apps, and plug-ins. You can also search for and erase duplicate files with the Duplicate Finder tool.
So even if CCleaner doesn’t have the most extensive number of utilities, it’s still a handy Windows optimization program.
The second entry on our list of PC optimization software might not look like much at first glance, but it proves that you shouldn’t judge software from its fancy UI.
Tweaking Windows Repair is a complete system repair and optimization tool. It works fast and efficiently so your PC can return to its original state.
Tweaking Windows Repair is available in both a free and a Pro version. Both are good at solving the most common PC-related issues you may ever encounter.
While the Pro version offers a few extra features, all the basics are covered in the free version. So, unless your PC has encountered some severe problem, there’s no need to spend a single dollar.
Tweaking Windows Repair
Resolve all your Windows-related errors using this comprehensive optimizing software.
WinUtilities Free is another all-in-one PC optimization software with a freeware and Pro edition, with an annual subscription. The publisher reveals little about the differences between the freeware and Pro editions of WinUtilities.
The UI design of both editions is almost identical. Still, the File Undelete, Task Scheduler, and Duplicate Files Finder only work in the Pro version, which also has free technical support.
WinUtilities Pro also boasts a more effective registry scan engine and disk cleaner.
WinUtilities Free has an impressive 25 modules that consist of PC optimization, cleanup and repair, files & folders, registry, and other system tools.
Users can select Registry Defrag, Disk Defrag, Startup Cleaner, RAM optimizer, and BHO (Browser Helper Objects) Remover tools in the optimization category.
The software includes a Disk Cleaner to remove junk data, a Registry Cleaner to fix invalid registry entries, Shortcut Fixer, and Uninstall Manager.
The software’s 1-Click Maintenance option incorporates most cleanup and defrag tools.
WinUtilities Free has helpful file, folder, and registry tools to split and merge files, analyze disk space, back up the registry, and remove and restore context menu options and settings.
The publisher has also packed all those tools within a clean and intuitive UI.
? How to find the best PC optimization software for gaming?
To find the best PC tune-up software, you need to see which one fits you best. There is a wide variety of PC utilities out there, but only some of them will actually boost your computer.
For the best results, you should know what aspect of your PC needs the most optimization:
Too many junk files and no storage left?
Do you use all RAM for simple activities?
Do errors cause slowness in your computer?
Do you have outdated drivers?
Knowing this, you can easily find the right software to optimize your computer. You can also take advantage of many game booster applications to optimize your gaming experience and boost your performance.
You can use as well any Windows optimizer software to optimize your performance since it will clear all your temporary files and free up the necessary space.
Finally, if you want a real boost, you might want to try using RAM cleaner applications to free up RAM and leave more memory for other important tasks.
Does Windows 10 have an optimizer?
Windows 10 has numerous free built-in optimization tools. It comes with a built-in antivirus known as Windows Defender.
Also, it has a troubleshooting feature that allows you to find and fix fundamental issues. There is also the SFC and DISM scan feature that helps to repair broken system files.
Lastly, you can update your drivers from the Device Manager for free on Windows 10. So, you are not short of optimization options.
We have concluded this guide on the list of the best free PC optimization software. With this, we believe you have everything you need to keep your PC in top shape.
Do you need a list of the best Windows 10/11 boot repair tools? Then, check our comprehensive guide on the top options to use.
To keep your system optimized and secure from threats, you can use Microsoft PC Manager, and with a single click, you can boost your PC performance.
Bad Image error messages can pop up for Steam and other software. For example, the error message might state something like:
Steam.exe – Bad Image. C:\Windows\App\Patchexample.dll is either not designed to run on Windows or contains an error. Try installing the program again using the original installation media.
As a consequence, users can’t launch Steam games. Here are some potential resolutions for users who need to fix a Bad Image error for Steam.
What does the Steam.exe bad image error mean?
When you attempt to open an application in Windows, but it does not launch correctly, you will encounter a bad image issue.
It is possible that the files or the libraries required to run the application are corrupted, or the process might be halted.
Users reported other similar errors that will be addressed in this article. However, some of the most common errors are the following:
Steam.exe bad image gamemanager32.dll – Path references to DLL files are included in each and every Bad Image error message.
Steam.exe bad image detoured.dll – The Steam.exe Bad Image issue is most often caused by a problem with the file that Steam is trying to open.
RDR2.exe bad image – Follow the solutions below to repair your system as well as your system DLL files.
Gta5 exe Bad Image – GTA V is no exception from the bad image error, but don’t worry as it is fixable, just like the other cases.
RobloxPlayerBeta. exe – bad Image – Fix this issue by checking your Internet connection.
DayZ_x64. exe – bad image – Resintalling Steam will refresh its files and get rid of the bad image error.
Lost ark exe bad image – Alternatively, the SFC scan will attempt to fix and replace your system files that have been corrupted.
FullTrustNotifier.exe Bad Image – You should roll back your Windows 10 PC to a point where this error wasn’t present.
What is Steam.exe, and where can I find it?
For those who don’t already know, steam.exe is a mandatory program for the most popular games. Keep in mind that games won’t start without.
It is not harmful as long as it’s a legitimate version of Valve. It is what allows the games to update their performance over the internet.
By default, Steam is installed in the folder: C:\Program Files(x86)\Steam
While all the games-related files are stored in the folder C:\Program Files\Steam\steamapps\
Let’s see how you can fix the Steam.exe -Bad Image error without further ado. Follow along!
How can I fix the Steam.exe -Bad Image error?
1. Repair your system with a specialized tool
Most of the time, the Steam.exe Bad Image error can appear due to file corruption. Unfortunately, this is a common issue and you can quickly fix it by performing a scan with a specialized tool.
2. Roll Windows 10 Back to a Restore Point
Use the following keyboard shortcut to open the Run dialog box: Windows + R.
Input rstrui in Run’s text box and click OK.
Click the Next button to open a list of restore points.
To fully expand the restore point list, click the Show more restore points check box.
Select a restore point that predates the Bad Image error on your desktop or laptop.
To check what software and updates get removed for a restore point, press the Scan for affected programs button. That button opens the window shown directly below, which lists software updates that will be deleted.
Click Next and OK to confirm the selected restore point.
Bad Image errors can be due to faulty Windows 10 patch updates.
Thus, restoring Windows 10 to an earlier date that predates recent patch updates might resolve the Steam.exe – Bad Image error for some users.
Doing so might delete a recent update responsible for the Steam.exe -Bad Image error. Users can restore Windows 10 earlier with the System Restore utility as follows.
3. Run a System File Checker Scan
Press Windows, then input cmd in the search box and open the Command Prompt result as an administrator.
Before initiating the SFC scan, enter the following command, then press Enter: DISM.exe /Online /Cleanup-image /Restorehealth
Then, input the following command, and hit the Enter key again: sfc /scannow
This will run the System File Checker scan, which can take up to 30 minutes or longer.
After that, the Command Prompt window will tell users if WRP repaired any corrupted files. If so, restart the desktop or laptop.
All Bad Image error messages include path references to DLL files. Therefore, Bad Image errors can be due to corrupted DLL system files.
A System File Checker scan can fix corrupted system files to resolve the Bad Image error. So, users should give an SFC scan a shot as follows.
Press the Windows key, type Steam, then open the desktop client.
From the top menu of the window, navigate to Library.
Right-click on the game that returns the Bad Image error message, then select Properties.
Select the Local Files tab on the opened window.
Press the Verify Integrity of Game Files button on the Local Files tab.
Some users have said on forums that the Bad Image error arises for specific Steam games instead of the client software.
Thus, users can launch the client software, but not the Steam games, for which the error message pops up.
Users have confirmed that verifying Steam game file integrity can fix today’s issue for Steam games.
5. Reinstall Steam
Press simultaneously on the following keys: Windows + R. Enter appwiz.cpl, then click OK.
Select the Steam software listed there, then click on the Uninstall button.
Restart your PC.
Now, navigate to the Steam download page. From the top-right corner of the window, select Install Steam.
Follow the on-screen instructions to reinstall the app.
Steam Bad Image error messages suggest that users try reinstalling the software. Doing so could replace corrupted Steam files.
Thus, that’s another possible resolution for the League of Legends Bad Image error in Steam.
Is Bad Image error a virus?
Usually, that’s not the case, and Bad Image errors actually signals a problem with an application’s inability to launch properly.
However, there’s a malware that goes by an identical name, i.e., Bad Image Virus, which keeps throwing the same error message. This is to target the user in purchasing a fake antivirus or stealing their personal information.
A quick fix here would be to run a full malware scan on the PC since that would help identify and eliminate the virus.
How can I fix the Steam.exe bad image on Windows 11?
Press Windows, type virus & threat protection, and open the top result.
Scroll down the page and select Scan options.
Select the Full scan option, then click Scan now.
With Windows Security’s virus and threat protection, you may examine your device for security risks. In addition, it allows you to view the outcomes of past virus and threat scans you’ve conducted and obtain the most recent version of the security that Microsoft Defender Antivirus offers.
Is Steam setup exe safe?
If you’re wondering if the Steam setup executable file is safe, keep in mind that Steam is entirely trustworthy from our perspective.
Steam is safe to download, so long as you download it from the official manufacturers’ page.
A .exe file is an executable program file that most applications you will get on your computer run. If you ever end up installing an unknown .exe file, then that is cause to worry.
Those resolutions will surely fix the Bad Image error for some Steam users. Note that some of the above steps might solve the same issue for alternative software.
In this article, we will explore what to do when the Teredo is unable to qualify message appears out of nowhere.
A problem with the Xbox One and the Xbox One app for Windows 10 is making people pretty upset.
The problem lies with Teredo, a network adapter protocol that helps facilitate connections like those used when a NAT configuration is present.
The first thing you’ll want to do is make sure that your Internet Connection is working correctly. Then, once you have good internet, and the problem persists, you can proceed with the other solutions.
If Teredo is unable to qualify, it signifies that your computer is unable to receive a Teredo IP address.
Any of the following may trigger this error:
Poor internet connection – Since this is a connectivity issue, poor internet connections are a significant cause. Once you notice this problem, your internet connection should be the first thing you check.
Conflicting software – VPNs are the primary tools that could trigger this issue. You may want to disable your VPN and see if the problem persists.
Registry settings – If the service is disabled on the Registry, you can expect some adverse effects.
Corrupted files – In this case, you should reinstall Teredo.
What is Teredo on my computer?
Microsoft created the Teredo program to enable communication between computers using various implementations of the IP addressing scheme.
When IPv6 or IPv4 hosts are hidden behind one or more IPv4 network address translators, Teredo, an IPv6 transition technology, assigns addresses and automatically tunnels host-to-host IPv6 communication (NATs).
How do I enable Teredo in Windows 11?
Press Windows key + X and select Windows PowerShell (Admin).
Now enter netsh interface teredo set state default
Close PowerShell.
How can I fix Teredo is unable to qualify error?
1. Check if any installed VPN service hinders Teredo
Press the Windows key + X and select Device Manager.
Click on the View menu, and choose Show hidden devices.
Expand Network adapters, then uninstall adapters with similar names to TAP-Windows Adapter V9.
Verify if uninstalling the VPN adapter cleared the Teredo issues.
Sometimes VPN services can interfere with Teredo and cause errors like the Teredo is unable to qualify one to appear.
We recommend disabling and removing VPN adapters from your PC to fix the problem.
Once you remove the VPN from your PC, check if the problem is resolved. If removing the VPN solves the problem, it might be a good time to consider switching to a different VPN software.
Hence, it is advisable to consider effective VPN services to avoid this error on your device.
2. Check to see if Teredo is disabled from the Registry
Press Windows key + X and select Command Prompt (Admin).
Run this command line: reg query HKLMSystemCurrentControlSetServicesiphlpsvcTeredo
If Teredo is disabled, this line will show up in output: DisabledComponents REG_DWORD 0x8e
Re-enable Teredo through this Command Prompt line: reg add HKLMSystemCurrentControlSetServicesTcpip6Parameters /v DisabledComponents /t REG_DWORD /d 0x0
Sometimes Teredo is unable to qualify error can appear if Teredo is disabled in your registry.
This can lead to problems, but you can easily modify your registry using these lines. After doing that, check if the issue is resolved.
3. Make sure IP Helper is running
Press Windows Key + R and enter services.msc. Now press Enter or click OK.
When the Services window opens, locate the IP Helper service and double-click it to open its properties.
Set Startup type to Automatic and click the Start button to start the service. Click Apply and OK to save changes.
To use Teredo, you need to have the IP Helper service running. If this service is disabled for some reason, you’ll encounter Teredo is unable to qualify error.
However, this solution can fix the issue with the above steps.
Once you start the IP Helper service, the problem with Teredo should be resolved entirely.
Several users reported that the IP Helper service wouldn’t start due to issues with dependent services. However, you can solve this problem in a few steps or move to another solution.
4. Reinstall Teredo
Press Windows key + X. Select Command Prompt (Admin) or Powershell (Admin).
Now run the following command: netsh interface Teredo set state disable
Press Windows key + X and choose Device Manager from the list.
When Device Manager opens, go to View and select Show hidden devices from the menu.
Locate Teredo in the Network Adapters section, right-click it and choose Uninstall device. Repeat this for all Teredo devices.
Uninstall anything you see with Teredo in it from the right-click menu.
Restart your PC and re-enable Teredo with this line in Command Prompt (Admin): netsh interface Teredo set state type=default
Make sure to NOT manually install the Teredo Tunneling Pseudo-Interface adapter as it might cause trouble since it reinstalls automatically
If you have ever wondered how to enable Teredo on a PC, the steps above should give you all the necessary information.
5. Check for an invalid value on the Teredo server name
Press Windows key + X. Select Command Prompt (Admin).
Enter the script below and hit Enter. win10.ipv6.microsoft.com
Check for the correct parameter with the Command Prompt line below. netsh interface Teredo show state
If the parameters aren’t correct, use this command line to revert them: netsh interface Teredo set state servername=default
If you keep getting Teredo is unable to qualify error, you might be able to fix the problem simply by checking the server name value.
This is quite simple, and you can do it from Command Prompt with the commands and parameters from this solution.
After making these changes, check if the problem with Teredo is resolved.
6. Make sure the host file entry isn’t causing problems
Press Windows key + X. Select Command Prompt (Admin).
Type in the line of command and hit Enter. netsh interface Teredo show state
If it displays the message failed to resolve server name, run the command line below. notepad.exe c:\WINDOWS\system32\drivers\etc\hosts
Use Notepad’s Edit/Find function to search for win10.ipv6.microsoft.com and use the Find Next feature until you find another entry that you will subsequently delete.
According to users, sometimes this problem can appear if the Hosts file is changed.
7. Ensure the router is configured to enable Teredo connectivity
Once an IPv6 connection is detected, certain routers will prevent Teredo connections. Therefore, you should confirm that your router has the most recent firmware and, if necessary, contact the router manufacturer for support.
Next, confirm that Xbox may be used for multiplayer gaming on Xbox Live.
8. Create a new user account
Press Windows Key + I to open the Settings app.
When the Settings app opens, navigate to the Accounts section.
In the left pane, navigate to Family & other people, then in the right pane, click Add someone else on this PC.
Choose I don’t have this person’s sign-in information.
Select Add a user without a Microsoft account.
Enter the desired user name and click Next.
Sometimes you might be able to fix the problem simply by creating a new user account. After creating a new account, switch to it and check if that solves your problem.
How can I fix Teredo is unable to qualify on Windows 11?
Following our guide, you do not need to bother about the steps on Windows 11 because the latest Windows OS is very similar to Windows 10.
Hence, solutions on Windows 10 will often be applicable on Windows 11, and except for the very rare UI differences, it will be difficult to tell one apart from the other.
How do I remove Teredo from Windows 11?
Press Windows key + X. Select Command Prompt (Admin) or Powershell (Admin).
Now run the following command: netsh interface Teredo set state disable
Press Windows key + X and choose Device Manager from the list.
When Device Manager opens, go to View and select Show hidden devices from the menu.
Locate Teredo in the Network Adapters section, right-click it and choose Uninstall device. Repeat this for all Teredo devices.
Uninstall anything you see with Teredo in it from the right-click menu.
How can I reset Teredo?
Press Windows key + X and choose Windows PowerShell (Admin).
Now run the following command and hit Enter. netsh interface teredo set state disabled
Next, you need to run this command: netsh interface teredo set state default
If the issue is resolved, you might consider moving your files to the new account and using the new one instead of your old one.
What are the most common Teredo errors?
Teredo cannot qualify message comes in several variants, and these are the most notable ones:
Teredo failed to open tunnel adapter – This is a common problem with Teredo, and to fix it, you need to reinstall the Teredo adapter.
Your Teredo is unable to qualifyconnectivity blocked – This is another Teredo-related issue, and if you encounter it, check if Teredo is disabled in your registry.
Teredo failed to resolve the server name – Sometimes, this error can appear due to your services. To fix the issue, check if IP Helper and other services are running. If not, enable them, and the issue will be resolved.
Teredo error client is in a managed network – Sometimes this message can appear due to issues with the server name. However, you can fix the issue using the Command Prompt.
Teredo keeps disconnecting – This is another common issue with Teredo. To fix it, be sure to check your host file, and update it if necessary.
Teredo not working, not in device manager – If you encounter any of these issues, you might be able to fix the problem simply by resetting IPv6 on all tunnel interfaces.
Teredo is unable to qualify pfSense – Thi is a somewhat common problem when using this firewall.
The error also affects various games, so it’s not uncommon to see Teredo is unable to qualify on Windows 11 and 10 error in the following titles:
Logitech G HUB is a software that allows you to customize Logitech gaming peripherals like mice and keyboards. One of the features of G HUB is the ability to create profiles for individual games. And that’s where auto-switching profiles come in, but the feature may fail sometimes.
What causes problems with auto-switching profiles?
Auto-switching profiles are a feature that automatically changes a G HUB profile from your Logitech gaming keyboard to fit the game that you’re playing.
Instead of manually changing configurations every time you want to play a different game, G HUB will do it for you. This is great so you won’t have to waste time figuring things out on your keyboard.
But sometimes problems arise with G HUB not switching profiles. These include:
Windows and software updates – If G HUB or Windows are not updated frequently, you will encounter such bugs.
Faulty drivers – When your hardware is not installed properly you may expect G HUB issues in recognizing it.
Hardware problems – Although it’s improbable, if one or more keys malfunction, you may have issues with switching profiles.
Now that we know where the problems may arise, let’s fix this issue with our solutions below.
How do I fix the auto-switching profiles in G HUB?
There are a few things that you can do right off the bat to fix this problem:
A quicker and safer way to update your drivers is by using a dedicated software. Outbyte Driver Updater is the most suitable option because it scans your device for any outdated or missing drivers.
After it finds the drivers that slow down your PC performance, it automatically updates them with the latest version.
Outbyte Driver Updater
Prevent errors and performance matters and keep your drivers up-to-date with this great program.
You’ll find similar solutions like updating Windows 11 to checking if the LGHUB Updater is enabled or running the program as an administrator. If you have G HUB, there’s a pretty good chance you have Steam installed.
People have complained in the past about Steam games suddenly not launching. We recommend checking your antivirus software and updating your GPU drivers to solve that problem.
Feel free to comment below if you have any questions regarding the above processes. Also, do not hesitate to comment about guides you’d like to see or information about any other gaming app.
First, let us say that this post doesn’t refer to the Windows Experience Index but rather to the indexing feature in Windows 10/11, which is related to file search. Then, we’ll briefly go through its features and explain how to enable or disable it.
For those who don’t know what exactly indexing does in Windows 10/11, here’s a short explanation: by turning on specific components of the index service, you can speed up file searches, or you can choose to disable it, in case you suspect it might be the culprit for your computer’s slow performance.
To access the indexing options service in Windows 10/11, open the search bar or press the Windows key and W together. Then, just type indexing there, and you will find it.
What is Search indexing in Windows 10?
The search indexing feature of Windows 10 aims to make it easier to discover files on your computer by creating an index of your files.
It’s similar to the index found at the end of a vast book; it makes it much easier and quicker to discover what you’re looking for since Windows doesn’t have to go through each file.
Indexing files are somewhat important, and in this article we’re going to cover the following topics:
What is file indexing – Indexing is a built-in feature of Windows that allows you to quickly and easily find specific files or applications.
Indexing options Windows 10 – Indexing is a customizable feature, and in this article we are going to show you how to change basic indexing options.
Indexing windows 10 SSD – File Indexing fully supports SSDs, and in this article we are going to show you how to index your entire drive.
Windows indexing external hard drives, removable drives – Indexing fully supports external hard drives and removable drives so you can easily index files on any removable storage device.
Windows indexing exclude – As we mentioned, Windows Indexing supports customization, and you can easily exclude any directory from being indexed. This is rather useful if you have a directory or a drive that you rarely access.
Windows indexing rebuild, repair, reset – Sometimes your index can get corrupted and that can negatively impact your performance. However, you can easily repair your index with just a few clicks.
Windows indexing turns off, and on – Some users want to completely disable Windows Indexing. There are a few ways to do that, and we’re going to cover them all in this article.
Windows indexing file contents – Indexing also allows you to index file contents. This is rather useful iyou’rere working with text files and you need to find a file that has a specific word in it.
Speed up indexing windows 10
Turn off indexing windows 10 SSD
Should I turn off indexing in Windows 10?
Windows will take more time to search for files without an index if the files are stored on a hard drive, which is sluggish to read.
In addition, if you have a powerful central processing unit, you won’t need to be concerned with continual background indexing.
If, on the other hand, you don’t use search very often, have a slow CPU, and are working with an SSD, turning indexing off could be a smart option for you.
How can I enable or disable indexing in Windows 10?
1. Disable the Windows Search service
Press the Windows key then input services inside the search bar and open the first result.
Find the Windows Search service and double-click it.
Find Startup type: and select Disablefrom the pull-down menu. Now click the Stop button to stop the service. Finally, click the OK button to save the changes.
Now restart your PC. If you are using SSD, this will turn off SSD indexing in Windows 10/11.
After your PC restarts, the Windows Indexing feature should be completely disabled on your PC. To turn it back on, undo the changes you made in this solution.
As you can see, Windows Search is responsible for content indexing, property caching, and search results for files, emails, and other content.
So, by enabling or disabling it, you will turn on or turn off the features mentioned above. You can easily stop or restart the service, in case you have problems with it.
Press Windows then type cmd and choose the Run as administrator option from the right side.
When Command Prompt opens, you need to enter the following command and press Enter to run it: sc stop "wsearch" && sc config "wsearch" start=disabled
To enable Indexing, you just have to use: sc config "wsearch" start=delayed-auto && sc start "wsearch"
After doing that you’ll stop the Windows Search service instantly and the Indexing feature should be disabled.
As you can see, this is a fast and simple way to disable Indexing, so if you’re an advanced user and you want to disable this feature quickly, be sure to try this method.
Press Windows then type indexing options and click the top result to open it.
Now, you’llll see the list of indexed locations. Click the Modify button.
Uncheck the locations that you don’t want to index and click OK to save changes. If needed, you can also check a new location from the file tree to add it to your index.
If you want to change your indexing options, you can choose which locations you want to index. By disabling certain locations from indexing, you might improve your performance.
By doing this you can optimize your PC and improve your performance by disabling indexing for the directories that you rarely use.
4. Turn off Indexing for a specific partition
Open File Explorer by pressingWindows + E, followed by This PC, and locate your hard drive. Right-click the desired drive and choose Properties from the menu.
When the Properties window opens, navigate to the General tab. Now uncheck Allow files on this drive to have context indexed. Click OK to save the changes made.
After doing that, you’ll get a confirmation dialog asking you to change these settings only for the root directory or for all subdirectories on the drive. Choose the desired option and click on OK.
If you want to improve your performance, you can disable indexing for an entire partition or hard drive. After doing that, your partition and files on it will be indexed and you’ll be able to search through them.
5. Rebuild Search Index
Tap Windows then input indexing options and click the top result.
When the Indexing Options window opens, click Advanced.
Now click the Rebuild button.
Sometimes issues with indexing can occur, and your search might become slow or unable to find the desired files. If this happens, your Search Index is most likely corrupted, but you can easily fix that.
After doing that, you just need to wait for a couple of moments while Windows rebuilds your Search Index.
How to turn off indexing Windows 10?
Press Windows + E then go to This PC.
Right-click your C drive, or the one that you are using, and select Properties.
Here, unselect the box next to Allow files on this drive to have contents indexed in addition to file properties. Then click OK to save the changes made.
Indexing will be turned off for all the files in your specific drive. If you are using multiple drives, you can repeat the same steps for each one of them.
Should I disable indexing windows 10?
The frequent writing to disk that indexing performs will ultimately slow down SSDs, therefore turning off indexing can increase your performance even if you have an SSD drive.
This is because indexing causes the disk to be written constantly. You will need to entirely disable indexing if you want to experience the full potential of Windows 10/11.
Most users don’t know what to do when the Windows search box goes missing. Read our article to learn how you can get it back in just a couple of steps.
Windows Indexing is a useful feature, and we hope that this article helped you understand how to configure or turn off indexing in Windows 10/11 without the registry, which is another long story.
If you have any other questions, feel free to leave them in the comments section below.
There are many files on your PC, some files and executables you don’t recognize because you rarely encounter them. One of those files is HpseuHostLauncher.exe.
It’s always a good idea to be cautious of unknown files since they can contain hidden malware. This is because hackers are tricky and can disguise malware to look like a system file.
Today’s guide will explain what HpseuHostLauncher.exe is and what it does.
What is the HpseuHostLauncher.exe file on my PC?
HpseuHostLauncher.exe is a process associated with HP devices. If you have an HP device, such as a printer, you will likely have this file on your PC.
Specific devices have software that works alongside them or provide helpful information; if you notice this file on your PC, you shouldn’t worry about it.
Is HpseuHostLauncher.exe a virus?
As mentioned in the previous section, HpseuHostLauncher.exe is associated with HP devices, so it’s most likely not malware.
Hackers can be tricky, and sometimes they will disguise malware as a regular file and give it a similar name to trick the users.
If you’re concerned that this file might be malicious, you can always scan it with reliable antivirus software to be sure.
No, this software isn’t necessary for the startup, and you might be able to disable automatic startup from its settings.
However, the HpseuHostLauncher is necessary for some processes on your PC, especially if you have HP external devices connected to it.
Is it OK to disable HpseuHostLauncher?
If you’re using HP devices, you might need this application running on your PC. In addition, some HP computers use HP software to optimize performance, so you should keep the software running.
If you’re using just an HP printer or any other external device, you can disable this application, which might only affect this device and not the entire operating system.
You can also disable this application from starting with your system using the Task Manager like this:
First, press Ctrl + Shift + Esc to open Task Manager.
Then, navigate to the Startup tab.
Locate HpseuHostLauncher or any HP software, right-click it and choose Disable from the menu.
Close the Task Manager.
After disabling the application from the Startup, you won’t have this software starting with your PC anymore.
You likely won’t have any issues after disabling this application, but if you do, you can always go back and enable it in the Startup or start it manually.
According to some users, you can uninstall the HpseuHostLauncher and all other HP processes. However, this feature is located in the system file.
So, even if it is unnecessary, it is advisable not to remove it as it is safe. You can disable it instead, as shown in this guide.
Should I disable HpseuHostLauncher on Windows 11?
There is no difference in the operations of HpseuHostLauncher on Windows 11 and other operating systems.
Hence, if you are not using any external P device, you can disable it on Windows 11.
HpseuHostLauncher.exe isn’t a necessary file, but some Hewlett-Packard devices might require it to work correctly.
Since you appreciate this company and security is one of your primary concerns, make sure to use one of the best VPNs for HP laptops.
Also, if you want to learn about other processes, we have a great guide on TextInputHost.exe, so don’t miss it.
We hope you found this guide informative, and if you have any additional information about this file, feel free to share it with us in the comments section below.
We all know that to keep our Windows 11 computers running smoothly and fast, we must do regular maintenance and clean the files left from old software installations, including in the registry.
Today we’re looking at cleaning the Windows 11 registry of these leftovers. But, again, we highly recommend you use a third-party tool if you want to clean the Windows 11 registry.
These tools have been created with this purpose in mind, and they evaluate the registry keys and only delete the ones that are no longer in use.
Also, remember that some registry entries still in use can get damaged, and third-party software can sometimes fix them, so this method has one advantage.
You can do this in two ways: with the built-in Registry Editor or go with a Windows 11 Registry repair tool, free or otherwise.
Should I clean the Windows 11 registry?
Before we begin explaining how to clean your Windows 10 registry, a word of advice: be very careful if you delete anything.
If you don’t know what you are doing, then there is a big possibility that your programs and the operating system will no longer work properly. So follow these guidelines at your own risk.
We recommend creating a Restore Point before beginning and creating a backup of your registry before you start deleting entries. Moreover, you are better off using the Disk Cleanup tool rather than cleaning your registry alone.
How to clean the registry of Windows 11 manually?
If you’re having problems with a corrupt registry on Windows, you can always clean it by opening the Registry Editor and manually deleting the problematic keys.
This is especially important if you want to remove software leftovers that might interfere with your operating system or other applications.
Remember that this is an advanced procedure. Therefore, it is recommended that you use the best registry cleaner tools in Windows 11 that automatically does the job.
? Before you begin cleaning your Windows 10 registry ?
➡️ Make sure that there are no running programs on your computer. Close everything except the registry cleaning utility before you begin.
Active programs create and modify registry entries, so they might interfere with the scan or even become damaged.
➡️ While the scan or the repair process is running, don’t interfere with the computer. For example, a simple rename of a folder or a moved shortcut creates a registry entry and might compromise the entire process.
➡️ Some registry cleaning programs assess the risk of each registry and tell which of them are safe to modify or clean.
Remember to select only those the program says, and do not select any registry entries marked as risky to modify.
➡️ If your registry utility has an auto-delete feature, disable it. It is better that you have control over what entries should be deleted.
After the scan is complete, everything should be running smoothly. However, if this isn’t the case, and specific software doesn’t work anymore, you should immediately restore the registry as it was before.
How do I clean the Windows 11 Registry?
1. Clean the registry in Windows 11
2. Clean the registry in Windows 11 via Registry Editor
You can easily manually clean registry on Windows 10 using the built-in Registry Editor app. This is a great option if you do not wish to use any third party tools.
Before you clean your registry, it’s advised to back it up. Removing certain entries from the registry can cause various problems to appear, therefore be sure to back up your registry beforehand.
1. Press Windows Key + R and enter regedit.
2. Now press Enter or click OK to open the Registry Editor.
3. In the app, go to File > Export.
4. Now select All as Export range.
5. Enter the desired file name, choose a safe location and click on Save. This will create a backup. If any issues occur after you modify your registry, you can simply run the file you just created in order to restore the registry to its original state.
6. Now you can start cleaning the files. In the Registry Editor, go to HKEY_LOCAL_MACHINE\SOFTWARE.
7. Right click on the file you want to remove and select Delete. You can also use the keyboard task Delete to accomplish the same thing.
Using the built-in Registry Editor app, you can easily manually clean the registry on Windows 10. This is an excellent option if you do not wish to use any third-party tools.
3. Revert to a registry backup
If you want to restore the PC to a previous registry backup, you need to search for registry entries of software that you have uninstalled.
Press Windows + R, then type regedit and press Enter.
Click File, followed by Import.
In the Import Registry File box, select the location where the backup copy was saved, then click the Open button.
The Registry Editor is the Windows default tool for viewing and modifying the registry. However, this manual search is very time-consuming, and filtering through the thousands of entries can be quite hard.
This is why we recommend using a third-party tool to clean the registry, as these will create a Windows registry backup before starting the cleaning process.
Does Windows 11 have a registry?
Yes, Windows 11 does have a Registry that contains critical data regarding the OS and other parts of the system. The Registry was first released with Windows 3.1 in the year 1992.
With it, you can easily make administrator-level changes to the PC, though we recommend extreme caution during the process since a minor lapse on your end can considerably affect the health of the PC and even cause it to stop working.
How to clean the registry on Windows 10?
Press the Windows key, type cmd, and open the top result as an administrator.
Next, type or paste the following command that will clean everything, including the registry: DISM /Online /Cleanup-Image /ScanHealth
The command allows you to quickly clean Registry in Windows 10.
Why do we have to clean the registry?
Registry entries are the footprints of everything you do on your computer. Every installed program, every webpage opened, and every change you make creates a registry entry.
You can imagine how many of these registry entries exist if you consider that every operation you do on your computer makes its registry entry.
While registry keys occupy next to nothing on hard drives, they do, however, make up for it in sheer numbers.
After some time of running Windows 10 and installing and uninstalling programs and apps, you end up with hundreds or thousands of registry entries that are entirely useless.
Even if they are not used anymore, the operating system still filters through them, and this process burdens them.
We can see that Windows 10 can’t manage file systems with many entries, even with all the upgrades and improvements.
This is probably due more to hardware limitations than to the software, but even so, we can make it better.
Does Windows 10 come with a registry cleaner?
Microsoft’s Disk Cleanup is a software application initially made available with Windows 98 and has since been incorporated into all later editions of Windows.
Users can delete any files, including those in the registry, that are no longer required, or that may be done without risk.
The performance of the hard drive and the computer may be sped up and improved by removing any extra items, including temporary files. An ideal job and frequency for preventative maintenance are to run Disk Cleanup at least once each month.
If the problem persists, you should use the restore point you created before starting to revert to the original state of the registry.
The RTKVHD64.syserror is a Blue Screen of Death error that usually shows up when playing video games, listening to songs, or performing any activity that requires a fully functional audio driver.
The Stop Code in case of this error reads: SYSTEM_SERVICE_EXCEPTION
Troubleshooting the error usually becomes a challenge if you are unsure what the RTKVHD64.sys file does. So, we will first find out about it and then head to the solutions.
What is RTKVHD64?
RTKVHD64 is a file related to the Realtek Audio driver, and if it’s damaged, corrupt, or deleted, you may encounter the RTKVHD64.sys BSOD error in Windows 10 and 11.
Other than that, outdated drivers, corrupt system files, issues with the hard drive, the presence of malware, or conflicting applications, too, are likely to cause the error.
Also, there are other variations of the issue you need to watch out for as reported below. Below are some of these variations:
Rtkvhd64.sys no sound
Rtkvhd64.sys memory integrity
Rtkvhd64.sys driver windows 11
Rtkvhd64.sys location
How do I solve RTKVHD64 Sys on Windows 10?
1. Repair files with the System File Checker
Type Command Prompt in the Search bar, and click on Run as administrator.
Click Yes in the UAC prompt.
Before you utilize SFC, paste the following command and hit Enter to run the DISM tool: DISM.exe /Online /Cleanup-image /Restorehealth
Once done, execute the following command to run the SFC scan:sfc /scannow
Restart Windows after the scan is complete.
Using the System File Checker scan may not always work for these issues.
If theRTKVHD64.sys Blue Screen errorpersists after the System File Checker scan checks, we suggest you try a professional system repair software that automatically runs a deep scan of your Windows system and finds and fixes the problems causing this Blue Screen error.
2. See if there is any hard drive corruption
Press Windows + R, type cmd in the text field, hold the Ctrl + Shift keys, and then click OK to launch Command Prompt with administrative privileges.
Click Yes in the UAC prompt.
Paste the following command and hitEnter:chkdsk /f
If asked to schedule the scan the next time you restart the computer, press Y and then hit Enter.
Now, restart the computer.
Issues with your hard drive or storage controllers may be behind Realtek driver RTKVHD64.sys error. Repeated misuse over time, improper shutdowns, incomplete installation of software, or power outages may corrupt the data on the hard drive.
The Check Disk utility should fix things if issues with the hard drive are responsible for the error.
3. Update the Realtek driver
Type Device Manager in the Search bar, and click on the relevant search result.
Double-click Sound, video and game controllers to expand the list of devices under it.
Right-click Realtek High Definition Audio and select Update driver from the context menu.
Select Search automatically for drivers.
As RTKVHD64.sys is a Realtek audio driver file, updating an antiquated Realtek sound card driver is a probable fix for this error.
Even if Windows doesn’t find new driver software, the Realtek website might still have a newer version. So, make sure to check there as well and manually update the driver.
Windows automatically updates some drivers, but you can’t rely on the OS to keep them all up-to-date.
You can also use a professional software that can do all the work for you in the safest way.
Enter Windows Security in the Search bar at the bottom-left corner, and click on the relevant result.
Click on Virus & threat protection here.
Select Scan options.
Choose Full scan from the list and then click on Scan now.
Malware that corrupts system files is a culprit for BSOD errors. As such, an antivirus scan can feasibly resolve the RTKVHD64.syserror.
In case you are confident that it’s malware behind the error, but Windows Security can’t detect it, we strongly recommend trying out a fast and reliable antivirus.
5. Roll Windows back to a restore point
Press Windows + R to open Run, type rstrui.exe in the text field, and click OK.
Select Choose a different restore point, and click on Next.
Choose a restore point from the list and click on Next.
Verify the restore details, and click Finish to start the process.
Wait for the process to complete.
If the RTKVHD64.syserror occurred after recently installing some new hardware or software, performing a system restore could be a potential fix.
The System Restore tool will undo any modifications to system files, restore deleted system scripts and remove software installed after the selected restore point. Just make sure to choose one created before the error first showed up.
How can I fix RTKVHD64.sys error on Windows 11?
The RTKVHD64.sys BSoD error is as commonly encountered in Windows 11 as it was in the previous iteration.
In addition to the solutions listed above, you should also check for compatibility. Make sure the installed Realtek driver is compatible with your version of the OS. If it’s not, head to the OEM’s website, and look for one that is.
Also, you may try disabling the third-party antivirus since it has led to the error for many. If that fixes the issue, we recommend switching to an effective antivirus that doesn’t cause conflicts.
These were some of the effective solutions for the System Service ExceptionRTKVHD64.syserror, and you must have had it fixed by now.
Also, find out how to view the BSoD details to better equip yourself when troubleshooting these.
This article also provides further general fixes for blue screen issues.
Today, we will show you how to act when getting the notification message: Restart to repair drive errors (Important) in Windows 10/11.
This issue you are experiencing could be due to hard drive issues, failed updates, as well as the bloated Windows registry.
Therefore, you must try out any enlisted solutions to fix this problem.
What is the cause of Restart to repair drive errors?
The message Restart to repair drive errors may appear on your screen if your computer’s operating system fails to recognize the hard drive correctly. Moreover, you may come across such an error if your hard disk has corrupted sectors or if it has been infected with malicious software.
In other cases, the problem stems from a hard disk that’s been physically damaged. For example, if the hard disk has been physically cracked, you could hear a buzzing or tingling sound from your computer system.
In this situation, the only way out is to get a brand-new hard drive and install it on the computer. But, if that’s not the case, follow along to find out how to get rid of the notification message properly.
Why does my PC keep having drive errors?
Malware attacks, hardware malfunctions, careless system maintenance, power outages, or even human mistake are the usual causes of hard disk problems. The CHKDSK command can be used to repair a corrupted or malfunctioning hard drive.
Once you pay note of these factors, you will see a significant decline in drive errors.
How can I fix Restart to repair drive errors in Windows 10?
1. Restart your PC
The first applicable workaround in resolving the Restart to repair drive errorsWindows 10/11 issue is to restart your PC.
This could potentially fix the problem in some cases. However, if this does not resolve the issue on your Windows 10PC, you can proceed to other workarounds.
2. Run the SFC Scan
Press Windows then input cmd and select the Run as administrator option under the result.
Paste or type the following command and press Enter: sfc /scannow
The SFC scan will find and fix any system files that have been corrupted. For example, this could fix the Restart to repair SSD drive errors.
If you don’t want to perform these initial steps, then you should use an automated solution as more secure method.
Tap Windows then input cmd and select Run as administrator.
Now, type the following commands and press Enter after each: CHKDSK C: /FCHKDSK C: /R
After the CHKDSK process, restart your PC.
Due to the fact that the Restart to repair drive errors not working in Windows 10 problem is disk related, CHKDSK can also be used to fix the problem. CHKDSK process cleans up disk-related errors on your PC.
3.2 Use File Explorer
Alternatively, you can run CHKDSK from the File Explorer window. Follow these steps to do that:
Press Windows + E, then go to This PC.
Right-click the C drive and select Properties.
Select the Tools tab and click the Check button followed by Scan drive to run the CHKDSK scan.
In some cases, security and maintenance restart to repair drive errors appear precisely after using CHKDSK or other similar disk inspection tools. They linger on even after rebooting the device.
If the Restart to repair drive errors Windows server 2016 won’t go away, you might want to undo this step, so carefully go through the steps below.
Restart to repair drive errors keep showing up after reboot
Press Windows, then type cmd and select the Run asadministrator option.
Type in the following commands, then press Enter after each one: fsutil dirty query g:CHKNTFS /X G:
Next, proceed with manually rebooting your PC.
Open CMD again and enter the following lines as soon as Windows loads, and press Enter after each: Chkdsk /f /r g:fsutil dirty query g:
Even CMD can occasionally go through a hard time, so don’t worry if you can’t run Command Prompt as admin at first. We will guide you through it every step of the way.
4. Run DISM
Here’s how to run DISM in Windows:
Tap Windows, enter cmd,and select Run as administrator from the right side.
Copy and paste the following command and press Enter: exe /Online /Cleanup-image /Restorehealth
DISM (Deployment Image Servicing and Management) is a tool used to scan and solve issues of corrupted system files, which could cause the repair drive errors you face.
5. Run System Restore in Safe Mode
Reboot your computer and start into Safe Mode. Know that the steps are similar for Windows 11 and 10, so you can follow the guide linked in both OSs.
Once your PC starts up, press Windows + R then type rstrui and press Enter.
Click Next to proceed. Then select the restore point to which you wish to revert and click Next.
Follow the on-screen steps to revert your system to the selected restore point.
Restoring Windows to a point before experiencing the Restart to repair drive errors server 2019 in Windows 10/11 prompt can also fix the issue.
System restore does not affect your files, documents, or personal data. If you don’t have any restore points created, check out how to make a restore point in Windows 10 and Windows 11.
Press any key to boot from CD or DVD when prompted to continue.
Follow the on-screen steps until you see the Repair your computer option in the bottom-left. Make sure to click it afterward.
Click Troubleshoot, followed by Advanced options.
Next, choose Automatic Repair or Startup Repair. Then, wait for the Windows Automatic/Startup Repair to be completed.
Restart your PC and boot to Windows.
Automatic repair is applicable in fixing the Restart to repair drive errors. However, it would be best if you had a Windows bootable installation DVD ready for this purpose.
Can I interrupt scanning and repairing drive?
We discourage stopping this process once it has begun, but there are cases where the scan and repair become stuck and will take uneding hours. In such cases, it is possible to interrupt scanning and repairing drive. You will however have to boot to safe mode.
Should I restart to repair drive errors?
If you get this problem, you should attempt to restart your computer. Any code that is frozen in a condition that is acting up will also be removed.
Restarting your system will start from scratch, leaving behind any system errors or bugs causing issues.
How can I fix Restart to repair drive errors in Windows 11?
Press Windows + I, then go to Windows Update, followed by Update history.
Scroll down and select Uninstall updates.
Click the most recent Windows Update in the newly opened window, and select Uninstall.
Moreover, you may repair the restart to repair drive error in Windows 11 by following the procedures precisely as they are described above.
They are not limited to Windows 10, and the steps to achieve them are exactly, or almost precisely, the same in Windows 11.
Conclusively, we hope this helps you fix the hard drive issue in Windows 10/11. However, if Windows cannot repair the drive, check out our guide to find more effective solutions.
If you need further assistance concerning the addressed issue, drop a comment for us below. Thanks for reading!
We frequently use printers to print important documents, but problems with printers can sometimes appear.
You will find multiple user reports from different times, that indicate that users often aren’t able to remove the printer on their Windows 10 PCs.
To fix printer problems we sometimes need to remove the printer, but users reported that they cannot remove the printer in Windows 10.
Why can’t I remove printer in Windows 10?
Here are a few of the most common reasons you aren’t able to remove the printer on a Windows 10 PC.
There is a bug in the Windows version that you are running.
Your printer drivers aren’t up to date.
Old printer drivers are interfering with the removal process.
There might be a presence of corrupt printer registry entries.
A stuck print job queue is also responsible for this problem.
What can I do if I get Can’t remove printer access denied message?
If you can’t remove printer in Windows 11 or older, it’s probably because you don’t have administrative privileges. We wrote in-depth about the Access is denied guide, so we encourage you to check it out for more solutions.
If the printer is displayed as an unspecified device that can cause additional problems with it, and prevent you from removing it. This is most likely a configuration or a driver issue.
A few users reported that a deleted printer keeps coming back, and that’s a variation of this error, but luckily, this guide will show you how to fix this problem.
How do I fix unable to remove printer message on Windows 10?
1. Remove the printer
1.1 Change the Print server properties
Open the Start menu, type Control panel, and open it.
Select Devices and Printers.
Choose the questionable printer and click the Print server properties.
Go to the Drivers tab, select the printer you want to remove, and click the Remove button.
Select Remove driver and driver package option.
After removing the printer, click Apply and OK to save the changes.
Users reported that they can’t remove their printer on Windows 10, and if you’re having the same problem, you might be able to fix it by deleting the printer driver from the Print server properties window.
1.2 Remove the printer software
Press the Win + I buttons to open the Settings app.
Select Apps.
Locate the printer software and remove it from your PC.
1.3 Stop the Print Spooler service
Press Windows + R to open the Run dialogue.
Type services.msc and click OK.
Locate the Printer Spooler service, right-click it and choose to Stop from the menu.
Go to the following folder (you’ll need administrator privileges to access it): C:\Windows\System32\spool\Printers
Delete everything from the Printers folder.
Go back to Services window, locate Print Spooler service, right-click it and choose Start.
If you can’t remove your printer by using the method from steps 1.1 and 1.2, you’ll have to stop the Print Spooler service first. To do that, follow the steps above.
After restarting the Spooler service, try using the Print server properties window to remove your printer.
Keep in mind that issues can occur if your printer is shared with other computers on your network, so be sure to stop printer sharing and remove printer mappings.
If you have trouble removing the printer, check out our list with the best driver removal software that you can get right now.
2. Edit the registry
Press Windows + R to open the Run dialogue.
Type regedit and click OK.
When Registry Editor opens navigate to the following key: HKEY_LOCAL_MACHINE\SYSTEM\CurrentControl\SetControl\Print\Printers
Expand the Printers key and locate your printer.
Right-click it and choose Delete from the menu. Be careful not to delete any other key from the registry.
After deleting the printer key restart your PC.
If you can’t remove a printer in Windows 10, you might have to change a few values in your registry.
Changing the registry can cause problems with your PC, therefore it might a good idea to create a backup of your registry, just in case.
When your PC restarts, go to the Devices and Printers window, find your printer and delete it.
If you find it difficult to work with the embedded Registry Editor from Windows, you can try a lot of other registry editors.
3. Cancel all print jobs
Open the Control Panel.
Click on Devices and Printers.
Select your printer and right-click on it.
Choose See what’s printing from the context menu.
Remove all entries from the printing queue.
Sometimes you won’t be able to remove a printer because there are still active print jobs.
If the devices and printers menu isn’t opening on your Windows 10 PC, then you can check out our guide that will help you resolve the problem.
4. Update the printer driver
4.1 Update the drivers manually
Right-click the Start button and select Device Manager from the list.
Expand Print queues and select your printer.
Right-click your printer and go to Update driver.
Follow the instructions to update the printer driver.
Restart your computer.
If none of the previous workarounds resolved the problem, let’s try updating the printer driver to the latest version. Follow the steps above to do that.
4.2Update the drivers automatically
If you don’t want the hassle of searching for drivers on your own, you can use a tool that will do this for you automatically.
Professional software, like Fortect Driver Updater, will greatly simplify the updating process and will inform you if your drivers are going out of date again in the future.
Locate the printer you want to remove, right-click it and choose Delete from the menu.
According to users, if you can’t remove a certain printer in Windows 10, you might want to try removing it by using the Print Management tool.
6. Delete hidden printers from Device Manager
Press Windows + X to open the Power User Menu.
Select Device Manager from the list.
Click on View and select Show hidden devices.
Delete your printer from Print queues and Printers sections.
Restart your PC.
Sometimes hidden devices can cause problems with printers, therefore you’ll need to remove them. To do that, follow the steps above.
7. Delete the driver entries from the registry
Open the Start menu, type cmd, and click on Run as administrator.
Type the below command and pressEnter. net stop spooler
Launch Registry Editor.
Go to the following key in the left pane: HKEY_LOCAL_MACHINE\SYSTEM\CurrentControlSet\Control\Print\Environments\Windows NT x86\Drivers\Version-4
If you use the 64-bit version of Windows 10, you’ll have to navigate to the following key instead: HKEY_LOCAL_MACHINE\SYSTEM\CurrentControlSet\Control\Print\Environments\Windows x64\Drivers\Version-4
Expand the Version 4 key and locate your printer.
Right-click it and choose Delete.
After doing that, go to the following path in File Explorer: C:\Windows\System32\spool\drivers\w32x863
Delete all files from that folder. If you have the w32x861 or w32x862 folders instead on your PC, be sure to delete all files from those folders as well.
Bear in mind that some printers can have extra folders, so you’ll have to find those folders and delete them. For example, HP’s printers have hphp and Hewlett_Packard additional folders.
Delete the .inf files that are linked to the removed drivers %windir%inf.
Start Command Prompt as administrator and execute the below command. net start spooler
We have to mention that this is an advanced procedure, so be extra cautious while performing it. First, you need to uninstall all printers from your PC. After all, printers are uninstalled, do the steps above.
Bear in mind that this is an advanced solution, therefore we advise you to create a System Restore point so you can restore your PC in case anything goes wrong.
What can I do if I can’t remove the printer driver in use?
1. Delete the driver as every user
If you have multiple users on your PC, you might not be able to remove the printer since the driver is in use.
In order to fix this problem, you need to log in to each user account that has the printer connected and delete the device. After that, log in to the administrator account and delete the driver package.
Locate explorer.exe, right-click it and choose End task.
In Task Manager click on File and select Run new task.
Create new task window will appear. Enter explorer.exe and click OK.
When Explorer starts again, try to delete the printer driver.
If you can’t delete the driver, stop the Print Spooler service and try again. Be sure to turn on the Spooler service back on after you delete the driver.
3. Use the Kyocera Deleter tool
If you can’t remove the printer because the driver is in use, you might want to try using the Kyocera Deleter tool from Kyocera’s download center.
Users reported that this tool will delete your printer without any problem but be sure to run this tool as the administrator since it requires administrator privileges to remove your printer.
If you are the owner of a Kyocera printer, you might also be interested in consulting our comprehensive guide on how to download and use Kyocera printer drivers for Windows 10.
4. Try to delete the printer quickly after restarting the Print Spooler service
A few users reported that you can fix this problem by trying to remove the printer after restarting the Print Spooler service.
We already explained how to restart this service in one of our previous solutions, so we advise you to check it out.
This process requires speed, therefore be sure to remove the printer as soon as you restart the Print Spooler service.
According to users, you only have a few seconds to remove the printer, so be sure to do it as fast as you can. If Print Spooler doesn’t work, we have a helpful guide on how to solve its issues.
5. Disable the Bidirectional support
Open Devices and Printers.
Locate your printer, right-click it and select Printer properties.
When the Properties window opens, go to the Ports tab and uncheck the Enable bidirectional support option.
Click Apply and OK to save the changes.
Users reported that you can fix this problem by disabling the Bidirectional support. To do that, follow the steps above.
6. Set the Print Spooler service to Manual
Users reported that you can fix this problem by setting the Spooler service to Manual. To do that, open the Services window, locate the Print Spooler service, and double-click it to open its properties.
Set the Startup type to Manual and click Apply and OK to save the changes.
After that, try to remove your printer. If the uninstall tool mentions Print Spooler service, simply go to Services, locate Print Spooler service and start it.
After that, you should be able to remove your printer without any problems.
Not being able to remove a printer in Windows 10 can be a big problem, but you can usually fix this problem by restarting the Print Spooler service and trying to delete the printer again.
How do I fix Cannot remove printer on Windows 11?
Clear the print queue.
Reconnect your printer.
Run the printer troubleshooter.
Remove the printer from the printer server properties.
Uninstall the printer driver.
How do I force a printer to uninstall in Windows 10?
Open the Start menu.
Search for the command prompt and open it as an administrator.
Execute the below command. wmic printer get name
Run the below command to delete the printer. printui.exe /dl /n "Your_Printer_Name"
You need to replace the “Your_Printer_Name” text from the above command with the name of your printer.
Restart your PC.
If you’re still unable to remove the printer in Windows 10, you can also consider changing your printer to a better one. You can choose one of the best wireless printers from our extensive list.
Do I need to uninstall an old printer before installing a new one?
It is not compulsory to remove your old printer and its components from your PC before installing a new one. However, it is good practice to do so if you are sure you won’t be using the old device anytime soon.
This is to avoid confusion and free up valuable space.
NOTE
There has been a PrintNightmare vulnerability regarding the Windows Print Spooler service. To fix the problem and counter the issue, read our guide on how to download the KB5004945 patch and stay clear.
We hope that our solutions helped you fix the printer problems. Make sure you provide us with your feedback in the comments section below.
Logitech G is a big name in gaming peripherals and G HUB allows you to optimize and customize your Logitech G gear. You can create unique profiles for each peripheral and choose which features you want to activate. However, sometimes, the assignments are not working.
Why aren’t the assignments in Logitech G HUB working?
Assignments within Logitech G HUB are the commands tied to a specific input on a mouse or keyboard. For example, a gaming mouse may have buttons on the side. You can assign those buttons to, perhaps, open Task View, and the other to close the game you’re playing.
Sometimes assignments, and to a greater extent Logitech G HUB, will stop working and there are various reasons for this:
Faulty drivers – If your gear is not correctly set up, G HUB won’t be able to make the right assignments.
Firewall block – The Windows Firewall or a third-party one can prevent Logitech G HUB from working properly, so don’t hesitate to learn what to do if the disabled firewall still blocks apps.
Devices not being detected – This may be caused by an imperfect connection or a malfunctioning cable.
Now that we know why this happens, let’s start troubleshooting this problem to fix it.
How do I fix assignments not working on Logitech G HUB?
This guide will cover three of the most common and effective solutions to assignments not working in Logitech G HUB. But there are a couple of things that you can do:
Check the ports of your peripherals, they may be loose.
Make sure you have the correct device connected to Logitech G HUB.
Download the most recent version of the software.
And, of course, restart your PC.
Also note that Logitech G HUB works for both Windows 10 and Windows 11 just fine, even if the website only mentions the former.
1. Update the GPU drivers
Start by searching for the Windows 11 Device Manager and click the first entry that you see.
Click Display adapters to make your computer’s GPU appear. Right-click the GPU and select Update driver (if you have multiple, do this to both).
Click Search automatically for drivers to update the GPU. The update will happen automatically.
You can also try uninstalling the drivers. Right-click the GPU entry and select Uninstall.
A small window will appear warning you of what you’re about to do. Check off the box you see and click the Uninstall button.
Afterward, right-click the entry again and install the drivers again.
A faster and simpler solution, if this one doesn’t update the driver, is to use a third-party tool to automatically find and install driver updates.
2. Allow the app through Windows Firewall
In the search bar, type in Allow an app through Windows Firewall. Click the entry that you see.
Click the Change settings button at the top and then Allow another app near the bottom.
Click Browser and search for the Logitech G HUB app.
Once located, double-click it and then select the Add button.
Once Logitech G HUB has been given permission, click the OK button.
3. Reinstall G HUB
Press the Start button and select Settings.
Click on Apps from the left pane, then select Installed apps.
Search for Logitech G HUB under this section, click the three dots to the right and select Uninstall.
Press the Windows key + E to open File Explorer and click View.
Hover over Show and select Hidden items.There are some files that you need to delete but can only be found with this view turned on.
In the address bar of the File Explorer, type in the following path replacing username with your actual user name and press Enter: C:\Users\username\AppData\Roaming
Scroll down and delete the LGHUB folder.
Now, type in the following path in the address bar and press Enter: C:\ProgramData
There are a series of fixes that we can recommend if you still have problems with G HUB. A common source for problems is the app not detecting computer mice. Solutions for this are similar to what has been covered.
Updating drivers and reinstalling Logitech G HUB are things that you can do. For more generic solutions on Windows 11, we recommend updating the operating system to its latest version.
Feel free to comment below if you have any questions regarding the above processes. Also, do not hesitate to comment about guides you’d like to see or information about any other gaming app.



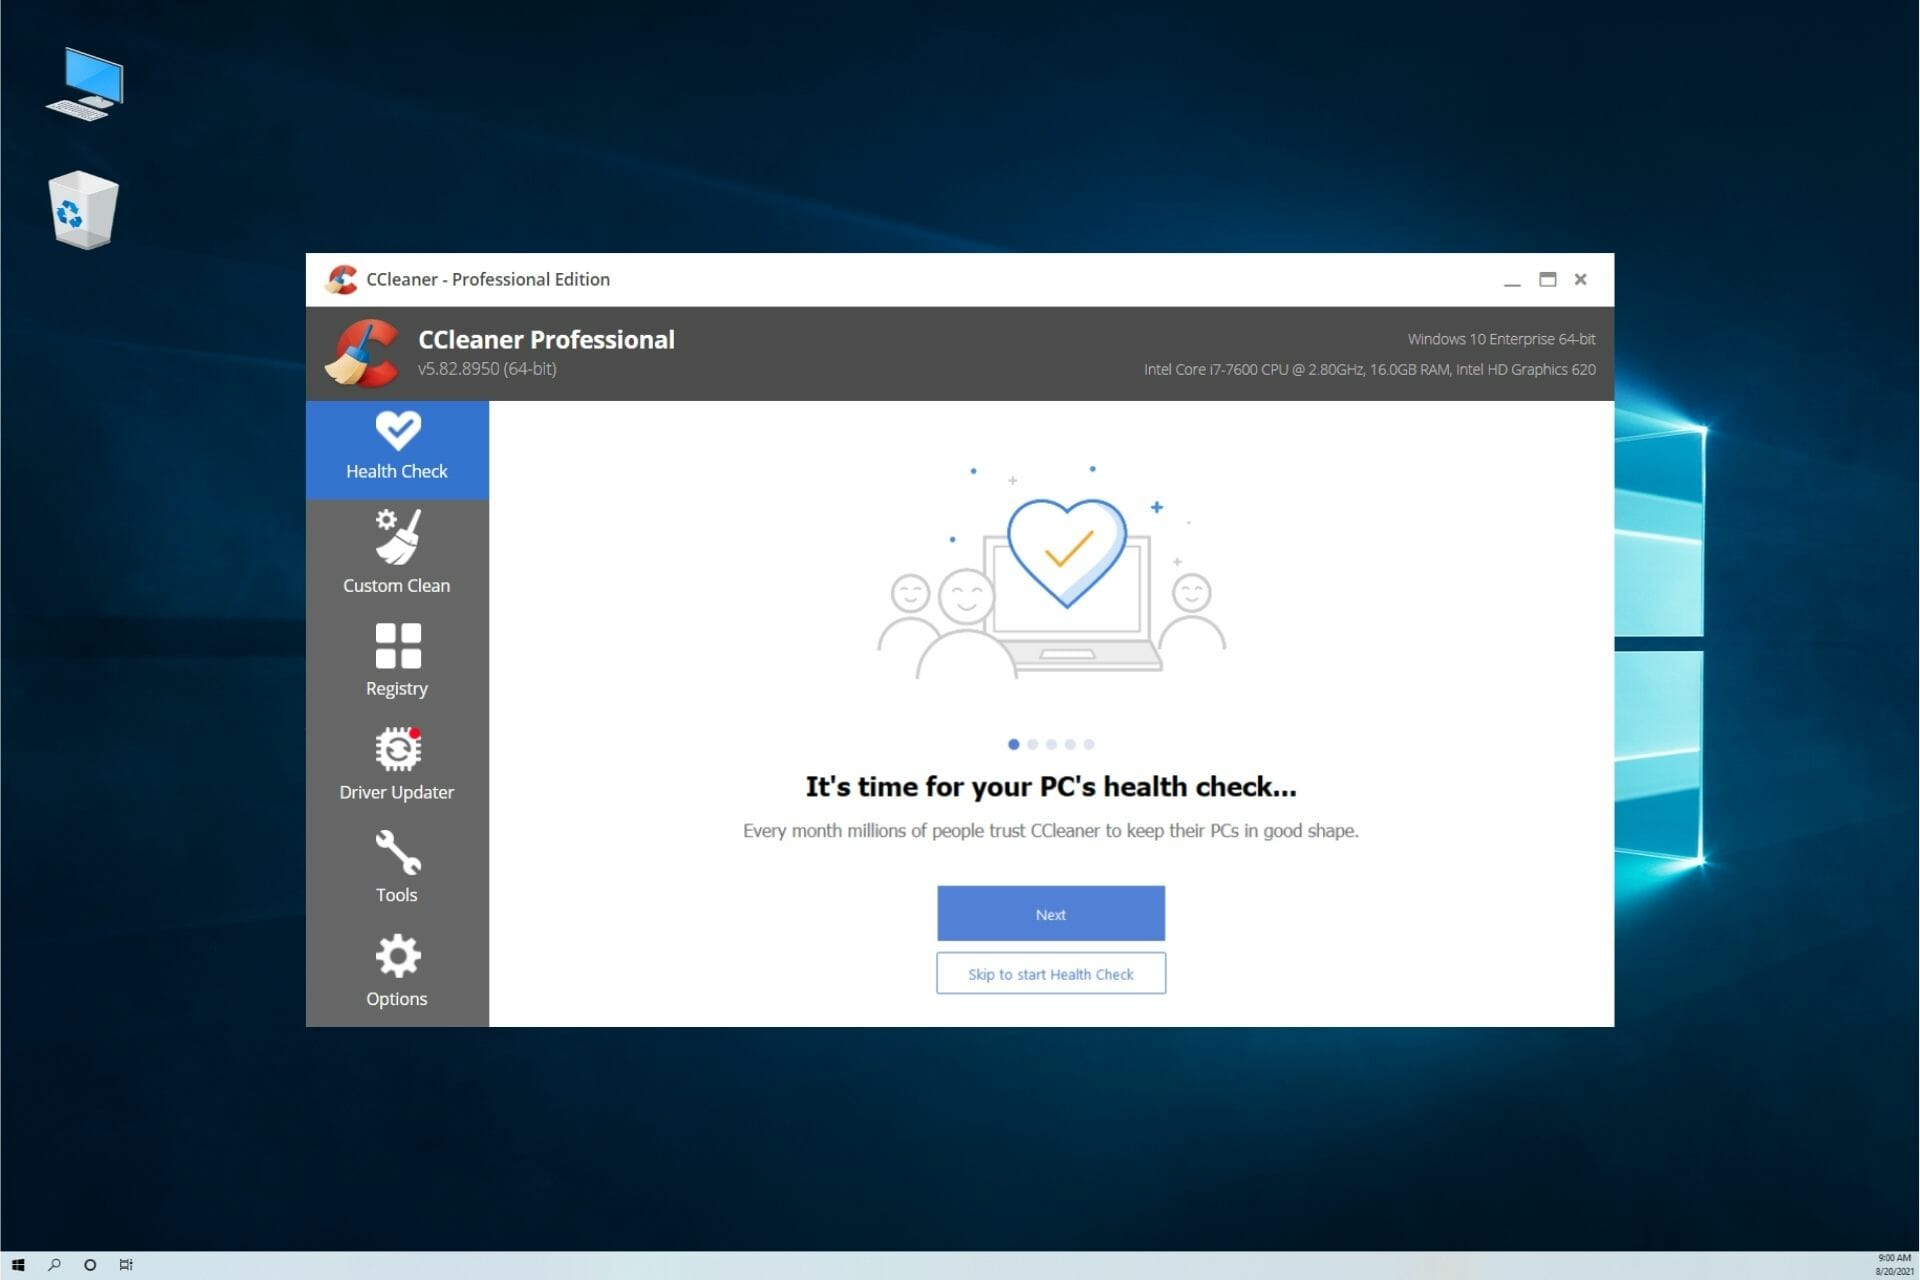



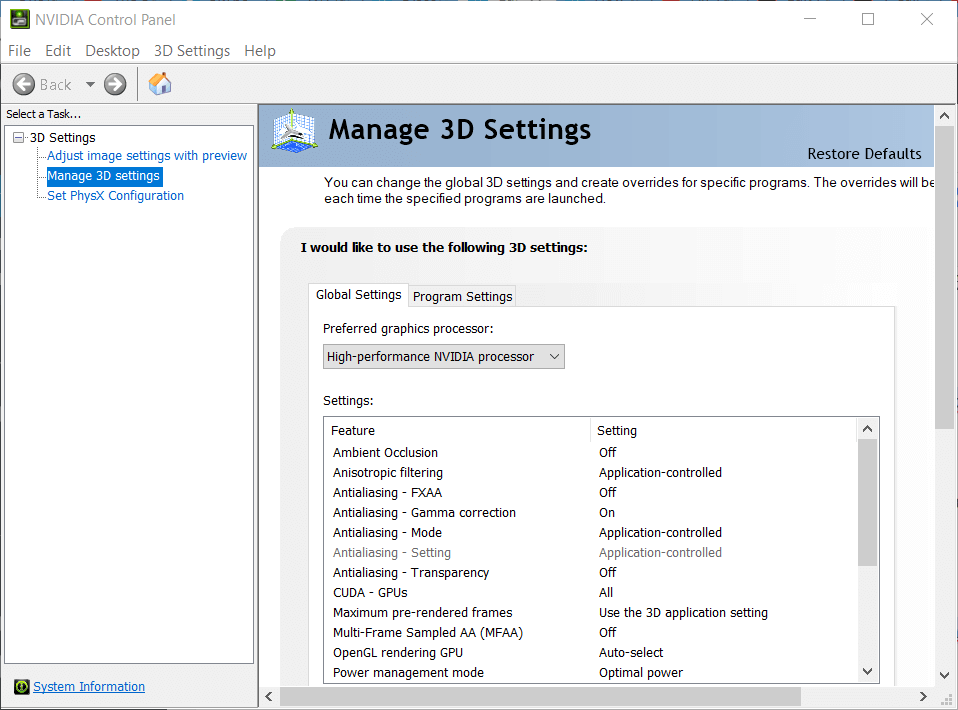
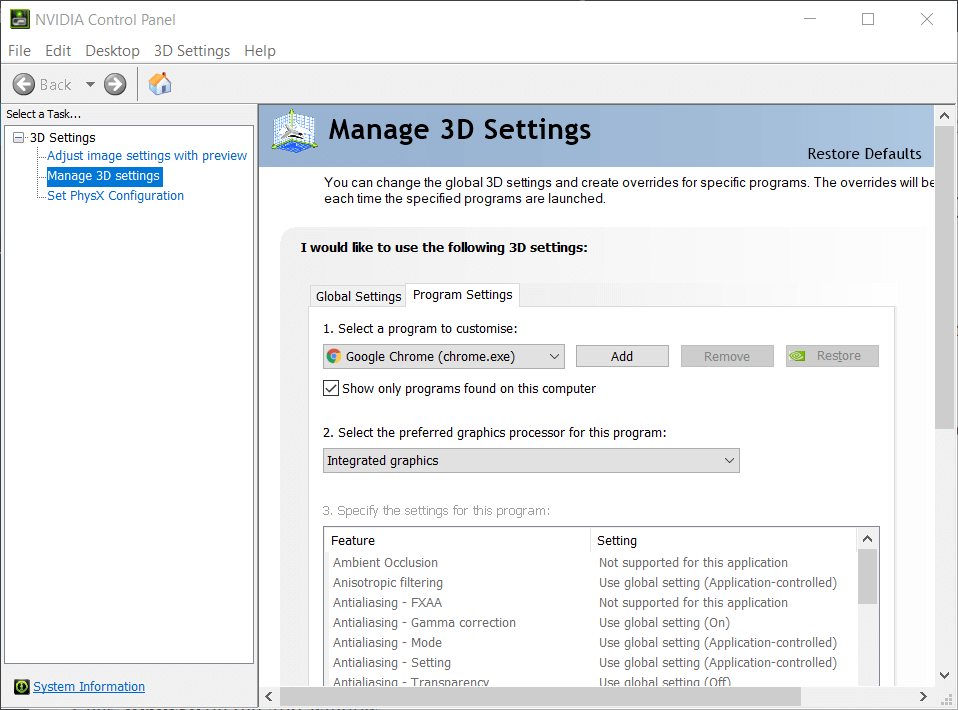
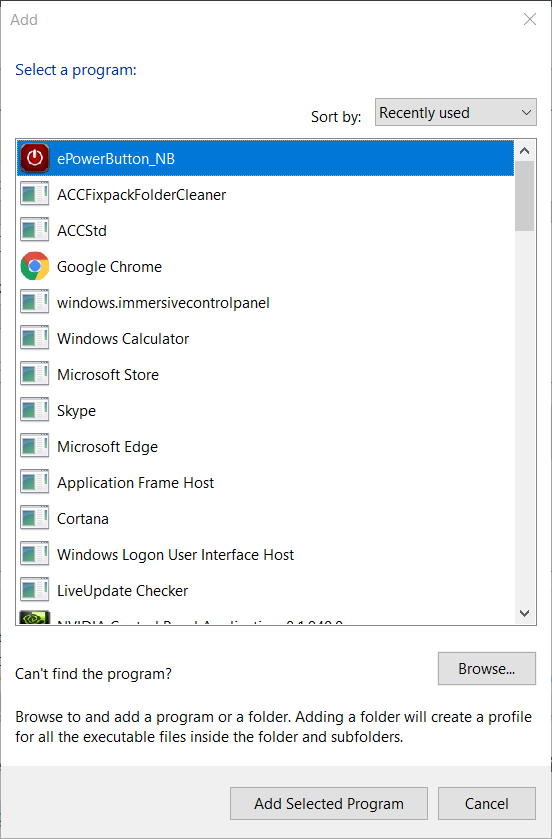
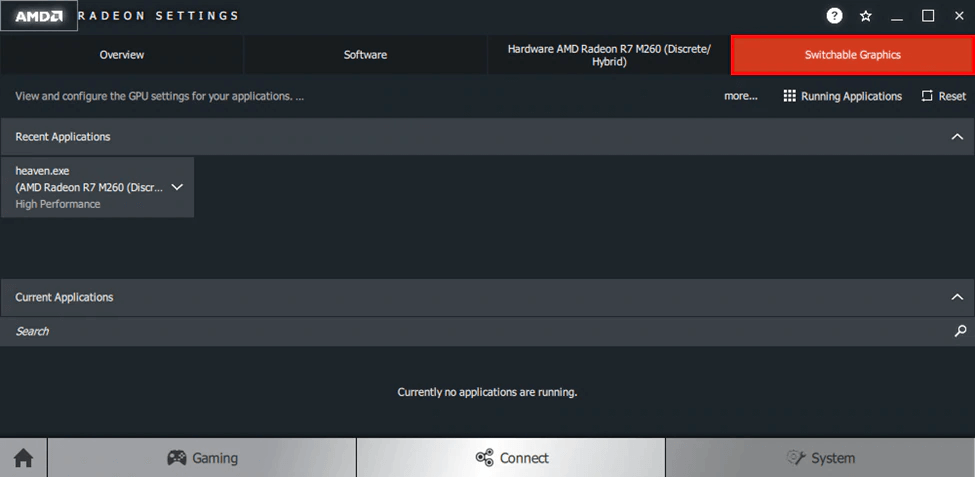
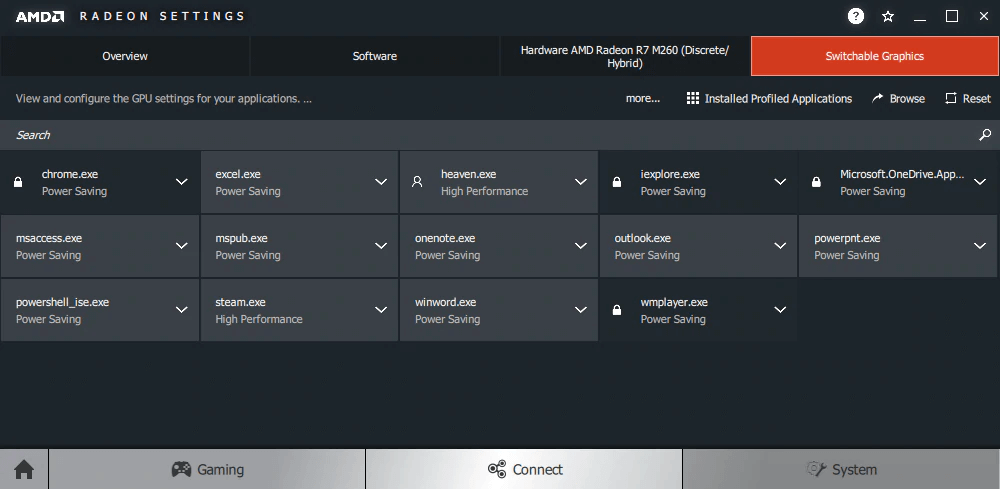
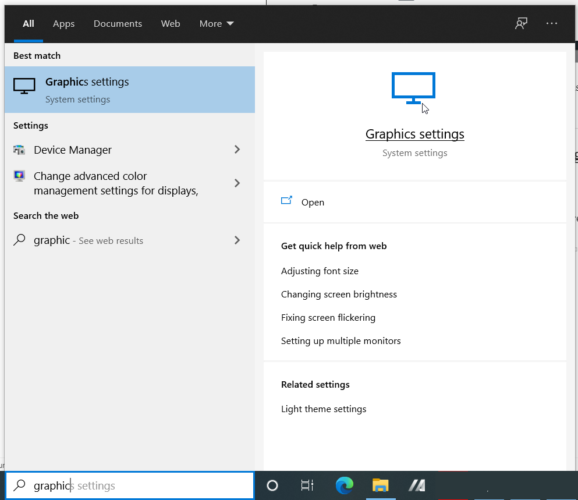
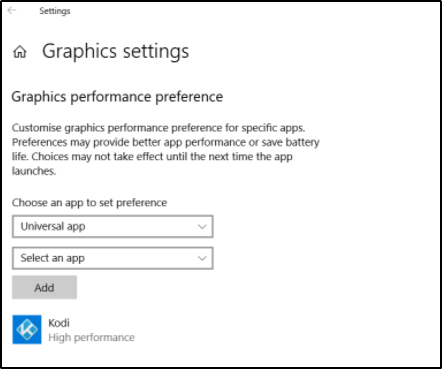
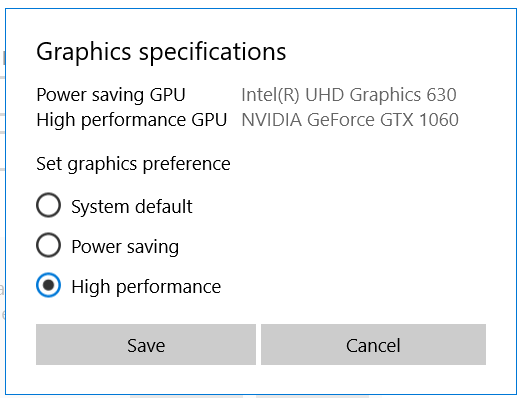
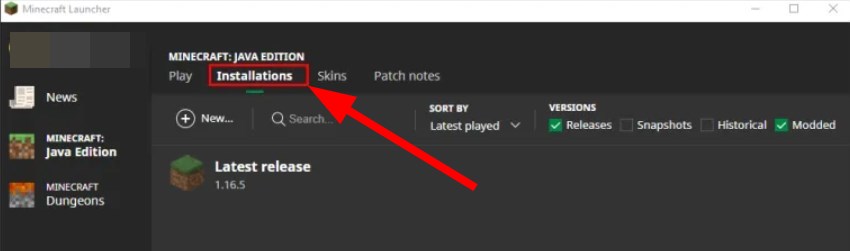
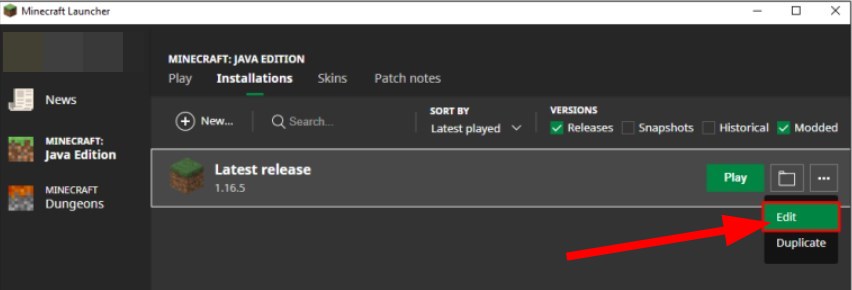
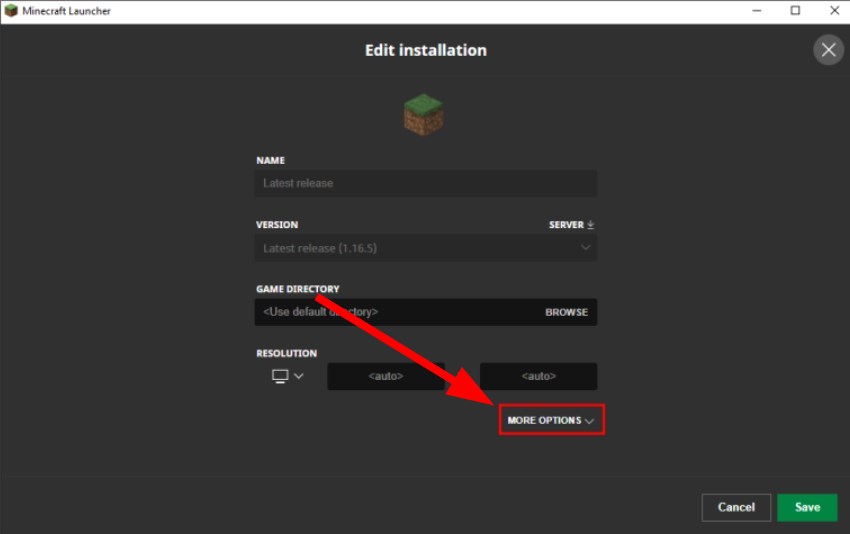



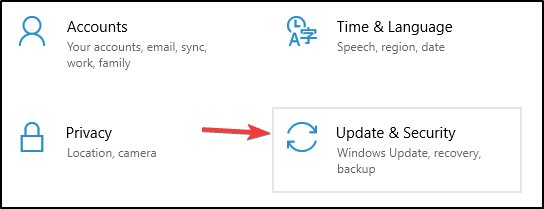

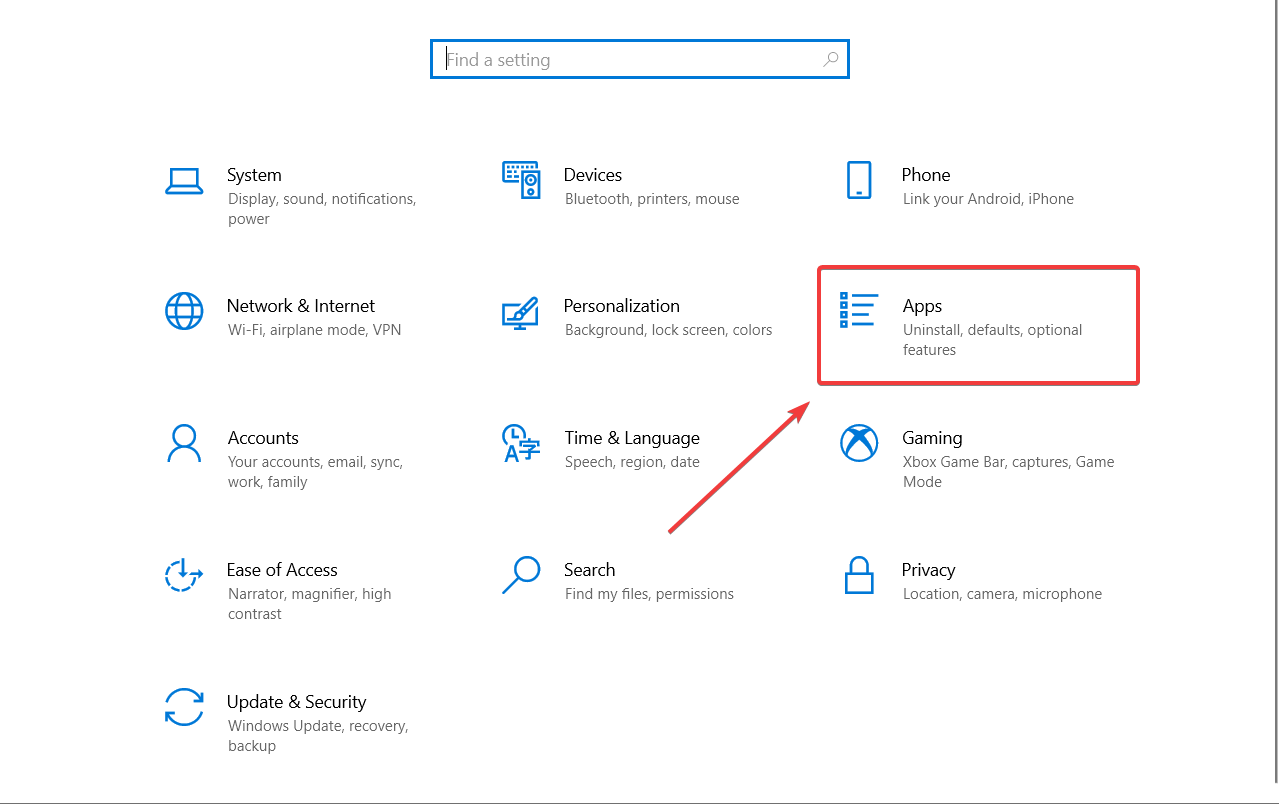
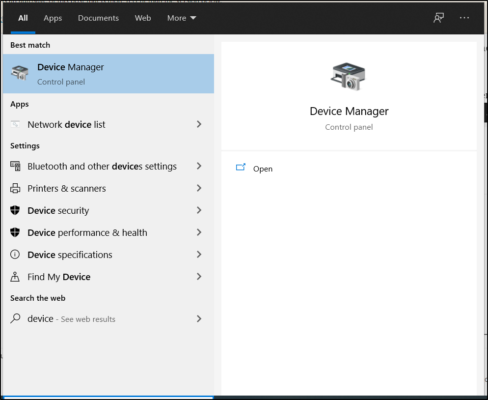 .