How to Fix Werfault.exe Error on your PC [4 Ways]

The werfault.exe application error is more common than you might think and if you encounter it, you’ll have issues with the error reporting feature.

What causes the Werfault.exe error?

This issue is caused by corrupt system files or problems with your drivers. Issues with Windows Error Reporting service can also lead to this issue.

How do I fix WerFault.exe error?

1. Run the SFC command inside PowerShell (Admin)

  1. Press the Windows key+ X and select Windows PowerShell (Admin).
  2. Inside the command prompt, type the command below and hit Enter: sfc /scannow PowerShell command - WerFault.exe windows 10
  3. Scanning your protected system files and replacing the corrupt files with a cached version will start.
  4. Wait for the process to complete and reboot your PC.
  5. Try to see if the issue is resolved.

2. Use the Windows Memory Diagnostic tool

  1. Press the Windows key + R, type mdsched.exe, and press Enter.
  2. Choose the Restart now and check for problems option inside the windows memory diagnostic tool.
    Windows memory diagnostic tool - WerFault.exe windows 10
  3. Wait for the scan to finish and fix memory-related problems inside your Windows 10 OS.

3. Disable the Error Reporting Service

  1. Press Windows key + R, type services.msc, and press Enter.
  2. Double-click the Windows Error Reporting Service to open its properties.
    Windows error reporting service - WerFault.exe windows 10
  3. Double-click on it.
  4. Set the Startup type to Disabled.
  5. Finally, click the Apply button, followed by OK.

For detailed instructions, visit our guide on how to disable Windows Error Reporting service on Windows 11.

4. Reinstall your display drivers

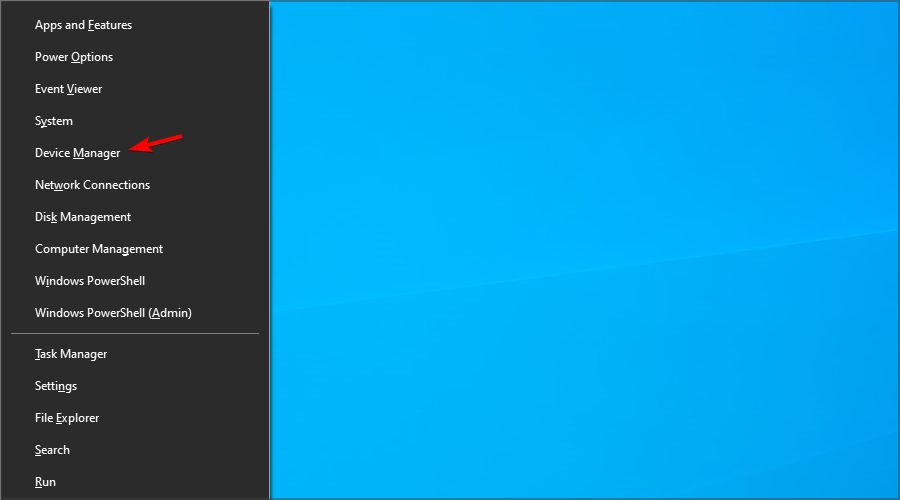
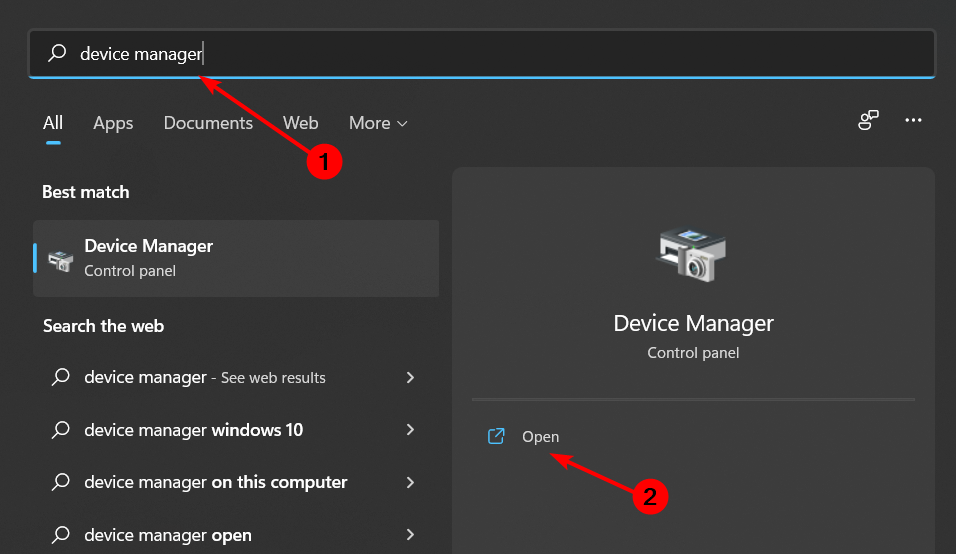
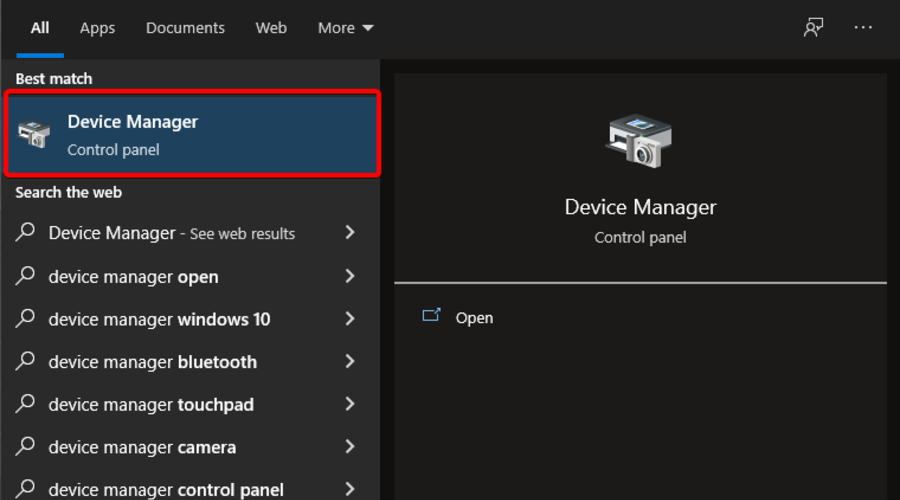
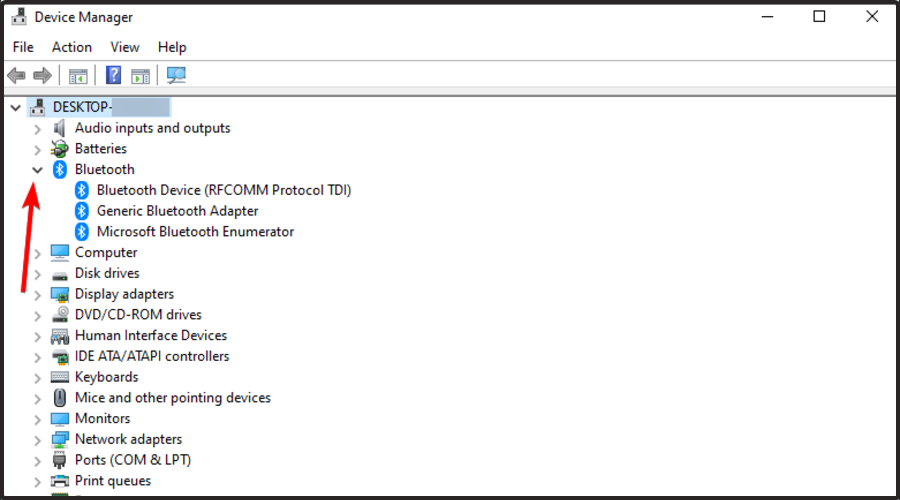
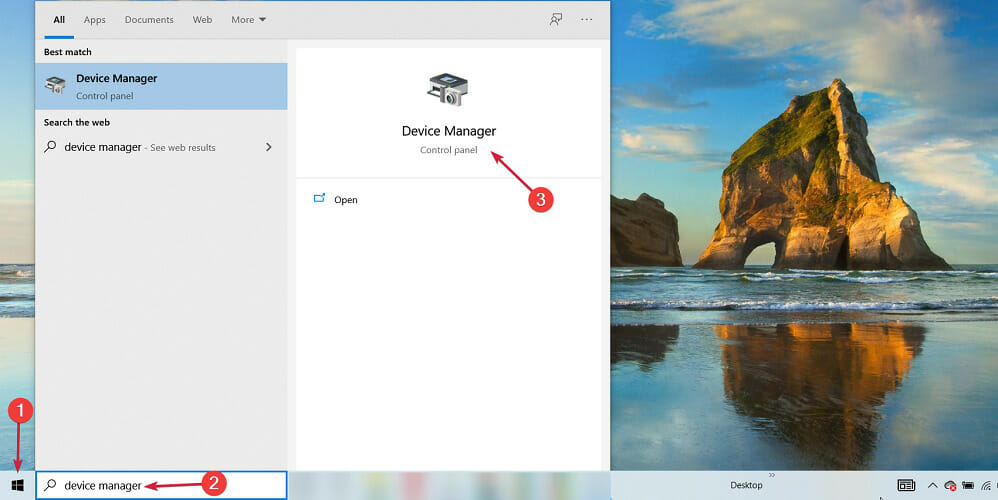
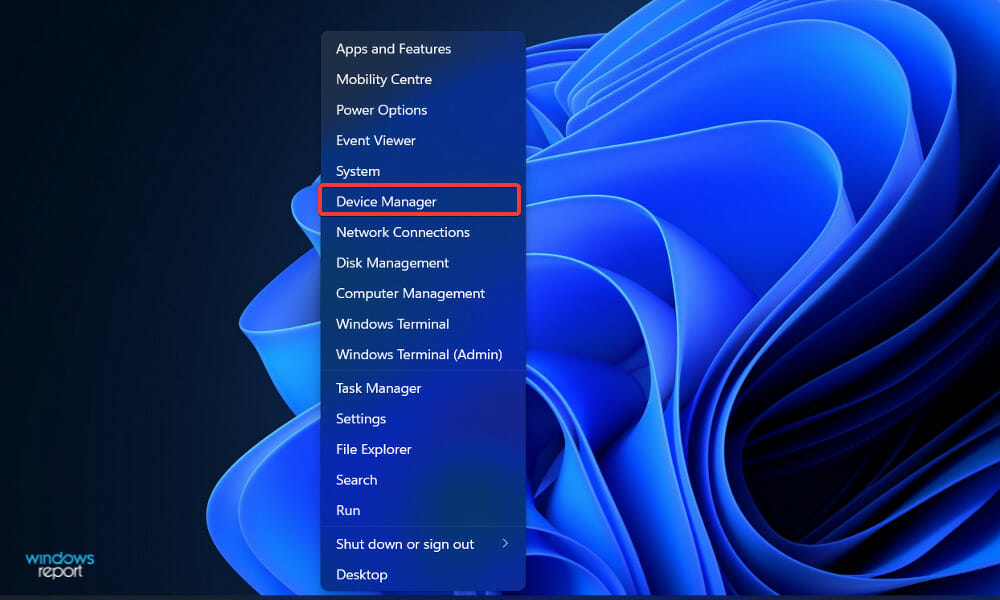
  1. Press the Windows key + X and choose Device Manager.
    Device Manager - Werfault.exe windows 10
  2. Inside the Device Manager window, click on Display adapters to expand the section.
  3. Right-click the display adapter and select Uninstall device.
  4. Now, click the Uninstall button to confirm the action.
  5. Finally, click the Scan for hardware changes icon at the top.

Is WerFault exe a virus?

WerFault.exe is an important system process that reports issues on Windows 10 and 11. These reports help Microsoft detect and fix bugs and issues troubling your PC and your most-used apps. Hence, it is not a virus and poses no threat to your PC.

In today’s fix article, we explored the best methods to try and troubleshoot your WerFault.exe error, but keep in mind that this issue can manifest as werfault.exe application error with a black screen.

If there’s a problem with this exe file, your Error Reporting service can keep restarting. We also have a guide on how to disable the Windows Problem Reporting service, so you might want to check it out.

Feel free to let us know the solution that helped you fix this issue in the comments below.

Fix: Character Map is Not Working in Windows 11

The Character Map is a Windows utility that allows you to add special characters to your writing, like shapes and Greek letters for mathematical equations.

Some users have experienced the Character Map software not opening on their Windows 11 machines. While annoying, a lot of common Windows fixes work in addressing this issue.

What causes the Character Map to not work on Windows 11?

Before going into the solutions, we need to take some time to understand why this error happens. Doing so will hopefully teach you what went wrong and what steps you can take to prevent future problems.

  • Your computer is out of date – Having out of software can cause compatibility issues with various apps, including, but not limited to, the Character Map. Be sure to stay up to date.
  • The update may be buggy – Conversely, the update you just installed may be the source of your problem. If you notice issues appearing after an update, you will need to roll back Windows 11.
  • Malware is causing a malfunction – Be more mindful of what files you download and pages you visit on the internet. If you get infected with a virus, download some antivirus software to get of it.
  • There are corrupt files on your hard drive – Like malware, corrupt files can interfere with software. This can be cleared up with an SFC scan.

How can I fix the Character Map?

Fixing the Character Map problem is very easy to do. We recommend trying the simpler solutions before moving on to the more complicated ones:

  • Download the latest Windows 11 update. Microsoft rolls out them once a month on Patch Tuesday, so be sure to keep an eye out for that.
  • You can always try restarting your computer. For the majority of the time, a straightforward reboot will fix whatever computer problem you have.
  • Use a third-party registry cleaner like CCleaner to eliminate corruption on your computer.

1. SFC Scan and repair windows image

  1. Bring up the Command Prompt in the Windows Search bar and select Run as administrator.
  2. In the Command Prompt, type in the following and hit Enter on your keyboard afterward: sfc /scannow
  3. Give your computer enough time to complete the process.
  4. Next, enter the following three commands one after the other: DISM /Online /Cleanup-Image /CheckHealth DISM /Online /Cleanup-Image /ScanHealth DISM /Online /Cleanup-Image /RestoreHealth
  5. Wait for each process to finish up and close the Command Prompt.

You can also scan for underlying PC issues using a third-party utility like a PC repair tool. Upon scanning your PC, it will fix the detected problems and offer you a user-friendly overview of all the changes made.

2. Perform a clean boot

  1. Press the Windows + R keys simultaneously to open the Run command.
  2. In the new window, type msconfig then click OK to open the System Configuration.
  3. Click the bubble next to Selective Startup. Make sure the boxes next to both Load System Services and Load Startup Items are blue.
  4. Now go to the Services tab. Click the box next to Hide all Microsoft services.
  5. Now select the Disable all button underneath the Services window.
  6. Now go to the Startup tab and click Open Task Manager.
  7. Disable all the apps you see that you are not currently using. You can do this by clicking one and selecting Disable in the upper-right corner.
  8. Close the Task Manager when done.
  9. Go back to System Configuration. Click Apply, then OK.
  10. Restart your computer to perform a clean boot. See if the problem has been resolved.

3. Create a new user profile

  1. Locate the Command Prompt on the Windows search bar and select Run as administrator.
  2. In the Command Prompt, type in net user "account name" /add
  3. Where it states account name, replace it with a new username, then hit the Enter key.
  4. Now type the following in and hit Enter when done: net localgroup administrators "account name" /add
  5. Like before, replace account name with the name of the new account you created.
  6. Close the Command Prompt and sign into the new user account. Check if the problem persists.

4. Run keyboard troubleshooter

  1. Launch the Windows 11 Settings app, and in the System tab, click Troubleshoot.
  2. On the following page, select Other troubleshooters.
  3. Locate the Keyboard entry and click the Run button on the right side.
  4. Allow the keyboard troubleshooter to complete the process and follow any directions it may give you. Once done, click Close the troubleshooter.

What can I do if a registry file no longer works?

The Registry Editor is another Windows utility software used to manage registry files which contains all the different settings, data, and values for apps and hardware on your computer.

If a registry file stops working or responding, it may be corrupted. You can try one of the mentioned solutions or refresh the system via the Settings menu.

While we’re on the topic of utilities, one that people use frequently is a file manager like File Explorer. The problem with File Explorer is that it isn’t that intuitive.

You should download a third-party file manager like WinZip or Total Commander instead of using the limited File Explorer.

Feel free to comment below if you have questions about other Windows utilities. And please tell us if there’s a specific guide for any Windows 11 error you’d like to see.

USB Device Descriptor Failure on Windows: How to Fix & Cause

We use USB devices all the time, so it’s quite frustrating when your USB ports aren’t working. This will affect your devices as well, and you won’t be able to use them at all.

Windows 10 users reported a USB Device Descriptor Failure error that prevented them from using their devices. However, there are ways to fix this problem, and in today’s guide, we’ll show you how to do that, so let’s get started.

What causes the USB device Descriptor Failed code 43 error?

Below are some of the factors that can cause the USB Device Descriptor Failure error:

  • Outdated or faulty drivers: Sometimes, you might be getting the USB device_descriptor_failure on Windows 10 64 bit because your USB drivers are faulty or outdated. The quickest way to rectify this reinstall or update your drivers and restart your PC.
  • Issues with power settings: In some cases, this issue might be due to the Fast Startup feature in your power settings. You need to disable the feature and restart your computer to solve the problem.
  • Outdated BIOS: The BIOS is integral to the smooth functioning of your hardware. Hence, if it is outdated, you can face issues like this.

Now that we know the causes of this issue, below are some of the variations that users have encountered:

  • Unknown USB device (Device Descriptor Request Failed) code 43: This is a relatively common error; we wrote in-depth about it in our Error code 43 for USB devices guide.
  • USB device_descriptor_failure Bluetooth: You can encounter this issue using a Bluetooth adapter on your PC. For more information, we suggest visiting our Bluetooth not working guide.
  • Unknown USB Device (Device Failed Enumeration) Windows 10: If you get a message saying there’s an unknown USB device on your PC, there might be a problem with the device itself. Alternatively, there might be an issue with your drivers.

How do I fix the request for USB device descriptor failed?

1. Use Hardware and Devices troubleshooter

  1. Press Windows key + R to open the Run dialog.
  2. Now enter the following and press enter: msdt.exe -id DeviceDiagnostic
  3. Once the troubleshooter window opens, click Next and follow the instructions on the screen.

Although this isn’t the best solution, some users report that it has helped them fix this error, so it’s worth trying out.

2. Turn off Fast Startup

  1. Press Windows key + S and enter power plan. Select Choose a power plan.
  2. On the left side click the Choose what the power buttons do.
  3. Next click on Change settings that are currently unavailable.
  4. Go to the Shutdown settings section and uncheck the Turn on fast startup.
  5. Next, click Save changes and restart your computer to apply the changes.

Some users report that Windows 10 boots too quickly and that external devices aren’t getting detected before the boot is completed, and this causes a USB Device Descriptor Failure error.

3. Update your BIOS

  1. Visit your motherboard manufacturer’s website.
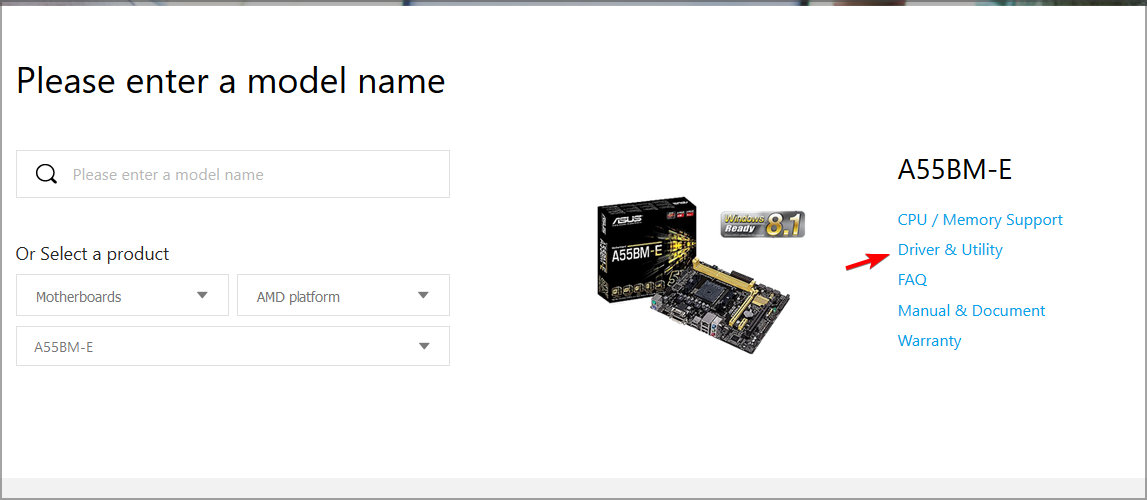
  2. Search for the model of your motherboard and go to the Driver & Utility section.
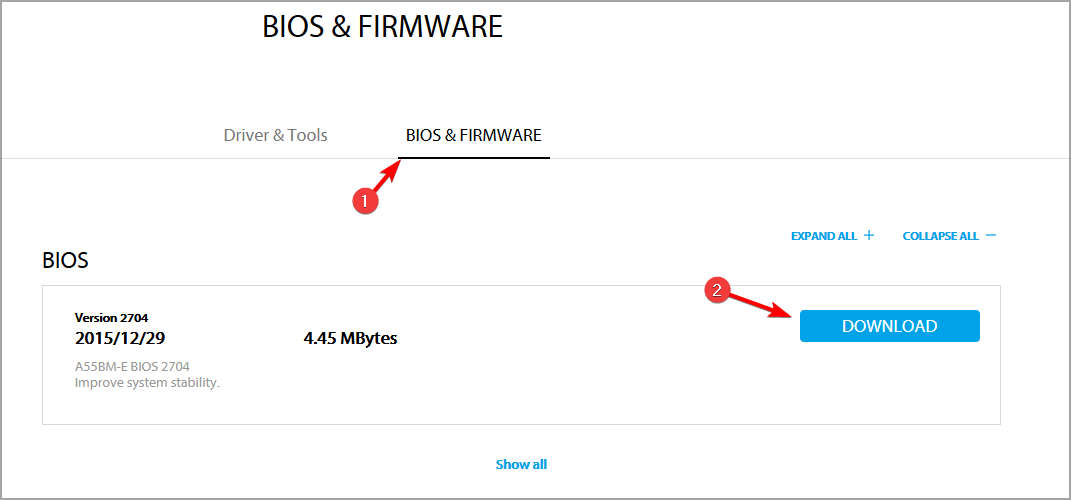
  3. Head to BIOS & Firmware section and download the latest version of BIOS.
  4. Once the file is downloaded, extract it to a flash drive.
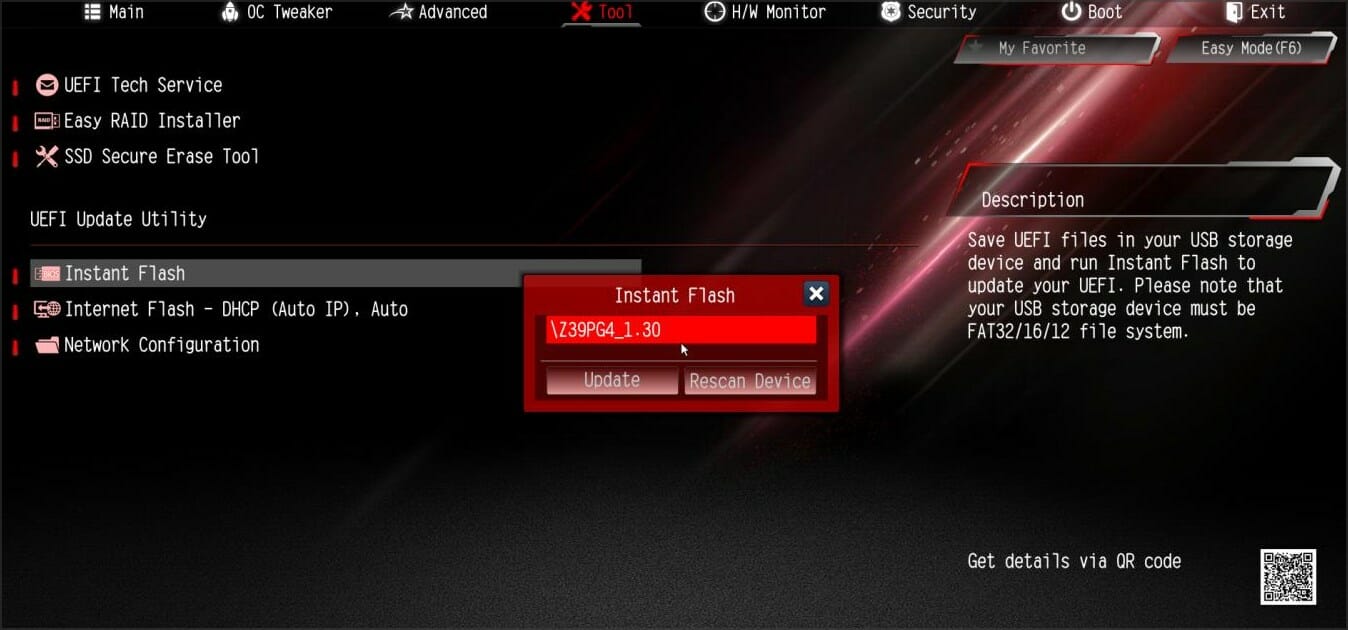
  5. Restart your PC and access BIOS.
  6. Now go to Firmware update section and select the files from your flash drive.
  7. Wait for the process to finish.

For more information, we suggest reading our how to update BIOS guide.

Note icon NOTE
Updating your BIOS can cause issues, even permanent damage, if you don’t do it correctly, so if you don’t know how to do it, maybe it’s best to hire a professional to do it for you.

4. Update USB Hub drivers

  1. Press Windows key + X and select Device Manager.
  2. Expand Universal Serial Bus controllers.
  3. Right-click the USB Root Hub, and go to Update driver.
  4. Select Search automatically for drivers and wait for the process to finish.
  5. Restart your computer.

Update drivers automatically

While a quick way to fix the USB device_descriptor_failure error if it’s related to the driver is to download the latest versions, doing it manually is a real hassle.

Hence, we suggest doing it automatically using a dedicated driver updater tool. Once installed, the program will automatically scan your PC for outdated drivers.

The third-party software will check your installed driver versions and recommend proper updates. Choose the drivers you want to update and click to update them automatically.

⇒ Get Outbyte Driver Updater

5. Disable USB Selective Suspend Settings

  1. Press Windows key + S and type power plan. Select Choose a power plan.
  2. Find your currently selected plan and click Change plan settings.
    Change Plan Settings
  3. Click Change advanced power settings.
  4. Find USB Settings and then select USB selective suspend setting. Change it to Disabled, and click on Apply and OK to save changes.

Some users also reported that disabling the USB Selective Suspend Setting from the Power Options also resolves the USB Device Descriptor Failure error, so feel free to try that.

6. Reinstall USB Hub

  1. Go to Search, type devicemngr, and open Device Manager.
  2. Expand Universal Serial Bus controllers.
  3. Right-click the USB Root Hub, and go to Uninstall device.
  4. Click on Uninstall to confirm. Wait for the process to finish.
  5. Restart your computer.

Once you boot your computer again, it should automatically install the USB Root Hub driver.

How can I fix an Unknown USB Device (Device Descriptor Request Failed) on Windows 11?

Windows 11 is similar to its predecessor, and all solutions from this guide can be applied.

There might be some minor differences in steps that you need to take, but in most cases, you should be able to use these solutions on the latest version as well.

For more information, visit our how to fix Device Descriptor Request Failed Error in Windows 11 guide.

That’s about it; we hope this article helped you solve the USB Device Descriptor Failure error on your PC.

If you’re having additional problems with your USB devices, read our guide on what to do if USB isn’t recognized in Windows.

For any comments or questions, write them down below.

PC did not Start Correctly on Windows 10: Why & How to Fix

You may have encountered an issue where your Windows PC doesn’t start as it should. It denotes this with an error right out of the blue that reads: Your PC did not start correctly.

This could happen for a variety of reasons and can sometimes be fixed by simply restarting your PC. However, the problem might be much deeper than that, in which case, it will require the technical fixes detailed in this guide.

Why is my computer not starting up properly?

Below are some of the reasons you are getting your PC did not start correctly error message on your device:

  • Outdated OS: In some cases, this problem might be caused by an outdated operating system. The quickest way around this is to update your PC to the latest version.
  • Faulty system files: Another known cause of this issue is missing or faulty system files. You need to repair and restore these corrupt files to fix this issue.
  • Antivirus interference: Sometimes, your security software might interfere with your boot sequence, leading to the discussed error message. You need to disable your antivirus temporarily and restart your PC to restore normalcy.

Your PC won’t start properly? Fix it with these solutions

1. Safe Mode/Startup Repair

  1. Go to the Start Menu and type Update and recovery.
  2. Click on Update and Recovery and go to Recovery.
  3. Now, under Advanced startup, click Restart now.restart now your PC didn't start correctly
  4. When your PC restarts, click Troubleshoot on the Choose an option screen.
  5. Now, select the Advanced options option.
  6. Click on Startup Settings 
  7. Next, click the Restart button.
  8. After your PC restarts, press 4 or F4 to Enable Safe Mode.
  9. Finally, Sign in with an account that has administrator rights.

Your PC should be in Safe Mode now. You must run Startup Repair from the Advanced boot option:

  1. Press and hold Shift and click on Restart.
  2. Click on Troubleshoot > Advanced Options.
  3. Now, click on Startup Repair and follow the onscreen instructions to complete the process.

2. Disable antivirus

Some reports suggest your antivirus is causing the problem. That’s a common thing in Windows 10, as the system is known for interfering with third-party antivirus software.

Although Windows 10 antivirus mainly affects updates and how they’re installed. It can sometimes cause a system error including, your PC did not start correctly.

So, try pausing your antivirus protection for some time. If the problem doesn’t occur while your antivirus is disabled, consider changing it or switching to Windows Defender.

You can also try to use a different security tool. The best antivirus software for Windows 10 is specifically configured to protect you without causing any issues in your system.

3. Use sfc/scannow

  1. Press the Windows key, type cmd, and select Run as administrator under Command Prompt.
  2. Enter the following command, and press Enter: sfc/scannowsfc scannow your PC can't start correctly
  3. Wait for the process to finish.

The next thing we will try is running the sfc/scannow command in the Command Prompt. This command acts as a troubleshooter for various system-related issues and might fix your PC did not start correctly prompt.

4. Update Windows

  1. Press the Windows key + I and select the Update & Security option.
  2. Click the Check for updates button.
  3. Finally, install any available updates.
check for updates your PC did not start correctly

In some cases, your PC might not start correctly because the OS is outdated. You can put an end to the error message by updating the latest version and restarting your PC.

5. Restore the system

  1. Right-click the Start menu and open the Control Panel.
  2. In the Category view, open System and Security.
  3. Now, click File History.
  4. Open Recovery from the bottom left.
  5. Next, click on Open System Restore.system restore your PC did not start correctly
  6. Click Next until you can see the list of the available Restore Points.
  7. Now, choose a restore point and click the Next button.
  8. Finally, click the Finish button to complete the process.

There’s a chance some unwanted changes have been made on your computer. This can be the cause of your PC did not start correctly error message.

The best thing to do, in this case is to perform a system restore to a time when your PC was working well.

6. Rebuild Boot Configuration Data

  1. Repeat Steps 1 to 5 in Solution 1.
  2. Now, choose the Command Prompt option.
  3. In the command line, type the following command and press Enter: bootrec /rebuildbcd
  4. Now, there are two scenarios you can encounter:
    • Total identified Windows installations: 0. Continue to Step 5.
    • Total identified Windows installations: 1. Type Y, press enter, and restart your PC.
  5. In the command line, type the following commands and press Enter after each: bcdedit /export c:bcdbackup attrib c:bootbcd -h -r -s ren c:bootbcd bcd.old bootrec /rebuildbcd
  6. Press Y or Yes and press Enter.
  7. Finally, reset the PC, and you should be good to go.

If you’re unable to boot normally even though you’ve performed all the previous steps, there’s a chance that the Boot Configuration Data is corrupted.

This can be the reason you are getting a prompt that your computer did not start correctly.

Also, some essential files may get deleted, or the system update can cause issues. Either way, you’ll need to rebuild the Boot Configuration Data to resolve this problem.

7. Fix the corrupted Master Boot Record

  1. Repeat Steps 1 to 5 in Solution 1.
  2. Select the Command Prompt option.
  3. Now, type the command below and hit Enter: chkdsk /r
  4. Wait for the repairs to finish. If the problem is still there, type the commands below and press Enter after each: bootrec /RebuildBcd bootrec /fixMbr bootrec /fixboot
  5. Reset your PC and look for changes.

Master Boot Record (MBR) is a special boot sector that saves the boot configuration and information on your HDD.

If it’s corrupted or incomplete, you won’t be able to boot your computer normally, leading to errors like your PC did not start correctly.

A large variety of errors can occur because of this issue, and it’s not exactly easy to resolve it, especially without the installation or recovery media. However, there’s always a way, and you should be able to perform this action by following the steps above.

8. Delete updates

  1. Press the Windows key + I to open the Settings app and select Updates & Security.
  2. Click View update history.
  3. Now, select Uninstall updates.
  4. Finally, right-click the faulty update and select Uninstall.
    uninstall update your PC did not start correctly
  5. Now, find the latest update installed on your computer (you can sort updates by date), right-click it, and go to Uninstall.
  6. Restart your computer.

If this error occurred after the latest update, there’s a good chance you’ll need to uninstall it and revert to the previous working version of the system.

That is all you need to fix the prompt that says your PC did not start correctly. If you still can’t fix the issue after following the steps in this guide, you will need to contact Microsoft support for further assistance.

If your computer won’t restart for some reason, check our detailed guide to fix the issue quickly.

Feel free to let us know the solution that helped you fix the issue in the comments below.

In case the issue persists, Microsoft advises you to contact support for further troubleshooting.

Spacebar Is Not Working in Windows 11: How to Fix It

The normal functioning of all of your PC components makes for a great user experience. In case some of the connected components, such as the keyboard do not work, then it could be pretty frustrating, especially, when the issue pops up out of nowhere.

Some users have reported that the spacebar is not working in Windows 11. For some, the issue triggers after the Windows 11 update. In this guide, we will give you a bunch of solutions that will help you resolve the spacebar not working in Windows 11 problem. Let us get right into it.

Why is the spacebar not working in Windows 11?

We did some digging and found a bunch of solutions that trigger the spacebar not working in the Windows 11 problem.

  • The issue is related to Windows update: Some users have reported that the problem started right after they installed the latest Windows update.
  • Sticky key feature is enabled: The sticky key feature is useful if you are a shortcut person. However, the spacebar won’t work if that is enabled.
  • There are some issues with the Keyboard driver: A problem with the keyboard software could be the reason the spacebar is not working in Windows 11.
  • You haven’t updated the driver: You need to make sure that you have the latest keyboard driver installed on your PC in order for the smooth functioning of the associated hardware.
  • There is some issue with the system files: If the system files are corrupt or missing then this could trigger multiple issues with your PC.

What can I do if the spacebar is not working in Windows 11?

Here are a few things that we would like you to apply before you go ahead with the advanced troubleshooting solutions:

  • Close all the programs and restart your PC and see if this fixes the issue or not.
  • Close all the background apps because there could be some programs that are blocking the spacebar.
  • Make sure that the keyboard connection, wired or wireless is perfectly fine.
  • You might have to replace the keyboard as the problem could be the hardware. For that, we have a guide as well, that lists some of the best keyboards that you can buy.

Now let us check out the advanced solutions to fix the problem.

1. Disable Sticky Key

  1. Press the Win + I keys to open the Windows Settings menu.
  2. Click on Accessibility on the left pane.
  3. Select Keyboard.
  4. Turn off the Sticky keys toggle.
  5. Restart your PC.

Sticky keys is an amazing feature, but several users have reported that the spacebar not working in Windows 11 problem was easily fixed by turning off the feature. You can also try disabling the feature and see if this resolves the problem or not.

If you are not able to turn off the Sticky keys on your PC, then you can refer to our guide and fix the problem. But before that, you should check how to turn off Sticky keys and see if the normal ways help you fix the problem or not.

2. Uninstall Windows 11 update

  1. Press the Win + I keys to open the Windows Settings menu.
  2. Select Windows Update from the left pane.
  3. Under Related settings, select Uninstall updates.
  4. Hit the Uninstall button for the recently installed update.
  5. Restart your PC.

Often the latest update may include some bugs along with several new features. As important as it is to keep your PC up to date, it is sometimes better to uninstall the update as it could very well be the reason for the problem that you are facing.

3. Run the Keyboard troubleshooter

  1. Press the Win + I keys to open the Windows Settings menu.
  2. Select Troubleshoot from the right side.
  3. Click on Other troubleshooters.
  4. Hit the Run button for Keyboard.
  5. The troubleshooter will detect any issues with your keyboard and will prompt you to apply the fixes to resolve the problem.
  6. Restart your PC.

You can use the keyboard troubleshooter to fix any keyboard-related problems such as the spacebar not working in Windows 11. It will automatically detect any issues and will ask you to apply the fixes.

This isn’t the only key that has issues, and many reported that the backspace key is not working for them, but we have dedicated guide to fix that.

4. Download the latest driver

  1. Open the Start menu by pressing the Win key.
  2. Search for Device Manager and open it.
  3. Expand the Keyboards option.
  4. Right-click on your keyboard driver.
  5. Select the Update driver option.
  6. Click on Search automatically for drivers.

You can follow the above steps to update the driver of your keyboard and see if this resolves the issue or not.

However, there is another way that makes use of a third-party tool called Outbyte Driver Updater. This will help you update all the drivers at once.

Apart from updating the drivers, you can use it as a download manager, schedule scans to keep all of your drivers up to date, create driver backups, and much more.

Outbyte Driver Updater

You need to keep your drivers updated at all times and Outbyte Driver Updater will make your PC faster as well!
Free trial Visit website

5. Rollback drivers

  1. Open the Start menu by pressing the Win key.
  2. Search for Device Manager and open it.
  3. Expand the Keyboards option.
  4. Double-click on your keyboard driver.
  5. Switch to the Driver tab.
  6. Hit the Rollback driver button.

Sometimes that new version of the program can bring in bugs that could cause multiple issues. In such a case, we would suggest you roll back the drivers and see if this helps.

That is it from us in this guide. We have a guide that will help you fix the Caps lock stuck on or Num lock issue. You might also want to take a look at our Ctrl key not working guide for more solutions.

Some users have reported that their keyboard is not typing the double letters. This can be easily fixed by following our dedicated guide. If the keyboard is not working at all on your Windows 11 PC, then you should check out our guide which will help you fix the issue.

Feel free to let us know in the comments below, which one of the above solutions will help you resolve the problem.

There’s No Compatibility Tab in Windows 11: How to Fix This

Compatibility problems on Windows apps are rare, but they do happen like software not properly launching. Errors like these are caused by an app having some kind of compatibility issue.

Usually, you can go to an app’s compatibility tab and tweak some settings, but what if the tab is missing? Don’t fret because getting the tab back is possible using the right set of tools.

What causes the compatibility tab to go missing?

Before going into what you can do to bring the compatibility tab on Windows 11 apps, it’s recommended you learn what causes the problem in the place.

Because it’s worth noting the missing tab is not always the result of malware or anything malicious.

  • The system administrator may have disabled the tab: This is to prevent other people on a network from messing with software. If this is happening to you, ask the admin for help.
  • You have disabled the tab either purposely or accidentally: To fix this, you can either go back in the system files to reenable the tab or use the Compatibility Troubleshooter – assuming it works.
  • A file may have gotten corrupted after a recent update: It’s recommended that you uninstall the update to revert your computer back to an earlier state.
  • It may not be compatible with Windows 11: Installing older apps can cause a weird compatibility program with newer versions of Windows. Games like Fallout 3 are notorious for this.

There are only a handful of ways to restore the compatibility tab on your computer. It’s also worth mentioning that there aren’t any quick and easy ways to fix this problem either.

How can I bring back the compatibility tab on Windows 11?

There are a few pieces of advice that we would like to give you prior to fixing this problem. They will go a long way to help you and save you future headaches:

  • Be careful of what you download. A fix for this problem has been circulating the internet, which involves downloading a file for Registry Editor. Those types of files tend to have malware.
  • Prior to making any changes, you should create a System Restore point in case you make a mistake and things go wrong. This will restore your computer to an earlier form.
  • Make sure you have admin permissions, or you contact the admin of your network so you can actually make changes. Without that level of control, you won’t be able to do these solutions.

1. Make older programs run properly

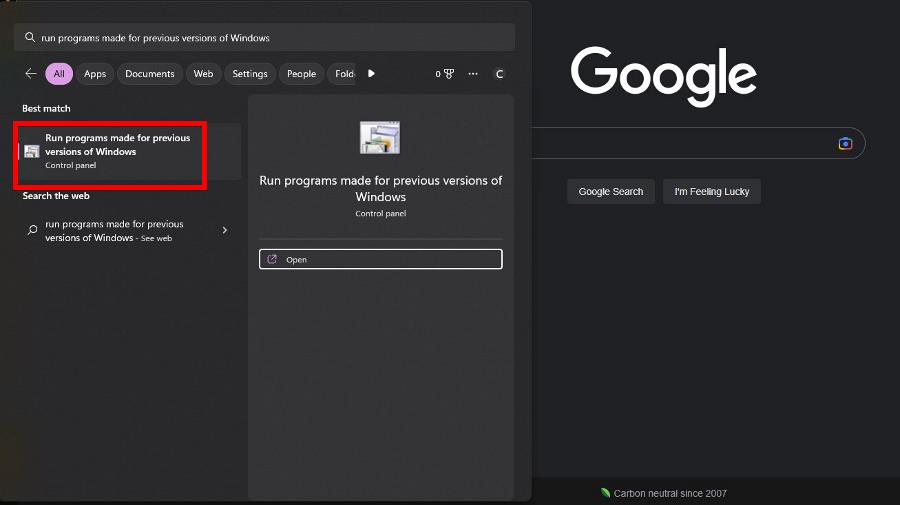
  1. In the Windows 11 Search bar, type in Run program made for previous versions of Windows. Select the entry that appears.
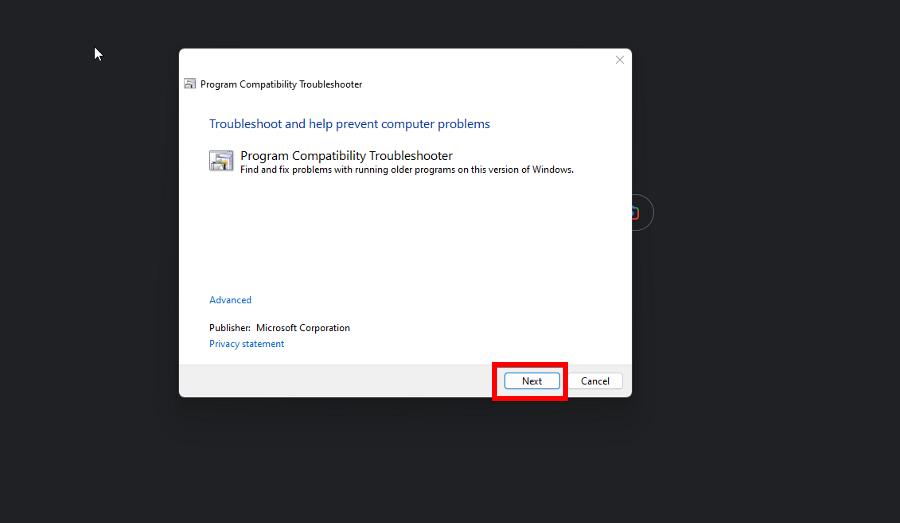
  2. Click Next in the window that appears.
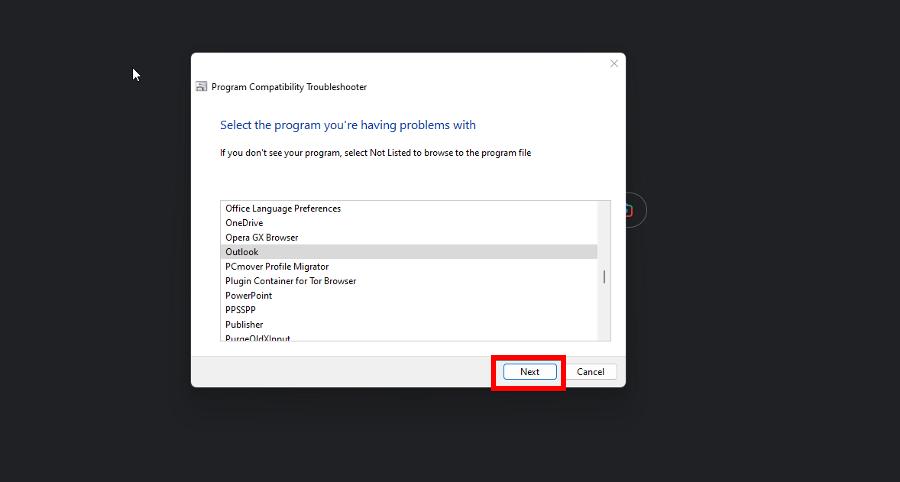
  3. After it finishes searching, select the problematic software, then click Next.
  4. Select Try recommended settings to test the app.
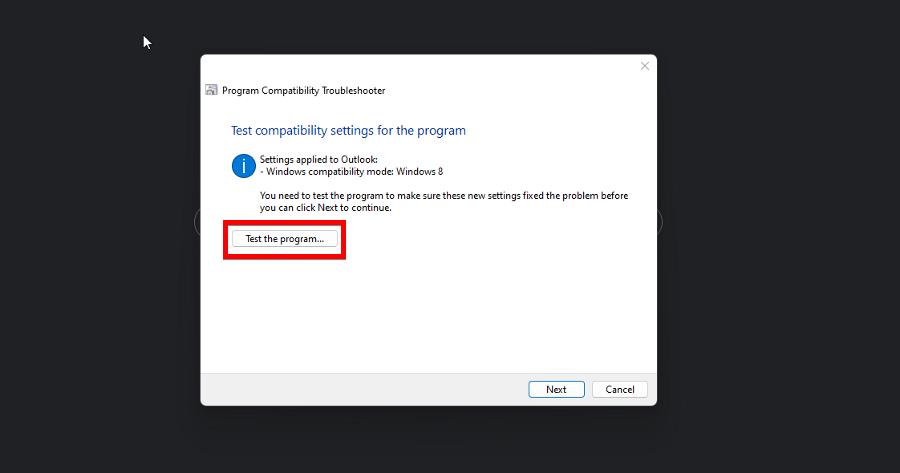
  5. On the following window, click Test the program. The app will appear under a configuration.
  6. See if it works properly under these settings, then click Next.
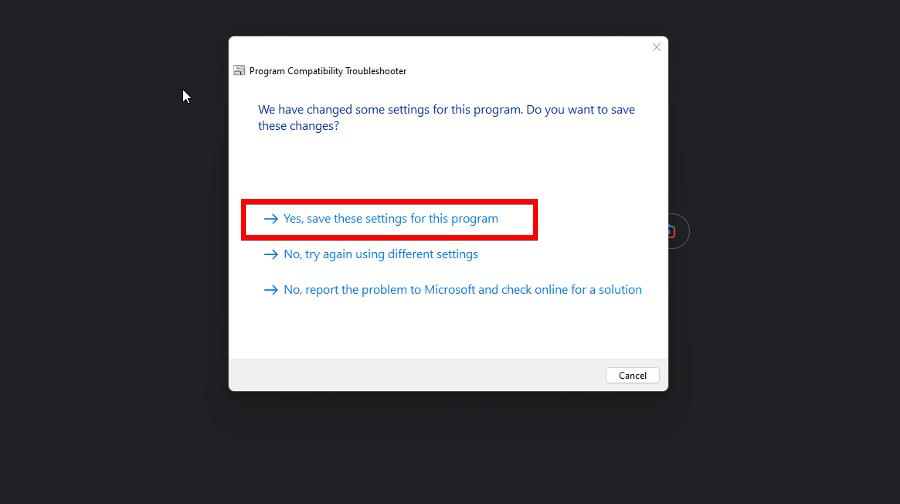
  7. If the app works correctly, select Yes, save these settings for this program. Otherwise, click one of the other two to go back to either try another configuration or report to Microsoft.
  8. Close the troubleshooter when it finishes.

2. Use Group Policy Editor

  1. Right-click the Windows logo in the bottom left corner and click Run.
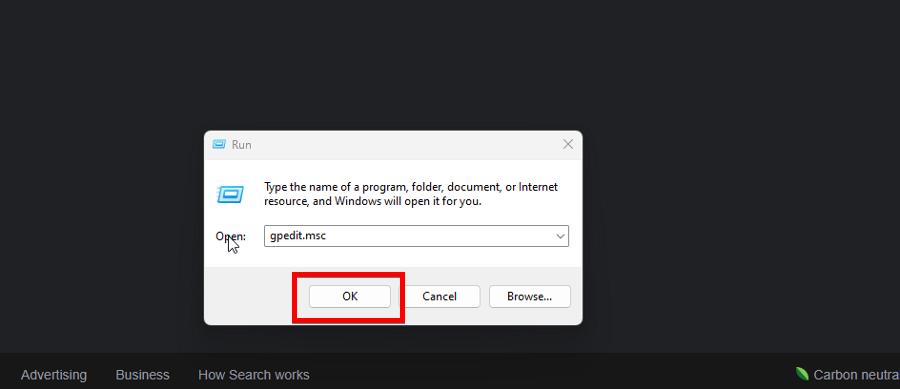
  2. In the Run window, type in gpedit.msc and click OK.
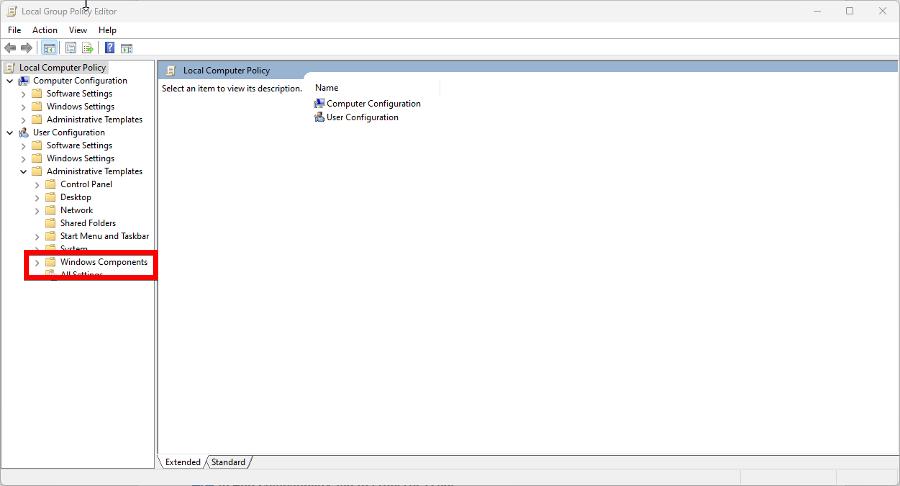
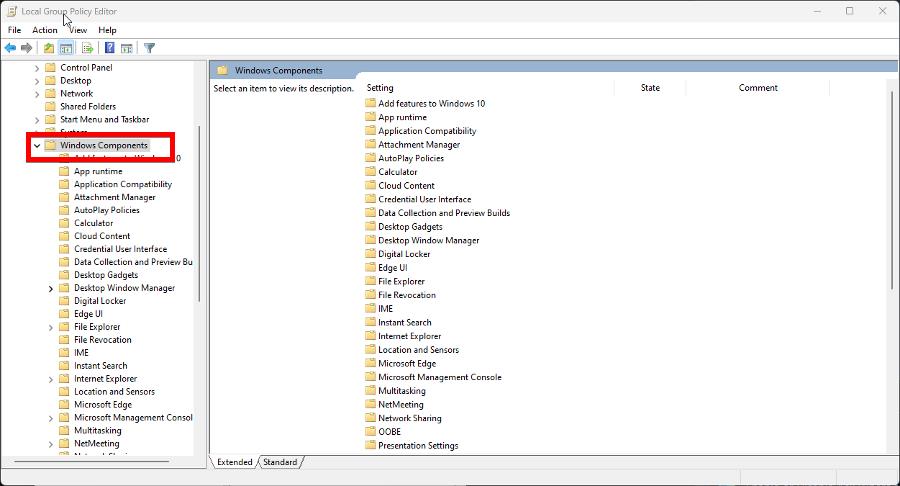
  3. Under User Configuration, expand Administrative Templates, then click Windows Components.
  4. Now search for Application Compatibility. Open that as well.
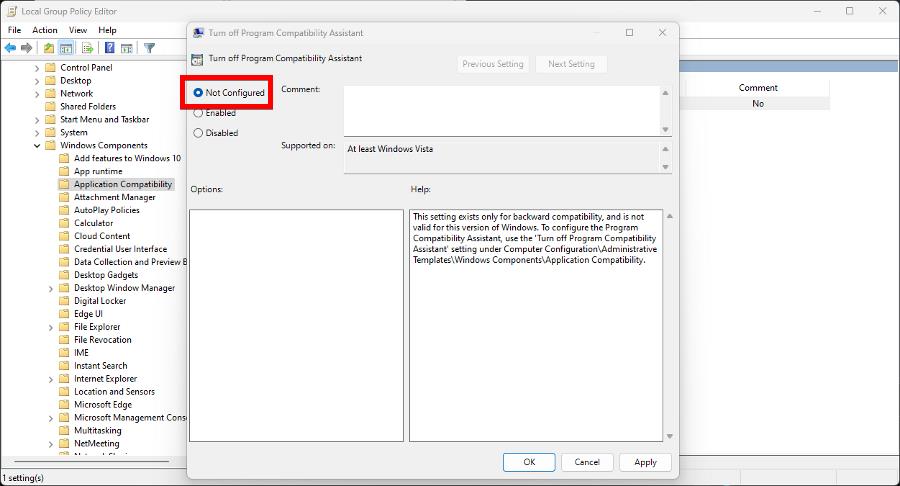
  5. Double-click Remove Program Compatibility Property Page to edit the policy (another policy will be used as an example, but the steps are still the same).
  6. Click the bubble next to Not Configured if the policy is enabled.
  7. Select Apply at the bottom of the window then OK.

This solution may be tricky to accomplish because the Local Group Policy Editor is not available on Windows 11 Home as it is exclusive to Windows 11 Pro.

However, it is undoubtedly possible to enable the tool on Windows 11 Home. Be aware it will require you to run a specific batch file to turn it on, which is a little complicated to do.

3. Run compatibility troubleshooter

  1. Right-click the problematic app and select Properties.
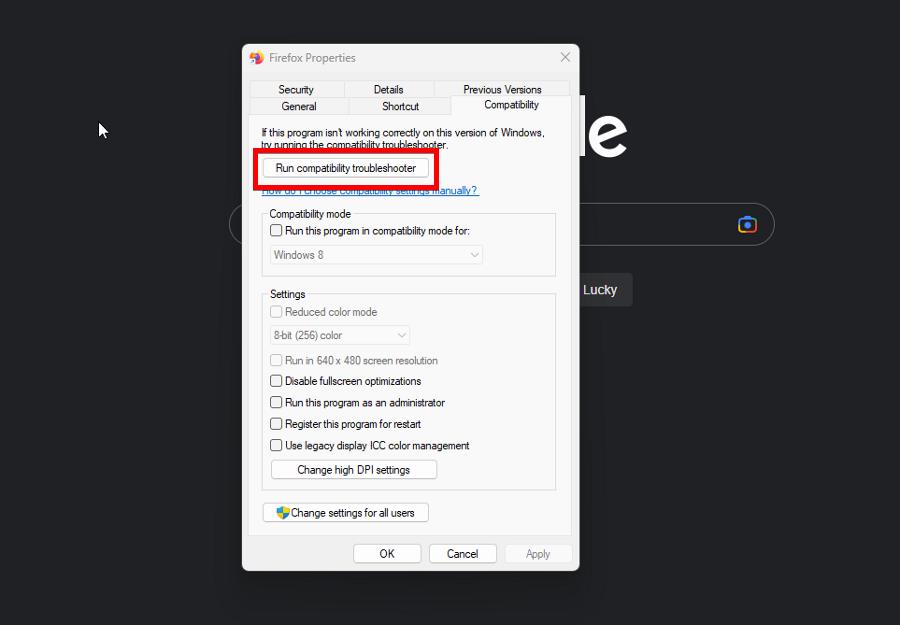
  2. Go to the Compatibility tab, then click Run compatibility troubleshooter.
  3. Similarly to the previous solution, select Try recommended settings to have Windows 11 reconfigure the problematic app.
  4. Once you have settled on a configuration, go back to the Properties window.
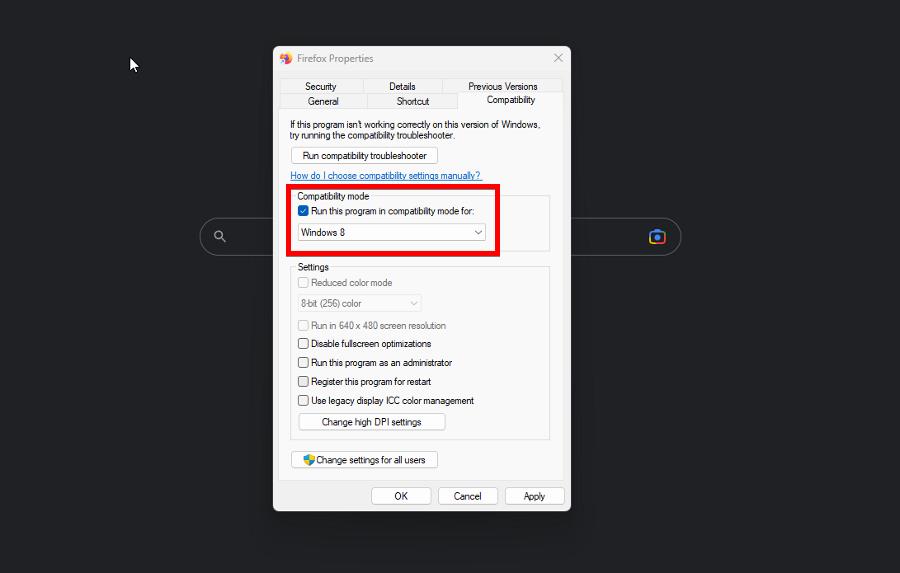
  5. Under Compatibility mode, click the box next to Run this program in compatibility mode for and select the original operating system for the app.
  6. Click Apply, then OK.

The purpose of this solution is to future-proof the compatibility error so that it doesn’t happen again; hopefully, anyway.

Alternatively, you can select the Troubleshooter Program option but there’s no real difference between the two. You’re ultimately doing the same thing with either choice.

For a complete walkthrough on adjusting these settings in Windows 11, see this compatibility mode guide.

Can I use the Local Group Policy Editor for other things?

Once you get the Local Group Policy Editor working on your Windows 11 computer, you can fix all kinds of issues. And it would behoove you to read up on them if they happen to you.

The software can be used to fix Windows 11 installing the same old Intel graphics drivers over and over. You can use the Policy Editor to disable automatic updates, for instance.

Additionally, you can also disable driver signature enforcement which is a security measure that only allows drivers signed by Microsoft to be installed.

This is useful when installing custom drivers for apps, but be aware that doing so can put your PC at risk of malware.

And lastly, if you find the Details tab missing in Windows 11, we have a dedicated set of solutions that will help.

Feel free to comment below if you have questions about other native Windows software. And please tell us if there’s a specific guide for any Windows 11 error you’d like to see.

Fix: Windows Could not Find a Driver for your Network Adapter

Some users have stated in forums that they can’t connect to the web when Windows can’t find a network adapter driver.

The Network Adapter troubleshooter they try to fix the issue displays this error message: Windows could not find a driver for your network adapter.

Consequently, that troubleshooter doesn’t fix the issue, and the users can’t connect to the Internet. These are some resolutions that might fix this network adapter error, so be sure to check them out below.

Why is my PC not detecting my network adapter?

The Windows cannot find a network adapter driver issue can be caused by various factors. Below are some of them:

  • Issues with the router: Sometimes, this issue can be caused by glitches with your router. Hence, you should first reset your router before doing any other thing.
  • Faulty network driver: You are likely to get this error code if your network driver is faulty. The solution to this is to uninstall and reinstall your drivers.
  • Outdated driver: Another cause of this issue is a badly outdated driver. Updating your driver should help fix this effortlessly.

What to do if Windows can’t find a network adapter driver?

1. Reset the router

  1. Turn off the router, unplug it for a few minutes and then plug it in again.
  2. Then turn the router back on. Thereafter, press the Reset button on the router with a paperclip for about 15-30 seconds.

You’ll be surprised how often resetting the router fixes internet connectivity in Windows. That will establish a new connection with the ISP and reset it to its default factory settings.

2. Enable the adapter

  1. Press the Windows key + R, type ncpa.cpl, and click the OK button.
    ncpa windows could not find a driver for network adapter
  2. Right-click your network adapter.
  3. Finally, select the Enable option.
    enable

In some cases, Windows could not find a driver for your network adapter issue can be because the adapter is disabled. The quickest way to fix this is to enable the adapter and restart your PC.

If the adapter is enabled, you can disable and re-enable it again.

3. Open alternative Windows Troubleshooters

  1. Press the Windows key + I to open the Settings app and select Update & Security.
    update and
  2. Select Troubleshoot in the left pane and click Additional troubleshooters.
    troubleshoot windows could not find a driver for network adapter
  3. Now, select Internet Connections, and click Run the troubleshooter.
    run the
  4. Wait for the diagnosis to complete and apply the recommended fixes.
  5. Next, press the Windows key, type cmd, and select Run as administrator under Command Prompt.
    cmd admin
  6. Type the command below and hit Enter to run the Hardware and Device troubleshooter: msdt.exe -id DeviceDiagnosticmsdt windows could not find a driver for network adapter
  7. Finally, wait for the command to finish running and apply the recommended fixes.

Ok, the Network Adapter troubleshooter doesn’t provide a resolution for fixing the connection.

However, there are a couple of other Windows troubleshooters that might still fix the connection.

For example, the Internet Connections troubleshooter is closely linked with the network adapter. The Hardware and Devices troubleshooter might also come in handy for fixing connected device errors.

4. Update network driver

  1. Right-click the Start icon and select the Device Manager option.
    device manager
  2. Click the arrow next to the Network adapter option to expand it and right-click your network device.
  3. Now, select the Update driver option.
    update driver
  4. Finally, choose the Search automatically for drivers option and install any available update.
    search auto windows could not find a driver for network adapter

An outdated network driver could be the reason you are getting the Windows could not find a driver for your network adapter option. Hence, you need to check if updates are available for your PC by following the steps above.

If the Windows driver updater cannot find the latest drivers, you can check the manufacturer’s website for them.

Updating your drivers manually can be a tedious task. For a rapid, safe, and well-done driver installation, we recommend you use specialized software to do all the hard work for you in seconds.

However, a program like Outbyte Driver Updater not only downloads and installs drivers but also helps you manage them by troubleshooting, backing up, and restoring them. As an outcome, it is worthwhile to install it!

⇒ Get Outbyte Driver Updater

5. Reinstall the driver for the network adapter

  1. Press the Windows key + R, type devmgmt.msc, and click OK.
    devmgmt
  2. Double-click the Network adapters category to expand it and right-click your network adapter.
  3. Now, select the Uninstall device option.
    uninstall device
  4. Select the Uninstall button.
    uninstall button windows could not find a driver for network adapter
  5. Finally, click the Scan for hardware changes icon and restart your PC.
    scan for

The Windows could not find a driver error message highlights that the issue might be due to the corrupted network adapter driver.

Alas, users can’t attempt to fix this issue by updating the driver without a connection.

However, reinstalling the network driver might be a potential remedy. Follow the guidelines above to reinstall the network adapter driver.

6. Roll Windows back to a restore point

  1. Press the Windows key + R, type rstrui, and click the OK button.
    rstrui
  2. Click Next to open the list of system restore points.
    next
  3. To expand the list, select the Show more restore points option.
  4. Now, select a restore point and click the Next button.
    restore point windows could not find a driver for network adapter
  5. You can also click the Scan for affected programs option to check what software gets removed.
  6. Finally, click the Finish button to complete the process.
    finish windows could not find a driver for network adapter

The System Restore utility might provide a resolution for the Windows could not find a driver error for users who can select a restore point that predates the time the issue arose.

Users can usually roll back Win 10 by a month. System Restore will undo system changes after the selected restore date.

7. Check the Power Management setting for the network adapter

  1. Press the Windows key + X and select the Device Manager option.
    device manager
  2. Expand the Network adapters option and double-click your network device.
    option windows could not find a driver for network adapter
  3. Then select the Power Management tab at the top.
  4. Deselect the Allow the computer to turn off this device to save power option if it’s selected.
  5. Select the OK option to close the window.
    allow

The Windows could not find a driver error can also be due to a Power Management setting that turns devices off when selected.

We have come to the end of this detailed guide. All you need to do now is to follow the steps above carefully, and the Windows could not find a driver for your network adapter issue will be fixed for good.

Similarly, you can check out our detailed guide if Windows 10 can’t find your WiFi adapter instead.

Feel free to let us know the solution that helped you fix this issue in the comments below.

Currently Not Connected to Any Networks [Windows 11 Fix]

When your computer is unable to connect to the network, you may see a message on the screen that says Currently not connected to a network. Such a message indicates that your PC has no connection to the internet through a router or modem. 

You will also notice that you cannot access the internet using your Wi-Fi. Sometimes there are available connections and other times you’re not connected and there are no connections available.

Why does my laptop say I’m not connected to any networks? 

When your laptop says it’s not connected to any networks, it basically means that no Internet access is available. This can be due to a number of reasons:

  • Your computer’s network adapter is not working correctly – This can be caused by any number of things, including missing drivers or problems with the network cable itself.
  • Downtime from your ISP – The wireless network you’re connected to might be down or undergoing maintenance.
  • Improper router configuration – This can happen if you are using a wireless router that is not configured properly. Router configuration software may be of help.
  • Firewall settings – The network may be protected with a firewall that prevents unauthorized access. 

How do you fix You are currently not connected to any networks error?

Before any advanced troubleshooting, try the following:

  • Try plugging in an Ethernet cable if available.
  • Make sure that there are no obstacles between the router and your computer
  • Ensure that your computer is connected to the same network as your wireless router.
  • Restart your router. Sometimes, your router won’t connect to the internet because of cache build-up.
  • Try restarting your PC and you can even schedule a restart.

1. Run Network adapter troubleshooter 

  1. Press Windows + I to launch Settings.settings windows 11
  2. Click on Troubleshoot on the right in the System tab.Open system troubleshooter
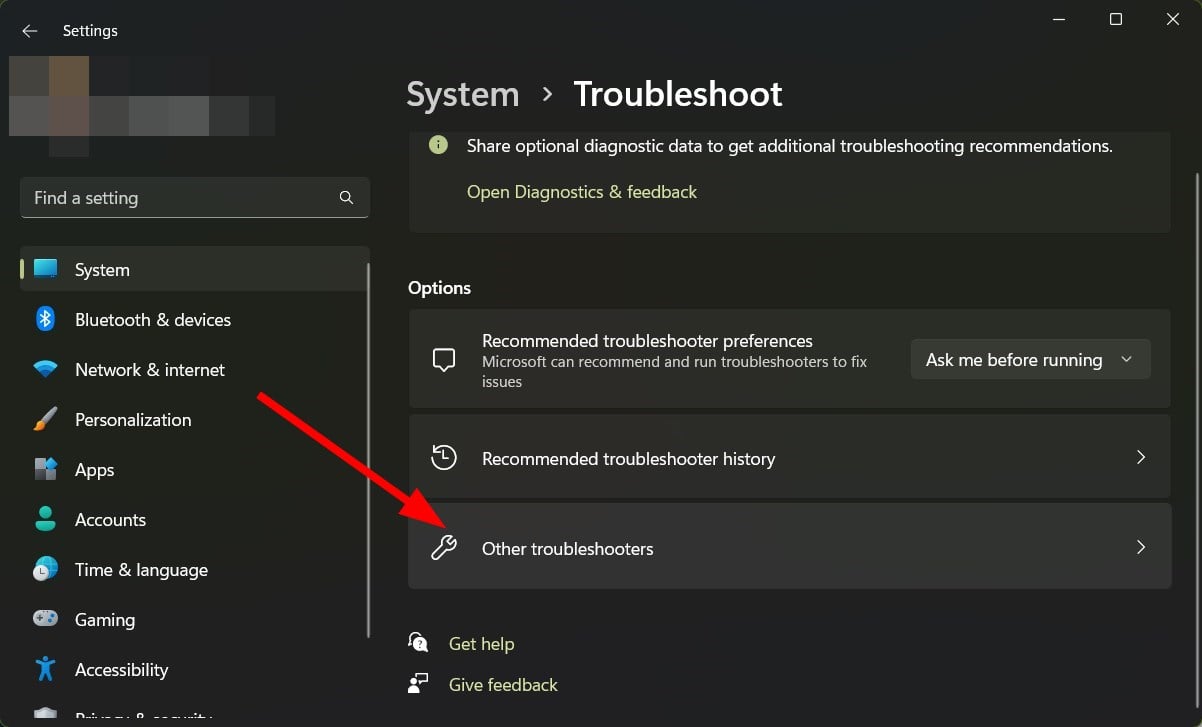
  3. Select Other troubleshooters.
  4. Locate the Network Adapter troubleshooter and click on the Run button next to it.

2. Troubleshoot Internet connection issues

  1. Press Windows + I to launch Settings.settings windows 11
  2. Select System then click on Troubleshoot.Open system troubleshooter
  3. Navigate to Other troubleshooters.
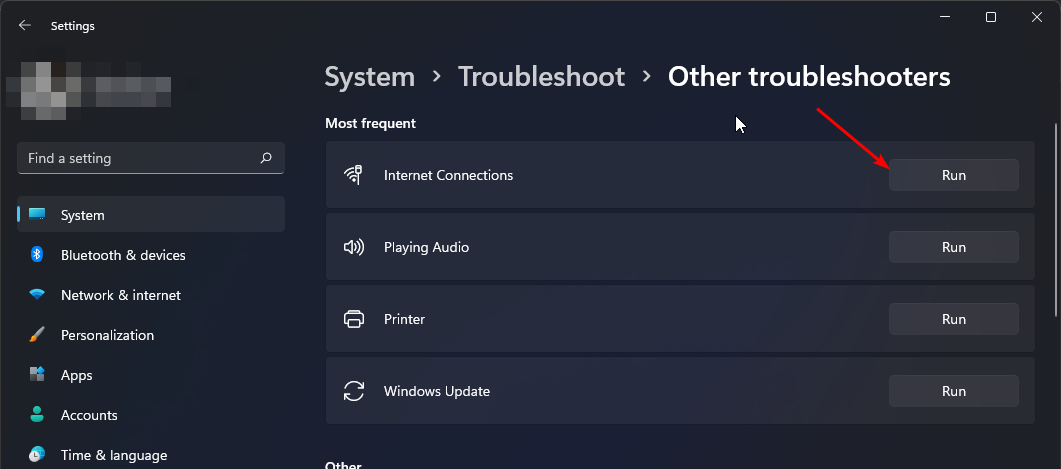
  4. Click the Run button next to Internet Connections.
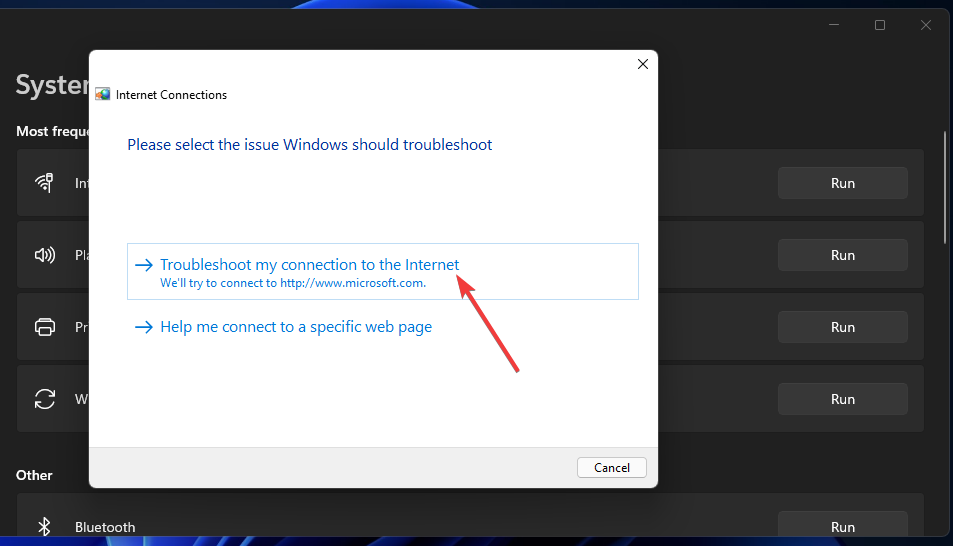
  5. Select Troubleshoot my connection to the Internet in the pop-up window and wait for Windows to identify the problem and recommend a fix.

3. Remove the Network from saved networks

  1. Hit the Windows key and click on Settings.settings windows 11
  2. Navigate to Network & internet and click on Wi-Fi.
  3. Scroll down and click on Manage known networks.
  4. Locate the problematic network and click on Forget.
  5. Restart your PC and check if the issue persists.

4. Update your Network drivers

  1. Hit the Windows + I keys to open Settings.settings windows 11
  2. Type Device Manager in the search bar and click Open.
  3. Navigate to your Network adapter, right-click and select Update driver.
  4. Select Search automatically for updated drivers.Search automatically for drivers

Another way that would be much easier and more accurate would be to use a third-party driver updater. Such tools are instrumental in ensuring you get the right drivers without much hassle.

Outbyte Driver Updater updates network drivers that are missing or out of date. It scans your PC for any devices with missing or outdated driver updates, then downloads and installs them for you. With Outbyte Driver Updater installed on your computer, you can get the latest version of your drivers.

Outbyte Driver Updater

Use the Outbyte Driver Updater program to get the latest updates for your drivers with a single click.
Free Trial Download now

5. Reinstall your Network drivers

  1. Hit the Windows + I keys to open Settings.settings windows 11
  2. Type Device Manager in the search bar and click Open.
  3. Navigate to your  Network adapter, right-click and select Uninstall device.
  4. Confirm Uninstall in the next confirmation dialog.
  5. Restart your PC and your drivers will be automatically reinstalled.

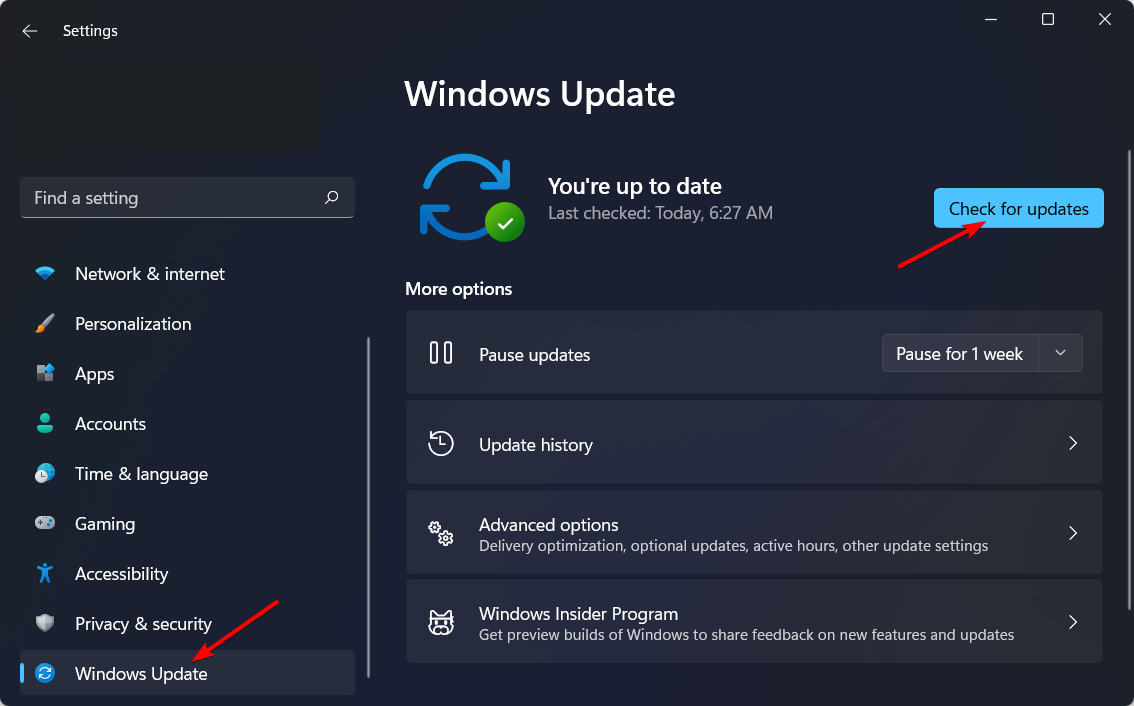
6. Check for Windows updates

  1. Hit the Windows + I keys to open Settings.settings windows 11
  2. Click on Windows Update then select Check for Updates.check-updates lenovo-ideapad-keyboard-not-working
  3. Hit Download & install if available.

You need to install an updated version of Windows on your computer. This will ensure that all of the necessary drivers are working correctly and that everything works properly when you try to connect to the internet.

7. Enable IPv6 in the network adapter

  1. Hit the Start Menu icon and click on Settings.settings windows 11
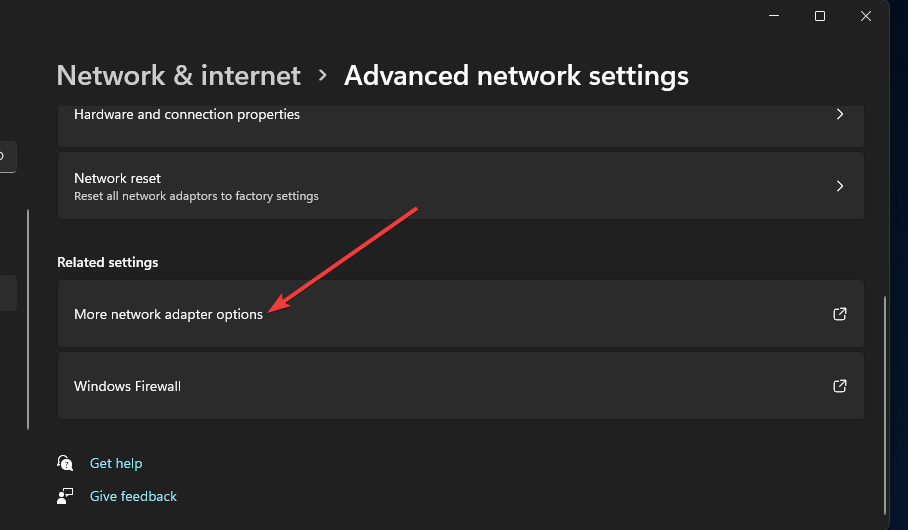
  2. Navigate to Network & internet and click on Advanced network settings.going advanced network settings win11
  3. Scroll down and under Related settings, click on More network adapter options.
  4. Right-click on the problematic network and select Properties.
  5. Locate the Internet Protocol Version 6 (TCP/IPv6) box and tick the checkbox then click OK.

IPV6 is an internet protocol that allows computers to communicate with each other over the internet. The main difference with IPV4 is that it supports more addresses, which means it can support a much larger number of devices.

It also offers improved security because it can be used over public networks like the Internet and Wi-Fi hotspots that are not managed by your network administrator. You will also notice improved overall performance.

8. Perform a Network reset

  1. Hit the Windows key and click on Settings.settings windows 11
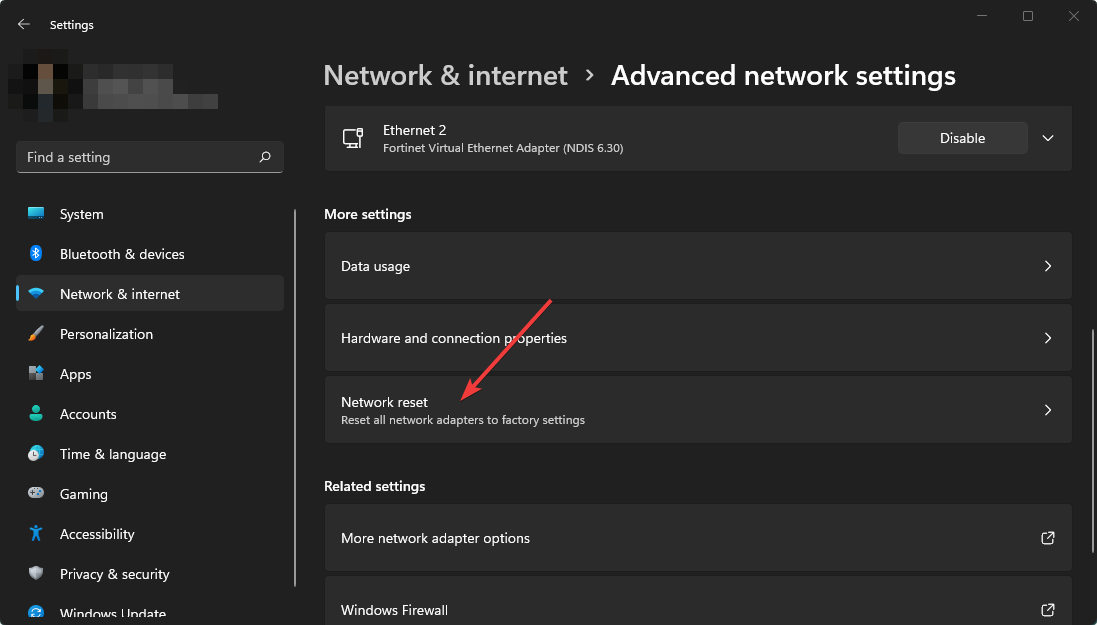
  2. Navigate to Network & internet and select Advanced network settings.going advanced network settings win11
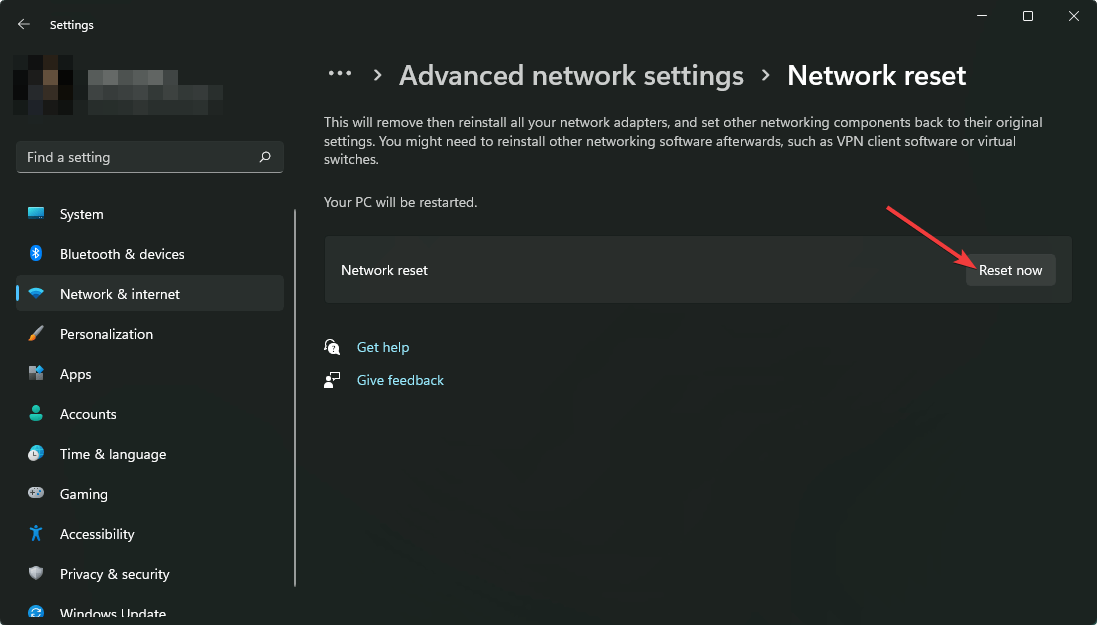
  3. Click on Network reset.clicking network reset win11 settings
  4. Next, hit the Reset now button. clicking reset now for network reset win11 settings

Why won’t my computer connect to the internet but others will?

There can be a number of reasons why your computer might not be able to connect to the internet while other devices have no issues. Here are some common reasons:

  • Wi-Fi signal strength – If there is not enough signal strength or a poor Wi-Fi signal, then it will be hard for your computer to connect. Try moving closer to your router or another device that has a strong Wi-Fi signal or consider installing Wi-Fi repeater software.
  • Damaged network cable – Sometimes Ethernet cables become damaged especially if you’ve used them for a long time. Try another cable just to make sure yours is in great condition.
  • Conflicting programs – If you have recently installed any new hardware or software, it may be interfering with your current connection. Try uninstalling any new programs and re-install them if necessary.

That’s all we had for the You are currently not connected to any networks issue. Hopefully, you’ve been able to resolve it with one of our recommended solutions.

Users also complained of a related issue where they were getting an error message that says none of the networks previously connected are in range. If you’ve come across a similar issue, don’t forget to check out our article for quick fixes.

Also, if your internet keeps disconnecting randomly, we have an answer to finally resolve this problem.

Let us know if you have been able to fix this issue in the comment section below.

The Request is Not Supported Error: 5 Ways to Fix It

The request is not supported is a dreaded message that can appear on anyone’s PC. According to most users, they have encountered the message when they tried running some of their programs or even Windows services.

The details of the error are still fuzzy but what’s common for every user who has encountered the error is that the apps won’t open when they try to launch them. For now, we have compiled a few solutions that have proved helpful to many users.

What does the request not supported mean?

The error can occur for several different reasons, but it typically indicates an issue with the device driver or the program that’s being used. It usually occurs when users try to run a program or application that has been installed on their PC. 

When this happens it is an indication that the program(s) have been modified and are no longer compatible with the operating systems. Other reasons why this may happen include:

  • Virus infection – When a virus finds its way to your PC, all your programs are at risk. This is because they contain malicious code that can alter how an app works. A reliable antivirus can help you avert such risks.
  • Missing/corrupt system files – A corrupted system file could prevent your PC from working properly. The cause of the problem might be a software update that causes incompatibility.
  • Incomplete/missing updates – Windows updates are essential for the smooth running of your PC. If the update was downloaded from an unreliable source, or if it was unable to install because of a problem with the file structure, you may get the request is not supported error.
  • Missing DLL files – If you have missing DLL files and an application requires one or more of these DLL files, you may be unable to launch the program. The files may have been removed from your computer by virus protection software or another program.
  • Incompatible programs – If you try to install a program that is not supported by your version of Windows or from an unofficial site, you may be unable to launch it.

The request not supported error can also manifest itself in various ways such as:

  • The request is not supported disk management
  • Error 50: the request is not supported windows process activation service
  • The request is not supported cmd

How do I fix the request not supported error?

Before you attempt any of the fixes below, try the following basic checks:

  • Ensure your PC is up-to-date with the latest Windows updates. Also, check out what to do if Windows Update is not showing.
  • Uninstall any apps that you have recently downloaded.
  • Try alternative methods of opening the programs.
  • Attempt to launch the programs in compatibility mode.
  • Finally, try restarting your PC, and here’s what to do if your PC restarts automatically.

1. Run a DISM scan 

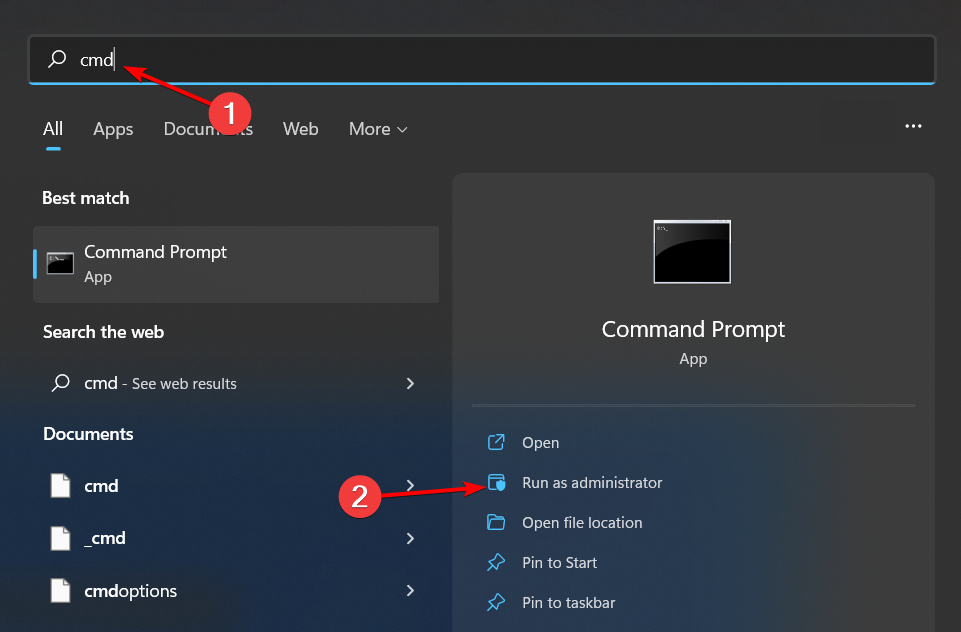
  1. Hit the Windows key, type cmd in the search bar, and click Run as administrator.cmd-run-admin-w11 unexpected kernel mode trap windows 11
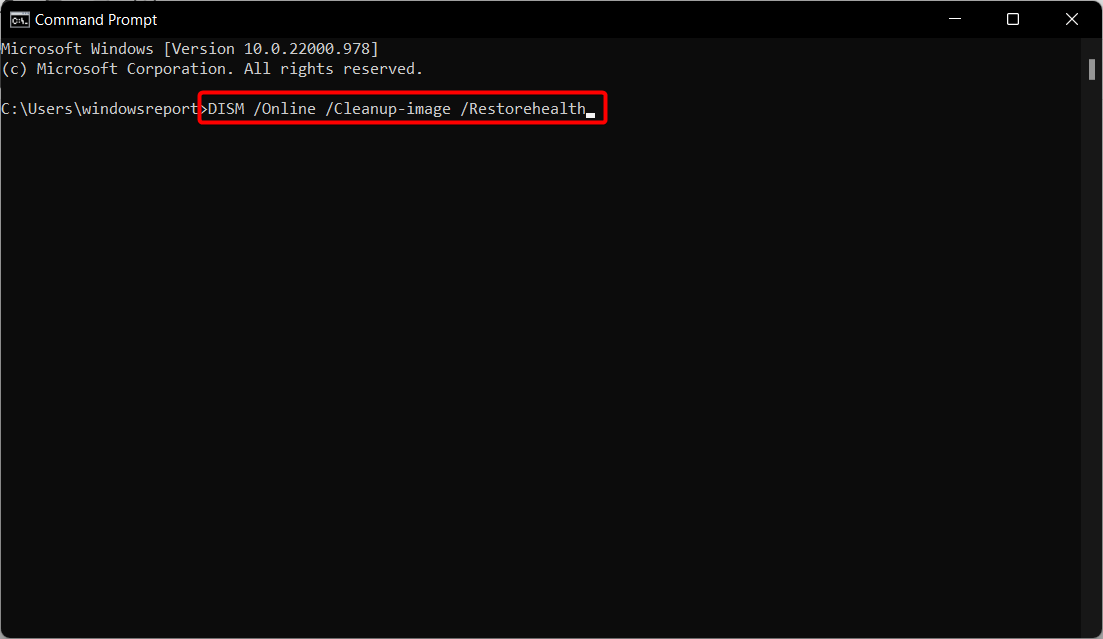
  2. Type and Enter the following command: DISM.exe /Online /Cleanup-Image /RestorehealthDISM-RESTORE faulting application path
  3. Restart your PC.

2. Run the System File Checker scan 

  1. Hit the Windows key, type cmd in the search bar, and click Run as administrator.cmd-run-admin-w11 unexpected kernel mode trap windows 11
  2. Type and Enter the following command: sfc /scannow
  3. Restart your PC.

3. Run the chkdsk command 

  1. Hit the Windows key, type cmd in the search bar, and click Run as administrator.cmd-run-admin-w11 unexpected kernel mode trap windows 11
  2. Type and Enter the following command and remember to replace f with the letter of the drive in question: chkdsk /f X:chkdsk-f repair corrupted directory

4. Run the Windows Store Apps troubleshooter 

  1. Hit the Windows key and click on Settings.settings windows 11
  2. Click on System on the left pane then Troubleshoot on the right pane.Open system troubleshooter
  3. Select Other troubleshooters.
  4. Scroll down, locate Windows Store Apps and click the Run button.troublshoot windows store apps

The Windows Store Apps troubleshooter should be able to shed more light on the issue of whether the problem affects all apps downloaded from the Microsoft Store.

5. Start Windows in Safe Mode

If you have performed all four methods above but you’re still getting the error, it may be time to start your PC in Safe Mode. Safe mode will open only the essential drivers and services, making it easier to test whether your problem is a driver or a Windows issue.

If the problem still persists, try performing a custom install of Windows. Custom installs are also much faster than using the default installation options on Windows 11 machines.

When you use a custom install, you also get to save all of your personal files. This means that you won’t have to worry about losing anything important on accident or by accidentally deleting it.

If something goes wrong with your computer, then you will be able to access all of your data without having to worry about losing anything important. You can learn more about the difference between a Windows upgrade and a clean install in our detailed article.

Let us know of any additional methods not mentioned here that may have worked for you in the comment section below.

How to Reinstall Bluetooth Driver on Windows 11

If Bluetooth is acting up on your Windows 11 PC, reinstalling the driver might help. Whether you are fixing connection issues, updating to the latest version, or trying to roll back, a fresh install can make a difference.

Most of the time, Windows handles drivers automatically, but sometimes it is better to install one manually for smoother performance. Find below a few different methods to reinstall BT drivers:

How to reinstall the Bluetooth Driver in Windows 11

Before you start, make sure your Bluetooth adapter is plugged in if you use an external one, Windows is updated, and your internet connection is stable. Also, it is a good idea to disconnect any Bluetooth devices to avoid problems. Once that is done, you can go ahead and reinstall the driver.

1. Uninstall the Bluetooth driver

  1. Press Win + R on the keyboard to open Run.
  2. Type the following command and click on OK: devmgmt.msc
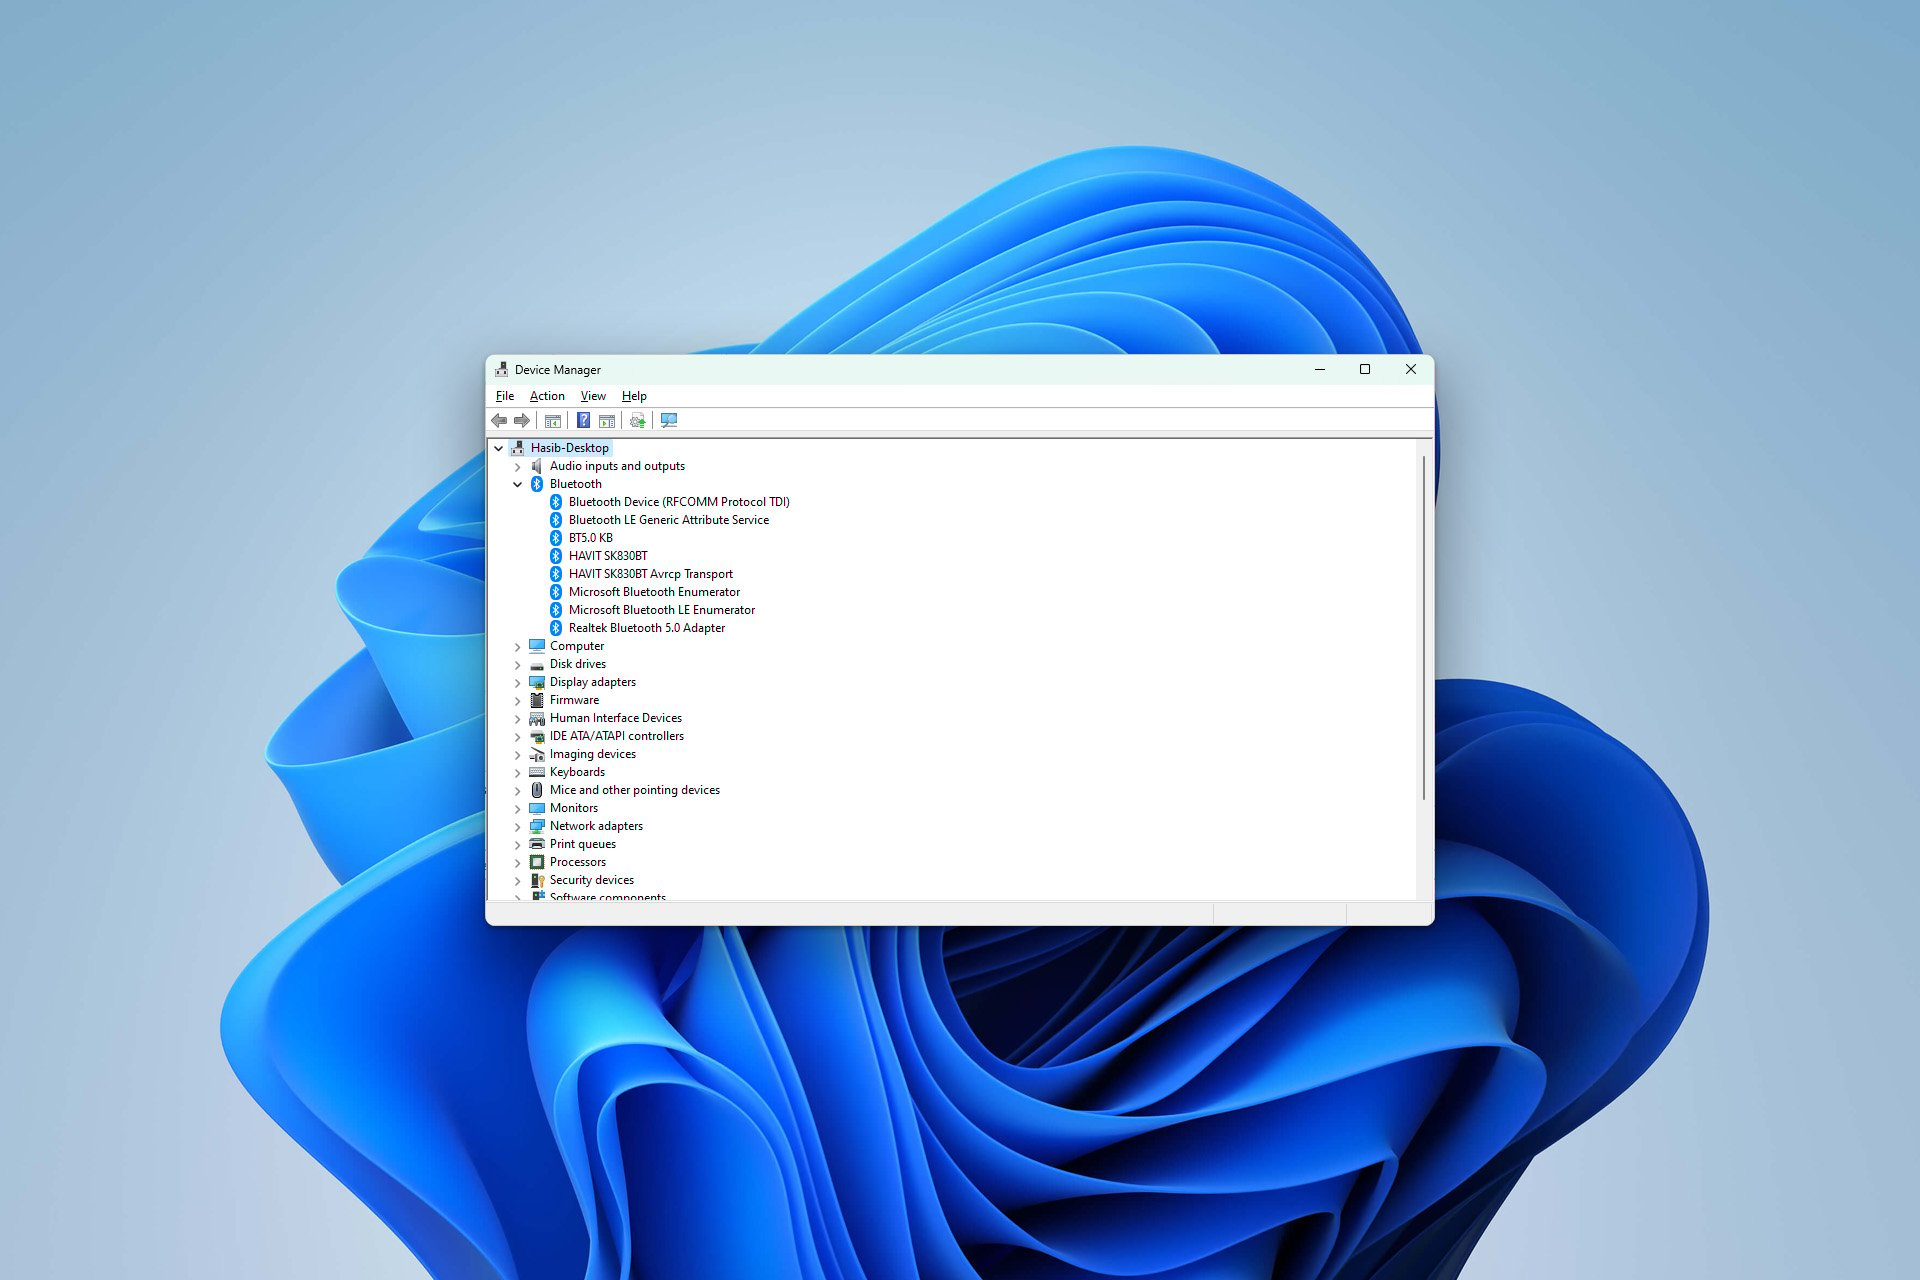
  3. Expand Bluetooth on the Windows Device Manager.
  4. Right-click on the Bluetooth driver, for example, Realtek Bluetooth 5.0 Adapter, and choose Uninstall device.uninstalling bluetooth driver windows 11
  5. Tick Attempt to remove the driver for this device and click on Uninstall.remove bluetooth driver windows

Now, you will lose Bluetooth ability on your PC or laptop. To get it back, you will need to install the necessary things again. See the next section for details.

2. Install it again

Note icon NOTE
After uninstalling, a simple restart can automatically install the BT driver again. If not, you can update Windows. It should automatically install the driver. However, it only happens in some cases. So, you should follow the methods mentioned below.

2.1 Use Device Manager

  1. Open the Device Manager like before.
  2. Select Bluetooth.
  3. Click on Action from the menu and choose Scan for hardware changes.scan for hardware changes device manager
  4. If it doesn’t automatically install the driver, you may see a driver with a yellow explanatory sign.
  5. Right-click on it and choose Update driver.
  6. Then, choose your preferred way to install the driver.

If you want the latest driver, you should choose the automatic method. If the latest driver has some issues, download or collect the older version of the driver manually and choose that file from the device manager to install.

2.2 From the manufacturer’s website

  1. Go to your motherboard or Bluetooth manufacturer’s website.
  2. Find and go to its download center.
  3. Look for the Bluetooth driver and download it.downloading bluetooth driver realtek
  4. Install it on your PC.

2.3 Use a third-party driver updater

We recommend you use a specialized driver updating tool to update or install any drivers on Windows 11 and 10. It is because this tool can download the latest drivers when the Device Manager often fails to detect the latest one.

Otherwise, these driver updaters can scan and update any outdated drivers automatically according to your own schedule.

Why has my Bluetooth disappeared from Windows?

If you notice that the Bluetooth icon or option has simply disappeared, it means there is something wrong. It can be with your Bluetooth adapter or the driver. In most cases, updating or re-installation of the driver should fix the issue. Otherwise, changing the BT adapter is the only option.

If you are interested, learn how to solve Bluetooth not detecting devices on Windows. If you’re using Windows 10 instead, here’s how to install a Bluetooth driver on Windows 10. And if you run into problems like error code 28, or you’re dealing with Intel hardware, check out the latest Intel Bluetooth driver update or read more about Intel’s recent driver improvements for better compatibility.

This article has shown you how to reinstall the Bluetooth driver on Windows 11 computers. If you have any suggestions or questions, write them down in the comment box.

Can’t Delete Calendar Events in Outlook: How to Fix It

The Calendar feature is a very useful option in Outlook; to help you keep reminders of important events. However, you’d often need to delete such events from your calendar. If you can’t delete calendar events in Outlook, this article will help you resolve such errors.

Why can’t I delete calendar events in Outlook?

Here are a couple of reasons why you can’t delete calendar events in Outlook:

  • Outdated Microsoft Office: If Microsoft Office is running on an outdated version, you might find it hard to delete calendar events on Outlook.
  • Poor network connection: If you’ve got an unstable connection, Outlook won’t be able to function properly.
  • Corrupt app data: If the Outlook application’s data is corrupted, it can result in a long list of errors, one of which includes being unable to delete calendar events.

If a deleted calendar event keeps returning to Outlook we invite you to apply the solutions below to fix the problem.

What can I do if I can’t delete calendar events in Outlook?

Before we move on to more advanced solutions, here are a couple of quick fixes you can attempt:

  • Exit all clients, such as Outlook web, on which the mailbox is set up.
  • Restart your PC.
  • Fix network congestion.
  • Close and relaunch the Outlook app.

If those quick fixes couldn’t resolve the error, here are a couple of advanced troubleshooting techniques you can attempt.

1. Use the Outlook web version

  1. Start your preferred browser.
  2. Visit outlook.com and click on the Calendar option.
  3. Right-click the specified calendar on the Navigation Pane, and then select Delete (or Remove) in the drop-down menu.
  4. A delete Calendar dialog box will open. Click the Yes button to remove the event.

Using the Outlook web version is one of the easiest ways to fix the inability to delete calendar events in Outlook.

Now, when you open Outlook on another device, the information should have been synced and you shouldn’t see that event anymore.

If interested, know the ways to add the creation date column to your calendar list view in Outlook.

2. Reset the Calendar App

  1. Press Windows key + I to open Settings.
  2. Click on Apps and select Installed apps.
  3. Search and select the Mail and Calendar app, click the three-dot option, and select Advanced options.
  4. Under the Reset section, click the Reset button.

Once you complete the steps, the Mail and Calendar applications will revert to their default state, deleting all data stored locally on the computer.

You’ll have to reconfigure Outlook when you next launch the application.

3. Run Outlook commands

  1. Exit Outlook on any of your devices.
  2. Press the Windows + R keys to launch the Run window, type this in the search box, and then press Enter: outlook /cleanreminders
  3. Press the Windows + R keys to launch the Run window, type this in the search box, and then press Enter: outlook /cleandmrecords

After running either of these switches, relaunch Outlook, and then try to delete the calendar event again. For more information about these types of switches, see Microsoft’s documentation of Outlook command line switches for Windows.

If an Outlook delegate cannot delete calendar items, it has insufficient permissions. The admin must assign the delegate with at least Author permissions on the Deleted Items folder from Outlook.

We believe our guide should help you resolve the error, but if you’ve got other solutions to resolve this error, do let us know in the comments.

Boost WhatsApp Web Typing with the 10 Best Tips & Tricks

WhatsApp is the world’s most popular messaging app used by billion of people around the world and has become the primary way people communicate online for certain regions.

Among the different forms of WhatsApp, the browser version is arguably the most overlooked. Although it’s the least robust, WhatsApp Web is still a handy tool to have for browsers.

What are the benefits of WhatsApp Web?

Like on desktop and mobile, WhatsApp Web as a service still offers a great messaging experience even if it’s not as robust. Below is a short list of why you should use WhatsApp Web.

  • You don’t have to download anything: To log in to WhatsApp Web, all you need is the mobile version to scan a QR code. Once that’s done, you’re logged in for as long as you want.
  • You have a much bigger keyboard to use: A bigger keyboard allows for faster typing than what can be done on a mobile device. It’s similar in function to WhatsApp on a desktop.
  • Compatibility issues won’t be a problem: Ever so often, WhatsApp will drop support for older phones. On browsers, that isn’t a problem unless you have an older operating system.
  • You’re able to house multiple WhatsApp accounts: WhatsApp Web can be signed into one account while the desktop app can be another.
  • You can save the battery on your smartphone: That way, you can use your mobile device for other things while still being able to communicate.

There are tons of tips and tricks for WhatsApp Web so we’re going to only list the top 10 so you can get the most out of the service.

The list will cover keyboard shortcuts to speed up typing and browser extensions that enhance the user experience.

What are the 10 best tips and tricks for WhatsApp Web?

1. Use keyboard shortcuts to quickly access features

  1. Pressing the CTRL + ALT +, keys at the same time opens the Settings menu.
  2. Press the CTRL + Alt + Shift + F keys to open a Search bar helping you locate messages in a chat.
  3. Pressing Ctrl + Alt + Shift + E at the same time archives a chat to store it. To view archived chats, click Archived at the top of the chats.
  4. Ctrl + Alt + Backspace deletes the chat. If you plan on one day restoring that chat, it’s strongly recommended you back it up first.
  5. Press the Ctrl + Alt + Shift + P keys at the same time pins the chat. You can tell if you did it correctly if you see a thumbtack icon next to the pinned chat.
  6. To create a new chat, press Ctrl + Alt + N. Then you can choose if you want a new group or community.
  7. If you want to open the Emoji Panel to send a reaction, press Ctrl + Alt + E.
  8. Pressing Ctrl + Alt + G opens the Gif Panel.
  9. And finally, pressing Esc closes the chat.

WhatsApp has a variety of keyboard shortcuts to help browser users utilize certain features in a much faster way than dragging the mouse over and clicking through a bunch of menus.

The added benefit of WhatsApp on mobile is you literally have everything at your fingertips so it’s much faster to pull off the app’s functions. The list is by no means extensive.

The full list can be found on WhatsApp’s website. The commands shown earlier are a collection of the better ones.

2. Enter Emoji shortcuts for quick reactions

  1. Enter a colon into the WhatsApp chat box. Afterward, type the name of the emoji you want.

It can be tricky to find the right emoji. Instead of trying and failing over and over, you can find the entire list of Emoji shortcuts for WhatsApp web on Github.

There you will find every single keyword for all 1,514 Emojis.

3. Change font on WhatsApp

  1. Launch the Settings app and click Accessibility.
  2. Select Text size.
  3. Drag the Text Size slider to the right to increase the font size. Click Apply.
  4. Additionally, you can press Ctrl + Alt + = to increase WhatsApp Web’s font.

If you’re looking for a way to completely change the font style on WhatsApp Web, you’re out of luck, unfortunately.

On WhatsApp for mobile and desktop, you can download font apps that change the look. Apps or browser extensions made specifically to change WhatsApp’s font aren’t available.

There are some, like Font Changer, for Google Chrome, but we had a tricky time setting it up. It also doesn’t work on Opera. And Firefox’s extensions library doesn’t have anything either.

Other changes to the WhatsApp Web font revolve around changing the format of the messages themselves.

4. Format messages

  1. Placing two underscore marks, one before and one after a word, to italicize it.
  2. Surround text with asterisks on either side to bold the text.
  3. To add a strikethrough line, place tildes (better known as the squiggly line next to the number one key) on both sides of a text.
  4. Placing three backticks around text will monospace it.

Common keyboard shortcuts like CTRL + B to bold text or CTRL+ I to italicize don’t work on WhatsApp Web. You will have to use the special formatting commands.

5. Add superscript on WhatsApp

WhatsApp Web supports both superscript and subscript characters which are smaller-size text to the top right or bottom right of a word. They’re most often seen in mathematical expressions or formulas.

Most people add an arrow pointing up or down to signify superscript or subscript but it is possible to add these characters to WhatsApp using some special websites.

You have websites like Tiny Text Generator and LingoJam to create either script. From there, you can copy and paste the special characters to WhatsApp.

6. Create an extra line with Enter

In the WhatsApp text box, press the Shift and Enter keys at the same time to add another line without sending the message to the other person.

7. Enable or disable disappearing messages

  1. In a WhatsApp chat, click the username at the top. A new menu will appear from the right.
  2. Click Disappearing messages.
  3. Select a period of time.

WhatApp’s Disappearing Messages will go after forever after a set period of time. You can choose from 24 hours to a week to a month and a half.

8. Schedule messages on desktop

  1. Head over to the Chrome Web Store and install the Blueticks browser extension to Google Chrome.
  2. Next to WhatsApp Web and click the clock icon next to the text box.
  3. In the Schedule a Message window, write whatever message you want to send and the time.
  4. Click Schedule Send.

There are different extensions and apps that can schedule messages for WhatsApp Web. But for the most part, Blueticks is the most widely used and recommended.

Also, be aware Blueticks is only available through the Chrome Web Store so it’ll work on the aforementioned Chrome browser and Opera, but nowhere else.

9. Manage audio messages with Zapp

  1. Go to the Chrome Web Store, then click Add to Chrome to install Zapp.
  2. Using the Zapp extension, you can speed up the playback up to twice as fast and increase or decrease the volume with your mouse’s wheel.

Like Blueticks from the previous solution, Zapp is only available through the Chrome Web Store.

10. Get background notifications with WAToolkit

  1. Like the previous apps, go to the Chrome Web Store and install WAToolkit.
  2. From here on, notifications from WhatsApp Web will appear on your browser even if it’s not currently open.

The notifications will appear in the WAToolkit extension icon in the upper right-hand corner of the browser. From our experience, WAToolkit appears to work best with Google Chrome.

On Opera, the extension is pretty spotty. The notifications don’t always come through.

Is there a specific browser that works best with WhatsApp Web?

Despite having some problems with WAToolkit, Opera is arguably still the best browser to use with WhatsApp Web. Most of the Chrome extensions work and WhatsApp comes integrated with Opera.

On the side, there is a WhatsApp tab that’s basically the web version. Besides Opera, Chrome is also really good thanks to its tab management features and Firefox is a decent choice too.

We also recommend checking out our guide on the best WhatsApp extensions for sending bulk messages throughout the day. You have the likes of WAPSender to send curated messages.

There’s also WA Self Sender on Microsoft Edge that can delay WhatsApp messages so they send out at a certain time.

Feel free to leave a comment below if you have any questions about other WhatsApp tricks or if you know of one that we left out.

Leave a suggestion about guides that you’d like to see or information on other Windows services.

Edge Shortcut Keeps Appearing on Desktop: 5 Easy Fixes

While Microsoft Edge has its fair share of innovative and user-friendly features, a lot of users prefer other reliable browsers over it. But, of late, users reported a problem wherein the Edge shortcut keeps appearing on the desktop.

The issue was reported on all iterations, even for users who never used the browser, and there was no word from Microsoft on it. This left users perplexed, many wondering if was malware. So, if you, too, are concerned, here’s all you need to know.

Why does the Edge shortcut keep appearing on the desktop?

The primary reason the Edge shortcut appeared on the desktop is that the browser underwent an update in the background. The Release Notes for Microsoft Edge list quite a few updates in the second and third week of January 2023.

So, if the shortcut appeared around the same time and Edge was updated, you know the culprit. Let’s now walk you through the solutions that did the trick for other users.

What can I do if the Edge shortcut keeps appearing?

1. Delete the Edge shortcut

When faced with the problem, your primary approach should be to delete the Edge shortcut. Just right-click on the shortcut, and choose Delete from the context menu./

Delete the Microsoft Edge shortcut from the desktop

Though, there’s a chance that the Edge shortcut will keep appearing on the desktop. If you want to fix things once and for all, the solutions below will help.

2. Disable Edge from launching at the startup

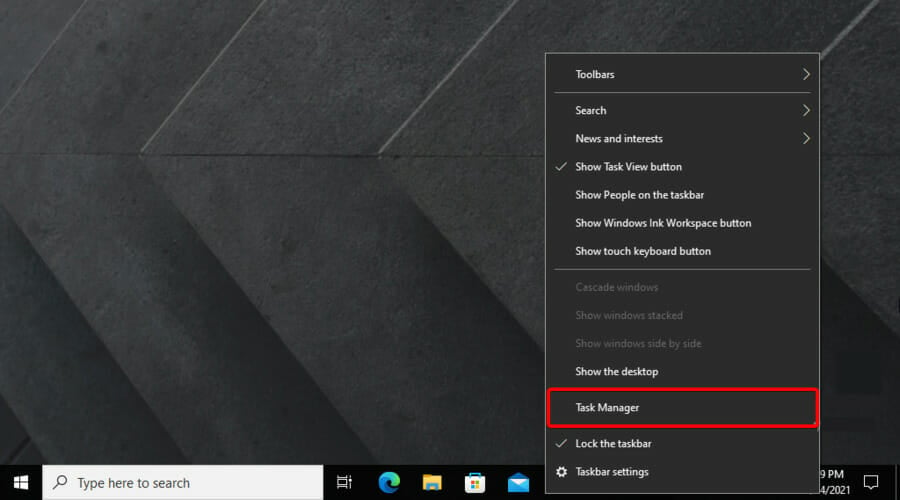
  1. Press Ctrl + Shift + Esc to launch the Task Manager, and head to the Startup apps tab.startup app
  2. Now, select Microsoft Edge from the list of apps, and click Disable.disable startup app to fix edge shortcut keeps appearing

While you are at it, also make sure to remove Microsoft Edge from the startup folder in Windows. This will stop Microsoft Edge from running in the background and prevent it from creating a shortcut on the desktop.

Also, find out the other ways to stop Edge from loading at startup.

3. Disable automatic updates for Edge

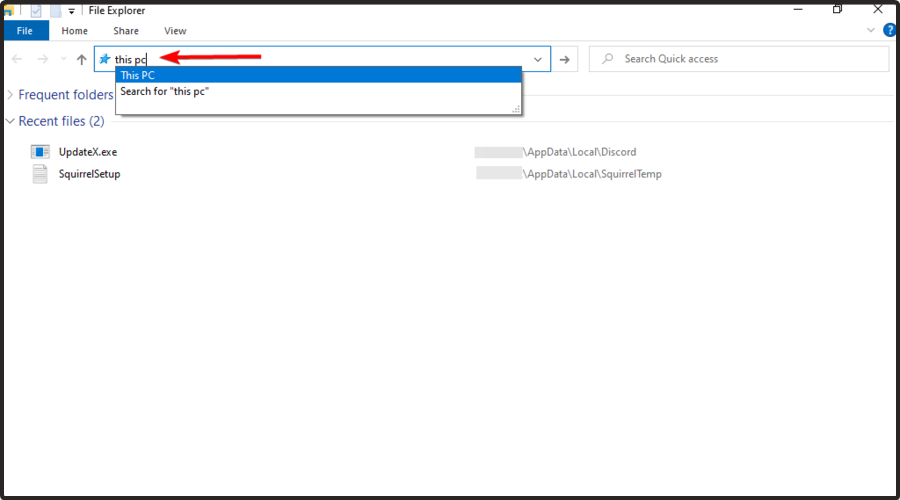
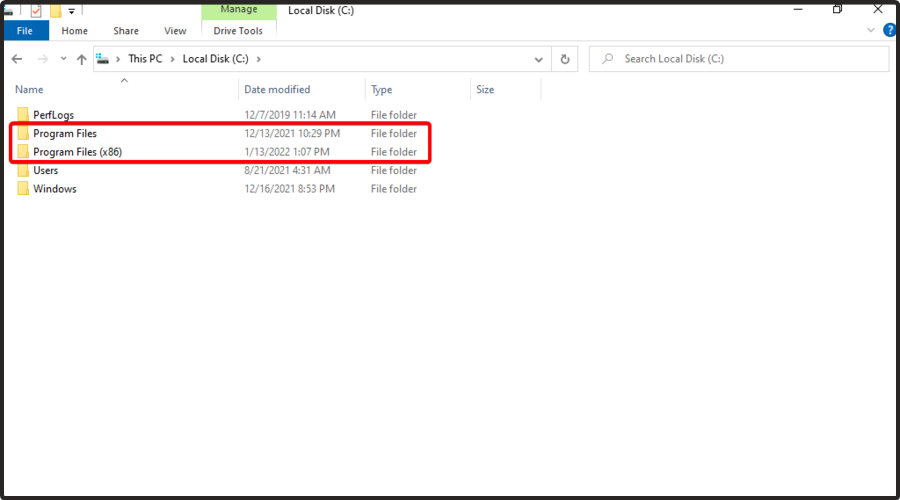
  1. Press Windows + E to open File Explorer, paste the following path in the address bar, and hit Enter:C:\Program Files (x86)\Microsoftpaste path
  2. Now, double-click on the EdgeUpdate folder to view its contents.edgeupdate
  3. Right-click on the MicrosoftEdgeUpdate.exe file, and then select Rename from the context menu.rename to fix edge shortcut keeps appearing
  4. Change the file’s name to anything else, we choose MicrosoftEdgeUpdate111.exe.change to fix edge shortcut keeps appearing
  5. If prompted with a confirmation box, click on Continue to proceed.
  6. From now on, Edge won’t be able to update automatically. Even if you try to do it manually, the browser would instead throw an error.edge automatic update

This is a quick way to disable automatic updates in Edge to prevent it from creating desktop shortcuts. It’s worked for many. Though, if you use the browser, even occasionally, we wouldn’t recommend disabling updates.

4. Modify the Registry

Note icon NOTE
Making changes to the Registry Editor is a critical task, and we recommend you follow the steps here as it is. Do not make any other changes.
  1. Press Windows + R to open Run, type regedit in the text field, and hit Enter.registry editor
  2. Click Yes in the UAC prompt.
  3. Now, paste the following path in the address bar at the top, and hit Enter:HKEY_LOCAL_MACHINE\SOFTWARE\Policies\Microsoft\EdgeUpdateedgeupdate key
  4. In the EdgeUpdate key, right-click on the right side, hover the cursor over New, choose DWORD (32-bit) Value from the context menu, and then name it as CreateDesktopShortcutDefault.DWORD to fix edge shortcut keeps appearing
  5. Double-click on the new DWORD to modify its value.dword
  6. Make sure the field under Value data reads 0, and then click on OK to save the changes.modify value data to fix edge shortcut keeps appearing
  7. Once done, restart the computer for the changes to come into effect.

This is a concrete fix that will prevent Edge from creating a shortcut on the desktop. To revert the changes, all you have to do is delete the new DWORD.

5. Check the Task Scheduler

If the problem persists, it could be that Edge is configured to run in the Task Scheduler, an issue reported by many. Here, you will have to check this manually and delete the configured task, if any.

Once done with the solutions here, the Edge shortcut will not keep appearing anymore on the desktop in Windows, be it any iteration.

While we are discussing the browser, find out how to fix issues with Edge’s window position and size, another common problem reported by several users.

For any queries or to share another possible fix for the problem, drop a comment in the section below.

Can’t Connect to Virtual Machine on Windows 11: Hyper-V Fix

Did you just start your new Windows 11 Virtual Machine but can’t connect? Most users have this problem after a recent Windows update. A Cannot connect to virtual machine. Try to connect again. If the problem persists message appears on their screens.

Others also complain that their VPNs are the culprit so if you are in the same boat, this article will be of much help to you.

Why is my virtual machine not working?

If you’re experiencing issues with your virtual machine, there are a few common reasons why this might be happening:

  • Incorrect setup – The most common cause of a virtual machine not working is that it has been set up incorrectly. This can occur if you haven’t installed the operating system or any other software correctly.
  • Unsupported hardware – Ensure that the operating system you are using supports your desired guest operating system and the hardware you are using.
  • VPN interference – Sometimes, the VPN you use can prevent you from connecting to your VM.
  • Proxy server – A proxy server acts as an intermediary for network traffic between a client and a server. Sometimes, they can restrict access through their internal networks.
  • Firewall interference – Your firewall may block access to a port to the virtual machine and cause problems with your computer.

What can I do if I can’t connect to my Virtual Machine?

Here’s what you should do first:

  • Check your internet connection and ensure it is stable enough to run a VM.
  • Try connecting your computer directly to the wireless router with an Ethernet cable. 
  • Make sure that the host operating system is up to date. 
  • Turn off then turn on the Virtual Machine.
  • Try restarting your PC and see if it restores the connection. Here’s what to do if your PC won’t restart.

1. Restart the Hyper-V service

  1. Hit the Windows + R keys to open the Run dialog box.
  2. Type in services.msc and hit Enter.Services -0x800700e9
  3. Locate the Hyper-V related services, right-click on each, select Stop, then Start again.

2. Disable VPN 

  1. Press the Windows key and Settings.settings windows 11
  2. Next, select Network & internet.
  3. Select VPN in the right-side menu.VPN settings
  4. Click the VPN connection you want to disable, click on the drop-down and select Remove.
  5. Restart your PC.

3. Disable Firewall temporarily 

  1. Hit the Windows button, type Windows Security in the search bar, and click Open.
  2. Click on Firewall & network protection then select Public network.
  3. Locate Microsoft Defender Firewall and toggle the off button.

4. Run the Network adapter troubleshooter

  1. Press Windows + I to launch Settings.settings windows 11
  2. Click on Troubleshoot on the right in the System tab.Troubleshoot -0x80860010
  3. Select Other troubleshooters.
  4. Locate the Network Adapter troubleshooter and click on the Run button next to it.

How do I connect my VM to my computer?

Connecting a virtual machine to your computer is the same as connecting a physical computer. However, you must take care to ensure that all of your virtual machines are connected to the same host.

A virtual machine allows you to run an entirely separate operating system on your desktop or laptop. There are many available virtual machines available for Windows 11 to choose from so you’ll be spoilt for choice.

The process for connecting a VM to a host depends on the type of network you are using. For example, if you are using a network that uses static IP addresses, then the configuration will be simple. 

If you have more than one VM, it is possible that they may have different IP addresses, so it is important to check this before proceeding.

For multiple VMs running on the same host and they have different IP addresses, you will have to use some form of virtualization software. 

These types of software allow multiple VMs to run on one physical hardware server and share hardware resources such as CPU and memory between them.

Another important factor to note when connecting a VM, you need to enable Hyper-V. In order to connect your virtual machine to your computer, Hyper-V is essential. This will allow you to connect the virtual machine to your computer so that you can run applications on it.

You can also customize the screen resolution on your Hyper-V environment for a better user experience. To know how to do that, follow this guide.

Hopefully, this article has shed some light on what to do when you can’t connect to your virtual machine.

Also, check out how to activate Windows 11 on a virtual machine if you haven’t already. Let us know if you have been able to fix this issue in the comment section below.

Password Expiration in Windows 11: How to Enable/Disable It

Password expiration is a feature that allows users to set a password that will be automatically changed every so often. This is because most people forget their passwords or are unsure about what they have been using for a long time. 

To prevent unauthorized access to your accounts, you should regularly change your password and username. It’s also advisable to enable password expiration in Windows 11 for extra security. If you don’t know how to, this article will come in handy to show you how to enable/disable password expiration.

Why should I set up password expiration in Windows 11?

You already know that having passwords on your accounts is a security measure to keep your files from unauthorized parties. However, if you use your password for too long, someone could be able to figure it out and get into your PC.

Setting up password expiration in Windows 11 can help improve your computer’s security. By allowing a time limit on the password that you have set, you can keep unwanted users from accessing your computer. 

Other reasons include the following: 

  • Prevent unauthorized changes – Password expiration helps prevent unwanted changes in your system settings or personal data by unauthorized users who have accessed the computer.
  • Protects your PC from hackers – If you are using a complex password for your PC and don’t change it regularly, then there is a possibility that your password will be compromised by hackers, especially when your user account expires.
  • Safeguard your privacy – Setting up password expiration will force users to change their passwords more often and make them harder to crack. This is especially helpful for anyone who uses the same password on multiple accounts.

If you regularly forget your passwords, then setting up this feature will not help you much as Windows 11 doesn’t have a default password.

How do I stop my Microsoft password from expiring?

Before you proceed to the following steps, ensure the next are in check:

1. Use the Microsoft website

  1. Navigate to your browser and log into the Microsoft Security page.
  2. Click on Password security and enter your current login credentials.
  3. Type in your new password and re-enter to confirm.
  4. Next, check the box Make me change my password every 72 days, then hit Save.
  5. To disable password expiration, follow steps 1 through 4, but this time round, make sure to uncheck the Make me change my password every 72 days option before you save.

Note that this method will only work for users with active Microsoft accounts on their Windows devices. If you’re a local account user, proceed to the next two methods.

2. Use Computer Management

  1. Hit the Search icon, type lusrmgr.msc in the search bar and click Open.
  2. Click on Users on the left pane.
  3. Under the listed users, double-click on yours and uncheck the box Password never expires to enable password expiration, then press Apply and OK.
  4. Since this option is disabled by default, you don’t have to worry about it. However, if you change your mind again and want to disable it after enabling it, simply follow steps 1 through 3 and check the Password never expires box, press Apply then OK.

3. Use Command Prompt

  1. Hit the Search icon, type cmd in the search bar, and click Run as administrator.
  2. Type in the following command to list all the users currently registered on your PC and hit Enter: net accounts
  3. Next, type in the following command and press Enter to enable password expiration. Remember to replace user name with the account you wish to enable: wmic UserAccount where Name="user name" set PasswordExpires=True
  4. To disable password expiration in Windows 11, type in the following command and replace user name with the name of the user account you wish to disable password expiration and hit Enter: wmic UserAccount where Name="user name" set PasswordExpires=False
  5. If you want to disable for all accounts, type in the following command and press Enter: wmic UserAccount set PasswordExpires=False

How can I extend the password expiration time limit?

Although the default expiry period for local accounts is 42 days while Microsoft accounts are 72, you can extend the password expiration time limit to be less or more depending on how often you want to change your password. Follow the steps below to adjust the time limit:

1. Use Group Policy 

  1. Hit the Windows  + R  keys to open the Run command.
  2. Type gpedit.msc and hit Enter to open Group Policy Editor.GPEDiT.msc -Windows Remediation Service Failed to Start?
  3. Navigate to the following location: Computer Configuration > Windows Settings > Security Settings > Account Policies > Password Policy
  4. Go to Maximum password age on the right pane, right-click on it, and select Properties.
  5. You’ll find that 42 days has been set as the default expiry time. Press the drop-down menus to increase or decrease the time limit, then click Apply and OK to save changes. The maximum amount of days is 999 days.

2. Use Command Prompt

  1. Hit the Windows key, type cmd in the search bar, and click Run as administrator.
  2. Type the following command and press Enter. Remember to replace user name with the corresponding name of the account you wish to adjust the expiration time limit: wmic UserAccount where Name="user account name" set PasswordExpires=True
  3. Next, type and Enter the following command. Remember to replace ## with the desired number of days you wish your password expiration limit to last: net accounts /maxpwage:##

For those who want to change their passwords regularly but have the habit of forgetting them easily, a password manager with emergency access should be a must-have.

Other users prefer not to have passwords at all, so if you’re confident in the people around you and want to do away with passwords, you can delete all your saved passwords and enable automatic login so that you don’t have to remember passwords.

However, if you’re not sure about giving full access to your PC, consider changing the minimum PIN length for your Windows 11. And if you’re wondering which authentication method to go for, we have a password vs PIN comparison to help you out.

If you’re interested in adding a user to a Windows server, we also have an expert article that you need to check out for all the details.

Do let us know of any additional thoughts you may have on this topic down below.

Fix: Windows Cannot Access the Specified Device, Path or File

When you use, download, or install different devices or files, they can be opened right away, and sometimes you might get Windows cannot access the specified device message.

Fixing this problem is simpler than you think, and in this article, we’re going to show you a couple of solutions that will surely fix this problem for you.

How can I fix the Windows cannot access the specified device error?

1. Recover deleted, corrupted, or removed file

Sometimes, you may have deleted or removed the file, or your file is corrupted. As a consequence, this will activate the Windows cannot access the specified device error.

Regardless if you have accidentally deleted that file, or maybe you have lost it after a computer crash, these situations can be solved easily with professional third-party software.

We recommend you Recuva, a smart solution that allows recovering your deleted files fast and easily.

Use it to recover your missing files from a Windows computer, digital camera card, recycle bin, or even an MP3 player! If you have lost music, pictures, documents, emails, videos, or any other files, Recuva is the solution. It will help you to recover all of these files.

It is a flexible solution that will help you recover files from rewriteable media, such as USB sticks, memory cards, or external hard drives.

Recuva

Recover deleted files from various devices with Recuva: different formats and damaged disks!
Free trial Visit Website

2. Disable your antivirus

  1. Right-click the antivirus icon on your Taskbar and select the Disable option.
  2. Press the Windows key + X and select the Task Manager option.
    task manager windows cannot access the specified device
  3. Now, click the Startup tab at the top.
  4. Finally, right-click the antivirus software and select the Disable option.
    disable

If you are trying to open your Battle.net file or other folders and keep getting the Windows cannot access the specified device error, it might be due to your antivirus software.

The solution to this is to disable your antivirus temporarily.

3. Check file location

  1. Right-click the faulty file and select the Properties option.
    properties
  2. Click the General tab at the top.
  3. Now, check the path before the Location option to know the file’s location.
    location
  4. Finally, copy this file path and paste it into the Windows Explorer search box.

In some cases, explorer.exe Windows cannot access the specified device path, or file error on Windows 7 or other operating systems can be caused by missing file path.

If the path is missing before the Target option in Step 3 above, you will not be able to access the file.

4. Gain permissions for your file

  1. Right-click on your file and select Properties.
  2. Navigate to Security, click on your account, and then choose Edit.
  3. Now, remove all checks from Deny, and click OK.
  4. Finally, verify if the error has disappeared.

If you don’t have permission to access a file, you will encounter the message that Windows cannot access the specified device. In this case, you need to grant read and write access to the file.

5. Unblock the file

  1. Right-click on the file you need to access.
  2. Select Properties.
  3. Navigate to the General tab.
  4. Verify the option This file came from another computer and might be blocked to help protect this computer.
  5. Check Unblock on the right small box beside that option.windows cannot access the specified device path or file desktop apps
  6. Click OK.

To protect your computer, sometimes, Windows will block certain files. Similar to antivirus, sometimes your operating system will offer you false notifications.

Then, it will block whichever file you want to access or modify. Use the above-mentioned steps to unblock your file.

There you have it; everything you need to fix the Windows cannot the specified device error. You only need to follow the instructions carefully, and things should be back to normal.

If you are facing other issues, like the system cannot write to the specified device error, check our detailed guide to fix it.

Feel free to let us know the solution that helped you fix this issue in the comments below.

The previous section contains tested solutions to this issue, so be sure to try them and leave us an answer in our comments section.

My Print Machines Run Out Of Paper: 8 Fixes For The Error

Are you getting a Paper has run out printer error? If so, it might just be that the printer has indeed run out of paper!

However, some Windows users have reported the error even for printers loaded with paper. So if you’re getting a paper has run out the error with a printer full of paper, these are potential fixes that might get it printing again.

What can I do if my print machines run out of paper?

1. Check and Reload the Paper

First, check the general condition of the paper loaded in the printer. Replace any paper that might be in any way torn, damp, or bent. Also, check that all the paper is of the same type and length.

The paper stack shouldn’t include any more than 25 sheets. Tap your paper stack on a flat surface to align the sheet edges, and then place the stack back in the print tray.

2.Check the Printer’s Rear Panel Cover

A panel at the back of your printer might not fully be in place. Turn your printer around and check the rear panel is in place. If it isn’t, there might be some paper jammed there.

Remove the rear panel completely. Then you can remove any crumpled paper, and place the back panel back on the printer.

3. Update Your Printer’s Driver

Any hardware error might be driver-related. Even though Windows updates automatically update printer drivers, it could still be worthwhile checking for printer driver updates. You can update drivers with Device Manager in Windows 10 as follows.

  1. Open Cortana and enter ‘Device Manager’ in its search box. Select Device Manager to open the window below that includes a list of peripherals.
  2. Select Printers and right-click your printer model to open the context menu. Select the Update Driver Software option on the context menu.
  3. Now select the Search automatically for updated driver software option. Update the driver if Windows finds anything for you to install.

In addition, you have other methods to update your PC drivers efficiently and without provoking serious damages. So if you need to update the printer driver automatically with no effort, try out Outbyte Driver Updater.

5. Reset the Printer

Resetting the printer might do the trick. First, remove the power cable without turning the printer off. Then you should wait for about half a minute before plugging the power cable back in the printer. If the printer doesn’t automatically switch on, press its power button.

5. Clean the Printer’s Rollers

The accumulation of dirt in the printer’s rollers can generate paper feed errors. So cleaning the rollers is a potential fix. You can clean the rollers as follows.

  1. First, switch the printer off and disconnect its power cable.
  2. Get a lint-free cloth and bottled water to clean the rollers with, but don’t use tap water or alcohol.
  3. You can usually access the pick rollers at the front with the removal of the primary paper tray. However, some printers also have a back access door that you access the rollers from.
  4. Then wipe the rollers with cloth and rotate them upward with fingers. Clean your printer’s duplexer rollers if it has a duplexer.
  5. Leave the rollers to dry out for about half an hour. Then reconnect the printer’s power cable, and switch the printer back on if required.

6. Check the Print Spooler is on

  1. The Print Spooler stores the printer jobs, and switching the Print Spooler on, if it’s off, might fix the paper has run out error. You can check if that’s enabled or disabled by pressing the Cortana button and entering ‘services’ in the search box.
  2. Select Services to open the window in the snapshot below.
  • Scroll down to the Print Spooler, and double-click that service to open its window below.
  • If the Print Spooler isn’t running, press the Start button.
  • Press the Apply and OK button to apply the new setting.

7. Clear the Print Caches

  1. Clearing the print cache will erase print jobs that have stalled. To do that, open File Explorer and enter
    c:windowssystem32spoolprinters
  2. Select all the files in that folder, and then press the X Delete button on File Explorer’s toolbar to erase them.
  3. Go to the File Explorer’s path bar and enter
    c:windowssystem32spooldriversw32x86
  4. Now erase all the content, including subfolders, in that folder path.

8. Is Your Printer Windows 10 Compatible?

If you’re encountering a paper that has run out of error after recently upgrading to Windows 10, check that your printer is compatible with the new platform.

Although most printer models from the last three years are compatible with Windows 10, there are still plenty of antiquated printers that aren’t compatible. To check your printer’s compatibility, open the manufacturer’s website that should include a page listing of its supported Windows 10 printers.

For example, this HP page provides further details for what HP printers are, and are not, compatible with Windows 10. If the printer doesn’t have a Windows 10 driver, you can’t print documents with it. If it is compatible with the platform, the manufacturer’s page should include a recommended driver to update to.

So those are a few ways you can fix the somewhat mysterious paper that has run out of errors. Aside from that, you might also be able to service the printer if it’s still within a warranty period. If so, you can arrange a manufacturer repair for it.

Turn Off BitLocker Permanently on Windows 11 [How to]

BitLocker is useful if you want to protect your data, but if you don’t want to use it anymore, this guide will show you how to turn off BitLocker on Windows 11.

How do I disable BitLocker on Windows 11?

1. Use BitLocker manager

  1. Click the magnifying glass icon to bring up the Search bar.
  2. In the Search bar, type in bitlocker.
  3. Click Manage BitLocker when it appears.manage bitlocker search
  4. Select the drive and, click on Turn off BitLocker.turn off bitlocker
  5. A small window will appear telling you that the drive will be decrypted. It may take a while depending on the driver’s size.
  6. Click Turn off BitLocker.turn off bitlocker button
  7. Give your computer time to decrypt the drive. To give you an idea of how long it took, it took BitLocker 10 minutes to decrypt in this example.drive decrypting this pc
  8. Once done, the BitLocker Drive Encryption menu will state that the feature has been turned off.

You can also access these options by opening This PC, right-clicking your drive, and choosing Show more options > Manage BitLocker.

    2. How to disable BitLocker from the Command Prompt?

    1. Bring up the search bar by clicking on the magnifying glass icon.
    2. Type in Command Prompt. Click Run as administrator.run as administrator command prompt
    3. A window will appear asking if you want to make changes. Select Yes.UAC command prompt yes button
    4. In the Command Prompt, type in manage-bde -off <drive letter>: Replace <drive letter> with an actual drive letter, in our case it was C.manage-bde -off C: command
    5. Hit Enter on your keyboad.
    6. A message will appear that decryption is underway. This will remove the Bitlocker encryption.decryption in progress cmd
    7. Like before, give BitLocker some time to decrypt fully. The time it takes to decrypt is contingent on the drive’s total size.

    As you decrypt, you will be putting your computer’s drive at risk from online threats. For this, it’s recommended you download some antivirus software to protect you.

    ⇒ Get TotalAV

    3. Turn off BitLocker in Windows 11 with PowerShell

    1. Bring up the search bar by clicking the magnifying glass icon.
    2. Type in Windows PowerShell.
    3. Click Run as administrator.
    4. A window will appear asking you if want to make changes. Select Yes.
    5. In PowerShell, type in this command: Disable-BitLocker -MountPoint "<driver letter>:" Just like for the Command Prompt, enter your drive’s letter (‘C’ in this case) in where it says ‘<driver letter>’.
    6. Hit Enter on your keyboard.
    7. PowerShell will show that BitLocker decryption is in progress. Give it some time to finish. Depending on the drive’s size, it may take a while.

    What will happen if I turn off BitLocker?

    If you turn off BitLocker, you won’t be asked for your BitLocker password when starting PC. This might make your PC and files less secure, so if you’re working with sensitive files, you might want to keep it enabled.

    How do I enable BitLocker on Windows 10?

    To enable BitLocker on Windows 10, you just need to follow the same steps you used to enable it on Windows 11. Luckily, we have a special guide that can help you with that.

    How do I turn off BitLocker encryption on Windows 10?

    Windows 10 and 11 are similar and you can follow the same steps from this guide to disable BitLocker on Windows 10.

    Before you go, you might want to check our guide on how to enable or disable the BitLocker auto unlock feature.

    As you can see, it’s pretty simple to remove disk encryption in Windows 11, and we hope you found this guide helpful.

    Did Not Connect: Potential Security Issue In Firefox: Fix

    This article will explore the issue that makes the browser display Firefox did not connect potential security error message. Firstly, we must note that Firefox offers support for Windows, Linux, and Mac devices and is accessible in more than 90 languages.

    Furthermore, Firefox automatically filters the majority of trackers, so you don’t have to fiddle with any of your security settings. You might also deploy software to remove Internet tracks on your PC.

    The browser features a private browsing mode, third-party cookie blocking, crypto-miner blocking, fingerprinter blocking, and an individual protection report.

    However, sometimes you may have to deal with some security errors like:

    How do I change my secure connection settings?

    1. Open Firefox and click on the hamburger menu followed by Settings.settings-firefox firefox did not connect potential security issue
    2. Next, navigate to Privacy & Security then scroll down until you find the HTTPS-Only Mode and select the Don’t enable HTTPS-Only Mode.dont-enable-https-only firefox did not connect potential security issue

    How do I fix did not connect: potential security issues in Firefox?

    1. Accept the risk and continue

    1. To fix the Firefox did not connect potential security issue on every site, click on the Advanced button.
      firefox did not connect potential security issue
    2. Click on the Accept the Risk and Continue button.

    Bear in mind that this is a precarious way to resolve the error if you do not trust the website because you only get this error when, for some reason, the browser can’t guarantee your security.

    Accepting the risk will work if encountering Firefox did not connect potential security issue on Google.

    Note that not all browsers trigger such errors. We recommend Opera One because it is a Chromium-based, multi-platform browser.

    It offers many customization and security features, including an interface that makes your favorite tools easily accessible, with pre-installed social media apps, a battery saver, and AI integration.

    Opera One

    Browse securely and error-free with this top-notch Chromium browser!

    2. Temporarily disable your Antivirus or Firewall

    1. To fix the Firefox did not connect potential security issue on Youtube, click on the Start menu, type in Windows Security, and select the app.
    2. On the left pane, select Virus & threat protection, scroll to the Virus & threat protection settings menu, and select the Manage settings option.
      firefox did not connect potential security issue
    3. Toggle off the switch in the Real-time protection section.
      https://windowsreport.com/wp-content/uploads/2022/05/Manage-protections-1.png
    4. Select the Firewall & network protection option on the left pane, then select Private network from the right pane.
      firefox did not connect potential security issue
    5. Toggle off the Microsoft Defender Firewall switch.

    This solution serves as a Firefox that did not connect to a potential security issue bypass.

    Like in the previous step, we recommend only applying this fix if you are sure of the site you will visit. You should also only temporarily disable your protection, which means you must turn it back on after visiting the site.

    Remember that the steps to turn off your security will vary depending on your anti-malware provider.

    3. Include the side in your trusted list

    1. Click on the Start menu, type internet options, and click on the Internet Options applet.
    2. Select the Security tab under the Select a zone to view or change security settings menu, click on Trusted sites, then click the Sites button.
    3. Add the URL of the site you wish to trust to the text field under Add this website to the zone menu, then click the Add button and Close.
    4. Click Apply and Ok.
      firefox did not connect potential security issue

    Why do I keep getting secure connections failed?

    The Firefox did not connect potential security issue sec_error_unknown_issuer error can be triggered by a few things but here is what you need to know.

    When the Firefox browser is connected to a secure site, it must check the legitimacy of the certificate issued by the site. Also, it must verify that the encryption is powerful enough to keep your privacy effectively.

    If the browser can’t validate this, it will disconnect from the website and display a warning notice for potential security risks ahead.

    These risks could come in many error variations, including:

    • SEC_ERROR_EXPIRED_ISSUER_CERTIFICATE – Triggered when the issuer certificate has expired.
    • SEC_ERROR_EXPIRED_CERTIFICATE – Issued at the expiry of an SSL certificate.
    • SEC_ERROR_UNKNOWN_ISSUER – Triggered when Firefox does not recognize the certificate issuer.
    • MOZILLA_PKIX_ERROR_MITM_DETECTED – It may be triggered when accessing nameservers on HTTPS.

    Note that this error does not imply that there is malware, but it takes, but it allows you to determine if the site is safe and if you wish to proceed. You may also encounter a similar error in Microsoft Office with a potential security concern or a security concern in Excel so check out how to fix it.

    Our solutions have not been written in any particular order, and any should effectively resolve this issue.

    As a best practice, we recommend that you always use a VPN when communicating with the Internet. This will guarantee your online safety and privacy even when you have the Firefox did not connect potential security issue.

    However, using any of the best VPN extensions for Firefox should offer you adequate safety. We covered a similar issue in our Sec_Error_Bad_Signature in Firefox guide, so don’t miss it for more information.

    We also have an article on Firefox Error HSTS that covers a similar subject matter, so don’t hesitate to check it out.

    Don’t hesitate to leave us a comment in the section below and share your thoughts and any other potential solutions that you have in mind.

    Website Not Loading Properly In Google Chrome? Here’s What to Do

    Is Google Chrome not loading pages properly on your Windows PC? Well, you are not alone, and today we’ll show you how to fix it.

    We’ll address underlying issues like interfering extensions, corrupted cache and cookies, incorrect settings, and more.

    Sounds good? Let’s get to it.

    How do I fix Google Chrome not loading pages?

    1. Try a different browser

    If you’re having problems opening certain websites, you might want to try a different browser. In this case, there is no better alternative than Opera One.

    opera user interface

    This browser is similar to Chrome but focuses heavily on user security and privacy, further offering a free built-in VPN service.

    If the issue affects only Library Genesis, follow our Libgen not working troubleshooting guide for site-specific fixes.

    Opera One also has a Private Mode that allows you to browse any information without collecting your data, thus protecting your privacy even more.

    It has a new user interface with a pleasant-looking chromatic and modular design with tab islands to ensure effortless multitasking.

    A new browser also means a fresh start, so you can easily import your bookmarks from Chrome, and off you go.

    Opera

    Ditch Chrome’s errors and ;oad pages properly using Opera!

    2. Restart your computer

    1. Press Ctrl + Shift + Esc and launch the Windows Task Manager.
    2. In the Task Manager window, click on Google Chrome and End Process.task manager google chrome not loading pages properly
    3. Now, restart your PC.
    4. After restarting your PC, you can launch Google Chrome and check if the pages are loading correctly.

    If Google Chrome isn’t loading pages properly, the quickest solution would be to close all Chrome processes and restart your computer. Even if the Task Manager won’t open at first, don’t worry, we got your back.

    3. Clear cookies and cache

    1. Launch Chrome, click on the three dots in the upper right corner and select Settings.chrome browser settings
    2. Go to Privacy & Security.google chrome privacy and security
    3. Select Delete browsing data.
    4. Select a time range and check the boxes for Cookies and other site data and Cached images and files.
    5. Hit the Clear data button to confirm.chrome clear data

    Alternatively, if you want to automate this task and prevent cached files and cookies from causing bugs in Chrome, use a professional cleaning and optimizing tool.

    4. Update Google Chrome

    1. Open Chrome.
    2. Click on three vertical dots in the top right corner and go to Settings.going settings chrome
    3. Click on About Chrome.
    4. Chrome will automatically check for new updates and install any available ones.updating-chrome Google Chrome not responding

    An outdated browser can also cause websites not to load correctly. Therefore, you need to update Google Chrome to fix the problem. 

    5. Remove unwanted extensions

    1. In the Chrome address bar, type the following address and press Enter to go to the extensions page: chrome://extensions/
    2. Toggle the switch off next to the extensions you want to disable.disabling extension chrome
    3. Next, click on Remove for the extensions you want to delete.removing browser assistant chrome

    If Chrome doesn’t load pages, the issue might be your extensions. Hence, you have to either disable or remove the problematic extensions.

    6. Disable hardware acceleration

    1. Open Google Chrome.
    2. Type the following address in the address bar and press Enter: chrome://settings/system
    3. Toggle off the button next to the Use hardware acceleration when available.enabling hardware acceleration in chrome
    4. Relaunch Chrome.

    Though Hardware Acceleration is very helpful, it may cause high Chrome CPU usage issues on low-end devices and prevent web pages from loading correctly.

    Therefore, you should disable hardware acceleration in Google Chrome. 

    7. Reinstall Google Chrome

    1. Press Win + I to open the Settings app.
    2. Go to Apps and click on Apps & features.going apps & features Microsoft windows 11
    3. Search for Google Chrome.
    4. Click on the three vertical dots and then on Uninstall.uninstalling chrome windows 11 settings
    5. Follow onscreen instructions to complete the uninstallation process.
    6. Download Chrome again and install it.

    To ensure that Google Chrome is completely removed, you should use uninstaller software to remove any leftover Chrome files or registry entries. A reinstall should also help if Chrome keeps capturing your screen.

    There you go! These solutions will help you if Google Chrome is not loading pages properly. Moreover, if you want to know how to block adult websites on Google Chrome, we’ve got you covered.

    Feel free to try all of them and let us know which one worked for you.

    Steam Not Responding On PC: 5 Quick Fixes

    We all know that Steam is one diverse gaming client, but sometimes Steam just is not responding.

    This can be an issue since you won’t be able to play your favorite games, but fear not, there’s a way to fix this problem.

    Most of the time, this issue is not strictly related to Windows 10, so let’s get to solving your problem.

    Why is Steam not responding on my PC?

    • Temporary bugs – Like any other app or program, Steam might run into different random troubles. In this case, you should not worry, because you can easily solve it by restarting, repairing or reinstalling the app. You’re going to see how, later in this guide.
    • Cache blocking processes – As you probably already know, cache are usually stored in the browser history. Steam also saves them, so in order to fix our presented issue, it is recommended to clear the download cache.
    • Outdated time settings – These ones are pretty obvious, but it seems like some users forget take this into consideration. We’re going to show you how to always keep them up to date.
    • Compatibility Mode limits the app – When enabled, this feature might block certain processes on Steam. In these terms, it is recommended to disable it.

    Now, let’s see what you can do if Steam is not responding to clicks.

    What can I do if the Steam server is not responding?

    1. Clear Steam’s cache

    1. Press on the Windows key, input Steam, then open the app.
    2. Click on Steam, located in the upper-left corner of the window.
    3. Head to Settings.
    4. Select the Downloads tab.
    5. Now, click on Clear Download Cache, then confirm the process by pressing on Ok.
    6. You’re all set.

    Your cache folder is used to store up temporary files associated with games or programs in your library. However, Steam might stop responding if the cache is corrupted.

    2. Update your date and time

    1. Press in the Windows key, type Control Panel, then open it.
    2. Now, select Clock and Region.
    3. Click on Date and Time.
    4. Select the Internet Time tab, then click on Change settings.
    5. Check the Synchronize with an Internet time server box, then click on Update now.
    6. Click on Update Now, then click OK.

    3. Run a check on your storage devices

    1. Use the following keyboard shortcut to open File Explorer: Windows + E.
    2. In the search box, type This PC, then press on Enter.
    3. Go to Local Disk (C:).
    4. Go to Program Files or Program Files (x86).
    5. Right-click on the drive in which Steam is installed, and select Properties.
    6. Select the Tools tab, and then click on the Check button.
    7. If there are any errors present, select Scan drive.
    8. After this step is complete, you may open Steam.

    4. Disable Compatibility Mode

    1. Right-click on your Windows Taskbar, then navigate to Task Manager.
    2. In the Processes tab, click on each Steam instances, then choose to End task.
    3. Now, right-click on any Steam shortcut or executable file at hand, select Properties.
    4. Go to the Compatibility tab, and uncheck Run this program in compatibility mode for option.
    5. Click on Apply, then on OK, and try to open Steam again.

    Windows Compatibility Mode does exactly what it says, but it’s mostly useful for running older programs. Such as those that worked well with older versions of Windows.

    If Steam is not responding, make sure that you’re not running the app in Compatibility mode.

    5. Reinstall Steam

    1. Press on the Windows key, type Control Panel and navigate to the first result.
    2. Now, under the Programs section, click on Uninstall a program.
    3. In the shown list, search for Steam, click on it, then choose to Uninstall it.

    When everything else fails, the best bet is to simply uninstall your Steam client altogether and reinstall it. Before trying this solution, be sure to back up your games.

    There are several ways to uninstall the application, but the most effective one is to use uninstaller software that can completely remove any program from your PC.

    Therefore, to fix this annoying error it might work to uninstall your Steam so you need to erase any files associated with this program. For that, you should have your pick from the best uninstaller software for Windows 10.

    We hope that these solutions were helpful to you. If Steam is still not responding, feel free to let us know in the comments section below.

    Sorry We Are Having Temporary Server Issues: How to Fix

    Office 365 is one of the best office tools, but many reported Sorry we are having temporary server issues while using it.

    This isn’t the only issue, and many reported that Office 365 is slowing down their computer. Even if you encounter server problems, there are a couple of solutions that you can use.

    How can I fix Sorry we are having temporary server issues error?

    1. Check your computer’s time zone

    1. Right-click the clock in the bottom right corner and choose Adjust date/time.
    2. Locate the Time zone setting.
    3. Make sure it’s correct.

    After making these changes, check if Sorry we are having temporary server issues in PowerPoint is gone.

    2. Run Office as administrator

    1. Type any of the Office application in the Search bar. For example, type Word.
    2. Right-click on Word and select Run as Administrator option.
    3. Once the Office application is up and running, try to activate the license and check for any improvements.

    3. Disable two-factor authentication

    1. Login to Microsoft Account using a web browser.
    2. Next, go to Account Manage page. If you are not already signed in, you may have to sign in again.
    3. Expand Security and check Security dashboard.
    4. Select Advanced security options.
    5. Locate Two-step verification option and choose Turn off.

    6. Follow the instructions on the screen to complete the process.

    Launch Microsoft Office and enter the activation key. If the activation is displayed, move to the next method.

    4. Turn off firewall

    1. Press Windows key + S and type firewall. Choose Firewall & network protection.
    2. Under Firewall and Network protection, click on Private Network (Active).
      Windows Firewall and Network Protection Active
    3. Click on the toggle switch under Windows Defender Firewall to turn off the Firewall.
      Windows Defender Firewall Off
    4. Make sure box under Incoming Connections section for Block all incoming connections including those in the list of allows apps is unchecked.
    5. Close the Settings window.

    Launch Microsoft Office and try to activate the license. After the activation is successful, make sure to re-enable the Firewall and Antivirus protection.

    5. Use Support and Recovery Assistant for Office 365

    1. Download Support and Recovery tool for Office 365.
    2. Run the installer and when the dialogue box opens click on Install.
      Support and Recovery for Office 365
    3. The app will open in a new window. Select I agree to accept the service agreement.
    4. Click on Yes when prompted by the UAC.
    5. Follow the on-screen instructions to complete the Recovery process.

    After performing these steps, check if Sorry we are having temporary server issues message in Excel is gone.

    If none of the solutions helped fix this error and you are still unable to activate the license, contact Microsoft support. The team can help you remotely over the phone.

    If the support cannot solve the problem immediately, wait for a day or two. If the error is from Microsoft’s end, the support staff will fix the issue and notify you through email.

    This isn’t the only error that you can encounter, and users reported This email address is already connected to Office 365, or potential security concerns but we fixed that in a separate guide.

    Did we miss a solution that worked for you? Let us know in the comments below.

    There Is A Problem With Adobe Acrobat/Reader: Fix

    Many people surfing the Internet reported encountering various Adobe Acrobat Reader issues while trying to access the PDF files via their browsers.

    When trying to open specific content, the following error message appears blocking access to the PDF file:

    There is a problem with Adobe Acrobat/Reader. If it is running, please exit and try again. (error 0:104)

    A user explains:

    I get the same error message.  I’m able to open pdf‘s that are saved to my hard drive, but not directly from the internet. […]
    when I use IE and view report (pdf) from browser  it showed error
    “There is a problem with Adobe Acrobat /Reader. If it is running, please exit and try again.(0:104)”

    A similar error message reads: There is a problem with adobe acrobat/reader. If it is running, please exit and try again. (error 0:521)

    Fixing this issue requires a few Acrobat Reader or browser tweaks. We came up with a series of solutions that should help you to fix this problem.

    How do I fix the There is a problem with Adobe Acrobat/Reader error?

    1. Reinstall Adobe Acrobat Reader

    Adobe Reader
    1. Completely uninstall Adobe Acrobat Reader.
    2. Download the latest version from the official website.
    3. Run the installer.
    4. Add Adobe Acrobat to your firewall and malware protection exceptions list.

    In order to protect yourself against security vulnerabilities and to ensure that your software is error-free, we recommend you keep your system up to date at all times.

    This should become part of your maintenance regime and you should not ignore product updates as Adobe is always providing bug fixes and increasing product compatibility.

    That being said, you should always download software from official sources or otherwise trusted websites.

    The link below will take you to the official Adobe website where you can download the Acrobat Reader.

    Adobe Acrobat

    The official Adobe Acrobat download source for the most popular digital PDF reader and editor.

    2. Consider using a different web browser

    Since most likely the problem occurred when you tried reading a PDF file from your browser, you might as well go for an alternative browser that doesn’t present such issues.

    Opera One is one such browser, and it is optimized for a number of activities, among which we can also mention PDF files.

    More so, the overall look and feel of Opera One are extremely modern and lightweight, so it doesn’t matter if besides the PDF file you have an extra 20 tabs opened, you will not feel the RAM is all used up.

    It is Chromium-based and features heavy extension support. This makes it increasingly customizable and frequently updated, making it an excellent web browser overall. Plus, it comes with it’s own AI.

    ⇒ Get Opera One

    3. Change Adobe security settings

    1. Open Acrobat Reader, go to Edit and select Preferences…
    2. Go to the Security (Enhanced) tab, uncheck the box next to Enable Protected mode at startup, and click OK.
    3. Close Acrobat Reader and try to see if this fixed the browser issue.

    4. Activate Acrobat Reader add-on

    1. Open the Tools menu in IE and select Manage Add-ons.
    2. Under the Add-ons type section, choose Toolbars and Extensions.
    3. At the drop-down Show menu, select All add-ons.
    4. Select Adobe PDF Reader from the list and choose Enable.
    5. Click Close and check to see if it fixed the issue.

    5. Remove all previous Acrobat Reader versions

    1. Open the Control Panel, then Programs.uninstall programs from control panel
    2. Under Programs and Features, select Uninstall a program.
    3. Select each unused Acrobat Reader versions that you do not use and select Uninstall.
    4. Make sure to leave only the Acrobat Reader option that you are currently using.

    Now, if you don’t want to change your default browser, follow the troubleshooting steps listed above.

    We hope that our guide helped you to fix the Adobe Acrobat Reader PDF issues you encountered on your browser.

    If you liked this article, leave a comment in the comment section below.

    Best Music Player for Windows 11 [Out of 8 Most Used]

    If you’re looking for a superb music player for Windows 11, there are quite a few really good options available. 

    Music adds value to life. It makes your workday more enjoyable, boosts your mood, and helps you relax at the end of the day. It’s even been shown to improve sleep quality.

    If you’re not keen on a subscription service and would just like a simple music player app for your computer, then there’s really no reason to look any further than the default music player. 

    And speaking about default players, does Windows 11 still have Media Player?

    Does Windows 11 have a music player?

    When talking about music players, you probably think of Windows Media Player immediately. This is a very popular media player and is often pre-installed on Windows PCs, laptops, and notebooks. 

    Windows 11’s New Media Player improved considerably, thus throwing over both Groove Music and the dusty Windows Media Player.

    It supports CD playing, video, and audio file playback and can be used to organize your media libraries. It also has the ability to download album covers, lyrics, and other useful information related to your music.

    However, if you want something even more feature-packed, then you can go for third-party apps. Here’s a quick preview of our favorite picks:

    • Spotify – Best offline music player for Windows 11
    • iTunes – Best music app for Windows 11 with iPhone/iPad/iPod sync
    • VLC – Best MP3 player for Windows 11 (multi-format support & no codecs)
    • AIMP – Best free music player for Windows 11 with tagging capacities
    • MediaMonkey – Best audio player for Windows 11 to manage collections
    • Musixmatch – Top music player for laptop and PC Windows 11
    • Winamp – Easy-to-use music player widget for Windows 11

    If you’re just looking for a simple MP3 player that can play your music and handle basic functions like creating playlists, Windows Media Player is probably fine.

    What is the best music player for Windows 11?

    1. Spotify – Best offline music player for Windows 11

    If you have a Windows computer and you haven’t yet tried Spotify, you’re missing out.

    Spotify is a music app that gives you access to millions of songs, albums, and artists. You can also create curated playlists and listen to mixes chosen by the app itself.

    Its performance is outstanding. It works by streaming music from a library of 15 million songs directly to your computer as you listen. You can also adjust equalizer settings for the best music experience.

    Another thing that makes Spotify so good is the UI, it’s very simplistic, yet still allows for all the features available with the program.

    You can also download playlists for offline listening on your phone or tablet if you have a paid subscription.

    Additional features include:

    • Has a huge variety of songs from all genres
    • You can search for songs using phrases you remember and it will bring up possible matches
    • Allows for offline listening with its download feature
    • Has a social feature that enables you to follow other users of the app and see what they are listening to
    • Recommends new music based on what you’re already listening to
    • Easily cast on other devices
    • Allows you to set a custom background for your playlists

    ⇒ Get Spotify

    2. iTunes – Best music app for Windows 11 with iOS sync

    iTunes has been one of the best-known media players since it was first introduced by Apple. Nowadays, with the development of Windows 11, iTunes is more than a media player.

    The interface is elegant, and you can choose between multiple themes for customizing your experience. You can also use it to organize your library, download podcasts, and listen to Internet radio stations.

    iTunes is free to download, and it comes with a variety of additional features that will make your music-listening experience much more pleasant.

    It is also an online music store that allows users to purchase and download songs (as well as ringtones) from a catalog of over 20 million songs.

    What’s more, iTunes is also used to sync your local media files to your iPhone/iPad/iPod device for enjoyment on the go.

    Additional features include:

    • iTunes allows you to sync all of your data between your various devices
    • Receives regular updates as new content is added as soon as it is released
    • You can shop the iTunes Store for music, movies, TV shows, iPod games, audiobooks, free podcasts, and more

    While we’re at it, you might also want to check out these awesome iTunes alternatives for Windows 11.

    ⇒ Get iTunes

    3. VLC – Best MP3 player for Windows 11 (multi-format support & no codecs)

    VLC is one of the most popular media players for Windows 11, and for good reason. It has a lot to offer, including support for almost every video format you can think of without the need to install additional codecs, advanced playback controls, and more.

    You can do almost anything with the VLC media player. However, one feature that stands out is its ability to play back almost every file format that you throw at it.

    If you’re looking for a feature-packed music player that works on just about every operating system, look no further. VLC may be a simple video player, but it has many useful features.

    This best audio player for Windows 11 comes with a built-in equalizer to help improve audio quality while playing your music files. In fact, it’s one of the best equalizers for Windows 11 on the market.

    If you want more control over how your music sounds, VLC lets you create custom presets or download extra ones from the Internet.

    Additional features include:

    • Multi-format player
    • Support both audio and video
    • Supports subtitles with color thumbnails
    • Allows for minor editing with a library of effects

    ⇒ Get VLC

    4. AIMP – Best free music player for Windows 11 with tagging capacities

    AIMP’s interface looks quite modern and minimalistic, and most of the tools are located on its main window.

    You can easily switch between your music library and playlists, create new ones, open audio files stored on your computer or use the built-in browser to find them online.

    If you have an album cover, you can easily set it as the background image for your playlist by browsing for it in the corresponding menu.

    AIMP is a music player for Windows that can play most audio formats you throw at it. It has advanced tagging capabilities that help you organize your music library better.

    You can edit tags manually or have them automatically filled in using the online free database.

    Additional features include:

    • Comes with several built-in sound effects that help you enhance your listening experience even further
    • Has automatic searching and downloading album art
    • Ability to download additional plugins, skins, and visualizations from the web 

    ⇒ Get AIMP

    5. MediaMonkey – Best audio player for Windows 11 to manage collections

    MediaMonkey is another cult favorite. It has a lot of features and capabilities, but the best part is that it’s really lightweight and fast.

    There are few apps that offer as much power and simplicity as MediaMonkey. It’s not just a great app for playing your music, but also a fantastic way to manage it all so you can find just what you’re looking for. 

    Given how feature-packed Windows 11 is, getting another app that doesn’t hog your RAM is a plus. The best thing about MediaMonkey is that you can use it to manage large music collections.

    With the growing popularity of podcasts, you don’t have to worry about missing out on your favorite podcasters as it is also a supported feature.

    Additional features include:

    • Ability to convert audio formats
    • Allows syncing across multiple devices
    • You can Wi-Fi sync and manage your playlist from another device
    • Ability to backup your favorite tracks on the cloud
    • Easily cast on other devices
    • Generates reports on your listening habits
    • Removes any duplicate tracks to clean up your playlist

    ⇒ Get MediaMonkey

    6. Musixmatch – Top music player for laptop and PC Windows 11

    If you are looking for the best music player for Windows 11 that also comes packed with a lot of extra features, then look no further. Musixmatch offers an amazing music experience and is the best choice for your Windows 11 PC.

    Among the features that make Musixmatch stand out is the ability to sync your preferences across multiple devices, including mobile, desktop, and tablet devices, as well as being able to find lyrics in real-time while listening to music.

    It’s one of the best Windows 11 music players that can also translate song lyrics into over 40 languages. If you are a power user and want to explore more features, you can purchase the premium version.

    Additional features include:

    • Enjoy a large number of songs translated into different languages
    • Create playlists of your favorite songs
    • You also get a dark theme
    • Access to your listening history if you forget what song you were listening to 

    ⇒ Get Musixmatch

    7. Winamp – Easy-to-use music player widget for Windows 11

    Winamp is a very old player that has been around for years and has a huge variety of add-ons. There are skins, plug-ins, and visualizations that make playing back audio an absolute joy.

    The fact that it’s no longer being developed isn’t an issue – the last stable version was released in 2013.

    If you like some extra features without having to expand the windows often, Winamp is for you. It supports keyboard shortcuts allowing you to control it without having to switch to its window.

    You can also minimize Winamp to the system tray and control it from there: right-click on the icon and select Playback / Play / Pause / Stop to control your music, or click on the icon with the left mouse button to open the main window of the application.

    Additional features include:

    • Supports multiple formats
    • Easy to use and customizable user interface
    • Allows playlist creation

    ⇒ Get Winamp

    Are music players free?

    You may have a huge collection of CDs, and ripping them might be a time-consuming process. Or maybe you subscribe to a streaming service but don’t have the bandwidth or data to stream all the time. Perhaps you just like having your music locally stored.

    Regardless of your reason, a good music player can help you organize and discover new music in your extensive library.

    You’ll find almost all of them have a free version. However, if you want a more advanced version with fewer ads and more features, you have to pay for it.

    For instance, Cyberlink PowerDVD is feature-rich and handles every single file format without breaking a sweat.

    Here are more contenders for the title of best music player for Windows 11 that we simply cannot ignore:

    ➡️ Foobar2000
    ➡️ MusicBee
    ? Dopamine
    ? Tidal

    Prefer online listening without subscriptions or installs? Check our guide to free unblocked music sites.

    Do music players slow down my PC?

    The only time you’ll notice a performance hit across your entire system is when you’re playing a song. But even then it will be negligible.

    Most modern computers can play music without bogging down your system, so if you notice any slowdown while loading or playing songs, it’s likely because of other issues.

    When you consider the sheer variety of choices available when it comes to downloading and listening to your music, choosing the best music player for Windows 11 can be a challenge.

    Fortunately, there are now many Windows music apps on the market that cater to a wide variety of tastes. This is great news for those who want all the benefits of a popular music player without being bombarded by unnecessary features.

    Some are so advanced that they allow you to create a slideshow with music. The options are endless.

    Aside from music players, you can also integrate music recognition software on your PC if you easily forget song titles or artists.

    Ultimately, what you choose will depend on your needs, but if one of these apps strikes your fancy, it’s probably a safe bet that it will work well for you!

    Bluetooth Not Detecting Devices on Windows 10: 6 Easy Fixes

    Many users reported that Bluetooth is not finding devices on Windows 10, and they can’t add any Bluetooth device. If you are experiencing the same problem, read this guide completely.

    The Bluetooth trouble starts after an operating system upgrade, as reported by some users. The upgrade was supposed to be easy, but things don’t always go as planned.

    One of the effects of this upgrade is that Bluetooth is not working on Windows 10 or detecting devices. While this problem can be frustrating, it is not the most difficult to fix.

    This guide will show you nine proven ways to fix Bluetooth not finding devices on Windows 10 issues. You only need to follow the steps carefully, and things will return to normal.

    Why is Bluetooth not finding devices?

    On your Windows devices, a couple of factors will trigger this Bluetooth error. A few of the most common triggers include:

    While this does not amount to every single trigger, they are the most likely causes.

    If your Bluetooth is not finding devices on Windows 10, it might be that the device you are trying to connect is not in range. Also, the device might not be visible for pairing.

    Another known cause of this issue is outdated or faulty Bluetooth drivers. This can be fixed by updating or reinstalling the drivers.

    What Bluetooth-related issues can I encounter?

    Many users use Bluetooth daily, but sometimes Bluetooth does not find devices. Here are some similar issues that users reported:

    • Bluetooth not detecting, and recognizing devices in Windows 10/11: If this problem occurs, try restarting the Bluetooth Support service and check if that helps.
    • Bluetooth not finding headphones, Fitbit, UE Boom, Beats, JBL, keyboard: This problem can occur with various devices, and to fix it, be sure to check if you’re pairing the device properly with your PC.
    • Windows 10/11 Bluetooth not working: Many users claim Bluetooth isn’t working on their PC. However, you can fix the issue by reinstalling or updating your Bluetooth drivers.
    • Bluetooth not connecting: If Bluetooth isn’t connecting, the issue could be your Wi-Fi. Some devices have Wi-Fi and Bluetooth on a single card. To fix the problem, you have to disable Wi-Fi temporarily.
    • Bluetooth not discovering devices: This is another problem you can encounter with Bluetooth, but you should be able to fix it by running the Hardware and Devices troubleshooter.
    • Bluetooth is not pairing – If you’re having Bluetooth connectivity problems, it’s not uncommon that you can’t pair any device with your PC. This is a common issue, and many users reported errors establishing a connection with a Bluetooth message.

    In some cases, Bluetooth won’t turn on, making paring devices an impossible task. This can be just a temporary glitch, which you can fix by restarting your PC.

    Bluetooth errors can cause a lot of trouble, but luckily, this guide is here to help you fix them.

    What can I do if Bluetooth is not finding devices on Windows 10?

    Here’s what you should do first:

    • The problem might be related to the pairing process if Bluetooth is not finding devices. Some devices use the Power button for pairing; one short press will power your device. However, a long press will start the pairing process and pair your device with your PC.
    • Sometimes other Bluetooth devices can prevent you from finding other Bluetooth devices. If that’s the case, users are suggesting disabling all Bluetooth devices and trying to pair only the desired device.
    • Try connecting your Bluetooth adapter to a different USB port if this happens. Users reported issues while using a USB 3.0 port, but the problem was entirely resolved after connecting the adapter to the USB 2.0 port.
    • Some laptops have Wi-Fi and Bluetooth on a single card, which can cause problems. If Bluetooth is not detecting devices, try disabling your Wi-Fi adapter and check if that helps.
    • Alternatively, you might want to consider purchasing a Bluetooth adapter. They are usually cheap, and you can get a decent Bluetooth adapter for about $10 and permanently fix this issue.

    1. Add the Bluetooth device again

      The next workaround for Bluetooth not finding devices issue would be to add your devices again by accessing your Bluetooth device settings.

    1. 1. Hit the Windows key, type Control Panel, then open the app.

      fix-bluetooth-not-finding-devices-windows-10
    2. 2. Click on Hardware and Sound.

      hardware and sounds
    3. 3. Now, click on Devices and Printers.

      Devices and Printers
    4. 4. Choose the Add a device option at the top-left corner.

      add a device
    5. 5. Select the device, and follow the on-screen instructions to complete the process.

      add device

    2. Add the device via Network Connection Properties

    1. Press Windows + R to open Run, type ncpa.cpl, and then click OK. ncpa.cpl
    2. Right-click on the Bluetooth Network Connection adapter, and choose Properties.properties to fix bluetooth not finding devices windows 10
    3. Head to the Bluetooth tab, and click on Bluetooth settings.bluetooth settings to fix bluetooth not finding devices windows 10
    4. Tick the checkbox for Allow Bluetooth devices to find this PC, and click on OK to save the changes.allow visibility to fix bluetooth not finding devices windows 10
    5. Now, click on Manage Bluetooth Personal Area Network Devices.manage personal area network devices to fix bluetooth not finding devices windows 10
    6. Turn on the device that you want to connect to the PC.
    7. Click on Add a device button near the top-left.add a device to fix bluetooth not finding devices windows 10
    8. Immediately turn on the pairing mode on the device, select it when listed on the PC, and follow the on-screen instructions to connect.connect device to fix bluetooth not finding devices windows 10

    Once done, the device should now be there on the list device’s list in Settings and in the Device Manager. This workaround was shared by one of our readers. So, we recommend you try it, and in case it doesn’t work out, head to the other solutions here.

    3. Run the Bluetooth Troubleshooter

    1. Press Windows + I to open Settings, and choose the Update & Security section.
    2. Select Troubleshoot from the left pane, then click on Additional troubleshooters located on the right side of the window.
    3. Choose Bluetooth, then click the Run the troubleshooter button.
    4. You’ll be notified if any problems are found, and your OS will take care of them.

    Windows has all sorts of built-in troubleshooters that can help you fix common problems automatically. If Bluetooth is not finding devices, you might be able to fix this issue by using the Hardware and Devices troubleshooter.

    After the troubleshooter is finished, check if the problem with Bluetooth devices is still there. This isn’t the most reliable solution, but it should be able to help you with some common Bluetooth issues.

    4. Update drivers

    4.1. Update drivers manually

    1. Press the Windows + X keys and choose Device Manager.
      device manager
    2. Double-click on the Bluetooth option to expand it.
      option
    3. Right-click on each of the devices there and select Update driver.
      update bluetooth not finding devices
    4. Select the Search automatically for drivers option.
      search automatically
    5. Wait till the search is complete and install the available updates.

    If Bluetooth is not finding or showing devices on Windows 10, you can try to update your drivers manually from the Device Manager. You can also check the official website of your driver’s manufacturer for the latest available driver if the built-in updater fails.

    4.2. Update drivers automatically

    On the flip side, if all of the steps mentioned above sound too much, you should go for a dedicated driver fixer and updater.

    These tools are an excellent solution to your Bluetooth issues because they can update their drivers if they are too old or fix them if they are broken or missing.

    Download the program, install it, and launch it. Everything from that point onward is pretty much automated, as you only need to confirm which drivers to fix.

    Then restart your PC like any other update, and your Bluetooth drivers should be working well now.

    5. Restart the Bluetooth service

    1. Press Windows + R to open Run, type services.msc, then hit Enter.
      services.msc bluetooth not finding devices
    2. Locate Bluetooth Support Service, then right-click on it, and select Properties.
    3. In case the service isn’t running, click the Start button to start it.
    4. If the service is running, click Stop, then Start it again.
    5. Click on Apply and OK to save changes. The can’t add Bluetooth device issue in Windows 10 will be fixed.

    You can apply the above steps for both Windows 10 and Windows 11 operating systems.

    For Bluetooth to work correctly, you must have certain services running, such as Bluetooth Support. If there are any issues with this service, you might not be able to find Bluetooth devices.

    However, you can fix this problem simply by restarting this service. After restarting this service, the issue should be resolved, and everything will start working again.

    6. Reinstall the Bluetooth drivers

    1. Press on the Windows key, type Device Manager, and then open it.
    2. Expand the Bluetooth section.
    3. Locate the device giving you problems, right-click it, and choose Uninstall device from the menu.
    4. When the confirmation dialog appears, click Uninstall.
    5. Now, from the window’s top menu, select the Action tab, and click on Scan for hardware changes. Windows should now automatically install the missing drivers.

    If you are seeing the Can’t find Bluetooth on this device error on Windows 10, the problem might be related to your drivers. To fix this problem, users suggest reinstalling their Bluetooth devices.

    After reinstalling the drivers, the issue should be resolved. Besides, you might want to try using the official drivers from the manufacturer. Visit the manufacturer’s website and download the latest drivers for your Bluetooth adapter.

    What can I do if Bluetooth is not detecting devices on Windows 11?

    If Bluetooth is not finding devices on your Windows 11 PC, you can try basic fixes like disabling and enabling the device’s visibility. Also, you can bring the device closer to your PC and try connecting again.

    If these fixes fail, you can apply the solutions listed in this guide, as they work superbly on Windows 10 and 11. Lastly, if Bluetooth is not working on Windows 11, check our guide to fix it quickly.

    While still on connectivity issues, you can check our guide for easy fixes if you can’t remove a Bluetooth device on Windows.

    Make sure you comment in the section below and share your opinion regarding this subject.

    Driver PNP Watchdog: 9 Easy Fixes For Windows

    Did you get the Blue Screen of Death (BSoD) with the stop code Driver PNP Watchdog error? If so, don’t panic; this post is meant for you.

    Windows users reported getting Driver PNP Watchdog error while installing Windows updates. During the process of updating their Windows 10 OS, the update is initiated and then freezes while displaying the BSoD with the Driver PNP Watchdog error.

    Meanwhile, the reasons for this error include malware or viruses, damaged PC registries, outdated drivers, or faulty hard drives, among others.

    If you are embattled with Driver PNP Watchdog error, you may not be able to install important updates because of the error. However, Windows Report will show you several methods on how to fix Driver PNP Watchdog error.

    How can I fix the Driver PNP Watchdog error?

    1. Repair PC Registry

    Due to several issues, the system files may be corrupted leading to a damaged Windows registry. Although, sometimes the windows registry may be bloated thereby causing Driver PNP Watchdog error.

    Therefore, you need to repair your Windows registry by using System File Checker (SFC). The System File Checker utility program authenticates the veracity of all system files and fixes files with problems when possible.

    Here’s how to run an SFC scan on Windows 10:

    1. Go to Start > type cmd > right-click Command Prompt > select Run as Administrator.
    2. Now, type the sfc /scannow command.driver pnp watchdog
    3. Wait for the scanning process to complete and then restart your computer. All corrupted files will be replaced on reboot.

    In addition to running SFC Scan, you can also use DISM to fix Driver PNP Watchdog BSoD problem. Deployment Image Servicing and Management is a tool that is used to scan and resolve issues of corrupted system files as well.

    Here’s how to run DISM in Windows:

    1. Press Windows key + X and run Command Prompt (Admin).
    2. Copy and paste the following command on the command line:
      • exe /Online /Cleanup-image /Restorehealthdriver pnp watchdog
    3. In case the DISM can’t obtain files online, try using your installation USB or DVD. Insert media and type following command:
      • DISM.exe /Online /Cleanup-Image /RestoreHealth /Source:C:RepairSourceWindows /LimitAccess
    4. Ensure you replace “C:RepairSourceWindows” path of your DVD or USB.

    Note: Ensure that you replaced the repair source path with your own.

    2. Run Automatic Repair

    You can also fix Driver PNP Watchdog BSoD by performing automatic repair. However, you may need to use Windows bootable installation DVD for this purpose.

    Here’s what to do:

    1. Insert Windows bootable installation DVD and restart your PC afterward.
    2. Press any key to boot from CD or DVD when prompted to continue.
    3. Select your language preferences, and click “Next”.
    4. Click Repair your computer in the bottom-left.
    5. In the “choose an option” screen, Click Troubleshoot > Click Advanced option > Automatic Repair. Then, wait for the Windows Automatic to be complete.driver pnp watchdog
    6. Restart your PC and boot to Windows.

    If the error still persists, we suggest you use professional software that automatically repairs the BSOD error for good. Using such dedicated software is safer in order to avoid any PC malfunction.

    3. Run CHKDSK

    Some Windows 10 users were able to fix Driver PNP Watchdog BSoD problem by performing CHKDSK on your hard drive. Unwanted files or folders which occupy your disk space can cause the Driver PNP Watchdog error as well; therefore, you need to free up your hard disk.

    Here’s how to do this:

    1. Go to Start > Type “command prompt” >Right-click on it, and select “Run as administrator”.driver pnp watchdog
    2. Now, type CHKDSK C: /F.driver pnp watchdog
    3. Then, type CHKDSK C: /R in the Command Prompt and hit Enter key.driver pnp watchdog
    4. After the CHKDSK process finishes, restart your PC.

    Further solutions to get rid of Driver PNP Watchdog error

    4: Run a full system scan

    Viruses and malware can cause the Driver PNP Watchdog error; therefore, you need to scan your Windows 10 PC for viruses and malware so as to remove them.

    You can either use Windows’ built-in antivirus Windows Defender or any third-party antivirus to run a full system scan.

    However, we do recommend that you use specialized software. This free tool will scan and remove malware that could be responsible for Driver PNP Watchdog error from your computer.

    Once you download the software, install it and run the system scan. The software will detect any malfunctioning or suspicious activity on your device and deal with it accordingly.

    Meanwhile, if you still get Driver PNP Watchdog error while running Windows update, you may proceed to the next solution.

    5. Install Microsoft Hotfix

    Several Windows users reported success in fixing Driver PNP Watchdog BSoD simply by installing Microsoft Hotfix as reported by some Windows users.

    Here’s how to do this:

    1. Go to the Microsoft Support.
    2. Now, Click on Hotfix Download Available menu
    3. After download, Install the Hotfix by following the prompts
    4. Restart your PC afterward.

    6. Run the Windows Updates troubleshooter

    Windows 10 OS has several troubleshooters to fix several issues. Meanwhile, for the purpose of the Driver PNP Watchdog BSoD problem which takes place during Windows Update, we recommend that you use Windows Update troubleshooter.

    The Windows Update troubleshooter, on the other hand, fixes issues arising from recent Windows updates and it’s only available on Windows 10 PCs only.

    Here’s how to run the troubleshooter:

    • Go to Start
    • In the search field box, type ‘Troubleshooting’ without quotes
    • Click Troubleshooting
    • Click View all in the left pane
    • Select Windows Updatedriver pnp watchdog
    • Click Next to run Windows Update Troubleshooter, then follow the instructions on the screen

    If you still cannot fix the Driver PNP Watchdog BSoD problem after running the Windows Update troubleshooter, you may consider resetting your Windows 10 PC.

    7. Update system drivers

    Outdated system drivers can cause system errors and most especially Driver PNP Watchdog BSoD errors. Moreover, Driver PNP Watchdog error is related to ‘driver’; therefore, you may have to update all your system drivers without using Windows Update. This is because Driver PNP Watchdog BSoD problem emerges while running Windows Update.

    To cut a long story short, you need to use third-party programs to update your ol’ system drivers. We strongly recommend a dedicated driver updater tool to automatically download all the outdated drivers on your PC. Using such a tool is time-saving and safer.

    The best driver updater software automate the whole process and come with additional optimization and restore features.

    8. Reset this PC

    This is an advanced recovery option that reinstates your PC to its factory state. Here’s how to reset your Windows 10 PC:

    1. Hard power off your PC 3 times until the Advanced Recovery environment appears.
    2. Choose Advanced options.
    3. Now, select Troubleshoot.
    4. Hence, Click Reset this PC.
    5. Choose whether you want to keep or delete your files and apps.
    6. Click Reset to proceed

    9. Rerun Windows Update

    There are instances where Windows Update process is halted or disrupted by the background process causing Driver PNP Watchdog BSoD problem.

    Therefore, we recommend that you rerun the Windows update. In order to do this, restart your PC after getting Driver PNP Watchdog BSoD error, ensure your PC is connected to an uninterrupted power source before proceeding with Windows Update.

    Follow these steps to run Windows update:

    • Go to Start>type ‘settings’ > launch Settings.
    • Go to the Update & Security menu.driver pnp watchdog
    • In the Windows Update window, check for updates and install the available updates.
    • After the update is complete, restart your Windows PC.

    In conclusion, all of the solutions we mentioned above can potentially fix the Driver PNP Watchdog BSoD problem. Therefore, if you have any questions concerning the solutions we mentioned above. Let us know by commenting below.

    You can see our troubleshooting BSoDs sections for articles on other error codes that show when a Blue Screen of Death is displayed.

    Make sure to visit the great Windows 10 Errors Hub for guides and troubleshooter on anything related to the latest Windows operating system.

    Minecraft Keeps Crashing Windows 10: Why & How to Fix

    Minecraft is still one of the most popular games in the world, played by millions daily. However, you can’t expect such a huge game to work flawlessly for everyone, as some users complain that Minecraft keeps crashing on Windows 10.

    In this guide, we will show you the easy ways to fix this issue and restore normalcy to your game.

    Why does my Minecraft keep crashing?

    Listed below are some of the reasons Minecraft keeps crashing on your Windows 10 PC:

    • Outdated drivers: Your graphics card drivers play an important role in the smooth running of your games. If the drivers are outdated, they can cause your games to crash. The solution to this is to update your drivers to the latest version.
    • Outdated operating system: Sometimes, the problem might be because of an outdated operating system. In this case, you need to update your PC to the latest version.
    • Faulty updates: If you started noticing this issue after updating your PC, it might be because of issues with the update. Uninstalling your updates should fix this for good.

    How can I solve Minecraft crashing problems in Windows 10?

    1. Update graphics card drivers

    1. Press the Windows key + X and select the Device Manager option.
      device manager
    2. Double-click the Display adapters option and right-click the device there.
    3. Now, select the Update driver option.
      update driver minecraft keeps crashing windows 10
    4. Finally, choose Search automatically for drivers and install any available updates.
      search auto

    When it comes to your hardware, the most common reason Minecraft crashes your Windows 10 PC is an outdated graphics driver. Given the circumstances, updating your graphics card driver is the most obvious workaround.

    If you cannot get the latest drivers following the steps above, you can download them from the manufacturer’s website. If you don’t know how to do that, we strongly recommend Outbyte Driver Updater.

    That’s a lightweight tool known to download all the outdated drivers on your personal computer automatically.

    Moreover, do note that Outbyte Driver Updater scans for updates as your antivirus scans for threats. This tool will keep your system safe as you can manually download and install the wrong driver version.

    Outbyte Driver Updater

    Update your graphics card driver to the latest version and solve Minecraft crashes! Outbyte Driver Updater is up for the task!
    Free Trial Download Now

    2. Update Windows

    1. Press the Windows key + I and select Update & Security.
      update and minecraft keeps crashing windows 10
    2. Click the Check for updates button.
      check for
    3. Finally, download and install all available updates, including the optional ones.

    Windows 10 is a tricky platform. As much as it’s optimized for gaming, you’re dependent on constant updates for the system.

    Hence, if Minecraft keeps crashing on Windows 10, you should update and restart your PC.

    3. Update Minecraft

    If updating Windows didn’t help, you may as well try to update the game itself. In fact, this is a more common solution, as various versions of Minecraft tend to give some headaches to players.

    And what’s broken in the current version can easily be fixed in the next one.

    To update Minecraft, go to the Microsoft Store, and check for updates. If you have the win32 version, you can check for updates in-game.

    4. Roll back updates

    1. Press the Windows key + I to open the Settings app and select Updates & Security.
      update and minecraft keeps crashing windows 10
    2. Select View update history.
      view update minecraft keeps crashing windows 10
    3. Now, click the Uninstall updates option.
      uninstall updates
    4. Next, right-click the latest update installed on your computer and select Uninstall.
      uninstall minecraft keeps crashing windows 10
    5. Finally, follow the onscreen instructions to complete the process and restart your computer.

    In some cases, Minecraft might be crashing your Windows 10 PC because of a recent update. This can be due to bugs in the update or incompatibility issues.

    The quickest way around this is to uninstall the update and restart your PC.

    5. Make sure Java is installed

    Java is essential for running Minecraft (and many other apps and games) on your computer. If you don’t have Java installed on your computer, you won’t even be able to run the game.

    So, make sure you have it. If Java is not installed on your computer, you can download it free from the official Java website.

    6. Update Java

    1. Press the Windows key + S, type configure java, and open Configure Java.
    2. Go to the Update tab.
    3. Finally, click the Update Now button.
      update now

    Even if you have Java installed on your computer, there’s a chance something will go wrong if you use an outdated version. This might be the reason Minecraft keeps crashing on Windows 10.

    7. Use the SFC scan

    1. Press the Windows key, type cmd, and select Run as administrator under Command Prompt.
      cmd
    2. Type the command below and hit Enter: sfc/scannowsfc scan
    3. Finally, wait for the command to finish running and restart your PC.

    Corrupt system files can be the reason Minecraft keeps crashing on Windows 10. Fortunately, Windows has a built-in tool that can be used for this purpose, which you can use by running the command above.

    8. Try DISM

    1. Press the Windows key + X, type cmd, and select Run as administrator under Command Prompt.
      cmd admin
    2. Type the command below and hit Enter: DISM.exe/Online /Cleanup-image /Restorehealthdism restore minecraft keeps crashing windows 10
    3. If the DISM can’t obtain files online, try using your USB or DVD installation. Insert media and type the following command: DISM.exe /Online /Cleanup-Image /RestoreHealth /Source:C:RepairSourceWindows /LimitAccessdism restore
    4. Be sure to replace the C:RepairSourceWindows path of your DVD or USB.
    5. Finally, wait for the command to finish running and restart your PC.

    In some cases, running the SFC scan might not fix the Minecraft keeps crashing on Windows 10 issue. To fix this, you must run the DISM scan and repeat the SFC process afterward.

    9. Reset winstock

    1. Launch Command Prompt as admin.
    2. Now, type the following commands and press Enter after each: netsh winsock resetwinstock minecraft keeps crashing windows 10 netsh int ip resetint ip
    3. If the commands above do not work, type the ones below and press Enter after each of them: ipconfig /release ipconfig /flushdns ipconfig /renew
    4. Finally, wait for the commands to finish running and restart your PC.

    Users reported that this solution usually fixes issues with IP configuration problems, but remember that if you use a static IP address, you’ll have to set it again. This should fix the Minecraft crashing Windows 10 issue.

    10. Uninstall suspicious Mods

    And finally, since Minecraft Mods are very popular, make sure none of that does damage to your game. And if there are any troublesome Mods, the logical solution is to delete them.

    That’s about it; we certainly hope at least one of these solutions helped you deal with the Minecraft keeps crashing on Windows 10 issue.

    In the same vein, if other games like PUBG keeps crashing your PC, check our detailed guide to fix it convincingly.

    If you have any questions or suggestions, let us know in the comments below.

    Fix: Laptop Not Detecting My Wi-Fi But Detecting Others

    Is your laptop not detecting your Wi-Fi but detecting others? This is a common issue, but don’t worry. While it can seem like a real hassle, it’s often easy to fix.

    Whether the problem stems from faulty router settings, software glitches, or Windows configurations, we’ll walk you through all steps necessary to quickly fix it.

    How to fix laptop not detecting WiFi

    1. Update your WiFi drivers and install the WiFi software

    1. Open Device Manager by typing its name in the Search bar.
    2. Open the Network Adapters list by double-clicking it or clicking the little arrow in front of it. 
    3. Locate your Wi-Fi adapter and right-click on it, then select Update Driver. 
    4. Select Automatically search for drivers if you want the wizard to find your required drivers online automatically.
      • If you prefer to download them yourself, make sure you get them from the official website of your device manufacturer, then proceed with the above-listed steps, but select Browse my computer for drivers for Step 5.
    5. Proceed with the update. If your drivers are already up to date, a message prompt will let you know just that. 

    2. Use Command Prompt

    1. Type command prompt in Windows search and click on Run as administrator to start Command Prompt with full administrative rights.Cmd - Run as administartor
    2. Now run the following commands:
      • reg delete HKCRCLSID{988248f3-a1ad-49bf-9170-676cbbc36ba3} /va /f
      • netcfg -v -u dni_dne

    3. Check if the required services are running

    1. Press Windows Key + R to open the Run dialog.
    2. Now enter services.msc and press Enter or click OK.
      services run window home network not avaialble
    3. Now you need to pay close attention to the following services:
      • Windows EventLog
      • Remote Procedure Call (RPC)
      • Windows Update
    4. Make sure that all of these services are properly running. If any of these services aren’t running, right-click that service and choose Start from the menu.

    4. Enable Wi-Fi network

    1. Open the Settings app by pressing Windows + I.
    2. Click the Network & Internet section.
      network settings wi-fi not available
    3. In the right pane, scroll down and click on Network and Sharing Center.
      network and sharing center wi-fi adapter not working
    4. When Network and Sharing Center window opens, click the Change adapter settings.
      network adapters wi-fi network not working
    5. Locate your Wi-Fi connection, right-click it, and choose Enable.
      home network won't show

    5. Make sure that you have the latest updates installed

    1. Open the Settings app by pressing Windows + I.
    2. Now head over to the Update & Security section.
      update and security home network won't show
    3. In the right pane, click the Check for updates button.
      check for updates wifi not available

    6. Select a Property

    1. On your keyboard, press Windows key + X and select Device Manager.
      home network won't show
    2. Expand Network adapters, right-click on your Wi-Fi driver, and select Properties.
      home network won't show
    3. Click on the Advanced tab.
    4. Depending on your router, select a Property; in most cases, it will be one of the 802 properties on the list of Properties; make sure that the value is not disabled.
      home network won't show

    As you can see, network and Internet issues may be inconvenient, but you should be able to fix them using one of our solutions.

    If the laptop won’t connect to Wi-Fi but other devices will, we also have a guide that can help you fix that, so don’t miss it.

    Tell us in the comments below what has worked best for you.

    6 Fixes for Laptop Microphone Not Working [Built-in Mics]

    Several users have complained about microphone issues on Windows 10 devices, so, like always; we prepared a comprehensive guide to help them and yourself.

    If your Windows 10 device presents this problem, this guide will help you fix your microphone. There are a few steps to do if the built-in mic is not working, but rest assured, they are easy and effective.

    Why is my built-in microphone not working?

    There are a lot of causes why the built-in microphone is not working. The most common of them is a corrupted driver. However, you should also check if the mic is muted or if the app you’re using it has enough permissions.

    Here are some of the most common iterations of these problems, and for some of them, we already have comprehensive solutions:

    Here are a few methods for you to try, but before you start, if you have more than one audio port, try plugging your microphone in a different one and try it.

    How do I turn my microphone back on my laptop?

    1. Set your microphone as default

      1. Right-click on the volume icon and select Recording Devices.
    1. 2. In the window that opens, select the device which has the status Ready.

    2. 3. Click on the Set Default from the bottom of the window.

    3. 4. If you’ve done this correctly you should see the green mark on the correct microphone and audio level reacting to sound.

    To check if your microphone is set to the default value, you must check it from the Recording tab. To access this option, follow the steps above.

    This quick fix is usually all you need, and your microphone should work properly now.

    2. Use the Audio troubleshooter

    fix built-in microphone windows 10
    1. Open Windows Search using the Windows key + S combination, type troubleshooting in the box, and select the utility from the results.
    2. The Troubleshooting window will now open. From the left menu, select View All.
    3. From the list that opens, select Recording Audio, and a new window will open.
    4. Follow the steps of the troubleshooter and apply the fixes that are provided.

    If the first method did not fix your problem, then you should use the Windows audio troubleshooter, which might be of help in some cases. To do this, go through the steps above.

    Windows 10 offers a series of dedicated troubleshooters that you can use to fix microphone issues.

    To run these troubleshooters, go to Settings, click on Update & Security, then click on Troubleshoot and select and run the following troubleshooters: Playing Audio, Recording Audio, and Speech.

    If the issue affects your headset, you can run the Hardware and Devices troubleshooter.

    Granted that this isn’t as quick as the first method, the troubleshooting utility might provide the solution if your microphone isn’t working on your Windows 10 device.

    3. Update Audio Drivers

    1. Right-click the Start button and select Device Manager.
    2. Locate your audio device in the list, right-click it and select Properties.
    3. In the window that opens, select the Driver tab and click on Update Driver.
    4. Instruct the wizard to search on the Internet for a suitable driver and let it install the updates it finds (if any).

    The third time’s a charm, right? If both of the methods above have failed, you might want to update your audio drivers, which might help if there is a problem with the installed drivers.

    There are two methods of doing this, and we suggest you try them both. For the manual update, you can use the steps above.

    If the default driver update utility does not find an update, visit the website of your sound card manufacturer and download from there the latest driver.

    Install the driver, and that should fix your problem. Additionally, if none of the solutions are working, try the microphone (if you have a headset with a microphone) on a different computer.

    We also recommend the tool below to download all the outdated drivers on your PC automatically.

    This recommended solution can repair and update your drivers in just one go and just a few clicks. Don’t worry because it’s very simple to use.

    Outbyte Driver Updater

    Upkeep your drivers and fight off any corruption that prevents your microphone from working!
    Free trial Download now

    4. Enable app access to the microphone

    1. Click the Windows button and select Settings.
    2. Now, go to Privacy.
    3. Scroll down and select Microphone from the left, then check the option Allow apps to access your microphone.

    If you’re running Windows 10 and noticed the built-in microphone is not working with particular apps and programs, ensure that the respective software can access your microphone.

    The OS automatically blocks app access to your microphone due to privacy concerns. Luckily, we have a full guide on how to bypass the mic cam access issues.

    5. Disable audio enhancements

    1. Click the Start button and choose Settings.
    2. Now, click on Apps.
    3. Look for the audio enhancement app you installed recently, click on it, and hit the Uninstall button (The app shown in the image is just an example).

    Audio enhancement software can help you improve the overall sound quality on your Windows 10 computer, but sometimes these programs can cause more harm than good and bring up issues like static noise in your microphone.

    If your built-in laptop microphone stopped working after you installed or updated an audio enhancement software, try disabling it to see if this solves the problem.

    6. Reset Windows Audio Service

    1. Go to Search, type services.msc, and hit Enter to launch the Services page.
    2. Locate the Windows Audio service.
    3. Right-click on it and select Start if the service is not enabled. If it’s enabled, then select Restart.reset windows audio service
    4. Wait for a few seconds and restart your computer.

    We hope our solutions helped you fix the internal microphone issues, and you can now communicate without any problems.

    You might also be interested in reading our guide on what to do if the microphone level is too low. We also have a guide on what to do if microphone is not showing up in Device Manager, so don’t miss it.

    If you have any other suggestions or questions, comment below, and we will get back to you as soon as possible.

    How to Set Different Wallpapers on Dual Monitors Windows 11

    Windows 11 has dedicated a lot of effort to offer an unmatched desktop visual experience. Customization is unparalleled even on a dual-screen setup. If you want to know how to set different wallpapers on dual monitors in Windows 11, you’re in the right place.

    Now, you can easily add multiple monitors to enhance productivity, and increase comfort. Such displays are great if you are dealing with a lot of content on your computer.

    Tasks are both easier and faster to perform with multiple monitors because you can do them in parallel.

    In addition, it makes life easier for your eyes because you don’t have to keep switching your gaze from one display to another.

    Can I put 2 different wallpapers on dual monitors?

    Most people use dual-monitor setups for gaming, entertainment, or work. But what if you want to use wallpaper on your Windows 11 PC? The big question is how will the double monitor setup impact that decision.

    You’ll be pleased to know that you can set a different wallpaper on each monitor, stretch a wallpaper across two monitors in Windows 11, or simply set up live wallpapers on Windows 11.

    You can even use wallpapers for dual monitors with different resolutions.

    In our guide today, we will show you how to set different wallpapers on dual monitors in Windows 11.

    How do I set different wallpapers on dual monitors Windows 11?

    1. Use the Settings app

    1. Press the Windows + I keys at the same time to open the Settings window.
    2. Navigate to the Personalization tab.
    3. Go to Background and select Personalize your background to open the drop-down menu.
    4. Click on the Browse photos button and select the desired wallpaper for your first monitor. browse pc for photos
    5. The chosen picture will show up in the Recent images section. Right-click on it and select Set for monitor 1. set dual screen wallpaper windows 11 option
    6. Repeat the process for the other monitor.

    Lots of users prefer to set a different wallpaper on each monitor on Windows 11. The OS is very customizable and allows you to easily do this via Settings.

    This is also how you can change the wallpaper on a second monitor in Windows 11. Now, if you want to set the same wallpaper, simply select the option Set for all monitors at the end of the procedure described here.

    2. Copy files to the Windows directory

    1. Locate the images you want to use as a background, select both of them, and click on Copy.
    2. Navigate to: C:Windows/Web/Wallpaper/Windows
    3. Right-click and select Paste from the menu.
    4. Select the checkbox for Do this for all current items and click on Continue.
    5. Select your preferred images and right-click to select Set for monitor 1 or Set for monitor 2 from the menu.
    6. Restart your device to effect the changes.

    3. Use the Run command dialog

    1. Press the Windows + R keys simultaneously to open the Run window.
    2. Enter the following command in the dialog box:shell:::{ED834ED6-4B5A-4bfe-8F11-A626DCB6A921} -Microsoft.PersonalizationpageWallpaper
    3. Click on Desktop Background.
    4. Select your desired wallpaper, right-click on it, and select Set for monitor 1 or Set for monitor 2.
    5. Restart your device for the changes to take effect.

    How can I stretch my wallpaper across two monitors in Windows 11?

    At times, you may want your wallpaper to extend across all your monitors for a more uniform and seamless look. Here are the steps you should follow:

    1. Press the Windows + I keys simultaneously to open Settings.
    2. Select System and click on Display.
    3. Click the Advanced display button to open the drop-down menu.
    4. Select Extend and both monitors will have the extended wallpaper.

    Can’t set different backgrounds for dual monitors Windows 11

    While using a different background per monitor is not complicated in theory, occasional faults can happen. Some users struggle with Set for monitor 1 missing scenarios.

    Others cannot seem to master wallpapers for dual monitors with different resolutions. Whatever the situation, if you can’t set different backgrounds for dual monitors in Windows 11, we have a few tips:

    1. Use the Windows + TAB shortcut on your keyboard.
    2. Locate the desktop icons at the bottom of your screen.
    3. Make sure you only keep Desktop 1 and close all the others.
    Note icon NOTE
    You won’t be able to set different wallpapers on your Windows 11 dual monitors if they are mirrored.

    Now, we’ve already seen how you can stretch a wallpaper across two monitors in Windows 11. But what if your screens have different resolutions?

    Wallpapers for dual monitors with different resolutions

    You can set up different resolutions on each monitor if you are using the screens for different activities. While perfect alignment is not tangible, there is a trick you can try to match your background to your dual desktop setup.

    1. Get the resolution details from each of your screens and sum up the widths. This will be your cumulative resolution.
    2. Next, tweak the image so that its resolution matches that of your monitors.
    3. Save the newly modified picture on your PC and use the Settings app to set up the wallpaper just as indicated in our first solution.

    To fully enjoy the benefits of this setup and get the most out of it, consider trying a dual monitor customization software and ease the process of managing multiple screens.

    If you were looking for ways to different wallpapers on dual monitors in Windows 11, we hope this guide provided you with the answers you need.

    PC Games to Play When Bored [18 Cool Titles]

    If you’re looking for some good games to play when bored on a computer but can’t decide on which one to grab, we’ll give you a helping hand.

    In this article, we’ll list a series of random games to play when you’re bored, including action games, strategy games, drawing games, puzzles, and even some other simple games that can’t even be categorized. Read on to find out more!

    What to play when bored on PC?

    Clustertruck

    The Clustertruck platform game was created by the independent Swedish firm Landfall Games and released by tinyBuild. On September 27, 2016, it was made available for Windows, Linux, macOS, Xbox One, and PlayStation 4.

    Before exploring this game any further, you must note that it is not free, and at the time of writing this article, it would cost about $14.99. That said, we love it for so many other reasons. First, it very well satisfies lovers of racing games and speed.

    You will need to race through multiple obstacles of varying difficulty. While the first-person viewpoint it offers may initially seem discouraging, the physics are so well done that it becomes less of a bother as you play. Heads up! Be prepared to die multiple times as you start the game.

    This is almost inevitable for newbies and is one of the reasons why it keeps you glued to your seat. On the downside, the opening world may be underwhelming, but as soon as you get past it, it becomes much more fun. You should give it a try!

    ⇒ Play Clustertruck

    Crossy Road

    Have you found the answer to the old joke, ‘Why did the chicken cross the road?‘ We think we might have, and the answer is: out of boredom!

    This colorful game, although very simple and straightforward with blocky graphics, still makes a very fun option when you’re not in the mood to play any complex and demanding games.

    As you might have expected, you play as a chicken who not only tries to pass the road without getting crushed by cars and trucks but also picks up coins along the way.

    Advancing in this game, you realize that the coins you gather can also improve the way you can explore this virtual world, so make sure to pick them all up!

    HearthStone

    HearthStone is a very engaging and competitive card game initially launched in 2014, which offers gamers a way to spend a few hours of their time every session.

    One of the most important elements in this game, besides the variety of characters, powers, and animations, is the complexity of every situation and the high probability of being amazed at the results.

    If you’ve ever played this game, you know that at any point, you could be hit by three Arcane Missiles no matter your defense, or lose a game that you thought was already won.

    The excitement of getting various cards and that one simple mistake or running out of luck can cause you to lose the match, makes this game a go-to option when feeling bored.

    Added to this, you can also earn new cards through playing, or investing in card packs which will surely give you an edge against your opponents.

    You can choose to play online in 1v1 matches which also involve ranking, try the casual mode for a more worry-free environment, and even play against a friend.

    ⇒ Download HearthStone via Battle.net

    Line Rider

    Line Rider may be one of your first calls if you want to play a JavaScript or Windows internet game. Boštjan Čadež created it in 2006, and after featuring it on DeviantArt, it took the internet by storm.

    This game looks basic but is truly very entertaining. You would have to draw a couple of lines using your mouse and watch the young animated character slide through when you press the play button.

    We love this game because it tests your ability to create smooth, easy-to-follow tracks with your mouse movements. You aim to keep the young character on track for as long as possible, and it is quite an exciting way to stay engaged and pass some free time.

    Lastly, it would not matter what browser you use, as the game is made to be compatible with almost all the available browsers. So, simply get connected to the internet, fire up your browser and play away.

    ⇒ Play Line Rider

    Cookie Clicker

    A cookie is the central theme of the incremental clicking game Cookie Clicker. The game starts off rather slow as you click toward automation and beyond.

    Early on, you may still profit by clicking the cookie as quickly as possible. Still, ultimately, your automation and improvements should relieve some pressure on your fingers so you can enjoy the moment.

    The game is genuinely intriguing since there’s more to it than first seems. There are a lot more events and attention-grabbing features than merely clicking to acquire buildings, make some renovations, and move on.

    There are other aspects nearby that are just as entertaining and potentially lucrative as the news ticker positioned at the screen top.

    A bonus for the Steam version depends on the number of other people also using it. This implies that, provided you have the unlockable content, and the game is sufficiently well-liked on Steam at the time you play, you will get yet another set of cookie production bonuses.

    Additionally, you have the option of ascending and resetting your progress in favor of chips of prestige and heavenly chips, which provide benefits and advantages.

    ⇒ Play Cookie Clicker

    Marvel Snap

    For those of you who are fans of the Marvel universe, this is the perfect game! You can throw your favorite Marvel superheroes in battles to death while using cunning strategies and focusing on the powers of each character.

    This online card game offers countless hours of fun. It allows you to understand the abilities and shortcomings of every hero you engage with, while also ensuring that your boredom doesn’t take charge entirely.

    With almost unlimited effects, powers, and interactions, this game will keep you on your toes.

    You can create your perfect Avengers crew and fight immersive battles in well-known places like the Stark Tower, Daily Bugle, or Central Park.

    As your card deck is formed out of 12 cards and doesn’t include duplicates, you can get the hang of it quickly and learn how to use your energy wisely to reach your goals.

    Each card pulled from the deck is revealed, and thus the effects of that card are presented, ensuring that you not only will go through the thrill of battle but experience surprises at every turn.

    ⇒ Play Marvel Snap on Steam

    Fall Guys

    Fall Guys is a battle royale-style party game developed by Mediatonic and published by Devolver Digital. The game features colorful, bean-like characters known as Fall Guys, and they compete in obstacle course-style minigames to be the last ones standing.

    The game has been well-received by critics and players alike for its fun and fast-paced gameplay and its charming and humorous presentation. We love it because of its variety of minigames, which range from simple obstacle courses to more complex challenges that require precise timing and quick reflexes.

    The game also features randomized elements, such as the course layout or the inclusion of certain obstacles, which helps keep each round feeling fresh and unpredictable. Another aspect of the game that we admire is its accessibility.

    The controls are simple and easy to pick up, and the game features various customization options for players to customize their Fall Guys characters. The game also features a well-designed online multiplayer system, which allows players to compete against each other in real-time.

    Furthermore, the servers are stable, and the matchmaking process is quick and efficient. In all, it is a fun and engaging party game that is well-suited for both casual and hardcore players and is a great game to play with friends or family.

    ⇒ Play Fall Guys

    Quick Draw

    If you are fascinated by AI, this is a game for you. You will be given the word and asked to sketch it, and while you trace it, the AI will try to deduce what you are attempting to draw.

    The game goes in rounds of 6, and the aim is to draw representations close enough to the words you are given so that the AI makes a correct guess before 20 seconds.

    It is a fascinating game, and you will go from drawing easy tasks, like a zig-zag, to more complex ones, like an entire train. We also love it because the controls are simple.

    So all you need is to arm yourself with a mouse, and you are good to go. Play and see how many drawing the AI can guess correctly.

    ⇒ Play Quick Draw

    Enter the Gungeon

    Here is another fun one to pass some time. Enter the Gungeon was developed by Dodge Roll, and released on April 5, 2016, and since its release, it has become a massive hit among gamers online.

    Enter the Gungeon takes the dungeons of The Legend of Zelda and blends them with the action sequences and complexity of Nuclear Throne. You will attempt to get a gun that can kill your past by entering the Gungeon while playing as one of four characters, each with its own unique loadout.

    Along the journey, you’ll come across many similarly adorable but dangerous foes with gun and bullet themes. Blow them away with a variety of outrageous weapons. Whether you play with a gamepad or a keyboard and mouse, the gunplay is flawless and feels tight and polished.

    You will repeatedly visit the Gungeon in this rogue-like game to earn new weapons and skills. Fortunately, since the dungeons are produced randomly, the repetition never seems too much. Over 200 weapons are available, several different monsters to confront, and many exceptionally well-kept secrets exist.

    Before many weapons emerge, you must buy them using in-game money that bosses drop.

    However, before you can accomplish that, you’ll need to free several prisoners who have taken up residence either within the actual Gungeon or close to the entrance, known as the Breach.

    ⇒ Play Enter The Gungeon on Steam

    Factorio

    Factorio is a factory construction and survival game like no other, offering you a wide range of buildings, soldiers, and layouts which will be more than enough to keep you occupied for the next couple of hours.

    Even though it is a game with simple graphics, and a simple premise, diving deep into this game will involve an immense array of variations and elements to understand.

    When it comes to the premise. it seems pretty simple: you crashed onto an alien planet and need to develop the infrastructure to build a rocket to leave this planet and return home. That being said, you are not the only one inhabiting this planet, so ‘dealing with the locals’ will involve fighting various critters of various sizes and skill sets.

    To reach your goal, you will have to expand the surface and complexity of the factory, so conquering new land is an everyday task you simply must complete, indifferent to the consequences to the inhabitants of this alien world.

    Chuzzle Deluxe

    If you’re a fan of puzzle games, then you might be already familiar with the Chuzzle series. The first thing you’ll notice about this game is its colorful interface and great music.

    Your goal in this game is to combine three or more Chuzzles to clear them. After you combine enough of them, you’ll advance to the next level.

    The game also features some powerups, so you might get Chuzzles that explode after you combine them. There are also giant Chuzzles available that take up four spaces. However, as you progress, certain rows will become locked, so you won’t be able to move them unless you destroy the lock.

    But even if you have no moves left, you can scramble the board twice before the game ends. It’s worth mentioning that the game has four different modes and tens of achievements, so it will provide you with hours of fun.

    Chuzzle is a great puzzle game, with colorful graphics, a great soundtrack, and cute sound effects, so it’s worth trying out.

    ⇒ Play Chuzzle Deluxe on Steam

    A Dark Room

    A Dark Room is as simple as a game can be in design, as the entire story is built gradually by simple lines of text and audio effects.

    Don’t let the simple appearance fool you, though, as the complexity of the story is far beyond what it would seem like at first glance.

    You have a few simple commands to use at a given time, and every one of those decisions impacts the storyline.

    Explore this simple text world and try to stay alive while experiencing the sound effects, which will surely provide you with a more immersive experience than without them.

    ⇒ Play A Dark Room

    Stardew Valley

    If you’re looking for a stress-free simulation game that you can play for hours, you can’t go wrong with Stardew Valley. This is a farming simulator adventure game, and your goal is to establish a farm and explore the world.

    You can plant all sorts of crops, but you must take care of them if you want them to grow properly. The game allows you to decorate your farm any way you want, and you can build buildings, farm crops, or raise animals.

    During your gameplay, you’ll meet a cast of friendly and interesting characters and explore the world while fighting various enemies. The game has an extensive crafting system, allowing you to make different foods, clothes, and other items. The best thing about the game is that you can play it any way you want.

    You can choose to explore the world and fight monsters, or you can work on your farm, and customize it how you want. There are no time limits, so you can enjoy the game at your own pace.

    The game is surprisingly complex, and it will take you tens of hours until you reach the endgame and even more if you want to achieve 100% completion. Stardew Valley is a unique game, with great graphics, a complex crafting system, and interesting characters, so it’s worth checking out.

    ⇒ Play Stardew Valley on Steam

    Color Pipes

    Puzzle games are fun, and if you need a game that will test you to the limits, then Color Pipes is the right one for you.

    The game’s premise is pretty simple, you have a board with several differently colored circles. Your goal is to connect the circles of the same color with a line.

    However, lines can’t go one over another, so you’ll need to plan the best route to connect all the dots carefully. While the game sounds simple, the puzzles can get pretty challenging, so the game will keep you occupied for days until you manage to solve them all.

    There are 5 difficulty levels and 24 different puzzles for each level, which will put to the test even veteran puzzle players. If you love puzzles and you’re looking for a challenging game, Color Pipes is worth checking out.

    ⇒ Play Color Pipes

    Wordle

    Probably one of the most recent additions that took the web by storm is Wordle. In this game, you need to guess the given five-letter word.

    Simply enter your word, and if the letters match their position, they’ll be colored green. In case letters are available in the given word, but it’s not in the correct position, they will be yellow.

    The game’s premise is pretty simple, but it’s harder than it looks. You only have six tries, so you must make sure that each of your tries matters and guess at least a couple of letters.

    After the six tries, the game is over. It’s important to mention that there’s only one word given per day, so you can’t solve multiple puzzles daily.

    Overall, it’s an exciting game, and perfect to play if you want a quick puzzle game. The game is completely free, so go ahead and give it a try.

    ⇒ Play Wordle

    Slither.io

    If you like online games, and you are a fan of the Snake games, Slither.io is a must-try. The game is pretty simple, you control the snake and eat the light circles on the map to grow.

    The more you eat, the more you grow, but the same goes for other players. The game’s goal is to be the last snake standing, and you win by causing other players to collide with your body.

    The movement is simple, and you move automatically by pointing your cursor. You can also use the Space key to gain boost, but keep in mind that using boost will cause you to lose length, so use it only when necessary.

    It’s worth mentioning that you can choose one of many available skins for your snake, and you can even create one from scratch if you wish to do so.

    Overall, this is a fun and simple game that you can play in your browser, so be sure to give it a try.

    ⇒ Play Slither.io

    The Wiki Game

    Wikipedia is a great source of information, but did you know there’s also a Wikipedia game? That’s right, and in it, you need to traverse from a random starting article to another random within a 2-minute time limit.

    To navigate through the articles, you can only utilize the links that are available in the current article. This doesn’t seem too complicated at first, but it can get challenging depending on the random articles you get.

    The game requires you to have basic knowledge in order to connect the two articles, so certain rounds can be harder than others.

    After the round, a new set of articles is determined, and the game starts again. This is an interesting concept, and it’s a great game if you like reading Wikipedia and learning.

    While playing, you’ll also compete with other players so you can see how fast you get from one term to another, so it’s a great choice if you’re feeling competitive and want to test your knowledge.

    ⇒ Play The Wiki Game

    Plants vs. Zombies

    Another classic that you must try if you haven’t already is Plants vs. Zombies. In this game, your objective is to save your home from hordes of zombies by using different plants.

    While playing the game, you collect points, and you use them to purchase new plants and place them on the map. Regarding the available plants, there are 49 plants that you can utilize any way you want.

    When it comes to zombies, there are 26 different types, and each type has unique features and abilities that pose a different challenge.

    The game has 5 different modes that you can play, including Adventure Mode, Mini Games, Puzzle Mode, Survival Mode, and Zen Garden mode.

    Overall, it’s a unique game with great graphics, interesting enemies, and power-ups, so if you want a game that will keep you invested, be sure to try it.

    ⇒ Play Plants vs. Zombies on Steam

    As you can see, there are many games to choose from for those moments when you don’t feel like playing a heavy graphics game, nor do you want to think too much about this topic.

    This list will provide you with countless hours of fun, so make sure to explore them all!

    DS4 for Windows 11: How to Download & Set up

    For those who are still unsure of what DS4Windows is or why they require this application, here is a brief explanation. The software allows you to use your PlayStation and Nintendo controllers on a Windows 11 PC by simulating a virtual DS4 controller on your computer.

    With it comes new capabilities, such as the ability to remap or rebind the keys to your preference (buttons, joysticks, keyboards, mice, and so on), as well as the ability to play far more games with your controller.

    There is no need to purchase a controller that is compatible or to restrict yourself to only using a keyboard and mouse. Take command of the situation! Remember that while it is possible to switch from Xbox to DS4 emulation, keep in mind that the vast majority of games only support gamepads.

    It is possible that your gamepad will not be identified if you switch to DS4 emulation because the game itself does not have native compatibility for controllers. Follow along as we will show you how to download the DS4Windows program on your computer, right after we see how the software works.

    Is DS4Windows safe?

    The software is a virtual emulator that may be used in conjunction with PlayStation 3 and Xbox 360 video games. It gives customers a plethora of options, including the ability to change settings fast and map controllers. It is completely safe to download and install from official websites.

    It can be infected with adware or malware, and in rare cases, it might be infected with a virus, however there is a means to determine whether or not an application is an official one.

    If you have downloaded the DS4Windows file from an unauthorized website or if you have installed it via a thumb drive or a pen drive, you should be cautious. Hackers can modify any application software from these sources to suit their needs and intentions.

    why ds4 windows 11 download

    Using the DualShock 4 PlayStation 4 controller on a PC isn’t for everyone, and we understand why. In contrast to keyboard gamers, you have chosen to live the analog life rather than submitting to the complicated hand positioning required by a mouse.

    Although there are a variety of options available, the PlayStation 4 controller has quickly become one of the team’s favorite PC gaming controllers, not least because it feels amazing in your hands.

    Despite keeping the classic shape of the controller, the new controller features more modern joysticks and triggers that are better suited to modern shooters and action games than its predecessor—though it is not as sensationally exciting as the DualSense controller found on the PlayStation 5.

    It takes a little more effort to get the DualShock 4 to operate on a PC, but Steam, the gaming community, and an official Bluetooth dongle make the process a little less difficult. In fact, if you prefer Steam as your gaming platform of choice, its integration makes it simpler to use an Xbox controller.

    How can I download DS4 for Windows 11?

    1. Use DS4Windows’s website

    1. Head to DS4Windows’s official website and click on the Download button from the top-right corner.download-ds4-official ds4 windows 11 download
    2. You will be redirected to a new window from where you can hit the Download button.download-again ds4 windows 11 download
    3. Once the ZIP folder is downloaded, head to its location, right-click on it and choose Extract All.zip-unzip ds4 windows 11 download
    4. Now access the unzipped folder and look for the executable file. Once you find it, double click on it to start the installation process. That’s it!executable-file ds4 windows 11 download

    The software’s official website is as secure as you can get. If you are afraid that you might catch viruses from any other third-party links, feel assured that you can follow their website safely.

    2. Use a third party website

    1. Head to filehonor’s link for DS4Windows and hit the Download button. download-filehonor ds4 windows 11 download
    2. Note that this version is free. From the new window, scroll down until you see the download link and click on it.download-link ds4 windows 11 download
    3. Now you will have to click on all the links under the Assets section and save them on your computer.assets ds4 windows 11 download
    4. Navigate to your files’ location, right click on the ZIP files and choose Extract All. Repeat the step for both of the ZIP files. zip-extract ds4 windows 11 download
    5. Now look for the DS4Windows executable file(.EXE) inside one of the folders and double click on it. The installation process will start automatically.

    Can I connect XBOX to my PC?

    xbox ds4 windows 11 download

    In the world of video games, Microsoft has had a long and illustrious association with them. As a result of its relationship with the PC, more than a billion people play video games on the platform.

    Meanwhile, the Xbox has maintained its position as one of the most popular video game home consoles for the past two decades, despite the fact that certain systems have received more favorable reviews than others.

    Historically, PC and console gaming were considered to be two distinct entities. The former prefers high-powered specialized machines, whilst the latter is more concerned with mass accessibility.

    Still, Microsoft, more than any other corporation, possesses a unique position as well as the motivation and drive to close the gap.

    The latest iteration of Windows, Windows 11, may not fully integrate all aspects of gaming into the long-awaited singularity, but it is Microsoft’s most gaming-friendly operating system yet. It essentially transforms your PC into an Xbox, erasing the distinction between the two systems.

    When you turn on your computer, you’ll be able to access a slew of impressive gaming features. Microsoft’s formerly independent Xbox PC application is now included with Windows 11.

    Everyone who has the Xbox program installed on their computer may sync their credentials with the PC, form groups, communicate with their friends, listen to music, customize their avatars, and keep track of their achievements.

    With the Game Bar program, you can take amusing screenshots and amazing movies, as well as keep track of the overall performance of your computer. The Xbox app, in addition to providing useful auxiliary functions, provides compelling reasons to make your PC your primary gaming platform.

    For further information and solutions to a possible error you might face, take a look at our guide on how to fix DS4Windows controller connection in Windows 10/11.

    Alternatively, another common error is users rendered unable to sign in to Xbox account in Windows 10/11, to which we have responded with a thorough article on the issue at hand.

    And lastly, if you encounter bugs while trying to download games from the XBOX Game Pass, we recommend that you head to our post in order to learn how to fix it.

    Was this guide helpful for you? Don’t hesitate to let us know in the comments section below. Thanks for reading!

    KB5022358: Everything you need to know about this Beta Channel build

    After presenting the latest Dev Channel build and the cumulative update (KB5022360) that users of the stable version received, it’s time to turn to the Beta Insider Channel.

    Keep in mind that KB5022360 will also bump your Windows 11 version from 21H2 to version 22H2. We also recommend you check out the issues that Windows 11 version 22H2 users are still struggling with.

    We’ve also provided a detailed preview of the changes that Microsoft is preparing for File Explorer, so make sure you take a quick peek.

    Circling back to the Beta Channel, Insiders will be pretty pleased with what the Redmond-based tech giant has provided before the weekend.

    What should I expect from builds 22621.1245 and 22623.1245?

    As we’ve got accustomed to by now, Microsoft released twin builds, in the form of 22621.1245 and 22623.1245 (KB5022358) to the Beta Channel for Windows 11 Insiders.

    Just like usual, build 22623.1245 comes with new features rolling out, while build 22621.1245 has new features off by default.

    The only change is that Microsoft is beginning to roll out screen recording in Snipping Tool to Windows Insiders in the Beta Channel.

    And, as part of the most recent Snipping Tool update, the tech giant also added the ability to pause while recording and you should notice improved performance and reliability.

    The rest of the changelog is just your boilerplate stuff, fixes to some of the issues that were still affecting OS performance. Let’s take a closer look.

    Fixes in Build 22623.1245

    [Taskbar & System Tray]

    • Fixed a high hitting ShellExperienceHost crash related to interacting with Quick Settings.

    [Task Manager]

    • Fixed a few issues causing Task Manager crashes.
    • You now shouldn’t have to make Task Manager be as wide before the navigation pane appears.
    • If text scaling has been increased, the search box shouldn’t overlap with the title bar text anymore.
    • Made some tweaks to address cases where text in dialogs was getting cut off when text scaling was increased.
    • Fixes an issue where certain parts of the title bar couldn’t be used to drag the window.

    Fixes for BOTH Build 22621.1245 & Build 22623.1245

    • This update changed the experience for preview .NET Framework updates. After you installed this update, all future preview (optional) .NET Framework updates would be displayed on the Settings > Windows Update > Advanced options > Optional updates On that page, you could control which optional updates you wanted to install.
    • Fixed an issue that affected the ReFS. The issue caused high nonpaged pool usage, which depleted system memory.
    • Fixed an issue that affected copying from a network to a local drive. Copying was slower than expected for some users.
    • Fixed an issue that caused Windows Server 2022 domain controllers (DC) to stop responding. This occurred when they processed Lightweight Directory Access Protocol (LDAP) requests.
    • Fixed an issue that affected a Group Policy for Expanded Toasts.
    • Fixed an issue that might have occurred when the Input Method Editor (IME) was active. Applications might have stopped responding when you used the mouse and keyboard at the same time.
    • Fixed an issue that affected conhost.exe. It stopped responding.
    • Fixed a resource conflict issue between two or more threads (known as a deadlock). This deadlock affected COM+ applications.
    • Fixed an issue that affected devices that are subject to Microsoft Exploit Protection Export Address Filtering (EAF). Some applications stopped responding or did not open. These included Microsoft Office and Adobe Reader.
    • Fixed an issue that stopped you from searching for a file based on the file’s contents.
    • Fixed an issue that affected searchindexer.exe. It randomly stopped you from signing in or signing out.
    • Fixed an issue that might have occurred when you converted or reconverted Japanese Kanji using a multibyte character set (MBCS) app. The cursor might have moved to the wrong location when you typed.
    • Vhanged how you enabled the Windows diagnostic data processor configuration in preparation for EU Data Boundary To learn more, see Enable Windows diagnostic data processor configuration.
    • Fixed an issue that affected mstsc.exe. It stopped responding while connecting to a RemoteApp and Desktop Connection.
    • Fixed an issue that might have affected FindWindow() or FindWindowEx(). They might have returned the wrong window handle.
    • Fixed an issue that affected picture files you found using search on the taskbar. This issue stopped you from opening those pictures.
    • Fixed an issue that might have affected applications that used Microsoft Edge WebView2 to display content. Applications that used WebView2 included Microsoft Office and the Widgets app. The content might have appeared blank or greyed out.

    What can I do if I can’t install KB5022358?

    1. Press Win+ I to access Settings.
    2. Select the System category and click on Troubleshoot.w11 troubleshoot
    3. Press the Other troubleshooters button.other troubleshooters windows 11
    4. Press the Run button next to Windows Update.windows update troubleshooter

    Also, make sure to report any other issues you might come across, in order for Microsoft to address and improve the overall OS experience for us all.

    This is everything you can expect if you are a Windows 11 user. Leave a comment below if you found any issues since installing this build.

    Chrome Says Not Secure But The Certificate Is Valid: Fix

    When you’re trying to access a website and Google Chrome says the certificate is not secure, but you know the certificate is valid, it’s warning you that the webpage you are on has a mixture of HTTP and HTTP resources.

    Chances are your connection is not secure in Chrome. We’ve put together methods that will help you solve the problem.

    A website certificate is vital. The website’s server uses the HTTPS certificate to prove the website’s identity to web browsers like Chrome. 

    This is crucial since anyone can create a certificate claiming to be valid. Chrome requires websites to use certificates from trusted organizations.

    ?️Quick Tip:

    Before we begin troubleshooting and resolving the issue, we suggest that you view the required URL with a more trustworthy and end-to-end security browser.

    It will tell you who issued the certificate, what sort of certificate it is, and whether the issuer is well-known and legitimate. You may set Opera One to notify you about public sites that use certificates issued by local vendors if you believe this might be the problem.

    Opera One

    Consider this reinvented browser for more information about a site’s security certificate.

    Why does Chrome say that the certificate is not secure?

    The not secure warning you encounter on a webpage means the website does not provide an encrypted connection.

    Here are some common Chrome errors you might encounter when using the web browser and what they mean.

    • This webpage has a redirect loop or ERR_TOO_MANY_REDIRECTS – The webpage you’re trying to access has too many redirects; probably because the cookies are not working correctly
    • This webpage is not available or ERR_SSL_VERSION_OR_CIPHER_MISMATCH – The website you’re visiting has an outdated security code, and Chrome blocks the connection
    • Connect to a network – You have to sign in before using your Wi-Fi portal and connect to the website
    • ERR_SSL_WEAK_EPHEMERAL_DH_KEY – The website to which you’re trying to connect has an outdated security code
    • Delete Expired DigiCert Certificate (Mac computers only) – The webpage uses a certificate that isn’t set upright on your computer
    • This site can’t provide a secure connection; network error sent an invalid response or ERR_SSL_FALLBACK_BEYOND_MINIMUM_VERSION – If the page had a problem which Chrome couldn’t understand, you’d see this error; the solution is to ‌contact the website owner

    Sometimes, third-party software on your PC is stopping Chrome from safely connecting to the web.

    This error only occurs on Windows OS, and most likely, the culprit is the Superfish software on your computer.

    You can remove it by downloading the SuperFish removal tool and following the installation instructions.

    What can I do when Chrome says the certificate is not secure?

    1. Clear Chrome’s cache and cookies

    1. Open the Chrome browser on your PC.
    2. At the top right, click on More.chrome says not secure but certificate is valid
    3. Click on More tools and then select Clear browsing data. chrome says not secure but certificate is valid
    4. Select the Advanced tab.chrome says not secure but certificate is valid
    5. Choose a time frame, such as Last hour or All time.
    6. Ensure that you check Cookies and other site data and Cached images and files box.
    7. Click on Clear data.chrome says not secure but certificate is valid
    8. Reload the website.

    Browsers store local copies on your computer data so that they don’t have to load the website from scratch every time you visit a website.

    Clearing Chrome’s cache and cookies will help the website load from scratch with updated information and might help validate the website’s security certificate.

    2. Flush your DNS records on Windows

    1. Press Win + R simultaneously to open the Run console.chrome says not secure but certificate is valid
    2. Type cmd and then press Enter.
    3. In the command prompt window, type the following command: ipconfig/flushdnschrome says not secure but certificate is valid
    4. Press Enter to clear the DNS.
    5. You’ll receive a message showing the successful clearance of the DNS records.chrome says not secure but certificate is valid

    Sometimes a DNS cache may become corrupted because of a technical glitch on the website’s administrative side.

    It can also become corrupted because of DNS poisoning. DNS poisoning is when unauthorized domain names or IP addresses are inserted into the cache.

    Flushing the DNS will clear any IP address or DNS records in your system’s cache. It helps to resolve connectivity and Internet security issues.

    3. Use the Chrome DevTools

    1. On the non-secure web page, press Ctrl + Shift + I to open Chrome DevTools. You can also right-click anywhere on the page and click inspect.
    2. Once DevTools is open, click on Security.chrome says not secure but certificate is valid
    3. Reload the page from the Security tab to see what’s causing the non-secure error.not secure website
    4. If the non-secure error is caused by mixed content resources, Google will show you that too.
    5. Click on View # requests in Network Panel.
    6. You will see if unsecured images cause the non-secure connection.

    This usually happens when the website administrator hosts images on a secondary domain and that domain uses the https:// connection.

    However, Chrome will show you if the website has an expired, missing, or invalid SSL certificate. Click on view certificate, and you will find all the details regarding the website’s certificate.

    How do I fix the site’s security certificate that is not trusted for Mac?

    1. Delete problematic certificates

    1. Open the Keychain Access app from the Utilities.
    2. Select the login keychain.keychain login
    3. Choose Certificates at the bottom menu bar.click on certificates
    4. Right-click on any certificate that displays a red X, then click on Delete. The certificate will be re-downloaded.

    2. Override the old certificate

    1. Double-click the certificate to open its settings in the Keychain app.
    2. Click the arrow next to Trust to display the trust policies for the certificate.
    3. Choose new trust settings from the pop-up menu to override the trust policies.
    4. Close the window to override the trust policies and quit Keychain.

    The certificate is the one MacOS uses to validate the connection you’re trying to make with the website’s server. macOS warns you if the certificate is invalid or has expired.

    You can also clear your browser’s cache. Clearing the cache is important because the downloaded cache on your computer might be obsolete.

    Another way you can troubleshoot this error is to ensure that the date and time on your device are in sync with the website’s server.

    If you’ve tried the methods above but couldn’t resolve the issue, you can contact the website’s administrator for support.

    For any problem with your website’s security certificate, we have prepared an in-depth guide to help you solve that. Speaking of which, we recently covered error during SSL handshake with remote server in a different guide, so don’t miss it.

    Should you have any other questions or suggestions, write about them in the comments section below and we will get back to you.

    Outlook Navigation Bar Moved to Left: How to Change Its Location

    Microsoft moved the Outlook Navigation bar to the Left to make it look similar to its other Office apps’ interface. However, several users have dissed the decision and expressed anger. If you are one of them, don’t worry, we have the fix.

    This guide discusses all the possible fixes to bring the Outlook navigation bar to the bottom. Let’s get started! 

    What can I do if the Outlook Navigation bar is moved to the left?

    1. Change Outlook settings

    1. Click on File and choose Options.
    2. Click on Advanced and disable Show Apps in Outlook.
    3. Save changes.

    2. Use Registry Editor

    Note icon NOTE
    Before making any changes, it is advised to back up your registry files. To do that, go to File, then click Export. Now save the .reg file to an accessible location.

    3.1 If Microsoft.Office.Outlook.Hub.HubBar is present

    1. Press Windows + R to open the Run console, type regedit, and hit Enter.REGEDIT RUN COMMAND
    2. Follow the below-mentioned path: HKEY_CURRENT_USER\Software\Microsoft\Office\16.0\Common\ExperimentEcs\OverridesRegedit 3
    3. Locate and double-click Microsoft.Office.Outlook.Hub.HubBar String and edit its Value data to False.False
    4. Now, relaunch Outlook for the changes to come into effect and check if the Navigation bar is still on the left.

    In case you want to know how to backup and share custom views on Outlook, read this guide.

    3.2 If Microsoft.Office.Outlook.Hub.HubBar is not present

    1. Launch the Registry Editor, and navigate the following path: HKEY_CURRENT_USER\Software\Microsoft\Office\16.0\Common\ExperimentEcs\Overrides
    2. Right-click on Overrides and select New, then choose String Value.Outlook navigation pane
    3. Name it, Microsoft.Office.Outlook.Hub.HubBar.
    4. Double-click on it, modify the Value data to False, and save the changes.Navigation pane 2
    5. If Outlook is running, close it and then relaunch the program for the changes to be visible.

    So, these are steps to bring the Microsoft Outlook navigation bar from left to bottom. If you don’t wish to make changes to the Registry, please wait for the update from Microsoft.

    If you’re facing issues like Outlook not updating your inbox, the sender’s name missing from your inbox, or your Outlook view suddenly changing by itself, these guides can help you get things back to normal.

    Also, if you are looking for an alternative, find out the best email clients that work with Office 365.

    If you have any queries or want to share feedback, drop a comment in the section below.

    Google Meet Stuck On Getting Ready: 3 Quick Fixes

    Despite having to play catch-up with competitors such as Zoom and Microsoft Teams in the beginning, Google Meet has made significant strides in the previous few months.

    Meeting with Gmail has proven to be a successful integration for Google since it has made the service far more accessible to many of the company’s most loyal customers.

    Furthermore, because Google Meet can be accessed directly from a browser window, the inconvenience of downloading and launching a separate application has been avoided.

    Sadly, Meet users have stated that the service has not always lived up to the billing and have experienced unexpected loading screens and delays.

    We have prepared below a list of solutions you can take in order to fix the Getting ready loop issue right after we understand why the error occurred in the first place. Follow along!

    Why does the Google Meet getting ready loop happen?

    In the event that you find yourself caught on the loading screen for an interminable period of time, waiting for the Connecting icon to stop spinning, you might be inclined to ask yourself why does it happen.

    While pinpointing the exact reason for the problem is difficult, if not impossible, we suspect that the entire problem is due to a faulty network connection.

    When you request that Google Meet host a meeting, the service checks that all of the necessary hardware and network requirements are met before beginning the session.

    If one or both of the participants fails to perform under duress, the session will not be able to begin, and Google Meet will remain stuck on the Getting ready page.

    Moreover, if this is the case, we may be able to resolve the problem without causing shambles by using the trial and error method.

    How can I fix Google Meet stuck on getting ready?

    1. Check your Internet connection

    If there is a connection problem, it is critical to rule out the most serious possibility on the list, an unreliable Internet connection, before proceeding. The most common reason for connectivity problems is a shaky connection, which occurs more often than you might think.

    Before proceeding further down the list, make sure to troubleshoot your Internet connection. It’s as simple as going to a video streaming service and watching one or two videos to see if they’re playing smoothly.

    Alternatively, click on the WiFi icon from your taskbar to see whether you are connected to the Internet or not. If it turns out you aren’t, choose a network and connect to it.wifi google meet getting ready loop

    Otherwise, if you are connected to a network already but the videos you tried to watch aren’t loading, you should unplug and replug your router.

    2. Replug the camera

    One of the most prevalent annoyances associated with video chatting and conferencing has got to be running into webcam difficulties. Google Meet, in particular, has become well-known for being plagued by the issue.

    As a result, it’s usually advisable to unplug the camera and reconnect it to check if anything has changed in the meanwhile.

    If you’re working on a laptop and don’t have access to an external webcam, you could delete your webcam driver and restart your computer to have the driver reinstalled again.

    3. Reinstall the webcam driver

    1. Right-click on the Start icon then click on Device Manager to open it.device-manager google meet getting ready loop
    2. Now locate the Camera option, expand it then right-click the driver and choose Uninstall.device-manager google meet getting ready loop
    3. Restart your computer and it will automatically reinstall the camera driver.

    Also, let us remind you that Outbyte Driver Updater is a reliable solution created specifically for those who want to keep all of their computer’s driver software up to date with ease. Do not hesitate to give it a try as well.

    What are the advantages of using Google Meet?

    Google Meet is a free service available to all Google users. In the free edition, participants are limited to a maximum of 100 people.

    A further advantage is that the time limit for free users is 60 minutes, as opposed to Zoom, which has a 40-minute meeting limit for its free edition.

    Of course, because it is organically integrated with other Google services, people who already have Google accounts will be able to quickly begin using Google Meet without any difficulty.

    An additional benefit of using Google Meet is that it is really straightforward to use. It is as simple as clicking or tapping on a link to participate in a meeting.

    It should be noted that the platform’s default video resolution for both incoming and outgoing video feeds is 360p. The resolution, on the other hand, can be changed to 720p.

    In addition, users can individually adjust the resolution of the send and receive feeds, allowing them to have greater control over their data usage.

    Google’s global IT infrastructure, which has been in place for many years, provides assurance of security. Keep in mind that the organization adheres to internal and legal standards in order to protect data privacy, digital properties, and the interests of its user community.

    It employs encryption to protect video calls, brute force attack avoidance tactics, and multi-factor account login and recovery to keep users’ information safe.

    For more information check out our article on how to connect the meeting room system to Google Meet, to enhance your video-audio call experience.

    Alternatively, if you have any issues with the audio, you should take a look at our guide on what to do if the mic is off due to the size of the call on Google Meet.

    And lastly, you can round up your knowledge about this beautiful Google feature by reading our post on how to use Google Meet inside Gmail.

    Let us know in the comments area below which approach worked best for you in fixing the Google Meet suck on getting ready loop, as well as how frequently you utilize Google Meet. Thanks for reading!