Subwoofers change the way you can listen to music and even watch movies. They add bass and allow you not just to hear the sound, but also feel it down to your very core.
Thus, it is obvious that a lot of AV and stereo receivers have subwoofer outputs.
That’s precisely why we’ve compiled this list of what we think are the best receivers that support subwoofers so that finding the right for you is much easier.
Note: All the prices and offers in this article are subject to change, so be sure to check the official product page to get the latest deal. If the product you’re looking for is no longer available, you can try to find it on its official manufacturer page or get another one from our list.
Which receiver has the best sound quality with subwoofer output?
Pyle PTA44BT – best Bluetooth stereo receiver with subwoofer output
The Pyle PTA44BT is a good all-around stereo receiver that is compatible with pretty much any device you want to pair it with, including smartphones, tablets, laptops, and computers.
More so, you can stream things on the Internet and even via Bluetooth, so you don’t need any wires, you just need to be in range.
Pros:
500W peak power which can be used for multi speakers w/ 4-8 ohms impedance
Supports Bluetooth wireless music streaming
Compatible with almost any device
Supports iPod or MP3, USB, micro SD, and AUX playback
If you love simplicity in all of your gadgets, then you’ll want the Sony STRDH190.CEK as a stereo receiver.
It has a low-profile design that makes it fit into pretty much any cabinet, and the minimalist controls and the low number of knobs and buttons make it a great fit into the modern household.
Connectivity is the name of the game when it comes to the Onkyo TX-NR575E stereo receiver.
This is because it has support for pretty much any connection method you can imagine, including Wi-Fi and Bluetooth, and it can stream content off of Spotify, TIDAL, Amazon Music, TuneIn, and more
More so, the sound it delivers is of the highest quality, thanks to the 5.2.2-Channel Dolby Atmos and DTS:X playback, as well as the traditional 7.2 Channel, surround sound.
Audio and video output from the Internet will be something you’ll enjoy every day if you get the Onkyo TX-8270.
Not only will you get to enjoy all the benefits of online streaming, but the image and sound quality you’ll receive will be top-notch, clearly showing you that it was worth every extra penny.
Updates have become an invaluable part of our computer use as we have had new Windows operating systems.
New drivers for the computer’s hardware components, known bug fixes, security patches, and significant improvements and upgrades are all possible with updates.
But, many users are facing various problems with Windows Update, which prevent them from receiving the latest features and improvements from Microsoft.
What does the Windows Update reset script do?
If you want to use the Windows update script, you should be aware that it performs the following tasks:
Re-registers all your Windows update files
Reset network connections on the OS
Gets rid of older OS update folders
All your OS services that are connected with updates will be reset. Using this script is fast and convenient and is a preferred option for restarting services.
If any of the three above points are what you hope to achieve, then you should go ahead and use the script.
Can I run Windows Update reset script in PowerShell?
Here’s how to download the script with the Windows update reset script for computers running Windows 10. You may also run the Windows Update reset script on Powershell.
All you need to do is to run the reset Windows Update script, and everything will be automatically reset. It even works on older versions of Windows, so its use is not limited to Windows 10.
This script comes from a third-party source, and we’re not responsible for any potential damage that can occur after using it.
2. Once the download is done, right-click on the zip file and selectExtract All.
3. Open the file, right-click on theWUResetfile, and selectRun as administrator.
4. Wait for the script to execute completely.
This simple batch script resets all Windows Update components, like the SoftwareDistribution folder, BTS service, Cryptographic Services, etc.
2. Create the script manually
If you wonder How do I manually reset Windows updates?, open Notepad.
Paste the following text into Notepad: @ECHO OFF echo Simple Script to Reset / Clear Windows Update echo. PAUSE echo. attrib -h -r -s %windir%system32catroot2 attrib -h -r -s %windir%system32catroot2*.* net stop wuauserv net stop CryptSvc net stop BITS ren %windir%system32catroot2 catroot2.old ren %windir%SoftwareDistribution sold.old ren "%ALLUSERSPROFILE%\Application Data\Microsoft\Network\Downloader" downloader.old net Start BITS net start CryptSvc net start wuauserv echo. echo Task completed successfully... echo. PAUSE
Now click on File, then Save as, and save the file as WUReset.bat.
To run the script, right-click on it and click on Run as Administrator.
With this solution, you will create and use a very easy Windows update reset batch script.
Expand the dropdown list on the Code button and click Download ZIP.
Once the download is done, right-click on the zip file and select Extract all.
Open the file, right-click on the ResetWUEng file, and select Run as administrator.
This Windows Update reset tool is an easy and efficient update solution.
Does Windows Update reset registry?
Several pieces of data in your Windows Registry describe how the OS functions and your system’s registry is often affected by changes you make, so it frequently modifies, adds, and deletes the information.
That said, Windows may be reset by reinstalling the OS, which by default resets the registry. And unless you start individually resetting registry items, it is the only way your registry will be reset.
Therefore, NO, an update won’t wholly reset your registry.
If you are wondering how to reset Windows Update components in Windows 10, there you have it.
We hope that this script will save you a lot of time and work if you already have problems with Windows Update.
But if even Windows Update Reset Script doesn’t solve the issue, you probably have some more serious problems, if that’s the case, you can tell us in the comments, and we’ll try to assist you further.
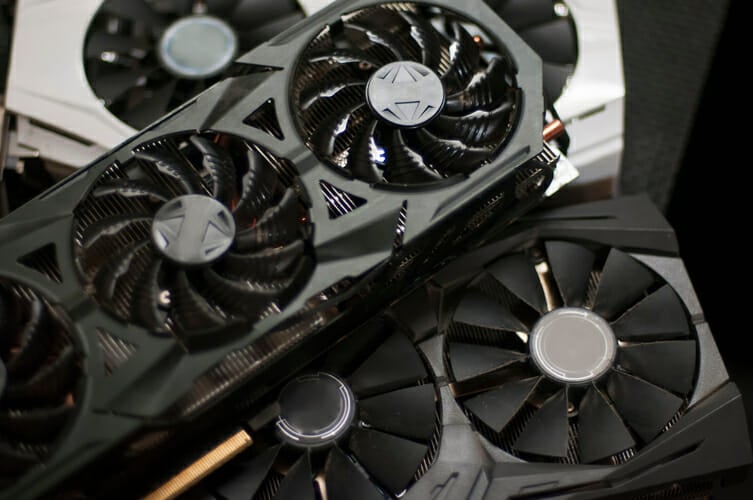
An external graphics card, aka eGPU, allows you to house a desktop graphics card and connect it to your laptop, allowing it to run apps or connect it to an external monitor with the desktop graphics card.
Currently, it’s possible to embrace the full power of desktop-grade GPUs on an eGPU thanks to the latest technologies such as Thunderbolt 3 that provides bandwidth up to 40Gbps.
Before the adoption of Thunderbolt connectivity in lots of high-end laptops, eGPUs never got the chance to take off due to the limitations of bandwidth when using USB 2.0 to connect the laptop to the eGPU.
Our team of expert testers has made sure to try out all the devices that were worthy of mention to create the results presented in this guide.
The testing has been carried out both from the perspective of single-unit capabilities and head to head with similar devices. Thus, the list of the best external GPU for laptops with USB-C has been created.
The resulting list ensures that no matter what choice you make after reading this guide, you will still get one of the best-ranked and most capable USB-C external GPUs, to take your graphics processing power to the next level.
What to consider when choosing the best eGPU?
Compatibility
As in the case of choosing any device for your PC the most important element to consider at first is its compatibility with your system.
This ensures that you’re not going to invest any of your hard-earned money into a device that will prove useless.
Our list provides you with information about the compatibility with Windows-based PCs, but the list doesn’t end there. Most notably, a good USB-C GPU dock will work on Mac, and iOS, thus enabling good portability.
Processing speed
What would a GPU be if it didn’t offer an efficient processing speed for the graphics that are required?
The processing speed of your eGPU ensures not only that you won’t experience any sort of lag while working in demanding graphic software, but also that your gaming experience will be as smooth as silk.
Even though it can be annoying to experience lag while working in Photoshop, the impact is a lot bigger if you’re playing online games professionally, and every second can literally mean the difference between the life and death of your character.
Number and type of ports
Even though the processing speed is a very important element, the connectivity capabilities are next in line. This element is extremely important as well, as this is the bridge that connects the processing unit to your PC.
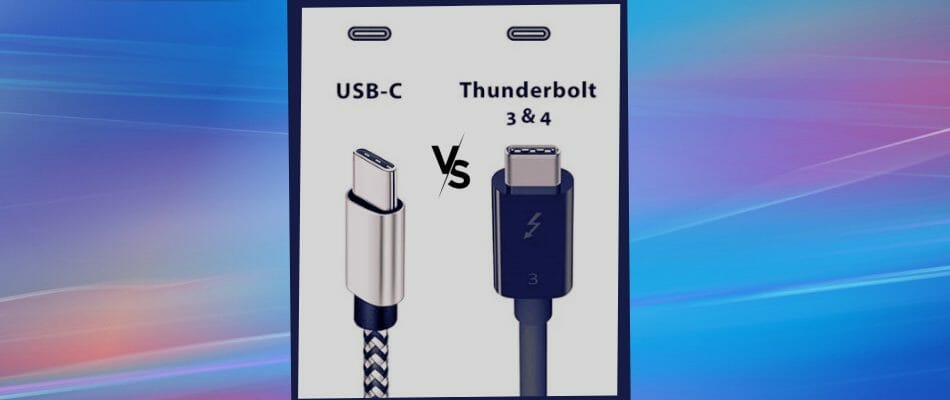
When it comes to new devices, there are two main ways of connecting them, which are known as USB-C or Thunderbolt 3. Because of the similarities of these two types of ports, it can get confusing.
To clarify this idea once and for all, let’s first understand what are the similarities and also what are differences when comparing an eGPU USB-C vs Thunderbolt 3 connection.
eGPU USB-C vs Thunderbolt 3
Even though these two types of ports look almost identical, their capabilities are not the same.
In fact, a USB-C cable can easily connect to a Thunderbolt 3 port and the other way around, but the results of the connection itself will be very different.
Similarities:
➡ Both types of cables/ports allow you to use them both for transferring data, and power through a single cable connection.
➡ Both look exactly the same way, thus causing confusion for users who have devices without proper markings next to the port.
Differences:
➡ USB-C only offers up to 20Gbps data transfer speeds and can muster about 100 watts of power to power/charge your devices.
➡ Thunderbolt 3 enables you to transfer data with speeds closer to 40Gbps, and can power/charge devices with a capability of 100W of bi-directional power.
Key takeaways:
Even though all Thunderbolt 3 cables and ports use USB-C, not all USB-C connections are also Thunderbolt 3.
Because when it comes to efficiently using the capabilities of your eGPU, it is of course recommended that you have Thunderbolt 3 compatibility rather than the slower USB-C option.
If you don’t have enough Thunderbolt ports available, then the connection will of course be affected, and thus the efficiency of the entire setup will suffer.
Cooling efficiency
If your eGPU gets too hot under extreme graphics processing loads, then both the quality and the smoothness of your gaming experience will be considerably affected.
Some devices employ water-cooling elements to help with this issue, while others use powerful fans to considerably reduce the heat build-up. Not all cooling systems are the same though, and in the next point, you will understand why that is.
Noise production
Even though it is very important to maintain your eGPU’s temperatures under control, the method used to perform this action also affects the level of noise your device will produce.
In the case of water-based cooling systems, the entire process is a lot more silent and offers the same cooling capacities as other variants.
If your device is equipped with a fan-based cooling system, the sound of the device working at full speed might be considered bothersome in some cases.
Design
Last but not least, the way your device looks can make a huge difference to the overall experience. Because this element depends on your specific preferences, there are no special guidelines to discuss.
That being said, a seamless box for your eGPU makes the device look a lot more stable and feel more sturdy while cooling vents on the sides will promote the efficiency of the built-in cooling system.
At the same time, the cooling vents and their design also allow you a peek into the inner workings of your eGPU.
All these elements considered, let’s explore what our experts concluded after rigorously testing a variety of devices available at this point in time on the market.
Sonnet’s eGPU Breakaway Box 750 brings the power of a dedicated GPU to your system and does this without you needing to buy any extra GPU slots for your PC.
Because this amazing external GPU works with any sort of PC, the times in which you had to upgrade your motherboard just to get a better GPU installed are long gone.
You simply have to add your compatible video card, connect your Thunderbolt 3 system with the included Thunderbolt 3 cable and enjoy some desktop-class level gaming performance and video acceleration.
Sonnet’s eGPU Breakaway Box 750 is one of the quietest and coolest eGFX boxes on the market with a significant variable speed and a temperature-controlled fan.
Fully compatible with both Mac and Windows systems, this slick-looking GPU covers a wide range of models for both hardware types.
This amazing eGPU supports AMD Radeon VII, RX, RX Vega, Pro W, and Pro WX models; and NVIDIA GeForce RTX series, TITAN, and Quadro models.
Besides the amazing capability levels, it also bolsters one of the best configurable cooling systems that enable you to use variable speed and control the temperature of your GPU with extreme accuracy.
This fan also works very silently compared to other models, while not compromising on design and power.
As you can see, no matter what your initial system setup is, with Sonnet’s eGFX Breakaway Box, you can’t go wrong.
The Razer Core X Aluminum External GPU Enclosure (eGPU) unit adds external NVIDIA GeForce, NVIDIA Quadro, or AMD Radeon graphics to your Windows or Mac PC with a speed of up to 40Gbps.
Please note that the graphics card is sold separately. This amazing device enables you to use up to 3 full-sized desktop graphic cards, thus enabling you to bolster your PC’s video processing capabilities to the maximum level.
In order to ensure that your Razer Core X GPUs will be able to run at full speed, this amazing device includes a 650W ATX PSU power supply that bolsters a powerful 100W laptop charging port as well.
The Razer Core X is fully compatible with both Windows and macOS devices.
In the case of Windows, you will need to have Thunderbolt 3 eGPU support with RS45 (or later) and, of course, a compatible Nvidia or AMD graphics card.
When it comes to the compatibility requirements for macOS, the Razer Core X works perfectly with High Sierra 10.13.4 or later models that have Thunderbolt 3 compatibility. Added to this, you will need to have a compatible AMD graphics card, but doesn’t support Nvidia.
Besides its great capabilities and stability, the Razer Core X impresses with its CNC aluminum exterior which perfectly wraps around the device without any obvious seams. The iconic Razer’s silver logo can be found on the cooling on the side of the device.
To ensure the effect is fully appreciated, the positioning of the cooling panel allows you to observe the actual GPU working to offer you unparalleled graphic processing capabilities.
The PowerColor Gaming Station Graphic Cards Thunderbolt EGPU Box uses the AMD XConnect Technology and the high-speed Thunderbolt 3 connection to improve the gaming experience.
The 40Gbps Thunderbolt 3 interface ensures that the processing speed is astonishingly high, and never wavers no matter what type of intensive graphics you test it with.
It’s very easy to connect with any of the following graphics chipset: AMD Radeon RX 500/400Series. AMD Radeon R9 Fury/Nano/300/290/290X/285.
The wide range of compatibility features on this nice-looking box ensures that your friends will be more than curious to find out what it is, and beyond that, your PC will be capable of processing ultra high-quality graphics without any sort of problem.
Added to this, the PowerColor gaming Station offers you the capability to use many I/O ports that include 5 USB 3 Type-A ports, a Gigabit Ethernet (RJ–45) connector, and also the Thunderbolt type C slot. This ensures that no matter how you plan on using it, you’ll always have a port for easy connection available.
The power efficiency on this device is out of this world! Offering a whopping 550W power supply ensures that every last drop of power from your GPU will be used efficiently.
To ensure a fast and efficient power transfer, it uses a three-phase thermal control system that can be set to a variety of modes: fanless, silent, and cooling mode, while at the same time looking slick in any environment.
The Gigabyte AORUS RTX 3080 offers a great experience for real-time ray tracing and graphics-intensive games.
This powerful external GPU box is the world’s best water-cooled device of this sort, making it a must-have for the more custom-devices oriented of you. Even though it is the first of its kind, that doesn’t mean that the capabilities it possesses don’t impress. In fact, the Aorus RTX from Gigabyte offers some of the same capabilities as the more high-end products of this type, and at a more affordable cost.
The Dual Thunderbolt 3 controller provides a faster and better connection than any other Thunderbolt port, which means high performance.
All key components of the graphics card benefit from the quiet WATERFORCE Cooling System, thus making this external GPU one of the most silent on the market at this point in time. In case you’re bothered by extra noise, this device is for you.
Added to this entire setup, the Gigabyte AORUS RTX 3080 is RTX Studio-enabled. This technology combines GPU acceleration technology and state-of-the-art Studio Drivers to enhance all graphic design software.
Some of the most well-known software options that can use this high-end tech are Adobe Photoshop, Illustrator, Premiere Pro, etc. If you want to take your creative work to the next level, this external GPU will help you tremendously.
This amazing device not only looks great and is completely silent while cooling your system efficiently, but also contains a built-in network chip that allows you to connect it to a wired network, so your PC won’t need to take that task up either.
To start using this powerful machine, simply install the AORUS engine and the RGB fusion 2.0, and behold the amazing and customizable RGB lighting effects for a full-on gaming experience.
Bottom runners
Besides the eGPU options that made the list after our rigorous testing process, there have been some other devices that proved their capabilities.
Even though not directly comparable with the options we chose for this list, they could still be a good option for some users:
This device has not made the Top 4 list we explored today because of its lack of Thunderbolt support, but that being said, it is still a versatile and useful option.
Offering a 550-Watt PSU, and being cable of charging laptops at 60W is very useful, while at the same time allowing you to use the built-in HDD/SSD drive slots to extend your PC’s capabilities.
This tiny eGPU box, besides its reduced weight and size, has some useful features that might come in handy to a variety of users.
It comes with an embedded AMD Radeon RX570 8GB graphics, and offers plug and play for Mac, Mac Mini, and MacBook’s running Mac OS High Sierra 10.13.4 or later.
Unfortunately, it is not compatible with Windows-based devices, so that’s why it scored lower on the compatibility element.
Even though acceptable when it comes to capabilities, the Akitio Node only offers support for AMD on macOS High Sierra and should work fine on Windows-based systems.
Offering a built-in 400W SFX power supply will surely be enough to power your eGPU without issues while offering support for GPU with only one PCIe (x16) slot.
These are some of the best eGPUs with USB-C ports out there that will definitely be able to unleash your notebook’s true potential for graphics-intensive apps such as rendering but most importantly gaming.
All these eGPUs future-proof your laptop allowing upgradeability of your GPU and they’ll all be able to reduce the chance of you being stuck with an outdated laptop.
Pick your favorite one from Amazon according to your preferences.
The Error applying transforms error message can pop up in Windows when you attempt to update installed software or uninstall a program. The full error message states: Error applying transforms. Verify that the specified transform paths are valid.
Consequently, you can’t install a software update or remove a program when that error message pops up. These are some of the causes and potential fixes for the transforms error.
Why does error applying transforms occur?
A few elements can trigger this installation or uninstallation error. At the top of the list are the following:
Subkey or product key issues – Issues with your installation keys may also cause problems applying transforms.
Broken software update – There are possibilities that an older update was not well done, which would cause problems for future installations or uninstallation.
Corrupt Windows installer – The installer is critical to installation and would cause errors if it is corrupted.
Errors with the Registry – In some cases, this could be misconfigured app registry paths that have made installation or uninstallation possible.
If the applying transforms error message pops up when updating software, uninstall the previous version first.
For example, you would uninstall the currently installed Java software if the error message pops up when installing the most updated Java version.
Keeping leftover files and old versions of software may interfere with the functionality of the up-to-date version of that same software.
It would be best if you uninstalled the software with the help of a third-party PC cleaning and optimization utility. This is to ensure that no trace of your app remains on your PC to take up space and cause other errors.
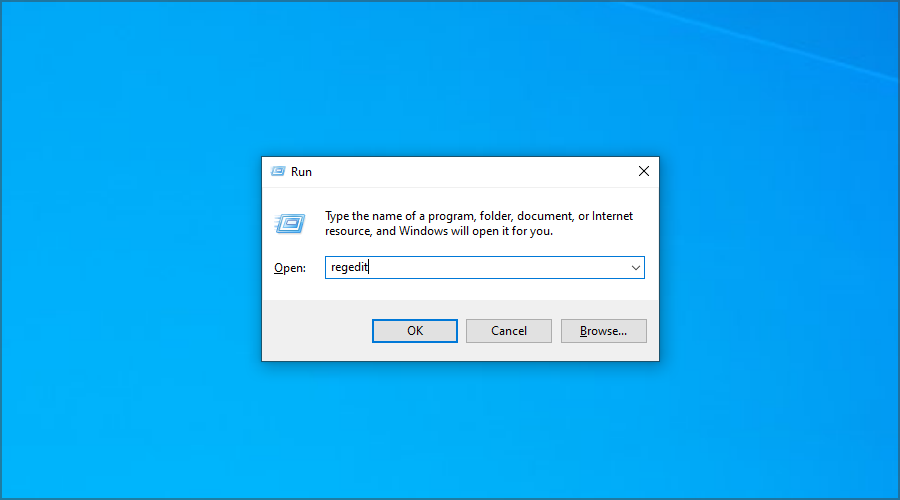
Open Run with the Windows key + R hotkey, input regedit, and hit Enter.
Go to the following path: Computer\HKEY_CLASSES_ROOT\Installer\Products
Next, right-click Products in the Registry Editor and select Find.
Select the Keys, Values, and Data check boxes on that window, then enter the title of the software that you’re getting the Error applying transforms error message for in the search box.
Then press the Find Next button to find the registry key for the software entered.
Double-click on the key.
Double-click Transforms, delete all info in the Value data box, and press the OK button.
If the applying transforms error message opens when uninstalling the software, delete Transforms by right-clicking it and selecting Delete.
Then close the Registry Editor window.
One of those fixes will fix the Error applying transforms error so you can install or remove the required software. If you have any further resolutions, please share them below.
Blue Screen of Death errors, such as RESOURCE NOT OWNED, aren’t that common, but these can cause a lot of problems, especially when encountered in a loop. The fixes are rather simple and shouldn’t take much time. So let’s dive straight into the subject.
What does the Resource Not Owned error mean?
The RESOURCE_NOT_OWNED BSOD, as per Microsoft, basically points to the fact that a thread tried to release a resource that it did not own in the first place. Here are a few cases you may encounter the error:
Resource Not Owned in Edge – Many reported that Edge first stopped responding, and then the PC crashed with this stop code.
Resource Not Owned with Surface Pen – The error appeared for several users with a Surface Pen, though the issue was primarily limited to a particular version.
Resource Not Owned on Surface Pro 7 – Some Surface Pro 7 users came across the error, but our solutions worked flawlessly in this case.
How can I fix the stop code Resource Not Owned?
Before we try the slightly complex solutions, here are a few quick ones that might help:
Restart the computer.
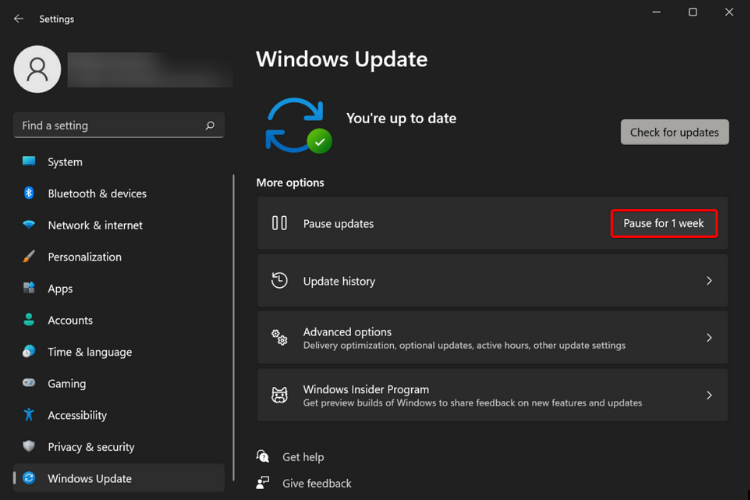
Update Windows to the latest available version. Microsoft has identified the bug and released a patch for it, so updating the OS should fix things.
Update Microsoft Edge if you are facing the error when running the browser. Many managed to fix things this way.
In case you are using a Surface Pen, disconnect it and try the solutions here before reconnecting.
If these didn’t work, head to the ones listed next.
1. Use a third-party repair solution
The blue screen RESOURCE NOT OWNED error is not so common, neither is it so scary either, but it’s not really a piece of cake either. You need to allocate a little bit more time if you want to tackle the problem manually.
However, there is an easier and quicker solution that might fix the problem in no time, using a third-party repair software that will get the job done automatically.
2. Update your drivers
Press Windows + R to open Run, type devmgmt.msc in the text field, and hit Enter.
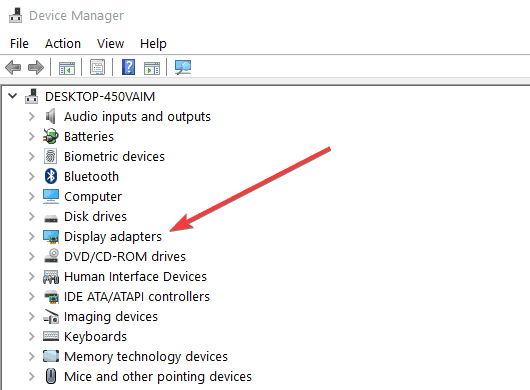
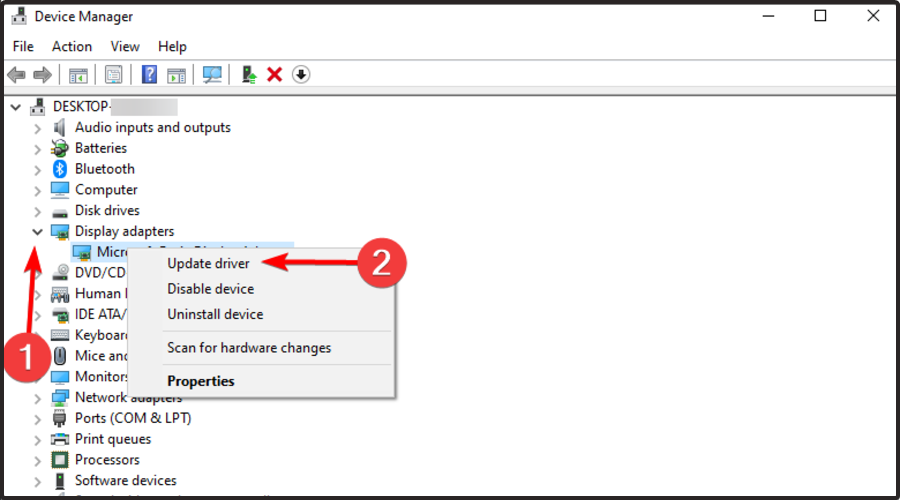
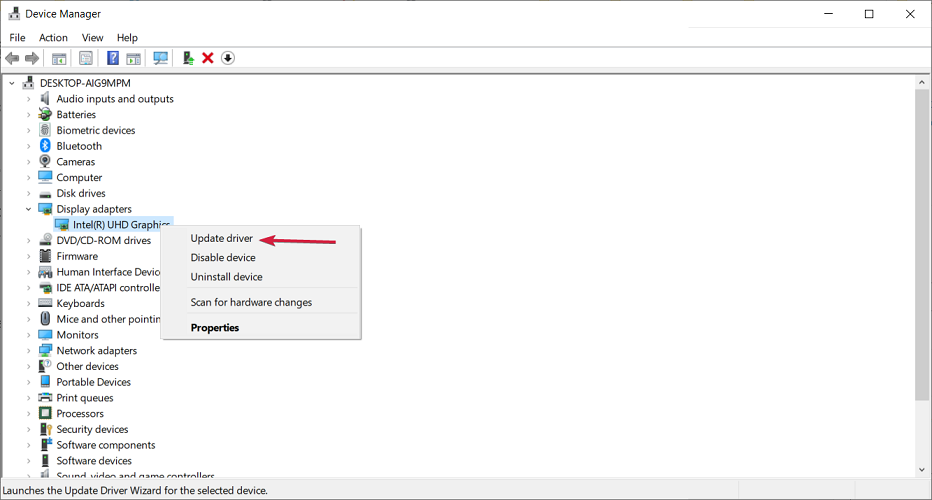
Expand the Display adapters entry, right-click on the graphics adapter, and select Update driver.
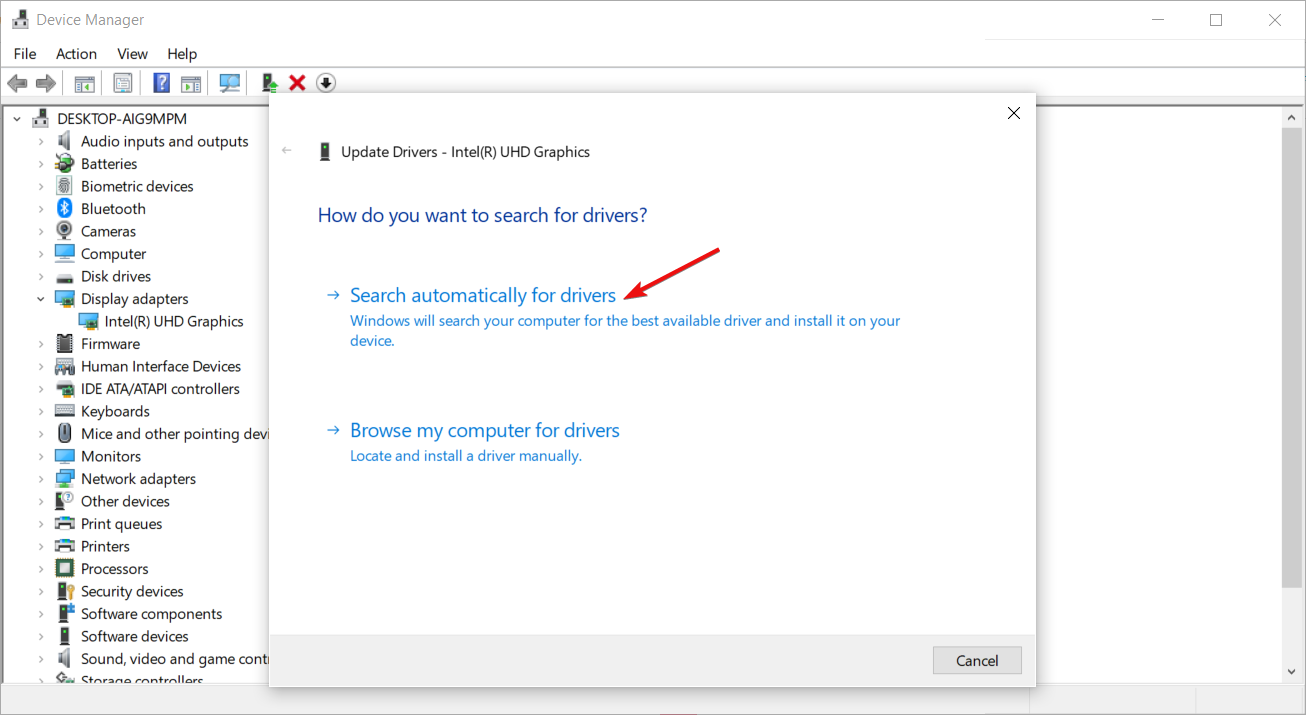
Now, select Search automatically for drivers and wait for Windows to install the best one.
Corrupt or outdated drivers are likely to lead to the Resource Not Owned error in Windows 10 and even the latest iteration. So, update the drivers, starting with the one for your graphics adapter, since it’s usually responsible for the error.
If Windows can’t find a better version, you can also manually update the drivers. Bear in mind that you will have to do it for all the drivers on the PC. Also, sometimes, you may have to roll back the driver updates in case a newer version is not available.
Update drivers automatically
Searching for drivers on your own can be time-consuming. So, we advise you to use a tool that will do this for you automatically.
Using an automatic driver updater will certainly save you from the hassle of searching for drivers manually, and it will always keep your system up to date with the latest drivers. You can check these 10 best driver updaters for more efficiency.
3. Uninstall conflicting software
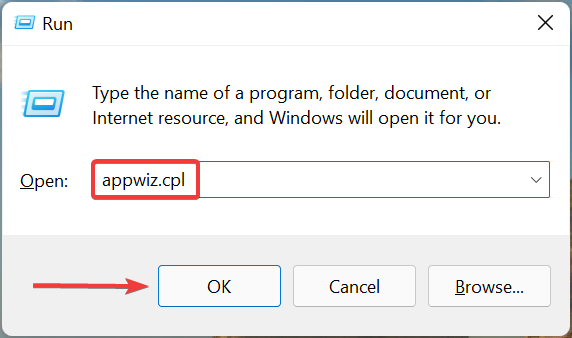
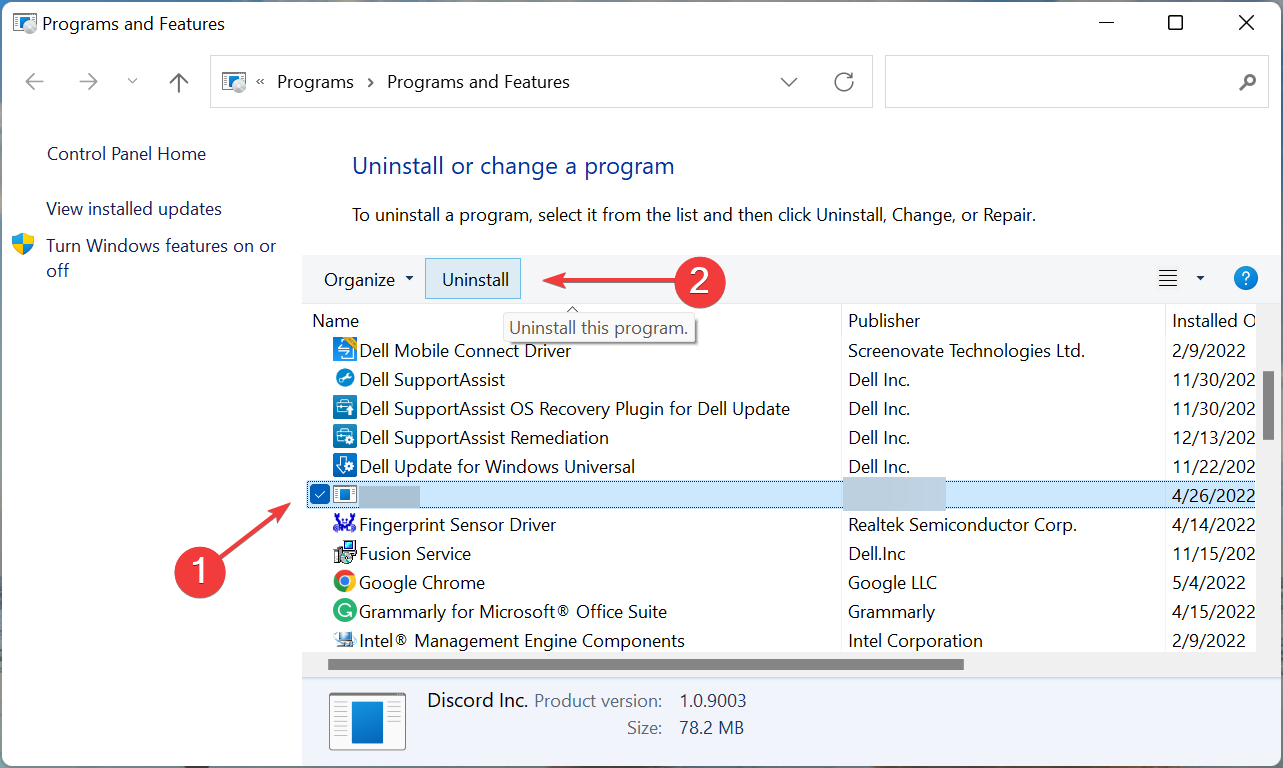
Press Windows + R to open Run, type appwiz.cpl in the text field, and click OK.
Now, select the app(s) installed around the same time the error first appeared and click Uninstall.
Follow the on-screen instructions to complete the process.
Several users reported that they encountered the error due to a conflicting application. You could identify it using the log file, though the process isn’t as straightforward. But remember, it usually has to do with drivers.
Furthermore, if you use CCleaner to uninstall the troublesome software, it will wipe up all entries, ensuring that no files remain to cause BSOD issues.
Press Windows + S to open the Search menu, enter Internet Options, and click on the relevant search result.
Navigate to the Advanced tab, and scroll down to Security.
Now, make sure the following four entries are checked, and then click on OK to save the changes.
Use SSL 3.0
Use TLS 1.0
Use TLS 1.1
Use TLS 1.2
If you are encountering the RESOURCE_NOT_OWNED blue screen error when using Edge, modifying the Internet Options should do the trick the way it did for other users.
If none of the methods have worked yet, it’s likely a hardware problem to blame. First, check for RAM issues using the built-in Windows Memory Diagnostic tool, or run Memtest86+, an open-source third-party tool that runs extensive tests on the memory.
Also, check for dust accumulation and overheating (usually a sign of the former),and make sure all the connections are in order.
In case that, too, doesn’t work, you will have to get the hardware looked at by an expert for a thorough check. Some users had to get the CPU replaced for things to get up and running.
That’s it! By now, the RESOURCE NOT OWNED error should be fixed, and your computer working fine if it’s not a major hardware problem to blame.
Before you leave, do not forget to find out how to check a BSOD log to help effortlessly troubleshoot things.
If you have any other queries or know of a method not listed here, drop a comment below.
The webcam software selection for Windows 10 below will help you use the full potential of your webcam. Most of them work just fine on older versions of Windows, as well as on Windows 11.
Webcam recording software can help you record high-quality videos and assist you in the post-production editing process. You can use some of the software presented below to create instructional videos or gameplay videos as many of them come with picture-in-picture features.
There are also some options that offer fun features like all sorts of filters and masks that are better suited for casual use. Most of these programs are free, but some also have premium versions, as we tried to cover all available options.
ManyCam is perhaps the most recognizable program on the list (and the best, in our opinion), as it surely is among the most popular ones. This tool is arguably the best free virtual webcam software.
Although it can’t be compared with YouCam 9, feature-wise, it still offers a handful of usable options.
The best thing about ManyCam is the fact that this tool is very flexible, as it supports many programs and services.
So, you can integrate it as a camera source for Skype, and make gaming footage with the Game Capture feature, it also supports YouTube integration.
ManyCam offers many real-time effects and allows you to overlay a whiteboard and other annotations on top of your recording.
You can use Manycam to record instructional videos or gameplay, as it has a picture-in-picture feature. You get to display footage from your screen and webcam at the same time.
Other key features of ManyCam include:
Custom watermarks
Mobile app
Virtual backgrounds & Chroma Key
Background blur
ManyCam is subscription-based. They offer 3 plans and charge yearly. All plans have a 30-day money-back guarantee.
ManyCam
Trust this great software for the best online video experience whether is streaming or going live!
CyberLink’s YouCam 9 is one of the most feature-rich webcam software in the domain. You can use CyberLink’s software for basically any video recording – capturing of images, videos, or even for video surveillance.
CyberLink offers a free version of this software, as well as two other options: Deluxe, and Standard.
But you shouldn’t be skeptical about paying for YouCam 9, because the software was developed by CyberLink, which is one of the biggest, and most reliable companies in the business.
Of course, the features list varies in these two versions. Logically, the standard version offers fewer features than the Deluxe.
Cyberlink YouCam offers real-time video editing features including lightning adjustments, live skin smoothing, denoise, live masks, and other effects.
YouCam supports picture-in-picture and text overlay while recording, so you can use it for various types of projects. You can make instructional materials with annotated key points, add subtitles, watermarks, and more.
Other key features of Cyberlink YouCam include:
Presentation feature with pre-made templates
Live cursor recording
Photo Editing Features
Multiple language options
CyberLink YouCam9 is compatible with PCs that run Windows 7 or higher. You can try it for free before purchasing a license.
CyberLink You Cam 9
If you’re searching for high-quality video streaming software then this versatile tool is what you need!
Bandicam is a lightweight Windows software that records your screen, your gameplay, and footage from connected external devices, including your webcam, PlayStation, smartphones, and more.
Bandicam allows you to record from multiple sources at the same time. You can record gameplay and webcam footage and overlay them together.
To record videos with your webcam, you just have to open the app and activate the Device Recording mode.
The software ensures high-quality videos with ultra-HD support and a hardware-accelerated encoder. You also get a high speed and high compression ratio.
With Bandicam you can record nonstop for 24 hours. You can also set up schedules for automatic recordings.
Other key features of Bandicam include:
Real-time overlay of pen drawing, arrowhead, and text
Specific screen area recording
Record computer sounds and your voice together
Insert text/comments for post-production
Chroma-key effect
Bandicam has a free version and a one-time purchase licensed version. You get lifetime support and updates for the premium version.
Bandicam
Record multiple sources simultaneously with high-quality and ultra-HD support at amazing speeds.
Because of that, we decided to put this program on our list of the best webcam software for Windows 10.
This program lets you capture videos (both from the screen, and from your webcam) in various formats, including VI, WMV, FLV, MPG, MP4, etc.
Its versatility allows you to capture videos from external sources, like IP webcams and it also offers some fun features like mouse highlighting.
Upgrade your social media activity with a program that is excellent for recording gameplay or tutorial videos for YouTube. We should also mention that it allows you to do the whole job in a single program, by both screen-capturing and recording from your webcam.
Key features of Debut Video Capture include:
Picture-in-picture
Green screen tool
Time lapse video recording
Logo and watermark support
Text captions support
Debut Video Capture has free and paid versions. The free version has its limitations, but you can use it for basic video recording and also see how the software works before deciding to buy it.
Debut Video Capture Software
Create your best media content with this video software that can do it all, from recording to customizing clips!
ApowerREC is a resourceful screen recording software. It allows you to capture desktop and webcam footage and it supports the post-production editing process.
The user interface is easy to navigate. You can easily set your recording preferences such as output format, hotkeys, output folders, and more.
To record webcam footage, just make sure you connect your camera device and ApowerREC will automatically detect it. Press the webcam button in the recording window, and you’re all set.
When you start recording, the UI collapses into a floating toolbar with minimal options such as pause/start buttons. You can opt to hide the toolbar while recording.
To record webcam footage, just make sure you connect your camera device and ApowerREC will automatically detect it. Press the webcam button in the recording window and you’re all set.
ApowerREC has an annotation feature that lets you edit your footage in real-time. You can use it to add text, arrows, lines, and numbers. This can be great for creating instructional materials.
Other key features of ApowerREC include:
Record certain areas of the screen
Split recording for big files
Locked Window recording: capture just one even though you navigate through other apps while recording
Intro and outro editing options
Watermark support
Support for online uploads of your videos
ApowerREC is a licensed software with lifetime updates and technical support. It comes with a free trial, so you can try it and see if you are satisfied with it before purchasing.
ApowerREC
Record, add annotations, edit and upload videos online with ApowerREC.
Screencast-O-Matic’s screen recorder software records desktop, audio, and webcam footage. It provides many tools which can help you create various styles of videos.
The screen recorder is free and ready to use. You don’t need much setup before starting to record. You just need to install a launcher and record & edit from your browser.
The free version comes with basic real-time and post-production editing options such as frame resize and trim & cut. It also has some royalty-free music that you can in the background of your footage.
You can overlay webcam footage over your desktop and easily pick the location of your webcam section within the frame with drag-and-drop.
You get unlimited record time with the premium version and a maximum of 15 minutes for the free version.
Once your video is ready, you can upload it directly to YouTube, Google Drive, Dropbox, Vimeo, and other sharing and storing platforms.
If you upgrade and integrate the Screen-O-Matic video editor, you will be able to add more effects such as captions, narration, blur sections, zoom, add text, and more.
Other key features of Screencast-O-Matic’s Screen Recorder include:
Stock videos and images library
Online back-up of all your files
Organize content into playlists
Password protect video files
The software is compatible with multiple types of devices and operating systems. You can use it on macOS and Windows computers, as well as on Android and iOS mobile devices.
Screencast-O-Matic
Capture, edit, store and back up webcam footage with the help of one full-feature software.
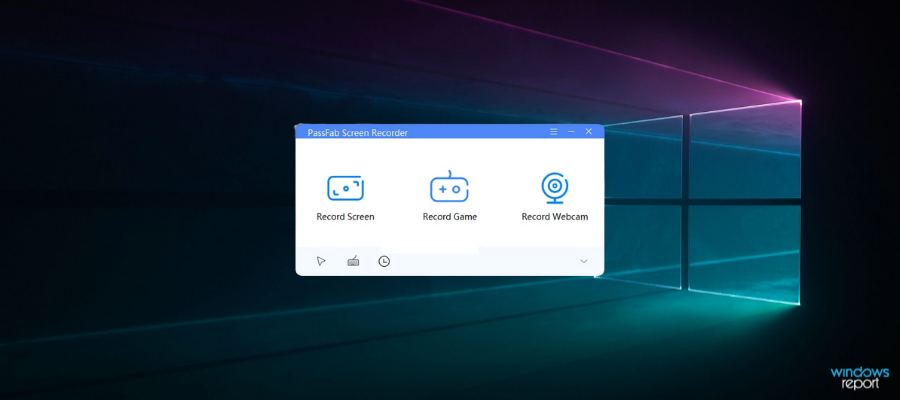
Another good option that comes with several recording and editing features is PassFab Screenrecorder. You can record webcam footage, capture your desktop activity, or combine them with picture-in-picture features.
Not only is PassFab really easy to use, but it is also very lightweight. You don’t have to worry about it interfering with other tasks and processes on your device.
You can set up the software to only record certain screen areas. This can save you some time as you won’t have to worry about cutting frames when you finish recording.
PassFab has no recording limit, so users don’t have to worry about fitting their footage into a specific timeframe. You can trim and adjust the speed of your footage when you are done recording.
You can use PassFab for instructional videos and add real-time annotations on top of your footage. Of course, you can also add text, draw, and overlay images in editing mode.
Other key features of PassFab Screen recorder include:
4K video resolution (provided you have the suitable hardware)
Compatible with all webcam, microphone, and speaker devices
Compatible with all webcam, microphone and speaker devices
Simultaneos recording of screen and webcam footage
PassFab is a licensed product. You can purchase a monthly, yearly, or lifetime license. Passfab offers free updates and customer support to its users. They offer a 30-day money-back guarantee for unsatisfied users.
PassFab Screen Recorder
Provide high-quality video materials to any type of audience with this lightweight webcam and screen recording tool.
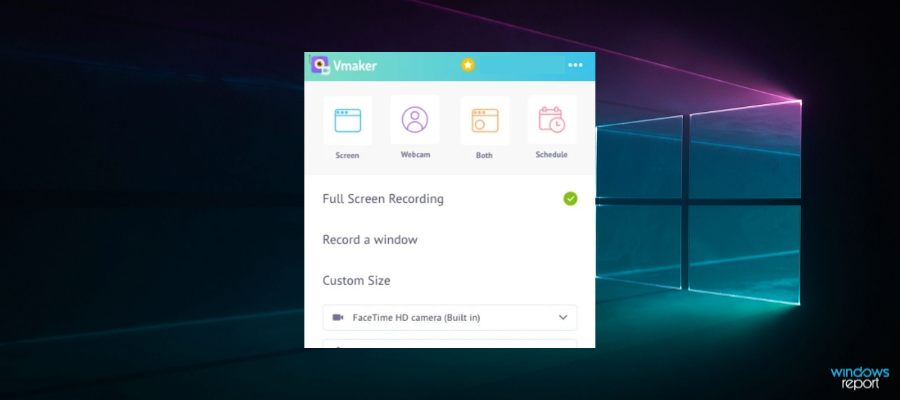
Another software you can use to record webcam videos is Vmaker. It supports the creation of high-quality 4K recordings.
Vmaker is a full-feature video recording suite that provides free Webcam Recorder software.
You can use V maker directly, no download is required. Just add the browser extension to your browser and start recording.
One of the benefits of this software is that it provides unlimited cloud storage. You don’t have to worry about file size or the number of videos you create.
On top of that, the cloud allows you to easily access your video library from any device. You can easily create, edit and share videos on the go.
V maker allows you to record webcam, screen, and audio footage simultaneously. It comes with a set of various filters and frames that you can add on top of your footage.
The software also offers support for screen annotations, so you can easily integrate video titles, subtitles, images, and more.
Other key features of V maker include:
Basic video editor
Supports teamwork within the cloud
One-tab recording in the browser
Real-time collaborations
Scheduled recordings
V maker comes with a free, but limited version and with two premium options that offer more advanced features.
Snapcamera is a software that brings the Snapchat filters to your desktop.
The main purpose of this app is to offer you thousands of real-time video lenses. You can transform yourself in your favorite video game character while recording gameplay footage on your desktop.
The filter library is exactly like the one you find in Snapchat- with mostly user-generated filters. The app is very simple and easy to use. You can start recording with just one click.
You can also make your own filters, select your favorites and store them in a separate section that allows ease of access.
You can use this app to record stand-alone webcam footage, but you can also capture your screen and overlay the videos together. The software also supports gameplay recording.
You can integrate this app with other software and use the filters in real-time video calls. It also has support for live streaming on Twitch.
Other key features of Snapcamera include:
Footage resolution settings
Flip video preview
Snapcode overlay so your viewers can access your filters
Lens effects triggered by hotkeys
Snapcamera is a free, easy-to-use software that adds a touch of fun to your videos.
Logitech is one of the most famous webcam manufacturers in the world.
Therefore it is reasonable for the company to have its own webcam software. So, if you have Logitech’s webcam, probably the best option is to use its webcam software for Windows 10, as well.
With integrated surveillance mode this tool is ideal for your home cameras. It can also capture images and record videos from your system’s webcam
Additional options (like the ability to adjust the camera’s sensitivity or to enable motion detection).
Other key features of this software include:
Motion detection adjustments
Scheduled recording
Image quality adjustments for brightness, anti-flickering, and more
This software is free. Keep in mind, however, that you need Logitech hardware to use it.
Windows 10 has its own camera app, and we simply have to mention it.
Not because Windows 10 camera is a better option, or offers more features than third-party programs, but simply because a lot of people prefer Windows’ built-in tools and apps, over any third-party solution.
So, if you don’t want to install any additional software, but still want to use your camera properly, you should definitely stay with Windows Camera.
It features the basic characteristics and it comes with a user-friendly interface that features the capture and record buttons.
You also get some additional adjustment characteristics, like adding a framing grid or reducing flickering.
Windows 10‘s default camera also works with the majority of communication services, so if you’re using your webcam just for talking with your friends/family, you basically don’t need any additional options.
That’s about it for our top five picks for webcam software for Windows 10. We offered you various options, so you can choose the one that suits you the best.
Let us know what you think about our choices, or if you have some tools to add to the list, in the comments below.
Windows 7 is an old operating system for which Microsoft ended support in 2020. However, there are a bunch of users across the globe still using the OS for reasons best known to them. The BSOD error isn’t a fun error to cross paths with, as it makes your PC inaccessible.
If you are experiencing a BSOD error in Windows 11, you can check out our article. In this guide, though, we will be giving you information on where you can find the BSOD dump file location in Windows 7.
What causes the BSOD error in Windows 7?
BSOD errors, in short for Blue Screen of Death error, can happen a lot on systems running an older version of Windows.
You can encounter a BSOD error because of a hardware-related issue, outdated driver software, a virus or malware attack on your PC, conflicting third-party programs that might have changed the system files, etc.
There are some of the most common reasons you can face BSOD errors in Windows 7:
Hardware malfunction: If you have installed new RAM or put in a new SSD into your PC, then because of a loose connection or loss of power, it can malfunction. Hardware can be broken when you push it beyond its capabilities, which will cause a BSOD error on your PC.
Corrupt system files: BSOD errors can also trigger because of corrupt system files. It can happen if a third-party program has changed some system settings or replaced the DLL files.
Virus attacks: The presence of viruses or malware can often cause multiple issues, one of which is the BSOD error. You can check out some of the best antivirus tools for Windows 7.
Outdated device drivers: If the drivers on your PC are outdated, then your hardware will have issues communicating with your PC, ultimately causing the BSOD error.
Power issues: If you are powering your PC with a fluctuating voltage, this can cause certain hardware to misbehave.
How can I find the BSOD dump file location in Windows 7?
In your homescreen, right-click on My Computer and select Properties.
On the right side, select Advanced system settings.
Switch to the Advanced tab.
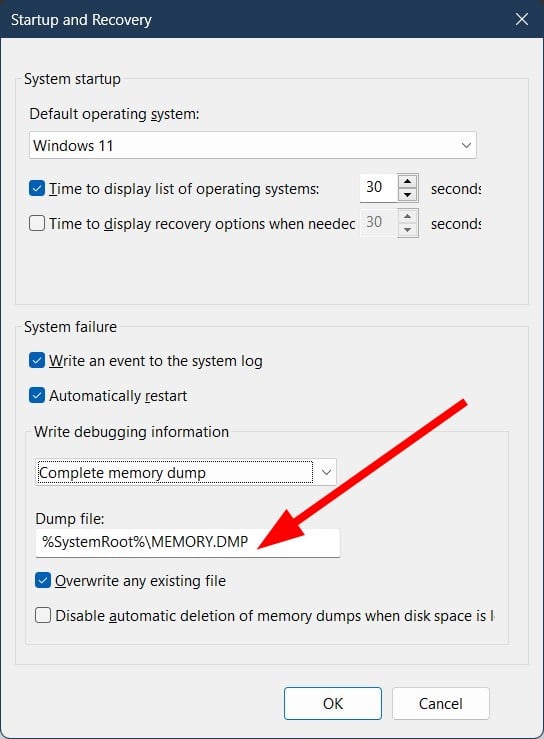
Under the Startup and Recovery section, click on Settings.
If under Write debugging information is selected as none, then you need to select Kernel memory dump for the dump file that contains all information for troubleshooting.
The memory dump file is typically located in %SystemRoot%\MEMORY.DMP with system root is typically C:\Windows.
Also, if you were wondering about the other iteration, the location remains the same for these as well:
That is it from us in this guide. If you are not a fan of looking into the problem but want to get rid of it, then we have a guide that lists a bunch of free BSOD fixers that will help you resolve any BSOD errors in no time.
Let us know in the comments below if the above-mentioned steps helped you to view the BSOD dump file location in Windows 7 or not.
The MSVCR71.dll has been included with Windows operating systems since the first version of Windows XP up to the latest iteration. But several users reported that the MSVCR71.dll is missing.
The DLL file missing error can be encountered while running several applications or even at startup and usually reads, The application failed to start because MSVCR71.dll was not found. So let’s find out all about the problem and its solutions.
Why is msvcr71.dll missing on Windows 10?
Here are a few reasons why the MSVCR71.dll was not found:
Corrupt system files – The most common reason the specific DLL is missing is corrupt system files. It can also cause a range of other issues and is usually easy to fix.
DLL file is not stored in the default location – If the file’s location is changed, either deliberately or inadvertently, it would throw the error.
DLL file deleted inadvertently – In some cases, users reported that the MSVCR71.dll was deleted, and getting it manually did the trick.
What is msvcr71 dll used for?
The file is critical to Microsoft Visual C Runtime and allows Windows to run applications effectively, primarily those written in C++. The location for MSVCR71.dll in Windows 10 is:C:\Windows\System32
In the absence of the DLL file or if it’s corrupt, applications that depend on it would fail to run, thus necessitating the need to troubleshoot things.
How do I fix the msvcr71 dll missing error?
Before you try the slightly complex solutions, here are a few quick ones to try:
Check the Recycle Bin for the file, and in case you find it there, move MSVCR71.dll to the default folder.
Install the latest available version of Windows. You can even update Windows offline in no time.
If you have another working PC (with the same configuration) running the DLL, transfer it to a USB drive and then move it to the problematic computer that doesn’t have MSVCR71.dll.
In case these don’t work, head to the solutions listed next.
1. Use a dedicated tool
Specialized repair software can be used for multiple types of computer issues. It will automatically scan your computer, find the problem, and then repair them by various methods.
Hence, it can be used successfully for BSoD issues whenever your computer is freezing, registry issues fix, cleaning module, etc.
2. Reinstall the problematic application
Press Windows + R to open Run, type appwiz.cpl in the text field, and hit Enter.
Now, locate the application that’s throwing the error, select it, and click on Uninstall.
Follow the on-screen instructions to complete the process.
Applications that rely on the MSVCR71.dll file usually come with it. And if you find that it’s missing, simply reinstalling the application should work. Just make sure to get it from a reliable source.
3. Download VC++ Redistributable package
MSVCR71.dll’s description says it is a Microsoft C Runtime Library, a low-level set of instructions that other programs depend on to work.
Microsoft often packages these runtime libraries together and releases them to the general public as a simple installer.
Many sources have claimed that this error has disappeared after installing the Microsoft Visual C++ 2010 Redistributable Package (x86). But before you do that, make sure to uninstall any existing redistributable package on the PC.
Run the tool, and wait for it to get things ready.
Next, click on Accept to agree to the license terms.
Choose the Upgrade this PC now option and click Next.
Now, wait for the download to complete and follow the instructions to complete the repair process.
An in-place upgrade fixes a range of issues with Windows, including missing DLL files. And you wouldn’t lose any of the saved files or applications. But, try it only as the last resort since it takes quite some time to complete.
And that’s it! The MSVCR71.dll should be available now, and the application(s) that earlier threw the error would work fine.
In case you are looking to fix things automatically, go with a reliable DLL repair tool, and it will also prevent such issues in the future.
Tell us which fix worked for you in the comments section below.
Windows 10 has been a massive success for Microsoft and regularly receives new features and patches. However, many wonder if Windows 11 is better than its predecessor. A Windows 11 vs Windows 10 study is needed for this.
If you are wondering what other people think, we did a survey about Windows 11 to understand what users think about the iteration and their expectations from it. Let’s now compare Windows 10 and Windows 11.
Windows 11 vs Windows 10 – Main Differences
What does Microsoft plan for Windows 11?
Microsoft has big plans for Windows 11 and focuses heavily on user interface redesign and improving the user experience.
These are just some of the new features you will experience, and that’s just the tip of the iceberg. While all these features look promising, what about the hardware requirements?
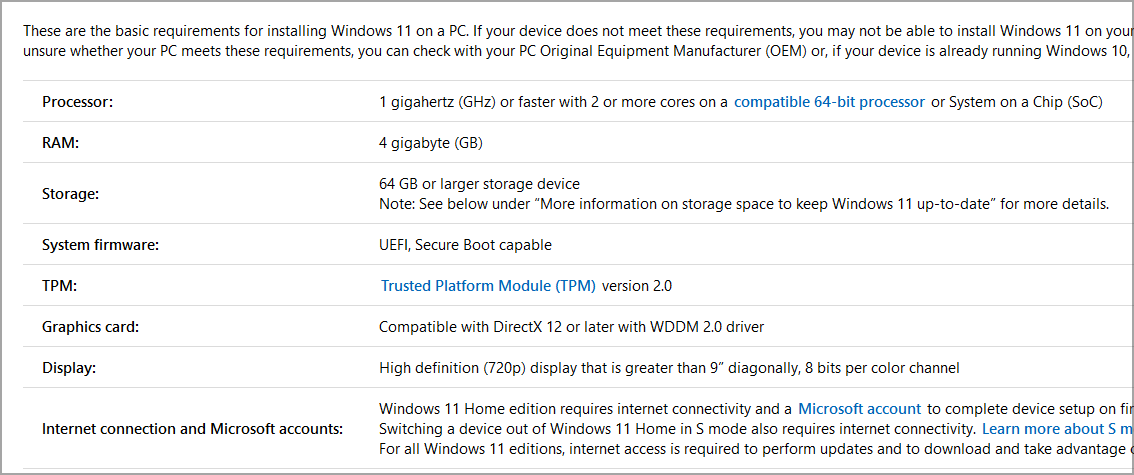
What system requirements does Windows 11 have?
Windows 11 hardware requirements (Source: Microsoft)
Many users reported that they can’t upgrade to the latest version because the TPM device is not detected, and this has sparked a controversy among users all over the world, especially among the ones who don’t have hardware that can support a TPM chip.
Can your PC run Windows 11? Download PC Health Check software from Microsoft and check if your computer is compatible with the latest version.
Is Windows 11 officially released?
After being available for testing for months in the Insider channel, Windows 11 is officially available to the public.
In the past, you had to join Windows Insiders to download Windows 11, but that’s not the case anymore.
Now you can get the latest version in the form of an update, or by downloading the ISO file and performing a clean install.
Is Windows 11 stable now?
Ever since Windows 11 was released officially for users, after rigorous testing and release in the Beta channel, it’s been relatively stable. Though, you may encounter errors from time to time, as is the case with any iteration of the OS.
But, Microsoft is working on these and you should see an improvement in stability in the days to come.
Should I install Windows 11?
The short answer is yes, you should install Windows 11, as long as your PC meets the hardware requirements. If it doesn’t, you’ll be pleased to hear that support for Windows 10 will last until 2025.
This means that if you’re comfortable with Windows 10, you won’t have to update yet. Speaking of update, one major concern with new releases are the compatibility issues.
Users experienced compatibility issues with older software and hardware, so they expect a similar problem with the latest version.
Of course, these issues are mostly things of the past, and developers have fixed the vast majority of bugs that were present with the release of Windows 10.
If you want a smooth upgrade without any headaches, we suggest you wait for a couple of weeks, at least until the initial issues are resolved.
But if you’re looking at this from a long-term perspective, then yes, you should upgrade to Windows 11 since it is the future of Windows. Plus, the upgrade is free, so there’s no reason not to update.
We’ll discuss some methods if you want to know how to upgrade to the latest version. But first, let’s compare Windows 11 vs Windows 10 features.
Windows 10 vs Windows 11 comparison: New options and features
New design and user interface
The first thing you’ll notice when you start Windows 11 is its new user interface. Microsoft has revamped how all windows look, and now, each window and user interface element has rounded corners.
This also applies to the context menu as well as the File Explorer. Speaking of the context menu, some users aren’t too thrilled about the redesign, but you can disable the new context menu in Windows 11 if you want.
File Explorer went through some changes, and now it looks much cleaner than before. The Ribbons are gone and instead, we get the most common commands available in the new and sleek toolbar.
This is a major step forward from Windows 10 File Explorer and the new interface feels less cluttered while providing you with only the most essential options. To top it off, there’s a set of new icons available as well.
These aren’t the only changes, and Start Menu and Taskbar went through a major revamp, and now they sport a new and more streamlined look.
The Taskbar is now centered, and it looks similar to the one from macOS or Chrome OS. If you’re not a fan of this change, you can always move Start Menu to the left from the Settings app.
Unfortunately, the Taskbar is now locked at the bottom, and you can’t move it to the top or the side like you could in the earlier versions.
The Start Menu got a revamp as well, and now it comes with rounded corners just like all other windows. You’ll also notice that the Start Menu is now streamlined and features fewer applications.
Now you have a pinned apps section that allows you to quickly and easily access your favorite apps. Below it, there’s a recommended section that you can use to access recently opened files or recently installed apps.
Of course, you can still see all your apps, but now they are hidden behind the All apps button. We love the new look of the Start Menu, as it seems a lot more organized and minimalistic compared to its Windows 10 counterpart.
The Notification center got a full revamp as well, and now instead of an Action Center, we have a Quick Settings panel and Notifications panel.
This means that quick settings aren’t grouped with notifications anymore, and you can view them separately. Of course, the two new panels come with rounded corners, so they match the new design of Windows 11.
Last but not least, Microsoft Edge got a new design in Windows 11 that sports a simple and minimalistic user interface.
Windows 11 has retired Live Tiles, and instead, it has widgets that do the same job. Although similar, they don’t reside in the Start Menu, instead, they have their panel.
This seems like a great feature, and since widgets have their dedicated panel, they won’t take away any precious workspace as Live Tiles did.
Improved multitasking
Although Windows 10 can snap windows onto different sides of your screen to better organize your workspace, the latest version takes that to a whole new level with Snap layouts.
With this feature, you can choose between 6 available layouts to organize your open applications better. However, Snap won’t work on old display monitors, so keep that in mind.
That’s not all, and with the new Snap groups feature, Windows 11 will memorize which applications you had open and in which layout, so you can easily revert to that layout.
Simply hover over the application in the Taskbar, and you’ll be able to choose the Snap layout that is associated with that application and restore it along with all the apps that were in it.
Virtual desktops are getting some improvements as well, and now you’ll be able to customize the background for each virtual desktop.
Switching between desktops is also improved, and now you can do it simply by hovering over the Task View icon in the Taskbar and selecting the desired virtual desktop.
Windows 11 also brings improvements when working with external monitors, and now windows on your external monitor will be memorized once you disconnect it.
After connecting your PC to the external monitor, the windows that were open on it will be restored automatically, allowing you to continue where you left off.
This is a welcome quality of life improvement, that should make multitasking on multiple monitors a lot easier than before.
Improved touchscreen input
Windows 11 focuses heavily on touchscreen functionality and it brings a new touchscreen experience. There’s no more full-screen Start Menu, and instead, icons will have more space and be easier to touch when you use your device in tablet mode.
For easier navigation, there are a couple of new touch gestures allowing you to easily switch to the last used app, go back to the desktop or restore your open app windows.
You can now also open Task View with gestures and switch between app windows and virtual desktops. Speaking of which, you can now switch between desktops simply with a four-finger swipe.
Touch Keyboard has better customization, and there are new themes to choose from, as well as a new theme engine that lets you create new themes more easily.
Pen input has been improved as well. It now comes with a Pen menu on the Taskbar to quickly launch apps that support pen input.
Pens also support haptic feedback, so you’ll be able to feel vibrations while you use them. Lastly, there’s a voice input support built-in allowing you to enter text simply by using your microphone.
Windows 11 is heavily focused on user collaboration. So it’s no wonder that we’ll see Microsoft Teams built into the latest version.
The software will be available right from your Desktop and ready to use as soon as your OS starts. This is similar to what Windows 10 did since it came with Skype preinstalled.
Since Skype is losing its userbase, and users are moving to more collaborative alternatives, it’s no wonder that Microsoft decided to remove Skype from Windows 11 and replace it with Microsoft Teams.
It seems that Microsoft Teams will get some major improvements soon. And we expect that Microsoft Teams integration into Windows will be received well among users.
If you’re a fan of Skype and you still use it, you won’t be left out, since there’s a way to enable Skype in Windows 11.
Overall, we believe this is a step in the right direction and that adding Microsoft Teams will challenge other collaboration platforms such as Slack.
Android app integration
Windows 11 brings native support for Android apps on Windows thanks to the Intel Bridge technology. Even if this is Intel technology, AMD users should be able to run Android apps natively as well.
Microsoft has teamed up with Amazon for application delivery. It means that if the PC is compatible, one can download and run apps from Amazon App Store.
Android app running on Windows 11 (Source: Microsoft)
This is a brand-new feature, and on Windows 10, users had to rely on Android emulators to run Android apps. This also brings another important question, what will happen with Android emulators on Windows 11?
We believe that Android emulators will remain relevant since not all computers will be able to natively handle Android apps.
However, Google is introducing Android App Bundles that should replace APK files. So we might see some compatibility issues in the future.
Microsoft Store
Microsoft Store is another component that was revamped in Windows 11. The first thing that you’ll notice about the new Microsoft Store is its new look.
The store is now divided into two segments, a content pane and a sidebar that you use to access certain categories, such as apps, games, movies, and TV shows.
The new store looks sleek and more streamlined than its predecessor. However, these aren’t the only changes.
As we mentioned previously, Windows 11 can run Android apps natively. And now you’ll be able to download Android apps right from the Windows Store.
The new Microsoft Store will also support Win32 apps, meaning that you can download and install regular desktop apps from it. There’s also support for .NET, UWP, Xamarin, Electron, React Native, Java, and Progressive Web Apps.
The store will be able to handle browser links. So when you download an application using your web browser, Microsoft Store will take over and install the application in the background.
Last but not least, we have to mention gaming improvements. Windows 11 incorporates many features from the latest Xbox Series X to bring gamers the best possible experience.
One of these features is the DirectStorage, which will allow games to load faster from the NVMe SSDs. Moreover, this feature will also load graphics assets faster, thus delivering more detailed gaming worlds.
Another feature that deserves mention is AutoHDR, and with this feature, you’ll be able to add HDR enhancements to the games that are built on DirectX 11 or higher.
With this feature, you should be able to make older games more vibrant than before, but to do so, you need to turn on Auto HDR in Windows 11 and have compatible hardware.
Probably the biggest change in terms of gaming is the introduction of the Xbox Game Pass. So you’ll get to play new titles from Xbox Game Studios and Bethesda and gain access to more than 100 different games.
Lastly, with Xbox Game Pass Ultimate, you can experience Xbox Cloud Gaming from a web browser and enjoy Xbox titles even on a low-end PC.
These are some amazing improvements, and we can’t wait to see how DirectStorage and Xbox Game Pass for Windows 11 will work in action. And if you compare Windows 11 vs Windows 10 gaming, the former performs better.
How to upgrade to Windows 11?
If you’re looking to upgrade to Windows 11, the process is simple and similar to installing a regular update:
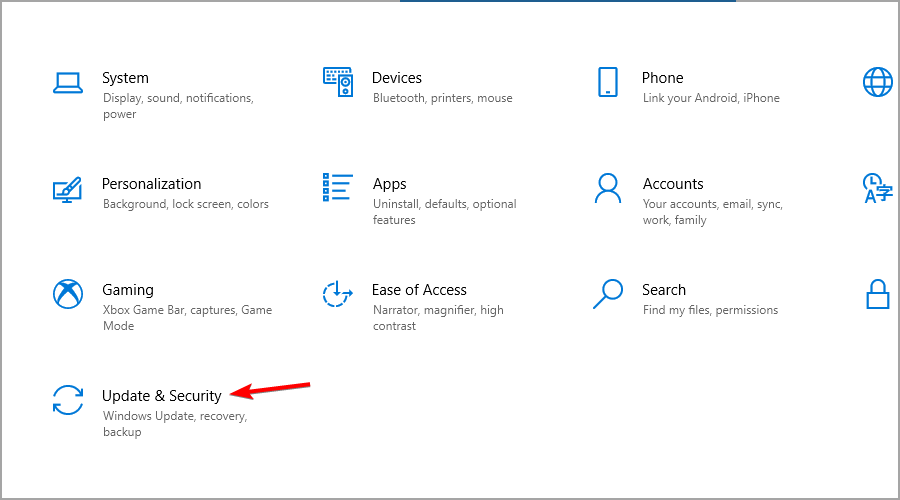
Head to the Settings app on your PC. You can open it quickly with the Windows Key + I shortcut.
Next, navigate to the Update & Security section.
Click on Download and Install button.
Follow the instructions on the screen to complete the process.
What are some good laptops compatible with Windows 11?
As we already know the official system requirements for Windows 11, it is safe to assume that not all devices can run the new OS.
The most considerable difference in the requirements is the TPM 2.0. This is a security feature that manages encryption keys, thus making your machine a lot safer.
If your PC doesn’t have a TPM chip, you’ll have to buy a TPM chip and install it to upgrade to the latest version.
That being said, Microsoft has also announced that in the case of some system types, a missing TPM feature will not stop users from getting Windows 11.
What are the disadvantages of Windows 11?
While there are no significant drawbacks to Windows 11, some users still prefer the previous iteration for the UI. Also, one thing that many disliked was Microsoft removing the drag and drop feature in Windows 11.
Many also felt that Windows 11 is slightly more resource-intensive, and they often ran out of memory while comparing Windows 11 vs Windows 10 RAM usage. But this is primarily because the latest iteration has a lot more features and subsequently needs more RAM.
Though, this gives the previous iteration a slight edge when comparing Windows 11 vs Windows 10 performance on an older PC.
Besides, many users reported that the latest iteration has a slight disadvantage when comparing Windows 11 vs Windows 10 battery life. Microsoft claims that the latest OS will deliver better in terms of battery life due to power optimization.
Conclusion
Windows 11 brings many improvements, and the most notable one is a full user interface redesign, coming as a major upgrade from Windows 10.
The Start Menu is streamlined, and it feels less cluttered than before. The rounded corners on windows look great; the same goes for other user interface elements.
Multitasking is improved, and now you can easily switch between Snap layouts and better organize open windows.
Probably the most significant change is the native support for Android apps and the overhaul of the Microsoft Store. This makes the store a centralized hub for all application downloads.
Lastly, improvements such as DirectStorage, AutoHDR, and Xbox Game Pass for PC will take gaming to a new level.
The latest OS is a significant step forward with great features and a more streamlined user interface. So there’s no reason not to enjoy it.
We use PDF documents on an everyday basis, and to edit them, we need professional PDF editor software such as UPDF.
The software is a well-known PDF editor, and it’s currently on sale during the shopping season, so let’s take a closer look and see what this software has to offer.
Here’s what you’ll get with UPDF Black Friday deal
Easy-to-use user interface
UPDF allows you to read any PDF document easily, and you can choose between four different reading layouts. To make sure that your late-night reading sessions are comfortable for your eyes, there’s also a dark mode available.
Navigation through documents is easy, and you can add bookmarks or search for specific phrases easily. Thanks to the tabbed interface, you can easily read or edit multiple documents.
Lastly, there’s a page management feature that allows you to rearrange pages, and add or remove them. You can even split or rotate pages as you will.
Annotations, comments, and editing
Annotations are present, so you can highlight important sections or add comments for additional information.
That’s not all, the application also supports shapes and stamps, and you can add them freely to any document.
Signatures are available as well, and you can add handwritten or electronic signatures to any location on your document.
Regarding the editing features, you can edit any element on the page, or even add watermarks or backgrounds to your PDFs.
You can use text, image, or PDF for your watermark, and you can adjust the size, opacity, and other features right from the sidebar.
The interface is incredibly friendly to use, allowing you to change the font style, size, color, and other properties with ease. The same goes for images, and you can move them, rotate, extract or replace them with ease.
If you need to add additional info, you can always add hyperlinks or links to other pages of the PDF document.
OCR and file conversion
UPDF uses AI-powered OCR technology that has 3 output layouts allowing you to extract textual information from an image or scanned PDF, and it can even make PDFs searchable.
If needed, you can also convert searchable PDFs into image-only PDFs. By doing so, you’ll prevent them from being editable and searchable.
The OCR feature is 99% accurate while offering amazing performance. Regarding the supported languages, this feature works with 38 different popular languages.
The software also supports exporting, and you can export files into several popular formats, including Word, Excel, PowerPoint, CVS, Text, image, etc. Of course, OCR is supported during conversion and it can extract text from scanned images.
Get the Black Friday UPDF deal
The software is available at 40% for both purchase plans, and with a special buy one gift one plan during the shopping season, you’ll get the following gifts with each purchase:
Annual plan – Get 6 extra free months as a gift when buying an annual plan
Perpetual plan – Each perpetual plan comes with aJoysoft PDF Password Remover lifetime license as a gift
UPDF
Get one of the best PDF editors at discounted price this shopping season.
Taking a screenshot helps you in a situation when you wish to save a good amount of information. In place of typing and saving the information, you can simply take a screenshot and be done with it.
If you have a Toshiba laptop, then there are a bunch of different ways to take screenshots on it. In this guide, we will show you exactly how to take a screenshot on a Toshiba laptop.
What are the benefits of taking a proper screenshot?
Here are a few advantages or benefits you get when you take a screenshot on your PC.
You can report an issue: If you are facing an error on our PC, then you can quickly take a screenshot of the error message and report it to the support team to get further assistance in resolving it.
Save important information: Say you wish to save flight information but it is too much to write down, you can simply take a screenshot and save all the information.
Explain something to someone: You can take a screenshot and guide someone on how to navigate through a bunch of options with clear instructions, to make their life easier.
Create instant and custom memes: You get meme templates on the internet, with screenshots, and you can personalize and customize them to match the situation that you wish to explain. We have a list of some of the best meme-creator software if you are interested.
How can I take a screenshot on a Toshiba laptop?
Take a screenshot on Windows 11
1. Use the PrintScr button
Open the webpage, or app screen, you wish to take a screenshot of.
Press the Fn + PrintScr button.
Open the Microsoft Paint application.
Press Ctrl + V on a new page in MS Paint.
Click on File.
Select Save As and select the file format.
Enter the name of the file.
Hit the Save button.
Taking about the usual way of taking a screenshot, you can make use of the PrintScr button on your keyboard.
Pressing the Fn + PrintScr button will take a screenshot of the entire screen. If you wish to take a screenshot of a particular window, then you need to press Alt + PrintScr.
2. Use the Snipping tool
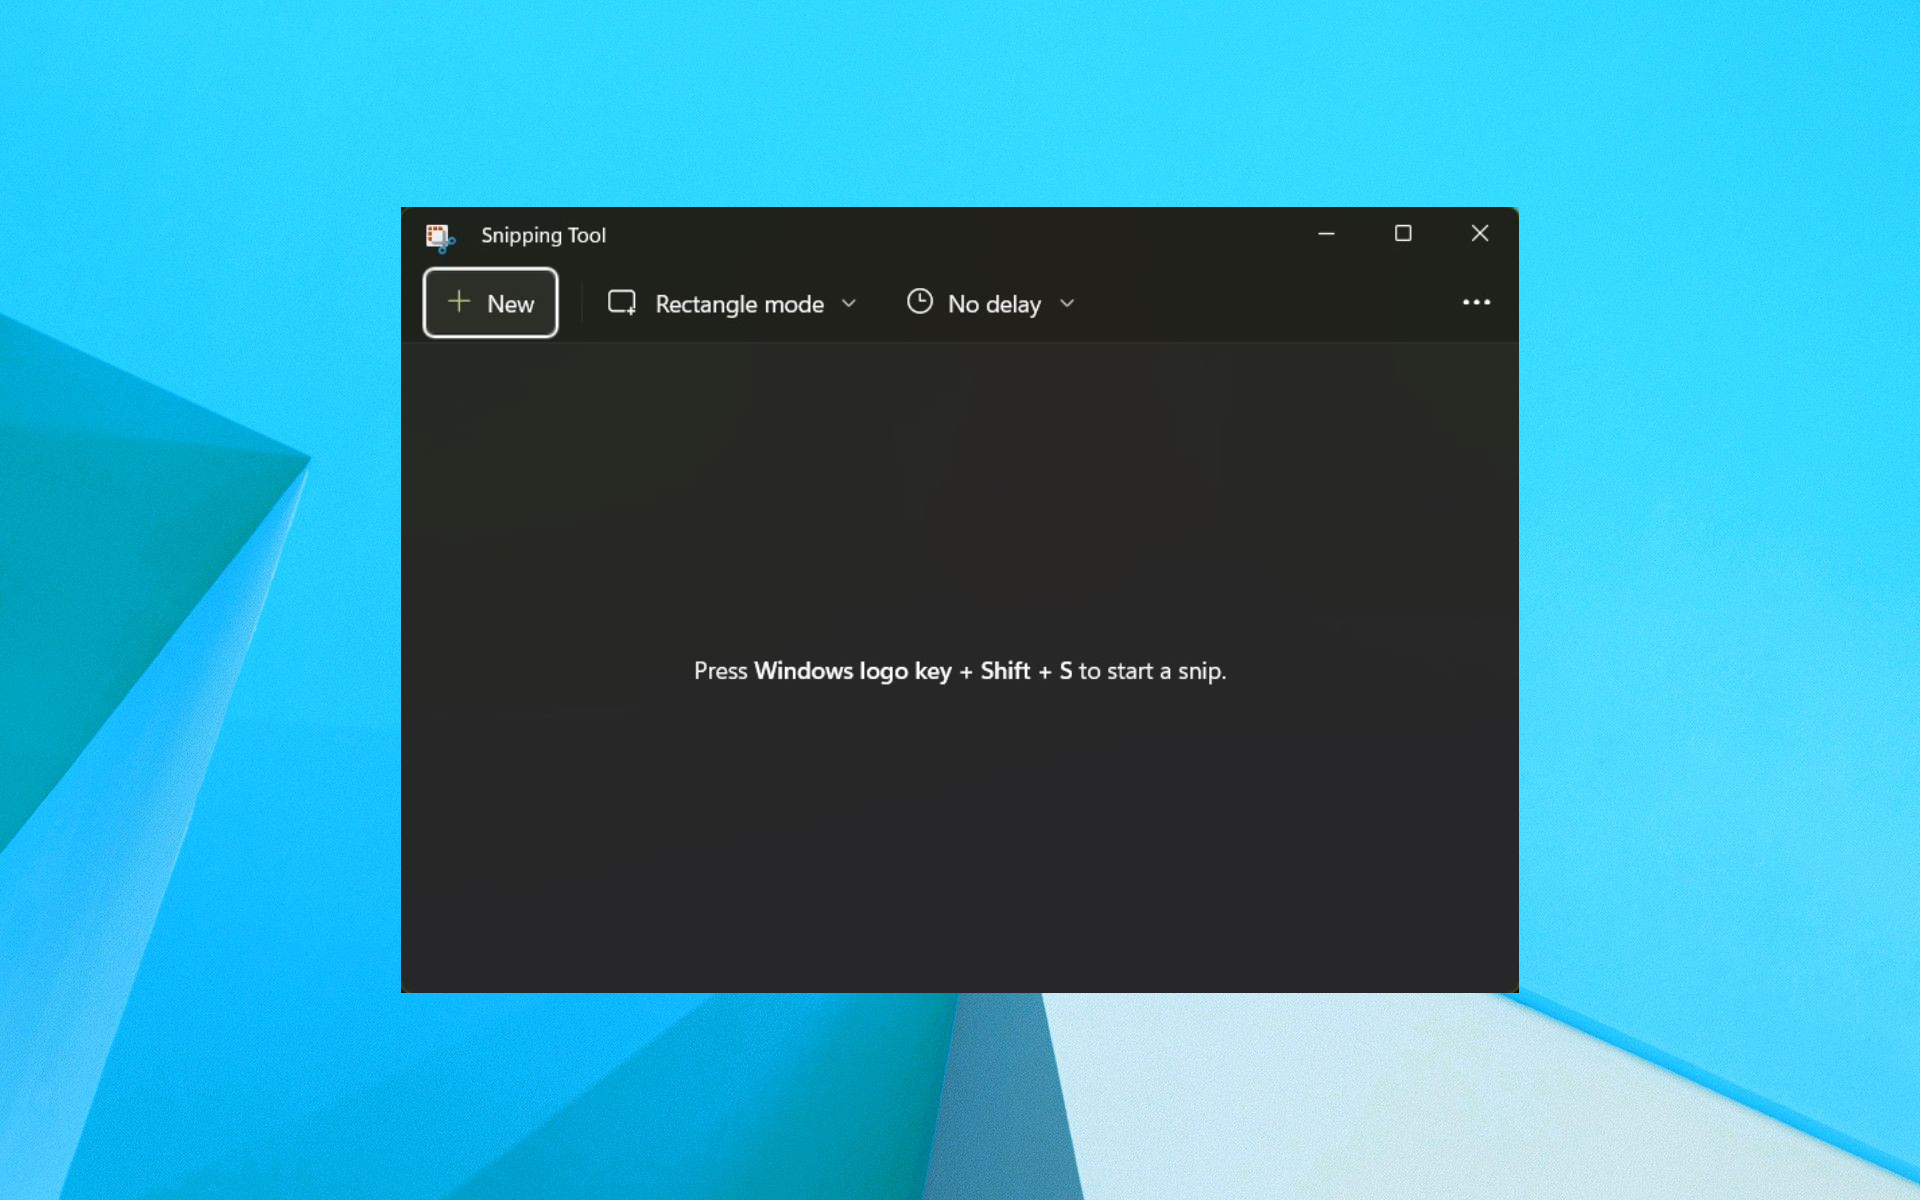
Press the Windows button to open the Start menu.
Search for Snipping tool and open it.
Click on New.
Drag your mouse over the region you wish to capture.
Click on Save Snip.
Choose the location to save your screenshot.
Windows operating system comes with a bunch of essential tools one of which is the Snipping Tool. Using this tool, you can easily capture a screenshot and save it on your PC.
It also features some other editing tools to finalize your screenshots and make them send-ready. You can choose the option to take a rectangle screenshot, an oval screenshot, etc., and also capture a part of the region you wish to capture.
Take a screenshot on Windows 10
NOTE
For those using Windows 10 on their Toshiba laptops, they can also try taking screenshots by pressing the Windows + PrintScr keys.
1. Use the PrintScr button
Open the webpage, or app screen, you wish to take a screenshot of.
Press the Fn + PrintScr button.
Open the Start menu.
Select Paint application from the list.
Press Ctrl + V on a new page in MS Paint.
Click on File.
Select Save As and select the file format.
Enter the name of the file.
Hit the Save button.
Taking about the usual way of taking a screenshot, you can make use of the PrintScr button on your keyboard.
Pressing the Fn + PrintScr button will take a screenshot of the entire screen. If you wish to take a screenshot of a particular window, then you need to press Alt + PrintScr.
2. Use the Snipping tool
Press the Windows button to open the Start menu.
Search for the Snipping tool and open it.
Click on New.
Drag your mouse over the region you wish to capture.
Click on Save Snip.
Choose the location to save your screenshot.
Windows operating system comes with a bunch of essential tools one of which is the Snipping Tool. Using this tool, you can easily capture a screenshot and save it on your PC.
It also features some other editing tools to finalize your screenshots and make them send-ready. You can choose the option to take a rectangle screenshot, an oval screenshot, etc., and also capture a part of the region you wish to capture.
For those using Windows 7 on their Toshiba laptops, they can also try taking screenshots by pressing the Windows + PrintScr keys.
1. Use the PrintScr button
Open the webpage, or app screen, you wish to take a screenshot of.
Press the Fn + PrintScr button.
Click on the Start menu.
Select Accessories.
Click on the Microsoft Paint application.
Press Ctrl + V on a new page in MS Paint.
Click on File.
Select Save As and select the file format.
Enter the name of the file.
Hit the Save button.
Taking about the usual way of taking a screenshot, you can make use of the PrintScr button on your keyboard.
Pressing the Fn + PrintScr button will take a screenshot of the entire screen. If you wish to take a screenshot of a particular window, then you need to press Alt + PrintScr.
2. Use the Snipping tool
Press the Windows button to open the Start menu.
Search for the Snipping tool and open it.
Click on New.
Drag your mouse over the region you wish to capture.
Click on Save Snip.
Choose the location to save your screenshot.
Windows operating system comes with a bunch of essential tools one of which is the Snipping Tool. Using this tool, you can easily capture a screenshot and save it on your PC.
It also features some other editing tools to finalize your screenshots and make them send-ready. You can choose the option to take a rectangle screenshot, an oval screenshot, etc., and also capture a part of the region you wish to capture.
That is it from us in this guide. Let us know in the comments below, which one of the methods you are using to capture screenshots on your Toshiba laptop.
Those who are running Windows 11 may have noticed a few changes from the Patch Tuesday update KB5019980.
Since its release, Microsoft has been making small but evident changes to Windows 11. You can check out an updated review of the OS to find out what you have been missing if you are still not on the Windows 11 train.
A new way to search
In a new KB5019980 update, Microsoft has made some noticeable changes. The most obvious change is visible in the Taskbar and Start menu. One of the features included in this new update is a rework of the search interface.
The new search bar is still very similar to the previous one. However, instead of displaying an icon that looks like a magnifying glass, it now displays a large text button that reads Search.
Mandatory update
Unfortunately, if you don’t like the new search change, it is a mandatory update that will be installed automatically as soon as it is available. The only workaround is to block the updates but that can only last you so long.
While some people will argue that this isn’t an eye-catching change, others will say it’s annoying because it takes up more space on their screen than before and makes it harder for them to type into the address bar.
A Twitter user responded to the changes: I wish we had the option to toggle between the icon and the search bar. The new design looks nice but I prefer more space on my taskbar.
It appears that Microsoft is still in the testing stages as they try out different variations of the Search icon so user feedback will be an important ingredient for the final change.
While it’s certainly an interesting change, it’s unclear how useful the new button will be in practice. Do you think this update is an improvement? Are there other changes that need to be made to Windows 11? Share your thoughts in the comments below.
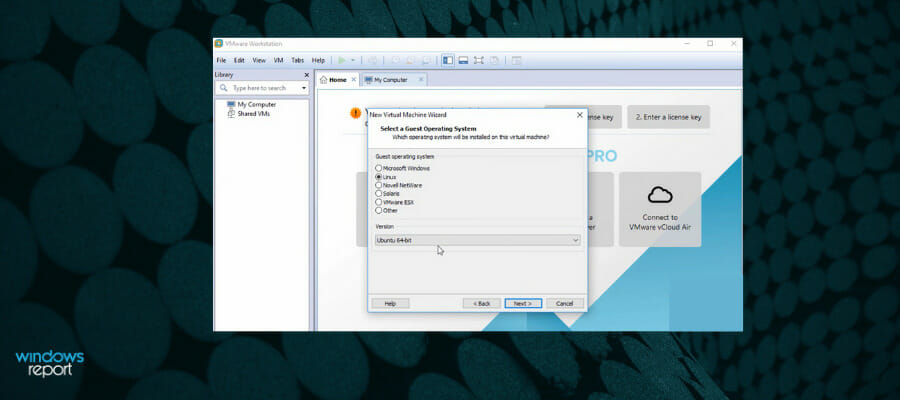
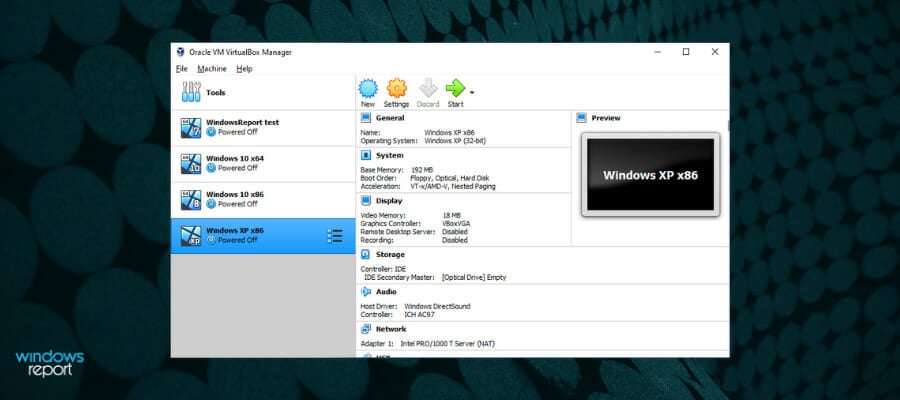
A virtual machine for Windows 10 enables you to run multiple operating systems on the same computer. Same for Windows 11, it’s a wonderful alternative to dual-booting since you just have to rely on a specialized application.
OS virtualization is also cheaper than buying a bunch of desktops or laptops just to install a particular operating system on each. And you don’t need bigger office space either. To unlock the full potential of your computer, you only need to install a Windows 10 virtual machine.
No special experience is necessary to use a virtual PC Windows 10 and 11. You just have to configure a few settings at the software and hardware level. For instance, you’ll need to choose the amount of disk space and RAM to allocate to each OS.
On the other hand, your computer must be powerful enough to sustain this configuration. This being said, we’re here to help you pick a Windows 10 and 11 VM. In fact, you won’t be needing any program, but only the very best virtual machine for Windows 10 and 11.
Note: All the prices and offers in this article are subject to change, so be sure to check the official product page to get the latest deal. If the product you’re looking for is no longer available, you can try to find it on its official manufacturer page or get another one from our list.
What is the best virtual machine for Windows 10?
VMware Workstation – the most complete VM
VirtualBox – user-friendly interface
Azure Virtual Machine – works great on any Windows PC
5G Core Labs – simple options
Hyper-V – one of the most popular choices on the market
VMware Workstation is one of the best OS virtualization tools on the market, thanks to its versatility and speed. You can easily set it up to run multiple operating systems on the same host, regardless of your PC skills.
It comes in two main versions that cover all your needs. The VMware Workstation Player caters to home users and you can use it for free. And yes, it is the best virtual machine for Windows 10 and 11 as far as we are concerned.
After 20 years of active development, VMware Workstation Player is a mature and stable local virtualization solution that can be used both as a personal educational tool and a simplified tool for business. It was mainly created as an option for casual users who need to run a Windows 10 and 11 virtual machine.
And then, there’s the VMware Workstation Pro for professional users. The professional version of VMware Workstation sets the industry standard for running multiple operating systems as virtual machines (VMs) on a single Windows PC.
It was built for IT professionals, developers, and businesses to create and test software on any device.
Here are the extra features provided by VMware Workstation Pro:
Clone machines and take multiple snapshots of the guest OS
Replay changes made to the guest OS for testing software
Compatible with cloud or container technologies like Docker and Kubernets
Capacity to securely connect with vSphere, ESXi, or other Workstation servers
Enables easy transfer of VMs to and from your local PC
Contains the most secure hypervisors in the industry
High-performance 3D graphics (supports DirectX 10.1 and OpenGL 3.3)
Create complex IPv4 or IPv6 virtual networks
VMware Workstation
Experience fast and secure connexions. Maximize productivity with the ultimate virtualization software.
VirtualBox is a user-friendly virtual machine software program that has rich features. Creating and running VM feels like a walk in the park.
The Guest Additions feature is optional but should be mandatory since it grants extra privileges to the host machine. For example, you can share files, drives, and peripherals, enable drag-and-drop support between the host and guest machine, as well as copy content the same way.
All virtual machine parameters are kept in plain-text XML files. Thanks to this approach, you can easily share folders and also use them on the go. VirtualBox supports Windows, many Linux versions, Mac OS X, Solaris, and OpenSolaris.
Azure Virtual Machine is the official Microsoft virtualization service that aims to scale up thousands of Windows VMs.
This software includes managing multiple VMs or large-scale for big data or container workloads, managing groups of different virtual machines.
In other words, you can create thousands of virtual machines in a few moments with built-in load balancing and centralized templates.
The main purpose of this program is to simplify the governance of your VMs. To do that, it’s possible to automate the deployment of virtual machines or issue OS updates for improved security.
Moreover, you can increase the availability of applications across availability zones, or choose VM images and consumption models.
Another important benefit implies scalable applications with VM scale sets to choose the right size of your infrastructure while optimizing your costs.
Hence, if you need professional solutions in terms of VM organizing and performance you can best use Azure Virtual Machine to enhance the virtualization experience.
The next solution is represented by 5G Core Labs, a resourceful program that can provide virtualization services in just a few clicks.
With such an intuitive option, you can set up virtual machines easily in a few steps, assuring all the needed services to deploy an efficient virtual machine.
Moreover, the complete services of this VM software can offer valuable benefits like ready virtual machine images, snapshots of VMs to roll them back if needed, managing infrastructure load via APIs, multiple network interfaces, and more.
It’s also feasible to set up cloud security options to protect more virtual machines and stay secure all the time. By setting up this cloud firewall you don’t take any risks and get a high uptime.
On the same note, you’re protected against DDoS attacks on the network thus reducing connectivity issues and enjoying nonstop availability.
Therefore, you can obtain this performant service and set up VM easily, choosing a number of cores, RAM memory, number of disks, and so on. You only pay for consumed resources and take helpful processes
Hyper-V was released in 2008 to Microsoft Visual PC as the built-in option for creating virtual machines. This OS virtualization software solution is robust. It comes with an accessible interface and intuitive features for all users.
Hyper-V can virtualize not only operating systems but also hard drives, switches, external media drives, and other devices. On the other hand, it doesn’t work with sound cards or graphic cards.
It only works with 64-bit Windows and can be found in the Windows 10 Pro, Enterprise, and Education editions. Should you encounter difficulties installing Hyper-V on Windows 10, feel free to check this nifty guide.
Moreover, this Microsoft-provided service is mostly used by developers who need to test other versions of Windows on different devices or test older version Windows applications.
Thus you can have a try to test other operating systems and see various functions that aren’t accessible on current versions of Windows.
Qemu depicts an open-source generic emulation machine and virtualizer software. It can run full system emulation and user-mode emulation.
The most popular aid provided by Qemu is system virtualization, offering a virtual model of a machine. More exactly, the CPU, memory, and other emulated services depend on the machine.
On this mode, you can run a fully emulated CPU or it may work as well with a hypervisor such as Hax or Hypervisor. Framework. At the same time, the user-mode emulation can be used to launch compiled processes for one CPU.
Moreover, using this program you can build your virtual machine on multiple OS platforms. For example, the recent versions of macOS, Linux OS, FreeBSD, or OpenBSD are allowed to execute when you need it.
Another significant feature allows the users a number of standalone utilities like disk images that permit you to create or convert disk images.
Thus you should benefit from such powerful virtualization services to run other operating systems anytime you feel like it. With the practical support offered by Qemu, you can set up and emulate your VM efficiently.
Citrix Hypervisor is a virtualization management platform optimized for application, desktop, and server virtualization infrastructures.
It has comprehensive management tools, giving you the possibility to automate and distribute live environments with ease.
Citrix Hypervisor also provides support for high-performance enhanced 3D graphics, with a great variety of GPU pass-through and virtualized GPU vendor options. It includes support for Intel’s Virtual Graphics Technology (GVT-g) and NVIDIA GRID vGPU.
With sophisticated server consolidation and containment, Citrix Hypervisor allows for increased performance and capacity gains in CPU cores. It has integration with Microsoft Windows Update Services for automatic Windows VM driver updates, as well as host RAM, VM RAM, and virtual disks per VM.
This article should serve as a good guide for virtualization options. The best virtual machine for Windows 10 and 11 will cover your virtualization needs from a high-end corporate application perspective, but also cater to your own personal necessities.
These virtual machines can handle various operating systems, so you can use them to run macOS and GarageBand on Windows 10.
Got some more Windows 10 and 11 VM suggestions? Don’t be shy to share them in the comments section below.
A living trust is a very useful legal document that you can create during your lifetime. While it is very similar to a will, a living trust will only become applicable after you die.
Using a living trust means that all your properties will belong only to your trust and you’re able to avoid probate, confirming legal documents by yourself.
If you need more security regarding your valuable heritage and how it will impact your family, you should, by all means, prepare a living trust when the time is right.
Plus, you can even do it by yourself with the condition of having certain know-how before signing. This is where living trust programs will become useful.
That offers you peace of mind regarding the way your assets will be split up to your heirs, after your death.
You should also be aware of the importance of such an arrangement because, even if it can be revocable, it’s not a last-minute decision. The living trust implies your property as well, and a trustee will entirely benefit from it.
Whether it’s your children or other trusted relatives, you should know that you can put administration conditions in case you need to share house workarounds with them.
You have two options regarding the type of living trust that you can choose:
Revocable living trust – you transfer your assets into the account of the trust, and you keep control over them. You have the option to change aspects and revoke it entirely, as needed.
Irrevocable living trust – this option allows you to give away all your assets to the beneficiary of the trust. You do not have the option to change or revoke it.
In this article, we will explore some of the best software options on the market that allow you to easily create professional-looking and efficient living trusts.
The most resourceful online library with thousands of official legal documents you can use, specifically living trust forms.
With this extensive platform, you can search for any documents or legal forms out there. The search bar can filter your results by state and also give the official forms to complete your living trust.
Not only that, you have different trustee forms based on the state and it’s extremely easy to access them from the comfort of your house.
You can use this official US database to find various living trusts or official papers such as wills, real estate, or adoption documents.
Moreover, any person can use the official forms found on this website, no matter the status. So any individual or even attorney can complete the forms online in a few clicks.
In terms of plans, you can choose different packages that contain different life documents so you can prepare the estate planning ahead of time.
Therefore, try out a complete solution to fill out your living trust and even notarize it in minutes online.
US Legal Forms
Fill your living trust forms entirely online with this legal resource used by millions.
Quicken WillMaker Plus is an incredibly useful software that allows you to create plans for your estates, living trusts, etc.
You get step-by-step assistance, from the start till the end of the process, including all aspects of legal data that allow you to choose the best option.
This software can create a variety of documents for you – wills, living trust, living will, and different financial arrangements, and also offer information regarding your chosen caregivers and manage the process of fund allocation.
With the Living Trust module, you can rest assured that all your property papers pass the probate easily and in a timely manner.
This module allows your family to be taken care of in the event of your death, by naming the person to carry out your instructions and also allowing them to make important decisions regarding your health care requirements.
With that being said, take advantage of this leading estate planning software to stay relaxed about your properties and the final distribution of assets.
Let’s quickly look at its key features:
Can create custom estate plans with a wide range of utilities – will, health care, etc.
Interview format of the software allows you to give concrete answers to complicated legal terms
Contains a user-friendly legal manual that can help you find answers to common questions
Your projects will be sent to a team of lawyer-editors that will customize the papers with the requirements of the laws in your country
Offers you a very useful checklist feature – this tool allows you to make sure that you have all the documents needed
Quicken WillMaker Plus
Assure your inner peace regarding all the properties or assets you have, using Quicken WillMaker Plus!
Rocket Lawyer – Step-by-step guidance directly in the app
Rocket Lawyer is another great tool that allows you to create all documents needed for creating a professional and all-encompassing will. In order to make things easier for you, this app uses a very easy-to-understand interview format with guidance for every stage of the process.
You can create asset worksheets, progress reports, and it also provides you with will templates. These templates can be very useful when you’re not sure how to start creating your documents.
Using this comprehensive software, you can make legal documents digitally and sign them as well to be prepared for any real estate concerns. Plus, you have the option to contact attorneys that will sure provide qualitative assistance.
In addition, this tool permits the beneficiaries to have complete control over your assets after you die, and thereby avoid complicated legal processes in order to offer the most valuable properties.
Thus don’t hesitate and act out shortly if you need to have mind peace regarding the future of your valuable assets.
Let’s quickly look at its key features:
You can easily export your living trust documents in a PDF file format or print it immediately
Create a schedule of assets, living will, assign a health care directive, or create documents relating to choosing the caregiver and the instructions for survivors
Legal reference guide so you always adhere easily to the known legal requirements
Easy to install and easy to use
Provides useful pre-made templates
Rocket Lawyer
Providing for your loved ones is simple once legal matters are made simple.
Globally known for its impressive general ledger features, QuickBooks can just as well serve as a reliable living trust software for proper estate planning and family businesses.
Proper estate planning can help mitigate any risks following a business owner’s passing by determining how money and assets will be divided upon death.
With QuickBooks, you can do more than just make sure the right people inherit your assets, but also minimize taxes during the transition process while avoiding legal impediments.
More so, the software will help you with all the financial queries, including invoices, budgets, or expenses that you have to make before the last moment. You can arrange every money aspect and let everything clear for your heirs.
Another useful feature helps you to track actual expenses to always know where your money is going. You can sort out transactions and therefore stay updated about your financial status before you make the final decisions.
By creating a detailed estate plan or living trust for your family, you can rest assured knowing that your loved ones will be secure when you’re no longer around.
Let’s quickly look at its key features:
Ownership transfer assistance
Protection against unnecessary tax payments and debts
Safeguard the legacy of your business
Smooth succession of assets to loved ones
Avoid probate (your family will be able to access the funds faster and with minimal expenses)
QuickBooks
Your trusted partner in financial planning for every task from bookkeeping to setting up a living trust!
LawDepot is a handy software option that offers you a user-friendly interface and helps with creating your own living trust documents and other additional documents for your will.
Even though this app can’t compare with Quicken or Rocket Lawyer, it still has a great set of features that can make the will-making process easier.
It lacks the ability to create checklists, spell check your documents, and also lacks asset worksheets, but it makes up for that because of its ease of use.
Let’s quickly look at its key features:
You can use great templates specifically designed for estate planning
Create your last will and testament, a living trust, or a Power of Attorney document.
Create documents that are part of the will, like choosing caregivers and executors in case something goes wrong
Similar to Quicken WillMaker, LawDepot allows you to also create revocation documents
Creating your own will, with an entire list of supporting documents isn’t as difficult as it used to be. You can now use specialized will creator software to help you through the entire process, in a step-by-step manner.
These software options encompass a large array of features that cover all your needs regarding the easy creation of a living will, executor documents, and other important documents of your estate plan.
We would love to find out what your experience with using this software was, and what option you chose to try. Feel free to share your opinion with us by using the comments section below.
Multiple user reports confirm that GIFs are missing in Microsoft Teams for several users. Microsoft Teams comes with a native option to send GIFs, but for some reason, it isn’t available for everyone. You can also refer to our guide on what to do if MS Teams is crashing on startup if you’re facing this problem.
The GIFs on Microsoft Teams are available via GIPHY and can be used on desktop and web clients. If the GIF is missing for you in Microsoft Teams and you are looking for solutions, then this guide will give you a bunch of solutions to resolve the error.
If you don’t see the GIF option both on the desktop and the web app, and it is missing in Microsoft Teams, then the team owner has disabled the option.
In such a case, you need to ask your Team owner to enable the GIF option under Settings to allow all members to send/receive GIFs.
In case, that is not the reason for you, then it could be because of the reasons listed below:
Hardware acceleration feature: The GIF was missing in Microsoft Teams for several users because the hardware acceleration feature was disabled.
Corrupt cache: The presence of corrupt cache files can also cause multiple issues with a program, which could also be the reason for this issue.
Browser glitch: If you are coming across the error on your web app, then this could also be because of a temporary glitch or bug in your browser.
Buggy Team version: The current version of the Microsoft Teams that you are running might be the issue as it may have a bug that is causing the problem.
How can fix GIF is missing in Microsoft Teams error?
Next to your team name on the left side, click on the 3-dot icon.
Select Manage team.
Click on Settings.
Expand Fun stuff.
Check the box for Enable Giphy for this team.
Often to maintain the sanctity of a Team, admins disable the GIF option for the group. This could be the reason you aren’t able to send/receive or view GIFs in Microsoft Teams.
2. Enable hardware acceleration
Launch Microsoft Teams.
Click on the 3-dot icon at the top toolbar and select Settings.
Under the General tab, uncheck the box for Disable GPU hardware acceleration.
Restart Microsoft Teams and check if you could see GIF.
Launch Team and check if you could fix GIF that is missing in Teams error.
Corrupt cache files can conflict with the smooth functioning of an app and cause them to misbehave. This could also be the reason why you aren’t seeing the GIF option in Microsoft Teams.
6. Clear browsing data
Open Google Chrome.
Click on the 3-dot icon at the top-right.
Click on History.
Select History.
From the left, select Clear browsing data.
Make sure to check the boxes for Browsing data, Cookies and other site data and Cached images and files.
Hit the Clear data button.
Relaunch the browser.
Log in to Microsoft Teams and see if this resolves the error.
Often browser cache can cause it to misbehave and ultimately cause issues with the web apps. You can try clearing the browser cache and checking if this resolves the issue.
Also, if this doesn’t fix the problem, we suggest you switch to a different web browser. There are a plethora of web browsers available on the internet.
For Windows 10 users, we have a guide that lists some of the best tested and tried web browsers for your OS.
If you are running an older version of Windows, then do not worry, as we have a list sorted out for web browser that requires very less resources to run and provides you with a fast browsing experience.
7. Sign out and log in again
Launch Microsoft Teams.
Click on your Profile icon in the top-right corner.
Select the Sign out option.
In the welcome screen, hit Get started.
select your account to log in.
Enter the credentials and check if this fixes the error.
There might be a temporary glitch that is causing the issue with your Microsoft Teams account, because of which you are experiencing the GIF is missing in Teams error.
In such a case, the best bet is to log out of your account and re-login to fix the issue and check whether this resolves the problem.
That is it from us in this guide. Well, GIF is missing in Teams isn’t the only error that you may come across when using this tool.
If you are looking for ways to record a Microsoft Team meeting, then you should look no further, as we have a guide that lists five ways to do that easily.
Let us know in the comments below which one of the above solutions helped you resolve the GIF missing in Teams error.
Have you ever found a great video but only wanted the audio version? Fortunately, there is a way. There is a way to get MP3s from MP4s. The Windows Media Player allows you to convert files from MP4 to MP3.
People love the convenience of being able to download their favorite music and take them with them wherever they go. So why not use save these songs in mp3 format? If you want to convert MP4 to MP3 in Windows Media Player, you’ll be surprised to learn how easy it is.
Does Windows have an MP4 to MP3 Converter?
Yes, Windows has an MP4 to MP3 Converter. You can use the built-in Windows Media Player, which comes with all versions of Windows.
There are many reasons why you would want to convert MP4 files to MP3. These include:
Your device doesn’t support MP4 – Sometimes, Windows can’t play MP4 files. This is despite MP4 being the most common video file type out there. MP3s can be played on a wider range of devices.
Free hard drive space – MP4 files take up a lot of storage space. A typical 1-hour video file can be around 100MB in size. But an MP3 version of that same video will be less than 10MB.
Allow sharing – MP3 formats make it easier to share your music with others than MP4 does. This is because it has a smaller file size and can be shared easily through other methods without any problems.
You want to listen rather than watch – If the content of your MP4 is something you’d like to listen to, say a song or an audiobook, converting it into MP3 format makes sense and allows you to multitask.
Can Windows Media Player convert to MP3?
Most users wonder: Is Windows Media Player MP3 or MP4? Windows Media Player supports both MP3 and MP4. The difference between the two is that MP3 is a compression format, and MP4 is a container format.
There are many programs that can do this, but most of them are either complicated or require you to pay money. If you’re looking for something that works well, is easy to use, and is free, then the Windows Media Player is your best bet.
Both formats can contain many different types of data, including music, video, pictures, and text. When you play an MP3 file in Windows Media Player, the player decompresses it and plays it as audio.
However, some users are a bit obsessed with quality, and converting from MP4 to MP3 can significantly affect the audio quality. If you are one of these people, you are better off using a third-party tool.
With the help of MP4 to MP3 converter software, you can easily convert any MP4 file to MP3 without any hassle. You just need to select an audio format and then start converting it. MP4 converter software lets you change the settings for audio quality, bitrate, sample rate, and channels.
You can also change the output file size and location. The best thing about this software is that it supports batch conversion so that if there are multiple files in one folder, then all of them will be converted at once in just one click.
This saves your time and money as well because if there are many files in one folder, then it will take more time.
How can I convert an MP4 into an MP3 in Windows Media Player?
Launch your Windows Media Player.
On the top left corner, click on File then select Open (This will take you to a location in your PC where you have stored MP4 files).
Select the file you want to convert into an MP3 and click on it to open it in Windows Media Player.
Go back to the top left corner, click on File and select Save as.
In the Save as dialog that appears, navigate to the Filename field, and at the very end where the file extension is (.mp4), delete the 4 and replace it with 3 so that the new file name reads as xxx.mp3.
What if Windows Media Player saves as is greyed out?
There are many reasons why you may not be able to save a Windows Media Player playlist. The most common reason is that you’re trying to save the playlist on a removable drive, such as a USB stick or CD.
Make sure that there isn’t already another program open that’s using the file you want to save. For example, if you’re trying to save a song from the library while another program is playing it, this will prevent you from saving the file.
This is because Windows Media Player will be prevented from accessing it until the active program has finished playing it.
Another reason why some users experience trouble with saving playlists is that they’ve chosen a folder that already contains another copy of the same song.
And that’s how to convert your MP4 to MP3 files in Windows Media Player. If for some reason your Windows Media Player is not working, we have a fix for that.
You came to the right place if you wondered why Cricut wouldn’t connect to the computer. A good number of users have asked the same question.
It can be unpleasant if you can’t wait to start your projects, and the only thing standing in your way is the setup of your Cricut machine.
Even though the process should run smoothly by just following the on-screen instructions, sometimes situations arise in which that is not possible.
For the reasons mentioned above, in this article, we will explore some of the best fixes regarding this issue.
Why is my computer not connecting to Cricut?
Users have experienced Cricut connection issues on their computers for the following reasons:
Issues with the firewall – It could be that your firewall has blocked out Cricut, and if this is not corrected, you will not be able to connect.
Bluetooth issues – The Bluetooth may have been disabled or needs some troubleshooting before connecting to Cricut.
Issues with the driver – If you have old, outdated, or inadequate USB drivers, it may also be why it won’t connect.
There are a few variations to this problem. The solutions below will work if Cricut won’t connect to a computer via USB and Bluetooth, Cricut Explore Air 2 not connecting to a laptop, Cricut easy press, Cricut explore, maker, or joy won’t connect to a computer.
Now we will talk about potential fixes for this connection issue.
How do I fix Cricut if it won’t connect to the computer?
1. Make sure your Windows firewall isn’t blocking the machine
Click on the Cortana search box, type windows Firewall, then click on Allow an app through Windows Firewall.
Click on Change Settings.
Scroll through the list and tick the boxes for the Cricut, then select both Private and Public.
Click Allow another app if you can’t find the Cricut software listed.
Navigate to the installation folder of your Cricut software, add the executable file, then repeat step 3 of this method.
Click OK.
2. Make sure your Bluetooth is turned on, or connect the USB cable
Ensure your Cricut machine is turned on and not more than 3-4 meters away from your PC.
Press Windows + X keys on your keyboard and select Settings.
Click the Devices option.
Ensure Bluetooth is toggled On, then click Add Bluetooth or other device.
Select Bluetooth and wait for your PC to recognize the Cricut machine.
Select the machine, enter PIN 0000, then select Connect.
Check if Cricut won’t still connected to your computer.
To connect your Cricut machine through a USB cable, connect the wires to both peripherals and follow the on-screen instructions to install the required USB driver.
3. Install the USB drivers manually
Press Windows + X keys on your keyboard and select Device Manager.
Find the Cricut machine in the list, right-click it and select Update driver.
Select Browse my computer for the drivers.
Type %APPDATA% inside the search box, then select Browse.
Inside the explorer window, navigate to: Roaming\CricutDesignSpace\Web\Drivers\CricutDrivers.
Once that folder is selected, click Ok, then click Next.
Finally, restart your computer for the changes to take effect.
A faster solution is to use a specialized driver updating tool to automatically search, find, and install the right USB drivers for you.
If Cricut still refuses to connect after checking your firewall, Bluetooth, and USB drivers, see our complete Cricut Design Space not working guide for additional troubleshooting methods that cover software updates, cache fixes, and reinstall steps.
You should note that these solutions are not written in any particular order and should use what seems most relevant to you.
If Cricut doesn’t connect to your computer, we hope it is now resolved.
Please let us know if this guide helped you solve your issue by using the comment below.
Some users have contacted us about an issue where Outlook is stuck on We’re getting things ready while using Office 365.
Consequently, those users can’t install Office 365 when that happens. This guide will cover all the possible variations of this error, and you will be able to fix it fast. Read on to find out more.
Why is my Outlook account stuck on We’re getting things ready?
User privilege – If your installation gets stuck on We’re getting things ready issue is most likely the lack of necessary privileges. Installing the software requires administrative rights; if you don’t, you might encounter issues like this on your PC.
OS Compatibility issues – In addition to the necessary privileges, you might have to install the setup in compatibility mode.
Third-party application – It’s also possible that other applications are interfering with the process. In some cases, it could be antivirus software.
Old installations – If you have any older versions of Office installed, it could be an easy trigger for this installation failure. It’s advised to remove them before trying to install the new version.
What can I do if Outlook is stuck on We’re getting things ready?
1. Run the Office installer as administrator
Locate the setup file and right-click it.
Now choose Run as administrator.
The installation should now be able to complete without issues.
2. Run the installer in compatibility mode
Right-click the setup file for Microsoft Office and select Properties.
Click the Compatibility tab.
Check the box next to the Run this program in compatibilityoption—select Windows 8 on the platform drop-down menu.
Then select the Run this program as administrator option. Finally, click Apply and then OK.
3. Uninstall other installations of Office
Press the Windows key + R keyboard shortcut to open the Run dialog.
Type appwiz.cpl in the Open box and press Enter to open Programs and Features.
Select the Office software listed in Programs and Features.
If screen dimming is causing problems on your Windows 11 PC, you’re not alone. Many users experience Windows 11 auto dimming screen issues, especially during gaming or when using Windows 11 split screen.
In some cases, the brightness drops even when it’s set to maximum, making it even more frustrating. This often happens due to settings that automatically adjust brightness in Windows 11.
Whether you’re seeing screen dimming at full brightness or random dips while multitasking, we’ll help you fix it.
How can I fix screen dimming in Windows 11?
1. Disable Night Light
Click Start on the taskbar to bring up that menu, then select the pinned Settings app on the Start menu.
Click Display on the System tab.
Then turn off the Night light setting by clicking its toggle button.
If your Windows 11 screen darkens, the Night Light feature may be causing it.
2. Turn off your monitor’s auto-dimming feature
Your monitor might have an auto-dimming feature that’s dimming the brightness. The best way to determine if that’s the case is to look through the manual for your PC’s VDU (visual display unit).
That manual will tell you about the monitor’s auto-dimming feature and how to disable it.
Press the Windows key + I keyboard shortcut to open Settings.
Select the Gaming tab in Settings.
Next, click Game Mode on that tab.
Click the toggle button to turn off Game Mode if it’s enabled.
Some users reported that you can fix this problem by disabling the game mode only for specific games that cause screen dimming. You can do that by following these steps:
Open Game Mode settings and go to Graphics.
Select the desired game and click on Options.
Check Don’t use optimizations for windowed games. Next, click Save.
4. Update your graphics card’s driver
Right-click the Start button, then select Device Manager on the open menu.
Next, double-click the Display adapters category in Device Manager.
Right-click the graphics card listed there and select the Update driver option for it.
Thereafter, click the Search automatically for drivers button. The Update Driver utility might then detect and install a new driver.
However, third-party driver updater software will more likely detect if there are new drivers available for your PC’s graphics card and will be effective if your Windows 11 screen is dimming randomly.
A driver updater utility will scan your PC and list devices with outmoded drivers. Then, you can download and install new drivers with the software.
This resolution is recommended if your PC’s graphics card already has the latest driver.
Right-click the Start button, then select Device Manager on the open menu.
Double-click the Display adapters category in Device Manager.
Right-click the graphics adapter and select Uninstall device.
Select the Delete driver for this device checkbox on the Uninstall Device window.
Then select the Uninstall option to confirm.
If your Windows 11 screen goes dark randomly, reinstall your drivers and check if that helps.
6. Clean-boot Windows 11
To launch Run, press the Windows key + R hotkey, then input this text in the Open box and press Enter or click OK:msconfig
First, click Selective Startup on the General tab, then uncheck the Load startupitems checkbox to disable that setting.
Select the checkboxes for Load system services and Use original boot configuration if they’re not selected.
Next, click Hide all Microsoftservices on the Services tab to select the setting.
Select the Disable all button.
Click Apply to save the new boot settings, then press the OK button to exit MSConfig, and select Restart on the dialog box.
If this resolution fixes the screen dimming, a background process, service, or app was likely causing it. You’ll need to identify the background process, app, or service to resolve the issue if you want to restore your PC’s original boot configuration.
You can restore the original boot configuration by selecting the Load startup items option in MSConfig you previously disabled. Click the Enable All button in MSConfig to restore third-party services.
What causes screen dimming issues in Windows
Screen dimming can arise from certain Windows 11 or built-in monitor features that automatically lower brightness levels. These are some of the more common causes of screen dimming:
Night Light and Game Mode: Night Light and Game Mode are two other features in Windows 11 that can feasibly cause screen dimming when you’re playing games in full-screen mode
Monitors’ auto-dimming features: Some monitors have auto-dimming features that reduce brightness levels for Windows games
Graphics cards’ drivers: Your graphics card’s driver might be faulty or outdated
Adaptive brightness: Some laptops have adaptive brightness features. If your Windows 11 brightness keeps decreasing, this feature might be the problem.
Our solutions will come in handy if Windows 11 screen brightness keeps changing, Windows 11 adaptive brightness is missing, or your screen dims after 30 seconds.
Wrapping up
The resolutions above should be enough to fix screen dimming in Windows 11 for many users. Those potential fixes are especially recommended for screen dimming that arises when playing games.
If those aren’t enough to solve Windows 11’s screen dimming, there could be a hardware issue with your PC’s monitor. In this case, you might need to return and change the VDU (or the whole PC if it’s a laptop) to its manufacturer for repairs.
The VC Runtime Minimum X86.msi is a program that runs applications that use Visual C++ libraries. It is an installer for the Microsoft Visual C++ Redistributable package. Users have been successful in downloading the X64 version so today we are going to look at the X86 version.
It installs the runtime components of C++ that are required to run applications built with Visual Studio 2010 and later releases of Visual Studio on a computer that does not have Visual Studio 2010 or later installed.
Why is VC Runtime Minimum X86.Msi missing?
There are a number of reasons why VC Runtime Minimum X86.msi would not be installing on your machine and hence leading to the VC Runtime Minimum X86.msi error. Below are some reasons:
Multiple versions of the Visual C++ Redistributable are installed – You must uninstall the other versions of the Visual C++ Redistributable before you install this one.
You have an older version of Visual Studio installed – The older version may not be compatible with the newer version. For example, if you have Visual Studio 2015 installed, you need to uninstall all earlier versions first before attempting to install VC Runtime Minimum X86.msi again.
Outdated OS – If you have an older version of Windows, Microsoft may have stopped supporting it after making changes in these newer versions.
Unsupported service pack – Microsoft discontinues some service packs from time to time. Always check to ensure you are downloading the correct version.
Incompatible hardware – You may be running a 32-bit version of Windows even though your computer has 64-bit hardware and software support; this causes problems because of the configurations.
How can I download the VC Runtime X86.Msi?
First off, uninstall any copy of the file from your PC.
Press the Windows key, type Control Panel in the search bar and click Open.
Select Uninstall a program under Programs.
Locate and select the Microsoft Visual C++ Redistributable package, and click on Uninstall at the top.
Click Yes on the UAC (User Account Control) prompt that pops up.
Again, click Uninstall in the window that appears. Similarly uninstall any other similar packages as well.
If you have installed Microsoft Visual Studio recently and you are getting a VC runtime minimum X86.msi error, then there are chances that you might have missed installing some of these required components during the installation process.
The most common cause of this problem is when you have installed the wrong version of VC++ runtime libraries. You may have installed the 32-bit version on a 64-bit computer or vice versa. The solution is to uninstall the incorrect version and then install the correct one.
Elsewhere, users also complained of the runtime error in Windows 11. If you have been affected, don’t forget to check out our expert article on how to address this issue.
If you are on an earlier version of Windows, don’t worry. We also have a dedicated guide when you experience the visual c runtime error in Windows 10.
Do let us know if you have been successful in the VC runtime minimum x86.msi download in the comment section below.
Twitch has slowly found its niche with live-streaming and On-demand Video, accumulating dozens of millions of daily viewers. However, many users seem to get the Twitch error 2000 when trying to run their favorite streams.
Beyond that, Twitch.tv is a reliable service. However, errors are pretty uncommon, but occasional issues can occur. For example, our presented error code says something like this:
There was a network error. Please try again (error #2000).
Let us discuss all you need to know about this error.
What is a 2000 error on Twitch and why does it occur?
It is always important to be aware of the reasons for the errors you encounter in your daily activity. Thus, we’ve compiled a shortlist that will help you have a better perspective of our presented situation:
Bugs related to stream or Internet connection – You should check your Internet connection and refresh the stream.
Temporary problems with your browser – Any browser can sometimes run into troubles, making you unable to run your favorite streams. We strongly recommend using a dedicated browser with Twitch integration, even if these appear randomly and temporarily.
Antivirus, extensions, or browser’s cache blocking the app – Remember that antivirus might over-protect your experience by blocking specific processes. Also, the browser’s cache and extensions can limit your Twitch activity.
Do keep in mind that the following solutions are useful when facing any of these issues:
There was a network error. Please try again. (error #2000) – Network errors are some of the trickiest ones out there. You may restart your router and PC or temporarily disable your VPN/Proxy.
Twitch machine got unplugged error 2000 – Encountering the Twitch machine got unplugged error 400 is nothing out of the ordinary either. You may use the above tips with confidence.
Twitch error 2000constantly – Ensure that you are well connected to the Internet.
Twitch error 2000BitDefender – You may want to disable the antivirus until the issue is corrected.
Twitch error 2000AdBlock – Remove your AdBlock browser extension to see if the error goes away.
Twitch error 2000 Firefox, Chrome– There are multiple causes of this error, ranging from global issues with the network to the browser’s cache. That’s why clearing the cache seems like a wise move.
Twitch error 2000vod, on certain streams – Clear the browser’s cache as we have shown below in order to fix this.
Let us now talk about some easy solutions.
How do I fix error 2000 on Twitch?
Before you go into these solutions, make sure to do the following:
⇒ Ensure you are well connected to the Internet.
⇒ Retest your router connections then restart your computer.
⇒ Refresh the Stream.
1. Install a better browser with Twitch integration
From the start, you can log into your Twitch account and start watching your favorite streaming channels or broadcast using a different browser integrated with Twitch.
This browser works amazingly well for gaming enthusiasts and avid followers of streams, does not cost you a thing, and you’ll undoubtedly avoid Twitch error 2000.
This browser is optimized for streaming games (in-built Twitch option in the sidebar) and contains a seamless integration with Discord to exchange views with your gaming community.
Opera GX
Twitch is integrated into the sidebar of Opera GX to instantly see the channels you follow and get notified anytime someone goes live!
Hit the Windows key, type Chrome, then open the first result.
Use the following hotkey to open the Clear browsing data menu: Ctrl + Shift + Delete.
Select All time as the time range.
Checkmark the Cookies and other site data and Cached images and files boxes. (If you want, you can also check the browsing data option)
Click on the Clear Data button.
After clearing the cache, Twitch error 2000 Chrome will be gone.
4.2 Mozilla Firefox
Press on the Windows key, type Firefox, then open it.
PressShift+ Ctrl+ Delete to open the Clear browsing data menu.
Select Everything as the time range.
Checkmark anything you want to clear from the History and Data sections. We recommend checking all the boxes except Active logins.
Now, click on OK.
4.3 Microsoft Edge
Hit the Windows key, type Edge, and open the first result.
Use the following keyboard shortcut: Ctrl + Shift + Delete.
Check all the boxes except the Passwords one.
Now, click onClear.
Once you clear the cache in your browser, check if the Twitch error 2000 in Edge is gone.
4.4 Opera
Press on the Windows key, type Opera, then open it.
Use the same keyboard shortcut: Ctrl + Shift + Delete.
Choose All Time in the Time range section.
Checkmark, all the boxes, then click on Clear data.
You can also click on the Advanced tab, set the Time Range to All Time, checkmark anything you need, and click on Clear data.
We suggest not selecting the Passwords and other sign-in data options.
Automated repair and optimization tools can search your computer for cookies and erase them all at once, so you don’t have to do it separately for each browser.
Clearing the browser cache will most likely solve the problem with Twitch, but it is not guaranteed. However, it’s pretty simple and doesn’t hurt anything, either.
5. Disable extensions
5.1 Chrome
Hit the Windows key, type Chrome, then open the first result.
Click on the menu button (the 3 vertical dots placed in the right-top corner of the window).
Hover the mouse over More tools, then click on Extensions.
On to the extension you want to remove, clickRemove.
Confirm by clickingRemove.
5.2 Mozilla Firefox
Press the Windows key, type Firefox, then open the first result.
From the window’s top-right corner, navigate the Firefox menu (marked as 3 horizontal lines).
Navigate to Add-ons and themes.
From the left window pane, select Extensions.
Find the ones you want to disable, click on them, then on the Disable button.
If you want to delete an extension entirely, click Remove.
Once the problematic add-ons are gone, check if Twitch error 2000 is gone in Firefox.
5.3 Microsoft Edge
Hit the Windows key, type Edge, then open the first result.
Click on the General menu (3 horizontal dots in the top-right corner of the page).
Navigate to Extensions.
Choose to Manage extensions.
Find the extension you want to delete, then click on Remove.
In the pop-up window, confirm by clicking again on Remove.
5.4 Opera
Press the Windows key, type Opera, and click on the first result.
Use the following keyboard shortcut: Ctrl + Shift + E.
Find the extension you want to remove, then click on Disable.
Besides the stored data, your browser will likely have a few extensions with various uses, which can lead to Twitch error 2000 in Opera. Even though most of them have nothing to do with the Twitch network error, some might.
Click on your antivirus icon, hover over Avast shields Control and select Disable for 10 minutes (This step varies for different antivirus software).
Check if the Twitch error 2000 is resolved.
Some users found out that the web-based protection some antivirus solutions offer was the cause of the problem, and many reported Twitch error 2000 when using Bitdefender.
They resolved the error by simply disabling the module within the client options, and Twitch started working again.
However, since there are so many best antivirus programs for browsing, we can’t say with certainty which ones are blocking the stream and invoking the error above.
Moreover, you can’t keep going without protection for an extended time either. For that reason, we suggest trying out the antivirus TotalAV.
It not only keeps you away from Twitch errors but also offers impeccable malware protection, as confirmed by users worldwide.
This concludes our guide. We hope these steps provided you with a resolution for the Twitch network error 2000.
Unfortunately, this isn’t the only error, many reported that Twitch is not loading on Chrome, and we covered that issue in a separate guide.
In the end, share your thoughts, alternative solutions, or questions in the comment section below, and we will get back to you as soon as possible.
If you are noticing a certain lag when running high-end applications or games, it could be that the RAM is full. This is where increasing the virtual memory, or page file size in Windows 11, comes to aid.
Virtual memory or page file is one of the most misunderstood concepts, and many myths surround it. However, no matter what others say or do, a thorough understanding of it is imperative to get the best performance from your computer.
In the following sections, we will walk you through the steps to increase virtual memory in Windows 11 and help you understand its importance and optimal virtual memory size.
What is a good virtual memory size for Windows 11?
Every person uses the computer differently; likewise, the optimal size for virtual memory will also differ. While some run video editing apps or play games which consume high resources, others may use the computer for relatively lighter tasks.
For both these types of users, an excellent virtual memory size wouldn’t be the same. While the former would require a higher virtual memory, the latter might be better off with the bare minimum.
Microsoft recommends keeping the virtual memory size between 1.5 to 3 times the available RAM on your computer. So, to set or increase the page file, you first need to check the RAM on a Windows 11 system.
Available memory in Windows 11
Once you have checked the available RAM, you can easily set up the virtual memory or page file in Windows 11. For example, say the available memory is 4 GB, so the minimum virtual memory to be set up is 4 x 1.5= 6GB while the maximum would be 4 x 3 = 12 GB.
Also, the page file is, by default, stored in the system drive, i.e., where Windows is stored, though you can change it.
So, if you have configured the settings such that protected operating system files and hidden items are visible, there would be a pagefile.sys entry in the C: drive.
Page File in C: drive
How do I check virtual memory in Windows 11?
Right-click on the Strat menu and select Terminal (Admin).
In the Terminal, type the code below and hit Enter: systeminfo.exe
Then, scroll down, and you will see the values for Virtual Memory: Max Size, Available, and In Use.
Also, it’s important to mention that Windows can, on its own, take care of the virtual memory or page file. But, if you are facing freezing or lagging issues in Windows 11, increasing it manually might help.
Quick Tip:
A great workaround to resolve RAM-related issues is to use another capable browser like Opera One.
With this optimized browser, you can improve your overall memory due to the lightweight system impact, secured browsing with a free VPN, or ask questions to the built-in AI.
Opera One
Navigate on this browser with tab optimization and light resource usage.
How can I increase the virtual memory and page file values in Windows 11?
1. Using the Settings app
If you are looking to boost system performance, you can quickly increase the page file size through your PC’s built-in settings. You can increase the virtual memory for every disk or partition separately.
1. Press Windows + Sto launch the Search menu.
2. Enter View advanced system settings in the text field at the top, and click on the relevant search result that appears.
3. In the Advanced tab, click on the Settings button underPerformance.
4. Navigate to the Advanced tab in the Performance Options window.
5. Next, click on Change underVirtual memory.
6. Untick the checkbox for Automatically manage paging file size for all drives.
7. If Windows was managing the virtual memory earlier, it’s best to clear the previously set value and then increase it.
To do that, click on the drive with System managed listed, select No paging file, and click on Set.
8. Click Yes on the confirmation prompt that pops up.
9. Now, choose a drive or partition from the list, select the Custom size option and enter the same value under Initial size and Maximum size fields in MB (1GB=1024MB), taking cue from the previous section.
10. Once done, click on Set and then on OK at the bottom to save the changes.
11. Next, restart the computer for the changes to come into effect.
Click the Windows search, type PowerShell, and open the app.
Type the script below and hit Enter. Get-Volume
Make a note of the drive with the Windows installation.
Type the following script followed by Enter. Update-HostStorageCache
Type the following code, including your Windows drive letter, and hit Enter. Get-PartitionSupportedSize -DriveLetter C
Run the following command: $size=Get-PartitionSupportedSize - DriveLetter C
Type the script below, followed by Enter: Resize-Partition -DriveLetter C -Size $size.SizeMax
Verify the increase using the script below: Get-Volume
You now know how to increase virtual memory or page file size in Windows 11 and can use it to boost the system’s performance.
But remember that though virtual memory works the same way as the available RAM, it’s certainly not as fast. Please read the next section to understand all about it.
That’s all there’s to increasing virtual memory in Windows 11. Once you have raised it using the steps listed here, the computer should perform better, and applications should stop crashing if that was the case earlier.
Two great games come to Game Pass today and both are day-one brand new releases. Let’s dive right in and check them out.
Pentiment
The first of them is Pentiment, which is getting high critical praise and currently has a review score of 86 on Metacritic.
Via Xbox Wire.
Obsidian Entertainment’s narrative adventure game is available for Xbox Series X|S, Xbox One, PC Steam, and Windows 10 and 11. Set in 16th century Bavaria, Pentiment tasks players “to investigate and uncover the mysteries and scandals that lie in this quaint town, all while working toward saving the life of their close friend.”
Also releasing today as another day-one Game Pass game, Somerville is a gorgeous sci-fi action-adventure platformer. Described as a “brief but beautiful sci-fi survival story” by one reviewer, Somerville apparently has made quite an impression on someone, for developer Jumpship has just announced that it has been acquired by Swedish company Thunderful Group.
Will you be trying out either of these Game Pass releases? Let us know in the comments. If you don’t yet have a Game Pass subscription, you can sign up here. Jump over to the Xbox Game Pass FAQ page to learn more about Game Pass.
Trying to access your files and folders from an app will request you to browse through your File Explorer directories like desktop and other drives. However, it can be hard to find the needed files if the Browse for folder option only shows the desktop.
The most common cause is having too many folders or possibly too many icons on the desktop. It makes it difficult for the Browse for folder option to load all the items.
Some other factors that can cause the Browse for folder only to show desktop are:
Outdated Windows OS – When you have an outdated Windows Operating system running on your PC, numerous issues may arise. It means you don’t have the updates and patches needed to fix bugs that may impede its performance and cause issues with File Explorer on your computer.
Corrupt System files – It is possible to experience difficulties browsing through your folders from an app if there are corrupted system files. They can prevent your PC from accessing the necessary data for performing tasks like Browse for folders, causing the File Manager not to show files.
The causes for this problem may vary in different computers. However, we’ll take you through general fixes for the issues.
What can I do if only the desktop is displayed when browsing for folders?
We recommend you go through the following preliminary checks before trying any advanced troubleshooting:
Eject and reconnect any external drive plugged into your PC.
Turn off background apps that may also access folders.
Click on Windows Update and click Check for updates.
If there are any updates available for your PC, Windows will search for and install them. In addition, windows updates will fix bugs causing Browse for folders not to display all your library.
When you enable virtualization on Windows 11, you can emulate a different operating system, including Android and Linux. Many Windows 10 PCs and new devices that come preinstalled with Windows 11 already have virtualization enabled, so following these steps might not be needed.
Step #1: Prepare to enable virtualization
Before you begin, be sure you know your device’s model and manufacturer, you will need this information later on in the process. First, you will need to make some changes to the UEFI or BIOS, here’s how to do it.
Go to Settings (Windows key + i keyboard shortcut).
Go to System > Update & Security > Advanced startup.
Click Restart now.
Once your PC restarts, you should see an option that displays Choose an Option. From here, navigate to Troubleshoot > Advanced options > UEFI Settings
Your PC will restart again and then enter into the UEFI or BIOS interface.
Step #2: See manufacturer UEFI or BIOS instructions
It’s important to remember that you should only change what you need to in UEFI or BIOS. Be careful, making other changes may prevent you from accessing the Windows operating system!
Microsoft provides some helpful links for common PC manufacturers to walk you through the device-specific UEFI or BIOS instructions. The following instructions are for those upgraded from Windows 10 to Windows 11. Below is a list provided by Microsoft.
Files is a third-party file explorer app for Windows 11 and Windows 10 users that is available for download via the Microsoft Store. While Microsoft has made significant changes and enhancements over the years to Windows products and services, the File Explorer has not evolved much with Fluent Design.
However, we saw a developer from the Windows team launch his own File Explorer app for Windows in beta. And now, Files is getting a bunch of notable changes as well as improvements that are all designed to enhance its user experience. The most notable change is that the app is currently in the process of transitioning from UWP to WinAppSDK. This will in turn assist with getting builds more frequently and generally enhance its performance.
We’re already seeing the benefits of this transition with faster build times, easier access to APIs and improved performance when navigating between directories.
Some of the changes that you can expect when this update goes live include: the added option to double-click to open folders in the column layout, reorganized the options in the settings dialog to make them easier to find, and added support for extracting multiple archives at the same time.
Looking to disable the Windows Defender Credential Guard on Windows 11? You’re not alone. While it enhances security, this feature can block access to apps like VMware. Here’s what you need to know to disable it effectively.
How do I disable the Windows Defender Credential Guard on Windows 11?
Before trying advanced solutions try the following: disconnect remote connections, and close background apps. If these don’t work, keep reading.
1. Disable via Group Policy
Press Windows + R key to open the Run dialog box, type gpedit.msc in the text space, and click OK to open the Group Policy Editor.
Navigate to the following location: Computer Configuration\Administrative Templates\System\Device Guard
Click on Device Guard and double-click the Turn on Virtualization Based Security policy option.
Then, click the Disabled or the Not Configured option and the OK button to save the changes.
Exit and restart your PC to effect the change you made.
Selecting the disabled option or Not configured will stop the activities of Windows Defender Credentials Guard on your Windows 11. Also, you can check the fixes for missing gpedit on Windows 11 if you cannot find it.
2. Disable via Registry Keys
Left-click the Start button, type Regedit in the search box, and select Registry Editor.
Navigate to the following keys and set their values to 0 to disable the virtualization-based security: HKEY_LOCAL_MACHINE\SYSTEM\CurrentControlSet\Control\Lsa\LsaCfgFlagsHKEY_LOCAL_MACHINE\SOFTWARE\Policies\Microsoft\Windows\DeviceGuard\LsaCfgFlags
Restart your computer.
Note that you must set the registry settings to 0 to disable virtualization-based security.
Before the booting process completes, confirm the prompt notifying you that UEFI was modified. Also, ensure the prompt will implement the changes you made.
4. Disable Virtualization-Based Security
Left-click the Start button, type comm in the search space, and select Run as Administrator.
Click Yes when the User Account Control window appears.
Run the following command and click ENTER: bcdedit
Then copy and paste the following commands and press ENTER: bcdedit /set {0cb3b571-2f2e-4343-a879-d86a476d7215} loadoptions DISABLE-LSA-ISO,DISABLE-VBS bcdedit /set vsmlaunchtype off
Finally, restart your PC to implement the changes.
The Windows Defender Credential Guard is dependent on VBS (Virtualization-Based Security). Hence, disabling the Virtual-Based Security will automatically disable the Credential Guard on your Windows device.
Ensure to follow the steps strictly to avoid complicating your PC further.
Is Windows display resolution greyed out on your PC? This article will explain why this happens and how to eliminate this problem.
Usually, you should be able to change the display resolution from Windows settings without any problem. But, for some users, the option is not clickable or greyed out. If the resolution is terrible, it may ruin your experience. So, you should take steps to solve it.
Before that, you should also know about the reasons behind this problem.
Why is the display resolution option greyed out on Windows?
There are various reasons the option to change display resolution may be greyed out on Windows 11 or earlier versions. These are:
Missing display driver: If you have not installed the GPU driver, you can continue using Windows, but with a very sluggish and problematic experience.
Outdated graphics driver: Outdated graphics drivers are often responsible for PC resolution issues.
Incorrect configuration: Good display settings will always give you a better experience. But, misconfiguration may cause many issues, including resolution-related problems.
System bugs: Any software or core OS bug may trigger this problem too.
Malware: In rare cases, viruses and malware can prevent you from making specific changes on Windows.
How do I fix the Windows display resolution greyed out problem?
You will need to do a few things before taking the actual steps to overcome this issue. These are:
Updating Windows to the latest version.
Checking your monitor connections, especially the cable quality.
For best, if possible, use at least HDMI rather than VGA.
After ensuring the above things, if you still cannot change the resolution on Windows, do these things:
Search your model and download the appropriate driver.
Install it on your PC.
If you don’t know which one to download and install, we suggest you use Outbyte Driver Updater. This tool can detect any missing driver and install it with just a single click on your PC. In addition, it can automatically scan and update outdated drivers on Windows.
Outbyte Driver Updater
Have your display driver updated and all other outdated drivers for top performance.
Open the Start Menu, type device manager, and press Enter.
Expand the Display adapter.
Right-click on the graphics card and choose Update driver.
Follow the onscreen steps to finish the process.
To update, you also can use Outbyte Driver Updater. After updating, you should overcome the display resolution greyed-out issue on Windows. If not, follow the next methods.
Right-click on your graphics driver and choose Uninstall device.
Restart your PC if necessary after uninstalling.
Install the driver as shown in method 1.
It should enable your ability to change the resolution on Windows.
4. Repair corrupted system files
In Start Menu, type CMD.
Right-click on the Command Prompt and choose Run as administrator.
Type the following command and press Enter to execute it: sfc /scannow
Restart Windows after finishing the process.
You can also learn more about repairing corrupted system files if you want. It will help you solve internal Windows bugs causing display resolution problems.
5. Change the refresh rate
Press Win + I on the Keyboard to open Windows Settings.
Go to System and click on Display.
Scroll down and click on Advanced display.
Choose a refresh rate and save the settings.
Now, Go back to the Display settings, and you should be able to click on the Display resolution option.
6. Uninstall the recent Windows update
Open Windows Settings like before.
Go to Windows Update and click on Update history.
Click on Uninstall updates.
Click on Uninstall next to the update you want to remove.
Restart your PC if necessary.
Some particular updates may create problems on specific computers. If you are getting the Windows display resolution greyed out issue after updating the OS to the latest version, uninstalling it may solve the problem.
7. Run a virus scan
Download any of these antiviruses or the one you prefer and install it on your PC if you don’t have one.
Please open it and run a virus scan.
Delete any detected viruses.
For the best experience, we suggest you use TotalAV. It is currently the best security program for your personal computer.
8. Reset Windows
Go to System and then Recovery on Windows Settings.
You can change the resolution from your graphics card software if none of the above-mentioned methods work. To do this, follow these steps:
Open the graphics control panel software. We are using NVIDIA in this case.
Click on Change resolution.
Choose a resolution you prefer and click on Apply.
If necessary, you can contact a technician for a more precise solution. It is also possible that your monitor has physical issues preventing you from changing the resolution.
You can also consider doing a system restore to see if it resolves the problem.
This article has mentioned the best ways to solve the display resolution greyed-out issue on Windows. Let us know in the comment box if you know any better method.
If you’re dealing with Assasin’s Creed Black Flag not launching on your Windows PC or crashing right on startup, this article is for you.
Whether this beloved RPG isn’t launching on Steam or through the Ubisoft Connect app, the solutions below will help you force a successful startup.
How to fix Assasin’s Creed Black Flag not launching/ crashing on startup
Start by making sure you meet the Assasin’s Creed Black Flag system requirements. You must run Windows 7 or newer, with at least a quad-core processor, 2 GB of RAM, and a graphics card with 512 MB of memory.
If you have no luck launching the game despite meeting all requirements, follow the steps below.
1. Update drivers
1.1. Update driver manually
1. Press the Windows + X and select Device Manager.
2. Select the Display adapters option.
3. Right-click on each of the drivers there and select Update driver.
4. Click the Search automatically for drivers option.
5. Wait for the search to complete and install the update.
If you can’t find the drivers with the built-in tool, you can go to the manufacturer’s website to download the latest version. Alternatively, you can use a dedicated tool for the update.
1.2. Update driver automatically
There is always the risk of downloading and installing the wrong drivers if you do it manually. That’s why we recommend using specialized software such as Fortect Driver Updater.
Keeping drivers up to date and making sure they’re not corrupt will prevent a black screen when you startup Assasin’s Creed Black Flag.
2. Install the game in Compatibility mode
Download the game from the manufacturer’s website.
Right-click on the game setup file and click on Properties.
Click on the Compatibility tab and check the box Run this program in compatibility mode.
Select an older version of Windows.
Click on Apply and OK to save changes.
Once this is done, try to install the game again.
You could try installing the game in compatibility mode and check if that helps.
3. Verify the integrity of game files
Start Steam and go to your game library.
Locate Assassin’s Creed 4 Black Flag on the list and right-click it.
Choose Properties from the menu.
Now navigate to the Local Files tab and click Verify integrity of game files button.
The verification process will now start. This process can take about 10 minutes, so try not to interrupt it.
Once the scan is finished, try to rerun the game. If the scan can’t fix the problem, go to the game’s installation directory and remove the following files:
Locate the Launcher in the game’s installation folder.
In there, you’ll find the XAudio2_7.dllg file.
Copy it to the following path and replace the old file: C:Windowssystem32
Afterward, the problem should be solved.
After that, you should be good to go, and the game should work correctly. However, we highly recommend using a dedicated .dll file fixer in Restore to keep your files healthy and prevent startup errors and related issues like AC not updating.
5. Check your antivirus
Check your blocked connections in the antivirus and firewall. Your security software may mistakenly flag Assasin’s Creed as a threat and block access to it.
If that’s the case, consider temporarily disabling your antivirus and firing up Windows Defender or switching to a better antivirus that won’t cause these issues.
Some users have said that removing such apps as Samsung Link, WindowFX, Tweak7, and ObjectDock has solved the problem, even if there’s no clear link between them and the game.
To remove these files, the best way would be to use uninstaller software. If you’re unfamiliar, uninstaller software can remove any application from your PC and all its files and registry entries.
If any application is interfering with the game, you can easily remove it by using a third-party tool made just for that.
7. Remove your saved game files
Go to C:Program File(x86)UbisoftUbisoft Game Launchersavegames<User ID><Number>
Locate your saved files.
Now, move them to your desktop.
Try to start the game again.
If you can’t start Assassin’s Creed 4 Black Flag, the problem might be your save game files. Sometimes, your saved games can get corrupted, preventing the game from running.
The game will try to load the corrupted save file, and since it won’t be able to run it, the game will crash. However, you can fix the problem by moving your saved game files to a different location.
8. Run the game as an administrator
Locate the game’s shortcut and right-click it.
Choose Run as administrator from the menu.
Start the game and see if the problem persists.
If the problem persists, you might be able to solve it simply by running the game as an administrator.
If this workaround works for you, you’ll have to use it whenever you want to start Assassin’s Creed 4 Black Flag on your PC.
How do I fix AC4BFSP.exe has stopped working?
Open File Explorer after closing the Steam client.
Follow the path below to get to the Assassin’s Creed installation folder: C:\Program Files (x86)\Steam\SteamApps\common\Assassin’s Creed IV Black Flag
Right-click on AC4BFSP.exe.
Select Run this file as an administrator.
Despite being highly popular, Assasin’s Creed Black Flag is no short on errors and bugs. Related launching bugs happen on other iterations too, particularly in AC Valhalla and Origins.
Even so, as long as your system supports the game and you follow the optimization steps in this guide, Assasin’s Creed Black Flag not launching or crashing at startup should become a thing of the past.
Minecraft is one of the popular games in the community and offers a refreshing concept. However, it, too, is prone to errors. The most common of these is the GLFW error 65542 WGL when opening the Minecraft launcher.
This error is primarily encountered in the Java edition of the game and is followed by the error message GLFW error 65542: WGL:The driver does not appear to support OpenGL on Minecraft.
Identifying the underlying cause here is tricky, so we recommend you execute the fixes in the listed sequence for a quick solution to GLFW error 65542 WGL on Minecraft.
What does GLFW error 65542 WGL the driver does not appear to support OpenGL mean?
The GLFW error 65542 WGL generally arises when the OpenGL library is missing or there’s a problem with the graphics driver. The installed driver could be outdated, or corrupt, or there might be a bug in the installed version.
Besides, incompatibility or issues with the game itself could also lead to GLFW error 65542 WGL on Minecraft Java. So, verify your computer meets the minimum requirements for Minecraft before downloading the game.
Do you need OpenGL for Minecraft?
No, you don’t necessarily need OpenGL for Minecraft. Though having it will certainly boost the graphics and enhance the whole gaming experience.
In case you are using OpenGL, make sure the graphics card in use supports it to avoid running into errors.
How do I fix GLFW error 65542 WGL when launching Minecraft?
1. Download the OpenGL32.DLL file
If it’s the missing OpenGL.dll file behind the error, you would have to download it to fix GLFW 65542 error.
In any case, you can perform this task by using PC repairing software that will replace any missing DLL files in minutes.
2. Update the graphics driver
An outdated graphics driver is just as likely to be responsible forGLFW error 65542 WGLin Minecraft on the Nvidia graphics card, and updating it has helped fix the problem for many users. With each update, manufacturers release patches for previously known bugs along with several other improvements.
Press Windows + S to launch the Search menu, enter Device Manager in the text field at the top, and click on the relevant search result.
2. Double-click on the Display adapters entry here.
3. Now, right-click on the installed graphics card, and select Update driver from the context menu.
4. Select Search automatically for drivers from the two options here.
5. Wait for Windows to install the best available driver for the graphics adapter.
There is a more automated method you can utilize to update drivers on your system within a few clicks.
Outbyte Driver Updater software will entirely scan the system for outdated or broken drivers and simply choose which driver you need to update.
Therefore, you can update the graphic drivers accordingly and even create a restore point for any drivers if you need to restore them.
3. Uninstall conflicting drivers
Press Windows + R to launch the Run command, enter appwiz.cpl in the text field, and either click OK or hit Enter to launch Programs and Features.
Now, locate any entry here by the name DisplayLink, select it, and click on Uninstall.
Follow the on-screen instructions to complete the process.
The DisplayLink USB Graphics Software has been found to conflict with the Java-based edition of Minecraft, and it’s recommended that you uninstall it from the PC.
Make sure to restart the computer for the changes to fully come into effect and the GLFW error 65542 TL Launcher should be fixed.
OpenGL errors generally have to do with problematic or incompatible drivers and can prevent you from launching games. Though in some cases, it was misconfigured power settings that led to the game not getting the required power.
No matter the underlying cause, you can always easily fix OpenGL errors in Windows, be it with Minecraft or any other game.
How do I fix the graphics driver error in Minecraft?
After updating the game, many users reported getting the Driver outdated error message, which lists that your graphics drivers have a new update available.
In this case, it’s best to update the graphics driver on your device. Do not forget to check the manufacturer’s website as well for the latest version, because oftentimes, the updates are not released through Windows Update but are directly uploaded to the OEM’s website.
If there are no updates available, check for compatibility issues. And in case everything seems fine, you can safely ignore the error message.
By now, you know all the solutions for GLFW error 65542 WGL when opening Minecraft in Windows 7, 10, and 11. Also, find out how to fix common Minecraft errors on your PC.
Tell us which fix worked and your review of Minecraft in the comments section below.
The advantage of video streaming is that you’re able to start watching the videos once the download commences, as the file is sent in a constant stream, so you don’t need to keep waiting.
The benefits include the ability to do live broadcasts or webcasts, so you need to deliver it from a specialized streaming server.
Video streaming problems may occur due to several factors including Internet speed and the type of media player you’re using.
Why is my streaming not working?
If you’re experiencing video streaming problems in Windows, there are a few checks you need to consider before troubleshooting, including:
Issues with the browser: Oftentimes, it’s the browser or corrupt browsing data to blame for the problem.
Video file format and quality: Certain file formats are difficult to stream and could lead to compatibility issues. Even a very high-quality video could make streaming difficult on a poor connection.
Problems with the website: In many cases, it’s an issue with the website’s server or in its code that leads to streaming issues.
Background applications: The more background applications consume data, the lesser the speed available for streaming. So, check that. And especially look for any ongoing OS updates since these are usually prioritized.
Misconfigured device settings: Hardware acceleration or other browser and device settings could trigger video streaming issues in Windows 10.
If your Internet network connectivity is constantly fluctuating, you may have video streaming problems such as slow and inconstant buffering.
However, if your Internet connection works fine but you still have video streaming issues, you need to check your media player, and change the buffer settings because each player has its own buffer settings.
Some of the most common video file formats used when creating video streams include Windows Media, Quicktime, MPEG-4, Adobe Flash, and RealMedia.
Ensure you check your wireless network card, the version driver you’re using, and the router model and firmware because you may have to upgrade the drivers, the router, and the firmware in some cases.
Why is my Internet fast but streaming slow?
Slow Internet speed on Windows 11 or any other operating system is a common problem, and in most cases, it’s related to your ISP or network hardware.
However, many reported issues with streaming services, and according to users, Twitch keeps buffering even if their connection is fast.
This isn’t the only service affected by this issue, and many reported Disney Plus buffering issues, but luckily, there are ways to fix this problem.
How do I fix video streaming issues on Windows 10?
Before we start making major changes, here are a few quick things to try:
Check for any pending Windows updates and install them. An up-to-date OS is imperative for faster performance.
Disable the antivirus and firewall, both built-in and third-party, temporarily and check whether the streaming issues in Windows 10 are eliminated. If yes, we recommend you switch to a more reliable and effective antivirus solution.
If none work, move the solutions listed next.
1. Run the Hardware and Devices troubleshooter
Click the Start button, type control panel, and select the app from the results.
Go to the View by option on the top right corner and select Large icons.
Next, click Troubleshooting.
Click View alloption on the left panel.
Click Hardware and Devices and select Run as administrator.
Finally, click Next to run the troubleshooter.
Follow the steps on the screen.
If you’re experiencing problems with video streaming, then run the Hardware and Devices troubleshooter to resolve the issue.
This checks for commonly occurring issues and ensures any new device or hardware is correctly installed on your computer.
Follow the instructions to run the Hardware and Devices troubleshooter. The troubleshooter will begin detecting any issues that may be causing video streaming not to work as it should.
Hopefully, the troubleshooter will also optimize Windows 10 for streaming video and you will be able to enjoy your video.
2. Update display drivers
2.1 Start your PC in Safe Mode
Click on the Start button and select Settings.
Click Update & Security.
Select Recovery from the left pane and go to Advanced startup.
Click Restart now.
Select Troubleshoot from the choose an option screen, then click Advanced options
Go to Startup Settings and click Restart.
Once your computer restarts, a list of options will come up.
Choose 4 or F4 to start your computer in Safe Mode.
In order to update display drivers, you need to start your computer on Safe Mode, then uninstall your current display adapter, and finally check for driver updates.
Safe mode starts up your computer with limited files and drivers, but Windows will still run. To know whether you’re on Safe mode, you’ll see the words at the corners of your screen.
If the video streaming problem isn’t there while in Safe Mode, then your default settings and basic drivers are not contributing to the issue.
2.2 Use the Device Manager
Right-click the Start icon and select Device Manager.
Right-click the added adapter from Device Manager
Select Disable and click Yes to confirm.
Turn off your computer and disconnect any installation or recovery media if you’re using one.
Turn on your computer and see if the problem has been resolved.
If you have many display adapters, you need to disable the added display adapter by performing the steps above.
If this doesn’t fix the video streaming problems, do the following:
Restart in Safe Mode
Re-enable the added display adapter
Disable the other adapter
Once you’re through and the video streaming issue is sorted, exit safe mode so you can get your computer back to normal mode.
2.3 Exit Safe Mode
Press the Windows key + R to start the Run console, type msconfig, and press Enter or click OK.
Go to the Boot tab and deselect or uncheck the Safe Boot option box.
Restart your computer.
2.4 Update your drivers automatically
Updating drivers manually is very annoying and could cause permanent damage to your PC by downloading and installing the wrong driver versions.
We strongly recommend using a professional driver updater tool to do it automatically.
Outbyte Driver Updaterkeeps your system running smoothly by upgrading its drivers. This utility analyzes your system for outdated drivers.
With a few clicks, the program will scan your PC’s hardware and peripherals for potential driver upgrades. We recommend using it to save yourself some time.
3. Disable Adaptive brightness
Click the Start button, type control panel, and select the app from the results.
Now, click Hardware and Sound.
Click Advanced Power Options.
Enable Adaptive Brightness then change the settings to Off.
Does the video streaming issue persist? Try the next solution if this didn’t help.
4. Update graphics card drivers
Graphic card drivers also play an important role when streaming videos. That’s why is important to keep them updated.
Right-click the Start button and select Device Manager.
2. ClickDisplay adaptersto expand the section.
3. Right-click on the graphics card driver and selectUpdate driver.
4. Choose Search automatically for drivers.
5. If the system finds a new driver, it will install it.
If you don’t want to complicate yourself with this task, there is an excellent tool called Outbyte Driver Updater that updates your drivers automatically.
Once you download and install it, the tool will scan your system, and find any problems with your drivers allowing you to fix them with just one click.
Search for your graphics card from the list of devices, right-click on it then click Uninstall device.
If you get an option to Delete the driver software for this device, click on it.
Follow on-screen instructions to complete it and restart your computer if prompted.
Visit the website of the graphics card manufacturer and download the latest drivers, then install them.
If your videos are not streaming or playing in Microsoft Edge, follow the steps above to uninstall and reinstall graphics card drivers.
Check if your video streaming function works again, and if not, try the next solution.
6. Install drivers in compatibility mode
Download the latest driver from the manufacturer’s website and save it on your local disk.
Right-click on the driver set up file and select Properties.
Click the Compatibility tab, check the box next to Run this program in Compatibility mode, and select Windows 7 from the drop-down list.
The driver will install, then check its functionality.
Restart the computer and check if the issue persists
7. Perform a clean boot
Press the Windows key + R to start Run, type msconfig, and press Enter or click OK.
Select the Services tab and check the Hide all Microsoft services box and click Disable all.
Go to Startup tab and click Open Task Manager.
Close Task Manager then click OK.
Reboot your computer
Performing a clean boot for your computer reduces conflicts related to software that can bring up the root causes of video streaming failure.
These conflicts can be caused by applications and services that start up and run in the background whenever you start Windows normally.
In order to successfully perform a clean boot on Windows 10, you have to be logged on as the administrator.
You will have a clean boot environment after all these steps are carefully followed, after which you can try and check if the video streaming problem is gone.
If you want to know how to add or remove startup apps on Windows 10, check out thissimple guide.
8. Run the Video Playback Troubleshooter
Click the Start button, type control panel, and select the app from the list.
Go to the View by option on the top right corner, click the drop-down arrow, and select Large icons.
Now, click Troubleshooting.
Click View all option on the left pane.
Select Video playback.
Follow on-screen instructions to run the troubleshooter
The Video Playback troubleshooter tool is built-in on Windows 10 operating system so as to check and resolve any issues you may have.
9. Clear browsing data
Open Edge, click the three dots button from the upper-right corner of the window, and select Settings.
Click on Privacy, search, and services from the left pane, then scroll down on the right and select Choose what to clear under Clear browsing data.
Check the boxes Browsing history, Cookies and saved website data, and Cached data and files and click Clear.
We have shown you how to clear the browsing data in Edge, but the process is very similar in other browsers as well. Check if the video streaming issue persists or try the next solution.
10. Reset your browser
In Edge, click the Menu button from the top right and select Settings.
Choose Reset settings from the left pane, then click on Restore settings to their default values.
In the next pop-up window click on Reset.
Restart your browser to apply the changes.
If you tried video streaming on a different browser and it worked, then the problem may be due to a corrupt add-on or compatibility issues of the website with Microsoft Edge.
In this case, you can reset the browser, but it is good to note that this feature might reset the security or privacy settings you added to your list of Trusted Sites.
It may also reset any parental control settings, so it is recommended you note the sites before resetting Explorer or Edge, then re-enable add-ons.
11. Change buffer settings in Windows Media Player app
Open or launch Windows Media Player app.
Click Organize on the top left corner.
Click Options.
Go to the Performance tab.
Go to Network Buffering.
Change the Buffer value from 5, to either 10, 20, or 30. The higher you set the buffer value, the more of your video will be loaded.
Windows Media Player is no longer the default video-playing app in Windows, but if you’re still using it, this solution will help you fix the Microsoft Edge streaming video problems.
How can I fix streaming problems on Windows 11?
Although Windows 11 has a different design and some new and improved features, it’s not all so different from Windows 10.
That is why all the solutions we outlined above in this guide will also work for the new OS.
Why do streaming videos keep buffering?
Buffering is downloading the video before the player plays it back, whether it’s a separate one or embedded one in the browser.
It does that all the time, but when the player can’t download the video faster than it plays is back, we actually call this effect buffering.
There are many reasons for this problem, but as you have seen from our guide, it usually comes from a bad or unstable Internet connection.
We hope these solutions helped resolve the video streaming issue on your computer.
Several users have complained that their computers are crashing regularly with the stop code VIDEO_DXGKRNL_FATAL_ERROR in Windows 11.
This problem occurs only occasionally and has a bug check value of 0x00000113. This indicates a violation in the Microsoft DirectX graphics kernel subsystem, as noted in the bug check value.
Typically, the error arises when a corrupt driver interferes with the proper operation of the graphics card’s graphics processor.
Our article will present various high-quality troubleshooting tips if you’re struggling to resolve this problem.
You’ll find below various methods that other users experiencing the same error have successfully employed.
What is VIDEO DXGKRNL FATAL error Windows 11?
The DirectX graphics kernel subsystem has found and reported a violation, as shown by the VIDEO_DXGKRNL_FATAL_ERROR message. In most cases, this issue comes following an update to the Windows operating system.
Before we can go on to the list of possible solutions, we must first determine what is causing the problem.
What causes Video_dxgkrnl_fatal_error?
The following is a list of likely causes of the VIDEO_DXGKRNL_FATAL_ERROR crash, as determined by the manufacturer:
➡ Violation of the DirectX graphics kernel subsystem – A faulty DirectX installation causes this problem. Or by several corrupted DLL (dynamic link library) files on the system. In this particular instance, reinstalling the complete DirectX library would be the appropriate solution.
➡ The Nvidia graphics driver is crashing DXGKRNL – There is a very old Nvidia driver from February 2015 that has been identified as causing the VIDEO_DXGKRNL_FATAL_ERROR crashes in Windows 11.
➡ The crash is made possible by an erratic power supply – Laptops with a malfunctioning power supply are utterly prone to experiencing the problem. According to reports, this issue can be caused by frequent switching between the main power supply and the battery.
➡ Because of an outdated BIOS version – Several users have reported that the problem was solved as soon as they updated their BIOS version to the most recent available.
➡ A third-party security suite is causing the crash – A few user reports point to a third-party antivirus as the source of the VIDEO_DXGKRNL_FATAL_ERROR in Windows 11 error that occurs.
Without further ado, let’s jump into the list of solutions for the VIDEO_DXGKRNL_FATAL_ERROR in Windows 11.
How do I fix Stop Code video Dxgkrnl fatal error?
1. Reinstall the graphics card driver
The first solution we provide here is to reinstall the graphics driver because this fatal error may be caused by your faulty graphics. Hence, follow our steps to manually reinstall the driver.
1. Press the Windows key + X on your keyboard, then select Device Manager from the list of options.
2. Once the Device Manager window opens, locate the Display adapters option. Click on it, then right-click on the graphics driver and choose Uninstall.
3. Restart your PC
After you remove the Intel graphics driver, be sure to reinstall it from Intel’s official website. If you have both integrated and dedicated graphics cards, some users suggested deleting both drivers.
We strongly suggest using a dedicated driver updating program to scan out-of-date drivers automatically. Once you’ve done this, the VIDEO_DXGKRNL_FATAL_ERROR issue in Windows 11 will be solved.
2. Uninstall your antivirus software
It is possible that a third-party antivirus product, even though antivirus protection is necessary, will cause this error to appear.
Windows 11’s VIDEO_DXGKRNL_FATAL_ERROR is a BSoD frequently reported to be caused by the antivirus software McAfee.
The fact is that this has only been confirmed to occur with outdated third-party security clients. Thus before deciding to delete the security software permanently, it is recommended that you first attempt updating the client to the most recent version available.
Press the Windows key + I to open the Settings app and go to Windows Update.
Click on the blue Check for updates button or the alternative if you get it.
By upgrading to the most current operating system, you can fix any issues with your device, including the Windows 11 Valorant VIDEO_DXGKRNL_FATAL_ERROR issue. Shortly, there is a reasonable probability that the bug will be addressed in future releases.
4. Run the SFC scan
Press the Windows + S key to open the Search bar, then type cmd;and right-click on the most relevant result to run it as an administrator.
Copy and paste in the following command, and don’t forget to press Enter:sfc /scannow
After the process is completed (which could take some time), do not hesitate to restart your computer; to altogether remove the Windows 11 VIDEO_DXGKRNL_FATAL_ERROR problem.
5. Run the DISM scan
Press the Windows + S key to open the Search bar, then type cmd. Now right-click on the most relevant result to run it as an admin.
Write or paste in the following commands and press Enter after each: DISM /online /Cleanup-Image / ScanHealth DISM /Online /Cleanup-Image /RestoreHealth
Sit down and wait for the procedure to be completed. Consider that it may take up to 10 minutes. Restart your computer to confirm your changes were applied properly when you’re finished.
6. Set the default graphics adapter in BIOS
If you have both a dedicated and an integrated graphics adapter, you may need to change the default graphics adapter in the BIOS settings to resolve this error.
This problem has been reported by users to be caused by changing the default graphics adapter to automatic in the BIOS.
As a result, we strongly encourage you to enter the BIOS and designate your dedicated graphics card as the default graphic adapter instead.
There have been multiple proven occurrences of power supply failure on laptops and notebooks, and the problem has been traced back to this source.
If you experience frequent screen dimming (similar to when you turn off the power), the issue could be caused by a faulty connection between your power supply and the charger.
According to the information available, occasional changes between the primary power source and the battery power could result in the Windows 11 NVIDIA VIDEO_DXGKRNL_FATAL_ERROR crash over time.
To see if this situation applies to you, keep an eye on your computer’s power supply; and battery power to see if there are any frequent fluctuations between the two sources.
Is Blue Screen of Death fixable?
The term Blue Screen of Death refers to the error message appearing on your screen if your computer has encountered a problem that cannot be fixed. If this occurs, the computer will shut down to prevent any more damage to itself.
Utilizing the unique code associated with each error will allow you to investigate the issue and zero in on the source of the problem. The name of the problematic file, if it was determined that a particular file was to blame for the crash, will be provided in the error message.
Errors of this nature are typically the result of problems with the hardware in your system. Although random access memory (RAM) is often the cause of the issue, several other factors must also be considered.
They are entirely fixable, and we recommend you check out our dedicated post on how to fix BSoDs in Windows 11.
Most BSOD errors (stop failures) happen when a problem suddenly forces your computer to shut down or restart.
Some blue screen of death (BSoD) issues are caused by problems with your computer’s RAM, hard disk, drivers, or system file corruption.
TDR is an abbreviation for the Timeout, Detection, and Recovery components found in Microsoft Windows. Because of this, it’s supposed to assist & prevent BSoDs by resetting the GPU and driver. When there’s an issue that causes an excessive amount of time to pass between frames.
If this problem occurs too many times a row, the computer will crash and display a blue screen of death.
You must begin repairing this mistake as soon as possible because it has the potential to cause your computer to enter a reboot loop.
This can make you unable to access your data, making troubleshooting significantly more difficult.
The first step in dealing with this situation is to identify and correct any problems with your drivers. Several customers report that the problem is no longer present by simply updating or reinstalling their drivers, particularly the graphics driver.
Some Windows 10 users are having issues with the error messageCould not find the recovery environment which occurs just at the beginning of the refresh or reset process.
This can be frustrating, as it prevents them from carrying out the refresh process. In this guide, we will show you how to fix the error and complete your system refresh as you intended.
What does Could not find the recovery environment mean?
This error message mainly appears because your Windows 10 Installation media disk is broken. Also, it might be because you don’t have the installation media disk.
Irrespective of the cause, we will show you how to fix it in the ensuing sections of this article.
Moreover, the following are the most common error variations that you may encounter:
Could not find the recovery environment. Insert your Windows installation or recovery media – This is the most common error message attributed to these situations, but there are plenty of other variations you might encounter.
Autopilot reset ran into trouble. Could not find the recovery environment – Enable recovery mode in this case.
Could not find the recovery environment for Windows 11, 10, 8, and 8.1 – It can affect most Windows versions, luckily the solutions below work on all of them.
Windows 10 factory reset could not find the recovery environment – This error also stated that there was a problem resetting your PC which will probably let you only enter recovery mode.
Error when initializing the recovery environment Lenovo, Surface Pro 3, Asus, HP – Use a Restore point in order to solve this on any laptop brand.
Could not findrecovery nor admintool binaries – Create a new Windows 10 installation media.
Reagentc.exe: the Windows re image was not found/the specified path was not found (reagentc /enable not working)
We can’t create a recovery drive on this PC. Some files are missing – Try to create a new installation media back from 0 to include all files.
Windows 10 could not find the recovery environment when trying to reset PC – Your installation media is at fault here and will need to be replaced.
Following the tutorial below, you will learn how to make a Windows 10 installation media disk properly and start the system refresh process.
How do I fix Could not find the recovery environment?
1. Enable recovery environment
Press the Windows button and search for cmd.
Right-click on Command Prompt and choose Run as administrator.
Type the code below and press Enter: reagentc/info
If it shows Windows RE to be disabled, type the code below and hit Enter: reagentc/enable
This will enable the Windows recovery environment.
Enabling the recovery environment with the reagentc.exe tool on CMD is one of the quick ways to fix the could not find the recovery environment, reset this PC error. After running the code, you can check if the recovery feature is now working.
2. Create Windows 10 installation media
2.1. Preliminary requirements for creating a Windows 10 installation media
USB stick that has at least 8 GB of space on it. Note: Be sure that you do not have any vital data on the USB drive before you use it in this step.
Stable internet connection.
2.2. Create a Windows 10 installation media
Insert the blank USB stick into your Windows 10 device.
If you want to go for a permanent solution that can save your PC from Windows errors, using the restore point can surely help. Thus, carefully use the steps from down below.
1. Type control and selectControl Panel from the results.
2. In theControl Panelsearch box, typeRecovery.
3. SelectRecoveryfrom search results, click on Open System Restore, and click on Next.
4. Choose the restore point you want to use and selectNextandFinish.
5. Once the process completes, go toSettings, navigate toRecovery, select theReset this PC option and check if the issue persists.
If you’re interested in more info on how to create a restore point and how that would help you, take a look at thissimple article to find out everything you need to know.
If none of the manual options worked, it’s time to install a third-party application that can use System Restore to get your computer back to a previous state before the error.
How do I get to the recovery environment in Windows 11?
Press the Windows key + I to open the Settings app.
Under the System menu, scroll down on the right pane and click on Recovery.
Click on Restart now under the Advanced startup option.
The Windows recovery environment can be found on your PC settings, as shown above. After following the steps, you can decide what to do in the recovery environment.
How do I get to the Windows 10 recovery environment?
The Windows 10 recovery environment is on your PC settings. We have explained the steps in detail earlier in this guide.
So, be sure to check it out and follow the steps carefully.
That’s it. There you have a few easy steps that will not take more than 10 minutes to complete and get your System Reset feature in Windows 10 up and running in no time.
Today we’ll walk you through some tried and tested tricks to increase the Ethernet speed on your Windows 10 PC. Now, as a rule of thumb, LAN is faster than WiFi, but there’s always room for improvement.
Below we’ll show you how to increase Ethernet speed on your Windows PC.
How do I speed up my Ethernet connection in Windows 10?
Before we start, power cycle your router/ modem. Also, try using a different port and use a good cable. In our experience, Cat-6 cables are extremely reliable.
If you’re still having trouble, follow the steps below to make Ethernet faster:
1. Update your operating system
Press Windows + I to open the Settings app, and click on Update & Security.
Now click the Check for updates button.
Windows will now check for available updates and download them automatically in the background.
2. Update your network drivers
Open Device Manager.
Locate the Network adapters section and expand it.
Select the Ethernet adapter you’re currently connected to.
Right-click on it and select Update driver.
Select Search automatically for drivers and wait for the process to complete.
Alternatively, you can update your drivers by downloading them directly from the manufacturer’s website. However, if you do this, you have to be extra careful not to install a mismatched version.
To avoid that and speed up the process you can use an automated driver updater such as Fortect’s The program will scan your system for outdated, missing, or broken drivers and then fix them.
Press Windows + I to open the Settings app and navigate to Network & Internet section.
2. Select Proxy in the left pane, and then disable all the options on the right.
3. Restart the PC and your ethernet should be faster now.
The best VPN for your Windows 10 PC should have proven security, a decent number of servers, and a well-established privacy policy
4. Disable Windows Auto-Tuning Feature
Press Windows + X to open the Power User menu and select Command Prompt (Admin).
Click Yes in the UAC prompt.
Now, paste the following command and hit Enter:netsh interface tcp show global
Now, look for the Receive Window Auto-Tuning Level feature, and verify if it’s enabled or disabled.
In case it’s enabled, execute the following command to disable it:netsh int tcp set global autotuninglevel=disabled
According to might, you should be able to fix slow LAN speed in Windows 10 simply by disabling the Receive Window Auto-Tuning Level feature. In case this doesn’t work, head to the following method.
5. Disable Large Send Offload (LSO)
Press Windows + X and choose Device Manager from the list.
Double-click to expand the Network adapters entry.
Right-click on the network card in use and select Properties from the context menu.
Please navigate to the Advanced tab, select Lage Send Offload V2 (IPv4) under Properties, and set it to Disabled.
Similarly, disable Lage Send Offload V2 (IPv6), and then click on OK to save the changes.
Press Windows + R to open Run, type ncpa.cpl in the text field, and click OK.
Right-click the Ethernet option and select Properties.
Select Internet Protocol Version 4 (TCP/IPv4) and go to Properties.
Select the “Use the following DNS server addresses” option, enter the value provided below in the available fields, and click on OK.
Preferred DNS server:8.8.8.8
Alternate DNS server: 8.8.4.4
If you’re getting slow LAN speed in Windows 10, there might be a problem with the DNS. This issue is usually related to your ISP and its DNS, but you can always change your DNS.
You can use Google’s Public DNS addresses 8.8.8.8 and 8.8.4.4, OpenDNS addresses 208.67.222.222 and 208.67.220.220, or other DNS addresses.
Google also offers the following IPv6 public DNS servers: 2001:4860:4860::8888 and 2001:4860:4860::884.
7. Change duplex settings
Press Windows + R to open the Run command, type devmgmt.msc in the text field, and click OK.
Expand Network adapters, right-click on the Ethernet/LAN network card, and select Properties.
Navigate to the Advanced tab, click on Speed & Duplex settings under Property, select 100 Mb Full Duplex from the Value dropdown menu, and click OK to save the changes. You can also try the other values here and verify which works in your case.
According to users, sometimes you might experience slow LAN speed in Windows 10 due to the duplex settings, and modifying the value should fix it.
8. Disable IPv6
Type View network connections in the Search bar and click on the relevant search result.
Select your network connection, right-click on it, and choose Properties from the menu.
Locate Internet Protocol Version 6 (TCP/IPv6), uncheck the box for it, and click OK to save the changes.
Because IPv6 is a newer IP version, some systems, apps and networks may not be fully compatible with it.
To fix the problem, users recommend disabling the IPv6 feature entirely. After disabling this feature, check if the slow LAN speed in Windows 10 issue is resolved. If not, head to the following method.
9. Enable the QoS feature
Open your router’s configuration page and enable QoS. We must mention that QoS is an advanced feature, so it might require some configuration before you can properly use it.
It’s also worth noting that this feature might not be available on your router. So be sure to check your router’s instruction manual for more information
10. Refresh or reset your OS
Refreshing Windows can help you eliminate various issues behind slow LAN speed in Windows 10. The process will take time, but it should work for most.
If it doesn’t, resetting Windows to its factory settings would do the trick, as long as it’s a software-related issue. However, when you reset the OS, all the stored files, installed apps, and configured settings would be lost. So, make sure you try it as a last resort.
Why is my Ethernet speed so slow?
Ethernet is typically slow when the cable or ethernet port on your router/PC is damaged. Out of date network drivers as well as pending updates on your OS may also be at fault.
Besides, configured DNS servers, third-party apps, firewalls, Proxy, and misconfigured network settings likely cause slow LAN speed in Windows 10.
This concludes our guide on how to speed up Ethernet on a Windows 10 PC. Let us know which tips worked best for you. And if you have any questions or additional tips and tricks, feel free to leave a comment.
Since Windows can fit on any kind of device, especially on portable and touch-based ones, the Internet connection is a must when talking about this new OS developed by Microsoft.
Also, to have access to Microsoft Store and for being able to check your emails, to connect with your friends and coworkers through Skype or social media platforms you must have an internet connection enabled all the time.
So, when dealing with DNS problems, you need to act quickly to restore and troubleshoot your Internet connections, whether we are talking about your router, Wi-Fi adapter, or any other.
Related to your network, a common problem that might be displayed on your device is the following one Your DNS server might be unavailable.
What does it mean when your DNS server might be unavailable?
This alert is telling you that something isn’t working properly and you can’t connect to the Internet until all the issues are being fixed.
It’s possible that the cache in your browser needs to be cleared, or that the router in your network is having some kind of technical issue. The DNS server you’re using might be misbehaving, or perhaps your firewall is the source of the issue.
The reasons that might cause the DNS system error are various, but we will try to address the most common ones by explaining the methods below.
By following the guidelines from this tutorial you will be able to learn how to resolve the Windows Your DNS server might be unavailable error message with ease, so don’t hesitate and check the same.
DNS problems can be serious and they can prevent you from accessing the Internet. Speaking of DNS problems, users reported the following issues:
DNS server might be experiencing problems – If this error occurs, be sure to wait for a couple of minutes and try to access Internet again.
DNS server might be down – To fix this problem, you might have to temporarily switch to a different DN.
Your DNS server might be unavailable Spectrum, Comcast, Verizon Fios – It’s possible that resetting a router will help fix a DNS problem. It is possible that resetting the router would fix the problem because doing so will cause its cache to be updated.
DNS server not responding, not available – Sometimes you might get this error message if your DNS server isn’t properly configured; to fix the problem, check your DNS configuration.
DNS server timed out, not found, disconnected, keeps disconnecting, could not be found, could not be reached – If you’re getting this error message, your PC might not be able to reach the DNS server.
Your DNS server might be unavailable on mobile hotspot, on all devices, Wi-Fi – Using the flush command in Command Prompt is the most efficient way to address the problem of the DNS server not being available.
DNS_PROBE_FINISHED_NXDOMAIN – The DNS PROBE FINISHED NXDOMAIN issue manifests itself when a web browser is unable to connect to a website because the domain name system is unable to convert the website’s URL into its associated IP address.
This being said, let’s see how you can fix the DNS server might be unavailable issue in Windows 11 and 10. Follow along!
How do I make my DNS server available?
1. Reset your router
This is the easiest troubleshooting solution to perform when dealing with the DNS server that might be an unavailable error in Windows 10.
In case you are using a router for establishing your network connection, just unplug and reconnect the router cable or press the router reset button.
In this way, if the problem is only minor, you will be able to quickly address the Your DNS server might be an unavailable error.
2. Remove additional security programs
In case you are using more than one security tool on your Windows device, you might get a DNS alert.
This is happening due to incompatibility problems and other conflicts between your antivirus and/or antimalware software.
Therefore, just uninstall the additional security platforms and keep just one antivirus program on your device.
Click theStartbutton, typesecurity, and selectWindows Securityfrom the results.
2. Choose Virus & threat protection.
3. If you don’t have a third-party antivirus, you should be able to flick the Windows Defender protection off from here but if you do, then click on Open app to get to your antivirus.
4. Go through theProtectionorSecuritymenus of your antivirus to disable it.
Several users reported that Avast antivirus caused this problem on their PC, so if you’re using Avast, be sure to remove it and check if that solves the problem.
If you discover that this issue was caused by your antivirus, maybe it’s time to look at our list of the best antiviruses for Windows and get a better one.
3. Run the Internet Connections and Network Adapter troubleshooters
Click the Start button and open Settings.
Select Update & Security.
Click on Troubleshoot from the left pane, then choose Additional troubleshooters from the right.
Select the Internet Connections option to expand it, then hit the Run the troubleshooter button.
Go on with the steps to clear any possible issue with the Internet connection.
If this still didn’t fix the problem do the same to start the Network Adapter troubleshooter from the Additional troubleshooters list.
Each Windows system features an inbuilt network troubleshooter. By running the same you will be able to find the cause of your DNS problem and address the issue.
The Internet Connections and Network Adapter troubleshooters are perfect for newbies and for those who don’t know how to manually fix a system problem.
4. Update the Network adapter driver
Right-click the Start button and select Device Manager.
Click on the Network adapters, locate the Wi-Fi adapter, right-click on it and select Update driver.
Now select the first option, Search automatically for drivers.
If the system finds a new driver it will install it and you will be prompted to restart your PC.
4.1 Update drivers automatically
A computer cannot control video cards, computer applications, sound cards, or wireless connections; they must be managed by a driver. You may manually update drivers if you are completely familiar with the drivers your PC requires for network adapters.
The best alternative is to use a driver updater application like Outbyte Driver Updater, which searches deeper into the system for the best match for your PC.
This solution has a large daily-updated driver database, so it will propose the most recent drivers available after scanning your system. In addition, you will receive a completely thorough report detailing the precise state of your Windows 10’s missing, damaged, or obsolete drivers.
Outbyte Driver Updater
Keep your drivers up to date, regardless if you encounter errors, for the health of your PC.
Press Windows + R and enter ncpa.cpl, then press Enter or click OK.
Locate your network connection, right-click it, and choose Properties.
When the Properties window opens, select Internet Protocol Version 4 (TCP/IPv4), and click the Properties button.
In the General tab, select Use the following IP address option. Enter the desired IP address, Subnet mask, Default gateway, Preferred DNS server, and Alternate DNS server. Once you’re done, click on OK. If you don’t know the correct values to enter, you can check the network configuration on another device on your network.
Sometimes, the Your DNS Server Might be Unavailable error message might appear if your IP address isn’t set manually. After doing that, the problem should be resolved and you should be able to access the Internet.
8. Make sure that DNS is automatically obtained
Press Windows + R and type ncpa.cpl, then hit Enter or click OK.
Right-click your network connection and choose Properties.
Now, select Internet Protocol Version 4 (TCP/IPv4) and click on Properties.
Select Obtain DNS server address automatically and click OK.
Now select Internet Protocol Version 6 (TCP/IPv6) and click on Properties.
Select Obtain DNS server address automatically and click OK button to save changes.
9. Use OpenDNS or Google’s DNS
Press Windows + R, type ncpa.cpl in the window, then press Enter or click OK.
Right-click your active network connection and select Properties.
Next, highlight Internet Protocol Version 4 (TCP/IPv4) and click on Properties.
Select Use the following DNS server addresses. Now enter 8.8.8.8 as Preferred DNS server and 8.8.4.4 as Alternate DNS server. Alternatively, you can use 208.67.222.123 and 208.67.220.123 instead. Now click OK to save the changes.
If you’re getting Your DNS Server Might be Unavailable message, you might be able to fix it simply by setting your DNS manually.
10. Check if your PC is properly connected
Sometimes, the Your DNS Server Might be Unavailable message can appear if your computer isn’t properly connected to your modem or router.
A few of our readers reported that this error occurred because their PC was connected directly to the modem instead of the router.
If you use both modem and router, be sure to check if your PC is properly connected. Of course, you should also check the cables for any damage and try to replace them.
How do I fix Your DNS server might be unavailable errors in Windows 11?
Even though the new Windows 11 has a new design and some improved features, it doesn’t mean that it’s immune to such issues as the Your DNS server might be unavailable error.
As it’s a common problem in Windows 10, it’s no surprise that you also encountered it in the latest iteration.
Luckily, Windows 11 still has a lot of the menus and functionalities from the previous OS so all the solutions we provided above can apply to the new one.
The menus have rounded corners and a slightly different design but the contents are the same, especially the networking part.
The only notable difference is that in solution 2 you have to click on Manage settings from the Virus & threat protection settings to turn off Windows Defender.
Your DNS Server Might be Unavailable is a common problem that can occur on almost any PC, but we hope that you managed to fix it by using one of our solutions.
There are so many Windows 11 updates available that it’s nearly impossible to keep track of them all at the same time. Today, we’ll take a closer look at several changes that have a significant influence on the Outlook Mail operation.
If you start the Outlook Mail app and it crashes due to a memory or other problem, you should be aware that this is a widespread issue that affects many people.
Other of our readers reported that Outlook hangs, freezes or it’s not responding in Windows 11.
There were even some who reported that Outlook crashes when replying to emails.
With the help of its Windows Update mechanism, Microsoft was able to resolve the issue. Because there is no hotfix available, all you need to do is ensure that you are running the most recent version of your Windows 11 operating system in order for this repair to take effect.
If, however, you have installed the latest update and it still doesn’t work, let us see a few other workarounds that you can use to prevent Outlook from crashing on startup.
Our guide will address all these Windows 11 Outlook issues.
How do I fix Outlook crashing in Windows 11?
Is Outlook compatible with Windows 11?
The short answer is yes. Outlook is fully compatible with Windows 11, especially Outlook 2016.
1. Disable add-ins
Exit the Microsoft Outlook app, then launch Run by pressing the Windows key + R on your keyboard and type in Outlook/safe and click the OK button.
Now, go to the File section, followed by Options, and click on the Add-Ins button.
Select the COM Add-ins option and click on the Go button.
Click OK to clear all the checkboxes and restart Outlook.
It is possible that add-ins will cause your Outlook service to act in an unexpected way at times. Disabling add-ins may assist you in resolving this issue more quickly.
2. Repair Office
Let the Repairprocess complete, then proceed with a computer reboot to apply the changes made. Restart Outlook to see whether its functionality has been restored.
Press the Windows key + I to open theSettings app then go to Apps, followed by Apps & features.
2. Once you are inside the Apps & features window,search for Office in the search bar then click on the three dot menu next to it followed by Advanced options.
3. Scroll down until you find the Reset section, then click on the Repairbutton.
Press the Windows key + I to open the Settings window and click on Apps followed by Apps & features.
Within the Apps & features box, seek for the Office application by typing its name into the search area and selecting it from the three-dot menu, then selecting Advanced settings.
Scroll down until you reach the Reset area, and then click on the Reset button to restart the process.
When you reinstall Office, all of the data that you have previously saved to the application will be deleted. Consequently, before commencing the process of resetting your smartphone, we strongly recommend that you create a backup of any important data stored on your device.
4. Run the Windows troubleshooter
Press the Windows key + I to open the Settings app, and navigate to System in the left panel followed by Troubleshoot from the right side.
Once you have entered the Troubleshoot menu, select the Other troubleshooters option from the drop-down menu.
Now, scroll down until you come across the Windows Store Apps troubleshooter, and click the Run button next to it to start the process.
Upon completion of the troubleshooting process, the troubleshooting tool will identify the precise bug that has occurred, as well as provide guidance on how to resolve the bug. It is crucial that you adhere to the directions provided exactly as they are laid out in the written form.
5. Reinstall Office
Press the Windows key + I to open the Settings window and click on Apps followed by Apps & features.
Once you’re inside the Apps & features window, search for the Office app by typing it in the search bar and click on the three-dot menu, followed by the Uninstall button.
Now go back to your browser and search for the Office application, which you should then download and run according to the instructions that are shown to you.
6. Try another email client
If the Outlook application keeps crashing and nothing seems to resolve it, then it might be a good idea to consider a more stable email software.
For instance, Mailbird is the go-to email option in terms of efficiency and integration with other apps you’re using.
You can sync all the emails from multiple accounts in one inbox and manage all your work from one place.
Plus, customize your layout how you prefer on this platform and integrate platforms like Dropbox, Todoist, and Google Calendar.
Aside from that, you’ll definitely want to take a look at the new design of the Office applications for Windows 11 and update the apps to enjoy a new style.
Alternatively, if you continue to experience difficulties with the Outlook application, see our guide on how to solve Outlook crashes on Windows 10 for more solutions that are applicable in the latest OS as well.
Let us know in the comments below which solution worked best for you as well as how often you use Microsoft Outlook over Gmail. Thanks for reading!



 Audio and video output from the Internet will be something you’ll enjoy every day if you get the Onkyo TX-8270.